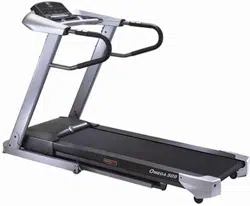

TREADMILLUSER'S GUIDE
CONGRATULATIONSand THANKYOUforyourpurchaseof thisHorizonSeriestreadmill!
Whetheryour goal is to win races or simply enjoy a fuller, healthier lifestyle, a Horizon Series treadmill
can help you attain it- adding club-quality performance toyour at-home workouts, with the ergonomics
and innovative features you need to get stronger and healthier, faster. Because we're committed to
designing fitness equipment from the inside out, we use only the highest quafity components. It's a
commitment we back with one of the strongest frame-to-motor warranty packages in the industry.
Youwantexerciseequipmentthat offers the most comfort,the bestreliability and thehighest quality
in its class.
TheHorizonSeriesderivers.
Important Precautions
Assembly
Before You Begin
4
6
13
Treadmill Operation 16
Conditioning Guidelines 24
Troubleshooting & Maintenance 32
Limited Warranty 35
CONTACTINFORMATION Back Panel
SAVETHESEINSTRUCTIONS
Readall instructions before using this treadmill. Whenusing an electrical product, basic precautions
shouldalwaysbefollowed,including the following:Readaftinstructionsbeforeusingthis treadmill.It isthe
responsibilityof the ownertoensurethat aft usersof this treadmill areadequatelyinformedof aft warnings
and precautions.Ifyouhaveanyquestionsafter readingthis manual,contactCustomerTechSupportat the
numberlisted onthe backpanelof this manual
i_I _ iii
GROUNDINGINSTRUCTIONS
Thisproductmust begrounded.If a treadmill shouldmalfunctionorbreakdown,groundingprovidesa path
of leastresistanceforelectrical currentto reducetherisk of electricalshock.Thisproductis equippedwith
a cordhavingan equipment-groundingconductorand a groundingplug. Theplug must bepluggedinto an
appropriateoutlet that is properlyinstafledand groundedin accordancewith local codesand ordinances.
i _-_I_T_ ¸¸¸_ ¸¸ _'_'_ ": ............................_
Improperconnectionof theequipment,groundingconductorcanresult ina risk of
electric shock.Checkwith a qualifiedelectricianorservicemanifyouarein doubt
as to whethertheproductis properlygrounded,Donotmodify theplug provided
i with the product,if it will not fit theoutlet, have properOutletinstalled by a
qualified e!ectrician
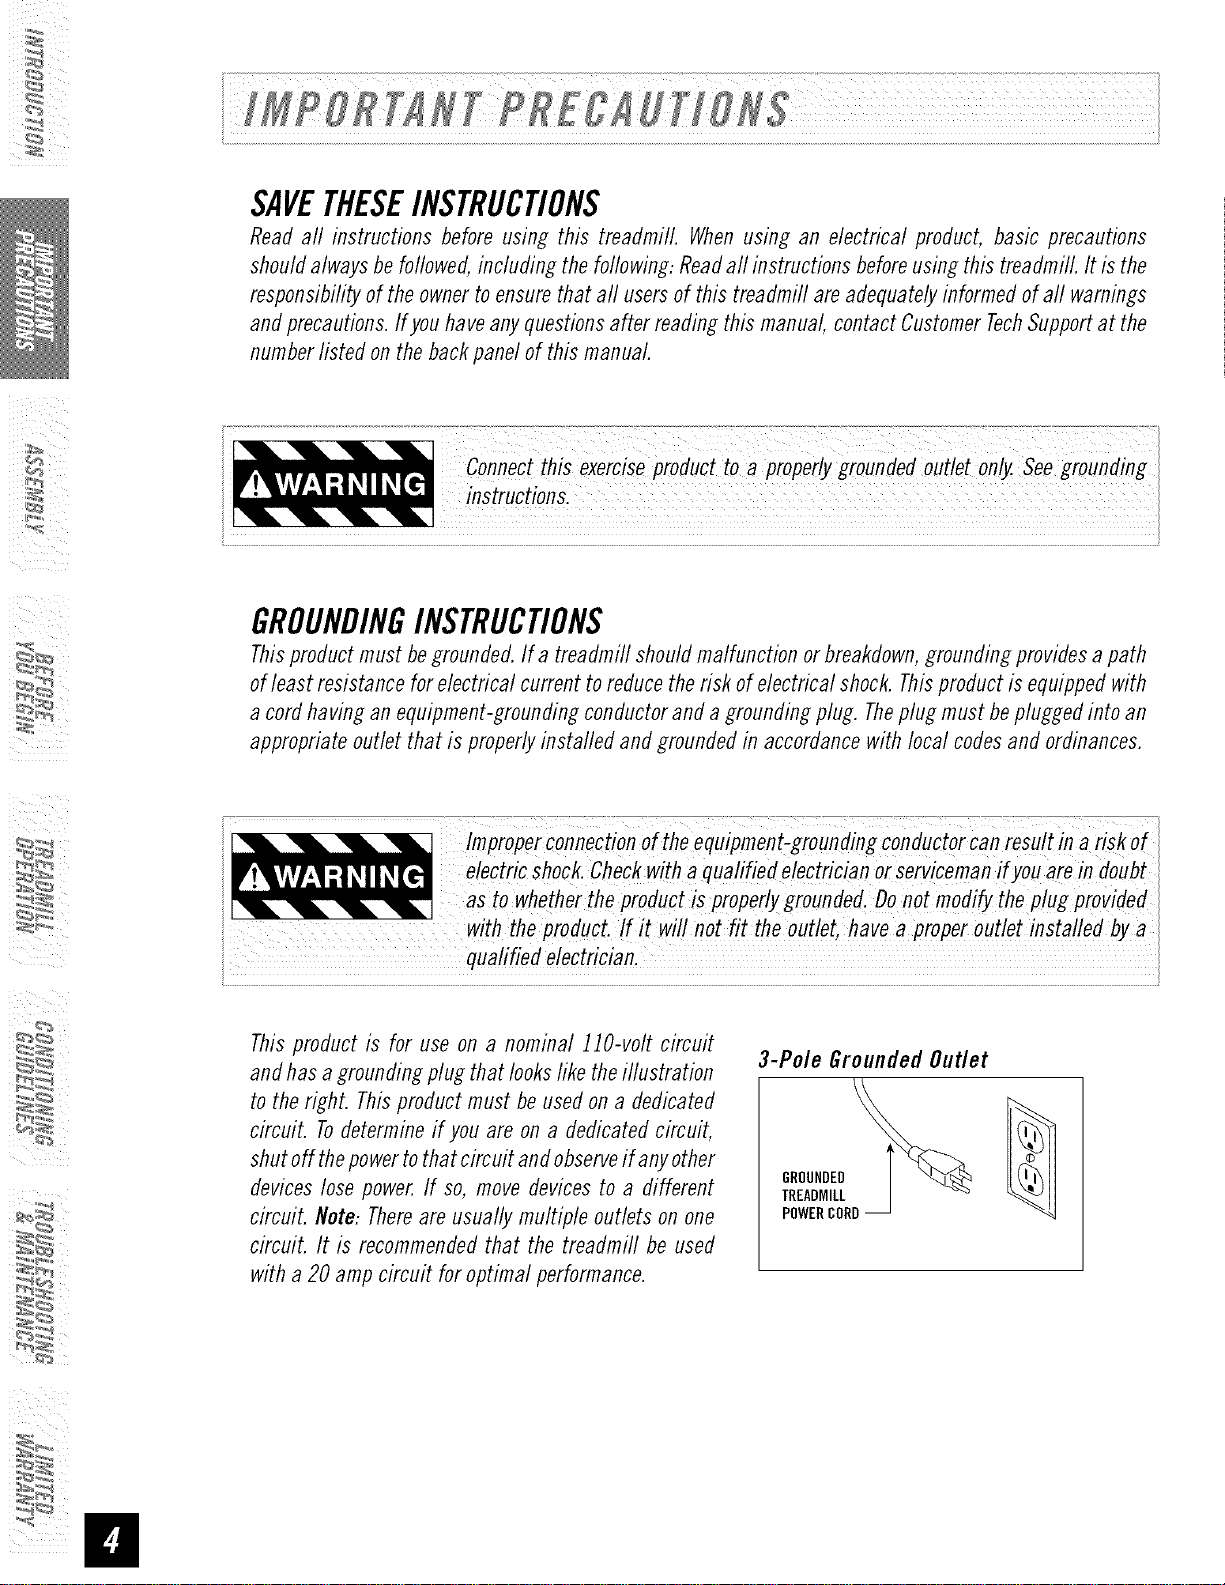
This product is for use on a nominal 110-volt circuit
and has a grounding plug that looks like the iflustration
to the right. This product must be used on a dedicated
circuit. Todetermine if you are on a dedicated circuit,
shut off thepower to that circuit and observe if any other
devices lose power. If so, move devices to a different
circuit. Note: Thereare usually multiple outlets on one
circuit. It is recommended that the treadmill be used
with a 20 amp circuit for optimal performance.
3-Pole Grounded Outlet
GROUNDED
TREADMILL
POWERCORD
• Neveruse the treadmill before securing the safety tether clip toyour clothing.
• Ifyou experience any kind of pain, including but not limited to chest pains, nausea, dizziness, or shortness
of breath, stop exercising immediately and consult your physician before continuing.
• Donot wear clothes that might catch on any part of the treadmill.
• Always wear athletic shoes while using this equipment.
• Donot jump on the treadmill.
• Keep power cord away from heated surfaces.
• Donot insert or drop any object into any opening.
• Unplug treadmill before moving or cleaning it. Toclean, wipe surfaces down with soap and slightly damp
cloth only, never use solvents. (SeeMAINTENANCE)
• At no time should more than one person be on treadmill while in operation.
• Thetreadmill should not be used bypersons weighing more than 275 pounds. Failure to comply will void
the warranty.
• Thetreadmill is intended for in-home use only. Donot use this treadmill in any commercial, rental, school
or institutional setting. Failure to comply will void the warranty.
• Do not use the treadmill in any location that is not temperature controlled, such as but not limited to
garages, porches, pool rooms, bathrooms, car ports or outdoors. Failure to comply may void the warranty.
• Usethe treadmill only as described in this manual
OTHERSAFETYTIPSFORYOURTREADMILL
OPERATION
Toreduce the risk of damaging important components on your treadmill, it is strongly
recommended that your treadmill is plugged into a dedicated 20 amp circuit, without
the use of an additional extension cord and/or power strip. Failure to comply may void
the warranty.
IMPORTANT..Thetreadmill is not compatible withGFCl-equippedoutlets.
It is essential that_fourtreadmifl is usedonlyindoors,in a climate controlledroom.If your treadmill hasbeen
exposedto colder temperaturesor high moistureclimates, it is stronglyrecommendedthat the treadmill is
warmeduptoroom temperaturebeforefirst time use,Failureto dosomay causeprematureelectronicfailure.

IMPORTANT..READTHESESAFETYINSTRUCTIONSBEFOREUSE!
i_I "_ i_ii
During the assembly process of the treadmill there are several areas that special attention must be paid.
It is very important to follow the assembly instructions correctly and to make sure aft parts are firmly
tightened. If theassembly instructions are not followed correctly, the treadmill could have frame parts that
are not tightened and will seem loose and may cause irritating noises. Thereshould be no side-to-side play
in the console masts or any forward and back play in the console assembly or handlebars. If there is any
play in these areas, the treadmill has not been properly assembled. Toprevent damage to the treadmill, the
assembly instructions must be reviewed and corrective actions should be taken.
UNPACKING
Placethetreadmill cartonona levelflat surface.It is recommendedthatyou placeaprotectivecoveringon
your floor. TakeCAUTIONwhenhandling and transporting this unit. Neveropenboxwhenit is onits side.
Oncethe bandingstraps have beenremoved,donot lift or transport this unit unlessit is fully assembled
and in the upright foldedposition, with thelock latch secure.Unpackthe unit whereit will beused. The
enclosedtreadmill is equippedwith high-pressureshocksand mayspring openif mishandled.Nevergrab
holdofanyportionof theincline frameandattern_ttofit ormovethe treadmill.FAILURETOFOLLOWTHESE
INSTRUCTIONSCOULDRESULTININJURY!
Beforepreceeding,findyour treadmill's serialnumber
model name located to the left Of
powerswitchand powercordand enter it in the space
MODELNAMEINTHEBOXESBELOW:
* Referto theSERIALNUMBERandMODELNAMEwhencaring forservice.
* Alsoenterthis serialnumberonyourWarrantyCard.

READINGRACK
MP3-1NJACK
SPEAKERS(T83ONLY)
HEADPHONEJACK
ON/OFFSWITCH
CIRCUITBREAKER
TRANSPORTWHEEL_
AIRCELL
CONSOLE
(T83SHOWN)
TOUCHPADPANEL
FAN
SAFETYKEYPLACEMENT
CONSOLEMAST
MOTORCOVER
FOOTLOCKLATCH
RUNNINGBELT/RUNNINGDECK
SIDERAIL
ROLLERENDCAP
REARROLLER
ADJUSTMENTBOLTS
[] 4 mmAllen Wrench
[] 5 mmAllen Wrench
[] 6 mm T-wrench
x
[] 1Safety Key
[] 1ConsoleAssembly(locatedundertreadmill deck)
[] 1PowerCord
[] 4 HardwareBags
[] 1SupportBar
[] 2 Handlebars
Ifyou havequoStionso_if thereareanymissingpa_s, contactcustomerTech
i Contactinf°rmationis !°catef!°nthebackpane! ofthismanual.
Fora comp/eteexp/odeddiagram, visit us at www.horizonfitness.com
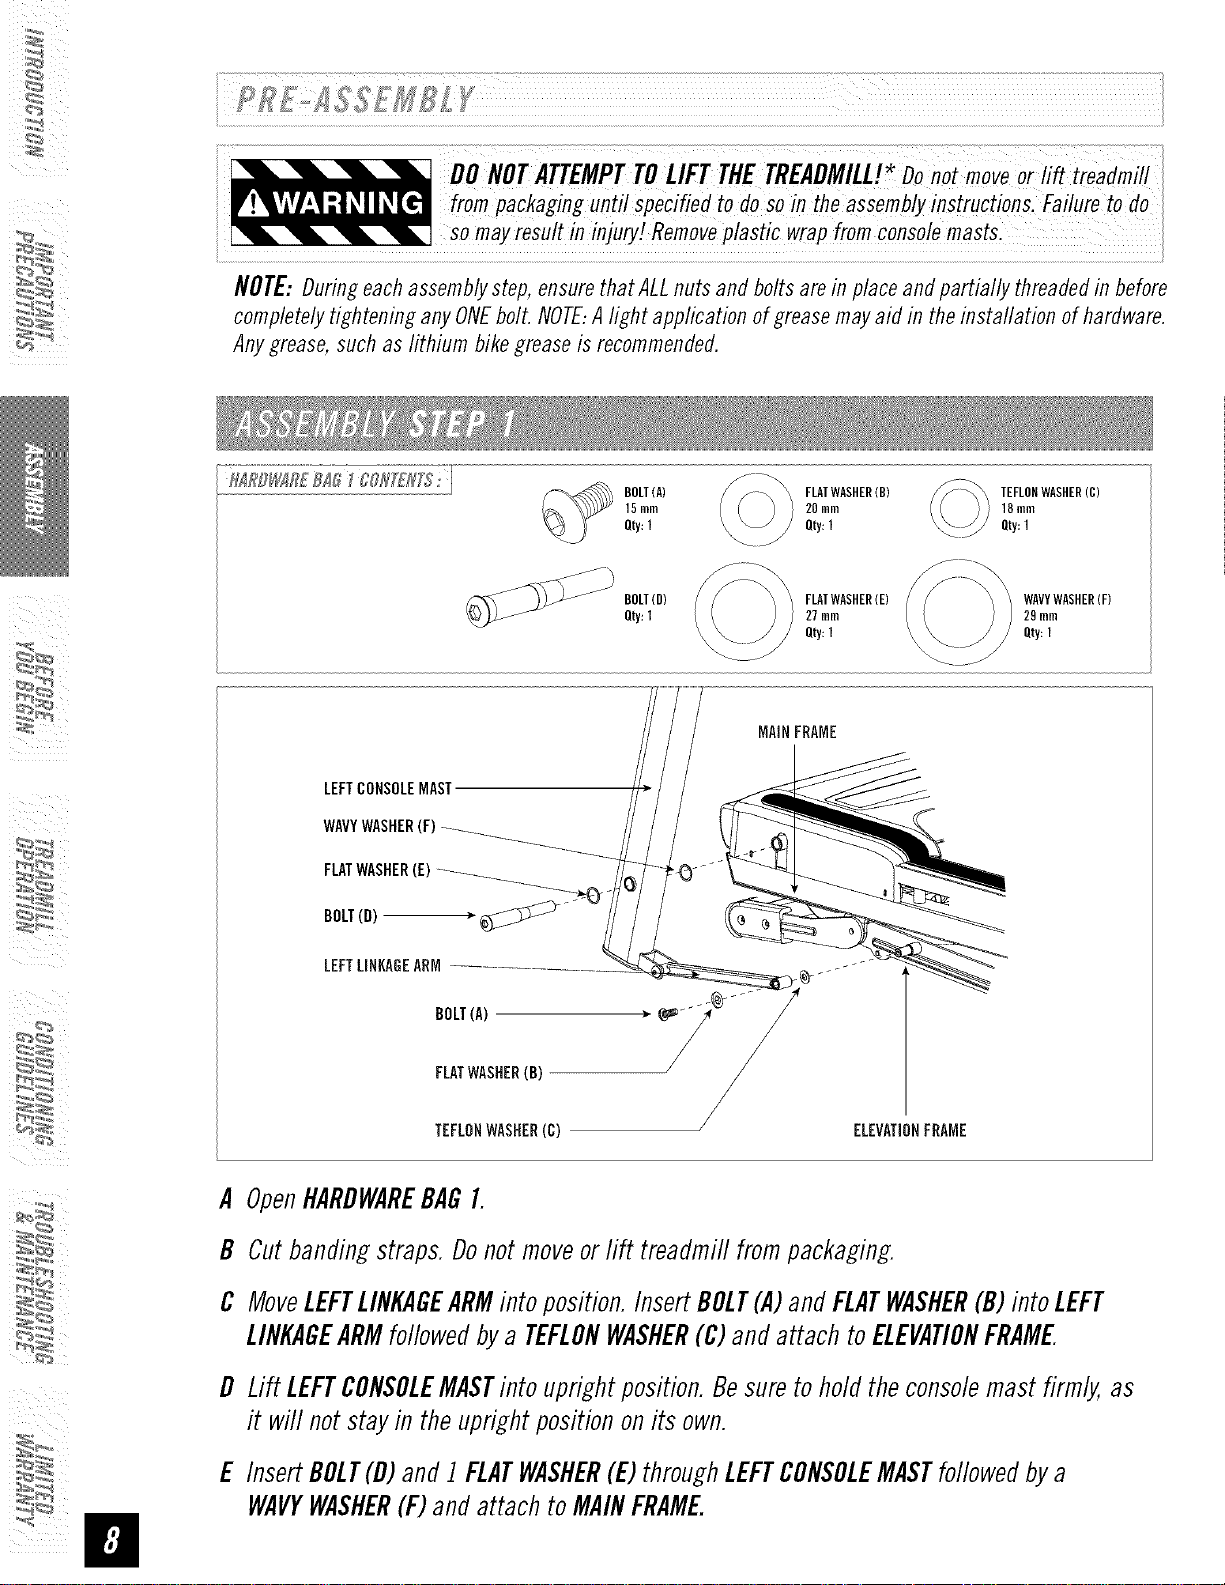
NOTE=During each assembly step, ensure that ALL nuts and bolts are in place and partially threaded in before
completely tightening any ONEbolt. NOTE:A light application of grease may aid in the installation of hardware.
Any grease, such as lithium bike grease is recommended.
i_I _ i_ii
[
I--h_RD_S_REB_O_c_Hrl_z_,j
BOLT(A) FLATWASHER(H) TEFLONWASHER(C)
15turn 20 rnrn 18 mm
Qty:1 Qty:1 Qty:1
BOLT(H)
Qty:1
FLATWASHER(E) WAVYWASHER(F)
27 mm 29 mm
Qty:1 Oty:1
MAiNFRAME
LEFTCONSOLEMAST
WAVYWASHER
LEFTLINKAGEARM ._ ......
BOLT(A) _,_ -?/_
FLATWASHER(B)
/
TEFLONWASHER(O) /
ELEVATIONFRAME
A OpenttARDWAREBAGI.
B Cutbandingstraps.Donotmoveorlift treadmill frompackaging.
C MoveLEFTLINKAGEARMinto position.InsertBOLT(A)andFLATWASHER(B)into LEFT
LINKAGEARMfollowedbya TEFLONWASHER(C)andattach toELEVATIONFRAME
D Lift LEFTCONSOLEMASTinto uprightposition.Besureto holdtheconsolemast firmly,as
it will notstayin theuprightpositiononits own.
E InsertBOLT(D)and1FLATWASHER(E)throughLEFTCONSOLEMASTfollowedbya
WAVYWASHER(F)andattachto MAINFRAME.

BOLT(D)
Qty:1
FLATWASHER(E)
27mm
Qty:1
WAVYWASHER(F)
29ram
Qty:1
MAINFRAME
CONSOLECABLES
ELEVATIONFRAMECONSOLECABLES
A. PuffLEADWIREthroughRIGHTCONSOLEMASTAfter
puffingtheLEADWIREthroughthemast, thetopof the
CONSOLECABLESshouldbelocatedat the topofthe
mast.DetachanddiscardLEADWIRE.
B.OpenHARDWAREBAG2.
C.MoveRIGHTLINKAGEARMinto positionandattach to
ELEVATIONFRAME.
NOTE..WhileholdingRIGHTCONSOLEMASTin the
uprightposition,tightenPRE-ATTACHEDBOLTusing
T-wrenchto attachRIGHTLINKAGEARM.
D.AttachRIGHTCONSOLEMASTtoMAINFRAMEusing1
BOLT(D),1FLATWASHER(E)and1WAVYWASHER(F).
E.Lift theRUNNINGDECKuntil locklatch onsideof
treadmiflis fully engaged.
F.RemoveCONSOLEfromboxandplaceoutof theway.
G.LowerthetreaflmiflRUNNINGDECKfromthefolded
positionbysteppingonLOCKLATCHonlowerright side.
MAST
BOLT(B)
movethetreadmill from thebox
i and themachine hassprung
andCan,otbeaSsembled,
refer to the troubleshooting
section in order to restorethe
i treadmill toits properposition,
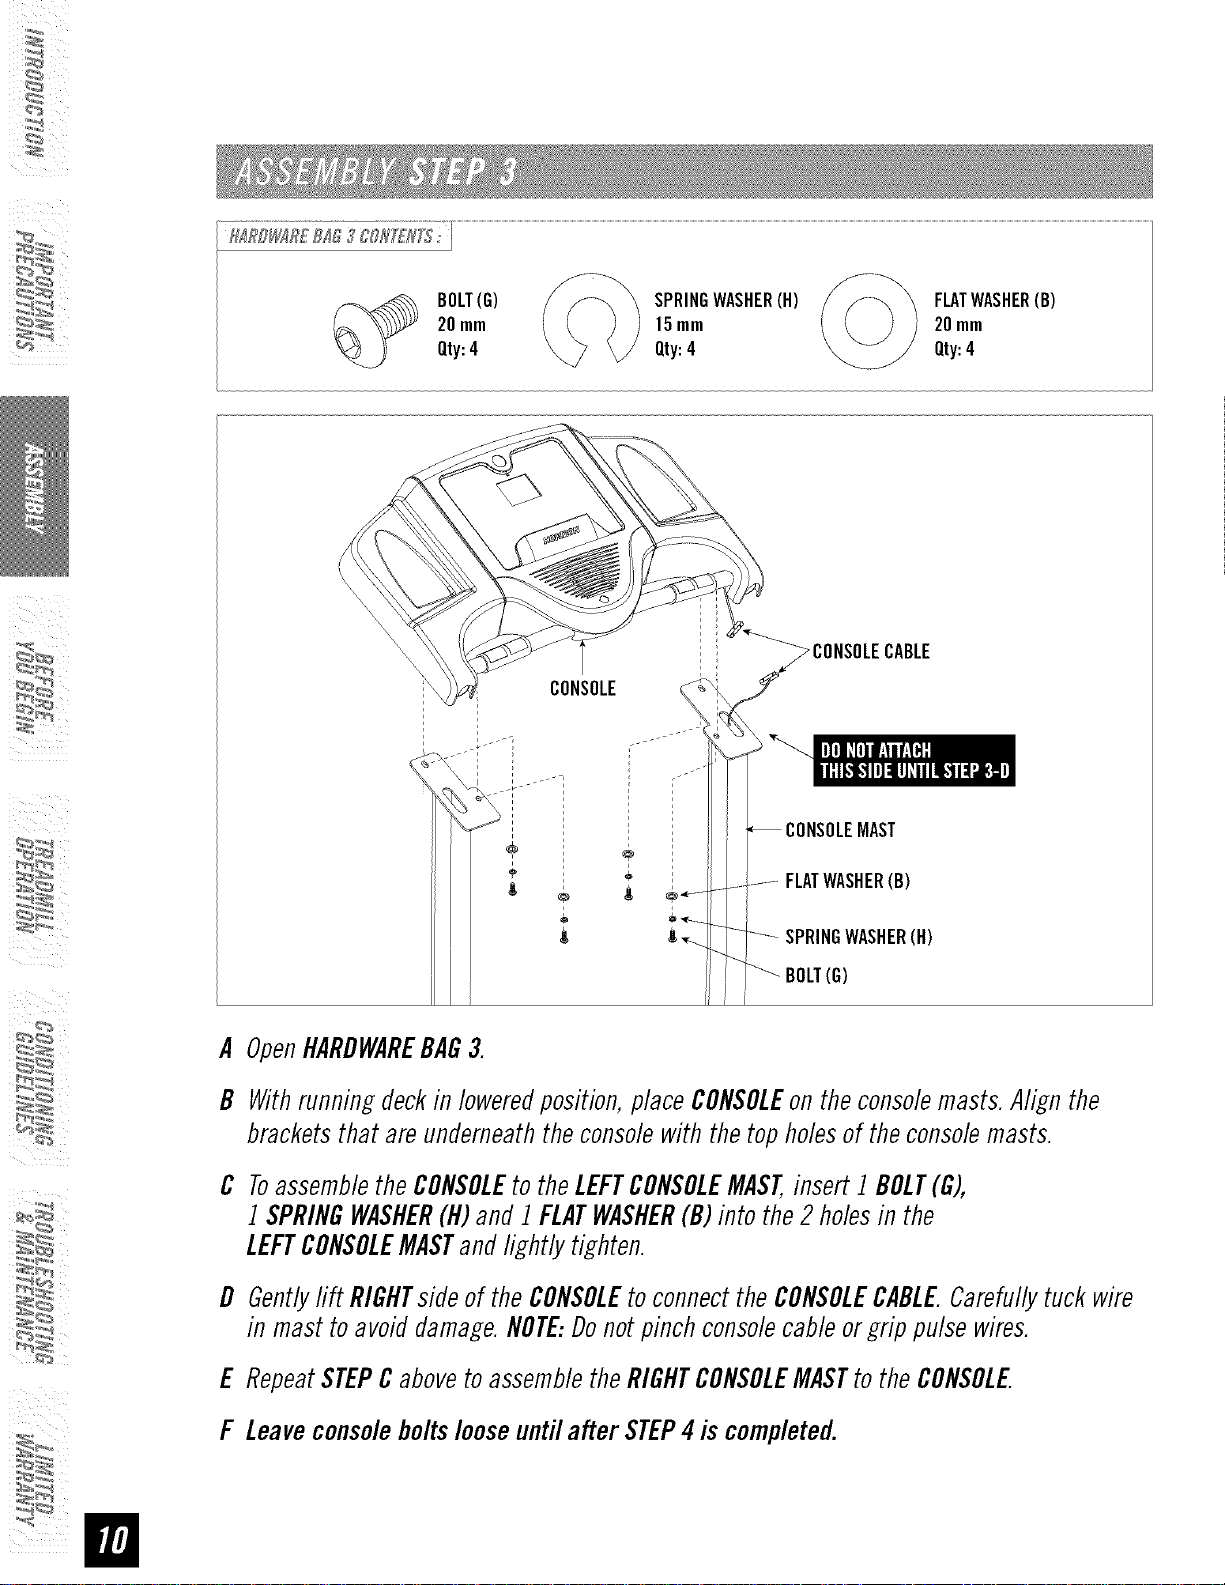
BOLT(G)
20mm
Qty:4
SPRINGWASHER(H)
15mm
Qty:4
FLATWASHER(B)
20mm
Qty:4
/
i_I _ i_ii
CONSOLE
÷
>CONSOLECABLE
MAST
FLATWASHER(B)
SPRINGWASHER(H)
(G)
A OpenHARDWAREBAG3.
B Withrunningdeckin loweredposition,placeCONSOLEon theconsolemasts.Align the
bracketsthat areunderneaththeconsolewith thetopholesof theconsolemasts.
C ToassembletheCONSOLEtotheLEFTCONSOLEMAST,insert 1 BOLT(G),
1 SPRINGWASHER(H)and 1FLATWASHER(B)into the2 holesin the
LEFTCONSOLEMASTandlightly tighten.
D Gentlylift RIGHTs/deof theCONSOLEto connecttheCONSOLECABLE.Carefullytuck wire
in mast toavoiddamage.NOTE:Donotpinchconsolecableorgrip pulsewires.
E RepeatSTEPCabovetoassembletheRIGHTCONSOLEMASTto theCONSOLE
F Leaveconsoleboltslooseuntil after STEP4is completed.

BOLT(I)
15mm
Qty:4
A.
B.
C.
\
\ \
\ \
\
BOLT(i)
F,
OpenHARDWAREBAG4.
AlignSUPPORTBARwith holesin CONSOLEMASTS.
InsertBOLTS(I) into all 4 holesof theSUPPORTBAR.
NOTE:Lookinto holesin theright mastbeforeinsertingbolts toavoidpinchingcables.
D. Tightenaft console bolts (Step3) and support bar bolts (Step4) completely.
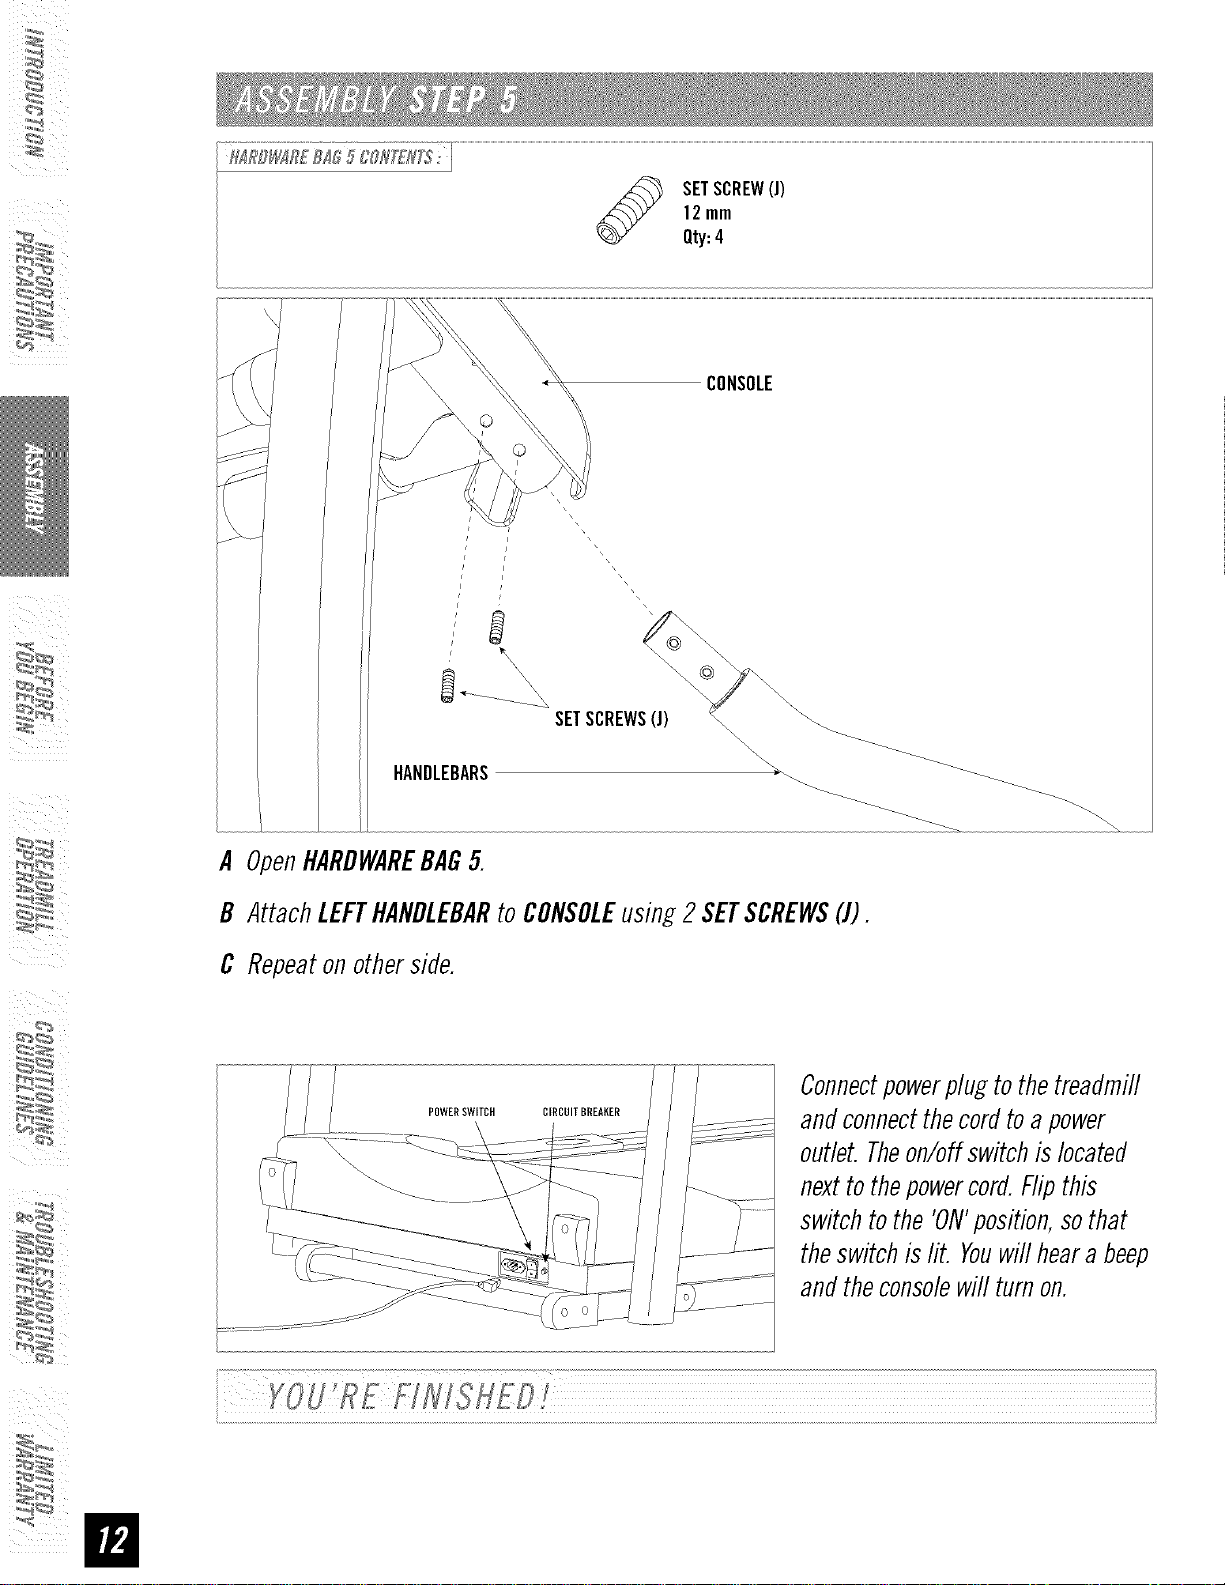
IIIRBI#IR£III 5 {I'0R[£#_'_: i
SETSCREW(l)
12rnm
Qty:4
/ ...................
s
\
s
\
SETSCREWS(J) \
HANDLEBARS _ _
A OpenHARDWAREBAG5.
B AttachLEFTHANDLEBARto CONSOLEusing2 SETSCREWS(J).
C Repeatonotherside.
POWERSWITCH
ConnectpowerpluEto the treadmill
and connectthecord toa power
outlet. Theon/off switch is located
nextto thepowercord. Flipthis
switch to the 'ON'position,so that
theswitch is lit. Youwill heara beep
and the consolewill turn on.
CONGRATULATIONS!onchoosingyourtreadmill. You'vetakenanimportant stepin developingand
sustaining anexerciseprogram! Yourtreadmill is a tremendouslyeffectivetoolfor achievingyourpersonal
fitnessgoals. Regularuseofyour treadmill can improvethe quality ofyour life in so manyways.
HEREAREJUSTAFEWOFTHEHEALTHBENEFITSOFEXERCISE:
• Weight Loss
• A Healthier Heart
• Improved Muscle Tone
• Increased Daily EnergyLevels
Thekey to reaping these benefits is to develop an exercise habit. Yournew treadmill will help you eliminate
obstacles that prevent you from exercising. Inclement weather and darkness won't interfere with your
workout when you use your treadmill in the comfort of your home. This guide provides you with basic
information for using and enjoying your new machine.
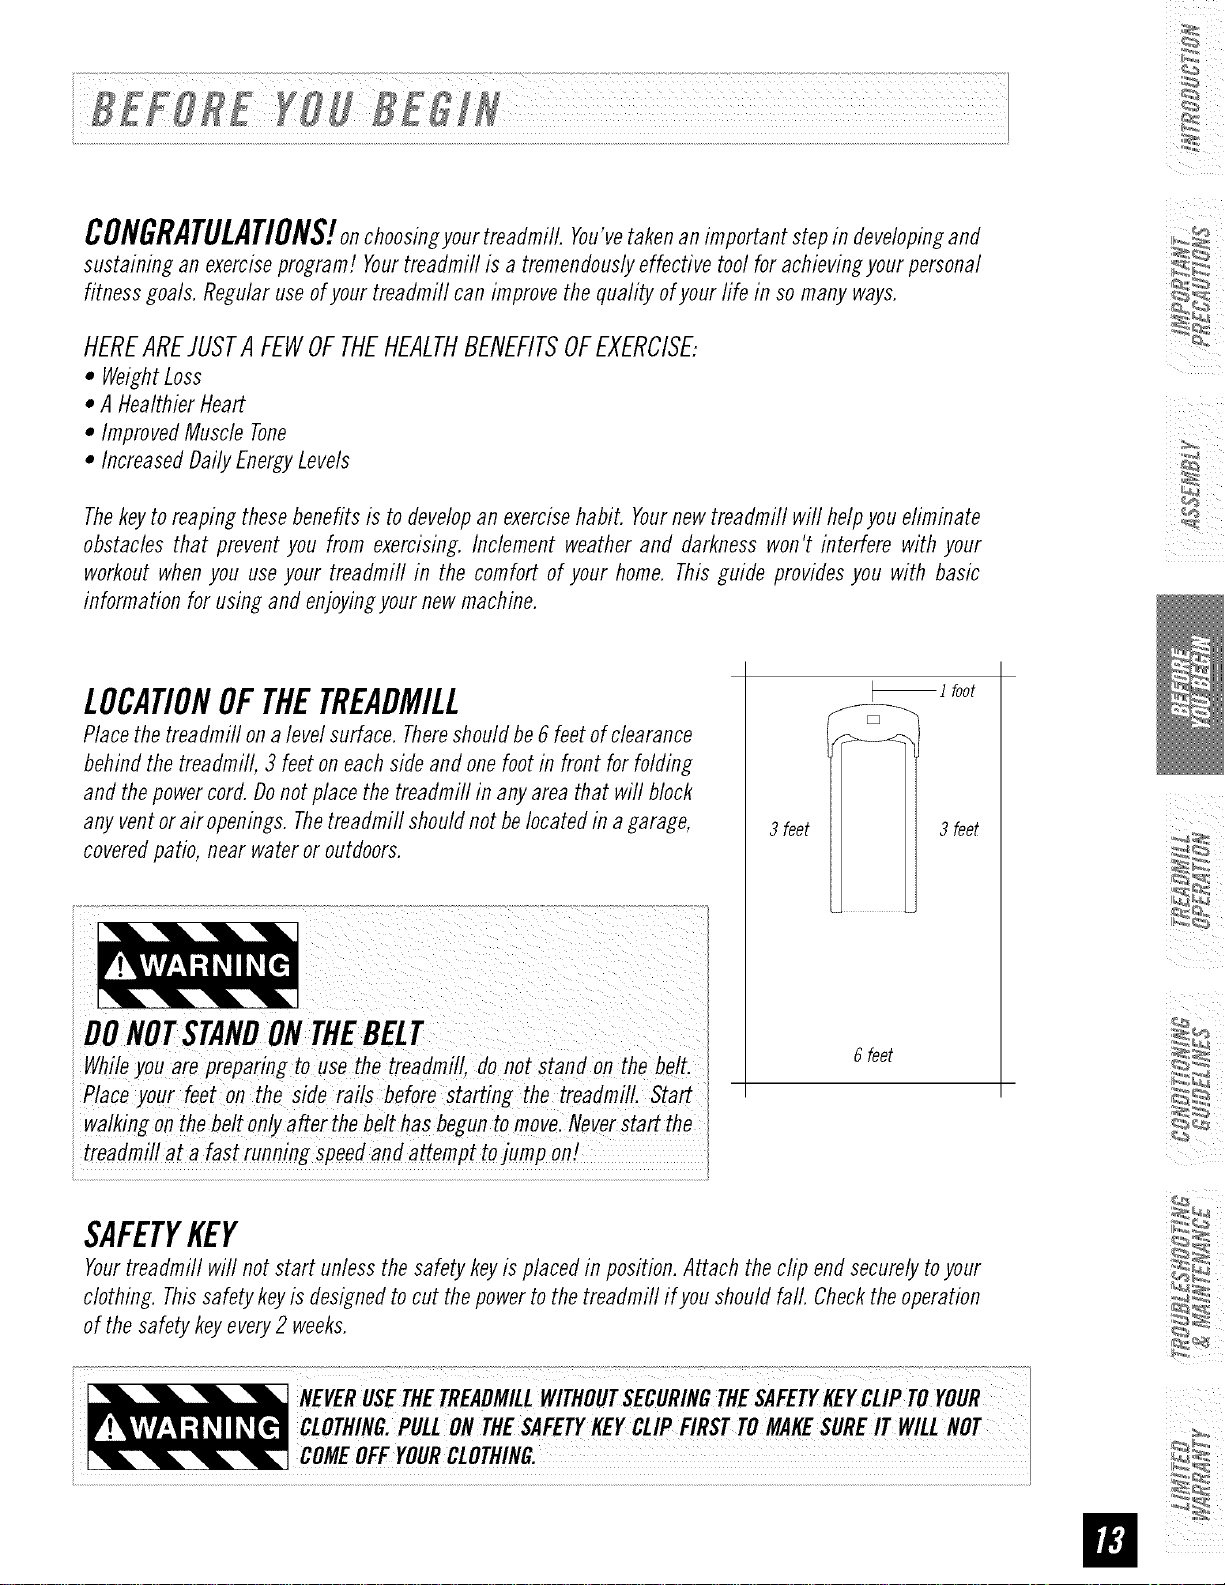
LOCATIONOFTHETREADMILL
Place the treadmill on a level surface. Thereshould be 6 feet of clearance
behind the treadmill, 3 feet on each side and one foot in front for folding
and the power cord. Donot place the treadmill in any area that will block
any vent or air openings. Thetreadmill should not be located in a garage,
covered patio, near water or outdoors.
While you are preparing touse the treadmill, do not stand on the be!t.
Place your feet on the side rails before starting the treadmill. Start
walking on the be!t only after the be!t has begun to move Never Start the
treadmill at a fast running speed and attempt tojump on!
_ i foot
3 feet 3 feet
6 feet
SAFETYKEY
Your treadmill will not start unless the safety key is placed in position. Attach the clip end securely to your
clothing. This safety key is designed to cut the power to the treadmill if you should fall. Check the operation
of the safety key every 2 weeks.
PROPERUSAGE
Yourtreadmill is capableofreachinghigh speeds.Alwaysstart off usinga slowerspeedandadjust thespeedin
srnafl incrementsto reacha higherspeedlevel Neverleavethe treadmill unattendedwhileit is running. When
not in use,removethesafety key,turn the on/off switch to off and unplug the powercord.Makesure to follow
theMAINTENANCEschedulelocatedonpage34 in this manual.Keepyourbodyand headfacing forward.Donot
attempt to turn aroundorlookbackwardswhile the treadmiflis running.Stopyour workoutimmediatelyif you
feelpain, faint, dizzyorare shortof breath.
Donotoperatethe treadmillif thepowercordorplugis damaged.
i If the treadmillappearsto notbe workingproperly,donotusethe treadmill.
i
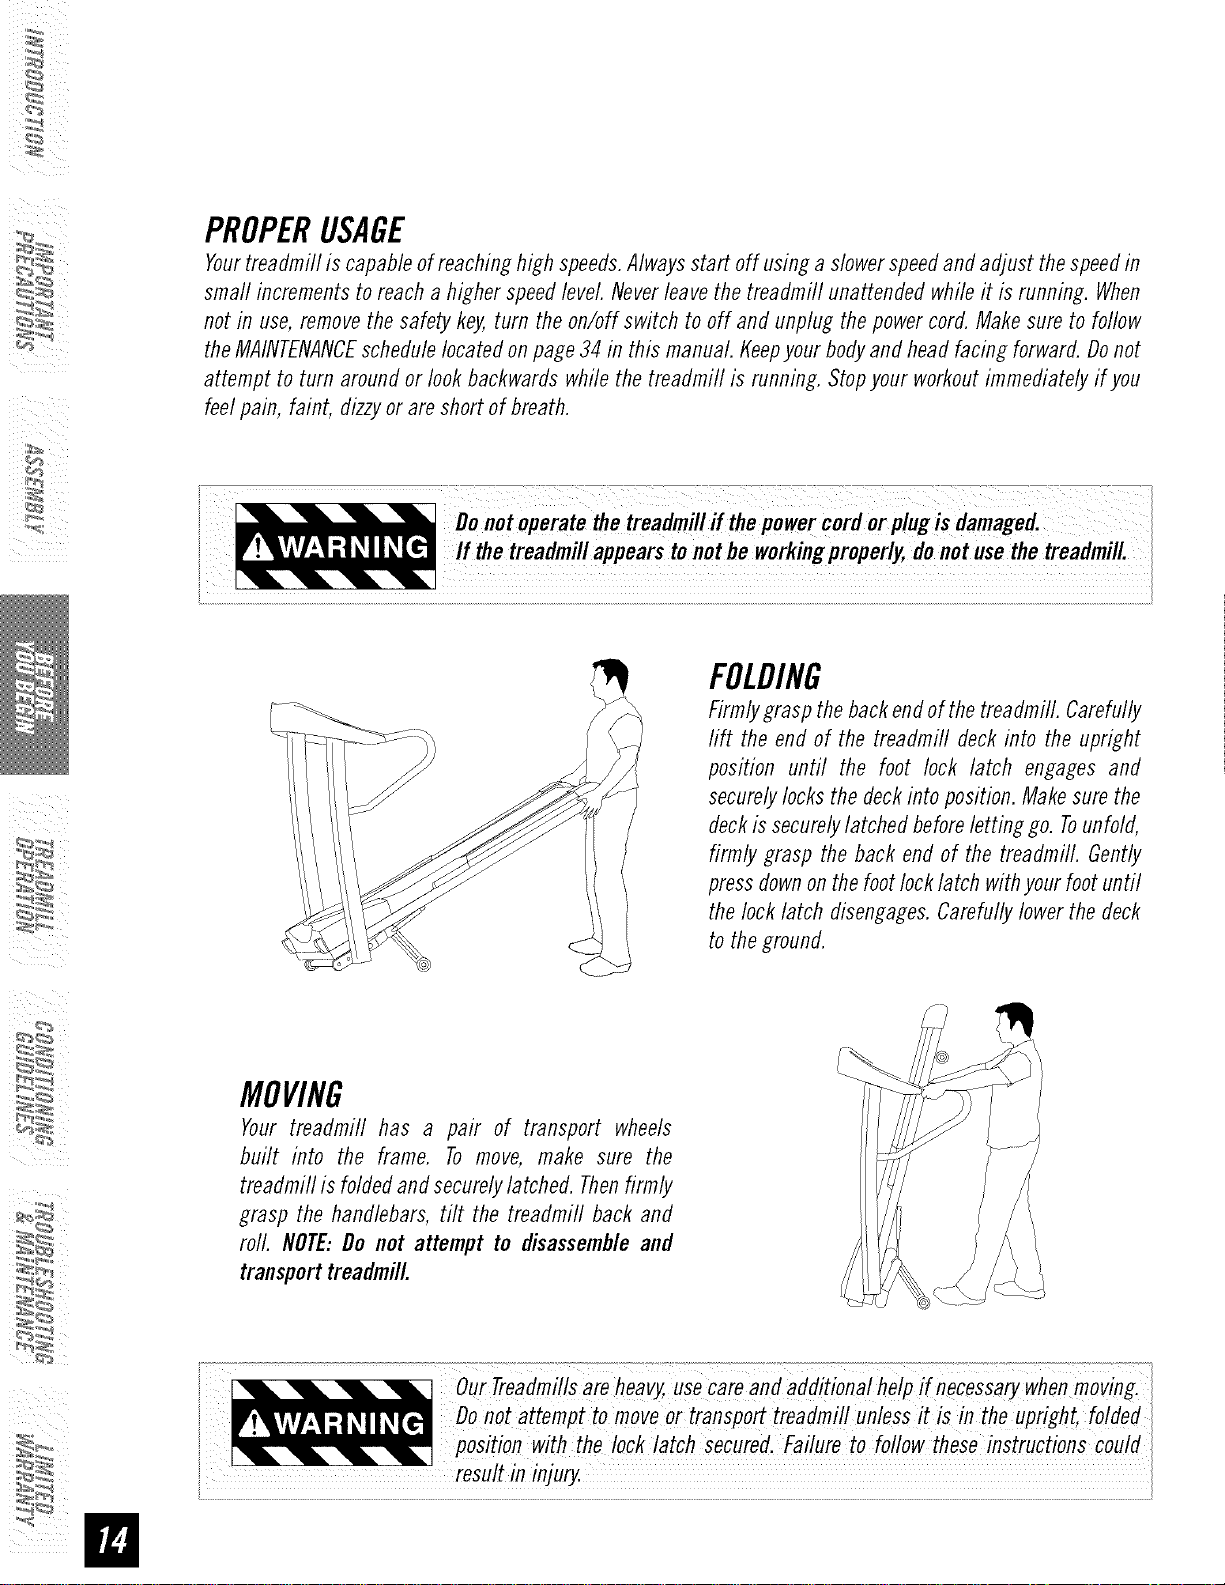
FOLDING
Firmlygraspthebackendof thetreadmill. Carefu//y
rift the endof the treadmill deckinto the upright
position until the foot lock latch engages and
securelylocksthedeckintoposition.Makesurethe
deckis securelylatched beforeletting go. Tounfold,
firmly grasp the back end of the treadmill. Gently
pressdownonthe footlocklatch withyourfootuntil
thelock latch disengages.Carefullylower thedeck
to theground.
MOVING
Your treadmill has a pair of transport wheels
built into the frame. To move, make sure the
treadmill is foldedandsecurelylatched.Thenfirmly
grasp the handlebars, tilt the treadmill backand
roll. NOTE:Do not attempt to disassembleand
transporttreadmill.
o/Treadmillsareheavy,uSecareaddition ihelp
Do,otattempttomoveortransPO treadmillunless!tisintheupright,foideU
i _ p°siti°n with the Iock!atch secured.Failure to foflowthese instructions COU!d
resu! inj, ;]
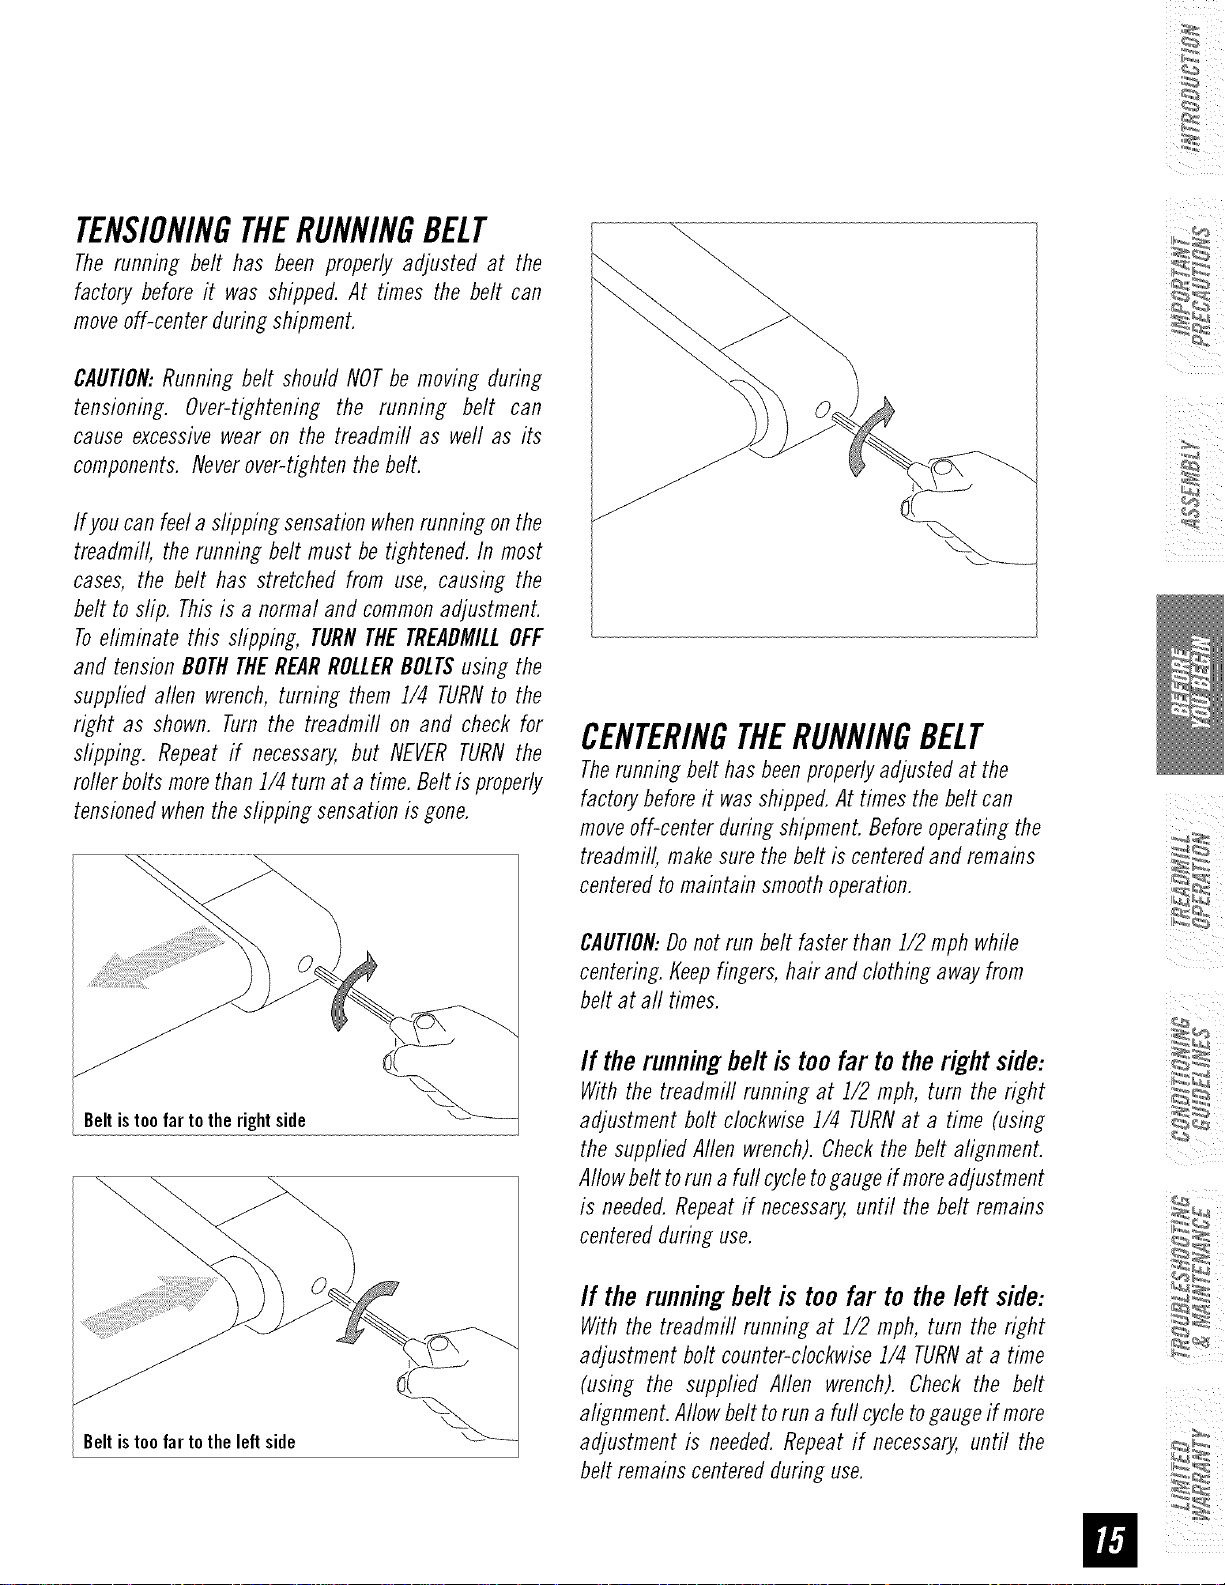
TENSIONINGTHERUNNINGBELT
The running belt has been properly adjusted at the
factory before it was shipped. At times the belt can
moveoff-center during shipment.
CAUTION:Running belt should NOTbe moving during
tensioning. Over-tightening the running belt can
cause excessivewear on the treadmill as well as its
components.Neverover-tightenthe belt.
If youcan feela slipping sensationwhenrunning onthe
treadmill, the running belt must betightened.In most
cases, the belt has stretched from use, causing the
belt to slip. Thisis a normal and commonadjustment.
Toeliminate this slipping, TURNTHETREADMILLOFF
and tensionBOTHTHEREARROLLERBOLTSusing the
supplied allen wrench,turning them 1/4 TURNto the
right as shown. Turnthe treadmill on and check for
slipping. Repeat if necessary,but NEVERTURNthe
roller boltsmorethan 1/4 turn at a time. Beltis properly
tensionedwhenthe slipping sensationisgone.
Beltistoofartotherightside
Beltistoofartotheleftside
CENTERINGTHERUNNINGBELT
Therunning belt hasbeenproperlyadjustedat the
factorybeforeit wasshipped.At timesthe beltcan
moveoff-center during shipment.Beforeoperatingthe
treadmill, makesurethe belt is centeredand remains
centeredtomaintain smoothoperation.
CAUTION:Donot run belt faster than 1/2 mph while
centering.Keepfingers, hair and clothingawayfrom
beltat all times.
If the running belt is too far to the right side:
Withthe treadmill running at 1/2 mph, turn the right
adjustment bolt clockwise 1/4 TURNat a time (using
the suppliedAllen wrench).Checkthe belt alignment.
Allowbelttoruna fullcycletogaugeif moreadjustment
is needed.Repeatif necessary,until the belt remains
centeredduring use.
If the running belt is too far to the left side:
Withthe treadmill running at 1/2 mph, turn the right
adjustment bolt counter-clockwise1/4 TURNat a time
(using the supplied Allen wrench). Check the belt
alignment.Allowbelttoruna full cycletogaugeif more
adjustment is needed.Repeatif necessary,until the
beltremainscenteredduring use.

i_I : iii
Note:Thereis a thin protectivesheetof clearplastic onthe overlayof the consoleand shouldberemoved.
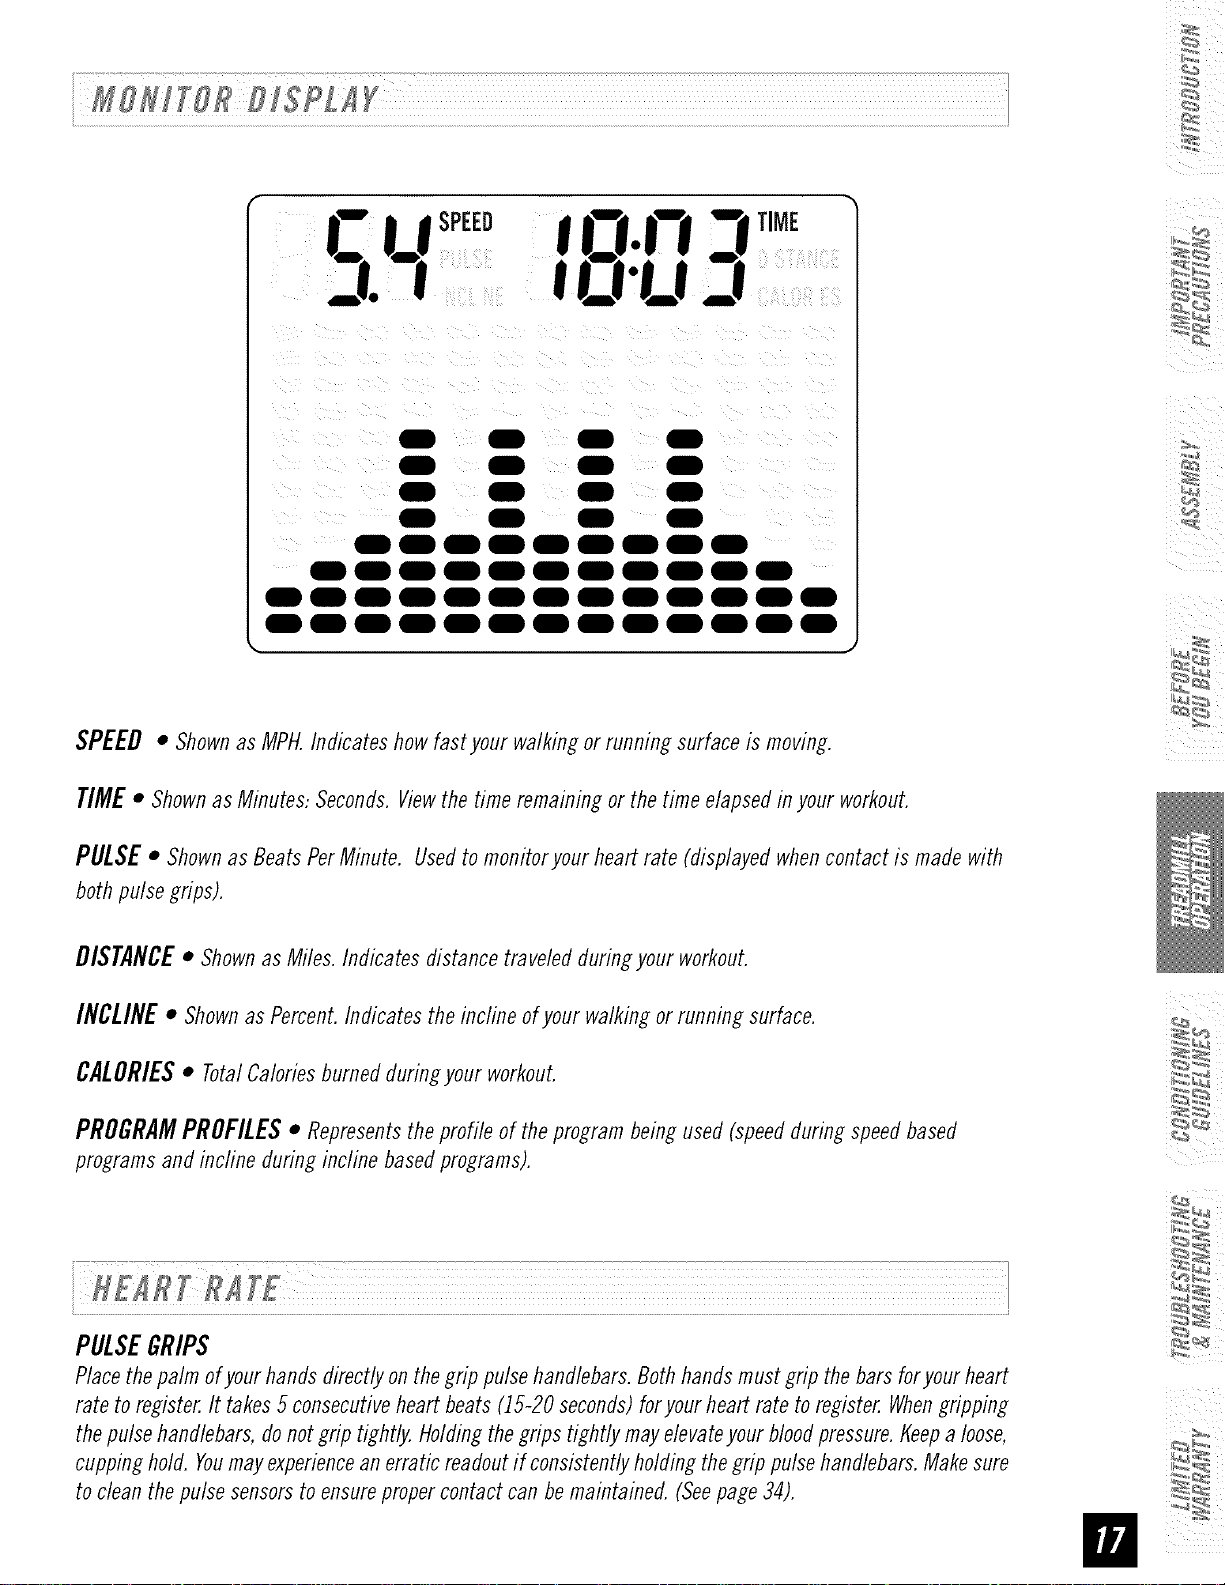
A) MONITORDISPLAY:Speed,Time,Pulse,Distance,Incline, Caloriesand ProgramProfiles.
B) STOP:Pressto pause/endyour workout.Holdfor 3 secondsto resetthetreadrni//.
C) START/PAUSE:Simplypressto beginexercising;pressagain to pauseyour workout.
D) ENTER/PROGRAMSETTINGKEYS:Presstoadjust Time,Incline,Speedand Level.
E) QUICKPROGRAMKEYS:Usedto quicklyselectdesiredprogram.
F) OUICKADJUSTINCLINEKEYS:Usedtoreach desiredincline morequickly.
G) OUICKADJUSTSPEEDKEYS:Usedto reach desiredspeedmorequickly.
H) INCLINEARROWKEYS:Usedto adjust incfine in srna// increments(0.5%increments).
I) SPEEDARROWKEYS:Usedtoadjust speedin srna//increments(0.1rnphincrements).
]) SAFETYKEYPOSIflON:Enablestreadmill whensafety keyis inserted.
K) BLOWERFAN:Persona/workoutMowerfan.
L) BLOWERFANBUTTON:Pressthe fan button oncefor lowspeed,twice for mediumspeed,threetimes
for high speedand fourtimesto turn the fan off.
M) READINGRACK..Holdsreadingrnateria/ (Removesalessticker beforeuse).
N) WATERBOTTLE/ CDIMP3 HOLDERS:Holdspersona/workoutequipment.
/4
r,_;*0
3. t3"U-I
000000000
||0000|000|
0000000000000
0000000000000
SPEED• Shown as MPH. Indicates how fast your walking or running surface ismoving.
TIME • Shown as Minutes: Seconds. Viewthe time remaining or the time elapsed in your workout.
PULSE • Shown as Beats Per Minute. Used to monitor your heart rate (displayed when contact is made with
both pulse grips).
DISTANCE• Shownas Miles. Indicates distance traveled during your workout.
INCLINE • Shown as Percent. Indicates the incline of your walking or running surface.
CALORIES • TotalCalories burned during your workout.
PROGRAM PROFILES • Represents the profile of the program being used (speed during speed based
programs and incfine during incline based programs).
PULSEGRIPS
Place the palm of your hands directly on the grip pulse handlebars. Both hands must grip the bars for your heart
rate to register. It takes 5 consecutive heart beats (15-20 seconds) foryour heart rate to register. Whengripping
the pulse handlebars, do not grip tightly. Holding the grips tightly may ehvate your blood pressure, t_eepa loose,
cupping hold. Youmay experience an erratic readout if consistently holding the grip pulse handlebars. Make sure
to clean the pulse sensors to ensure proper contact can be maintained. (Seepage 34).
I)
2)
3)
4)
5)
6)
Checktomakesurenothingwill hinderthe movementof thetreadmill.
Plugin thepowercordand turnthetreadmill ON.
Standonthesiderailsof thetreadmill.
Attachthesafetykeyclip topart ofyourclothing.
Insertthesafetykeyintothesafetykeyholein theconsole.
Youhavetwooptionstostart yourworkout:
i_I _ i_ii
A)
B)
C)
D)
QUICKSTARTUP
Simplypressthe STARTkeyto begin workingout. OR...
SELECTAPROGRAM
Selecta PROGRAMusing theQUICKPROGRAMKEYS.
Oncea PROGRAMhasbeenchosen,pressENTER.
SELECTALEVEL
Selecta PROGRAMLEVELusingthe ARROWkeys.
Oncea PROGRAMLEVELhasbeenchosen,pressENTER.
SELECTA TIME
Selecta Timeusing theARROWkeysor usethe default time.
Oncea TIMEhasbeenchosen,pressSTART.
FINISHINGYOURWORKOUT
Whenyour workoutis complete,the MONITORDISPLAYwill flash and beep.Yourworkoutinformation will
staydisplayedontheconsolefor 30 secondsand thenreset.
CLEARCURRENTSELECTION
Toclear thecurrentprogramselectionorscreen,hold the STOPbuttonfor 3 seconds.
SCANVIEWINGSCREENS
Tohavethedisplayscreenrotate continuously(Speedand Time,PulseandDistance,Incline and Calories),
holdthe ENTERbutton for 5 seconds.PressENTERoneadditional time to turn off scanfeature.
¸¸4¸¸
Allows'OnTheFly'manual SPEEDand iNCLINEchanges.Time-basedgoal.
F# { :2L ;¸¸¸¸¸¸¸¸¸¸¸¸¸¸¸¸¸¸¸¸¸¸¸¸¸¸¸¸¸¸¸¸¸¸¸L?LL?L?/
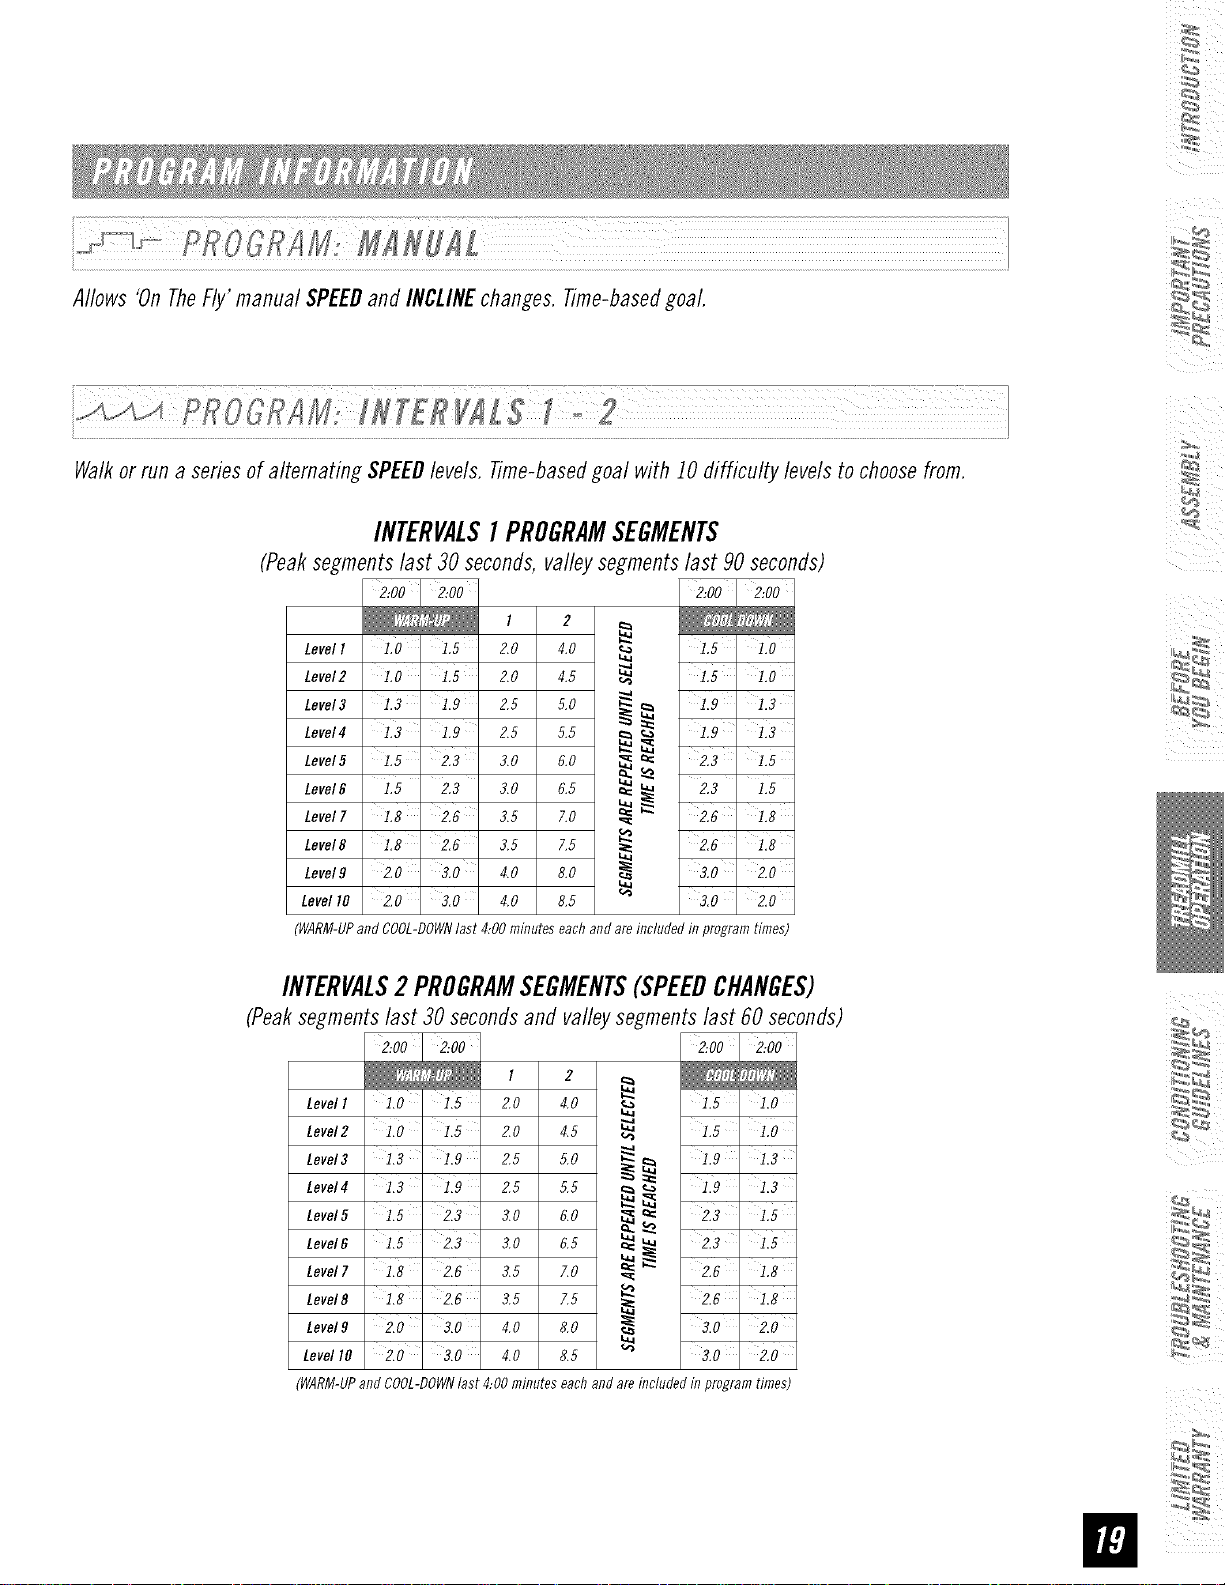
Walkorrun a seriesof alternating SPEEDlevels. Time-basedgoal with 10difficulty levelsto choosefrom.
INTERVALS1PROGRAMSEGMENTS
(Peak segments last 30 seconds, valley segments last 90 seconds)
2:00 2:00
t 2
Levell 1.0 ' i.5 2,0 4,0 _ 1.5 ' 1,0
Level2 1.0 ' 1.5 2.0 4.5 _ 1.5 ' 1,0
....a
1.9 1.3
Level3 1.3 1.9 2,5 5.0 _ 1.9 ' 1,3
Level4 1.3 ' i.9 2.5 5.5 _
Level5 1.5 2.3 3.0 6.0 _'__= 2.3' 1,5
Level_ :.5 2.3 s,o 0,5 ___ 2.3 :,5
Level7 1.8 2.6 3,5 7,0 _ _ 2.6 1,8
Level8 118 2.6 3,5 7,5 _ 2.6 1,8
Level9 2.0 ' 3.0 4,0 8,0 _ 3.0 ' 2.0
Level10 2.0 3.0 4,0 8,5 _ 3.0 _ 2.0
(WARM-UPandCOOL-DOWNlast 4:00minuteseachandareincludedinprogramtimes)
INTERVALS2 PROGRAMSEGMENTS(SPEEDCHANGES)
(Peaksegments last 30 seconds and valley segments last 60 seconds)
2:00 2:002:00 ' 2:00
LevelI 1,0 1,5 2.0 4.0 _ 1,5 1.0
Level2 110 1,5 2,0 4,5 _ 1,5 ' 1.0
Level3 1,3 ' 1.9 2.5 5.0 _ _ 1.9 1.3
Lever41.3 1.9 g,5 5,5 _ _, 1.9 1.3
Level5 1,5 ' 2,3 3,0 6,0
_= 2,3 1.5
Lever61.5 2Z 3,0 6,5 _ ____ 2Z , 1.5
Level8 1,8 Z6 3,5 7,5 ,__ Z6 1.8
Level9 2,0 ' 3,0 4,0 8,0 _ 3,0 ' 2.0
LevellO 2,0 ' 3,0 4.0 8.5 _ 3,0' 2.0
(WARM-UPandCOOL-DOWNlast 4:00minuteseachandareincludedinprogramtimes)
L_

i_I _ iii
i_. ¸-._._U_._,_._,,7._e_._,7_.,_ _ ....................................................._< !
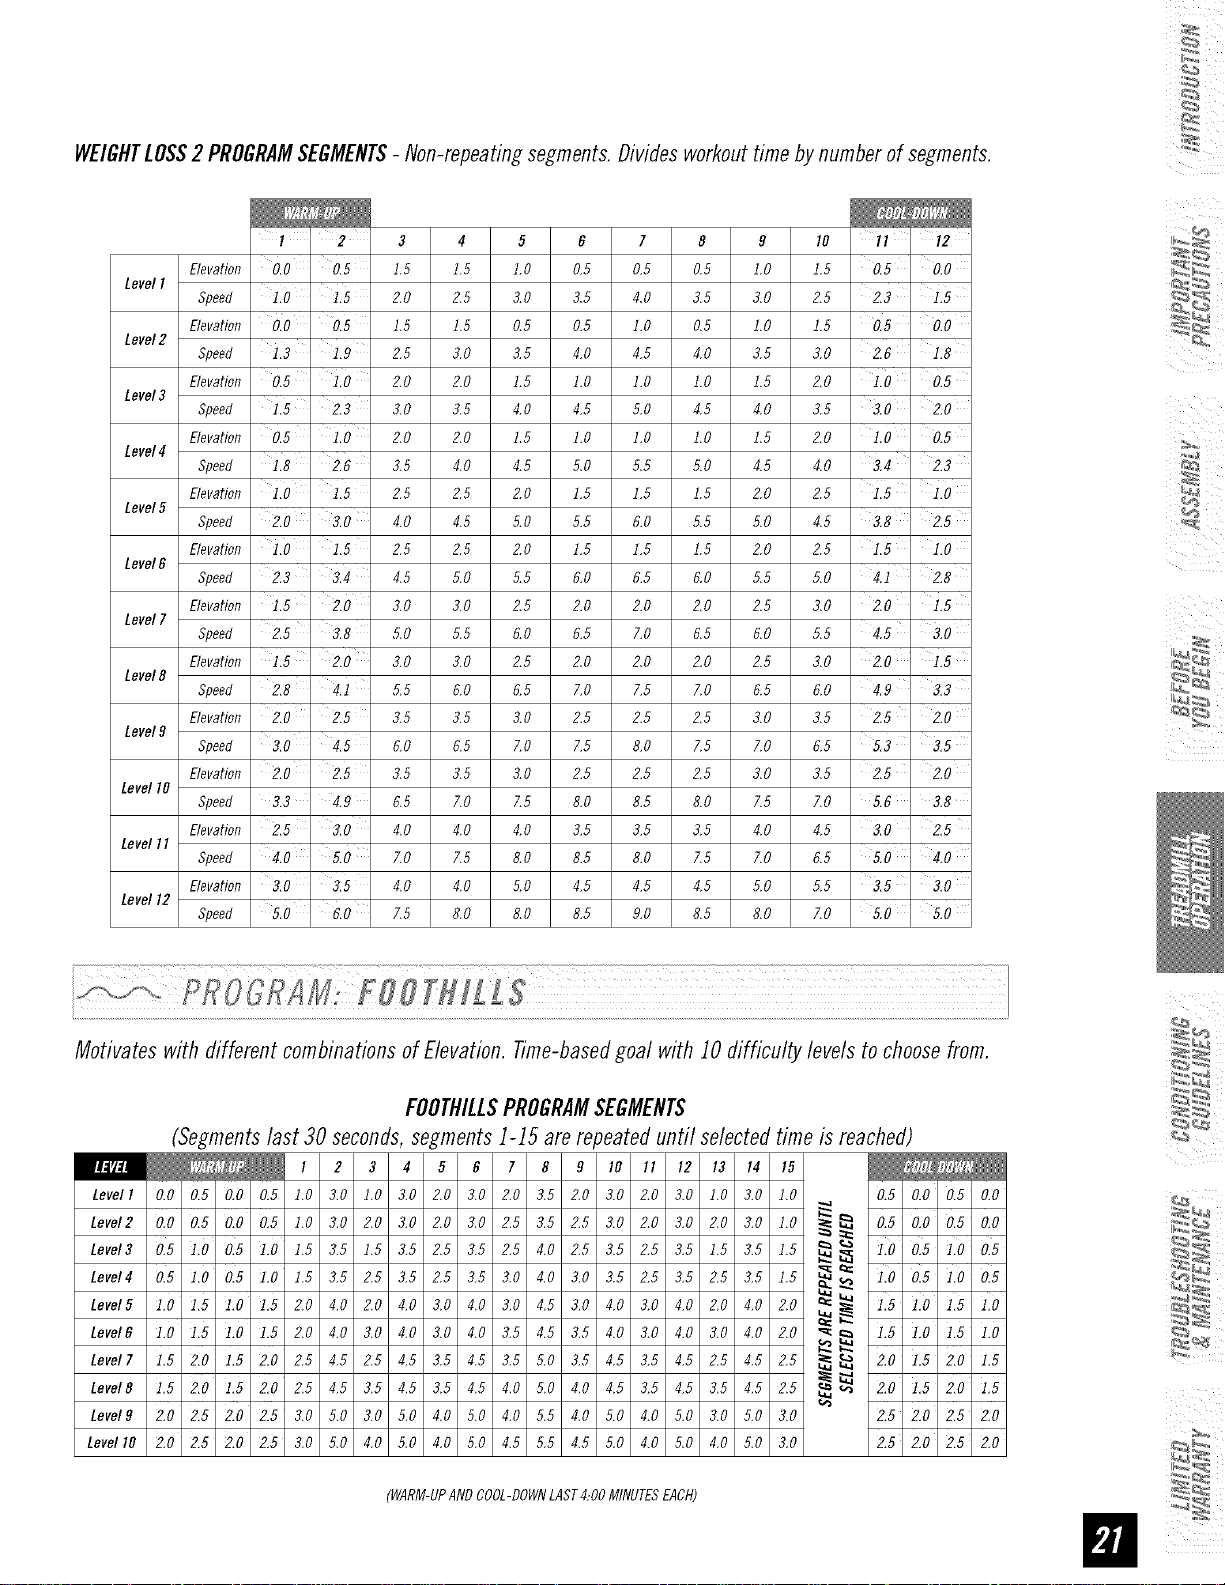
CROOR MWEJOHTLOSSf 2
Challengeswith variouscombinationsof hills and valleys(INCLINE&SPEEDlevels). Time-basedgoal with 10
or 12difficulty levelsto choosefrom.
WE/GHTLOSSI PROGRAMSEGMENTS(all segmentslast 30seconds)
I 2 3 4 5 6 7 8
Elevation 0.0 ' 0.5 1.5 1.5 1.0 0.5 0.5 0.5 l.O 1.5 015' 0.0
LevelI
Speed LO ' 2.0 2.5 3.0 3.5 4.0 3.5 3.0 2.5 2,3 _ 1,5
,evat,onO0 ,5 ,0 05 05 ,0 100
Level2 Speed L3 1,9 2.5 3.0 3.5 4.0 4.5 4.0 3.5 3.0 _ 2.6 1,8
Elevation 0,5 ' ],0 2.0 2.0 1.5 1.0 ].0 ].0 ].5 2.0 _ ],0 ' 0,5
Level3 Speed L5 ' 2,3 3.0 3.5 4.0 4.5 5.0 4.5 4.0 3.5 _ 3,0 2,0
Elevation 0,5 l,O 2.0 2.0 1.5 1.0 ].0 ].0 ].5 2.0 _ ],0 ' 0,5
Level4
Speed L8 ' 2,6 3,5 4,0 4,5 5,0 5,5 5,0 4,5 4,0 _ 3,4 ' 2,3
Elevation i.0 2.5 2.5 2.0 1.5 1.5 1.5 2.0 2.5 _ 1.5 i.0
Level5
Speed 2.0 3,0 4.0 4.5 5.0 5.5 6.0 5.5 5.0 4.5 _-. 3,8 2,5
Elevation 1,0 ' 2,5 2,5 2,0 1,5 1,5 1,5 2,0 2,5 _ ],5 ' 1,0
Level6
Speed 2,3 ' 3.4 4.5 5,0 5.5 6,0 6.5 6,0 5.5 5,0 _ 4.1 _ 2.8
Elevation L5 2,0 3,0 3,0 2,5 2,0 2,0 2,0 2,5 3,0 _= 2,0 115
Levell Speed 2,5 ' 3,8 5,0 5,5 6,0 6,5 ZO 6,5 6,0 5,5 _ 4,5 ' 3,0
Elevation L5 ' 2,0 3,0 3,0 2,5 2,0 ZO 2,0 2,5 3,0 _ 210 '
Level8 Speed 2,8 4.i 5,5 6,0 6,5 7,0 Z5 7,0 6,5 6,0 _ 4.9 3,3
Elevation 2,0 ' 2,5 3.5 3,5 3,0 2,5 Z5 2.5 3.0 3,5 _ 2,5 ' 2,0
Level9
I
Speed 3.0 ' 4.5 6,0 6.5 7.0 7.5 8.0 7.$ 7.0 6.5 5.3 3.5
Elevation 2,0 ' 2,5 3,5 3,5 3,0 2,5 Z5 2,5 3,0 3,5 2,5 _ 2,0
Level10
Speed 3,3 ' 4,9 6,5 7,0 7,5 8,0 8,5 8,0 7,5 7,0 5,6 ' 3,8
(WARM-UPandCOOL-DOWNlast 4:00minuteseachandareincludedinprogramtimes)
¸¸4¸¸
WEIGHTLOSS2 PROGRAMSEGMENTS- Non-repeatingsegments.Dividesworkouttimebynumberof segments.
3 4 5 6 7 8 9 10 il ' i2
Elevation 0,0 ' 0,5 1.5 1.5 1.0 0.5 0.5 0.5 1.0 1.5 0.5 ' 0,0
LevelI
Speed iiO ' 1,5 2.0 2.5 3.0 3.5 4.0 3.5 3.0 2.5 2.3 '
Elevation 010 ' 0,5 1.5 1.5 0.5 0.5 I.O 0.5 I.O 1.5 0.5 ' 0,0
Level2
Speed 1,3 ' 1,9 2.5 3.0 3.,5 4.0 4.,5 4.0 3.5 3.0 2.6 1,8
Elevation 0,5 ' 110 2.0 2.0 1.5 I.O I.O I.O 1.5 2.0 0,5
Level3
Speed 1,5 ' 2,3 3.0 3.5 4.0 4.5 5.0 4.5 4.0 3.5 3.0 2,0
Elevation 0,5 110 2.0 2.0 1.5 1.0 1.0 1.0 1.5 2,0 1.0 ' 0,5
Level4
Speed 1,8 ' 2,6 3.5 4.0 4.,5 5.0 5.,5 ,5.0 4.5 4.0 3.4 22
Elevation iio ' 1,5 2.5 2.5 2.0 1.5 1.5 1.5 2.0 2.5 115
Level5
Speed 2,0 3,0 4.0 4.5 5.0 5.,5 6.0 ,5.5 ,5.0 4.5 3.8 ' 2,5
Elevation 1,0 '1,5 2.5 2.5 ZO 1.5 1.5 1.5 2.0 2.5 1.5 I,O
LeveI6
Speed 22 3,4 4.5 ,5.0 5.,5 6.0 6.,5 6.0 ,5.5 ,5.0 4.i 2,8
Elevation 1,5' 2.0 3.0 3.0 Z5 2.0 2.0 2.0 2.5 3.0 2.0 1,5
Level7
Speed 2.5 ' 3,8 5.0 5.5 6.0 6.5 7.0 6.5 6.0 5.5 4.5 ' 3.0
Elevation 115 ' 2,0 3.0 3.0 Z5 2.0 2.0 2.0 2.5 3.0 2.0 ' 1,5
Level8
Speed 2,8 ' 4,1 5.5 6.0 6.5 7.0 7.5 7.0 6.5 6.0 4.9 33
Elevation 2,0 ' 2,5 3.5 3.5 3.0 2.5 2.5 2.5 3.0 3.5 2.5 ' 2,0
Levelg
Speed 3,0 4,5 6.0 6.5 7.0 7.5 8.0 7.5 7.0 6.5 5.3 ' 3,5
Elevation 2,0' 2,5 3.5 3.5 3.0 2.5 2.5 2.5 3.0 3.5 2.5 ' 2,0
LeveltO
Speed 32 4,9 6.5 7.0 7.5 8.0 8.5 8.0 7.5 7.0 5.6 3,8
Elevation 2,5 ' 3,0 4.0 4.0 4.0 3.5 3.5 3.5 4.0 4.5 3.0 ' 2,5
Levell I
Speed 4,0 5,0 7.0 7.5 8.0 8.5 8.0 7.5 7.0 6.5 5.0 ' 4,0
Elevation 3,0 ' 3,5 4.0 4.0 5.0 4.5 4.5 4.5 5.0 5.5 3.5 ' 3,0
Level12
Speed 5,0 ' 6,0 7.5 8.0 8.0 8.5 9.0 8.5 8.0 ZO 5,0 ' 5,0
Motivates with different combinationsofE/evatbn. Time-basedgoal with 10difficulty levelsto choosefrom.
FOOTHILLSPROGRAMSEGMENTS
(Segmentslast 30seconds,segments1-15 are repeateduntil selectedtime is reached)
Levell 0,0 0,5 0,0 0,5 1.0 3.0 1.0 3.0 2.0 3.0 2.0 3.5 2.0 3.0 2.0 3.0 1.0 3.0 1.0 0,5 0,0 0,5 0,0
LevsI, 0,00,50,00,5],0_,02,0_,02,0_,02,5_,52,5_,02,0_,02,0_,0],01£ 0,50,00,50,0
Level3 0.5 ].0 0.5 ].0 1.,5 3.,5 1.,5 3.,5 2.,5 3.,5 2.,5 4.0 2.,5 3.,5 2.,5 3.,5 1.,5 3.,5 1.,5 __ _ 1.0 0.5 1.0 0.5
Levels 0.5 1.0 0.5 1.0 1.,5 3.,5 2.,5 3.,5 2.,5 3.,5 3.0 ,40 3.0 3.,5 2.,5 3.,5 2.,5 3.,5 1.,5 _ _ 1.0 0.5 1.0 0.5
Level5 ],0 ],5 ],0 ],5 2.0 4.0 2.0 4.0 3.0 4.0 3.0 4.,5 3.0 4.0 3.0 4.0 2.0 4.0 2.0 _ 1,5 1,0 1,5 1,0
"_ _ ],5 ],0 ],5 ],0
Level6 1,0 1,5 1,0 1,5 2.0 4.0 3.0 4.0 3.0 4.0 3.5 4.5 3.5 4.0 3.0 4.0 3.0 4.0 2.0 _
Level7 1,5 2,0 1,5 2,0 2.5 4.5 2.5 4.5 3.5 4.5 3.5 5.0 3.5 4.5 3.5 4.5 2.5 4.5 2.5 _ _ 2,0 ],5 2,0 ],5
Level8 1,5 2,0 1,5 2,0 2.5 4.5 3.5 4.5 3.5 4.5 4.0 5.0 4.0 4.5 3.5 4.5 3.5 4.5 2.5 _ _ 2,0 ],5 2,0 ],5
Levelg 2,0 2,5 2,0 2,5 3.0 5.0 3.0 5.0 4.0 5.0 4.0 5.5 4.0 5.0 4.0 5.0 3.0 5.0 3.0 2,5 2,0 2,5 2,0
LevellO 2,0 2,5 2,0 2,5 3.0 5.0 4.0 5.0 4.0 5.0 4.5 5.5 4.5 5.0 4.0 5.0 4.0 5.0 3.0 2,5 2,0 2,5 2,0
(WARM-UPANDCOOL-DOWNLAST4:00MINUTESEACH)
b_
i_I "_ i_ii
¸sE L!!!I¸!!!!I!¸L!i!!LLI!!!LL!L!!!I!i,
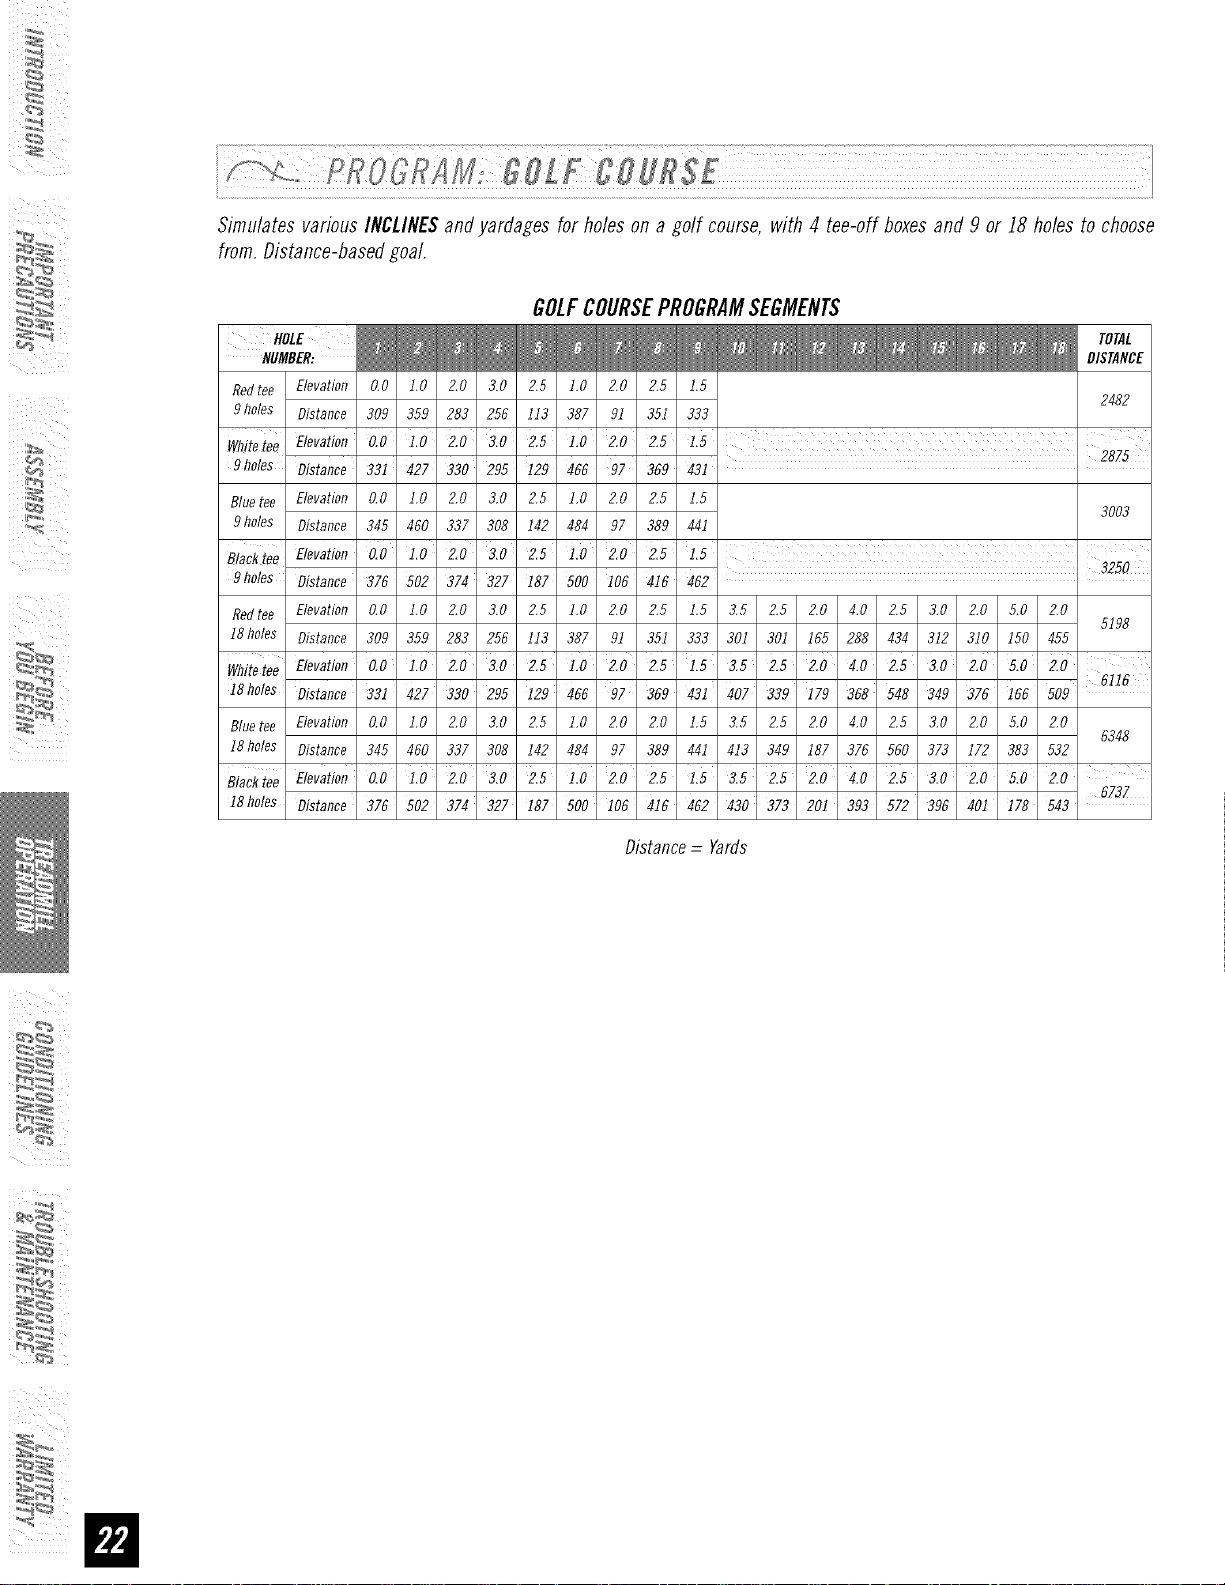
Simulates various INCLINESandyardages for holes on a golf course, with 4 tee-off boxesand 9 or I8 holes to choose
from.Distance-basedgoal.
GOLFCOURSEPROGRAMSEGMENTS
HOLE
HUMBER:
Redtee Elevation 0,0 1.0 2.0 3.0 2.5 1.0 2.0 2.5 1.5
2482
9holes Distance 309 359 283 256 113 387 9I 351 333
I
Wflitetee Elevation 0,0 1.0 2.0 3.0 2.5 1.0 2.0 2.5 1.5 2875
9holes Distance 33i 427 330 295 I29 466 97 369 43I
Bluetee Elevation 0,0 1.0 2.0 3.0 2.5 1.0 2.0 2,5 1.5
3003
9holes Distance 345 460 337 308 142 484 97 389 44I
B/aekiee Elevation 0.0 1.0' 2.0' 3.0 2.5 1.0 2.0 2.5 1.5
3250
9holes Distance 376 502 374 327 I87 BOO I06 416 462
Redtee Elevation 0,0 1.0 2.0 3.0 2.5 1.0 2.0 2.5 1.5 3,5 2.5 2.0 4.0 2.5 3.0 2.0 5.0 2.0
5198
I8 holes Distance 309 359 283 255 113 387 9I 351 333 301 30I 155 288 434 312 310 I50 455
WhiteteeElevation0.0 1.0 2.0 3.0 2.5 1.0 2.0 2.5 1.5 3.5 2.5 2.0 4.0 2.5 3.0 2.0'5.0'2.0'
6116
18 holes Distance 33i 427 330 295 i29 456 97 369 43i 407 339 179 358 548 349 376 i65 509
Bluetee Elevation 0,0 1.0 2.0 3.0 2.5 1.0 2.0 2.0 1.5 3,5 2.5 2.0 4.0 2.5 3.0 2.0 5.0 2.0
6348
I8 holes Distance 345 460 337 308 142 484 97 389 44I 413 349 187 376 560 373 172 383 532
Blacktee Elevation 0.0 i.0 2.0 3.0 2.5 1.0 2.0 2.5 1.5 3.5 2.5' 2.0' 4.0 2.5 3.0 2.0 5.0 2.0
18holes Distance 375 502 374 327 I87 500 I06 416 462 430 373 201 393 572 396 40i I78 543 6737
Distance = Yards
¸¸4¸¸
Letsyou createandreusea perfect workoutforyou with specific speed,incline and time combination.
Theultimate in personalprogramming.Time-basedgoal.
I. Oncethe CUSTOMprogramhas beenchosen,pressENTER.
2.ChoosethedesiredTIMEusingthePROGRAMSETTINGKEYSand
pressENTER.
3.Choosethe desiredSPEEDfor all 15segmentsusingtheARROWKEYSand
pressENTER.Note:Youwill needto pressENTERafter eachsegment.
,4) TheSTOPkeywill takeyou backto theprevioussegment.
4. Choosethe desiredINCLINEfor aft 15segmentsusing theARROWKEYSand
pressENTER.Note:Youwill needto pressENTERafter eachsegment.
,4) TheSTOPkeywill takeyou backto theprevioussegment.
5. PressSTARTto beginyourprogram.At this time,yourprogramhasbeen
successfullysavedinto memory,and canbeusedfor future workouts.
,4) ToRESETyour programinformation and deleteit frommemory,pressand
holdthe ENTERkeyfor 5 seconds(afleryouhaveselectedthe
CUSTOMprogram).
B) Whileusingyoursavedprogram,youareable to adjust thespeedor
incline, but anychangeswill not besaved.
/
ALWAYSCONSULTYOURPHYSICIANBEFOREBEGINNINGANEXERCISEPROGRAM.
/
/
i_I _ iii
HOWOFTEN?(Frequencyof Workouts)
The American Heart Association recommends that you exercise at least 3 to 4 days per week to maintain
cardiovascular fitness. If you have other goals such as weight or fat loss, you will achieve your goal faster with
more frequent exercise. Whether it's 3 days or 6 days, remember that your ultimate goal should be to make
exercise a lifetime habit. Many people are successful staying with a fitness program if they set aside a specific
time of day to exercise. It doesn't matter whether it's in the morning before breakfast, during lunch hour or while
watching the evening news. What's more important is that it's a time that allows you to keep a schedule, and a
time whenyou won't be interrupted. Tobe successful with your fitness program, you have to make it a priority in
your life. So decide on a time, puff out your day planner and pencil in your exercise times for the next month!
HOWLONG?(DurationofWorkouts)
For aerobic exercise benefits, it's recommended that you exercise from between 24 and 60 minutes per session.
But start slowly and gradually increase your exercise times. If you've been sedentary during the past year, it may
be a good idea to keepyour exercise times to as little as five minutes initially. Yourbody will need time to adjust
to the new activity. If your goal is weight loss, a longer exercise session at lower intensities has been found to
be most effective. A workout time of 48 minutes or more is recommended for best weight loss results.
HOWHARD?(IntensityofWorkouts)
How hard you workout is also determined by your goals. If you useyour treadmill to prepare for a 5t{ run, you
will probably work out at a higher intensity than if your goal is general fitness. Regardless of your long term
goals, always begin an exercise program at low intensity. Aerobic exercise does not have to be painful to be
beneficial! Thereare two ways to measure your exerciseintensity. Thefirst is by monitoring your heart rate using
the grip pulse handlebars and the second is by evaluating your perceived exertion level (this is simpler than it
sounds!).
PERCEIVEDEXERTIONLEVEL
A simple way to gaugeyour exercise intensity is to evaluateyour perceived exertion level. Whileexercising, if you
are too winded to maintain a conversation without gasping, you are working out too hard. A good rule of thumb
is to work to the point of exhilaration, not exhaustion. If you cannot catch your breath, it's time to slow down.
Always be aware of these warning signs of overexertion.
¸¸4¸¸
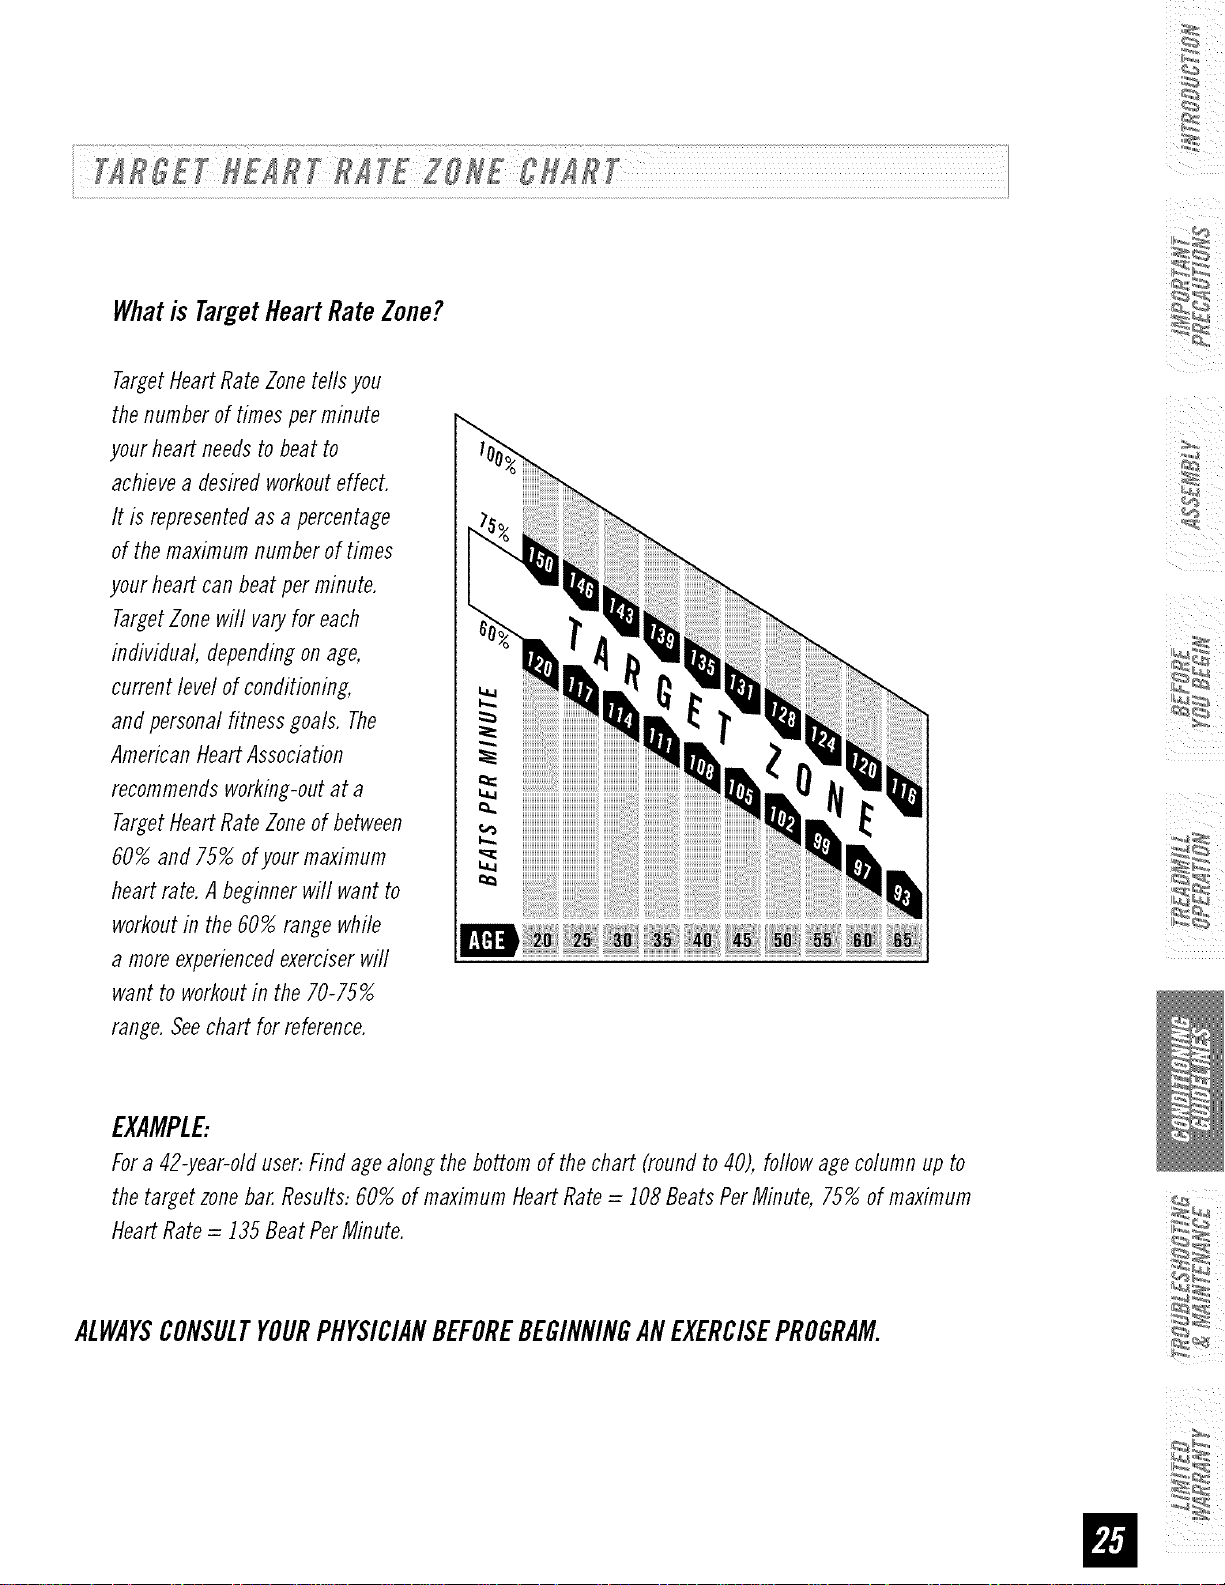
Whatis TargetHeartRateZone?
Target Heart Rate Zone tells you
the number of times per minute
your heart needs to beat to
achieve a desired workout effect.
It is represented as a percentage
of the maximum number of times
your heart can beat per minute.
Target Zone will vary for each
individual, depending on age,
current level of conditioning,
and personal fitness goals. The
American Heart Association
recommends working-out at a
Target Heart Rate Zone of between
60% and 75% of your maximum
heart rate. A beginner will want to
workout in the 60% range while
a more experienced exerciser will
want to workout in the 70-75%
range. See chart for reference.
EXAMPLE:
For a 42-year-old user: Find age along the bottom of the chart (round to 40), follow age column up to
the target zone bar. Results: 60% of maximum Heart Rate = 108 Beats Per Minute, 75% of maximum
Heart Rate = 135 Beat Per Minute.
ALWAYSCONSULTYOURPHYSICIANBEFOREBEGINNINGANEXERCISEPROGRAM.
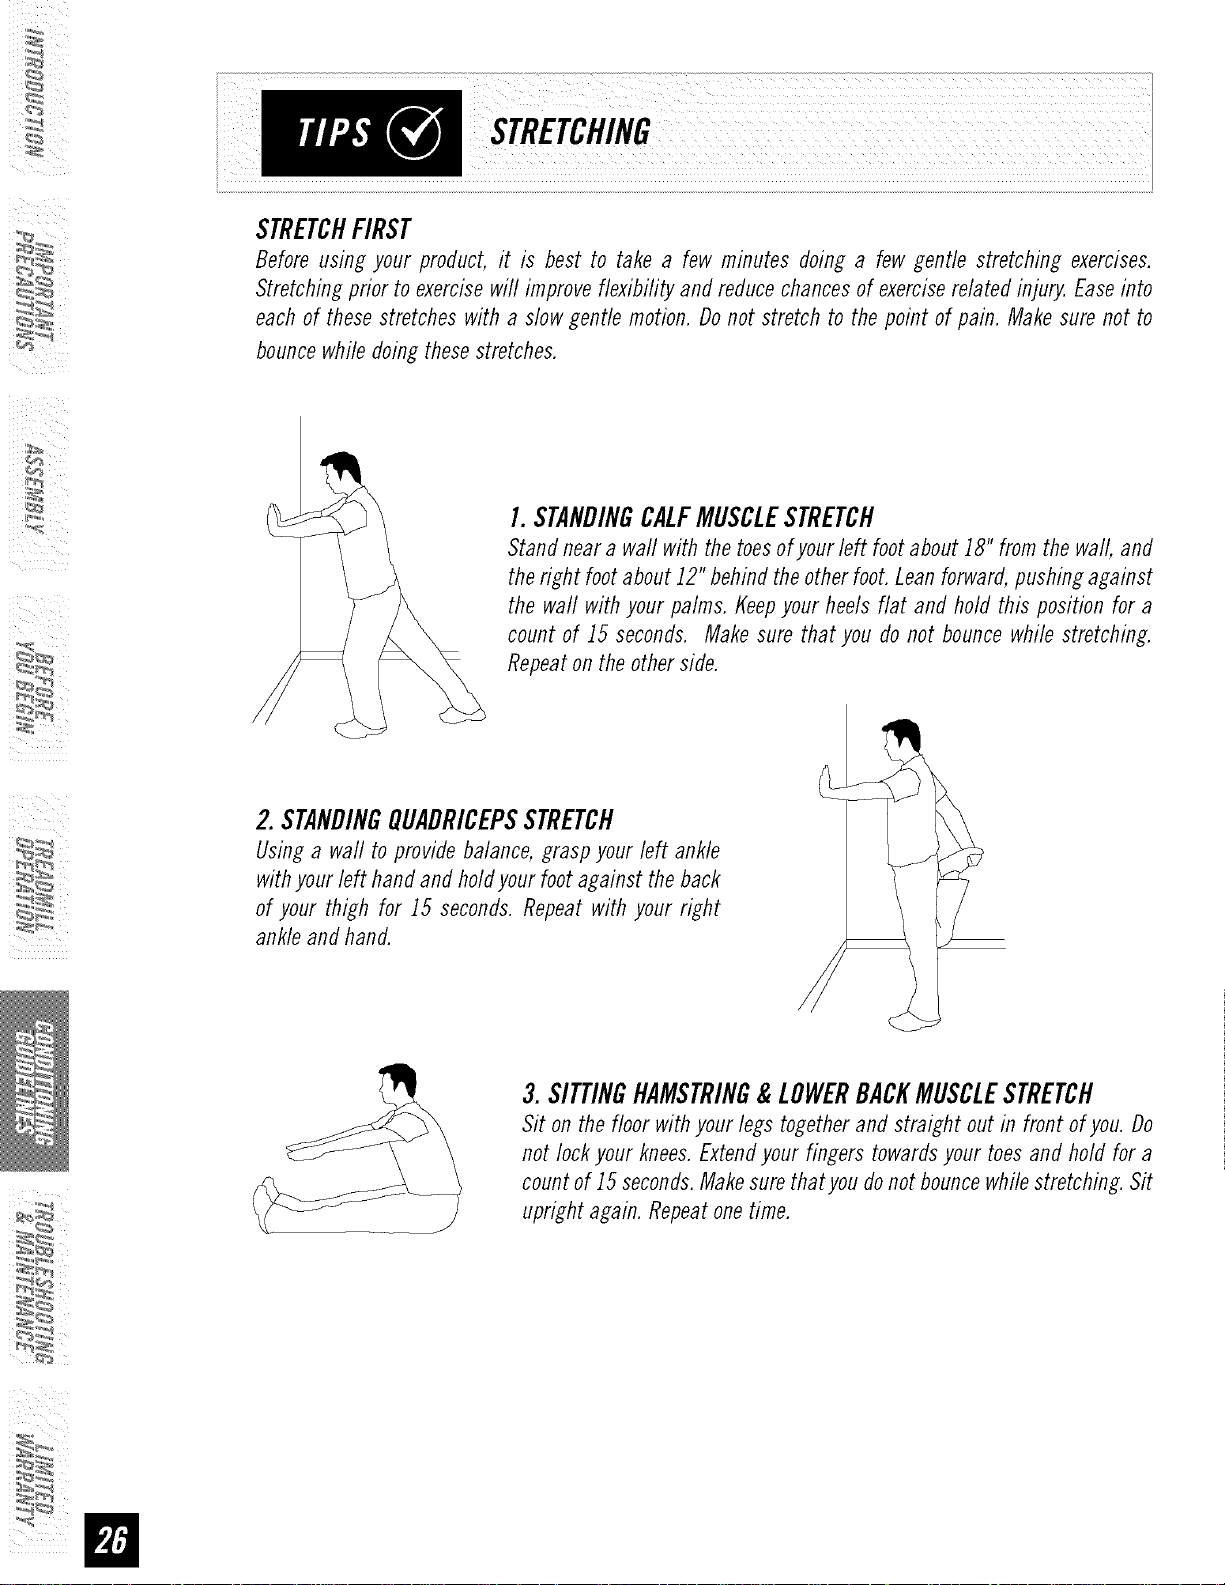
STRETCHING
i •
STRETCHFIRST
Before using your product, it is best to take a few minutes doing a few gentle stretching exercises.
Stretching prior to exercise will improve flexibility and reduce chances of exercise related injury. Ease into
each of these stretches with a slow gentle motion. Do not stretch to the point of pain. Make sure not to
bounce while doing these stretches.
i_I _ iii
I. STANDINGCALFMUSCLESTRETCH
Stand near a wall with the toes of your left foot about iS" from the wall, and
the right foot about J2" behind the other foot. Lean forward, pushing against
the waft with your palms, t{eep your heels flat and hold this position for a
count of J5 seconds. Make sure that you do not bounce while stretching.
Repeat on the other side.
2. STANDINGQUADRICEPSSTRETCH
Using a wall to provide balance, grasp your left ankle
with your left hand and hold your foot against the back
of your thigh for J5 seconds. Repeat with your right
ankle and hand.
3.SITTINGHAMSTRING&LOWERBACKMUSCLESTRETCH
Sit on the floor with your legs together and straight out in front of you. Do
not lock your knees. Extend your fingers towards your toes and hold for a
count of J5 seconds. Make sure thatyou do not bounce while stretching. Sit
upright again. Repeat one time.
WARMUP
The first 2 to 5 minutes of a workout should be devoted to warming up. The warm-up will limber your
muscles and prepare them for more strenuous exercise. Make sure that you warm-up on your product at a
slow pace. The warm up should gradually bring your heart rate into your Target Heart Rate Zone.
54
COOLDOWN
Never stop exercising suddenly! A cool-down period of 3-5 minutes allows your heart to readjust to the
decreased demand. Make sure that your cool down period consists of a very slow pace to allow your heart
rate to lower. After the cool-down, repeat the stretching exercises listed above to loosen and relax your
muscles.
An important step in developinga long term fitness programis to determineyour goals. Is your primary
goalfor exercisingtoloseweight?Improvemuscle?Reducestress?Preparefor the springracingschedule?
Knowingwhatyour goals are will helpyou developa moresuccessfulexerciseprogram.Beloware some
commonexercisegoals:
• Weight Loss - lower intensity, longer duration workouts
• Improve Body Shape and Tone- interval workouts, alternate between high and low intensities
• Increased Energy Level - more frequent daily workouts
• Improved Sports Performance - high intensity workouts
• Improved Cardiovascular Endurance - moderate intensity, longer duration workouts
If possible try to define your personal goals in precise, measurable terms, and then putyour goals in writing.
Themore specific you can be, the easier it will be to track your progress. If your goals are long term, divide
them up into monthly and weekly segments. Longer term goals can lose some of the immediate motivation
benefits. Short term goals are easier to achieve. Your console provides you with several readouts that can
be used to record your progress. Youcan track Distance, Calories or Time.
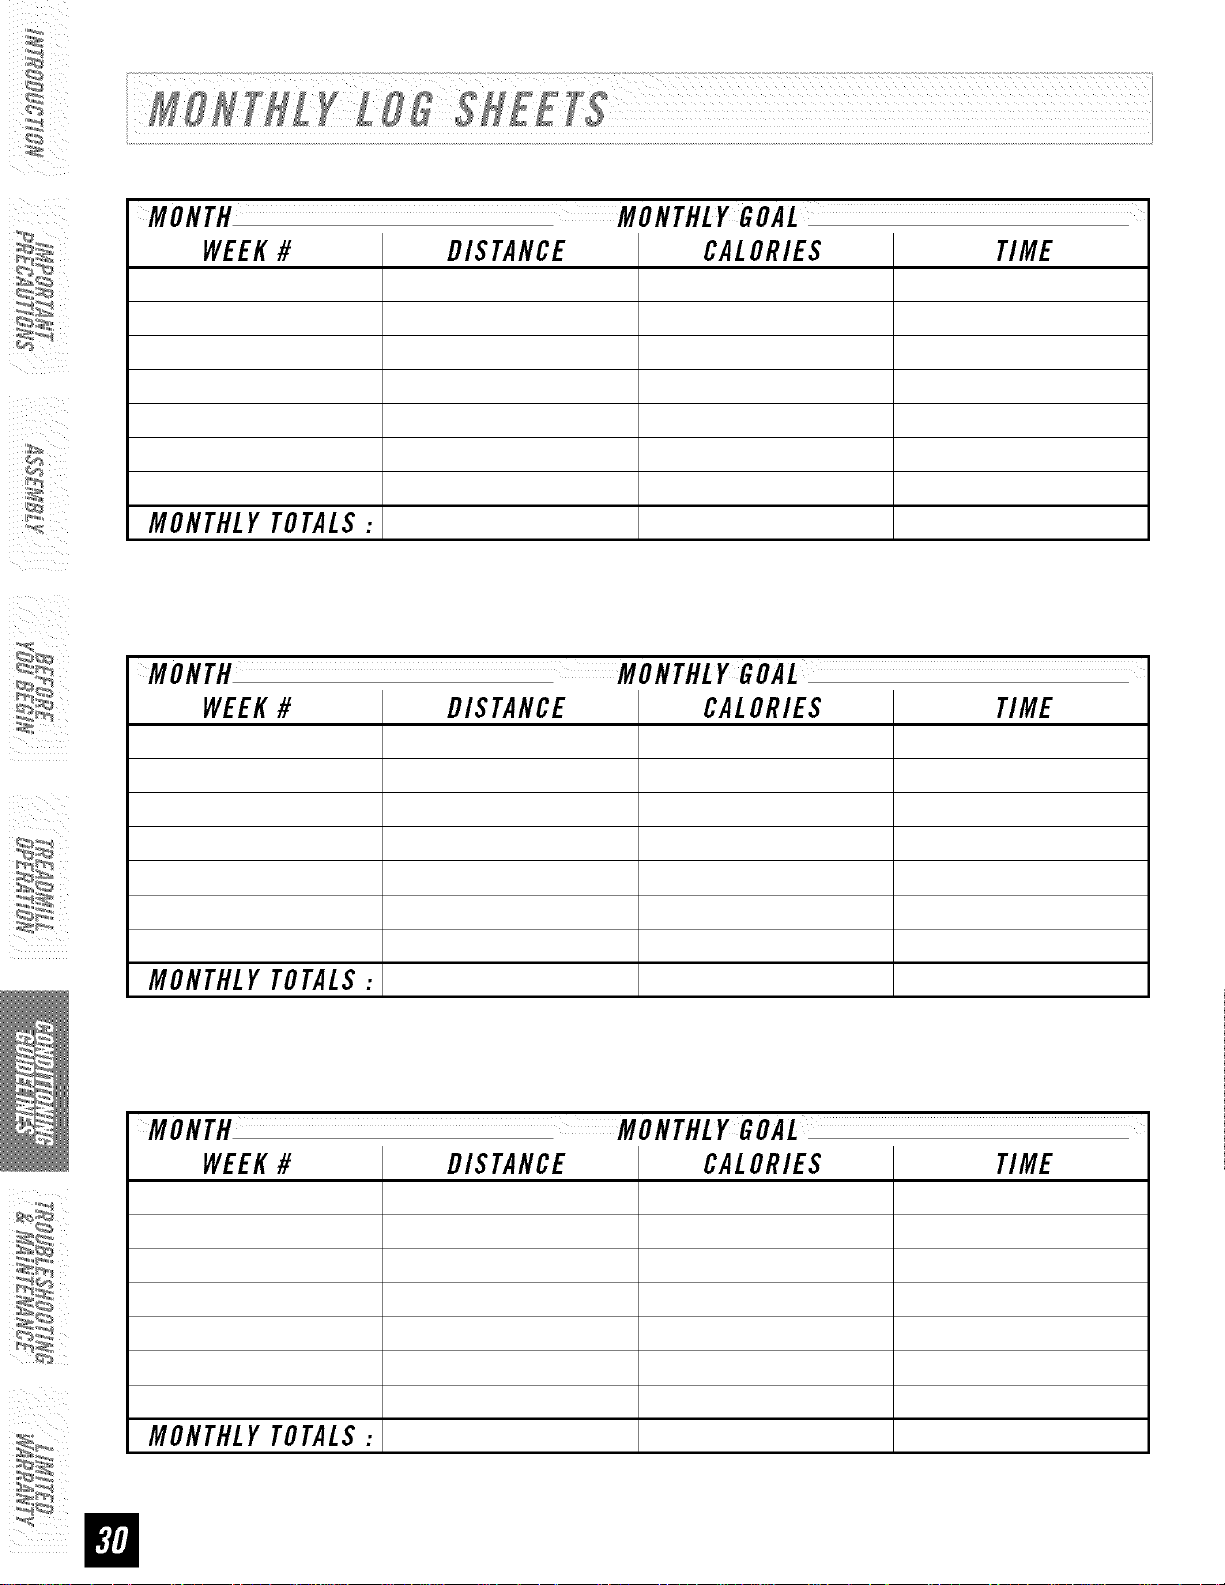
KEEPINGANEXERCISEDIARY
Tomake your personal exercise log book, photocopy the weekly and monthly log sheets, which are located
on the following pages, or you can print them off of your computer bygoing to:
www.horizonfitness,com/ uifles/week!vlo ,pclf
www.horizonfitness,com/guides/monthlyIog,pclf
Asyour fitness improves, you can look back and see how far you've come!
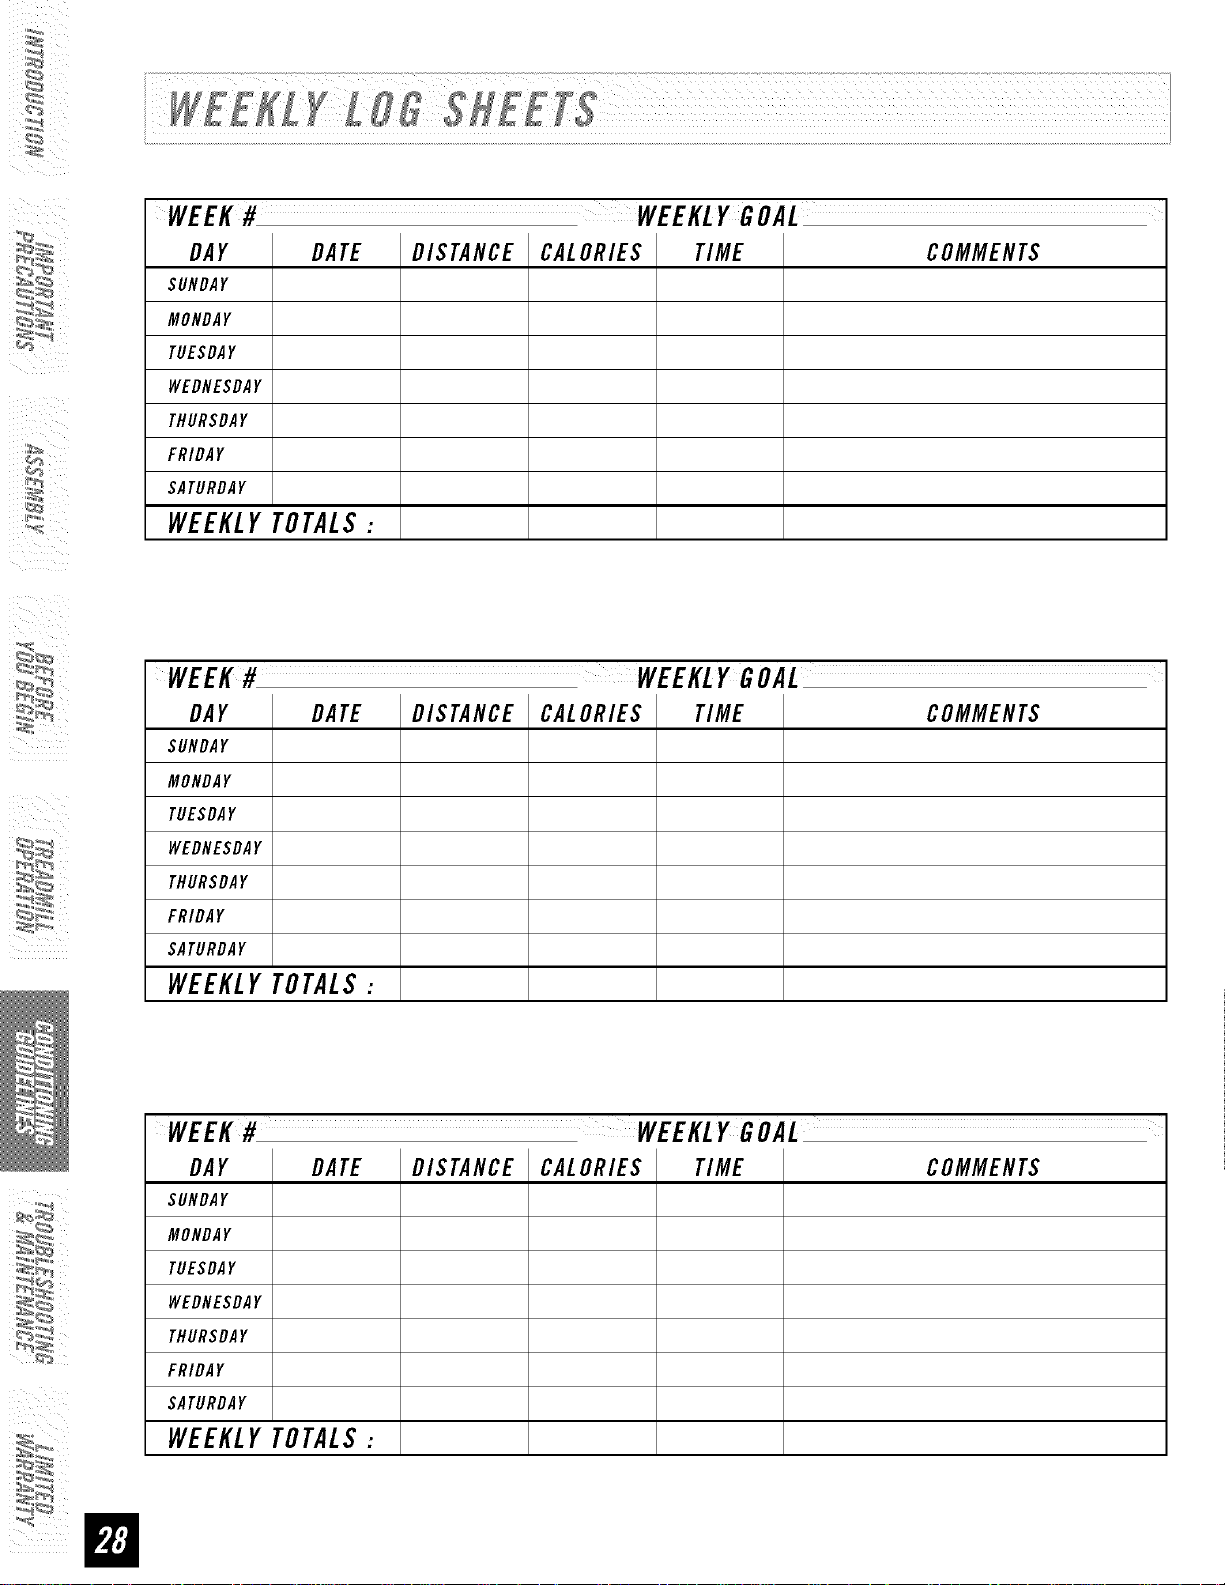
WEEK# WEEKLYGOAL
DAY DATE DISTANCE CALORIES TIME COMMENTS
$UNDAY
MONDAY
TUESDAY
WEDNESDAY
THURSDAY
FR/DAY
SATURDAY
WEEKLYTOTALS:
i_I "_ i_ii
WEEK# WEEKLYGOAL
DAY DATE DISTANCE CALORIES TIME COMMENTS
SUNDAY
MONDAY
TUESDAY
WEDNESDAY
THURSDAY
FRIDAY
SATURDAY
WEEKLYTOTALS:
DAY
SUNDAY
MONDAY
TUESDAY
WEDNESDAY
THURSDAY
FRIDAY
SATURDAY
WEEKLYTOTALS:
DATE DISTANCE CALORIES TIME COMMENTS
¸¸4¸¸
DAY DATE DISTANCE CALORIES TIME COMMENTS
SUNDAY
MONDAY
TUESDAY
WEDNESDAY
THURSDAY
FRIDAY
SATURDAY
WEEKLYTOTALS:
WEEK# WEEKLYGOAL
DAY DATE DISTANCE CALORIES TIME COMMENTS
SUNDAY
MONDAY
TUESDAY
WEDNESDAY
THURSDAY
FRIDAY
SATURDAY
WEEKLYTOTALS:
WEEK# WEEKLYGOAL
DAY DATE DISTANCE CALORIES TIME COMMENTS
SUNDAY
MONDAY
TUESDAY
WEDNESDAY
THURSDAY
FRIDAY
SATURDAY
WEEKLYTOTALS:
i
i IIIIRI-N{I I II 5HIll,
WEEK# DISTANCE CALORIES TIME
MONTHLYTOTALS:
i!l
MONTH MONTHLYGOAL
WEEK# DISTANCE CALORIES TIME
MONTHLYTOTALS:
MONTH MONTHLYGOAL
WEEK# DISTANCE CALORIES TIME
MONTHLYTOTALS:
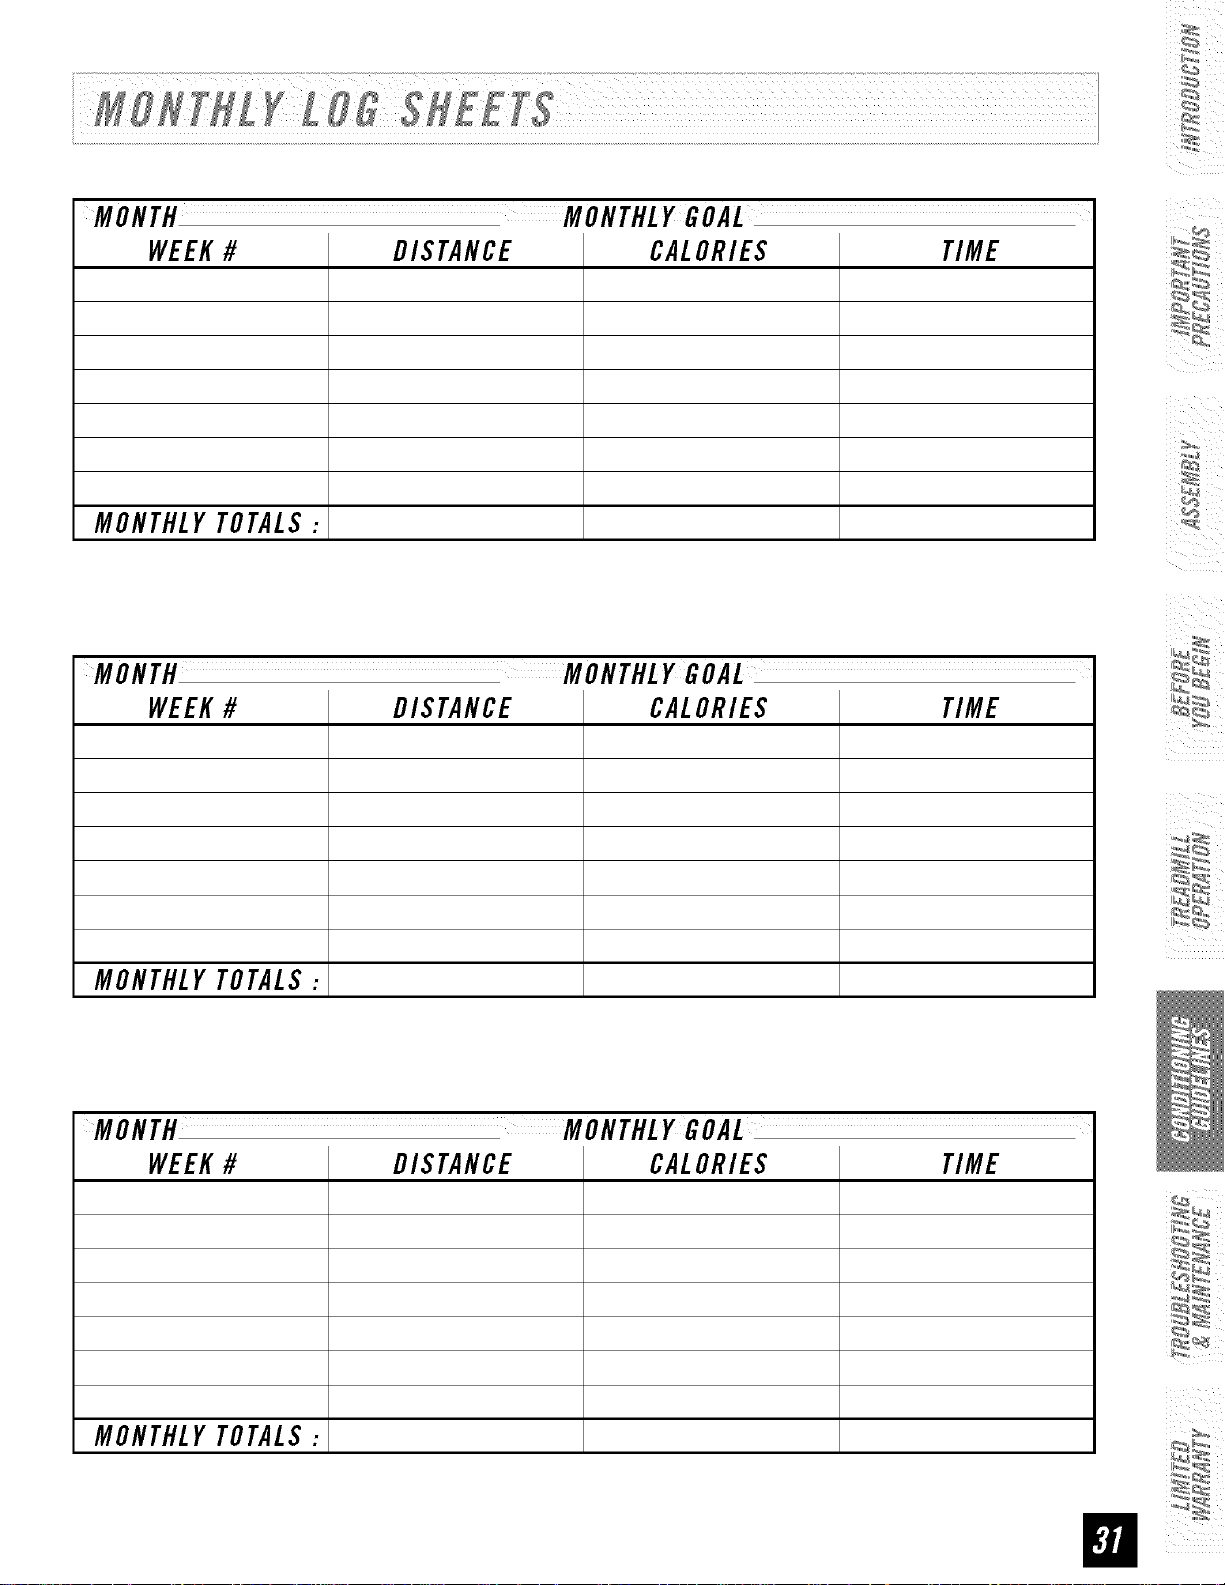
WEEK# DISTANCE CALORIES TIME
MONTHLYTOTALS:
WEEK# DISTANCE CALORIES TIME
MONTHLYTOTALS:
WEEK#
MONTHLYTOTALS:
DISTANCE CALORIES TIME
¸¸4¸¸
iI _ iii
i!l
i i i
i i
in
COMMONPRODUCTQUESTIONS
ARETHESOUNDSMYTREADMILLMAKESNORMAL?
All treadmills makea certain type of thumping noiseflue to thebelt rifling overthemilers,especiallynew
treadmills. Thisnoise wit diminish overtime, although may not totally go away.Overtime, the belt will
stretch, causing the belt to ride smootheroverthe rollers.
WHYIS THETREADMILLI PURCHASEDLOUDERTHANTHEONEATTHESTORE?
All fitness proinicts seemquieterin a large store showroombecausethereis generallymorebackgrounflnoise
than in yourhome.Also,there will be lessreverberationon a carpeted concretefloor than on a woodoverlay
floor.Sometimesa heavyrubber mat will help reflucereverberationthrough the floor.If a fitness profluct is
placed closeto a wall, therewill be morereflectednoise.
WHENSHOULDI BEWORRIEDABOUTANOISE?
Aslong as the soundsyour treadmill makesare no Iotiner than a normal conversationaltoneof voice,it is
consiflerefl normalnoise.
TROUBLESHOOTING-TREADMILL
Yourtreadmill is flesignefl to be reliable anfl easyto use.However,if you experiencea problem, pleasereferencethe
troubleshootingguifle fistefl below.
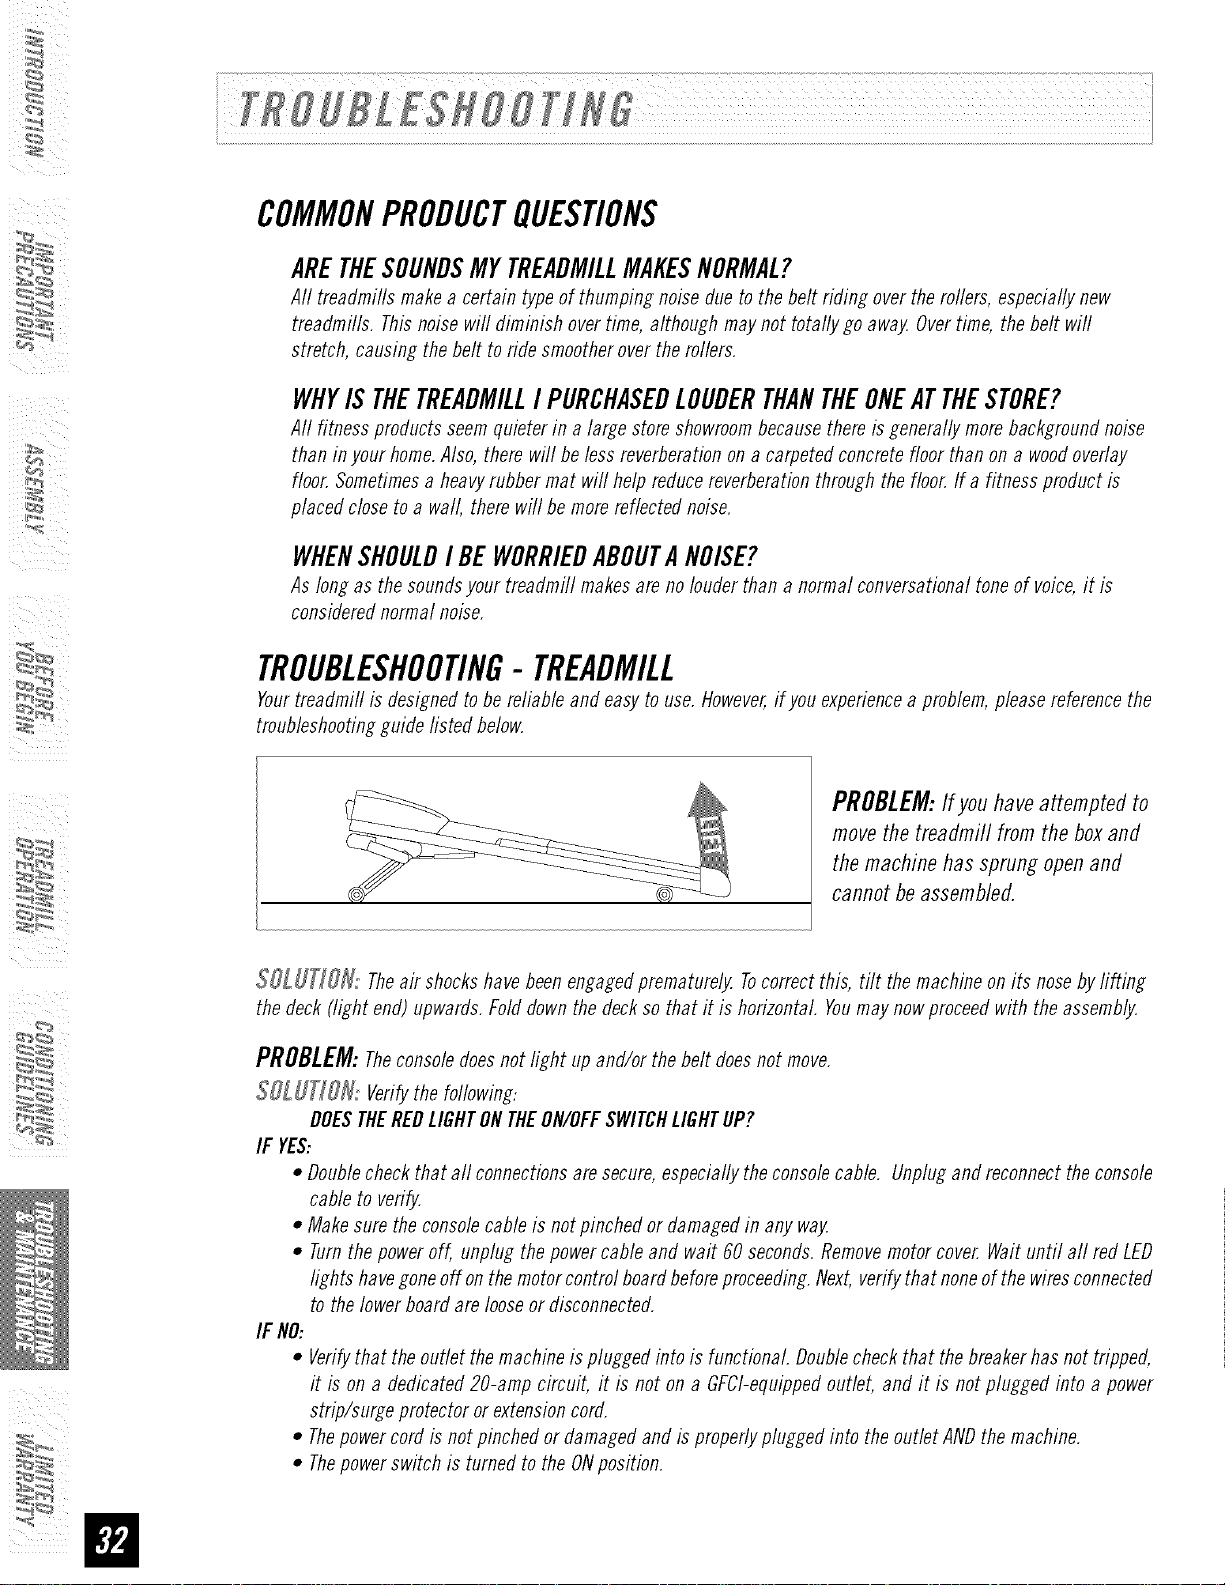
PROBLEM:If you have attempted to
move the treadmill from the box and
the machine has sprung open and
cannot be assembled.
$_]_: Theair shockshavebeenengageflprematurely. Tocorrectthis, tilt themachine on its nosebylifting
thefleck (light end) upwards.Folfl flown thefleck sothat it is horizontal. Youmay nowproceefl with the assembly.
PROBLEM: Theconsolefloesnot light up anfl/or the belt floes not move.
SOLUTION: Verifythe following:
DOESTHEREDLIGHTONTHEON/OFFSWITCHLIGHTUP?
IF YES:
• Doublecheckthat all connectionsaresecure,especiallytheconsolecable. Unpluganfl reconnectthe console
cable to verify.
• Makesure the consolecableis notpinched or damagedin anyway.
• Turnthe poweroff, unping thepowercable and wait 60 seconds.Removemotorcover.Waituntil aft red LED
lights havegoneoff on themotorcontrol boardbeforeproceeding.Next,verifythat noneof thewiresconnected
to thelowerboard are looseor disconnected.
IF NO:
Verifythat the outlet themachineis pluggefl into is functional Doublecheckthat thebreakerhas not tripped,
it is on a dedicated 20-amp circuit, it is not on a GFCI-equippedoutlet, and it is not pluggefl into a power
strip/surge protectoror extensioncord.
Thepowercordis not pinchedor damagedand is properlyphinged into the outlet ANDthe machine.
Thepowerswitch is turned to the ONposition.

PROBLEM:Thetreadmill circuit breakertrips during a workout.
$SLUTJON: Verifythe following:
• Makesure the treadmill is plugged into adedicated 20-amp circuit.
• Verifythat you do not havethe machineon an extensioncordor surge protector
• Confirm that the machine is not plugged into a GFCI-equippefi outlet or on a circuit that has a GFCI-equippefloutlet on it.
PROBLEM:Therunning belt does not stay centered during a workout.
$OLUT]OHi Verifythe following:
• Makesure the treadmill is on a level surface.
• Verifythat the belt is properly tightened and centered(Referto the Adjustment section for detailed directions).
54
PROBLEM:Operating speed appears inaccurate.
$OL UT]OH: Auto-cafibrate the treadmill:
• Poweron the treadmill and have the safety keyin position on the
console.Press and hold the elevation "+" and speed %" buttons for
approximately 5seconds toenter the EngineeringMode. Theconsole
will beepand "ENGO"appears in the display.
• Press the Speed"+" or "-" button until "ENG2"appearsin the display.
• Press, "ENTER"toselect. Press, "START"to begin. Thetreadmill
running belt will begin to moveautomatically and the auto-calibration
sequencewill properlyset and store the speed values.
• Uponsuccessful calibration, the treadmill will beepseveral times. The
console will automatically exit EngineeringModeand return to the
start-up screen.
i DONOTstandonrunningbe!twhile
i ca!ibrating-stand onthe guide
rails. Treadmillwill fluctuate between
i lowand highSPeedsfoi severai
_minutesuntil calibration is completel
TROUBLESHOOTING- HEARTRATE
Checkyour exerciseenvironment for sourcesof interference such as fluorescent lights, computers, undergroundfencing, home
security systems or appliances containing large motors. Theseitems may causeerratic heart rate readouts.
Youmayexperiencean erratic readout underthe following conditions:
° Grippingthe heart rate handlebars too tighL Tryto maintain moderatepressure whileholding ontothe heart rate handlebars.
• Constantmovement and vibration due to constantly holding the heartrate handlebarswhile exercising.If youarereceiving
erratic heart rate readouts, try to only hold the grips long enoughto monitor yourheart rate.
• Whenyou arebreathing heavily during a workout.
• Whenyour hands areconstricted by wearing a ring.
• Whenyour hands aredry or cold. Trytomoisten yourpalms byrubbing them togetherto warm.
• Anyonewith heavyarrhythmia.
° Anyonewith arteriosclerosisorperipheral circulation disorder
• Anyonewhoseskin on the measuring palm is especially thick.
Thefollowinginformationmaybeaskedofyouwhenyoucall.Pleasehavetheseitemsreadilyavailable:
• ModelName
• SerialNumber
• DateofPurchase(receiptorcreditcardstatement)
In orderforCustomerTechSupporttoserviceyourtreadmilltheymayneedtoaskdetailedquestionsaboutthesymptomsthatare
occurring.Sometroubleshootingquestionsthatmaybeaskedare:
• Howlonghasthisproblembeenoccurring?
• Doesthisproblemoccurwitheveryuse?Witheveryuser?
• Ifyouarehearinga noise,doesit comefromthefrontor theback?Whatkindofnoiseisit (thumping.grinding,squeaking,
chirpingetc.)?
• Hasthemachinebeenlubricatedandmaintainedperthemaintenanceschedule?
Answeringtheseandotherquestionswillgivethetechnicianstheabilitytosendproperreplacementpartsandtheservicenecessary
togetyouandyourHorizonFitnesstreadmillrunningagain]
I i ii
i i i
i i
in
Cleanlinessof your treadmill and its operation environment will keep maintenance problems and service calls to a
minimum. Forthis reason,werecommendthat the following preventivemaintenanceschedulebe infiowed.
AFTEREACHUSE(DALLY)
Cleanand inspect, following thesesteps:
• Turnoff the treadmill with theon/off switch, then unplug thepowercord at the waftoutlet.
• Wipedownthe running belt, deck,motor cover,and consolecasing with a damp cloth. Neverusesolvents,as they
cancause damageto the treadmill.
• Inspectthepowercord.If thepowercordis damaged,contact HorizonFitness.
• Make surethepowercordis not underneaththe treadmifl or in anyotherarea whereit can becomepinchedor cut.
• Checkthe tension and alignment of the running belt. Make sure that the treadmill belt will not damageany other
componentson the treadmill bybeing misaligned.
EVERYWEEK
Cleanunderneaththe treadmill following thesesteps:
• Turnoff the treadmill with theon/off switch, then unplug thepowercord at the waftoutlet.
• Foldthe treadmifl into the upright position, making surethat the locklatch is secure.
• Movethe treadmill toa remotelocation.
• Wipeorvacuumanydustparticlesorotherobjectsthat mayhaveaccumulatedunderneaththetreadmill
• Returnthe treadmill to its previousposition.
EVERYMONTH-IMPORTANT!
• Turnoffine treadmill with theon/offswitch, thenunplug thepowercordat the wafloutlet.
• Inspectall assemblybolts of themachine for proper tightness.
• Turnoff the treadmill and wait 60 seconds.
• Removethe motor cover.Waituntil aft display screensturn off.
• Cleanthemotor and lowerboard area to eliminate anylint or dust particles that may haveaccumulated.Failure to
doso mayresult in prematurefailure of keyelectrical components.
• Vacuumand wipedown thebelt with a damp cloth. Vacuumanyb/acMwhiin nartic/es that may accumulate around
the unit. Theseparticles mayaccumu/ate from normal treadmill use.
EVERY6 MONTHSOR150MILES
It ISnecessaryto lubricate your treadmill runmng deck everysix months
or 150 miles to maintain optimal performance.Oncethe treadmill reaches
]50 miles, the console will display the message "LUBE"or "LUBEBELT.
Thetreadmill /viii not operate while the messageis showing. HoldStop
for 5 secondsto suspend messagefor 5 miles. Yourtreadmill came with
a bottle of lubricant which can be usedfor two appfications. If you need
hinricant, contact HorizonFitness. Onlyuselubricant providedbyHorizon
Fitness.
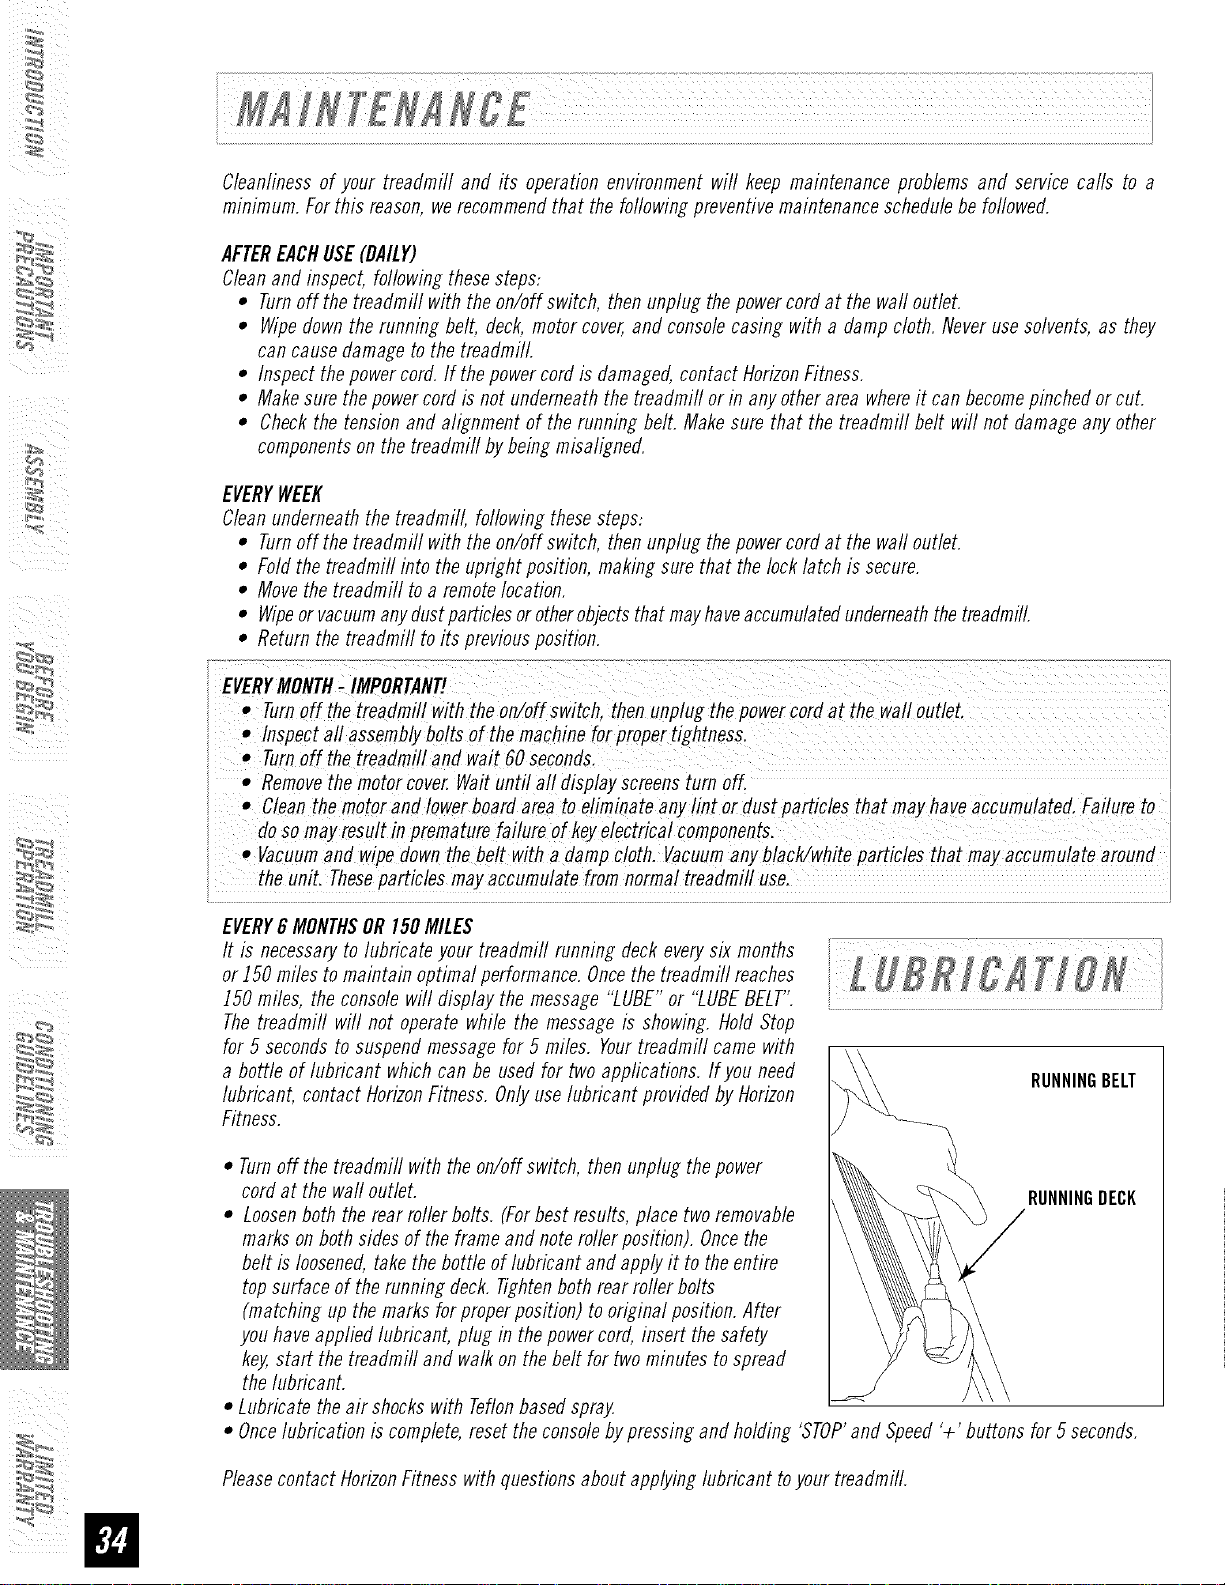
RUNNINGBELT
• Turnoffthe treadmill with the on/offswitch, then unplug thepower
cord at the waftoutlet. RUNNINGDECK
• Loosenboth therear roller bolts. (Forbest restllts, place two removable
markson both sides of the frame and noteroller position). Oncethe
belt is loosened,take the bottle of lubricant and applyit to theentire
topsurface of the running deck. Tightenboth rear roller bolts
(matching up themarks for properposition) tooriginal position.After
you haveapplied lubricant, ping in the powercord, insert the safety
key,start the treadmill and walk on thebelt for two minutes to spread
thelubricant.
• Lubricate theair shockswith Teflonbasedspray.
• Oncelubrication is complete,reset the consolebypressing and holding 'STOP'and Speed'+' buttons for 5 seconds.
Pleasecontact HorizonFitness with questionsabout applyinglubricant toyour treadmill.
WeightCapacity= 275LBS
FRAME• LIFETIME
HorizonFitness warrants the frame against defects in
workmanshipand materials for the fifefime of the original
owner (Theframeis definedas the weldedmetal baseof the
unit anddoesnot include anyparts that canberemoved.)
MOTOR° 20 YEARS
HorizonFitness warrants the motoragainst defects in
workmanshipand materials for aperiod of twentyyears
from thedate of purchase, so long as the deviceremains
in the possessionof the original owner
ELECTRONICS&PARTS• I YEAR
HorizonFitness warrants the electroniccomponents,finish
and all original parts fora period of oneyear from the date
of original purchase, so long as the deviceremains in the
possessionof the original owner
LABOR• I YEAR
HorizonFitness shall coverthe labor cost for the repair
of the device for a period of oneyear from the date of the
original purchase, so long as the device remains in the
possessionof the original owner
EXCLUSIONSANDLIMITAtiONS
WhoIScovered:
• Theoriginalownerandis nottransferable.
WhatIScovered:
• Repairorreplacementof adefectivemotor,electroniccomponent,or
defectivepart and is thesoleremedyof the warranty
WhatISNOTcovered:
• Normalwearand tear,improperassemblyor maintenance,or
installation of parts oraccessoriesnot originallyintendedor
compatiblewith the equipmentassold.
• Damageor failureduetoaccident, abuse,corrosion,discolorationof
paint orplastic, neglect,theft, vandalism, fire,flood,wind,lightning.
freezing,orother natural disastersofanykind, powerreduction,
fluctuation or failure from whatevercause,unusualatmospheric
conditions,collision,introductionof foreign objectsinto the covered
unit, ormodifications that are unauthorizedor not recommendedby
HorizonFitness.
• Incidentalor consequentialdamages.HorizonFitnessis not
responsibleorliable for indirect, specialor consequentialdamages,
economicloss,lossofproperty,orprofits, loss of enjoymentor use,
or otherconsequentialdamagesof whatsoevernaturein connection
with the purchase,use,repairormaintenanceof theequipmenL
• Equipmentusedforcommercialpurposesorany useotherthan a
single familyor Household,unlessendorsedby HorizonFitnessfor
coverage.
• Equipmentownedor operatedoutsidethe USand Canada.
• Delivery,assembly,installation, setup for originalor replacement
units or laboror othercostsassociatedwithremovalorreplacement
of the coveredunit.
• Anyattempt torepairthis equipmentcreatesarisk of injury Horizon
Fitnessis not responsibleorliable forany damage,loss or liability
arising fromanypersonalinjury incurredduring thecourseof, or as
aresult of anyrepair orattemptedrepairofyourfitness equipment
byother than an authorizedservicetechnician. All repairsattempted
byyouonyourfitness equipmentareundertakenAT YOUROWNRISK
andHorizonFitnessshall havenoliability for anyinjury to theperson
orpropertyarising fromsuchrepairs.
¸¸4¸¸
SERVICE/RETURNS
• In-homeserviceis available within 150 milesof the nearest
authorizedrepaircenter (Mileagebeyond150miles from an
authorizedservicecenteris the responsibilityof the consumer).
• All returnsmust bepre-authorizeflbyHorizonFitness.
• HorizonFitness'obligation underthis warrantyis limited to
replacing orrepairing, at HorizonFitness'option,the sameor
comparablemodelat oneofits authorizedservicecenters.
• A HorizonFitnessauthorizedservicecentermust receiveall
equipmentfor whicha warrantyclaimis made. Thisequipmentmust
bereceivedwithall freight and other transportationchargesprepaid,
accompaniedbysufficient proofof purchase.
• Replacementunits, parts and electroniccomponentsreconditioned
toAs-newConditionbyHorizonFitnessor its vendorsmaysometimes
besuppliedas warrantyreplacementandconstitute fulfillment of
warrantyterms.
• Thiswarrantygivesyouspecific legalrights, andyourrights may
varyfromstate tostate.

Forfast and friendlyservice,pleasecontactoneofour
trainedcustomertechniciansvia phone,email orourwebsite.
E
Customer TechSupport Hotline.. 1-800- 244- 4192
Website..www.horizonfitness.com
Everyemployeeat HorizonFitnesstakespride in providingyouwith a high quality product.
HZSeriesT81.Rev.2.0 I© 2007 HorizonFitnessProductsI Destined& Engineeredin theU.S.A.I Madein China