Loading ...
Loading ...
Loading ...
5
Your product is equipped with a polarized alternating current line plug (a plug having one blade wider than the other).
There is only one way it can be plugged into a power supply. This is a safety feature. If you are unable to insert the plug
fully into the outlet, try again by turning it the other way. If it would still not go in, it is probably due to an obsolete
outlet which should be replaced. Do not temper with the plug or outlet to defeat the purpose of this safety mechanism.
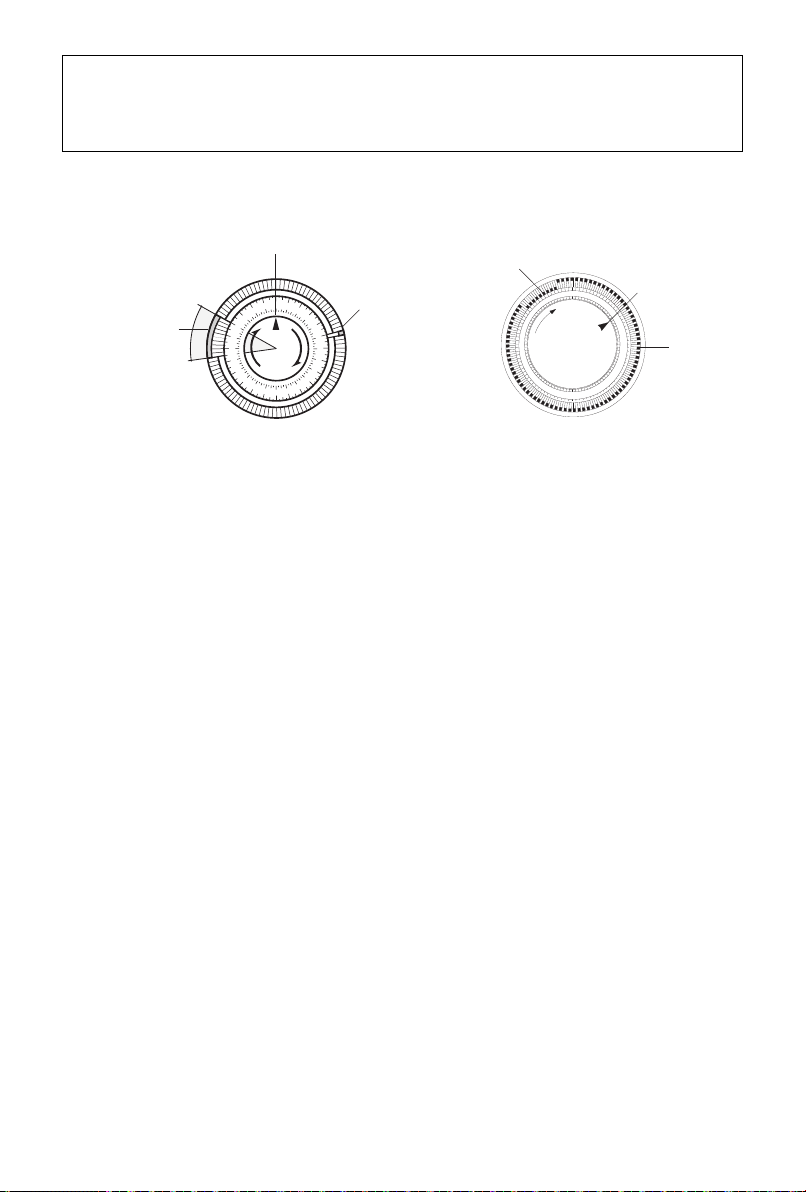
HOW TO USE THE TIMER
Please refer to the illustration below:
IMPORTANT: There are 96 tabs around the dial. Each tab represents a 1/4 hour (15 minutes) and there is a tab for each
quarter hour of the day (24 hours). Your appliance can be programmed to switch itself ON and OFF at the time of your choi-
ce. With a timer you can approximate your setting to within 15 minutes and program up to 48 cycles (1 cycle = 1 “ON” + 1
“OFF”) over a period of 24 hours (12 hours a.m.+12 hours p.m.).
The tabs can be pushed inwards or pulled outwards simply by using your fingers. When a tab is in the inward position
(towards the center of the dial), the heater will be on during the corresponding 15 minute period. If a tab is in the outward
position, the heater will be off during that period.
Please note that when you first use your heater all the tabs are out. You must push in the tabs that correspond to the
period when you want the heater to be on. (If you want to bypass the timer you must push all 96 tabs inward.)
Timer operation
A) Plug in the heater.
B) Turn timer dial clockwise to set clock with the current time of day (see CLOCK SETTING).
C) Push tabs inwards for the period you want the heater to operate. For example, in the shown illustration, the heater
will operate from 14.00 (2 p.m.) to 16.30 (4.30 p.m.) and from 4.45 a.m. to 5 a.m.
D) Push switch(-es) in.
E) Once you have set the tabs for the desired heating periods, your heater will cycle on and off according to these set-
tings.
F) As long as you keep the heater plugged in, the timer will maintain the proper time.
A safety device
A safety device switches the heater off in the event of overheating. To restart the heater, call the nearest Service center.
6. MAINTENANCE AND SERVICE
Always unplug the heater from the power outlet and allow the radiator to cool. Wipe radiator with a soft damp cloth; do
not use detergents and abrasives.
Should the radiator not be in use over a certain length of time, roll the cable around the holder and store it in a dry place
(see fig. on front page).
This appliance has been built to last for many years of trouble-free service.
In case of malfunction or doubt, do not try to repair the heater by yourself: this might increase the risk of fire and electric
shock.
Call nearest Service Center Visit www.delonghi.com for a completelist of Service Centers (U.S. Only
19
20
21
22
2
3
2
4
1
2
3
4
5
6
7
8
9
10
11
12
13
18
14
15
16
17
1
1
2
2
3
3
4
4
5
5
6
6
7
7
8
8
9
9
10
10
1
1
11
12
12
13
13
14
14
15
15
16
16
17
17
18
18
19
19
20
20
21
21
22
22
23
23
24
24
1
1
2
2
3
3