Documents: Go to download!
User Manual
- Owner's manual - (English, French, Spanish)
- Energy Guide - (English)
- Spec Sheet - (English)
- Spec Sheet (web) - (English)
User Manual Samsung RF24BB6600AP Refrigerator
Installation
Refrigerator at a glance
The actual refrigerator and provided component parts of your refrigerator may differ from the illustrations in this manual, depending on the model and the country.
Type A
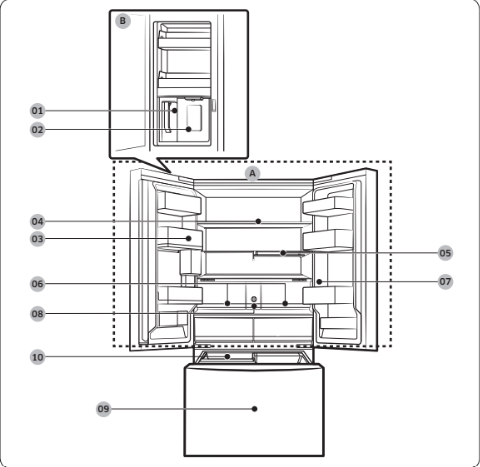
Type B
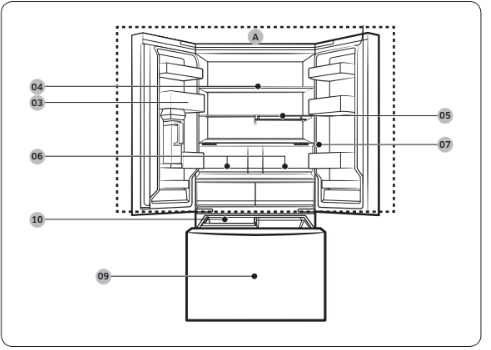
- AutoFill pitcher *
- Water dispenser **
- Fridge door bin
- Fridge shelf
- Quick Space shelf *
- Crisper+ / Fridge Drawers
- Control panel
- Water filter *
- Freezer
-
Ice maker
Door bins
Your refrigerator ships with door bins of different types and sizes. If the door bins for your refrigerator were packaged separately, use the figure below to help you position the bins properly.
NOTE
The actual refrigerator and provided component parts of your refrigerator may differ from the illustrations in this manual, depending on the model and the country.
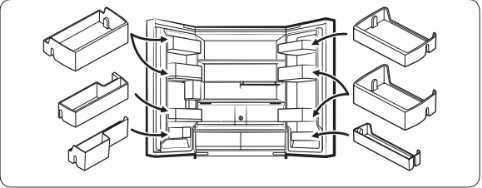
Step-by-step installation
STEP 1 Select a site
The site must:
- Have a solid level surface without carpeting or flooring that may obstruct ventilation
- Be out of direct sunlight
- Have adequate room for opening and closing the door
- Be away from any heat source
- Provide room for maintenance and servicing
- Have a temperature range between 50 °F (10 °C) and 110 °F (43 °C)
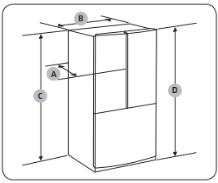
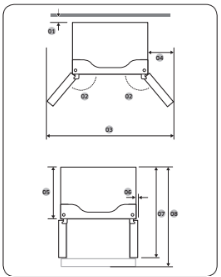
Clearance
See the following figures and tables for installation space requirements.
STEP 2 Flooring
If the refrigerator cannot pass through the entrance due to its size, see Door removal for entrance.
NOTE
To prevent floor damage, make sure the front leveling legs are in the upright position.
- The surface you install the refrigerator on must support a fully loaded refrigerator.
- To protect the floor, put a large piece of cardboard along the path to the refrigerator's final installation location.
- Once the refrigerator is in its final position, do not move it unless necessary to protect the floor. If you have to move the refrigerator, place thick paper or cloth such as old carpets along the path of movement.
STEP 3 Door removal for entrance
If the refrigerator cannot pass through the entrance to your home or kitchen due to its size, follow these instructions to remove and then re-install the refrigerator's doors. If you do not need to remove the doors, go to page 28 to continue the installation procedure.
WARNING
Unplug the power cord of the refrigerator before removing the doors.
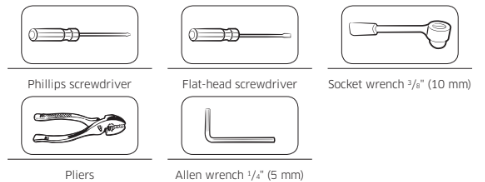
Tools required (not provided)
Detach the fridge doors

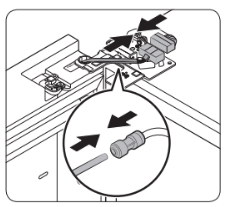
CAUTION
-
Do not remove both doors simultaneously. Make sure to remove one door at a time. Otherwise, any of the doors may fall and cause physical injury.
- Make sure the refrigerator is off before disconnecting the connectors.
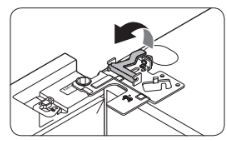
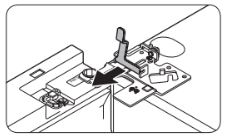


To reattach the fridge doors

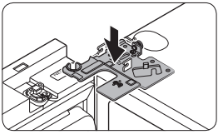

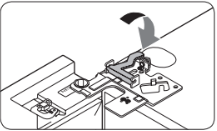
- Make sure the wire connectors are connected properly. Otherwise, the display will not operate.
CAUTION
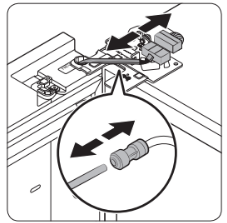
- To prevent water leaks, make sure the red clips tighten the coupler properly.
- Keep the clips out of children’s reach.

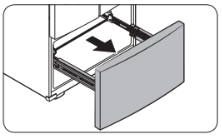
To detach the freezer drawer
1. Lift up the front of the upper basket and pull up to remove.
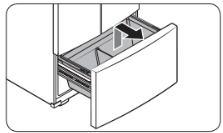
2. Then, pull up to remove the lower basket from the rail assembly.

3. Press down the hooks to unlock the rail assembly.
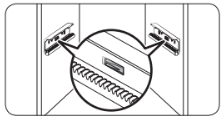
4. While holding the upper area of the freezer drawer front, slide the drawer out all the way to remove the freezer drawer from the rail assembly.
CAUTION
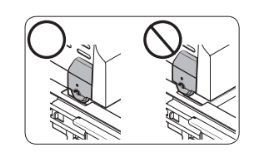
- Be careful not to scratch or dent the rail assembly.
- Make sure you mount the freezer baskets in the correct position. Otherwise, the door will not open or close properly, which causes frost to build up.
- Do not store too much food in the freezer drawer. This prevents the freezer drawer from closing properly, resulting in frost buildup.
To reattach the freezer drawer
Once the refrigerator is in or near it's final location, re-attach the freezer drawer by following the directions in the reverse order of removal.
STEP 4 Leveling the refrigerator
CAUTION
- When installed, the refrigerator must be leveled on a flat, solid floor. Not leveling the refrigerator can cause damage to the refrigerator or physical injury.
- Leveling must be performed with the refrigerator empty. Make sure no food items are inside the refrigerator.
- For safety reasons, adjust the front a little higher than the rear.
Level the refrigerator using the special screws (levelers) on the front legs. Use a flat-head screwdriver to turn the levelers.
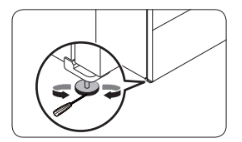
- To adjust the height of the left side: Insert a flat-head screwdriver into the leveler of the left side front leg. Turn the leveler clockwise to raise the left side or turn it counterclockwise to lower.
- To adjust the height of the right side: Insert a flat-head screwdriver into the leveler of the right side front leg. Turn the leveler clockwise to raise the right side or turn it counterclockwise to lower.
STEP 5 Adjust the door height and the door gap
Snap rings
The height of a door can be adjusted using the provided snap rings, which come in 4 different sizes (1 mm, 1.5 mm, mm, and 2.5 mm).
To adjust the height of a door
1. Check the height difference between the doors, and then lift up and hold the door with the lower height.

2. Insert a suitable-sized snap ring (A) between the door grommet (B) and the hinge as shown.

CAUTION
- Insert only one snap ring. If you insert two or more snap rings, the rings may slip out or make a rubbing noise.
- Keep the snap rings out of children’s reach and keep them for future use.
- Do not raise the door too much. The door can contact and damage the top cover.
STEP 6 Connect the water dispenser line (applicable models only)
A water dispenser with a filter is one of the helpful features on your new refrigerator. To help promote better health, the water filter removes unwanted particles from your water. However, it does not sterilize or destroy microorganisms. You may need to purchase a water purifying system to do that. The water line also connects to the ice maker. For the ice maker to operate properly, water pressure must be between 30-125 psi (206-861 kPa). If the refrigerator is installed in an area with low water pressure (below 30 psi / 206 kPa), you can install a booster pump to compensate for the low pressure. After you have connected the water line, check if the water dispenser works properly. Press the water dispenser lever until the water runs from the water outlet.
NOTE: Water line installation kits are available at extra cost from your retailer. We recommend using a water line installation kit that contains copper tubing and a 1 mm) compression nut.

3. Connect the water line installation kit (A) to the shutoff valve (B).
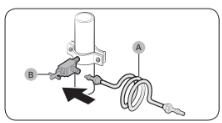
Connect the water supply line to the refrigerator
There are several items you must purchase to complete this connection. You may find these items sold as a kit at your local hardware store.
1. Connect the household water line to the assembled compression fitting.
- If you are using copper tubing, slip the compression nut (B) (not supplied) and ferrule not supplied) on the copper tubing (not supplied) as shown.
- If you are using plastic tubing (A), insert the molded end (Bulb) of the plastic tubing (A) into the compression fitting.
CAUTION
- If you use plastic tubing (A), do not use it without the molded end (Bulb).
- Leaving the water line disconnected may cause the water valve to produce a buzzing sound over time. If this is the case, make sure that the ice making function is turned OFF” and do not attempt to use the water dispenser.
NOTE
Only connect the water line to a potable water source.
- If you have to repair or disassemble the water line, cut off 1 of the plastic tubing to make sure you get a snug, leak-free connection.
- You can test the water line quickly using a paper cup. Under normal conditions, the water dispenser can fill a 5 3/4 oz. (170 cc) cup in about 10 seconds.
STEP 7 Initial settings
By completing the following steps, the refrigerator should be fully functioning.
- Plug the power cord into the wall socket to turn the refrigerator on.
- Open the door, and check if the interior light lights up.
- Set the temperature to the coldest setting, and wait for about an hour. Then, the freezer will be slightly chilled, and the motor should be running smoothly.
- Wait until the refrigerator reaches the set temperature. Now the refrigerator is ready for use.
STEP 8 Final check
When installation is complete, confirm that:
- The refrigerator is plugged into an electrical outlet and grounded properly.
- The refrigerator is installed on a flat, level surface with a reasonable clearance from walls and cabinets.
- The refrigerator is level and is sitting firmly on the floor.
- The door opens and closes freely, and the interior light turns on automatically when you open the door.
Operations
Control panel
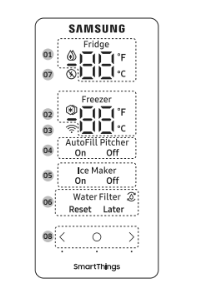
SmartThings
Installation
Visit the Google Play Store, Galaxy Apps, or Apple App Store and search for “SmartThings”. Download and install the SmartThings app provided by Samsung Electronics to your smart device.
NOTE
- The supporting software version of the SmartThings app is subject to change according to the OS supporting policy the manufacturer provides. In addition, as for the SmartThings app or the functions that the app supports, the new application update policy on the existing OS version can be suspended due to usability or security reasons.
- The SmartThings app is subject to change without notice to improve usability or performance. As the mobile phone OS version is updated every year, the SmartThings is also updated continually according to the latest OS. If you have enquiries regarding the items mentioned above, please contact us on [email protected].
- For improved performance, the SmartThings app is subject to change without notice or discontinued support according to the manufacturer’s policy. In addition, further updates on the app or the function in the app may stop due to usability and security reasons, even if updates are currently supported on your OS.
- Recommended encryption systems include WPA/TKIP and WPA2/AES. Any newer or non-standard Wi-Fi authentication protocols are not supported.
- Wireless networks may be affected by the surrounding wireless communication environment.
- If your Internet service provider has registered the MAC address of your PC or modem for identification, your Samsung Smart Refrigerator may fail to connect to the Internet.
- If this happens, contact your Internet service provider for technical assistance.
- The firewall settings of your network system may prevent your Samsung Smart
- Refrigerator from accessing the Internet. Contact your Internet service provider for technical assistance. If this symptom continues, contact a local Samsung service center or retailer.
- To configure the wireless access point (AP) settings, see the user manual of the AP router).
- Samsung Smart Refrigerators support both Wi-Fi 2.4 GHz with IEEE 802.11 b/g/n and Soft-AP protocols. (IEEE 802.11 n is recommended.)
- Unauthorized Wi-Fi wireless routers may fail to connect to applicable Samsung Smart Refrigerators.
Samsung account
You are required to register your Samsung account to use the app. If you don’t have a Samsung account, follow the app’s onscreen instructions to create a free Samsung account.
Getting started
Turn on the device you want to connect, open the SmartThings app on your phone, and then follow the instructions below. If a pop-up appears saying that a new device has been found, tap ADD NOW. If a pop-up doesn't appear, tap the + button, and then select the device you want to connect from the list of available devices. If your device isn't in the list of available devices, tap Supported Devices, select the device type (Refrigerator), and then select the specific device model. Follow the instructions in the app to set up your device. Once setup is complete, your refrigerator will appear as a "card" on your Devices screen.
Refrigerator app
Integrated control
You can monitor and control your refrigerator at home and on the go.
- Tap the refrigerator icon on the SmartThings Dashboard or tap the Devices icon at the bottom of the Dashboard, and then tap the refrigerator "card" to open the Refrigerator page.
- Check the operation status or notifications related to your refrigerator, and then change options or settings if necessary.
NOTE: Some options or settings of the refrigerator may not be available for remote control.
Using the SMART GRID (Demand Response) Function
This feature monitors energy prices and demand information from your utility company and sends notifications to the refrigerator to run high energy consuming tasks during off- peak times when electricity costs and demand are lower. If the refrigerator receives a control signal from the utility company, the refrigerator will display the DAL ~ TALR levels on the refrigerator display and control the power consumption according to the level. Exception condition] The DAL and TALR control signals from a utility company work as long as product performance is maintained. If the refrigerator receives the SMART GRID (Demand Response) signal (DAL or TALR), the refrigerator will operate in Delay Appliance Load (DAL) or Temporary Appliance Load Reduction (TALR) mode.
- Delay Appliance Load (DAL): The refrigerator responds to a DAL signal by providing a moderate load reduction for the duration of the delay period. This function controls functions that consume a lot of energy such as adjusting the Cooling system, running the defrost cycle, and making ice.
- When the refrigerator operates in DAL mode, “L3” is displayed on the refrigerator display.
- DAL mode is automatically deactivated after it lasts for the amount of time stipulated by the DAL signal (max. 4.5 hours) or when the Peak Demand Off key is pressed.
- Temporary Appliance Load Reduction (TALR): The refrigerator responds to a TALR signal by aggressively reducing the load for a short time period. This function reduces energy consumption by stopping the compressor and controlling the functions that consume a lot of energy such as the defrost cycle and making ice.
- When the refrigerator operates in TALR mode, “L4” is displayed on the refrigerator display.
- TALR mode is automatically deactivated after it lasts for the received duration (max. minutes), or when the Peak Demand Off key is pressed. The mode is immediately deactivated and the refrigerator returns to the normal state when the door is opened or closed, or the dispenser is used.
Peak Demand Off (Override mode)
When you want the refrigerator to ignore the SMART GRID (Demand Response) signal from the utility company, you can activate Peak Demand Off (Override mode). When you activate Peak Demand Off (Override mode), the refrigerator ignores the SMART GRID (Demand Response) signal and is not controlled by the utility company.
Activating and deactivating Peak Demand Off (Override mode)
- Tap and hold for 3 seconds.
- Then the Peak Demand Off (Override mode) icon ( ) turns on.
- If the refrigerator receives a SMART GRID (Demand Response) signal from the utility company, ’Or’ is displayed in the freezer temperature display.
- To deactivate Peak Demand Off (Override mode), tap and hold for 3 seconds.
- Then the Peak Demand Off (Override mode) icon ( ) turns off.
NOTE : Alternatively, you can activate or deactivate Peak Demand Off (Override mode) using the SmartThings app and the Energy Management function. See the next page.
Using the Energy Management Function
The Energy Management function enables you to control and monitor your Energy Management refrigerator using the SmartThings app for your convenience.
NOTE: To use the Energy Management refrigerator functions, you have to install the corresponding app first.
1. Operational Status
- You can check the DR and Peak Demand status.
-
Shows the accumulated power consumption. Power consumption data is updated every 10 minutes.
NOTE: The energy consumption report may differ from the power consumption specifications of the product depending on the operating environment and the stored food.
3. Delay Defrost Capability
- The Delay Defrost Capability function saves energy by delaying the defrost operation to a time specified by the user. You can configure the time. and this function will save energy during the specified period in a 24 hour cycle. If the time is not set, the function works with the default time settings. The default time settings are below:
- 6 am to 10 am: 1st. November ~ 30th. April
- 3 pm to 7 pm: 1st. May ~ 31th. October
To change the time setting for the Delay Defrost Capability
You can change the time setting for the Delay Defrost Capability on the app.
Special features
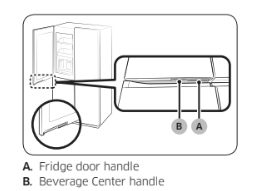
Beverage Center
The left fridge door has two handles on the bottom. To use the autofill pitcher, drink cold or purified water, press handle (B) to open the Beverage Center.
Water pitcher (AutoFill Pitcher) (applicable models only)
Cold, purified water is always ready in the AutoFill Pitcher. You can put tea or fruits in the infuser to enjoy the various infused water you like.
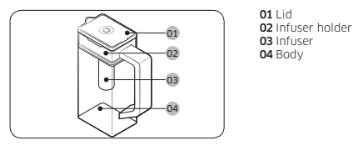
To fill the Water pitcher
1. Grasp a handle groove of the lid, and then pull up to open the lid.
2. Put tea leaves or fruit to your taste into the infuser.
NOTE
If you want to keep the infused water in its initial concentration, turn the AutoFill Pitcher function off.
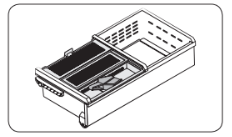
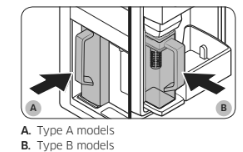
3. Enable the AutoFill Pitcher function on the control panel. Open the Beverage Center door (Type A) or the left door of the fridge (Type B), and then mount the water pitcher onto the holder. Push it straight in as shown in the figure.
CAUTION
- Make sure the water pitcher fits in the water pitcher holder.
4. Close the door. The water pitcher will start to fill with chilled water a short time later.
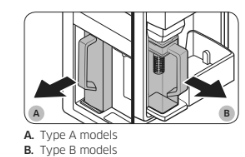
5. To drink tea, open the Beverage Center door (Type A) or the left door of the fridge (Type B), and then detach the water pitcher. Pull it straight out.
Ice maker
The refrigerator has a built-in ice maker that automatically dispenses ice.
- The overall design and/or accessories may differ with the model.
- This product has two types of ice makers.
WARNING
- Choking hazard: Ice may cause choking in small children.

Ice making
After you have installed your refrigerator and plugged it in, follow these instructions to ensure proper ice making and to keep the ice bucket full of ice.
For first-time use
- Let the ice maker make ice for 1-2 days.
- Discard the first 1-2 buckets of ice to remove impurities in the water supply system.
Diagnosis
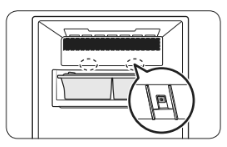
- The overall design and/or accessories may differ with the model.
- If ice does not dispense, first check the status of ice maker using the Test button on the bottom of the ice maker.
- Press the Test button on the bottom of the ice maker. You will hear a chime ding-dong) when you press the button.
- You will hear another chime if the ice maker is operating properly.

- Ice accumulating on one side of the tray is normal. Arrange the ice evenly in the tray to store more ice.

- Take caution when removing the ice bucket, the ice cubes may pour down from the tilt.
- When reinserting the ice bucket, remove any ice lump that are left over in the tray.
CAUTION
- Leaving the water line disconnected may cause the water valve to produce a buzzing sound over time. If this is the case, make sure to turn the ice making function (Cubed Ice Ice Bites ) off.
- If the ice making chime rings repeatedly, contact the waterline installer or a local
- Samsung service center.
- Do not put food in the ice bucket. The frozen food may damage the ice maker, especially when you open or close the door.
- When the refrigerator recovers power after a power failure, the ice bucket may contain a mix of melted and jammed ice cubes, which can prevent the ice maker from working properly. To prevent this, make sure to empty the ice bucket before using the refrigerator.
- Do not put fingers or any objects into the ice maker. This can cause physical injury or property damage.
- Due to sublimation, ice stored in the freezer for a long time gets smaller and then forms large ice chunks. Therefore, if it will be a long time before you use ice, turn the ice maker off as follows.
- Use the new hose-sets supplied with the appliance only. Do not re-use an old hose set.
Maintenance
Handling and care
Ice bucket (applicable models only)
CAUTION
- To prevent injury, make sure to clean up any ice or water that has fallen on the floor.
- To prevent accidents or injury, do not let children play with the water dispenser or the ice maker.
- Use only the provided ice bucket. Third-party ice buckets may cause a system failure.
NOTE
- The water pressure required for ice making is between 30-125 psi (206-861 kPa).
- Noise from the ice maker as it produces ice during the ice making process is normal.
Where to keep the scoop
Keep the scoop inside the scoop tray.
You can also store the scoop inside the ice bucket. In this case, sit the handle of the scoop against the side wall of the bucket for easy access.

AutoFill Pitcher (applicable models only)
1. Grasp a handle groove of the lid, and then pull up to remove.

2. Grasp both sides of the infuser holder, and then lift to remove.

3. While slightly twisting the infuser, pull it out of the sealed mouth.
4. Clean the infuser with neutral agents and running water. Rinse and dry well.
5. Reassemble the AutoFill Pitcher in the reverse order of disassembly.

Fridge shelves
The appearance of the shelves differs by model.
Top shelf
Quick Space shelf *
- To remove a shelf, fully open the corresponding door. Hold the front of the shelf, and then gently lift up and pull out.
- To reinsert, hold the shelf at an angle so the front is higher than the back, and then insert the top hook into the top shelf notch. Then, lower the shelf and insert the bottom shelf hook into the bottom shelf notch.
CAUTION
- The tempered glass shelves are heavy.
- Use caution when removing them.
- The shelf must be inserted correctly. Do not insert upside down.
- Glass containers may scratch the surface of glass shelves.
Vegetable shelf
NOTE: You must remove the Quick Space shelf before removing the Vegetable shelf.
- Pull the shelf out.
- Press the front of the shelf to lift the rear side of it.
- Hold the rear side of the shelf and tilt it vertically.
- Carefully pull out the shelf as shown in the figure.
Door bins
- To remove the door bin, hold the front sides of the bin, and then gently lift up to remove.
- To reinsert, insert the door bin slightly above its final location making sure that the back of the bin is against the door. Hold the rear of the door bin with both hands, and then press down so that it fits snugly.
CAUTION
- Do not remove a bin that is filled with food. Empty the bin beforehand.
- Use caution when opening the door if the bottom bin contains larger bottles, which may fall over.
- Do not allow children to play with the bins. Sharp corners of the bin may cause injury.
Crisper+ / Fridge Drawers
Gently lift up the front of the drawer and slide out.
- We recommend that you remove the door bins before removing the drawer. This is to prevent damage to the door bins.
- To reinsert, insert the drawer into the frame rails and then slide inward.
Freezer baskets
Upper basket
- To remove, fully slide open the freezer drawer. Lift up the front of the upper basket and pull up to remove.
- To reinsert, align the front wheels of the upper basket with the end of the lower basket. Slide the upper basket to the front.
Lower basket
- To remove, first remove the upper basket. Then, tilt up the front of the lower basket to pull out.
- To reinsert, put the basket onto the rail assembly rear side first.
CAUTION
- Do not twist the basket when removing or reinserting the basket. The basket can be scratched.
- To prevent physical injury, property damage, or suffocation, keep children away from freezer baskets that have been removed.
- Do not remove the divider.
- Put the wheels of the upper basket on the end of the rails of the lower basket. Then, slide the upper basket all the way to the front. Otherwise, the drawer will not open or close properly, which will cause frost to build up.
Cleaning
Interior and exterior
WARNING
- Do not use benzene, thinner, home/car detergent, or CloroxTM to clean the refrigerator. They may damage the surface of the refrigerator and cause a fire.
- Do not spray water onto the refrigerator. This may cause electric shock.
Regularly use a dry cloth to remove all foreign substances such as dust or water from the power plug terminals and contact points.
- Unplug the power cord.
- Use a moistened, soft, lint-free cloth or paper towel to clean the refrigerator’s interior and exterior.
- When done, use a dry cloth or paper towel to dry well.
- Plug in the power cord.
Dispenser nozzle (applicable models only)
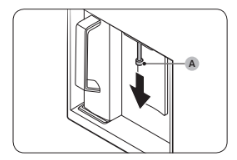
1. Hold the end of the dispenser nozzle (A).
2. While turning the dispenser nozzle (A) left, pull it down to remove it from the dispenser.
3. Clean the dispenser nozzle thoroughly, and then assemble it back.

CAUTION
- Fully insert the dispenser nozzle, so it is back to its original position.
- Do not use a sponge with rough textures for cleaning the dispenser nozzle.
Replacement
Water filter
WARNING
- Do not use third-party water filters. Use only Samsung-provided or -approved filters.
- Unapproved filters may leak and damage the refrigerator, causing electric shock. Samsung is not responsible for any damage that may occur from use of third-party water filters.
The Water Filter Reset indicator ( ) turns red to let you know it is time to replace the water filter. Before replacing the filter, make sure the water supply line is shut off.
NOTE
- A newly installed filter may cause the water dispenser to spurt water briefly. This is because air has entered the waterline.
- The replacement process may cause the water dispenser to drip for a short period of time. If it drips, simply wipe up any water on the floor with a dry towel.
Reverse osmosis water filtration system
The water pressure of the water supply system to a reverse osmosis water filtration system must be between 30-125 psi (206-861 kPa). The water pressure of the reverse osmosis water filtration system to the refrigerator’s cold water line must be at least 30 psi (206 kPa). If the water pressure is below these specifications:
- Check if the sediment filter in the reverse osmosis system is blocked. Replace the filter if necessary.
- Refill the water tank in the reverse osmosis system with water.
- If your refrigerator has a water filter, it may further reduce the water pressure when used in conjunction with a reverse osmosis system. Remove the water filter.
For more information or servicing, contact a licensed plumbing professional.
Ordering a new filter : To purchase a new water filter, contact a local Samsung service center or visit www. samsungparts.com on the web.
LED Lamps: To replace the lamps of the refrigerator, contact a local Samsung service center.
WARNING
- The lamps are not user-serviceable. Do not attempt to replace a lamp yourself. This can cause electric shock.
Door panel (applicable models only)
You can select the door panel you prefer for your BESPOKE refrigerator. Purchase the door panel at a Samsung retail store and an authorized installer will install the panel for you.
CAUTION
- Disassembling or assembling the door panel on your own may result in product damage or personal injury. If you find any problems with the door panel, contact a Samsung service center
- A service fee may be charged for panel replacement even within the warranty period.
Troubleshooting
General
Temperature
1. Fridge/freezer does not operate. Fridge/freezer temperature is warm.
- Power cord is not plugged in properly. - Properly plug in the power cord.
- Temperature control is not set correctly. - Set the temperature lower.
- Refrigerator is located near a heat source or direct sunlight. - Keep the refrigerator away from direct sunlight or a heat source.
- Not enough clearance between refrigerator and nearby walls or cabinets. - Make sure there is a gap of at least 2.5 inches (5 cm) between the refrigerator back and sides and any nearby walls or cabinets.
- The refrigerator is overloaded. Food is blocking the refrigerator vents. - Do not overload the refrigerator. Do not allow food to block vents.
2. Fridge/freezer is over-cooling.
- Temperature control is not set correctly. - Set the temperature higher.
3. Interior wall is hot.
- Refrigerator has heat-proof piping in the interior wall. - To prevent condensation from forming, the refrigerator has heat-proof piping in the front corners. If the ambient temperature rises, this equipment may not work effectively. This is not a system failure.
Odors
1. Refrigerator has odors.
- Spoiled food. - Clean the refrigerator and remove any spoiled food.
- Food with strong odors. - Make sure strong smelling food is wrapped airtight.
Frost
1. Frost around the vents.
- Food is blocking the vents. - Make sure no food blocks the refrigerator vents.
2. Frost on interior walls.
- Door is not closed properly. - Make sure food does not block the door. Clean the door gasket.
Condensation
1. Condensation forms on the interior walls.
- If door is left open, moisture enters the refrigerator. - Remove the moisture and do not leave a door open for extended periods of time.
- Food with high moisture content. - Make sure food is wrapped airtight.
Do you hear abnormal sounds from the refrigerator?
Before calling for service, review the information below. If you still have questions about sounds your refrigerator is making, please call Samsung Customer Care at 1-800-SAMSUNG Note that you will be charged for any service visits related to normal operating sounds in which no defects were found.
These sounds are normal.
- When starting or ending an operation, the refrigerator may make sounds similar to a car engine ignition. As the operation stabilizes, the sounds will decrease.
- While the fan is operating, these sounds may occur. When the refrigerator reaches the set temperature, the fan sound will stop.
- During a defrost cycle, water may drip on the defrost heater, causing sizzling sounds.
- As the refrigerator cools or freezes, refrigerant gas moves through sealed pipes, causing bubbling sounds.
- As the refrigerator temperature increases or decreases, plastic parts contract and expand, creating knocking noises. These noises occur during the defrosting cycle or when electronic parts are working.
- For ice maker models: When the water valve opens to fill the ice maker, you may hear a buzzing sound.
- Due to pressure equalizing when you open and close the refrigerator door, you may hear a whooshing sound.
LIMITED WARRANTY (U.S.A.)
SAMSUNG REFRIGERATOR
LIMITED WARRANTY TO ORIGINAL CONSUMER PURCHASER WITH PROOF OF PURCHASE
This SAMSUNG brand product, as supplied and distributed by Samsung Electronics America, Inc. (SAMSUNG) and delivered new, in the original carton to the original consumer purchaser, is warranted by SAMSUNG against manufacturing defects in materials or workmanship for the limited warranty period of:
This limited warranty is valid only on products purchased and used in the United States that have been installed, operated, and maintained according to the instructions attached to or furnished with the product. To receive warranty service, the purchaser must contact SAMSUNG at the address or phone number provided below for problem determination and service procedures. Warranty service can only be performed by a SAMSUNG authorized service center. The original dated bill of sale must be presented upon request as proof of purchase to SAMSUNG or SAMSUNG’s authorized service center to receive warranty service.
SAMSUNG will provide in-home service within the contiguous United States during the warranty period at no charge, subject to availability of SAMSUNG authorized servicers within the customer’s geographic area. If in-home service is not available, SAMSUNG may elect, at its option, to provide transportation of the product to and from an authorized service center. If the product is located in an area where service by a SAMSUNG authorized servicer is not available, you may be responsible for a trip charge or required to bring the product to a SAMSUNG authorized service center for service.
To receive in-home service, product must be unobstructed and accessible to the service agent.
During the applicable warranty period, a product will be repaired, replaced, or the purchase price refunded, at the sole option of SAMSUNG. SAMSUNG may use new or reconditioned parts in repairing a product, or replace the product with a new or reconditioned product. Replacement parts and products are warranted for the remaining portion of the original product’s warranty or ninety (90) days, whichever is longer. All replaced parts and products are the property of SAMSUNG and you must return them to SAMSUNG.
This limited warranty covers manufacturing defects in materials or workmanship encountered in normal household, noncommercial use of this product and shall not cover the following: damage that occurs in shipment, delivery, installation, and uses for which this product was not intended; damage caused by unauthorized modification or alteration of the product; product where the original factory serial numbers have been removed, defaced, changed in any way, or cannot be readily determined; cosmetic damage including scratches, dents, chips, and other damage to the product’s finishes; damage caused by abuse, misuse, pest infestations, accident, fire, floods, or other acts of nature or
God; damage caused by use of equipment, utilities, services, parts, supplies, accessories, applications, installations, repairs, external wiring or connectors not supplied or authorized by SAMSUNG; damage caused by incorrect electrical line current, voltage, fluctuations and surges; damage caused by failure to operate and maintain the product according to instructions; in-home instruction on how to use your product; and service to correct installation not in accordance with electrical or plumbing codes or correction of household electrical or plumbing (i.e., house wiring, fuses, or water inlet hoses). The cost of repair or replacement under these excluded circumstances shall be the customer’s responsibility.
Visits by an authorized servicer to explain product functions, maintenance or installation are not covered by this limited warranty. Please contact SAMSUNG at the number below for assistance with any of these issues.
EXCLUSION OF IMPLIED WARRANTIES
IMPLIED WARRANTIES, INCLUDING THE IMPLIED WARRANTIES OF MERCHANTABILITY OR FITNESS FOR A PARTICULAR PURPOSE, ARE LIMITED TO ONE YEAR OR THE SHORTEST PERIOD ALLOWED BY LAW. Some states do not allow limitations on how long an implied warranty lasts, so the above limitations or exclusions may not apply to you. This warranty gives you specific rights, and you may also have other rights, which vary from state to state.
LIMITATION OF REMEDIES
YOUR SOLE AND EXCLUSIVE REMEDY IS PRODUCT REPAIR, PRODUCT REPLACEMENT, OR REFUND OF THE PURCHASE PRICE AT SAMSUNG’S OPTION, AS PROVIDED IN THIS LIMITED WARRANTY. SAMSUNG SHALL NOT BE LIABLE FOR SPECIAL, INCIDENTAL OR CONSEQUENTIAL DAMAGES, INCLUDING BUT NOT LIMITED TO TIME AWAY FROM WORK, HOTELS AND/OR RESTAURANT MEALS, REMODELING EXPENSES, LOSS OF REVENUE OR PROFITS, FAILURE TO REALIZE SAVINGS OR OTHER BENEFITS REGARDLESS OF THE LEGAL THEORY ON WHICH THE CLAIM IS BASED, AND EVEN IF SAMSUNG HAS BEEN ADVISED OF THE POSSIBILITY OF SUCH DAMAGES. Some states do not allow exclusion or limitation of incidental or consequential damages, so the above limitations or exclusions may not apply to you. This warranty gives you specific rights, and you may also have other rights, which vary from state to state.
SAMSUNG does not warrant uninterrupted or error-free operation of the product. No warranty or guarantee given by any other person, firm, or corporation with respect to this product shall be binding on SAMSUNG.
See other models: RF24BB6600AP RF30BB69006M RF29BB86004M 1271570 1496810
