EN
FR
PG.21
PG.40
www.napoleongrills.com
N415-0526 Nov 22.18
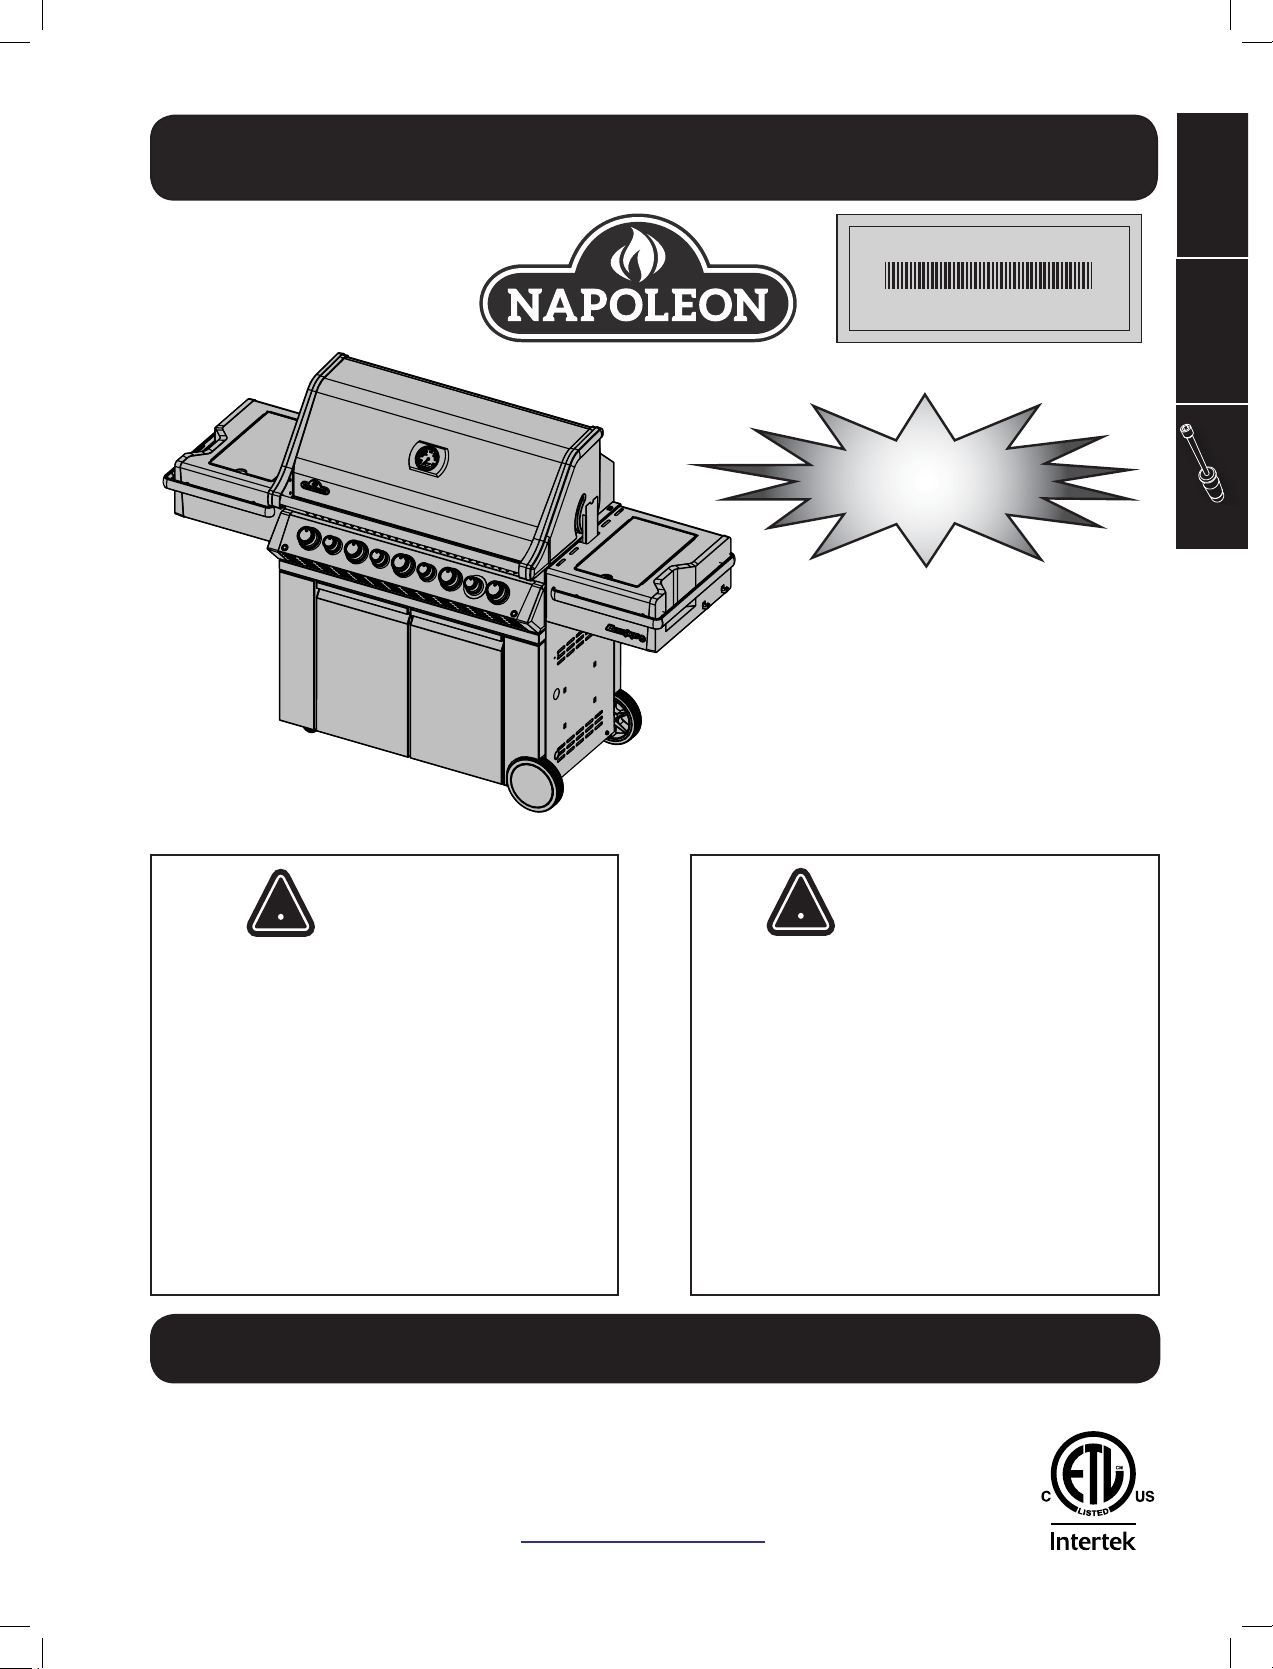
APPLY SERIAL NUMBER LABEL FROM CARTON
Serial No.
XXXXXX000000
MODEL NO.
Noce to Installer: Leave these instrucons with the grill owner for future reference.
This gas grill must be used only outdoors in a well-venlated space and must not be used inside a
building, garage, screened-in porch, gazebo or any other enclosed area.
DO NOT DISCARD
Adults and especially children should be alerted to the hazards of high surface temperatures.
Young children should be supervised near the gas grill.
WARNING
Do not try to light this appliance without
reading the “LIGHTING” instrucons secon
of this manual.
Do not store or use gasoline or other
ammable liquids or vapors in the vicinity of
this or any other appliance. An L.P. cylinder
not connected for use must not be stored in
the vicinity of this or any other appliance.
If the informaon in these instrucons is
not followed exactly, a re or explosion may
result, causing property damage, personal
injury or death.
Wolf Steel Ltd.
214 Bayview Drive,
Barrie, Ontario, CANADA L4N 4Y8
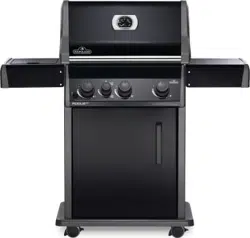
PRO665-3
!
DANGER
IF YOU SMELL GAS:
• Shut o gas to the appliance.
• Exnguish any open ame.
• Open lid.
• If odor connues, keep away from the
appliance and immediately call your gas
supplier or re department.
!
2
EN
www.napoleongrills.com
N415-0526 Nov 22.18
*Conditions and Limitations
This Limited Warranty creates a warranty period as specified in the
aforementioned table, for any product purchased through an authorized NAPOLEON
dealer, and entitles the original purchaser to the specified coverage in respect of
any component replaced within the warranty period, either by NAPOLEON or an
authorized NAPOLEON dealer, to replace a component of such product that has
failed in normal private use as a result of a manufacturing defect. The “50% off”
indicated in the table means the component is made available to the purchaser at
a 50% discount off the regular retail price of the component for the period
indicated. This Limited Warranty does not cover accessories or bonus items.
For greater certainty, “normal private use” of a product means that the product:
has been installed by a licensed, authorized service technician or contractor, in
accordance with the installation instructions included with the product and all
local and national building and fire codes; has been properly maintained; and has
not been used as a communal amenity or in a commercial application.
Similarly, “failure” does not include: over-firing, blow outs caused by
environmental conditions such as strong winds or inadequate ventilation,
scratches, dents, corrosion, deterioration of painted and plated finishes,
discoloration caused by heat, abrasive or chemical cleaners or UV exposure,
chipping of porcelain enameled parts, or damages caused by misuse, accident,
hail, grease fires, lack of maintenance, hostile environments such as salt or
chlorine, alterations, abuse, neglect or parts installed from other manufacturers.
Should deterioration of parts occur to the degree of non-performance (rusted
through or burnt through) within the duration of the warranted coverage, a
replacement part will be provided. The replacement component is the sole
responsibility of NAPOLEON defined by this Limited Warranty; in no event will
NAPOLEON be responsible for installation, labor or any other costs or expenses
related to the re-installation of a warranted part, for any incidental, consequential,
or indirect damages or for any transportation charges, labor costs or export duties.
This Limited Warranty is provided in addition to any rights afforded to you by local
laws. Accordingly, this Limited Warranty imposes no obligation upon NAPOLEON to
keep parts in stock. Based on the availability of parts, NAPOLEON may at its
discretion discharge all obligations by providing a customer a prorated credit
towards a new product. After the first year, with respect to this Limited Warranty
NAPOLEON may, at its discretion, fully discharge all obligations with respect to this
warranty by refunding to the original warranted purchaser the wholesale price of
any warranted but defective part(s).
The bill of sale or copy will be required together with a serial number and a
model number when making any warranty claims from NAPOLEON.
NAPOLEON reserves the right to have its representative inspect any product
or part prior to honoring any warranty claim. You must contact NAPOLEON
Customer Service or an authorized NAPOLEON dealer to obtain the benefit of
the warranty coverage.
napoleongrills.com
Napoleon President’s Limited Lifetime Warranty
NAPOLEON products are designed with superior components and materials, and are assembled by trained craftsmen
who take great pride in their work. The burner and valve assembly are leak tested and test-fired at a quality test station.
This grill has been thoroughly inspected by a qualified technician before packaging and shipping to ensure that you,
the customer, receive the quality product you expect from NAPOLEON.
NAPOLEON warrants that components in your new NAPOLEON product will be free from defects in material and
workmanship from the date of purchase, for the following period:
Aluminum castings / stainless steel base ................................. Lifetime
Stainless steel lid ...................................................................... Lifetime
Porcelain enamel lid ................................................................. Lifetime
Stainless steel cooking grids .................................................... Lifetime
Stainless steel tube burners ..................................................... 10 years full coverage, plus 50% off for life
Porcelain-enameled cast iron cooking grids ............................. 10 years full coverage, plus 50% off for life
Stainless steel sear plates ........................................................ 5 years full coverage, plus 50% off for life
Stainless steel infrared rotisserie burner .................................. 5 years full coverage, plus 50% off for life
Ceramic infrared burners (excluding screen) ............................ 5 years full coverage, plus 50% off for life
All other parts ........................................................................... 2 years
3
EN
www.napoleongrills.com
N415-0526 Nov 22.18
WARNING! Failure to follow these instrucons could result in property damage, personal injury or
death. Read and follow all warnings and instrucons in this manual prior to operang grill.
Safe Operang Pracces
•
•
•
garage, screened-in porch, gazebo or any other enclosed area.
•
•
•
•
•
recommended near vinyl siding or panes of glass.
•
•
• When the propane cylinder is connected to the appliance, the gas grill and cylinder must be stored outdoors in a
•
Disconnected cylinders must not be stored in a building, garage or any other enclosed area. Natural gas units
must be disconnected from the supply when being stored indoors.
•
by the grill manufacturer.
•
•
•
•
•
•
built-in side burner
•
covering.
• Adults and especially children should be alerted to the hazards of high surface temperatures. Young children
should be supervised near the gas grill.
•
• Do not light burners with lid closed.
•
•
•
• Keep any electrical supply cord and fuel supply hose away from any heated surfaces.
•
•
•
•
•
•
• Do not use a pressure washer to clean any part of the unit.
!
4
EN
www.napoleongrills.com
N415-0526 Nov 22.18
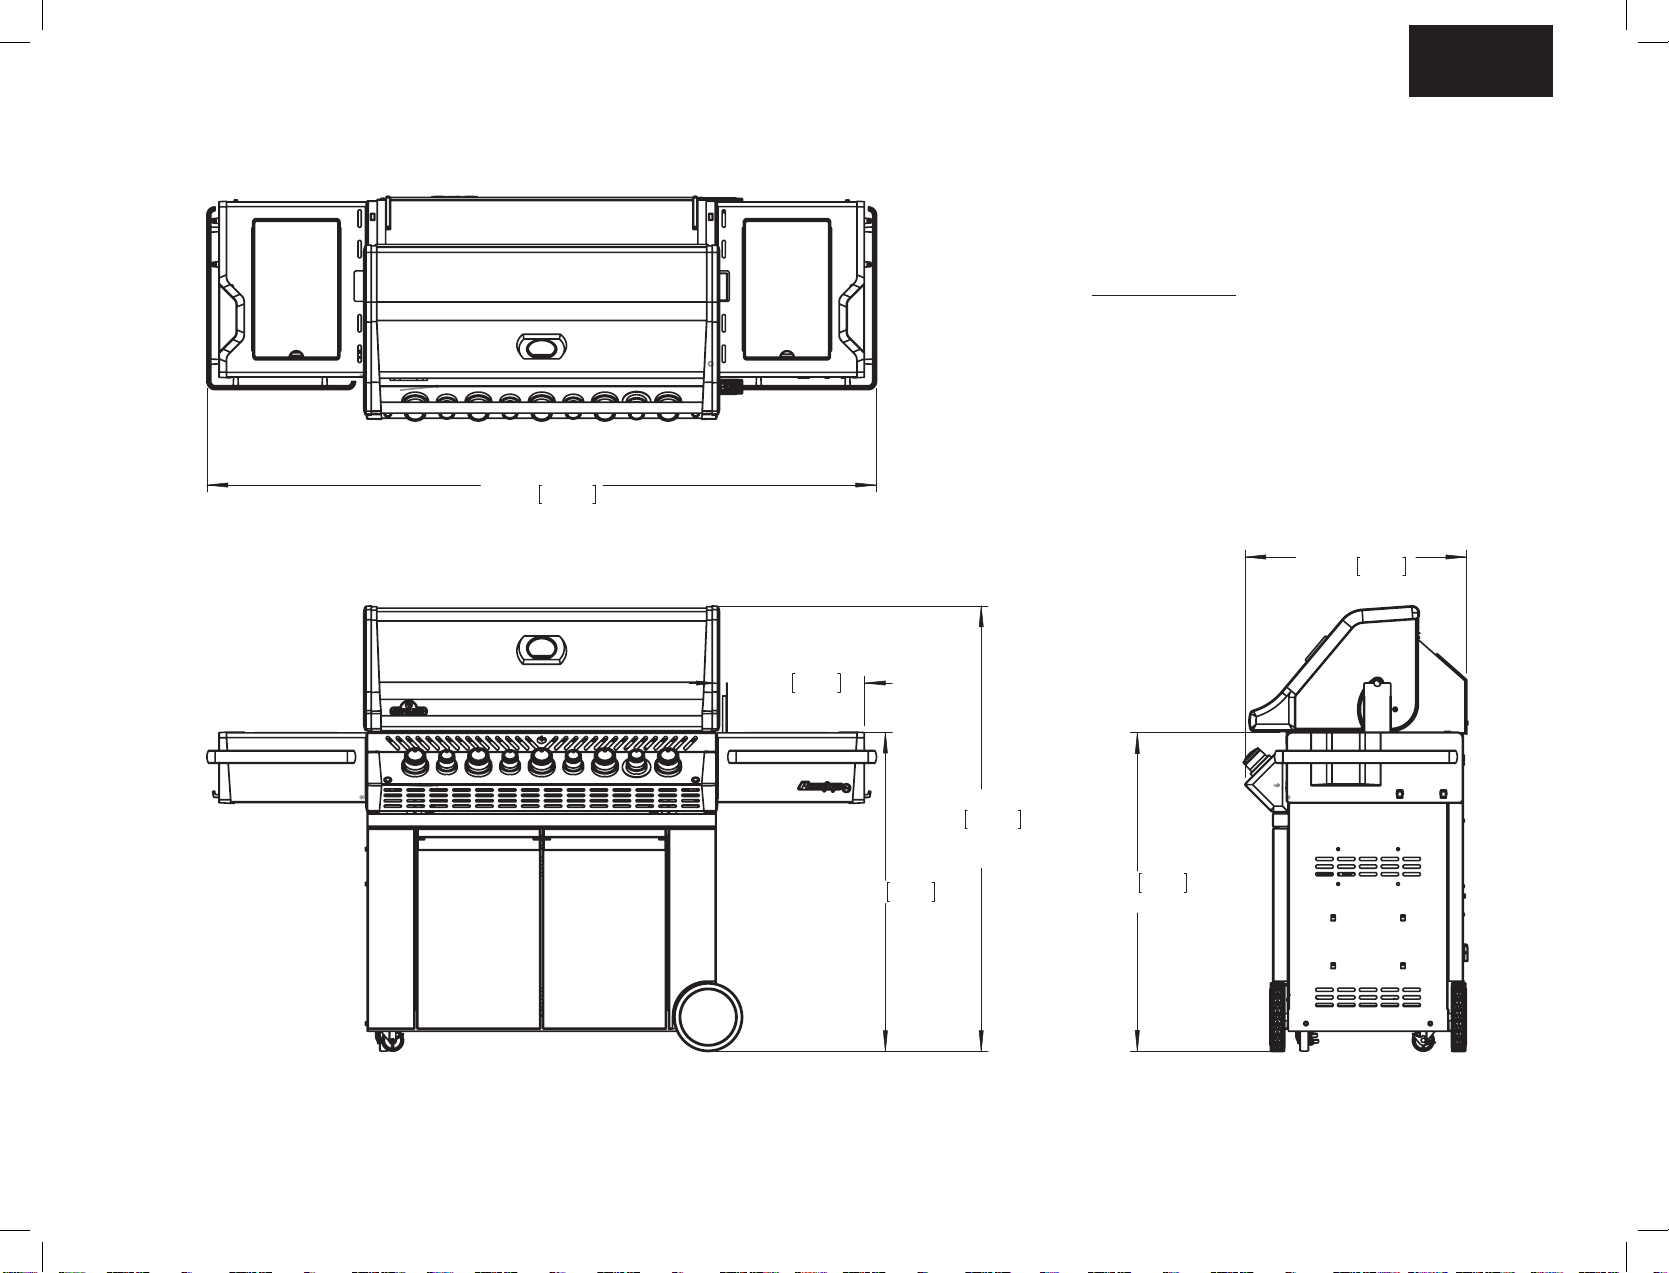
OVERALL HEIGHT
51"
130cm
(56" [142cm]
- LID OPEN)
16 3/4"
43cm
36 1/2"
93cm
OVERALL WIDTH
76 3/4"
195cm
36 1/2"
93cm
(GRILL HEIGHT)
OVERALL DEPTH
25 1/2"
65cm
wyv]]\TZGnypss
GRILL SIZE: 665 in
2
(4324 cm
2
)
WARMING RACK SIZE: 345 in
2
(2185 cm
2
)
ALL DIMENSIONS ARE APPROXIMATE
DIMENSIONS
5
EN
www.napoleongrills.com
N415-0526 Nov 22.18
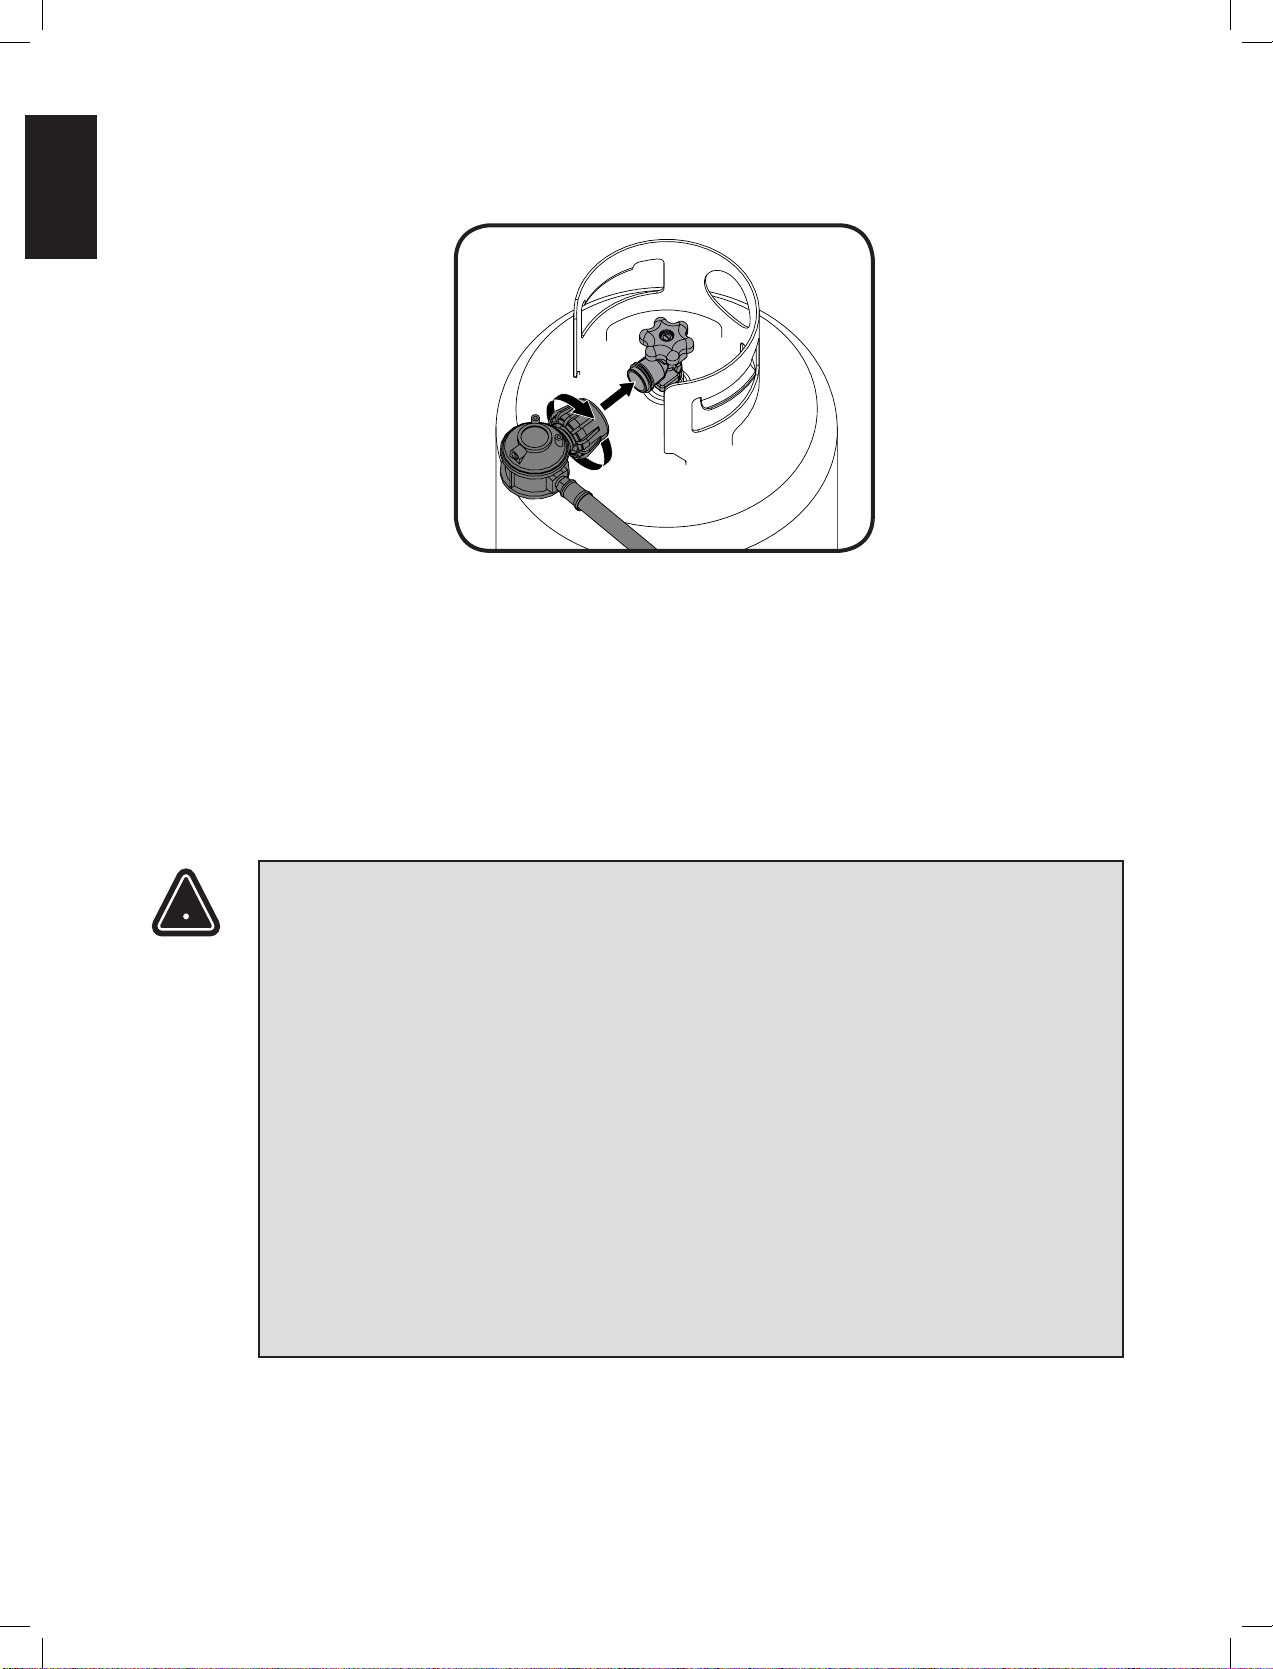
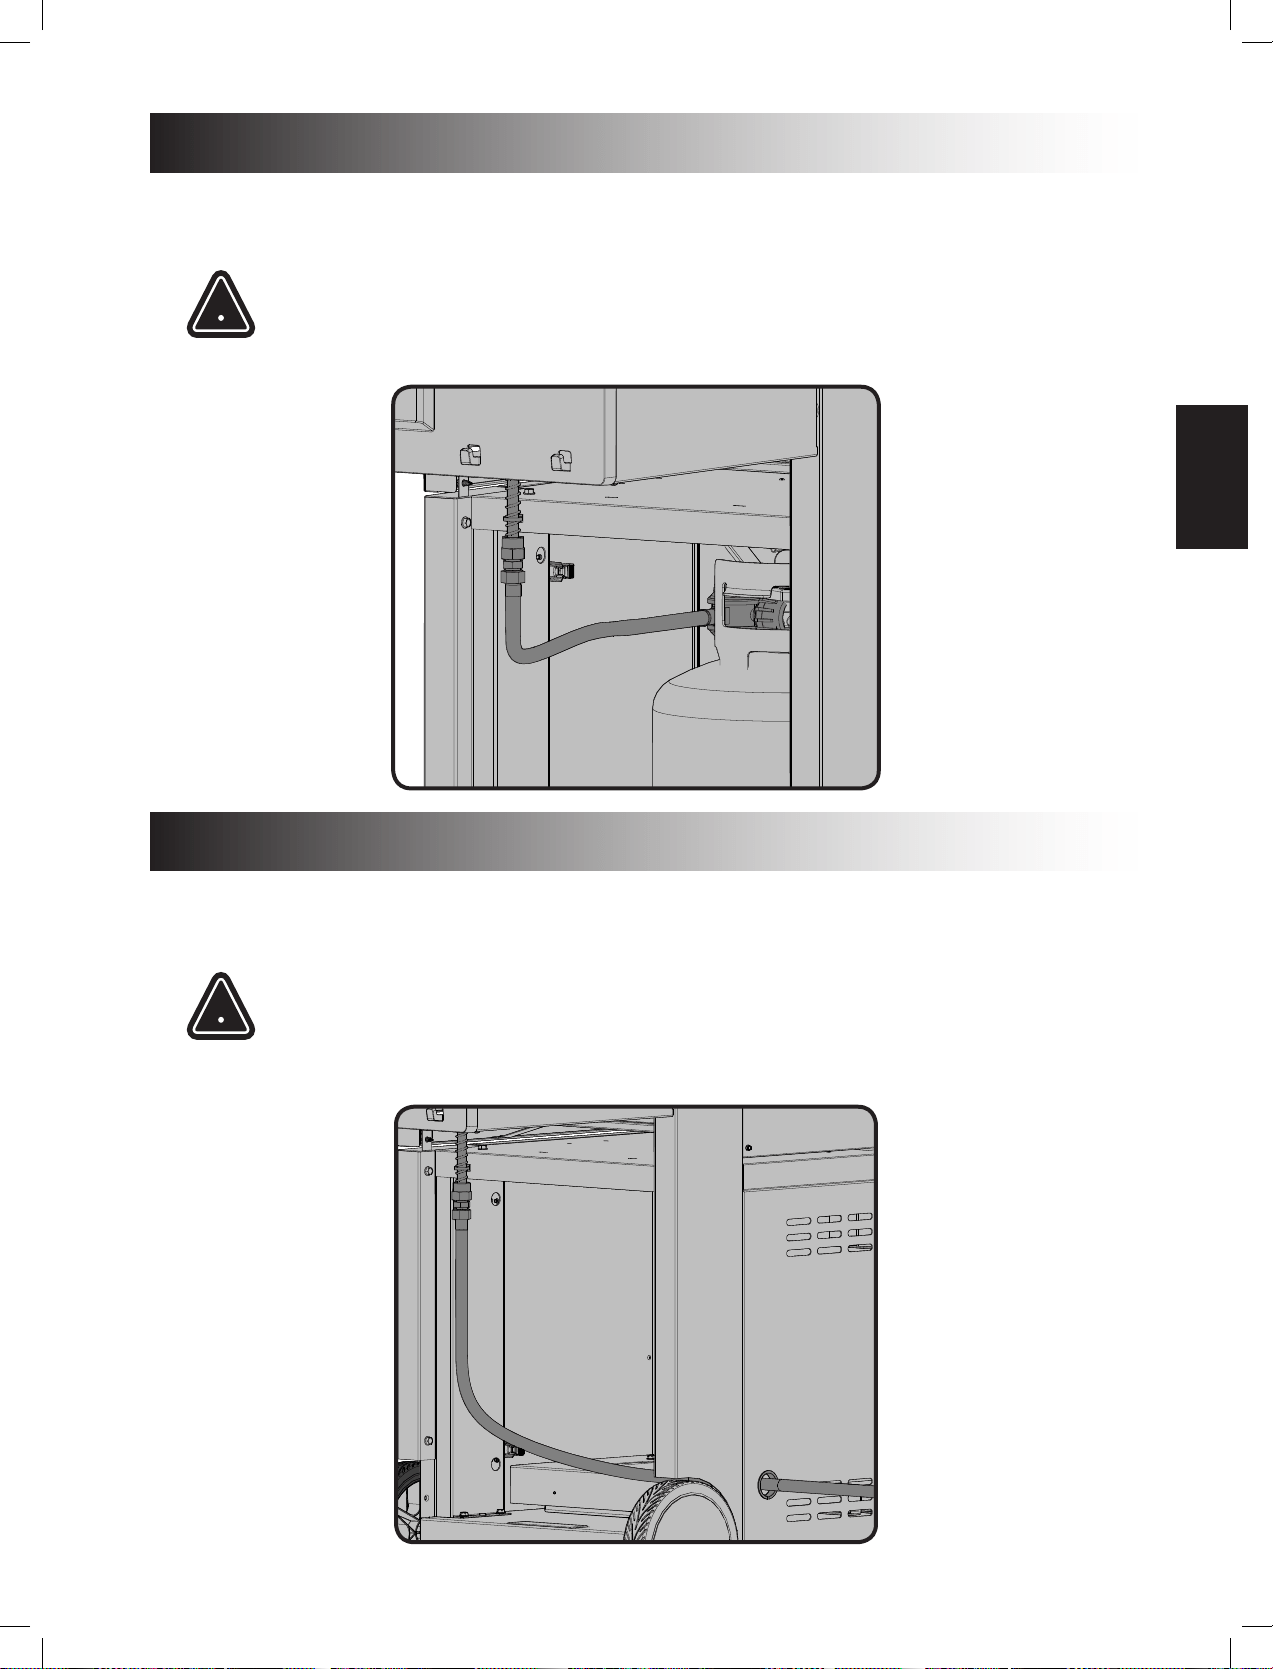
Gas Hook-Up Instrucons
WARNING! A re will result if the gas supply hose makes contact with the underside of the grill or
drip pan.
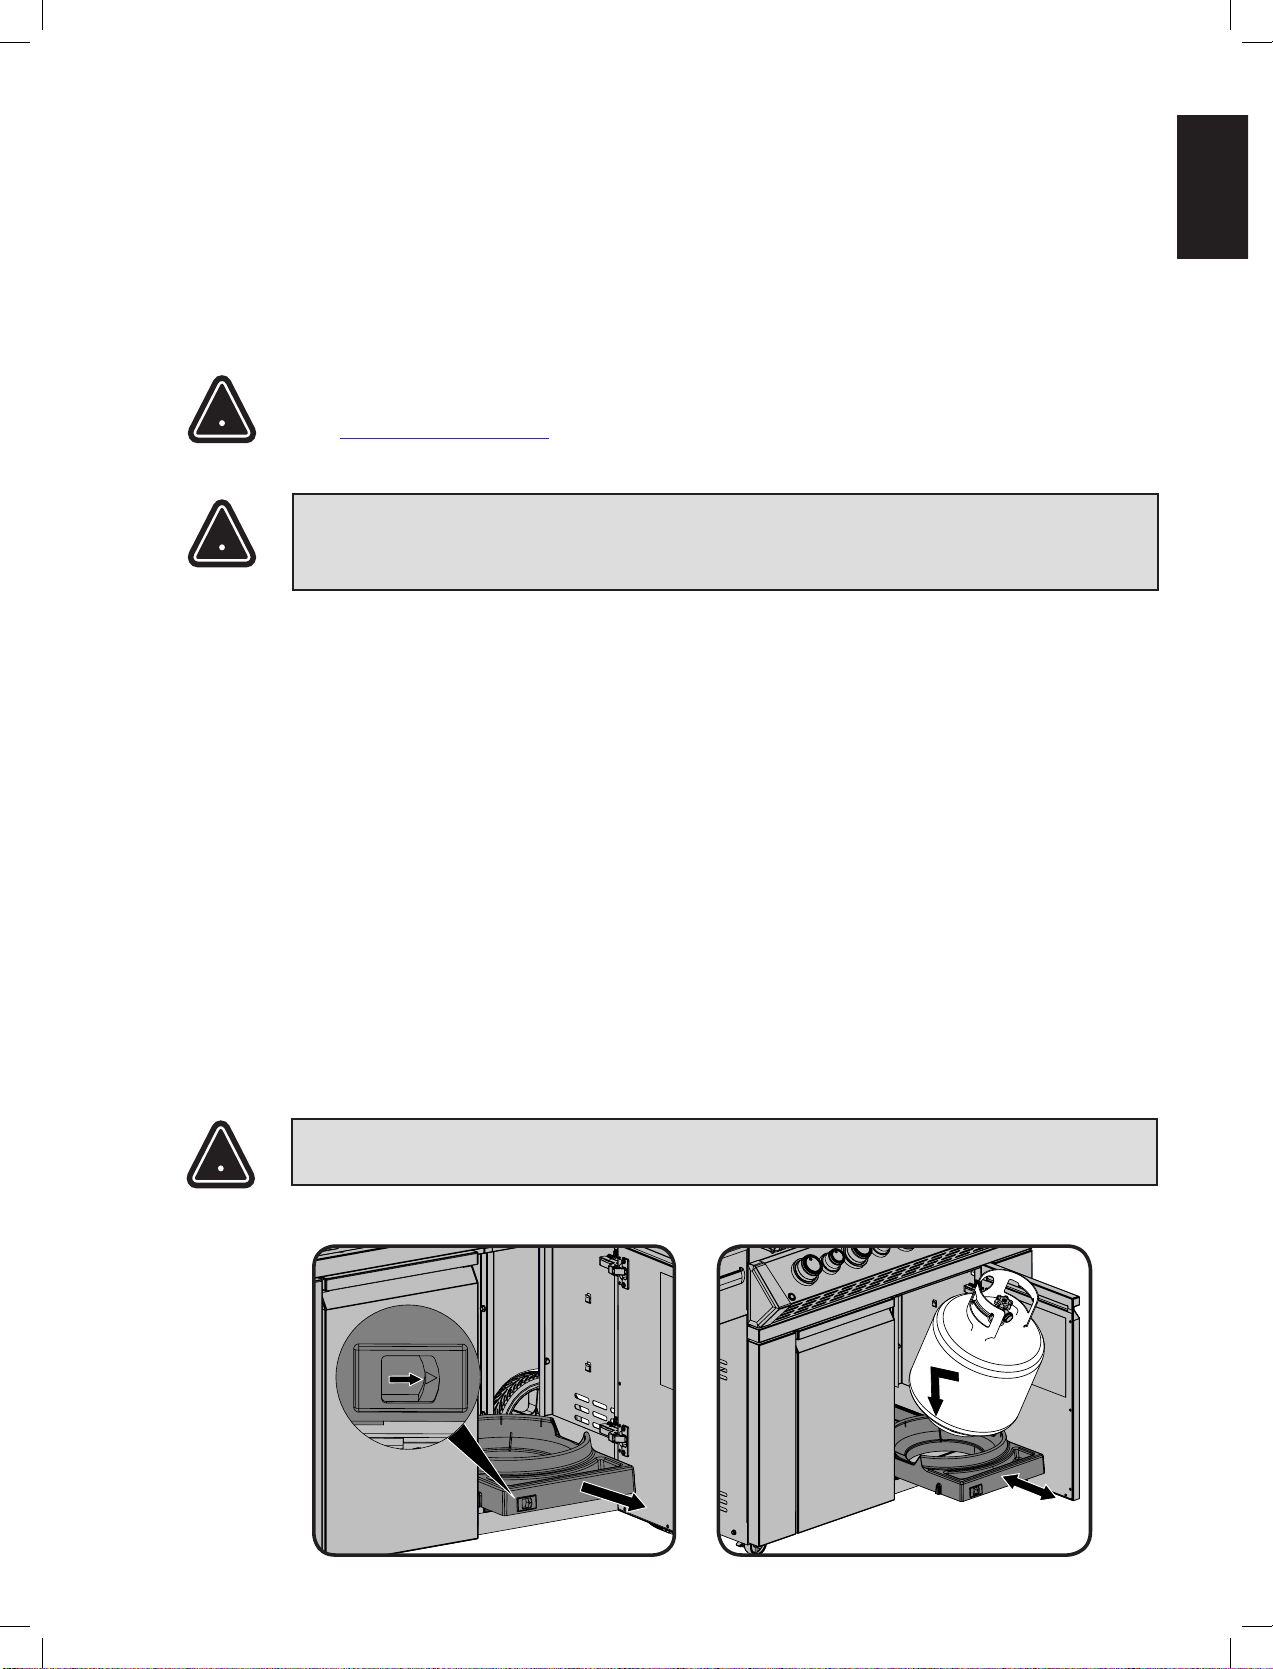
Propane Cylinder Installaon: Ensure the gas regulator hose is kink free.
Remove the
General Informaon
and
of local codes, with the current CSA C22.1
Code, in the United States.
WARNING: This product can expose you to chemicals including lead and lead compounds, which are
known to the State of California to cause cancer, and chemicals including di-n-butyl phthalate, which are
go to .
Propane Cylinder Specicaons
WARNING! If these instrucons are not followed exactly, a re causing death or serious
injury may
occur.
WARNING! Do not store a spare propane cylinder on the shelf beneath the barbecue.
A dented or rusty cylinder may be hazardous and should be checked by your propane supplier. Never
use a cylinder with a damaged valve. Use only a propane supply cylinder constructed and marked in
vapor space of the cylinder. The cylinder supply system must be arranged for vapor withdrawal and the
or serious injury may occur.
!
!
!
6
EN
www.napoleongrills.com
N415-0526 Nov 22.18
Hand ghten clockwise. Do not use tools. Leak test all joints prior to using the grill. A leak test must be
performed annually and each me a cylinder is hooked up or if a part of the gas system is replaced. If
this grill is to be connected directly to a house propane gas supply line, follow the instrucons for the
natural gas hook-up. Ensure that the supply pressure is 11 inches water column.
Natural Gas Hook-Up
WARNING!
•
• Do not route hose underneath the drip pan.
•
• Do not route hose over top of rear panel.
•
• Ensure the hose does not contact any high temperature surfaces or it may melt and leak causing a
•
in the manual.
•
• The outdoor cooking gas appliance must be isolated from the gas supply piping system by closing its
!
7
EN
www.napoleongrills.com
N415-0526 Nov 22.18
Leak Tesng Instrucons
WARNING! A leak test must be performed annually and each me a cylinder is hooked up or if a
part of the gas system is replaced.
WARNING! Never use an open ame to check for gas leaks. Be certain no sparks or open ames
are in the area while you check for leaks. Sparks or open ames will result in a re or explosion,
damage to property, serious bodily injury, or death.
Leak tesng
See Leak
hose, manifolds and valves.
gas installer.
immediately shut o the gas supply, disconnect it, and have the grill
Electrical Precauons
WARNING! Failure to follow these instrucons could result in property damage, personal injury or
death.
•
•
•
• Do not let the cord hang over the edge of a table or touch hot surfaces.
• Do not use an outdoor cooking gas appliance for purposes other than intended.
•
the outlet.
•
• Never remove the grounding plug or use with an adapter of 2 prongs.
•
approved for outdoor use with a W-A marking.
!
!
!
STOP
8
EN
www.napoleongrills.com
N415-0526 Nov 22.18
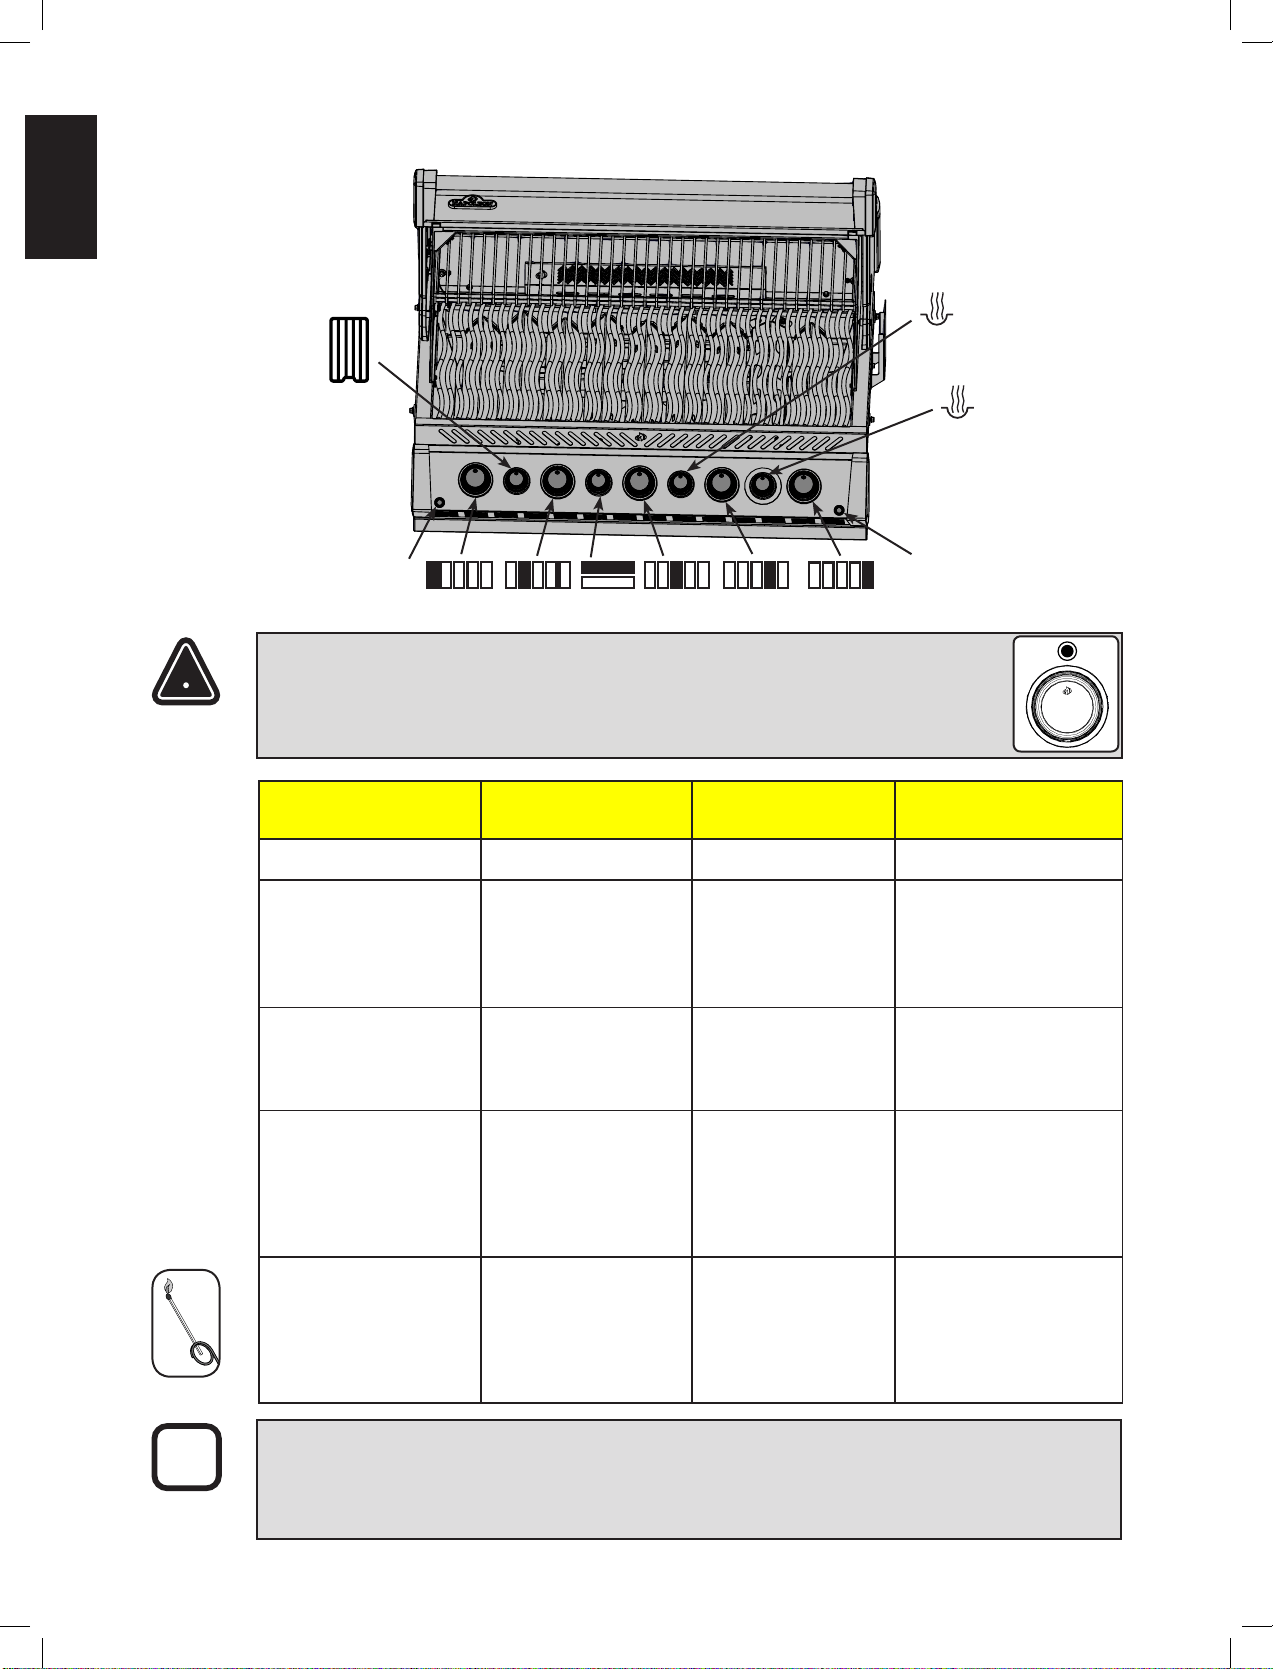
Lighng Instrucons
O Posion
WARNING! Open lid
WARNING! Ensure all burner controls are in the o posion. Slowly turn on the
gas supply valve.
Main Burner
Lighng
Smoker Burner
Lighng
Rear Burner Lighng
(if equipped)
Side Burner Lighng
(if equipped)
1. Open grill lid. 1. Open grill lid. 1. Open grill lid. 1. Open burner cover.
burner knob to the high
lights and then release.
burner control knob to the
2. Remove warming rack.
burner control knob to the high
then immediately turn the
light with a match.
burner control to the high
lights, or light with a match.
not ignite within 5 seconds,
turn the control knob to
minutes for any excess gas to
dissipate. Either repeat steps
ignite within 5 seconds,
turn the control knob to
minutes for any excess gas to
dissipate. Repeat step 2.
by match.
within 5 seconds, turn the
for any excess gas to dissipate.
Repeat step 2.
match, clip the match into the
the lit match down through
the grill and sear plate while
turning the corresponding
burner valve to high.
ignite within 5 seconds,
turn the control knob to
minutes for any excess gas
WARNING! The propane cylinder is equipped with an excess ow device. Unless all burners are
turned o prior to turning the cylinder on, only small ames and low heat will be achievable.
WARNING! Do not use rear burner while operang main burner.
Igniter
Le
Burner
Side Burner
Right
Burner
Le Centre
Burner
Rear
Burner
Right Centre
Burner
Centre
Burner
Smoker Burner
Light
Smoker Tray
!
!
9
EN
www.napoleongrills.com
N415-0526 Nov 22.18
Cooking Instrucons
Inial Lighng
does not occur again. Simply run the main burners on high for approximately one-half hour.
Main Burner Use
Your All Season Grill cookbook by
Direct Cooking
Indirect Cooking
method is much the same as cooking in your oven and is generally used for larger cuts of meats such
as roasts, chickens
smoking foods. Lower tem
can vent underneath the control panel. This may cause the control panel to become extremely hot to
touch and the knobs to deform.
the possibility of improper heat build up.
NOTE! Napoleon is not responsible for: over ring, blow outs caused by environmental condions
such as strong winds, or inadequate venlaon.
3
1
2
!
10
EN
www.napoleongrills.com
N415-0526 Nov 22.18
Smoker Burner
moker tray.
Infrared Side Burner Use (If Equipped): The gas grill should be located so that the side burner is protected
WARNING!
Do not close the side burner lid while it is operang or hot.
WARNING! Do not adjust cooking grid while hot or operang.
WARNING! Do not use side burner to deep fry foods as cooking with oil can create a dangerous
situaon.
oven temperature to
CAUTION! Due to the intense heat the infrared burners provide, food le unaended over burners
will burn quickly. Keep the lid open when cooking with the infrared burners.
Protecon Of Your Infrared Burners: The infrared burners of your grill are designed to provide a long
• Never let water come in direct contact with your ceramic burner.
• Do not allow hard objects to impact the infra red burner.
•
Rear Burner Use (If Equipped): Remove the warming rack prior to use, the extreme heat will damage the
warming rack.
cooked across the hangers inside the grill. The meat will naturally hang with the heavy
side down. Tighten
the counterbalance arm and weight so the arm is facing up. Slide the counterweight in or out to balance
foods. Keep the lid closed for best results. Your roasts and fowl will brown perfectly on the outside and
approximately 1½ hours on medium to high. Search Grill Master Recipes at
recipes
ATTENTION! Barbecue sauce and salt can be corrosive and will cause rapid deterioraon of
the gas grill components unless cleaned regularly. When nished cooking disassemble rosserie
components, wash thoroughly with warm soapy water and store indoors.
!
!
!

11
EN
www.napoleongrills.com
N415-0526 Nov 22.18
Infrared Heat
the red end of the visible light spectrum but less than a radio wave. This energy was discovered in 1800
most of the heat in the beam fell into the spectral region just beyond the red end of the spectrum, where
no visible light existed.
Most materials readily absorb infrared energy in a wide range of wavelengths,
causing an increase in its tem
perature. The same phenomenon causes us to feel warmth when we are
exposed to sunlight. The infrared rays from the sun travel through the vacuum of space, through the
Foods cooked over infrared heat sources are heated by the same principle. Charcoal grilling is our most
and vaporize into smoke giving the food its delicious grilled taste. The Napoleon infrared burner cooks
the same type of infrared heat to the food as charcoal, without
vide a more consistently heated area that is far easier to
the burners can be set to high, yet they can also be
process and then rises to the food being cooked. This generates lower grill temperatures that are ideal
• Keep the lid closed when the side burner is not in use.
•
Damage caused by failure to follow these steps is not covered by your grill warranty.
12
EN
www.napoleongrills.com
N415-0526 Nov 22.18
Infrared Grilling Chart
Food Control Seng Cooking Time Helpful Suggesons
Steak
side.
side
side
grilling, ask for marbled
fat acts as a natural
tenderizer while cooking
and keeps it moist and
juicy.
side.
each side.
side.
to order is made easier
by varying the thickness
meat, try adding hickory-
smoker.
Chicken pieces
side.
then medium-low to low
20-25 min.
thigh and the leg from
the skinless side should
though for the meat to
This helps it to cook
faster and more evenly.
To add a trademark
taste to your cooking,
your Napoleon woodchip
smoker,
accessory.
Medium 6 min. per side
before grilling. Choose
thicker chops for more
tender results.
Spare ribs
20 min. per side
Choose ribs that are lean
meat easily pulls away
from the bone.
Lamb chops
15 min. per side
before grilling. Choose
extra thick chops for more
tender results.
Medium - Low 4-6 min. Select the larger size
wieners. Slit the skin
lengthwise before grilling.
13
EN
www.napoleongrills.com
N415-0526 Nov 22.18
WARNING! Always wear protecve gloves and safety glasses when servicing your grill.
WARNING! To avoid the possibility of burns, maintenance should be done only when the grill is
cool. Avoid unprotected contact with hot surfaces. Ensure all burners are turned o. Clean grill in an
area where cleaning soluons will not harm decks, lawns, or paos. Do not use oven cleaner to clean
any part of this gas grill. Do not use a self-cleaning oven to clean cooking grids or any other parts of
the gas grill. Barbecue sauce and salt can be corrosive and will cause rapid deterioraon of the gas grill
components unless cleaned regularly.
Cleaning Instrucons
Note
coastal areas and other harsh environments, such as the warm, highly humid atmosphere around pools
and hot tubs. These stains could be perceived as rust, but can be easily removed or prevented. To provide
Grids And Warming Rack: The grids and warming rack are best cleaned with a brass wire brush during
surface.
Control Panel: The control panel text is printed directly on the stainless steel and with proper
maintenance
will remain dark and legible. To clean the panel, use only warm soapy water. Never apply abrasive cleaners
Cleaning Inside The Gas Grill: Remove the cooking grids. Use a brass wire brush to clean loose debris from
wire brush to remove the ash. Remove the sear plates and brush debris from the burners with the brass
wire brush. Sweep all debris from inside the gas grill into the drip pan.
Cleaning The Outer Grill Surface: Do not use abrasive cleaners or steel wool on any painted, porcelain or
stain
your Napoleon Grill dealer.
Lights
small amount of degreaser may be used. Do not use abrasive cleaners as this may scratch or damage the
lens.
WARNING! Accumulated grease is a re hazard.
Drip Pan
Grease and excess drippings pass through to the drip pan, located beneath the gas grill and accumulate
in the disposable grease tray below the drip pan. To access the disposable grease tray or to clean the
drip pan, slide the drip pan free of the grill. Never line the drip pan with aluminum foil, sand or any other
For supplies, see your Napoleon Grill dealer.
!
!
14
EN
www.napoleongrills.com
N415-0526 Nov 22.18
WARNING! Always wear protecve gloves and safety glasses when cleaning your grill.
WARNING! Turn o the gas at the source and disconnect the unit before servicing. To avoid
the pos
sibility of burns,
maintenance should be done only when the grill is cool. A leak test must be
performed
annually and whenever any component of the gas train is replaced or gas smell is present.
Maintenance Instrucons
free and clear
from debris.
Combuson Air Adjustment
light blue and occasionally yellow.
•
•
Adjusng the air shuer:
1. Remove cooking grids and sear plates and leave lid open. You may have to open the door or remove
are:
Main Tube Burner Rear Tube Burner
Smoker Burner
*Infra-Red burners have no air adjustment.
installed.
Light Blue
Yellow Tipping
Dark Blue
Burner
Approximately
!
15
EN
www.napoleongrills.com
N415-0526 Nov 22.18
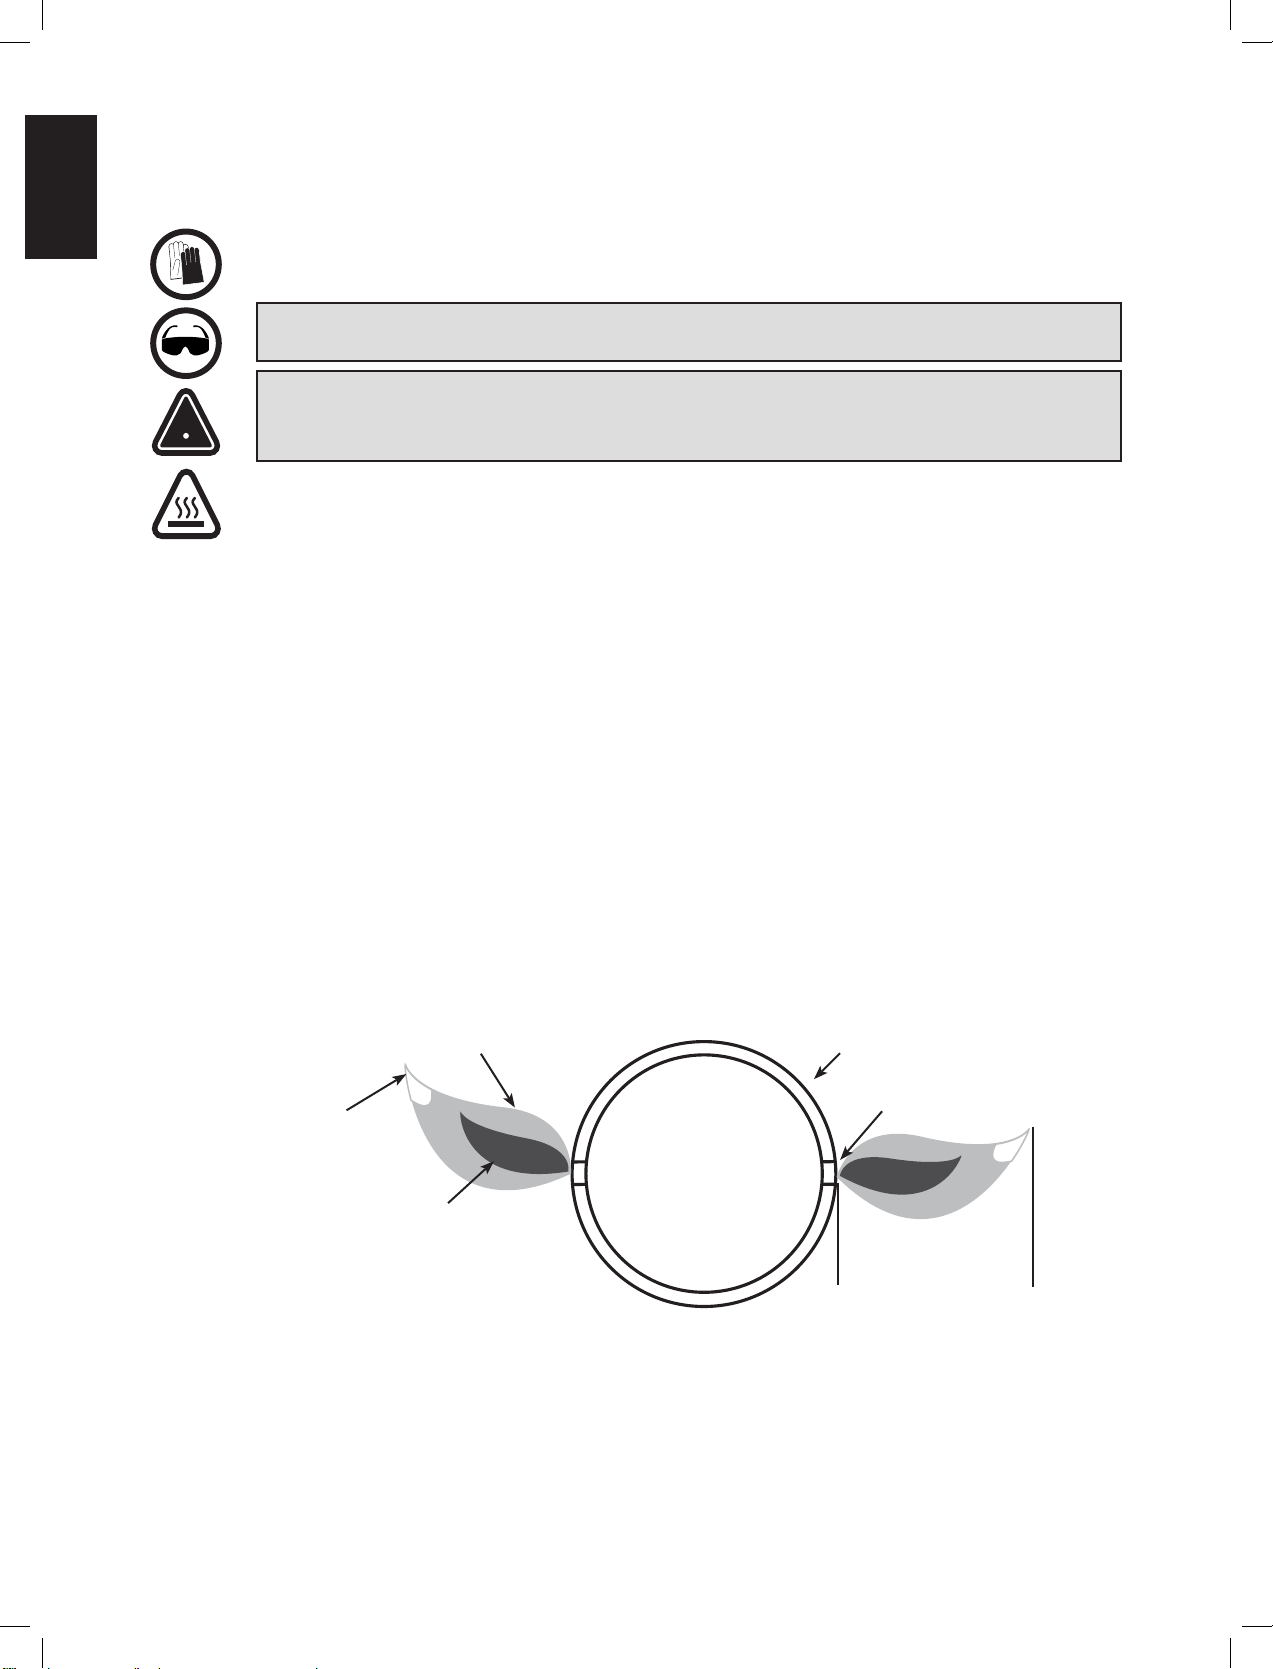
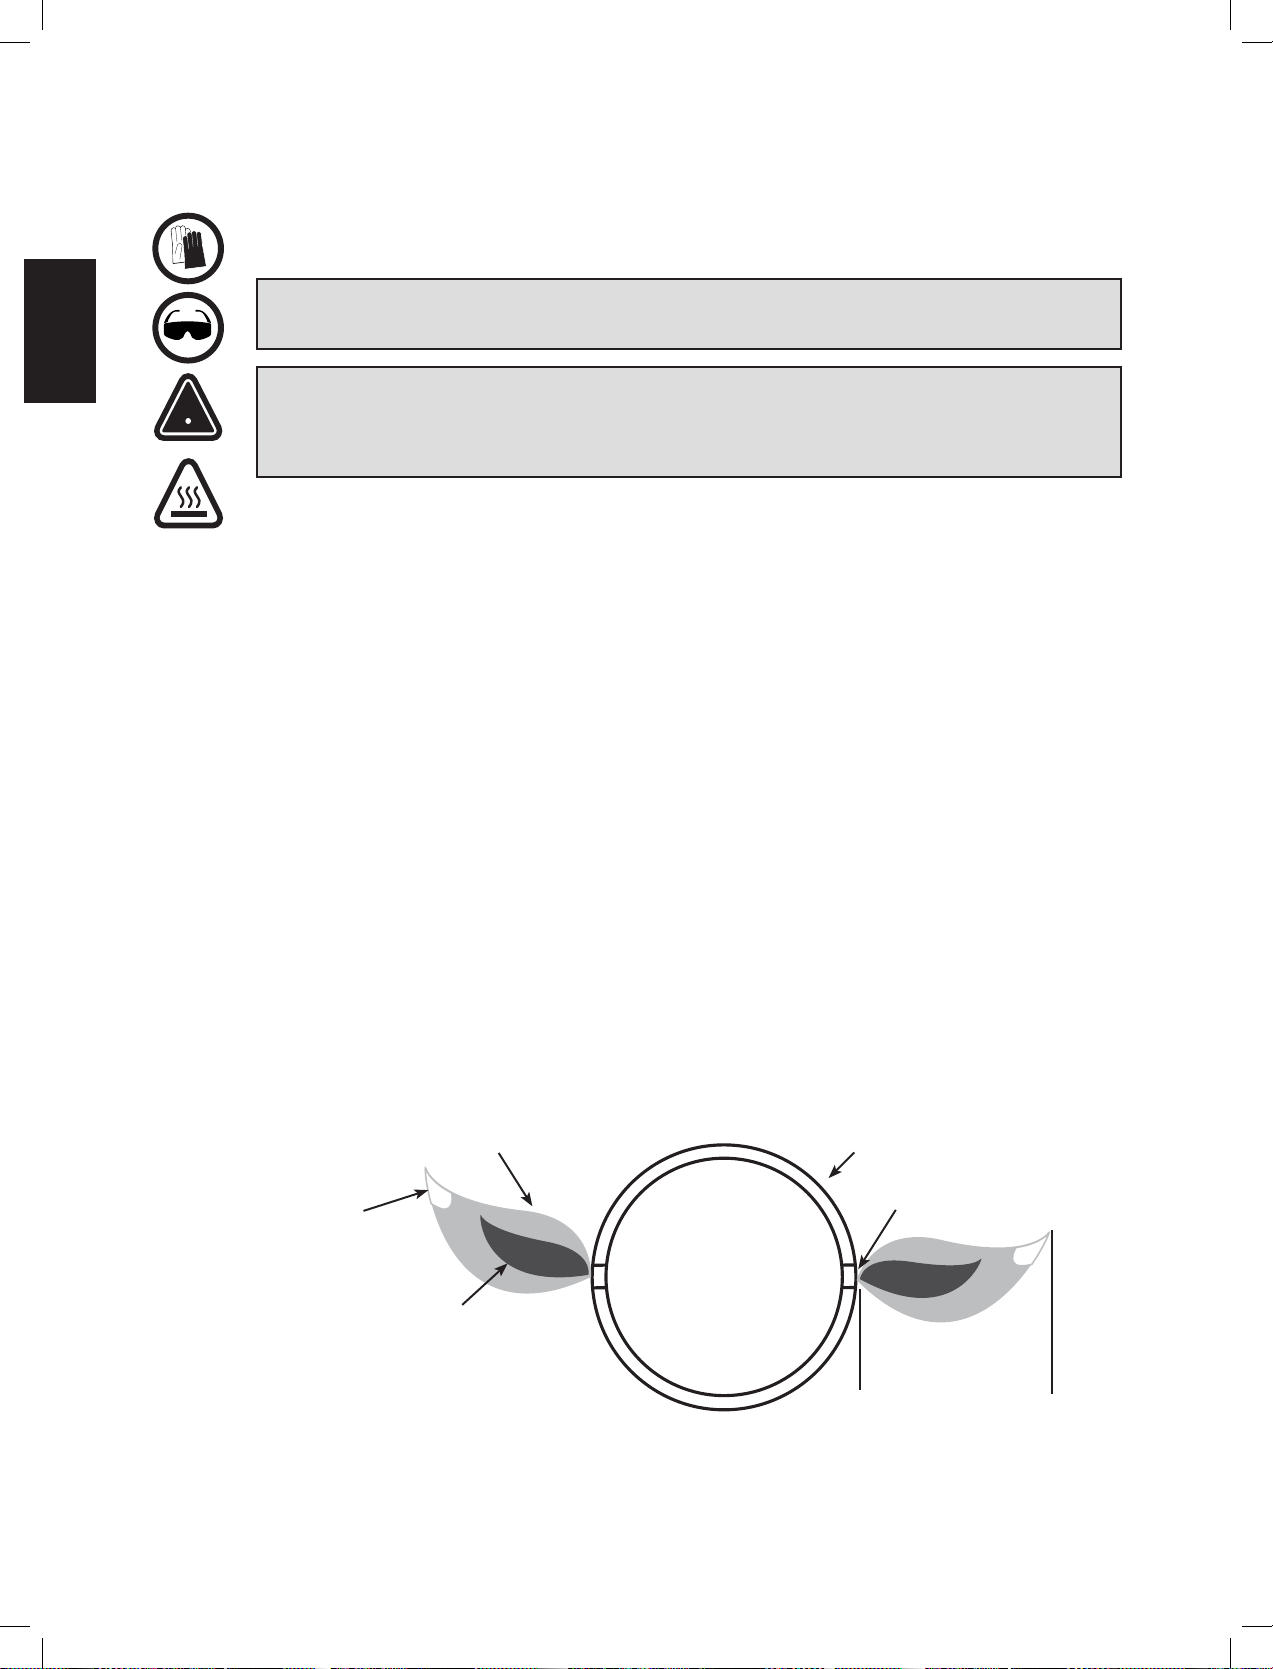
Protecon Of Infrared Burners: The infrared burners of your grill are designed to provide a long service
life, though care must taken to prevent cracking of their ceramic surfaces. Fractures will cause the burners
them. Damage caused by failure to follow these steps is not covered by your grill warranty.
re
moving cooking grates and accessories into or from the grill.
pressure to crack the ceramic. Repeated soaking of the ceramic can also cause it to swell and expand.
This expansion causes undue pressure on the ceramic that can cause it to crack and crumble.
the burner from the grill. Turn it upside down to drain the excess water and bring indoors to dry
thoroughly.
causing
the cook
Burner
environment can cause surface corrosion to occur. This can be removed with a brass wire brush.
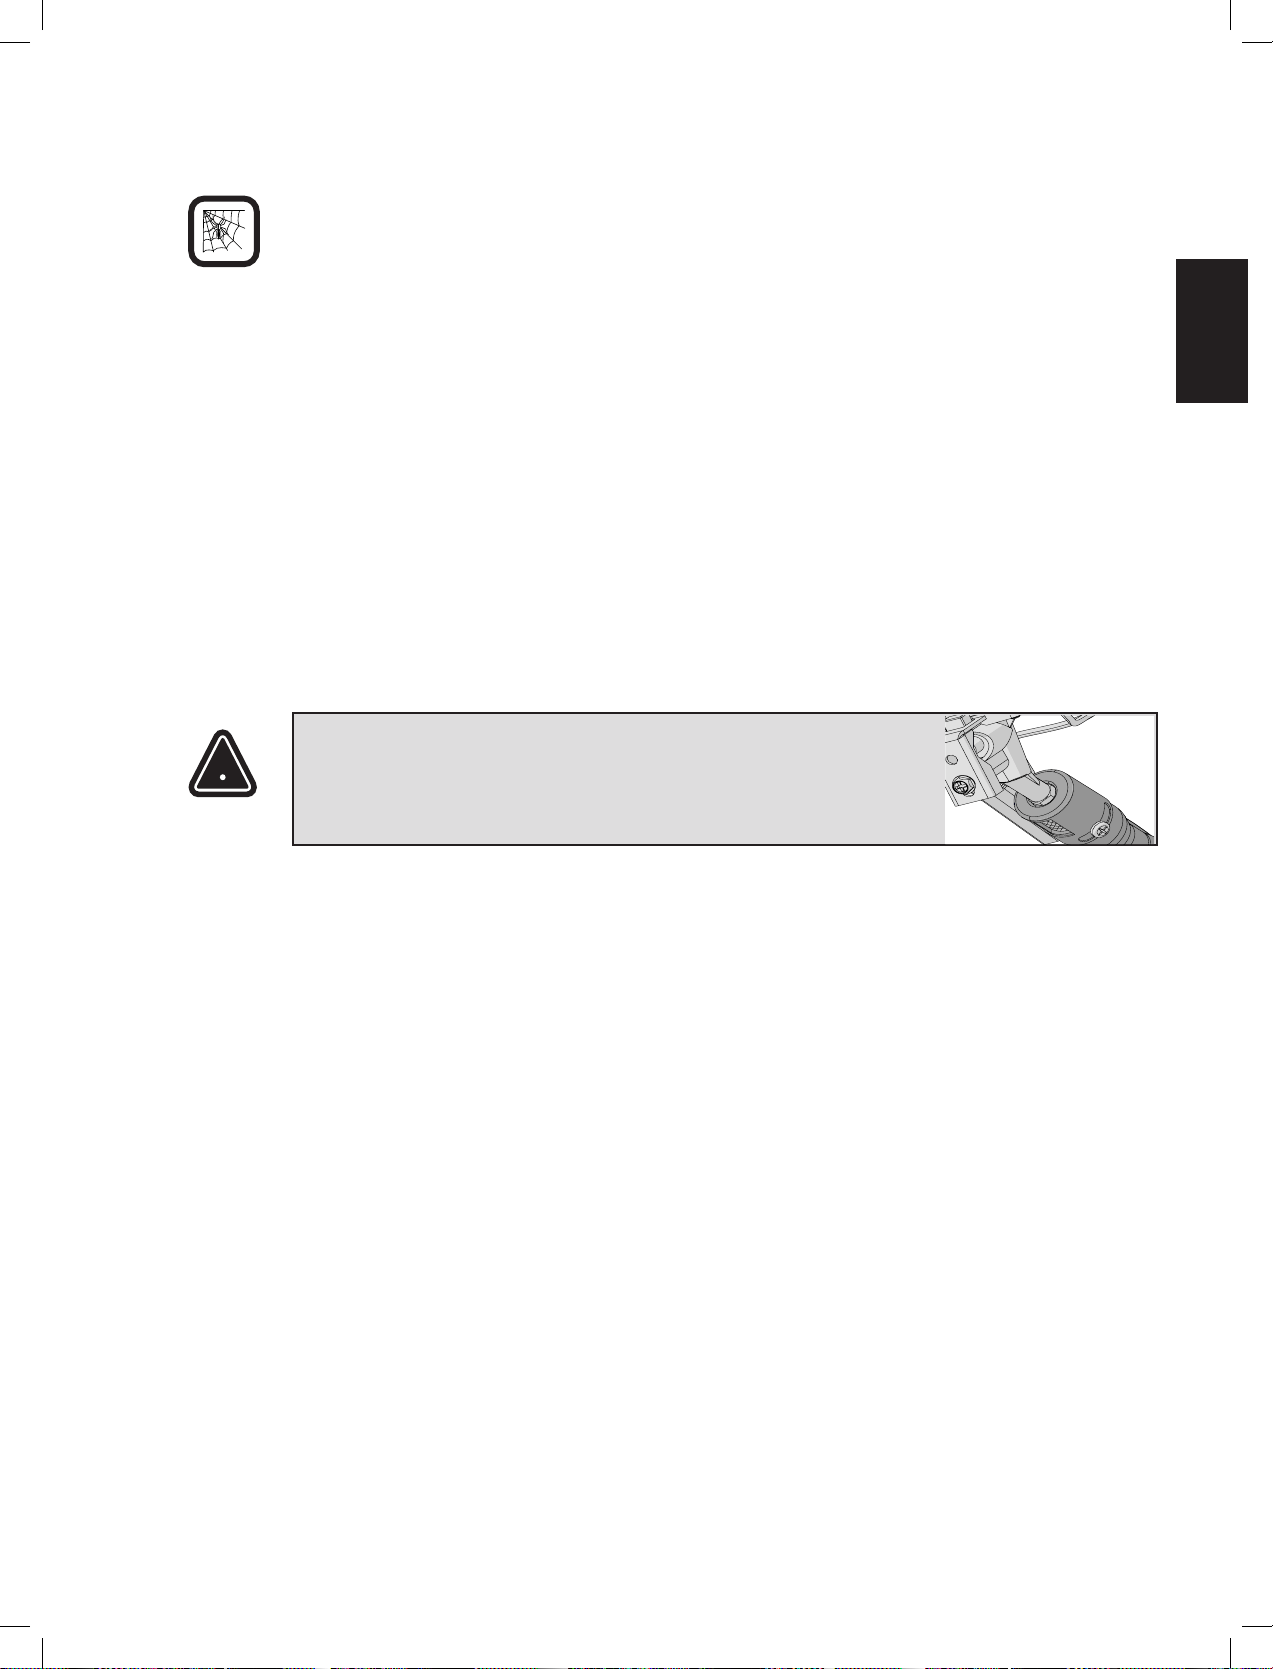
CAUTION! Beware of Spiders.
tube brush
to clean the inside of the burner. Shake any loose debris from the burner through the gas inlet. Check the
corrosion, use an opened paperclip or the supplied port maintenance bit to clean them. Drill out blocked
ports using this drill bit in a small cordless drill. The ports are easier to clean if the burner is removed from
Reinstallaon: Reverse the procedure to reinstall the burner. Check that the valve enters the burner when
WARNING! When reinstalling the burner aer cleaning it is
very important that the valve/orice enters the burner tube before
lighng your gas grill. If the valve is not inside the burner tube a re or
explosion could occur.
!
Replacement Screen N565-0002
16
EN
www.napoleongrills.com
N415-0526 Nov 22.18
CAUTION! Hose: Check for abrasions, melng, cuts, and cracks in the hose. If any of these
condions exist, do not use the gas grill. Have the part replaced by your Napoleon Grill dealer or
qualied gas installer.
Aluminum Casngs
surrounding areas
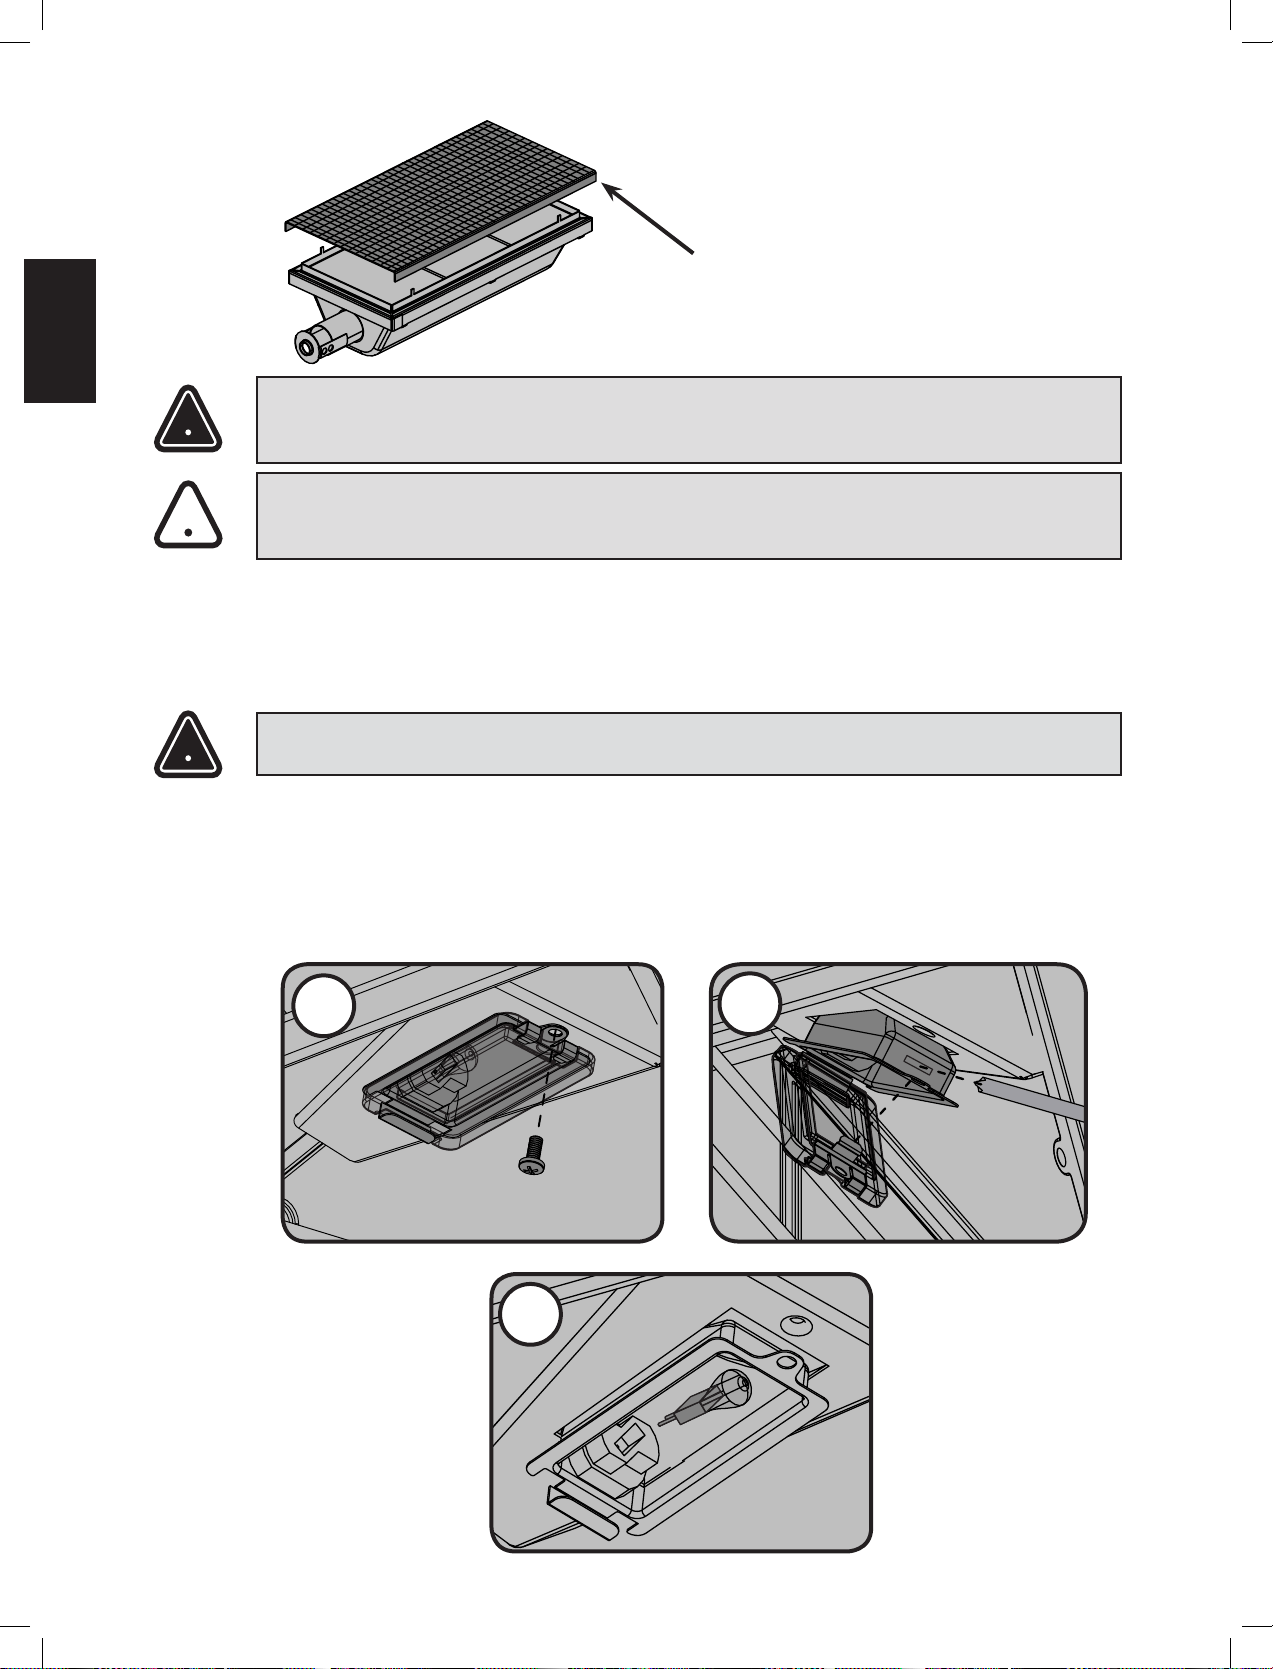
WARNING! Always wear protecve gloves when changing the halogen bulb in the internal lights
of your grill.
Lights
hands.
from the socket and replace with the new bulb. Reinstall the lens, by snapping it back into the housing
1
2
3
WARNING! The Infrared side burner is supplied with a drip pan which holds only a minimal amount
of grease. To prevent grease res, the pan must be cleaned aer each use.
!
!
!
17
EN
www.napoleongrills.com
N415-0526 Nov 22.18
Troubleshoong
Problem Possible Causes Soluon
when valve turned to
high.
procedure.
For natural gas - undersized supply line.
when the tank valve is turned on. Turn tank
code.
for 10 to 15 minutes.
uneven heat.
Sear plates installed incorrectly.
Excessive grease and ash build on sear
plates and in drip pan.
Ensure sear plates are installed with the holes
for 10 to 15 minutes.
Clean sear plates and drip pan regularly. Do not
line pan with aluminum foil. Refer to cleaning
Burners burn with
accompanied by the
smell of gas.
Thoroughly clean burner by removing. See
burner, accompanied
by the smell of gas, and
Main burner will not
light with the igniter,
but will light with a
match.
Normal occurrence on hot days.
the performance or safety of the gas grill.
Burners will not cross
light each other.
Dirty or corroded cross light brackets.
peeling inside lid or
hood.
Grease build-up on inside surfaces.
hood is porcelain, and will not peel. The
peeling is caused by hardened grease, which
Regular cleaning will prevent this. See cleaning
Lack of gas.
Supply hose is pinched.
tube.
Check gas level in propane cylinder.
Clean out venturi tube.
when the tank valve is turned on. Turn tank
18
EN
www.napoleongrills.com
N415-0526 Nov 22.18
Problem Possible Causes Soluon
the burner abruptly
sound, followed by a
type sound and grows
clogged.
Leaking gasket surrounding the ceramic
housing.
two minutes. Relight burner and burn on high
surface is covered by objects or accessories.
two minutes, then relight.
Allow burner to cool and inspect very closely
your authorized Napoleon dealer to order a
replacement burner assembly.
Contact your authorized Napoleon dealer for
assembly.
working.
Unit not connected to power.
Blown Fuse.
Faulty transformer.
Terminals on switch or circuit board are
corroded or loose.
Faulty igniter.
Dirty or corroded electrodes.
Replace fuse located on outlet line of
transformer.
Oven and control panel
lights not working
Unit not connected to power.
Blown fuse.
Faulty transformer.
Terminals on switch or circuit board are
corroded or loose.
Replace fuse located on outlet line of
transformer.

19
EN
www.napoleongrills.com
N415-0526 Nov 22.18
KEEP YOUR RECEIPT AS PROOF OF PURCHASE TO VALIDATE YOUR WARRANTY.
Ordering Replacement Parts
Warranty Informaon
MODEL:
DATE OF PURCHASE:
SERIAL NUMBER:
(Record informaon here for easy reference)
For replacement parts and warranty claims, contact the Napoleon dealer where the product was purchased.
Before contacng the dealer, check the Napoleon Grills Website for more extensive cleaning, maintenance,
troubleshoong and parts replacement instrucons at
www.napoleongrills.com.
To process a claim, the following informaon is required:
1. Model and serial number of the unit.
2. Part number and descripon.
3. A concise descripon of the problem (‘broken’ is not sucient).
4. Proof of purchase (photocopy of the invoice).
In some cases, Napoleon could request to have the parts returned to the factory for inspecon before
providing replacement parts.
Before contacng Napoleon dealer, please note that the following items are not covered by the warranty:
• Costs for transportaon, brokerage or export dues.
• Labour costs for removal and reinstallaon.
• Costs for service calls to diagnose problems.
• Discolouraon of stainless steel parts.
• Part failure due to lack of cleaning and maintenance, or use of improper cleaners (oven
cleaner or other harsh chemicals).

20
EN
www.napoleongrills.com
N415-0526 Nov 22.18
Notes
21
FR
www.napoleongrills.com
N415-0526 Nov 22.18
APPOSEZ LÉTIQUETTE DU NUMERO DE SERIE DU CARTON
N
O
de série
XXXXXX000000
N
O
DE MODÈLE
Ce gril doit être ulisé uniquement à l’extérieur, dans un endroit bien aéré et ne doit jamais être
ulisé à l’intérieur d’un bâment, d’un garage, d’un gazebo, d’une véranda avec paramousque, ou
de tout autre endroit fermé.
DANGER
SI VOUS DÉTECTEZ UNE ODEUR DE
GAZ:
• Fermez l’alimentaon en gaz à
l’appareil.
• Éteignez toute amme nue.
• Ouvrez le couvercle.
• Si l’odeur persiste, éloignez-vous de
l’appareil et appelez immédiatement
votre fournisseur de gaz ou le service des
incendies.
Note à l’installateur : Laissez ces instrucons au propriétaire du gril pour consultaon ultérieure.
Les adultes et parculièrement les enfants doivent être sensibilisés aux risques que représentent les
surfaces exposées à des températures élevées. Surveillez les jeunes enfants lorsqu’ils sont près du gril.
PRO665-3
AVERTISSEMENT
Ne tentez pas d’allumer cet appareil avant
d’avoir lu la secon «INSTRUCTIONS
D’ALLUMAGE» de ce manuel.
Pour votre sécurité, n’entreposez pas et
n’ulisez pas d’essence ou autres liquides
et vapeurs inammables à proximité de cet
ou tout autre appareil. Une bonbonne de
propane non branchée ne devrait pas être
entreposée à proximité de cet ou de tout
autre appareil. Si ces instrucons ne sont pas
suivies à la lere, un feu ou une explosion
pourraient s’ensuivre, causant des dommages
à la propriété, des blessures corporelles ou
des pertes de vie.
Wolf Steel Ltd.
214 Bayview Drive,
Barrie, Ontario, CANADA L4N 4Y8
NE PAS JETER
!
!
22
FR
www.napoleongrills.com
N415-0526 Nov 22.18
*Conditions et limitations
La présente garantie limitée couvre une période de garantie telle que spécifiée
dans le tableau ci-dessus pour tout produit acheté par l’entremise d’un détaillant
autorisé NAPOLÉON et donne droit à l’acheteur d’origine à la couverture spécifiée
relativement à tout composant remplacé durant la période de garantie, que ce soit
par NAPOLÉON ou un détaillant autorisé NAPOLÉON, pour le remplacement de tout
composant qui présente une défaillance dans le cadre d’un usage privé normal à
la suite d’un défaut de fabrication. La mention « 50 % de rabais » indiquée dans
le tableau signifie que le composant est mis à disposition de l’acheteur à 50 % de
son prix de détail courant pour la période indiquée. La présente garantie limitée ne
couvre ni les accessoires ni les articles offerts gratuitement.
Il est entendu que l’« usage privé normal » d’un produit signifie que le produit : a
été installé par un technicien de service ou entrepreneur certifié, conformément
aux instructions d’installation incluses avec le produit et à tous les codes
d’incendie et de construction locaux et nationaux; a été entretenu correctement; et
n’a pas été utilisé dans une application à usage collectif ou commercial.
De la même manière, « défaillance » n’inclut pas : la surchauffe, les extinctions
causées par des conditions environnementales telles que des vents forts ou une
ventilation inadéquate, les égratignures, les bosses, la corrosion, la détérioration
des finis peints et plaqués, la décoloration due à la chaleur, aux nettoyants
abrasifs ou chimiques ou à l’exposition à des rayons UV, l’écaillage des pièces en
porcelaine émaillée ou les dommages causés par un mauvais usage, un accident,
la grêle, des feux de graisse, un manque d’entretien, un environnement inadéquat
tel que le sel ou le chlore, des altérations, des abus, des négligences ou des pièces
installées par d’autres fabricants.
Dans le cas d’une détérioration des composants causant le mauvais
fonctionnement de l’appareil (perforation par la rouille ou la surchauffe) pendant
la période couverte par la garantie, les pièces de rechange seront fournies par
NAPOLÉON. Les composants de rechange relèvent de la seule responsabilité de
NAPOLÉON telle que définie par la présente garantie limitée; en aucun cas,
NAPOLÉON ne saurait être tenu responsable de l’installation, de la main-d’œuvre
ou de tous autres coûts ou dépenses relatifs à la réinstallation d’une pièce
garantie, de tous dommages accessoires, consécutifs ou indirects ni de tous frais
de transport, de main-d’œuvre ou taxes d’exportation.
La présente garantie limitée vient s’ajouter à tous les droits qui vous sont
accordés par la législation locale. Par conséquent, la présente garantie limitée
n’impose pas à NAPOLÉON l’obligation de garder des pièces en stock. En fonction
de la disponibilité des pièces, NAPOLÉON peut, à sa discrétion, se libérer de toute
obligation en fournissant à un client un crédit au prorata applicable à un nouveau
produit. Après la première année, NAPOLÉON peut, à sa discrétion, se libérer
entièrement de toute obligation en ce qui concerne la présente garantie limitée en
remboursant à l’acheteur d’origine le prix de gros de toute pièce garantie et
défectueuse.
La facture ou une copie sera requise ainsi que le numéro de série
et le numéro de modèle lors d'une réclamation auprès de NAPOLÉON.
NAPOLÉON se réserve le droit de demander à son représentant d’inspecter tout
produit ou pièce avant d’honorer toute réclamation. Pour pouvoir bénéficier de la
couverture de garantie, vous devez contacter le service à la clientèle de NAPOLÉON
ou un détaillant autorisé NAPOLÉON.
napoleongrills.com
Garantie à Vie Limitée du Président des grils à
g
az Napoléon
Les produits NAPOLÉON sont conçus avec des composants et des matériaux de qualité supérieure, assemblés
par des artisans qualifiés qui sont fiers de leur travail. Le brûleur et le montage de la soupape subissent un test
de détection de fuite et d’allumage à une station de test de la qualité. Ce gril a été soigneusement inspecté par
un technicien qualifié avant d’être emballé et expédié pour garantir que vous, le client, recevez le produit de
qualité dont vous vous attendez de la part de NAPOLÉON.
NAPOLÉON garantit que les composants de votre nouveau produit NAPOLÉON seront exempts de défauts de
matériau ou de fabrication à compter de la date de l’achat, et ce, pour la durée suivante :
Couvercle en acier inoxydable .................................................. À vie
Couvercle en porcelaine émaillée ............................................. À vie
Grilles de cuisson en acier inoxydable ...................................... À vie
Brûleurs tubulaires en acier inoxydable .................................... 10 ans de pleine garantie, plus 50 % de rabais jusqu’à la 10e année
Grilles de cuisson en fonte émaillée en porcelaine .................... 10 ans de pleine garantie, plus 50 % de rabais jusqu’à la 10e année
Plaques de brûleur en acier inoxydable .................................... 5 ans de pleine garantie, plus 50 % de rabais jusqu’à la 5e année
Brûleur arrière infrarouge en acier inoxydable ................................ 5 ans de pleine garantie, plus 50 % de rabais jusqu’à la 5e année
Brûleurs infrarouges en céramique (grillage exclu) ................... 5 ans de pleine garantie, plus 50 % de rabais jusqu’à la 5e année
Toutes les autres pièces ........................................................... 2 ans
23
FR
www.napoleongrills.com
N415-0526 Nov 22.18
AVERTISSEMENT! Si ces instrucons ne sont pas suivies, des dommages matériels, des bles
sures
corporelles ou des pertes de vie pourraient s’ensuivre. Lisez et respectez tous les averssements et les
instrucons de ce manuel avant de faire fonconner le gril.
Praques sécuritaires d’ulisaon
•
•
•
fermé.
•
•
•
•
•
•
•
•
•
•
•
le tuyau et le fond du gril.
•
•
changée.
•
•
•
•
•
•
• Ne pas allumer le gril avec le couvercle fermé.
•
•
•
•
•
•
•
•
•
•
•
!
24
FR
www.napoleongrills.com
N415-0526 Nov 22.18
51"
130cm
(56" [142cm]
16 3/4"
43cm
36 1/2"
93cm
76 3/4"
195cm
36 1/2"
93cm
25 1/2"
65cm
wyv]]\TZGnypss
DIMENSIONS GRILLE:
665 in
2
(4324 cm
2
)
DIMENSIONS GRILLE DE RÉCHAUD
: 345 in
2
(2185 cm
2
)
TOUS LES DIMENSIONS SONT APPROXIMATIVES
- OUVREZ LE COUVERCLE)
DIMENSIONS
25
FR
www.napoleongrills.com
N415-0526 Nov 22.18
Instrucons De Branchement Du Gaz
AVERTISSEMENT! Le tuyau doit être xé de façon à ce qu’aucune pare du boyau ne touche le
dessous du gril ou le roir d’égouement. Si vous ne suivez pas ces instrucons à la lere, un feu en
résultera.
Installaon Bouteille de Propane
!
Informaon générale
CSA 1.6-2015
Fuel Gas » aux États-Unis.
AVERTISSEMENT
www.
.
Spécicaons pour la bonbonne de propane
AVERTISSEMENT! Si ces instrucons ne sont pas suivies à la lere, un incendie pourrait
s’ensuivre, causant des blessures graves ou la mort.
AVERTISSEMENT! Ne rangez pas de cylindre de propane de rechange sur la tablee sous le gril.
de cylindre de propane de rechange sous cet appareil ou à proximité. Ne remplissez jamais le cylindre à
plus de 80 pour cent de sa pleine capacité.
!
!
26
FR
www.napoleongrills.com
N415-0526 Nov 22.18
Raccord de La Bonbonne
Branchement au Gaz Naturel
sont pas fournies.
AVERTISSEMENT!
•
•
•
•
•
•
•
•
•
!

27
FR
www.napoleongrills.com
N415-0526 Nov 22.18
Précauons électriques
AVERTISSEMENT! Omere de suivre ces instrucons peut entraîner des dommages matériels,
des blessures corporelles ou des pertes de vie.
•
•
•
•
•
•
•
interrupteur de défaut à la terre.
•
broches.
•
!
Test de détecon de fuites
AVERTISSEMENT! Il doit être fait avant la première ulisaon, annuellement et à chaque fois
qu’une pièce du système de gaz est remplacée ou réparée
AVERTISSEMENT! N’ulisez pas une amme nue pour vérier pour des fuites de gaz. Assurez-
vous qu’il n’y ait aucune éncelle ni amme nue à proximité de l’endroit à vérier. Les éncelles ou les
ammes nues provoqueront un feu ou une explosion, causant des dommages matériels, des blessures
graves ou des pertes de vie.
1.
2. Fermez tous les boutons des brûleurs. Ouvrez la soupape de la bonbonne.
le tuyau et ses raccords.
4.
de gaz.
5.
fuite soit réparée.
!
!
STOP
28
FR
www.napoleongrills.com
N415-0526 Nov 22.18
Instrucon d’allumage
AVERTISSEMENT! Ouvrez le couvercle
AVERTISSEMENT! Fermez tous les boutons de contrôle des brûleurs, ouvrez la
soupape d’alimentaon en gaz lentement.
Allumage du brûleur
principal
Allumage brûleur de
fumaison
Allumage du brûleur
arrière
(si équipé)
Allumage du brûleur
latéral.
(si équipé)
1. Ouvrez le couvercle. 1. Ouvrez le couvercle. 1. Ouvrez le couvercle. 1. Ouvrez le couvercle du
brûleur.
2. Enfoncez et tournez
2. Appuyez et tournez le
». Appuyez et maintenez
2. Enlevez la grille-réchaud.
2. Appuyez et trournez le
pas, tournez immédiatement
maximum.
Appuyez et maintenez
4. Si la veilleuse ou le brûleur
secondes, tournez le bouton
dissiper. Ensuite, répétez les
pas en moins de 5 secondes,
surplus de gaz de se dissiper.
4. Appuyez et gardez
une allumette.
4.
pas en moins de 5 secondes,
gaz de se dissiper. Répétez
brûleur et tournez la soupape
du brûleur correspondant à
5.
pas en moins de 5
secondes, tournez le
au surplus de gaz de
se dissiper. Répétez les
étapes 2.
AVERTISSEMENT! La bonbonne est équipée d’un disposif de contrôle d’écoulement du gaz.
À moins que tous les boutons des brûleurs soient fermés avant d’ouvrir la bonbonne, seules de petes
ammes seront obtenues.
AVERTISSEMENT! N’ulisez jamais le brûleur arrière avec le brûleur principal.
Fermez
Brûleur de
fumaison
Bouton
d’allumeur
Brûleur de
gauche
Bruleur
d’arriere
Brûleur de
droite
Brûleur de
latéral
Brûleur de
droite centre
Brûleur de
gauche centre
Brûleur de
centre
Lumières
Fumaison
plateau
!
!
29
FR
www.napoleongrills.com
N415-0526 Nov 22.18
Éclairage inial :
Instrucons d’opéraon
Ulisaon du brûleur principal :
Cuisson directe
elon vos
préférences.
Cuisson indirect :
NOTE! Napoléon ne sera pas responsable d’une surchaue ou d’une exncon causée par des
condions environnementales telles que des vents forts ou une venlaon inadéquate.
3
1
2
!
30
FR
www.napoleongrills.com
N415-0526 Nov 22.18
AVERTISSEMENT! La sauce BBQ et le sel sont corrosifs et causeront une détérioraon
rapide des composantes de votre gril à gaz à moins de les neoyer régulièrement. Une fois la cuisson
terminée, démontez les composantes de la rôssoire, lavez-les bien à l’eau chaude savonneuse et
rangez-les à l’intérieur.
Brûleur de fumaison
élevé pendant 10 minutes, puis réduisez la chaleur au besoin.
conférant un
détaillant Napoléon autorisé.
Ulisaon du brûleur de lateral infrarouge :
Le brûleur latéral est muni
AVERTISSEMENT! Ne fermez pas le couvercle du brûleur latéral pendant que
celui-ci fonconne
ou est chaud.
AVERTISSEMENT! N’ajustez pas la grille de cuisson lorsqu’elle est chaude ou que le brûleur
fonconne.
AVERTISSEMENT! N’ulisez PAS le brûleur latéral pour faire frire la nourriture, car le fait de
cuire avec de l’huile peut créer une situaon dangereuse.
en tournant souvent les aliments, ou placez les aliments sur la surface de cuisson principale, fermez le
AVERTISSEMENT! Dû à la chaleur intense produite pour le brûleur infrarouge, les aliments qui
sont laissés sur les brûleurs sans surveillance brûleront rapidement.
Protecon des brûleurs infrarouges :
!
!
!

31
FR
www.napoleongrills.com
N415-0526 Nov 22.18
Chaleur infrarouge
sur le charbon de bois et se vaporisent en fumée, donnant ainsi aux aliments leur goût savoureux. Les
•
•
•
•
•
la graisse et les débris.
Les dommages causés par le non respect de ces étapes ne sont pas couverts par la garane du gril.
32
FR
www.napoleongrills.com
N415-0526 Nov 22.18
Tableau de cuisson à l’infrarouge
Aliment Réglage des
contrôles
Temps de cuisson Conseils praques
Steak
ensuite réglage à
ensuite réglage à
4 min - Saignant
6 min - À point
8 min - Bien cuit
votre viande, demandez
marbrée. Le gras de la
viande agira comme un
durant la cuisson et
gardera la viande plus
juteuse.
4 min - Saignant
5 min - À point
6 min - Bien cuit
de vos hambourgeois
tous en même temps,
nous vous conseillons de
votre viande, ajoutez
des copeaux de bois à
saveur de hickory dans
une pipe à boucane de
Napoléon.
Morceaux de poulet
ensuite réglage de
20-25 min
le pilon à la cuisse doit
à plat sur la grille de
à la viande de cuire de
et plus rapidement.
touche personnelle à
votre poulet, ajoutez
des copeaux de bois à
une pipe à boucane de
Napoléon.
avant de faire cuire.
de porc plus épaisses
pour obtenir une viande
plus tendre.
pendant 5 minutes
ensuite réglage à
« bas » pour terminer
la cuisson
tournez souvent
charnues et maigres.
la viande se détache
facilement des os.
pendant 5 minutes
ensuite réglage à
« moyen » pour
terminer la cuisson
avant de faire cuire.
obtenir une viande plus
tendre.
Saucisses 4-6 min Choisissez des saucisses
plus grosses. Faites une
entaille dans la peau,
sur la longueur de la
saucisse avant de faire
griller.
33
FR
www.napoleongrills.com
N415-0526 Nov 22.18
AVERTISSEMENT! Portez toujours des gants protecteurs et des lunees de sécurité lorsque
vous faites l’entreen de votre gril.
AVERTISSEMENT! Assurez-vous que les brûleurs sont éteints avant de neoyer. Éviter tout
contact avec les surfaces chaudes. Neoyez votre gril dans un endroit où les produits de neoyage
n’endommageront pas votre pao, terrain ou terrasse. N’ulisez pas de produit de neoyage
à fourneau pour neoyer votre gril. La sauce BBQ et le sel sont très corrosifs et causeront une
détérioraon très rapide de votre gril à moins que vous ne fassiez un neoyage régulier.
Neoyage
Note
Les grilles de cuisson et la grille-réchaud : Les grilles de cuisson et la grille-réchaud sont plus faciles à
en permanence dû à la chaleur excessive de la surface de cuisson.
Neoyage du panneau de commande: Le texte sur le panneau de commande est imprimé directement
Neoyage de l’intérieur du gril :
AVERTISSEMENT! L’accumulaon de graisse peut créer un risque de feu.
Tiroir d’égouement
Neoyage de l’extérieur du gril :
porcelaine ou en acier inoxydable. Les éléments en porcelaine émaillée doivent être manipulés avec soin.
performance du gril.
Lumières
!
!
34
FR
www.napoleongrills.com
N415-0526 Nov 22.18
Instrucons d’entreen
AVERTISSEMENT! Portez toujours des gants protecteurs et des lunees de sécurité lorsque
vous neoyez votre gril.
AVERTISSEMENT! Fermez le gaz à la source et débranchez l’appareil avant l’entreen.
L’entreen devrait être eectué seulement lorsque le gril est froid pour éviter toutes possibilités de
brûlure. Un test de détecon de fuites devrait être eectué annuellement ou à chaque fois qu’une
composante de gaz est remplacée.
Ajustement De L’air De Combuson (ceci doit être eectué par un installateur qualié)
•
la suie.
•
Pour ajuster le volet d’air:
ajustements normaux sont:
Brûleur tube principal Brûleur tube arrière
Brûleur de fumaison
*Les brûleurs infrarouges n’ont pas de réglage de volet d’air.
Bleu Foncé
Brûleur
!
35
FR
www.napoleongrills.com
N415-0526 Nov 22.18
AVERTISSEMENT! Lors de la réinstallaon du brûleur après le
neoyage, il est très important que la soupape / l’orice entre dans le
brûleur avant que vous allumiez votre gril à gaz. Si la soupape n’est pas à
l’intérieur du brûleur, un feu ou une explosion pourrait survenir.
Protecon du brûleur infrarouge
Brûleur tubulaire
ATTENTION! Aux araignées
!
36
FR
www.napoleongrills.com
N415-0526 Nov 22.18
AVERTISSEMENT! Boyau : Vériez l’usure, les coupures, les craquelures ou s’il est fondu. Si
vous découvrez une de ces défectuosités, n’ulisez pas votre gril. Faites remplacer la pièce par votre
détaillant Napoléon ou par un installateur qualié.
Moulages en aluminium :
savonneuse
AVERTISSEMENT! Portez toujours des gants protecteurs lorsque vous remplacez l’ampoule
halogène des lumières internes de votre gril.
Lumières
1
2
3
AVERTISSEMENT! Le brûleur latéral infrarouge est muni d’un plateau d’égouement qui ne
peut contenir qu’une pete quanté de graisse. An d’éviter les feux de graisse, le plateau doit être
neoyé après chaque ulisaon.
Écrans de rechange N565-0002
!
!
!
37
FR
www.napoleongrills.com
N415-0526 Nov 22.18
Guide De Dépannage
Problème Causes possibles Soluons
incorrect.
soupape de la bonbonne. Tournez la soupape de
La grosseur du tuyau doit être conforme au code
brûleurs sont jaunes et vous
détectez une odeur de gaz.
odeur de gaz et possiblement
Le brûleur principal ne
poils doux.
Le régulateur murmure
ne seront pas remplacés.
pas les uns aux autres.
Sales ou corrodés supports légers croix.
La peinture semble peler à
internes.
générée par les brûleurs est
trop basse.
débris dans le tube du venturi.
soupape de la bonbonne. Tournez la soupape de
38
FR
www.napoleongrills.com
N415-0526 Nov 22.18
Problème Causes possibles Soluons
semblable à une lampe à
intensité.
Fermez le brûleur et laissez-le refroidir pendant
au moins deux minutes. Réallumez le brûleur
uniformément incandescentes.
de cuisson avec des objets ou des accessoires.
Fermez le brûleur et laissez-le refroidir pendant
au moins deux minutes puis réallumez-le.
votre détaillant autorisé Napoléon.
Contactez votre détaillant autorisé Napoléon pour
de rechange.
Un fusible est brûlé.
Le transformateur est défectueux.
Les bornes sur le commutateur ou la carte de
circuit sont corrodées ou desserrées.
Les électrodes sont sales ou corrodées.
de courant avec disjoncteur de fuite à la terre
du gril. Branchez le cordon du transformateur
transformateur.
besoin.
gauche du cabinet.
Un fusible est brûlé.
Le transformateur est défectueux.
Les bornes sur le commutateur ou la carte de
circuit sont corrodées ou desserrées.
de courant avec disjoncteur de fuite à la terre
du gril. Branchez le cordon du transformateur
transformateur.
besoin.
gauche du cabinet.

39
FR
www.napoleongrills.com
N415-0526 Nov 22.18
GARDEZ VOTRE REÇU COMME PREUVE D’ACHAT POUR VALIDER VOTRE
Commande de pièces de rechange
Informaon sur la garane
MODÈLE :
DATE D’ACHAT :
NUMÉRO DE SÉRIE :
(Inscrivez l’informaon ici pour y avoir accès facilement.)
Pour commander des pièces de rechange ou faire une réclamaon sous garane, communiquez avec
le détaillant Napoléon où le produit a été acheté.
Avant de contacter le détaillant Napoléon, consultez le site Web des grils Napoléon pour
obtenir plus de renseignements sur le neoyage, l’entreen, le dépannage et les pièces à
francais.napoleongrills.com.
Pour qu’une réclamaon soit traitée, l’informaon suivante est nécessaire :
1. Modèle et numéro de série de l’appareil.
2. Numéro de la pièce et descripon.
3. Descripon concise du problème (« cassé » n’est pas susant).
4. Preuve d’achat (copie de la facture).
Dans certains cas,
Napoléon peut vous demander de retourner la pièce à des ns d’inspecon avant
de fournir une pièce de rechange.
Avant de contacter le détaillant Napoléon, veuillez noter que la garane ne couvre pas les éléments
suivants :
• coûts de transport, de courtage et frais d’exportaon;
• coûts de main-d’oeuvre pour l’enlèvement et l’installaon de la pièce;
• coûts des appels de service pour diagnosquer le problème;
• décoloraon des pièces en acier inoxydable;
• casse des pièces causée par un manque d’entreen et de neoyage, ou par l’ulisaon de
neoyants inappropriés (neoyant à fourneau ou autres produits chimiques agressifs).

40
www.napoleongrills.com
N415-0526 Nov 22.18
ATTENTION! Lors du déballage et de l’assemblage, nous vous conseillons de porter des gants
de travail et des lunees de sécurité pour votre protecon. Malgré tous nos eorts pour assurer que
l’assemblage soit aussi sécuritaire et sans problème que possible, il se peut que les bords et les coins
des pièces usinées en acier soient coupants et qu’ils causent des coupures si les pièces ne sont pas
manipulées correctement.
CAUTION! During unpacking and assembly we recommended you wear work gloves and safety
glasses for your protecon. Although we make every eort to make the assembly process as problem
free and safe as possible, it is characterisc of fabricated steel parts that the edges and corners might
be sharp and could cause cuts if handled incorrectly.
Geng Started
1. Remove all cart panels, hardware, and grill head from carton. Raise lid and remove any
components
packed inside. Use the parts list to ensure all necessary parts are included.
2.
Assemble the grill where it is to be used, lay down cardboard or a towel to protect parts from being
lost or damaged while assembling.
4. Most stainless steel parts are supplied with a protecve plasc coang that must be removed
prior to using the grill. The protecve coang has been removed from some of the parts during the
manufacturing process and may have le behind a residue that can be perceived as scratches or
blemishes. To remove the residue, vigorously wipe the stainless steel in the same direcon as the
grain.
5.
6.
If you have any quesons about assembly or grill operaon, or if there are damaged or missing parts
please call our Customer Soluons Department at 1-866-820-8686 between 9 AM and 5 PM (Eastern
Standard Time).
OUTILS REQUIS POUR L’ASSEMBLAGE (ouls non inclus)
TOOLS REQUIRED FOR ASSEMBLY (tools not included)
Pour commencer
1.
2.
4. La plupart des pièces en acier inoxydable comportent un revêtement de protecon en plasque qui
doit être reré avant d’uliser le gril. Le revêtement de protecon a déjà été reré de certaines
pièces lors du processus de fabricaon, ce qui a pu laisser un résidu pouvant être perçu comme des
égragnures ou des marques. Pour enlever ce résidu, froez l’acier inoxydable vigoureusement
dans le sens du grain.
5.
6.
Si vous avez des quesons à propos de l’assemblage ou du fonconnement du gril, ou si des pièces sont
manquantes ou endommagées, veuillez appeler notre Centre Soluon Client au 1 866 820-8686 entre
9 h et 17 h (heure normale de l’Est).
!
!
41
www.napoleongrills.com
N415-0526 Nov 22.18
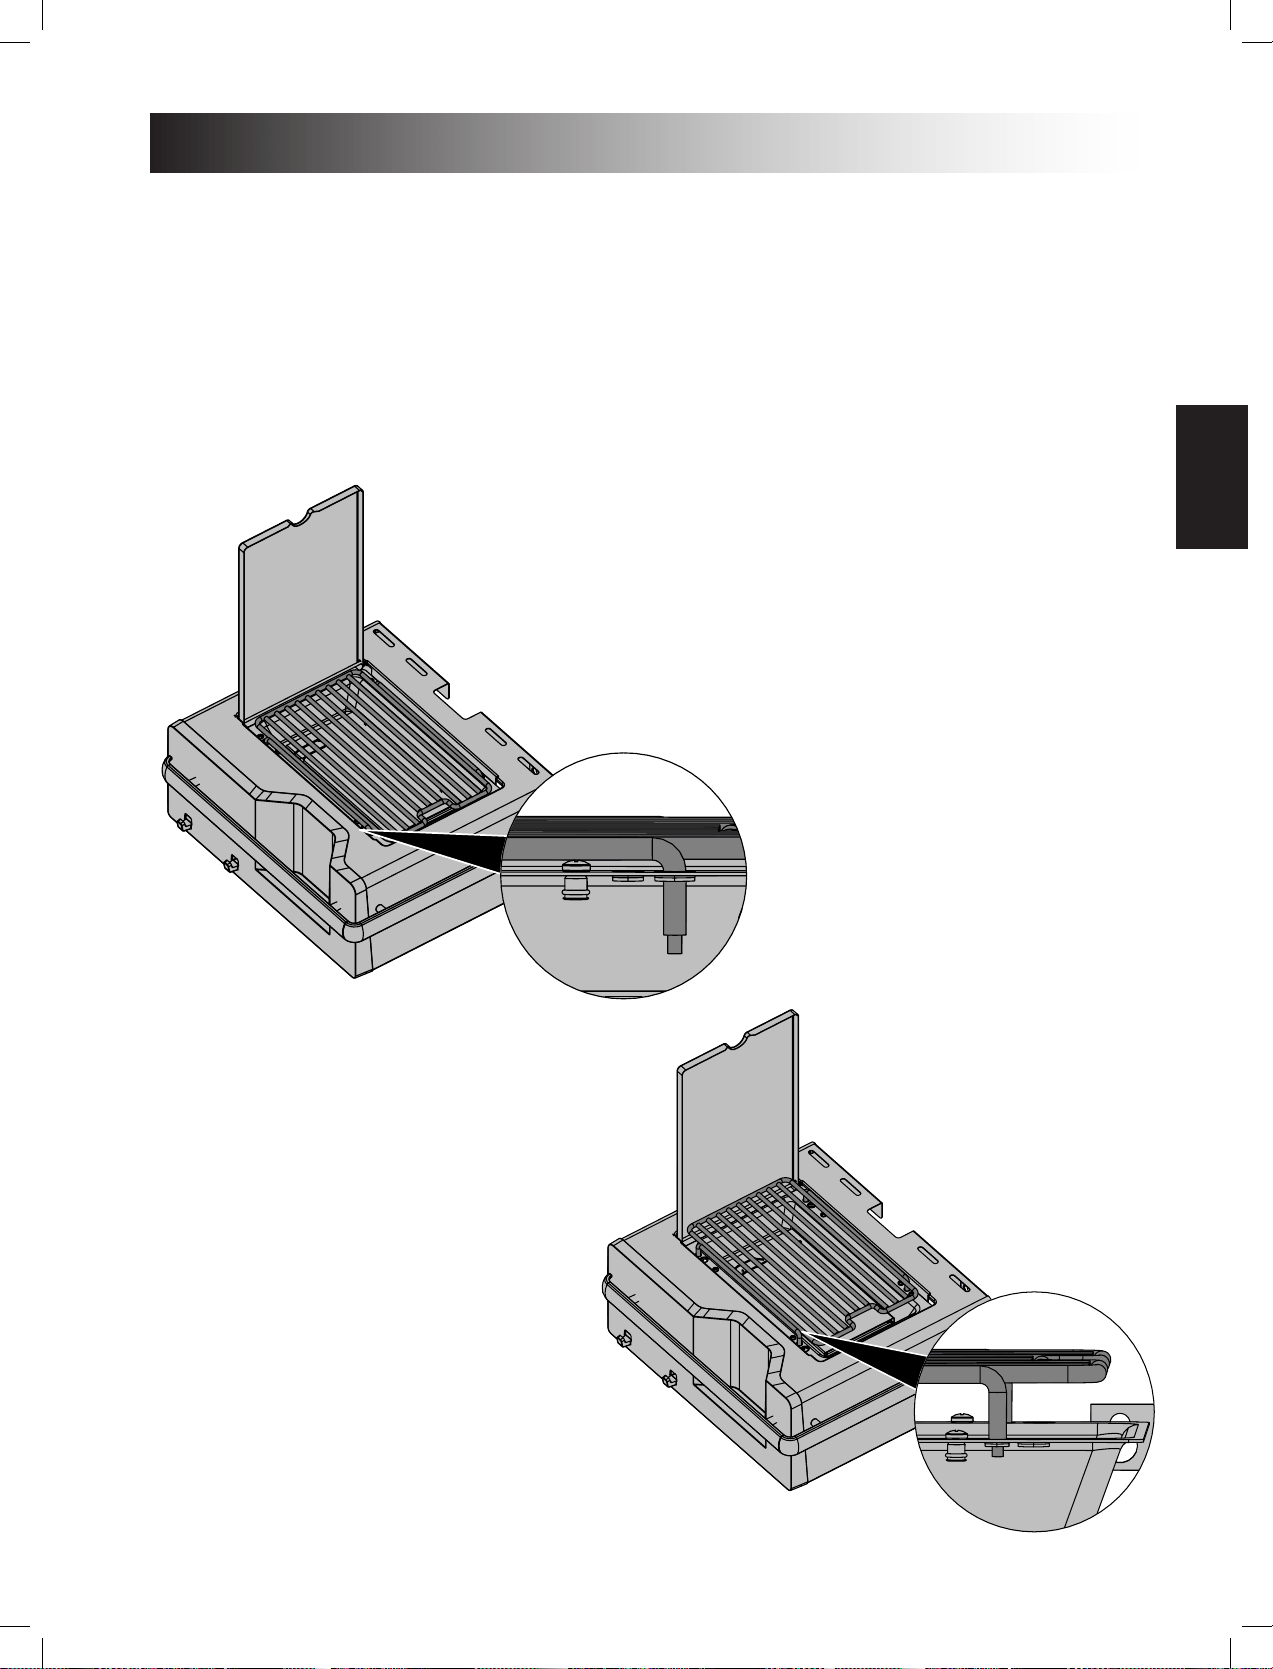
Cooking Grid Placement
and the grid is cool to the touch before changing between the two heights. The grid must be at the lower
height in order to close the lid.
Installaon de la grille de caisson
changer la grille de niveau. La grille doit être au niveau inférieur pour pouvoir fermer le couvercle.
42
www.napoleongrills.com
N415-0526 Nov 22.18
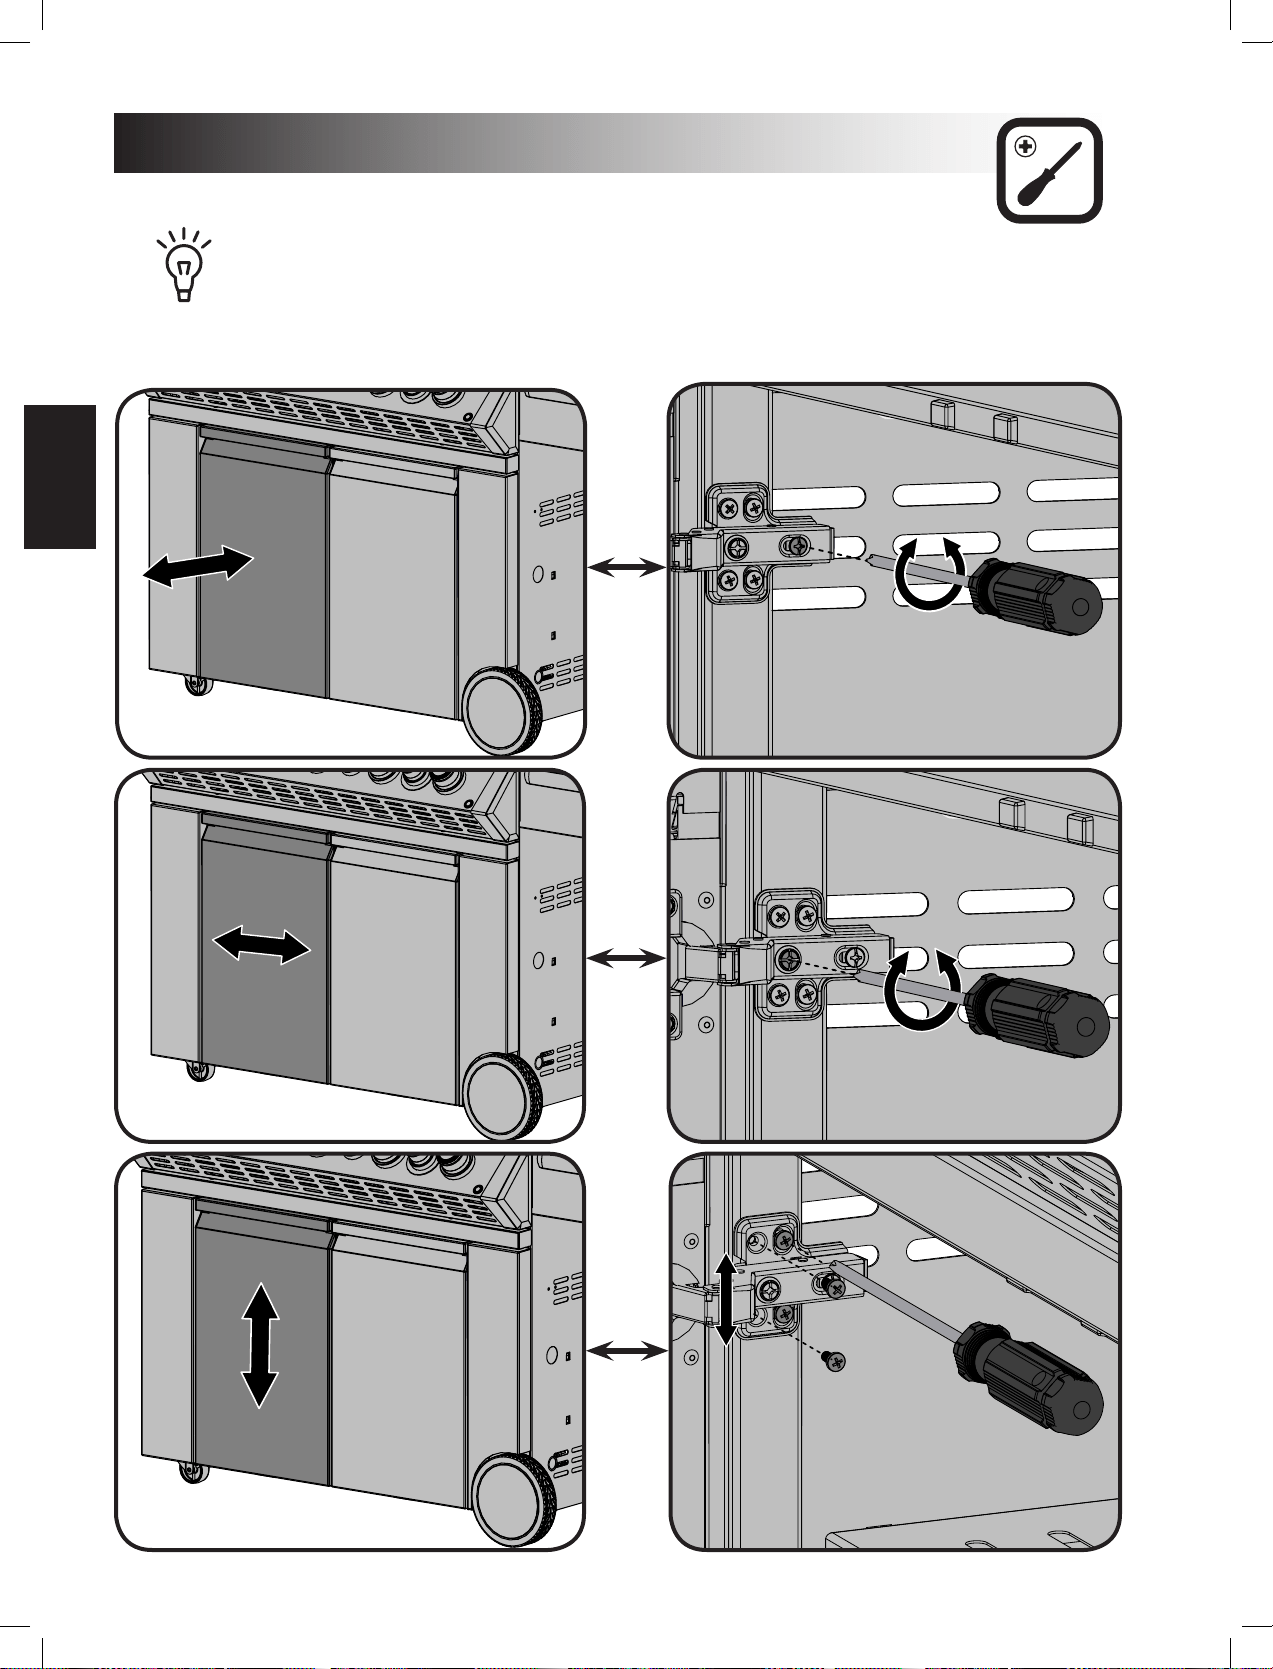
The cabinet doors have been aligned at the factory but hinge adjustment may be necessary if the grill
has been moved or is sing on uneven ground. For easy hinge adjustment follow the illustraons
outlined below.
Les portes du cabinet ont été alignées en usine, mais il est possible qu’un ajustement des
charnières soit
nécessaire dans le cas d’un gril qui aurait été déplacé ou qui aurait été déposé sur une surface inégale.
Pour un ajustement facile des charnières, référez-vous aux illustraons ci-dessous.
x2
43
www.napoleongrills.com
N415-0526 Nov 22.18
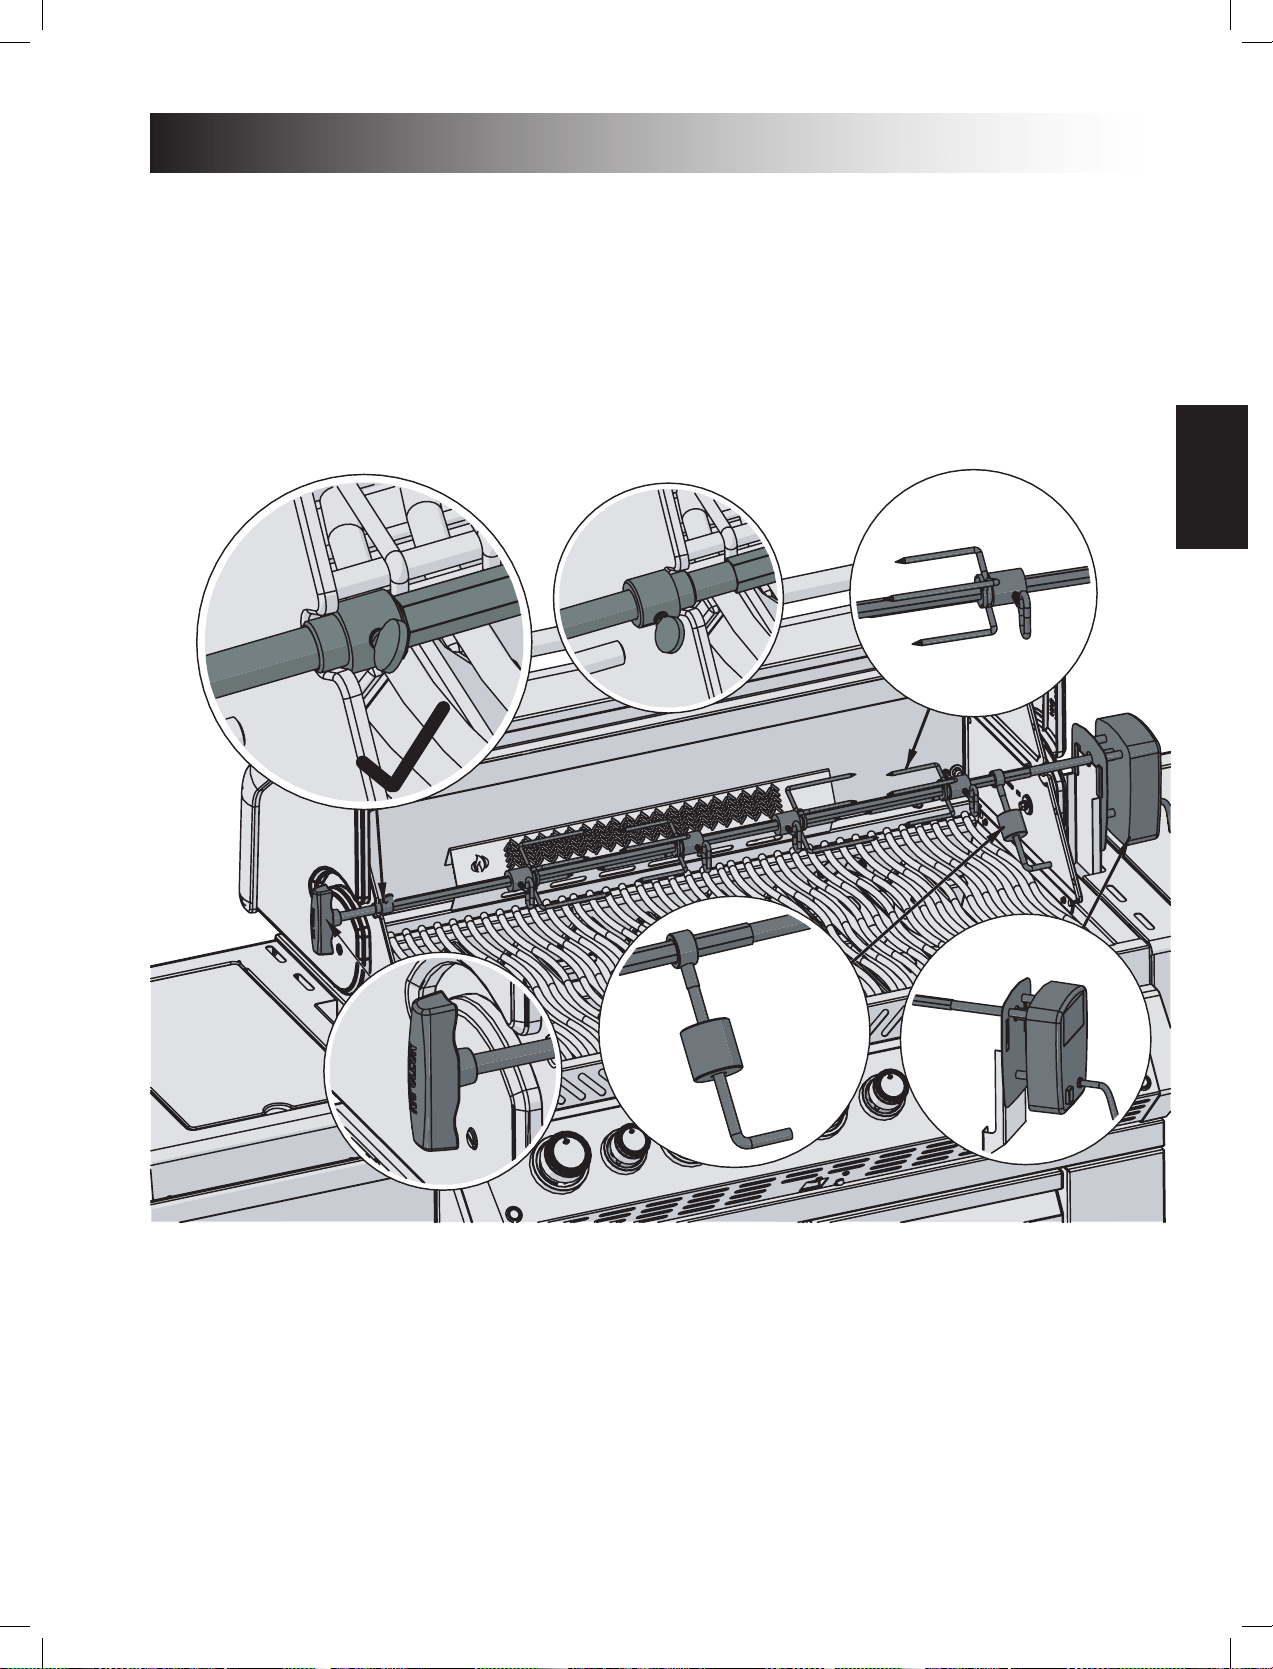
Rosserie Kit Assembly Instrucon
Instrucons d’assemblage de l’ensemble de rôssoire
Ensure stop bushing is ghtened on the inside of hood casng.
Assurez-vous que la bague d’arrêt soit serrée à l’intérieur de la hoe.
X
44
www.napoleongrills.com
N415-0526 Nov 22.18
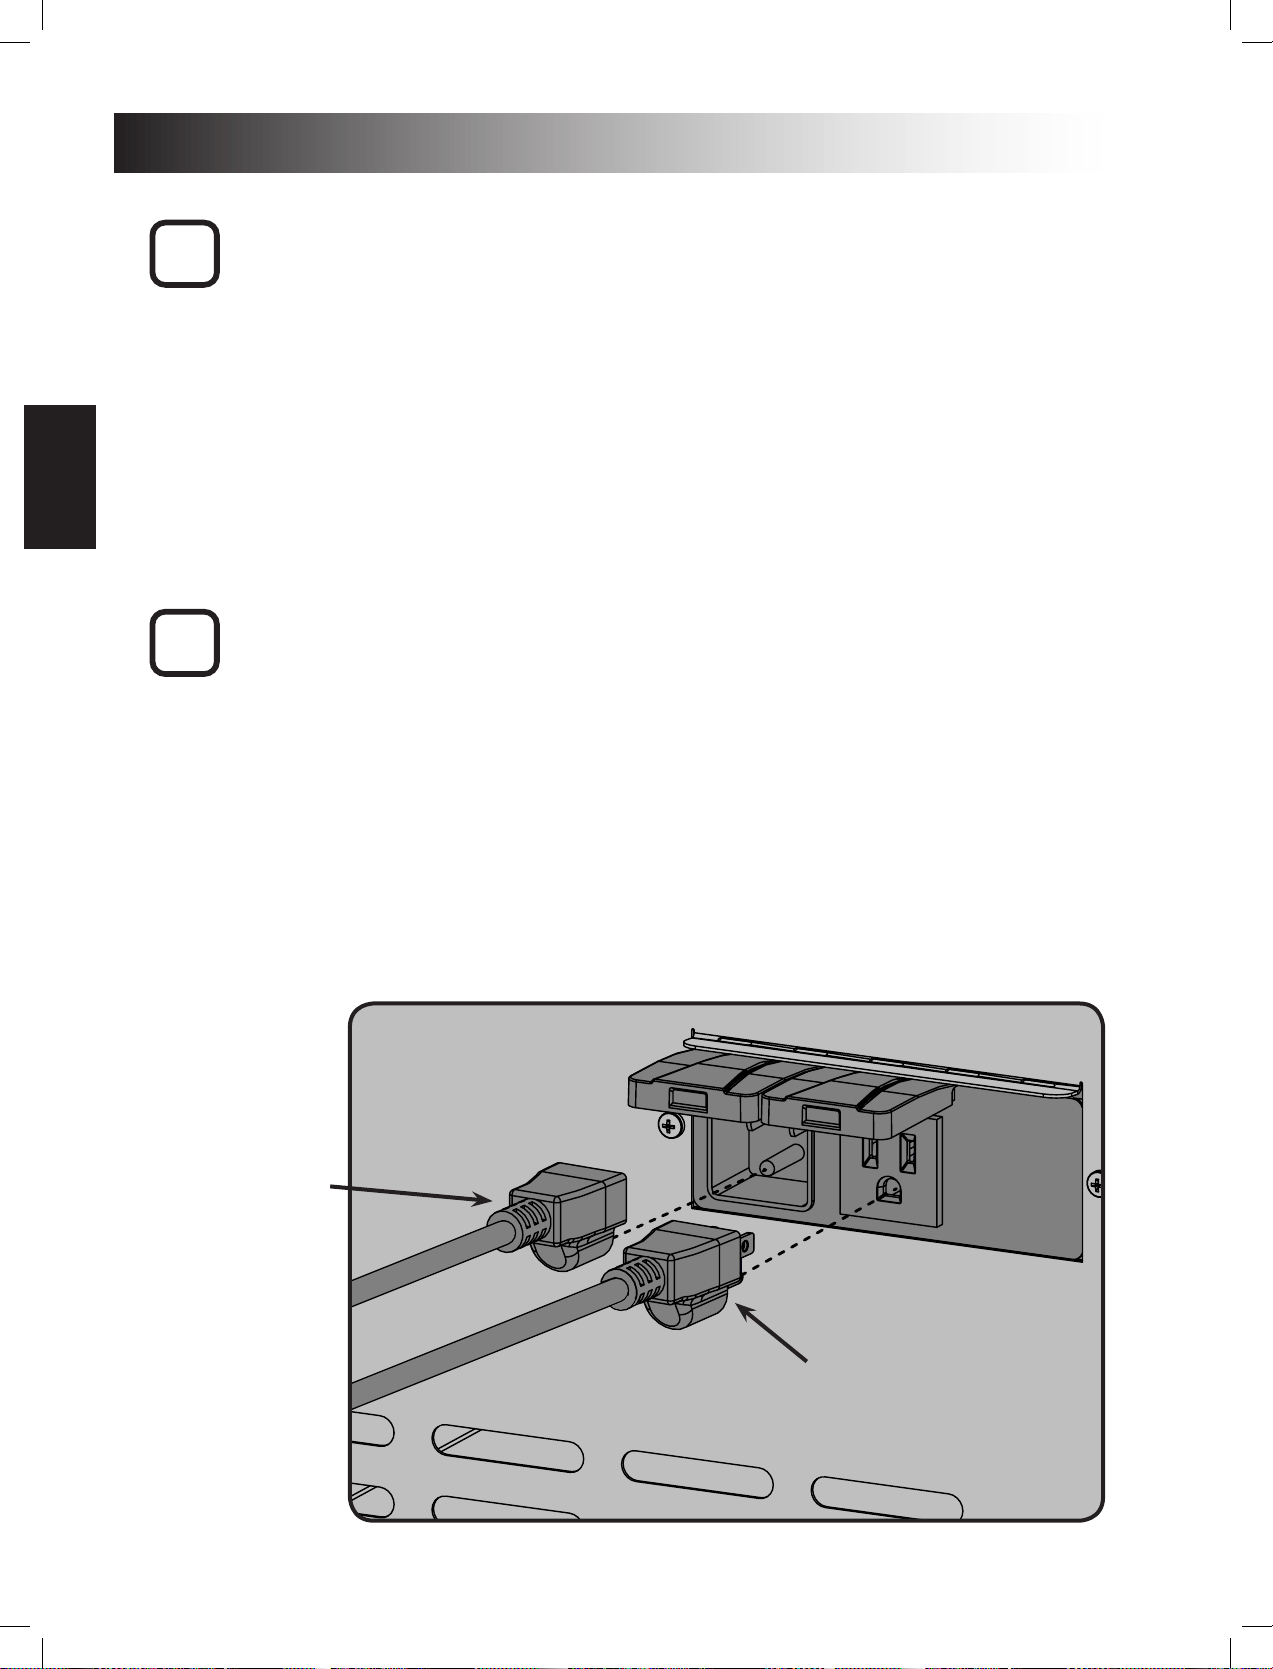
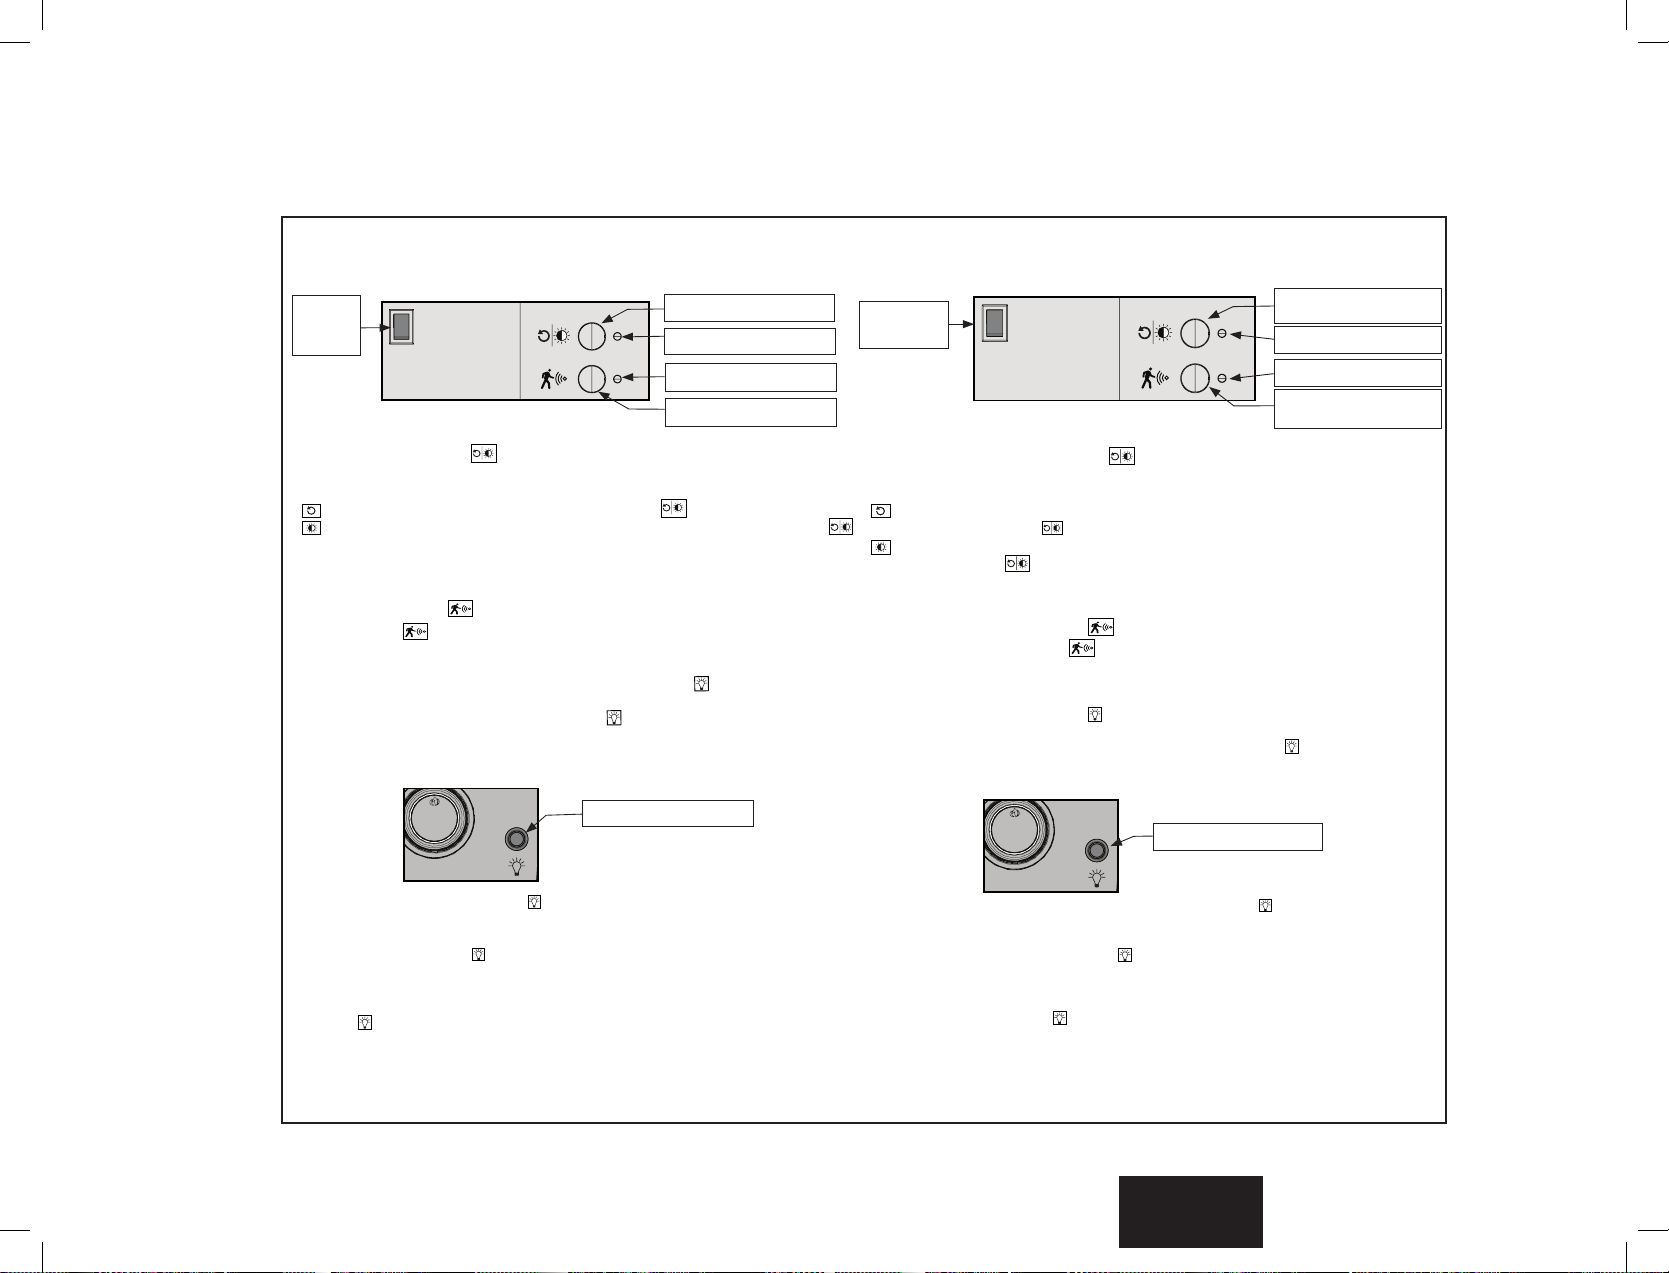
Providing Power To Your Grill
CAUTION! To ensure protecon against electric shock, use only a Ground Fault Interrupter (GFI)
protected circuit with this outdoor gas cooking appliance.
To provide power to your grill, plug a grounded electrical cord into the electrical box installed in the rear
panel of your grill as shown.
• Ensure the cord is approved and marked for OUTDOOR USE.
•
• Keep electrical cords out of pathways.
• Do not let the cord hang over the edge of a table or touch hot surfaces.
To provide power to the internal lights, plug the transformer cord into the electrical box installed in the
rear panel of your gill as shown. The light switch located on the control panel allows you to easily turn the
the rear panel of your grill as shown.
Fournir le courant à votre gril
MISE EN GARDE ! An de se protéger contre les décharges électriques, branchez l’appareil
de cuisson extérieur au gaz sur un circuit muni d’une prise avec interrupteur de défaut à la terre
seulement.
•
•
•
•
Power Supply
To Rosserie Motor
Au moteur de rôssoire
Alimentaon
électrique
(Not Included)
(Pas Inclus)
!
!
45
www.napoleongrills.com
N415-0526 Nov 22.18
N385-0359
CONSIGNES ÉLECTRIQUES
L
ISEZ TOUTES LES INSTRUCTIONS DU MANUEL AVANT DE METTRE EN MARCHE LES SYSTÈMES
ÉLECTRIQUES. LE BOÎTIER DE COMMANDE EST SITUÉ DANS LE CABINET SOUS LE GRIL.
POUR COMMENCER, ALLUMEZ L’INTERRUPTEUR PRINCIPAL.
LUMINOSITÉ / RÉINITIALISATION
• LA LUMIÈRE DEL ROUGE INDIQUE LA MISE SOUS TENSION.
• LE BOUTON ILLUMINÉ ROUGE EST L’INTERRUPTEUR DE RÉINITIALISATION ET D’INTENSITÉ LUMINEUSE.
• POUR EFFECTUER UNE RÉINITIALISATION AUX VALEURS D’USINE, APPUYEZ ET MAINTENEZ
ENFONCÉ LE BOUTON POUR 2 SECONDES.
• POUR PASSER D’UNE LUMINOSITÉ ÉLEVÉE, À MOYENNE, À FAIBLE, APPUYEZ PLUSIEURS FOIS
SUR LE BOUTON .
• LA LUMINOSITÉ NE PEUT ÊTRE RÉGLÉE QUE LORSQUE LA COULEUR DES BOUTONS DE
COMMANDE EST RÉGLÉE SUR LE BLEU OU LE BLANC.
CAPTEUR DE MOUVEME
NT
• APPUYEZ SUR LE BOUTON POUR ACTIVER ET ÉTEINDRE LE CAPTEUR DE MOUVEMENT.
• LA LUMIÈRE DEL BLEUE INDIQUE QUE LE CAPTEUR DE MOUVEMENT EST ACTIVÉ.
• LORSQU’UN MOUVEMENT EST DÉTECTÉ À MOINS DE 1 M DU CAPTEUR (SITUÉ SUR LE
PANNEAU DE COMMANDE), LES LUMIÈRES DES BOUTONS DE COMMANDE S’ALLUMERONT.
L’INTERRUPTEUR D’ÉCLAIRAGE CONTRÔLERA UNIQUEMENT LES LUMIÈRES DE LA HOTTE
ET DU CABINET.
• LORSQUE LE CAPTEUR EST ÉTEINT, L’INTERRUPTEUR D’ÉCLAIRAGE CONTRÔLERA LES
BOUTONS DE COMMANDE, LES LUMIÈRES DE LA HOTTE ET LES LUMIÈRES DU CABINET.
RÉGLAGES DE LA COULEUR
• APPUYEZ ET MAINTENEZ ENFONCÉ L’INTERRUPTEUR D’ÉCLAIRAGE AFIN DE BASCULER ENTRE
LES COULEURS (BLEU, BLANC ET VERT).
• LE VERT EST LA COULEUR PERMETTANT DE PASSER AU MODE À DÉFILEMENT.
• RELÂCHEZ L’INTERRUPTEUR D’ÉCLAIRAGE AFIN DE RÉGLER LE MODE.
• LORSQUE L’ÉCLAIRAGE EST RÉGLÉ SUR LE VERT, LES LUMIÈRES DES BOUTONS DE COMMANDE
DÉFILERONT LENTEMENT À TRAVERS LE SPECTRE DES COULEURS.
• POUR SÉLECTIONNER UNE COULEUR DANS LE SPECTRE, APPUYEZ RAPIDEMENT SUR
L’INTERRUPTEUR D’ÉCLAIRAGE À DEUX REPRISES.
FERMETURE AUTOMATIQUE
• LORSQUE LE CAPTEUR DE MOUVEMENT EST ACTIVÉ, LES LUMIÈRES DES BOUTONS DE COMMANDE
S’ÉTEIGNENT APRÈS 15 MINUTES D’INACTIVITÉ.
• POUR TOUS LES MODES, LES LUMIÈRES DE LA HOTTE ET DU CABINET S’ÉTEINDRONT APRÈS 2 HEURES.
0
I
INTERRUPTEUR
PRINCIPAL
BOUTON DE LUMINOSITÉ /
RÉINITIALISATION
VOYANT DEL ROUGE
VOYANT DEL BLEU
BOUTON DU CAPTEUR DE
MOUVEMENT
INTERRUPTEUR D’ÉCLAIRAGE
ELECTRICAL INSTRUCTIONS
READ ALL INSTRUCTIONS IN THE MANUAL PRIOR TO TURNING ON THE ELECTRICAL SYSTEMS.
THE CONTROL BOX IS LOCATED IN THE CABINET UNDER THE GRILL HEAD.
TO START, TURN ON MAIN POWER SWITCH.
BRIGHTNESS/ RESET
• THE RED LED INDICATES THE POWER IS ON.
• RED IS THE RESET AND LIGHT INTENSITY SWITCH.
• TO PERFORM A FACTORY RESET, PRESS AND HOLD THE BUTTON FOR 2 SECS.
• TO TOGGLE BETWEEN HIGH, MEDIUM AND LOW BRIGHTNESS REPEATEDLY PRESS THE
BUTTON.
• THE BRIGHTNESS CAN ONLY BE ADJUSTED WHEN THE KNOB COLOUR IS SET TO BLUE
OR WHITE.
MOTION SENSOR
• PRESS THE BUTTON TO TURN THE MOTION SENSOR ON AND OFF.
• THE BLUE LED INDICATES THE MOTION SENSOR IS ON.
• WHEN MOTION IS DETECTED WITHIN 1m OF THE SENSOR (LOCATED ON THE CONTROL
PANEL), THE KNOB LIGHTS WILL TURN ON.THE LIGHT SWITCH WILL ONLY CONTROL
THE HOOD LIGHTS AND CABINET LIGHTS.
• WHEN THE SENSOR IS OFF THE LIGHT SWITCH CONTROLS THE KNOB LIGHTS,
HOOD LIGHTS AND CABINET LIGHTS.
0
I
MAIN
POWER
SWITCH
RESET & BRIGHTNESS BUTTON
RED LED INDICATOR
BLUE LED INDICATOR
MOTION SENSOR BUTTON
COLOUR SETTINGS
• PRESS AND HOLD THE LIGHT SWITCH TO TOGGLE BETWEEN COLOURS (BLUE,
WHITE, GREEN)
• GREEN IS THE COLOUR SPECTRUM MODE.
• RELEASE THE LIGHT SWITCH TO SET THE MODE.
• WHEN SET TO GREEN, THE KNOB LIGHTS WILL SLOWLY CYCLE THROUGH THE
COLOUR SPECTRUM.
• TO SELECT A CUSTOM COLOUR FROM THE SPECTRUM QUICKLY PRESS THE LIGHT
SWITCH TWICE.
AUTO SHUT OFF
• WHEN THE MOTION SENSOR IS ON THE KNOB LIGHTS WILL SHUT OFF AFTER 15 MINS
OF INACTIVITY.
• IN ALL MODES, THE HOOD AND CABINET LIGHTS WILL TURN OFF AFTER 2 HOURS.
LIGHT SWITCH
46
www.napoleongrills.com
N415-0526 Nov 22.18
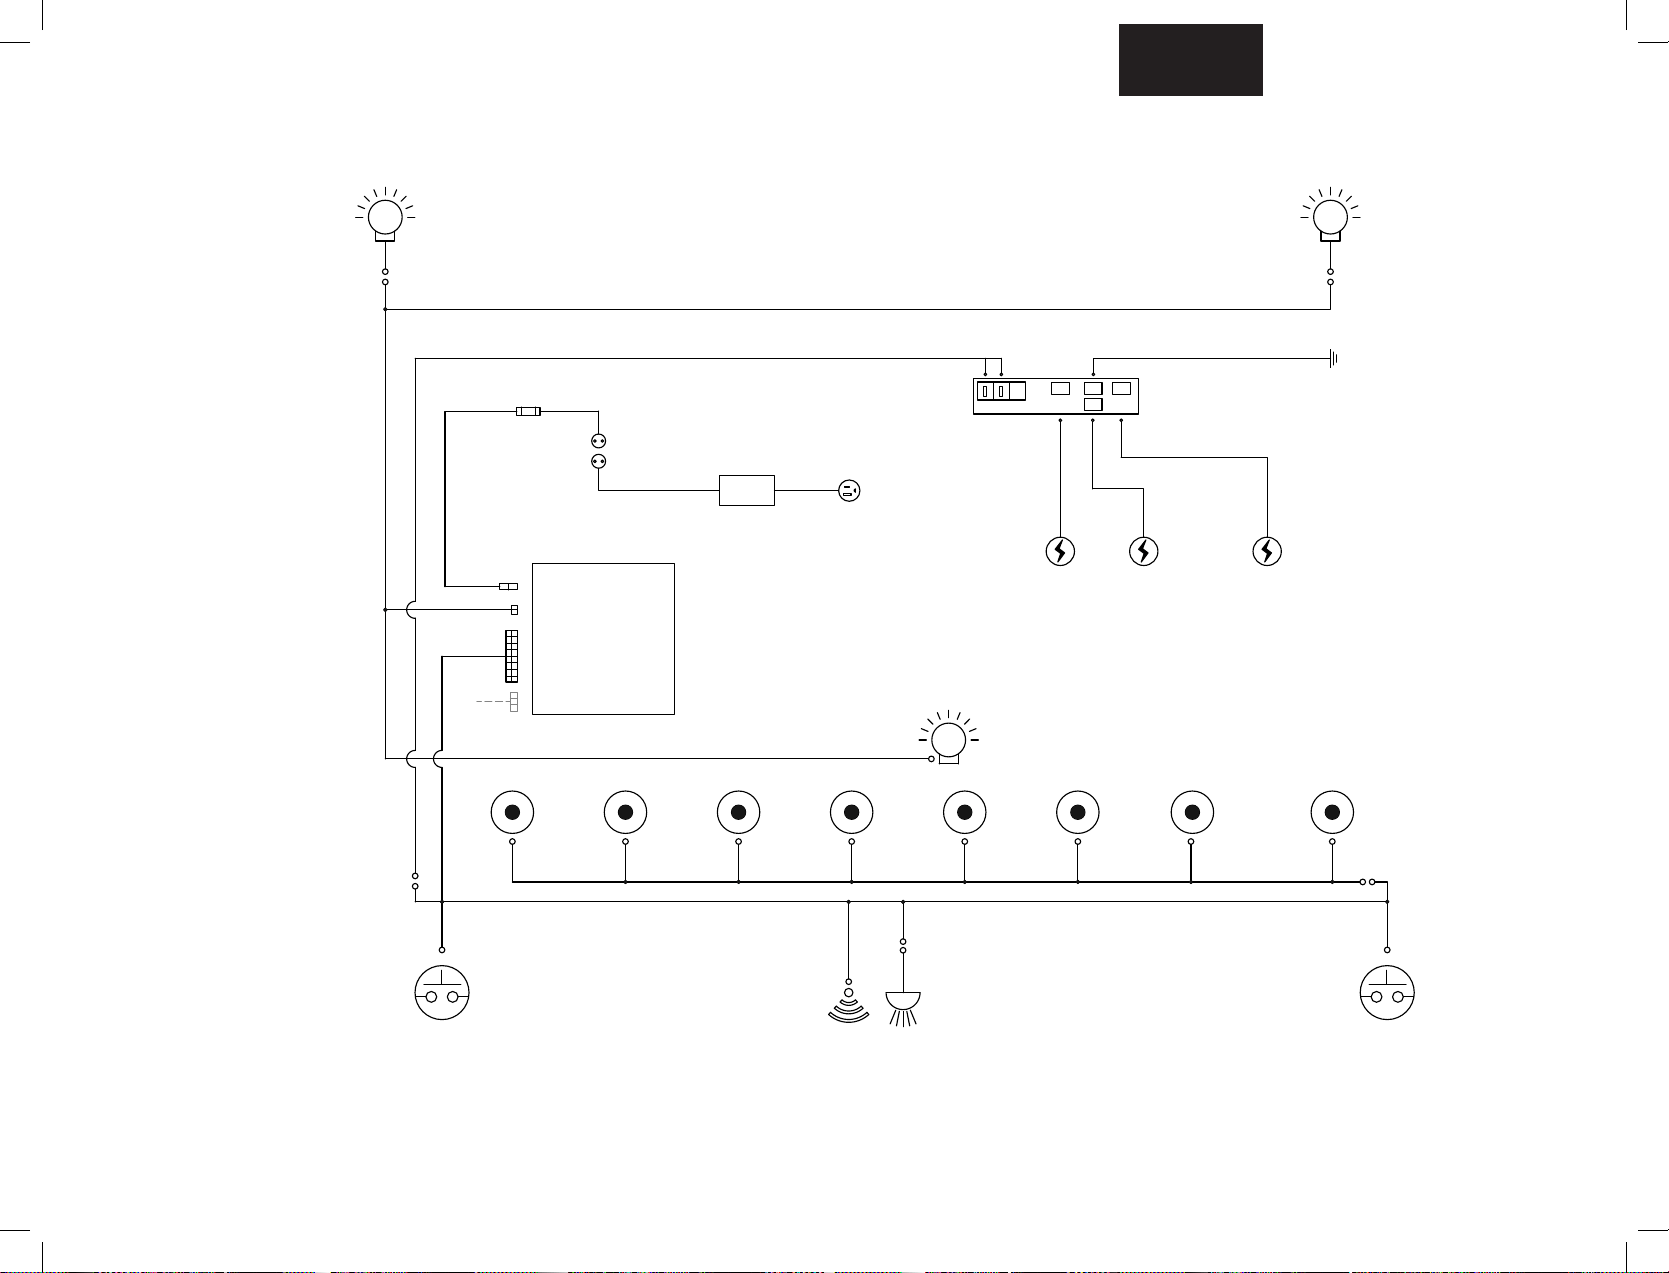
CONTROL BOX / BOÎTIER DE COMMANDE
- 12VAC, 0.4W, 32mA
CABINET LIGHT / LUMIÈRE DU CHARIOT
- 12VAC, 0.75W, 63mA
POWER TRX / TRANSFORMATEUR
- INPUT / ENTRÉE : 120VAC-60Hz, 85W
- OUTPUT / SORTIE : 12VAC-3333mA, 40W
HALOGEN LAMP / LUMIÈRE HALOGÈNE
- 12VAC, 10W
POWER / PUISSANCE
LIGHTS / LUMIÈRES
SWITCHES-KNOBS /
RESERVED / RÉSERVÉ
FUSE / FUSIBLE - 4 A
IGNITER / MODULE D'ALLUMAGE
- 12VAC/DC, 1.5W, 120mA
- 12VAC, 10W
KNOB LIGHT / LUMIÈRES DES BOUTONS (x8)
- 12VDC, 0.4~1.1W, 34~95mA
SWITCH - IGNITION / COMMUTATEUR - ALLUMAGE
- 12VDC, 0.3~0.8W, 22~65mA
SWITCH - LIGHTS / COMMUTATEUR - LUMIÈRES
- 12VDC, 0.3~0.8W, 22~65mA
PROX SENSOR / CAPTEUR PROX
- 3.3VDC, 0.01W, 5mA
LOGO LIGHT / LUMIÈRE LOGO
- 3.3VDC, 1.0W, 300mA
HALOGEN LAMP / LUMIÈRE HALOGÈNE
ELECTRODE / ÉLECTRODE
ELECTRODE / ÉLECTRODE
ELECTRODE / ÉLECTRODE
SIDE BURNER / BRÛLEUR LATÉRAL
REAR BURNER / BRÛLEUR ARRÈRE
SMOKE BURNER / BRÛLEUR FUMOIR
COMMUTATEURS -
BOUTONS
Lorem ipsum
47
www.napoleongrills.com
N415-0526 Nov 22.18
Propane Only – Proper Hose Connecon
WARNING! Ensure the hose does not contact any high temperature surfaces, or it may melt and
leak causing a re.
Propane seulement - Branchement adéquat du boyau
AVERTISSEMENT! Assurez-vous que le boyau ne touche à aucune surface à haute température
sinon il risque de fondre, de provoquer une fuite et causer un feu.
WARNING! The installaon must be performed by a licensed gas er, and all connecons must
be leak tested before operang the grill.
Natural Gas Only – Proper Hose Connecon
Gaz naturel seulement - Branchement adéquat du boyau
AVERTISSEMENT! L’installaon doit être eectuée par un installateur ceré pour le gaz et
tous les raccordements doivent être testés pour des fuites avant de faire fonconner le gril. Serrer la
connexion avec deux clés.
!
!
48
www.napoleongrills.com
N415-0526 Nov 22.18
Leak Tesng Instrucons
WARNING! A leak test must be performed annually and each me a cylinder is hooked up or if a
part of the gas system is replaced.
WARNING! Never use an open ame to check for gas leaks. Be certain no sparks or open ames
are in the area while you check for leaks. Sparks or open ames will result in a re or explosion,
damage to property, serious bodily injury, or death.
Leak tesng
See Leak
hose, manifolds and valves.
gas installer.
immediately shut o the gas supply, disconnect it, and have the grill
Natural Gas Only
Propane Only
X
!
!
STOP
49
www.napoleongrills.com
N415-0526 Nov 22.18
Propane Seulement
Gaz Naturel Seulement
X
Test de détecon de fuites
AVERTISSEMENT!
Il doit être fait avant la première ulisaon, annuellement et à chaque fois
qu’une pièce du système de gaz est remplacée ou réparée.
AVERTISSEMENT! N’ulisez pas une amme nue pour vérier pour des fuites de gaz. Assurez-
vous qu’il n’y ait aucune éncelle ni amme nue à proximité de l’endroit à vérier. Les éncelles ou les
ammes nues provoqueront un feu ou une explosion, causant des dommages matériels, des blessures
graves ou des pertes de vie.
Test de fuites
faites ce test. Consultez le schéma de test de fuites pour voir les endroits à tester.
1 - Fermez tous les boutons des brûleurs. Ouvrez la soupape de la bonbonne.
2 - Appliquez une soluon de deux parts égales de savon liquide et d’eau sur tous les joints du
régulateur, le tuyau et ses raccords.
3 -
Des bulles indiqueront une fuite de gaz. Resserrez le joint ou remplacez la pièce avec une autre
recommandée par le Centre Soluon de Napoléon et faites inspecter votre gril par votre fournisseur
de gaz.
4 - Si la fuite ne peut être réparée, fermez l’alimentaon de gaz à la bonbonne, enlevez-la et faites
inspecter votre gril par votre fournisseur de gaz ou détaillant. N’ulisez pas l’appareil jusqu’à ce que la
fuite soit réparée.
!
!
STOP
50
www.napoleongrills.com
N415-0526 Nov 22.18
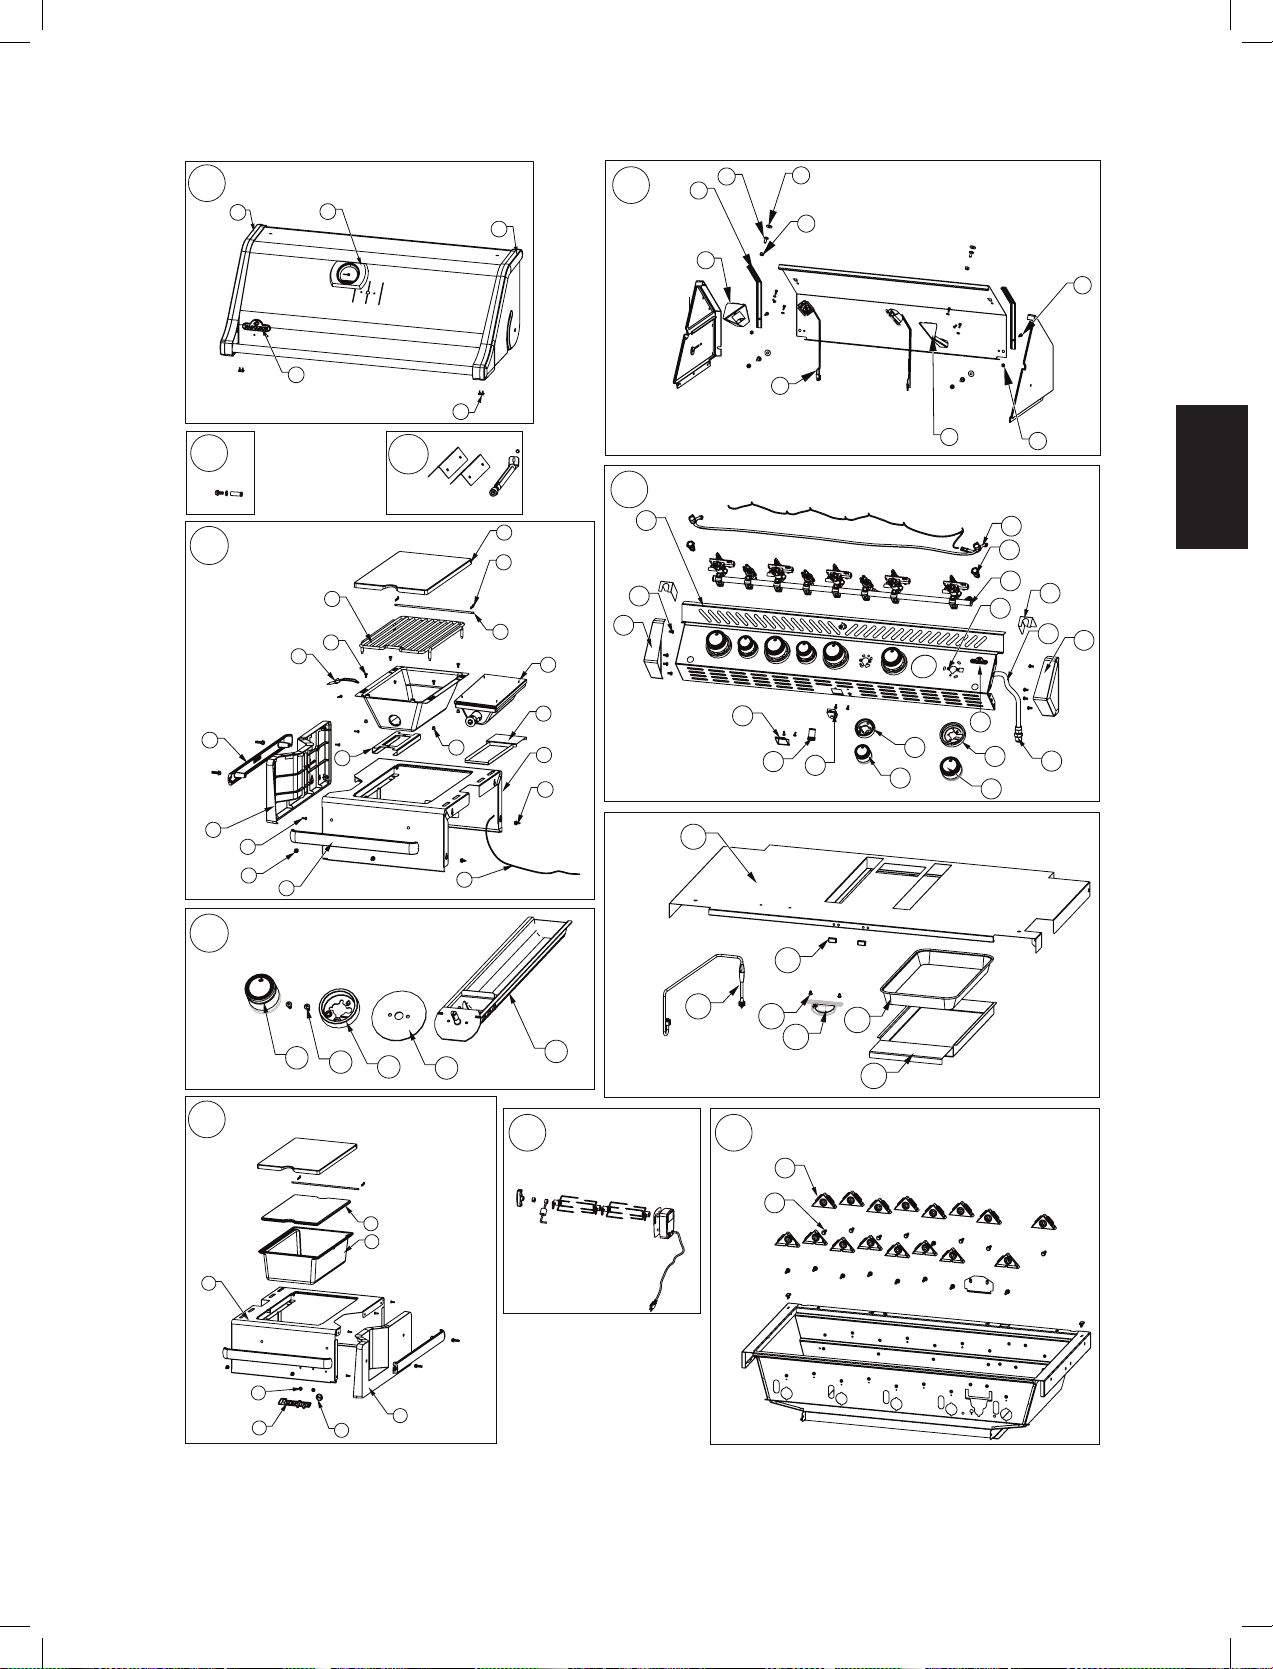
PRO665-3 Parts List / Liste Des Pièces
Item Part # Descripon
PRO665-3
1 x
2 x
x
4
x
5 x
6 x
x
8 x
x
10 x
11 N100-0045-SER x
12 x
x
14 N200-0106 x
15 N010-0800-SER x
16 x
x
18 N585-0111-GY1SG x
N455-0055 p
W456-0050 n
20 N255-0058 x
21 x
22 x
N655-0206 x
24 N455-0016 p
N455-0002 n
25 x
26 x
x
28 x
x
N080-0401-GY1SG x
x
x
x
x
x
x
x
x
x
40 x
41 x
42 x
x
51
www.napoleongrills.com
N415-0526 Nov 22.18
Item Part # Descripon
PRO665-3
44 x
45 x
46 N105-0012 x
x
48 p
n
p
50 x
51 N015-0011 x
52 x
x
54 x
55 x
56 x
x
58 N010-0802 x
N185-0005 x
60 N555-0025 x
61 x
62 55110 x
x
64 x
65 x
66 p
N455-0068 n
x
68 x
x
x
x
x
x
x
x
x
x
x
x
ac
N200-0110 x
80 x
81 x
82 N450-0006 x
x
84 x
85 x
PRO665-3 Parts List / Liste Des Pièces
52
www.napoleongrills.com
N415-0526 Nov 22.18
Item Part # Descripon
PRO665-3
86 x
x
88 N485-0021 x
x
x
x
N240-0026 x
S81005 x
W450-0020 x
x
x
x
x
x
100 x
101 x
102 x
x
104 N010-1165-SER p
N010-1166-SER n
105 x
106 x
p
n
108 x
x
110 x
111 N120-0025 x
112 x
x
114 x
115 x
116 x
N660-0010 x
118 x
x
120 N120-0024 x
121 x
122 x
x
124 N402-0018 x
125 x
126 62008 x
x
128 x
N051-0012 x
PRO665-3 Parts List / Liste Des Pièces

53
www.napoleongrills.com
N415-0526 Nov 22.18
PRO665-3 Parts List / Liste des pièces
Item Part # Descripon
PRO665-3
N051-0010 x
N010-0800 x
N010-1164-SER x
x
x
x
x
x
N450-0044 x
x
140 x
141 N080-0405 x
142 x
N555-0060 x
144 x
N215-0015 ac
61665 ac
56040 ac
ac
x - standard x - compris
p - propane units only p - appareils propane seulement
n - natural gas units only n - appareils gaz naturel seulement
ac - accessory ac - accessoires

54
www.napoleongrills.com
N415-0526 Nov 22.18
41
40
26
37
56
46
39
69
68
60
59
62
38
64
50
1
57
44
65
46
36
43
42
67
66
7
30
2
10
53
28
51
45
21
34
54
31
20
19
27
25
55
17
11
49
42
33
12
48
63
52
18
13
15
61
32
14
58
29
23
16
24
22
35
47
9
8
4
5
6
143
PRO665-3
55
www.napoleongrills.com
N415-0526 Nov 22.18
73
74
72
55
71
79
81
78
80
81
82
83
76
77
75
93
95
97
103
98
92
88
89
87
96
99
100
91
75
90
102
101
86
67
134
133
135
138
139
137
136
132
121
122
120
119
118
117
112
116
115
109
114
113
108
110
111
107
105
106
84
85
141
31
18
126
123
124
125
55
131
128
127
129
130
70
104
140
15
142
64
144

N415-0526