manual
100 %
Recycled Paper
; with 101
the possibilities
Thank you for purchasing this Samsung product.
safety
nforrnat on
©ongratulations on your new Samsung
microwave oven, This manual contains important
information on the installation, use and care of
your appliance, Please take time to read this
manual to take full advantage of your microwave
oven s many benefits and features,
WHATYOUNEEDTOKNOW
ABOUTSAFETYINSTRUCTIONS
Warnings and Important Safety Instructions in this manual
do not cover all possible conditions and situations that
may occur. It is your responsibility to use common sense,
caution, and care when installing, maintaining, and
operating your microwave oven.
PRECAUTIONSTOAVOID
POSSIBLEEXPOSURETO
EXCESSIVEMICROWAVE
ENERGY
A. Do not attempt to operate this oven with the door
open since open-door operation can result in harmful
exposure to microwave energy. It is important not to
defeat or tamper with the safety interlocks.
B, Do not place any object between the oven front
face and the door or allow soil or cleaner residue to
accumulate on the sealing surface.
C, Do not operate the oven if it is damaged. It is
particularly important that the oven door closes
properly and that:
1. The door is not bent or damaged
2, The hinges and latches are not broken or loosened
3, The door seals and sealing surface are clean and
operative.
D, Only properly qualified service personnel should adjust
or repair the oven. Do not attempt to adjust or repair
the oven yourself.
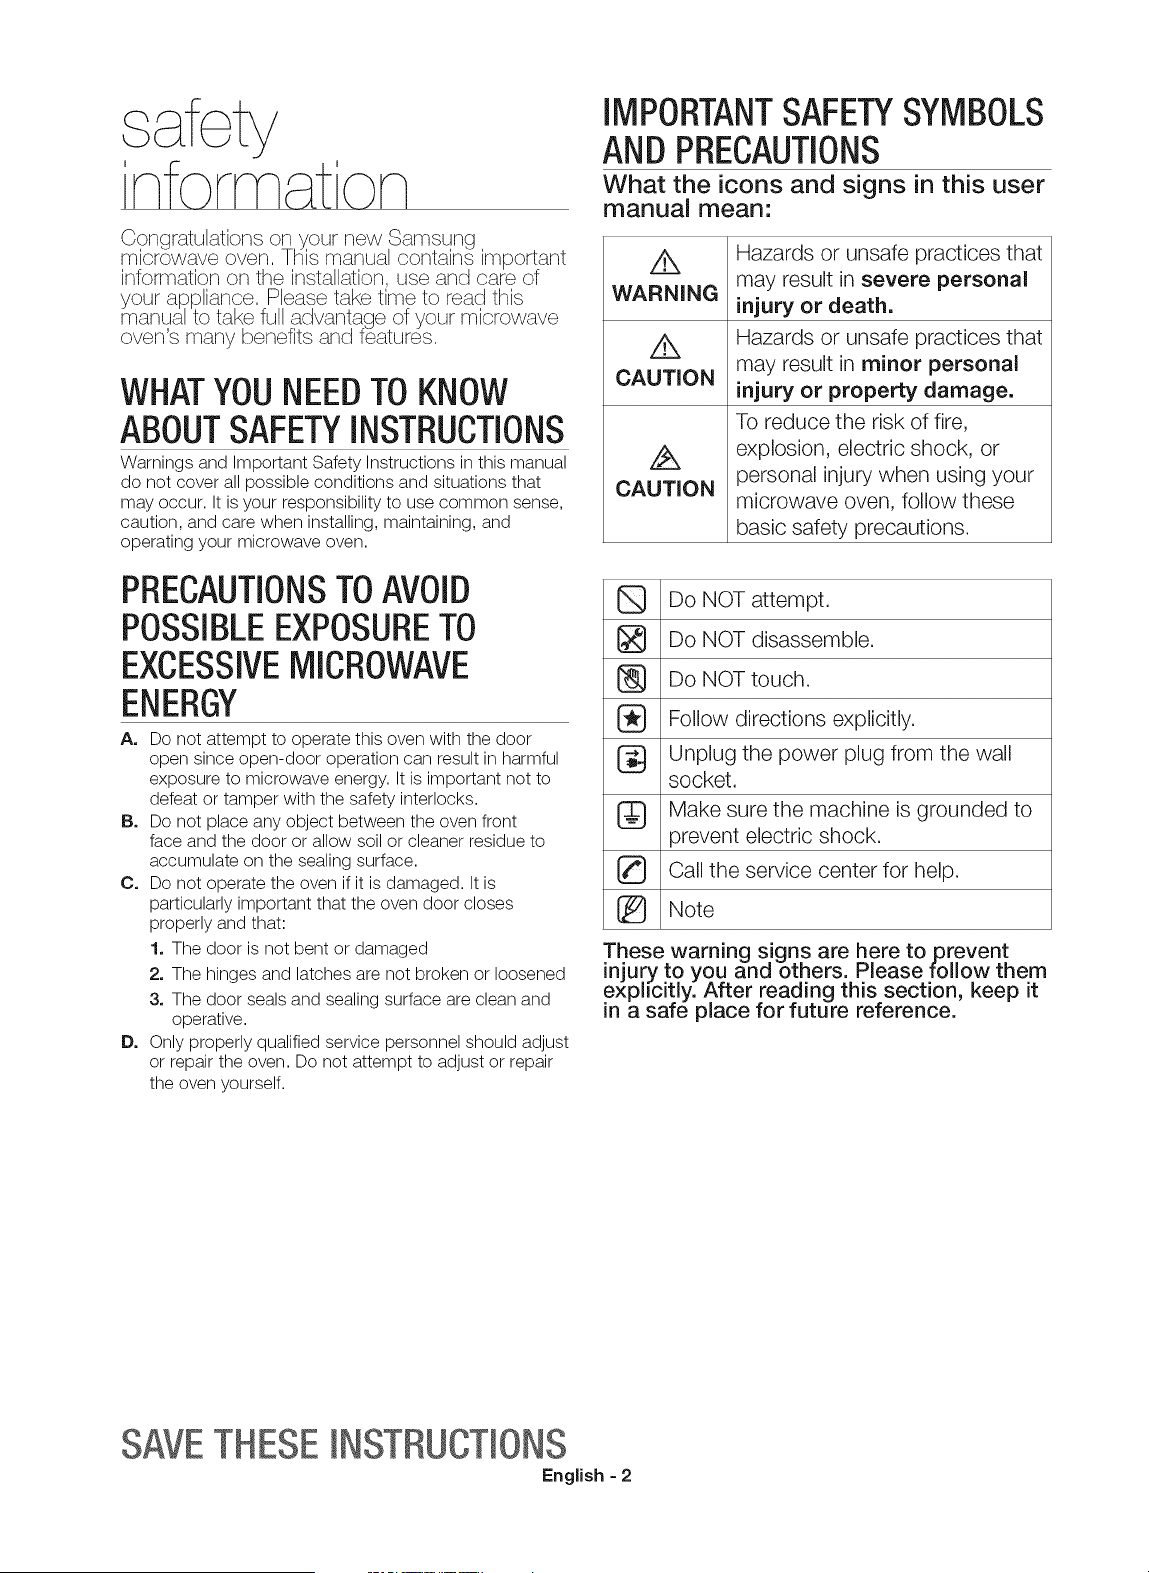
IMPORTANTSAFETYSYMBOLS
ANDPRECAUTIONS
What the icons and signs in this user
manual mean:
¥
WARNING
¥
CAUTION
CAUTION
Hazards or unsafe practices that
may result in severe personal
injury or death.
Hazards or unsafe practices that
may result in minor personal
injury or property damage.
To reduce the risk of fire,
explosion, electric shock, or
personal injury when using your
microwave oven, follow these
basic safety precautions.
Do NOT attempt.
Do NOT disassemble.
Do NOT touch.
Follow directions explicitly.
Unplug the power plug from the wall
socket.
Make sure the machine is grounded to
prevent electric shock.
Call the service center for help.
Note
These warning signs are here toprevent
injury to you and others. Please follow them
exphcitly. After reading this section, keep it
in a safe place for future reference.
SAVETHESEINSTRUCTIONS
English - 2
iMPORTANTSAFETY
iNSTRUCTiONS
When using any electrical appliance, basic safety
precautions should be followed, including the following:
Ak WARNING
WARNING
To reduce risk of burns, electric shock, fire, personal
injury or exposure to excessive microwave energy:
1o Read all safety instructions before using the
appliance.
2o Read and follow the specific "Precautions to avoid
possible exposure to excessive microwave energy" on
this page.
3o This appliance must be grounded. Connect only to
properly grounded outlets. See Important "Grounding
instructions" on page 4 of this manual.
4o Install or locate this appliance only in accordance with
the provided installation instructions.
5o Some products such as whole eggs and sealed
containers (for example, sealed glass jars), can
explode if heated rapidly. Never heat them in a
microwave oven.
6o Use this appliance only for its intended use as
described in the manual. Do not put corrosive
chemicals or vapors in or on this appliance. This type
of oven is specifically designed to heat, cook, or dry
food. It is not designed for industrial or laboratory use.
7o As with any appliance, close supervision is necessary
when it is used by children.
8o Do not operate this appliance if it has a damaged
power cord or plug, if it is not working properly, or if it
has been damaged or dropped.
9o This appliance should be repaired or serviced only
by qualified service personnel. Contact the nearest
authorized service facility for examination, repair, or
adjustment.
10oDo not cover or block any openings on the appliance.
11oDo not tamper with or make any adjustments or
repairs to the door.
12oDo not store this appliance outdoors. Do not use this
product near water, for example, near a kitchen sink,
in a wet basement, near a swimming pool, or similar
locations.
13oDo not immerse the power cord or plug in water.
14oKeep the cord away from heated surfaces. (including
the back of the oven).
15oDo not let the cord hang over the edge of a table or
counter.
16oWhen cleaning surfaces of the door and oven that
come together when the door closes, use only mild,
nonabrasive soaps, or detergents applied with a
sponge or soft cloth. Unplug the microwave before
cleaning.
17oTo reduce the risk of fire in the oven cavity.
ao Do not overcook food. Carefully attend appliance
when paper, plastic, or other combustible materials
are placed inside the oven to facilitate cooking.
b, Remove wire twist-ties from paper or plastic bags
before placing the bags in the oven.
co If materials inside the oven ignite, keep the oven
door closed, turn the oven off, and disconnect the
power cord, or shut off the power at the fuse or
circuit breaker panel. If the door is opened, the fire
may spread.
do Do not use the cavity for storage purposes. Do not
leave paper products, cooking utensils, or food in
the cavity when it is not in use.
18, Liquids, such as water, milk, coffee, or tea can
be overheated beyond the boiling point without
appearing to be boiling. Visible bubbling or boiling
when the container is removed from the microwave
oven is not always present. THIS COULD RESULT
IN VERY HOT LIQUIDS SUDDENLY BOILING OVER
WHEN THE CONTAINER IS DISTURBED OR A
SPOON OR OTHER UTENSIL IS INSERTED INTO
THE LIQUID. To reduce the risk of injury:
ao Do not overheat liquid.
bo Stir liquid both before and halfway through heating
it.
co Do not use straight-sided containers with narrow
necks.
do After heating, allow the container to stand in the
microwave oven for a short time before removing
the container.
e, Use extreme care when inserting a spoon or other
utensil into the container.
A CAUTION
CAUTION
1. Clean Ventilating Hoods Frequently - Grease should
not be allowed to accumulate on the hood or filter.
2. When flaming foods under the hood, turn the fan on.
3, Use care when cleaning the vent-hood filter. Corrosive
cleaning agent, such as lye-based oven cleaner, may
damage the filter.
SAVETHESEINSTRUCTI0NS
English - 3
GROUNDINGINSTRUCTIONS
This appliance must be grounded. In the event of an
electrical short circuit, grounding reduces the risk of
electric shock by providing an escape wire for the
electrical current. This appliance is equipped with a cord
that includes a grounding wire and a grounding plug.
The plug must be plugged into an outlet that is properly
installed and grounded.
WARNING
WARNING
Improper use of the grounding plug can result in a risk of
electric shock.
,, Plug into a grounded 3 prong outlet. Do not remove
the third (grounding) prong. Do not use an adaptor or
otherwise defeat the grounding plug.
,, Consult a qualified electrician or service person if you
do not understand the grounding instructions or if you
are not sure if the appliance is properly grounded.
,, We do not recommend using an extension cord with
this appliance. If the power-supply cord is too short,
have a qualified electrician or serviceman install an
outlet near the appliance. However, if it is necessary
to use an extension cord, read and follow the "Use of
Extension Cords" section below.
Use of Extension Cords
A short power-supply cord is provided to reduce the risk
of your becoming entangled in or tripping over a longer
cord. Longer cord sets or extension cords are available
and you can use them if you exercise care. If you use a
long cord or extension cord:
1, The marked electrical rating of the cord set or
extension cord should be at least as great as the
electrical rating of the appliance.
2, The extension cord must be a grounding-type 3-wire
cord and it must be plugged into a 3-slot outlet.
3, The longer cord should be arranged so that it will not
drape over the counter top or tabletop where it can
be pulled on by children or tripped over accidentally.
If you use an extension cord, the interior light may
flicker and the speed of the blower may vary when the
microwave oven is on. Cooking times may be longer,
too.
WARNING
CRITICAL
INSTALLATION
WARNINGS
This appliance must be installed by a qualified
technician or service company.
,, Failing to have a qualified technician install
the oven may result in electric shock, fire, an
explosion, problems with the product, or injury.
Unpack the oven, remove all packaging material and
examine the oven for any damage such as dents
on the interior or exterior of the oven, broken door
latches, cracks in the door, or a door that is not lined
up correctly. If there is any damage, do not operate
the oven and notify your dealer immediately.
@
@
Make sure to install your oven in a location with
adequate space.
Remove all foreign substances such as dust or water
from the power plug terminals and contact points
using a dry cloth on a regular basis.
,, Unplug the power plug and clean it with a dry
cloth.
Failing to do so may result in electric shock or fire.
Plug the power cord into a properly grounded
3 pronged outlet. Your oven should be the only
appliance connected to this circuit.
,, Sharing a wall socket with other appliances, using
a power strip, or extending the power cord may
result in electric shock or fire.
Do not use an electric transformer. It may result in
electric shock or fire.
,, Ensure that the voltage, frequency and current
provided match the product's specifications.
Failing to do so may result in electric shock or fire.
Keep all packaging materials out of the reach of
children. Children may use them for play.
This appliance must be properly grounded. Read
and follow the specific "Grounding instructions"
found in the beginning of this Section. Do not ground
the appliance to a gas pipe, plastic water pipe, or
telephone line.
This may result in electric shock, fire, an
explosion, or problems with the product
,, Never plug the power cord into a socket that is
not grounded correctly and make sure that it is in
accordance with local and national codes.
Do not cut or remove the third (ground) prong from
the power cord under any circumstances.
Connect the oven to a 20A circuit. If you connect the
oven to a 15A circuit, make sure that circuit breaker
is operable.
Do not install this appliance in a humid, oily, or dusty
location, or in a location exposed to direct sunlight or
water (rain drops).
This may result in electric shock or fire.
Plug the power plug into the wall socket firmly. Do
not use a damaged power plug, damaged power
cord, or loose wall socket.
This may result in electric shock or fire.
Do not mount over a sink.
Do not pull or excessively bend the power cord.
Do not twist or tie the power cord.
Do not hook the power cord over a metal object,
place a heavy object on the power cord, insert the
power cord between objects, or push the power
cord into the space behind the appliance.
This may result in electric shock or fire.
Do not pull the power cord when you unplug the oven.
,, Unplug the oven by pulling the plug only.
Failing to do so may result in electric shock or fire.
When the power plug or power cord is damaged,
contact your nearest service center for a
replacement or repair.
SAVETHESEINSTRUCTIONS
English - 4
INSTALLATION
CAUTION
CAUTIONS
_ osition the oven so that the plug is easily
accessible.
Failing to do so may result in electric shock or fire
due to electric leakage.
_ Unplug the oven when it is not being used for long
periods of time or during a thunder/lightning storm.
Failing to do so may result in electric shock or
fire.
CRITICAL USAGE
WARNING
WARNINGS
lf the microwave is flooded, please contact your
nearest service center : Failing to do so may result in
electric shock or fire.
Read and follow the specific "Precautions to Avoid
Possible Exposure to Excessive Microwave Energy",
found in the beginning of this Section.
If the microwave generates a strange noise, a
burning smell, or smoke, unplug it immediately and
contact your nearest service center.
Failing to do so may result in electric shock or fire.
In the event of a gas leak (propane gas, LP gas,
etc.), ventilate the room immediately. Do not touch
the microwave, power cord, or plug.
,, Do not use a ventilating fan.
A spark may result in an explosion or fire.
Take care that the door or any of the other parts do
not come into contact with your body while cooking
or just after cooking.
Failing to do so may result in burns.
In the event of a grease fire on the surface units
below the oven, smother the flaming pan on the
surface unit by covering the pan completely with a
lid, a cookie sheet or a flat tray.
Never leave surface units beneath your oven
unattended at high heat settings. Boil overs cause
smoking and greasy spillovers that may ignite and
spread if the vent fan is operating. To minimize
automatic fan operation, use adequate sized
cookware and use high heat on surface units only
when necessary.
If materials inside the oven should ignite, keep the
oven door closed, turn the oven off, and disconnect
the power cord, or shut off power at the fuse or
circuit breaker panel. If the door is opened, the fire
may spread.
,, Always observe Safety Precautions when using
your oven. Never try to repair the oven on your
own. There is dangerous voltage inside. If the
oven needs to be repaired, contact an authorized
service center near you.
[_} o not attempt to repair, disassemble, or modify the
appliance yourself.
,, Because a high voltage current enters the product
chassis during operation, opening the chassis can
result in electric shock or fire.
You may be exposed to electromagnetic waves.
When the oven requires repair, contact your
nearest service center.
@
G
If any foreign substance such as water enters the
microwave, unplug the it and contact your nearest
service center.
Failing to do so may result in electric shock or fire.
Do not touch the power plug with wet hands.
,, This may result in electric shock.
Do not turn the appliance off by unplugging the
power plug while the appliance is in operation.
,, Plugging the power plug into the wall socket again
may cause a spark and result in electric shock or
fire.
Keep all packaging materials well out of the reach of
children. Packaging materials can be dangerous to
children.
,, If a child places a bag over its head, the child can
suffocate.
Do not let children or any person with reduced
physical, sensory or, mental capabilities use this
appliance unsupervised.
Make sure that the appliance is out of the reach of
children.
Failing to do so may result in electric shock,
burns, or injury.
Keep children away from the door when opening
or closing it as they may bump themselves on the
door or catch their fingers in the door.
Do not touch the inside of the appliance immediately
after cooking. The inside of the appliance will be hot.
,, The heat on the inside of the oven can cause
burns.
Do not put aluminum foil (except as specifically
directed in this manual), metal objects (such as
containers, forks, etc.), or containers with golden or
silver rims into the microwave.
,, These objects can cause sparks or a fire.
Do not use or place flammable sprays or objects
near the oven.
,, Heat from the microwave can cause flammable
sprays to explode or burn.
Failing to do so may result in electric shock or
injury.
Do not tamper with or make any adjustments or
repairs to the door. Under no circumstances should
you remove the outer cabinet.
Do not store or use the oven outdoors.
SAVETHESEINSTRUCTI0NS
English - 5
USAGE CAUTIONS
CAUTION
lf the surface of the microwave is cracked, turn it off.
Failing to do so may result in electric shock.
Dishes and containers can become hot. Handle with
care.
Hot foods and steam can cause burns. Carefully
remove container coverings, directing steam away
from your hands and face.
Remove lids from baby food before heating. After
heating baby food, stir well to distribute the heat
evenly. Always test the temperature by tasting before
feeding the baby. The glass jar or surface of the food
may appear to be cooler than the food in the interior,
which can be so hot that it will burn the infant's
mouth.
Make sure all cookware used in the oven is suitable
for microwaving.
Use microwavable cookware in strict compliance
with such manufacturer's recommendations.
Do not stand on top of the microwave or place
objects (such as laundry, oven covers, lighted
candles, lighted cigarettes, dishes, chemicals, metal
objects, etc.) on the appliance.
,, Items, such as a cloth, may get caught in the
door.
This may result in electric shock, fire, problems
with the product, or injury.
Do not operate the appliance with wet hands.
This may result in electric shock.
Do not spray volatile material such as insecticide
onto the surface of the appliance.
,, As well as being harmful to humans, it may also
result in electric shock, fire, or problems with the
product.
Do not place the appliance over a fragile object such
as a sink or glass object.
,, This may result in damage to the sink or glass
object.
Do not put your face or body close to the appliance
while cooking or when opening the door just after
cooking.
,, Take care that children do not come too close to
the appliance.
,, Failing to do so may result in children burning
themselves.
Do not place food or heavy objects over the door
when opening the door.
The food or object may fall and this may result in
burns or injury.
Do not abruptly cool the door, the inside of the
appliance, or the dish by pouring water over it during
or just after cooking.
,, This may result in damage to the appliance. The
steam or water spray may result in burns or injury.
Do not try to preheat the oven or operate it while
empty.
Do not cook without the glass tray in place on the
oven floor. Food will not cook properly without the
tray.
Do not defrost frozen beverages in narrow-necked
bottles. The containers can break.
Do not scratch the glass of the oven door with a
sharp object.
,, This may result in the glass being damaged or
broken.
Do not store anything directly on top of the appliance
when it is in operation.
Do not use sealed containers. Remove seals and lids
before use. Sealed containers can explode due to
buildup of pressure even after oven has been turned
off.
/t,, CRITICAL CLEANING
WAONINoINSTRUCTIONS
Do not clean the appliance by spraying water directly
onto it.
Do not use benzene, thinner, or alcohol to clean the
appliance.
This may result in discoloration, deformation,
damage, electric shock, or fire.
Before cleaning or performing maintenance, unplug
the appliance from the wall socket and remove food
waste from the door and cooking compartment.
Failing to do so may result in electric shock or fire.
Take care not to hurt yourself when cleaning the
appliance (external/internal)
You may hurt yourself on the sharp edges of the
appliance.
Do not clean the appliance with a steam cleaner.
This may result in corrosion.
Keep the inside of the oven clean. Food particles or
spattered oils stuck to the oven walls or floor can
cause paint damage and reduce the efficiency of the
oven.
WARNING
STATE OF CALIFORNIA
PROPOSITION 65
WARNINGS:
WARNING: This product contains chemicals known to
the State of California to cause cancer and reproductive
toxicity.
SAVETHESEINSTRUCTIONS
English - 6
cont nt
SETTING UP YOUR MICROWAVE OVEN
8 Checking the parts
8 Warranty and service information
8 Setting up your microwave oven
9 Features
9 Checking the control panel
10 Setting the time
10 Child lock
USING YOUR MICROWAVE OVEN
10 Kitchen timer button
10 Add 30 sec button
10 Vent buttons (2speed &on/off)
10 Light hi/Io/off button
10 Cooking presets buttons
11 Reheat button
12 Auto defrost button
13 Soften/melt button
14 Microwave cooking times &
Power levels
14 Eco mode
COOKWARE GUIDE
:_ 15 Microwave-safe utensils
CLEANING AND MAiNTAiNING YOUR MICROWAVE
OVEN
19 Cleaning the exterior
19 Cleaning the interior
19 Cleaning the turntable and roller
rings
19 Storing and repairing your
microwave oven
19 Replacing the cooktop/night light
19 Replacing the oven light
20 Cleaning the grease filter
20 Replacing the charcoal filter
TROUBLESHOOTING
APPENDIX
WARRANTY (USA)
WARRANTY (CANADA)
COOKING GUIDE
16
....... 16
17
17
17
17
18
General microwave tips
Cooking meat
Cooking poultry
Cooking seafood
Cooking eggs
Cooking vegetables
Recipes
English = 7
sort ncj UD
I
Be sure to follow these instructions closely so
that your new microwave oven works properly,
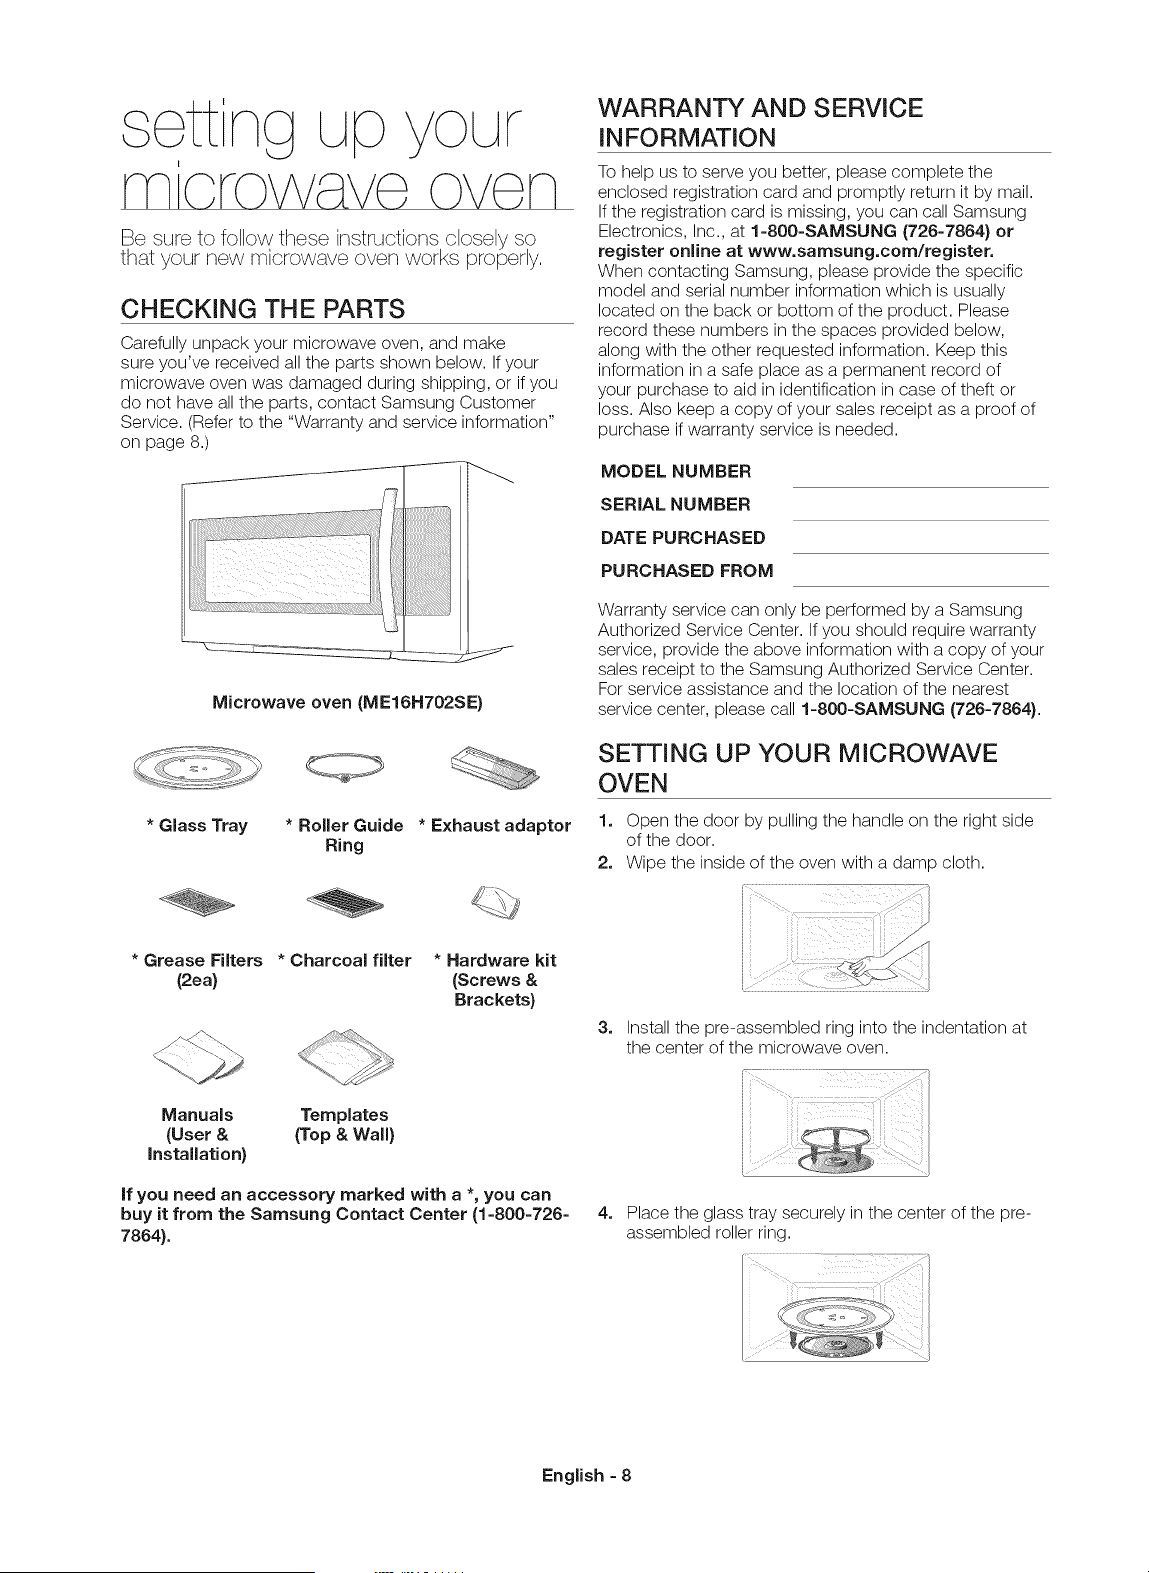
CHECKING THE PARTS
Carefully unpack your microwave oven, and make
sure you've received all the parts shown below. If your
microwave oven was damaged during shipping, or if you
do not have all the parts, contact Samsung Customer
Service. (Refer to the "Warranty and service information"
on page 8.)
i ili!ii!ii!ii!ii
--_--_ ::3:
Microwave oven (ME16H702SE}
* Glass Tray * Roller Guide
Ring
* Grease Filters * Charcoal filter
(2ca}
* Exhaust adaptor
* Hardware kit
(Screws &
Brackets}
Manuals Templates
(User & (Top & Wail}
Installation}
If you need an accessory marked with a *, you can
buy it from the Samsung Contact Center (1-800-726-
7884).
WARRANTY AND SERVICE
INFORMATION
To help us to serve you better, please complete the
enclosed registration card and promptly return it by mail.
If the registration card is missing, you can call Samsung
Electronics, Inc., at 1-800-SAMSUNG (726-7864} or
register online at www.samsung.com/register.
When contacting Samsung, please provide the specific
model and serial number information which is usually
located on the back or bottom of the product. Please
record these numbers in the spaces provided below,
along with the other requested information. Keep this
information in a safe place as a permanent record of
your purchase to aid in identification in case of theft or
loss. Also keep a copy of your sales receipt as a proof of
purchase if warranty service is needed.
MODEL NUMBER
SERIAL NUMBER
DATE PURCHASED
PURCHASED FROM
Warranty service can only be performed by a Samsung
Authorized Service Center. If you should require warranty
service, provide the above information with a copy of your
sales receipt to the Samsung Authorized Service Center.
For service assistance and the location of the nearest
service center, please call 1-800-SAMSUNG (726-7864}.
SETTING UP YOUR MICROWAVE
OVEN
1. Open the door by pulling the handle on the right side
of the door.
2. Wipe the inside of the oven with a damp cloth.
3=
4=
Install the pre-assembled ring into the indentation at
the center of the microwave oven.
Place the glass tray securely in the center of the pre-
assembled roller ring.
English - 8
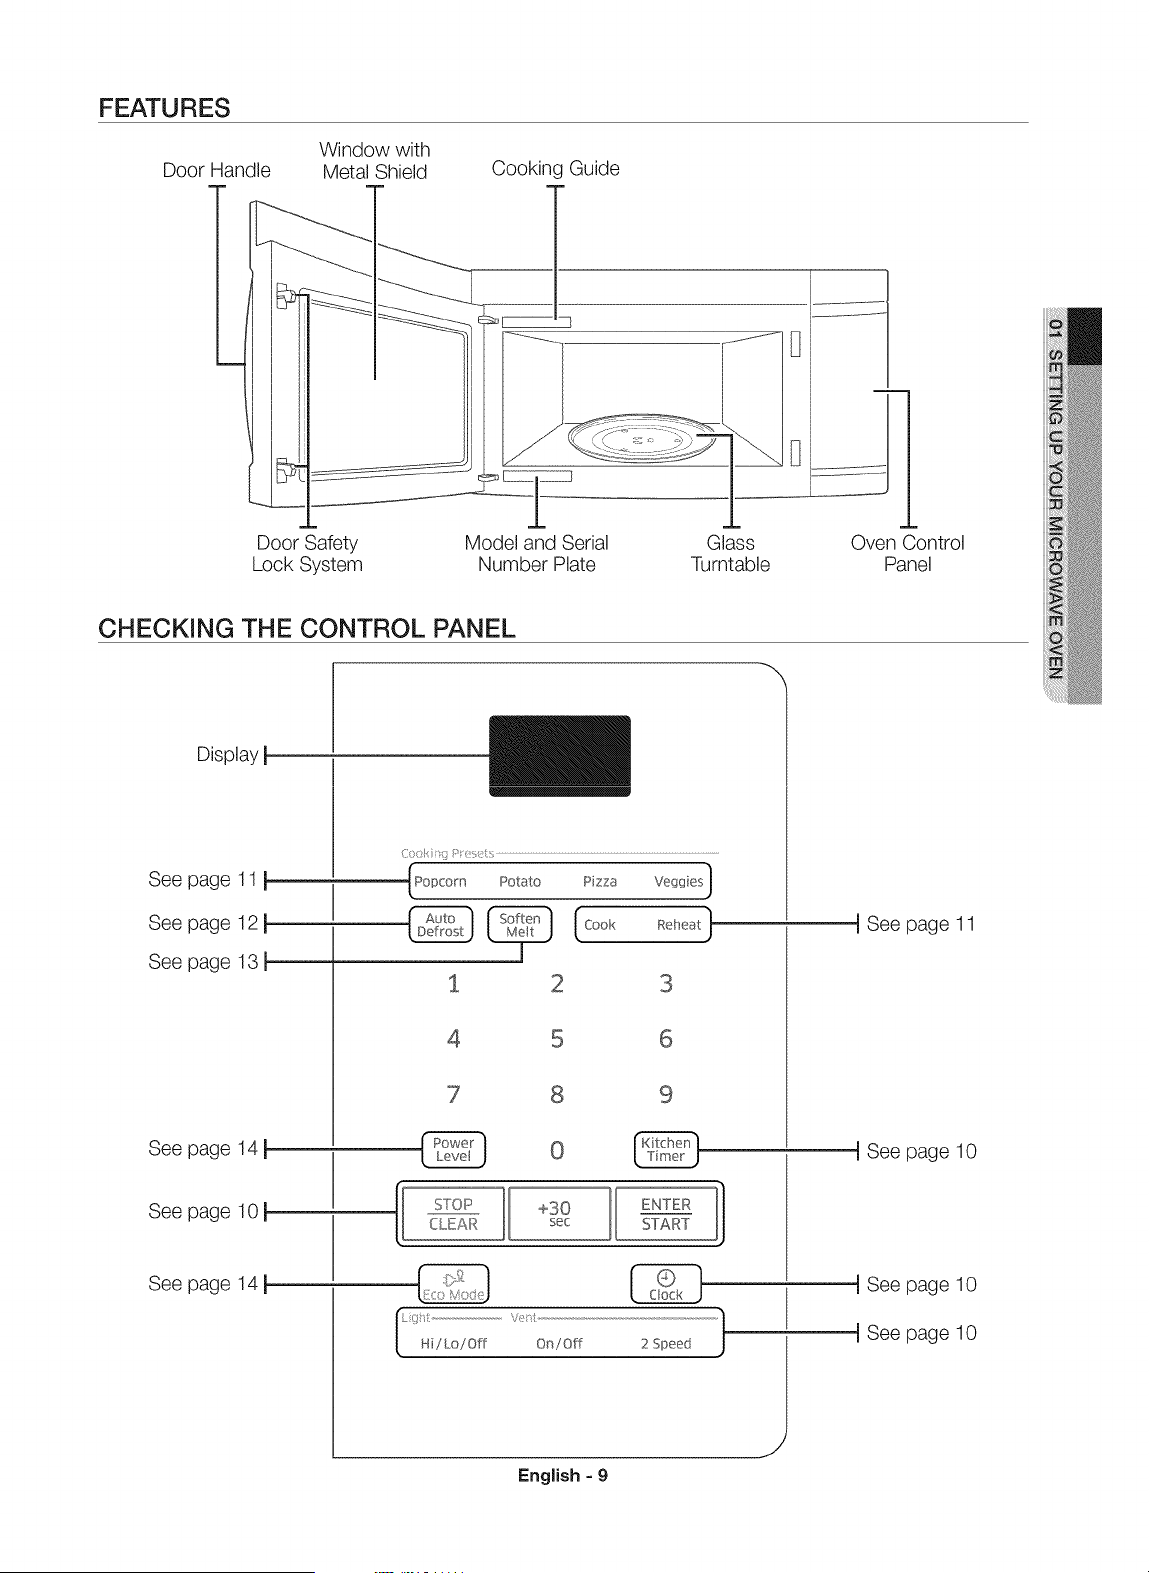
FEATURES
Door Handle
Door Safety
Lock System
Window with
Metal Shield
Model and Serial
Number Plate
Cooking Guide
Glass
Turntable
.... jr
Oven Control
Panel
CHECKING THE CONTROL PANEL
Display I
r
See page 11 }
See page 121
See page 131
{POpCOrn Potato Pizza Veggies]
@ [_oo_oohoot}
1 3
4
8 9
1
See page 141
See page 101
]1 ]IENTERCLEAR sec START
See page 141
...............................................'_<:, ..........................................................................................................................]
On/Off 2 Speed J
English - 9
I See page 11
I See page 10
I See page 10
] See page 10

SETTING THE TIME
Your microwave oven is equipped with a built-in clock. Set the clock when first installing your microwave oven and after
a power failure. The time is displayed whenever the microwave oven is not being used.
1, Press the Clock button.
2, Use the number buttons to enter the current time.
3. Press the ENTER/START button.
CHILD LOCK
The Child Lock function allows you to lock the buttons so that the microwave oven cannot be operated accidentally. The
oven can be locked at any time.
Activating/Deactivating
If you want to activate or deactivate the child lock function, press the ENTER/START button for 3 seconds.
Cooking has never been easier than with your new Samsung microwave oven,
The following section describes everything you need to know about using your microwave oven,
KITCHEN TIMER BUTTON
Use the Kitchen Timer for timing up to 99 minutes, 99 seconds.
1. Press the Kitchen Timer button.
2, Use the number buttons to set the length of time you want the timer to run.
3. Press the ENTER/START button.
4. The display counts down and beeps when the time has elapsed.
5. To cancel the timer setting: Press the STOP/CLEAR button once.
ADD 30 SEC BUTTON
This simplified control saves you time, letting you quickly start cooking at 100 % power.
1. Press the Add 30 sec button for each 30 seconds you want food to cook. For example, press it twice to cook for
one minute, and then press the ENTER/START button to start cooking.
2. Add 30 sec to a cooking program already in progress by pressing the Add 30 sec button for every additional
30 seconds you want to add.
VENT BUTTONS (2 SPEED & ON/OFF)
The vent removes steam and other vapors from the cooking surface. You can manually select the vent setting.
1. Press the Vent 2 Speed button to set the speed level.
2. Press the Vent On/Off button to turn the vent on.
3. Press the Vent On/Off button again to turn the vent off.
LIGHT Hi/LO/OFF BUTTON
The Light button allows you to select a light setting for your microwave.
Press (times)1 2 3
Light High Low Off
COOKING PRESETS BUTTONS
The Cooking Presets buttons let you cook favorite foods using preset power levels and times at the touch of a button.
If the food is not thoroughly cooked or reheated when you use the Preset buttons, complete the cooking process by
selecting a power level and cooking the food for an additional amount of time.
A Do not use the Cooking Presets buttons continuously. You must let the oven cool for 5 minutes between uses or
....... the food will overcook.
English - 10
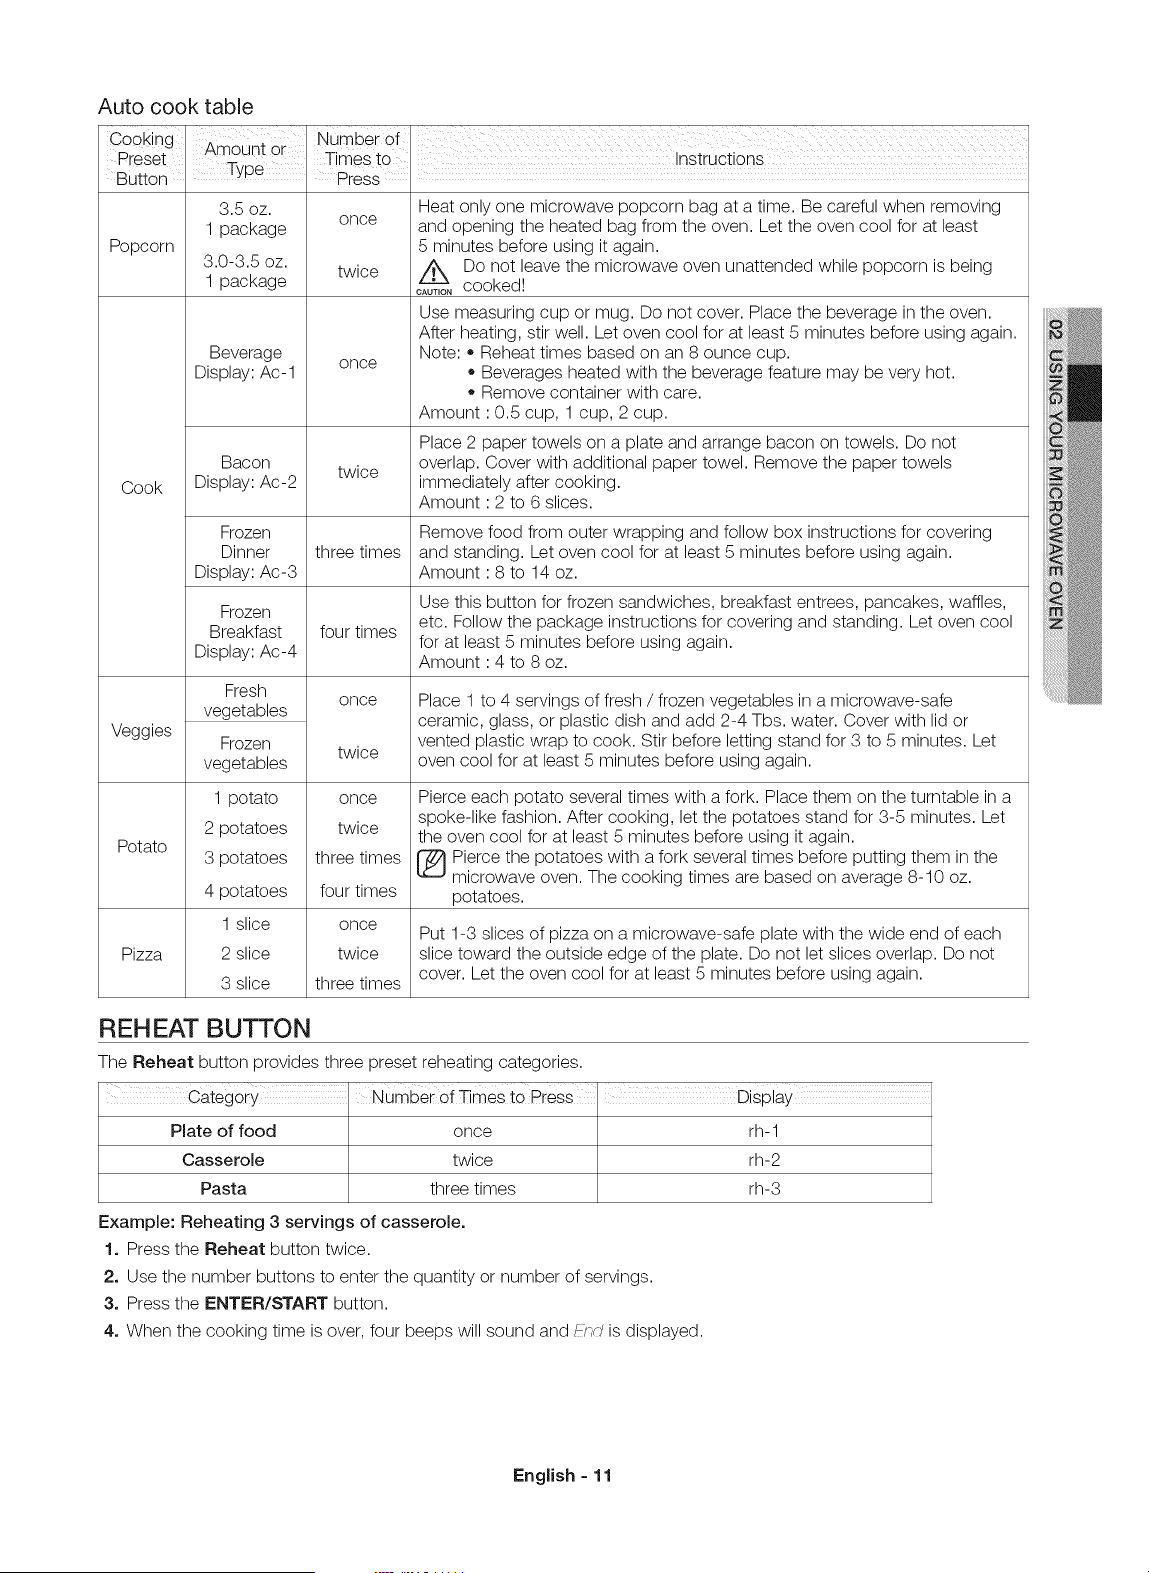
Auto cook table
Popcorn
Cook
Veggies
Potato
3.5 oz.
1 package
3.0-3.5 oz.
1 package
Beverage
Display: Ac-1
Bacon
Display: Ac-2
Frozen
Dinner
Display: Ac-3
Frozen
Breakfast
Display: Ac-4
once
twice
Fresh
vegetables
Frozen
vegetables
1 potato
2 potatoes
3 potatoes
4 potatoes
1 slice
2 slice
3 slice
once
twice
three times
fourtimes
once
twice
Heat only one microwave popcorn bag at a time. Be careful when removing
and opening the heated bag from the oven. Let the oven cool for at least
5 minutes before using it again.
Z_ Do not leave the microwave oven unattended while popcorn is being
oAoT,o,cooked!
Use measuring cup or mug. Do not cover. Place the beverage in the oven.
After heating, stir well. Let oven cool for at least 5 minutes before using again.
Note: • Reheat times based on an 8 ounce cup.
Beverages heated with the beverage feature may be very hot.
Remove container with care.
Amount : 0.5 cup, 1 cup, 2 cup.
Place 2 paper towels on a plate and arrange bacon on towels. Do not
overlap. Cover with additional paper towel. Remove the paper towels
immediately after cooking.
Amount : 2 to 6 slices.
once
twice
three times
four times
once
twice
three times
Remove food from outer wrapping and follow box instructions for covering
and standing. Let oven cool for at least 5 minutes before using again.
Amount : 8 to 14 oz.
Use this button for frozen sandwiches, breakfast entrees, pancakes, waffles,
etc. Follow the package instructions for covering and standing. Let oven cool
for at least 5 minutes before using again.
Amount : 4 to 8 oz.
Place 1 to 4 servings of fresh / frozen vegetables in a microwave-safe
ceramic, glass, or plastic dish and add 2-4 Tbs. water. Cover with lid or
vented plastic wrap to cook. Stir before letting stand for 3 to 5 minutes. Let
oven cool for at least 5 minutes before using again.
Pierce each potato several times with a fork. Place them on the turntable in a
spoke-like fashion. After cooking, let the potatoes stand for 3-5 minutes. Let
the oven cool for at least 5 minutes before using it again.
[_ ierce the potatoes with a fork several times before putting them in the
microwave oven. The cooking times are based on average 8-10 oz.
potatoes.
Put 1-3 slices of pizza on a microwave-safe plate with the wide end of each
Pizza slice toward the outside edge of the plate. Do not let slices overlap. Do not
cover. Let the oven cool for at least 5 minutes before using again.
REH EAT BUTTON
The Reheat button provides three preset reheating categories.
i i
Category Number of Times to Press Display
Plate of food once rh-1
Casserole twice rh-2
Pasta three times rh-3
Example: Reheating 3 servings of casserole,
1. Press the Reheat button twice.
2. Use the number buttons to enter the quantity or number of servings.
3. Press the ENTER/START button.
4. When the cooking time is over, four beeps will sound and/?-_d is displayed.
English - 11
Reheating table
Follow the instructions below when reheating different types of food.
Category Amount
Plate of food
1 serving
(1 plate)
1 to4
servings
Casserole
Pasta
Use only pre-cooked, refrigerated foods. Cover the plate with a vented plastic wrap or
waxed paper tucked under the plate. If the food is not as hot as you would like after
using the reheat function, continue heating using additional time and power.
Contents:
3-4 oz. meat, poultry, or fish (up to 6 oz. with bone)
1_ cup starch (potatoes, pasta, rice, etc.)
1_ cup vegetables (about 3-4 oz.)
Cover the plate with a lid or vented plastic wrap. If the food is not as hot as you would
like after using the reheat function, continue heating using additional time and power.
Stir the food once before serving.
Contents:
3-4 oz. meat, poultry or fish (up to 6 oz. with bone)
_ cup starch (potatoes, pasta, rice, etc.)
_ cup vegetables (about 3-4 oz.)
The 'right' temperature of the food varies from person to person. Allow food to stand 1 to 5 minutes before serving.
AUTO DEFROST BUTTON
The defrost choices are preset in the oven. The defrost cycle provides you with the best defrosting method for
frozen foods, because the oven automatically sets the defrosting times according to the weight you enter. For added
convenience, the auto defrost function beeps to remind you to check or turn over the food during the defrost cycle.
Press the Auto Defrost button once and select the food weight. The available weight ranges from 0.1 to 6.0 Ibs.
1. Press the Auto Defrost button.
2. Use the number buttons to enter the weight.
3. Press the ENTER/START button.
(_ fter pressing the ENTER/START button, the display counts down the defrosting time. The oven will beep twice
during the defrost cycle. At this time, open the door and turn the food as needed. Remove any thawed portions,
then return the frozen portions to the oven and press the ENTER/START button to resume the defrost cycle. The
defrost cycle continues while the oven is beeping and only stops when the door is opened.
Defrosting tips
When using auto defrost, the entered weight is the net weight in pounds and tenths of pounds (the weight of the food
minus the container).
Use the auto defrost cycle for raw food only. The auto defrost cycle gives best results when the food you want to thaw
is no colder than 0 °F (taken directly from a true freezer). If food has been stored in a refrigerator-freezer that does not
maintain a temperature of 5 °F or below, always program a lower food weight (for a shorter defrosting time) to prevent
the food from cooking.
If the food is stored outside the freezer for up to 20 minutes, enter a lower food weight.
The shape of the package alters the defrosting time. Shallow rectangular packets defrost more quickly than a thick
block.
Separate the pieces as they begin to defrost. Separated pieces defrost more easily.
Shield areas of food with small pieces of foil if they start to become warm.
You can use small pieces of aluminum foil to shield foods such as chicken wings, leg tips, and fish tails, but the foil must
not touch the sides of the oven as foil causes arcing, which can damage the oven lining.
English - 12
Auto defrosting table
Follow the instructions below when defrosting different types of food.
Roast Beef, 2.5-6.0 Ibs. Start with the food placed fat side down. After each stage, turn the food over and shield
Pork any warm portions with narrow strips of aluminum foil.
Steaks, After each stage, rearrange the food. If there are any warm or thawed portions of food,
Chops, 0.5-3.0 Ibs. shield them with narrow, flat pieces of aluminum foil. Remove any pieces of food that are
Fish nearly defrosted. Let stand, covered for 5 - 10 minutes.
Ground 0.5-3.0 Ibs. After each stage, remove any pieces of food that are nearly defrosted. Let stand covered
Meat with foil for 5 - 10 minutes.
Remove giblets before defrosting poultry. Start defrosting with the breast side down. After
Whole 2.5-6.0 Ibs. the first stage, turn the chicken over and shield any warm portions with narrow strips of
Chicken aluminum foil. After the second stage, again shield any warm portions with narrow strips
of aluminum foil. Let stand, covered, for 30 - 60 minutes in the refrigerator.
Chicken 0.5-3.0 Ibs. After each stage, rearrange or remove any pieces of food that are nearly defrosted. Let
Pieces stand for 10 - 20 minutes.
Bread 0.1 - 2.0 Ibs. Arrange the rolls in a circle on kitchen paper in the middle of the turntable.
Turn over halfway through the defrosting time.
SOFTEN/MELT BUTTON
SOFTEN/MELT lets you melt chocolate, soften cream cheese, and melt butter.
Example: To melt chocolate.
1. Touch the Soften/Melt button.
2. Choose the food category by pressing the Soften/Melt button repeatedly.
3. Choose the food amount (1 or 2) by pressing a number button.
4. Touch the ENTER/START button.
Soften / Melt table
Place chocolate chips or square in a microwave-safe dish.
Melt chocolate
(St-l) 2 squares or 1 cup chips Stir well at half time when the oven beeps, and re-start the oven.
Unless stirred, the chocolate keeps its shape even when heating time is
over.
Soften cream
cheese Unwrap the cream cheese and place on microwave-safe dish.
(St-2) Let stand 1-2 minutes.
Melt butter
(St-S)
1 package (8 oz.)
1 stick (1/4 lb.)
2 sticks (1/2 lb.)
Remove wrapping and cut butter in half vertically.
Place butter in dish, cover with wax paper.
Stir well after finishing and let stand 1-2 minutes.
English - 13

MICROWAVE COOKING TIMES &
POWER LEVELS
The power level lets you control the heating intensity from
Warm (1) to High (10).
Cooking at high power levels
1. Use the number buttons to enter the cooking time.
2. Press the ENTER/START button.
3. When the cooking time is over, four beeps will
sound and End is displayed.
If you do not enter a power level, the microwave
oven cooks at the High Power Level by default.
Cooking at lower power levels
Cooking at high power does not always give you the
best results with foods that require slower cooking, such
as roasts, baked goods, or custards. Your oven has 9
additional power settings in addition to high.
1. Use the number buttons to enter the cooking time.
(_ hen selecting more than one cooking stage, you
must press the Power Level button before you can
enter the second cooking stage.
(_ ress the Power Level button twice to set the
power level to High for a cooking stage.
2. Press the Power Level button.
3. Use the number buttons to enter the power level.
4. Press the ENTER/START button.
5. When the cooking time is over, four beeps will
sound and End is displayed.
Cooking with more than one cook cycle
For best results, some recipes call for one Power Level
for a certain length of time, and another Power Level for
another length of time. Your oven can be set to change
from one to another automatically, if the first cycle is the
defrost cycle.
1. Use the number buttons to enter the cook time.
2. Press the Power Level button.
3. Use the number buttons to enter the power level.
4. Use the number buttons to enter the second cook
time.
5. Press the Power Level button.
6. Use the number buttons to enter the power level.
7. Press the ENTER/START button.
8. When the cooking time is over, four beeps will
sound and End is displayed.
Power Levels
The 10 power levels allow you to choose the optimal
)ower level for your cooking needs.
100 %
90 %
80 %
7O %
6 60 %
5O%
4O%
3O%
Power
level
10
(High)
Boiling water.
Cooking ground beef.
Making candy.
Cooking fresh fruit and
vegetables.
Cooking fish and poultry.
Preheating browning dish.
Reheating beverages.
Bacon slices.
Reheating meat slices quickly.
Sauteing onions, celery, and
green pepper
Reheating all types of items
(Dinner plate, pasta, meat,
soup or sauce, etc,).
Cooking scrambled eggs.
Cooking breads and cereal
products.
Cooking cheese dishes, veal.
Cooking cakes, muffins,
brownies, cupcakes.
Cooking pasta.
Cooking meats, whole poultry.
Heating custard
Cooking whole chickens,
turkey, spare ribs, rib roasts,
sirloin roasts.
Cooking less tender cuts of
meat.
Reheating frozen convenience
foods.
Thawing meat, poultry, and
seafood.
Cooking small quantities of
food.
Finishing cooking casserole,
stew, and some sauces.
Softening butter and cream
2 20 % cheese.
Heating small amounts of food.
1 10 % Softening ice cream.
Raising yeast dough.
ECO MODE
Eco Mode reduces standby power usage.
When you press the Eco Mode button once, the display
will go out and the microwave shifts to the mode which
minimizes power usage.
To cancel the Eco Mode, press the Eco Mode button
once again, or press any other button.
English - 14
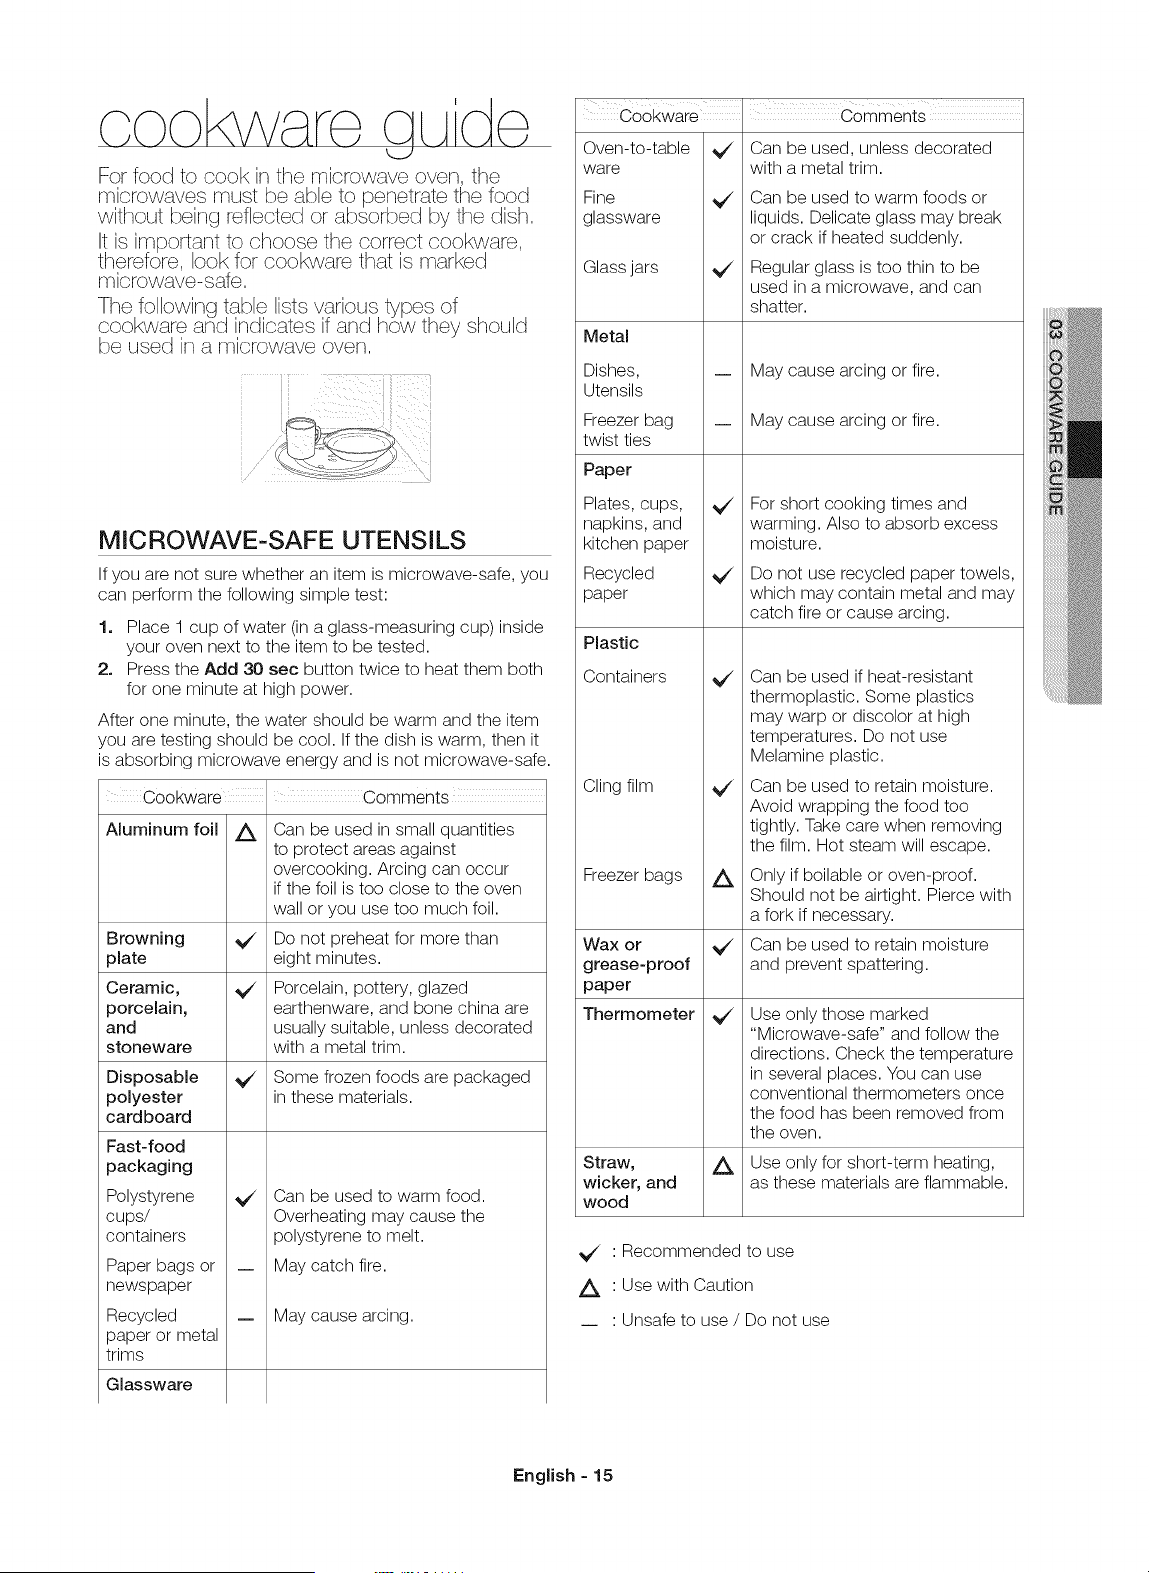
For food to cook in the microwave oven, the
microwaves must be able to penetrate the food
without being reflected or absorbed by the dish,
It is important to choose the correct cookware,
therefore, look for cookware that is marked
microwave-safe,
The following table lists various types of
cookware and indicates if and how they should
be used in a microwave oven,
MICROWAVE-SAFE UTENSILS
If you are not sure whether an item is microwave-safe, you
can perform the following simple test:
1. Place 1 cup of water (in a glass-measuring cup) inside
your oven next to the item to be tested.
2. Press the Add 30 sec button twice to heat them both
for one minute at high power.
After one minute, the water should be warm and the item
you are testing should be cool. If the dish is warm, then it
is absorbing microwave energy and is not microwave-safe.
Cookwarel Comments
Aluminum foil
Browning
plate
Ceramic,
porcelain,
and
stoneware
Disposable
polyester
cardboard
Fast-food
packaging
Polystyrene
cups/
containers
Paper bags or
newspaper
Recycled
paper or metal
trims
Glassware
Can be used in small quantities
to protect areas against
overcooking. Arcing can occur
if the foil is too close to the oven
wall or you use too much foil.
Do not preheat for more than
eight minutes.
Porcelain, pottery, glazed
earthenware, and bone china are
usually suitable, unless decorated
with a metal trim.
Some frozen foods are packaged
in these materials.
Can be used to warm food.
Overheating may cause the
polystyrene to melt.
May catch fire.
May cause arcing.
i ¸
Cookware _ Comments
Oven-to-table
ware
Fine _/
glassware
Glass jars
Metal
Can be used, unless decorated
with a metal trim.
Can be used to warm hods or
liquids. Delicate glass may break
or crack if heated suddenly.
Regular glass is too thin to be
used in a microwave, and can
shatter.
Dishes,
Utensils
Freezer bag
twist ties
Paper
Plates, cups, _/
napkins, and
kitchen paper
Recycled
paper
Plastic
_ May cause arcing or fire.
_ May cause arcing or fire.
For short cooking times and
warming. Also to absorb excess
moisture.
Do not use recycled paper towels,
which may contain metal and may
catch fire or cause arcing.
Containers
Cling film
Freezer bags
Wax or
grease-proof
paper
Thermometer
Straw,
wicker, and
wood
_/ Can be used if heat-resistant
thermoplastic. Some plastics
may warp or discolor at high
temperatures. Do not use
Melamine plastic.
_/ Can be used to retain moisture.
Avoid wrapping the food too
tightly. Take care when removing
the film. Hot steam will escape.
A Only if boilable or oven-proof.
Should not be airtight. Pierce with
a fork if necessary.
Can be used to retain moisture
and prevent spattering.
Use only those marked
"Microwave-safe" and follow the
directions. Check the temperature
in several places. You can use
conventional thermometers once
the food has been removed from
the oven.
/k Use only for short-term heating,
as these materials are flammable.
' Recommended to use
A ' Use with Caution
_ : Unsafe to use / Do not use
English - 15
Microwave energy actually penetrates food,
attracted and ak_sorbed by the water, fat, and
sugar in the food, The microwaves cause the
mc}lecubs in the food to move rapidly, The rapid
movement of these molecules creates friction
and the resulting heat cooks the food,
GENERAL MICROWAVE TIPS
Dense foods, such as potatoes, take longer to heat than
lighter foods. Foods with a delicate texture should be
heated at a low power level to avoid becoming tough.
Foods with a non-porous skin such as potatoes or hot
dogs, should be pierced to prevent bursting.
Putting heating oil or fat in the microwave is not
recommended. Fat and oil can suddenly boil over and
cause severe burns.
Some ingredients heat faster than others. For example,
the jelly in the jelly doughnut will be hotter than the dough.
Keep this in mind to avoid burns.
The altitude and the type of cookware you are using can
affect the cooking time. When trying a new recipe, use the
minimum cooking time and check the food occasionally to
prevent overcooking.
Home canning in the microwave oven is not
recommended because not all harmful bacteria may be
destroyed by the microwave heating process.
Although microwaves do not heat the cookware, the heat
from the food is often transferred to the cookware. Always
use pot holders when removing food from the microwave
and instruct children to do the same.
Making candy in the microwave is not recommended as
candy can be heated to very high temperatures. Keep this
in mind to avoid injury.
Cooking techniques
lf the oven is set to cook for more than 25 minutes, it
will automatically adjust to 70 percent power after 25
minutes to avoid overcooking.
Stirring
Open the microwave door and stir foods such as
casseroles and vegetables occasionally while cooking
to distribute heat evenly. Food at the outside of the dish
absorbs more energy and heats more quickly, so stir from
the outside towards the center. The oven will turn off when
you open the door to stir your food.
Arrangement
Arrange unevenly shaped foods, such as chicken pieces
or chops, with the thicker, meatier parts toward the
outside of the turntable where they can receive more
microwave energy. To prevent overcooking, place thin or
delicate parts towards the center of the turntable.
Shielding
Shield food with narrow strips of aluminum foil to prevent
overcooking. Areas that need shielding include poultry
wing-tips, the ends of poultry legs, and corners of square
baking dishes. Use only small amounts of aluminum foil.
Larger amounts can damage your oven.
Turning
Turn foods over midway through the cooking cycle
to expose all parts to the microwave energy. This is
especially important with large items such as roasts.
Standing
Foods cooked in the microwave build up internal heat
and continue to cook for a few minutes after the oven
stops. Let foods stand to complete the cooking process,
especially foods such as roasts and whole vegetables.
Roasts need this time to complete cooking in the center
without overcooking the outer areas. All liquids, such as
soup or hot chocolate should be shaken or stirred when
cooking is complete. Let liquids stand a moment before
serving. When heating baby food, stir well and test the
temperature before serving.
Adding moisture
Microwave energy is attracted to water molecules. Food
that is uneven in moisture content should be covered or
allowed to stand so that the heat disperses evenly. Add a
small amount of water to dry food to help it cook.
Venting
After covering a dish with plastic wrap, vent the plastic
wrap by turning back one corner to let excess steam
escape.
COOKING MEAT
Place the meat fat side down on a microwave-safe
roasting rack in a microwave-safe dish. Use narrow strips
of aluminum foil to shield any bone tips or thin pieces of
meat. Check the temperature in several places before
letting the meat stand the recommended time.
The following temperatures are the removal temperatures.
The temperature of the food will rise during standing time.
Food Cooking time! instrUCtions
Power level
Roast beef
(boneless)
Up to 4 Ibs.
Pork
(boneless
or bone-in)
Up to 4 Ibs.
Cooking Time:
10-15 min./Ib, for
145 °F - Rare
12-17 min./Ib, for
160 °F - Medium
14-19 min./Ib, for
170 °F - Well Done
Power Level:
High (10) for first
5 minutes, then
Medium (5).
Cooking Time:
15-20 min./Ib, at
170 °F Well Done
Power Level:
High (10) for first
5 minutes, then
Medium (5).
Place the roast fat-
side down on the
roasting rack and
cover with wax paper.
Turn over halfway
through the cooking
process. Let stand for
10 to 15 minutes.
Place the pork fat-side
down on the roasting
rack and cover with
wax paper. Turn
over halfway through
cooking process.
Let stand for 10 to
15 minutes.
The followin( temperatures are the removal temperatures.
The temperature of the food will rise during standing time.
Expect a 10 °F rise in temperature during the standing
time.
English - 16

Food' Remove' Afterstanding
from oven .... (10 MIN.)
Beef Rare
Medium
Well Done
Pork Medium
Well Done
Poultry Dark meat
Light meat
135 °F 145 °F
150 °F 160 °F
160 °F 170 °F
150 °F 160 °F
160 °F 170 °F
170 °F 180 °F
160 °F 170 °F
COOKING POULTRY
Place the poultry on a microwave-safe roasting rack in a
microwave-safe dish and cover with wax paper to prevent
spattering. Use aluminum foil to shield the bone tips, thin
pieces of meat, or areas that may start to overcook.
Check the temperature in several places before letting the
poultry stand the recommended time.
Cooking time!
E00d Power. level..... , Instructions
Whole Cooking Time:
chicken 6-10 min./Ib.
Up to4 180°Fdark
Ibs. meat
17O °F light
meat
Power Level:
Medium High
(7).
Chicken Cooking Time:
pieces 6-9 min./Ib.
Up to2 180°Fdark
Ibs. meat
17O °F light
meat
Power Level:
Medium High
(7).
Place the chicken breast-
side down on the roasting
rack. Cover with wax paper.
Turn over half way through
cooking process. Cook until
the juices run clear and the
meat near the bone is no
longer pink. Let stand for
5-10 minutes.
Place the chicken bone-side
down on the dish, with the
thickest portions towards
the outside of the dish.
Cover with wax paper. Turn
over halfway through the
cooking process. Cook until
the juices run clear and the
meat near the bone is no
longer pink. Let stand for
5-10 minutes.
COOKING SEAFOOD
Place the fish on a microwave-safe roasting rack in a
microwave-safe dish. Use a tight cover to steam the fish.
A lighter cover of wax paper or paper towel will decrease
steaming. Cook the fish until it flakes easily with a fork.
Do not overcook fish. Check it after the minimum cooking
time.
Food Cooking time!
PowerleVel
Tuna steaks Cooking
and salmon Time:
steaks 7-11 min./Ib.
Up to 1.5
Ibs.
Fillets
Up to 1.5
Ibs.
Shrimp
Up to 1.5
Ibs.
Power Level:
Medium-High
(7).
Cooking
Time:
4-8 min./Ib.
Power Level:
Medium-High
(7).
Cooking
Time:
4- 61/2min./Ib.
Power Level:
Medium-High
(7).
Arrange the steaks on
a roasting rack with the
meaty portions towards
the outside of the rack.
Cover with wax paper.
Turn them over halfway
through the cooking
process. Cook until the
fish flakes easily with
a fork. Let stand for
3-5 minutes.
Arrange the fillets in a
baking dish, tucking
any thin pieces under.
Cover with wax paper.
If the fillets are thicker
than 1/2in., turn them
over halfway through the
cooking process. Cook
until the fish flakes easily
with a fork. Let stand for
2-3 minutes.
Arrange the shrimp in
a baking dish without
overlapping or layering
them. Cover with wax
paper. Cook until firm
and opaque, stirring 2
or 3 times. Let stand for
5 minutes.
COOKING EGGS
You can use your microwave oven to cook eggs. Cook
them until they are just set as they become tough if they
are overcooked.
_ Never cook eggs in their shells and never warm
....... up hard-boiled eggs in their shells. Eggs cooked
or warmed up in their shells can explode. Always
pierce whole eggs to keep them from bursting.
COOKING VEGETABLES
Vegetables should be washed prior to cooking. Usually,
no extra water is needed. When cooking dense vegetables
such as potatoes, carrots, and green beans, add about 14
cup water.
Small vegetables (sliced carrots, peas, lima beans, etc.)
will cook faster than larger ones.
Whole vegetables, such as potatoes, acorn squash, or
corn on the cob, should be arranged in a circle on the
turntable before cooking. They will cook more evenly if
turned over halfway through the cooking process.
Always place vegetables such as asparagus and broccoli
with the stems pointing towards the edge of the dish and
English - 17

thetipstowardthecenter.
Whencookingcutvegetables,alwayscoverthedishwith
alidorventedmicrowavableplasticwrap.
Whole,unpeeledvegetablessuchaspotatoes,squash,
eggplant,etc.,shouldhavetheirskinspiercedinseveral
spotsbeforecookingtopreventthemfrombursting.
Foramoreevencookingresult,stirorrearrangewhole
vegetableshalfwaythroughthecooktime.
Generally,thedenserthefood,thelongerthestanding
time.(Thestandingtimereferstothetimenecessaryfor
dense,largefoodsandvegetablestofinishcookingafter
theycomeoutoftheoven.)Abakedpotatocanstandon
thecounterforfiveminutesbeforecookingiscompleted,
whileadishofpeascanbeservedimmediately.
RECIPES
Beef and barley stew
11_Ibs. beef stew cubes, cut into l_-inch pieces
1_2cup chopped onion
2 Tbs. all-purpose flour
1 Tbs. Worcestershire sauce
1 can (13.75-14.5 oz.) beef broth
2 medium carrots, cut into l_-inch slices (about 1 cup)
1_ cup barley
1 bay leaf
1Atsp. pepper
1 pkg. (9-10 oz.) frozen peas, thawed
1. In a 2-quart casserole, combine the beef, onion, flour,
and Worcestershire sauce and mix well. Cover with
lid. Cook at High for 6 to 8 minutes until the beef is no
longer pink, stirring once.
2. Stir in beef broth, carrots, barley, bay leaves, and
pepper. Cover with lid. Cook at Medium for 1 to 11_
hours until carrots and beef are tender, stirring 2 to 3
times.
3. Stir in peas. Cover with lid. Cook at Medium for 10
minutes. Let stand for 10 minutes. Remove bay leaves
before serving.
Makes 6 servings.
Broccoli and cheese casserole
1Acup butter or margarine
1Acup chopped onion
11/2Tbs. flour
1_ tsp. salt
1Atsp. dry mustard
1/8tsp. pepper
11_cups milk
1Acup chopped red pepper
8 oz. (2 cups) cheddar cheese, shredded
1 pkg. (9-10 oz.) frozen chopped broccoli, thawed
4 cups cooked spiral shaped pasta (8 oz. dry)
1. In a 2-quart casserole, cook butter and onion at High
for 1 to 2 minutes until the onion is soft, stirring once.
2. Add flour, salt, mustard, and pepper; mix well. Cook
at High for 30 to 60 seconds until mixture boils. Stir in
milk until smooth.
3. Stir in red pepper. Cook at High for 2 to 3 minutes until
mixture boils and thickens slightly, stirring twice. Stir in
cheese until melted.
4. Add broccoli and pasta, mix well. Cover with lid. Cook
at High for 4 to 6 minutes until heated through, stirring
once. Stir before serving.
Makes 6 servings.
Warm potato salad
2 Ibs. small red potatoes, cut into l_-inch pieces
4 slices bacon (uncooked), cut into l_-inch pieces
1Acup chopped onion
2 tsp. sugar
1 tsp. salt
1 tsp. flour
1_ tsp. celery seed
1/8tsp. pepper
21_Tbs. apple cider vinegar
1. In a 2-quart casserole, combine the potatoes and
1Acup water. Cover with lid. Cook at High until the
potatoes are tender (7-10 minutes); stir twice. Drain
and set aside to cool slightly.
2. In a medium bowl, cook the bacon at High until crisp
(21/2-31/2minutes); stir once. Place the bacon on a
paper towel. Reserve 1 Tbs. drippings.
3. Combine the drippings and onion. Cover with plastic
wrap; turn a corner back to vent steam. Cook at High
until tender (11_-21_ minutes); stir once.
4. Stir in sugar, salt, flour, celery seed, and pepper.
Cook at High until mixture boils (30-40 seconds). Stir
in vinegar and 1/2cup water. Cook at High until liquid
boils and thickens slightly (1-2 minutes); stir once. Add
bacon to dressing. Pour dressing over potatoes. Stir
well.
Makes 6 servings.
Black bean soup
1 cup chopped onion
1 clove garlic, minced
2 cans (15 oz. each) black beans, drained
1 can (14-16 oz.) stewed tomatoes, chopped
1 can (13.75-14.5 oz.) chicken broth
1 can (7-8.5 oz.) corn
1 can (4 oz.) chopped green chilies
1-2 tsp. ground cumin
1. Place the onion and garlic in a 3-quart casserole.
Cover with lid. Cook at High for 2 to 4 minutes until
tender.
2. Add one can of beans, and mash the beans with a
fork. Add remaining ingredients and mix well.
3. Cook uncovered at High for 10 minutes; stir. Reduce
power to Medium and cook for 5 minutes. Stir before
serving.
Makes about 2 quarts.
English - 18
F
Keeping your microwave oven cban improves
its performance, wards off unnecessary repairs,
and bngthens its life,
CLEANING THE EXTERIOR
It's best to clean spills on the outside of your microwave
oven as they occur. Use a soft cloth and warm, soapy
water. Rinse and dry.
/_ Do not get water into the vents. Never use abrasive
....... products or chemical solvents such as ammonia or
alcohol as they can damage the appearance of your
microwave.
Cleaning under your microwave oven
Regularly clean grease and dust from the bottom of your
microwave using a solution of warm water and detergent.
Cleaning the control panel
Wipe with a damp cloth and dry thoroughly. Do not
use cleaning sprays, large amounts of soap and water,
abrasives, or sharp objects on the panel as it is easily
damaged.
Cleaning the door and door seals
Always ensure that the door seals are clean and that the
door closes properly. Take particular care when cleaning
the door seals to ensure that no particles accumulate and
prevent the door from closing correctly. Wash the glass
door with very mild soap and water. Be sure to use a soft
cloth to avoid scratching.
If a thin film of water accumulates on the inside or outside
of the oven door, wipe it off with a soft cloth. A thin water
film can accumulate when you operate the oven at high
humidity and in no way indicates microwave leakage.
CLEANING THE TURNTABLE AND
ROLLER RINGS
Clean the roller rings periodically and wash the turntable
as required. You can wash the turntable safely in your
dishwasher.
STORING AND REPAIRING YOUR
MICROWAVE OVEN
If you need to store your microwave oven for a short or
extended period of time, choose a dust-free, dry location.
Dust and dampness may adversely affect the ability of the
microwave parts.
A
WARNING
Do not repair, replace, or service any part of your
microwave oven yourself. Allow only a qualified
service technician to perform repairs. If the oven
is faulty and needs servicing, or you are in doubt
about its condition, unplug the oven from the
power outlet and contact your nearest service
center.
Do not use the oven if it is damaged, in
particular, if the door or door seals are damaged.
Door damage includes a broken hinge, a worn
out seal, or a distorted/bent casing.
Do not remove the oven from its casing.
This microwave oven is for home use only and is
not intended for commercial use.
REPLACING THE COOKTOP/NIGHT
LIGHT
When replacing the cooktop/night light, make sure that
you are wearing gloves to avoid injury from the heat of the
bulb.
1. Unplug the oven or turn off the power at the main
power supply.
2. Remove the screw from the light cover and lower the
cover.
3. Replace the bulb with a 40 watt incandescent bulb.
4. Replace the light cover and mounting screw.
5 Turn the power back on at the main power supply.
CLEANING THE INTERIOR
Ensure that the microwave oven has cooled down
....... before cleaning it to avoid injury.
Remove the glass tray from the oven when cleaning
....... the oven or tray. To prevent the tray from breaking,
handle it with care and do not put it in water
immediately after cooking. Wash the tray carefully in
warm sudsy water or in the dishwasher.
Clean the interior surfaces (oven cavity) of your microwave
oven periodically to remove any splashes or stains. To
remove hardened food articles and remove smells, place
2 cups of water (add lemon juice for extra freshness) into
a four-cup measuring glass. Run the microwave at High
power for 5 minutes or until the water boils. Let water
stand in the oven for one or two minutes.
REPLACING THE OVEN LIGHT
When replacing the oven light, make sure that you are
wearing gloves to avoid injury from the heat of the bulb.
1. Unplug the oven or turn off the power at the main
power supply.
2. Open the door.
3. Remove the vent cover mounting screws (3 middle
screws).
4. Slide the vent grille to the left, then pull it straight out.
5. Remove the charcoal filter, if present.
EngJish - 19
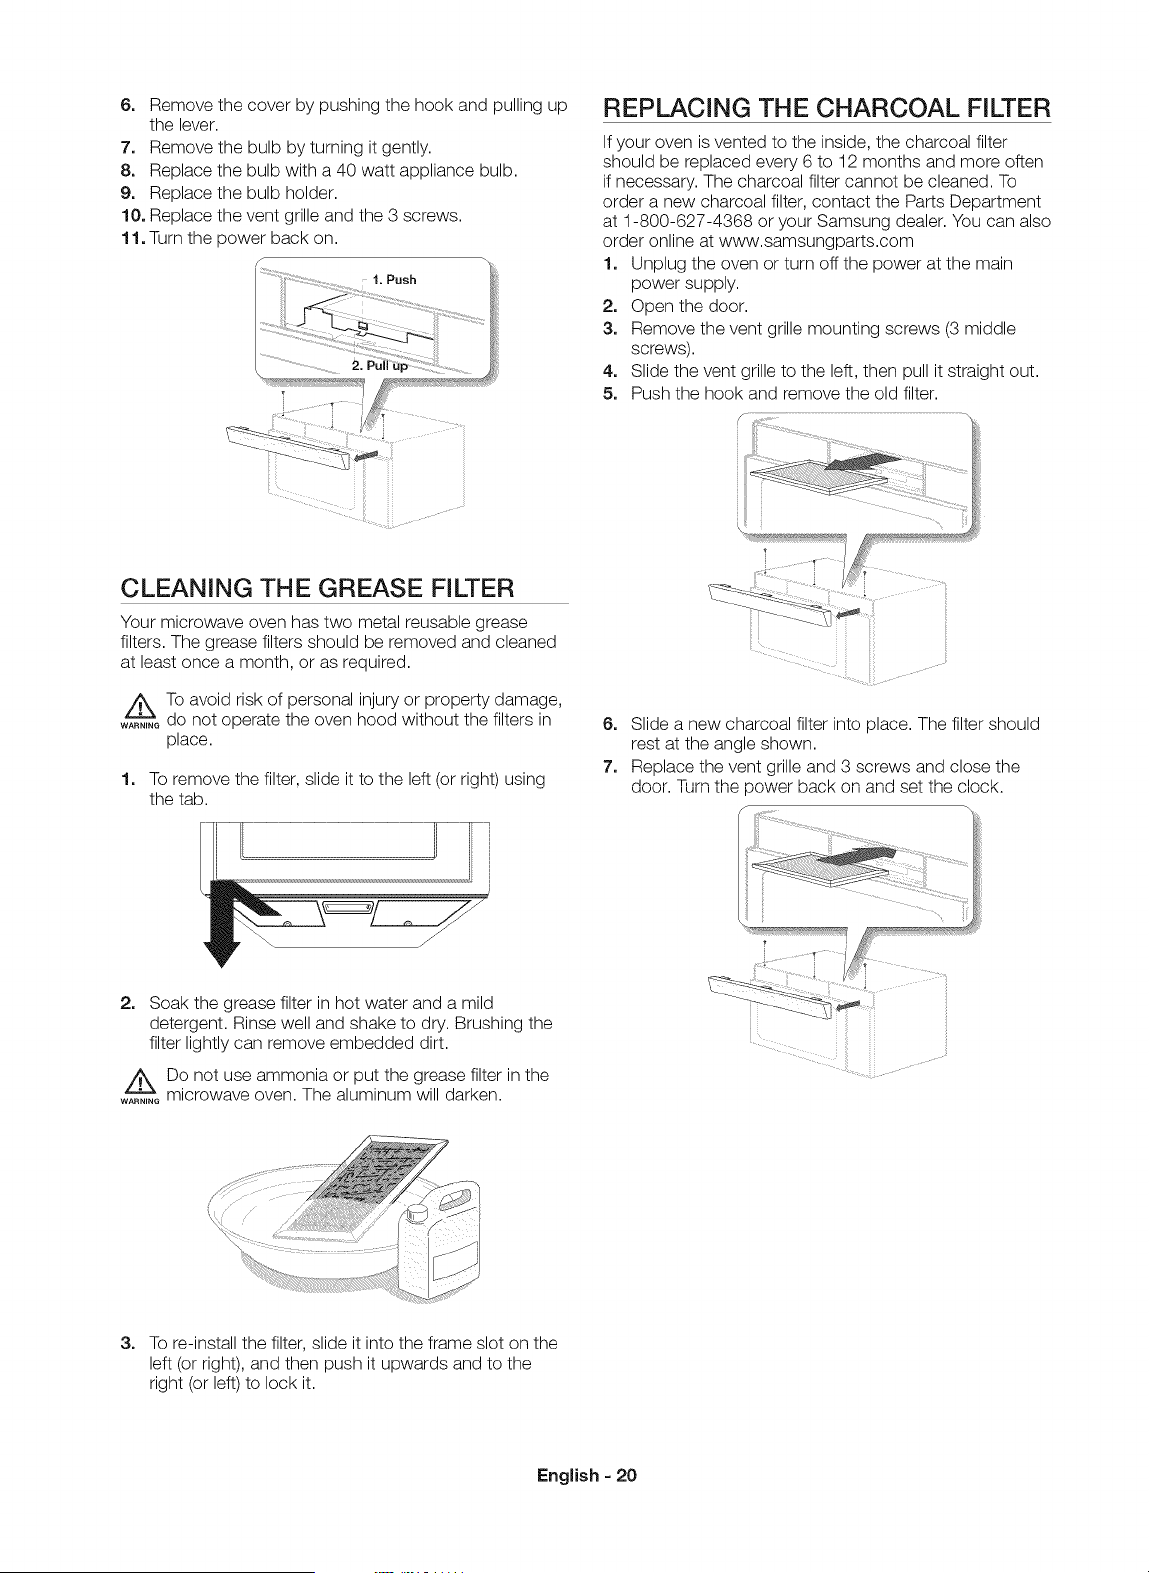
6o Removethecoverbypushingthehookandpullingup
thelever•
2. Remove the bulb by turning it gently•
8. Replace the bulb with a 40 watt appliance bulb.
9. Replace the bulb holder•
10. Replace the vent grille and the 3 screws•
11. Turn the power back on.
S
1. Push
REPLACING THE CHARCOAL FILTER
If your oven is vented to the inside, the charcoal filter
should be replaced every 6 to 12 months and more often
if necessary• The charcoal filter cannot be cleaned• To
order a new charcoal filter, contact the Parts Department
at 1-800-627-4368 or your Samsung dealer• You can also
order online at www.samsungparts.com
1o Unplug the oven or turn off the power at the main
power supply•
2. Open the door.
3o Remove the vent grille mounting screws (3 middle
screws).
4. Slide the vent grille to the left, then pull it straight out.
5. Push the hook and remove the old filter•
CLEANING THE GREASE FILTER
Your microwave oven has two metal reusable grease
filters• The grease filters should be removed and cleaned
at least once a month, or as required•
/_ To avoid risk of personal injury or property damage,
......._ do not operate the oven hood without the filters in
place•
1=
To remove the filter, slide it to the left (or right) using
the tab.
2. Soak the grease filter in hot water and a mild
detergent• Rinse well and shake to dry. Brushing the
filter lightly can remove embedded dirt.
z_Do not use ammonia or put the grease filter in the
....... microwave oven. The aluminum will darken•
6. Slide a new charcoal filter into place• The filter should
rest at the angle shown•
7. Replace the vent grille and 3 screws and close the
u_ _u_ u _ p,_vv_ _c_,r-, on
_ii ii
iiii ii
i_iliii
3. To re-install the filter, slide it into the frame slot on the
left (or right), and then push it upwards and to the
right (or left) to lock it.
English - 20
troLAbe hootna
Check these solutions if you have a problem
with your microwave:
I
Problem Solution
The display
and/or the oven
is not working.
The display
is working,
but the power
won't come on.
Is the power
going off before
the set time has
elapsed?
Cooks food too
slowly.
Has sparks or
arcing.
The turntable
makes noise
or becomes
stuck.
Causes TV
or radio
interference.
Vent Motor
suction force is
too weak.
Operating
noise is too
loud.
Make sure the plug is properly
connected to a grounded outlet.
If the wall outlet is controlled by a wall
switch, make sure the wall switch is
turned on.
Remove the plug from the outlet, wait
ten seconds, and plug it in again.
Reset the circuit breaker or replace
any blown fuses.
Plug a different appliance into the
outlet. If the other appliance doesn't
work, call a qualified electrician to
repair the wall outlet.
Plug the oven into a different outlet.
Make sure the door is closed securely.
Check if any packaging material or
anything else is stuck in the door seal.
Check if the door is damaged.
Touch Cancel twice and enter all the
cooking instructions again.
If there was a power outage, the time
indicator will display: 88:88.
If no power outage occurred,
remove the plug from the outlet, wait
ten seconds, and plug it in again.
Reset the clock and any cooking
instructions.
Reset the circuit breaker or replace
any blown fuses.
Make sure the oven has its own 20
amp circuit line. Operating another
appliance on the same circuit can
cause a voltage drop. If necessary,
move the oven to its own circuit.
Remove any metallic utensils,
cookware, or metal ties. If using foil,
use only narrow strips and allow at
least one inch between the foil and the
interior oven walls.
Clean the turntable, roller ring, and
oven floor.
Make sure the turntable and roller ring
are positioned correctly.
This is similar to interference caused
by other small appliances, such as
hair dryers. Move your microwave
(or appliance) away from appliances,
such as your TV or radio.
Set the vent mode to high.
The Vent Fan will only operate in low
speed mode while the microwave is
working.
The MWO makes noise during
operation. This is normal.
If you hear an abnormal sound
continuously, please contact the
Samsung Call Center (1-800-726-
7864).
Problem//I } solution/
Cook top lamp Set the lamp brightness level to
is too dim. high.
Difficult to Please refer to the instructions for
replace replacing the charcoal filter in the
Charcoal Filter. user's manual.
Turntable
rotates
improperly.
Make sure you have not put too
much food on the turntable.
If the food is too large or too
heavy, the turntable may operate
improperly.
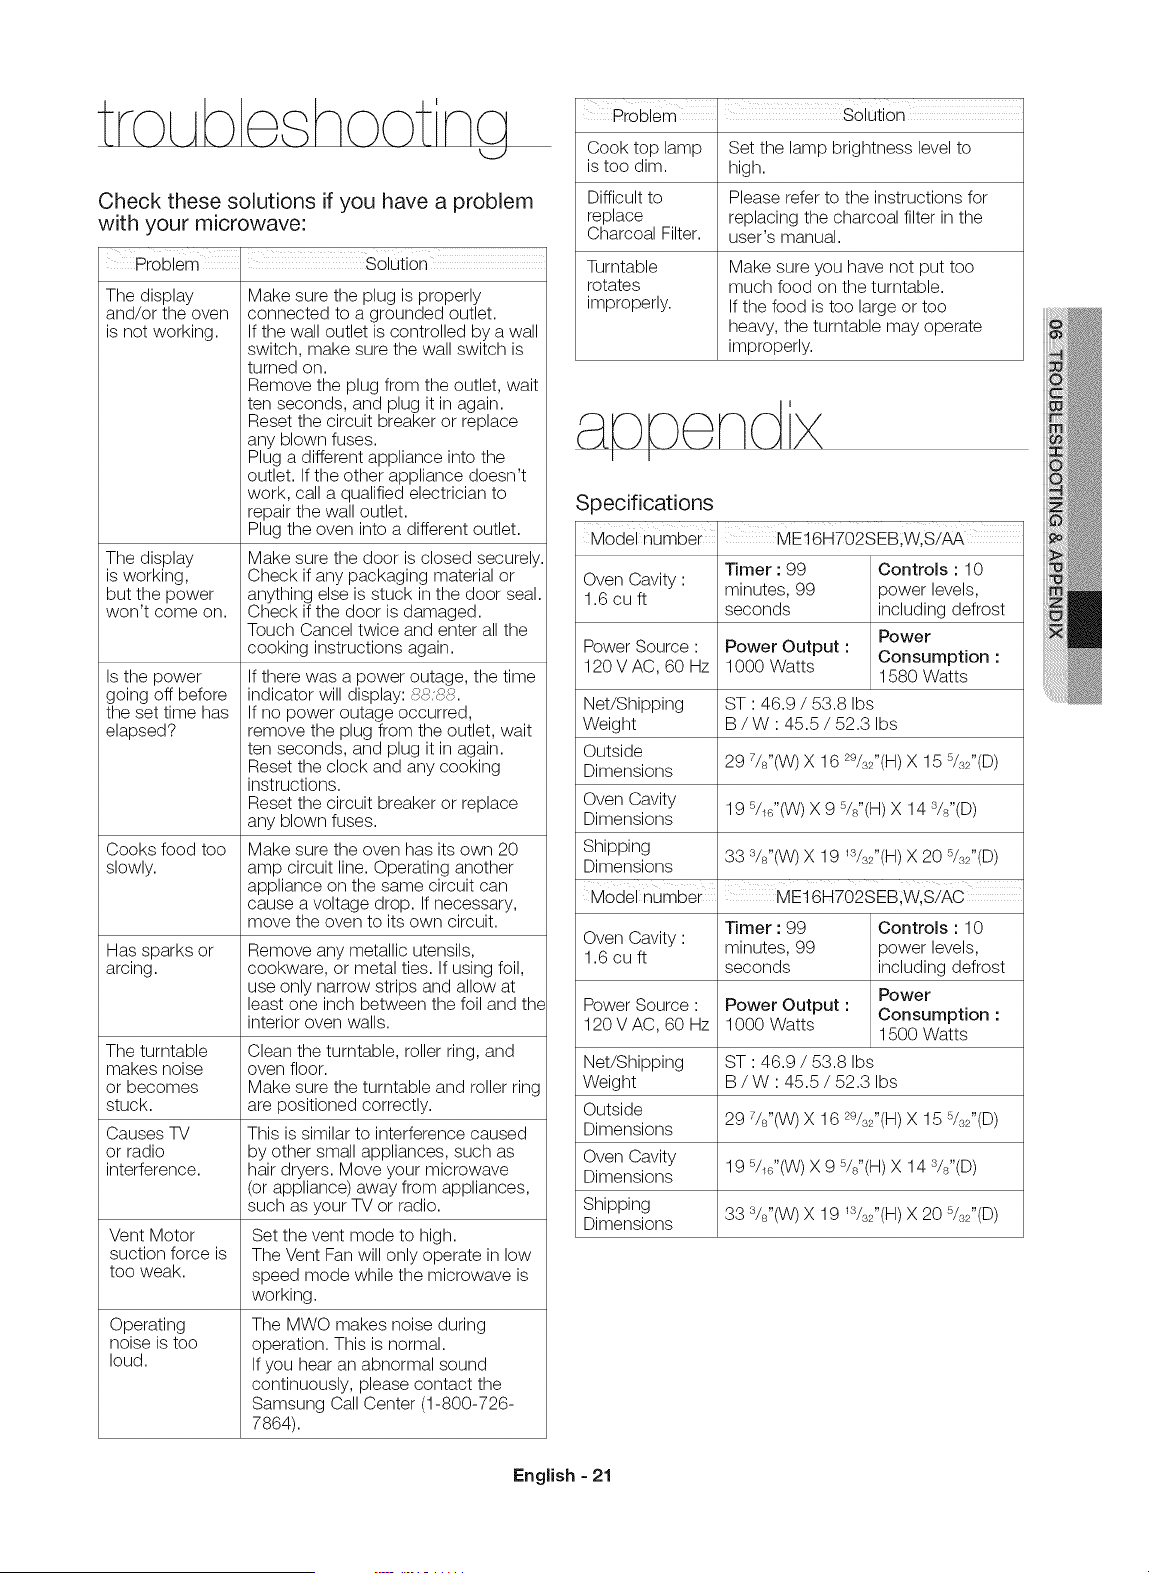
Specifications
Model number' ME16HT02SEB;WIs!AA
Timer : 99 Controls : 10
Oven Cavity'
1.6 cu ft minutes, 99 power levels,
seconds including defrost
Power
Power Source ' Power Output :
120 V AC, 60 Hz 1000 Watts Consumption :
1580 Watts
Net/Shipping ST : 46.9 / 53.8 Ibs
Weight B / W : 45.5 / 52.3 Ibs
Outside
29 7/s"(W)X 16 29&2"(H)X 15 5/,_2"(D)
Dimensions
Oven Cavity 19 5/16"(W)X 9 5/s"(H)X 14 :Ys"(D)
Dimensions
Shipping 33 s/s"(W) X 19 1:%2"(H)X 20 5/,_2"(D)
Dimensions
Model number ME16HT02SEB;W,S!AC
Timer : 99 Controls : 10
Oven Cavity ' minutes, 99 power levels,
1.6 cu ft
seconds including defrost
Power
Power Source ' Power Output : Consumption :
120 V AC, 60 Hz 1000 Watts 1500 Watts
Net/Shipping ST : 46.9 / 53.8 Ibs
Weight B / W : 45.5 / 52.3 Ibs
Outside
29 7/s"(W)X 16 29&2"(H)X 15 5/,_2"(D)
Dimensions
Oven Cavity 19 5&6"(W)X 9 5/s"(H)X 14 :Ys"(D)
Dimensions
Shipping
Dimensions 33 s/s"(W) X 19 Ws2"(H) X 20 5/,_2"(D)
English - 21
SAMSUNG OVER-THE-RANGE (OTR)
M ICROWAVE OVEN
Limited warranty to original purchaser
This SAMSUNG brand product, as supplied and distributed by
Samsung Electronics America, Inc. (SAMSUNG) and delivered
new, in the original carton to the original consumer purchaser,
is warranted by SAMSUNG against manufacturing defects in
materials and workmanship for a limited warranty period of:
ONE (1) YEAR PARTS AND LABOR, TEN (10) YEARS
PARTS WARRANTY FOR MAGNETRON
Samsung will charge a repair fee for replacing an accessory
or repairing a cosmetic defect if the damage to the unit and/or
damage to or loss of the accessory was caused by the customer.
Items this stipulation covers include:
- A Dented, Scratched, or Broken Door, Handle, Out-Panel, or
Control Panel
- A Broken or missing Tray, Guide Roller, Coupler, Filter, or Wire
Rack
User Replaceable Parts may be sent to the customer for unit
repair. If necessary, a Service Engineer can be dispatched to
perform service.
This limited warranty begins on the original date of purchase,
and is valid only on products purchased and used in the United
States. To receive warranty service, the purchaser must contact
SAMSUNG for problem determination and service procedures.
Warranty service can only be performed by a SAMSUNG
authorized service center. The original dated bill of sale must be
presented upon request as proof of purchase to SAMSUNG or
SAMSUNG's authorized service center.
SAMSUNG will repair or replace this product, at our option and at
no charge as stipulated herein, with new or reconditioned parts
or products if found to be defective during the limited warranty
period specified above. All replaced parts and products become
the property of SAMSUNG and must be returned to SAMSUNG.
Replacement parts and products assume the remaining original
warranty, or ninety (90) days, whichever is longer.
In-home service will be provided during the warranty labor
period subject to availability within the contiguous United States.
In-home service is not available in all areas. To receive in-home
service, the product must be unobstructed and accessible to
service personnel. If during in-home service repair can not be
completed, it may be necessary to remove, repair and return
the product. If in-home service is unavailable, SAMSUNG may
elect, at our option, to provide for transportation of our choice
to and from a SAMSUNG authorized service center. Otherwise,
transportation to and from the SAMSUNG authorized service
center is the responsibility of the purchaser.
This limited warranty covers manufacturing defects in materials
and workmanship encountered in normal, noncommercial use of
this product and shall not apply to the following, including, but
not limited to: damage which occurs in shipment; delivery and
installation; applications and uses for which this product was not
intended; altered product or serial numbers; cosmetic damage
or exterior finish; accidents, abuse, neglect, fire, water, lightning
or other acts of nature; use of products, equipment, systems,
utilities, services, parts, supplies, accessories, applications,
installations, repairs, external wiring or connectors not supplied
or authorized by SAMSUNG which damage this product or result
in service problems; incorrect electrical line voltage, fluctuations
and surges; customer adjustments and failure to follow
operating instructions, cleaning, maintenance and environmental
instructions that are covered and prescribed in the instruction
book; problems caused by pest infestations, and overheating or
overcooking by user; glass tray or turntable; reduced magnetron
power output related to normal aging. SAMSUNG does not
warrant uninterrupted or error-free operation of the product.
THERE ARE NO EXPRESS WARRANTIES OTHER THAN
THOSE LISTED AND DESCRIBED ABOVE, AND NO
WARRANTIES WHETHER EXPRESS OR IMPLIED, INCLUDING,
BUT NOT LIMITED TO, ANY IMPLIED WARRANTIES OF
MERCHANTABILITY OR FITNESS FOR A PARTICULAR
PURPOSE, SHALL APPLY AFTER THE EXPRESS WARRANTY
PERIODS STATED ABOVE, AND NO OTHER EXPRESS
WARRANTY OR GUARANTY GIVEN BY ANY PERSON, FIRM
OR CORPORATION WITH RESPECT TO THIS PRODUCT
SHALL BE BINDING ON SAMSUNG. SAMSUNG SHALL NOT
BE LIABLE FOR LOSS OF REVENUE OR PROFITS, FAILURE
TO REALIZE SAVINGS OR OTHER BENEFITS, OR ANY OTHER
SPECIAL, INCIDENTAL OR CONSEQUENTIAL DAMAGES
CAUSED BY THE USE, MISUSE OR INABILITY TO USE THIS
PRODUCT, REGARDLESS OF THE LEGAL THEORY ON WHICH
THE CLAIM IS BASED, AND EVEN IF SAMSUNG HAS BEEN
ADVISED OF THE POSSIBILITY OF SUCH DAMAGES. NOR
SHALL RECOVERY OF ANY KIND AGAINST SAMSUNG BE
GREATER IN AMOUNT THAN THE PURCHASE PRICE OF THE
PRODUCT SOLD BY SAMSUNG AND CAUSING THE ALLEGED
DAMAGE. WITHOUT LIMITING THE FOREGOING, PURCHASER
ASSUMES ALL RISK AND LIABILITY FOR LOSS, DAMAGE OR
INJURY TO PURCHASER AND PURCHASER'S PROPERTY AND
TO OTHERS AND THEIR PROPERTY ARISING OUT OF THE
USE, MISUSE OR INABILITY TO USE THIS PRODUCT SOLD BY
SAMSUNG NOT CAUSED DIRECTLY BY THE NEGLIGENCE OF
SAMSUNG. THIS LIMITED WARRANTY SHALL NOT EXTEND
TO ANYONE OTHER THAN THE ORIGINAL PURCHASER OF
THIS PRODUCT, IS NONTRANSFERABLE AND STATES YOUR
EXCLUSIVE REMEDY.
Some provinces or territories may or may not allow limitations on
how long an implied warranty lasts, or the exclusion or limitation
of incidental or consequential damages, so the above limitations
or exclusions may not apply to you. This warranty gives you
specific legal rights, and you may also have other rights which
vary from state to state.
To obtain warranty service, please contact SAMSUNG at:
1-800-SAMSUNG (726-7864) or www.
samsung.com/us/support
English = 22
SAMSUNG OVER-THE-RANGE (OTR)
MICROWAVE OVEN
Limited warranty to original purchaser
This SAMSUNG brand product, as supplied and distributed by
Samsung Electronics Canada, Inc. (SAMSUNG) and delivered
new, in the original carton to the original consumer purchaser,
is warranted by SAMSUNG against manufacturing defects in
materials and workmanship for a limited warranty period of:
ONE (1) YEAR PARTS AND LABOR, FIVE (5) YEARS
PARTS WARRANTY FOR MAGNETRON
Samsung will charge a repair fee for replacing an accessory
or repairing a cosmetic defect if the damage to the unit and/or
damage to or loss of the accessory was caused by the customer.
Items this stipulation covers include:
- A Dented, Scratched, or Broken Door, Handle, Out-Panel, or
Control Panel
- A Broken or missing Tray, Guide Roller, Coupler, Filter, or Wire
Rack
User Replaceable Parts may be sent to the customer for unit
repair. If necessary, a Service Engineer can be dispatched to
perform service.
This limited warranty begins on the original date of purchase, and
is valid only on products purchased and used in the Canada. To
receive warranty service, the purchaser must contact SAMSUNG
for problem determination and service procedures. Warranty
service can only be performed by a SAMSUNG authorized service
center. The original dated bill of sale must be presented upon
request as proof of purchase to SAMSUNG or SAMSUNG's
authorized service center.
SAMSUNG will repair or replace this product, at our option and at
no charge as stipulated herein, with new or reconditioned parts
or products if found to be defective during the limited warranty
period specified above. All replaced parts and products become
the property of SAMSUNG and must be returned to SAMSUNG.
Replacement parts and products assume the remaining original
warranty, or ninety (90) days, whichever is longer.
In-home service will be provided during the warranty labor period
subject to availability within the contiguous Canada. In-home
service is not available in all areas. To receive in-home service,
the product must be unobstructed and accessible to service
personnel. If during in-home service repair can not be completed,
it may be necessary to remove, repair and return the product.
If in-home service is unavailable, SAMSUNG may elect, at our
option, to provide for transportation of our choice to and from a
SAMSUNG authorized service center. Otherwise, transportation
to and from the SAMSUNG authorized service center is the
responsibility of the purchaser.
This limited warranty covers manufacturing defects in materials
and workmanship encountered in normal, noncommercial use of
this product and shall not apply to the following, including, but
not limited to: damage which occurs in shipment; delivery and
installation; applications and uses for which this product was not
intended; altered product or serial numbers; cosmetic damage
or exterior finish; accidents, abuse, neglect, fire, water, lightning
or other acts of nature; use of products, equipment, systems,
utilities, services, parts, supplies, accessories, applications,
installations, repairs, external wiring or connectors not supplied
or authorized by SAMSUNG which damage this product or result
in service problems; incorrect electrical line voltage, fluctuations
and surges; customer adjustments and failure to follow
operating instructions, cleaning, maintenance and environmental
instructions that are covered and prescribed in the instruction
book; problems caused by pest infestations, and overheating or
overcooking by user; glass tray or turntable; reduced magnetron
power output related to normal aging. SAMSUNG does not
warrant uninterrupted or error-free operation of the product.
THERE ARE NO EXPRESS WARRANTIES OTHER THAN
THOSE LISTED AND DESCRIBED ABOVE, AND NO
WARRANTIES WHETHER EXPRESS OR IMPLIED, INCLUDING,
BUT NOT LIMITED TO, ANY IMPLIED WARRANTIES OF
MERCHANTABILITY OR FITNESS FOR A PARTICULAR
PURPOSE, SHALL APPLY AFTER THE EXPRESS WARRANTY
PERIODS STATED ABOVE, AND NO OTHER EXPRESS
WARRANTY OR GUARANTY GIVEN BY ANY PERSON, FIRM
OR CORPORATION WITH RESPECT TO THIS PRODUCT
SHALL BE BINDING ON SAMSUNG. SAMSUNG SHALL NOT
BE LIABLE FOR LOSS OF REVENUE OR PROFITS, FAILURE
TO REALIZE SAVINGS OR OTHER BENEFITS, OR ANY OTHER
SPECIAL, INCIDENTAL OR CONSEQUENTIAL DAMAGES
CAUSED BY THE USE, MISUSE OR INABILITY TO USE THIS
PRODUCT, REGARDLESS OF THE LEGAL THEORY ON WHICH
THE CLAIM IS BASED, AND EVEN IF SAMSUNG HAS BEEN
ADVISED OF THE POSSIBILITY OF SUCH DAMAGES. NOR
SHALL RECOVERY OF ANY KIND AGAINST SAMSUNG BE
GREATER IN AMOUNT THAN THE PURCHASE PRICE OF THE
PRODUCT SOLD BY SAMSUNG AND CAUSING THE ALLEGED
DAMAGE. WITHOUT LIMITING THE FOREGOING, PURCHASER
ASSUMES ALL RISK AND LIABILITY FOR LOSS, DAMAGE OR
INJURY TO PURCHASER AND PURCHASER'S PROPERTY AND
TO OTHERS AND THEIR PROPERTY ARISING OUT OF THE
USE, MISUSE OR INABILITY TO USE THIS PRODUCT SOLD BY
SAMSUNG NOT CAUSED DIRECTLY BY THE NEGLIGENCE OF
SAMSUNG. THIS LIMITED WARRANTY SHALL NOT EXTEND
TO ANYONE OTHER THAN THE ORIGINAL PURCHASER OF
THIS PRODUCT, IS NONTRANSFERABLE AND STATES YOUR
EXCLUSIVE REMEDY.
Some provinces or territories may or may not allow limitations on
how long an implied warranty lasts, or the exclusion or limitation
of incidental or consequential damages, so the above limitations
or exclusions may not apply to you. This warranty gives you
specific legal rights, and you may also have other rights which
vary from state to state.
To obtain warranty service, please contact SAMSUNG at:
1-800-SAMSUNG (726-7864) or www.
samsung.com/ca/support, www.
samsung.com/ca_fr/support
English - 23

Scan this with your smarLphone
Scan the QR code _ or visit
www.samsung.com/spsn
to view our helpful
How-to Videos and Live Shows
*Requires reader to be installed on your smartphone
Please be advised that the Samsung warranty does NOT cover service calls to explain product
operation, correct improper installation, or perform normal cleaning or maintenance.
QUESTIONS OR COMMENTS
www.samsu ng.com/ca/su pport (English)
CANADA 1-800-SAMSUNG(726-7864) www.samsung.com/ca fr/support (French)
U.S.A
Consumer Electronics 1-800-SAMSU NG(726-7864) www.samsung.com/us/su pport
U.S.A 1-800-SAMSU NG(726-7864) www.samsung.com/us/su pport
Mobile Phones
Four srmcro ondeS
Manuel d'utilisation
100 % )
Recycled Paper
._rrecycl_ a 100 %.
monde de possibilites
Nous vous remercions d'avoir choisi ce produit Samsung.
MEI6HT02SE AA AC CFR.indd 1 2014-02-24 Z_ 11:56:45
F61bitationspourI_acqubitionde votrenouveaufoura micro-
ondesSamsung,Oe manuelcontbnt des informations
importantesconcemantI1nstalbtion,I'utiBationet I_entretbn
de votreappareil,Veuibz b lifeattentivementafinde profiter
pbinementdes nombreuxavantageset fonctionsqu_offre
votrefour micro-ondes,
CEQUEVOUSDEVEZSAVOIRSURLES
CONSBNESDESECURITE
Lesavertissementset bs consignesdes@udteimportantescontenus
dansce manuelnesontpasexhaustifs,IIest devotreresponsabilite
de faireappelb,votrebonsenset defairepreuvede prudenceet de
minutbIorsde FinstalBtion,de Fentretienet de Futilisationdu four
micro-ondes.
CONSBNESPERMETTANTD'EVITER
UNEEXPOSITIONEXCESSIVEAUX
MICRO-ONDES
A. N'utilisezjamaislefouralorsquelaporteest ouverte;vous
risquerbzd'6treexposee.unequantitetrop importantede
micro-ondes,Netentezjamab deneutralberou de modifierbs
verrouillagesdes@urite,
B. Neplacezaucunobjetentrelafagadedu fouret laporteet
ne laissezaucunresidualimentaireou de produitd'entretbn
s'accumubrsur bs surfacesassurant1'6tanch6ite,
C. N'utilisezpasb foursi celui-ciestendommage.IIest imperatifque
la portedufourfermecorrectementet que:
1. La portenesoitpasdeform@ou endommagee
2. Lescharniereset Ioquetsnesobnt pascass@ou dessert@
3. Lesjointsde laporteet lasurfaceassurantFetanch6it6sont
nettoyesetfonctionnels.
D. Toutesbs operationsd'ajustementou de r@arationdoivent6tre
exdusivementeffectu@sparuntechnicienqualifie;netentez
jamabd'ajusterou de r@arerle fourvous-m6me.
SYMBOLESDESECLIBIT¢:IMPORTANTS
ETPRO:CAUTIONS
Signification des ic6nes et des symboles
utilis_s dans ce manuel"
it,,
AVERTISSEMENT
ATTENTION
A
ATTENTION
Risquesou manipulations
dangereusessusceptibles
d'entrafnerdes blessures graves,
voire mortelles.
Risquesou manipulations
dangereusessusceptibles
d'entrainer des blessures
legeres ou des deg_ts
materiels.
Afin de reduireles risques
d'incendie,d'explosion,
d'electrocutionou de blessures
lotsde I'utilisationdu four a micro-
ondes,vous devez respecterces
reglesde s6curitede base.
NE PAStenter.
NE PASdemonter.
NE PAStoucher.
Suivezscrupuleusementlesconsignes.
Debranchezla fiche d'alimentationde la prise
murale.
Assurez-vousque I'appareilest reliea laterre afin
d'eviter tout risque d'electrocution.
Contactezle serviced'assistancetechnique.
[_ Remarque
Les symboles d'avertissement sont I& pour minimiser
les risques de blessure ; veillez _.bien les respecter.
Apr_s lecture de cette rubrique, conservez le manuel
dans un endroit s0r din de pouvoir le consulter
ult6rieurement.
CONSERVEZPRB@SEMENTCESCONSBNES
Fran_:ais canadien - 2
CONSIGNESDESF:CURITE
IMPORTANTES
Lorsquevousutilisezdesappareilselectriques,respectezlesconsignes
de securit6de basesuivantes:
/t,, AVERTISSEMENT
AVERTI_SEMENT
Consignesvisantb_reduirelesrisquesde br@lure,d'electrocution,
d'incendie,de blessureou d'expositionexcessiveauxmicro-
ondes:
1. Usezattentivementtouteslesconsignesdesecurit6avantd'utiliser
I'appareil,
2. Usezet respectezles,,Consignespermettantd'eviterune
expositionexcessiveauxmicro-ondes,,detaill6essur cettepage,
3. Cetappareildoit 6trereliea.laterre.N'effectuezlebranchement
quesurdes prisescorrectementraisesa laterre,Reportez-vousa.
lasection,,Consignesde misea laterre,,enpage4 dece manuel.
4. InstallezI'appareilconformementaux instructionsfournies.
5. Certainsproduitstelsquelesceufsentiers(avecleurcoquille)et les
recipientsdos (ex,: recipientsenverrefermes)sontsusceptibles
d'explosers'ilssontchauffesrapidement.Nelesfaitesjamais
chaufferaufour micro-ondes,
6. Utilisezce fouruniquementpourI'usageauquelilest destine(tel
quedecritdansce manuel),N'utilisezpasde produitschimiques
ou devapeursb.caracterecorrosifdartscefour,Cetypede fourest
specialementco%upourfairerechauffer,cuireoudeshydraterdes
aliments.IIn'estpasco%u pour6tre utilisedansun laboratoireou
a.desfinsindustrielles,
7. Commepourtoutappareil,unevigilanceextr6mes'imposeIorsque
lefourest utilisepardesenfants,
8. N'utilisezpascefoursi un c_.bled'alimentationou uneficheest
endommage(e),s'il nefonctionnepascorrectementou s'il a et6
endommageou a subiunechute,
9. La reparationou I'entretiendecet appareildoit imperativement
6treassure(e)parunemaind'ceuvrequali%e,Contactezleservice
d'assistancetechniquele plusprochedechezvoussivous
souhaitezeffectuerun contrOle,unereparationou un r%lage.
10. N'obstruezjamaislesouverturesdufour.
11. N'essayezpasde modifier,d'ajusterou de reparerla porte.
12. N'entreposezjamaislefoura.I'exterieur.N'utilisezpascetappareila.
proximited'eau(ex.: presd'un evier,dansunecavehumide,b.c6te
d'unepiscineou dansdesendroitssimilaires).
13. N'immergezjamaislaficheou lecb.bled'alimentationdartsI'eau,
14. Tenezlecordoneloign6dessurfaceschaudes.(ycomprisde
I'arrieredufour),
15. Nelaissezpas lecordonpendrepar-dessuslebord d'unetableou
d'un comptoir,
16. Lorsquevousnettoyezleszonesde laporteet du fourquientrent
encontactunefoislaportefermee,utilisezuniquementuneeponge
ou un chiffondouximbibe(e)d'un produitmenagerdouxet non
corrosif.DebranchezI'appareilavantde procederau nettoyage.
17. Pourreduirelerisqued'incendiea.I'interieurdufour :
a. @vitezde surcuirevosaliments,Surveillezattentivementla
cuissonIorsquevousplacezdu papier,du plastiqueou d'autres
materiauxcombustiblesa.I'interieurdu fourpourfaciliterla
cuisson,
b. Retirezlesligaturesmetalliquesdessacsen papierou en
plastiqueavantde lesplacerdanslefour,
c. Encasde departde feu,laissezla portedu fourfermee,
eteignezI'appareilet debranchezle c_bled'alimentationou
coupezI'alimentationauniveaudu tableaudefusiblesou du
dlsjoncteur,Sivousouvrezlaportedu four,I'incendierisquede
se propager,
d. N'entreposezpasd'objetsa I'interieurdu four,Nelaissezpas
de paplers,d'ustensilesde cuisineoud'alimentsa.I'interieurdu
four Iorsquecelui-ciestinutilise,
18. ToutIlquide(ex.: eau,lait,cafeouthe)est susceptiblede depasser
lepointd'ebullitionsansquelephenom6nesoitpourautant
visible,Unbouillonnementn'estparconsequentpastoujours
visibleIorsquevousretlrezle recipientdu four.ENCASDE
MOUVEMENTBRUSQUEOUDECONTACTAVECUNECUILLERE
OUUNAUTREUSTENSILE,DEL'EAUBOUILLANTERISQUEDE
SOUDAIND@BORDERDURECIPIENT.Consignespour reduireles
risquesde blessure:
a. Nefaitespassurchaufferles Iiquides.
b. RemuezleIiquideavanteta.lamoi% dutempsde chauffe.
c. N'utilisezpasde recipientsacoletroit.
d. Unefolsletempsde chauffe6coule,laissezlerecipientdartsle
micro-ondespendantquelquesinstantsavantde lesortir.
e. Soyezextr6mementprudentIorsquevous introduisezune
cuillereou un autreustensiledartslerecipient.
z£
ATTENTION
1.
2.
3.
ATTENTION
Nettoyezregulierementlahotte; ne laissezpaslagraisse
s'accumulersurlahotteou lefiltre,
Silesalimentssituessurlacuisinieres'enflamment,activezla
ventilation,
Nettoyezlefiltrede lahotteavecprecaution,Lesproduits
caustiques,commelesnettoyantsspecialfoura.basede lessive,
risquentd'endommagerlefiltre.
CONSERVEZP ECIEUSEMENTCESCONSIGNES
Frangais canadien - 3

INSTRUCTIONSDEMISEALATERRE
Cet appareildoit6trereliee.laterre.La raisee.laterrereduitlerisque
de chocelectrique,car ellefournitaucourantuncheminde fuiteen
casde court-circuit.Cefour estequip6d'un cordond'alimentation
disposantd'unefichedemisee.laterre,Lafichedoit6tre brancheesur
uneprisesecteurposeeet raiseb.laterreconformemente.la I%islation
envigueur.
/k AVERTISSEMENT
AVERT[SS[MENT
Touteutilisationnonconformede lafichede misea.laterrepeut
entrainerun risqued'electrocution,
BranchezI'appareilsur uneprisemuraletripolairerelieee.laterre,Ne
coupeznine retirezlatroisiemebroche(misea.laterre),N'utilisez
pasd'adaptateuret nedemontezpaslafichede misea laterre,
Contactezun electricienou un reparateurquali%si lesconsignesde
misee.la terrenevoussemblentpasclairesou si vousn'¢tespas
certainquevotreappareilestcorrectementrelieb.lamasse,
IIest deconseill6d'utiliserunerallongeaveccetappareil,Sile
cordond'alimentationesttrop court,faitesinstalleruneprisee.
proximitedevotreappareilpar unelectricienou un reparateur
qualifie,Toutefois,s'il s'avereindispensabled'utiliserunerallonge,
lisezet respectezlesconseilsindiquesdanslarubrique,,Utilisation
de rallonges,>ci-dessous.
Utilisationderallonges
Lefour estfourniavecuncordond'alimentationcourtafinde Iimiterles
risquesd'entravement.Descordonspluslongsou desrallongessont
disponibleset peuvent_treutilisessi vousfaitespreuvede prudence.
Encasd'utilisationd'un cordonpluslongou d'unerallonge:
1, Lescaracteristiqueselectriquesducordonou de larallongedoivent
6treau moinsegalesb.cellesdeI'appareil,
2, Larallongedolt _treuncordone.3ills reliablee.laterreet branchee
suruneprisefemelletripolaire,
3, Encasd'utilisationd'un cordonpluslong,celui-cinedoit pas
passerpar-dessuslecomptoirou la tableaflnd'eviterqu'un
enfantnetiredessusouquequelqu'unne s'yentrave.Si vous
utilisezunerallonge,I'intensitede I'eclairageinterieurpeutvaciller
et la ventilationsubirdesvariationsIorsquelefour micro-ondes
fonctionne.Lestempsde cuissonpeuventegalement_treplus
longs.
AVERTiSSEMENT
AVERTISSEMENTS
IMPORTANTSRELATIFSA
L'INSTALLATION
Cetappareildoit6treinstalleparuntechnicienquali%ou une
societ6de depannage.
Lenon-respectdecetteconsignepeutprovoquer
uneelectrocution,un incendie,uneexplosion,un
dysfonctionnementde I'appareilou des blessures,
DeballezI'appareil:retireztouslesel6mentsd'emballageet
verifiezquelefourn'estpas endommage(tracesde choc a.
I'interieurou e.I'extedeur,Ioquetscasses,fissuresauniveaude la
porteou portemalalignee),Encasde dommages,n'utilisezpasle
fouret contactezimmediatementvotrerevendeur.
Veilleze.cequelefoursoitinstalledansunemplacement
suffisammentgrand,
@
@
Retirezregulierementtoutesubstanceetrangere(poussiereou
eau)presentesur lesborneset lespointsde contactde lafiche
d'alimentationa I'aided'unchiffonsec,
Debranchezlaficheet nettoyez-lab.I'aided'un chiffonsec,
Lenon-respectdecetteconsignepeutentrainerunrisque
d'electrocutionou d'incendie,
Branchezlecordond'alimentationsuruneprisetripolaire
correctementrelieeb.laterre.Nebranchezaucunautreappareil
electriquesur cecircuit.
Partagerla m6meprisemuraleavecd'autresappareilsb.I'aide
d'unemultipriseou d'unerallongerisquede provoquerune
electrocutionou un incendie,
N'utilisezpasde transformateurelectrique,Celapourrait
entraTnerunrisqued'electrocutionou d'incendie.
Veillezb.cequelatension,lafrequenceet I'intensitedu
courantsoientconformesaux caractedstiquesde I'appareil.
Lenon-respectdecetteconsignepeutentrainerunrisque
d'electrocutionou d'incendie,
Gardeztousles el6mentsd'emballagehorsde laporteedes
enfants.Ceux-cidsqueraientde lesutiliserpourjouer.
Cetappareildoit6trecorrectementreliee.laterre,Lisezet
respectezles ,,Consignesde misee.laterre,>detailleesau debut
de cechapitre.Nereliezjamaiscet appareile.uneconduitede
gaz,b.untuyaud'eauen plastiqueou b.uneIignetelephonique,
Celapourraitentrdinerun risqued'electrocution,d'incendie,
d'explosionou de defaillancede I'appareil,
Nebranchezjamaislecordond'alimentationsuruneprisequi
n'estpascorrectementrelieee.laterreet assurez-vousquela
raisee.laterreestconformeauxnormeslocaleset nationales.
Necoupezni ne retirezJAMAISlatroisiemebroche(raisee.la
terre)de laficheducordond'alimentation,
Connectezlefour a uncircuitde20 A. Sile fourestconnectee.un
circuitde 15A, assurez-vousqueledisjoncteurfonctionne.
N'installezpascet appareildansun endroithumide,graisseuxou
poussiereuxet veillezb.ce qu'ilne soitpasexposedirectementb.
lalumieredusoleilou aunesourced'eau(eaude pluie),
Celapourraitentrdinerun risqued'electrocutionou d'incendie.
Branchezcorrectementlafichedansla prisemurale,N'utilisez
jamaisuneficheou uncordond'alimentationendommage(e)ou
uneprisemuralemalfixee,
Celapourraitentrdinerun risqued'electrocutionou d'incendie.
N'installezpasI'appareilau-dessusd'un evier.
Netirezjamaissurle cordond'alimentationet ne le pliezpasde
faconexcessive.
Nevrillezet neserrezpaslecordond'alimentation.
Concernantlecordond'alimentation: ne I'accrochezpassur un
objetmetallique; ne posezpas d'objetIourddessus; nelefaites
passerentredesobjetset nele poussezpas dansI'espaceb.
I'arrierede I'appareil.
* Celapourraitentrdrnerun risqued'electrocutionou d'incendie.
Pour debrancher la fiche, ne tirez pas sur le cordon.
* Debranchezle fourentirantsurlaficheuniquement.
* Lenon-respectdecetteconsignepeutentrainerunrisque
d'electrocutionou d'incendie.
Sila ficheou lecordond'alimentationestendommage(e),
contactezlecentrede depannagele plusprochepourdemander
b.ce qu'ellesoitremplaceeou reparee,
CONSERVEZPRECIEUSEMENTCESCONSIGNES
Fran_:ais canadien - 4
z£
ATTENTION
SYMBOLES
D'AVERTISSEMENT
RELATIFSA L'INSTALLATION
_ nstallezlefourde tellefagonquelaficherestefacilement
accessible,
Le non-respectde cetteconsignepeutentraTnerun risque
d'electrocutionou d'incendiesuitea unefuiteelectrique.
_ 6branchezla prised'alimentationsi I'appareildoit resterinutilise
pendantuneperiodeprolongeeou en casd'orage.
Le non-respectde cetteconsignepeutentraTnerun risque
d'electrocutionou d'incendie.
AVER_SSEMENT
AVERTISSEMENTS
IMPORTANTSRELATIFSA
L'UTILISATION
Encasd'inondation,veuillezcontacterlecentrede depannagele
plusprochesi votreappareila 6teen contactavecI'eau,Lenon-
respectde cetteconsignepeutentrainerun risqued'electrocution
ou d'incendie,
Lisezet respectezles,,Consignespermettantd'eviterune
expositionexcessiveauxmicro-ondes,>d6tailleesau debutde ce
chapitre,
SiI'appareilgenereun bruitanormal,uneodeurdebrQI6ou de la
fumee,debranchez-leimmediatementet contactezleservicede
depannagele plusproche,
Le non-respectde cetteconsignepeutentrdinerun risque
d'electrocutionou d'incendie,
Encasde fuitede gaz(propane,GPL,etc.),aerezimmediatement
lapbce sanstouchera I'appareil,au cordond'alimentationou a
lafiche.
N'utilisezpasde ventilateur,
La moindreetincellerisqueraitde provoqueruneexplosionou
un incendie.
Veilleza netoucheraucunedes partiesdufour (ex,: porte)
Iorsquecelui-ciest en marcheouvientjustede fonctionner,
Le non-respectde cetteconsignerisqued'entrdinerdes
br01ures,
Encasde departde feusurlacuisinbresitueesouslefour,
etouffezlesflammesa I'aided'un couvercle,d'uneplaquede
cuissonmetalliqueou d'un plateau.
Lotsd'uneutilisationa puissanceelev6e,ne laissezjamaisles
el6mentssituessousI'appareilsanssurveillance.Encasde
debordement,lesparticulesgrassesprovenantdesaliments
risquentdes'enflammersila hottefonctionne.Afinquelahottene
sedeclenchepasautomatiquementchaquefoisquevousvous
servezdevotrefour,utilisezdes platsdetailleapproprieeet ne
faitesfonctionnervotretablede cuissona puissancemaximale
queIorsquecelaestvraimentnecessaire.
Encasde departde feua I'interieurdu four,laissezsaporte
fermee,eteignezI'appareilet debranchezlecordond'alimentation
ou coupezI'alimentationau niveaudutableaude fusiblesou du
disjoncteur.Si vousouvrezla portedufour,I'incendierisquede se
propager.
Respectezsystematiquementlesconsignesde Securit6
Iorsquevousutilisezvotrefour. Netentezjamaisde reparer
lefourvous-m6me.Latensioncirculanta I'interieuresttres
elev6e,Silefournecessitedesreparations,contactezun
centrededepannageagr6eprochedechezvous.
(_Ne tentezpasde reparer,demonterou modifiervous-m6me
I'appareil,
Le chassisde I'appareiletanttraverseparuncouranta haute
tension,ilexisteun risqued'electrocutionou d'incendie.
Vousrisqueriezd'6treexposea desondes
electromagn6tiques.
Sile fournecessitedes reparations,contactezlecentrede
depannagele plusprochede chezvous.
@
SiunesubstanceetrangeretellequedeI'eaupenetredans
I'appareil,debranchez-leet contactezvotrecentrededepannage
leplusproche,
Le non-respectde cetteconsignepeutentraTnerun risque
d'electrocutionou d'incendie.
@
Netouchezpas lafiched'alimentationsi vousavezles mains
mouillees.
* Celapourraitentra_nerunrisqued'electrocution.
N'eteignezpasI'appareilalorsqu'il esten fonctionnementen
debranchantlecordond'alimentation,
* Lefait de rebrancherlecordond'alimentationdansla
prisemuralepeutprovoqueruneetincelleentrainantune
electrocutionou un incendie.
Teneztouslesel6mentsd'emballagehorsde porteedesenfants
afind'evitertoutaccident,
* Risqued'asphyxieaveclessacsplastiquenotamment.
Nelaissezpaslesenfantsoutoutepersonnea capacites
physiques,sensoriellesou mentalesreduitesutilisercetappareil
sanssurveillance.
Veillezace queI'appareilsetrouvehorsde porteedesenfants,
* Le non-respectde cetteconsignepeutentrdinerun risque
d'electrocution,de brOluresou de blessures,
* Veillezace quelesenfantssoienteloign6sde laporteIorsde
sonouvertureou de safermeturecarilspourraientsecogner
contrelaporteou seprendrelesdoigtsdedans.
Netouchezpas I'interieurdu fourjusteapressonfonctionnement;
lesel6mentssont encorebrOlants.
* La chaleura I'interieurdu fourrisquede provoquerdes
brOlures.
N'utilisezpasde papieraluminium(saufsi indiquepr6cisement
dartsce manuel),d'objetsmetalliques(recipients,fourchettes,etc.)
ou de recipientscomportantdes ornementsdotesou argentes.
* Cesobjetsrisquentde provoquerdesetincellesou de
s'enflammer.
N'utilisezet n'entreposezpasd'aerosolsou d'objetsinflammables
a proximitedu four.
* La chaleurd6gageeparlefour micro-ondesrisquedefaire
exploserou s'enflammerlesgaz,
* Le non-respectde cetteconsignepeutentrdrnerun risque
d'electrocutionou desblessures,
N'essayezpasde modifier,d'ajusterou de reparerlaporte,Le
chassisexterieurne doit6treretiresousaucunpretexte,
N'entreposezet n'utilisezjamaislefouren exterieur,
CONSERVEZP ECIEUSENENTCESCONSIGNES
Frangais canadien - 5
AVERTISSEMENTS
RELATIFSA L'UTILISATION
Sidesfissuresapparaissenta.lasurfacedu fourmicro-on@s,
eteignezcedernier,
Lenon-respectdecetteconsignerisqued'entrainerune
electrocution.
Lesplatset r@ipientspeuventdevenirextr_mementchauds.
Manipulezdesavecpr@aution,
Lesplatschaudset lavapeurpeuventprovoquerdes brOlures.
Retirezlecouvercledes r@ipientsavecpr@autionen veillanta.
eloignerces derniersde votrevisageet de vosmainsafind'@iter
queledegagementde vapeurnevous brClle,
Retirezlescouverclesdes petitspotspourbeb6avantde les
fairechauffer,Lorsquevousrechauffezdes alimentspourbeb6,
remuez-lesbienpourr@artirlachaleuruniformement.Testez
toujourslatemperaturedesalimentsavantde lesdonnerb.un
beb6Contrairementace qu'il para_t,le recipienten verreou la
surfacedesalimentspeuvent6trechaudsau pointdebr@lerla
bouchedubeb6.
Veilleza.cequetouslesustensilesutilisesdanslefoursoient
adaptesa.lacuissonauxmicro-on@s.
Utilisezdesustensilesadaptesa.lacuissonauxmicro-ondesen
respectantrigoureusementlesrecommandationsdesfabricants.
Nemontezpassur I'appareilet neposezpasd'objetsdessus
(ex.: linge,couverclede four,bougiesallumees,cigarettes
allum@s,plats,produitschimiques,objetsmetalliques,etc.).
Desarticlespeuventrestercoincesdanslaporte.
Celapourraitentrdinerun risqued'electrocution,d'incendie,de
defaillancede I'appareilou desblessures.
N'utilisezpasI'appareilaveclesmainsmouill@s.
Celapourraitentrdinerun risqued'electrocution.
Nevaporisezpas de substancesvolatiles(ex.: insecticide)surla
surfacede I'appareil,
Cessubstancessontnonseulementnocivespourlasante,
maisellespeuventegalemententraineruneelectrocution,un
incendieou uneddaillancede I'appareil,
Neplacezpas I'appareilsur unsupportfragile,commeun @ierou
un objeten verre,
L'@ierou I'objeten verrepourrait_treendommage,
N'approchezpasvotrevisageouvotrecorpsde I'appareil
pendantlacuissonou lotsde I'ouverturede laportejuste apres
lacuisson,
Veillezace quelesenfantsnes'approchentpastrop presde
I'appareil,
* Lenon-respectdecetteconsignerisqued'entdner des
brOlurespourlesenfants,
Neplacezpas denourritureou d'objetsIourdssur laportelotsde
son ouverture,
* Encasdechute,vousrisqueriezde vousbr@lerou de vous
blesser,
Necr@zpasde chocthermiquebrutalau niveaude laporte,de
I'interieurde I'appareiloudu plat(ex.: enversantde I'eaudessus
pendantoujusteapreslacuisson),
* Celarisqued'endommagerI'appareil,Lavapeurou les
projectionsd'eaupourraiententra_nerdes br@luresou des
blessures.
Netentezjamaisdefaireprechaufferou fonctionnerlefour micro-
ondesa.vide,
@
Veilleztoujoursa.ce queleplateauen verresetrouvea.I'interieur
du fouravantde mettreen marchecedernier.Dansle cas
contraire,lesalimentsne seraientpascuitscorrectement.
Nefaitesjamaisd@ongelerde boissonssurgeleescontenues
dansdes bouteillesa.coletroit,Celles-cirisqueraientd'eclater.
Nerayezpas lasurfacevitreede laportedu fourb.I'aided'un
objettranchant,
Celapourraitendommager,voirebriserlavitre,
NeposezriensurI'appareilIorsquecelui-cifonctionne.
N'utilisezpasde r@ipientsfermeshermetiquement,Retirezles
obturateurset lescouverclesavantI'utilisation,Lesrecipients
fermeshermetiquementpeuventexploseren raisonde
I'accumulationde pression,m6meapresI'arr_tdu four.
CONSIGNESDENETTOYAGE
AVERTISSEMENT
IMPORTANTES
Nenettoyezpas I'appareilen pulverisantdirectementde I'eau
dessus,
N'utilisezpasde benzene,de diluantou d'alcoolpournettoyer
I'appareil,
Celapourraitentrdinerunedecoloration,uneddormation,des
dommagessurI'appareilainsiqu'unrisqued'electrocutionou
d'incendie.
Avantde nettoyerI'appareilou d'effectuerun entretien,
debranchez-lecordond'alimentationde laprisemuraleet eliminez
toutrestealimentairede la porteet ducompartimentdecuisson.
Lenon-respectdecetteconsignepeutentrainerunrisque
d'electrocutionou d'incendie,
Prenezgardea.ne pasvousblesseren nettoyantI'appareil
(exterieur/interieur)
Lesar_tesdecelui-cipeuventser@elertrestranchantes.
Nenettoyezpas I'appareila.I'aided'un nettoyeurvapeuL
• Celapourraitentrdinerun ph@omenedecorrosion,
Veillez_.maintenirI'interieurdufourtoujourspropre,Lesparticules
d'alimentsou lesprojectionsd'huileadherantauxparoisrisquent
d'ab_merlefour ou d'en reduireson efficacite.
/i',
AVERT_SS_MENT
AVERTISSEMENTSDE
LA PROPOSITION65
I "
ADOPTIVEPARL ETATDELA
CALIFORNIE:
AVERTISSEMENT' Ceproduitcontientdes substanceschimiques
reconnuesparI'@tatde laCaliforniecommeetantdessubstances
toxiquespourla reproductionet provoquantdescancers.
CONSERVEZPRECIEUSEMENTCESCONSIGNES
Fran_:ais canadien - 6
I
REGLAGEDE VOTREFOURMICRO-ONDES
8
8
8
9
9
10
10
ContrOleducontenu
Informationsconcernantlagarantieet
I'assistance
Pr6parationdevotrefourmicro-ondes
Fonctions
Boutonsdu tableaude commande
R6glagedeI'horloge
S6curit6enfants
UTILISATIONDUFOUR
10
10
10
MICRO-ONDES
10
10
11
12
13
14
14
Boutonminuterie
Boutonaddajouter30 s.
Boutonsventilation
(2 vitesseset marche/arr6t)
Bouton6clairage61ev6/faible/d6sacti%
Boutonsprogrammesdecuisson
Boutonr6chauffage
Boutond6cong61ationautomatique
Boutonramollir/fairefondre
Tempsdecuissonaufourmicro-ondeset
niveauxde puissance
Mode6co
GUIDEDESRI_CIPIENTS
....f:: 15
Ustensilesadapt6sa la cuissonaufour
micro-ondes
NETTOYAGEETENTRETIENDEVOTREFOURMICRO-ONDES
/) 19 Nettoyagede lapartieext6rieure
19 Nettoyagede la partieint6rieure
19 Nettoyagedu plateautournantet de
I'anneaudeguidage
19 Rangementet entretiendufourmicro-
ondes
19 Remplacementde I'ampouledela
surfacede cuisson/veilleuse
19 Remplacementde I'ampouledufour
20 Nettoyagedu filtreagraisse
20 Remplacementdufiltreacharbon
DI_PANNAGE
/
ANNEXE
/
GARANTIE(¢TATS-UNIS)
/- f
i 1
GARANTIE(CANADA)
y-i/¸•.
Zi',i)
GUIDEDECUISSON
16
16
17
17
17
17
18
Conseilsg6n6rauxd'utilisationdu micro-
ondes
Cuissondelaviande
Cuissondelavolaille
Cuissondesfruitsde mer
Cuissondesceufs
Cuissondes16gumes
Recettes
Frangais canadien - 7
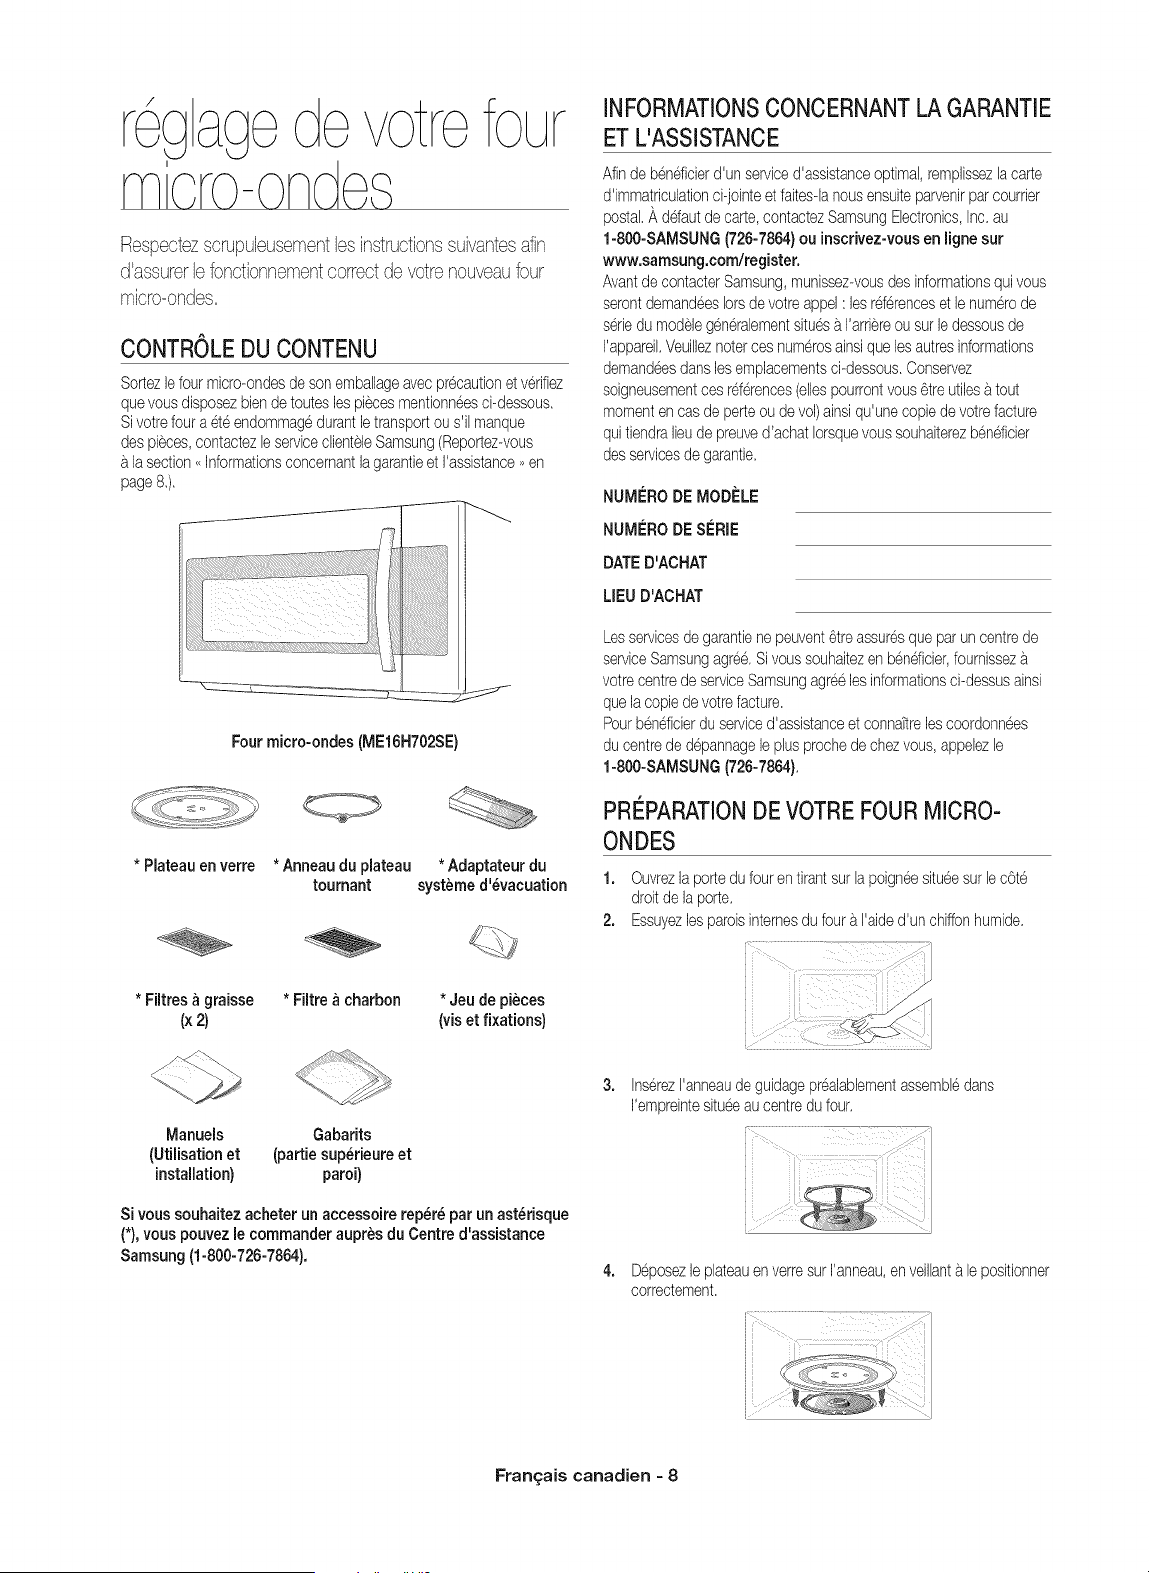
Respectezscrupubusementbs instructionssuivantesafin
d'assurerb fonctionnementcorrect de votrenouveaufour
mbro-ondes,
CONTROLEDU CONTENU
Sortezlefourmicro-ondesde sonemballageavecpr@autionet verifiez
quevousdisposezbiende touteslespiecesmentionneesci-dessous.
Sivotrefoura et6endomma@durantletransportou s'il manque
des pi@es,contactezb serviceclienteleSamsung(Reportez-vous
a.la section,,Informationsconcernantlagarantieet I'assistance,>en
page8.).
Fourmicro-ondes (ME16H702SE)
* Plateauenverre * Anneaudu plateau * Adaptateur du
tournant systeme d'_vacuation
* Filtres a graisse * Filtre a charbon * Jeu de pieces
(x 2) (vis et fixations)
INFORMATIONSCONCERNANTLA GARANTIE
ET L'ASSISTANCE
Afinde b@dicierd'un serviced'assistanceoptimal,remplissezlacarte
d'immatriculationci-jointeet faites-lanousensuiteparvenirparcourrier
postal._,ddaut de carte,contactezSamsungElectronics,Inc.au
1-800-SAMSUNG(726-7864)ou inscrivez-vousen lignesur
www.samsung.com/register.
Avantde contacterSamsung,munissez-vousdesinformationsquivous
serontdemand@slotsde votreappel: lesrderenceset lenumerode
seriedu modele@n@abmentsitu@a.I'arrbreou surledessousde
I'appareikVeuilleznotercesnumerosainsiquelesautresinformations
demand@sdanslesemplacementsci-dessous.Conservez
soigneusementcesrderences(elbspourrontvous6treutibs atout
momentencasde perteoude vol)ainsiqu'unecopiede votrefacture
quitiendralieude preuved'achatIorsquevoussouhaiterezben@cier
desservicesdegarantie.
NUMI_RODE MODI_LE
NUMI_RODE SI_RIE
DATED'ACHAT
LIEU D'ACHAT
Lesservicesde garantienepeuvent6treassuresqueparuncentrede
serviceSamsungagre&Sivoussouhaitezen bendicier,fournisseza.
votrecentrede serviceSamsungagr6eles informationsci-dessusainsi
quelacopiedevotrefacture.
Pourb@eficierdu serviced'assistanceet connaitrelescoordonnees
du centrede d@annagele plusprochede chezvous,appebzle
1-800-SAMSUNG(726-7864),
PREPARATIONDEVOTREFOURMICRO-
ONDES
1. Ouvrezla portedu fourentirantsur lapoign@situeesur lecOte
droitde laporte.
2. Essuyezlesparoisinternesdu foura I'aided'un chiffonhumide.
Manuels Gabarits
(Utilisation et (pattie sup_rieureet
installation) paroi)
Sivous souhaitezacheter un accessoirerep_r_ par un ast_risque
(*),vous pouvezle commander aupresdu Centre d'assistance
Samsung(1-800-726-7864).
3. InserezI'anneaude guidagepr@labbmentassembledans
I'empreintesitu@aucentredufour.
D@osezleplateauenverresurI'anneau,enveillanta.lepositionner
correctement.
Fran£ais canadien - 8
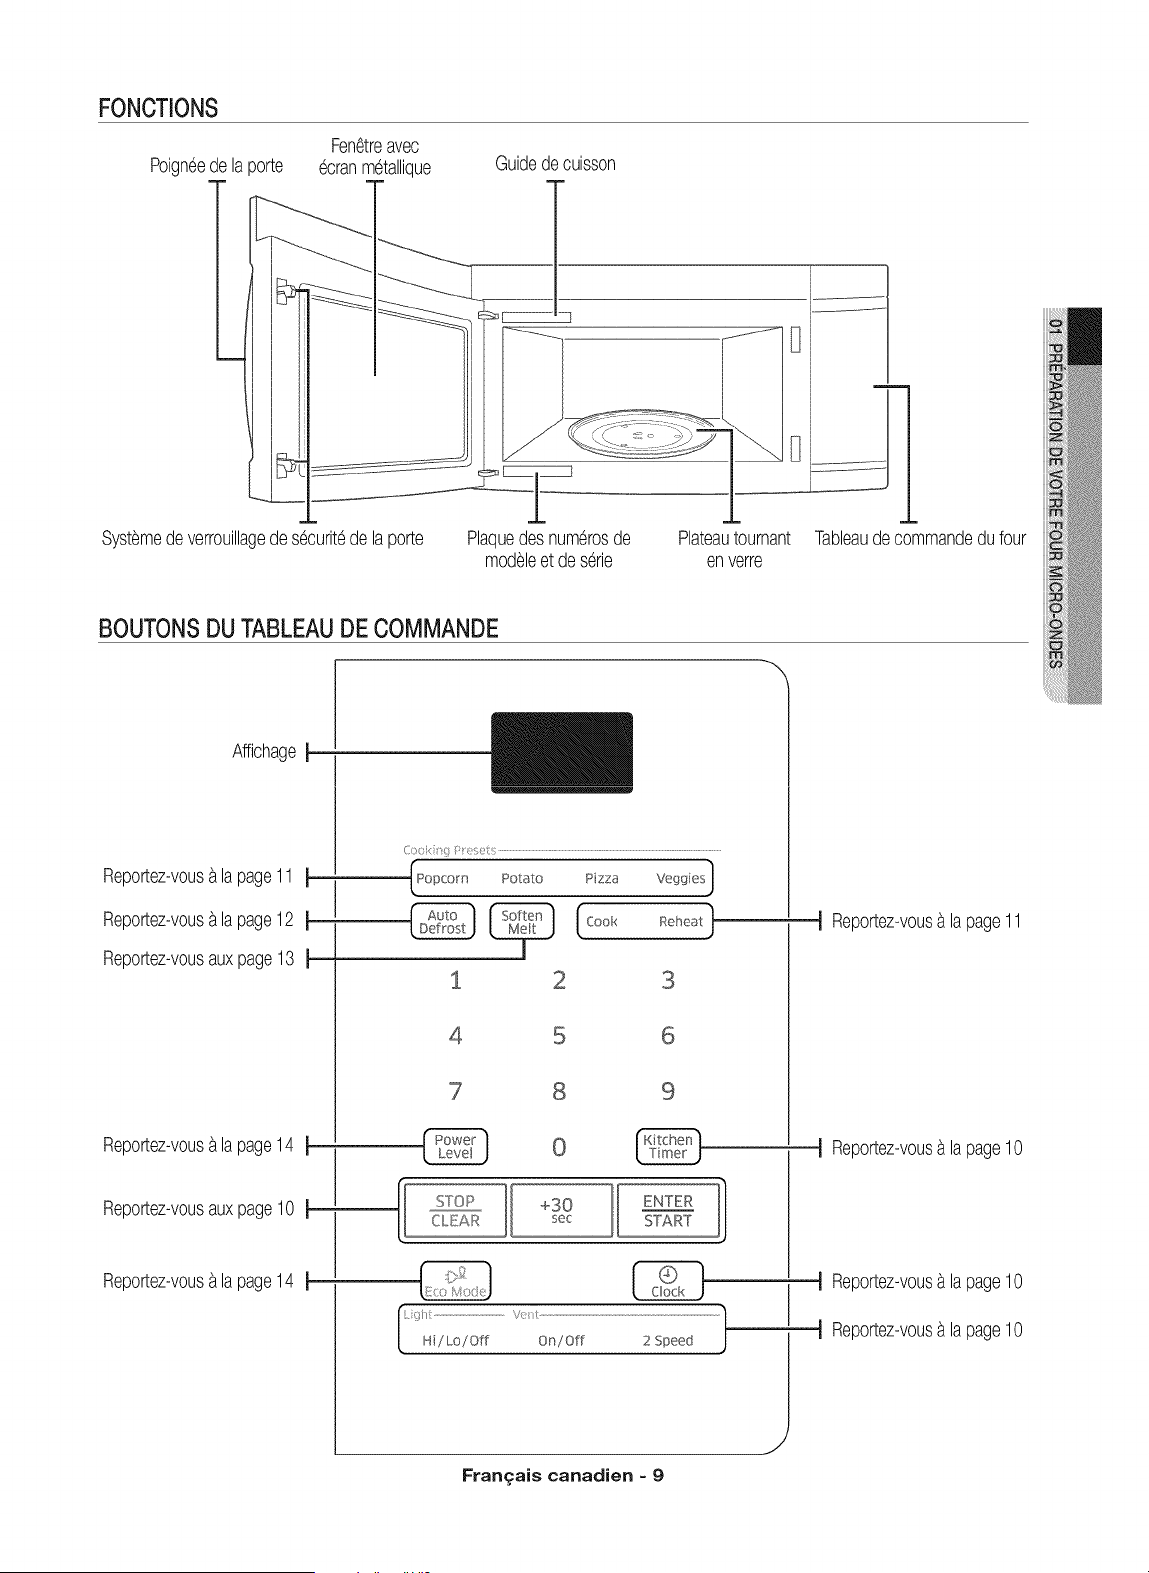
FONCTIONS
Poign6ede la porte
Fen6treavec
6cranm6tallique
Syst6medeverrouillagede s6curit6de la porte
Guidede cuisson
Plaquedesnum6rosde
mod61eet des6rie
Plateautournant
enverre
Tableaudecommandedufour
BOUTONSDU TABLEAUDECOMMANDE
AffichageI
Reportez-vous_la page11 1
Reportez-vous_la page12 I
Reportez-vousauxpage13 1----
( ::;
Popcorn Potato Pizza Vegg es]
(Cook Re,_at !
1 3
4 6
9
1
I Reportez-vous_ la page11
Reportez-vous_la page14 ]
Reportez-vousauxpage10 ]
Reportez-vous_la page14 ]
sToPII ENTER1
CILEAR sec START
Frangais canadien = 9
] Reportez-vous_ la page10
] Reportez-vous_ lapage10
] Reportez-vous_ lapage10
RI_GLAGEDE L'HORLOGE
Votrefourmicro-ondesestequip6d'unehorlogeintegr6e.L'horlogedolt _treregl@lotsde I'installationinitialedufour ouapresunecoupurede
courant.L'heures'afficheIorsquelefourmicro-ondesn'estpasencoursdefonctionnement.
1. Appuyezsur leboutonClock (Hodoge}.
2. Utilisezlepavenumeriquepour reglerI'heureactuelle.
3. Appuyezsur leboutonENTER/START(ENTREE/DEPART}.
SI_CURITEENFANTS
LafonctionS@uriteenfantsvouspermetde verrouillerlesboutonsafinquele fourmicro-ondesne puissepas_tremisen marchede maniere
accidentelle.Lefourpeut6treverrouilleb.tout moment.
Activation/D6sactivation
Pouractiverou d@activerlas@uriteenfants,appuyezpendant3 secondessurle boutonENTER/START(ENTREE/DEPART).
Avecvotrenouveaufour micro-ondesSamsung,la cuisine#aurajamaiset6aussifacile,
La sectionsuivantedecrit toutce quevousdevez savoirsur I'utiBationde cet appareik
BOUTONMINUTERIE
Vouspouvezreglerla minuteriesur 99 minuteset 99 secondesau maximum.
1. Appuyezsur leboutonKitchen Timer (Minuterie},
2. Utilisezlepavenumeriquepourddinir ladureedefonctionnementde laminuterie.
3. Appuyezsur leboutonENTER/START(ENTREE/DEPART).
4. Led@omptes'afficheet un signalsonoreretentitunefob cetemps@oule.
5. Pourannulerle reglagedela minuterie:Appuyezunefob surle boutonSTOP/CLEAR(ARRET/SUPPRIMER}.
BOUTONADD AJOUTER30 S.
Cettecommandesimpli%evouspermetde gagnerdutempset de demarrerrapidementlacuissonb.pleinepuissance(I00 %).
1. Appuyezsur leboutonAdd 30 sec. (Ajouter 30 s} autantdefob quevoussouhaitezajouter30 secondesautempsde cuisson.Par
exemple,appuyezdeuxfoissur leboutonpour untempsdecuissond'uneminute,puissur leboutonENTER/START(ENTREE/D(-'PART}
pourdemarrerlacuisson.
2. Vouspouvezajouter30 secondesa.un programmeencoursenappuyantsurleboutonAdd30 sec. (Ajouter 30 s} autantde fob quevous
souhaitezajouterde tranchesde30 secondes.
BOUTONSVENTILATION(2 VITESSES ET MARCHE/ARRit:T)
Laventilationpermetd'@acuerla vapeurd'eauemiseparbs aliments.Laventilationpeut_tre r%leemanuelbment.
1. Appuyezsur leboutonVent2 Speed(Ventilation2vitesses} pourreglerla vitesse.
2. Appuyezsur leboutonVentOn/Off (Marche/Arr_t du ventilateur} pouractiverlaventilation.
3. Appuyeza.nouveausurleboutonVent On/Off (Marche/Arr_tdu ventilateur} )ourdesactiverla ventilation.
BOUTON€:CLAIRAGEI_LEVEJFAIBLE/DI_SACTIVE_
Le boutonLight (Eclairage)permetde reglerI'intensitede I'@lairagedansvotrefourmicro-ondes.
Nbde pressions 1 2 3
Eclairage Eleve Fable U@active
BOUTONSPROGRAMMESDE CUISSON
LesboutonsProgrammesde cuisson vouspermettentde fairecuirevos platspr6fer6sa.I'aided'uneseulepression.Si lesalimentsne sont pas
assezcuitsou pas assezchaudsapresun programmede cuisson,terminezlacuissonenselectionnantmanuellementunepuissanceet un tempsde
cuisson.
N'utilisezpasles boutonsProgrammesde cuissonen continu.Lefourdoit refroidirpendantau moins5 minutesentrechaqueutilisation
........ pour@itertoutesurcuisson.
Fran_:ais canadien - 10
Tableau de cuisson automatique
Pop-corn
Cuim
Legumes
Pommede
term
Pizza
3,50Z,
1 sachet
3,0b.3,5 oz.
1 sachet
Boissons
Ecran:Ac-1
Bacon
Ecran:Ac-2
Dinersurgele
Ecran:Ac-3
Petit-dejeuner
surgele
Ecran:Ac-4
Legumesfrais
Legumessurgeles
quatm
Nefaiteschaufferqu'unseulsachetde pop-cornspecialmicro-ondesa.lafois.Soyezprudent
une IorsquevousouvmzlesachetapresI'avoirretiredufour.Laissezlefour refroidirpendantau
moins5 minutesavanttoutenouvelleutilisation,
deux Z_ Nelaissezpas lefour micro-ondessanssurveillancependantlacuissondu pop-com.
ATTENTION
Versezle liquidedartsunetassegradueeou unvermmesumur.Necouvmzpas. Placezla
boissondanslefour.Unefoisle tempsde chauffe6coule,remuezbien.Laissezle fourrefroidir
pendantau moins5 minutesavanttoutenouvelleutilisation,
une Remarque: * Lestempsde rechauffageont et6calculespourunetassede 8 onces,
Lesboissonsrechauff6esb.I'aidede lafonctionBoissonspeuventdevenir
brOlantes,
Retimzle recipientavecprecaution,
Quantite:0,5tasse,1tasse,2tasses
Placez2 feuillesde papierabsorbantsur uneassiette,puisdisposezdessuslestranchesde
baconnveillanta.ce qu'ellesnesechevauchentpas,Couvmzletout d'uneautmservietteen
deux
papier.Retimzimmediatementlesfeuillesde papierabsorbantunefois lacuissonterminee,
Quantite: 2b.6 tranches
Retirezralimentde sonemballageet suivezlesinstructionsfigurantsurce demierpour connaitm
lamethodede couvertumdu platet le tempsde repos.Laissezlefourrefroidirpendantaumoins
trois
5 minutesavanttoutenouvelleutilisation,
Quantite:8 b.14oz.
Utilisezce boutonpourlessandwichssurgeles,petits-dejeuners,cr6pes,gaufmsetc,Suivez
lesinstructionsfigurantsurI'emballagepourconnaitmlamethodedecouvertureet letempsde
repos,Laissezlefourrefroidirpendantaumoins5 minutesavanttoutenouvelleutilisation.
Quantite:4 b.8 oz.
une Mettez1a 4 portionsde legumesfrais/surgelesdansun platen plastique,envermouen
ceramiqueadapteb.lacuissonauxmicro-ondeset ajoutez2 a4 cuillemsa.souped'eau.
Protegezle toutd'un couvercleou d'un filmplastiqueperforeletempsde lacuisson,puislaissez
deux
reposer3 b.5 minutesapresavoirremue,Laissezlefour refroidirpendantau moins5 minutes
avanttoutenouvelleutilisation.
1pommede term une
2 potatoesdeterre deux
3 potatoesdeterre trois
4 pommesdeterm qu_m
1 part une
2 part deux
3 part tmis
Piquezchaquepommede terreplusieursfoisb.I'aided'unefoumhette,Disposez-lesenetoilesur
leplateau,Apreslacuisson,laissezlespommesde termreposer3 a.5 minutes.Laissezlefour
refroidirpendantau moins5 minutesavanttoutenouvelleutilisation.
_ ercezplusieursfoislespommesde terma.I'aided'unefourchetteavantde lesplacerdarts
lefour micro-ondes,Lestempsde cuissonsontbasessurdes pommesdeterm pesant
chacune8 a.10 ozen moyenne.
Disposez1 b.3 partsde pizza,pointesvers lecentre,sur un platadaptea.lacuissonauxmicro-
ondes,Veilleza.ce quelespartsnesechevauchentpas, Necouvmzpas.Laissezlefour refroidir
pendantau moins5 minutesavanttoutenouvelleutilisation,
BOUTONRECHAUFFAGE
LeboutonReheat (R_chauffage)proposetroiscategoriesde rechauffageprogrammees.
Assiettegarnie une rh-1
Plat mijot6 deux rh-2
P&tes trois rh-3
Exemple: r_chauffer3 portions de plats mijot6s.
1. AppuyezdeuxfoissurleboutonReheat(R_chauffage},
2. Utilisezlesboutonsnumeriquespourreglerlesquantites/portions.
3. Appuyezsur leboutonENTER/START(ENTREE/DEPART),
4. Lorsqueletempsdecuissonest ecoul6,un signalsonomretentitquatmfoiset le message_*_o':"_','_:s'affiche.
Frangais canadien - 11
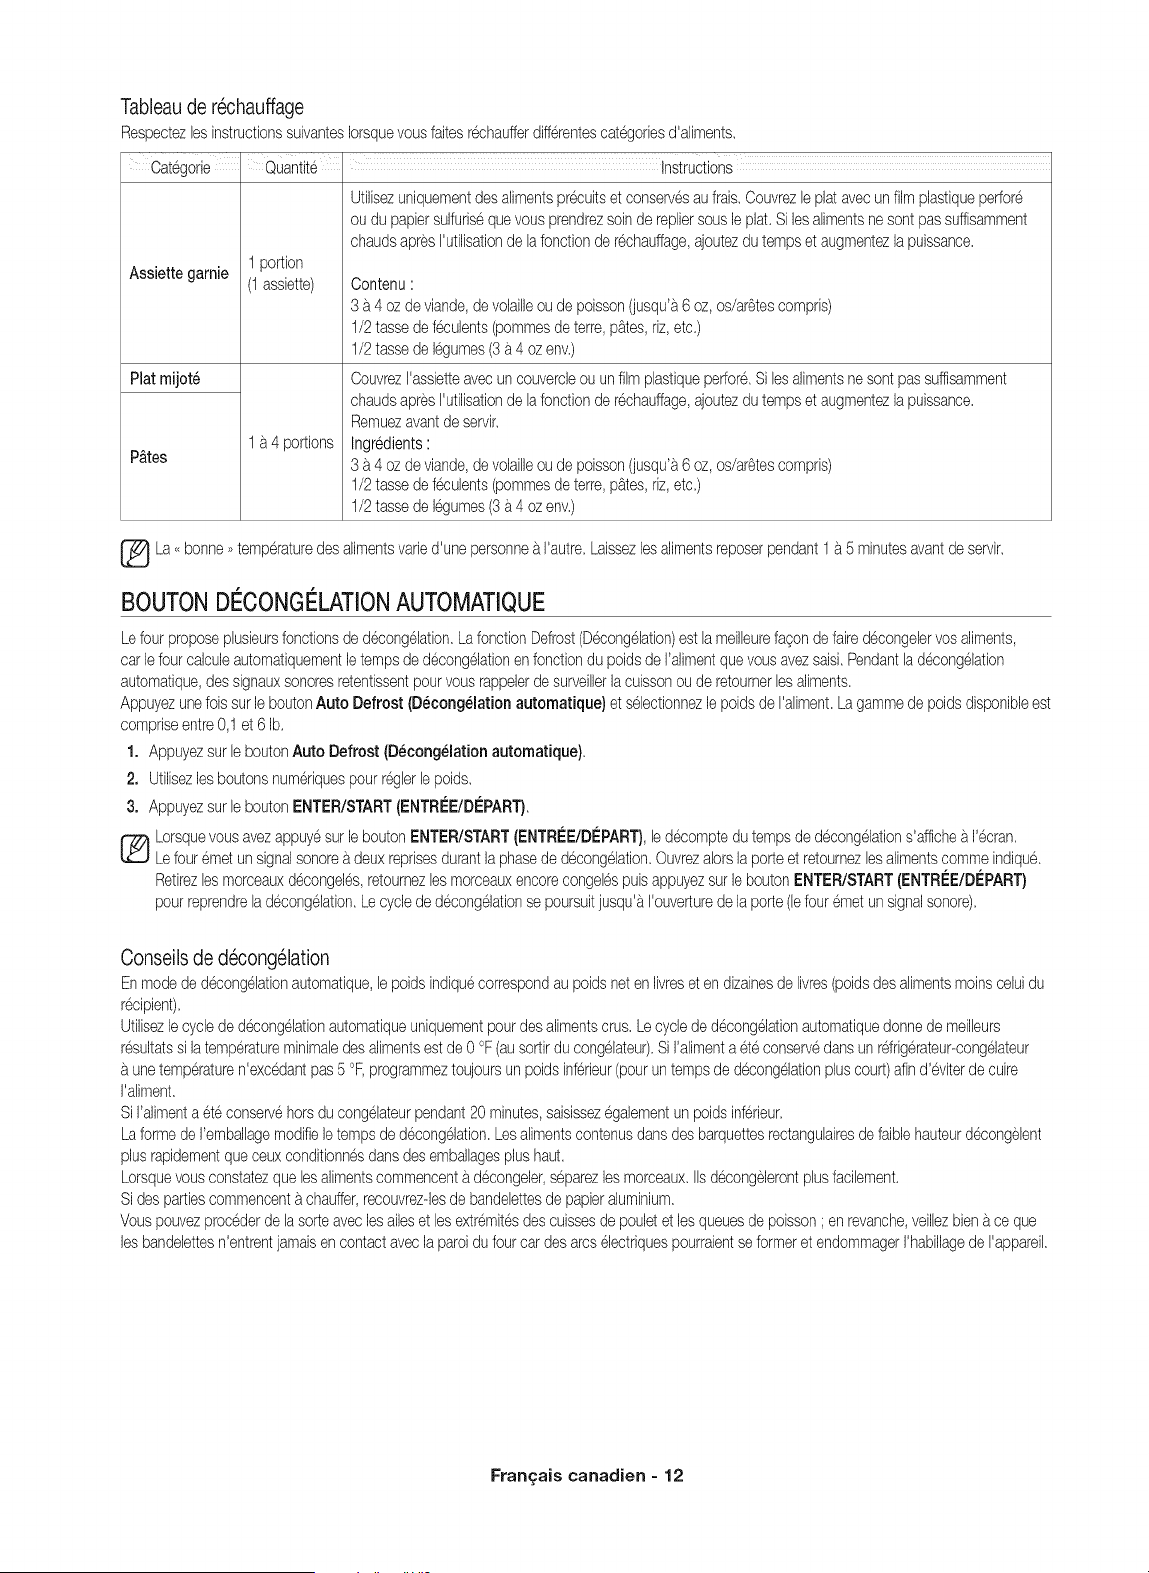
Tableaude rechauffage
RespectezlesinstructionssuivantesIorsquevousfaitesrechaufferdifferentescategoriesd'aliments.
cat%orie quantite instructions
utilisezuniquementdesalimentspr@uitsetconser%saufrais.Couvrezleplatavecunfilmplastiqueperfore
ou du papiersulfurisequevousprendrezsoinde repliersousleplat. Silesalimentsnesontpassuffisamment
chaudsapresI'utilisationde lafonctionde rechauffage,ajoutezdutempset augmentezla puissance,
Assiettegarnie 1 portion
(1assiette) Contenu'
3 a 4 ozde viande,de volailleou de poisson(jusqu'a6 oz,os/ar6tescompris)
1/2tassedefeculents(potatoesdeterre,pates,riz,etc.)
1/2tassedelegumes(3 b.4 ozenv,)
Plat mijot_ CouvrezI'assietteavecun couvercleou unfilmplastiqueperfore.Silesalimentsnesont passuffisamment
chaudsapresI'utilisationde lafonctionde rechauffage,ajoutezdutempset augmentezla puissance,
Remuezavantde servir.
1a4 portions Ingredients'
P&tes 3 a 4 ozde viande,de volailleou de poisson(jusqu'a6 oz,os/ar6tescompris)
1/2tassedefeculents(potatoesdeterre,pates,riz,etc.)
1/2tassedelegumes(3 b.4 ozenv,)
La<<bonne,,temperaturedesalimentsvaried'unepersonneb.I'autre.Laissezlesalimentsreposerpendant1 a 5 minutesavantdeservir.
BOUTONDI CONGELATIONAUTOMATIQUE
Lefour proposephsieursfonctionsde decong61ation,LafonctionDefrost(Decong61ation)est lameilleurefagondefairedecongelervosaliments,
carle fourcalculeautomatiquementletempsde decong61ationenfonctiondu poidsde I'alimentquevousavezsaiskPendantlad@ongelation
automatique,dessignauxsonoresretentissentpourvousrappelerde surveillerlacuissonou de retournerlesaliments,
Appuyezunefoissur leboutonAuto Defrost (D_cong_lationautomatique}etselectionnezlepoidsde I'aliment.Lagammede poidsdisponibleest
compriseentre0,1 et 6 Ib,
1. Appuyezsur leboutonAuto Defrost (D_cong_lationautomatique).
2. Utilisezlesboutonsnumeriquespour reglerlepoids.
3. Appuyezsur leboutonENTER/START(ENTR!'E/DI'PART}.
LorsquevousavezappuyesurleboutonENTER/START(ENTRI'E/DI'PART),ledecomptedutempsde decong61ations'affichea.%cran.
Lefour emetun signalsonoreb.deuxreprisesdurantlaphasede decong61ation.Ouvrezalorslaporteet retournezlesalimentscommeindique.
Retirezlesmorceauxdecongel6s,retournezlesmorceauxencorecongelespuisappuyezsurleboutonENTER/START(ENTRI'E/DI_PART)
pour reprendreladecong61ation.Lecyclededecong61ationsepoursuitjusqu'b.I'ouverturede laporte(lefouremetunsignalsonore).
Conseils de decong61ation
Enmodede d@ongelationautomatique,lepoidsindiquecorrespondau poidsnetenlivreseten dizainesde livres(poidsdesalimentsmoinscehi du
recipient),
Utilisezlecyclede d@ongelationautomatiqueuniquementpourdesalimentscrus.Lecyclede decong61ationautomatiquedonnede meilleurs
resultatssi latemperatureminimaledesalimentsestde 0 °F (ausortirdu congelateur),SiI'alimenta et6conser%dartsunrdrig6rateur-congelateur
a.unetemperaturen'excedantpas5 °F,programmeztoujoursun poidsinferieur(pourun tempsde decongelationpluscourt)afind'@iterdecuire
I'aliment,
SiI'alimenta ete conser%horsducongelateurpendant20 minutes,saisissez%alementun poidsinferieur,
Laformede I'emballagemodifiele tempsde decongelation.Lesalimentscontenusdartsdes barquettesrectangulairesdefaiblehauteurd@ongelent
plusrapidementqueceuxconditionnesdansdesemballagesplushaut,
Lorsquevousconstatezquelesalimentscommencentb.decongeler,s@arezlesmorceaux.IIsdecongelerontplusfacilement,
Sides partiescommencenta.chauffer,recouvrezdesde bandelettesde papierahminium,
Vouspouvezprocederde lasorteaveclesaileset lesextremitesdescuissesdepouletet les queuesde poisson; enrevanche,veillezbienb.ceque
lesbandelettesn'entrentjamaisencontactavecla paroidu fourcardesarcselectriquespourraientseformeret endommagerI'habillagede I'appareil,
Fran_:ais canadien = 12
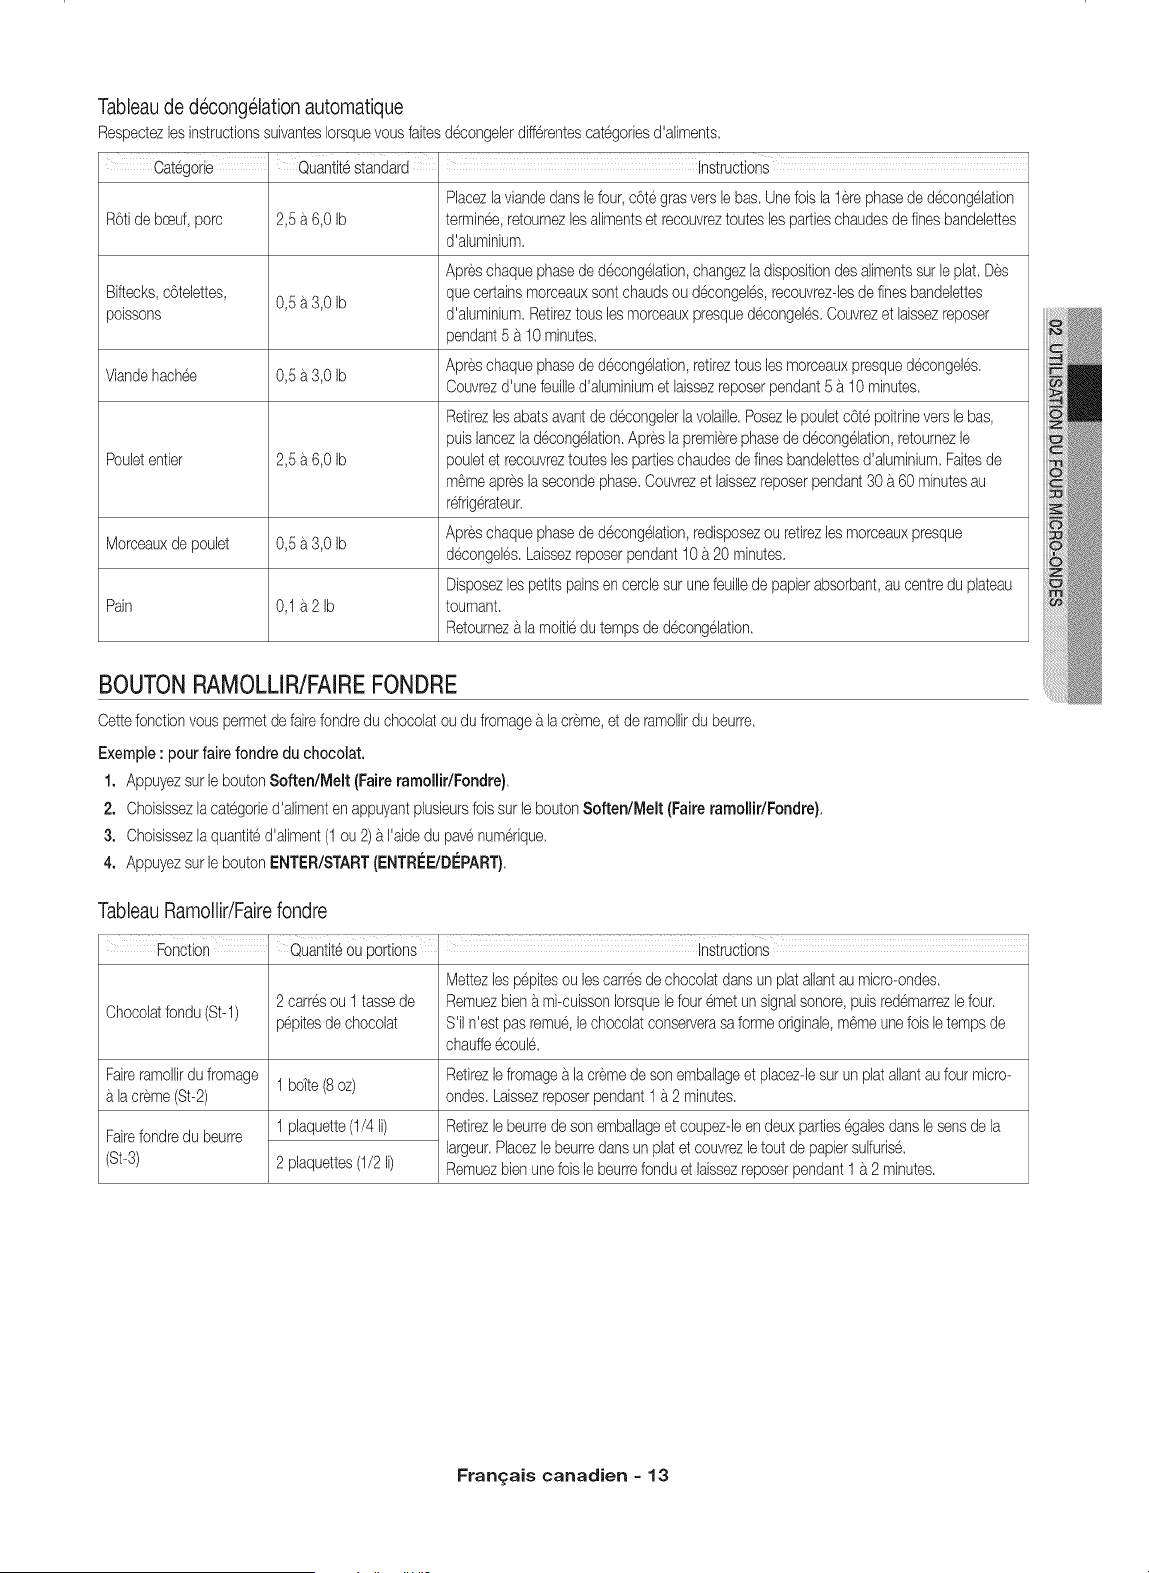
Tableau de decong61ationautomatique
RespectezlesinstructionssuivantesIorsquevousfaitesdecongelerdifferentescategoriesd'aliments.
ROtide bceuf,porc
Biftecks,c6telettes,
poissons
2,5a.6,0 Ib
0,5a.3,0 Ib
Viandehachee 0,5a.3,0 Ib
Pouletentier
2,5a.6,0 Ib
Morceauxde poulet 0,5 a.3,0 Ib
Pain 0,1a.2 Ib
Placezlaviandedanslefour,cOtegrasverslebas.Unefois la1erephasede decong61ation
terminee,retournezlesalimentset recouvreztouteslespartieschaudesde finesbandelettes
d'aluminium.
Apreschaquephasede d6congelation,changezladispositiondesalimentssurleplat. Des
quecertainsmorceauxsontchaudsou decongel6s,recouvrezdesdefinesbandelettes
d'aluminium.Retireztous lesmorceauxpresqued6congeles.Couvrezet laissezreposer
pendant5 a.10minutes,
Apreschaquephasede d6congelation,retireztousles morceauxpresquedecongel6s.
Couvrezd'unefeuilled'aluminiumet laissezreposerpendant5 a.10 minutes,
Retirezlesabatsavantde decongelerlavolaille.Posezle pouletcOtepoitdneverslebas,
puislancezladecong61ation.Apreslapremierephasede decong61ation,retournezle
pouletet recouvreztoutesles partieschaudesdefinesbandelettesd'aluminium.Faitesde
m6meapreslasecondephase,Couvrezet laissezreposerpendant30 a.60 minutesau
rdrigerateur.
Apreschaquephasede d6congelation,redisposezou retirezlesmorceauxpresque
decongel6s,Laissezreposerpendant10a.20 minutes.
Disposezlespetitspainsen cerclesurunefeuillede papierabsorbant,au centredu plateau
tournant.
Retourneza.lamoitiedutempsde decong61ation.
BOUTONRAMOLLIR/FAIREFONDRE
Cettefonctionvouspermetdefairefondredu chocolatou du fromagea.lacreme,et de ramollirdu beurre.
Exemple: pour fairefondre du chocolat.
1. Appuyezsur leboutonSoften/Melt (Faireramollir/Fondre}.
2. Choisissezlacategoried'alimentenappuyantplusieursfoissurleboutonSoften/Melt (Faireramollir/Fondre}.
3. Choisissezlaquantited'aliment(1ou2)a.I'aidedu pavenumerique.
4. AppuyezsurleboutonENTER/START(ENTRI£E/DI£PART}.
Tableau Ramollir/Fairefondre
Fonction
Chocolatfondu(St-l)
Faireramollirdu fromage
a.lacreme(St-2)
Fairefondredu beurre
(St-3)
©uantite 0u portions , instructions
Mettezlespepitesou lescarresde chocolatdartsun platallantau micro-ondes.
2 carresou 1tassede Remuezbiena.mi-cuissonIorsquelefour emetun signalsonore,puisredemarrezlefour.
pepitesde chocolat S'iln'estpasremue,lechocolatconserverasaformeoriginale,m6meunefoisletempsde
chauffeecoul6.
1 boite(8oz)
1 plaquette(I/4 li)
2 plaquettes(1/2li)
Retirezlefromagea.la cremedeson emballageet placezdesurun platallantaufour micro-
ondes.Laissezreposerpendant1 a.2 minutes,
Retirezlebeurrede sonemballageet coupezdeen deuxpartiesegalesdanslesensde la
largeur.Placezlebeurredansun platet couvrezletoutde papiersulfurise,
Remuezbienunefoisle beurrefonduet laissezreposerpendant1a.2 minutes,
Frangais canadien - 13
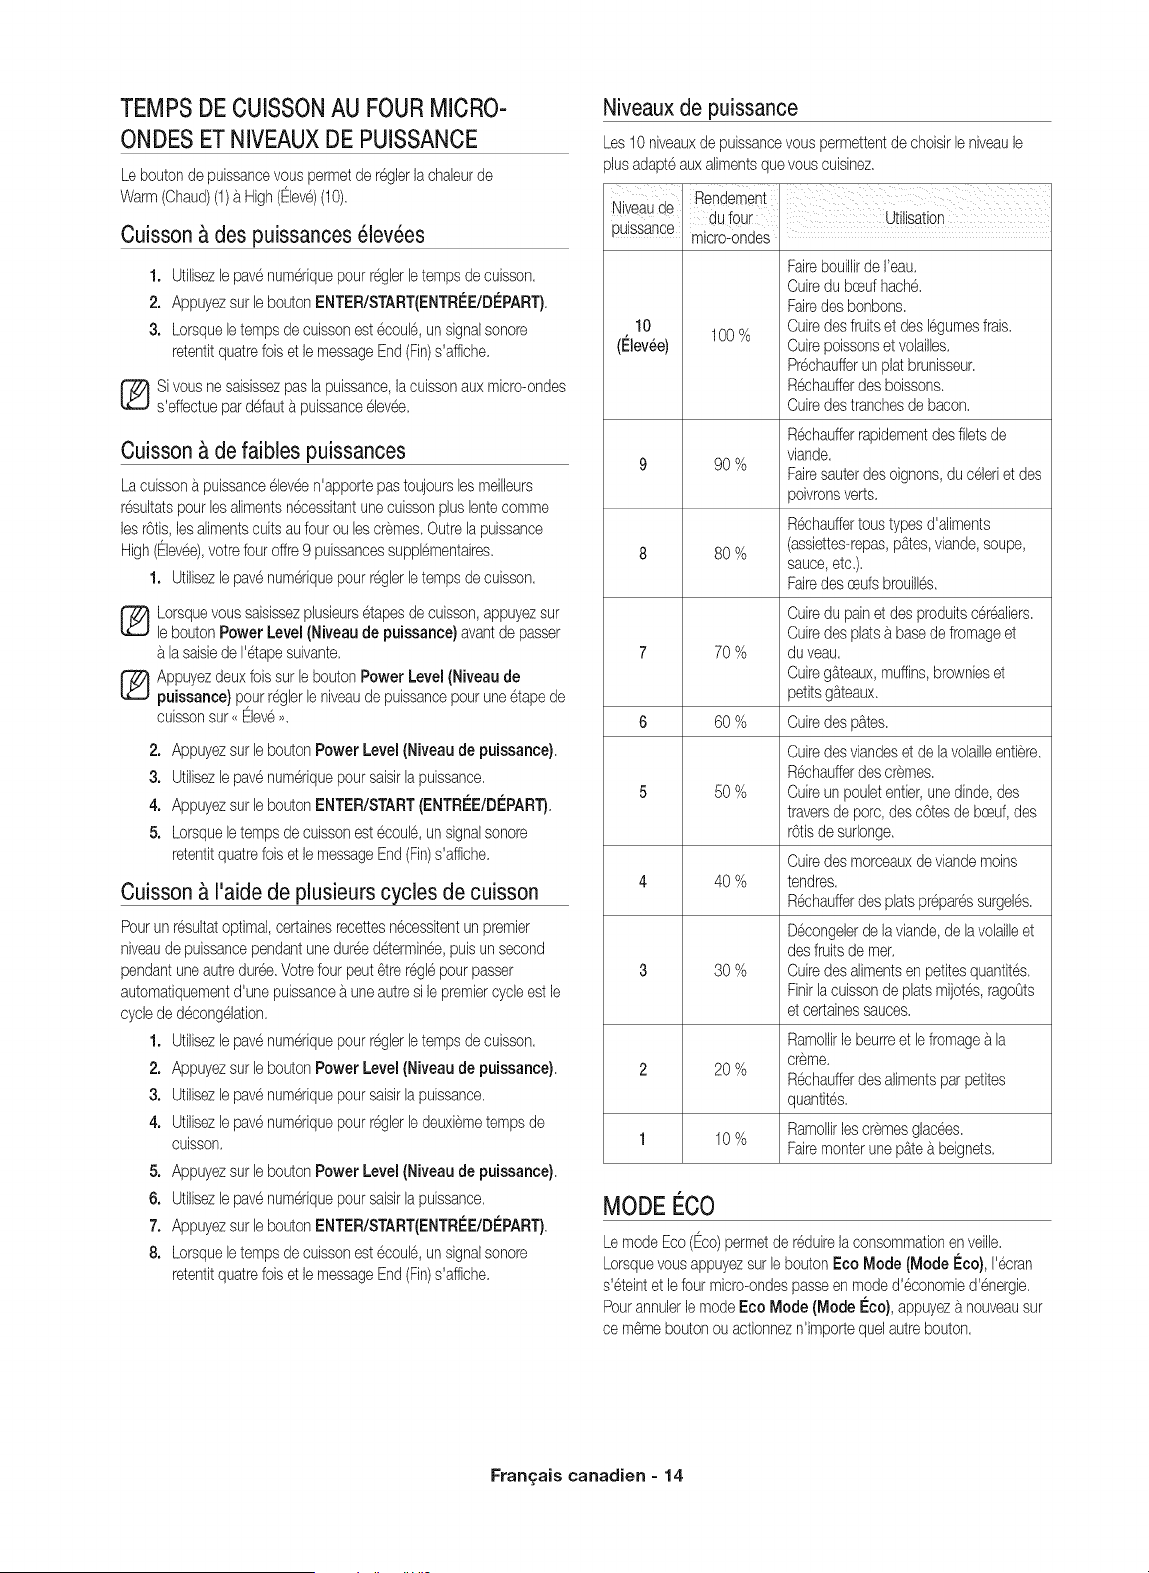
TEMPSDE CUISSONAU FOURMICRO-
ONDESETNIVEAUXDE PUISSANCE
Le boutondepuissancevous permetde reglerla chaleurde
Warm(Chaud)(f)_.High(@leve)(10),
Cuisson & des puissances 61evOes
1. Utilisezlepavenumeriquepour reglerletempsde cuisson,
2. Appuyezsur leboutonENTER/START(ENTREE/DEPART),
3. Lorsqueletempsde cuissonestecoulO,unsignalsonore
retentitquatrefoiset lemessageEnd(Fin)s'affiche.
Sivousnesaisissezpasla puissance,lacuissonaux micro-ondes
s'effectuepardefauta.puissanceelevOe.
Cuisson & de faibles puissances
La cuissona puissanceelev@n'apportepastoujourslesmeilleurs
resultatspourlesalimentsn@essitantunecuissonpluslentecomme
lesr0tis,lesalimentscuitsaufourou lescremes,Outrela puissance
High(@levee),votrefouroffre9 puissancessupplementaires.
1. Utilisezlepavenumeriquepour reglerletempsde cuisson,
Lorsquevoussaisissezphsieursetapesde cuisson,appuyezsur
leboutonPower Level (Niveaude puissance}avantde passer
b.la saisiede I'etapesuivante.
Appuyezdeuxfoissur leboutonPower Level (Niveaude
puissance} pourreglerleniveaude puissancepouruneetapede
cuissonsur <<Eleve,,.
2. Appuyezsur leboutonPower Level(Niveaude puissance}.
3. Utilisezlepavenumeriquepoursaisirlapuissance.
4. Appuyezsur leboutonENTER/START(ENTREE/DEPART}.
5. Lorsqueletempsde cuissonestecoulO,unsignalsonore
retentitquatrefoiset lemessageEnd(Fin)s'affiche.
Cuisson & I'aide de plusieurs cycles de cuisson
Pourunresultatoptimal,certainesrecettesnecessitentunpremier
niveaude puissancependantunedureedeterminOe,puisunsecond
pendantuneautredur@,Votrefour peutCtrer%le pour passer
automatiquementd'unepuissancea.uneautresi lepremiercycleest le
cyclededecongOlation.
1. Utilisezlepavenumeriquepour reglerletempsde cuisson,
2. Appuyezsur leboutonPower Level (Niveaude puissance}.
3. Utilisezlepavenumeriquepoursaisirlapuissance.
4. Utilisezlepavenumeriquepour reglerle deuxiemetempsde
cuisson,
5. Appuyezsur leboutonPower Level (Niveaude puissance}.
6. Utilisezlepavenumeriquepoursaisirlapuissance.
7. Appuyezsur leboutonENTER/START(ENTREE/DEPART),
8. Lorsqueletempsde cuissonestecoulO,unsignalsonore
retentitquatrefoiset lemessageEnd(Fin)s'affiche.
Niveaux de puissance
Les 10niveauxde puissancevouspermettentde choisirleniveaule
plusadapteauxalimentsquevouscuisinez,
NiveaUde
PUissance
10
tLIe)'-'ev-e" 100%
90%
80%
70 %
6 60 %
50%
4 40 %
30%
Fairebouillirde I'eau,
Ouiredu bceufhach&
Fairedesbonbons,
Cuiredesfruitset desI%umesfrais.
Cuirepoissonset volailles,
Prechaufferunplat brunisseur.
R@haufferdesboissons,
Cuiredestranchesdebacon,
R@haufferrapidementdesfiletsde
viande,
Fairesauterdesoignons,du celeriet des
poivronsverts.
R@hauffertous typesd'aliments
(assiettes-repas,pb.tes,viande,soupe,
sauce,etc,),
Fairedesceufsbrouilles.
Cuiredu painetdes produitsceroaliers.
Cuiredesplatsb.basede fromageet
du veau,
Cuireg_.teaux,muffins,brownieset
petitsg_.teaux.
Cuiredesp_.tes.
Cuiredesviandeset de lavolailleen%re.
R@haufferdescremes.
Cuireunpouletentier,unedinde,des
traversde porc,descotesde bceuf,des
r0tisde surlonge.
Cuiredesmorceauxdeviandemoins
tendres,
R@haufferdesplatspr@aressurgeles.
Decongelerde laviande,de lavolailleet
desfruitsde met,
Cuiredesalimentsen petitesquantit@,
Finirlacuissonde platsmijotes,rago@ts
et certainessauces.
Ramollirle beurreet le fromagea.la
creme,
2 20 %
R@haufferdesalimentsparpetites
quantites.
Ramollirles cremesglac@s.
1 10%
Fairemonterunepb.teb.beignets.
MODE ECO
Le modeEco(@co)permetde reduirelaconsommationenveille.
Lorsquevousappuyezsur leboutonEco Mode (ModeI_co),I'ecran
s'eteintet lefourmicro-ondespasseen moded'economied'@ergie.
PourannuletlemodeEco Mode (Mode I_co},appuyezb.nouveausur
ce m@meboutonou actionnezn'importequelautrebouton,
Fran_:ais canadien - 14
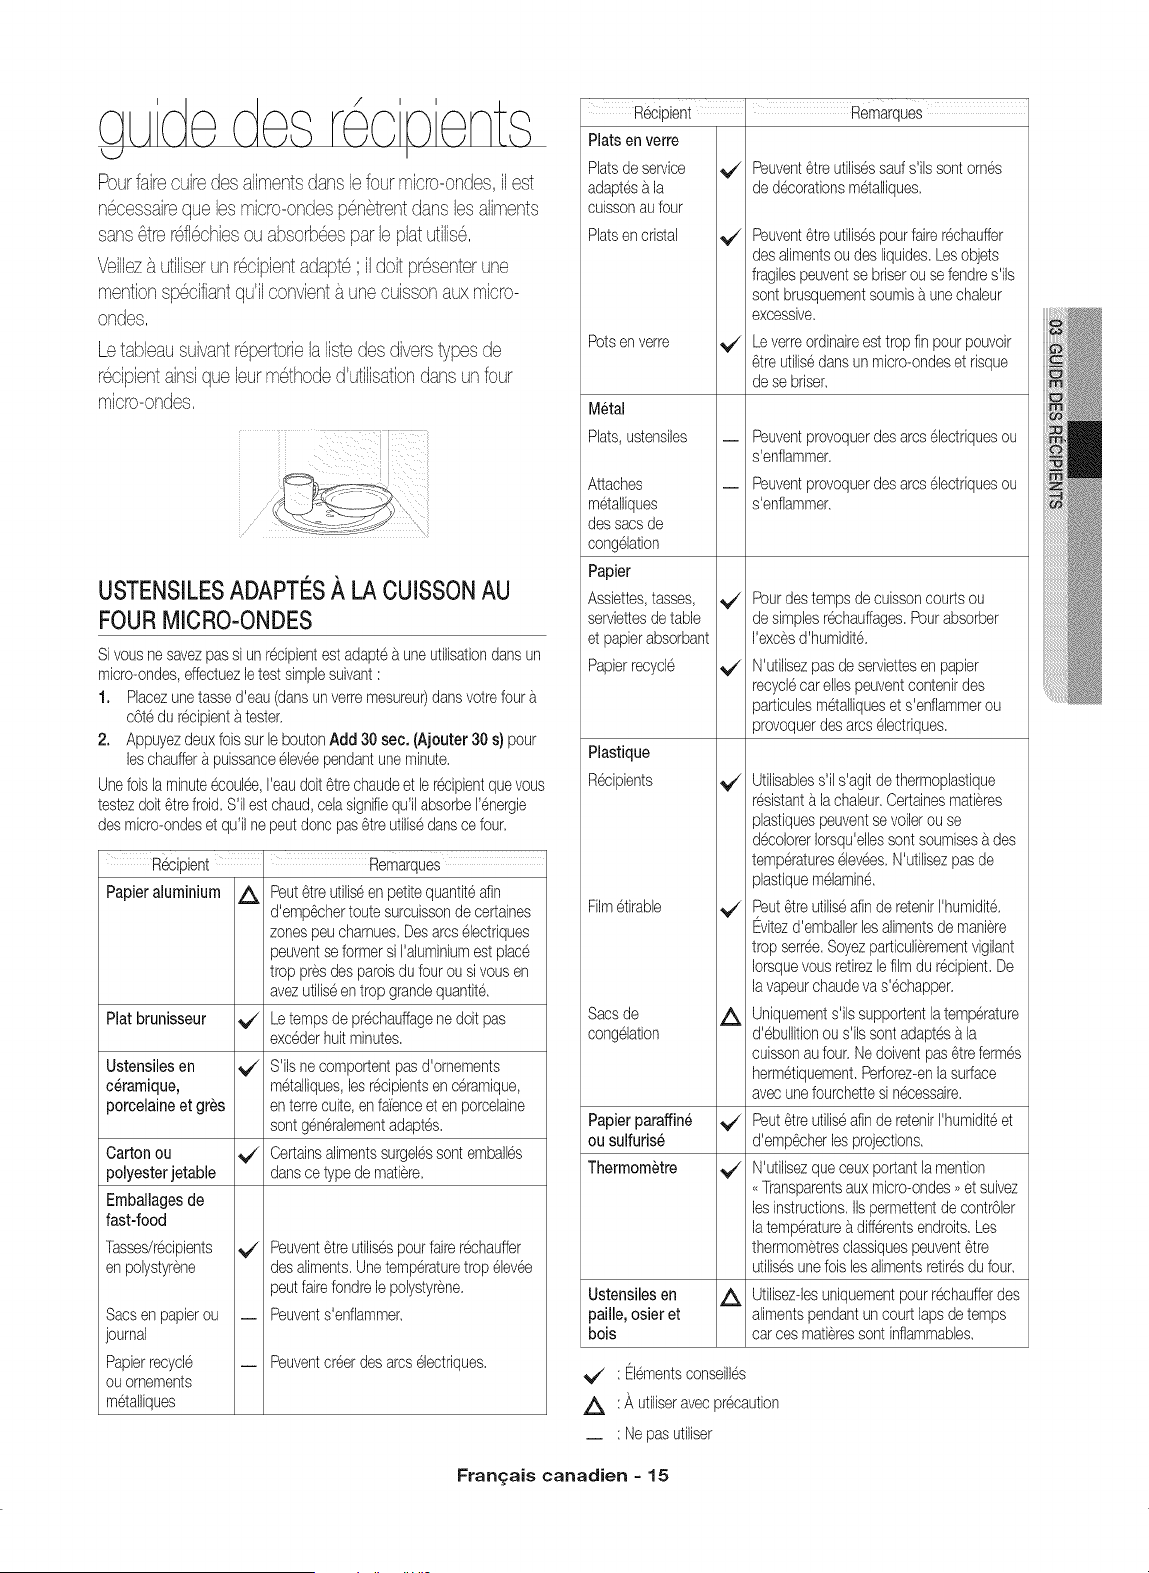
Pourfairecuiredes alimentsdansb four micro-ondes,il est
n6cessaireque bs mbro-ondes p6n6trentdans bs aliments
sans6trerdl6chbs ouabsorbeespar b platutiB6,
VeiNeza utiliserun redpbnt adapte;il doit presenterune
mentionspedfiantqu11convbnt a une cubson auxmbro-
ondes,
Letableausuivantr@ertorb laIistedes diverstypes de
redpbnt ainsiquebur methoded'utilisationdansun four
mbro-ondes,
USTENSILESADAPTES,_LA CUISSONAU
FOURMICRO-ONDES
Sivousne savezpassi unr@ipientestadapteb.uneutilbationdansun
micro-on@s,effectuezletest simplesuivant:
1. Placezunetassed'eau(dansunverremesureur)dansvotrefoura.
cOtedu r@ipientb.tester.
2. AppuyezdeuxfoissurleboutonAdd 30 se¢.(Ajouter30 s} pour
leschaufferb.puissance6leveependantuneminute.
Unefob laminuteecoul6e,I'eaudoit6trechaudeet ler@ipientquevous
testezdoit6trefroid.S'ilestchaud,celasignifiequ'ilabsorberenergie
desmicro-ondeset qu'il nepeutdoricpas6treutilisedanscefour.
RScipient i Remarques
Papieraluminium /_ Peut6treutiliseenpetitequantiteafin
d'emp@hertoutesurcuissonde certaines
zonespeuchamues.Desarcsebctriques
peuventseformersi I'aluminiumest place
trop presdespards du fourou sivousen
avezutiliseentrop grandequantit&
Plat brunisseur _/" Letempsde pr@hauffagene doitpas
excederhuitminutes.
Ustensilesen
c6ramique,
porcelaineet gres
Cartonou
polyesterjetable
Emballagesde
fast-food
Tasses/r@ipients
enpdystyr@e
Sacsen papbrou
journal
Papbrrecycle
ouornements
metalliques
v / S'ilsnecomportentpasd'ornements
metalliques,bs r@ipbntsenceramique,
enterrecuite,enfdJ'enceet enporceBine
sontg@erabmentadaptes.
Certainsalimentssurgelessontemballes
dartscetypede matiere.
Peuvent6treutilisespourfaker@hauffer
desaliments.Unetemperaturetrop 6bvee
peutfairefondreb polystyrene.
_ Peuvents'enflammer.
_ Peuventcreerdesarcsebctriques.
R@ipient I Remarques
Platsen verre
Platsde service _/"
adapt@a.la
cuissonau four
Platsencristal
Potsen verre
M6tal
Plats,ustensiles
Attaches
metalliques
dessacsde
congelation
Papier
Assiettes,tasses,
serviettesdetable
et papbrabsorbant
Papierrecycle
Peuvent6tre utilisessaufs'ilssontorn@
de d@orationsmetalliques.
v / Peuvent6tre utilisespourfairer@hauffer
desalimentsoudes liquides.Lesobjets
fragilespeuventse briserousefendres11s
sontbrusquementsoumisa unechaleur
excessive.
Leverreordinaireesttropfin pourpouvoir
6treutilisedansun micro-ondeset risque
dese briser.
_ Peuventprovoquerdes arcselectriquesou
s'enflammer,
_ Peuventprovoquerdes arcselectriquesou
s'enflammer.
Pourdestempsde cuissoncourtsou
desimplesr@hauffages.Pourabsorber
I'excesd'humidit&
_/_ N'utilisezpas deserviettesen papier
recyclecar ellespeuventcontenirdes
particulesmetalliqueset s'enflammerou
provoquerdes arcselectriques.
Plastique
R@ipbnts _/"
Filmetirabb _/"
Sacsde
congelation
Papierparaffin6
ou sulfuris_
Thermometre _/"
Utilisabbss'il s'agitdethermopBstique
resistanta lachabur,Certainesmatieres
plastiquespeuventsevoibrou se
d@olorerIorsqu'elbssontsoumisesb.des
temperatureselevees,N'utilisezpas de
pBstiquemelamin&
PeutCtreutiliseafinde retenirI'humidit&
Evitezd'embalbrbs alimentsde maniere
trop settee,Soyezparticulierementvigilant
Iorsquevousretirezb filmdu r@ipient,De
lavapeurchaudevas'@happer.
Uniquements'ib supportentlatemperature
d'ebullitionou s'ilssontadaptesa la
cqssonau four.Nedoiventpas6trefermes
hermetiquement,Perforez-enla surface
avecunefourchettesi n@essaire.
Peut6treutiliseafinde retenirI'humiditeet
d'emp@herbs projections.
N'utilbezqueceuxportantla mention
<<Transparentsaux micro-ondes,>et suivez
bs instructions,IIspermettentde contrObr
latemperaturea.differentsendroits,Les
thermometresdassiquespeuvent6tre
utilisesunefoisbs alimentsretir@dufour,
Ustensilesen Utilisez-bsuniquementpourr@haufferdes
paille,osier et alimentspendantun courtlapsdetemps
bois carces matieressontinflammables,
: @lementsconseill@
A : _, utiliseravec pr@aution
_ : Ne pas utiliser
Frangais canadien - 15
QLAde de CLA' n
L.J
Les micro-ondessont d'abordattir6espub absorbeespar
Feau,la graisseet b sucrecontenusdans bs aliments,En
pen6trant dans bs aliments, bs micro-ondes provoquent
une excitation des mdecubs, Cette agitationcree des
mouvements de friction qui g6n_rent la chabur n6cessaire
la cuisson des aliments,
CONSEJLSGI NI RAUXD'UTILISATIONDU
MICRO-ONDES
Les aliments denses, comme les potatoes de terre, chauffent plus
bntement que bs autres aliments. Lesaliments delicats doivent
6tre r@hauff@ a.une puissance moins ebv6e afin d'@iter qu'ils ne
durcissent,
Les aliments dont la peau n'est pas poreuse, tels que bs potatoes de
terre ou bs saucisses pour hot-dogs, doivent 6tre perc@ pour @iter
qu'ils n'@latent,
II est d@onseille de mettre de I'huib ou de B matiere grasse dans
le micro-ondes, Les matieres grasses et I'huib pourrabnt entrer en
ebullition de fagon soudaine et, par consequent, deborder et provoquer
de graves brOlures.
Certains ingredbnts chauffent plus rite que d'autres, Par exempb, la
confiture situee au cceur d'un beignet sera plus chaude que B pate du
beignet. Souvenez-vous en afin de pr@enir tout risquede brOBre,
L'altitude et b type d'ustensib utilise peuvent influer sur le temps de
cuisson, Lorsque vous testez une nouvelle recette, selectionnez b
temps de cuisson minimal et verifiezoccasionnelbment bs aliments
pour @iter qu'ils ne sobnt trop cuits.
La confection de conserves maison a.I'aide du micro-ondes n'est pas
recommandee car certaines bacteries patho@nes peuvent ne pas 6tre
detruites lois de la cuisson,
Bien que les micro-ondes ne chauffent pas directement les ustensibs,
la chabur des aliments se transmet souvent aux ustens[bs, Utilisez
toujours des maniquesIorsque vous retirez les aliments du four et
apprenez aux enfants b.proceder de m6me,
II n'est pas recommande de faire des bonbons dans b micro-ondes car
le sucre peut atteindre des temperatures tres 6levees. Souvenez-vous
en afin de pr@enir tout risque de bbssure.
Techniques de cuisson
Sile fourest programmepouruntempsde cubsonsuperieura.
25 minutes,ilse regleraautomatiquementa.70 pourcent de sa
puissanceapres25 minutespour@itertoutesurchauffe.
Melange
Ouvrezlaportedu fourmicro-ondeset remuezlesalimentsde temps
a.autre(ex.: lesplatsmijotesou leslegumes)encoursde cuissonafin
de r@artiruniformementlachaleur.Lanourrituresitueeen periph6rie
du platabsorbeplusd'energieet chauffedoncplusrapidement; c'est
pourquoivousdevezremuerlecontenuenpartantdu bordvers le
centre.Lefours'eteintautomatiquementIorsquevousouvrezla porte
pour remuerlesaliments.
Disposition
Disposezbs alimentsdeformesinegales(ex.: morceauxde poubt ou
cOtelettes)detellefagonquela partiela plus@aissesoitorient@vers
I'exterieurdu plateautournantet regoiveainsiuneplusgrandequantite
de micro-ondes.Pour@iterlasurcuisson,placezles morceauxfinsou
delicatsaucentredu plateautournant.
Protection
Recouvrezlesalimentsde bandelettesde papieraluminiumpour
@iterlasurcuisson.Lesextremit6sdesailesou descuissesdevolaille
ainsiquelescoinsdesplatscart@sontparexempledeszones
particulierementsensibles.Utilisezuniquementde petitesquantitesde
papieraluminium.Degrandesquantitesrisquentd'endommagervotre
four.
Rotation
Retoumezlesalimentsa mi-cuissonafind'en exposertouteslesparties
auxmicro-ondes.Cettemethodeser@eleparticulierementefficace
pour lacuissonde grandespi@esde viandecommelesr6tis.
Position debout
Lesalimentscuitsauxmicro-ondesconserventlachaleuret continuent
a.cuireplusieursminutesapresI'arr6tdu four.Laissezqesdoncreposer
quelquesinstantsb tempsquela cuissonsetermine.Cetteconsigne
s'appliqueessentielbmentaux r6tiset legumesentiers.Lecentredu
r6ticontinuedoncb.cuiresanspourautantquelespartiesexterieures
ne soienttrop cuites.Tousbs liquides(ex.:soupeou chocolatchaud)
doivent6tre remu@ou melang6senfin de cuisson.Laissezreposerles
liquidesquelquesinstantsavantde bs servir.Lorsquevousr@hauffez
desalimentspour beb6,remuezqesbienet verifiez-enla temperature
avantde bs servir.
Ajout de liquide
Lesmicro-ondessontattir@sparlesmol@ulesd'eau.Recouvrezou
laissezreposerlesalimentsdontlateneureneaun'estpas uniforme,
afinquelachaleurse repartissedefa9onhomo@ne.Ajoutezunepetite
quantited'eauauxalimentssecspourbur permettrede cuire.
A6ration
Lorsquevousrecouvrezlesplatsd'un filmplastique,relevezun coindu
filmafinde permettrea.lavapeurde s'@happer.
CUISSONDE LA VIANDE
Placezlaviandecotegrasversle bassurunegrillea.r6tiradapt@
a.la cuissonauxmicro-ondeset letout dansun platdu m6metype.
Recouvrezlesos ou lespartiespeucharnuesde finesbandelettesde
papieraluminium.Verifiezlatemperatureb.differentsendroitsavantde
laisserlaviandereposerpendantladureerecommandee.
Lestemperaturessuivantessontlestemperatureslotsdu retraitdu four.
Latemperaturedesalimentsaugmentedurantletempsde repos.
Tempsde Cuisson) I
TyPed a ment Puissance C0nsgnes
R6tidebceuf
(d6soss@
Jusqu'b.4 Ib
Porc
(d6sosseou
non)
Jusqu'b.4 Ib
Tempsde cuisson:
10b.15 min/Iba.
145°F(saignant)
12a 17 min/ib
160°F(apoint)
14a 19 min/Ib
170°F(biencult)
Niveaude puissance:
eleve(10)durantles
5 premieresminutes,
puismoyen(5).
Tempsde cuisson:
15a 20 min/Ib
170°F(biencult)
Niveaude puissance:
eleve(10)durantles
5 premieresminutes,
puismoyen(5).
Placezler6ticote grasvers
lebassur lagrillea.r6tiret
couvrezde papiersulfurise.
Retourneza lamoi%du
tempsde cuisson.Laissez
reposerpendant10 b.
15 minutes.
Placezlaviandede porc
c6tegrasversb bassurla
grillea rOtiret couvrezde
papiersulfurise.Retournez
b.la moitiedutempsde
cuisson.Laissezreposer
pendant10 b.15 minutes.
Fran_:ais canadien - 16
Lestemperaturessuivantessontlestemperatureslotsduretraitdu
four.Latemperaturedesalimentsaugmentedurantletempsderepos.
Attendez-vousb.ce quelatemperatures'61evede 10°F pendantle
tempsde repos.
ApieSrepos
Type d a ment Re!rat du f°u! (i 0 MtN)
Bceuf Saignant 135°F 145°F
_,point 150°F 160°F
Biencuit 160°F 170°F
Porc _,point 150°F 160°F
Biencult 160°F 170°F
Volaille Viandenoire 170°F 180°F
Viandeblanche 160°F 170°F
CUISSONDE LA VOLAILLE
Placezlavolaillesurunegrillea.r6tirtransparenteauxmicro-ondes,
dansun platadapteauxmicro-on@s,et couvrezde papiersulfurise
pour@iterbs projections.Recouvrezdefinesbandelettesd'aluminhm
lesos, lespartiespeucharnueset leszonessusceptiblesdetrop cuire.
Verifiezla temperatureb.differentsendroitsavantde laisserlavolaille
reposerpendantladureerecommand@.
Type' Tempsde cuisson/ Consi_nes
da ment Pussance
Poubtentier
Jusqu'b.4 Ib
Tempsde cuisson:
6 a.10 min/Ib
180°Fviandenoire
170°Fviandeblanche
Niveaude puissance:
Moyennement61eve(7)
Tempsde cuisson:
6 a.9 min/Ib
180°Fviandenoire
170°Fviandeblanche
Niveaude puissance:
Moyennement61eve(7)
Morceaux
de poulet
Jusqu'b.2 Ib
Placezlepoulet,cOtepoitrine
verslebas,surlagrilleb.rOtir.
Couvrezde papiersulfuris&
Retoumeza mi-cuisson.
Faitescuirejusqu'a,cequele
juss'@oulantdu pouletsoit
clairet quelachairautourdes
os nesoit plusrosee.Laissez
reposerpendant
5a.10minutes.
Placezlepoubt dansunplat,
I'osorienteverslebaset la
pattieplus@aisseorientee
versI'exterieurdu plat.
Couvrezde papiersulfuris&
Retourneza.lamoi%du
tempsde cuisson.Faites
cuirejusqu'b,cequelejus
s'@oulantdu poubtsoitclair
et quela chairautourdesos
nesoitplusros@.Laissez
reposerpendant
5a.10minutes.
CUISSONDESFRUITSDE MER
Placezlepoissonsur unegrillea r6tiradapteeb.lacuissonauxmicro-
ondeset dansun platdu m6metype.Utilisezuncouverclehermetique
pourcuirelepoissonb.I'etuv@.L'utilisationde papiersulfuriseou d'une
servietteenpapiercommecouvercbproduitmoinsde vapeur.Faites
cuirelepoissonjusqu'b,ce qu'ils'emiettefacibmentb.lafourchette.
Evitezdesurcuirelepoisson.Privilegiezletempsde cuissonminimumet
verifiezla cuissonjusteapres.
Tempsde CUsson)....
TyPed!ahment Puissance C0nslgnes
Steaksde
thonet de
saumon
Jusqu'a.1,5Ib
Filets
Jusqu'a.1,5Ib
Tempsde cuisson :
7 b.11 min/Ib
Niveaude puissance:
Moyennementelev6(7)
Tempsde cuisson :
4 b.8 min/Ib
Niveaude puissance:
Moyennementelev6(7)
Tempsde cuisson :
4 b.61Amin/Ib
Niveaude puissance:
Moyennementelev6(7)
Crevettes
Jusqu'a.1,5Ib
Placezlessteakssurlagrille
r6tir,cOtele plus@ais
orienteversI'exterieurde
lagrille.Couvrezde papbr
sulfuris&Retourneza.la
moi% dutempsde cuisson.
Faitescuirelepoisson
jusqu'a,ce qu'il s'emiette
facilementa.lafourchette.
Laissezreposerpendant
3 b.5 minutes.
Placezlesfiletsdansun
platen prenantsoinde
rentrerlesmorceauxles
plusfinssouslesfilets.
Couvrezde papiersulfuris&
SiI'@aisseurdesfiletsest
superieureb.I/2 pouce,
retournez-lesa.mi-cuisson.
Faitescuirelepoisson
jusqu'a,ce qu'il s'emiette
facilementa.lafourchette.
Laissezreposerpendant
2 b.3 minutes.
R@artissezlescrevettes
dartsun platen @itant
qu'ellesnese chevauchent.
Couvrezde papiersulfuris&
Faiteslescuirejusqu'b.
ce qu'elbsdeviennent
fermeset opaquestouten
leschangeant2 a 3 Dis
de positionen coursde
cuisson.Laissezreposer
pendant5 minutes.
CUISSONDESCEUFS
Vouspouvezutiliservotrefourb.micro-ondespourcuiredes ceufs.
Faites-lescuirejustece qu'ilfautcar ilsdeviennentdursIorsqu'ilssont
trop cults.
Nefaitesjamaiscuiredesceufsou r@haufferdes ceufsdurs
,dans bur coquillecarilsrisqueraientd'exploser.Perceztoujours
lesceufsentiersafind'@iterqu'ilsn'@latent.
CUISSONDESLI GUMES
Lavezleslegumesavantde procedera.lacuisson.IIest g@eralement
inutiled'ajouterde I'eau.Pourleslegumesa.chairdensetelsqueles
pommesde terre,lescarotteset les haricotsverts,ajoutezenviron_Ade
verred'eau.
Lespetitslegumes(rondellesde carottes,petitspois,haricotsdu Cap,
etc.)cuisentplusvitequeleslegumesplusvolumineux.
Leslegumesentiers,commelespotatoesdeterre,courgesou @is
de md_'s,doivent6tredispos@en cerclesur leplateautournantavant
lacuisson.IIscuirontde maniereplusuniformesi vouslesretoumeza.
mi-cuisson.
Dirigeztoujourslatige deslegumes(ex.: asperges,brocolis)versles
bordsdu plat,pointeverslecentre.
Lorsquevousfaitescuiredeslegumescoupesen morceaux,recouvrez
toujoursleplatd'un couvercleou d'un filmplastiqueperforeadaptea.la
cuissonaux micro-ondes.
Fran_2ais canadien = 17
Avantlacuisson,percezlapeaudesBgumesentiersnonpeBs
(ex:pommesdeterre,courges,aubergines,etc.)afind'@iterqu'ils
n'eclatent,
Pourunecuissonplusuniforme,remuezlesBgumesentiersouchangez
Burdispositionami-cuisson.
Gen6ralement,plusI'alimentestdense,plusletempsdereposest
long(letempsdereposcorrespondautempsnecessaireauxaliments
densesetvolumineuxpourterminerleurcuissonunefoissortisdufour).
Unepommedeterreaufourdoitreposerpendantcinqminutesavant
quesacuissonnesoitterminee,alorsqu'unplatdepetitspoispeut6tre
serviimmediatement.
RECETTES
Rago0t de bceuf & I'orge
1,5Ib de bceufd6coupeen morceauxd'environ0,5 pouced'@aisseur
½ tassed'oignonshaches
2 cuiIBresasoupedefarine
1c,a s,de sauceWorcestershire
Bouillonde bceuf(entre13,75et 14,5oz)
2 carottesmoyennes,coup@sen rondellesde 0,5pouce(1tasseenv.)
½ tassed'orge
1feuillede laurier
_Acc depoivre
1paquet(9a 10oz)depoissurgeBs,decongeBs
1. Dansun faitoutd'unecontenancede 2 litres,incorporezlebceuf,
lesoignons,lafarineet lasauceWorcestershire.Melangezbien,
Couvrez.Faitescuirea puissance6leveependant6 a8 minutes,en
melangeantunefois,jusqu'acequelaviandenesoitplusrosee.
2. Ajoutezlebouillon,lescarottes,Forge,lesfeuillesde laurieret
le poivre.Remuez,Couvrez,Faitescuirea puissancemoyenne
pendant1h00a 1h30,en melangeant2 a 3fois,jusqu'acequeles
carotteset lebceufsoientbientendres,
3. Ajoutezlespois,Couvrez,Faitescuirea puissancemoyenne
pendant10 minutes,Laissezreposerpendant10minutes.
Retirezlesfeuillesde laurieravantde servir.
Pour6 personnes.
Brocolis au fromage
_Atassede beurreou de margarine
_Atassed'oignonshaches
1½cuilBrea soupede farine
½ cuilBrea cafede sel
_AcuilBrea cafede moutarde
YscuiiBrea cafede poivre
1½tassedehit
_Atassede poivronrougehache
8 oz(2 tasses)defromagerapedetype Cheddar
1paquet(9a 10oz)debrocolishachessurgeBs,d@ongeBs
4 tassesde patescuitestorsad@s(8 ozde patesseches)
1. Dartsun faitoutd'unecontenancede 2 litres,faitescuirelebeurre
et les oignonsa puissanceelev@pendant1a 2 minutes,en
remuantunefois,jusqu'ace quelesoignonssoientbientendres.
2. Ajoutezlafarine,lesel,lamoutardeet le poivre,Melangezbien.
Faitescuirea puissance6leveependant30 a 60 secondesjusqu'a
ebullition,Incorporezlelait et melangezjusqu'aI'obtentiond'un
melangeonctueux,
3. Incorporezle poivronrouge,Faitescuireapuissanceelev@
pendant2 a 3 minutes,en remuantdeuxlois,jusqu'ace quele
melangeentreen ebullitionet s'@aississeBgerement,Incorporez
lefromageet melangezbienjusqu'ace qu'ilsoitentierementfondu,
4. Ajoutezlesbrocoliset lespates,Melangezbien.Couvrez,Faitescuire
a puissance6leveependant4 a 6 minutes,en remuantunelois,
jusqu'acequelemelangesoitbienchaud,Remuezavantdeservir.
Pour6 personnes.
Salade de pommes de terre chaude
2 Ib depetitespommesde terrea peaurouge(Roseval),
coup@sen morceauxde 0,5 pouce
4 tranchesde lard(cru)coupeesen morceauxde ½ pouce
_Atassed'oignonshaches
2 cuilBresacafe desucre
1cuiIBrea cafede sel
1cuiIBrea cafede farine
½ cuilBrea cafede grainesde celeri
YscuilBrea cafede poivre
2½cuilBresasoupedevinaigrede cidre
1. Dansun faitoutd'unecontenancede 2 litres,incorporezles
pommesdeterreavecle _Ade tassed'eau.Couvrez,Faitescuire
a puissance6leveejusqu'ace quelespommesde terresoient
tendres(7 a 10 min.),en melangeantdeuxfois. Egouttezet laissez
refroidirletoutquelquesinstants,
2. Dartsun saladierdetaillemoyenne,faitescuirelestranchesde lard
a puissance6levee,en melangeantunefois,jusqu'ace qu'elles
deviennentcroustillantes(2½a 3½ minutes),Disposezlestranches
surdu papierabsorbant,PrelevezunecuilBrea soupede graisse
de cuissondu lard.
3. Melangezdaaveclesoignons,Recouvrezletoutde filmetirableet
relevez-enun coinpourhissers'@happerlavapeur.Faitescuirea
puissance6leveejusqu'acequelapr@arationsoittendre
(1½a 2½ minutes); melangezunefois,
4. Incorporezle sucre,lesel,lafarine,lesgrainesde celeriet le poivre.
Faitescuirea puissance6leveejusqu'aebullitiondu melange
(30a 40 secondes).Ajoutezlevinaigreet une½ tassed'eau,Faites
cuirea puissanceelev6ejusqu'ace queleIiquideentreen ebullition
et s'@aississeBgerement(1a 2 minutes),melangez,Ajoutezles
tranchesde larda lasauce,Versezlasaucesurlespommesde
terre,Remuezbien.
Pour6 personnes.
Soupe de haricots noirs
1tassed'oignonshaches
1goussed'ail,6mincee
2 boi_es(15oz chacune)de haricotsnoirs%outtes
1boTte(entre14 et 16 oz)detomatesconcass@s
Bouillonde poulet(entre13,75et 14,5oz)
1bo_te(entre7 et 8,5 oz)demall's
1boTte(4oz)de pimentsvertseminc6s
1a 2 c.a cafedecuminen poudre
1. Mettezlesoignonset Faildansunfaitoutd'unecontenancede
3 Iitres.Couvrez.Faitescuirea puissanceelev6ependant
2 a 4 minutesjusqu'acequ'ilsdeviennenttendres.
2. Ajoutezuneboitede haricotset ecrasez-lesa I'aided'une
fourchette.Ajoutezlerestedes ingredientsetmelangezbien.
3. Faitescuirea puissance6leveependant10minutessans
couvercle; melangez.Reglezlapuissancesurle niveaumoyenet
faitescuirependant5 minutes,Remuezavantde servir.
Pourenvirondeuxlitresde soupe.
Franqais canadien = 18
nettoyageet
entreten de votre
NETTOYAGEDU PLATEAUTOURNANTET DE
L'ANNEAUDEGUIDAGE
Nettoyezreguli6rementI'anneaude guidageet lavezleplateautournant
desquen@essaire.Leplateautournantpeut_trelaveen toutes@urite
au lave-vaisselle.
Gardervotrefour mbro-ondesproprepermetd'am61iorerses
perlormances,d'6viterbs r6parationsinutbs et de prolonger
sa dureede vb,
NETTOYAGEDE LA PARTIEEXTERIEURE
IIestpref6rablede nettoyerimmediatementlestracesde projections
b.I'exterieurdu four.Utilisezunchiffondouxet de I'eauchaude
savonneuse.Rincezets@hez.
Z_ Evitezde mouillerlesorificesdeventilation.N'utilisezjamaisde
........ pro@itsabrasifsoude solvantschimiquestelsqueI'ammoniac
ou I'alcool,quirisquerabntd'altererI'apparencede votremicro-
ondes.
Nettoyage du dessous de votre four micro-ondes
Nettoyezregulierementlagraisseet la poussiereaccumuBessur le
dessousdevotremicro-ondesa I'aided'un melanged'eauchaudeet
de produitdenettoyage.
Nettoyage du tableau de comrnande
Frotteza I'aided'untorchonhumide,pub essuyezsoigneusement.
N'utilisezpas de d@apants,de savonet d'eauengrandesquantites,de
produitsabrasifsou d'objetspointussur letableaucar ilestfragile.
Nettoyage de la porte et des joints
Veilleztoujoursace quelesjointsde laportesobnt propreset b.ce que
celle-cifermecorrectement.Nettoyezavecun sointout particulierles
jointsde laporteafinqu'aucuneparticulenes'accumuleet ne nuise
I'etanch6it6de laporte.Nettoyezlavitredela portea I'aided'eauet de
savontresdoux.Veillezb.utiliserun chiffondouxpour@iterlesrayures.
Siunemincepelliculed'eauseformesur lapard interieureou exterieure
de lavitredu four,essuyezqaa I'aided'unchiffondoux.Ce phenomene
peutsepro@ireIorsqueles alimentsplac@b.I'interieurdu four
possedentuneforteteneuren eau;celan'indiqueen rienlapresence
d'unefuitedartslemicro-ondes.
RANGEMENTET ENTRETIENDU FOUR
MICRO-ONDES
Sivousdevezentreposervotrefourmicro-ondespouruneperiode
courteou prolon@e,choisissezun endroitsecet nonpoussBreux.La
poussiereet I'humiditerisquentde d6teriorercertainseBmentsdufour.
AVERTJ_ME_T
* Ner@arezpaset neremplacezpasvous-m6meles
eBmentsdufour.Seuluntechnicbnqualifiepeuteffectuer
lesr@arations.Si lefour esten panneou n@essite
uneinterventiontechnique,debranchezdede laprise
d'alimentationet contactezleserviceapres-venteleplus
pro@e.
* N'utilisezpaslefour si laporteparaitendommag@(ex.:
porteoujoints); il peuts'agird'unecharnierecass@,d'un
joint useou d'un habillaged6forme.
Neretirezpas lefour deson habillage.
Cefour micro-ondesestco%u pouruneutilisation
domestiqueet nonpouruneutilisationcommerciale.
REMPLACEMENTDEL'AMPOULEDE LA
SURFACEDE CUISSON/VEILLEUSE
Lorsde I'operationde remplacementde I'ampoulede lasurfacede
cuisson/veilleuse,portezdesgantsafind'@itertoutebrQlure.
1. D@ranchezlefourou coupezI'alimentationau niveaude la prise
d'alimentationsecteur.
2. Retirezlavisdu cachede I'ampouleet abaissezlaprotection.
3. Installezuneampoulea incandescencede 40 W.
4. Replacezlaprotectionde I'ampouleet lesvisde fixation.
5 RetablissezI'alimentationauniveaude la prisesecteur.
NETTOYAGEDE LA PARTIEINTERIEURE
Z_ Assurez-vousquelefourmicro-ondesa refroidiavantde le
........ nettoyerafind'@itertouteblessure.
Z_ Retirezleplateauen verredu fourIorsquevoussouhaitez
........ nettoyerlefour ou leplateau.Pournepas briserle plateau,
manipulezqeavecpr@autionet neleplongezpasdans
I'eauimmediatementapreslacuisson.Lavezle plateauavec
pr@autiondansde I'eauchaudesavonneuseou au lave-
vaisselle.
Nettoyezregulierementlessurfacesinternes(pards)de votrefour micro-
ondesafind'eliminerlesprojectionsou bs taches.Poureliminerles
particulesd'alimentsincrust@set lesmauvaisesodeurs,faiteschauffer
2tassesd'eau(additionneedejus decitronpourdesodoriser)dansun
r@ipientenverred'unecapacitede quatretassesa puissanceelev6e
pendant5 minutesoujusqu'a,ebullition.Laissezreposerdanslefour
pendantunea deuxminutes.
REMPLACEMENTDEL'AMPOULEDU FOUR
Lorsde I'operationde remplacementde I'ampouledufour,portezdes
gantsafind'@itertoutebrOlure.
1. Debranchezle fourou coupezI'alimentationau niveaude laprise
d'alimentationsecteur.
2. Ouvrezla porte.
3. Retirezlesvis de montagede laprotectiondu ventilateur
(3vis aucentre).
4. Faitescoulisserlagrilledu ventilateurverslagauche,puistirezqa
toutdroitversI'exterieur.
5. Retirezlefiltreb.charbonactifs'il yen a un.
6. Retirezlaprotectionen poussantlecrochetet en levantlelevier.
7. RetirezI'ampouben lad@issantdoucement.
8. Instalbzuneampouleneuvede 40 W.
9. RemontezlesupportdeI'ampoule.
10. Replacezlagrilleduventilateuret les3 vis.
Frangais canadien - 19
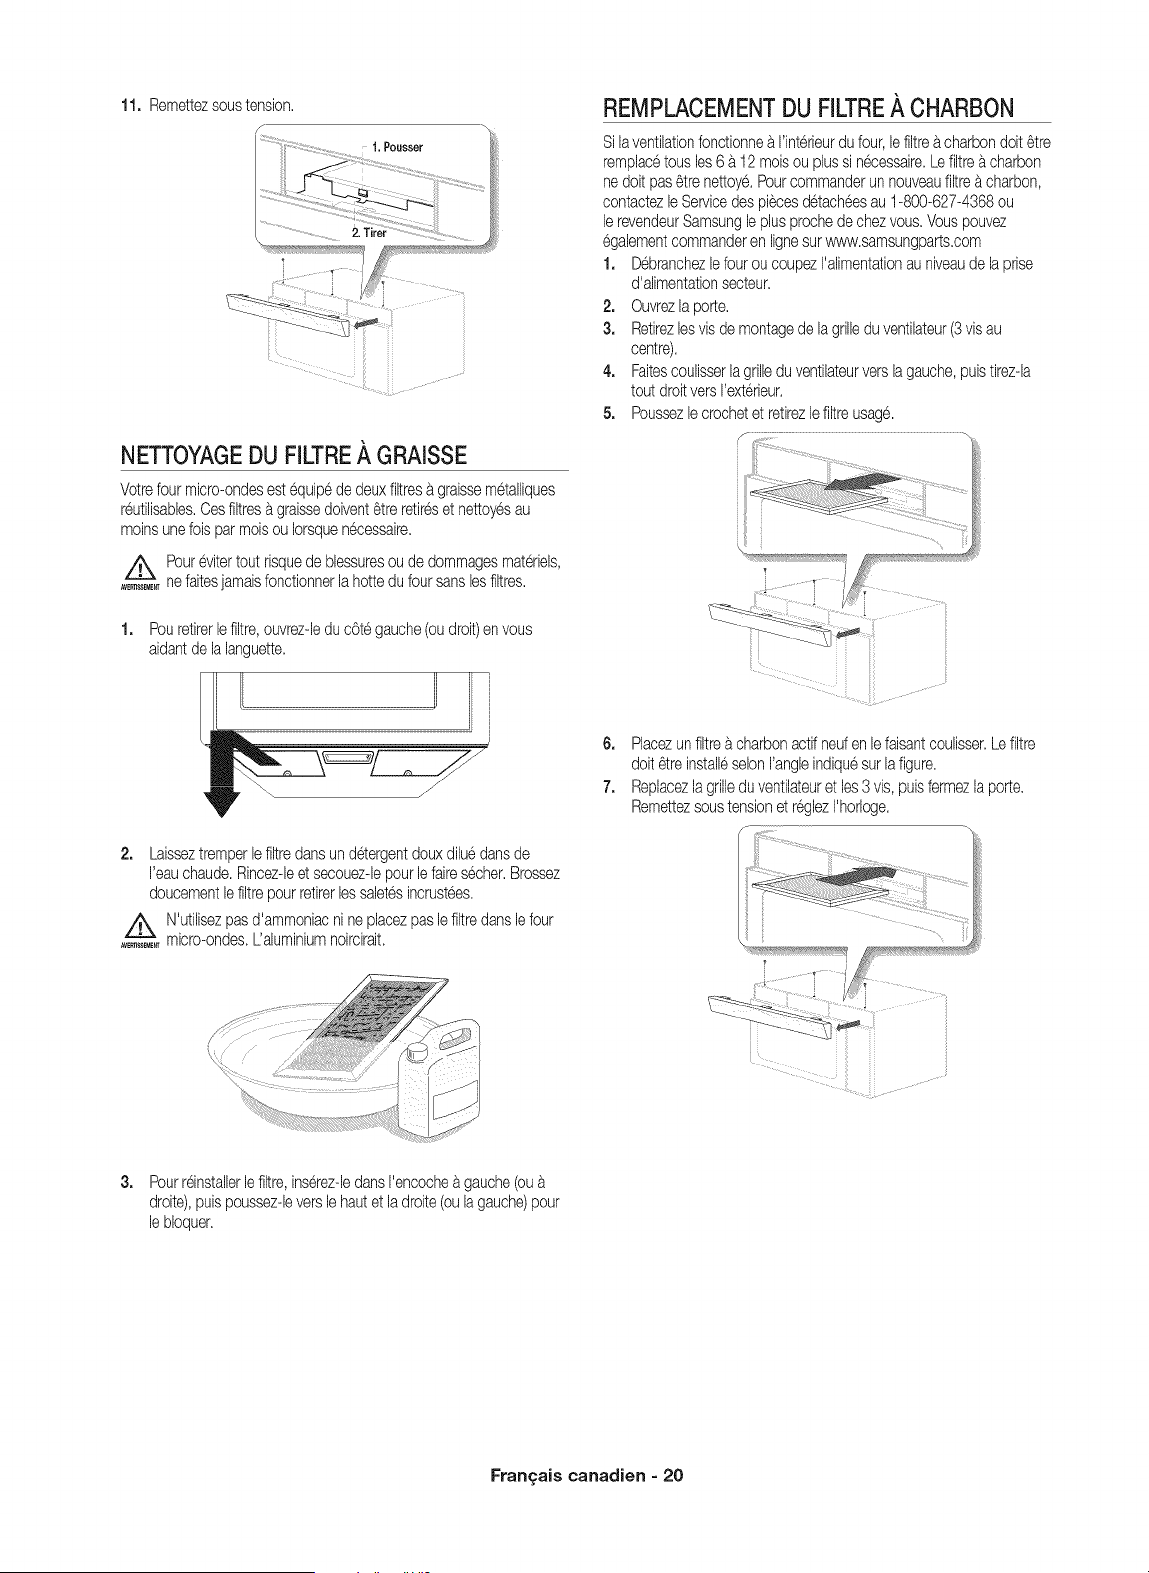
11.Remettezsoustension.
J
NETTOYAGEDU FILTRE/ GRAISSE
Votrefourmicro-ondesestequipededeuxfiltresb.graissemetalliques
reutilisables.Cesfiltresa.graissedoivent_treretireset nettoyesau
moinsunefoisparmoisou Iorsquenecessaire.
_Pour evitertout risquede blessuresou de dommagesmateriels,
........ nefaitesjamaisfonctionnerlahottedufour sanslesfiltres.
1,
Pouretirerlefiltre,ouvrez-ledu c6tegauche(oudroit)en vous
aidantde lalanguette.
2. Laisseztremperlefiltredansun detergentdouxdiluedansde
I'eauchaude.Rincez-leetsecouez-lepourlefairesecher.Brossez
doucementlefiltrepour retirerlessaletesincrustees.
_ N'utilisezpasd'ammoniacnine placezpaslefiltredanslefour
........ micro-ondes.L'ahminiumnoircirait.
REMPLACEMENTDU FILTRE/ CHARBON
Sila ventilationfonctionneb,I'interieurdufour,lefiltreb.charbondoit _tre
remplacetousles 6 a.12moisou plussi necessaire.Lefiltrea.charbon
ne doitpas_tre nettoye.Pourcommanderun nouveaufiltreb,charbon,
contactezleServicedes piecesdetacheesau 1-800-627-4368ou
lerevendeurSamsungleplusprochede chezvous.Vouspouvez
egalementcommanderen lignesurwww.samsungparts.com
1. Debranchezlefourou coupezI'alimentationauniveaude la prise
d'alimentationsecteur.
2. Ouvrezla porte.
3. Retirezlesvisde montagede lagrilleduventilateur(3visau
centre).
4. Faitescoulisserlagrilleduventilateurverslagauche,puistirez-la
toutdroitversI'exterieur.
5. Poussezlecrochetet retirezlefiltreusage.
6. Placezunfiltreb.charbonactifned en lefaisantcoulisser.Lefiltre
doit _treinstalleselonI'angleindiquesur lafigure.
Remettezsoustensionet reglezI'horloge.
3. Pourreinstallerlefiltre,inserez-ledansI'encocheb,gauche(oub.
droite),puispoussez-leverslehautet ladroite(oulagauche)pour
le bloquer.
Frangais canadien - 20
de nn Qe
I k..J
Consultezcette section si vous rencontrezun probleme
de fonctionnement :
Probleme I solution
L'affichageet/ou le
four nefonctionne
pas.
L'affichagefonctionne
maisI'appareilne
s'allumepas.
L'appareils'eteint-il
avantlafin dutemps
programme?
Lacuissondes
alimentseattrop
lente.
Formationd'etincelles
ou d'arcselectriques.
Leplateautoumant
eatbruyantou ne
toumepas.
Provoquedes
interferencessur la
radioou let61eviseur.
Laforced'aspiration
du moteurdu
ventilateureattrop
faible.
Assurez-vousquelaficheest branchee
suruneprisecorrectementmiseb.laterre.
Sila prisemuraleeatcommandeepar
un interrupteurmural,assurez-vousque
celui-ciesten positionouverte.Retirezla
fichede laprise,attendezdixsecondes,
puisrebranchez-la.Rearmezledisjoncteur
ou remplacezlesfusiblesgrilles.Branchez
un autreappareilsurlaprise.SiI'appareil
nefonctionnepas,contactezunelectricien
qualifieafinde reparerla prisemurale.
Branchezlefoursuruneautreprise.
Assurez-vousquelaporteestcorrectement
fermee.Verifiezqu'il ne resteaucunresidude
materield'emballageou toutautremateriau
surlejointde laporte.Verifiezquelaporte
n'estpas endommagee.Appuyezdeuxfois
surCancel(Annuler)poursaisira.nouveau
touteslesinstructionsde cuisson.
S'ily aeu unecoupurede courant,I'horloge
affiche::i&.x:_/.:Siaucunecoupurede
courantnes'estproduite,retirezlafiche
de laprise,attendezdixsecondes,puis
rebranchez-la.ReglezI'heureet saisissez
unenouvellefois lesconsignesdecuisson.
Rearmezledisjoncteurou remplacezles
fusiblesgrilles.
Assurez-vousquelefour a sonproprecircuit
d'alimentationelectriquede20 A. Uutilisation
d'un autreappareilsur lem6mecircuitrisque
d'entra;nerunechutedetension.Au besoin,
rebranchezlefoursur son proprecircuit.
Retirezdu four leseventuelsustensiles,plats
ou attachesenmetal.Si vousutilisezdu
papieraluminium,decoupezuniquementde
petitesbandeletteset menagezun espace
d'au moinsunpouceentreI'aluminiumet les
patoisinternesdu four.
Nettoyezleplateautournant,sonanneau
et la soledufour.Assurez-vousquele
plateautournantet son anneausontplaces
correctement.
Cesinterferencessontsemblablesa.celles
provoqueesparlesautrespetitsappareils,
telsquelesseche-cheveux.Eloignezvotre
micro-ondes(ouI'appareil)des autres
appareils(tel6viseurou radio).
Reglezle modede ventilationsurelev6.Le
ventilateurnefonctionnequ'enmodede
vitessefaiblependantlefonctionnementdu
micro-ondes.
Probleme I solution
Lebruitde
fonctionnementeat
trop fort.
L'intensitede lalampe
desurfacecuisson
eattropfable.
IIest difficilede
remplacerlefiltrea.
charbon.
Leplateautournant
netournepas
correctement.
Le micro-ondeseatbruyantpendantle
fonctionnement.Ceciesttouta.faitnormal.
Sivousentendezde fagoncontinueun
bruitanormal,veuillezcontacterleCentre
d'assistanceSamsung(1-800-726-7864).
Reglezla luminositede lalampesurleniveau
elev6.
Reportez-vousaux instructionscontenues
dansle manueld'utilisationpourle
remplacementdu filtrea.charbon.
Verifiezquevousn'avezpaschargele
plateautournantavectropd'aliments.
Silesalimentssonttrop encombrants
ou trop Iourds,le plateautournantpeut
eventuellementmalfonctionner.
Caract6ristiquestechniques
i
Numerode modele ME16H702SEB,W,SiAA
Commandes:
Dimensions Minuterie:
10 niveaux
interieuresdufour' 99 minutes,
1,6piedcube 99 secondes de puissance,
decong61ationincluse
Alimentation : Consommation:
Puissance: 1000W
120 V CA, 60 Hz 1580W
Poidsnet/avec ST:46,9 / 53,8Ib
emballage B/W:45,5/ 52,3Ib
Dimensions
297/8"(L)X 16 29/s2"(H)X15 5/s2"(P)
exterieures
Dimensions
19%8"(L)X 9 5/8"(H)X14%" (P)
interieures
Dimensionsdans
33 8/8"(L)X 1918/s2"(m)X205/s2"(P)
I'emballage
i
Numerode modele ME16H702SEB,W,SiAC
Commandes:
Dimensions Minuterie:
10 niveaux
interieuresdufour' 99 minutes, de puissance,
1,6piedcube 99 secondes
decong61ationincluse
Alimentation : Consommation:
Puissance: 1000W
120 V CA, 60 Hz 1500W
Poidsnet/avec ST:46,9 / 53,8Ib
emballage B/W:45,5/ 52,3Ib
Dimensions
297/8"(L)X 16 29/s2"(H)X15 5/s2"(P)
exterieures
Dimensions
19%8"(L)X 9 5/8"(H)X14%" (P)
interieures
Dimensionsdans
33 8/8"(L)X 19 18/82" (m)X208/82"(P)
I'emballage
Frangais canadien - 21
/
c arante
\ /
FOURMICRO-ONDES HOTTEINTEGREEDE
SAMSUNG
Garantie limit_e & I'acqu@eurd'origine
Ce produitde lamarqueSAMSUNG,foumiet distribueparSarnsungEbctronics
America,Inc. (SAMSUNG),Iivreenetat neufdanasoncartond'origineet achete
par b consornrnateuret acquereurd'origine,s'accornpagned'une garantbde
SAMSUNGcentretoutvicede fabricationau nlveaudespieceset de lamain
d'ceuvrependantuneperiodelirniteede :
UN (1)AN POUR LES PIECES ET LA MAIN D'CEUVRE,DIX (10)ANS
POUR LES PIECES DU MAGNI_TRON
Sarnsungfactureralestravauxde r@arationIorsqu'unaccessoiredolt6tre
r@areou un ddaut esthetiquecorrig&si I'endornrnagementde I'appareilet/ou
I'endornrnagernentou lapertede I'accessoirea eteoccasionne(e)par b client.
Leselernentsconcernespar cettestipulationsont:
- uneporte,unepoignee,unpanneauexterieurou letableaude cornrnandes
bossele(e),raye(e)ou brise(e)
- un plateau,un guidede plateauroulant,un co@bur,unfiltreouunegrille
rnetalliquebrise(e)ou manquant(e)
Lespiecesremplaceespar I'utilisateurpeuvent6treenvoyeesau clientpour
r@aration.Sinecessaire,un ing@burdu serviced'assistancepourra6treenvoye
poureffectuerles r@arations.
Cettelirnitede garantbs'appliquea cornpterde ladated'acquisitionet couvre
unlquernentles produltsacheteset utilisesaux Etats-Unb.Poursepr@alolr
du servicede garantb,I'acheteurdoit contacterSAMSUNGafind'etablirles
proceduresrelativesau diagnosticet a I'interventionnecessaire.Pour6tre
couverteparla garantb,la maintenancenepeut6treeffectueeque parun
servicetechniqueagreeSAMSUNG.Lorsde la rernised'un produitddectueux
SAMSUNGou a uncentrede serviceSAMSUNGagree,I'acquereureattenu
de presenterlecoupond'achatd'originea ladernandedes interessesa titrede
preuved'achat.
La societeSAMSUNGprendraencharge,a saconvenance,la r@arationoule
remplacementdu produita ses fraistelque stipuledans lespresentesconditions
et procederaau rernplacernentouau changernentdespiecesoudesproduits
si ces dernbrss'averentddectueuxdanalaIlrnltede laperiodede garantb
rnentionneeprecedernrnent.Toutepieceou toutproduitrernplacedevbnt
laproprietedeSAMSUNGet dolt lui 6trerestitu&Lespieceset produltsde
rechangesontprotegespour lerestede la periodede garantieinitialeou pour
quatre-vingt-dix(90)jours,selonI'eventualitela pluseloignee.
Enfonctlondes disponibilitessurleterrltoiredesEtats-Uniscontigus,unservice
domicileest proposedans lalirnitede laperiodede garantb.Leservicea domicile
n'estpasdisponiblepourtoutesleszones.Pourb@dicierdu servicea domicile,
rappareildoit6tre faclbrnentaccessiblea notrepersonnel.Danslecas ouil
seraitimpossibleder@arerI'appareilau coursdu servicea domicile,il se peut
queI'appareildoive6treernporte,r@areet retourn&Encasd'indisponbilitedu
servicea domicile,SAMSUNGpourrachoisirlernoyende transportde son choix
pouracherninerou renvoyerI'appareilverset depuisuncentrede serviceagree
de SAMSUNG.Danslecascontraire,laresponsabilitedu transportverset depuis
lecentrede serviceagr@de SAMSUNGincornberaa I'acquereur.
Cettegarantielirniteecouvrebs ddauts de fabricationdespieceset lamain
d'ceuvresurvenantsuitea uneutlllsationnorrnabet noncornrnercialede ce
produitet ne s'appliquepasauxproblernesci-apres,y cornpris,rnaissans
s'y lirniter: toutdornrnagesurvenantau coursde I'expedition,lalivrabonet
I'lnstallation; touteutillsationde I'appareilcontraireaubut auquelil etait destine;
tout nurnerode produitou de serieefface; tout dornrnagedu rev6ternent
exterburou de I'aspectdu prodult; toutdornrnagecauseparaccident,abus,
negligence,incendb,lnondation,foudreou autrecatastrophenaturelle;toute
utilisationde produits,equipernents,systemes,appareils,services,pieces,
fournitures,accessoires,applications,installations,r@arations,c_blages
externesouconnecteursnonfournisouautorisespar SAMSUNGetsusceptibbs
d'endornrnagerbdlt appareilou de nuirea sonfonctlonnernent; toutesurtension,
fluctuationoutensionde ligneebctriqueincorrecte; tout reglageeffectuepar
I'acquereuret non-respectdesinstructionsde fonctionnernent,denettoyage,
d'entretbnetde respectde I'envlronnernentcouverteset prescrltesdansle
presentcarnetd'entretbn ;tout problerneresultantd'une proliferationd'lnsectes
nuisibbs,d'unesurchauffeou d'un plattrop cult par I'utlllsateur; tout problerne
relatifau plateauen verreou plateautournantou a unepuissancereduitedu
rnagnetronen raisond'uneusurenorrnale.SAMSUNGnegarantitpasun
fonctlonnernentcontinuou sanserreurde ce prodult.
SAMSUNGNEFOURNITAUCUNEAUTREGARANTIEAUTREQUECELLES
MENTIONNEESET DECRITESCI-DESSUS,ETAUCUNEGARANTIE,
EXPRESSEOUIMPLICITE,Y COMPRIS,MAISSANSS'YUMITER,LES
GARANTIESIMPLICITESDEQUAUTECOMMERCIALEOUD'APTITUDE
UNUSAGEPARTICULIER,NEDOlTS'APPLIQUERAPRB EXPIRATIONDES
PERIODESDEGARANTIEEXPRESSESCONSIDEREESCI-DESSUS,ET
AUCUNEAUTREGARANTIEEXPRESSERELATIVEAU PRESENTPRODUIT,
QU'ELLESOITDONNEEPARUNETIERCEPERSONNE,UNEENTREPRISE
OUUNEPERSONNEMORALENEPOURRAETRECONSIDEREECOMMEUN
ENGAGEMENTDELAPARTDESAMSUNG.SAMSUNGN'ENDOSSEAUCUNE
RESPONSABILITEENCASDEPERTEDEREVENU,DEMANQUEA GAGNER,
DINCAPACITEA REALISERDESECONOMIESOUTOUTAUTREAVANTAGE
FINANCIER,OUENCASDEDOMMAGERESULTANTDEL'UTILISATIONOU
D'UNEMAUVAISEUTILISATIONDECETAPPARELOUD'UNEINCAPACITE
UTILISERCETAPPAREIL,QUELLEQUESOITLABASELEGALESUR
LAQUELLEREPOSELAPLAINTE,ETMEMESI SAMSUNGA ETEAVERTIE
DEL'EVENTUALiTEDETELSDOMMAGES.TOUTTYPEDECOMPENSATION
EXIGEEAUPRB DESAMSUNGNESAURAENAUCUNCASEXCEDERLE
PRIXD'ACHATDUPRODUITVENDUPARSAMSUNGETA UORIGINEDES
DOMMAGESALLEGUES.SANSLIMITERCEQUISUIT,L'ACQUEREURPREND
ENCHARGETOUSLESRISQUESETRESPONSABILITESCONCERNANTLA
PERTE,LESDOMMAGESOU LESBLESSURESINFLIGEESA L'ACQUEREUR
ETAUXBIENSDECELUI-CIETATOUTEAUTREPERSONNEETBIEN
RESULTANTDEL'UTILISATION,LAMAUVAISEUTILISATIONDEL'APPAREIL
ETL'INCAPACITEA UTILISERLEPRESENTAPPAREILVENDUPARSAMSUNG
ETQUINESERAITPASLIEEDIRECTEMENTA UNENEGLIGENCEDELAPART
DESAMSUNG.CETTEGARANTIELIMITEEN'ESTVALABLEPOURPERSONNE
D'AUTREQUEL'ACHETEURINITIALDU PRODUIT,N'ESTPASTRANSFERABLE
ETENONCEVOTRERECOURSEXCLUSIR
Certainesprovincesouterritolrespeuventautoriserou nondeslimitationsquant
ladureedes garantiesirnplicltes,ou I'exclusionou lalimitationde dornrnages
accessoiresou indirects;il sepeutpar consequentque leslimitationset
exclusions@onceesci-dessusnes'appliquentpasavotrecas.Cettegarantie
vousconferedesdroitslegauxspecifiques,vouspouvezegalernentavoird'autres
droitsqulvarlentd'un Etata I'autre.
Pourb@dicierd'un serviced'assistancecouvertparvotregarantb,contactez
SAMSUNGa I'adressesuivante:
1-800-SAMSUNG(726-7864)ou
www.samsung.com/us/support
Fran£ais canadien = 22

garanteCana
FOURMICRO-ONDES HOTTEINTEGREEDE
SAMSUNG
Garantie limitCe & I'acqu@eurd'origine
Ce produitde la marqueSAMSUNG,fourniet distribueparSamsungElectronics
Canada,Inc.(SAMSUNG),Iivreenetatned danssoncartond'orlgineet achete
par leconsommateuret acquereurd'orlgine,s'accompagned'unegarantbde
SAMSUNGcontretoutvicedefabricationau niveaudespieceset dela main
d'ceuvrependantuneperiodeIimiteede :
UN (1)AN POUR LES PIECES ET LA MAIN D'(:EUVRE, ClNQ (5)ANS
POUR LES PI_:CES DU MAGNETRON
Samsungfactureralestravauxde r@arationIorsqu'unaccessolredolt6tre
r@areou unddaut esthetiquecorrige,sl I'endommagementde I'appareilet/ou
I'endommagementou lapertede I'accessoirea ete occasionnc(@par leclient.
Leselcmentsconcernesparcette stipulationsont :
- uneporte,unepoignee,un panneauexterieuroub tableaude commandes
bossele(e),raye(e)oubrise(e)
- un plateau,un guidede plateauroulant,unco@bur, unfiltreou unegrille
metalliquebrise(e)ou manquant(e)
LespiecesremplaceesparI'utilisateurpeuvent6treenvoyeesauclientpour
r@aration.Sinecessaire,uning@ieurdu serviced'assistancepourra6treenvoye
poureffectuerlesr@arations.
Cettelimitede garanties'appliquea compterdela dated'acquisitionet couvre
uniquementlesproduitsacheteset utilisesau Canada.Poursepr@aloirdu
servicedegarantie,I'acheteurdoltcontacterSAMSUNGafin d'etablirles
proceduresrelativesaudiagnosticeta I'interventionnecessaire.Pour6tre
couvertepar lagarantb,lamaintenancene peut6treeffectueequepar un
servicetechniqueagreeSAMSUNG.Lorsde laremised'un produitddectueux
SAMSUNGou a uncentrede serviceSAMSUNGagrec,I'acquereurest tenu
de presenterlecoupond'achatd'originea lademandedesintcressesa titrede
preuved'achat.
LasocieteSAMSUNGprendraen charge,a saconvenance,lar@arationou le
remplacementdu produita sesfraistelquestipuledansbs presentesconditions
et procederaau remplacementou auchangementdespiecesou des produits
si cesdembrss'averentddectueuxdanslalimitede la periodede garantie
mentionneeprecedemment.Toutepieceoutout produitremplacedevient
laproprietede SAMSUNGet doitlui 6trerestitue.Lespieceset produitsde
rechangesontprotegespour lerestede laperiodedegarantieinitialeou pour
quatre-vingt-dix(90)jours, selonI'@entualitelapluseloignee.
Enfonctiondesdisponibilitessur b territdrecanadiencontigu,unservice
domicileest proposedansla limitede la periodede garantie.Le servicea domicile
n'estpasdisponibbpourtoutesleszones.Pourbendicierdu servicea domicile,
I'appareildolt6trefacibmentaccessiblea notrepersonnel.Danslecasouil
seraitimpossiblede r@arerI'appareilaucoursdu servicea domicile,il sepeut
queI'appareildoive6treemporte,r@areet retourn&Encas d'indisponibilitedu
servicea domicile,SAMSUNGpourrachoisirle moyende transportde sonchoix
pouracheminerourenvoyerI'appareilverset depuisun centrede serviceagree
de SAMSUNG.Danslecas contraire,la responsabilitedu transportvers et depuis
lecentrede serviceagreede SAMSUNGincomberaa I'acquereur.
Cettegarantielimiteecouvrebs ddauts de fabricationdes pieceset lamain
d'ceuvresurvenantsuitea uneutilisationnormaleet noncommercialede ce
produitet nes'appliquepasauxproblemesci-apres,y compris,maissans
s'ylimiter:tout dommagesurvenantaucoursde I'expedition,la livraisonet
I'installation; touteutilisationde I'appareilcontraireau but auquelil etaitdestine;
tout numerode produitou de serieefface; toutdommagedu revCtement
exterieurou de I'aspectdu produit; tout dommagecausepar accident,abus,
negligence,incendie,inondation,foudreou autrecatastrophenaturelle; toute
utilisationde produits,equipements,systemes,appareils,services,pieces,
fournitures,accessoires,applications,installations,r@arations,c&blages
extemesou connecteursnonfoumisou autorisesparSAMSUNGet susceptibbs
d'endommagerbdit appareilou denuirea sonfonctionnement; toutesurtension,
fluctuationou tensionde ligneebctriqueincorrecte; toutreglageeffectuepar
I'acquereuret non-respectdesinstructionsde fonctionnement,de nettoyage,
d'entretienet de respectde I'environnementcouverteset prescritesdansle
presentcametd'entretien; tout problemeresultantd'uneproliferationd'insectes
nuisibbs,d'une surchauffeou d'un plattrop cultpar I'utilisateur; tout probleme
relatifau plateauenverreouplateautoumantou a unepuissancereduitedu
magnetronenraisond'uneusurenormale.SAMSUNGne garantitpasun
fonctionnementcontinuou sanserreurde ceproduit.
SAMSUNGNEFOURNITAUCUNEAUTREGARANTIEAUTREQUECELLES
MENTIONNEESETDECRITESCI-DESSUS,ETAUCUNEGARANTIE,
EXPRESSEOUIMPLICITE,YCOMPRIS,MAISSANSS'Y LIMITER,LES
GARANTIESIMPUCITESDEQUALITECOMMERCIALEOUD'APTITUDE
UN USAGEPARTICULIER,NEDOlTS'APPLIQUERAPRB EXPIRATIONDES
PERIODESDEGARANTIEEXPRESSESCONSIDEREESCI-DESSUS,ET
AUCUNEAUTREGARANTIEEXPRESSERELATIVEAUPRESENTPRODUIT,
QU'ELLESOITDONNEEPARUNETIERCEPERSONNE,UNEENTREPRISE
OUUNEPERSONNEMORALENEPOURRAETRECONSIDEREECOMMEUN
ENGAGEMENTDELAPARTDESAMSUNG.SAMSUNGN'ENDOSSEAUCUNE
RESPONSABILITEENCASDEPERTEDEREVENU,DEMANQUEA GAGNER,
D'INCAPACITEA REALISERDESECONOMIESOUTOUTAUTREAVANTAGE
FINANCIER,OUENCASDEDOMMAGERESULTANTDEL'UTILISATIONOU
D'UNEMAUVAISEUTILISATIONDECETAPPAREILOUD'UNEINCAPACITE
UTILISERCETAPPAREIL,QUELLEQUESOITLABASELEGALESUR
LAQUELLEREPOSELAPLAINTE,ETMEMESISAMSUNGA ETEAVERTIE
DEL'EVENTUALITEDETELSDOMMAGES.TOUTTYPEDECOMPENSATION
EXIGEEAUPRB DESAMSUNGNESAURAENAUCUNCASEXCEDERLE
PRIXD'ACHATDU PRODUITVENDUPARSAMSUNGETA L'ORIGINEDES
DOMMAGESALLEGUES.SANSLIMITERCEQUISUIT,L'ACQUEREURPREND
ENCHARGETOUSLESRISQUESETRESPONSABILITESCONCERNANTLA
PERTE,LES DOMMAGESOULESBLESSURESINFLIGEESA L'ACQUEREUR
ETAUXBIENSDECELUI-CIETA TOUTEAUTREPERSONNEETBIEN
RESULTANTDEL'UTILISATION,LA MAUVAISEUTILISATIONDEL'APPAREIL
ET LINCAPACITEA UTILISERLE PRESENTAPPAREILVENDUPARSAMSUNG
ETQUINESERAITPASLIEEDIRECTEMENTA UNENEGLIGENCEDELAPART
DESAMSUNG.CETTEGARANTIELIMITEEN'ESTVALABLEPOURPERSONNE
D'AUTREQUEL'ACHETEURINITIALDU PRODUIT,N'ESTPASTRANSFERABLE
ET ENONCEVOTRERECOURSEXCLUSIF.
Certainesprovincesou territoirespeuventautorlserou non deslimitationsquant
la dureedes garantleslmpllcltes,ouI'excluslonou la limitationde dommages
accessoiresou lndirects; il sepeutpar consequentqueles limitationset
exclusions@onceescl-dessusne s'appliquentpasa votrecas.Cettegarantie
vousconferedesdroitslegauxspecifiques,vouspouvezegalementavolrd'autres
droltsquivarientd'un Etata I'autre.
Pourbendicbr d'un serviced'assistancecouvertparvotregarantie,contactez
SAMSUNGa I'adressesuivante:
1-800-SAMSUNG(726-7864) ou
www.samsung.com/ca/support,
www.samsung.com/ca_fr/support
Fran£ais canadien - 23
VeuilleznoterquelagarantieSamsungn'inclutpaslesd_placementsduserviceapres-ventepourexpliquerle
fonctionnementdeI'appareil,corrigeruneinstallationnoncorrecteouex_cuterdestravauxdenettoyageou
d'entretienr_guliers.
DES QUESTIONS OU DES COMMENTAIRES?
www.samsu ng.com/ca/su pport (English)
CANADA 1-800-SAMSUNG(726-7864) www.samsung.com/ca fr/support (French)
U.S.A
Consumer Electronics 1-800-SAMSU NG(726-7864) www.samsung.com/us/su pport
U.S.A 1-800-SAMSU NG(726-7864) www.samsung.com/us/su pport
Mobile Phones