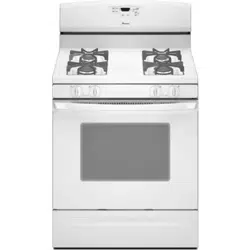
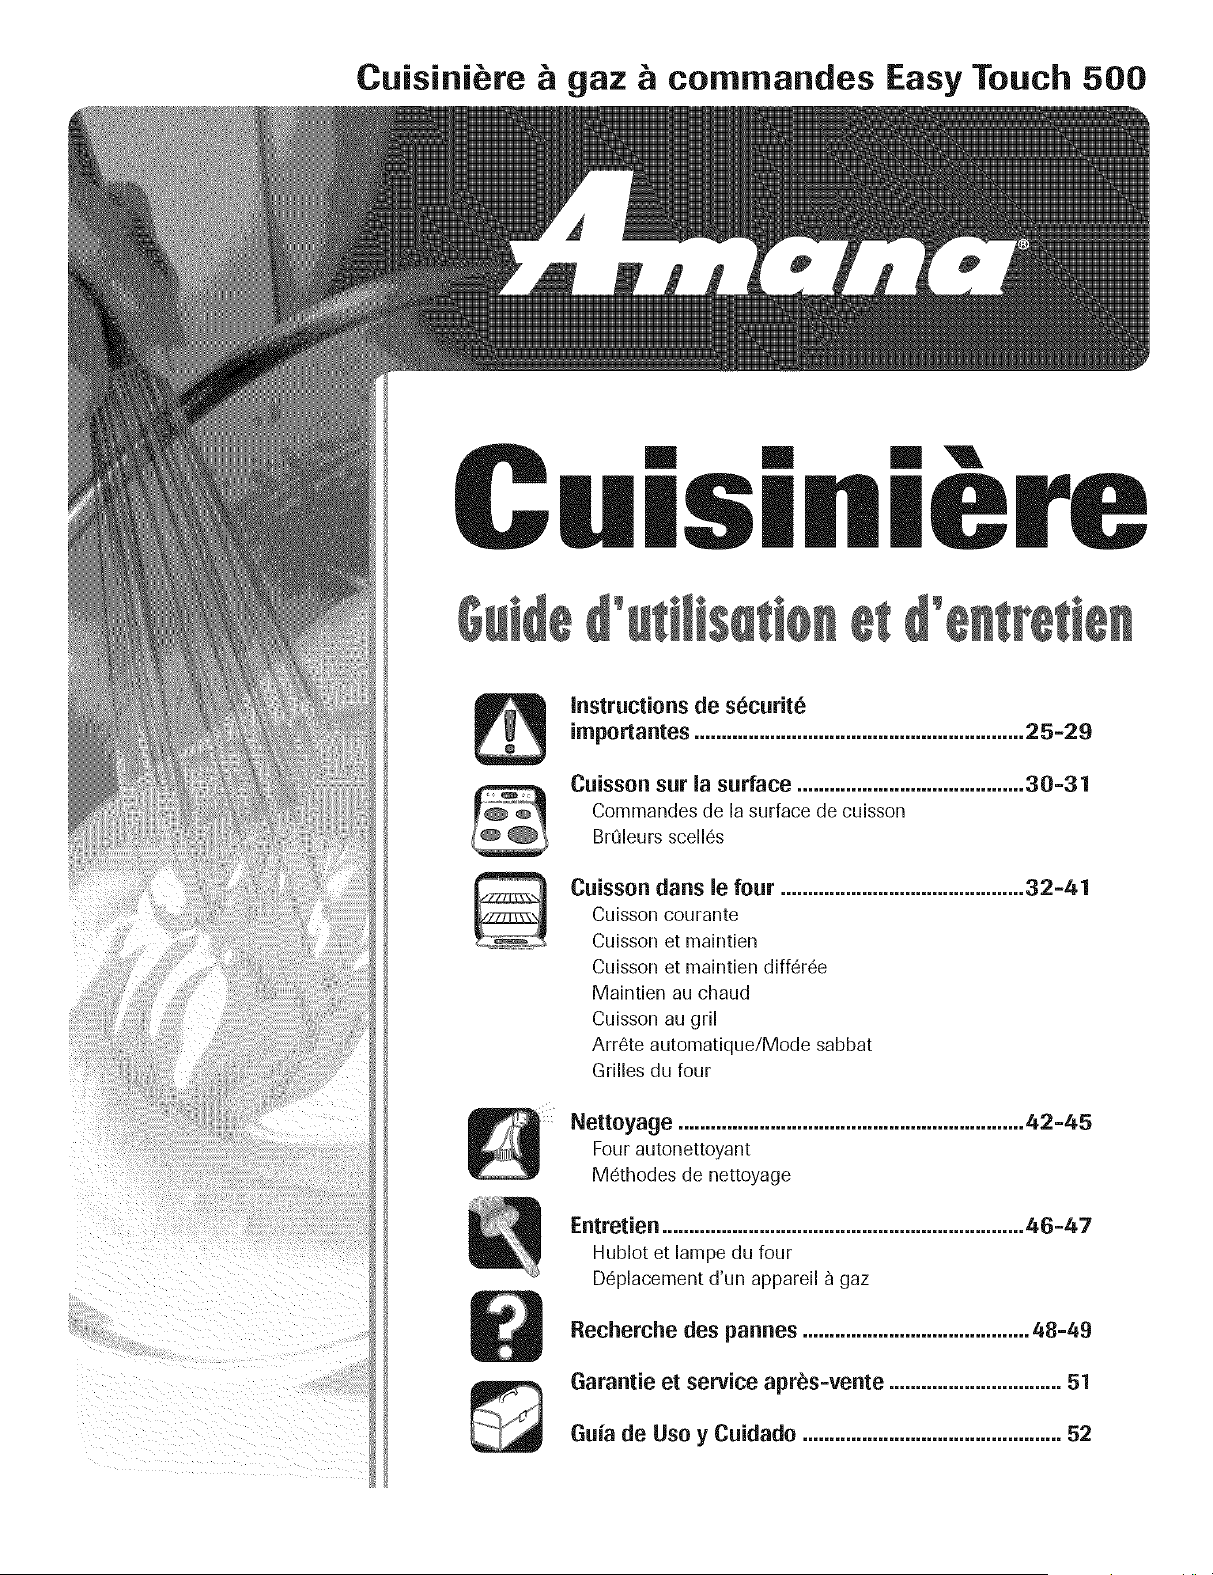
Gas - Easy Touch Control 500
Surface Cooking ................................................ 5=6
Surface Controls
Sealed Gas Burners
Oven Cooking .................................................. 7=15
Baking Broiling
Cook & Hold Sabbath Mode
Delay Cook & Hold Oven Racks
Keep Warm
Care & Cleaning ............................................ 16=19
Self-Clean Oven
Cleaning Procedures
Maintenance .................................................. 19=20
Oven Window & Light
Removal of Gas Appliance
Troubleshooting ............................................ 21 =22
_ Warranty & Service .............................................. 23
Guide d'utilisation et d'entretien ...................... 24
Guia de Uso y Cuidado ....................................... 52
Form No. A/01/06 Part No 8113P608-60 @2006 Maytag Appliances Sales Co Litho USA.
technician. Do not attempt to adjust, repair, service, or
replace any part of your appliance unless it is specifically
recommended in this guide. All other servicing should be
referred to a qualified servicer. Have the installer show
you the location of the gas shut off valve and how to
shut it off in an emergency.
Always disconnect power to appliance before servicing.
ImportentSefety
Instructions
Warning and Important Safety Instructions appearing in
this guide are not meant to cover all possible conditions
and situations that may occur. Common sense, caution,
and care must be exercised when installing, maintaining,
or operating the appliance.
Always contact the manufacturer about problems or
conditions you do not understand.
Recognize Safety Symbols, Words, Labels
General instructions
Read and follow all instructions before using this
appliance to prevent the potential risk of fire, electric
shock, personal injury or damage to the appliance as a
result of improper usage of the appliance. Use appliance
only for its intended purpose as described in this guide.
To ensure proper and safe operation: Appliance must
be properly installed and grounded by a qualified
ImportantSurety
To check if device is properly installed, look underneath
range with a flashlight to make sure one of the rear
leveling legs is properly engaged in the bracket slot. The
anti-tip device secures the rear leveling leg to the floor
when properly engaged. You should check this anytime
the range has been moved.
Do not use water on grease fires. Use baking soda, a
dry chemical or foam-type extinguisher to smother fire
or flame.
Child Safety
To Prevent Fire or
Smoke Damage
Be sure all packing materials are removed from the
appliance before operating it.
Keep area around appliance clear and free from
combustible materials, gasoline, and other flammable
vapors and materials.
If appliance is installed near a window, proper
precautions should be taken to prevent curtains from
blowing over burners.
NEVER leave any items on the cooktop. The hot air from
the vent may ignite flammable items and may increase
pressure in closed containers which may cause them to
burst.
Many aerosol-type spray cans are EXPLOSIVE when
exposed to heat and may be highly flammable. Avoid
their use or storage near an appliance.
Many plastics are vulnerable to heat. Keep plastics away
from parts of the appliance that may become warm or
hot. Do not leave plastic items on the cooktop as they
may melt or soften if left too close to the vent or a
lighted surface burner.
To eliminate the hazard of reaching over hot surface
burners, cabinet storage should not be provided directly
above a unit. If storage is provided, it should be limited
to items which are used infrequently and which are
safely stored in an area subjected to heat from an
appliance. Temperatures may be unsafe for some items,
such as volatile liquids, cleaners or aerosol sprays.
In Case of Fire
Turn off appliance and ventilating hood to avoid
spreading the flame. Extinguish flame then turn on hood
to remove smoke and odor.
* Cooktop: Smother fire or flame in a pan with a lid or
cookie sheet.
NEVER pick up or move a flaming pan.
,, Oven: Smother fire or flame by closing the oven door.
NEVER leave children alone or unsupewised near the
appliance when it is in use or is still hot.
NEVER allow children to sit or stand on any part of the
appliance as they could be injured or burned.
Children must be taught that the appliance and utensils
in it can be hot. Let hot utensils cool in a safe place, out
of reach of small children. Children should be taught
that an appliance is not a toy. Children should not be
allowed to play with controls or other parts of the
appliance.
About Your Appliance
2
The oven vent is located at the base of the backguard.
Avoid touching oven vent area while oven is on and for
several minutes after oven is turned off. Some parts of
importantSafety
the vent and surrounding area become hot enough to
cause burns. After oven is turned off, do not touch the
oven vent or surrounding areas until they have had
sufficient time to cool.
Other potentially hot surfaces include cooktop, areas
facing the cooktop, oven vent, surface near the vent
opening, oven door, area around the oven door and
oven window.
Do not touch a hot oven light bulb with a damp cloth as
the bulb could break. Should the bulb break, disconnect
power to the appliance before removing bulb to avoid
electrical shock.
Do not use the cooktop or oven as a storage area for food
or cooking utensils.
Cooking Safety
Always place a pan on a surface burner before turning it
on. Be sure you know which knob controls which
surface burner. Make sure the correct burner is turned
on and that the burner has ignited. When cooking is
completed, turn burner off before removing pan to
prevent exposure to burner flame.
Always adjust surface burner flame so that it does not
extend beyond the bottom edge of the pan. An exces-
sive flame is hazardous, wastes energy and may damage
the appliance, pan or cabinets above the appliance.
NEVER leave a surface cooking operation unattended
especially when using a high heat setting or when deep
fat frying. Boilovers cause smoking and greasy spillovers
may ignite. Clean up greasy spills as soon as possible.
Do not use high heat for extended cooking operations.
NEVER heat an unopened container on the surface
burner or in the oven. Pressure build-up may cause
container to burst resulting in serious personal injury or
damage to the appliance.
Use dry, sturdy potholders. Damp potholders may cause
burns from steam. Dish towels or other substitutes
should never be used as potholders because they can
trail across hot surface burners and ignite or get caught
on appliance parts.
Always let quantities of hot fat used for deep fat frying
cool before attempting to move or handle.
Do not let cooking grease or other flammable materials
accumulate in or near the appliance, hood or vent fan.
Clean hood frequently to prevent grease from
accumulating on hood or filter. When flaming foods
under the hood turn the fan on.
NEVER wear garments made of flammable material or
loose fitting or long-sleeved apparel while cooking.
Clothing may ignite or catch utensil handles.
Always place oven racks in the desired positions while
oven is cool. Slide oven rack out to add or remove food,
using dry, sturdy potholders. Always avoid reaching into
the oven to add or remove food. If a rack must be
moved while hot, use a dry potholder. Always turn the
oven off at the end of cooking.
Use care when opening the oven door. Let hot air or
steam escape before moving or replacing food.
PREPARED FOOD WARNING: Follow food
manufacturer's instructions. If a plastic frozen food
container and/or its cover distorts, warps, or is otherwise
damaged during cooking, immediately discard the food
and its container. The food could be contaminated.
NEVER use aluminum foil to cover oven racks or oven
bottom. This could result in risk of electric shock, fire, or
damage to the appliance. Use foil only as directed in this
guide.
3
Utensil Safety
Use pans with flat bottoms and handles that are easily
grasped and stay cool. Avoid using unstable, warped,
easily tipped or loose-handled pans. Also avoid using
pans, especially small pans, with heavy handles as they
could be unstable and easily tip. Pans that are heavy to
move when filled with food may also be hazardous.
Be sure utensil is large enough to properly contain food
and avoid boilovers. Pan size is particularly important in
deep fat frying. Be sure pan will accommodate the
volume of food that is to be added as well as the bubble
action of fat.
To minimize burns, ignition of flammable materials and
spillage due to unintentional contact with the utensil, do
not extend handles over adjacent surface burners.
Always turn pan handles toward the side or back of the
appliance, not out into the room where they are easily
hit or reached by small children.
Never let a pan boil dry as this could damage the utensil
and the appliance.
Follow the manufacturer's directions when using oven
cooking bags.
Important$afetv
Only certain types of glass, glass/ceramic, ceramic or
glazed utensils are suitable for cooktop or oven usage
without breaking due to the sudden change in tempera-
ture. Follow manufacturer's instructions when using
glass.
This appliance has been tested for safe performance
using conventional cookware. Do not use any devices or
accessories that are not specifically recommended in
this guide. Do not use element covers for the surface
units, stovetop grills, or add-on oven convection
systems. The use of devices or accessories that are not
expressly recommended in this manual can create
serious safety hazards, result in performance problems,
and reduce the life of the components of the appliance.
Cleaning Safety
Turn off all controls and wait for appliance parts to cool
before touching or cleaning them. Do not touch the
burner grates or surrounding areas until they have had
sufficient time to cool.
Clean appliance with caution. Use care to avoid steam
burns if a wet sponge or cloth is used to wipe spills on a
hot surface. Some cleaners can produce noxious fumes
if applied to a hot surface.
Self-Clean Oven
Clean only parts listed in this guide. Do not clean door
gasket. The door gasket is essential for a good seal.
Care should be taken not to rub, damage, or move the
gasket. Do not use oven cleaners of any kind in or
around any par of the self-clean oven.
It is normal for the cooktop of the range to become hot
during a self-clean cycle. Therefore, touching the
cooktop during a clean cycle should be avoided.
important Safety Notice
and Warning
The California Safe Drinking Water and Toxic Enforce-
ment Act of 1986 (Proposition 65] requires the Governor
of California to publish a list of substances known to the
State of California to cause cancer or reproductive harm,
and requires businesses to warn customers of potential
exposures to such substances.
Users of this appliance are hereby warned that the
burning of gas can result in low-level exposure to
some of the listed substances, including benzene,
formaldehyde and soot, due primarily to the incomplete
combustion of natural gas or liquid petroleum [LP) fuels.
Properly adjusted burners will minimize incomplete
combustion. Exposure to these substances can also be
minimized by properly venting the burners to the
outdoors.
Users of this appliance are hereby warned that when
the oven is engaged in the self-clean cycle, there may
be some low-level exposure to some of the listed
substances, including carbon monoxide. Exposure to
these substances can be minimized by properly venting
the oven to the outdoors by opening the windows and/
or door in the room where the appliance is located
during the self-clean cycle.
IMPORTANT NOTICE REGARDING PET BIRDS:
Never keep pet birds in the kitchen or in rooms where
the fumes from the kitchen could reach. Birds have a
very sensitive respiratory system. Fumes released during
an oven self-cleaning cycle may be harmful or fatal to
birds. Fumes released due to overheated cooking oil, fat,
margarine and overheated non-stick cookware may be
equally harmful.
Save These instructions for Future Reference
4
SurfeceCookln9
Low: Use to simmer foods, keep foods
warm and melt chocolate or butter. Some
cooking may take place on the Low
setting if the pan is covered. It is possible
to reduce the heat by rotating the knob
toward OFF. Be sure flame is stable.
High: Use to bring liquid to a boil, or reach
pressure in a pressure cooker. Always
reduce setting to a lower heat when liquids
begin to boil or foods begin to cook.
An intermediate flame size is used to
continue cooking. Food will not cook any
faster when a higher flame setting is used
than needed to maintain a gentle boil.
Water boils at the same temperature
whether boiling gently or vigorously.
Surface Controls
Setting the controls:
The size and type of cookware will affect the heat setting.
1. Place a pan on the burner grate.
The burner flame may lift off or appear separated from
the port if a pan is not placed on the grate.
2. Push in and turn the knob counterclockwise to the Light
setting.
* A clicking (spark) sound will be heard and the burner
will light. (All four ignitorswill spark when any surface
burner knob is turned to the Light position.)
3. After the burner lights, turn knob to desired flame size.
The ignitorwill continue to spark until the knob is
turned past the Light position.
Pilotless ignition
Pilotless ignition eliminates the
need for a constant standing
pilot light. Each surface burner
has a spark ignitor. Use care
when cleaning around the
surface burner.
If the surface burner does
not light, check if ignitor is
broken, soiled or wet.
BURNER CAP
PortS__gnitor
BURNER BASE
Surface Control Knobs
Use to turn on the surface burners. An infinite choice of heat
settings is available from Low to High. At the High setting a
detent or notch may be felt. The knobs can be set on or
between any of the settings.
Graphics next to the knob identify which burner the O O
knob controls. For example, the graphic at right shows O O
the left front burner location.
Operating During a
Power Failure
1. Hold a lighted match to the desired surface burner.
2. Push in and turn the control knob slowly to Light.
3. Adjust the flame to the desired level.
5
Cookln
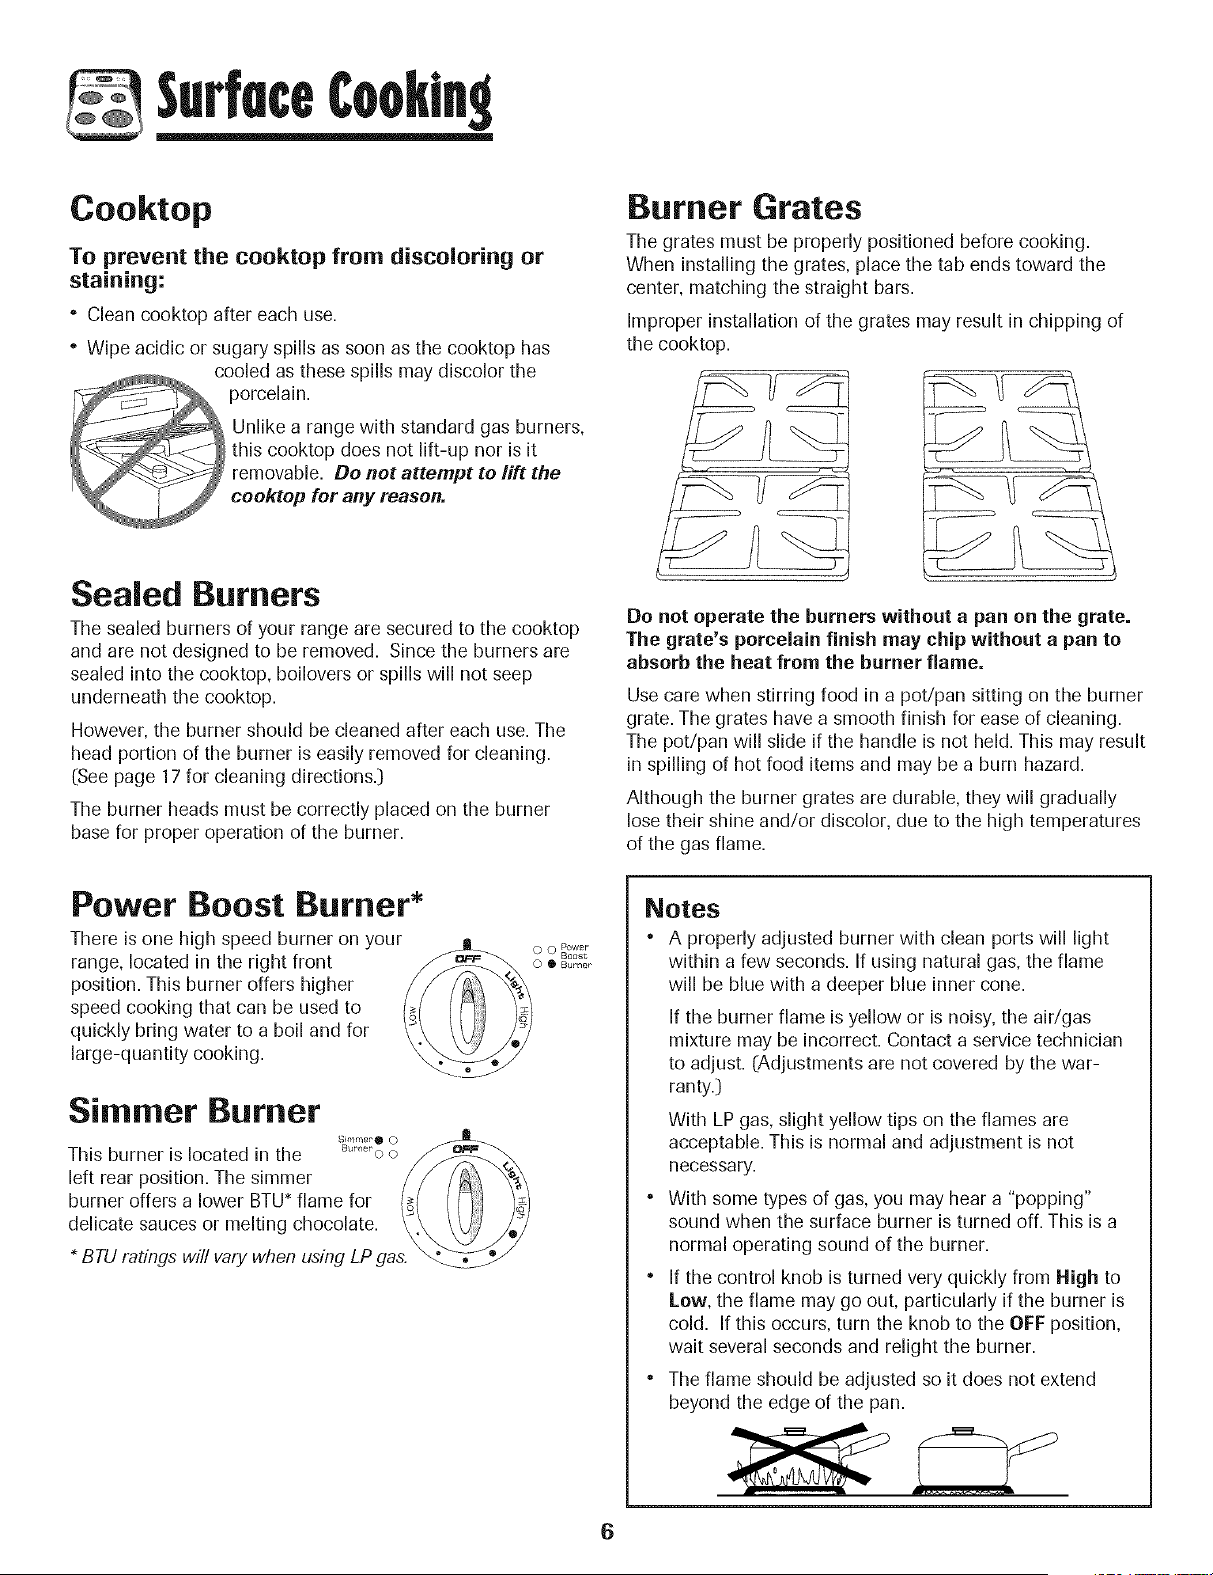
Cooktop
To prevent the cooktop from discoloring or
staining:
Clean cooktop after each use.
Wipe acidic or sugary spills as soon as the cooktop has
cooled as these spills may discolor the
porcelain.
Unlike a range with standard gas burners,
this cooktop does not lift-up nor is it
removable• Do not attempt to lift the
cooktop for any reason.
Burner Grates
The grates must be properly positioned before cooking.
When installingthe grates, place the tab ends toward the
center, matching the straight bars.
Improper installationof the grates may result in chipping of
the cooktop.
Sealed Burners
The sealed burners of your range are secured to the cooktop
and are not designed to be removed. Since the burners are
sealed into the cooktop, boilovers or spills will not seep
underneath the cooktop.
However, the burner should be cleaned after each use. The
head portion of the burner is easily removed for cleaning.
(See page 17 for cleaning directions.}
The burner heads must be correctly placed on the burner
base for proper operation of the burner.
Do not operate the burners without a pan on the grate.
The grate's porcelain finish may chip without a pan to
absorb the heat from the burner flame.
Use care when stirring food in a pot/pan sitting on the burner
grate. The grates have a smooth finish for ease of cleaning.
The pot/pan will slide if the handle is not held. This may result
in spilling of hot food items and may be a burn hazard.
Although the burner grates are durable, they will gradually
lose their shine and/or discolor, due to the high temperatures
of the gas flame.
Power Boost Burner"
There is one high speed burner on your = p.....
J=-_ O0
• • _ Boost.
range, located m the right front _.F_ o • B........
posmon. ThB burner offers higher
speed cooking that can be used to _( _q } l_i
quickly bring water to a boil and for \_\ _i i / /_/
.arge-quanti ty cooking. _,_±
Simmer Burner
Simmer 0 0
This burner is located in the Bur"er'o0
left rear position, The simmer
burner offers a lower BTU* flame for
delicate sauces or melting chocolate,
BTU ratings will vary when using LPgas.
Notes
" A properly adjusted burner with clean ports will light
within a few seconds. If using natural gas, the flame
will be blue with a deeper blue inner cone.
If the burner flame is yellow or is noisy, the air/gas
mixture may be incorrect.Contact a service technician
to adjust. (Adjustments are not covered by the war-
ranty.)
With LP gas, slight yellow tips on the flames are
acceptable. This is normal and adjustment is not
necessary.
" With some types of gas, you may hear a "popping"
sound when the surface burner is turned off. This is a
normal operating sound of the burner.
• If the control knob is turned very quickly from High to
Low, the flame may go out, particularly if the burner is
cold. If this occurs, turn the knob to the OFF position,
wait several seconds and relight the burner.
" The flame should be adjusted so it does not extend
beyond the edge of the pan.
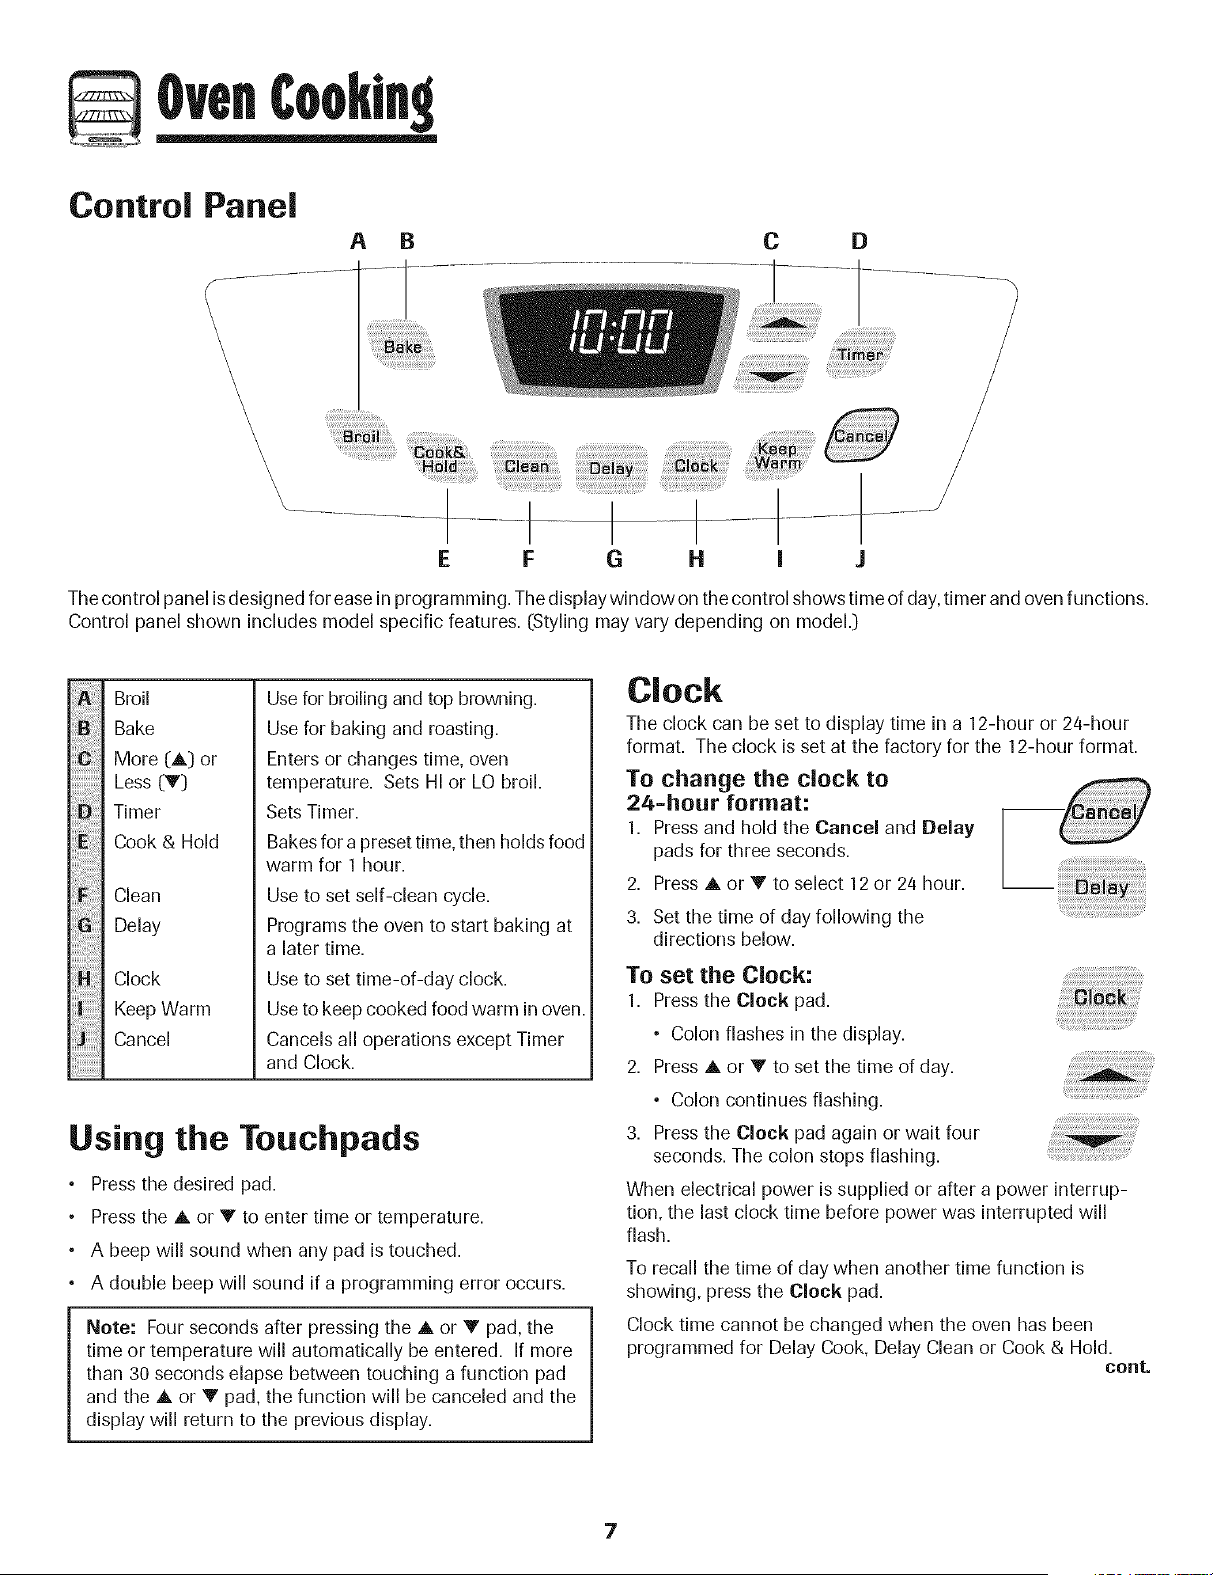
Control Panel
A B
........................
\
\
C
D
E F G H I
t
J
The control panel is designed for ease in programming. The displaywindow on the control shows time of day, timer and oven functions.
Control panel shown includes model specific features. (Styling may vary depending on model.)
ii|!i!i!i!i!i!i!i!iii!i:z
Broil
Bake
More (,_,) or
Less (V)
Timer
Cook & Hold
Clean
Delay
Clock
Keep Warm
Cancel
Use for broiling and top browning.
Use for baking and roasting.
Enters or changes time, oven
temperature. Sets HI or LO broil.
Sets Timer.
Bakes for a preset time, then holds food
warm for 1 hour.
Use to set self-clean cycle.
Programs the oven to start baking at
a later time.
Use to set time-of-day clock.
Use to keep cooked food warm in oven.
Cancels all operations except Timer
and Clock.
Using the Touchpads
Pressthe desired pad.
Pressthe A or V to enter time or temperature.
• A beep will sound when any pad is touched.
• A double beep will sound if a programming error occurs.
Note: Four seconds after pressing the A or T pad, the
time or temperature will automatically be entered. If more
than 30 seconds elapse between touching a function pad
and the A or V pad, the function will be canceled and the
display will return to the previous display.
Clock
The clock can be set to display time in a 12-hour or 24-hour
format. The clock is set at the factory for the 12-hour format.
To change the clock to
24=hour format:
1. Press and hold the Cancel and Delay
pads for three seconds.
2. Press A or V to select 12or 24 hour.
3. Set the time of day following the
directions below.
To set the Clock:
1. Press the Clock pad.
• Colon flashes in the display.
2. Press A or V to set the time of day.
° Colon continues flashing.
3. Press the Clock pad again or wait four
seconds. The colon stops flashing.
,, ;!iiiii!iiiiiii!iiiiiiiii ; iiiii iiiii
_;_;i!_!i_i_!i_i_!i_i_!i_i_!i_i_!i_i!_i_ii!_!_i_i_iii:ii_!_!_iii:i;_!_!_ii_i_?_'_
When electrical power is supplied or after a power interrup-
tion, the last clock time before power was interrupted will
flash.
To recall the time of day when another time function is
showing, press the Clock pad.
Clock time cannot be changed when the oven has been
programmed for Delay Cook, Delay Clean or Cook & Hold.
cent.

To cancel the Clock display:
If you do not want the time of day to display:
Press and hold the Cancel and Clock
pads for three seconds. The time of day
will disappear from the display
When the clock display is canceled, press
the Clock pad to briefly display the time
of day.
To restore the Clock display:
Press and hold tile Cancel and Clock pads for three
seconds. The time of day will reappear in the display.
::::::
Timer
Tile timer can be set from one minute (0:01) up to 99 hours
and 59 minutes (99:59).
The timer can be used independently of any other oven
activity. It can also be set while another oven function is
operating.
The timer does not control the oven. It only controls a beeper.
To set the Timer:
1. Press the Timer pad.
• 0:00 lights in the display.
• The colon will flash.
2. Press the A or V pad until the
_!ii!!i!!ili_ii_ii_ii_iiiiii_!i_ii!i_ii!ii!ii!ili_ii:ii:ii_ii:_i_:ii_i_:!i_!;_iiii_i;!ili;il;;ii;iil,
correct time appears in the display.
• The colon will continue to flash.
3. Press Timer pad again or wait four seconds.
• The colon continues flashing and the time begins
counting down.
• The last minute of the timer countdown will be displayed
as seconds.
4. At the end of the set time, one long beep will sound.
To cancel the Timer:
1. Press and hold the Timer pad for three seconds.
OR
2. Press the Timer pad and set the time to 0:00.
Locking the Control
and Oven Door
Tile touch pad controls and oven door carl be locked for
safety, cleaning, or to prevent unwanted use. They will not
function when locked.
If the oven is currently in use, the controls and door cannot be
locked.
The current time of day will remain in the display when the
controls are locked.
To lock:
Press and hold tile Cancel and Cook &
Hold pads for three seconds. (Press
Cancel pad first.)
LOCK flashes in the display.
To unlock:
Press and hold tile Cancel and Cook & Hold pads for three
seconds. (Press Cancel pad first.)
LOCK disappears from the display.
Fault Codes
BAKE or LOCK may flash rapidly in tile display to alert you if
there is an error or a problem. If BAKE or LOCK flash in the
display, press the Cancel pad. If BAKE or LOCK continue to
flash, disconnect power to the appliance. Wait a few minutes,
and then reconnect power. If the flashing still continues,
disconnect power to the appliance and call an authorized
servicer.
8
Baking
To set Bake:
1. Press the Bake pad.
• BAKEwill flash.
• 000 will light in the display.
2. Select the oven temperature. The oven
temperature can be set from 170° to 550°.
Pressor press and hold the A or V pads.
• 350° will light when either pad is first pressed.
• Press the A pad to increase the temperature.
• Press the V pad to decrease the temperature.
3. Press Bake pad again or wait four seconds.
• BAKEwill stop flashing and light in the display.
• 100° or the actual oven temperature will display. The
temperature will rise in 5° incrementsuntil the preset
temperature is reached.
4. Allow the oven to preheat for 8-15 minutes.
• When the set oven temperature is reached, one long
beep will sound.
• To recall the set temperature during preheat, press the
Bake pad.
5. Place food in the oven.
8. Check cooking progress at the minimum cooking time.
Cook longer if needed.
7. When cooking is finished, press Cancel
8. Remove food from the oven.
Baking Notes
• To change the oven temperature during cooking,
press the Bake pad, then the A or V pad until the
desired temperature is displayed.
To change the even temperature during preheat,
press the Bake pad twice, then press the A or V pads
until the desired temperature isdisplayed.
• If you forget to turn off the oven, it will automatically turn
off at the end of 12 hours. If you wish to deactivate this
feature, see page 13.
Baking Differences Between Your Old
and New Oven
It is normal to notice some baking time differences between a
new oven and an old one. See "Adjusting the OvenTemperature"
on page 13.
Cook & Hold
Cook & Hold allows you to bake for a preset amount of time,
followed by a one-hour Keep Warm cycle.
To set Cook & Hold:
1.
Pressthe Cook & Hold pad.
• BAKE and HOLD flash.
• 000 lights in the display.
2. Select the oven temperature. The oven
temperature can be set from 170° to 550°. ......................................
Pressor press and hold the A or V pads.
• Press the A pad to increase the temperature.
• Press the V pad to decrease the temperature.
3. Press Cook & Hold again OR wait four seconds.
• HOLD flashes.
• 00:00 flashes in the display.
4. Enter the amount of time you want to bake by pressing the
A or V pads. Bake time can be set from 10 minutes
(00:10) to 11 hours, 59 minutes (11:59).
• BAKE and HOLD light in the display.
• The baking time will light in the display.
• The baking time will start counting down.
When the cooking time has elapsed:
• Four beeps will sound.
• BAKEwill turn off.
° HOLD and WARM will light.
° 170° will display.
After one hour in HOLD WARM.-
• "End" will display.
° The time of day reappears in the display.
To cancel Cook & Hold at any time:
Press the Cancel pad. Remove food from oven.
9
Delay Cook & Hold
When using Delay, the oven begins to cook later in the day.
Set the amount of time that you want to delay before the oven
turns on and how long you want to cook. The oven begins to
heat at the selected time and cooks for the specified length of
time.
Delay time can be set from 10 minutes (00:10) to 11 hours, 59
minutes (11:59).
To set a Delayed Cook & Hold cycle:
1. Press the Delay pad.
• DELAY flashes.
• 00:00 flashes in the display.
2. Press the A or V pad to set the delay time.
While DELAY is still flashing:
3. Press the Cook & Hold pad.
• 000 lights in the display.
• BAKE and HOLD flash.
,, ,ii !ii!iii!!i!ii!i!ii!ilili!ii!iiii
_i,_,v_i_ _ ,,_7/,_
4. Press A to set the baking temperature.
° 00:00 and HOLD flash.
° BAKE stays lit.
Press A to set the baking time.
° The Delay time, DELAY, BAKE and HOLD light in
the display.
When the Delay time has expired:
° DELAY will turn off.
• Baking time is displayed.
• BAKE and HOLD are displayed.
To set a Delay when Cook & Hold has already
been programmed:
1. Press the Delay pad.
° DELAY flashes.
• 00:00appearsthed splay
2. Press the A or V pad to set the delay time.
° After four seconds, DELAY will
stay lit to remind you that a delayed
cooking cycle has been set.
When the Delay time has expired
and the oven starts:
• The baking time will be displayed.
° DELAY will turn off.
° BAKE and HOLD will remain lit.
To cancel:
Press the Cancel pad.
• All timed and untimed cooking functions will be
canceled.
° The time of day will reappear in the display.
Notes:
Do not use Delay Cook & Hold for items that require a
preheated oven, such as cakes, cookies, and breads.
Do not use delayed baking if oven is already hot.
10
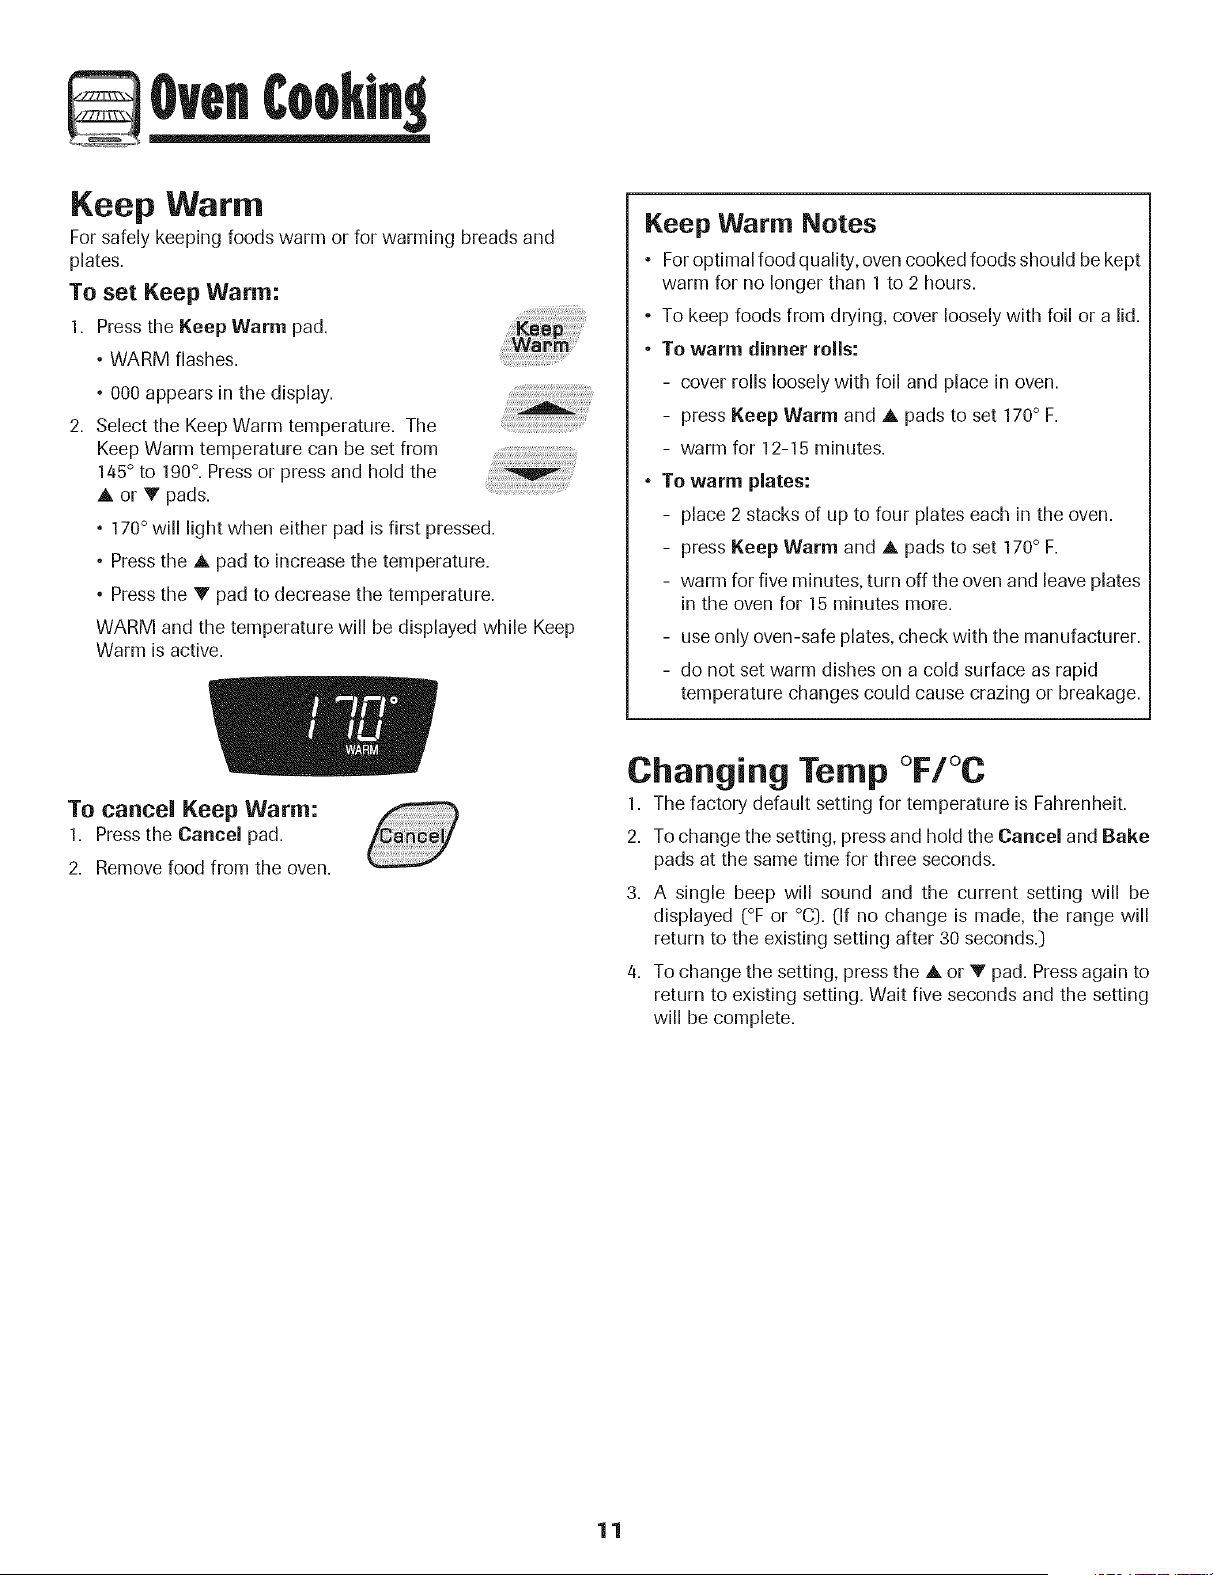
Keep Warm
For safely keeping foods warm or for warming breads and
plates.
To set Keep Warm:
1. Press the Keep Warm pad.
• WARM flashes.
• 000 appears in the display.
Select the Keep Warm temperature. The
Keep Warm temperature can be set from ....
145° to 190°. Press or press and hold the
A or V pads.
° 170° will light when either pad is first pressed.
• Press the A pad to increase the temperature.
• Press the V pad to decrease the temperature.
WARM and the temperature will be displayed while Keep
Warm is active.
To cancel Keep Warm:
1. Press the Cancel pad.
2. Remove food from the oven.
Keep Warm Notes
° For optimal food quality, oven cooked foods should be kept
warm for no longer than 1 to 2 hours.
• To keep foods from drying, cover loosely with foil or a lid.
• To warm dinner rolls:
- cover rolls loosely with foil and place in oven.
- press Keep Warm and A pads to set 170° F.
- warm for 12-15 minutes,
° To warm plates:
- place 2 stacks of up to four plates each in the oven.
- press Keep Warm and A pads to set 170° F.
- warm for five minutes, turn off the oven and leave plates
in the oven for 15 minutes more.
- use only oven-safe plates, check with the manufacturer.
- do not set warm dishes on a cold surface as rapid
temperature changes could cause crazing or breakage.
Changing Temp °F/°C
1. The factory default setting for temperature is Fahrenheit.
2. To change the setting, press and hold the Cancel and Bake
pads at the same time for three seconds.
3. A single beep will sound and the current setting will be
displayed (°F or °C). (If no change is made, the range will
return to the existing setting after 30 seconds.)
4. To change the setting, press the A or V pad. Pressagain to
return to existing setting. Wait five seconds and the setting
will be complete.
11
Broiling
To set Broil:
1. Press the Broil pad.
• BROIL flashes.
• SEt is displayed.
2. Press the A pad to set HI broil or press the V pad to set
LO broil.
• HI or LO will be displayed.
° Select Hi broil (550° E/for normal broiling. Select
LO broil (450° F) for low-temperature broiling of longer
cooking foods such as poultry.
3. After four seconds, the oven will start.
• BROILwill remain lit.
4. For optimum browning, preheat for 2-3 minutes before
adding food.
5. Place food in the oven. Close the oven door.
6. Turn meat once about halfway through cooking.
7. When food is cooked, press the Cancel pad.
Remove food and broiler pan from the oven.
• The time of day will reappear in the display.
Broil Notes
• For best results when broiling, use a pan designed for
broiling.
° HI is used for most broiling. Use LO broil when broiling
longer cooking foods. The lower temperature allows
food to cook to the well done stage without excessive
browning.
° To change the oven temperature during broiling,
press the Broil pad, then the A or V pad to switch
between LO and HI broil.
• Broil times may be longer when the lower broiling temp-
erature is selected.
° Most foods should be turned halfway through broiling
time.
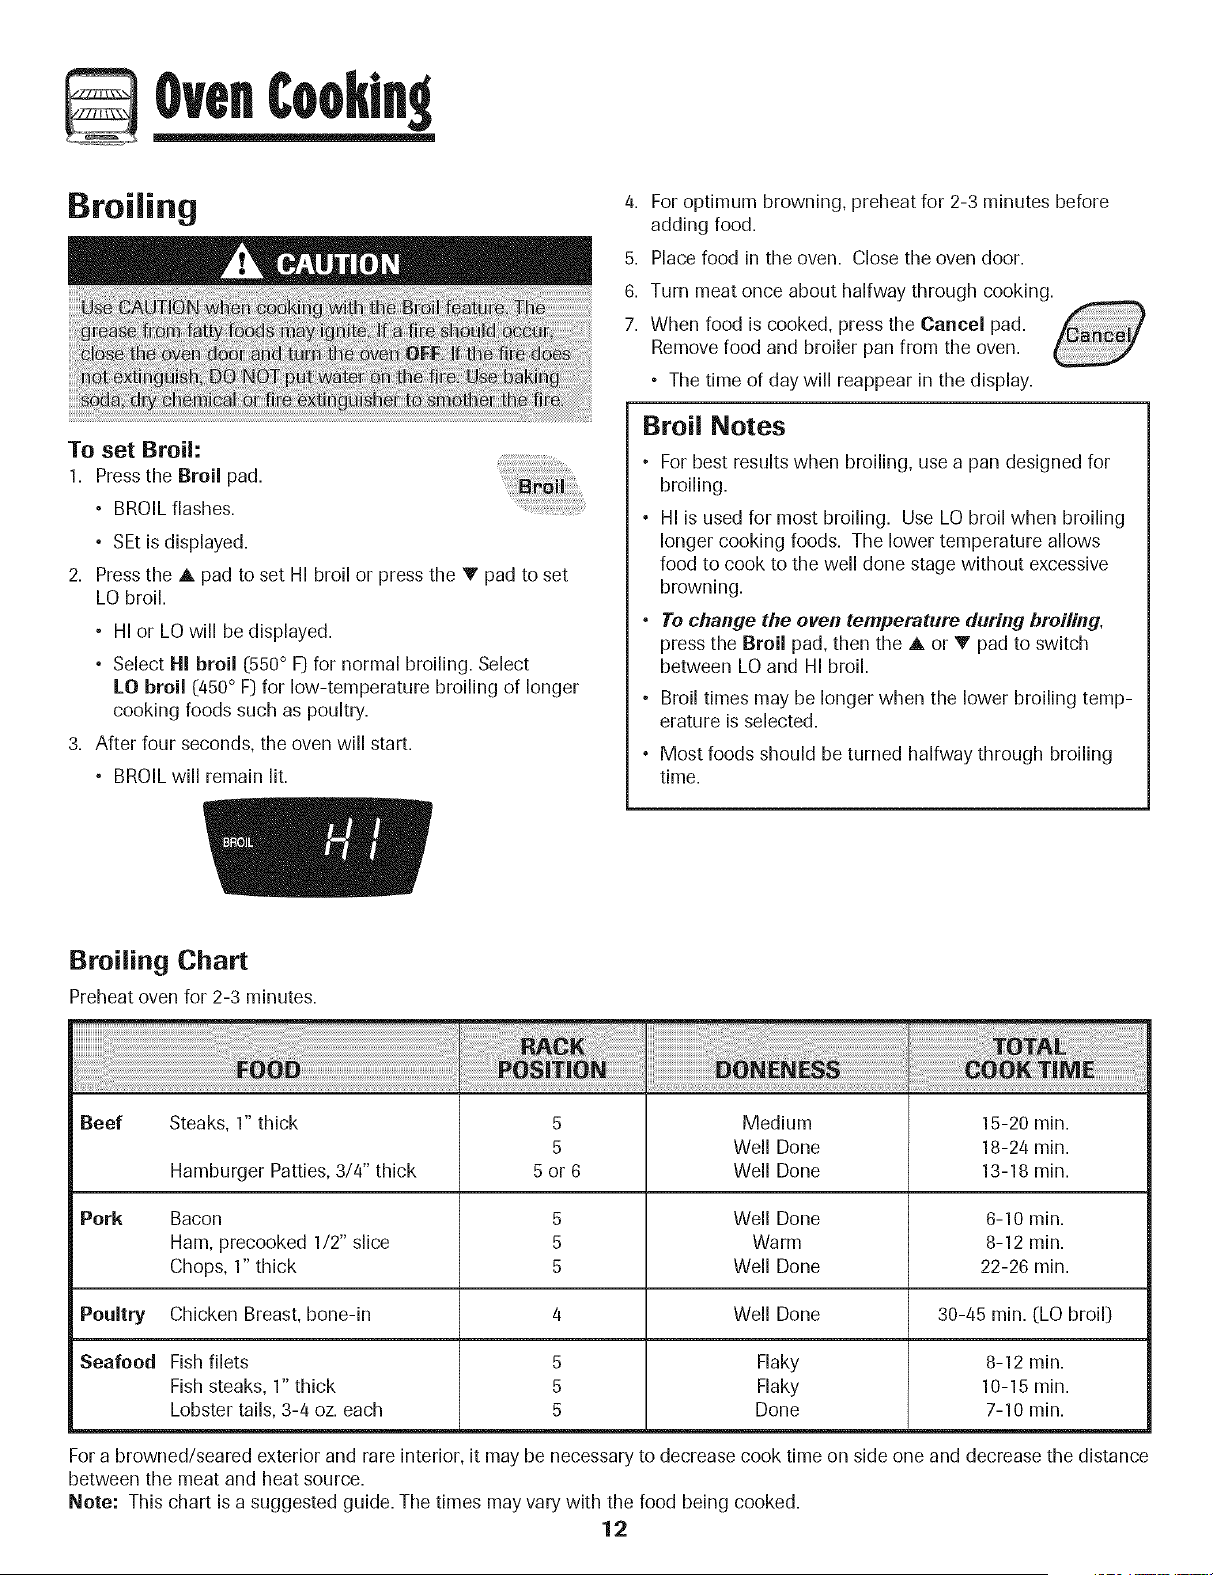
Broiling Chart
Preheat oven for 2-3 minutes.
Beef Steaks, 1" thick 5
Pork
Hamburger Patties, 3/4" thick
Bacon
Ham, precooked 1/2" slice
Chops, 1" thick
Poultry Chicken Breast, bone-in
Seafood Fish filets
Fish steaks, 1" thick
Lobster tails, 3-4 oz. each
5
5or6
5
5
5
5
5
5
Medium 15-20 min.
Well Done 18-24 min.
Well Done 13-18 min.
Well Done 6-10 min.
Warm 8-12 min.
Well Done 22-26 min.
Well Done
Flaky
Flaky
Done
30-45 min. (LO broil)
8-12 min.
10-15 min.
7-10 min.
For a browned/seared exterior and rare interior, it may be necessary to decrease cook time on side one and decrease the distance
between the meat and heat source.
Note: This chart is a suggested guide. The times may vary with the food being cooked.
12
Automatic Shut-Off/
Sabbath Mode
The oven will automatically turn off after 12 hours if you
accidentally leave it on. This safety feature can be turned off.
To cancel the 12=hour shut=off and run the
oven continuously for 72 hours:
1. Set the oven to bake (see page 9).
2. Press and hold the Clock pad for five seconds.
• SAb will be displayed and flash for five seconds.
• SAb will then be displayed continuously until turned off
or until the 72-hour time limit is reached.
• BAKEwill also be displayed if a bake cycle is in use
while the oven is in Sabbath Mode,
• BAKE/s the only function that operates during the
Sabbath Mode. Aft other functions (Timer, Keep Warm,
Cleag etc.) are locked out during the Sabbath Mode.
To cancel Bake when in Sabbath Mode:
Press Cancel.
° BAKE will turn off in the display.
• No beeps will sound.
To cancel the Sabbath Mode:
1. Press the Clock pad for five seconds.
OR
2. After 72 hours, the Sabbath Mode will end.
° SAb will flash for 5 seconds.
• The time of day will return to the display.
Adjusting the Oven Temperature
Oven temperatures are carefully tested for accuracy at the
factory. It is normal to notice some baking or browning
differences between a new oven and an old one. As ranges
get older, the oven temperature can shift.
You may adjust the oven temperature if you think the oven is
not baking or browning correctly. To decide how much to
change the temperature, set the temperature 25° higher or
lower than your recipe recommends, then bake. The results
of the "test" should give you an idea of how much to adjust
the temperature.
To adjust the oven temperature:
1. Press Bake.
2. Enter 550° by pressing the A pad.
i! i ii!!
3. Press and hold the Bake pad for several
seconds or until 0° appears in the display.
If the oven temperature was previously adjusted, the
change will be displayed. For example, if the oven tem-
perature was reduced by 15° the display will show "-15 °".
Pressthe A or V pad to adjust the temperature.
Each time a pad is pressed, the temperature changes by
5°. The oven temperature can be increased or decreased
by 5° to 35°.
The time of day will automatically reappear in the display.
You do not need to readjust the oven temperature if there
is a power failure or interruption. Broiling and cleaning
temperatures cannot be adjusted.
Sabbath Mode Notes
° Sabbath Mode can be turned on at any time with or
without the oven on.
• Sabbath Mode cannot be turned on if the touchpads are
locked out or when the door is locked.
• If the oven is baking when Sabbath Mode is set, BAKE
will go out at the end of the baking cycle. There will be
no audible beeps.
• If the oven light is desired while in Sabbath Mode, it
must be turned on before the Sabbath Mode is started.
• When the Sabbath Mode is started, no preheat beep will
sound.
• All prompts, messages and beeps are deactivated when
Sabbath Mode is active.
• The automatic door lock does not operate during the
Sabbath Mode.
• Pressing Cancel will cancel a bake cycle, however the
control will stay in the Sabbath Mode.
• If power fails, the oven will power up in Sabbath Mode with
72 hours remaining and no cycle active.
13
Pilotless ignition
Your range is equipped with pilotless ignition.With this type of
ignition system, the gas automatically shuts off and the oven
will not operate during a power failure.
A lighted match will not light the oven burner. No attempt
should be made to operate the oven during a power failure.
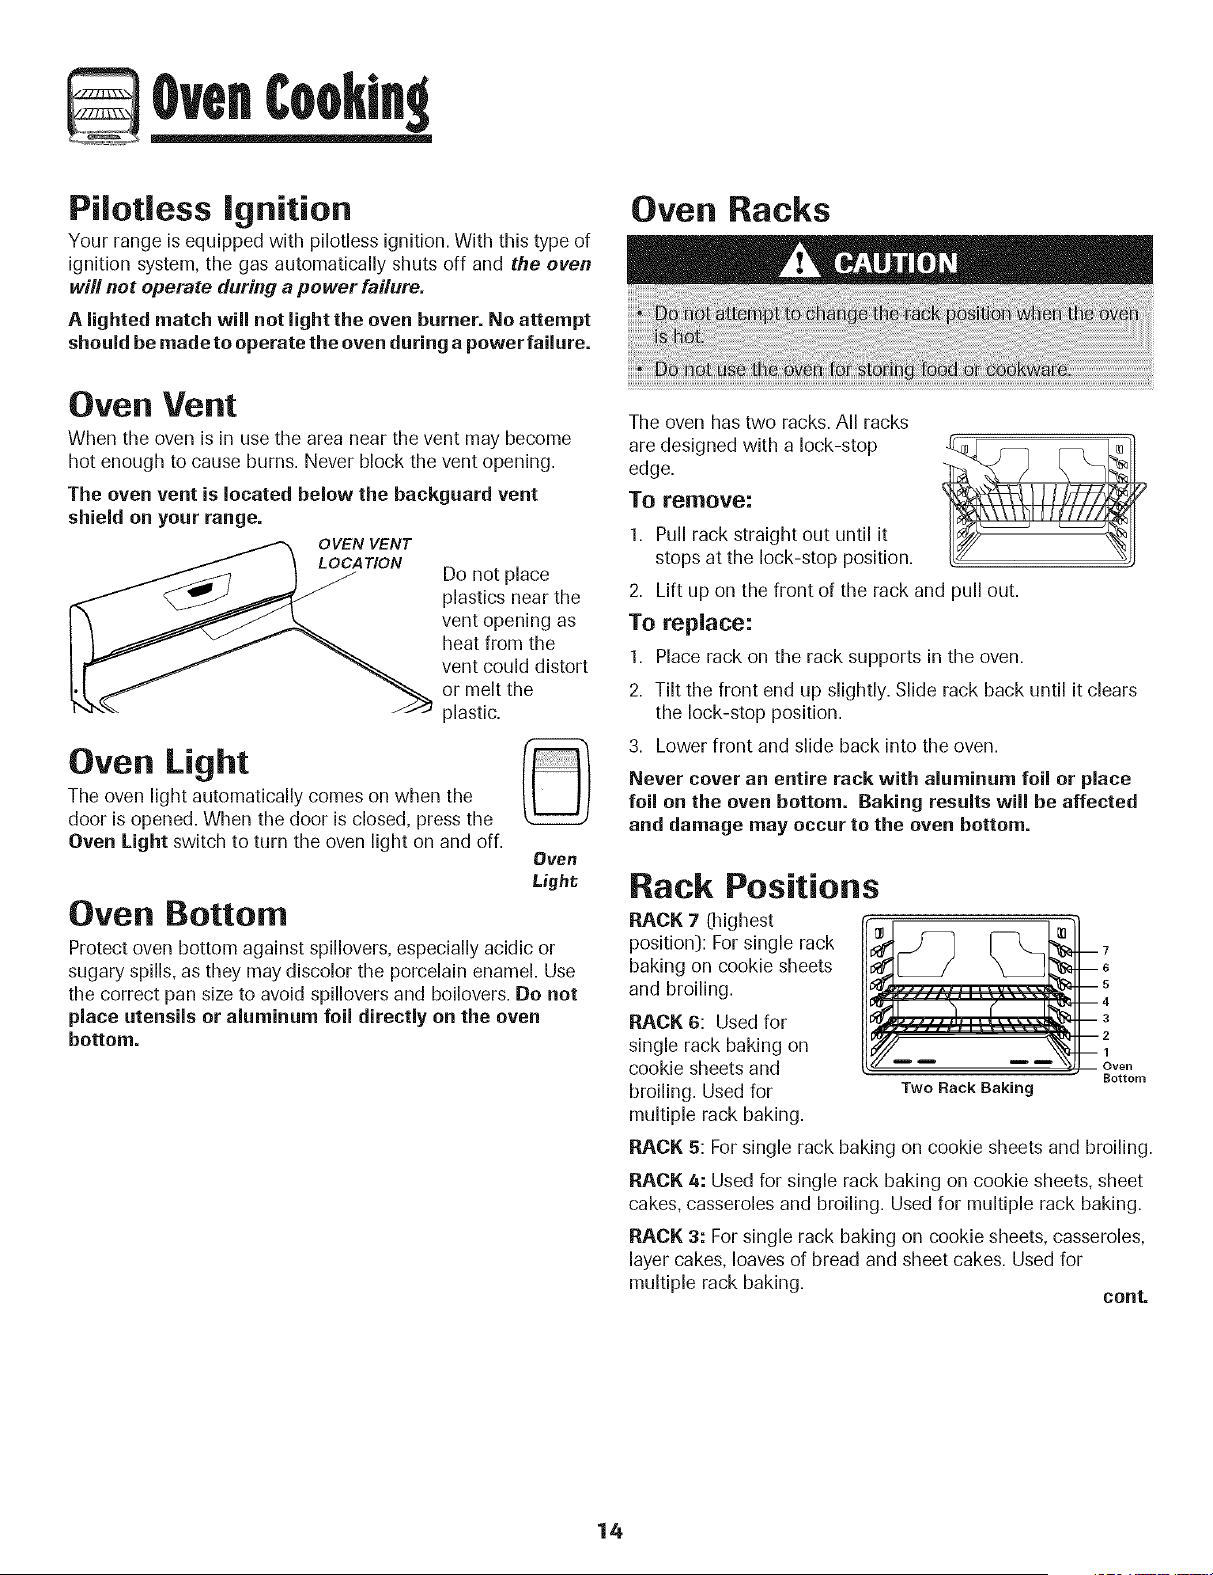
Oven Racks
Oven Vent
When the oven is in use the area near the vent may become
hot enough to cause burns. Never block the vent opening.
]'he oven vent is located below the backguard vent
shield on your range.
OVEN VENT
Do not place
plastics near the
vent opening as
heat from the
vent could distort
or melt the
plastic.
Oven Light
The oven light automatically comes on when the
door is opened. When the door is closed, press the
Oven Light switch to turn the oven light on and off.
©
Oven
Light;
Oven Bottom
Protect oven bottom against spillovers, especially acidic or
sugary spills, as they may discolor the porcelain enamel. Use
the correct pan size to avoid spillovers and boilovers. Do not
place utensils or aluminum foil directly on the oven
bottom.
The oven has two racks. All racks
are designed with a lock-stop
edge.
To remove:
1. Pull rack straight out until it
stops at the lock-stop position.
2. Lift up on the front of the rack and pull out.
To replace:
1. Place rack on the rack supports in the oven.
2. Tilt the front end up slightly. Slide rack back until it clears
the lock-stop position.
3. Lower front and slide back into the oven.
Never cover an entire rack with aluminum foil or place
foil on the oven bottom. Baking results will be affected
and damage may occur to the oven bottom.
Rack Positions
BACK 7 (highest
position): For single rack
baking on cookie sheets
and broiling.
BACK 6: Used for
single rack baking on
cookie sheets and
broiling. Used for
multiple rack baking.
I_iven
Bottom
Two Rack Baking
BACK 5: For single rack baking on cookie sheets and broiling.
RACK 4: Used for single rack baking on cookie sheets, sheet
cakes, casseroles and broiling. Used for multiple rack baking.
RACK 3: For single rack baking on cookie sheets, casseroles,
layer cakes, loaves of bread and sheet cakes. Used for
multiple rack baking, cont.
14

RACK 2: Used for single rack baking on cookie sheets and
roasting small cuts of meat. Also use for multiple rack baking.
RACK 1: Use for roasting large cuts of meat and poultry.
Oven Bottom: Place oven rack
on raised sides of oven bottom.
Use for additional space when
cooking large oven meals.
MULTIPLE RACK COOKING:
Two rack: Use rack positions 3
and 6, or 2 and 4.
Baking Layer Cakes on Two Racks
For best results when baking cakes on two racks, use racks 2and
4.
Place the cakes on the rack as shown.
EasyRack TM
Tile EasyRackTM offers a convenient place to grasp bakeware
when taking it out of the oven.
/f)) JJ // J/ IJ II II II t/ tt tt tt _t_\
Notes
The EasyRackTM is to be used in ovens with a hidden
bake element only. Do not use the EasyRackTM if your
oven has an exposed bake element.
Use the EasyRackTM only in the oven in which it was
purchased.
15
¢leanln
Self-Clean Oven
The self-clean cycle uses above-normal cooking temperatures
to automatically clean the oven interior.
It is normal for flare-ups, smoking, or flaming to occur during
cleaning if the oven is heavily soiled. It is better to clean the
oven regularly rather than to wait until there is a heavy build-
up of soil in the oven.
During the cleaning process, the kitchen should be well
ventilated to get rid of normal odors associated with cleaning.
Before Self=Cleaning
1. Turn off the oven light before cleaning. The light may burn
out during the clean cycle.
2. Remove all pans, and oven racks from the oven. The oven
racks will discolor and may not slide easily after a self-
clean cycle if they are not removed.
3. Clean oven frame, door frame, area outside of gasket, and
around the opening in the door gasket with a nonabrasive
cleaner such as Bon Ami* or detergent and water. The
self-cleaning process does not clean these areas. They
should be cleaned to prevent soil from baking on during
the clean cycle. 0-he gasket is the
seal around the oven door and
window.)
4. To prevent damage, do not clean or
rub the gasket around the oven
door. The gasket is designed to
seal in heat during the clean cycle.
5. Wipe up excess grease or spillovers from the oven bottom.
This prevents excessive smoking, flare-ups or flaming
during the clean cycle.
6. Wipe up sugary and acidic spillovers such as sweet
potatoes, tomato, or milk-based sauces. Porcelain enamel
is acid-resistant, not acid-proof. The porcelain finish may
discolor if acidic spills are not wiped up before a self-clean
cycle.
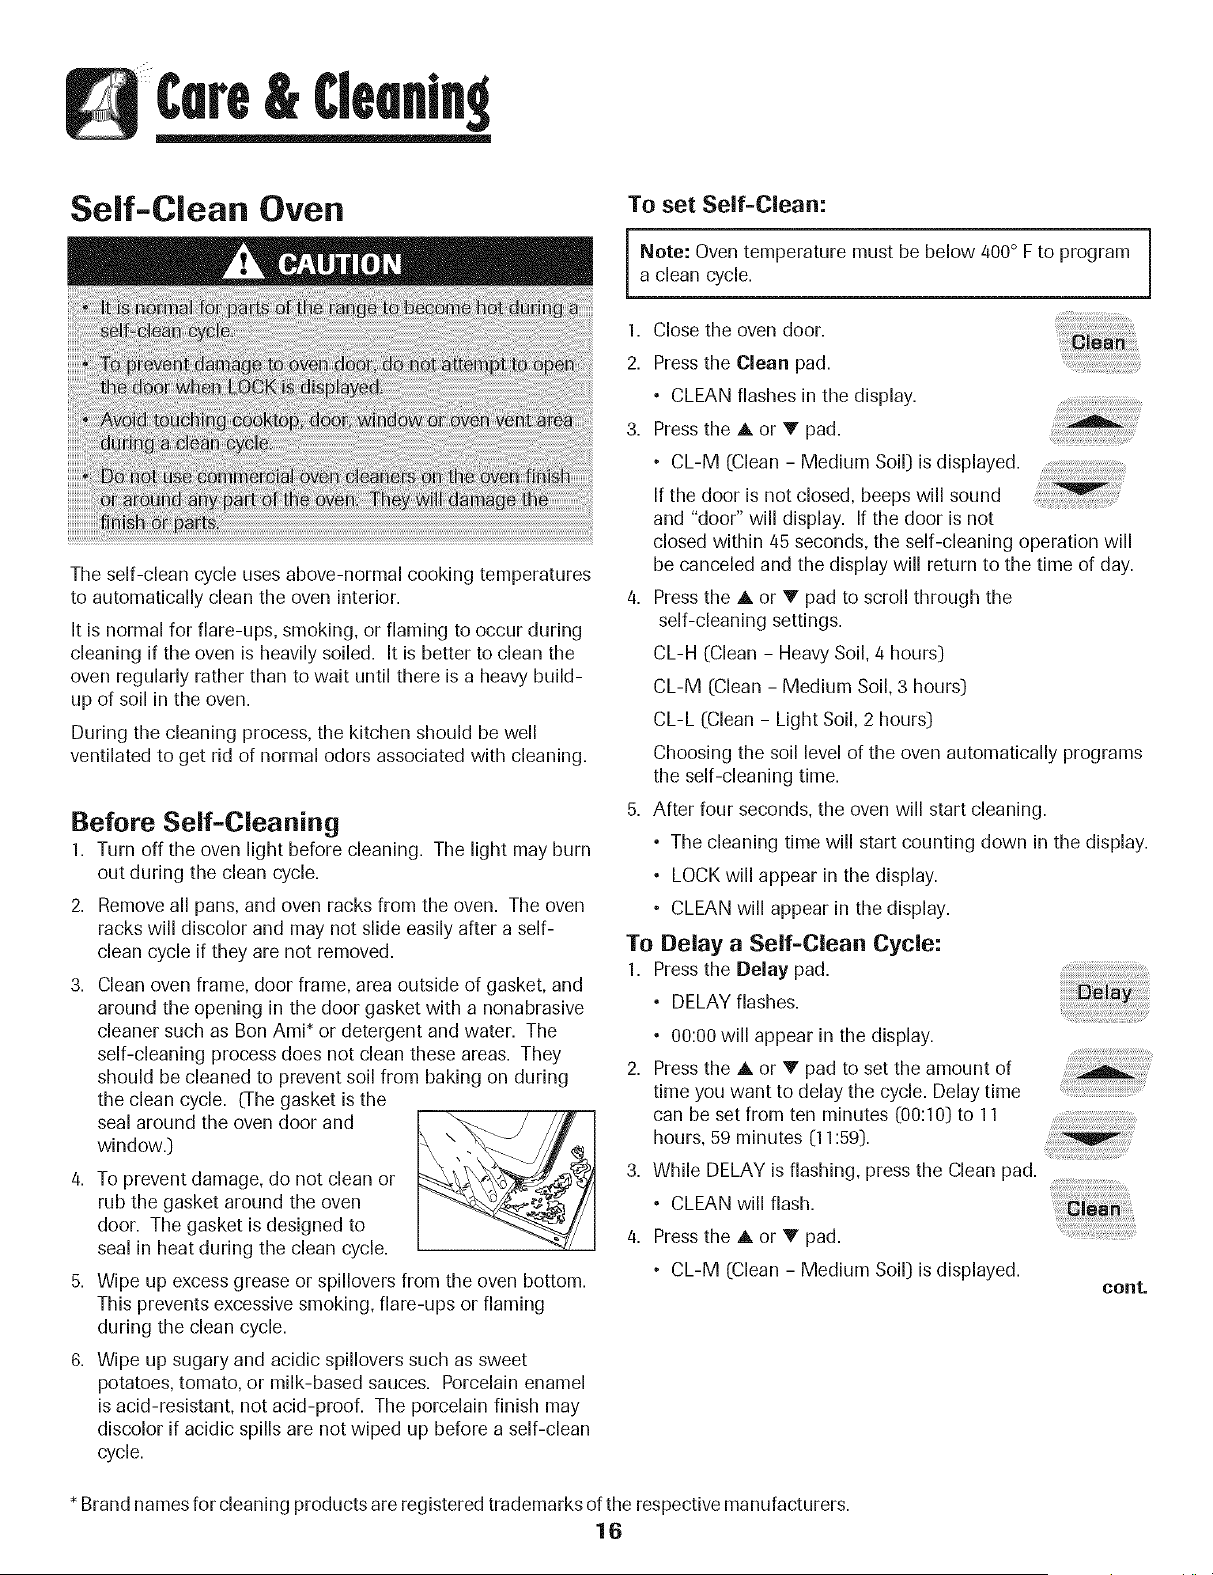
To set Self=Clean:
Note: Oven temperature must be below 400° F to programa clean cycle.
1. Close the oven door.
2. Press the Clean pad.
• CLEAN flashes in the display.
3. Press the A or V pad.
• CL-M (Clean - Medium Soil) is displayed ..... ......
Ifthe door is not closed, beeps will sound
ii_ ii_ iili
and "door" will display. If the door is not
closed within 45 seconds, the self-cleaning operation will
be canceled and the display will return to the time of day.
4. Press the A or V pad to scroll through the
self-cleaning settings.
CL-H (Clean - Heavy Soil, 4 hours)
CL-M (Clean - Medium Soil, 3 hours)
CL-L (Clean - Light Soil, 2 hours)
Choosing the soil level of the oven automatically programs
the self-cleaning time.
5. After four seconds, the oven will start cleaning.
• The cleaning time will start counting down in the display.
• LOCK will appear in the display.
• CLEAN will appear in the display.
To Delay a Self=Clean Cycle:
1. Press the Delay pad.
• DELAY flashes.
• 00:00 will appear in the display.
2. Press the ,& or V pad to set the amount of
time you want to delay the cycle. Delay time
can be set from ten minutes (00:10) to 11
hours, 59 minutes (11:59).
3. While DELAY is flashing, press the Clean pad.
• CLEAN will flash.
4. Press the A or V pad.
• CL-M (Clean - Medium Soil) is displayed.
!ili!i ii!iiiiii! i;
_:_!ii!ii_il;ii_iiii!iilii!ii!i_i_i_i!il;_
cant.
* Brand names for cleaning products are registered trademarks of the respective manufacturers.
16
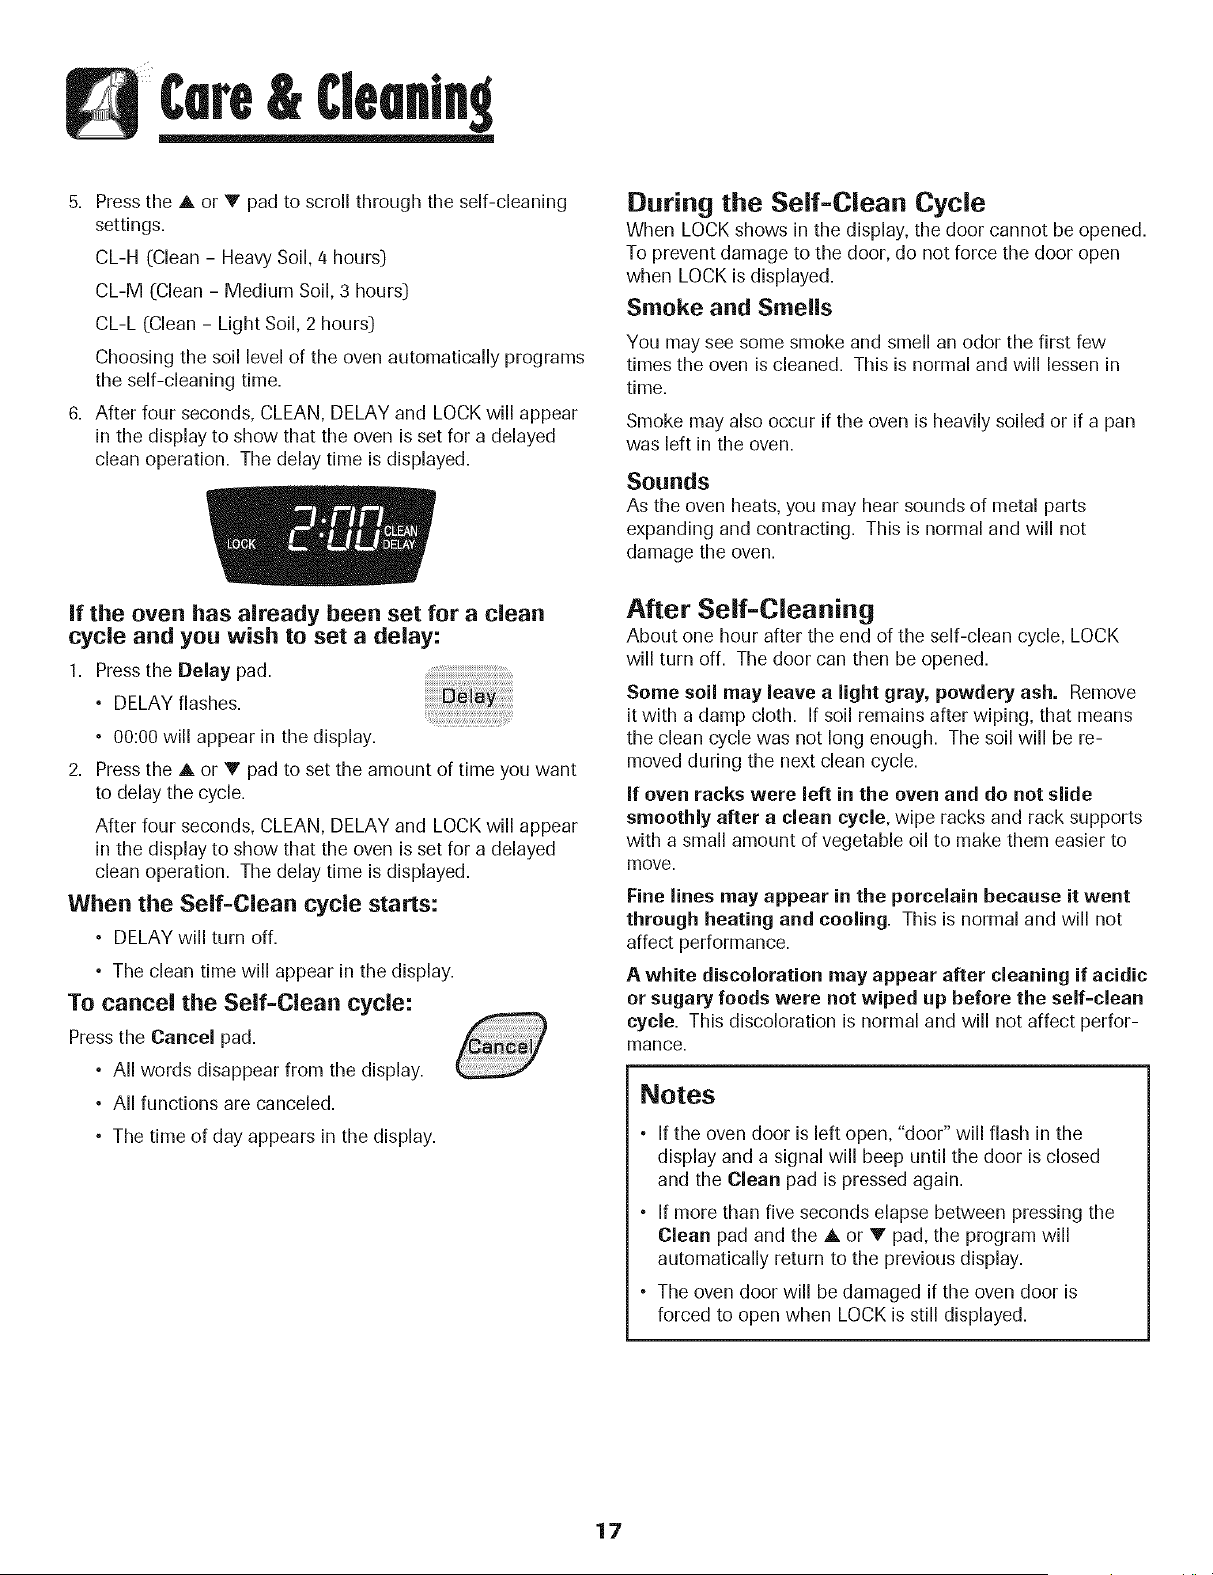
Clemn
5. Press the A or V pad to scroll through the self-cleaning
settings.
CL-H (Clean - Heavy Soil, 4 hours)
CL-M (Clean - Medium Soil, 3 hours)
CL-L (Clean - Light Soil, 2 hours)
Choosing the soil level of the oven automatically programs
the self-cleaning time.
6. After four seconds, CLEAN, DELAY and LOCK will appear
in the display to show that the oven is set for a delayed
clean operation. The delay time is displayed.
If the oven has already been set for a clean
cycle and you wish to set a delay:
1. Press the Delay pad.
• DELAY flashes.
• 00:00 will appear in the display.
2. Press the A or V pad to set the amount of time you want
to delay the cycle.
After four seconds, CLEAN, DELAY and LOCK will appear
in the display to show that the oven is set for a delayed
clean operation. The delay time is displayed.
When the Self=Clean cycle starts:
• DELAY will turn off.
• The clean time will appear in the display.
To cancel the Self=Clean cycle:
Press the Cancel pad.
• All words disappear from the display.
• All functions are canceled.
• The time of day appears in the display.
During the Self=Clean Cycle
When LOCK shows in the display, the door cannot be opened.
To prevent damage to the door, do not force the door open
when LOCK is displayed.
Smoke and Smells
You may see some smoke and smell an odor the first few
times the oven is cleaned. This is normal and will lessen in
time.
Smoke may also occur if the oven is heavily soiled or if a pan
was left in the oven.
Sounds
As tile oven heats, you may hear sounds of metal parts
expanding and contracting. This is normal and will not
damage the oven.
After Self=Cleaning
About one hour after the end of the self-clean cycle, LOCK
will turn off. The door can then be opened.
Some soil may leave a light gray, powdery ash. Remove
it with a damp cloth. If soil remains after wiping, that means
the clean cycle was not long enough. The soil will be re-
moved during the next clean cycle.
If oven racks were left in the oven and do not slide
smoothly after a clean cycle, wipe racks and rack supports
with a small amount of vegetable oil to make them easier to
move.
Fine lines may appear in the porcelain because it went
through heating and cooling. This is normal and will not
affect performance.
A white discoloration may appear after cleaning if acidic
or sugary foods were not wiped up before the self=clean
cycle. This discoloration is normal and will not affect perfor-
mance.
Notes
° If the oven door is left open, "door" will flash in the
display and a signal will beep until the door is closed
and the Clean pad is pressed again.
• If more than five seconds elapse between pressing the
Clean pad and the A or V pad, the program will
automatically return to the previous display.
• The oven door will be damaged if the oven door is
forced to open when LOCK is still displayed.
17
Clemn
Cleaning Procedures
* Brand names are registered trademarks of the
respective manufacturers.
** To order call 1-877-232-6771 USA and
1-806-688-8468 Canada.
Burner Caps and
Sealed Gas
Burners
Burner Grates =
Porcelain on
Cast Iron
Clock and
Control Pad
Area
Control Knobs
Cooktop and
Control Panel =
Porcelain Enamel
Side Panels,
Storage Drawer
and Door
Handles -
Painted Enamel
Removable Burner Caps
• Allow burner to cool. Remove burner cap and wash in soapy water with a plastic scouring pad. For
stubborn soils, clean with a soap-filled, nonabrasive pad or Cooktop Cleaning Creme*
(Part #20000001}** and a sponge.
• Do not clean in the dishwasher or self-cleaning oven.
Sealed Gas Burners
• Clean frequently. Allow burner to cool. Clean with soap and plastic scouring pad. For stubborn soils,
clean with a soap-filled, nonabrasive pad. Do not enlarge or distort holes.
• Be careful not to get water into burner ports.
• Use care when cleaning the ignitor. If the ignitor is wet or damaged the surface burner will not light.
• Wash with warm, soapy water and a nonabrasive, plastic, scrubbing pad For stubborn soils,
clean with a soap-filled, nonabrasive, plastic pad or Cooktop Cleaning Creme* (Part #20000001}**
and a sponge. If soil remains, reapply Cooktop Cleaning Creme, cover with a damp paper towel
and soak for 30 minutes. Scrub again, rinse and dry.
• Do not clean in the dishwasher or self-cleaning oven.
• To activate control lock for cleaning, see "Locking the Controls" page 8.
• Wipe with a damp cloth and dry. Do not use abrasive cleaning agents as they may scratch the finish.
• Glass cleaners may be used if sprayed on a cloth first. DO NOTspray directly on centrol pad and
display area.
• Remove knobs in the OFFposition by pulling forward.
• Wash, rinse and dry. Do not use abrasive cleaning agents as they may scratch the finish.
• Turn on each burner to be sure the knobs have been correctly replaced.
Porcelain enamel is glassfused on metal and may crack or chip with misuse. Itis acid resistant, not acid proof.
All spillovers, especially acidic or sugary spillovers, should be wiped up immediately with a dry cloth.
° When cool, wash with soapy water, rinse and dry.
• Never wipe off a warm or hot surface with a damp cloth. This may cause cracking or chipping.
° Never use oven cleaners, abrasive or caustic cleaning agents on exterior finish of range.
° When cool, wash with warm soapy water, rinse and dry. Never wipe a warm or hot surface with a damp
cloth as this may damage the surface and may cause a steam burn.
• Forstubborn soil, use mildly abrasive cleaning agents such as baking soda paste or BonAmi *. Do not use
abrasive cleaners such as steel wool pads or oven cleaners. These products will scratch or permanently
damage the surface.
Note: Use a dry towel or cloth to wipe up spills, especially acidic or sugary spills. Surface may
discolor or dull if soil is not immediately removed. This is especially important for white surfaces.
18
Clemn
Oven Window • Avoid using excessive amounts of water which may seep under or behind glass causing staining.
and Door = Glass • Wash with soap and water. Rinse with clear water and dry. Glass cleaner can be used if sprayed on a
cloth first.
• Do not use abrasive materials such as scouring pads, steel wool or powdered cleaners as theywill scratch
glass.
Oven Interior • Follow instructionson page 15-16 to set a self-clean cycle.
Oven Racks * Clean with soapy water.
• Remove stubborn soil with cleansing powder or soap-filled scouring pad. Rinse and dry.
• Racks will permanently discolor and may not slide out smoothly if left in the oven during a self-clean
operation. If this occurs, wipe the rack and embossed rack supports with a small amount of vegetable oil
to restore ease of movement, then wipe off excess oil.
Stainless Steel * DO NOT USE ANY CLEANING PRODUCT CONTAINING CHLORINE BLEACH.
(select models) * DO NOT USEABRASIVE OR ORANGE CLEANERS.
• ALWAYS WIPE WITH THE GRAIN WHEN CLEANING.
• _ai_y__eaning_LightS_i_-__ipewith_ne_fthef____wing-s_apywater_whitevinegar/waters__uti_n_
Formula 409 Glass and Surface Cleaner* or a similar glass cleaner - using a sponge or soft cloth.
Rinse and dry. To polish and help prevent fingerprints, follow with Stainless Steel Magic Spray*
(Part No. 20000008:)**.
• Moderate/Heavy Soil -- Wipe with one of the following -Bon Ami*, Smart Cleanser*, or Soft Scrub* -
using a damp sponge or soft cloth. Rinse and dry. Stubborn soils may be removed with a damp multi-
purpose Scotch-Brite* pad; rub evenly with the grain. Rinse and dry. To restore luster and remove streaks,
follow with Stainless Steel Magic Spray*.
,, Discoloration -- Using a damp sponge or soft cloth, wipe with Cameo Stainless Steel Cleaner*. Rinse
immediately and dry. To remove streaks and restore luster, follow with Stainless Steel Magic Spray*.
• Brand names for cleaning products are registered trademarks of the respective manufacturers.
•* To order direct, call 1-877-232-6771 USA and 1-806-688-8408 Canada.
Oven Door
Note: The oven door on a new range may feel "spongy"
when it is closed. This is normal and will decrease with use.
Oven Window
To protect the oven door window:
1. Do not use abrasive cleaning agents such as steel wool
scouring pads or powdered cleansers as they may scratch
the glass.
2. Do not hit the glass with pots, pans, furniture, toys, or other
objects.
3. Do not close the oven door until the oven racks are in
place.
Scratching, hitting, jarring or stressing the glass may weaken
its structure causing an increasedrisk of breakage at a later
date.
19
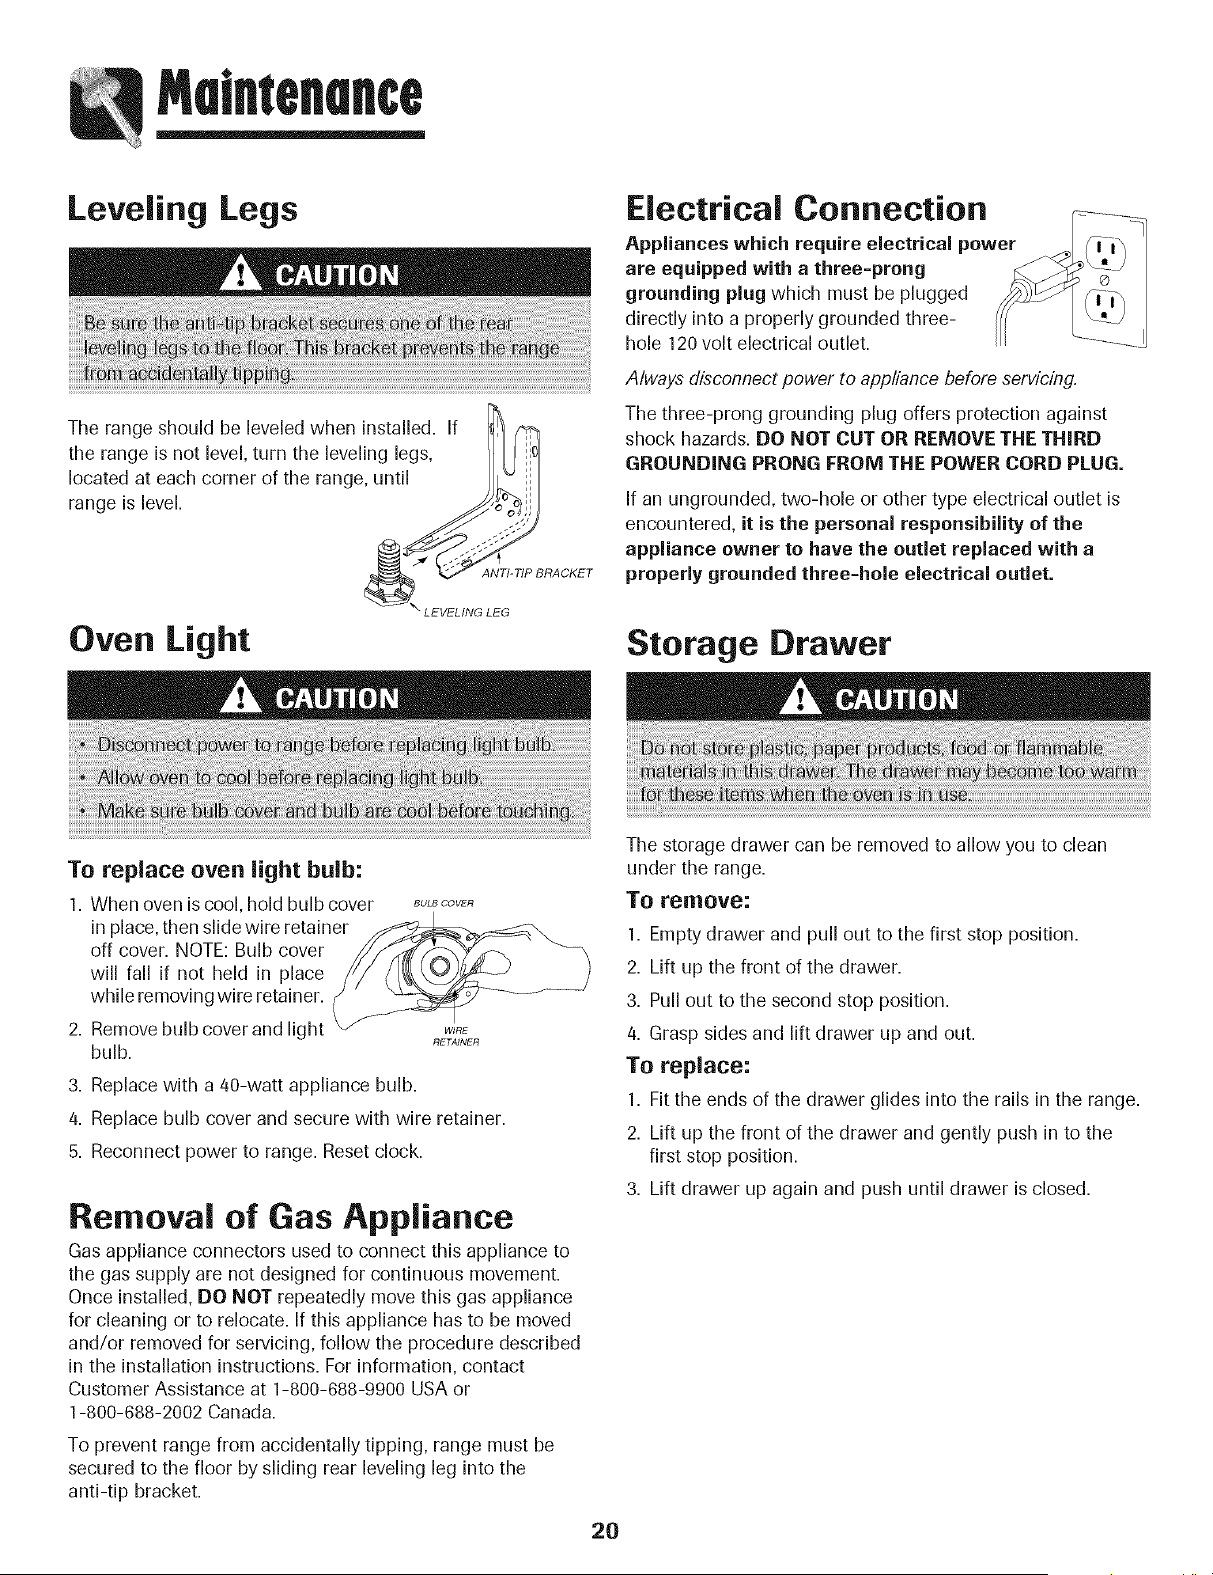
Leveling Legs
The range should be leveled when installed. If
the range is not level, turn the leveling legs, I _1
located at each corner of the range, until
range is level. - _,,/J
&_ ANTI I_BRACKET
LEVELING LEG
Oven Light
Electrical Connection
Appliances which require electrical power
are equipped with a three-prong
grounding plug which must be plugged
directly into a properly grounded three-
hole 120volt electrical outlet.
Always disconnect power to appliance before servicing,
The three-prong grounding plug offers protection against
shock hazards. DO NOT CUT OR REMOVE THE THIRD
GROUNDING PRONG FROM THE POWER CORD PLUG.
If an ungrounded, two-hole or other type electrical outlet is
encountered, it is the personal responsibility of the
appliance owner to have the outlet replaced with a
properly grounded three-hole electrical outlet.
Storage Drawer
To replace oven light bulb:
1. When oven is cool, hold bulb cover BuL_OOVER
in place, then slide wire retainer
off cover. NOTE: Bulb cover
will fall if not held in place
while removing wire retainer.
2. Remove bulb cover and light
RETAINER
bulb.
3. Replace with a 40-watt appliance bulb.
4. Replace bulb cover and secure with wire retainer.
5. Reconnect power to range. Reset clock.
Removal of Gas Appliance
Gas appliance connectors used to connect this appliance to
the gas supply are not designed for continuous movement.
Once installed, DO NOT repeatedly move this gas appliance
for cleaning or to relocate. If this appliance has to be moved
and/or removed for servicing, follow the procedure described
in the installation instructions. For information, contact
Customer Assistance at 1-800-688-9900 USA or
1-800-688-2002 Canada.
To prevent range from accidentally tipping, range must be
secured to the floor by sliding rear leveling leg into the
anti-tip bracket.
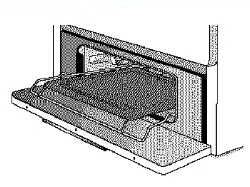
The storage drawer can be removed to allow you to clean
under the range.
To remove:
1. Empty drawer and pull out to the first stop position.
2. Lift up the front of the drawer.
3. Pull out to the second stop position.
4. Grasp sides and lift drawer up and out.
To replace:
1. Fit the ends of the drawer glides into the rails in the range.
2. Lift up the front of the drawer and gently push in to the
first stop position.
3. Lift drawer up again and push until drawer is closed.
2O
froubleshoofln9
For most concerns, try these first. •
o
o
o
Surface burner fails to light.
o
o
The flame is uneven.
Surface burner flame lifts
off ports.
Baking results are not as •
expected or differ from
previous oven. •
o
°
°
o
o
Food is not broiling properly or •
smokes excessively. •
°
°
°
°
Oven will not self=clean.
o
°
°
Check if oven controls have been properly set.
Check to be sure plug is securely inserted into receptacle.
Check or re-set circuit breaker. Check or replace fuse.
Check power supply.
Check to be sure unit is properly connected to power supply.
Check for a blown circuit fuse or a tripped main circuit breaker.
Check to besure ignitor is dry and clicking. Burner will not light if ignitor is damaged,
soiled or wet. If ignitor doesn't click, turn control knob OFF.
• Burner ports may be clogged.
• Check to be sure a pan is sitting on the grate above.
Check the oven temperature selected. Make sure oven is preheated when recipe
or directions recommend preheat.
Make sure the oven vent has not been blocked. See page 14 for location.
Check to make sure range is level.
Temperatures often vary between a new oven and an old one. As ovens age, the oven
temperature often "drifts" and may become hotter or cooler. See page 13 for
instructions on adjusting the oven temperature. Note: It is not recommended to
adjust the temperature if only one or two recipes are in question.
Use correct pan. Dark pans produce dark browning. Shiny pans produce light
browning.
Check rack positions and pan placement. Stagger pans when using two racks. Allow
1-2 inches between pans and oven wall.
Check the use of foil in the oven. Never use foil to cover an entire oven rack. Place
a small piece of foil on the rack below the pan to catch spillovers.
Check oven rack positions. Food may be too close to flame.
Aluminum foil was incorrectly used. Never line the broiler insert with foil.
Trim excess fat from meat before broiling.
A soiled broiler pan was used.
Preheat oven for 2-3 minutes before placing food in the oven.
Broil with the oven door closed.
Check to make sure the cycle is not set for a delayed start. See pages 15-16.
Check if door is closed.
Check if control is in Sabbath Mode. See page 13.
Oven may be over 400° F.Oven temperature must be below 400° F to program a
clean cycle.
21
Troubleshooting
Oven did not clean properly.
Oven door will not unlock after
self=clean cycle.
Moisture collects on oven
window or steam comes from
oven vent.
There is a strong odor or light
smoke when oven is turned on.
Fault Codes
Noises may be heard.
There are no beeps and
no display.
SAb flashing and then
displayed continuously.
• Longer cleaning time may be needed.
• Excessive spillovers, especially sugary and/or acidic foods, were not removed prior
to the self-clean cycle.
• Oven interior is still hot. Allow about one hour for the oven to cool after the
completion of a self-clean cycle, The door can be opened when "LOCK" is not
displayed,
• The control and door may be locked, See page 8.
° This is normal when cooking foods high in moisture.
° Excessive moisture was used when cleaning the window.
This is normal for a new range and will disappear after a few uses. Initiating a clean
cycle will "burn off" the odors more quickly.
• Turning on a ventilation fan will help remove the smoke and/or odor.
• Excessive food soils on the oven bottom. Use a self-clean cycle.
° BAKE or LOCK may flash rapidly in the display to alert you if there is an error
or a problem. If BAKEor LOCK appear in the display, press the Cancel pad.
If BAKE or LOCK continue to flash, disconnect power to the appliance.
Wait a few minutes, and then reconnect power. If the flashing still continues,
disconnect power to the appliance and call an authorized servicer.
° If the oven is heavily soiled, excessive fiareups may result in a fault code during
cleaning. Press the CANCEL pad and allow the oven to cool completely, wipe out
excess soil, then reset the clean cycle. If the fault code reappears, contact an
authorized servicer.
• The oven makes several low level noises. You may hear the oven relays as they go on
and off. This is normal.
• As the oven heats and cools, you may hear sounds of metal parts expanding and
contracting. This is normal and will not damage your appliance.
° Control may be in Sabbath Mode. See page 13.
• Oven is in Sabbath Mode. To cancel, press and hold the Clock pad for five
seconds.
22
Warrant
CUSTOMER'SSOLEAND EXCLUSIVE
REMEDY UNDER THIS LIMITED
WARRANTY SHALL BE PRODUCT REPAIR
AS PROVIDEDHEREIN. IMPLIED
WARRANTIES, INCLUDING WARRANTIES
OF MERCHANTABILITY OR FITNESSFORA
PARTICULAR PURPOSE,ARE LIMITED TO
ONE YEAR OR THESHORTESTPERIOD
ALLOWED BY LAW. MAYTAG
CORPORATIONSHALL NOT BE LIABLE
FOR INCIDENTAL OR CONSEQUENTIAL
DAMAGES. SOME STATESAND
PROVINCESDO NOT ALLOW THE
EXCLUSION OR LIMITATION OF
INCIDENTAL OR CONSEQUENTIAL
DAMAGES, OR LIMITATIONS ON THE
DURATION OF IMPLIED WARRANTIES OF
MERCHANTABILITY OR FITNESS,SO
THESEEXCLUSIONS OR LIMITATIONS
MAY NOT APPLY TO YOU. THIS
WARRANTY GIVESYOU SPECIFICLEGAL
RIGHTSAND YOU MAY ALSO HAVE
OTHER RIGHTS,WHICH VARY STATETO
STATEOR PROVINCETO PROVINCE.
What is Not Covered By These Warranties
1. Conditions and damages resulting from any of the following:
a. Improper installation, delivery, or maintenance.
b. Any repair, modification, alteration, or adjustment not authorized by the
manufacturer or an authorized servicer.
c. Misuse, abuse, accidents, or unreasonable use, or acts of God.
d. Incorrect electric current, voltage, electrical and/or gas supply.
e. Improper setting of any control.
2 Warranties are void if the original serial numbers have been removed, altered,
or cannot be readily determined.
3. Light bulbs, water filters and air filters.
4. Products purchased for commercial or industrial use.
5. The cost of service or service call to:
a. Correct installation errors. For products requiring ventilation, rigid metal
ducting must be used.
b. Instruct the user on the proper use of the product.
c. Transport the appliance to and from the servicer.
6. Any food loss due to refrigerator or freezer product failures.
7. Expenses for travel and transportation for product service in remote locations.
8. Outside of the United States and Canada this warranty does not apply.
Contact your dealer to determine if another warranty applies.
9. Consequential or incidental damages sustained by any person as a result of
any breach of these warranties. Some states do not allow the exclusion or
limitation of consequential or incidental damages, so the above exclusion may
not apply.
If You Need Service
First see the Troubleshooting section in your Use and Care Guide or call the
dealer from whom your appliance was purchased or call Maytag Services, LLC,
Customer Assistance at 1-800-688-9900 USA and 1-800-688-2002 Canada to
locate an authorized servicer.
• Be sure to retain proof of purchase to verify warranty status. Refer to
WARRANTY for further information on owner's responsibilities for warranty
service.
° If the dealer or service company cannot resolve the problem, write to Maytag
Services, LLC, Attn: CAIR_ Center, P.O. Box 2370, Cleveland, TN 37320-2370, or
call 1=800-688-9900 USA and 1=800-688-2002 Canada. U.S.customers
using TTY for deaf, hearing impaired or speech impaired,call 1-800-688-2080.
° User's guides, service manuals and parts information are available from Maytag
Services, LLC, Customer Assistance.
Notes: When writing or calling about a service problem, please include:
a. Your name, address and telephone number;
b. Model number and serial number;
c. Name and address of your dealer or servicer;
d. A clear description of the problem you are having;
e. Proof of purchase (sales receipt).
23
Cuisini_re _ gaz & comrnandes Easy Touch 500
Cuisinii re
instructions de s_curit6
importantes .............................................................25=29
Cuisson sur la surface .......................................... 30=31
Commandes de la surface de cuisson
BrCJleursscell6s
Cuisson darts le four ............................................. 32=41
Cuisson courante
Cuisson et maintien
Cuisson et maintien diff6r6e
Maintien au chaud
Cuisson au gril
Arr6te automatique/Mode sabbat
Grilles du four
Nettoyage ................................................................42=45
Four autonettoyant
M6thodes de nettoyage
Entretien ...................................................................46=47
Hublot et lampe du four
D6placement d'un appareil b gaz
Recherche des pannes ..........................................48=49
Garantie et service apr_s=vente ................................ 51
Guia de Uso y Cuidado ................................................52
Lire routes les instructions avant d'utiliser cet appareil;
observer toutes les instructions pour eliminer les risques
d'incendie, choc electrique, dommages materiels et corporels
que pourrait susciter une utilisation incorrecte de I'appareil.
Utiliser I'appareil uniquement pour les fonctions prevues,
decrites darts ce guide.
Pour une utilisation adequate et en s_curit_, il faut que
I'appareil soit convenablement instaiie par un technicien
qualifi& et relic _ la terre. Ne pas regler, reparer ni remplacer
un composant, _ moins que ceia ne soit specifiquement
recommande darts ce guide. Toute autre reparation doit etre
effectuee par un technicien qualifi& Demander _ I'installateur
de montrer ou se trouve [e robinet d'arret de gazet comment
le fermer en cas d'urgence.
Toujours debrancher I'appareil avant d'y faire de I'entretien.
securlteimport es
Les instructions de securite importantes et les paragraphes
_{avertissement >>de ce guide ne sont pas destines _ couvrir
toutes les conditions et situations qui pourraient se presenter.
II faut faire preuve de bon sens, de prudence et de soin Iors de
I'installation, de I'entretien ou du fonctionnement de I'appareil.
Toujours prendre contact avec le fabricant dans le cas de
problemes ou de conditions qui ne seraient pas comprises.
Reconnaitre les etiquettes, paragraphes et
symboles sur la s curit6
25
s6curiteimponentes
instructions g n rales
Utiliser une lampe torche pour determiner si la bride
antibasculement est convenablement installeesous la
cuisiniere. L'un des pieds arriere de reglage de raplomb doit
etre convenablement engage duns la fente de la bride.
Lorsque la cuisiniere est convenablement calee, la bride
antibasculement immobilisele pied arriere contre le sol.
Verifier la parfaite immobilisationde la cuisiniere par la bride
apres chaque d@lacement de la cuisiniere.
Pour viter un incendie ou des
dommages par la tumee
S'assurer que tousles materiaux de conditionnement sont
retires de I'appareil avant de le mettre en marche.
Garder les materiaux combustibles, I'essence et autres
matieres et vapeurs inflammables bien eloignes de I'appareil.
Si I'appareil est installe pres d'une fenetre, des precautions
appropriees doivent etre prises pour eviter que le vent entraine
les rideaux au-dessus des brQleurs.
NE JAMAIS hisser des articles sur la table de cuisson. L'air
chaud de I'event peut les enfiammer et mettre egalement sous
pression des contenants fermes qui pourraient alors exploser.
De nombreux flacons d'aerosol peuvent EXPLOSERIorsqu'on
les expose _ la chaleur, et ilspeuvent contenir un produit tres
inflammable.Eviter d'utiliser ou remiser un flacon d'aerosol
proximite de I'appareil.
De nombreux articles en plastique peuvent etre deteriores par
la chaleur. Conserver les articles en plastique _ distance des
composants de I'appareil susceptibles de devenir tiedes ou
chauds. Ne pas laisser des articles en plastique sur la table
de cuisson: un article en plastique trop proche de I'event du
four ou d'un brOleur allume pourrait s'amollir ou fondre.
Pour eliminer le besoin d'atteindre quelque chose par-dessus
les brOleurs de surface, il est preferable qu'il n'y air aucune
armoire de cuisine directement au-dessus de I'appareil. S'il y
a une armoire, on ne devrait y remiser que des articles peu
frequemment utilises et capables de resister _ la chaleur
emise par I'appareil. La temperature pourrait etre excessive
pour certains articles, comme liquides volatils, produits de
nettoyage ou flacons d'aerosol.
En cas d'incendie
Interrompre le fonctionnement de I'appareil et de la hotte de
ventilation pour minimiser le risque d'extension des flammes.
Eteindre les flammes, puis mettre la hotte en marche pour
evacuer la fumee et Fair vici&
• Table de cuisson : Utiiiser un couvercle ou une plaque
biscuits pour etouffer les flammes d'un feu qui se declare
dans un ustensile de cuisine.
NE JAMAIS saisir ou d@lacer un ustensile de cuisine
enflamm&
• Four : Fermer la porte du four pour etouffer les flammes.
Ne pus projeter de I'eau sur un feu de graisse. Utiliser du
bicarbonate de sodium ou un extincteur _ mousse ou produit
chimique sec pour eteindre les flammes.
Securit pour les enfants
NE JAMAIS hisser des enfants seuls ou sans supervision
Iorsque I'appareil est en service ou encore chaud.
NE JAMAIS hisser un enfant s'asseoir ou se tenir sur une
partie quelconque de rappareil. II pourrait se blesser ou se
brOler.
II est important d'enseigner aux enfants que la cuisiniere et les
ustensiles places dessus ou dedans peuvent etre chauds.
Laisser refroidir les ustensiles en un lieu sQr,hors d'atteinte
26
InstructionsdesecurlteJmponentes
des enfants. II est important d'enseigner aux enfants qu'un
appareil menager n'est pas un jouet, et qu'ils ne doivent
toucher aucune commande ou autre composant de Fapparefl.
Familiarisation avec I'appareil
L'event de four est situe _ la base du dosseret.
Evitez de toucher le voisinage de I'event de four Iorsque le four
est utilise et pendant plusieurs minutes apres I'arret du four.
Certains composants de I'event et la zone voisine peuvent
devenir suffisamment chauds pour provoquer des brQlures.
Apres I'arret du four, ne touchez pas I'event de four ou la zone
voisine avant que ces composants aient pu se refroidir
suffisamment.
Autres surfaces potentiellement chaudes : table de cuisson,
zones faisant face _ la table de cuisson, event de four, zone
voisine de I'event, porte de four et zone voisine de porte et de
hublot.
Ne touchez pas ['ampoule chaude du four avec un linge
humide; le choc thermique pourrait la briser. Si tel est le cas,
debranchez I'appareil avant de retirer I'ampoule pour eviter
une decharge electrique.
Ne remisez pas des aliments ou ustensiles de cuisine sur la
table de cuisson ou dans le four.
Cuisson et s6curit
Placer toujours un ustensile sur un brQleur de surface avant de
rallumer. Veiller _ bien connaitre la correspondance entre les
boutons de commandeet les brQleurs. Veiller _ allumer le
brQleur correct et verifier que le brQleur s'allume
effectivement. A la fin de la periode de cuisson, eteindre le
brQleur avant de retirer I'ustensile, pour eviter une exposition
aux flammes du brQleur.
Veiller _ toujours ajuster correctement la taille des flammes
pour qu'elles ne d@assent pas sur la peripherie de I'ustensile.
Des flammes de trop grande taille sur un brQleur sont
dangereuses, elles entrainent un gaspillage d'energie et elles
peuvent faire subir des dommages _ I'ustensile, _ I'appareil ou
I'armoire situee au-dessus.
NE JAMAIS laisser un breleur de surface allume sans
surveillance, particulierement avec une puissance de
chauffage elevee ou Iors d'une operation de friture. Un
debordement pourrait provoquer la formation de fumee et des
produits gras pourraient s'enflammer. Eliminer des que
possible les produits gras renverses. Ne pas utiliser une
puissance de chauffage elevee pendant une periode
prolongee.
NE JAMAIS faire chauffer un recipient non ouvert dans le
four ou sur un breleur de surface; I'accumulation de pression
dans le recipient pourrait provoquer son eclatement et de
graves dommages materiels ou corporels.
Utiliser des maniques robustes et seches. Des maniques
humides peuvent provoquer la formation de vapeur brelante.
Ne jamais utiliser un torchon _ vaisselle ou autre article textile
la place de maniques; un tel article pourrait trainer sur un
breleur et s'enflammer, ou accrocher un ustensile ou un
composant de I'appareil.
Laisser toujours refroidir un recipient d'huile de friture chaude
avant de tenter de le d@lacer et le manipuler.
Ne pas laisser la graisse de cuisson ou autre materiau inflam-
mable s'accumuler dans ou pres de I'appareil, de la hotte ou
du ventilateur de I'event. Nettoyer frequemment la hotte pour
empecher toute accumulation sur la hotte elle-meme ou sur le
filtre. Lors du flambage d'aliments sous la hotte, mettre le
ventilateur en marche.
NE JAMAIS porter, Iors de I'utilisation de I'appareil, des
vetements fairs d'un materiau inflammable, ou amples, ou
Iongues manches. De tels vetements peuvent s'enflammer ou
accrocher la poignee d'un ustensile.
27
s
imponentes
Placer toujours les grilles _ la position appropfiee darts le four
Iorsque le four est froid. Faire couiisser la grille vers rextefieur
avant d'ajouter ou eniever un plat; utiiiser pour cela une
manique robuste et seche. Eviter d'introduire [a main darts [e
four pour y placer ou retirer un plat. S'il est necessaire de
deplacer une grille [orsqu'elle est chaude, utiiiser une manique
seche. Veiiier _ toujours arreter [e four _ [a fin d'une periode
de cuisson.
Ouvrir toujours la porte du four tres prudemment. Laisser rair
chaud ou la vapeur s'echapper avant de retirer/introduire un
plat.
AVERTISSEMENT : Mets prepares : Respecter les instruc-
tions du fabficant. Si [e contenant ou [e couvercle en plastique
d'un mets surgele se ddorme ou est endommage durant [a
cuisson, jeter immediatement [e recipient et son contenu. Les
aliments pourraient etre contamines.
NE JAMAIS garnir la sole ou une grille du four avec de [a
feuille d'aluminium. Ceci pourrait susciter un risque de choc
electrique ou d'incendie, ou une autre deterioration de
rapparei[. Utiliser de [a feuille d'aluminium uniquement selon
[es instructions de ce guide.
Ustensiles et s6curit
Utiliser des ustensiles _ fond plat comportant une poignee
qu'on peut faciiement saisir et qui reste froide. Eviter d'utiiiser
un ustensile instable ou ddorm& qui pourrait facilement
basculer, ou dont la poignee est mal fixee. Eviter egalement
d'utiliser des ustensiles de petite taille comportant une
poignee [ourde; ces ustensiles sont generalement instabies et
peuvent facilement basculer. Un ustensile Iourd Iorsqu'il est
rempli peut egalement ¢tre dangereux lots des manipulations.
Veiller _ utiliser un ustensile de taille suffisante pour que le
contenu ne risque pas de deborder. Ceci est particulierement
important pour un ustensile rempli d'huile de friture. Verifier
que la taille de ['ustensile est suffisante pour qu'[I puisse
recevoir les produits alimentaires _ cuire, et absorber
raugmentation de volume suscitee par rebullition de la
graisse.
Pour minimiser les risques de brOlure, d'inflammation de
matieres et de renversement par contact non intentionnel avec
un ustensile, ne pas orienter la poignee d'un ustensile vers un
brOleur adjacent; orienter toujours la poignee d'un ustensile
vers le cote ou rarriere de rappareil; ne pas hisser non plus la
poignee d'un ustensile deborder _ ravant de rappareil, ou un
jeune enfant pourrait facilement la saisir.
Veiller _ ne jamais hisser le contenu liquide d'un ustensile
s'evaporer completement; rustensile et rappareil pourraient
subir des dommages.
Appiiquer les instructions du fabricant Iors de remploi d'un
sachet pour cuisson au four.
Seuls certains materiaux en verre, vitroceramique, ceramique,
ou certains ustensiies vitrifies/emaiiies peuvent etre utiiises sur
la table de cuisson ou dans le four sans risque de bris sous
reffet du choc thermique. Observer les instructions du
fabricant lots de rutilisation d'un ustensile en verre.
La secufite de fonctionnement de cet apparei[ a ete testee
raide d'ustensiles de cuisine conventionnels. Ne pas utiliser un
ustensile ou accessoire qui n'est pas specifiquement
recommande dans ce guide. Ne pas utiliser de couvre-brOleur,
gri[ place sur [a table de cuisson ou systeme de convection
additionne[. L'utilisation d'un dispositif ou accessoire qui n'est
pas expressement recommande dans ce guide peut degrader
[a securite de ['apparei[ ou sa performance, ou reduire [a
[ongevite des composants.
Nettoyage et s curit6
Arreter toutes [es commandes et attendre [e refroidissement
de tousles composants avant de les toucher ou d'entre-
prendre le nettoyage. Ne pas toucher la grille d'un brOleur ou
la zone voisine avant que ces composants aient pu suffisam-
ment refroidir.
Exercer une grande prudence Iors du nettoyage de rappareil.
Travailler prudemment pour eviter des brOhres par la vapeur
en cas d'utilisation d'un chiffon ou d'une eponge humide [ors
de relimination d'un produit renverse sur une surface chaude.
Certains produits de nettoyage peuvent generer des vapeurs
nocives Iorsqu'on les applique sur une surface chaude.
Four autonettoyant
Nettoyer uniquement les pieces mentionnees dans ce guide.
Ne pas nettoyer le joint de porte; le joint joue un role essentiel
quant _ retancheit& Ne pas frotter, endommager ou deplacer
le joint. Ne pas utiliser de produit de nettoyage du four darts
le four autonettoyant ou sur les zones voisines.
I1est normal que la surface de cuisson devienne chaude
durant une operation d'autonettoyage; par consequent, eviter
de toucher la surface de cuisson durant rautonettoyage.
28
s
impomntes
Avertissement et avis
important pour la s curit
La Ioi californienne _ Safe Drinking Water and Toxic Enforce-
ment Act >>de 1986 (proposition 65)stipule la publication par
le gouverneur de la Californie d'une liste de substances que
I'etat de Califomie considere comme cancerigenes ou
dangereuses pour le systeme reproducteur, et impose aux
entrepfises commerciales I'obligation de signaler _ leurs
clients les fisques d'exposition _ de telles substances.
Les utilisateurs de cet appareil peuvent ¢tre exposes _ une
faible concentration de certaines substances figurant darts la
liste mentionnee ci-dessus, dent benzene, formaldehyde et
suie, du fait de la combustion incomplete du gaz naturel ou du
gaz de petrole liqudie. Pour minimiser la combustion
incomplete, veiller _ ce que les brQleurs soient parfaitement
regles. Pour minimiser I'exposition _ ces substances, veiller
bien evacuer les gaz de combustion _ I'exterieur.
Nous informons les utilisateurs de cet appareil que Iors d'une
operation d'autonettoyage, ils peuvent etre exposes _ une
faible concentration de certaines substances figurant dans la
liste mentionnee ci-dessus, dent le monoxyde de carbone.
Pour minimiser I'exposition, veiller _ ce que la piece ouse
trouve le four soit convenaNement aeree durant une operation
d'autonettoyage par I'ouverture d'une fenetre ou d'une porte.
AVIS IMPORTANT - OISEAUX FAMILIERS : Les oiseaux ont
un systeme respiratoire tres sensible. Ne pas garder un oiseau
familier darts la cuisine ou dans une piece ou il pourrait etre
expose aux fumees. Les fumees emises durant une operation
d'autonettoyage peuvent etre dangereuses ou mortelles pour
un oiseau, de meme que les fumees emises Iors du chauffage
excessif de graisse, huile, margarine, et du chauffage excessif
darts un ustensile _ revetement antiadhesif.
Conserver ces instructions pour consultation ult rieure
29
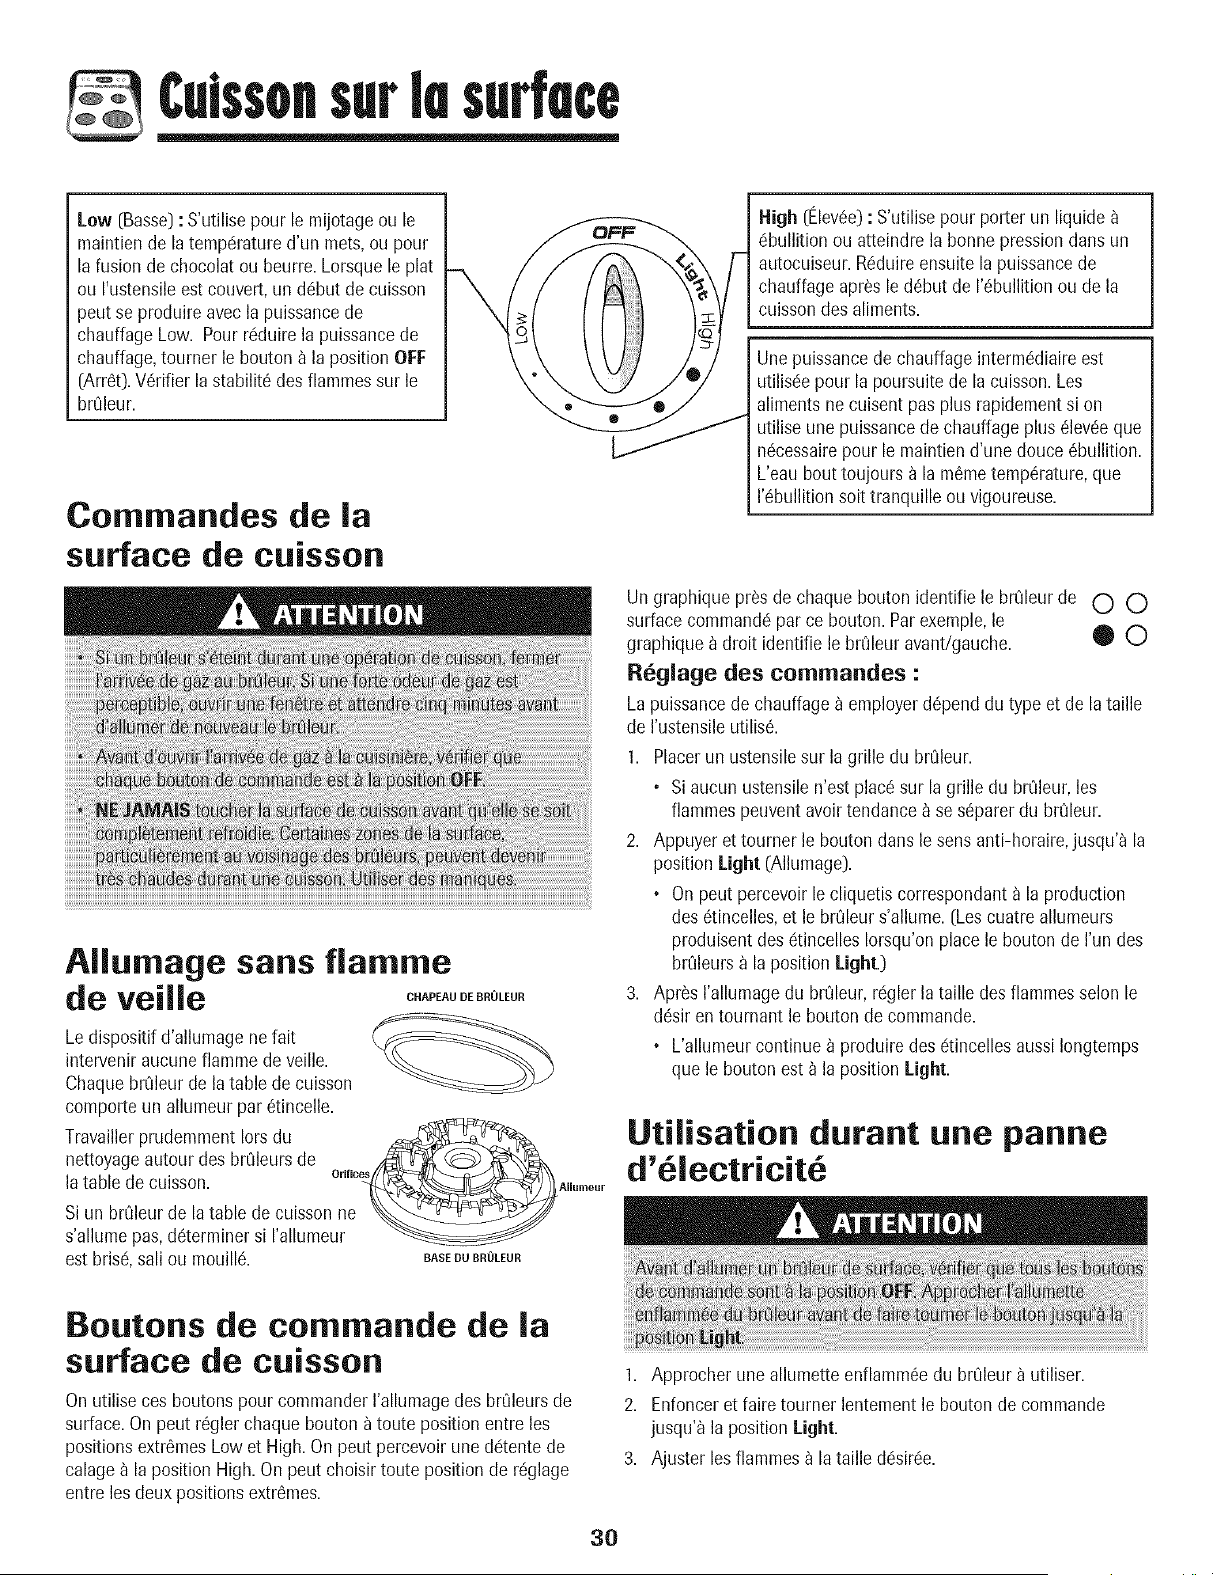
Culssonsurle surfece
Low [Basse]:S'utilise pour le mijotageou le
maintiende la temp6ratured'un mets,ou pour
lafusion de chocolatou beurre.Lorsque le plat
ou I'ustensileest couvert, un d6but de cuisson
peut se produire avec la puissancede
chauffage Low. Pour r_duire la puissancede
chauffage,tourner le bouton_ la position OFF
(Arr6t).V6rifier la stabilit6 desflammes sur le
br01eur.
Commandes de la
surface de cuisson
Allumage sans flamme
de veille c.Ap,A,oE..O.,.o
Ledispositifd'allumagenefait
interveniraucune flammede veille.
ChaquebrOleurde la table de cuisson
comporte un allumeurpar 6tincelle.
TravaillerprudemmentIorsdu
nettoyageautour des br01eursde ,-J_ (0) ,'_-'_X_,
latable de cuisson. °""_--__A..
Si un br01eurde la table de cuisson ne _..__
s'allume pas,d6terminersi I'allumeur
est brisc!,sail ou mouill6. BASEDU,ROLEU,
Boutons de cornmande de ia
surface de cuisson
Onutiliseces boutonspour commanderI'allumagedes brOleursde
surface.Onpeut r_gler chaquebouton a toute position entre les
positionsextr6mesLow et High. On peut percevoirune d6tente de
calage_ la position High. On peut choisir toute position de r6glage
entre lesdeux positionsextr6mes.
30
High (Elev_e):S'utilise pour porter un liquide
c!bullitionou atteindre la bonne pression dartsun
autocuiseur.R6duireensuitela puissancede
chauffageapr_s le d6but de 1'6bullitionou de la
cuissondes aliments.
Une puissancede chauffageinterm_diaireest
utilis(!epour la poursuite de la cuisson.Les
alimentsne cuisent pas plus rapidementsi on
utilise une puissancede chauffage plus 61ev6eque
nc!cessairepour le maintiend'une douce 6bullition.
L'eau bout toujours a la m6metemp6rature,que
I'_bullition soittranquille ouvigoureuse.
Un graphiquepros de chaquebouton identifie le brt_leurde O O
surfacecommandc!parce bouton.Parexemple,le
graphique_ droit identifie le brCfleuravant!gauche. O O
R_glage des commandes :
La puissancede chauffageb employerd6pend du type et de lataille
de I'ustensileutilis_.
1. Placerun ustensilesur la grille du brOleur.
• Si aucun ustensilen'est plac6sur la grille du br01eur,les
flammespeuventavoir tendance_ se s6parerdu brCdeur.
2. Appuyer et tourner le boutondarts le sens anti-horaire,jusqu'a la
position Light (Allumage).
. Onpeut percevoir le cliquetiscorrespondanta la production
des 6tincelles,et le brt_leurs'allume.[Lescuatreallumeurs
produisentdes c!tincellesIorsqu'onplace le bouton de I'un des
brCdeursb la position Light.)
3. Apr_s I'allumagedu brt_leur,rc!glerla taille des flammesselon le
d6sir en tournant le boutonde commande.
. L'allumeurcontinue _ produire des c!tincellesaussiIongtemps
que le bouton est _ la position Light.
Utilisation durant une panne
d' iectricit
1. Approcher une allumette enflamm6edu brOleurb utiliser.
2. Enfonceret faire tourner lentementle boutonde commande
jusqu'_ la positionLight.
3. Ajuster lesflammes a la taille dc!sirc!e.
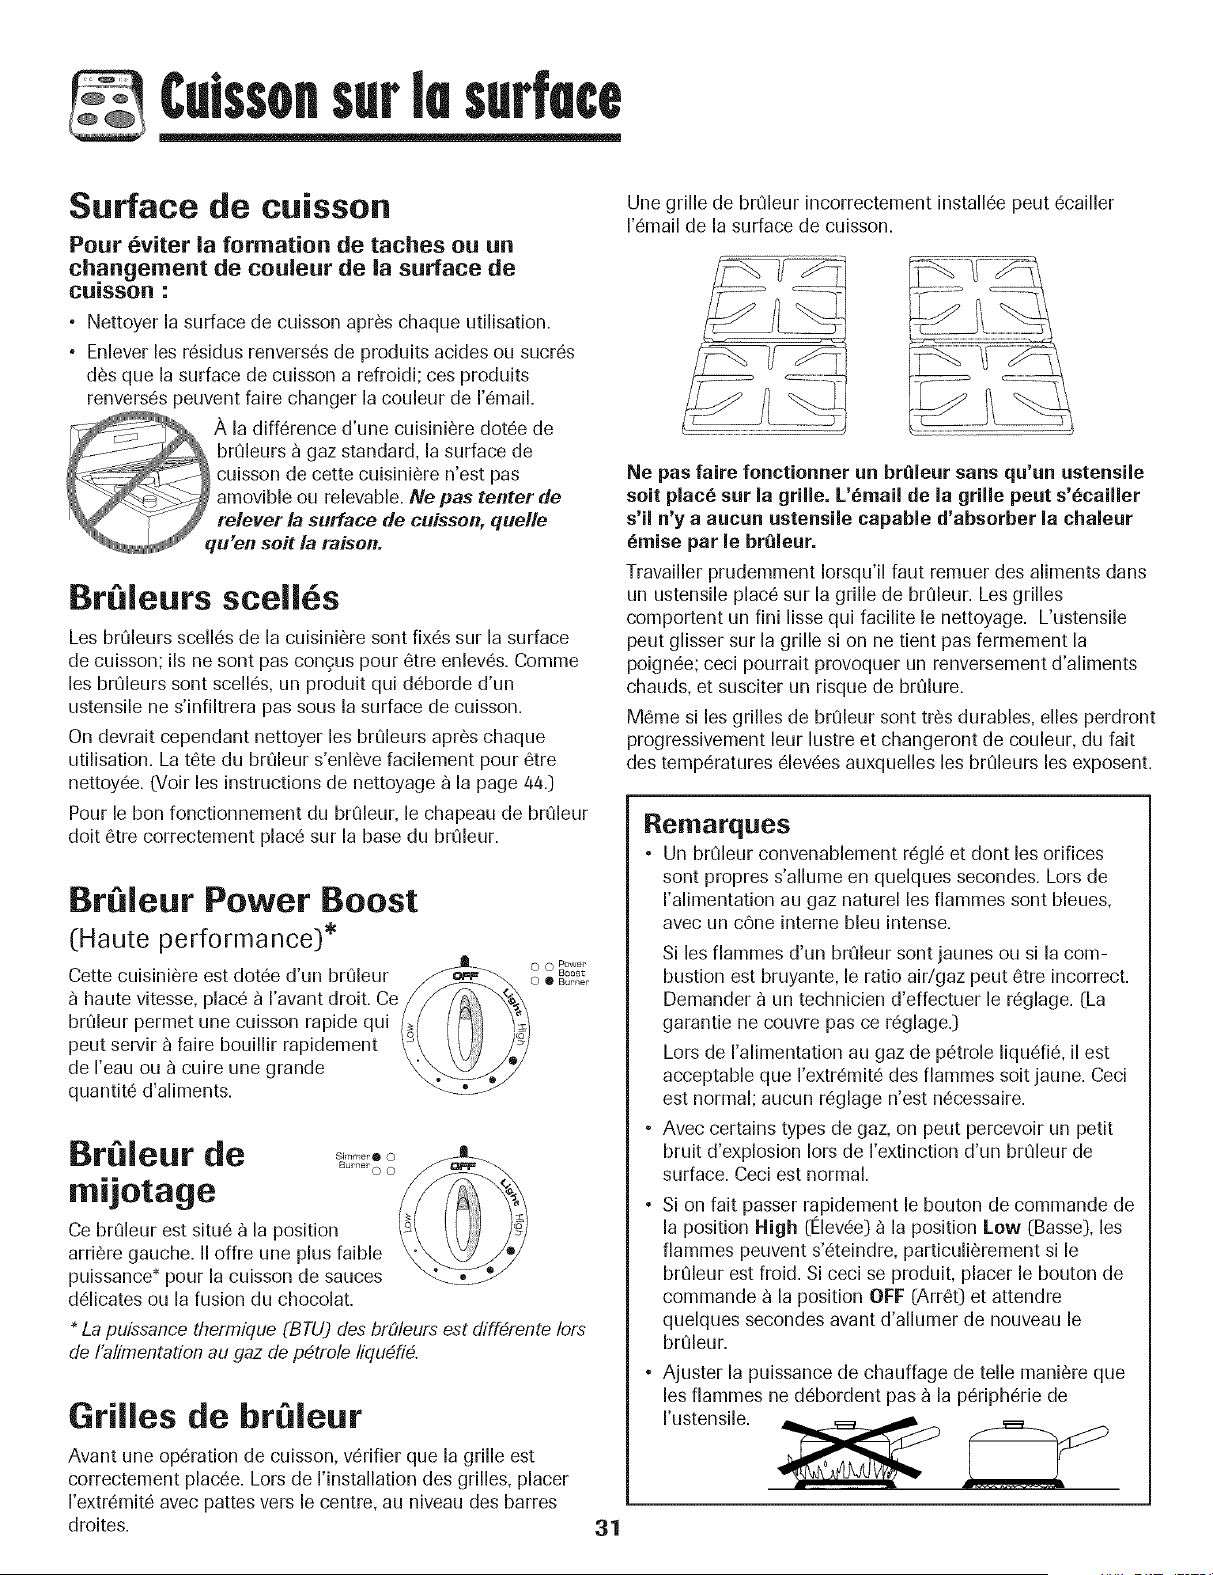
Culssonsurlesurface
Surface de cuisson
Pour _viter ia formation de taches ou un
changement de couleur de la surface de
cuJssoR :
• Nettoyer la surface de cuisson apr(_schaque utilisation.
• Enlever les rOsidus renversOs de produits acides ou sucrOs
d_s que la surface de cuisson a refroidi; ces produits
renversOs peuvent faire changer la couleur de 1'Omail.
A la diffOrence d'une cuisini_re dotOe de
brQleurs b gaz standard, la surface de
cuisson de cette cuisini(_re n'est pas
amovible ou relevabJe.Ne pas tenter de
re/ever la surface de cuisson, que//e
u'en soit la raison.
Br leurs scell s
Les brQleurs scellOs de la cuisini_re sont fixOssur la surface
de cuisson; ils ne sont pas congus pour 6tre enlevOs. Comme
les brQleurs sont scellOs, un produit qui dOborde d'un
ustensile ne s'infiltrera pas sous la surface de cuisson.
On devrait cependant nettoyer les brOleurs apr_s chaque
utilisation. La tote du brQleur s'enl_ve facilement pour 6tre
nettoyOe. L-VoJrles instructions de nettoyage _ la page 440
Pour le ban fonctionnement du brQleur, le chapeau de brQleur
dolt 6tre correctement plac6 sur la base du brQleur.
Br leur Power Boost
(Haute performance)*
Baost
Cette euisini@reest dotOe d'un brQleur _ o • _.....
hautevitesse,plac6ravantdroit.
bruleur permet une cumson rap_dequ_
...... !_ !
peut serv,r a fa,re boudhr rap,dement \"\ kk)i /g/
de I'eau ou _ cuire une grande _</_'
quantlte d ahments. _:_-_/
Br leur de o
Bulmel" O O
mijotage
Ce br01eur est situ6 _ la position
arri(_regauche• II afire une plus faible
puissance _ pour la cuisson de sauces
dOlicates ou la fusion du chocolat.
La puissance thermique (BTU) des braleurs est diff4rente /ors
de I'alimentation au gaz de p4trole liqu4fi4.
Grilles de br leur
Avant une opOratJonde cuisson, vOrifier que la grille est
correctement placOe. Lors de I'installation des grilles, placer
I'extrOmit6 avec pattes vers le centre, au niveau des barres
droites.
Une grille de brQleur incorrectement installOe peut 6cailler
1'Omailde la surface de cuisson.
Ne pas faire fonctionner un br_leur sans qu'un ustensile
salt plac_ sur la grille. L'ernail de la grille peut s'_caiJler
s'il n'y a aucun ustensile capable d'absorber la chaieur
_rnise par le brQleur.
Travailler prudemment Iorsqu'il faut remuer des aliments dans
un ustensile plac6 sur la grille de brQleur. Les grilles
comportent un fini lisse qui facilite le nettoyage. L'ustensile
peut glisser sur la grille si on ne tient pas fermement la
poign6e; ceci pourrait provoquer un renversement d'aliments
chauds, et susciter un risque de brOlure.
M6me si les grilles de brQleur sont tr6s durables, elles perdront
progressivement leur lustre et changeront de couleur, du fait
des temp@atures 61ev6esauxquelles les brOleurs les exposent.
Remarques
• Un brQleur convenablement rOgl6 et dont les orifices
sont propres s'alhme en quelques secondes. Lors de
I'alimentation au gaz naturel les fiammes sont bleues,
avec un cOne interne bleu intense.
Si les fiammes d'un brQleur sont jaunes ou si la com-
bustion est bruyante, le ratio air/gaz peut etre incorrect.
Demander _ un technicien d'effectuer le reglage. (La
garantie ne couvre pas ce reglage.)
Lors de I'alimentatJon au gaz de pOtrole liqudi& il est
acceptable que I'extremit8 des fiammes soit jaune. Ceci
est normal; auoun reglage n'est nOcessaire.
• Avec certains types de gaz, on peut percevoir un petit
bruit d'explosion Iors de I'extinction d'un brOleur de
surface. CecJest normal.
° Si on fait passer rapidement le bouton de commande de
la position High [l_levee] _ la position Law (Basse], les
fiammes peuvent s'eteindre, particulierement si le
breleur est froid. Si ceci se produit, placer le bouton de
commande _ la position OFF (Arre0 et attendre
quelques secondes avant d'alhmer de nouveau le
breleur.
• Ajuster la puissance de chauffage de telle maniere que
les fiammes ne debordent pas _ la peripherie de
I'ustensile. _ ._
31
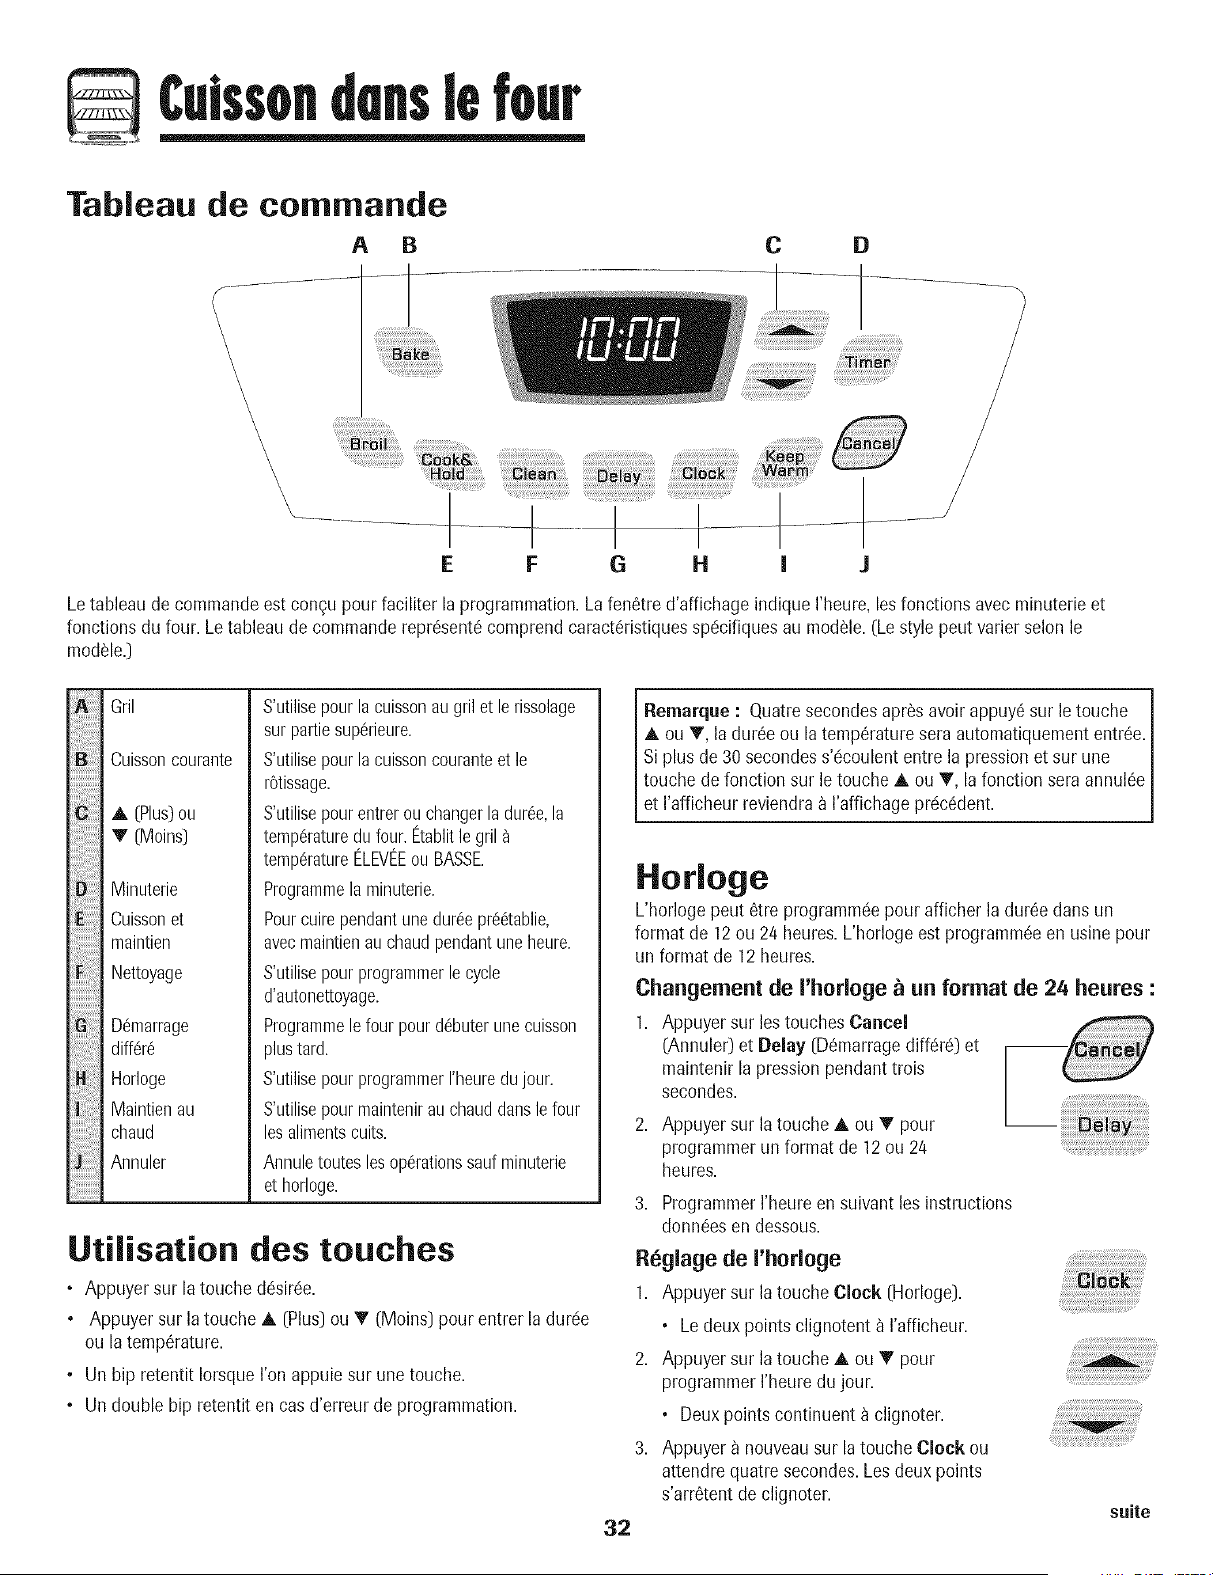
Cuissondenslefour
Tableau de commande
A B
E
Letableau de commandoest concu pour faciliter la programmation.Lafen6tred'affichage indique I'heure, lesfonctions avec minuterie et
fonctionsdu four. Le tableau de commandorepr6sent6comprendcaract6ristiquessp_!cifiquesau mo@le.(Lestyle pout varier solonle
module.)
ii_Bii_ji!iiiil
i!iiF;_!i!i!i!ii!ii!iiii
iii!Ji!i!i!i!i!i!Jii!i!
Gril
Ouissoncourante
A (Plus)ou
V (Moins)
Minuterie
Cuisson et
maintien
Nettoyage
Demarrage
diff6r_
Horloge
Maintienau
chaud
Annuler
S'utilisepourlacuissonau gril et le rissolage
surpattiesup6rieure.
S'utilisepourlacuissoncouranteet le
r6tissage.
S'utilisepourentrerou changerla dur@,la
temp6raturedufour.Etablitlegril
temp6ratureCLEVI_Eou BASSE
Programmela minuterie.
Pourcuirependantunedureepre6tablie,
avecmaintienau chaudpendantuneheure.
S'utilisepourprogrammerlecycle
d'autonettoyage.
Programmele four pourdebuterunecuisson
plustar&
S'utilisepourprogrammerI'heoredujour.
S'utilisepourmaintenirauchauddanslefour
lesalimentscuits.
Annuletouteslesop(!rationssaulminuterie
et horloge.
Utilisation des touches
, Appuyersur la touche d6sir6e.
, Appuyer sur latouche A (Plus)ou • (Moins)pour entrer la dur_!e
ou latemp@ature.
, Un bip retentit Iorsque I'onappuiesur unetouche.
• Un double hip retentit en cas d'erreur de programmation.
Rernarque: Quatresecondesapr_s avoirappuy6sur le touche
A ou _, la dur_e ou la tempSraturesera automatiquemententree.
Si plus de 30 secondess'_!coulententre la pressionet sur une
I touche de fonction sur le touche A ou T, la fonction sera ann(Jibe
|et I'afficheur reviendra_ I'affichagepr_!cSdent.
Horloge
L'horloge peut _tre programm(!epour afficher la dur_e clansun
format de 12ou 24 heures.L'horloge est programm6een usinepour
un format de 12 heures.
Changement de I'horloge _ un format de 24 heures :
1. Appuyer sur les touchesCancel
(Annuler)et Belay (D_marragediff_r_!)et
maintenirla pressionpendanttrois
secondes.
2. Appuyer sur la touche A ou • pour
programmerun format de 12 ou 2/4
heures.
3. ProgrammerI'heureensuivant los instructions
donn_esen dessous.
R_glage de I'horloge
1. Appuyer sur la touche Clock (Horloge).
• Ledeux pointsclignotent _ I'afficheur.
2. Appuyer sur la touche A ou _' pour
programmerI'heuredujour.
• Deuxpointscontinuent a clignoter.
3. Appuyer a nouveausur la touche Clock ou
attendrequatre secondes.Les deuxpoints
s'arr_tentde clignoter.
32
;ii:!ii!ii!!i!ii! i!
suite
Culssondenslefour
Lorsquele courant 6lectrique arriveou apr6s une interruption de
courant,la derni6re heure avant I'interruptionde courant va
clignoter.
PourrappelerI'heuredujour Iorsqu'uneautre fonction de durc!e
s'affiche,appuyersur la touche Clock (Horloge).
L'heure de rhorloge ne pout 6tre chang6eIorsquele four a _t6
programm6pour une cuisson ou un nettoyagediffc!rc!ou pour la
fonction de cuissonet maintien.
Annulation de I'affichage de I'heure :
Si I'onne d_sirepas raffichage de rheure du jour :
Appuyer sur lostouchesCancel (Annule0 et
Clock et los maintenirainsi pendanttrois
secondes.L'heuredu jour disparait de
I'afficheur.
Lorsqueraffichage de rheure est annul6,
appuyersur la touche Clock pour afficher
bri6vementI'heuredu jour.
R_aflichage de I'heure :
Appuyer sur lestouchesCancel et Clocket los maintenirainsi
pendanttrois secondes.L'heure du jour rc!apparaita rafficheur.
Nlinuterie
La minuteriepeut 6tre programm6ede une minute [0:01)jusqu'_
99 heureset 59 minutes[99:59).
La minuterie pout 6tre utilis6e ind6pendammentde toute autre
activit6du four. Ellepout 6tre aussi programm6ealors qu'une autre
fonction du four est en cours d'utilisation.
La minuterienecommandepas le four. Elle ne sert qu'_ c!mettre
des hips.
Program[nation de la minuterie :
1. Appuyer sur la touche Timer (Minuterie).
• 0:00s'allume a rafficheur.
• Losdeux points clignotent.
2. Appuyer sur la touche ,i, ou T jusqu'_ ce que
I'heurejuste paraissea I'afficheur.
• Lesdeux points continuent _ clignoter.
3. Appuyer _ nouveausur la touche Timer ou attendrequatre
secondes.
.........2"¸/"¸ i i "
• Lesdeux points continuent _ clignoter et le d6comptede la
dur6ecommence.
• Laderni_reminutedu dc!comptesera affich6esous forme de
secondes.
4. A la fin de la durc!eprogrammc!e,un hip long retentit.
Annulation de la minuterie :
1. Appuyersur la touche Timer et ]a maintenir ainsi pendanttrois
secondes.
OU
2. Appuyersur la touche Timer et rc!glerI'heurea 0:00.
Verrouillage des commandos
et de la porte du four
La porte du four et les touchespeuvent 6treverrouill6es pour des
raisonsde s6curit6, nettoyageou pour emp6chertoute utilisation
non souhait_!e.Ellesne pourront 6tre utilis6essi ellessent
verrouill6es.
Sile four esten cours d'utilisation, les commandeset la porte ne
peuvent6tre verrouillc!es.
L'heure actuelledu jour resteraa rafficheur Iorsquelos commandes
serontverrouillc!es.
Verrouillage :
Appuyersur lostouchesCancel et Cook &
Hold (Cuissonet maintien] et los maintenir
ainsi pendanttrois secondes.(Appuyer
d'abord sur la toucheCancel.)
• Le mot LOCK(Verrouillage)
clignote _ I'afficheur.
D_verrouillage :
Appuyersur lostouchesCancel et Cook & Hold et los maintenir
ainsi pendanttrois secondes.(Appuyerd'abord sur la touche
Cancel.)
• Le mot LOCKdisparaitde I'afficheur.
Codes d'anomalie
LesrootsBAKE(Cuissoncourante] ou LOCKpeuventclignoter
rapidement_ I'afficheurpour pr6veniren cas d'erreur ou de
probl6me.Sitel estle cas,appuyersur la touche Cancel. Si los roots
BAKEou LOCKcontinuent _ clignoter,d6brancherrappareil.
Attendrequelquesminutes,puis rebrancherI'appareil.Si run des
rootscontinuea clignoter,d6brancherI'appareilet prendre contact
avecun r6parateurautoris6.
33
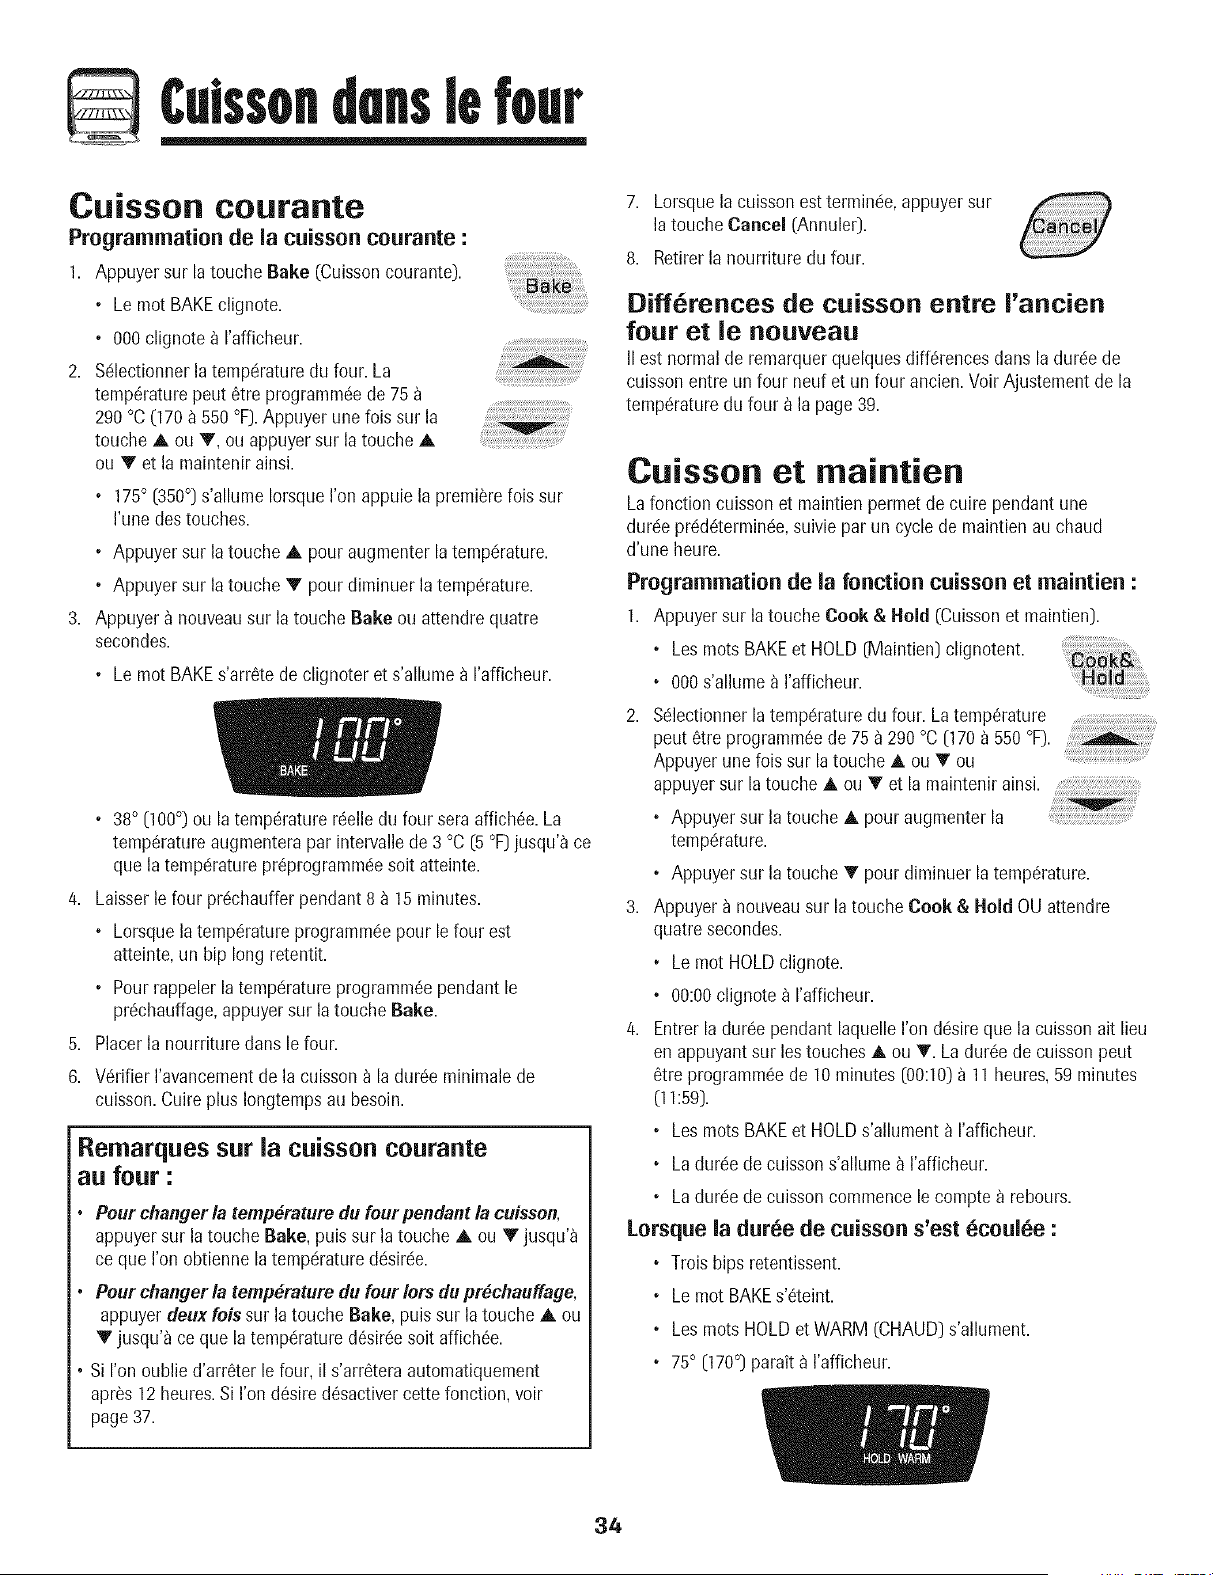
Culssondenslefour
Cuisson courante
Programmation de la cuisson courante :
1. Appuyer sur la touche Bake (Cuissoncourante).
Lemot BAKEclignote.
000clignote _ rafficheur.
2. S61ectionnerla ternp_raturedu four. La
temp6raturepeut _tre programmc!ede 75
290°C (170_ 550 °F].Appuyer unelois sur la
touche A ou V, ou appuyersur la touche A
ou Yet la rnaintenirainsi.
_iiiili!ii_ii!i,i!i!ii_j_!i__'_
175° (350°] s'allume Iorsque I'onappuie la premierefois sur
I'unedes touches.
• Appuyer sur la toucheA pour augmenter la tempc!rature.
• Appuyer sur la toucheV pour dirninuer la tempc!rature.
3. Appuyer _ nouveausur la touche Bake ou attendrequatre
secondes.
• Lemot BAKEs'arr6tede clignoter et s'allurnea rafficheur.
38° (100°) ou la temperaturer6elle du four sera affich6e.La
temp6ratureaugrnenterapar intervallede 3 °C (5 °F]jusqu'a ce
que la tempc!raturepr6prograrnrnc!esoit atteinte.
/4. Laisserlefour pr6chaufferpendant 8 _ 15 minutes.
• Lorsquela ternp6ratureprograrnrn6epour lefour est
atteinte,un bip long retentit.
• Pourrappelerla ternpc!ratureprograrnrn6ependant le
pr6chauffage,appuyersur la touche Bake.
5. Placerla nourriture dans le four.
6. V6rifier I'avancementde la cuissona la durc!erninirnalede
cuisson.Cuire plus Iongtempsau besoin.
Remarques sur la cuisson courante
aL! |our :
Pour changerla temperaturedu four pendant la cuisson,
appuyersur la touche Bake, puis sur la touche A ou V jusqu'a
ceque I'onobtienne latempdratureddsirde.
Pour changer la temperature du four lots dupr_chauffage,
appuyerdeux lois sur la touche Bake, puis sur la touche A ou
V jusqu'a ce que la tempc!ratured_sir_!esoit affich_e.
Si I'onoublie d'arr_ter lefour, il s'arr_teraautomatiquement
apr_s 12 heures.Si I'on d_sired_sactivercette fonction, voir
page37.
7. Lorsquelacuissonesttermin6e,appuyersur
la touche Cancel (Annuler].
8. Rotiferla nourriture du four.
Differences de cuisson entre I'ancien
four et le nouveau
IIest norrnal de rernarquerquelquesdifferencesdans ladur_!ede
cuissonentre un four neuf et un four ancien. Voir Ajusternentde la
ternp_!raturedu four _ la page39.
Cuisson et maintien
Lafonction cuisson et rnaintienperrnetde cuire pendantune
dur_!epr_d6terrnin_!e,suivie par un cycle de rnaintienau chaud
d'une heure.
Programmation de la fonction cuisson et maintien :
1. Appuyersur la touche Cook & Hold (Cuissonet rnaintien).
• LosrnotsBAKEet HOLD(Maintien] clignotent.
• 000s'allurnea I'afficheur.
2. %lectionner la ternp_!raturedu four. Laternp_rature ........................................................
pout 8tre prograrnrn_ede 75 _ 290 °C (170a 550°F).
Appuyer une lois sur la touche A ou • ou
appuyersur la touche A ou _ et la rnaintenirainsi.
• Appuyersur la touche A pour augmenter la
temp_!rature.
• Appuyersur la touche T pour dirninuer la ternp_rature.
3. Appuyer a nouveausur la touche Cook & Hold OU attendre
quatre secondes.
, Lemot HOLDclignote.
• 00:00clignote a rafficheur.
/4. Entrerla dur_e pendant laquelleI'on d_!sireque la cuissonait lieu
en appuyantsur lostouches A ou T. La dur_e de cuissonpout
_tre prograrnrn_ede 10 minutes (00:10)a 11heures,59minutes
0 _:59).
• LesrnotsBAKEet HOLDs'allurnent a rafficheur.
• La dur_!ede cuissons'allurne_ I'afficheur.
• La dur_!ede cuissoncommencele cornptea rebours.
Lorsque la dur_e de cuisson s'est _coul_e :
• Troiships retentissent.
Lemot BAKEs'_teint.
Losrnots HOLDet WARM (CHAUD]s'allurnent.
• 75° (170°] parait _ I'afficheur.
34
¢ulssondenslefour
Apr_s une heare de MAINTIEN AU CHAUD :
• Lemot End(Fin]s'affiche.
• L'heuredu jour r6apparaita I'afficheur.
Annalation de la fonction caisson et [naintien
tout [no[nent :
Appuyer aur la touche Cancel (Annulet). Retirerla
nourriture du four.
Caisson et maintien differee
Avec la fonction diff6r_e,le four se met _ cuire plus tard dans la
journ6e. Programmerla dur6e d'attented6sir_eavant que le four
nese mottoen marcheet ladurc!ede cuisson d_sir6e.Le four
commence_ chauffera I'heuresc!lectionn6eet cult pour la durc!e
sp6cifi6e.
Ladur6ed'attente peut 6tre programm6ede 10minutes (00:10)
11heures,59 minutes (11:59).
Program[nation d'an cycle de caisson
et [naintien diff6r_e :
1. Appuyer sur la touche Delay [Diff6r6).
• Lemot DELAYclignote.
• 00:00clignote_ I'afficheur.
2. Appuyer sur la touche A ou T pour
programmerla dur_e d'attente.
Alors que le mot DELAYclignote toujours •
3. Appuyer sur la touche Cool{ & Hold [Cuisson
et maintien). ......
• 000s'allume a I'afficheur.
• Lesroots BAKE(Cuissoncourante)
et HOLD(Maintien)clignotent.
4. Appuyer sur A puur prugrammer la temp_rature de cuissun.
• 00:00et le mot HOLDclignotent.
• Lemot BAKEresteallure&
5. Appuyer sur A pour programmer la dur#e de caisson.
• Ladur6ed'attente, learootsDELAY,BAKEet HOLDs'allument
I'afficheur.
Lorsqae la dar6e d'attente s'est 6coulee :
• Le mot DELAYs'6teint.
• La dur6ede cuissonestaffich6e.
• LesrootsBAKEet HOLDsont affich_s.
Pour programmer an temps d'attente Iorsqae la
fonction caisson et [naintien a d_j_ _t_
progra[n[nee :
1. Appuyersur la touche Delay.
• Le mot DELAYclignote.
• 00:00parait _ I'afficheur.
2. Appuyersur la touche A ou _' pour programmer
la dur_e d'attente.
• Apr_s quatre secondes,le mot DELAYreste
allumc!pour rappeler qu'un cycle de cuisson
diffc!rc!ea 6t6 programm&
Lorsque la clarke d'attente s'est _coal6e et qae
le four se [net en [narche :
• La dur_ede cuissonet latemperatureseraaffich6e.
• Le mot DELAYs'6teint.
•Les roots BAKEet HOLDresteallure&
Annulation :
Appuyersur la touche Cancel.
• Touteslea fonctions de cuissonminutc!eet non
minut6eserontannulc!es.
• L'heuredu jour r6apparait_ I'afficheur.
iili_iii;iiiiii!iiliii_!_!!i!:!!!i;iii:;ii:;ii:¸!;!;!;:;;;i[;!
Remarques :
Ne pusutiliser la cuissonet maintien diff_rc!ediffc!rc!epour
des articles qui n(!cessitentque le four soit pr6chauff_,
comme lesg_teaux,lespetits biscuits et les pains.
Ne pusutiliser le cyclede cuissonet maintien diff_r_ssile
four estd_ja chaud.
35
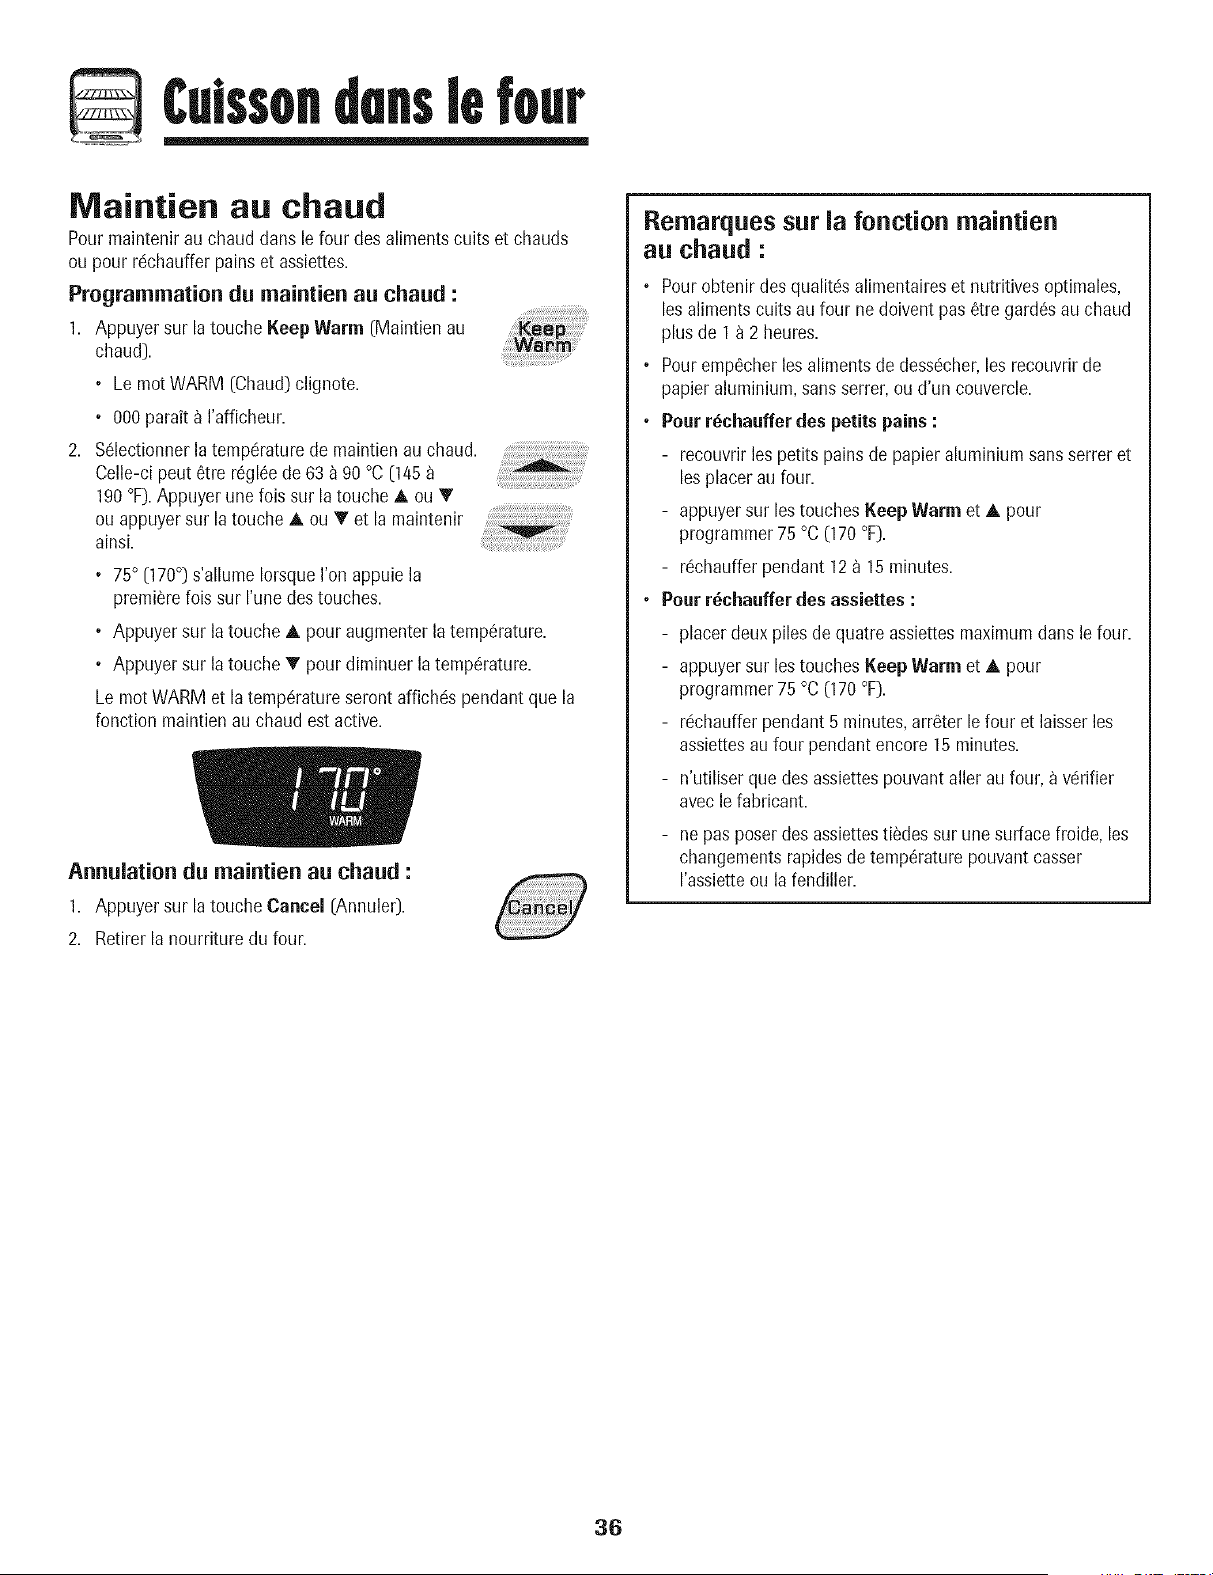
Culssondenslefour
Nlaintien au chaud
Pourmaintenirauchaud dans le four desalimentscults et chauds
ou pour rdchaufferpains et assiettes.
Programmation du maintien au chaud :
1. Appuyer sur la touche Keep Warm (Maintien au
chaud)....
• LemotWARM (Chaud)clignote.
• 000parait _ I'afficheur.
2. S_lectionnerla temperaturede maintien au chaud. .....................................................
Celle-cipeut 6tre r6gl6ede63 _ 90 °C (145
190°F).Appuyerune lois sur la toucheA ou T
ou appuyersur la touche A ou Yet la maintenir
ainsi.
• 75° (170°) s'allume IorsqueI'on appuie la
premierefois sur I'unedestouches.
• Appuyer sur la toucheA pour augmenterlatemp6rature.
• Appuyer sur la toucheT pour diminuer latemp6rature.
Lemot WARMet la temp@atureserontaffichdspendant que la
fonction maintienauchaud est active.
Annulation du maintien au chaud :
1. Appuyer sur la touche Cancel (Annuler).
2. Retirerla nourriture du four.
Rernarques sur la fonction maintien
au chaud :
• Pourobtenir des qualit6salimentaireset nutritivesoptimales,
lesalimentscults au four ne doivent pas 6tre gard6sau chaud
plus de I a 2 heures.
• Pouremp6cherlesalimentsde dess6cher,les recouvrir de
papier aluminium,sans serrer,ou d'un couvercle.
• Pour r_chauffer des petits pains :
- recouvrirles petits pains de papier aluminium sansserrer et
lesplacer au four.
- appuyersur lestouches Keep Warm et A pour
programmer75 °C (170°F).
- r6chaufferpendant 12_ 15 minutes.
• Pour r_chauffer des assiettes :
- placer deux piles de quatre assiettesmaximumdans le four.
- appuyersur lestouches Keep Warm et A pour
programmer75 °C (170°F).
- rdchaufferpendant5 minutes,arr6ter le four et laisser les
assiettesau four pendantencore 15 minutes.
- n'utiliser quedes assiettespouvantafteraufour, a vdrifier
avecle fabricant.
- ne pas poserdes assiettestildes sur une surfacefroide, les
changementsrapidesde temp@aturepouvantcasser
I'assietteou lafendiller.
36
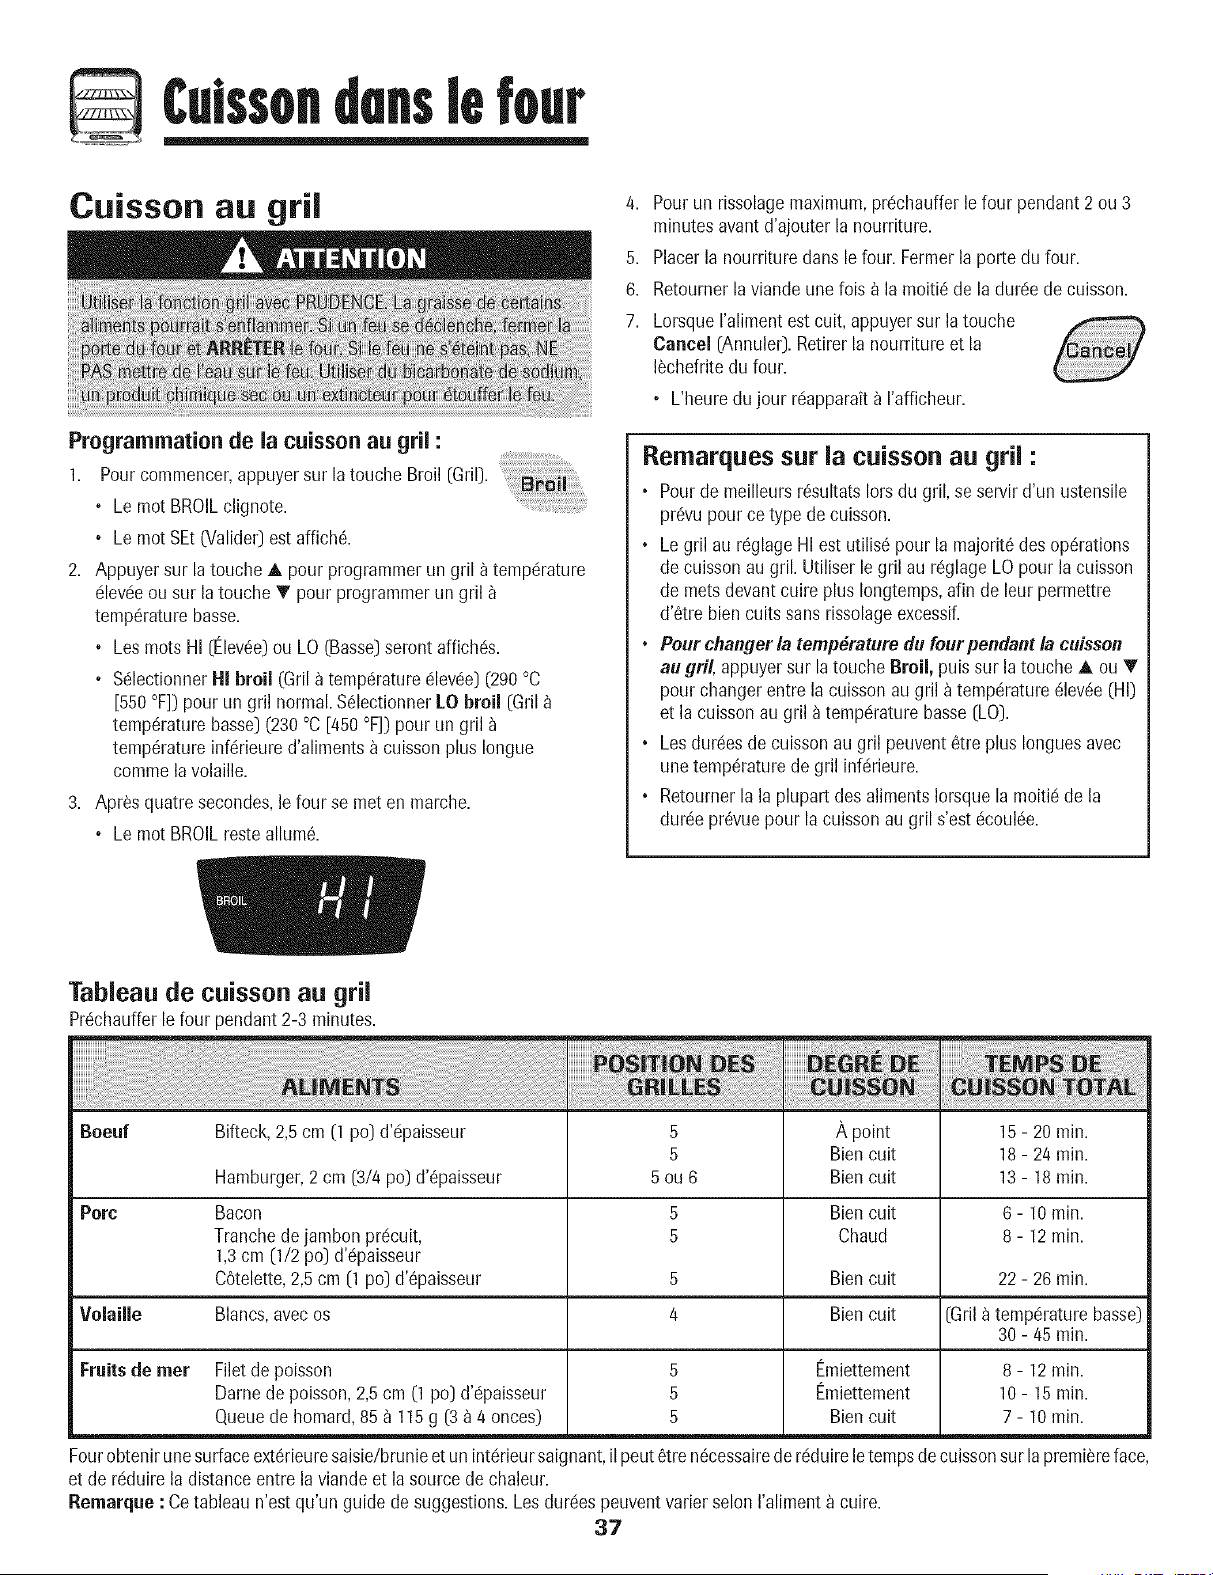
Culssondenslefour
Cuisson au gril
Programmation de la cuisson au gril :
4. Pour un rissolagemaximum,pr6chaufferle four pendant 2 ou 3
minutes avant d'ajouterla nourriture.
5. Placerla nourriture clansle four. Fermerla porte du four.
6. Retournerla viandeune fois _ la moiti6 de la durc!ede cuisson.
7. Lorsque I'alimentest cult, appuyersur la touche
Cancel (Annulet).Retirerla nourritureet la
I_chefritedu four.
• L'heure dujour rc!apparaita I'afficheur.
_i:i;iiii_i!ii!il;ii;i!!!!i!!_!i!iiiiiiiiiiii¸;i:_i_:_i;;ii_!!ii_
1. Pourcommencer,appuyersur la touche Broil (Gril).
• Lemot BROILclignote.
• Lemot SEt(Valide0 est affich&
2. Appuyer sur la touche A pour programmerun gril a temp@ature
c!levc!eou sur la toucheT pour programmerun gril
temp@aturebasse.
• Lesmots HI (Elev6e)ou LO (Basse]seront affichc!s.
• Sc!lectionnerI-!1broil (Gril a temp@ature_levc!e](290 °C
[550°F]) pour un gril normal.S61ectionnerLO broil (Gril
temp@aturebasse) (230°C [450°F]) pour un gril
temp6ratureinfc!rieured'alimentsa cuissonplus Iongue
comme lavolaille.
3. Apr_s quatre secondes,le four se met en marche.
• Lemot BROILresteallum&
Tableau de cuisson au gril
Prc!chaufferlefour pendant 2-3 minutes.
Remarques sur la cuisson au gril :
, Pourde meilleursr6sultats Iorsdu gril, se servir d'un ustensile
pr6vupour ce type de cuisson.
° Le gril au r6glageHI est utilis6 pour la majorit6des op6rations
decuissonau gril. Utiliser le gril au r6glage LO pour la cuisson
de metsdevant cuire plus Iongtemps,afin de leur permettre
d'6tre biencults sansrissolageexcessif.
• Pourchanger/atempdraturedufourpendantlacuisson
augril, appuyersur la touche Broil, puis sur la touche A ou T
pourchanger entre la cuissonau gril a temp6rature61ev6e(HI)
et la cuissonau gril a tempc!raturebasse (LO).
° Lesdur_esde cuissonau gril peuvent6tre plus Ionguesavec
unetemp6raturede gril inf@ieure.
, Retournerla la plupart des alimentsIorsquela moitic!de la
durc!epr@uepour la cuissonau gril s'estc!couk!e.
Boeul Bifteck,2,5 cm (1 po) d'@aisseur 5 A point 15- 20 min.
5 Biencult 18 - 24 rain.
Hamburger,2 cm (3/4 po) d'@aisseur 5 ou 6 Biencult 13 - 18 min.
Pore Bacon 5 Biencult 6 - 10rain.
Tranchedejambon prc!cuit, 5 Chaud 8 - 12rain.
1,3cm (1/2 po) d'@aisseur
C6telette,2,5cm (1 po) d'@aisseur 5 Biencult
Volaille Blancs,avecos 4 basse)
Fruitsde met
Filetde poisson
Dame de poisson,2,5cm (1 po) d'@aisseur
Queuede homard, 85 _ 115g (3 _ 4 onces)
5
5
5
Bien cult
Emiettement
Emiettement
Bien cult
22- 26 min.
[Gril a temp6rature
30- 45 min.
8 - 12min.
10- 15rain.
7 - 10min.
Fourobtenirune surfaceext6rieuresaisie/brunieet un int6rieursaignant,il peut6tre n6cessairede rc!duirele tempsde cuissonsur la premiereface,
et de rc!duirela distanceentre laviande et lasourcede chaleur.
Remarque : Cetableau n'est qu'un guide de suggestions.Les dur_!espeuventvarier selon I'alimenta cuire.
37
Culssondenslefour
Arr t automatique/
Mode sabbat
Lefour s'arr6teautomatiquementapr_s 12 heuress'il a dtd
accidentellementlaiss6en marche.Cettecaract6ristiquede s6curit6
pout 6tre arr6t6e.
Pour annulet I'arr_t 12 heures et faire fonctionner le
four en continu pendant 72 heures :
1. Programmerle four pour une cuissoncourante[voir page34].
2. Appuyer sur la touche Clock (Horioge)et la
maintenirainsi pendant 5 secondes.
• SAbsera affich6 et clignotera pendant 5 secondes.
• SAbsera ensuiteaffichd en continujusqu') ce qu'on I'arr6teou
jusqu'a ce que la durde limite de 72 heuressoit atteinte.
• Lemot BAKE(Cuissoncourante)seraaussi affich_ si un
cycle de cuissoncourante est en cours alors que le four est en
modesabbat.
• LaCUISSONAUFOURestla seulefonctionqui est
op4rationnelleenmode sabbat.Touteslos autresfonctions
(Minuterie,Maintienau chaud,Nettoyage,etc.) sont verrouill4es
pendantle mode sabbaL
Annulation de la cuisson courante alors que le four
est en mode sabbat :
Appuyer sur la touche Cancel (Annule0.
• Lemot BAKEs'dteint_ I'afficheur.
• Aucun hip sonorene retentit.
Annulation du mode sabbat :
1. Appuyer sur la touche Clock pendant5 secondes.
OU
2. Apr_s 72 heures,le modesabbatse termine.
• SAbclignote pendant5 secondes.
• L'heuredu jour revienta I'afficheur.
Remarques sur le mode sabbat :
• Le modesabbat pout 6tre mis en marchea tout moment,clue
lefour soit en marche ou non.
• Le modesabbat ne pout pas 6tre mis en marche si lea
commandossont verrouill6esou la porte verrouill6e.
• Sile four eaten mode cuissonIorsquele mode sabbat est
programm&le mot BAKEs'6teint _ la fin du cyclede cuisson.II
n'y auraaucun signal sonoreaudible.
• Si1'6clairagedu four est souhait6pendantle mode sabbat,la
lampedevra 6treallum6eavant que le mode sabbat ne ddbute.
• Lorsquele modesabbat a d6marr& aucun bip de prdchauffage
ne retentit.
• Tousles messageset les hipssont ddsactiv_sIorsquele mode
sabbatest actif.
• Leverrouillageautomatiquede la porte ne fonctionne pas
pendant le mode sabbat.
• SiI'on appuiesur latouche Cancel,un cyclede cuisson
couranteaufour seraannul& Cependant,le programmateur
resteraen modesabbat.
• Apr_sune panne de courant,le four revient en modesabbat
avec72 heuresrestanteset aucuncycle actif.
38
Culssondenslefour
Ajustement de la temperature
du four
La pr6cisiondes tempc!raturesdu four a 6t6 soigneusementvc!rific!e
I'usine.II est normalde remarquerquelquesdiff6rencesdans la
cuissonentre un four neuf et un four ancien. Au fur et a mesureque
les cuisiniSressont moins neuves,la temp6raturedu four peut varier.
II est possibled'ajuster la temp(!raturedu four si I'on penseque le
four necuit pasou ne rissole pascorrectement.Pour d_ciderde
I'ajustementa apporter,r6gler le four _ une temp6raturede 15 °C
(25°F)plus c!lev(!eou plus basseque la temp6ratureindiqu6edans
la recette,puis faire cuire la pr@aration.Lesr6sultatsdu_test _de
cuissondoivent donner une idle du nombrede degrc!sduquel la
temp6raturedolt 6tre ajustc!e.
Ajustement de la temperature du four :
I. AppuyersurlatoucheBake (Cuissoncourante}.
2. Entrer285 °C (550°F}en appuyant sur la touche A.
3. Appuyer sur la touche Bake et la maintenirainsi
pendantplusieurssecondesou jusqu'a ce que 0°
paraisse_ I'afficheur.
Si la temperaturedu four a _t6 prc!cc!demmentajust6e,le
changementseraaffich& Par exemple,si la tempc!raturedu four
a €!t6rc!duitede 8 °C (15°F),I'afficheurindiquera -8° (-15°).
4. Appuyer sur la touche A ou T pour ajuster la tempc!rature.
A chaquefois que I'onappuie sur une touche, la temp(_rature
change de 3 °C (5 °F).Latemp(!raturedu four peut 6tre
augment6eou diminuc!ede 3 _ 20 °C[5 _ 35°F).
5. L'heuredu jour r6apparaitautomatiquement_ I'afficheur.
II n'estpas n6cessairede r6ajusterla tempc!raturedu four en cas
de panne ou d'interruption de courant. Lestempc!raturesde
cuissonau gril et de nettoyagene peuvent6tre ajust6es.
Changement de la
temperature °F/°C
1. Le rc!glagepar ddaut de I'usinepour la tempc!ratureesten
Fahrenheit.
2. Pour modifierce r6glage,appuyersur lestouches Cancel et
Bake simultanc!mentet maintener-lesenfoncc!espendanttrois
secondes.
3. Un bip retentit et le r6glagecourant (°Fou °C)parait _ I'afficheur.
(Sivous ne faites pas de changement,la cuisini6reretourneau
r_glageexistantapr_s30 secondes.)
4. Pour modifier le r_glage,appuyersur la touch(! A ou T.
Appuyer a nouveausur la touche pour retournerau r_glage
existant.Attender cinq secondeset le r_!glagesera_!ffectu&
39
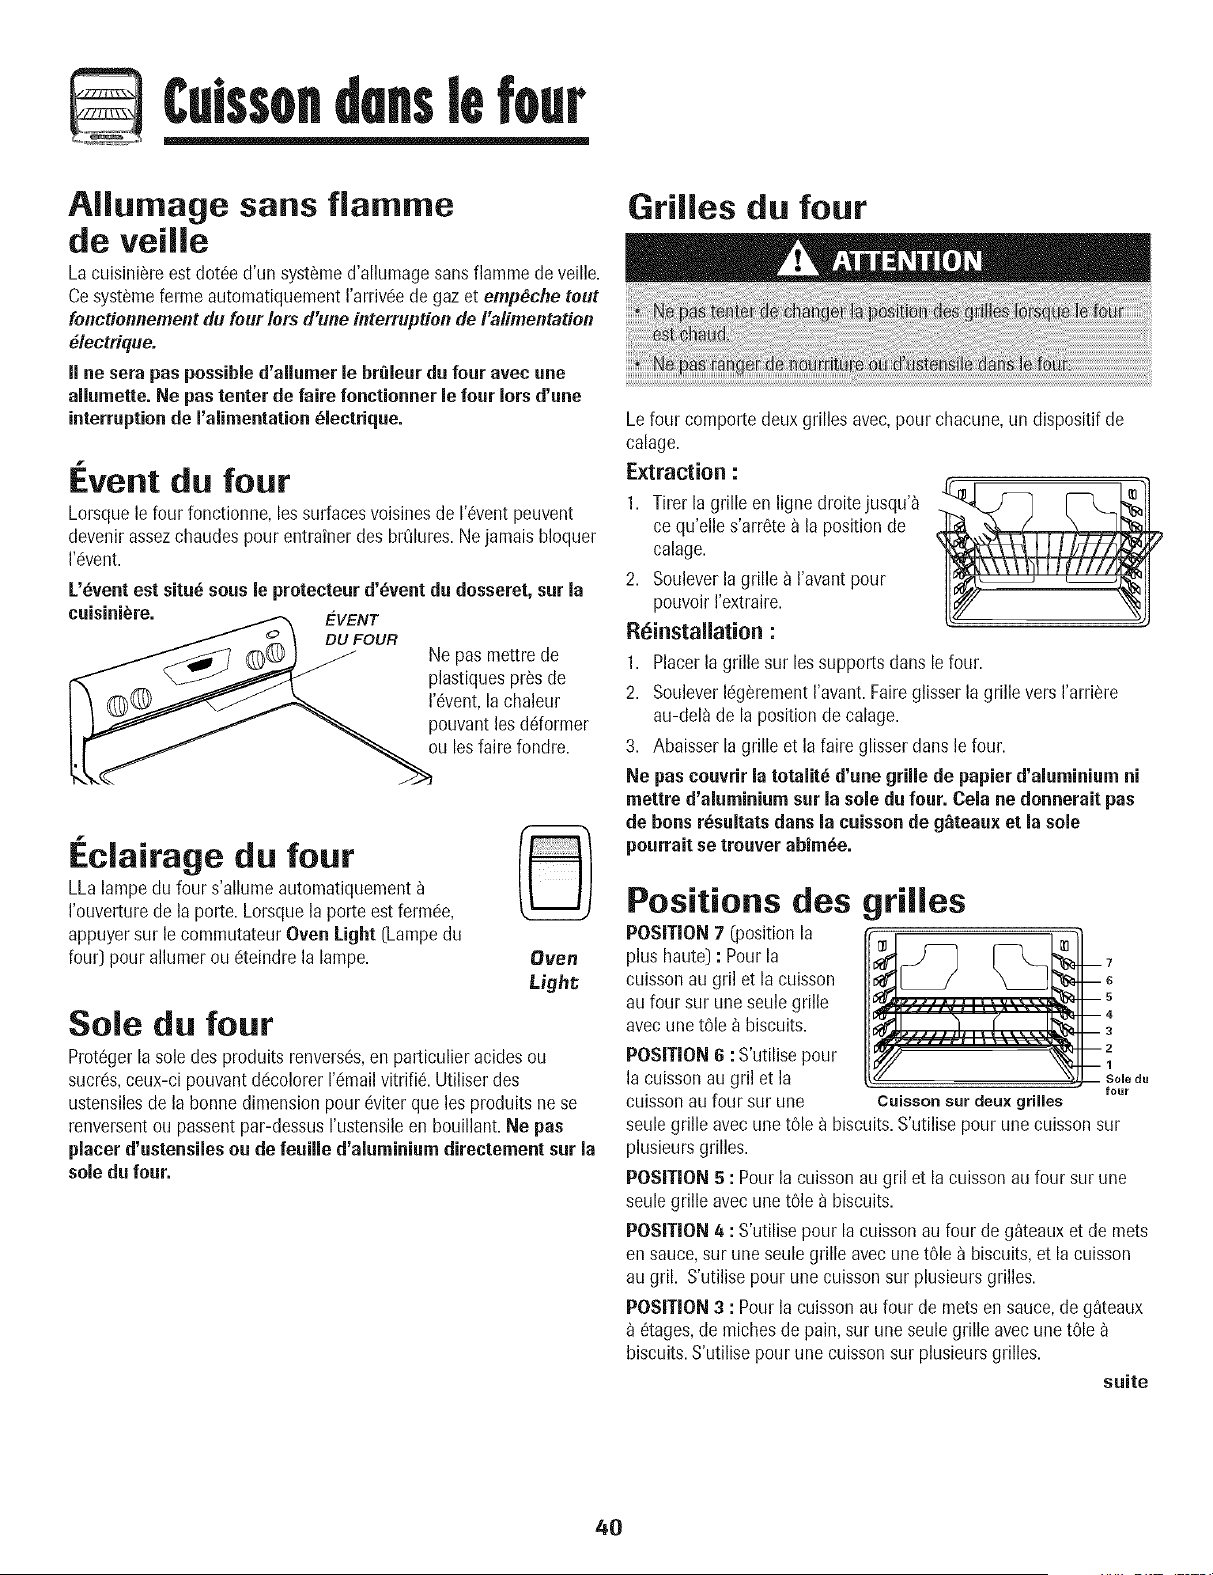
Culssondenslefour
Allumage sans flamme
de veille
Lacuisini_reestdot_e d'un syst_med'allumagesansflamme de veille.
Cesyst_meferme automatiquementI'arrivdede gaz et emp#che tout
fonctionnementdu four/ors d'une interruptionde I'alimentation
#lectrique.
II ne sera puspossibled'allumer le brQleur du four avec une
allumette. Ne pustenter de faire fonctJonner le four Iors d'une
interruptionde J'aJimentatJon_Jectrique.
f
Event du four
Lorsquele four fonctionne, les surfacesvoisinesde 1'6ventpeuvent
devenirassezchaudes pour entrainer des brQlures.Ne jamais bloquer
I'c!vent.
L'_ventest situ_ seas le protecteur d'_vent du dosseret,sur la
cuisini_re. _ EVENT
_._ \ DU FOUR
__ @(_ _ Ne pus mettre de
_ __ plastiquesprosde
I _@___ revent, lachaleur
I _ _ _ pouvantles ddormer
Ecla=rage du four
LLalampe du four s'allume automatiquement
I'ouverturede la porte. Lorsquela porte est ferm(_e,
appuyersur le commutateurOven Light [Lampe du
four} pourallumer ou dteindrela lampe. Oven
Light
Sole du four
Prot6ger la sole des produits renvers6s, en particulier acides ou
sucrds, ceux-ci pouvant ddcolorer rdmail vitrifi_. Utiliser des
ustensiles de la bonne dimension pour dviter que les produits ne se
renversent ou passent par-dessus I'ustensile en bouillant. Ne pus
placer d'ustensiles ou de feuiiie d'aiuminium directernent sur la
sole du four.
Grilles du four
Le four comporte deux grilles avec, pour chacune, un dispositif de
calage.
Extraction :
1. Tirer la grille en ligne droitejusqu'_
ce qu'elle s'arr6te a la positionde
calage.
2. Souleverla grille _ I'avantpour
pouvoir I'extraire.
R_installation :
1. Placerla grille sur les supportsduns le four.
2. SouleverIdg_rementI'avant.Faireglisser la grille vers I'arri_re
au-delade la positionde calage.
3. Abaisser la grille et la faire glisser dartsle four.
Ne puscouvrir la totalitd d'une grille de papier d'aiuminium ni
mettre d'aluminiumsur la sole du four. Cela ne donneraitpus
de hens r_sultats dunsla caisson de g_teau× et la sole
pourraitse trouver abim_e.
Positions des grilles
omo oton i
plus haute} : Pour la
cuisson au gril et la cuisson
aufour sur uneseulegrille
avec une t6le _ biscuits. _ _i
POSITION6 :S'utilisepour
la cuissonau gril et la so_od,
four
cuissonau four sur une Cuisson sur deuxgrilles
seulegrille avec une tOlea biscuits.S'utilise pour une cuisson sur
plusieursgrilles.
POSITION5 : Pour la cuissonau gril et la cuissonau four sur une
seulegrille avec une t61ea biscuits.
POSITION4 : S'utilisepour lacuissonau four de g_teauxet de mets
ensauce,sur une seulegrille avec une t61ea biscuits,et lacuisson
augril. S'utilise pour unecuissonsur plusieursgrilles.
POSITION3 : Pourla cuissonau four de metsen sauce,de g_teaux
6tages,de michesde pain,sur une seule grille avecune t61e
biscuits.S'utilise pour une cuissonsur plusieursgrilles.
suite
4O
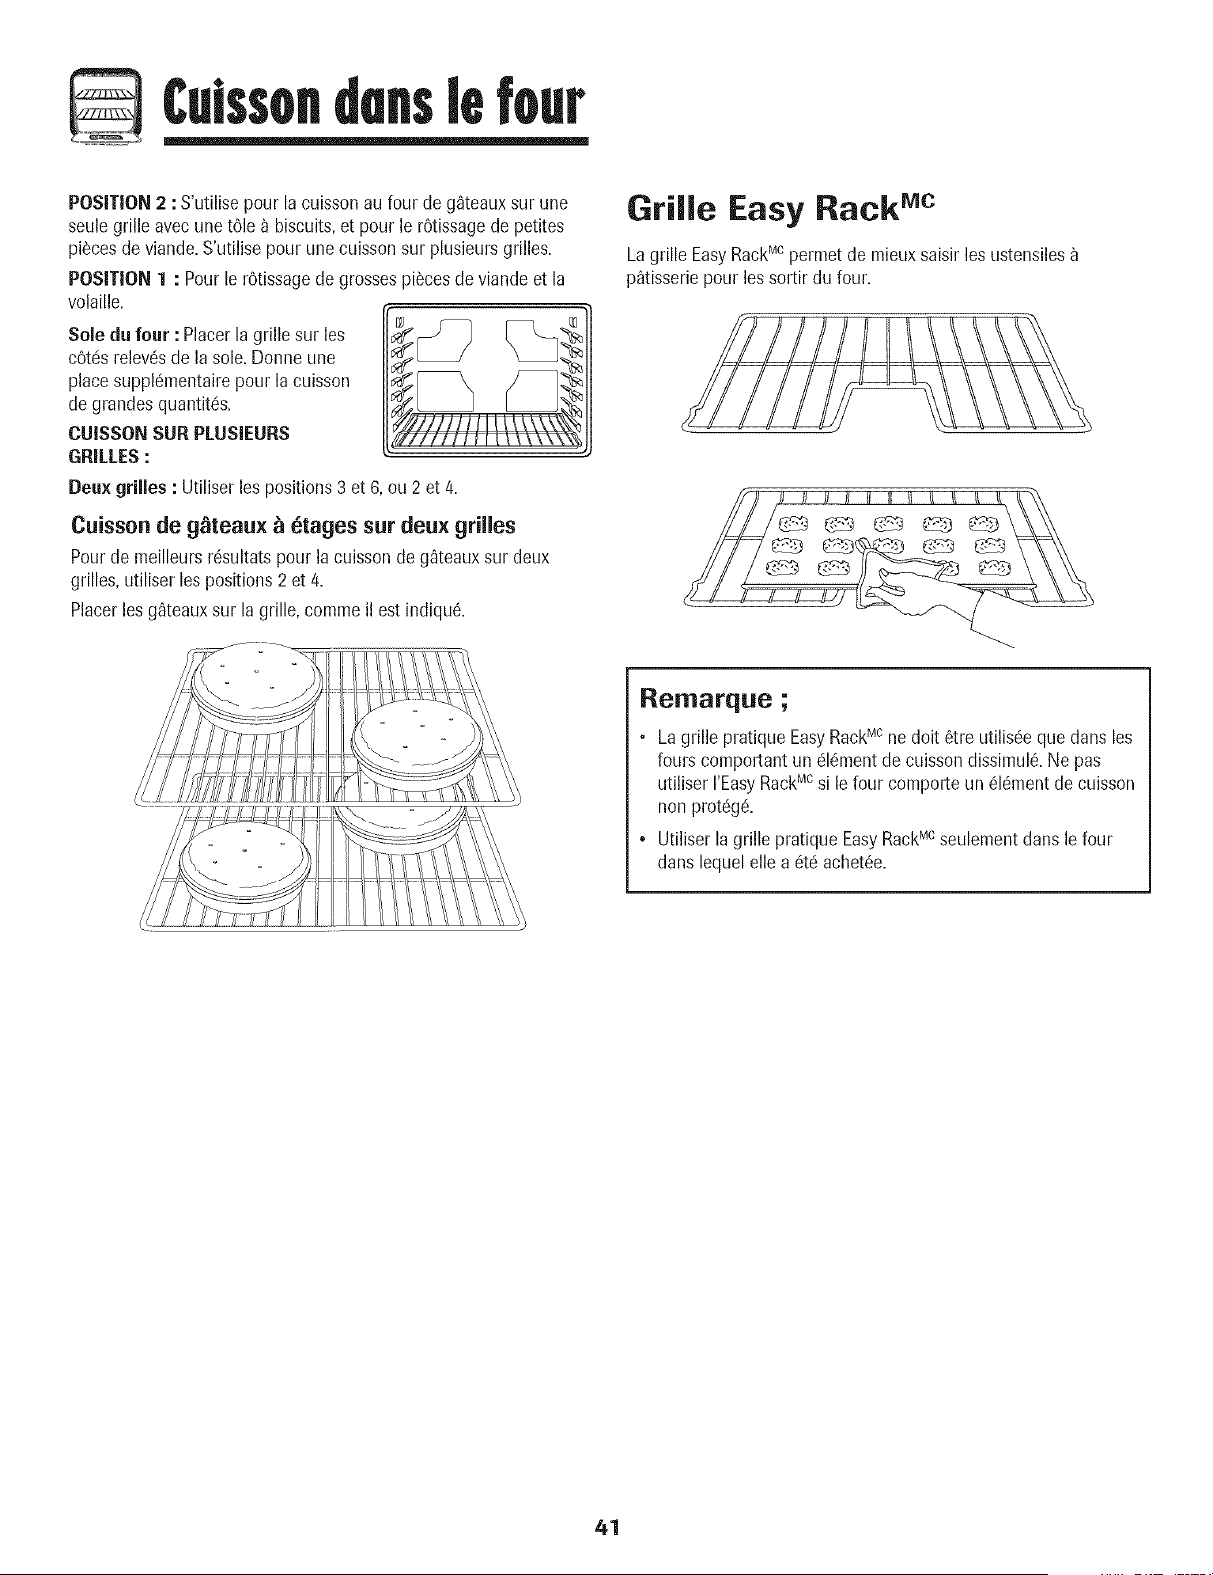
Culssondenslefour
POSITION2 :S'utilise pour lacuisson aufour de g_teauxsur une
seulegrille avec une tOle_ biscuits,et pour le r6tissagede petites
pi_cesdeviande.S'utilise pour unecuissonsur plusieursgrilles.
POSITION1 : Pourle rOtissagede grossespi6cesde viandeet la
volaille.
Sole du four : Placerla grille sur los
cOt6srelev6sde la sole. Donneune
placesuppl_mentairepour la cuisson
de grandesquantit6s.
CUISSONSLIRPLUSIEURS
GRILLES:
Deux grilles : Utiliserles positions3 et 6, ou 2 et 4.
Cuisson de g_teau× _ 6rages sur deux grilles
Pourde meilleursr6sultats pour la cuissonde g_teaux sur deux
grilles,utiliser lespositions 2 et 4.
Placerlos g_teauxsur la grille, commeil est indiqu6.
Grille Easy Rack Mc
Lagrille EasyRackMcperrnetde mieux saisir los ustensiles
p_tisseriepour los sortir du four.
Remarque ;
. Lagrille pratique EasyRackMcne dolt 6tre utilis6e que dans los
fours comportant un c!16mentde cuissondissimul& Ne pas
utiliser I'EasyRackMcsile four comporteun 616mentdecuisson
nonprotc!g6.
* Utiliserla grille pratique EasyRackMcseulernentdartslefour
dans lequel elle a 6t6 achet6e.
41
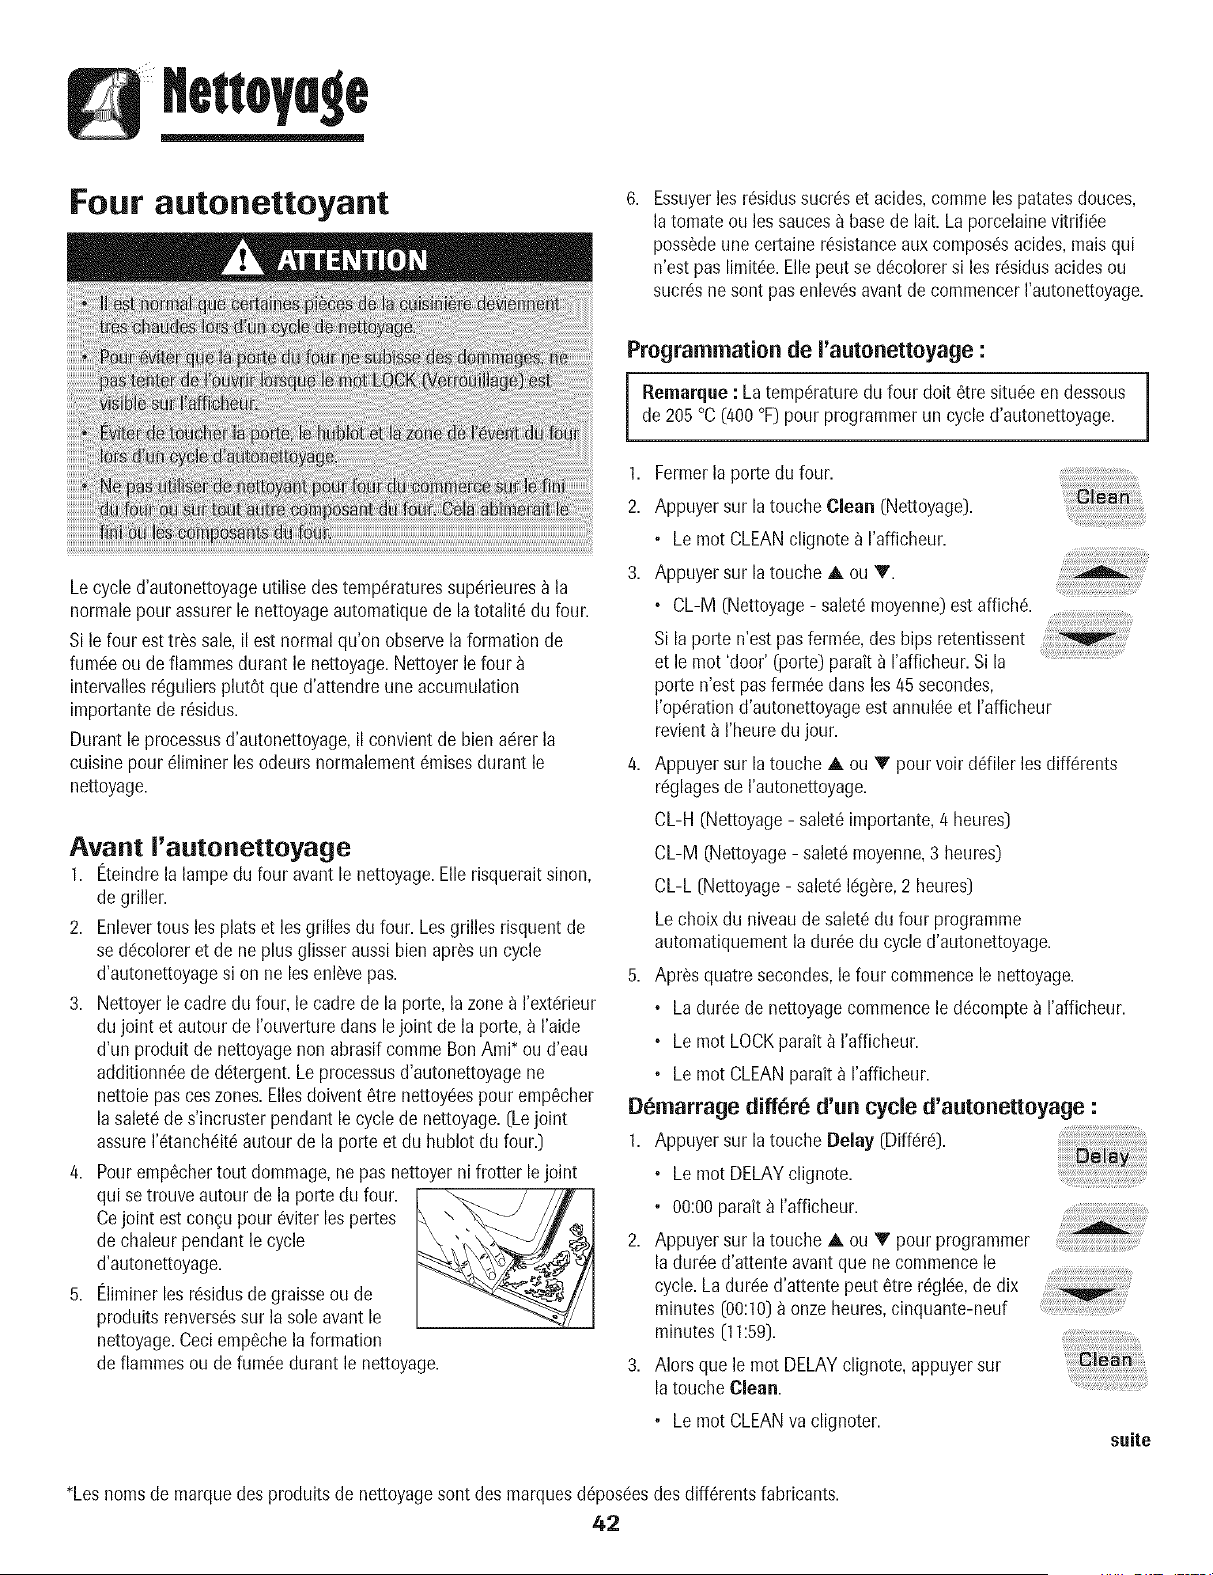
Four autonettoyant
Essuyerles r6sidussucr6set acides,comme lespatatesdouces,
la tomate ou les sauces_ basede lait. La porcelainevitrific!e
poss_deune certaine r6sistanceaux compos_sacides,mais qui
n'est pas limit6e.Ellepeut se d6colorersi les rdsidus acidesou
sucrc!sne sont pasenlevdsavant de commencerI'autonettoyage.
Lecycle d'autonettoyageutilisedes temperaturessupdrieures_ la
normalepour assurerle nettoyageautomatiquede la totalit6 du four.
Si le four eattr_s sale, il est normal qu'on observela formation de
fumde ou de flammes durant le nettoyage.Nettoyerle four
intervallesr6guliersphtOt que d'attendre une accumulation
importantede r6sidus.
Durantle processusd'autonettoyage,il convientde bien adrerla
cuisinepour 61iminerles odeurs normalement6misesdurant le
nettoyage.
Avant I'autonettoyage
1. Eteindrela lampedu four avant le nettoyage.Erierisqueraitsinon,
de griller.
2. Enlevertous les plats et lesgrilles du four. Les grilles risquent de
se ti!!coloreret de ne plus glisser aussi bien apr_sun cycle
d'autonettoyagesi on ne lesenl_vepus.
3. Nettoyer le cadredu four, le cadre de la porte,la zone a I'extdrieur
du joint et autour de I'ouvertureclanslejoint de la porte, a I'aide
d'un produit de nettoyagenon abrasif commeBon Ami* ou d'eau
additionn6ede ddtergent.Le processusd'autonettoyagene
nettoie pusces zones.Ellesdoivent 6tre nettoyc!espour emp6cher
la salet6 de s'incruster pendant lecycle de nettoyage.(Lejoint
assureI'_tanch6it6autour de la porte et du hublot du four.)
4. Pour emp6chertout dommage,ne pas nettoyerni frotter le joint
qui se trouve autour de la porte du four.
Cejoint est con_upour 6viter lespertes
de chaleur pendantle cycle
d'autonettoyage.
5. Eliminerles r6sidusde graisse ou de
produits renvers6ssur la sole avant le
nettoyage.Ceciemp6chelaformation
de flammesou de fumde durant le nettoyage.
Prograramation de I'autonettoyage :
Relrlarque: La tempdraturedu four doit 6tre situ(!eell dessous [
de205 °C (400 °F)pour programmerun cycled'autonettoyage.
l
1. Fermerla porte du four.
2. Appuyersur la touche Clean (Nettoyage).
. Le mot CLEANclignote a I'afficheur.
3. Appuyersur la touche A ou V.
• CL-M (Nettoyage- saletdmoyenne)est affich&
Si la porte n'est pasferm6e,des bips retentissent
et le mot 'door' (#orte) parait a I'afficheur.Sila
porte n'est pasferm6edans les45 secondes,
I'op6rationd'autonettoyageest annul6eet I'afficheur
revienta I'heuredu jour.
4. Appuyersur la touche A ou V pourvoir ddiler les diff_rents
rc!glagesde I'autonettoyage.
CL-H (Nettoyage- salet6 importante,4 heures)
CL-M (Nettoyage - salet(! moyenne, 3 heures)
CL-L (Nettoyage- salet6 Ic!g_re,2 heures)
Lechoix du niveaude salet_ du four programme
automatiquementla dur6e du cycle d'autonettoyage.
5. Apr_squatre secondes,le four commencele nettoyage.
La dur6ede nettoyagecommencele d6compte_ I'afficheur.
Le mot LOCKparait _ I'afficheur.
• Le mot CLEANparait _ I'afficheur.
g6marrage diff6r_ d'un cycle d'autonettoyage :
1. Appuyersur la touche DeJay (Diffdrd).
• Le mot DELAYclignote.
° 00:00parait a I'afficheur.
2. Appuyer sur la touche A ou Y pour programmer
la durde d'attenteavant que ne commencele
cycle.Ladurded'attente peut _tre r_glde,de dix
minutes [00:10)a onzeheures,cinquante-neuf
minutes (11:59).
: iiii!ii i !ii!ii!ili iii!i!i:i!i!i!!i !
Alors que le mot DELAYclignote,appuyersur
la touche Clean.
Le mot CLEANva clignoter.
suite
*Lesnomsde marquedes produits de nettoyagesont des marquesd@os_!esdes diff_rentsfabricants.
42
4. Appuyer sur la touche A ou T.
• CL-M (Nettoyage- saletc!moyenne)est affich&
5. Appuyer sur la touche ,L ou • pour voir driller los diffc!rents
reglagesde I'autonettoyage.
CL-H(Nettoyage- salet6importante,/4heures)
CL-M (Nettoyage- saletc!moyenne,3 heures)
CL-L (Nettoyage- salet6 Ic!g_re,2 heures)
Lechoixdu niveaude salet6 du four programme
automatiquementla duree du cycled'autonettoyage.
6. Apr_s quatre secondes,los mots CLEAN(Nettoyage),DELAY
(Diferc!e)et LOCK(Verrouillage)paraissent_ I'afficheurpour
indiquerqua le four est programme!pour uneop(!rationde
nettoyagediffer& Letempsd'attente parait a I'afficheur.
Si le four a dej_ eta programme pour un cycle de
nettoyage et qua I'on desire etablir un dalai :
1. Appuyer sur la touche Delay.
• Lemot DELAYclignote.
• 00:00parait a I'afficheur.
2. Appuyer sur la touche A ou T pour programmer
ladureedc!sirc!ede I'attente avantqua ned_bute ..... .......
cycJe.
Apr_s quatre secondes,les mots CLEAN,DELAY
et LOCKparaissent_ I'afficheurpour indiquer qua le four est
programme!pour uneoperationde nettoyagediffc!rc!.Letemps
d'attente parait a I'afficheur.
Lorsque le cycle d'autonettoyage debate :
• Lemot DELAYs'c!teint.
_';_;!_i_'__i:iiii:,_i_!_ii_i_i!iiii_i!(_i!(_i!(_i!(_i!(_i!(_i!(_i!(_i!(_i!iiiiii_ii_iii_ii:_;_,_
, Ladurc!ede nettoyageparait a I'afficheur.
Annulation du cycle d'autonettoyage :
Appuyer sur la touche Cancel [Annular).
• Touslos mots disparaissentde I'afficheur.
• Touteslos fonctions sont annulc!es.
• L'heuredu jour parait _ I'afficheur.
Pendant le cycle d'autonettoyage
Lorsquele mot LOCKparait _ I'afficheur,la porte ne peut 6tre
ouverte.Pourc!viterd'endommagerla porte, ne pas la forcer pour
I'ouvrir Iorsquele mot LOCKest affich_.
Fum_e et odeurs
La premierefois o_ le four est nettoy_,il pout y avoirproduction
d'odeur et de fumee.Ceciest normalet disparaitraa I'usage.
Sile four esttr_s saleou si une ustensilea 6t8 laiss_eduns le four, il
pout y avoir production de fum_e.
Bruits
Pendantque le four chauffe, il peut se produire des bruits de m_!tal
en dilatation ou en contraction.Ceci est normal et n'indique pusqua
le four s'abime.
Apres le cycle
d'autonettoyage
Environune heure apr_s la fin du cycle,le mot LOCKs'_teint.Ace
moment,la porte pout 6tre ouverte.
La salet_ peat avoir laiss_an r_sidugris poadreux. L'enlever
avecun linge humide.S'il restede la salet(_,cela indiqueque le cycle
de nettoyagen'a pus_!t_!assezlong. Cettesalet_!restantesara
enlev_eau prochaincycle d'autonettoyage.
Si les grilles ont _t_ laiss_es_ I'int_riear da four pendant le
cycle d'autonettoyageet qu'elles glissent real sur leurs sup-
ports,los enduire,ainsi qua lossupports, d'une fine couche d'huile
v_!g_tale.
De fines lignes peuventapparaitre darts la porcelaine parce
qu'elle a sabi chalear et refroidissement.Ceciest normal et
n'affecterapas la performance.
Une d_coloration blanche peat apparaitre apr_s le nettoyage
si des aliments acides ca sucresn'ont pas _t_ enlev_s avant
qua ne commencerautonettoyage. La d_colorationest normale
et n'affecterapus la performancedu four.
Remarques :
• Si la porte du four n'est pus ferrule, le mot<<door _ (porte]
clignote _ I'afficheur et le four #met des bipsjusqu'_ ce que la
porte soit ferm#e et que I'onappuiea nouveausur Clean.
• S'il s'ecouleplus de cinq secondesentre le momentoQI'on
appuie sur Clean et cehi oQ I'onappuiesur latouche A ou T,
I'afficheurretourne automatiquement_ I'affichagepr_cSdent.
• Laporte du four se trouveraendommag_!esi I'on forceson
ouverturealorsqua le mot LOCKest encoreaffich_!.
43
M thodes de nettoyage
Chapeauxde
brQleur et
br_leurs _ gaz
Grillesdes
brr_leurs -
porcelaine
sur fonte
Zone de la
consolede
commande et
horloge
Boutons de
comraande
Table de cuisson
et tableau de
commande -
6mail vitrifi6
Lesnoms de marquesont des marques
d6pos6esdes diffc!rentsfabricants.
** Pour commanderdirectement,
composerle 1-877-232-6771E.-U.ou
1-800-688-8408Canada.
Chapeauxde brQleur amovibles
• Laisserle brCfleurrefroidir. Enleverle chapeaude brQleurpour le laverdans de I'eausavonneuseavecuntampon
r_cureren plastique.Pourles souillurestenaces,nettoyeravec un tampon non abrasif,savonneux,ou avec une
6pongeet la cr_me de nettoyagepour table de cuissonCooktopCleaningCreme*(produit n° 20000001)**.
, Ne pas effectuerle nettoyageau lave-vaisselleou dartsle four autonettoyant.
BrOleurs _ gaz sceU6s
• Nettoyerfrc!quemment.Laisserle br0leur refroidir. Nettoyeravec du savonet un tampona rc!cureren plastique.Pour
les souillurestenaces,nettoyeravec un tampon savonneuxet non abrasif. Ne pas agrandir ou ddormer les trous.
, Veiller _ ne pasintroduire d'eau dans les orificesdu brQleur.
, TravaillerprudemmentIorsdu nettoyagede I'allumeur.Si I'allumeurest endommag6ou mouill6, les brCJleursde la
table decuisson ne pourront pass'allumer.
• Laverles grilles avecde I'eausavonneusetilde et un tampon a r_cureren plastique non abrasif.Pour les souilhres
tenaces,nettoyeravecun tampon en plastique non abrasif,savonneux,ou avecune 6pongeet la cr6me de nettoyage
pourtable decuisson CooktopCleaningCreme*[produit n° 20000001)**.S'il restedes souillures,appliquerde
nouveaula cr_me pour table de cuisson,recouvrir avec un essuie-touthumide, et laissertremper pendant30 minutes.
Frotterde nouveau,rincer et faire s6cher.
, Ne pas effectuerle nettoyageau lave-vaisselleou dartsle four autonettoyant.
, Pourutiliserla fonction Verrouillagedes commandespour le nettoyage,voir page33.
, Laver,rincer et faire sc!cher.Ne pas utiliser un agent de nettoyageabrasif susceptiblede rayerla finition.
• On peut utiliser un produit de nettoyagedu verre,pulv_ris_d'abord sur un chiffon. NE PAS projeter le produit
directementsur les touchesde commande ou sur I'afficheur.
• Placerchaque bouton a la positiond'ARRET,et retirer chaquebouton en le tirant.
, Laver,rincer et faire sc!cher.Ne pas utiliser un agent de nettoyageabrasif susceptiblede rayerla finition.
, Fairefonctionner bri_vementchaquebrCfleurpour vc!rifierque le bouton a c!tc!correctementr6installc!.
L'_mailvitrific!est du verre li6 au m6talparfusion. II peut se fissurerou s'c!cailleren cas de mauvaiseutilisation. II est
r6sistantauxacides,mais pastotalement inattaquablepar les acides.Tousles produits renversc!s,en particulieracides
ou sucr6s,doivent 6tre essuy6simm_diatementavecun linge sec.
° Une fois refroidi, laveravecde I'eausavonneuse,rincer et s_cher.
° Nejamais essuyerune surfacetilde ou chaudeavecun linge humide. Cecipourrait la fissurer ou r_!cailler.
°Ne jamais utiliser de nettoyantspour four, d'agents de nettoyagecaustiquesou abrasifssur le fini extSrieurde la
cuisini_re.
suite
44
Panneaux • Une fois lospisces refroidies,loslaver _ I'eausavonneusetilde, rincer et sdcher.Ne jamais essuyerune surface
lat_raux, tiroir tilde ou chaudeavec un linge humide, ceci pouvant endommagerla surface et entrainer une brQlurepar la vapeur.
de remisage • Pour lestaches rebelles,utiliser des agentsde nettoyage16g_rementabrasifscommela p_te au bicarbonatede
et poign_es soudeou Ben Ami*. Ne pas utiliser de nettoyantsabrasifs,caustiquesou 6nergiquescomme les nettoyantspour
de porte = four ou lestamponsen laine d'acier.Ces produits raieraientou endommageraientde fa_on permanentela surface.
_mail point Remarque: Utiliser un linge ouun terchen sec pour essuyer lospreduits renvers_s,surtout s'ils sent acides
ou sucres. La surface pourrait se d_colorer ou se temir si la salet_ n'_tait pas imm_diatement enlev_e. Ceci
est particuli_rement important dartslecas de surfaces blanches.
Hublot et porte ° Eviterd'utiliser trop d'eau,qui risquerait de s'infiltrer sous ou derriere le verre et de tacher
du four en verre ° Laver_ I'eauet ausavon Rinceravecde reau propre et s6cher Un produit de nettoyagedu verre peut 6tre utilis6 en
le vaporisantd'abord sur un lingo
°Ne pas utiliser de produits abrasifscommetampons _ r6curer,lained'acier ou produit de nettoyageen poudre qui
risqueraientde rayer le verre
Int_rieur du four ° Exc!cuterleainstructionsprc!sentc!esauxpages42-43 pour I'autonettoyagedu four.
Grilles du four ° Nettoyeravecde I'eausavonneuse.
° Eliminerlossouillures tenacesavecune poudre de nettoyageou un tampon_ r6curer savonneux.Rincer et faire
s6cher.
° Silos grilles sent laiss6esdans le four pendantle cycle d'autonettoyage,oliosse d_colorentet peuventne plustr_s
bienglisser.Si ceci se produit, appliquer par essuyageun peu d'huile v6g6talesur la grille et sossupportsen relief
pour faciliter le mouvement,et enleverrexc_sd'huile.
Acier inoxydable °NE PAS UTILISERDE PRODUITSDE NETTOYAGECONTENANTDU JAVELLISANT.
(certainsmod_les] °NE PAS UTILISERDE NETTOYANTS_ ORANGE_ OU ABRASlFS.
° TOUJOURSESSUYERDANS LE SENSDE LA TEXTUREDE L'/tCIER LORSDU NETTOYAGE.
° Nettoyage journalJer/salet_I_g_re = Essuyeravec I'un desproduits suivants:eausavonneuse,vinaigre blanc/eau,
produit de nettoyagepour verre et surface Formula409"ou un produit semblablepour verre - avec un lingo souple
et une 6ponge.Rinceret sc!cher.Pourpolir et enleverlos marquesde doigts,faire suivrepar unevaporisationde
Magic Spray*pour acier inoxydable_roduit n° 20000008]**.
° Salet_ mod_r_e/_paisse =Essuyeravec I'un des produits suivants:BenAmi*, Smart Cleanser*ou Soft Scrub" -
I'aided'un lingo soupleou d'une 6pongehumide.Rinceret s6cher.Lestaches rebellespeuvent6tre enlev6esavec
un tampon multi-usagesScotch-Brite"humidifi6. Rotter uniformc!mentdartslesonsdu mc!tal.Rinceret s_cher.
Pourredonnerdu lustreet retirer los rayures,faire suivre par une vaporisationde Magic Spray*pour acier
inoxydable.
• D_coloration - A I'aided'une _!pongehumidifi_!eou d'un lingo souple,essuyer_ I'aide du nettoyantCameo"pour
acier inoxydable.Rincer imm_diatementet s_cher.Pour enleverlos marqueset redonner du lustre,faire suivre par
unevaporisationde Magic Spray" pouracier inoxydable.
• Loshems de marquesentdes marquesd_!pos_esdes diff,!rentsfabricants.
•* Pourcommanderdirectement,composerle 1-877-232-6771E.-U.ou 1-800-688-8408Canada.
45
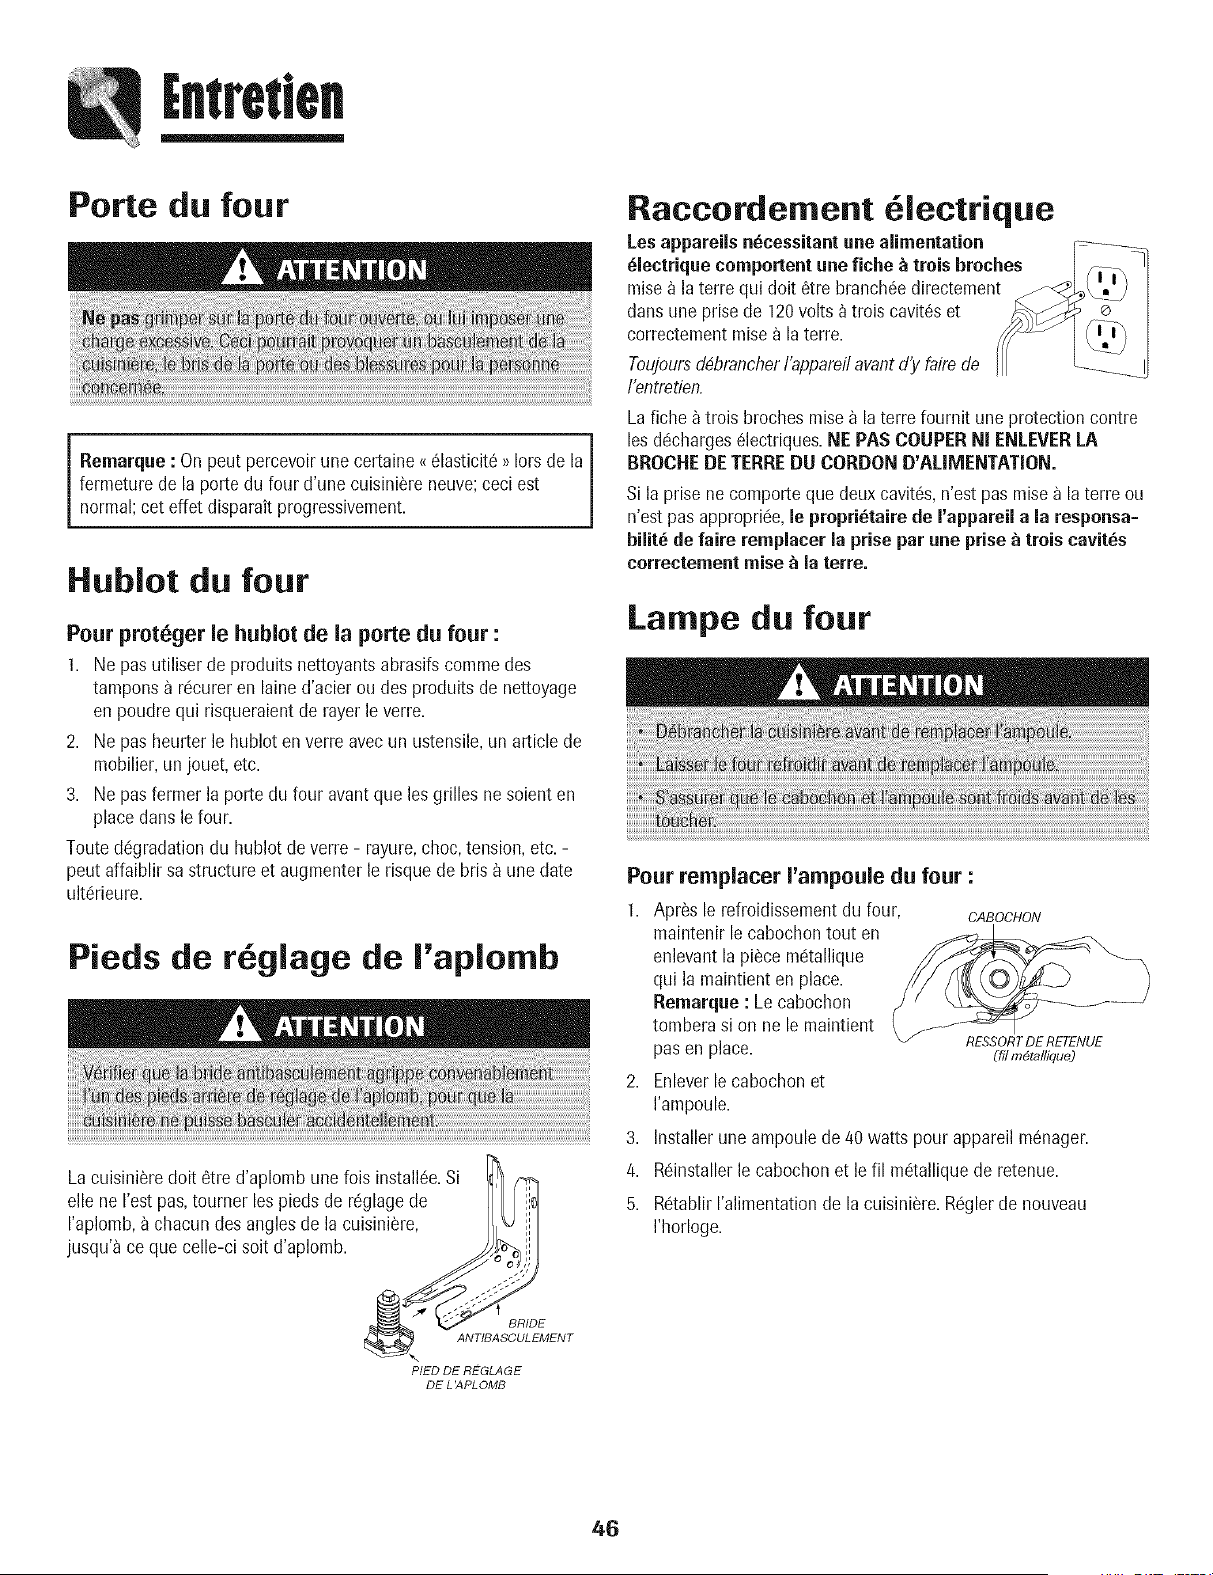
Porte du four
i emarque : On pout percevoirune certaine_61asticit6))lots de la
fermeture de la porte du four d'une cuisini_reneuve;ceciest
normal;cot effet disparait progressivement.
Hublot du four
Pour proteger le hublot de la porte du four :
1. Ne pas utiliser de produits nettoyantsabrasifscommedes
tampons a r6cureren laine d'acier ou des produits de nettoyage
en poudre qui risqueraientde rayerle verre.
2. Ne pas heurterle hublot en verre avec un ustensile,un article de
mobilier,un jouet, etc.
3. Ne pasfermer la porte du four avantque les grilles ne soient en
place dana le four.
Touted_gradationdu hublot de verre - rayure,choc,tension, etc. -
peut affaiblir sa structure et augmenterle risque de bris _ une date
ult6rieure.
Pieds de r glage de I'aplornb
Lacuisini_re dolt 6tre d'aplombunefois install6e.Si /,_
elle ne I'estpas,tourner los pieds de r6glagede
I'aplomb,_ chacundes anglesde la cuisini_re,
jusqu'a ce que celle-cisoit d'aplomb. _ _ J
PIED DE REGLAGE
DE L ',4PL OMB
Raccordement 61ectrique
Losappareils n_cessJtantune alJrnentation
_lectrique comportent une fiche _ trois broches
raise_ la terre qui doit 6tre branch6edirectement
dartsune prisede 120volts _ trois cavit6s et
correctementraisea la torte.
Toujoursd4brancherI'appareilavantd'y fairede
I'entretien.
La fiche _ trois broches mise _ la terre fournit une protectioncontre
lead_charges61ectriques.NE PAS COUPERNI ENLEVERLA
BROCHEDETERREDU CORDON D'ALIMENTATION.
Si la prise ne corr_porteque deux cavit6s,n'est pas raisea la terre ou
n'est pas appropric!e,le propri_tairede rappareil a la responsa=
bilit_ de faire remplacer la prise par une prise _ trois cavit_s
correeternentraise_ la torte.
Lampe du four
Pour remplacer I'ampoule du four :
1. Apr_s le refroidissementdu four, CABOCHON
maintenir le cabochontout en
enlevantla piece mdtallique
qui la maintienten place.
Rernarque : Lecabochon
tomberasi on ne le maintient
pas en place.
2. Enleverle cabochon et
I'ampoule.
3. Installerune ampoulede 40 watts pour appareil m6nager.
4. R6installerle cabochon et le fil mc!talliquede retenue.
5. R6tablirI'alimentationde la cuisini_re.R6glerde nouveau
I'horloge.
RESSORT DE RETENUE
(fit m6tallique)
46
D placement d'un appareil
gaz
Lesraccordsdes appareils_ gazservanta branchercet appareil
I'alimentationde gazne sont paspr6vus pour 6tre d@lacc!s
continuellement.Unefois I'appareilinstallS,NE PAS le d@lacer de
fagonr@6t6e pour le nettoyerou lechanger de place.Sicet
appareildoit 6tre d_m6nag6et/ou enlevc!pour 6tre r@ar6,suivrela
m6thoded_crite dans les instructionsd'installation.Pourtoute
information,prendrecontact avec le servicea la clientele au
1-800-688-9900E.-U.ou 1-800-688-2002au Canada.
IIfaut que le pied arri_re de la cuisini_resoit engag6 clansla bride
antibasculementpourque la cuisiniSrene puisse basculer
accidentellement.
Tiroir de remisage
Letiroir de remisagepeut _tre enlev_pour vous permettrede
nettoyersous la cuisini_re.
D6pose :
1. Vider le tiroir et le tirer jusqu'_ la position de la premierebut6e.
2. SouleverI'avant.
3. Tirerjusqu'_ la position de la seconde butc!e.
/4. Saisirle tiroir par les c6t6set soulever/tirerpour I'extraire.
R_installation :
1. Ins6rerles extrc!mit6sdes glissi_resdu tiroir dans les rails de la
cuisini_re.
2. SouleverI'avantdu tiroir et pousserdoucementjusqu'a la
positionde lapremiere but6e.
3. Souleverde nouveaule tiroir et le pousserpour le fermer.
47
Becherchedes
Pour la plupart des problbrnes
observes,essayerd'abord les
solutionspossibles,_ droite.
Un br_leur de surface ne
s'allume pas.
Flammesnon uniformes.
Sbparationentre les flammes et
le brr_leur.
R_sultats de cuisson au four
diffbrents des attentes ou de ceux
produits par le four ant_rieur.
R_sultatsincorrects Iors de la
cuissonau gril, ou bmission
excessivede furn_e.
V6rifier que les commandesdu four sont correctementr6gl6es.
Vc!rifiersi lafiche est bien ins_r6edans la prise.
Inspectedrc!armerle disjoncteur.Inspectedremplacerlesfusibles.
ContrOlerla source d'alimentationc!lectrique.
®
®
V6rifier que I'appareilestcorrectementraccord6a la sourced'61ectricit6.
D6terminersi I'alimentation61ectriqueest interrompue (fusible grillddisjoncteur ouvert).
V6rifier que I'allumeurestsec et qu'il 6metdes 6tincelles.Le brCfleurne peut s'allumersi
I'alhmeurestendommag6,souil18oumouill6.SiI'allumeurne g6n_repasd'6tincelles,ramener
le bouton de commandea la position OFF [Arr6t).
Orificesdu brOleurobstru6s.
Veiller a placercorrectementI'ustensilesur la grille du brOleur.
V6rifier que la temp6ratures6lectionn6eest correcte. Veiller a prc!chaufferlefour si
ceciest demand6dartsla recette.
D6terminersi 1'6ventdu four est obstru6.Voir son emplacementpage 40.
S'assurerque lacuisini_reestd'aplomb.
Les r6glagesde temp6raturevarient souvententre un four neuf et le four qu'il remplace.
Onobservesouventune d6rivedu r6glage de temp6ratured'un four a mesurequ'il vieillit;
il peut devenirplus chaud ou moins chaud.Voir page 38 les instructionsd'ajustementde
latemp6raturedu four. Remarque : II n'est pas utile de modifier le r6glagede temp6rature
si la variation n'affecte qu'une ou deux recettes.
Utiliserlesbonsustensiles.Lesustensilesfonc6sdonnentun brunissementdecouleur fonc6e,
les ustensilesbrillants,un brunissementplus clair.
Vc!rifierla position desgrilles et des ustensiles. Lots de la r6partition sur deux grilles,ne pas
superposerles plats. Veiller _ laisser un espacede 2,5_ 5 cm (1 _ 2 po) entreles plats et les
paroisdu four.
Contr01erI'utilisationde feuille d'aluminiumdans le four. Ne jamais recouvrircompl_tement
unegrilledufour avecde la feuilled'aluminium.Placerun petit morceaudefeuilled'aluminium
sur la grille sous le plat pour r6cup6rer lesmati_resrenversc!es.
D6terminerla position des grilles. Lesalimentspeuvent 6tre trop pros des flammes.
Utilisationincorrectede feuille d'aluminium.Nejamais garnir la grille de 16chefriteavec
de la feuille d'aluminium.
EnleverI'exc6sde graissesur la piecede viandeavantla cuissonau gril.
Utilisationd'une I_chefritesouill6e.
Pr6chaufferle four pendant2 _ 3 minutesavantde placer le plat dans le four.
Portedu four fermc!edurant la cuissonau gril.
suite
48
Becherchedespennes
impossibilit_d'autonettoyage
du four.
Le four ne se nettoie pas
correcteruent,
La porte du four ne se d_verrouille
pas aprbsrautonettoyage.
• D_terminerque I'appareiln'a pas c!t6programmc!pour un autonettoyagediffCr& Voir
pages42-43.
• VCrifierque la porteest fermCe.
• V@ifiersi la commandoesten Mode Sabbat.Voirpage38.
• Lefour eatpeut 6tre a une temperaturesup@ieure_ 205°C [400°F]. LatempCraturedu
four dolt 6treinfCrieurea 205 °C(400°F)pour pouvoirprogrammerun cycled'autonettoyage.
• Untemps de nettoyageplus long peut 6tre nc!cessaire.
• Onn'a pas_limin6avantI'opCrationd'autonettoyagelesaccumulationsexcessivesde rCsidus,
particuli_rementlosrc!sidusd'alimentsacidesou sucrCs.
o
Accumulationd'humidit_ sur le • Ceciest normaldurant la cuissond'alimentscontenantbeaucoupd'eau.
hubiot ou vapeur sortant de r_vent. . Utilisationexcessived'humidit6 Iorsdu nettoyagedu hublot.
Emissiond'une forte odeur ou de
fum_e Iors de la raiseen marche
du four.
Codes d'anomalie.
Des bruits se font entendre.
L'intCrieurdu four est encorechaud. Attendre environ une heure apr_sI'ach_vementde la
pCrioded'autonettoyage.IIest possibled'ouvrir laporte apr_sladisparitiondu messageLOCK
Nerrouillage) sur I'afficheur.
Loscommandoset la porte sent peut-CtreverrouillCes.Voir page 33.
• Ceciest normal pour une cuisini_re neuveet disparait apr_s quelquesutilisations.
Un cycled'autonettoyage_br01era;)plus rapidementles odeurs.
• La raiseen marche d'un ventilateuraide _ retirer fum_e et odeurs.
• Prc!sencede saletc!ssur la sole. Procc!der_ un autonettoyage.
• LesmotsBAKE (Cuissoncourante)ou LOCKpeuventclignoterrapidement_ I'afficheurpour
prc!venird'une erreuroud'un probl_me.Si le mot BAKEou LOCKparaita I'afficheur,appuyer
sur latouche Cancel [Annule0. Si le mot BAKEou LOCKcontinue_ clignoter,d_brancher
I'appareil.Attendre quelquesminutes,puisrebrancherI'appareil.Si lemot continue_clignoter,
dCbrancherI'appareilet prendre contact avec un r@arateurautoris&
. Silefour est tr_ssale,losflamm_chespeuventproduire un code d'anomalieau cours du cycle
d'autonettoyage.Appuyersur la touche Cancel et laisser le four refroidir compl_tement,
essuyerla salet_en excSspuisreprogrammerI'autonettoyage.Silecoded'anomalierCapparait,
prendrecontact avec un r@arateur autorisC.
o
o
Lefour fait plusieursbruits faibles.II est possibled'entendreles relaisdu four qui se mettent
en marche et s'arrCtent.Ceci eat normal.
Alorsque le fourse rCchauffeetserefroidit,il est possibled'entendredesbruitscorrespondant
ladilatationet_ la contraction despiscesmCtalliques.Ceciestnormalet n'endommagepas
I'appareil.
II n'y a ni bip ni affichage. • Lefour est peut-Ctreen Mode Sabbat.Voir page38.
SAb clignote puis
reste allum&
• Lefour eaten modesabbat.Pourannuler,appuyersur la touche Clock [Horloge)et
maintener-laenfonc6ependant cinq secondes.
49

Bemrques
50
epres-vente
LESEULETUNIQUERECOURSDU CLIENTEN
VERTUDE CETTEGARANTIELIMITEEESTLA
REPARATIONDUPRODUITCOMMEDECRITE
PRECEDEMMENT.LESGARANTIESIMPLICITES,
Y COMPRISLESGARANTIESDE QUALITE
MARCHANDEOU D'ADAPTATIONA UN USAGE
PARTICULIER,SONTLIMITEESA UNAN OUA
LA PERIODELA PLUSCOURTEPERMISEPARLA
LOI.MAYTAGCORPORATIONNESERAPAS
TENUERESPONSABLEDESDOMMAGES
DIRECTSOU INDIRECTS.CERTAINSETATSET
CERTAINESPROVINCESINTERDISENT
L'EXCLUSIONETLA LIMITATIONDES
DOMMAGESDIRECTSOU INDIRECTSAINSI
QUELESLIMITATIONSSURLA DUREEDES
GARANTIESIMPLICITESDEQUALITE
MARCHANDEOU D'ADAPTATIONA UN USAGE
PARTICULIER.IL ESTDONCPOSSIBLEQUECES
LIMITATIONSNES'APPLIQUENTPASA VOUS.
CETTEGARANTIEVOUSCONFEREDESDROITS
JURIDIQUESSPEClFIQUESETIL SEPEUTQUE
VOUSAYIEZD'AUTRESDROITS,QUIVARIENT
D'UN ETATA L'AUTREOU D'UNEPROVINCEA
L'AUTRE.
Ne scat pas couverts par ces garanties
1. Lesprobl_meset dommagesrc!sultantdes situationssuivantes :
a. Miseen service,livraisonou entretien effectu6sincorrectement.
b.Toute r@aration, modification,alt6rationet tout r6glagenonautorisc!spar le
fabricant ou parun prestatairede serviceapr_s-venteagrc!&
c. Mauvaisemploi,emploi abusif,accidents,usagenon raisonnable,ou catastrophe
naturelle.
d. Courant61ectrique,tension, alimentation_lectriqueou en gaz incorrects.
e. R6glageincorrect d'une commande.
2. Lesgaranties ne peuvent _tre honor6essi les num_rosde s6ried'origine ont 6tc!
enlev_s,modifi6soune sont pasfacilement lisibles.
3. Ampoules,filtres _ eau et filtres a air.
4. Lesproduits achet6sa des fins commercialesou industrielles.
5. Lesfrais de d@annageou de visite pour :
a. Correctiond'erreursde raiseen service.Pour lesproduits n_cessitantune
ventilation,un conduit m6tallique rigide dolt 6tre utilis_.
b. Initiation de I'utilisateura I'emploide I'appareil.
c. Transportde I'appareilchez le r@arateuret retour de I'appareilchez I'utilisateur.
6. Tout aliment perdu en raisonde pannesdu rdrigc!rateurou du cong61ateur.
7. D@ensesde d@lacementet de transport pour la r@aration du produit dansdes
endroits61oign6s.
8. Cette garantien'est pasvalide a I'ext(!rieurdes Etats-Uniset du Canada.Communiquez
avecvotred_taillant pour savoir si une autre garanties'applique.
9. Dommagesindirects ou accessoiressuns par toute personne_ la suite d'une
quelconqueviolation des garanties.CertainsEtatsou provincesnepermettentpas
I'exclusionou la limitation de responsabilit6en ce qui concerneles dommagesdirects
ou indirects.L'exclusionci-dessuspeut en cons6quencene pas s'appliquera votre cas.
Si vous avez besoin d'aide
Consultezd'abord lasection sur le d@annagedans le manueld'utilisationet d'entretien,
puis appelezle ddtaillant de qui vous avezachetc!votre appareil ou le service_ la clientele
de Maytag Services,LLC au 1-800-688-9900aux Etats-Uniset au 1-800-688-2002au
Canadapour savoir ou trouver un r@arateur autoris&
• Veilleza conserverla facture d'achat pour justifier de la validit(_de lagarantie.Pour
d'autres renseignementsconcernant lesresponsabilit6sdu propridtaire_ I'dgarddu
servicesous garantie,voir le textede la GARANTIE.
• Si led6taillantou I'agencedeserviceapr_s-ventene peut r6soudrele probl_me,_crivez
Maytag Services,LLC a I'adressesuivante: CAIR:"Center,P.O.Box 2370,Cleveland,TN
37320-2370Etats-Unis,ou appelezau 1=800-688=998e aux Etats=Unisoa au
1=800=688=2002au Canada.
• Lesguidesd'utilisation, les manuelsde serviceet les renseignementssur les pi_cessont
disponiblesaupr_sdu servicea la clientele de MaytagServices,LLC.
Rell_al'ques : Veillez_ fournir I'informationsuivanteIorsquevouscommuniquez
avecnous au sujet d'un probl_me:
a. Vos nom, adresseet numdrode t_ldphone;
b. Numdrode moduleet num_ro de s_rie de I'appareil;
c. Nom et adressede votre ddtaillant ou de votre agencede service;
d. Descriptiond_taill_edu probl_meobserw!;
e. Preuved'achat [facture de vente).
51
Estufa a Gas con Control 'Easy Touch' 500
//
lnstrucciones Importantes
sobre Seguridad .....................................................53=57
Cocinando en la Estufa .........................................58=59
Controles Superiores
Quemadores de Gas Sellados
Cocinando en el Homo .........................................60=69
Horneado
'Cook & Hold'
'Cook & Hold' Diferido
Mantener Caliente
Asar a la Parrilla
Cierre Autom_tico/Modo Sab_tico
Parrillas del Homo
Cuidado y Limpieza ............................................... 70=73
Horno Autolimpiante
Procedimientos de Limpieza
Mantenimiento ....................................................... 74=75
Ventana y Luz del Horno
Retiro de la Estufa a Gas
Localizaci6n y Soluci6n
de Averias ................................................................76=77
Garantia y Servicio ................................P_gina altima
Lea y siga todas las instrucciones antes de usar este
electrodorn_stico para evitar el riesgo potencial de incendio,
choque el6ctrico, lesi6n personal o da_o al electrodom6stico
como resultado de su uso inapropiado. UtiNce este
electrodom6stico solamente para el prop6sito que ha sido
destinado segQn se describe en esta gufa.
Para asegurar funcionarniento correcto y seguro: El
electrodom6stico debe ser instaladodebidamente y puesto a
tierra por un t6cnico calificado. No intente ajustar, reparar,
prestar servicio o reemplazar ninguna pieza de este electro-
dom6stico a menos que sea especfficamente recomendado en
esta gufa. Todas las reparaciones deben set realizadas por un
t6cnico caNficado. Pida a[ insta[ador que le indique la
ubicaci6n de la v_lvula de cierre del gas y como cerrarla en
caso de una emergencia.
Siempre desenchufe el electrodom6stico antes de efectuar
alguna reparaci6n.
Las advertencias e instrucciones importantes sobre segufidad
que aparecen en esta gufa no est_n destinadas a cubrir todas
las posibles circunstancias y situaciones que puedan ocurrir.
Se debe ejercer sentido com_n, precauci6n y cuidado cuando
instale, realice mantenimiento o haga funcionar el artefacto.
Siempre p6ngase en contacto con el fabricante si surgen
problemas o situaciones que usted no comprenda.
Reconozca los sfmbolos, advertencias,
etiquetas de seguridad
53
Impomntes Segufl@d
Instrucciones Generales
Paravefificar si el dispositivo est_ debidamente instalado, mire
debajo de la estufa con una linterna para asegurarse de que
uno de los tornilios niveiadores traseros est6 debidamente
enganchado en [a ranura de[ soporte. El dispositivo antivuelco
asegura el tornillo nivelador trasero a[ piso cuando est_
debidamente enganchado. Esto debe vefificarse carla vez
que la estufa sea movida.
Para Evitar un Incendio o
Da o Causado pot el Humo
Aseg_rese de que se hayan retirado todos los materiales de
empaque del electrodomestico antes de su uso.
Mantenga el _rea alrededor del electrodomestico libre y
exenta de materiales combustibles, gasolina u otros vapores y
materiales inflamables.
Si el electrodomestico es instalado cerca de una ventana, se
debe tener cuidado para evitar que las cortinas pasen sobre
los quemadores.
NUNCA deje articulos sobre la cubierta de la estufa. El aire
caliente del respiradero puede encender los artfculos
inflamables y aumentar la presidn en los envases cerrados
hasta haceflos reventar.
Muchos envases de tipo aerosol son EXPLOSIVOScuando son
expuestos al calory pueden set aitamente inflamables. Evite
su uso o su almacenamiento cerca del electrodomestico.
Muchos pl_sticos son vulnerables al calor. Mantenga los
pi_sticos alejados de las piezas de la estufa que puedan estar
tibias o calientes. No deje artfculos de pkistico sobre la
cubierta de la estufa pues se pueden derretir o ablandar si
est_indemasiado cerca del respiradero o de un quemador
superior encendido.
Para eiiminar el riesgo de pasar sobre los quemadores
superiores calientes, no se deben guardar artfculos en los
armarios que est_n directamente sobre la estufa. Si tales
armafios son usados para almacenamiento, debe limitarse a
colocar artfculos de uso poco frecuente y que pueden
guardarse en forma segura en una _ireaque est,1sujeta al
calor proveniente de la estufa. Las temperaturas pueden no
ser apropiadas para algunos artfculos, tal como Ifquidos
vol_tiles, limpiadores o sprays en aerosol.
En Caso de Incendio
Apague el electrodom_stico y la campana de ventilaci6n para
evitar que las llamas se dispersen. Extinga las llamas luego
encienda la campana para expulsar el humo y el olor.
• En la cubierta: Apague el fuego o la llama en una sart6n
con una tapa o una bandeja de hornear.
NUNOA levante o mueva una sart6n en llamas.
• En el homo: Apague el fuego o la llama cerrando la puerta
del horno.
No use agua en los incendios de grasa. Use bicarbonato, un
producto qufmico seco o un extinguidor del tipo con espuma
para apagar un incendio o la llama.
Seguridad para los Ni os
NUNCA deje a los niffos solos o sin supervisi6n cuando el
electrodom_stico est6 en uso o est6 caliente.
NUNCA permita que los niffos se sienten o se paren en
ninguna parte de[ electrodomestico pues se pueden lesionar o
quemar.
54
Se les debe ense_ar a los ni_os que el electrodom6stico y
los utensilios que estan en 61o sobre 61pueden estar
calientes. Deje enffiar los utensilios calientes en un lugar
seguro, fuera del alcance de los ni_os peque_os. Se les
debe ense_ar a los ni_os que un electrodom6stico no es un
juguete. No se debe permitir que los ni_os jueguen con los
controles u otras piezas de la estufa.
Generalidades
El respiradero del homo se encuentra debajo del protector
trasero.
Evite tocar el area del respiradero mientras el homo est6
encendido y durante vafios minutos despu6s de habeflo
apagado. Algunas partes del respiradero y del area que Io
rodea se calientan Io suficiente como para causar
quemaduras. Despu6s de apagar el homo, no toque el
respiradero o el area que Io rodea hasta que haya tenido
suficiente tiempo para enffiarse.
Otras superficies que pueden estar calientes inchyen la
cubierta, las superficies que estan dirigidas hacia la cubierta,
el respiradero del homo, la superficie cercanas a la abertura
del respiradero, la puerta del homo y la area que la rodea, y la
ventanilla del horno.
No toque un foco de homo caliente con un paffo hQmedo ya
que se puede romper. Si el foco se rompe, desconecte el
suministro el6ctfico al eiectrodom6stico antes de retirar el foco
para evitar un choque ei6ctrico.
55
No utilice la cubierta o el homo como areas de
almacenamiento para alimentos o utensilios de cocina.
Seguridad Para Cocinar
Siempre coloque un utensilio en un quemador superior antes
de encendeflo. AsegOresede usar la perilla correcta que
controla cada quemador superior. Aseg_rese de encender el
quemador correcto y comprobar de queen efecto el
quemador haya sido encendido. Cuando haya terminado de
cocinar, apague el quemador antes de retirar el utensilio para
evitar exposici6n a la llama del quemador.
Siempre ajuste la llama del quemador superior de modo que
no se extienda mas alia del borde inferior del utensilio. Una
llama excesiva es peligrosa, desperdicia energfa y puede
da_ar la estufa, el utensilio o los armafios que estan sobre la
estufa.
NUNCA deje sin supervisi6n la cubierta de la estufa cuando
est6 cocinando, especialmente cuando usa un ajuste de calor
alto o cuando est6 usando una freidora. Los reboses pueden
producir humo y los derrames de grasa pueden inflamarse.
Limpie los derrames grasosos tan pronto como sea posible.
No use calor alto durante perfodos de cocci6n prolongados.
NUNCA caliente un envase cerrado en el quemador superior
o en el homo. La acumulaci6n de presi6n puede hacer
explotar el envase causando una lesi6n personal grave o da_o
a la estufa.
Usetomaollas secos y gruesos. Los tomaollas hamedos
pueden causar quemaduras a causa del vapor. Las toallas u
otros sustitutos no deben ser usados como tomaollas porque
ellos pueden quedar colgando a trav6s de los quemadores
superiores y encenderse o enredarse en las piezas de la
estufa.
Siempre deje enfriar la grasa caliente que se ha usado en la
freidora antes de intentar mover o manipulafla.
No permita que se acumule grasa u otros materiales
inflamables en la estufa o cerca de ella, en la campana o en el
ventilador aspirador. Limpie la campana extractora con
frecuencia para evitar que la grasa u otros materiales
inflamables se acumulen en la campana o en el filtro.
Encienda el ventilador cuando cocine alimentos flameados
debajo la campana.
NUNCA use vestimentas de materiales inflamables, ropa
suelta o de mangas largas cuando est6 cocinando. La
vestimenta se puede encender o enganchar en los mangos de
los utensilios.
Siemprecoloquelasparrillasdelhomoenlaposici6ndeseada
cuandoelhomoestefr[o.Deslicelaparfilladelhomohacia
afueraparaagregaroretiraralimento,usandotomaollassecos
yresistentes.Siempreevitealcanzardentrodelhomopara
agregaroretiraralimentos.Siunaparrilladebesetsacada
cuandoest_todav[acaliente,useuntomaollasseco.Siempre
apagueelhomodespuesdehaberterminadodecocinar.
Tengacuidadocuandoabralapuertadelhorno.Dejeque
escapeelaireo elvaporcalienteantesdesacarovolver
colocarelalimento.
ADVERTENCIA SOBRE LOS ALIMENTOS PREPARADOS:
Siga las instrucciones del fabricante de losalimentos. Si un
envase de pl_stico de alimento congelado y/o su tapa se
deforma, se comba o se da_a de alguna otra manera durante
la coccidn, descarte inmediatamente el alimento y su envase.
Elalimento puede estar contaminado.
NUNCA use papel de aluminio para cubrir una parrilla del
homo o la parte inferior del horno. Eluso incorrecto puede
resultar en un riesgo de choque electrico, incendio o da_o al
electrodomestico. Use papel de aluminio solamente como se
indica en esta guia.
Utensilios Apropiados
Usesartenes con fondos pianos y mangos que sean f_ciles de
tomar y que permanezcan frfos. Evite usar sartenes u ollas
inestables, combadas que se pueden volcar f_cilmente u ollas
cuyos mangos esten sueltos. Adem_s evite usar utensilios
especialmente peque_os o sartenes con mangos pesados
pues ellos pueden set inestables y volcarse f_cilmente. Los
utensilios que son pesados de mover cuando est_n Ilenos con
alimento pueden tambien set un peligro.
AsegQrese de que el utensilio sea Io suficientemente grande
como para contener en forma debida los alimentos y evitar
derrames. El tama_o es particuhrmente importante cuando
se utilizan freidoras. AsegQrese de que el utensilio tiene
capacidad para el volumen de alimentos que se va a agregar
al igual que para la formaci6n de burbujas de la grasa.
Para reducir a un minimo las quemaduras y que los materiales
inflamables y los derrames se enciendan debidos a contacto
no intencional con el utensilio, los mangos no deben
extenderse sobre el quemador superior adyacente. Siempre
gire los mangos de los utensilios hacia el lado o hacia la parte
trasera de la estufa, no hacia la habitaci6n donde puede set
f_cilmente golpeados o alcanzados por los ni_os peque_os.
Nunca deje que un utensilio hierva hasta quedar seco pues
esto puede da_ar el utensilio y la estufa.
Siga las instrucciones del fabricante cuando use bolsas para
cocinar en el horno.
56
Solamente ciertos tipos de utensilios de vidfio cer_mico, de
cer_mica o glaseados son convenientes para uso en la
cubierta de la estufa o en el homo sin quebrarse debido al
cambio repentino de temperatura. Siga las instrucciones del
fabricante cuando use utensilios de vidrio.
Esteelectrodomestico ha sido probado respecto a su
rendimiento seguro usando utensilios de cocina
convencionales. No use ningQn dispositivo o accesofio que no
haya sido espedficamente recomendado en esta gufa. No use
cubiertas de los elementos, rejillas superiores de la estufa o
sistemas de convecci6n para hornos. El uso de dispositivos o
accesorios que no son expresamente recomendados en esta
gufa, puede crear sefios peligros de segufidad, resultar en
problemas de rendimiento y reducir la vida _til de los
componentes de la estufa.
Seguridad de la Limpieza
Apague todos los controles y espere que se enfrfen las piezas
de la estufa antes de tocaflas o limpiaflas. No toque las
rejillas de los quemadores o las _reas circundantes hasta que
elias no hayan tenido tiempo suficiente de enfriarse.
Limpie la estufa con cuidado. Tenga cuidado para evitar
quemaduras de vapor si se usa una esponja o un paso mojado
para limpiar los derrames en una superficie caliente. Algunos
limpiadores pueden producir vapores nocivos cuando se
aplican a una superficie caliente.
Homo Autolimpiante
Limpie solamente las piezas que se indican en esta guia. No
limpie la junta de la puerta. La junta es esencial para un
sellado hermetico. No restriegue, da_e, ni mueva la junta de
la puerta. No use limpiadores de homo de ninguna clase en el
homo ni alrededor de cualquier parte del homo autolimpiante.
Es normal que la cubierta de la estufa se caliente durante el
ciclo de autolimpieza. Por Io tanto, se debe evitar tocar la
cubierta durante un ciclo de autolimpieza.
InstrucclonesImpomntes Seguri@d
Aviso y Advertencia
Irnportante Sobre Seguridad
La Propuesta 65 de la Ley de 1986 del Estado de California
Sobre Segufidad y Contaminaci6n del Agua Potable (California
Safe Drinking Water and Toxic Enforcement Act of 1986) exige
que el Gobernador de California publique una lista de las
sustancias que seg_n el estado de California causan c_ncer o
daffo al sistema reproductivo y exige que las empresas
adviertan a sus clientes sobre la exposici6n potencial a tales
sustancias.
Se advierte a los usuafios de esta estufa que la combusti6n
del gas puede resultar en exposici6n de bajo nivel a algunas
de [assustancias publicadas en [a [ista, inchyendo benceno,
formaldeh{do y holffn, debido principalmente a [a combusti6n
incomp[eta del gas natural o de los combustibles de petr6leo
licuado. Los quemadores ajustados en forma debida
reducir_n [a combusti6n incompleta. La exposici6n a estas
sustancias puede tambien ser reducida a un m{nimo
ventilando los quemadores al exterior en forma adecuada.
Se advierte a los usuafios de este electrodomestico que
cuando el homo est_ funcionando en el ciclo de autolimpieza,
puede haber exposici6n de bajo nivel a algunas de las
sustancias indicadas en la lista, incluyendo mon6xido de
carbono. La exposici6n a estas sustancias puede ser reducida
a un m{nimo ventilando el homo al exterior en forma
adecuada, abfiendo las ventanas y/o [a puerta en la habitaci6n
en donde est_ ubicado el electrodomestico durante el ciclo de
autolimpieza.
AVlSO INIPORTANTE RESPECTO A LOS PAJAROS
DOMESTICOS:
Nunca mantenga los p_jaros en la cocina o en las
habitaciones donde puedan Ilegar los humos de la cocina. Los
p_jaros tienen un sistema respiratorio muy sensitivo. Los
humos producidos durante el cido de autolimpieza del homo
pueden ser perjudiciales o mortales para los p_jaros. Los
humos que despide el aceite de cocina recalentado, la grasa,
margarina y los utensilios antiadherentes recalentados pueden
tambien ser perjudiciales.
Conserve estas Jnstrucciones para Referencia Futura
57
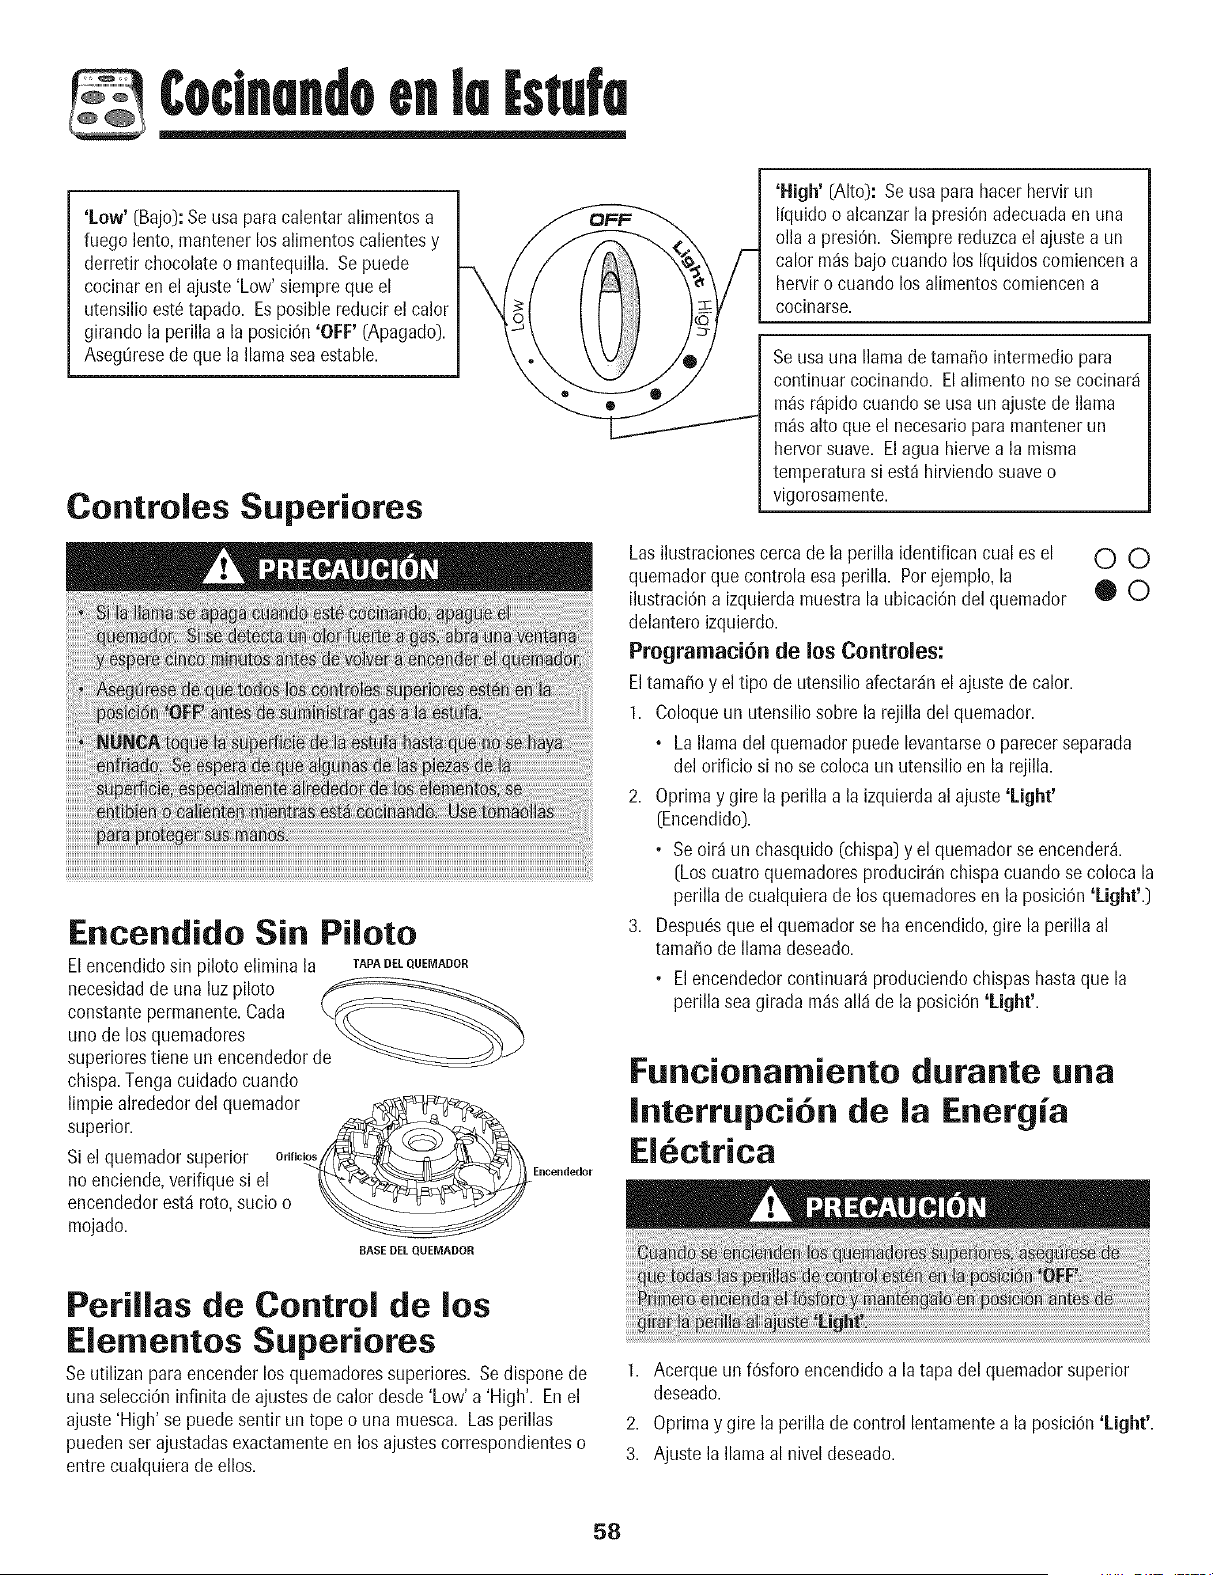
¢oclnandoenlu Estufu
'Low' [Bajo):Seusa paracalentaralimentosa
fuego lento, mantener los alimentoscalientesy
derretir chocolateo mantequilla. Se puede
cocinaren el ajuste 'Low' siempreque el
utensilioeat6tapado. Esposible reducirel calor
girando la perilla a la posici6n 'OFF' (Apagado).
AsegOresede que la llamasea estable.
Controles Superiores
Encendido Sin Piloto
Elencendidosin piloto eliminala TAPADELQUEMADOR
necesidadde una luz piloto
constantepermanente.Cada
unode losquemadores
superiorestiene un encendedorde
chispa.Tengacuidado cuando
limpie alrededordel quemador
superior
Si el quemadorsuperior O"B_//__L._/\\
no enciende,verifique si el "_._E,,_,,(l_do,
encendedorest_ rote, sucio o _.___
mejade.
BASE DEL QUEMADOR
Perillas de Control de los
Elementos Superiores
Seutilizanparaencenderlos quemadoressuperiores. Se dispone de
unaselecci6n infinita de ajustesde calor desde'Low' a 'High'. Enel
ajuste'High' se puedesentirun tope o una muesca. Lasperillas
puedenset ajustadasexactamenteen los ajustescorrespondienteso
entre cualquierade ellos.
I
'High' [Alto): Seusa parahacer hervir un
Ifquidoo alcanzarlapresi6n adecuadaen una
ella a presi6n. Siemprereduzcael ajuste a un
calor m_sbajocuando los Ifquidoscomiencena
herviro cuando los alimentoscomiencena
cocinarse.
Se usa una llama de tamafio intermedio para
continuar cocinando. El alimento no se cocinard
m_s rdpido cuando se usa un ajuste de llama
m_s alto que el necesario para mantener un
hewer suave. El agua hierve a la misma
temperatura si est_ hirviendo suave o
vigorosamente.
Las ilustracionescerca de la perilla identifican cual es el O O
quemadorque controla esaperilla. Per ejemplo,la
ilustraci6na izquierdamuestrala ubicaci6ndel quemador O O
delanteroizquierdo.
Programaci6n de los Controles:
Eltamafio y el tipo de utensilio afectar_inel ajuste de calor.
l. Coloqueun utensiliosobre la rejilla del quemador.
• Lallama del quemadorpuede levantarseo parecerseparada
del orificio si no se coloca un utensilio en la rejilla.
2. Optimay gire la perilla a la izquierdaal ajuste 'Light'
[Encendido).
, Se oir_ un chasquido (chispa)y el quemadorse encender_.
[Loscuatro quemadoresproducir_nchispacuando se colocala
perilla de cualquierade los quemadoresen la posici6n'Light'.)
3. Despuc!squeel quemadorse ha encendido,gire la perilla al
tamafio de llama deseado.
, El encendedorcontinuar_ produciendochispashasta que la
perilla seagirada m_salki de la posiciOn'Light'.
Funcionamiento durante una
Interrupci6n de la Energia
El ctrica
1. Acerque un f6sforo encendidoa la tapa del quemadorsuperior
deseado.
2. Optima y gire la perilla de control lentamentea la posici6n'Light'.
3. Ajuste la llamaal nivel deseado.
58
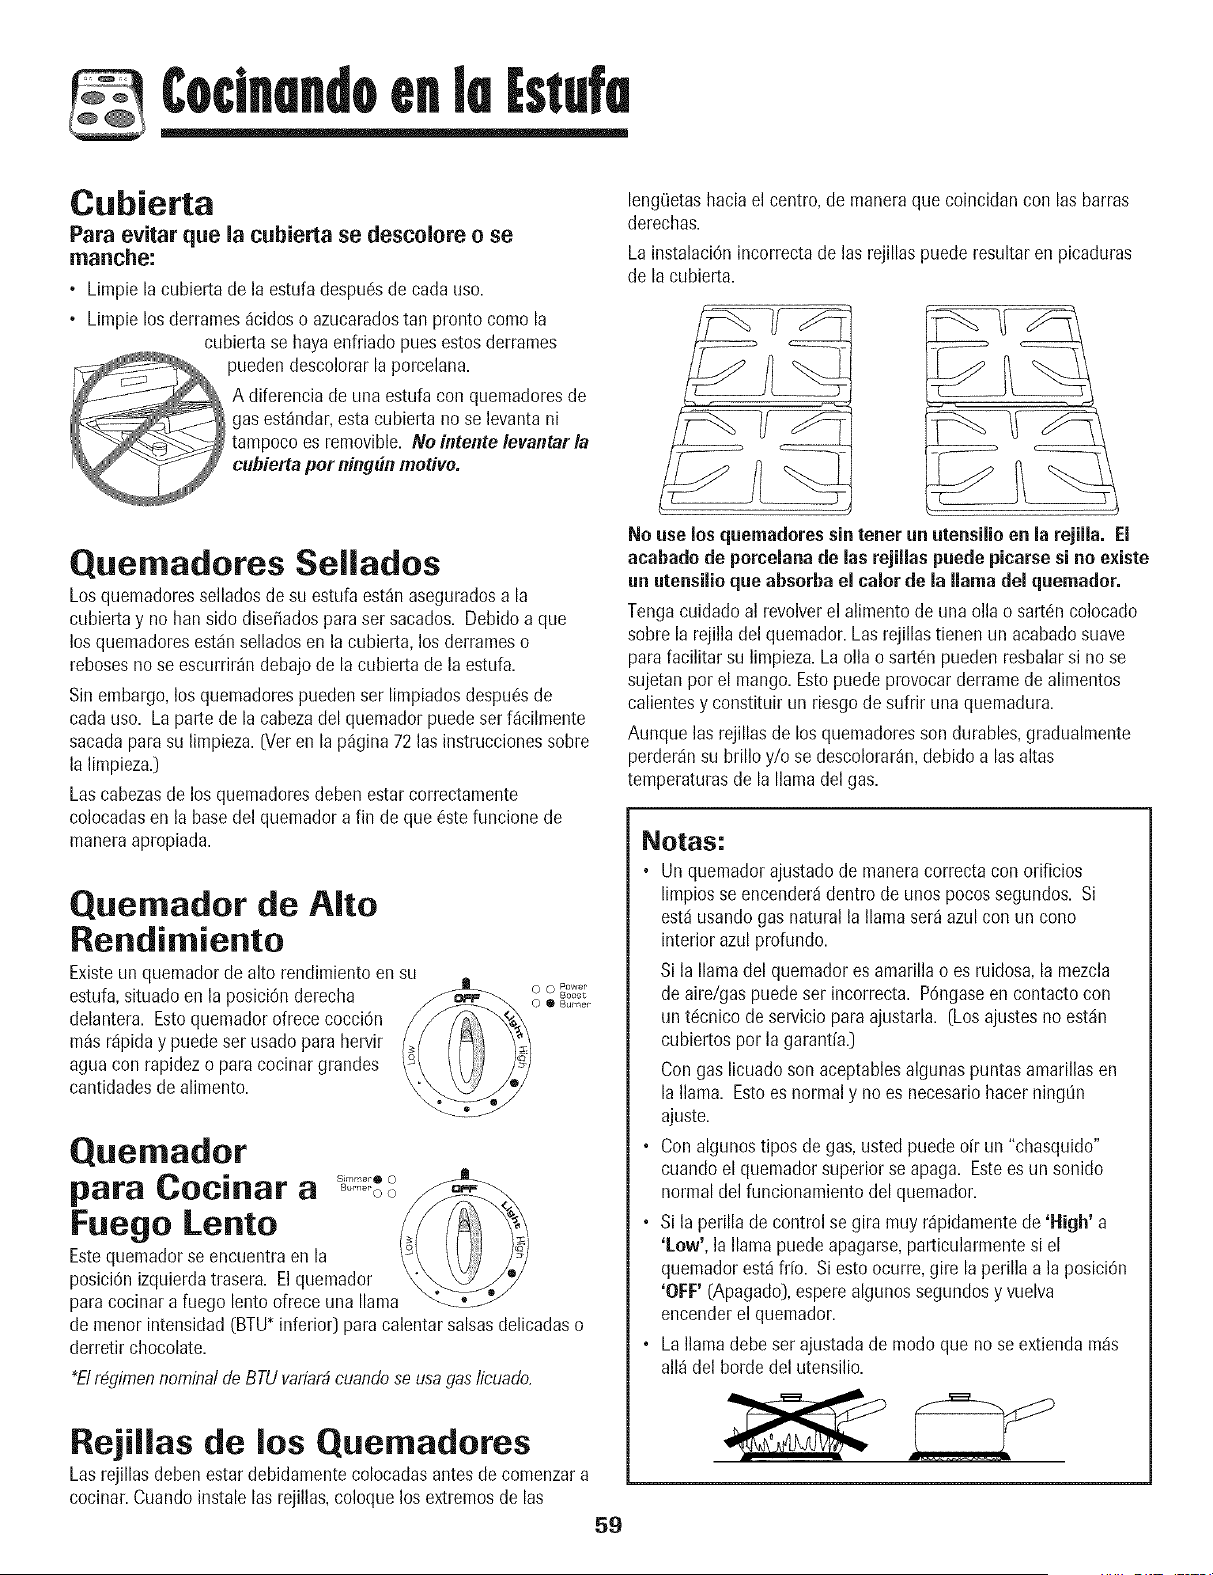
¢odnandoenla Estufa
Cubierta
Para evitar que la cubierta se descolore o se
manche:
° Limpielacubiertade la estufa despu6sde cada uso.
° Limpie losderrames_cidos o azucaradostan pronto como la
cubiertase hayaenfriado puesestos derrames
puedendescolorarlaporcelana.
A diferencia de una estufa con quemadoresde
gasest_ndar,esta cubierta no se levanta ni
tampocoes removible. No intente levantarla
cubiertaper ning#nmotive.
Quemadores Sellados
Losquemadoressellados de su estufaest_naseguradosa la
cubiertay no han sido disefiadospara set sacados. Debido a que
los quemadoresest_inselladosen lacubierta, los derrameso
rebosesnose escurrir_n debajo de la cubierta de la estufa.
Sin embargo,los quemadorespueden ser limpiadosdespu0sde
cada uso. La parte de la cabezadel quemadorpuedeset f_cilmente
sacadaparasu limpieza.07eren la p_gina 72 las instruccionessobre
la limpieza.)
Lascabezasde los quemadoresdebenestarcorrectamente
colocadasen la basedel quemadora fin de que 6atefuncionede
maneraapropiada.
Quemador de Alto
Rendimiento
Existeun quemadorde alto rendimiento en su
estufa,situadoen la posiciOnderecha
delantera. Estoquemadorofrece cocci6n
m_sr_piday puedeser usadopara hervir
agua con rapidezo para cocinar grandes
cantidadesde alimento.
Quemador
= Simr-,e_'@0 __
Dara Coc|nar a oo,-ooroo
Fuego Leato
Estequemadorse encuentra en la \- \ i _) J / ;J
posici6nizquierdatrasera. Elquemador _X>..._V_/_
paracocinara fuego lento ofrece una Ilama_-_ _/
de menor intensidad (BTU*inferior) para calentar salsasdelicadaso
derretir chocolate.
*Elr#gimennominalde BTU variar#cuandose usagaslicuado.
Rejillas de los Quemadores
Lasrejillas deben estar debidamentecolocadasantesdecomenzara
cocinar. Cuandoinstale las rejillas,coloquelos extremosde las
59
leng(]etashaciael centro,de maneraque coincidancon las barras
derechas.
LainstalaciOnincorrectade las rejillas puede resultar en picaduras
de lacubierta.
No use los quemaderes sin tener un utensilio en la rejilla. El
acabado de porcelanade las rejillas puede picarse si no existe
un utensilioque absorba el calor de la llama del quemador.
Tengacuidado al revolverel alimento de una olla o sart_n colocado
sobre la rejilla del quemador.Las rejillastienen un acabadosuave
parafacilitar su limpieza.La olla o sartc!npuedenresbalarsi no se
sujetanpot el mango.Estopuedeprovocarderramede alimentos
calientesy constituir un riesgode sufrir una quemadura.
Aunque las rejillasde losquemadoresson durables,gradualmente
perder_insu brilloy/o se descolorar_n,debido alas altas
temperaturasde la llama del gas.
Notas:
• Un quemadorajustado de maneracorrecta con orificios
limpiosse encender_identro de unospocossegundos. Si
est,1usandogas natural la llama ser_azul con un cono
interior azul profundo.
Si la llamadel quemadores amarillao es ruidosa, la mezcla
de aire/gas puede ser incorrect& P6ngaseen contacto con
un t6cnico de serviciopara ajustarla. (Losajustesno est_in
cubiertos por la garantia.)
Con gas licuadoson aceptablesalgunaspuntas amarillas en
la llama. Estoesnormal y noes necesariohacer ningOn
ajuste.
• Con algunostipos de gas, usted puede oir un "chasquido"
cuando el quemadorsuperior se apaga. Estees un sonido
normal delfuncionamientodel quemador.
• Si la perilla de control se gira muy r_pidamentede 'High' a
'Low', la llama puedeapagarse,particularmentesi el
quemadorest,1fr[o. Si esto ocurre,gire la perilla a la posici0n
'OFF' (Apagado),esperealgunossegundosy vuelva
encenderel quemador.
• La llamadebe ser ajustadade modo que no se extienda m_s
all_ del borde del utensilio.
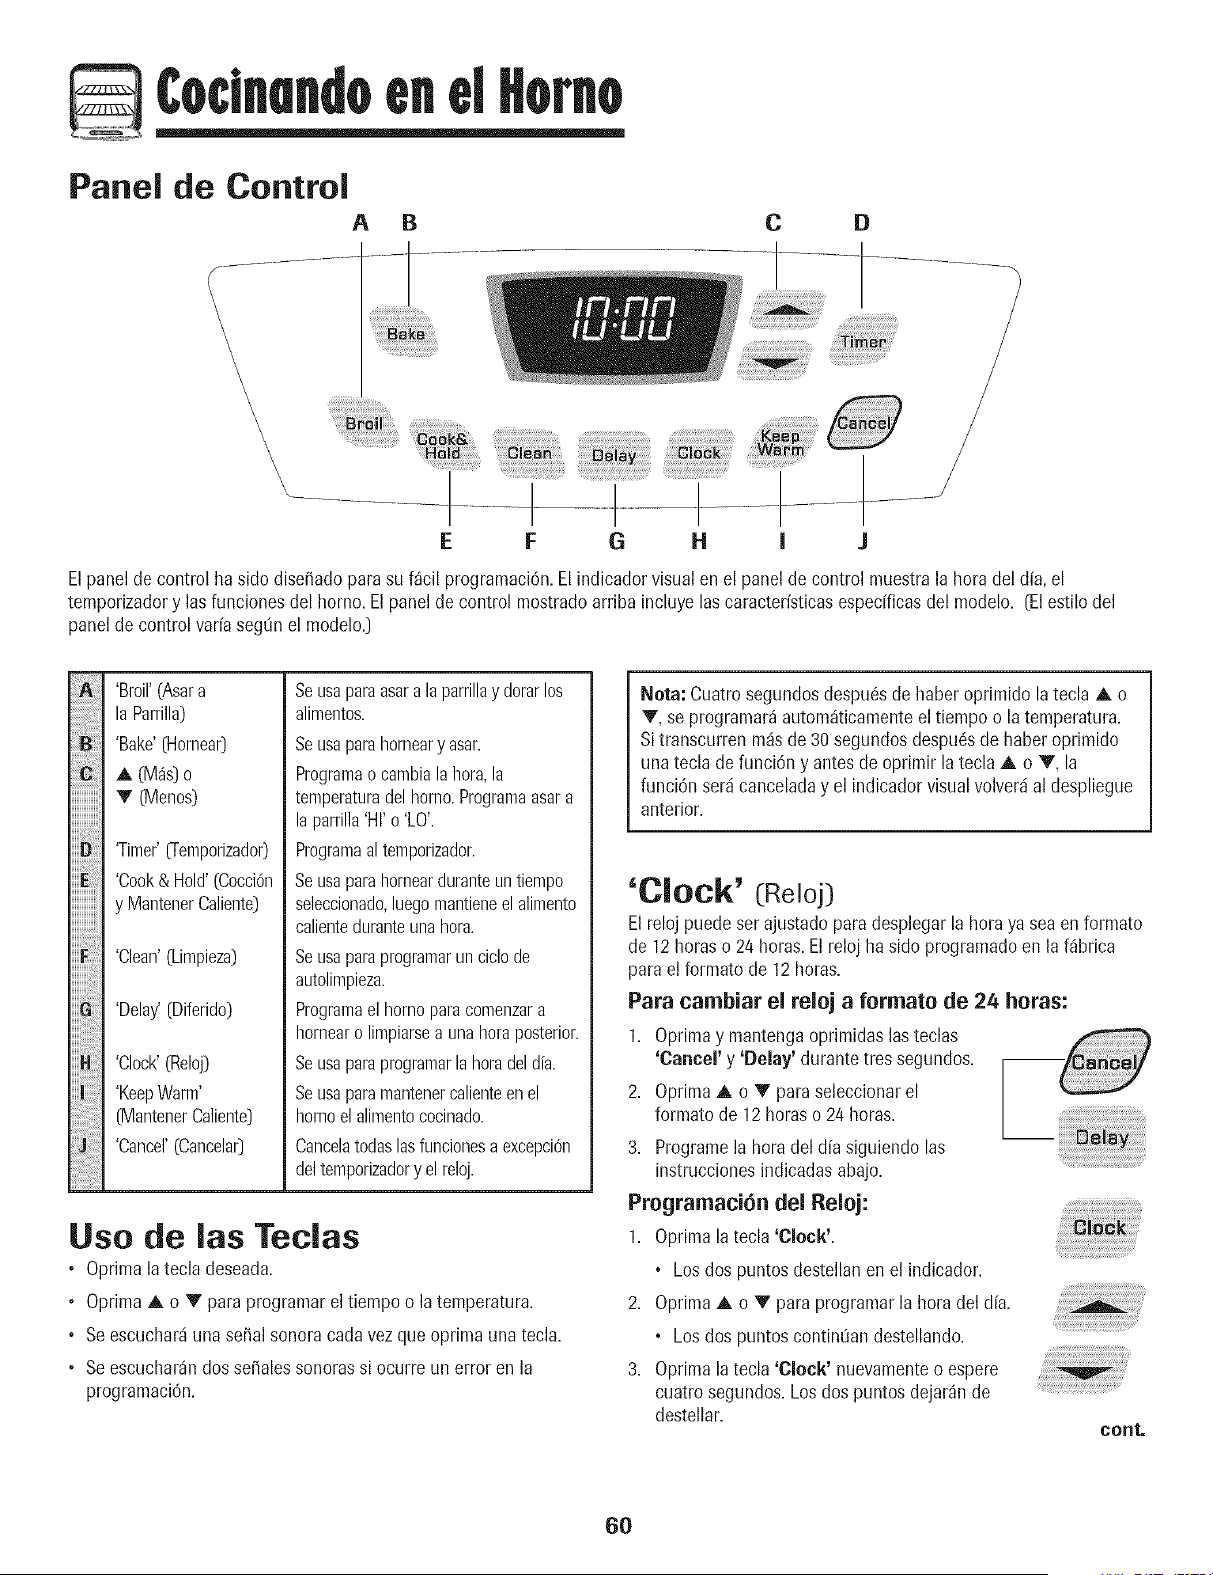
Coclnandoen d Homo
Panel de Control
A B
\
\
C D
E F
' /
......................
G H I J
Elpanelde control ha side dise_adopara su f_cil programaci6n.Elindicadorvisualen el panelde control muestrala hera del d[a, el
temporizadory lasfuncionesdel homo. El panel de control mostradoarribaincluyelas caracteristicasespec[ficasdel modelo. [Elestilo del
panelde control varia segOnel modelo.]
'Broil'(Asara
laParrilla)
'Bake'[Hornea0
A (M_s)o
V (Menos)
'Timer'[l-emporizado0
'Cook& Hold'(Cocci0n
y MantenerCaliente)
'Clean'(Limpieza)
'Delay'[Diferido)
'Clock'(Reloj)
'KeepWarm'
[MantenerCaliente]
'Cancel'(Cancela0
Seusaparaasara laparrillay dorarlos
alimentos.
Seusaparahorneary asar.
Programaocambialahera,la
temperaturadelborne.Programaasara
laparrilla'HI'o 'LO'.
Programaaltemporizador.
Seusaparahornearduranteuntiempo
seleccionado,luegomantieneel alimento
calienteduranteunahera.
Seusaparaprogramarun ciclode
autolimpieza.
Programael homoparacomenzara
hornearo limpiarsea unaheraposterior.
Seusaparaprogramarla heradel dia.
Seusaparamantenercalienteenel
homoelalimentococinado.
Cancelatodaslasfuncionesa excepci6n
deltemporizadory el reloj.
Use de las Teclas
• Oprimala tecla deseada.
OprimaA o V para programarel tiempo o la temperatura.
Seescuchar_iunasepal sonoracadavezque oprima unatecla.
• Seescuchar4ndosso,ales sonorassi ocurre un error en la
programaci6n.
Nora: Cuatrosegundosdespu6sde haber oprimido la tecla A o
V, se programar_autom_ticamenteel tiempo o la temperatura.
Sitranscurren m_sde 30 segundosdespu6sde haberoprimido
unatecla de funciOny antes de oprimir la tecla A o V, la
funciOnser_icanceladay el indicadorvisual volver_ial despliegue
anterior.
'Clock' (Reloj)
Elreloj puedeserajustado para desplegarla hera ya sea en formate
de 12 horaso 24 horas.El reloj ha side programadoen la f_brica
parael formate de 12 betas.
Para cambiar el reloj a formate de 24 betas:
1. Optima y mantengaoprimidas lasteclas
'Cancel' y 'Belay' durantetres segundos.
2. Optima A o V paraseleccionarel
formate de 12 horaso 24 horas.
3. Programela hera del aliasiguiendo las
instruccionesindicadasabajo.
Programaci6n del Reloj:
1. Optima la tecla 'Clock'.
• Los dos puntosdestellanenel indicador.
2. Optima A o V paraprogramarla hera del d[a.
• Los dos puntoscontinLiandestellando.
3. Optima la tecla 'Clock' nuevamenteo espere
cuatrosegundos.Losdos puntos dejar_nde
destellar.
cont.
6O
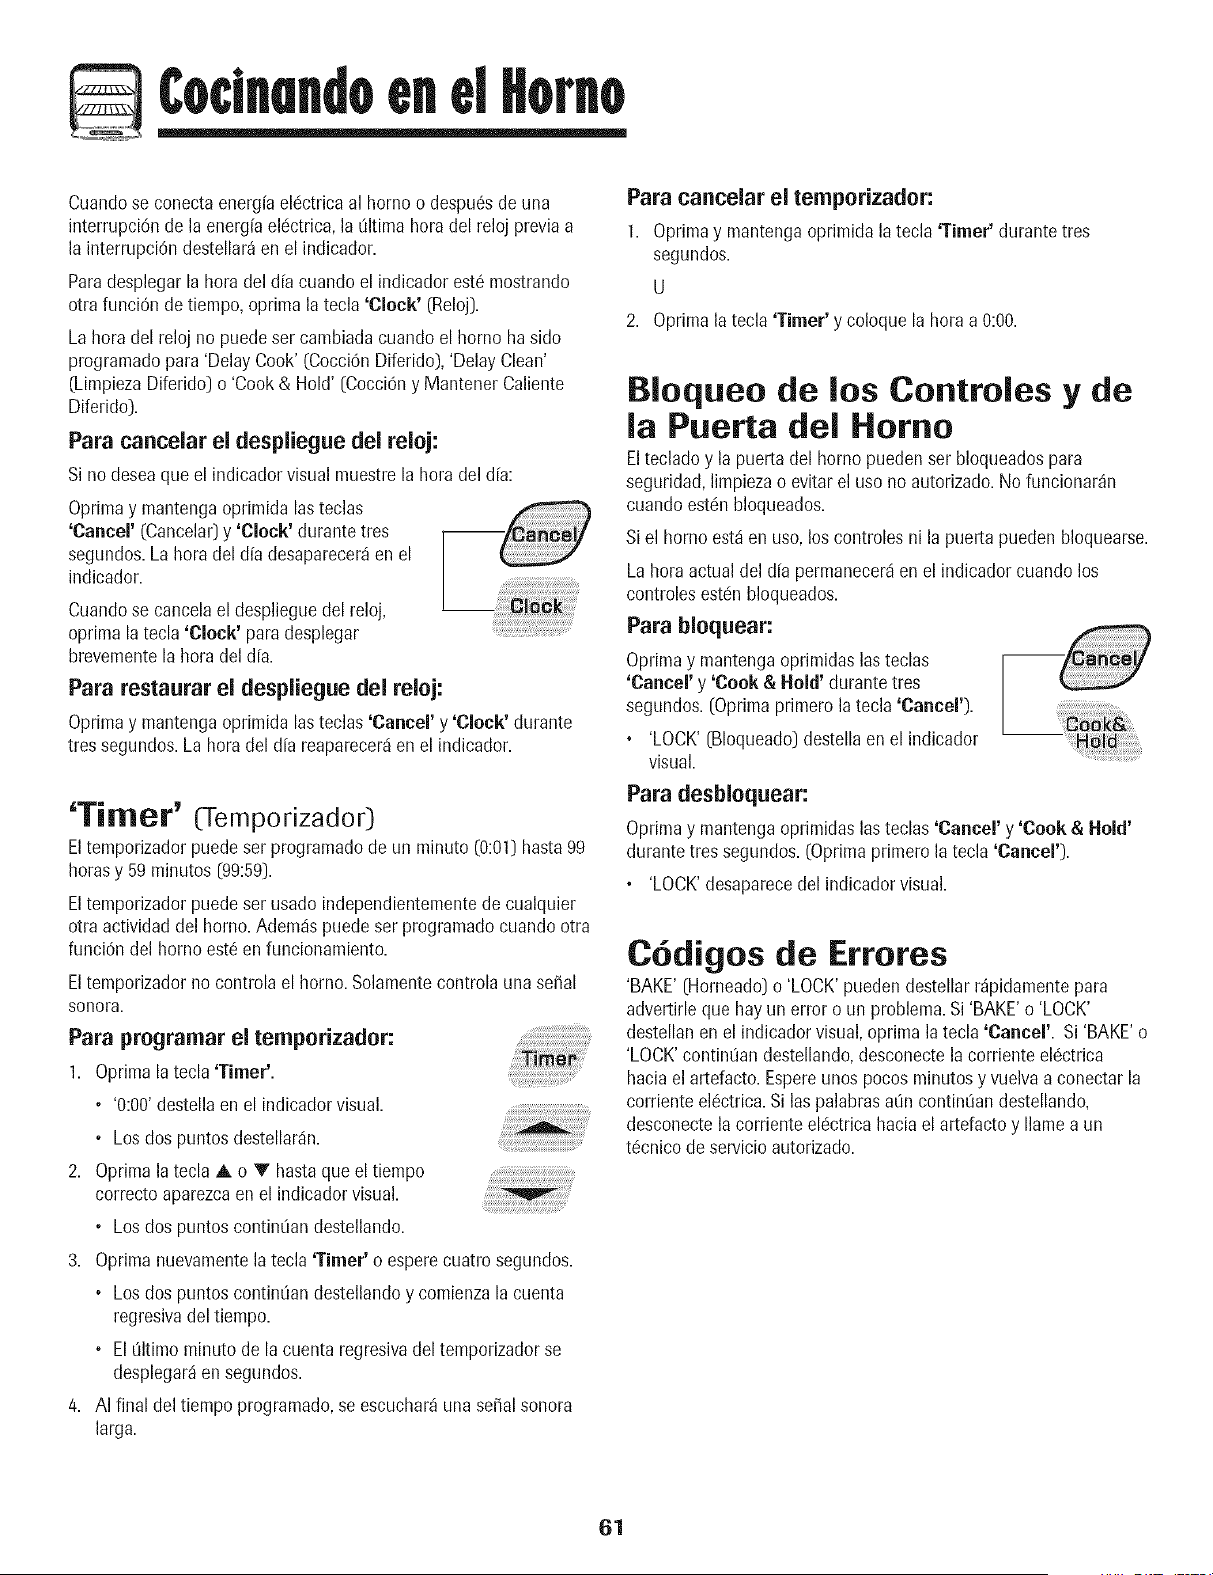
Coclnandoen d Homo
Cuandose conectaenergfael_ctrica al homo o despuCsdeuna
interrupciCnde la energfaelc!ctrica,la 01timahora del reloj previaa
la interrupciCndestellar_en el indicador.
Paradesplegarla hora del d[a cuando el indicadorest6 mostrando
otra funciCnde tiempo, oprima la tecla 'Clock' (Reloj).
La hora del reloj no puedeser cambiadacuandoel homo hasido
programaticpara 'DelayCook' (CocciCnDiferido),'Delay Clean'
(LimpiezaDiferido)o 'Cook& Hold' [Cocci0ny MantenerCaliente
Diferido).
Para cancelar el despliegue del reloj:
Si no deseaque el indicadorvisual rauestre la hora del d[a:
Oprimay mantengaoprimida lasteclas
'Cancel' (Cancelar)y 'Clock' durante tres
segundos.Lahora del dfadesaparecer_en el
indicador.
Cuandose cancelael desplieguedel reloj.....
oprima lateela 'Clock' paradesplegar
brevementela hora del d[a.
Para restaurar el despliegue del reloj:
Oprimay mantengaoprimida lasteclas 'Cancel' y 'Clock' durante
tres segundos.La hora del d[a reaparecer_ien el indicador.
'Timer' (Temporizador)
Eltemporizadorpuedeser programadode un minute (0:01)hasta99
horasy 59 minutos [99:59).
Eltemporizadorpuedeser usado independientementede cualquier
otra actividaddel homo. Adem_ispuedeser programaticcuando otra
funci0n del homo est6 en funcionamiento.
Eltemporizadorno controla el homo. Solamentecontrolauna sepal
sonora.
Para programar el temporizador:
1. Oprimala tecla 'Timer'.
• '0:00'destellaenel indicadorvisual.
• Losdos puntos destellar_in.
2. Oprimala tecla A o Y hastaque el tiempo
correcto aparezcaen el indicadorvisual.
• Losdos puntos contin0an destellando.
3. Oprimanuevamentela tecla 'Timer' o esperecuatro segundos.
• Losdos puntos continOandestellandoy comienzala cuenta
regresivadel tiempo.
• ElOltimominutode la cuenta regresivadel temporizadorse
desplegar_ien segundos.
4. AI final del tiempo programatic, se escuchar_una sepalsonora
larga.
Para cancelar el temporizador:
1. Oprimay mantengaoprimida la tecla 'Timer' durantetres
segundos.
U
2. Oprima la tecla 'Timer' y coloque la horaa 0:00.
Bloqueo de los Controles y de
la Puerta del Homo
Eltecladoy la puertadel horno puedenser bloqueadospara
seguridad,limpiezao evitar el uso no autorizado.No funcionar_n
cuandoestc!nbloqueados.
Siel homo est,1en uso, los controlesni la puerta pueden bloquearse.
La hora actual del aliapermanecer_en el indicador cuandolos
controlesestc!nbloqueados.
Para bloquear:
Optimay mantengaoprimidaslas teclas
'Cancer y 'Cook & Hold' durantetres
segundos.(Oprimaprimero la tecla 'Cancer). ........
, 'LOCK'[Bloqueado)destellaenel indicador
V iS U a I.
Para desbloquear:
Optimay mantengaoprimidaslas teclas 'Cancer y 'Cook & Hold'
durantetres segundos.(Oprimaprimero la tecla 'Cancer).
, 'LOCK'desaparecedel indicadorvisual.
CCdigos de Errores
'BAKE'[Horneado)o 'LOCK'puedendestellarr_pidamentepara
advertirleque hay un error oun problem& Si 'BAKE'o 'LOCK'
destellanen el indicadorvisual,oprima la tecla 'Cancel'. Si 'BAKE'o
'LOCK'contint3andestellando,desconectelacorrienteel(_ctrica
hacia el artefacto.Espereunos pocos minutosy vuelvaa conectar la
corrienteelCctrica.Si laspalabrasaOncontint3andestellando,
desconectelacorrienteelc!ctricahaciael artefacto y Ilamea un
tCcnicodeservicioautorizado.
61
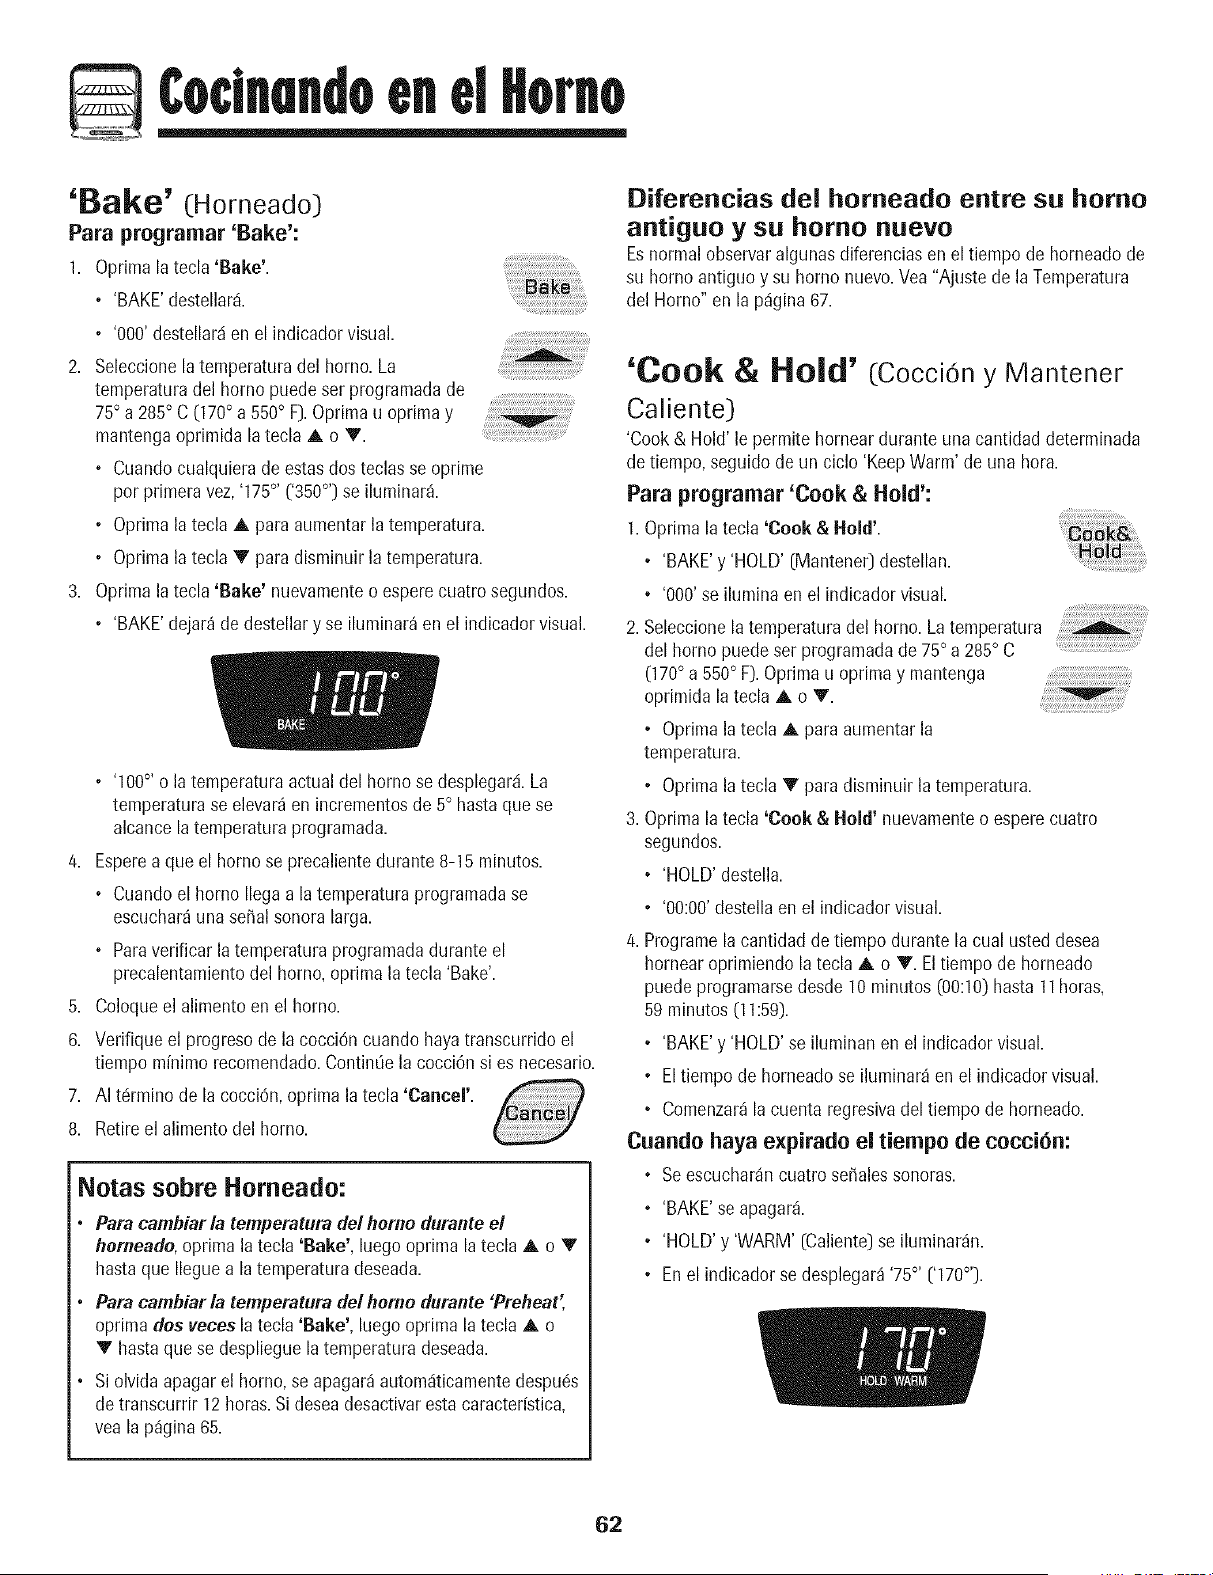
Coclnandoen d Horno
'Bake' (Horneado)
Para programar 'Bake':
1. Oprimala tecla 'Bake'. ....
• 'BAKE'destellar&
• '000'destellar_ien el indicadorvisual.
2. Seleccione[atemperaturadel homo. La
temperaturadel homo puedeset programadade ...........
75° a 285° C (170° a 550° F).Oprimau optima y
mantengaoprimida la tecla A o Y.
• Cuandocualquierade estasdos teclasse oprime
per primeravez,'175°, ('350°') se iluminar&
• Oprimalatecla A para aumentarla temperatura.
• Oprimalatecla V para disminuir la temperatura.
3. Oprimala tecla 'Bake' nuevamenteo esperecuatro segundos.
• 'BAKE'dejar_de destellary se iluminar_en el indicadorvisual.
• '100°' o la temperaturaactual del homo se desplegar& La
temperaturase elevar_en incrementosde 5° hastaquese
alcancela temperaturaprogramada.
4. Esperea que el homo se precalientedurante8-15 minutes.
• Cuandoel homo Ilegaa la temperaturaprogramadase
escuchar_una serial sonoralarga.
• Paraverificar la temperaturaprogramadadurante el
precalentamientodel homo,oprima la tecla 'Bake'.
5. Coloqueel alimento en el homo.
6. Verifique el progresode la cocci6n cuando hayatranscurridoel
tiempo mfnimorecomendado.ContinOela cocci6nsi es necesario.
7. AI t6rmino de la cocci6n,oprima la tecla 'Cancel'.
8. Retireel alimento del homo.
Notas sobre Horneado:
Para cambiar la temperatura de/home durante el
herneade, oprima la tecla 'Bake', luegooptima la tecla A o Y
hastaque Ileguea la temperaturadeseada.
Para cambiar la temperatura de/borne derante 'Preheat',
oprima des veces latecla 'Bake', luegooprima la tecla A o
V hastaquese desplieguela temperaturadeseada.
Si olvidaapagar el homo, se apagar_ autom_iticamentedespu6s
de transcurrir 12 horas.Si deseadesactivarestacaracterfstica,
vea la p%ina 65.
Diferencias del horneado entre st= homo
antiguo y su homo nuevo
Esnormal observaralgunasdiferenciasen el tiempode horneadode
su homo antiguoy su homo nuevo.Vea "Ajustede la Temperatura
del Homo" en la p_gina87.
'Cook & Hold' (CocciOny Mantener
Caliente)
'Cook& Hold' le permitehorneardurante unacantidaddeterminada
detiempo, seguidode unciclo 'KeepWarm' de una hera.
Para programar 'Cook & Hold':
1. Oprimala tecla 'Cook & Hold'.
• 'BAKE'y 'HOLD' (Mantener)destellan.
• '000'se iluminaen el indicador visual.
2. Seleccionela temperaturadel horno.Latemperatura
del horno puede ser programadade 75° a 285° C
(170° a 550° F). Oprimau optima y mantenga ...... ....
oprimida latecla A o Y. :
• Oprimala tecla A para aumentar la
temperatura.
• Oprimala tecla V para disminuir la temperatura.
3. Oprimala tecla 'Cook & Hold' nuevamenteo esperecuatro
segundos.
• 'HOLD'destella.
• '00:00'destellaenel indicadorvisual.
/4.Programela cantidad de tiempo durante la cual usteddesea
hornearoprimiendola tecla A o V. El tiempo de horneado
puedeprogramarsedesde 10 minutes (00:10)hasta 11horas,
59 minutes(11:59).
• 'BAKE'y 'HOLD'se iluminan en el indicadorvisual.
• Eltiempode horneadose iluminar_en el indicadorvisual.
• Comenzar_la cuenta regresivadel tiempo de horneado.
Cuando haya e×pirado el tiempo de cocei6n:
• Seescuchar_ncuatrosefialessonoras.
• 'BAKE'se apagar&
• 'HOLD'y 'WARM' (Caliente)se iluminar_n.
• Enel indicadorse desplegar_'75°, ('170°').
62
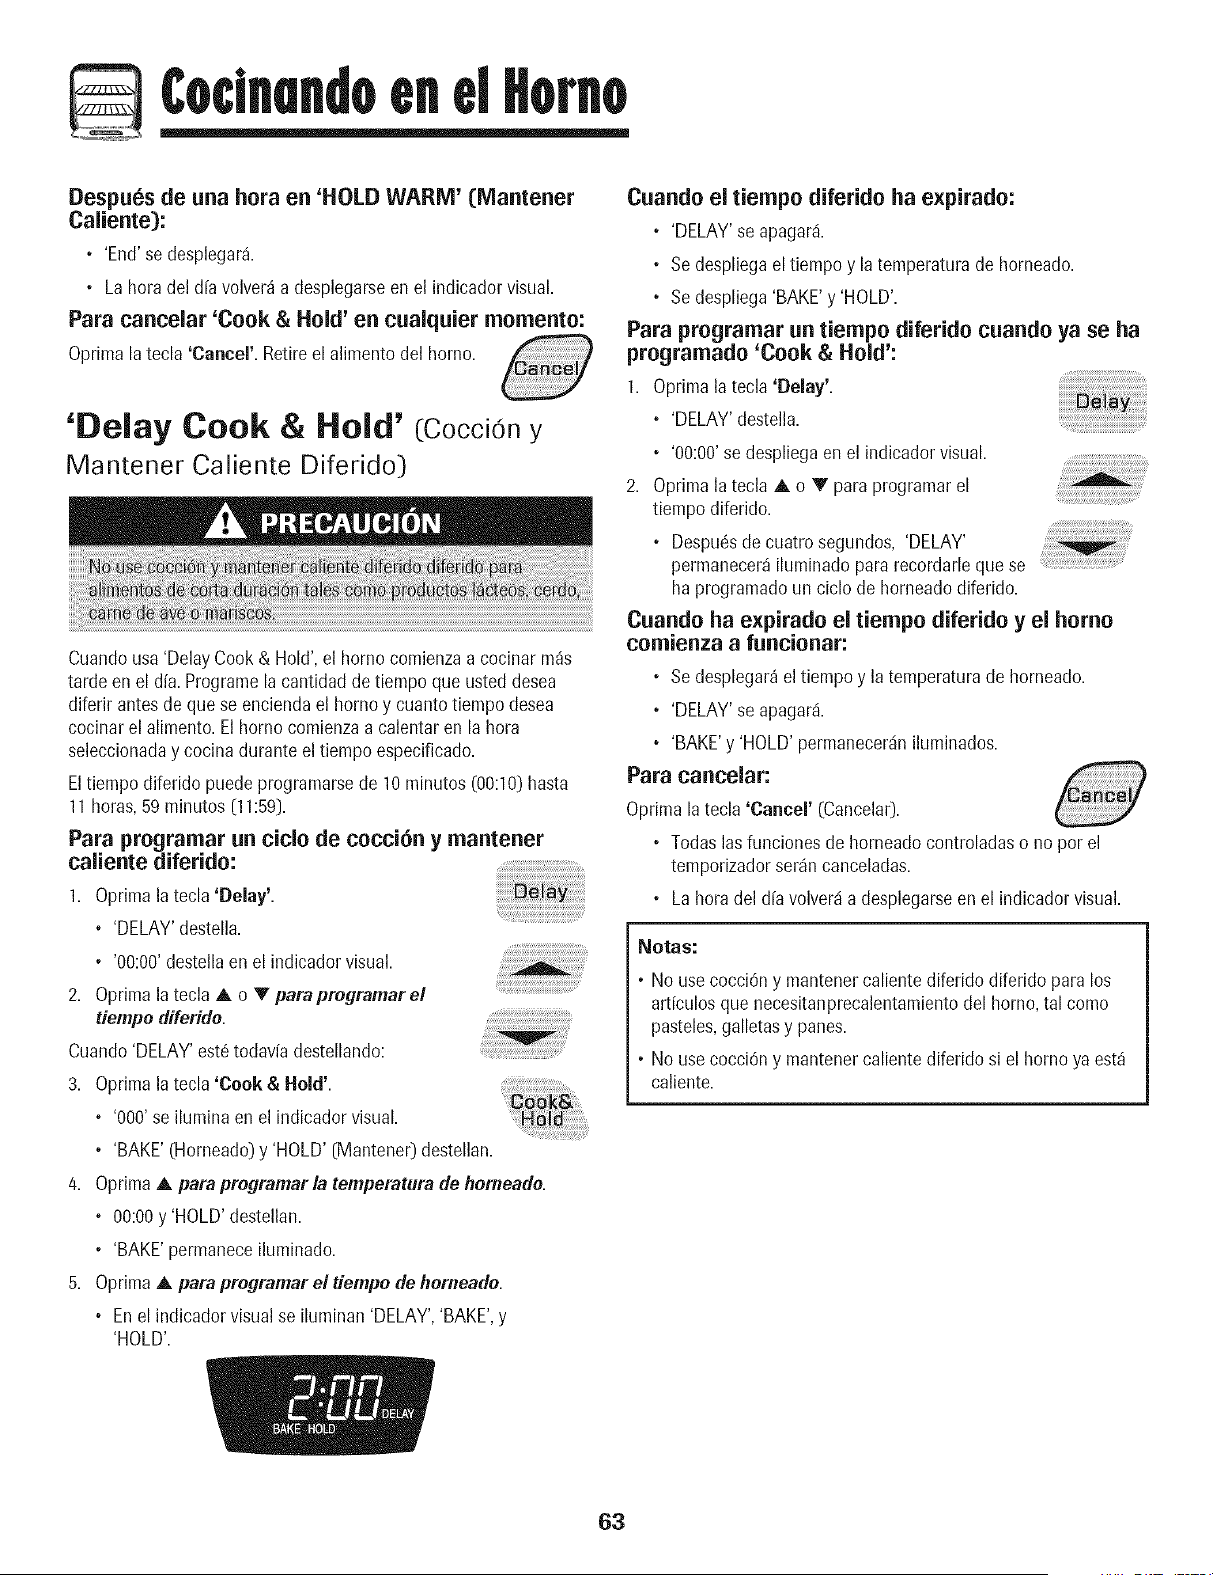
Coclnandoenel Homo
Despu_s de una hora en 'HOLD WARM' (Mantener
Caliente):
• 'End'se desplegar&
• La horadel d[avolver_ a desplegarseen el indicadorvisual.
Para cancelar 'Cook & Hold' en cualquier memento:
Oprimala tecla 'Cancer. Retireel alimentodel homo.
'Delay Cook & Hold' (CocciOny
Mantener Caliente Diferido)
Cuandousa 'DelayCook & Hold', el homo comienzaa cocinar rn_s
tarde enel d[a.Programelacantidadde tiernpoque usted desea
diferir antesde que se enciendael homo y cuanto tiernpodesea
cocinarel alimento.El homo comienzaa calentar en la hora
seleccionaday cocina durante el tiernpo especificado.
Eltiempodiferido puedeprograrnarsede 10 rninutos(00:10)hasta
11horas,59minutos (11:59).
Para programar un ciclo de cocei6n y mantener
caliente diferido: ....
1. Oprimala tecla 'Delay'.
• 'DELAY'destella.
• '00:00'destellaen el indicadorvisual.
2. OprimalateclaAoVparapreqramarel
dempo diferido.
Cuando'DELAY'est6todaviadestellando:
3. Optima la tecla 'Cook & Hold'. ..................................
• '000'se ilumina en el indicadorvisual.
• 'BAKE'(Horneado)y 'HOLD' (Mantener)destellan.
4. OprimaA para programar la temperatura de homeado.
• 00:00y'HOLD' destellan.
• 'BAKE'permaneceiluminado.
5. Optima A para programar el tiempo de horneado.
• Enel indicadorvisualse iluminan 'DELAY','BAKE',y
'HOLD'.
Cuando el tiempo diferido ha e×pirado:
• 'DELAY'se apagar&
• Sedespliegael tiempo y la temperaturade horneado.
• Sedespliega'BAKE'y 'HOLD'.
Para programar un tiempo diferido cuando ya se ha
programatic 'Cook & Hold':
1. Oprima la tecla 'Delay'.
• 'DELAY'destella.
• '00:00'se despliegaen el indicadorvisual.
2. Oprima la tecla A o V paraprogramarel
tiempo diferido.
• Despu6sde cuatrosegundos, 'DELAY'
permanecer_iluminadopara recordarleque se
haprogramadoun ciclo de horneadodiferido.
Cuando ha expirado el tiempo diferido y el homo
comienza a funcionar:
• Sedesplegar_el tiempo y la temperaturade horneado.
• 'DELAY'se apagar&
• 'BAKE'y 'HOLD' permanecer_iniluminados.
Para cancelar:
Optimala tecla 'Cancer (Cancelar).
• Todaslas funcionesde horneado controladaso no por el
temporizadorser_ncanceladas.
• La hora del d[a volver_ia desplegarseen el indicadorvisual.
NOtaS= =
No usecocci6n y mantenercaliente diferido diferido para los
art[culosquenecesitanprecalentamientodel homo,tal como
pasteles,galletasy panes.
• No usecocci6n y mantenercalientediferido si el homo ya est_
caliente.
63
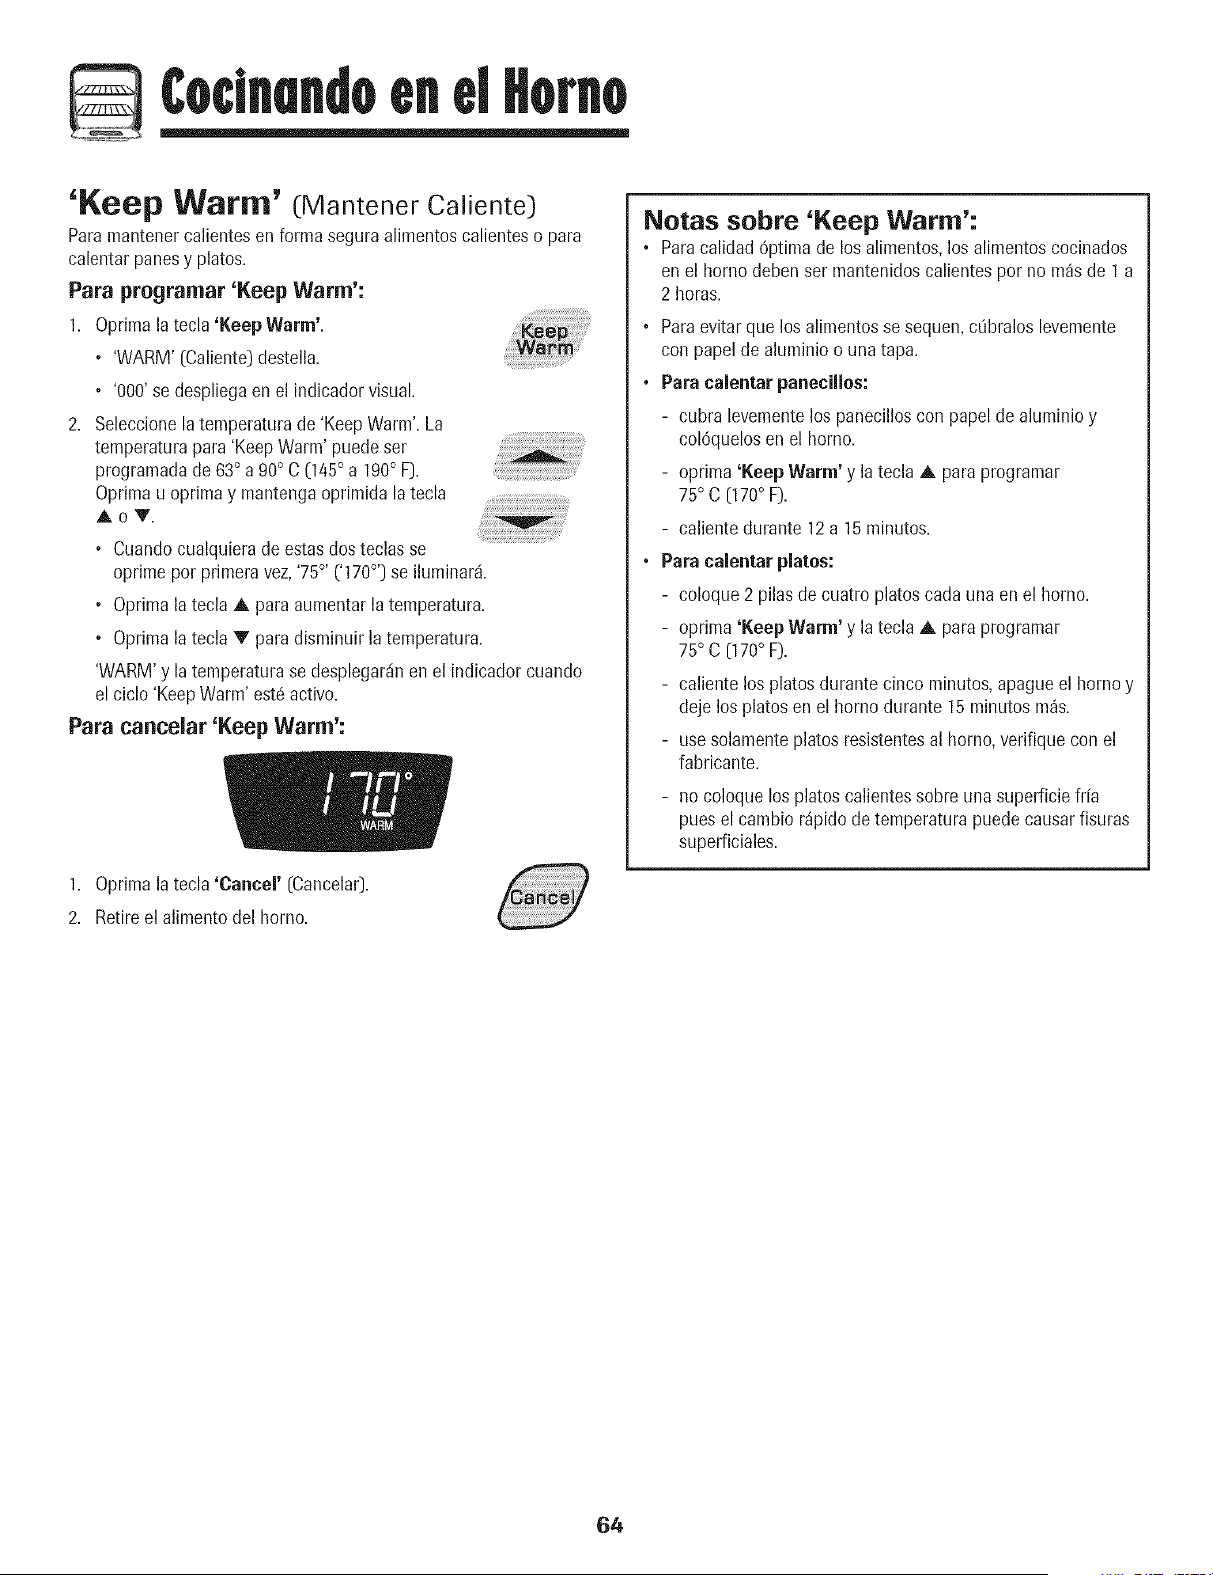
£oclnandoen d Homo
'Keep Warm' (Mantener Caliente]
Paramantenercalientesen forma segura alimentoscalienteao para
calentarpanesy plates.
Para programar 'Keep Warm':
1. Oprimala tecla 'Keep Warm'.
• 'WARM' [Caliente]destella.
• '000'se deapliegaenel indicadorvisual.
2. Seleccionela temperaturade 'KeepWarm'.La
temperaturapara 'Keep Warm' puedeser
programadade63° a 90° C 045 ° a 190° F].
Oprimau oprimay mantengaoprimida la tecla
AoY.
i i!ili!iii illi ii iiiiiiiiiiiiiiii!i i
i! iii !iiiiiilili i i i !ii!!ii!i !ii!i
• Cuandocualquierade estasdos teclasse
oprime per primeravez,'75°' ('170°'] se iluminar&
• Oprimalatecla A para aumentarla temperatura.
• Oprimalatecla V para disminuir la temperatura.
'WARM'y latemperaturase desplegar_inen el indicador cuando
el ciclo 'KeepWarm' est6active.
Para eancelar 'Keep Warm':
1. Oprimala tecla 'Cancel' [Cancelar].
2. Retireel alimento del homo.
Notas sobre 'Keep Warm':
, Paracalidad 6ptima de losalimentos,los alimentoscocinados
en el homo deben ser mantenidoscalientesper no m_s de I a
2 horas.
• Paraevitarque los alimentosse aequen,cObraloslevemente
con papelde aluminioo una tapa.
, Para calentar panecilles:
- cubra levementelos panecilloscon papel de aluminio y
col6quelosen el homo.
- oprima 'Keep Warm' y la tecla A paraprogramar
75° C [170° F].
- caliente durante 12a 15 minutes.
• Para calentar plates:
- coloque 2 pilasde cuatro platescadauna en el homo.
- oprima 'Keep Warm' y latecla A para programar
75° C [170° F].
- caliente los plates durante cinco minutes,apague el homo y
deje los plates en el homo durante 15 minutesm_s.
- use solamenteplates resistentesal homo,verifique con el
fabricante.
- no coloque los plates calientessobre una auperficiefr[a
pues el cambio r_pido de temperaturapuede cauaarfisuras
superficiales.
64
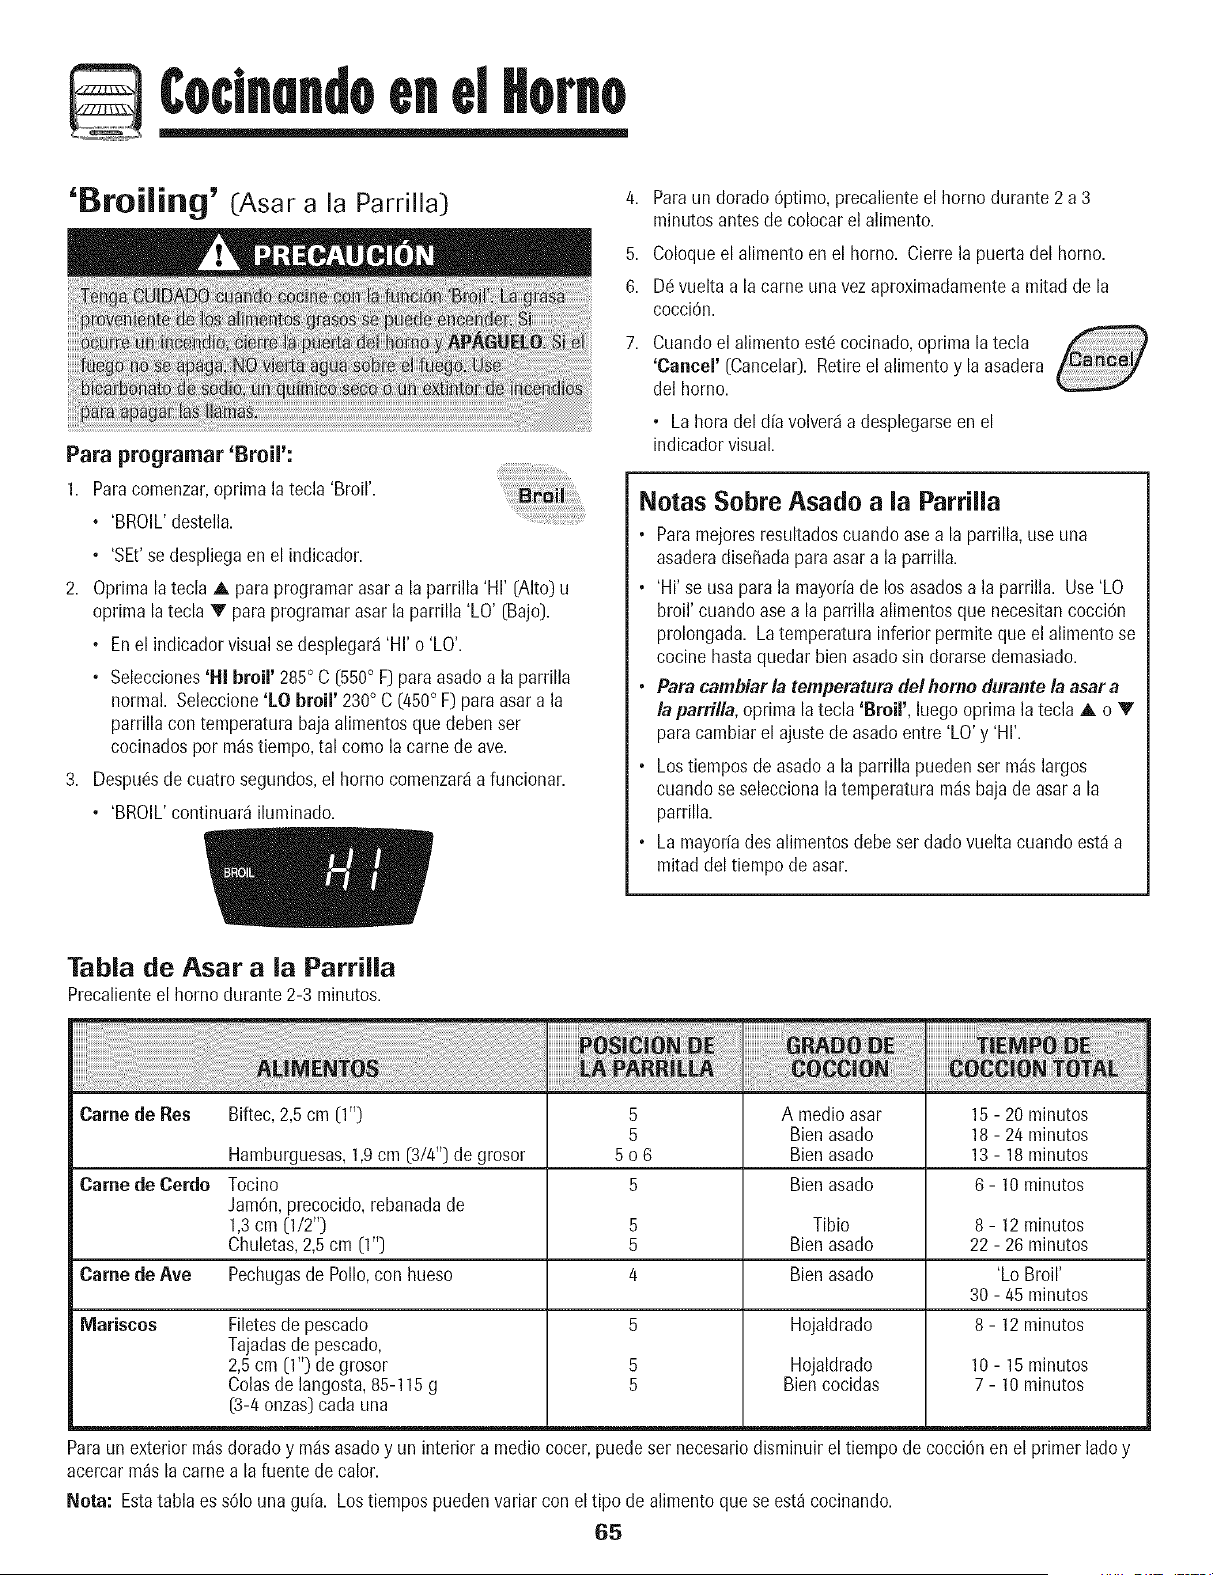
CoclnaMoen d Horno
'Broiling' (Asar a la Parrilla)
Para programar 'Broil':
1. Paracornenzar,oprimala tecla 'Broil'.
, 'BROIL'destella.
, 'SEt' sedespliegaen el indicador.
2. Oprima la tecla A para programarasara la parrilla 'HI' [Alto) u
optima la tecla V para programarasar la parrilla 'LO' [Bajo].
• Enel indicador visualse desplegar4'HI' o 'LO'.
, Selecciones'HI broil' 285° C [550° F] para asadoa la parrilla
normal. Seleccione'LO broil' 230° C (450° F) para asar a la
parrilla con temperaturabaja alimentosque deben ser
cocinadospor rn_stiempo,tal como la came de ave.
3. Despu_sde cuatro segundos,el homo comenzar4a funcionar.
, 'BROIL'continuar4 iluminado.
Tabla de Asar a la Parrilla
Precalienteel homo durante 2-3 minutos.
4,
5.
6.
7.
Paraun dorado 6ptimo,precalienteel homo durante 2 a 3
minutos antesde colocar el alimento.
Coloqueel alimento en el homo. Cierre la puertadel homo.
De1vueltaa la came unavezaproximadamentea mitad de la
cocciOn.
Cuandoel alimento est6 cocinado,oprima la tecla
'Cancel' [Cancela0. Retireel alimentoy la asadera
del homo.
° La hora del dfavolver_ia desplegarseen el
indicador visual.
Notas Sobre Asado a la Parrilla
• Paramejoresresultadoscuandoase a la parrilla,use una
asaderadise_adapara asara la parrilla.
• 'Hi' se usa parala mayorfade losasadosa la parrilla. Use'LO
broil' cuandoase a la parrilla alimentosque necesitancocciOn
prolongada. Latemperaturainferior permite que el alimento se
cocinehastaquedarbien asadosin dorarsedemasiado.
• Para cambiar la temperatura de/home durante la asar a
laparrilla, oprima la tecla 'Broil', luegooprima latecla A o V
paracambiarel ajuste de asadoentre 'LO'y 'HI'.
• Lostiempos de asadoa la parrilla pueden ser m_s largos
cuandose seleccionala temperatura masbaja de asar a la
parrilla.
° La mayoriadesalimentosdebeser dadovuelta cuandoest,1a
mitaddel tiempo de asar.
Came de Res Biftec, 2,5 cm [1") 5 A medio asar 15 - 20 minutos
5 Bien asado 18 - 24 minutos
Hamburguesas, 1,9cm [3/4"] de grosor 5 o 6 Bien asado 13 - 18 minutos
Came de Cerdo Tocino 5 Bien asado 6 - 10 minutos
JamOn, precocido, rebanada de
1,3 cm [1/2") 5 Tibio 8 - 12 minutos
Chuletas, 2,5 cm [1"] 5 Bien asado 22 - 26 minutos
Came de Ave Pechugas de Polio, con hueso 4 Bien asado 'Lo Broil'
30 - 45 minutos
IVJariscos 8 - 12 minutos
Filetesde pescado
Tajadasde pescado,
2,5cm [1") de grosor
Colasde langosta,85-115 g
[3-4 onzas]cada una
5
5
5
Hojaldrado
Hojaldrado
Biencocidas
10 - 15 minutos
7 - 10 minutos
Paraun exterior m_s doradoy m_isasadoy un interior a mediococer, puedeser necesariodisminuirel tiempo de cocciOnen el primer lado y
acercarm_sla camea lafuente de calor.
Nora: Estatabla es s61ouna gu[a. Los tiempospueden variar con el tipo de alimento que se est_ cocinando.
65
Coclnandoen d Homo
Cierre Autom tico/
IVIodo Sab tico
Elhomo se apagar_iautom4ticamentedespu6sde 12horassi usted Io
dejaaccidentalmenteencendido. Esta caracterfsticade seguridad
puedeser desactivada.
Para cancelar el cierre aurora;trice de 12 horas y
dejar que el homo funcione continuamente durante
72 horas:
1. Programeel homo para hornear [ver p_igina62). ....
2. Optimay mantengaoprimida la tecla 'Clock'
(Reloj]durantecinco segundos.
• 'SAb'se desplegar_y destellar_idurante cinco segundos.
• 'SAb'se desplegar_continuamentehastaquese desactiveo
hastaque transcurrael limite de 72 betas.
• 'BAKE'(Horneado)tambi6nse desplegar_si se est4 usandoun
ciclo de horneado cuandoel homo est4 en modesab_itico.
• Lafuncidn'BAKE'esla Emicaquese puede utilizarcon el mode
sabbtico.Las dem4sfunciones(temporizador,mantenercaliente,
autollmpieza,etc.) sebloquear4nduranteell modesab4tico.
Para eaneelar 'Bake' cuando el Mode Sab_tico
est_ active:
Oprimala tecla 'Cancer (Cancelar].
• 'BAKE'se apagar_ien el indicadorvisual.
• No se oir_ ningunasepalsonora.
Para eancelar el Mode $ab;itico:
1. Oprimala tecla 'Clock' durantecinco segundos.
O
2. Despu_sde 72horas,elMode Sab4ticoterminate.
• 'SAb'destellar4durante 5 segundos.
• Laheradel d[a reaparecer4en el indicadorvisual.
Notas Sobre el Mode Sab_tico
• ElMode Sab4ticopuedeser activadoen cualquier memento,
est6o no el homo encendido.
• ElMode Sab4ticonopuedeset activadosi lasteclas est4n
bloqueadaso cuando la puertaest,1bloqueada.
• Siel homo est4horneandocuando el Mode Sab_ticoes
programado, 'BAKE'se apagar_al final del ciclo de horneado.
No se emitir_inse_alessonoras.
• Sise deseala luz del homo durante el Mode Sab_itico,c!sta
debeser encendidaantesde que comienceel Mode Sab_tico.
• Cuandocomienzael Mode Sab_itico,no se emitir_ la seffal
sonorade precalentamiento.
• La mayor[ade lasadvertenciasy mensajesy todaslas seffales
sonorasest_ndesactivadascuandoel Mode Sab_ticoest_
active.
• Elciclo de autolimpiezay bloqueo autom_ticode la puerta no
funcionar_durante el Mode Sab_itico.
• Sioprime latecla 'Cancel' se cancelar_iun ciclo 'Bake',sin
embargoel control permanecer4en Mode Sab4tico.
• Sifalla la corrienteel_ctrica,cuando vuelvala energia el homo
seactivar_en Mode Sab_ticocon 72 betas restantesy ningL_n
ciclo active.
66
CocinaMoen el Homo
Ajuste de la temperatura
del homo
Laexactitud de las temperaturasdel horno es cuidadosamente
probadaen laf_brica. Esnormal notar alguna diferencia entre la
temperaturade horneado, entre un homo nuevoy un homo antiguo.
Conel correrdel tiempo, la temperaturadel homo puedecambiar.
Ustedpuede ajustar la temperaturadel homo, si considera que su
homo noest_ horneandoo dorando en forma correcta. Paradecidir
cuantodebecambiarla temperatura,programela temperaturadel
homo a 15° C (25° F) m_salta o m_isbajaque la temperatura
indicadaen sus recetas,luego hornee. Los resultadosde la
"prueba" puedendarleuna ideade cuantoajustarla temperatura.
Ajuste de la temperatara del homo: .....
1. Oprimala tecla 'Bake' (Horneado).
2. Programe280° [550°) oprimiendola tecla A. .........................................
3. Oprimay mantengaoprimida la tecla 'Bake'
durante variossegundos o hasta que 0° aparezca
en el indicadorvisual.
Si la temperaturadel homo ha sido previamenteajustada,el
cambioaparecer_en el indicadorvisual. Por ejemplo,si la
temperaturadel homo fue reducidaen 8° C [15° F) el indicador
mostrar_i'- 8°' ('-15°').
4. Oprimala tecla A o V para ajustar la temperatura.
Cadavezque se oprimeuna tecla, la temperaturacambiaen
3° C (5° F). Latemperaturadel homo puede ser aumentadao
disminuidaen 3° a 20° C [5° a 35° F}.
5. La hora del dfa reaparecer_autom_ticamenteen el indicador
visual.
No necesitareajustarla temperaturadel homo si hayuna DID o
interrupci6ndeenergfael_ctrica. Lastemperaturasde asara la
parrillay limpiezano puedenser ajustadas.
Cambio de la temperatura
de °F/°C
1. Elajuste de f_ibricade la medidadetemperaturaes Fahrenheit.
2. Paracambiar el ajuste,optima y mantengaoprimidaslas teclas
'Cancel' (CancelaOy 'Bake' al mismotiempo durantetres
segundos.
3. Escuchar_una sepalsonoray el ajuste actual (°Fo °C)se
desplegar_en lapantalla.(Sino se realizaningOncambio,la
estufa regresar_al ajuste actual despu6sde 30 segundos).
4. Paracambiar el ajuste,oprima la tecla A o V. Oprimala
nuevamentepara regresaral ajuste anterior. Esperecinco
segundosy el ajustese guardar&
67
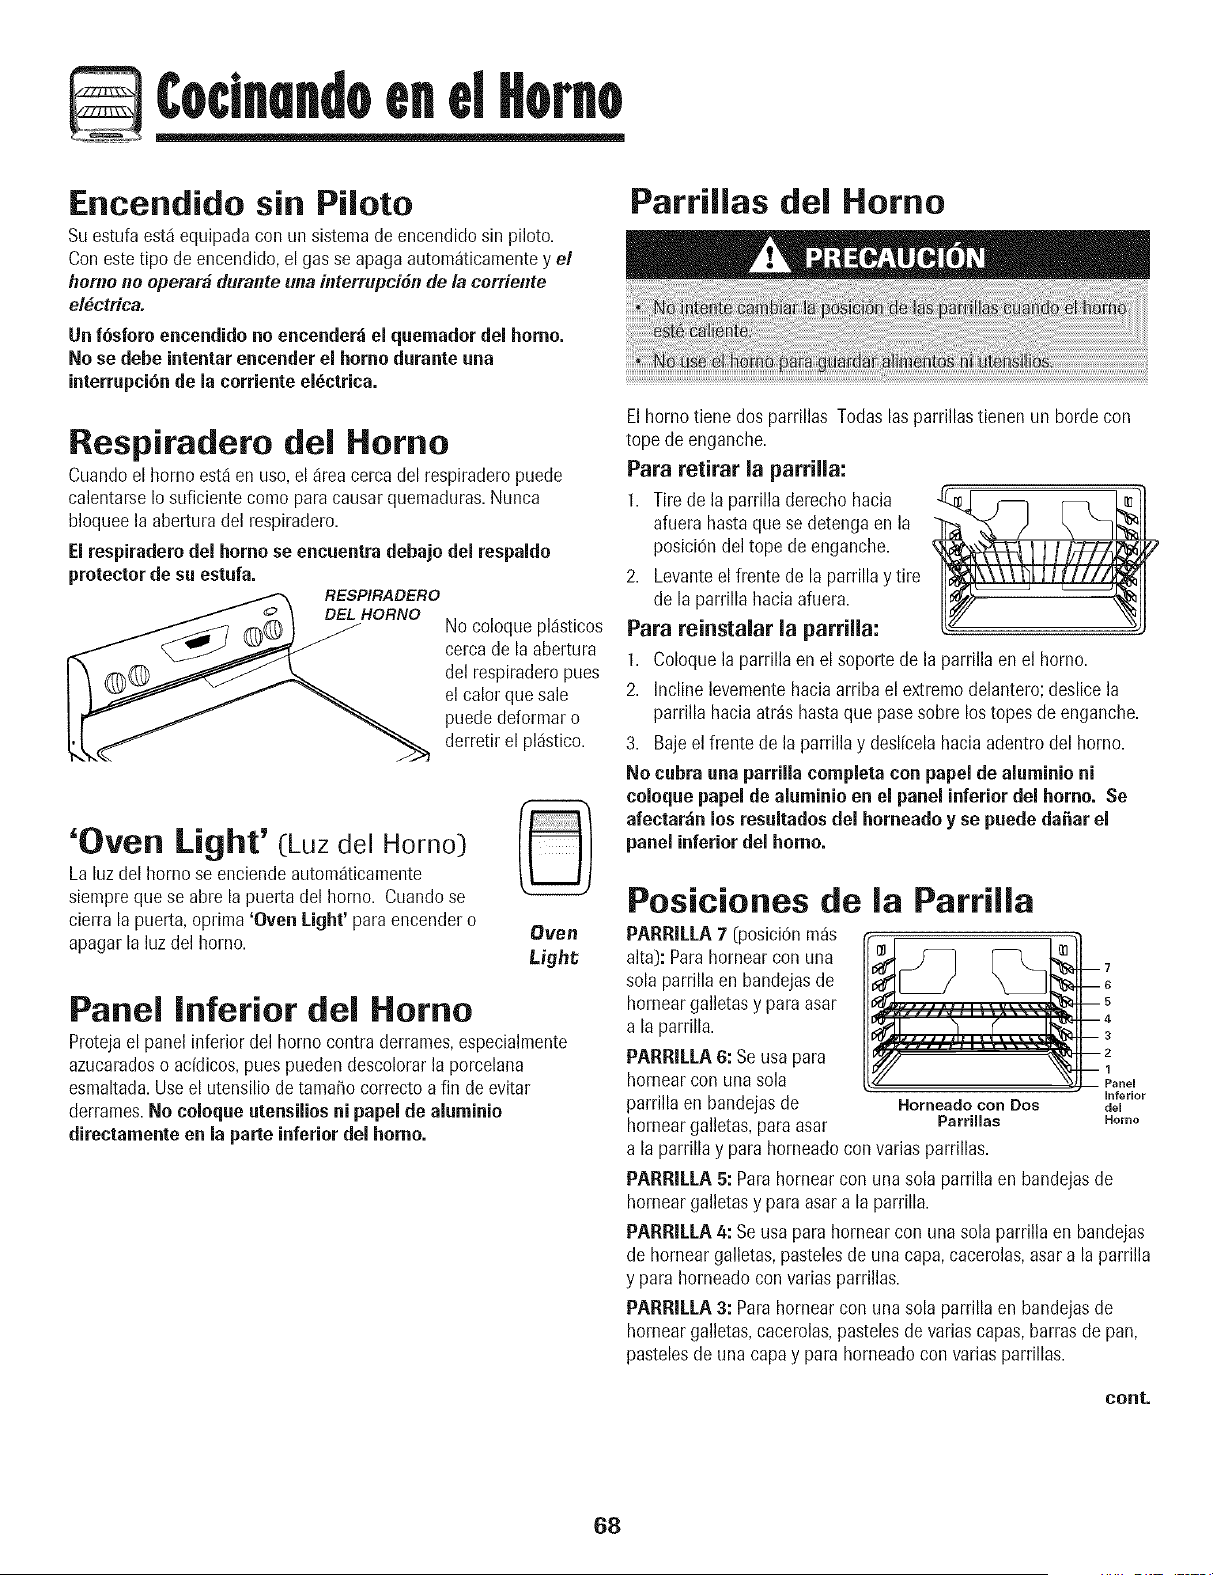
£ocinandoenel Homo
Encendido sin Piloto
Suestufa est,1equipadacon un sistema de encendidosin piloto.
Coneste tipo de encendido,el gas seapaga autom_ticamentey el
homo ne operar_ duranteunainterrupciSnde fa corriente
electric&
Un f6sforo encendido no encender_ el quemador del homo.
No se debe intentar encender el homo durante una
interrupci6nde la corriente el_ctrica.
Respiradero del Homo
Cuandoel horno est,1en uso, el _ireacercadel respiraderopuede
calentarseIosuficiente como para causarquemaduras.Nunca
bloqueela aberturadel respiradero.
El respiraderodel homo se encuentra debajo del respaldo
protector de su estufa.
RESPIRADERO
No coloquepl_isticos
cercade la abertura
del respiraderopues
el calor que sale
puededeformaro
derretir el pl_istico.
'Oven Light' (Luz del Homo) __)
La luz del homo se enciendeautom_ticamente
siemprequese abre la puerta del homo. Cuandose
cierra la puerta,oprima'Oven Light' para encendero Oven
apagarla luz del homo.
Light:,
Panel inferior del Homo
Protejael panel inferior del horno contra derrames,especialmente
azucaradoso addicos, puespueden descolorarla porcelana
esmaltada.Use el utensilio de tamaSocorrectoa fin de evitar
derrames.No coloque utensilios ni papel de aluminio
directamente en la parte inferior del homo.
Parrillas del Homo
Elhomo tiene dos parrillas Todas lasparrillastienen un horde con
tope de enganche.
Para retirar la parrilla:
1. Tire de la parrilla derecho hacia
afuera hasta que se detengaen la
posici0ndel tope de enganche.
2. Levanteel frente de la parrillay tire
de la parrilla haciaafuera.
Para reinstalar la parrilla:
1. Coloquela parrilla en el soporte de la parrilla en el homo.
2. Incline levementehaciaarriba el extremodelantero;deslicela
parrilla hacia atr_s hastaque pasesobre los topes de enganche.
3. Bajeel frente de la parrilla y desl[celahacia adentrodel homo.
No cubra una parrilla completa con papel de aluminio ni
coloque papel de aluminio en el panel inferior del homo. Se
afectar_n los resultadosdel horneado y se puede da_ar el
panel inferior del homo.
Posiciones de la Parrilla
PARRILLA7 (posici6nm_s
alta): Parahornear con una
sod parrillaen bandejasde
homear galletasy para asar
a la parrilla.
PARRILLA 6: Se usa para
hornearcon una sola
parrillaen bandejasde
horneargalletas,paraasar
inferior
Horneado con Dos del
Parrillas Homo
a la parrilla y para horneadocon varias parrillas.
PARRILLA5: Parahornearcon unasod parrillaen bandejasde
horneargalletasy paraasara la parrilla.
PARRILLA4: Seusa para hornear con una solaparrilla en bandejas
de homear galletas,pastelesde una capa,cacerolas,asar a la parrilla
y para horneadocon varias parrillas.
PARRILLA3: Para hornearcon una sod parrilla en bandejasde
horneargalletas,cacerolas,pastelesde varias capas,barrasde pan,
pastelesde una capay para horneadocon variasparrillas.
cont.
68
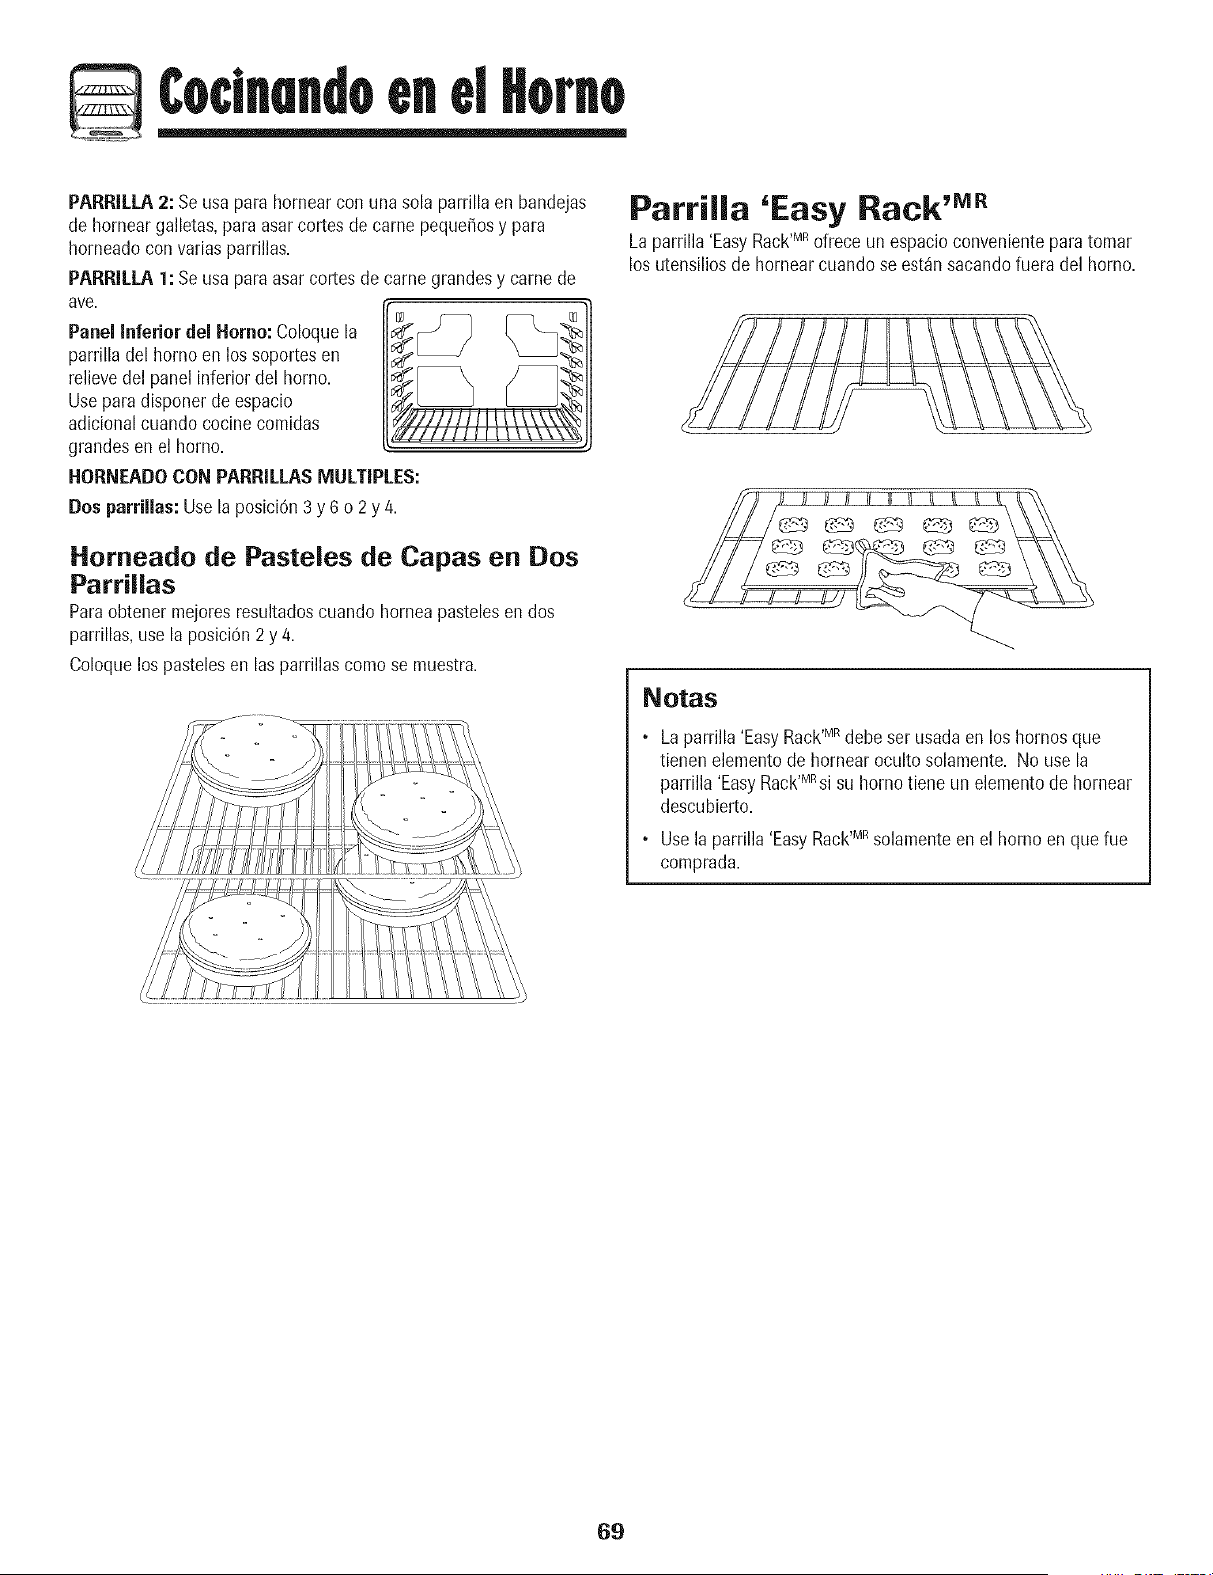
Coclnandoen d Homo
PARRILLA2: Seusa para hornear con una sola parrilla en bandejas
de hornear galletas,para asarcortes de came peque_osy para
horneadocon varias parrillas.
PARRILLA1: Se usa para asarcortes de came grandesy came de
ave.
Panel inferior del Homo: Coloquela
parrilh del homo en los soportesen
relievedel panel inferior del homo.
Useparadisponerde espacio
adicionalcuando cocine comidas
grandesen el homo.
HORNEADOCON PARRILLASMULTIPLES:
Dos parrillas: Use la posici6n3 y 6 o 2y 4.
Homeado de Pasteles de Capas en Dos
Parrillas
Paraobtener mejoresresultadoscuando horneapastelesen dos
parrillas,use la posici6n2 y 4.
Coloquelos pastelesen Insparrillas como se muestra.
Parrilla 'Easy Rack 'MR
La parrilla 'EasyRack'MRofrece un espacio convenientepara tomar
los utensiliosde hornear cuandose est_n sacandofuera del homo.
_ l/ l/ l/ IJ Jl II I/ _ t_ t_ kk\\
Notas
• Laparrilla 'EasyRack'MRdebeser usadaen los hornosque
tienenelemento de hornear oculto solamente. No usela
parrilla'EasyRack'M%isu homo tiene un elementode hornear
descubierto.
• Usela parrilla'EasyRack'MRsolamenteen el homo en que fue
cornprada.
69

CuldudoUmplem
Homo Autolimpiante
Elciclo de autolimpiezausatemperaturasde cocci0nsuperioresalas
normalespara limpiarautom_iticamentetodo el interior del homo.
Esnormal que ocurran Ilamaradas,humoo llamasdurante la limpieza
si el homo est_demasiadosucio. Esmejor limpiar el homo
regularmenteenvezde esperarhasta que se haya acumulado
demasiadasuciedad.
Duranteel procesode limpieza,la cocina debe estar bien ventilada
paraeliminar los olores normalesasociadoscon la limpieza.
Antes de la Autolimpieza
1. Apague la luz del horno antes de la limpieza.La luz del horno
puedefundirse duranteel ciclo de limpieza.
2. Retiretodos los utensiliosy las parrillasdel homo. Lasparrillas
del homo se descolorar_ny no se deslizar_nf_cilmentedespuc!s
de un ciclo de autolimpiezasi no son retiradasdel homo.
3. Limpieel marcodel homo, el marco de la puerta,el _rea fuera de
lajunta de la puertay alrededorde la aberturaen la junta de la
puerta,con un agentede limpieza no abrasivotal como 'Bon
AmP o con detergentey agua.El proceso de autolimpiezano
limpia estas_ireas.Eliasdebenser limpiadasparaevitarque la
suciedadse horneedurante el ciclo de autolimpieza. (Lajunta es
el sello alrededor de la puertay ventana del homo.)
4. Paraevitar dafio no limpie ni frote la _:2_ _
junta situadaalrededorde la puerta del \,
homo.Lajunta est_disefiadapara
sellar herm6ticamenteel calor durante
el ciclo de limpieza.
5. Limpieel excesode grasa o derrames
de laparte inferior del homo. Esto
evita humo excesivoo Ilamaradasdurante el ciclo de limpieza.
6. Limpielos derramesazucaradoso _cidostales como papa dulce
(camote),tomates o salsasa base de leche.La porcelana
esmaltadaes resistenteal _cido pero no a pruebade _cidos. El
acabadode porcelanapuede descolorarsesi los derrames_icidos
o azucaradosno son limpiadosantes de un ciclo de autolimpieza.
Para programar 'Self=Clean' (Autolimpieza):
Nota: Latemperaturadel homo debe ser inferior a 205° C
(400° F)para programarun ciclo de limpieza.
1. Cierrela puertadel homo.
2. Oprimala tecla 'Clean' [Limpieza).
• 'CLEAN'destellaen el indicadorvisual.
Optimalatecla A o V.
, Se despliega'CL-M (Limpieza- Suciedad
Mediana).
Si la puerta no secierra, se oir_n se_ales
sonorasy la palabra 'door' se desplegar_en
i iiii!ii iiil!i!ii ii iiiiii!i!! !J
el indicadorvisual. Si la puerta no se cierra dentro de 45
segundos,la operaciOnde autolimpiezaserdcanceladay el
indicadorvolverda desplegarla hora del d[a.
4. Oprimala tecla A o V paradesplazarlos
ajustesde autolimpieza.
'CL-H' (Limpieza- SuciedadIntensa,4 horas)
'CL-M' (Limpieza- SuciedadMediana,3 horas)
'CL- L' (Limpieza- SuciedadLeve,2 horas)
AI seleccionarel nivel de suciedad del homo se programa
automdticamenteel tiempo de limpieza.
5. Despu6sde cuatro segundos,el homo comenzar_a limpiar.
, Eltiempo de limpiezacomenzar_la cuenta regresivaen el
indicador.
• 'LOCK'se desplegarden el indicadorvisual.
• 'CLEAN'se desplegarden el indicadorvisual.
Para diferir un title de autolimpieza:
1. Optima la tecla 'Delay' (Diferido).
• 'DELAY'destella.
• '00:00'se desplegar_en el indicadorvisual.
2. Oprimala tecla A o V paraprogramarla
cantidadde tiempo que usted deseadiferir el
ciclo.El tiempo diferido puede set programatic
de 10 minutos [00:10)a 11 horas,59 minutos
[11:59).
3. CuandoDELAYest_!destellando,oprimala tecla
'Clean'.
• 'CLEAN'destellard.
4. Optima la tecla A o V.
, 'CL-M' (Limpieza- SuciedadMediana)se
despliegaen el indicador.
1
cont.
*Loshombresde los productosson marcasregistradasde sus respectivosfabricantes.
7O
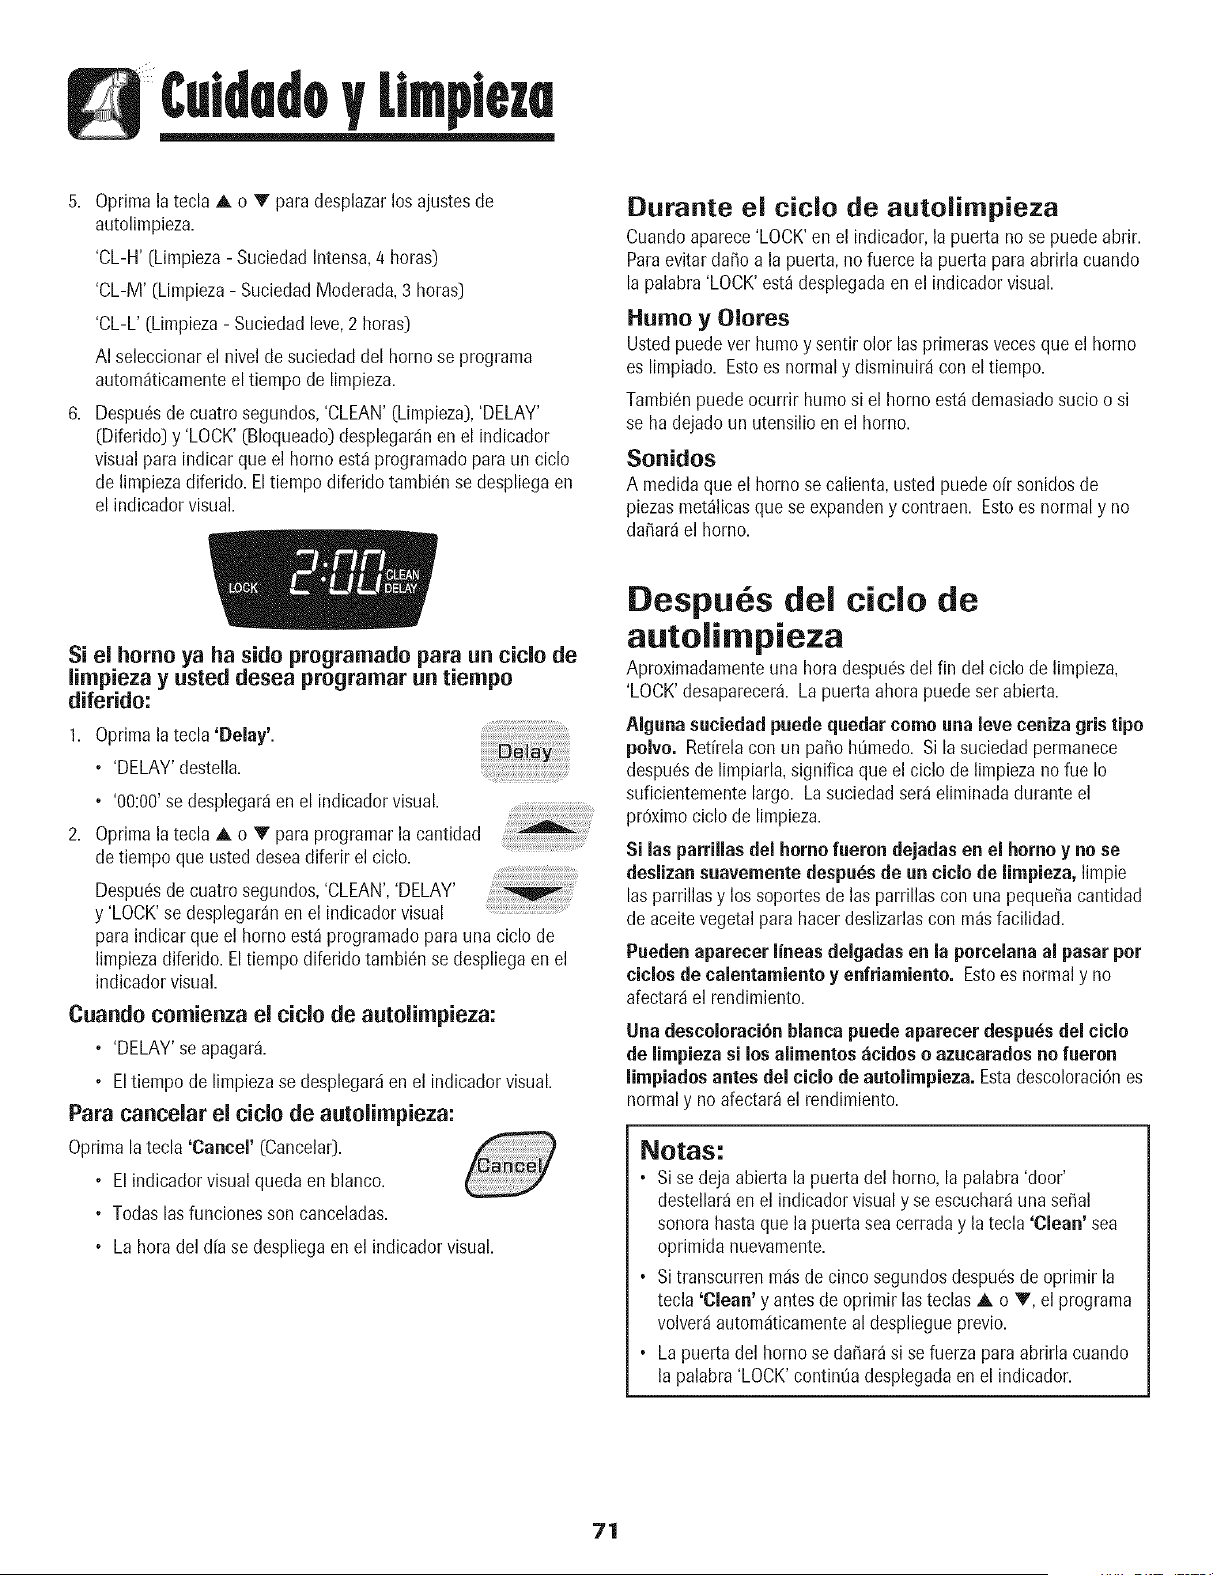
C.idedoy [Implez,, l
5. Optima la tecla A o V para desplazarlos ajustesde
autolimpieza.
'CL-H' (Limpieza- SuciedadIntensa,4 horas)
'CL-M' (Limpieza- SuciedadModerada,3 horas]
'CL-L' (Limpieza- Suciedadlove,2 horas)
AI seleccionarel nivel de suciedaddel homo se programa
autom_ticamenteel tiempo de limpieza.
6. Despu_sde cuatro segundos,'CLEAN'(Limpieza),'DELAY'
(Diferido] y 'LOCK'(Bloqueado)desplegar4nen el indicador
visualpara indicar que el homo est_programatic paraun ciclo
de limpieza diferido. El tiempo diferido tambi_n se despliegaen
el indicadorvisual.
Si el home ya ha side pregramade para un ciclo de
limpieza y usted desea programar un tiempe
diferido:
1. Oprimala tecla 'Delay'.
• 'DELAY'destella.
• '00:00'se desplegarden el indicadorvisual.
2. Optima la tecla A o V para programarla cantidad
de tiempo que usted deseadiferir el ciclo.
Despu6sde cuatro segundos,'CLEAN','DELAY'
y 'LOCK'se desplegar_nen el indicadorvisual
paraindicar que el homo est_ programatic para una ciclo de
limpiezadiferido.Eltiempodiferido tambi6n se despliegaen el
indicadorvisual.
Cuande cemienza el title de autolimpieza:
• 'DELAY'se apagar_.
• Eltiempo de limpiezase desplegarden el indicadorvisual.
Para caneeiar el title de autolimpieza:
Oprimala tecla 'Cancel' (Cancelar].
• Elindicadorvisualquedaen blanco.
• Todaslasfuncionesson canceladas.
• Lahera deld[a se despliegaen el indicadorvisual.
;i!ii!ii!i!i!iii!iiiii!i i
Durante el title de autolimpieza
Cuandoaparece'LOCK'en el indicador,la puerta no se puedeabrir.
Paraevitardafio a la puerta,no fuerce la puertapara abrirla cuando
la palabra 'LOCK'est_desplegadaen el indicadorvisual.
Humo y Olores
Ustedpuede vet humo y sentir olor las primerasvecesque el borne
es limpiado. Estoes normaly disminuird con el tiempo.
Tambi6npuedeocurrir humosi el homo est_ demasiadosucio o si
se ha dejado un utensilio en el homo.
Sonidos
A medidaque el horno secalienta,usted puedeoir sonidosde
piezasmet_licasquese expandeny contraen. Estoes normaly no
dafiar4el homo.
Despu s del ciclo de
autolimpieza
Aproximadamenteuna hera despu6sdel fin del ciclo de limpieza,
'LOCK'desaparecer_.Lapuerta ahorapuedeser abierta.
AIguna suciedadpuede quedar come una love ceniza gris ripe
polvo. Ret[relacon un patio htimedo. Si la suciedadpermanece
despu_sde limpiarla,significa que el ciclo de limpiezano fue Io
suficientementelargo. Lasuciedadser_eliminadadurante el
pr6ximociclo de limpieza.
Si las parriiiasdel homo faeron dejadasen el homo y no se
deslizansuavemente despabsde an ciclo de limpieza, limpie
las parrillasy los soportesde las parrillas con una pequefiacantidad
de aceitevegetal para hacerdeslizarlascon m_s facilidad.
Paeden aparecer lineas delgadas en la porcelanaal pasar per
ciclos de calentamiento y enfriamiento. Estoes normaly no
afectar4el rendimiento.
Una descoloraci6nblanca puede aparecer despu_s del ciclo
de limpieza si los alimentos zicidoso azucarados no fueron
limpiados antes del ciclo de autolimpieza. Estadescoloraci6nes
normaly no afectar_el rendimiento.
Notas:
• Si se deja abierta la puertadel homo,la palabra'door'
destellar_enel indicadorvisual y se escuchar_una serial
sonora hasta que la puerta seacerraday la tecla 'Clean' sea
oprimida nuevamente.
• Si transcurrenrodsde cincosegundosdespudsde oprimir la
tecla 'Clean' y antesde oprimir [asteclas A o V, el programa
volverdautomdticamenteal despliegueprevio.
• Lapuerta del homo se dafiar_ si se fuerza para abrirla cuando
la palabra'LOCK'continL]adesplegadaenel indicador.
71
CuldedoUmptem
Procedimientos de Limpieza
Loshombresde los productosson marcasregistradas
de sus respectivosfabricantes.
** Para hacerpedidos,Ilame al 1-877-232-6771EE.UU.o
al 1-800-688-8408Canada.
Tapas de
Quemadores y
Quernadores de
GasSeliados
Rejiiias de los
Quernadores =
percelana sebre
hierro forjado
Area del Relojy
de las Teclas
de Control
Perillasde
Control
Cubierta y Panel
de Control -
Esmalte de
Porcelana
Tapasde QuemadoresRemovibles
, Dejeenfriarel quemador.Retirelatapay I_velaen aguajabonosaconuna esponjade restregardepldstico.Parasuciedad
dificil, limpiecon una esponjano abrasivarellenaconjab6n o concrema para limpiezade cubiertas'CooktopCleaning
Creme'*(Pieza#20000001]**y una esponja.
, No las laveen el lavavajillasni en un homo autolimpiante.
Quemadoresde Gas Sellados
, Lflnpieloscoil frecuencia.Dejeenfriar el quemador.Limpiecoil jab6n y una esponjade restregar de pl_stico. Para
suciedaddificil, limpie con una esponjano abrasivarellenacon jab6n. No agrande ni modifique losagujeros.
, Tongacuidado de que no entreagua en los orificios de los quemadores.
, Tongacuidado cuando limpie el encendedor.Si elencendedorest4 hOmedoo dahado,el quemadorsuperior no
encender_.
° L_velasconagua tibiajabonosay unaesponjadepl4sticono abrasiva. Paramanchasrebeldes,limpiecon una esponja
depldsticorellena conjab6n, no abrasivao con 'CooktopCleaningCreme'*(Cremapara Limpiezade Cubiertas](Pieza
20000001]**y una esponja.Si la suciedad persiste,vuelvaa aplicar 'CooktopCleaningCreme',cubracon unatoalla de
papelhOmeday deje remojardurante 30 minutos.Restrieguenuevamente,enjuaguey seque.
° No las laveen el lavavajillasni en un homo autolimpiante.
° Paraactivar'Control Lock' (Bloqueode loscontroles] para la limpieza,ver p%ina 61.
° Lave,enjuaguey seque. No useagentes de limpiezaabrasivospuespueden rayarel acabado.
° Sepuedeusar limpiavidriossi se roc[anen el paho primero. NOrocie directamenteen elpanel.
• Retire las perillas cuando est6n en la posiciOn 'OFF' [Apagado] tirdndolas hacia adelante.
• Lave, enjuague y seque. No use agentes de limpieza abrasivos pues pueden rayar el acabado.
• Encienda cada quemador para asegurarse de que las perillas han sido correctamente reinstaladas.
Laporcelanaesmaltadaesvidrio fundido en metal y puede agrietarseo picarsesi no se usacorrectamente.Esresistente
a los _cidos,no a prueba de _cidos.Todos losderrames,especialmentelos derramesazucaradoso ac[dicos deben set
limpiadosinmediatamentecon un paso seco.
• Cuandoseenfrie, lavecon aguajabonosa,enjuaguey seque.
• Nunca limpie una superficietibia o calientecon un pahohOmedo.Estopuedecausaragrietamientoo picaduras.
• Nunca use limpiadoresde homo,agentesde limpiezaabrasivoso c_usticosen el acabadoexterior de la estufa.
72
C.idedoy[Implez,, l
PaneiesLateraies,
Gavetade
AImacenamiento
y Manijas de las
Puertas= Esmalte
Pintado
Ventana y Puerta
del Homo =Vidrio
• Cuandoest_frfa, lavecon aguatibia jabonosa,enjuaguey seque.Nunca limpieuna superficietibia o caliente
con un paso hQmedopues esto puede da_ar la superficiey causar una quemaduraa causadel vapor.
• Paramanchasrebeldes,use agentesde limpieza levementeabrasivostal como pasta de bicarbonatoo 'BonAmi".
No uselimpiadoresabrasivos,c_usticoso _sperostal comoesponjasdelanadeacero olimpiadoresdehornos.Estos
productospueden rayaro da_ar permanentementela superficie.
Nota: Use una tealla o unpa#o seco para limpiar losderrames,especialmente los derramesac/dicos o
azucarados. La superficie se puede descolorar e perder el brillo si el derrame no se limpia inmediatamente.
Estoes especialmente importante en lassuperficies blancas.
, Eviteusar cantidadesexcesivasde agua pues puede escurrirsedebajo o detr_sdel vidrio causandomanchas.
, Lavecon agua y jab0n. Enjuaguecon agua limpiay seque. Ellimpiadorde vidrio puedeusarsesi se roc[aen un
paso primero.
, No use materialesabrasivostalescomoesponjasde restregar,limpiadoresen polvo o esponjasde lanade acero
puespueden rayar el vidrio.
interior del Homo • Siga las instruccionesen las p_ginas70-71 para programarun ciclo de autolimpieza.
Parrillasdel
Homo
Aeero Inoxidable
[modelosselectos)
° Limpiarcon agua con jab6n.
° Sacarlas manchasdiffciles con polvo de limpiezao una esponjaIlenacon jab6n. Enjuaguey seque.
• Lasparrillassedescolorar_npermanentementey puedennodeslizarsecon suavidadsisondejadasenel homodurante
unciclode autolimpieza.Si estosucede,limpie la parrillay lossoportesen relievecon unapeque_acantidadde aceite
vegetalpara restaurarla facilidad de movimiento,luego limpie el excesode aceite.
• NO USENINGUN PRODUCTODE LIMP/EZA QUECONTENGABLANQUEADOBA BASEDE CLOBO.
• NO USELIMPIADOBES "ORANGE" NI L/MPIADORESABRAS/VOS.
• S/EMPRELIMPIE LAS SUPERFICIESDEACERO A FAVORDEL GRANO.
• Limpieza Diaria/Suciedad Leve= Limpiecon uno de los siguientes- agua conjab0n, una soluci6n de vinagre
blancocon agua,limpiador para superficiesy vidrio 'Formula409'*o un limpiavidriossimilar - usandouna esponja
o un paso suave. Enjuaguey seque. Parapulir y evitar marcasde los de(los,use el producto 'StainlessSteel
MagicSpray" (PiezaNo. 20000008)**.
• Sueiedad Moderada/Intensa = Limpiecon unode lossiguientes- 'Bon Ami'*, 'SmartCleanser'*o 'Soft Scrub'*-
usandouna esponja hOmedao un paso suave. Enjuaguey seque. Lasmanchasdificiles puedenser quitadas con
unaesponja multi-uso 'Scotch-Brite'*hOmeda;frote a favor del grano. Enjuaguey seque. Pararestaurarel
lustrey sacar lasvetas,aplique 'StainlessSteelMagic Spray'*.
• Descoloraei6n - Useuna esponjamojadao un paso suave,limpie con limpiador deacero 'CameoStainlessSteel
Cleaner".Enjuagueinmediatamentey seque.Paraeliminarlas estriasy restaurarel lustre,use despuc!srociador
paraacero inoxidable'StainlessSteelMagic Spray'*.
*Loshombresde los productosson marcasregistradasde sus respectivosfabricantes.
** Parahacer pedidos,Ilameal 1-877-232-6771EE.UU.o al 1-800-688-8408Canada.
73

Mententmlento
Puerta del Homo
Nora: La puerta del homo en una estufanuevapuedesentirse
"esponjosa"cuando se cierra. Estoes normaly disminuir_con el
use.
Ventana del Homo
Para proteger la ventana de la puerta del homo:
1. No use agentesde limpiezaabrasivostales come esponjasde
restregarde lana de aceroo limpiadores en polvo pues ellos
puedenrayarel vidrio.
2. No golpee el vidrio con ollas,sartenes,muebles,juguetes u otros
objetos.
3. No cierre la puertadel homo hasta que lasparrillas del homo no
est_nen su lugar.
AI golpear,rayar, hacervibrar o esforzarel vidrio puededebilitar su
estructuracausandoun mayor riesgode rotura en una fecha
posterior.
Tornillos Niveladores
Laestufa debe ser niveladacuando se instala. Si la (,_
estufa no est,1nivelada,gire lostornillos niveladores
ubicadosen cadaesquina de la estufa hasta que
quede nivelada. _,,/J
TORNILLO NIVELADOR
Conexi6n El ctrica
Loseiectrodem_sticos que requieren energia
el_etrica est_n equipadoscon un enehufe de
ires clavijascon conexi6n a tierra, el cual
debeser enchufado directamenteen un
tomacorrienteel6ctrico de tres agujeros,para
120voltios debidamenteconectadoa tierra.
Siempredesenchufeel electrodom#sticoantes de efectuar
reparaciones.
Elenchufe de tres clavijascon conexiOna tierra ofrece protecciOn
contra peligrosde choqueselc!ctricos.NO OOLITENI ELIMINE LA
TEIICERACLAVIJADECONEXION A TIEIIRA DELENCHUFE
DELCORDONELECTIIICO.
Sisolamentese disponede un tomacorrientesin conexi6n a tierra,
de dos agujerosu otro tipo de tomacorrienteelc!ctrico,el
propietariodel eleetrodom_stJco es personalmente
responsablede reemplazar el temacerriente con an
tornaeorriente el_ctrico de tres agujeros debidamente puesto
a tierra.
Luz del Homo
iiiiiiiiii;!!!!!!!!!!!!!!!!!!!!!!!!!!!!!!!!!iiiiiiiiiiiiiiiiiiiiiiiiiiiiiiiiiiiiiiiiiiiiiiiiiiiiiiiiiiiiiiiiiiiiiiiiiiiiiiiiiiiiiiiiiiiiiiiiiiiiiiiiiiiiiiiiiiiiiiiiiiiiiiiiiiiiiiiiiiiiiiiiiiiiiiiiiiiiiiiiiiiiiiiiiiiiiiiiiiiiiiiiiiiiiiiiiiiiiiiiiiiiiiiiiiiiiiiiiiiiiiiiiiiiiiiiiiiiiiiiiiiiiiiiiiiiiiiiiiiiiiiiiiiii
Para reemplazar el foco del homo:
1. Cuando el horno est6 frfo, sujete la tapa de la bombilla en
su lugar, luego deslice el ret6n de alambre fuera de la
cubierta. Nora: La cubierta de la
CUBIERTA DE
bombilla se caer_ si no es LABOMBILLA
sujeta en su lugar cuando
est_ sacando el ret6n de
alambre.
2. Saque la cubierta del foco
y el foco. J RETENDEALAMBRE
3. Coloque un foco de 40
watts para
electrodom6sticos.
4. Vuelva a colocar la cubierta de la bombilla y asegt3relacon
el ret6n de alambre.
5. Vuelva a enchufar la estufa. Vuelva a colocar la hora
correcta.
74
Mantentmlento
Retire de Ja Estufa a Gas
Losconectoresde la estufa a gas usadospara conectareste
artefactoal suministro de gas no est_indise_adosparamovimiento
continuo. Unavez instalados,NO mueva repetidamenteeste
artefactoa gas para su limpiezao paraubicarloen otro lugar. Si
esteartefactotiene queser movido y/o retiradopara reparaci6n,
siga el procedimientodescrito en las instruccionesde instalaci6n.
Parainformaci6n,p6ngaseen contacto con el Servicioa los Clientes
Ilamandoal 1-800-688-9900EE.UU.o al 1-800-688-2002Canada.
Paraevitarque la estufase vuelqueaccidentalmente,se debe
aseguraral piso colocandoel tornillo niveladortrasero dentro del
soporteantivuelco.
Gaveta de Almacenamiento
Lagaveta de almacenamientopuede ser retiradapara que usted
puedalimpiar debajo de la estufa.
Para sacar :
1. Vade la gavetay deslfcelahacia afuera hastala primera posici6n
tope.
2. Levantela partedelanterade la gaveta.
3. Tfrela hastala segundaposici6n de tope.
4. Sujetelos ladosy levante la gavetapara retirarla.
Para volver a colocar:
1. Insertelos extremosde las correderasde la gavetaen los rieles
de la estufa.
2. Levantela partedelanterade la gavetay suavementeempt_jelaa
la primera posici6ndetope.
3. Levantela gaveta nuevamentey empt3jelahasta que quede
completamentecerrada.
75
S S
$oluclonde
Para la mayoria de los problemas,
verifique primero Io siguiente.
Elquemador superior no se
enciende.
• Revisesi los controlesdel homo est_n debidamenteajustados.
• Verifique si el enchufe est_ firmemente insertadoen el tomacorriente.
• Verifique o vuelva a reponer el disyuntor. Verifique o reemplaceel fusible.
• Verifique el suministro de energfaelc!ctrica.
o
o
o
Verifique si la estufaest_ debidamenteconectadaa la fuente de alimentaci0n.
Verifique si est_ fundido un fusible del circuito o si sedispar0 el disyuntorprincipal.
Verifique para asegurarsede que el encendedorest6secoy que emitachasquidos. El
quemadorno se encender_isi el encendedorest_da_ado,sucioo mojado. Si el encendedor
no produceun chasquido,gire la perilla de control a la posiciOn'Off' [Apagado).
La llama es dispareja. • Losorificios del quemadorpuedenestarobstmidos.
La llama del quemador superior se • Verifique paraasegurarsede queel utensilioest,1asentadoen la parrilla sobreel quemador.
levantadel orificio.
°
Losresultadosdel horneado no son
come se esperaban o son
diferentes a los del homo anterior.
Losalimentos nose asan a la
parrillaen forma debida o sale
demasiado humo.
Verifique la temperaturadel homo seleccionada.Aseg0resede que el homo est6
precalentadocuando la recetao instruccionesrecomiendanprecalentamientodel homo.
• Aseg0resedeque el respiraderodel homo noest6bloqueado.Verp_gina68paralaubicaciOn.
• Verifique para asegurarsede que laestufa estdnivelada.
• Lastemperaturasa menudovar[anentre un homo nuevoy uno antiguo. A medidaque pasa
el tiempo, la temperaturadel homo cambiay puede hacerserodscaliente o rodsfrfa. Ver
pdg.70 para las instruccionescomo ajustar la temperaturadel homo. Nora: No se
recomiendaajustar la temperaturasi ha tenido problemascon solo una o dos recetas.
• Useel utensilio correcto. Los utensiliososcurosproducendoradooscuro.Los utensilios
brillantesproducen dorado claro.
• Verifique lasposicionesde las parrillasy la colocaci0nde los utensilios.Alterne losutensilios
cuando usedos parrillas. Deje2,5-5cm [1-2 pulgadas)entre los utensiliosy las paredesdel
homo.
• Verifique el uso de papel de aluminio en el homo. Nunca use papel de aluminio para cubrir
unaparrillacompletadelhomo.Coloqueunpedazopequefiodepapeldealuminioen la parrilla
que est_ debajo del utensilio para recibir los derrames.
• Verifique las posicionesde las parrillasdel homo. El alimento puedeestar muycercade
la llama.
• Elpapelde aluminiose us0de maneraincorrecta.Nuncaforreel insertodelasadorcon papel
de aluminio.
• Recorteel excesode grasade la came antes de ponerla a asar a la parrilla.
• Seus6 una asaderasucia.
• Precalienteel homo durante dos atres minutos antesde colocar el alimento en el homo.
• Ase a la parrilla con la puerta del homo cerrada.
76
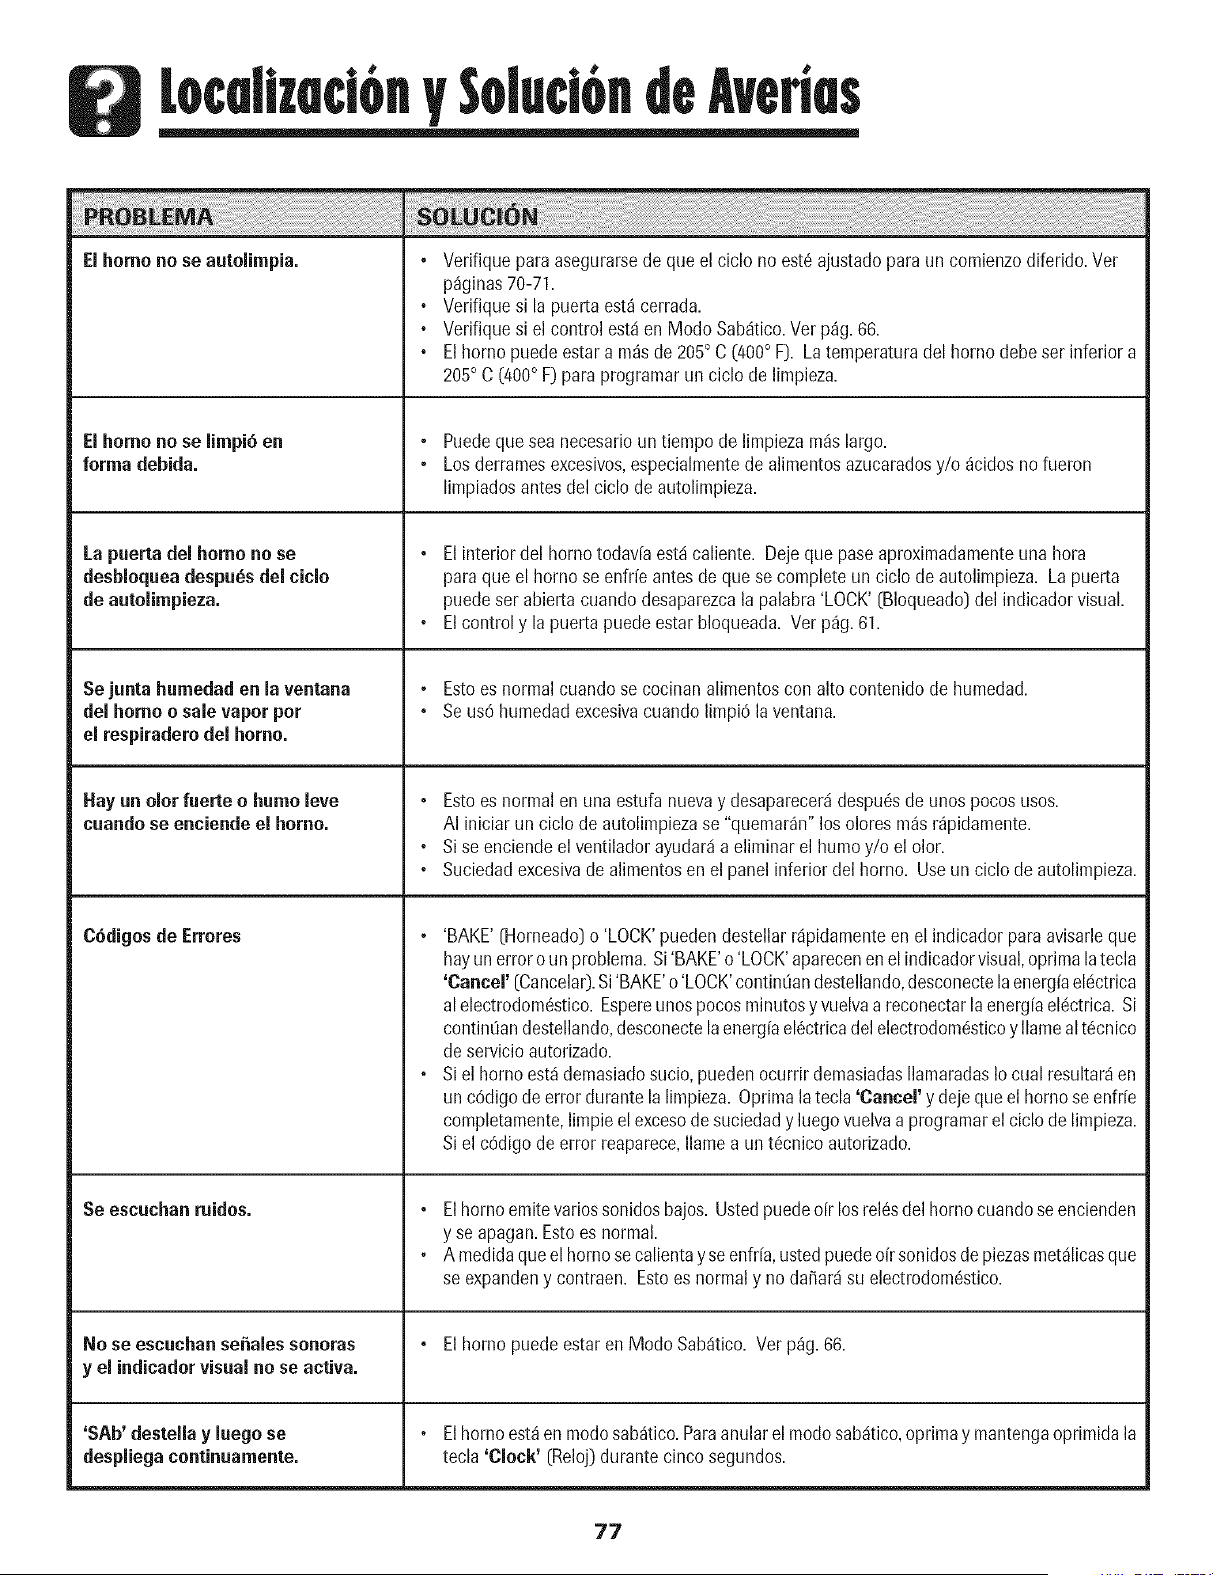
Ei homo no se autolimpia.
El homo no se lirnpi6 en
forma debida.
La puerta del homo no se
desbloqueadespu_sdel ciclo
de autolimpieza.
Se junta humedad en la ventana
del homo o sale vapor per
el respiraderodel homo.
Hay un oior faerie o humo leve
cuandose enciende el homo,
C6digos de Errores
Se escuchan ruidos.
_O $G Gscuchan SG['laJes sonoras
y el indicadorvisual no se activa.
'SAb' destella y luego se
despliega continuamente.
• Verifique para asegurarsede queel ciclo noest6ajustadoparaun comienzodiferido.Ver
p%inas 70-71.
• Verifiquesi la puerta est_ cerrada.
• Verifiquesi el control est,1en Modo Sab4tico.Vet p%. 66.
• Elhomo puede estar a m_sde 205° C (400° F]. Latemperaturadel homo debeser inferior a
205° C (400° F) paraprogramarun ciclo de limpieza.
• Puedeque sea necesarioun tiempo de limpiezam_s largo.
• Losderramesexcesivos,especialmentede alimentosazucaradosy/o _cidos no fueron
limpiadosantesdel ciclo de autolimpieza.
° El interior del homo todav[aest,1caliente. Deje que paseaproximadamenteuna hora
para que el homo se enfrie antes de que se completeun ciclo de autolimpieza. Lapuerta
puedeser abierta cuandodesaparezcala palabra 'LOCK'(Bloqueado)del indicadorvisual.
• Elcontrol y la puertapuede estar bloqueada. Verp%. 61.
• Estoes normalcuando se cocinan alimentoscon alto contenidode humedad.
° Se us6 humedadexcesivacuando limpi6 la ventana.
° Estoes normalen una estufa nuevay desaparecerddespudsde unos pocosusos.
AI iniciar un ciclo de autolimpiezase "quemar_n"los olores m_s r_pidamente.
• Sise enciendeel ventilador ayudarda eliminar el humo y/o el olor.
• Suciedadexcesivade alimentosen el panelinferior delhomo. Useun ciclode autolimpieza.
• 'BAKE'(Horneado)o 'LOCK'puedendestellarr4pidamenteen el indicadorpara avisarleque
hayun error o un problema. Si 'BAKE'o'LOCK'aparecenenel indicadorvisual,oprimalatecla
'Cancel' (CancelaO.Si'BAKE'o 'LOCK'continOandestellando,desconectelaenergiaek!ctrica
al electrodom6stico.Espereunospocosminutosy vuelvaa reconectarlaenerg[ael6ctrica. Si
continOandestellando,desconectelaenergiael6ctricadelelectrodom6sticoy Ilamealt6cnico
de servicioautorizado.
• Siel homo est_ demasiadosucio, puedenocurrir demasiadasIlamaradasIocual resultar4en
un c6digode error durante la limpieza. Oprimala tecla 'Cancel' y dejequeel homose enfr[e
completamente,limpieel excesode suciedady luego vuelvaa programarel ciclode limpieza.
Siel c6digo deerror reaparece,Ilame a un t6cnico autorizado.
° Elhomo emitevariessonidos bajos. Ustedpuedeoir losrel6sdel homo cuandoseencienden
y se apagan.Estoes normal.
° A medidaque el homo secalientay seenfr[a,ustedpuedeoirsonidosdepiezasmet_ilicasque
se expandeny contraen. Estoes normal y no daffar_isu electrodom6stico.
° El homo puede estar en Modo Sab_itico.Ver p%. 66.
• Elhomo est_en modosab_tico.Paraanularel modosab_itico,oprimay mantengaoprimidala
tecla 'Clock' (Reloj)durantecinco segundos.
77

78

Servtdo
iiiiiiiiiiiiiiiiiiiiiiiiiiiiiiiiiiiiiiiiiii_....................................................................................................................................................................i
LA UNICAY EXCLUSIVASOLUCIONPARAEL
CLIENTEBAJOESTAGARANTIALIMITADAES
LA REPARACIONDELPRODUCTOSEGUNSE
INDICAAQUi. LAS GARANTiASIMPLJCITAS,
INCLUYENDOLASGARANTIASDE
COMERClALIZACIONO DEAPTITUDPARAUN
PROPOSITOEN PARTICULARESTAN
LIMITADASA UN AIqOO AL PERIODODE
TEMPOMJNIMOPERMITIDOPORLA LEY.
MAYTAGCORPORATIONNOSERA
RESPONSABLEDEDAklOSINCIDENTALESO
CONSECUENTES.ALGUNOSESTADOSY
PROVINClASNO PERMITENLA EXCLUSIONO
LIMITACIONDEDAIqOSINCIDENTALESO
CONSECUENTESO LA LIMITACIONDE LA
DURACIONDELAS GARANTiASIMPLJCITASDE
COMERCIALIZACIONO APTITUD,PORLOQUE
ESTASEXCLUSIONESO LIMITACIONES
PUEDENNOAPLICARSEENSU CASO.ESTA
GARANTiALEOTORGADERECHOSLEGALES
ESPECiFICOS.USTEDTAMBIENPUEDETENER
OTROSDERECHOSQUEVARiANDEUN
ESTADOA OTROO DEUNA PROVlNCIAA
OTRA.
Lo que no cubren estas garantias
1. Situacionesy da_os resultantesde cualquierade las siguientessituaciones:
a. InstalaciOn,entregao mantenimientoinapropiados.
b. Cualquierreparaci6n,modificaciOn,alteraciOno ajustenoautorizadosporel
fabricanteo taller de servicioautorizado.
c. Mal uso,abuso,accidentes,uso no razonableo hechosfortuitos.
d. Corriente,voltaje,suministroelc!ctricoo suministro de gas incorrectos.
e.Ajuste inadecuadode cualquier control.
2. Lasgarant[asquedan nulassi los nt3merosde serie originaleshan sido retirados,
alteradoso no se pueden determinarfacilmente.
3. Bombillas,filtros de agua y filtros de aire.
4. Los productoscompradospara usocomercial o industrial.
5. El costo del servicioo Ilamadade serviciopara:
a. Corregirerroresde instalaci0n.Paralos productos que requieran ventilaci0n,se
debenusar conductosde metal r[gido.
b. Instruir al usuarioen el uso adecuadodel producto.
c.Transportedel electrodomOsticoal establecimientode servicioy de regreso.
6. CualquierpOrdidade alimentosdebido a fallas del refrigeradoro congelador.
7. Costosde viaje y transportede servicioen areasremotas.
8. Estagarant[a no se aplica fuera de los EstadosUnidosy Canada.POngaseencontacto
con su distribuidor para determinarsi se aplica cualquierotra garant[a.
9. Los da_osconsecuenteso incidentalessufridos por cualquier personacomo resultado
del incumplimientode esta garant[a.Enalgunos estadosno se permitela exclusiono
limitaciOndeda_os consecuenteso incidentales,pot Io tanto la limitaciOno exclusion
anterior puede no aplicarse en st] caso.
Si necesita servicio
Primeroreviselasecci6nde IocalizaciOny soluciOnde averiasensu gufa deuso y cuidado
o Ilameal distribuidor donde adquiri6 el electrodomdstico.Tambidnpuede Ilamar a Maytag
Services,LLC,AtenciOnal cliente, al 1-800-688-9900en EE.UU.y al 1-800-688-2002en
Canadaparaubicar a un agente de serviciocalificado.
• AsegOresede conservarel comprobantede compraparaverificar el estadode la
garantia.Consultela secciOnsobre la GARANTiApara mayorinformaciOnsobre las
responsabilidadesdel propietarioparaobtener serviciobajo la garantia.
• Si el distribuidor o la compa_[adeservicio no pueden resolverel problem& escriba a
Maytag Services,LLC, Attn: CAIR4R:Center,P.O.Box2370,Cleveland,TN37320-2370o
Ilameal 1=800=688=9900en EE.UU.y al 1=800=888=2002en Canad&
• Lasgu[asdel propietario,manualesde servicioe informaciOnsobre las piezaspueden
solicitarsea MaytagServices,LLC,AtenciOnal cliente.
NOtaS: CuandoIlameo escriba acerca de un problemade servicio,por favor
incluyalasiguienteinformaciOn:
a. Su nombre,direcciOny ntimero de teldono;
b. Ntimerode modeloy nt3merode serie;
c. Nombrey direcciOnde su distribuidor o t_cnico deservicio;
d. UnadescripciOnclara del problemaque esta experimentando;
e. Comprobantede compra [recibo de compra).
Form No. A/01/06 Part No 8113P608-60 ¢_)2006 Maytag Appliances Sales Co Litho USA.