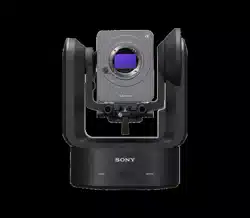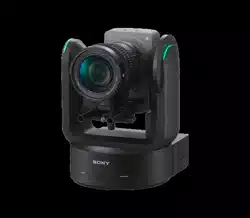
Help Guide
Interchangeable Lens Digital Camera
ILME-FR7 / ILME-FR7K
This guide describes the configuration and operation of the ILME-FR7 / ILME-FR7K Interchangeable Lens Digital
Camera.
Refer to this manual and the operating instructions for related devices as required.
Overview
Typical Usage Applications
System Configuration
Controlling a Single Unit Using the Supplied Infrared Remote Control
Controlling a Single Unit Using a Tablet or Computer
Controlling a Single Unit Using an External Remote Controller
Controlling Multiple Units Using External Remote Controller
Location and Function of Parts
Front View
Rear View
Connector Block
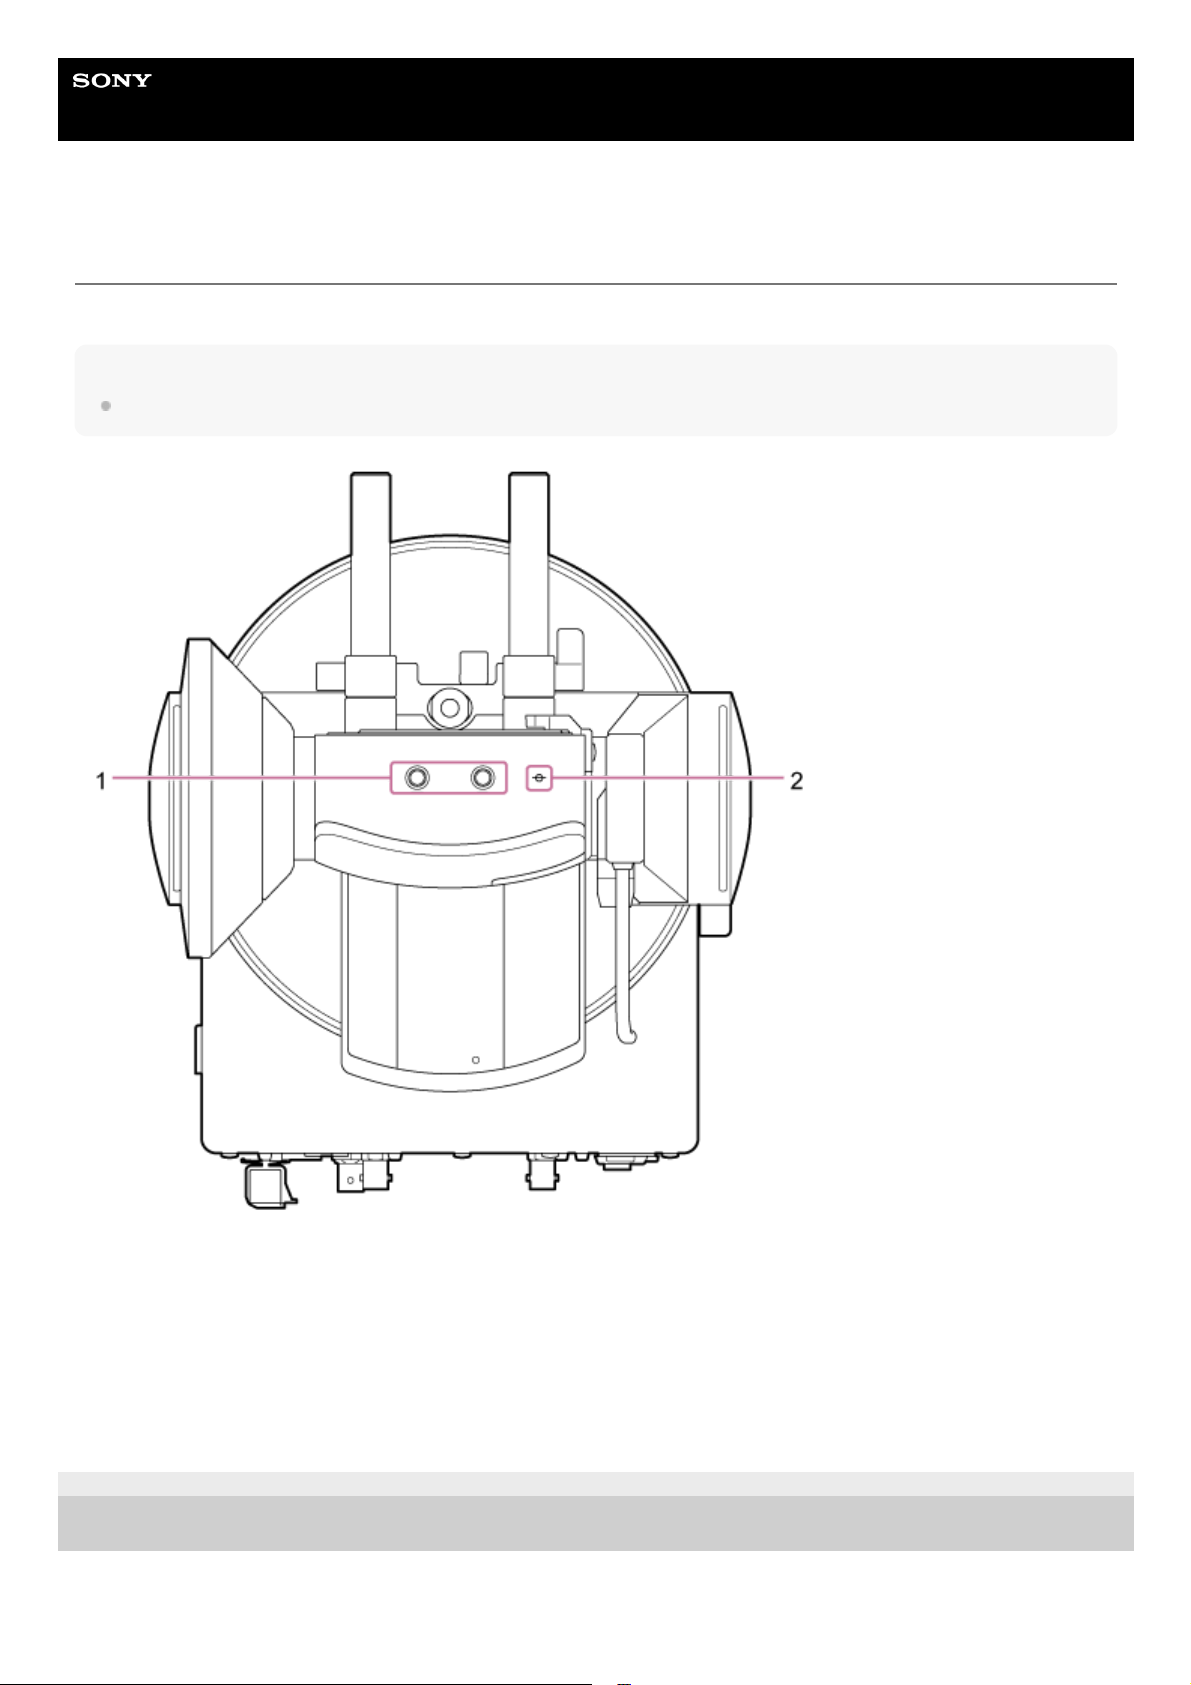
Side View
Top View
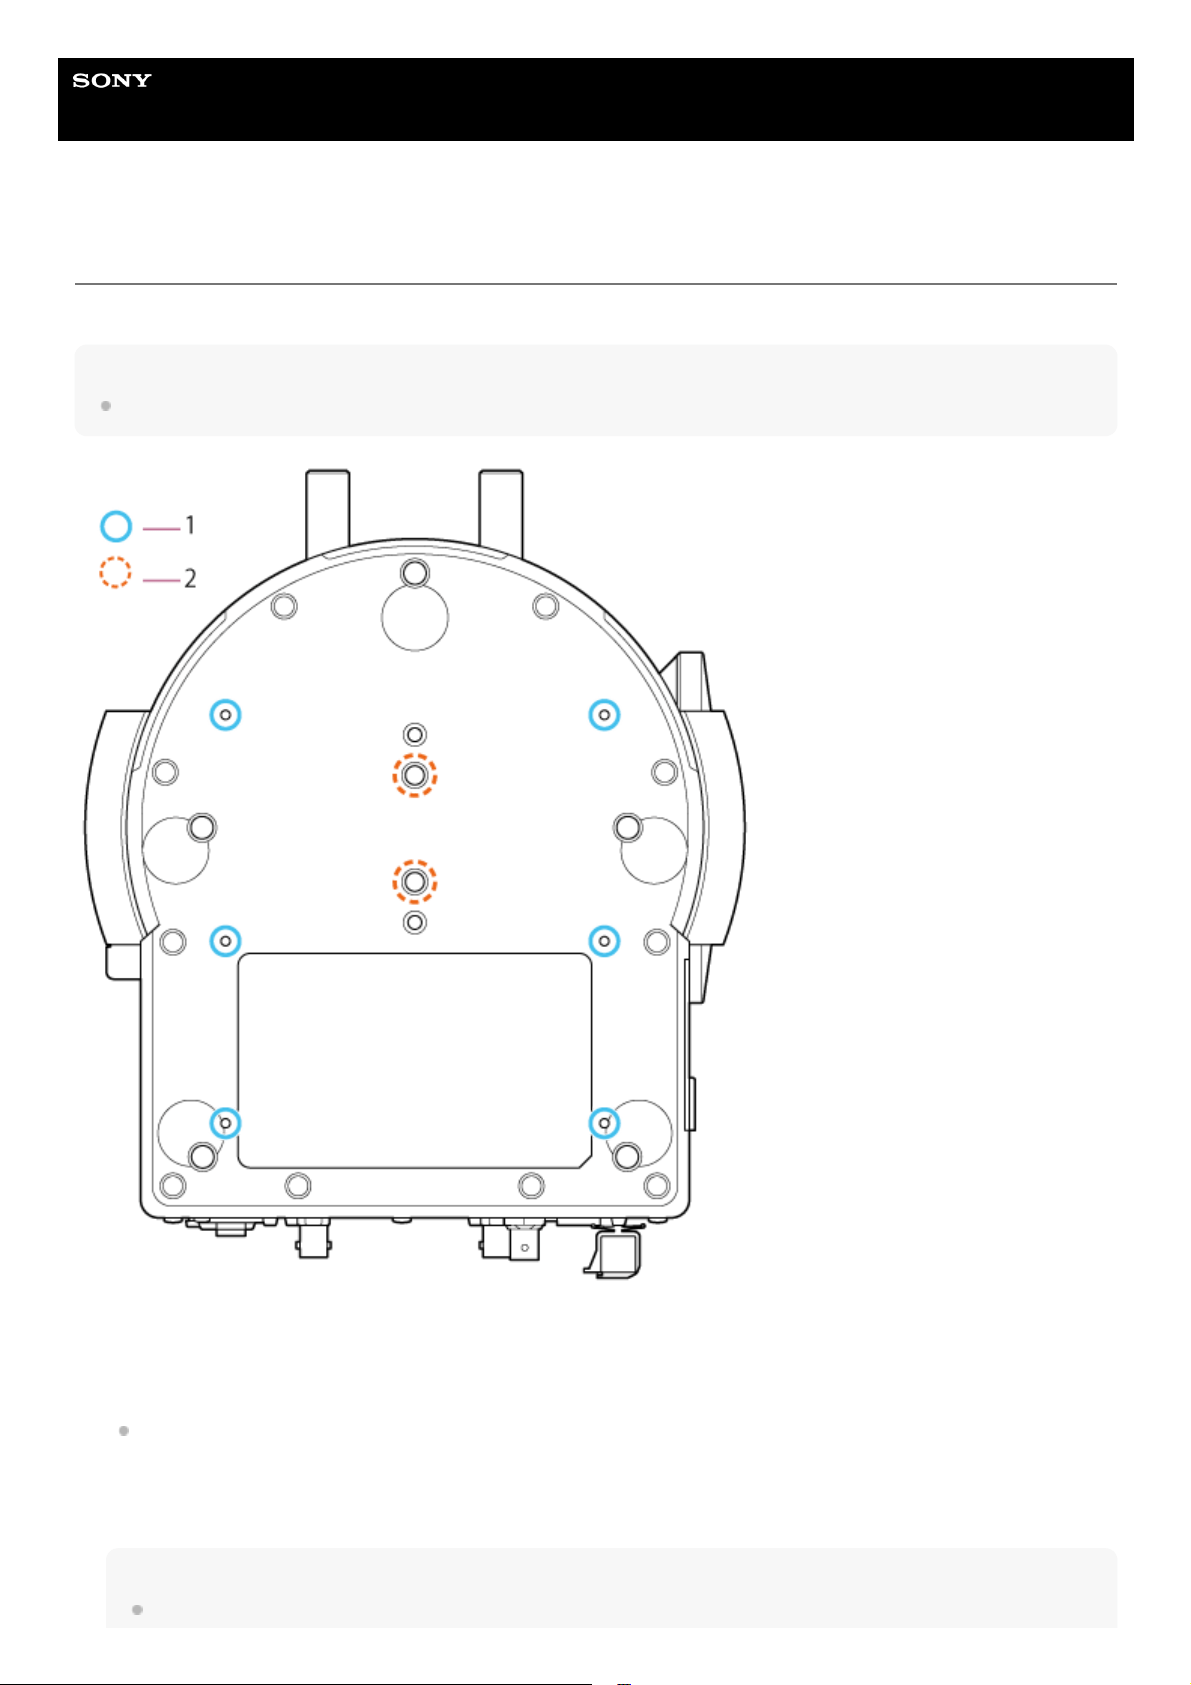
Bottom View
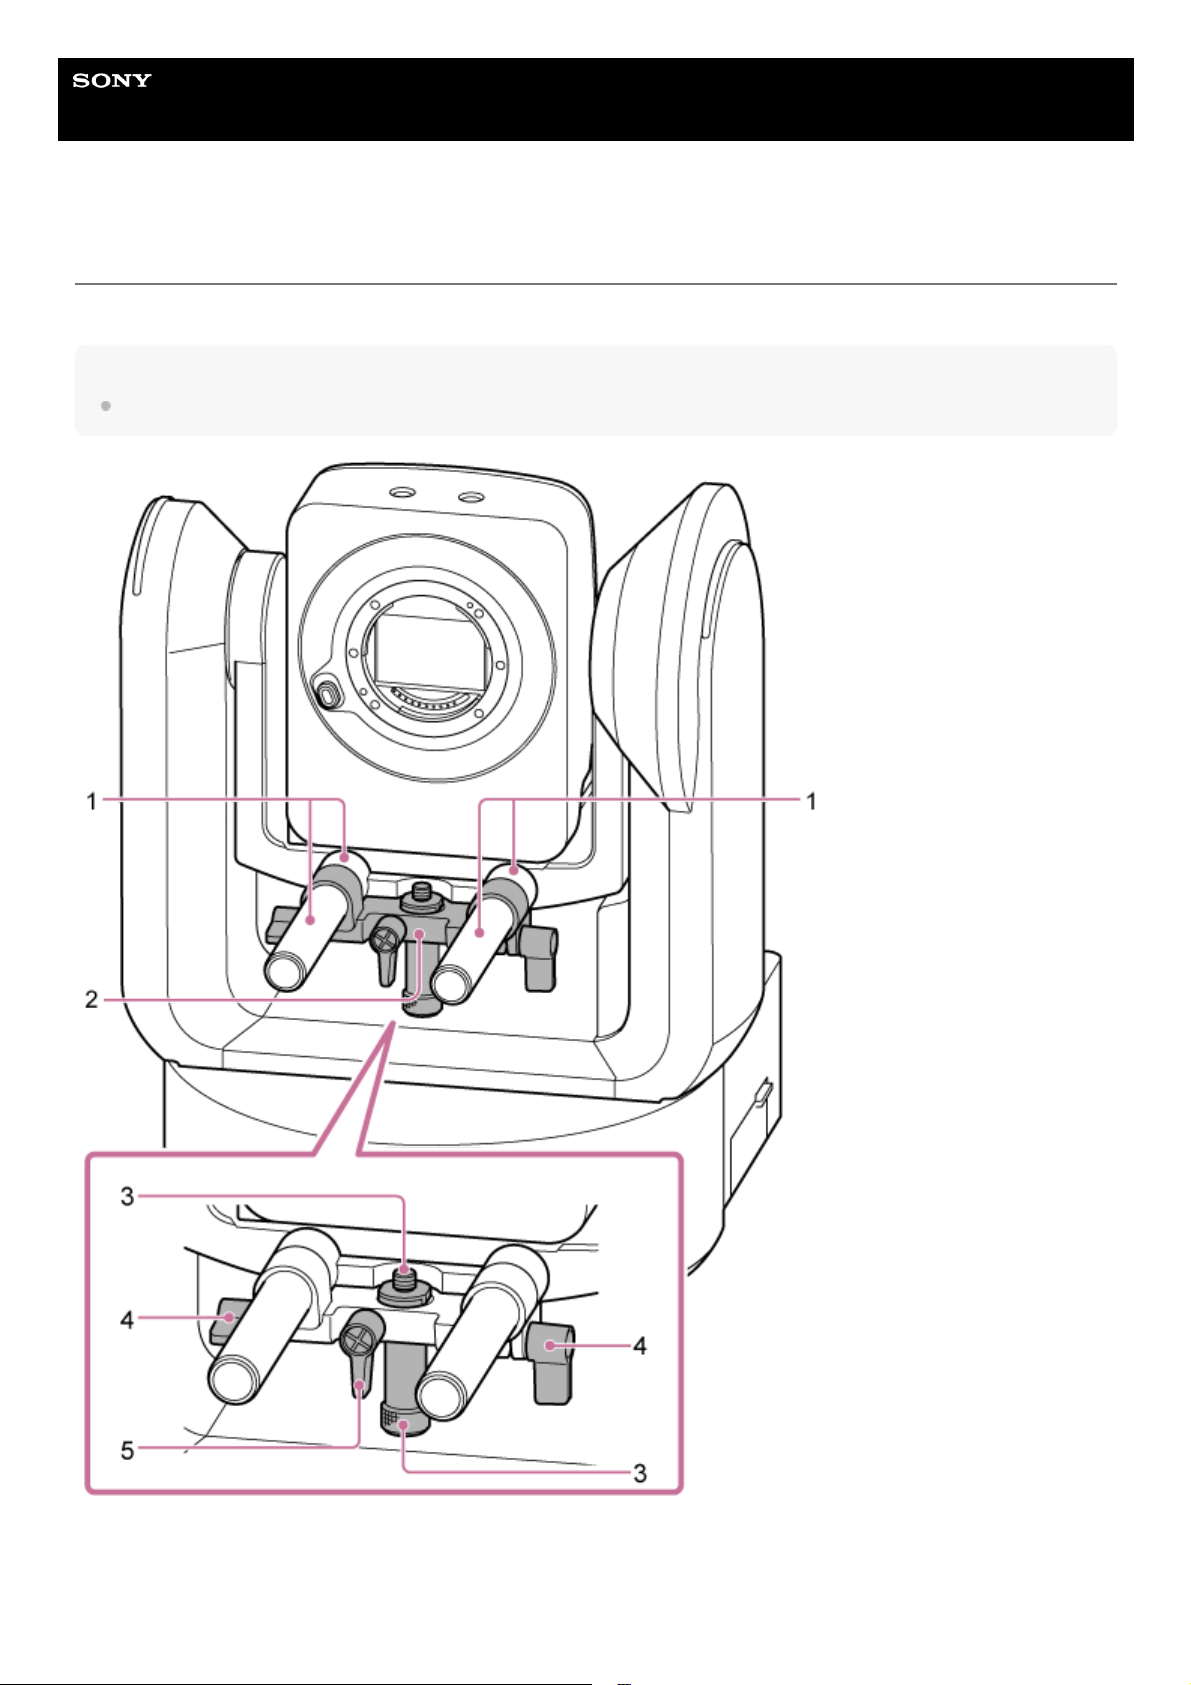
Lens Support
Location and Function of Parts of the Infrared Remote Control (supplied)
Web App Screen
Web App Screen Overview
Structure of Common Area of Screens
Structure of the Live Operation Screen
Structure of the Playback Operation Screen
Structure of the Settings Screen
1
Preparation
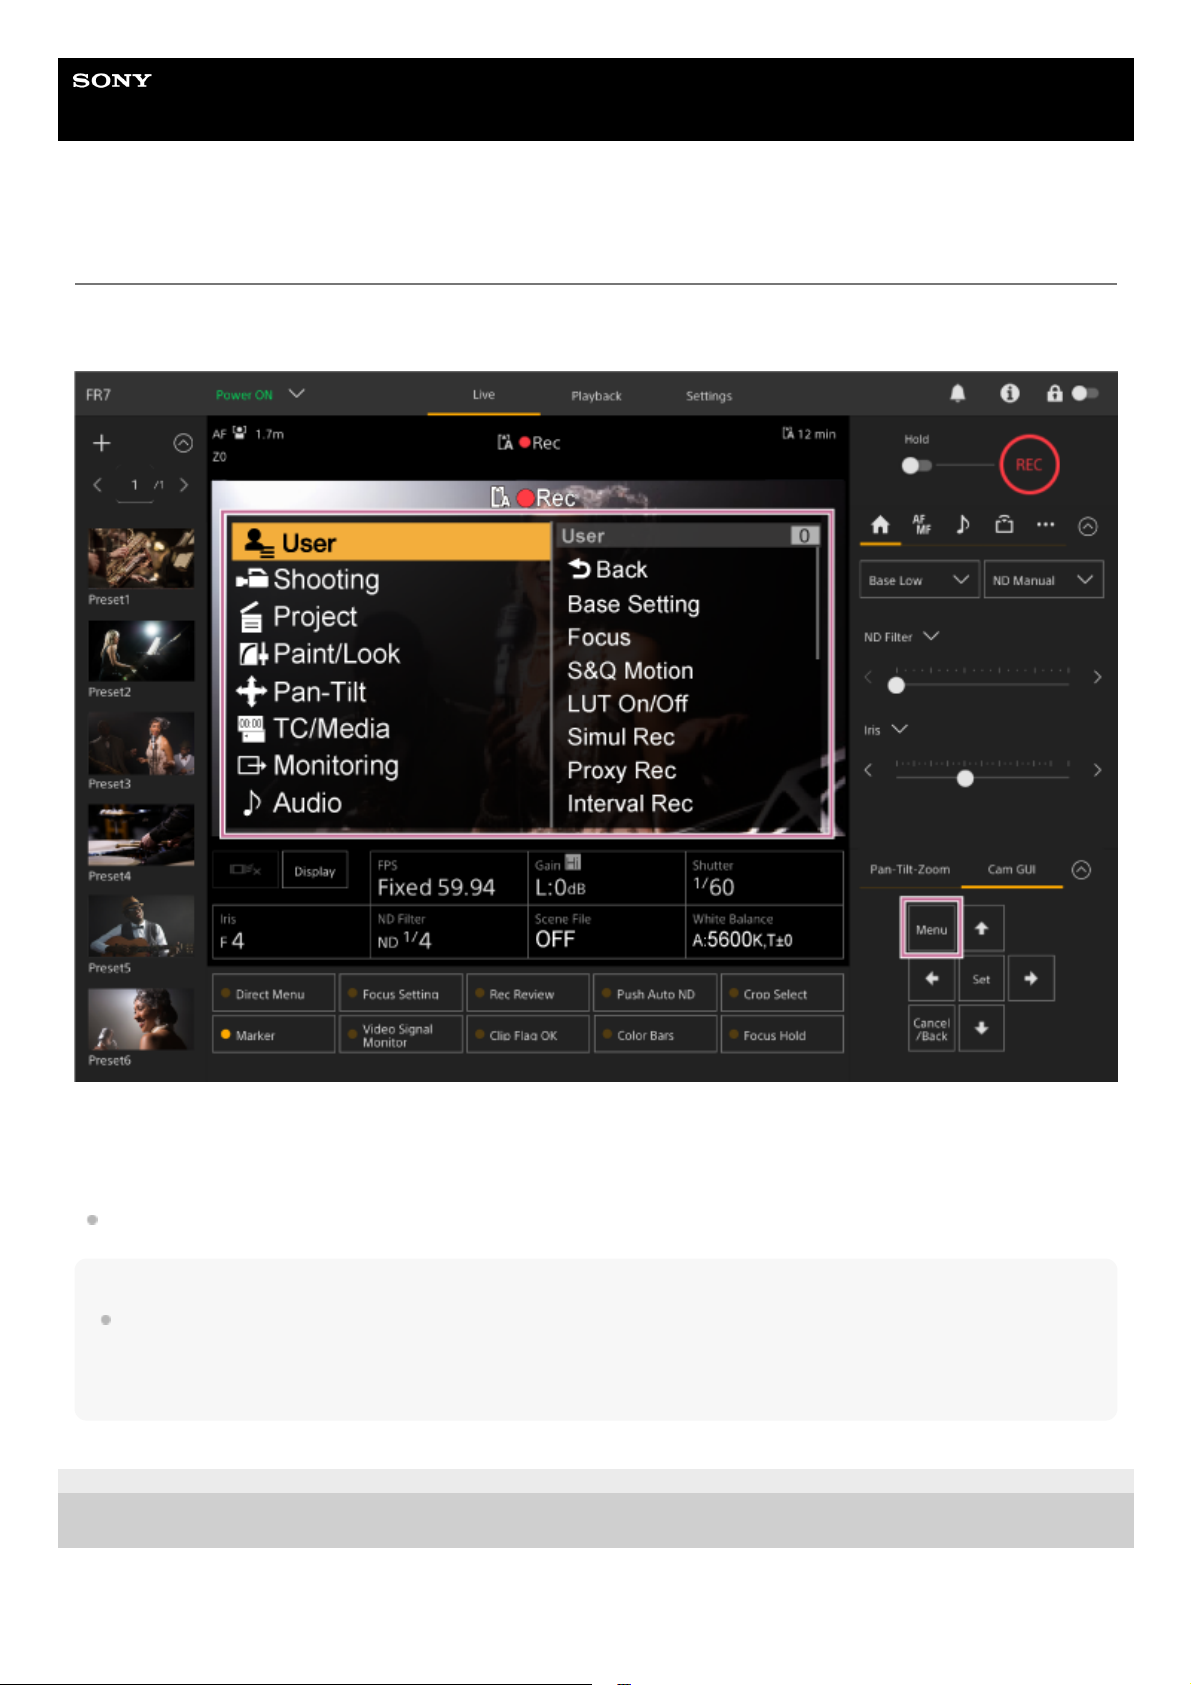
Camera Menu
Camera Screen Display
Mounting the Unit
Mounting Upright in a Fixed Location
Mounting Upright in a High, Fixed Location
Mounting on a Ceiling
Attaching/Removing a Lens
Precautions when Attaching/Removing a Lens
Checking the Lens Switches
Precautions When Using a Zoom Lens
Attaching a Lens
Removing a Lens
Connecting Cables
Connecting the Unit to a Network Device Via Wired Connection
Connecting a Power Supply
Using AC Power
Using PoE++ Power
Resetting the Pan/Tilt
Configuring Before Shooting
Initializing the Unit Using the Web App
Accessing the Web App from a Web Browser
Initializing the Unit
Configuring Basic Operation
Preparing Memory Cards
Supported Memory Cards
Inserting Memory Cards
Ejecting a Memory Card
Formatting (Initializing) Memory Cards
2

Shooting
Checking the Remaining Recording Time
Restoring Memory Cards
Basic Operation
Starting/Stopping Recording
Switching Between Memory Cards
Checking the Audio
Specifying Time Data
Reviewing the Recording (Rec Review)
Adjusting the Framing
Framing Adjustment Screen
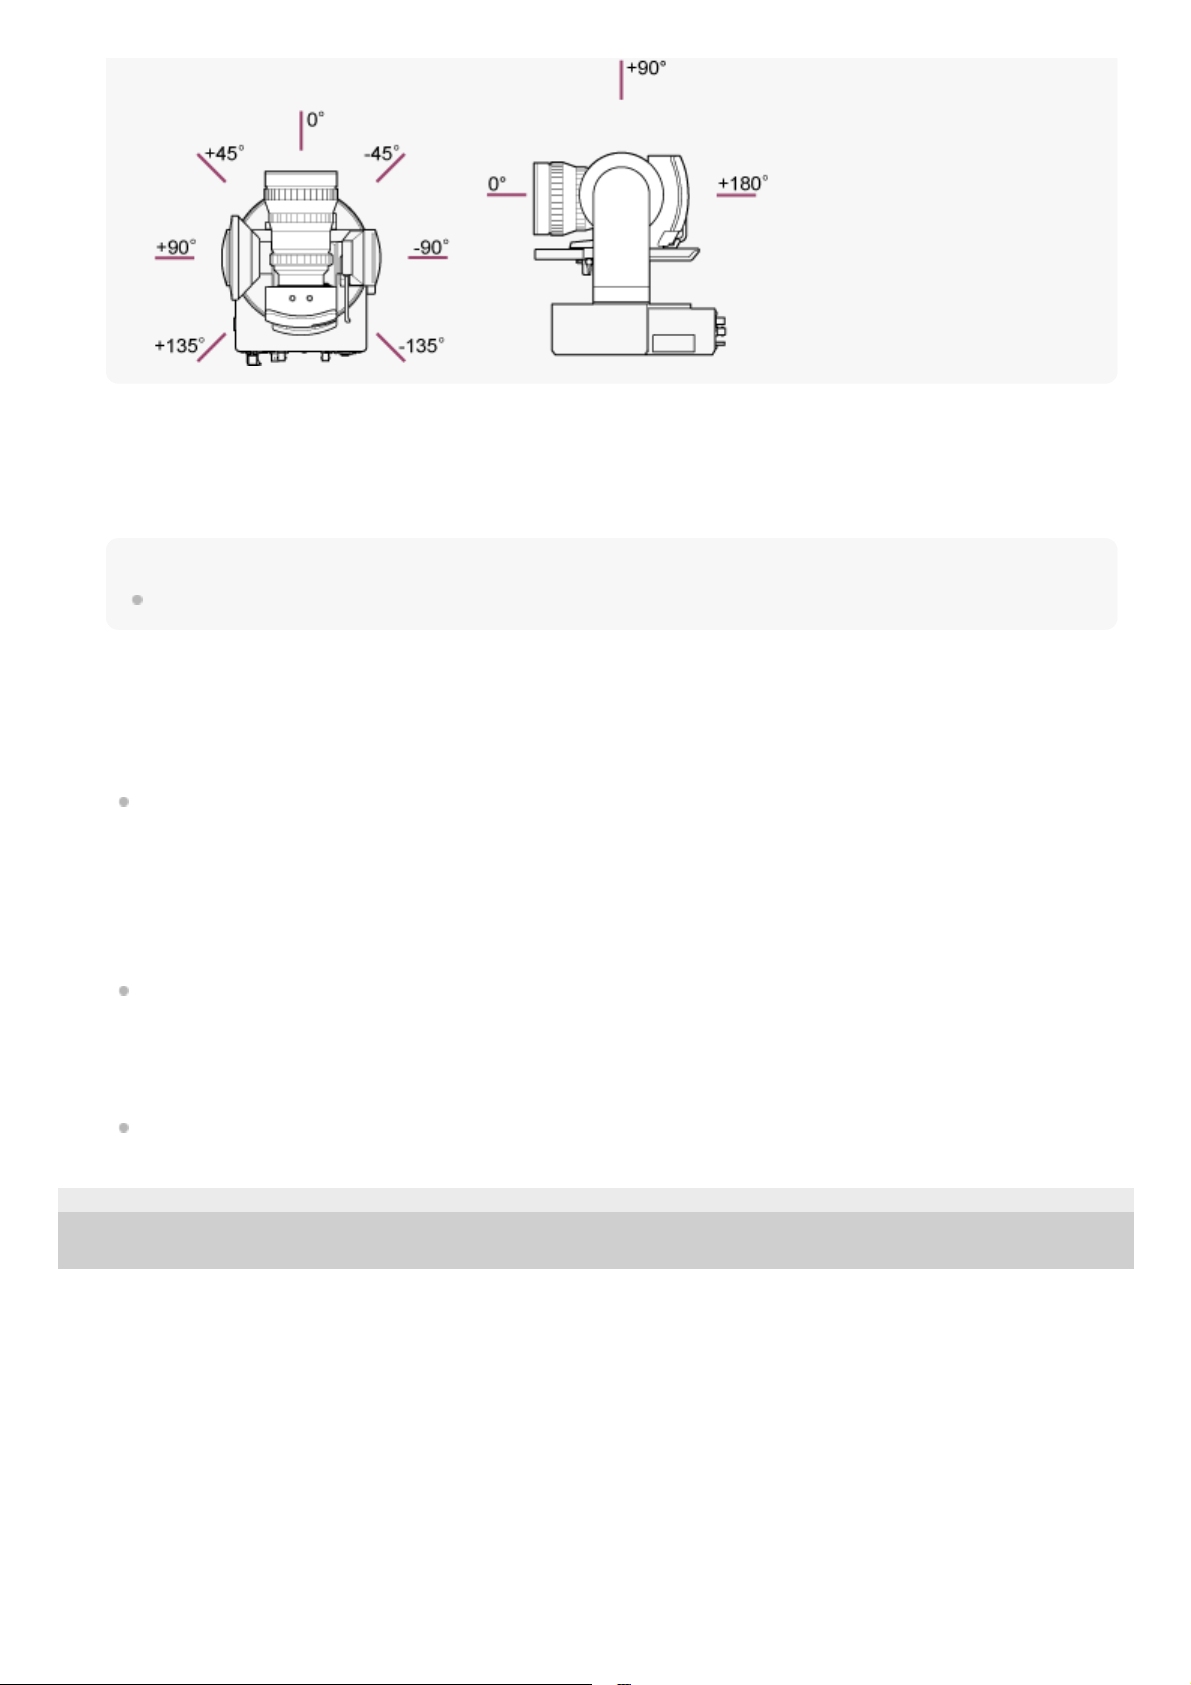
Adjusting the Shooting Direction
Adjusting the Shooting Direction Using the Web App
Setting the Pan/Tilt Operating Speed
Setting the Pan/Tilt Operation Acceleration
Adjusting the Shooting Direction Using the Supplied Infrared Remote Control
Adjusting the Zoom
Setting the Zoom Type
Adjusting the Zoom Using the Web App
Setting the Zoom Operating Speed
Adjusting the Zoom Using the Supplied Infrared Remote Control
Saving/Restoring the Camera Pan/Tilt/Zoom Position
Calibrating an E-Mount Lens
Saving/Restoring Pan/Tilt, Zoom Position, and Focus Setting Using the Web App
Renaming Position Presets Using the Web App
Replacing a Saved Position with a New Position Using the Web App
Deleting a Saved Position Using the Web App
Changing the Transition Speed of Position Presets
Saving/Restoring Pan/Tilt and Zoom Position Using the Supplied Infrared Remote Control
3
Adjusting the Focus
Focus Adjustment Screen
Adjusting the Focus Manually (Manual Focus)
Adjusting Manually Using the Web App
Adjusting Manually Using the Supplied Infrared Remote Control
Focusing by Specifying a Focus Position (Spot Focus)
Using Auto Focus Temporarily (Push Auto Focus (AF))
Using Single-Shot Auto Focus (Push Auto Focus (AF-S))
Adjusting the Focus Automatically (Auto Focus)
Adjusting Automatically Using the Web App
Adjusting Automatically Using the Supplied Infrared Remote Control
Setting the Auto Focus Area/Position (Focus Area)
Changing the Focus Area Quickly (Focus Setting)
Moving the Focus Area Frame Using Touch Operation (Touch Focus Area)
Adjusting the Auto Focus Operation (AF Transition Speed, AF Subject Shift Sensitivity)
Setting the Auto Focus Target Manually (AF Assist) Using the Web App
Focusing Manually During Auto Focus Using the Supplied Infrared Remote Control
Using Manual Focus Temporarily During Auto Focus (Push Manual Focus)
Tracking Using Face and Eye Detection (Face/Eye Detection AF)
Tracking a Specified Subject (Realtime Tracking AF)
Adjusting the Brightness
Brightness Adjustment Screen
Setting the Base Sensitivity
Setting the Target Level for Automatic Brightness Adjustment
Adjusting the Iris
Adjusting the Iris Automatically
Adjusting the Iris Manually
Adjusting the Gain
Adjusting the Gain Automatically
4
Useful Functions
Adjusting the Gain Manually
Adjusting the Shutter
Adjusting the Shutter Automatically
Adjusting the Shutter Manually
Adjusting the Light Level (ND Filter)
About the ND Filter
Adjusting in Preset Mode
Adjusting Automatically in Variable Mode
Adjusting Manually in Variable Mode
Adjusting for Natural Colors (White Balance)
White Balance Adjustment Screen
Adjusting the White Balance Automatically
Adjusting the White Balance Manually
Running Auto White Balance
Configuring the Audio to Record
Audio Configuration Screen
Selecting the Audio Input Device
Adjusting the Audio Recording Level Automatically
Adjusting the Audio Recording Level Manually
Direct Menu Operation
Assignable Buttons
Slow & Quick Motion
Recording Video Intermittently (Interval Rec)
Recording Cached Pictures (Picture Cache Rec)
Recording to Memory Cards A and B Simultaneously (2-slot Simul Rec)
Video Signal Monitor
Clip Flags
Breathing Compensation
5
Network Functions
Proxy Recording
Proxy Recording Overview
Recording a Proxy
Shooting with the Desired Look
Look Overview
Selecting a Look
Importing a Desired Base Look
Customizing a Look
Saving a Look
Deleting a Base Look
Shooting with Look Adjustment in Post-Production
Shooting with Look Adjustment in Post-Production
Applying a LUT to HDMI Output and Streaming
Changing a LUT
Changing the Distribution of Dark and Bright Areas in the Recorded Image
RAW Recording
Recording RAW Video
Recording RAW Video in Slow & Quick Motion Mode
Adjusting the Bokeh (Bokeh Control Function)
Switching the Bokeh Control Function On/Off
Adjusting the Degree of Bokeh
Saving and Loading Configuration Data
Saving and Loading Configuration Data Overview
Saving an ALL File
Loading an ALL File
Transferring Files
About File Transfer
6
Thumbnail Screen
Camera Menu and Detailed Settings
Registering a File Transfer Destination
Selecting a File and Uploading
Uploading a Proxy File on a Memory Card from the Thumbnail Screen
Uploading an Original File on a Memory Card from the Thumbnail Screen
Checking the File Transfer Status
Uploading Using Secure FTP
Configuring Streaming
About Streaming
Setting the Streaming Format
Setting the Video Codec for Streaming
Setting the Audio Codec for Streaming
Starting/Stopping Streaming
Thumbnail Screen
Playing Clips and Other Clip Operations
Playing Recorded Clips
Operations on Recorded Clips
Camera Menu Configuration
Operating the Camera Menu
Operating the Camera Menu
Entering a Character String
User Menu
User
Edit User Menu
Edit User
Shooting Menu
ISO/Gain/EI
7

ND Filter
Shutter
Iris
Auto Exposure
White
White Setting
Offset White
Focus
S&Q Motion
LUT On/Off
Noise Suppression
Flicker Reduce
SteadyShot
Project Menu
Base Setting
Rec Format
Cine EI Setting
Simul Rec
Proxy Rec
Interval Rec
Picture Cache Rec
SDI/HDMI Rec Control
Assignable Button
Paint/Look Menu
Scene File
Base Look
Reset Paint Settings
Black
Knee
8
Detail
Matrix
Multi Matrix
Pan-Tilt Menu
P/T Acceleration
TC/Media Menu
Timecode
TC Display
Users Bit
HDMI TC Out
Clip Name Format
Update Media
Format Media
Media Life
Monitoring Menu
Output Format
Display On/Off
Video Signal Monitor
Marker
Audio Menu
Audio Input
Audio Output
Thumbnail Menu
Display Clip Properties
Set Clip Flag
Lock/Unlock Clip
Delete Clip
Transfer Clip
9
Web Menu and Detailed Settings
Transfer Clip (Proxy)
Filter Clips
Customize View
Technical Menu
Color Bars
Genlock
Tally
Rec Review
Zoom
Lens
APR
Network Menu
Wired LAN
File Transfer
Maintenance Menu
Language
Clock Set
Hours Meter
Shooting Menu Settings and Default Values
ISO/Gain Settings and Default Values
AGC Limit Settings and Default Values
Image Quality Settings Saved for Each Shooting Mode
Web Menu Configuration
Web Menu Operations
Shooting Menu
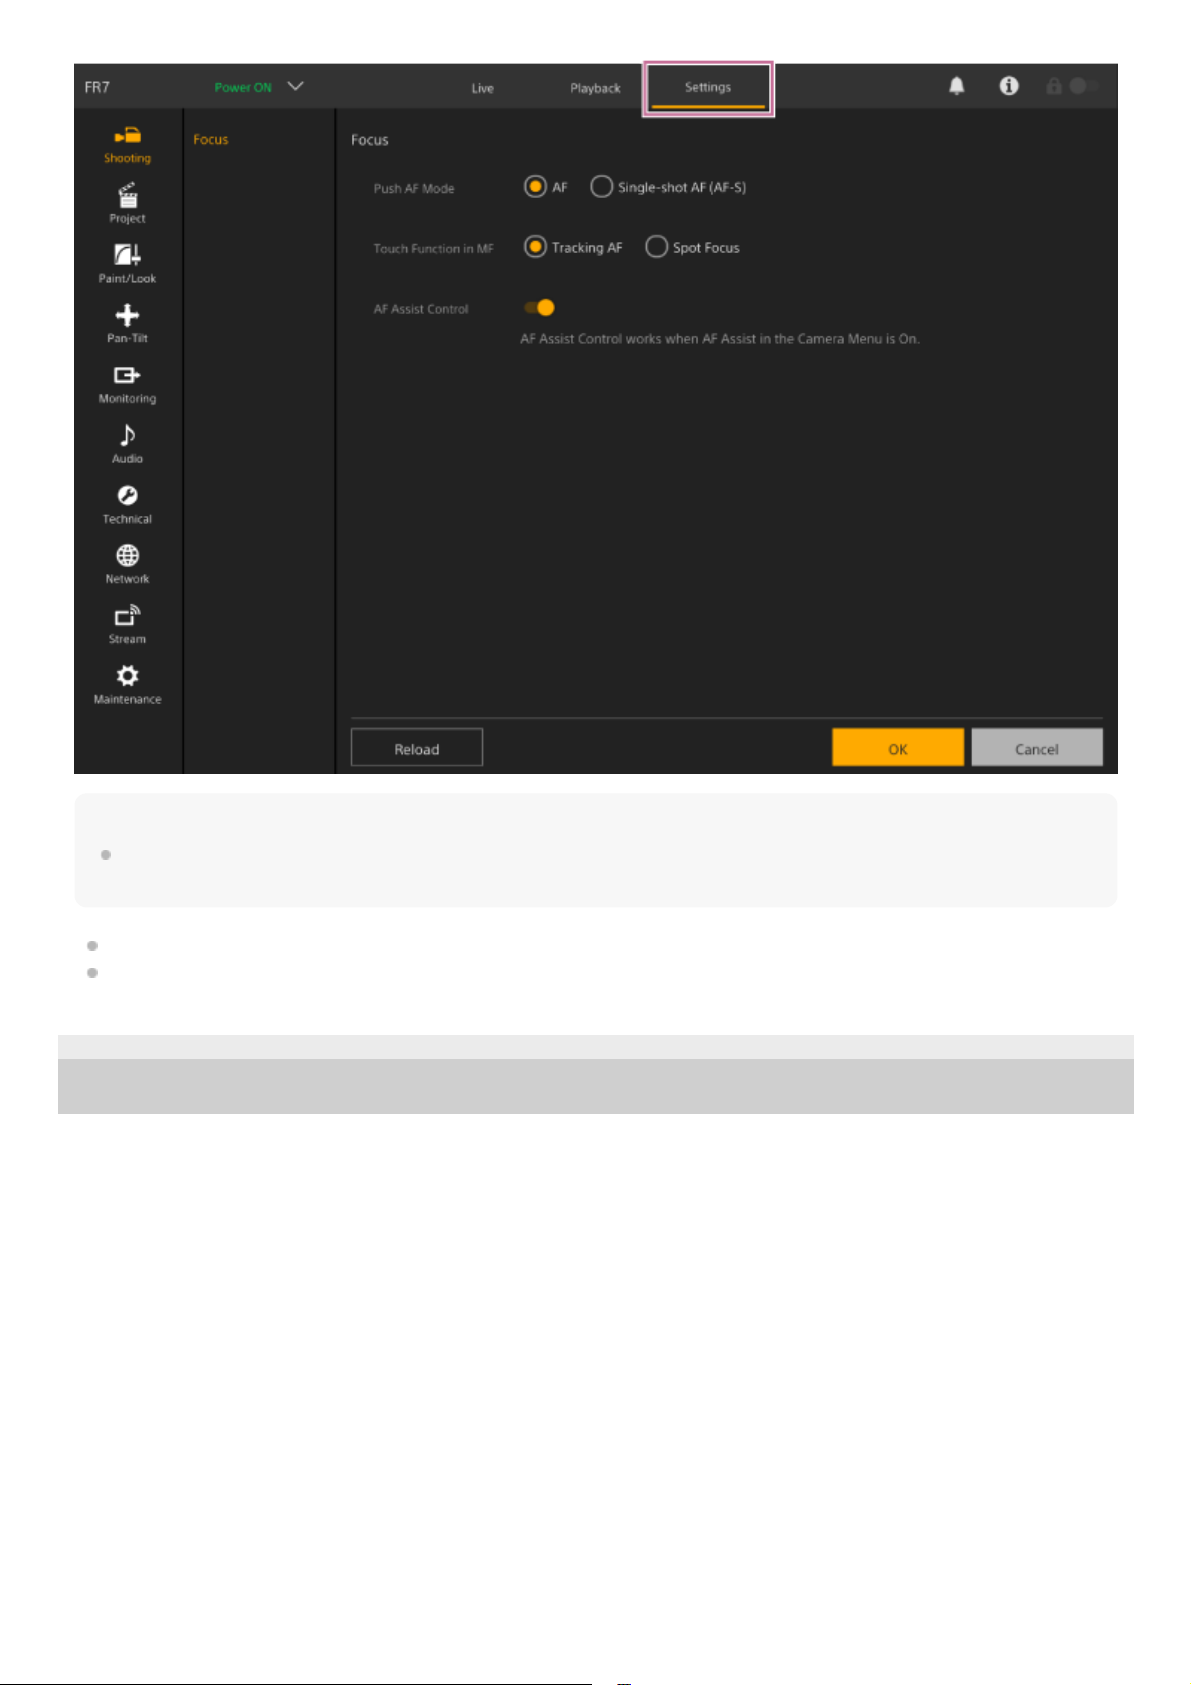
Focus
Project Menu
10
Base Setting
Rec Format
Simul Rec
Proxy Rec
Interval Rec
Picture Cache Rec
All File
Paint/Look Menu
Base Look
Pan-Tilt Menu
P/T Speed
P/T Acceleration
P/T Range Limit
P/T Direction
P/T Preset
Monitoring Menu
Output Format
Output Display
Audio Menu
Audio Input
Audio Output
Technical Menu
Tally
IR Remote
Network Menu
Camera Name
User
Wired LAN
11
External Device Connection
File Transfer
FTP Server 1 to 3
SSL
Referer Check
Brute Force Attack Protection
Stream Menu
Stream
Video Stream
Audio Stream
Maintenance Menu
Language
Accessibility
Clock Set
Reset
Information
System Log
HTTP Access Log
Service
EULA
Software
Connecting External Monitors and Recording Devices
Operating Using an RM-IP500 Remote Controller (Option)
About Operation Using an RM-IP500 Remote Controller (option)
Connecting an RM-IP500 Remote Controller
Synchronizing with an External Device
About Synchronizing with an External Device
Synchronizing the Phase of the Video Signal (Genlock)
12
Appendix
5-041-957-11(1)
Copyright 2022 Sony Corporation
Locking the Timecode to Other Devices
Connecting an External Microphone or External Audio Device
Managing/Editing Clips Using a Computer
Outputting an Optical Fiber Signal
Connecting a Tally Signal
Usage Precautions
Output Formats and Limitations
Troubleshooting
Error/Warning Messages
List of Menu Items
Preset Position Saved Items
Block Diagrams
Updating E-Mount Lens Software
Attaching the Lens Release Button Cover
Licenses
Specifications
Trademarks
13
Help Guide
Interchangeable Lens Digital Camera
ILME-FR7 / ILME-FR7K
System Configuration
This unit can be combined with peripheral devices to form various system configurations.
E-mount lens1.
LA-EA3 / LA-EA4 A-mount Adaptor2.
Infrared remote control (supplied)3.
CFexpress Type A memory cards / SDXC memory cards4.
CFexpress Type A card reader / SD card reader5.
ECM-680S, ECM-678
*
, ECM-674
*
Microphone
6.
EC-0.5X3F5M 3-pin → 5-pin XLR adaptor cable is required.
*
AC adaptor (supplied)7.
Video monitor8.
RM-IP500 Remote Controller9.
14

5-041-957-11(1) Copyright 2022 Sony Corporation
15
Help Guide
Interchangeable Lens Digital Camera
ILME-FR7 / ILME-FR7K
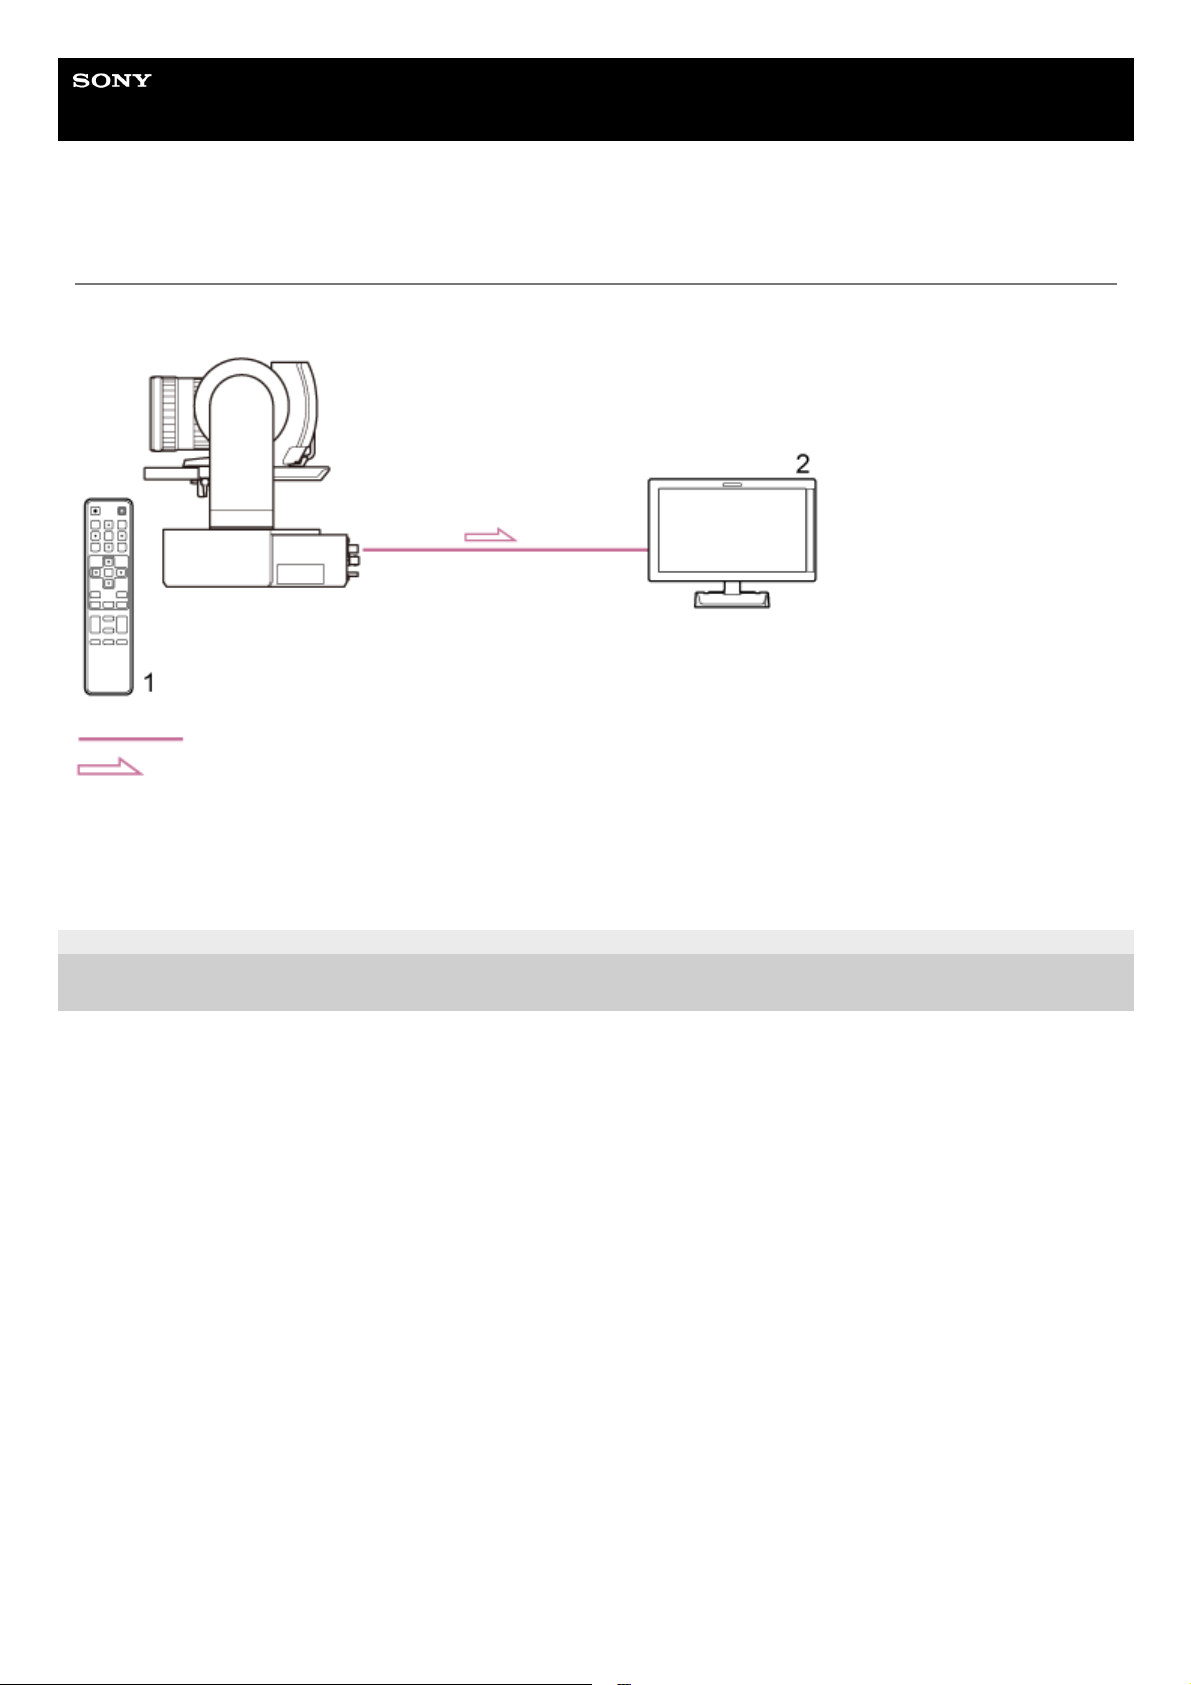
Controlling a Single Unit Using the Supplied Infrared Remote Control
You can control a single unit remotely using the supplied infrared remote control.
Video signal
Signal flow
5-041-957-11(1)
Copyright 2022 Sony Corporation
Infrared remote control (supplied)1.
Video monitor2.
16
Help Guide
Interchangeable Lens Digital Camera
ILME-FR7 / ILME-FR7K
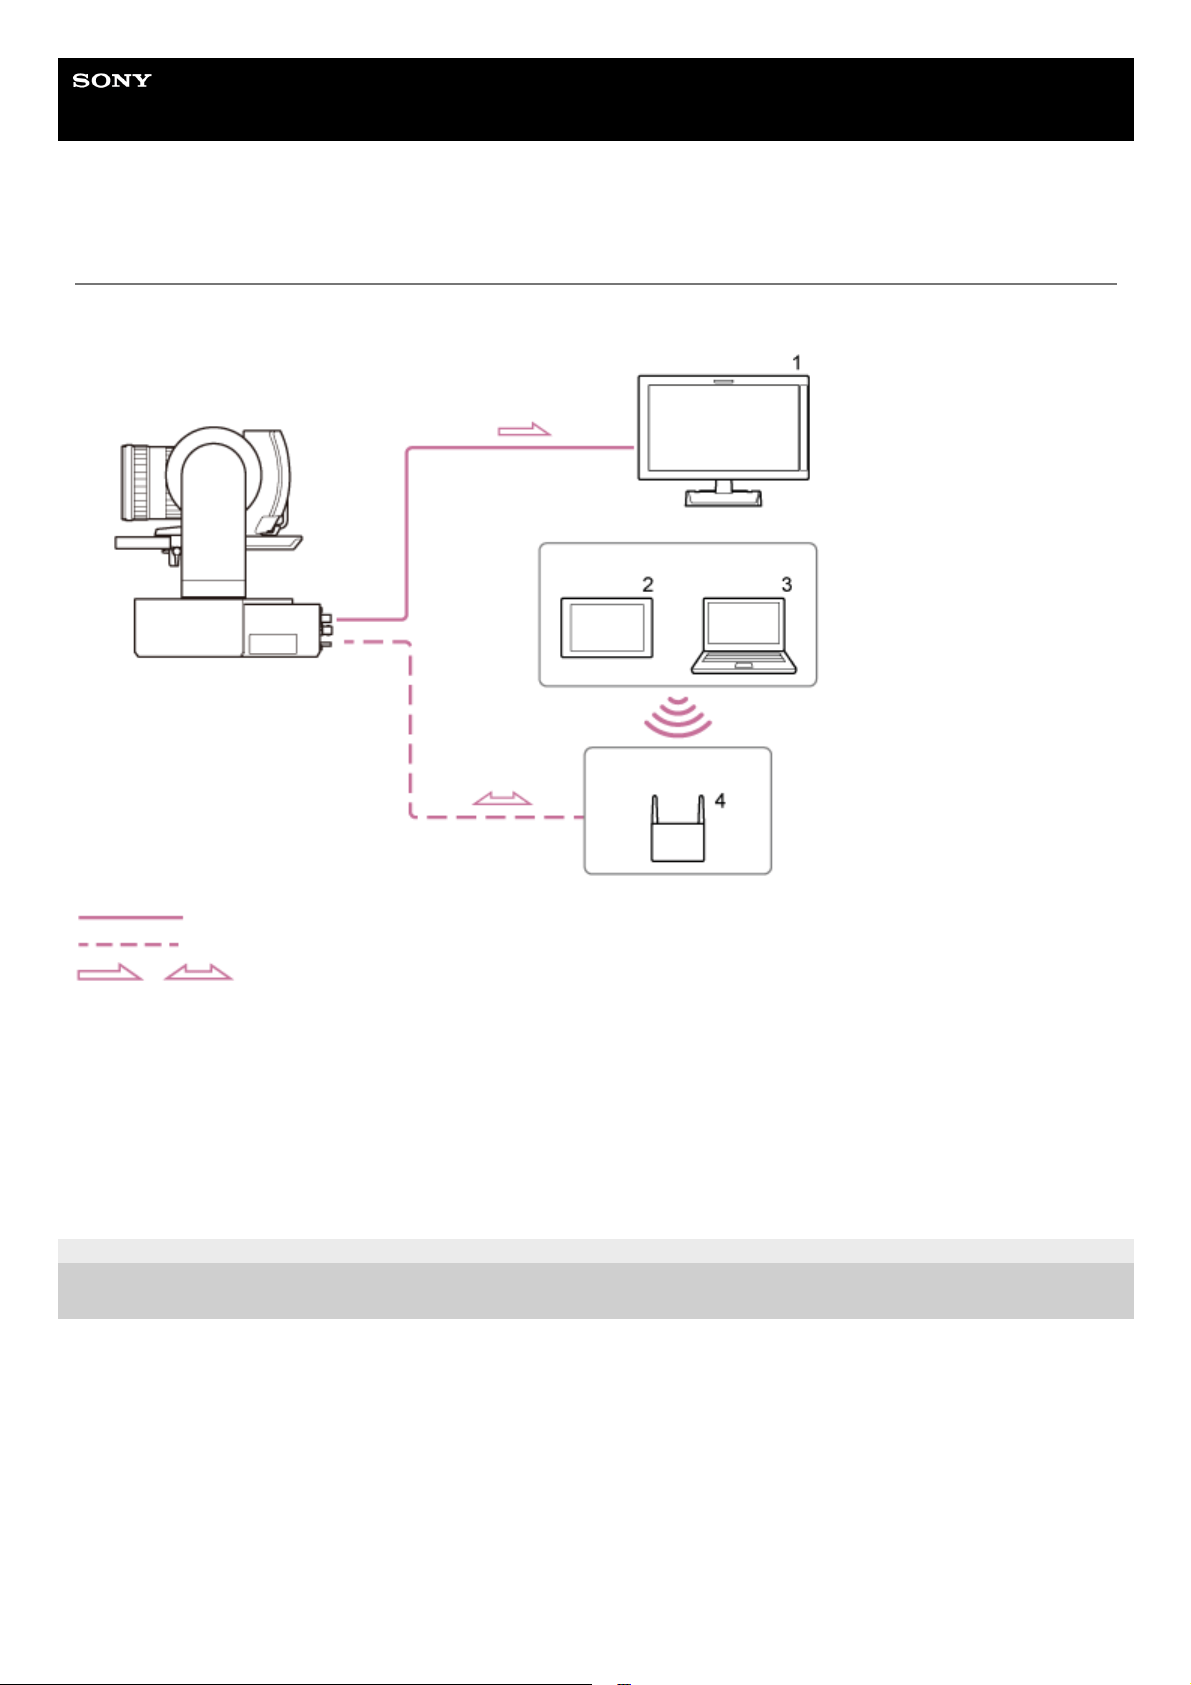
Controlling a Single Unit Using a Tablet or Computer
You can connect a tablet or computer to the unit and then control unit using a web browser.
Video signal
Remote control signal
Signal flow
5-041-957-11(1)
Copyright 2022 Sony Corporation
Video monitor1.
Tablet2.
Computer3.
Access point4.
17
Help Guide
Interchangeable Lens Digital Camera
ILME-FR7 / ILME-FR7K
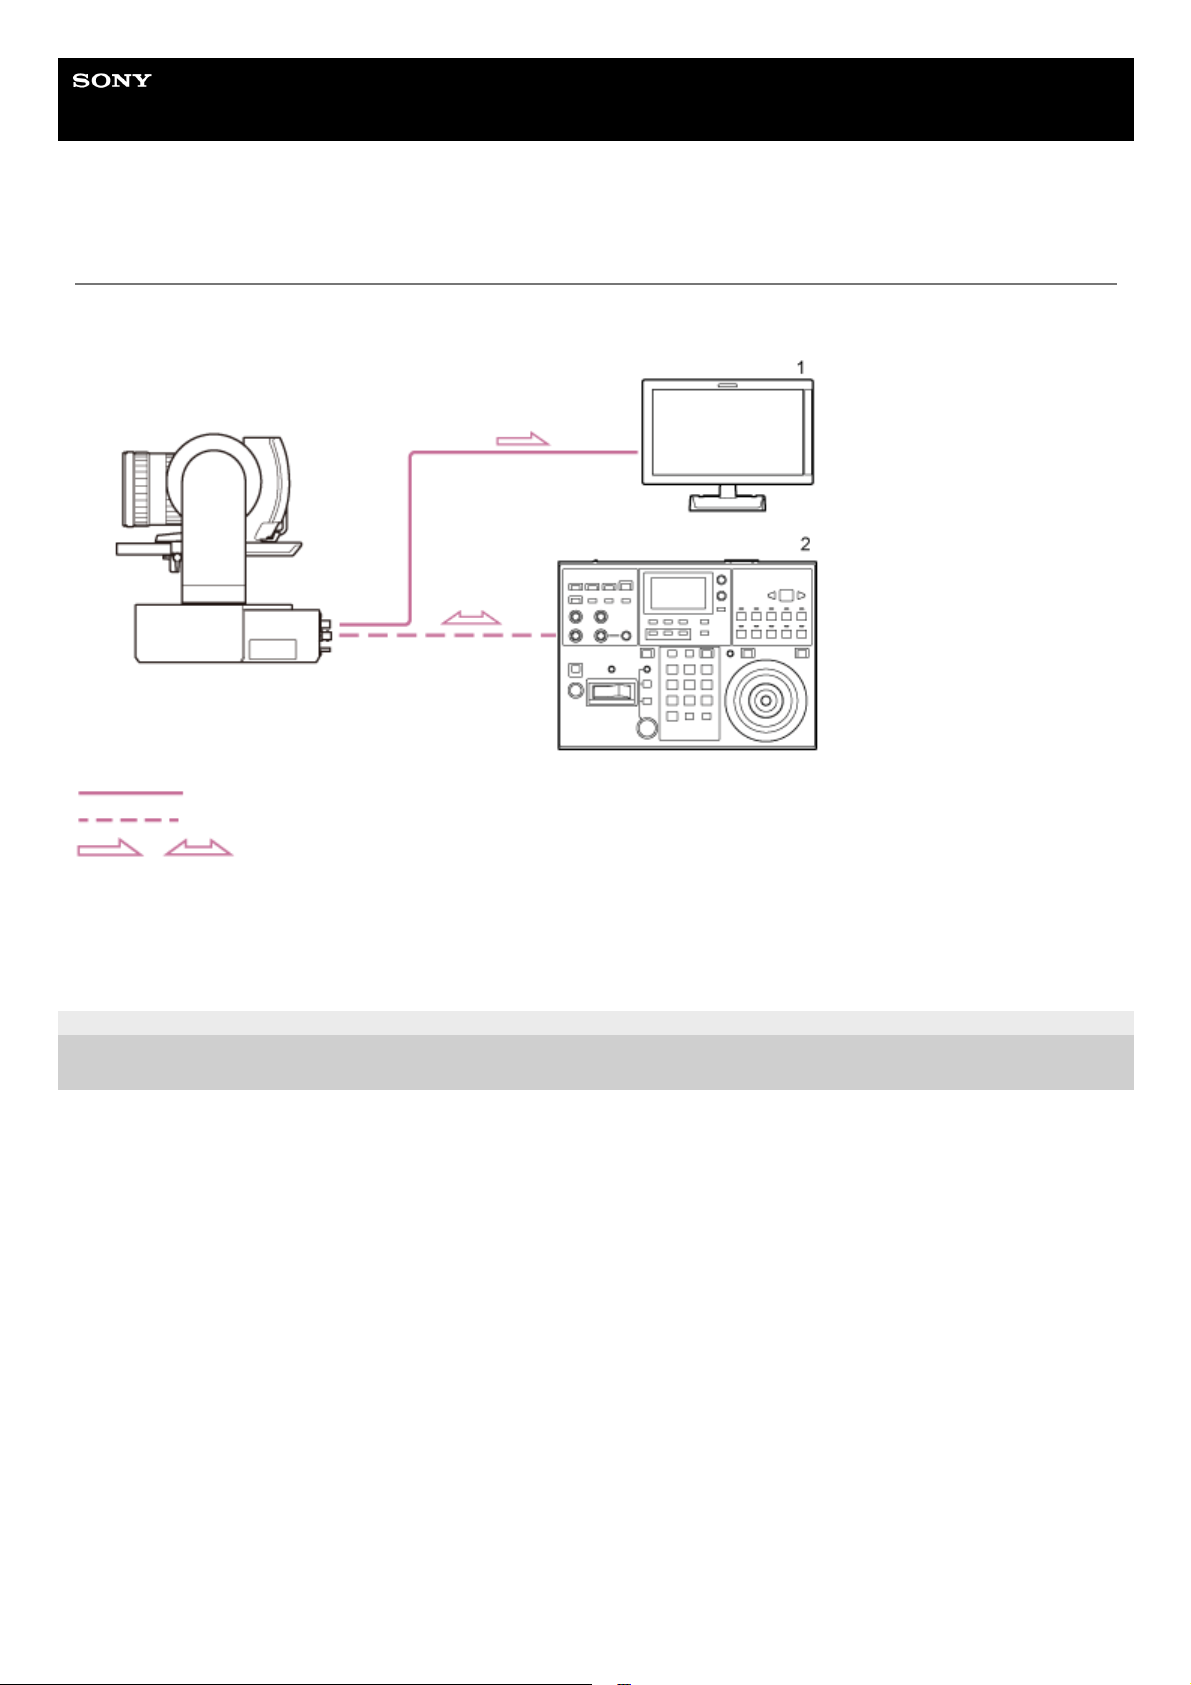
Controlling a Single Unit Using an External Remote Controller
You can control the unit remotely using a remote controller.
Video signal
Remote control signal
Signal flow
5-041-957-11(1)
Copyright 2022 Sony Corporation
Video monitor1.
RM-IP500 Remote Controller2.
18
Help Guide
Interchangeable Lens Digital Camera
ILME-FR7 / ILME-FR7K
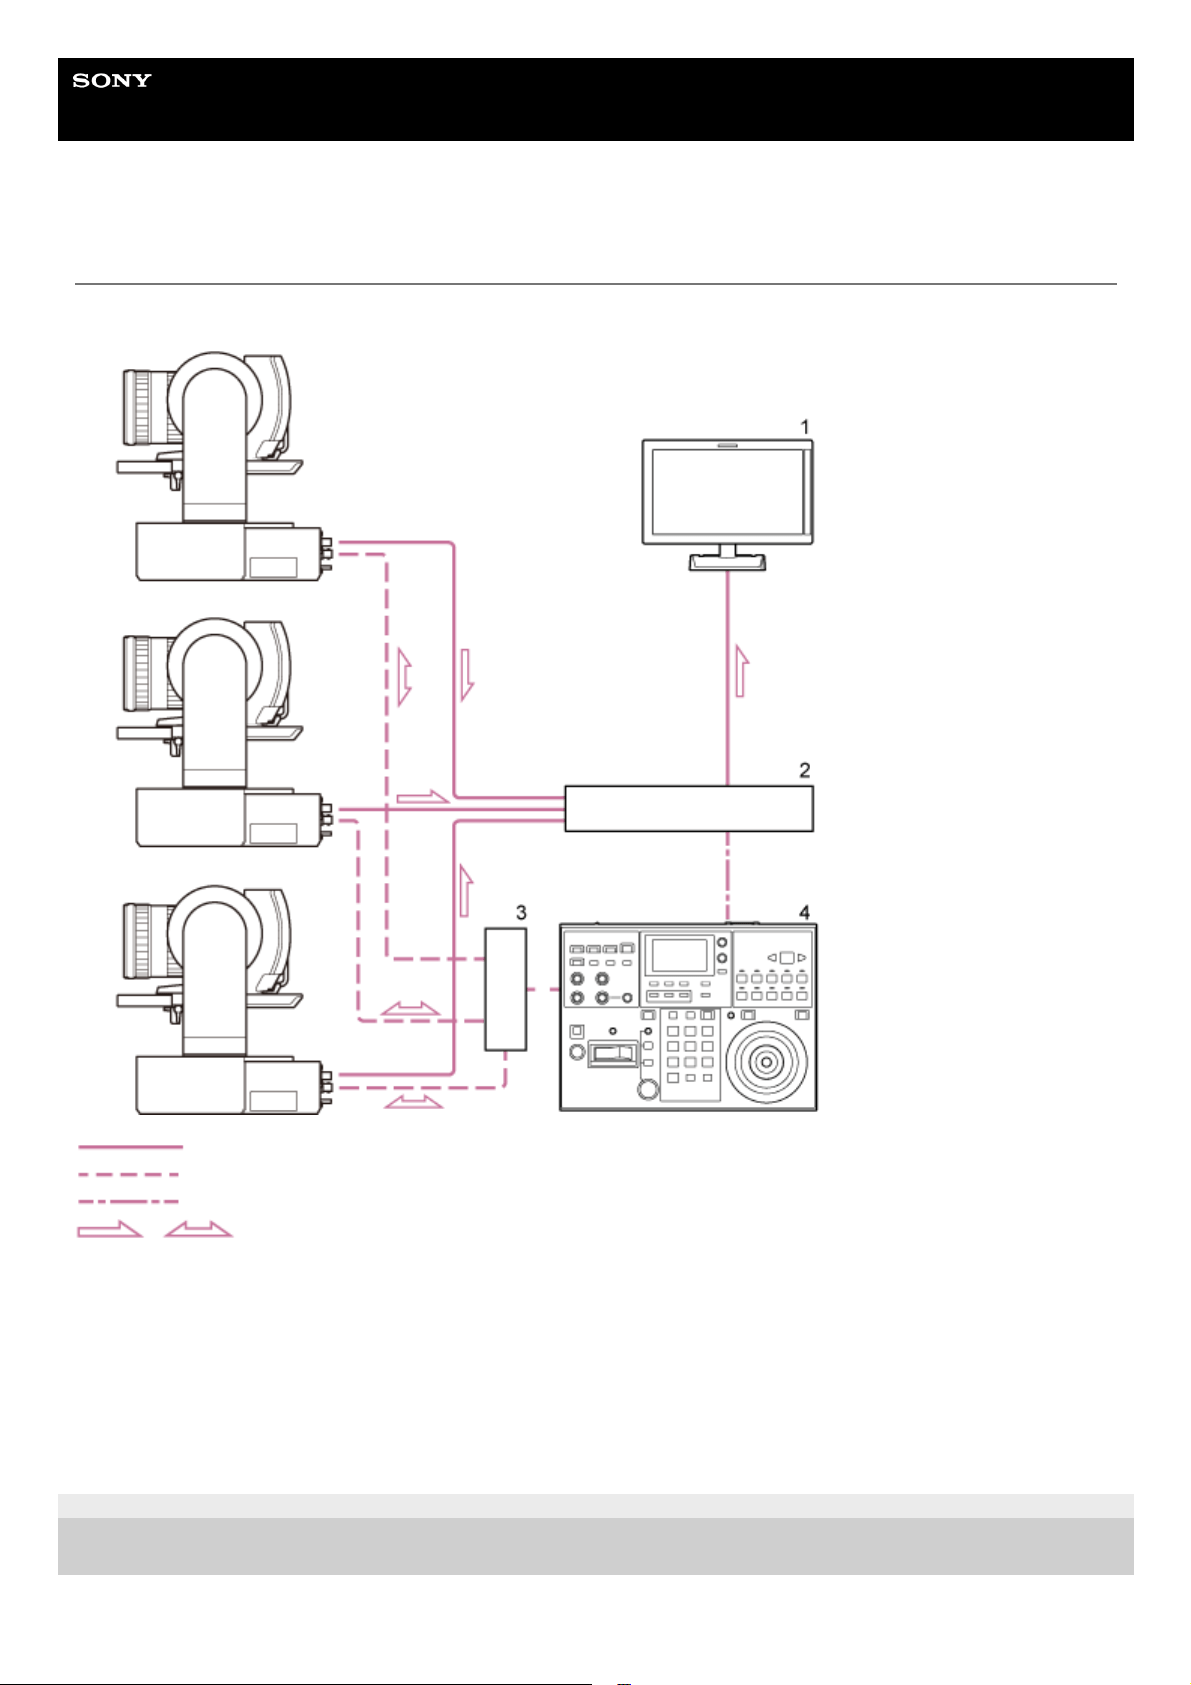
Controlling Multiple Units Using External Remote Controller
You can control up to 100 units remotely using a single remote controller (RM-IP500).
Video signal
Remote control signal
Tally/contact signal
Signal flow
5-041-957-11(1)
Copyright 2022 Sony Corporation
Video monitor1.
Video switcher2.
Ethernet hub3.
RM-IP500 Remote Controller4.
19
Help Guide
Interchangeable Lens Digital Camera
ILME-FR7 / ILME-FR7K
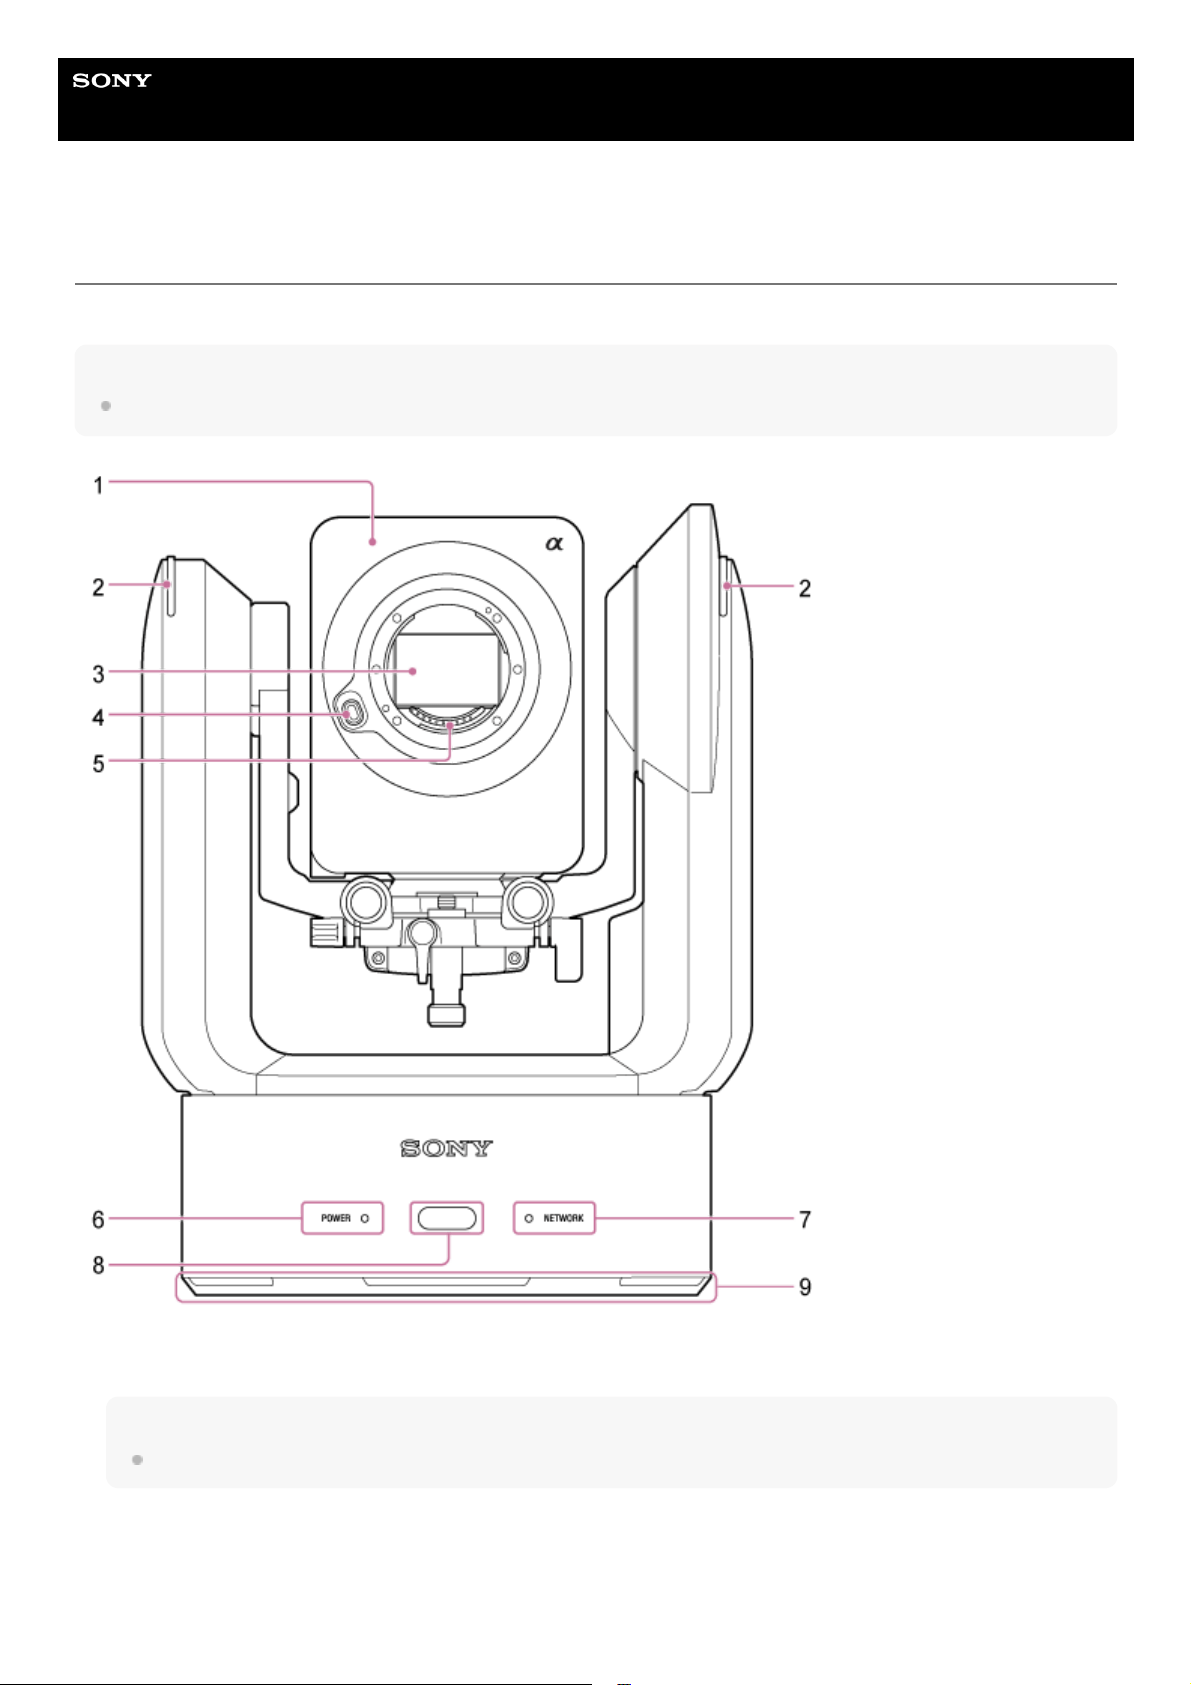
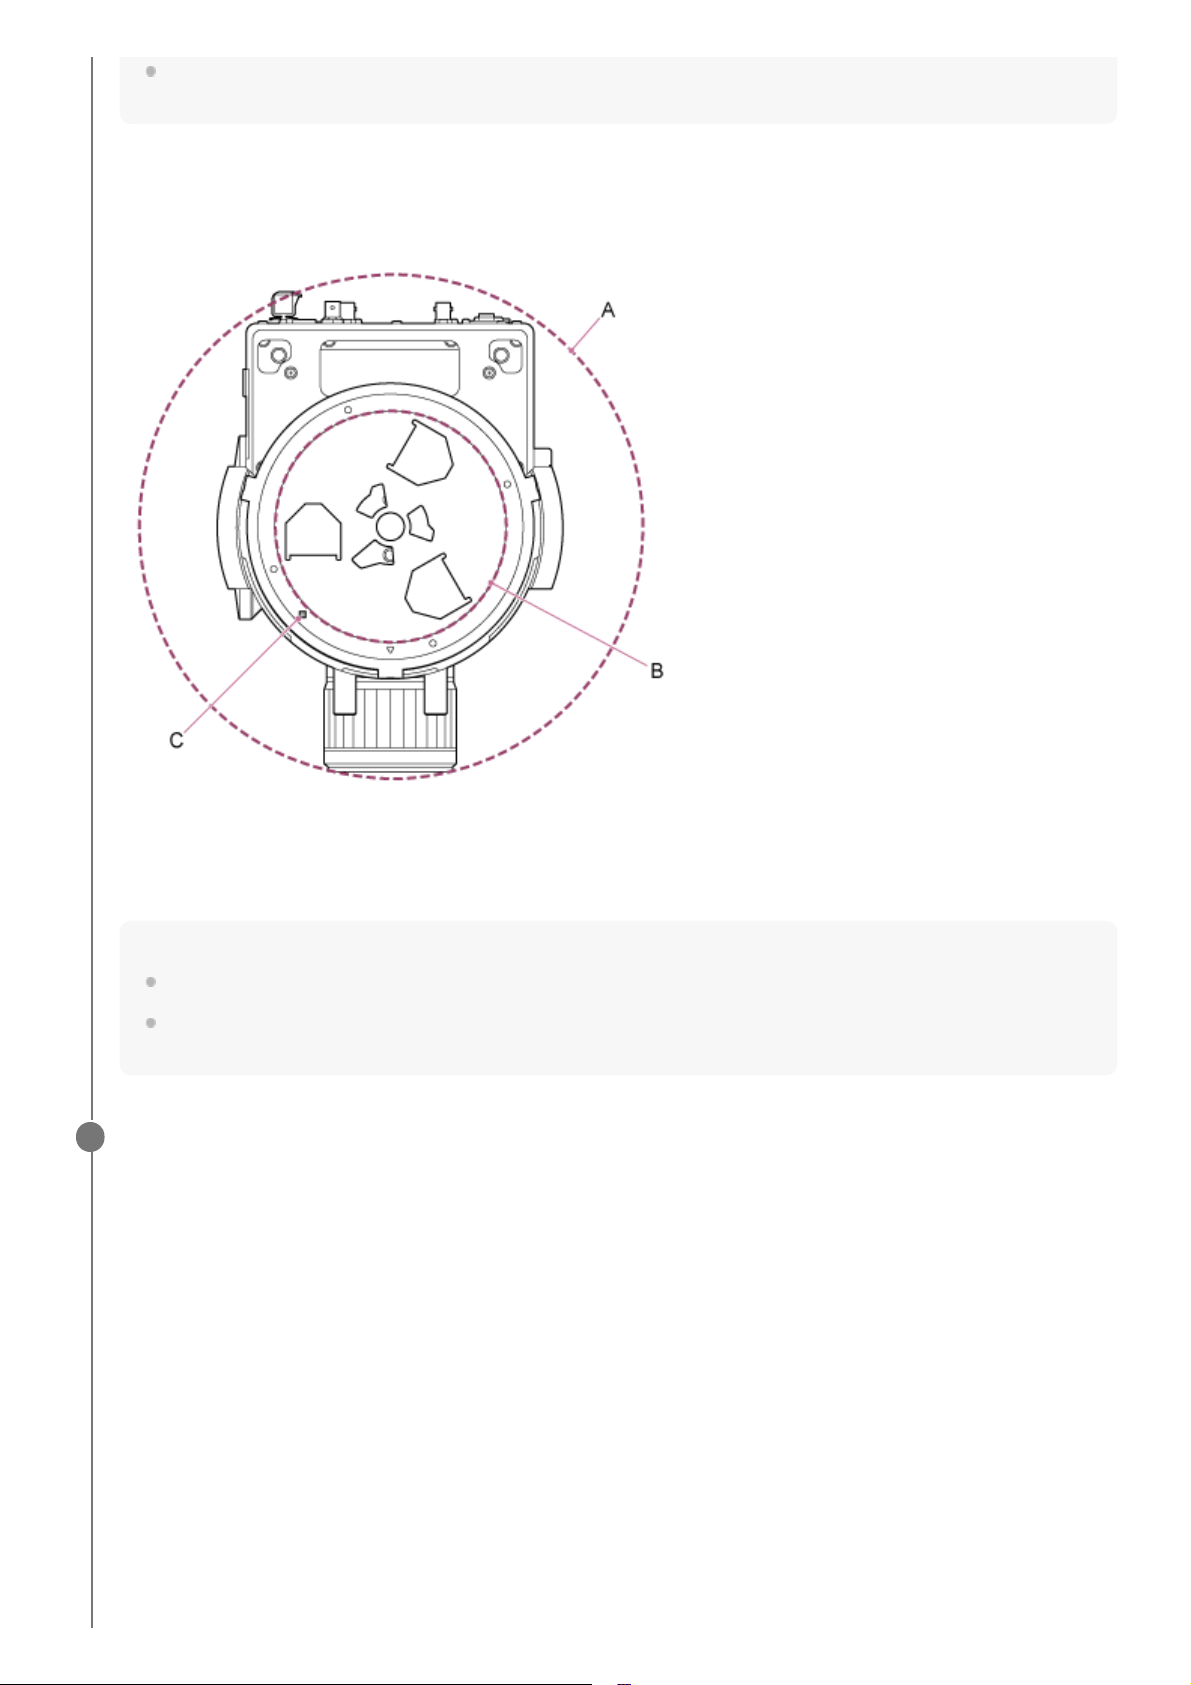
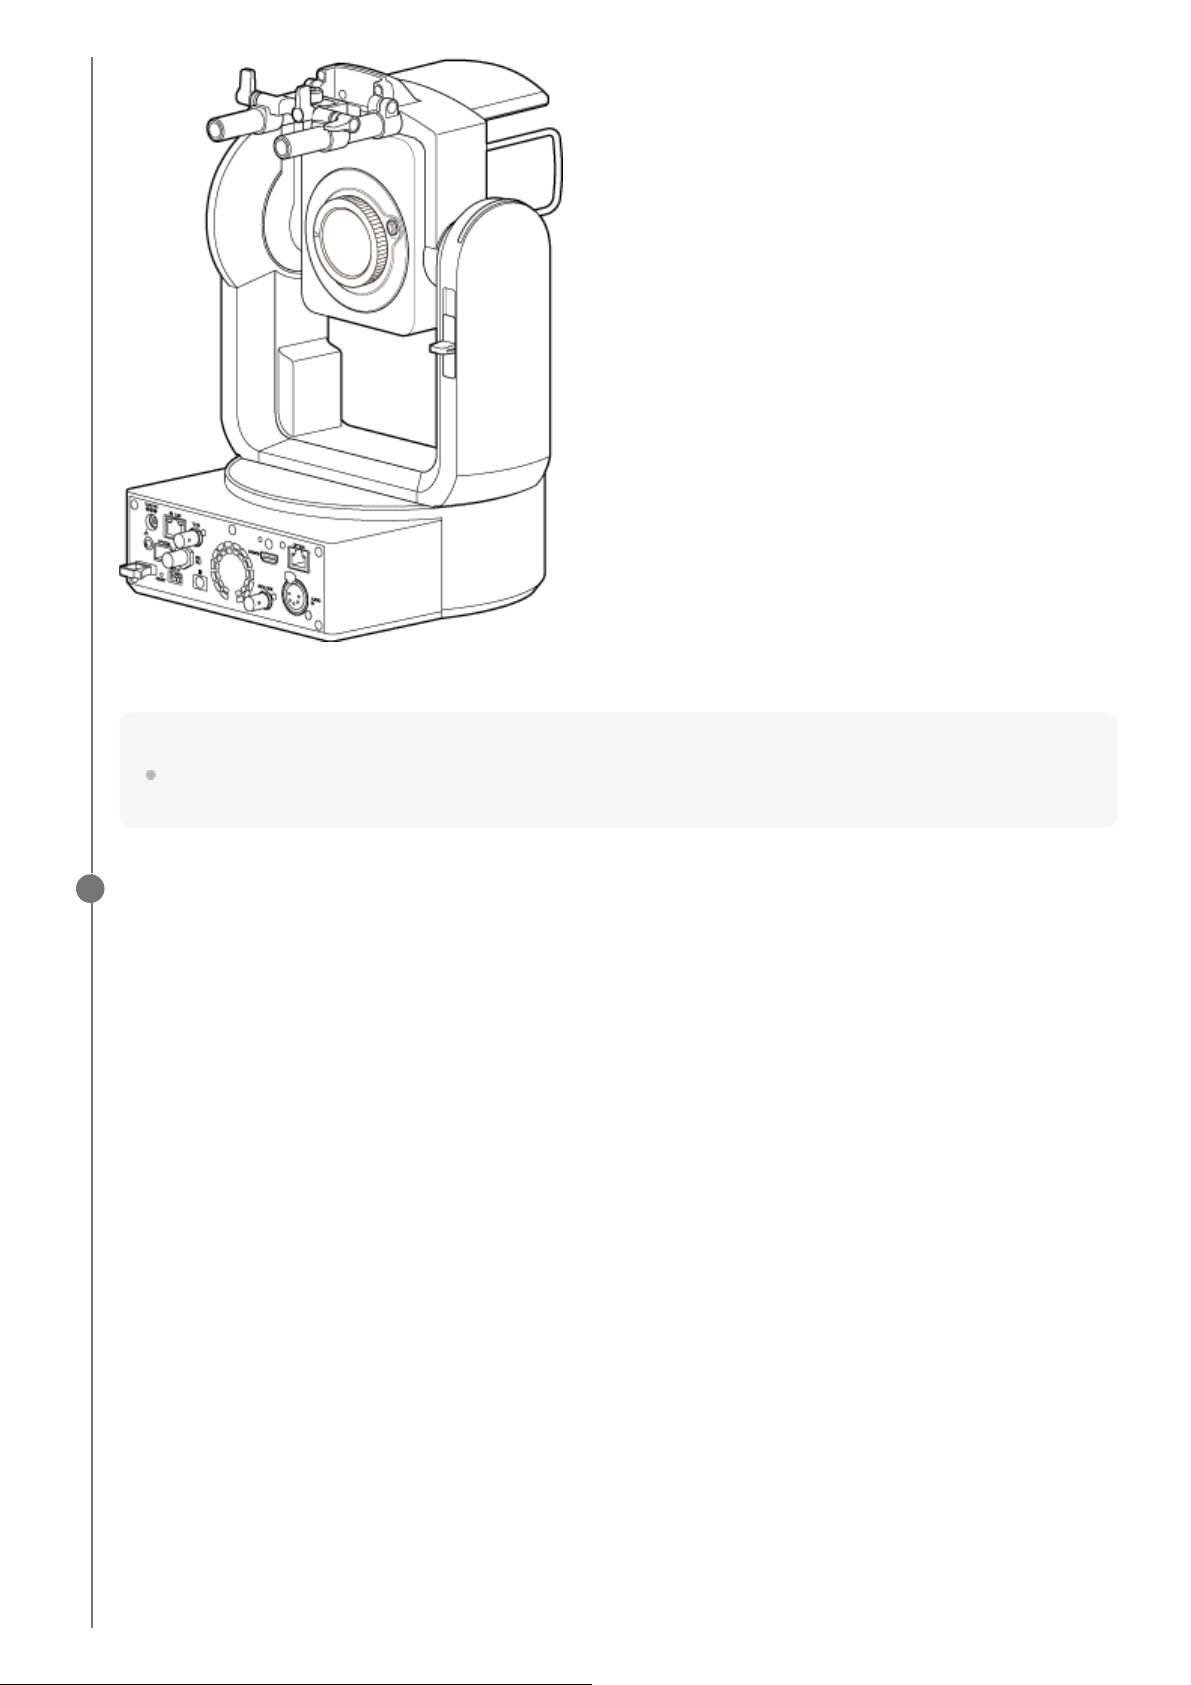
Front View
This topic describes the location and function of parts on the front of the unit.
Hint
This description refers to the illustration of the unit without an attached lens.
Camera head
Note
Do not subject the camera head to strong impacts.
1.
Recording/tally lamp
When configured as a recording lamp, the lamp lights up red when recording to a memory card. The lamp blinks
when the remaining free space on the recording media is low or when an error occurs.
2.
20
For details, see “Error/Warning Messages.”
When configured as a tally lamp, the lamp lights up red or green according to the external tally signal.
For details, see “Connecting a Tally Signal.”
Image sensor
Note
Do not touch directly with your hands.
3.
Lens release button
Press to remove the lens.
For details, see “Removing a Lens.”
4.
Lens signal contacts
Note
Do not touch directly with your hands.
5.
POWER lamp6.
NETWORK lamp
The state of the unit is indicated by the combination of display color and lit status (lit, blinking, not lit) of the POWER
lamp and NETWORK lamp.
7.
POWER
lamp
NETWORK
lamp
Unit status
Lit
green
*1
Lit green Power-on (network connected)
Not lit Power-on (network not connected)
Blinking
green
Not lit Power-on process in progress
Lit
orange
Not lit Power standby state
Blinking
yellow
Not lit Software update in progress
Blinking
orange
slowly
*2
Blinking
green
slowly
*2
The unit cannot operate normally. For details, view the system log. If the problem
persists even after putting the unit in standby mode or turning the power off and then on
again, contact your Sony service representative.
Blinking
orange
rapidly
*3
Blinking
green
rapidly
*3
A malfunction occurred on the unit. Contact your Sony service representative.
Blinks green when a command is received from the supplied infrared remote control.
*1
Blinking slowly: Blinking once per second
*2
Blinking rapidly: Blinking four times per second
*3
Infrared remote control sensor
Receives the control signal from the supplied infrared remote control.
8.
21

5-041-957-11(1) Copyright 2022 Sony Corporation
Air inlet
Note
Do not block the air flow. Doing so may cause a malfunction.
9.
22
Help Guide
Interchangeable Lens Digital Camera
ILME-FR7 / ILME-FR7K
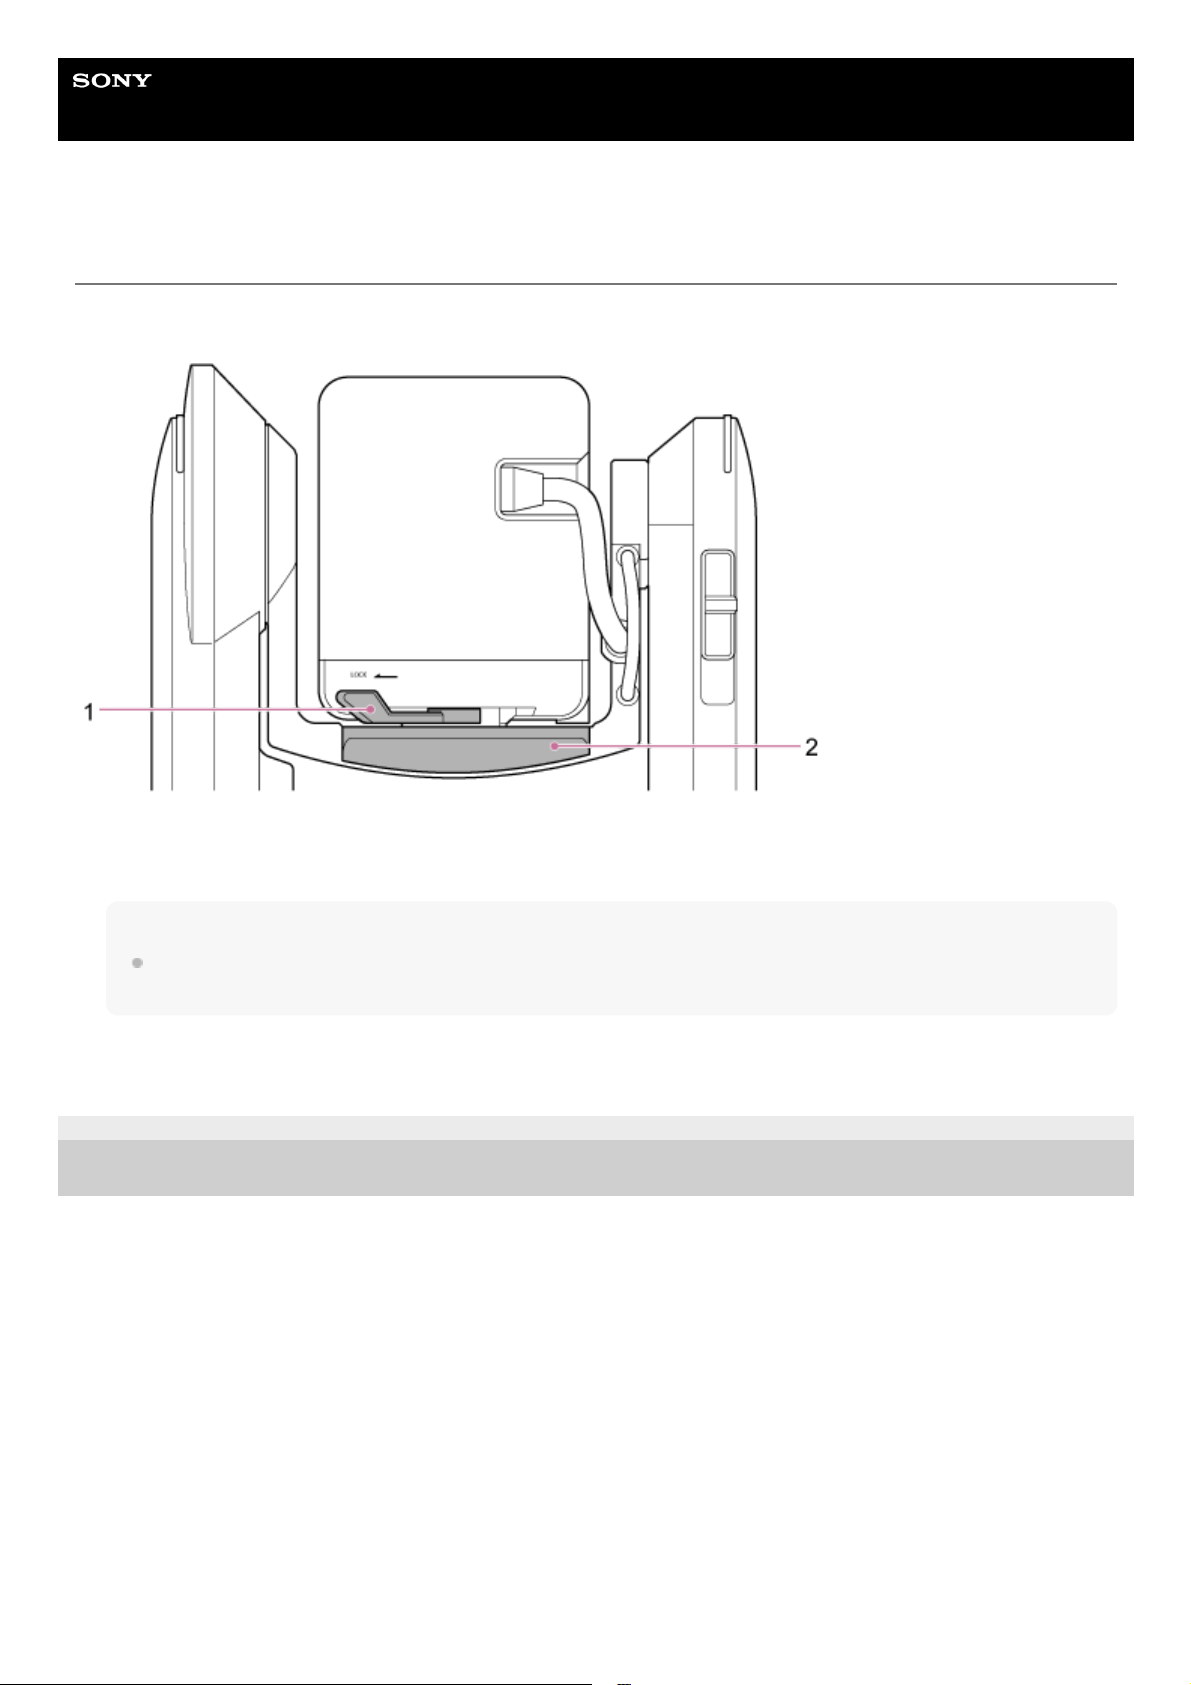
Rear View
This topic describes the location and function of parts on the rear of the unit.
5-041-957-11(1) Copyright 2022 Sony Corporation
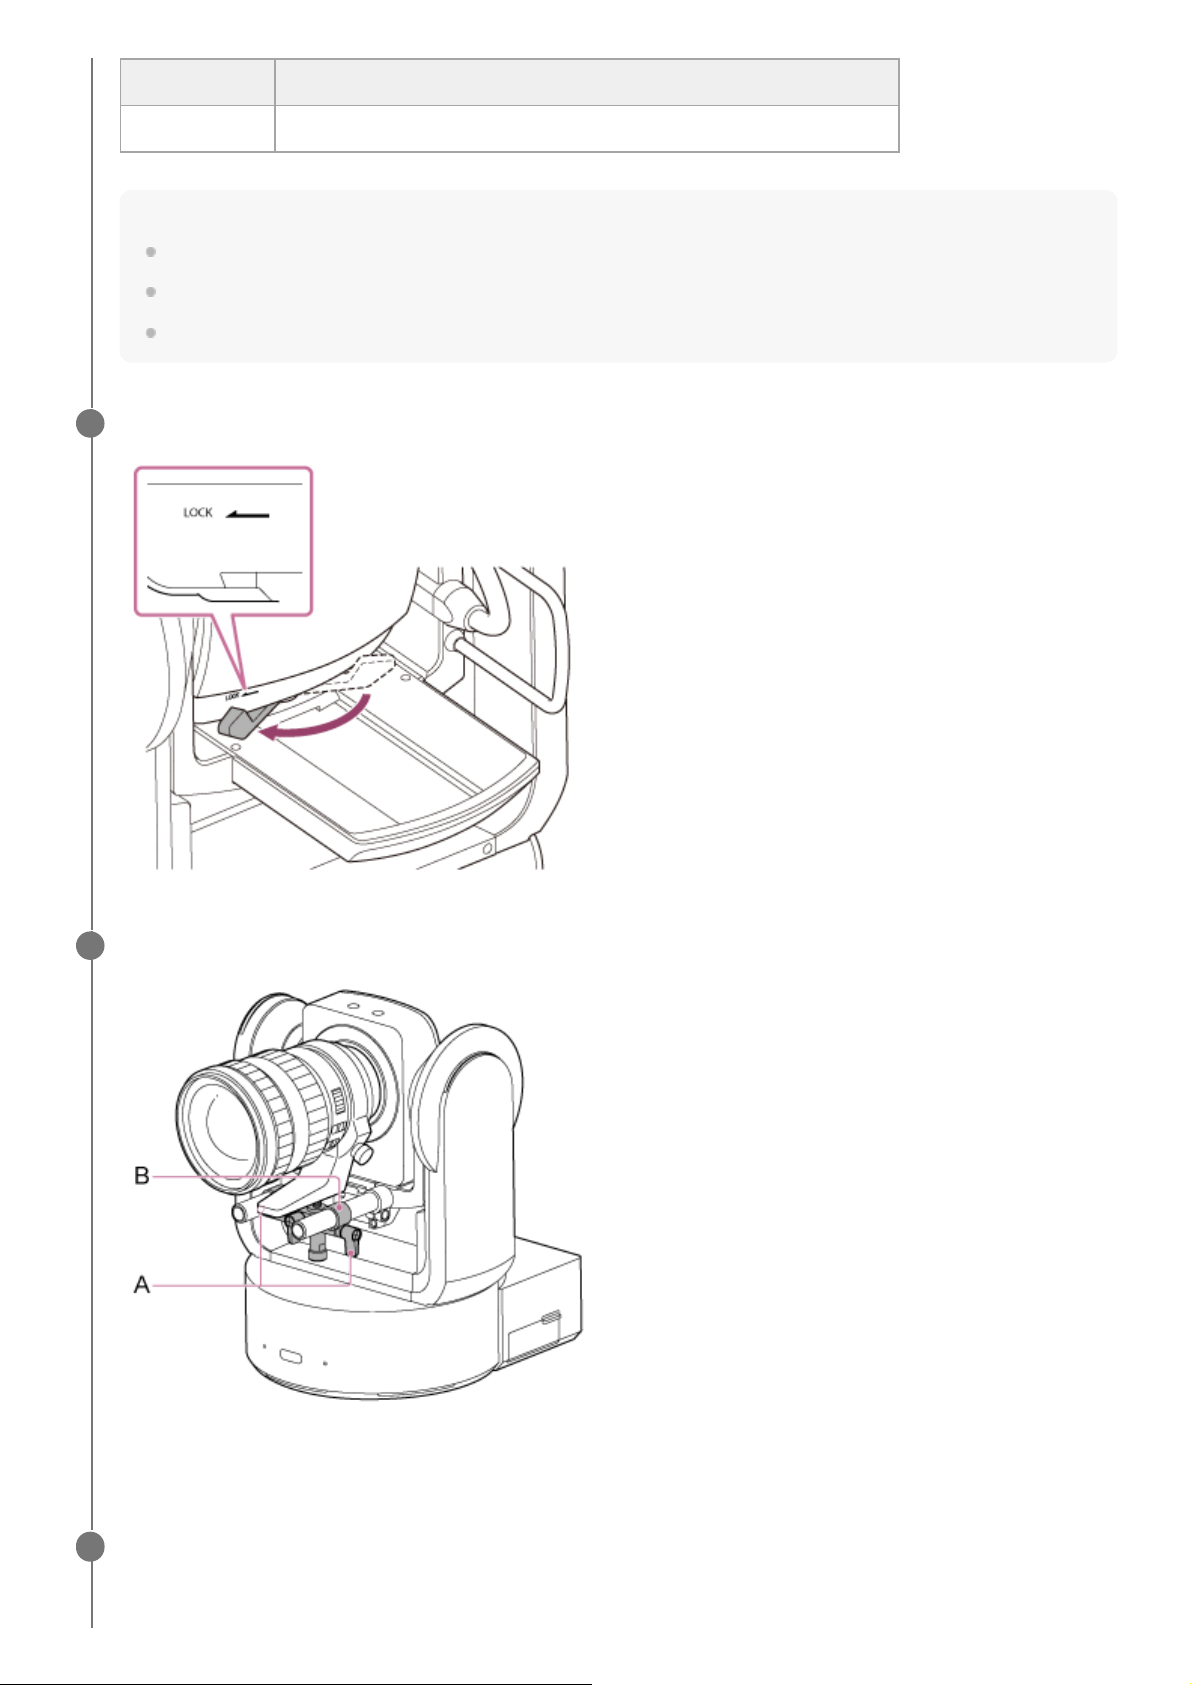
Camera head lock lever
Locks the forward/rearward movement of the camera head.
Note
Turn off the power of the unit and lock the camera head horizontally using the pan/tilt lock lever before operating the lock
lever to avoid injury due to pinched fingers. For details about the pan/tilt lock lever, see “Pan/tilt lock lever” in “Side View.”
1.
Slide base2.
23
Help Guide
Interchangeable Lens Digital Camera
ILME-FR7 / ILME-FR7K
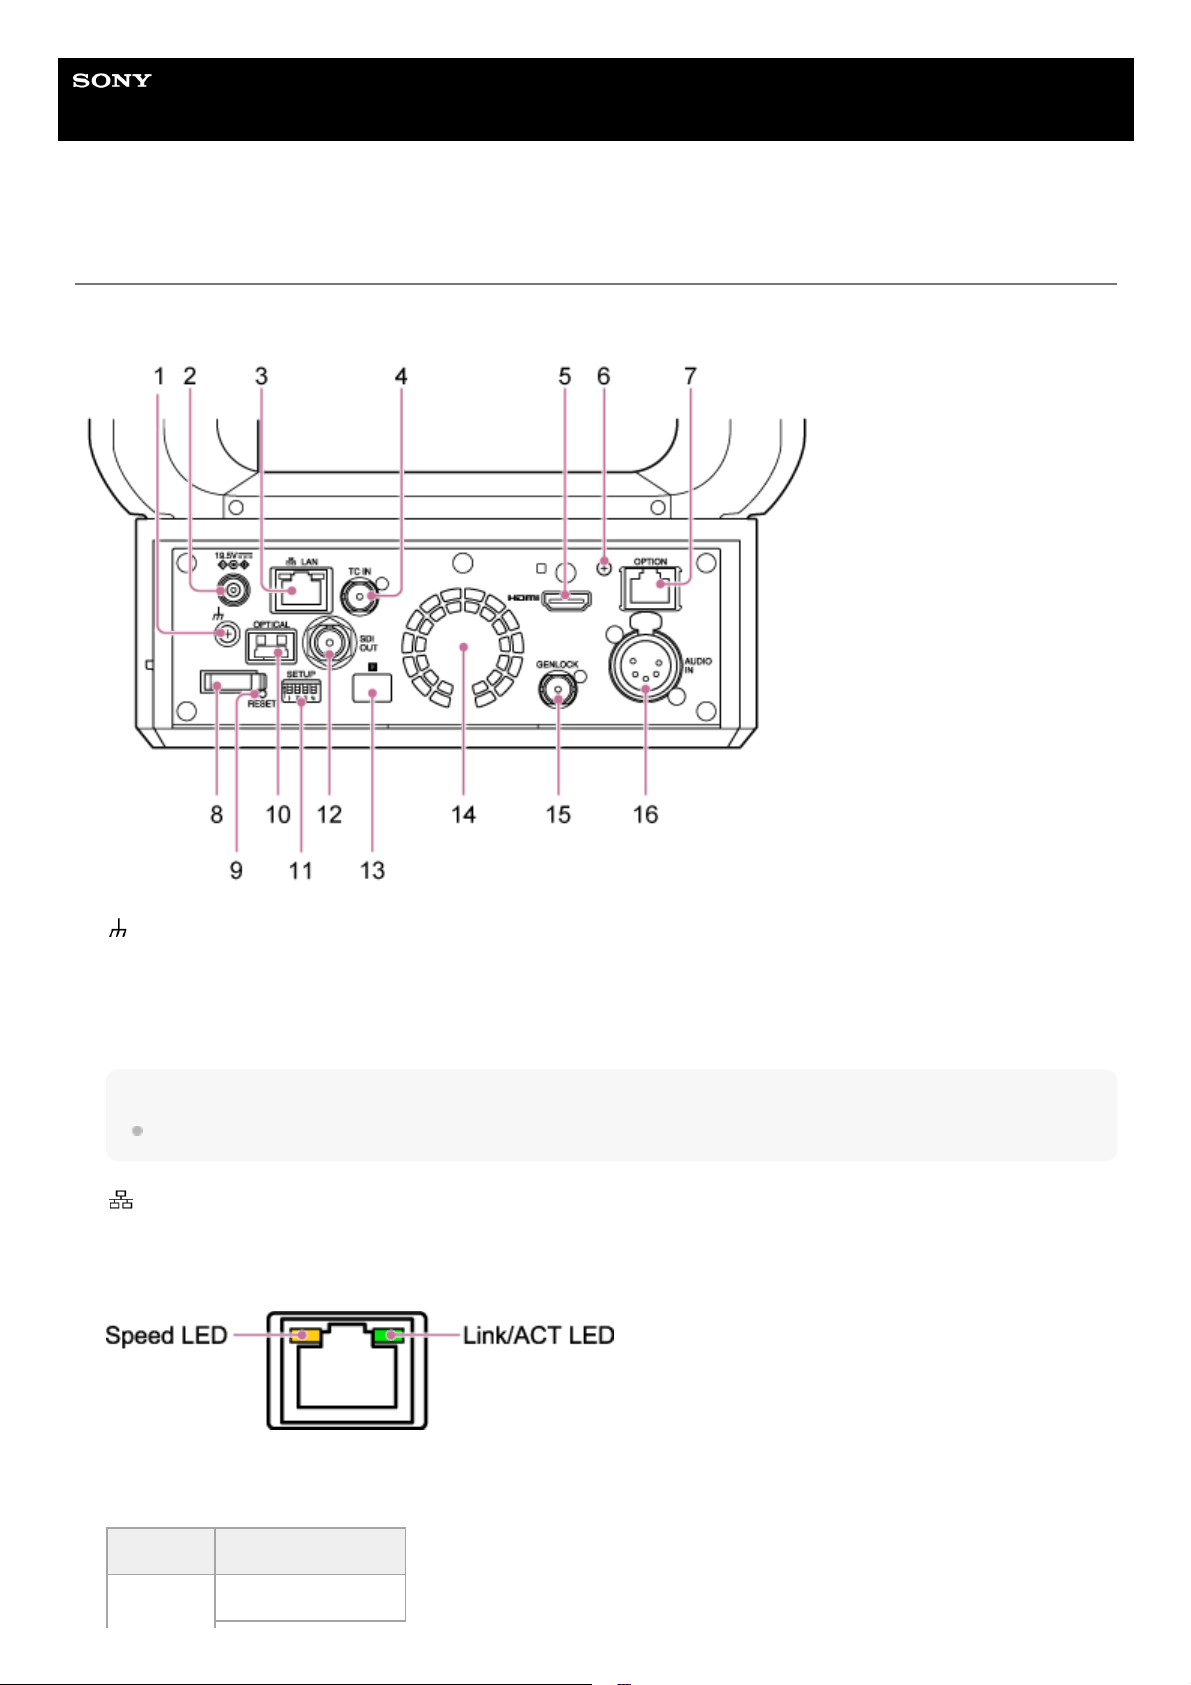
Connector Block
This topic describes the location and function of parts on the connector block of the unit.
(ground) connection
Connect to ground by connecting to the ground terminal of a power outlet or to a grounding bar.
1.
DC IN connector (standard DC jack)
Connect to an AC adaptor.
Note
Do not use any AC adaptor other than the one provided. Connecting another adaptor may cause a fire or malfunction.
2.
LAN (network) connector (RJ-45)
Connect a network cable (category 5e or higher) for network communication and PoE++
*
power supply.
Speed LED display status
Indicates the speed of the network connection.
3.
PoE++: Power over Ethernet Plus Plus. Conforms to IEEE802.3bt (Type 4 Class 8). For details about connecting, refer to the operating
instructions for the power supply device.
*
Display Connection speed
Not lit 10 Mbps
24
Link/ACT LED display status
Indicates the status of the network connection.
Note
When connecting this product to the Internet, connect via a system that provides a protection function, such as a router or
firewall. If connected without such protection, security issues may occur.
Display Connection speed
100 Mbps
Lit orange 1000 Mbps
Display Connection status
Not lit No link
Blinking green Link established, data active
Lit green Active link
TC IN connector
Input an external reference timecode signal.
For details, see “Locking the Timecode to Other Devices.”
4.
HDMI connector
Outputs the video from the unit as an HDMI signal.
For details, see “HDMI connector (Type A connector)” in “Connecting External Monitors and Recording Devices.”
5.
HDMI cable retaining plate mounting screw
To prevent the HDMI cable from being removed, attach the supplied HDMI cable retaining plate using the supplied
mounting screw (M2.6×6), and attach the HDMI cable using a commercially available cable tie or band.
For details about attaching the HDMI cable retaining plate, see “Connecting Cables.”
6.
OPTION connector
Use to connect a tally signal from an external device.
For details, see “Connecting a Tally Signal.”
7.
Cord clamper
Use to secure the AC adaptor cord.
8.
RESET switch
Press for at least 5 seconds using the tip of a pen or similar device to reset the settings of the unit to the factory
default values.
You can select whether to reset the network connection settings only or all settings using SETUP switch 1.
9.
OPTICAL output connector
Outputs an SDI signal converted to optical format when an SFP+ module (option) is connected.
For details, see “Outputting an Optical Fiber Signal.”
10.
SETUP switches11.
25
Configures the following settings.
Switch 1: Sets which settings are reset when the RESET switch is pressed.
Switch 2: Sets whether the +48 V power supply (phantom power) is turned on/off when an audio input device is
connected. The setting is applied immediately.
This function is enabled when [Audio] > [Audio Input] > [AUDIO IN Select] is set to [MIC] in the camera menu.
Note
Setting switch 2 to the ON position and connecting a microphone that is not compatible with a +48 V source may damage the
connected device. Check the setting before connecting the device.
Switch 3: Enables/disables VISCA over IP communication. The settings are applied when the camera is turned on.
Set to the ON position to use the unit when connected to a remote controller (RM-IP500).
Note
If the administrator password has not been configured, VISCA over IP communication is disabled, regardless of the switch
setting. For details about configuring the administrator password, see “Initializing the Unit.”
Switch 4: Changes the speed of pan/tilt operations sent from the infrared remote control. The setting is applied
immediately.
Setting Description
OFF
(default)
Resets the network connection settings only. The network settings, security settings, and user
information (user name and password) of the unit will be reset.
ON Resets all settings to factory defaults.
Setting Description
OFF
(default)
Do not supply +48 V power (phantom power supply). Configure this setting when using an external
audio device (such as a mixer), dynamic microphone, or microphone with a built-in battery.
ON
Supply +48 V power (phantom power supply) to a phantom power compatible microphone connected to
the AUDIO IN connector (CH-1 or CH-2).
Setting Description
OFF (default) Will not respond to VISCA over IP commands.
ON Accepts VISCA over IP commands.
Setting Description
OFF (default) Operates at normal speed.
ON Operates at maximum speed.
26
5-041-957-11(1) Copyright 2022 Sony Corporation
SDI OUT connector
Outputs the video from the unit as a 12G/6G/3G/HD-SDI signal.
The unit can also be configured for RAW signal output.
For details, see “SDI OUT connector (BNC type)” in “Connecting External Monitors and Recording Devices.”
12.
Infrared remote control sensor (rear)
Infrared sensor for the supplied infrared remote control.
13.
Fan/air outlet
Emits heat from inside the unit.
Note
Do not cover the air outlet. Doing so may cause a malfunction.
Note that the area near the air outlet may become hot.
14.
GENLOCK connector
Use to input an external sync signal.
For details, see “Synchronizing the Phase of the Video Signal (Genlock).”
15.
AUDIO IN connector (XLR type 5-pin connector)
Use to input the signal from an external microphone or audio device.
It functions as an AUDIO IN CH-1 connector or AUDIO IN CH-2 connector.
For details, see “Connecting an External Microphone or External Audio Device.”
16.
27
Help Guide
Interchangeable Lens Digital Camera
ILME-FR7 / ILME-FR7K
Side View
This topic describes the location and function of parts on the side of the unit.
Hint
This description refers to the illustration of the unit without an attached lens.
Pan/tilt lock lever
Locks the pan/tilt mechanism of the unit. Use in the following cases.
When transporting or packing the unit.
When attaching or removing a lens. For details, see “Attaching a Lens” or “Removing a Lens.”
When using a lens that does not support pan/tilt operation (such as Sony SEL100400GM / SEL200600G /
SEL400F28GM / SEL600F40GM lenses).
Hint
The pan/tilt movement can be fixed at the following angles.
1.
28
5-041-957-11(1) Copyright 2022 Sony Corporation
Slide base2.
Screw holes for external devices (4 places)
For M3 screws of up to 6 mm (1/4 inch) length.
Note
Do not use screws longer than 6 mm (1/4 inch). Doing so may cause a malfunction.
3.
Access indicator A4.
Access indicator B
Indicator is lit or blinks when recording media is inserted.
For details, see “Inserting Memory Cards.”
5.
CFexpress Type A / SD card slot (A)6.
CFexpress Type A / SD card slot (B)
Use for inserting recording media.
For details, see “Inserting Memory Cards.”
7.
QR code for network connection
Use when configuring initial settings.
For details, see “Accessing the Web App from a Web Browser.”
8.
29
Help Guide
Interchangeable Lens Digital Camera
ILME-FR7 / ILME-FR7K
Top View
This topic describes the location and function of parts on the top of the unit.
Hint
This description refers to the illustration of the unit without an attached lens.
5-041-957-11(1) Copyright 2022 Sony Corporation
Screw holes for external devices (2 places)
Compatible with 1/4-20 UNC screws for a tripod.
Maximum length of 6 mm (1/4 inch).
1.
ɸ (imager mark)
The imager mark is on the same plane as the image sensor.
To measure the distance between the unit and the subject accurately, use this imager mark as a reference point.
2.
30
Help Guide
Interchangeable Lens Digital Camera
ILME-FR7 / ILME-FR7K
Bottom View
This topic describes the location and function of parts on the bottom of the unit.
Hint
This description refers to the illustration of the unit without an attached lens.
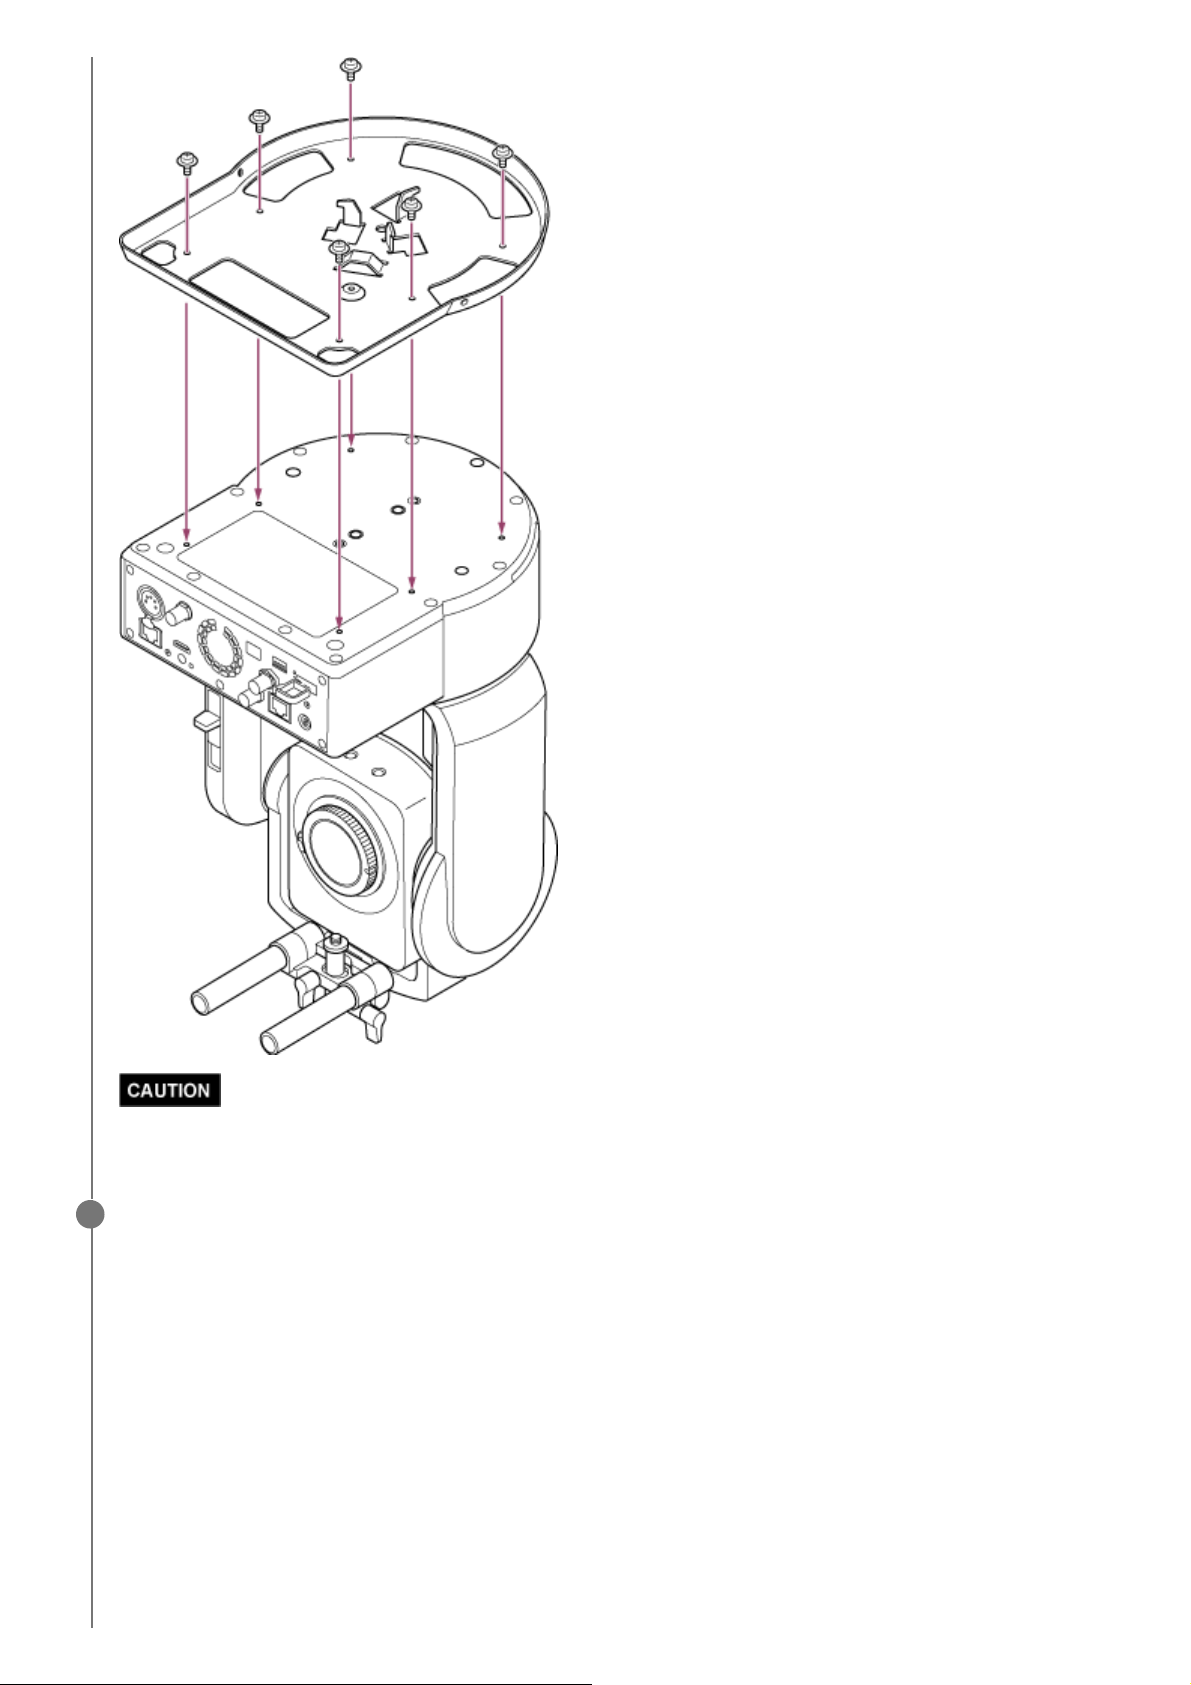
Ceiling bracket mounting screw holes (6 places)
When mounting the unit on a ceiling or a shelf in a high location, attach the body bracket (option) to the base of the
unit using the six body bracket mounting screws in these screw holes.
For details about mounting, see “Mounting Upright in a High, Fixed Location” and “Mounting on a Ceiling.”
1.
Tripod mounting screws (2 places)
Used when mounting the unit on a camera tripod (option, 1/4-20 UNC screws of up to 5.5 mm (1/4 inch) length).
Note
Do not use screws longer than 5.5 mm (1/4 inch). Doing so may cause a malfunction.
2.
31

5-041-957-11(1) Copyright 2022 Sony Corporation
32
Help Guide
Interchangeable Lens Digital Camera
ILME-FR7 / ILME-FR7K
Lens Support
This topic describes the location and function of parts of the lens support of the unit.
Hint
This description refers to the illustration of the unit without an attached lens.
Lens support rod (2)
Supports the lens.
Can also be used for mounting general Ø15 rod accessories.
1.
33
5-041-957-11(1) Copyright 2022 Sony Corporation
Lens support unit
The lens support can slide forward/rearward according to the lens and then secured.
2.
Lens support pedestal attachment screw
Attach to the lens support pedestal. You can adjust the screw up/down to match the height of the lens support
pedestal.
3.
Lens support rod clamp lever (2 places)
Secures the forward/rearward position of the lens support unit.
4.
Lens support pedestal attachment screw clamp lever
Secures the vertical position of the lens support pedestal attachment screw.
Hint
If a clamp lever is in a position that makes it difficult to turn, release the clamp lever and rotate it to an angle that will make
operation easier. When in the desired position, close the clamp lever.
A: Lens support pedestal attachment screw clamp lever
B: Lens support rod clamp lever
Note
To prevent the lens support unit from interfering with pan/tilt operation, move the lens support unit up against the camera
head when not using the lens support unit, and move the lens support pedestal attachment screw to its highest position
(closest to the lens).
5.
34
Help Guide
Interchangeable Lens Digital Camera
ILME-FR7 / ILME-FR7K
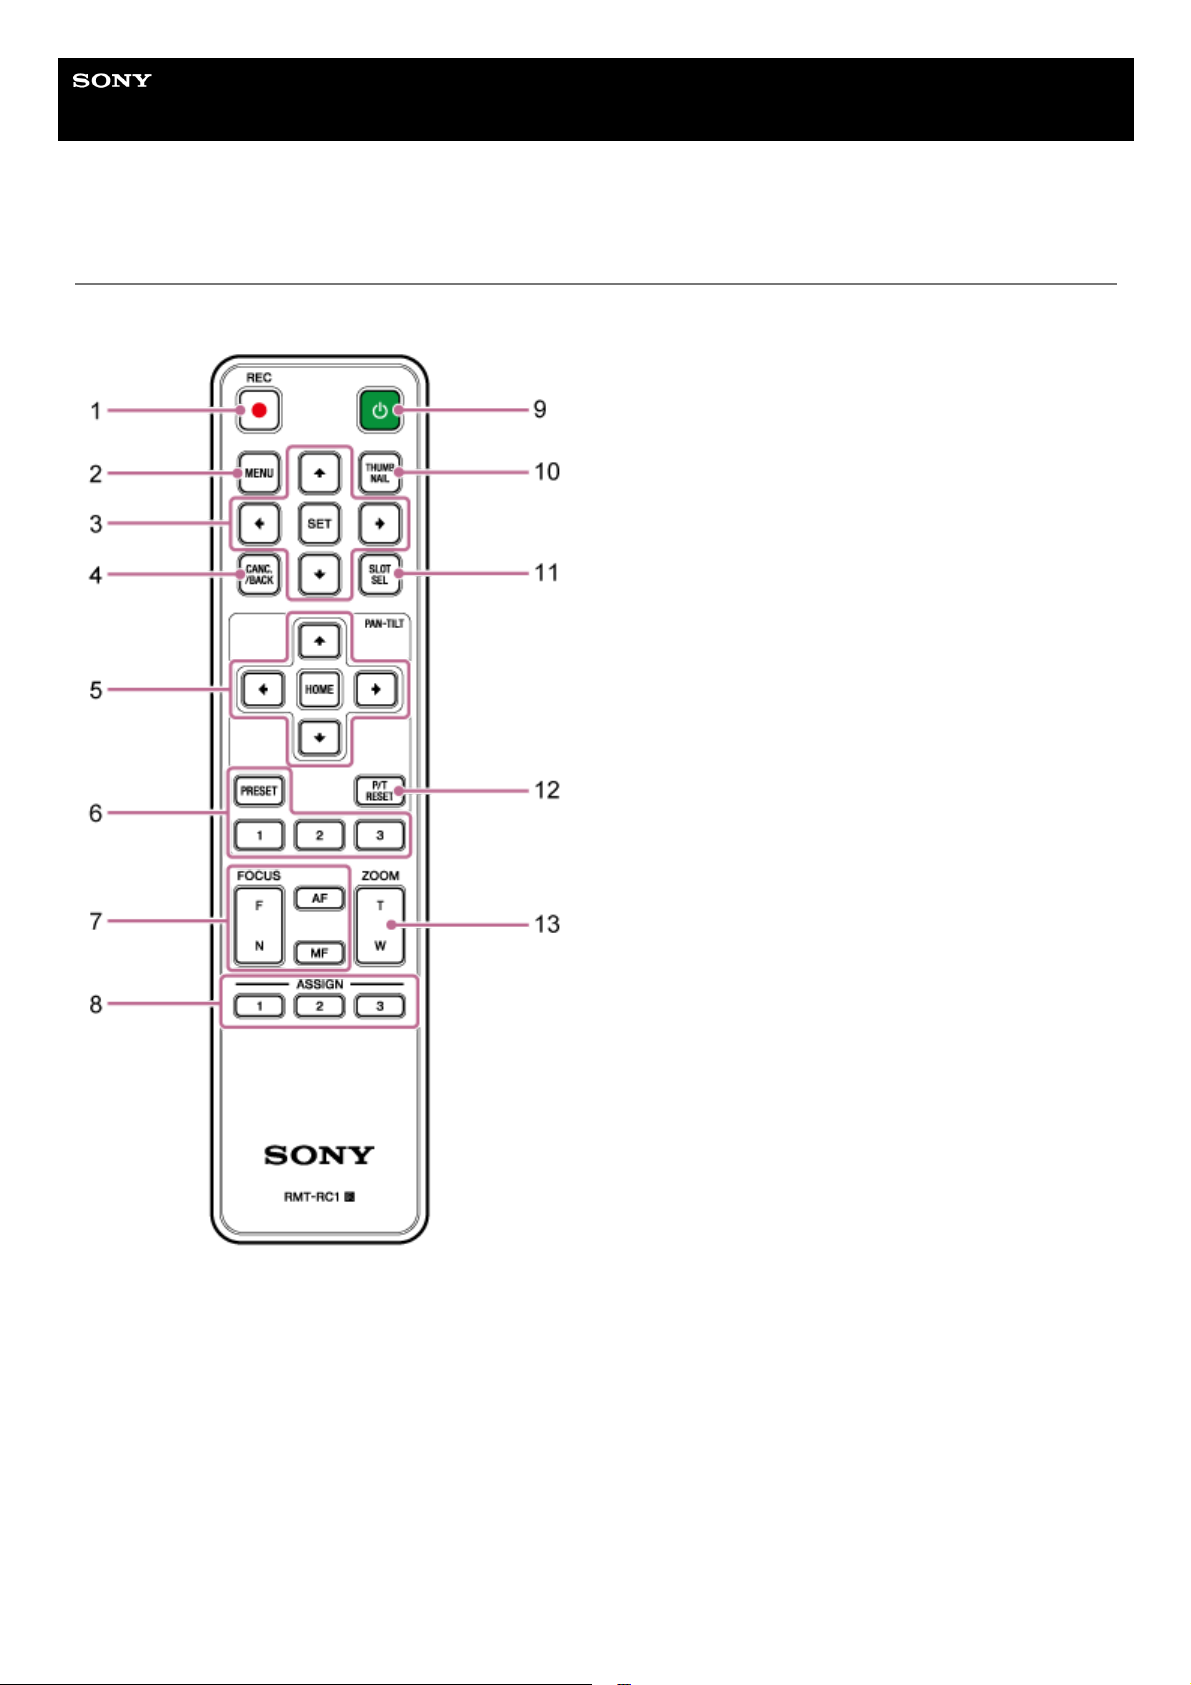
Location and Function of Parts of the Infrared Remote Control (supplied)
This topic describes the location and function of pars of the infrared remote control (supplied).
REC● (record START/STOP) button
Press to start or stop recording.
1.
MENU button
Press to show or hide the camera menu.
2.
GUI control buttons
Press to perform operations in the camera menu, in message dialogs that include buttons, and other screen display
functions.
3.
CANC./BACK button
Press to cancel a setting or to return to the previous screen of the camera menu of the unit.
4.
35

Infrared remote control battery
The infrared remote control requires two AA (LR6) batteries.
Insert the batteries into the infrared remote control as shown in the following diagram.
Pan and tilt control buttons
Press the arrow buttons to control the pan/tilt of the camera. Press the HOME button to return the orientation of the
camera to face the front.
5.
Preset position control buttons
Press and hold the PRESET button and press one of the 1 to 3 buttons to store camera direction, zoom, and focus
adjustment status in the pressed number button.
Press a number button with stored settings to recall the saved state.
6.
Focus control buttons
Use to adjust the focus.
To adjust the focus automatically, press the AF button.
To adjust the focus manually, press the MF button, then press either the F (Far) button to focus on far subjects or the
N (Near) button to focus on near subjects.
7.
Assignable buttons 1 to 3
Executes the functions assigned to the assignable buttons using the camera menu.
If you assign the [Direct Menu] function to an assignable button, you can adjust the exposure, white balance, and
other settings using the GUI control buttons.
For details about assignment using the camera menu, see “Assignable Buttons.”
For details about the direct menu, see “Direct Menu Operation.”
8.
(power) button
Press to turn on the unit or to switch the power supply to standby state.
9.
THUMBNAIL button
Displays the thumbnail screen showing the clips recorded on the memory card of the unit.
For details about the thumbnail screen, see “Thumbnail Screen.”
You can select clips and control playback on the thumbnail screen using the GUI control buttons.
For details about selecting clips and controlling playback, see “Playing Recorded Clips” and “Operations on
Recorded Clips.”
10.
SLOT SEL (memory card slot (A)/(B) select) button
When two memory cards are inserted, press the button to switch between the memory cards for recording.
Press this button while the thumbnail screen is displayed to switch between the memory cards to view.
11.
P/T RESET (pan/tilt reset) button
Resets the pan/tilt functions. Press the button when the POWER lamp and NETWORK lamp are blinking
simultaneously or when [Execute Pan-Tilt Reset] is displayed in the framing control panel in the Web App.
12.
Zoom control buttons
To zoom in, press the T (telephoto) button.
To zoom out, press the W (wide) button.
13.
36

Note
Do not use any batteries other than manganese or alkaline batteries as they may rupture.
Dispose of used batteries according to the laws and regulations of the country or region.
5-041-957-11(1)
Copyright 2022 Sony Corporation
37
Help Guide
Interchangeable Lens Digital Camera
ILME-FR7 / ILME-FR7K
Web App Screen Overview
By connecting a tablet or computer, you can pan/tilt, zoom, record, play recorded video, and configure the unit from a
web browser (hereinafter, this function is referred to as the “Web App”).
For details about launching the Web App, see “Accessing the Web App from a Web Browser.”
Note
The Web App does not support the camera audio output.
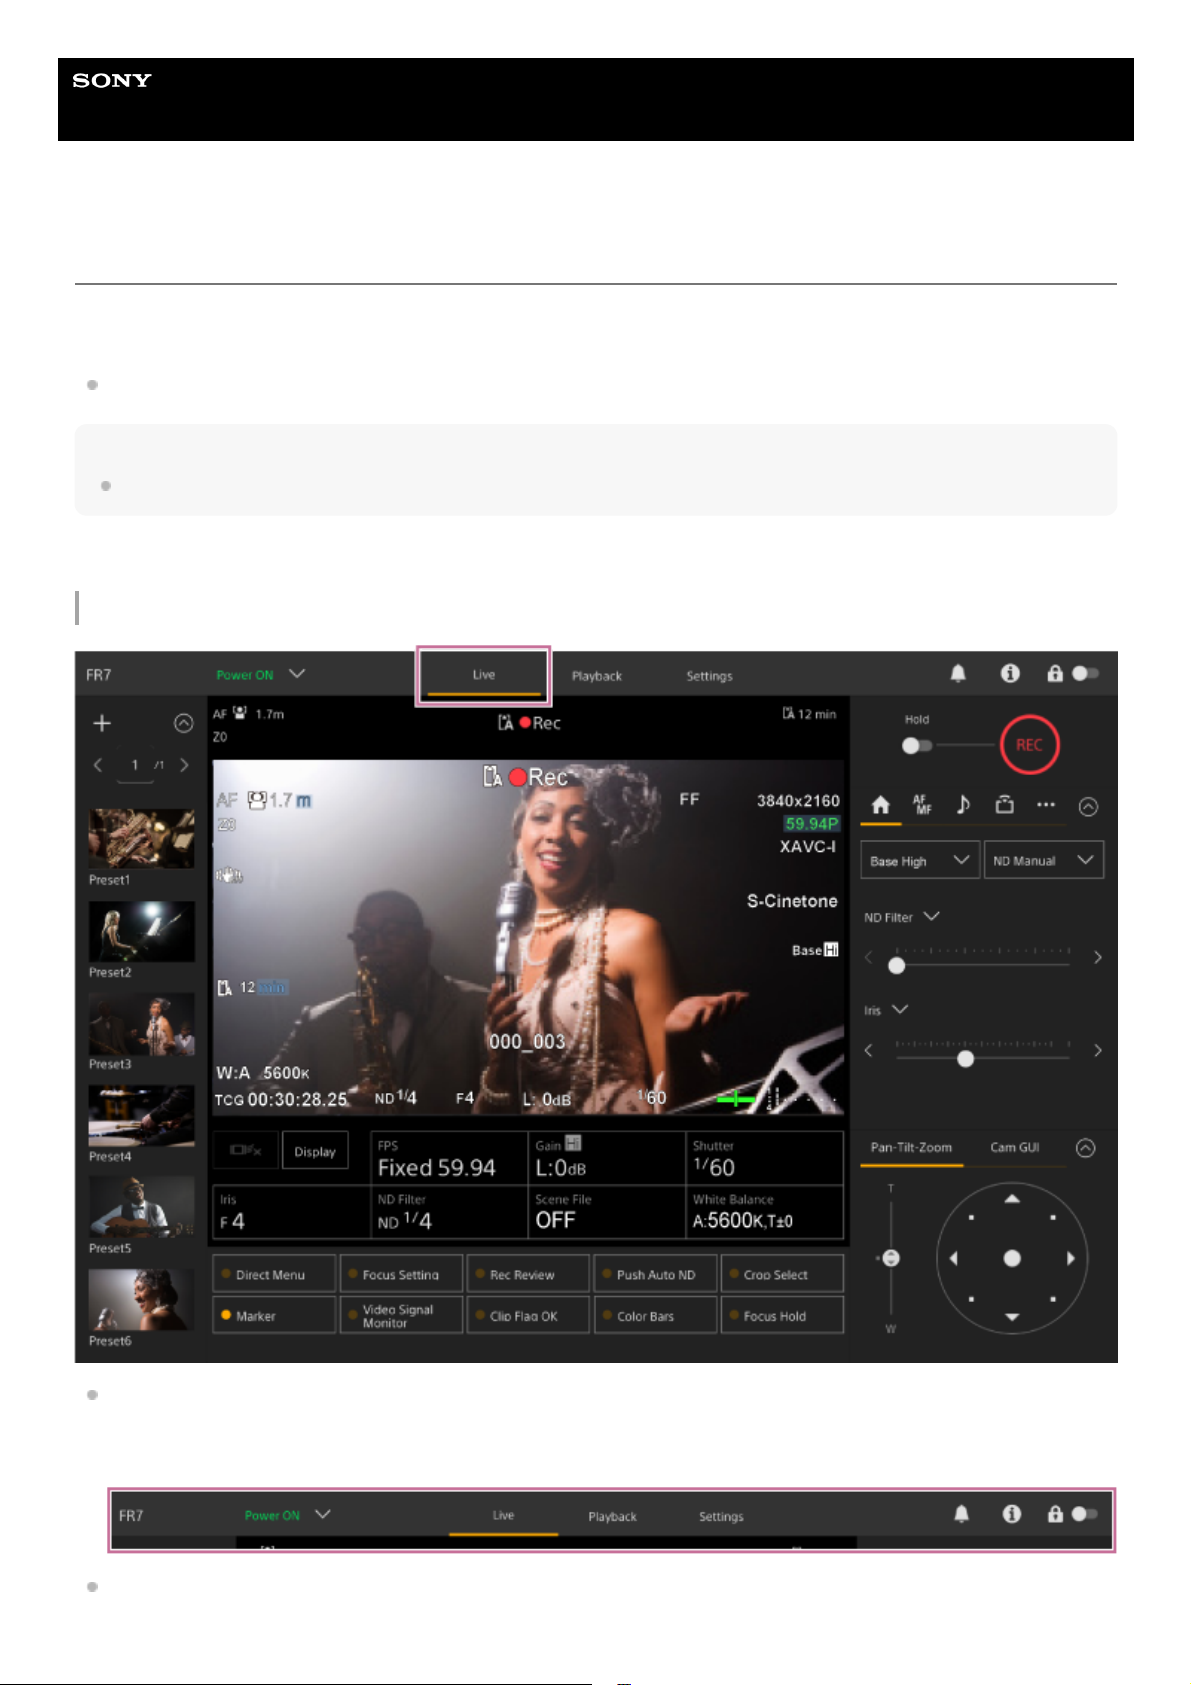
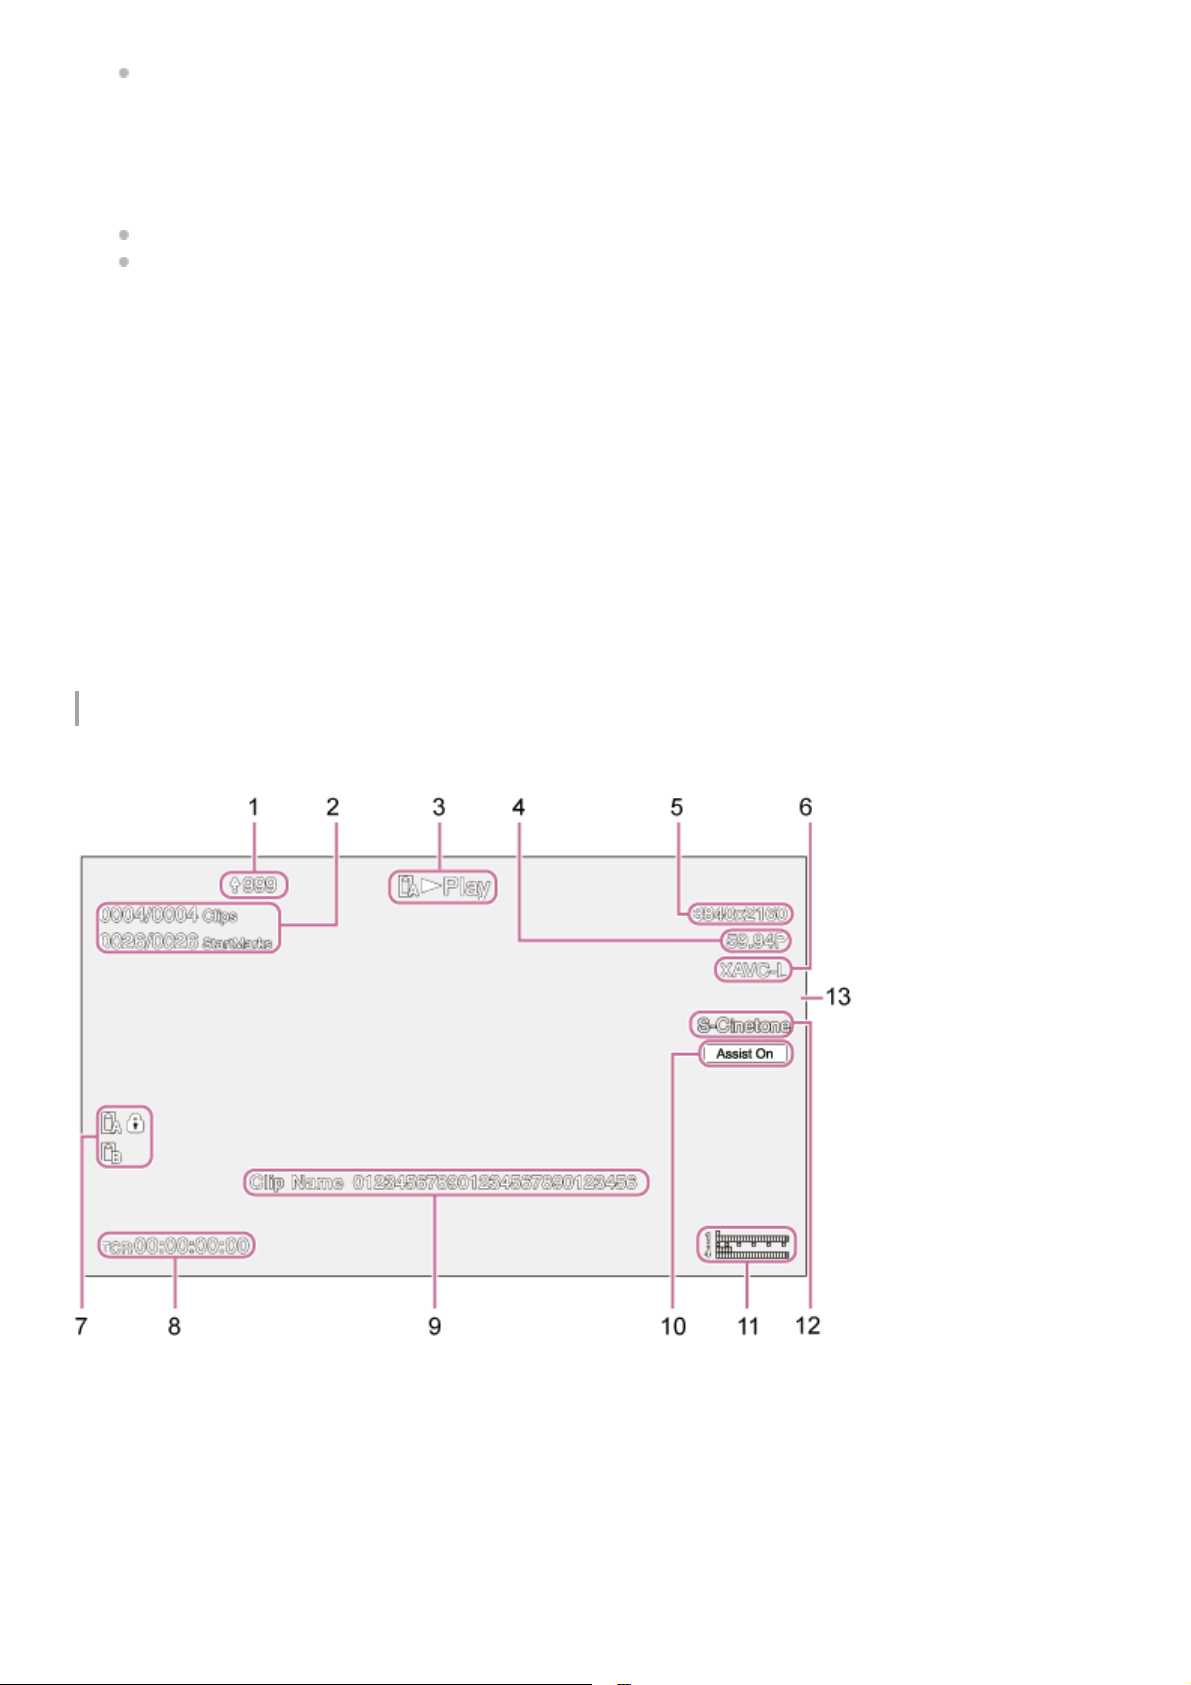
When the Web App launches, the following live operation screen appears.
Live operation screen
For details about the live operation screen, see “Structure of the Live Operation Screen.”
Buttons and icons common to the live operation screen and playback operation screen are displayed at the top of the
screen.
For details about the common area of the screens, see “Structure of Common Area of Screens.”
You can switch between screens by pressing the screen switching tabs in the common area.
38
Playback operation screen
Press the [Playback] tab to display the playback operation screen.
For details about the playback operation screen, see “Structure of the Playback Operation Screen.”
Settings screen
Press the [Settings] tab to display the settings screen (hereinafter referred to as the web menu).
39
Note
In the web menu, settings are not applied until you press the [OK] button. If you change settings on a page that has an [OK]
button, be sure to press the [OK] button.
For details about the settings screen, see “Structure of the Settings Screen.”
In this Help Guide, the settings screen of the Web App is referred to as the web menu.
5-041-957-11(1)
Copyright 2022 Sony Corporation
40
Help Guide
Interchangeable Lens Digital Camera
ILME-FR7 / ILME-FR7K
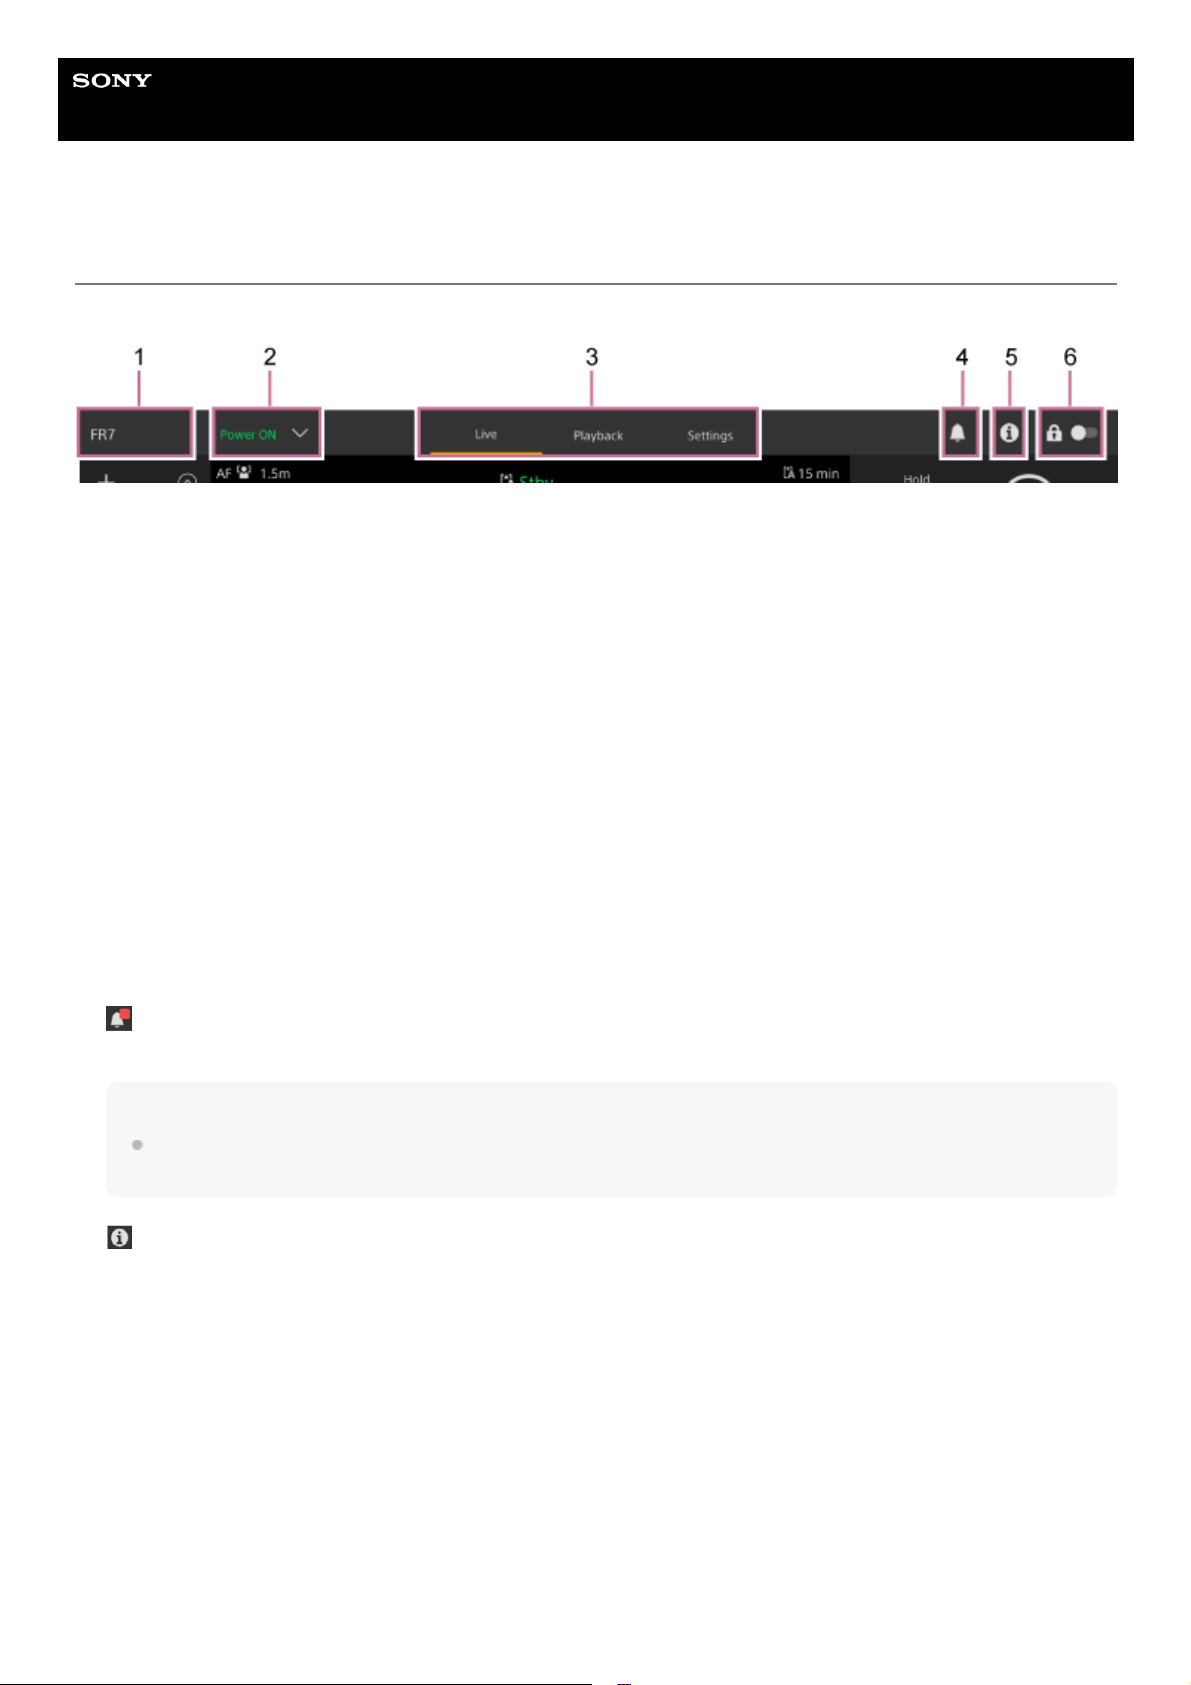
Structure of Common Area of Screens
This topic describes the structure of the common area of screens.
Camera name
Displays the name of the camera.
You can change the name using [Network] > [Camera Name] in the web menu.
The background color changes according to the external tally signal.
1.
Power switch
When the unit is turned on, [Power ON] is displayed. You can press the switch and select [Power Standby] to set the
power supply of the unit to standby state.
When [Power Standby] is displayed, you can press the switch and select [Power ON] to turn on the power supply of
the unit.
2.
Operation screen switching tabs
Press a tab to display the corresponding operation screen.
[Live] tab: Display the live operation screen.
[Playback] tab: Display the playback operation screen.
[Settings] tab: Display the settings screen (web menu).
3.
Notifications mark
When a message arrives, the mark indication changes as shown below.
(Notifications On)
Take the necessary action according to the message displayed in the camera image panel.
Note
Messages are not displayed when [Monitoring] > [Output Display] > [HDMI] is set to [Off] in the web menu. Set to [On] to
check the contents of messages.
4.
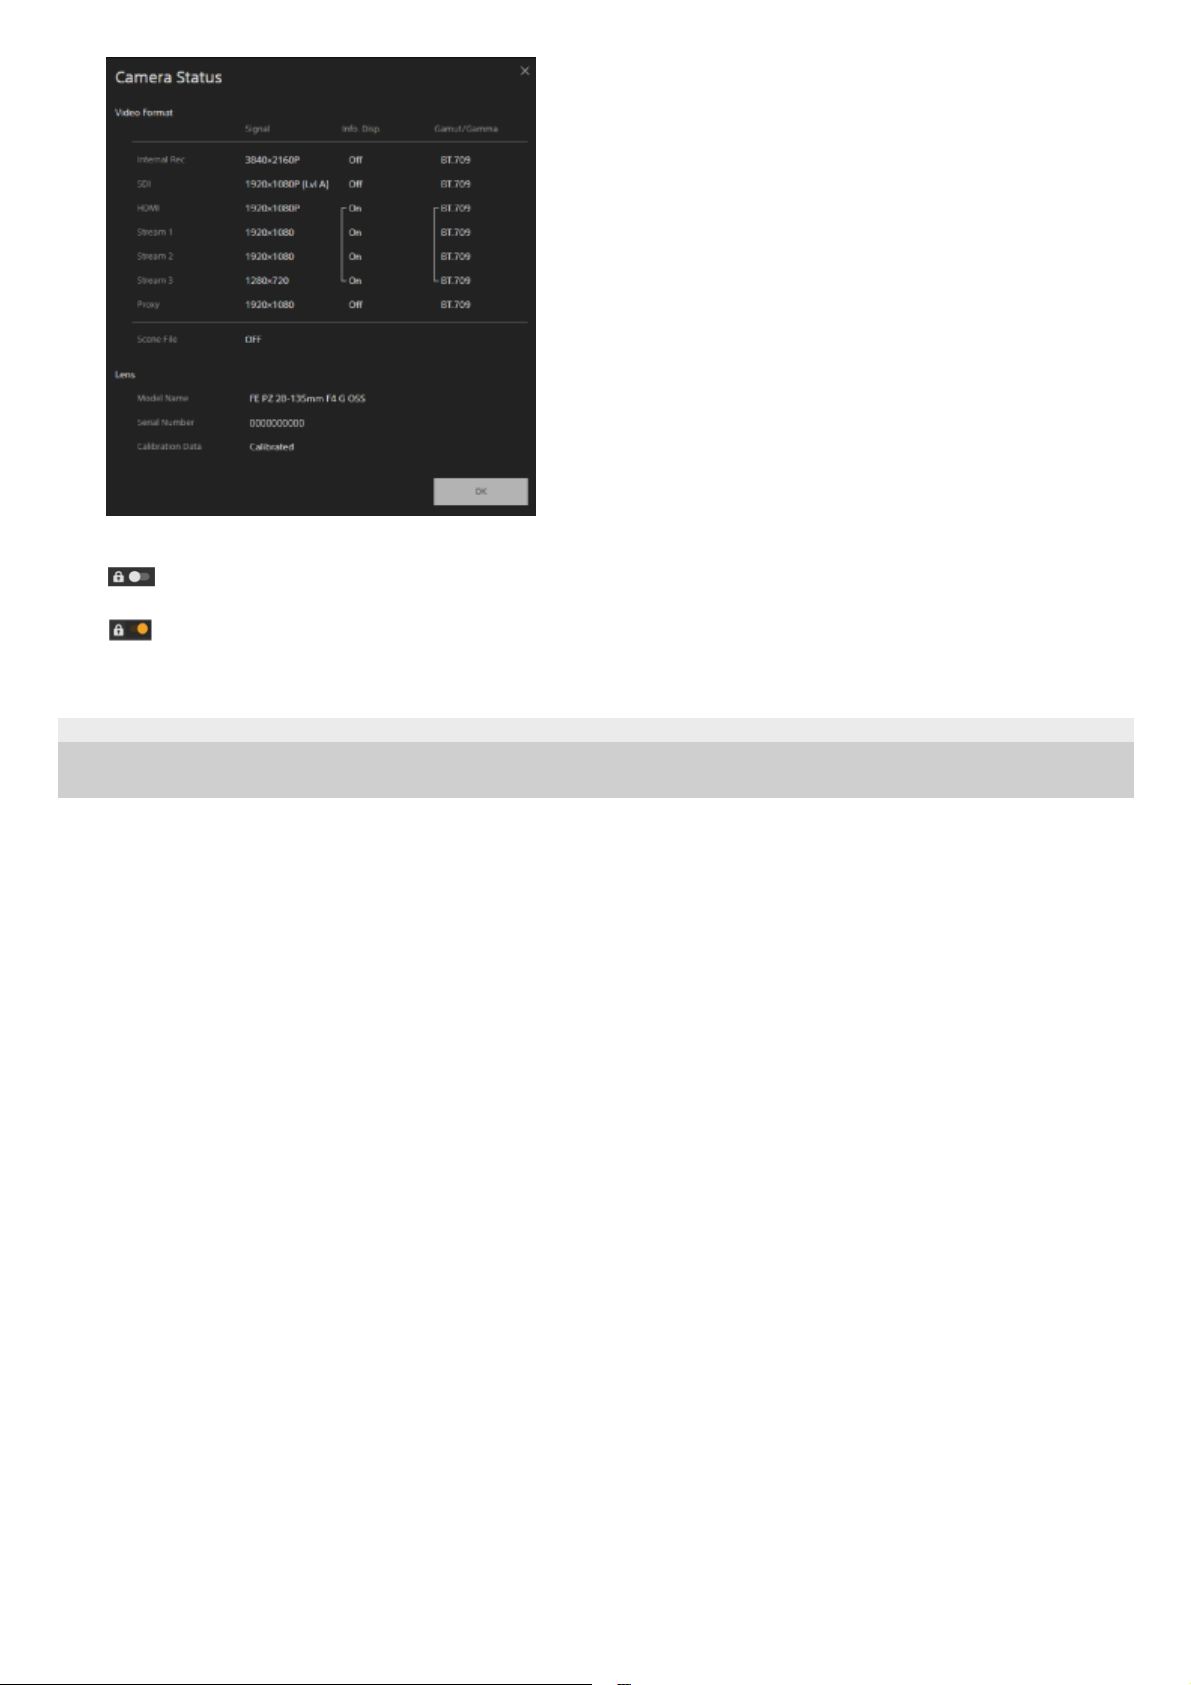
(Camera Status) button
Press the button to display camera recorded image/output image signal information and lens information on a
separate screen.
5.
41
5-041-957-11(1) Copyright 2022 Sony Corporation
Screen operation lock switch
(Operation Unlock): Set the switch to the left position to control operations on the live operation screen and
playback operation screen.
(Operation Lock): Set the switch to the right position to lock operations on the live operation screen and
playback operation screen to prevent accidental misoperation.
6.
42
Help Guide
Interchangeable Lens Digital Camera
ILME-FR7 / ILME-FR7K
Structure of the Live Operation Screen
This topic describes the structure of the live operation screen.
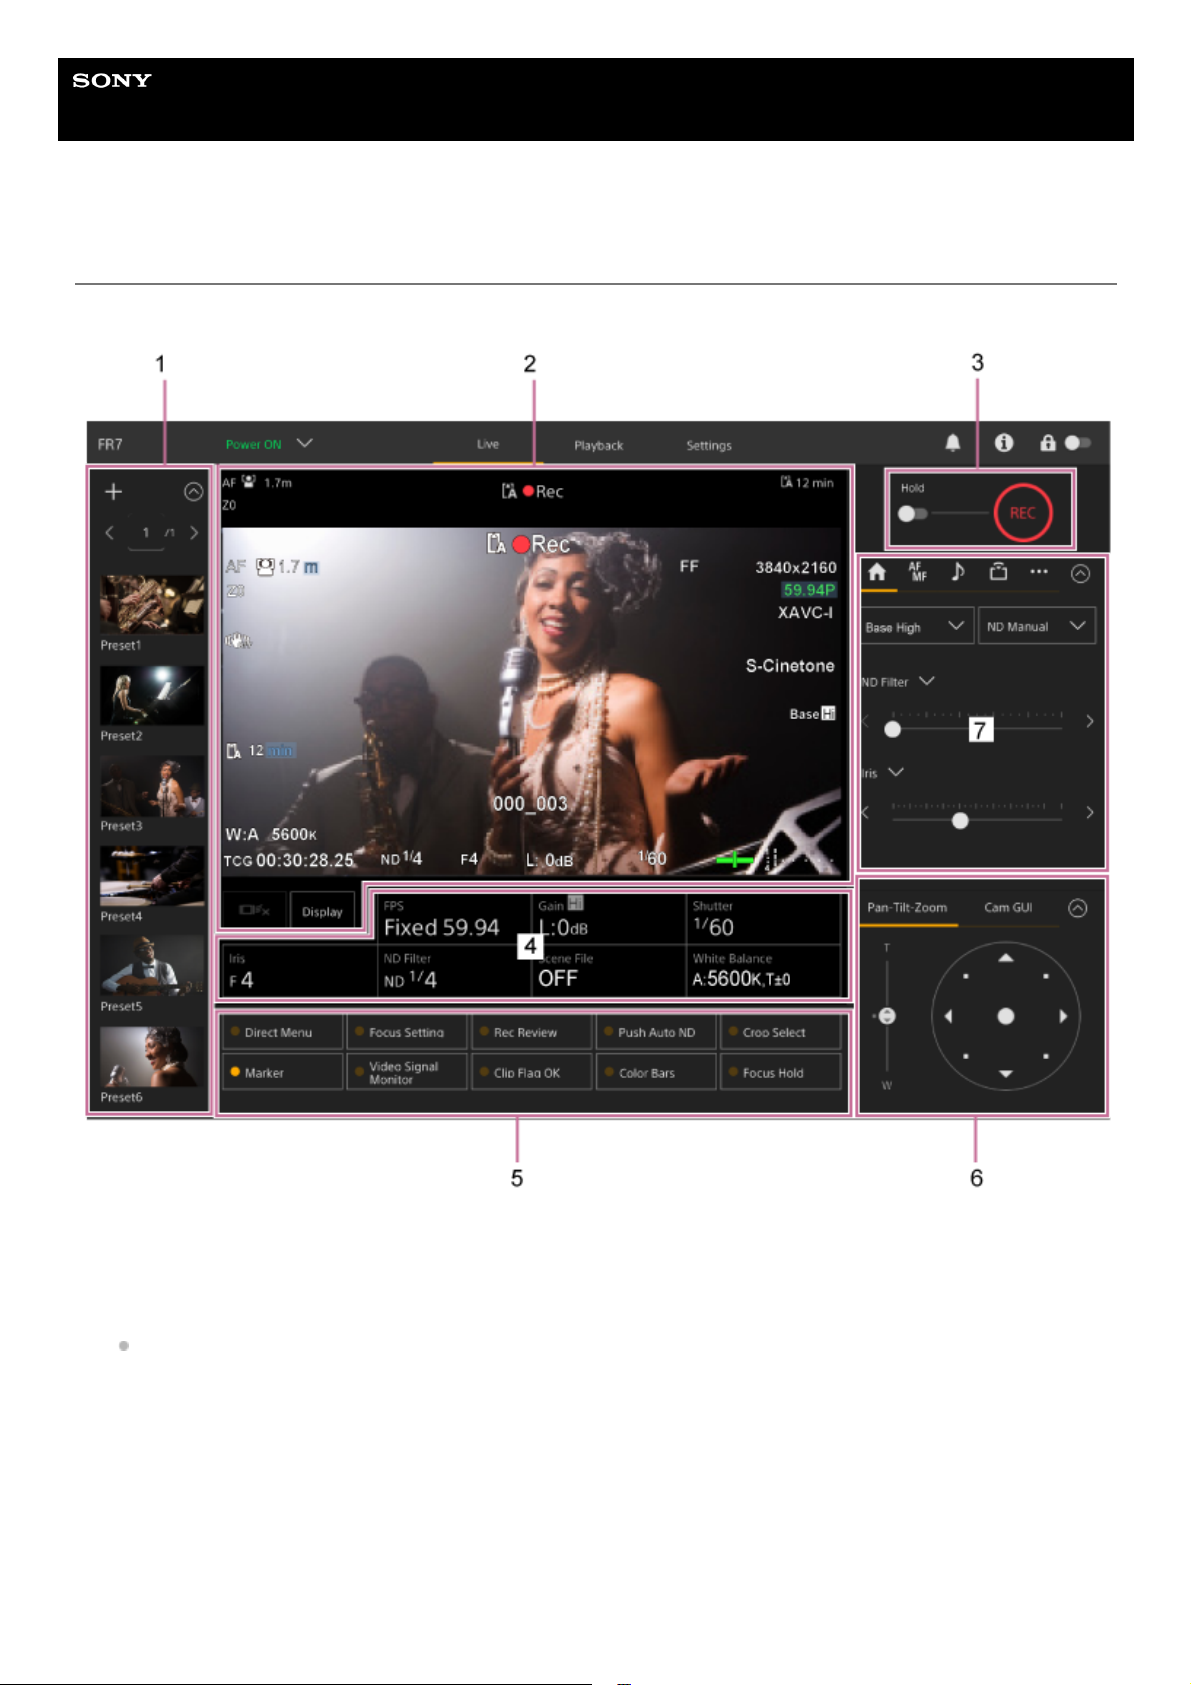
Preset position control panel
Displays the registered position of a preset using a thumbnail. Double-tap the thumbnail to return to the position
stored in the preset.
For details about preset position, see “Saving/Restoring Pan/Tilt, Zoom Position, and Focus Setting Using the
Web App.”
1.
Camera image panel
Displays the current camera image and the status of the unit.
It displays the same image as the HDMI output.
The following status is displayed above the image. A red frame or green frame is also displayed around the image
according to the received external tally signal.
2.
43
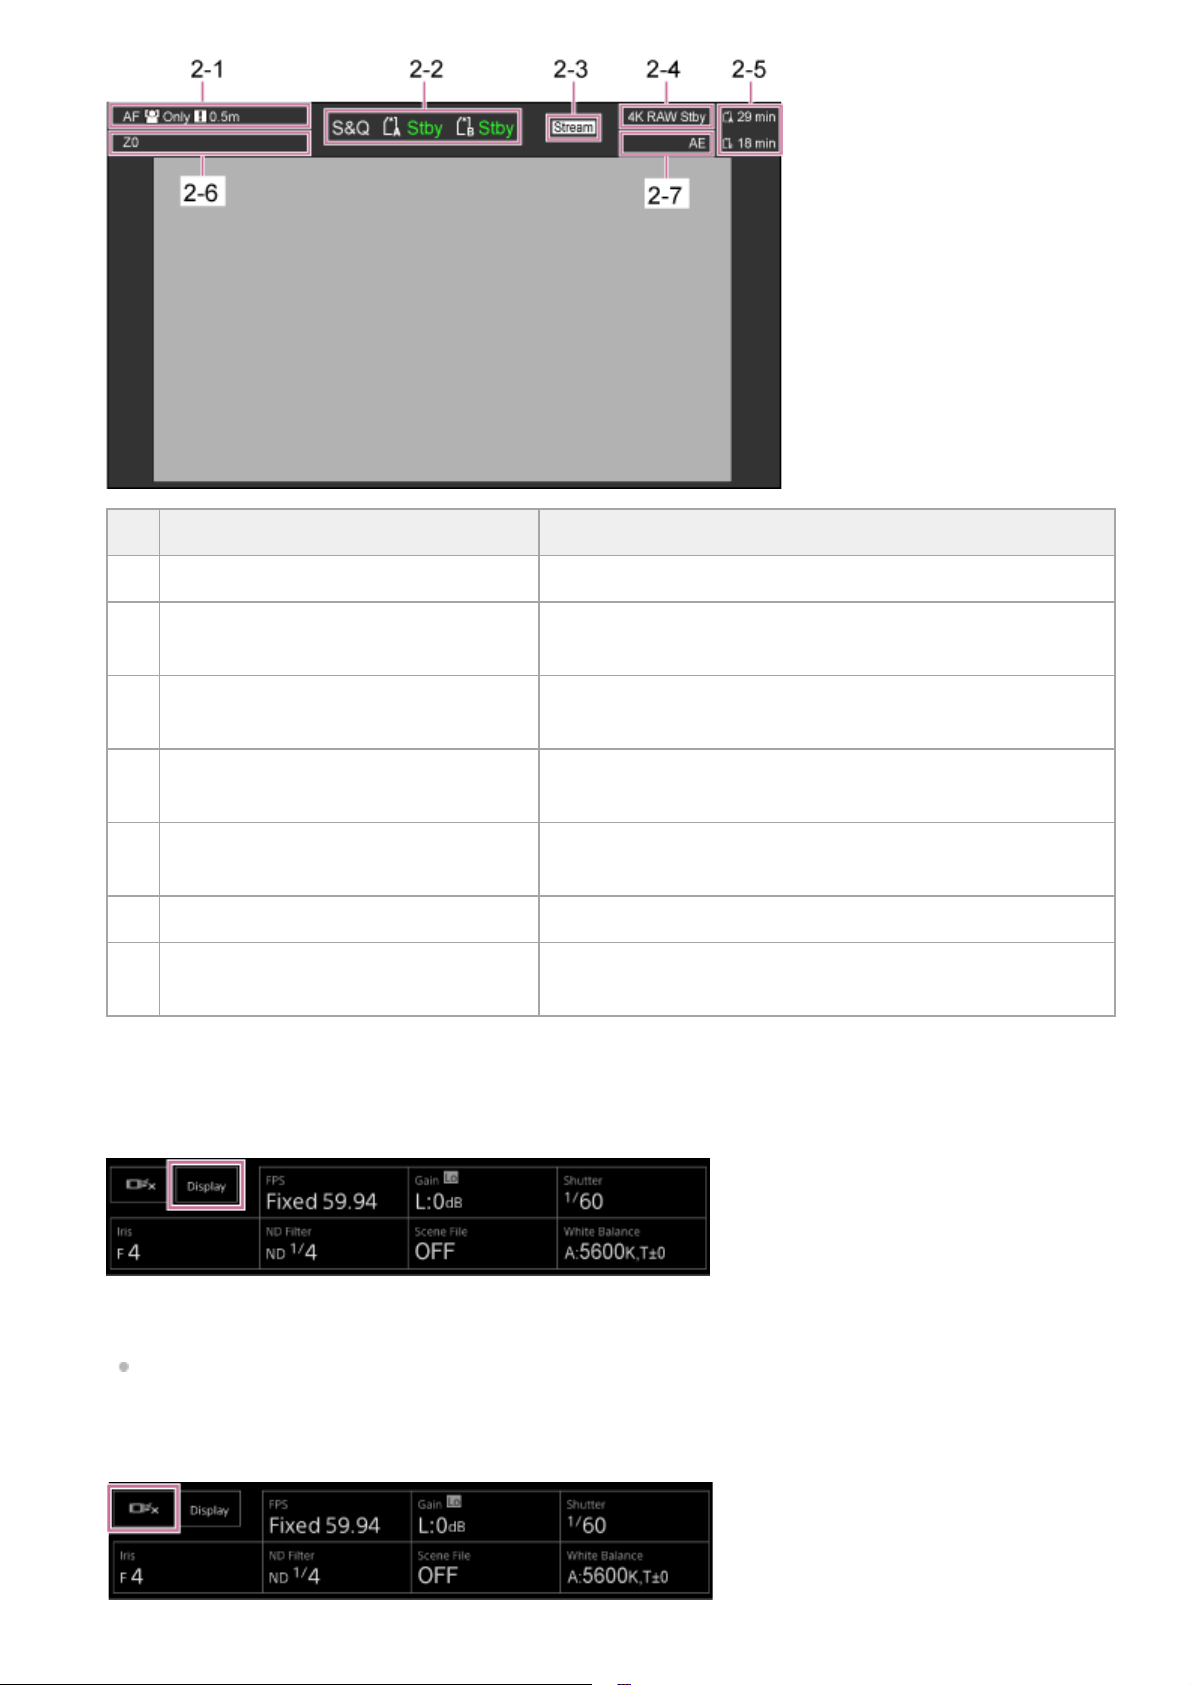
[Display] button
Press this button to display camera information on the image.
Press again while the camera information is displayed to hide the camera information.
In addition to markers, autofocus-related indicators and messages are displayed according to the status.
For details about the displayed camera information, see “Camera Screen Display.”
Realtime tracking AF stop button
Press the button to stop tracking a subject.
No. Display Description
2-1 Focus mode indicator See “Focus mode indicator” in “Camera Screen Display.”
2-2
Recording mode, slot A/B, Interval Rec
recording interval indicator
See “Recording mode, slot A/B, Interval Rec recording interval
indicator” in “Camera Screen Display.”
2-3 Streaming status indicator
Displayed during streaming (when [Stream Setting] is set to
[SRT-Caller] only)
2-4 RAW output operation status indicator
Displays the output status of the RAW signal. For details about
RAW, see “Recording RAW Video.”
2-5 Remaining media capacity indicator
See “Remaining media capacity indicator” in “Camera Screen
Display.”
2-6 Zoom position indicator See “Zoom position indicator” in “Camera Screen Display.”
2-7 AE mode/AE level indicator
Displays the AE mode/AE level indicator. For details about AE,
see “Adjusting the Brightness.”
44
For details about tracking, see “Tracking a Specified Subject (Realtime Tracking AF).”
Record START/STOP button
Press the button to start recording. During recording, the record START/STOP button lights up red.
Press during recording to stop recording.
You can set the Hold switch to the Hold state to prevent misoperation of the record START/STOP button.
3.
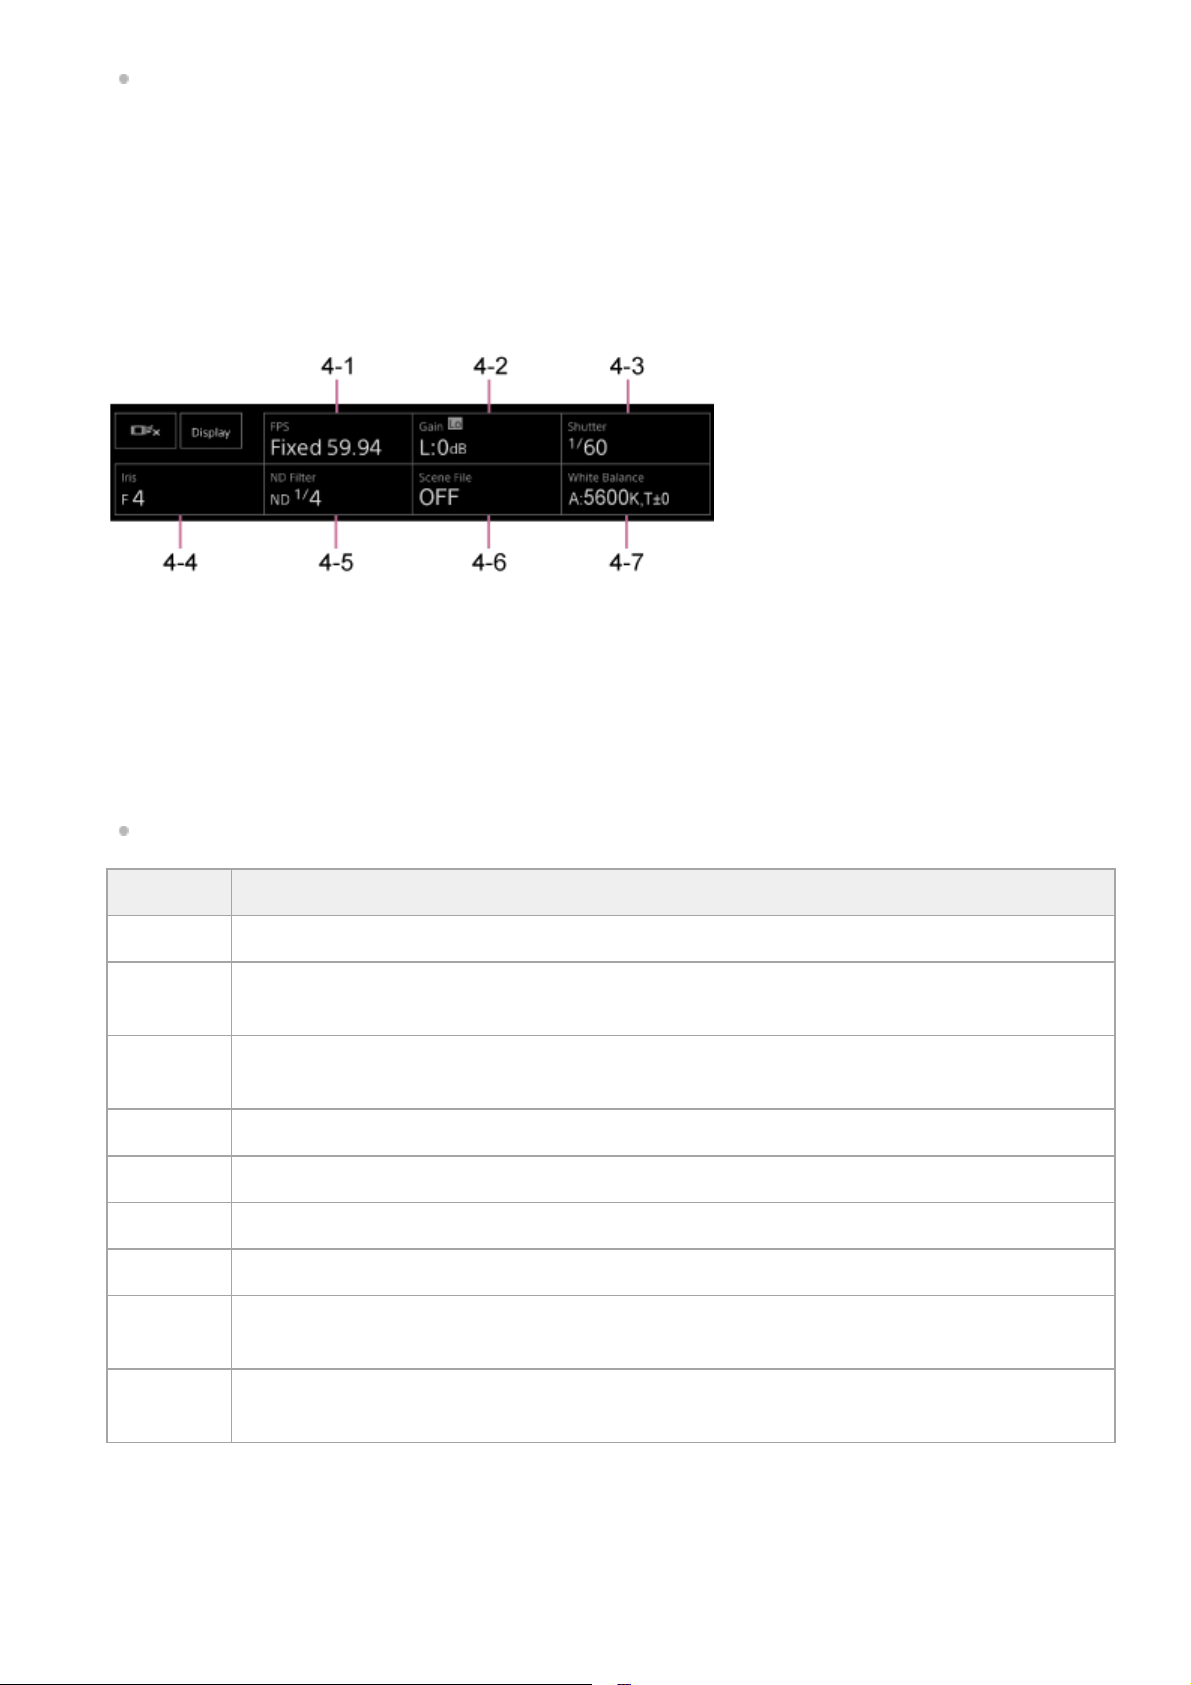
Camera basic configuration panel
Displays settings for basic functions required for shooting on buttons. Press a button to display the corresponding
setup screen for each function in the camera basic configuration adjustment panel below (5).
4-1 [FPS]
4-2 [ISO/Gain / Exposure Index]
4-3 [Shutter]
4-4 [Iris]
4-5 [ND Filter]
4-6 [Scene File / Base Look/LUT]
4-7 [White Balance]
For details, refer to the description of each function.
4.
Function Reference
FPS “Slow & Quick Motion”
ISO/Gain
“Setting the Base Sensitivity,” and “Adjusting the Gain Automatically” and “Adjusting the Gain
Manually” in “Adjusting the Gain”
Exposure
Index
“Setting the Base Sensitivity,” “Changing the Distribution of Dark and Bright Areas in the Recorded
Image”
Shutter “Adjusting the Shutter Automatically” and “Adjusting the Shutter Manually” in “Adjusting the Shutter”
Iris “Adjusting the Iris Automatically” and “Adjusting the Iris Manually” in “Adjusting the Iris”
ND Filter “About the ND Filter” in “Adjusting the Light Level (ND Filter)”
Scene File “Look Overview” and other topics in “Shooting with the Desired Look”
Base
Look/LUT
“Shooting with Look Adjustment in Post-Production”
White
Balance
“White Balance Adjustment Screen”
Assignable buttons/Camera basic configuration adjustment panel
Displays assignable buttons during normal operation. Press the “Camera setup panel” button to display the
corresponding setup items. Press the [X] button or press the camera setup panel button again to return to the
assignable button display.
5.
45
For details about assignable buttons, see “Assignable Buttons.”
For details about the camera basic configuration adjustment panel, refer to the description of each function.
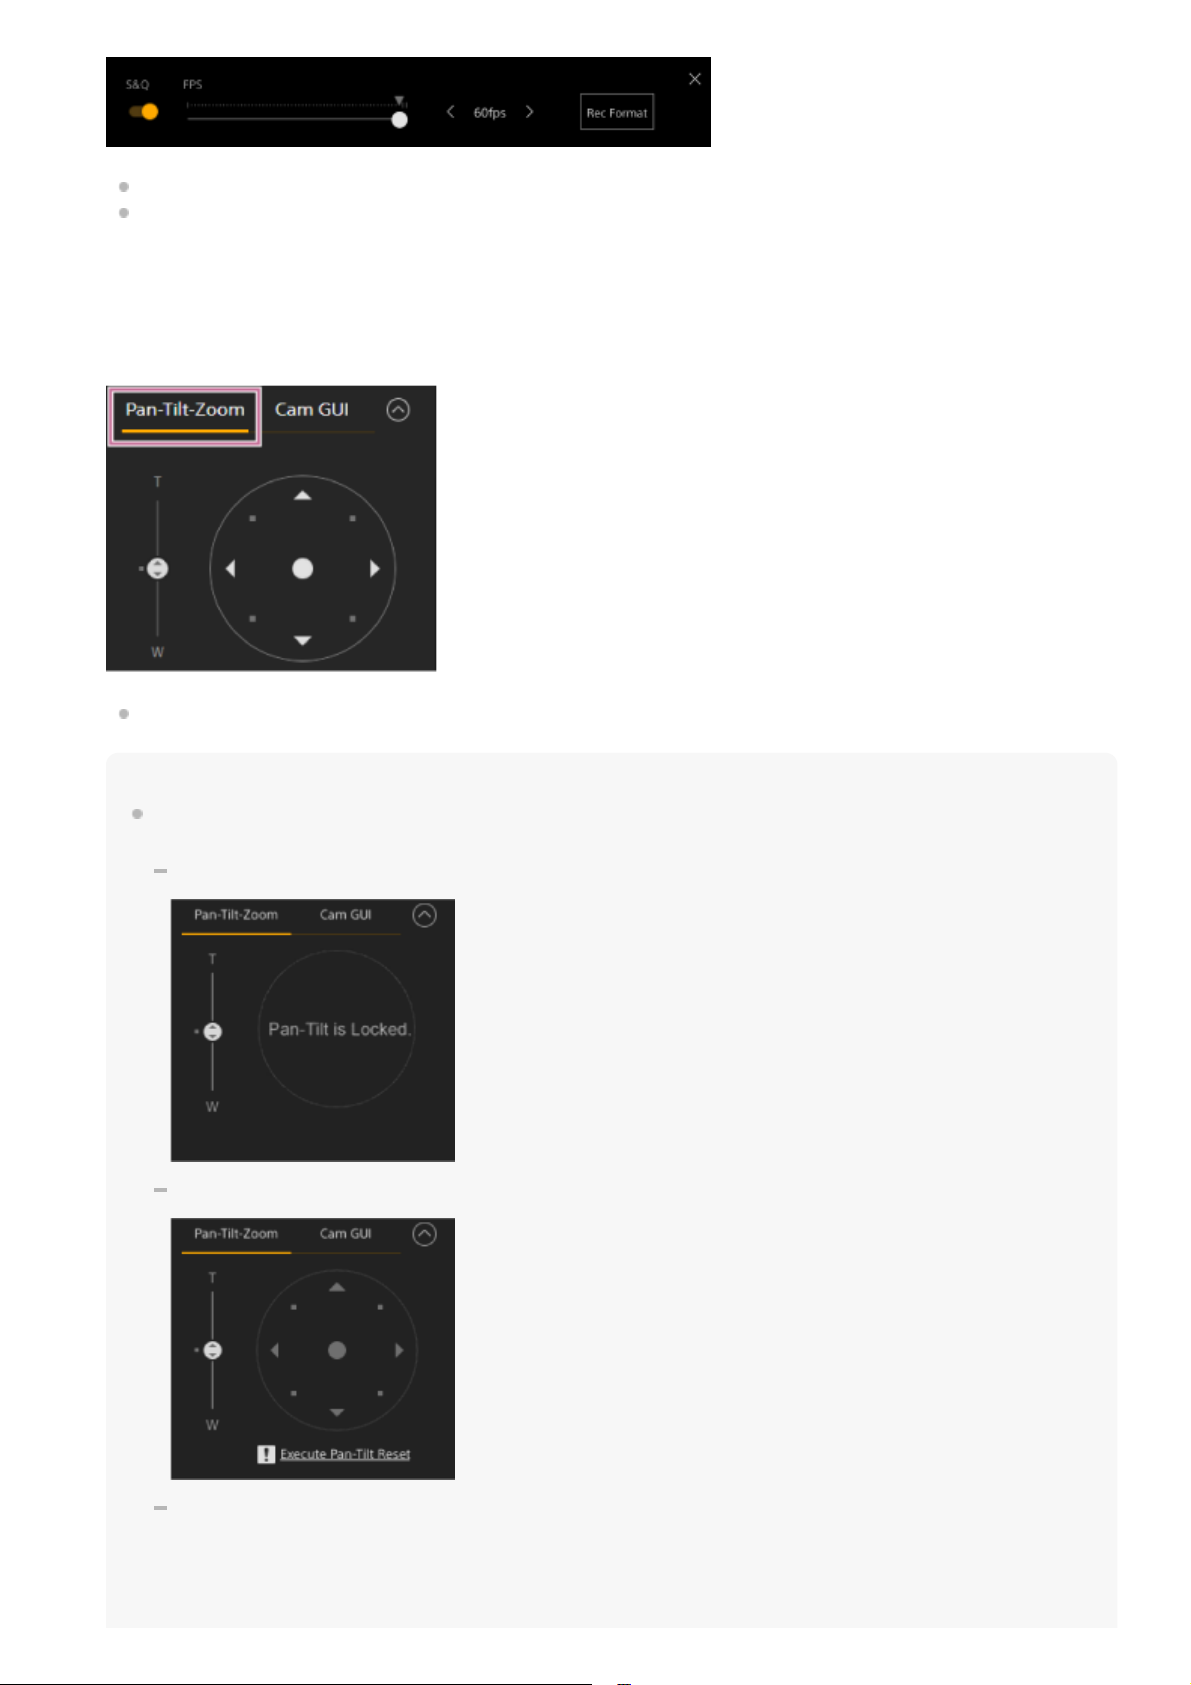
Framing control panel / GUI control panel
Switch between the framing control panel / GUI control panel using the tabs at the top.
Use the framing control panel to adjust the framing. Press the [Pan-Tilt-Zoom] tab to display the framing control
panel.
For details about operation, see “Adjusting the Framing.”
Hint
The joystick part of the framing control panel is displayed as shown below when pan/tilt operation is disabled and when
pan/tilt initialization is required.
When pan/tilt operation is locked using the pan/tilt lock lever
When pan/tilt operation is not initialized
When pan/tilt operation needs to be reset
6.
46
When pan/tilt operation is disabled
When pan/tilt is not initialized or needs to be reset, you can quickly access the [Pan-Tilt Reset] button in the camera control
panel by pressing the message displayed below the joystick.
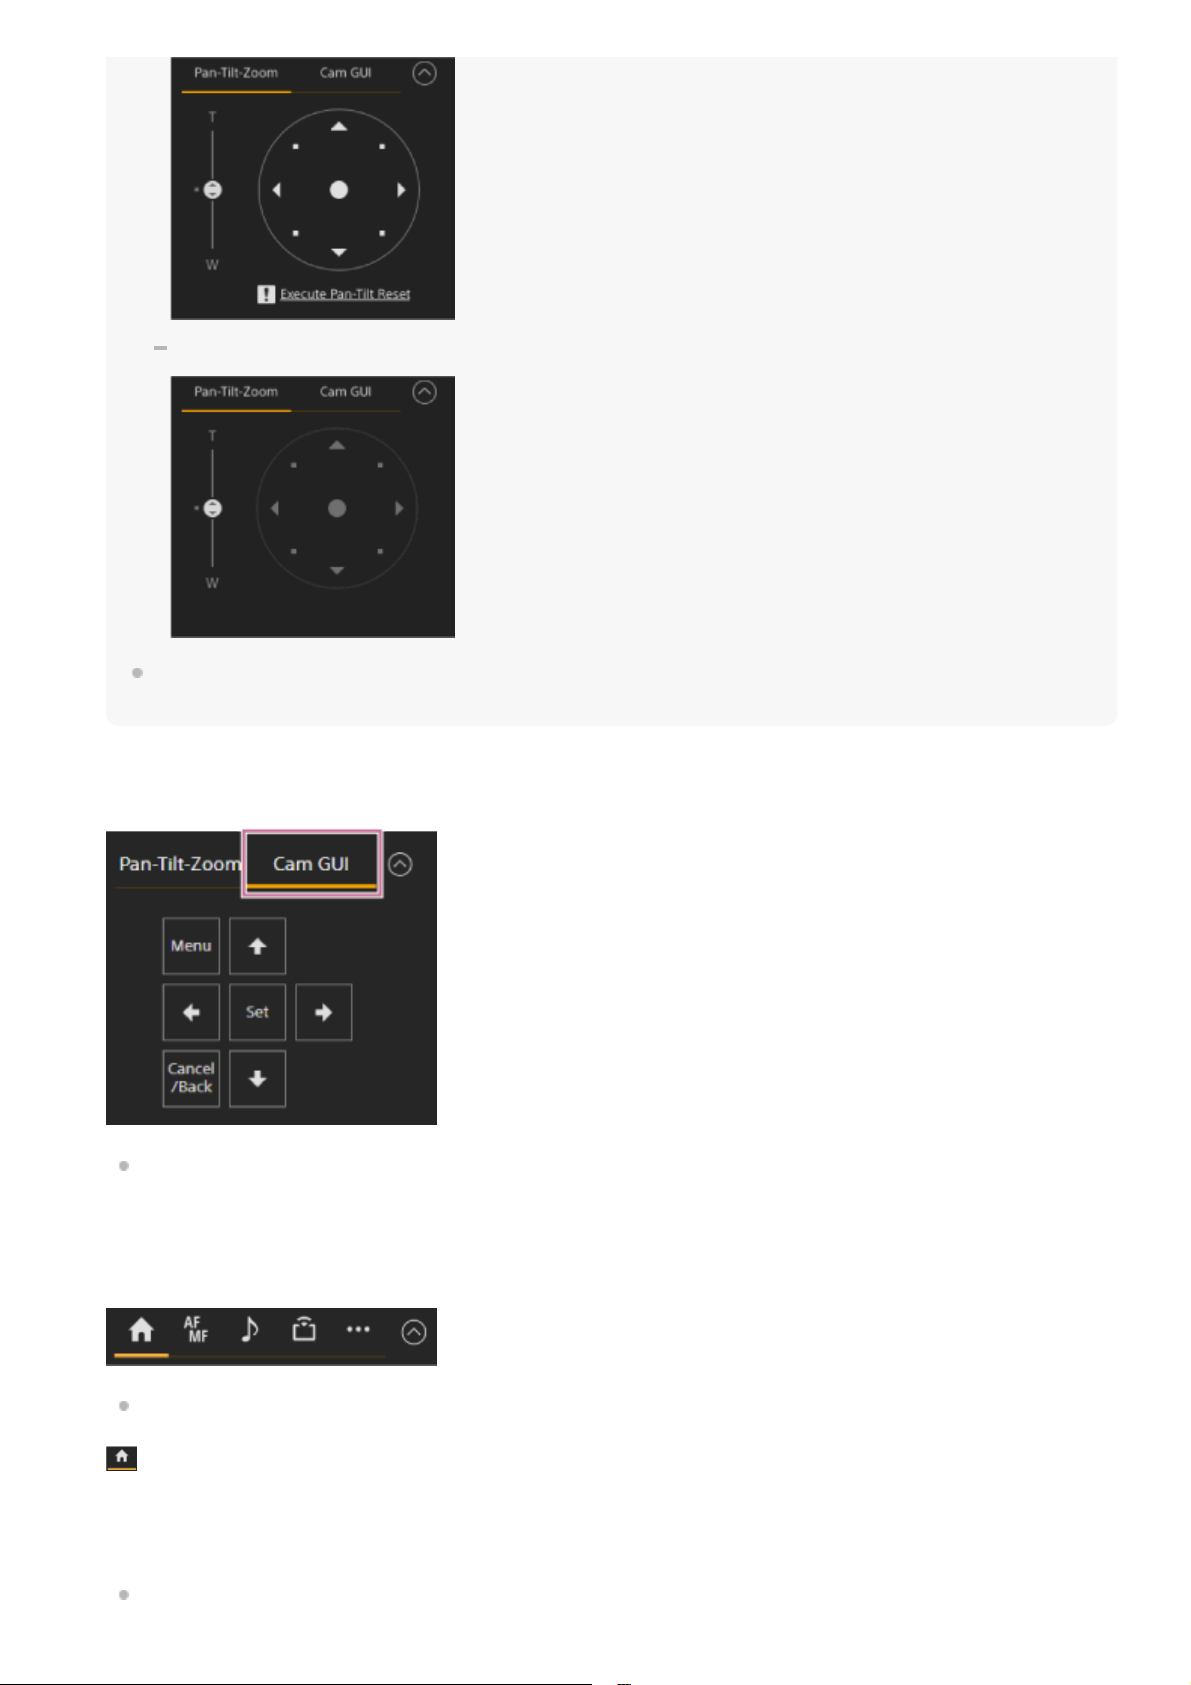
Use the GUI control panel to operate the camera menu, clip playback, and other functions. Press the [Cam GUI] tab
to display the GUI control panel.
For details about operation, see “Operating the Camera Menu” and “Playing Clips and Other Clip Operations.”
Camera control panel
Use to configure the functions required to operate the camera.
Switch between the screens to display using the tabs at the top.
For details, see the description of each function.
(Main) tab
Displays the setup items for frequently used functions.
The top and bottom slider functions can be changed by pressing the [▼] button and selecting from the displayed list.
The following functions can be selected.
ND Filter
7.
47

Iris
ISO
*
Gain
*
Exposure Index
*
AE Level
Zoom Speed
Pan-Tilt Speed
(Focus) tab
Displays the setup items related to focus.
(Audio) tab
Displays the setup items related to audio.
Displayed according to menu settings.
*
48
5-041-957-11(1) Copyright 2022 Sony Corporation
(Stream) tab
Displays the setup items related to streaming.
The items displayed will vary depending on the streaming format setting.
When set to [SRT-Caller], streaming can be started/stopped on this screen.
For details, see “About Streaming” and other topics in “Configuring Streaming.”
(Others) tab
Displays the setup items related to other functions.
49

50

Help Guide
Interchangeable Lens Digital Camera
ILME-FR7 / ILME-FR7K
Structure of the Playback Operation Screen
This topic describes the structure of the playback operation screen.
Camera image panel
Displays the playback image and related information. When playback is stopped, the camera image screen appears.
1.
51
1-1 Shooting date and time
1-2 Playback status indicator
1-3 Playback format (picture size) indicator
1-4 Playback format (codec) indicator
1-5 Clip name display
1-6 Clip number/total number of clips
1-7 Streaming status indicator
1-8 Playback format (frame rate and scan method) indicator
1-9 Base Look indicator
Playback control panel
Displays the playback control buttons.
[Display] button
Press to switch between the screen display on the image.
[Thumbnail] button
Displays the clips recorded on the memory card on the camera image panel as thumbnails.
2.
Button Function
(Play/Pause) button Plays a clip. During playback, pauses the clip.
(Fast Forward) button, (Fast
Reverse) button
Plays a clip at high speed. When the button is pressed, the playback
speed changes in three steps.
(Next) button, (Previous)
button
Jumps to start of clip or the previous/next clip.
(Stop) button Stops playback.
52
5-041-957-11(1) Copyright 2022 Sony Corporation
Pressing the [Thumbnail] button during thumbnail screen display closes the thumbnail screen and returns to the
camera image.
For details about the thumbnail screen, see “Thumbnail Screen.”
[Slot Select] button
Switches between the target playback media.
Assignable buttons
Displays the assignable buttons assigned to functions of the unit.
For details about assignable buttons, see “Assignable Buttons.”
3.
GUI control panel
Use the GUI control panel to operate the camera menu, clip playback, and other functions.
For details about operation, see “Operating the Camera Menu” and “Playing Recorded Clips.”
4.
53
Help Guide
Interchangeable Lens Digital Camera
ILME-FR7 / ILME-FR7K
Structure of the Settings Screen
Use the settings screen to configure the various setup items of the unit, including initial settings, network settings,
shooting/playback settings using the web menu.
Note
In the web menu, settings are not applied until you press the [OK] button as a general rule. If you change settings on a page that
has an [OK] button, be sure to press the [OK] button.
For details about the settings screen, see “Web Menu and Detailed Settings.”
5-041-957-11(1)
Copyright 2022 Sony Corporation
54
Help Guide
Interchangeable Lens Digital Camera
ILME-FR7 / ILME-FR7K
Camera Menu
Press the [Menu] button in the GUI control panel of the live operation screen to display the camera menu in the camera
image panel.
You can configure the settings required for shooting and playback using the camera menu.
Press the [Menu] button while the camera menu is displayed to hide the camera menu.
The camera menu is operated using the GUI control panel.
For details about the camera menu, see “Camera Menu and Detailed Settings.”
Note
When [Monitoring] > [Output Display] > [HDMI/Stream] is set to Off in the web menu (disables information overlay on the screen
display), the camera menu is no longer displayed in the camera image panel. However, be aware that menu operations in the
GUI control panel are still active. To avoid inadvertent operation, take care to not perform any menu operations using the GUI
control panel when [HDMI/Stream] is set to Off.
5-041-957-11(1)
Copyright 2022 Sony Corporation
55

Help Guide
Interchangeable Lens Digital Camera
ILME-FR7 / ILME-FR7K
Camera Screen Display
You can displays the status and settings of the unit superimposed on the output image from the camera. You can set the
outputs for which screen display is enabled using [Monitoring] > [Output Display] in the web menu.
You can show/hide the information using the [Display] button. Even when hidden, it will appear while performing direct
menu operations.
You can show/hide items individually using [Monitoring] > [Display On/Off] in the camera menu.
Information displayed on the screen while shooting
Upload indicator/remaining files indicator
For details about transferring files, see “About File Transfer” and other topics in “Transferring Files.”
1.
Focus area indicator
Displays the focus area for auto focus.
For details about auto focus, see “Adjusting Automatically Using the Web App” and other topics in “Adjusting the
Focus Automatically (Auto Focus).”
2.
Recording mode, slot A/B, Interval Rec recording interval indicator
For details about Interval Rec, see “Recording Video Intermittently (Interval Rec).”
3.
Display Meaning
●Rec Recording
Stby Recording standby
Depth-of-field indicator4.
Imager scan mode indicator5.
56
A (mismatch) mark is displayed if there is a mismatch between the image circle size of the lens and the effective
picture size imager scan mode setting.
When Imager Scan Mode is set to FF, a “C” mark is displayed in modes with narrower angle of view (cropped).
Cropping occurs in the following modes.
When the recording format is 3840×2160 and S&Q Motion frame rate is 100 fps or 120 fps
When [Codec] is set to RAW or RAW & XAVC-I and the RAW output format is 3840×2160
For details about the imager scan mode, see “Setting the imager scan mode” in “Configuring Basic Operation.”
RAW output operation status indicator
Displays the output status of the RAW signal.
For details about RAW, see “Recording RAW Video.”
6.
Slow & Quick Motion shooting frame rate indicator
For details about Slow & Quick Motion, see “Slow & Quick Motion.”
7.
Focus position indicator
Displays the focus position.
8.
Focus mode indicator
Face/eye detection AF
For details about face/eye detection AF, see “Tracking Using Face and Eye Detection (Face/Eye Detection AF).”
9.
Display Meaning
Focus Hold Focus Hold mode
MF MF mode
AF AF mode
(Realtime tracking AF mode) Realtime tracking AF mode
Display Meaning
(Face/eye detection AF) Indicates face/eye detection AF is active
(face/eye only AF) Indicates face/eye only AF is active
(saved tracking face) Indicates a tracking face has been saved
(AF paused icon during face/eye detection AF)
Indicates that AF was paused during face/eye detection AF
*
Displayed when there is no saved tracking face and a face is not detected, or when there is a saved tracking face but the tracking target
face is not detected.
*
Zoom position indicator
Displays the zoom position in the range 0 (wide angle) to 99 (telephoto) (if a lens that supports zoom position display
is attached).
You can also change the indicator to a bar display or focal length display using the [Technical] > [Lens] > [Zoom
Position Display] setting in the camera menu.
The following items are added to the display when Clear Image Zoom is enabled.
10.
57
For details about zoom, see “Setting the Zoom Type” and other topics in “Adjusting the Zoom.”
Display MeaningDisplay Meaning
(Clear Image Zoom is enabled) Clear Image Zoom is enabled
Magnification value When using Clear Image Zoom
Image stabilization mode indicator11.
SDI output/HDMI output Rec Control status indicator
Displays the output status of the REC control signal.
For details, see “Connecting External Monitors and Recording Devices.”
12.
Focus indicator
For details, see “Using Single-Shot Auto Focus (Push Auto Focus (AF-S))” in “Adjusting the Focus.”
13.
Remaining media capacity indicator
A
(protect) icon appears if the memory card is write-protected.
14.
White balance mode indicator15.
Display Meaning
(ATW) Auto mode
(ATW Hold) Auto mode paused
W:P Preset mode
W:A Memory A mode
Timecode external lock indicator/time data display
Displays “EXT-LK” when locked to the timecode of an external device.
For details about timecode, see “Specifying Time Data.”
16.
ND filter indicator
For details about ND filters, see “Adjusting the Light Level (ND Filter).”
For details about bokeh control, see “Adjusting the Bokeh (Bokeh Control Function).”
17.
Display Meaning
(A) Auto mode
(B) Bokeh control mode
Scene file indicator
For details about scene files, see “Look Overview” and other topics in “Shooting with the Desired Look.”
18.
Iris indicator
Displays the iris position (F value) (if a lens that supports iris setting display is attached).
19.
58
For details about the iris, see “Adjusting the Iris Automatically” and “Adjusting the Iris Manually.”
Video level warning indicator20.
Gain indicator
Displays the EI value when in Cine EI mode.
For details about the gain, see “Adjusting the Gain Automatically” and “Adjusting the Gain Manually.”
For details about Cine EI mode, see “Setting the shooting mode” in “Configuring Basic Operation.”
21.
Display Meaning
(A) Auto mode
L Preset L mode
(Temporary adjustment mode) Temporary adjustment mode
(B) Bokeh control mode
Clip name display
Displays the name of the clip being recorded or to record next.
22.
Shutter indicator
For details about the shutter, see “Adjusting the Shutter Automatically” and “Adjusting the Shutter Manually.”
23.
AE mode/AE level indicator
For details about auto exposure (AE), see “Setting the Target Level for Automatic Brightness Adjustment.”
24.
Spirit level indicator
Displays the horizontal level in ±1° increments up to ±15°.
25.
Audio level meter
Displays the audio level of each channel.
26.
Video signal monitor
Displays a waveform, vectorscope, and histogram.
The orange line indicates the set value of the brightness level marker.
In Cine EI mode, it displays the LUT type of the signal being monitored.
For details, see “Video Signal Monitor.”
For details about Cine EI mode, see “Setting the shooting mode” in “Configuring Basic Operation.”
27.
Base Sensitivity indicator/Base ISO indicator
In Custom mode, it displays the base sensitivity set using the [ISO/Gain / Exposure Index] button in the camera basic
configuration panel or [Shooting] > [ISO/Gain/EI] > [Base Sensitivity] in the camera menu.
In Cine EI mode, it displays the Base ISO sensitivity set using the [ISO/Gain / Exposure Index] button in the camera
basic configuration panel or [Shooting] > [ISO/Gain/EI] > [Base ISO] in the camera menu.
For details about the base sensitivity, see “Selecting the Base Sensitivity.”
For details about Cine EI mode, see “Setting the shooting mode” in “Configuring Basic Operation.”
28.
Monitoring look indicator
In Cine EI mode, it displays the monitor LUT setting.
For details about the LUT setting, see “Shooting with Look Adjustment in Post-Production” and related topics.
29.
59
Information displayed on the screen during playback
The following information is superimposed on the playback picture.
For details about Cine EI mode, see “Setting the shooting mode” in “Configuring Basic Operation.”
Base look/recording look indicator
Displays the base look setting.
In Cine EI mode, it displays the video signal to record on the memory cards.
For details about the base look, see “Look Overview” in “Shooting with the Desired Look.”
For details about Cine EI mode, see “Setting the shooting mode” in “Configuring Basic Operation.”
30.
Proxy status indicator31.
Recording format (codec) indicator
Displays the name of the format for recording on the memory cards.
Set the recording format (codec) using [Project] > [Rec Format] > [Codec] in the web menu or camera menu.
32.
Recording format (frame rate and scan method) indicator33.
Recording format (picture size) indicator
Displays the picture size for recording on the memory cards.
Set the recording format (picture size) using [Project] > [Rec Format] > [Codec] in the web menu or camera menu.
34.
Tally indicator
Displays a red frame or green frame around the image according to the received external tally signal.
35.
Upload indicator/remaining files indicator1.
Clip number/total number of clips2.
Playback status indicator3.
Playback format (frame rate and scan method) indicator4.
Playback format (picture size) indicator5.
60

5-041-957-11(1) Copyright 2022 Sony Corporation
Playback format (codec) indicator6.
Media indicator
A
(protect) icon appears if the memory card is write-protected.
7.
Time data display8.
Clip name display9.
Gamma display assist indicator10.
Audio level meter
Displays the playback audio level.
11.
Base look/recording look indicator12.
Tally indicator13.
61

Help Guide
Interchangeable Lens Digital Camera
ILME-FR7 / ILME-FR7K
Mounting Upright in a Fixed Location
This topic describes mounting the unit on a desktop or tripod.
Installation note
To protect the lens and the lens connector block of the unit, keep the lens and the cap or cover of the unit attached
until you attach the lens.
To prevent lens failure, do not hold the lens parts while working.
To prevent unit failure, do not hold the camera head while working.
Check the mounting space.
When mounting on a desktop
Mount this unit on a flat surface, taking into consideration the space required for turning the lens and the wiring at
the rear of the unit.
Note
Mount it in a stable location that is not subject to vibration. Locations subject to vibration may cause vibration in the image.
If the unit must be mounted on an inclined surface, keep it within ±15° of the horizontal and take measures to prevent the
unit from falling.
When mounting on a tripod
Attach the tripod to the tripod mounting screw hole on the bottom.
Use a tripod mounting screw with the following amount of protrusion from the mounting surface, and tighten it with a
hand screwdriver.
A: Tripod mounting screws 1/4-20 UNC, ISO 1222 (6.35 mm)
B: Protrusion (4.5 mm to 5.5 mm)
1
62

Next, attach the lens. See “Attaching a Lens,” taking into account the information in “Precautions when
Attaching/Removing a Lens,” “Checking the Lens Switches,” and “Precautions When Using a Zoom Lens.”
5-041-957-11(1)
Copyright 2022 Sony Corporation
Do not use tripod screws for mounting the unit in a high location.
Note
Select a tripod that will not tip over even when the lens turns.
63
Help Guide
Interchangeable Lens Digital Camera
ILME-FR7 / ILME-FR7K
Mounting Upright in a High, Fixed Location
This topic describes the procedure for mounting the unit upright in a high location using the ceiling bracket (CIB-PCM1
(option)).
To mount the unit in a high location, ask a professional contractor.
When mounting in a high location, make sure that the mounting surface and mounting material (excluding
accessories) can support 200 kg (440 lb 14.8 oz) or more, and mount the unit as described in this Help Guide. If the
mounting is not sturdy enough, the unit may fall and cause serious injury.
Attach the supplied fall prevention wire rope to the CIB-PCM1 Ceiling Bracket (option) to prevent the unit from falling.
When the unit is mounted in a high location, check that the mounting has not become loose once a year. Shorten the
inspection interval according to the usage conditions.
Installation note
To protect the lens and the lens connector block of the unit, keep the lens cap and cover on until the lens is attached.
To prevent lens failure, do not hold the lens parts while working.
To prevent unit failure, do not hold the camera head while working.
Check the high-location mounting accessories and mounting space.
CIB-PCM1 ceiling bracket kit (option)
Before you start, check that you have the following parts.
Body bracket (1)
Ceiling bracket (1)
Lens release button cover (1)
Fall prevention wire rope (1)
+PSW M3×8 screws (9)
+PSW M4x8 stainless steel screw for fall prevention wire rope (1)
Note
1
64
The fall prevention wire rope is designed to support the unit when suspended. Do not apply any load to it other than the
load of the unit.
Mounting space
Refer to the following drawing when determining the mounting location and direction, taking into consideration the
space required for turning the lens and the wiring at the rear of the unit.
A: Camera head range of movement (e.g. SEL70200GM2 (with SEL20TC attached): Ø340)
B: Ceiling bracket (hole on mounting surface side (Ø60))
C: Mounting alignment hole
Note
Mount it in a stable location that is not subject to vibration. Locations subject to vibration may cause vibration in the image.
If the unit must be mounted on an inclined surface, keep it within ±15° of the horizontal and take measures to prevent the
unit from falling.
Slide the pan/tilt lock lever to the LOCK position to lock the pan/tilt of the camera head.
2
65
Note
If the camera head pan/tilt does not lock when the lock lever is in the LOCK position, move the camera head manually until
it locks in position.
Attach the body bracket to the bottom of the unit using the six supplied screws (M3×8).
3
66
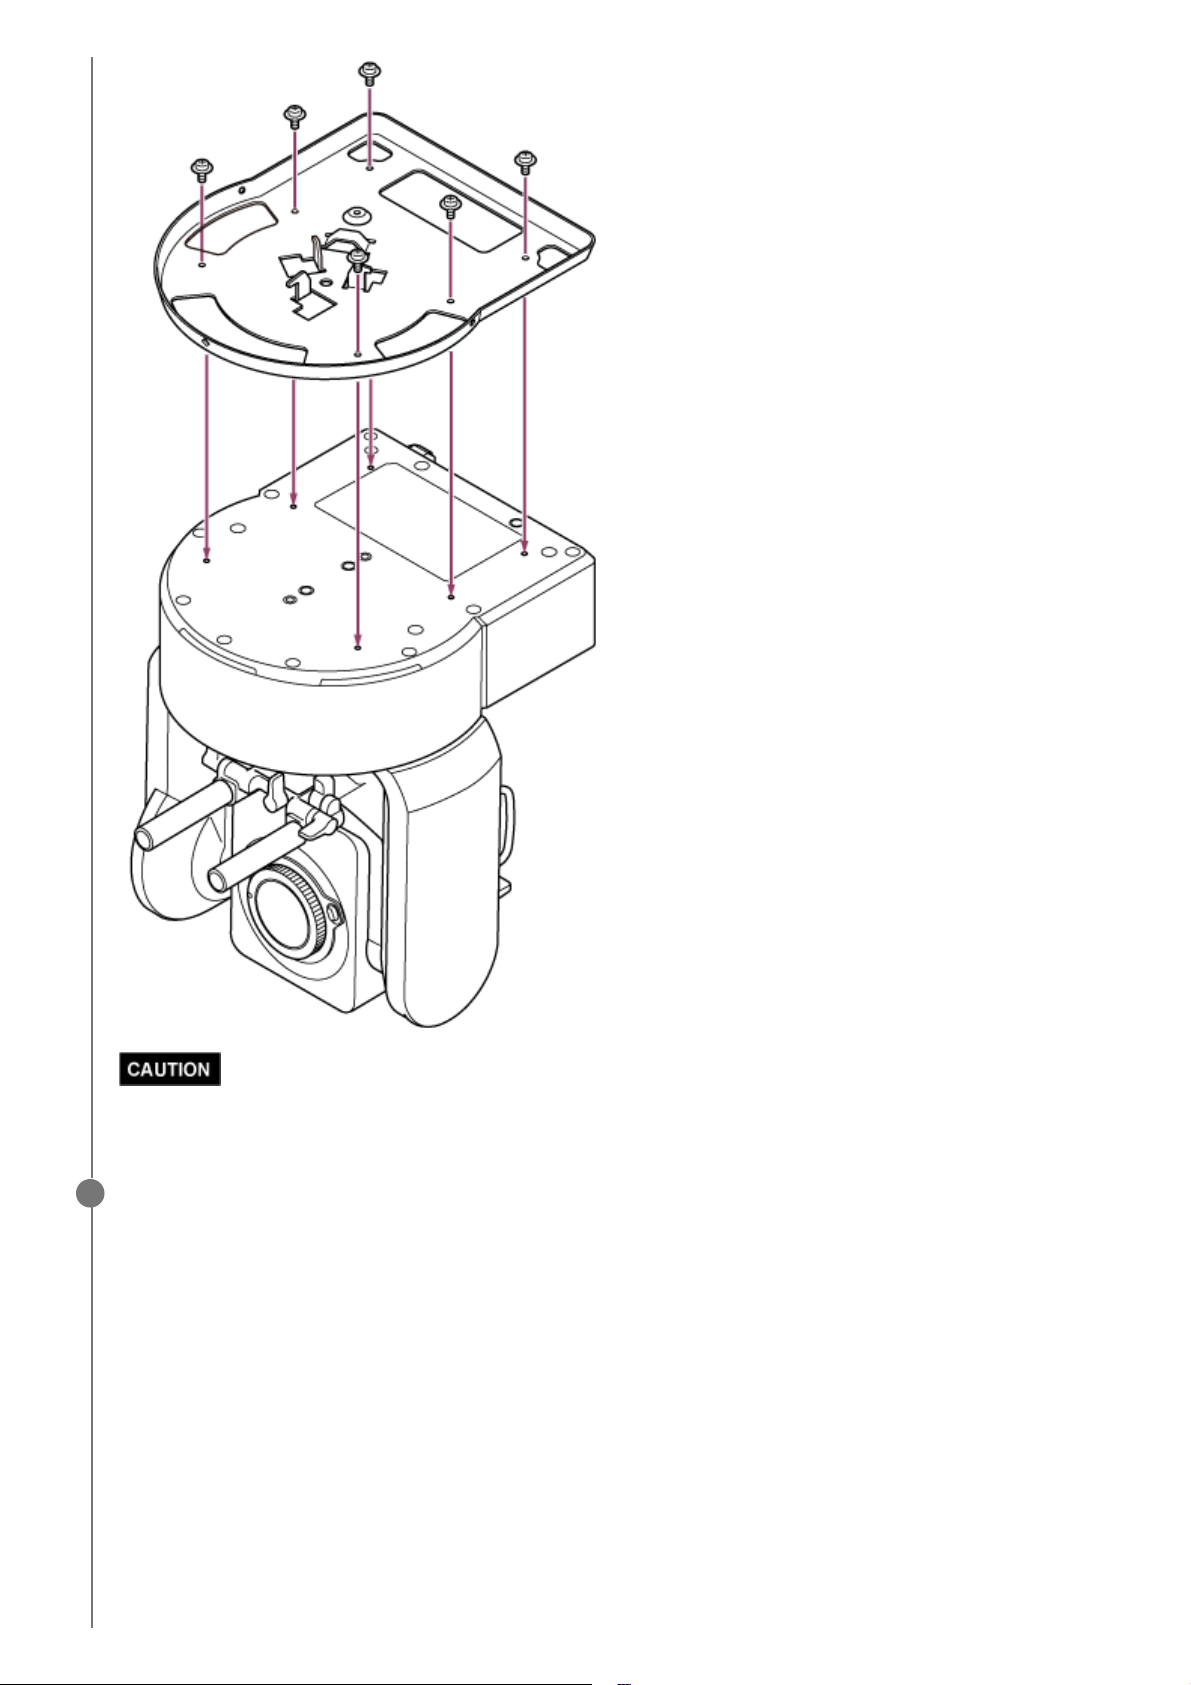
Use the supplied screws. The use of screws other than the supplied screws may damage the interior of the unit.
Attach the fall prevention wire rope to the body bracket.
4
67
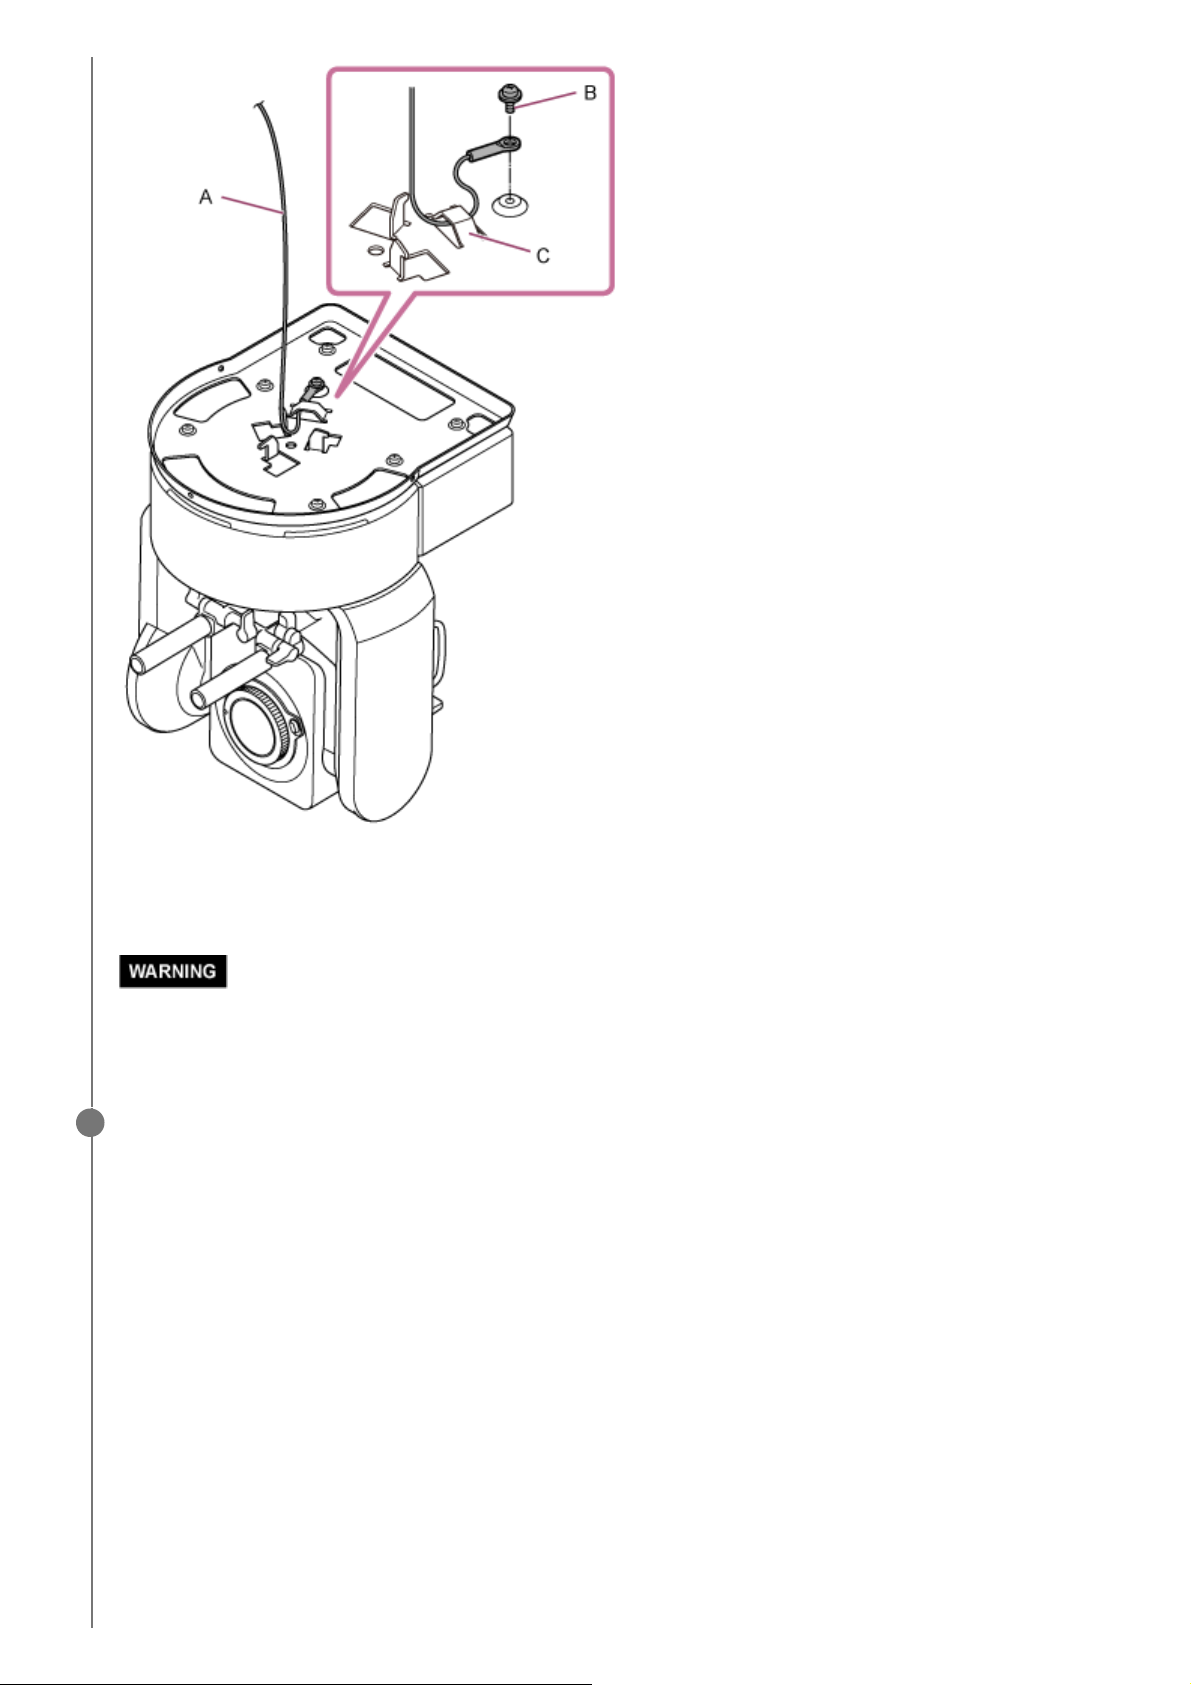
A: Supplied wire rope
B: Supplied Phillips screw (M4×8)
C: Wire rope metal loop
Use the supplied screw. The use of a screw other than the supplied screw may reduce the effectiveness of the wire
rope function.
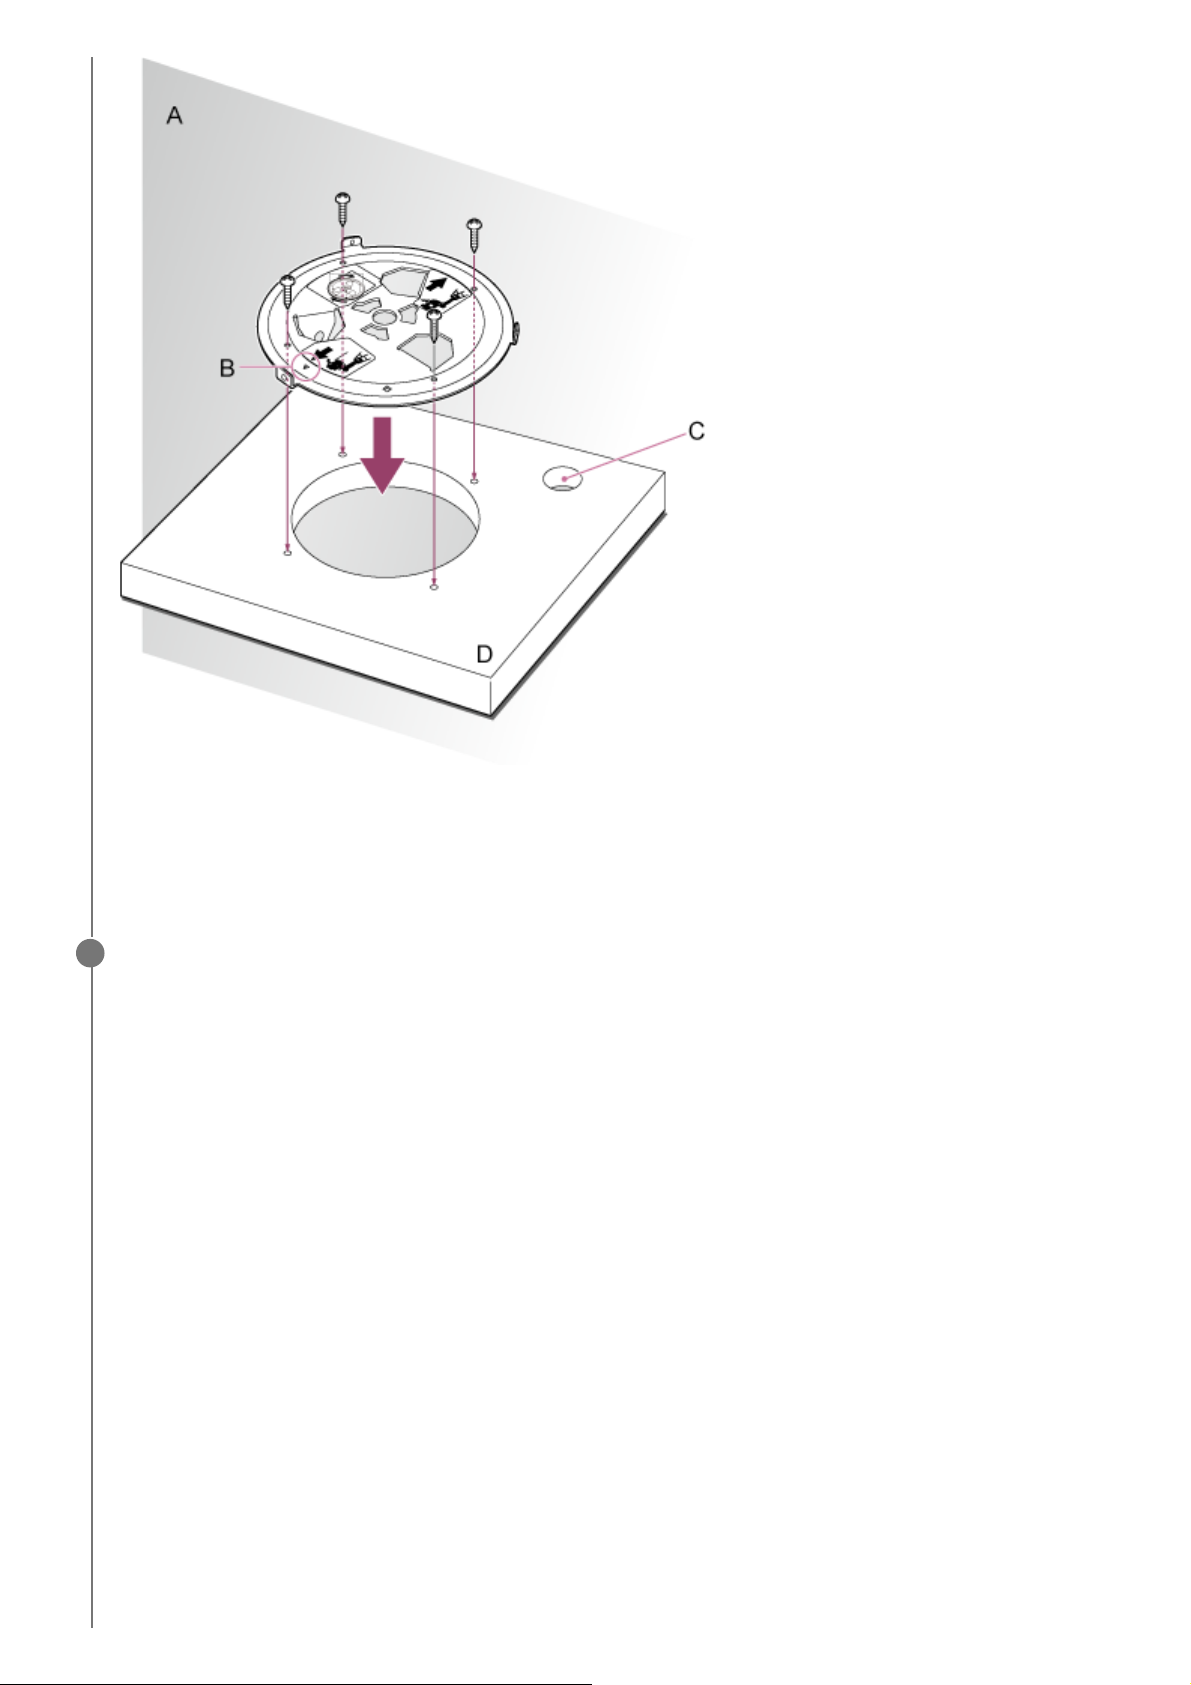
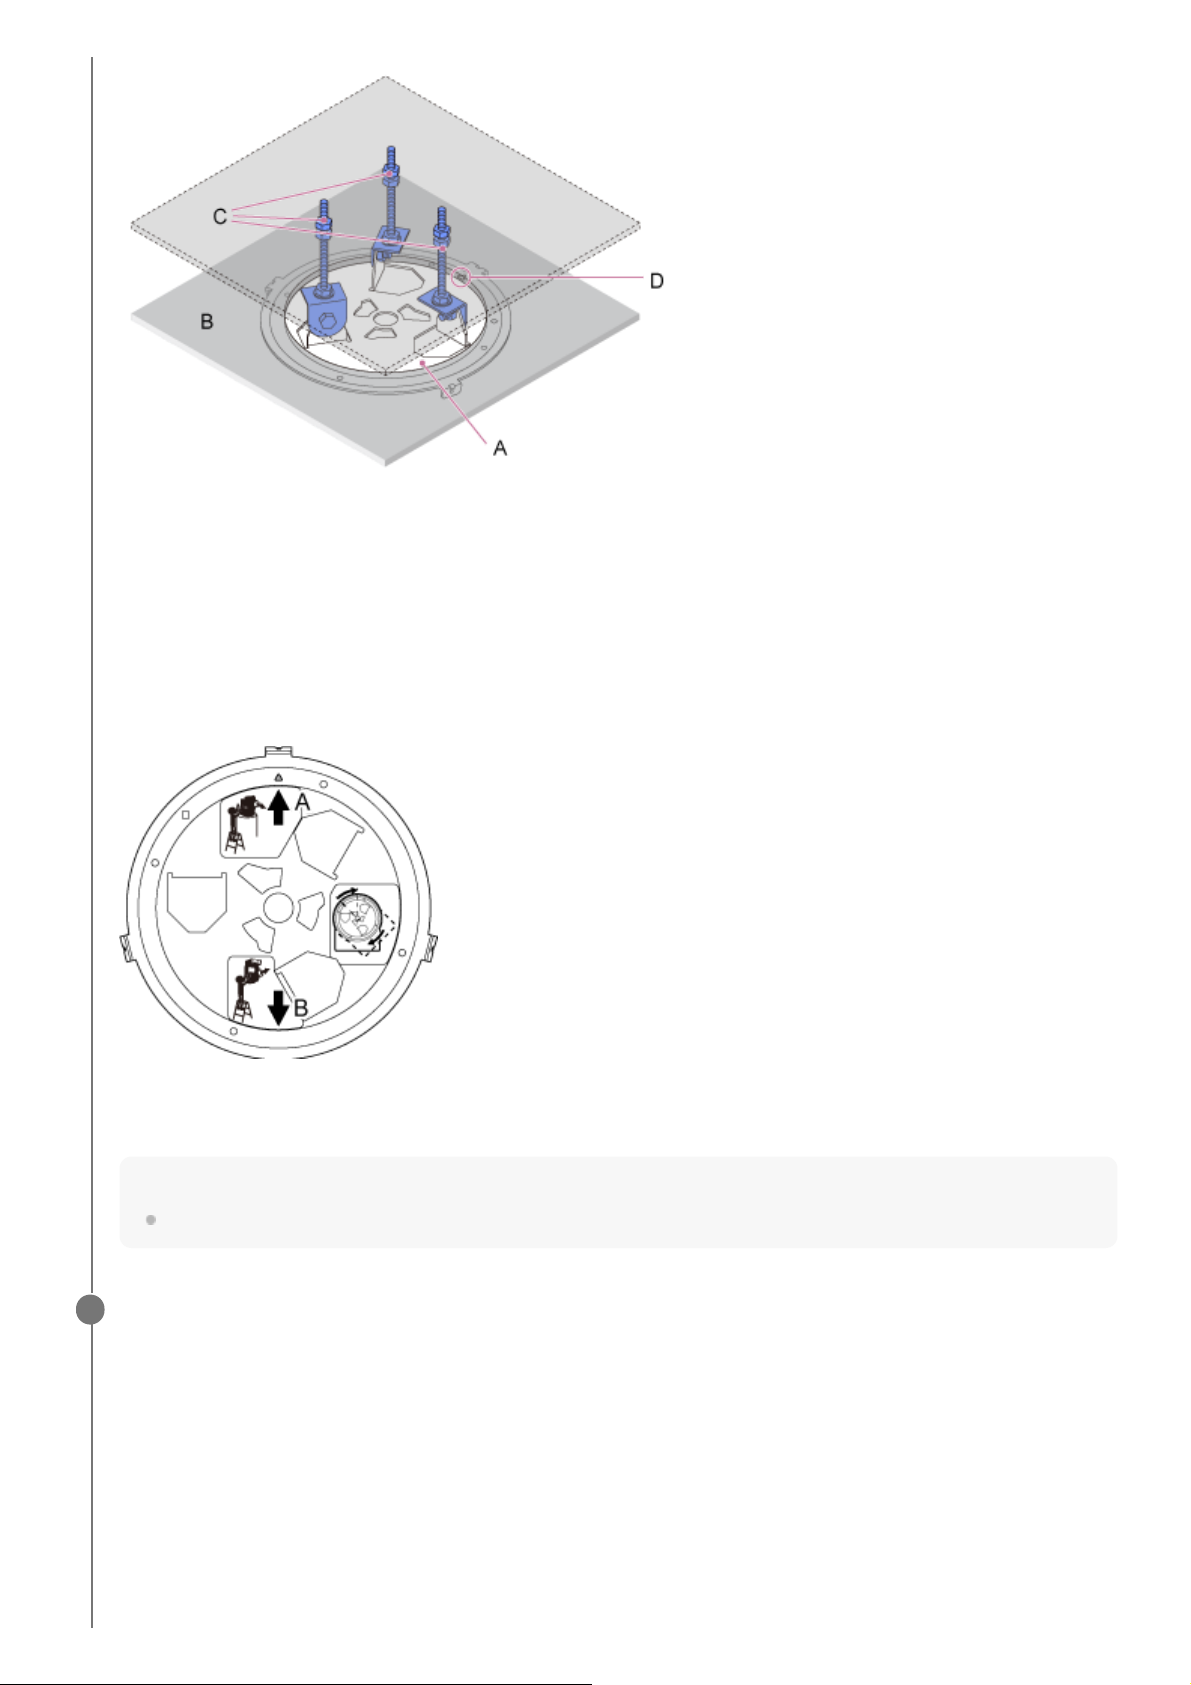
Attach the ceiling bracket to the surface, such as a shelf, where the unit will be mounted.
5
68
A: Wall
B: △ mark (camera forward direction)
C: Hole for connection cables
D: Shelf or other mounting surface
Attach the fall prevention wire rope to a point near the mounting surface.
Use an M5 (3/16 inch) hexagon socket head cap screw (option) and attach it to an object near the shelf or surface
to which the ceiling bracket is attached.
6
69
A: Wire rope
B: Hexagon socket head cap screw (M5, 3/16 inch)
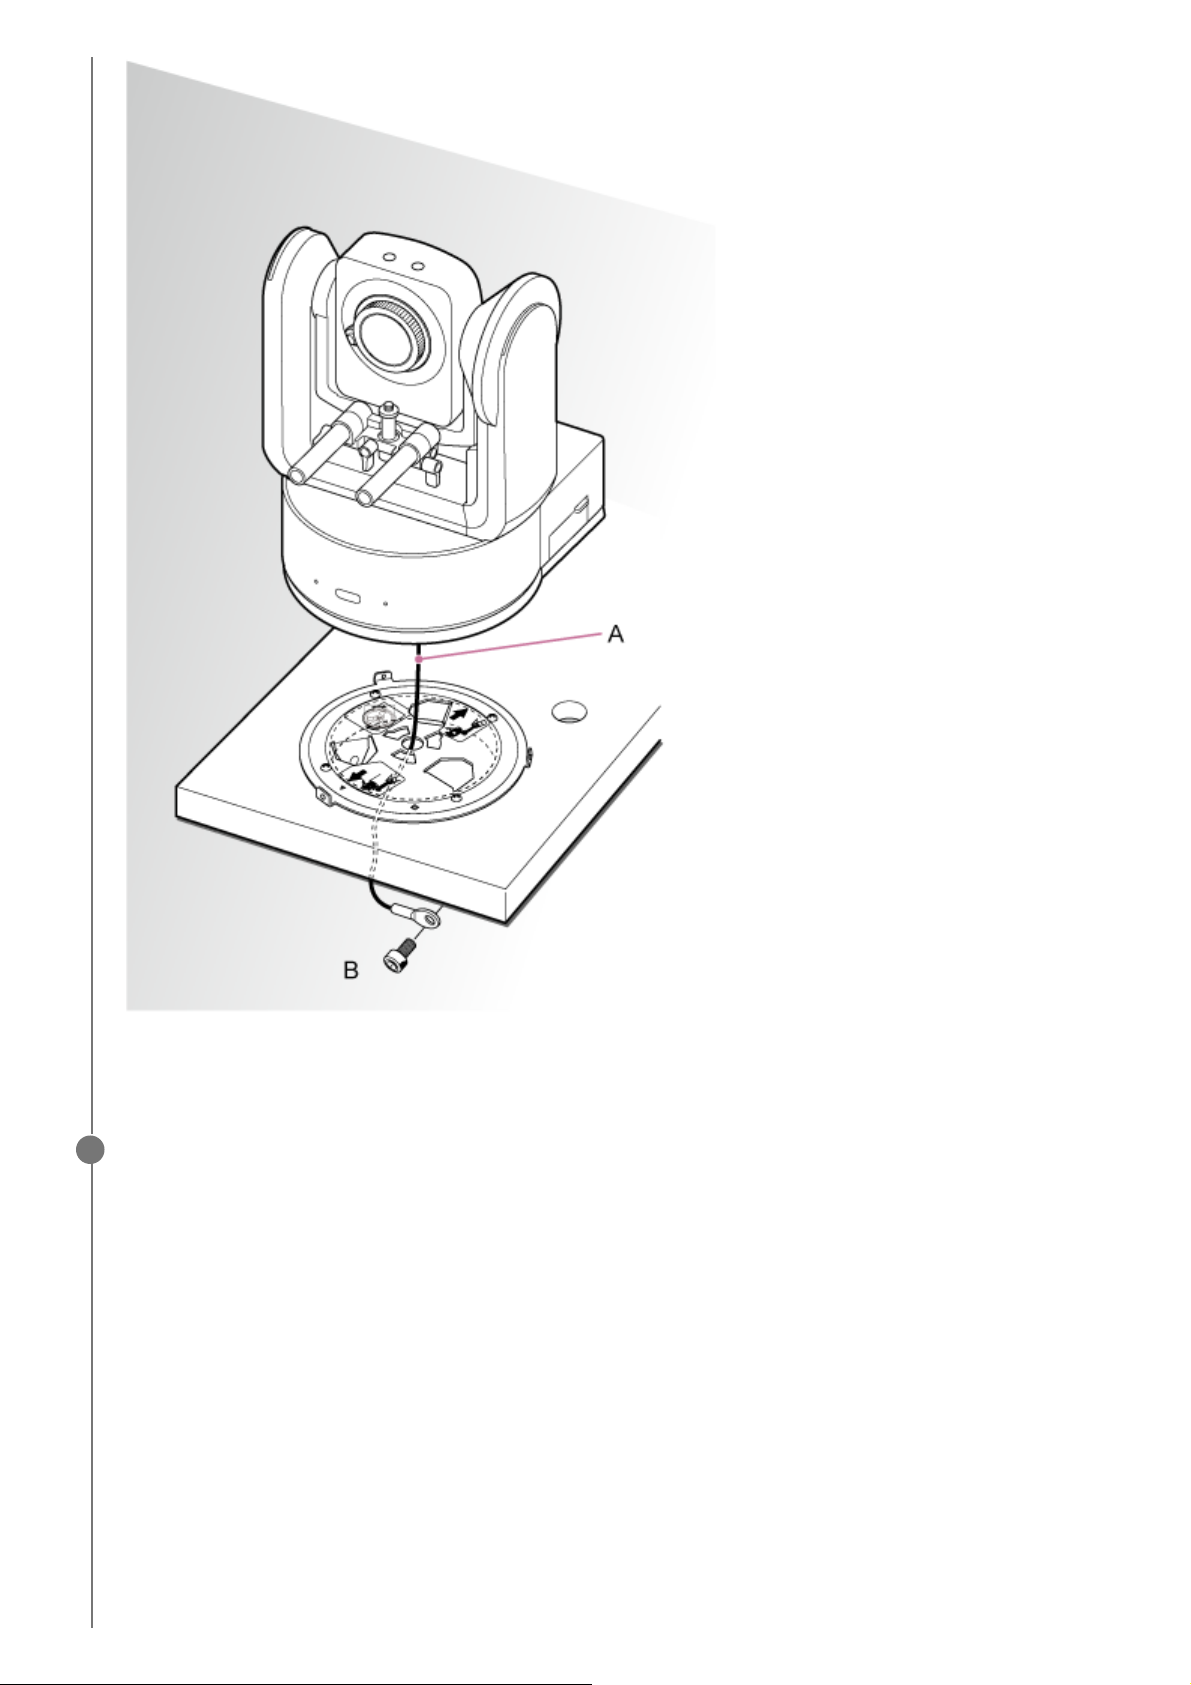
Align the 〇 screw hole at the front of the body bracket with the ◇ hole of the ceiling bracket, insert the
unit, and temporarily fix the body bracket in the ceiling bracket by turning the unit clockwise.
7
70
A: 〇 hole
B: ◇ hole
Attach the body bracket and ceiling bracket using the three supplied rotation lock screws (M3×8).
8
71
Next, attach the lens. See “Attaching a Lens,” taking into account the information in “Precautions when
Attaching/Removing a Lens,” “Checking the Lens Switches,” and “Precautions When Using a Zoom Lens.”
Note
After attaching a lens, check that the lens is securely attached.
The lens does not have any protection against falling. Sony can assume no liability for a lens falling from the unit.
5-041-957-11(1)
Copyright 2022 Sony Corporation
Check the mounting status.
Specifically, check the following items.
Mounting screws are correctly attached.
Fall prevention wire rope is correctly attached and is not twisted.
Unit is mounted level (without tilt or wobble).
Unit does not spin freely when turned.
9
72
Help Guide
Interchangeable Lens Digital Camera
ILME-FR7 / ILME-FR7K
Mounting on a Ceiling
This topic describes the procedure for mounting the unit on a ceiling using the ceiling bracket (CIB-PCM1 (option)).
To mount the unit on a ceiling, ask a professional contractor.
When mounting on a ceiling, make sure that the mounting surface and mounting material (excluding accessories)
can support 200 kg (440 lb 14.8 oz) or more, and mount the unit as described in this Help Guide. If the mounting is
not sturdy enough, the unit may fall and cause serious injury.
Attach the supplied fall prevention wire rope to the CIB-PCM1 Ceiling Bracket (option) to prevent the unit from falling.
When the unit is mounted on a ceiling, check that the mounting has not become loose once a year. Shorten the
inspection interval according to the usage conditions.
Installation note
To protect the lens and the lens connector block of the unit, keep the lens cap and cover on until the lens is attached.
To prevent lens failure, do not hold the lens parts while working.
To prevent unit failure, do not hold the camera head while working.
Check the ceiling mounting accessories and mounting space.
CIB-PCM1 ceiling bracket kit (option)
Before you start, check that you have the following parts.
Body bracket (1)
Ceiling bracket (1)
Lens release button cover (1)
Fall prevention wire rope (1)
+PSW M3×8 screws (9)
+PSW M4×8 stainless steel screw for fall prevention wire rope (1)
Note
1
73
The fall prevention wire rope is designed to support the unit when suspended. Do not apply any load to it other than the
load of the unit.
Mounting space
Refer to the following drawing when determining the mounting location and direction, taking into consideration the
space required for turning the lens and the wiring at the rear of the unit.
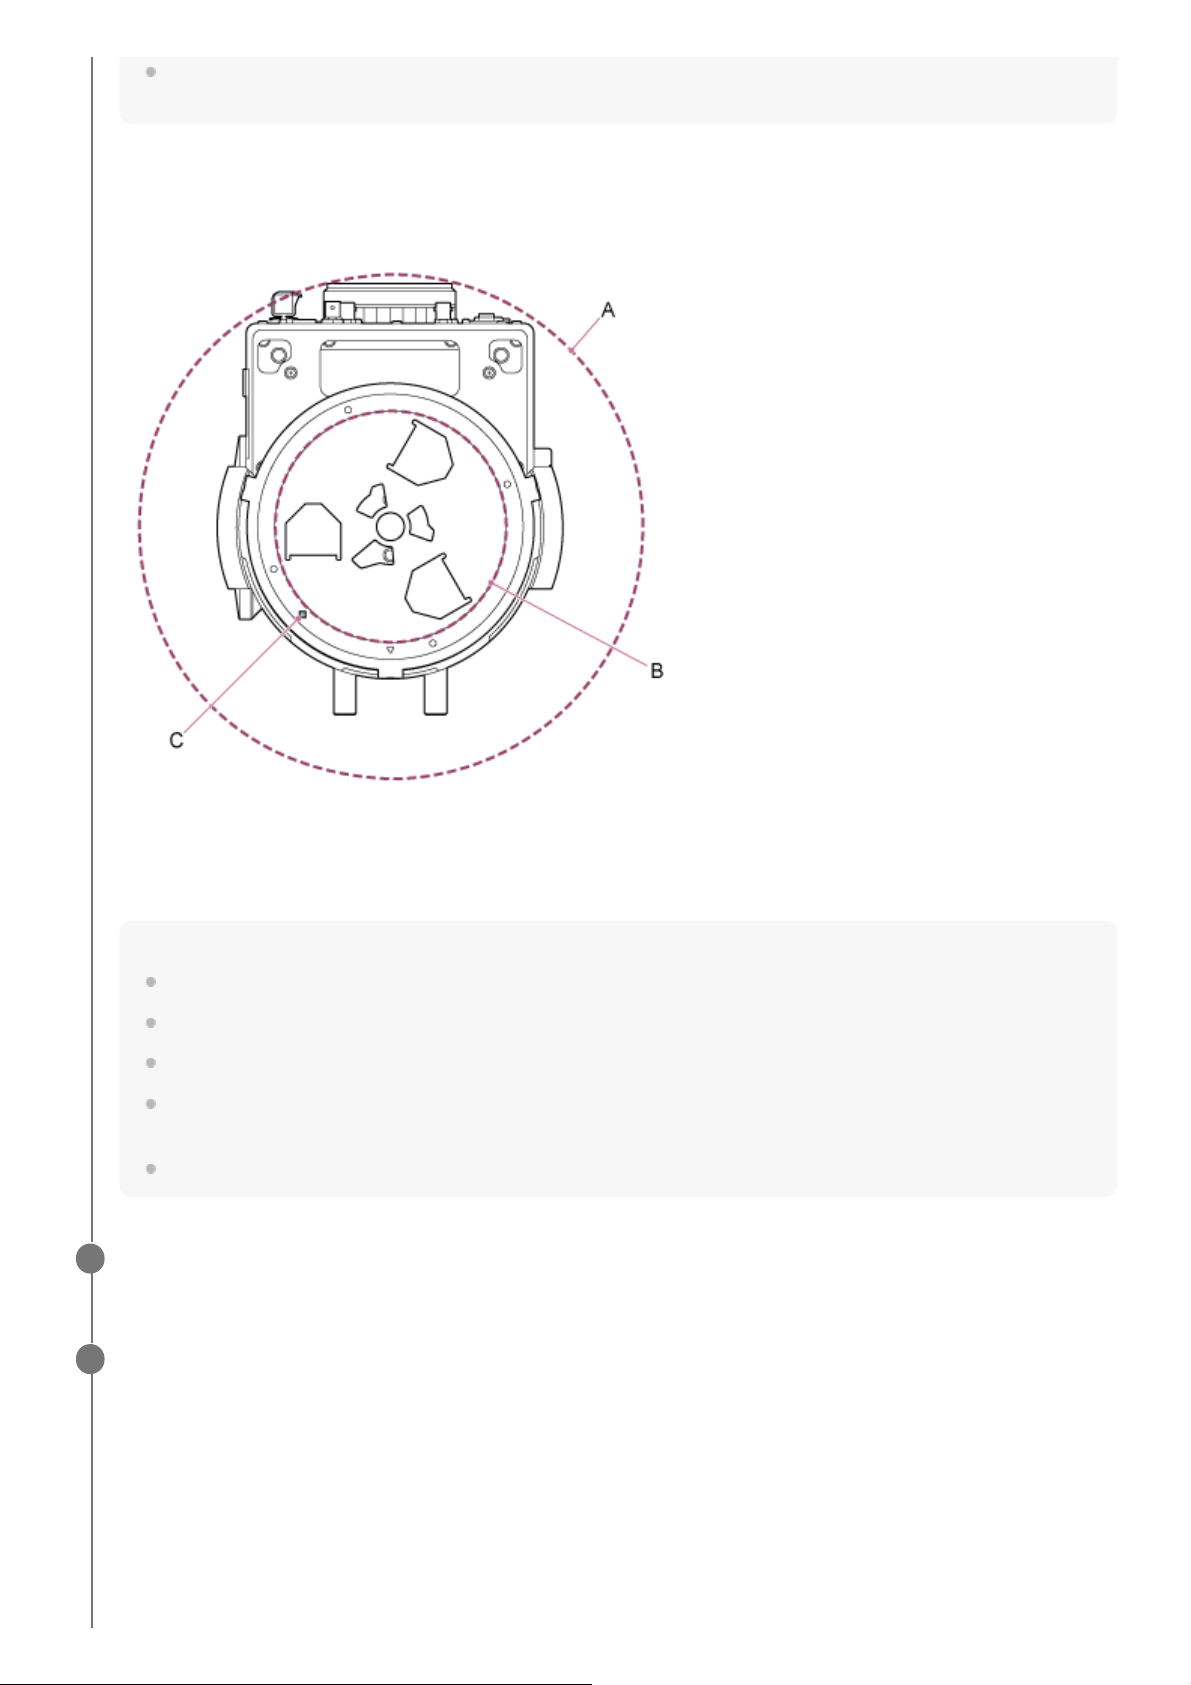
A: Camera head range of movement (e.g. SEL70200GM2 (with SEL20TC attached): Ø340)
B: Ceiling bracket (hole on ceiling side (Ø60))
C: Mounting alignment hole
Note
Mount on a ceiling (such as concrete) with sufficient strength.
To mount the unit on a ceiling with insufficient strength, provide sufficient reinforcement.
Mount it in a stable location that is not subject to vibration. Locations subject to vibration may cause vibration in the image.
If the unit must be mounted on an inclined surface, keep it within ±15° of the horizontal and take measures to prevent the
unit from falling.
The side opposite the △ hole on the ceiling bracket is the shooting direction (camera front side).
Slide the pan/tilt lock lever to the UNLOCK position to unlock pan/tilt and turn the camera head by 180° in
the tilt direction.
2
Slide the pan/tilt lock lever to the LOCK position to lock the pan/tilt of the camera head.
3
74
Camera head turned by 180°
Note
If the camera head pan/tilt does not lock when the lock lever is in the LOCK position, move the camera head manually until
it locks in position.
Attach the body bracket to the bottom of the unit using the six supplied screws (M3×8).
4
75
Use the supplied screws. The use of screws other than the supplied screws may damage the interior of the unit.
Attach the ceiling bracket to a mounting plate (option), and then attach the plate to the ceiling.
5
76
A: Ceiling bracket
B: Ceiling
C: Mounting plate
D: △ hole
Attach the bracket, according to the orientation of the ceiling bracket
Note that when mounted on a ceiling, the front of the camera is on the opposite side of the ceiling bracket in
comparison to a normal upright mounting. Mount correctly by referring to the diagram indicating the mounting
direction.
A: Front for upright mounting (△ hole orientation)
B: Front for ceiling mounting
Note
The mounting surface material is the responsibility of the customer.
Attach the fall prevention wire rope to the ceiling.
6
77
A: Ceiling bracket
B: Hexagon socket head cap screw (M5, 3/16 inch)
C: Wire rope (supplied)
D: Mounting plate
E: Ceiling
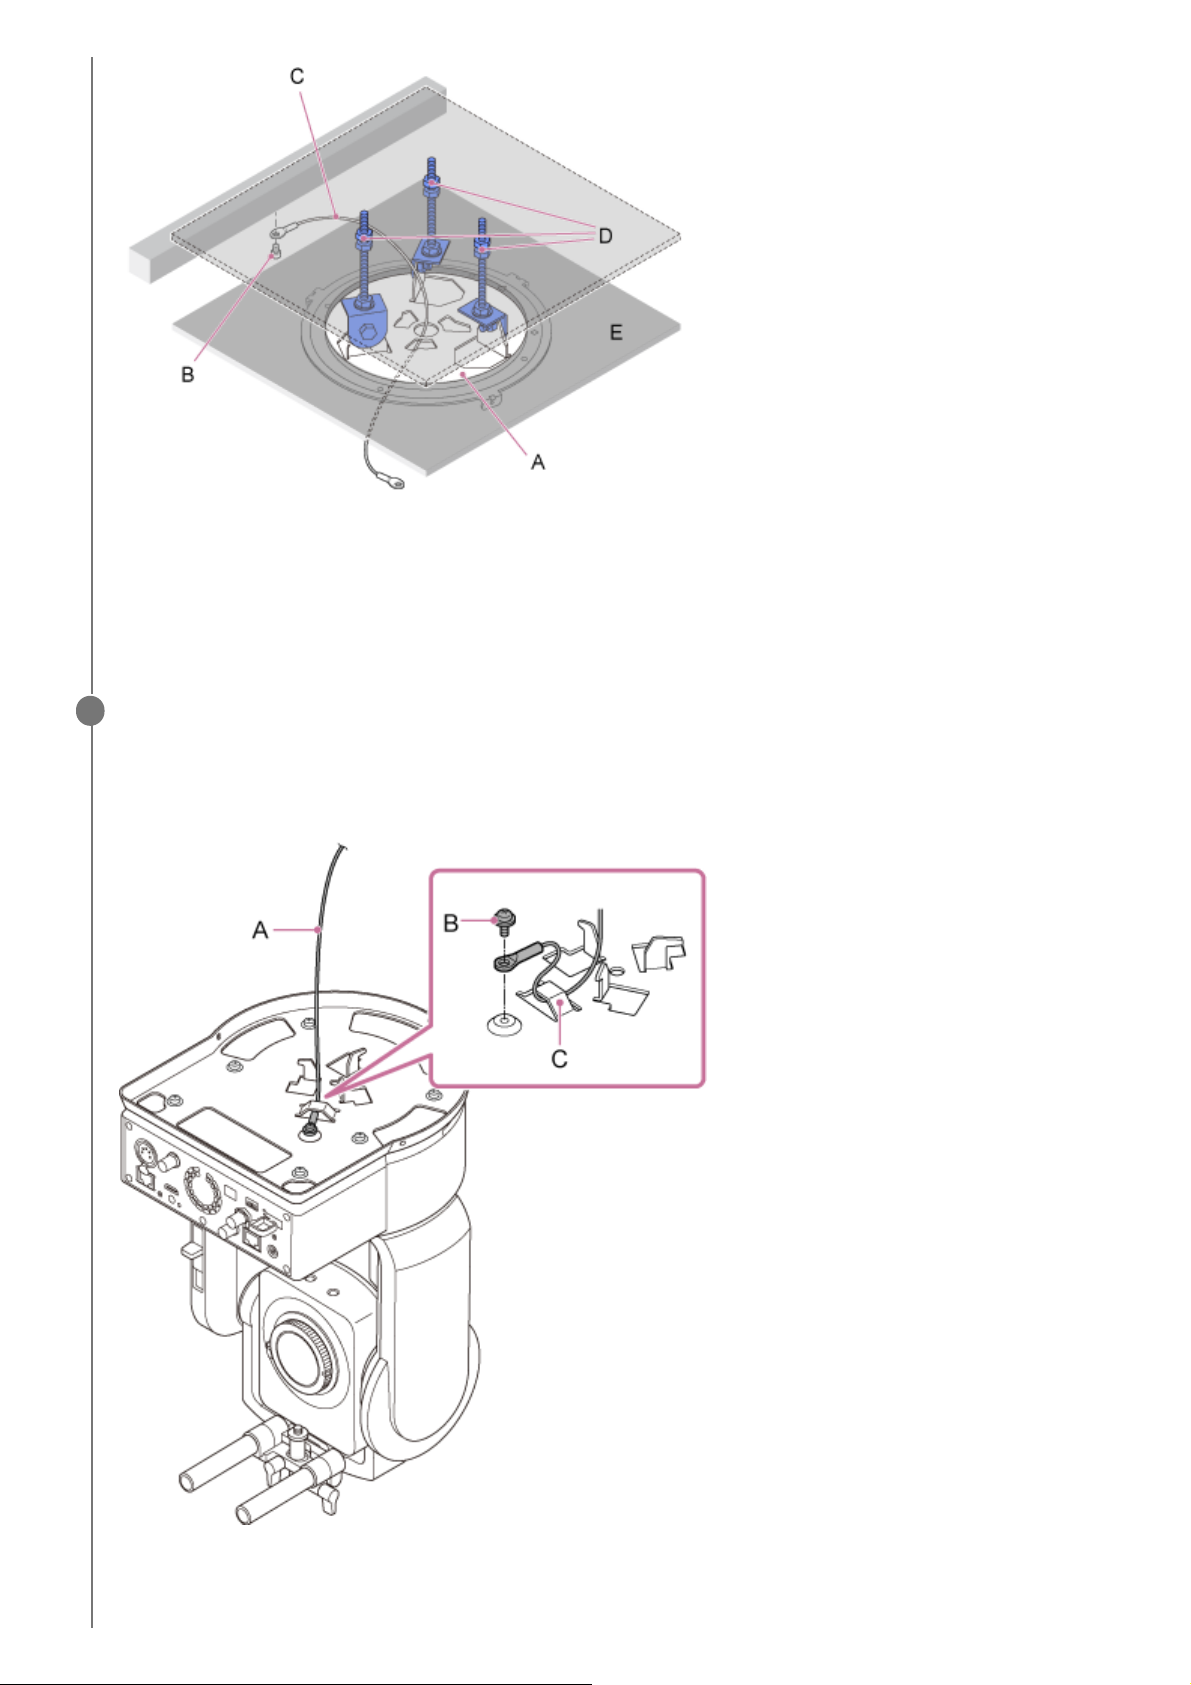
Pull the fall prevention wire rope through the hole in the center of the ceiling bracket, and attach it to the
body bracket.
Route the fall prevention wire rope through the wire rope metal loop of the body bracket and attach it securely to the
bracket using the supplied stainless steel screw (M4×8).
A: Supplied wire rope
B: Supplied Phillips screw (M4×8)
C: Wire rope metal loop
7
78
Use the supplied screw. The use of a screw other than the supplied screw may reduce the effectiveness of the wire
rope function.
Note
It is recommended that one person holds the unit as shown in the following diagram while another person mounts the unit.
Do not hold the camera head or lens support while mounting the unit. There is a risk of damage or injury if the unit is
dropped or falls.
Take care when wiring that electrical connectors and cables do not become short-circuited by the fall prevention wire rope.
The mount can support a suspended mass of up to 8.8 kg (19 lb 6.4 oz) (including the lens). To prevent the unit falling, do
not exceed the maximum expected mass.
Align the screw hole (A) on the body bracket with the ◇ hole (B) on the ceiling bracket, insert the unit and
turn it about 60 degrees clockwise until the screw hole (A) and the screw hole (C) are aligned.
8
79
A: Screw hole on the body bracket
B: Screw hole on the ceiling bracket (◇ hole)
C: Screw hole
D: Ceiling
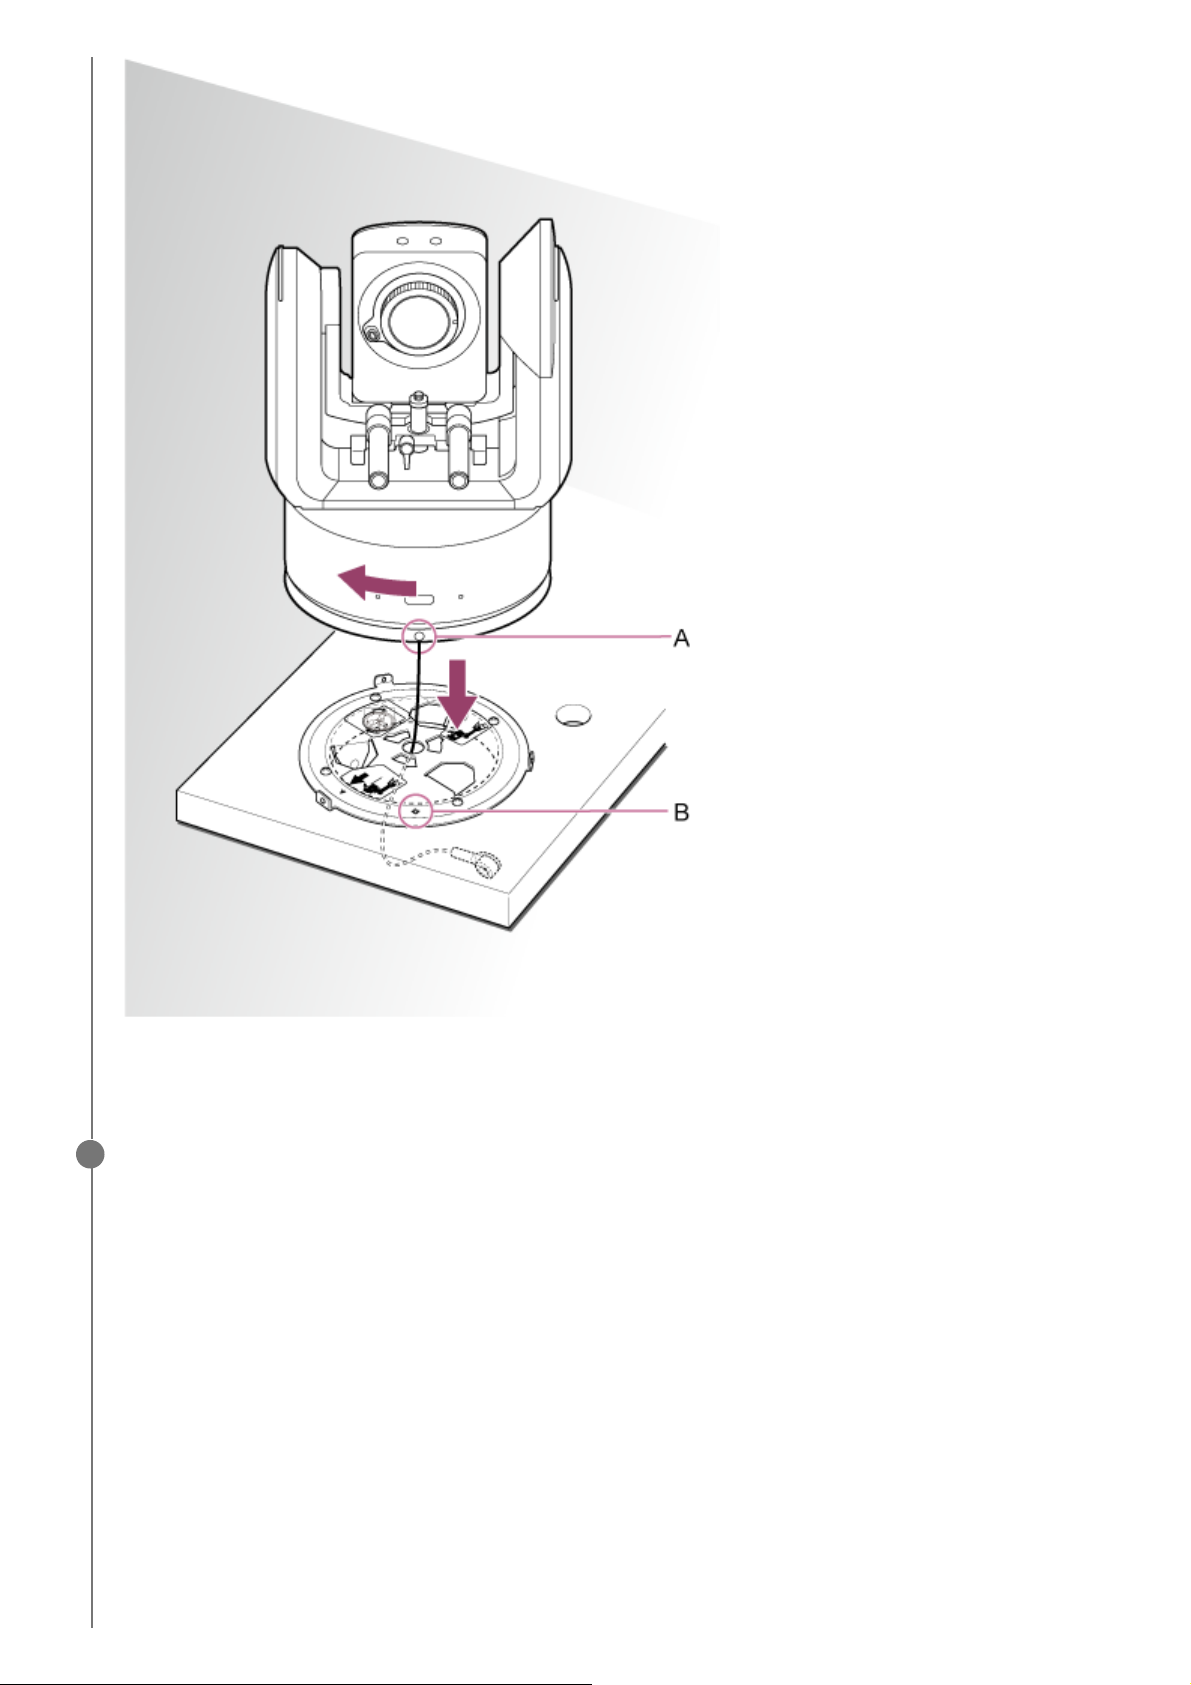
E: Mounting plate
Attach the body bracket and ceiling bracket using the three supplied rotation lock screws (M3×8).
9
80

Next, attach the lens. See “Attaching a Lens,” taking into account the information in “Precautions when
Attaching/Removing a Lens,” “Checking the Lens Switches,” and “Precautions When Using a Zoom Lens.”
Note
To operate the pan/tilt correctly when the unit is mounted on a ceiling, set [Pan-Tilt] > [Direction] > [Ceiling] to [On] in the web
menu.
After attaching a lens, check that the lens is securely attached.
The lens does not have any protection against falling. Sony can assume no liability for a lens falling from the unit.
5-041-957-11(1)
Copyright 2022 Sony Corporation
Check the mounting status.
Specifically, check the following items.
Mounting screws are correctly attached.
Fall prevention wire rope is correctly attached and is not twisted.
Unit is mounted level (without tilt or wobble).
Unit does not spin freely when turned.
10
81

Help Guide
Interchangeable Lens Digital Camera
ILME-FR7 / ILME-FR7K
Precautions when Attaching/Removing a Lens
Do not leave the lens facing the sun. Direct sunlight can enter through the lens, be focused in the unit, and may cause a
fire.
Note
Attach/remove a lens while the unit is turned off.
A lens is a precision component. Do not place the lens on a surface with the lens mount face down. Attach the supplied lens
mount cap.
Hint
For details about lenses supported by the unit, contact your Sony service representative.
5-041-957-11(1)
Copyright 2022 Sony Corporation
82
Help Guide
Interchangeable Lens Digital Camera
ILME-FR7 / ILME-FR7K
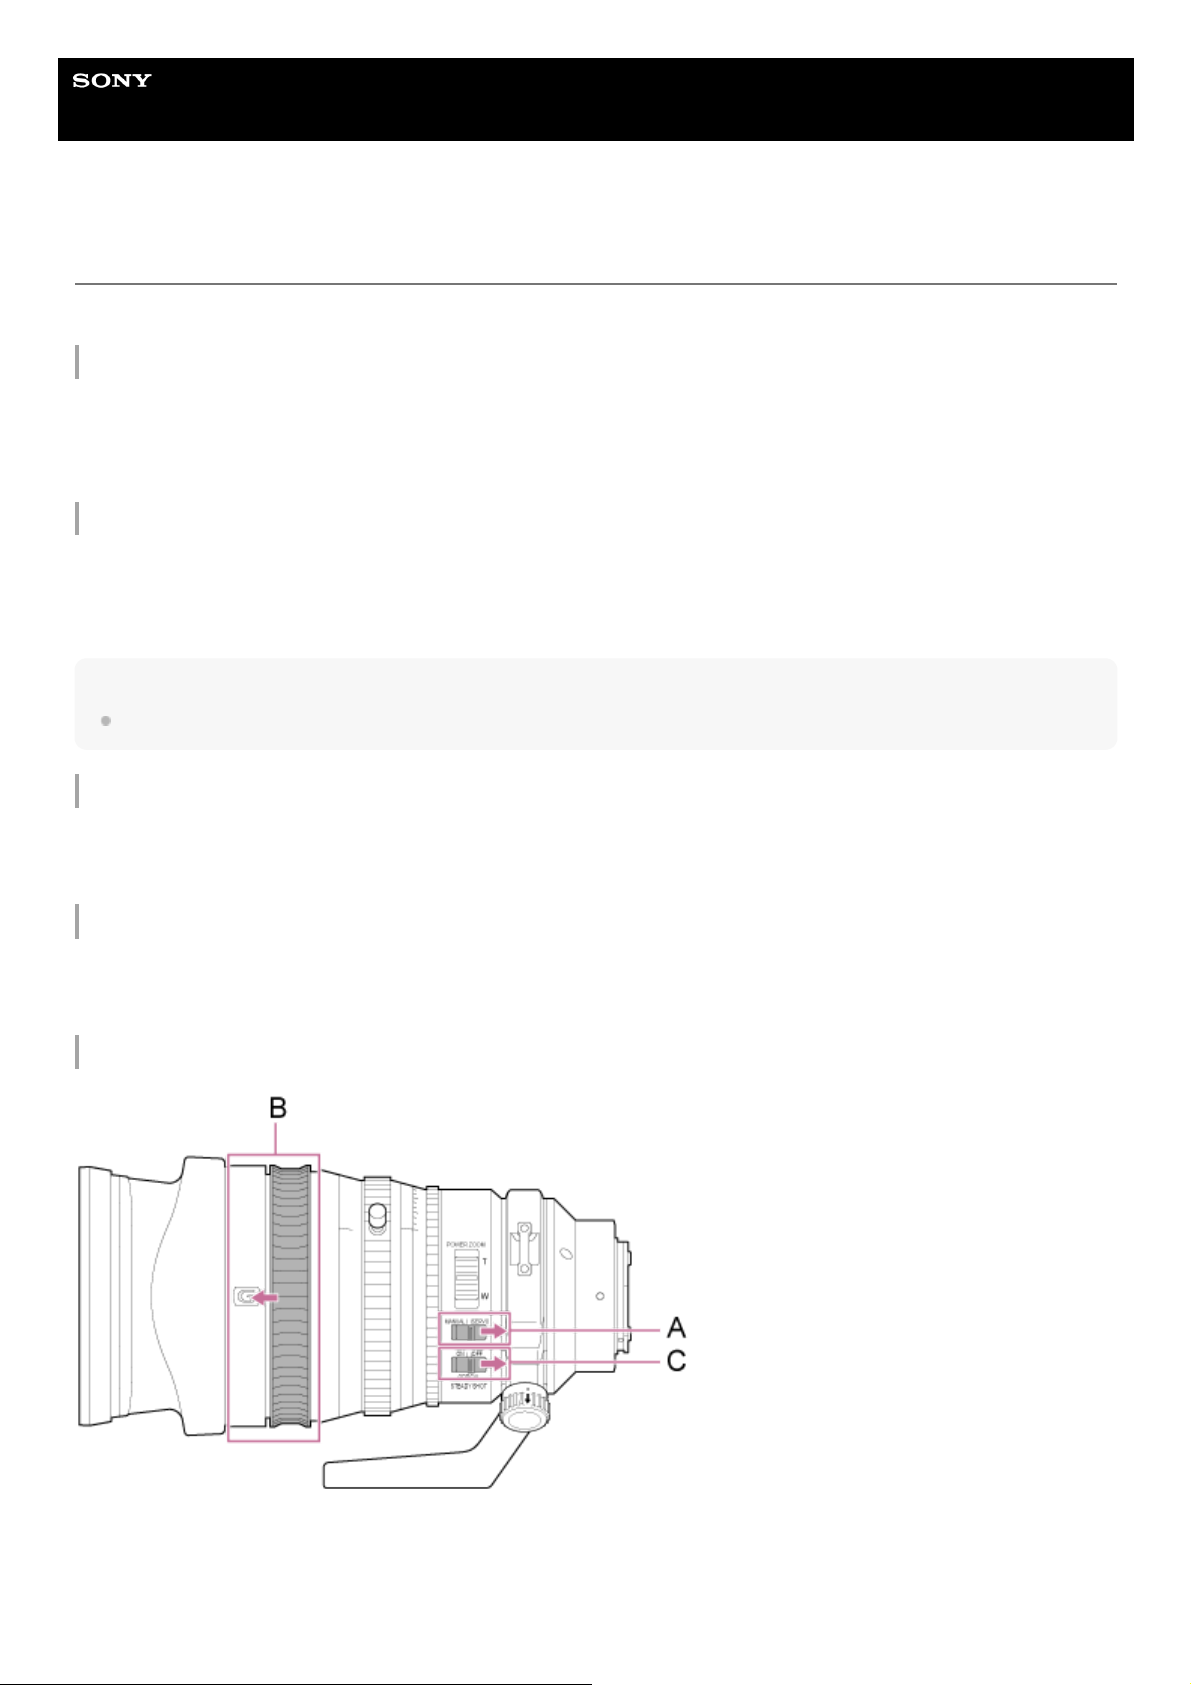
Checking the Lens Switches
The following checks and settings are required, depending on the type of lens.
For a lens with a zoom switch
Set the switch to SERVO.
If the switch is set to MANUAL, the zoom can only be adjusted using the zoom ring. Zoom control from the unit has no
effect.
For a lens with a focus mode switch
Set the switch to AF/MF or AF.
If the switch is set to MF, the focus can only be adjusted using the lens ring or adjusted manually from a remote control
unit. If the switch is set to Full MF, the focus can only be adjusted using the lens ring.
Note
When using an A-mount lens, manual adjustment from a remote control unit may not be available.
For a lens with an Auto Iris switch
Set the switch to AUTO.
When not set to AUTO, the iris can only be adjusted using the lens ring. Iris operation from the unit has no effect.
For a lens with an image stabilization switch
Set the switch to OFF.
If the switch is set to ON, unexpected behavior may occur during pan/tilt operation.
SELP28135G
A: Set the ZOOM switch to SERVO.
B: Move the focus ring to the forward position (AF/MF mode).
C: Set the image stabilizer switch to OFF.
83

5-041-957-11(1) Copyright 2022 Sony Corporation
84
Help Guide
Interchangeable Lens Digital Camera
ILME-FR7 / ILME-FR7K
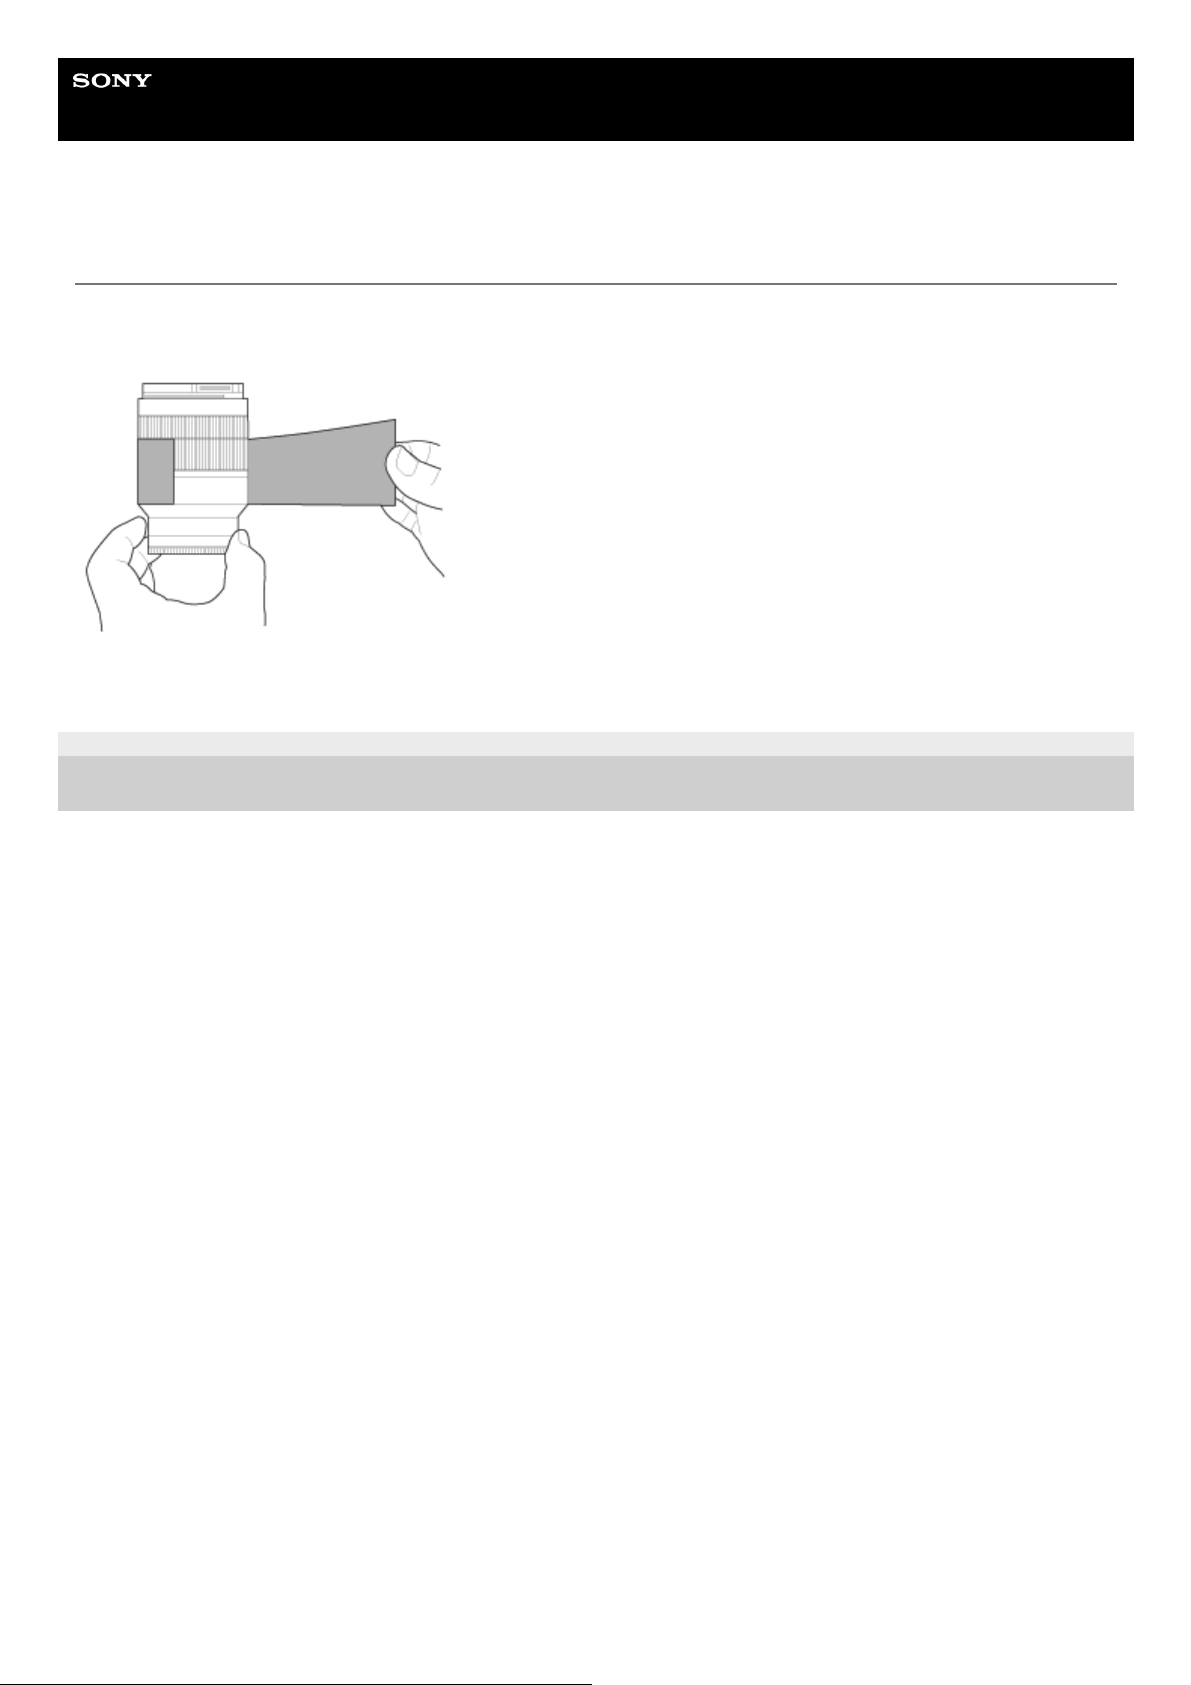
Precautions When Using a Zoom Lens
When using a zoom lens other than a power zoom lens, the zoom position may change depending on the mounting
environment. Secure the zoom ring in position using tape according to the purpose of use.
Plastic film tape: 471 BLA 50 or equivalent
5-041-957-11(1)
Copyright 2022 Sony Corporation
85
Help Guide
Interchangeable Lens Digital Camera
ILME-FR7 / ILME-FR7K
Attaching a Lens
This topic describes how to attach an E-mount lens or A-mount lens.
Note
When using an A-mount lens, the iris is set manually and focus is set to MF.
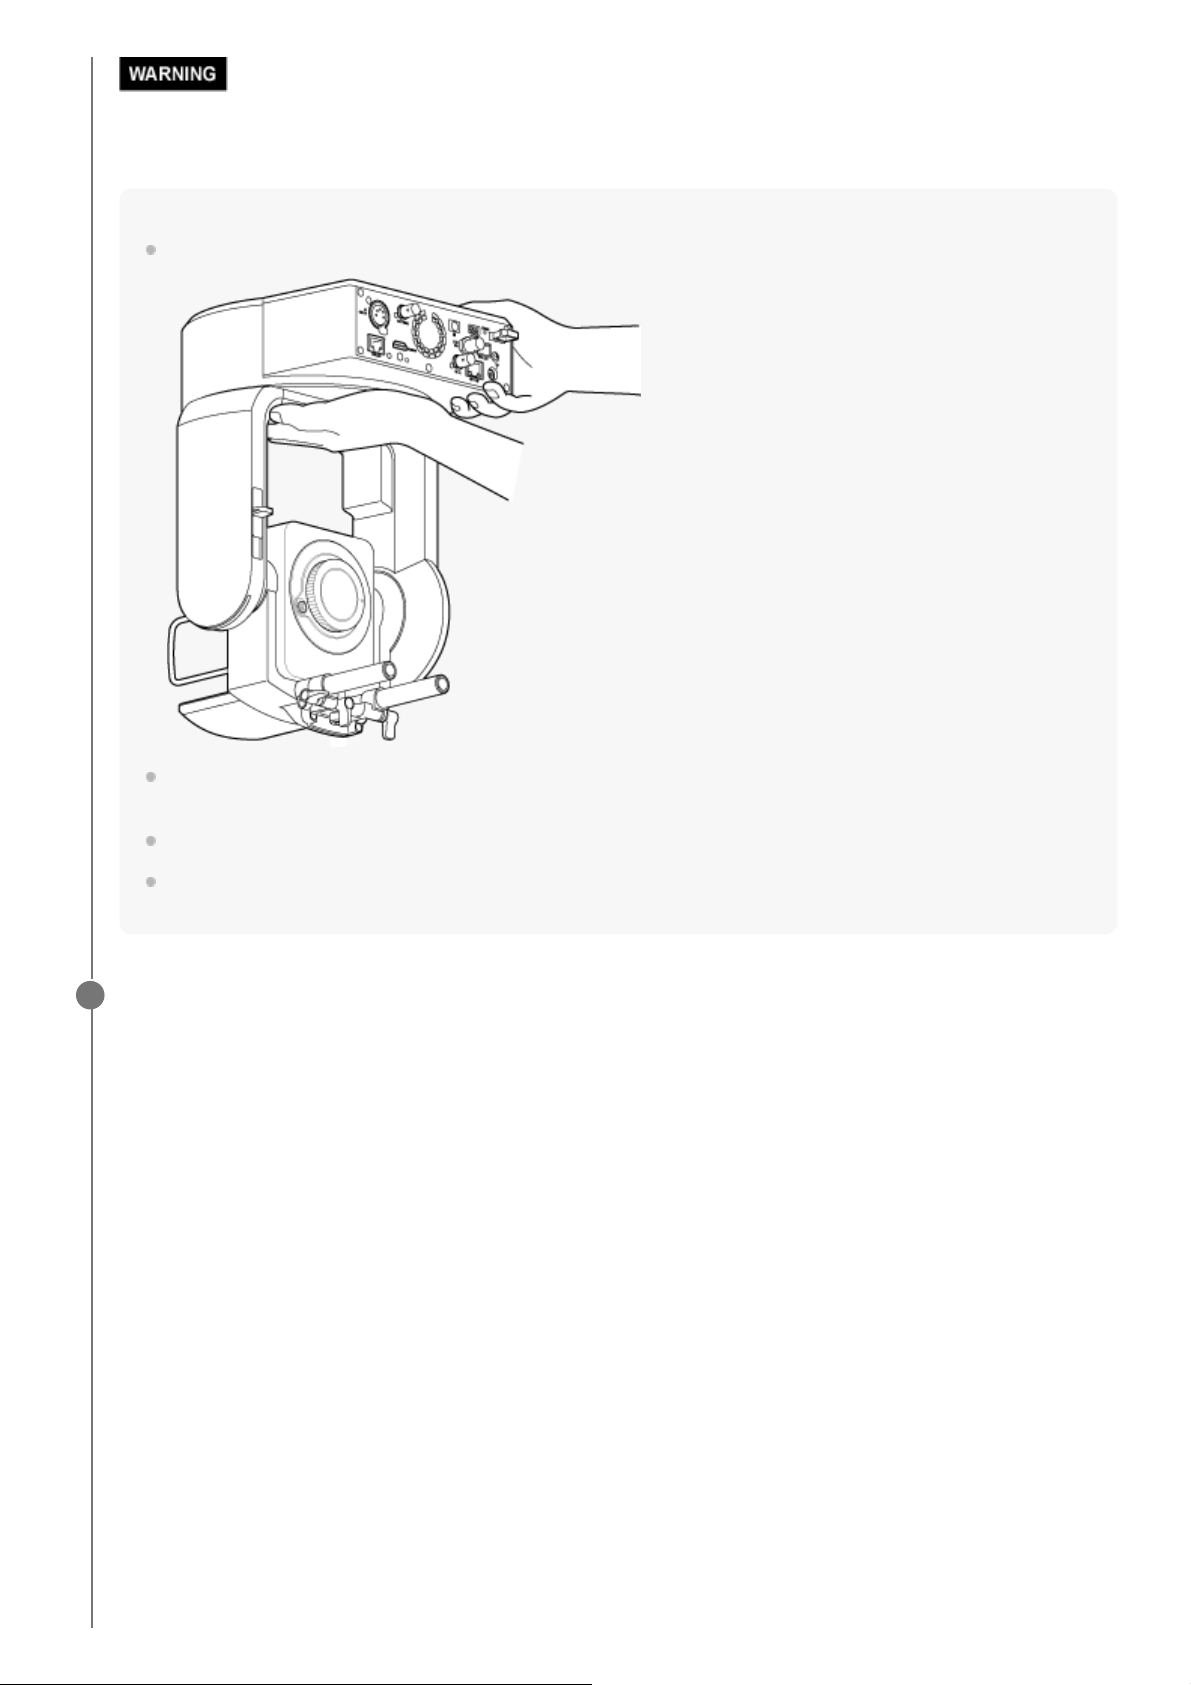
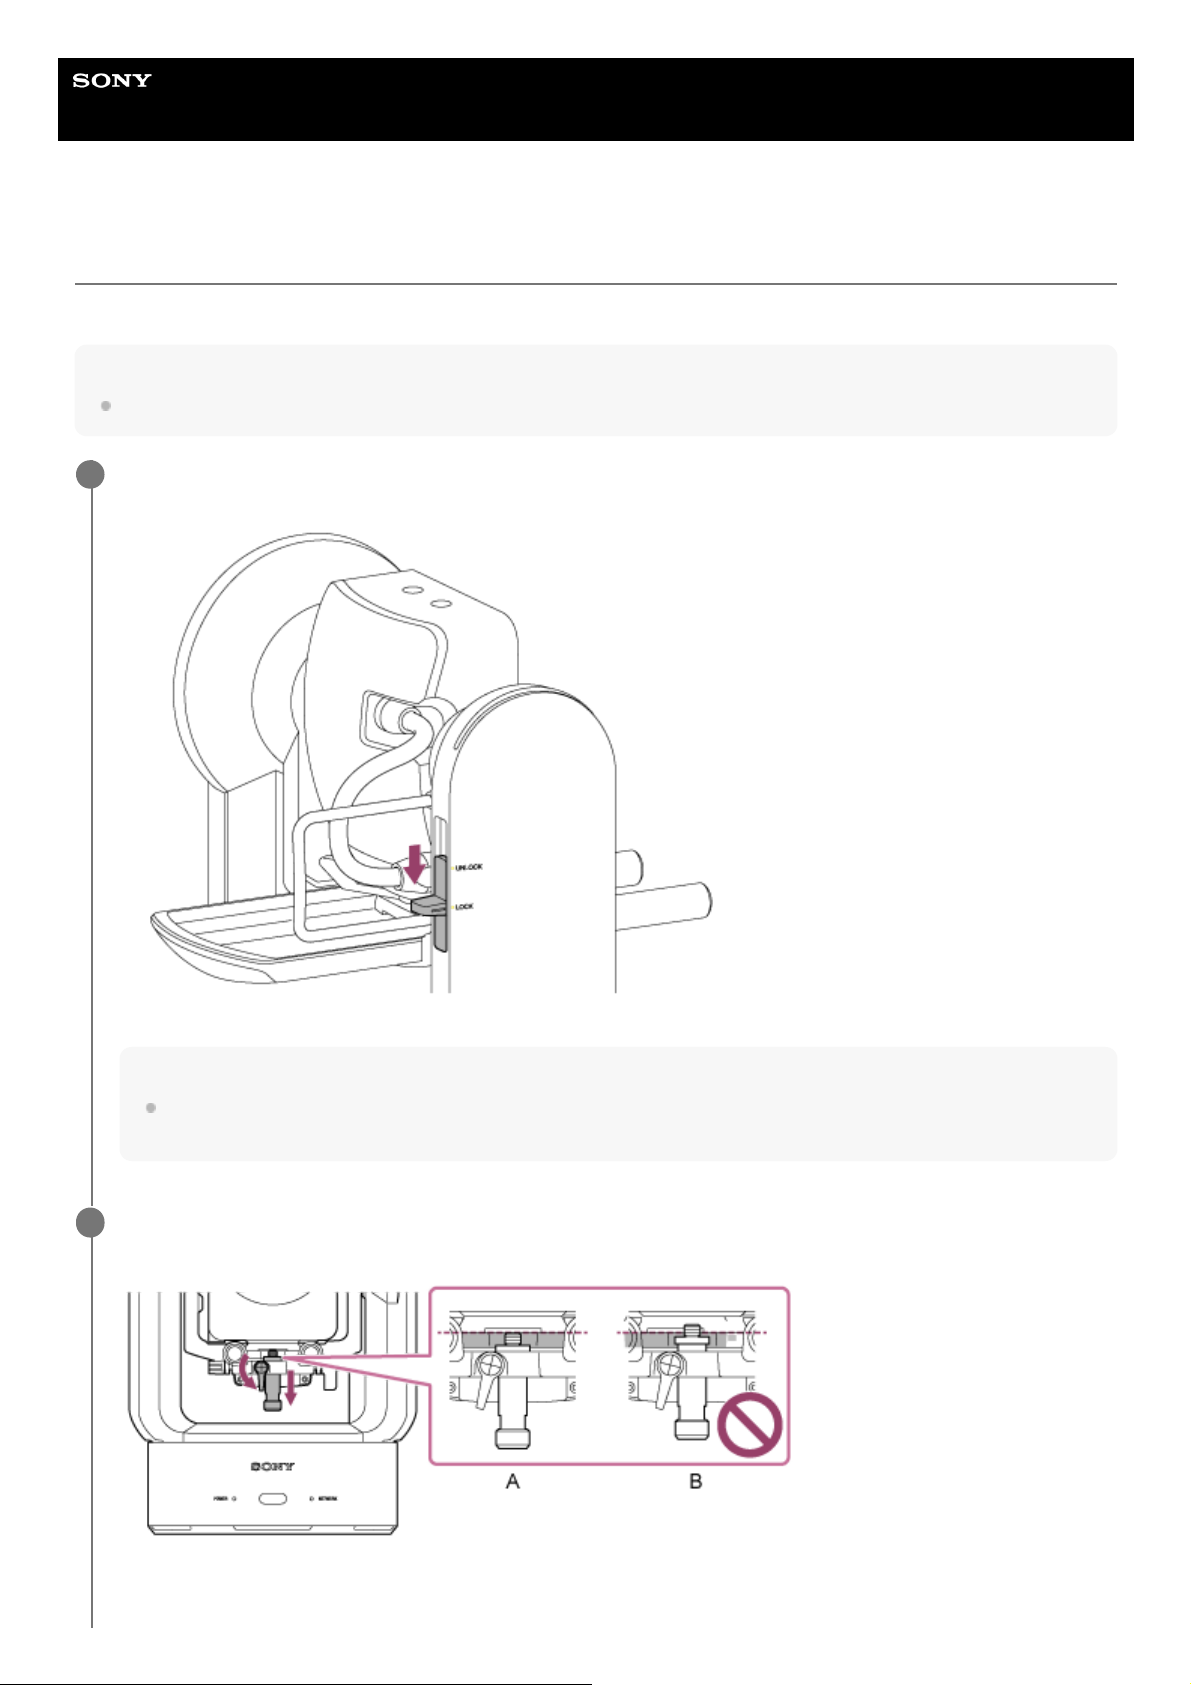
Slide the pan/tilt lock lever to the LOCK position to lock the pan/tilt of the camera head.
Note
If the camera head pan/tilt does not lock when the lock lever is in the LOCK position, move the camera head manually until
it locks in position.
1
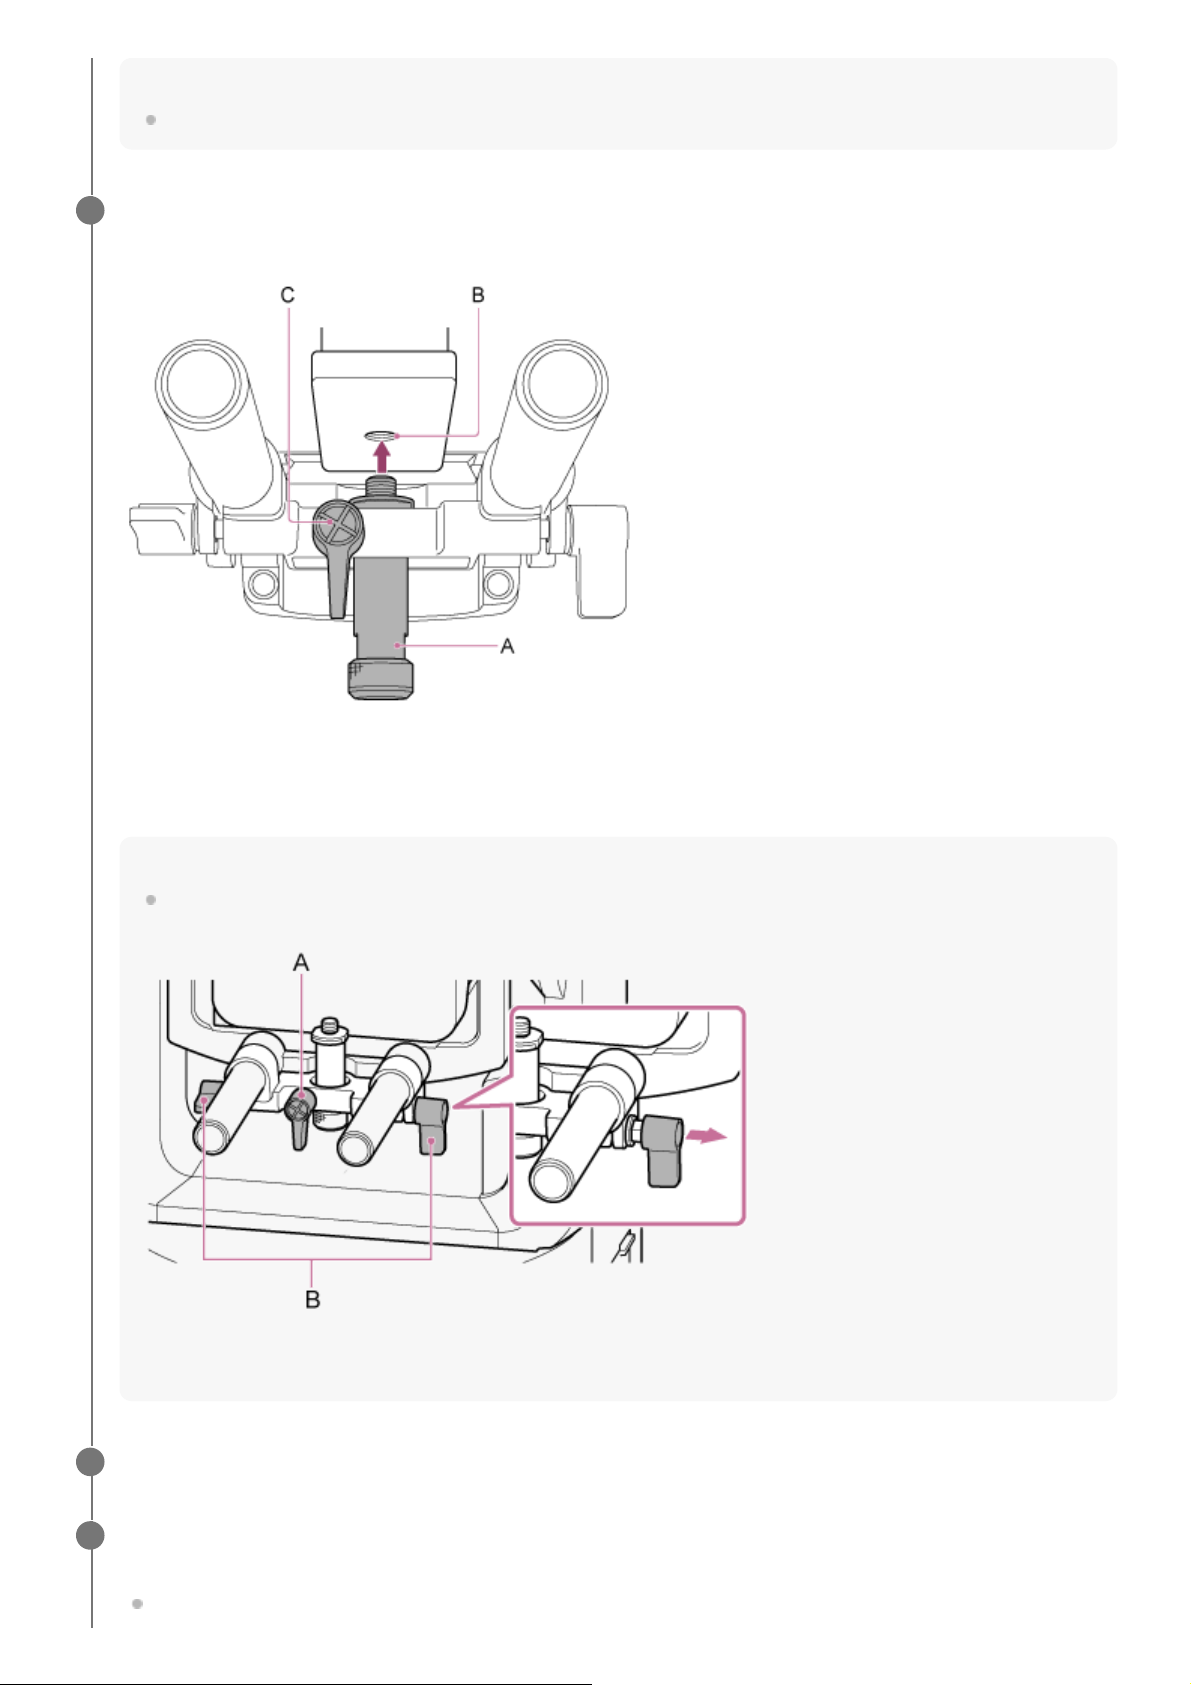
Turn the clamp lever for the lens support pedestal attachment screw counterclockwise to loosen the lock,
then move the lens support pedestal attachment screw to a position that does not interfere with the lens.
A: Correct
B: Incorrect
2
86
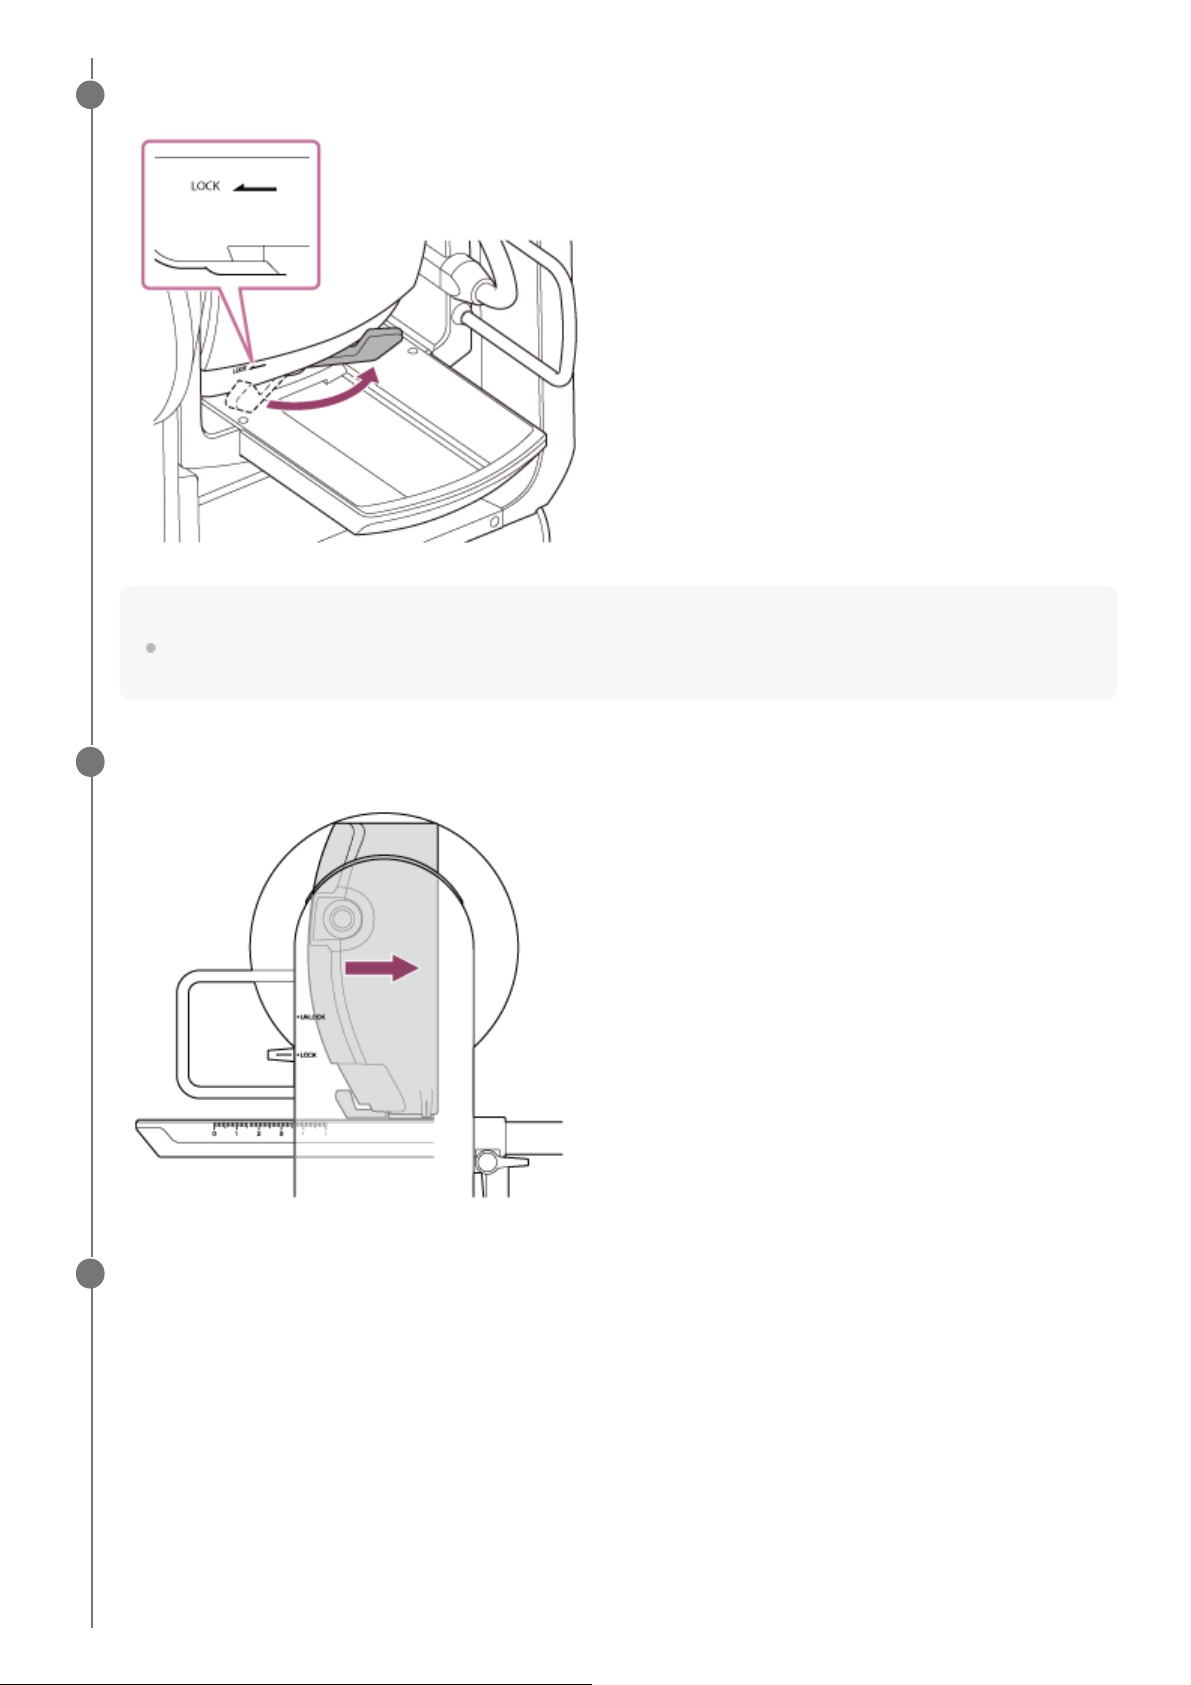
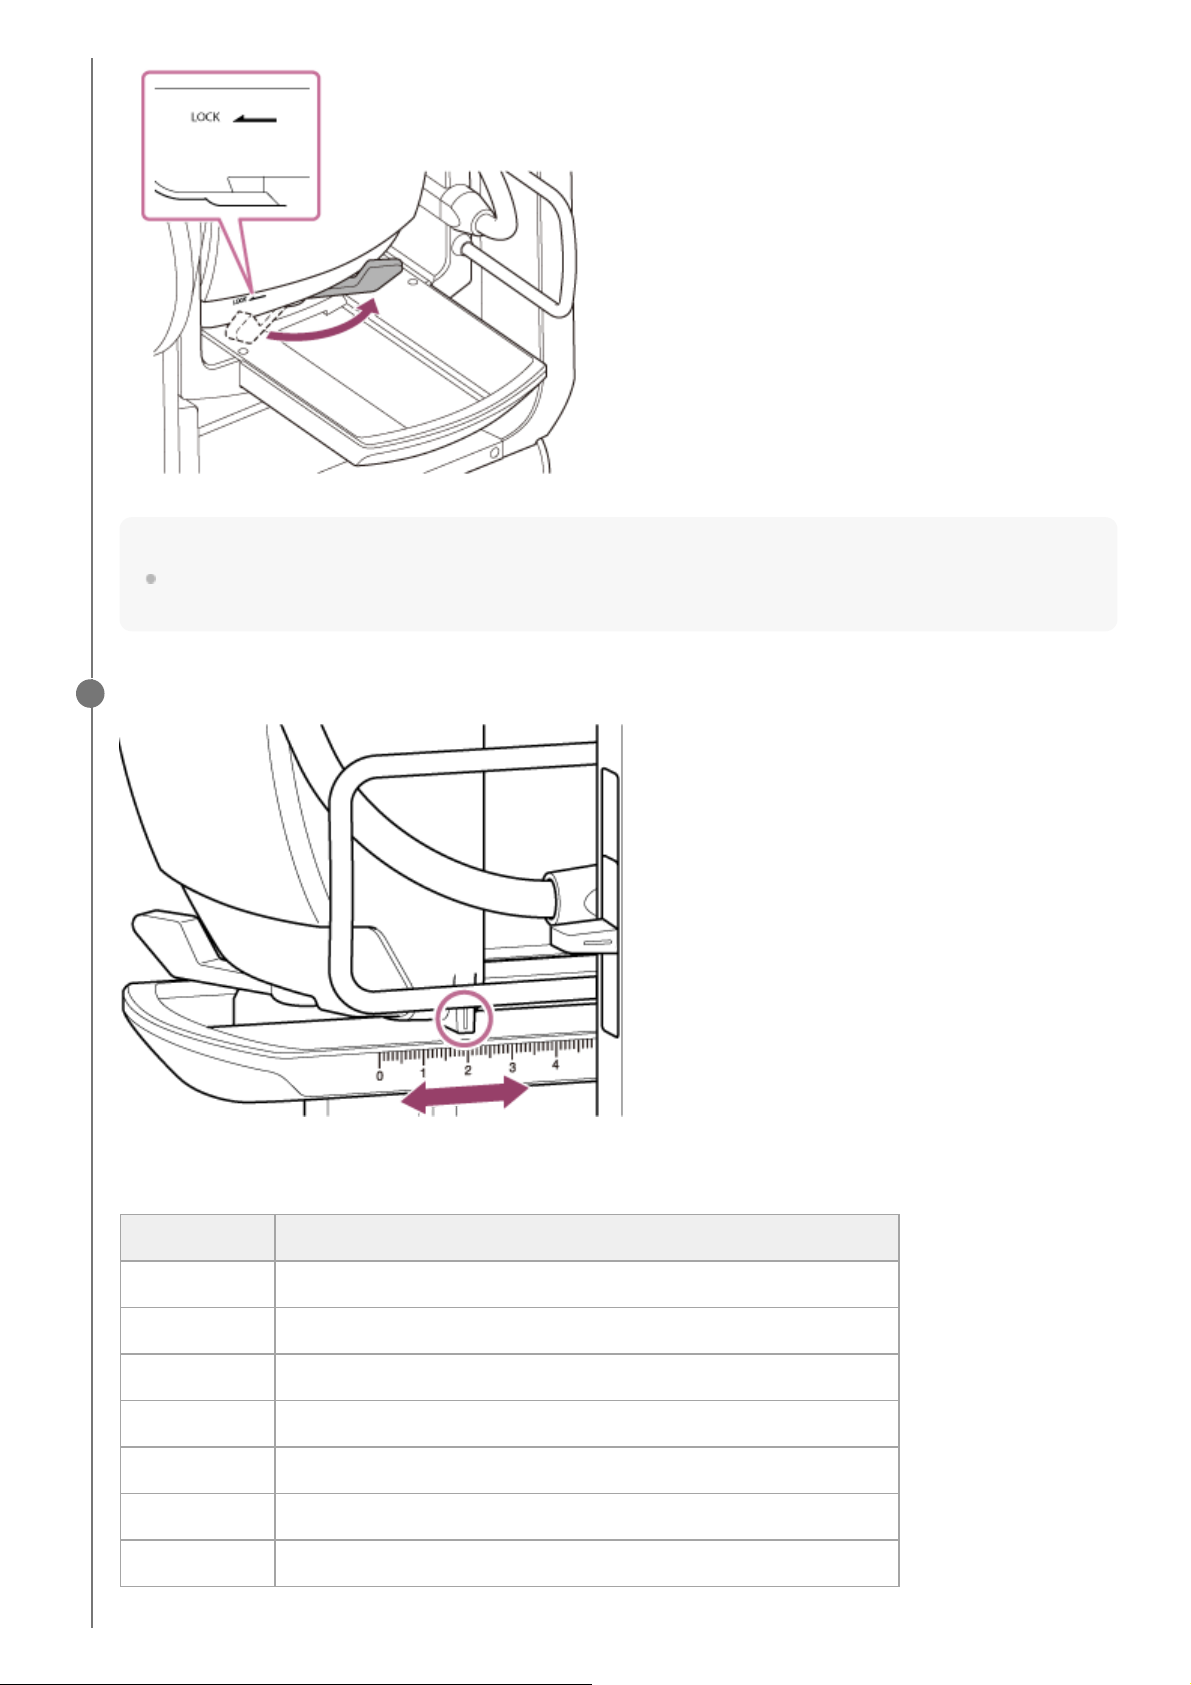
Turn the camera head lock lever in the direction of the arrow to unlock the camera head.
Note
Until the camera head is locked again, there is a risk that the camera head may move under its own weight. Support the
camera head with your hand while performing the task.
3
Slide the camera head to the frontmost position.
4
Turn the camera head lock lever in the direction of the arrow to lock the camera head.
5
87
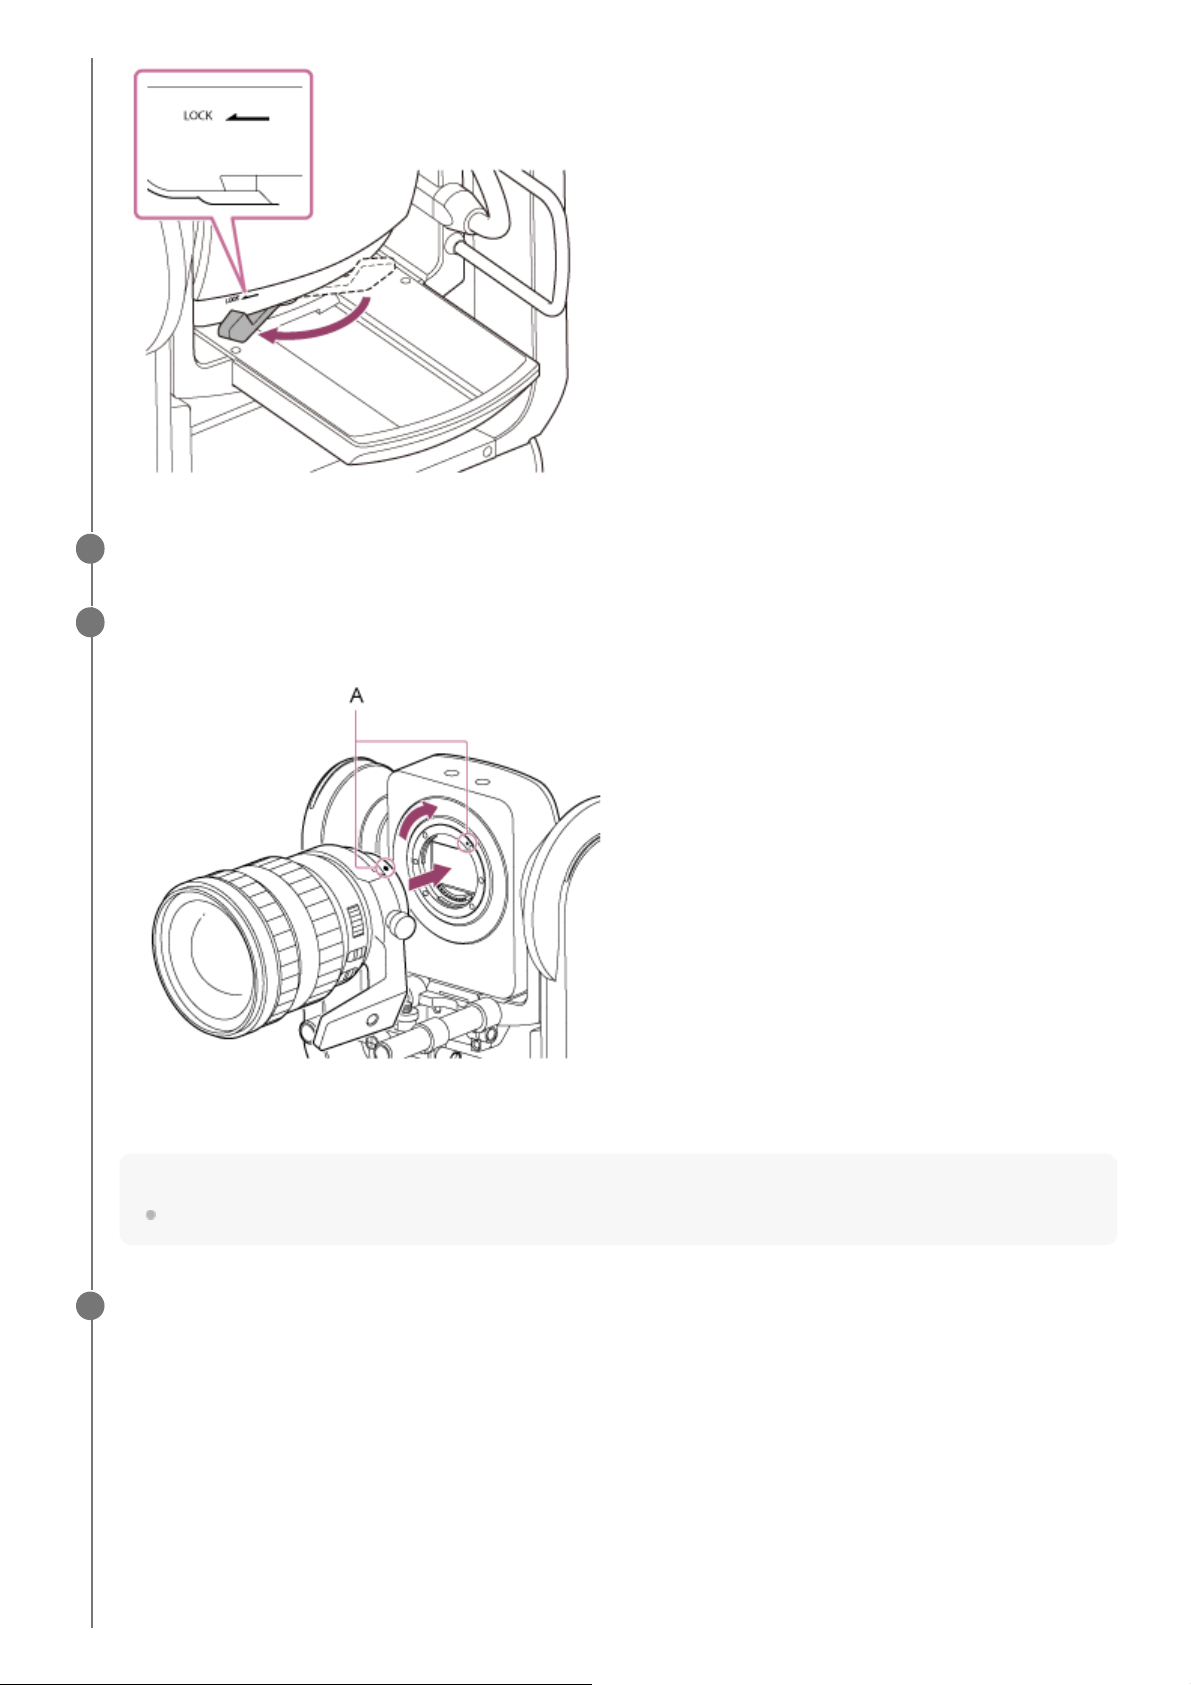
Remove the cap and cover from the unit and the lens.
6
Align the lens mount mark (white) with the unit, carefully insert the lens into the camera head, and then
turn the lens clockwise until it clicks into the locked position.
A: Mount marks (white)
Note
To use an A-mount lens, attach a lens mount adaptor (option) to the unit and then attach the A-mount lens.
7
Turn the camera head lock lever in the direction of the arrow to unlock the camera head.
8
88
Note
Until the camera head is locked again, there is a risk that the camera head may move under its own weight. Support the
camera head with your hand while performing the task.
Maintain the forward/rearward balance of the camera head so that the slide base is horizontal.
If you are using one of the following lenses, you can roughly balance the unit and lens by referring to the scale on
the slide base.
9
Scale position Lens name
0.5 SEL70200GM (with SEL20TC attached)
1.7 SEL70200GM
2.0 SEL70200GM2 (with SEL20TC attached)
3.0 SELP28135G, SEL70200GM2
3.5 SELP18110G
3.6 SELC1635G
4.3 SEL70200G
89
Note
Use the slide base scale as a reference for rough balance.
While attaching the lens, make appropriate adjustments to the balance so that the unit does not tilt back and forth.
Adjust the balance on a horizontal surface.
Scale position Lens name
5.0 or higher SEL1224GM, SEL1635GM, SELP1635G, SELP18105G, SELP1020G
Turn the camera head lock lever in the direction of the arrow to lock the camera head.
10
Turn the lens support clamp levers counterclockwise to loosen the lens support unit.
A: Lens support rod clamp lever (2 places)
B: Lens support unit
11
Move the lens support unit so that the lens support pedestal is aligned with the lens support pedestal
attachment screw, then turn the screw clockwise to secure the lens support pedestal.
12
90
Note
Make sure the lens support pedestal is perpendicular to the lens support pedestal attachment screw, and then tighten.
Turn the clamp lever for the lens support pedestal attachment screw clockwise to lock the lens support
pedestal attachment screw.
A: Lens support pedestal attachment screw
B: Attachment screw hole
C: Lens support pedestal attachment screw clamp lever
Hint
If a clamp lever is in a position that makes it difficult to turn, release the clamp lever and rotate it to an angle that will make
operation easier. When in the desired position, close the clamp lever.
A: Lens support pedestal attachment screw clamp lever
B: Lens support rod clamp lever
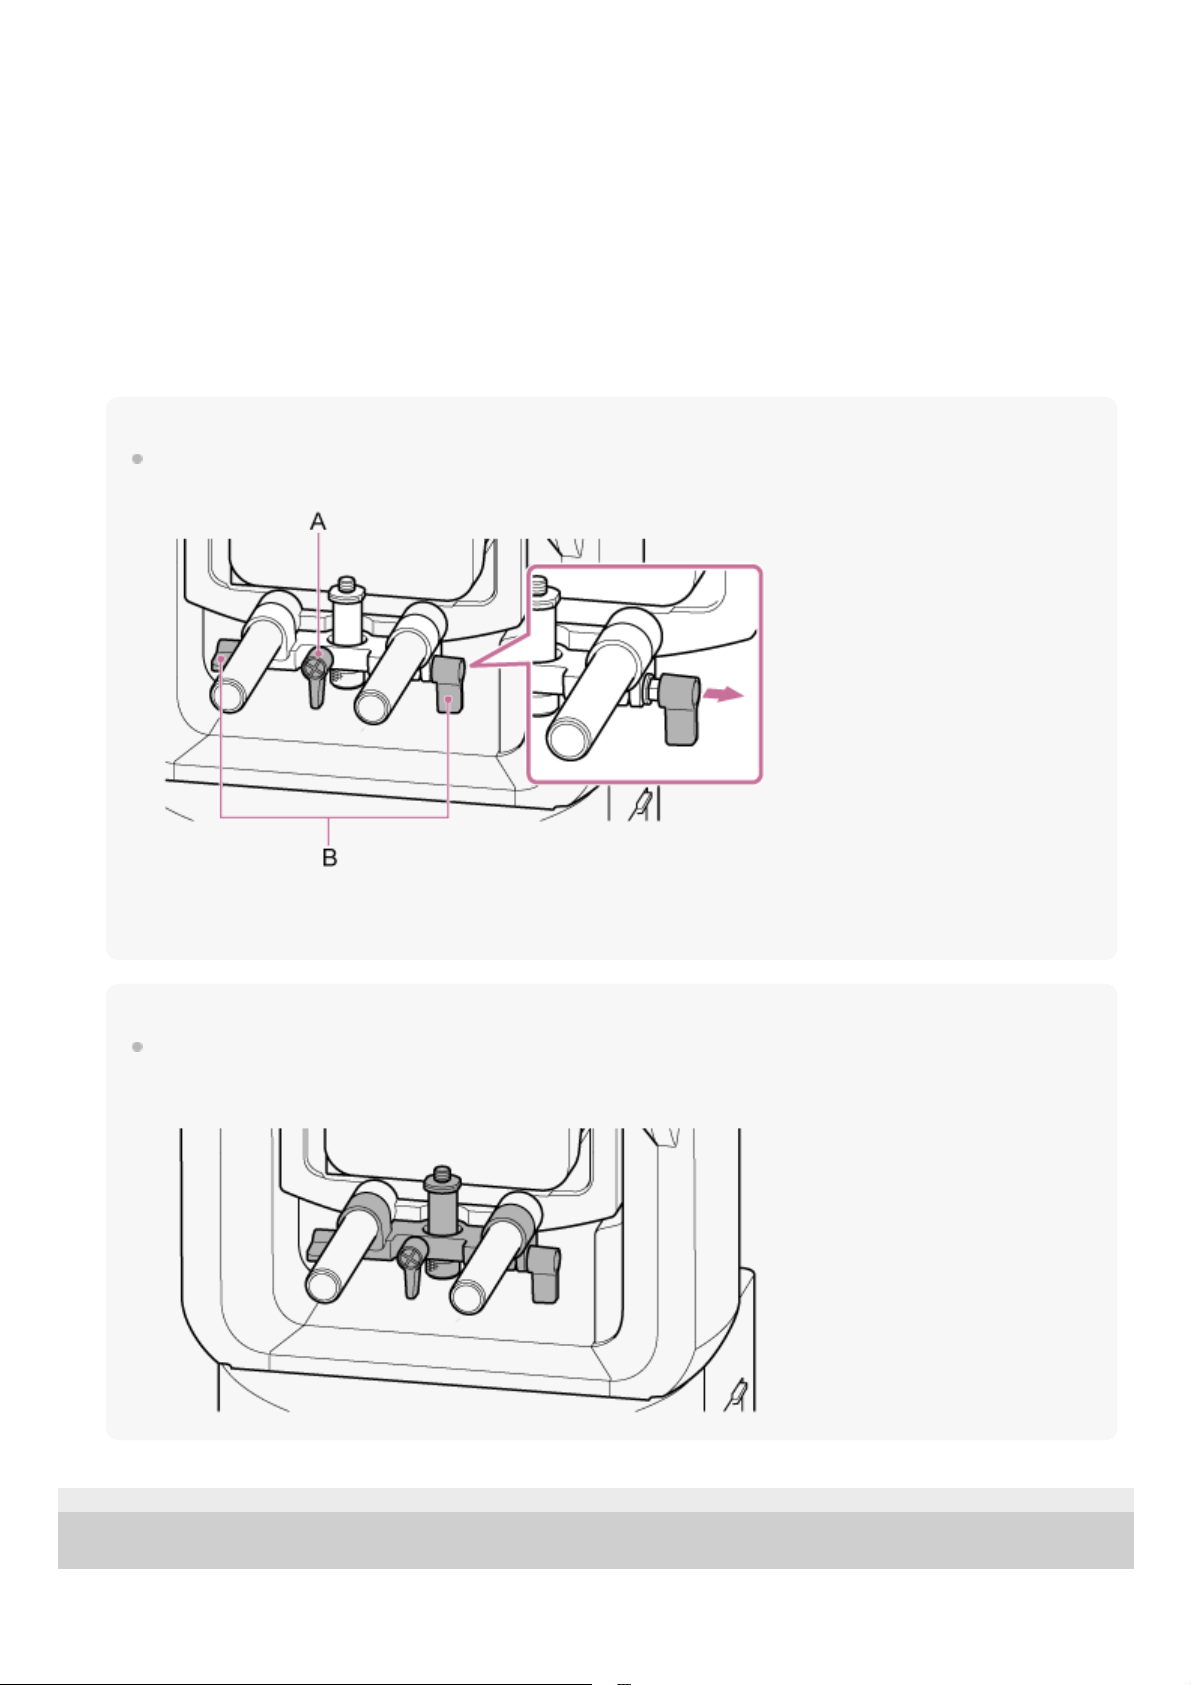
13
Turn the two lens support rod clamp levers clockwise to secure the lens support unit.
14
Check that both levers are tightened and not loose, the lens is attached correctly, and that the lens
switches are set correctly.
If a lever is loose or the lens is not attached correctly, the lens may fall and become damaged.
15
91


Help Guide
Interchangeable Lens Digital Camera
ILME-FR7 / ILME-FR7K
Removing a Lens
Remove a lens using the reverse procedure of attaching the lens.
Note
Grasp the lens securely in your hand to prevent the lens from falling.
If another lens will not be attached immediately, always attach the body cap.
5-041-957-11(1)
Copyright 2022 Sony Corporation
Check that the pin/tilt is locked.
1
Turn the clamp lever for the lens support pedestal attachment screw counterclockwise to loosen the lock.
2
Remove the lens support pedestal attachment screw on the lens support unit and move it to a position that
does not interfere with the lens.
3
Unlock the camera head and slide the camera head to the frontmost position.
For details, see steps 3 to 5 in “Attaching a Lens.”
4
Press and hold the lens release button and turn the lens counterclockwise while supporting the lens.
5
With the mount marks (white) of the camera and the lens aligned, pull out the lens toward the front.
6
93
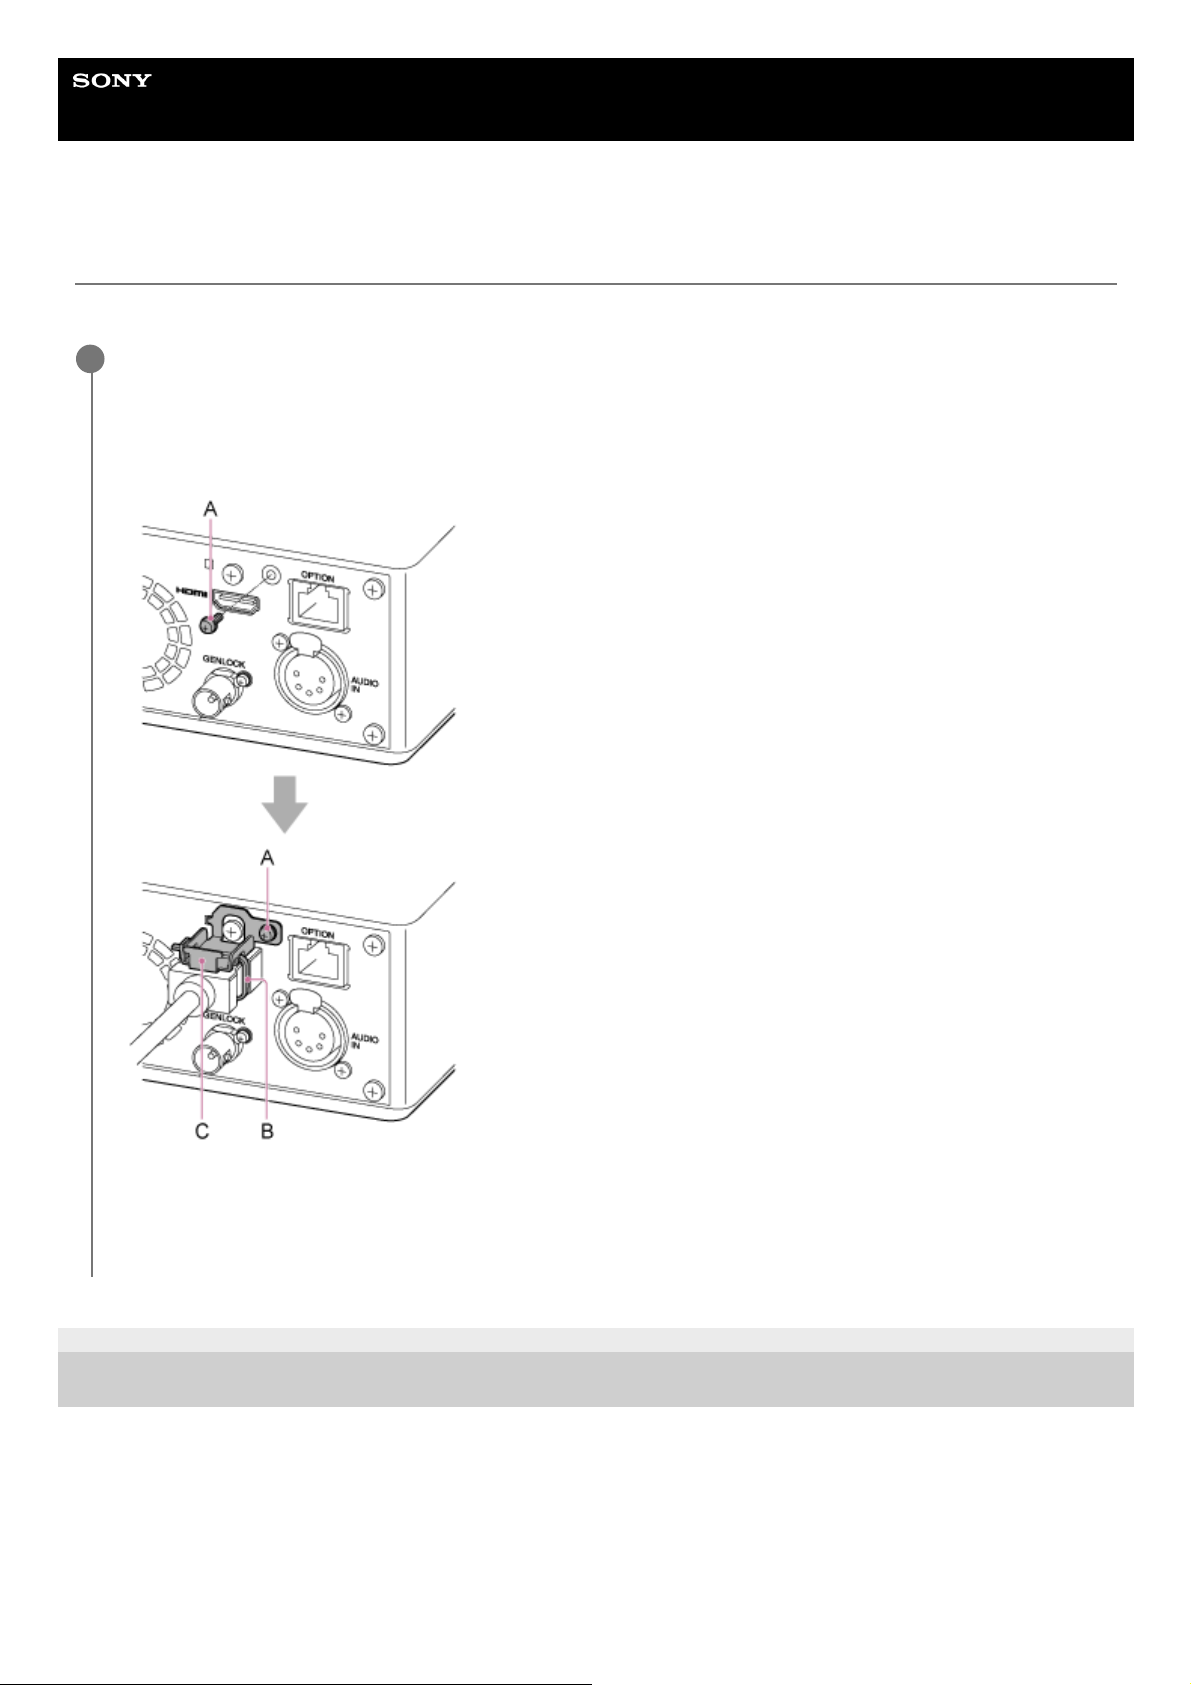
Help Guide
Interchangeable Lens Digital Camera
ILME-FR7 / ILME-FR7K
Connecting Cables
This topic describes cable connections.
5-041-957-11(1)
Copyright 2022 Sony Corporation
Connect the required cables to the connectors on the rear panel.
To prevent the HDMI cable from being removed, remove the HDMI cable retaining plate mounting screw (M2.6×6,
black) from the connector block and attach the supplied HDMI cable retaining plate using the mounting screw.
Secure the HDMI cable to the HDMI cable retaining plate using a commercially available cable tie or band.
A: HDMI cable retaining plate mounting screw (M2.6×6, black)
B: Commercially available cable tie or band
C: HDMI cable retaining plate (supplied)
1
94
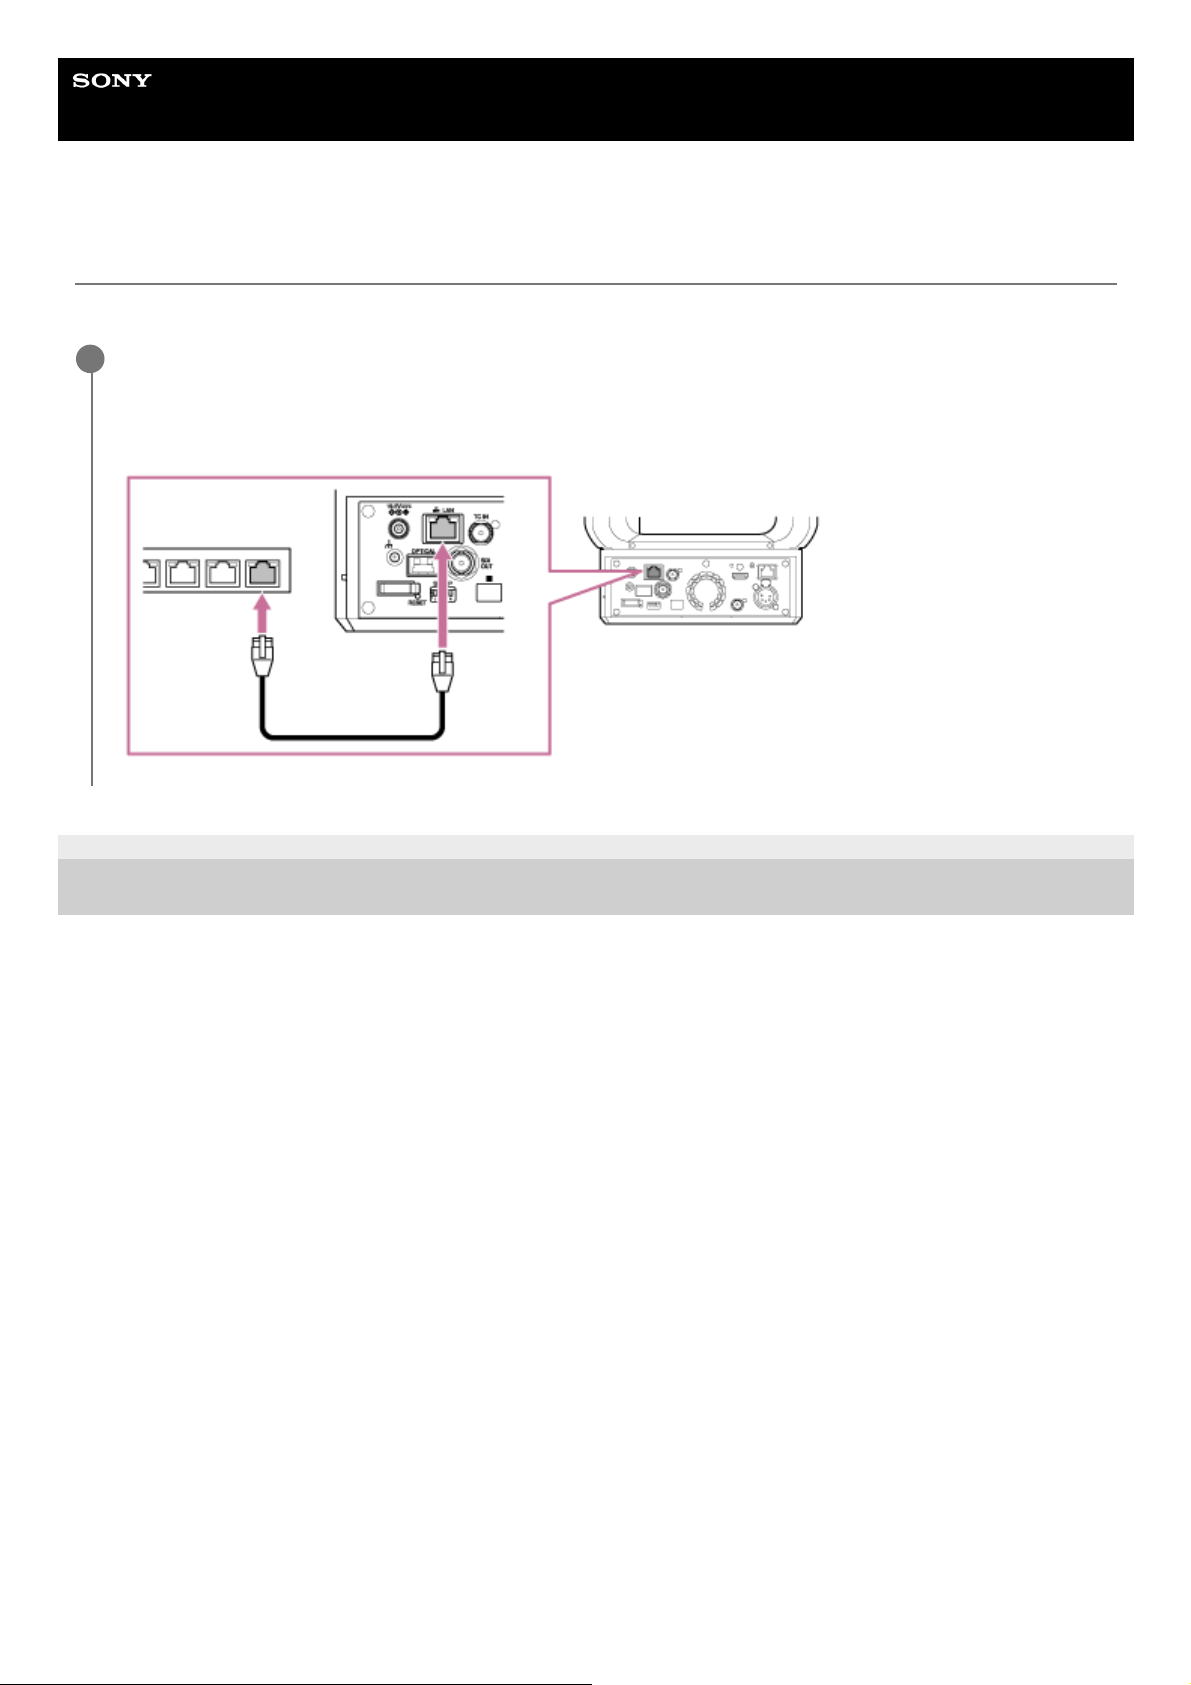
Help Guide
Interchangeable Lens Digital Camera
ILME-FR7 / ILME-FR7K
Connecting the Unit to a Network Device Via Wired Connection
This topic describes connecting the unit to a network device via a wired connection.
5-041-957-11(1)
Copyright 2022 Sony Corporation
Connect the unit to a network device (such as a Wi-Fi access point or switching hub) using a Category 5e
or higher LAN cable.
1
95
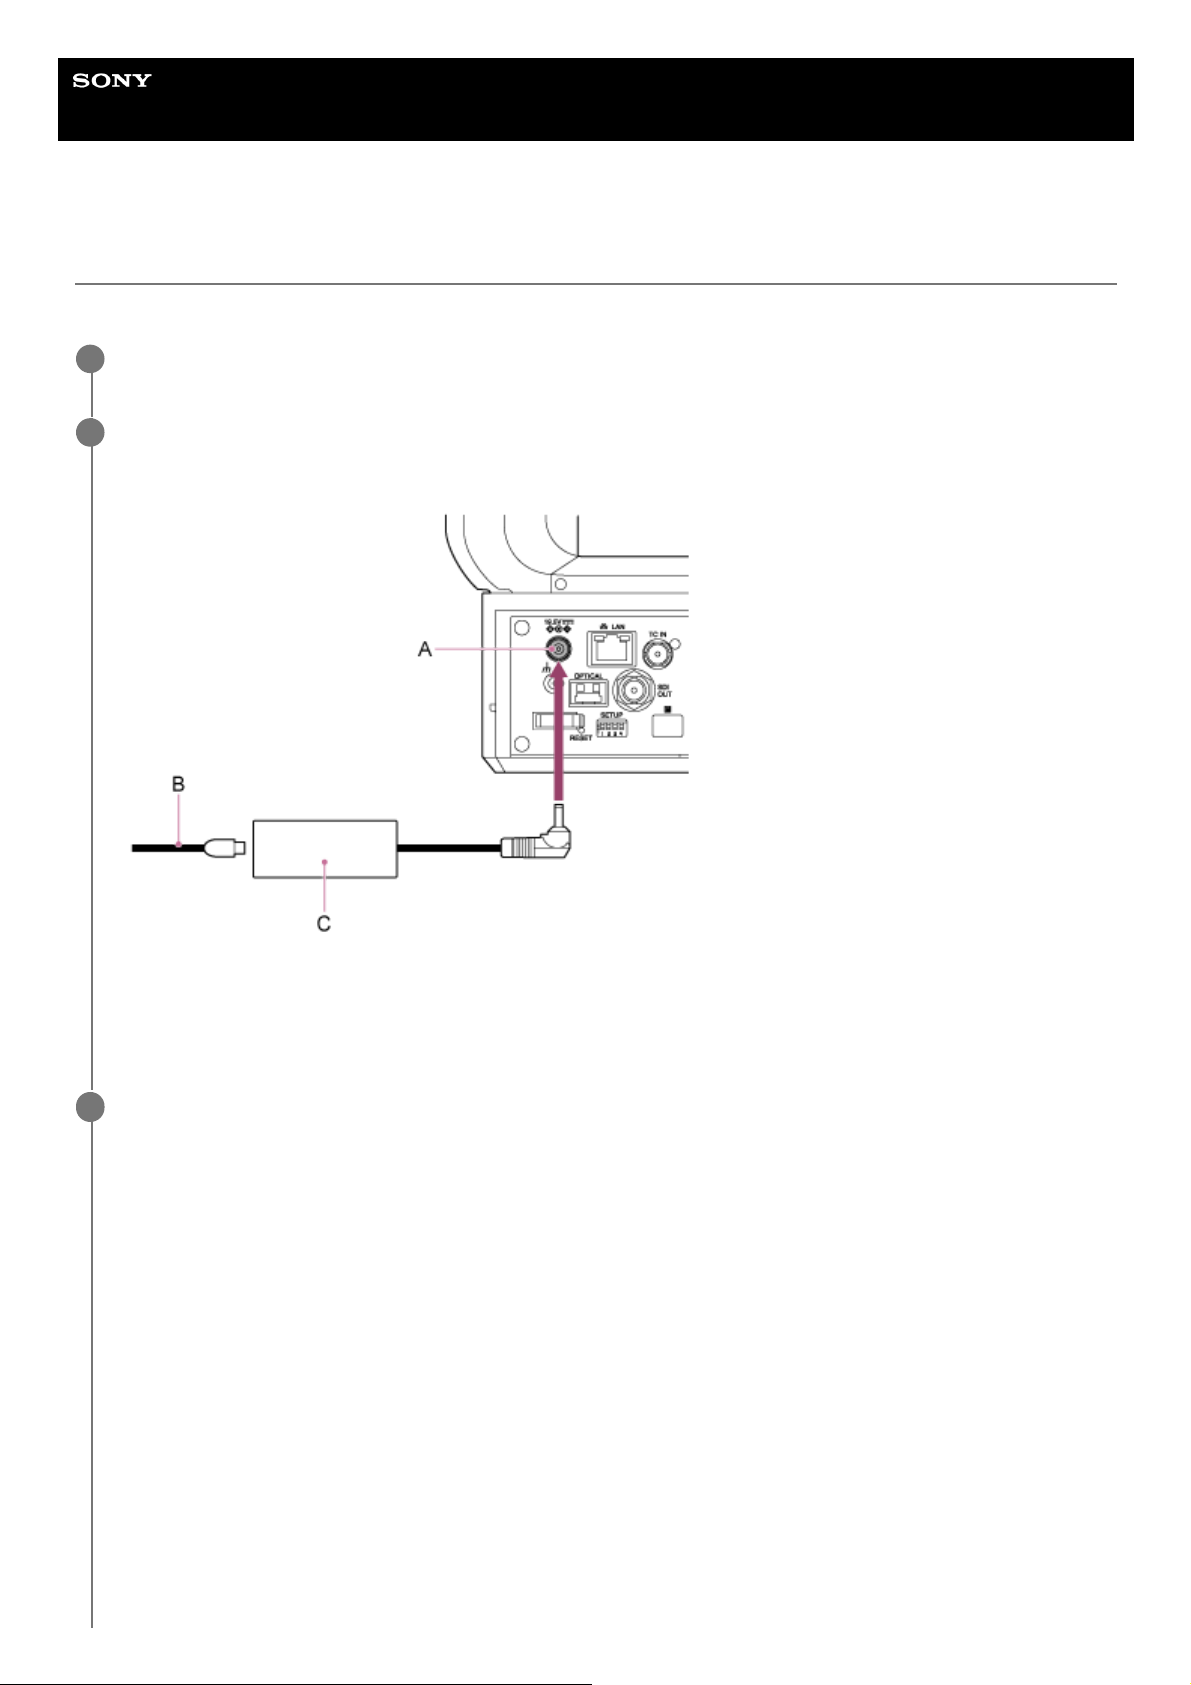
Help Guide
Interchangeable Lens Digital Camera
ILME-FR7 / ILME-FR7K
Using AC Power
This topic describes the procedure to power the unit using AC power.
Slide the pan/tilt lock lever to the LOCK position to lock the pan/tilt of the camera head.
1
Connect the AC adaptor (supplied) to the DC IN connector on the unit, and connect the power cord
(supplied) to an AC power source.
A: DC IN connector
B: Power cord
C: AC adaptor
2
Secure the AC adaptor cord using the cord clamper if you want to prevent the cord from being
disconnected.
Unlock the cord clamper, route the cord through the clamper as shown below, and lock the clamper.
3
96
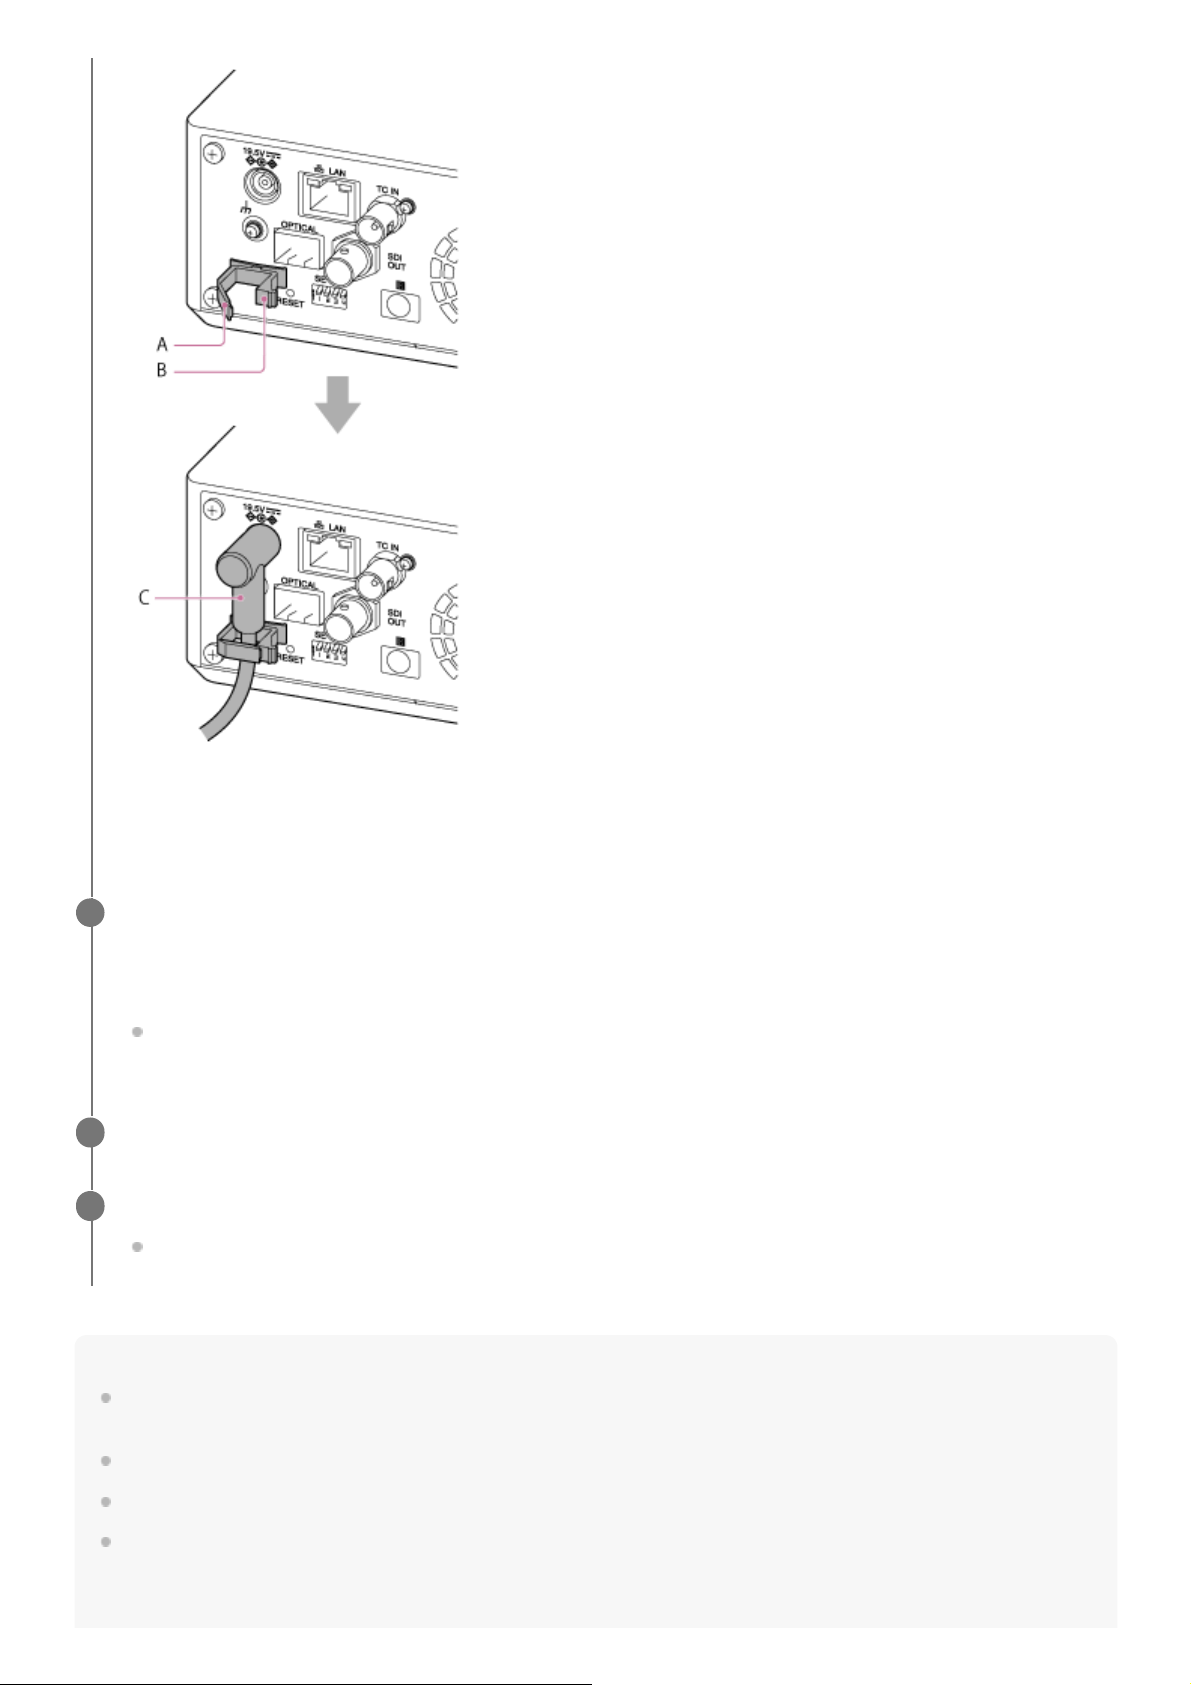
Note
Do not use any AC adaptor or power cord, other than those provided with the unit. Connecting another adaptor or power cord
may cause a fire or malfunction.
Do not connect and use an AC adaptor in a confined space, such as between a wall and furniture.
Do not short-circuit the metal parts of the plug of the AC adaptor. Doing so may cause a malfunction.
Connect the AC adaptor to the nearest AC power source. If a problem occurs during operation, immediately disconnect the
power cord from the AC power source.
A: Cord clamper
B: Cord clamper lock
C: AC adaptor cord
Check that the POWER lamp on the front of the unit changes from blinking green to solid green and that
startup has finished.
When the unit has started normally and connected to the network, the NETWORK lamp will light up green.
When using a lens that does not support pan/tilt operation, lock the pan/tilt lock lever and skip the following
steps. For details about lenses that support pan/tilt, contact your dealer or Sony service representative.
4
Slide the pan/tilt lock lever to the UNLOCK position to unlock the pan/tilt of the camera head.
5
Reset the pan/tilt.
For details, see “Resetting the Pan/Tilt.”
6
97

When disconnecting the AC adaptor from the unit, grasp the plug and pull it straight out. Pulling on the cable may cause a
malfunction.
5-041-957-11(1)
Copyright 2022 Sony Corporation
98
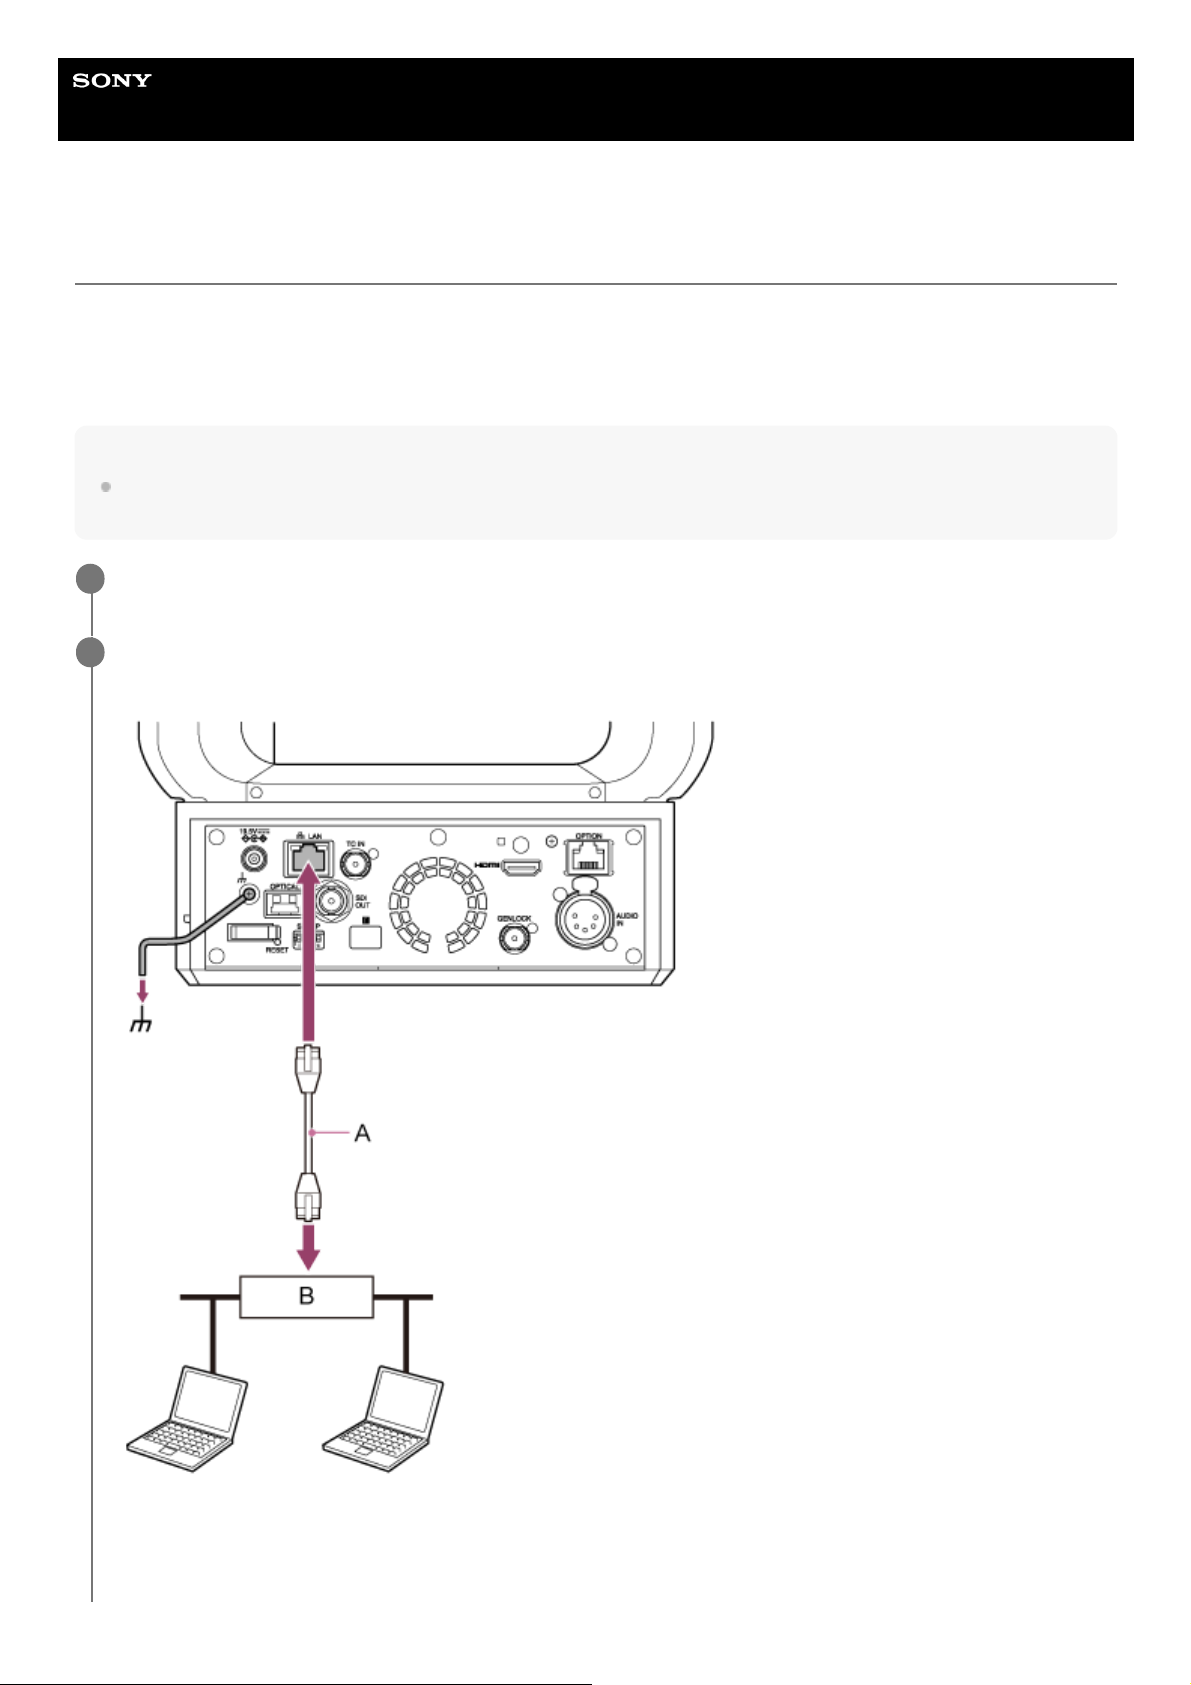
Help Guide
Interchangeable Lens Digital Camera
ILME-FR7 / ILME-FR7K
Using PoE++ Power
When the unit is connected to a PoE++ compatible power delivery device, power is supplied to the unit via a
commercially available network cable.
This method enables power to be supplied to the unit without the need for power supply wiring in environments where
there is no power supply outlet near the mounting location.
Note
When power is supplied by PoE++, the recording and playback functions cannot be used with the recording media inserted in the
unit.
Slide the pan/tilt lock lever to the LOCK position to lock the pan/tilt of the camera head.
1
Connect the unit and a PoE++ compatible power delivery device using a commercially available network
cable.
A: Network cable
B: PoE++ compatible power delivery device
2
99
Note
The unit conforms to IEEE802.3bt Type 4 Class 8. For details about verified compatible PoE++ power delivery devices, contact
your dealer or Sony service representative.
The unit is compliant with soft authentication (LLDP), but it may be necessary to configure network devices (IEEE802.3bt
compliant).
Do not connect an AC adaptor when using PoE++ power delivery with soft authentication (LLDP) enabled.
If an AC adaptor and PoE++ power delivery device are connected at the same time, power is supplied from the AC adaptor.
When supplying power via PoE++, use a Category 5e or higher network cable.
Wait about 10 seconds after turning the unit on again when powered via PoE++.
When using PoE++ power delivery, connect the ground terminal to ground.
When connecting via PoE++ power delivery, do not run wiring outdoors.
5-041-957-11(1)
Copyright 2022 Sony Corporation
Check that the POWER lamp on the front of the unit changes from blinking green to solid green and that
startup has finished.
When the unit has started normally and connected to the network, the NETWORK lamp will light up green.
Note
When power is supplied by PoE++, initial authentication is performed during the interval until startup has finished.
When using a lens that does not support pan/tilt operation, lock the pan/tilt lock lever and skip the following steps. For
details about lenses that support pan/tilt, contact your dealer or Sony service representative.
3
Slide the pan/tilt lock lever to the UNLOCK position to unlock the pan/tilt of the camera head.
4
Reset the pan/tilt.
For details, see “Resetting the Pan/Tilt.”
5
100
Help Guide
Interchangeable Lens Digital Camera
ILME-FR7 / ILME-FR7K
Resetting the Pan/Tilt
You can reset the pan/tilt, for example, when you replace the lens, using the following procedure.
5-041-957-11(1)
Copyright 2022 Sony Corporation
Slide the pan/tilt lock lever to the UNLOCK position and check that the pan/tilt of the camera head is
unlocked.
1
Execute the pan/tilt reset function.
Pan/tilt reset can be executed from the infrared remote control, Web App, or the RM-IP500 Remote Controller
(option).
Operation using the infrared remote control: Press the P/T RESET button.
Operation using the infrared remote control: Press the P/T RESET button.
Operation using the Web App: Press the [Pan-Tilt Reset] button on the
(Others) tab on the live operation
screen.
Operation using the RM-IP500: Refer to the operating instructions for the RM-IP500.
Note
Executing pan/tilt reset causes the camera head and lens to turn. Check that the lens is not obstructed before executing.
The unit has a function that limits the pan/tilt range, but this function is disabled when the unit is turned on or pan/tilt reset is
executed.
Hint
When pan/tilt reset is completed, the unit returns to the pre-execution position.
2
101
Help Guide
Interchangeable Lens Digital Camera
ILME-FR7 / ILME-FR7K
Accessing the Web App from a Web Browser
By connecting the unit to a tablet or computer, you can operate and configure the unit from a web browser.
Check whether your tablet or computer supports Web App operations.
Note
If the required environment is not satisfied, or depending on the usage of the tablet/computer, video display in a web
browser may be adversely affected.
The Web App of this unit uses JavaScript. If using antivirus software on your tablet/computer, the web page may not be
displayed correctly.
1
Item Requirement
Display
1080×810 pixels or higher recommended
Tablet display size: 10-inch or larger
recommended
Supported OS and web
browser
Windows
OS Windows 10 or later
Web
browser
Google Chrome
Mac
OS macOS 10.15 or later
Web
browser
Google Chrome
Safari
iPad
OS iPadOS 15 or later
Web
browser
Google Chrome
Safari
Android
OS Android 12 or later
Web
browser
Google Chrome
Check that the unit, tablet or computer, and peripheral devices are turned on.
2
Check that the unit and tablet or computer are connected via Wi-Fi or wired LAN local area connection.
3
Connect to the unit from the web browser of your tablet or computer.
Connecting using a QR code
Scan the QR code printed on the media cover on the side of the unit using the camera of the tablet.
4
102
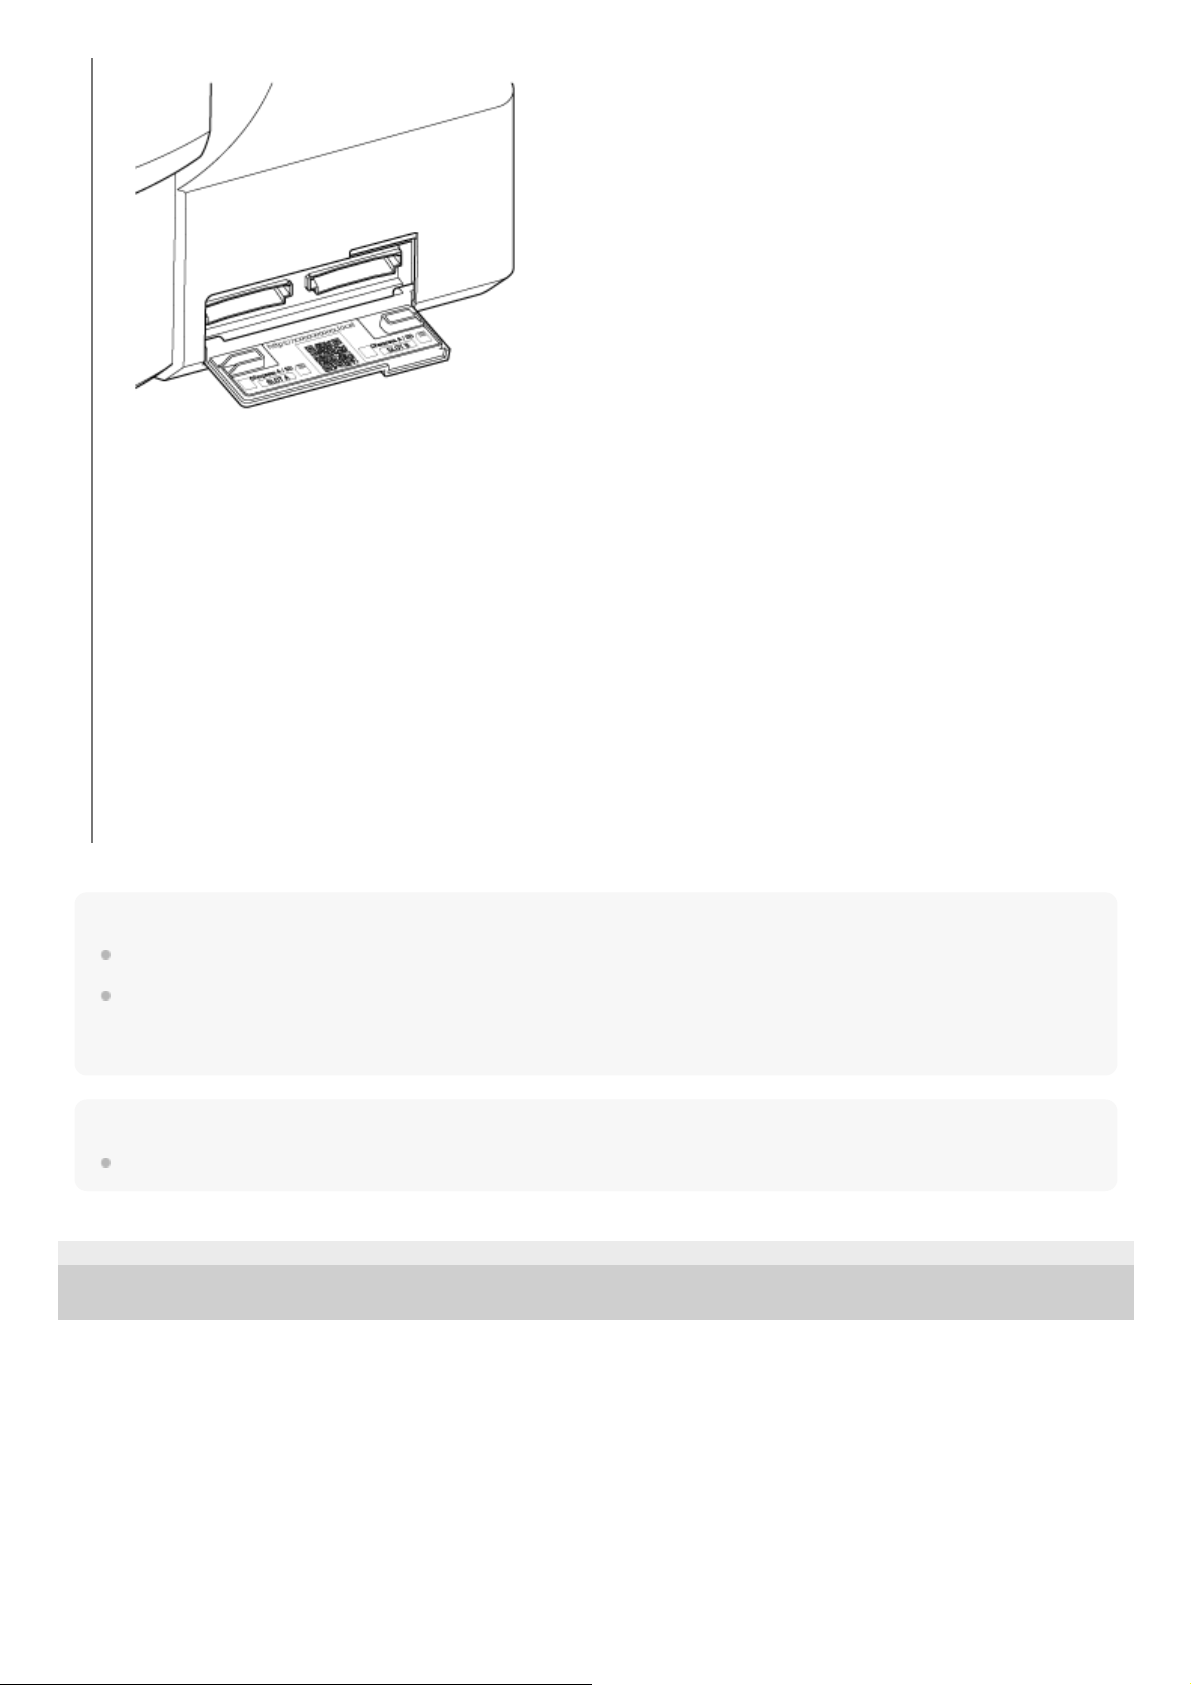
Note
If the HTTP port number was changed from a value of 80, enter “http://IP address of the unit:Port number” in the address bar.
When connecting using a QR code or by entering the URL in the address bar of a web browser, use a device that supports
mDNS
*
.
Hint
You can subsequently access the unit quickly using the bookmark function of the web browser.
5-041-957-11(1)
Copyright 2022 Sony Corporation
Open the displayed link on the tablet.
The web browser on the tablet launches and displays the Web App screen of the unit.
Connecting by entering a URL in the address bar of a web browser
Launch a web browser on the tablet or computer, and enter the URL printed on the media cover on the side of the
unit.
The web browser should display the Web App screen of the unit.
Connecting by entering the IP address of the unit in the address bar of a web browser
Launch a web browser on your tablet or computer and enter “http://IP address of the unit” in the address bar.
The web browser should display the Web App screen of the unit.
mDNS: A communication protocol used to determine the IP address from a host name on a local network.
*
103
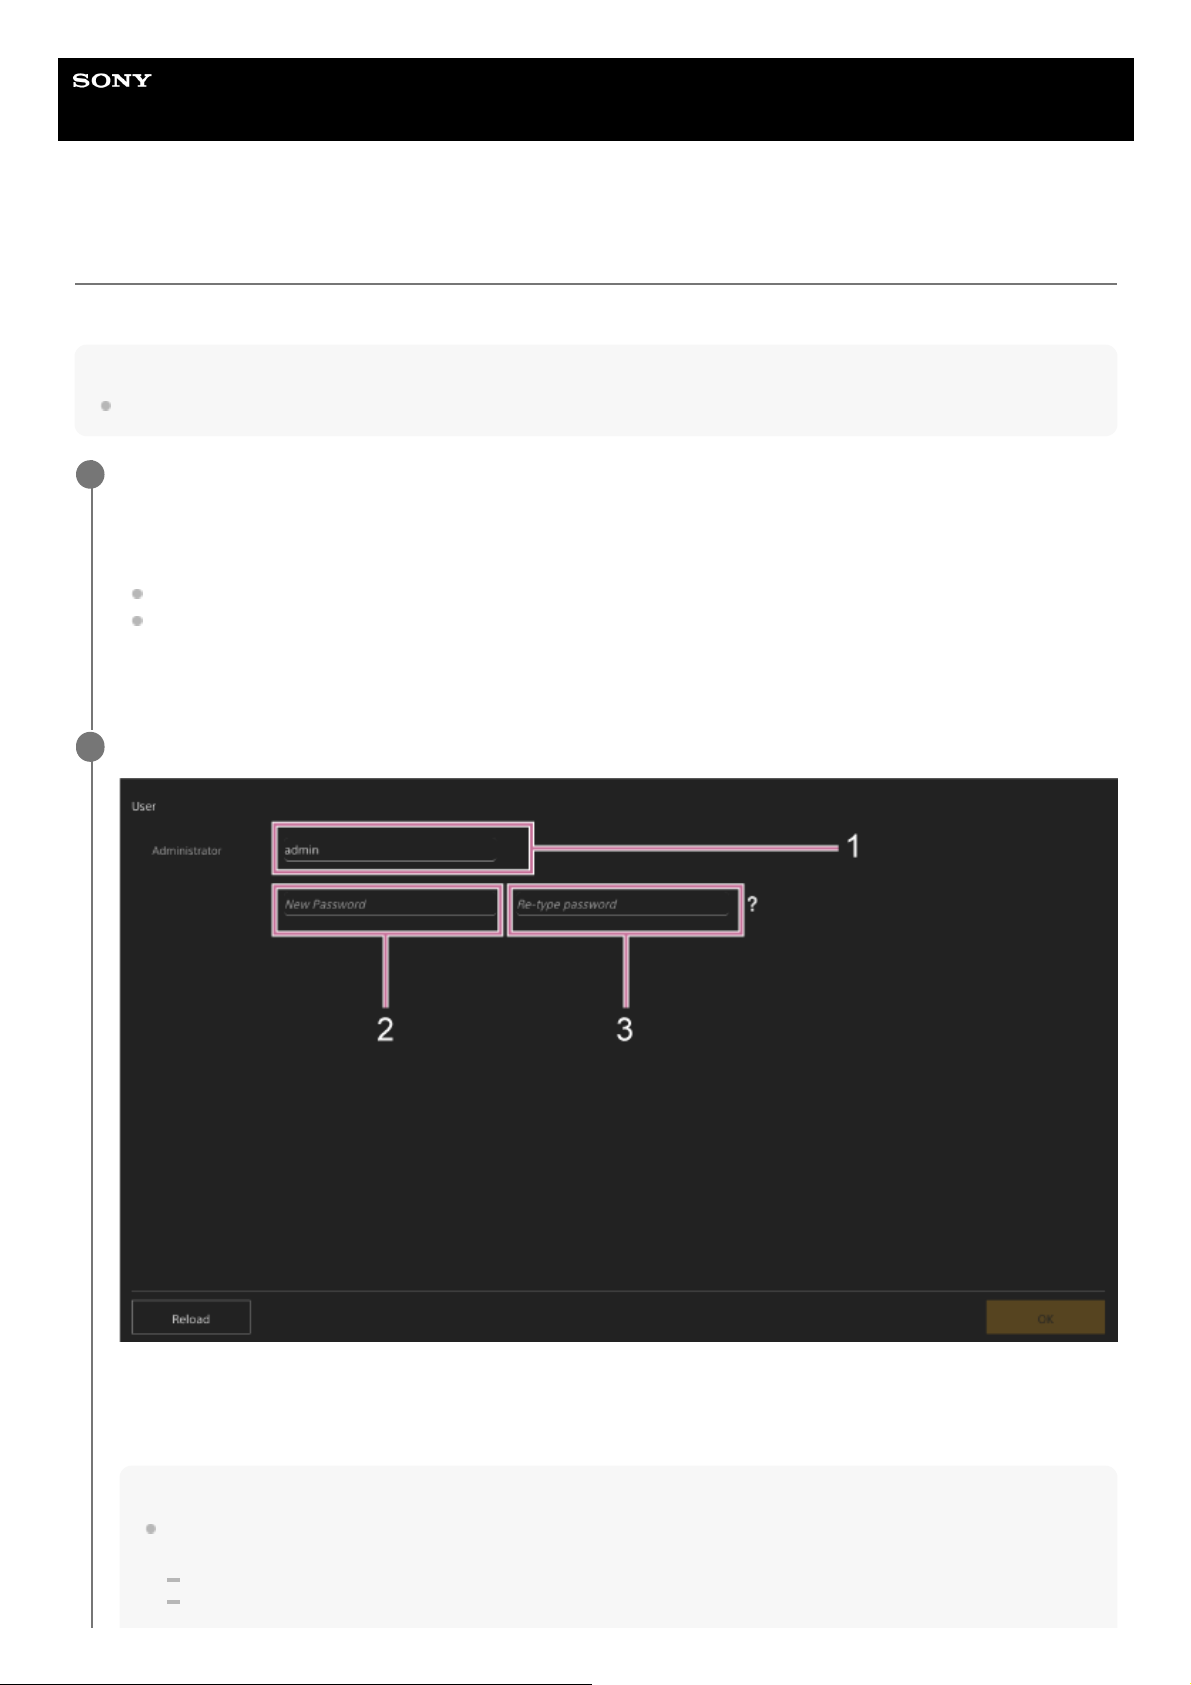
Help Guide
Interchangeable Lens Digital Camera
ILME-FR7 / ILME-FR7K
Initializing the Unit
Make sure to configure the unit using the following procedure when using the unit for the first time.
Hint
If the backup battery becomes completely discharged, you will need to configure the initial setup again.
Connect to the unit from a tablet or computer, and launch the Web App.
When the unit is used for the first time, you will be prompted to enter a user name and password in the web
browser. Enter the following settings.
User name: admin
Password: (leave blank)
Follow the on-screen instructions to configure the initial setup.
1
Enter the administrator (Administrator) user name and password, and press the [OK] button.
1: Enter the administrator user name.
2: Set the administrator password.
3: Enter the same password again for confirmation.
Note
The following characters can be used in the user name and password. The password must include at least one upper case
letter, one lower case letter, one number, and be 8 to 64 characters in length.
Alphanumeric characters
Symbols (!$%`*+-./<=>?@[]^_{|}~)
2
104
The live screen for shooting operations appears. Continue to configure the basic operation of the unit according to the
operation mode.
5-041-957-11(1)
Copyright 2022 Sony Corporation
Your web browser will reload and you will be prompted to enter the user name and password.
Enter the user name and password that were configured in step 2.
The language and clock setup screen appears.
3
Specify the following items and press the [OK] button.
[Language]
Select the language to use for the Web App and camera screen display. Changing the language will change the
Web App display language.
[Date & Time Format]
Select the display format for the date and time from the following options.
[yyyy-mm-dd hh:mm:ss], [mm-dd-yyyy hh:mm:ss], [dd-mm-yyyy hh:mm:ss]
[y] indicates the year, [m] indicates the month, [d] indicates the day, [h] indicates the hour, [m] indicates the minute,
and [s] indicates the second, respectively.
[12 h/24 h]
Select [12 h] (12-hour clock) or [24 h] (24-hour clock) for the time display.
[Time Setting]
Select the method for setting the date/time.
[Synchronize with PC]: Synchronize to the date/time of the computer or tablet.
[Manual setting]: Set manually. When this method is selected, entry fields for the date and time appear.
[Time Zone]
Select the time zone.
4
105

Help Guide
Interchangeable Lens Digital Camera
ILME-FR7 / ILME-FR7K
Configuring Basic Operation
This topic describes how to configure the unit for basic operations.
Setting the shooting mode
You can switch the shooting mode between “Custom mode” to create images flexibly while shooting, and “Cine EI mode”
to operate the unit similarly to a film camera with footage developed in post production.
Switch the shooting mode using [Project] > [Base Setting] > [Shooting Mode] in the web menu or camera menu.
Custom mode
In Custom shooting mode, you can select the video standard.
Switch using [Project] > [Base Setting] > [Target Display] in the web menu or camera menu.
[SDR(BT.709)]: Shooting according to HD broadcast standard
[HDR(HLG)]: Shooting according to next generation 4K broadcast standard
For details, see “Look Overview” and other topics in “Shooting with the Desired Look.”
Cine EI mode
When the shooting mode is set to Cine EI mode, select the base color space for the recording signal and output signal.
The color space selected here is the color space of the video output when [MLUT] is set to [Off].
Switch using [Project] > [Cine EI Setting] > [Color Gamut] in the camera menu.
[S-Gamut3.Cine/SLog3]: Easy to adjust color gamut for digital cinema (DCI-P3).
[S-Gamut3/SLog3]: Sony wide color gamut that covers the ITU-R BT.2020 color space.
For details, see “Shooting with Look Adjustment in Post-Production.”
Note
In Cine EI mode, the following functions cannot be adjusted automatically (tracking).
White balance
Gain
Shutter
In Cine EI mode, settings for the following functions cannot be changed.
ISO sensitivity/gain (set to base ISO sensitivity (fixed))
[Paint/Look] menu settings (excluding Base Look)
Scene File (disabled)
The following functions are available in Cine EI mode only.
Monitor LUT
Exposure Index
Hint
In Cine EI mode, shooting occurs at a base ISO sensitivity without using gain in order to maximize the performance of the image
sensor. The brightness is adjusted using lighting and the ND filter to adjust the amount of light that reaches the image sensor.
Setting the system frequency
106
Switch using [Project] > [Rec Format] > [Frequency] in the web menu or camera menu. The unit may reboot
automatically after switching, depending on the selected value.
Note
You cannot switch the system frequency during recording or playback.
Setting the imager scan mode
You can set the effective picture size and resolution of the image sensor.
Switch using [Project] > [Rec Format] > [Imager Scan Mode] in the web menu or camera menu.
[FF]: Full-frame size.
[S35]: Super 35mm size.
Note
You cannot switch the imager scan mode during recording or playback.
When set to S35, the video format is restricted to 1920×1080.
Setting the codec
You can set the codec for recording.
Switch using [Project] > [Rec Format] > [Codec] in the web menu or camera menu.
Note
You cannot switch the codec during recording or playback.
Setting the video format
You can set the video format for recording and the output format for output from the camera.
Switch the video format for recording using [Project] > [Rec Format] > [Video Format] in the web menu or camera
menu.
Switch the output format from the SDI OUT and HDMI OUT connectors using [Monitoring] > [Output Format] in the
web menu or camera menu.
Note
You cannot switch the video format during recording or playback.
Restrictions may apply to the signal from the SDI OUT and HDMI OUT connectors, depending on the video format setting.
5-041-957-11(1)
Copyright 2022 Sony Corporation
107
Help Guide
Interchangeable Lens Digital Camera
ILME-FR7 / ILME-FR7K
Supported Memory Cards
The unit records audio and video on CFexpress Type A memory cards (available separately) or SDXC memory cards
(available separately) inserted in the card slots. The memory cards are also used for proxy recording.
CFexpress Type A memory cards
Use the Sony CFexpress Type A memory cards
*
listed in “Recommended media” in the unit.
For details on operations with media from other manufacturers, refer to the operating instructions for the media or
consult the manufacturer’s information.
SDXC memory cards
Use the SDXC memory cards
*
listed in “Recommended media” in the unit.
Recommended media
The guaranteed operating conditions will vary depending on the Rec Format and Recording settings.
CFexpress Type A
VPG400-compliant
Supported for all recording formats of the unit.
SDXC
Supported under the conditions in the following table. “Yes” indicates operation has been verified, and “No” indicates that
operation is not guaranteed.
RAW Out & XAVC-I, 4096×2160 Class 300, Normal mode
RAW Out & XAVC-I, 3840×2160 Class 300, Normal mode
Referred to as “CFexpress cards” in this Help Guide.
*
Referred to as “SD cards” in this Help Guide.
*
System frequency Class 10 U1 U3 VSC V10 VSC V30 VSC V60 VSC V90
59.94P No No No No No No Yes
50P No No No No No No Yes
29.97P No No No No No Yes Yes
25P No No No No No Yes Yes
24P No No No No No Yes Yes
23.98P No No No No No Yes Yes
System frequency Class 10 U1 U3 VSC V10 VSC V30 VSC V60 VSC V90
59.94P No No No No No No Yes
108
RAW Out & XAVC-I, 3840×2160 Class 300, S&Q (60 fps or lower)
RAW Out & XAVC-I, 3840×2160 Class 300, S&Q (100 fps, 120 fps)
Verified media not available.
XAVC-I, 4096×2160 Class 300, Normal mode
XAVC-I, 4096×2160 Class 300, S&Q (60 fps or lower)
System frequency Class 10 U1 U3 VSC V10 VSC V30 VSC V60 VSC V90
50P No No No No No No Yes
29.97P No No No No No Yes Yes
25P No No No No No Yes Yes
23.98P No No No No No Yes Yes
System frequency Class 10 U1 U3 VSC V10 VSC V30 VSC V60 VSC V90
59.94P No No No No No No Yes
50P No No No No No No Yes
29.97P No No No No No No Yes
25P No No No No No No Yes
23.98P No No No No No No Yes
System frequency Class 10 U1 U3 VSC V10 VSC V30 VSC V60 VSC V90
59.94P No No No No No No Yes
50P No No No No No No Yes
29.97P No No No No No Yes Yes
25P No No No No No Yes Yes
24P No No No No No Yes Yes
23.98P No No No No No Yes Yes
System frequency Class 10 U1 U3 VSC V10 VSC V30 VSC V60 VSC V90
59.94P No No No No No No Yes
50P No No No No No No Yes
29.97P No No No No No No Yes
25P No No No No No No Yes
24P No No No No No No Yes
23.98P No No No No No No Yes
109
XAVC-I, 3840×2160 Class 300, Normal mode
XAVC-I, 3840×2160 Class 300, S&Q (60 fps or lower)
XAVC-I, 3840×2160 Class 300, S&Q (100 fps, 120 fps)
Verified media not available.
XAVC-I, 1920×1080 Class 100, Normal mode
XAVC-I, 1920×1080 Class 100, S&Q (60 fps or lower)
System frequency Class 10 U1 U3 VSC V10 VSC V30 VSC V60 VSC V90
59.94P No No No No No No Yes
50P No No No No No No Yes
29.97P No No No No No Yes Yes
25P No No No No No Yes Yes
23.98P No No No No No Yes Yes
System frequency Class 10 U1 U3 VSC V10 VSC V30 VSC V60 VSC V90
59.94P No No No No No No Yes
50P No No No No No No Yes
29.97P No No No No No No Yes
25P No No No No No No Yes
23.98P No No No No No No Yes
System frequency Class 10 U1 U3 VSC V10 VSC V30 VSC V60 VSC V90
59.94P No No No No No Yes Yes
50P No No No No No Yes Yes
29.97P No No Yes No Yes Yes Yes
25P No No Yes No Yes Yes Yes
23.98P No No Yes No Yes Yes Yes
System frequency Class 10 U1 U3 VSC V10 VSC V30 VSC V60 VSC V90
59.94P No No No No No Yes Yes
50P No No No No No Yes Yes
29.97P No No No No No Yes Yes
25P No No No No No Yes Yes
23.98P No No No No No Yes Yes
110
XAVC-I, 1920×1080 Class 100, S&Q (100 fps, 120 fps)
XAVC-I, 1920×1080 Class 100, S&Q (150 fps, 180 fps)
Verified media not available.
XAVC-I, 1920×1080 Class 100, S&Q (200 fps, 240 fps)
Verified media not available.
XAVC-L, 3840×2160 420, Normal mode
XAVC-L, 3840×2160 420, S&Q (60 fps or lower)
XAVC-L, 3840×2160 420, S&Q (100 fps, 120 fps)
System frequency Class 10 U1 U3 VSC V10 VSC V30 VSC V60 VSC V90
59.94P No No No No No No Yes
50P No No No No No No Yes
29.97P No No No No No No Yes
25P No No No No No No Yes
23.98P No No No No No No Yes
System frequency Class 10 U1 U3 VSC V10 VSC V30 VSC V60 VSC V90
59.94P No No Yes No Yes Yes Yes
50P No No Yes No Yes Yes Yes
29.97P No No Yes No Yes Yes Yes
25P No No Yes No Yes Yes Yes
23.98P No No Yes No Yes Yes Yes
System frequency Class 10 U1 U3 VSC V10 VSC V30 VSC V60 VSC V90
59.94P No No Yes No Yes Yes Yes
50P No No Yes No Yes Yes Yes
29.97P No No No No No Yes Yes
25P No No No No No Yes Yes
23.98P No No No No No No Yes
System frequency Class 10 U1 U3 VSC V10 VSC V30 VSC V60 VSC V90
59.94P No No No No No Yes Yes
50P No No No No No Yes Yes
111
XAVC-L, 1920×1080 HD50, Normal mode
XAVC-L, 1920×1080 HD50, S&Q (60 fps or lower)
XAVC-L, 1920×1080 HD50, S&Q (100 fps, 120 fps)
XAVC-L, 1920×1080 HD50, S&Q (150 fps, 180 fps)
System frequency Class 10 U1 U3 VSC V10 VSC V30 VSC V60 VSC V90
29.97P No No No No No No Yes
25P No No No No No No Yes
23.98P No No No No No No No
System frequency Class 10 U1 U3 VSC V10 VSC V30 VSC V60 VSC V90
59.94P No No Yes No Yes Yes Yes
50P No No Yes No Yes Yes Yes
29.97P No No Yes No Yes Yes Yes
25P No No Yes No Yes Yes Yes
23.98P No No Yes No Yes Yes Yes
System frequency Class 10 U1 U3 VSC V10 VSC V30 VSC V60 VSC V90
59.94P Yes Yes Yes Yes Yes Yes Yes
50P Yes Yes Yes Yes Yes Yes Yes
29.97P No No Yes No Yes Yes Yes
25P No No Yes No Yes Yes Yes
23.98P No No Yes No Yes Yes Yes
System frequency Class 10 U1 U3 VSC V10 VSC V30 VSC V60 VSC V90
59.94P No No Yes No Yes Yes Yes
50P No No Yes No Yes Yes Yes
29.97P No No No No No Yes Yes
25P No No No No No Yes Yes
23.98P No No No No No Yes Yes
System frequency Class 10 U1 U3 VSC V10 VSC V30 VSC V60 VSC V90
59.94P No No No No No Yes Yes
50P No No No No No Yes Yes
29.97P No No No No No No Yes
112
XAVC-L, 1920×1080 HD50, S&Q (200 fps, 240 fps)
XAVC-L, 1920×1080 HD35, Normal mode
XAVC-L, 1920×1080 HD35, S&Q (60 fps or lower)
XAVC-L, 1920×1080 HD35, S&Q (100 fps, 120 fps)
System frequency Class 10 U1 U3 VSC V10 VSC V30 VSC V60 VSC V90
25P No No No No No No Yes
23.98P No No No No No No Yes
System frequency Class 10 U1 U3 VSC V10 VSC V30 VSC V60 VSC V90
59.94P No No No No No Yes Yes
50P No No No No No Yes Yes
29.97P No No No No No No Yes
25P No No No No No No Yes
23.98P No No No No No No Yes
System frequency Class 10 U1 U3 VSC V10 VSC V30 VSC V60 VSC V90
59.94P Yes Yes Yes Yes Yes Yes Yes
50P Yes Yes Yes Yes Yes Yes Yes
29.97P Yes Yes Yes Yes Yes Yes Yes
25P Yes Yes Yes Yes Yes Yes Yes
23.98P Yes Yes Yes Yes Yes Yes Yes
System frequency Class 10 U1 U3 VSC V10 VSC V30 VSC V60 VSC V90
59.94P Yes Yes Yes Yes Yes Yes Yes
50P Yes Yes Yes Yes Yes Yes Yes
29.97P No No Yes No Yes Yes Yes
25P No No Yes No Yes Yes Yes
23.98P No No Yes No Yes Yes Yes
System frequency Class 10 U1 U3 VSC V10 VSC V30 VSC V60 VSC V90
59.94P No No Yes No Yes Yes Yes
50P No No Yes No Yes Yes Yes
29.97P No No Yes No Yes Yes Yes
25P No No Yes No Yes Yes Yes
113

XAVC-L, 1920×1080 HD35, S&Q (150 fps, 180 fps)
XAVC-L, 1920×1080 HD35, S&Q (200 fps, 240 fps)
5-041-957-11(1)
Copyright 2022 Sony Corporation
System frequency Class 10 U1 U3 VSC V10 VSC V30 VSC V60 VSC V90
23.98P No No No No No Yes Yes
System frequency Class 10 U1 U3 VSC V10 VSC V30 VSC V60 VSC V90
59.94P No No Yes No Yes Yes Yes
50P No No Yes No Yes Yes Yes
29.97P No No No No No Yes Yes
25P No No No No No Yes Yes
23.98P No No No No No Yes Yes
System frequency Class 10 U1 U3 VSC V10 VSC V30 VSC V60 VSC V90
59.94P No No Yes No Yes Yes Yes
50P No No Yes No Yes Yes Yes
29.97P No No No No No Yes Yes
25P No No No No No Yes Yes
23.98P No No No No No No Yes
114
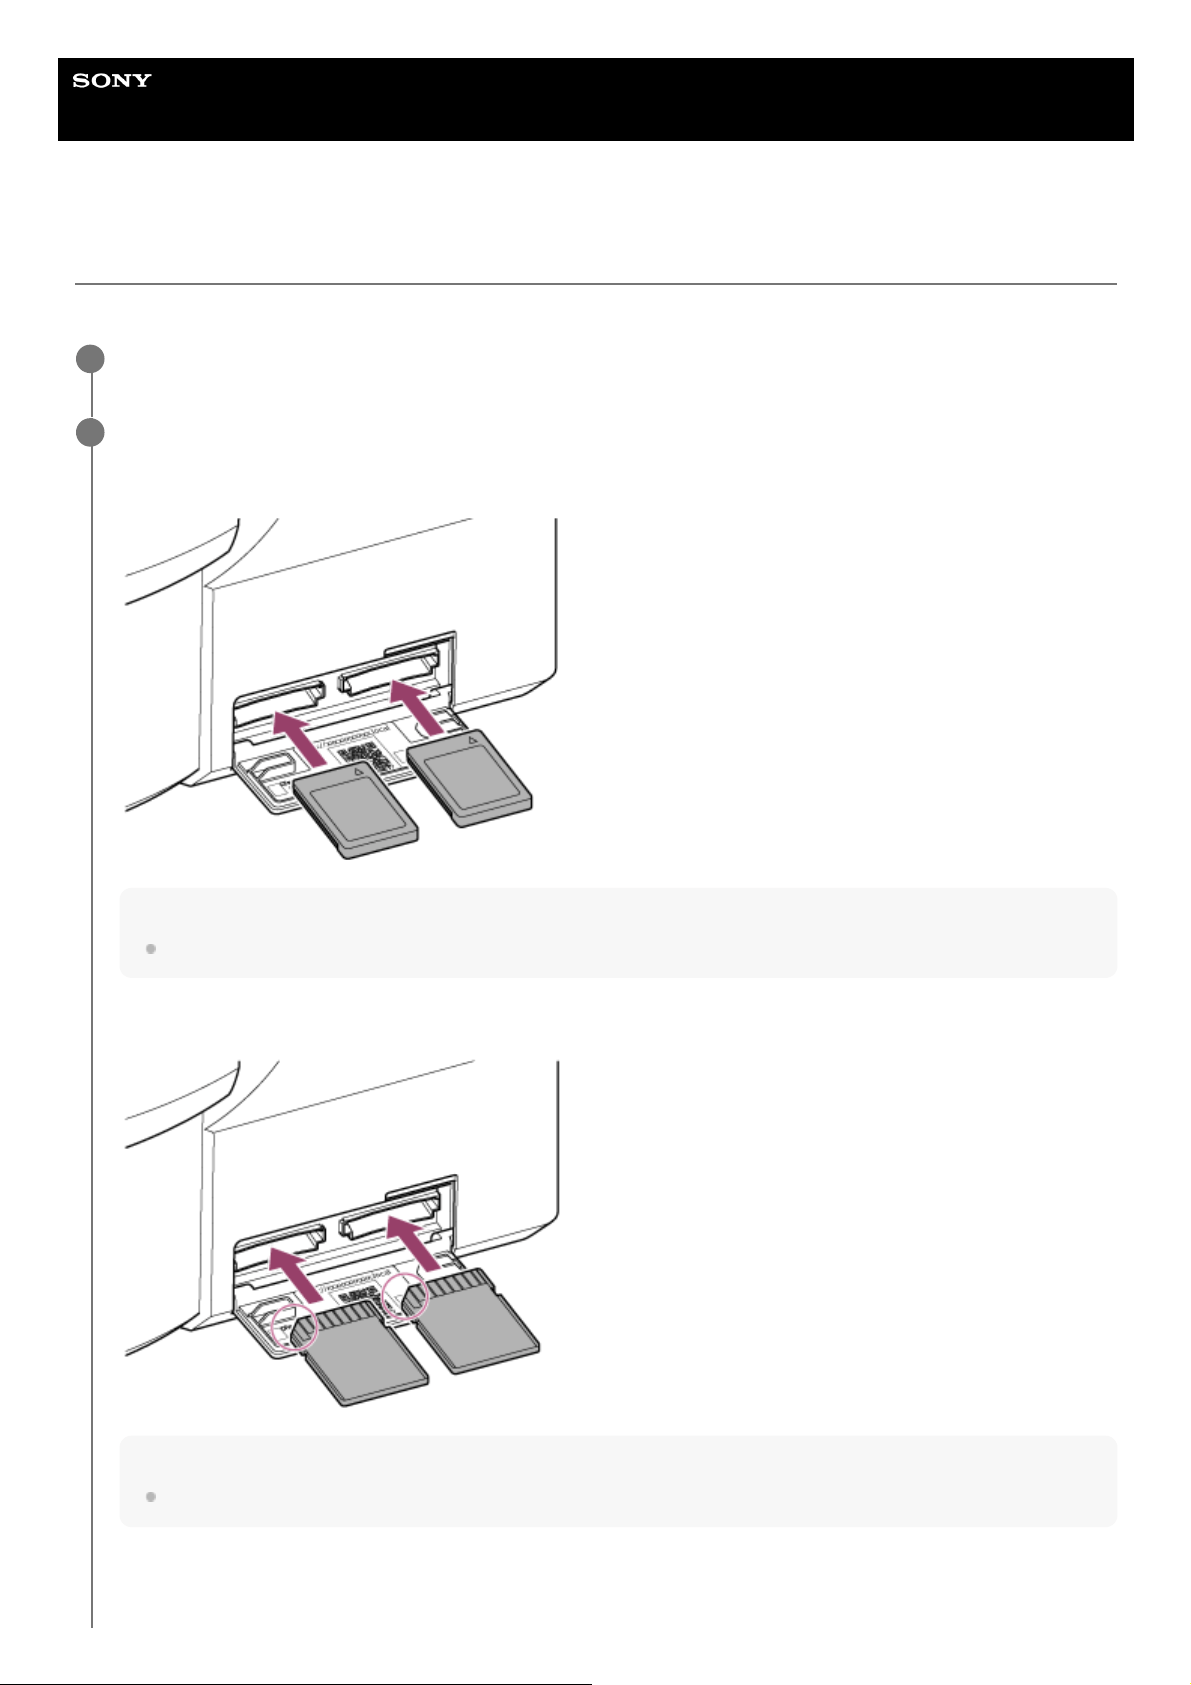
Help Guide
Interchangeable Lens Digital Camera
ILME-FR7 / ILME-FR7K
Inserting Memory Cards
This topic describes the precautions when inserting memory cards.
Open the media cover of the card slot section.
1
Insert a memory card.
For CFexpress cards, the label faces up.
Note
On a ceiling mounted unit, the label faces down.
For SD cards, the label faces down.
Note
On a ceiling mounted unit, the label faces up.
The access indicator is lit red, then changes to green if the card is usable.
2
115

Note
The memory card, memory card slot, and image data on the memory card may be damaged if the card is forced into the slot in
the incorrect orientation.
When recording to media inserted in both CFexpress Type A / SD card slots A and B, insert media in both slots that is
recommended for operation with the format of the recording.
5-041-957-11(1)
Copyright 2022 Sony Corporation
Note
If the access indicator blinks red continuously and does not change to green, temporarily turn off the unit, and remove and
reinsert the memory card.
Close the media cover.
3
116

Help Guide
Interchangeable Lens Digital Camera
ILME-FR7 / ILME-FR7K
Ejecting a Memory Card
Open the media cover of the card slot section, and lightly press the memory card in to eject the card.
Note
If the unit is turned off or the memory card is removed while the memory card is being accessed, the integrity of data on the card
cannot be guaranteed. All data recorded on the card may be discarded. Always make sure the access indicator is green or off
before turning off the unit or removing the memory card.
When removing a memory card immediately after recording is finished, the memory card may be hot, but this does not indicate a
problem.
5-041-957-11(1)
Copyright 2022 Sony Corporation
117

Help Guide
Interchangeable Lens Digital Camera
ILME-FR7 / ILME-FR7K
Formatting (Initializing) Memory Cards
If an unformatted memory card or a memory card that was formatted in a different specification is inserted, the message
“Media Needs to be Formatted” is displayed in the camera image panel.
Format the card using the following procedure.
Note
Formatting a memory card erases all data, including recorded video data and setup files.
Messages may appear during execution depending on the formatting process duration.
If formatting fails
Memory cards not supported by the unit cannot be formatted.
A warning message is displayed. Follow the instructions to replace the card with a supported memory card.
To use a card formatted on the unit in the slot of another device
First, make a backup of the card, then reformat the card in the device to be used.
5-041-957-11(1)
Copyright 2022 Sony Corporation
Select [TC/Media] > [Format Media] in the camera menu.
1
Select Media(A) (slot A) or Media(B) (slot B), then select the formatting method (Full Format or Quick
Format).
A confirmation message appears.
[Full Format]: Initializes the media completely, including the data region and data management information.
[Quick Format]: Initializes the data management information of the media only.
2
Select [Execute].
A message is displayed while formatting is in progress, and the access indicator is lit red.
When formatting ends, a completion message appears.
3
118

Help Guide
Interchangeable Lens Digital Camera
ILME-FR7 / ILME-FR7K
Checking the Remaining Recording Time
When shooting (recording/standby), you can monitor the remaining capacity of the memory card in each slot using the
slot A/B remaining media indicators in the camera image panel.
The remaining recording time is calculated from the remaining capacity of the media in each slot and the current
recording format (recording bit rate), and is displayed in units of minutes.
Memory card replacement timing
When the total remaining recording time on the two memory cards becomes less than 5 minutes, the message “Media
Near Full” appears and the recording/tally lamp starts blinking to warn you.
Replace with media that has free space.
If you continue recording until the total remaining recording time reaches zero, the message changes to “Media Full” and
recording stops.
Note
Up to approximately 600 clips can be recorded on one memory card.
5-041-957-11(1)
Copyright 2022 Sony Corporation
119

Help Guide
Interchangeable Lens Digital Camera
ILME-FR7 / ILME-FR7K
Restoring Memory Cards
If for any reason an error should occur in a memory card, the card must be restored before use.
When you load a memory card that needs to be restored, a message appears in the camera image panel asking whether
you want to restore it.
To restore a card
Select [Execute] using the arrow buttons in the GUI control panel and press the [Set] button.
A message and progress status (%) are displayed while formatting is in progress, and the access indicator is lit red.
When restoration ends, a completion message appears.
If restoration fails
Memory cards on which memory errors have occurred cannot be restored. A warning message is displayed. Follow
the instructions to replace the memory card.
Memory cards on which memory errors have occurred may become usable if they are reformatted.
In some cases, some clips can be restored while others cannot. The restored clips can be played normally.
Note
For restoration of media recorded with this unit, be sure to use this unit.
Media recorded with a device other than this unit or with another unit of different version (even of the same model) may not be
restored using this unit.
Clips shorter than 2 seconds cannot be restored.
5-041-957-11(1)
Copyright 2022 Sony Corporation
120
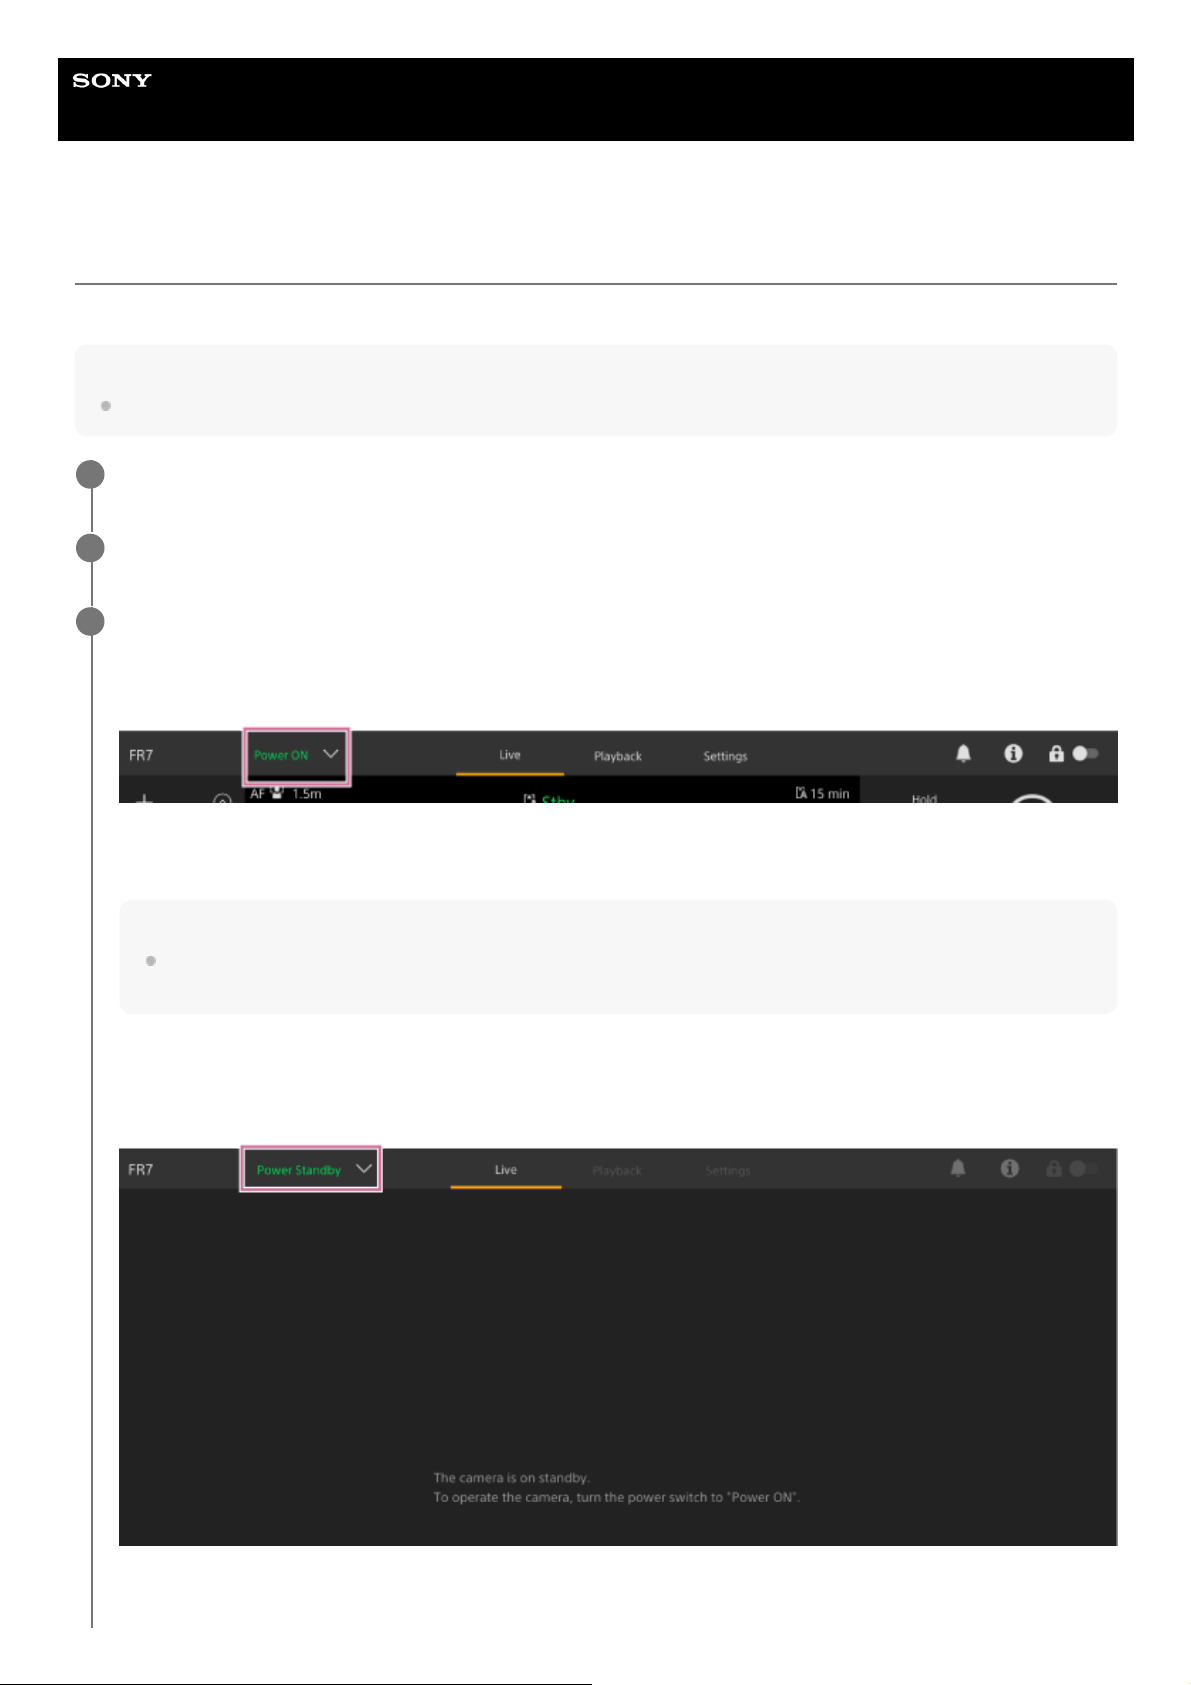
Help Guide
Interchangeable Lens Digital Camera
ILME-FR7 / ILME-FR7K
Starting/Stopping Recording
This topic describes how to start/stop recording.
Note
Recording and playback are not supported when the unit is powered via PoE++ power delivery.
Attach the necessary devices, and check that power of the unit and peripheral devices is being supplied.
1
Insert the memory card(s).
2
Check the power status of the unit at the top left of the Web App screen.
When power supply is on
When the unit is turned on, [Power ON] is displayed on the power switch at the top of the Web App screen.
The POWER lamp lights up on the front of the unit and the camera image appears on the live operation screen of
the Web App.
Note
If the administrator password has not been configured, a screen prompting you to configure the password appears. See
“Initializing the Unit.”
When power supply is in standby state
When the power supply of the unit is in standby state, [Power Standby] is displayed on the power switch in the Web
App.
In this state, press the power switch and select [Power ON]. The unit turns on, the POWER lamp lights up on the
front of the unit, and the camera image appears on the live operation screen of the Web App.
3
121

To switch the power supply of the unit to standby state
Press the power switch in the Web App and select [Power Standby] to set the power supply of the unit to standby state.
Hint
You can also set the power supply to standby state using the power button on the supplied infrared remote control.
Hint
You can also turn on the unit using the power button on the supplied infrared remote control.
Press the record START/STOP button.
Recording starts, and the recording/tally lamp (2 places) of the unit lights up.
During recording, the record START/STOP button lights. Also, an icon for the target recording media and [●Rec] are
displayed.
4
To stop recording, press the record START/STOP button again.
Recording stops, and the recording/tally lamp (2 places) of the unit turns off.
During recording standby state, the record START/STOP button is not lit. Also, an icon for the target recording
media and [Stby] are displayed.
Hint
You can also start/stop recording using the record START/STOP button on the supplied infrared remote control.
5
122

5-041-957-11(1) Copyright 2022 Sony Corporation
123
Help Guide
Interchangeable Lens Digital Camera
ILME-FR7 / ILME-FR7K
Switching Between Memory Cards
When two memory cards are inserted, you can press the [Slot Select] button on the playback control panel of the Web
App to switch memory cards.
Hint
You can also press the SLOT SEL (memory card slot (A)/(B) select) button on the supplied infrared remote control to switch
memory cards.
About relay recording
When recording, the unit automatically switches to the second memory card just before the remaining capacity on the
first card is reduced to zero (relay recording). You can continue recording continuously when switching memory cards by
replacing the memory card that is full with a new memory card.
Note
You cannot switch between memory cards during playback mode. Also, continuous playback of a clip spanning media in slot A
and slot B is not supported.
About recorded data
When you stop recording, the video, audio, and accompanying data from the start to the end of the recording are saved
as a single “clip” on a memory card.
Clip name of recorded data
The name of each clip recorded by the unit is automatically assigned using [TC/Media] > [Clip Name Format] in the
camera menu.
Maximum clip duration
Up to 6 hours per clip.
The maximum duration of continuous recording is the same as the maximum duration of a clip. If the recording time
exceeds the maximum duration of a clip, a new clip is created automatically and recording continues. The new clip
appears as a separate clip on the thumbnail screen.
Multiple clips are recorded in succession during relay recording, but recording will stop automatically after approximately
24 hours.
Note
Do not eject a memory card while recording to it is in progress. When recording, only change memory cards in slots for which the
slot access indicator is off.
When the remaining capacity on the memory card being recorded becomes less than one minute and a recordable memory card
is inserted in the other slot, a “Will Switch Slots Soon” message appears. The message disappears after switching memory card
slots.
Relay recording may not operate if recording is started when the remaining memory card capacity is less than one minute. For
correct relay recording, check that the remaining memory card capacity is more than one minute before starting recording.
Video created using the relay recording function of the unit cannot be played back seamlessly on the unit.
124

To combine video created using the relay recording function of the unit, use “Catalyst Browse” software.
5-041-957-11(1)
Copyright 2022 Sony Corporation
125

Help Guide
Interchangeable Lens Digital Camera
ILME-FR7 / ILME-FR7K
Checking the Audio
Audio is output from the SDI and HDMI connectors of the unit. Select the combination of audio channels that are output
from the HDMI connector using [Audio] > [Audio Output] > [HDMI/Stream Output CH] in the camera menu.
CH1/CH2: CH1 and CH2 combination
CH3/CH4: CH3 and CH4 combination
When monitoring the audio in the Web App, use the audio level meter at the bottom right of the camera image.
5-041-957-11(1)
Copyright 2022 Sony Corporation
126

Help Guide
Interchangeable Lens Digital Camera
ILME-FR7 / ILME-FR7K
Specifying Time Data
This topic describes how to set time data.
Setting the timecode
Set the timecode to record using [TC/Media] > [Timecode] in the camera menu.
Setting user bits
You can add an 8-digit hexadecimal number to the recorded image as user bits. You can also set the user bits to the
current time. Set using [TC/Media] > [Users Bit] in the camera menu.
Displaying time data
Set the timecode to display using [TC/Media] > [TC Display] > [Display Select] in the camera menu.
Pressing an assignable button with [DURATION/TC/U-BIT] assigned will switch the display between the timecode, user
bits, and duration in sequence.
5-041-957-11(1)
Copyright 2022 Sony Corporation
127

Help Guide
Interchangeable Lens Digital Camera
ILME-FR7 / ILME-FR7K
Reviewing the Recording (Rec Review)
You can review the last recorded clip on the screen (recording review).
Note
Rec Review is not supported if the video format is changed after recording a clip.
Setting the Rec Review start position
You can set the playback start position to one of the following using [Technical] > [Rec Review] in the camera menu.
Last 3 seconds of the clip
Last 10 seconds of the clip
Start of the clip
Hint
If you want to review a specific clip after recording multiple clips, press the [Thumbnail] button to display the thumbnail screen,
and select the clip to start playback.
You can also press the THUMBNAIL button of the supplied infrared remote control to display the thumbnail screen.
Rec Review method
Assign the Rec Review function to one of the assignable buttons on the basic configuration adjustment panel
beforehand.
For details about assignment, see “Assignable Buttons” in “Useful Functions.”
Stop recording and then press an assignable button assigned with the Rec Review function to start playback of the
previously recorded clip.
128
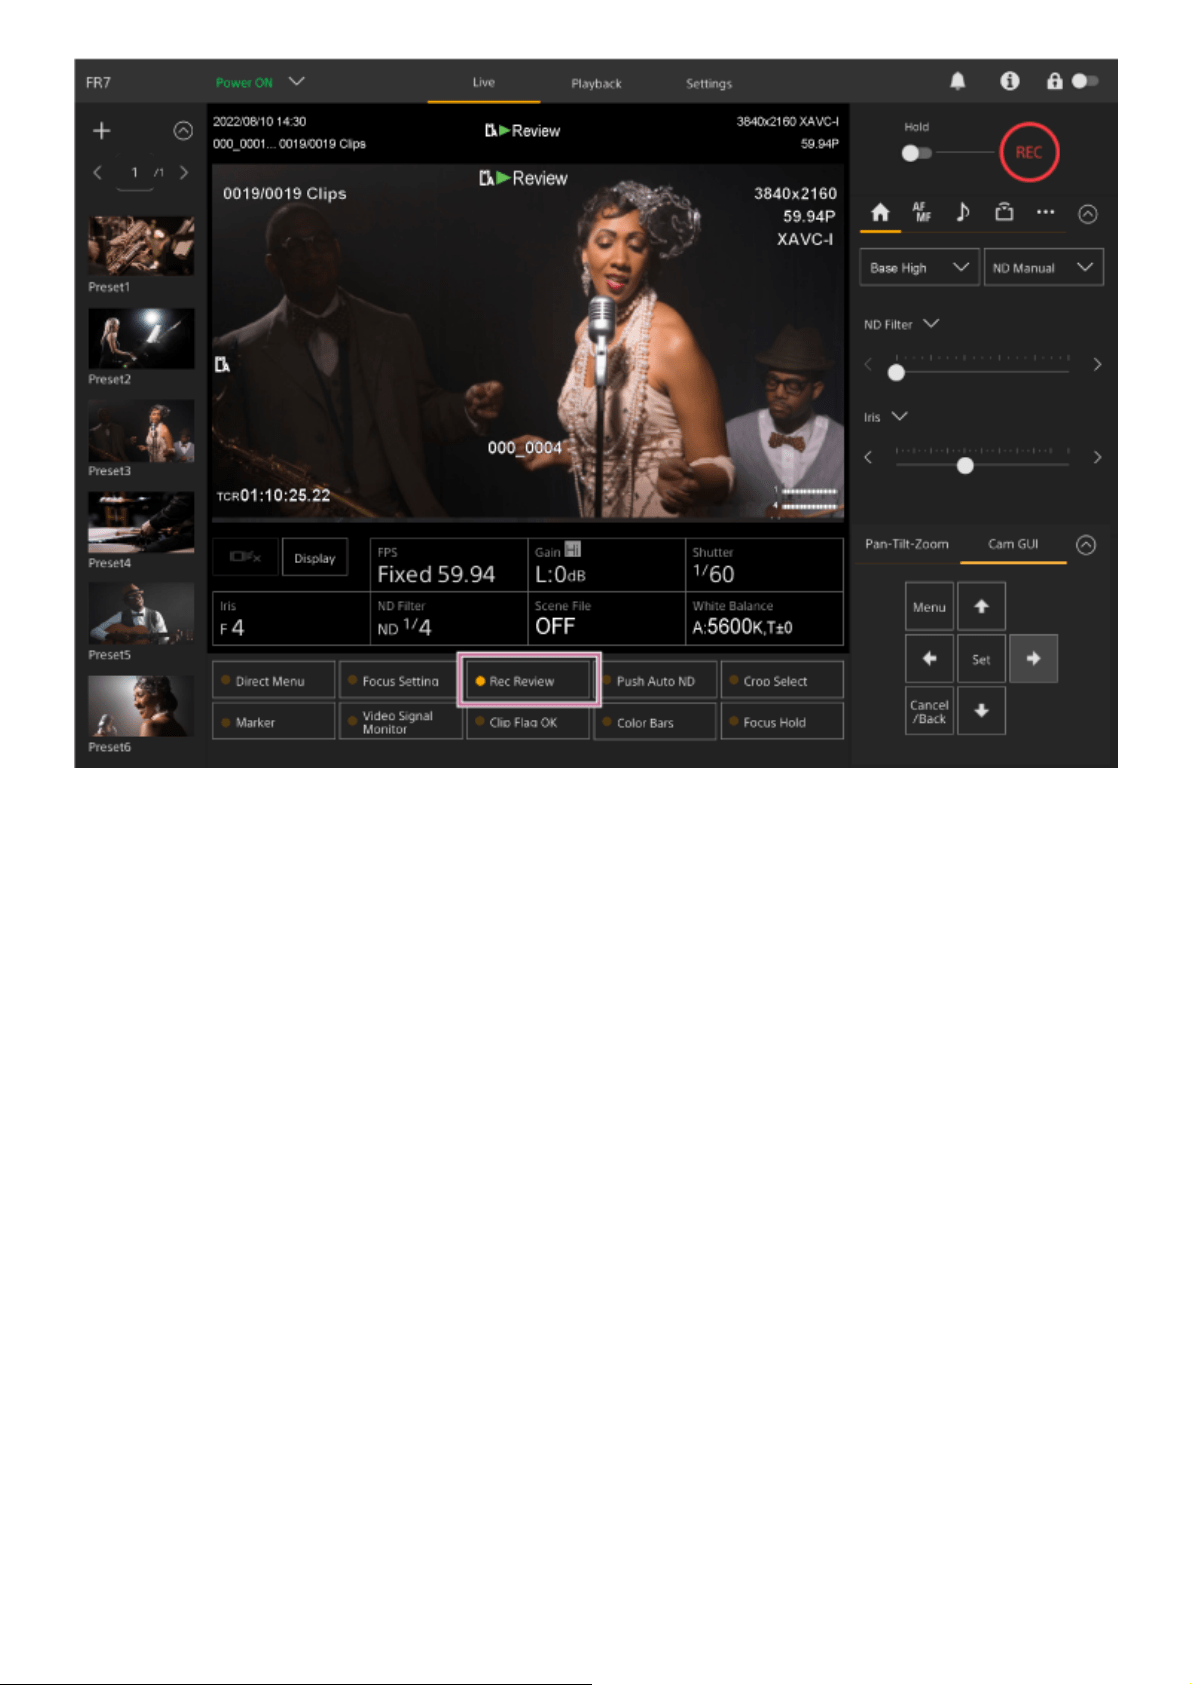
The clip is played to the end, Rec Review ends, and the unit returns to Stby (standby) mode.
To stop Rec Review
Press an assignable button with Rec Review assigned or press the [Cancel/Back] button.
129
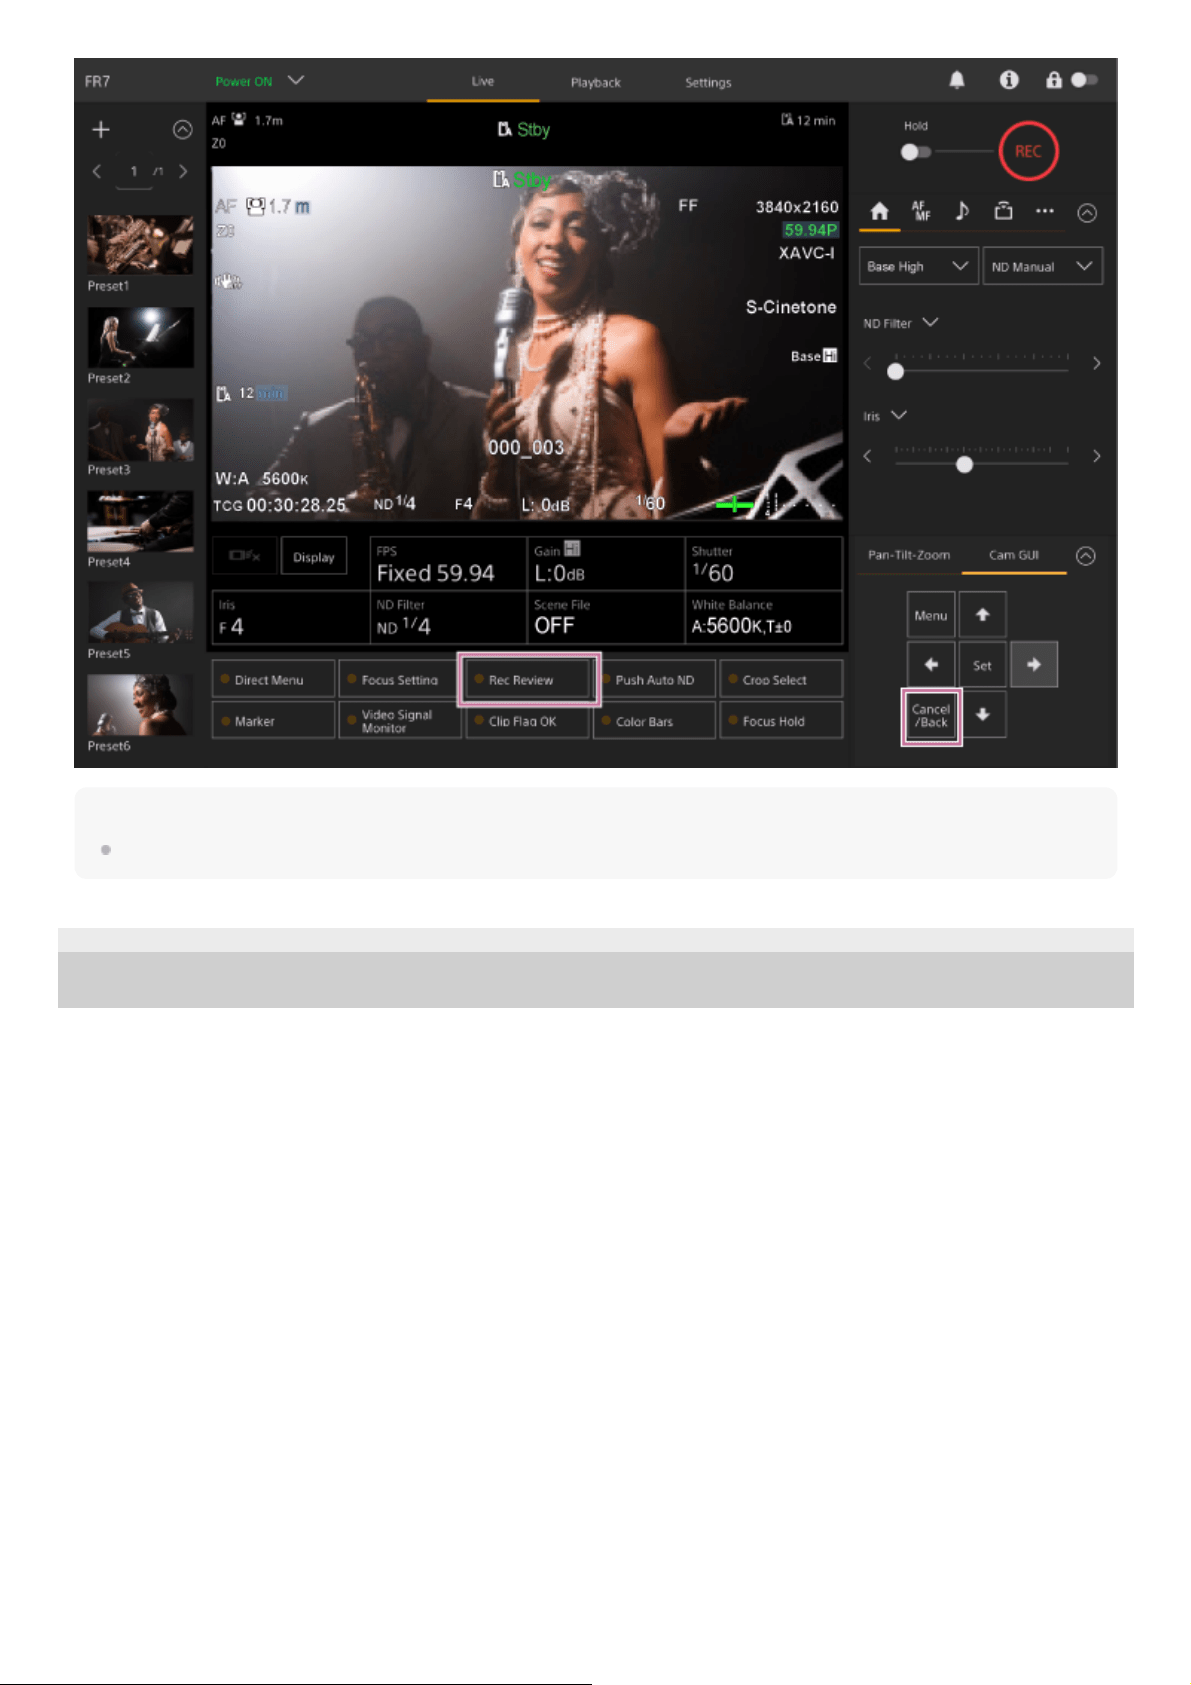
Hint
You can also press the [Cancel/Back] button of the supplied infrared remote control to stop the Rec Review function.
5-041-957-11(1)
Copyright 2022 Sony Corporation
130
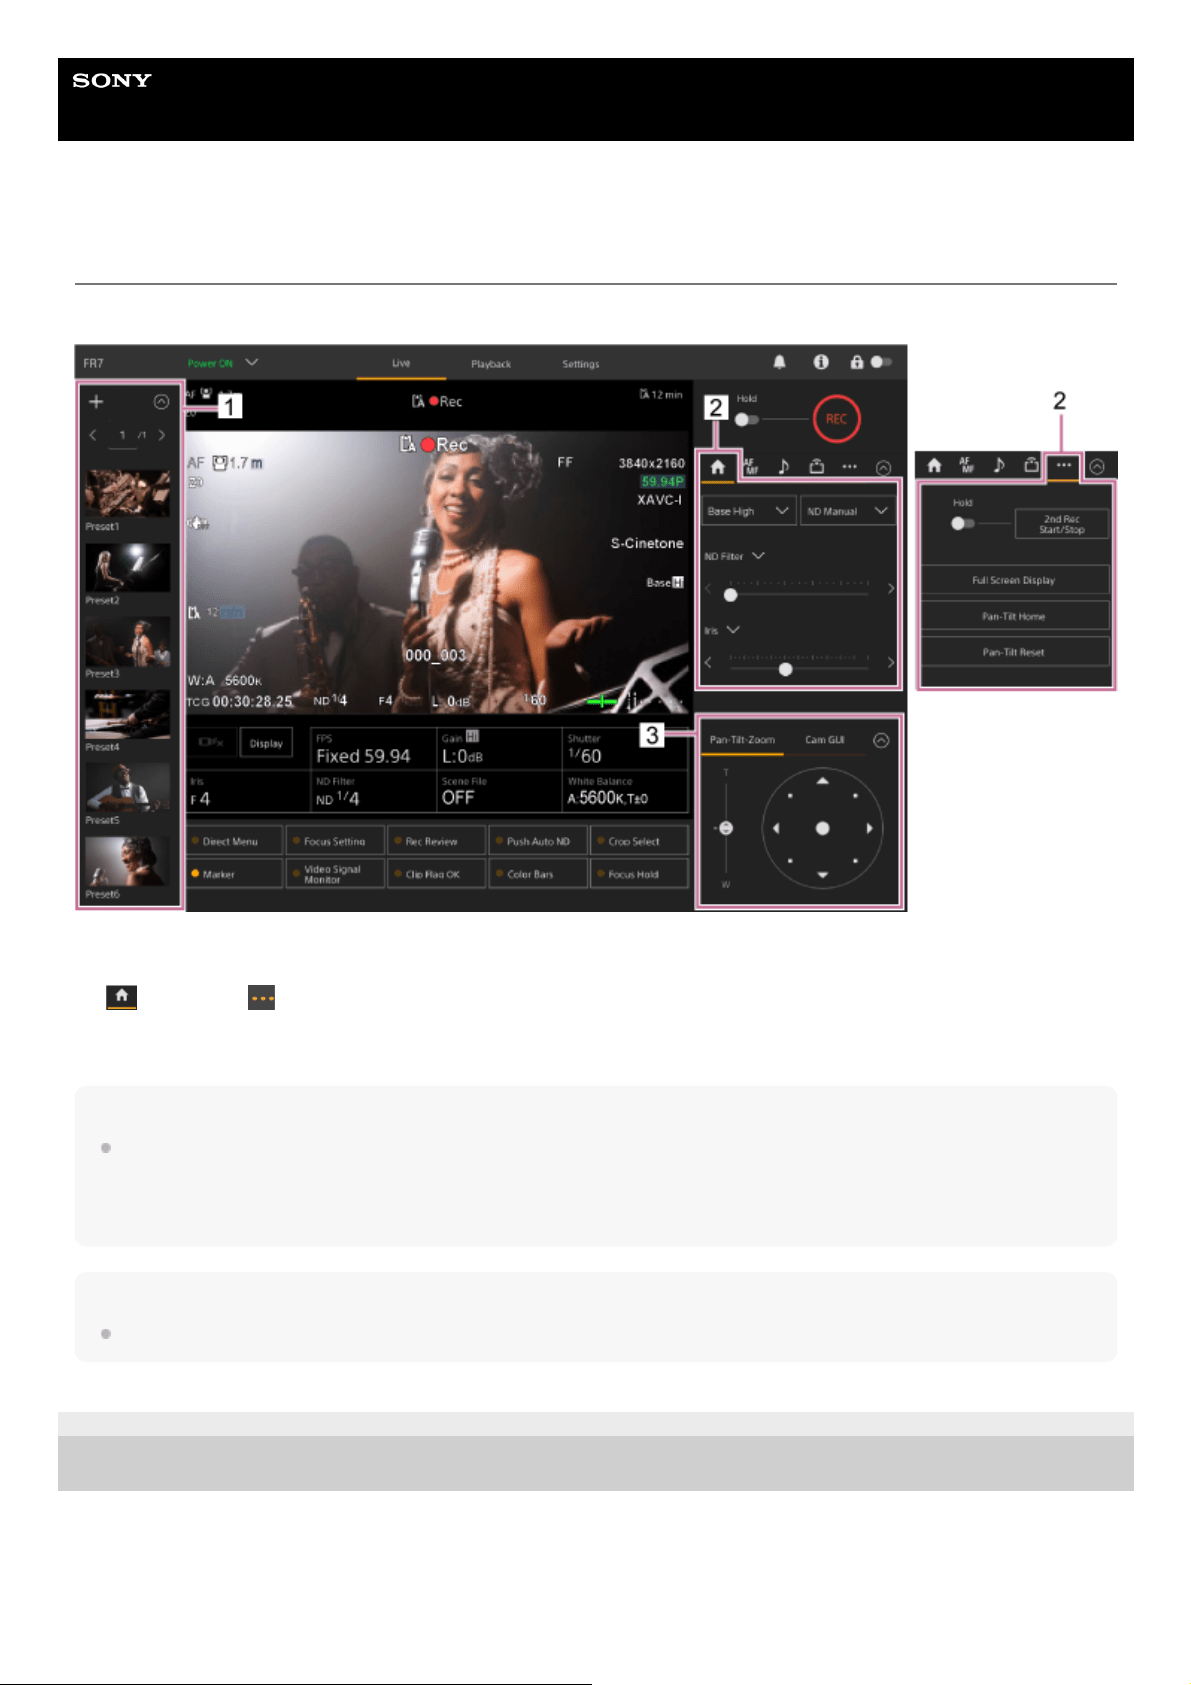
Help Guide
Interchangeable Lens Digital Camera
ILME-FR7 / ILME-FR7K
Framing Adjustment Screen
The framing is adjusted using the following parts of the live operation screen.
Note
Depending on the direction of the camera, the focal length of the lens, and the zoom position, part of the unit or cables connected
to the connector block may be visible. Before shooting, check the field of view for the lens and focal length you are using. You
can also control the pan/tilt range using [Pan-Tilt] > [P/T Range Limit] in the web menu. When the unit is turned on or pan/tilt
reset is executed, this range limit setting is ignored. For details, see [Pan-Tilt] > [P/T Range Limit] in the web menu.
Hint
You can also control the framing using the supplied infrared remote control.
5-041-957-11(1)
Copyright 2022 Sony Corporation
Preset position control panel1.
(Main) tab / (Others) tab2.
Framing control panel3.
131

Help Guide
Interchangeable Lens Digital Camera
ILME-FR7 / ILME-FR7K
Adjusting the Shooting Direction Using the Web App
Moving the camera horizontally is called panning, and move the camera vertically is called tilting.
You can adjust the shooting direction using pan/tilt operations.
Hint
If [Execute Pan-Tilt Reset] is displayed below the joystick, an inconsistency has occurred in the pan/tilt control origin information
of the unit. Execute the pan/tilt reset function to update the origin information. For details, see “Resetting the Pan/Tilt.”
To face the camera back to the front
Press the [Pan-Tilt Home] button on the
(Others) tab in the camera control panel.
Note
Depending on the direction of the camera, the focal length of the lens, and the zoom position, part of the unit or cables connected
to the connector block may be visible. Before shooting, check the field of view for the lens and focal length you are using. You
can also control the pan/tilt range using [Pan-Tilt] > [P/T Range Limit] in the web menu. When the unit is turned on or pan/tilt
reset is executed, this range limit setting is ignored. For details, see [Pan-Tilt] > [P/T Range Limit] in the web menu.
5-041-957-11(1)
Copyright 2022 Sony Corporation
Press the [Pan-Tilt-Zoom] tab in the framing control panel to display the joystick.
1
Drag the center of the joystick in the direction you want to view while monitoring the camera image panel.
The direction and speed of the camera changes in response to the drag direction and level.
You can adjust the pan/tilt more precisely by pressing the peripheral areas of the joystick.
2
132

Help Guide
Interchangeable Lens Digital Camera
ILME-FR7 / ILME-FR7K
Setting the Pan/Tilt Operating Speed
You can change the pan/tilt operating speed using the [Pan-Tilt Speed] slider in the camera control panel by operating
the joystick in the framing control panel.
Note
If there is a wall or other obstacle within the range of motion of the camera, be careful not to hit the camera or lens during pan/tilt
operation.
The pan/tilt acceleration depends on physical characteristics, such as the weight balance of the lens. You can change the
acceleration setting using [Pan-Tilt] > [P/T Acceleration] > [Ramp Curve] in the web menu or camera menu.
5-041-957-11(1)
Copyright 2022 Sony Corporation
Press the
(Main) tab in the camera control panel.
1
Select the [Pan-Tilt Speed] slider from the list.
If the [Pan-Tilt Speed] slider is not displayed, select either of the two slider function selection buttons to display the
slider.
2
Move the slider knob left or right.
Moving the knob to the left decreases the operating speed, while moving the knob to the right increases the
operating speed.
3
133
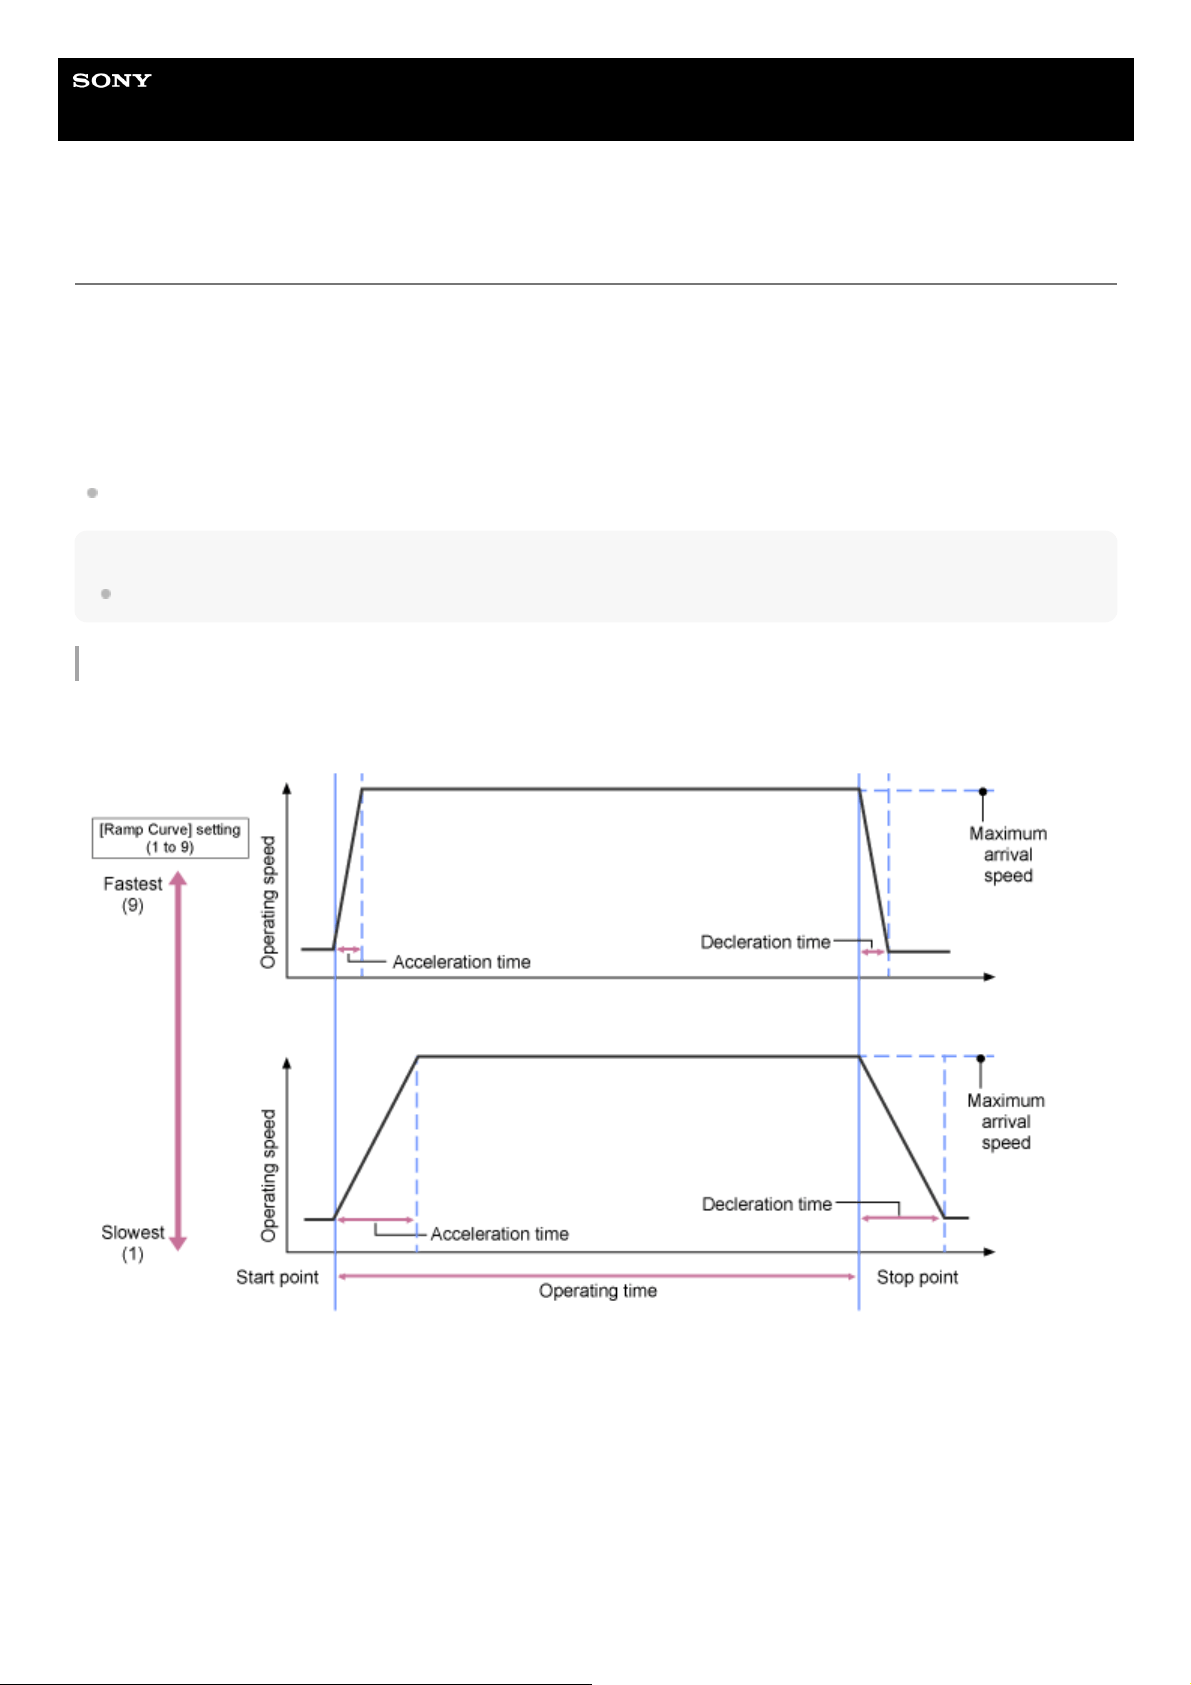
Help Guide
Interchangeable Lens Digital Camera
ILME-FR7 / ILME-FR7K
Setting the Pan/Tilt Operation Acceleration
You can set the acceleration operation in nine gradations using [Pan-Tilt] > [P/T Acceleration] > [Ramp Curve] in the web
menu or camera menu. Increase the value for more rapid changes in speed, or decrease the value for more gradual
changes in speed.
For greater responsiveness when operating the pan/tilt, select a value in the range 7 to 9.
For greater positional accuracy at the start/end of the movement to a preset position, a value in the range 1 to 6 is
recommended.
For details about preset position, see “Saving/Restoring Pan/Tilt and Zoom Position.”
Note
When the value is set high, the function may not work properly if a heavy lens is attached. Check the operation before actual use.
Relationship between [Ramp Curve] setting and pan/tilt operation
When pan/tilt is operated
When a preset position is recalled
134
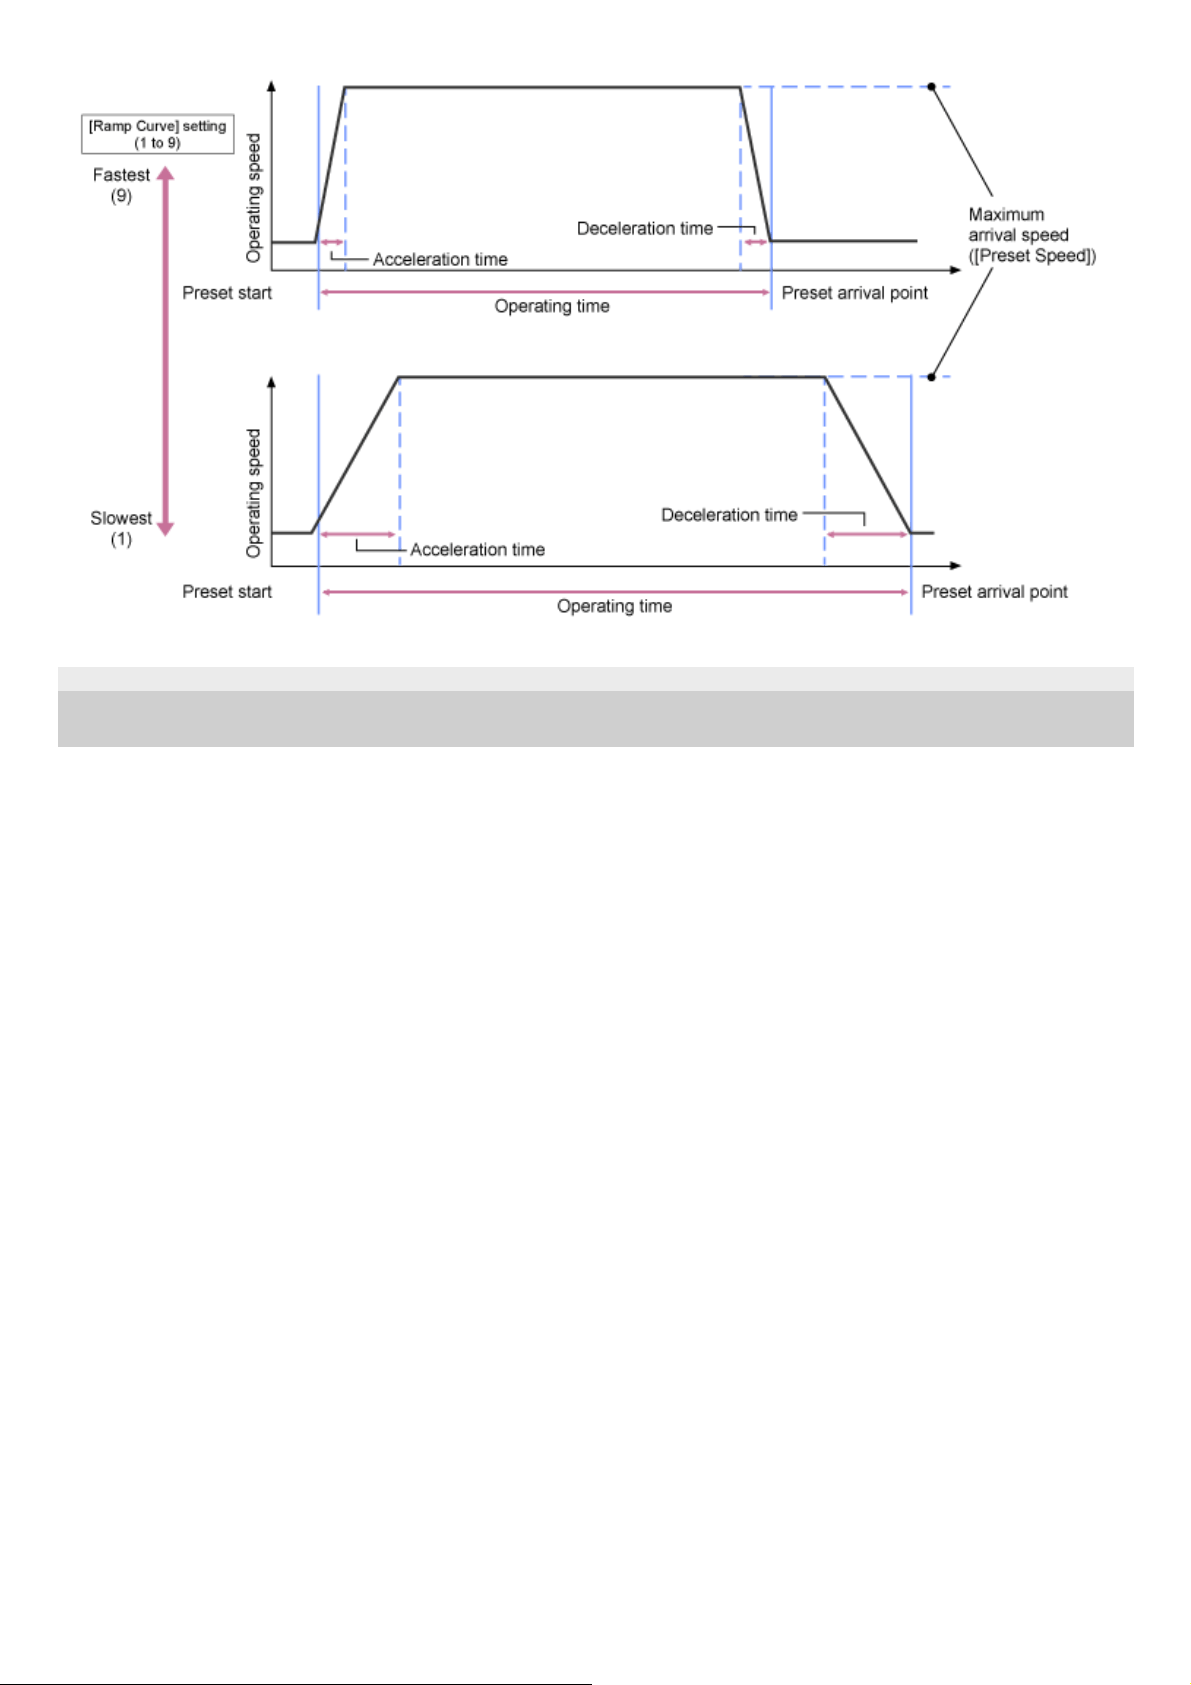
5-041-957-11(1) Copyright 2022 Sony Corporation
135
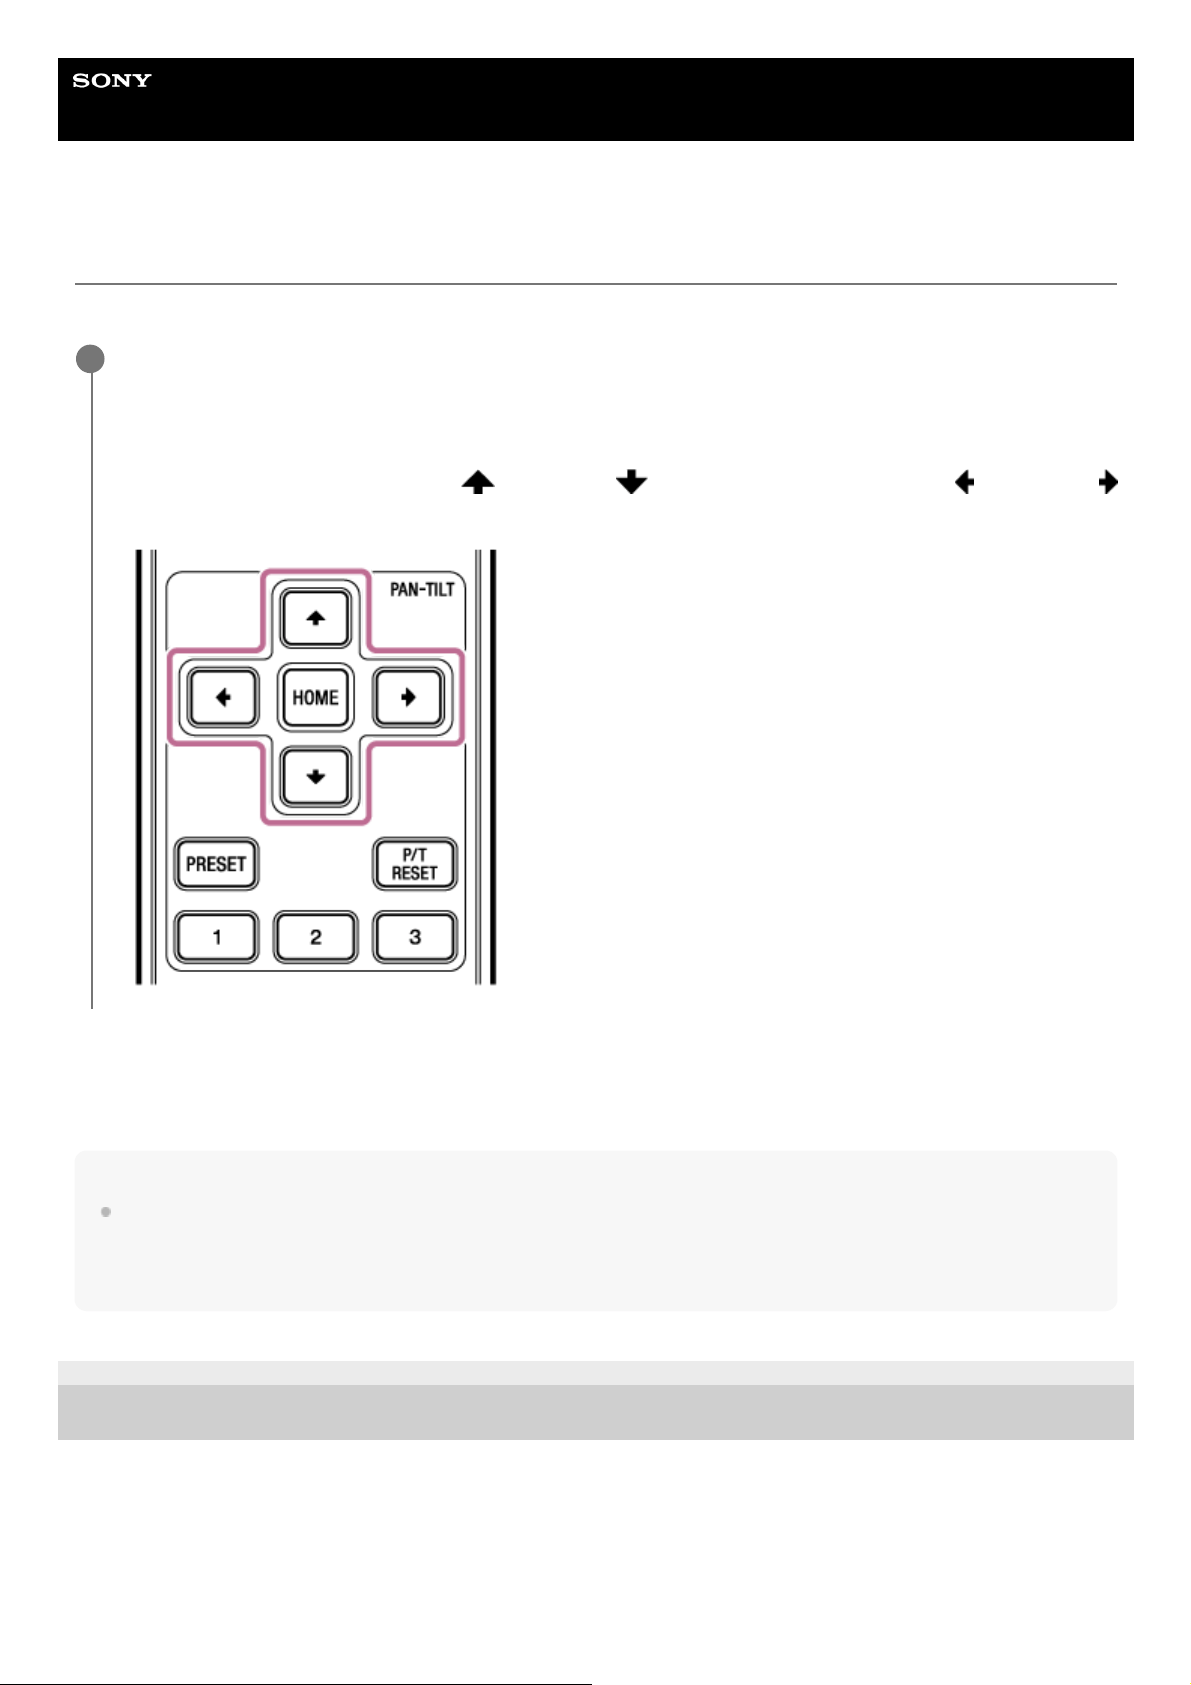
Help Guide
Interchangeable Lens Digital Camera
ILME-FR7 / ILME-FR7K
Adjusting the Shooting Direction Using the Supplied Infrared Remote Control
You can adjust the shooting direction using the pan/tilt operation buttons of the supplied infrared remote control.
To face the camera back to the front
Press the HOME button.
Note
Depending on the direction of the camera, the focal length of the lens, and the zoom position, part of the unit or cables connected
to the connector block may be visible. Before shooting, check the field of view for the lens and focal length you are using. You
can also control the pan/tilt range using [Pan-Tilt] > [P/T Range Limit] in the web menu. When the unit is turned on or pan/tilt
reset is executed, this range limit setting is ignored. For details, see [Pan-Tilt] > [P/T Range Limit] in the web menu.
5-041-957-11(1)
Copyright 2022 Sony Corporation
Press the arrow buttons to control the pan/tilt.
Press the arrow button of the direction you want to view while monitoring the camera image.
To move a short distance, press the arrow button briefly.
To move a large distance, press and hold the arrow button.
To move diagonally, press and hold the
(up arrow) or (down arrow) button and press the (left arrow) or
(right arrow) button.
1
136
Help Guide
Interchangeable Lens Digital Camera
ILME-FR7 / ILME-FR7K
Setting the Zoom Type
Set the type of zoom using [Technical] > [Zoom] > [Zoom Type] in the camera menu.
The type of zoom will vary depending on the type of lens that is attached.
Note
Clear Image Zoom is not available in the following cases.
When the [Shooting] > [S&Q Motion] > [Setting] is set to On and the [Frame Rate] setting in the camera menu is higher than 60
fps
When [Project] > [Rec Format] > [Codec] in the camera menu is set to [RAW] or an option that includes RAW
Operating the SERVO/MANUAL select switch on a lens resets the magnification of Clear Image Zoom to 1×.
During Clear Image Zoom operation, the focus area is set to Wide. Also, face/eye detection AF is disabled.
When set to [On(Clear Image Zoom)], the pan/tilt preset function is disabled.
Clear Image Zoom
The unit is equipped with a zoom function that uses image signal processing called Clear Image Zoom. When Clear
Image Zoom is enabled, zoom is supported even for fixed-focus lenses. It can also be used to extend the range beyond
the optical range on a power zoom lens.
The maximum zoom ratio using Clear Image Zoom varies depending on the recording resolution.
For QFHD/4K recording resolution: 1.5×
For HD recording resolution: 2×
5-041-957-11(1)
Copyright 2022 Sony Corporation
Type of attached lens
[Zoom Type] setting
[Optical Zoom Only] [On(Clear Image Zoom)]
Fixed-focus lens/Manual zoom
lens
Zoom operation is not
supported.
Clear Image Zoom is supported.
Power zoom lens
Optical zoom only is
supported.
Optical zoom and Clear Image Zoom are
supported.
137
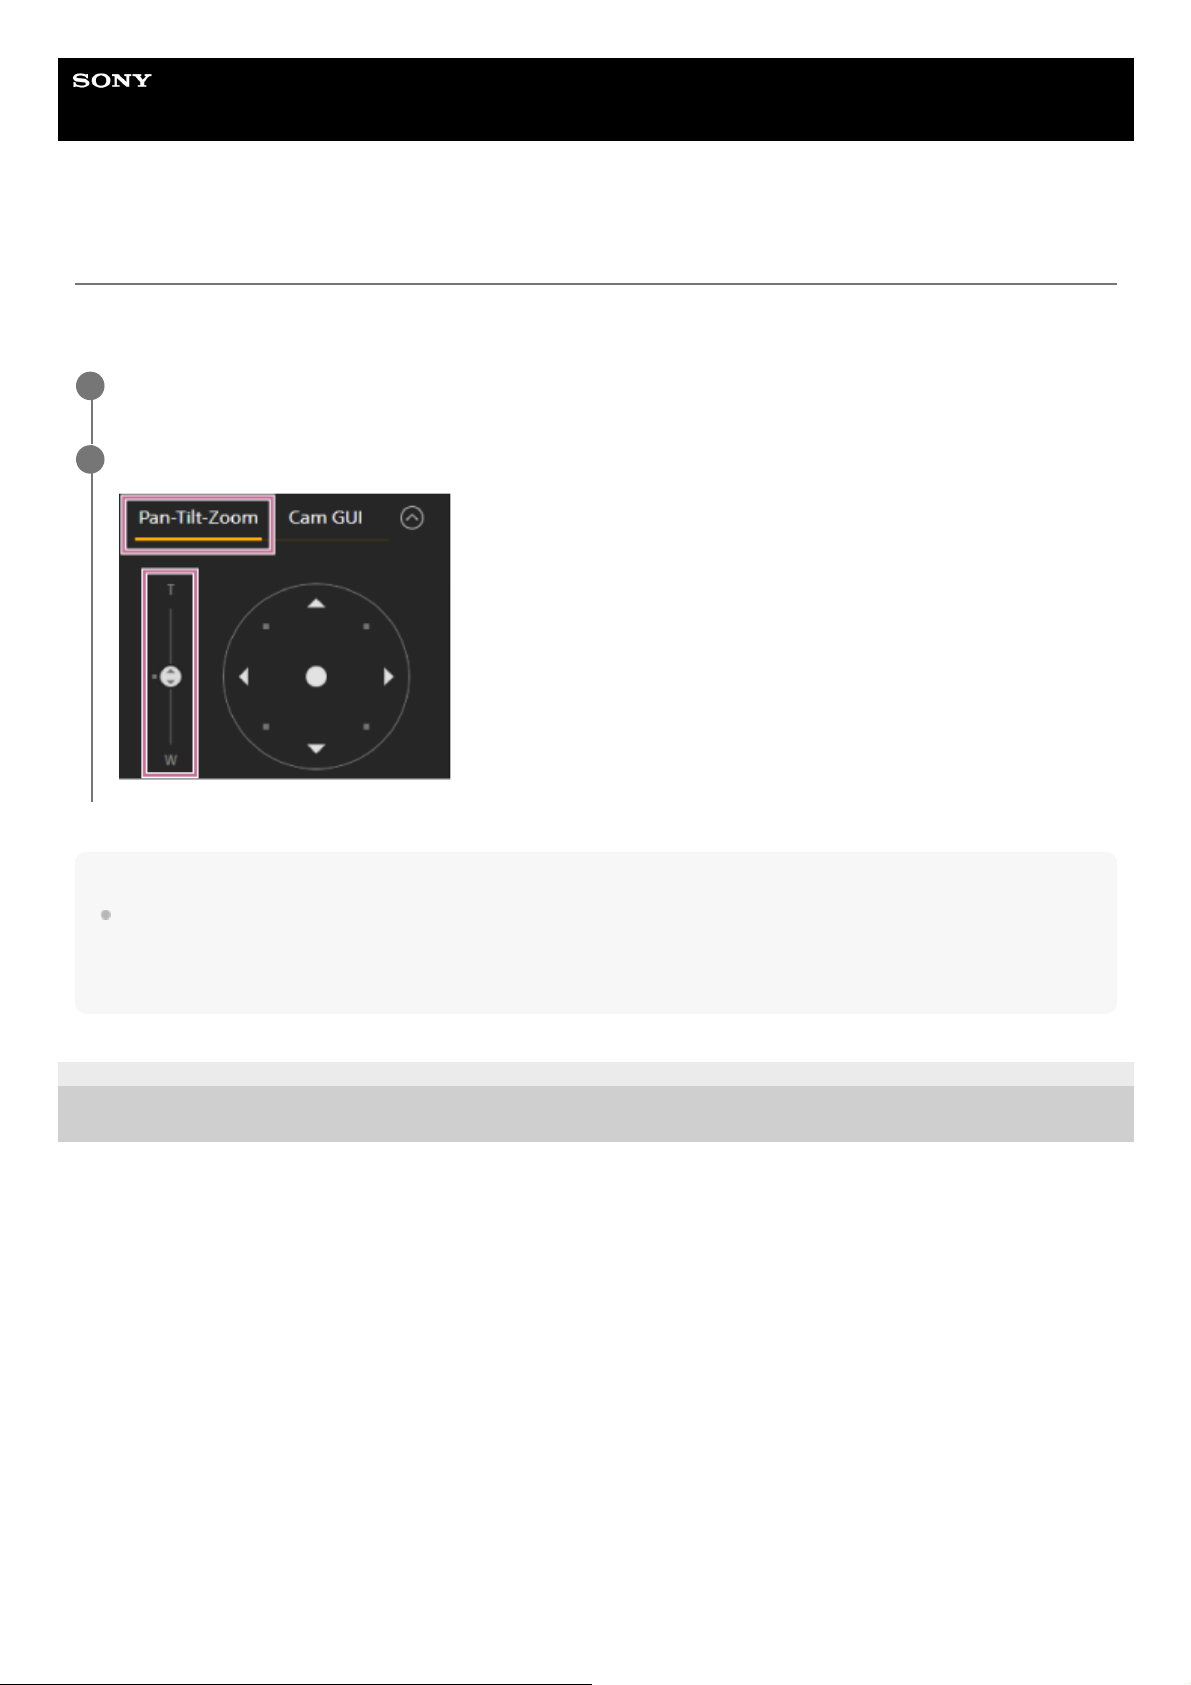
Help Guide
Interchangeable Lens Digital Camera
ILME-FR7 / ILME-FR7K
Adjusting the Zoom Using the Web App
You can adjust the zoom of the unit using optical zoom or Clear Image Zoom. This topic describes how to make
adjustments using the Web App. For details about Clear Image Zoom, see “Setting the Zoom Type.”
Note
Depending on the direction of the camera, the focal length of the lens, and the zoom position, part of the unit or cables connected
to the connector block may be visible. Before shooting, check the field of view for the lens and focal length you are using. You
can also control the pan/tilt range using [Pan-Tilt] > [P/T Range Limit] in the web menu. When the unit is turned on or pan/tilt
reset is executed, this range limit setting is ignored. For details, see [Pan-Tilt] > [P/T Range Limit] in the web menu.
5-041-957-11(1)
Copyright 2022 Sony Corporation
Press the [Pan-Tilt-Zoom] tab in the framing control panel to display the pan/tilt control panel.
1
Slide the [Zoom] slider knob in the [T] (Telephoto) direction or [W] (Wide) direction to adjust the zoom.
2
138

Help Guide
Interchangeable Lens Digital Camera
ILME-FR7 / ILME-FR7K
Setting the Zoom Operating Speed
You can change the zoom operating speed of the [Zoom] slider in the framing control panel using the [Zoom Speed]
slider in the camera control panel.
5-041-957-11(1)
Copyright 2022 Sony Corporation
Press the
(Main) tab in the camera control panel.
1
Select the [Zoom Speed] slider from the list.
If the [Zoom Speed] slider is not displayed, select either of the two slider function selection buttons to display the
slider.
2
Move the [Zoom Speed] slider knob left or right.
Moving the knob to the left decreases the operating speed, while moving the knob to the right increases the
operating speed.
3
139
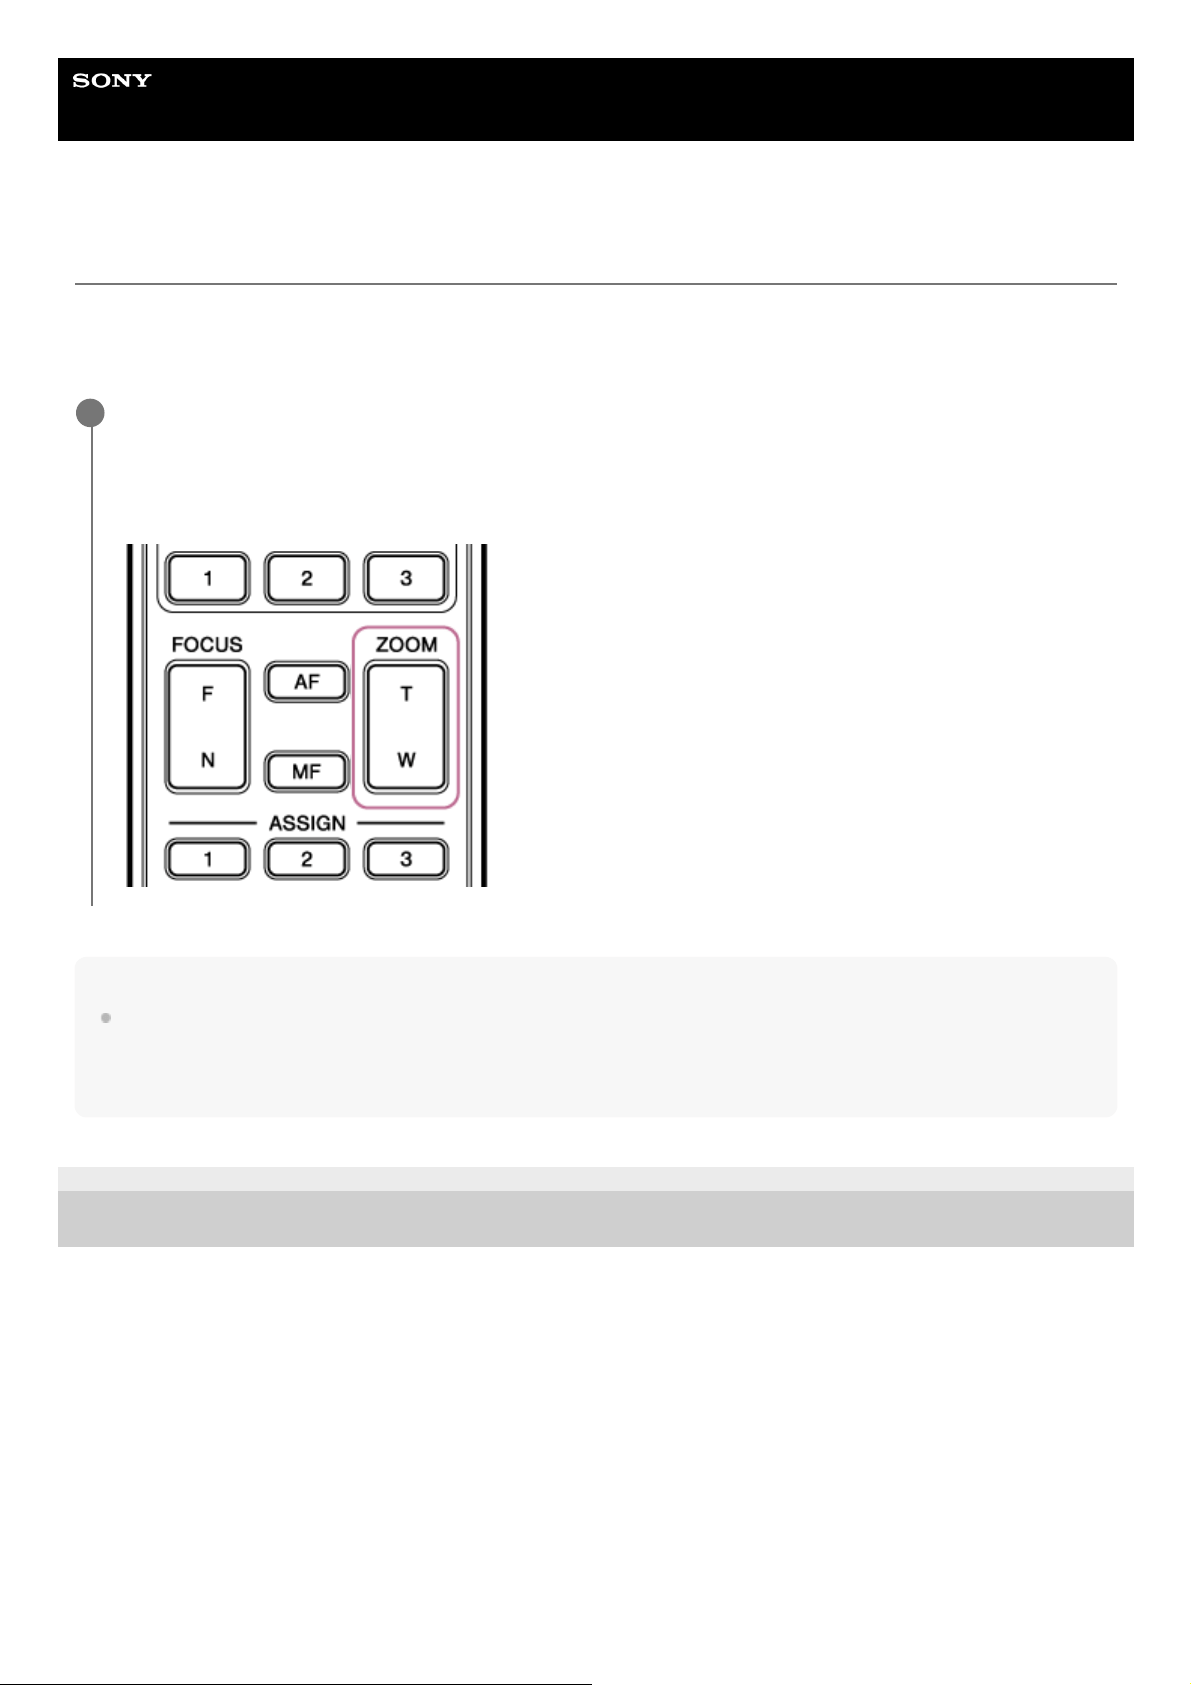
Help Guide
Interchangeable Lens Digital Camera
ILME-FR7 / ILME-FR7K
Adjusting the Zoom Using the Supplied Infrared Remote Control
You can adjust the zoom of the unit using optical zoom or Clear Image Zoom. This topic describes how to make
adjustments using the supplied infrared remote control. For details about Clear Image Zoom, see “Setting the Zoom
Type.”
Note
Depending on the direction of the camera, the focal length of the lens, and the zoom position, part of the unit or cables connected
to the connector block may be visible. Before shooting, check the field of view for the lens and focal length you are using. You
can also control the pan/tilt range using [Pan-Tilt] > [P/T Range Limit] in the web menu. When the unit is turned on or pan/tilt
reset is executed, this range limit setting is ignored. For details, see [Pan-Tilt] > [P/T Range Limit] in the web menu.
5-041-957-11(1)
Copyright 2022 Sony Corporation
Press the zoom button to adjust the zoom.
Press the T (Telephoto) or W (Wide) button while monitoring the screen to adjust the zoom.
To zoom in, press the T button.
To zoom out, press the W button.
1
140
Help Guide
Interchangeable Lens Digital Camera
ILME-FR7 / ILME-FR7K
Calibrating an E-Mount Lens
Calibration corrects for differences in the zoom position due to differences in individual lenses when using an E-mount
power zoom lens.
To calculate the zoom position accurately, calibrate your lens to correct for individual differences in the lens using the
following procedure.
Calibration data
Calibration data for up to five lenses can be saved in the unit. The oldest data will be overwritten when a 6th or
subsequent lens is calibrated.
You can check whether calibration data is available for the attached lens by pressing the
(Camera Status) button
in the common area of the Web App screen and selecting [Lens] > [Calibration Data].
5-041-957-11(1)
Copyright 2022 Sony Corporation
If the lens has a SERVO/MANUAL switch, set to the SERVO position.
Note
The lens will be unable to receive zoom instructions from the unit if the switch is set to MANUAL.
1
Run the calibration using [Technical] > [Lens] > [Lens Calibration] in the camera menu.
During calibration, the zoom lens moves automatically and is measured.
2
141
Help Guide
Interchangeable Lens Digital Camera
ILME-FR7 / ILME-FR7K
Saving/Restoring Pan/Tilt, Zoom Position, and Focus Setting Using the Web App
You can save the pan/tilt, zoom position, and focus setting and recall them when required using the Web App.
For details about the items that can be saved/restored, see “Preset Position Saved Items.”
Note
This function is disabled when [Technical] > [Zoom] > [Zoom Type] is set to [On(Clear Image Zoom)] in the camera menu
If the [Pan-Tilt] > [P/T Direction] [Ceiling] setting in the web menu is changed, all the saved preset positions are deleted.
Determine the position that you want to save using pan/tilt and zoom operations.
1
Press the [+] button in the preset position control panel.
The image with the saved position is displayed in the preset position control panel.
Hint
If the preset position control panel is not displayed, press the
(Open) button to display it.
Positions are saved in sequence from [Preset1].
If there are unused presets within a sequence of presets, positions will be saved in presets starting with the unused
presets. For example, if position presets are saved in [Preset1] and [Preset3] but not in [Preset2], the next position presets
will be saved in [Preset2] and then in [Preset4].
Up to 100 position presets can be saved.
You can rename each position preset. For details, see “Renaming Position Presets Using the Web App.”
2
Restore a saved position.
3
142

5-041-957-11(1) Copyright 2022 Sony Corporation
Double-press the position thumbnail you want to restore in the preset position control panel to restore the
corresponding position.
Hint
You can also restore a position by pressing the image, pressing the
(Preset Position Menu) button that appears and
selecting [Recall].
The transition speed to a saved position is determined by the [Pan-Tilt] > [P/T Preset] > [Common Speed] setting in the
web menu when the position was saved. You can also change the transition speed after saving. For details, see “Changing
the Transition Speed of Position Presets.”
The degree of change in the pan/tilt position when moving to a preset position can be adjusted using the transition speed
and [Ramp Curve] settings. For details, see “Changing the Transition Speed of Position Presets” and “Setting the Pan/Tilt
Operation Acceleration.”
143
Help Guide
Interchangeable Lens Digital Camera
ILME-FR7 / ILME-FR7K
Renaming Position Presets Using the Web App
You can rename position presets.
5-041-957-11(1)
Copyright 2022 Sony Corporation
Press the position preset you want to rename.
The
(Preset Position Menu) button appears at the top right of the image.
1
Press the
(Preset Position Menu) button and select [Rename] from the displayed menu.
2
Enter a new preset name.
3
144
Help Guide
Interchangeable Lens Digital Camera
ILME-FR7 / ILME-FR7K
Replacing a Saved Position with a New Position Using the Web App
You can replace a saved position with a new position.
5-041-957-11(1)
Copyright 2022 Sony Corporation
Determine the position that you want to save using pan/tilt and zoom operations.
1
Press the position image you want to replace in the preset position control panel.
The
(Preset Position Menu) button appears at the top right of the screen.
2
Press the
(Preset Position Menu) button and select [Replace] from the displayed menu.
The new position replaces the current setting.
3
145
Help Guide
Interchangeable Lens Digital Camera
ILME-FR7 / ILME-FR7K
Deleting a Saved Position Using the Web App
You can delete position presets.
5-041-957-11(1)
Copyright 2022 Sony Corporation
Press the position image you want to delete in the preset position control panel.
The
(Preset Position Menu) button appears at the top right of the image.
1
Press the
(Preset Position Menu) button and select [Delete] from the displayed menu.
The saved position is deleted.
2
146
Help Guide
Interchangeable Lens Digital Camera
ILME-FR7 / ILME-FR7K
Changing the Transition Speed of Position Presets
You can change the transition speed when restoring a saved position.
Hint
When [Pan-Tilt] > [P/T Preset] > [Speed Select] is set to [Common], all positions will be restored at the set speed using [Pan-Tilt]
> [P/T Preset] > [Common Speed].
5-041-957-11(1)
Copyright 2022 Sony Corporation
Set [Pan-Tilt] > [P/T Preset] > [Speed Select] to [Separate] in the web menu.
1
Press the image for the position for which you want to change the transition speed in the preset position
control panel.
The
(Preset Position Menu) button appears at the top right of the image.
2
Press the
(Preset Position Menu) button and select [Speed] from the displayed menu.
3
Select the desired transition speed.
The next time a saved position is restored, the camera will move at the configured speed.
4
147
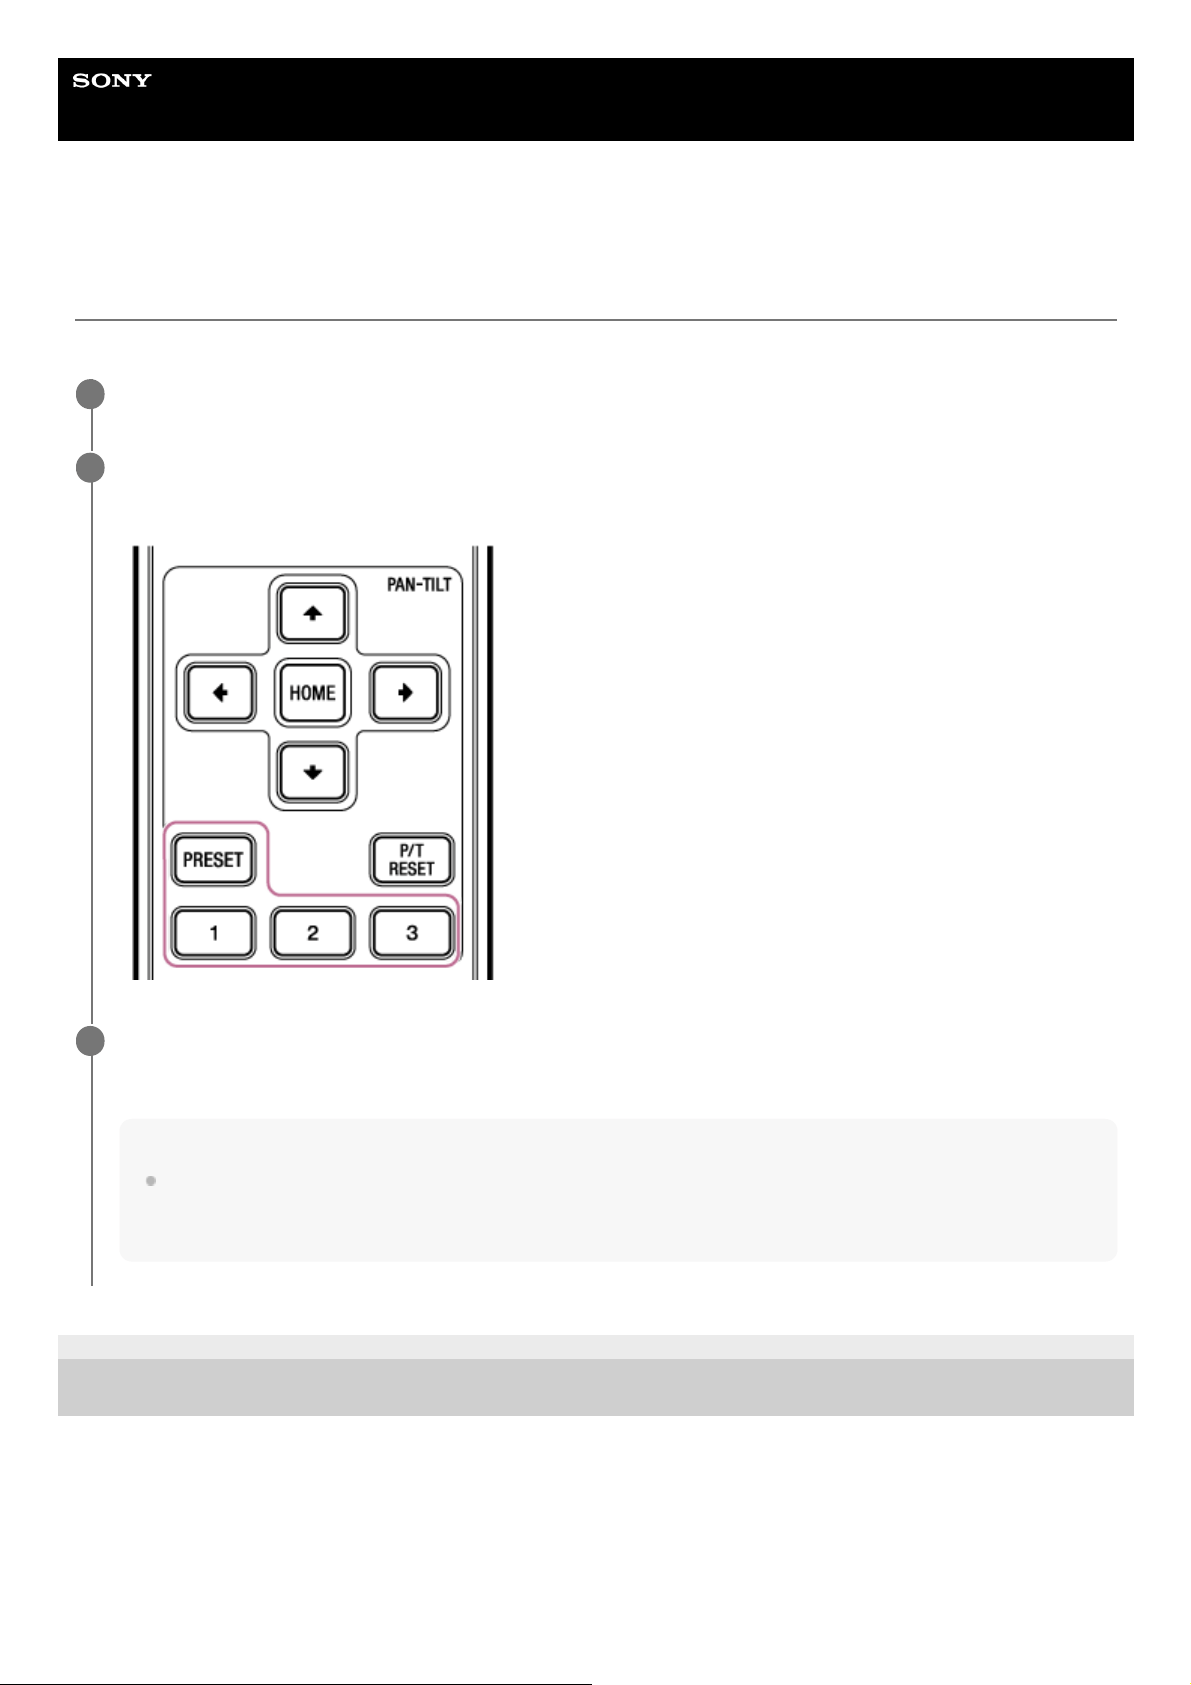
Help Guide
Interchangeable Lens Digital Camera
ILME-FR7 / ILME-FR7K
Saving/Restoring Pan/Tilt and Zoom Position Using the Supplied Infrared Remote
Control
You can save the pan/tilt and zoom position and recall them when required using the supplied infrared remote control.
5-041-957-11(1)
Copyright 2022 Sony Corporation
Adjust the pan/tilt and zoom of the camera.
1
Press and hold the PRESET button and press one of the 1 to 3 buttons.
The position is saved.
2
Restore a saved position.
Press one of the 1 to 3 buttons with a saved position to restore that position.
Hint
In the case of the infrared remote control, the image moves to the saved position at the maximum speed.
You can also change the transition speed after saving. For details, see “Changing the Transition Speed of Position
Presets.”
3
148
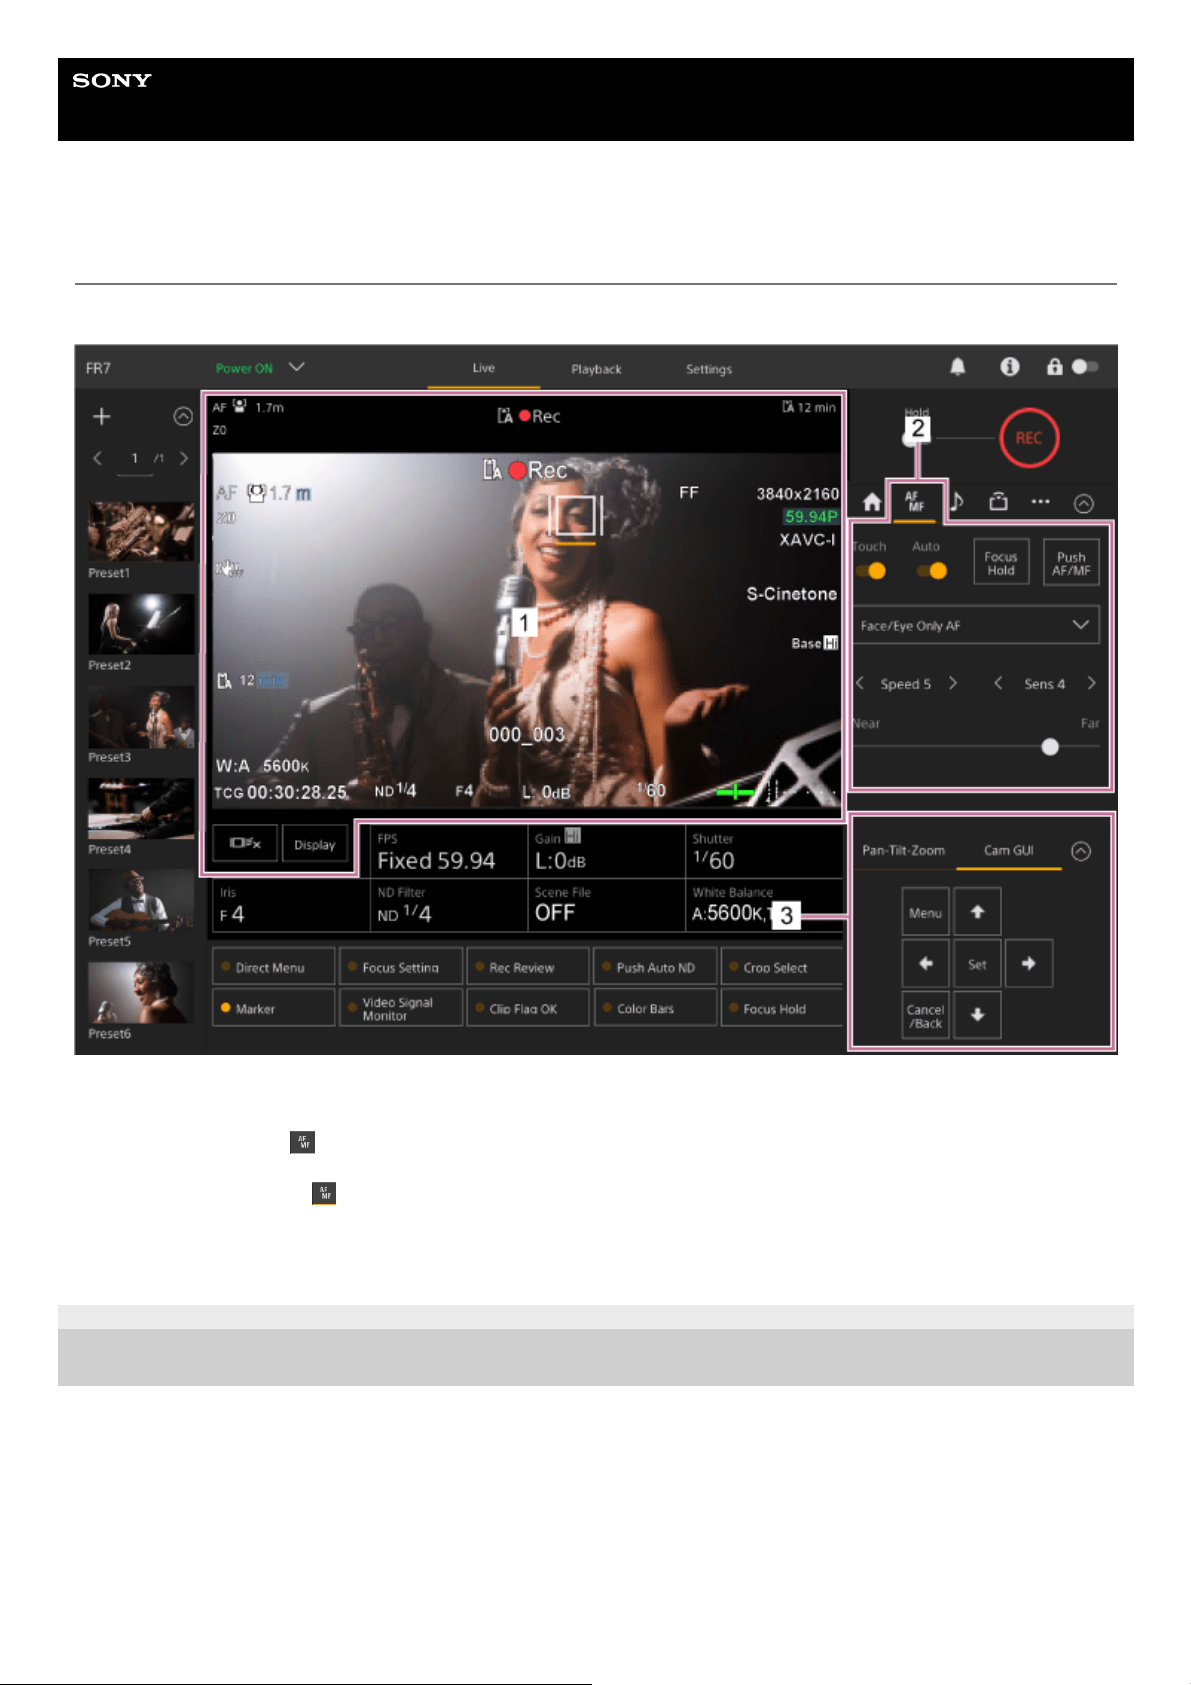
Help Guide
Interchangeable Lens Digital Camera
ILME-FR7 / ILME-FR7K
Focus Adjustment Screen
The focus is adjusted using the following parts of the live operation screen.
5-041-957-11(1) Copyright 2022 Sony Corporation
Camera image panel
You can adjust the focus by touching the camera image. You can disable touch operation by turning off the [Touch
Focus] switch on the
(Focus) tab in the camera control panel.
1.
Camera control panel
(Focus) tab2.
GUI control panel3.
149
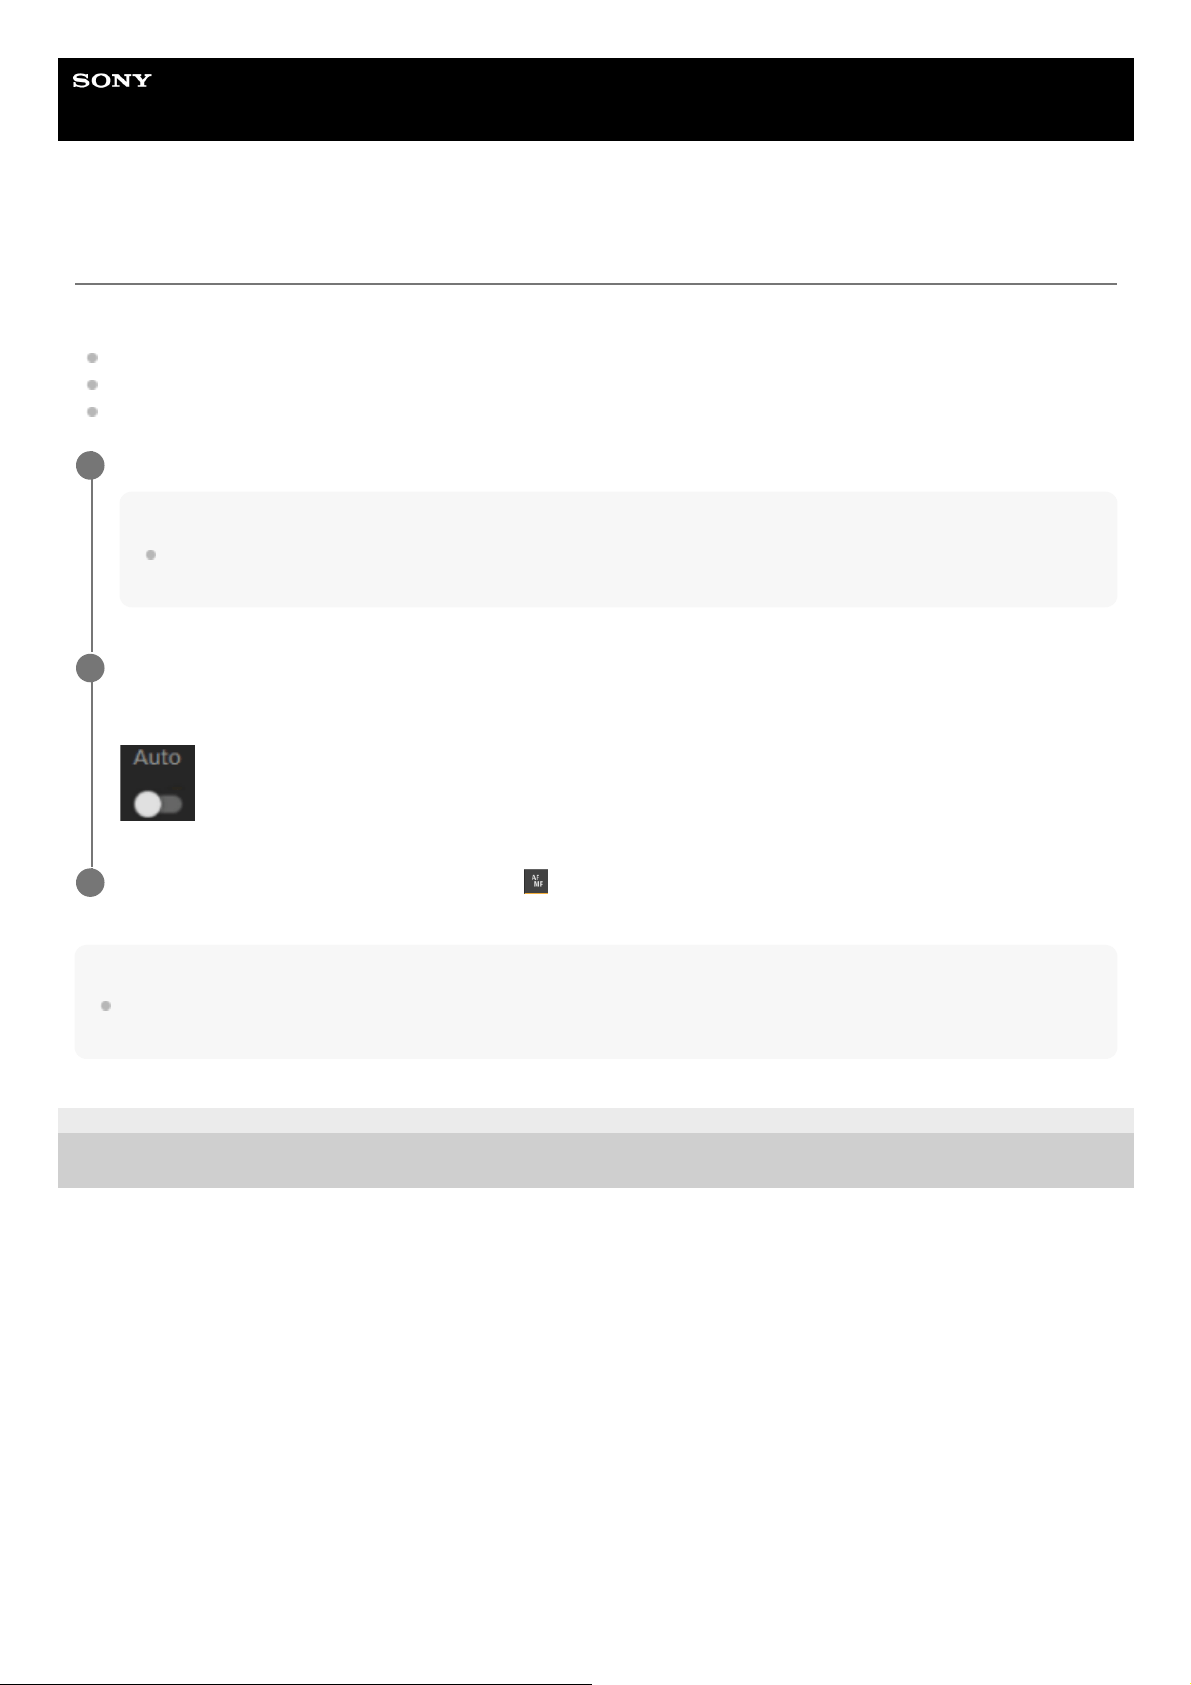
Help Guide
Interchangeable Lens Digital Camera
ILME-FR7 / ILME-FR7K
Adjusting Manually Using the Web App
You can adjust the focus manually, for example, in the following cases.
Subjects partially obscured by water droplets
Subjects with low contrast against the background
Subjects further away than nearby subjects
Hint
You can also use auto focus when manual adjustment is the main method of operation. For details, see “Setting the Auto Focus
Target Manually (AF Assist) Using the Web App.”
5-041-957-11(1)
Copyright 2022 Sony Corporation
If the lens is fitted with a focus selector switch, set the switch to the “AF/MF” or “AF” position.
Note
If the switch is set to the “Full MF” or “MF” position, lens focusing cannot be operated from the unit. See “Focus
adjustments for lenses with focus mode switch” in “Checking the Lens Switches.”
1
Slide the [Auto Focus] switch to the left position in the camera control panel to turn auto focus off.
Manual focus mode is activated.
(MF)
2
Adjust using the slider at the bottom of the
(Focus) tab.
3
150
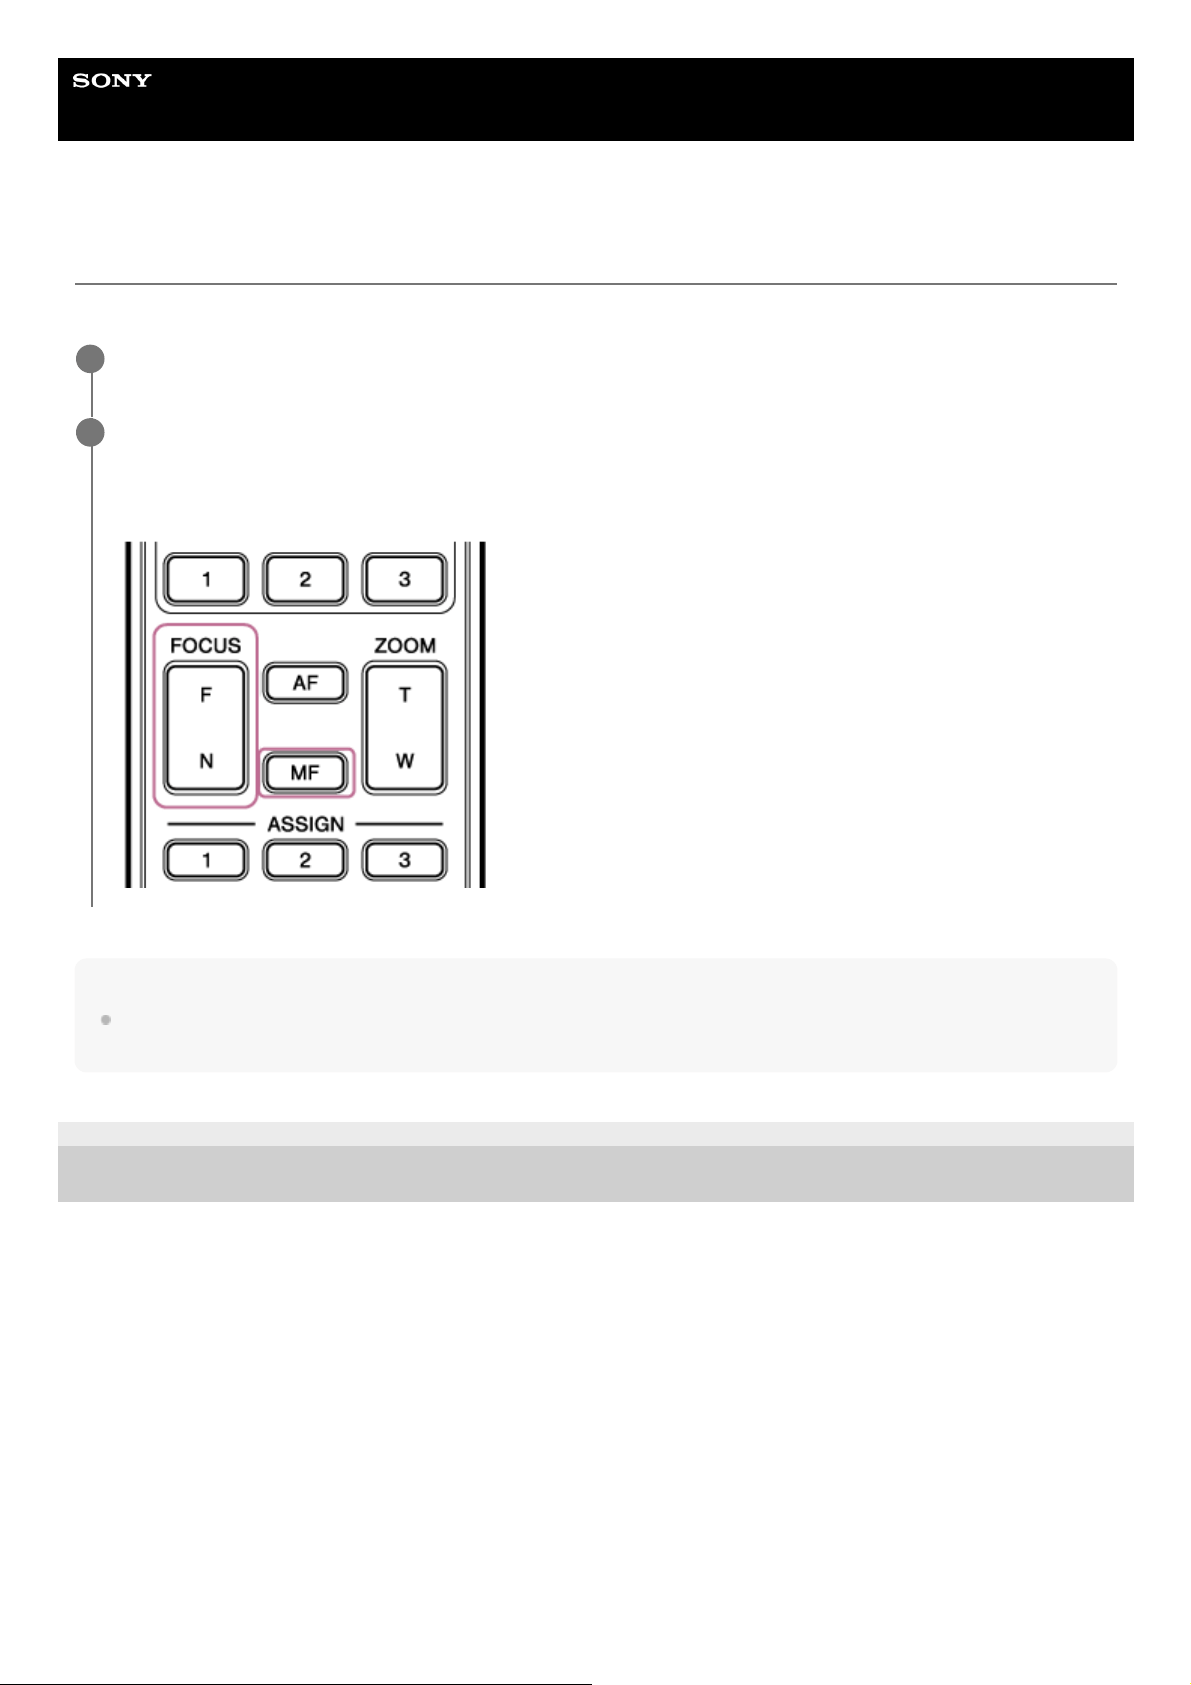
Help Guide
Interchangeable Lens Digital Camera
ILME-FR7 / ILME-FR7K
Adjusting Manually Using the Supplied Infrared Remote Control
You can adjust the focus manually using the supplied infrared remote control.
Hint
You can also use auto focus when manual adjustment is the main method of operation. For details, see “Focusing Manually
During Auto Focus Using the Supplied Infrared Remote Control.”
5-041-957-11(1)
Copyright 2022 Sony Corporation
Press the MF button on the infrared remote control.
1
Adjust the focus manually using the F (Far) button and N (Near) button.
To focus on a far subject, press the F button.
To focus on a near subject, press the N button.
2
151
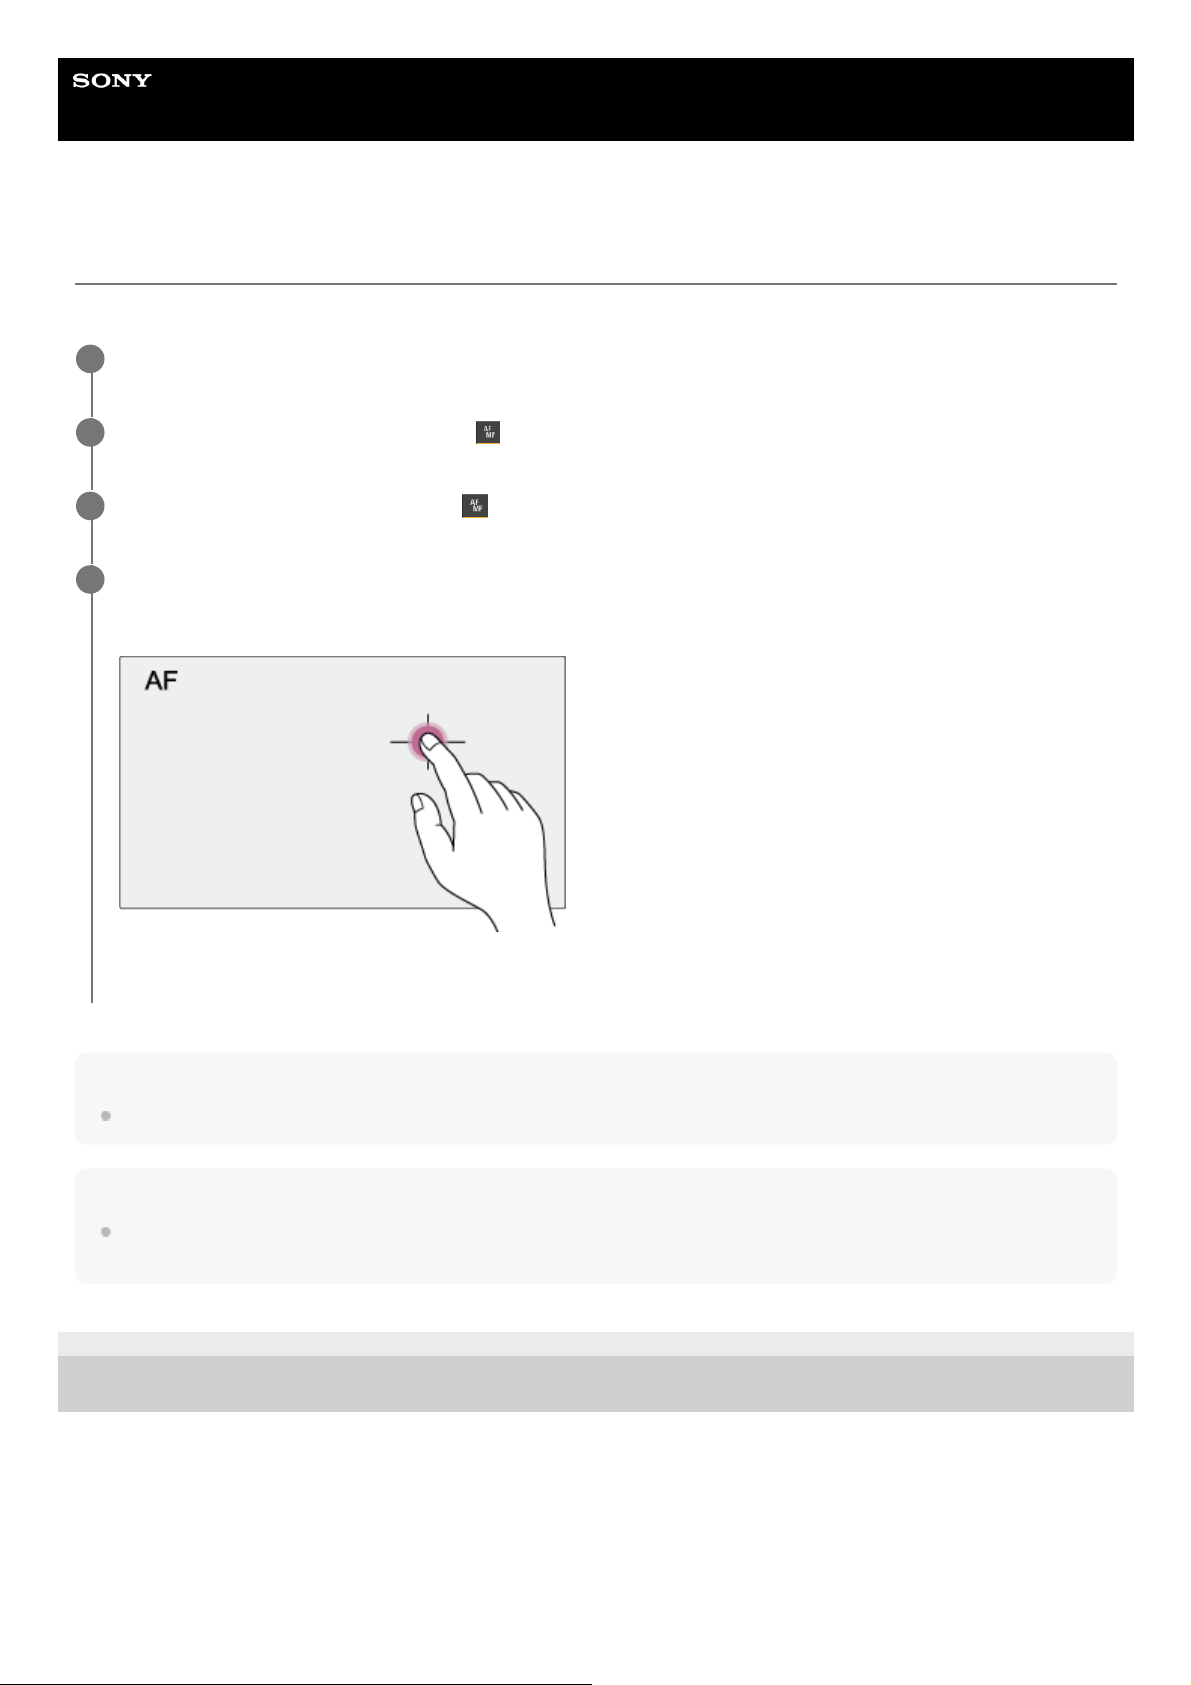
Help Guide
Interchangeable Lens Digital Camera
ILME-FR7 / ILME-FR7K
Focusing by Specifying a Focus Position (Spot Focus)
In manual focus mode, you can specify the position where you want to adjust the focus in the camera image panel.
Note
The spot focus function does not operate if the lens is set for manual focusing.
Hint
In spot focus mode, you can press an assignable button assigned with [Push AF/MF] to temporarily stop spot focus and enable
auto focus while the button is pressed. The focus returns to manual focus when you release the button.
5-041-957-11(1)
Copyright 2022 Sony Corporation
Set [Shooting] > [Focus] > [Touch Function in MF] to [Spot Focus] in the web menu or camera menu.
1
Slide the [Touch Focus] switch on the
(Focus) tab to the right position to turn it on.
2
Slide the [Auto Focus] switch on the
(Focus) tab to the left position to turn it off.
3
Specify the focus position.
The spot focus marker appears and the image is adjusted to be in focus at that position.
Example of specifying the position by touch operation
4
152
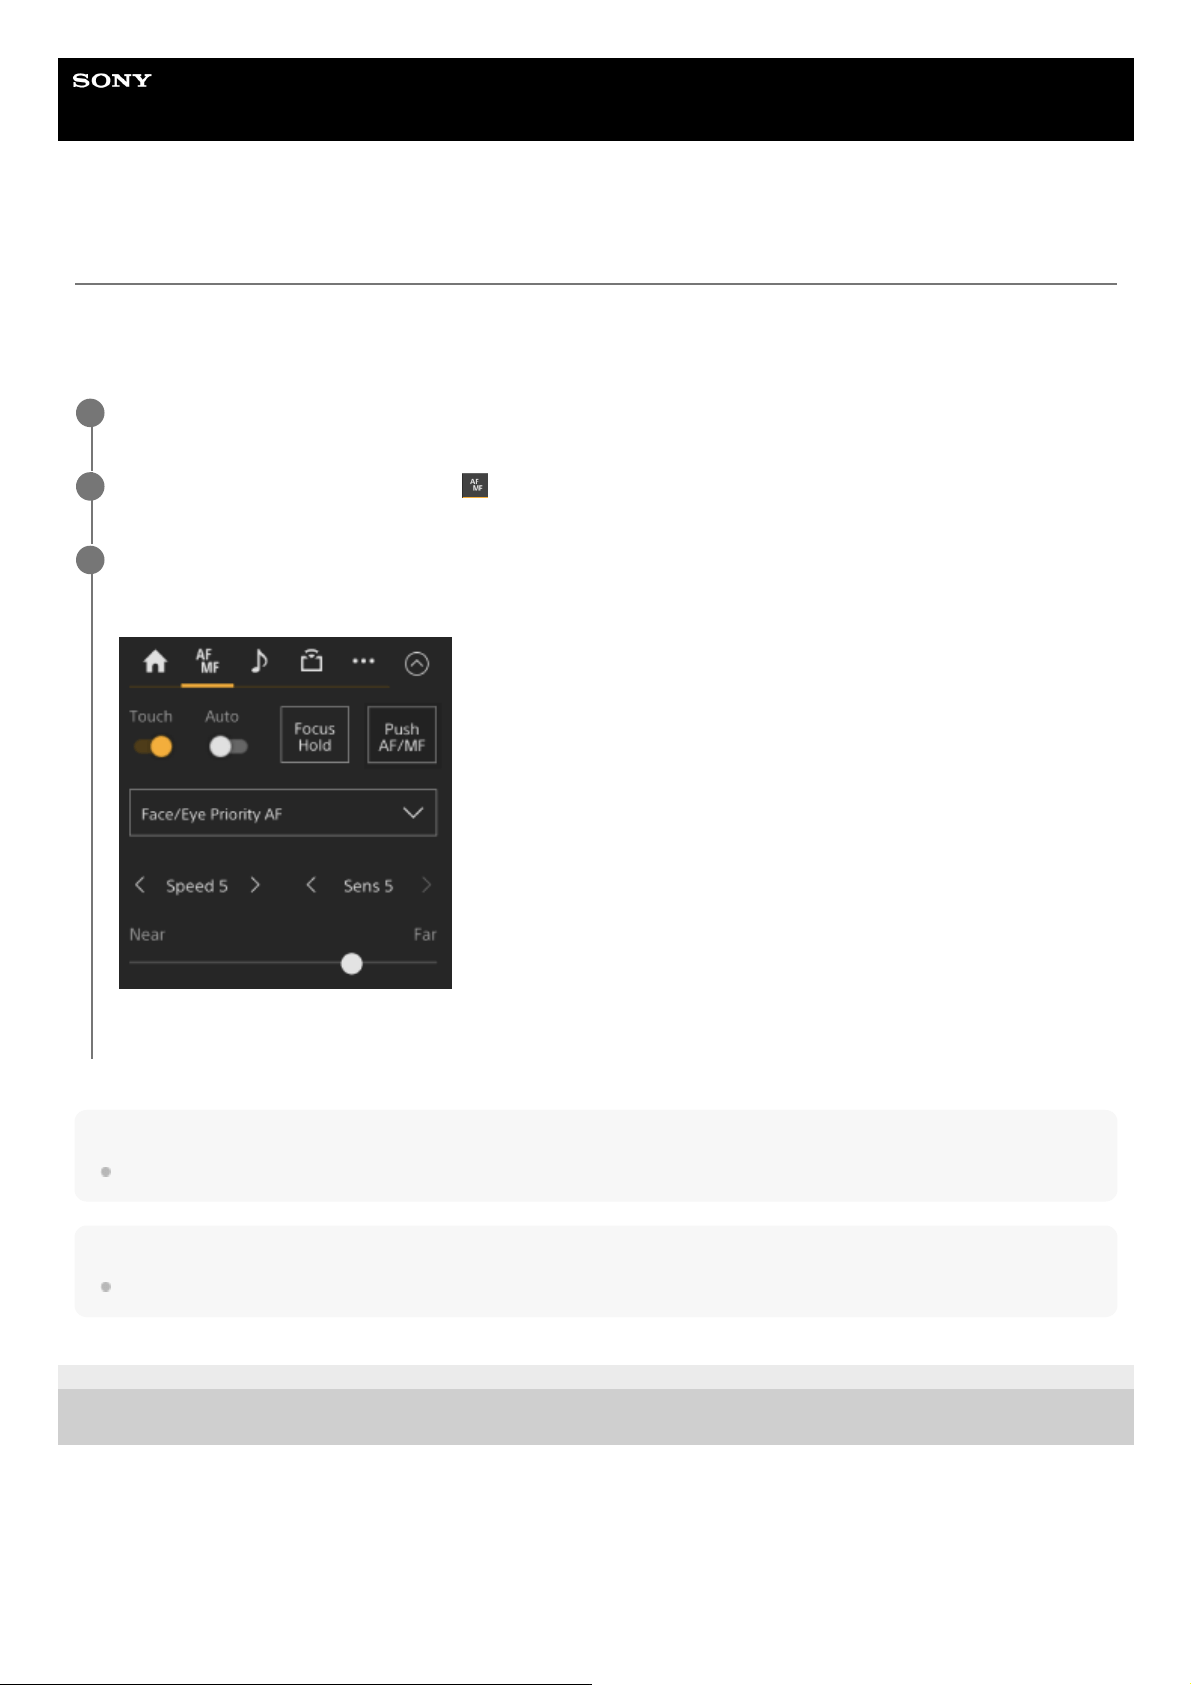
Help Guide
Interchangeable Lens Digital Camera
ILME-FR7 / ILME-FR7K
Using Auto Focus Temporarily (Push Auto Focus (AF))
When in manual focus mode, you can adjust the focus temporarily using auto focus by pressing the [Push AF/MF] button
to focus automatically while the button is pressed.
This is useful when you want to move the focus slowly from one subject to another subject during manual focus.
Note
The push auto focus function does not operate if the lens is set for manual focusing.
Hint
The same operation is supported using an assignable button assigned with [Push AF/MF].
5-041-957-11(1)
Copyright 2022 Sony Corporation
Set [Shooting] > [Focus] > [Push AF Mode] to [AF] in the camera menu.
1
Slide the [Auto Focus] switch on the
(Focus) tab to the left position to turn it off.
2
Press the [Push AF/MF] button.
Auto focus is active while the button is pressed.
Push auto focus is released and the focus returns to manual focus when you release the button.
3
153
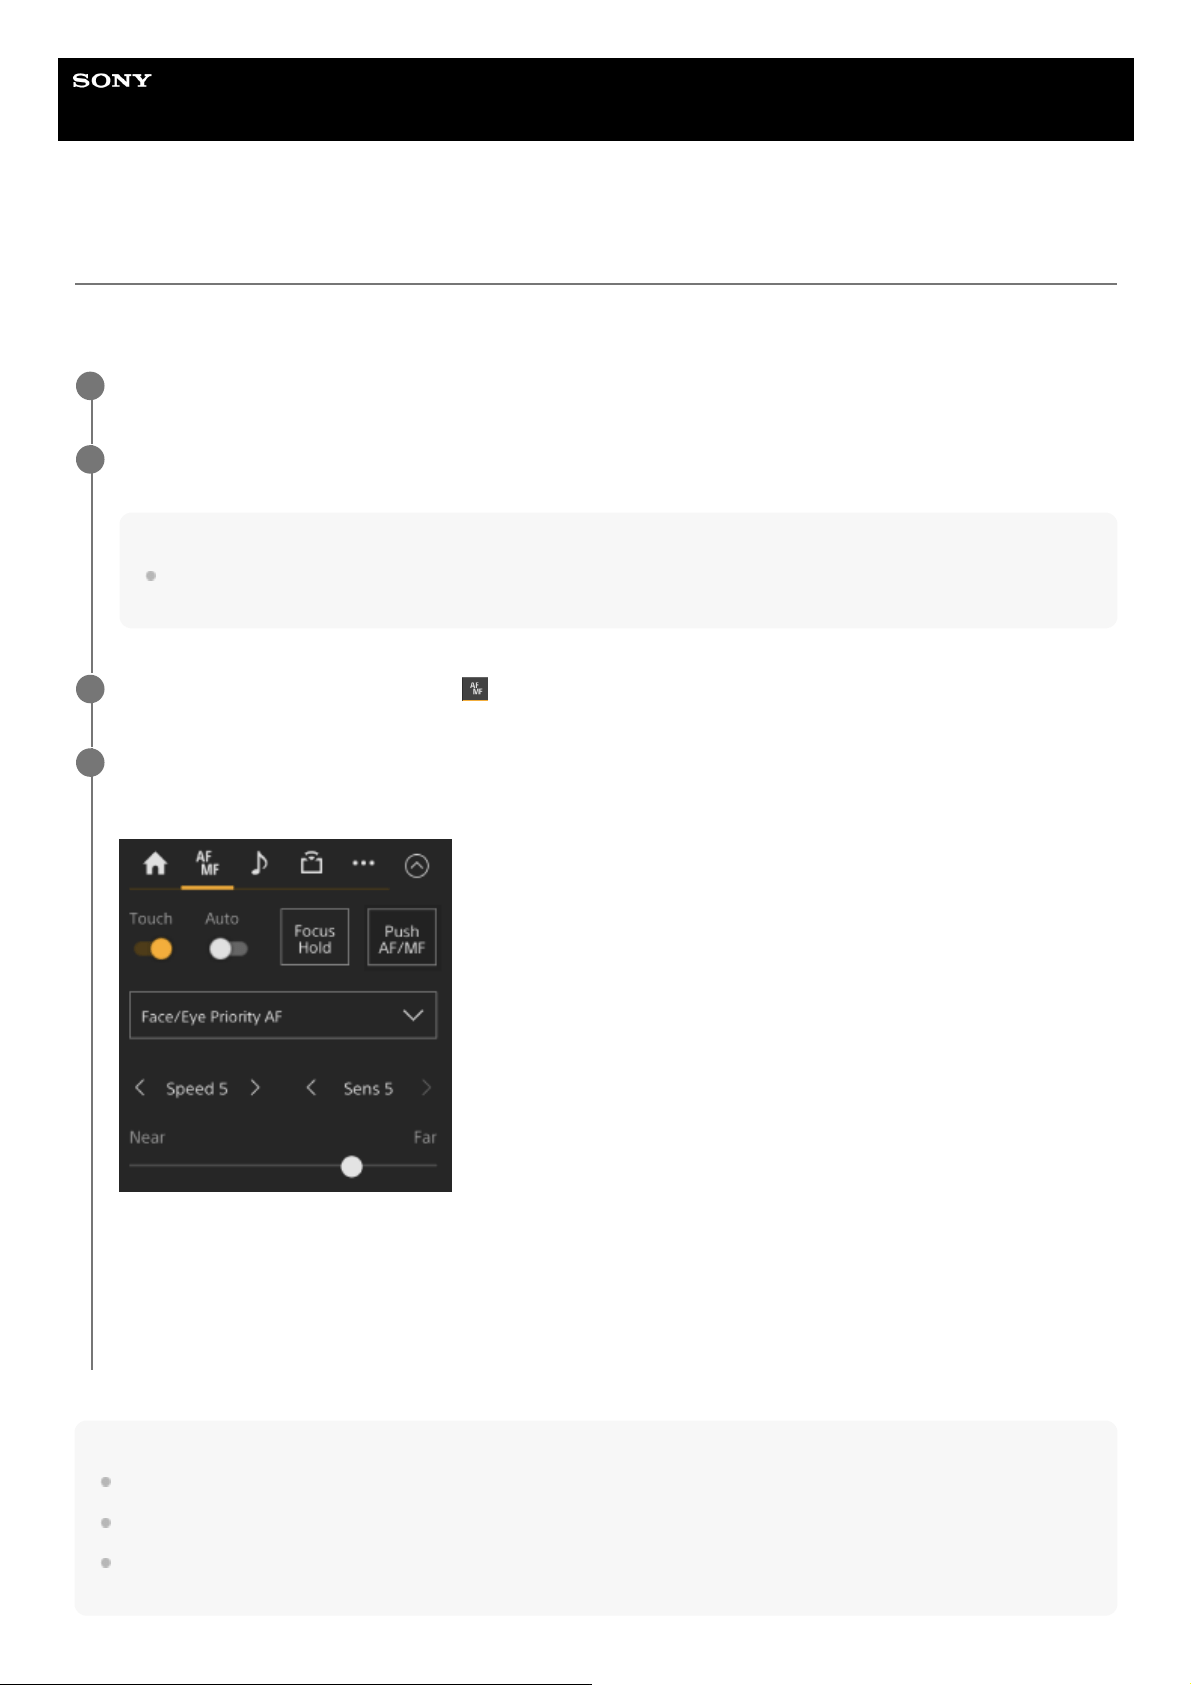
Help Guide
Interchangeable Lens Digital Camera
ILME-FR7 / ILME-FR7K
Using Single-Shot Auto Focus (Push Auto Focus (AF-S))
You can press the [Push AF/MF] button when in manual focus mode to focus automatically at high speed.
This function is convenient when you focus on a subject before shooting.
Note
The push auto focus function does not operate if the lens is set for manual focusing.
The focus area frame is not hidden when using the [Display] button.
During Clear Image Zoom operation, the [Focus Area (AF-S)] frame position cannot be set. During push auto focus operation, the
AF operation also gives priority to the center portion.
Set [Shooting] > [Focus] > [Push AF Mode] to [Single-shot AF(AF-S)] in the web menu or camera menu.
1
Specify the position for which you want to adjust the focus using [Shooting] > [Focus] > [Focus Area (AF-
S)] in the camera menu.
Hint
You can change the position by pressing an assignable button assigned with [Focus Setting] to display an orange frame
around the focus area and selecting a position using touch operation.
2
Slide the [Auto Focus] switch on the
(Focus) tab to the left position to turn it off.
3
Press the [Push AF/MF] button.
If you release the button before focusing finishes, push auto focus will stop.
During push auto focus, the focus status is displayed by the focus indicator.
On: The focus is fixed at the focus position.
Blinking: Out of focus. As the unit will not focus automatically, change the composition and focus settings to
achieve focus.
The focus returns to manual focus when you release the button.
4
154

Hint
The same operation is supported using an assignable button assigned with [Push AF/MF].
You can also assign [Push AF Mode] to an assignable button.
You can also assign [Focus Area (AF-S)] to an assignable button.
You can display/hide the focus area frame using [Monitoring] > [Display On/Off] > [Focus Area Ind.(AF-S)] in the camera menu.
5-041-957-11(1)
Copyright 2022 Sony Corporation
155
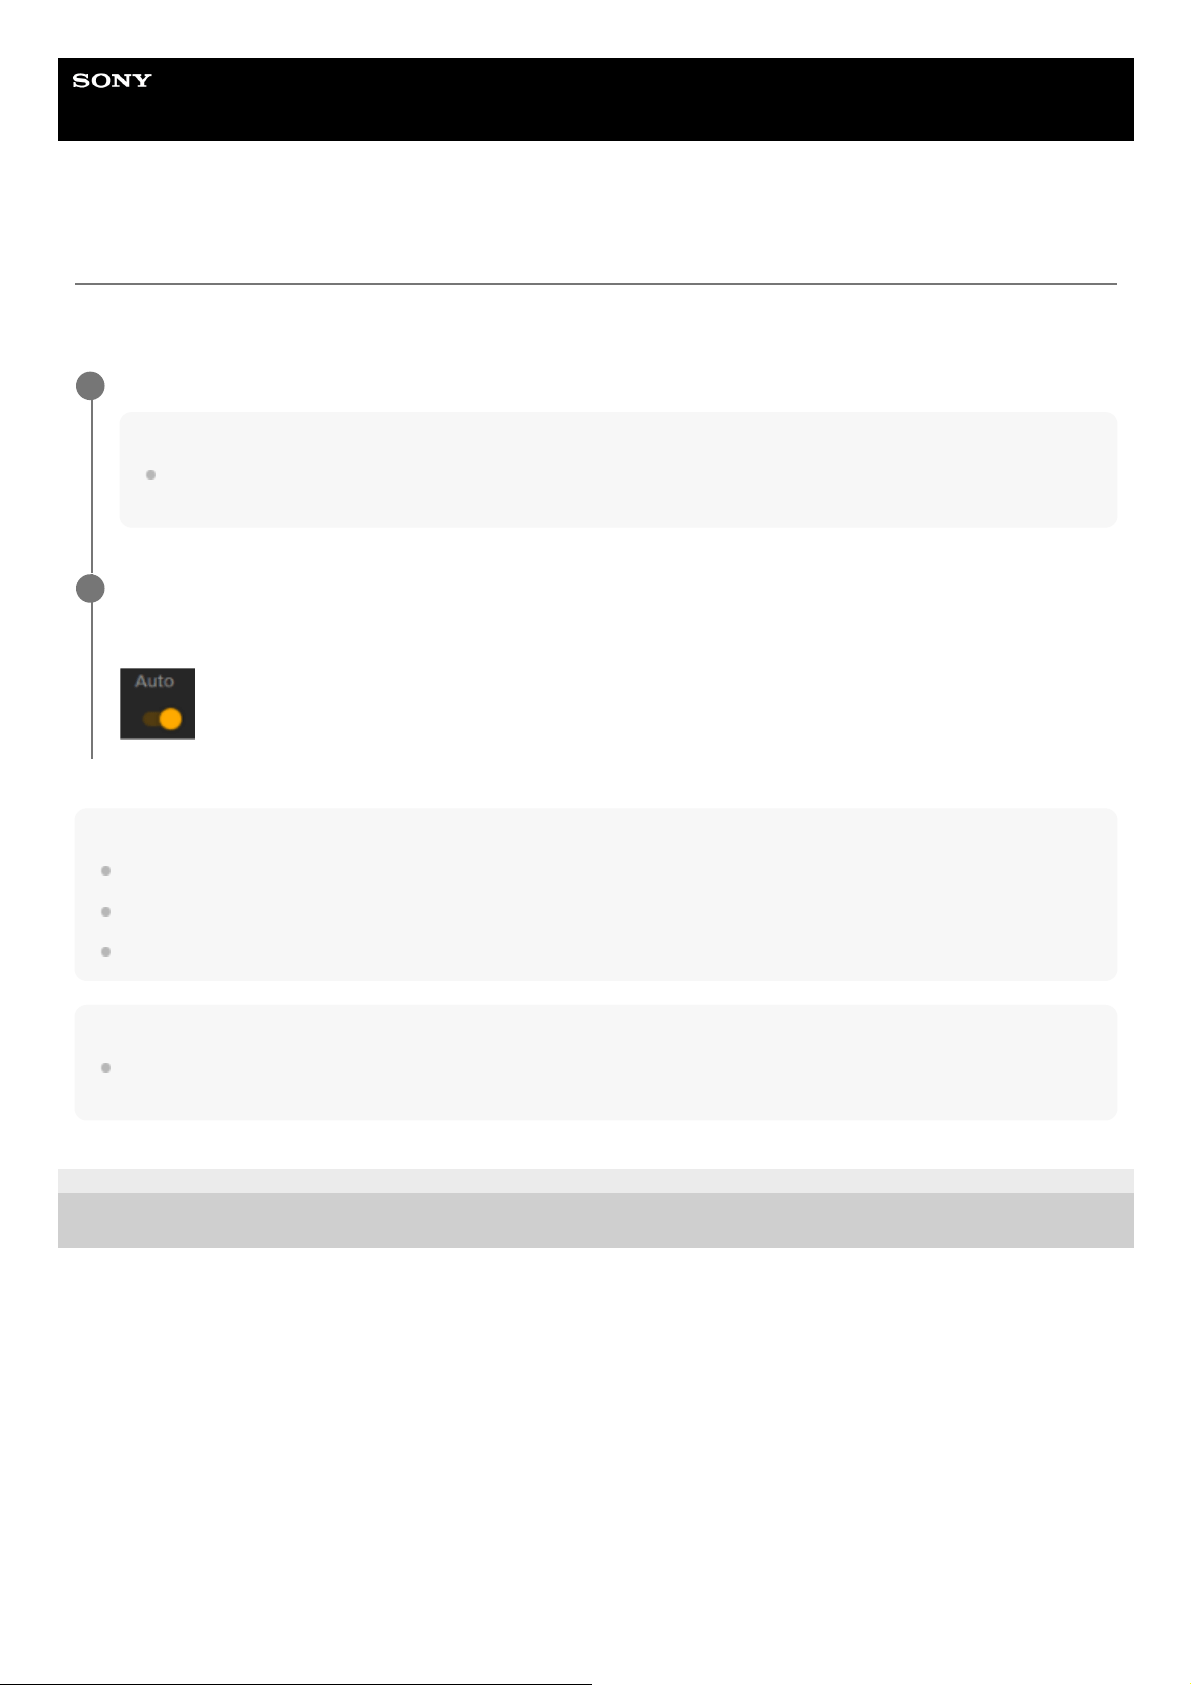
Help Guide
Interchangeable Lens Digital Camera
ILME-FR7 / ILME-FR7K
Adjusting Automatically Using the Web App
The unit uses phase detection AF for high-speed focusing and contrast AF for high-accuracy focusing.
The combination of these two AF methods provides auto focus with both high speed and high accuracy.
Note
A lens that supports auto focus is required.
Accuracy may not be obtained depending on the shooting conditions.
The focus cannot be adjusted automatically on an A-mount lens.
Hint
During auto focus mode, you can adjust the focus using the Focus slider in the camera control panel. For details, see “Setting the
Auto Focus Target Manually (AF Assist) Using the Web App.”
5-041-957-11(1)
Copyright 2022 Sony Corporation
If the lens is fitted with a focus selector switch, set the switch to the “AF/MF” or “AF” position.
Note
If the switch is set to the “Full MF” or “MF” position, lens focusing cannot be operated from the unit. See “Focus
adjustments for lenses with focus mode switch” in “Checking the Lens Switches.”
1
Slide the [Auto Focus] switch to the right position in the camera control panel to turn it on.
Auto focus mode is activated.
(AF)
2
156
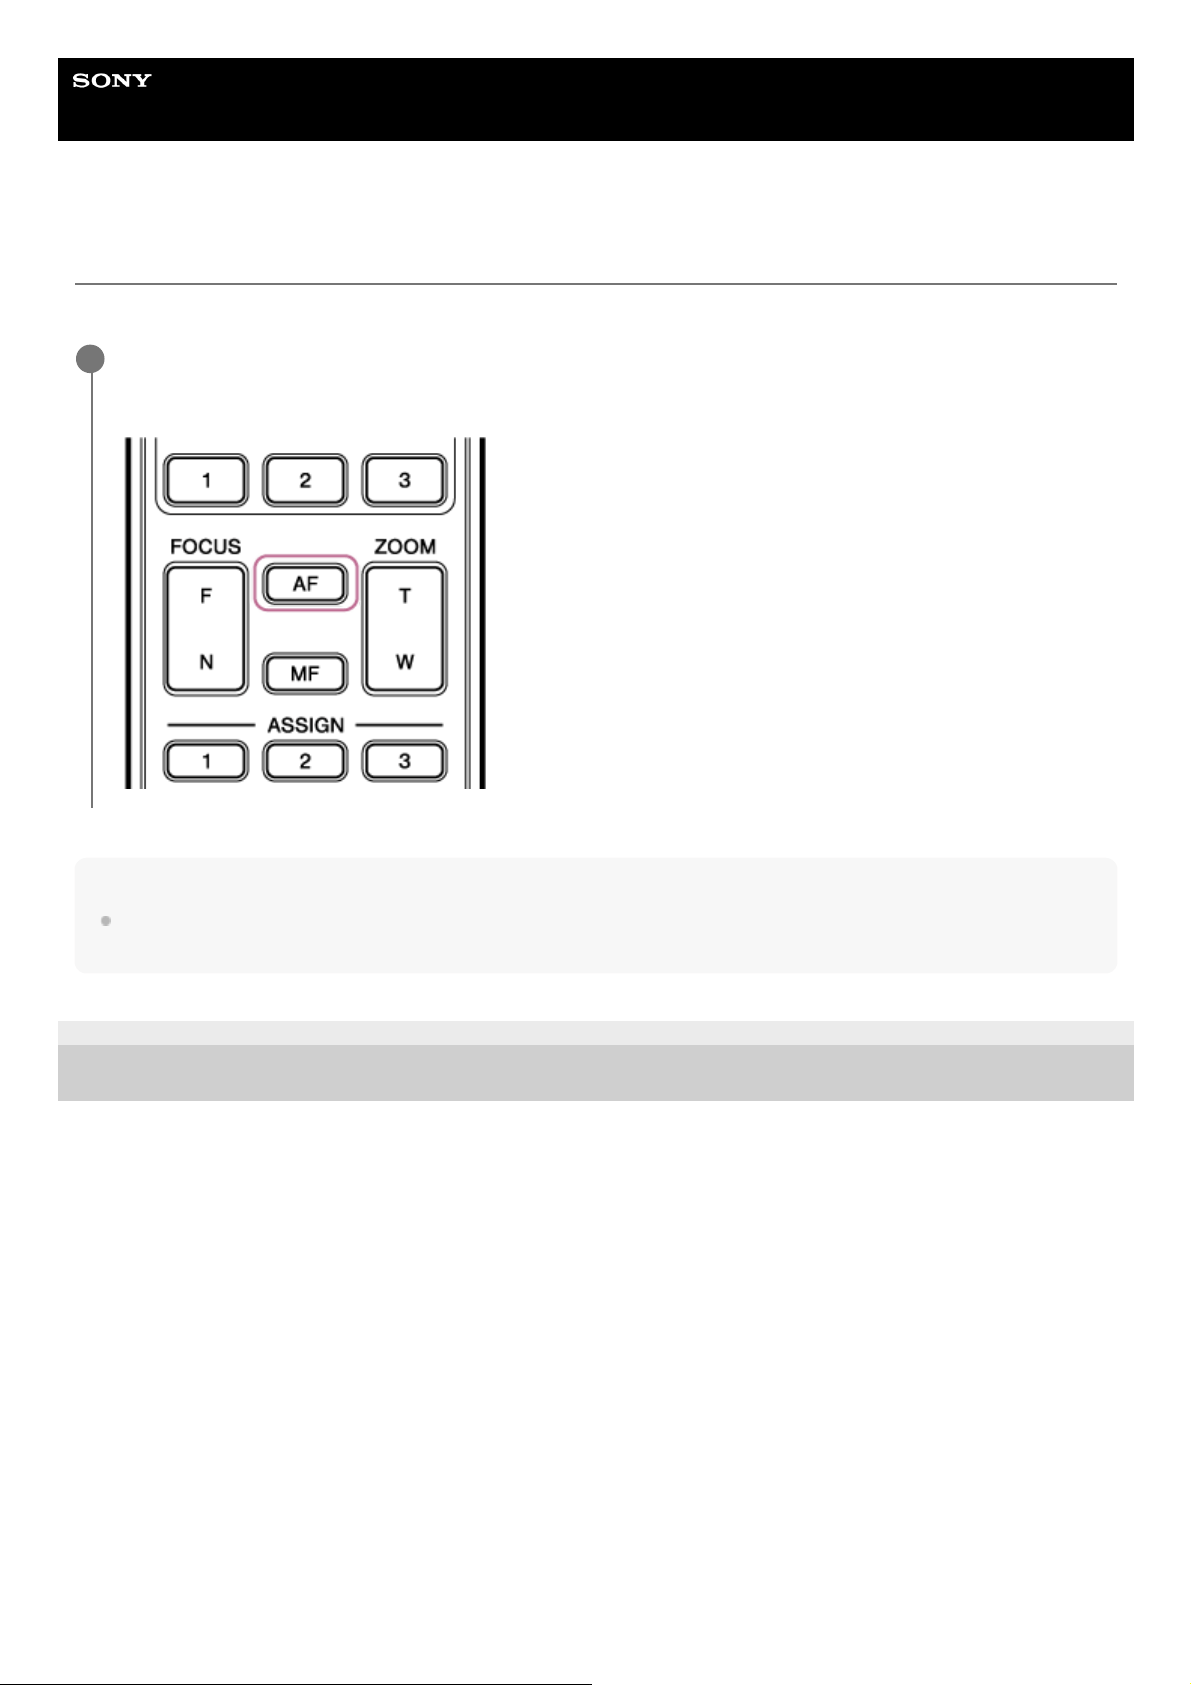
Help Guide
Interchangeable Lens Digital Camera
ILME-FR7 / ILME-FR7K
Adjusting Automatically Using the Supplied Infrared Remote Control
You can adjust the focus automatically using the supplied infrared remote control.
Note
You can also use auto focus when manual adjustment is the main method of operation. For details, see “Focusing Manually
During Auto Focus Using the Supplied Infrared Remote Control.”
5-041-957-11(1)
Copyright 2022 Sony Corporation
Press the AF button on the infrared remote control.
The focus on a subject is adjusted automatically.
1
157

Help Guide
Interchangeable Lens Digital Camera
ILME-FR7 / ILME-FR7K
Setting the Auto Focus Area/Position (Focus Area)
You can set the target area for auto focus and adjust the focus for that area.
Press the [Menu] button GUI control panel to open the camera menu.
1
Set the target area for auto focus using [Shooting] > [Focus] > [Focus Area] in the camera menu.
[Wide]:
Searches for a subject over a wide angle of the image when focusing. A frame is not displayed.
[Zone]:
Automatically searches for a focus position within the specified zone.
After selection, specify the position using the arrow buttons in the GUI control panel.
You can return to the center position by pressing and holding the [Set] button.
[Flexible Spot]:
Focuses on a specified position in the image.
After selection, specify the position using the arrow buttons in the GUI control panel.
2
158
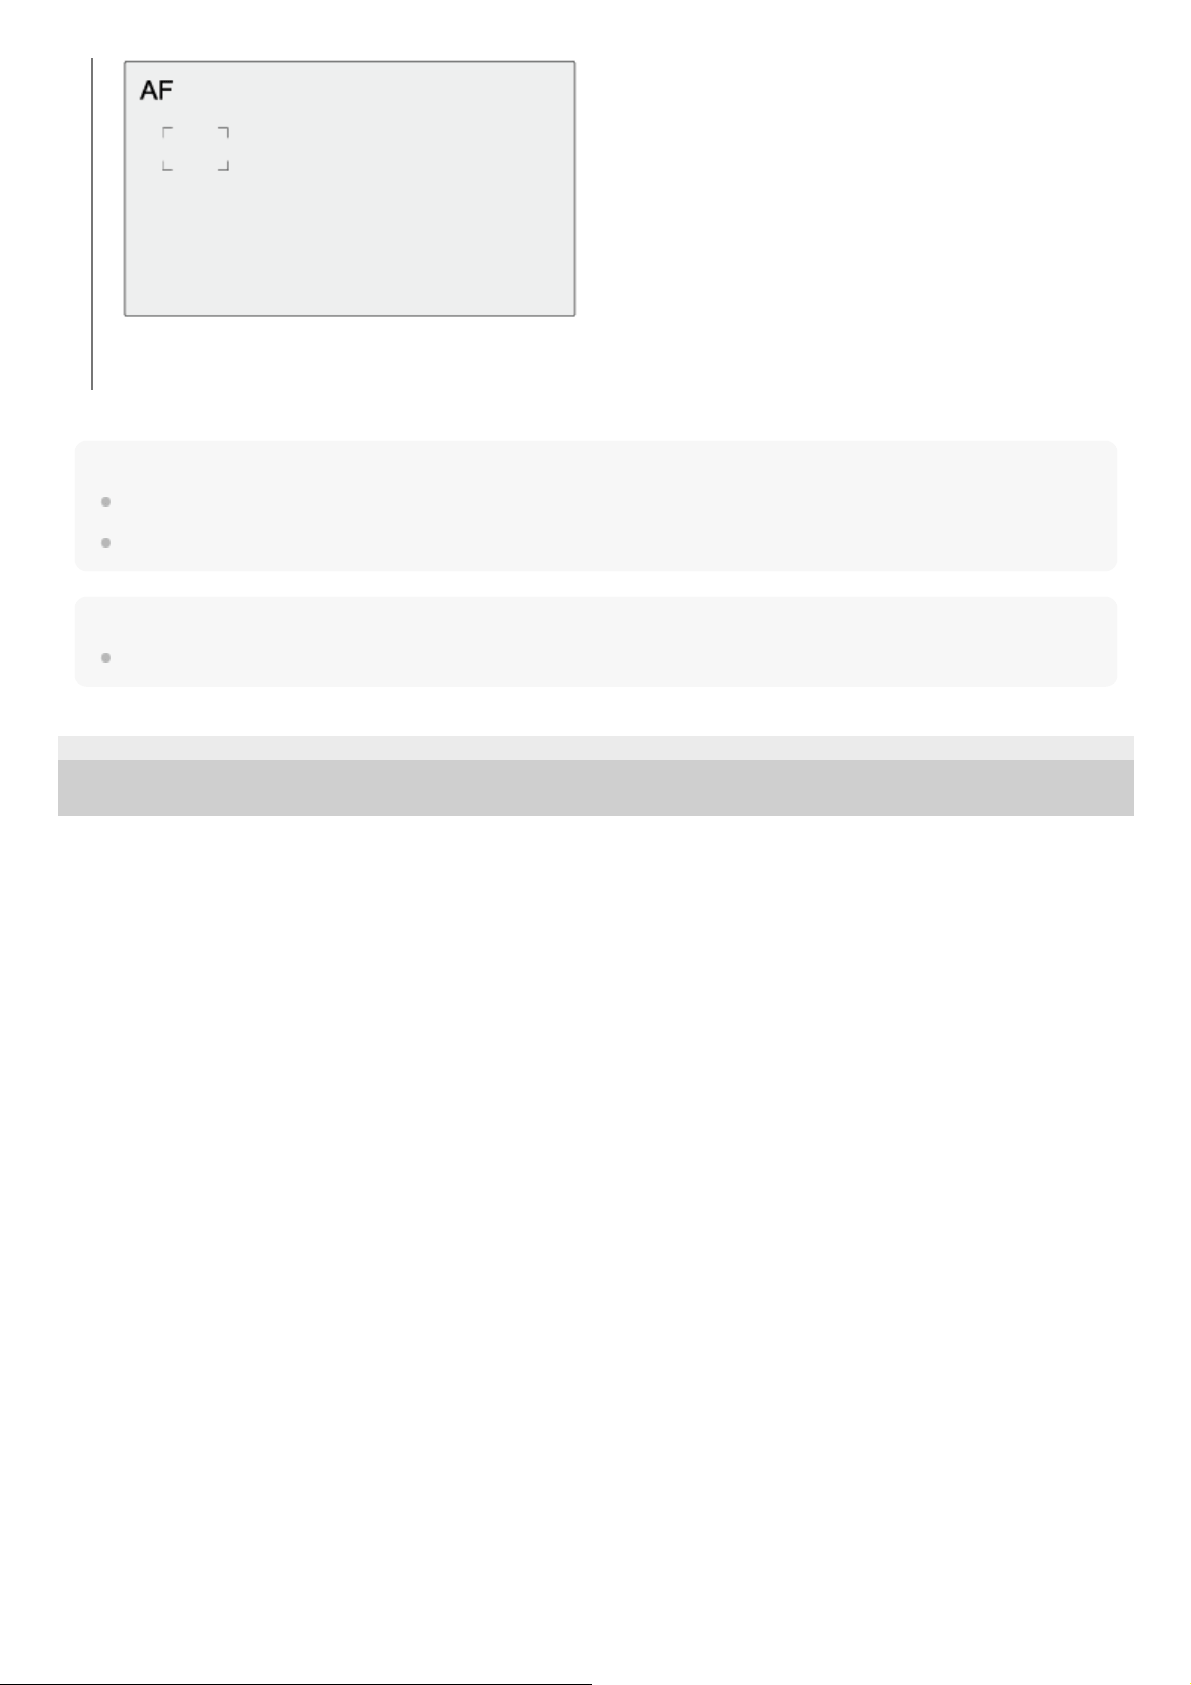
Note
The focus area frame is not hidden when using the [Display] button on the camera image panel.
During Clear Image Zoom, the focus area is set to [Wide] (fixed).
Hint
You can display/hide the focus area frame using [Monitoring] > [Display On/Off] > [Focus Area Indicator] in the camera menu.
5-041-957-11(1)
Copyright 2022 Sony Corporation
You can return to the center position by pressing and holding the [Set] button.
159
Help Guide
Interchangeable Lens Digital Camera
ILME-FR7 / ILME-FR7K
Changing the Focus Area Quickly (Focus Setting)
You can change the position and size of the auto focus area quickly during shooting by assigning [Focus Setting] to an
assignable button.
For details about assignable buttons, see “Assignable Buttons.”
The operation varies depending on the focus area setting.
When [Shooting] > [Focus] > [Focus Area] is set to [Flexible Spot] or [Zone] in the camera
menu
You can change the position of the focus area by pressing an assignable button assigned with [Focus Setting] and
adjusting using the arrow buttons in the GUI control panel. You can return the position of the focus area to the center
while adjusting the position by pressing the [Set] button.
You can change the size of the focus area by pressing and holding an assignable button assigned with [Focus
Setting]. After changing the size, you can change the position of the focus area by pressing the [Set] button. When
finished, press an assignable button assigned with [Focus Setting] to return to the original screen.
When [Shooting] > [Focus] > [Focus Area] is set to [Wide] in the camera menu
You can only change the size of the focus area by pressing and holding an assignable button assigned with [Focus
Setting]. The position can be also be changed by first changing the type to [Flexible Spot] or [Zone].
Hint
When both [Shooting] > [Focus] > [Push AF Mode] is set to [Single-shot AF(AF-S)] in the camera menu and the [Auto Focus]
switch is set to the off position (manual focus mode), you can change the [Focus Area (AF-S)] focus area position.
The focus area frame is displayed orange when the position of the focus area can be changed.
5-041-957-11(1)
Copyright 2022 Sony Corporation
160
Help Guide
Interchangeable Lens Digital Camera
ILME-FR7 / ILME-FR7K
Moving the Focus Area Frame Using Touch Operation (Touch Focus Area)
You can change the position of the focus area by pressing an assignable button assigned with [Focus Setting] to change
the focus area display to orange, and then move the focus area frame using touch operation in the camera image panel.
Tap the screen to move the focus area, with the focus area centered on the tapped position. Drag on the screen to move
the focus area to the position traced by your finger.
Hint
You can enable/disable the touch focus area on the shooting screen using an assignable button assigned with [Focus Setting].
Tap any position.
The tapped position becomes the center of the focus area.
1
Drag to move the focus area, tracing your finger position.
2
161

Note
If you tap a position or drag the focus area to a position that exceeds the setting range, the focus area is set to the
top/bottom/left/right edge of the setting range.
This function is not available in the following circumstances.
When the [Auto Focus] switch is turned off in the camera control panel
When the [Touch Focus] switch is turned off in the camera control panel
When the focus area frame is displayed in gray or is not displayed at all
5-041-957-11(1)
Copyright 2022 Sony Corporation
162
Help Guide
Interchangeable Lens Digital Camera
ILME-FR7 / ILME-FR7K
Adjusting the Auto Focus Operation (AF Transition Speed, AF Subject Shift
Sensitivity)
You can adjust the auto focus operation by changing the transition speed and the subject shift sensitivity.
Setting the AF transition speed
You can set the speed of the focus drive for when the subject changes using the [AF Transition Speed] button in the
camera control panel.
Select the speed from the range [Speed 1] (Slow) to [Speed 7] (Fast) in increments of 1. Press the < button to decrease
the value (slower) or the > button to increase the value (faster).
When set to low speed, the focus moves slowly when the subject to be focused changes, enabling the shooting with
impressive image expression.
When set to high speed, the focus switches between subjects quickly. In the example below, the focus changes quickly
from the building in the background to the person walking in the foreground. The subject that enters the frame is
immediately focused, making this setting ideal for documentary shooting which requires quick focusing.
AF subject shift sensitivity
You can set the sensitivity for changing between subjects using [AF Subj. Shift Sens.] button in the camera control panel.
163
Select the sensitivity from the range [Sens 1] (Locked On) to [Sens 5] (Responsive) in increments of 1. Press the <
button to decrease the value (change slowly) or the > button to increase the value (change rapidly).
When set to a low sensitivity, the focus does not readily shift even if another subject moves in front of the in-focus
subject.
When set to a high sensitivity, the focus shifts to give priority to the subject that moves in front.
Hint
If [AF Speed/Sens.] is assigned to an assignable button, the level bars for adjusting values are displayed in the camera image
panel in the following order each time the button is pressed, allowing you to change the AF transition speed and AF subject shift
sensitivity settings.
AF transition speed → AF subject shift sensitivity → No display …
5-041-957-11(1)
Copyright 2022 Sony Corporation
164
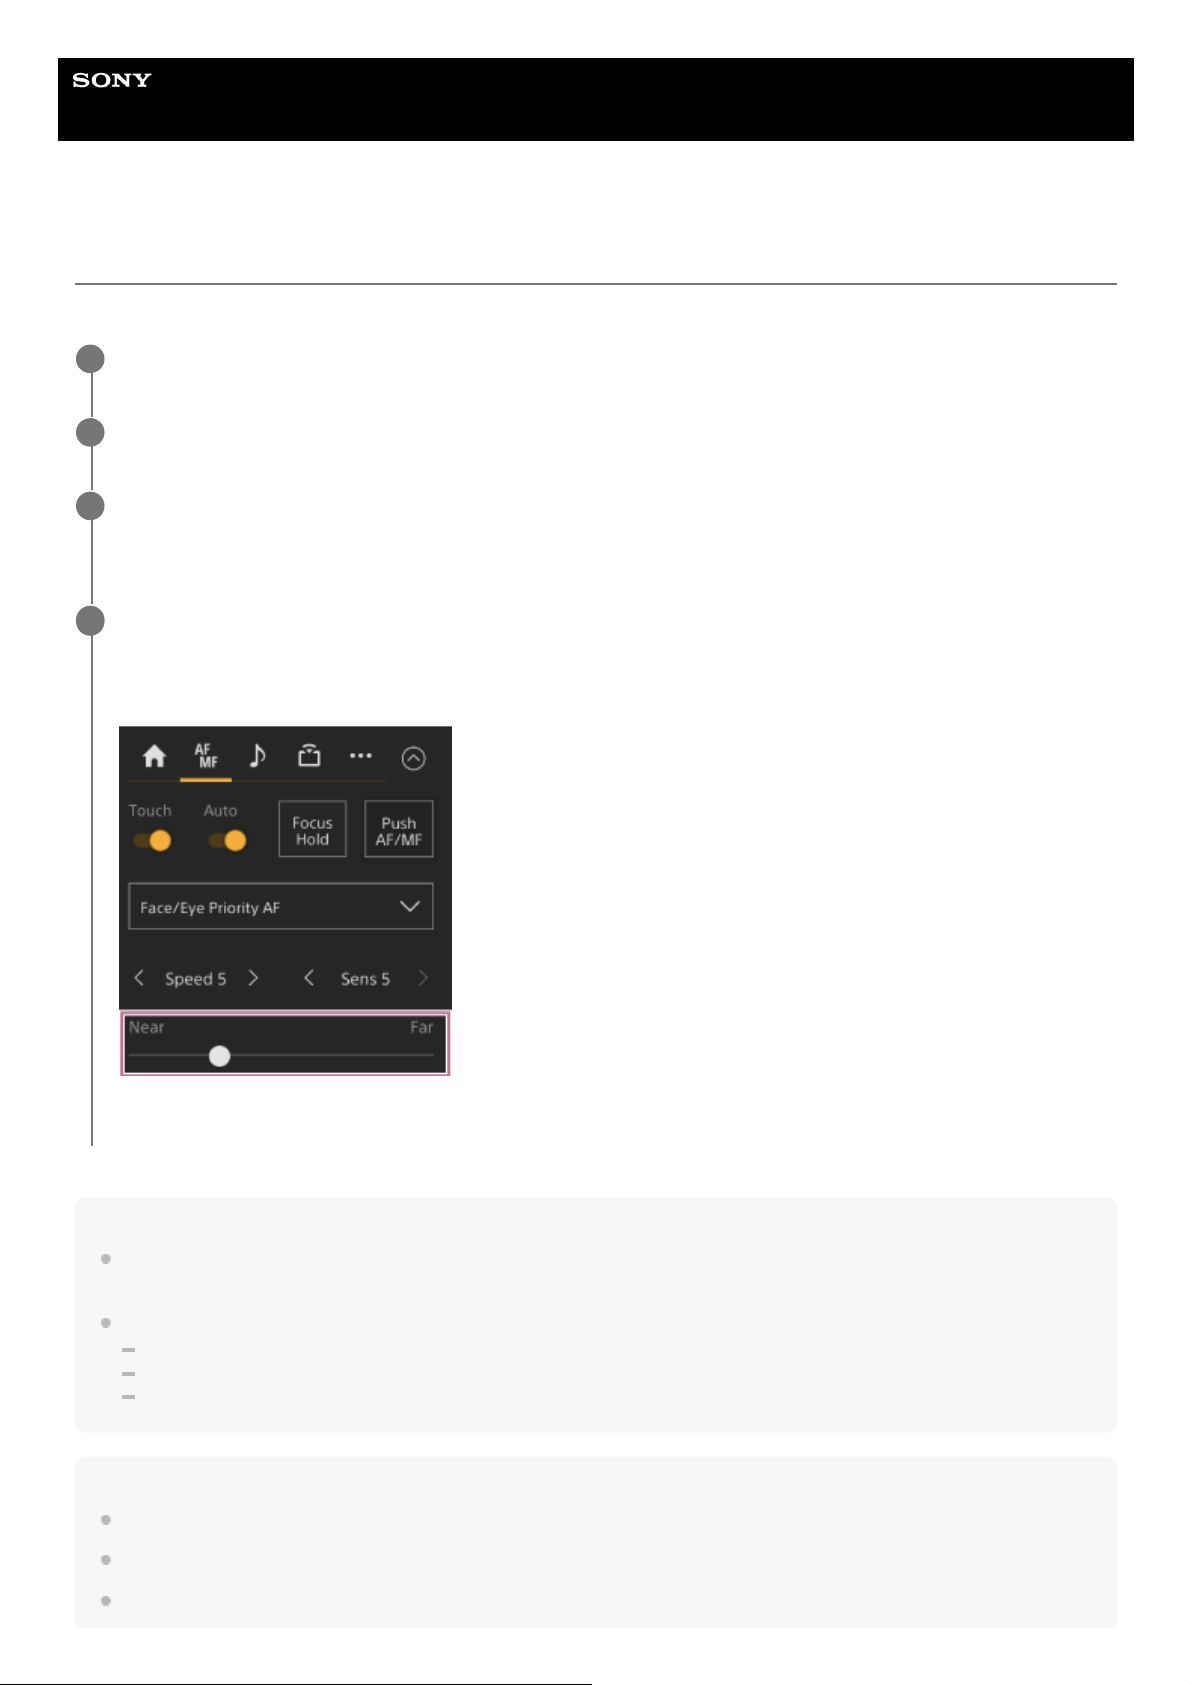
Help Guide
Interchangeable Lens Digital Camera
ILME-FR7 / ILME-FR7K
Setting the Auto Focus Target Manually (AF Assist) Using the Web App
After shifting and adjusting the focus manually, you can pass focus control to auto focus for fine focus adjustment.
Note
In the AF assist state, shifting the focus becomes difficult, regardless of the [Shooting] > [Focus] > [AF Subj. Shift Sens.] setting in
the camera menu.
The AF assist state is canceled by the following.
When the subject focused using the [Focus] slider is no longer visible
When switching to manual focus
When a face is registered
Hint
The AF assist state can be canceled quickly by using an assignable button assigned with [Push AF/MF].
Operating the [Focus] slider clears the registered face selection.
In Face/Eye Only AF mode, auto focus focuses on the face closest to the focus position of the [Focus] slider.
Set [Shooting] > [Focus] > [AF Assist] to [On] in the camera menu.
1
Set [Shooting] > [Focus] > [AF Assist Control] to [On] in the web menu.
2
Slide the [Auto Focus] switch to the right position in the camera control panel to turn it on.
Auto focus mode is activated.
3
Set the focus target using the [Focus] slider in the camera control panel.
[Near]: Focus on a near subject.
[Far]: Focus on a far subject.
In the AF assist state, a subject at the distance set with the [Focus] slider will be focused automatically.
4
165

5-041-957-11(1) Copyright 2022 Sony Corporation
166

Help Guide
Interchangeable Lens Digital Camera
ILME-FR7 / ILME-FR7K
Focusing Manually During Auto Focus Using the Supplied Infrared Remote Control
When [Shooting] > [Focus] > [AF Assist] is set to [On] in the camera menu, you can use the F (Far) button and N (Near)
on the supplied infrared remote control even during auto focus to adjust the focus on a subject.
5-041-957-11(1)
Copyright 2022 Sony Corporation
167
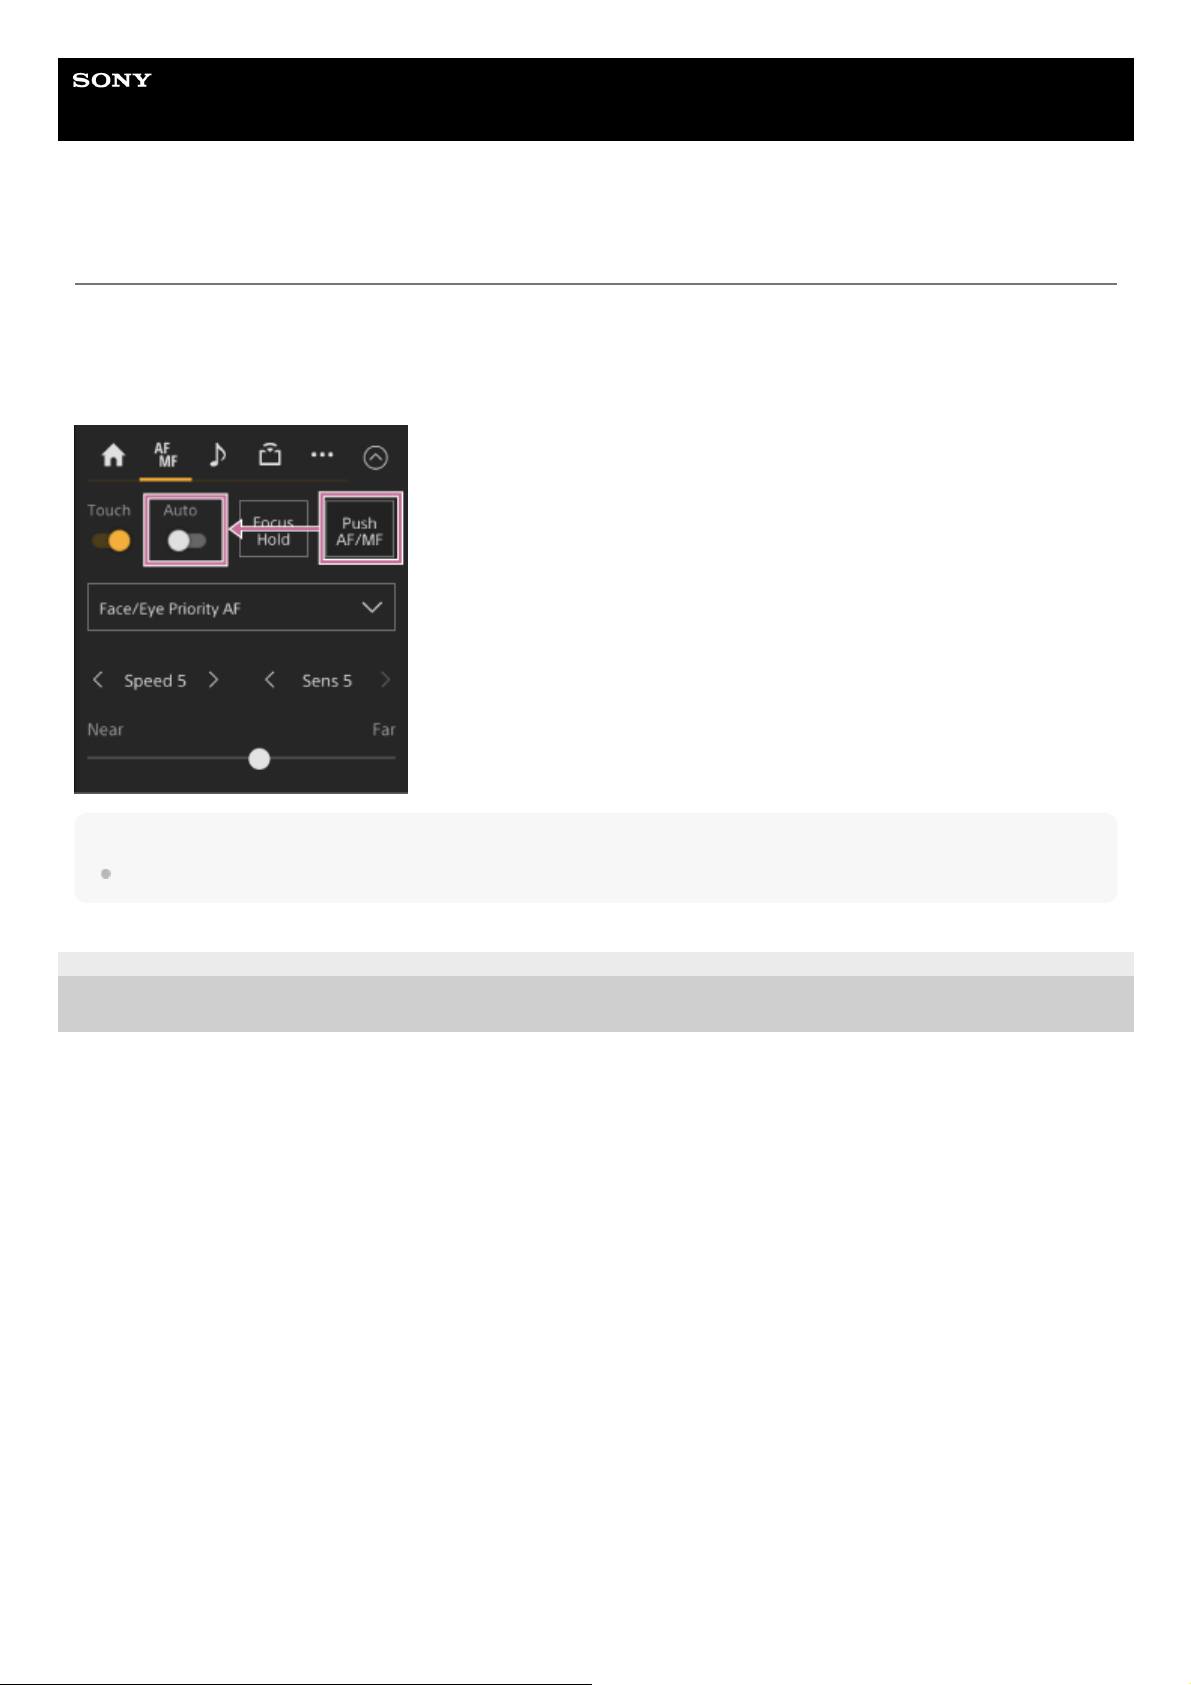
Help Guide
Interchangeable Lens Digital Camera
ILME-FR7 / ILME-FR7K
Using Manual Focus Temporarily During Auto Focus (Push Manual Focus)
Press the [Push AF/MF] button when in auto focus mode to focus manually while the button is pressed. The focus
returns to auto focus when you release the button.
This allows you to temporarily stop auto focus and focus manually when something that is not the subject of shooting
crosses in front of the subject.
Hint
The same operation is supported using an assignable button assigned with [Push AF/MF].
5-041-957-11(1)
Copyright 2022 Sony Corporation
168
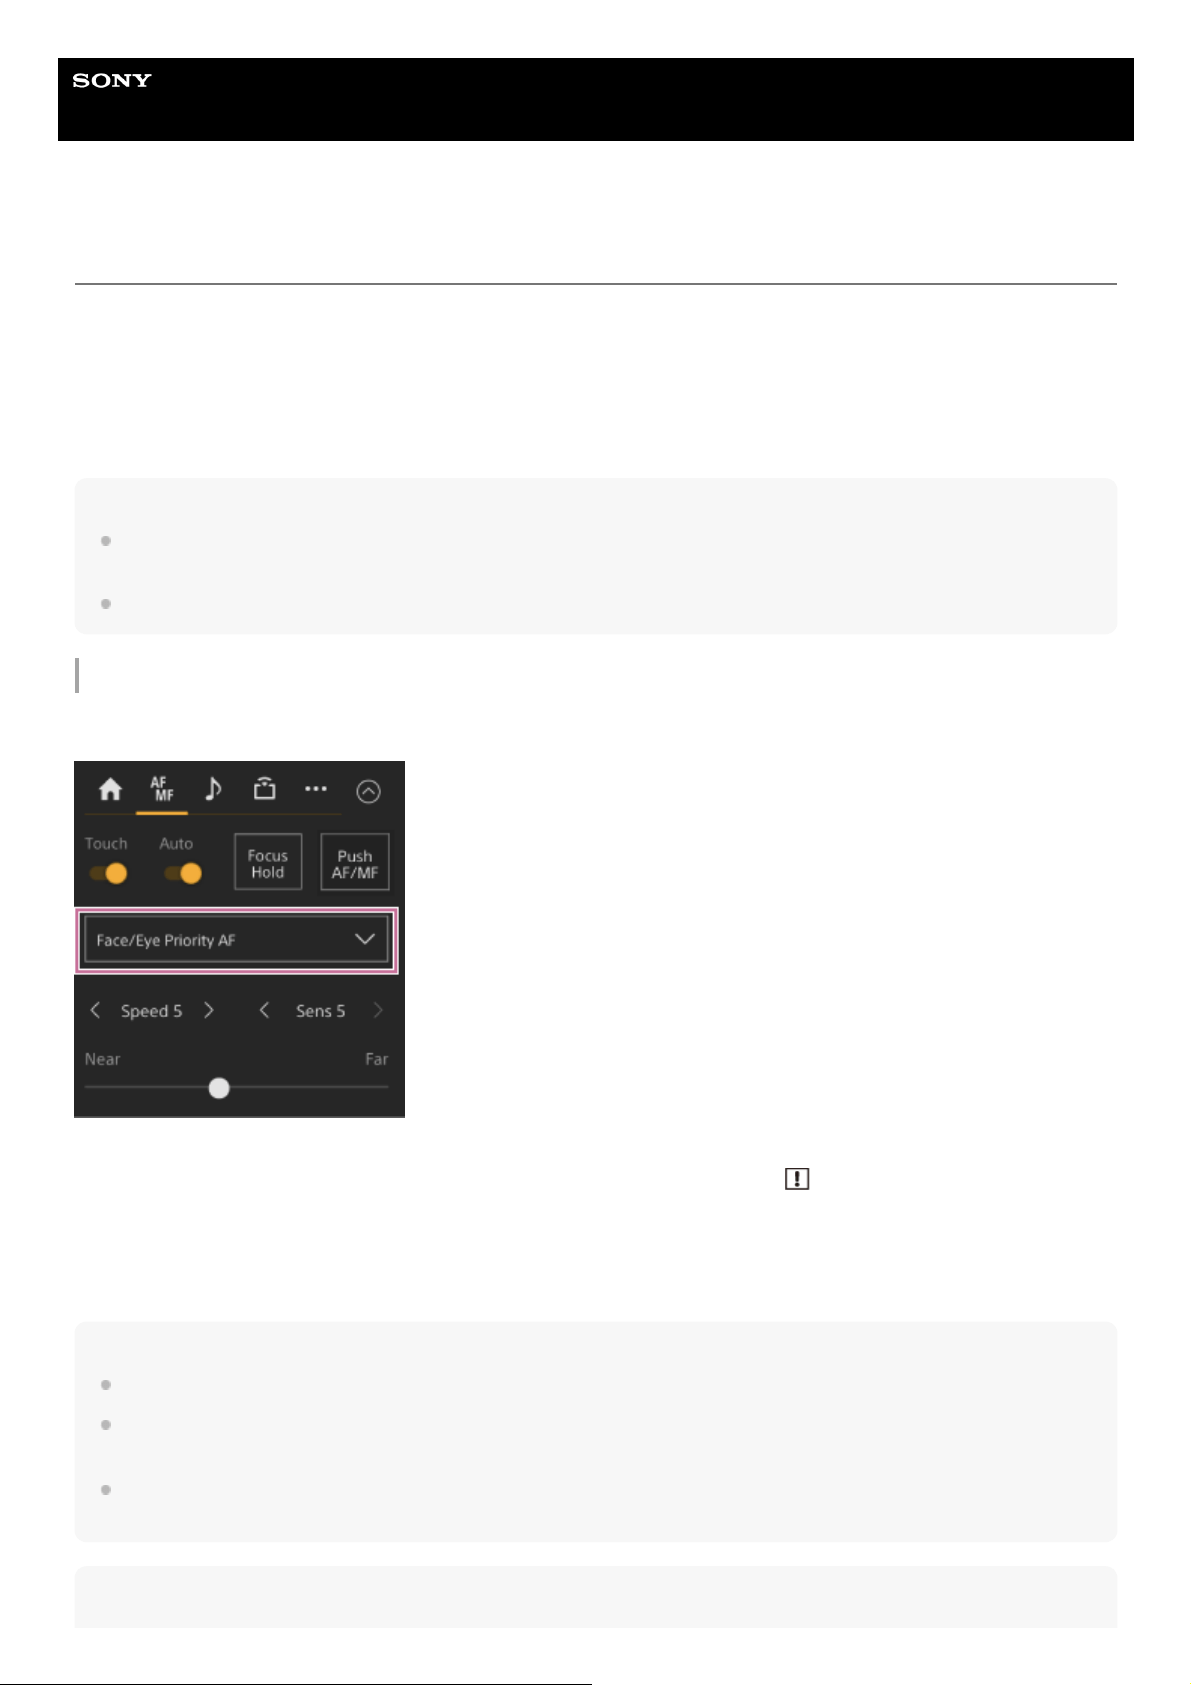
Help Guide
Interchangeable Lens Digital Camera
ILME-FR7 / ILME-FR7K
Tracking Using Face and Eye Detection (Face/Eye Detection AF)
The unit can detect people’s faces and eyes as a target to track, and then adjust the focus on faces and eyes within the
focus area.
When faces are detected, gray face/eye detection frames are displayed. When auto focusing is possible, the frames
change to white and tracking starts. When eyes are detected and the focus is adjusted, the face/eye detection frame is
displayed on the eyes. When multiple individuals are detected, the main subject is automatically determined.
This function is available only when the focus mode is AF mode or during push auto focus.
Hint
When the focus area is set to [Zone] or [Flexible Spot] and faces or eyes overlap within the specified focus area, the face/eye
detection frames change to white, and the unit focuses on those faces/eyes automatically.
When push auto focus (AF-S) is used, the face/eye detection frames for the faces/eyes that are in focus change to green.
Setting using the [Face/Eye Detection AF] button in the camera control panel
Press the [Face/Eye Detection AF] button and set the face/eye detection AF operation.
[Face/Eye Only AF]: The camera detects the faces/eyes of subjects (people) and focuses and tracks only on their
faces/eyes. While a face or eye is not detected, AF is temporarily stopped and the
(Face/Eye Only AF mode auto
focus paused) icon is displayed. This mode is effective when you want to auto focus and track faces/eyes only.
[Face/Eye Priority AF]: The camera detects the faces/eyes of subjects (people) and prioritizes the focusing/tracking on
the faces/eyes. When a face or eye is not detected, focusing is in AF mode (default setting).
[AF]: The face/eye detection AF function is disabled.
Note
During push auto focus operation, [Face/Eye Priority AF] is activated even if [Face/Eye Only AF] is currently selected.
When the [Auto Focus] switch is set to the off position, face/eye detection AF is disabled (excluding during push auto focus
operation).
If you turn the camcorder off while [Face/Eye Only AF] is selected, the mode automatically switches to [Face/Eye Priority AF]
when the camcorder is next turned on.
Hint
169

You can set the face/eye detection AF operation using [Shooting] > [Focus] > [Face/Eye Detection AF] in the camera menu.
To hide face/eye detection frames
You can show/hide face/eye detection frames using [Monitoring] > [Display On/Off] > [Face/Eye Detection Frame] in the
camera menu.
Note
Green face/eye detection frames are displayed for faces and eyes that are in focus using push auto focus (AF-S), and are not
hidden using the [Display] button or when [Face/Eye Detection Frame] is set to [Off].
To switch the face/eye detection AF operation using an assignable button
Assign [Face/Eye Detection AF] to an assignable button. You can then switch face/eye detection AF operation in the
order [Face/Eye Priority AF], [Face/Eye Only AF], and [AF] each time you press the button.
Setting using the direct menu
You can also set the face/eye detection AF operation using the direct menu.
For details about the direct menu, see “Direct Menu Operation.”
5-041-957-11(1)
Copyright 2022 Sony Corporation
170
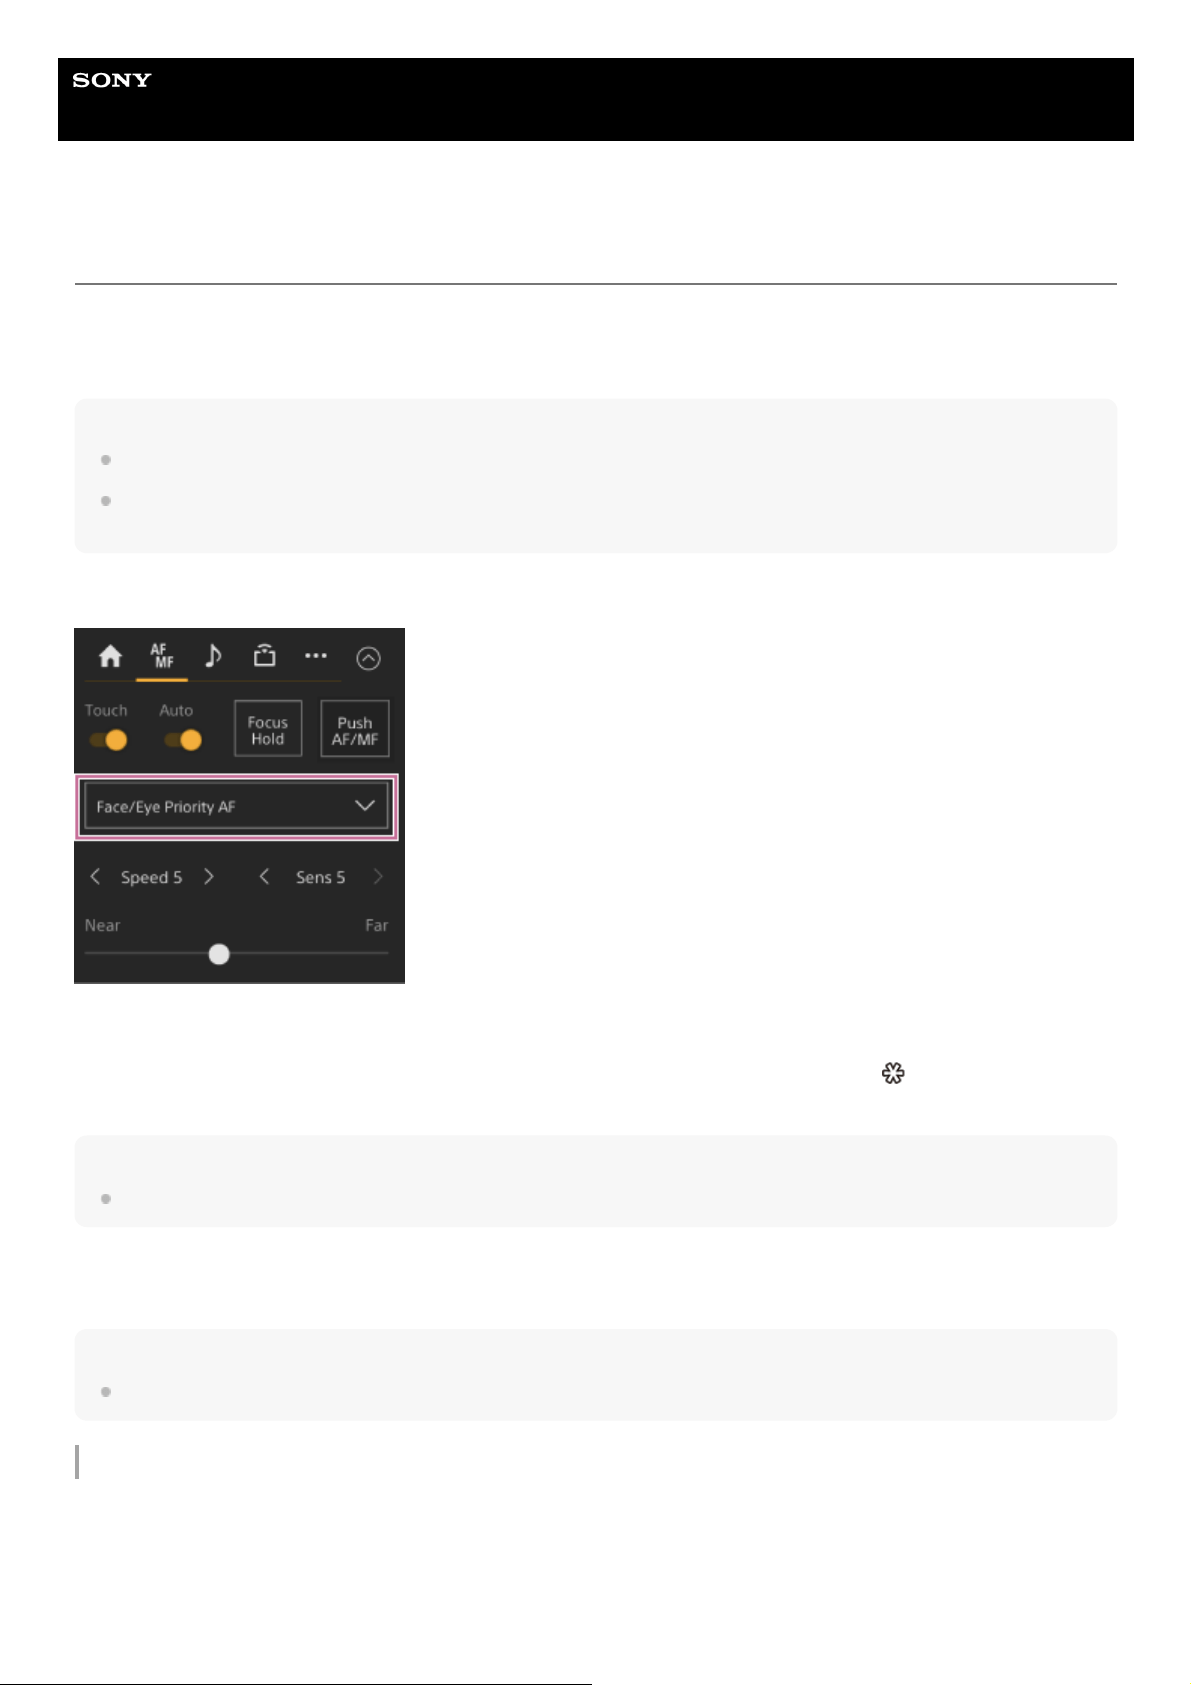
Help Guide
Interchangeable Lens Digital Camera
ILME-FR7 / ILME-FR7K
Tracking a Specified Subject (Realtime Tracking AF)
You can maintain focus on a subject by specifying the subject by touch operation or by selecting a face detection frame
in the camera control panel.
When a subject is selected, a white tracking frame is displayed and tracking starts.
Hint
Tracking occurs over the entire image area, regardless of the focus area setting.
When [Shooting] > [Focus] > [Touch Function in MF] is set to [Tracking AF] in the web menu or camera menu, realtime tracking
AF is supported even when the focus mode is MF mode.
The following actions occur for the tracking target, depending on the face/eye detection AF operating mode setting.
[Face/Eye Only AF] or [Face/Eye Priority AF]: Focusing and tracking of the specified subject.
If the tracking target is a person and a face/eye is detected, the camera focuses on that face/eye.
When a tracking target face/eye is detected, the tracking target face is saved. When saved, a
(saved tracking face
icon) is displayed.
Note
If tracking AF is started during manual focus, the tracking target face is not saved.
[AF]: Focusing and tracking of the specified subject. Face/eye detection does not occur, even if the tracking target is a
person.
Note
The realtime tracking AF function does not operate if the lens is set for manual focusing.
Starting realtime tracking AF
When a specific subject is specified as the tracking target, tracking of that target starts.
To specify by touch operation
171
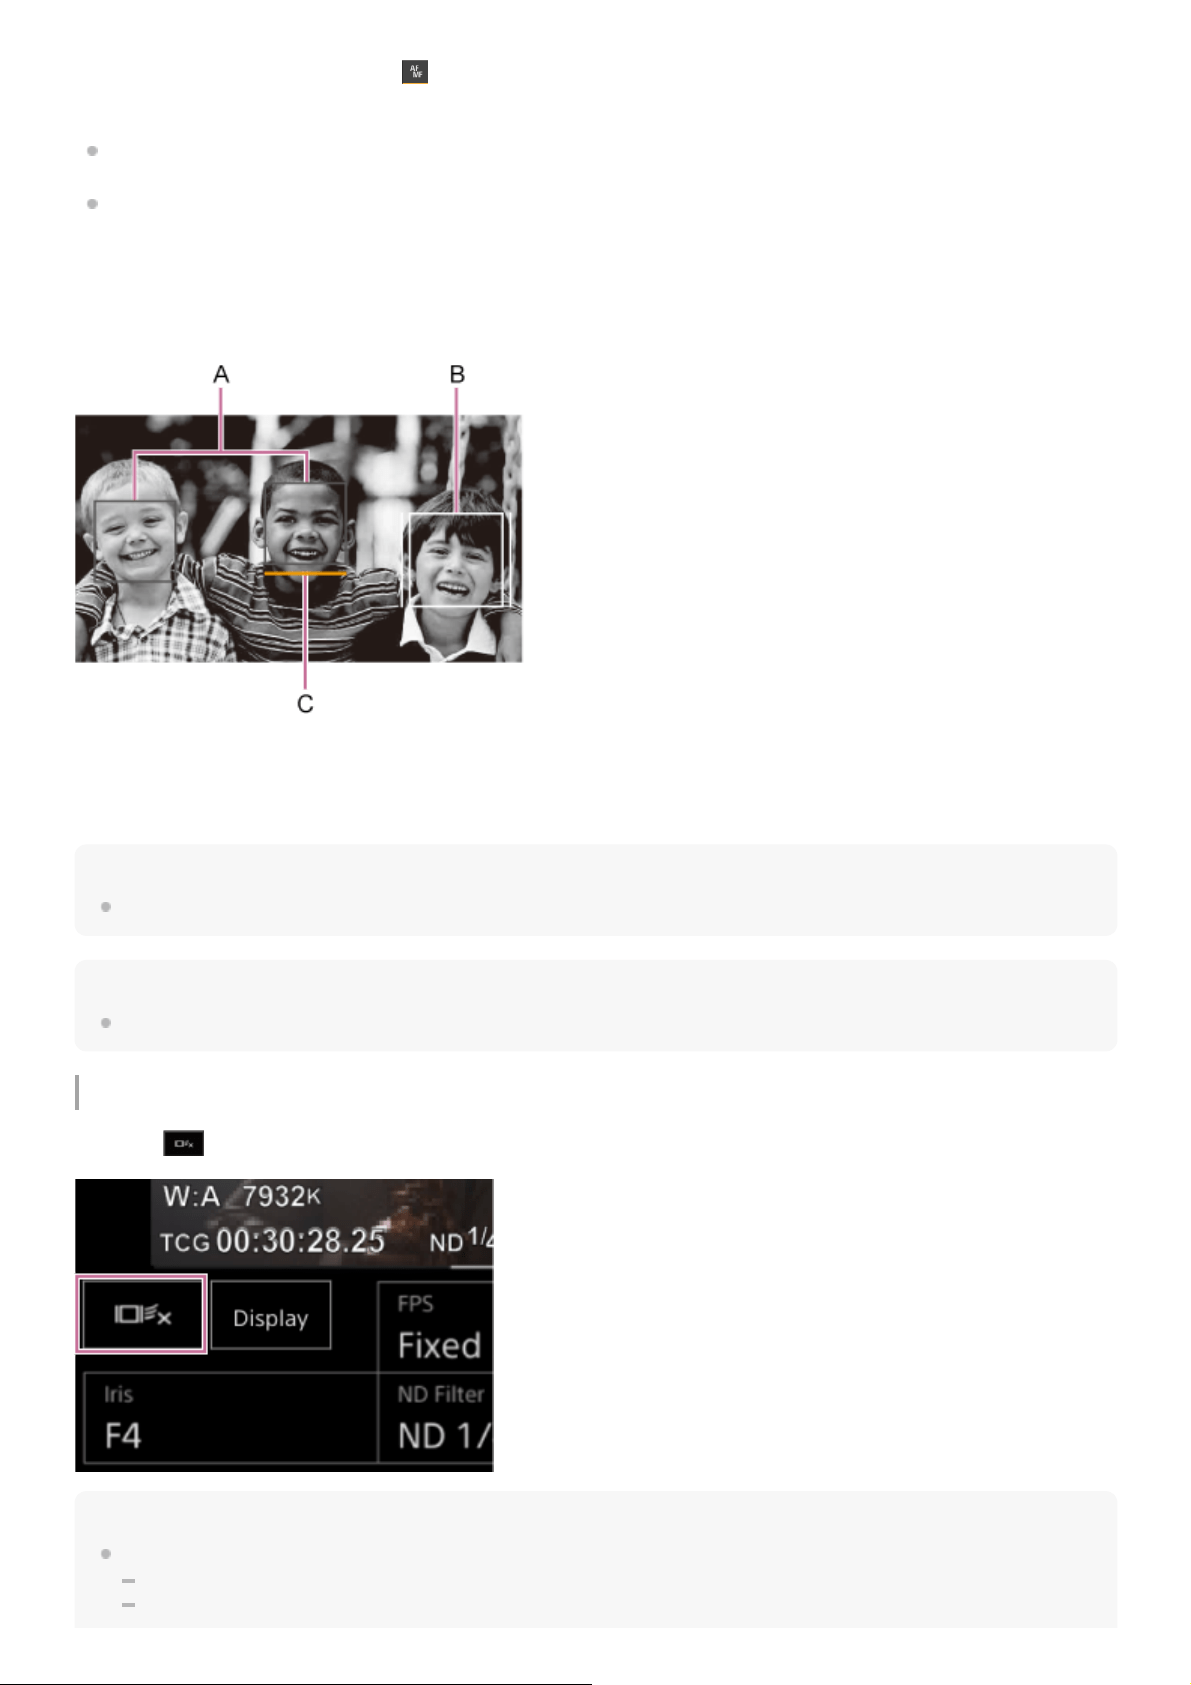
Slide the [Touch Focus] switch on the (Focus) tab in the camera control panel to the right position to turn it on, then
tap the target subject to track in any of the following states.
During manual focus or during push manual focus, and when [Shooting] > [Focus] > [Touch Function in MF] is set to
[Tracking AF] in the web menu or camera menu
During auto focus or during push auto focus (AF)
To specify by face detection frame selection
Move the face selection cursor (orange underline) to the target subject to track using the arrow buttons in the GUI control
panel, and press the [Set] button.
A: Face detection frames (gray)
B: Tracking frame
C: Face selection cursor (orange)
Note
During manual focus, tracking cannot be started by face detection frame selection.
Hint
You can also change the target to track during realtime tracking AF.
Stopping realtime tracking AF
Press the
(realtime tracking AF stop) button.
Hint
Realtime tracking AF will stop in the following cases:
When the [Auto Focus] switch or AUTO/MANUAL control on the lens is switched
When the focus mode is changed
172

When AF assist is executed
When the focus area setting or face/eye detection AF action is changed
When an assignable button assigned with [Push AF/MF] is pressed
When the tracking target is not within the shooting screen or when the subject is out of focus for a few seconds
When a tracking face is saved (when the
(saved tracking face icon) is displayed), realtime tracking AF will resume when the
saved tracking face enters the image area. To clear the tracking face, stop realtime tracking AF as described above.
5-041-957-11(1)
Copyright 2022 Sony Corporation
173
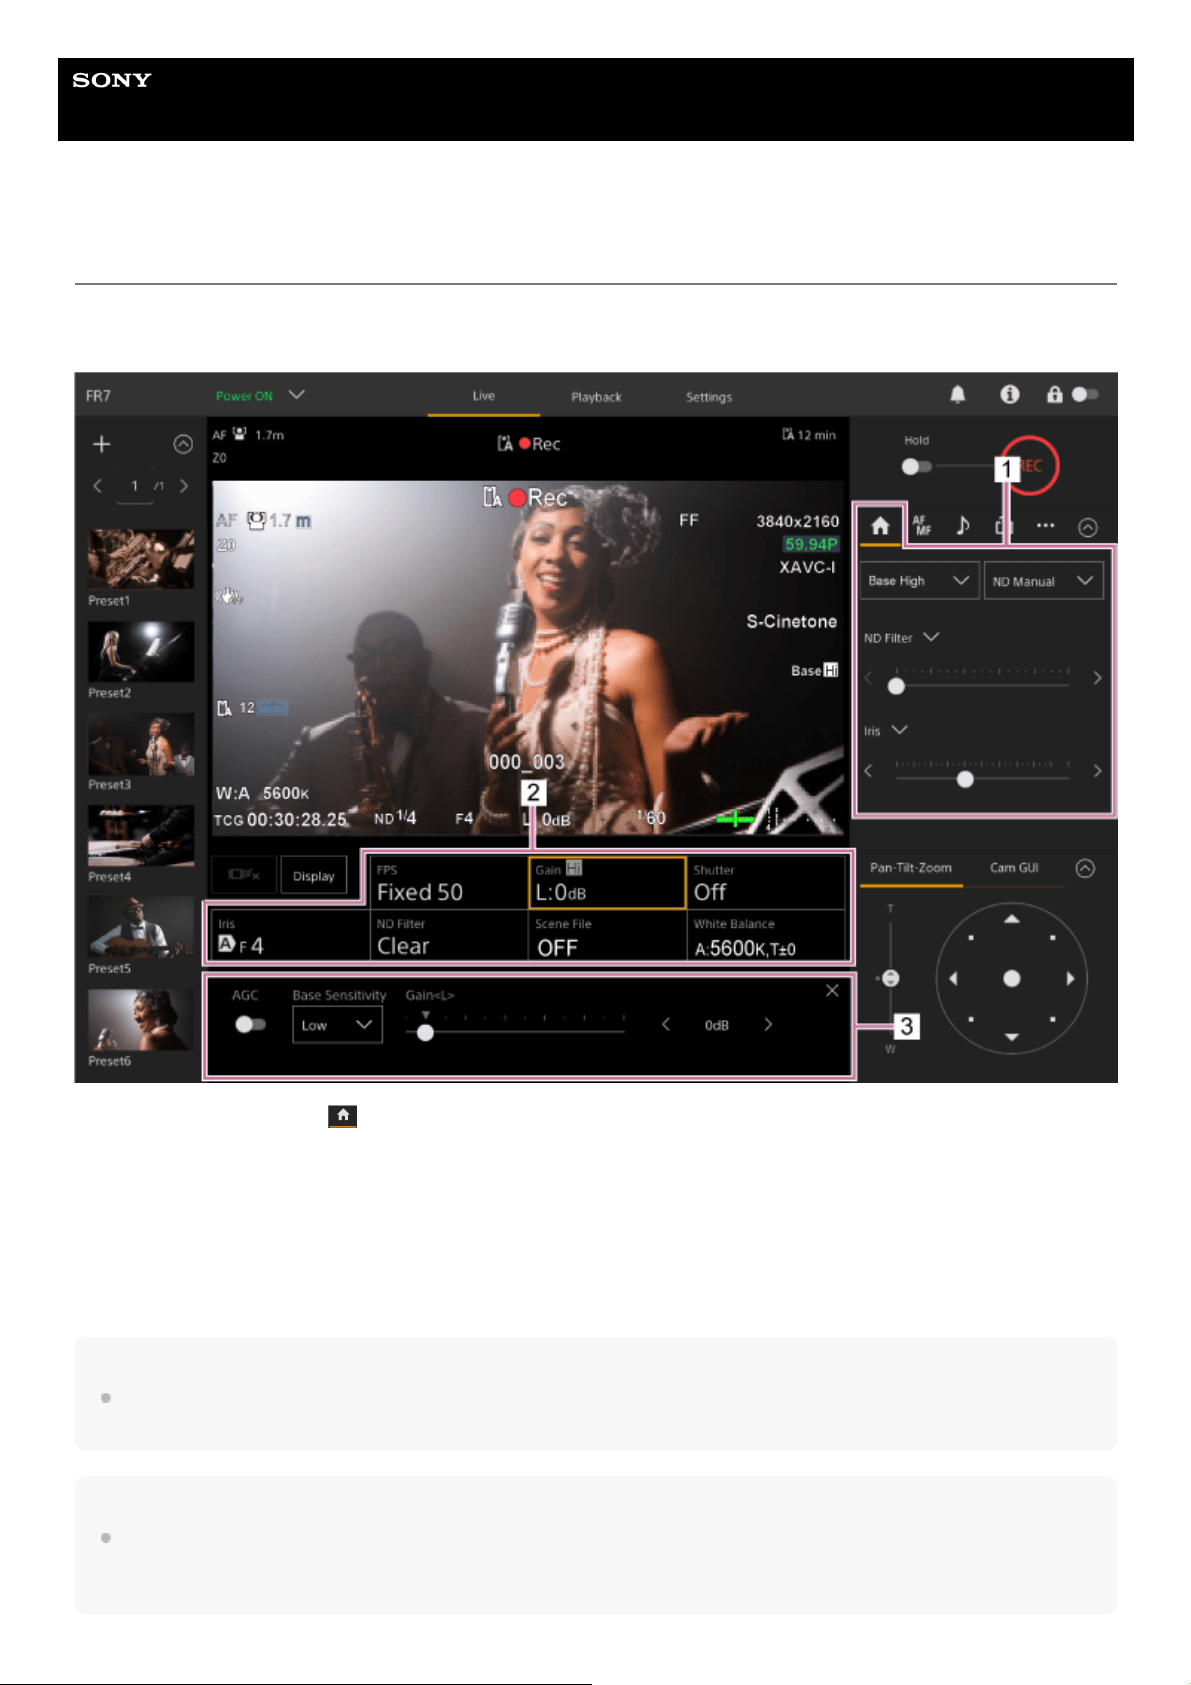
Help Guide
Interchangeable Lens Digital Camera
ILME-FR7 / ILME-FR7K
Brightness Adjustment Screen
You can adjust the brightness by adjusting the iris, gain, shutter speed, and by adjusting the light level using ND filters in
the following control panels of the Web App live operation screen. You can also adjust the brightness automatically.
Note
The gain cannot be adjusted when [Shooting Mode] is set to [Cine EI]. Also, the brightness cannot be adjusted automatically
using the shutter speed. Brightness auto adjustment using the iris and ND filter is supported.
Hint
Cine EI mode is a mode for shooting at a base sensitivity without using gain in order to maximize the performance of the image
sensor. The brightness is adjusted using lighting and the ND filter to adjust the amount of light that reaches the image sensor. For
details about Exposure Index (EI), see “Changing the Distribution of Dark and Bright Areas in the Recorded Image.”
Camera control panel –
(Main) tab1.
Camera basic configuration panel
Displays the setting status of basic functions required for shooting on buttons. Press a button to display the
corresponding setup screen for each function in the camera basic configuration adjustment panel below.
2.
Camera basic configuration adjustment panel
Displays the adjustment panel for the setup item selected on the camera basic configuration panel.
3.
174

5-041-957-11(1) Copyright 2022 Sony Corporation
175
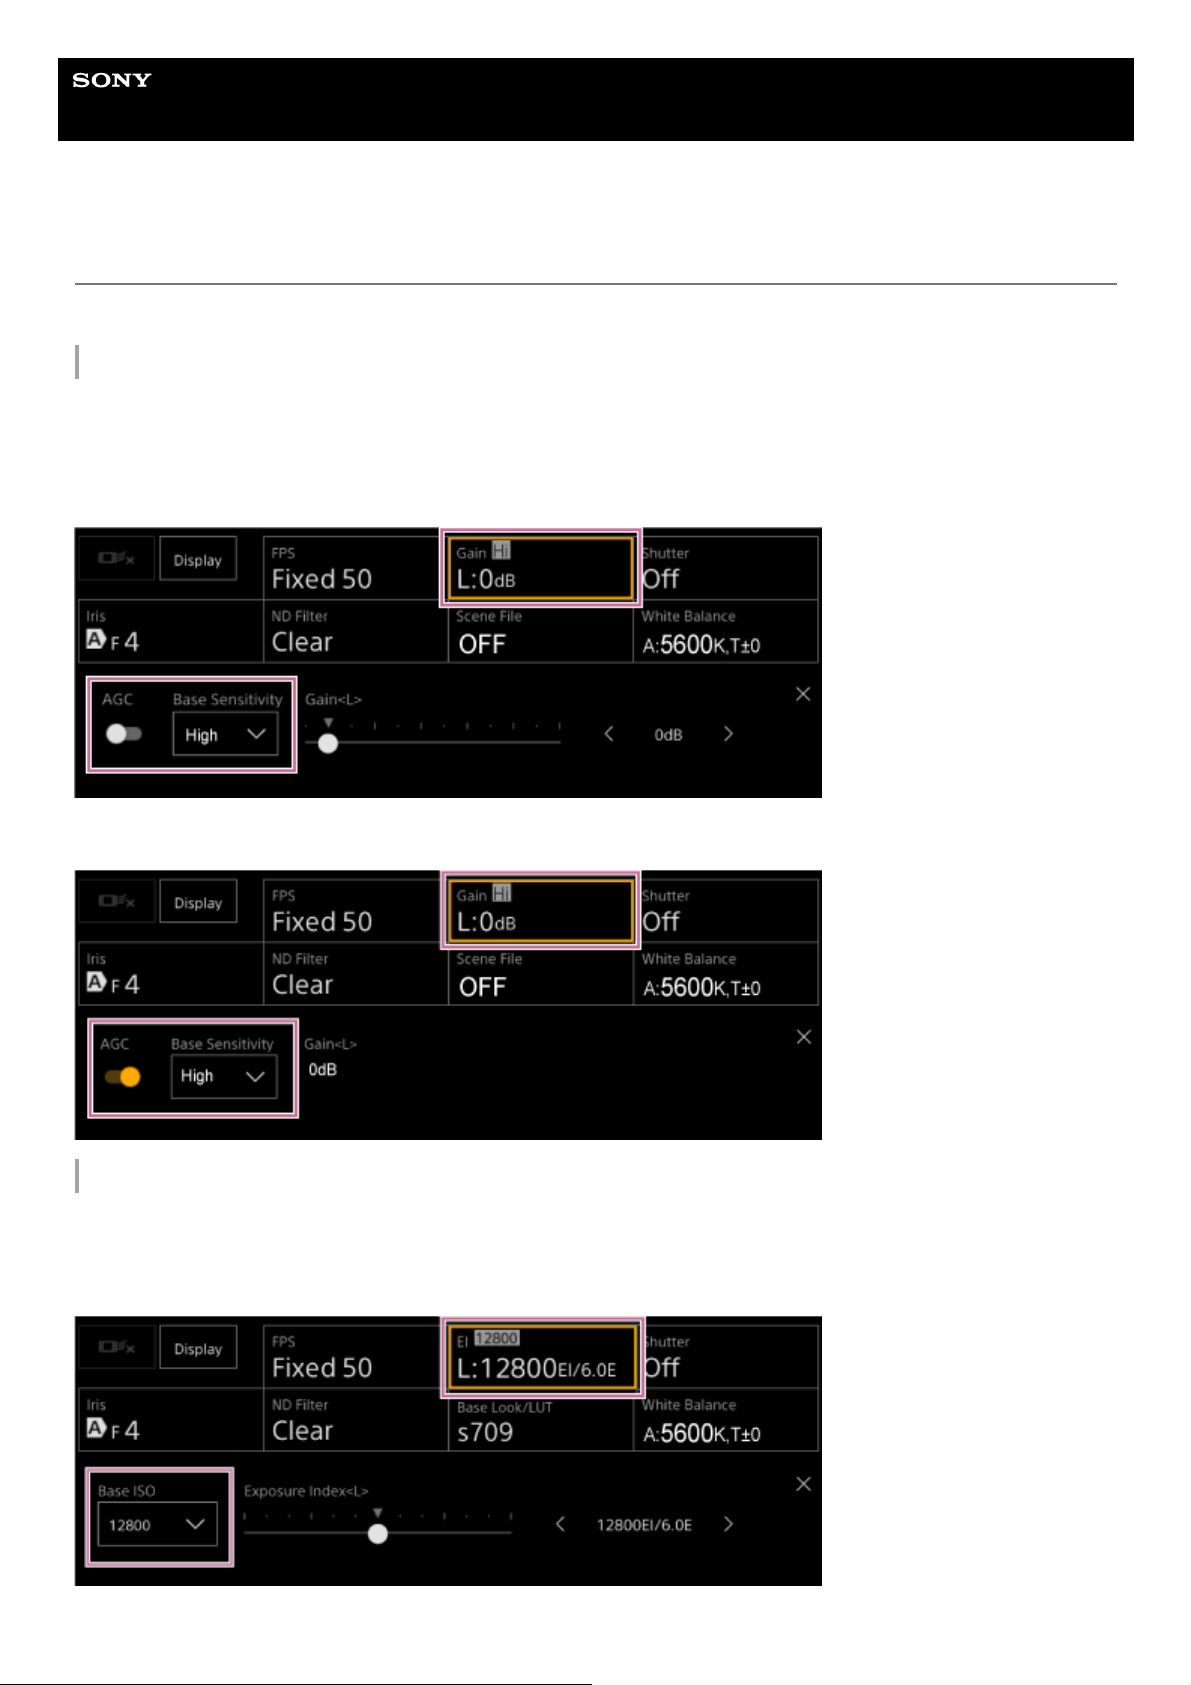
Help Guide
Interchangeable Lens Digital Camera
ILME-FR7 / ILME-FR7K
Setting the Base Sensitivity
You can set the base sensitivity before starting to adjust the brightness.
When [Shooting Mode] is set to [Custom]
Press the [ISO/Gain] button in the camera basic configuration panel and set [Base Sensitivity] on the ISO/gain
adjustment panel to [High] or [Low].
Select [Low] in normal lighting conditions and select [High] in low lighting conditions.
Screen when [AGC] is turned off
Screen when [AGC] is turned on
When [Shooting Mode] is set to [Cine EI]
Press the [Base ISO/Exposure Index] button in the camera basic configuration panel and set [Base ISO] on the Base
ISO/Exposure Index adjustment panel to [ISO 12800] or [ISO 800].
Select [ISO 800] in normal lighting conditions and select [ISO 12800] in low lighting conditions.
176

Hint
You can also set this on the
(Main) tab in the camera control panel.
Can also be set using [Shooting] > [ISO/Gain/EI] > [Base Sensitivity] or [Base ISO] in the camera menu.
You can also assign [Base ISO/Sensitivity] to an assignable button.
5-041-957-11(1)
Copyright 2022 Sony Corporation
177
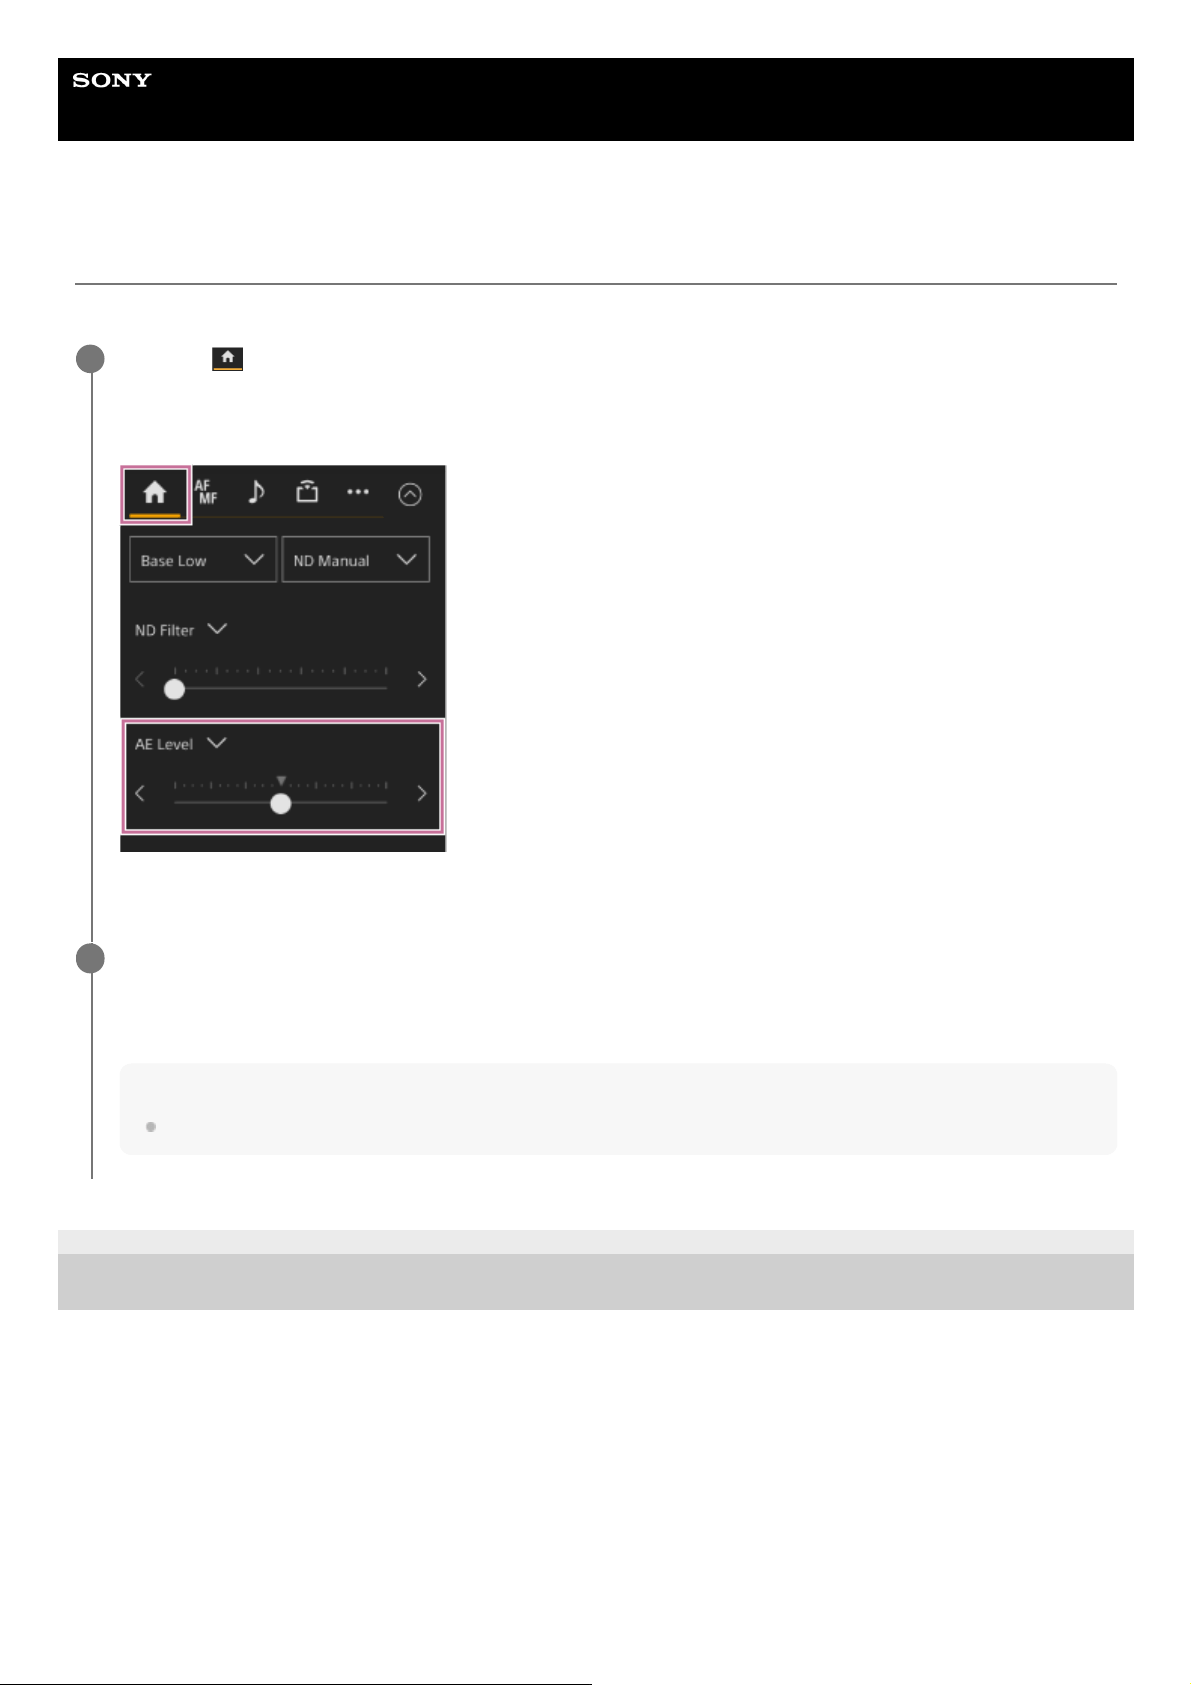
Help Guide
Interchangeable Lens Digital Camera
ILME-FR7 / ILME-FR7K
Setting the Target Level for Automatic Brightness Adjustment
The target level for automatic brightness adjustment is set using the [AE Level] slider in the camera control panel.
5-041-957-11(1)
Copyright 2022 Sony Corporation
Press the
(Main) tab in the camera control panel.
If the [AE Level] slider is not displayed, select either of the two slider function selection buttons and select the [AE
Level] slider from the list.
The [AE Level] slider appears.
1
Set the target level using the slider.
Move the slider knob to the left to make the image darker. Move the slider knob to the right to make the image
brighter.
Hint
Can also be set using [Shooting] > [Auto Exposure] > [Level] in the camera menu.
2
178
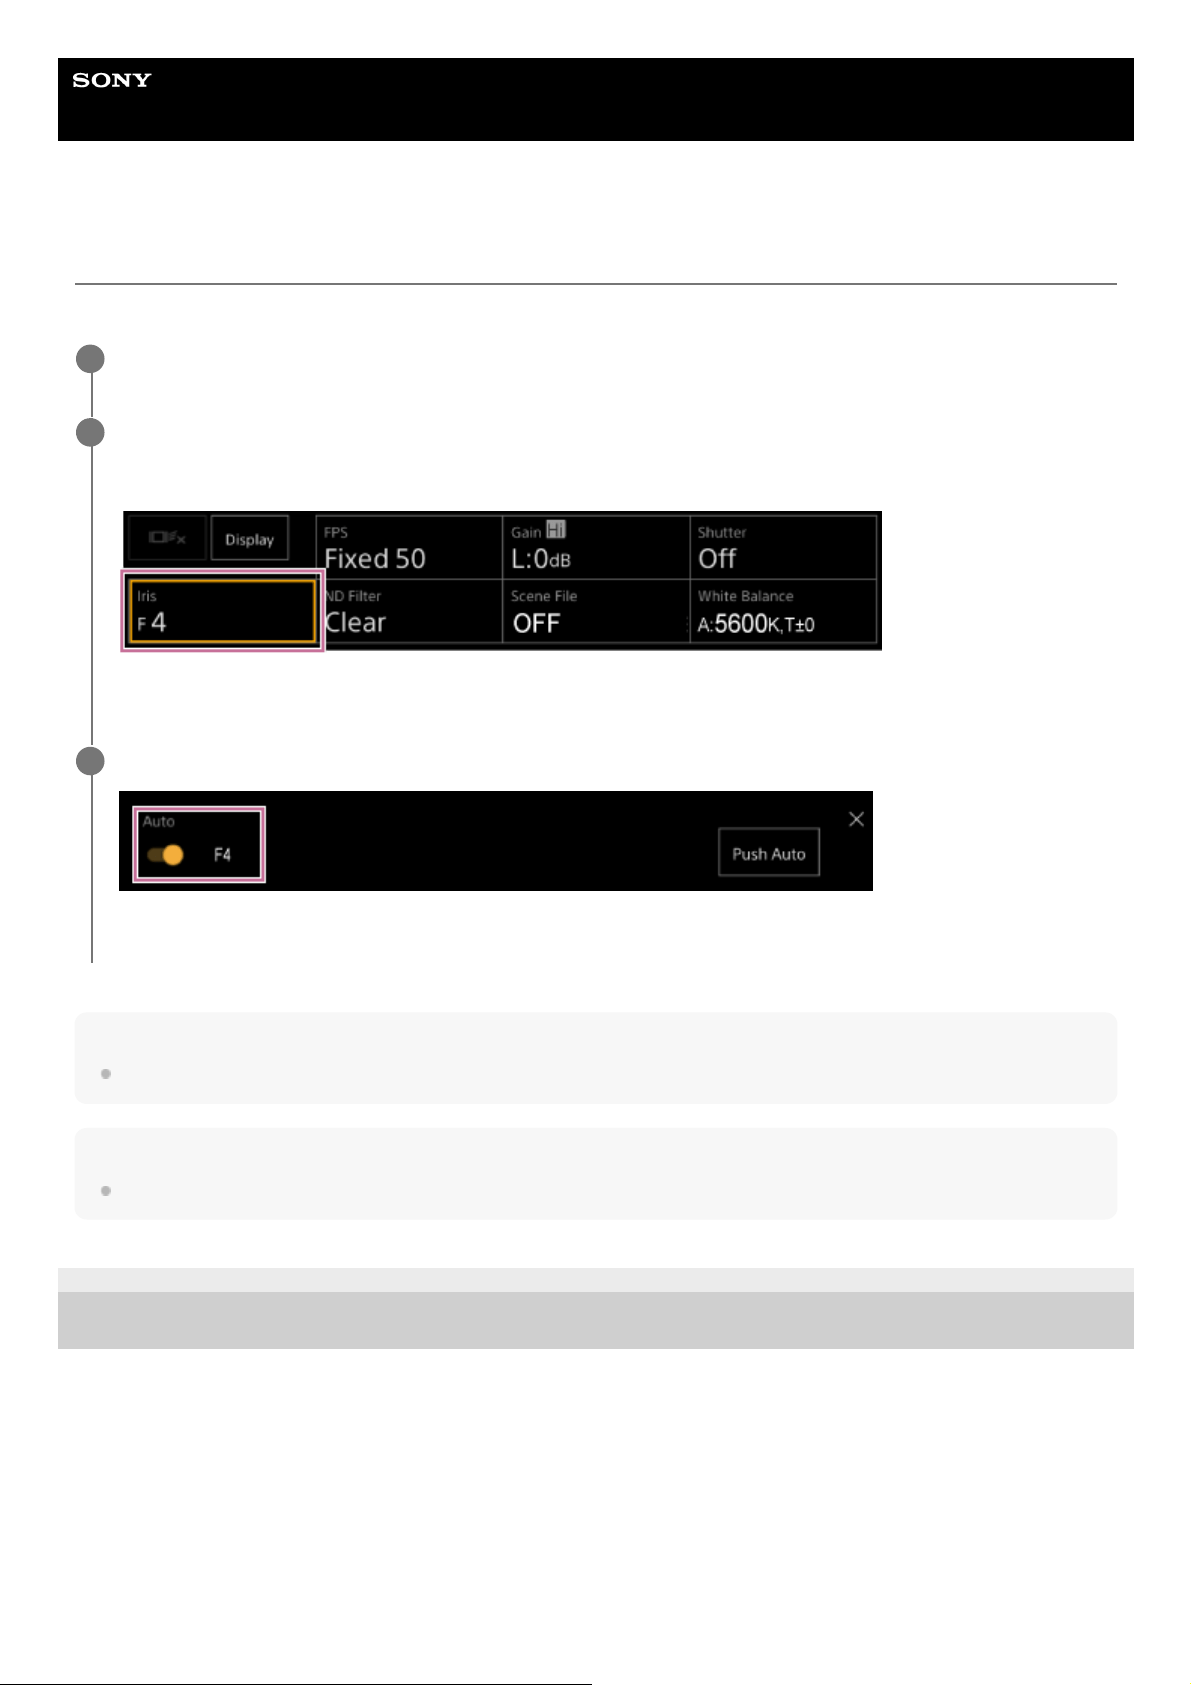
Help Guide
Interchangeable Lens Digital Camera
ILME-FR7 / ILME-FR7K
Adjusting the Iris Automatically
You can adjust the brightness automatically according to the subject. A compatible lens is required.
Note
The iris cannot be adjusted automatically on an A-mount lens.
Hint
You can also assign [Auto Iris] to an assignable button.
5-041-957-11(1)
Copyright 2022 Sony Corporation
If a lens with an Auto Iris switch is attached, set the switch to AUTO.
1
Press the [Iris] button in the camera basic configuration panel.
The frame of the [Iris] button changes to orange.
The Iris adjustment panel appears.
2
Slide the [Auto] switch to the right position to turn it on.
The iris switches to auto adjustment mode. The auto adjusted iris value is displayed on the right side of the switch.
3
179
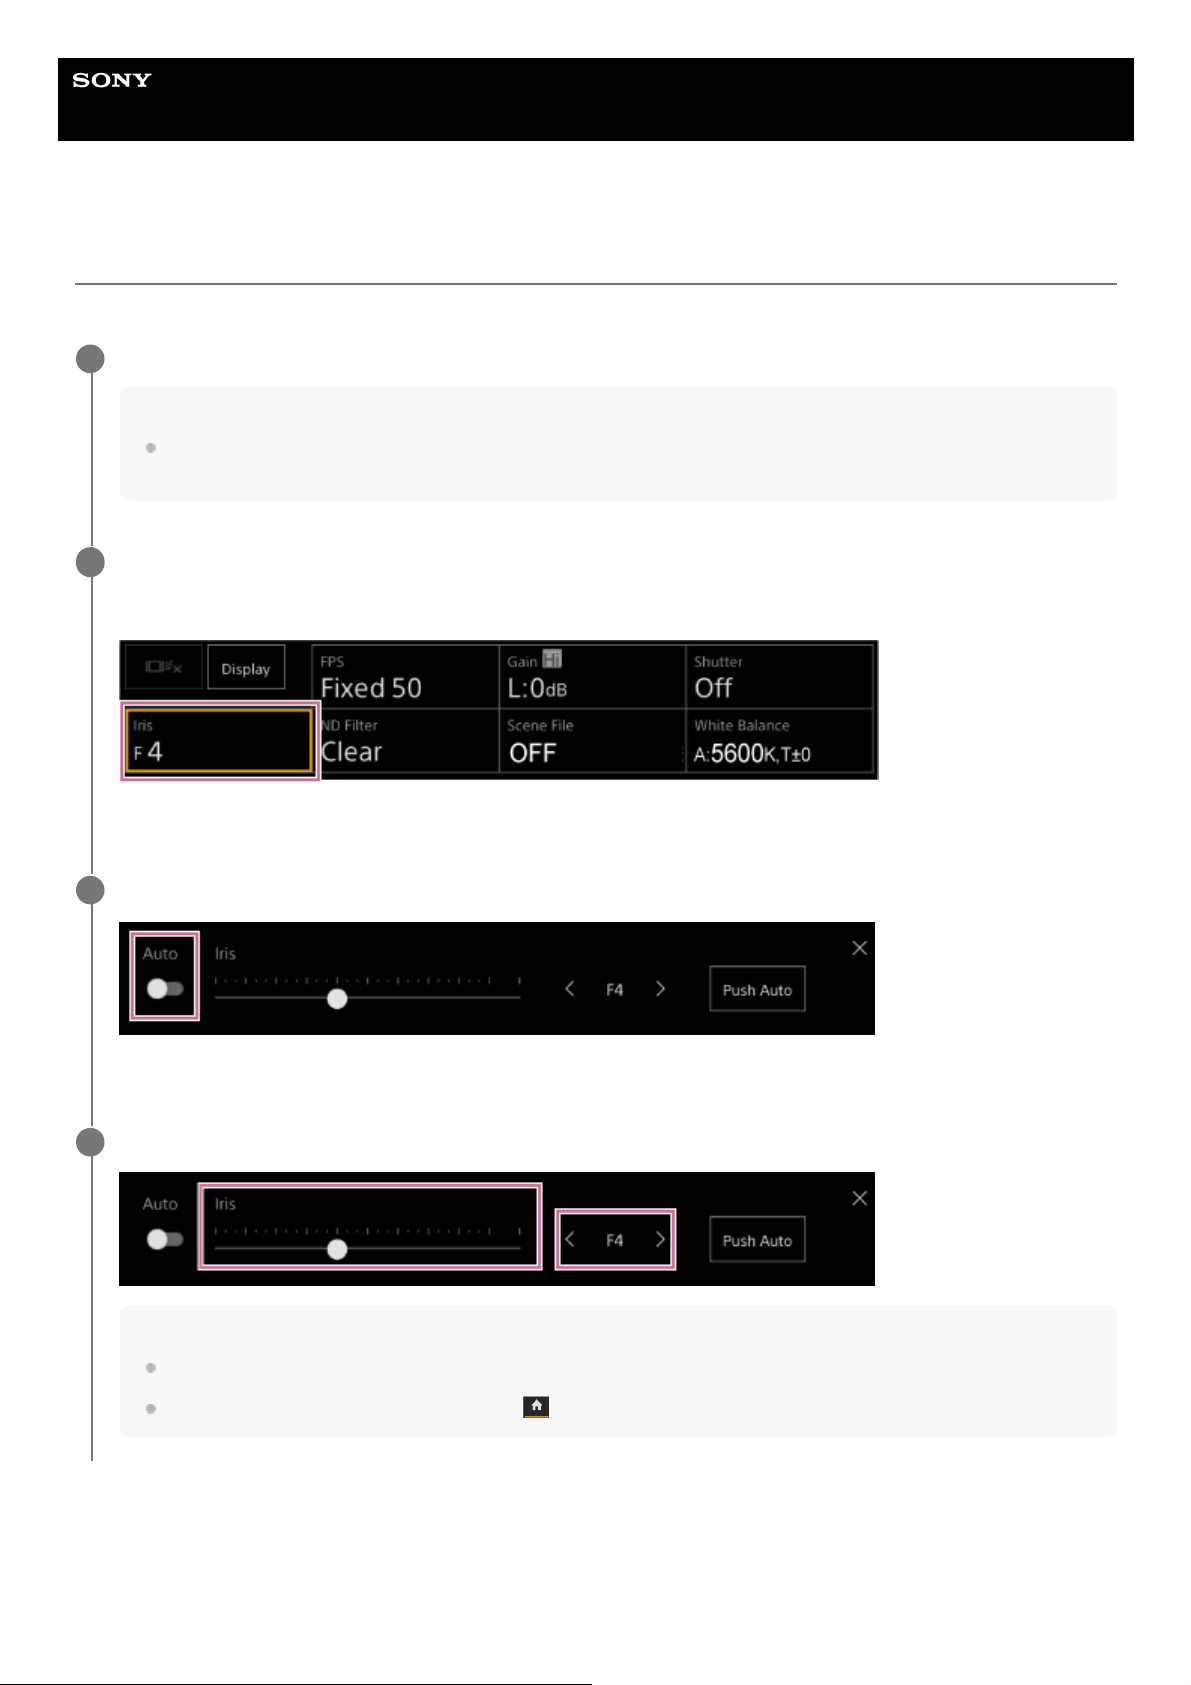
Help Guide
Interchangeable Lens Digital Camera
ILME-FR7 / ILME-FR7K
Adjusting the Iris Manually
You can adjust the brightness manually.
To temporarily adjust the iris automatically
You can also press the [Push Auto] button on the Iris adjustment panel to adjust the iris automatically while the button is
pressed.
If a lens with an Auto Iris switch is attached, set the switch to AUTO.
Note
When the Auto Iris switch of the lens is set to MANUAL, the [Auto Iris] and [Push Auto Iris] functions on the unit have no
effect. Manual iris adjustments on the unit also have no effect.
1
Press the [Iris] button in the camera basic configuration panel.
The frame of the [Iris] button changes to orange.
The Iris adjustment panel appears.
2
Slide the [Auto] switch to the left position to turn it off.
The iris switches to manual adjustment mode.
3
Adjust the iris using the [Iris] slider or [Iris] adjustment buttons.
Hint
The slider and adjustment button settings are linked.
You can also assign the iris to the slider on the
(Main) tab in the camera control panel.
4
180

Hint
Press an assignable button assigned with the [Push Auto Iris] function to adjust the iris automatically while the button is pressed.
The iris returns to manual mode when you release the button.
5-041-957-11(1)
Copyright 2022 Sony Corporation
181

Help Guide
Interchangeable Lens Digital Camera
ILME-FR7 / ILME-FR7K
Adjusting the Gain Automatically
You can adjust the brightness automatically using the gain setting when [Shooting Mode] is set to [Custom].
5-041-957-11(1)
Copyright 2022 Sony Corporation
Set [Project] > [Shooting Mode] to [Custom] in the web menu or camera menu.
1
Press the [ISO/Gain] button in the camera basic configuration panel.
The frame of the [ISO/Gain] button changes to orange.
The ISO/Gain adjustment panel appears.
2
Slide the [AGC] switch to the right position to turn it on.
The gain switches to auto adjustment mode. The auto adjusted gain value is displayed on the right side of the
switch.
Hint
You can also perform the same action by setting [Shooting] > [Auto Exposure] > [AGC] to [On] in the camera menu.
You can also assign [AGC] to an assignable button.
3
182
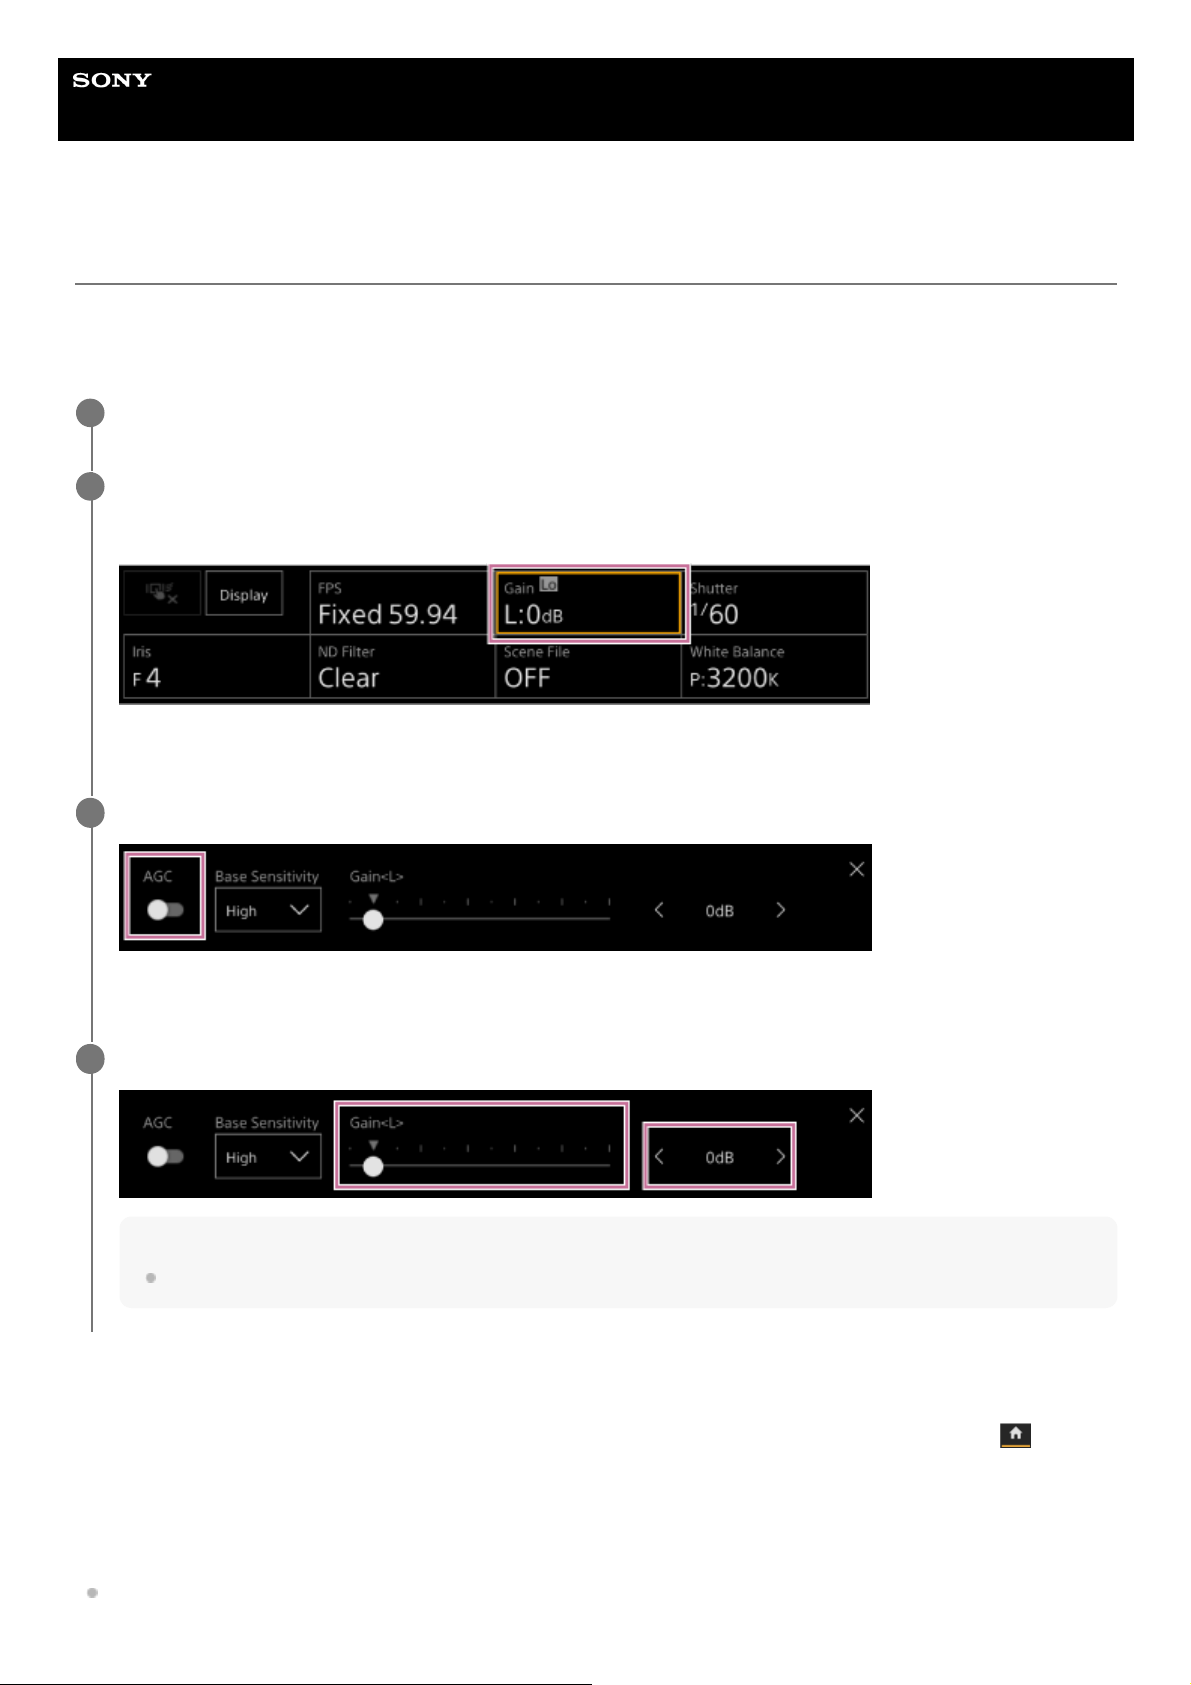
Help Guide
Interchangeable Lens Digital Camera
ILME-FR7 / ILME-FR7K
Adjusting the Gain Manually
You can adjust the brightness manually using the gain setting when [Shooting Mode] is set to [Custom].
You can control the gain when you want to adjust the exposure while using a fixed iris setting or when you want to
prevent the gain increasing due to AGC.
To temporarily adjust the gain manually
You can also adjust the gain temporarily by assigning [ISO/Gain] to a slider function selection button on the
(Main)
tab in the camera control panel and using the slider.
This is useful when you want to adjust the exposure by one step without changing the depth of field.
The adjustment result returns to the preset value configured using [ISO/Gain<L>] after performing any of the following
operations.
Changing ISO/Gain adjustment items
Set [Project] > [Shooting Mode] to [Custom] in the web menu or camera menu.
1
Press the [ISO/Gain] button in the camera basic configuration panel.
The frame of the [ISO/Gain] button changes to orange.
The ISO/Gain adjustment panel appears.
2
Slide the [AGC] switch to the left position to turn it off.
The gain switches to manual adjustment mode.
3
Adjust the gain using the [ISO/Gain] slider or [ISO/Gain] adjustment buttons.
Hint
The slider and adjustment button settings are linked.
4
183

Switching the base sensitivity
Setting the AGC switch to the on position
Switching the power supply of the unit to standby
To temporarily adjust the gain automatically using an assignable button
Press an assignable button assigned with the [Push AGC] function to adjust the gain automatically while the button is
pressed.
The gain returns to manual mode when you release the button.
The adjustment result returns to the preset value configured using [ISO/Gain<L>] after performing any of the following
operations.
Changing ISO/Gain adjustment items
Switching the base sensitivity
Setting the AGC switch to the on position
Switching the power supply of the unit to standby
Note
This function cannot be executed when [Shooting] > [Iris] > [Bokeh Control] is set to [On] in the camera menu.
5-041-957-11(1)
Copyright 2022 Sony Corporation
184
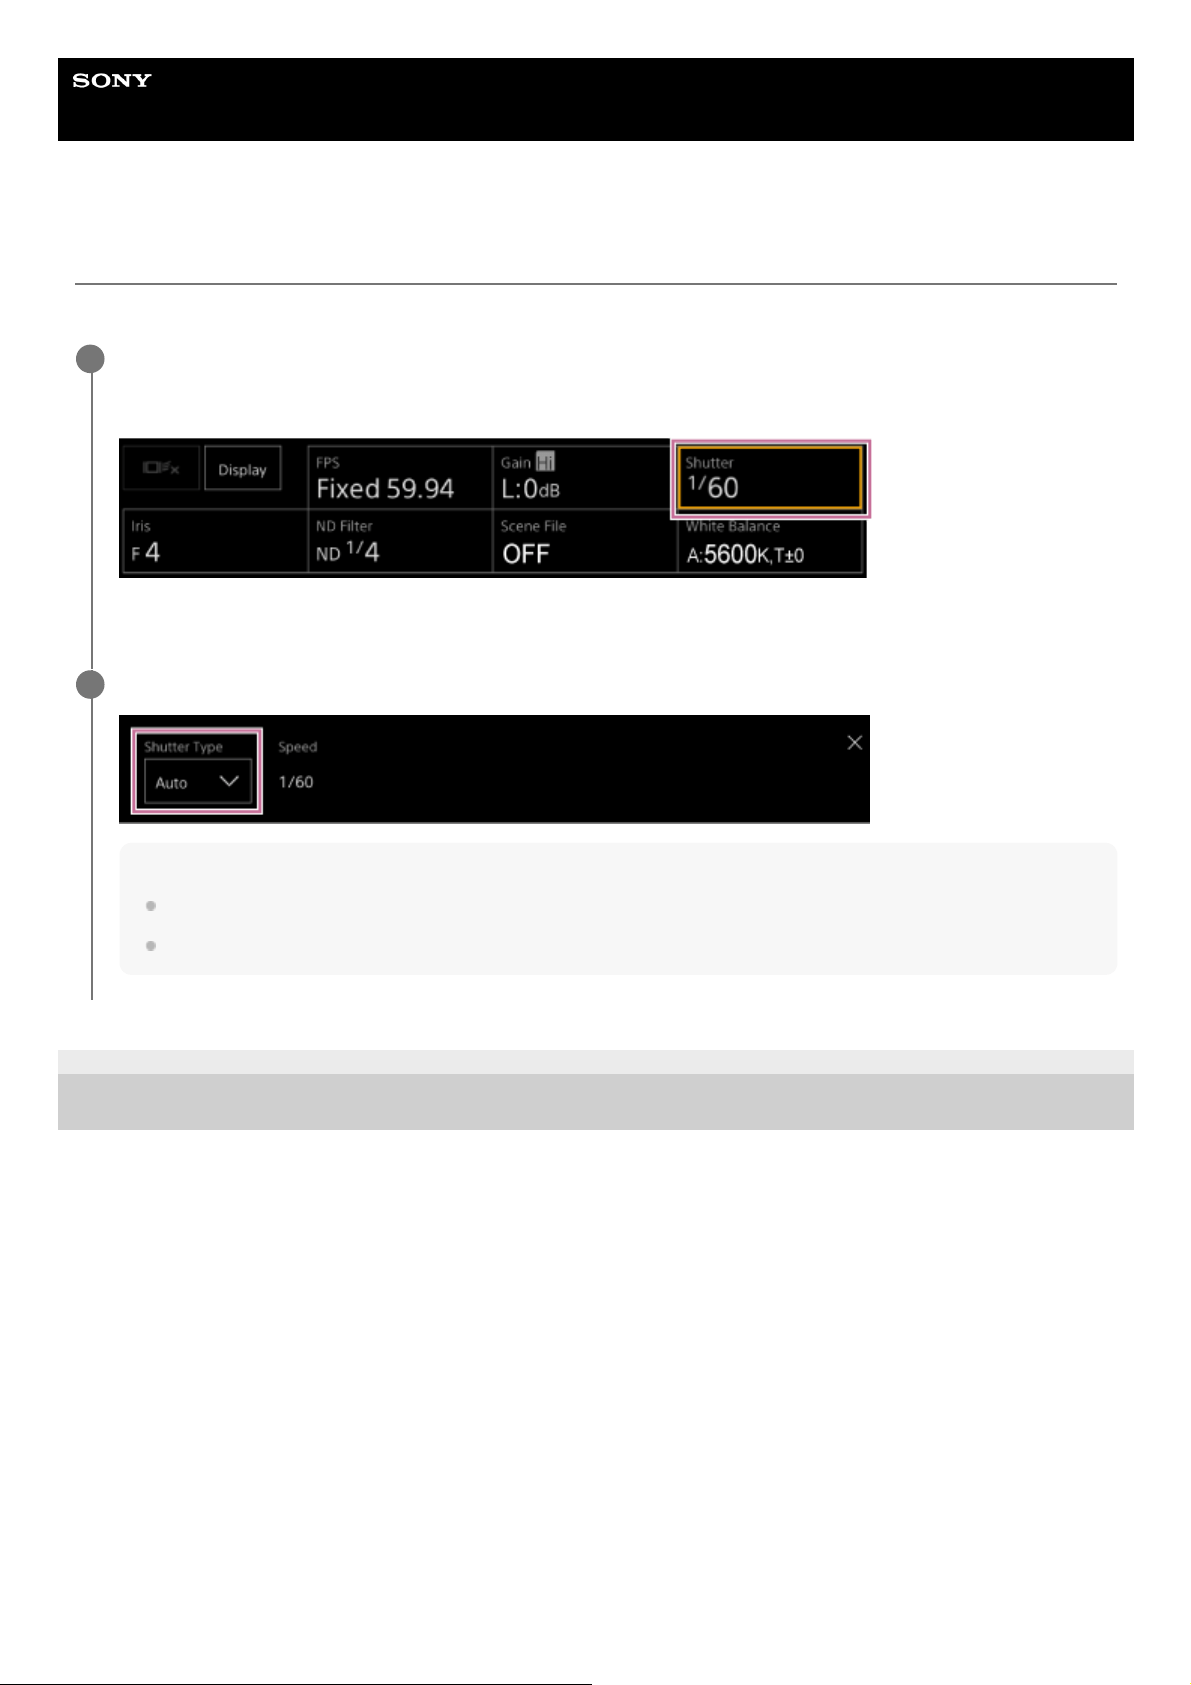
Help Guide
Interchangeable Lens Digital Camera
ILME-FR7 / ILME-FR7K
Adjusting the Shutter Automatically
You can adjust the shutter automatically in response to the brightness of the image.
5-041-957-11(1)
Copyright 2022 Sony Corporation
Press the [Shutter] button in the camera basic configuration panel.
The frame of the [Shutter] button changes to orange.
The Shutter adjustment panel appears.
1
Press the [Shutter Type] button and select [Auto] from the list.
Hint
You can also perform the same action by setting [Shooting] > [Auto Exposure] > [Auto Shutter] to [On] in the camera menu.
You can also assign [Auto Shutter] to an assignable button.
2
185
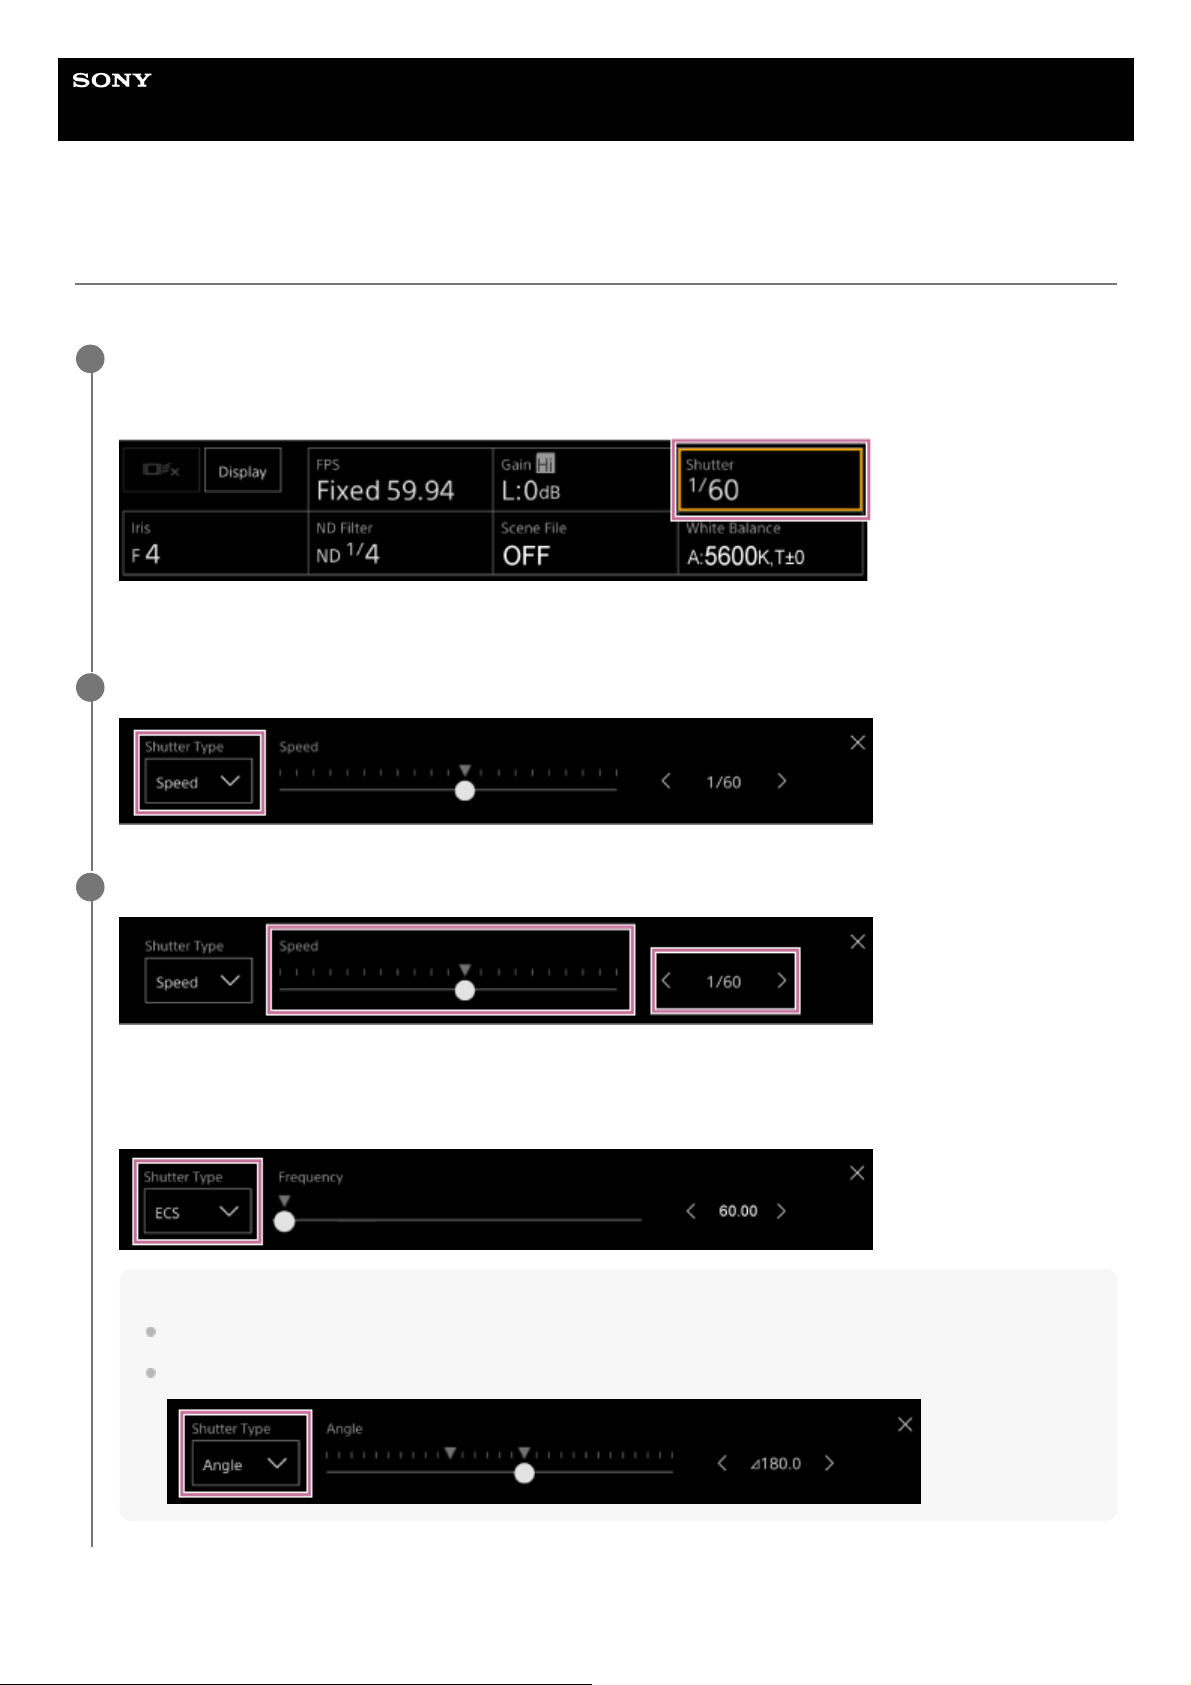
Help Guide
Interchangeable Lens Digital Camera
ILME-FR7 / ILME-FR7K
Adjusting the Shutter Manually
You can adjust the shutter manually.
Press the [Shutter] button in the camera basic configuration panel.
The frame of the [Shutter] button changes to orange.
The Shutter adjustment panel appears.
1
Press the [Shutter Type] button and select [Speed] from the list.
2
Adjust the shutter using the [Speed] slider or [Speed] adjustment buttons.
To adjust the exposure time to match the frame interval, select [Off] in step 2. You can also set a fixed value using
[ECS] (frequency) or automatically adjust it using [Auto].
Example: Set using [ECS] (frequency)
Hint
The slider and adjustment button settings are linked.
To use [Angle] instead of [Speed] or [Off], set [Shooting] > [Shutter] > [Mode] to [Angle] in the camera menu.
3
186

5-041-957-11(1) Copyright 2022 Sony Corporation
187

Help Guide
Interchangeable Lens Digital Camera
ILME-FR7 / ILME-FR7K
About the ND Filter
In conditions where the lighting is too bright, you can set the appropriate brightness by changing the ND filter.
When shooting a brightly lit subject, closing the iris too much may cause diffraction blur, producing an image starting to
go out of focus (typical phenomena in video cameras). You can suppress this effect to obtain better shooting results
using the ND filter.
The unit features the following ND filter modes.
Preset mode
See “Adjusting in Preset Mode.”
Variable mode (automatic adjustment)
See “Adjusting Automatically in Variable Mode.”
Variable mode (manual adjustment)
See “Adjusting Manually in Variable Mode.”
5-041-957-11(1)
Copyright 2022 Sony Corporation
188
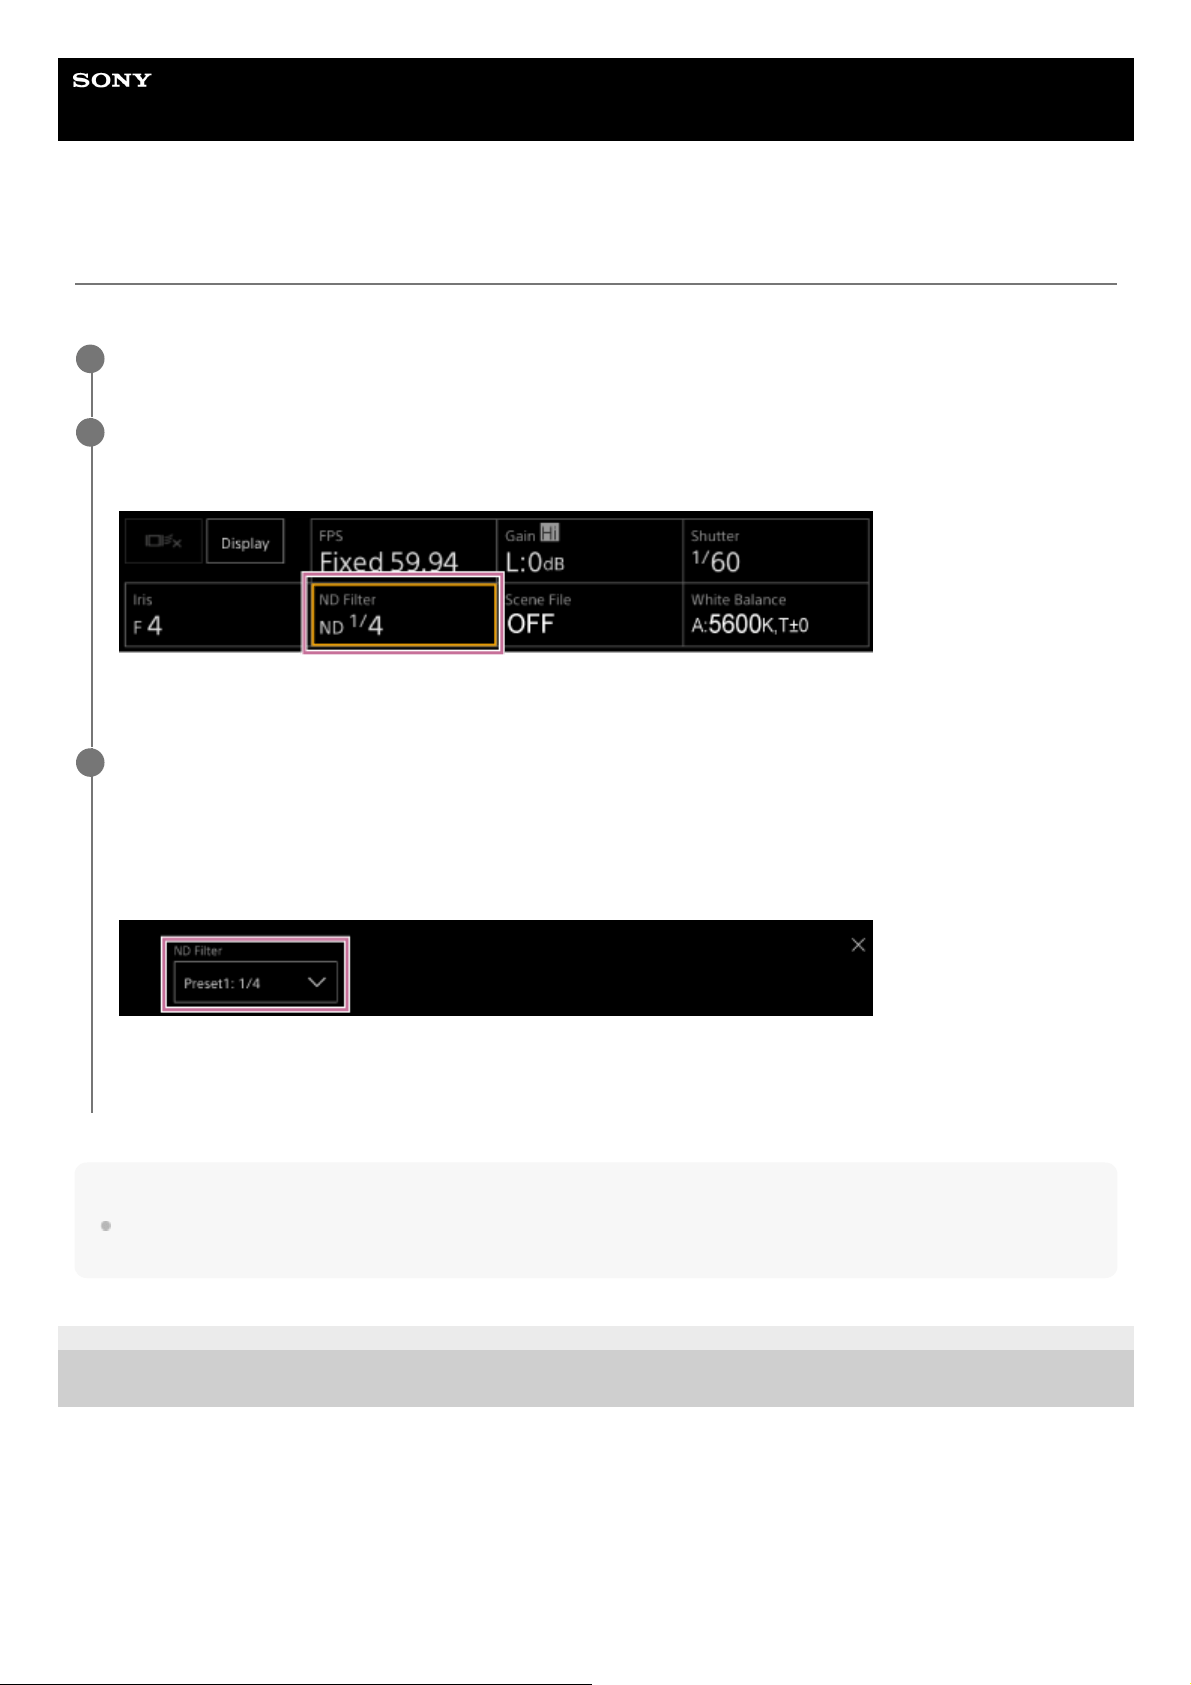
Help Guide
Interchangeable Lens Digital Camera
ILME-FR7 / ILME-FR7K
Adjusting in Preset Mode
You can select three ND filter transmittance values beforehand and quickly switch between them when shooting.
Hint
When an assignable button assigned with [ND Filter Position] is pressed, the ND filter changes in the sequence [Clear] →
[Preset1] → [Preset2] → [Preset3] → [Clear].
5-041-957-11(1)
Copyright 2022 Sony Corporation
Set [Shooting] > [ND Filter] > [Mode] to [Preset] in the camera menu.
1
Press the [ND Filter] button in the camera basic configuration panel.
The frame of the [ND Filter] button changes to orange.
The ND Filter adjustment panel appears.
2
Press the [ND Filter] button and select one of the following from the list.
[Clear]: No ND filter.
[Preset1]: Transmittance set by [Shooting] > [ND Filter] > [Preset1] in the camera menu.
[Preset2]: Transmittance set by [Shooting] > [ND Filter] > [Preset2] in the camera menu.
[Preset3]: Transmittance set by [Shooting] > [ND Filter] > [Preset3] in the camera menu.
When one of [Preset1] to [Preset3] is selected for the ND filter, the transmittance value is displayed beside the ND
filter name.
3
189
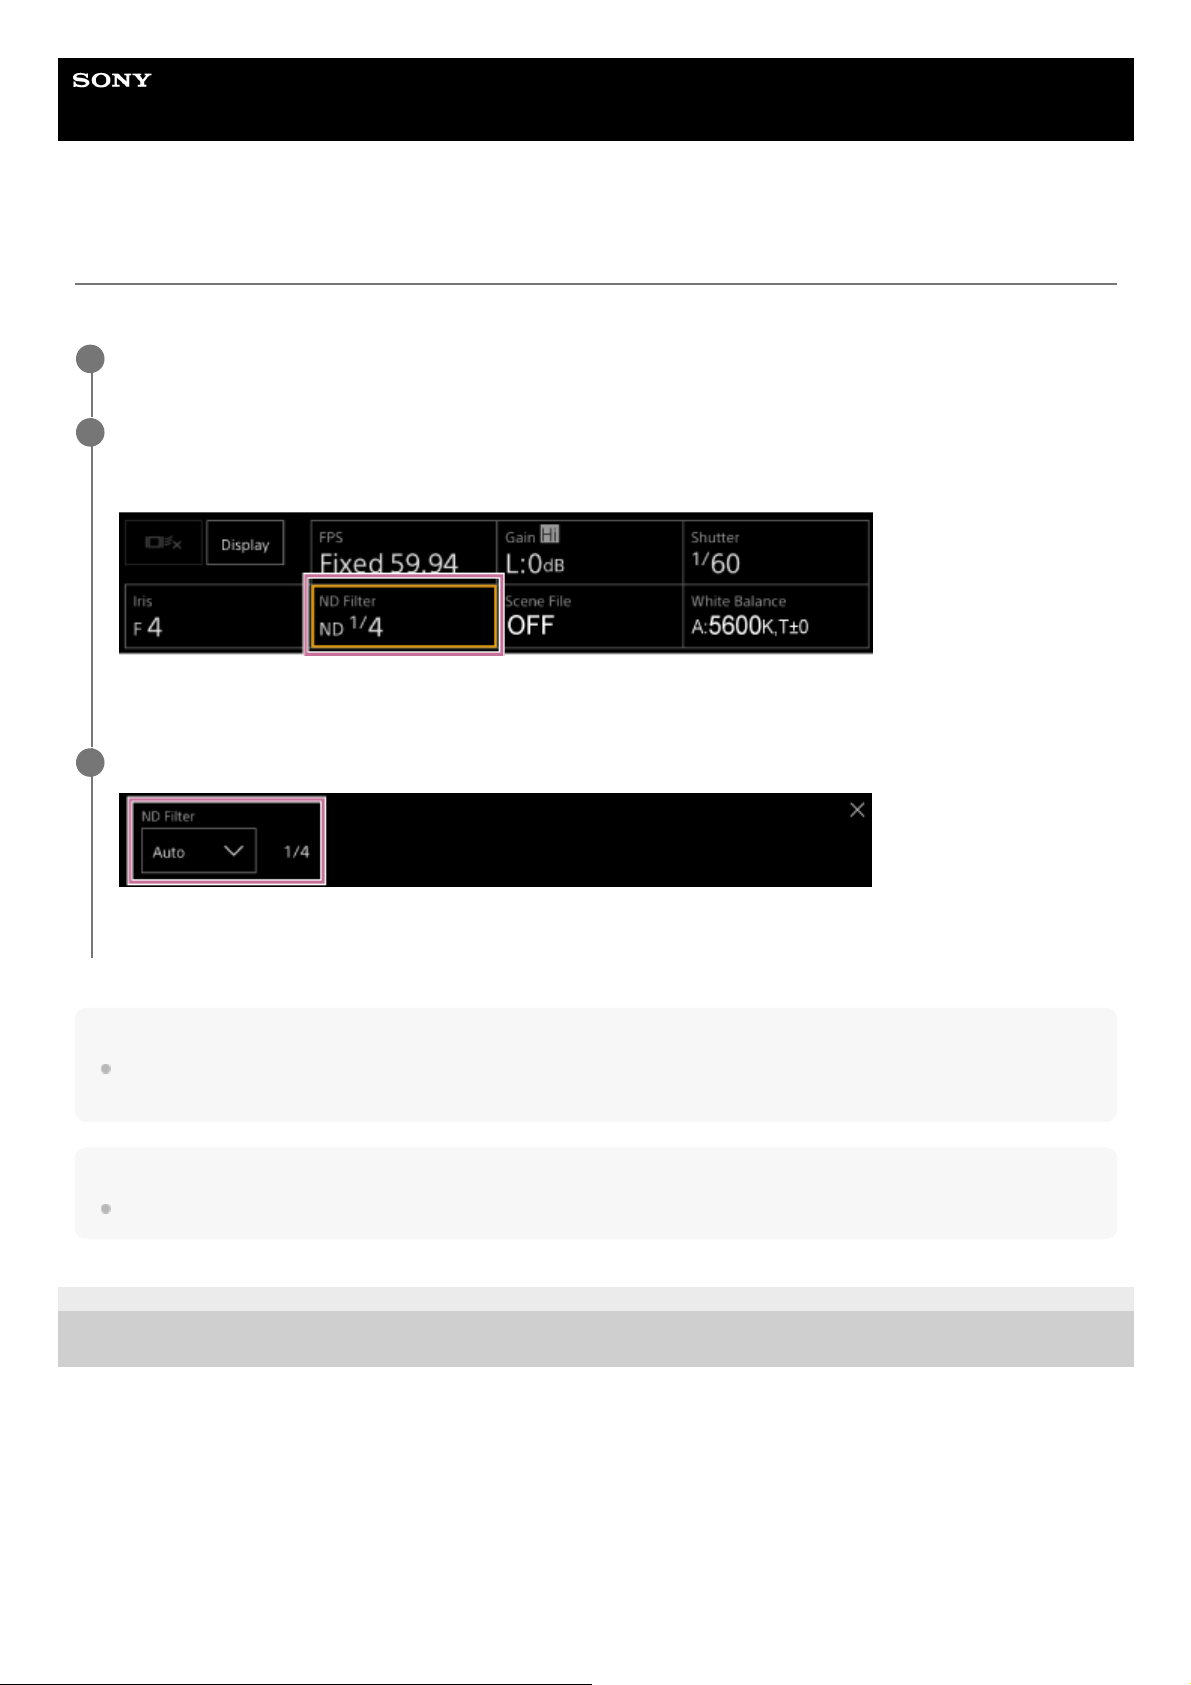
Help Guide
Interchangeable Lens Digital Camera
ILME-FR7 / ILME-FR7K
Adjusting Automatically in Variable Mode
You can enable auto exposure adjustment using the ND filter.
Note
When the ND filter is switched to or from [Clear] during shooting, the ND filter frame is displayed on the image and an operating
sound is emitted.
Hint
You can also assign [Auto ND Filter] to an assignable button, and press the button to switch between [Auto] and [Manual].
5-041-957-11(1)
Copyright 2022 Sony Corporation
Set [Shooting] > [ND Filter] > [Mode] to [Variable] in the camera menu.
1
Press the [ND Filter] button in the camera basic configuration panel.
The frame of the [ND Filter] button changes to orange.
The ND Filter adjustment panel appears.
2
Press the [ND Filter] button and select [Auto] from the list.
The automatically adjusted ND filter transmittance value is displayed beside the [ND Filter] button.
3
190
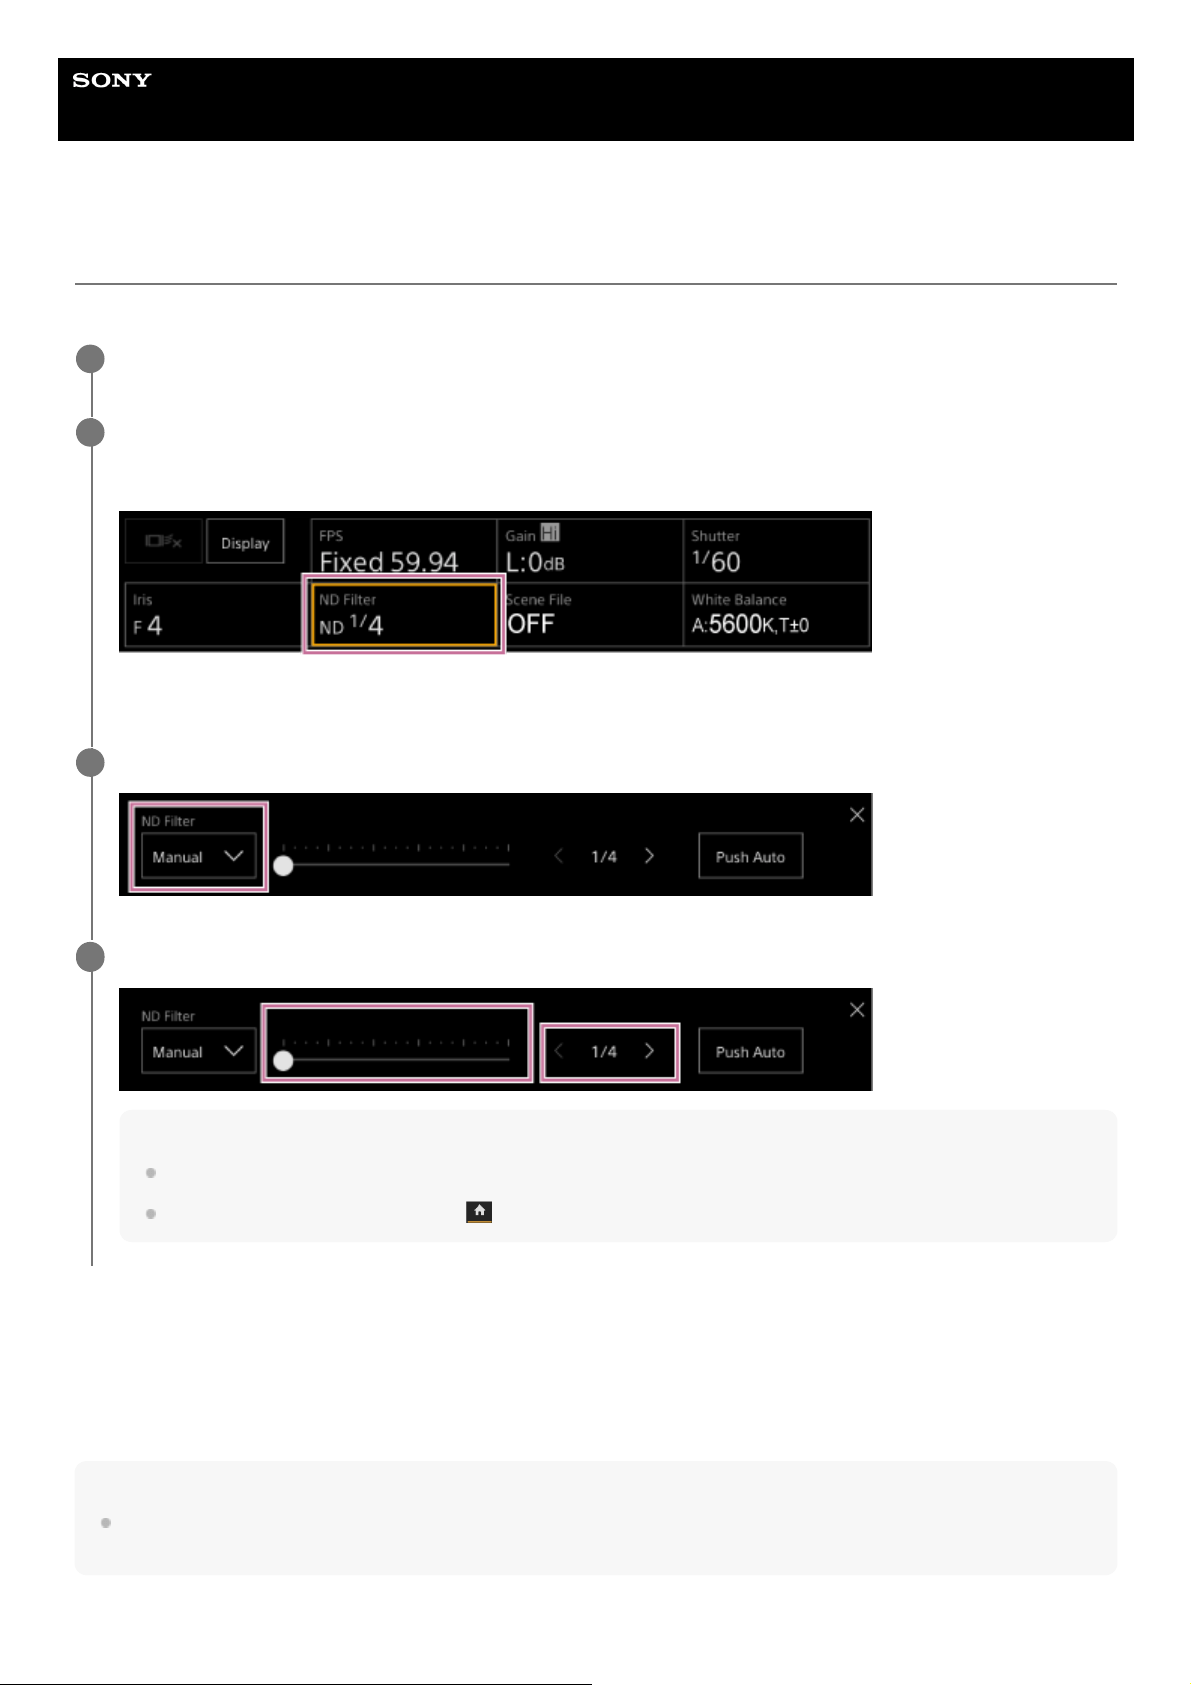
Help Guide
Interchangeable Lens Digital Camera
ILME-FR7 / ILME-FR7K
Adjusting Manually in Variable Mode
You can perform manual exposure adjustment using the ND filter.
To temporarily adjust automatically
You can assign [Push Auto ND] to an assignable button, and temporarily turn auto ND filter on while the button is
pressed. Releasing the button sets auto ND filter back to off.
Set the ND filter to [Manual].
Note
When the ND filter is switched to or from [Clear] during shooting, the ND filter frame is displayed on the image and an operating
sound is emitted.
Set [Shooting] > [ND Filter] > [Mode] to [Variable] in the camera menu.
1
Press the [ND Filter] button in the camera basic configuration panel.
The frame of the [ND Filter] button changes to orange.
The ND Filter adjustment panel appears.
2
Press the [ND Filter] button and select [Manual] from the list.
3
Adjust the transmittance of the ND filter using the [ND Filter] slider or [ND Filter] adjustment buttons.
Hint
The slider and adjustment button settings are linked.
You can also adjust the ND filter on the
(Main) tab in the camera control panel.
4
191

Hint
You can also assign [ND Filter Position] to an assignable button, and press the button to switch between [Manual] and [Clear].
You can also press the [Push Auto] button on the ND Filter adjustment panel to turn auto ND filter on while the button is pressed.
5-041-957-11(1)
Copyright 2022 Sony Corporation
192
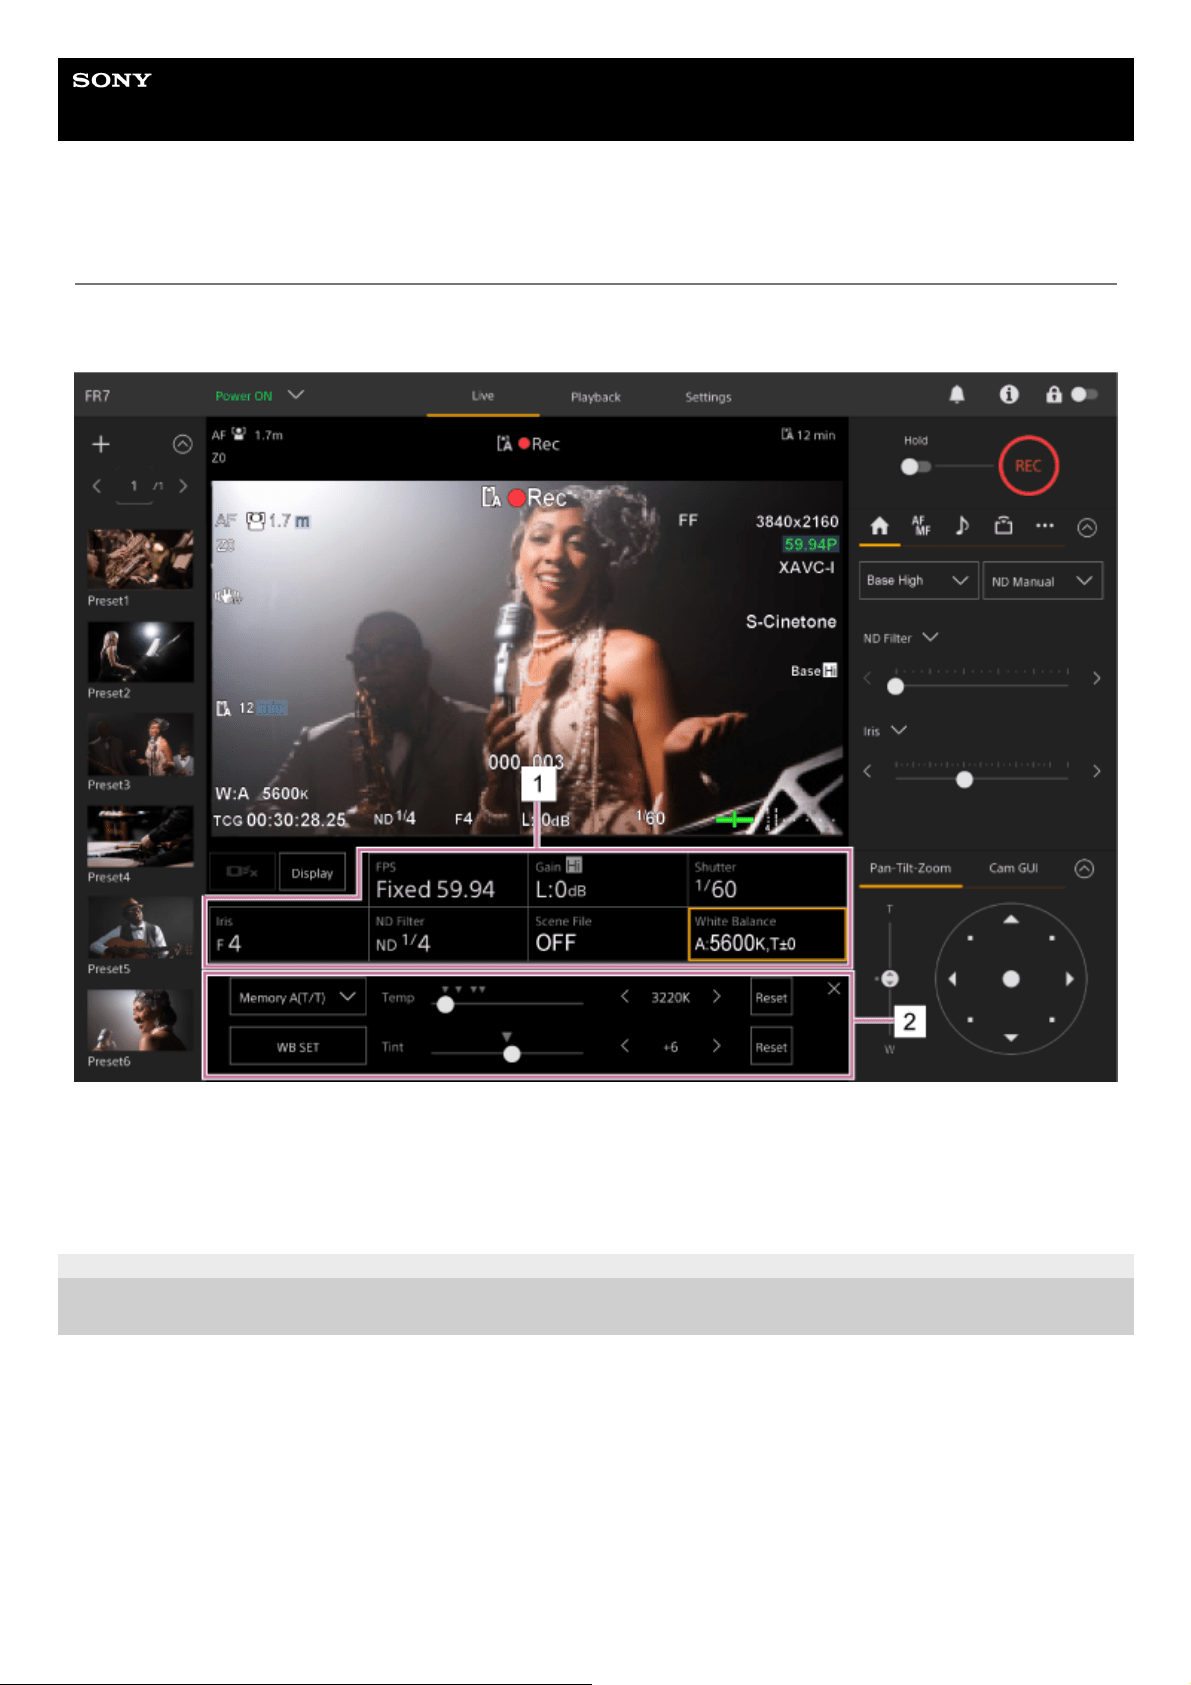
Help Guide
Interchangeable Lens Digital Camera
ILME-FR7 / ILME-FR7K
White Balance Adjustment Screen
You can adjust the white balance using the live operation screen of the Web App to obtain a white balance that makes
the image look more natural.
5-041-957-11(1) Copyright 2022 Sony Corporation
Camera basic configuration panel1.
Camera basic configuration adjustment panel
Displays the adjustment panel for the setup item selected on the camera basic configuration panel.
2.
193
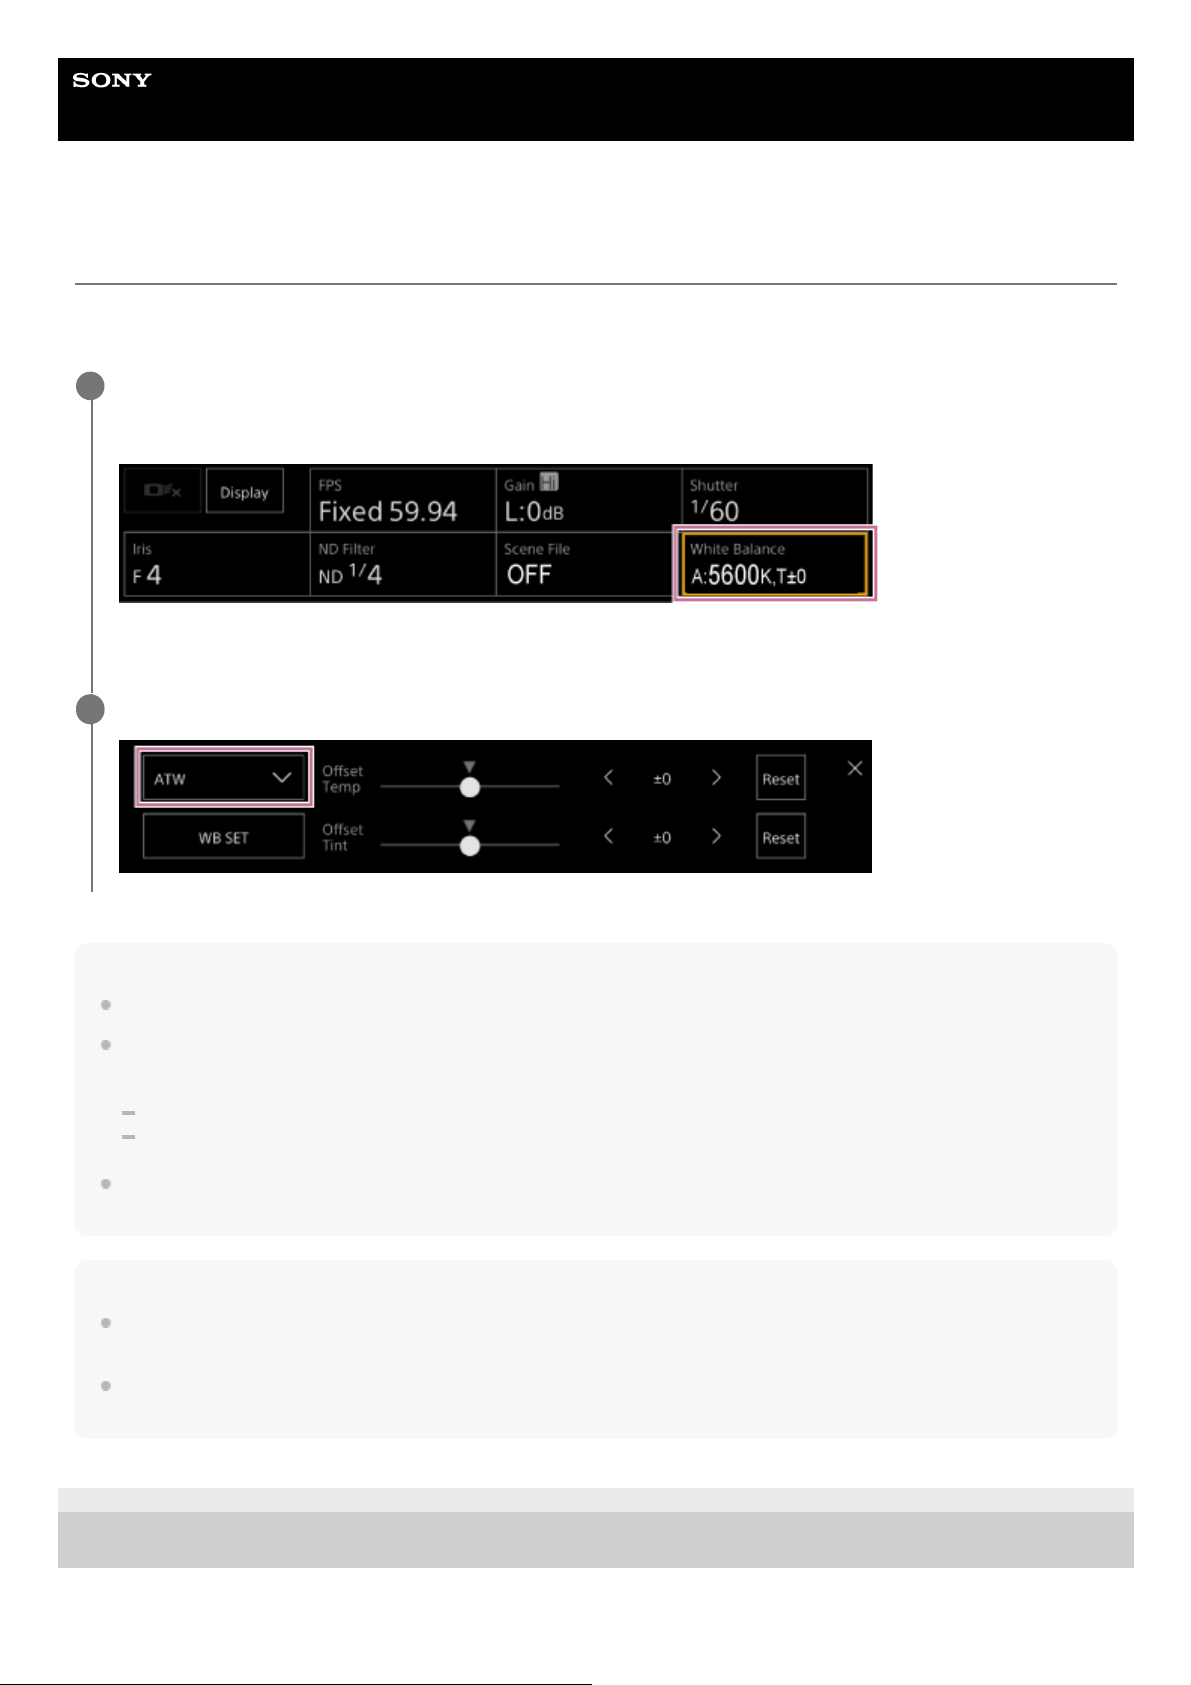
Help Guide
Interchangeable Lens Digital Camera
ILME-FR7 / ILME-FR7K
Adjusting the White Balance Automatically
You can obtain an appropriate adjusted white balance at all times using ATW (auto tracking white balance).
When ATW is enabled, the white balance is automatically adjusted as the color temperature of the light source changes.
Note
ATW cannot be used when [Shooting Mode] is set to [Cine EI].
It may not be possible to adjust to the appropriate color using ATW, depending on the lighting and subject conditions.
Examples:
When a single color dominates the subject, such as sky, sea, ground, or flowers.
When the color temperature is extremely high or extremely low.
If the ATW auto tracking speed is slow or the appropriate effect cannot be obtained, press the [WB SET] button to run auto white
balance.
Hint
You can select the response speed when in ATW mode from five steps (1, 2, 3, 4, 5) using [Shooting] > [White Setting] > [ATW
Speed] in the camera menu. The lower the number, the faster the response speed.
You can freeze the current white balance setting by assigning the [ATW Hold] function to an assignable button, and pressing the
assignable button to temporarily pause ATW during ATW mode.
5-041-957-11(1)
Copyright 2022 Sony Corporation
Press the [White Balance] button in the camera basic configuration panel.
The frame of the [White Balance] button changes to orange.
The White Balance adjustment panel appears.
1
Press the [White Mode] button and select [ATW] from the list.
2
194
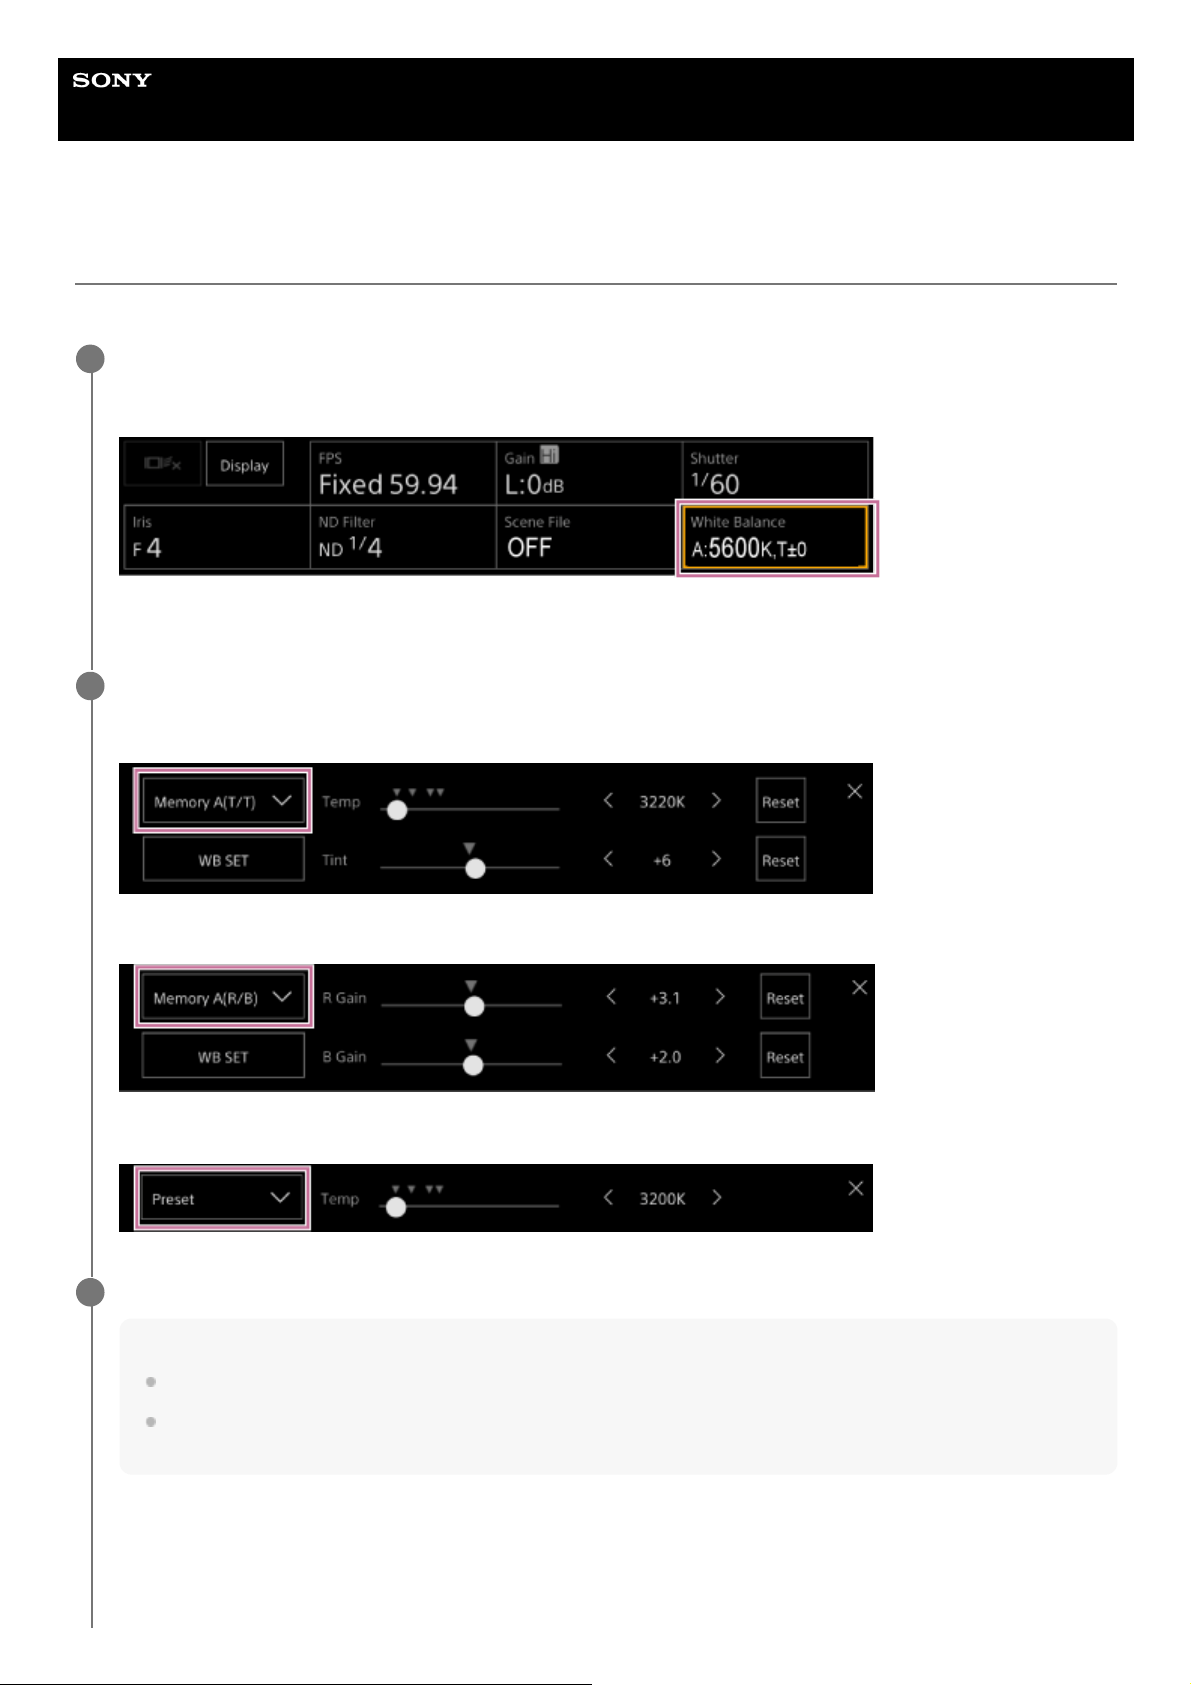
Help Guide
Interchangeable Lens Digital Camera
ILME-FR7 / ILME-FR7K
Adjusting the White Balance Manually
You can adjust the white balance manually.
Press the [White Balance] button in the camera basic configuration panel.
The frame of the [White Balance] button changes to orange.
The White Balance adjustment panel appears.
1
Press the [White Mode] button and select one of the following from the list.
[Memory A(T/T)]
[Memory A(R/B)]
[Preset]
2
Adjust the white balance using the sliders or adjustment buttons.
Hint
The slider and adjustment button settings are linked.
The difference between [Memory A(T/T)] and [Memory A(R/B)] is that the axis of adjustment is different, but the adjustment
results are linked.
For [Memory A(T/T)]
This mode adjusts the white balance saved in memory A by adjusting the color temperature (Temp) and Tint.
You can set the color temperature in 20 K increments in the range 2000 K to 5600 K. Values above 5600 K can be
set at intervals equal to the amount of color change (mired) from 5580 K to 5600 K.
3
195

5-041-957-11(1) Copyright 2022 Sony Corporation
Pressing the [Reset] button restores the [Temp] (color temperature) or [Tint] setting to the default value.
For [Memory A(R/B)]
This mode adjusts the white balance saved in memory A by adjusting the R Gain and B Gain.
Pressing the [Reset] button restores the corresponding gain setting to the default value.
For [Preset]
This mode adjusts the color temperature to a preset value.
You can set the value in 100 K increments.
In preset mode, you can also assign [Preset White Select] to an assignable button, and press the button to change
to a preconfigured preset value.
[Custom] mode: 3200 K → 4300 K → 5600 K → 6300 K → 3200 K…
[Cine EI] mode: 3200 K → 4300 K → 5500 K → 3200 K…
196
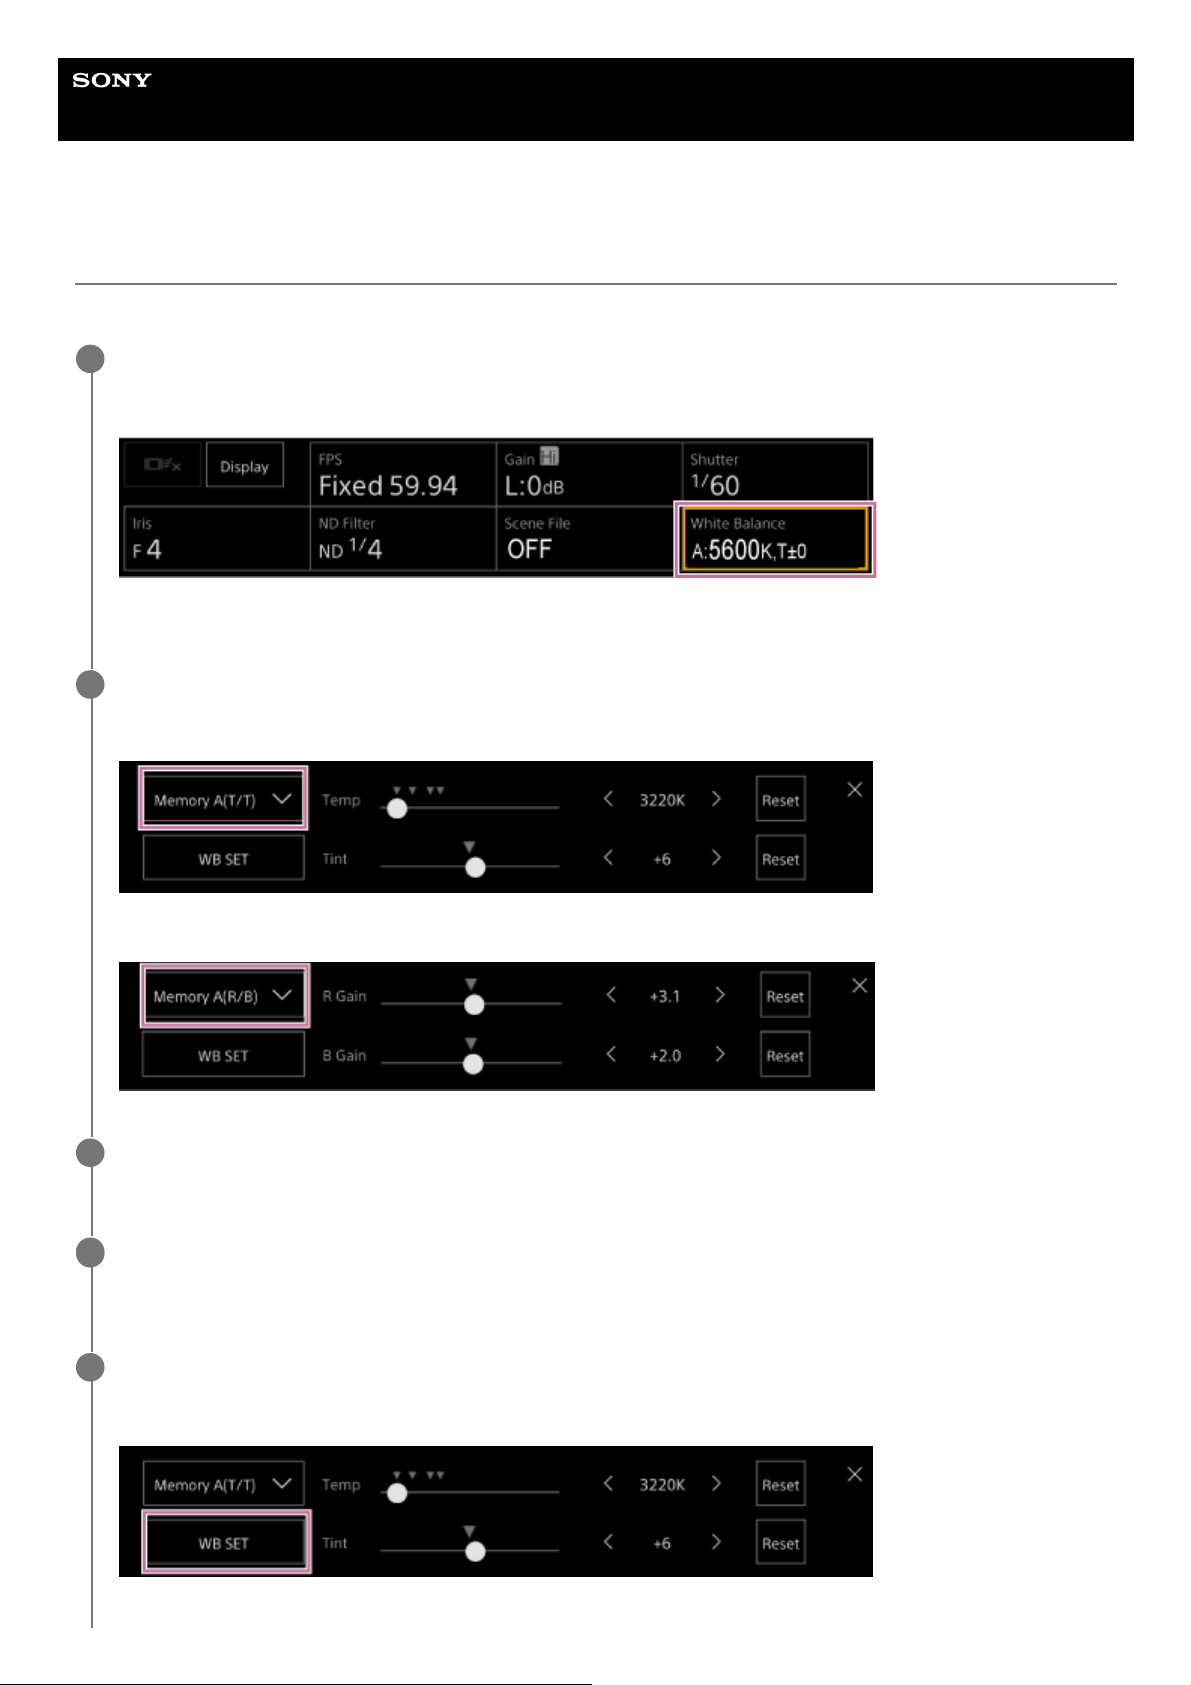
Help Guide
Interchangeable Lens Digital Camera
ILME-FR7 / ILME-FR7K
Running Auto White Balance
In memory A mode, the white balance to save is adjusted automatically.
Press the [White Balance] button in the camera basic configuration panel.
The frame of the [White Balance] button changes to orange.
The White Balance adjustment panel appears.
1
Press the [White Mode] button and select [Memory A(T/T)] or [Memory A(R/B)] from the list.
[Memory A(T/T)]
[Memory A(R/B)]
2
Place white paper (or other object) in a location with the same lighting source and conditions as the
subject, then zoom in on the paper to show white on the screen.
3
Adjust the brightness.
Adjust the iris using the procedure in “Adjusting the Iris Manually.”
4
Press the [WB SET] button on the white balance adjustment panel.
[Memory A(T/T)]
[Memory A(R/B)]
5
197
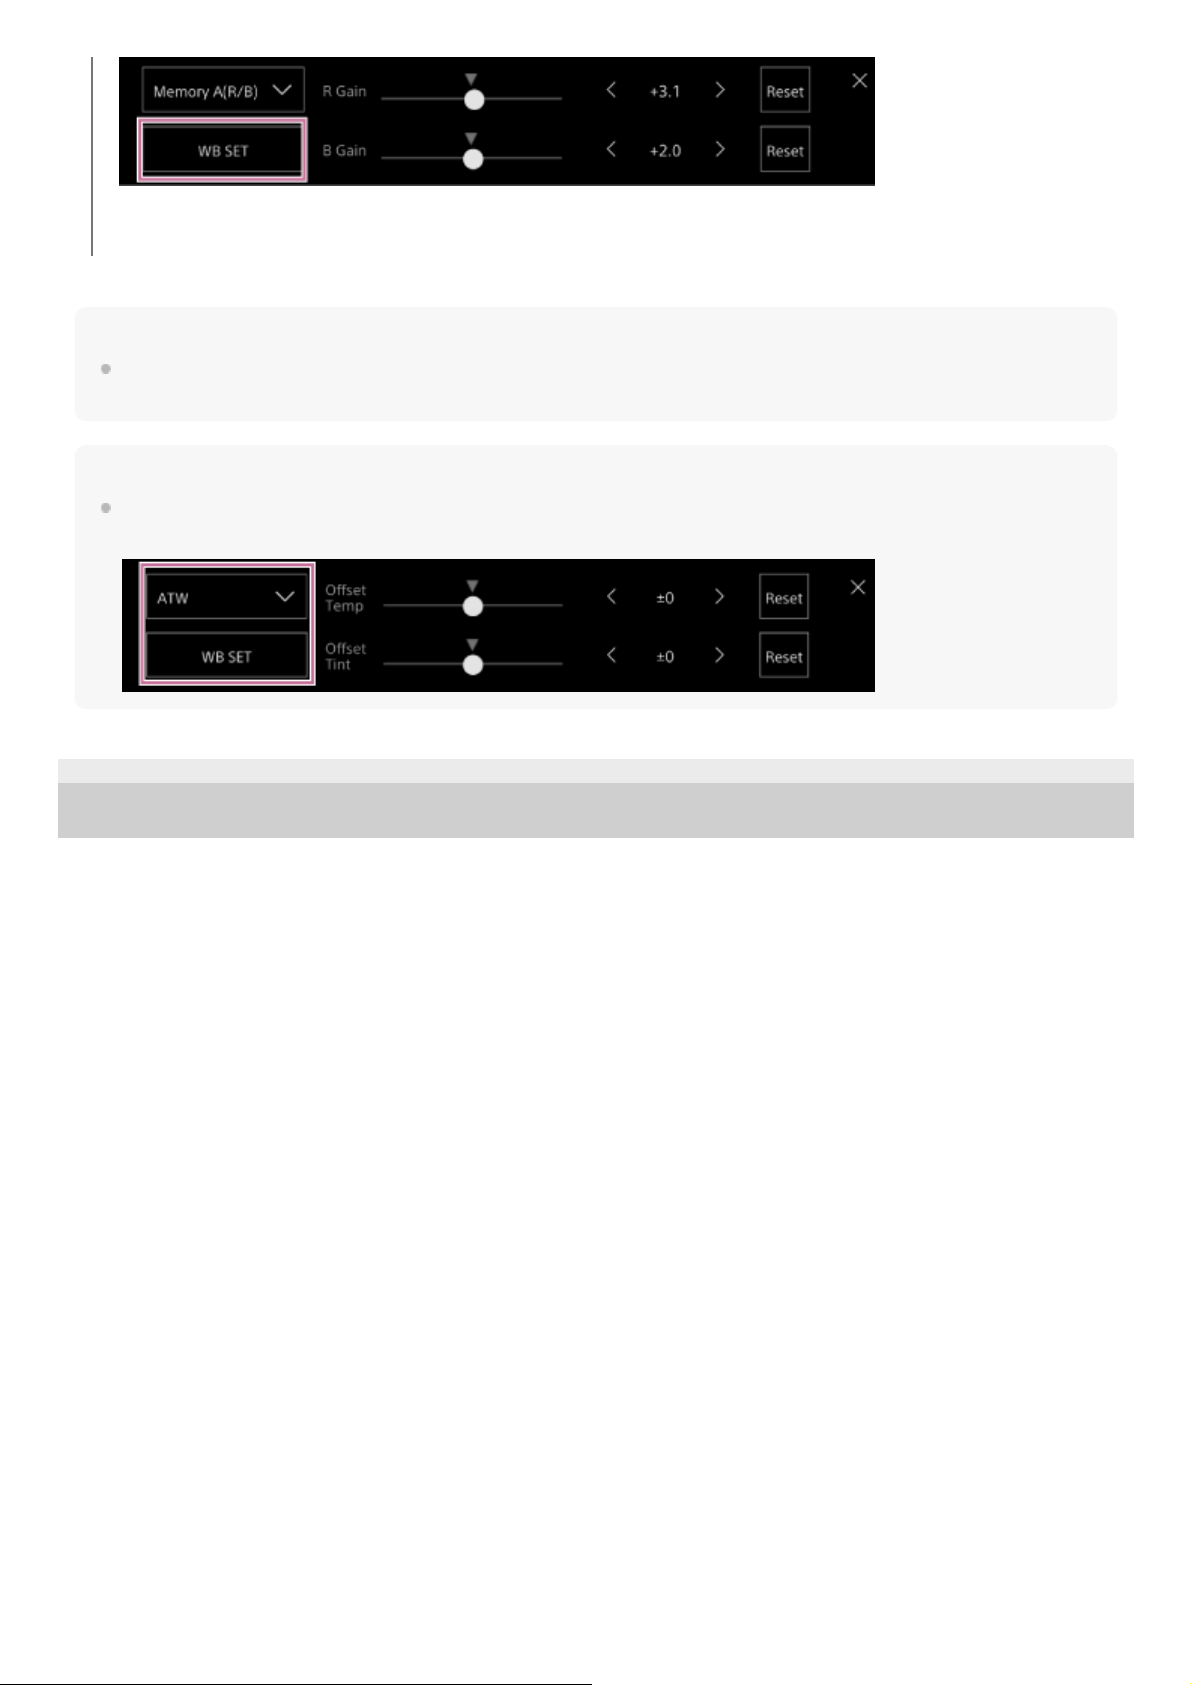
Note
If the adjustment is not successful, an error message is displayed on the screen for about three seconds. If the error message
persists after repeated attempts to set white balance, contact your Sony service representative.
Hint
You can also run it in ATW mode. You can use this when you want to quickly adjust the white balance during ATW operation.
After adjustment, the mode returns to normal ATW operation.
5-041-957-11(1) Copyright 2022 Sony Corporation
If auto white balance is run in memory mode, the result of auto adjustment is saved in memory A.
198
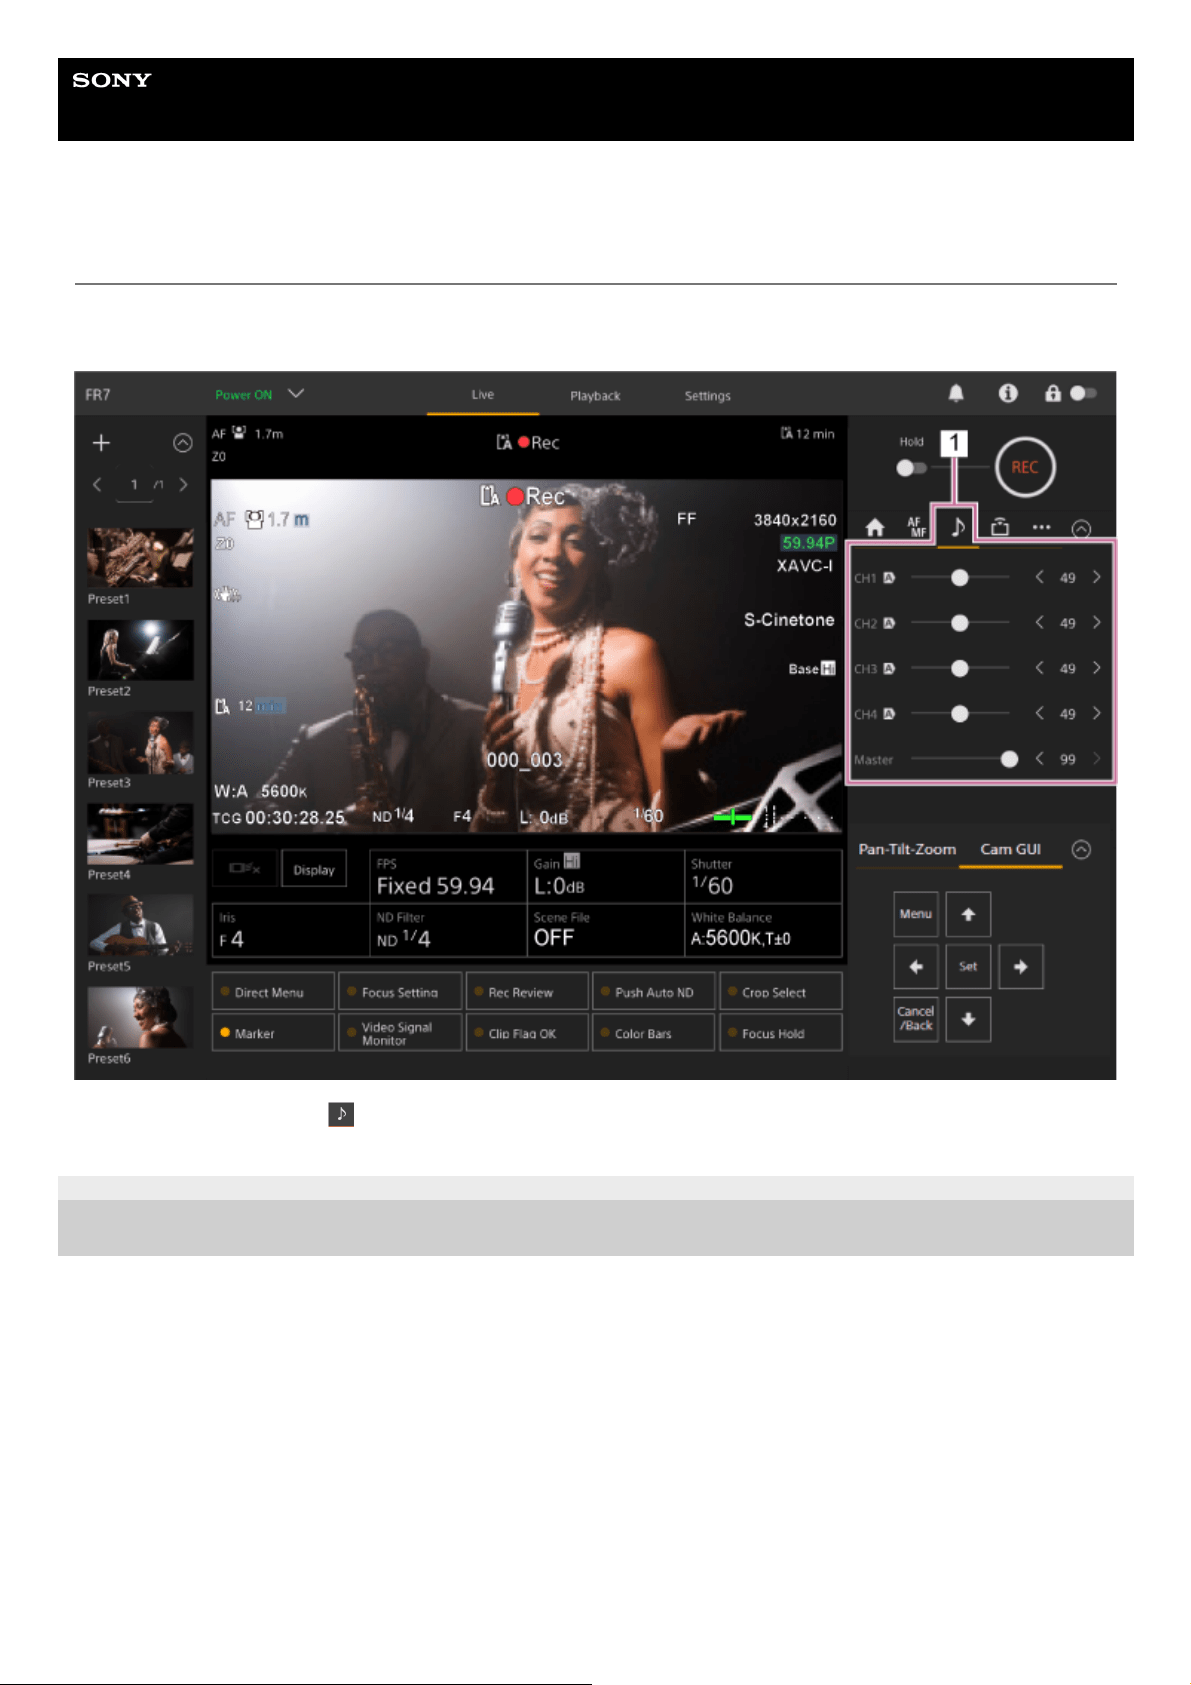
Help Guide
Interchangeable Lens Digital Camera
ILME-FR7 / ILME-FR7K
Audio Configuration Screen
You can adjust the audio level to be recorded by the unit on the live operation screen of the Web App. Configure the
switches on the connector block of the unit and configure the audio using the web menu.
5-041-957-11(1) Copyright 2022 Sony Corporation
Camera control panel –
(Audio) tab1.
199
Help Guide
Interchangeable Lens Digital Camera
ILME-FR7 / ILME-FR7K
Selecting the Audio Input Device
Set the following switches according to the device connected to the AUDIO IN connector.
Note
Audio is not recorded in Interval Rec mode or Slow & Quick Motion mode.
5-041-957-11(1)
Copyright 2022 Sony Corporation
When a microphone is connected, set SETUP switch 2 on the connector block on the rear of the unit.
CH-1 and CH-2 have common settings.
1
Setting Description
OFF
(default)
Select when using a dynamic microphone or battery-operated microphone. This turns off the +48 V
phantom power supply and sets the LINE or MIC input as the CH-1 and CH-2 audio source.
ON
Select when using a +48 V phantom power supply compatible microphone. This turns on the +48V
phantom power supply and sets the phantom power supply compatible microphone as the CH-1 and
CH-2 audio source.
Set the type of connected device using [Audio] > [Audio Input] > [AUDIO IN Select] in the camera menu.
2
Select the audio input using [Audio] > [Audio Input] > [CH1 Input Select] to [CH4 Input Select] in the web
menu or camera menu.
3
200

Help Guide
Interchangeable Lens Digital Camera
ILME-FR7 / ILME-FR7K
Adjusting the Audio Recording Level Automatically
Set the channel for which you want to adjust the audio recording level automatically to [Auto] on the [Audio] page of the
web menu or using [Audio] > [Audio Input] > [CH1 Level Control] to [CH4 Level Control] in the camera menu.
The channels specified for auto adjustment are indicated by an
(Auto) icon beside the corresponding channels on the
(Audio) tab of the live operation screen.
5-041-957-11(1)
Copyright 2022 Sony Corporation
201
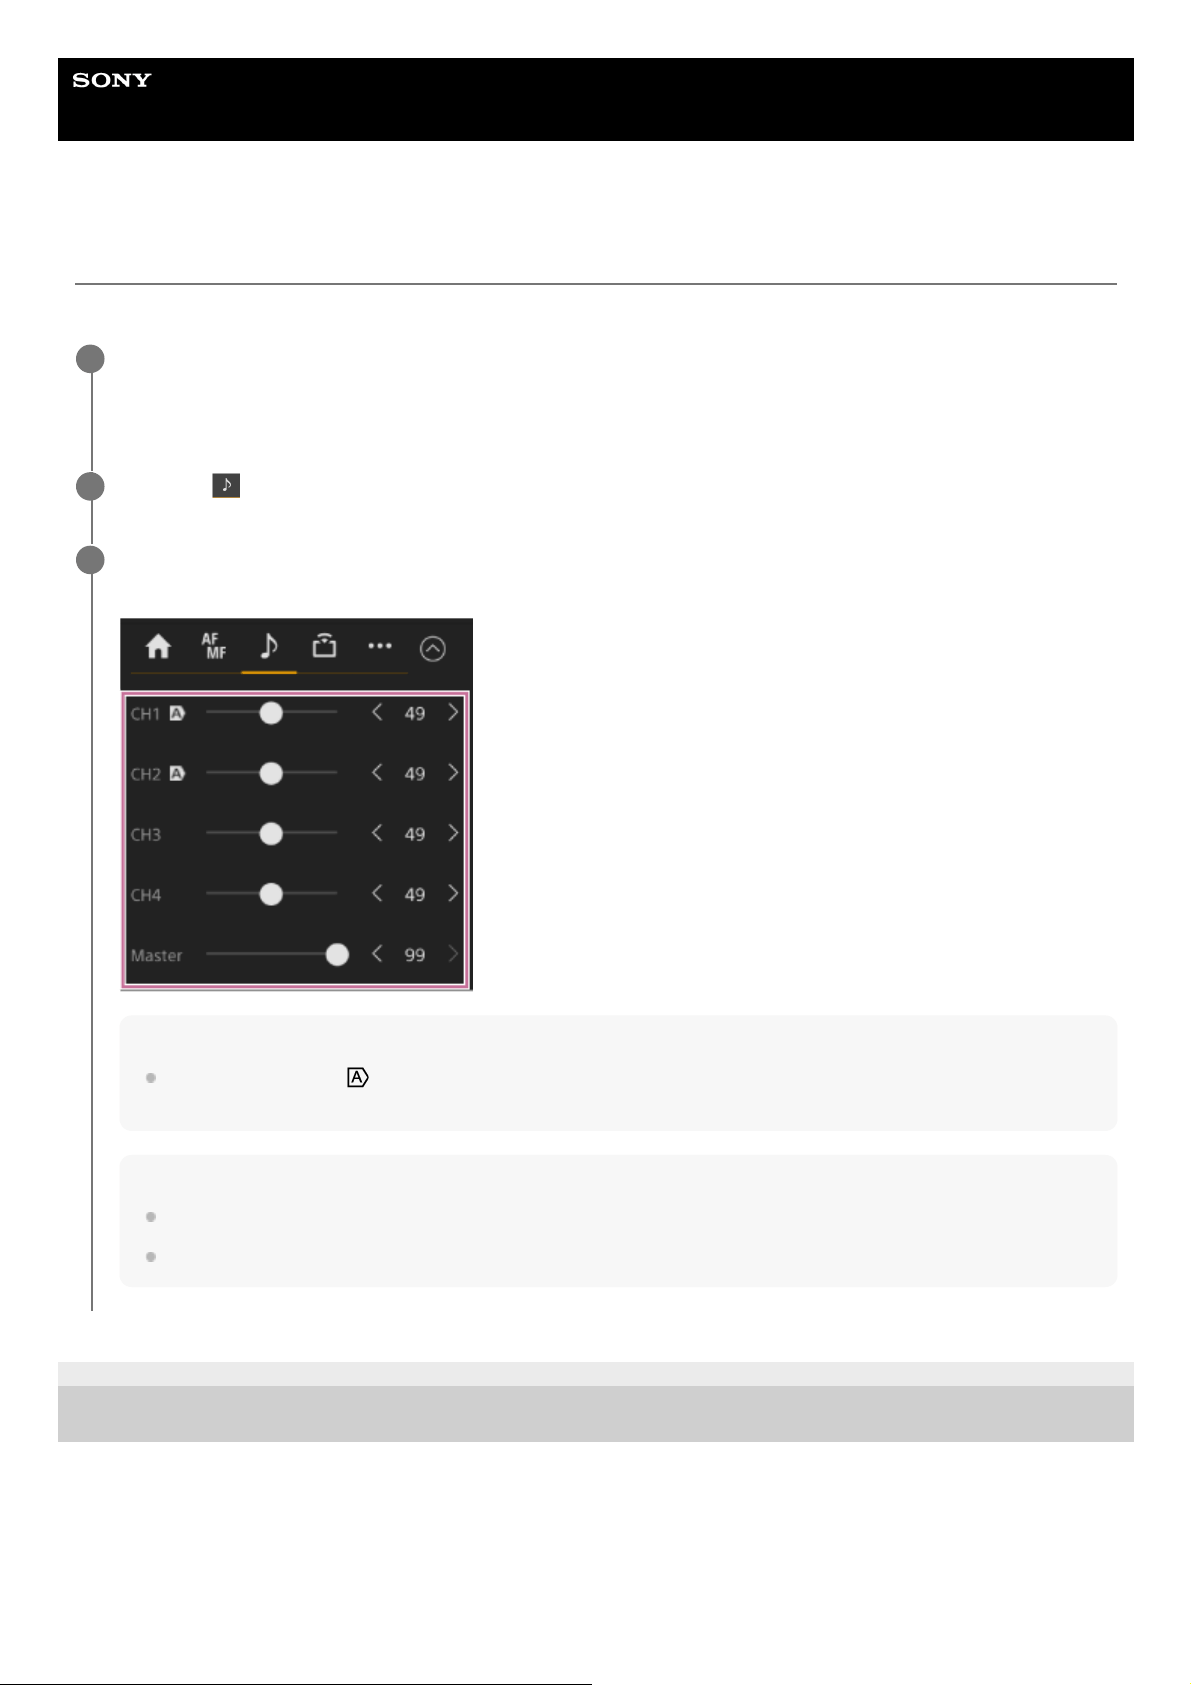
Help Guide
Interchangeable Lens Digital Camera
ILME-FR7 / ILME-FR7K
Adjusting the Audio Recording Level Manually
You can adjust the audio recording level manually.
5-041-957-11(1)
Copyright 2022 Sony Corporation
Set the channel for which you want to adjust the audio recording level manually to [Manual] on the [Audio]
page of the web menu or using [Audio] > [Audio Input] > [CH1 Level Control] to [CH4 Level Control] in the
camera menu.
1
Press the
(Audio) tab in the camera control panel.
2
On the [Audio] screen in the camera control panel, set the audio recording level using the slider or
adjustment buttons for the channel whose audio recording level you want to set manually.
Note
Channels for which the
(Auto) icon is displayed are adjusted automatically. Changes to values using the slider or
buttons are not applied to the recorded audio.
Hint
The slider and adjustment button settings in each row are linked.
You can check the audio input level in realtime using the audio level meter display on the shooting screen.
3
202
Help Guide
Interchangeable Lens Digital Camera
ILME-FR7 / ILME-FR7K
Direct Menu Operation
You can check the status and settings of the unit displayed overlaid on the camera image, and select and change the
settings using the GUI control buttons on the infrared remote control.
The following items can be configured.
[Face/Eye Detection AF]
[SteadyShot]
[White Mode]
[Color Temp]
[Scene File]
[ND Filter Position]
[Auto ND Filter]
[ND Filter] value
[Auto Iris]
[Iris] value
[AGC]
[Gain] value
[ISO] value
[Exposure Index]
[Shutter Type]
[Auto Shutter]
[Shutter]
[Auto Exposure Mode]
[Auto Exposure Level]
[S&Q Motion] and [Frame Rate]
Hint
You can also perform the same function using an assignable button and the GUI control panel of the Web App.
5-041-957-11(1)
Copyright 2022 Sony Corporation
Press an assignable button assigned with [Direct Menu] on the infrared remote control.
The [Direct Menu] button is assigned to assignable button 1 by factory default.
Only the items on the screen that can be configured using the direct menu are selectable using the orange cursor.
1
Move the cursor to the item you want to set using the arrow buttons in the GUI control panel and press the
[Set] button.
A menu is displayed or the item is displayed on a white background.
2
Select a setting using the arrow buttons and press the [Set] button.
The menu or white background disappears and the new setting is displayed with an orange cursor.
Press an assignable button assigned with [Direct Menu] again or wait 3 seconds without performing any action to
exit the direct menu.
3
203

204

Help Guide
Interchangeable Lens Digital Camera
ILME-FR7 / ILME-FR7K
Assignable Buttons
There are ten assignable buttons in the Web App of the unit to which you can assign functions.
The assignable buttons are displayed on the live operation screen and playback operation screen.
Note
The list of assignable buttons is not displayed when configuring settings in the camera basic operation panel of the live operation
screen. To end the operation, press the [X] button at the top right of the adjustment panel.
The following functions are assigned to the buttons by factory default.
Button 1: [Direct Menu]
Button 2: [Focus Setting]
Button 3: [Rec Review]
Buttons 1 to 3 are equivalent to the same number buttons on the supplied infrared remote control.
Button 4: [Push Auto ND]
Button 5: [Crop Select]
Button 6: [Marker]
Button 7: [Video Signal Monitor]
Button 8: [Clip Flag OK]
Button 9: [Color Bars]
Focus Hold button: [Focus Hold]
The Focus Hold button is equivalent to the Focus Hold button on an E-mount lens.
To change a button function
Use [Project] > [Assignable Button] in the camera menu.
When you change an assignment, the display of the assignable button list changes.
For details about the assignable functions, see “Assignable Button” in “Camera Menu and Detailed Settings.”
5-041-957-11(1)
Copyright 2022 Sony Corporation
205
Help Guide
Interchangeable Lens Digital Camera
ILME-FR7 / ILME-FR7K
Slow & Quick Motion
When the recording format is set to the following values, you can specify different values for the shooting frame rate and
playback frame rate.
The following table shows the configurable frame rates.
System frequency: 59.94/50/29.97/25/23.98, Imager scan mode: FF
System frequency: 59.94/50/29.97/25/23.98, Imager scan mode: S35
System frequency: 24, Imager scan mode: FF
Note
Slow & Quick Motion cannot be set during recording, playback, or while the thumbnail screen is displayed.
Audio recording is not supported in Slow & Quick Motion mode.
The auto focus function, auto iris function, and auto shutter function are disabled in Slow & Quick Motion mode. However, the
auto focus function can be used when the frame rate is set to the following.
Frame rate when the system frequency is set to 59.94/29.97/23.98: 30, 60, 120, 240
Frame rate when the system frequency is set to 50/25: 25, 50, 100, 200
For details about using RAW output, see “Recording RAW Video.”
Codec Video format Configurable frame rates
RAW 3840×2160P 1–60, 100, 120
RAW & XAVC-I 3840×2160P 1–60, 100, 120
XAVC-I
4096×2160P 1–60
3840×2160P 1–60, 100, 120
1920×1080P 1–60, 100, 120, 150, 180, 200, 240
XAVC-L
3840×2160P 1–60, 100, 120
1920×1080P 1–60, 100, 120, 150, 180, 200, 240
Codec Video format Configurable frame rates
XAVC-I 1920×1080P 1–60, 100, 120
XAVC-L 1920×1080P 1–60, 100, 120
Codec Video format Configurable frame rates
XAVC-I 4096×2160P 1–60
206

5-041-957-11(1) Copyright 2022 Sony Corporation
207
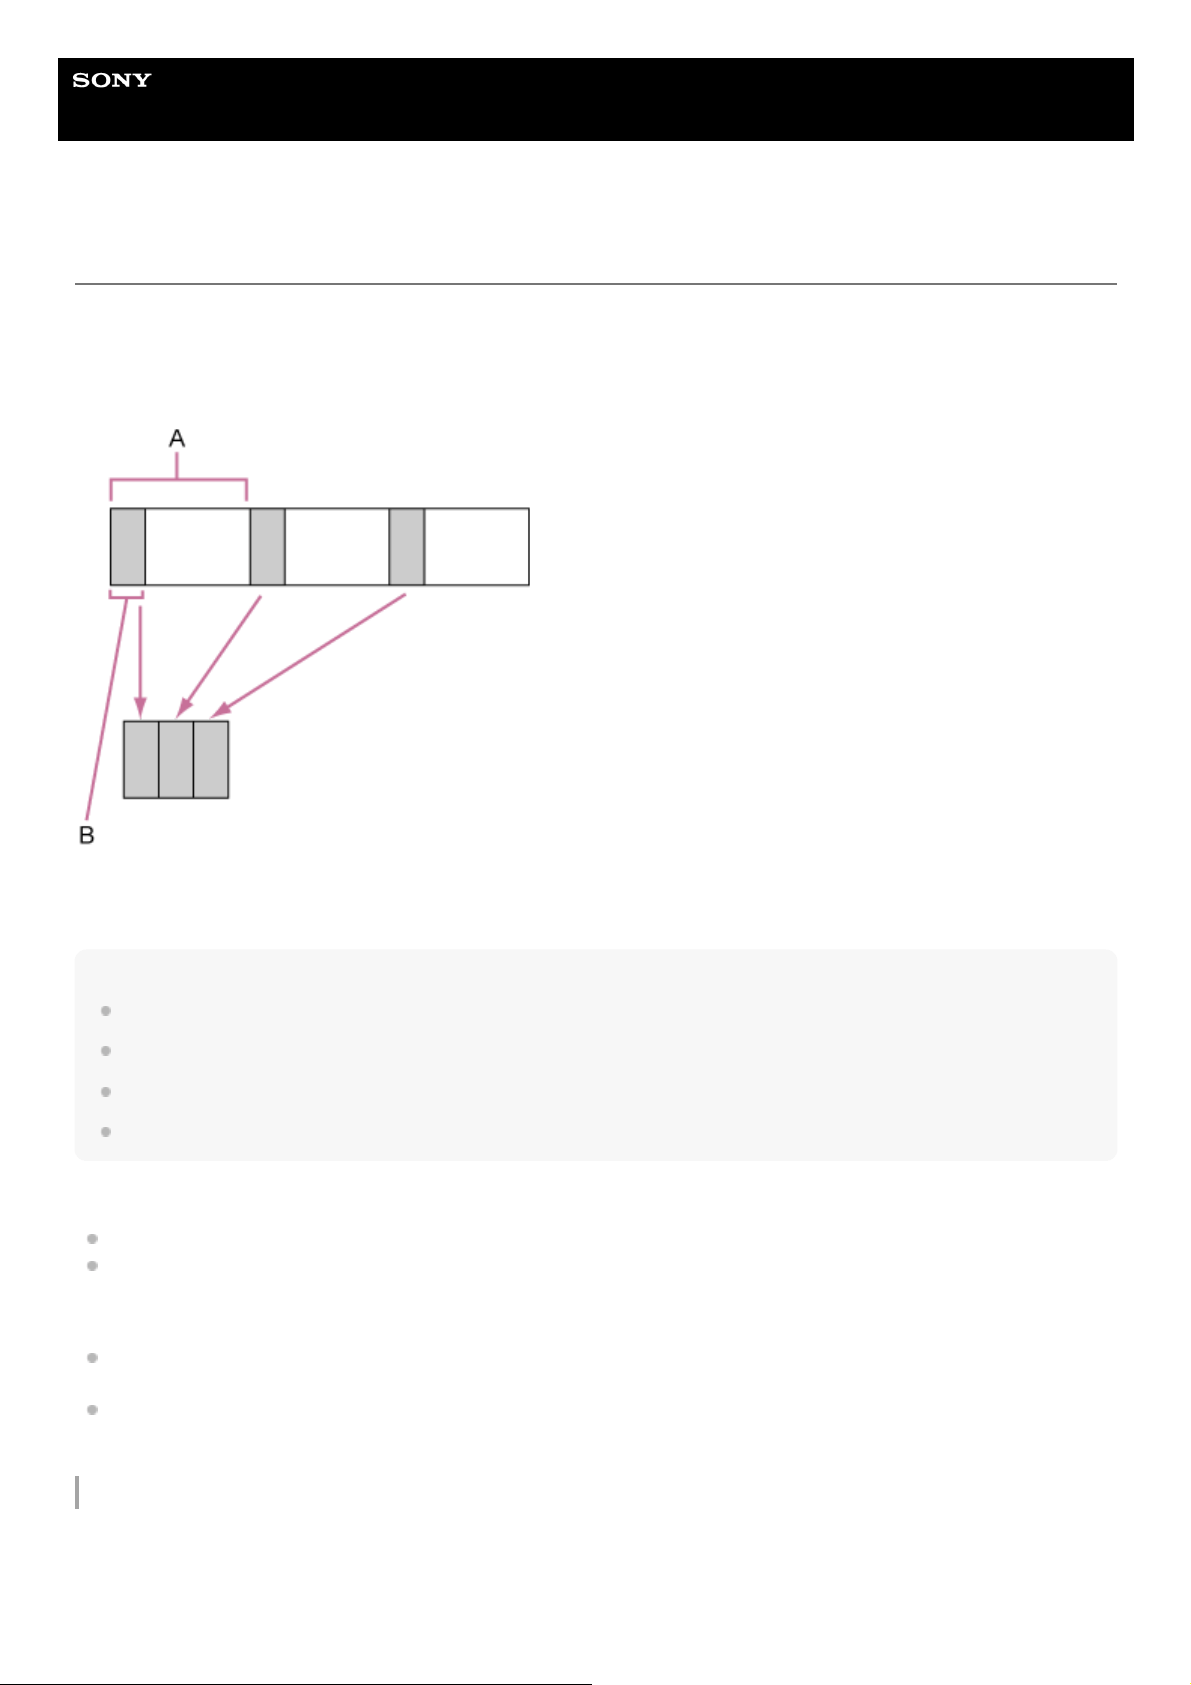
Help Guide
Interchangeable Lens Digital Camera
ILME-FR7 / ILME-FR7K
Recording Video Intermittently (Interval Rec)
The Interval Rec function allows you to capture video intermittently to the unit’s internal memory. This function is an
effective way to shoot slow-moving subjects.
When you start recording, the unit automatically records a specified number of frames (Number of Frames) at a specified
interval time (Interval Time).
A: Shooting interval (Interval Time)
B: Number of frames in one take (Number of Frames)
Note
Only one special recording function, such as Interval Rec recording, can be used at any one time.
If another special recording mode is enabled while Interval Rec is in use, Interval Rec is automatically released.
Interval Rec mode is automatically released after changing system settings, such as the video format.
Interval Rec settings cannot be changed during recording or playback, or when the thumbnail screen is displayed.
Limitations during recording
Audio is not recorded.
Reviewing the recording (Rec Review) is not possible.
If the unit is turned off during recording
If the power switch on the unit is set to the standby state, the media is accessed for several seconds to record the
images stored in memory up till that moment, and then the unit switches to standby state automatically.
If the DC power cord is disconnected, the power is turned off from the AC adaptor, or the PoE++ power delivery is
disconnected, then the shots taken up to that point may be lost (maximum 10 seconds). Care should be exercised.
Setting the number of frames and the interval between shooting
Set [Project] > [Interval Rec] > [Setting] to [On] in the web menu, and set [Number of Frames] and [Interval Time].
The unit exits Interval Rec mode when it is powered off, but the [Number of Frames] and [Interval Time] settings are
retained. You do not need to set them again the next time you shoot in Interval Rec mode.
208

Hint
Can also be set using [Project] > [Interval Rec] in the camera menu.
Starting shooting
Press the record START/STOP button to start recording. “Int●Rec” and “Int●Stby” appear alternately.
Stopping shooting
Stop the recording.
When shooting ends, the video data stored in memory up to that point is written to the media.
To exit Interval Rec mode, do one of the following.
Set the power supply of the unit to standby.
In recording standby mode, set [Project] > [Interval Rec] > [Setting] to [Off].
Also, Interval Rec mode is automatically released when the unit is rebooted.
5-041-957-11(1)
Copyright 2022 Sony Corporation
209
Help Guide
Interchangeable Lens Digital Camera
ILME-FR7 / ILME-FR7K
Recording Cached Pictures (Picture Cache Rec)
The Picture Cache Rec function allows you to capture video retroactively when you start recording by maintaining an
internal cache memory of a specified duration when shooting.
Setting the cache size
Set [Project] > [Picture Cache Rec] > [Setting] to [On] in the web menu, and set the cache size using [Cache Size].
Note
Picture Cache Rec cannot be used in combination with Interval Rec, 2-slot simultaneous recording, or proxy recording. When
Picture Cache Rec is set to On, these other special recording modes are forcibly set to Off.
Picture Cache Rec mode cannot be selected while recording or Rec Review is in progress.
When Picture Cache Rec is set to On, the timecode is recorded in [Free Run] mode even if set to [Regen] or [Rec Run].
The [Output Format] setting may not be configurable in Picture Cache Rec mode. If this occurs, temporarily set Picture Cache
Rec to Off, and then change the setting.
Hint
The cache time may be shorter, depending on the recording format. Check the time displayed in [Project] > [Picture Cache Rec] >
[Cache Rec Time] in the web menu.
Can also be set using [Project] > [Picture Cache Rec] in the camera menu.
You can also switch [Picture Cache Rec] between On and Off using an assignable button.
Starting Picture Cache Rec
When [Picture Cache Rec] is set to On, “●Cache” (● is green) appears.
When you press the record START/STOP button, recording starts and video is written to memory cards starting from the
video stored in the cache memory.
Note
Changing the recording format or basic look clears the video in cache memory stored up to that point, and starts caching new
video. Consequently, picture cache recording of pictures before changing format is not possible, even if you start recording
immediately after changing format.
If Picture Cache Rec is set to On or Off immediately after inserting a memory card, cache data may not be recorded on the card.
[Cache Size] setting Cache time (approximate)
[Short] 5 seconds
[Medium] 10 seconds
[Long] 20 seconds
[Max] Maximum value for each recording format
210

Video is stored in cache memory when the Picture Cache Rec function is set to On. Video prior to the function being set to On is
not cached.
Video is not stored in cache memory while a memory card is being accessed, such as during playback, Rec Review, or thumbnail
screen display. Picture cache recording of video during that interval is not possible.
Canceling Picture Cache Rec
Set [Project] > [Picture Cache Rec] > [Setting] to [Off] in the web menu, or press an assignable button assigned with the
[Picture Cache Rec] function.
5-041-957-11(1)
Copyright 2022 Sony Corporation
211
Help Guide
Interchangeable Lens Digital Camera
ILME-FR7 / ILME-FR7K
Recording to Memory Cards A and B Simultaneously (2-slot Simul Rec)
You can record to both memory card A and memory card B simultaneously by setting [Project] > [Simul Rec] > [Setting]
to [On] in the web menu or camera menu.
Recording separately to memory card A and memory card B
You can start/stop recording to each memory card independently using the record START/STOP button or the [2nd Rec
START/STOP] button on the
(Others) tab.
By factory default, both buttons are set to start/stop simultaneous recording to both memory cards A and B.
When the buttons are set to control recording for different memory cards, the [SDI/HDMI Rec Control] record start/stop
control follows the recording state of slot A.
Changing the setting
Set the following using [Project] > [Simul Rec] > [Rec Button Set] in the camera menu.
5-041-957-11(1)
Copyright 2022 Sony Corporation
[Rec Button
Set] setting
Buttons and memory cards
Rec Button:
[SlotA SlotB]
2nd Rec
Button: [SlotA
SlotB]
Starts/stops simultaneously recording to memory cards A and B using either button.
Rec Button:
[SlotA]
2nd Rec
Button: [SlotB]
The record START/STOP button starts/stops recording to memory card A, and the [2nd Rec
START/STOP] button on the (Others) tab starts/stops recording to memory card B.
Rec Button:
[SlotB]
2nd Rec
Button: [SlotA]
The record START/STOP button starts/stops recording to memory card B, and the [2nd Rec
START/STOP] button on the (Others) tab starts/stops recording to memory card A.
212
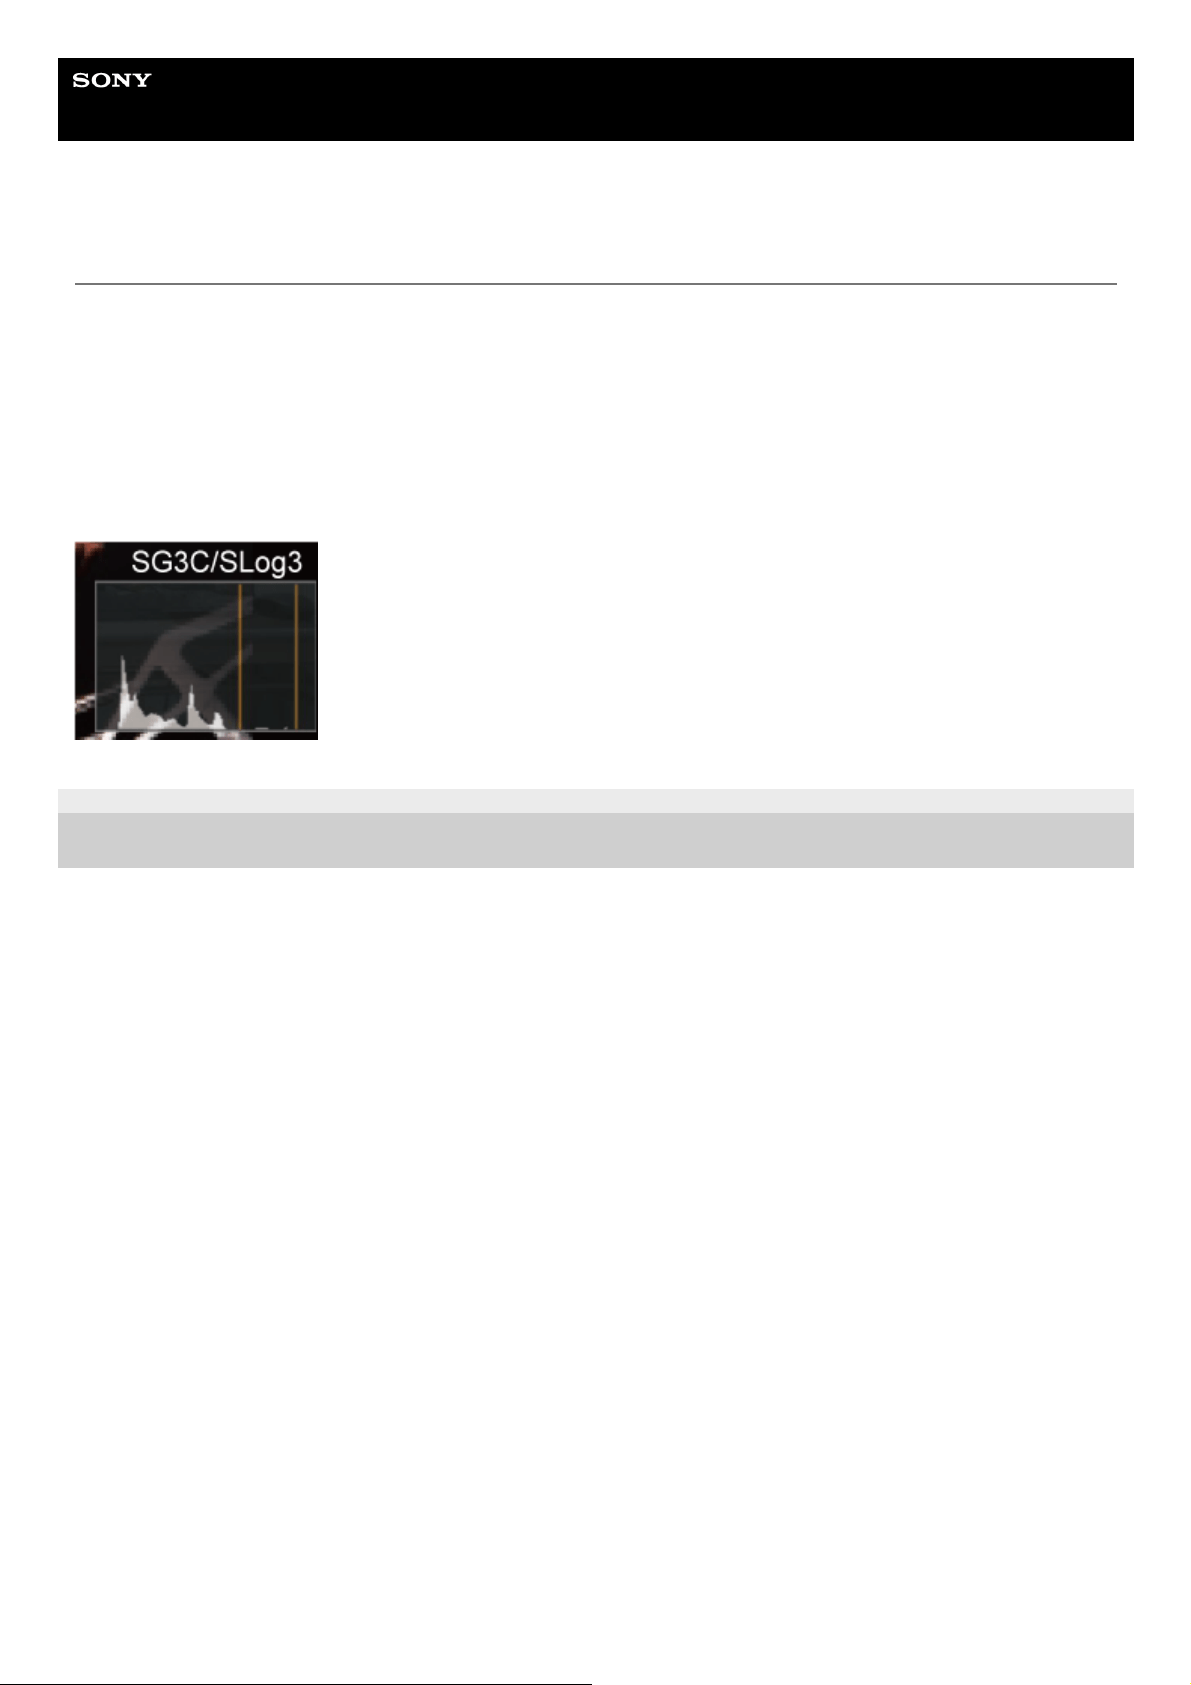
Help Guide
Interchangeable Lens Digital Camera
ILME-FR7 / ILME-FR7K
Video Signal Monitor
You can set the type of video signal to display in the camera image panel to waveform, vectorscope, or histogram using
[Monitoring] > [Video Signal Monitor] > [Setting] in the camera menu.
The orange line indicates the set values of [Level Marker 1] and [Level Marker 2].
You can also assign the [Video Signal Monitor] function to an assignable button.
Monitoring target display
In Cine EI mode, the color space setting or monitor LUT setting information is displayed at the top right of the video
signal monitor to indicate the target of monitoring.
5-041-957-11(1) Copyright 2022 Sony Corporation
213

Help Guide
Interchangeable Lens Digital Camera
ILME-FR7 / ILME-FR7K
Clip Flags
You can add an [OK] clip flag to a clip by pressing an assignable button assigned with the [Clip Flag OK] function and
selecting [Add OK].
You can delete an [OK] clip flag by pressing the button twice and selecting [Delete Clip Flag].
Hint
You can also add a clip flag using [Thumbnail] > [Set Clip Flag] in the camera menu.
The thumbnail screen can be displayed sorted by clip flag type (filtered clip thumbnail screen). For details, see “Operations on
Recorded Clips” in “Thumbnail Screen.”
5-041-957-11(1)
Copyright 2022 Sony Corporation
214

Help Guide
Interchangeable Lens Digital Camera
ILME-FR7 / ILME-FR7K
Breathing Compensation
You can set whether to perform breathing compensation for the lens using [Technical] > [Lens] > [Breathing
Compensation] in the camera menu.
This function corrects for the phenomenon in which changes in the angle of view occur as the focus position varies.
When breathing compensation is executed, a portion of the image is electronically cropped to maintain a constant angle
of view so that the breathing phenomenon does not appear.
Note
When breathing compensation is enabled, the angle of view and image quality may change slightly.
Depending on the lens, it may not be possible to correct the change in the angle of view when breathing compensation is
enabled.
Compensation is not possible when a lens that does not support breathing compensation is attached.
This function is set to Off (fixed) in the following cases.
When [Technical] > [Lens] > [Distortion Comp.] is set to [Off] in the camera menu
When [Shooting] > [S&Q Motion] > [Setting] is set to [On] in the web menu or camera menu
When [Project] > [Rec Format] > [Codec] is set to [RAW] or [RAW & XAVC-I] in the web menu or camera menu
5-041-957-11(1)
Copyright 2022 Sony Corporation
215
Help Guide
Interchangeable Lens Digital Camera
ILME-FR7 / ILME-FR7K
Proxy Recording Overview
This function allows you to simultaneously record low-resolution proxy data at the same time as recording high-resolution
original data video.
For details about supported memory cards, formatting memory cards, and checking the remaining capacity, see
“Supported Memory Cards” in “Preparing Memory Cards.”
About the recorded file
The file name extension is “.mp4”.
The timecode is also recorded simultaneously.
Storage destination of the recorded file
The recorded file is stored in the following directory.
About the file name
The file name consists of the clip name recorded on the memory card and an “S03” suffix.
For clip names, see [TC/Media] > [Clip Name Format] in the camera menu.
5-041-957-11(1)
Copyright 2022 Sony Corporation
Recording media Folder path
SDXC /PRIVATE/XDROOT/Sub
CFexpress Type A /XDROOT/Sub
216
Help Guide
Interchangeable Lens Digital Camera
ILME-FR7 / ILME-FR7K
Recording a Proxy
You can start recording when proxy recording is enabled.
To stop shooting
Stop the recording.
To set the audio channel for proxy recording
Set the audio channel for proxy data recording using [Project] > [Proxy Rec] > [Audio Channel] in the camera menu.
5-041-957-11(1)
Copyright 2022 Sony Corporation
Set [Project] > [Proxy Rec] > [Setting] to [On] in the web menu or camera menu.
1
Insert a memory card into a CFexpress Type A / SD card slot.
For CFexpress cards, insert with the label facing up.
For SD cards, insert with the label facing down with the beveled corner at the bottom.
Note
Proxy Rec cannot be set to On at the same time as S&Q Motion or Interval Rec. When Proxy Rec is set to On, these other
recording modes are forcibly set to Off.
2
Press the record START/STOP button.
Proxy recording starts.
Note
If the unit is turned off or the memory card is removed while the memory card is being accessed, the integrity of data on the
card cannot be guaranteed.
All data recorded on the memory card may be discarded. Always make sure the memory card access indicator is off before
turning off the unit or removing the memory card.
Make sure that the memory card does not pop out when inserting or removing it.
3
217
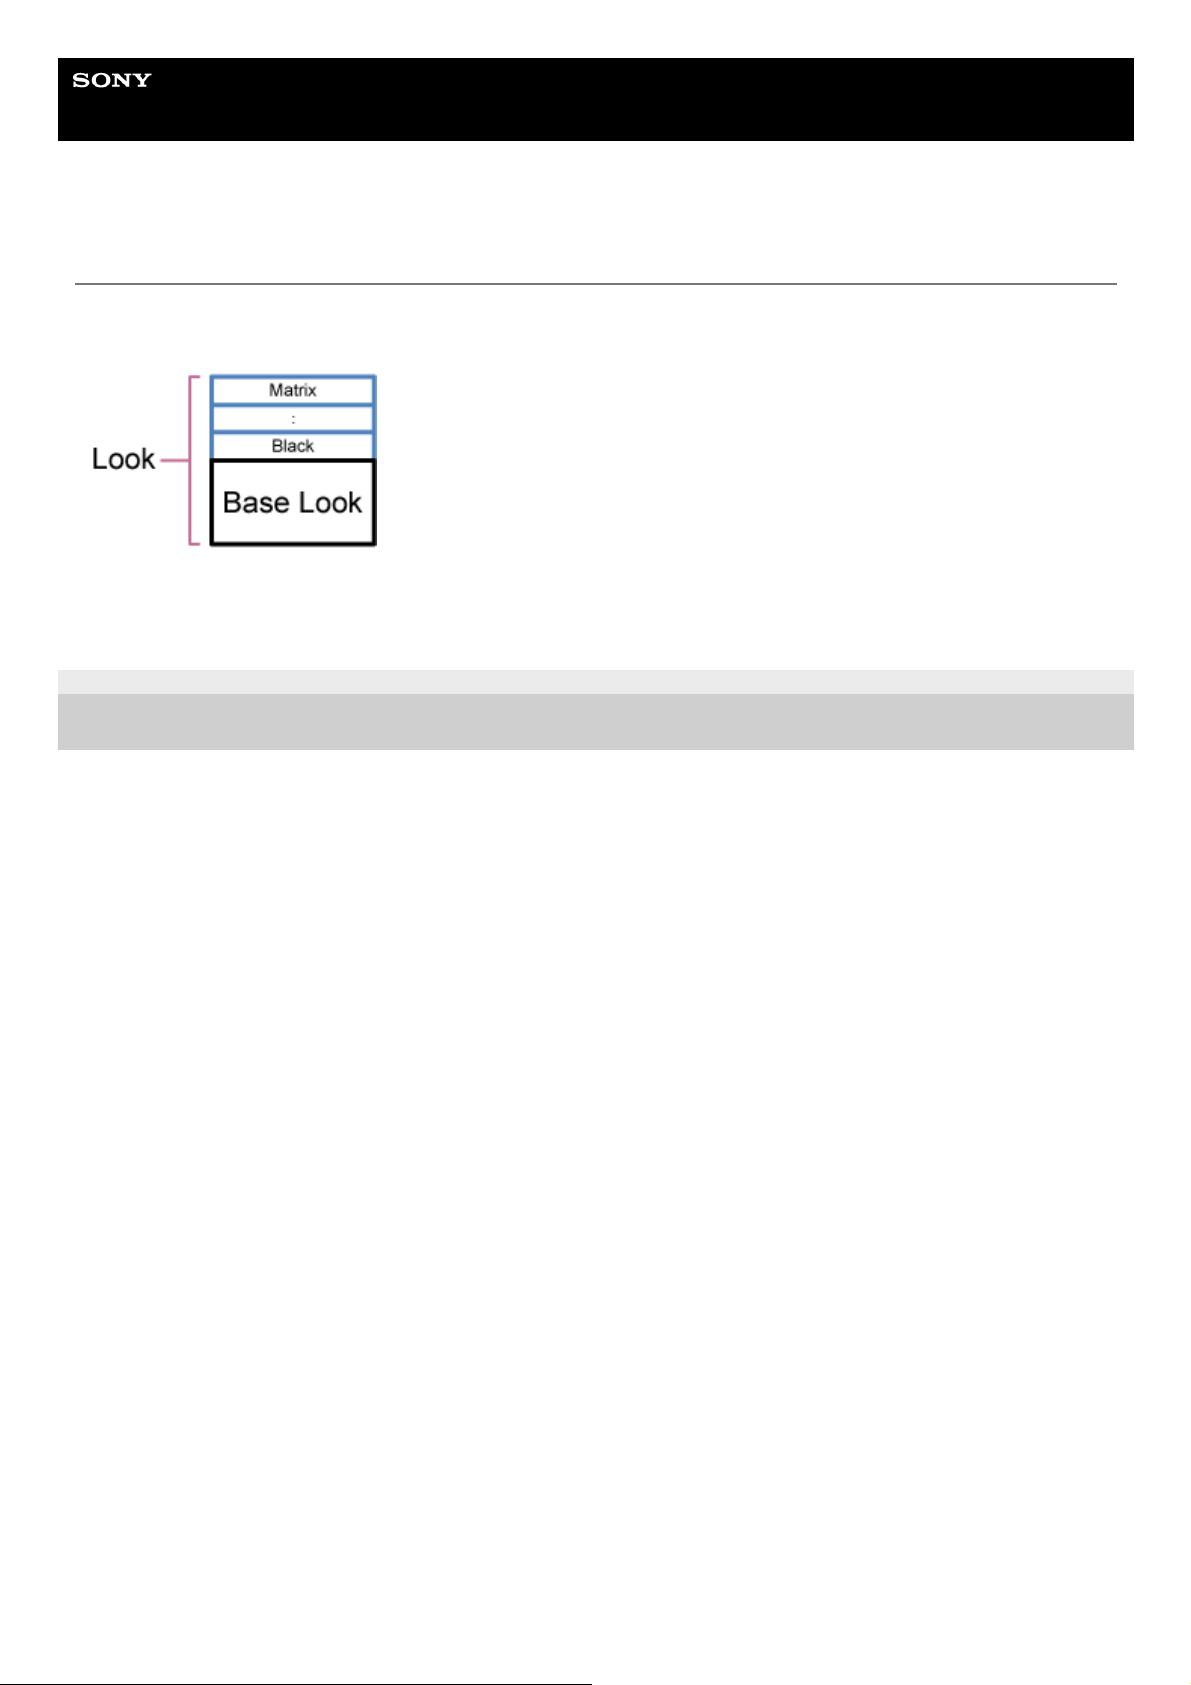
Help Guide
Interchangeable Lens Digital Camera
ILME-FR7 / ILME-FR7K
Look Overview
When the unit is in Custom mode, you can add adjustments to the black, matrix, and other parameters to create a “look”
based on the base look.
You can also quickly select a different look by saving different combinations of settings in scene files.
The unit is provided with a total of six preset looks.
5-041-957-11(1)
Copyright 2022 Sony Corporation
218
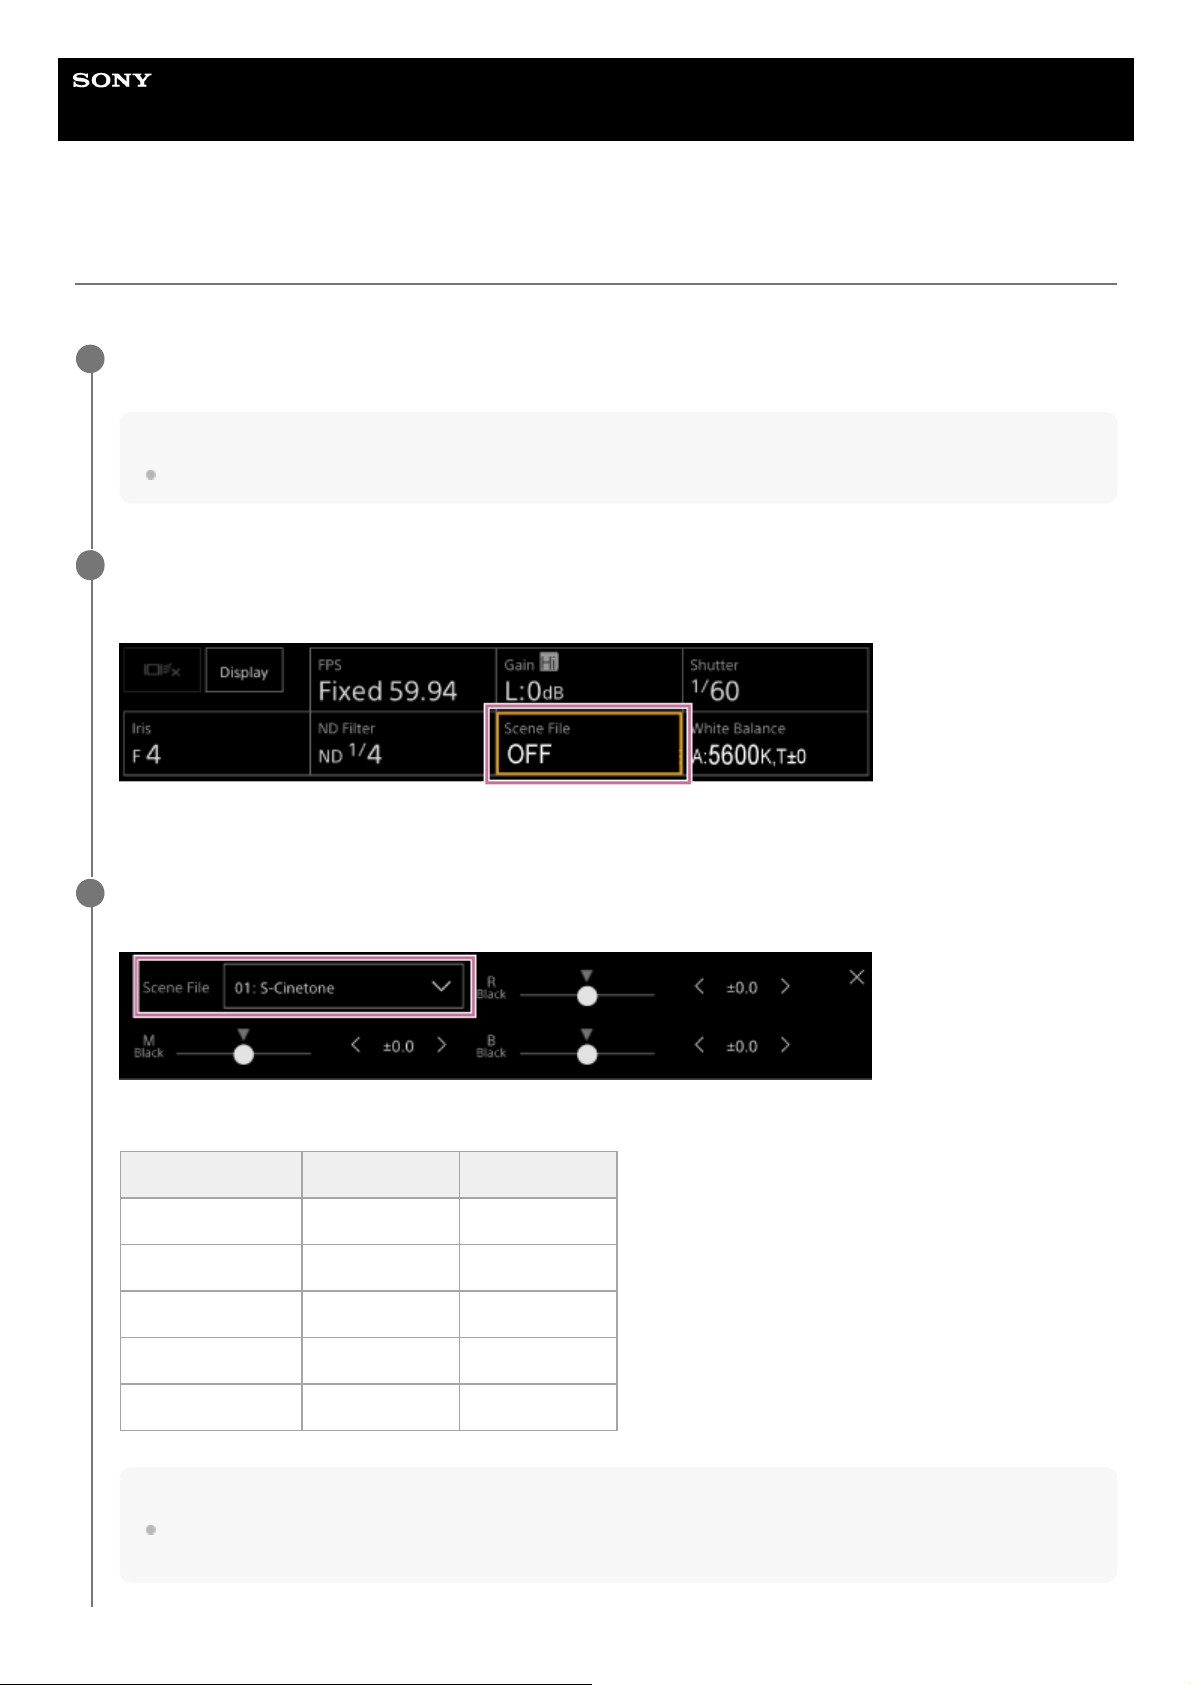
Help Guide
Interchangeable Lens Digital Camera
ILME-FR7 / ILME-FR7K
Selecting a Look
This topic describes how to select a look.
Check that [Project] > [Base Setting] > [Shooting Mode] is set to [Custom] in the web menu or camera
menu.
Hint
In [Custom] mode, the [ISO/Gain] button and [Scene File] button are displayed in the camera basic configuration panel.
1
Press the [Scene File] button in the camera basic configuration panel.
The frame of the [Scene File] button changes to orange.
The Scene File adjustment panel appears.
2
Press the [Scene File] button on the adjustment panel and select a scene file with the desired look from the
list.
The following presets are configured by factory default.
Hint
You can also select a look using [Paint/Look] > [Scene File] > [Recall] in the camera menu. You can also recall a preset
look using [Scene File] > [Preset Recall].
3
[Target Display] [SDR(BT.709)] [HDR(HLG)]
Scene file 1 [S-Cinetone] [HLG Live]
Scene file 2 [Standard] [HLG Natural]
Scene file 3 [Still] (Not registered)
Scene file 4 [ITU709] (Not registered)
Scene files 5 to 16 (Not registered) (Not registered)
219

5-041-957-11(1) Copyright 2022 Sony Corporation
220
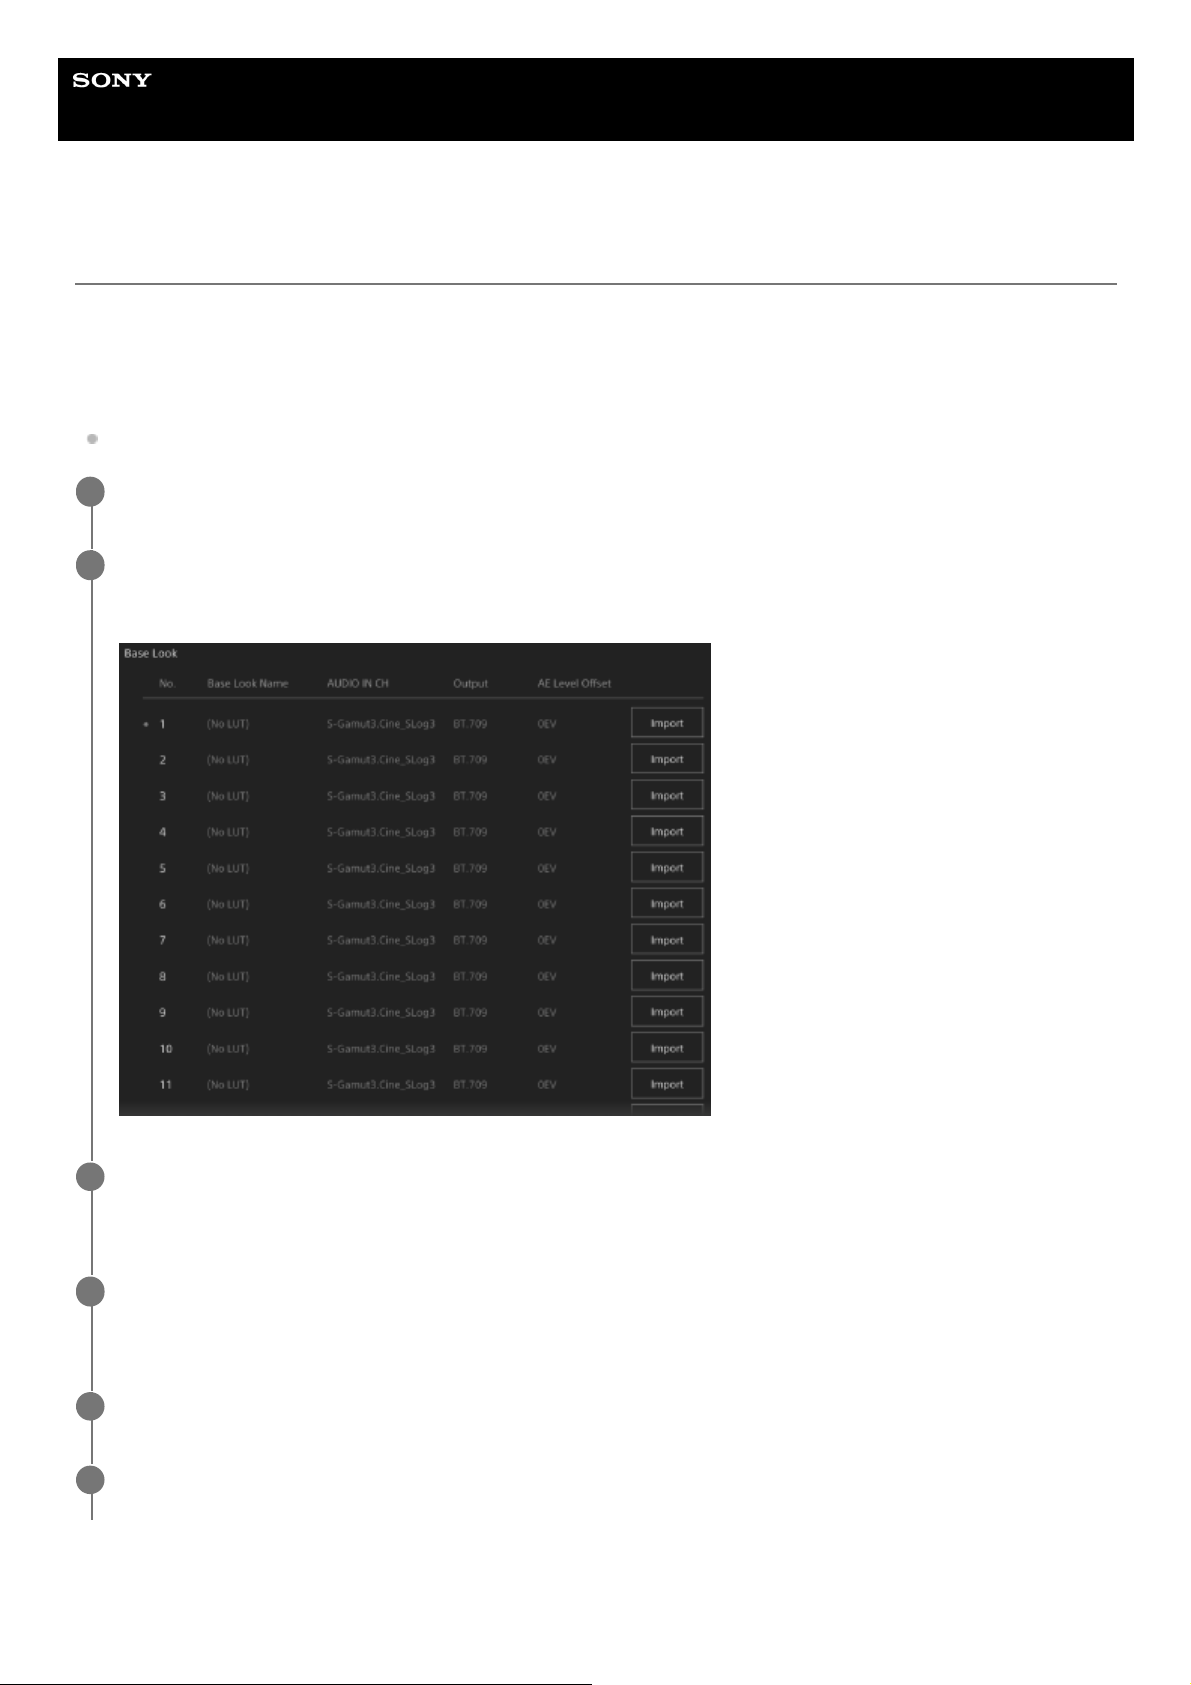
Help Guide
Interchangeable Lens Digital Camera
ILME-FR7 / ILME-FR7K
Importing a Desired Base Look
You can import a 3D LUT file, created on a computer or other device, as a base look. Up to 16 files can be imported.
File format: CUBE file (*.cube) for a 17-point or 33-point 3D LUT created using Catalyst Browse, RAW Viewer, or DaVinci
Resolve
*
(by Blackmagic Design Pty. Ltd.).
Input color space/Gamma: [S-Gamut3.Cine/S-Log3] or [S-Gamut3/S-Log3]
To adjust for underexposure
Verified with Resolve V9.0, V10.0, and V11.0.
*
Save the 3D LUT file on the device running the Web App.
1
Open [Paint/Look] > [Base Look] in the web menu.
A list of registered base looks appears.
2
Press the [Import] button in the row where you want to import the file.
The file selection dialog appears.
3
Select the prepared 3D LUT file.
The imported 3D LUT file becomes the base look of the unit.
4
Select the imported 3D LUT file using [Paint/Look] > [Base Look] > [Select] in the camera menu.
5
Configure [Paint/Look] > [Base Look] > [Input] and [Output] in the camera menu to match the attributes of
the imported 3D LUT file.
6
221

If there is a tendency for underexposure when auto exposure is selected when using the imported base look, adjust the
look using [Paint/Look] > [Base Look] > [AE Level Offset] in the web menu.
Note
Just importing a 3D LUT file does not affect the image. Load the imported 3D LUT file using [Paint/Look] > [Base Look] > [Select]
in the camera menu.
If [Input] is not set correctly, the proper look will not be obtained.
The [Input], [Output], and [AE Level Offset] menu item settings are applied to the base look selected using [Select]. If multiple 3D
LUT files are imported, select each 3D LUT file using [Select], and configure [Input], [Output], and [AE Level Offset] individually
for each file.
The configured [Input], [Output], and [AE Level Offset] settings are saved for each 3D LUT file.
The base look/LUT selection options for imported 3D LUT files are common to [SDR(BT.709)], [HDR(HLG)], and Cine EI modes,
but color space and gamma conversion is not performed according to these modes.
3D LUT files are not deleted when [Maintenance] > [Reset] > [All Reset (except for Network Settings)] is executed in the web
menu.
5-041-957-11(1)
Copyright 2022 Sony Corporation
222
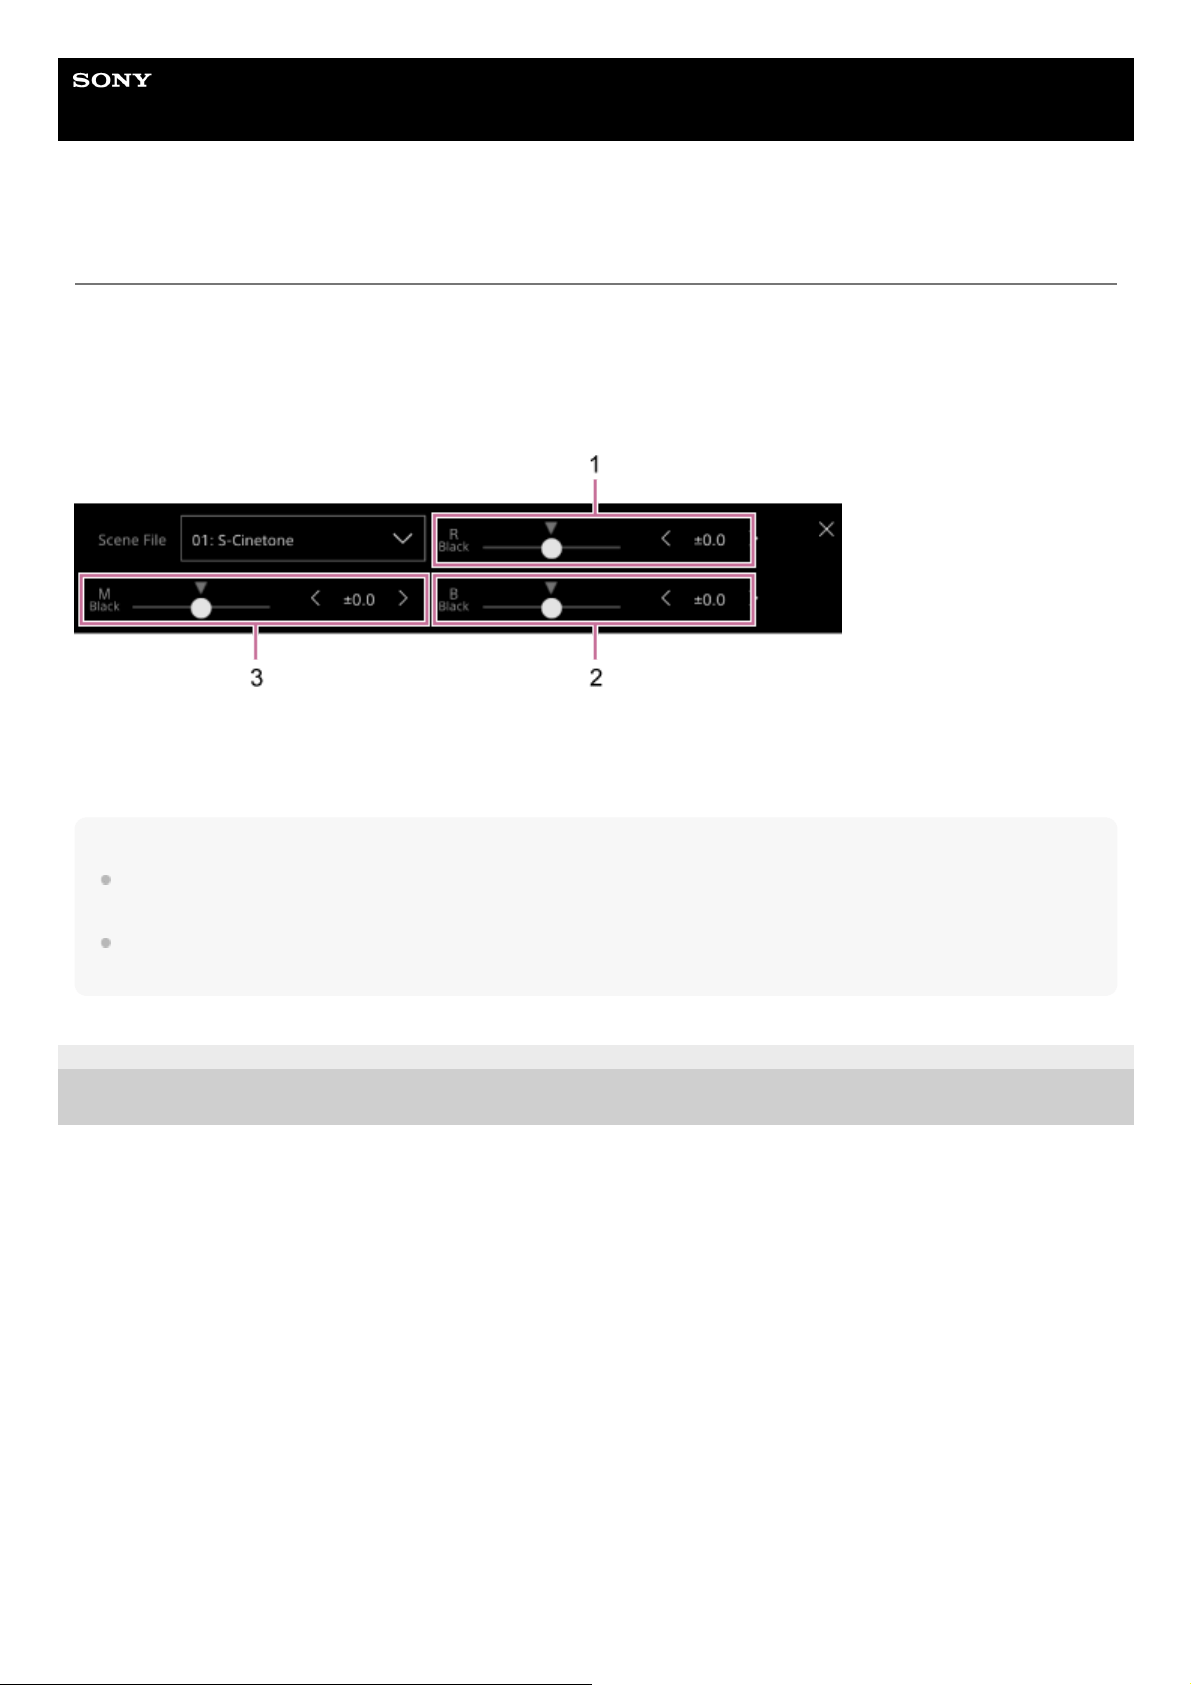
Help Guide
Interchangeable Lens Digital Camera
ILME-FR7 / ILME-FR7K
Customizing a Look
You can customize the look based on the base look using the [Master Black], [R Black], and [B Black] sliders in the
Scene File adjustment panel in the camera basic configuration panel and [Paint/Look] > [Matrix] and other setup items in
the camera menu.
Connect the unit to a TV or monitor, and adjust the picture quality while observing the picture on the TV or monitor
screen.
1: [R Black] slider/adjustment buttons
2: [B Black] slider/adjustment buttons
3: [Master Black] slider/adjustment buttons
Note
When you import a 3D LUT file and apply it to the image, the desired look defined in the 3D LUT file will not be obtained if
[Paint/Look] > [Matrix] and settings other than the base look settings in the camera menu are changed.
You can reset all customized settings using [Paint/Look] > [Reset Paint Settings] > [Reset without Base Look] in the camera
menu.
5-041-957-11(1)
Copyright 2022 Sony Corporation
223

Help Guide
Interchangeable Lens Digital Camera
ILME-FR7 / ILME-FR7K
Saving a Look
You can save the current look as a scene file in internal memory using [Paint/Look] > [Scene File] > [Store] in the camera
menu.
You can quickly recall a saved look using the Scene File adjustment panel or using direct menu operations.
Note
If you select another look without saving the current look, the current look is discarded.
Hint
You can overwrite the preset scene files. To restore a preset scene file, load the look to be restored using [Paint/Look] > [Scene
File] > [Preset Recall] in the camera menu, and then save the scene file using [Scene File] > [Store].
To delete a saved look
You can delete a scene file saved in internal memory using [Paint/Look] > [Scene File] > [Delete] in the camera menu.
Hint
When deleted, it is no longer displayed in the Scene File adjustment panel or the direct menu.
5-041-957-11(1)
Copyright 2022 Sony Corporation
224

Help Guide
Interchangeable Lens Digital Camera
ILME-FR7 / ILME-FR7K
Deleting a Base Look
You can delete imported 3D LUT files individually using [Paint/Look] > [Base Look] > [Delete] in the camera menu.
You can delete all imported 3D LUT files using [Paint/Look] > [Base Look] > [Delete All] in the camera menu.
Note
Before deleting, check that the base look is not being used in any scene files. If a base look that is being used is deleted, the look
of the corresponding scene files will be incorrect.
Imported 3D LUT files are not deleted when [Maintenance] > [Reset] > [All Reset (except for Network Settings)] is executed in the
web menu.
A deleted base look can no longer be used as a LUT in Cine EI mode.
5-041-957-11(1)
Copyright 2022 Sony Corporation
225

Help Guide
Interchangeable Lens Digital Camera
ILME-FR7 / ILME-FR7K
Shooting with Look Adjustment in Post-Production
By using the unit in Cine EI mode and recording gradations evenly from dark areas to bright areas, you can make fine
adjustments, such as locally restoring the gradations of dark areas and bright areas, in post production.
However, when viewing the recorded images on a conventional monitor, the overall contrast will appear low, making
focus and exposure adjustments difficult.
You can apply a LUT to the monitor target on the unit to assist various adjustments during shooting. You can also apply a
LUT to the playback video to check the finished result.
LUTs are applied by the following systems. However, only one LUT can be applied.
SDI output
HDMI output and streaming
Proxy clip recorded on recording media
High-res (main) clip recorded on recording media
5-041-957-11(1)
Copyright 2022 Sony Corporation
226
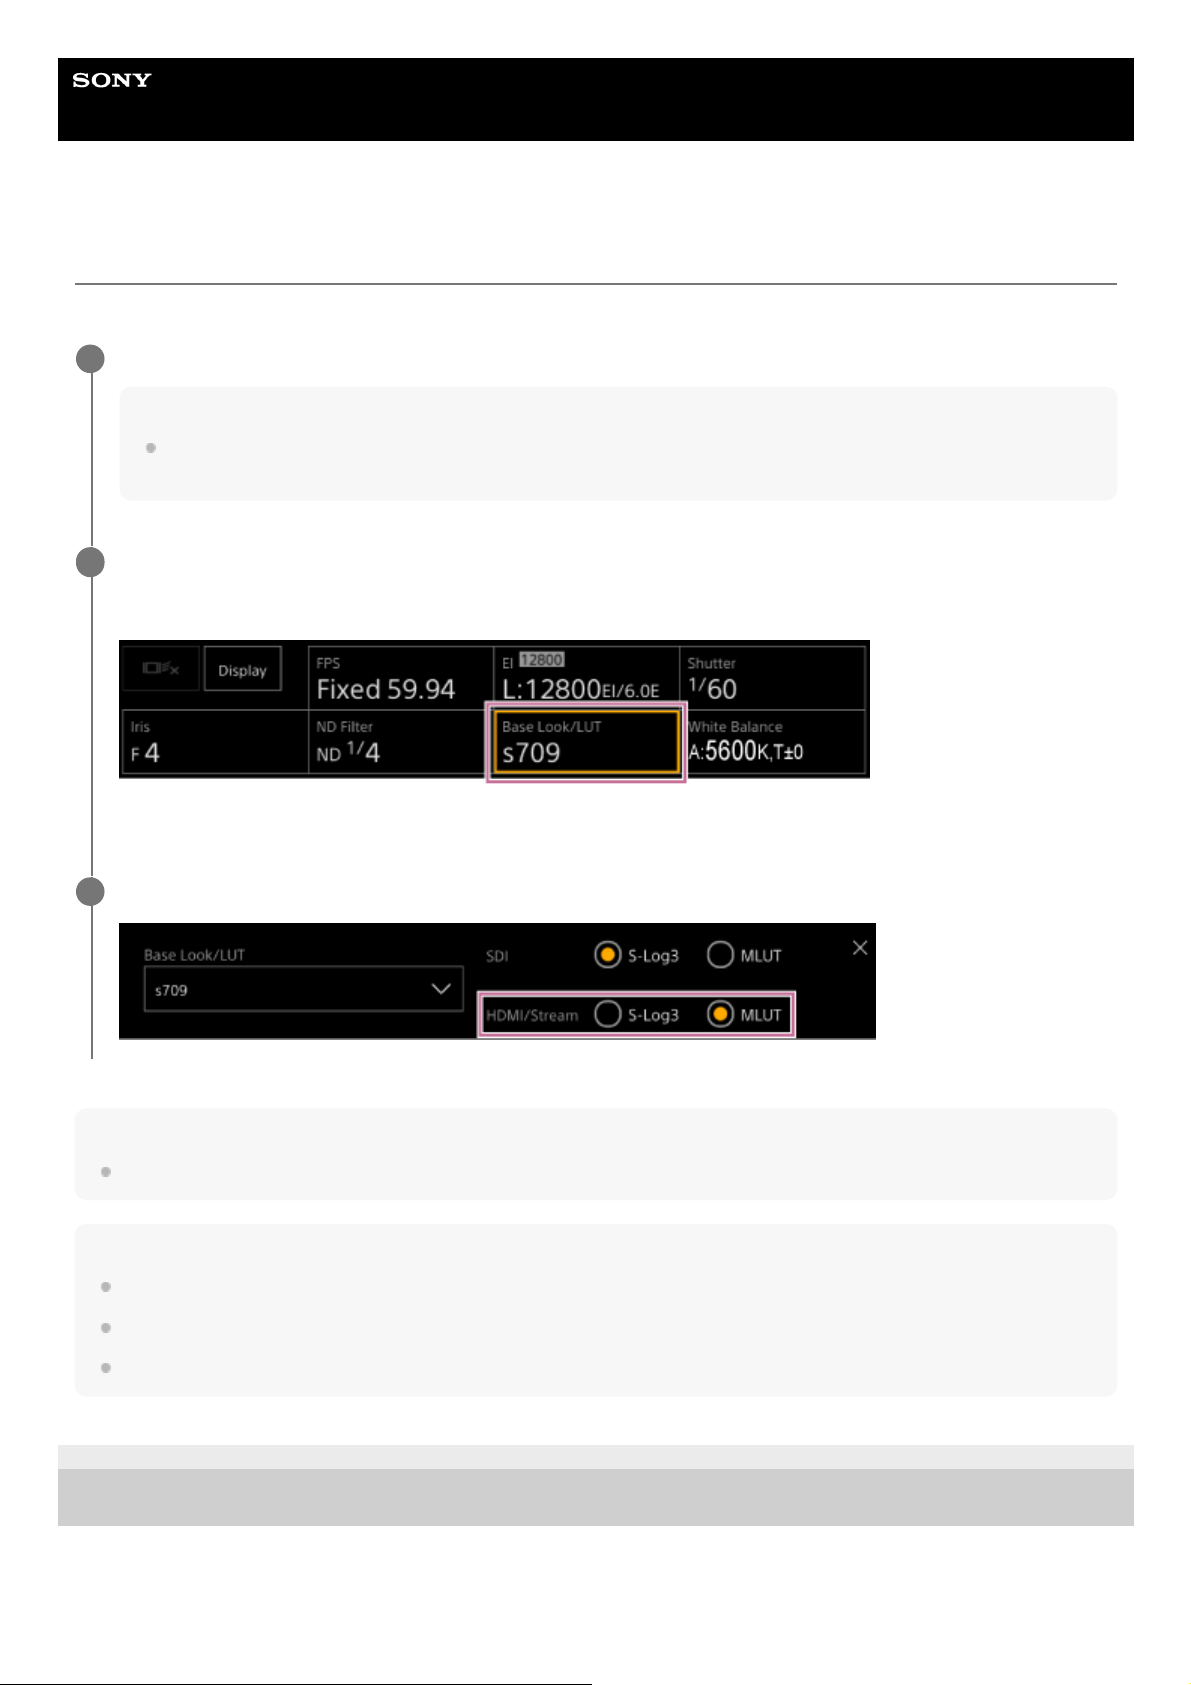
Help Guide
Interchangeable Lens Digital Camera
ILME-FR7 / ILME-FR7K
Applying a LUT to HDMI Output and Streaming
You can apply a LUT to HDMI output and streaming.
Note
The image in the Web App camera image panel is also included in the streaming image.
Hint
This can also be set using [Shooting] > [LUT On/Off] > [HDMI/Stream] in the camera menu.
SDI output can be set in the same way.
For video on recording media, you can set this using [Shooting] > [LUT On/Off] > [Internal Rec] and [Proxy] in the camera menu.
5-041-957-11(1)
Copyright 2022 Sony Corporation
Check that [Project] > [Base Setting] > [Shooting Mode] is set to [Cine EI] in the web menu or camera menu.
Hint
In [Cine EI] mode, the [Base ISO/Exposure Index] button and [Base Look/LUT] button are displayed in the camera basic
configuration panel.
1
Press the [Base Look/LUT] button in the camera basic configuration panel.
The frame of the [Base Look/LUT] button changes to orange.
The Base Look/LUT adjustment panel appears.
2
Select [HDMI/Stream] > [MLUT].
3
227
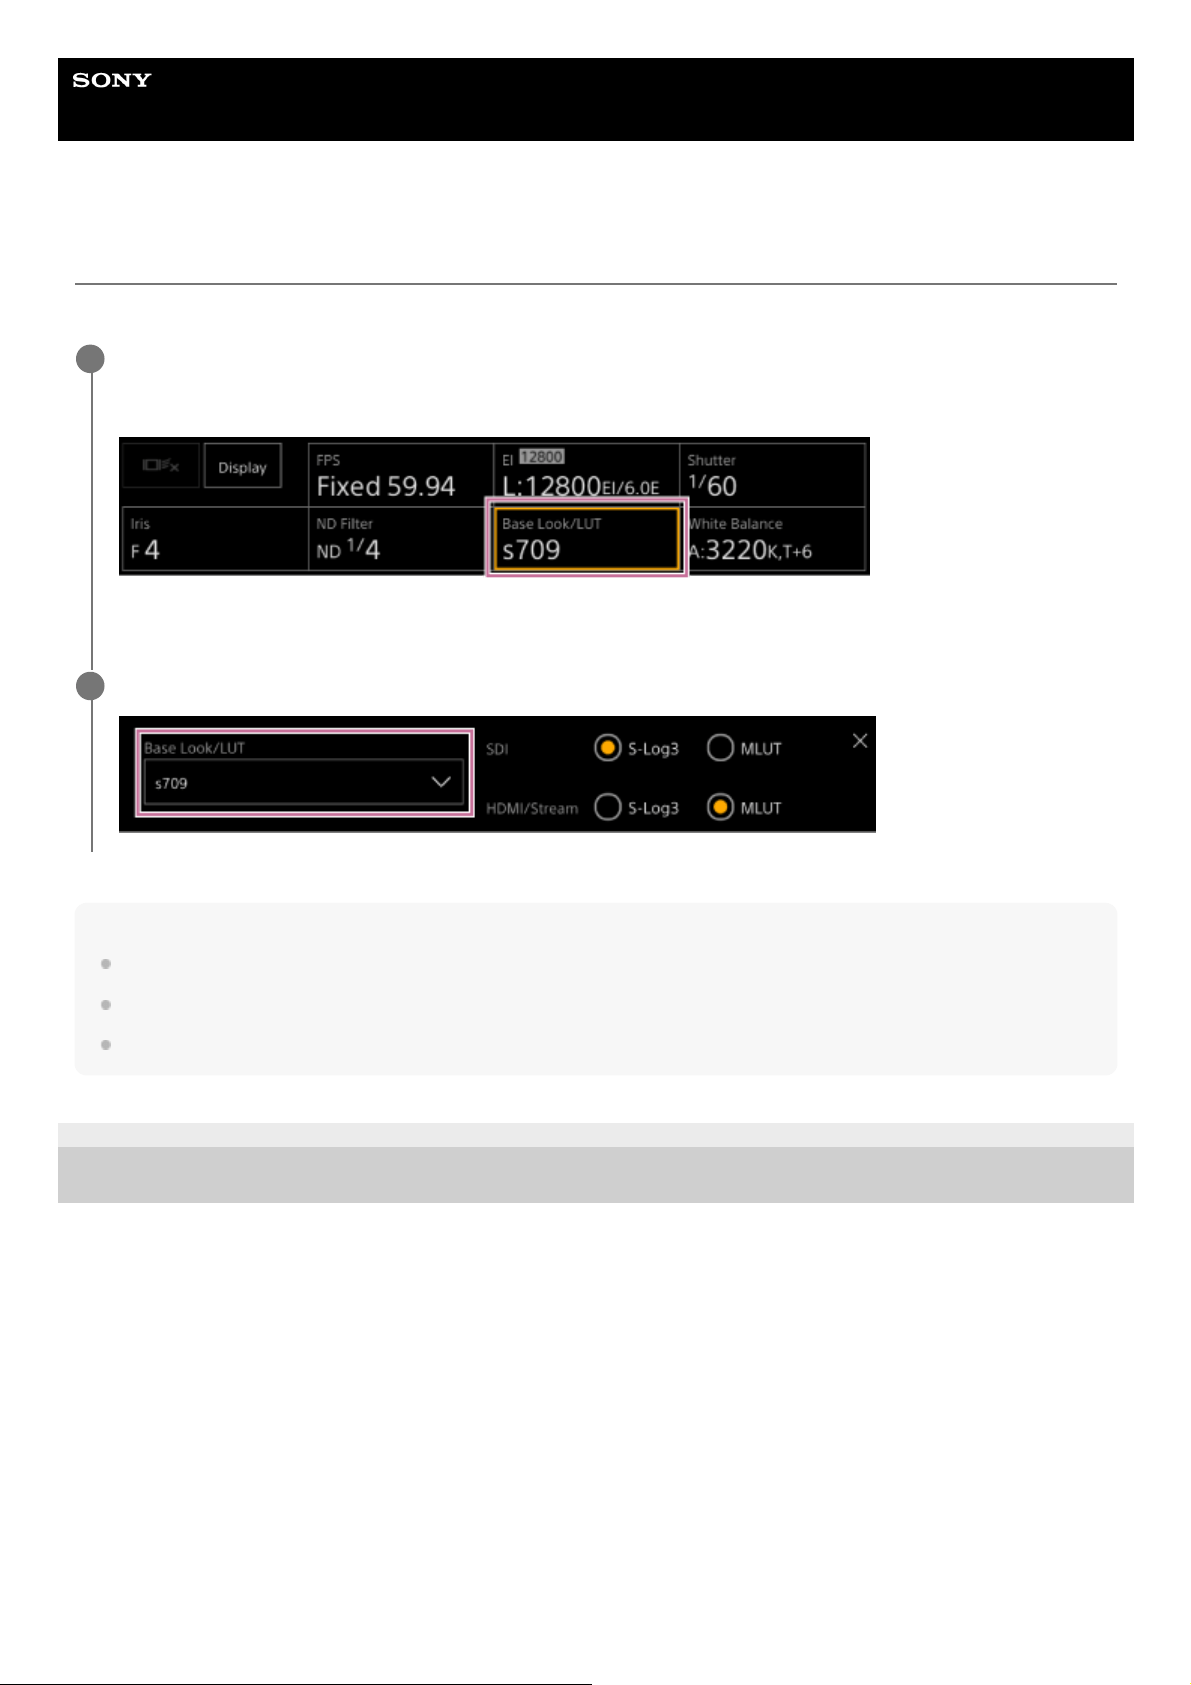
Help Guide
Interchangeable Lens Digital Camera
ILME-FR7 / ILME-FR7K
Changing a LUT
You can change the LUT to apply.
Hint
The unit provides [s709], [709(800%)], and [S-Log3] as preset LUTs.
You can also import and apply a 3D LUT file. For details, see “Importing a Desired Base Look” and “Deleting a Base Look.”
This can also be set using [Paint/Look] > [Base Look] > [Select] in the camera menu.
5-041-957-11(1)
Copyright 2022 Sony Corporation
Press the [Base Look/LUT] button in the camera basic configuration panel.
The frame of the [Base Look/LUT] button changes to orange.
The Base Look/LUT adjustment panel appears.
1
Press the [Base Look/LUT] button and select the base look to apply.
2
228
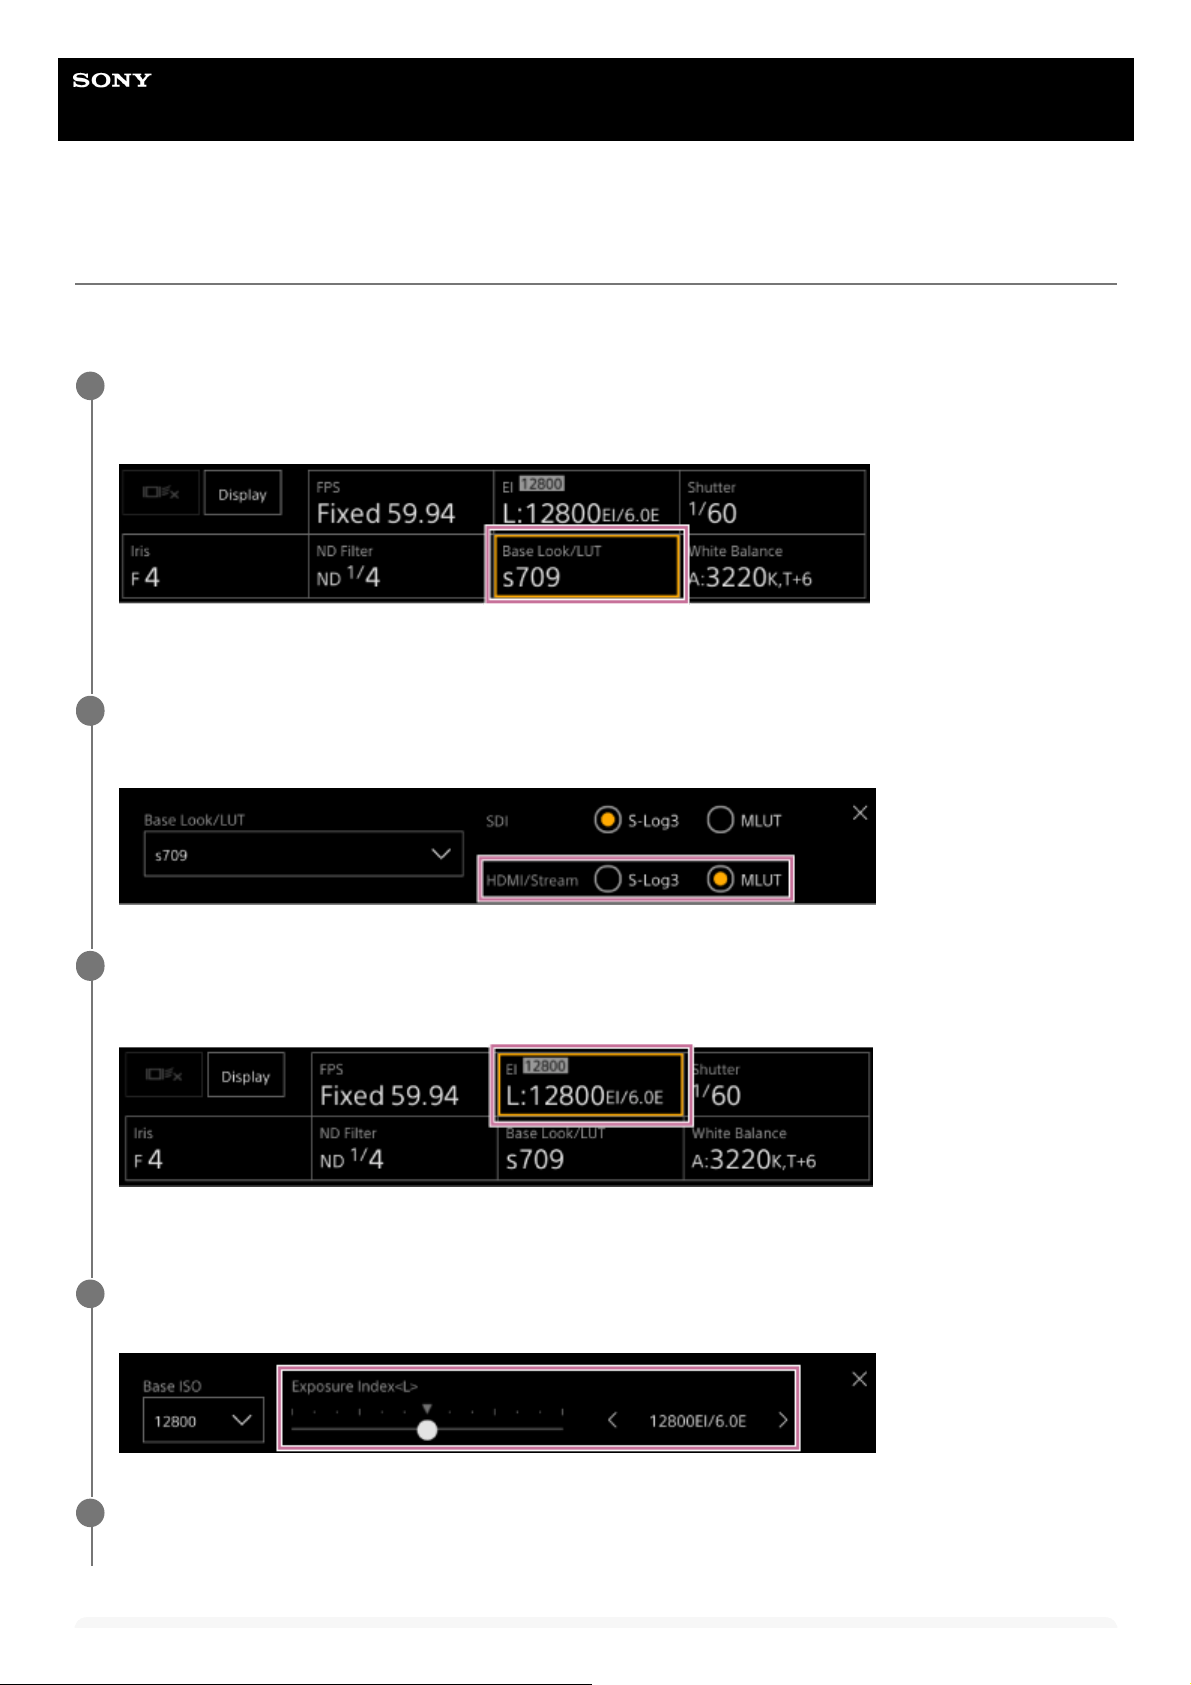
Help Guide
Interchangeable Lens Digital Camera
ILME-FR7 / ILME-FR7K
Changing the Distribution of Dark and Bright Areas in the Recorded Image
You can change the distribution of dark areas and bright areas, for example, if you want to prioritize the tone of dark
areas over bright areas, by changing the Exposure Index from the base sensitivity.
Press the [Base Look/LUT] button in the camera basic configuration panel.
The frame of the [Base Look/LUT] button changes to orange.
The Base Look/LUT adjustment panel appears.
1
Select [HDMI/Stream] > [MLUT].
A LUT is applied to HDMI output and streaming.
2
Press the [Base ISO/Exposure Index] button in the camera basic configuration panel.
The frame of the [Base ISO/Exposure Index] button changes to orange.
The Base ISO/Exposure Index adjustment panel appears.
3
Adjust the exposure index according to the desired distribution of dark and bright areas using the
[Exposure Index] slider or [Exposure Index] adjustment buttons.
4
Adjust the lighting and/or ND filter so that the camera image output from [HDMI/Stream] has the
appropriate exposure.
5
229

Hint
This can also be set using [Shooting] > [ISO/Gain/EI] > [Exposure Index] in the camera menu.
SDI output can be used in the same way.
The second numerical value of the setting indicates how many steps of brightness information are assigned for bright areas
(brightness higher than 18% gray). Areas brighter than these are overexposed.
Example: In “400EI/5.0E,” 5.0 steps are assigned on the bright side.
You can also use this as a guide to check the tone of dark and bright areas during shooting. Remember to return to the original EI
value after checking the exposure.
5-041-957-11(1)
Copyright 2022 Sony Corporation
230
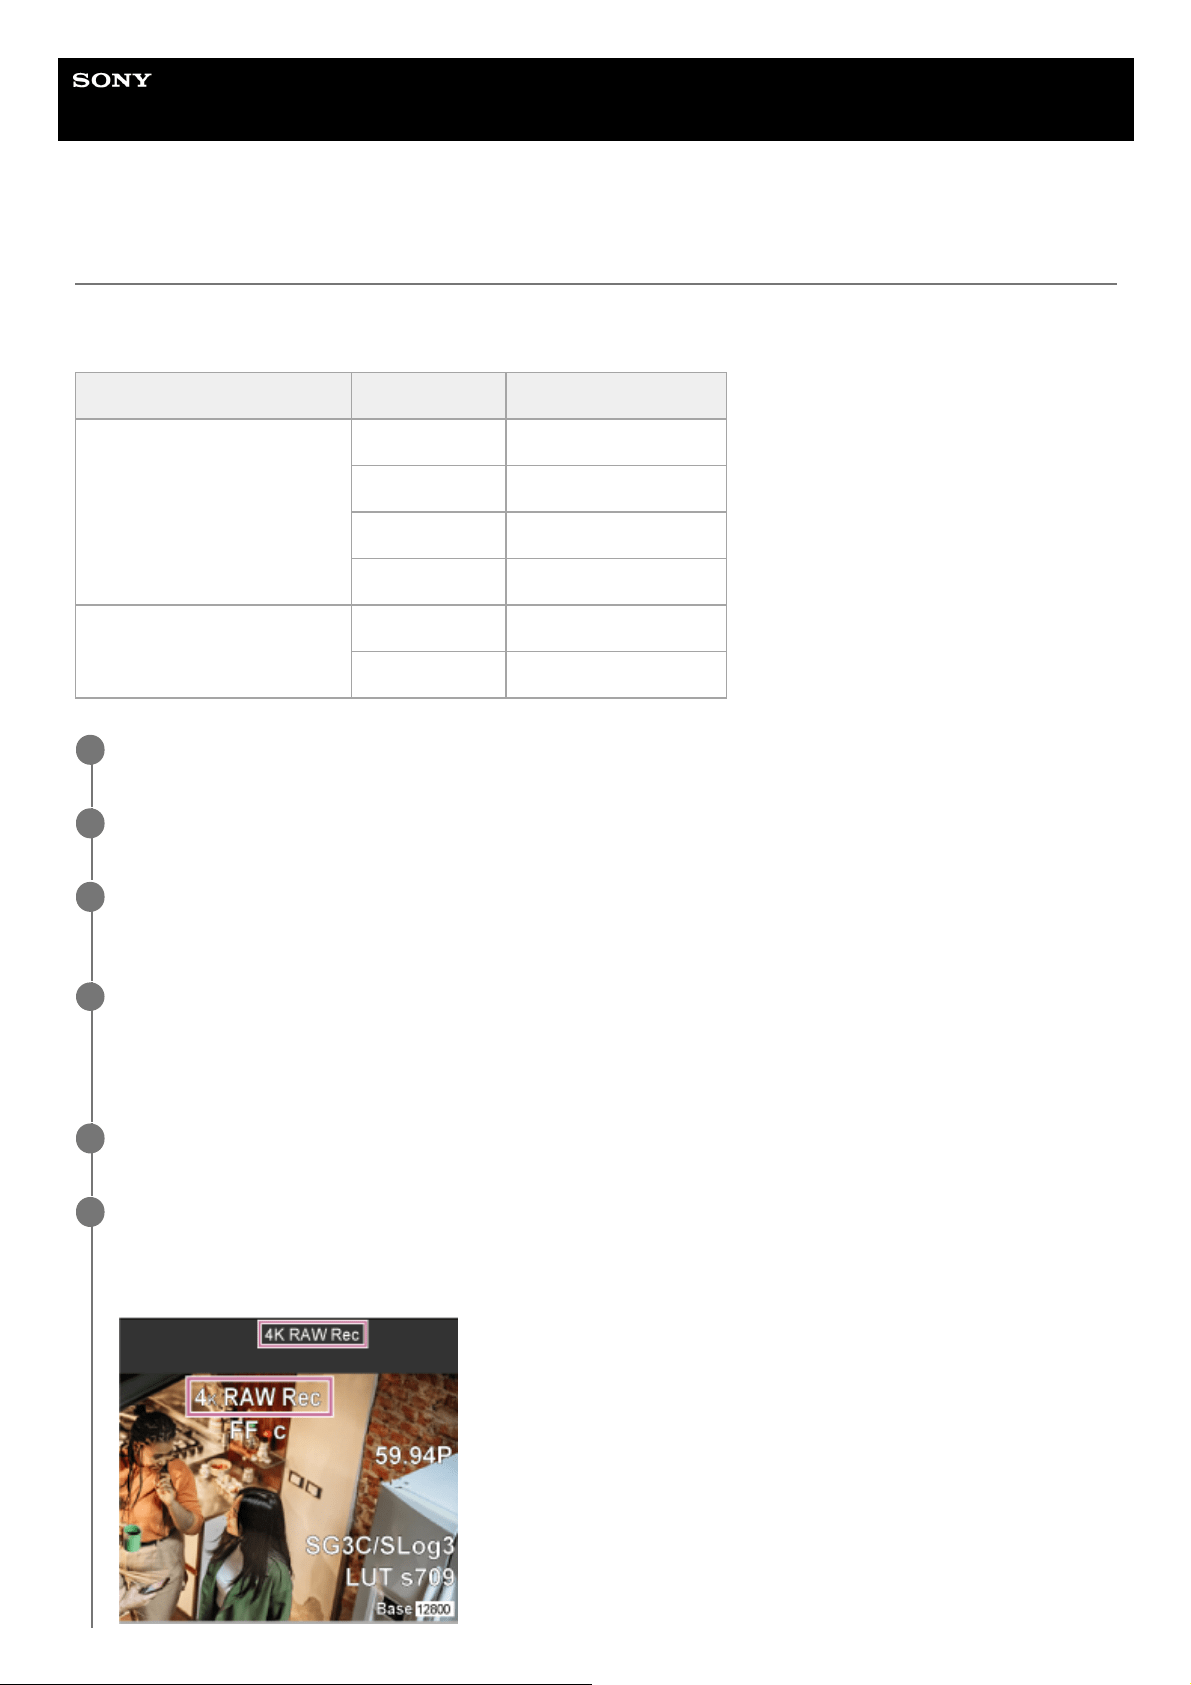
Help Guide
Interchangeable Lens Digital Camera
ILME-FR7 / ILME-FR7K
Recording RAW Video
You can record the RAW video signal output from the SDI OUT connector of the unit to a supported external recorder.
The supported RAW output formats are shown below.
System frequency [Codec] [RAW Output Format]
59.94 / 50 / 29.97 / 25 / 23.98
RAW 4096×2160
RAW 3840×2160
RAW & XAVC-I 4096×2160
RAW & XAVC-I 3840×2160
24
RAW 4096×2160
RAW & XAVC-I 4096×2160
Connect an external RAW recorder to the SDI OUT connector of the unit.
1
Set [Project] > [Base Setting] > [Shooting Mode] to [Cine EI] in the web menu or camera menu.
2
Set the angle of view (FF only) using [Project] > [Rec Format] > [Imager Scan Mode] in the web menu or
camera menu.
3
Set [Project] > [Rec Format] > [Codec] to [RAW] in the web menu or camera menu.
Selecting [RAW&XAVC-I] will simultaneously record video to the external RAW recorder and video to the memory
cards in the unit.
4
Set the resolution using [Project] > [Rec Format] > [RAW Output Format] in the web menu or camera menu.
5
Check that the external recorder is turned on, then press the record START/STOP button on the live
operation screen.
The RAW video recording status is indicated by an icon in the camera image panel.
6
231

Note
When recording is started on an external recorder without using the record START/STOP button on the live operation screen,
clips may not be recorded properly.
5-041-957-11(1)
Copyright 2022 Sony Corporation
Note
The recording control signal is output from the SDI OUT connector of the unit, but it is not possible to get the status of the
external recorder. Accordingly, the unit may indicate RAW video recording is in progress when the external recorder is not
actually recording. Check the indicator on the external recorder to obtain the correct operating status.
232

Help Guide
Interchangeable Lens Digital Camera
ILME-FR7 / ILME-FR7K
Switching the Bokeh Control Function On/Off
You can easily adjust the degree of bokeh by linking the ND filter and gain to the iris operation.
Switching the bokeh control function on/off
This function can be enabled only when adjusting the exposure manually. Set the ND filter to variable mode, then set the
iris, gain, shutter, and ND filter to manual adjustment.
You can switch the bokeh control function on/off using [Shooting] > [Iris] > [Bokeh Control] in the camera menu.
When the bokeh control function is set to On, a
(B) icon is displayed on the ND filter and gain indicators.
Note
This function is enabled only on E-mount lenses that can communicate with the unit.
The maximum effect of this function can be obtained using a Sony E-mount lens.
You can also assign the [Bokeh Control] function to an assignable button and switch the bokeh control function between On and
Off using the button.
The bokeh control function is set to Off when any of the following operations is performed.
When the unit is turned off
When any of the iris, gain, shutter, or ND filter is set to Auto
When the shooting mode is switched
When the ND filter is set to clear or preset mode
When the lens is removed
When the unit reboots, for example, after switching the frequency
5-041-957-11(1)
Copyright 2022 Sony Corporation
234
Help Guide
Interchangeable Lens Digital Camera
ILME-FR7 / ILME-FR7K
Adjusting the Degree of Bokeh
Note
The appearance may vary depending on the operation speed, lens, shooting settings, and subject, and also the brightness may
change. Performing a camera test before shooting is strongly recommended.
The brightness may change when the iris operation direction changes, such as when opening the iris after closing it or when
closing the iris after opening it. In this case, adjust slightly more than required beforehand and then back up a little, check the
brightness, and then start shooting. For example, if you want to open the iris to F8 aperture and blur the background, first close
the aperture past F8 and then return to F8, check the brightness, and start shooting.
Perform bokeh control operations slowly. If you need to speed up the operation, try adjusting gradually while checking the
changes to the image.
Hint
When the bokeh control function is set to On, the ND filter and gain operate together to offset changes in exposure due to iris
adjustment, allowing you to change the degree of bokeh.
The bokeh control is first linked to the ND filter in response to the iris operation. When the ND filter can no longer be changed, the
gain is linked.
In MF mode, it is recommended that you first open the iris and then adjust the focus.
If you use the auto ND filter instead of the bokeh control function, the ND filter follows the change in the brightness of the subject.
Display during gain link operation
When the bokeh control function is set to On, the gain may change as the iris is adjusted.
When the gain link is active and the gain changes, a message appears at the top of the screen and the
(B) icon on
the gain indicator blinks.
5-041-957-11(1)
Copyright 2022 Sony Corporation
Set the bokeh control function to On.
1
Adjust the ND filter and gain to determine the exposure.
2
Adjusts the iris.
The degree of bokeh changes.
3
235

Help Guide
Interchangeable Lens Digital Camera
ILME-FR7 / ILME-FR7K
Saving and Loading Configuration Data Overview
You can save the settings of the unit as configuration data using the Web App. This allows you to quickly recall an
appropriate set of menu settings for the current situation.
With this unit, you can save almost all settings related to camera functions, other than the following note, as an ALL file
(file with all settings).
Note
Network function settings and authentication information are not saved. For details about saved items, see “List of Menu Items.”
5-041-957-11(1)
Copyright 2022 Sony Corporation
236
Help Guide
Interchangeable Lens Digital Camera
ILME-FR7 / ILME-FR7K
Saving an ALL File
This topic describes how to save an ALL file.
5-041-957-11(1)
Copyright 2022 Sony Corporation
Open [Project] > [All File] in the web menu.
1
Press the [Save All File] > [Save] button.
The web browser will download a file named all-file.ALL momentarily.
2
Specify a location and file name for the downloaded all-file.ALL file, and save the file.
For details about file operations, refer to the operating instructions of your device.
3
237
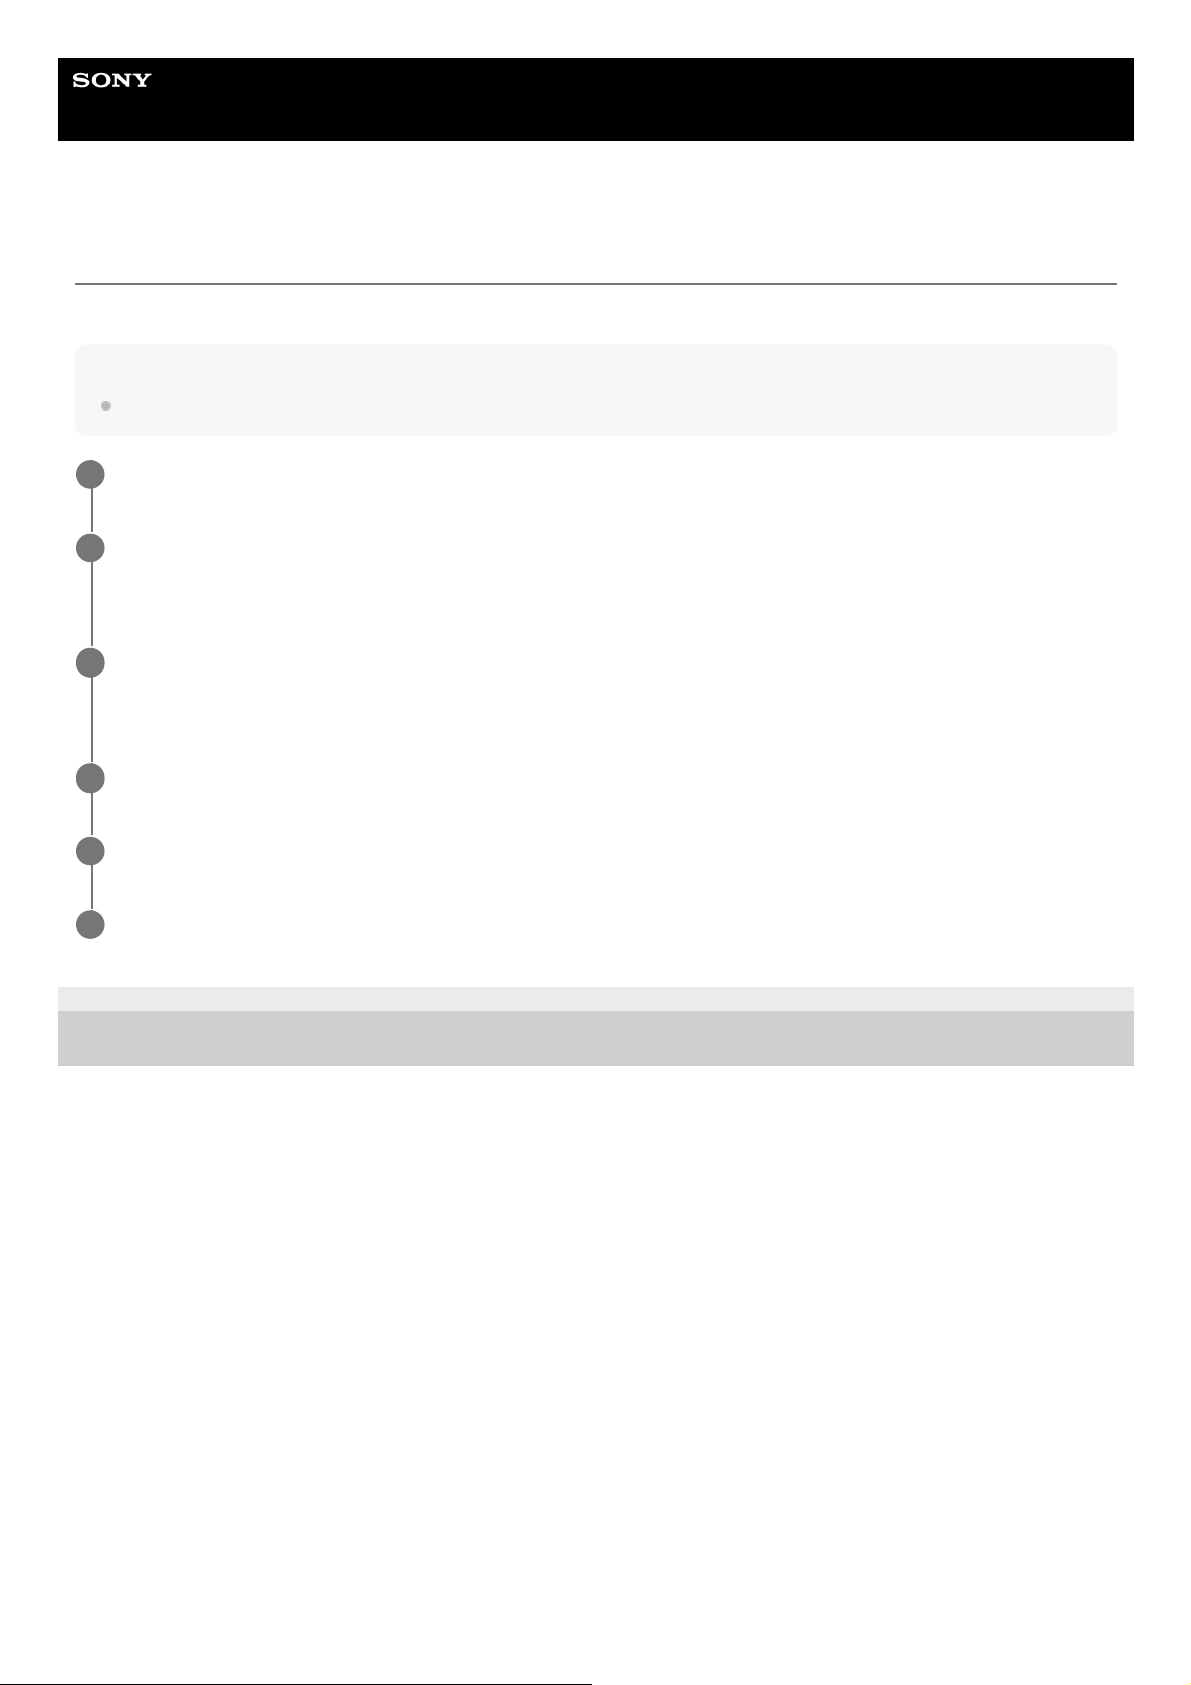
Help Guide
Interchangeable Lens Digital Camera
ILME-FR7 / ILME-FR7K
Loading an ALL File
This topic describes how to load an ALL file.
Note
The unit will reboot automatically after loading configuration data. After rebooting, reload the page in the web browser.
5-041-957-11(1)
Copyright 2022 Sony Corporation
Open [Project] > [All File] in the web menu.
1
Press the [Load All File] > [Load] button.
The open file dialog appears on the device running the Web App.
2
Open the file you want to load.
For details about file operations, refer to the operating instructions of your device.
3
When the load file name confirmation screen appears, press the [OK] button.
4
When the execution result screen appears, press the [OK] button.
5
Wait for the unit to reboot, then reconnect the Web App.
6
238

Help Guide
Interchangeable Lens Digital Camera
ILME-FR7 / ILME-FR7K
About File Transfer
You can upload a proxy file or original file that is recorded on the unit to a server on the Internet or a server on a local
network.
Note
When the power supply is set to standby state, file transfers are placed on hold even though the unit is still powered.
5-041-957-11(1)
Copyright 2022 Sony Corporation
239

Help Guide
Interchangeable Lens Digital Camera
ILME-FR7 / ILME-FR7K
Registering a File Transfer Destination
You can register a transfer destination server before starting a file transfer.
Select [Network] > [File Transfer] > [Default Upload Server] > [Server Settings1] (or [Server Settings2],
[Server Settings3]) in the web menu.
Hint
The name of the selection option will change according to [Display Name] configured in the next step.
1
Configure the following items for [Network] > [FTP Server 1] to [FTP Server 3] in the web menu.
[Display Name]
Enter the name of the server to display in the transfer job list when selecting a transfer destination server.
[Service]
Displays the server type.
[FTP]: FTP server
[Host Name]
Enter the address or host name of the server.
[Port]
Enter the port number of the server to connect.
[User Name]
Enter the user name.
[Password]
Enter the password.
[Passive Mode]
Turn passive mode on/off.
[Destination Directory]
Enter the name of the directory on the destination server.
Note
If characters that are invalid on the destination server are entered in [Destination Directory], files will be transferred to the
user’s home directory. Invalid characters will vary depending on the server.
[Using Secure Protocol]
Set whether to perform secure FTP transfer.
[Root Certificate]
Load/clear a certificate.
[Load]: Load a CA certificate. Loads PEM-format certificates.
[Clear]: Clear the CA certificate.
[None]: Do not load or clear a certificate.
Note
Set the clock of the unit to the correct time before loading a CA certificate.
When recording in XAVC-I 4096×2160P/3840×2160P 59.94/50P, [Load] cannot be selected.
[Root Certificate Status]: Displays the load status of the certificate.
2
240

5-041-957-11(1) Copyright 2022 Sony Corporation
[Reset]: Resets the Server Settings settings to the defaults.
241

Help Guide
Interchangeable Lens Digital Camera
ILME-FR7 / ILME-FR7K
Uploading a Proxy File on a Memory Card from the Thumbnail Screen
You can upload proxy files on a memory card individually from the thumbnail screen.
Note
Up to 200 transfer jobs can be registered.
5-041-957-11(1)
Copyright 2022 Sony Corporation
Press the [Thumbnail] button on the live operation screen of the Web App.
The display changes from the camera image to the thumbnail screen.
1
Select [Thumbnail] > [Transfer Clip (Proxy)] > [Select Clip] in the camera menu.
To transfer all proxy files simultaneously, select [Transfer Clip (Proxy)] > [All Clips].
Clips can be transferred from the thumbnail screen or the filtered clip thumbnail screen.
2
Select the clip you want to transfer using the [Set] button, and press the [Menu] button.
A transfer confirmation screen appears.
3
Select [Execute].
The proxy file corresponding to the selected clip is registered as a transfer job, and uploading begins.
When the transfer job is successfully registered, the transfer result screen appears.
4
Press the [OK] button.
5
242
Help Guide
Interchangeable Lens Digital Camera
ILME-FR7 / ILME-FR7K
Uploading an Original File on a Memory Card from the Thumbnail Screen
You can upload an original file on a memory card from the thumbnail screen.
Note
Up to 200 transfer jobs can be registered.
5-041-957-11(1)
Copyright 2022 Sony Corporation
Press the [Thumbnail] button on the live operation screen of the Web App.
The display changes from the camera image to the thumbnail screen.
1
Select [Thumbnail] > [Transfer Clip] > [Select Clip] in the camera menu.
To transfer all original files simultaneously, select [Transfer Clip] > [All Clips].
Clips can be transferred from the thumbnail screen or the filtered clip thumbnail screen.
2
Select the clip you want to transfer using the [Set] button, and press the [Menu] button.
A transfer confirmation screen appears.
3
Select [Execute].
The original file of the selected clip is registered as a transfer job, and uploading begins.
When the transfer job is successfully registered, the transfer result screen appears.
4
Press the [OK] button.
5
243

Help Guide
Interchangeable Lens Digital Camera
ILME-FR7 / ILME-FR7K
Checking the File Transfer Status
You can check the status of file transfer by selecting [Network] > [File Transfer] > [View Job List] in the camera menu.
Note
Up to 200 transfer jobs can be registered.
The transfer jobs are retained when the unit is switched to standby state, but up to 10 minutes of recent progress information may
be lost if the power is disconnected by any other means.
If an error occurs during file transfer, the transfer of a clip with the same name as a transferred clip may not be resumed
depending on the settings and status of the transfer destination server. In this case, check the transfer destination server settings
and status.
Hint
If [Network] > [File Transfer] > [Auto Upload (Proxy)] is set to [On] in the camera menu and a network connection exists, proxy
files are automatically uploaded to the server specified using [Default Upload Server] when recording ends.
5-041-957-11(1)
Copyright 2022 Sony Corporation
244
Help Guide
Interchangeable Lens Digital Camera
ILME-FR7 / ILME-FR7K
Uploading Using Secure FTP
You can upload files with encryption using FTPS in Explicit mode (FTPES) for the connection with the destination file
server.
For secure FTP transfer, set [Using Secure Protocol] to [On] in the destination file server settings and load a certificate.
For details about configuration, see “Registering a File Transfer Destination.”
5-041-957-11(1)
Copyright 2022 Sony Corporation
245
Help Guide
Interchangeable Lens Digital Camera
ILME-FR7 / ILME-FR7K
About Streaming
The unit can simultaneously stream the video and audio that is output from the HDMI connector.
Note
To use streaming as the main video, set [Monitoring] > [Output Display] > [SDI] to [On] and [HDMI/Stream] to [Off] in the web
menu, and monitor the camera status on an SDI monitor.
If a monitor connected to the HDMI connector does not support the HDMI output format configured using the [Monitoring] menu in
the web menu or camera menu, the camera image will not be output to the Web App. Streaming video also cannot be output.
The streaming resolution cannot be set higher than the HDMI output signal resolution.
When viewed by multiple users, the image may become distorted depending on the codec settings.
The unit supports the following streaming methods. The video codecs available for selection are shown in parentheses.
RTSP (H.264, H.265)
SRT-Caller (H.264)
SRT-Listener (H.264)
NDI|HX (H.264, H.265)
Configure the streaming format setting, video codec setting, and audio codec setting in that order.
●: Enabled, –: Disabled
Hint
The image in the Web App camera image panel is also a streaming system.
5-041-957-11(1)
Copyright 2022 Sony Corporation
Streaming format
Codec setting
Video Stream 1 Video Stream 2 Video Stream 3 Audio Stream
RTSP
●
video 1
●
video 2
– ●
SRT ● – – ●
NDI|HX
●
Main
●
Sub
– ●
Web App – – ● –
246

Help Guide
Interchangeable Lens Digital Camera
ILME-FR7 / ILME-FR7K
Setting the Streaming Format
Set the streaming format using [Stream] > [Stream] > [Stream Setting] > [Setting] in the web menu.
When [Setting] is set to [RTSP]
In RTSP streaming, the image from a single camera can be viewed simultaneously by up to five users.
You can set up to two video codec modes.
[Port Number]
Sets the port number to use for RTSP streaming. The default value is 554.
Changing the setting will reboot the RTSP server.
[Time Out]
Specifies the timeout time of the Keep-Alive command for RTSP streaming. The timeout time can be set in the range 0
seconds to 600 seconds. The default value is 60 seconds.
When set to 0 seconds, timeout due to the Keep-Alive command does not occur.
[Authentication]
Sets whether authentication is required.
[Video Port Number 1], [Video Port Number 2]
Specifies the image data communications port number to use for RTSP unicast streaming. The factory default value for
Video Port Number 1 is 51000. The factory default value for Video Port Number 2 is 53000. Specify an even number in
the range 1024 to 65534. The number set here and the subsequent odd number, obtained by adding 1, become the two
port numbers used for image data communications and control.
[Video Port Number 1] and [Video Port Number 2] correspond to [Stream] > [Video Stream] > [Video Stream 1] and
[Video Stream 2].
[Audio Port Number]
Specifies the audio data communications port number used for RTSP unicast streaming. The default value is 57000.
Specify an even number in the range 1024 to 65534. The number set here and the subsequent odd number, obtained by
adding 1, become the two port numbers used for audio data communications and control.
When [Setting] is set to [SRT-Caller] or [SRT-Listener]
The video codec mode is H.264 only.
[Destination]
Displayed when the streaming mode is set to [SRT-Caller]. Sets the connection destination URL.
[Port Number]
Displayed when the streaming mode is set to [SRT-Listener]. Sets the port number on which to listen. The default value
is 4201.
[Latency]
Sets the latency in the range 20 ms to 8000 ms. The default value is 120.
[TTL]
Sets the TTL value in the range 1 to 255. The default value is 64.
[Encryption]
Selects the encryption method. Select Off, AES128, or AES256. The default value is Off.
[Passphrase]
Sets the passphrase used for encryption. Pressing the [Reset] button will reset the configured passphrase.
[ARC]
To enable the Adaptive Rate Control function, set to On.
When the Adaptive Rate Control function is enabled, interruptions in the image caused by communication line
congestion can be reduced.
When [Setting] is set to [NDI|HX]
247

The unit complies with NDI|HX version 2 from NewTek.
To use NDI|HX, a license key must be purchased.
Purchasing a license key
Purchase at the following NewTek URL.
http://new.tk/ndi_sony
Note
Download the latest NDI|HX driver and install it in a NewTek product.
For details about NDI|HX registration and operation, refer to the operating instructions for the NewTek product.
[License]
Displays the license information for an enabled license.
[Source Name]
Displays the source name.
[Group]
To enable the NDI grouping function, set to On.
[Group Name]: Sets the NDI group name. Multiple settings can be configured separated by a comma.
[Discovery Server 1], [Discovery Server 2]
Sets NDI discovery server 1 and NDI discovery server 2.
[Reliable UDP Mode]
To enable Reliable UDP mode, set to On.
[Multicast Mode]
To enable multicast streaming, set to On.
[Multicast Prefix]: Sets the prefix to use for multicast streaming.
[Multicast Netmask]: Sets the netmask that determines the multicast address range.
[Multicast TTL]: Sets the TTL value for multicast streaming in the range 1 to 256. The default value is 3.
[Multi-TCP Mode]
To enable Multi-TCP mode, set to On.
[Unicast UDP Mode]
To enable Unicast UDP mode, set to On.
About 3rd-party services and software
Different terms of use may apply.
The provision of services and software updates may be interrupted or terminated without notice.
The description of services and software is subject to change without notice.
Separate registration and subscription may be required.
Sony will not be liable for any claims made by users or a third party due to the use of services and software of other
companies.
5-041-957-11(1)
Copyright 2022 Sony Corporation
248

Help Guide
Interchangeable Lens Digital Camera
ILME-FR7 / ILME-FR7K
Setting the Video Codec for Streaming
Set the video codec using [Stream] > [Video Stream] in the web menu.
[Video Stream 1], [Video Stream 2], [Video Stream 3]
You can set up to three image codec modes. Configure the following settings separately for each image mode.
[Video Stream 3] is used for the Web App camera image panel display.
Note
When [Stream] > [Stream Setting] > [Setting] is set to [SRT-Caller] or [SRT-Listener], some of the [Video Stream 1], [Video
Stream 2], and [Video Stream 3] settings ([Codec], [Size], [Frame Rate], [Bit Rate Compression Mode]) have default values.
[Codec 1], [Codec 2], [Codec 3]
Select [H.264], [H.265], or [Off]. Note that [Codec 1] cannot be set to [Off]. Also, [Codec 3] is set to [JPEG] (fixed).
Note
The following symptoms may occur depending on the combination of various settings, such as the picture size, frame rate, and
bit rate of [Codec 1], [Codec 2], and [Codec 3].
Increased video latency.
Frame skipping during video playback.
Intermittent audio.
Slow camera response to various commands.
Slow camera response to operations from a remote controller.
Slow monitor screen display and configuration operations.
If you experience these symptoms, reduce the values of the picture size, frame rate, and bit rate parameters, or change the
values of other setup parameters to resolve the issue.
When [Stream] > [Stream Setting] > [Setting] is set to [SRT-Caller] or [SRT-Listener], [Codec 1] is set to [H.264] (fixed). [Codec 2]
is set to [Off] (fixed).
When the picture size or system frequency of the HDMI output is changed, [Codec 2] is set to [Off].
[Size 1], [Size 2], [Size 3]
Selects the picture size to stream from the camera.
The available picture size options will vary depending on the picture size of the HDMI output.
Note
When the picture size or system frequency of the HDMI output is changed, the maximum picture size will be selected.
[Frame Rate 1], [Frame Rate 2], [Frame Rate 3]
Sets the frame rate of the image.
“fps” units indicate the number of frames streamed per second.
The available frame rate options will vary depending on the picture size of the HDMI output.
Note
When the picture size or system frequency of the HDMI output is changed, the maximum frame rate will be selected.
249

[I-Picture Mode 1], [I-Picture Mode 2]
Sets the method for specifying the I-picture insertion interval for H.264 and H.265 to [Time] or [Frame].
Cannot be set for [Codec 3].
[Time]: Sets the I-picture insertion interval as a time.
[Frame]: Sets the I-picture insertion interval as a number of frames.
[I-Picture Interval 1], [I-Picture Interval 2]
Sets the I-picture insertion interval in units of seconds. Sets a value in the range 1 second to 5 seconds. The default
value is 1 second.
Cannot be set for [Codec 3].
[I-Picture Ratio 1], [I-Picture Ratio 2]
Sets the I-picture insertion interval for H.264 and H.265 as a number of frames in the range 15 to 300. The default value
is 300 frames.
Cannot be set for [Codec 3].
[Profile 1], [Profile 2]
Sets the H.264 or H.265 image codec profile.
[H.264]: Select [high], [main], or [baseline] profile.
[H.265]: Select [main] or [main10] profile. When two video codecs are enabled, only the [main] profile selection option is
available.
Image compression efficiency increases in the order of [high], [main], and [baseline]. Select a profile supported by your
system.
When [H.265] is set to [main10], operation is in [main10] when the HDMI output is YCrCb or [main] when the HDMI
output is RGB.
Cannot be set for [Codec 3].
[Bit Rate Compression Mode 1], [Bit Rate Compression Mode 2]
Select [CBR] or [VBR].
To maintain a constant bit rate, select [CBR]. To maintain image quality, select [VBR].
Cannot be set for [Codec 3].
Note
The frame rate and bit rate actually streamed may differ from the set values, depending on the picture size, shooting scene,
network environment, and other factors.
When [Stream] > [Stream Setting] > [Setting] is set to [SRT-Caller] or [SRT-Listener], [Bit Rate Compression Mode 1] is set to
[CBR] (fixed).
[Bit Rate 1], [Bit Rate 2]
You can set the bit rate per video stream when [Bit Rate Compression Mode] is set to [CBR]. Setting a high bit rate
allows you to stream high image quality video.
Cannot be set for [
Codec 3].
[Quality 1], [Quality 2], [Quality 3]
Sets the image quality in the range 1 to 10. A value of 10 sets the highest image quality. The default value is 6.
For [Quality 1] and [Quality 2], you can set H.264 image quality by setting [Bit Rate Compression Mode] to [VBR] and
[Codec] to [H.264]. You can set H.265 image quality by setting [Bit Rate Compression Mode] to [VBR] and [Codec] to
[H.265].
5-041-957-11(1)
Copyright 2022 Sony Corporation
250

Help Guide
Interchangeable Lens Digital Camera
ILME-FR7 / ILME-FR7K
Setting the Audio Codec for Streaming
Set the audio codec using [Stream] > [Audio Stream] in the web menu.
[Setting]
To enable audio streaming, set to On.
[Codec]
Selects the type of codec to use for streaming audio.
[AAC (256kbps)]: Select to prioritize the sound quality.
[AAC (128kbps)]: Select to prioritize the data capacity.
This setting has no affect on the clip recorded by the unit or the audio signal embedded in the HDMI/SDI signal.
5-041-957-11(1)
Copyright 2022 Sony Corporation
251

Help Guide
Interchangeable Lens Digital Camera
ILME-FR7 / ILME-FR7K
Starting/Stopping Streaming
For [RTSP], [SRT-Listener], and [NDI|HX]
The unit waits for a streaming delivery request.
Launch a client app for viewing streaming and access the URL shown in the following table.
Enter the values for the user name and password that are configured on the unit.
<camera_address>: IP address of the unit
<Port>: Listener port configured using [Port Number]
RTSP streaming example
Up to two streams can be enabled on the unit. The URL of each stream is shown below.
rtsp://<camera_address>:<Port>/video1 ([Video Stream 1])
rtsp://<camera_address>:<Port>/video2 ([Video Stream 2])
Note
Playback in all applications or devices is not guaranteed.
For [SRT-Caller]
Press the [Stream now] button on the
(Stream) tab of the live operation screen to start streaming. The button label
changes to [Stop stream], and the [Stream] icon appears at the top of the camera image panel.
Press the [Stop stream] button during streaming to stop streaming. The button label changes back to [Stream now], and
the [Stream] icon at the top of the camera image panel disappears.
SRT-Listener streaming example
The URL of the stream is shown below.
srt://<camera_address>:<Port>
<camera_address>: IP address of the unit
<Port>: Listener port configured using [Port Number]
Note
Playback in all applications or devices is not guaranteed.
5-041-957-11(1)
Copyright 2022 Sony Corporation
Streaming format URL
RTSP
Video Stream 1 rtsp://<camera_address>:<Port>/video1
Video Stream 2 rtsp://<camera_address>:<Port>/video2
SRT-Listener srt://<camera_address>:<Port>
NDI|HX Refer to the operating instructions for the NDI|HX compatible client device.
252

253
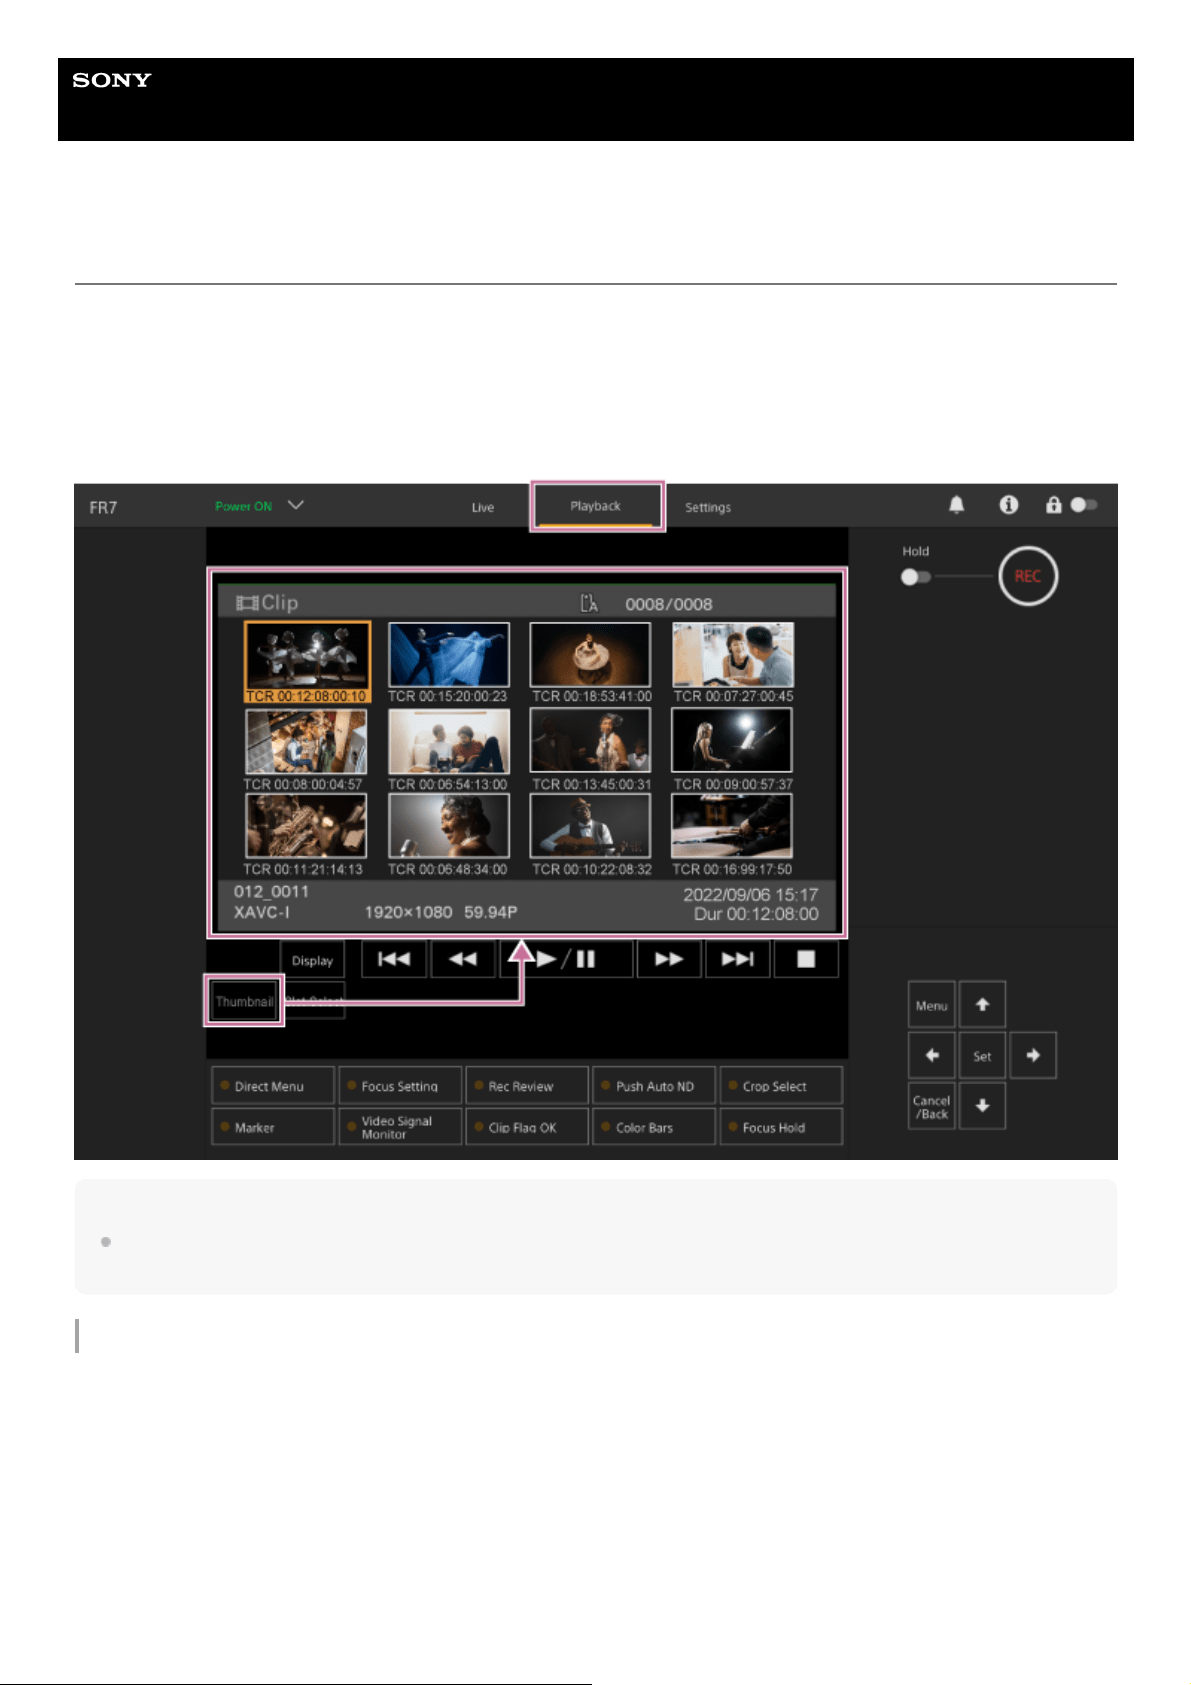
Help Guide
Interchangeable Lens Digital Camera
ILME-FR7 / ILME-FR7K
Thumbnail Screen
When you press the [Thumbnail] button on the playback operation screen or the THUMBNAIL button on the infrared
remote control, clips recorded on the memory card are displayed in the camera image panel. This display on the camera
image panel is referred to as the thumbnail screen.
You can select a clip on the thumbnail screen and start playback of that clip.
Pressing the [Thumbnail] button during thumbnail screen display closes the thumbnail screen and returns to the shooting
image display.
Note
Only the clips recorded in the currently selected recording format are displayed on the thumbnail screen. If an expected recorded
clip is not displayed, check the recording format. Take special note of this fact before formatting (initializing) media.
Screen layout
The thumbnail of a selected clip is displayed with an orange background.
Information for the selected clip is displayed at the bottom of the screen.
254
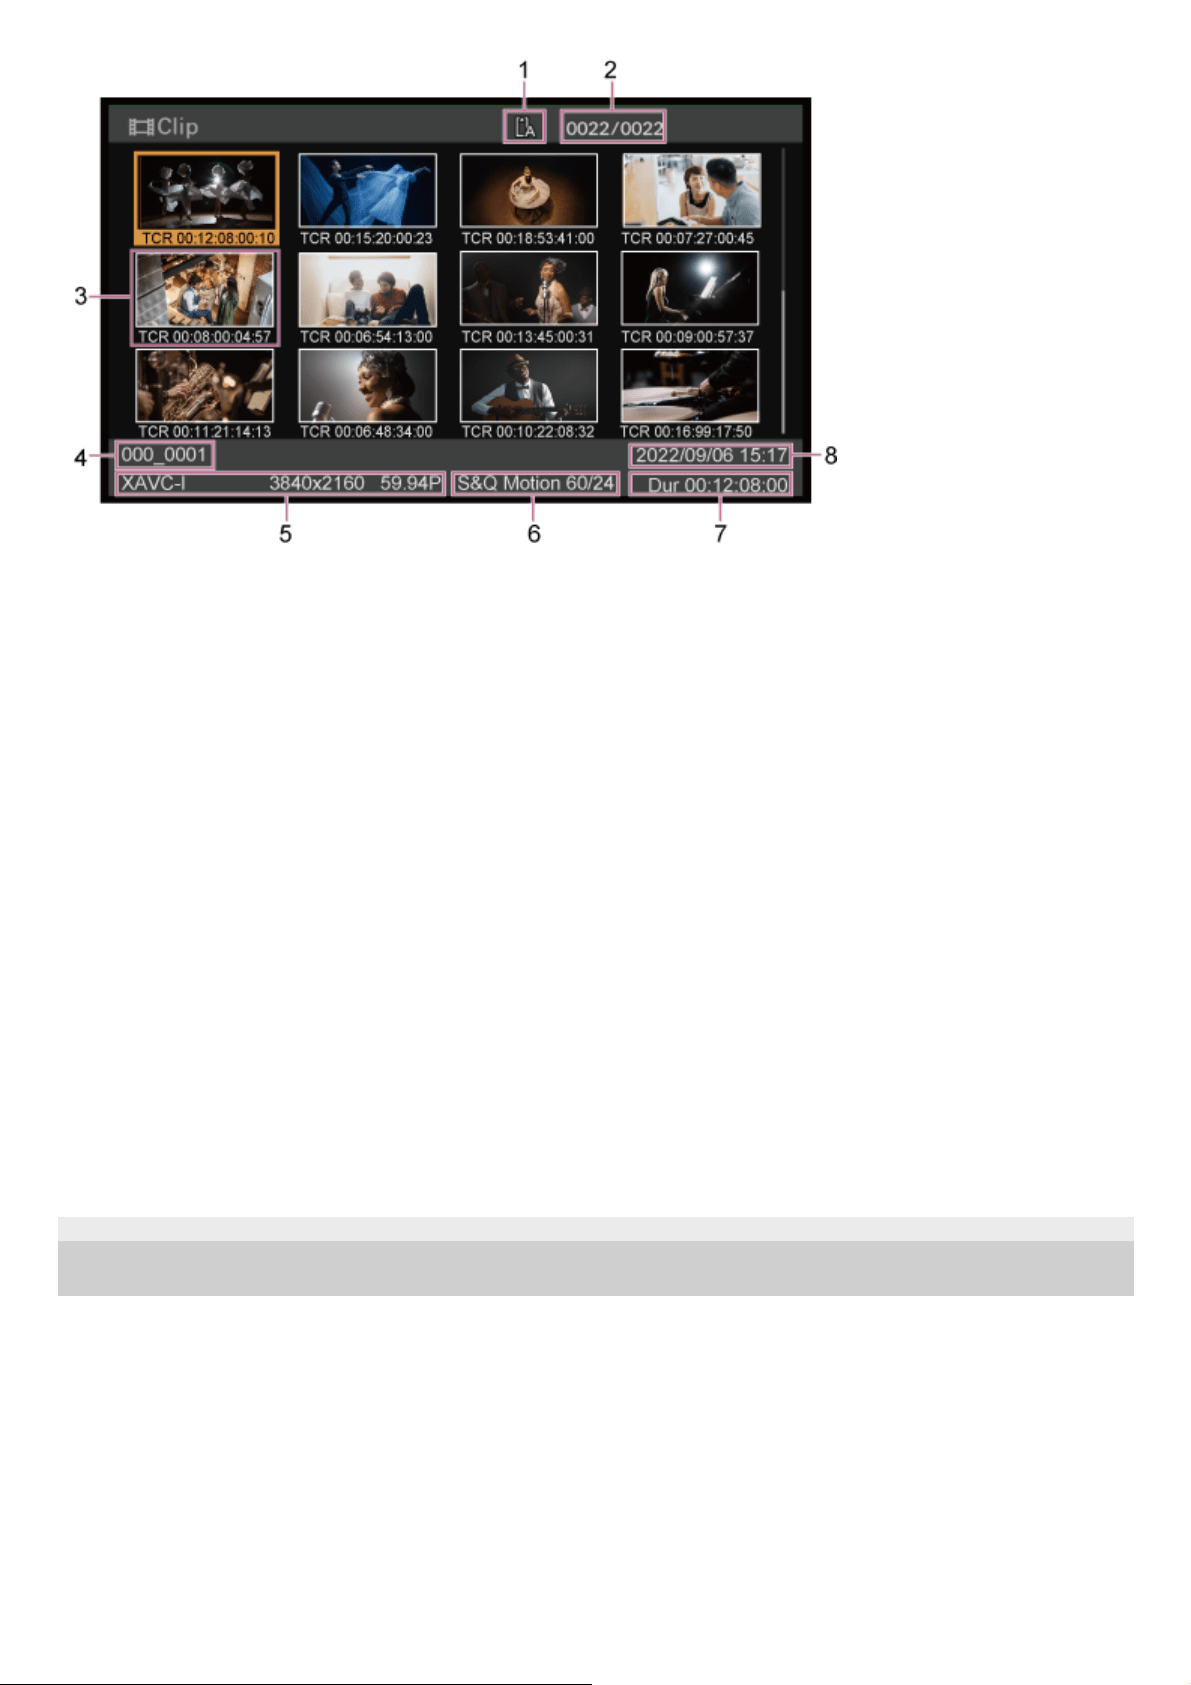
5-041-957-11(1) Copyright 2022 Sony Corporation
Selected memory card
A lock icon appears on the right if the memory card is write-protected.
1.
Clip number/total number of clips2.
Thumbnail (index picture)
Displays the index picture of a clip. When a clip is recorded, its first frame is automatically set as the index picture.
Clip/frame information is displayed below the thumbnail. You can change the information displayed using [Thumbnail]
> [Customize View] > [Thumbnail Caption] in the camera menu.
3.
Clip name
Displays the name of the selected clip.
4.
Recording format
Displays the file format of the selected clip.
5.
Special recording information
Displays the recording mode only if the clip was recorded using a special recording mode.
For Slow & Quick Motion clips, the frame rate is displayed on the right.
6.
Clip duration7.
Creation date8.
255
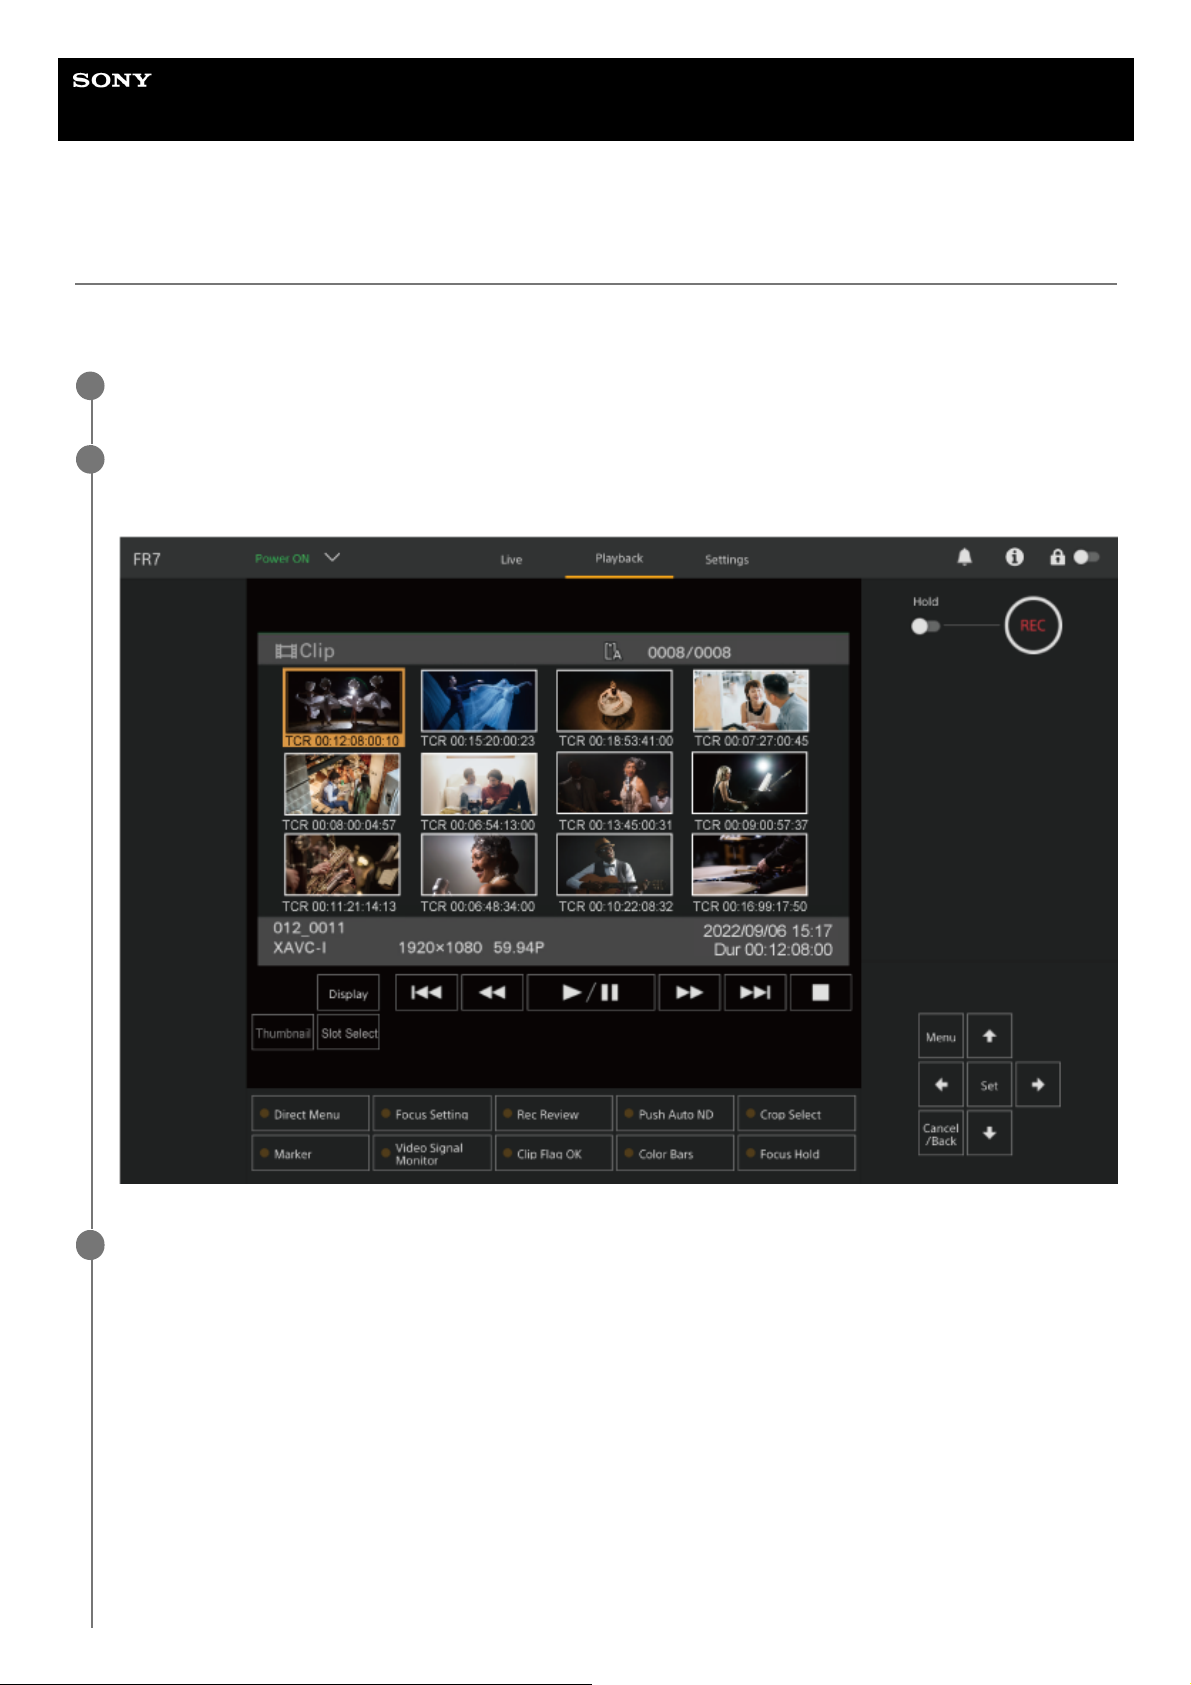
Help Guide
Interchangeable Lens Digital Camera
ILME-FR7 / ILME-FR7K
Playing Recorded Clips
You can play recorded clips when the unit is in recording standby (Stby) mode.
This topic describes how to play recorded clips using the GUI control panel.
Insert the memory card to play.
1
Press the [Thumbnail] button.
The clip thumbnails appear.
2
Use the arrow buttons in the GUI control panel to move the cursor to the thumbnail for the clip you want to
play.
3
256
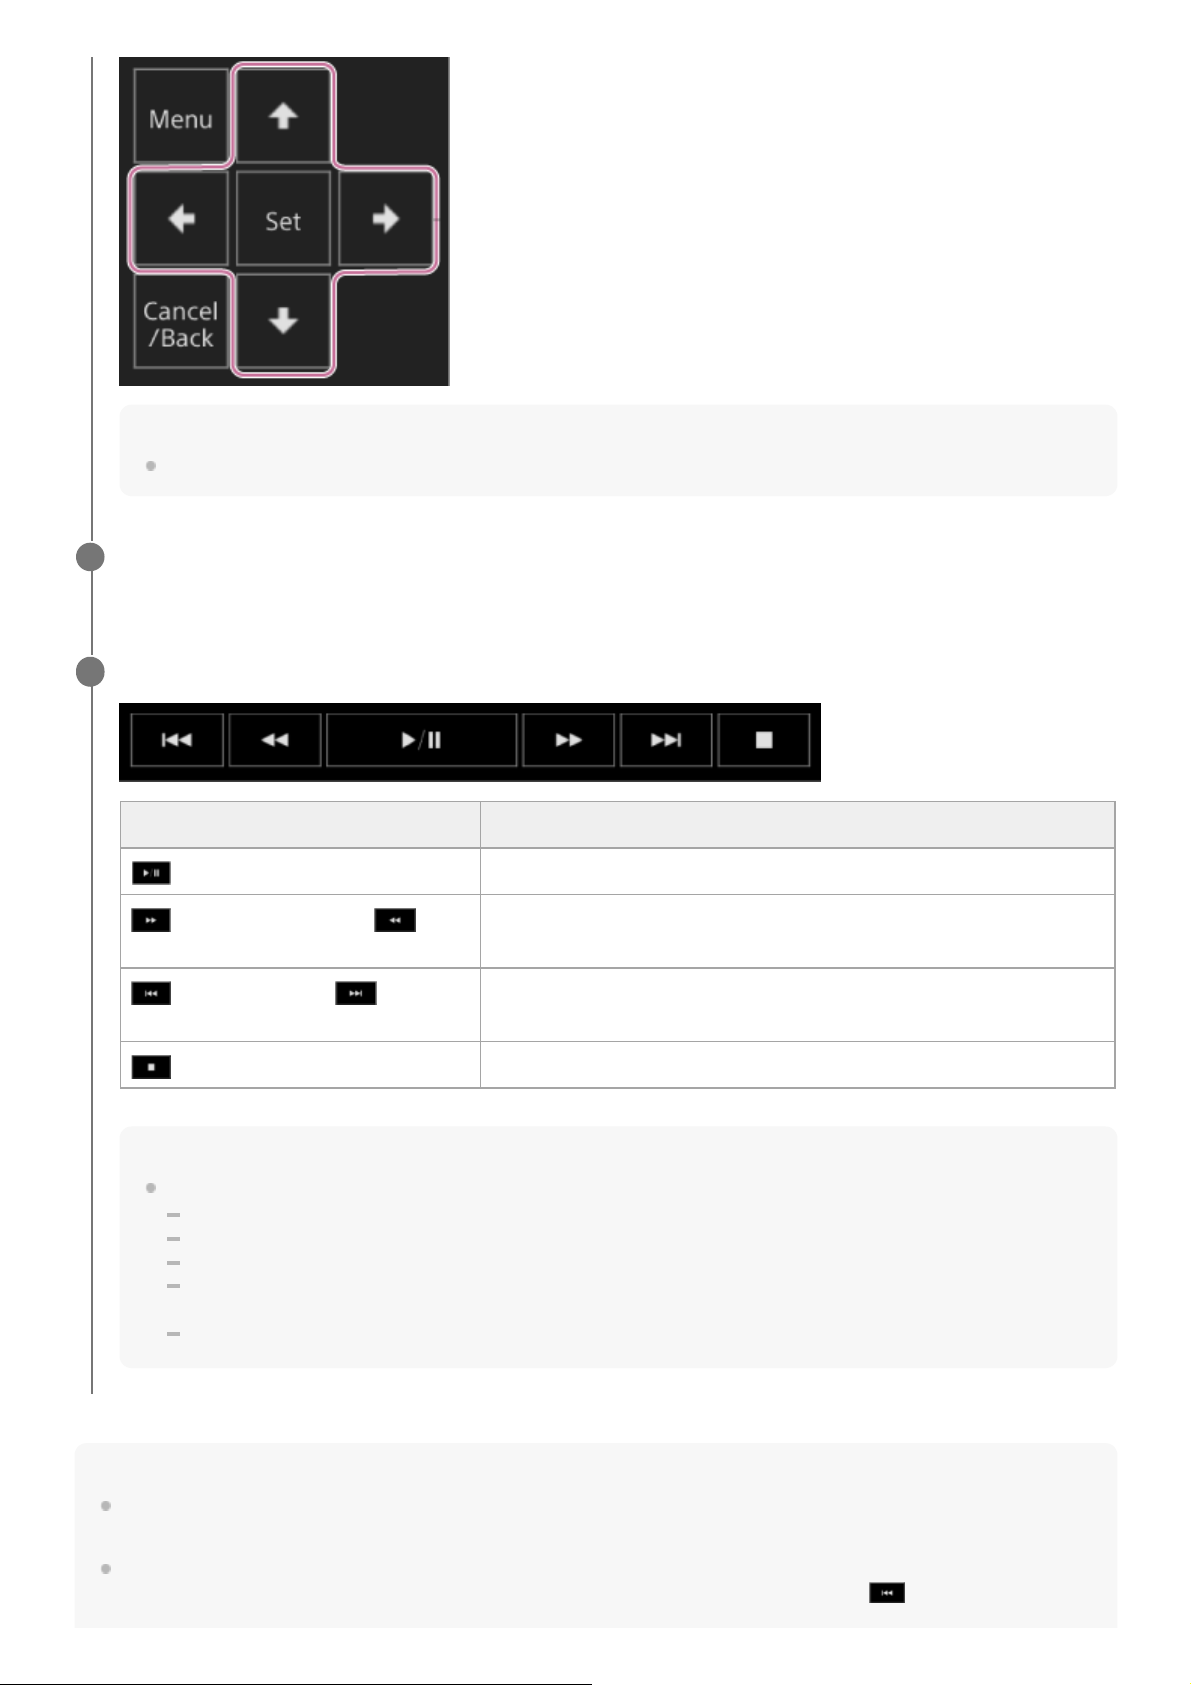
Note
There may be momentary picture breakup or still image display at the boundary between clips. You cannot operate the unit
during this period.
When you select a clip in the thumbnail screen and begin playback, there may be momentary picture breakup at the start of the
clip. To view the start of the clip without breakup, put the unit into playback mode, pause, press the
(Previous) button to
return to the start of the clip, and start playback again.
Note
Clips cannot be selected by touch operation.
Press the [Set] button in the GUI control panel.
Playback begins from the start of the selected clip.
4
Operate the playback control panel as required.
Hint
You can also control operation using the GUI control panel.
Play: Press the [Set] button.
Playback pause: Press the [Set] button during playback. Press again to return to normal playback.
Jump to start of clip/start of next clip: Press the left button/right button.
Fast forward/reverse: Press and hold the left button/right button. The playback returns to normal speed when you release
the button.
Stop playback: Press the [Cancel/Back] button.
5
Button Function
(Play/Pause) button Plays a clip. During playback, pauses the clip.
(Fast Forward) button, (Fast
Reverse) button
Plays a clip at high speed. When the button is pressed, the playback
speed changes in three steps.
(Previous) button, (Next)
button
Jumps to start of clip or the previous/next clip.
(Stop) button Stops playback.
257

5-041-957-11(1) Copyright 2022 Sony Corporation
258

Help Guide
Interchangeable Lens Digital Camera
ILME-FR7 / ILME-FR7K
Operations on Recorded Clips
On the thumbnail screen, you can operate the clips or check clip properties using the [Thumbnail] menu in the camera
menu.
Press the [Menu] button on the playback operation screen to display the camera menu in the camera image panel.
You can perform the following operations using the [Thumbnail] menu in the camera menu.
259

Hint
You can also press the [Menu] button on the live operation screen to display the camera menu.
Operations using the [Thumbnail] menu in the camera menu
260
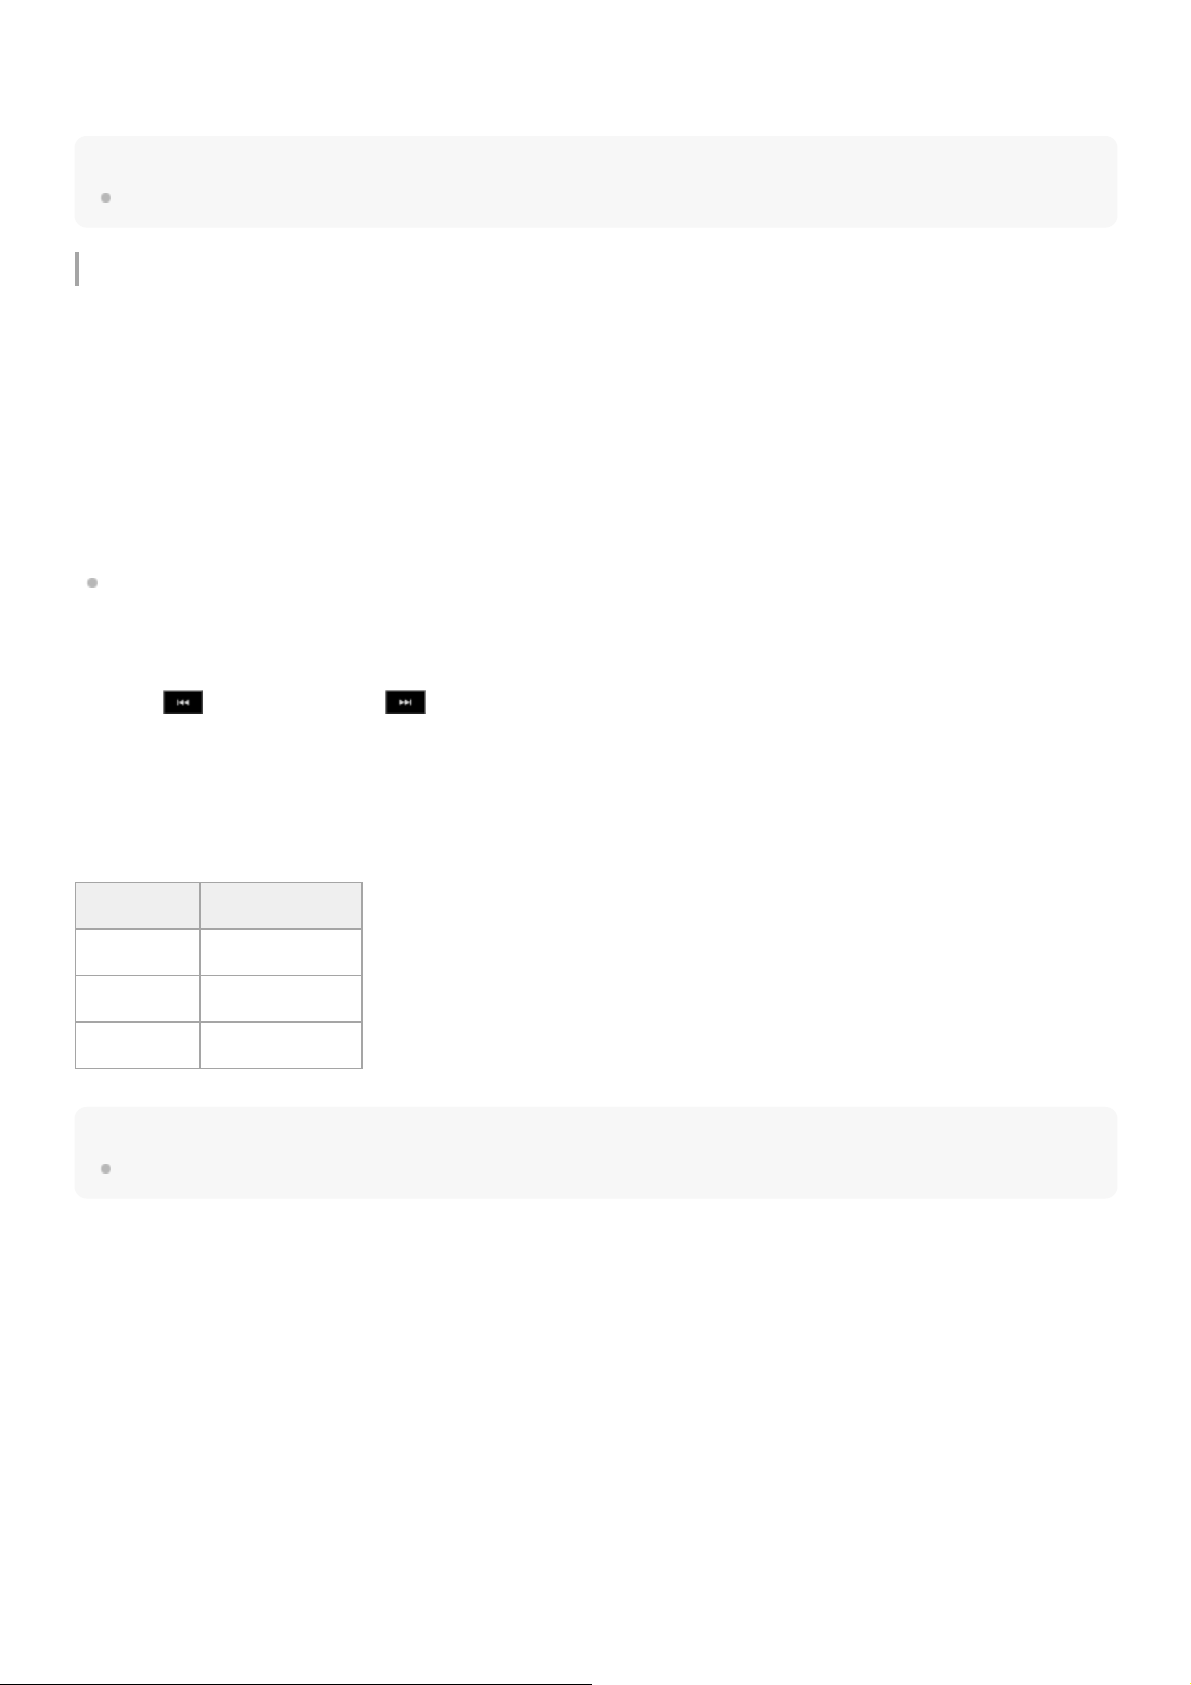
Select a function to operate using the arrow buttons in the GUI control panel and press the [Set] button.
Press the [Cancel/Back] button to return to the previous screen.
Note
Some items cannot be selected, depending on the state when the menu was displayed.
Menu items for clip operations
The [Thumbnail] menu in the camera menu has the following menu items related to clip operations.
[Display Clip Properties]
[Set Clip Flag]
[Lock/Unlock Clip]
[Delete Clip]
[Transfer Clip]
[Transfer Clip (Proxy)]
[Filter Clips]
[Customize View]
For details about each menu item, see the “[Thumbnail] menu.”
To display the clip properties screen
Select [Thumbnail] > [Display Clip Properties] in the camera menu to display the clip properties screen.
Press the
(Previous) button or (Next) button to jump to the previous/next clip.
To add clip flags
You can add clip flags (OK, NG, or KP marks) to clips to filter the display of clips based on the clip flags.
Select the thumbnail for the clip to which you want to add a clip flag, then select the clip flag using [Thumbnail]] > [Set
Clip Flag] in the camera menu.
Hint
You can also use an assignable button assigned with the clip flag function to add clip flags.
To display the filtered clip thumbnail screen
Select [Thumbnail] > [Filter Clips] in the camera menu, and select a clip flag type to display only those clips that have the
specified flag.
To display all clips, select [All].
You can also press the [Display] button to sort the thumbnail display by flags.
To delete clips
You can delete clips from memory cards.
Select [Thumbnail] > [Delete Clip] > [Select Clip] or [All Clips] in the camera menu.
[Select Clip]: Deletes the selected clip. Multiple clip selection is supported.
[All Clips]: Deletes all of the displayed clips.
To change the information displayed on the thumbnail screen
Setting Added clip flag
[Add OK] OK
[Add NG] NG
[Add KEEP] KP
261

You can change the clip/frame information displayed below the thumbnail.
Select [Thumbnail] > [Customize View] > [Thumbnail Caption] in the camera menu, and select the information to display.
[Date Time]: Displays the date and time the clip was created and last modified.
[Time Code]: Displays the timecode.
[Duration]: Displays the duration of the clip.
[Sequential Number]: Displays a sequential number on each thumbnail.
5-041-957-11(1)
Copyright 2022 Sony Corporation
262
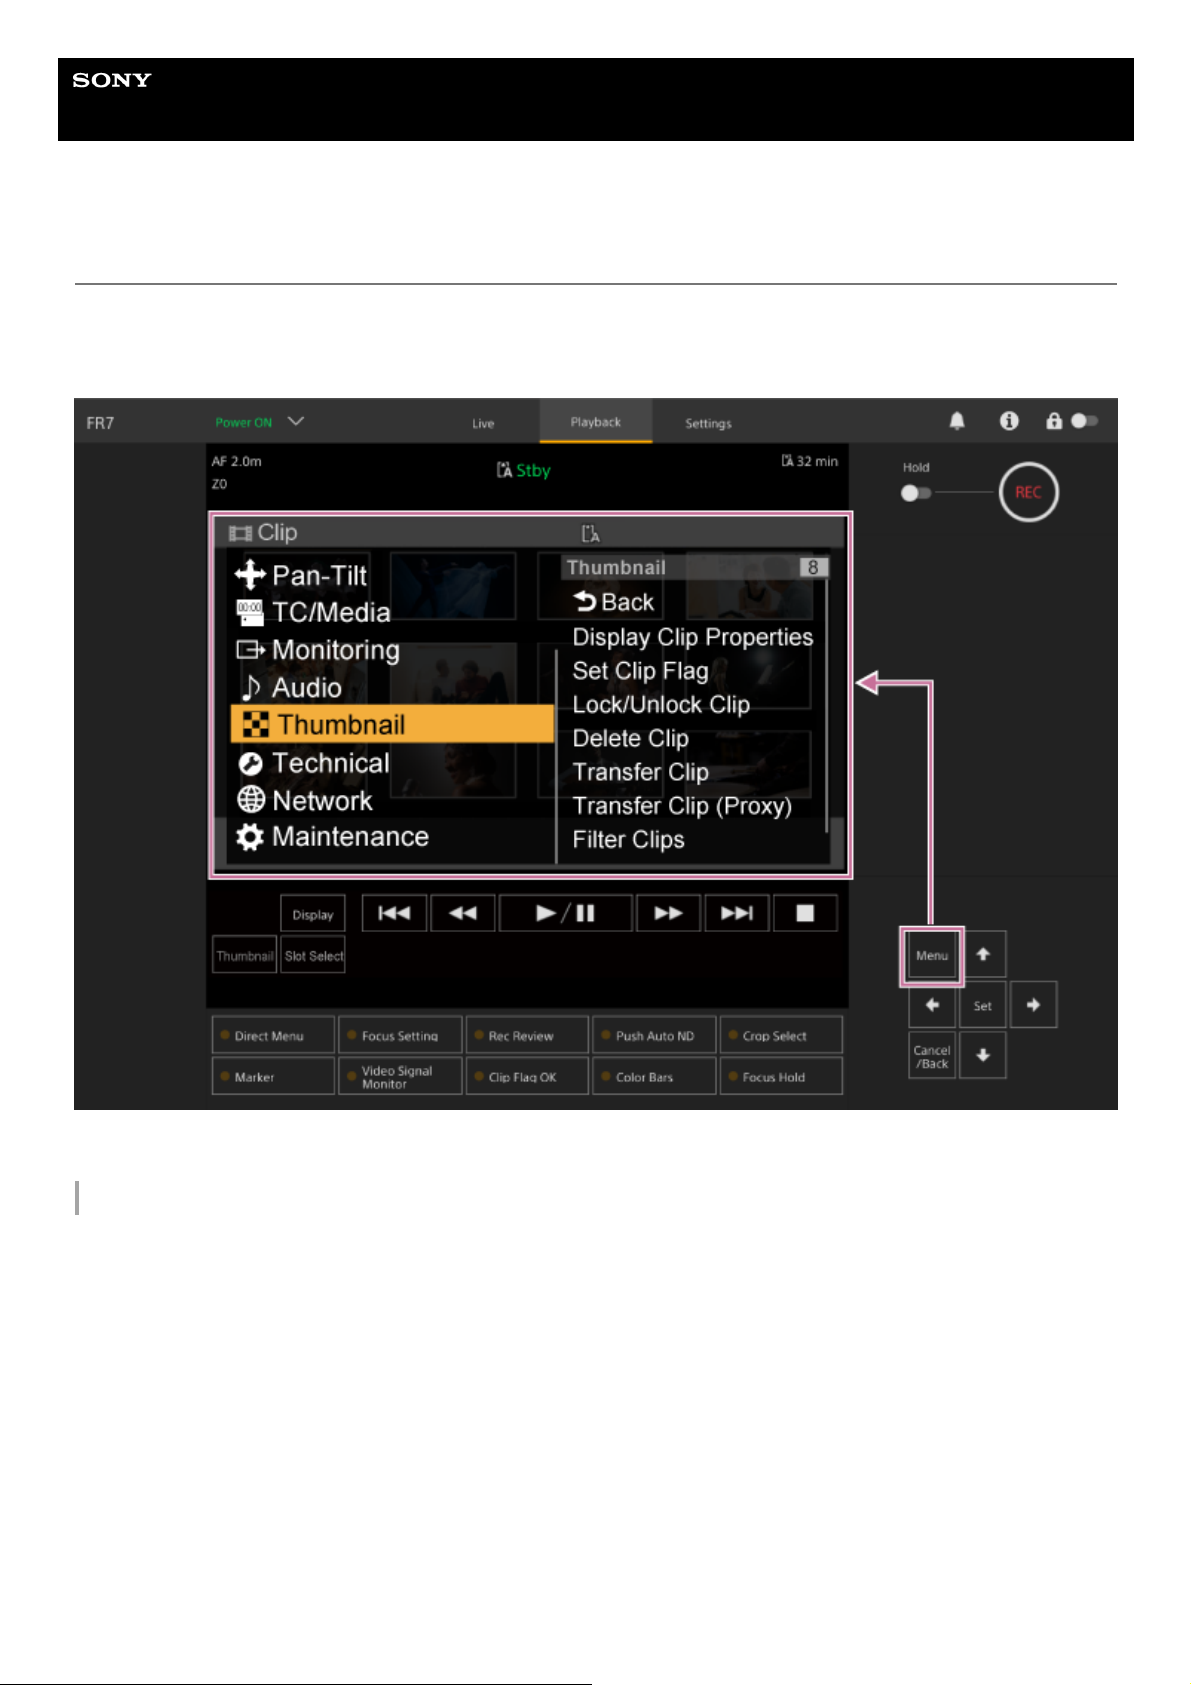
Help Guide
Interchangeable Lens Digital Camera
ILME-FR7 / ILME-FR7K
Camera Menu Configuration
When the [Menu] button in the GUI control panel or the MENU button on the infrared remote control is pressed, the
camera menu for configuring the various required settings for shooting and playback is displayed in the camera image
panel.
The menu comprises the following menus.
Menu configuration
[User] menu
Contains menu items configured by the user.
Can be edited using [Edit User Menu].
[Edit User] menu
Contains menu items for editing the [User] menu.
[Shooting] menu
Contains settings related to shooting.
[Project] menu
Contains basic project settings.
[Paint/Look] menu
Contains settings related to image quality.
[Pan-Tilt] menu
Contains settings related to the pan/tilt.
[TC/Media] menu
263
Contains settings related to timecodes and recording media.
[Monitoring] menu
Contains settings related to video output and the screen display.
[Audio] menu
Contains settings related to audio.
[Thumbnail] menu
Contains settings related to thumbnail display.
[Technical] menu
Contains settings for technical items.
[Network] menu
Contains settings related to networks.
[Maintenance] menu
Contains devices settings, such as the clock and language.
Camera menu configuration and hierarchy
Level 1 Level 2
User
(Factory settings)
Base Setting
Focus
S&Q Motion
LUT On/Off
Simul Rec
Proxy Rec
Interval Rec
Picture Cache Rec
Assignable Button
Scene File
Base Look
P/T Acceleration
Clip Name Format
Format Media
Video Signal Monitor
Marker
Zoom
Lens
Edit User Menu
Shooting ISO/Gain/EI
ND Filter
Shutter
Iris
264

Level 1 Level 2
Auto Exposure
White
White Setting
Offset White
Focus
S&Q Motion
LUT On/Off
Noise Suppression
Flicker Reduce
SteadyShot
Project
Base Setting
Rec Format
Cine EI Setting
Simul Rec
Proxy Rec
Interval Rec
Picture Cache Rec
SDI/HDMI Rec Control
Assignable Button
Paint/Look
Scene File
Base Look
Reset Paint Settings
Black
Knee
Detail
Matrix
Multi Matrix
Pan-Tilt P/T Acceleration
TC/Media Timecode
TC Display
Users Bit
HDMI TC Out
265
5-041-957-11(1) Copyright 2022 Sony Corporation
Level 1 Level 2
Clip Name Format
Update Media
Format Media
Media Life
Monitoring
Output Format
Display On/Off
Video Signal Monitor
Marker
Audio
Audio Input
Audio Output
Thumbnail
Display Clip Properties
Set Clip Flag
Lock/Unlock Clip
Delete Clip
Transfer Clip
Transfer Clip (Proxy)
Filter Clips
Customize View
Technical
Color Bars
Genlock
Tally
Rec Review
Zoom
Lens
APR
Network
Wired LAN
File Transfer
Maintenance
Language
Clock Set
Hours Meter
266

267
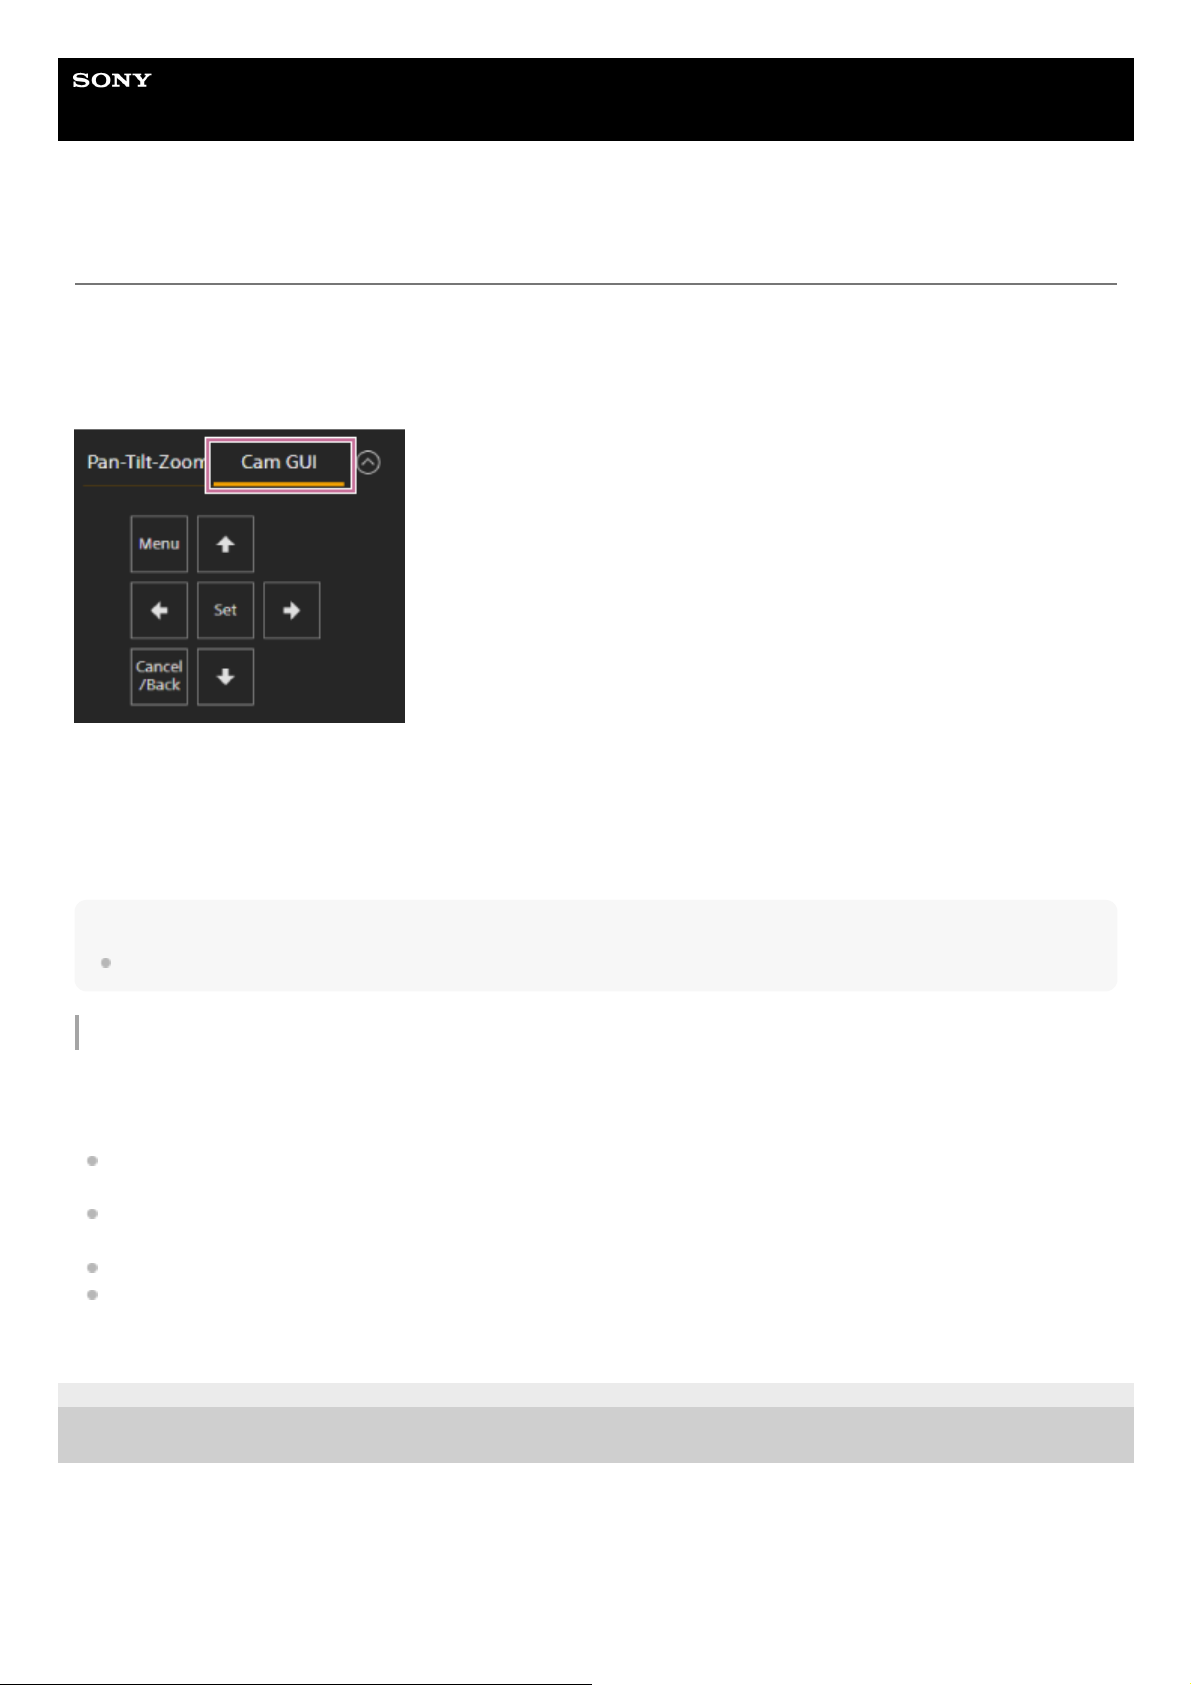
Help Guide
Interchangeable Lens Digital Camera
ILME-FR7 / ILME-FR7K
Operating the Camera Menu
When the [Menu] button in the GUI control panel or the MENU button on the infrared remote control is pressed, the
camera menu for configuring the various required settings for shooting and playback is displayed in the camera image
panel.
The menu is operated using buttons in the GUI control panel.
[Menu] button: Press to display the camera menu. Press again while the camera menu is displayed to hide the menu.
Arrow buttons: Press the arrows buttons to move the cursor up/down/left/right in the camera menu to select menu
items or settings.
[Set] button: Press to apply the selected item.
[Cancel/Back] button: Press to return to the previous menu. An uncompleted change is canceled.
Note
Some items cannot be selected, depending on the state when the menu was displayed.
Setting Menu Items
Move the cursor to the item you want to set using the arrow buttons in the GUI control panel and press the [Set] button to
apply the setting.
The menu item selection area displays up to eight lines. If the available options for an item cannot be displayed at the
same time, scroll the display by moving the cursor up/down.
For sub-items with a large settings range (for example, −99 to +99), the settings area is not displayed. The current
setting is highlighted to indicate that the value can be changed.
Selecting [Execute] for a function will execute the corresponding function.
Selecting an item that requires confirmation before execution will temporarily hide the menu and display a
confirmation message. Check the message, and then select whether to execute or cancel the function.
5-041-957-11(1)
Copyright 2022 Sony Corporation
268

Help Guide
Interchangeable Lens Digital Camera
ILME-FR7 / ILME-FR7K
Entering a Character String
When you select an item, such as a file name, which requires character entry, the character entry screen appears.
5-041-957-11(1) Copyright 2022 Sony Corporation
Press the arrow buttons in the GUI control panel to select the character type and apply the setting.
[ABC]: Uppercase alphabetic characters
[abc]: Lowercase alphabetic characters
[123]: Numeric characters
[!#$]: Special characters
1
Select a character and press the [Set] button to apply the setting.
The cursor moves to the next field.
[Space]: Enters a space character at the cursor position.
[←] [→]: Moves the position of the cursor.
[BS]: Deletes the character on the left of the cursor (backspace).
2
When finished, press the [Done] button to apply the setting.
The character string is confirmed and the character entry screen disappears.
3
269
Help Guide
Interchangeable Lens Digital Camera
ILME-FR7 / ILME-FR7K
User
This topic describes the function and settings of each menu item.
Note
You can add and remove menu items in the [User] menu using the [Edit User] menu. Up to 20 items can be configured.
5-041-957-11(1)
Copyright 2022 Sony Corporation
Item Description
Base Setting Project > Base Setting item
Focus Shooting > Focus item
S&Q Motion Shooting > S&Q Motion item
LUT On/Off Shooting > LUT On/Off item
Simul Rec Project > Simul Rec item
Proxy Rec Project > Proxy Rec item
Interval Rec Project > Interval Rec item
Picture Cache Rec Project > Picture Cache Rec item
Assignable Button Project > Assignable Button item
Scene File Project > Scene File item
Base Look Paint/Look > Base Look item
P/T Acceleration Pan-Tilt > P/T Acceleration item
Clip Name Format TC/Media > Clip Name Format item
Format Media TC/Media > Format Media item
Video Signal Monitor Monitoring > Video Signal Monitor item
Marker Monitoring > Marker item
Zoom Technical > Zoom item
Lens Technical > Lens item
Edit User Menu Displays the Edit User menu.
270
Help Guide
Interchangeable Lens Digital Camera
ILME-FR7 / ILME-FR7K
Edit User
The [Edit User] menu is displayed at the top level when [Edit User Menu] is selected in the [User] menu.
5-041-957-11(1)
Copyright 2022 Sony Corporation
Item
Sub-item
setting
Factory
default
Description
Add Item
Add an item to the [User]
menu
– – Adds a level 2 menu item to the [User] menu.
Customize Reset
Reset the items in the [User]
menu
– –
Restores the menu items registered in the [User] menu
to the factory default.
Level 2 menu item selected
during editing
Delete –
Deletes the registered level 2 menu item from the [User]
menu.
Move –
Rearranges the registered menu items within the [User]
menu.
Edit Sub
Item
–
Edits (register/delete) the registered level 3 menu sub-
item in the [User] menu.
271
Help Guide
Interchangeable Lens Digital Camera
ILME-FR7 / ILME-FR7K
ISO/Gain/EI
Sets gain settings.
Item Sub-item setting Factory default Description
Mode ISO/dB dB
Selects the gain setting
mode.
ISO/Gain<L>
For details about settings, see
“ISO/Gain Settings and Default
Values.”
–
Sets the <L> gain preset
value.
Exposure
Index<L>
When Base ISO is set to ISO 800:
200EI / 4.0E
250EI / 4.3E
320EI / 4.7E
400EI / 5.0E
500EI / 5.3E
640EI / 5.7E
800EI / 6.0E
1000EI / 6.3E
1250EI / 6.7E
1600EI / 7.0E
2000EI / 7.3E
2500EI / 7.7E
3200EI / 8.0E
When Base ISO is set to ISO 12800:
3200EI / 4.0E
4000EI / 4.3E
5000EI / 4.7E
6400EI / 5.0E
8000EI / 5.3E
10000EI / 5.7E
12800EI / 6.0E
16000EI / 6.3E
20000EI / 6.7E
25600EI / 7.0E
32000EI / 7.3E
40000EI / 7.7E
51200EI / 8.0E
When Base ISO is set to
ISO 800: 800EI / 6.0E
When Base ISO is set to
ISO 12800: 12800EI / 6.0E
Sets the Exposure
Index<L> value.
Shockless
Gain
On / Off Off
Turns the shockless gain
function on/off.
Base
Sensitivity
High / Low Low
Sets the base sensitivity
for Custom mode.
Base ISO ISO 12800 / ISO 800 ISO 800
Sets the base ISO
sensitivity for Cine EI
mode.
272

5-041-957-11(1) Copyright 2022 Sony Corporation
273
Help Guide
Interchangeable Lens Digital Camera
ILME-FR7 / ILME-FR7K
ND Filter
Sets the preset values for the ND filter.
5-041-957-11(1)
Copyright 2022 Sony Corporation
Item Sub-item setting Factory default Description
Mode Preset / Variable Variable Selects the ND filter mode.
Preset1 1/4 / 1/8 / 1/16 / 1/32 / 1/64 / 1/128 1/4 Sets the preset 1 value for the ND filter.
Preset2 1/4 / 1/8 / 1/16 / 1/32 / 1/64 / 1/128 1/16 Sets the preset 2 value for the ND filter.
Preset3 1/4 / 1/8 / 1/16 / 1/32 / 1/64 / 1/128 1/64 Sets the preset 3 value for the ND filter.
274

Help Guide
Interchangeable Lens Digital Camera
ILME-FR7 / ILME-FR7K
Shutter
Sets electronic shutter operation.
Item Sub-item setting
Factory
default
Description
Mode Speed / Angle Speed
Selects the operating mode
of the electronic shutter.
Speed: Mode for setting
the shutter speed in units
of seconds. Select for
shooting fast-moving
subjects clearly.
Angle: Mode for setting the
shutter speed as a shutter
angle.
Shutter
Speed
On/Off
On / Off Off
Sets whether the exposure
time when Speed mode is
selected follows the
[Shutter Speed] value or is
set for full exposure.
Shutter
Speed
64F to 1/8000
The available settings vary depending on the frame
frequency of the selected video format.
59.94P: 64F / 32F / 16F / 8F / 7F / 6F / 5F / 4F / 3F / 2F /
1/50 / 1/60 / 1/100 / 1/120 / 1/125 / 1/250 / 1/500 / 1/1000 /
1/2000 / 1/4000 / 1/8000
50P: 64F / 32F / 16F / 8F / 7F / 6F / 5F / 4F / 3F / 2F / 1/50
/ 1/60 / 1/100 / 1/120 / 1/125 / 1/250 / 1/500 / 1/1000 /
1/2000 / 1/4000 / 1/8000
29.97P: 64F / 32F / 16F / 8F / 7F / 6F / 5F / 4F / 3F / 2F /
1/30 / 1/40 / 1/50 / 1/60 / 1/100 / 1/120 / 1/125 / 1/250 /
1/500 / 1/1000 / 1/2000 / 1/4000 / 1/8000
25P: 64F / 32F / 16F / 8F / 7F / 6F / 5F / 4F / 3F / 2F / 1/25
/ 1/33 / 1/50 / 1/60 / 1/100 / 1/120 / 1/125 / 1/250 / 1/500 /
1/1000 / 1/2000 / 1/4000 / 1/8000
24P/23.98P: 64F / 32F / 16F / 8F / 7F / 6F / 5F / 4F / 3F /
2F / 1/24 / 1/32 / 1/48 / 1/50 / 1/60 / 1/96 / 1/100 / 1/120 /
1/125 / 1/250 / 1/500 / 1/1000 / 1/2000 / 1/4000 / 1/8000
59.94P:
1/60
50P: 1/50
29.97P:
1/30
25P: 1/25
24P/23.98P:
1/24
Sets the shutter speed
when Speed mode is
selected.
Shutter
Angle
64F / 32F / 16F / 8F / 7F / 6F / 5F / 4F / 3F / 2F / 360.0° /
300.0° / 270.0° / 240.0° / 216.0° / 210.0° / 180.0° / 172.8° /
150.0° / 144.0° / 120.0° / 90.0° / 86.4° / 72.0° / 45.0° / 30.0°
/ 22.5° / 11.25° / 5.6°
180.0°
Sets the shutter angle
when Angle mode is
selected.
ECS
On/Off
On / Off Off
Turns the Extended Clear
Scan function on/off.
275

5-041-957-11(1) Copyright 2022 Sony Corporation
Item Sub-item setting
Factory
default
Description
ECS
Frequency
23.99 to 8000
The available settings vary depending on the frame
frequency of the selected recording format.
59.94P:
60.00
50P: 50.00
29.97P:
30.00
23.98P:
23.99
25P: 25.02
24P: 24.02
Sets the ECS frequency
when Mode is set to ECS.
276
Help Guide
Interchangeable Lens Digital Camera
ILME-FR7 / ILME-FR7K
Auto Exposure
Sets automatic exposure adjustment settings.
Item Sub-item setting
Factory
default
Description
Level
+3.0 / +2.75 / +2.5 / +2.25 / +2.0 / +1.75 / +1.5 /
+1.25 / +1.0 / +0.75 / +0.5 / +0.25 / ±0 / −0.25 /
−0.5 / −0.75 / −1.0 / −1.25 / −1.5 / −1.75 / −2.0 /
−2.25 / −2.5 / −2.75 / −3.0
±0
Sets the brightness level for the
automatically detected exposure.
Mode Backlight / Standard / Spotlight Standard
Sets the operating mode of auto
exposure adjustment.
Backlight: Backlight mode (mode for
reduced darkening of a subject when the
subject is backlit)
Standard: Standard mode
Spotlight: Spotlight mode (mode for
reduced clipped whites when subject is lit
by spotlighting)
Speed −99 to +99 ±0
Sets the adjustment speed of auto
exposure adjustment.
AGC On / Off Off
Turns the AGC (auto gain control)
function on/off.
AGC
Limit
For details about settings, see “AGC Limit
Settings and Default Values.”
–
Sets the maximum gain of the AGC
function.
AGC
Point
F2.8 / F4 / F5.6 F2.8
Sets the F-stop value of the iris where
AGC operation starts when the AGC
function is On.
Auto
Shutter
On / Off Off
Turns the auto shutter control function
on/off.
A.SHT
Limit
1/100 / 1/150 / 1/200 / 1/250 / 1/2000 1/2000
Sets the fastest shutter speed of the auto
shutter function.
A.SHT
Point
F5.6 / F8 / F11 / F16 F11
Sets the F-stop value of the iris where
auto shutter operation starts.
Clip High
light
On / Off Off
Turns the function that ignores brightest
areas to provide a flatter response at high
luminance on/off.
278

5-041-957-11(1) Copyright 2022 Sony Corporation
Item Sub-item setting
Factory
default
Description
Detect
Window
1 / 2 / 3 / 4 / 5 / 6 / Custom 1
Sets the light metering range for
automatically adjusting the exposure
according to the brightness of the subject.
(Not available when adjusting exposure
manually)
Detect
Window
Indication
On / Off Off
Turns the light metering range indication
on/off.
Custom
Width
40 to 999 500 Sets the width of the light metering range.
Custom
Height
70 to 999 500
Sets the height of the light metering
range.
Custom
H
Position
−479 to +479 ±0
Sets the horizontal position of the light
metering range.
Custom
V
Position
−464 to +464 ±0
Sets the vertical position of the light
metering range.
279
Help Guide
Interchangeable Lens Digital Camera
ILME-FR7 / ILME-FR7K
White
Sets white balance settings.
5-041-957-11(1)
Copyright 2022 Sony Corporation
Item
Sub-
item
setting
Factory
default
Description
Preset
White
2000K
to
15000K
3200K Sets the white balance preset value.
Color
Temp
<A>
2000K
to
15000K
3200K
Sets the white balance color temperature saved in memory A.
Note
Since Color Temp is clipped at 2000K and 15000K during R Gain/B Gain operation, it may
not be possible to display the correct color temperature value for the R Gain/B Gain value.
Tint<A>
−99 to
+99
±0
Sets the white balance tint value saved in white memory A.
Note
Since Tint is clipped at ±99 during R Gain/B Gain operation, it may not be possible to
display the correct tint value for the R Gain/B Gain value.
R Gain
<A>
−99.0
to
+99.0
±0.0 Sets the white balance R gain value saved in memory A.
B Gain
<A>
−99.0
to
+99.0
±0.0 Sets the white balance B gain value saved in memory A.
280

Help Guide
Interchangeable Lens Digital Camera
ILME-FR7 / ILME-FR7K
White Setting
Adjusts white balance settings.
5-041-957-11(1)
Copyright 2022 Sony Corporation
Item
Sub-item
setting
Factory
default
Description
Shockless
White
Off / 1 / 2 / 3 2
Sets the white balance response speed when switching white
balance mode.
Off: Switches instantaneously.
1 to 3: Switches more slowly the higher the number.
ATW Speed 1 / 2 / 3 / 4 / 5 3
Sets the response speed in ATW mode.
The fastest response speed is 1, and the slowest response speed
is 5.
281

Help Guide
Interchangeable Lens Digital Camera
ILME-FR7 / ILME-FR7K
Offset White
Sets white balance offset settings.
5-041-957-11(1)
Copyright 2022 Sony Corporation
Item
Sub-item
setting
Factory
default
Description
Offset White
<A>
On / Off Off
Selects whether to add (On) or not to add (Off) an offset value to the white
balance in memory A.
Offset Color
Temp<A>
−99 to
+99
±0
Sets the color temperature offset to be added to the white balance in
memory A when [Offset White <A>] is set to On.
Offset Tint<A>
−99 to
+99
±0
Sets the tint value offset to be added to the white balance in memory A
when [Offset White <A>] is set to On.
Offset
White<ATW>
On / Off On
Selects whether to add (On) or not to add (Off) an offset value to the ATW
white balance.
Offset Color
Temp<ATW>
−99 to
+99
±0
Sets the color temperature offset to be added to the ATW white balance
when [Offset White<ATW>] is set to On.
Offset
Tint<ATW>
−99 to
+99
±0
Sets the tint value offset to be added to the ATW white balance when
[Offset White<ATW>] is set to On.
282
Help Guide
Interchangeable Lens Digital Camera
ILME-FR7 / ILME-FR7K
Focus
Sets focus settings.
5-041-957-11(1)
Copyright 2022 Sony Corporation
Item
Sub-item
setting
Factory
default
Description
AF
Transition
Speed
1(Slow) / 2 / 3 /
4 / 5 / 6 /
7(Fast)
5
Sets the speed of the focus drive for when the subject changes during
auto focus.
AF Subj.
Shift
Sens.
1(Locked On) /
2 / 3 / 4 /
5(Responsive)
5(Responsive) Sets the sensitivity for changing subject focus during auto focus.
Focus
Area
Wide / Zone /
Flexible Spot
Wide
Sets the target area for auto focus and push auto focus (AF).
See “Adjusting the Focus Automatically (Auto Focus)” and
“Setting the Auto Focus Area/Position (Focus Area).”
Wide: Searches for a subject over a wide angle of the image when
focusing.
Zone: Automatically searches for a focus point within the specified
zone.
Flexible Spot: Focuses on a specified position in the image.
Focus
Area (AF-
S)
Flexible Spot Flexible Spot Sets the target area for push auto focus (AF-S).
Face/Eye
Detection
AF
Face/Eye Only
AF /
Face/Eye
Priority AF / Off
Face/Eye
Priority AF
Enables/disables face detection AF.
See “Tracking Using Face and Eye Detection (Face/Eye
Detection AF).”
Push AF
Mode
AF / Single-shot
AF(AF-S)
AF Sets the push auto focus mode.
Touch
Function
in MF
Tracking AF /
Spot Focus
Tracking AF
Sets the operation when the camera image screen is touched in MF
mode.
AF Assist On / Off On
When set to On, allows you to temporarily override auto focus and set
focus manually.
See “Setting the Auto Focus Target Manually (AF Assist) Using
the Web App” and “Focusing Manually During Auto Focus Using
the Supplied Infrared Remote Control.”
283
Help Guide
Interchangeable Lens Digital Camera
ILME-FR7 / ILME-FR7K
S&Q Motion
Sets Slow & Quick Motion mode settings (see “Slow & Quick Motion”).
5-041-957-11(1)
Copyright 2022 Sony Corporation
Item Sub-item setting
Factory
default
Description
Setting On / Off Off Turns the Slow & Quick motion mode on/off.
Frame
Rate
1fps to 60fps / 100fps / 120fps /
150fps / 180fps / 200fps / 240fps
–
Sets the frame rate for Slow & Quick Motion shooting.
Note
The available settings vary depending on the selected
system frequency, codec, and video format.
284

Help Guide
Interchangeable Lens Digital Camera
ILME-FR7 / ILME-FR7K
LUT On/Off
Sets LUT settings.
5-041-957-11(1)
Copyright 2022 Sony Corporation
Item Sub-item setting
Factory
default
Description
SDI MLUT On / MLUT Off MLUT Off
Selects whether to apply Monitor LUT to the SDI
output video.
HDMI/Stream MLUT On / MLUT Off MLUT Off
Selects whether to apply Monitor LUT to the HDMI
and streaming output video.
Proxy MLUT On / MLUT Off MLUT Off
Selects whether to apply Monitor LUT to the proxy
recording video.
Internal Rec MLUT On / MLUT Off MLUT Off
Selects whether to apply Monitor LUT to the main
recording video.
LUT On/Off
Button Target
SDI / HDMI/Stream / SDI &
HDMI/Stream
HDMI/Stream
Sets the target output controlled by an assignable
button assigned with LUT On/Off.
285

Help Guide
Interchangeable Lens Digital Camera
ILME-FR7 / ILME-FR7K
Noise Suppression
Sets noise suppression settings.
Hint
The [Setting(Custom)] and [Level(Custom)] settings are reflected in the [Target Display] setting.
5-041-957-11(1)
Copyright 2022 Sony Corporation
Item
Sub-item
setting
Factory
default
Description
Setting(Custom) On / Off On Turns the noise suppression function on/off in Custom mode.
Level(Custom) Low / Mid / High Mid Sets the noise suppression level in Custom mode.
Setting(Cine EI) On / Off Off Turns the noise suppression function on/off in Cine EI mode.
Level(Cine EI) Low / Mid / High Mid Sets the noise suppression level in Cine EI mode.
286

Help Guide
Interchangeable Lens Digital Camera
ILME-FR7 / ILME-FR7K
Flicker Reduce
Sets flicker correction settings.
5-041-957-11(1)
Copyright 2022 Sony Corporation
Item
Sub-item
setting
Factory
default
Description
Mode Auto / On / Off Off Sets the flicker correction mode.
Frequency 50Hz / 60Hz 60Hz
Sets the frequency of the power source supplying the lighting that is
causing the flicker.
287
Help Guide
Interchangeable Lens Digital Camera
ILME-FR7 / ILME-FR7K
SteadyShot
Sets image stabilization settings.
5-041-957-11(1)
Copyright 2022 Sony Corporation
Item Sub-item setting
Factory
default
Description
Setting
Active / Standard
/ Off
Off
Sets the image stabilization function.
Note
Enabled when a compatible lens is attached.
When set to Active or Standard, unexpected behavior may occur during
pan/tilt operation.
288

Help Guide
Interchangeable Lens Digital Camera
ILME-FR7 / ILME-FR7K
Base Setting
Sets base settings.
5-041-957-11(1)
Copyright 2022 Sony Corporation
Item Sub-item setting
Factory
default
Description
Shooting
Mode
Custom / Cine EI Custom
Sets the shooting mode.
See “Setting the shooting mode” in “Configuring Basic
Operation.”
Target
Display
SDR(BT.709) /
HDR(HLG)
SDR(BT.709)
Sets the color space of the recording/output in Custom
mode.
289
Help Guide
Interchangeable Lens Digital Camera
ILME-FR7 / ILME-FR7K
Rec Format
Sets recording format settings.
[RAW Output Format] settings
Default values are shown in bold.
The conditions under which [RAW Output Format] cannot be set have been omitted.
[Video Format] settings
Item Sub-item setting
Factory
default
Description
Frequency 59.94 / 50 / 29.97 / 25 / 24 / 23.98 59.94 Selects the system frequency.
Imager
Scan
Mode
FF / S35 FF Selects the imager size.
Codec RAW / RAW & XAVC-I / XAVC-I / XAVC-L XAVC-I
Sets the clip recording/playback codec.
Note
When [Imager Scan Mode] is set to [S35],
[RAW] and [RAW & XAVC-I] cannot be
selected.
RAW
Output
Format
The available settings vary depending on
the [Frequency] setting.
See “[RAW Output Format] settings”
below.
–
Sets the size of the RAW image to output to an
external RAW recorder.
Note
When [Codec] is set to [RAW & XAVC-I], the
[Video Format] setting switches in link with
the [RAW Output Format] setting.
Video
Format
The available settings vary depending on
the [Frequency], [Imager Scan Mode], and
[Codec] settings.
See “[Video Format] settings” below.
– Sets the image size and bit rate.
Frequency Imager Scan Mode Codec Setting
59.94 / 50 / 29.97 / 25 / 23.98 FF RAW / RAW & XAVC-I
4096×2160
3840×2160
24 FF RAW / RAW & XAVC-I 4096×2160
Frequency Imager Scan Mode Codec Setting
290
Default values are shown in bold.
5-041-957-11(1)
Copyright 2022 Sony Corporation
Frequency Imager Scan Mode Codec Setting
59.94 / 50 / 29.97 / 25 / 23.98
FF
RAW –
RAW & XAVC-I
4096×2160P
3840×2160P
XAVC-I
4096×2160P
3840×2160P
1920×1080P
XAVC-L
3840×2160P
1920×1080P 50
1920×1080P 35
S35
XAVC-I 1920×1080P
XAVC-L
1920×1080P 50
1920×1080P 35
24 FF
RAW –
RAW & XAVC-I / XAVC-I 4096×2160P
291

Help Guide
Interchangeable Lens Digital Camera
ILME-FR7 / ILME-FR7K
Cine EI Setting
Sets Cine EI mode settings (see “Setting the shooting mode” in “Configuring Basic Operation”).
5-041-957-11(1)
Copyright 2022 Sony Corporation
Item Sub-item setting Factory default Description
Color
Gamut
S-Gamut3/SLog3 / S-
Gamut3.Cine/SLog3
S-
Gamut3.Cine/SLog3
Sets the color space in Cine EI
mode.
292

Help Guide
Interchangeable Lens Digital Camera
ILME-FR7 / ILME-FR7K
Simul Rec
Sets 2-slot simultaneous recording mode settings (see “Recording to Memory Cards A and B Simultaneously (2-slot
Simul Rec)”).
5-041-957-11(1)
Copyright 2022 Sony Corporation
Item Sub-item setting Factory default Description
Setting On / Off Off
Turns 2-slot
simultaneous recording
mode on/off.
Rec
Button
Set
Rec Button: [SlotA SlotB] 2nd Rec Button: [SlotA SlotB] /
Rec Button: [SlotA] 2nd Rec Button: [SlotB] / Rec Button:
[SlotB] 2nd Rec Button: [SlotA]
Rec Button: [SlotA
SlotB] 2nd Rec
Button: [SlotA SlotB]
Assigns the record
buttons used to control
each recording media.
293
Help Guide
Interchangeable Lens Digital Camera
ILME-FR7 / ILME-FR7K
Proxy Rec
Sets proxy recording mode settings (see “Proxy Recording”).
5-041-957-11(1)
Copyright 2022 Sony Corporation
Item Sub-item setting Factory default Description
Setting On / Off Off Turns proxy recording mode on/off.
Audio Channel CH1/CH2 / CH3/CH4 CH1/CH2 Selects the audio channel to record to proxy data.
294
Help Guide
Interchangeable Lens Digital Camera
ILME-FR7 / ILME-FR7K
Interval Rec
Sets interval recording mode settings (see “Recording Video Intermittently (Interval Rec)”).
5-041-957-11(1)
Copyright 2022 Sony Corporation
Item Sub-item setting Factory default Description
Setting On / Off Off
Turns interval recording mode on/off.
(Setting this mode to On will set all
other special modes to Off.)
Interval
Time
1 / 2 / 3 / 4 / 5 / 6 / 7 / 8 / 9 / 10 / 15 / 20
/ 30 / 40 / 50 (sec)
1 / 2 / 3 / 4 / 5 / 6 / 7 / 8 / 9 / 10 / 15 / 20
/ 30 / 40 / 50 (min)
1 / 2 / 3 / 4 / 6 / 12 / 24 (hour)
1
Sets the interval between recordings
in Interval Rec recording mode
(when Interval Rec is set to On).
Number
of
Frames
1frame / 2frames / 3frames /
6frames / 9frames / 12frames
The available settings vary depending
on the frame frequency of the selected
video format.
59.94P/50P: 2frames / 6frames /
12frames
29.97P/25P/24P/23.98P: 1frame /
3frames / 6frames / 9frames
59.94P/50P: 2frames
29.97P/25P/24P/23.98P:
1frame
Sets the number of frames to record
per take in Interval Rec recording
mode (when Interval Rec is set to
On).
295
Help Guide
Interchangeable Lens Digital Camera
ILME-FR7 / ILME-FR7K
Picture Cache Rec
Sets picture cache recording mode settings (see “Recording Cached Pictures (Picture Cache Rec)”).
5-041-957-11(1)
Copyright 2022 Sony Corporation
Item Sub-item setting
Factory
default
Description
Setting On / Off Off Turns the picture cache function on/off.
Cache
Size
Short / Medium /
Long / Max
Max
Sets the time for accumulation of images in picture cache memory
(picture cache recording time).
Cache
Rec Time
– –
Displays the time for accumulation of images in picture cache memory
(picture cache recording time).
296
Help Guide
Interchangeable Lens Digital Camera
ILME-FR7 / ILME-FR7K
SDI/HDMI Rec Control
Sets SDI/HDMI recording control settings.
5-041-957-11(1)
Copyright 2022 Sony Corporation
Item
Sub-item
setting
Factory
default
Description
Setting
Off / SDI/HDMI
Remote I/F /
Parallel Rec
Off
Sets recording start/stop control of an external connected device via the
SDI/HDMI output signal.
Off: Do not use remote control.
SDI/HDMI Remote I/F: Record stop/start control of an external connected
device, when there is no media inserted in the unit. Not synchronized with
frame accuracy to media in the unit.
Parallel Rec: Record stop/start control of an external connected device, when
media is inserted in the unit. Synchronized with frame accuracy to media in the
unit.
Note
For control using the HDMI output signal, set [TC/Media] > [HDMI TC Out] >
[Setting] to [On] in the camera menu.
297

Help Guide
Interchangeable Lens Digital Camera
ILME-FR7 / ILME-FR7K
Assignable Button
Sets function assignments to assignable buttons (<1> to <9>) and [Focus Hold Button].
The following functions can be assigned.
[Off]: No function assignment.
[Base ISO/Sensitivity]: Switches the base sensitivity of the image sensor.
[AGC]: Turns the AGC function on/off.
[Push AGC]: Enables the AGC function while the button is pressed.
[ND Filter]
In variable mode: Adjusts the ND filter transmittance. Press and hold to switch between Clear/Manual/Auto.
In preset mode: Press and hold to switch presets.
[ND Filter Position]: Switches ND filters.
[Auto ND Filter]: Turns the auto ND filter function on/off.
[Push Auto ND]: Enables the auto ND filter function while the button is pressed.
[Auto Iris]: Turns the iris function on/off.
[Push Auto Iris]: Enables the auto iris function while the button is pressed.
[Bokeh Control]: Turns the bokeh control mode on/off.
[Auto Shutter]: Turns the auto shutter function on/off.
[AE Level/Mode]: Adjusts the AE level. Press and hold to switch the AE mode.
[Backlight]: Switches between Backlight and Standard.
[Spotlight]: Switches between Spotlight and Standard.
[Preset White Select]: Switches the white balance preset mode value.
[ATW]: Turns the ATW function on/off.
[ATW Hold]: Pauses ATW function operation.
[AF Speed/Sens.]: Switches the AF transition speed setting and AF subject shift sensitivity setting.
[Focus Setting]: Sets the focus area.
[Face/Eye Detection AF]: Switches the face detection AF settings.
[Push AF Mode]: Switches the Push AF mode setting.
[Push AF/MF]: In MF focus mode, activates AF while the button is pressed. In AF focus mode, activates MF while the
button is pressed.
[Focus Hold]: In AF focus mode, focus is fixed while the button is pressed.
[S&Q Motion]: Turns the Slow & Quick Motion function on/off. Sets the shooting frame rate if pressed and held.
[LUT On/Off] Turns the LUT function on/off. The switching target is set using [Shooting] > [LUT On/Off] > [LUT On/Off
Button Target].
[SteadyShot]: Switches between Active, Standard, and Off.
[Crop Select]: Switches Imager Scan Mode. Switching enabled within the range without changing the recording format.
[Rec] Starts/stops recording.
[
Picture Cache Rec]: Turns picture cache recording mode on/off.
[Rec Review]: Turns the recording review function on/off.
[Clip Flag OK]: Executes Add OK. Press twice to execute Delete Clip Flag.
[Clip Flag NG]: Executes Add NG. Press twice to execute Delete Clip Flag.
[Clip Flag Keep]: Executes Add KEEP. Press twice to execute Delete Clip Flag.
[Slot Select] Switches between memory slot (A) and (B).
[Color Bars]: Turns the color bars on/off.
[DURATION/TC/U-BIT]: Switches between Time Code, Users Bit, and Duration.
[Display]: Turns the screen indicators on/off.
[Lens Info]: Switches the depth-of-field indicator.
[Video Signal Monitor]: Switches the video signal monitor (such as a waveform monitor).
[Marker]: Turns the marker function on/off.
298

[Thumbnail]: Displays/exits the thumbnail screen.
[Auto Upload (Proxy)]: Turns proxy file auto transfer on/off.
[Direct Menu]: Displays/exits the direct menu.
[User Menu]: Displays/exits the User menu.
5-041-957-11(1)
Copyright 2022 Sony Corporation
299

Help Guide
Interchangeable Lens Digital Camera
ILME-FR7 / ILME-FR7K
Scene File
Sets settings related to scene files (see “Shooting with the Desired Look”).
5-041-957-11(1)
Copyright 2022 Sony Corporation
Item Sub-item setting
Factory
default
Description
Recall – –
Loads a scene file stored in internal
memory and applies the settings as the
current image quality settings.
Store – –
Saves the current image quality state as a
scene file in internal memory.
Delete – –
Deletes a scene file stored in internal
memory.
Preset
Recall
When Shooting Mode is set to Custom and
Target Display is set to SDR(BT.709): S-Cinetone /
Standard / Still / ITU709
When Shooting Mode is set to Custom and
Target Display is set to HDR(HLG): HLG Live /
HLG Natural
–
Applies preset image quality settings (non-
rewritable) as the current image quality
settings.
300
Help Guide
Interchangeable Lens Digital Camera
ILME-FR7 / ILME-FR7K
Base Look
Sets settings related to the base look.
5-041-957-11(1)
Copyright 2022 Sony Corporation
Item Sub-item setting Factory default Description
Select
When Shooting Mode is set to Custom and
Target Display is set to SDR(BT.709): S-
Cinetone / Standard / Still / ITU709 / User1 to
User16
When Shooting Mode is set to Custom and
Target Display is set to HDR(HLG): HLG Live
/ HLG Natural / User1 to User16
When Shooting Mode is set to Cine EI: s709
/ 709(800) / S-Log3 / User1 to User16
When Shooting Mode is set
to Custom and Target Display
is set to SDR(BT.709): S-
Cinetone
When Shooting Mode is set
to Custom and Target Display
is set to HDR(HLG): HLG Live
When Shooting Mode is set
to Cine EI: s709
Selects a base look.
Delete – –
Deletes the selected
base look.
Delete
All
– – Deletes all base looks.
Input S-Gamut3/SLog3 / S-Gamut3.Cine/SLog3 S-Gamut3.Cine/SLog3
Sets the input gamut for
the base look selected
using [Select].
Output BT.709 / HLG BT.709
Sets the output color
gamut for the base look
selected using [Select].
AE
Level
Offset
0EV / 1/3EV / 2/3EV / 1EV / 4/3EV / 5/3EV /
2EV
0EV
Sets the exposure
reference value for the
base look selected
using [Select].
301

Help Guide
Interchangeable Lens Digital Camera
ILME-FR7 / ILME-FR7K
Reset Paint Settings
Resets the [Paint/Look] menu settings, excluding the base look.
5-041-957-11(1)
Copyright 2022 Sony Corporation
Item
Sub-item
setting
Factory
default
Description
Reset without Base
Look
Execute /
Cancel
–
Resets the [Paint/Look] menu settings, excluding the
base look.
Execute: Execute function.
302
Help Guide
Interchangeable Lens Digital Camera
ILME-FR7 / ILME-FR7K
Black
Sets black settings.
5-041-957-11(1)
Copyright 2022 Sony Corporation
Item Sub-item setting Factory default Description
Master Black −99.0 to +99.0 ±0.0 Sets the master black level.
R Black −99.0 to +99.0 ±0.0 Sets the R black level.
B Black −99.0 to +99.0 ±0.0 Sets the B black level.
303

Help Guide
Interchangeable Lens Digital Camera
ILME-FR7 / ILME-FR7K
Knee
Sets knee correction settings.
5-041-957-11(1)
Copyright 2022 Sony Corporation
Item Sub-item setting Factory default Description
Setting
When Target Display is set
to SDR(BT.709): On / Off / ---
When Target Display is set
to HDR(HLG): On / Off / ---
When Target Display
is set to
SDR(BT.709):Off
When Target Display
is set to HDR(HLG):Off
Turns the knee correction function on/off.
Note
Enabled only when [Base Look] > [Select] is set
to [Standard], [ITU709], [HLG Live], or [HLG
Natural].
Auto
Knee
When Target Display is set
to SDR(BT.709): On / Off / ---
When Target Display is set
to HDR(HLG): On / Off / ---
When Target Display
is set to
SDR(BT.709):On
When Target Display
is set to HDR(HLG):Off
Turns the auto knee function on/off.
Note
Enabled only when [Base Look] > [Select] is set
to [Standard] or [ITU709].
Point 75% to 109% 90% Sets the knee point.
Slope −99 to +99 ±0 Sets the knee slope.
304
Help Guide
Interchangeable Lens Digital Camera
ILME-FR7 / ILME-FR7K
Detail
Sets detail adjustment settings.
5-041-957-11(1)
Copyright 2022 Sony Corporation
Item Sub-item setting
Factory
default
Description
Setting On / Off On Turns the detail function on/off.
Level −7 to +7 ±0 Sets the detail level.
Manual
Setting
On / Off / --- Off Turns the detail manual adjustment function on/off.
V/H
Balance
−2 to +2 ±0
Sets the balance between vertical (V) and horizontal (H) detail for detail
manual adjustment.
B/W
Balance
Type1 / Type2 /
Type3 / Type4 /
Type5
Type3
Sets the balance between black (B) detail for low-luminance areas and
white (W) detail for high-luminance areas for detail manual adjustment.
Limit 0 to 7 7 Sets the limit level of the detail for detail manual adjustment.
Crispening 0 to 7 0 Sets the crispening level for detail manual adjustment.
High Light
Detail
0 to 4 0
Sets the detail level of high-luminance areas for detail manual
adjustment.
305
Help Guide
Interchangeable Lens Digital Camera
ILME-FR7 / ILME-FR7K
Matrix
Sets matrix correction settings.
5-041-957-11(1)
Copyright 2022 Sony Corporation
Item Sub-item setting Factory default Description
User Matrix On / Off Off Turns the user matrix correction function on/off.
User Matrix Level −99 to +99 ±0 Adjusts the color saturation of the entire image.
User Matrix Phase −99 to +99 ±0 Adjusts the color tone (phase) of the entire image.
User Matrix R-G −99 to +99 ±0 Sets a user-defined R-G user matrix.
User Matrix R-B −99 to +99 ±0 Sets a user-defined R-B user matrix.
User Matrix G-R −99 to +99 ±0 Sets a user-defined G-R user matrix.
User Matrix G-B −99 to +99 ±0 Sets a user-defined G-B user matrix.
User Matrix B-R −99 to +99 ±0 Sets a user-defined B-R user matrix.
User Matrix B-G −99 to +99 ±0 Sets a user-defined B-G user matrix.
306

Help Guide
Interchangeable Lens Digital Camera
ILME-FR7 / ILME-FR7K
Multi Matrix
Sets multi matrix correction settings.
5-041-957-11(1)
Copyright 2022 Sony Corporation
Item Sub-item setting
Factory
default
Description
Setting On / Off Off
Turns the multi matrix correction function
on/off.
Reset Execute / Cancel –
Resets the hue and saturation of each
axis color to the default values.
Axis
B / B+ / MG− / MG / MG+ / R / R+ / YL− / YL /
YL+ / G− / G / G+ / CY / CY+ / B−
B Selects the axis.
Hue −99 to +99 ±0
Sets the hue of the color used for multi
matrix correction.
Saturation −99 to +99 ±0
Sets the saturation of the color used for
multi matrix correction.
307

Help Guide
Interchangeable Lens Digital Camera
ILME-FR7 / ILME-FR7K
P/T Acceleration
Sets settings related to acceleration for pan/tilt operations.
5-041-957-11(1)
Copyright 2022 Sony Corporation
Item
Sub-item
setting
Factory
default
Description
Ramp
Curve
1 to 9 8
Selects the acceleration/deceleration for pan/tilt operations. The larger the
number, the higher the acceleration.
308
Help Guide
Interchangeable Lens Digital Camera
ILME-FR7 / ILME-FR7K
Timecode
Sets timecode settings.
5-041-957-11(1)
Copyright 2022 Sony Corporation
Item Sub-item setting
Factory
default
Description
Mode
Preset / Regen /
Clock
Preset
Sets the timecode running mode.
Preset: Starts running from a preset value.
Regen: Starts running from the timecode of the end of the
previous clip.
Clock: Uses the internal clock as the timecode.
Run Rec Run / Free Run Rec Run
Rec Run: Runs only when recording.
Free Run: Always running, regardless of recording operation.
Setting – –
Sets the timecode to an arbitrary value.
Set: Set the value.
Reset Execute / Cancel –
Resets the timecode to 00:00:00:00.
Execute: Execute function.
TC
Format
DF / NDF DF
Sets the timecode format.
DF: Drop Frame
NDF: Non-Drop Frame
309


Help Guide
Interchangeable Lens Digital Camera
ILME-FR7 / ILME-FR7K
Users Bit
Sets settings related to user bits.
5-041-957-11(1)
Copyright 2022 Sony Corporation
Item Sub-item setting Factory default Description
Mode Fix / Time Fix
Sets the user bit mode.
Fix: Uses an arbitrary fixed value in user bits.
Time: Uses the current hour, minute, and second in user bits.
Setting – – Sets the user bits to an arbitrary value.
311

Help Guide
Interchangeable Lens Digital Camera
ILME-FR7 / ILME-FR7K
HDMI TC Out
Sets settings related to timecode output when using HDMI.
5-041-957-11(1)
Copyright 2022 Sony Corporation
Item
Sub-item
setting
Factory
default
Description
Setting On / Off Off
Sets whether to output the timecode to devices for other purposes, using
HDMI.
312
Help Guide
Interchangeable Lens Digital Camera
ILME-FR7 / ILME-FR7K
Clip Name Format
Sets settings related to clip naming and deletion.
To set the title
5-041-957-11(1)
Copyright 2022 Sony Corporation
Item Sub-item setting
Factory
default
Description
Title
Prefix
nnn_ (nnn is the last 3
digits of the serial
number)
(Max. 7-digit display)
nnn
Sets the title part (4 to 46 characters) of the clip name.
Opens a character string entry screen.
For details about setting titles and the character entry screen, see
“To set the title” and “Character string entry screen structure”
below.
Number
Set
0001 to 9999 0001 Sets the 4-digit number suffix of the clip name.
Select the character to insert at the cursor position in the [Title Prefix] area from the character selection
area using the arrow buttons in the GUI control panel (character is highlighted), and press the [Set] button
in the GUI control panel.
The selected character is inserted, and the cursor moves to the right.
1
Repeat step 1 to set the title.
Use [BS] as required.
2
After setting the title, select [Done] to close the character entry screen.
For detail about operation on the character entry screen, see “Entering a Character String.”
The following characters can be selected.
!#$%()+,-.;=@[ ]^_~ space
0123456789
abcdefghijklmnopqrstuvwxyz
ABCDEFGHIJKLMNOPQRSTUVWXYZ
3
313

Help Guide
Interchangeable Lens Digital Camera
ILME-FR7 / ILME-FR7K
Update Media
Updates the management file on memory cards (see “Restoring Memory Cards”).
5-041-957-11(1)
Copyright 2022 Sony Corporation
Item Sub-item setting Factory default Description
Media(A) Execute / Cancel –
Updates the management file on the memory card in slot A.
Execute: Execute function.
Media(B) Execute / Cancel –
Updates the management file on the memory card in slot B.
Execute: Execute function.
314
Help Guide
Interchangeable Lens Digital Camera
ILME-FR7 / ILME-FR7K
Format Media
Formats (initializes) memory cards (see “Formatting (Initializing) Memory Cards”).
5-041-957-11(1)
Copyright 2022 Sony Corporation
Item Sub-item setting Factory default Description
Media(A) Full Format / Quick Format / Cancel – Formats the memory card in slot A.
Media(B) Full Format / Quick Format / Cancel – Formats the memory card in slot B.
315
Help Guide
Interchangeable Lens Digital Camera
ILME-FR7 / ILME-FR7K
Media Life
Displays the remaining life of the memory cards.
Note
Requires memory cards that support remaining media life display.
5-041-957-11(1)
Copyright 2022 Sony Corporation
Item Sub-item setting Factory default Description
Media(A) – – Displays the remaining life of the memory card in slot A.
Media(B) – – Displays the remaining life of the memory card in slot B.
316

Help Guide
Interchangeable Lens Digital Camera
ILME-FR7 / ILME-FR7K
Output Format
Sets output format settings.
5-041-957-11(1)
Copyright 2022 Sony Corporation
Item Sub-item setting
Factory
default
Description
SDI
For details about settings, see “Output Formats and
Limitations.”
–
Sets the SDI and HDMI output
resolution.
HDMI –
317
Help Guide
Interchangeable Lens Digital Camera
ILME-FR7 / ILME-FR7K
Display On/Off
Sets display item settings.
To show a display item, select On. To hide a display item, select Off.
Item Sub-item setting Factory default
File Transfer Status On / Off On
Rec/Play Status On / Off On
RAW Output Control Status On / Off On
Tally On / Off On
Focus Mode On / Off On
Focus Position On / Off On
Focus Area Indicator On / Off On
Focus Area Ind.(AF-S) On / Off On
Face/Eye Detection Frame On / Off On
Lens Info On / Off Off
Imager Scan Mode On / Off On
Rec Format On / Off On
Frame Rate On / Off On
Zoom Position On / Off On
SteadyShot On / Off On
Base Look/Rec Look On / Off On
SDI/HDMI Rec Control On / Off On
Monitoring Look On / Off On
Proxy Status On / Off On
Base ISO/Sensitivity On / Off On
Media Status On / Off On
Clip Name On / Off On
White Balance On / Off On
Scene File On / Off On
Focus Indicator On / Off On
Auto Exposure Mode On / Off On
318

5-041-957-11(1) Copyright 2022 Sony Corporation
Item Sub-item setting Factory default
Auto Exposure Level On / Off On
Timecode On / Off On
ND Filter On / Off On
Iris On / Off On
ISO/Gain/EI On / Off On
Shutter On / Off On
Level Gauge On / Off On
Audio Level Meter On / Off On
Video Level Warning On / Off On
Clip Number On / Off On
Notice Message On / Off On
319

Help Guide
Interchangeable Lens Digital Camera
ILME-FR7 / ILME-FR7K
Video Signal Monitor
Sets video signal monitor settings.
5-041-957-11(1)
Copyright 2022 Sony Corporation
Item Sub-item setting Factory default Description
Setting Off / Waveform / Vector / Histogram Off Sets the type of video signal monitor.
Level Marker 1 0% to 109% 70% Sets the level of luminance level marker 1.
Level Marker 2 0% to 109% 100% Sets the level of luminance level marker 2.
320
Help Guide
Interchangeable Lens Digital Camera
ILME-FR7 / ILME-FR7K
Marker
Sets marker display settings.
Item Sub-item setting
Factory
default
Description
Setting On / Off On Turns the display of all markers on/off.
Color
White / Yellow / Cyan / Green / Magenta /
Red / Blue
White Selects the marker signal color.
Center
Marker
1 / 2 / 3 / 4 / Off Off Selects the center marker.
Safety
Zone
On / Off Off Turns the safety zone marker on/off.
Safety
Area
80% / 90% / 92.5% / 95% 90%
Selects the size of the safety zone marker
(as a percentage of total screen size).
Aspect
Marker
Line / Mask / Off Off Selects the type of aspect marker.
Aspect
Mask
0 to 15 12
Sets the level of the video signal outside
the marker.
Aspect
Safety
Zone
On / Off Off Turns the aspect safety zone marker on/off.
Aspect
Safety
Area
80% / 90% / 92.5% / 95% 90%
Selects the size of the aspect safety zone
marker (as a percentage of total screen
size).
Aspect
Select
1:1 / 4:3 / 13:9 / 14:9 / 15:9 / 16:9 / 17:9 /
1.66:1 / 1.85:1 / 2.35:1 / 2.39:1 / Custom
2.39:1
Sets the mode when displaying the aspect
marker.
Custom
Aspect
Ratio
Enter an arbitrary value. 01.00:01.00
Sets the aspect ratio to an arbitrary value.
Note
Enabled when [Aspect Select] is set to
[Custom].
Guide
Frame
On / Off Off Turns the guide frame display on/off.
100%
Marker
On / Off Off Turns the 100% marker on/off.
User Box On / Off Off Turns the user box marker display on/off.
321

5-041-957-11(1) Copyright 2022 Sony Corporation
Item Sub-item setting
Factory
default
Description
User Box
Width
3 to 479 240
Sets the user box marker width (distance
from the center to the left and right edges).
User Box
Height
3 to 269 135
Sets the user box marker height (distance
from the center to the top and bottom
edges).
User Box
H Position
−476 to +476 0
Sets the horizontal position of the center of
the user box marker.
User Box
V Position
−266 to +266 0
Sets the vertical position of the center of
the user box marker.
322

Help Guide
Interchangeable Lens Digital Camera
ILME-FR7 / ILME-FR7K
Audio Input
Sets audio input settings.
Item Sub-item setting
Factory
default
Description
AUDIO IN
Select
MIC / LINE MIC Selects the type of device connected to the AUDIO IN connector.
Phantom
Power
+48V
On / Off Off Displays the status of the +48 V phantom power supply.
CH1 Input
Select
AUDIO IN CH1
AUDIO
IN CH1
Displays the input source for recording on channel 1.
CH2 Input
Select
AUDIO IN CH1 /
AUDIO IN CH2
AUDIO
IN CH2
Switches the input source for recording on channel 2.
CH3 Input
Select
Off / AUDIO IN CH1
AUDIO
IN CH1
Switches the input source for recording on channel 3.
CH4 Input
Select
Off / AUDIO IN CH1 /
AUDIO IN CH2
AUDIO
IN CH2
Switches the input source for recording on channel 4.
AUDIO IN
CH1 MIC
Ref.
−80dB / −70dB /
−60dB / −50dB /
−40dB / −30dB
−50dB
Sets the reference recording level for XLR microphone input from
AUDIO IN CH1.
AUDIO IN
CH2 MIC
Ref.
−80dB / −70dB /
−60dB / −50dB /
−40dB / −30dB
−50dB
Sets the reference recording level for XLR microphone input from
AUDIO IN CH2.
Line Input
Reference
+4dB / 0dB / −3dB /
EBUL
+4dB
Selects the reference input level when [AUDIO IN Select] is set to
LINE.
Reference
Level
−20dB / −18dB /
−16dB / −12dB /
EBUL
−20dB Selects the recording level of the 1 kHz reference tone signal.
CH1 Wind
Filter
On / Off Off Enables/disables the wind reduction filter for channel 1 recording.
CH2 Wind
Filter
On / Off Off Enables/disables the wind reduction filter for channel 2 recording.
CH3 Wind
Filter
On / Off Off Enables/disables the wind reduction filter for channel 3 recording.
CH4 Wind
Filter
On / Off Off Enables/disables the wind reduction filter for channel 4 recording.
323
5-041-957-11(1) Copyright 2022 Sony Corporation
Item Sub-item setting
Factory
default
Description
CH1 Level
Control
Auto / Manual Auto
Selects audio input level automatic adjustment or manual adjustment
for recording channel 1.
CH2 Level
Control
Auto / Manual Auto
Selects audio input level automatic adjustment or manual adjustment
for recording channel 2.
CH3 Level
Control
Auto / Manual Auto
Selects audio input level automatic adjustment or manual adjustment
for recording channel 3.
CH4 Level
Control
Auto / Manual Auto
Selects audio input level automatic adjustment or manual adjustment
for recording channel 4.
CH1 Input
Level
0 to 99 49 Sets the input level for recording channel 1.
CH2 Input
Level
0 to 99 49 Sets the input level for recording channel 2.
CH3 Input
Level
0 to 99 49 Sets the input level for recording channel 3.
CH4 Input
Level
0 to 99 49 Sets the input level for recording channel 4.
Master
Input
Level
0 to 99 99 Sets the master audio input level.
Limiter
Mode
Off / −6dB / −9dB /
−12dB / −15dB /
−17dB
Off
Selects the limiter characteristic for large input signals when adjusting
the audio input level manually.
CH1&2
AGC
Mode
Mono / Stereo Stereo
Sets the auto level adjustment mode for recording channel 1 and
channel 2. When set to Stereo, the AGC is linked between channels.
CH3&4
AGC
Mode
Mono / Stereo Stereo
Sets the auto level adjustment mode for recording channel 3 and
channel 4. When set to Stereo, the AGC is linked between channels.
AGC Spec
−6dB / −9dB / −12dB
/ −15dB / −17dB
−6dB Selects the AGC characteristic.
1kHz Tone
on Color
Bars
On / Off Off
Turns the 1 kHz reference tone signal on/off when displaying color
bars.
Note
When set to [On], the 1 kHz reference tone signal is set for recording
on channel 3 and channel 4, even if [CH3 Input Select] and [CH4 Input
Select] are set to [Off].
324

Help Guide
Interchangeable Lens Digital Camera
ILME-FR7 / ILME-FR7K
Audio Output
Sets audio output settings.
5-041-957-11(1)
Copyright 2022 Sony Corporation
Item
Sub-item
setting
Factory
default
Description
HDMI/Stream
Output CH
CH1/CH2 /
CH3/CH4
CH1/CH2
Sets the combination of audio channels for the
HDMI/streaming output.
325
Help Guide
Interchangeable Lens Digital Camera
ILME-FR7 / ILME-FR7K
Set Clip Flag
Sets clip flag settings.
5-041-957-11(1)
Copyright 2022 Sony Corporation
Item Sub-item setting Factory default Description
Add OK – – Adds an OK flag.
Add NG – – Adds an NG flag.
Add KEEP – – Adds a KEEP flag.
Delete Clip Flag – – Deletes all flags.
327

Help Guide
Interchangeable Lens Digital Camera
ILME-FR7 / ILME-FR7K
Lock/Unlock Clip
Sets clip protection settings.
5-041-957-11(1)
Copyright 2022 Sony Corporation
Item Sub-item setting Factory default Description
Select Clip – – Selects and locks/unlocks a clip.
Lock All Clips – – Locks all clips.
Unlock All Clips – – Unlocks all clips.
328
Help Guide
Interchangeable Lens Digital Camera
ILME-FR7 / ILME-FR7K
Transfer Clip
Transfers clips.
5-041-957-11(1)
Copyright 2022 Sony Corporation
Item Sub-item setting Factory default Description
Select Clip – – Transfers selected clips.
All Clips – –
Transfers all clips.
Note
Up to 200 transfer jobs can be registered.
330
Help Guide
Interchangeable Lens Digital Camera
ILME-FR7 / ILME-FR7K
Transfer Clip (Proxy)
Transfers proxy clips.
5-041-957-11(1)
Copyright 2022 Sony Corporation
Item Sub-item setting Factory default Description
Select Clip – – Transfers proxy clips corresponding to the selected clips.
All Clips – –
Transfers proxy clips corresponding to all the clips.
Note
Up to 200 transfer jobs can be registered.
331
Help Guide
Interchangeable Lens Digital Camera
ILME-FR7 / ILME-FR7K
Filter Clips
Sets settings of clips to display.
5-041-957-11(1)
Copyright 2022 Sony Corporation
Item Sub-item setting Factory default Description
OK – – Display only clips that have an OK flag.
NG – – Display only clips that have an NG flag.
KEEP – – Display only clips that have a KEEP flag.
None – – Display only clips that have no flag.
All – – Displays all clips, regardless of whether there are any flags.
332

Help Guide
Interchangeable Lens Digital Camera
ILME-FR7 / ILME-FR7K
Customize View
Switches the thumbnail screen view.
5-041-957-11(1)
Copyright 2022 Sony Corporation
Item Sub-item setting
Factory
default
Description
Thumbnail
Caption
Date Time / Time Code / Duration /
Sequential Number
Time Code
Switches the information displayed below
thumbnails.
333
Help Guide
Interchangeable Lens Digital Camera
ILME-FR7 / ILME-FR7K
Color Bars
Sets color bar settings.
5-041-957-11(1)
Copyright 2022 Sony Corporation
Item Sub-item setting Factory default Description
Setting On / Off Off Turns the color bars on/off.
Type ARIB / 100% / 75% / SMPTE ARIB Selects the color bar type.
334

Help Guide
Interchangeable Lens Digital Camera
ILME-FR7 / ILME-FR7K
Genlock
Configures the genlock status display (see “Synchronizing the Phase of the Video Signal (Genlock)).”
5-041-957-11(1)
Copyright 2022 Sony Corporation
Item Sub-item setting Factory default Description
Reference Internal / External(HD) / External(SD) – Displays the type of genlock reference signal.
335
Help Guide
Interchangeable Lens Digital Camera
ILME-FR7 / ILME-FR7K
Tally
Sets recording/tally lamp settings (see “Connecting a Tally Signal”).
5-041-957-11(1)
Copyright 2022 Sony Corporation
Item
Sub-item
setting
Factory
default
Description
Tally Lamp
Brightness
High / Low /
Off
High Sets the brightness of the recording/tally lamp.
G Tally Lamp
Enable /
Disable
Enable Enables/disables the G tally lamp.
Tally Control
External /
Internal
Internal
Selects the target for accepting the recording/tally lamp control
information of the unit.
External: Tally control from outside the camera.
Internal: Control via camera recording operation.
336

Help Guide
Interchangeable Lens Digital Camera
ILME-FR7 / ILME-FR7K
Rec Review
Sets recording review settings (see “Reviewing the Recording (Rec Review)”).
5-041-957-11(1)
Copyright 2022 Sony Corporation
Item Sub-item setting Factory default Description
Setting 3s / 10s / Clip 3s Sets the time for playback of clips just recorded for recording review.
337
Help Guide
Interchangeable Lens Digital Camera
ILME-FR7 / ILME-FR7K
Zoom
Sets the zoom settings (“Adjusting the Zoom”).
5-041-957-11(1)
Copyright 2022 Sony Corporation
Item Sub-item setting Factory default Description
Zoom Type Optical Zoom Only / On(Clear Image Zoom) Optical Zoom Only Sets the type of zoom.
338
Help Guide
Interchangeable Lens Digital Camera
ILME-FR7 / ILME-FR7K
Lens
Sets settings related to lenses.
5-041-957-11(1)
Copyright 2022 Sony Corporation
Item
Sub-item
setting
Factory default Description
Lens
Calibration
Execute /
Cancel
–
Executes the function that corrects for differences in the zoom
position due to differences in individual lenses when using a
power zoom lens.
Zoom Ring
Direction
Left(W)/Right(T)
/
Right(W)/Left(T)
Left(W)/Right(T)
Sets the direction of zoom ring operation.
Note
Enabled only when using an E-mount lens that supports zoom
ring direction switching.
Shading
Compensation
Auto / Off Auto Sets the automatic shading compensation.
Chroma
Aberration
Comp.
Auto / Off Auto Sets the automatic chromatic aberration compensation.
Distortion
Comp.
Auto / Off Auto Sets the automatic distortion compensation.
Breathing
Compensation
Auto / Off Off
Sets the lens breathing compensation.
See “Breathing Compensation.”
Distance
Display
Meter / Feet Meter Sets the display units for lens information and focus position.
Zoom Position
Display
Focal Length /
Number / Bar
Number Sets the display format for the zoom position.
339
Help Guide
Interchangeable Lens Digital Camera
ILME-FR7 / ILME-FR7K
APR
Executes APR.
5-041-957-11(1)
Copyright 2022 Sony Corporation
Item
Sub-item
setting
Factory
default
Description
APR
Execute /
Cancel
–
Runs APR (Automatic Pixel Restoration) for image sensor auto
adjustment.
Execute: Execute function.
Note
Always attach the lens cap before running APR.
340

Help Guide
Interchangeable Lens Digital Camera
ILME-FR7 / ILME-FR7K
Wired LAN
Sets settings related to wired LAN connections.
5-041-957-11(1)
Copyright 2022 Sony Corporation
Item
Sub-item
setting
Factory
default
Description
HTTP Port – 80 Displays the HTTP access port.
Detail
Settings
– – Displays properties of the wired LAN connection.
DHCP
On / Off
On Displays whether DHCP is enabled (On) or disabled (Off).
IP Address – Displays the IP address of the unit when [DHCP] is set to [Off].
Subnet Mask –
Displays the subnet mask of the unit when [DHCP] is set to
[Off].
Gateway – Displays the default gateway when [DHCP] is set to [Off].
DNS Auto
On / Off
On Displays the DNS auto acquisition setting.
341

Help Guide
Interchangeable Lens Digital Camera
ILME-FR7 / ILME-FR7K
File Transfer
Sets settings related to file transfers (see “About File Transfer”).
5-041-957-11(1)
Copyright 2022 Sony Corporation
Item
Sub-item
setting
Factory
default
Description
Auto
Upload
(Proxy)
On / Off Off Turns proxy file auto upload on/off.
Default
Upload
Server
Server
Settings1 to 3 >
Display Name
–
Selects the upload server for files. The server selected here becomes the
auto upload destination for proxy files, and the upload destination for files
from the thumbnail screen.
Displays the [Display Name] settings configured in [Server Settings1 to 3].
Clear
Completed
Jobs
Execute /
Cancel
–
Clears completed transfer jobs from the list.
Execute: Execute function.
Clear All
Jobs
Execute /
Cancel
–
Clears all transfer jobs from the list.
Execute: Execute function.
View Job
List
– – Displays the transfer job list.
342

Help Guide
Interchangeable Lens Digital Camera
ILME-FR7 / ILME-FR7K
Clock Set
Sets internal clock settings.
5-041-957-11(1)
Copyright 2022 Sony Corporation
Item Sub-item setting
Factory
default
Description
Time
Zone
UTC − 12:00 to UTC + 14:00 –
Sets the time difference from UTC in 30-minute
units.
Date
Mode
YYMMDD / MMDDYY /
DDMMYY
YYMMDD
Selects the display format for dates.
YYMMDD: Year, month, day
MMDDYY: Month, day, year
DDMMYY: Day, month, year
12H/24H 12H / 24H 24H
Selects the clock display format.
12H: 12-hour mode
24H: 24-hour mode
Date – –
Sets the current date.
Set: Set the value.
Time – –
Sets the current time.
Set: Set the value.
344
Help Guide
Interchangeable Lens Digital Camera
ILME-FR7 / ILME-FR7K
Hours Meter
Displays the accumulated running time.
5-041-957-11(1)
Copyright 2022 Sony Corporation
Item Sub-item setting Factory default Description
Hours(System) – – Displays the accumulated hours of use (cannot be reset).
Hours(Reset) – – Displays the accumulated hours of use (can be reset).
Reset Execute / Cancel –
Resets the accumulated running time to 0.
Execute: Execute function.
345

Help Guide
Interchangeable Lens Digital Camera
ILME-FR7 / ILME-FR7K
ISO/Gain Settings and Default Values
The range of [ISO/Gain<L>] settings and default values vary depending on the [Mode], [Base Look] > [Select], and [Base
Sensitivity] settings.
Default values in the tables are shown in bold.
When [Mode] is set to [ISO]
When [Base Look] > [Select] is set to [S-Cinetone], [Standard], [ITU709], or [Still]
When [Base Look] > [Select] is set to [HLG Live] or [HLG Natural]
When [ISO/Gain/EI] > [Base Sensitivity] is set to
[Low]
When [ISO/Gain/EI] > [Base Sensitivity] is set to
[High]
ISO 320
ISO 400
ISO 500
ISO 640
ISO 800
ISO 1000
ISO 1250
ISO 1600
ISO 2000
ISO 2500
ISO 3200
ISO 4000
ISO 5000
ISO 6400
ISO 8000
ISO 10000
ISO 12800
ISO 16000
ISO 20000
ISO 25600
ISO 5000
ISO 6400
ISO 8000
ISO 10000
ISO 12800
ISO 16000
ISO 20000
ISO 25600
ISO 32000
ISO 40000
ISO 51200
ISO 64000
ISO 80000
ISO 102400
ISO 128000
ISO 160000
ISO 204800
ISO 256000
ISO 320000
ISO 409600
When [ISO/Gain/EI] > [Base Sensitivity] is set to
[Low]
When [ISO/Gain/EI] > [Base Sensitivity] is set to
[High]
346

When [Base Look] > [Select] is set to [User1] to [User16]
When [Mode] is set to [dB]
A value in the range −3dB to +30dB in 1dB increments can be configured.
The default value is 0dB.
5-041-957-11(1)
Copyright 2022 Sony Corporation
When [ISO/Gain/EI] > [Base Sensitivity] is set to
[Low]
When [ISO/Gain/EI] > [Base Sensitivity] is set to
[High]
ISO 800
ISO 1000
ISO 1250
ISO 1600
ISO 2000
ISO 2500
ISO 3200
ISO 4000
ISO 5000
ISO 6400
ISO 8000
ISO 10000
ISO 12800
ISO 16000
ISO 20000
ISO 25600
ISO 128000
ISO 16000
ISO 20000
ISO 25600
ISO 32000
ISO 40000
ISO 51200
ISO 64000
ISO 80000
ISO 102400
ISO 128000
ISO 160000
ISO 204800
ISO 256000
ISO 320000
ISO 409600
When [ISO/Gain/EI] > [Base Sensitivity] is set to
[Low]
When [ISO/Gain/EI] > [Base Sensitivity] is set to
[High]
ISO 800
ISO 1000
ISO 1250
ISO 1600
ISO 2000
ISO 2500
ISO 3200
ISO 4000
ISO 5000
ISO 6400
ISO 8000
ISO 10000
ISO 12800
ISO 16000
ISO 20000
ISO 25600
ISO 12800
ISO 16000
ISO 20000
ISO 25600
ISO 32000
ISO 40000
ISO 51200
ISO 64000
ISO 80000
ISO 102400
ISO 128000
ISO 160000
ISO 204800
ISO 256000
ISO 320000
ISO 409600
347

Help Guide
Interchangeable Lens Digital Camera
ILME-FR7 / ILME-FR7K
AGC Limit Settings and Default Values
The range of [AGC Limit] menu settings and default values vary depending on the [Mode], [Base Look] > [Select], and
[Base Sensitivity] settings.
Default values in the tables are shown in bold.
When [Mode] is set to [ISO]
When [Base Look] > [Select] is set to [S-Cinetone], [Standard], [ITU709], or [Still]
When [Base Look] > [Select] is set to [HLG Live] or [HLG Natural]
When [ISO/Gain/EI] > [Base Sensitivity] is set to
[Low]
When [ISO/Gain/EI] > [Base Sensitivity] is set to
[High]
ISO 400
ISO 500
ISO 640
ISO 800
ISO 1000
ISO 1250
ISO 1600
ISO 2000
ISO 2500
ISO 3200
ISO 4000
ISO 5000
ISO 6400
ISO 8000
ISO 10000
ISO 12800
ISO 16000
ISO 20000
ISO 25600
ISO 6400
ISO 8000
ISO 10000
ISO 12800
ISO 16000
ISO 20000
ISO 25600
ISO 32000
ISO 40000
ISO 51200
ISO 64000
ISO 80000
ISO 102400
ISO 128000
ISO 160000
ISO 204800
ISO 256000
ISO 320000
ISO 409600
When [ISO/Gain/EI] > [Base Sensitivity] is set to
[Low]
When [ISO/Gain/EI] > [Base Sensitivity] is set to
[High]
348
When [Base Look] > [Select] is set to [User1] to [User16]
When [Mode] is set to [dB]
Select from 3dB / 6dB / 9dB / 12dB / 15dB / 18dB / 21dB / 24dB / 27dB / 30dB.
The default value is 15dB.
5-041-957-11(1)
Copyright 2022 Sony Corporation
When [ISO/Gain/EI] > [Base Sensitivity] is set to
[Low]
When [ISO/Gain/EI] > [Base Sensitivity] is set to
[High]
ISO 1000
ISO 1250
ISO 1600
ISO 2000
ISO 2500
ISO 3200
ISO 4000
ISO 5000
ISO 6400
ISO 8000
ISO 10000
ISO 12800
ISO 16000
ISO 20000
ISO 25600
ISO 16000
ISO 20000
ISO 25600
ISO 32000
ISO 40000
ISO 51200
ISO 64000
ISO 80000
ISO 102400
ISO 128000
ISO 160000
ISO 204800
ISO 256000
ISO 320000
ISO 409600
When [ISO/Gain/EI] > [Base Sensitivity] is set to
[Low]
When [ISO/Gain/EI] > [Base Sensitivity] is set to
[High]
ISO 1000
ISO 1250
ISO 1600
ISO 2000
ISO 2500
ISO 3200
ISO 4000
ISO 5000
ISO 6400
ISO 8000
ISO 10000
ISO 12800
ISO 16000
ISO 20000
ISO 25600
ISO 16000
ISO 20000
ISO 25600
ISO 32000
ISO 40000
ISO 51200
ISO 64000
ISO 80000
ISO 102400
ISO 128000
ISO 160000
ISO 204800
ISO 256000
ISO 320000
ISO 409600
349
Help Guide
Interchangeable Lens Digital Camera
ILME-FR7 / ILME-FR7K
Image Quality Settings Saved for Each Shooting Mode
The current status of configuration items related to image quality are saved for each of the following shooting modes.
When you change the shooting mode, the corresponding settings that are saved for the target shooting mode are
applied.
Custom mode SDR(BT.709) target display
Custom mode HDR(HLG) target display
Cine EI mode
The configuration items related to image quality which are saved for each shooting mode are shown in the following
tables.
“Yes” indicates a setting that is saved, and “No” indicates a setting that is not saved. “Yes” spanning multiple columns
indicates common settings.
Item
Shooting mode
Custom mode
Cine EI mode
SDR(BT.709) HDR(HLG)
Shooting menu
ISO/Gain/EI
ISO/Gain
Yes
1)
No
Exposure Index No Yes
Base Sensitivity Yes No
Base ISO No Yes
White
Preset White Yes Yes
Other than above Yes
White Setting Yes
Offset White Yes No
LUT On/Off No Yes
Noise Suppression
Setting(Custom) Yes Yes No
Level(Custom) Yes Yes No
Setting(Cine EI) No Yes
Level(Cine EI) No Yes
Paint/Look menu
Base Look
Select Yes Yes Yes
Input
2)
Yes
Output
2)
Yes
AE Level Offset
2)
Yes
350

5-041-957-11(1) Copyright 2022 Sony Corporation
Item
Shooting mode
Custom mode
Cine EI mode
SDR(BT.709) HDR(HLG)
Black Yes Yes No
Knee
Auto Knee Yes No No
Other than above Yes Yes No
Detail Yes Yes No
Matrix Yes Yes No
Multi Matrix Yes Yes No
Separate ISO sensitivity settings are saved for both Custom mode [SDR(BT.709)] and [HDR(HLG)].
1)
Settings are saved for each [Base Look], and do not depend on the shooting mode.
2)
351
Help Guide
Interchangeable Lens Digital Camera
ILME-FR7 / ILME-FR7K
Web Menu Configuration
Press the [Settings] operation screen switching tab to display the settings screen.
Use the settings screen to configure the various setup items of the unit, including initial settings, network settings,
shooting/playback settings using the web menu.
The menu comprises the following menus.
Menu configuration and hierarchy
Level 1 Level 1 description Level 2
Shooting Contains settings related to shooting. Focus
Project Contains basic project settings. Base Setting
Rec Format
Simul Rec
Proxy Rec
Interval Rec
Picture Cache Rec
352
Level 1 Level 1 description Level 2
All File
Paint/Look Contains settings related to image quality. Base Look
Pan-Tilt Contains settings related to the pan/tilt.
P/T Speed
P/T Acceleration
P/T Range Limit
P/T Direction
P/T Preset
Monitoring Contains settings related to video output and the screen display.
Output Format
Output Display
Audio Contains settings related to audio. Audio
Technical Contains settings for technical items.
Tally
IR Remote
Network Contains settings related to networks.
Camera Name
User
Wired LAN
File Transfer
FTP Server 1
FTP Server 2
FTP Server 3
SSL
Referer Check
Brute Force Attack Protection
Stream Contains settings related to streaming.
Stream
Video Stream
Audio Stream
Maintenance Contains devices settings, such as the clock and language. Language
Accessibility
Clock Set
Reset
Information
System Log
HTTP Access Log
353

Note
[Accessibility] is only available on models for North America.
5-041-957-11(1)
Copyright 2022 Sony Corporation
Level 1 Level 1 description Level 2
Service
EULA
Software
354
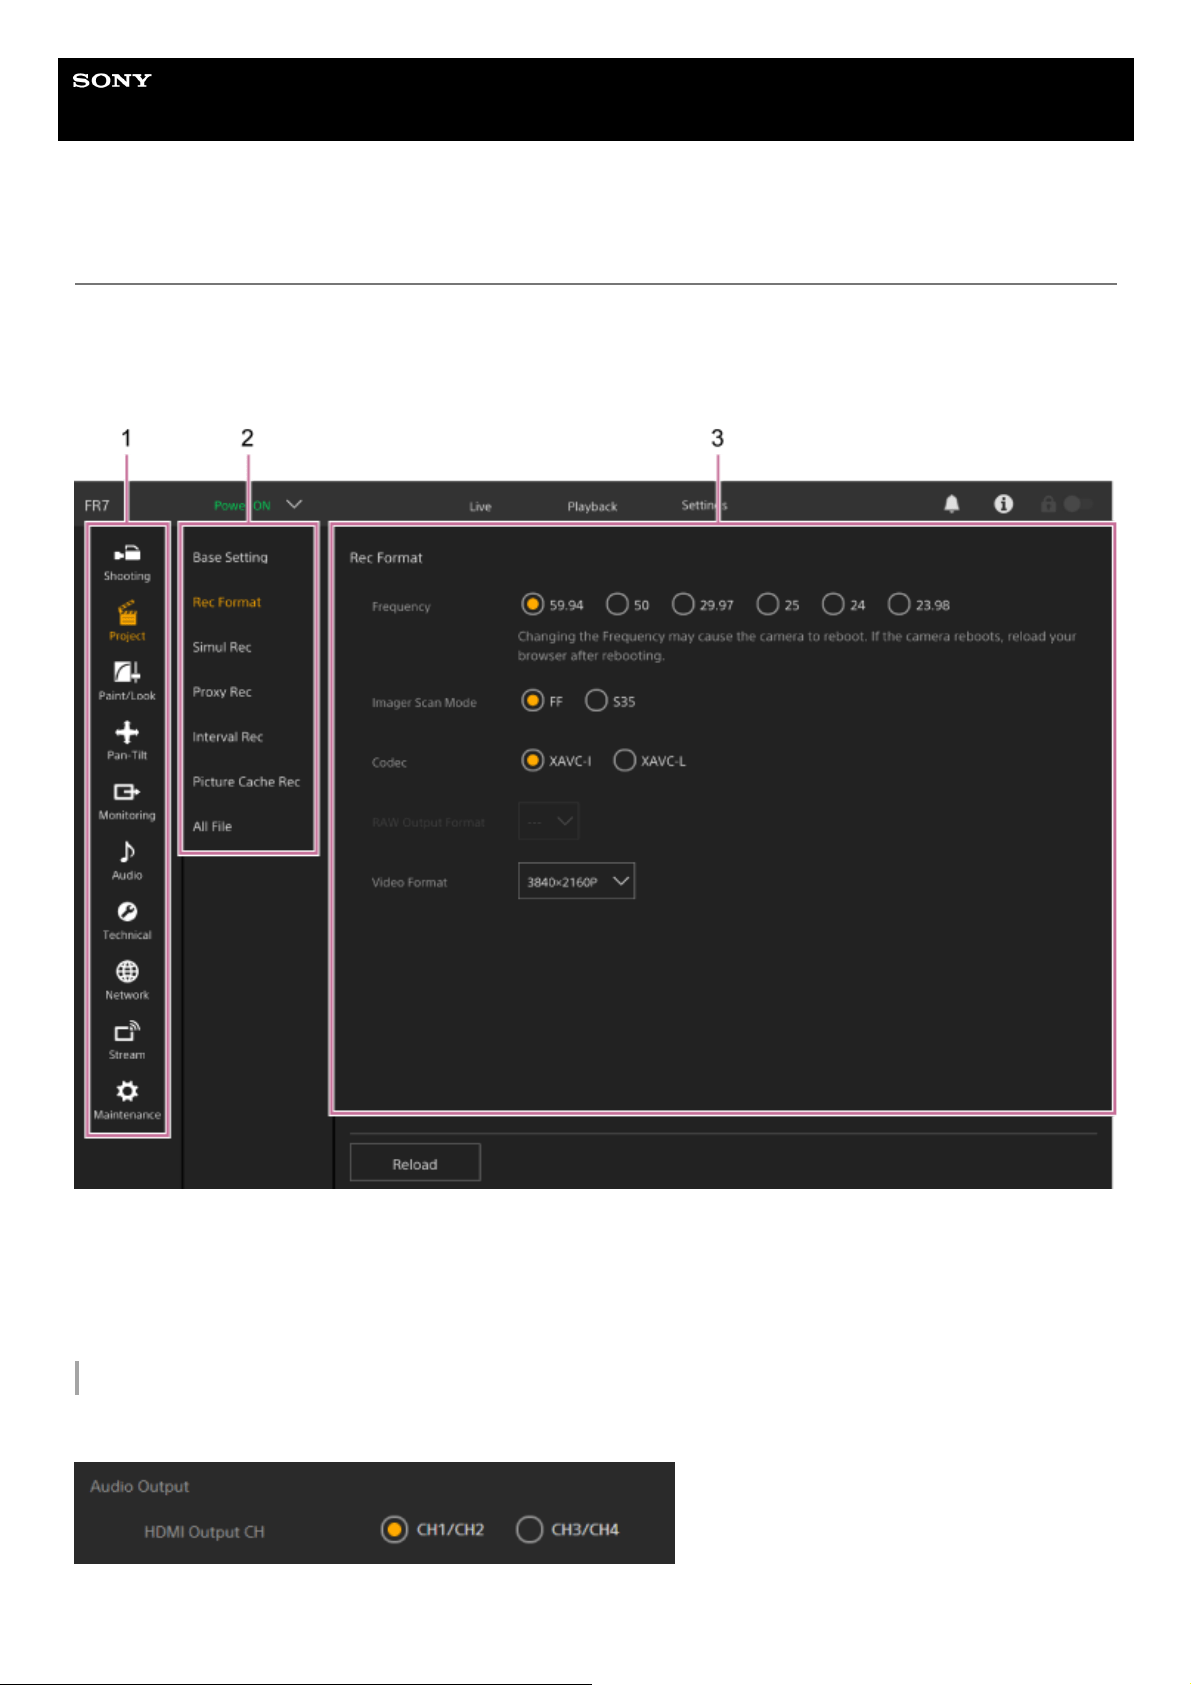
Help Guide
Interchangeable Lens Digital Camera
ILME-FR7 / ILME-FR7K
Web Menu Operations
Press the [Settings] operation screen switching tab to display the settings screen to configure the various setup items of
the unit, including initial settings, network settings, shooting/playback settings using the web menu.
Configure settings in the web menu on a tablet using touch operation or on a computer using mouse operation.
Press the menu for the items you want to configure to display the setup items and their settings in that menu.
Configuration method
Value selection
Press the radio button for an item. The radio button for a selected item is displayed in orange.
Menu (level 1)1.
Menu (level 2)2.
Settings3.
355
Item on/off
Press the switch to turn the item on/off. The switch is orange when the item is turned on, and white when turned off.
Value selection from a list
Press the drop-down button and select an item from the displayed list.
Numeric value selection
Press < or > to change the numeric value. If the numeric value is underlined, you can also enter a numeric value directly.
Character/number entry
Configuration on separate screen
Press the button to perform setup operations on a separate screen.
Guidance message
Information that helps you to configure some settings and messages that call attention to the user are displayed.
Saving a setting
When finished configuring a setting, press the [OK] button to save the setting.
Press the [Cancel] button to discard changes to a setting and revert to the previous setting.
Press the [Reload] button to update the screen display.
Note
If you press the [Reload] button before saving a setting, changes to the setting will be discarded.
If you move to a different page before saving a setting, changes to the setting will be discarded.
5-041-957-11(1)
Copyright 2022 Sony Corporation
356
Help Guide
Interchangeable Lens Digital Camera
ILME-FR7 / ILME-FR7K
Focus
Sets focus settings.
5-041-957-11(1)
Copyright 2022 Sony Corporation
Item
Sub-item
setting
Factory
default
Description
Push AF
Mode
AF / Single-shot
AF(AF-S)
AF Sets the push auto focus mode.
Touch
Function in
MF
Tracking AF /
Spot Focus
Tracking
AF
Sets the operation when the camera image screen is touched in MF
mode.
AF Assist
Control
On / Off On
When set to [On], you can use the focus slider in the Web App during
auto focus to adjust the focus position.
For details, see “Setting the Auto Focus Target Manually (AF
Assist) Using the Web App.”
Note
This item is enabled only when [AF Assist] is set to [On] in the camera
menu.
357

Help Guide
Interchangeable Lens Digital Camera
ILME-FR7 / ILME-FR7K
Base Setting
Sets base settings.
5-041-957-11(1)
Copyright 2022 Sony Corporation
Item Sub-item setting
Factory
default
Description
Shooting
Mode
Custom / Cine EI Custom
Sets the shooting mode.
See “Shooting mode” in “Configuring Basic
Operation.”
Target
Display
SDR(BT.709) /
HDR(HLG)
SDR(BT.709)
Sets the color space of the recording/output in Custom
mode.
358

Help Guide
Interchangeable Lens Digital Camera
ILME-FR7 / ILME-FR7K
Rec Format
Sets recording format settings.
[RAW Output Format] settings
Item Sub-item setting
Factory
default
Description
Frequency 59.94 / 50 / 29.97 / 25 / 24 / 23.98 59.94
Selects the system frequency.
Note
If the frequency is changed, the camera will
reboot. After rebooting, reload the page in the
web browser.
Imager
Scan
Mode
FF / S35 FF Selects the imager size.
Codec RAW / RAW & XAVC-I / XAVC-I / XAVC-L XAVC-I
Sets the clip recording/playback codec.
Note
When [Imager Scan Mode] is set to [S35],
[RAW] and [RAW & XAVC-I] cannot be
selected.
RAW
Output
Format
The available settings vary depending on
the [Frequency] setting.
See “[RAW Output Format] settings”
below.
–
Sets the size of the RAW image to output to an
external RAW recorder.
Note
When [Codec] is set to [RAW & XAVC-I], the
[Video Format] setting switches in link with
the [RAW Output Format] setting.
Video
Format
The available settings vary depending on
the [Frequency], [Imager Scan Mode], and
[Codec] settings.
See “[Video Format] settings” below.
– Sets the image size and bit rate.
Frequency Imager Scan Mode Codec Setting
59.94 / 50 / 29.97 / 25 / 23.98 FF RAW / RAW & XAVC-I
4096×2160
3840×2160
24 FF RAW / RAW & XAVC-I 4096×2160
359

Default values are shown in bold.
The conditions under which [RAW Output Format] cannot be set have been omitted.
[Video Format] settings
Default values are shown in bold.
5-041-957-11(1)
Copyright 2022 Sony Corporation
Frequency Imager Scan Mode Codec Setting
59.94 / 50 / 29.97 / 25 / 23.98
FF
RAW –
RAW & XAVC-I
4096×2160P
3840×2160P
XAVC-I
4096×2160P
3840×2160P
1920×1080P
XAVC-L
3840×2160P
1920×1080P 50
1920×1080P 35
S35
XAVC-I 1920×1080P
XAVC-L
1920×1080P 50
1920×1080P 35
24 FF
RAW –
RAW & XAVC-I / XAVC-I 4096×2160P
360
Help Guide
Interchangeable Lens Digital Camera
ILME-FR7 / ILME-FR7K
Simul Rec
Sets 2-slot simultaneous recording mode settings (see Recording to Memory Cards A and B Simultaneously (2-slot
Simul Rec)”).
5-041-957-11(1)
Copyright 2022 Sony Corporation
Item Sub-item setting
Factory
default
Description
Setting On / Off Off
Turns the simultaneous recording function on/off and sets the
recording destination media.
Rec Button
SlotA / SlotB /
SlotA/SlotB
SlotA/SlotB
Displays the record button assignment for each recording media.
Set [Project] > [Simul Rec] > [Rec Button Set] in the camera menu.
2nd Rec
Button
SlotA / SlotB /
SlotA/SlotB
SlotA/SlotB
361

Help Guide
Interchangeable Lens Digital Camera
ILME-FR7 / ILME-FR7K
Interval Rec
Sets interval recording mode settings (see “Recording Video Intermittently (Interval Rec)”).
5-041-957-11(1)
Copyright 2022 Sony Corporation
Item Sub-item setting Factory default Description
Setting On / Off Off
Turns interval recording mode on/off.
(Setting this mode to On will set all
other special modes to Off.)
Interval
Time
1 / 2 / 3 / 4 / 5 / 6 / 7 / 8 / 9 / 10 / 15 / 20
/ 30 / 40 / 50 (sec)
1 / 2 / 3 / 4 / 5 / 6 / 7 / 8 / 9 / 10 / 15 / 20
/ 30 / 40 / 50 (min)
1 / 2 / 3 / 4 / 6 / 12 / 24 (hour)
1
Sets the interval between recordings
in Interval Rec recording mode
(when Interval Rec is set to On).
Number
of
Frames
1frame / 2frames / 3frames / 6frames /
9frames / 12frames
The available settings vary depending
on the frame frequency of the selected
video format.
59.94P/50P: 2frames / 6frames /
12frames
29.97P/25P/24P/23.98P: 1frame /
3frames / 6frames / 9frames
59.94P/50P: 2frames
29.97P/25P/24P/23.98P:
1frame
Sets the number of frames to record
per take in Interval Rec recording
mode (when Interval Rec is set to
On).
363

Help Guide
Interchangeable Lens Digital Camera
ILME-FR7 / ILME-FR7K
Picture Cache Rec
Sets picture cache recording mode settings (see “Recording Cached Pictures (Picture Cache Rec)”).
5-041-957-11(1)
Copyright 2022 Sony Corporation
Item Sub-item setting
Factory
default
Description
Setting On / Off Off Turns the picture cache function on/off.
Cache
Size
Short / Medium /
Long / Max
Max
Sets the time for accumulation of images in picture cache memory
(picture cache recording time).
Cache
Rec Time
– –
Displays the time for accumulation of images in picture cache memory
(picture cache recording time).
364

Help Guide
Interchangeable Lens Digital Camera
ILME-FR7 / ILME-FR7K
All File
Performs ALL file operations (see “Saving and Loading Configuration Data”).
5-041-957-11(1)
Copyright 2022 Sony Corporation
Item
Sub-item
setting
Factory
default
Description
Load All
File
– –
Load an ALL file into the unit from the device running the Web App.
Note
When an ALL file is loaded into the unit, the unit will reboot. After rebooting,
reload the page in the web browser.
Save All
File
– – Save the settings of the unit to the device running the Web App as an ALL file.
365
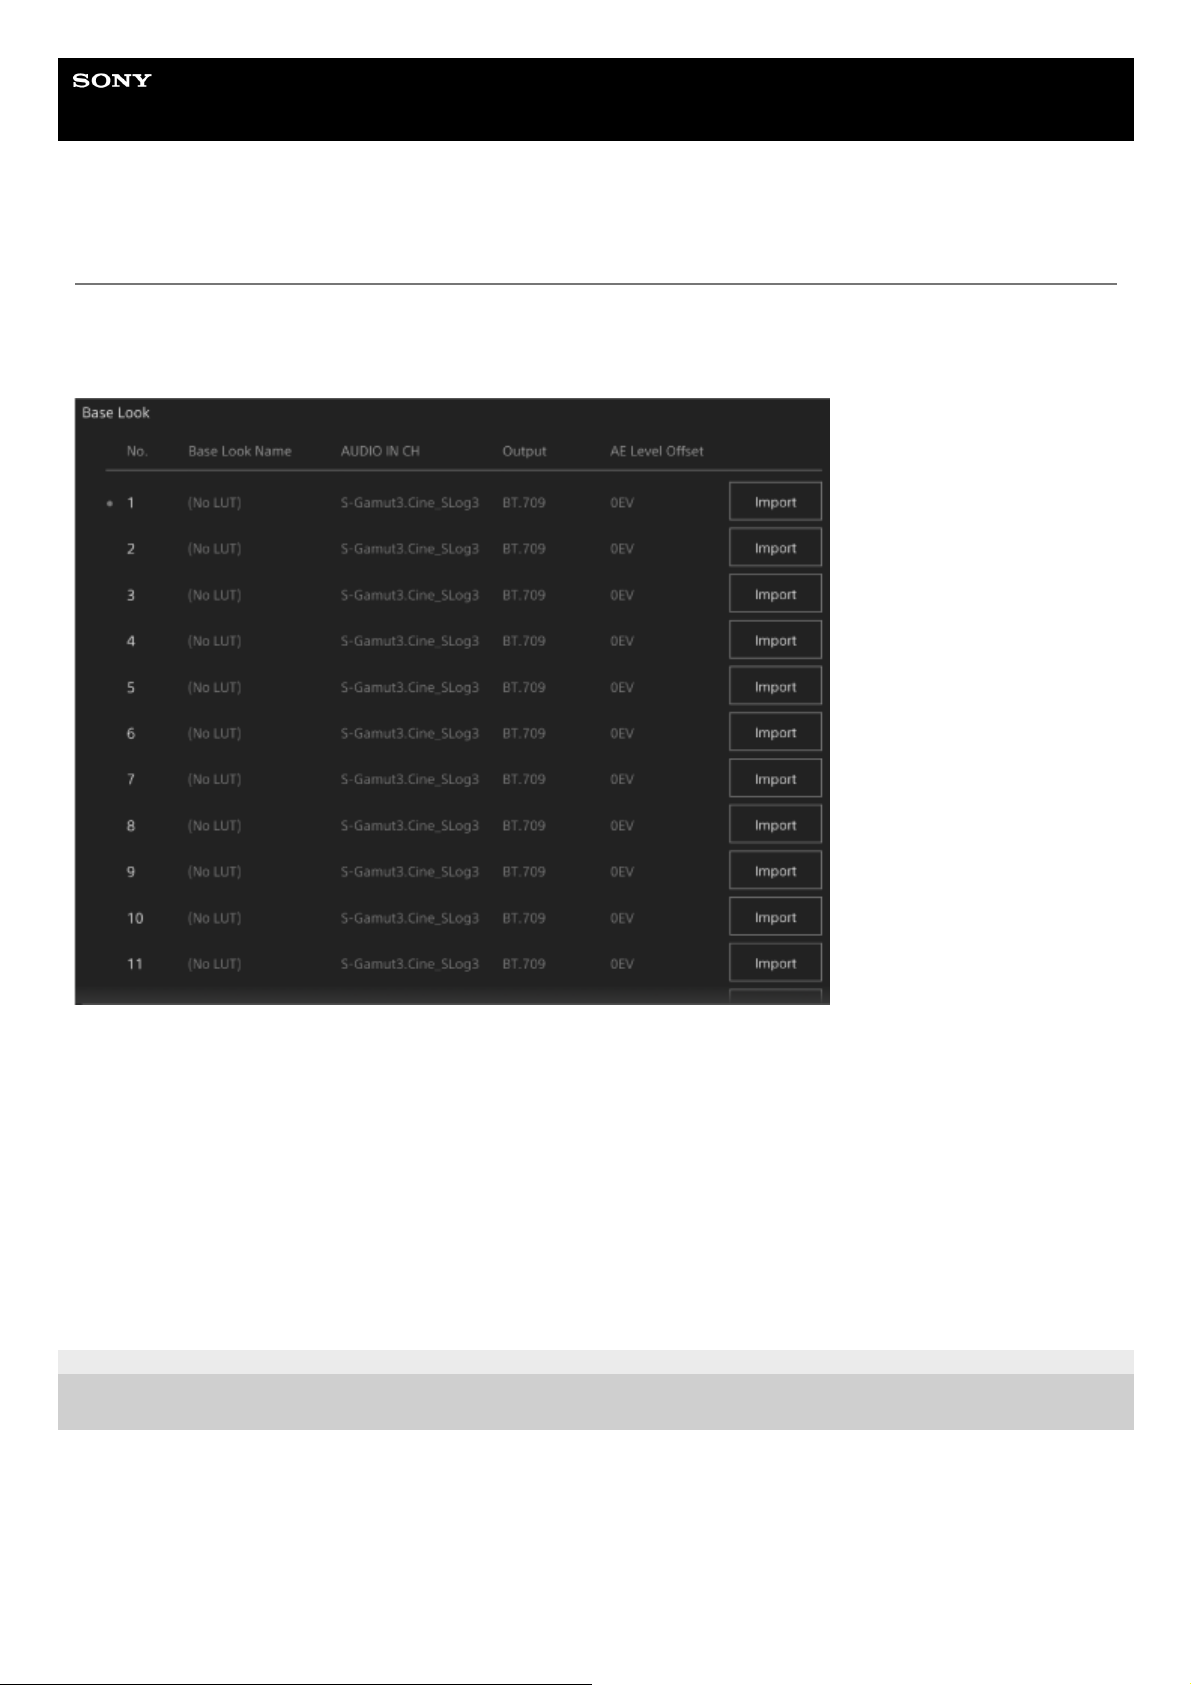
Help Guide
Interchangeable Lens Digital Camera
ILME-FR7 / ILME-FR7K
Base Look
You can load a base look into the unit.
A list of available base looks is displayed on the screen. The currently applied base look is indicated by a ● marker on
the left of the base look number.
[No.]: Base look number
[Base Look Name]: Base look name
[Input]: Base look input signal
[Output]: Base look output signal
[AE Level Offset]: Base look exposure reference value
To add a base look
Press the [Import] button to import a new base look. Follow the on-screen instructions.
After importing, set appropriate values for [Input], [Output], and [AE Level Offset]. For details, see “Importing a Desired
Base Look.”
5-041-957-11(1)
Copyright 2022 Sony Corporation
366
Help Guide
Interchangeable Lens Digital Camera
ILME-FR7 / ILME-FR7K
P/T Speed
Sets settings related to the pan/tilt speed.
5-041-957-11(1)
Copyright 2022 Sony Corporation
Item
Sub-item
setting
Factory
default
Description
Speed
Step
Normal /
Extended
Extended
Sets the number of speed steps of the pan/tilt drive.
Normal: Speed can be specified using 24-step range. Use this setting for
compatibility with existing Sony remote cameras.
Extended: Speed can be specified using 50-step range.
Speed
Mode
Normal /
Slow
Normal
Sets the speed mode of the pan/tilt drive.
Enabled only when [Speed Step] is set to [Normal].
Normal: Operates in normal-speed range (minimum to maximum (60
degrees/second)).
Slow: Operates in low-speed range (minimum to maximum (40
degrees/second)).
367

Help Guide
Interchangeable Lens Digital Camera
ILME-FR7 / ILME-FR7K
P/T Acceleration
Sets settings related to the pan/tilt speed.
5-041-957-11(1)
Copyright 2022 Sony Corporation
Item
Sub-item
setting
Factory
default
Description
Acceleration 1 to 9 8
Selects the acceleration/deceleration for pan/tilt operations. The larger the
number, the higher the acceleration.
368
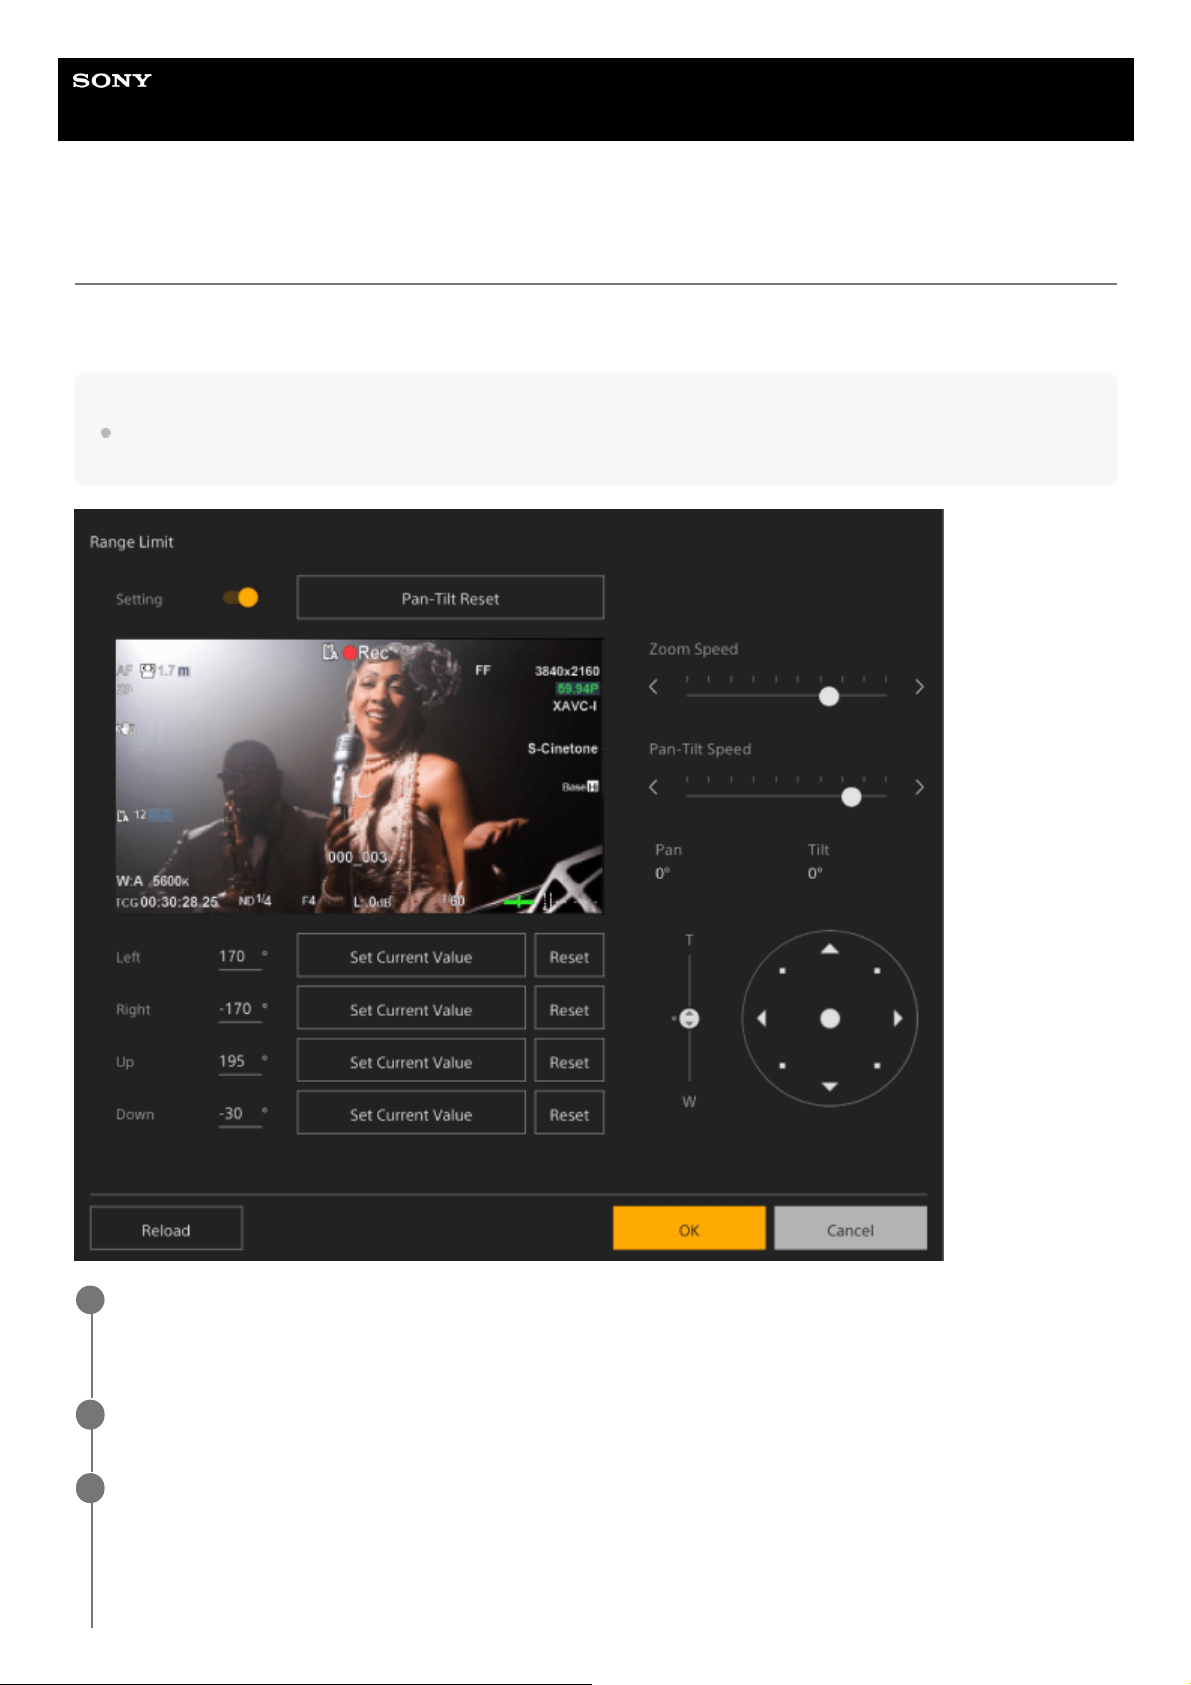
Help Guide
Interchangeable Lens Digital Camera
ILME-FR7 / ILME-FR7K
P/T Range Limit
Sets settings related to limiting the pan/tilt operating range.
Set the pan/tilt operating range limits using the following screen.
Note
When the unit is turned on or pan/tilt reset is executed, this range limit setting is ignored. This function cannot be used to avoid
obstacles near the unit.
Set the [Setting] switch to the on position.
The pan-tilt operating range limit function becomes enabled.
1
Check the image using the pan/tilt controls of the camera.
2
To set the positions at which to limit operation, press the [Left], [Right], [Up], [Down] > [Set Current Value]
button at those positions.
[Left]: Left side of camera
[Right]: Right side of camera
[Up]: Top side of camera
3
369
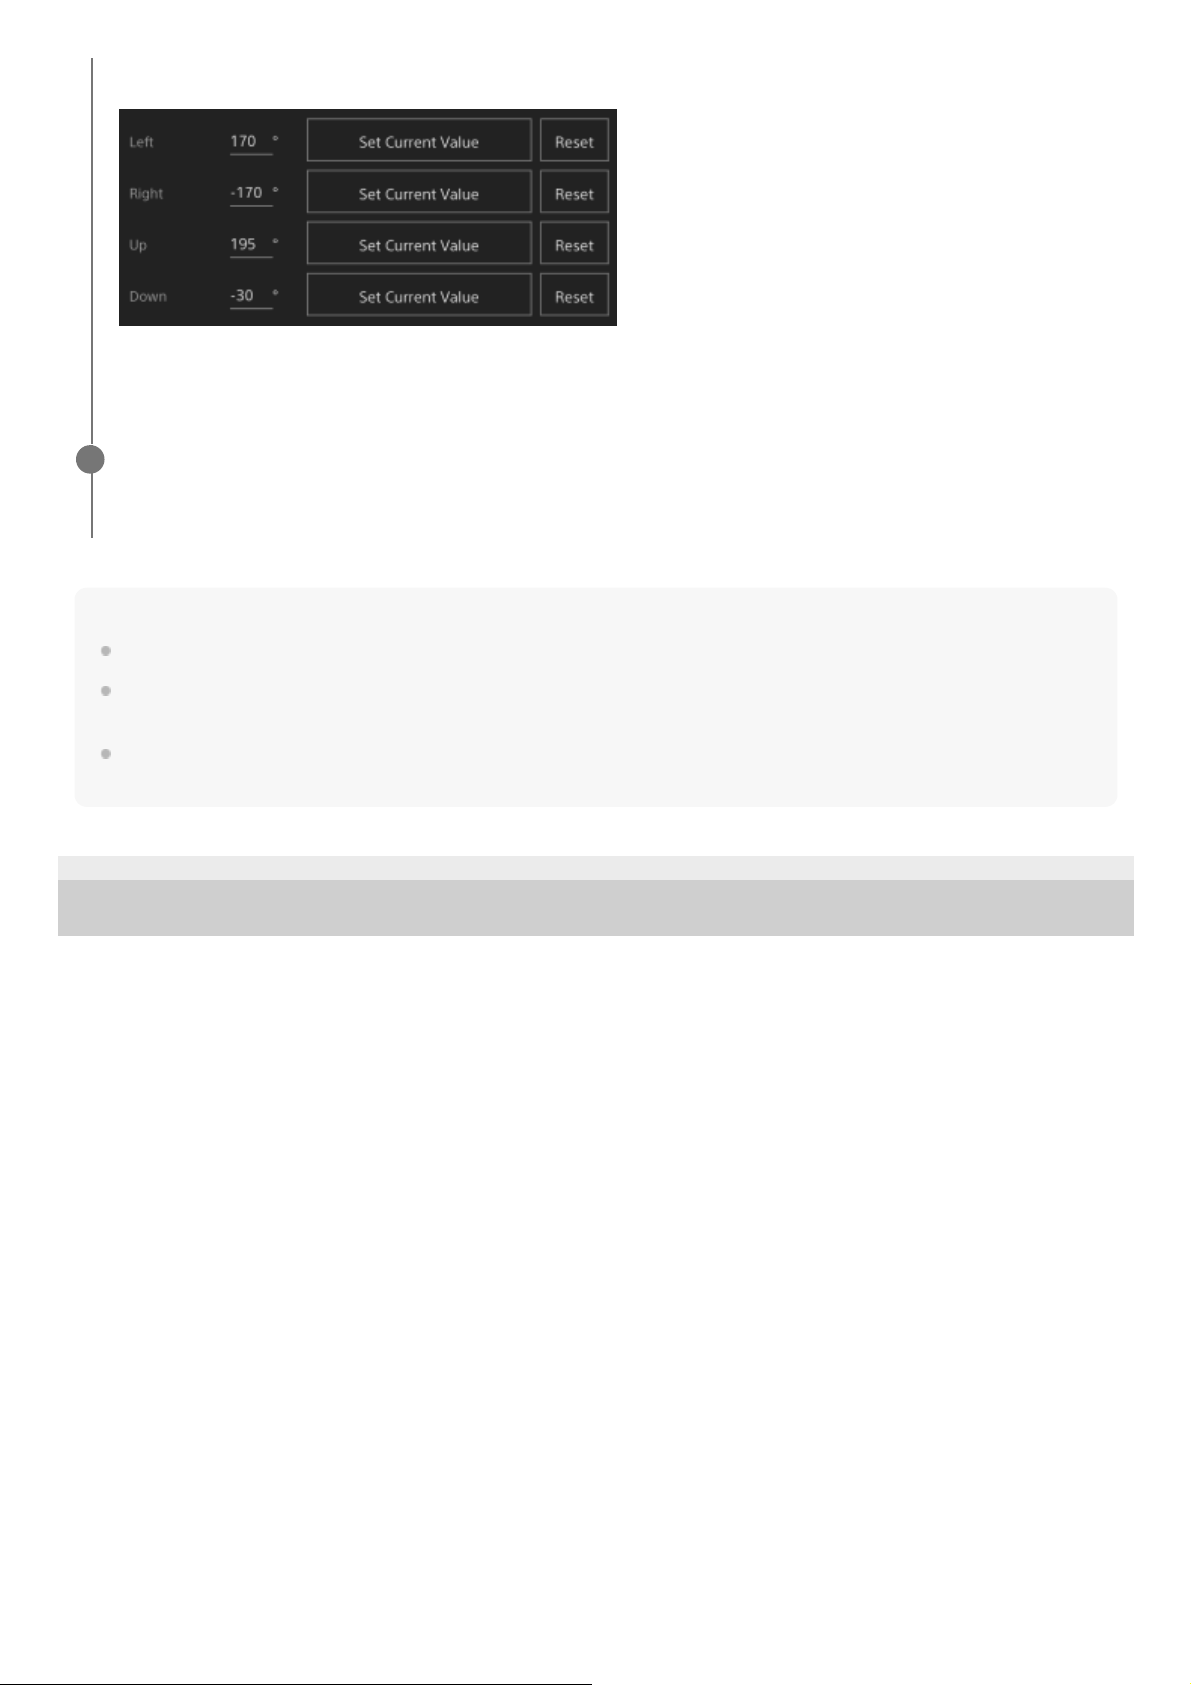
Note
Camera positions outside the limit positions cannot be saved as a preset.
If the [Pan-Tilt] > [P/T Direction] > [Ceiling] setting is changed, the configured limit position settings are returned to the factory
defaults.
The setting cannot be changed during playback, during thumbnail display, when a pan/tilt error occurs, when pan/tilt is not
initialized, and when pan/tilt is locked.
5-041-957-11(1)
Copyright 2022 Sony Corporation
[Down]: Bottom side of camera
The limit positions are set and are displayed as numeric values (angle).
To cancel a limit, press the [Reset] button for the individual positions.
Press the [OK] button.
The pan/tilt operation is restricted to stay within the configured limit positions.
4
370
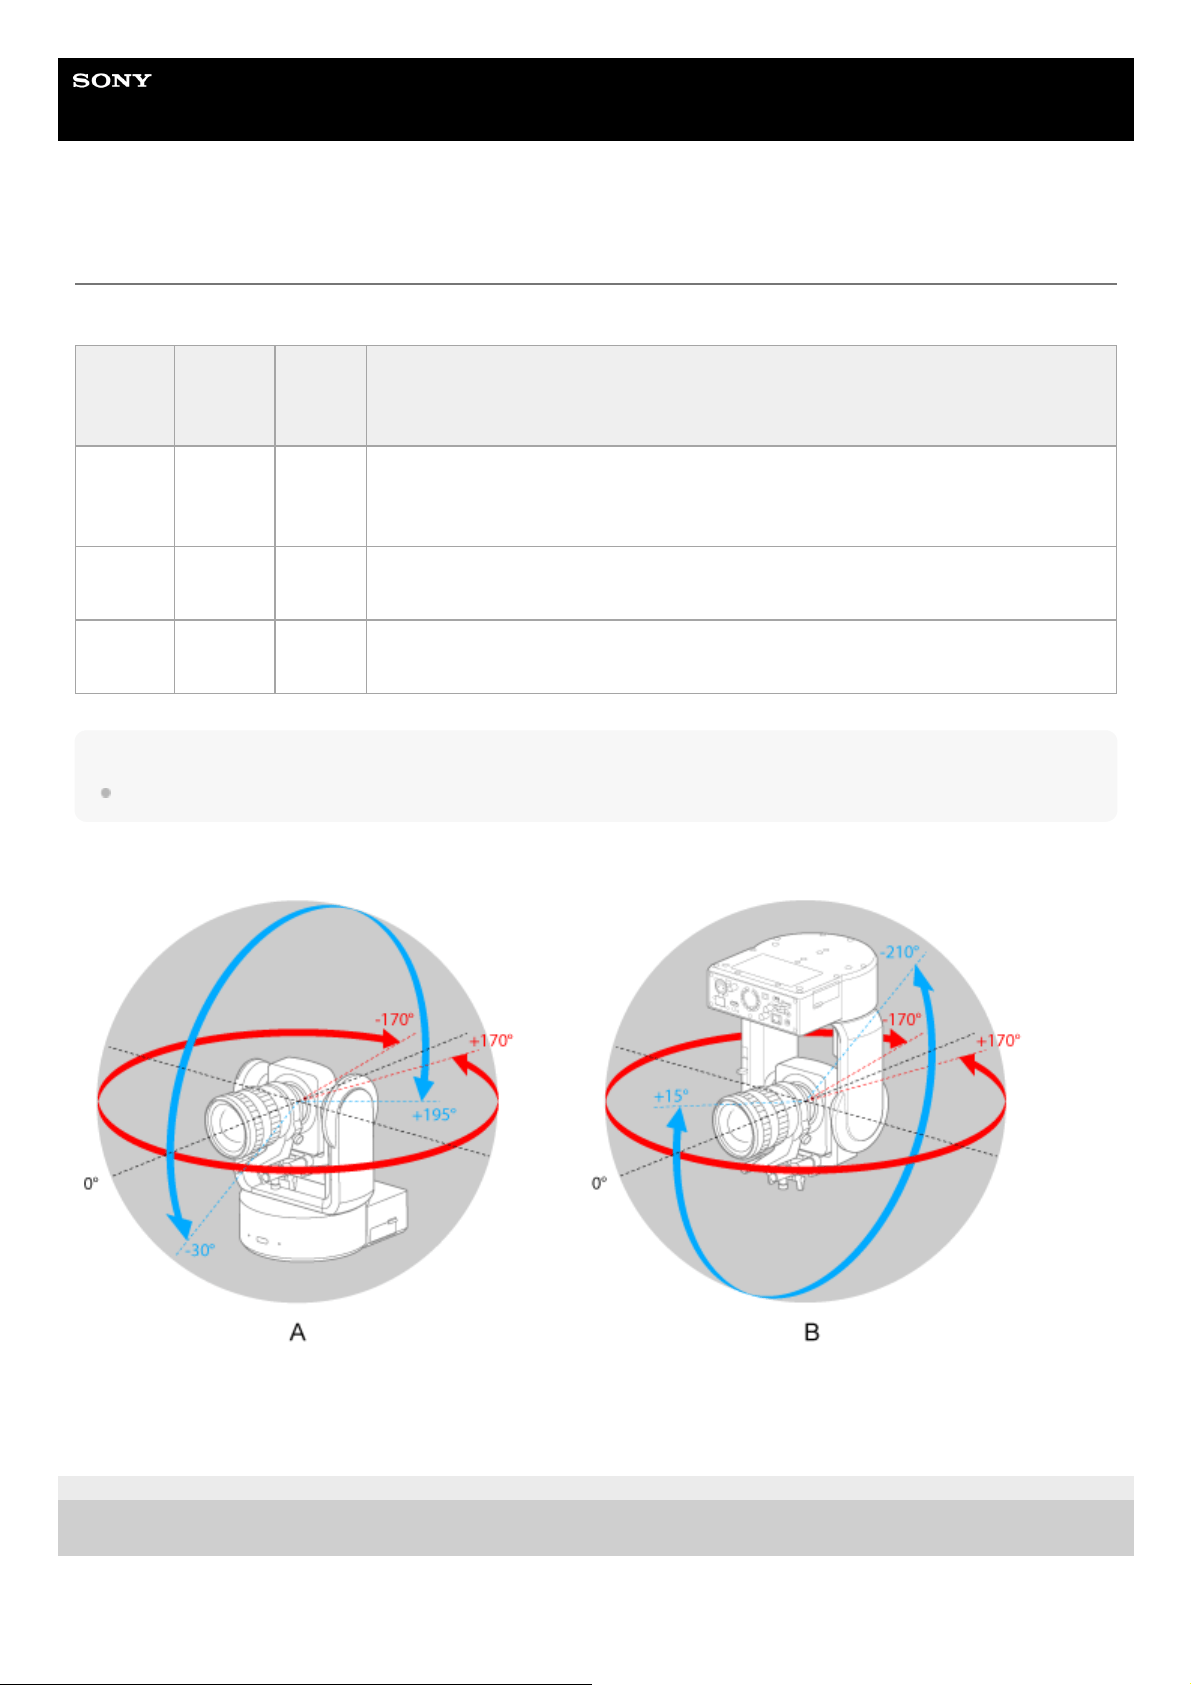
Help Guide
Interchangeable Lens Digital Camera
ILME-FR7 / ILME-FR7K
P/T Direction
Sets settings related to the pan/tilt direction.
Note
When a changed [Ceiling] setting is applied, all preset positions are deleted since the pan/tilt coordinates would become inverted.
The pan/tilt drive range changes as shown in the following diagram depending on the [Ceiling] setting.
A: When [Ceiling] is set to [Off]
B: When [Ceiling] is set to [On]
5-041-957-11(1)
Copyright 2022 Sony Corporation
Item
Sub-
item
setting
Factory
default
Description
Ceiling On / Off Off
When the unit is mounted on a desktop, set to [Off]. When the unit is mounted on a
ceiling, set to [On]. When [Ceiling] is set to [On], [Pan Direction] is automatically set
to [Opposite].
Pan
Direction
Normal /
Opposite
Normal
Sets the pan drive direction. When the setting is changed, the drive direction
reverses.
Tilt
Direction
Normal /
Opposite
Normal
Sets the tilt drive direction. When the setting is changed, the drive direction
reverses.
371

Help Guide
Interchangeable Lens Digital Camera
ILME-FR7 / ILME-FR7K
P/T Preset
Sets settings related to camera presets.
5-041-957-11(1)
Copyright 2022 Sony Corporation
Item
Sub-item
setting
Factory
default
Description
Speed
Select
Separate /
Common
Separate
Sets whether preset speeds are configured separately or use a common
setting.
Common
Speed
1 to 50 50
Sets the common speed for presets.
Note
A maximum drive speed of 24 is used if a value of 25 or higher is set when [Pan-
Tilt] > [P/T Speed] > [Speed Step] is set to [Normal].
372
Help Guide
Interchangeable Lens Digital Camera
ILME-FR7 / ILME-FR7K
Output Format
Sets output format settings.
5-041-957-11(1)
Copyright 2022 Sony Corporation
Item Sub-item setting
Factory
default
Description
SDI
For details about settings, see “Output Formats and
Limitations.”
–
Sets the SDI and HDMI output
resolution.
HDMI –
373
Help Guide
Interchangeable Lens Digital Camera
ILME-FR7 / ILME-FR7K
Output Display
Sets settings related to output signals.
Note
This setting is also applied to the HDMI output signal image, streaming output image, and the image in the Web App camera
image panel.
5-041-957-11(1)
Copyright 2022 Sony Corporation
Item
Sub-item
setting
Factory
default
Description
SDI On / Off Off
Sets whether the menu and status are embedded in the SDI output
signal.
HDMI/Stream On / Off On
Sets whether the menu and status are embedded in the HDMI
output signal.
374
Help Guide
Interchangeable Lens Digital Camera
ILME-FR7 / ILME-FR7K
Audio Input
Sets settings related to CH1 to CH4 audio input.
Sets the master audio input level. The master audio input level is used for all channels 1 to 4.
5-041-957-11(1)
Copyright 2022 Sony Corporation
Item Sub-item setting Factory default Description
Level
Control
Auto / Manual Auto
Selects audio input level automatic adjustment or
manual adjustment.
Level 0 to 99 49 Sets the input level.
Input
Select
AUDIO IN CH1 / AUDIO IN
CH2 / Off
CH1 and CH3: AUDIO
IN CH1
CH2 and CH4: AUDIO
IN CH2
Sets the audio input source.
Note
CH1 is [AUDIO IN CH1] (fixed).
Wind
Filter
On / Off Off Turns the wind noise reduction filter on/off.
Item Sub-item setting Factory default Description
Master 0 to 99 99 Sets the master input level.
375

Help Guide
Interchangeable Lens Digital Camera
ILME-FR7 / ILME-FR7K
Audio Output
Sets settings related to audio output.
Note
This setting is also applied to the streaming output audio.
5-041-957-11(1)
Copyright 2022 Sony Corporation
Item
Sub-item
setting
Factory
default
Description
HDMI/Stream
Output CH
CH1/CH2 /
CH3/CH4
CH1/CH2
Sets the combination of audio channels for the
HDMI/streaming output.
376
Help Guide
Interchangeable Lens Digital Camera
ILME-FR7 / ILME-FR7K
Tally
Sets recording/tally lamp settings (see “Connecting a Tally Signal”).
5-041-957-11(1)
Copyright 2022 Sony Corporation
Item
Sub-item
setting
Factory
default
Description
Tally Lamp
Brightness
High / Low /
Off
High Sets the brightness of the recording/tally lamp.
G Tally Lamp
Enable /
Disable
Enable Enables/disables the G tally lamp.
Tally Control
External /
Internal
Internal
Selects the target for accepting the recording/tally lamp control
information of the unit.
377
Help Guide
Interchangeable Lens Digital Camera
ILME-FR7 / ILME-FR7K
IR Remote
Sets settings related to the infrared remote control.
5-041-957-11(1)
Copyright 2022 Sony Corporation
Item
Sub-item
setting
Factory
default
Description
Setting On / Off On
Enables/disables operation of the unit from the infrared remote
control.
378

Help Guide
Interchangeable Lens Digital Camera
ILME-FR7 / ILME-FR7K
Camera Name
Sets settings related to the camera name (unit name).
Up to eight (0 to 8) of the following characters can be entered for Camera Name.
Alphanumeric characters
Symbols (space !#$`*+-./;<=>?@[\]^_`{|})
5-041-957-11(1)
Copyright 2022 Sony Corporation
Item Sub-item setting Factory default Description
Camera Name – FR7 Sets the camera name.
379
Help Guide
Interchangeable Lens Digital Camera
ILME-FR7 / ILME-FR7K
User
Sets settings related to user access of the unit.
Settings related to administrator users (Administrator) (required)
Settings related to general users (User 1 to User 9) (optional)
5-041-957-11(1)
Copyright 2022 Sony Corporation
Item
Sub-item
setting
Factory
default
Description
User Name – admin Sets the user name.
Current Password – –
When changing the password, enter the current
password.
New Password – – Enter the new password.
Re-Type
Password
– – Enter the new password again for confirmation.
Item
Sub-item
setting
Factory
default
Description
User Name – – Sets the user name.
Current Password – –
When changing the password, enter the current
password.
New Password – – Enter the new password.
Re-Type
Password
– – Enter the new password again for confirmation.
380
Help Guide
Interchangeable Lens Digital Camera
ILME-FR7 / ILME-FR7K
Wired LAN
Status
Displays the network status.
IPv4
Sets settings related to the IPv4 network.
IPv6
Sets settings related to the IPv6 network.
Item Sub-item setting Factory default Description
Host Name – – Displays the host name.
MAC Address – – Displays the MAC address of the unit.
Ethernet Status – – Displays the current communication speed.
IP Address – – Displays the IP address of the unit.
Subnet Mask – – Displays the subnet mask of the unit.
Gateway – – Displays the IPv4 default gateway of the unit.
Primary DNS Server – – Displays the primary DNS server of the unit.
Secondary DNS Server – – Displays the secondary DNS server of the unit.
IPv6 Address 1 – – Displays IPv6 address 1 of the unit.
IPv6 Address 2 – – Displays IPv6 address 2 of the unit.
IPv6 Gateway – – Displays the IPv6 default gateway of the unit.
Link-local IPv6 Address – – Displays the IPv6 link-local address of the unit.
Item Sub-item setting Factory default Description
DHCP On / Off On Turns the [DHCP] function on/off.
IP Address – – Sets the IPv4 address when [DHCP] is set to Off.
Subnet Mask – – Sets the subnet mask when [DHCP] is set to Off.
Gateway – – Sets the IPv4 default gateway when [DHCP] is set to Off.
Item
Sub-item
setting
Factory
default
Description
Obtain an IP Address
Automatically
On / Off On Turns auto IPv6 address acquisition on/off.
381

Common
Sets settings common to IPv4/IPv6 networks.
5-041-957-11(1)
Copyright 2022 Sony Corporation
Item
Sub-item
setting
Factory
default
Description
IP Address – –
Sets the IPv6 address when [Obtain an IP Address
Automatically] is set to Off.
Prefix Length – –
Sets the prefix when [Obtain an IP Address Automatically] is
set to Off.
Gateway – –
Sets the IPv6 default gateway when [Obtain an IP Address
Automatically] is set to Off.
Item
Sub-item
setting
Factory
default
Description
HTTP Port
80, 1024 to
65534
80 Sets the HTTP port number.
DNS Auto On / Off On
Sets whether to obtain the DNS addresses from the DHCP
server.
Primary DNS Server
IPv4/IPv6
address
– Sets the primary DNS server when [DNS Auto] is set to Off.
Secondary DNS
Server
IPv4/IPv6
address
–
Sets the secondary DNS server when [DNS Auto] is set to
Off.
382

Help Guide
Interchangeable Lens Digital Camera
ILME-FR7 / ILME-FR7K
File Transfer
Sets settings related to file transfers.
5-041-957-11(1)
Copyright 2022 Sony Corporation
Item
Sub-item
setting
Factory
default
Description
Auto
Upload
(Proxy)
On / Off Off Turns proxy file auto upload on/off.
Default
Upload
Server
Server
Settings1 to 3 >
Display Name
Server
Settings1
Selects the upload server for files. The server selected here becomes the
auto upload destination for proxy files, and the upload destination for files
from the thumbnail screen.
Displays the [Display Name] settings configured in [Server Settings1 to 3].
383
Help Guide
Interchangeable Lens Digital Camera
ILME-FR7 / ILME-FR7K
FTP Server 1 to 3
Sets settings related to file FTP transfers.
The settings are common for FTP Server 1 to 3.
5-041-957-11(1)
Copyright 2022 Sony Corporation
Item
Sub-item
setting
Factory
default
Description
Display Name – –
Sets the display name shown in the transfer destination setup
menu.
Service – – Displays the type of server.
Host Name – – Sets the host name of the transfer destination server.
Port
21, 990, 1024 to
65534
21 Sets the port number of the transfer destination server.
User Name – –
Sets the user name for authentication of the transfer destination
server connection.
Password – –
Sets the authentication password of the transfer destination
server connection.
Passive Mode On / Off Off Turns passive mode on/off.
Destination
Directory
– – Sets the name of the transfer destination directory.
Using Secure
Protocol
On / Off Off Sets whether to use (On) or not use (Off) secure FTP transfer.
Root Certificate – –
Loads the root certificate for secure FTP transfer.
Press the [Load] and select a root certificate on the displayed
screen.
Press the [Delete] button to delete the loaded root certificate.
Root Certificate
Status
– – Displays the load status of the root certificate.
Reset – – Resets the [Server Settings] settings to the defaults.
384
Help Guide
Interchangeable Lens Digital Camera
ILME-FR7 / ILME-FR7K
SSL
Sets settings related to SSL.
SSL
Enables/disables the SSL function.
SSL Server Authentication
Sets settings related to SSL server authentication.
Item Sub-item setting
Factory
default
Description
Function
Disable / Enable / Enable (Allow HTTP connection for
some clients)
Disable
Enables/disables the SSL
function.
Item Sub-item setting
Factory
default
Description
Certificate
Options
Use a self-signed certificate
(For test use) / Use an
external certificate
– Sets the installation method of the SSL server certificate.
Status – –
Displays the validity of the SSL server certificate when
[Certificate Options] is set to [Use a self-signed certificate
(For test use)].
Issuer DN – –
Displays the distinguished name of the issuer of the SSL
server certificate when [Certificate Options] is set to [Use a
self-signed certificate (For test use)].
Subject DN – –
Displays the distinguished name of the subject of the SSL
server certificate when [Certificate Options] is set to [Use a
self-signed certificate (For test use)].
Available
Period
– –
Displays the valid period of the SSL server certificate when
[Certificate Options] is set to [Use a self-signed certificate
(For test use)].
Extended
Key Usage
– –
Displays the extended key usage method when [Certificate
Options] is set to [Use a self-signed certificate (For test use)].
Delete – –
This button is displayed when [Certificate Options] is set to
[Use a self-signed certificate (For test use)].
Deletes the installed SSL server certificate.
Import – –
Installs an external SSL server certificate from a list when
[Certificate Options] is set to [Use an external certificate].
385

5-041-957-11(1) Copyright 2022 Sony Corporation
Item Sub-item setting
Factory
default
Description
Private Key
Password
– –
Sets the password for the private key information of the SSL
server certificate when [Certificate Options] is set to [Use an
external certificate].
Reset – –
This button clears the private key password display for entry
of a new password.
Self-Signed
Certificate
Generation
– –
Press the [Generate] button to generate a self-signed
certificate when [Certificate Options] is set to [Use a self-
signed certificate (For test use)].
386

Help Guide
Interchangeable Lens Digital Camera
ILME-FR7 / ILME-FR7K
Referer Check
Sets settings related to Referer checks.
Exception List
Sets settings related to the Referer check exception list.
5-041-957-11(1) Copyright 2022 Sony Corporation
Item Sub-item setting Factory default Description
Setting On / Off On Enables/disables the Referer check function.
Item
Sub-item
setting
Factory
default
Description
No. 1 to 10 – Sets the exception number from the list.
Host
Name
– – Sets the host name of the exception.
Port
Number
– – Sets the port number of the exception.
Set – – Press to register the configured exception in the exception list.
Delete – –
Select an exception that you want to delete and press the button to delete the
registered exception from the exception list.
387

388

Help Guide
Interchangeable Lens Digital Camera
ILME-FR7 / ILME-FR7K
Brute Force Attack Protection
Sets settings related to brute force attack prevention.
When an attacker is detected, the attacker list information is displayed.
5-041-957-11(1)
Copyright 2022 Sony Corporation
Item
Sub-item
setting
Factory
default
Description
Setting On / Off On Turns the [Brute Force Attack Protection] function on/off.
Count 3 to 100 8
Sets the number of attempts that will be considered as an attack.
Enabled when [Setting] is set to On.
Release
Mode
Always /
Timer
Timer
Sets the release condition.
Enabled when [Setting] is set to On.
Always: Do not delete from attacker list.
Timer: Delete from attacker list after the release time set using [Release Time]
has elapsed.
Release
Time
30 to
86400 s
60
Sets the release time.
Enabled when [Setting] is set to On.
When Release Mode: is set to [Timer], entries are deleted from the attacker list
after the release time has elapsed.
389
Help Guide
Interchangeable Lens Digital Camera
ILME-FR7 / ILME-FR7K
Stream
Sets streaming settings (see “About Streaming”).
Stream Setting
Sets settings related to the streaming protocol.
RTSP
The following items are displayed when [Stream Setting] is set to [RTSP].
Sets settings related to RTSP streaming.
SRT
The following items are displayed when [Stream Setting] is set to [SRT-Caller] or [SRT-Listener].
Sets settings related to SRT streaming.
Item Sub-item setting Factory default Description
Setting RTSP / SRT-Caller / SRT-Listener / NDI|HX / Off RTSP Selects the streaming protocol.
Item
Sub-item
setting
Factory
default
Description
Port Number
554, 1024 to
65534
554 Sets the RTSP port number.
Time Out 0 to 600 60
Sets the timeout of the [Keep Alive] command for RTSP
streaming.
Authentication On / Off On Turns the RTSP authentication function on/off.
Video Port
Number 1
1024 to 65534 51000
Sets the port number for sending video 1 for RTSP unicast
streaming.
Video Port
Number 2
1024 to 65534 53000
Sets the port number for sending video 2 for RTSP unicast
streaming.
Audio Port
Number
1024 to 65534 57000
Sets the port number for sending audio for RTSP unicast
streaming.
Item Sub-item setting
Factory
default
Description
Destination – –
Sets the connection destination URL when the unit is
operating as a caller.
Port
Number
1024 to 65534 4201
Sets the port number for listening when the unit is operating
as a listener.
Latency 20 to 8000 ms 120 Sets the latency.
390
NDI|HX
The following items are displayed when [Stream Setting] is set to [NDI|HX].
Sets settings related to NDI|HX.
5-041-957-11(1)
Copyright 2022 Sony Corporation
Item Sub-item setting
Factory
default
Description
TTL 1 to 255 64 Sets the TTL value.
Encryption Off / AES128 / AES256 Off
Enables/disables encryption and sets the encryption
method.
Passphrase
0 or string of 10 to 79
characters
0
Sets the passphrase used for encryption.
Press Reset to clear the entered passphrase.
ARC On / Off On Turns the [Adaptive Rate Control] on/off.
Item
Sub-item
setting
Factory
default
Description
License – – Displays the installation state of the NDI license key.
Source Name – – Displays the NDI source name.
Group On / Off Off Turns the NDI grouping function on/off.
Group Name – –
Displayed when the NDI grouping function is set to On.
Sets the group name.
Discovery Server
1
– – Sets NDI discovery server 1.
Discovery Server
2
– – Sets NDI discovery server 2.
Reliable UDP
Mode
On / Off On Turns Reliable UDP mode on/off.
Multicast Mode On / Off Off Turns multicast streaming on/off.
Multicast Prefix 239.255.0.0 239.255.0.0
Displayed when [Multicast Mode] is set to On.
Sets the prefix to use for multicast streaming.
Multicast Netmask 255.255.0.0 255.255.0.0
Displayed when [Multicast Mode] is set to On.
Sets the netmask that determines the multicast address
range.
Multicast TTL 1 to 256 3
Displayed when [Multicast Mode] is set to On.
Sets the TTL value for multicast streaming.
Multi-TCP Mode On / Off Off Turns Multi-TCP mode on/off.
Unicast UDP
Mode
On / Off On Turns Unicast UDP mode on/off.
391
Help Guide
Interchangeable Lens Digital Camera
ILME-FR7 / ILME-FR7K
Video Stream
Sets settings related to the streaming video codecs.
Video Stream 1
Sets settings related to video codec 1.
Item Sub-item setting
Factory
default
Description
Codec 1 H.264 / H.265 H.264 Sets the codec of image 1.
Size 1
4096×2160 / 3840×2160 / 2048×1080 / 1920×1080 /
1280×720 / 640×360
1920×1080
Sets the picture size of image
1.
Frame Rate
1
For details about supported frame rates, see
“Setting the Video Codec for Streaming.”
– Sets the frame rate of image 1.
I-Picture
Mode 1
Time / Frame Time
Sets the [IDR-Frame] insertion
interval for image 1 as a time or
number of frames.
I-Picture
Interval 1
1 / 2 / 3 / 4 / 5 s 1
Displayed when [I-Picture
Mode 1] is set to Time.
Sets the IDR-Frame insertion
interval for H.264 and H.265 as
a time.
I-Picture
Ratio 1
15 to 300 frames 30
Displayed when [I-Picture
Mode 1] is set to Frame.
Sets the IDR-Frame insertion
interval for H.264 and H.265 as
a number of frames.
Profile 1
H.264: high / main / baseline
H.265: main / main10
H.264:
high
Sets the H.264 or H.265 profile.
Bit Rate
Compression
Mode 1
CBR / VBR VBR
Sets the bit rate compression
mode of image 1.
Bit Rate 1
512 / 768 / 1000 / 2000 / 3000 / 4000 / 5000 / 6000 /
7000 / 8000 / 16000 / 24000 / 32000 / 50000 / 64000 /
80000 kbps
16000
Displayed when [Bit Rate
Compression Mode 1] is set to
On.
Sets the bit rate target value
when the bit rate compression
mode is set to CBR.
Quality 1 1 / 2 / 3 / 4 / 5 / 6 / 7 / 8 / 9 10 6
Sets the H.264 or H.265
quality.
392

Video Stream 2
Sets settings related to video codec 2.
Video Stream 3
Sets settings related to video codec 3.
Item Sub-item setting
Factory
default
Description
Codec 2 H.264 / H.265 / Off Off Sets the codec of image 2.
Size 2
4096×2160 / 3840×2160 / 2048×1080 /
1920×1080 / 1280×720 / 640×360 / 512×270
1920×1080 Sets the picture size of image 2.
Frame Rate
2
For details about supported frame rates, see
“Setting the Video Codec for Streaming.”
–
Displayed when [Codec 2] is not
set to Off.
Sets the frame rate of image 2.
I-Picture
Mode 2
Time / Frame Time
Displayed when [Codec 2] is not
set to Off.
Sets the IDR-Frame insertion
interval for image 2 as a time or
number of frames.
I-Picture
Interval 2
1 / 2 / 3 / 4 / 5 s 1
Displayed when both [Codec 2] is
not set to Off and [I-Picture Mode
2] is set to [Time].
Sets the IDR-Frame insertion
interval for H.264 and H.265 as a
time.
I-Picture
Ratio 2
15 to 300 frames 30
Displayed when both [Codec 2] is
not set to Off and [I-Picture Mode
2] is set to [Frame].
Sets the IDR-Frame insertion
interval for H.264 and H.265 as a
number of frames.
Profile 2
H.264: high / main / baseline
H.265: main
– Sets the H.264 or H.265 profile.
Bit Rate
Compression
Mode 2
CBR / VBR VBR
Displayed when [Codec 2] is not
set to Off.
Sets the bit rate compression mode
of image 2.
Bit Rate 2
512 / 768 / 1000 / 2000 / 3000 / 4000 / 5000 /
6000 / 7000 / 8000 / 16000 / 24000 / 32000 /
50000 / 64000 / 80000 kbps
8000
Displayed when both [Codec 2] is
not set to Off and [Bit Rate
Compression Mode 2] is set to
[On].
Sets the bit rate target value when
the bit rate compression mode is
set to CBR.
Quality 2 1 / 2 / 3 / 4 / 5 / 6 / 7 / 8 / 9 / 10 6
Displayed when both [Codec 2] is
set to H.264 and [Bit Rate
Compression Mode 2] is set to Off.
Sets the H.264 or H.265 quality.
393

5-041-957-11(1) Copyright 2022 Sony Corporation
Item Sub-item setting
Factory
default
DescriptionItem Sub-item setting
Factory
default
Description
Codec 3 JPEG JPEG
Sets the codec of
image 3.
Size 3 1280×720 / 1024×540 / 640×360 1280×720
Sets the picture size of
image 3.
Frame
Rate 3
For details about supported frame rates, see “Setting the
Video Codec for Streaming.”
–
Sets the frame rate of
image 3.
Quality 3 1 / 2 / 3 / 4 / 5 / 6 / 7 / 8 / 9 / 10 6 Sets the quality.
394
Help Guide
Interchangeable Lens Digital Camera
ILME-FR7 / ILME-FR7K
Audio Stream
Sets settings related to the streaming audio codec.
5-041-957-11(1)
Copyright 2022 Sony Corporation
Item Sub-item setting Factory default Description
Setting On / Off Off Turns audio streaming output on/off.
Codec AAC (128kbps) / AAC (256kbps) AAC (128kbps)
Displayed when [Setting] is set to On.
Sets the audio codec for streaming.
395

Help Guide
Interchangeable Lens Digital Camera
ILME-FR7 / ILME-FR7K
Language
Sets the display language.
Note
The available languages may vary depending on the country or region.
5-041-957-11(1)
Copyright 2022 Sony Corporation
Item Sub-item setting Factory default Description
Language – – Sets the display language.
396

Help Guide
Interchangeable Lens Digital Camera
ILME-FR7 / ILME-FR7K
Accessibility
Sets settings related to audio reading (text to speech).
Note
This function is only available on models sold in North America. The screen reader function can only be used when the language
is set to English (as of the release date).
Enable the screen reader function of the web browser on the device running the Web App.
5-041-957-11(1)
Copyright 2022 Sony Corporation
Item Sub-item setting
Factory
default
Description
Screen
Reader
On / Off
Off
Turns the screen reader function in the camera image
panel of the Web App on/off.
Speech
Rate
Slow2 / Slow1 / Normal / Fast1 /
Fast2 / Fast3 / Fast4
Normal
Sets the speed of the screen reader function.
A sample passage is read aloud at the configured
speed.
Speech
Volume
1 to 15 7
Sets the volume of the screen reader function of the
Web App.
A sample passage is read aloud at the configured
volume.
397
Help Guide
Interchangeable Lens Digital Camera
ILME-FR7 / ILME-FR7K
Clock Set
Sets internal clock settings.
5-041-957-11(1)
Copyright 2022 Sony Corporation
Item Sub-item setting
Factory
default
Description
Current
Date &
Time
– – Displays the current time configured on the unit.
PC Clock – –
Displays the current time of the tablet or
computer used for configuration.
Date &
Time
Format
yyyy-mm-dd hh:mm:ss / mm-dd-yyyy
hh:mm:ss / dd-mm-yyyy hh:mm:ss
yyyy-
mm-dd
Sets the display format of the date and time.
12 h / 24
h
12 h / 24 h 24 h Sets the time to 12-hour/24-hour display format.
Time
Setting
Keep current setting / Synchronize with PC
/ Manual setting / Synchronize with NTP
–
Sets the configuration method of the date and
time.
yy-mm-
dd
hh:mm:ss
yy: 19 to 37
mm: 01 to 12
dd: 01 to 31
hh: 00 to 23
mm: 00 to 59
ss: 00 to 59 (seconds)
–
Displayed when [Time Setting] is set to Manual
setting.
Sets the date and time manually.
NTP Auto On / Off Off
Displayed when [Time Setting] is set to
Synchronize with NTP.
Sets whether to obtain the IP address of the NTP
server from the DHCP server.
NTP
Server
IPv4/IPv6 address or host name –
Displayed when both [Time Setting] is set to
[Synchronize with NTP] and [NTP Auto] is set to
Off.
Specifies the NTP server used for time
synchronization.
Time
Zone
UTC − 12:00 to UTC + 14:00 – Selects the time zone.
398
Help Guide
Interchangeable Lens Digital Camera
ILME-FR7 / ILME-FR7K
Reset
Initializes the unit.
Reboot
Reboots the unit.
Reset
Resets the settings of the unit.
5-041-957-11(1)
Copyright 2022 Sony Corporation
Item Sub-item setting Factory default Description
Reboot Execute –
Reboots the unit.
Execute: Execute function.
Note
After rebooting, reload the page in the web browser.
Item
Sub-item
setting
Factory
default
Description
All Reset (except for
Network Settings)
Execute –
Resets the settings of the unit (excluding the network settings).
Execute: Execute function.
Note
Imported base looks and LUT files are note deleted.
Network Reset Execute –
Resets the network settings of the unit.
Execute: Execute function.
Note
After executing Network Reset, the unit will reboot. After
rebooting, reload the page in the web browser.
Factory Default Execute –
Returns the settings of the unit to the factory default state.
Execute: Execute function.
Note
After executing Factory Default, the unit will reboot. After
rebooting, reload the page in the web browser.
399
Help Guide
Interchangeable Lens Digital Camera
ILME-FR7 / ILME-FR7K
Information
Displays camera and lens information. Also used to update software.
Camera
Displays camera information and updates software.
Lens
Displays lens information and updates software.
Item
Sub-item
setting
Factory
default
Description
Model
Name
– – Displays the model name of the camera.
Serial
Number
– – Displays the serial number of the camera.
Version
Number
– – Displays the software version of the camera.
Version Up – –
Press the [Choose File] button and follow the on-screen instructions to
update the camera software.
Note
After updating, the unit will reboot. After rebooting, reload the page in the
web browser.
Item
Sub-item
setting
Factory
default
Description
Model
Name
– – Displays the model name of the lens.
Serial
Number
– – Displays the serial number of the lens.
Version
Number
– – Displays the software version of the lens.
400

5-041-957-11(1) Copyright 2022 Sony Corporation
Item
Sub-item
setting
Factory
default
Description
Version Up – –
Press the [Choose File] button and follow the on-screen instructions to
update the lens software.
For details, see “Updating E-Mount Lens Software.”
Note
After updating the lens, the unit will reboot. After rebooting, reload the page
in the web browser.
401
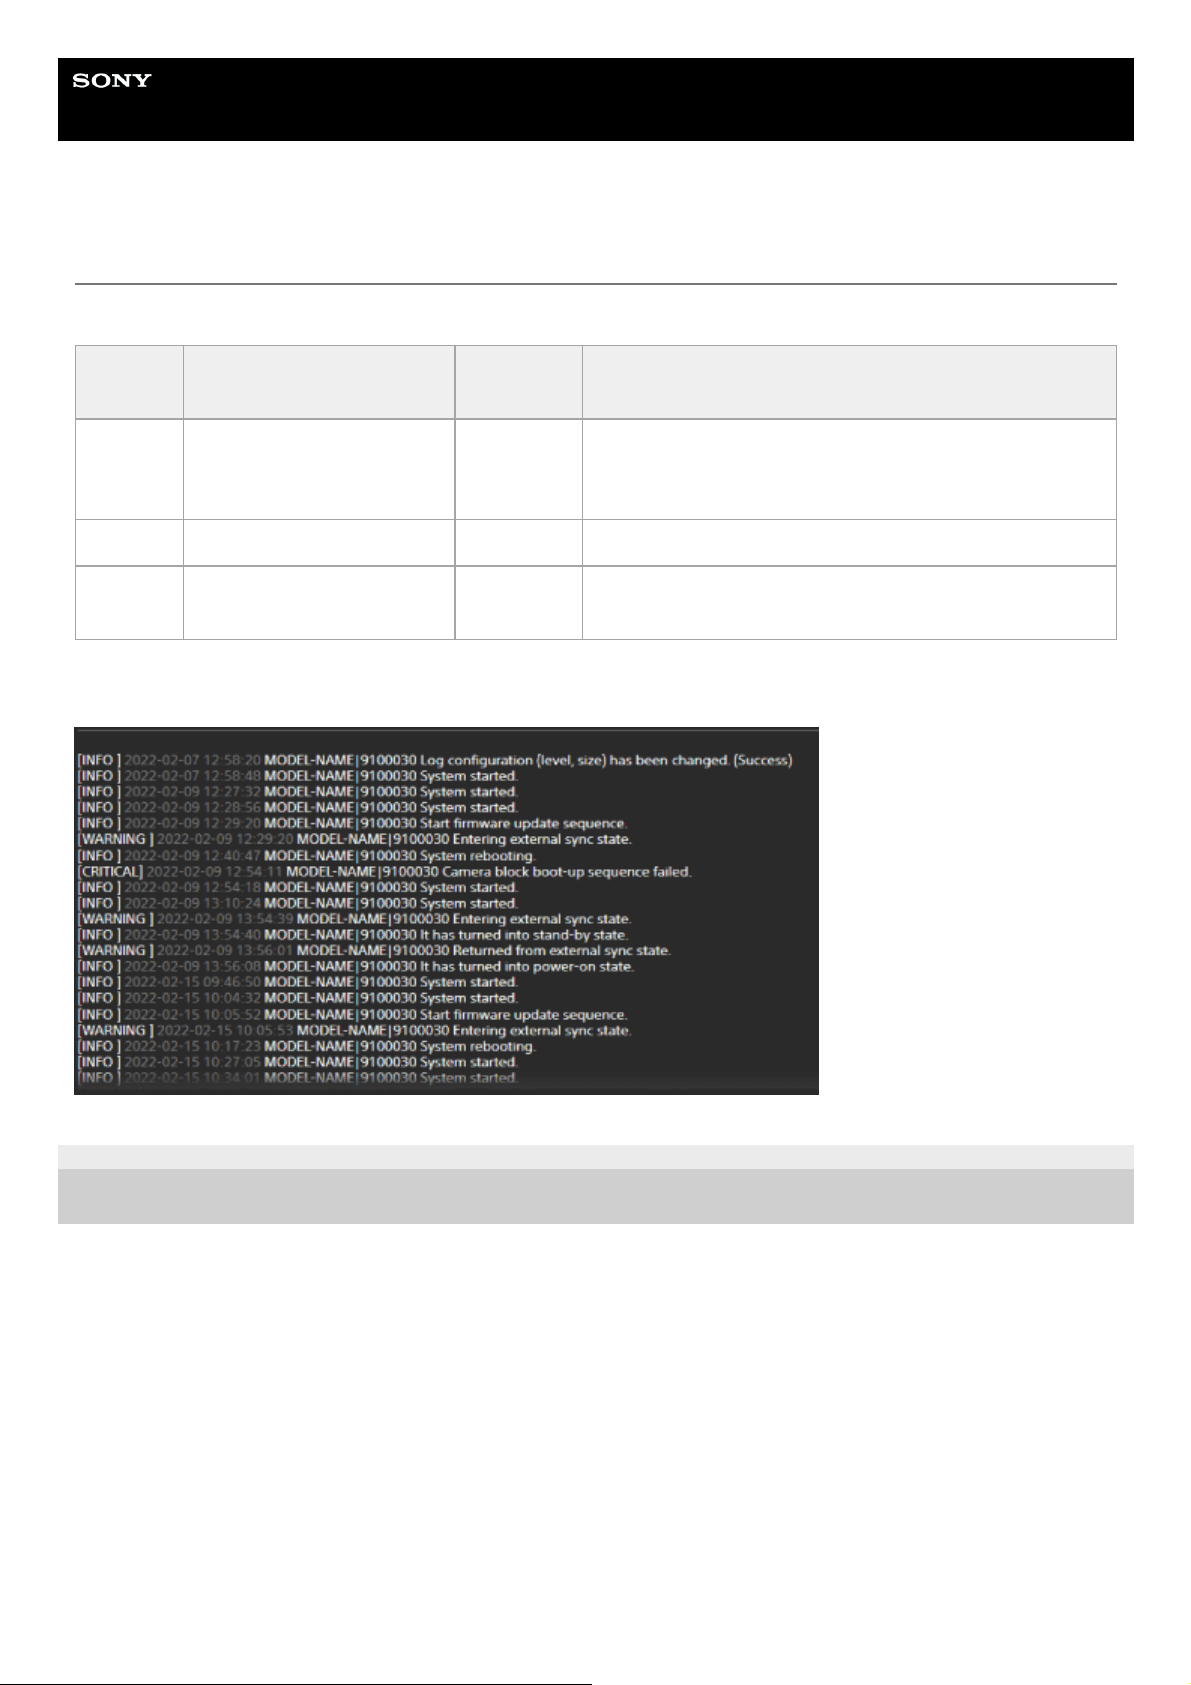
Help Guide
Interchangeable Lens Digital Camera
ILME-FR7 / ILME-FR7K
System Log
Sets settings related to the system log.
The acquired log is displayed as shown below.
5-041-957-11(1) Copyright 2022 Sony Corporation
Item Sub-item setting
Factory
default
Description
Log Level
Critical, Warning & Info /
Critical & Warning / Critical
Critical,
Warning &
Info
Sets the level for adding a record to the system log.
Log Size 200 to 1024 1024 Sets the size of the log to save in the system log.
Download
as File
– –
Press the [Download] button and save the system log to a
tablet or computer from the displayed screen.
402

Help Guide
Interchangeable Lens Digital Camera
ILME-FR7 / ILME-FR7K
HTTP Access Log
Sets settings related to the HTTP access log.
5-041-957-11(1)
Copyright 2022 Sony Corporation
Item Sub-item setting
Factory
default
Description
Log Level
Critical, Warning & Info /
Critical & Warning / Critical
Critical,
Warning &
Info
Sets the level for adding a record to the HTTP access log.
Log Size 200 to 1024 1024 Sets the size of the log to save in the HTTP access log.
Download
as File
– –
Press the [Download] button and save the HTTP access log
to a tablet or computer from the displayed screen.
403
Help Guide
Interchangeable Lens Digital Camera
ILME-FR7 / ILME-FR7K
Service
Obtains device information about the unit. Use when contacting your Sony service representative.
5-041-957-11(1)
Copyright 2022 Sony Corporation
Item
Sub-
item
setting
Factory
default
Description
I agree to download
device information.
– –
Place a check mark here to agree to acquire device information, and
press the [OK] button.
Press the displayed [Download] button. The web browser will
download a file named deviceinformation.dat momentarily.
Note
After downloading, the unit will reboot. After rebooting, reload the page
in the web browser.
404


Help Guide
Interchangeable Lens Digital Camera
ILME-FR7 / ILME-FR7K
Connecting External Monitors and Recording Devices
To display recorded/playback pictures on an external monitor, set the video output type for the external monitor and use
an appropriate cable for the monitor to be connected.
You can also connect an external recorder and record the output signal from the unit.
You can display the same information that is visible in the camera image panel, such as status information and menus,
on an external monitor. Set the desired system type for screen display to On using [Monitoring] > [Output Display] in the
web menu.
Note
If a monitor connected to the HDMI connector does not support the HDMI output format configured using the [Monitoring] menu in
the web menu or camera menu, the camera image will not be output to the Web App. Streaming video also cannot be output.
You can set both [Output Display] > [SDI] and [HDMI/Stream] to [Off], but that will prevent use of the camera menu and functions
that depend on the screen display. In addition, error notifications of the unit will be limited to the lamps (lit or blinking) of the unit
and the display of the notification mark at the top right in the Web App. To see the detailed status, set [Output Display] to [On].
Hint
[Output Display] > [SDI] is set to [Off] and [HDMI/Stream] is set to [On] by factory default. To use streaming as the main video, set
[SDI] to [On] and [HDMI/Stream] to [Off], and monitor the camera status on an SDI monitor.
SDI OUT connector (BNC type)
Set the output format using the [Monitoring] menu in the web menu or camera menu.
Use a commercially available 75 Ω coaxial cable for connection.
Note
Check that the connection between the unit and the external device is grounded before turning the devices on.
It is recommended that the unit and external device be turned on after connecting the 75 Ω coaxial cable.
If the external device must be connected to the unit while the unit is on, connect the 75 Ω coaxial cable to the external
device first and then connect it to the unit.
To start recording on the unit and external device simultaneously
With SDI signal output enabled, set [Project] > [SDI/HDMI Rec Control] > [Setting] to [SDI/HDMI Remote I/F] or [Parallel
Rec] in the camera menu to enable output of a REC trigger signal to the external device connected to the SDI OUT
connector. This will synchronize recording on the external device with the unit.
Note
If a connected external device does not support a REC trigger signal, the device cannot be operated.
When [Project] > [SDI/HDMI Rec Control] > [Setting] is set to [SDI/HDMI Remote I/F] in the camera menu, only the REC trigger
signal is output when there is no recording media currently inserted and the record START/STOP button is operated.
HDMI OUT connector (Type A connector)
Set the output On/Off setting and the output format in the [Monitoring] menu in the camera menu.
407

To start recording on the unit and external device simultaneously
With HDMI signal output enabled, set [TC/Media] > [HDMI TC Out] > [Setting] to [On] and [Project] > [SDI/HDMI Rec
Control] > [Setting] to [SDI/HDMI Remote I/F] or [Parallel Rec] in the camera menu to enable output of a REC trigger
signal to the external device connected to the HDMI OUT connector. This will synchronize recording on the external
device with the unit.
Note
If a connected external device does not support a REC trigger signal, the device cannot be operated.
When [Project] > [SDI/HDMI Rec Control] > [Setting] is set to [SDI/HDMI Remote I/F] in the camera menu, only the REC trigger
signal is output when there is no recording media currently inserted and the record START/STOP button is operated.
5-041-957-11(1)
Copyright 2022 Sony Corporation
408
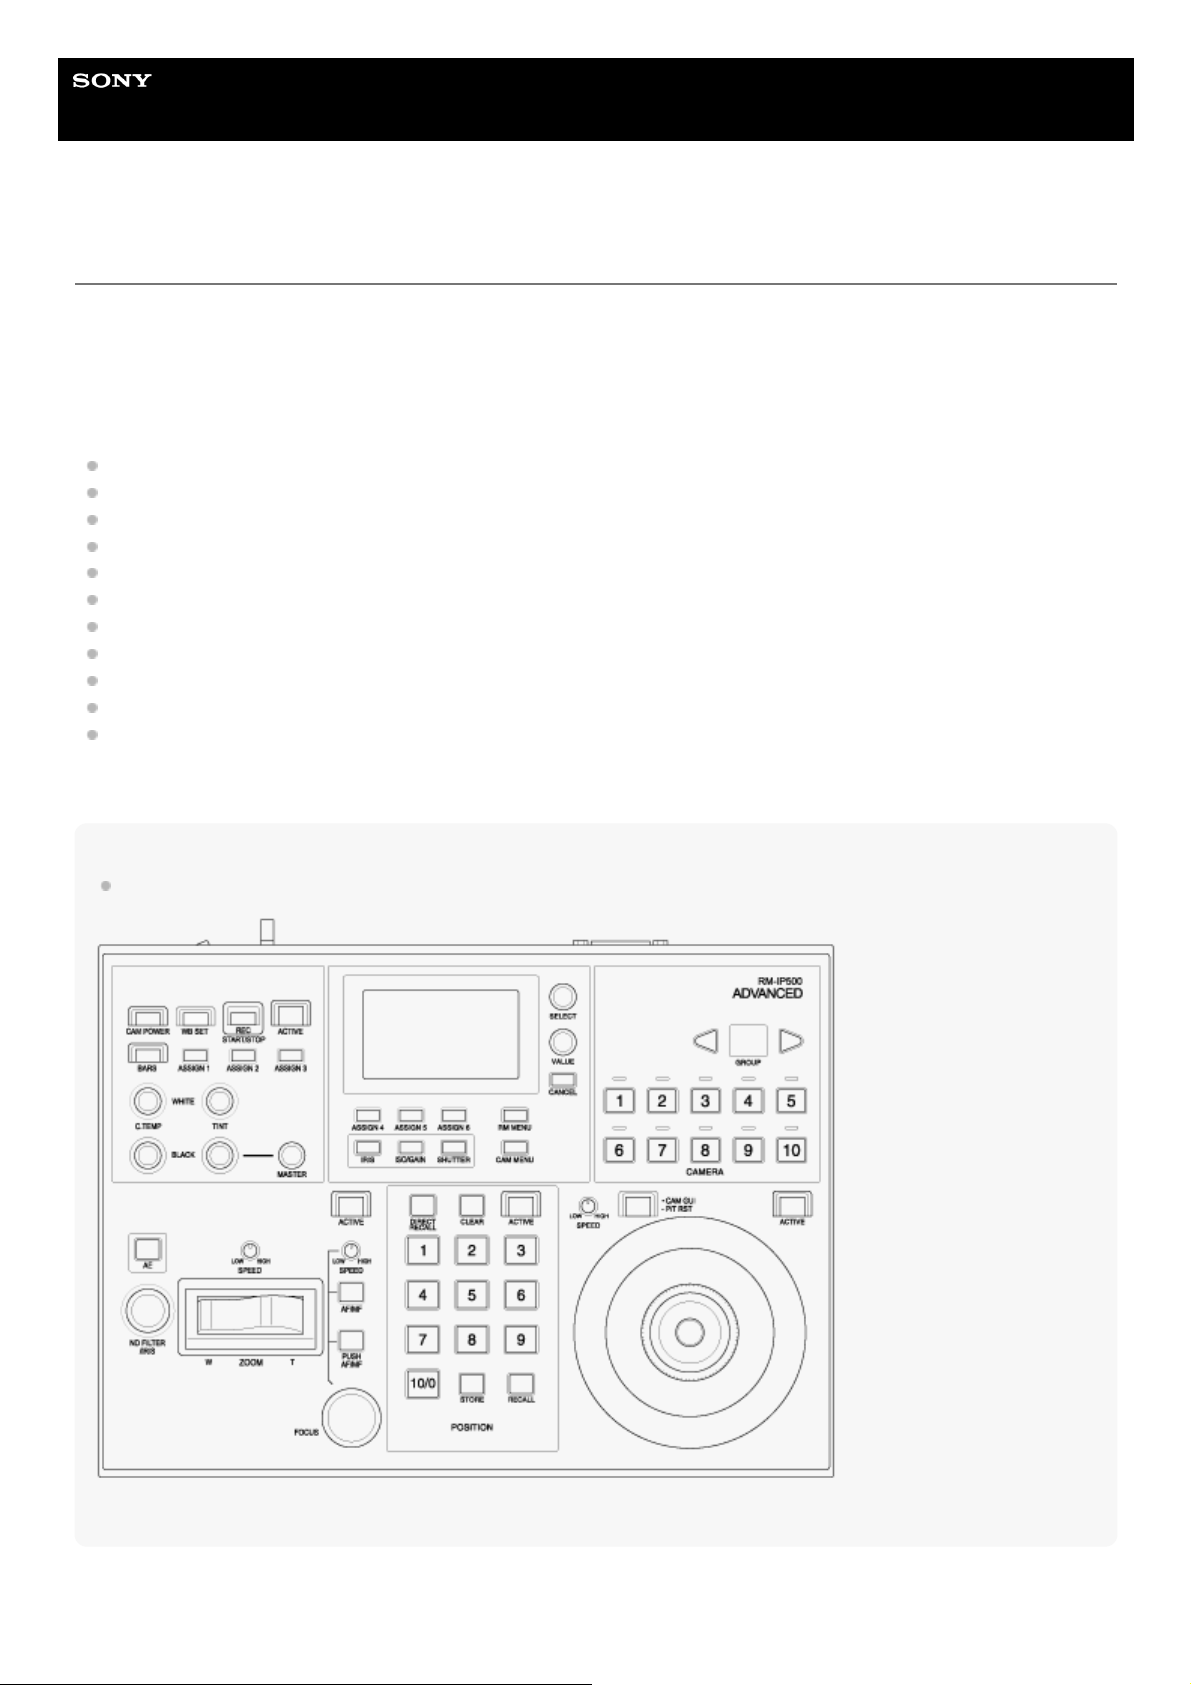
Help Guide
Interchangeable Lens Digital Camera
ILME-FR7 / ILME-FR7K
About Operation Using an RM-IP500 Remote Controller (option)
You can operate the unit using a Sony RM-IP500 Remote Controller running software version 2.2 or later. The devices
communicate using VISCA over IP (LAN).
Depending on the target item to operate, you may need to view the screen display of the unit. Prepare a monitor that can
be used to check the screen display.
The following operations are supported from an RM-IP500 Remote Controller.
Selecting the target camera
Adjusting the framing (pan, tilt, zoom)
Adjusting the focus (excludes touch operation)
Registering and recalling preset positions
Operating the menu of the unit (excluding the web menu)
Adjusting the brightness
Adjusting the white balance
Adjusting the black balance
Adjusting the audio input level
Starting/stopping recording
Executing assignable button functions of the unit
For details about RM-IP500 operation, refer to the operating instructions for the RM-IP500.
Hint
When using an RM-IP500, use the panel sheet for this unit that is supplied with the RM-IP500.
RM-IP500 (using panel sheet for this unit)
409

5-041-957-11(1) Copyright 2022 Sony Corporation
410

Help Guide
Interchangeable Lens Digital Camera
ILME-FR7 / ILME-FR7K
Connecting an RM-IP500 Remote Controller
For details about assigning functions, refer to the operating instructions for the RM-IP500.
5-041-957-11(1)
Copyright 2022 Sony Corporation
Set SETUP switch 3 of the unit to the ON position to enable VISCA over IP communication.
Note
The switch setting is applied when the unit is next turned on.
1
Connect the RM-IP500 to the same network as the unit.
2
Follow the procedure in the RM-IP500 operating instructions to configure VISCA over IP (LAN) connection
on the RM-IP500.
Assign this unit using RM menu > AUTO IP SETUP > ASSIGN CAM.
3
Assign functions of this unit to buttons and knobs, as required, using the following RM menu items of the
RM-IP500.
SW ASSIGN
AE CONFIG2
WB MODE
4
411

Help Guide
Interchangeable Lens Digital Camera
ILME-FR7 / ILME-FR7K
About Synchronizing with an External Device
When shooting using multiple units, the units can be synchronized to a specific reference signal or timecode via the
GENLOCK connector of the units.
For details about genlock, see “Synchronizing the Phase of the Video Signal (Genlock).”
For details about synchronizing timecodes, see “Locking the Timecode to Other Devices.”
5-041-957-11(1)
Copyright 2022 Sony Corporation
412
Help Guide
Interchangeable Lens Digital Camera
ILME-FR7 / ILME-FR7K
Synchronizing the Phase of the Video Signal (Genlock)
You can supply a reference signal to the GENLOCK connector to enable genlock.
The input reference signals that can be used vary depending on the system frequency of the selected recording format.
You can check the external sync status using [Technical] > [Genlock] > [Reference] in the camera menu.
Note
If the reference signal is unstable, genlock cannot be achieved.
The subcarrier is not synchronized.
5-041-957-11(1)
Copyright 2022 Sony Corporation
System frequency of recording format Supported input reference signals
59.94P
1920×1080 59.94i
720×486 59.94i
50P
1920×1080 50i
720×576 50i
29.97P
1920×1080 59.94i
720×486 59.94i
25P
1920×1080 50i
720×576 50i
24P 1920×1080 24PsF
23.98P 1920×1080 23.98PsF
59.94i
1920×1080 59.94i
720×486 59.94i
50i
1920×1080 50i
720×576 50i
413
Help Guide
Interchangeable Lens Digital Camera
ILME-FR7 / ILME-FR7K
Locking the Timecode to Other Devices
Set the unit that supplies the timecode to a mode in which the timecode output keeps running (such as Free Run or
Clock).
Note
Check that the supplied reference timecode and the reference video signal are in a phase relationship that complies with the
SMPTE timecode standard.
When operating with external lock, the timecode instantly acquires lock with the external timecode and the external timecode
value appears in the time data display area. However, do not start recording immediately. Wait for a few seconds until the
timecode generator stabilizes before recording.
If the frequency of the reference video signal and the frame frequency on the unit are not the same, lock cannot be acquired and
the unit will not operate properly. If this occurs, the timecode will not acquire successful lock with the external timecode.
If the external timecode source is disconnected, the timecode may shift by one frame per hour with respect to the reference
timecode.
To release external lock
Change the [TC/Media] > [Timecode] setting in the camera menu.
External synchronization is also released if the system frequency is changed and when you start recording in a special
recording mode (Slow & Quick Motion or Interval Rec).
5-041-957-11(1)
Copyright 2022 Sony Corporation
Set the following in [TC/Media] > [Timecode] in the camera menu.
Set [Mode] to [Preset].
Set [Run] to [Free Run].
1
Press an assignable button assigned with the [DURATION/TC/U-BIT] function to display the timecode on
the screen.
2
Supply an HD or SD reference video signal to the GENLOCK connector and the reference timecode to the
TC IN connector.
The timecode generator of the unit acquires lock with the reference timecode, and “EXT-LK” appears on the screen.
Once about ten seconds have elapsed after the timecode locks, the external lock state is maintained even if the
external reference timecode source is disconnected.
3
414

Help Guide
Interchangeable Lens Digital Camera
ILME-FR7 / ILME-FR7K
Connecting an External Microphone or External Audio Device
You can input the signal from an external microphone or external audio device and embed the audio in the recorded
video or output video of the unit.
Connect an external microphone or external audio device using an XLR cable.
When the audio is set to [LINE] using [Audio] > [Audio Input] > [AUDIO IN Select] in the camera menu, the AUDIO
IN connector functions as the AUDIO IN CH-1 connector and AUDIO IN CH-2 connector.
1
Pin No. Function
1 GND
2 AUDIO IN CH-1+ (HOT)
3 AUDIO IN CH-1− (COLD)
4 AUDIO IN CH-2+ (HOT)
5 AUDIO IN CH-2− (COLD)
Turn off the unit and connect the XLR cable to the AUDIO IN connector.
2
Set SETUP switch 2 to enable the phantom power supply as required.
Switch the +48 V power supply (phantom power) as described below.
Switch 2
Sets whether the +48 V power supply (phantom power) is turned on/off when an audio input device is connected.
3
Setting Description
OFF
(default)
This turns off the +48 V phantom power supply and sets the LINE or MIC input as the CH-1 and CH-2
audio source.
415
5-041-957-11(1) Copyright 2022 Sony Corporation
Note
Setting this switch to the ON position and connecting a microphone that is not compatible with a +48 V source may damage
the connected device. Check the setting before connecting the device.
Setting Description
ON
This turns on the +48V phantom power supply and sets the phantom power supply compatible
microphone as the CH-1 and CH-2 audio source.
Turn on the unit and set the type of connected device using [Audio] > [Audio Input] > [AUDIO IN Select] in
the camera menu.
4
416

Help Guide
Interchangeable Lens Digital Camera
ILME-FR7 / ILME-FR7K
Managing/Editing Clips Using a Computer
You can manage/edit clips using a computer.
Importing clips using a card reader (option)
Connect a CFexpress Type A card reader or SD card reader to your computer and use software that supports the
recording format of this unit, such as Catalyst Browse, to import the clips.
Using a nonlinear editing system
In a nonlinear editing system, editing software (option) that supports the formats recorded by the unit is required.
5-041-957-11(1)
Copyright 2022 Sony Corporation
417

Help Guide
Interchangeable Lens Digital Camera
ILME-FR7 / ILME-FR7K
Outputting an Optical Fiber Signal
You can output an SDI signal converted to an optical signal by connecting an SFP+ module (option) to the OPTICAL
connector of the unit. Use an SFP+ module that matches the signal band of each format.
Signal band
4K (59.94p, 50p): 12G
4K (other than 59.94p, 50p): 6G
HD (59.94p, 50p): 3G
HD (other than 59.94p, 50p): 1.5G
Note
Use a module that complies with the following standards.
SFF standards
SFF-8083/SFF-8418/SFF-8419*/SFF-8432/SFF-8433/SFF-8071/SFF-8472
SDI standards
ST297/ST292/ST424/ST425/ST2081/ST2082
The same signal as the SDI output connector is output to the SFP+ module.
The unit does not support optical fiber signal input.
Use an SFP+ module for optical fiber signal output. For details about verified SFP+ modules, contact your dealer or Sony service
representative.
5-041-957-11(1)
Copyright 2022 Sony Corporation
* Power Level I (1.0 W)
418

Help Guide
Interchangeable Lens Digital Camera
ILME-FR7 / ILME-FR7K
Connecting a Tally Signal
This topic describes tally signal control.
Lighting the tally lamp using a signal from a remote controller
You can light up the tally lamp using a VISCA over IP command from an external device, such as the RM-IP500.
Set [Technical] > [Tally] > [Tally Control] to [External] in the web menu or camera menu.
Lighting the tally lamp from an external device
You can light up the tally lamp of the unit red or green from an external device, such as the RM-IP500 or a switcher. You
can control the tally using commands transmitted over the network or using a tally signal input on the OPTION connector
of the unit.
Set [Technical] > [Tally] > [Tally Control] to [External] in the web menu or camera menu.
When inputting a tally signal on the OPTION connector, short-circuit pin 7 to GND (either pin 4 or 5) to light up the tally
lamp green, or pin 8 to GND (either pin 4 or 5) to light up the tally lamp red.
Note
When [Tally Control] is set to [External], the recording status of the unit is not indicated by the tally lamp.
When a red tally and green tally are input simultaneously, the tally lamp of the unit lights up red.
OPTION connector pin specifications
Pin No. Signal direction Signal specifications
1 – Reserved
2 – Reserved
3 OUT
Green tally lamp output
Low-level output when green tally lamp is lit.
Hi-Z (open-drain output) when green tally lamp is not lit.
4 – GND (Ground)
5 – GND (Ground)
419
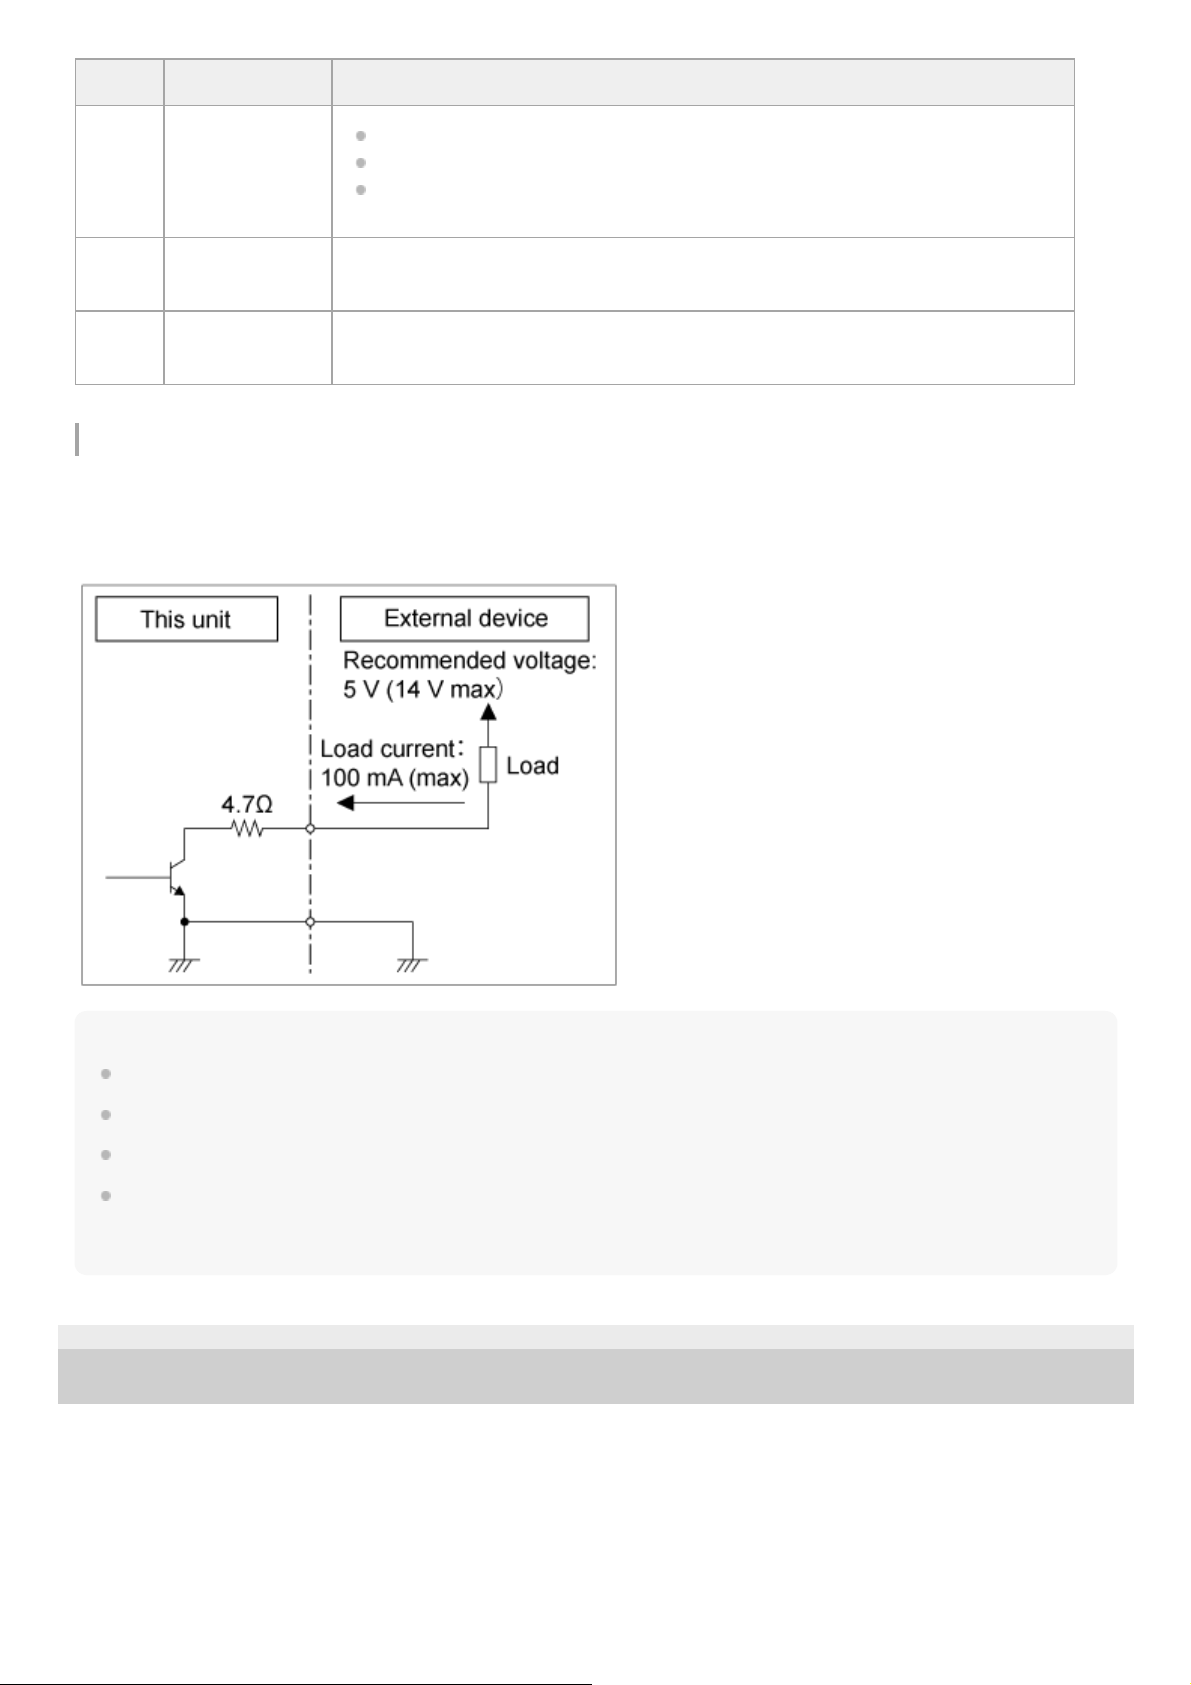
Lighting the tally lamp of an external device using a signal from the unit
You can light up the tally lamp of an external device using a signal from the unit by connecting pin 3 and pin 6 of the
OPTION connector as shown below.
OPTION connector pins 3 and 6 connection example
Note
Do not apply a voltage to pins 7 and 8.
Do not connect an external device that can apply voltage to the OPTION connector.
If an inrush or reverse voltage that exceeds the rating is applied to pin 3 or 6, it may cause a malfunction, smoke, or fire.
Set the output signal using [Technical] > [Tally] > [Tally Control] in the web menu or camera menu.
[Internal]: Recording operation status of the unit
[External]: Logical-AND of red/green tally signals received by the unit via the IN signals and remote controllers.
5-041-957-11(1)
Copyright 2022 Sony Corporation
Pin No. Signal direction Signal specifications
6 OUT
Red tally lamp output
Low-level output when red tally lamp is lit.
Hi-Z (open-drain output) when red tally lamp is not lit.
7 IN
Green tally external control input
Short-circuit to ground (pin 4 or 5) causes the tally lamp of the unit to light up green.
8 IN
Red tally external control input
Short-circuit to ground (pin 4 or 5) causes the tally lamp of the unit to light up red.
420

Help Guide
Interchangeable Lens Digital Camera
ILME-FR7 / ILME-FR7K
Usage Precautions
Condensation
If the unit is suddenly taken from a cold to a warm location, or if ambient temperature suddenly rises, moisture may form
on the outer surface of the unit and/or inside of the unit. This is known as condensation. If condensation occurs, turn off
the unit and wait until the condensation clears before operating the unit. Operating the unit while condensation is present
may damage the unit.
Camera CMOS image sensor phenomena
Note
The following phenomena that may occur in images are specific to image sensors. They do not indicate a malfunction.
White flecks
Although the image sensors are produced with high-precision technologies, fine white flecks may be generated on the
screen in rare cases, caused by cosmic rays, etc.
This is related to the principle of image sensors and is not a malfunction.
The white flecks especially tend to be seen in the following cases:
When operating at a high environmental temperature
When you have raised the gain (sensitivity)
Flicker
If shooting under lighting produced by fluorescent lights, sodium lamps, mercury-vapor lamps, or LEDs, the screen may
flicker or colors may vary.
Lens and pan/tilt drive units
If the lens and pan/tilt drive mechanism is not operated for an extended period, the viscosity of the grease applied inside
may increase, preventing the mechanism from moving. Operate the lens and pan/tilt mechanism regularly.
On consumable parts
The fan and built-in rechargeable battery are consumable parts that will need periodic replacement.
When operating at room temperature, a normal replacement cycle will be about 5 years. However, this replacement
cycle represents only a general guideline and does not imply that the life expectancy of these parts is guaranteed.
For details on parts replacement, contact your dealer.
The life expectancy of the AC adaptor and the electrolytic capacitor is about 5 years under normal operating
temperatures and normal usage (8 hours per day; 25 days per month). If usage exceeds the above normal usage
frequency, the life expectancy may be reduced correspondingly.
Periodic inspections are recommended to keep the unit working properly and to prolong its usable lifetime. Contact a
Sony service representative for more information about inspections.
About the built-in rechargeable battery
The unit has a built-in rechargeable battery for storing the date, time, and other settings even when the unit is turned off.
The built-in rechargeable battery will be charged after 24 hours have elapsed if the unit is connected to a power outlet
using the AC adaptor or if powered via PoE++, regardless of whether the unit is turned on/off. The rechargeable battery
will be fully discharged in about 2 months if the AC adaptor is not connected to a power supply. Use your unit after
421

charging the battery. However, even if the rechargeable battery is not charged, the unit operation will not be affected as
long as you do not need to record the date.
Usage and storage locations
Store in a level, ventilated place.
Avoid using or storing the unit in the following places.
Locations exposed to rain or water (including under eaves)
Outdoors and locations that exceed 40 °C (104 °F)
Remember that in summer in warm climates the temperature inside a car with the windows closed can easily exceed
50 °C (122 °F).
Locations colder than 0 °C (32 °F).
In damp or dusty locations. Locations where the unit may be exposed to rain
Locations subject to vibration or shock
Locations where radiation, X-rays, and strong magnetic fields are generated.
Close to radio or TV transmitters producing strong electromagnetic fields.
In direct sunlight or close to heaters for extended periods
Note on laser beams
Laser beams may damage the CMOS image sensor. If you shoot a scene that includes a laser beam, be careful not to
let the laser beam be directed into the lens of the unit. Specifically, high-power laser beams from medical devices or
other devices may cause damage due to reflected light and scattered light.
To prevent electromagnetic interference from portable communications devices
The use of portable telephones and other communications devices near this unit can result in malfunctions and
interference with audio and video signals. It is recommended that the portable communications devices near this unit be
powered off.
Do not place this product close to medical devices
This product (including accessories) has magnet(s) which may interfere with pacemakers, programmable shunt valves
for hydrocephalus treatment, or other medical devices. Do not place this product close to persons who use such medical
devices. Consult your doctor before using this product if you use any such medical device.
Security precautions
SONY WILL NOT BE LIABLE FOR DAMAGES OF ANY KIND RESULTING FROM A FAILURE TO IMPLEMENT
PROPER SECURITY MEASURES ON TRANSMISSION DEVICES, UNAVOIDABLE DATA LEAKS RESULTING
FROM TRANSMISSION SPECIFICATIONS, OR SECURITY PROBLEMS OF ANY KIND.
Depending on the operating environment, unauthorized third parties on the network may be able to access the unit.
When connecting the unit to the network, be sure to confirm that the network is protected securely.
Communication content may be unknowingly intercepted by unauthorized third parties in the vicinity of the signals.
When using wireless LAN communication, implement security measures properly to protect the communication
content.
When connecting this product to a network, connect via a system that provides a protection function, such as a router
or firewall. If connected without such protection, security issues may occur.
Power supply
The unit is not equipped with a power switch. To turn off the unit, check that all operations have ended and the unit is
in power standby state, then disconnect the AC adaptor. When using PoE++ power delivery, disconnect the LAN
cable.
Where possible, use a power source from a place where it is easy to insert and remove the power plug.
If you use an outlet in a dusty place, clean the area around the outlet regularly to prevent tracking.
Precautions for moving parts
Make sure that foreign matter does not enter moving parts.
Do not apply an excessive load when moving parts by hand. Doing so may cause a malfunction.
Do not interfere with the operation of moving parts during movement. Doing so may cause an injury or malfunction.
422

Moving parts may not operate normally if the unit is not used for an extended period of time. Regularly operate the
pan/tilt functions of the unit.
Precautions for the recording function
Always make a test recording, and verify that it was recorded successfully. SONY WILL NOT BE LIABLE FOR
DAMAGES OF ANY KIND INCLUDING, BUT NOT LIMITED TO, COMPENSATION OR REIMBURSEMENT ON
ACCOUNT OF FAILURE OF THIS UNIT OR ITS RECORDING MEDIA OR ANY OTHER MEDIA OR STORAGE
SYSTEMS TO RECORD CONTENT OF ANY TYPE.
Always verify that the unit is operating properly before use. SONY WILL NOT BE LIABLE FOR DAMAGES OF ANY
KIND INCLUDING, BUT NOT LIMITED TO, COMPENSATION OR REIMBURSEMENT ON ACCOUNT OF THE
LOSS OF PRESENT OR PROSPECTIVE PROFITS DUE TO FAILURE OF THIS UNIT, EITHER DURING THE
WARRANTY PERIOD OR AFTER EXPIRATION OF THE WARRANTY, OR FOR ANY OTHER REASON
WHATSOEVER.
SONY WILL NOT BE LIABLE FOR CLAIMS OF ANY KIND MADE BY USERS OF THIS UNIT OR MADE BY THIRD
PARTIES.
SONY WILL NOT BE LIABLE FOR THE LOSS, REPAIR, OR REPRODUCTION OF ANY DATA RECORDED ON
THE INTERNAL STORAGE SYSTEM, RECORDING MEDIA OR ANY OTHER MEDIA OR STORAGE SYSTEMS.
SONY WILL NOT BE LIABLE FOR THE TERMINATION OR DISCONTINUATION OF ANY SERVICES RELATED
TO THIS UNIT THAT MAY RESULT DUE TO CIRCUMSTANCES OF ANY KIND.
5-041-957-11(1)
Copyright 2022 Sony Corporation
423
Help Guide
Interchangeable Lens Digital Camera
ILME-FR7 / ILME-FR7K
Output Formats and Limitations
This topic describes the output formats and limitations.
Note
The resolution of the output format is limited by the [Project] > [Rec Format] > [Frequency], [Codec], and [Video Format] settings
in the web menu or camera menu.
The resolution of the output format is also limited by the combination with the S&Q frame rate. In addition to the table of SDI
OUT/HDMI OUT connector output formats below, the HDMI output changes to Full HD or lower when all the following conditions
are met.
[Shooting] > [S&Q Motion] > [Setting] is set to [On]
[Shooting] > [S&Q Motion] > [Frame Rate] is higher than 60fps
When the conditions above are met, the HDMI output 4096×2160P and 3840×2160P selection options for [Monitoring] > [Output
Format] > [SDI/HDMI] are grayed out and cannot be selected.
The image is not output if a higher resolution than the playback image resolution is configured.
SDI OUT/HDMI OUT connector output formats
When the system frequency is 50/59.94 Hz
Setting Selectable output format
Recording/playback
mode
RAW output resolution/
Internal recording
resolution
SDI HDMI
RAW
RAW & XAVC-I
4096×2160
(RAW)
(4096×2160 RAW)
4096×2160P
3840×2160P
1920×1080P (default)
1920×1080i
3840×2160
(RAW)
(3840×2160 RAW)
3840×2160P
1920×1080P (default)
1920×1080i
XAVC-I
XAVC-L
4096×2160
4096×2160 (2SI)
4096×2160P
1920×1080P
1920×1080i
3840×2160 (2SI)
3840×2160P
1920×1080P
1920×1080i
1920×1080P (Level A)
(default)
1920×1080P (default)
1920×1080i
1920×1080P (Level B)
1920×1080P
1920×1080i
424
When the system frequency is 25/29.97 Hz
Setting Selectable output format
Recording/playback
mode
RAW output resolution/
Internal recording
resolution
SDI HDMI
3840×2160
3840×2160 (2SI)
3840×2160P
1920×1080P
1920×1080i
1920×1080P (Level A)
(default)
1920×1080P (default)
1920×1080i
1920×1080P (Level B)
1920×1080P
1920×1080i
1920×1080i 1920×1080i
1920×1080
1920×1080P (Level A)
(default)
1920×1080P (default)
1920×1080i
1920×1080P (Level B)
1920×1080P
1920×1080i
1920×1080i 1920×1080i
(Output stopped)
720×480P
1)
720×576P
2)
When the system frequency is 59.94
1)
When the system frequency is 50
2)
Setting Output Format (output resolution)
Recording/playback mode
RAW output resolution/
Internal recording resolution
SDI HDMI
RAW
RAW & XAVC-I
4096×2160
(RAW)
(4096×2160 RAW)
4096×2160P
3840×2160P
1920×1080P
1920×1080i (default)
3840×2160
(RAW)
(3840×2160 RAW)
3840×2160P
1920×1080P
1920×1080i (default)
XAVC-I
XAVC-L
4096×2160
4096×2160 (2SI)
4096×2160P
1920×1080P
3840×2160 (2SI)
3840×2160P
1920×1080P
1920×1080P 1920×1080P
1920×1080PsF (default) 1920×1080i (default)
3840×2160
3840×2160 (2SI)
3840×2160P
1920×1080P
1920×1080P 1920×1080P
425
When the system frequency is 23.98 Hz
When the system frequency is 24 Hz
5-041-957-11(1)
Copyright 2022 Sony Corporation
Setting Output Format (output resolution)
Recording/playback mode
RAW output resolution/
Internal recording resolution
SDI HDMI
1920×1080PsF (default) 1920×1080i (default)
1920×1080
1920×1080P
1920×1080PsF
1920×1080P
1920×1080i
Setting Output Format (output resolution)
Recording/playback mode
RAW output resolution/
Internal recording resolution
SDI HDMI
RAW
RAW & XAVC-I
4096×2160
(RAW)
(4096×2160 RAW)
4096×2160P
3840×2160P
1920×1080P (default)
3840×2160
(RAW)
(3840×2160 RAW)
3840×2160P
1920×1080P (default)
XAVC-I
XAVC-L
4096×2160
4096×2160 (2SI)
4096×2160P
1920×1080P
3840×2160 (2SI)
3840×2160P
1920×1080P
1920×1080P (default) 1920×1080P (default)
3840×2160
3840×2160 (2SI)
3840×2160P
1920×1080P
1920×1080P (default) 1920×1080P (default)
1920×1080 1920×1080P (default) 1920×1080P (default)
Setting Output Format (output resolution)
Recording/playback mode
RAW output resolution/
Internal recording resolution
SDI HDMI
RAW
RAW & XAVC-I
4096×2160
(RAW)
(4096×2160 RAW)
4096×2160P
1920×1080P (default)
XAVC-I 4096×2160
4096×2160 (2SI)
1920×1080P (default)
4096×2160P
1920×1080P (default)
426

Help Guide
Interchangeable Lens Digital Camera
ILME-FR7 / ILME-FR7K
Troubleshooting
Power supply
Image output
Symptom Cause Solution
Unit does
not power
on.
The AC adaptor is not connected to the DC IN
connector firmly.
Insert the power cord firmly as far as it will go.
The AC power cord is not inserted firmly into the AC
adaptor or the AC outlet.
Insert the power cord firmly as far as it will go.
The LAN cable is not connected firmly between the
PoE++ power delivery device and the unit.
Check that the cable is inserted until it locks.
The LAN cable is connected to the OPTION connector,
but not to the LAN connector.
Connect the LAN cable to the LAN connector
correctly.
The unit is connected to a power delivery device that
does not support PoE++ (IEEE802.3bt, Type 4, Class 8
compliant).
Connect to a power delivery device that
supports PoE++ (IEEE802.3bt, Type 4, Class
8 compliant).
The total power consumption exceeds the maximum
rating of the PoE++ power delivery device.
Refer to the operating instructions for the
PoE++ power delivery device.
A network cable with category rating that does not
support PoE++ power delivery is connected.
Use a Category 5e or higher network cable
connected to the LAN connector.
The camera, PoE++ power delivery device, and
peripheral devices are not connected to ground.
Connect the camera, PoE++ power delivery
device, and peripheral devices to ground.
Symptom Cause Solution
No image is
output.
Connected devices are not connected correctly.
Connect the connected
devices correctly.
Initial setup was not completed.
Complete the initial setup
using the Web App.
No image is output
from the HDMI
connector.
A signal that is not supported by the HDMI output destination device
is being output.
Change the HDMI output
format setting or use a
device that supports the
output signal.
A cable that does not support the output HDMI standard is being
used.
Use a cable that supports
the output HDMI standard
in use.
427
Remote controller
Infrared remote control
Symptom Cause Solution
No image is output
from the SDI
connector.
A cable that does not support the output SDI standard is being used.
Use a cable that supports
the output SDI standard
in use.
The monitor connected to the SDI connector does not support the
output signal.
Use a monitor that
supports the output SDI
standard.
The recording format is set for RAW output.
Change the recording
format to a setting other
than RAW output.
The HDMI output is set to SD resolution.
Set the HDMI output to a
resolution other than SD.
No image is output
from the optical
fiber or the image
is distorted.
The module being used does not comply with the SFF or SMPTE
standards, or does not satisfy Power Level I (1.0 W).
See “Outputting an
Optical Fiber Signal.”
No image is output
or is distorted
when using
external sync.
An external sync signal suitable for the configured video signal
format is not being input.
Input an external sync
signal suitable for the
configured video signal
format.
There is noise in
the audio.
The camera, PoE++ power delivery device, and peripheral devices
are not connected to ground.
Connect the camera,
PoE++ power delivery
device, and peripheral
devices to ground.
The unit is being used in an environment with devices that generate
strong electric and magnetic fields (such as TV/radio transmitter
antennas, amateur radio transmitters, air conditioner motors, power
supply transformers).
Keep away from devices
that generate strong
electric and magnetic
fields.
The lens, lens support, and drive unit are in contact with the unit or
an object in the surrounding environment and an abnormal noise is
emitted.
Attach the lens
correctly.
Check for any
obstacles near the
camera.
Symptom Cause Solution
Infrared remote control
does not function when
pressed.
Infrared remote control operation is
disabled.
Set [Technical] > [IR Remote] > [Setting] to [On] in
the web menu.
The battery has been discharged
or the battery polarity is incorrect.
Operate the infrared remote control near the IR
sensor of the unit. If the Power LED blinks,
replace the battery.
Initial setup was not completed. Complete the initial setup using the Web App.
428
RM-IP500
Web App
Symptom Cause Solution
Pan/tilt operating speed is
slow.
The pan/tilt speed from the infrared
remote control is set to normal
mode.
Set SETUP switch 4 to the ON position on the
rear panel.
Operation targeted a
camera other than the
intended camera.
The infrared signal was received
by a camera other than the
intended camera.
Set [Technical] > [IR Remote] > [Setting] to [Off] in
the web menu of the camera you do not want to
control.
Symptom Cause Solution
Camera cannot be operated from the
RM-IP500 Remote Controller.
The power supply for
the camera is not
connected.
Check that the POWER lamp of the camp lights
up green or orange.
The camera or remote
controller is not
connected to the
network.
Check the camera and remote controller
connections.
Initial setup of the
camera was not
completed.
Complete the initial setup using the Web App.
VISCA over IP
communication is not
enabled.
Set SETUP switch 3 to the ON position on the
camera connector panel and reboot the unit.
The IP address of the
camera changed.
Check the IP address of the camera using
[Network] > [Wired LAN] in the web menu or
camera menu.
The IP address of the camera was
changed using AUTO IP SETUP on the
RM-IP500 Remote Controller.
At least 20 minutes has
elapsed since the
camera was started.
Reboot the camera. The IP address can be
changed using AUTO IP SETUP within the first
20 minutes after starting the camera.
Symptom Cause Solution
Cannot connect using a web
browser.
A category 5e or higher
LAN cable is not
connected.
Connect a Category 5e or higher LAN cable.
Not connected to LAN
correctly or connected
network is not operating
normally.
Check that the LINK LED for the LAN connector is lit. If
the LINK LED is not lit, contact your network
administrator.
The power supply for
the camera is not
connected.
See the “Power supply” section above.
A valid IP address is not
configured for the unit.
Perform a network reset.
429

Symptom Cause Solution
The configured IP
address is in use on
another device.
Check that the IP addresses of peripheral devices are
unique.
The configured subnet
mask does not match
the used network
subnet.
Perform a network reset.
The unit is being
accessed on the same
local network via a
proxy.
Change the configuration so that a proxy server is not
used.
The configured default
gateway for the unit is
incorrect.
Perform a network reset.
The entered URL is
incorrect.
Enter the correct URL and try again.
The HTTP port is
incorrect.
Display the camera menu on an external monitor and
check the setting of [Network] > [Wired LAN] > [HTTP
Port]. If a value other than 80 is configured, add the
HTTP port number to the host name or IP address
entered in the web browser.
Example: If HTTP Port is set to 8080, enter http://<IP
Address>:8080
The HTTP port number
of the unit is being
filtered or blocked.
Change the HTTP port number of the unit to a port that
is not being filtered or blocked.
Old cache of the web
browser is having an
adverse effect.
Delete the cache from the web browser.
Cannot connect to the Web
App using the 2D code (QR
code).
The device being used
does not support
mDNS.
Use a device that supports mDNS.
If using a device that does not support mDNS, enter the
IP address directly into the web browser.
The tablet or computer
is connected to a
different network than
the camera.
Connect the tablet or computer to the same network as
the camera.
Cannot connect to the Web
App by manually entering the
URL.
The device being used
does not support
mDNS.
Use a device that supports mDNS.
The tablet or computer
is connected to a
different network than
the camera.
Connect the tablet or computer to the same network as
the camera.
The authentication screen is
displayed continuously.
The correct user name
or password was not
entered.
Enter the registered user name and password. If you
have forgotten the registered user information, see
“RESET switch” in “Connector Block” to initialize the
user information for network connection.
430
Symptom Cause Solution
The user name and
password may have
been changed by a user
logged in using another
web browser.
Check the correct user name and password with the
camera administrator.
Camera image is not displayed
in the Web App.
The HDMI output of the
camera is set to
720×480 or 720×576.
Change the resolution of the HDMI output of the camera.
An HDMI monitor that
does not support the
HDMI output signal of
the camera is
connected.
Remove the HDMI monitor or use an HDMI monitor that
supports the HDMI output signal.
The unit was rebooted
and the session was
disconnected.
Wait about one minute and reload the web browser.
Old cache of the web
browser is having an
adverse effect.
Delete the cache from the web browser.
Resolution of the camera
image displayed in the Web
App is low.
The resolution for video
stream 3 used by the
Web App is set low.
Increase the value using [Stream] > [Video Stream] >
[Size 3] in the web menu.
Camera menu does not appear
when you press the [MENU]
button.
The camera menu is
configured so that it is
not being embedded in
the HDMI output signal.
Set [Monitoring] > [Output Display] > [HDMI/Stream] to
[On] in the web menu.
Value of a setting on the
settings screen is not
updated/displayed properly.
The settings screen of
the Web App does not
automatically reflect the
settings changed in
another Web App.
Press the [Reload] button at the bottom of the settings
screen of the Web App. The values of the settings on
the displayed setup screen are reloaded and updated.
The settings of
temporary Internet files
are having an affect.
Delete the cache from the web browser.
Cannot download configuration
file or log.
The download file
function of the web
browser is disabled.
Enable the download file function of the web browser.
Settings screen of the Web App
is accessible, but cannot
perform operations on the live
operation screen and playback
operation screen.
The Web App operation
screen is locked.
Set the operation lock switch at the top right in the Web
App to the
(Operation Unlock) position.
Web App screen takes some
time to display.
The streaming image of
the unit is being viewed
by multiple users
simultaneously.
Reduce the number of users that can access the Web
App simultaneously.
431
Shooting
Camera
Pan/tilt
Symptom Cause Solution
Image looks distorted at the start
and end of pan/tilt operation.
The image may be distorted if the image
stabilization function of the lens is turned on.
Turn off the image
stabilization function of the
lens.
Angle of view changed without
user operation.
Lens breathing occurred.
See “Breathing
Compensation.”
Cannot operate the focus, zoom,
or iris.
The settings of switches on the lens may be
incorrect.
See “Checking the Lens
Switches.”
Symptom Cause Solution
Cannot reset the
pan/tilt.
The pan/tilt lock lever is in
the LOCK position.
Slide the pan/tilt lock lever to the UNLOCK position.
Camera does not
stop in the
expected position.
The camera block is out of
balance.
Move the camera block forward/rearward to an appropriate position
as described in “Attaching a Lens,” and then turn the unit on again.
A lens that does not
support pan/tilt is
attached.
Refer to the lens compatibility information and attach a lens that
supports pan/tilt, and then turn the unit on again.
Cannot execute pan/tilt
reset.
Execute a pan/tilt reset as described in “Resetting the Pan/Tilt.”
An unexpected force was
applied to the camera
head, causing a pan/tilt
control error.
Camera does not
return to the front
when the [Pan-Tilt
Home] button is
pressed.
Ceiling mount mode has
been activated.
Set [Pan-Tilt] > [P/T Direction] > [Ceiling] in the web menu
according to the actual installation, and then turn the unit on again.
When mounted on a ceiling, the connector block will be at the front
of the camera.
Pan/tilt operation
is restricted.
Pan/tilt range limit is
configured.
Clear the pan/tilt range limit settings, as required, as described in
“P/T Range Limit.”
An unexpected force was
applied to the camera
head, causing a pan/tilt
error.
Execute a pan/tilt reset as described in “Resetting the Pan/Tilt.”
Pan/tilt operation
moved in the
opposite direction.
The ceiling mount mode
setting is different than the
actual mounting state.
Set [Pan-Tilt] > [P/T Direction] > [Ceiling] in the web menu
according to the actual installation.
Settings related to the
pan/tilt direction were
changed.
Check the [Pan-Tilt] > [P/T Direction] settings in the web menu.
432

Symptom Cause Solution
Image does not
move smoothly at
the start and end
of pan/tilt
operation.
The pan/tilt operation
acceleration/deceleration
setting is too high.
Reduce the pan/tilt operation acceleration/deceleration setting to
make the motion at the start and end of pan/tilt operation smoother
using [Pan-Tilt] > [P/T Acceleration] > [Ramp Curve] in the web
menu or camera menu. Note that this will mean that the lens takes
longer to reach the maximum speed.
Pan/tilt operation
stopped.
The camera block is out of
balance.
Move the camera block forward/rearward to an appropriate position
as described in “Attaching a Lens,” and then turn the unit on again.
The ramp curve
(acceleration/deceleration)
setting is too high for the
attached lens.
If a large lens is attached, reduce the value of [Pan-Tilt] > [P/T
Acceleration] > [Ramp Curve] in the web menu or camera menu.
A large lens is being used. Contact your Sony support representative.
Unit is obstructed
when the pan/tilt is
operated.
The lens support pedestal
attachment screw clamp
lever hits the camera.
Turn the lens support pedestal attachment screw clamp lever so
that it is pointing up.
The lens support clamp
lever hits the camera.
Turn the lens support clamp lever so that it is pointing up.
The camera head lock
lever hits the camera.
Check that the camera head lock lever is fully in the LOCK
position.
Abnormal noise
occurs during
pan/tilt operation.
The camera is out of
balance.
Move the camera head forward/rearward to an appropriate position
so that the slide base is horizontal.
The ramp curve
(acceleration/deceleration)
setting is too high for the
attached lens.
If a large lens is attached, reduce the value of [Pan-Tilt] > [P/T
Acceleration] > [Ramp Curve] in the web menu or camera menu.
The camera head is not
fixed in position and there
is a moving noise during
operation.
Set the camera head lock lever to the LOCK position.
Cannot save or
load a preset.
Saving and loading a
preset is not available
when [Zoom Type] is set
to [On(Clear Image
Zoom)].
Set [Technical] > [Zoom] > [Zoom Type] to [Optical Zoom Only] in
the camera menu.
The framing
control panel of
the Web App is
grayed out and
cannot be
operated.
The pan/tilt operation is
unavailable while the
thumbnail screen is
displayed and during
playback.
Exit the thumbnail screen display or stop playback.
The pan/tilt operation is
unavailable when the
camera image cannot be
displayed in the Web App.
See “Web App” in “Troubleshooting.”
The pan/tilt lock lever is in
the LOCK position.
Slide the pan/tilt lock lever to the UNLOCK position.
433
Recording / playback
File transfer
IP streaming
Symptom Cause Solution
“Execute Pan-Tilt
Reset” is displayed
below the framing
control panel in the
Web App.
An unexpected force was
applied to the camera
head, causing a pan/tilt
error.
Execute a pan/tilt reset as described in “Resetting the Pan/Tilt.”
Symptom Cause Solution
Recording does not start
when you press the
record START/STOP
button.
The memory card is full.
Replace the memory card with one having
sufficient space.
The memory card needs restoration.
Restore the memory card as described in
“Restoring Memory Cards.”
Unit is running using on PoE++ power.
Supply power to the DC IN connector using the
AC adaptor.
The recording/tally lamp is configured
as a tally lamp, so the recording status
cannot be determined by the lamp.
Configure the recording/tally lamp to function
as a recording lamp as described in
“Connecting a Tally Signal.”
Audio recording is not
possible.
A microphone is not connected.
Connect a microphone or audio device to the
AUDIO IN connector on the connector block.
The [Master Input Level] setting is at
the minimum value.
Adjust [Master Input Level].
Recorded sound is
distorted.
The audio input level setting is too high.
Adjust [CH1 Input Level] to [CH4 Input Level]
and [Master Input Level].
Recorded sound has a
high noise level.
The audio input level setting is too low.
Adjust [Audio Input Level] and [Audio] > [Audio]
> [Audio Input] > [AUDIO IN CH1 MIC Ref.] or
[AUDIO IN CH2 MIC Ref.] settings.
Clips cannot be played
back.
The clip is being edited.
Clips cannot be played back if you have
modified file names or folders, or if the clip is in
use on a computer. This is not a malfunction.
The clip was recorded using a camera
other than this unit.
Clips recorded using a camera other than this
unit may not be played back, or displayed in
incorrect size. This is not a malfunction.
Symptom Cause Solution
File
uploading
fails.
The user name and password on the
server are not correct.
The user name and password on the server may not be
correct. Enter the correct entries.
Symptom Cause Solution
434

Symptom Cause Solution
Streaming not
available.
The user name or password
entered in the client app to
view streaming from the unit is
incorrect.
If the streaming format of the unit is set to [RTSP], [SRT-
Listener], or [NDI|HX], it is necessary to enter the user name
and password set for this unit in the client app. Enter the
correct user name and password.
The streaming protocol is not
configured when the
streaming mode is set to
[RTSP/SRT] or [Listener/NDI].
Select the target protocol using [Stream] > [Stream Setting] in
the web menu.
Six or more RTSP sessions
have been set.
Set the number of sessions to five or fewer.
UDP port number is not set
correctly.
Set the port number and other settings for the target protocol
using [Stream] > [Stream] > [Stream Setting] in the web
menu.
UDP communication is
blocked.
Check the security software settings.
Audio is not being
streamed.
Audio output streaming is set
to [Off].
Set [Stream] > [Audio Stream] > [Setting] to [On] in the web
menu.
Streaming was
disconnected.
The protocol setting or
streaming codec settings were
changed during streaming.
Set the protocol setting and streaming codec settings before
starting streaming.
Picture size of [Video
Stream 1] cannot be
set to 4096×2160 or
3840×2160.
The picture size is 1920×1080
when [Output Format] is set to
HDMI.
The picture size for streaming cannot be set higher than the
HDMI picture size. Change the HDMI picture size using
[Monitoring] > [Output Format] in the web menu.
Frame rate of [Video
Stream 1] cannot be
set to 60 FPS or 50
FPS.
The streaming frame rate is
set to 29.97 or lower.
The frame rate used for streaming is limited by the system
frequency. Change the system frequency using [Rec Format]
> [Frequency] in the web menu.
[Video Stream 3]
stream cannot be
accessed.
[Video Stream 3] does not
support RTSP/SRT/NDI.
Use [Video Stream 1] or [Video Stream 2].
RTSP/SRT screen is
not
updated/displayed
properly.
The port number used for
RTSP or SRT is being filtered
or blocked.
Change the RTSP or SRT port number to a port that is not
being filtered or blocked by devices receiving the stream. Or
change the port number used for RTSP or SRT on the unit.
Image is distorted or
jerky.
The video information is not
transmitted properly due to
congestion in the
communications path.
Reduce the streaming bit rate or set the [Video Stream 2]
codec ([Codec 2]) to [OFF] to create a margin in the
communications band.
The order of video packets
has changed within the
communications channel.
Use the same Internet service provider on both the camera
side and the receiver side.
Not detected as NDI
device.
The streaming protocol is not
set to NDI|HX.
The streaming protocol must be set to NDI|HX in order to
detect the unit as an NDI device. Set [Stream] > [Stream
Setting] to [NDI|HX] in the web menu.
435
Connection with external devices
External synchronization
Tally
5-041-957-11(1)
Copyright 2022 Sony Corporation
Symptom Cause Solution
Cannot be used as
an NDI device.
An NDI|HX license is not
installed.
Install an NDI|HX license. You can check whether there is an
NDI|HX license using [Stream] > [Stream] > [Stream Setting]
> [NDI|HX] > [License] in the web menu.
Symptom Cause Solution
Cannot
synchronize to
external source.
An external sync signal suitable for the
configured video signal format is not
being input.
Input an external sync signal suitable for the
configured video signal format.
Unit is double-terminated.
The unit has a built-in 75 Ω terminator. Connect
directly to a signal source (one-to-one) or use a
distributor (splitter).
Symptom Cause Solution
Tally lamp
does not
light up.
The tally lamp brightness is set to Off.
Set the appropriate brightness using [Technical] >
[Tally] > [Tally Lamp Brightness] in the web menu.
The recording/tally lamp is configured as a
recording lamp.
Configure the recording/tally lamp to function as a
tally lamp as described in “Connecting a Tally
Signal.”
RM-IP500 is connected and VISCA over IP is
disabled.
Set SETUP switch 3 to the ON position on the
connector block.
The OPTION connector connection is incorrect
or the target pin is not short-circuited to GND.
Short-circuit pin 7 or pin 8 of the OPTION connector
to GND as described in “Connecting a Tally Signal.”
436

Help Guide
Interchangeable Lens Digital Camera
ILME-FR7 / ILME-FR7K
Error/Warning Messages
If a warning, caution, or operating condition that requires confirmation occurs on the unit, a message is displayed in the
camera image panel, and the POWER lamp and NETWORK lamp on the front panel and the recording/tally lamp start
blinking.
Note
The recording/tally lamp blinking indication is enabled only when both [Technical] > [Tally] > [Tally Control] is set to [Internal] and
[Tally Lamp Brightness] is set to [Off] in the web menu or camera menu.
Error messages
If the POWER lamp and NETWORK lamp are blinking as described below, take the following measures.
The unit will stop operation when the following display occurs.
Warning messages
Follow the instructions provided if the following display occurs.
POWER
lamp
NETWORK
lamp
Cause and solution
Blinking
orange
slowly
Blinking
green
slowly
The unit cannot operate normally. For details, see [Maintenance] > [System Log] in the web
menu. If the problem persists even after putting the unit in standby mode or turning the
power off and then on again, contact your Sony service representative.
Blinking
orange
rapidly
Blinking
green
rapidly
A malfunction occurred on the unit. Contact your Sony service representative.
Message
display
Recording/tally
lamp
Cause and solution
E + error
code
High-speed
blinking
Indicates an abnormality in the unit. Recording stops, even if ●REC is displayed in the
camera image panel.
Turn off the unit, and check for any problem with connected devices, cables, or media.
If the error persists when the unit is turned on again, contact your Sony service
representative. An error display or warning sound may not occur depending on the
status of the unit.
Message
display
Recording/tally
lamp
Cause and solution
Temperature
High
Blinking
The internal temperature is high.
Turn off the camcorder and allow it to cool down before operating it again.
437
Caution and operation messages
The following caution and operation messages may appear in the center of the screen. Follow the instructions provided
to resolve the issue.
Message
display
Recording/tally
lamp
Cause and solution
Media
Temperature
High
Blinking
The temperature of the CFexpress card is high.
Replace the card or allow it to cool down before using it again.
Voltage Low Blinking The DC IN voltage is low (level 1). Check the power source.
Insufficient
Voltage
High-speed
blinking
The DC IN voltage is too low (level 2). Recording is disabled.
Connect a different power source.
Media Near Full Blinking
The remaining capacity on the memory card is getting low.
Replace at the earliest convenience.
Media Full
High-speed
blinking
Clips could not be recorded or copied because there is no remaining capacity
on the memory card.
Replace immediately.
Clips Near Full Blinking
The number of additional clips that can be recorded on a memory card is
getting low.
Replace at the earliest convenience.
Clips Full
High-speed
blinking
The maximum number of clips that can be recorded on the memory card has
been reached.
Recording or copying more clips is not possible. Replace immediately.
Last Clip
Recording
Blinking
The clip currently recording is the last clip that can be recorded, as the
maximum number of clips has been reached.
Prepare a new memory card.
Media(A) Life
Near End
1)
Blinking
The memory card is approaching the end of its life. Replace at the earliest
convenience.
Media(A) Life
End
1)
High-speed
blinking
The memory card has reached the end of its life. Replace immediately.
Media(A) Near
Full
1)
Blinking When using the Simul Rec function
Media(A) Full
1)
High-speed
blinking
When using the Simul Rec function
Media(A) Clips
Near Full
1)
Blinking When using the Simul Rec function
Media(A) Clips
Full
1)
High-speed
blinking
When using the Simul Rec function
Media(A) Last
Clip Rec
1)
Blinking When using the Simul Rec function
“(B)” is displayed for the card in slot B.
1)
Display message Cause and Solution
438
Display message Cause and Solution
Backup Battery End
Please Change
The remaining capacity of the backup battery is insufficient.
Charge the backup battery.
Unknown Media(A)
1)
Please Change
A memory card that has been partitioned or a memory card
containing more clips that can be handled by the unit was inserted.
The card cannot be used in the unit, and must be replaced.
Cannot Use Media(A)
1)
Unsupported File System
A card using a different file system or an unformatted card was
inserted.
The card cannot be used in the unit, and must be replaced or
formatted using the unit.
Media Error
Media(A) Needs to be Restored
1)
An error occurred on the memory card, and the card must be
restored.
Restore the memory card.
Media Error
Cannot Record to Media(A)
1)
The memory card may be damaged, and can no longer be used
for recording.
Playback is possible, so making a copy and replacing the memory
card is recommended.
Media Error
Cannot Use Media(A)
1)
The memory card may be damaged, and can no longer be used
for recording or playback.
The card cannot be used in the unit, and must be replaced.
Media(A) Error
1)
Recording Halted
Playback Halted
Recording and playback was stopped because an error occurred
while using the memory card.
If the problem persists, replace the memory card.
Media Reached Rewriting Limit
Change Media(A)
1)
The memory card has reached the end of its life.
Make a backup, and replace the card immediately. If you continue
using the card, the card may not be able to record or play.
For details, refer to the operating instructions for the memory card.
The specified address is invalid.
The specified address is invalid.
Check that the setting is correct.
Cannot Use Specified Port Number
The specified port number is invalid.
Check that the setting is correct.
Lens I/F Error(xx:xx)
A lens error was detected in the lens I/F communication when an
E-mount lens was attached.
Check the status of the connection with the E-mount lens.
If the problem persists, contact your Sony service representative
with the error code (five characters in parentheses).
Cannot add auto upload job of Proxy file
because maximum number of upload jobs was
reached.
The maximum number of transfer jobs has been reached.
Clear any unwanted jobs. The auto upload destination setting for
proxy files may also be incorrect. Check that the setting is correct.
Fan Stopped
Fan has stopped running.
Check that there is no dust or foreign matter.
If the error persists after removing any dust or foreign matter,
contact your Sony service representative.
“(B)” is displayed for the card in slot B.
1)
439

5-041-957-11(1) Copyright 2022 Sony Corporation
440
Help Guide
Interchangeable Lens Digital Camera
ILME-FR7 / ILME-FR7K
List of Menu Items
The following tables list the menu items of the unit.
Legend
“Camera menu” and “web menu”
●: Available
▲: Some items available
–: Not available
“All File” and “Scene File”
Yes: Item saved in an ALL file or scene file
No: Item not saved
“All Reset (except for Network Settings)”
When [Reset]> [Reset] > [All Reset (except for Network Settings)] in the web menu is executed:
Yes: Initialized item (excludes network settings)
No: Not applicable
“Network Reset”
When [Reset]> [Reset] > [Network Reset] in the web menu is executed:
Yes: Initialized item (network setting)
No: Not applicable
“Factory Default”
Yes: Item reset to factory default
No: Not applicable
Shooting
Item
(level 2)
Camera
menu
Web
menu
All
File
Scene
File
All Reset (except for Network
Settings)
Network
Reset
Factory
Default
ISO/Gain/EI ● – Yes Yes Yes Yes Yes
ND Filter ● – Yes
Yes
*1
Yes No Yes
Shutter ● – Yes Yes Yes No Yes
Iris ● – Yes Yes Yes No Yes
Auto
Exposure
● – Yes
Yes
*2
Yes No Yes
White ● – Yes
Yes
*3
Yes No Yes
White Setting ● – Yes No Yes No Yes
Offset White ● – Yes No Yes No Yes
Focus ● ▲ Yes No Yes No Yes
S&Q Motion ● – Yes No Yes No Yes
441
Project
Paint/Look
Item
(level 2)
Camera
menu
Web
menu
All
File
Scene
File
All Reset (except for Network
Settings)
Network
Reset
Factory
Default
LUT On/Off ● – Yes No Yes No Yes
Noise
Suppression
● – Yes Yes Yes No Yes
Flicker
Reduce
● – Yes No Yes No Yes
SteadyShot ● – Yes No Yes No Yes
[Mode] not applicable
*1
[Clip High light], [Detect Window], [Average Peak Level Ratio], [Custom Width], [Custom H Position], [Custom V Position] not applicable
*2
[Preset White] not applicable
*3
Item
(level 2)
Camera
menu
Web
menu
All
File
Scene
File
All Reset (except for
Network Settings)
Network
Reset
Factory
Default
Base Setting ● ● Yes No Yes No Yes
Rec Format ● ● Yes No
Yes
*1
No Yes
Cine EI Setting ● – Yes No Yes No Yes
Simul Rec ● ● Yes No Yes No Yes
Proxy Rec ● ▲ Yes No Yes No Yes
Interval Rec ● ●
Yes
*2
No Yes No Yes
Picture Cache
Rec
● ●
Yes
*2
No Yes No Yes
SDI/HDMI Rec
Control
● – Yes No Yes No Yes
Assignable
Button
● – Yes No Yes No Yes
All File – ● No No No No No
[Frequency] not applicable
*1
[Setting] not applicable
*2
Item
(level 2)
Camera
menu
Web
menu
All
File
Scene
File
All Reset (except for
Network Settings)
Network
Reset
Factory
Default
Scene File ● – No No No No No
Base Look ● ▲
Yes
*1
No
Yes
*1
No
Yes
*1
Reset Paint
Settings
● – No No No No No
Black ● – Yes Yes Yes No Yes
442
Pan-Tilt
TC/Media
Item
(level 2)
Camera
menu
Web
menu
All
File
Scene
File
All Reset (except for
Network Settings)
Network
Reset
Factory
Default
Knee ● – Yes Yes Yes No Yes
Detail ● – Yes No Yes No Yes
Matrix ● – Yes Yes Yes No Yes
Multi Matrix ● –
Yes
*2
Yes
*2
Yes No Yes
LUT data imported as base look not applicable
*1
[Axis] not applicable
*2
Item
(level 2)
Camera
menu
Web
menu
All
File
Scene
File
All Reset (except for Network
Settings)
Network
Reset
Factory
Default
P/T Speed – ● No No Yes No No
P/T
Acceleration
● ● No No Yes No No
P/T Range
Limit
– ● No No Yes No No
P/T
Direction
– ● No No Yes No No
P/T Preset – ● No No Yes No No
Item
(level 2)
Camera
menu
Web
menu
All
File
Scene
File
All Reset (except for
Network Settings)
Network
Reset
Factory
Default
Timecode ● –
Yes
*1
No Yes No Yes
TC Display ● – Yes No Yes No Yes
Users Bit ● –
Yes
*1
No Yes No Yes
HDMI TC
Out
● – Yes No Yes No Yes
Clip Name
Format
● – *2 No Yes No Yes
Update
Media
● – No No No No No
Format
Media
● – No No No No No
Media Life ● – No No No No No
[Setting] not applicable
*1
[Auto Naming] applicable, [Camera ID] not applicable
*2
443
Monitoring
Audio
Thumbnail
Technical
Item
(level 2)
Camera
menu
Web
menu
All
File
Scene
File
All Reset (except for
Network Settings)
Network
Reset
Factory
Default
Output Format ● ● Yes No Yes No Yes
Output Display – ● Yes No Yes No Yes
Display On/Off ● – Yes No Yes No Yes
Video Signal
Monitor
● – Yes No Yes No Yes
Marker ● – Yes No Yes No Yes
Item
(level 2)
Camera
menu
Web
menu
All
File
Scene
File
All Reset (except for Network
Settings)
Network
Reset
Factory
Default
Audio
Input
● ▲ Yes No Yes No Yes
Audio
Output
● ▲ Yes No Yes No Yes
Item
(level 2)
Camera
menu
Web
menu
All
File
Scene
File
All Reset (except for
Network Settings)
Network
Reset
Factory
Default
Display Clip
Properties
● – No No No No No
Set Clip Flag ● – No No No No No
Lock/Unlock
Clip
● – No No No No No
Delete Clip ● – No No No No No
Transfer Clip ● – No No No No No
Transfer Clip
(Proxy)
● – No No No No No
Filter Clips ● – No No No No No
Customize View ● – Yes No Yes No Yes
Item
(level 2)
Camera
menu
Web
menu
All
File
Scene
File
All Reset (except for Network
Settings)
Network
Reset
Factory
Default
Color
Bars
● – *1 No *1 No Yes
444
Network
Stream
Item
(level 2)
Camera
menu
Web
menu
All
File
Scene
File
All Reset (except for Network
Settings)
Network
Reset
Factory
Default
Genlock ● – No No No No No
Tally ● ● Yes No Yes No Yes
Rec
Review
● – Yes No Yes No Yes
Zoom ● – Yes No Yes No Yes
IR
Remote
– ● No No Yes No Yes
Lens ● – Yes No Yes No Yes
APR ● – No No No No No
[Type] applicable, [Setting] not applicable
*1
Item
(level 2)
Camera
menu
Web
menu
All
File
Scene
File
All Reset (except for
Network Settings)
Network
Reset
Factory
Default
Camera Name – ● No No No No Yes
User – ● No No No Yes Yes
Wired LAN
*1
▲ ● No No No Yes No
File Transfer ● ▲ Yes No Yes Yes Yes
FTP Server 1 – ● No No Yes No Yes
FTP Server 2 – ● No No Yes No Yes
FTP Server 3 – ● No No Yes No Yes
SSL – ● No No No Yes Yes
Referer Check – ● No No No Yes Yes
Brute Force Attack
Protection
– ● No No No Yes Yes
Not configurable using the camera menu (display only)
*1
Item
(level 2)
Camera
menu
Web
menu
All
File
Scene
File
All Reset (except for Network
Settings)
Network
Reset
Factory
Default
Stream
Setting
– ● No No
Yes
*1
No
Yes
*1
Video
Stream
– ● Yes No Yes No Yes
445
Maintenance
5-041-957-11(1)
Copyright 2022 Sony Corporation
Item
(level 2)
Camera
menu
Web
menu
All
File
Scene
File
All Reset (except for Network
Settings)
Network
Reset
Factory
Default
Audio
Stream
– ● Yes No Yes No Yes
[NDI|HX] > [License] not applicable
*1
Item
(level 2)
Camera
menu
Web
menu
All
File
Scene
File
All Reset (except for Network
Settings)
Network
Reset
Factory
Default
Language ● ● Yes No Yes No Yes
Accessibility – ● Yes No No No Yes
Clock Set ● ●
Yes
*1
No
Yes
*2
No Yes
Reset – ● No No No No No
Hours Meter ● – No No No No No
Information – ● No No No No No
System Log – ● No No No No Yes
HTTP
Access Log
– ● No No No No Yes
Service – ● No No No No No
EULA – ● No No No No No
Software – ● No No No No No
Date and time information not applicable
*1
[Time Zone], date, and time information not applicable
*2
446
Help Guide
Interchangeable Lens Digital Camera
ILME-FR7 / ILME-FR7K
Preset Position Saved Items
“Yes” indicates a setting that is saved for the preset position, and “No” indicates a setting that is not saved.
Pan/tilt items
Zoom items
Focus items
Display location Item Save target
Framing control panel of live operation screen
Pan/tilt position Yes
[Pan-Tilt Speed]
No
1)
[Pan-Tilt] in the web menu
[P/T Speed] No
[P/T Acceleration] No
[P/T Range Limit] No
[P/T Direction] No
[P/T Preset] No
Can be configured separately for each preset position. For details, see [Pan-Tilt] > [Preset] in the web menu.
1)
Display location Item Save target
Framing control panel of live operation screen
Zoom position (focus distance) Yes
[Zoom Speed]
No
1)
[Technical] > [Zoom] in the camera menu [Zoom Type] No
Moves at maximum speed when restoring a preset position.
1)
Display location Item
Save
target
Camera image panel of live operation
screen
Tracking target specified for realtime tracking AF No
Specified coordinates for spot focus No
(Focus) tab of live operation screen [Touch Focus] switch No
[Auto Focus] switch Yes
[Focus Hold] button state No
[Push AF/MF] button state No
[Face/Eye Detection AF] Yes
447

5-041-957-11(1) Copyright 2022 Sony Corporation
Display location Item
Save
target
[AF Subj. Shift Sens.] Yes
[AF Transition Speed] Yes
Focus position
Yes
1)
[Shooting] > [Focus] in the web menu
[Push AF Mode] (including settings using assignable
buttons)
No
[Touch Function in MF] No
[AF Assist Control] No
[Shooting] > [Focus] in the camera menu
Focus size and focus position set using [Focus Area] Yes
Focus position set using [Focus Area (AF-S)] Yes
Not restored when the [Auto Focus] switch is set to the on position. Restored when set to off.
1)
448
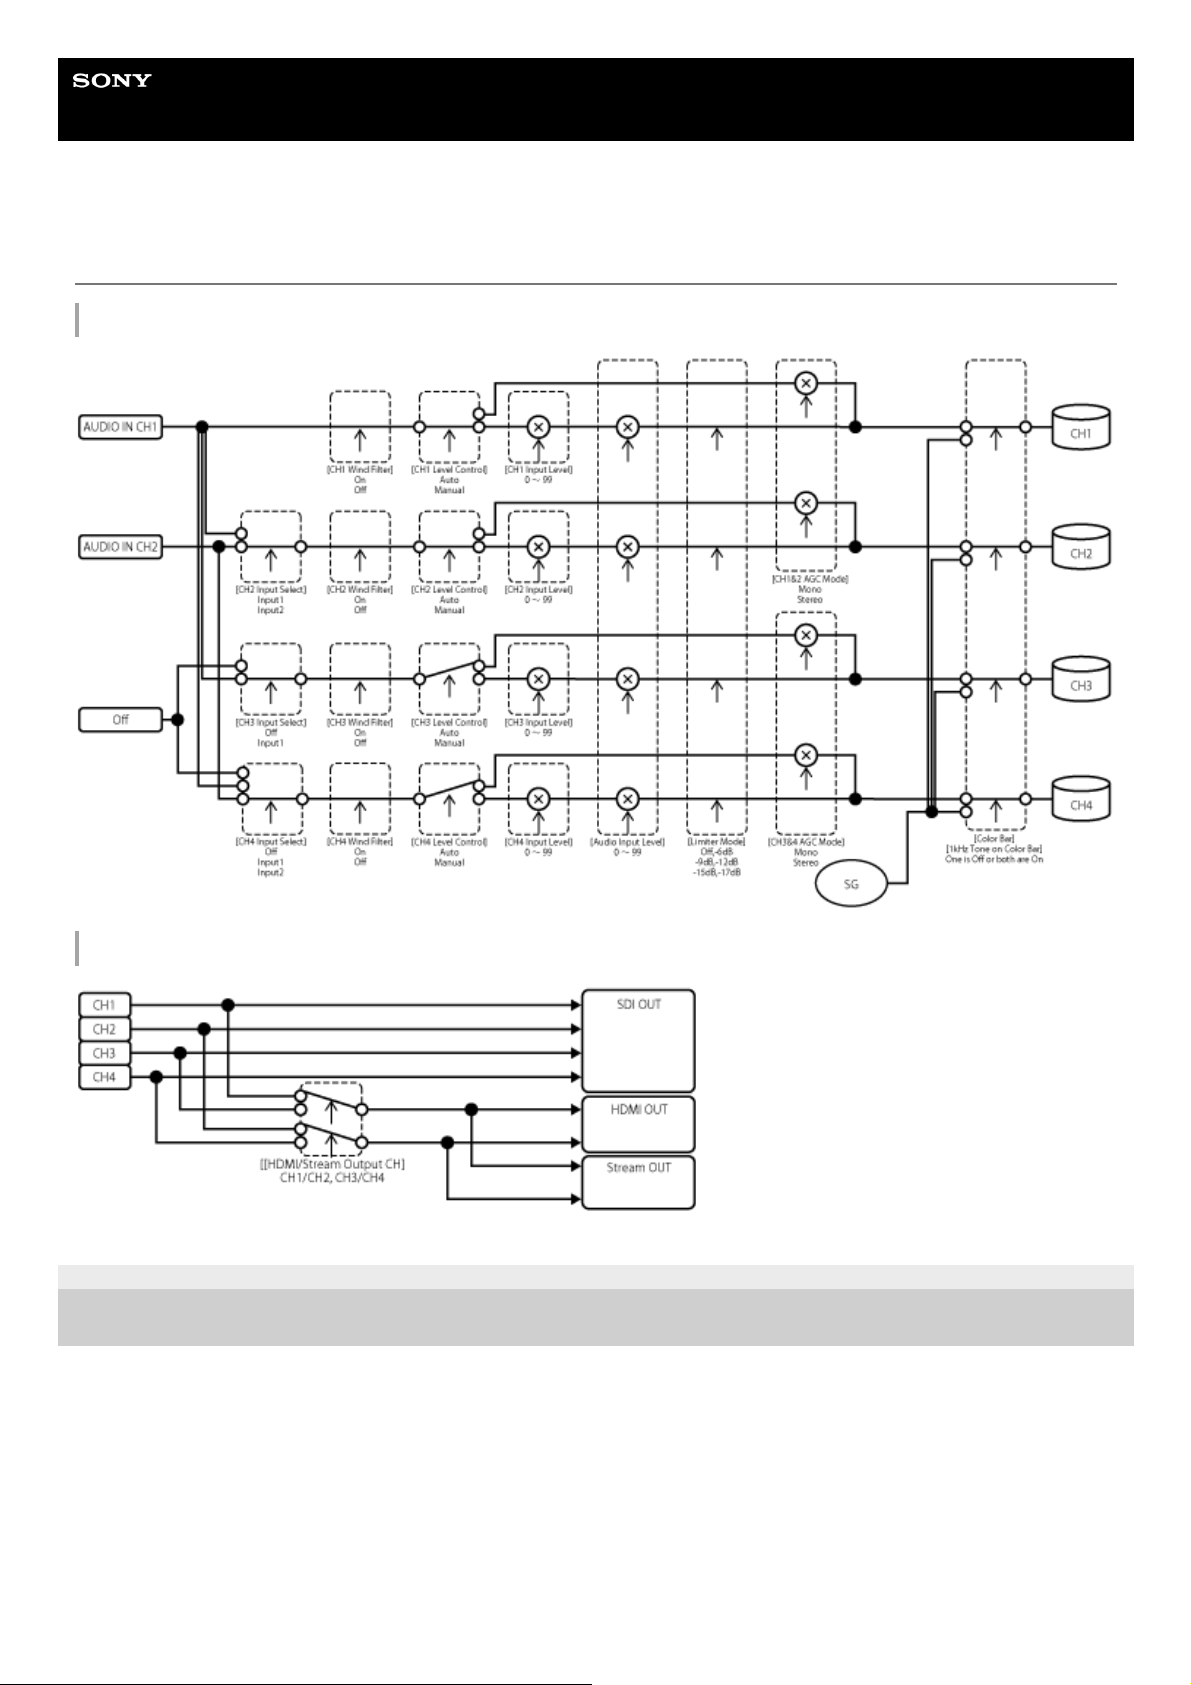

Help Guide
Interchangeable Lens Digital Camera
ILME-FR7 / ILME-FR7K
Updating E-Mount Lens Software
You can update the software of an E-mount lens using the unit.
Refer to the web site for the lens for lenses that can be updated and the corresponding software.
Software is updated using the web menu.
Note
Do not perform the following actions until the update has been completed.
Disconnecting the network
Removing a lens
Turning off the power
If a message indicating that the update failed is displayed, check the displayed description and try to update again.
5-041-957-11(1)
Copyright 2022 Sony Corporation
Attach an E-mount lens to the unit.
1
Check [Maintenance] > [Information] > [Lens] > [Model Name] and [Version Number] in the web menu.
The software version number of the E-mount lens is displayed on the side.
Check the software version number and then update the software as required.
2
Download the lens software update file for Windows (.exe extension) to the device running the Web App.
3
In [Maintenance] > [Information] > [Lens] > [Version Up], press the [Choose File] button and select the
downloaded update file.
4
Follow the on-screen instructions.
5
450
Help Guide
Interchangeable Lens Digital Camera
ILME-FR7 / ILME-FR7K
Attaching the Lens Release Button Cover
You can prevent unintentional removal of the lens by attaching the lens release button cover supplied with the CIB-PCM1
Ceiling Bracket (option) to the lens release button.
Note
This does not prevent the lens from completely being removed.
5-041-957-11(1)
Copyright 2022 Sony Corporation
Attach a lens.
For details about attaching a lens, see “Attaching a Lens.”
1
Slide the pan/tilt lock lever to the LOCK position to lock the pan/tilt of the camera head.
2
Move the camera block to a position so the lens eject cover can be attached.
3
Attach the lens eject cover so that it covers the lens release button.
4
Secure the lens eject cover using the lens eject cover retaining screw.
5
451

Help Guide
Interchangeable Lens Digital Camera
ILME-FR7 / ILME-FR7K
Licenses
MPEG-4 AVC Patent Portfolio License
THIS PRODUCT IS LICENSED UNDER THE AVC PATENT PORTFOLIO LICENSE FOR THE PERSONAL USE OF A
CONSUMER OR OTHER USES IN WHICH IT DOES NOT RECEIVE REMUNERATION TO
(i) ENCODE VIDEO IN COMPLIANCE WITH THE AVC STANDARD (“AVC VIDEO”) AND/OR
(ii) DECODE AVC VIDEO THAT WAS ENCODED BY A CONSUMER ENGAGED IN A PERSONAL ACTIVITY AND/OR
WAS OBTAINED FROM A VIDEO PROVIDER LICENSED TO PROVIDE AVC VIDEO.
NO LICENSE IS GRANTED OR SHALL BE IMPLIED FOR ANY OTHER USE. ADDITIONAL INFORMATION MAY BE
OBTAINED FROM MPEG LA, L.L.C. SEE HTTP://WWW.MPEGLA.COM
Obtaining Software Under the GPL/LGPL License
This product uses software to which the GPL/LGPL applies. This informs you that you have a right to have access to,
modify, and redistribute source code for these software programs under the conditions of the GPL/LGPL.
The source code is provided on the internet. Use the following URL and follow the download instructions.
https://oss.sony.net/Products/Linux/
We would prefer that you do not contact us about the contents of the source code.
μT-Kernel source code
This product uses the source code of μT-Kernel under T-License 2.1 granted of TRON Forum (www.tron.org).
5-041-957-11(1)
Copyright 2022 Sony Corporation
452
Help Guide
Interchangeable Lens Digital Camera
ILME-FR7 / ILME-FR7K
Specifications
General
Mass
Approx. 4.6 kg (10 lb 2.3 oz) (body only)
Approx. 6.0 kg (13 lb 3.6 oz) (including SELP28135G lens)
Dimensions
See “External dimensions.”
Power requirements
19.5 V DC
PoE++ (IEEE802.3bt Type 4 Class 8 compliant)
Power consumption
19.5 V DC: 80.0 W (max)
PoE++: 71.3 W (max)
Operating temperature
0 °C to 40 °C (32 °F to 104 °F)
Storage temperature
−20 °C to +60 °C (−4 °F to +140 °F)
Recording format (video)
XAVC Intra
XAVC-I 4K/QFHD mode: VBR, 600 Mbps (max) bit rate, MPEG-4 AVC/H.264
XAVC-I HD mode: CBG, 223 Mbps (max), MPEG-4 AVC/H.264
XAVC Long
XAVC-L QFHD mode: VBR, 150 Mbps (max) bit rate, MPEG-4 H.264/AVC
XAVC-L HD 50 mode: VBR, 50 Mbps (max), MPEG-4 H.264/AVC
XAVC-L HD 35 mode: VBR, 35 Mbps (max), MPEG-4 H.264/AVC
Recording format (audio)
LPCM 24-bit, 48 kHz, 4-channel
Recording frame rate
XAVC Intra
XAVC-I 4K mode: 4096×2160/59.94P, 50P, 29.97P, 25P, 24P, 23.98P
XAVC-I QFHD mode: 3840×2160/59.94P, 50P, 29.97P, 25P, 23.98P
XAVC-I HD mode: 1920×1080/59.94P, 50P, 29.97P, 25P, 23.98P
XAVC Long
XAVC-L QFHD mode: 3840×2160/59.94P, 50P, 29.97P, 25P, 23.98P
XAVC-L HD 50 mode: 1920×1080/59.94P, 50P, 29.97P, 25P, 23.98P
453
XAVC-L HD 35 mode: 1920×1080/59.94P, 50P, 29.97P, 25P, 23.98P
Recording/playback time
XAVC Intra
XAVC-I QFHD mode: 59.94P, Approx. 30 minutes (using CEA-G160T)
XAVC-I HD mode: 59.94P, Approx. 78 minutes (using CEA-G160T)
XAVC Long
XAVC-L QFHD mode: 59.94P, Approx. 115 minutes (using CEA-G160T)
XAVC-L HD 50 mode: 59.94P, Approx. 155 minutes (using CEA-G80T)
XAVC-L HD 35 mode: 59.94P, Approx. 210 minutes (using CEA-G80T)
Note
The recording/playback time may vary due to usage conditions and memory characteristics. The recording and playback times
are for a continuous recording as a single clip. The actual times may be shorter, depending on the number of clips recorded.
Pan/tilt drive section
Minimum pan speed: 0.02 deg./s
Minimum tilt speed: 0.02 deg./s
Maximum pan speed: 60 deg./s
Maximum tilt speed: 60 deg./s
Pan range: −170 deg. to + 170 deg.
Tilt range: −30 deg. to +195 deg.
Noise criterion rating: NC35 or lower
Preset positions: 100
Camera section
Imaging device
35mm full frame (35.6 × 23.8 mm), Exmor R CMOS sensor
Number of pixels
Approx. 12.9 megapixels (total pixels)
Approx. 10.3 megapixels (effective pixels)
Auto focus
Detection method: Phase detection/contrast detection
Internal ND filters
CLEAR: OFF
1: 1/4ND
2: 1/16ND
3: 1/64ND
Linearly variable ND: 1/4ND to 1/128ND
ISO sensitivity
ISO 800/12800 (Cine EI mode, D55 Light source)
Lens mount
E-mount
Latitude
15+ stop
454

Shutter speed
64F to 1/8000 sec. (23.98P)
Shutter angle
5.6° to 360°, 2 to 64 frames
Slow & Quick Motion
XAVC QFHD: 1 fps to 120 fps
XAVC HD: 1 fps to 240 fps
XAVC 4K: 1 fps to 60 fps
XAVC HD (S35): 1 fps to 120 fps
White balance
2000 K to 15000 K
Gain
−3 dB to +30 dB (1 dB increments)
Base look
S-Cinetone, Standard, Still, ITU709, s709, 709(800%), S-Log3, HLG Live, HLG Natural
Audio section
Sampling frequency
48 kHz
Quantization
24-bit
Frequency response
XLR input MIC mode: 20 Hz to 20 kHz (±3 dB or less)
XLR input LINE mode: 20 Hz to 20 kHz (±3 dB or less)
Dynamic range
XLR input MIC mode: 80 dB (Typical)
XLR input LINE mode: 90 dB (Typical)
Distortion
XLR input MIC mode: 0.08% or lower (−40 dBu input level)
XLR input LINE mode: 0.08% or lower (+14 dBu input level)
Input/output section
Inputs
DC IN
EIAJ compliant, 19.5 V DC
AUDIO IN
XLR type, 5-pin, female
LINE / MIC / MIC+48V switchable
MIC: Reference −30 dBu to −80 dBu
455

GENLOCK IN
BNC connector, 1.0 Vp-p, 75 Ω
TC IN
BNC connector
Outputs
SDI OUT
BNC connector, 12G-SDI, 6G-SDI, 3G-SDI (Level A/B), HD-SDI
HDMI
Type-A connector
OPTICAL output connector
SFP+ compliant
* The unit does not support optical signal input.
Input/output
LAN connector
RJ-45, 1000BASE-T
OPTION connector
RJ-45 tally input/output connector
Media slot section
CFexpress Type A / SD card slot (2)
Supplied accessories
AC adaptor (1)
Power cord (1)
Infrared remote control (1)
Body cap (1) (attached to the unit)
HDMI cable retaining plate (1)
Before Using This Unit (1)
Warranty booklet (1)
External dimensions
Dimensions are approximate values.
Unit: mm (inches)
456
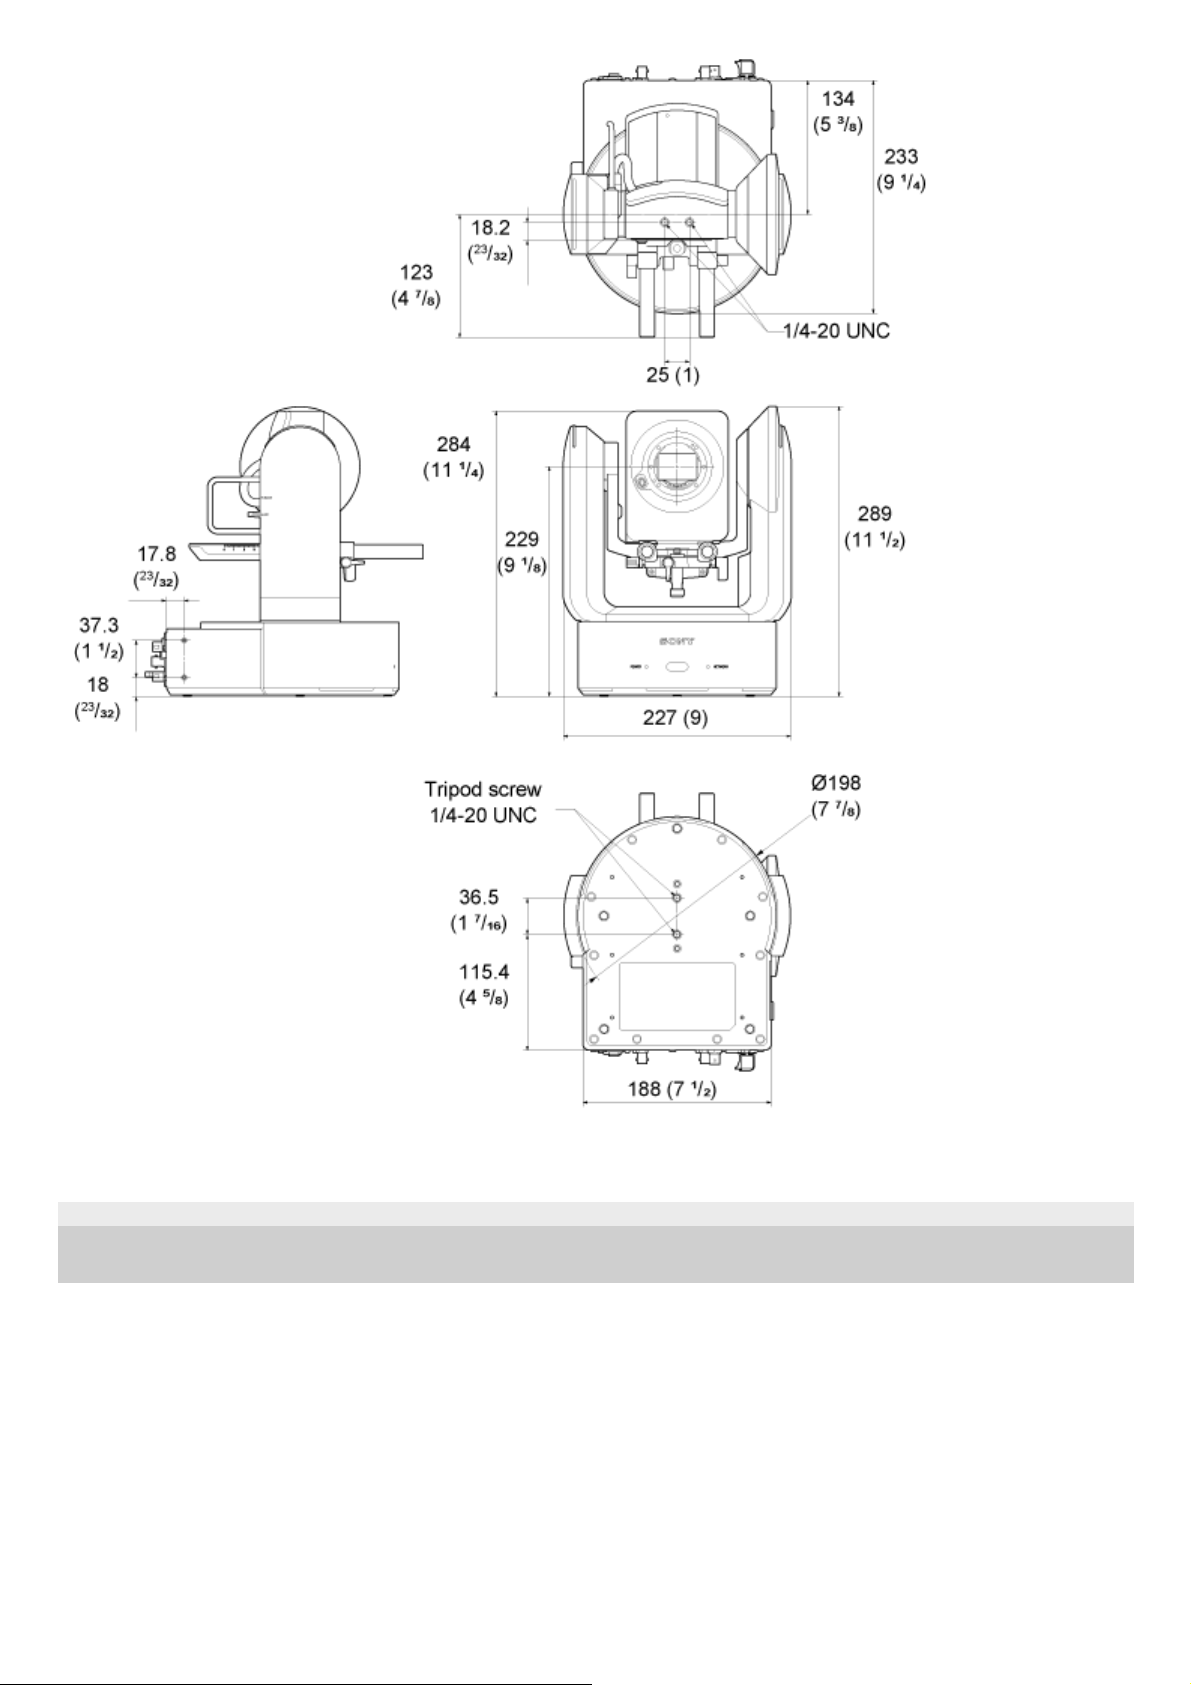
Design and specifications are subject to change without notice.
5-041-957-11(1)
Copyright 2022 Sony Corporation
457
Help Guide
Interchangeable Lens Digital Camera
ILME-FR7 / ILME-FR7K
Trademarks
is a trademark of Sony Group Corporation.
XAVC and
are registered trademarks of Sony Group Corporation.
The terms HDMI and HDMI High-Definition Multimedia Interface, and the HDMI Logo are trademarks or registered
trademarks of HDMI Licensing Administrator, Inc. in the United States and other countries.
Microsoft and Windows are trademarks or registered trademarks of Microsoft Corporation in the United States and/or
other countries.
Mac and macOS are registered trademarks of Apple Inc. in the U.S. and other countries.
The “Catalyst Browse” logo is a trademark or registered trademark of Sony Group Corporation.
IOS is a trademark or registered trademark of Cisco in the U.S. and other countries and is used under license.
iPadOS, Safari, and iPad are trademarks of Apple Inc., registered in the U.S. and other countries and regions.
Android and Google Chrome are trademarks or registered trademarks of Google LLC.
Wi-Fi is a registered trademark of Wi-Fi Alliance.
SDXC logo is a trademark of SD-3C, LLC.
CFexpress and the CFexpress Type A logo are trademarks of the CompactFlash Association.
NewTek™ and NDI® are trademarks or registered trademarks of NewTek, Inc.
JavaScript is a registered trademark of Oracle and/or its affiliates.
Intel, the Intel logo, and Intel Core are trademarks of Intel Corporation or its subsidiaries.
QR Code is a trademark of Denso Wave Inc.
All other company names and product names are registered trademarks or trademarks of their respective owners.
Trademarked items are not indicated by ™ or ® symbols in this document.
5-041-957-11(1)
Copyright 2022 Sony Corporation
458