Owner's Manual
Manual del Propietario
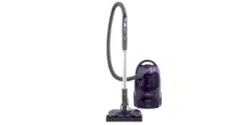
Vacuum Cleaner
Aspiradora
Model, Modelo
721.33189
721.33289
CAUTION: Read and follow all safety
and operating instructions before first
use of this product.
CUIDADO: Lea y sigue todas las
instrucciones de operaciSn y seguridad
antes del uso de este producto.
Directions for Use
It is a violation of Federal law to use this
product in a manner inconsistent with its
labeling.
Direcciones de uso
Es una violaci6n a la ley Federal utilizar
este producto de una manera contraria
con su etiquetado.
Sears, Roebuck and Co., Hoffman Estates, IL 60179 U.S.A
www.sears.com
PART No. : 3828FI3840A Printed in China
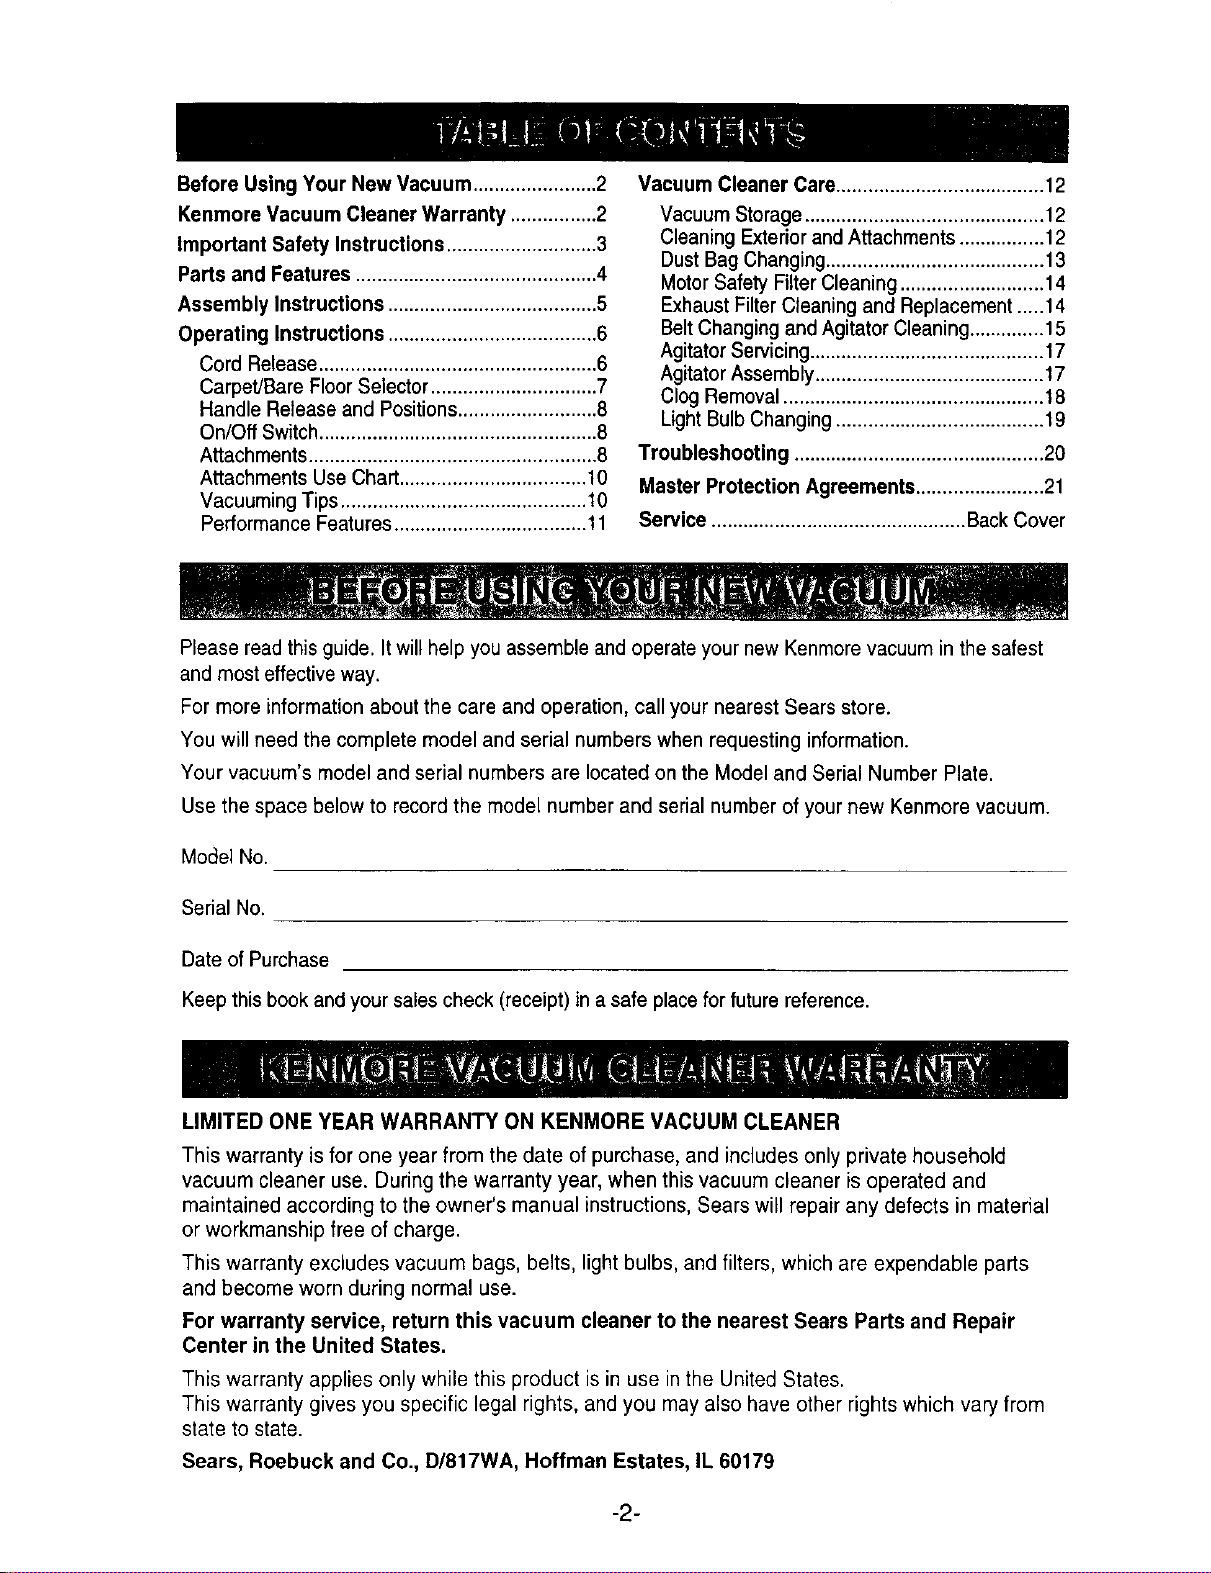
Before Using Your New Vacuum ....................... 2
Kenmore Vacuum Cleaner Warranty ................ 2
Important Safety Instructions ............................ 3
Parts and Features ............................................. 4
Assembly Instructions ....................................... 5
Operating Instructions ....................................... 6
Cord Release.................................................... 6
Carpet/Bare FloorSelector............................... 7
Handle Release and Positions.......................... 8
On/Off Switch.................................................... 8
Attachments ...................................................... 8
Attachments Use Chart ................................... 10
Vacuuming Tips .............................................. 10
Performance Features .................................... 11
Vacuum Cleaner Care....................................... 12
Vacuum Storage ............................................. 12
Cleaning Exterior and Attachments ................ 12
Dust Bag Changing ......................................... 13
Motor Safety Filter Cleaning ........................... 14
Exhaust Filter Cleaning and Replacement .....14
Belt Changing and Agitator Cleaning .............. 15
Agitator Servicing ............................................ 17
Agitator Assembly ........................................... 17
Clog Removal ................................................. 18
Light Bulb Changing ....................................... 19
Troubleshooting ............................................... 20
Master Protection Agreements ........................ 21
Service ................................................ Back Cover
Please read this guide. It will help you assemble and operate your new Kenmore vacuum in the safest
and most effective way.
For more information about the care and operation, call your nearest Sears store.
You will need the complete model and serial numbers when requesting information.
Your vacuum's model and serial numbers are located on the Model and Serial Number Plate.
Use the space below to record the model number and serial number of your new Kenmore vacuum.
Mo_el No.
Serial No.
Date of Purchase
Keep this book and your sales check (receipt) in a safe place for future reference.
LIMITED ONE YEAR WARRANTY ON KENMORE VACUUM CLEANER
This warranty is for one year from the date of purchase, and includes only private household
vacuum cleaner use. During the warranty year, when this vacuum cleaner is operated and
maintained according to the owner's manual instructions, Sears will repair any defects in material
or workmanship free of charge.
This warranty excludes vacuum bags, belts, light bulbs, and filters, which are expendable parts
and become worn during normal use.
For warranty service, return this vacuum cleaner to the nearest Sears Parts and Repair
Center in the United States.
This warranty applies only while this product is in use in the United States.
This warranty gives you specific legal rights, and you may also have other rights which vary from
state to state.
Sears, Roebuck and Co., D/817WA, Hoffman Estates, IL 60179
-2-
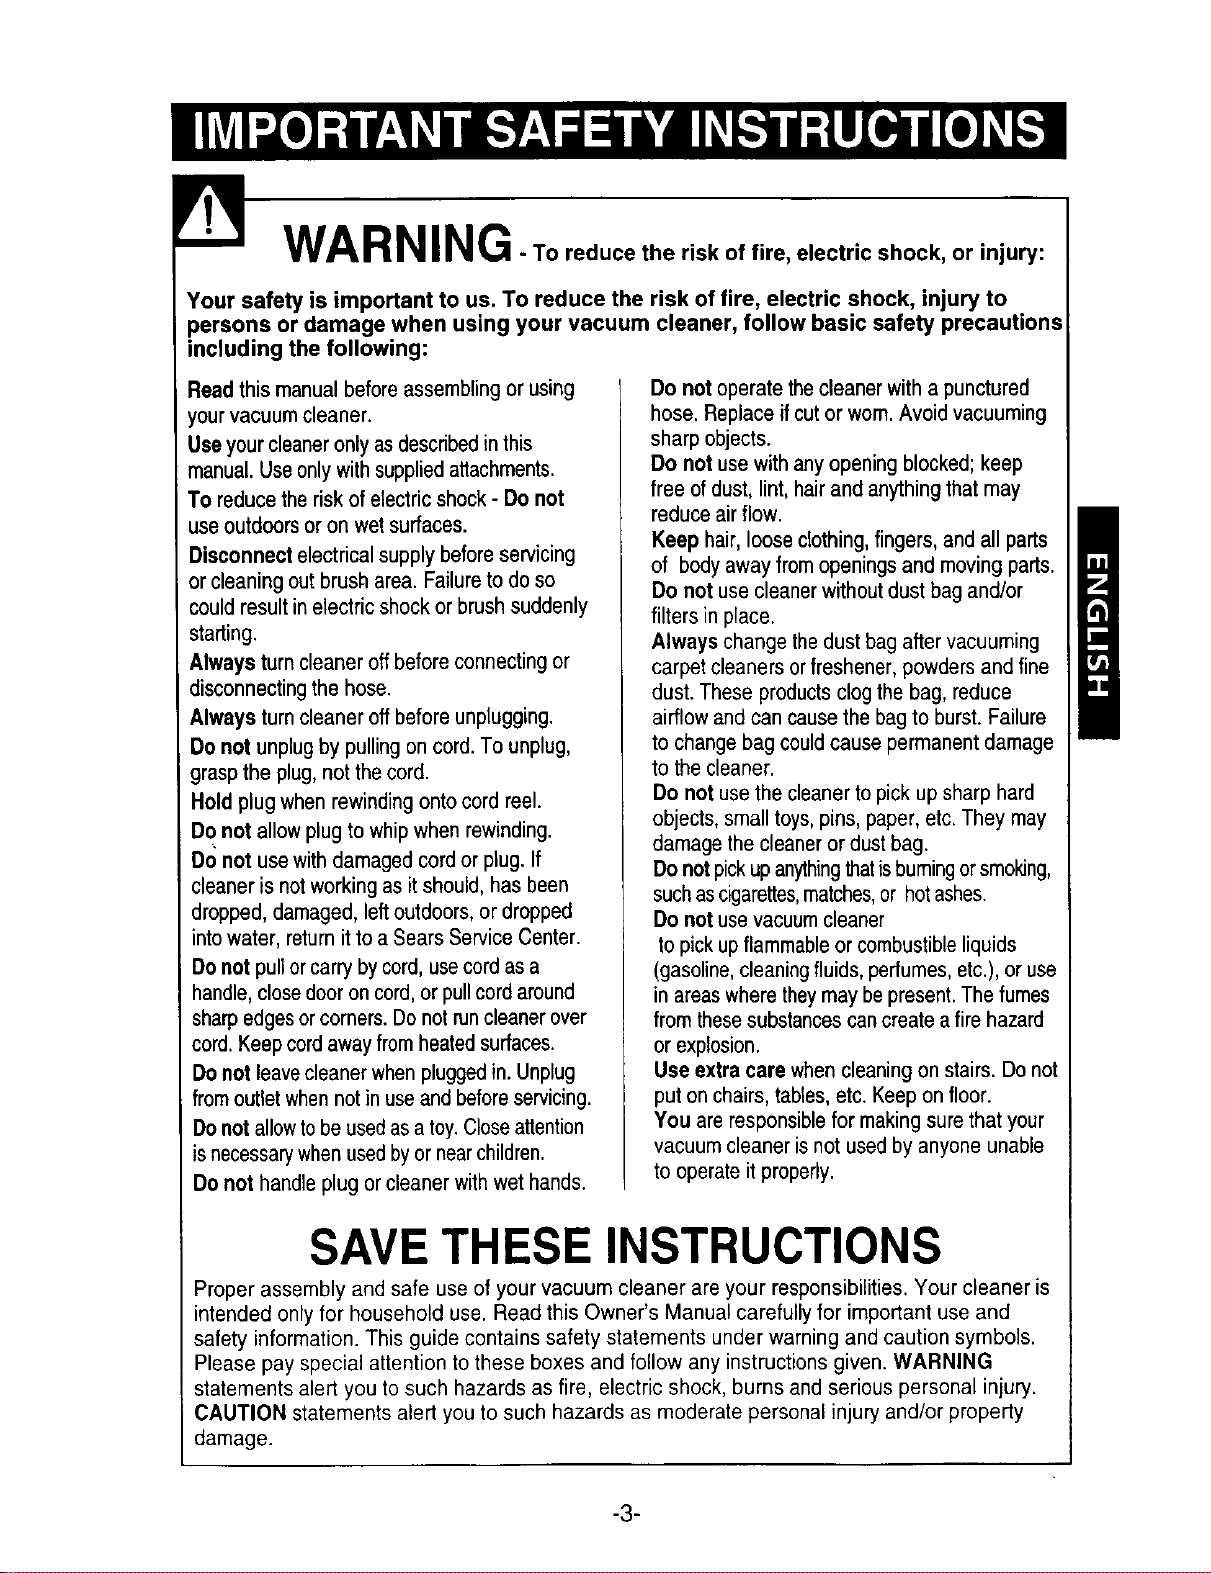
RNING To reduce the risk of fire, electric shock, or injury:
Your safety is important to us. To reduce the risk of fire, electric shock, injury to
persons or damage when using your vacuum cleaner, follow basic safety precautions
including the following:
Readthismanualbeforeassemblingorusing
yourvacuumcleaner.
Useyourcleaneronlyasdescribedin this
manual.Useonlywithsuppliedattachments.
To reducethe risk of electricshock- Do not
useoutdoorsor on wetsurfaces.
Disconnect electrical supply before servicing
or cleaning out brush area. Failure to do so
could result in electric shock or brush suddenly
starting.
Always turn cleaner off before connecting or
disconnecting the hose.
Always turn cleaner off before unplugging.
Do not unplug by pulling on cord. To unplug,
grasp the plug, not the cord.
Hold plug when rewinding onto cord reel.
Do not allow plug to whip when rewinding.
Do not use with damaged cord or plug. If
cleaner is not working as it should, has been
dropped, damaged, left outdoors, or dropped
into water, return it to a Sears Service Center.
Do not pull or carry by cord, use cord as a
handle, close door on cord, or pull cord around
sharp edges or corners. Do not run cleaner over
cord. Keep cord away from heated surfaces.
Do not leave cleaner when plugged in. Unplug
from outlet when not in use and before servicing.
Do not allow to be used as a toy. Close attention
_snecessary when used by or near children.
Do not handle plug or cleaner with wet hands.
Do not operate the cleaner with a punctured
hose. Replace if cut or worn. Avoid vacuuming
sharp objects.
Do not use with any opening blocked; keep
free of dust, lint, hair and anything that may
reduce air flow.
Keep hair, loose clothing, fingers,and all parts
of body away from openings and moving parts.
Do not use cleaner without dust bag and/or
filters in place.
Always change the dust bag after vacuuming
carpet cleaners or freshener, powders and fine
dust. These products clog the bag, reduce
airflow and can cause the bag to burst. Failure
to change bag could cause permanent damage
to the cleaner.
Do not use the cleaner to pick up sharp hard
objects, small toys, pins, paper, etc. They may
damage the cleaner or dust bag.
Do not pick up anythingthat isburning or smoking,
such as cigarettes,matches,or hot ashes.
Do not use vacuum cleaner
to pick up flammable or combustible liquids
(gasoline, cleaning fluids, perfumes, etc.), or use
in areas where they may be present. The fumes
from these substances can create a fire hazard
or explosion.
Use extra care when cleaning on stairs. Do not
put on chairs, tables, etc. Keep on floor.
You are responsible for making sure that your
vacuum cleaner is not used by anyone unable
to operate it properly.
SAVE THESE INSTRUCTIONS
Proper assembly and safe use of your vacuum cleaner are your responsibilities. Your cleaner is
intended only for household use. Read this Owner's Manual carefully for important use and
safety information. This guide contains safety statements under warning and caution symbols.
Please pay special attention to these boxes and follow any instructions given. WARNING
statements alert you to such hazards as fire, electric shock, burns and serious personal injury.
CAUTION statements alert you to such hazards as moderate personal injury and/or property
damage.
-3-

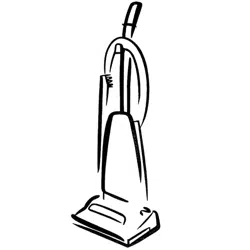
It is important to know your vacuum cleaner's parts and features to assure its proper and safe
use. Review these before using your cleaner.
f ltem Part No.
Dust Bag 50688
Belt 5275
Handle
Quick Release
Cord Hanger
Power Cord
Dust Cover
Exhaust Panel_
Height Adj
Knob
Bumper --
Carry Handle On/OffSwitch
Light
Extension
Wand
Dusting
Upholstery Tool
Handle
Release
Pedal
Motor Protecto_
Stretch Hose
E-Z Belt Check--
Carpet/Bare --
Floor Selector
Floor Nozzle
Crevice Tool
Agitator
-4-
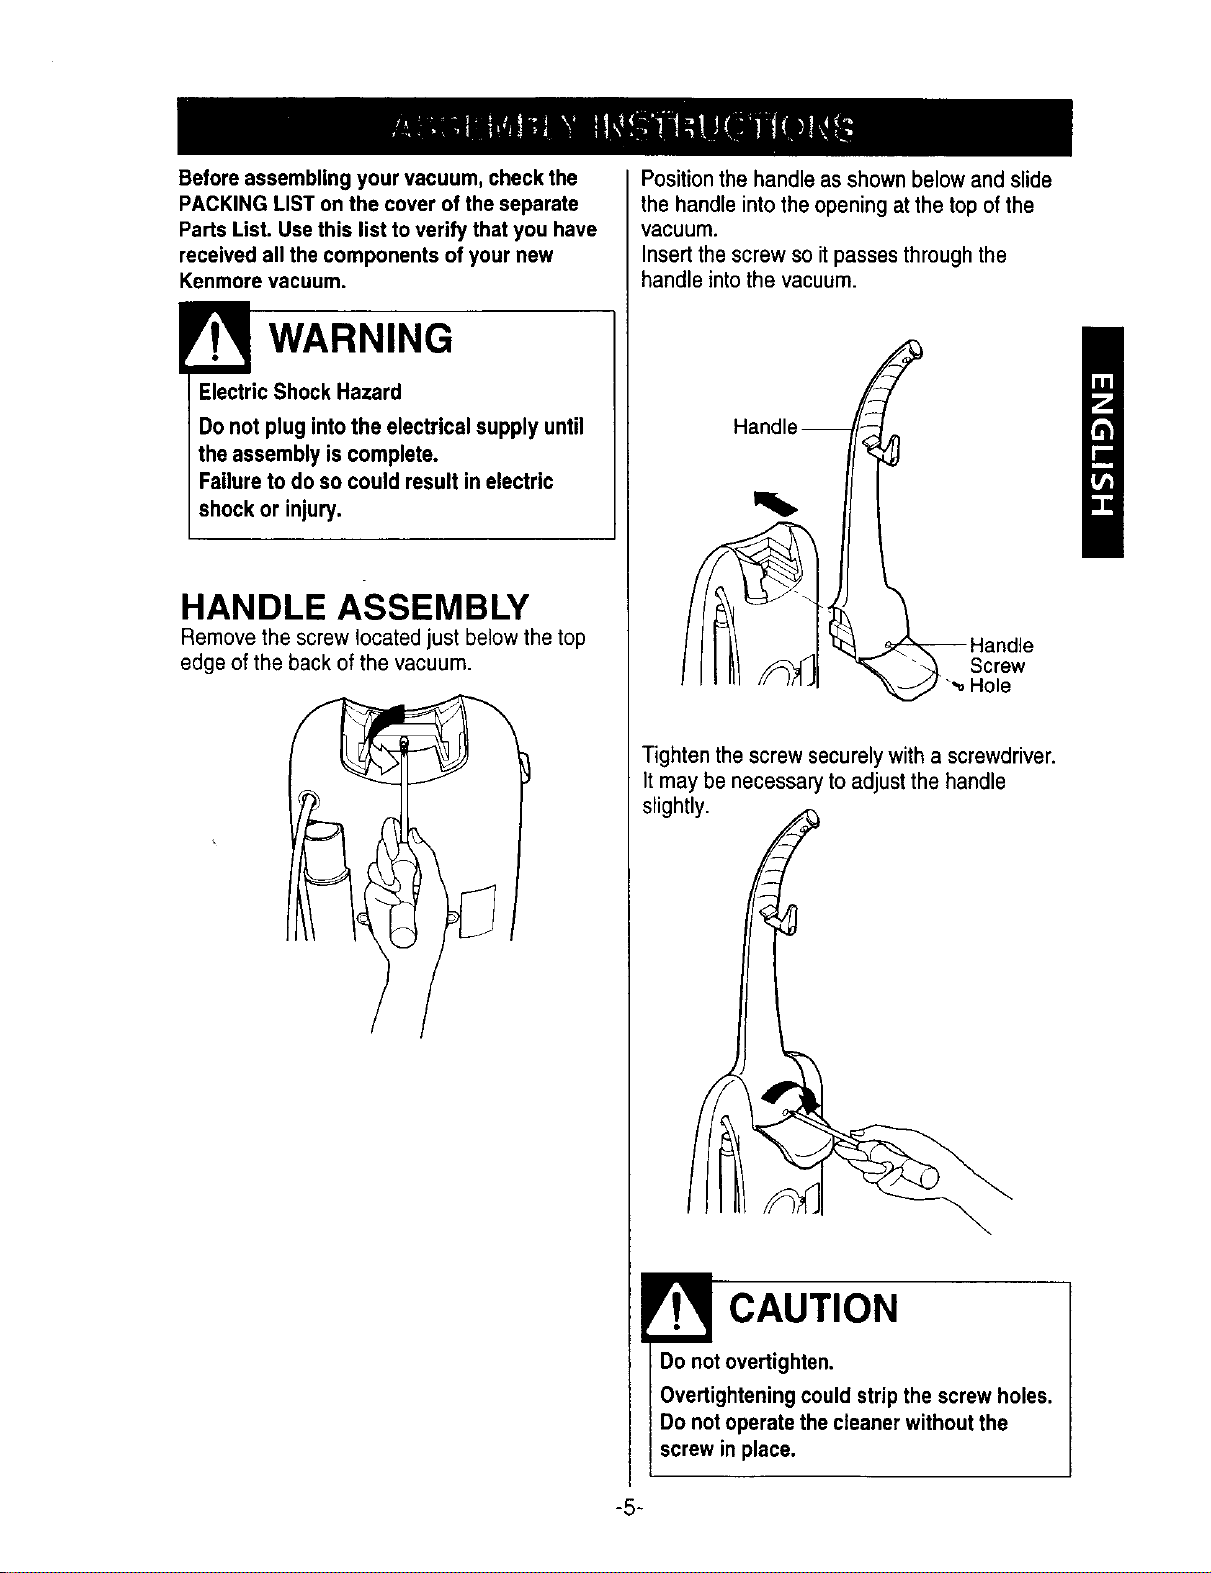
Before assembling your vacuum, check the
PACKING LIST on the cover of the separate
Parts List. Use this list to verify that you have
received all the components of your new
Kenmore vacuum.
WARNING
Electric Shock Hazard
Donot plugintothe electricalsupply until
the assemblyiscomplete.
Failureto doso could result in electric
shockor injury.
HANDLE ASSEMBLY
Remove the screw located just below the top
edge of the back of the vacuum.
Position the handle as shown below and slide
the handle into the opening at the topof the
vacuum.
Insertthe screw so itpasses through the
handle intothe vacuum.
H.
Handle
/11_/_ "_ "'_. Screw
I ! , ,ll l/ Irl. _.._J'_Hole
Tighten the screw securely with a screwdriver.
It may be necessary to adjust the handle
slightly.
CAUTION
Do not overtighten.
Overtightening could strip the screw holes.
Do not operate the cleaner without the
screw in place.
-5-
STRETCH HOSE
ASSEMBLY
Stopper
k_ Lower
II I_ --_'-_.Hose Holder
I I,Jj
/ J
_ling
Stretch
Hose
Attach the lower hose holder provided in the
accessory bag to the body and then clip hose
into the lower hose holder with the hose stopper
placed just above the lower hose holder.
Lastly, slide hose onto the hose coupling on
the floor nozzle and twist hose.
Make sure hose is firmly connected before
using the vacuum.
CORD ASSEMBLY
Make sure the quick release cord hanger is in
the upright position.
Lock the cord into
place by forcing it
into the locking
notch on the
handle as shown.
This helps keep the
power cord out of
the path of the floor
nozzle.
Notch
Cord
Quick-
Release Cord
Hanger
Cord
Handle
Wrap the power
cord around the
quick release cord
hanger and carry
handle, and clip
the plug onto the
power cord.
OPERATING INSTRUCTIONS
1.Turn the quick
release cord hanger
to either side and
down to release the
power cord.
0 -_Quickt_.\ Release
_'_ Cord
/////Hanger
2. Unclip the plug from the power cord and pull
the cord off the quick release cord hanger.
Check to be sure the power cord is still locked
into the locking notch. See CORD ASSEMBLY.
3. Check to see if the cleaner has bag
installed. See DUST BAG CHANGING.
4. Plug the polarized power cord into a 120
Volt electrical outlet.
NOTE: To reduce the risk of electric shock, this
vacuum cleaner has a polarized plug, one
blade is wider than the other. This plug will fit in
a polarized outlet only one way. If the plug does
not fit fully in the outlet, reverse the plug. If it
still does not fit, contact a qualified electrician to
install the proper outlet. Do not change the plug
in any way.
WARNING
Personal Injury and Product Damage
Hazard!
• DO NOT plug in if switch is in ON
position. Personal injury or product
damage could result.
• DO NOT use outlets above counters.
Damage to items in surrounding area
could occur.
-6-
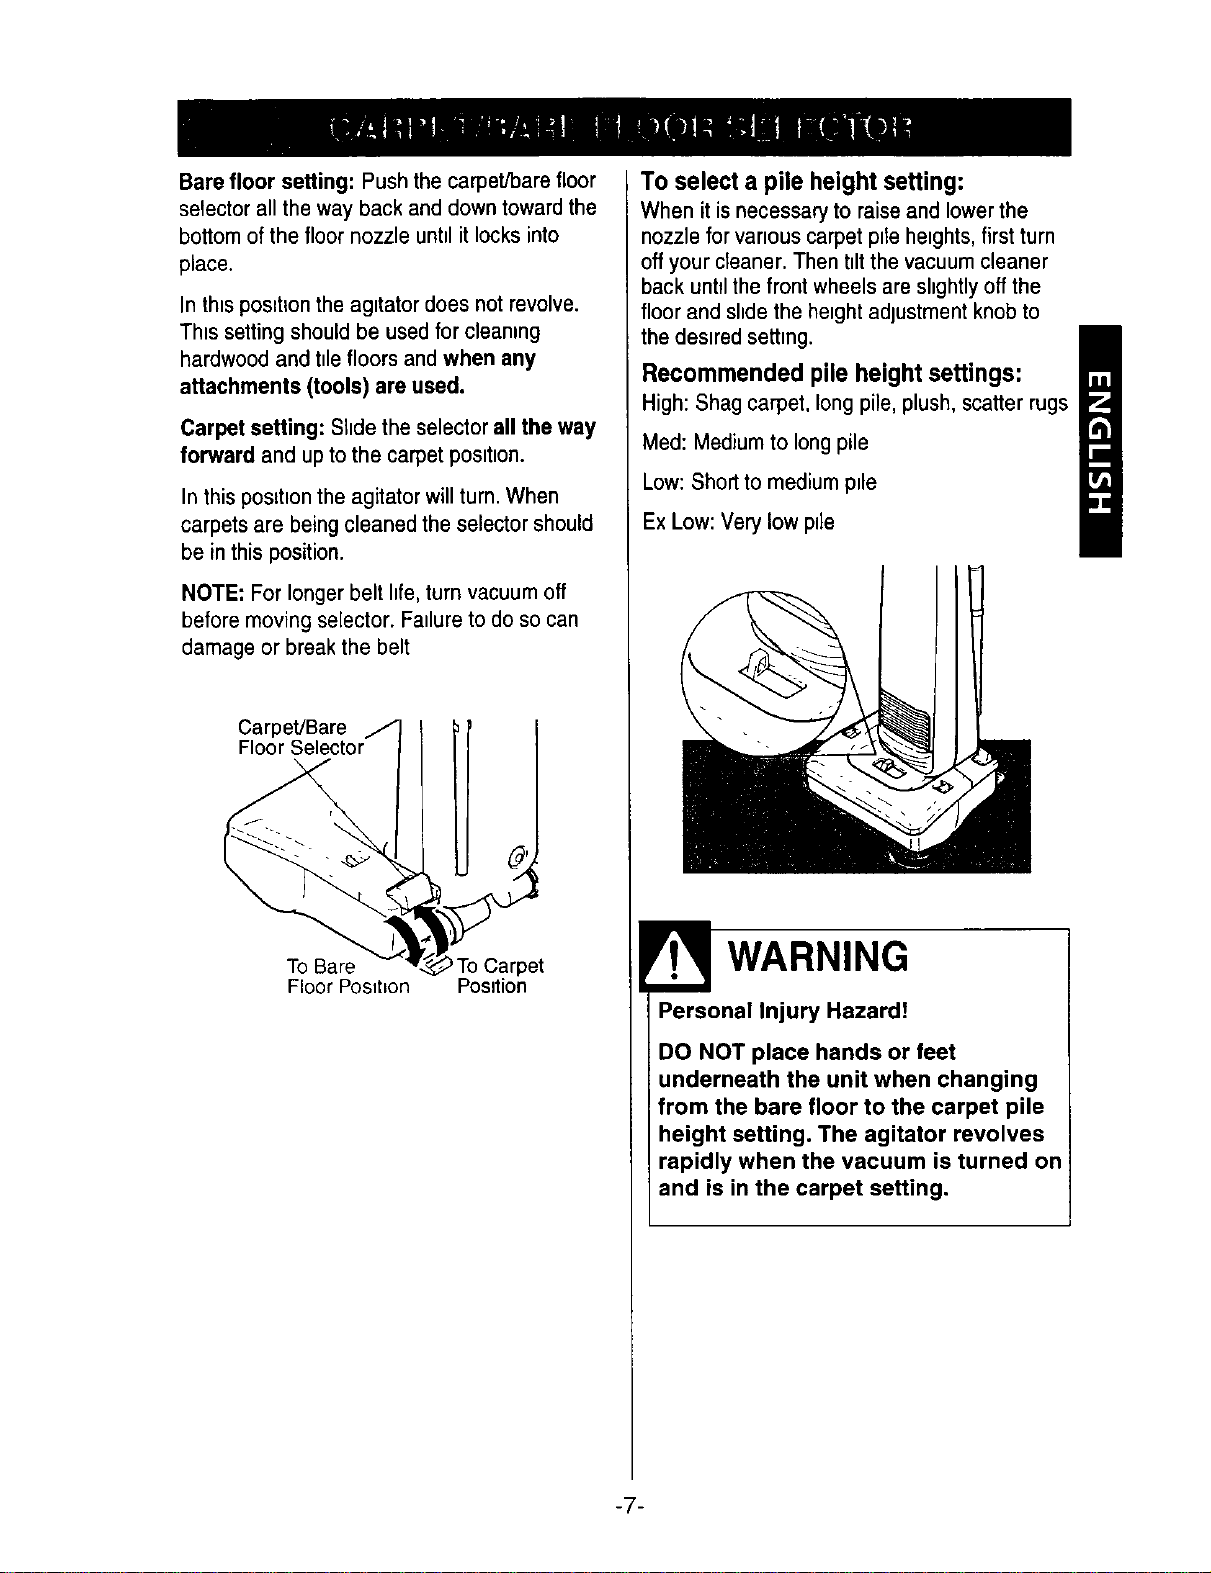
Bare floor setting: Pushthe carpet/barefloor
selector all the way back and down toward the
bottom of the floornozzle unhl it locks into
place.
In thtspostt_ontheagttator does not revolve.
This setting should be used for cleaning
hardwood and hiefloors and when any
attachments (tools) are used.
Carpet setting: SItdethe selectorall the way
forward and upto the carpetposttton.
Inthis position the agitator will turn. When
carpets are being cleaned the selector should
be in this position.
NOTE: For longer belt hfe,turnvacuum off
before moving selector. Fanluretodo so can
damage or break the belt
Carpet/Bare
Floor Selector
To Bare >To Carpet
Floor Pos_hon Position
To select a pile height setting:
When it isnecessary to raiseand lower the
nozzleforvanouscarpetpileheights,first turn
offyourcleaner.Thenttltthe vacuumcleaner
back unttlthe frontwheelsare slightlyoffthe
floor and slidethe heightadjustmentknobto
the desiredsetting.
Recommended pile height settings:
High:Shagcarpet,longpile,plush,scatterrugs
Med: Mediumto longpile
Low:Short to medium pile
ExLow: Very low pile
WARNING
Personal Injury Hazard!
DO NOT place hands or feet
underneath the unit when changing
from the bare floor to the carpet pile
height setting. The agitator revolves
rapidly when the vacuum is turned on
and is in the carpet setting.
-7-
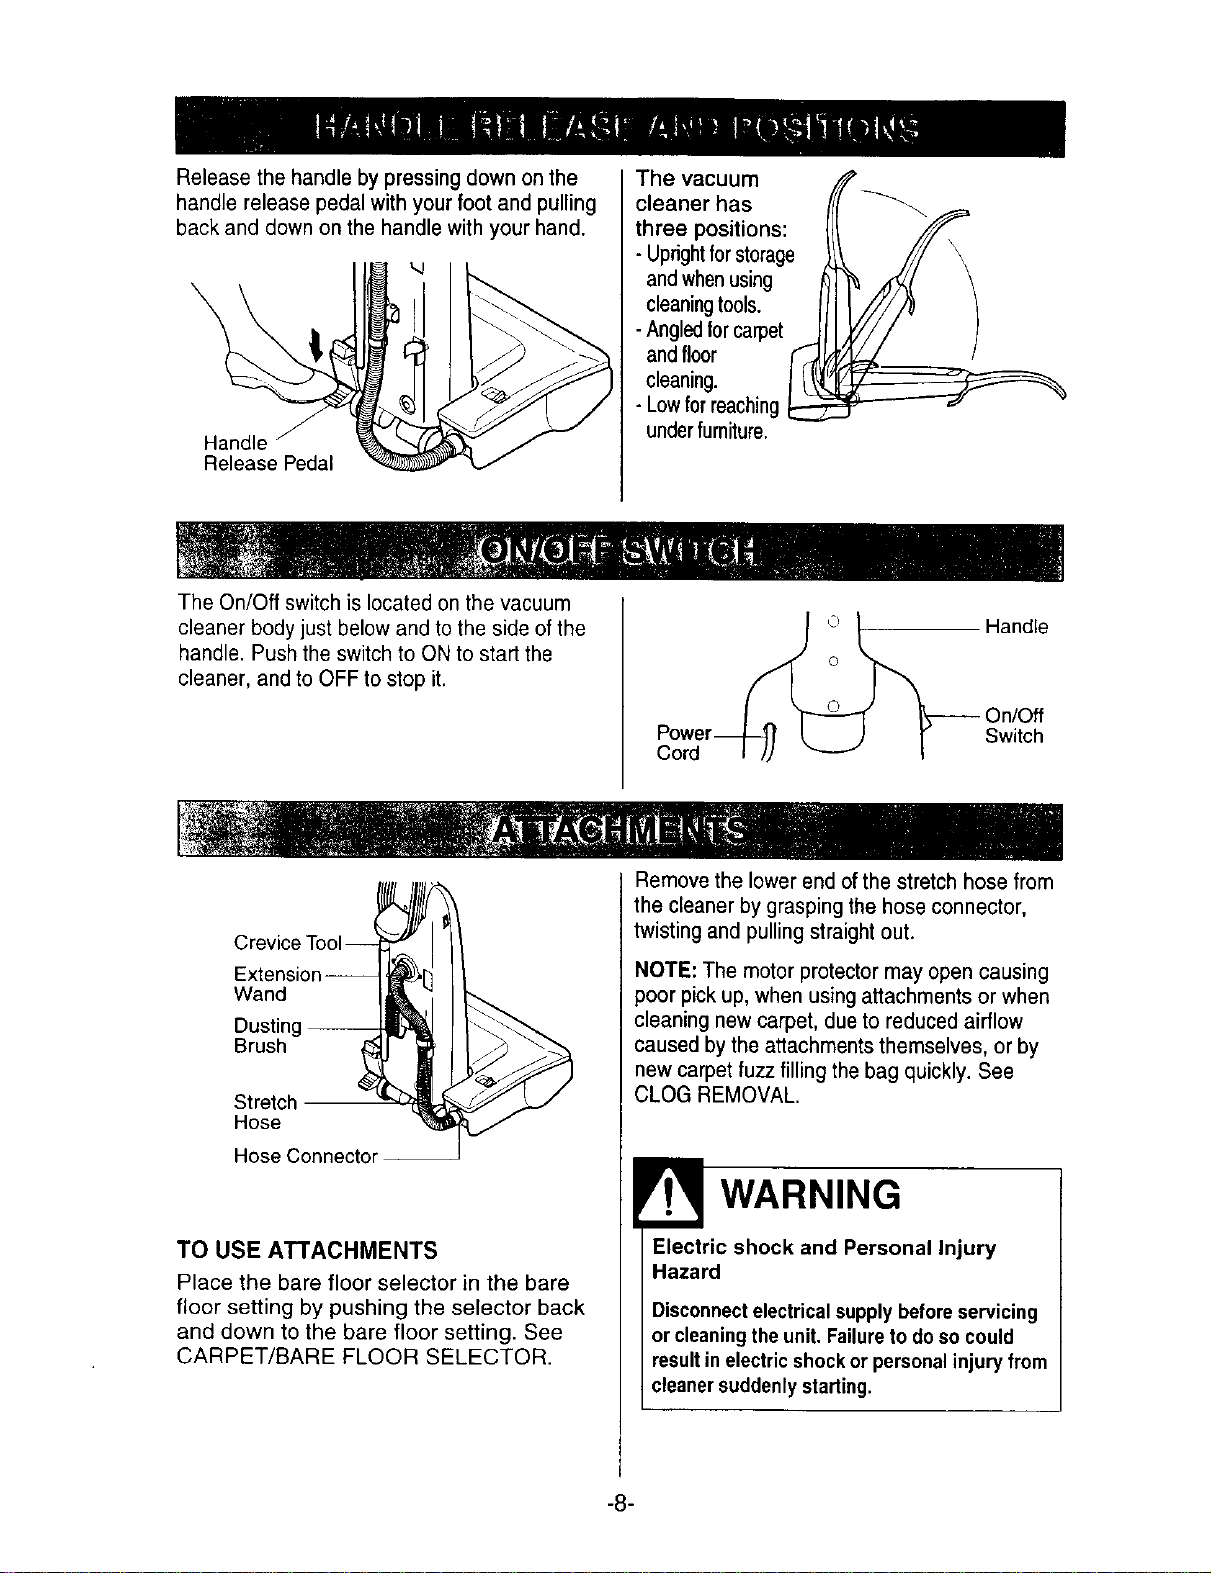
Release the handle by pressing down on the
handle release pedal with your foot and pulling
back and down on the handle with your hand.
b
Handle
Release Pedal
The On/Off switch is located on the vacuum
The vacuum
cleaner has
three positions:
- Uprightforstorage
andwhenusing
cleaningtools.
-Angledforcarpet
andfloor
cleaning.
- Lowforreaching
underfurniture.
cleaner body just below and to the side of the
handle. Push the switch to ON to start the
cleaner, and to OFF to stop it.
Pc°off,
- Handle
L.___ On/Off
Switch
Wand
Dustinc 1
Brush
Stretch
Hose
Hose Connector
TO USE ATTACHMENTS
Place the bare floor selector in the bare
floor setting by pushing the selector back
and down to the bare floor setting. See
CARPET/BARE FLOOR SELECTOR.
Remove the lower end of the stretch hose from
the cleaner by grasping the hose connector,
twisting and pulling straight out.
NOTE: The motor protector may open causing
poor pick up, when using attachments or when
cleaning new carpet, due to reduced airflow
caused by the attachments themselves, or by
new carpet fuzz filling the bag quickly. See
CLOG REMOVAL.
WARNING
Electric shock and Personal Injury
Hazard
Disconnectelectrical supply before servicing
or cleaningthe unit. Failureto do so could
resultin electric shock or personal injury from
cleaner suddenly starting.
-8-
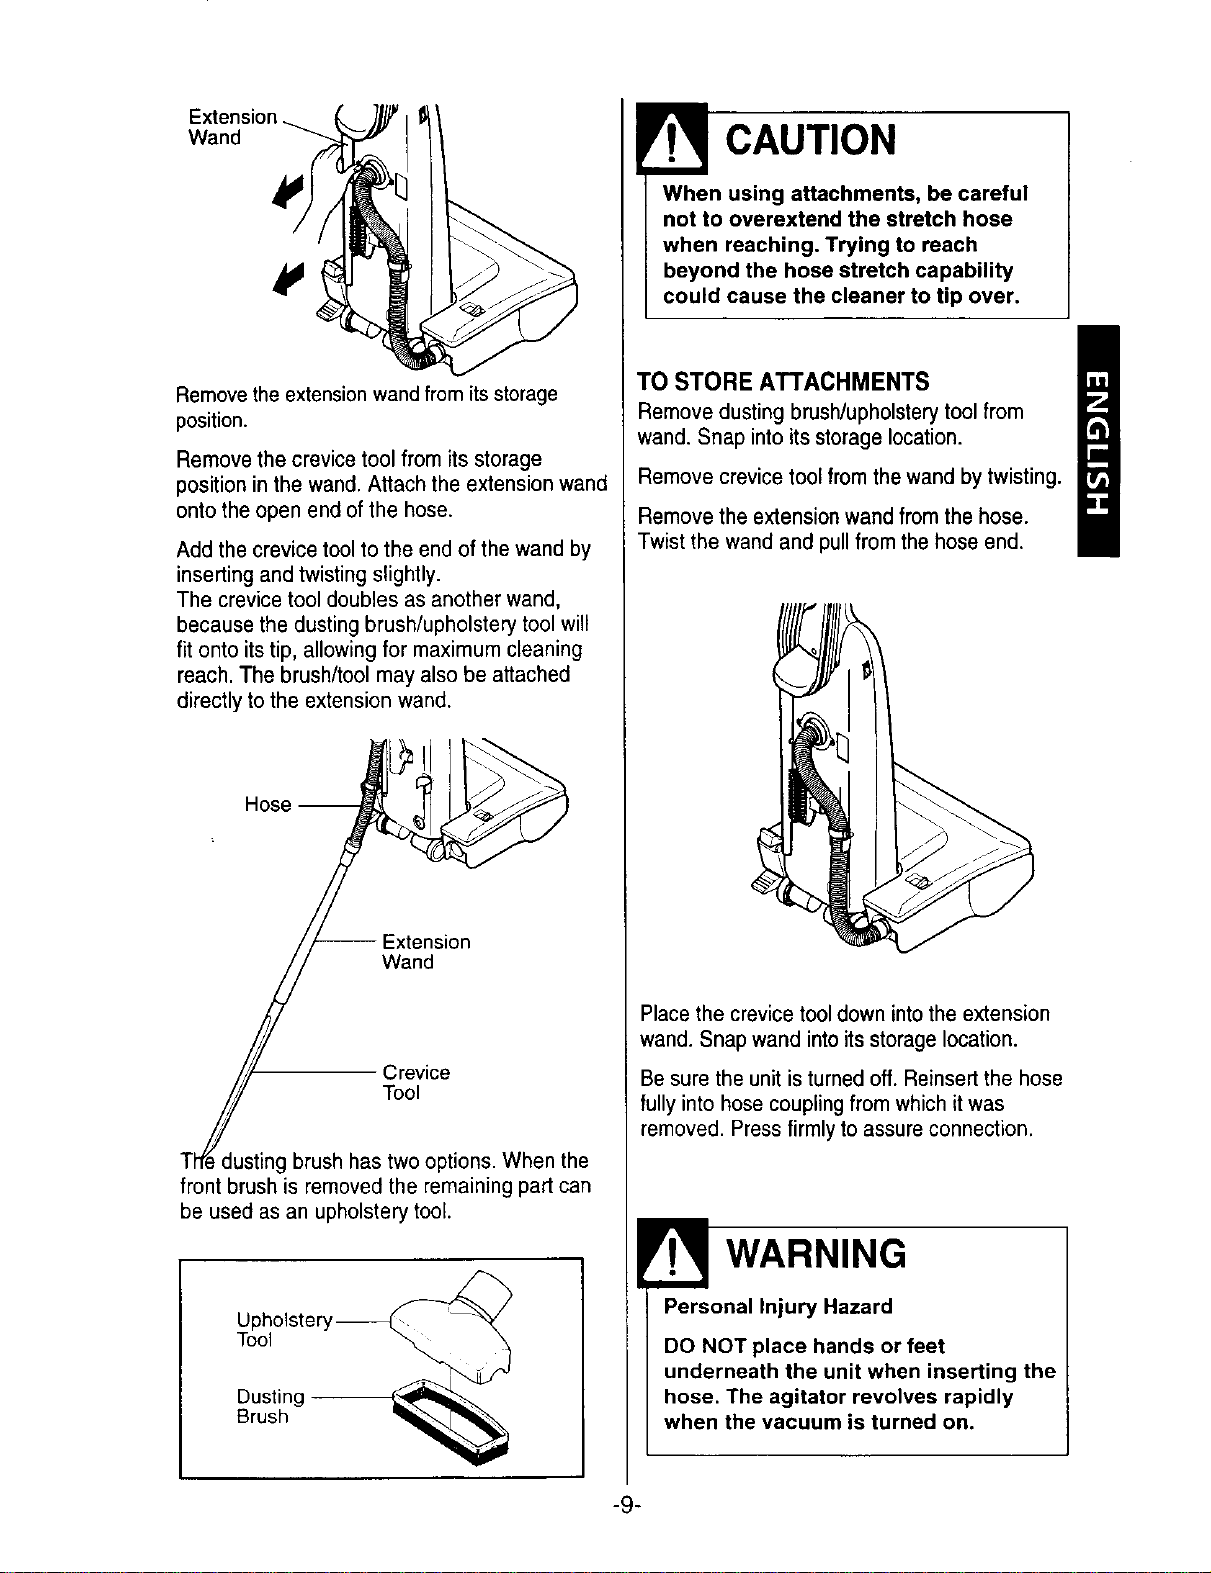
Extension
Wand
Remove the extension wand from its storage
position.
Remove the crevice tool from its storage
position in the wand. Attach the extension wand
onto the open end of the hose.
Add the crevice tool to the end of the wand by
inserting and twisting slightly.
The crevice tool doubles as another wand,
because the dusting brush/upholstery tool will
fit onto its tip, allowing for maximum cleaning
reach. The brush/tool may also be attached
directly to the extension wand.
Wand
Crevice
Tool
Jsting brush has two options. When the
front brush is removed the remaining part can
be used as an upholstery tool.
Upholstery
Tool _"--. _ r,_
CAUTION
When using attachments, be careful
not to overextend the stretch hose
when reaching. Trying to reach
beyond the hose stretch capability
could cause the cleaner to tip over.
TO STORE ATTACHMENTS
Remove dusting brush/upholstery tool from
wand. Snap into its storage location.
Remove crevice tool from the wand by twisting.
Remove the extension wand fromthe hose.
Twist the wand and pull from the hose end.
Placethe crevice tool down into the extension
wand. Snap wand intoits storage location.
Be sure the unit is turned off. Reinsert the hose
fully into hose coupling from which it was
removed. Press firmly to assure connection.
WARNING
Personal Injury Hazard
DO NOT place hands or feet
underneath the unit when inserting the
hose. The agitator revolves rapidly
when the vacuum is turned on.
-9-
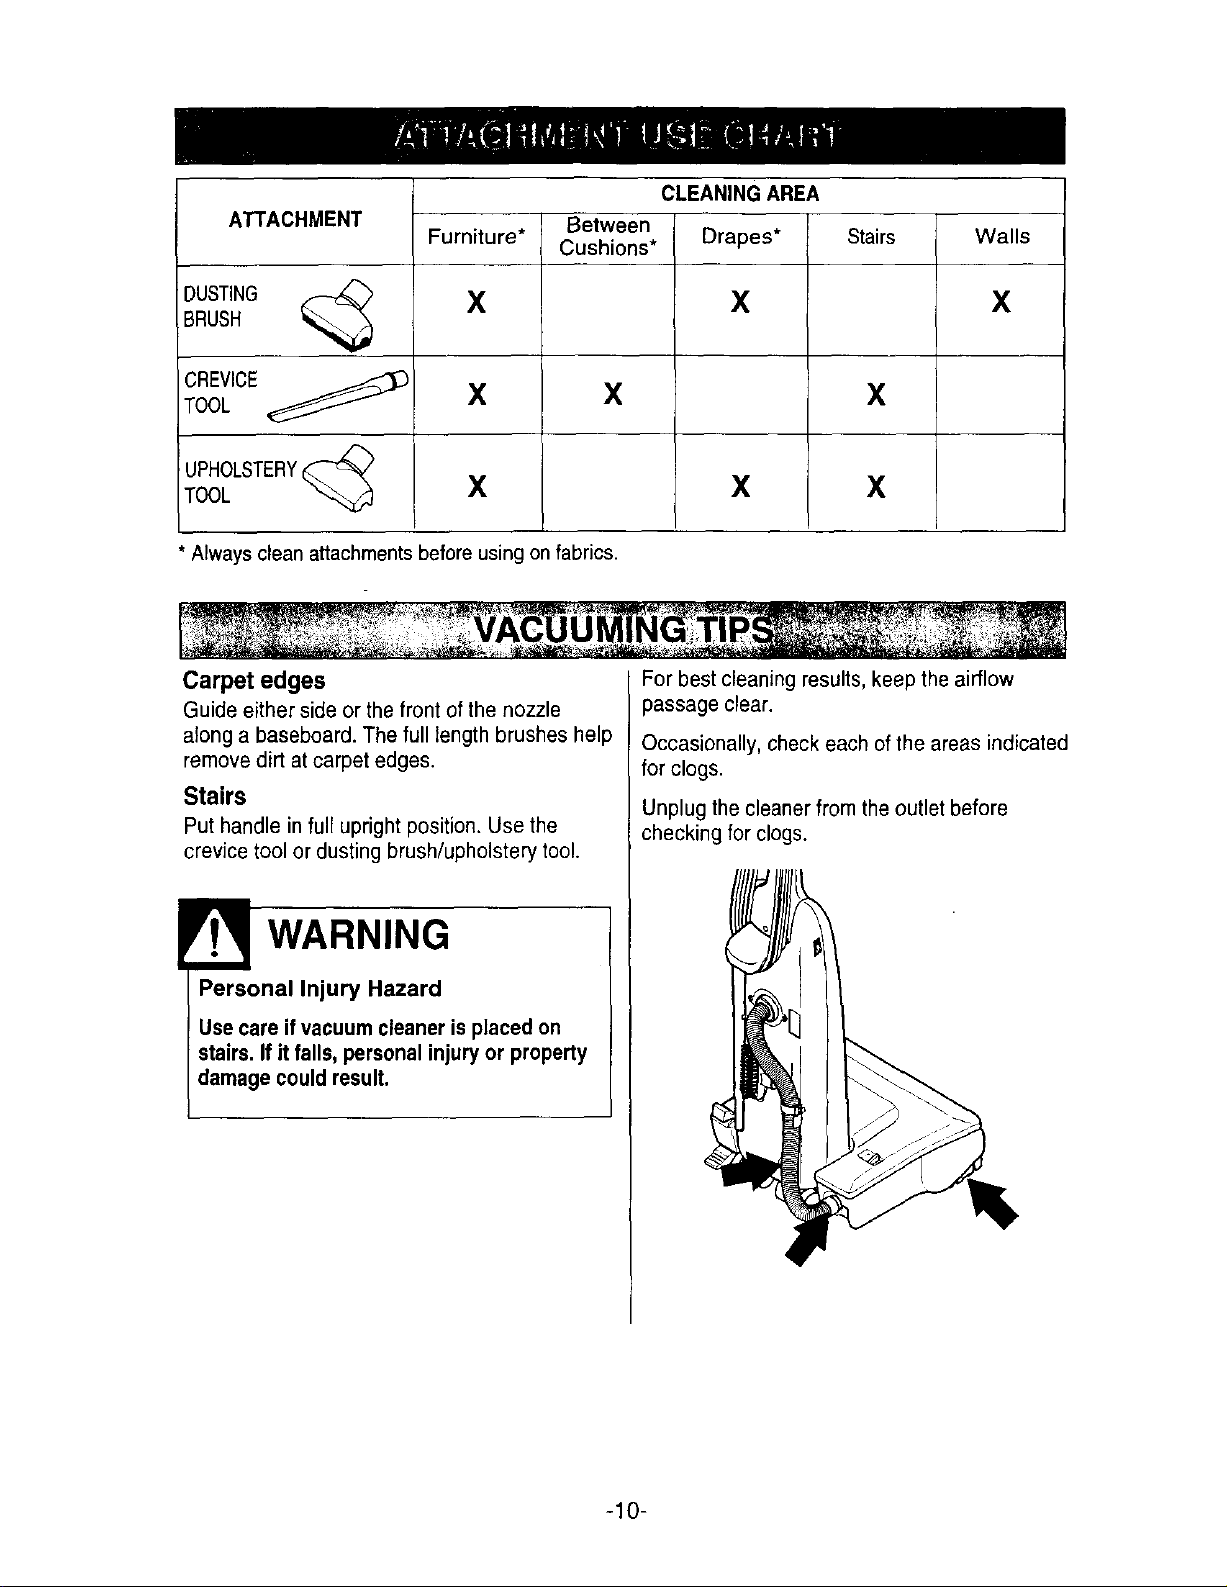
CLEANING AREA
Between Drapes* Stairs Walls
ATTACHMENT Furniture* Cushions*
DUSTING _ X X X
BRUSH
CREVICE
TOOL X X X
UPHOLSTERY__
TOOL _ X X X
* Always clean attachments before using on fabrics.
Carpet edges
Guideeithersideorthefront of thenozzle
along a baseboard.The full lengthbrusheshelp
removedirt at carpetedges.
Stairs
Put handle in full upright position. Use the
crevice tool or dusting brush/upholstery tool.
WARNING
Personal Injury Hazard
Use care if vacuum cleaner is placed on
stairs, If it falls, personal injury or property
damage could result.
For best cleaningresults, keep the airflow
passage clear.
Occasionally, checkeach of the areas indicated
for clogs.
Unplug thecleaner from the outlet before
checking for clogs.
-10-
WARNING
Electric Shock And Personal Injury
Hazard
Disconnect electrical supply before
servicing or cleaning the unit.
Failure to do so could result in
electric shock or personal injury from
cleaner suddenly starting.
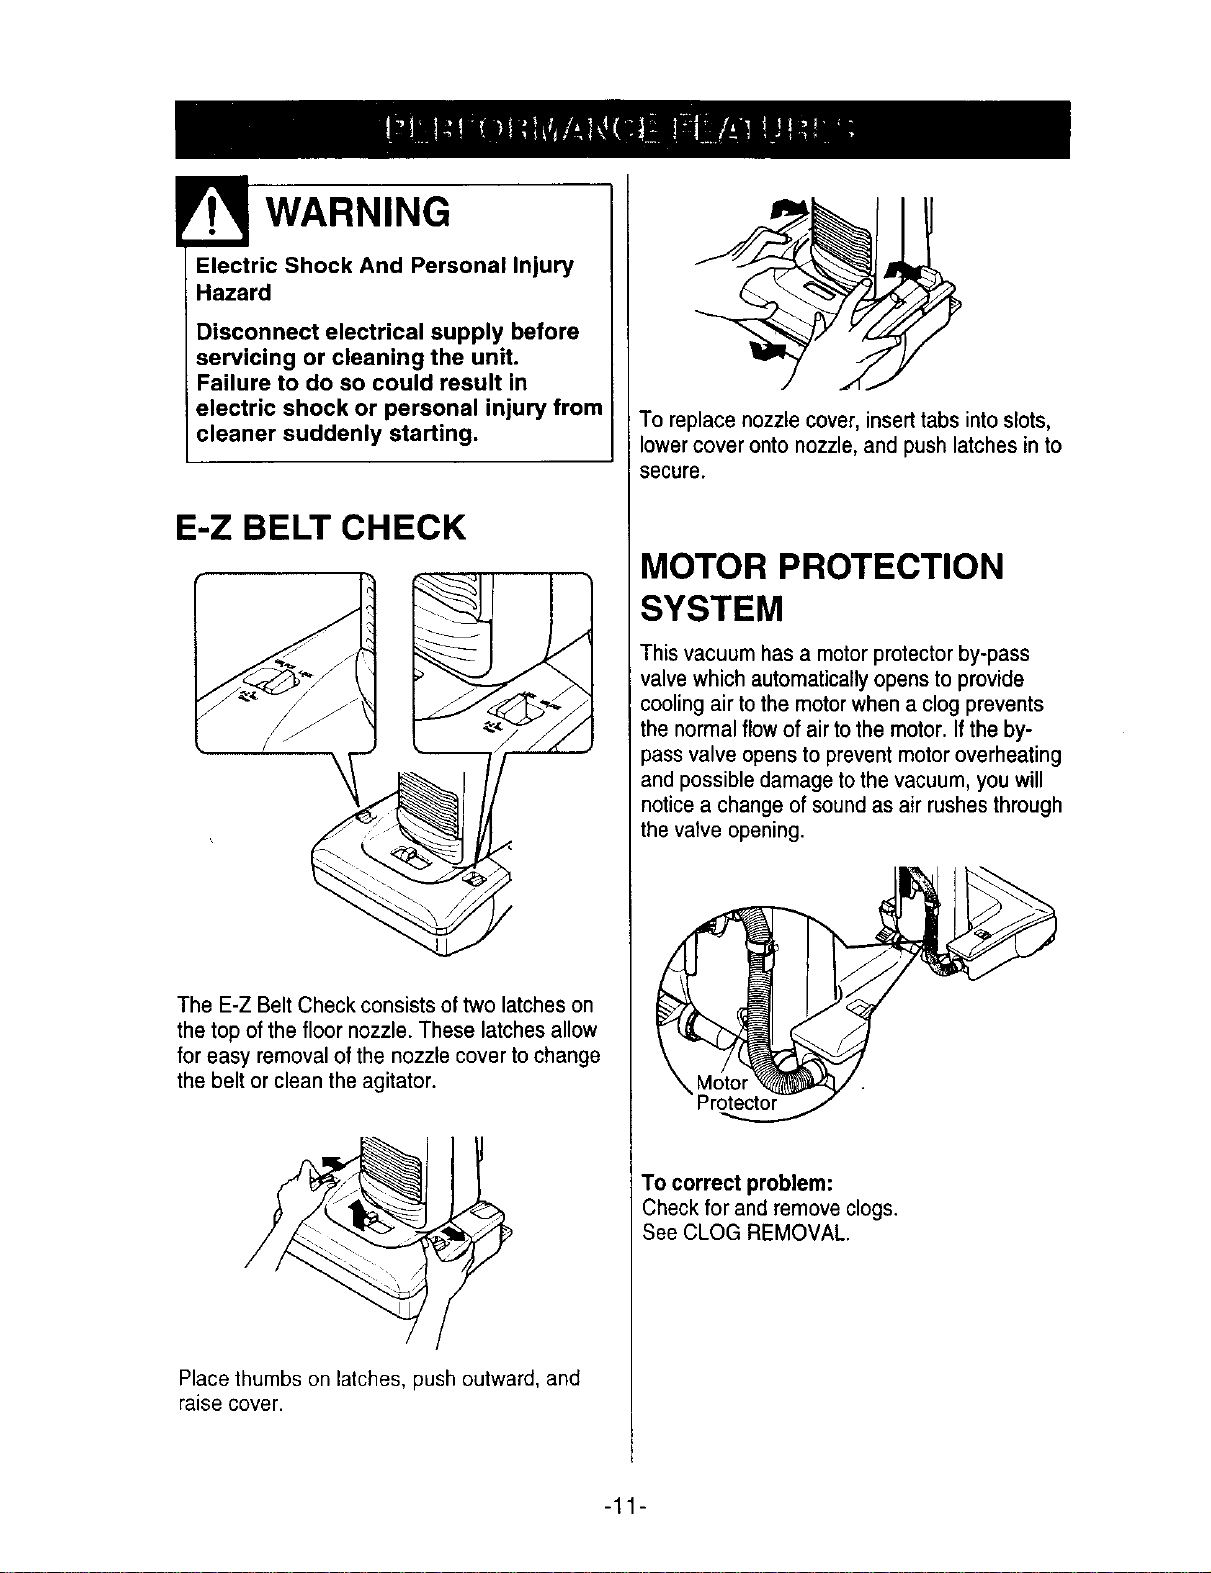
E-Z BELT CHECK
The E-Z Belt Check consists of two latches on
the top of the floor nozzle. These latches allow
for easy removal of the nozzle cover to change
the belt or clean the agitator.
Place thumbs on latches, push outward, and
raise cover.
To replace nozzle cover, insert tabsinto slots,
lowercover onto nozzle, and push latches in to
secure.
MOTOR PROTECTION
SYSTEM
This vacuumhas a motor protector by-pass
valvewhichautomatically opens to provide
cooling air to the motor when a clog prevents
the normal flow of airto the motor. Ifthe by-
)ass valve opens to prevent motor overheating
and possible damage tothe vacuum, you will
notice a change of soundas air rushes through
thevalve opening.
To correct problem:
Check for and remove clogs.
See CLOG REMOVAL.
-11-
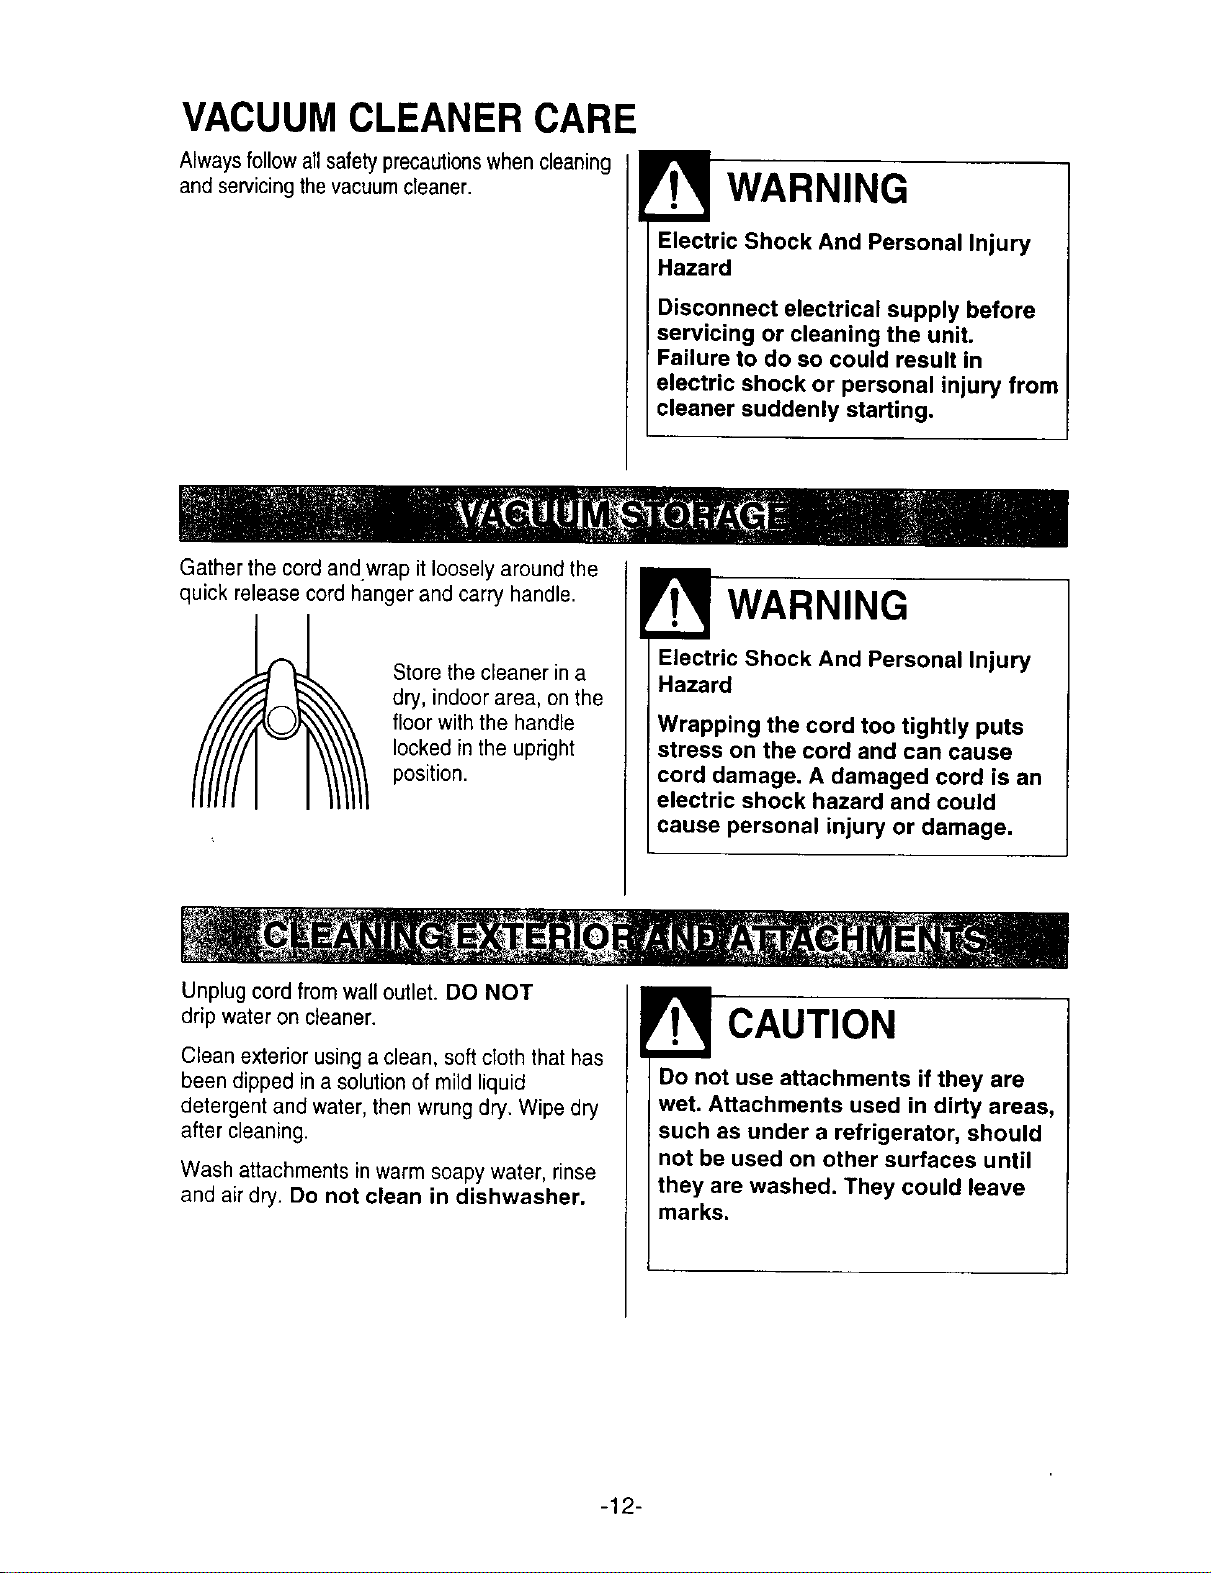
VACUUM CLEANER CARE
Always follow allsafetyprecautionswhencleaning
and servicingthe vacuumcleaner.
Gather the cord andwrap it loosely around the
WARNING
Electric Shock And Personal Injury
Hazard
Disconnect electrical supply before
servicing or cleaning the unit.
Failure to do so could result in
electric shock or personal injury from
cleaner suddenly starting.
quick release
cord hanger and carry handle.
Store the cleaner in a
dry, indoor area, on the
floor with the handle
locked in the upright
position.
WARNING
Electric Shock And Personal Injury
Hazard
Wrapping the cord too tightly puts
stress on the cord and can cause
cord damage. A damaged cord is an
electric shock hazard and could
cause personal injury or damage.
Unplug cord fromwall outlet.DO NOT
drip wateron cleaner.
Clean exterior using a clean, soft cloth that has
been dipped in a solution of mild liquid
detergent and water, then wrung dry. Wipe dry
after cleaning.
Wash attachments in warm soapy water, rinse
and air dry. Do not clean in dishwasher.
CAUTION
Do not use attachments if they are
wet. Attachments used in dirty areas,
such as under a refrigerator, should
not be used on other surfaces until
they are washed. They could leave
marks.
-12-
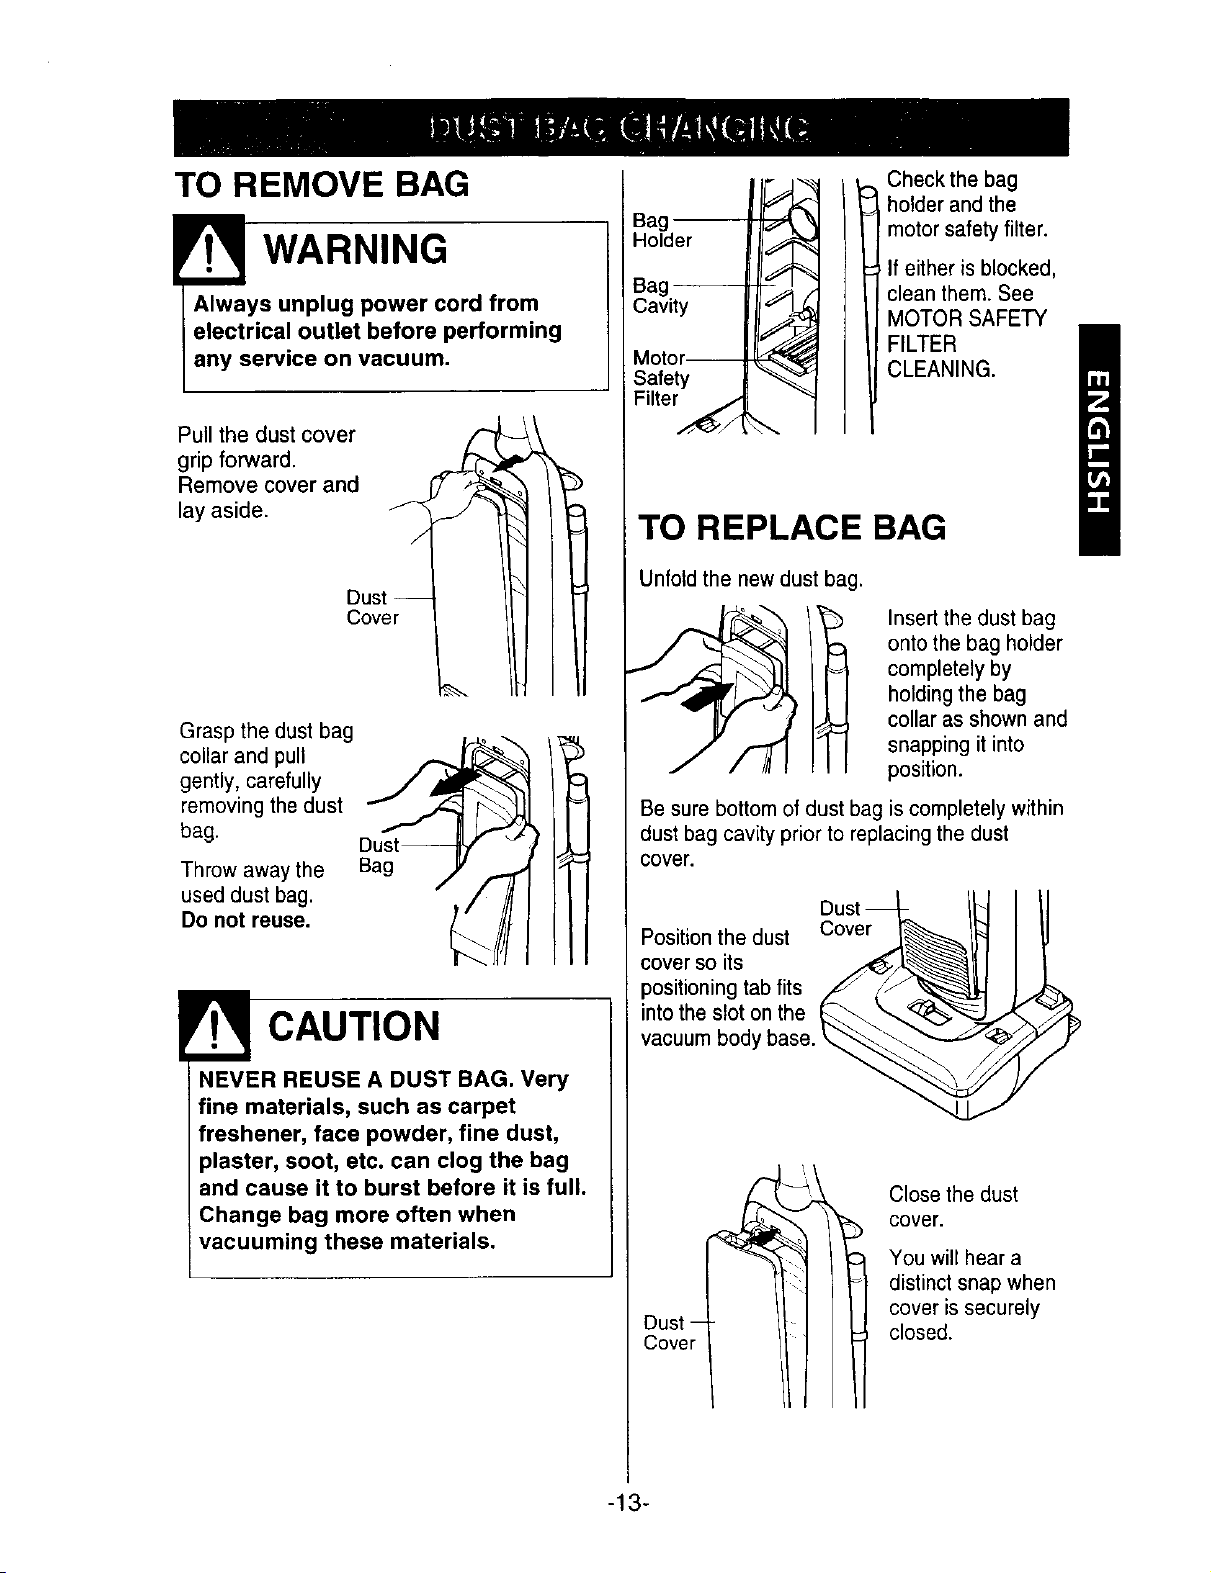
TO REMOVE BAG
WARNING
Always unplug power cord from
electrical outlet before performing
any service on vacuum.
Pull the dust cover /"1
grip forward.
Remove cover and _7 ._
lay aside. __/'_
Dust_
Cover _..
Grasp the dust bag
collar and pull
gently, carefully
removing the dust
bag.
Throw away the
used dust bag.
Do not reuse.
Bag
CAUTION
NEVER REUSE A DUST BAG. Very
fine materials, such as carpet
freshener, face powder, fine dust,
plaster, soot, etc. can clog the bag
and cause it to burst before it is full.
Change bag more often when
vacuuming these materials.
Bag
Holder
Bag --
Cavity
Motor--
Safety !
Filter_,_/d
Check the bag
holder and the
motor safety filter.
If either is blocked,
clean them. See
MOTOR SAFETY
FILTER
CLEANING.
TO REPLACE BAG
Unfold the new dust bag.
Insertthe dust bag
onto the bag holder
completely by
holdingthe bag
collar as shown and
snapping it into
position.
Be sure bottom of dust bag is completely within
dust bag cavity prior to replacing the dust
cover.
Position the dust Cover
cover so its
positioning tab fits
into the slot on the
vacuum body base.
Dust -
Cover
Close the dust
_) cover.
You will hear a
distinct snap when
cover is securely
closed.
-13-
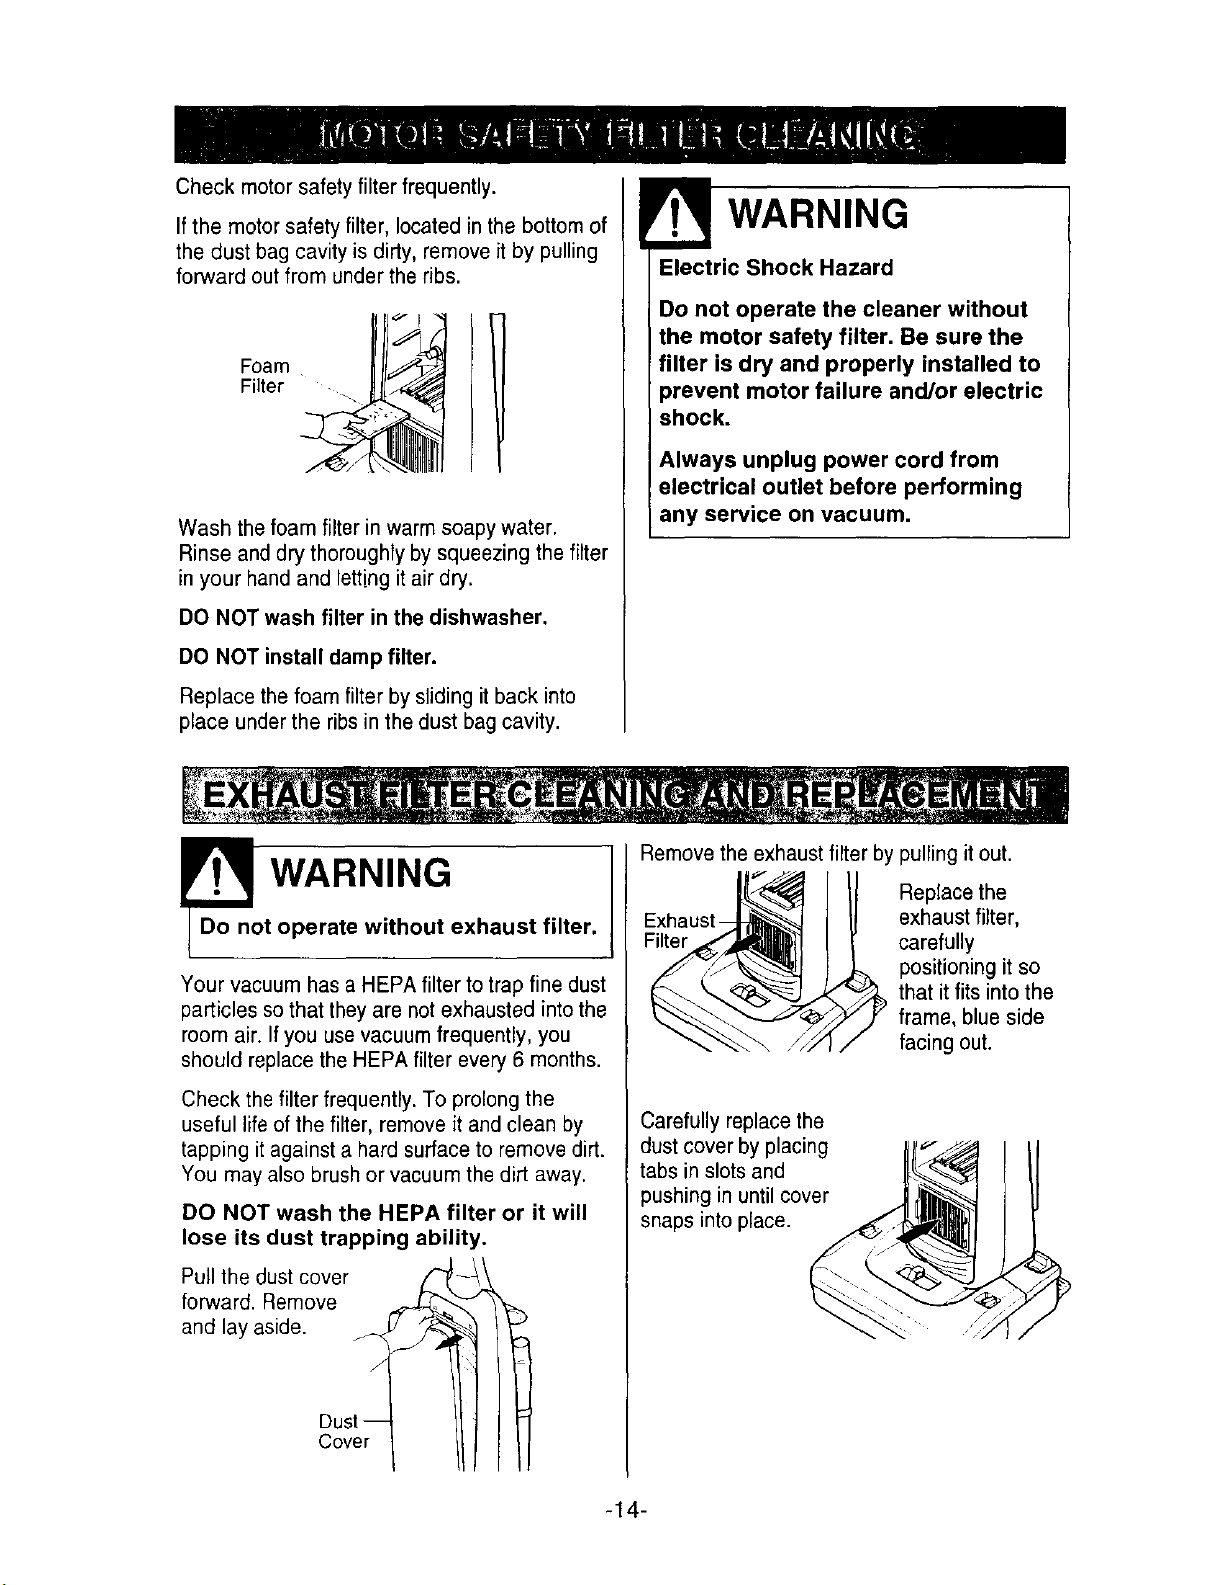
Check motor safety filter frequently.
If the motor safety filter, located in the bottom of
the dust bag cavity is dirty, remove it by pulling
forward out from under the ribs.
Foam __
Filter -
Wash the foam filter in warm soapy water.
Rinse and dry thoroughly by squeezing the filter
in your hand and letting it air dry.
DO NOT wash filter in the dishwasher.
DO NOT install damp filter.
Replace the foam filter by sliding it back into
place under the ribs in the dust bag cavity.
WARNING
Electric Shock Hazard
Do not operate the cleaner without
the motor safety filter. Be sure the
filter is dry and properly installed to
prevent motor failure and/or electric
shock.
Always unplug power cord from
electrical outlet before performing
any service on vacuum,
D onoWARNING
t operate without exhaust filter.
Your vacuum has a HEPA filter to trap fine dust
particles so that they are not exhausted into the
room air. If you use vacuum frequently, you
should replace the HEPA filter every 6 months.
Check the filter frequently. To prolong the
useful life of the filter, remove it and clean by
tapping it against a hard surface to remove dirt.
You may also brush or vacuum the dirt away.
DO NOT wash the HEPA filter or it will
lose its dust trappm
Pull the dust cover
forward. Remove
and lay aside.
J
Dust --
Cover
ability.
Remove the exhaust filter by pulling it out.
Exhaust_
Replace the
exhaust filter,
carefully
positioning it so
that it fits into the
frame, blue side
facing out.
Carefully replace the
dust cover by placing
tabs in slots and
pushing in until cover
snaps into place.
-14-
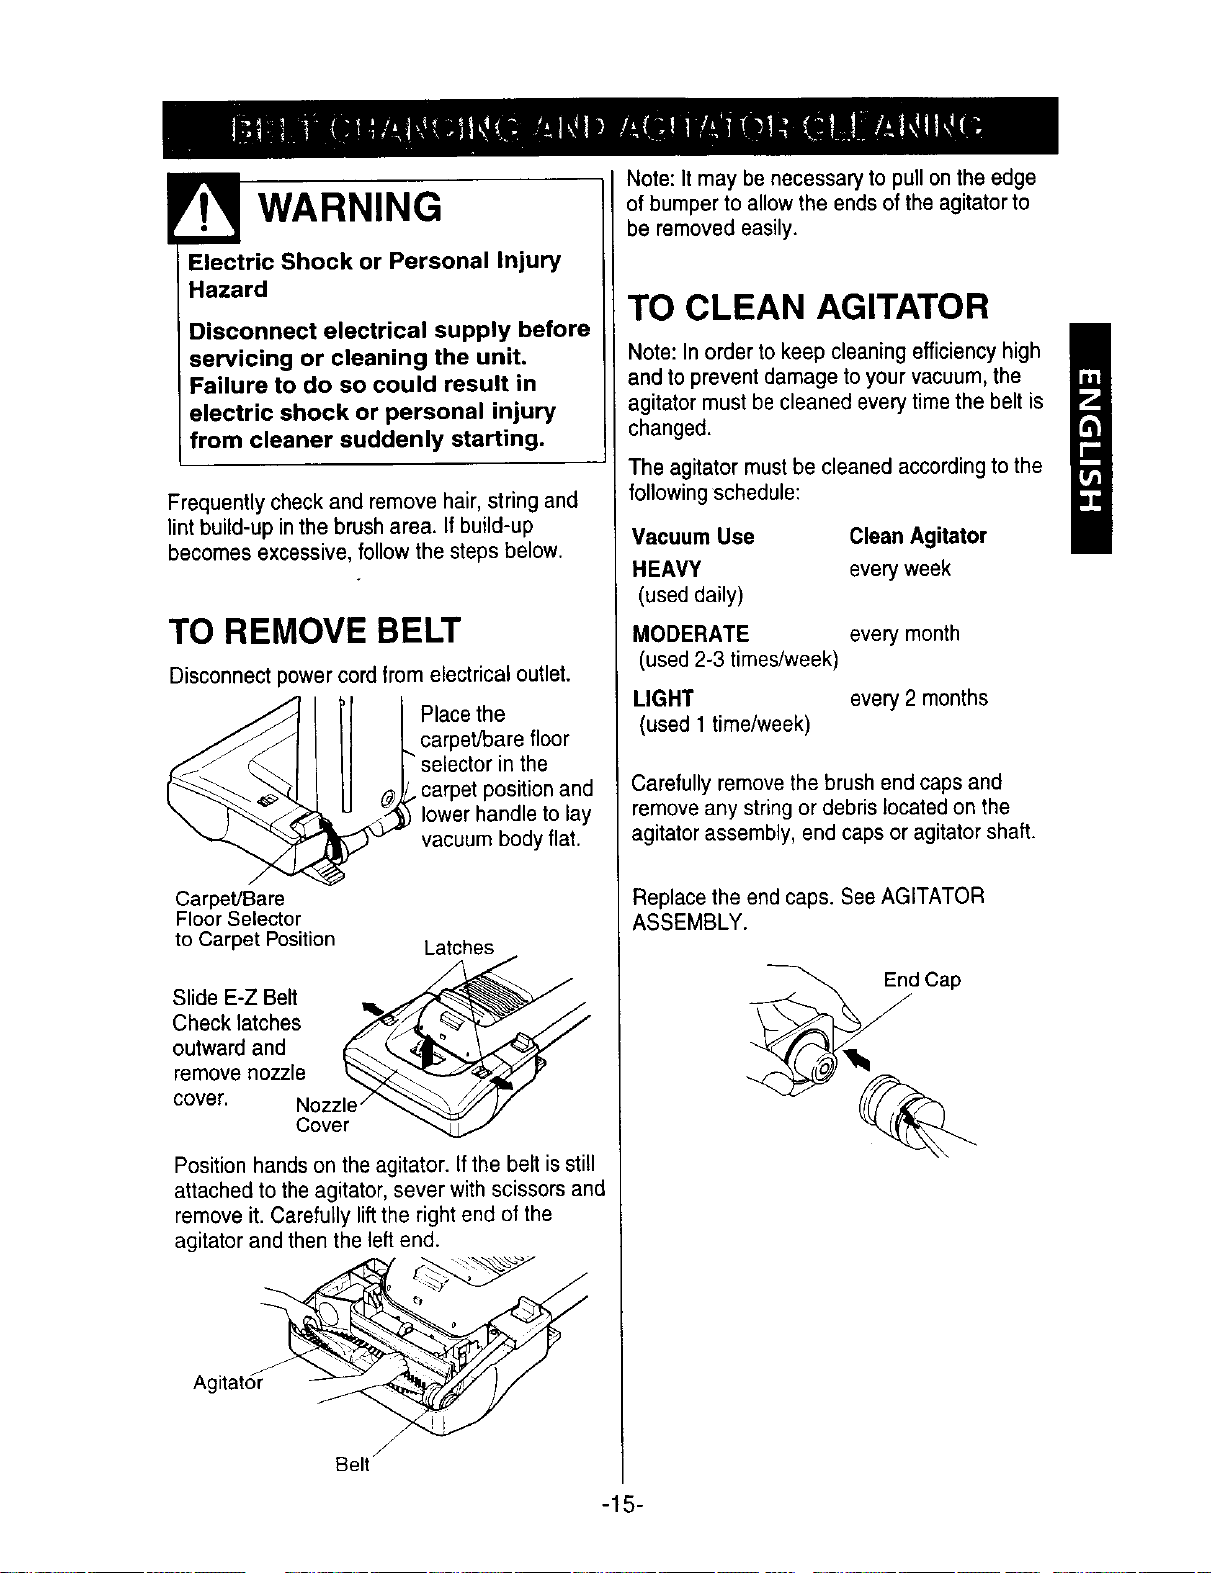
WARNING
Electric Shock or Personal Injury
Hazard
Disconnect electrical supply before
servicing or cleaning the unit.
Failure to do so could result in
electric shock or personal injury
=rom cleaner suddenly starting.
Frequently check and remove hair, string and
lint build-up in the brush area. If build-up
becomes excessive, follow the steps below.
TO REMOVE BELT
Disconnect power cord from electrical outlet.
Place the
carpet/bare floor
selector in the
carpet position and
lower handle to lay
vacuum body flat.
Carpet/Bare
Floor Selector
to Carpet Position
Latches
Slide E-Z Belt
Check latches
outward and
remove nozzle
cover. Nozzle /
Cover
Position hands on the agitator. If the belt is still
attached to the agitator, sever with scissors and
remove it. Carefully lift the right end of the
agitator and then the left end.
Agitator_
/
Belt
Note: It may be necessary to pull on the edge
of bumper to allow the ends of the agitator to
be removed easily.
TO CLEAN AGITATOR
Note: In orderto keep cleaning efficiency high
and to prevent damage to your vacuum, the
agitator must becleaned every time the belt is
changed.
The agitator must be cleaned according to the
followingschedule:
Vacuum Use Clean Agitator
HEAVY every week
(used daily)
MODERATE every month
(used 2-3 times/week)
LIGHT
(used 1 time/week)
every2 months
Carefully remove the brush end caps and
remove any string or debris located on the
agitator assembly, end caps or agitator shaft.
Replace the end caps. See AGITATOR
ASSEMBLY.
-15-
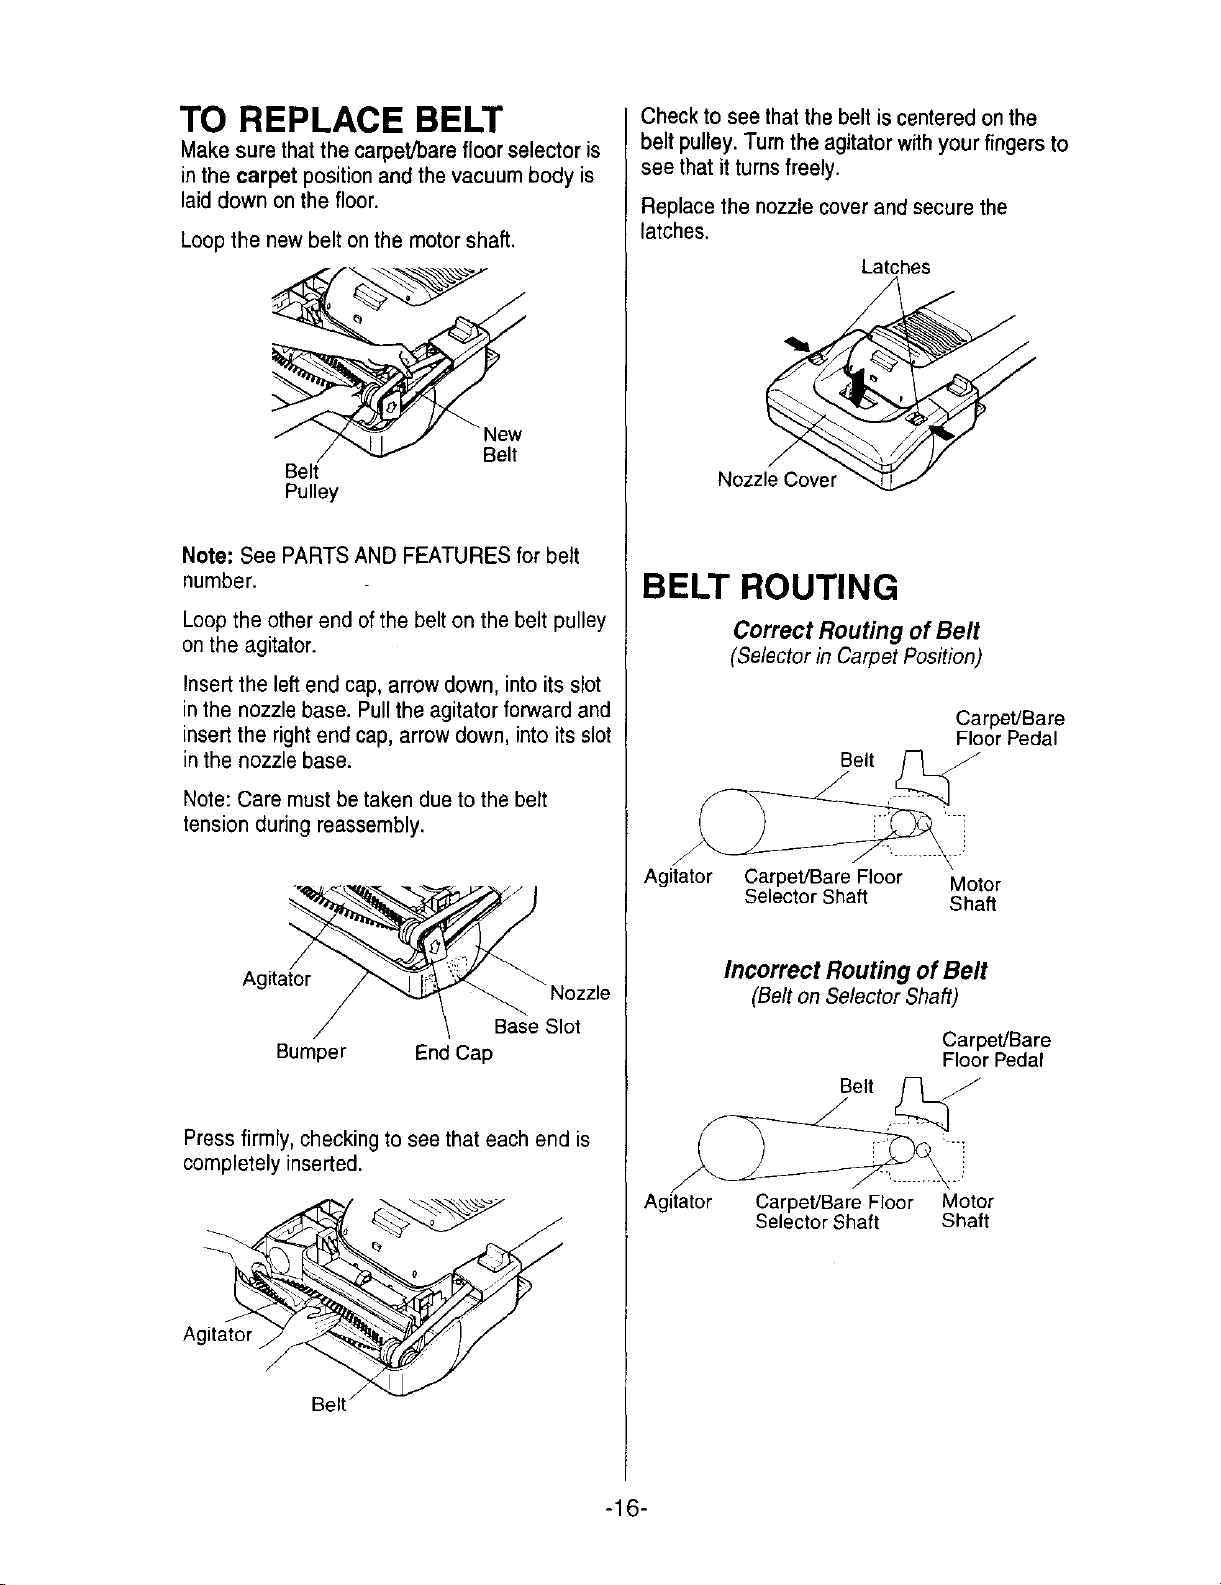
TO REPLACE BELT
Make sure that the carpet/bare floor selector is
in the carpet position and the vacuum body is
laid down on the floor.
Loop the new belt on the motor shaft.
Belt
Belt
Pulley
Note: See PARTS AND FEATURES for belt
number.
Loop the other end of the belt on the belt pulley
on the agitator.
Insert the left end cap, arrow down, into its slot
in the nozzle base. Pull the agitator forward and
insert the right end cap, arrow down, into its slot
in the nozzle base.
Note:Care must betaken due to the belt
tension during reassembly.
Agitator
Base Slot
Bumper End Cap
Press firmly, checking to see that each end is
completely inserted.
Ag
Belt _
Check to see that the belt is centered onthe
belt pulley. Turn the agitator with your fingers to
see that it turns freely.
Replace the nozzle cover and secure the
latches.
Latches
Nozzle Cover
BELT ROUTING
Correct Routing of Belt
(Selector in Carpet Position)
Carpet/Bare
Floor Pedal
Agitator Carpet/Bare Floor Motor
Selector Shaft Shaft
Incorrect Routing of Belt
(Belt on Selector Shaft)
Agitator
Carpet/Bare
Floor Pedal
Oe,
Carpet/Bare Floor Motor
Selector Shaft Shaft
-16-
_- WARNING
Electric Shock or Personal Injury
Hazard
Disconnect electrical supply before
servicing or cleaning the unit.
Failure to do so could result in
electric shock or personal injury
from cleaner suddenly starting.
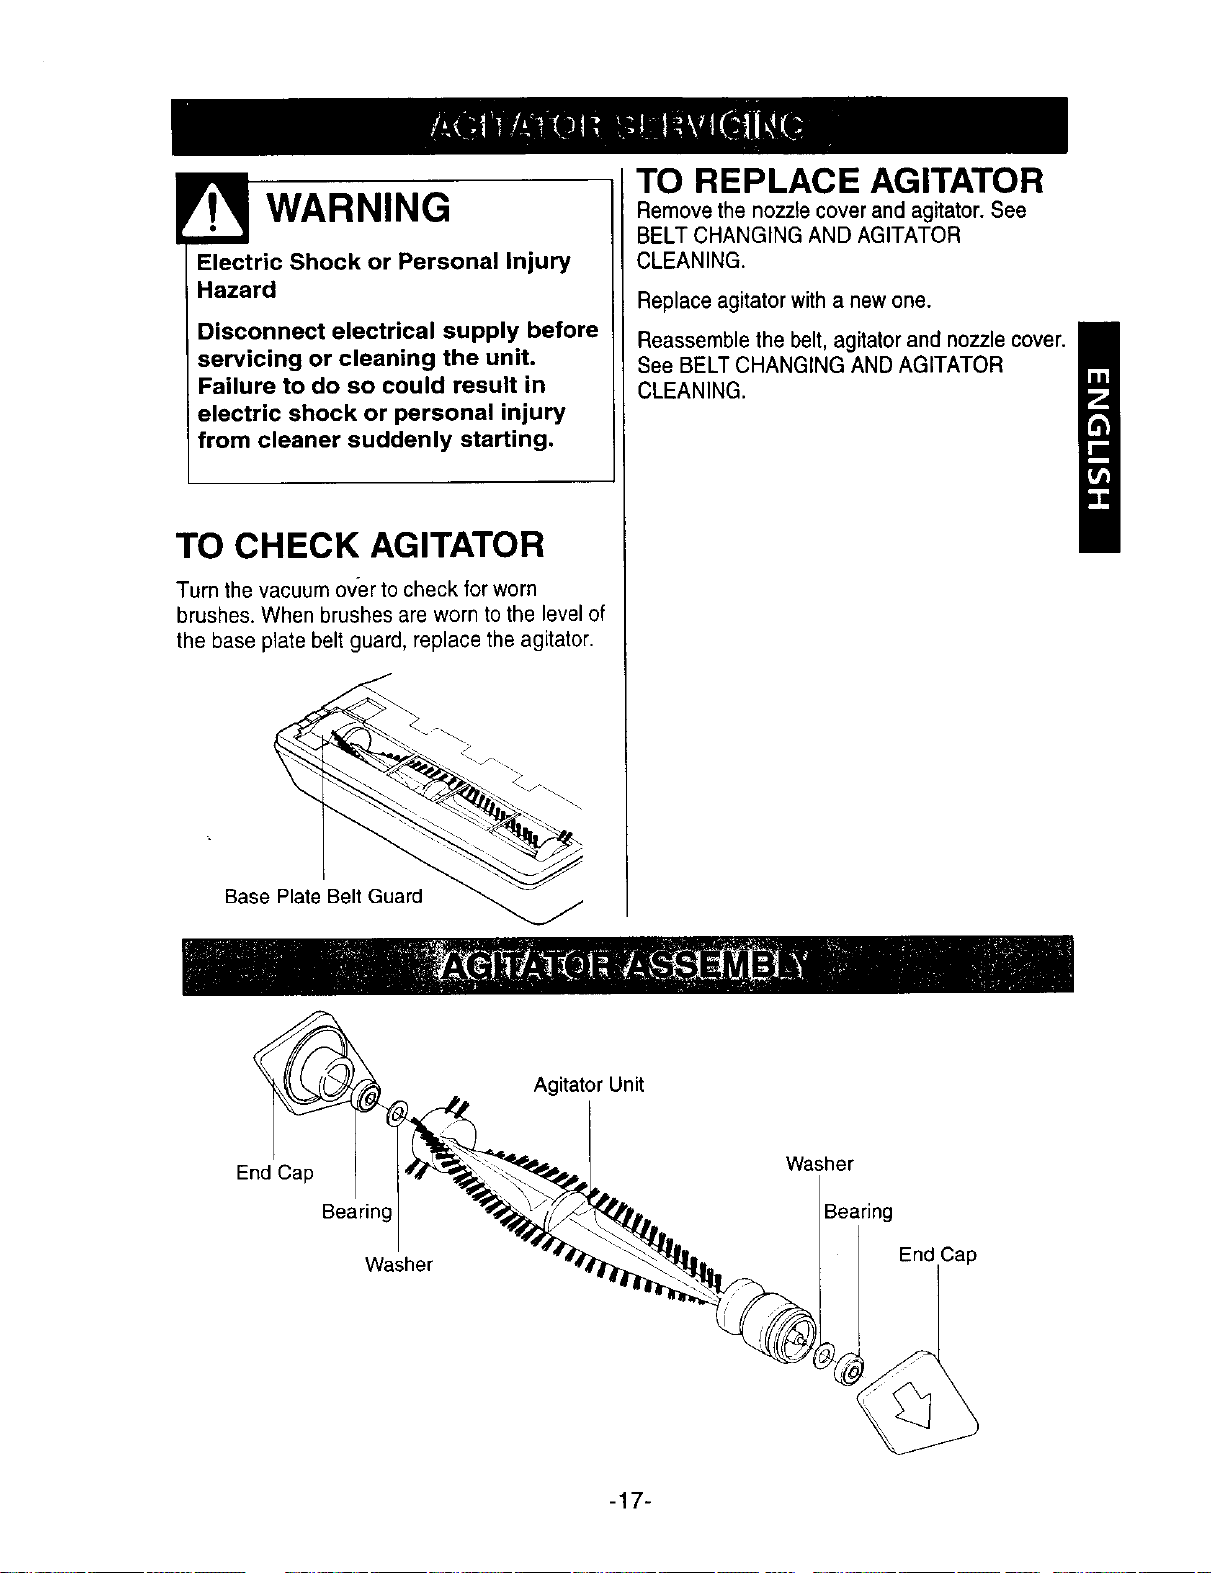
TO CHECK AGITATOR
Turn the vacuum over to check for worn
brushes. When brushes are worn to the level of
the base plate belt guard, replace the agitator.
Base Plate Belt Guard
TO REPLACE AGITATOR
Remove the nozzle cover and agitator. See
BELT CHANGING AND AGITATOR
CLEANING.
Replace agitator witha new one.
Reassemble the belt, agitator and nozzle cover.
See BELT CHANGING ANDAGITATOR
CLEANING.
Agitator Unit
End Cap
Bearing
Washer
Washer
Bearing
End Cap
-17-
Always follow all safety precautions when
cleaning and servicing the vacuum cleaner.
WARNING
Electric Shock Or Personal Injury
Hazard
Disconnect electrical supply before
servicing or cleaning the unit.
Failure to do so could result in
electric shock or personal injury
from cleaner suddenly starting,
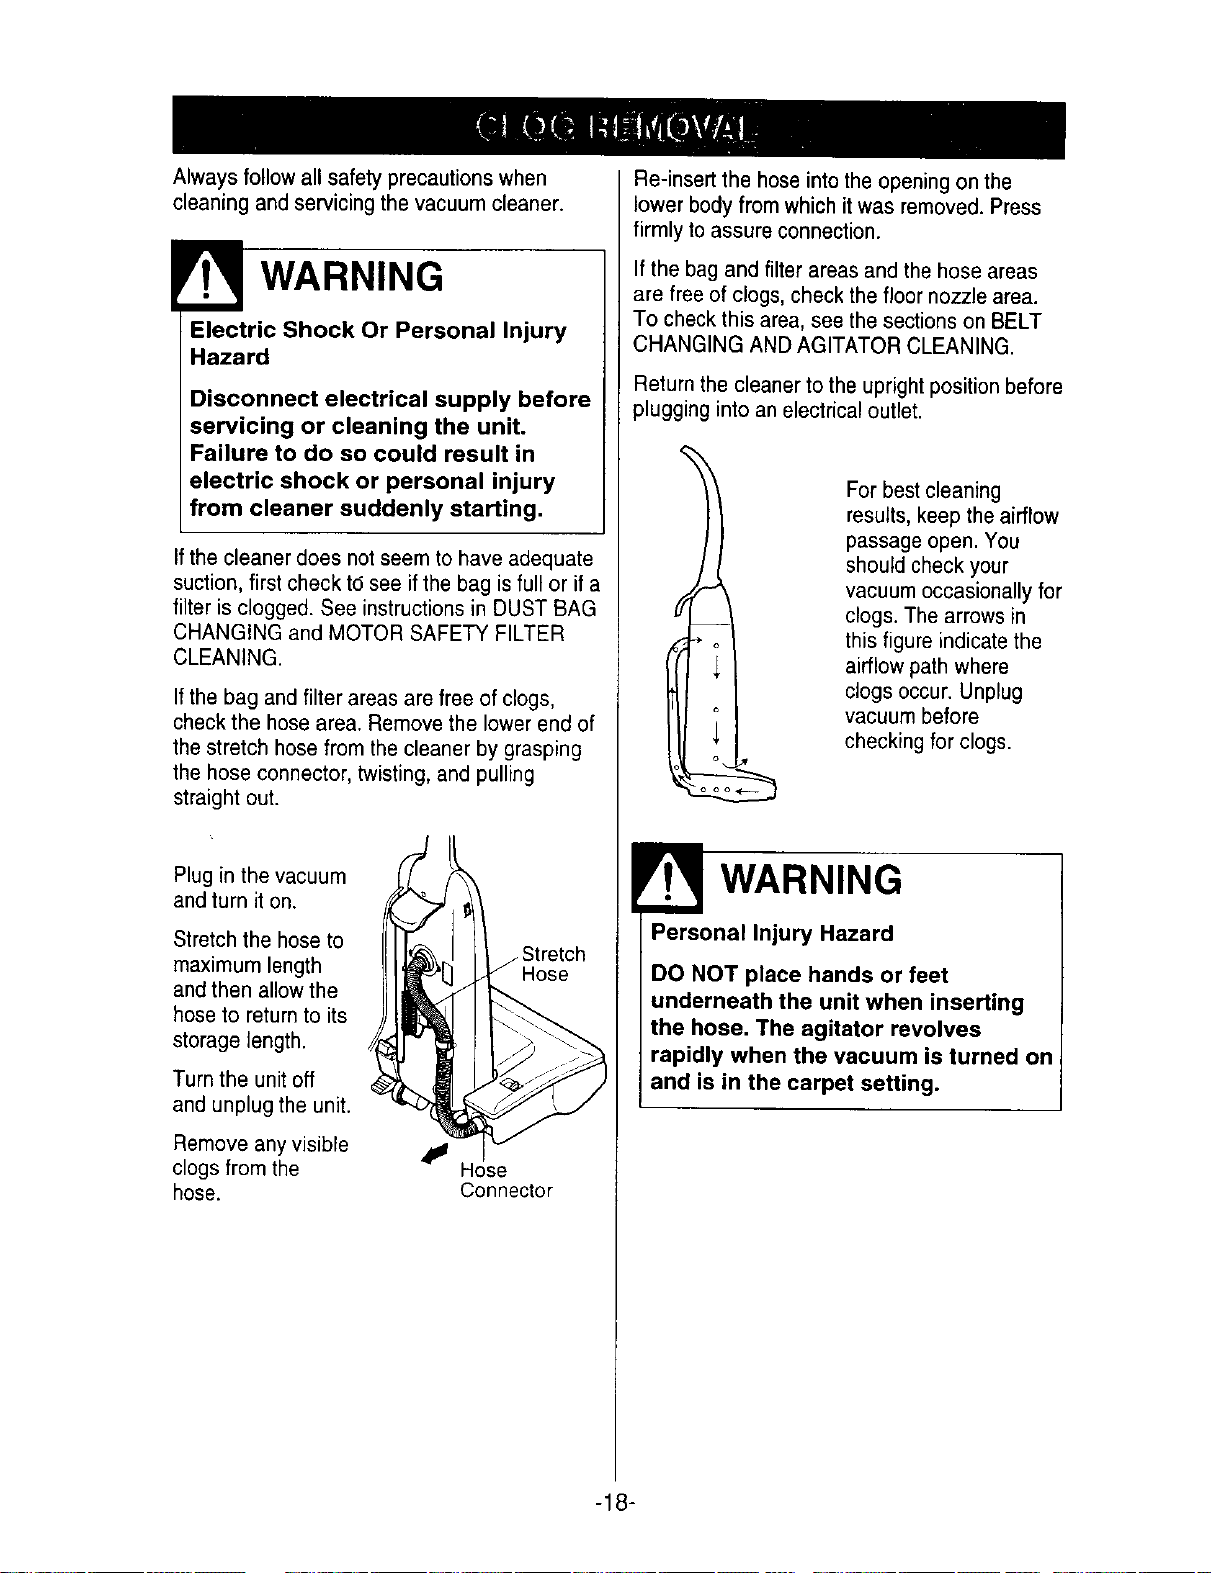
If the cleaner does not seem to have adequate
suction, first check td see if the bag is full or if a
filter is clogged. See instructions in DUST BAG
CHANGING and MOTOR SAFETY FILTER
CLEANING.
If the bag and filter areas are free of clogs,
check the hose area. Remove the lower end of
the stretch hose from the cleaner by grasping
the hose connector, twisting, and pulling
straight out.
Plug in the vacuum
and turn it on.
Stretch the hose to
maximum length
and then allow the
hose to return to its
storage length.
Turn the unit off
and unplug the unit.
Remove any visible
clogs from the
hose.
Hose
Connector
Re-insert the hose into the opening on the
lower body from which it was removed. Press
firmly to assure connection.
If the bag and filterareas and the hose areas
are free of clogs, check the floor nozzle area.
To check this area, see the sections on BELT
CHANGING AND AGITATOR CLEANING.
Return the cleaner to the upright position before
plugging into an electrical outlet.
o
For best cleaning
results, keep the airflow
passage open. You
should check your
vacuum occasionally for
clogs. The arrows in
this figure indicate the
airflow path where
clogs occur. Unplug
vacuum before
checking for clogs.
WARNING
Personal Injury Hazard
DO NOT place hands or feet
underneath the unit when inserting
the hose, The agitator revolves
rapidly when the vacuum is turned on
and is in the carpet setting.
-18-
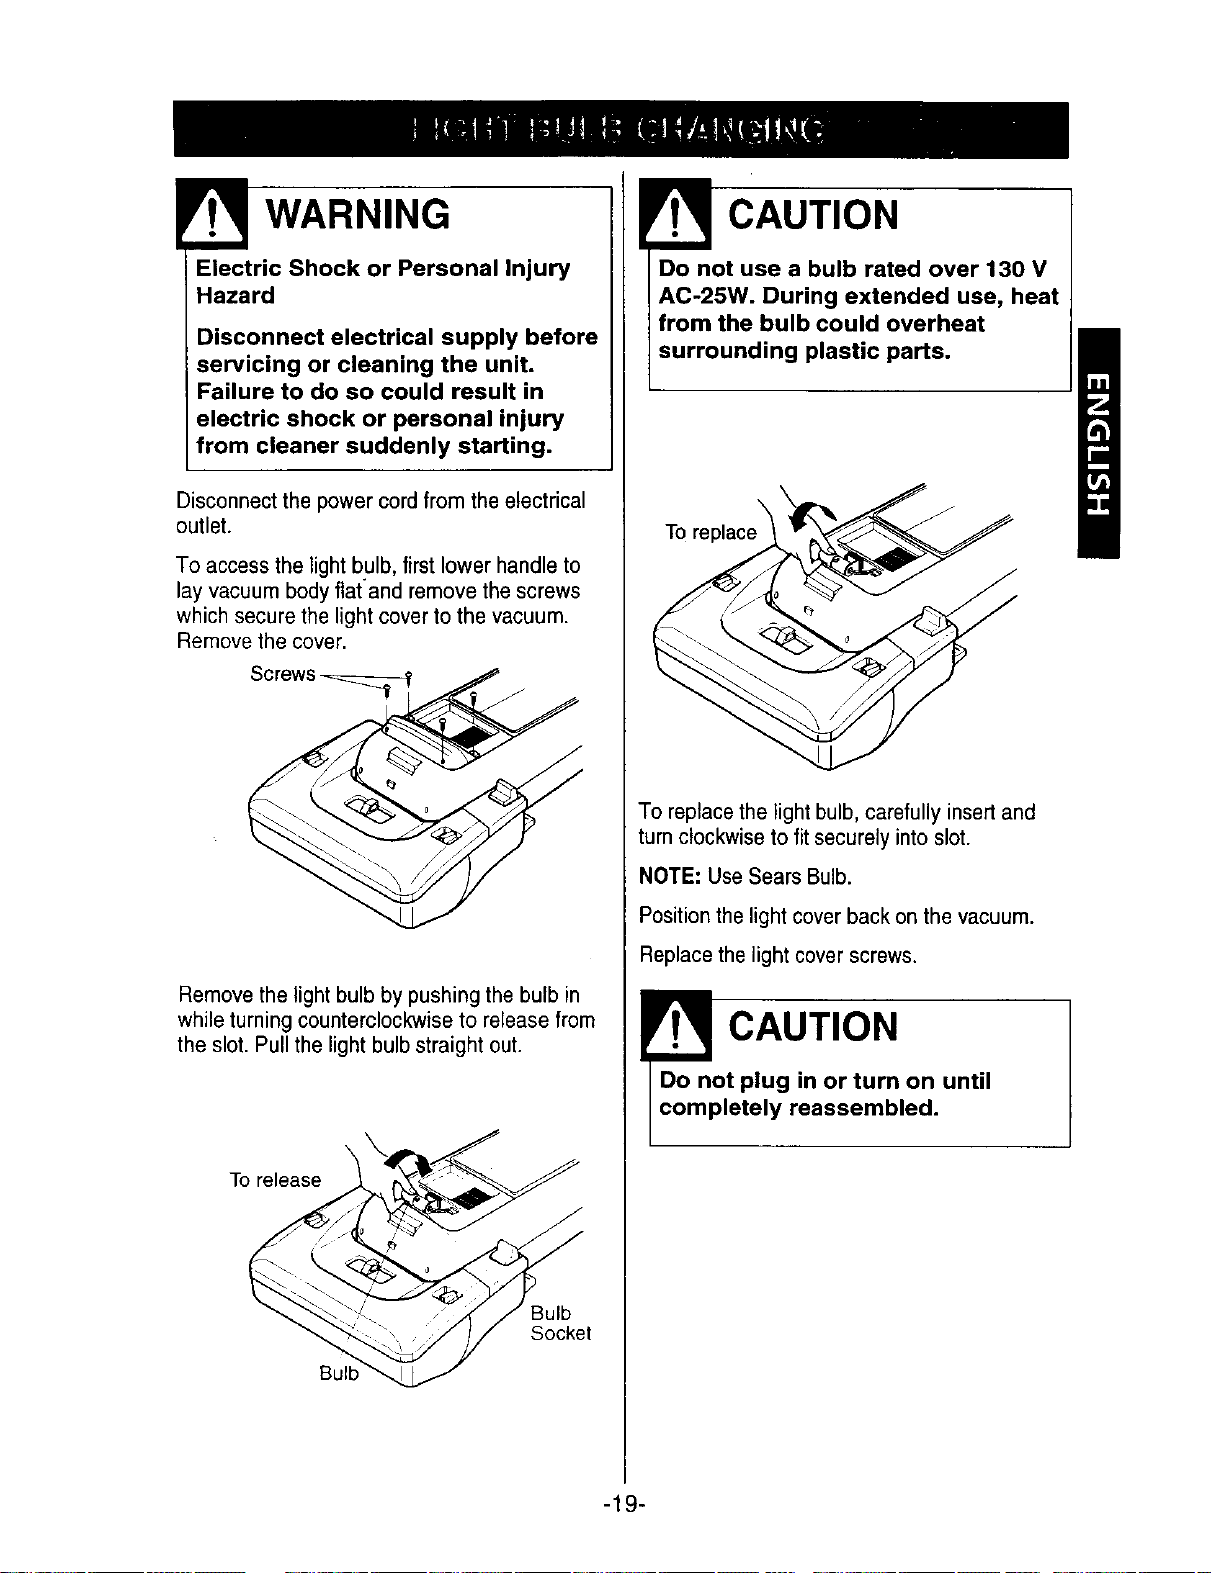
WARNING
Electric Shock or Personal Injury
Hazard
Disconnect electrical supply before
servicing or cleaning the unit.
Failure to do so could result in
electric shock or personal injury
from cleaner suddenly starting.
Disconnect the power cord from the electrical
outlet.
To access the light bulb, firstlower handle to
lay vacuum body flatand remove the screws
which secure the light cover to the vacuum.
Remove the cover.
Remove the light bulb by pushing the bulb in
while turning counterclockwise to release from
the slot. Pull the light bulb straight out.
To release
Bulb
Socket
Bull
CAUTION
Do not use a bulb rated over 130 V
AC-25W. During extended use, heat
from the bulb could overheat
surrounding plastic parts.
To
To replace the light bulb, carefully insert and
turn clockwise to fit securely into slot.
NOTE: Use Sears Bulb.
Position the light cover back on the vacuum.
Replace the light cover screws.
O oOCAUTION
t plug in or turn on until
etely reassembled.
-19-
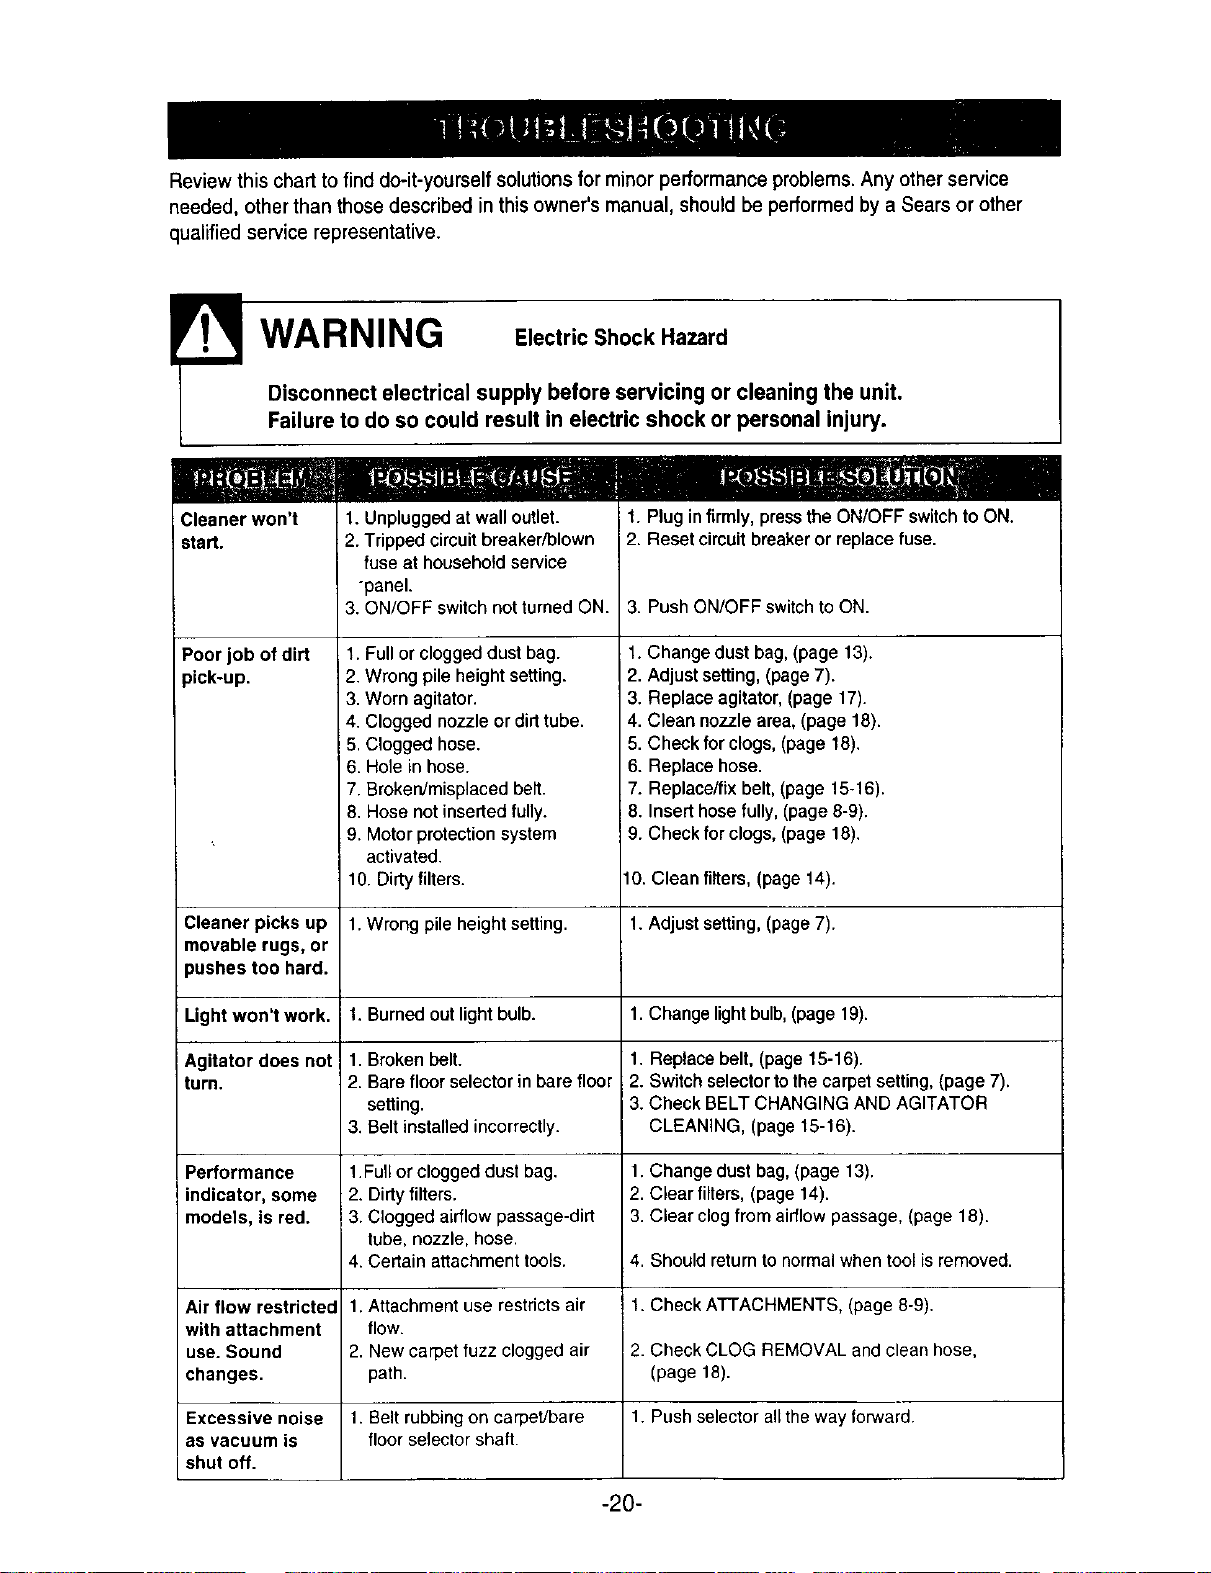
Review this chart to find do-it-yourself solutions for minor performance problems.Any other service
needed, other than those described in this owner's manual, should be performed by a Sears or other
qualified service representative.
WARNING Electric Shock Hazard
Disconnect electrical supply before servicing or cleaning the unit.
Failure to do so could result in eJectricshock or personal injury.
Cleaner won't
start.
Poorjob of dirt
Dick-up.
1. Unplugged at wall outlet.
2. Tripped circuit breaker/blown
fuse at household service
-panel.
3. ON/OFF switch not turned ON.
1. Full or clogged dust bag.
2. Wrong pile height setting.
3. Worn agitator.
4. Clogged nozzle or dirt tube.
5. Clogged hose.
6. Hole in hose.
7. Broken/misplaced belt.
8. Hose not inserted fully.
9. Motor protection system
activated.
10. Dirty filters.
1. Plug infirmly,pressthe ON/OFF switchto ON.
2. Resetcircuit breakerorreplacefuse.
3. Push ON/OFF switch to ON.
1.Change dust bag,(page 13).
2. Adjust setting, (page7).
3. Replaceagitator, (page 17).
4. Clean nozzle area,(page 18).
5. Check for clogs, (page 18).
6. Replace hose.
7. Replace/fixbelt, (page 15-16).
8. Insert hosefully, (page 8-9).
9. Checkfor clogs, (page 18).
10. Clean filters, (page 14).
Cleaner picks up 1. Wrong pile height setting. 1. Adjust setting, (page 7).
movable rugs, or
pushes too hard.
Light won't work. 1. Burned out light bulb. 1. Change light bulb, (page 19).
Agitator does not 1. Broken belt. 1. Replace belt, (page 15-16).
turn. 2. Bare floor selector in bare floor 2. Switch selector to the carpet setting, (page 7).
setting. 3. Check BELT CHANGING AND AGITATOR
3. Belt installed incorrectly. CLEANING, (page 15-16).
Performance 1.Full or clogged dust bag. 1. Change dust bag, (page 13).
indicator, some 2. Dirty filters. 2. Clear filters, (page 14).
models, is red. 3. Clogged airflow passage-dirt 3. Clear clog from airflow passage, (page 18).
tube, nozzle, hose.
4. Certain attachment tools. 4. Should return to normal when tool is removed.
Air flow restricted 1. Attachment use restricts air i 1. Check ATTACHMENTS, (page 8-9).
with attachment flow.
use. Sound 2. New carpet fuzz clogged air !2. Check CLOG REMOVAL and clean hose,
changes, path. (page 18).
Excessive noise 1. Belt rubbing on carpet/bare 1. Push selector all the way forward.
as vacuum is floor selector shaft.
shut off.
-20-
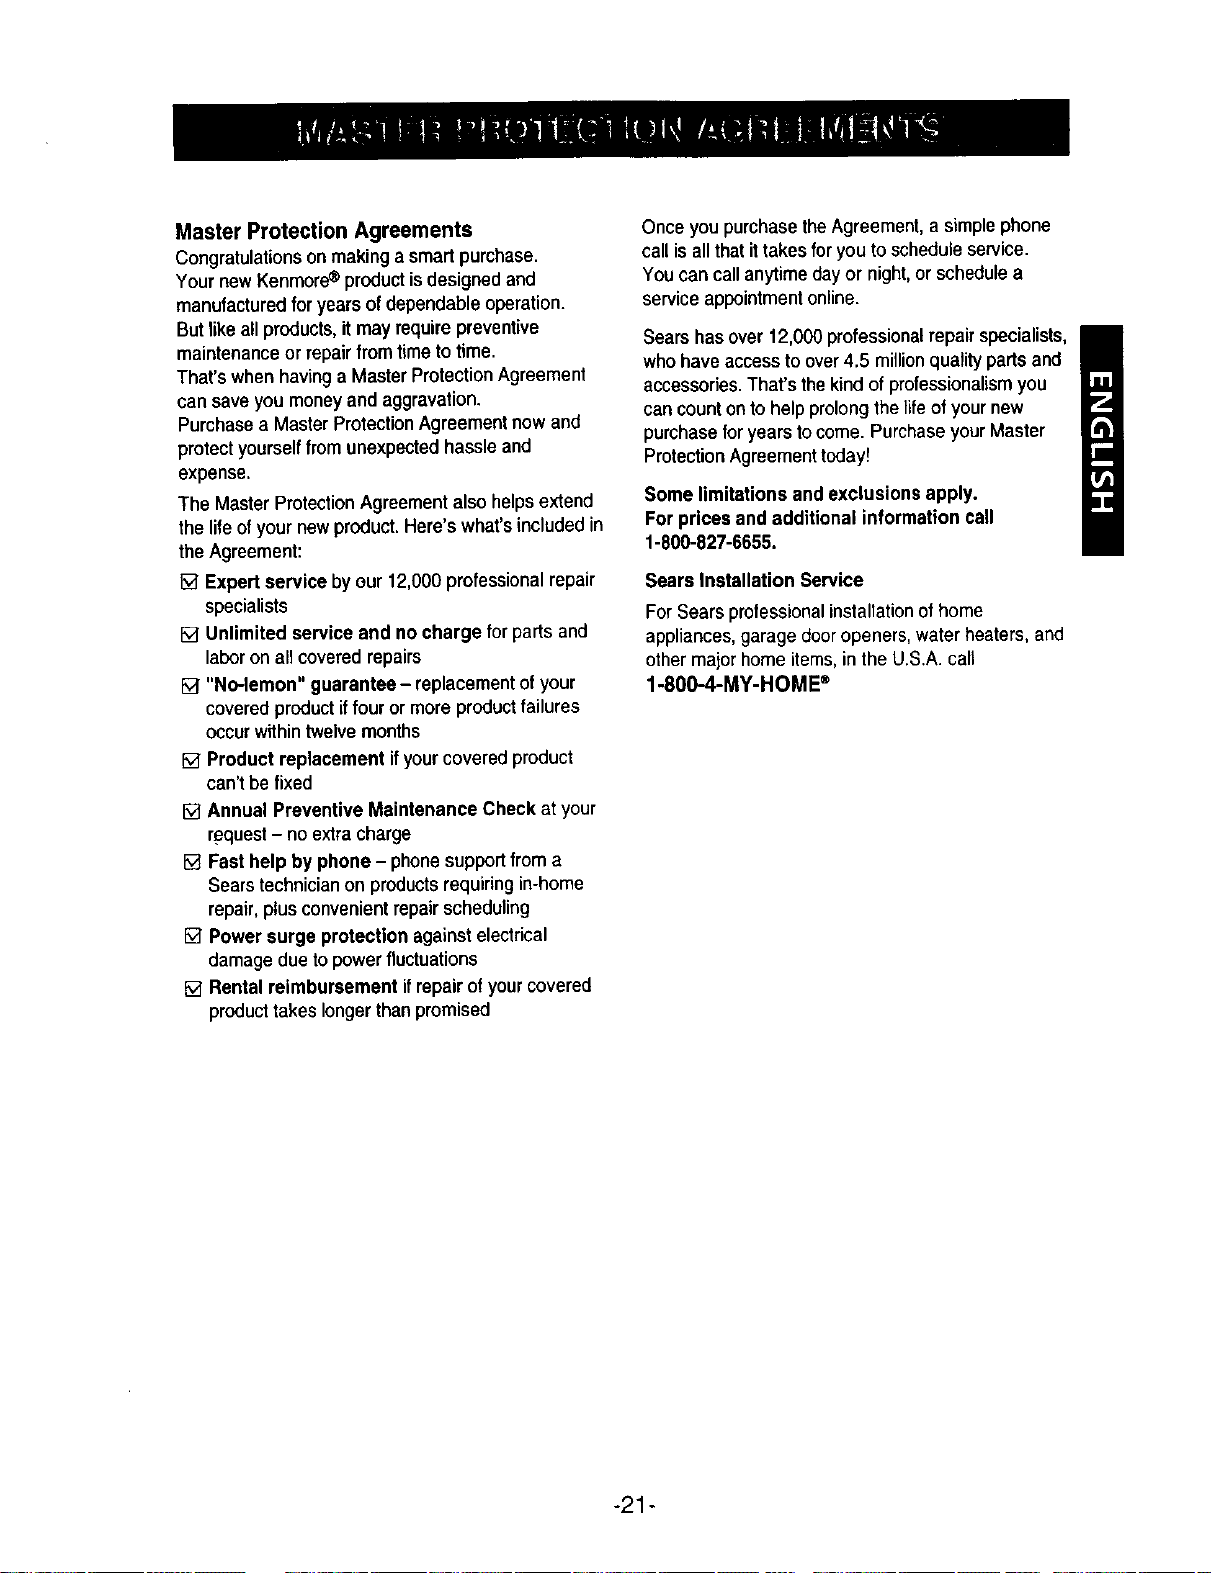
Master Protection Agreements
Congratulationsonmakinga smartpurchase.
YournewKenmore®productisdesignedand
manufacturedforyearsofdependableoperation.
But likeall products,itmay requirepreventive
maintenanceor repairfromtimetotime.
That'swhenhavinga MasterProtectionAgreement
cansave youmoneyand aggravation.
Purchasea MasterProtectionAgreementnow and
protectyourselffromunexpectedhassleand
expense.
The MasterProtectionAgreementalsohelpsextend
thelifeofyournewproduct.Here'swhat'sincludedin
theAgreement:
[] Expert service byour 12,000professionalrepair
specialists
[] Unlimited service and nocharge for parts and
labor on all covered repairs
[] "No-lemon" guarantee- replacement of your
covered product if four or more product failures
occur within twelve months
[] Product replacement ifyour covered product
can't be fixed
[] Annual Preventive Maintenance Check at your
request- no extra charge
[] Fast help by phone - phone support from a
Searstechnician on productsrequiring in-home
repair,plus convenient repair scheduling
[] Power surge protection against electrical
damagedue to powerfluctuations
[] Rental reimbursement if repair of your covered
product takes longer than promised
Once you purchase theAgreement,a simple phone
call is all that it takes foryou to schedule service.
You can call anytime dayor night, or schedulea
service appointmentonline.
Sears hasover 12,000professional repair specialists,
who have access to over4.5 millionquality parts and
accessories. That's the kind of professionalismyou
can count on to help prolong the life of your new
purchase foryears tocome. Purchaseyour Master
ProtectionAgreement today!
Some limitations and exclusionsapply.
For pricesand additional information call
1-800-827-6655.
Sears installation Service
For Sears professionalinstallation of home
appliances, garage door openers, water heaters,and
other major home items, in the U.S.A.call
1-800-4-MY-HOME®
-21 -
Antes de utilizar la nueva aspiradora ............... 1
Garantfa Kenmore para la aspiradora ............... 1
Instruccionesimportantesacercadelaseguridad.......2
Piezas y funciones ............................................. 3
Instrucciones de montaje ................................. 4
Instrucciones de funcionamiento ..................... 5
Extracci6ndelcable............................................ 6
Selector de alfombra/ suelo............................. 6
Desbloqueoy posicionesdel asa ..................... 7
Interruptorde encendido y apagado................. 7
Accesorios........................................................ 7
Diagrama de utilizaci6nde losaecesorios........9
Consejos para la aspiraci6n............................. 9
Caracterfsticasde rendimiento....................... 10
Mantenimiento de la aspiradora ...................... 11
Almacenamiento de la aspiradora.................. 11
Limpieza del exteriory los accesorios ............ 11
Cambio de la bolsa para el polvo ................... 12
Limpieza del filtrode seguridad del motor......13
Cambio y sustituci6ndel filtrode escape .......13
Cambio de la correa y limpieza del agitador...14
Mantenimiento del agitador ........................... 15
Conjunto del agitador...................................... 16
Eliminaci6n de obstrucciones......................... 17
Cambio de la bombilla.................................... 18
Resoluci6n de problemas ................................ 19
Acuerdos Acerca De La Protecci6n ................ 20
Reparaci6n .................................. Cubierta trasera
Leaesta guia. Leayudar_,a realizarel montajey a utilizarla nuevaaspiradoraKenmorede la formamasseguray
eficaz.
Llameal almac_nSearsm_iscercanosi deseaobtenerm_s informaci6nacercadelcuidadoy el mantenimiento.
NecesitardlosnSmerosdeseriey de modeloal solicitarla informaci6n.
LosntJmerosdeseriey de modelode la aspiradorase encuentranen la placadelnSmerodeseriey de modelo.
Utiliceel siguienteespacioparaanolarestos n6merosde la nuevaaspiradoraKenmore.
N-°de modeto:
Ngde serie:
Fecha de compra:.
Guarde este libro y la prueba de compra (recibo) en lugar seguro para su posterior consulta.
AI;IO DE GARANTIA LIMITADA PARA LA ASPIRADORA KENMORE
Esta garantfa estara vigente durante un aSo a partir de la fecha de compra e incluye 5nicamente
la utilizaci6n personal para casa de la aspiradora. Durante este aSo de garantia, siempre y cuando
la aspiradora funcione y se trate seg6n las instrucciones del manual del propietario, Sears
reparar_, los defectos del material o de la mano de obra sin coste alguno.
Esta garantia excluye las botsas de aspiraci6n, correas, bombillas y filtros, que son piezas
sustituibles y se pueden desgastar durante la utilizaci6n normal.
Devuelva esta aspiradora al centro de reparaciones y piezas m_is cercano en Estados
Unidos para obtener la reparacibn incluida en la garantia.
Esta garantia se aplica 0nicamente si el producto se utiliza en Estados Unidos.
Esta garantia le otorga derechos jurfdicos especfficos asf como otros derechos que dependeran
del estado en que se encuentre.
Sears, Roebuck and Co., D/817WA, Hoffman Estates, IL 60179
-1-
ATENClON-parareclucirelriesgodequesepr0duzcanfuegos,sacudidasel_cbicasodaflospersonales:
Su seguridad es importante para nosotros, para reducir el riesgo de que se
_roduzcan fuegos, sacudidas eldctricas o dafios personales al utilizar la aspiradora,
siga estas precauciones de seguridad:
Leaestemanualantesdemontaroutilizarlaaspiradora,
Utilicelaaspiradoraunicamentedelaformaenquese
describeenestemanualUtilice5nicamentelosacoesorios
suministrados.
Parareducirel peligrodequeseproduzcansacudidas
el6ctricas,nola utiliceenel exteriornisobresuperficies
mojadas.
Desconecteel suministroelectdcoantesderealizar
reparacioneso limpiarla_zonadelcepillo.Sino
desconectala unidad,sepodr(anproducirsacudidas
electdcaso elencendidorepentinodelcepillo.
Apaguelaaspiradorasiempreantesdeconectaro
desconectarlamanguera.
Apaguesiemprelaaspiradoraantesde desconectarla.
Nodesenchufeelaparatotirandodelcable.Sujeteel
enchufeyno elcableparadesconectarlo.
Sostengaelenchufeal enroliarlabobinadelcable.
Intentequeel cablenoseenrollebruscamente.
Noutiliceelcableni elenchufesiestadaSado.Sila
aspiradoranofuncionacomodebiera,sehacaido,est&
dafiada,sehadejadoenelexterioro sehacaidoal agua,
devuelvalaalCentrodemantenimientode Sears.
Notiredelcable,manejalaaspiradorapotelni Ioutilice
comoasa,nopilleelcableconlapuertaniIopasepor
bordesniesquinasafilados.
Notransporlelaaspiradoraatrav6sdelcable.Mantenga
elcablealajadodesuperficiescalientes.
Nodejelaaspiradorasinsupervisi6nsiesta enchufada.
DesenchSfeladelatomadela paredcuandonolautilicey
tambienantesdel mantenimiento.
Nodejequeseutilicecomojuguete.Tengaespecial
cuidadocuandola utilicennifioso seutilicecercadeellos.
Nomanejeelenchufenilaaspiradoraconlasmanos
mojadas.
Noutilicelaaspiradorasilamangueraestaperforada.
Sustituyalasiestacortadaodesgastada.Eviteaspirar
objetosafilados.
Nola utilicesilasaperturasestanbloqueadas,
mantengalassinpolvo,hilas,pelososualquiercosaque
redujeseel flujodeaire.
Mantengalasaperturasylaspiezasmoviblesalejadasdel
pelo,ropasuelta,dedosy otraspartesdelcuerpo.
Noutilicelaaspiradorasinla bolsaparaelpolvoy/osinlos
filtrosensulugar.
Cambiesiemprela bolsaparaelpoivodespuesdeaspirar
productosdelimpieza(polvos,ambientadores,etc.)para
alfombras.Estosproductospuedenobstruirla bolsa,
reducireltlujodeaireypuededarlugaraquesequemela
bolsa.Si nosecambialabolsasepuedenproducirdaSos
permanentesenlaaspiradora.
Noutilicelaaspiradorapararecogerobjetosafilados,
juguetespequeSos,papeles,pins,etc.,yaquepodrian
daharlaaspiradorao labolsaparael polvo.
Norecojaelementosqueardano humeen,come
cigarrillos,cerillasocenizas.
Noutilicelaaspiradorapararecogerliquidosintlamableso
liquidoscombustibles(gasolina,fluidosdelimpieza,
perfumes,etc.)nilautiliceenzonascercadeestos
productos.Losemanacionesde estassustanciaspueden
darlugara peligroso explosiones.
Tengaespecialcuidadoal limpiarescaleras.Nola
coloquesobresillas,mesas,etc,Mant_ngalasobreel
suelo.
Tendr_laresponsabilidaddeasegurarsequela
aspiradoranolautilizanadiequenoestecapacitadopara
utilizadaadecuadamente.
GUARDE ESTAS INSTRUCClONES
Sera responsabledel montaje y de una utilizaci6n segura adecuada de la aspiradora. La aspiradora esta
diseSadapara utilizarla flnicamente en el hogar. Lea con atenci6n el Manual del propietario para obtener
informaci6n importante acerca de la utilizaci6n y seguridaddel aparato. Esta guia contiene informaci6n
relativa a la seguridad bajo los simbolos de advertencia y atenci6n. Preste atenci6n espacial alas cajas con
estos simbolos y siga las instruccionesque se dan. La informaci6n de ADVERTENClA le avisa que existen
peligros como, fuego, sacudidas electricas, fuegos y daSospersonales serios. La informaci6n de
ATENClON le avisa que hay peligros como, daSo personal moderado y/o daSosen la propiedad.
-2-
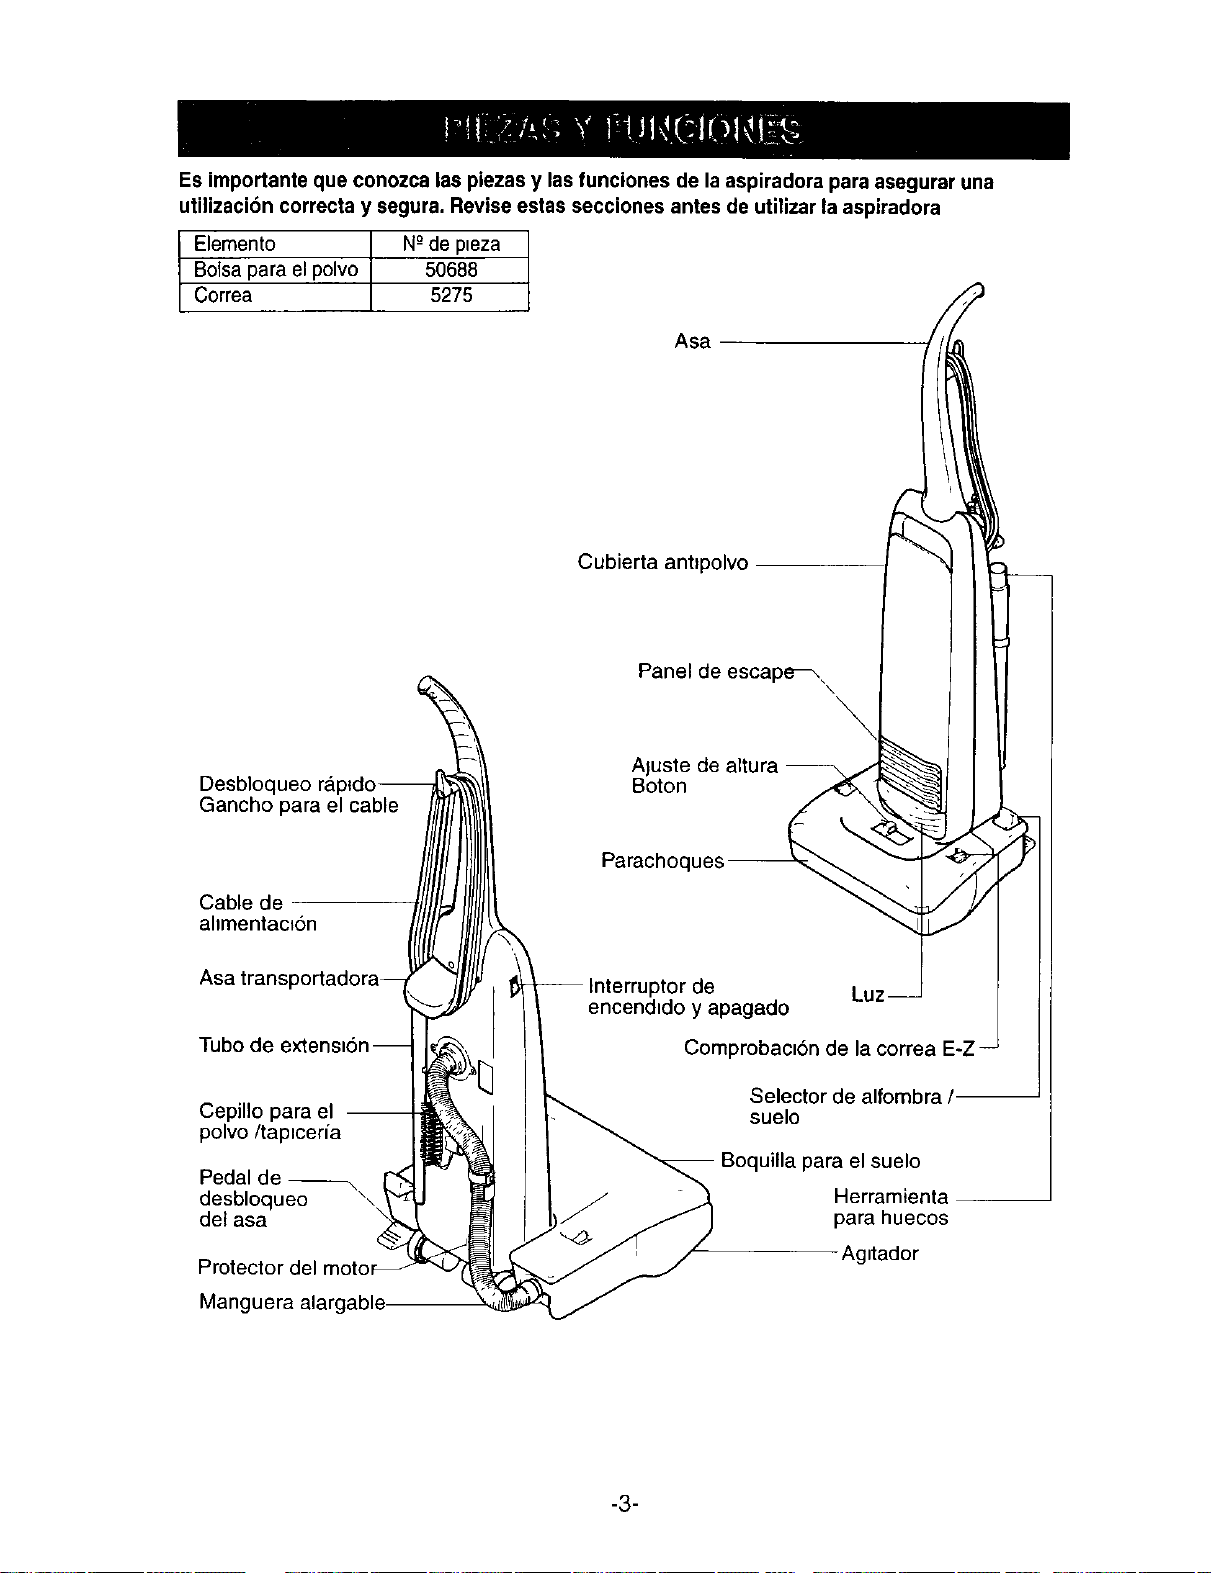
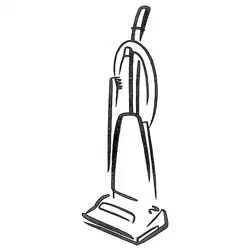
Es importante que conozca ias piezas y las funciones de la aspiradora para asegurar una
utilizaci6n correcta y segura. Revise estas secciones antes de utilizar la aspiradora
Elemento
Bolsa para el polvo
Correa
Ngde pleza
50688
5275
Asa
Cubierta antlpolvo
I
Panel de escap_
\
I
Desbloqueo
Gancho para el cable
Cable de
ahmentac_6n
Aluste de altura
Boton
Parachoque_
;Ib
Tubo dl
Cepillo para el --
polvo/taptcert'a
Pedal de --\
desbloqueo \\
del asa
Protector del
Manguera alargable
de Luz
encendldo y apagado
Comprobact6n de la corre_
Selector de alfombra/--
suelo
Boquilla para el suelo
Herramienta
para huecos
Agttador
-3-
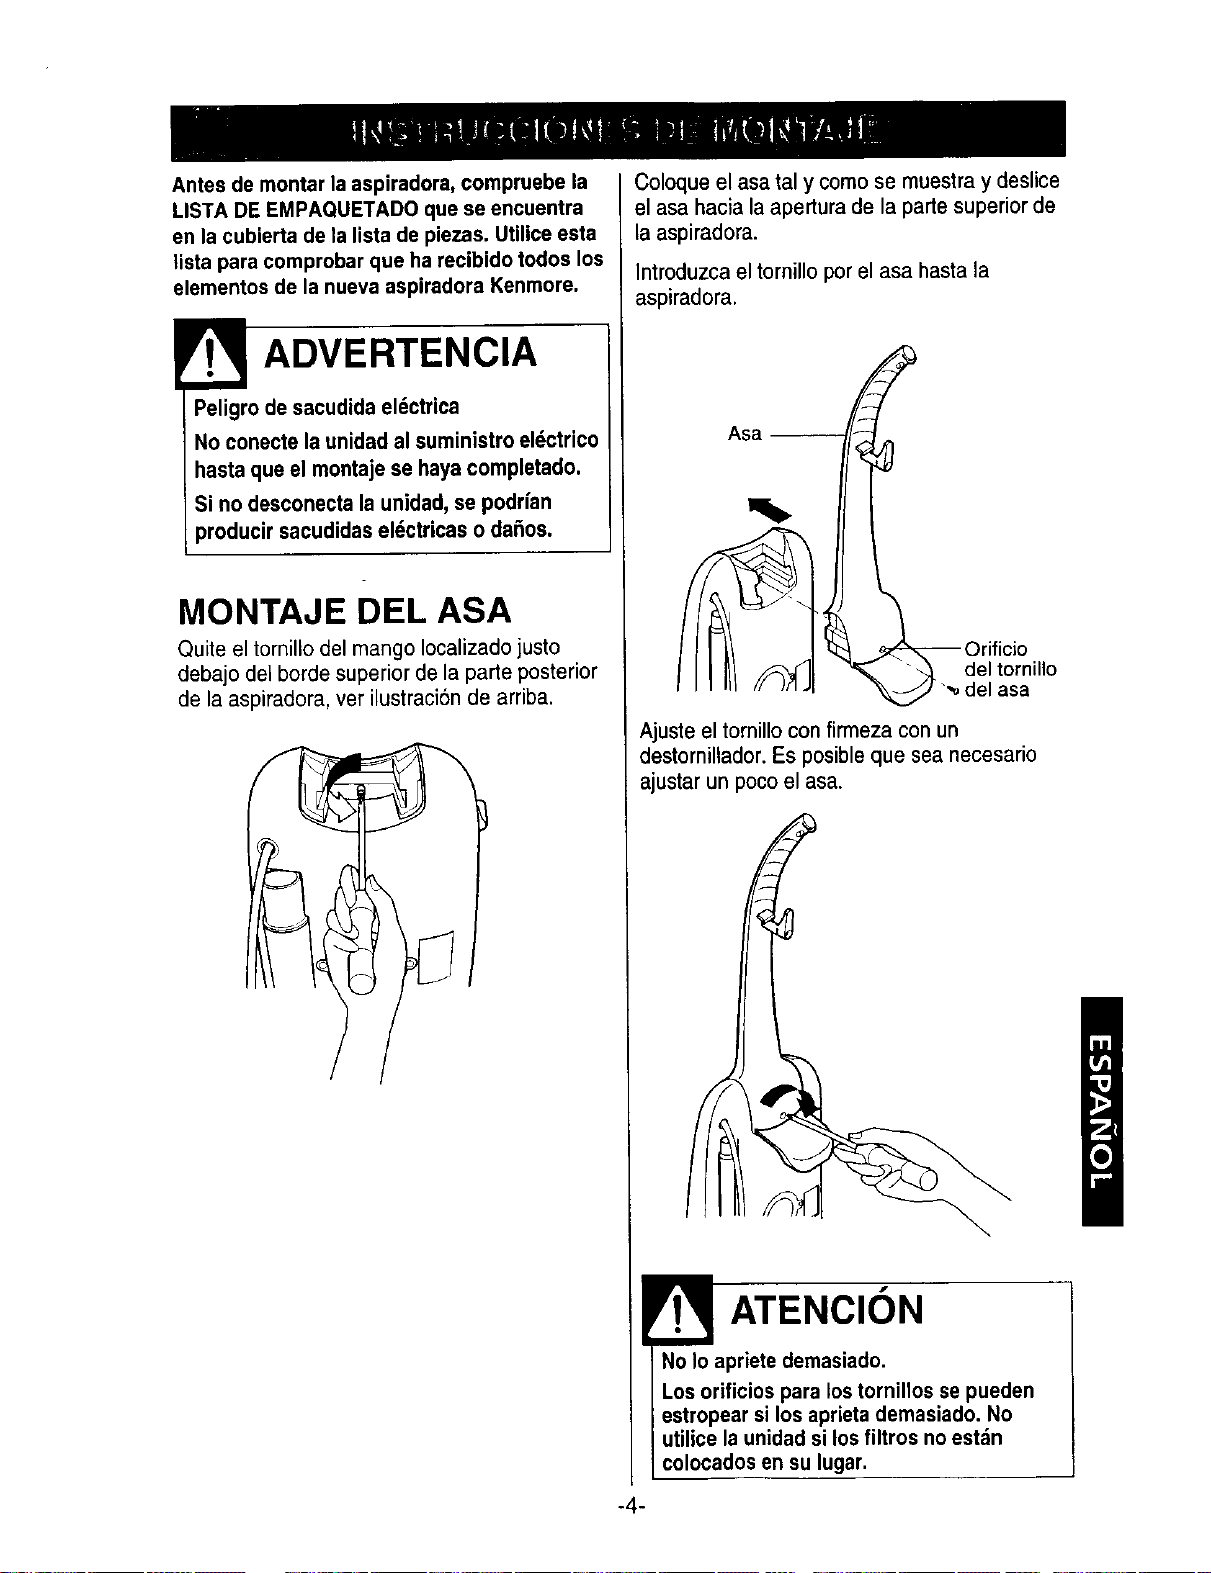
Antes de montar la aspiradora, compruebe la
LISTA DE EMPAQUETADO que se encuentra
en la cubierta de la lista de piezas. Utilice esta
lista para comprobar que ha recibido todos los
slementos de la nueva aspiradora Kenmore.
ADVERTENCIA
Peligrode sacudidaeldctrica
Noconecte launidadal suministroeldctrico
hastaqueel montajese hayacompletado.
Si no desconectala unidad,sepodrfan
producirsacudidasel_ctricaso da5os.
MONTAJE DEL ASA
Quite el tornillo del mango Iocalizado justo
debajo del borde superior de la parle posterior
de la aspiradora, vet ilustraci6n de arriba.
Coloque el asa tal y como se muestra y deslice
elasa hacia la apertura de la parle superior de
la aspiradora.
Introduzca el tornillo por el asa hasta la
aspiradora.
Asa
"_ " Orificio
"_._. deltornillo
J _ del asa
Ajuste el tornillo con firmeza con un
destornillador. Es posible que sea necesario
ajustar un poco el asa.
ATENCION
No Io apriete demasiado.
Los orificios para los tornillos se pueden
estropear si los aprieta demasiado. No
utilice la unidad si los filtros no est_n
colocados en su lugar.
-4-
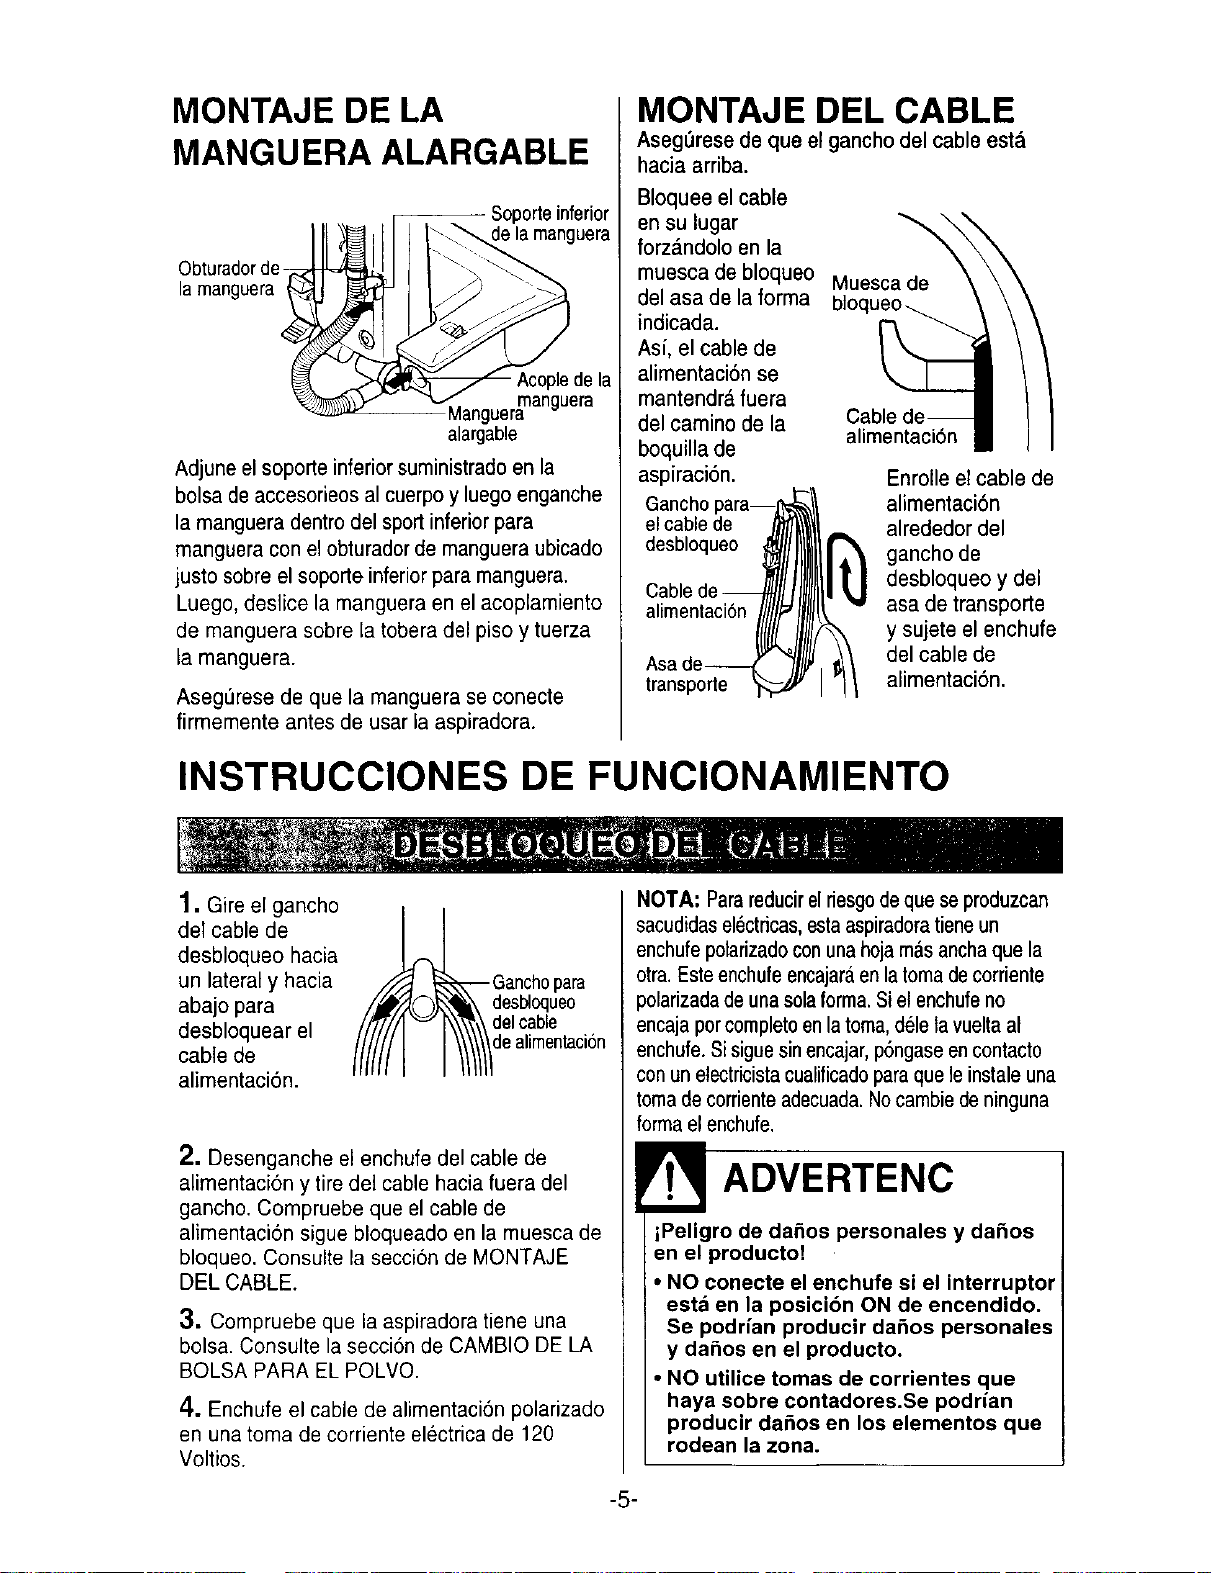
MONTAJE DE LA
MANGUERA ALARGABLE
Obturadorde-
la manguera
Soporteinferior
- Acopiede la
manguera
Manguera
alargable
Adjune el soporte inferior suministrado en la
bolsa de accesorieos al cuerpo y luego enganche
la manguera dentro del spoil inferior para
manguera con el obturador de manguera ubicado
justo sobre el soporte inferior para manguera.
Luego, desiice la manguera en el acoplamiento
de manguera sobre la tobera del piso y tuerza
la manguera.
Aseg_rese de que la manguera se conecte
firmemente antes de usar la aspiradora.
MONTAJE DEL CABLE
Aseg_rese de que el gancho del cable estd
hacia arriba.
Bloquee el cable
en su lugar
forz_ndolo en la
muesca de bloqueo Muesca de
del asa de la forma
indicada.
Asi, el cable de
alimentaci6n se
mantendrd fuera
del camino de la
boquilla de
aspiraci6n.
Gancho
el cable de
desbloqueo
Cable
alimentaci6n
transpode
alimentaci6n
Enrolle el cable de
alimentaci6n
alrededor del
gancho de
desbloqueo y del
asa de transporte
y sujete el enchufe
del cable de
alimentaci6n.
INSTRUCCIONES DE FUNCIONAMIENTO
1.Gire e[ gancho
del cable de
desbloqueo hacia
un lateral y hacia
abajo para
desbloquear el
cable de
alimentaci6n.
Ganchopara
desbloqueo
delcable
dealimentaci6n
2. Desenganche el enchufe del cable de
alimentaci6n y tire del cable hacia fuera del
gancho. Compruebe que el cable de
alimentaci6n sigue bloqueado en la muesca de
bloqueo. Consulte la secci6n de MONTAJE
DEL CABLE.
3. Compruebe que la aspiradora tiene una
bolsa. Consulte la secci6n de CAMBIO DE LA
BQLSA PARA EL POLVO.
4. Enchufe el cable de alimentaci6n polarizado
en una toma de corriente electrica de 120
Voltios.
NOTA: Para reducirel riesgode que se produzcan
sacudidas el_ctricas,esta aspiradoratiene un
enchufe polarizado conuna hoja mas anchaque la
otra. Este enchufe encajaraen la toma de corriente
)olarizada de una sola forma. Si el enchufe no
encaja por completo en la toma, dele la vuelta al
enchufe. Si sigue sinencajar, p6ngase en contacto
con un electricista cualificadopara que le instale una
toma de corriente adecuada. Nocambie de ninguna
forma el enchufe.
ADVERTENC
iPeligro de dafios personales y da_os
en el producto!
• NO conecte el enchufe si el interruptor
estd en la posicibn ON de encendido.
Se podrfan producir da_os personales
y da_os en el producto.
• NO utilice tomas de corrientes que
haya sobre contadores.Se podrian
producir da_os en los elementos que
rodean la zona.
-5-
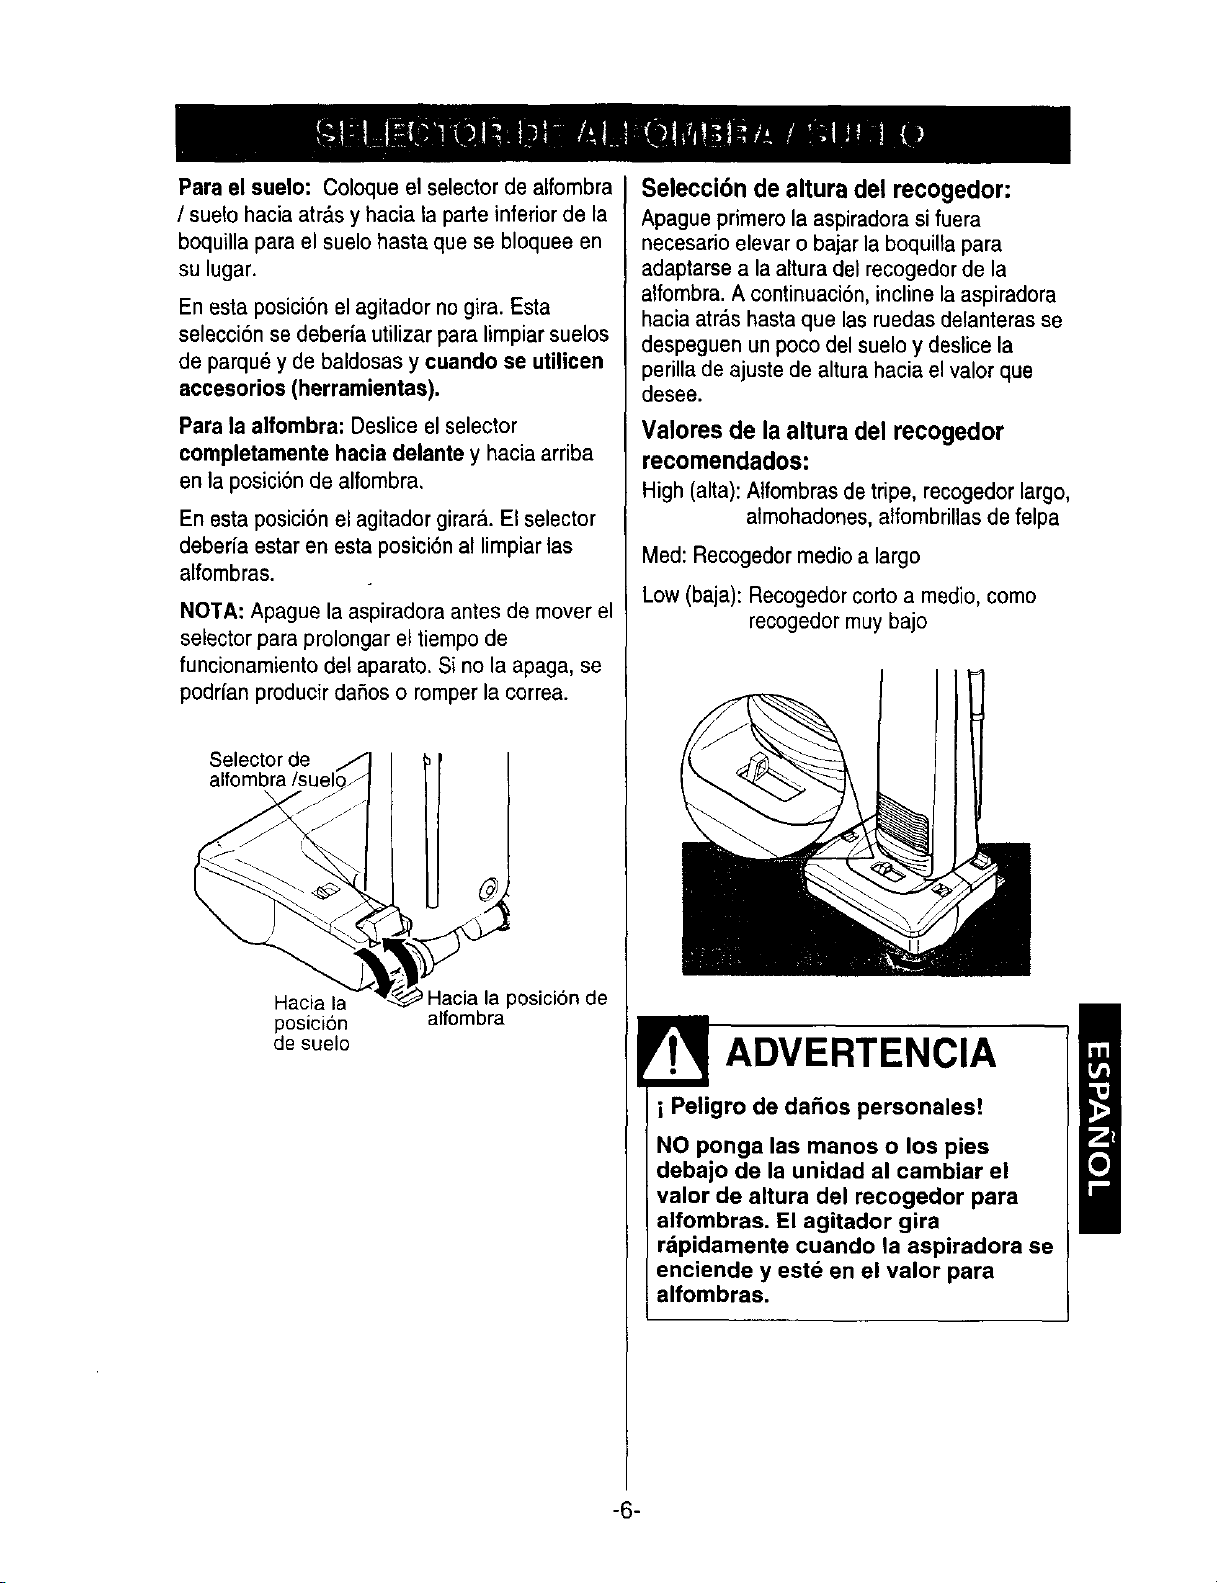
Para el suelo: Coloque el selector de aifombra
/ suelo hacia atrds y hacia la parte inferior de la
boquilla para el suelo hasta que se bloquee en
su lugar.
En esta posici6n el agitador no gira. Esta
seleccion se deberia utilizar para limpiar suelos
de parqu6 y de baldosas y cuando se utilicen
accesorios (herramientas).
Para la alfombra: Deslice el selector
completamente hacia delante y hacia arriba
en la posici6n de alfombra,
En esta posici6n el agitador girard. El selector
deberfa estar en esta posici6n al limpiar las
alfombras.
NOTA: Apague la aspiradora antes de mover el
selector para prolongar el tiempo de
funcionamiento del aparato. Si no la apaga, se
podrfan producir dafios o romper la correa.
Selector de
alfombra/suel_
Hacia la Hacia la posici6n de
posici6n alfombra
de suelo
Selecci6n de altura del recogedor:
Apaguepdmerola aspiradorasifuera
necesarioelevaro bajarla boquillapara
adaptarse a la altura del recogedor de la
alfombra. A continuaci6n, incline la aspiradora
hacia atra.shasta que las ruedas delanteras se
despeguen unpoco del suelo y deslice la
perilla de ajuste de altura hacia el valor que
desee.
Valores de la altura del recogedor
recomendados:
High(alta):Alfombrasde tripe,recogedorlargo,
almohadones,atfombrillasde felpa
Med: Recogedor medio a largo
Low (baja):Recogedorcorto a medio, como
recogedor muy bajo
ADVERTENCIA
gro de da_os personales!
NO ponga las manos o los pies
debajo de la unidad al cambiar el
valor de altura del recogedor para
alfombras. El agitador gira
rdpidamente cuando la aspiradora se
enciende y estd en el valor para
alfombras.
-6-

Desbloquee el asa presionando sobre el pedal
de desb_oqueo hacia abajo con el pie y tire del
asa hacia atr&s y hacia abajo con las manos.
Pedal
desbloqueo del as
La aspiradora tiene
tres posiciones: .
- Hacia arriba para Ill ,/_f_
guardarla y para
utilizar las
herramienlas de
limpieza.
- En diagonal para
limpiaralfombras
y suelos.
- Baja para Ilegar
por debajo de los
muebles.
El interruptor de encendido y apagado se
encuentra en el cuerpo de la aspiradora justo
por debajo del lateral del asa. Coloque el
interruptor en ON para encender la aspiradora
yen OFF para apagarla.
,sa
I _ _ _--interrupter de
Cablede _r L J [ encendidoy
alimentaci6n _ // _ , apagado
Herramienta
Tubo de --
Extensi6n
el polvo
Manguera
Alargable
Conector de la manguera
UTILIZACION DE LOS ACCESORIOS
Cotoque el selector en el valor de suelo
empujando el selector hacia atr&s y hacia
abajo. Consulte la secciSn de SELECTOR
DE ALFOMBRA / SUELO.
Quite el extremo in|erior de la manguera
alargable de la aspiradora sujetando el
conector de la manguera y gir_.ndolo y tirando
de el hacia fuera.
NOTA: El protector del motor se puede abrir y
dar lugar a una recogida de polvo deficiente al
utilizar los accesorios o al limpiar una alfombra
nueva. Esto se debe a que el flujo de aire se ha
reducido pot los propios accesorios o por la
Delusa de la nueva alfombra que ha Ilenado la
bolsa r_.pidamente. Consulte la secci6n de
ELIMINACION DE OBSTRUCCIONES.
ADVERTENCIA
Peligro de sacudidas eldctricas y da_os
personales.
Desconecte el suministro electrico
antes de realizar reparaciones o limpiar
la unidad. Si no desconecta la unidad,
se podr{an producir sacudidas
eldctricas o dafios personales al
encenderse la aspiradora.
-7-
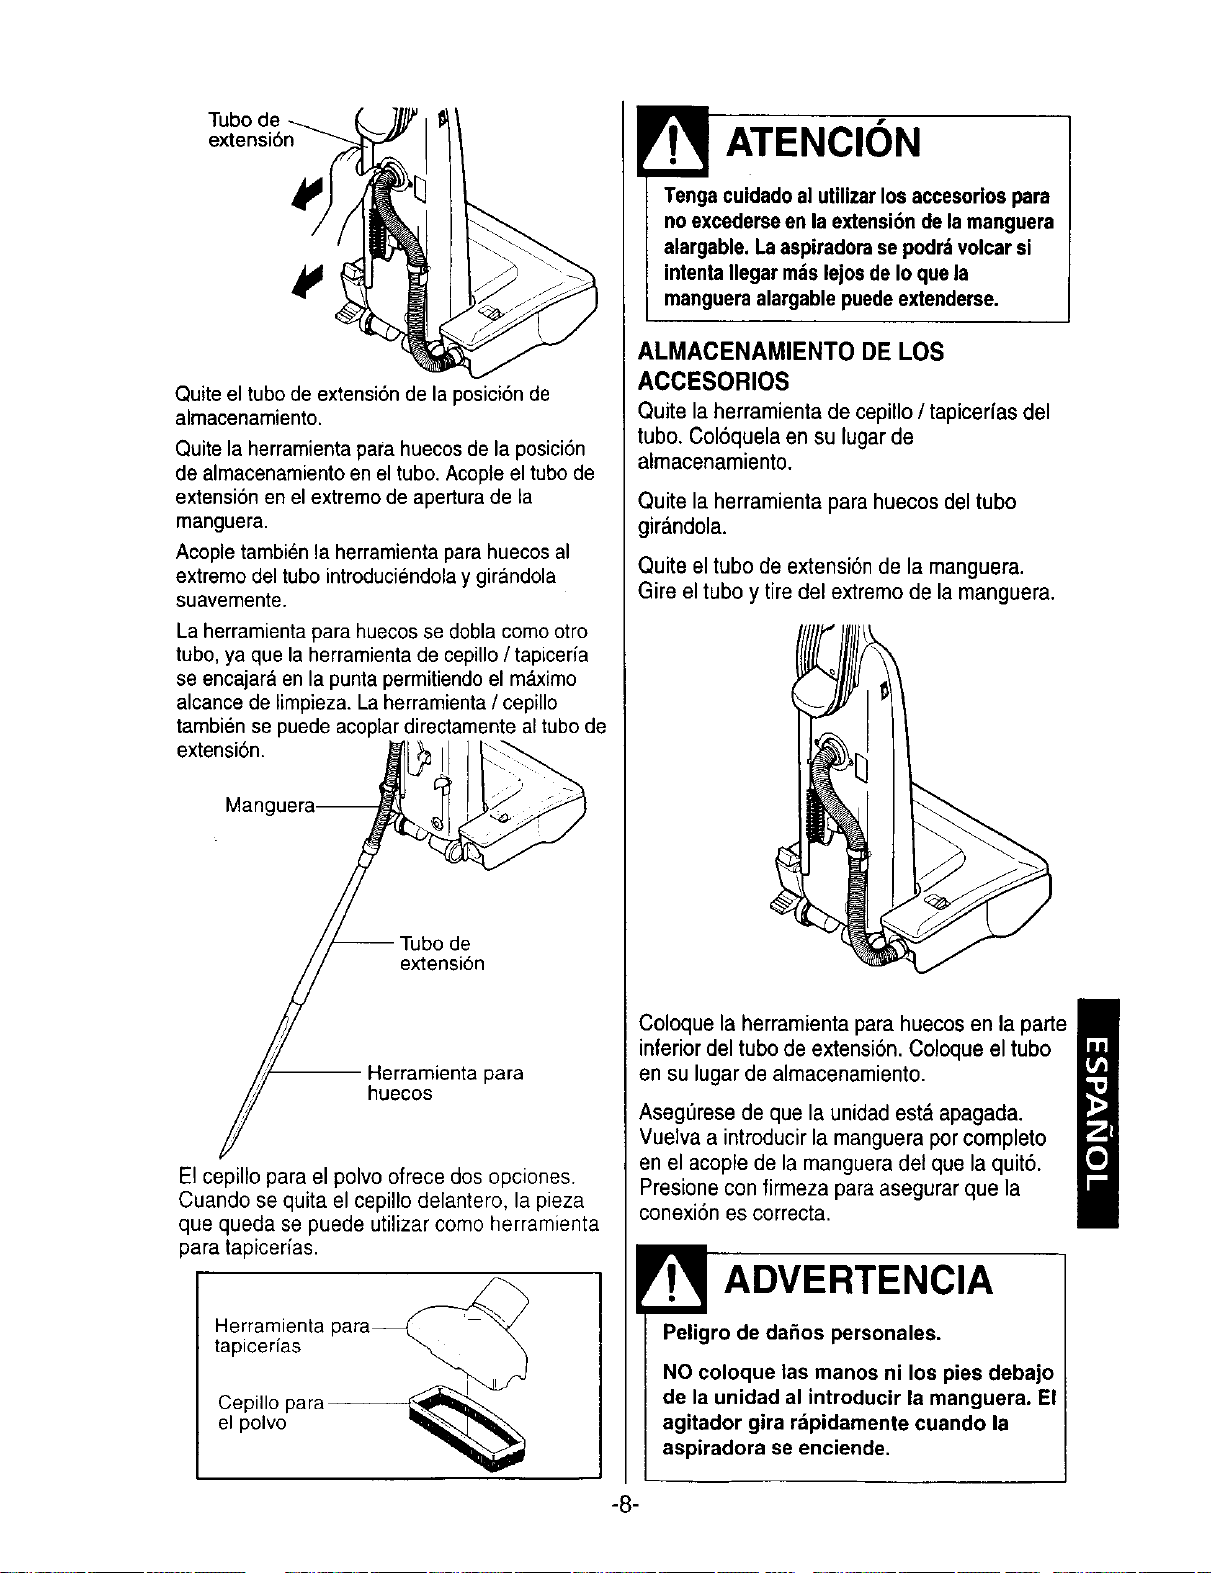
Tubo de
Quite el tubo de extensi6n de la posici6n de
almacenamiento.
Quite la herramienta para huecos de la posicion
de almacenamiento en el tubo. Acopte el tubo de
extensi6n en el extremo de apertura de la
manguera.
Acople tambi6n la herramienta para huecos al
extremo del tubo introduciendola y girandola
suavemente.
La herramienta para huecos se dobla como otro
tubo, ya que la herramienta de cepillo / tapiceria
se encajara en la punta permitiendo el m_imo
alcance de limpieza. La herramienta / cepillo
tambi6n se puede acoplar directamente al tubo de
extensi6n.
Mang
de
extensi6n
Herramienta para
huecos
El cepilto para el polvo ofrece dos opciones.
Cuando se quita el cepillo delantero, la pieza
que queda se puede utilizar como herramienta
para tapicerfas.
Herramienta para_
tapicerfas "--_ _,_
ATENCION
Tenga cuidado al utilizar los accesorios para
no excederse en la extensi6n de la manguera
alargable. Laaspiradora se podrdvolcar si
intenta Ilegar rodslejos de Io que la
manguera alargable puedeextenderse.
ALMACENAMIENTO DE LOS
ACCESORIOS
Quite la herramienta de cepillo / tapicefias del
tubo. Col6quela en su lugar de
almacenamiento.
Quite la herramienta parahuecos del tubo
girandola.
Quite el tubo de extensi6n de la manguera.
Gire el tubo y tire del extremo de la manguera.
Coloque la herramienta para huecos en la parle
inferior del tubo de extensi6n. Coloque el tubo
en su lugar de almacenamiento.
Asegerese de que la unidad est& apagada.
Vuelva a introducir la manguera por completo
en el acople de la manguera del que la quit6.
Presione con firmeza para asegurar que la
conexi6n es correcta.
ADVERTENCIA
Peligro de dafios personales.
NO coloque las manos ni los pies debajo
de la unidad al introducir la manguera. El
agitador gira rapidamente cuando la
aspiradora se enciende,
-8-
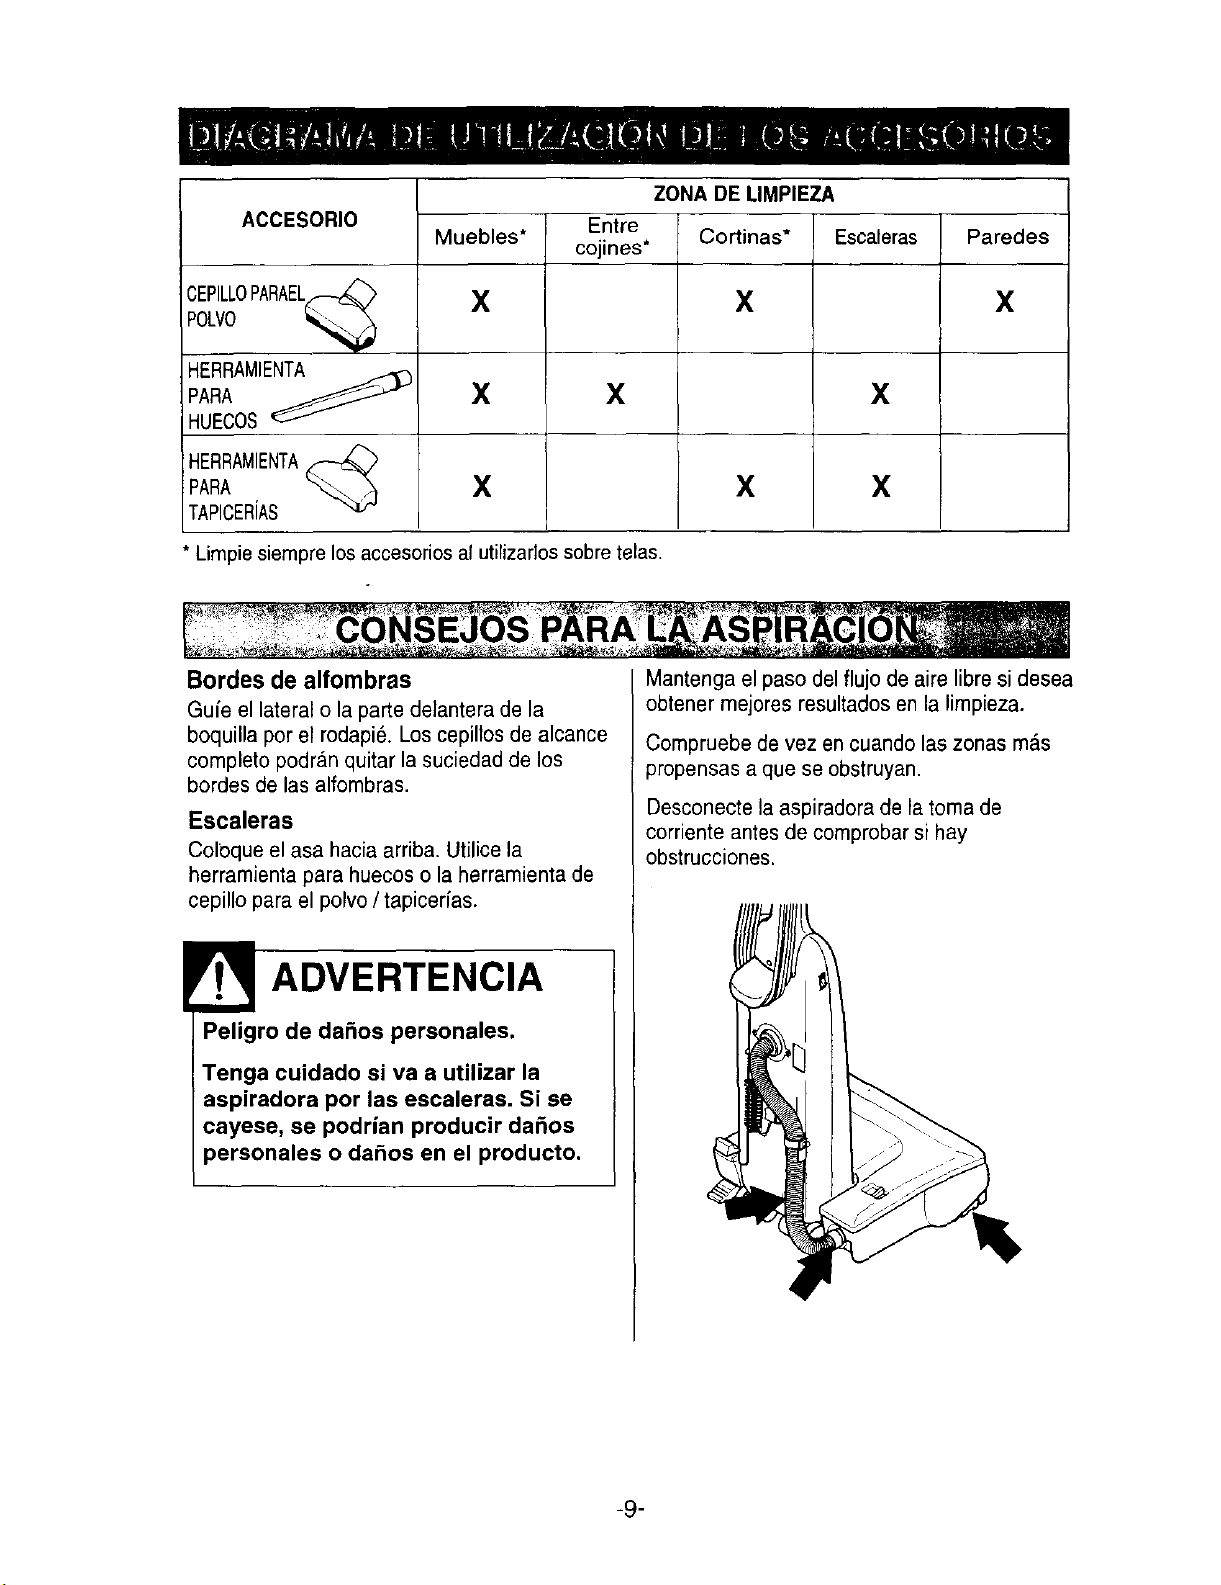
ZONA DE LIMPIEZA
Entre
ACCESORIO Muebles* cojines* Cortinas* Escaleras Paredes
CEPILLOPARAEL_
POLVO _ X X X
HERRAMIENTA
PARA _j/_'J_ X X X
HUECOS
HERRAMIENTA_
PARA X X X
TAPICERiAS
Limpie siempre los acoesorios al utilizarlos sobre telas.
Bordes de alfombras
Gufe el lateral o la parte delantera de la
boquilla por eFrodapi_. Los cepillos de alcance
completo podran quitar la suciedad de los
bordes de las alfombras.
Escaleras
Coloque el asa hacia arriba. Utilice la
herramienta para huecos o la herramienta de
cepillo para el polvo / tapicer(as.
ADVERTENCIA
Peligro de daSos personales.
Tenga cuidado si va a utilizar la
aspiradora por las escaleras. Si se
cayese, se podrian producir daSos
personales o dafios en el producto.
Mantenga el paso del flujo de aire libre si desea
obtener mejores resultados en la limpieza.
Compruebe de vez en cuando las zonas m&s
propensas a que se obstruyan.
Desconecte la aspiradora de Fatoma de
corriente antes de comprobar si hay
obstrucciones.
-9-
ADVERTENCIA
Peligro de sacudidas eldctricas y
dafios personales.
Desconecte el suministro eldctrico
antes de realizar reparaciones o limpiar
la unidad. Si no desconecta la unidad,
se podrfan producir sacudidas
el_ctricas o dafios personales al
encenderse la aspiradora.
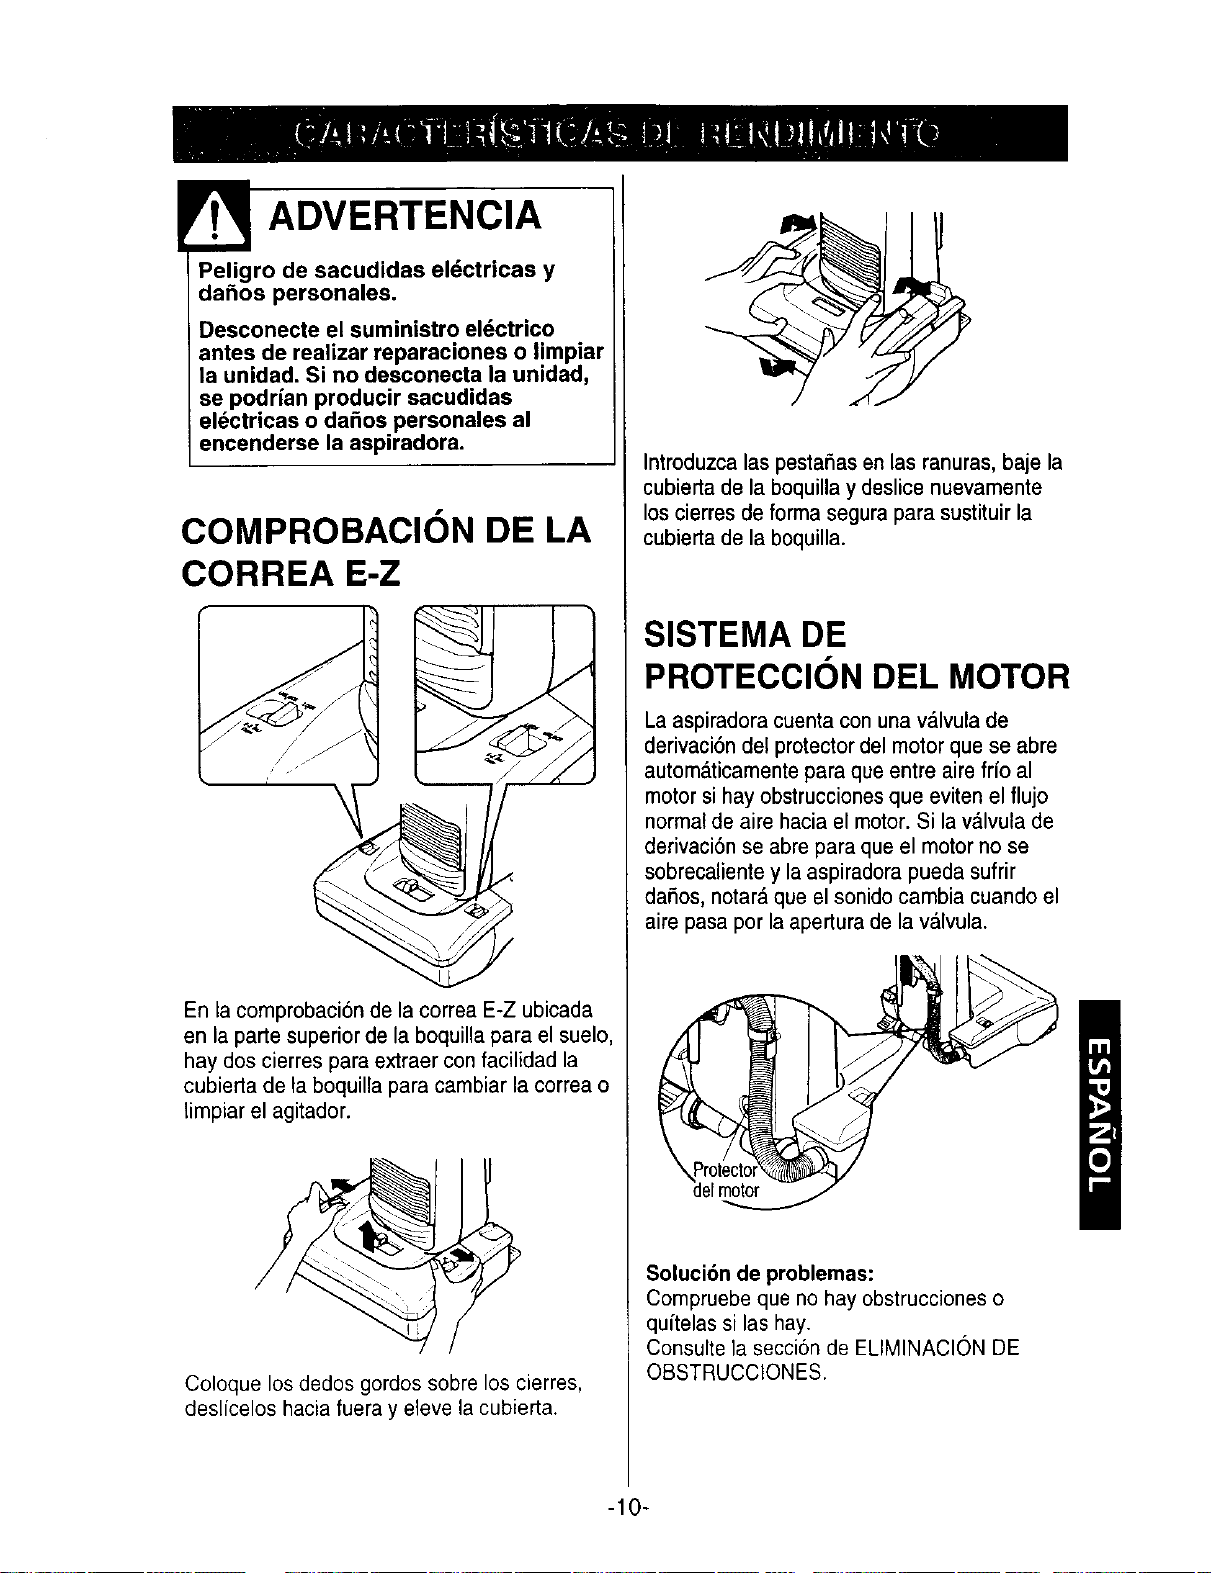
COMPROBACION DE LA
CORREA E-Z
En la comprobacion de la correa E-Z ubicada
en la parte superior de la boquilla para el suelo,
hay dos cierres para extraer con facilidad la
cubierta de la boquilla para cambiar la correa o
limpiar el agitador.
Coloque los dedos gordos sobre los cierres,
deslfcelos hacia fuera y eleve la cubierta.
Introduzcalas pestafias enlas ranuras, baje la
cubierta de la boquilla y deslice nuevamente
los cierres de forma segura para sustituir la
cubierta de la boquilla.
SISTEMA DE
PROTECClON DEL MOTOR
La aspiradora cuenta con una v_.lvula de
derivaci6n del protector del motor que se abre
automaticamente para que entre aire ffio al
motor si hay obstrucciones que eviten el flujo
normal de aire hacia el motor. Si la v&lvula de
derivaci6n se abre para que el motor no se
sobrecaliente y la aspiradora pueda sufrir
dafios, notar_ que el sonido cambia cuando el
aire pasa por la apertura de la valvula.
Soluci6n de problemas:
Compruebe que no hay obstrucciones o
quffelas si las hay.
Consulte la secci6n de ELIMINACION DE
OBSTRUCCIONES.
-10-
MANTENIMIENTO DE LA ASPIRADORA
Siga siempre todas las precauciones de seguridad
al limpiar o realizar el mantenimiento de ta
aspiradora.
ADVERTENCIA
Peligro de sacudidas el_ctricas y dafios
personales.
Desconecte el suministro el6ctrico antes de
realizar reparaciones o limpiar la unidad. Si
no desconecta la unidad, se podrian
producir sacudidas eldctricas o dafios
personales al encenderse la aspiradora.
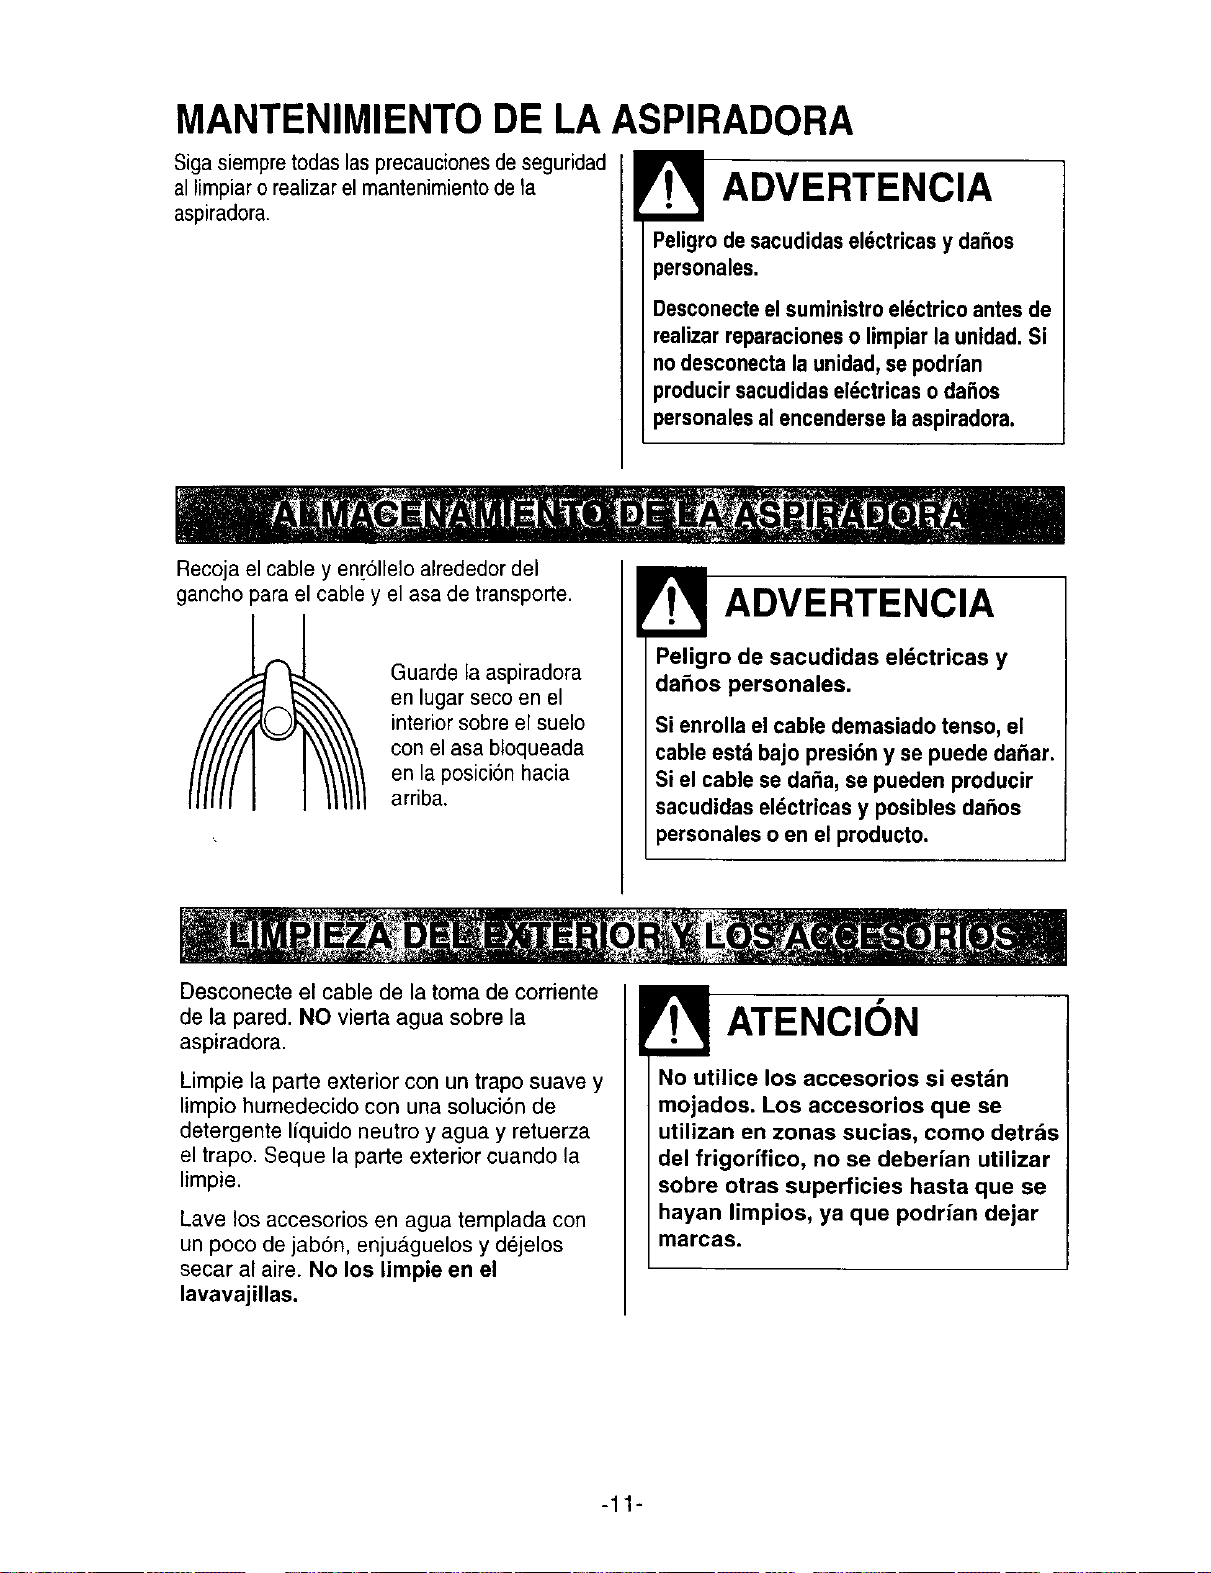
Recoja el cable y enr611eloalrededor del
gancho para el cable y el asa de transporte.
Guarde la aspiradora
en lugar seco en el
interior sobre el suelo
con el asa bloqueada
en la posici6n hacia
arriba.
ADVERTENCIA
Peligro de sacudidas eldctricas y
dafios personales.
Si enrolla el cable demasiado tenso, el
cable estd bajo presi6n y se puede da_ar.
Si el cable se da_a, se pueden producir
sacudidas eldctricas y posibles dafios
personales o en el producto.
Desconecte el cable de la toma de corriente
de la pared. NO vierta agua sobre la
aspiradora.
Limpie la parte exterior con un trapo suave y
limpio humedecido con una soluci6n de
detergente I{quido neutro y agua y retuerza
el trapo. Sequela parte exterior cuando la
limpie.
Lave los accesorios en agua templada con
un poco de jab6n, enjuaguelos y dejelos
secar al aire. No los limpie en el
lavavajillas.
ATENCION
No utilice los accesorios si estdn
mojados. Los accesorios que se
utilizan en zonas sucias, como detr&s
del frigorifico, no se debeHan utilizar
sobre otras superficies hasta que se
hayan limpios, ya que podrian dejar
marcas.
-11-
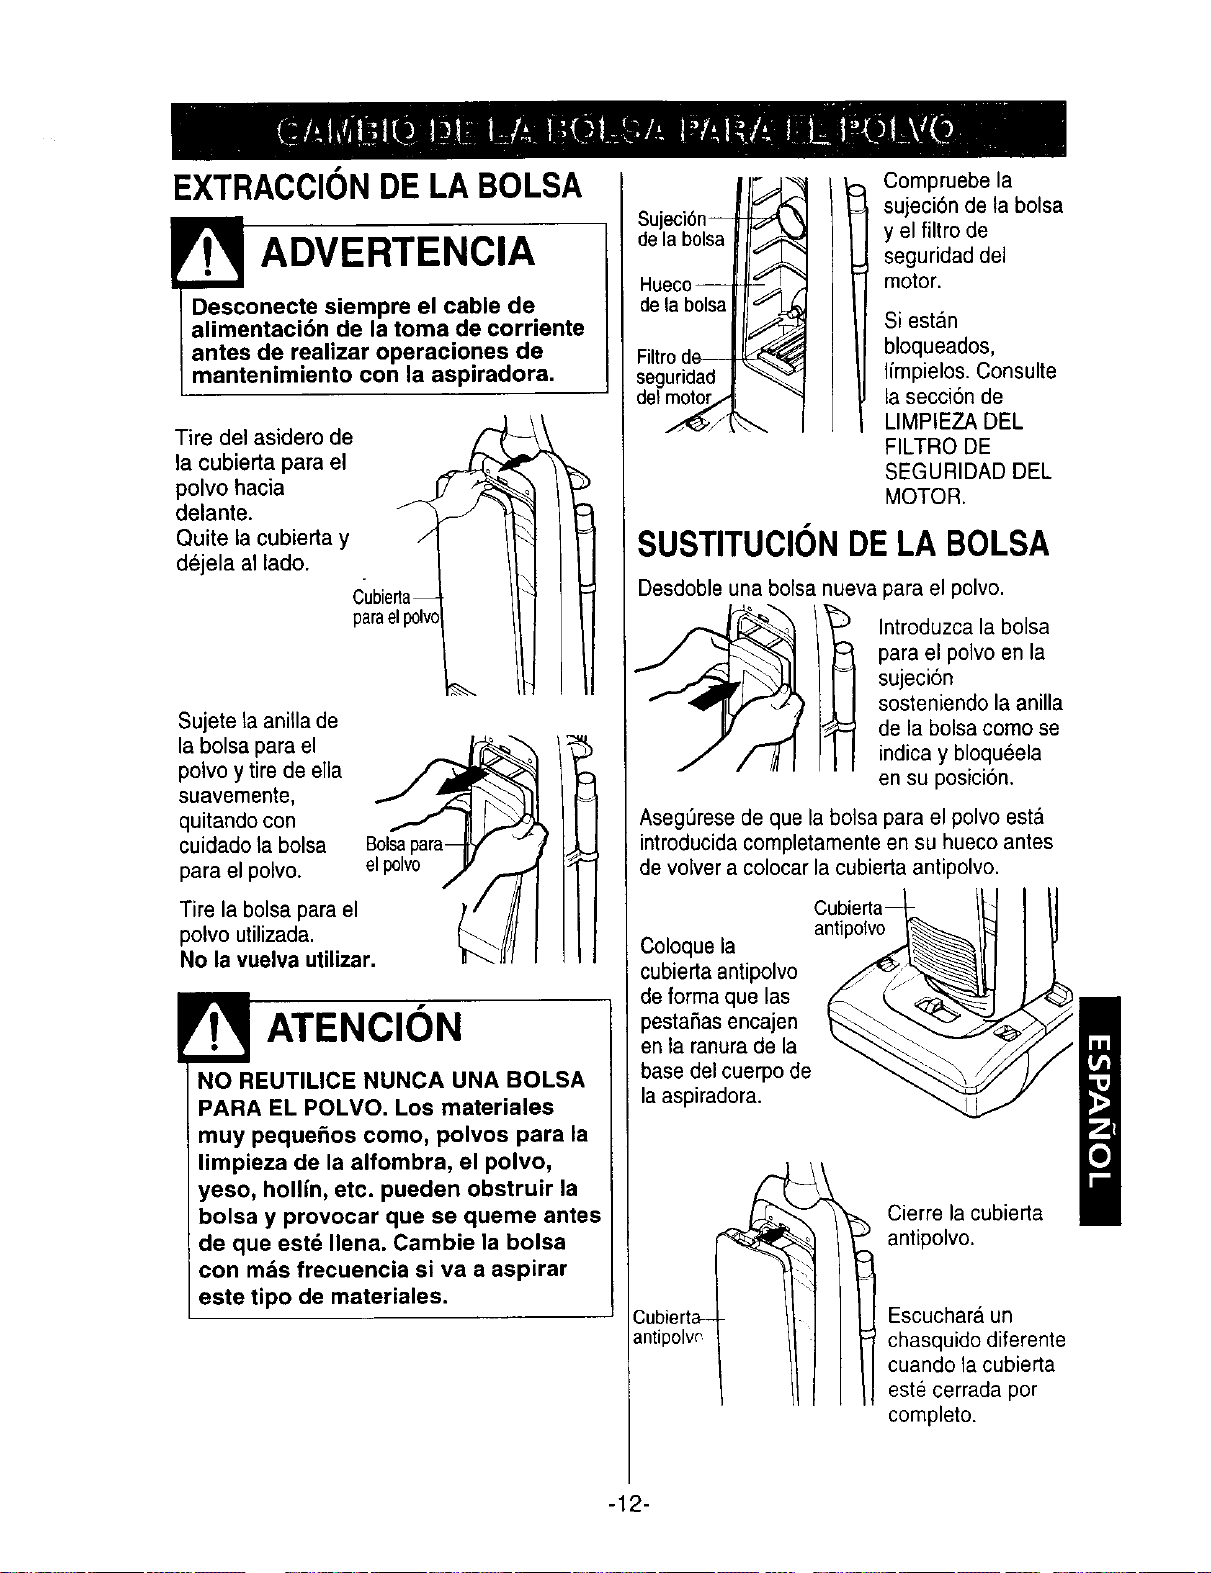
EXTRACCIONDELA BOLSA
FI. ADVERTENCIA
Desconecte siempre el cable de
alimentaci6n de la toma de corriente
antes de realizar operaciones de
mantenimiento con la aspiradora.
1
Tire del asidero de L'_
la cubierta para el
polvo hacia _
delante, f _ "t
Quite la cubierta y F] I
dejela al lado. _
Cubierta_
paraelpolvo_._..
Sujete ta anilla de
la bolsa para el
polvo y tire de ella
suavemente,
quitando con
cuidado la bolsa
para el polvo.
Tire la bolsa para el
polvo utilizada.
Bolsa
el polvo
No la vuelva utilizar.
ATENCION
NO REUTILICE NUNCA UNA BOLSA
PARA EL POLVO. Los materiales
muy peque_os como, polvos para la
limpieza de la alfombra, el polvo,
yeso, hollin, etc. pueden obstruir la
bolsa y provocar que se queme antes
de que estd Ilena. Cambie la bolsa
con mds frecuencia si va a aspirar
este tipo de materiales.
Sujeci6n--
de la bolsa
Hueco--
de la bolsa
F,,roO
seguridad J
del _ "-.
Compruebe la
sujeci6n de la bolsa
y el filtro de
seguridad del
motor.
Si estan
bloqueados,
limpielos. Consulte
la secci6n de
LIMPIEZA DEL
FILTRO DE
SEGURIDAD DEL
MOTOR.
SUSTITUCIONDELA BOLSA
Desdoble una bolsa nueva para el polvo.
_/_ Introduzca la bolsa
para el polvo en la
sujeci6n
sosteniendo la anilla
de la bolsa como se
indica y bloqueela
en su posicion.
AsegSrese de que la bolsa para el polvo est_l
introducida completamente en su hueco antes
de voiver a colocar la cubierla antipolvo.
Coloque la
cubierta antipolvo
de forrna que las
pesta5as encajen
en ta ranura de la
base del cuerpo de
la aspiradora.
4
Cubierta_-
antipolw
antipolvo
Cierre la cubierta
antipolvo.
Escuchara un
chasquido diferente
cuando la cubierta
este cerrada por
cornpleto.
-12-
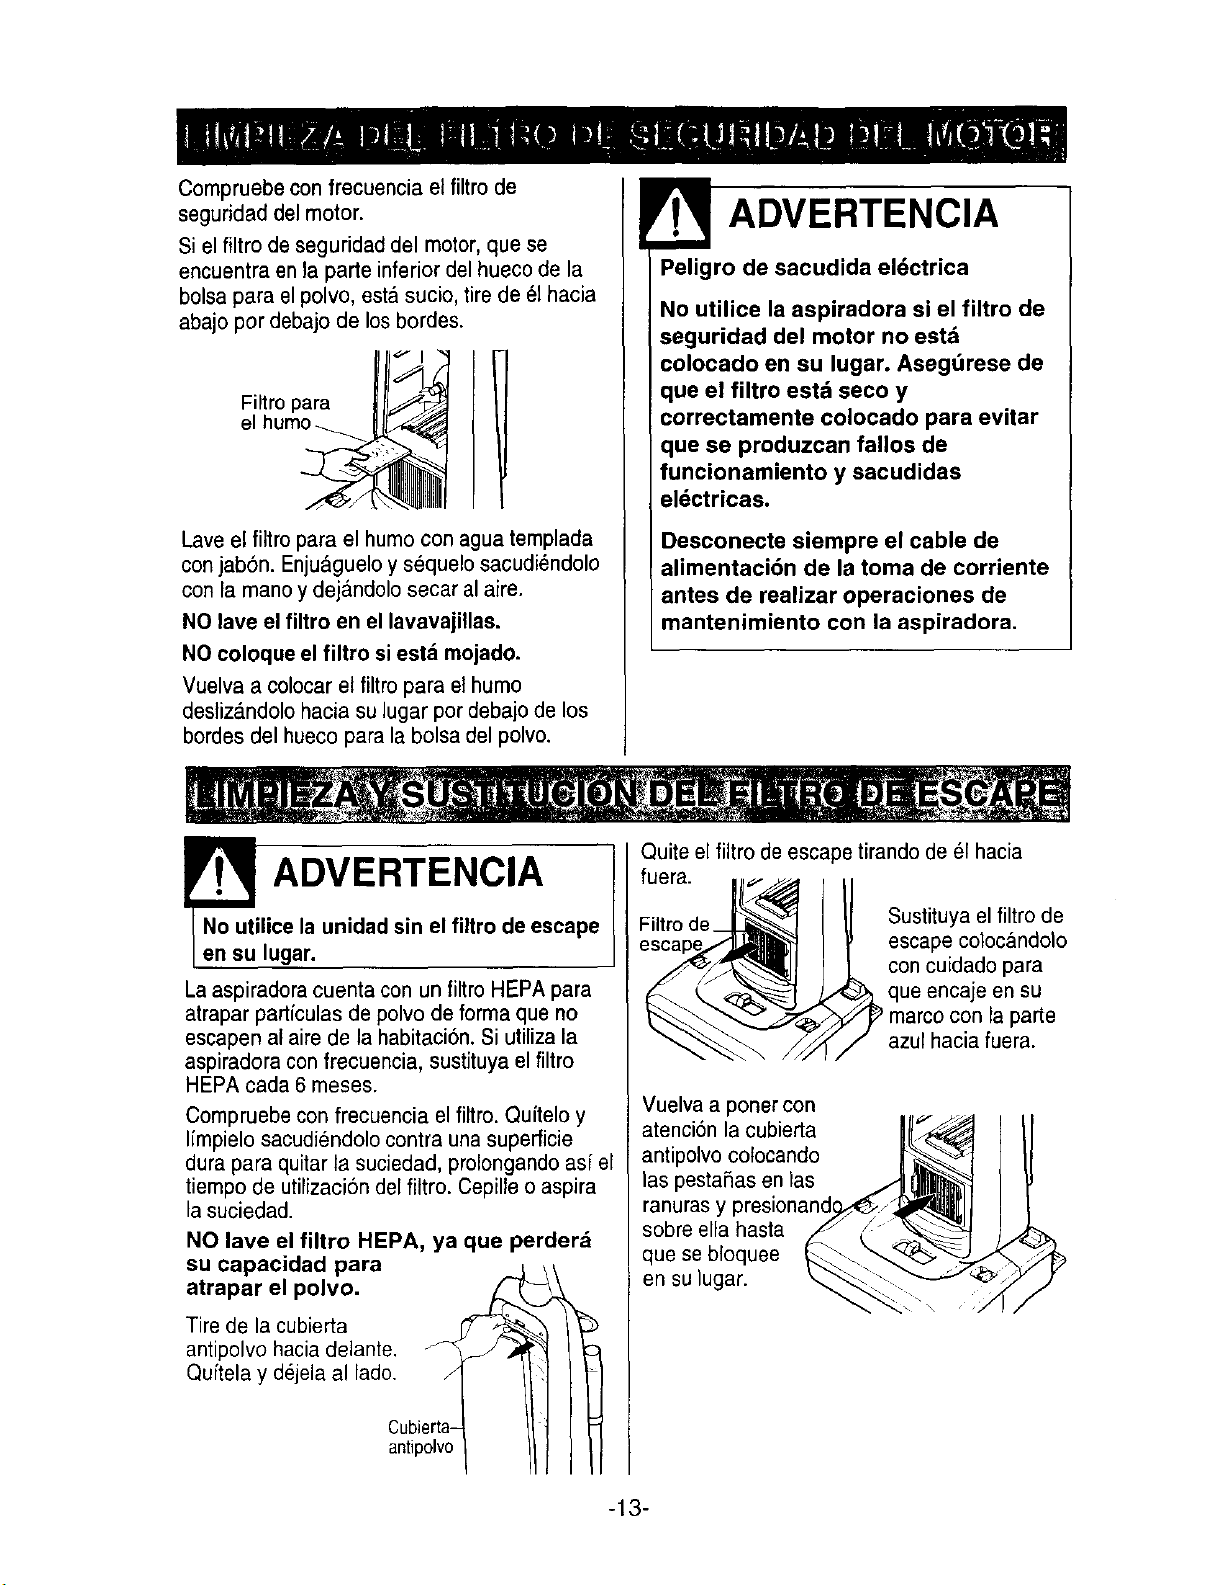
Compruebe con frecuencia el filtro de
seguridad del motor.
Si el filtro de seguridad del motor, que se
encuentra en la parte inferior del hueco de la
bolsa para el polvo, est_ sucio, tire de el hacia
abajo por debajo de los bordes.
Filtro para
Lave el filtro para el humo con agua templada
con jabSn. Enju&guelo y sequelo sacudiendolo
con la mano y dej_.ndolo secar al aire.
NO lava el filtro en el lavavajillas.
NO coloque el filtro si estd mojado.
Vuelva a colocar et filtro para el humo
desliza.ndolo hacia su lugar por debajo de los
bordes del hueco para la bolsa del polvo.
ADVERTENCIA
Peligro de sacudida el_ctrica
No utilice la aspiradora si el filtro de
seguridad del motor no estd
colocado en su lugar. Asegdrese de
que el filtro estd seco y
correctamente colocado para evitar
que se produzcan fallos de
funcionamiento y sacudidas
eldctricas.
Desconecte siempre el cable de
alimentaci6n de la toma de corriente
antes de realizar operaciones de
mantenimiento con la aspiradora.
ADVERTENCIA
I No utilice la unidad sin el filtro de escape
I en su lugar.
La aspiradora cuenta con un filtro HEPA para
atrapar parffculas de polvo de forma que no
escapen al aire de la habitaci6n. Si utiliza la
aspiradora con frecuencia, sustituya el filtro
HEPA cada 6 meses.
Compruebe con frecuencia el fittro. Qu{telo y
limpielo sacudiendolo contra una superficie
dura para quitar la suciedad, prolongando asf el
tiempo de utilizacion del filtro. Cepille o aspira
la suciedad.
NO lave el filtro HEPA, ya que perderd
su capacidad para _L _
atrapar el polvo.
Tire de la cubierta
antipolvo hacia delante.
Quftela y d_jela al lado. F
Cubierta-
antipolvo
Quite el filtro de escape tirando de 61hacia
fuera.
Filtro de
Sustituya el filtro de
escape co;ocandolo
con cuidado para
que encaje en su
) marco con la parte
azul hacia fuera.
Vuelva a poner con
atenci6n la cubierta
antipolvo co[ocando
las pestaSas en las
ranuras y presionandc
sobre ella hasta
que se bloquee
en su lugar.
\
-13-
ADVERTENCIA
Peligro de sacudidas eldctricas o dafios
personales,
Desconecte el surninistro ei_ctrico antes de
realizar reparaciones o limpiar la unidad, Si
no desconecta la unidad, se podrfan
producir sacudidas eldctricas o dafios
personales al encenderse la aspiradora,
Compruebe con frecuencia esta zona y quite
los pelos, hilas, tiras que se hayan quedado en
el cepillo. Si la suciedad es excesiva, siga
estos pasos.
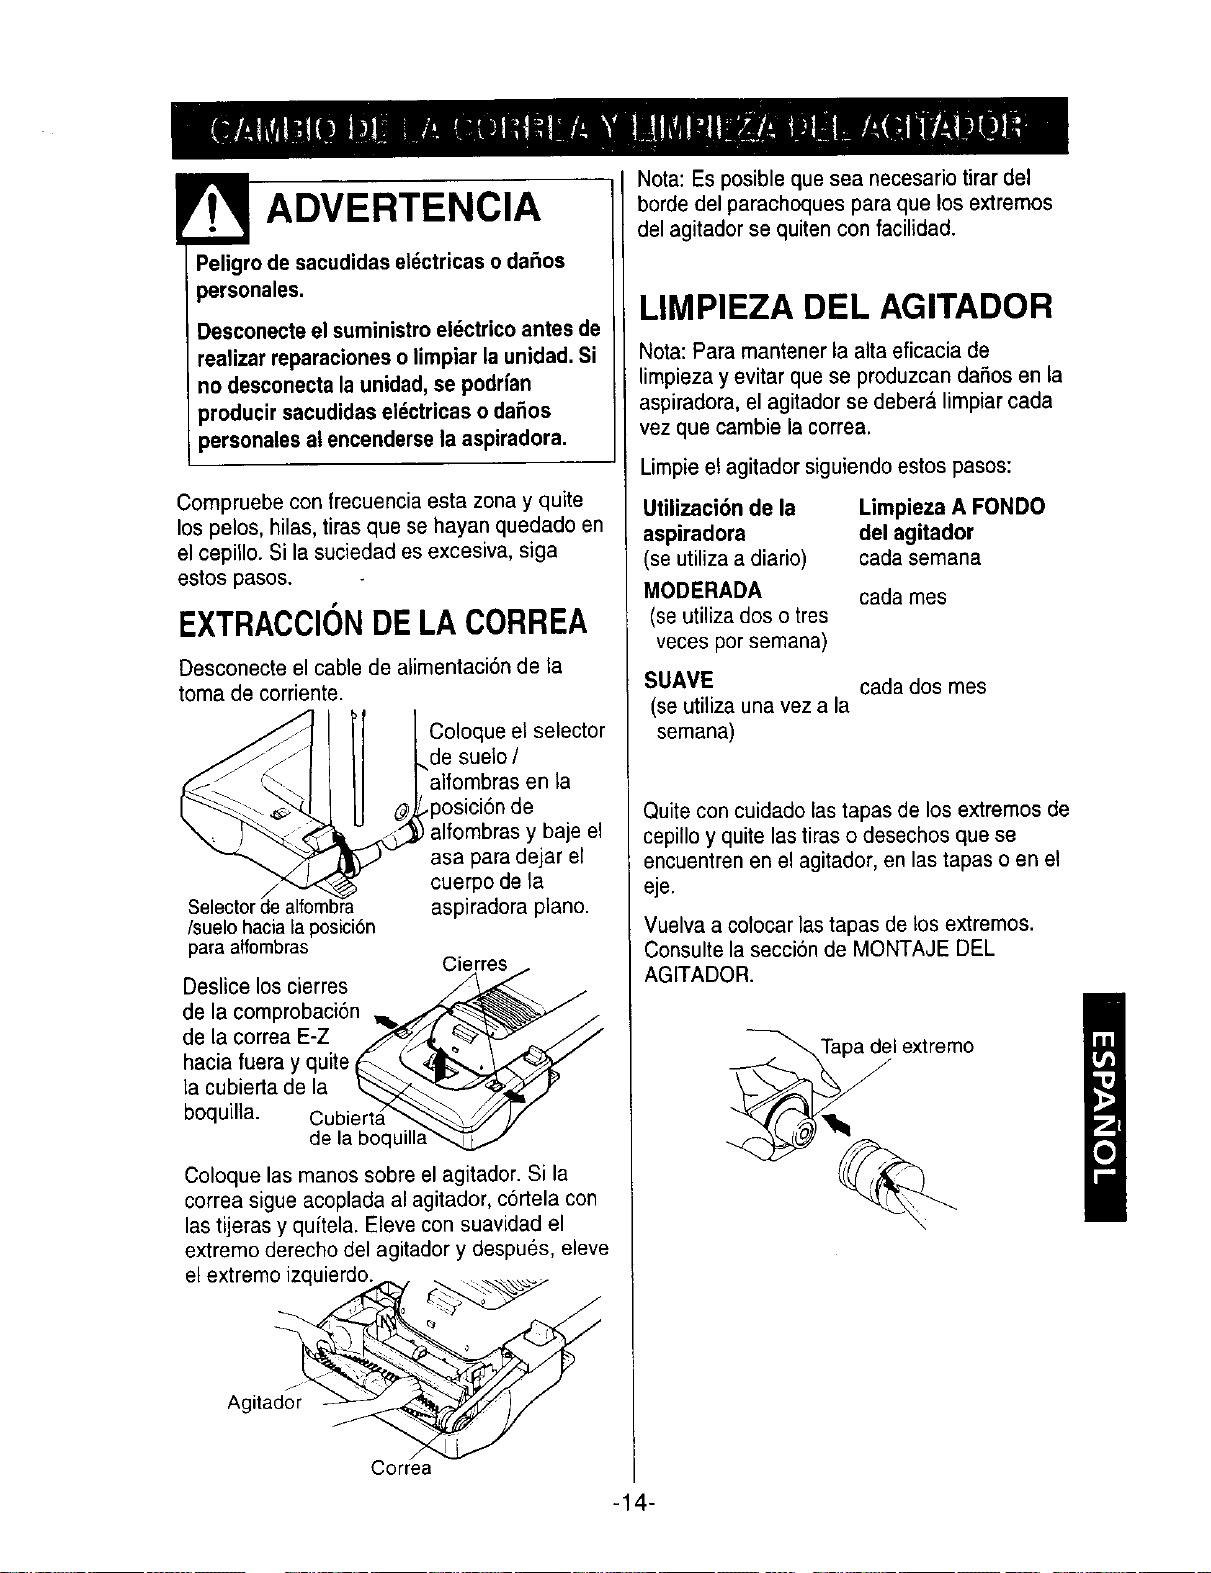
EXTRACCIONDELACORREA
Desconecte el cable de alimentaci6n de ta
toma de corriente.
/
Selector de i
/suelo hacia la posici6n
para alfombras
Deslice los cierres
de la comprobaci6n
de la correa E-Z
hacia fuera y quite
la cubierta de la
boquilla. Cubier
de la boquilh
Coloque el selector
de suelo /
"alfombras en la
..posicbn de
) alfombras y baje el
asa para dejar el
cuerpo de la
aspiradora piano.
Cierres
Coloque las manos sobre el agitador. Si la
correa sigue acoplada al agitador, c6rtela con
las tijeras y quftela. Eleve con suavidad el
extremo derecho del agitador y despu6s, eleve
el extreme izquierdo
Agitador
Correa
Nota: Es posible que sea necesario tirardel
borde del parachoques para que los extremos
del agitador se quiten con facilidad.
LIMPIEZA DEL AGITADOR
Nota: Para mantener la alta eficacia de
limpieza yevitarque se produzcan dafios en la
aspiradora, el agitador se deber_,limpiar cada
vez que cambie la correa.
Limpie elagitador siguiendo estos pasos:
Utilizacibn de la
aspiradora
(se utiliza a diario
MODERADA
(se utiliza dos o tres
veces por semana)
Limpieza A FONDO
del agitador
cada semana
cada mes
SUAVE cada dos mes
(se utiliza una vez a la
semana)
Quite con cuidado las tapas de los extremos de
cepillo y quite las tiras o desechos que se
encuentren en el agitador, en las tapas o en el
eje.
Vuelva a colocar las tapas de los extremos.
Consulte la secci6n de MONTAJE DEL
AGITADOR.
1extremo
-14-
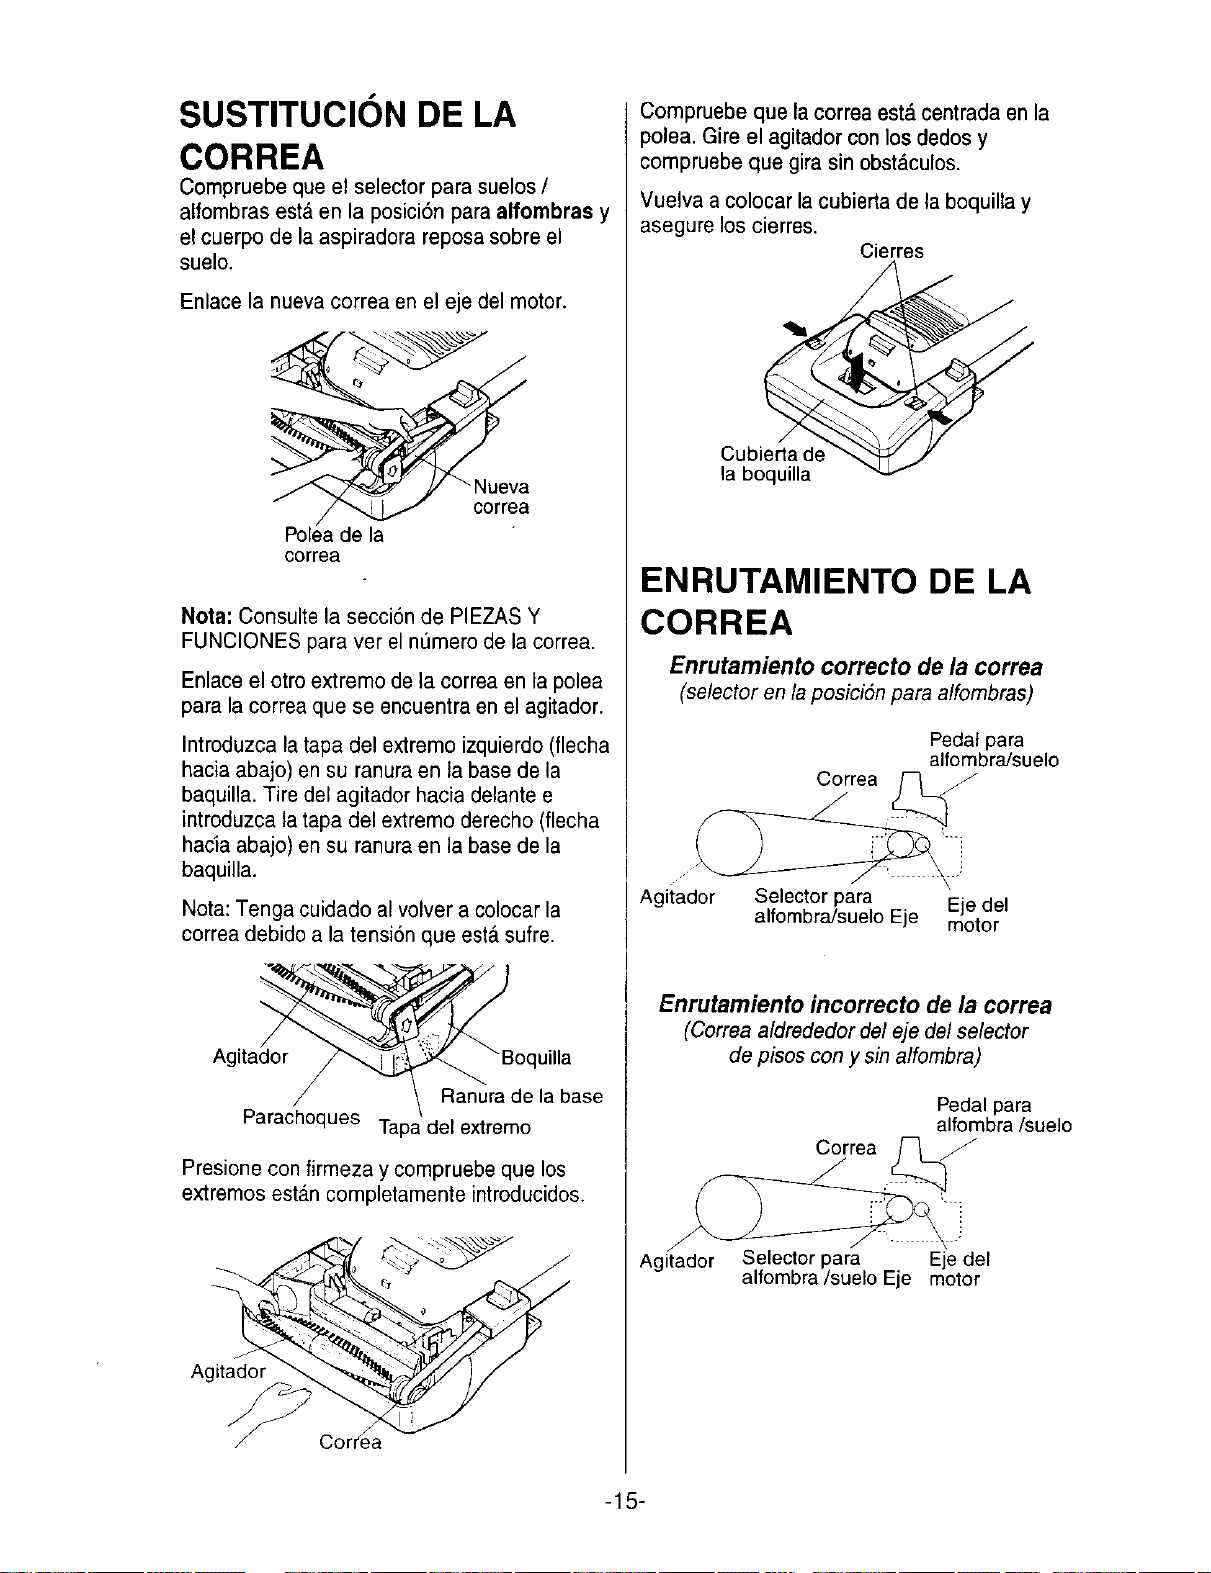
SUSTITUCION DE LA
CORREA
Compruebe que el selector para suelos /
alfombras est,. en la posici6n para alfombras y
el cuerpo de la aspiradora reposa sobre el
suelo.
Enlace la nueva correa en el eje del motor.
correa
Polea de la
correa
Nota: Consulte la secci6n de PIEZAS Y
FUNCIONES para vet el nemero de la correa.
Enlace el otro extremo de la correa en la polea
para la correa que se encuentra en el agitador.
Introduzca la tapa del extremo izquierdo (fiecha
hacia abajo) en su ranura en la base de la
baquilla. Tire del agitador hacia delante e
introduzca la tapa deLe×tremo derecho (flecha
hacia abajo) en su ranura en la base de la
baquilla.
Nota:Tenga cuidado ai voivera cotocar ta
correa debido a la tensi6nque est,. sufre.
Agi uilla
Ranura de la base
Parachoques Tapa del extrerno
Presione con firmeza y compruebe que los
extremos est_.n completamente introducidos.
A
Compruebe que la correa est,. centrada en la
)olea. Gire el agitador conlos dedos y
compruebe que gira sin obst_culos.
Vuelva a colocar la cubierta de la boquilla y
asegure los cierres.
Cierres
_ .
Cubi
la boquilla
ENRUTAMIENTO DE LA
CORREA
Enrutamiento correcto de la correa
'selector en la posici6n para alfombras)
Pedal para
alfombra/suelo
Correa ._
Agitador Selector para Eje del
alfombra/suelo Eje motor
Enrutamiento incorrecto de la correa
(Correa aldrededor del eje del selector
de pisos con y sin alfombra)
Pedal para
alfombra/suelo
Correa ._
Agitador Selector para Eje del
alfombra/suelo Eje motor
-15-
ADVERTENCIA
Peligro de sacudidas eldctricas o
da_os personales.
Desconecte el suministro eldctrico
antes de realizar reparaciones o limpiar
la unidad. Si no desconecta la unidad,
se podrian producir sacudidas
sldctricas o daSos personales al
sncenderse la aspiradora.
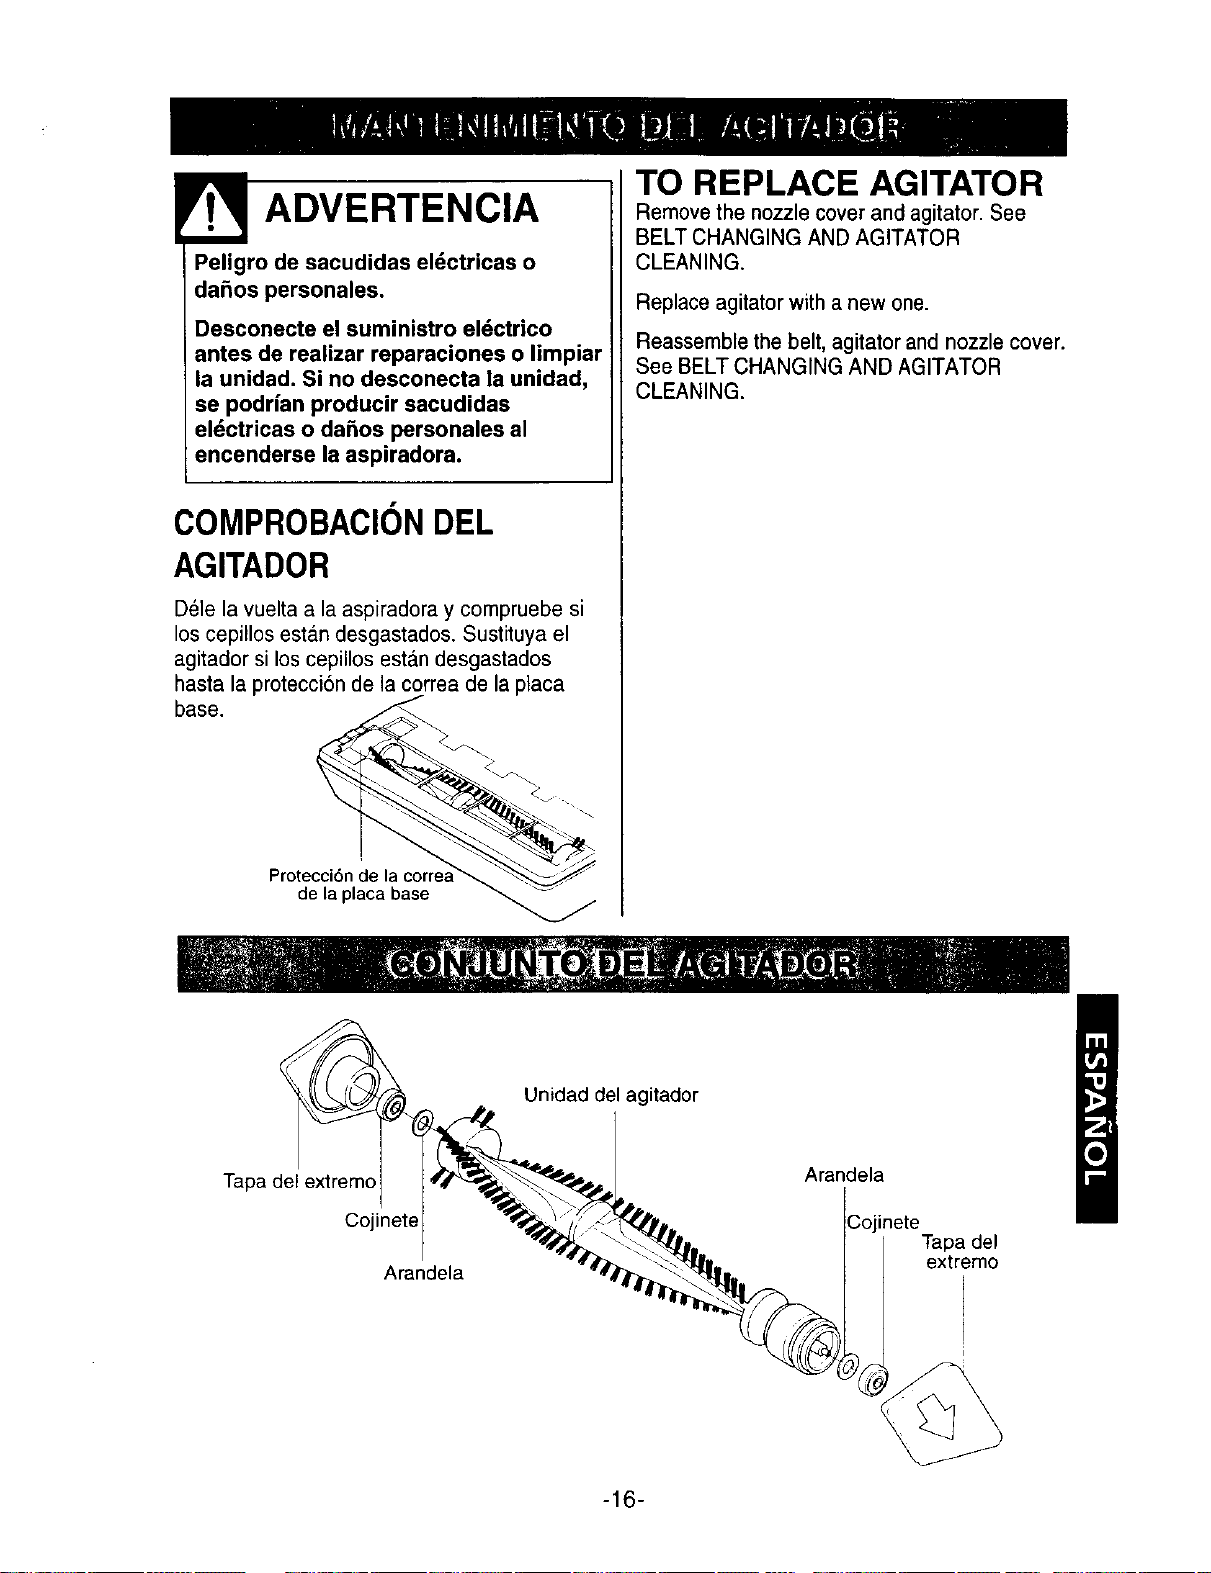
COMPROBACIONDEL
AGITADOR
D_le la vuelta a la aspiradora y compruebe si
los cepillos est_.n desgastados. Sustituya el
agitador si los cepillos est_.n desgastados
hasta la protecci6n de la correa de la placa
base.
I
Protecci6n de la corre_
de la placa base
TO REPLACE AGITATOR
Remove the nozzle cover and agitator. See
BELT CHANGING AND AGITATOR
CLEANING.
Replace agitator witha new one.
Reassemblethebelt,agitatorand nozzlecover.
See BELTCHANGING AND AGITATOR
CLEANING.
Unidad del agitador
Tapa del extremo
Cojinete
Arandela
Arandela
Cojinete
Tapa del
extremo
-16-
Siga siempre todas las precauciones de
seguridad al limpiar o realizar el mantenimiento
de la aspiradora.
ADVERTENCIA
Peligro de sacudidas el6ctricas o daSos
personales.
Desconecte el suministro eldctrico antes de
realizar reparaciones o limpiar la unidad. Si
no desconecta la unidad, se podrJan
producir sacudidas eldctricas o daSos
personales al encenderse la aspiradora.
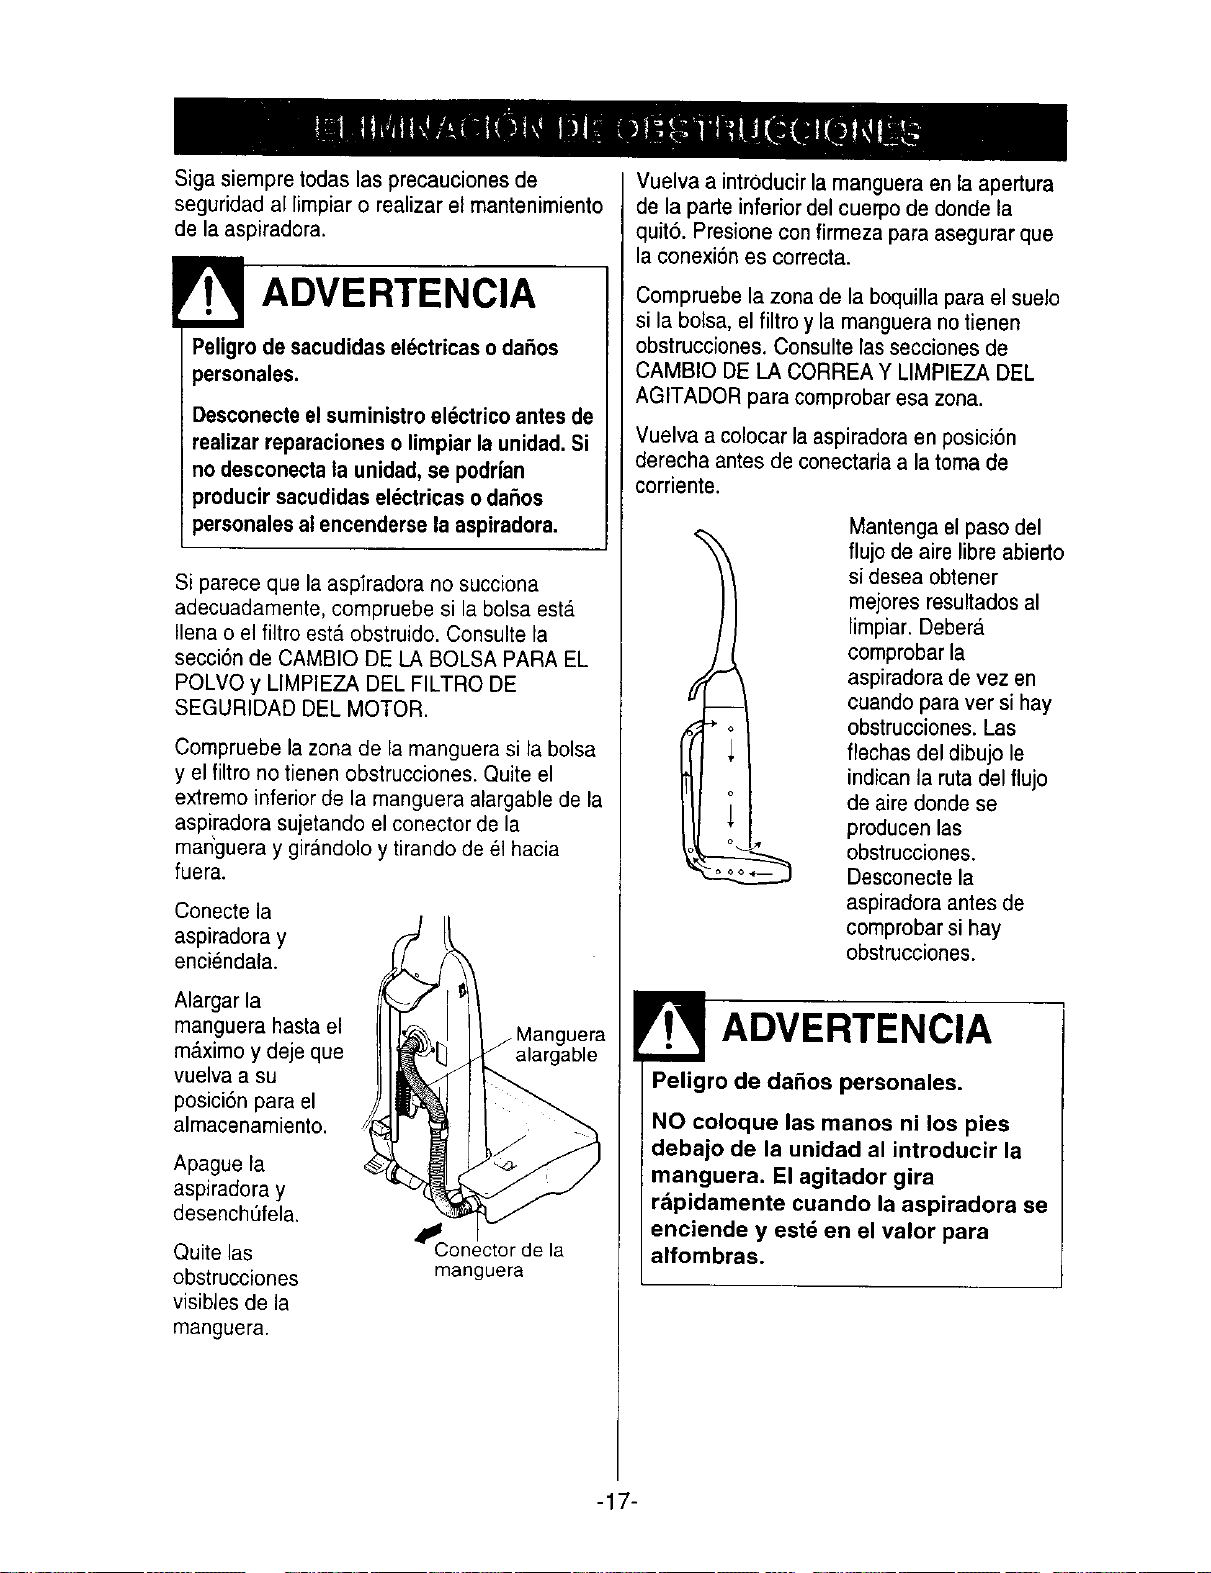
Si parece que la aspiradora no succiona
adecuadamente, compruebe si la bolsa est,.
Ilena o el filtro esta. obstruido. Consulte la
secci6n de CAMBIO DE LA BOLSA PARA EL
POLVO y LIMPIEZA DEL FILTRO DE
SEGURIDAD DEL MOTOR.
Compruebe la zona de la manguera si la bolsa
y el filtro no tienen obstrucciones. Quite el
extremo inferior de la manguera alargable de la
aspiradora sujetando el conector de la
marfguera y girandolo y tirando de el hacia
fuera.
Conecte la
aspiradora y
enciendala.
Alargar la
manguera hasta el
m_.ximo y deje que
vuelva a su
posici6n para el
almacenamiento.
Apague Fa
aspiradora y
desencht_fela.
Quite las
obstrucciones
visibles de la
manguera.
j Manguera
alargable
Conector de la
manguera
Vuelva a intrOducirla manguera en la apertura
de la parte inferior del cuerpo de donde la
quit6. Presione confirmeza para asegurar que
la conexion es correcta.
Compruebe la zona de la boquilla para el suelo
si la bolsa, el filtro y la manguera no tienen
obstrucciones. Consulte las secciones de
CAMBIO DE LA CORREA Y LIMPIEZA DEL
AGITADOR para comprobar esa zona.
Vuelva a colocar la aspiradora en posici6n
derecha antes de conectarla a la toma de
corriente.
Mantenga el paso del
flujo de aire libre abierto
si desea obtener
mejores resultados al
limpiar. Deber_.
comprobar la
aspiradora de vez en
cuando para ver si hay
obstrucciones. Las
flechas del dibujo le
indican la ruta del flujo
de aire donde se
producen las
obstrucciones.
Desconecte la
aspiradora antes de
comprobar si hay
obstrucciones.
ADVERTENCIA
o de daSos personales.
Ioque las manos ni los pies
o de la unidad al introducir la
uera. El agitador gira
I rdpidamente cuando la aspiradora se
I enciende y est_ en el valor para
_alfombras.
-17-
ADVERTENCIA
Peligro de sacudidas eldctricas o
da_tos personales.
Desconecte el suministro eldctrico
antes de realizar reparaciones o limpiar
la unidad. Si no desconecta la unidad,
se poddan producir sacudidas
eldctricas o da_os personales al
encenderse la aspiradora.
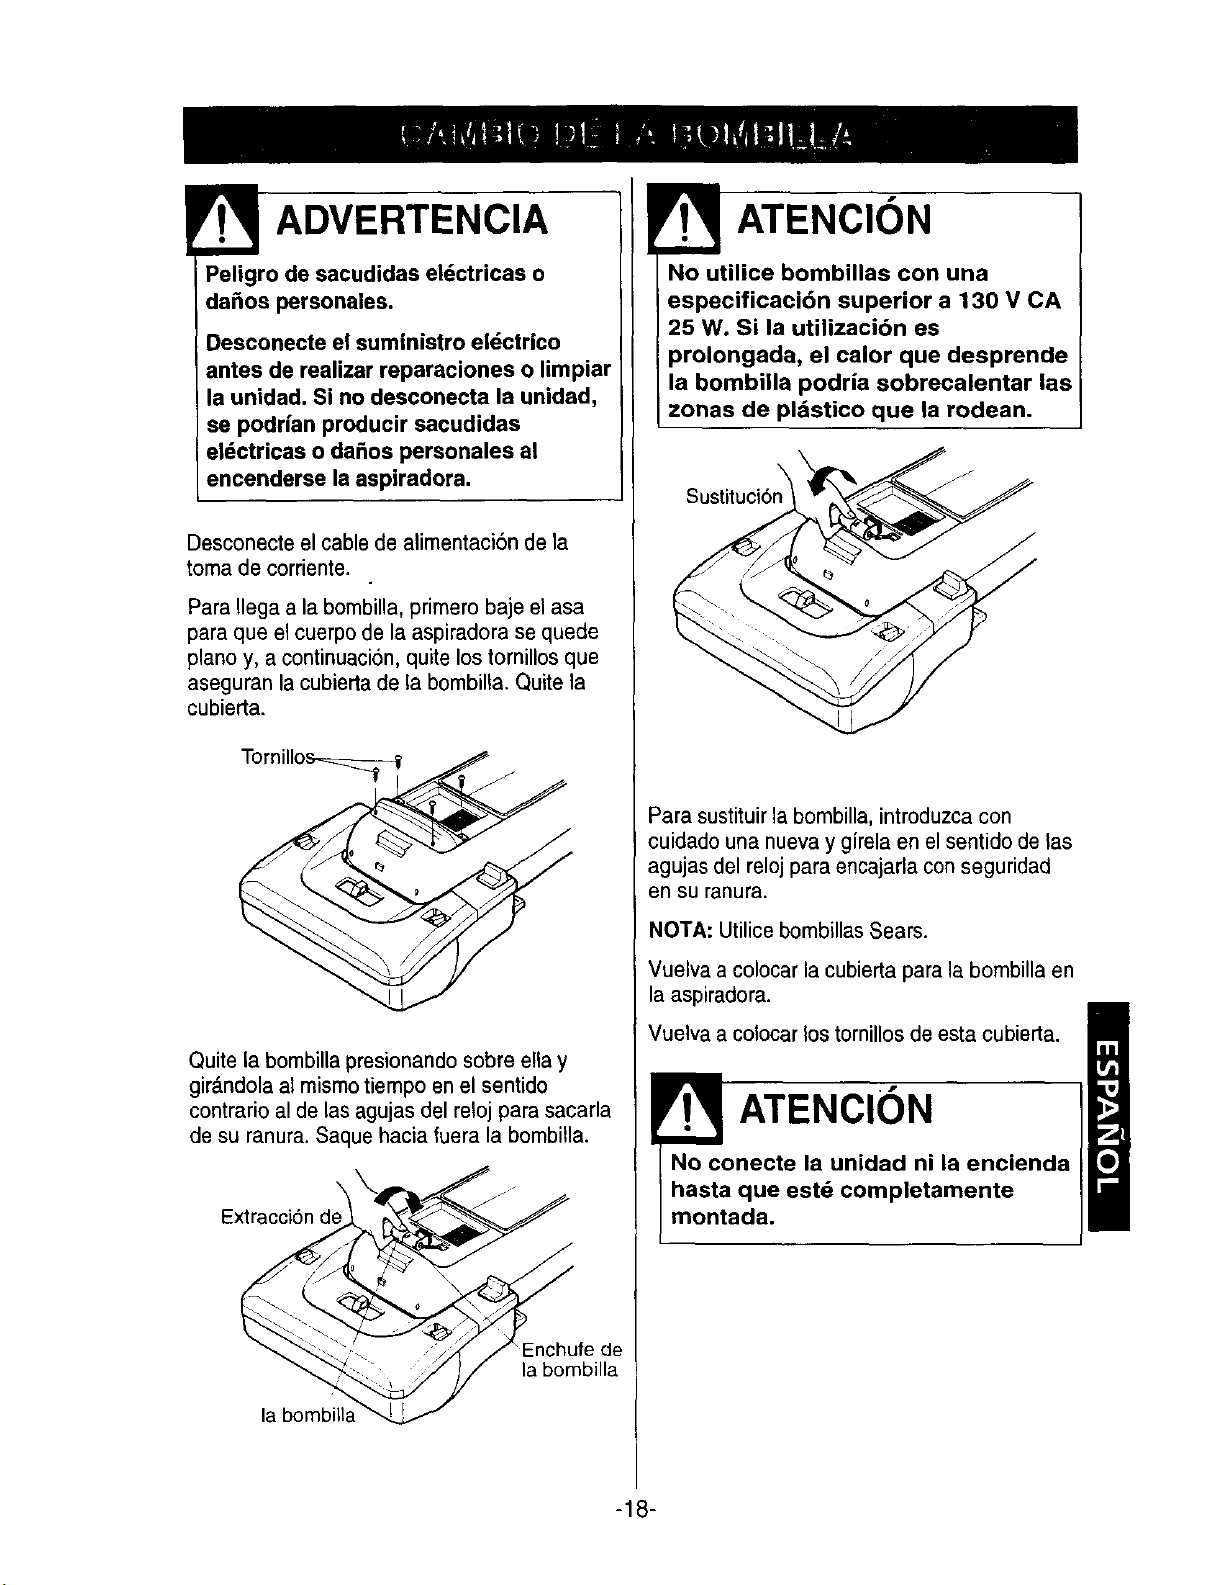
Desconecte el cable de alimentaci6n de la
toma de corriente.
Para Ilega a la bombilla, primero baje el asa
para que el cuerpo de la aspiradora se quede
piano y, a continuaci6n, quite los tornillos que
aseguran la cubierta de la bombilla. Quite la
cubierta.
Tornillo_
Quite la bombilla presionando sobre ella y
gir_.ndola al mismo tiempo en el sentido
contrario al de las agujas del reloj para sacarla
de su ranura. Saque hacia fuera la bombilla.
:hufe de
la bombilla
la
ATENCION
No utilice bombillas con una
especificaci6n superior a 130 V CA
25 W. Si la utilizaci6n es
prolongada, el calor que desprende
la bombilla podria sobrecalentar las
zonas de pldstico que la rodean.
Para sustituir la bombilla, introduzca con
cuidado una nueva y girela en el sentido de las
agujas del reloj para encajarla con seguridad
en su ranura.
NOTA: Utilice bombillas Sears.
Vuelva a colocar la cubierta para la bombilla en
la aspiradora.
Vuelva a colocar los tornillos de esta cubierta.
ATENCION
No conecte la unidad ni la encienda
hasta que estd completamente
montada.
-18-
Revise esta tabla para encontrar las soluciones que usted mismo puede aplicar si surgen pequefios
problemas en la utilizaci6n del producto. Si fuera necesario aplicar soluciones diferentes ala que se
describen en este manual del propietario, p6ngase en contacto con Sears o con un tecnico de
reparaciones cualificado.
ADVERTENCIA de sacudida eldctrica
Peligro
onecte el suministro el_ctrico antes de realizer reparaciones o limpiar la unidad.
Si no desconecta la unidad, se podnan producir sacudidas electricas o daSos personales.
La aspiradoranose
enciende.
Ineficaciaen la
limpieza.
Laaspiradorarecoge
lasaffombriUas
eueltasoaspiracon
demasiadafuerza,
La luznofunciona.
Elagitadorno
funciona.
Elindicadorde
utilizaci6nde
algunosmodelos
estaen rojo,
Flujodeaire
restringidoal utilizar
ue accesorio.El
sonidocambJa,
Ruidoexcesivo
cuandoIsaspiradora
estaapagada,
1.Estz_desconectadade latomede
corriente.
2.Se ha producido uneortocircuitoo se ha
fundidounfusibledelpanel dela casa,
3. El interrupterde encenclidoyapagado
no estd enON.
1.La bolsa pare el polvoesta Ilenau
obstruida.
2. Valor de la altura delrecogedor
inadecuado.
3. Agitador desgastado.
4. Boquillaobstruida otubo sucio.
5. Manguera obstruida.
6. Manguera perforada.
7. Correarota o mal colocada.
8. La manguera no est_ introducidapot
completo.
9. Sistemadeprotecci6ndelmotoractivado.
10. Filtrossucios.
1.Valorde laaltura del recogedor
inadecuado.
1. Labombilla se hafundido.
1. Correarota,
2. Elselectorest_en laposici6nparesuelos.
3. Lacorreanoestainstalada
correctamente.
1.LaPoiseparaelpolvoestaIlenauobstruida.
2. Filtrossucios.
3. Pasodel flujode aireobstruido: tube,
boquilla,manguera sucios.
4. Herramientas aecesorias.
1. El usodel accesorio restringeel flujo de
sire.
2. Las pelusasde la nueva alfombra han
obstruidola rule delaire.
1. Roce de la manguera con el eje del
selector para alfombra / suelo,
1.Condctelo firmemente y coloqueelinterruptorde
eneendidoy apagado en la posici6nON de
eneendido.
2. Restablezcael cortocircuitosy sustituyael fusible.
3.Coloque el interrupterde encendidoy apagado en la
posici6nON de eneendido.
1.Cambie labolsa parael polvo(pag.13).
2.Ajuste losvalores (p_g.7).
3.Sustituya el agitador (pdg. 17).
4. Limpielazona de Isboquilla (pag.18).
5. Compruebesi hayobstrucciones(peg. 18).
6. Sustituyala manguera.
7. Sustituya/fije la correa (peg. 15-16).
8. Introduzca la manguerapor completo(p_lg.8-9).
9. Compruebesi hayobstrucciones(peg.18).
10. Urnpie los fiitros (pag.14).
1. Ajustelos valores (pag.7).
1. Cambiela bombilla (p&g.19).
1.Sustituya laeorrea (pdg.15-16).
2. CambieelselectoraIs posiei6nparsalfombras(pag. 7).
3. Consultela seccion deCAMBIO DE LACORREA Y
LIMPIEZA DELAGITADOR(pag. 15-16).
1.Cambie la bolsa pare elpolvo (pag.13).
2. Limpie losfiltros (p_,g.14).
3, Elimine las obstruecionesdel pasodel flujo de aire
(peg. 18).
4, Se normalizar&cuandola herramientase quite.
1.Compruebe le secci6nde ACCESORIOS(p_g. 8-9).
2. Consultela seccion deELIMINACION DE
OBSTRUCCIONESy limpie lamanguers (peg 18).
1. Coloque el selector completamente hacia delante.
-19-
Acuerdos acerca de la proteccibn
Lefelicitamos porsusabiaelecci6nal haber
adquiridoeste producto.
Este nuevoproductoKenmore®hasidodise_adoy
fabricadoduranteafiosdefuncionamientoserioy
forma. Pero,al igualqueel restodeproductos,
necesitaun mantenimientopreventivoo realizar
ciertasreparacionesdevezen cuando.
Poreso,con estosAcuerdosacercade laprotecci6n
ahorrard tiempoy dineroy evitarddaSosmayores.
Adquiera estosAcuerdosacercadela protecci6ny
protdjasecontragastosy problemasinesperados.
LosAcuerdosacercadela protecci6ntambienle
ayudardna ampliarladuracibndeeste nuevo
producto.EnlosAcuerdosse incluyen:
[] Servicio experto porm_sde 12.000t_cnicosde
reparaci6nprofesionales
[] Servicio ilimitado sin costes para laspiezasy el
trabajorealizadoentodaslasreparaciones
cubiertas
[] Garantfa anual:sustituci6n del producto cubierto
sise producencuatro o m&sfallos en doce meses
[] Sustitucibn del producto si el productocubierto
nose puede arreglar
[] Mantenimientopreventivo anual siempre que Io
sblicitesin costes extra
[] Atenci6n deayuda al cliente: ayuda telef6nica
potparledeun tbcnicode Searsacerca de los
productosqueprecisenreparacionescaseras,
ademasdeunaprogramaci6nsobrereparaciones
[] Protecci6n contracortes eldctricosque pueden
provocardaSosel_ctricosdebidoalas
fluctuacionesdeenergfa
[] Reembolsosilareparaci6ndelproductocubierto
tardamdsdeIoque se estableci6
Si adquiere estosAcuerdos,s51otendr_,que hacer
una Ilamada telef6nica para activar este servicio.
Podr&Ilamara cualquier horadel dfa o conseguir una
cita online para el servicio.
En Sears hay masde 12.000t_cnicosde reparaci6n
profesionales que tienen acceso a unos4,5 millones
de piezas y accesorios de calidad. Este es el tipode
profesionalidad con la que puede contar para
prolongar la duraci6nde este producto durante aSos.
Adquiera ya su Acuerdoacerca de la protecci6n.
Se aplican algunas Iimitaciones y excepciones.
Llame al 1-800-827-6655 sl desea obtener rods
informacibnacerca de los precios.
Servicios de Instalaci6n Sears
Para solicitar servicios de instalaci6n
profesionales de Sears de electrodomesticos,
mandos de apertura de puertas de garajes,
calentadores de agua y otros aparatos en los
Estados Unidos, puede Ilamar a
1-800-4-MY-HOME ®
-20-

Your Home
For repair - in your home - of all major brand appliances,
lawn and garden equipment, or heating and cooling systems,
no matter who made it, no matter who sold it!
For the replacement parts, accessories and
owner's manuals that you need to do-it-yourself.
For Sears professional installation of home appliances
and items like garage door openers and water heaters.
1-800-4-MY-HOME ® Anytime, day or night
(1-800-469-4663) (U.S.A. and Canada)
www.sears.com www.sears.ca
Our Home
For repair of carry-in products like vacuums, lawn equipment,
and electronics, call or go on-line for the nearest
Sears Parts and Repair Center.
1-800-488-1222 Anytime, day or night (U.S.A. only)
www.sears.com
To purchase a protection agreement (U.S.A.)
or maintenance agreement (Canada) on a productserviced by Sears:
1-800-827-6655 (u.sJ_) 1-800-361-6665 (Canada)
Para pedirserviciode reparad6n Au Canada pourserviceen franc,,ais:
a domicilio,ypara ordenarpiezas: 1.800.LE.FOYERMC
1-888-SU-HOGAR su (1-800-533-6937)
(1-888-784-6427) www.sears.ca
SN/AR8
© Seam,RoebuckandCo.
© Registered Trademark / TM Trademark / sMService Mark of Sears, Roebuck and Co.
© Marca Registrada/ TMMarca de Fabrica / SMMarca de Servicio de Sears, Roebuck and Co.
MCMarque de commerce / MDMarque ddposde de Sears, Roebuck and Co.