Owner's Manual
Manual Dei Propietario
Vacuum Cleaner
Aspiradora
Model, Modelo 116.25812
116.25813
IMPORTANT
Before returning this product-
_acement parts=p!ease contact:
Sears Parts and Repair Center
(1-800-488-1222)
Anytime, day or night
(U.S.A_ only)
F__oranyother issue, please contact;
Vacuum Cleaner Help Line
(1-877-531-7321)
7:30am-4:00pm EST, M-F
(U.S.A. and Canada)
CAUTION:
Read and follow all
safety and operating
instructions before first
use of this product
CUIDADO:
Lea y siga todas las
instrucciones de operaciSn
y seguridad antes del uso de
este productoo
Sears, Roebuck and Co., Hoffman Estates, IL 60179 U.S.A.
www.sears.com
Part No. CO IZCYR20UOO-KCL_1ZCYRZOU_
Printed in Mexico
Impreso en M6xico
Before Using Your New
Vacuum Cleaner .................. 2
Kenmore Vacuum Cleaner Warranty , _ 3
Important Safety Instructions ........ 4
Parts and Features ................. 5-6
Assembly Instructions ......... 7-8
Power-Mate Jr3 Storage ............ 8
Operating Instructions ................ 9
How to Start ..................... 9
Vacuuming Tips ............... 10
Suggested Pile Height Settings ......... 11
Attachments ....................... 11
Altachment Use Table ............... 12
Performance Features ............. 12-14
How Your Vacuum Cleaner Works ...... 14
Canister Care ..................... 15
Bag Changing ................... 15
Cleaning Exterior and Attachments ........ 15
Motor Safety Filter Changing ........ 16
Exhaust Fiiter Changing ................ !7
Power-Mate ® Care ................... 17
Dirt Sensor ......................... 18
Beit Changing and Agitator Cleaning .. t8-19
Light Bulb Changing ............ 20
Agitator Servicing ................... 20
Troubleshooting .................. 21
Requesting Assistance
Or Service ................ Back Cover
Please read this guide. It will help you assemble and operate your new Kenmore vacuum
cteaner in the safest and most effective way,
For mere information about vacuum cleaner care and operation, call your nearest Sears store°
You wilt need the complete model and serial numbers when requesting information. Your vacu-
um cleaner's model and serial numbers are located on the Model and Serial Number Plate,
Use the space below to record the model number and serial number of your new Kenmore
vacuum cleaner_
Model No.
Serial No.
Date of Purchase
Keep this book and your sales check (receipt) in a safe place for future reference.
2
OneYearLimited Warranty
Whenassembled,operatedandmaintainedaccordingto all instructionssuppliedwith
theproduct,if thisvacuumcleanerfailsdueto a defectin materialor workmanshipwithin
oneyearfrom thedateof purchase,returnitto anySearsstore,SearsParts& Repair
Centeror otherKenmoreoutletfor freerepair.
If this vacuum cleaner is used for other than private family purposes, this warranty
applies for only 90 days from the date of purchase.
This warranty covers only defects in material and workmanship, Sears will NOT
pay for:
1, Expendable items that can wear out from normal use, including but not limited to
filters, belts, light bulbs, and bags.
2. A service technician to instrucl the user in correct product assembly, operation or
maintenance.
3. A service technician to clean or maintain this product.
4. Damage to or failure of this product if it is not assembled, operated or maintained
according to all instructions supplied with the producL
5. Damage to or failure of this product resulting from accident, abuse, misuse or use for
other than its intended purpose.
6. Damage to or failure of this product caused by the use of detergents, cleaners,
chemicals or utensils other than those recommended in all instructions supplied with
the product.
7. Damage to or failure of parts or systems resulting from unauthorized modifications
made to this product.
Disclaimer of implied warranties; limitation of remedies
Customer's sole and exclusive remedy under this limited warranty shall be product repair
as provided herein. Implied warranties, including warranties of merchantability or fitness
for a particular purpose, are limited to one year or the shortest period allowed by law.
Sears shall not be liable for incidental or consequential damages. Some states and
provinces do not allow the exclusion or limitation of incidental or consequential damages,
or limitations on the duration of implied warranties of merchantability or fitness, so these
exclusions or limitations may not apply to you.
This warranty applies only while this vacuum cleaner is used in the United States and
Canada.
This warranty gives you specific legal rights, and you may also have other rights which
vary from state to state_
Sears, Roebuck and Co., Hoffman Estates, IL 60179
Sears Canada Inc., Toronto, Ontario, Canada MSB 2B8
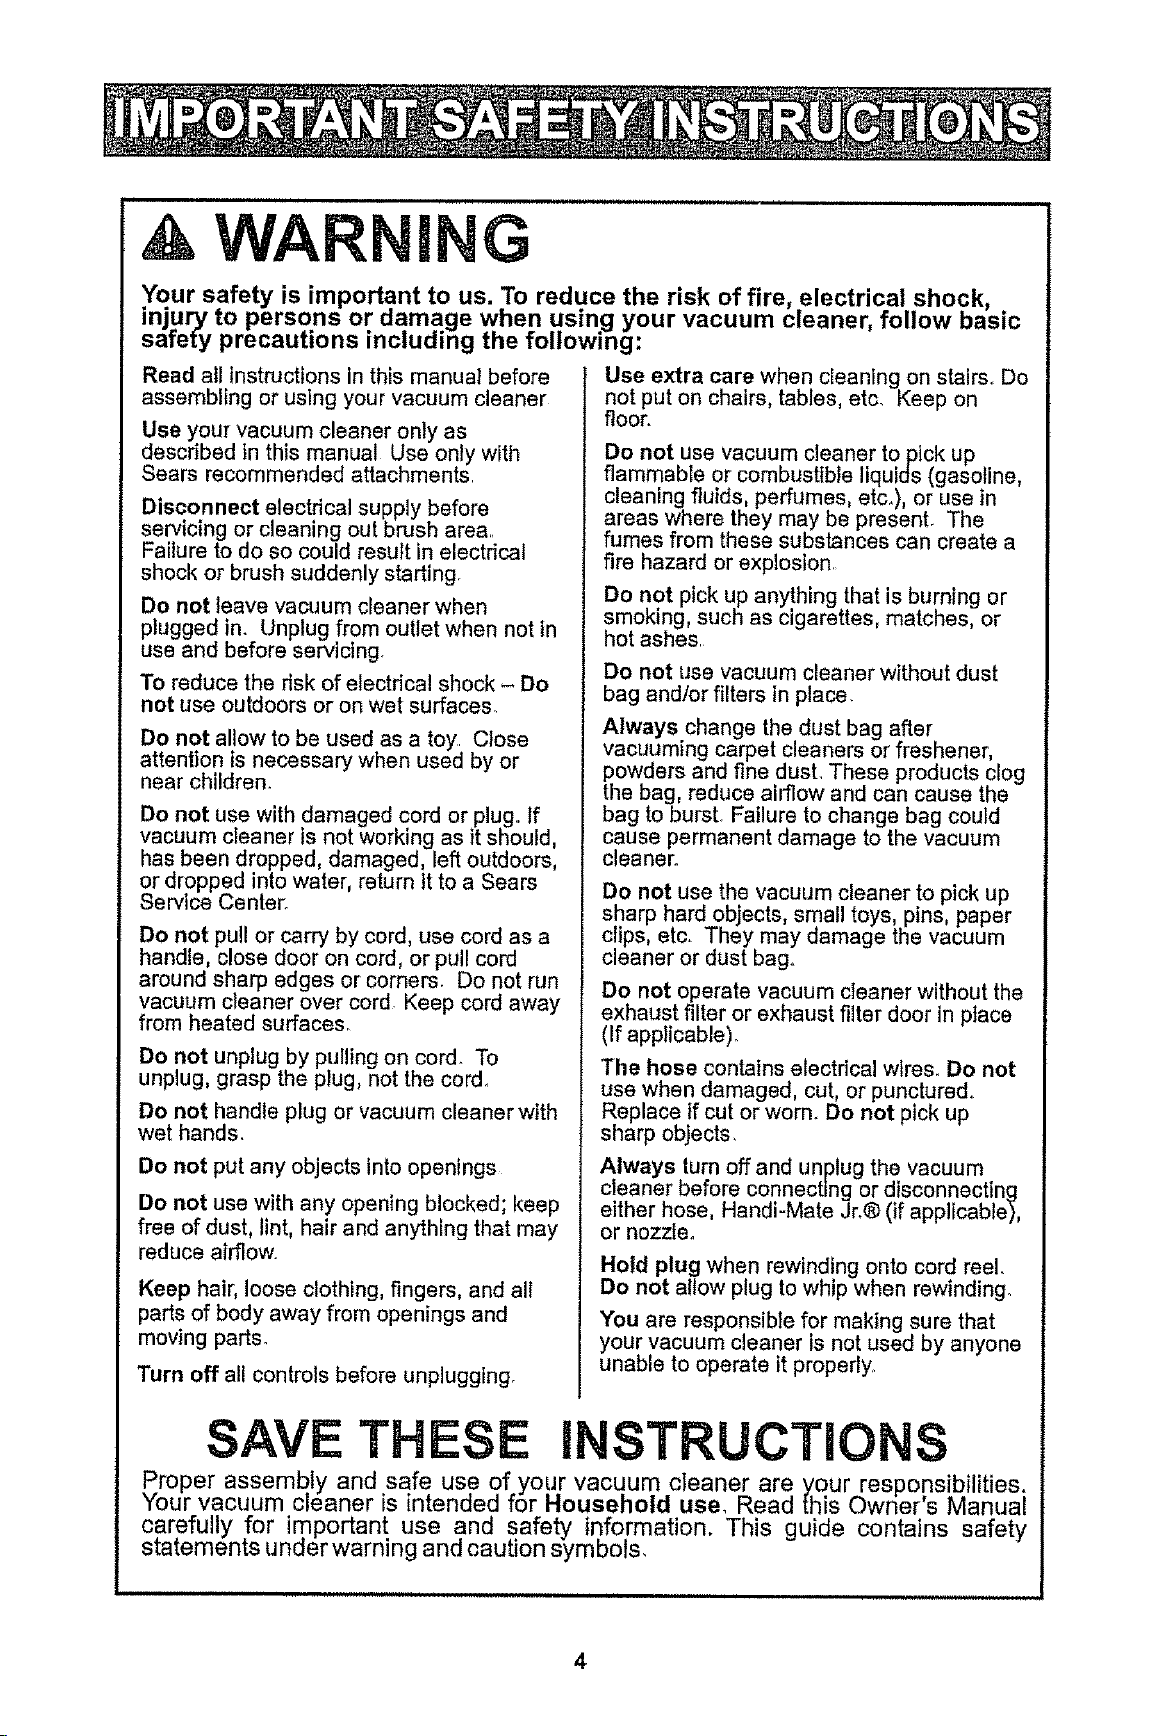
WARNING
Your safety is important to us. To reduce the risk of fire, electrical shock,
injury to persons or damage when using your vacuum cleaner, follow basic
safely precautions including the following.
Read all instructions in this manual before
assembling or using your vacuum cleaner
Use your vacuum cleaner only as
described in this manual Use only with
Sears recommended attachments.
Disconnect electrical supply before
servicing or cleaning out brush area..
Failure to do so could result in electrical
shock or brush suddenly starting
Do not leave vacuum cleaner when
plugged in. Unplug from outlet when not in
use and before servicing
To reduce the risk of electrical shock - Do
not use outdoors or on wet surfaces.
Do not allow to be used as a toy Close
attention is necessary when used by or
near children.
Do not use with damaged cord or plug. If
vacuum cleaner is not working as it should,
has been dropped, damaged, left outdoors,
or dropped into water, return It to a Sears
Service Center.
Do not pull or carry by cord, use cord as a
handle, close door on cord, or pull cord
around sharp edges or comers. Do not run
vacuum cleaner over cord. Keep cord away
from heated surfaces.
Do not unplug by pulling on cord To
unplug, grasp the plug, not the cord.
Do not handle plug or vacuum cleaner with
wet hands.
Do not put any objects into openings
Do not use with any opening blocked; keep
free of dust, lint, hair and anything that may
reduce airflow..
Keep hair, loose clothing, fingers, and all
parts of body away from openings and
moving parts.
Turn off all controls before unplugging.
Use extra care when cleaning on stairs.. Do
not put on chairs, tables, etc. Keep on
floor.
Do not use vacuum cleaner to pick up
flammable or combustible liquids (gasoline
cleaning fluids, perfumes, etc.), or use in
areas where they may be present. The
fumes from these substances can create a
fire hazard or explosion.
Do not pick up anything that is burning or
smoking, such as cigarettes, matches, or
hot ashes.
Do not use vacuum cleaner without dust
bag and/or filters in place.
Always change the dust bag after
vacuuming carpet cleaners or freshener,
powders and fine dust, These products clog
the bag, reduce airflow and can cause the
bag to burst. Failure to change bag could
cause permanent damage to the vacuum
cleaner.
Do not use the vacuum cleaner to pick up
sharp hard objects, small toys pins paper
clips, etc,. They may damage the vacuum
cleaner or dust bag.
Do not operate vacuum cleaner without the
exhaust filter or exhaust filter door in place
(If applicable)_
The hose contains electrical wires. Do not
use when damaged, cut, or punctured.
Replace if cut or worn. Do not pick up
sharp objects.
Always turn off and unplug the vacuum
cleaner before connecting or disconnecting
either hose, Handi-Mate Jr.® (if applicable),
or nozzle°
Hold plug when rewinding onto cord reel.
Do not allow plug to whip when rewinding°
You are responsible for making sure that
your vacuum cleaner is not used by anyone
unable to operate it properly,.
SAVE THE STRUCTiONS
orOperassembly and safe use of your vacuum cIeaner are your responsibilities.
ur vacuum cleaner is intended f6r Household use, Reaa this Owner's Manual
carefully for important use and safety information. This guide contains safety
statements under warning and caution symbols.
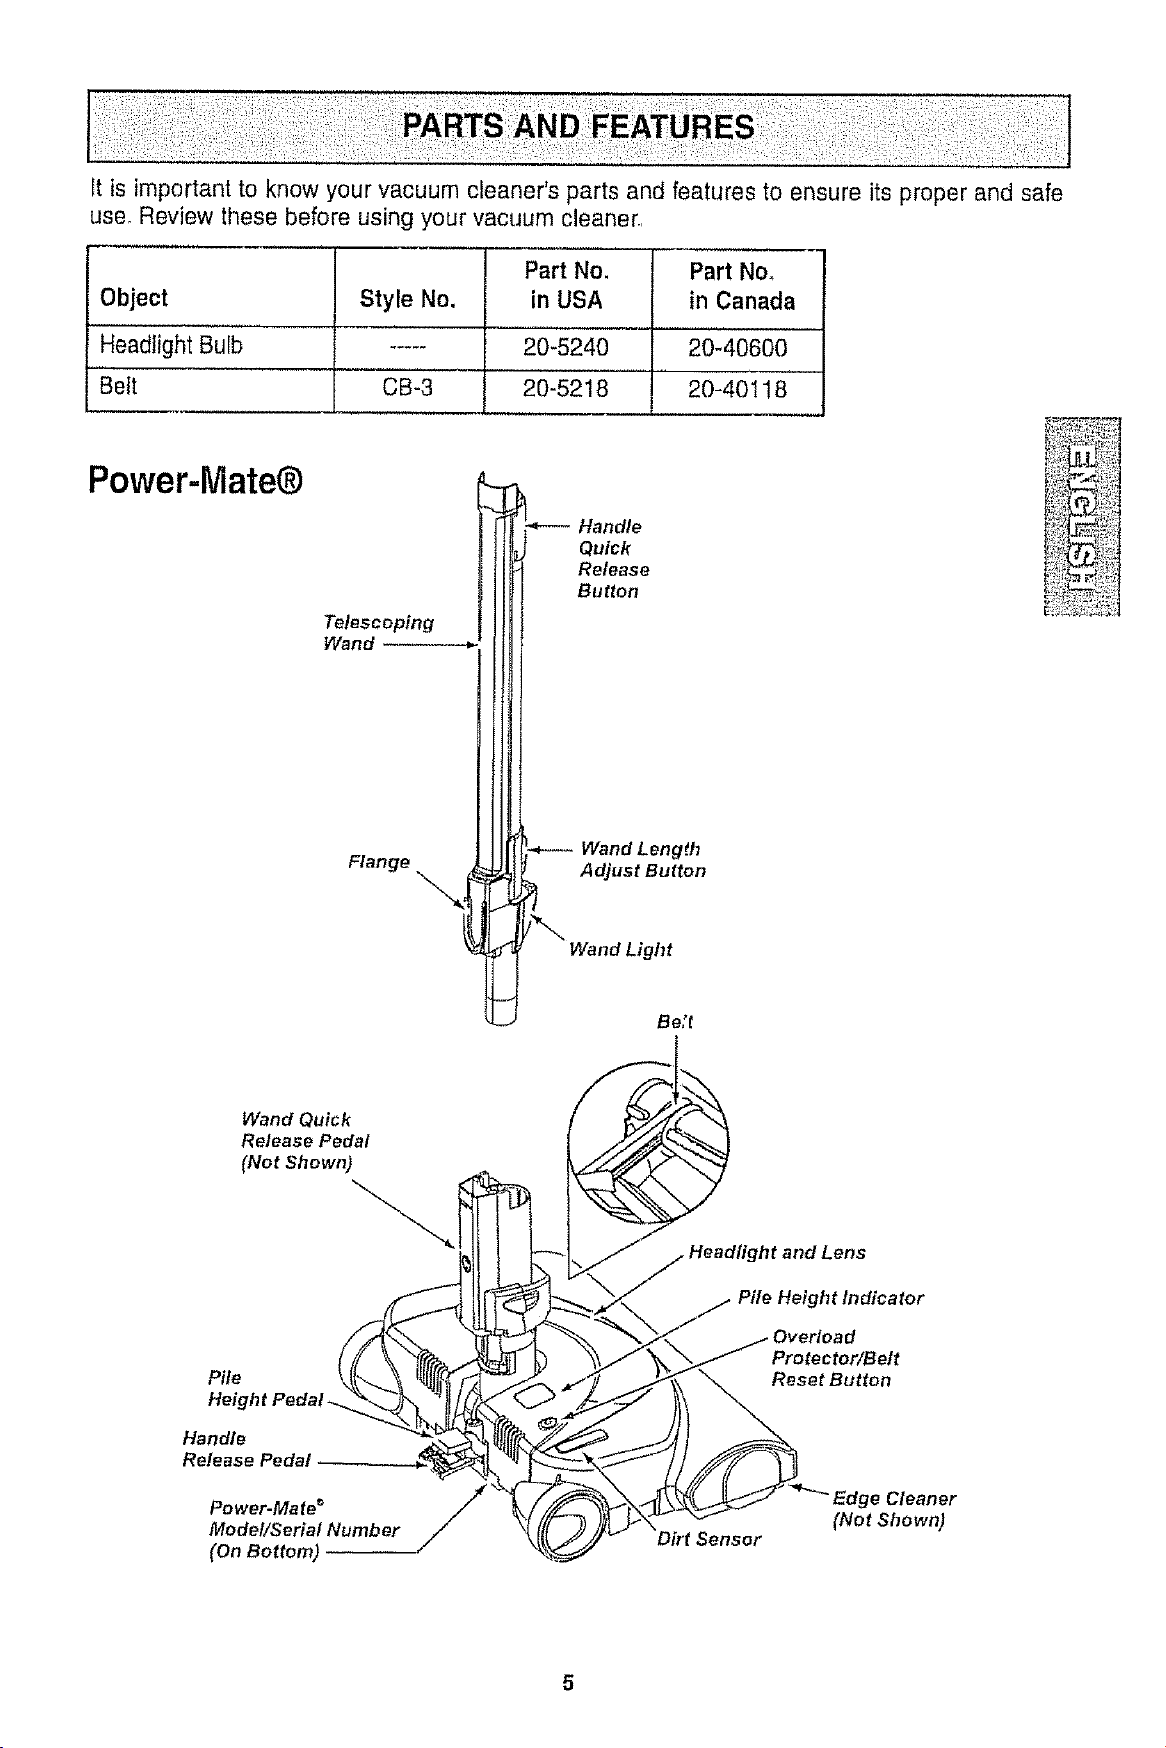
It is important to know your vacuum cleaner's parts and features to ensure its proper and safe
use_ Review these before using your vacuum cleaner.,
Object
Headlight Bulb
Belt
Style No.
CB-3
Part No,
in USA
Part No,
in Canada
20-5240 20-40600
20-5218 20-40118
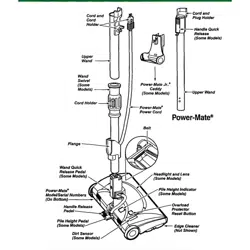
Power-Mate@
Telescoping
Wand
Flange
Quick
Release
Button
Wand Length
Adjust Button
Wand Light
Be;t
Wand Quick
Release Pedal
(Net Shown)
Pile
Height Peda!.
Handle
Release Pedal
Power-Mate _
Model/Serial Number
(On Bottom)
Protector/Belt
Reset Button
(Not Shown)
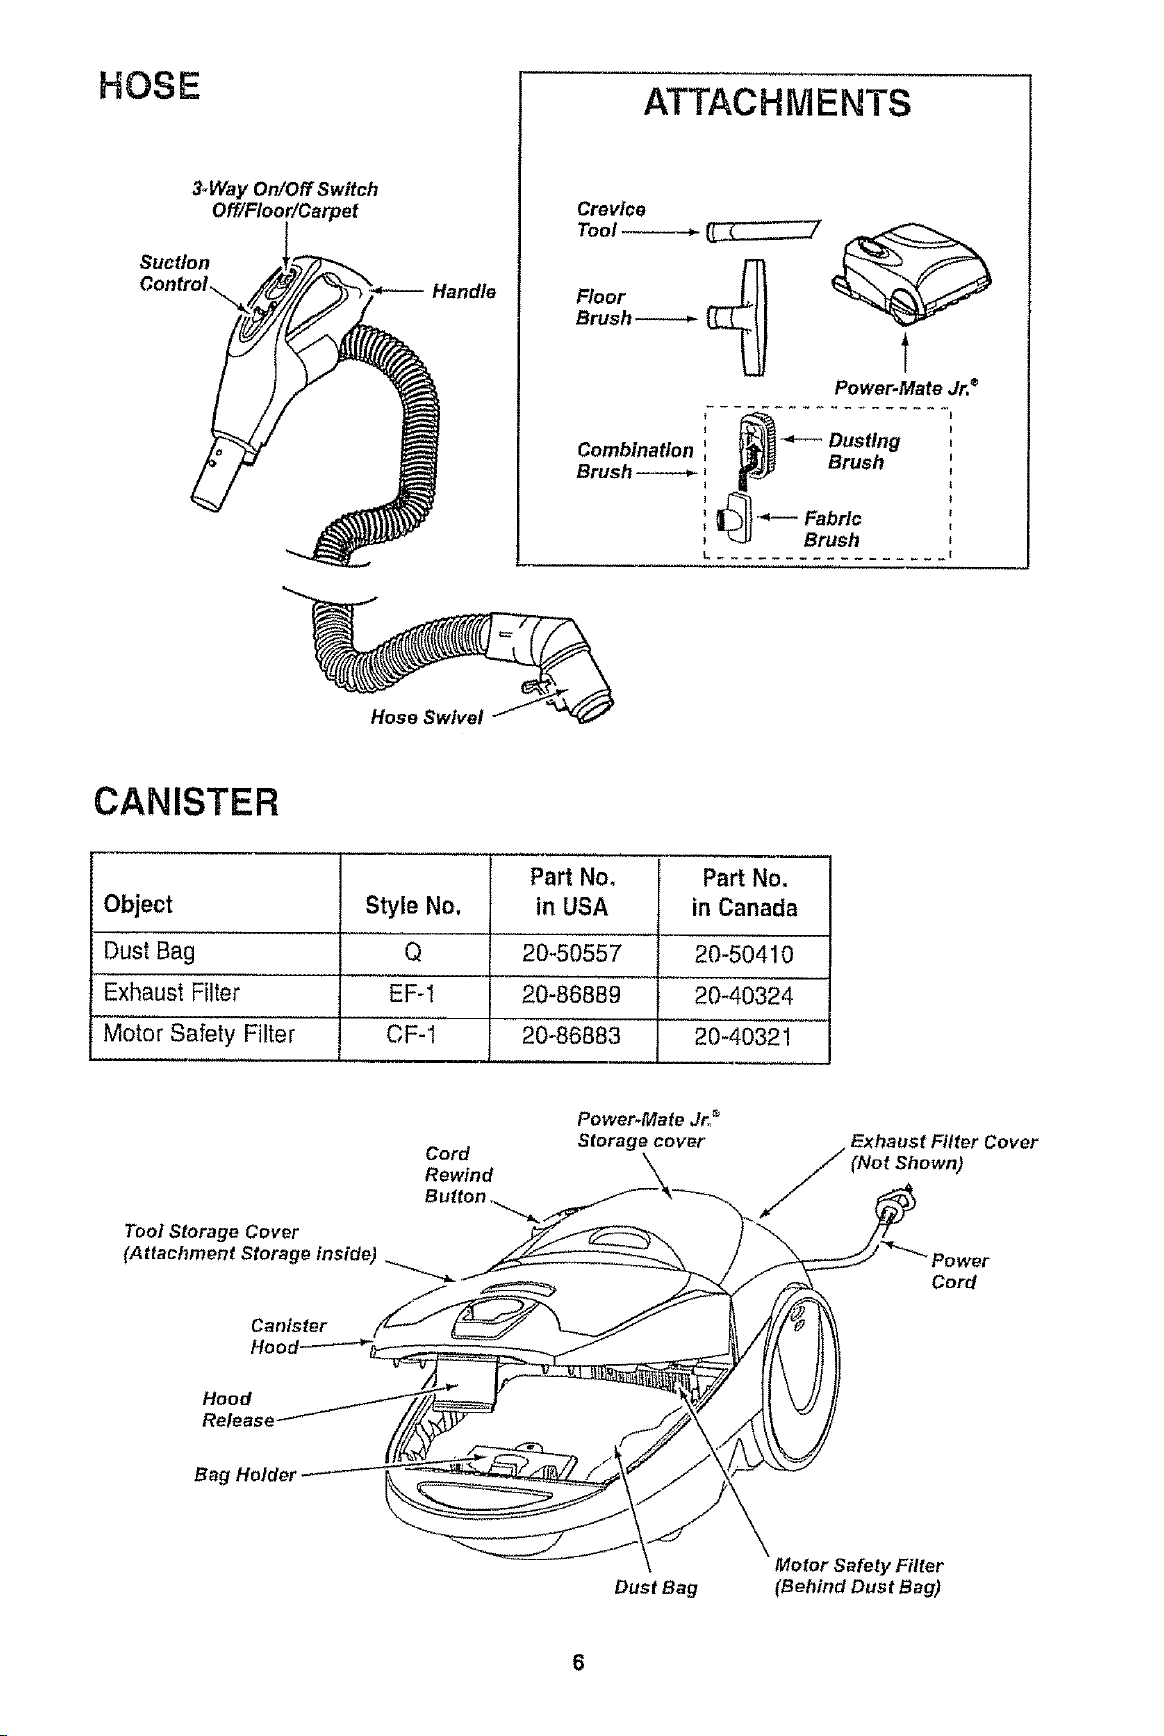
HOSE
3_Way On/Off Switch
Off/Floor!Carpet
Suct/on
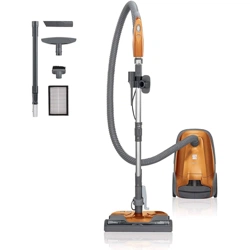
ATTACHMENTS
Crevice
Tool _
Floor
Brush
Power.Mate Jr. ®
I .................
Combination : _ _ Dusting
Brush _ _j _ urusn
i_l_---Fabrlc
_u Brush
L ................. E
Hose Swivel
CANISTER
Object
Dust Bag
Exhaust Filter
Motor Safety Filter
Style No.
Q
EF-1
CF-1
Part Noo
in USA
20-50557
20-86889
20-86883
Part No.
in Canada
20-50410
20_40324
20-4032!
Tool Storage Cover
(Attachment Storage inside)
Canister
Cord
Rewind
Button ._._ _
Power.Mate Jr__
Storage cover
Exhaust Filter Cover
Shown)
Cord
Hood
Release
Bag Holder
Dust Bag
Motor Safety Filter
(B ehind Bus tBag)
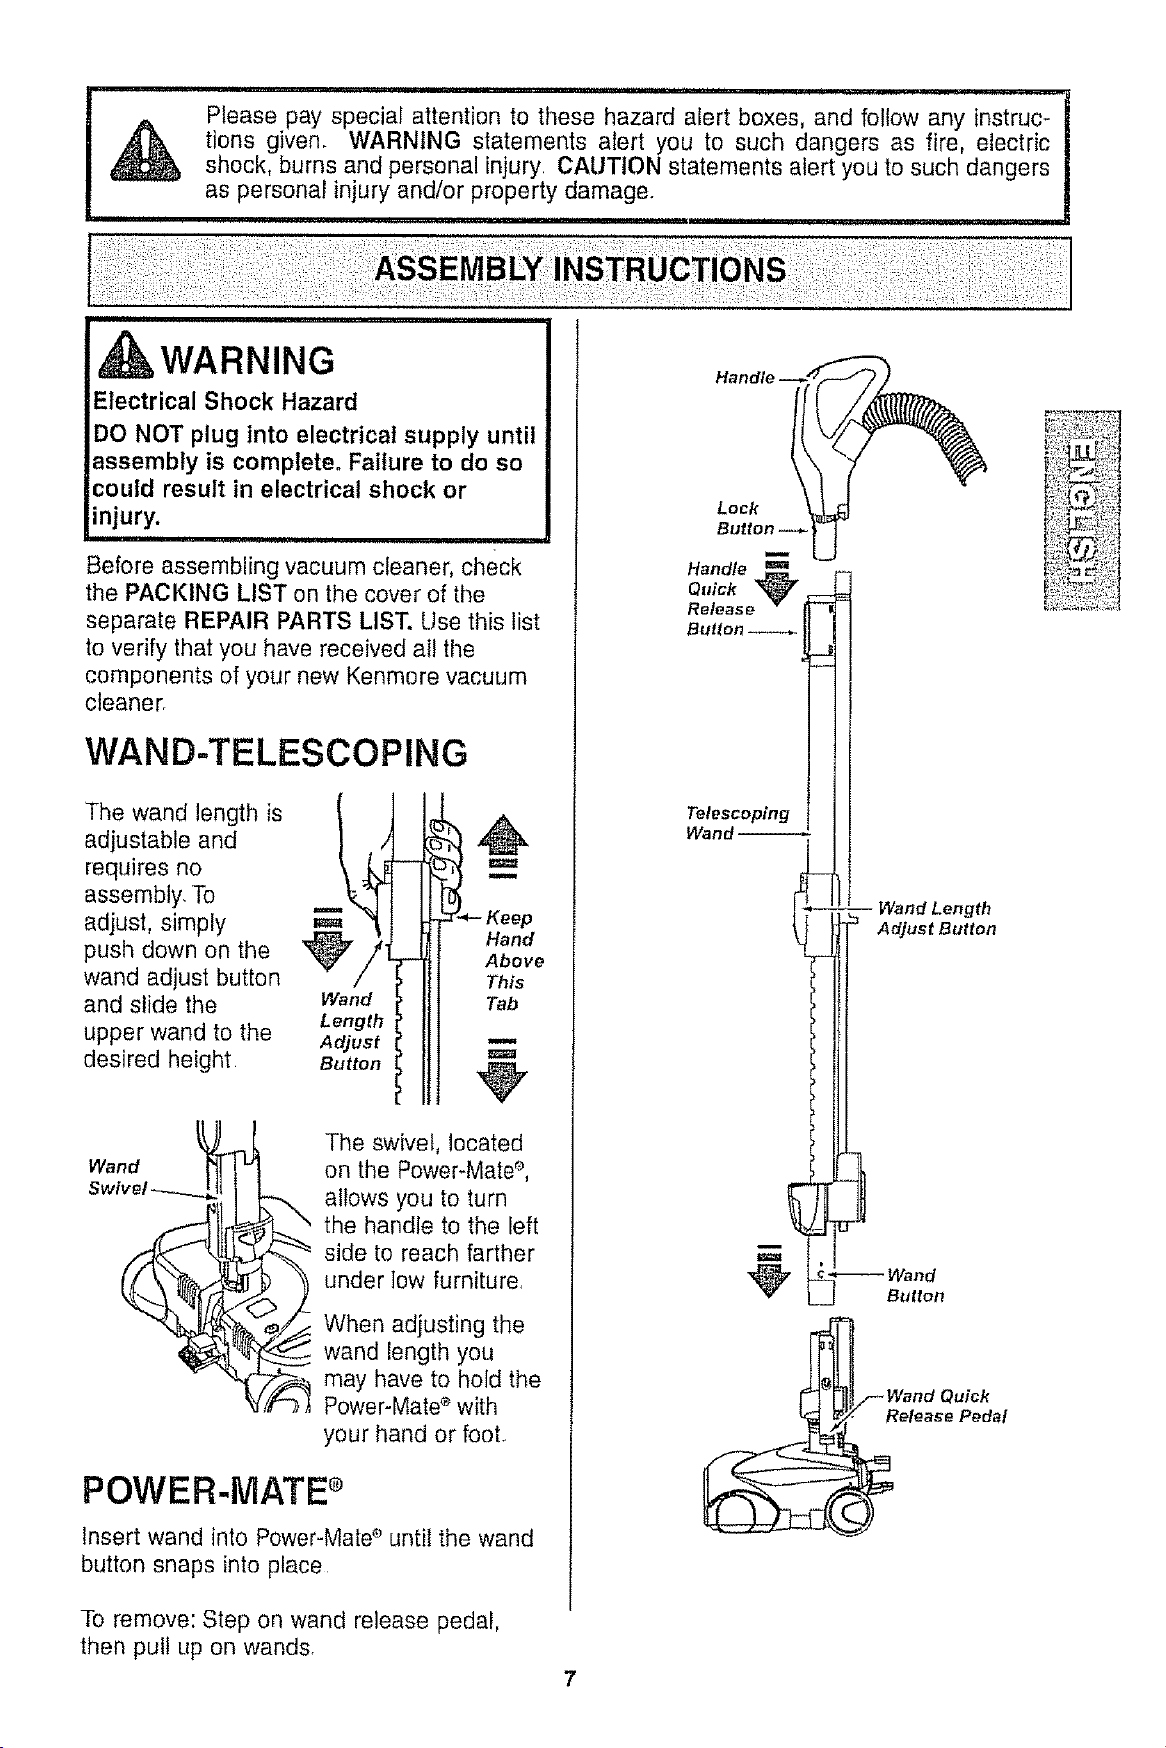
Please pay special attention to these hazard alert boxes, and follow any instruc-
tions given. WARNING statements alert you to such dangers as fire, electric
shock, burns and personal injury CAUTION statements alert you to such dangers
as personar injury and/or property damage.
WARNING
Electrical Shock Hazard
DO NOT plug into electrical supply until
assembly is complete. Failure to do so
could result in electrical shock or
injury.
Before assembling vacuum cleaner, check
the PACKING LIST on the cover of the
separate REPAIR PARTS LIST. Use this list
to verify that you have received all the
components of your new Kenmore vacuum
cleaner.
WAND-TELESCOPING
The wand length is
adjustable and
requires no
assembly. To
adjust, simply
push down on the
wand adjust button
and slide the
upper wand to the
desired height
Wand
Length
Adjust
Button
m
Hand
Above
This
Tab
u
Wand
The swivel, located
on the Power-Mate _,
allows you to turn
the handle to the left
side to reach farther
under low furniture,
When adjusting the
wand length you
may have to hold the
Power-Mate _ with
your hand or foot
POWER-MATE ®
Insert wand into Power-Mate e until the wand
button snaps into place
To remove: Step on wand release pedal,
then pull Lip on wands,
Loci{
Button _-
Handle
Q_tick
Release *
Button _
_J
Telescoping
Wand
-- Wand Length
Adjust Button
_ Wand
Button
Wand Quick
elease Pedal
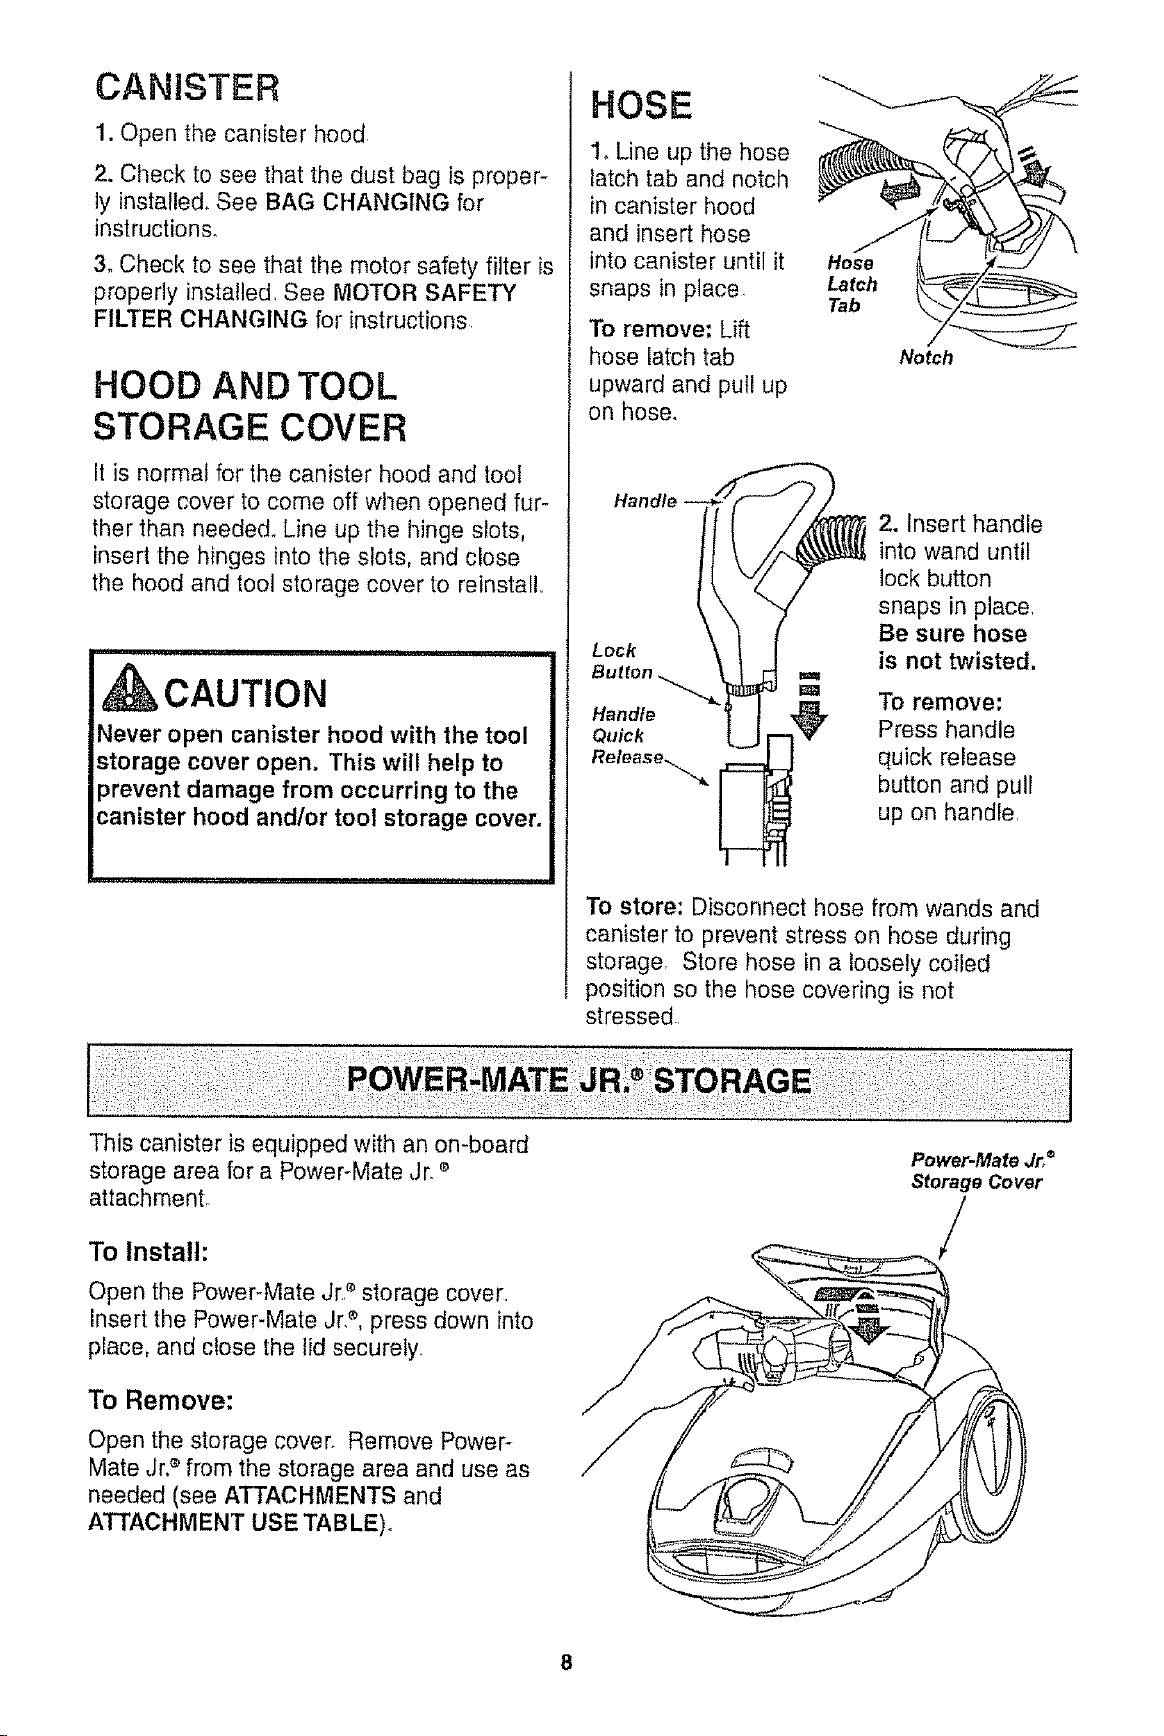
CANISTER
1. Open the canister hood
2. Check to see that the dust bag is proper-
lyinstalled. See BAG CHANGING for
instructions.
3. Check to see that the motor safety filter is
properly installed, See MOTOR SAFETY
FILTER CHANGING for instructions
HOOD AND TOOL
STORAGE COVER
It is normal for the canister hood and tool
storage cover to come off when opened fur-
ther than needed. Line up the hinge slots,
insert the hinges into the slots, and close
the hood and toot storage cover to reinstall,,
i
kCAUTION
Never open canister hood with the tool
storage cover open. This will help to
prevent damage from occurring to the
canister hood and/or toot storage cover.
HOSE
1. Line up the hose
latch tab and notch
in canister hood
and insert hose
into canister until it
snaps in place
To remove: Lift
hose latch tab
upward and pull up
on hose,
Hose
Latch
Tab
Notch
Lock
2. Insert handle
into wand until
lock button
snaps in place,
Be sure hose
is not twisted,
m
=a To remove:
Handle
Quick Press handle
Release_,,.,._ quick release
button and pull
up on handle,
To store: Disconnect hose from wands and
canister to prevent stress on hose during
storage, Store hose in a loosely coiled
position so the hose covering is not
stressed,
This canister is equipped with an on-board
storage area for a Power-Mate ,Jr, e
attachment°
To Install:
Open the Power-Mate Jr2 storage cover,
insert the Power-Mate Jr,e, press down into
place, and close the lid securely,
To Remove:
Open the storage cover. Remove Power-
Mate Jr.® from the storage area and use as
needed (see ATTACHMENTS and
ATTACHMENT USE TABLE).
Power-Mate Jr,®
Storage Cover
/
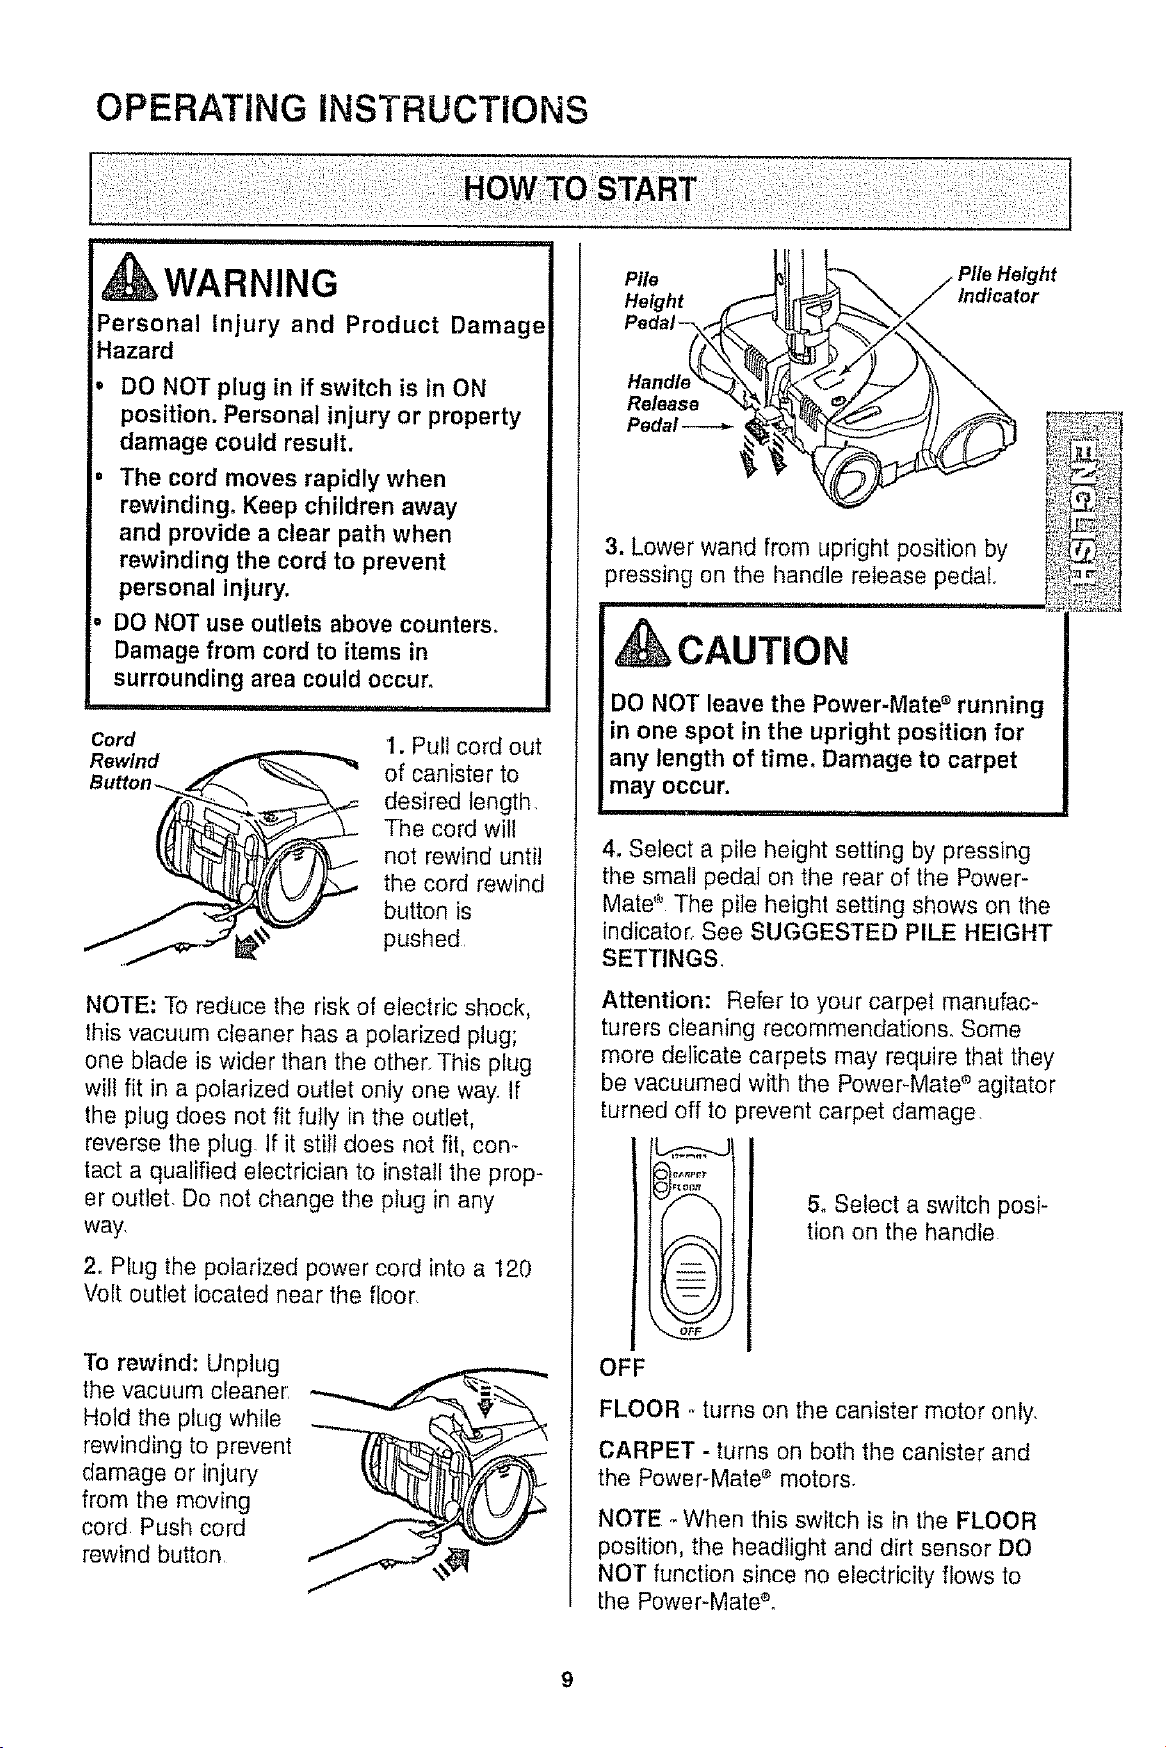
OPERATING iNSTRUCTiONS
iii iiii ii ii i
WARNING
Personal Injury and Product Damage
Hazard
• DO NOT plug in if switch is in ON
position. Personal injury or property
damage could result.
. The cord moves rapidly when
rewinding+ Keep children away
and provide a clear path when
rewinding the cord to prevent
personal injury.
° DO NOT use outlets above counters_
Damage from cord to items in
surrounding area could occur.
Cord
Rewind
I. Pull cord out
of canister to
desired length,
The cord will
not rewind until
the cord rewind
button is
pushed
NOTE: To reduce the risk of electric shock,
this vacuum cleaner has a polarized plug;
one blade is wider than the other This plug
will fit in a polarized outlet only one way If
the plug does not fit fully in the outlet,
reverse the plug If it still does not fit, con+
tact a qualified electrician to install the prop-
er outlet De not change the plug in any
way,
2. Plug the polarized power cord into a 120
Volt outlet located near the floor
To rewind: Unplug
the vacuum cleaner:
Hold the plug while
rewinding to prevent
damage or injury
from the moving
cord Push cord
rewind button
Pile
Height ,(_
Pedal-.,_
Pedal----_-
Indicator
3. Lower wand from upright position by
pressing on the handle release pedal,
M_III'II'III II III iiiii1,11111, i
CAUTION
DO NOT leave the Power-Mate ° running
in one spot in the upright position for
any length of time, Damage to carpet
may occur.
mlm,m,I' 'N I .................... I
4, Select a pile height setting by pressing
the small pedal on the rear of the Power-
Mate + The pile heighl setting shows on the
indicator, See SUGGESTED PILE HEIGHT
SETTINGS.
Attention: Refer to your carpet manufac-
turers cleaning recommendations, Some
more delicate carpets may require that they
be vacuumed with the Power+Mate ° agitator
turned off to
A
ff,--_.\
+ ;
-- +
-- +
+ -- •
3revent carpet damage,
5, Select a switch posi-
tion on the handle
OFF
FLOOR +turns on the canister motor only,
CARPET - turns on both the canister and
the Power-Mate + motors,
NOTE +When this switch is in the FLOOR
position, the headlight and dirt sensor DO
NOT function since no electricity flows to
the Power-Mate+o
++++++:,7+

For best cleaning action, the Power-Mate e
should be pushed straight away from you
and pulled straight back. At the end of each
puil stroke, the direction of the Power-Mate _
should be changed to point into the next
section to be cleaned This pattern should
be continued across the carpet with slow,
gliding motions.
NOTE: Fast,
jerky strokes do
not provide
complete clean-
ing
The hose swivel
allows the hose to ,__.
turn without moving
%the canister, This is
helpful for cleaning in "_
small areas Check
hose for twisting
before pulling canister
,,i,,i,u, ,, i,, , I
CAUTION
Product Damage Hazard
Use care if the Power-Mate s and wand is
left in the upright position as it may tip
over easily. Property damage can occur
if tipped.
WARNING
Personal Injury and Product Damage
Hazard
DO NOT run over power cord with
Power-Mate ®. Personal injury or
product damage could result.
DO NOT pul! plug from wall by
the power cord. If there is damage to
the cord or plug, personal injury or
property damage could result,
iii iii ,
Carpeted stairs
need to be
vacuumed regularly
For best cleaning
results, use Power
Level HIGH and
fulfy close the
suction control.
Suction
Control
,,i ,Ulll ii, ,11 iii,
kWARNING
Personal injury Hazard
Use care if canister is placed on
stairs. It may fall, causing personal
injury or property damage.
, umunlul,i i ,n
CAUTION
Product Damage Hazard
Do not pull on the hose to move the
canister from one stair to the next°
When finished cleaning in one area
use the handle grip on the canister
to move the vacuum cleaner to a new
location for further cleaning.
mm
The stair grip tocated
on the caster will aid
in preventing the
canister from
slipping when used
on stairs (see
PERFORMANCE
FEATURES)
NOTE: Be sure the canister is resting
securely on the stairs and the caster is in a
locked position before using
For best cleaning results, keep the airflow
passage open. Check each assembly area
in HOWYOUR VACUUM CLEANER
WORKS occasionally for clogs Unplug
from outlet before checking,
10
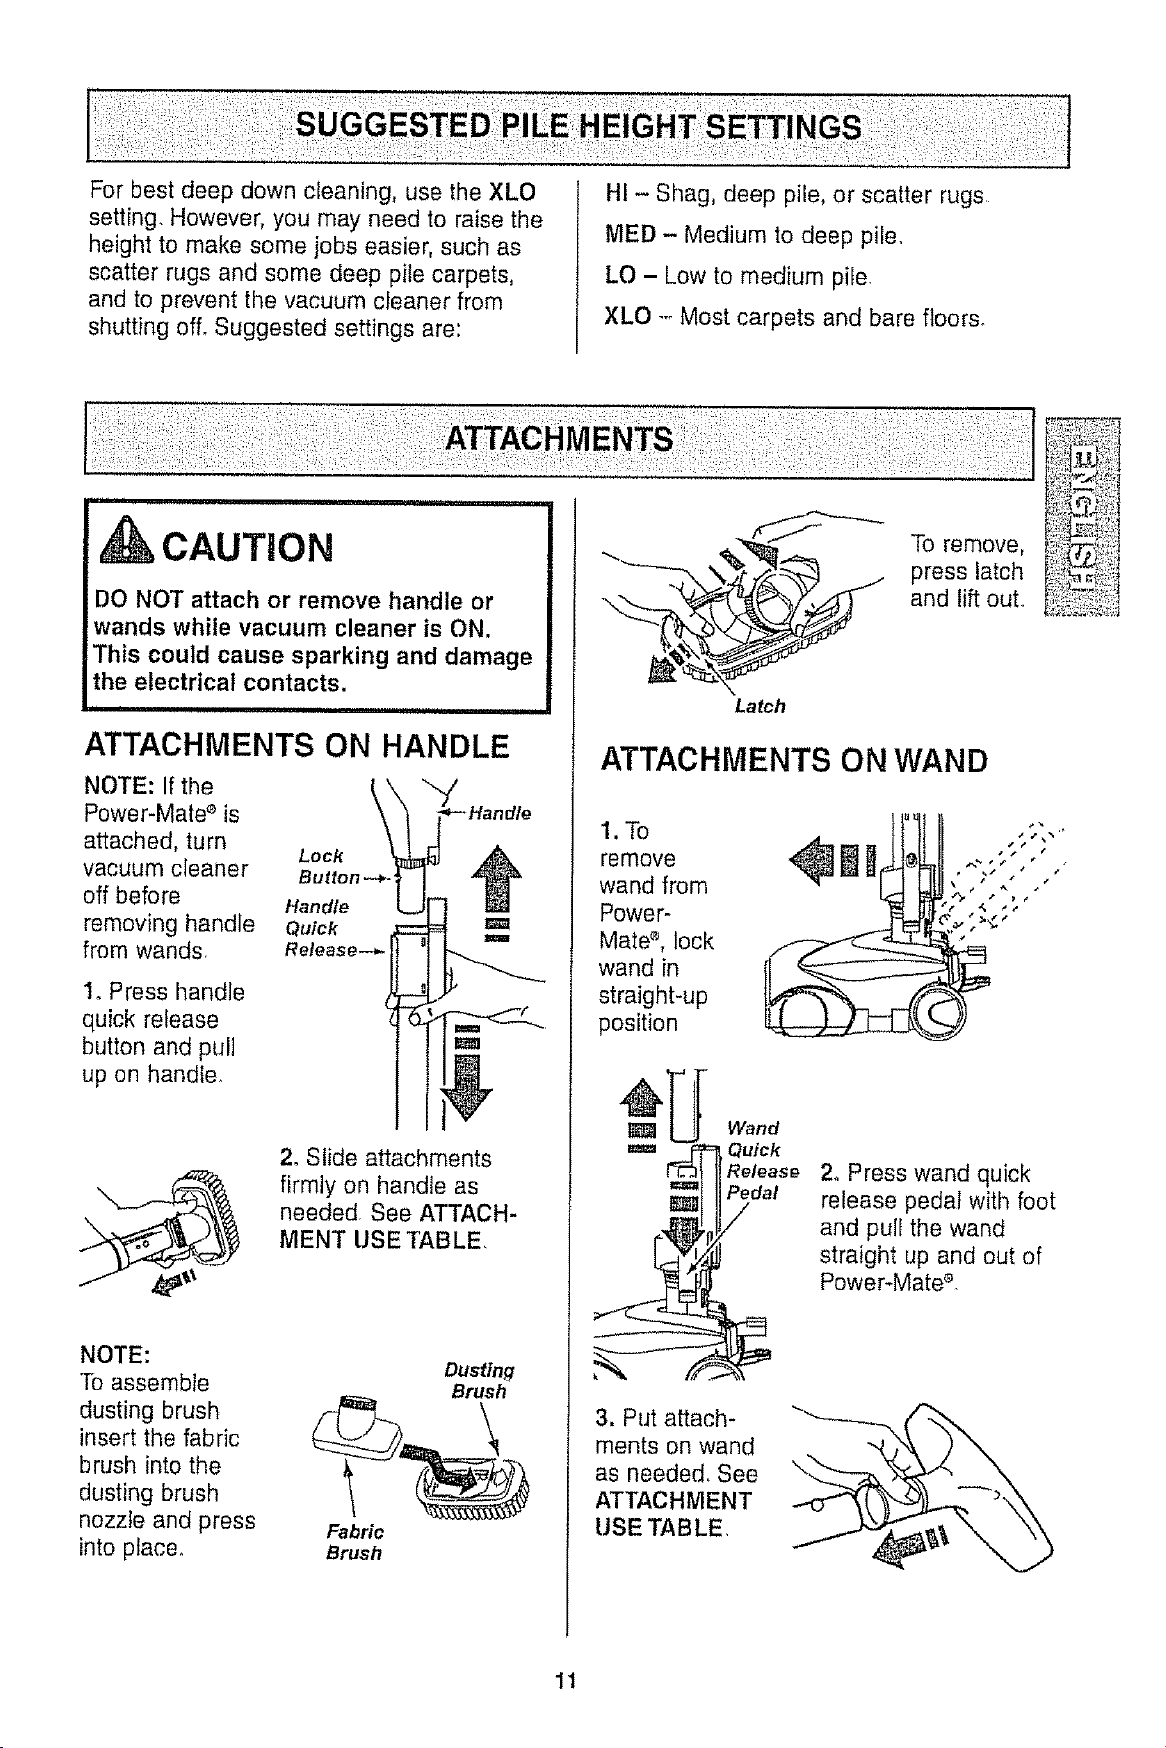
For best deep down cleaning, use the XLO
setting. However, you may need to raise the
height to make some jobs easier, such as
scatter rugs and some deep pile carpets,
and to prevent the vacuum cleaner from
shutting ofL Suggested settings are:
HI - Shag, deep pile, or scatter rugs
MED - Medium to deep pile.
LO - Low to medium pile
XLO -- Most carpets and bare floors.
DO NOT attach or remove handle or
wands while vacuum cleaner is ON.
This could cause sparking and damage
the electrical contacts.
i ................................
ATTACHMENTS ON HANDLE
NOTE: If the
Power-Mate s is
attached, turn
Lock
vacuum cleaner Button---*
off before Handle
removing handle Quick
from wands. Release.-*-
1. Press handle
quick release
button and pull
up on handler
2. Slide attachments
firmly on handle as
needed See ATTACH-
MENT USE TABLE,
NOTE:
To assemble
dusting brush
insert the fabric
brush into the
dusting brush
nozzle and press
into place.
Dusting
Brush
Fabric
Brush
Latch
To remove,
press latch
and lift out.
ATTACHMENTS ON WAND
1.To
remove
wand from
Power-
Mate s, lock
wand in
straight-up
position
Wand
Quick
Release
Pedal
2. Press wand quick
release pedal with foot
and pull the wand
straight up and out of
Power-Mate_.
3. Put attach-
ments on wand
as needed. See
ATTACHMENT
USETABLE
11
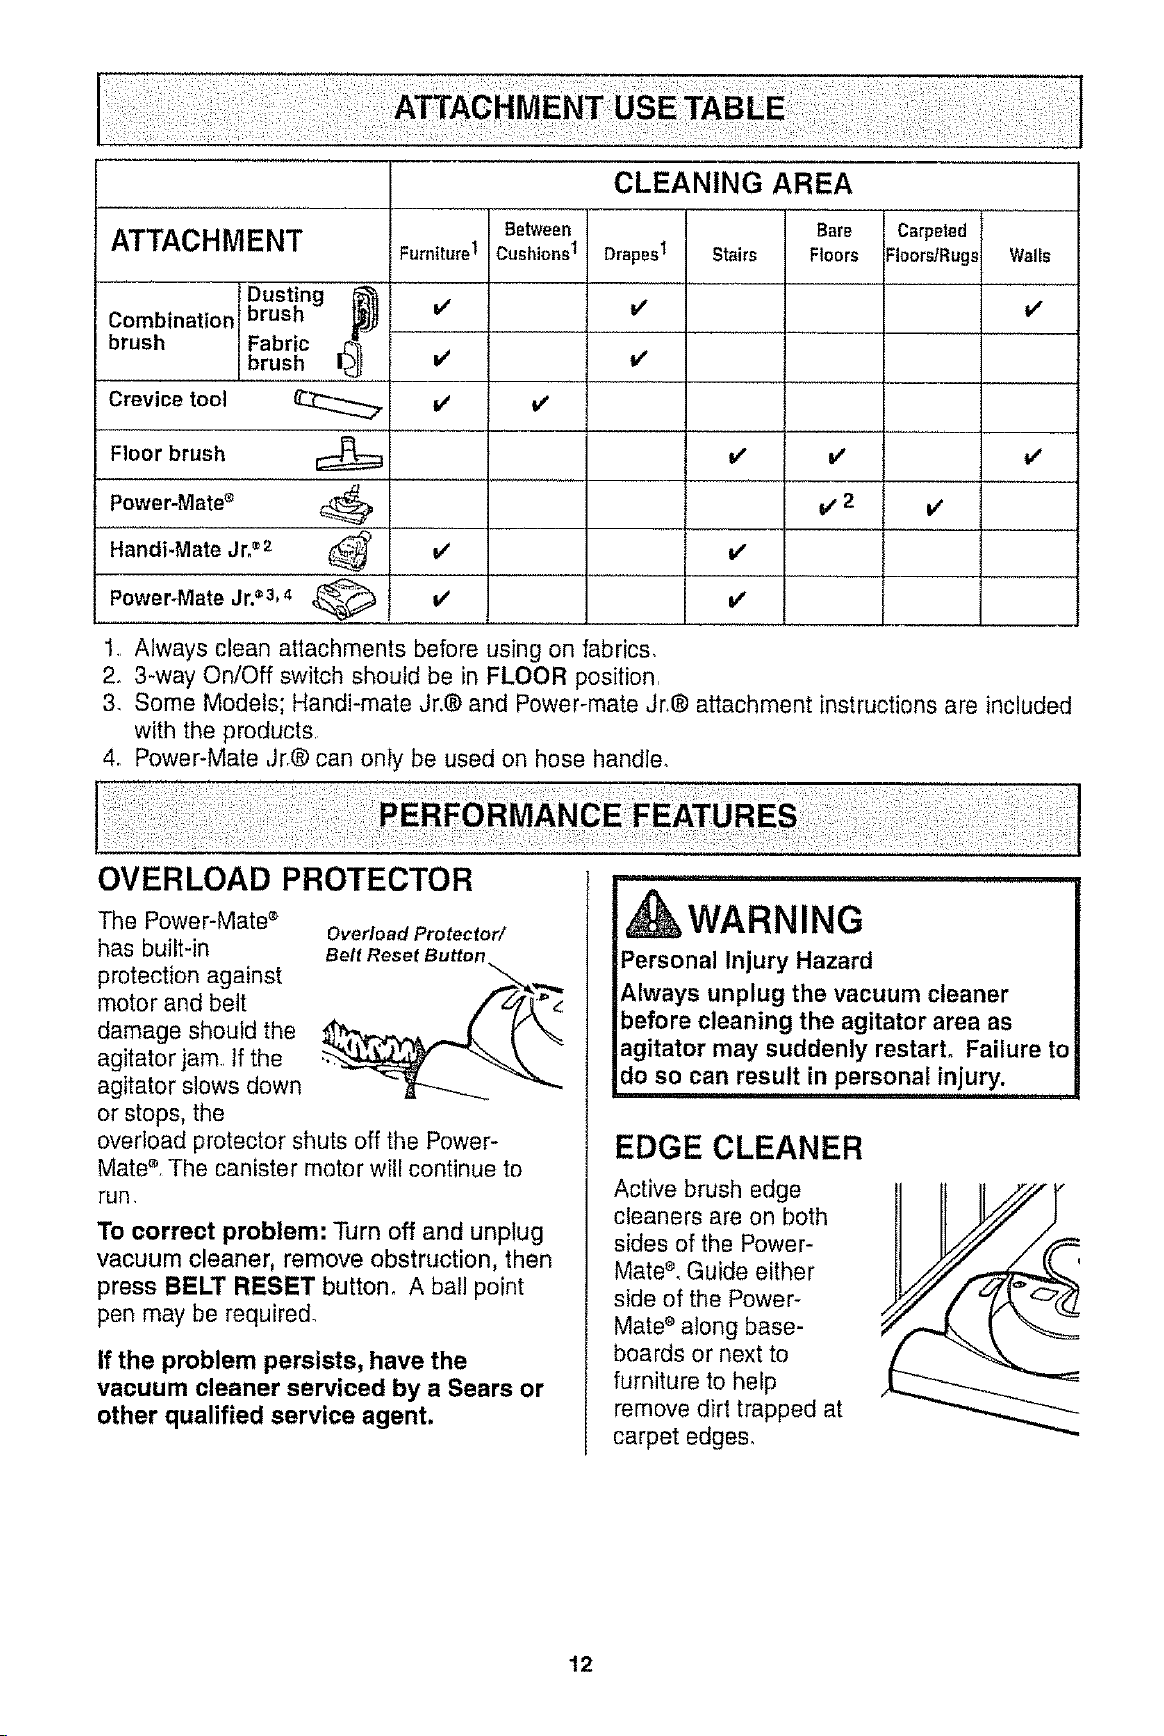
ATTACHMENT
Combination
brush
Crevice tool
Floor brush
Power-Mate _
Handi-Mate Jn®2
bDUst]ng {_
rush
Fabric
brush ........I_
v"
=/
v, 2
................ =
i,,' v"
v"
Carpeted
FIoorsfRugs Walls
v"
v"
v_
Power-Mate Jro_3, 4 ,_ _'
1. Always clean attachments before using on fabrics.
2. 3-way On/Off switch should be in FLOOR position
& Some Models; Handi-mate Jr.® and Power-mate Jr.® attachment instructions are included
with the products
4. Power-Mate Jr.® can only be used on hose handle.
OVERLOAD PROTECTOR
The Power-Mate s
has built-in
protection against
motor and belt
damage shouid the
agitator jam.. If the
agitator slows down
or stops, the
Overload Protector/
Belt Reset Button
overload protector shuts off the Power-
Mate _, The canister motor will continue to
run,
To correct problem: Turn off and unplug
vacuum cleaner, remove obstruction, then
press BELT RESET button. A bail point
pen may be required.
If the problem persists, have the
vacuum cleaner serviced by a Sears or
other qualified service agent,
........................
Personal Injury Hazard
Always unplug the vacuum cleaner
before cleaning the agitator area as
agitator may suddenly restart. Failure to
do so can result in personal injury.
,i...........................
EDGE CLEANER
Active brush edge
cleaners are on both
sides of the Power-
Mate _, Guide either
side of the Power-
Mate _ along base-
boards or next to
furniture to help
remove dirt trapped at
carpet edges,
12

SUCTION CONTROL
The suction
control allows \ I
you to change / Increase
suction
the vacuum . I
suction for Decrease
different fabrics suction
and carpet
weights, LOW POWER decreases suction
for draperies and lightweight rugs, while
HIGH increases suction for upholsteries and
carpets.
PERFORMANCE INDICATOR
When the vacuum
cleaner ts running Indicator
with normal airflow,
the light on the
performance
indicator is off, The
light comes on "--..
whenever the
airflow becomes btocked_ If that occurs,
check the disposable dust bag, motor
safety filter and other possible clog
locations shown in HOW YOUR VACUUM
CLEANER WOR KS.
To correct problem: See the TROUBLE.
SHOOTING table°
NOTE: The light may come on when using
certain attachments, due to reduced airflow
through attachment.
THERMAL PROTECTOR
This vacuum cleaner has a thermal
protector which automatically trips to protect
the vacuum cleaner from overheating If a
clog prevents the normal flow of air to the
motor, the thermal protector turns the
motor off automatically. This allows the
motor to cool in order to prevent possible
damage to the vacuum cleaner,
To correct problem: Turn the vacuum
cleaner off and unplug the power cord
from the outlet to allow the vacuum
cleaner to cool and the thermal protector
to reset, Check for and remove clogs, if
necessary. Also check and replace any
clogged filters, Wait approximately
thirty (30) minutes and plug the vacuum
cleaner in and turn back on to see ff the
motor protector has reset,
POWER-MATE ®STORAGE
The wand has a "U" shaped
flange that slides into
the "U" shaped slot on
the canister..
The flange allows the
wands and Power-
Mate®to be stored with
the canister to
conserve storage
space,, The canister
must be stored on end for
this feature to be used,
To attach the Power-Mate s, it must be in
the fiat position as shown in the
illustration, Use the handle release pedal
to place it in this position
The wand will slip out of the slot as it is lifted
up for use and will slide into the slot as it is
lowered for storage,
STAIR GRIP
During normal operation while the canister is
in the horizontal position, the caster wheel
rotates freely 360 °
The Stair Grip
feature allows
the caster
wheel to lock in
position when
the vacL!um
cleaner is
rotated 250
from horizontal into a vertical position in
order for the canister to rest on stairs,
WAND LIGHT
This vacuum cleaner is
equipped with a light on the
extension wand. This light
will operate only when the
l vacuum cleaneris in
CARPET mode (see HOW
TO START), The light will
operate when attached or not
attached to the Power-
Mate@.
The light can be used for lighting hard to
reach locations.
13

DIRT SENSOR
The dirt sensor
light system is
mounted on the
Power-Mate '_
nozzle near the
reset button.
It consists of a series of two red lights and two
green lights, The lights give you an indication
of the amount of dirt particles that are passing
through the sensor on its way to the dust bag.
INITIAL START UP
When the Power-Mate ® is first started, the fol-
lowing light sequence occurs in a two second
time frame:
1. Two reds come on,,
2. Two greens are on and will remain on until
the Power-Mate e nozzle is placed in use.
NOTE: If the nozzle is on a surface that has
dirt on it, dirt will be picked up by the vacuum
cleaner and the red lights might stay on.
The vacuum cleaner creates suction that
IN OPERATION
When the Power-Mate e is being moved back
and forth on the floor, the lights will change
from one configuration to another as dirt is
being vacuumed., As long as the red lights are
on, dirt is passing through the wand to indicate
that the surface still needs cleaning.
When the green lights stay on as the Power-
Mate s is moved back and forth over an area,
the sensor is not seeing enough dirt to warrant
further cleaning of that area,
NOTE: Dirt sensor lights DO NOT function in
the FLOOR setting.
picks up dirt. Rapidly moving air carries the f/f/_...._
dirt to the dust bag through the airflow pas- //) _
\
sages. Tile dust bag lets the air pass _/" ' It
through, while it traps the dirt° /_
Y
For best cleaning results, keep the air- _'
flow passage open. Check the starred z4",7
areas occasionally for clog& Unplug ./_#// Motor
from outlet before checking° _._i'e._/ Safety _haust
Fflf_r Filter
///
-- .k
14
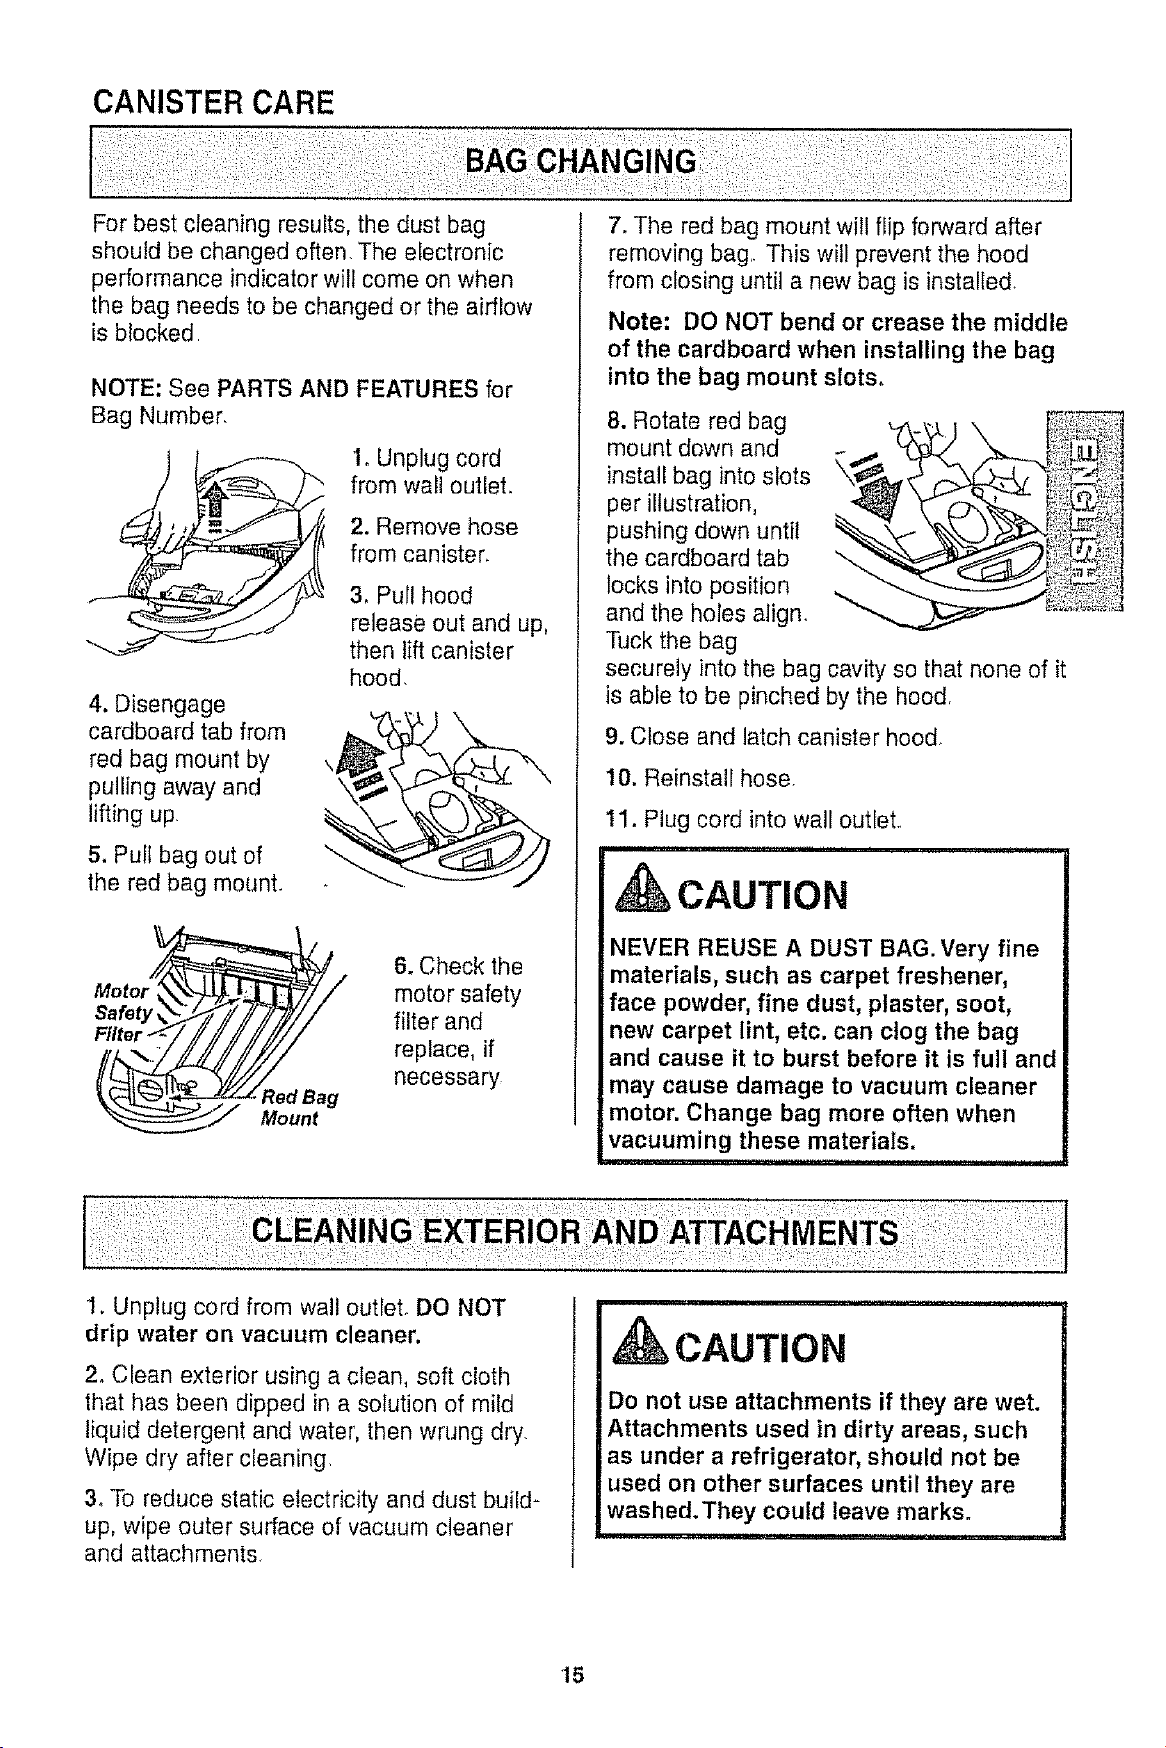
CANISTER CARE
For best cleaning results, the dust bag
should be changed often, The electronic
performance indicator will come on when
the bag needs to be changed or the airflow
is blocked
NOTE: See PARTS AND FEATURES for
Bag Number,
4. Disengage
cardboard tab from
red bag mount by
pulling away and
lifting up
5. Pull bag out of
the red bag mount.
1. Unplug cord
from wail outlet.
2. Remove hose
from canister.
3, Pull hood
release out and up,
then lift canister
hood,
Safety
Filte
Red Bag
Mount
6. Check the
motor safety
filter and
replace, if
necessary
7. The red bag mount will flip forward after
removing bag. This will prevent the hood
from closing until a new bag is installed
1. Unplug cord from wall outlet, DO NOT
drip water on vacuum cleaner.
Note: DO NOT bend or crease the middle
of the cardboard when installing the bag
into the bag mount slots.
8. Rotate red bag
mount down and
install bag into slots
per illustration,
pushing down until
the cardboard tab
locks into position
and the holes align.
Tuck the bag
securely into the bag cavity so that none of it
is able to be pinched by the hood,
9. Close and latch canister hood_
10. Reinstall hose
!1. Plug cord into wall outlet.
i ,i i, ,111,1111ii i i
CAUTION
NEVER REUSE A DUST BAG. Very fine
materials, such as carpet freshener,
face powder, fine dust, plaster, soot,
new carpet lint, etc. can clog the bag
and cause it to burst before it is full and
may cause damage to vacuum cleaner
motor. Change bag more often when
vacuuming these materials.
2o Clean exterior using a clean, soft cloth
that has been dipped in a solution of mild
liquid detergent and water, then wrung dry.
Wipe dry after cleaning.
3_To reduce static electricity and dust build-
up, wipe outer surface of vacuum cleaner
and attachments.
i
CAUTION
Do not use attachments if they are wet.
Attachments used in dirty areas, such
as under a refrigerator, should not be
used on other surfaces until they are
washed.They could leave marks.
15
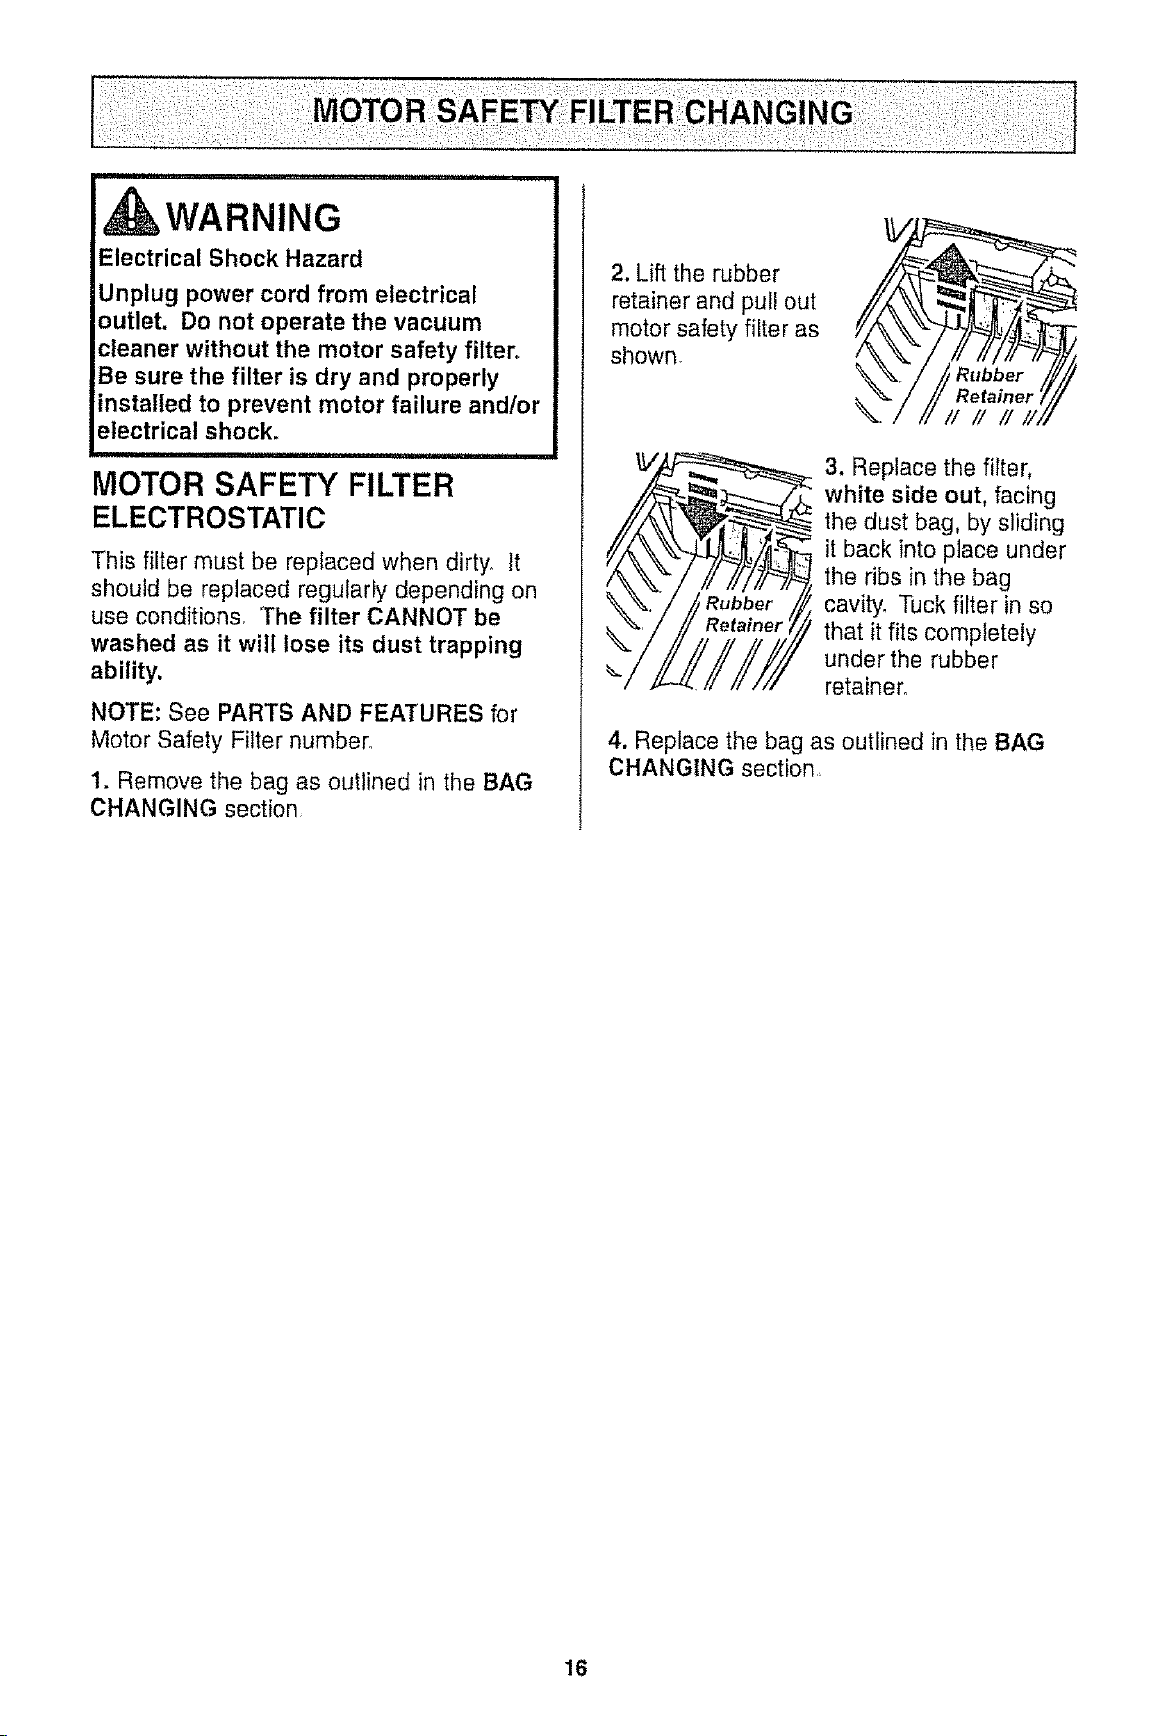
WARNING
Electrical Shock Hazard
Unplug power cord from electrical
outlet. Do not operate the vacuum
cleaner without the motor safety filter.
Be sure the filter is dry and properly
installed to prevent motor failure and!or
electrical shock.
ii , i iiiiiii1,11iii ...........
MOTOR SAFETY FILTER
ELECTROSTATIC
This filter must be replaced when dirty° It
should be replaced regularly depending on
use conditions. The filter CANNOT be
washed as it will lose its dust trapping
ability.
NOTE: See PARTS AND FEATURES for
Motor Safety Filter number°
1. Remove the bag as outlined in the BAG
CHANGING section
2. Lift the rubber
retainer and pull out
motor safety filter as
shown.
3, Replace the filter,
white side out, facing
the dust bag, by sliding
it back into place under
the ribs in the bag
cavity. Tuck filter in so
that it fits completely
under the rubber
retainer°
4. Replace the bag as outlined in the BAG
CHANGING section
16
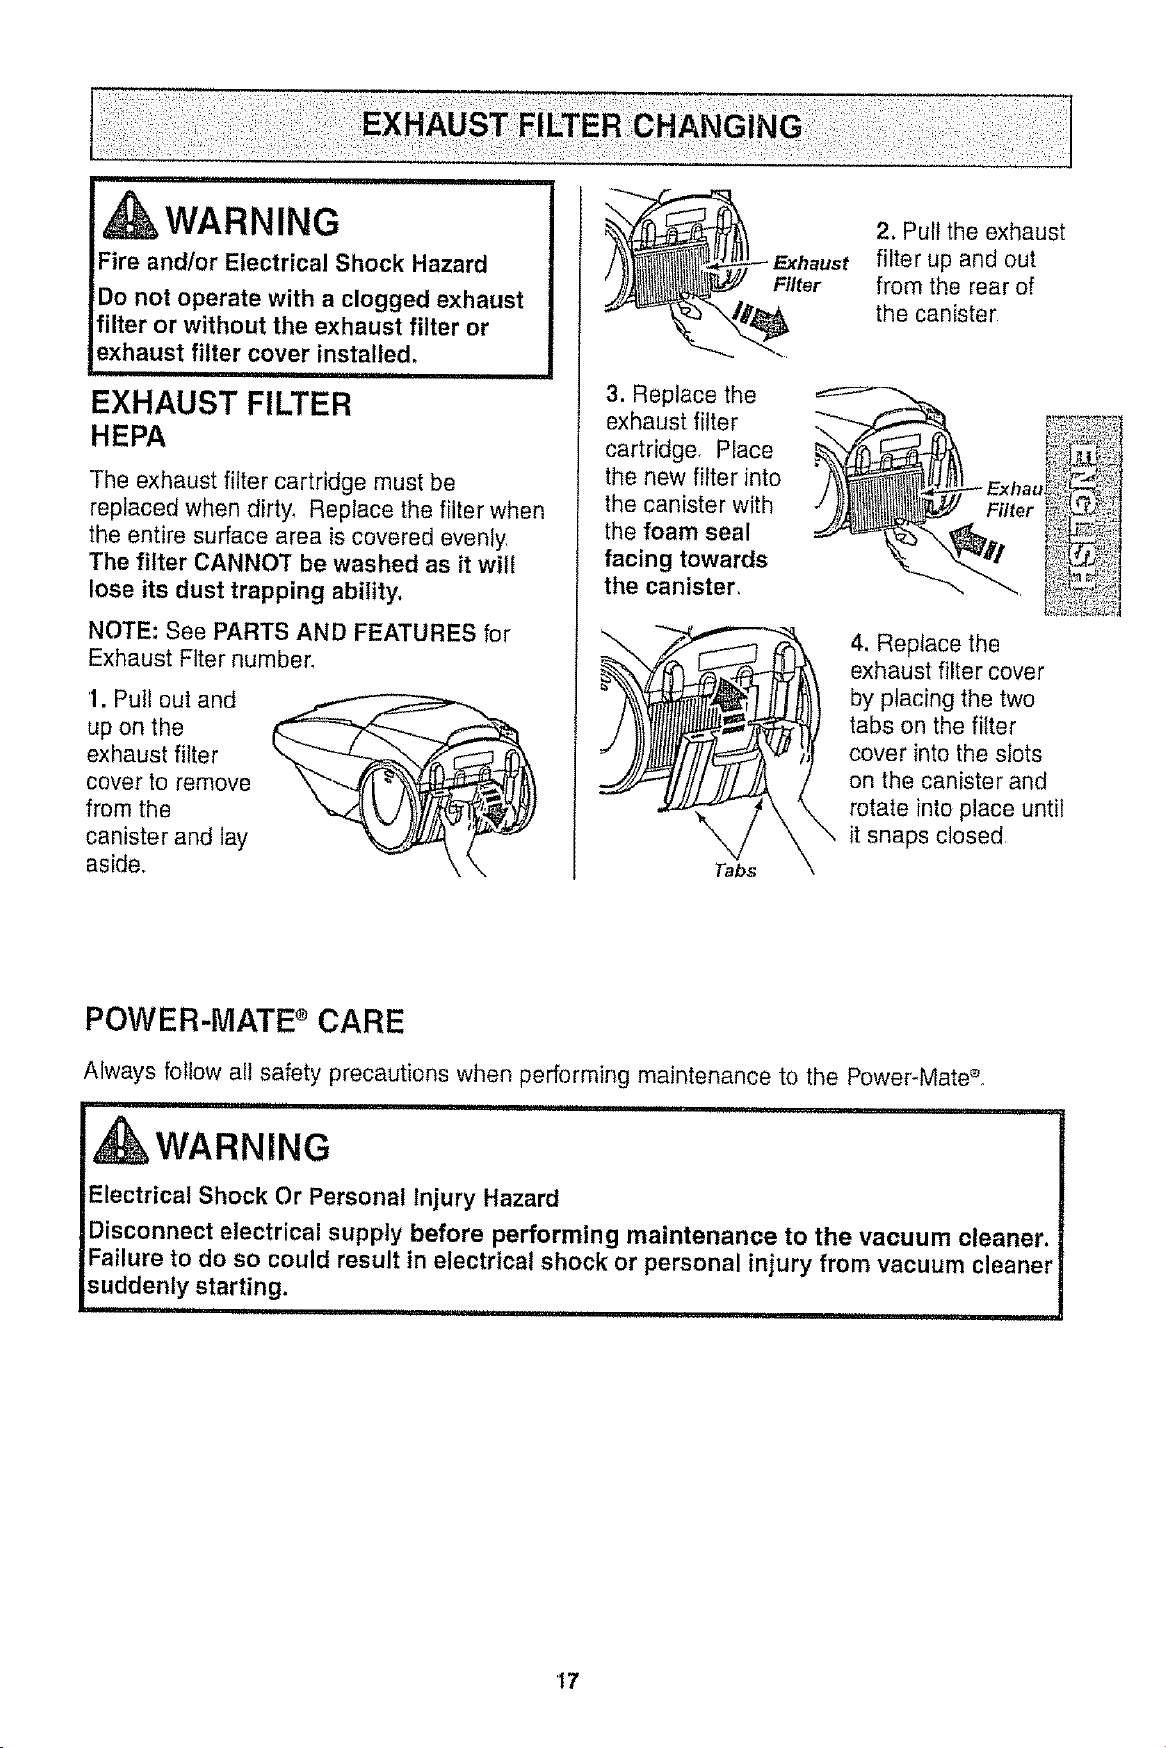
iiiii1,1,1111i ull, ,i i
WARNING
Fire and/or Electrical Shock Hazard
Do not operate with a clogged exhaust
filter or without the exhaust filter or
exhaust filter cover installed,
illllliiiiii ,,lllnlU n nul lUl
EXHAUST FILTER
HEPA
The exhaust filter cartridge must be
replaced when dirty_ Replace the filter when
the entire surface area is covered evenly
The filter CANNOT be washed as it will
lose its dust trapping ability.
NOTE: See PARTS AND FEATURES for
Exhaust Ftter number_
1. Pull out and
up on the
exhaust filter
cover to remove
from the
canister and lay
aside.,
Fi/ter
2. Pull the exhaust
filter up and out
from the rear of
the canister
3. Replace the
exhaust filter
cartridge, Place
the new filter into
the canister with
the foam seal
facing towards
the canister,
_! 4. Replace the
exhaust filter cover
by placing the two
tabs on the filter
cover into the slots
on the canister and
__S _ rotate into place until
it snaps closed
POWER-MATE e CARE
Always follow all safety precautions when performing maintenance to the Power-Mate_
ii ii ii i n ii1,1111111111ri iiiiii, ii i i I
d WARNING
Electrical Shock Or Personal Injury Hazard
Disconnect electrical supply before performing maintenance to the vacuum cleaner.
Failure to do so could result in electrical shock or personal injury from vacuum cleaner
suddenly starting.
IIIII I ,11111i ii1,1 i i1,1,11I iiiiii
17

Althoughthedirtsensorfeatureinyour
KenmorePoweFMateeisdesignedforyearsof
troublefreeuse,thepassageof dirtthrough
theairpassagesystemcancoatthelens
causingthegreenlighttocomeonandstay
on- neverswitchingto red.Whenthishappens
thelensesmustbecleaned,
CAuTiON
Never use water or any cleaning solution
when cleaning the lenses, The residue of
the water or cleaners will accelerate the
recoating of the lenses and make
cleaning necessary sooner.
TO CLEAN THE LENSES
1. Remove the
wand by pressing
the quick release
pedal and lifting
up on the wand°
3 ½ Inches ,,,,/. Ring
or 90 mm lt Jz_,l _
--Sensor
2, As indicated by the illustration, the two dirt
sensor elements are boated on the inside of
the swivel, approximately 3Ya inches/90 mm
down, (note the arrows) Each element should
be cleaned periodically, To reach the sensor
elements, use a small brush such as a botlle
brush° Brush each sensor element several
times to remove dust and dirt,
NOTE: Looking down inside the swivel you will
see a ring. The sensor elements are located
just slightly below this ring.
3. Reinstall the wand after cleaning the sen-
sors,
TO REMOVE BELT
1. Turn Power-
Mate ® upside
down.
2. Unscrew the
two (2) Power-
Mate e cover
screws_
3. Turn Power-
Mate ® right side
up. Press handle
release pedal and
lower the swivel,
Lift rear latches
up,
Latch Latches
4. To remove cover,
grasp the sides and
pull out.
5. Lift agitator
assembly out
and remove
worn bell
6, Check and clean end cap areas, See
AGITATOR ASSEMBLY for picture of
complete agitator assembly
18

TO CLEAN AGITATOR:
NOTE: In order to keep cleaning efficiency
high and to prevent damage to your vacuum
cleaner, the agitator must be cleaned every
time the belt is chart eg__d
The agitator must also be cleaned accord-
ing to the following schedule:
Vacuum Cleaner Use Clea__l__n_A_itator
HEAVY - every week
(used daily)
MODERATE - every month
(used 2-3 times/week)
LIGHT -
(used 1 time/week)
every 2 months
IMPORTANT
Disconnect vacuum cleaner from
electrical outlet. Check and remove hair,
string and lint build-up frequently in the
Power-Mate ® agitator and end cap areas.
Remove any dirt or debris in the belt path
area or in the brush roller area.
Carefully remove any string or debris
located on the agitator or end caps,
AGITATOR ASSEMBLY
Belt Pulley q
"-..Tj,-r"_ / Cap
Brush Unit
TO REPLACE BELT
1. Install new
belt over
motor drive,
then over
belt pulley
r
Agitator End Cap
NOTE: See PARTS AND FEATURES for
Belt number.
2. Place agitator
assembly back into
Power-Mate e
3. Line up ./__J_"!"_///'_"
front of
cover and
baseoRest _ _(_I_ !)!_
cover on
front edge "%Z'Z.Z_.z-z_ _!!!_;
of base as ! er !i il_;!_';--'__,,_-,,_
shown. ': ::-=";_"
Co Base ;_?!_
4, NOTE: On dirt sensor models be sure _t'_;:::_.::;
that the board is upright and the wires are
tucked back in place.
]
5. Rotata cover
back. Press
cover firmly until "
side and rear ,, ,! - "_
tabs snap into .... -_ ._
place,
Make sure there Side Rear
Latch Latches
is no gap
between the cover and base
6. Turn Power-Mate®upside down and
replace two (2) cover screws,
19
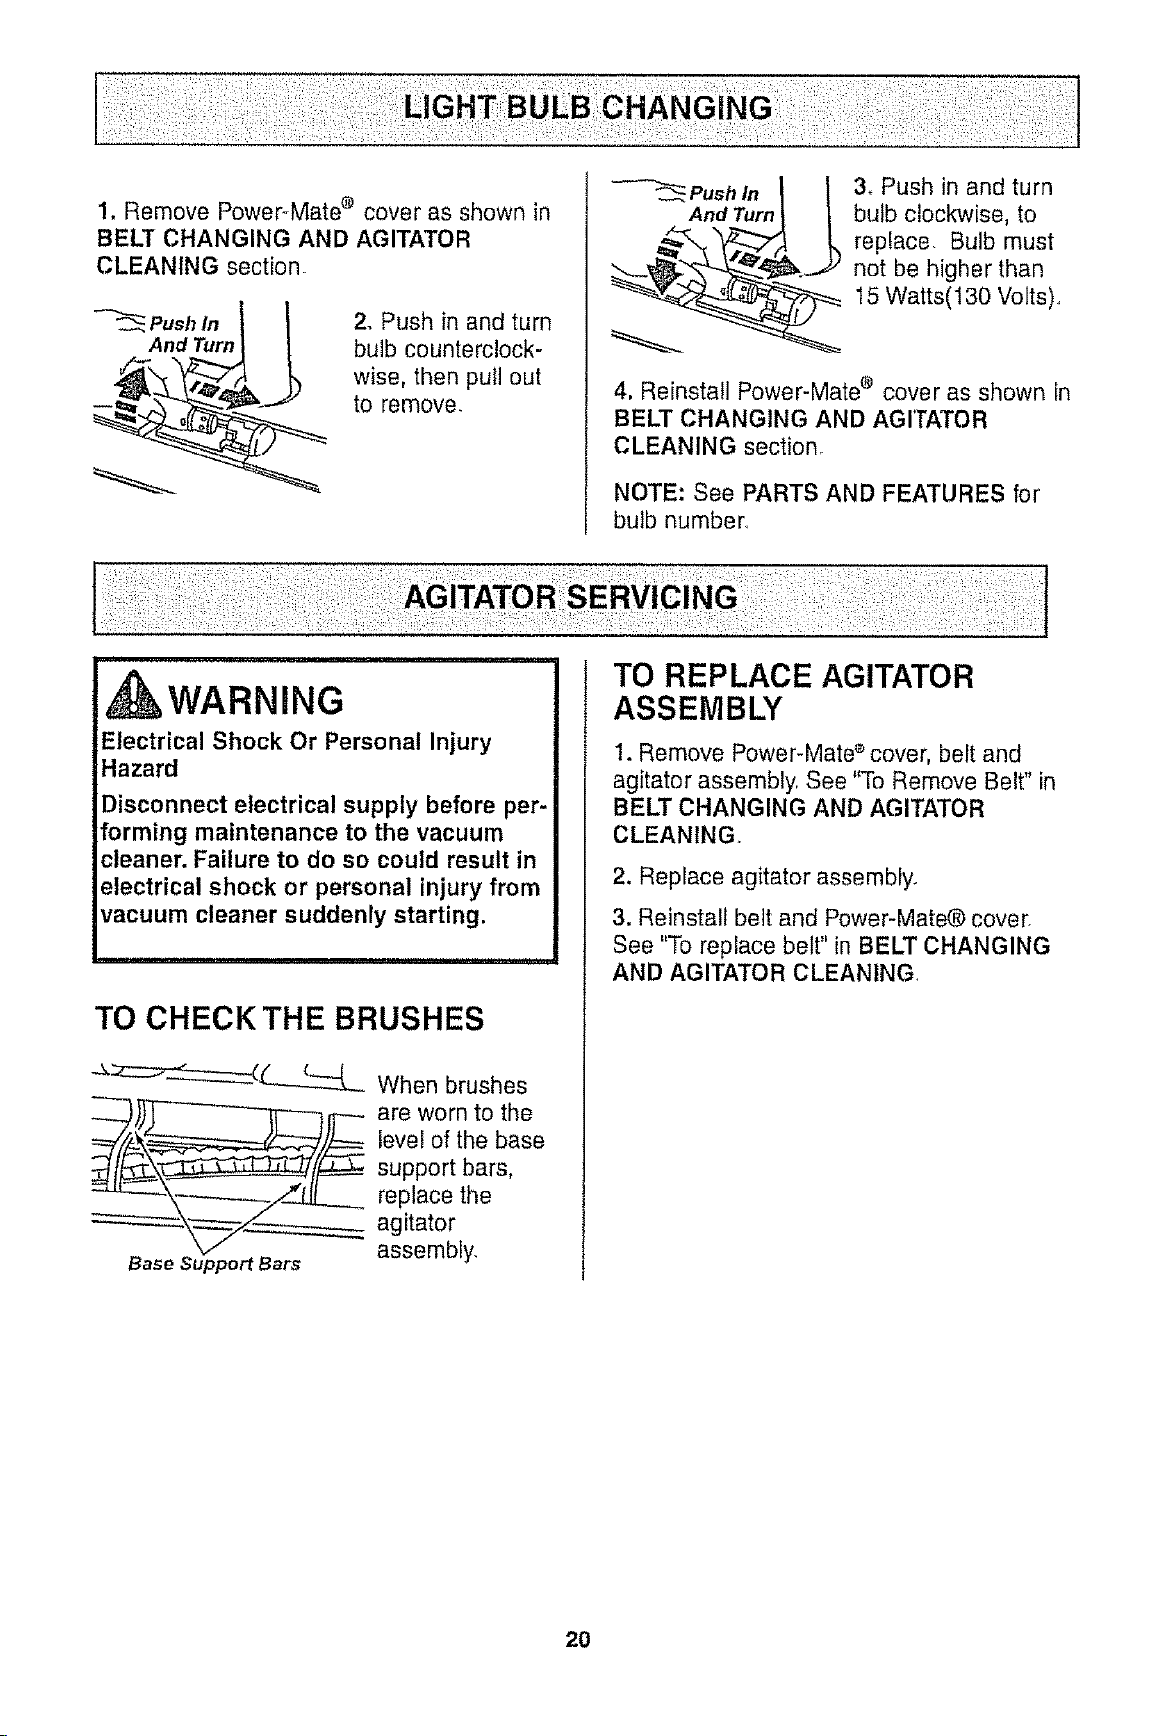
1. Remove Power_Mate ® cover as shown in
BELT CHANGING AND AGITATOR
CLEANING section_
Push in
And Turn
2, Push in and turn
bulb counterclock-
wise, then pull out
to remove,
_ Push In
And Turn
3_ Push in and turn
bulb clockwise, to
replace. Bulb must
_. not be higher than
_15 Watts(130 Volts),,
4. Reinstall Power-Mate e cover as shown in
BELT CHANGING AND AGITATOR
CLEANING section.
NOTE: See PARTS AND FEATURES for
bulb number,
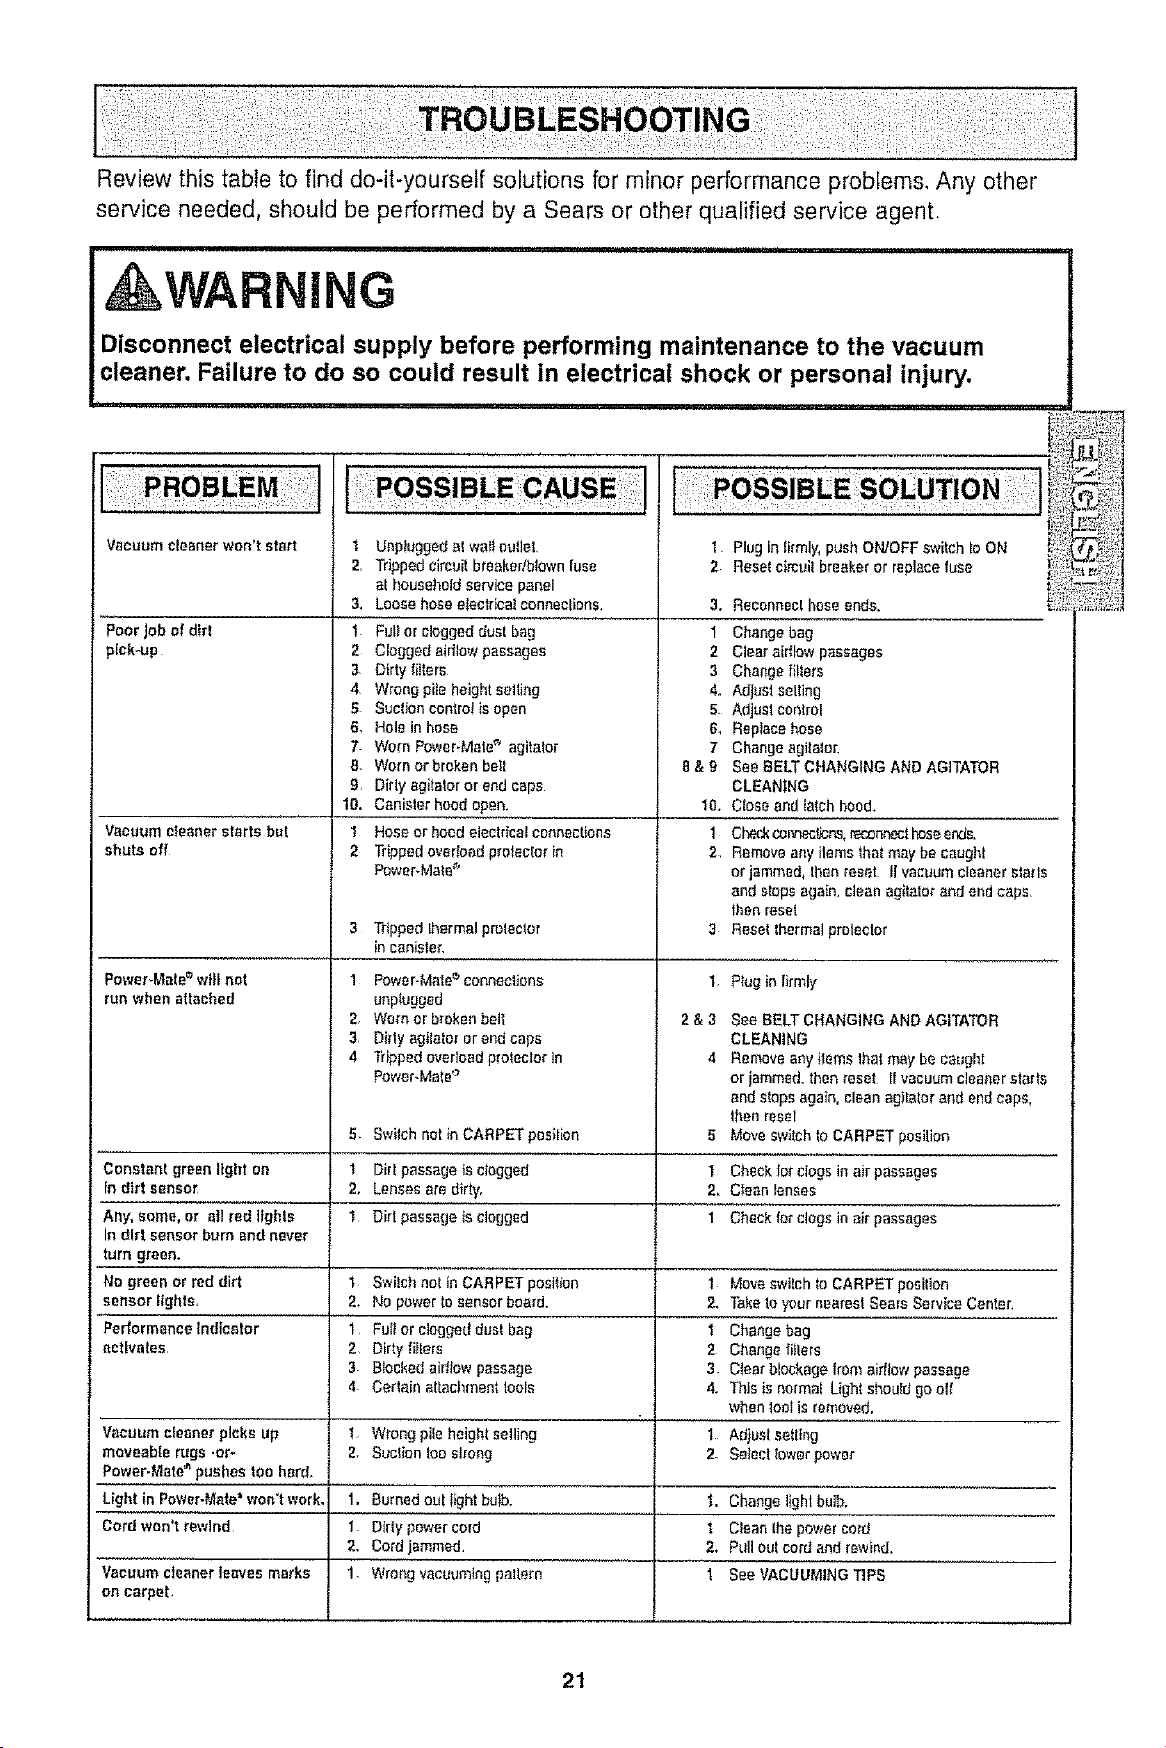
WARNING
Electrical Shock Or Personal Injury
Hazard
Disconnect electrical supply before per-
forming maintenance to the vacuum
cleaner. Failure to do so could result in
electrical shock or personal injury from
vacuum cleaner suddenly starting.
TO CHECKTHE BRUSHES
_:z:::__ When brushes
levei of the base
support bars,
replace the
agitator
Base Support Bars assembly,
TO REPLACE AGITATOR
ASSEMBLY
1. Remove Power-Mate s cover, belt and
agitator assembly See "To Remove Belt" in
BELT CHANGING AND AGITATOR
CLEANING..
2, Replace agitator assembly.
3. Reinstall belt and Power-Mate® cover.
See "To replace belt" in BELT CHANGING
AND AGITATOR CLEANING.
20
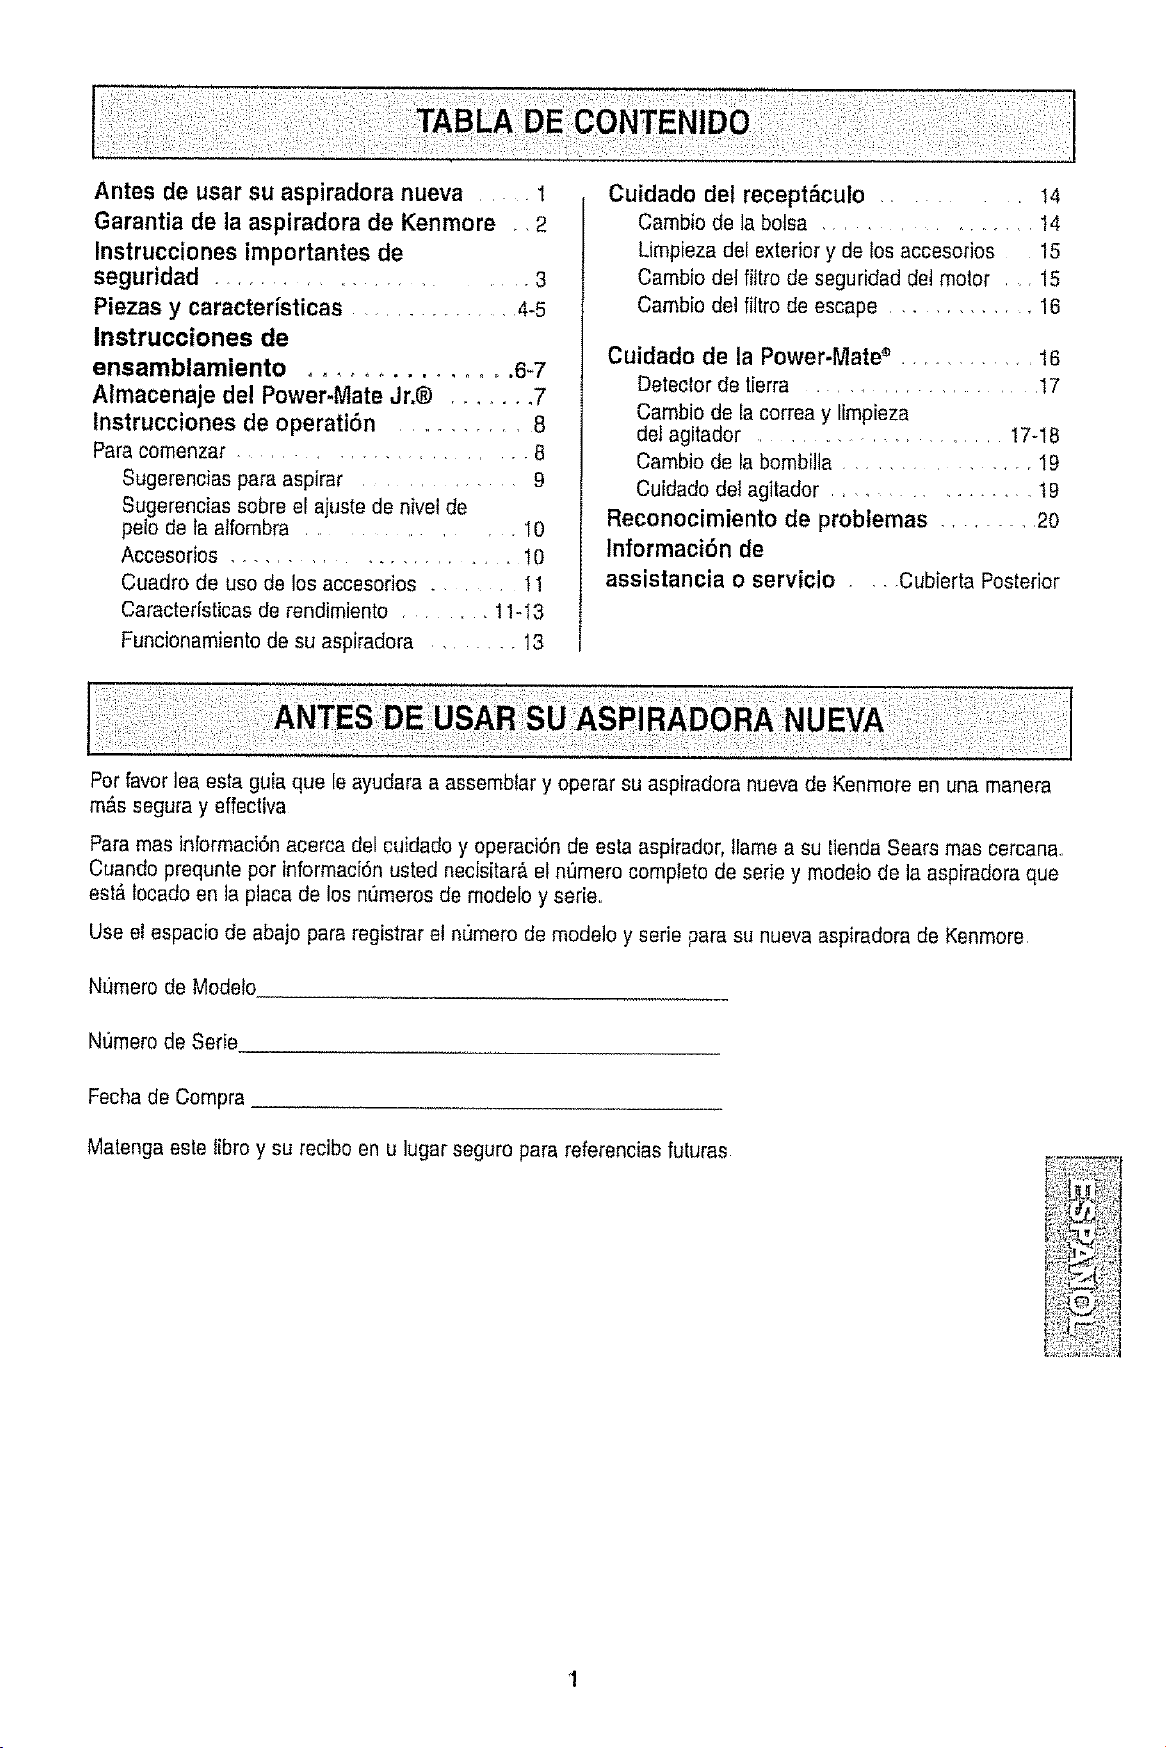
Review this table to find do-it-yourself solutions for minor performance probfems, Any other
service needed, should be performed by a Sears or other qualified service agent,
WARNING
Disconnect electrical supply before performing maintenance to the vacuum
cleaner, Failure to do so could result in electrical shock or personal injury.
,i,,,,11,,,i,i,,,,i,i,,,,,,, ,ii, i i, i
Vacuum cleanerwon't start t
2.
3_
Poor Jobef dirt 1
pick-up 2
Vacuumcleanerstartsbut
shuts off
Power-Mate =will not
run when attached
Constant green ligtlt on
In dirt sensor
Any.agree,ora,rG"'ii_'6;
In dirt sensor burn and never
turn green.
No green or red dirt
sensor Ilghts,
Pedormance indicator
activates
Unplugged _I waif outlet.
Tripped clrouit bteakerlbtown fuse
at household service panel
Loose hose electrical connections.
Fuli or clogged dual bag
Clogged aidlow passages
3 Dirty filters
4 Wrong pile height selling
5 Suclioncontrolis open
6. Hole in hose
7 Worn Power-Mate" agitalor
[I. Worn or broken belt
9. Dirly agitator or end caps
10. Canislerhood open.
I Hose or hoed electrical connections
2 Tripped overload proteolor in
PoweFMate _'
3 Tdpped thermal protector
in canister.
1 Power-Male _' Connections
unplugged
2. Worn or broken bet1
3 Dirty agitator or andcaps
4 Tripped overloadprolector in
Power.Mate °
1
2.
1
Switch not inCARPET posilion
Dirt passage is clogged
Lenses are dirty_
Dirt passage isclogged
t Swilch not in CAR PET position
2. No power to sensor board.
'i Fult or clogged dust bag
2. Dirty fiIlers
3 Blocked aid_aw passage
4 Certain attachment tools
1 Plug in !irmly, push ON/OFF swilch Io ON
2 Resef cimuil breaker or replace fuse
3. Reconnect hose ends.
1 Change bag
2 Clear airflow passages
3 Change {i!lers
4_ Adjust selling
5 Adjust control
& Replace hose
7 Change agitalor.
8 & 9 See BELT CHANGING AND AGITATOR
CLEAN!;NG
Close and latch hood.
Check cor_ecUcrL_,r_'_nr_%t hoseends,
Remove any ilams _hot may be caught
or jammed, lhan reset II vacuum cleaner elarls
and slops again, clean agitator and end caps,
then reset
Reset lhermal praleclor
Plugin firmly
10.
1
2
3
1
2&3
4
5
1
2.
1
1
2.
2
3
4.
t
2.
See BELT CHANGING AND AGITATOR
CLEANING
Remove any items g_at may be caught
orjammed, thenreset Ilvaeuumclaanerstarts
and slops again, clean agitator and end caps,
lhen reset
Move swileh to CARPET posilion
Check Ior clogs in air passages
Clean lenses
Check for clogs in air passages
Move ewilch to CARPET poeition
Take to your nearest Seers Service Center,
Ct_ange bag
Change fillers
Cider blockage tree aidlow passage
Thisisnormal Light should go air
when loof is removed.
Adjusl setting
$etect tower power
Vacuum cleaner picks up 1. Wrong pile height selling
moveable rugs .or- 2. Suclian too slrong
Power-Mate '_ pushes too hard,
Light in Power-Mate won't work,
Cord won't revdnd
Vacuum cleanerleaves marks
on carpet,
I, But.ned,out light bulb.
I. Dirty power cord
2. Cord jammed.
I. Wrong vacuuming paltern
I. Change light bulb.
I Clean Ihe power cord
2. Pull oul cord and rewind,
i See VACUUMING TIPS
21

22
Antes de usar su aspiradora nueva 1
Garantia de la aspiradora de Kenmore • •2
Instrucciones importantes de
seguridad .......................... 3
Piezas y caracteristicas ............... 4-5
Instrucciones de
ensamblamiento ............... 6-7
Almacenaje del Power-Mate Jr.@ ....... 7
Instrucciones de operatiSn ........... 8
Parecomenzar ..................... 8
Sugerencias pare aspirar ............. 9
Sugerencias sobre el ajuste de nivet de
pelo de ta atfombra .................. 10
Accesodos ....................... t0
Cuadro de use de los accesofios ......... 11
Caracter[sticasde rendimiento ...... 11-I3
Funcionamientede su aspiradora ....... 13
Cuidado del recept_culo ....... I4
Cambio de ]abolsa .................... I4
Limpieza del exterior y de Ios accesorios t5
Cambio det fittro de seguridad det motor . , 15
Cambio de] filtro de escape ............ 16
Cuidado de la Power-Mate s ............ t6
Detector de tierra ..................... I7
Cambio de la correa y limpieza
del agitador ..................... 17-18
Cambio de la bombilla ................. 19
Cu[dado del agitador ............... t9
Reconocimiento de problemas ......... 2o
Informaci6n de
assistancia o servicio .... Cubierta Posterior
Per favorlea esta guia que leayudara a assembler y operar su aspiradora nueva de Kenmore en una manera
m&s segura y effectiva
Paremas inlormaci6n acerca del cuidado y operaci6n de esta aspirador, tlame a su tienda Sears mas cercana
Cuando prequnte per informaci6n usted necisitar_ el nQmerocomplete de eerie y modeto de la aspiradora que
eel#,locado en laplaca de los numeros de modelo y serie..
Use el espacio de abajo pare registrar et numero de modelo y eerie pare su nueva aspiradora de Kenmore
Numero de Modelo
Nt)mero de Serie
Fechade Compra
Matengaeste fibre y su recibo en u lugar seguro para referencias futuras

Garantfa limitada de un afio
Siesta aspiradora fa!la por un defecto en sus materiales o fabricaci6n en el perfodo de
un aP,o desde la fecha de compra, cuando se instala, maneja y mantiene siguiendo
todas las instrucciones incluidas con el producto, devu61vata a cuatquier tienda Sears,
Sears Parts & Repair Center (Centro de Reparaciones y Piezas Sears) u a otro
distribuidor Kenmore para que reparen el aparato de forma gratuitao
Si esta aspiradora se utiliza para otros fines que no sea uso familiar privado, esta
garantfa es v_ttida sotamente durante 90 dfas desde la fecha de compra.
Esta garantfa cubre exclusivamente los defectos de materiales y fabricaci6n.
Sears NO pagard:
1_ Los elementos desechables que puedan desgastarse con un uso normal, incluyendo
sin car&cter excluyente, filtros, correas, I_mparas y bolsas.
2. Un t_cnico de! servicio t6cnico para que enseSe al usuario a instalar, manejar o
mantener correctamente el productoo
3° Un t6cnico del servicio t6cnico para timpiar o mantener este producto.
4. DaSos o averfa de este producto si no se ha instalado, manejado o mantenido
siguiendo todas las instrucciones incluidas con el producto.
5. DaSos o aveda de este producto originados per accidente, abuso, uso incorrecto u
uso del producto para otros fines distintos de los indicados.
6. Dafios o averfa de este producto causados por el uso de detergentes, limpiadores,
productos qufmicos o utensilios diferentes a los recomendados en todas las
instrucciones que se incluyen con el producto.
7. DaSos o aveffa de las piezas o sistemas causados por modificaciones no
autorizadas que se hayan hecho a este producto.
Limitaci6n de responsabilidad de las garantfas implfcitas; limitacibn de remedios
E_IQnico y exclusivo remedio del cliente bajo esta garantfa Iimitada ser_ la reparaci6n del
producto seg[3n Io indicado en este documento. Las garanflas implfcitas, incluyendo las
garantfas de comerciabilidad o idoneidad para un prop6sito especffico, se limitan a un
aSo o el perfodo mAs corto permitido por la ley. Sears no ser_ responsable por daSos
incidentales ni consecuenciales. Atgunos estados o provincias no permiten la exclusi6n
o limitaci6n de daSos incidentales o consecuenciales, ni limitaciones en ta duraci6n de
las garantfas imptfcitas de comerciabilidad o idoneidad, por Io que estas exclusiones o
limitaciones podri'an no apltcar en su caso.
Esta garantfa aplica solamente cuando esta aspiradora se utiliza en Estados Unidos o
Canada..
Esta garantfa le otorga derechos legales especfficos, y usted podrfa tener otros
derechos que varfan en funci6n de cada estado.
Sears, Roebuck and Co., Hoffman Estates, IL 60179
Sears Canada Inc,, Toronto, Ontario, Canada M5B 2B8
ADVERTENCIA
Su seguridad es muy importante para nosotros. Para reductr el riesgo de !ncendio,
cnoque el6ctrico, lesi6n corporal o dafios al utilizar au aspiraaora, act_e ae acuerao
con precauciones b&sicas de seguridad, entre elias:
Lea las Instrucctones en este manual antes de
armar o usar su asplradora,
Use su aspiradora 0nlcamente en la forma
descrita en este manual. Use _nicamente con
accesorios recomendados per Sears,
Desconecte et cord6n et6ctrico antes de
componer o limplar el _rea del cepil!o. De lo
contrario, el cepillo podrla arrancar de form
tmprevtsta o podrla productrse un cheque
el6ctrico..
No abandone la aspiradora cuando est6
conectada. Descon6ctefa cuando no la eat6
usando y antes de darle servicio.
Para reducir el rtesgo de cheque ei6ctrico no
use su asplradora al aire fibre ni sobre
superficies mojadas.
No permita que sea utilizada come juguete.
Se requiere tener mayor cuidado cuando sea
u!itizada en la proximEdadde niSos o per
nlnos_
No use la aspiradora si el cord6n o et enchufe
est_ daSadooSi la aspiradora no est_
funcfonando adecuadamente o s[ se ha
dejado caer, est_ dat'iada, se ha dejado
expuesta a la intempede o se ha dejado caer
en agua, devu61vafaa un Centre de servicie
de Sears
No hale ni transporte la aspiradora per el
cord6n; no use el cord6n come mango; no
cierre puertas sobre el cord6n; no hale el
cordon sobre rebordes agudos ni esquinas°
No pase la aspiradora sobre el cord6n..
Mantenga et cordon alejado de superficies
calientes.
No desconecte la asptradora tirando del
cordon el6ctdco Para desconeclarla, hale el
enchufe, no el cord6n_
No toque [a asptradora ni e1enchufe con tas
manes mojada&
No coloque objetos en las aberturas.
No utilice la aspiradora si alguna abertura
est6 bfoqueada; mant6ngala libre de polvo,
Apague redes los controles antes de
desenchufar,
Tenga cuidado especial af utilizar ]a
aspiradora en escalones.No la coloque sobre
sillas, mesas, etc. Mant6ngala en el piSOr
NO use la aspiradora para aspirar tfquidos
tnflamables o combustibles (gasolina, ffquidos
para limpieza, perfumes, etc.) ni la use en
tugares deride 6stos poddan estar presentes.
Los vapores de estas sustanctas pueden crear
un peligro de tncendfo o explosi6n.
No levante ninguna cosa que se est6
quemando o emitiendo humo, come
cfgarrilfo._,ceriilos o cenizas calientes
No use la asptradora sin tener instatada la
bolsa para polvo y/o los fiitrOSo
Cambie siempre la bolsa para polvo despu6s
de aspirar limpiadores de alfombras o
desodorantes, talcos y pelves fines. Estos
productos atascan la bolsa, reducan el flujo de
aire y pueden causar que 6sta se romp& St
no cambia la boisa podrfa ocasionar dafio
permanente a la asplradora.
No use la aspiradora para levantar objetos
agudos, juguetes pequeSos, alfileres,
sujetapapeles, etc. Podrian dafiar la
aspiradora o la bolsa para polvo.
No opere sin el fiitro de escape ni la cublerta
del filtro de escape instalados.
La manguera contiene cables el6ctricos. No
la use cuando estA dafiada, cortada, o
perforada, Reemplace siestA cortada o
desgastada. No Ievante objetos afilados.
Slempre apagu6 y desconecte ia aspiradora
antes de conectar o desconectar ]a manguera,
HandFMate J_.® (sf aplicable), o Ia boquilla.
SuJete el enchufe con la mane al enrollar et
cord6n el6ctrico Para desconectada, hale en
enchufe, no el cord6n_
Usted es responsabte de asegurar que su
aspiradora no sea utilizada per ninguna
personaque no pueda manejada
correctamente.
GUARDE ESTAS INSTRUCCiONES
El armado y use seguro de su aspiradora son su responsabilidad. Esta aspiradora ha side
disefiada exclusivamente para use dom6stico. La aspiradora deber_ almacenarse en un lugar
seco y en el interior Lea este Manual del prop ietado detenidamente, pues cont ene
informact6n importante sobre se.clurldacl y use. Esta qula contiene informaciOn sobre
seguddad debajo de stmbolos de advertiencla cutdado.
i iiiiii1,11111111,,1111,1,i ii i i
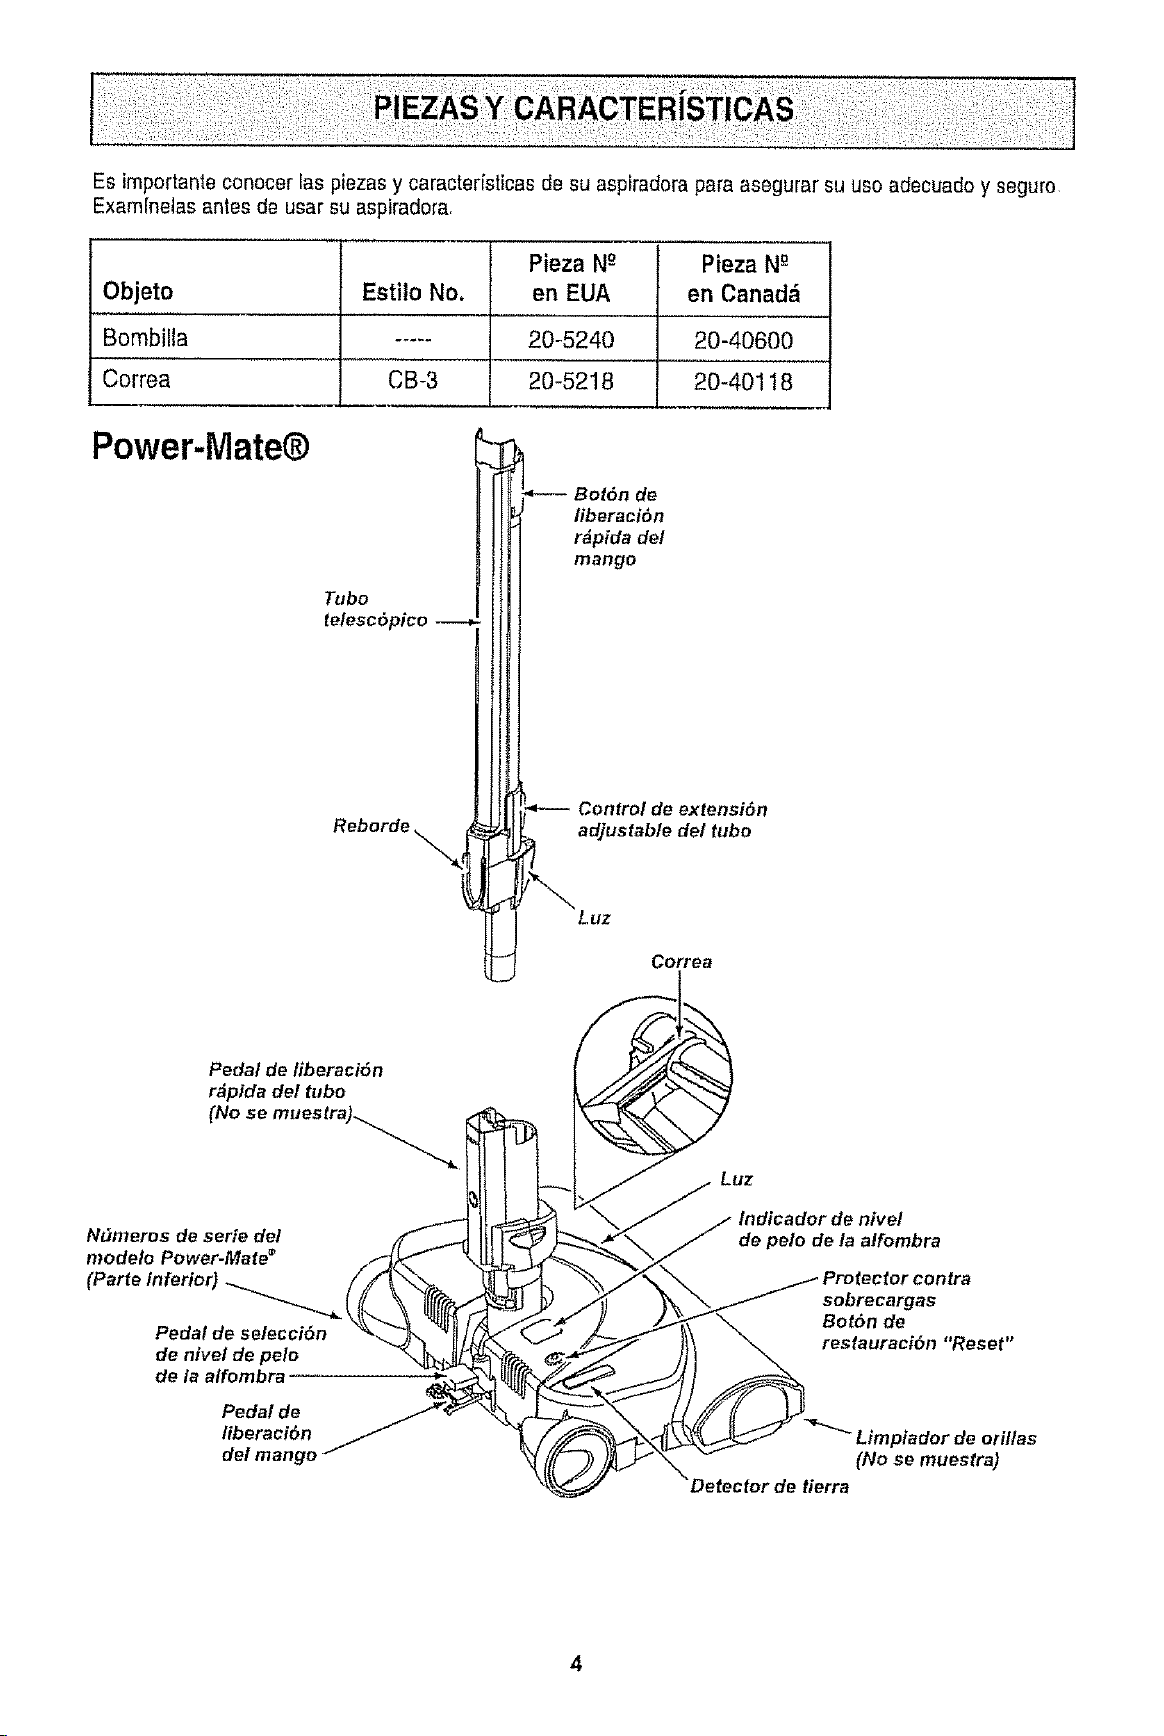
Es importanle conocer las piezasy caracter[sticas de su aspiradora para asegurar su uso adecuado y seguro
Exam[netas antes de usar su aspiradora,
Objeto
Bombilla
Correa
Esti!o No.
CB-3
Pieza Ng Pieza Ng
en EUA en Canad_
20-5240
20-5218
20-40600
20-40118
Power-iVlate®
Tubo
telesc6pico
Reborde
Bot6n de
/iberaci6n
r#pida de!
mango
Control de extensi6n
adjustable de/tubo
Luz
Correa
Pedal de liberaci6n
r_pfda del tubo
(No se muestra)_......_
Luz
Ndmeros de serte de/
modelo Power-Mate _
CPa.oi.fo.or (
Pedal de selecciSn
de nivel de pelo
de/a alfombra
Pedal de
/iberaei6n
del mango
de polo de la atfombra
sobrecargas
Bot6n de
restauraci6n "Reset"
Limpiador de otiltas
(No se muestra)
Detector de tierra

MANGUERA
Interrupter de encendide/
apagado de tres pesiciones
(Off/Floor/Carpet)
(Apagado/Piso/Alfombra)
Control de
aspiraci6n
Mange
ACCESORIOS
Herramlenta
para
hend/duras------_
Cepltlo 4
para pfsos
t
Power.Mate Jr. ®
1....................
_ Cepdlo
Cepillo para _ _. _ para sacudlr
comb/nact6n _ I1_
i -coptHo
para telas
Dispositivo
giratorio de
la manguera
RECEPT/ CULO
Objeto
Bolsa para polvo
Fittro de escape
Filtro de seguridad
del motor
Estilo No.
Q
EF-I
CF-1
Pieza N_
en EUA
20-50557
20-86889
20-86883
Pieza N_
en Canad_
20_50410
20-40324
20-4032l
Cubierla de
almacenamiento
para acceserios
(Almacenamiento
para accesorios
en denfro)
Tapa del
rece I
BetSn de
cord6n
el_ctrico
Cllbierta de aim acenamien to
para Pewer_Mate Jr/"_ Cubierta del fittro de
(No es muestra)
Cerd6n
el_ctrico
escape
Pestilto
de la tapa
Sujetador
de la bolsa
Bolsa para pelvo
Filtro de seguridad
del motor (Detrds
de la bolsa para polve)
Peltgm de cheque el_ctrico
No conecte la aspiradora basra clue terrninede
armada°De Io contrario podria causar un
cheque el_ctrico o lesi6n corporal
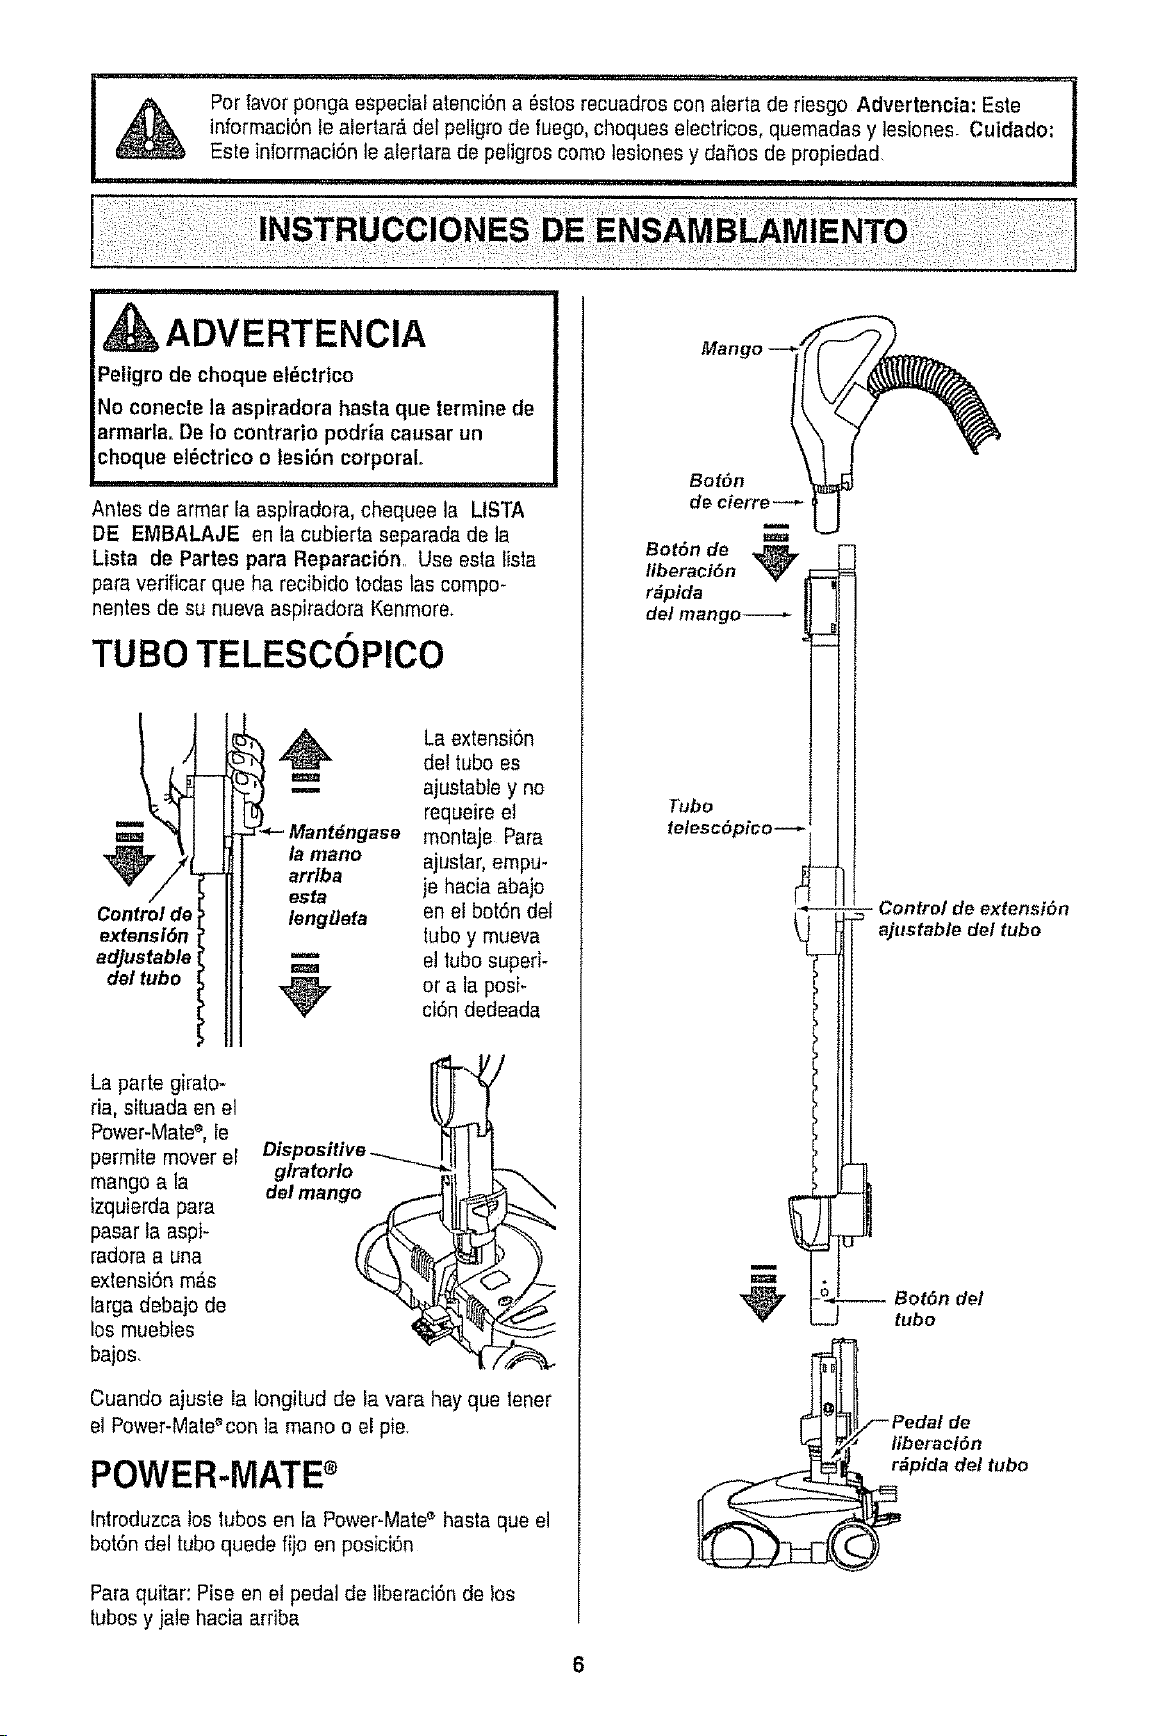
Antes de armar la aspiradora, chequee la USTA
DE EMBALAJE en la cubierta separada de la
Lista de Partes para Reparaci6n, Use esta tisla
para verificar que ha recibide todas las compe-
nentes de su nueva aspiradora Kenmore.
TUBe TELESCOPlCO
Controlde
extensi6n
adjustable
det tube
!__ant_ngase montaje PararequeireajustabledelLaextensi6ntub°elesyno
la manOarrlbaajustar,empu-
esta ie hacia abajo
lengtleta en el bot6n del
tubey mueva
_'" el tube superi-
_r ci6nOra tadedeadaPOSF
La parte giralo-
da, situada en el
Power-Mate%Ie
permite moverel
mango a la
izquierda para
pasar la aspi-
radora a una
extensi6nm_s
larga debajo de
los muebles
bajes,
gtratorlo
del mango_
Cuando ajuste ia Iongitud de la vara hay que tener
el Power-Mate%on la mane o el pie,
POWER.MATE
Introduzca los lubos en fa Power-Mate'_hasta que el
bot6n del tube quede fijo en posici6n
Paraquitar: Pise en el pedal de liberaci6n de bs
tubesy jale hacia ardba
Manc
Bot6n
de cierre --_
B°t°nliberaci6nde_ _---
r#pida M
de/mango----,-
_3[
Tube
telesc6pico--
5- Control de extensi6n
ajustable del tube
Bot6n del
tube
Pedal de
liberacl6n
pida del tube
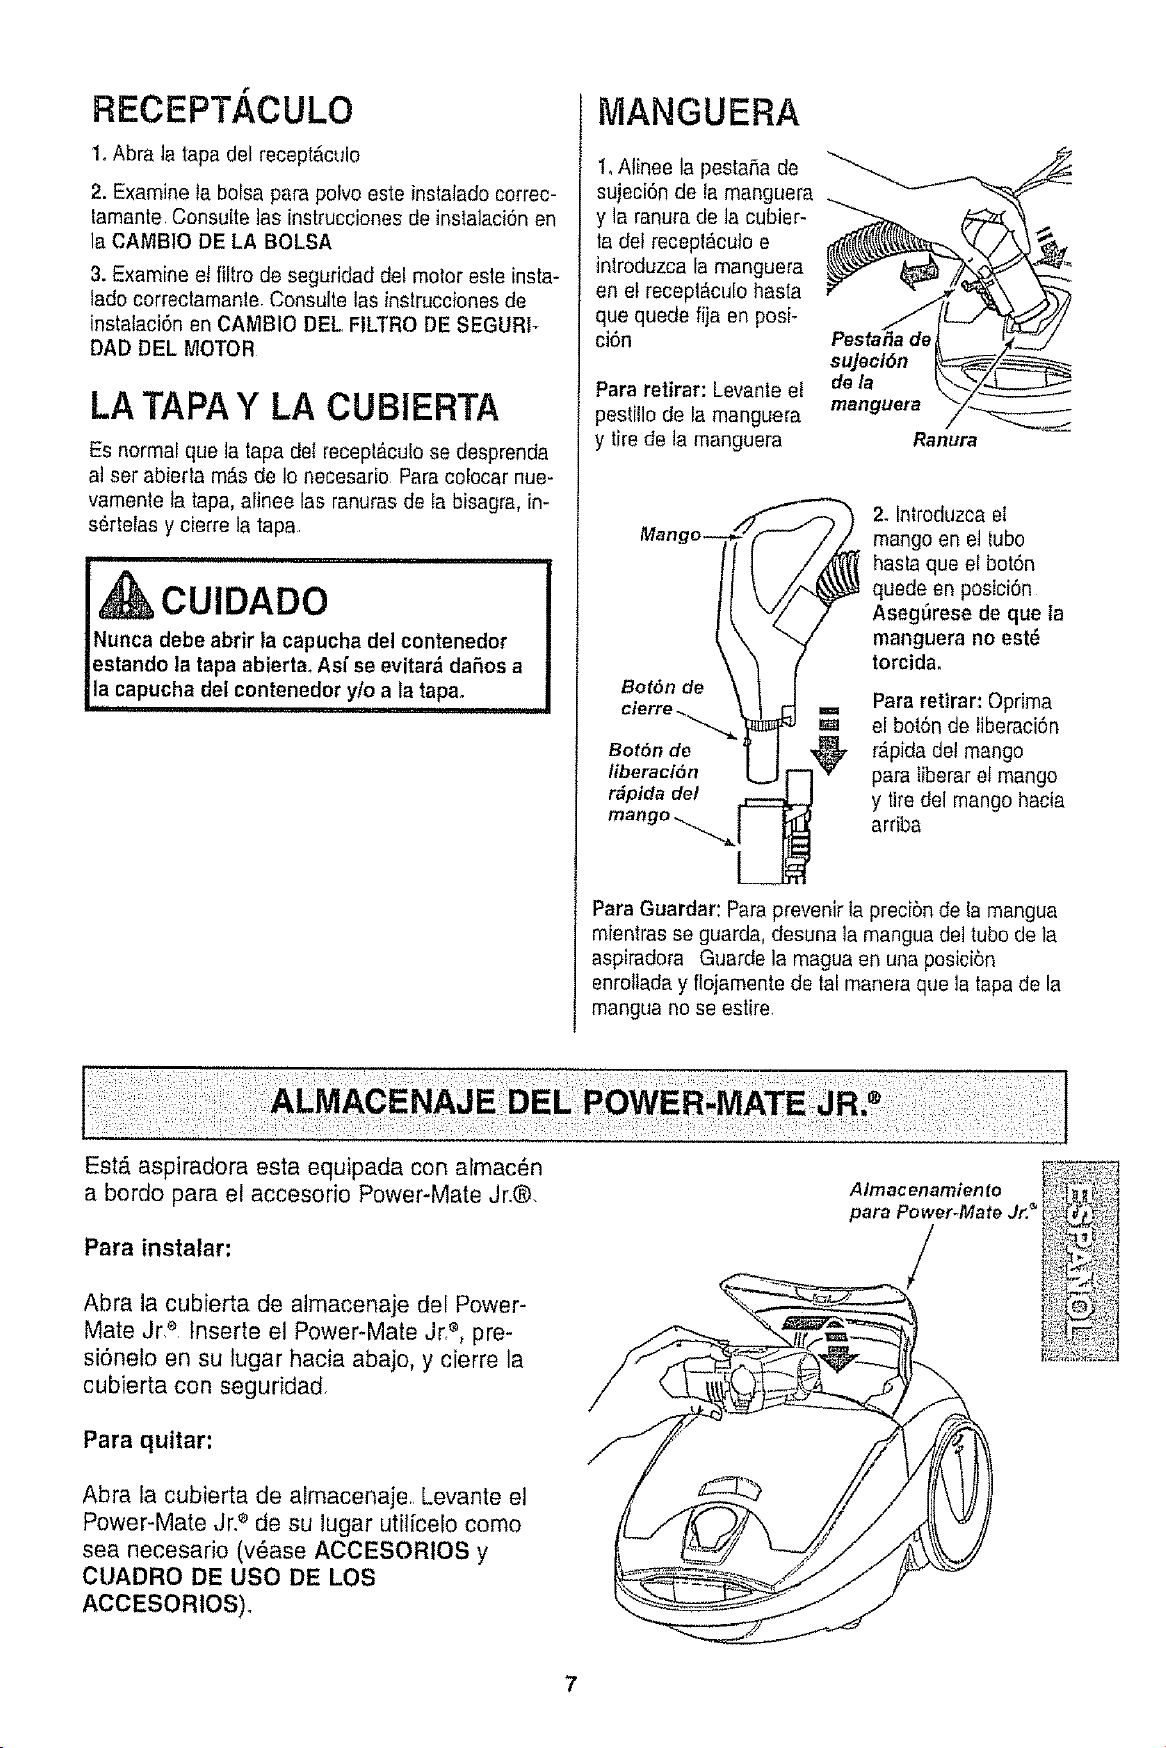
RECEPT/ CULO
1. Abra la tapa del recept&culo
2. Examine la balsa para polvo este instalado correc-
lamante Consulte las instrucciones de instalaci6n en
la CAMBIO DE LA BALSA
3. Examine el fiitro de seguridad del motor este insta-
tado correctamante.Consulte las instruccbnes de
instalaci6n 8n CAMBIO DEL FILTRO DE SEGUR1-
DAD DEL MOTOR
LA TAPA Y LA CUBiERTA
Es normal que la tapadet receptAcuEose desprenda
at set abierta mAsde Io necesado ParacoEocarnue-
vamente ta tapa, alinee las ranuras de ta bisagra, in-
s6rteras y cierre ta tapa
i ...................i i
I,&cu,oAoo
|Nunca debe abrir la capucha del contenedor
|estando latapa abierta. As[ se evitar&dafios a
i,!,acap,,ohado, aoteoedory/oa,atapa
MANGUERA
1, Atinee la pestaSa de
sujeci6n de ramanguera
y la ranura de la cubier-
ta del recepl_cuto e
intreduzcaia manguera
en el recepl_cu[o hasta
que quede fija en posi-
ci6n
Para retirar: Levanle et
pestillo de la manguera
y tire de la manguera
Pesta#a de
sujeci6n
de/a
manguera
Ranura
2. Introduzcael
mango en et tuba
hasta que el botSn
quede en posici6n
AsegSrese de que la
manguera no est_
torcida°
Para retirar: Opdma
el bot6n de iiberaci6n
Bot6n de _ r,_pidadel mango
liberaci6n r"-l'_' para tiberar et mango
r_pida de/ _ y tiredel mango hacia
mango "_"JL_ ardba
Para Guardar: Para prevenir la preci6n de la mangua
mientras se guarda, desuna la mangua del tube de Ia
aspiradora Guarde la magua en una posicibn
enrollada y flojamente de tal manera que la tapa de la
mangua no se estire.
a bordo para el accesodo Power-Mate Jr.®.
Para instalar:
Abra la cubierta de almacenaje del Power-
Mate JrP. fnserte el Power-Mate Jr,_, pre-
si6ne!o en su lugar hacia abajo, y cierre la
cubierta con seguridad
Para quitar:
Abra la cubierta de almacenaje.. Levante el
Power-Mate Jr2 de su lugar utilfcelo coma
sea necesario (v_ase ACCESORtOS y
CUADRO DE usa DE LOS
ACCESORIOS).
A Imac enamien to
para Power.Mate Jr. _
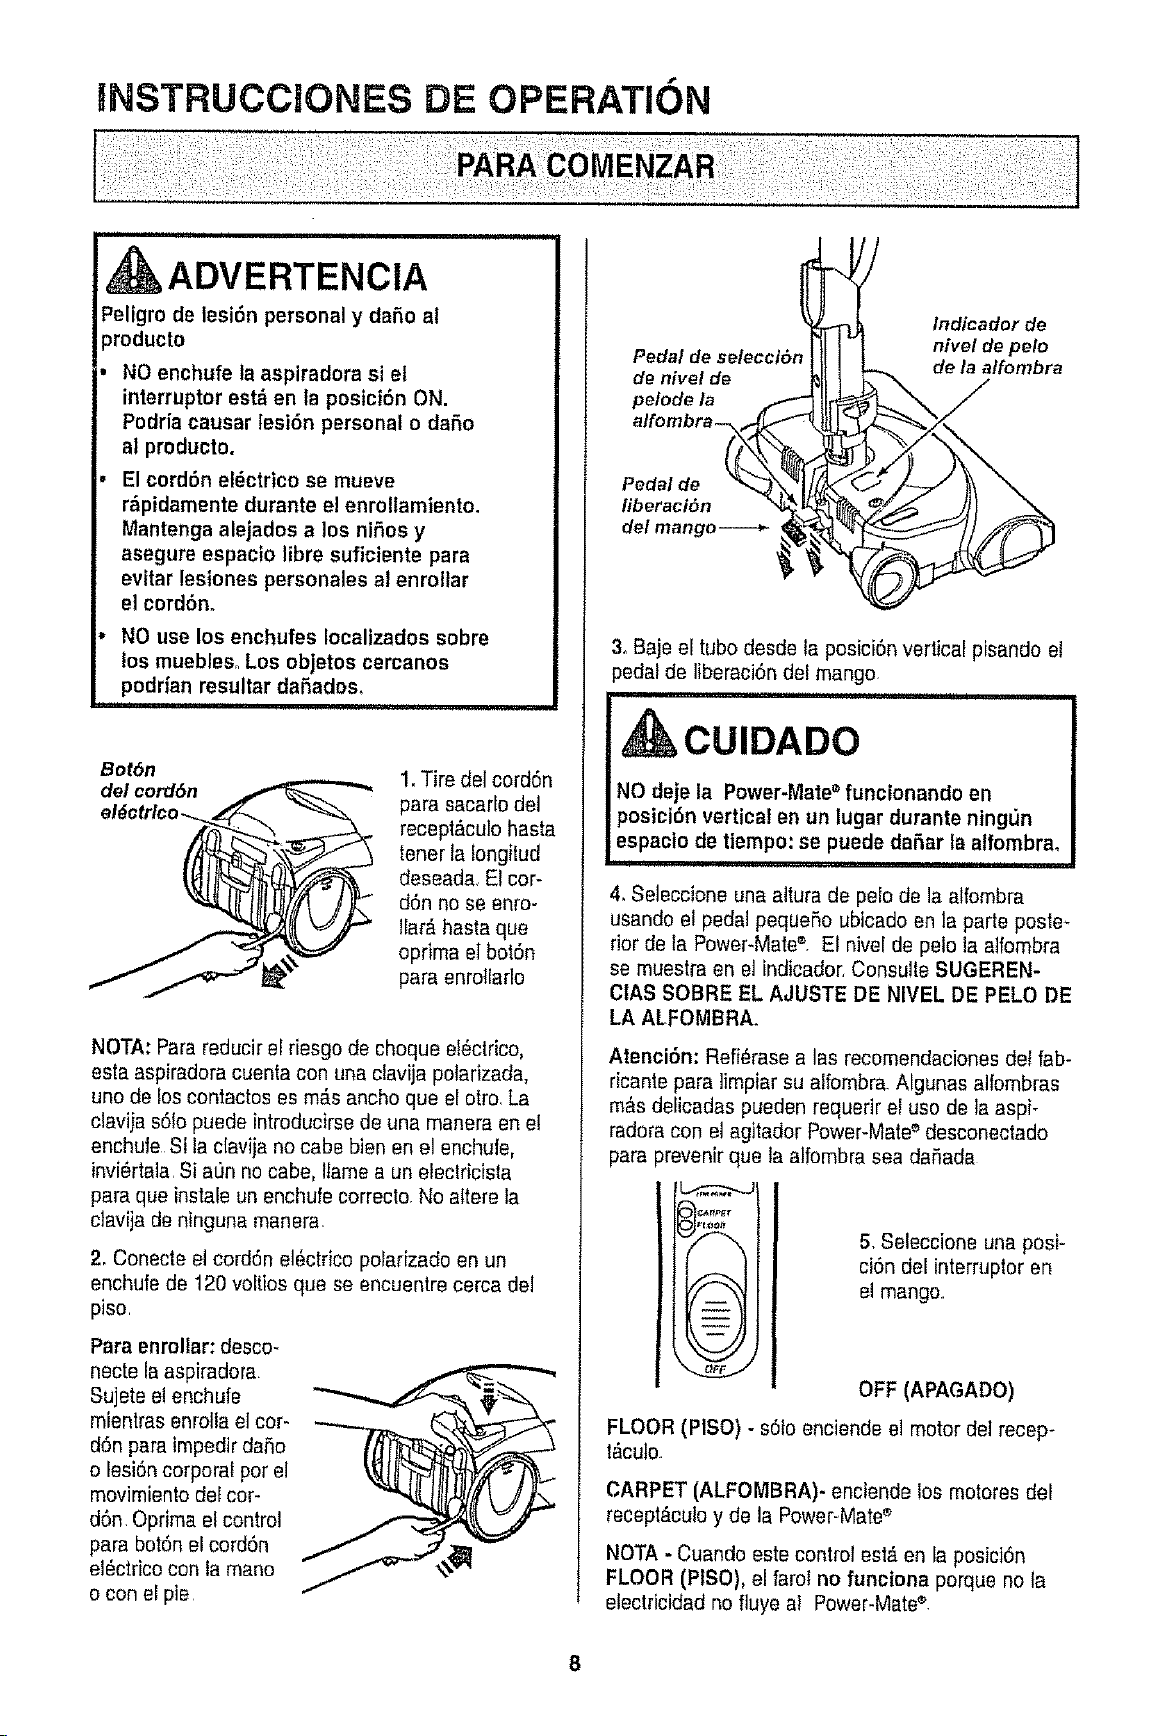
INSTRUCCJONES DE OPERATION
n nlll,u i i ii
ADVERTENCtA
Peligro de lesi6n personal y dare a!
_roducto
NO enchufe la aspiradora si et
interrupter est_ en la posici6n ON.
Podria causar tesiOn personal o dare
al producto.
El cordonel_ctrico se mueve
r&pidamente durante el enrollamiento.
Mantenga alejados a los niOos y
asegureespacio libre suficiente para
evitar lesiones personales al enro!lar
el cordbno
NO use los enchufes Iocalizados sobre
los muebles°Los objetos cercanos
podrian resultar daRados,
",,, ............. i
Bot6n
del cord6n
1. Tire dei cordon
para sacarlo del
recept,%ulohasta
tener lafongitud
deseada,El cor-
don no se enro-
Jlar_,hasta que
oprima el boibn
para enrotlarle
NOTA: Parareducir el riesgo de cheque e!_clrico,
esta aspiradoracuenta con una clavija polarizada,
uno de los contactos as m#,sancho que el otro, La
claviia sOlopuede introducirse de una manera an et
enchufe St la c[avija no cabe bien an el enchule,
invi_rtala, Si a_n no cabe, Ifamea un efeclricista
para que instale un enchufecorrecto No altere la
ciavija de n{ngunamanera
2, Conecte el cordon elOctdcopolarizado en un
enchufede t20 voltios que se encuentre cerca del
piso,
Para enrollar: desco-
necte la aspiradora
Sujete et enchufe
mientras enrottael cor-
don para impedlr dare
o lesion corporal per el
movimientodel cor-
don, Oprima el control
para botOnel cordon
el_ctrico con la mane
o con el pie
Pedal
de hive! de
pelode /a
Indicador de
nivel de pelo
de la a/fombra
Pedal de
fiberaciOn
del mango----_
3. Baje el tubedesde la posiciOnvertical pisando el
}edatde liberaciOndel mango
Frlll'"lllllllll III1' ii, iiii IIII I I
CUIDADO
NO deje la Power-Mate• funcionando en
posicibn vertical en un lugar durante ning_n
espacio de tiempo: se puede daOar la alfombra,
ii , ilnu i
4, Seleccione una altura de pelo de la alfombra
usando et pedal pequeOoubicado en la parte poste-
rior de la Power-Mats®, El nivel de pelo la a]fombra
se muestra en el indicador,Consulle SUGEREN-
CIAS SOBRE EL AJUSTE DE NIVEL DE PELO DE
LA ALFOMBRA.
AtenciOn: Refi_rase alas recomendacionesdet fab-
ricante para ]impiarsu alfombra Algunas alfombras
m&sdelicadas pueden requerir el use de la aspi-
radoracon el agitador Power-Mate_'desconeclado
para prevenir que la alfombra sea daOada
)le._##F,r
A
t -- i
= --
= -- J
\-.._j/
v
FLOOR(PISO)
l_cuto
5, Seleccione una posi-
ciOndel interrupter en
el mango,
OFF (APAGADO)
- s01oenciende el motor del recep-
CARPET (ALFOMBRA)- enciende los motores del
recept_culo y de la Power-Mates
NOTA. Cuando este control esl_ en la posiciOn
FLOOR (PISO), el farol no fanciona porque no ta
electricidad no fluye a! Power-Mate®
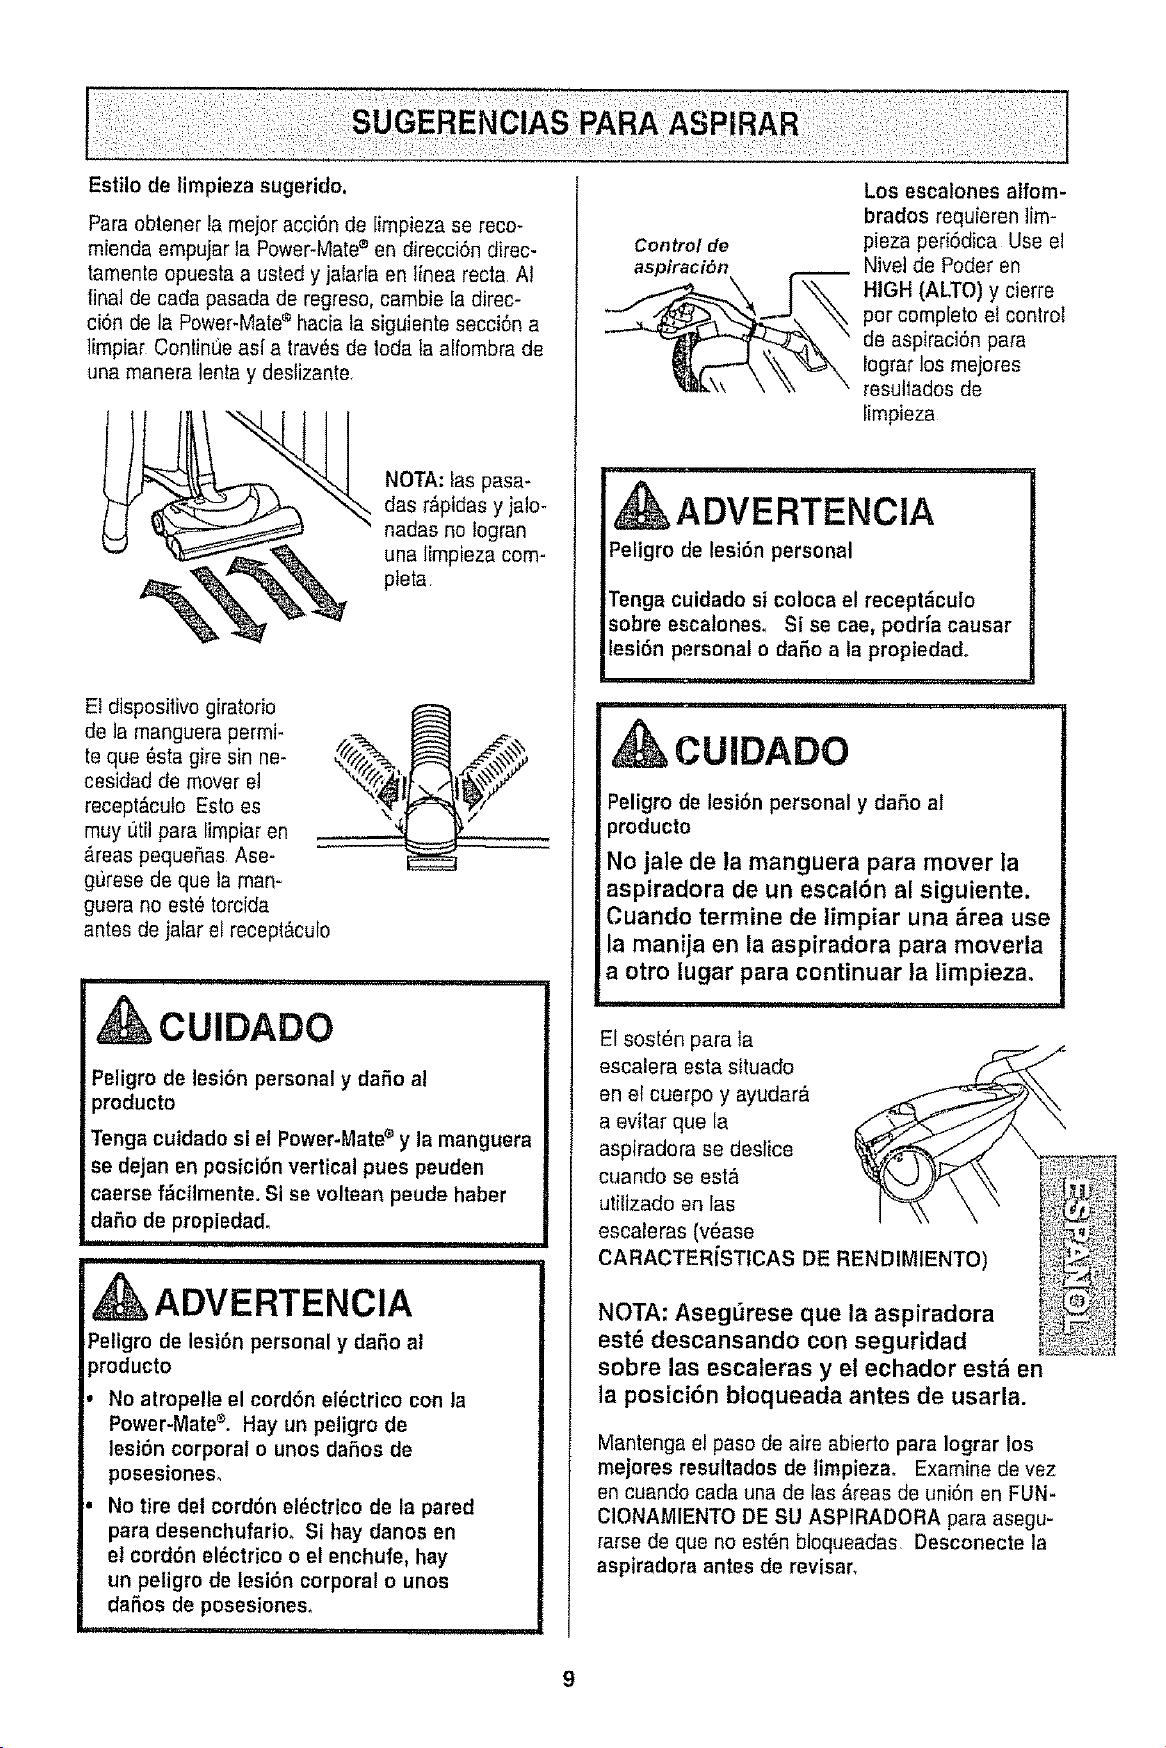
Estilo de tirnpieza sugerido,
Para obtener ta rnejoracciOnde [irnpiezase reco-
rniendaernpujar ta Power-Mate® en direcciOndirec-
tarnenteopuesta a usted y jalarla en tinea recta At
final de cada pasada de regreso,carnbie [adirec-
ciOn de la Power-Mate®hacia la siguiente secciOna
lirnpiar ContinlJeasf a travOsde loda ta alfornbra de
una manera Ionia y deslizante,
NOTA: fas pasa-
das r_ipidasy jalo-
nadas no logran
una limpieza com-
pteta
El diepositivo giratodo
de la rnangueraperrni-
teque 8sta gire sin ne-
cesidad de mover ei
receptD,cuto Esto es
muy _ltilpara lirnpiaren
#,reaspequefias Ase-
giJresede que la man-
guera no est6 torcida
antes de jalar et recept_culo
i
CUIDADO
Peligro de lesion personal y dafio al
producto
Tonga cuidado si el Power-Matee y la manguera
se dejan en posiciOn vertical pues peuden
caersef_cilmente. Si se voltean peude haber
daOo de propiedad,
,i
i ............................
ADVERTENClA
Peligrode lesiOn personal y dafio al
}roducto
No atropelle el cordOneiOctricocon la
Power-Matez, Hay un peligro de
lesiOn corporal o unosdafios de
posesiones,
No tire del cordOnel_ctrico de la pared
para desenchufario+Si hay danos en
el cordonel_ctrico o el enchufe, hay
un peligro de lesion corporal o unos
dafios de posesiones,
Control de
aspiraciOn
Los escalones alforn-
brados requieren lirn-
pieza periOdica Use el
Nivei de Poder en
HIGH (ALTO) y cierre
por completo et control
de aspiraciOnpara
lograr los rnejores
resullados de
Iimpieza
ADVERTENCIA
Peligrode lesion personal
Tonga cuidadosi coloca el recepti_culo
sobre esca!ones_ Si se cae, podrfa causar
lesion personal o daOo a la propiedad°
CUIDADO
Peligrode lesion personal y daflo al
producto
No jale de la manguera para mover la
aspiradora de un escalOn al siguiente,
Cuando termine de limpiar una i_rea use
la manija en la aspiradora para moverla
a otro lugar para continuar la limpieza.
El sostOn para la
escalera esta situado
aovitar la ",
aspiradora se deslice _._I X_.,._.__
cuando se est_
escaleras (vease i_.,_i_._,,t
CARACTERiSTICAS DE RENDIMIENTO)
NOTA: Aseg[_rese que la aspiradora
est6 descansando con seguridad li_!i_#_!I
sobre las escaferas y el echador est& en
la posici6n btoqueada antes de usarla.
Mantenga el paso de aire abierto para Iograr los
mejores resultados de limpieza. Examine de vez
en cuando cada una de las #,teasde union en FUN-
C!ONAMIENTO DE SU ASPIRADORA para asegu-
rarse de que no estOnbloqueadas Desconecte la
aspiradora antes de revisar,
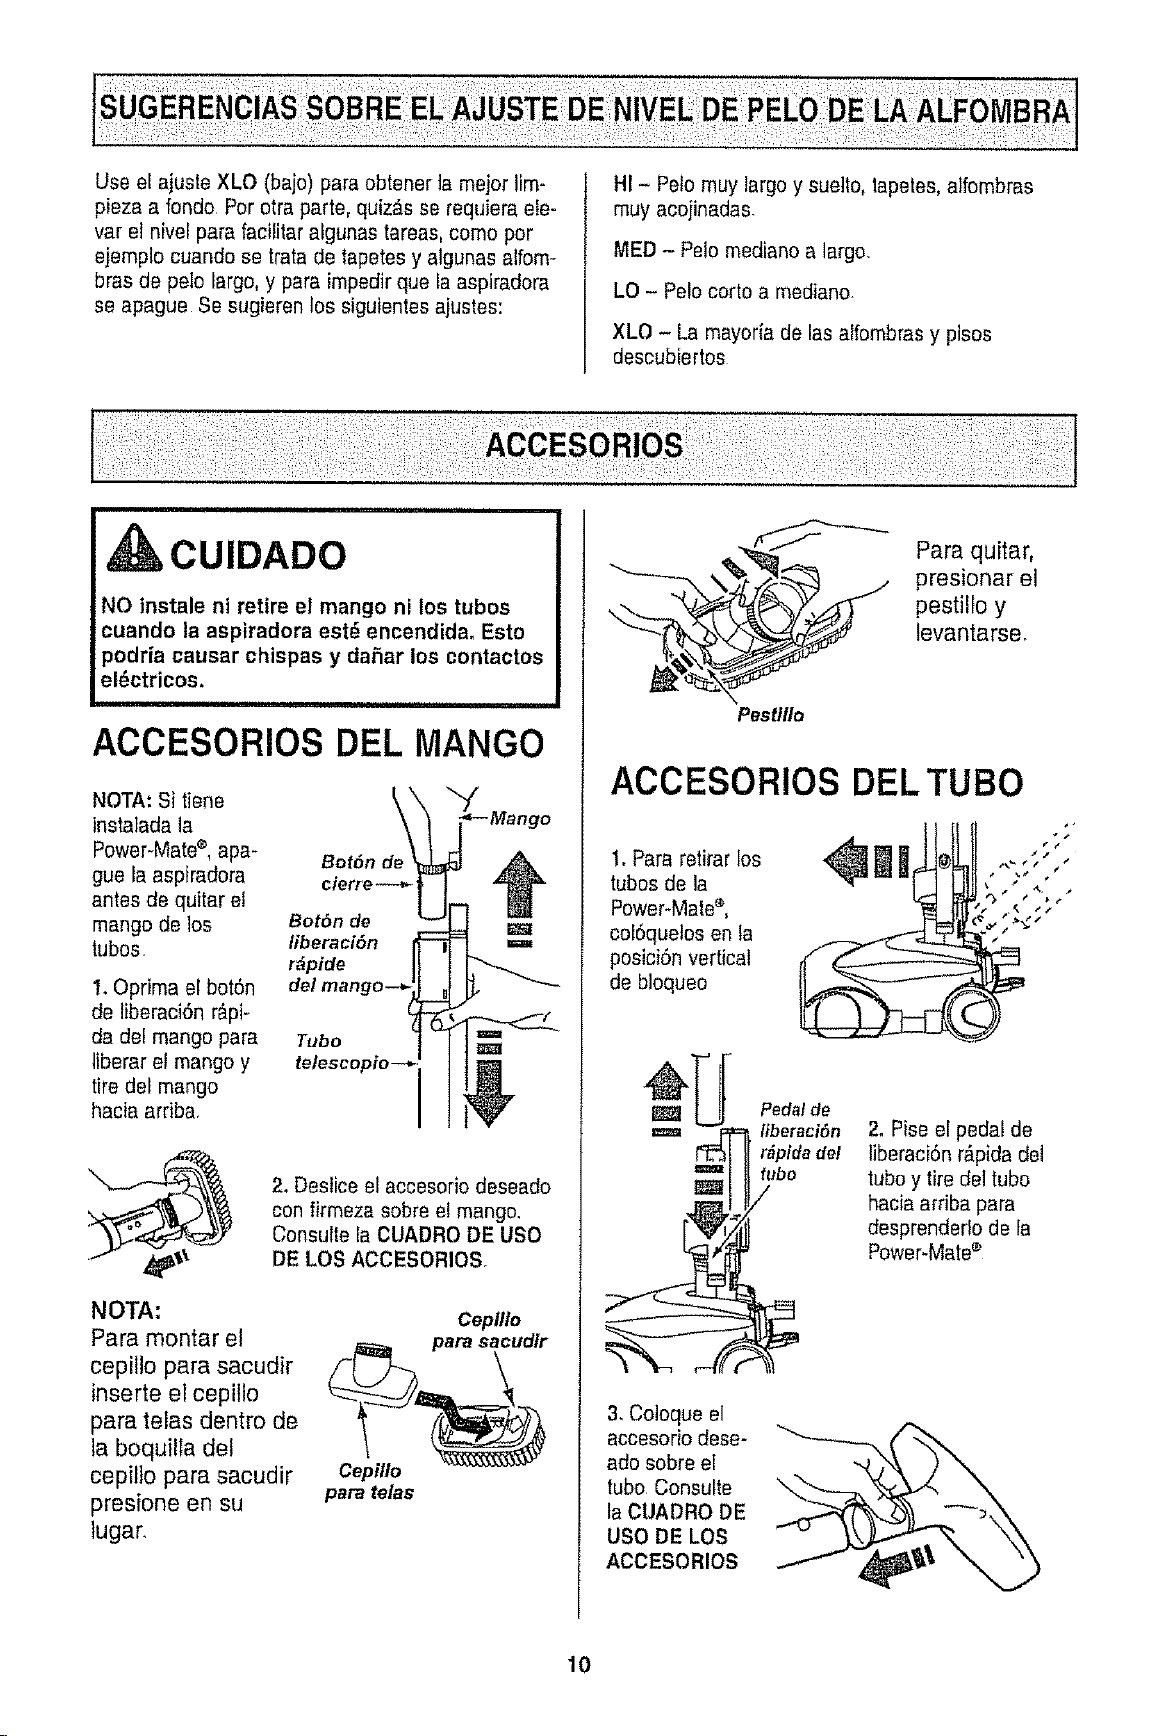
UseelajusteXLO(baje)paraobtenertamejorlim-
piezaarondoPoretrapart®,quiz_.sserequieraete-
varelnivelparafacilitaratgunastareas,comeper
ejempio cuando se tratade tapetes y atgunas alfem-
bras de pele largo, y para impedirque fa aspiradora
se apague Se sugieren los siguientes a}ustes:
HI - Pelomuy largoy euelto,lapetes, alfombras
muy acojinadas.
MED - Pelo mediano a large.
LO - Pelocorto a mediano
XLO - La mayer{ade las alfembras y pisos
deseubiertes
,CUIDADO
NO instale nt retire el mango ni los tubos
cuando la aspiradora est_ encendida. Esto
podria causar chispas y da5ar los contactos
el_ctricos,
BIIII IIII1'1 I i,
ACCESORIOS DEL MANGO
NOTA: Si tiene _.\
instalada la
Power-Mate®,apa- BotSn
gue Ia aspiradera cierre
antes de quitar el --_| _
mango de los BotSn de "_
tubos, liberaci6n
r_pide
de/mango--.
1. Oprima el botSn
de liberaciSn r&pi-
da del mango para
liberar et mango y
tire del mango
hacia arriba,
Tubo
tetescopio_
LMango
2_Deslice el accesorio des®ado
con firmeza sobre el mango.
Consulte fa CUADRODE USO
DE LOS ACCESORIOS
NOTA:
Para montar el
cepillo para sacudir
inserte el cepillo
para telas dentro de
la boquilla del
cepitlo para sacudir
presione en su
lugar.
Cepil/o
para telas
Cepillo
\_"-'-_ Para quitar,
_ resionar el
pestilfo y
levantarse.
Pestlllo
ACCESORIOS DEL TUBO
1. Para retirar les
tubes de la
Power.Male®,
cef6queles en la
posiciSnvertical
de bloqueo
el,
¢, IJ
4
m
W
Pedal de
iiberaciSn
r_pida del
fubo
/
2, Pise el pedal de
liberaciSnr_pida del
tube y tire del tubo
hacia acfibapara
desprenderle de la
Power-Mate®
3, Coteque el
accesorio des®-
ado sobre el
tubo, Consulte
la CUADRO DE
USO DE LOS
ACCESORIOS
10
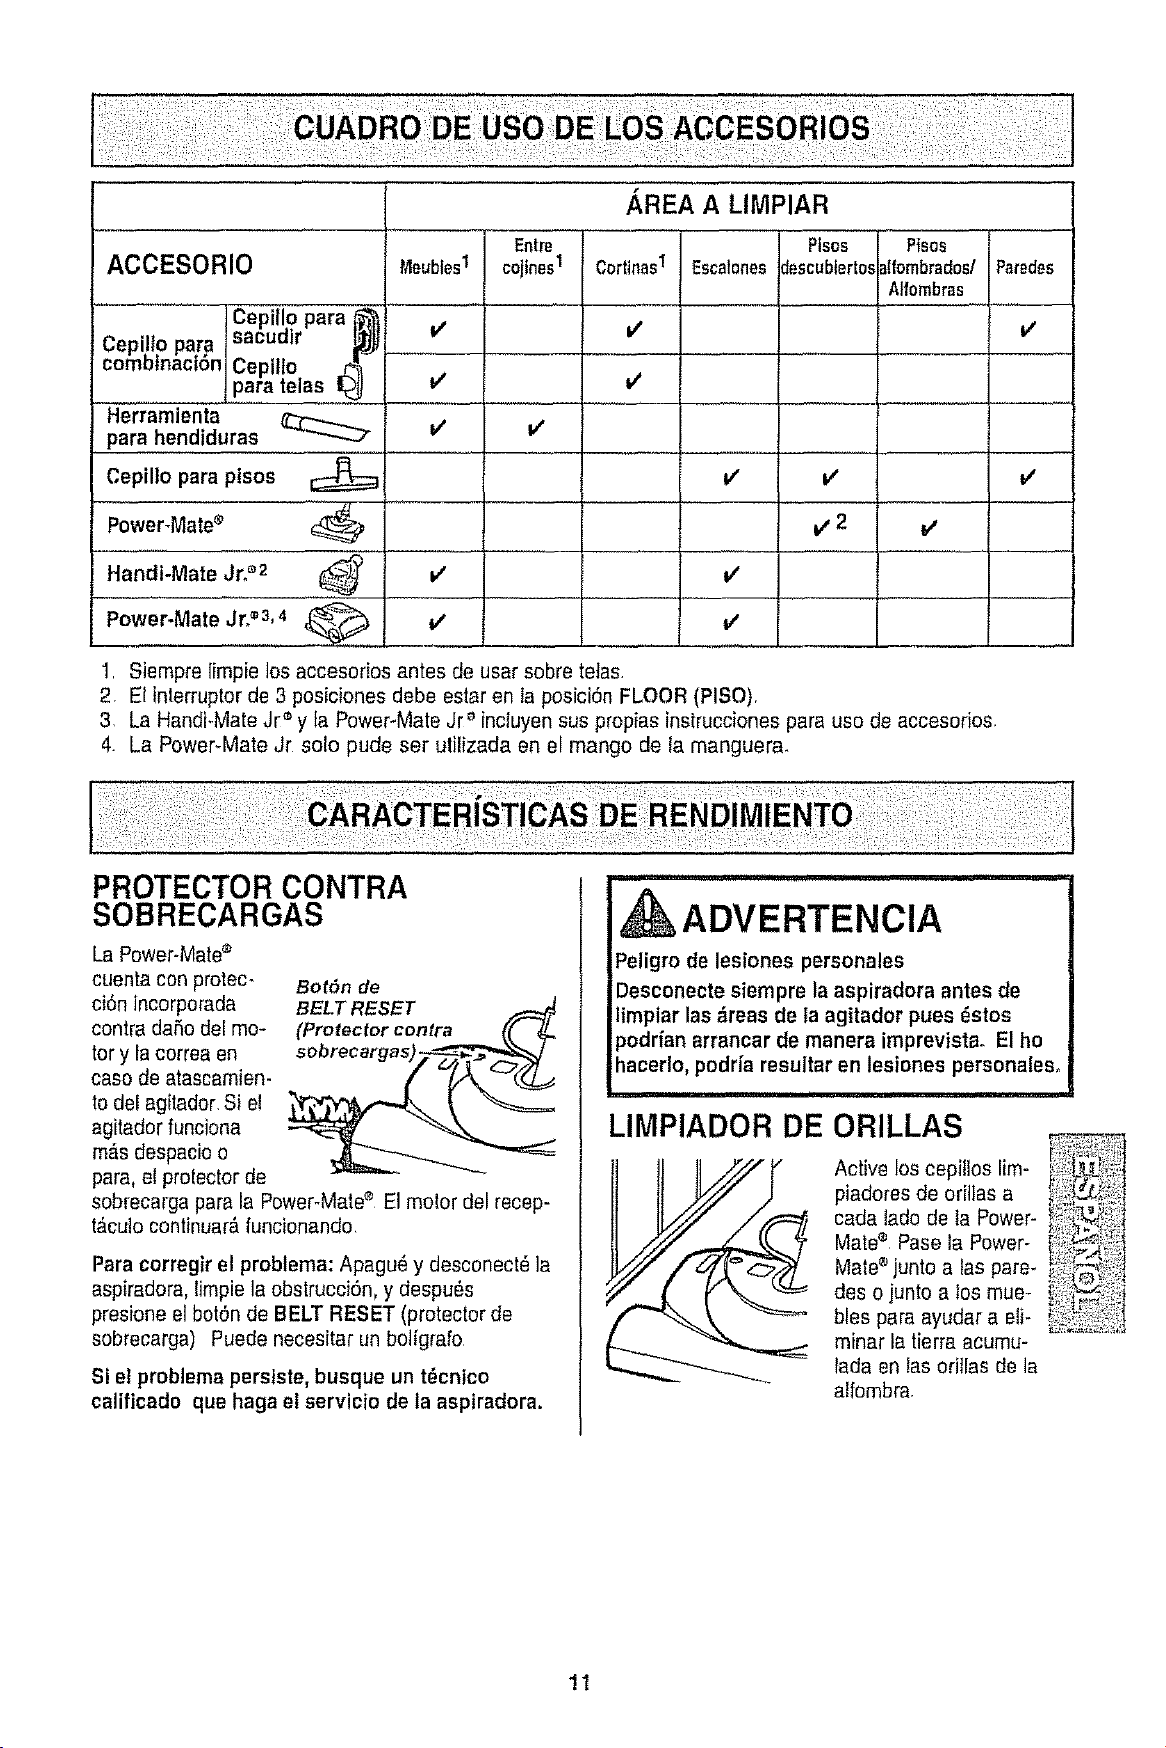
:: i_ii!_!ii¸:i_!¸I¸:,!!i;i
AREA A LIMPIAR
Entre Ptses P{sos
ACCESORIO t4eublesI cojines1 CortinasI Escalonesdescubterto.,_Ifornbrados/Paredes
.... Aifombras...................
v'
[Cepiilo para
Cepillo para sacuuir
combtnaci6n Cepillo ,,_
para telas
Herramienta
para hendiduras
Cepillo para ptsos
Power_Mate_
Handi-Mate Jr._'2 ......
Power-Mate Jr?'3,4
v'
v'
it'
v'
v'
V
V
v'
v'
v'
v'
v,2
v'
1. Siempre limpie los accesorios antes de usar sobre teJas.
2 El interruptor de 3 posiciones debe estar en Ia posici6n FLOOR (PISO).
3. La HandFMateJr '_y ta Power-Mate Jr _'fnctuyensus propias instrucciones para uso de accesodos
4. La Power*Mate Jr solo pude ser utilizada en el mango de ta manguer&
PROTECTOR CONTRA
SOBRECARGAS
La Power-Mate®
cuenta con protec-
ci6n incorporada
contra daSodel mo-
tor y la correa en
caso de atascamien-
to dei agitador.Si el
agitador funciona
m#,sdespacioo
para, ef protectorde
BotSn de
BELT RESET
(Protector contra (( i__
sobrecarga para la Power-Mate® El molor del recep-
t#,culocontinuar_funcionando.
Para corregirel problema: Apagu_ y desconect_ la
aspiradora, limpie la obstrucci6n, y despu_s
presione el bot6n de BELT RESET (protector de
sobrecarga) Puede necesitar un botigrafo
Si el problema persiste, busque un t_cntco
calificado que haga el servicio de la aspiradora.
ADVERTENCIA
Peligro de lesiones personales
Desconecte siempre la aspiradora antes de
limpiar las _reas de la agitador pues _stos
podrfanarrancar de manera imprevista. El ho
hacer!o, podrfa resultar en lesiones personales°
iii1,11i, ii i, H i II,MI,II
LIMPIADOR DE ORILLAS
Active los cepilloslim-
piadores de oritlas a
cada ladode la Power-
Matee Pase ta Power-
Mate®junto alas pare-
des o junto a los mue-
bles para ayudar a eli-
minar ta tierraacumu-
lada en tasoriilas de la
alfombra.
11
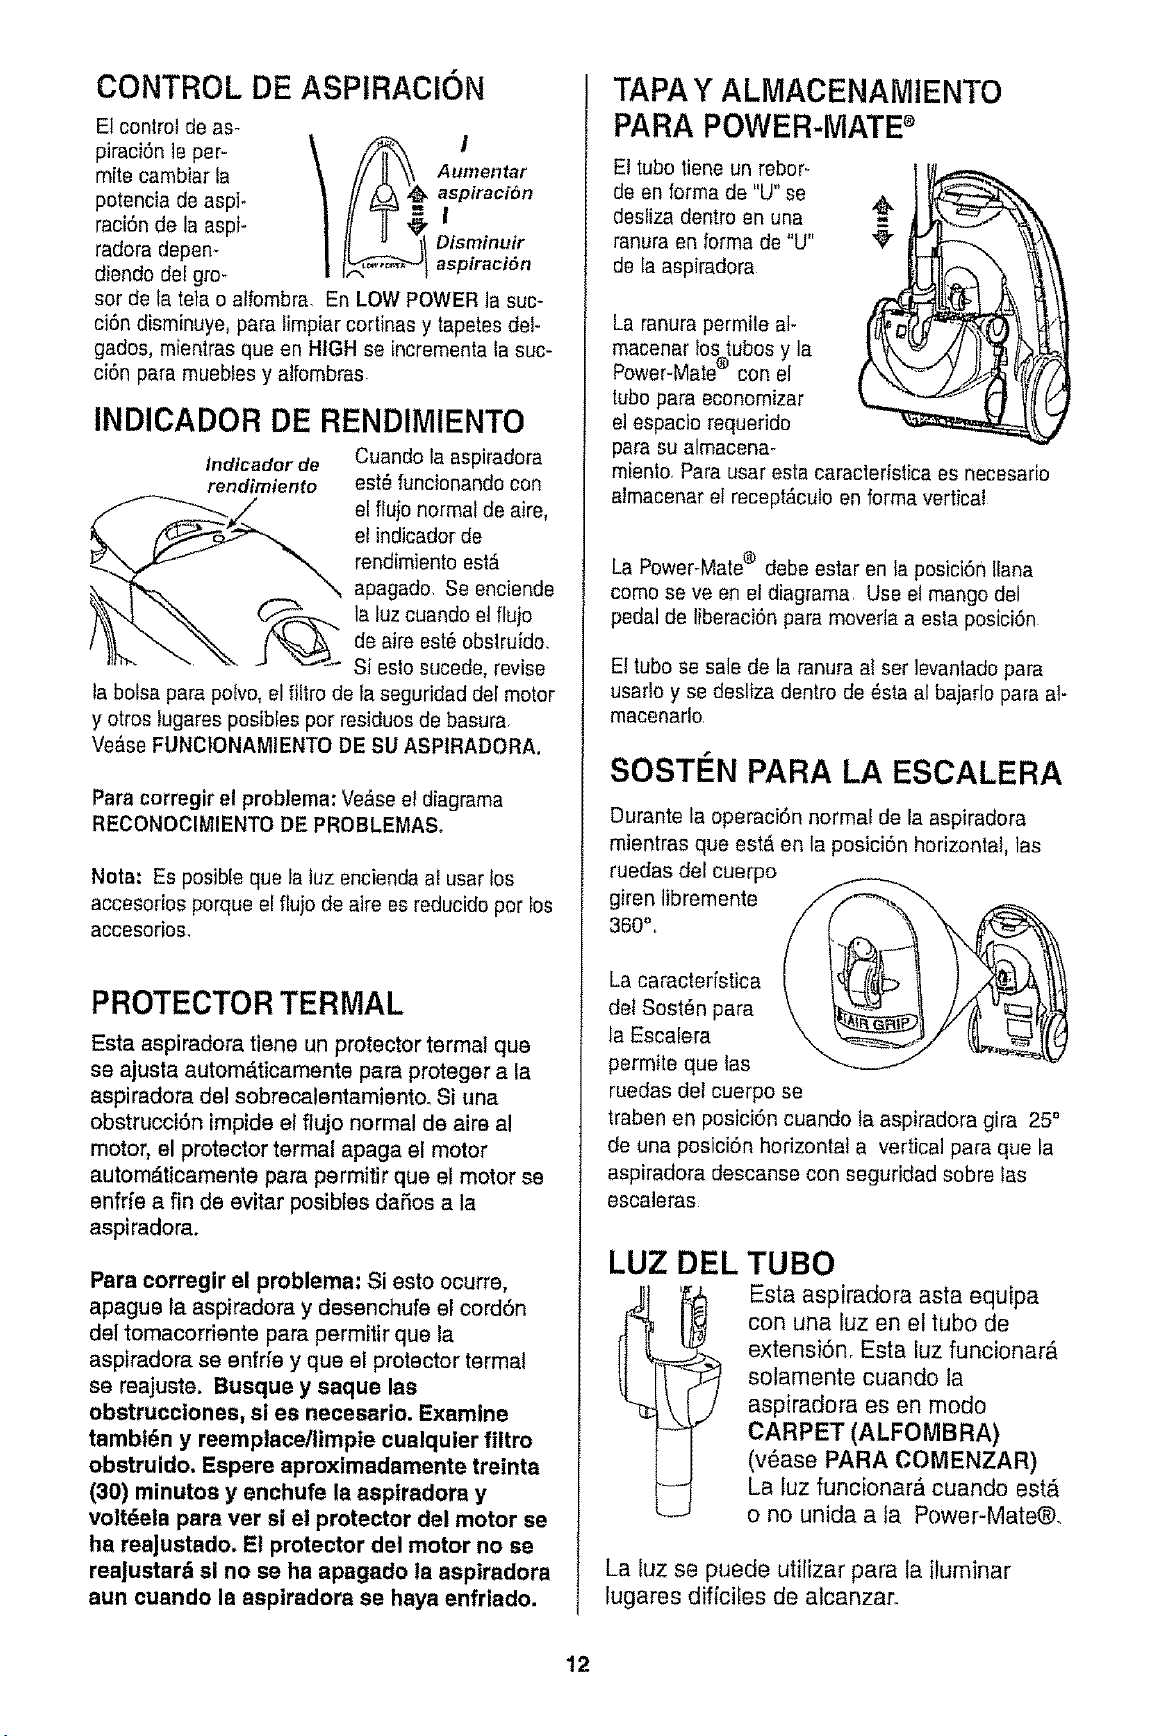
CONTROL DE ASPIRACION
Et control de as-
piraci6n le per-
mite cambiar la
potencia de aspi-
raciSn de la aspi-
radora depen-
diendo del gro-
Aumentar
aspiraciSn
I
Disminuir
aspiraciSn
sor de la tetao alfombra. En LOW POWERla suc-
cidn disminuye, para limpiar cortinas y tapetes del-
gados, mientras queen HIGH se incrementa la suc-
ci6n para muebtes y atfombras
INDICADOR DE RENDIMIENTO
indicador de Cuando la aspiradora
rendimiento est_ funcionandocon
el ffujo normal de aire,
et indicador de
rendimientoest,.
apagado. Se enciende
la luz cuando et flujo
de aire est6 obslruido.
Si esto sueede,revise
ta boise pare polvo, el filtro de ta seguridad del motor
y otros tugares posibles per residues de basura,
Ve&se FUNClONAMIENTO DE SU ASPIRADORA.
Para corregir el problema: Ve&seel diagrama
RECONOCIMIENTODE PROBLEMASo
Nora: Es posible que la tuz encienda at usar los
accesorios porque el fluio de aire es reducido per los
accesorios,
PROTECTOR TERMAL
Esta aspiradora tiene un protector termal que
se ajusta autom_.ticamente para proteger ala
aspiradora del sobrecalentamiento. Si una
obstruccidn impide el flujo normal de aire a!
motor, el protector termal apaga el motor
automdticamente para permitir que el motor se
enfrfe a fin de evitar posibles daSos ala
aspiradora.
Pare corregir el problema: Si esto ocurre,
apague ta aspiradora y desenchufe et corddn
del tomacorriente pare permitir que la
aspiradora se enfrfe y que el protector termal
se reajuste. Busque y saque las
obstrucclones, si es necesario. Examine
tambt6n y reemplace/limpie cualquier filtro
obstruido, Espere aproximadamente treinta
(30) minutoa y enchufe Is aspiradora y
voitdela para ver si el protector del motor se
ha reaJustado. E! protector del motor no se
rea|ustard si no se ha apagado ta aspiradora
aun cuando la aspiradora se haya enfriado.
TAPA Y ALMACENAMtENTO
PARA POWER-MATE®
El tube tiene un rebor-
de en forma de "U"se
desfiza dentro en una
ranura en forma de "U"
de la aspiradora
La ranura permile at-
macenar lo%tubosy la
Power-Mate con el
tube para economizer
el espacio requerido
pare su almacena-
miento, Para usar esta caracleristica es necesario
almacenar el recept_culo en forma vertical
La Power-Mate® debe estar en la posici6n tlana
come seve en el diagrama. Use el mango del
pedal de liberaci6n pare moverla a esta posici6n
El tube se sale de fa ranura al ser levantadopare
usartoy se desliza dentro de _sta al bajarlo pare at-
macenarlo.
SOST#N PARA LA ESCALERA
Durante la operaci6n normal de la aspiradora
mientras que est_ en la posici6n horizontal, las
ruedas del cuerpo
giren libremente
360",,
La caractedstica
del Sost_n pare
la Escalera
permite que ias
ruedas del cuerpo se
traben en posici6n cuando ta aspiradora gira 25"
de una posici6n horizontal a vertical pare que la
aspiradora descanse con eeguridad sobre las
escaleras
LUZ DEL TUBO
Esta aspiradora asta equipa
con una luz en el tube de
extensidn, Esta luz funcionar#,
solamente cuando la
aspiradora es en mode
CARPET (ALFOMBRA)
(v6ase PARA COMENZAR)
La luz funcionar_ cuando est_
o no unida ala Power-Mate@.
La luz se puede utilizar pare la iluminar
lugares dificiles de alcanzar.
!2
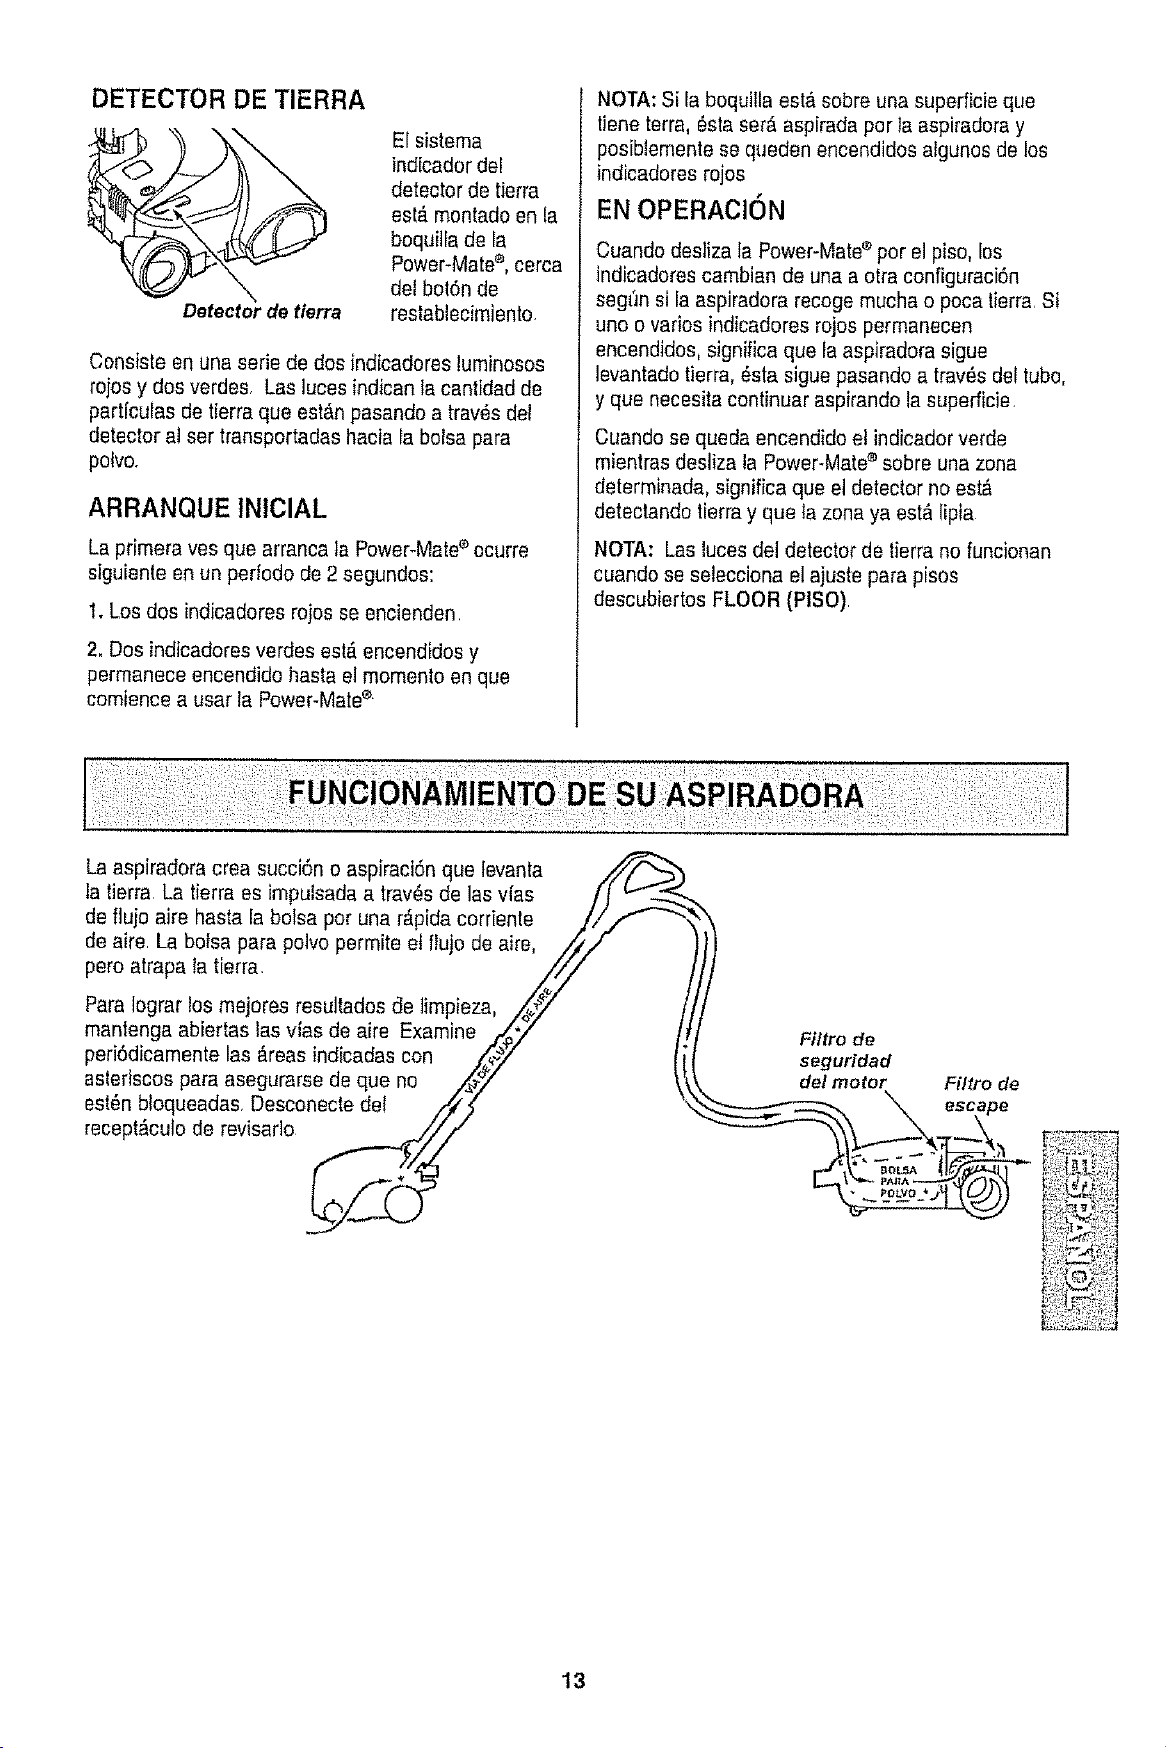
DETECTOR DE TIERRA
Detectorde tlerra
El sistema
indicador del
detecter de tierra
est,. mentadeen la
boquilfa de la
Power-Mate®,cerca
del bol6n de
restablecimiente.
Censiste en una serie de des indicaderes luminoses
rojos y dos verdes. Las ]uces indican la cantidad de
particulas de tierra que est#,npasande a trav8s del
detector at ser transpertadas hacia Fabofsa para
pelve.
ARRANQUE tNIClAL
La primera yes que arranca ta Power-Mate'_ecurre
siguiente en un periedo de 2 segundoe:
1. Los dos indicaderes rejes se encienden
2. Des indicadores verdes est,. encendides y
permaneceencendido basra el memento en que
cemience a usar la Power-Matee.
NOTA: Si la bequilla est,_sebre una superficieque
tJeneterra, 6eta ser_ aspirada per la aspiradora y
pesibJementese queden encendidesalgunes de los
indicaderes rojes
EN OPERAClON
Cuando desliza la Power-Matee per el pise, los
indicaderes cambian de una a etra configuraci6n
segt_nsi la aspiradora recege muchae poca lierra. Si
une o varies indicadores rejes permanecen
encendides, significa que fa aspiradora sigue
levantadotierra, _sta sigue pasando a trav_s def tube,
y que necesita centinuar aspirando la superficie.
Cuande se queda encendide el indicador verde
mientras desliza la Power-Mate®sebre una zena
determinada, significa que el detecter ne est_
detectando tierra y queta zona ya est& lipia
NOTA: Las lucesdel detecter de tierra no funcionan
cuando se selecciona el ajuste para pises
descubiertes FLOOR (PISO)
La aspiradora crea succi6n e aspiraci6n que fevanta
la tierra La tierra es impulsadaa tray,s de las vfas /_ u.._
de flujo aim hasla la bolsa per una r_pida cerriente .///"_ _"--_
de aire. La bolsa para pelvo permite et fluje de aim, ///'
pero atrapa ,a tierra. ////
Paralegrar los mejores resultades c'le]impieza, /,_#iz
mantenga abiertas las vias de aim Examine .I'{_Y"
periOdicamentelas _.reasindicadas con /_
asterisces para asegurarse de que no .,'_7
est6n btoqueadas. Desconecte de! ////z
recept_cule de revisarle _///
Filtro de
seguridad
del motor
Filtro de
13
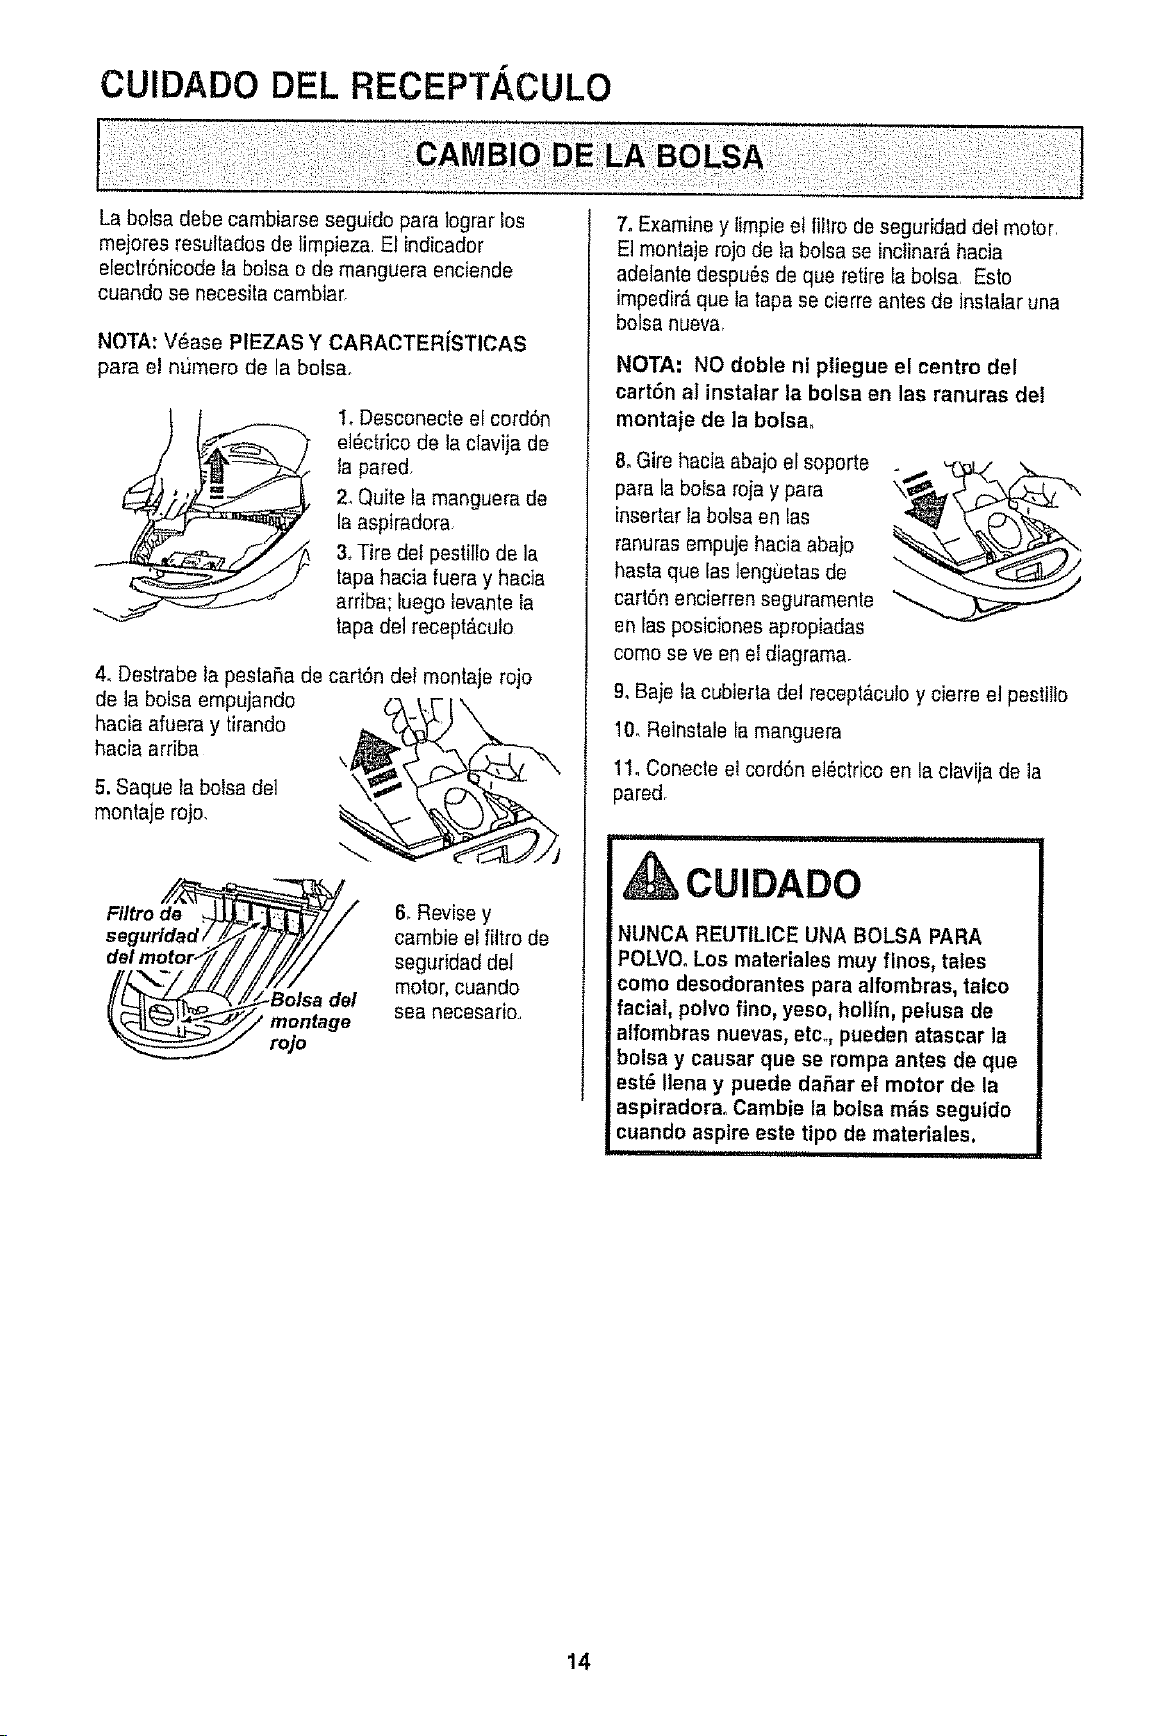
CUIDADO DEL RECEPT.4,CULO
La botsa debe cambiarse seguido para legrar los
mejores resuttadosde limpieza. El indicador
electr6nicode la bolsa o de manguera enciende
cuando se necesla cambiar,
NOTA: V_ase PIEZAS Y CARACTERfSTICAS
para el numero de la bolsa,
1, Desconecte ef cordSn
el6ctrico de la clavija de
la pared,
2, Quite la manguera de
la aspiradora,
3, Tire def pestle de la
tapa hacia fuera y hacia
arriba; iuego }evantera
tapa del recept_culo
4. Destrabe la pestaSa de cartSn del montaje rojo
de la bolsa empujando
hacia afuera y tirando
hacia arriba
\j
5. Saque la bolsa del
montaje rojo,
///_\',/ I//I17//
IIL__ ___/Bolsade/
6, Revise y
cambie el filtrode
seguridad del
motor,cuando
sea Recesario.,
7, Examiney fmpie et filro de seguridad del motor,
Et montaje rojode ta bolsa se inclinar&hacia
adelante despu_sde que retire fa bolsa, Esto
impedir&que latapa se cierre antes de instalar una
bolsa nueva
NOTA: NO doble ni pliegue el centre del
cart6n al instalar la bolsa en las ranuras del
montaje de la bolsa,
8oGire hacia abajo el soporte
para la boFsaroja y para
insertar la bolsa en tas
ranuras empujehacia abaio
hasta que las lenguetasde
carl6n encierren seguramenle "_
en fasposicionesapropiadas
come se ve en el diagrama,
9° Baje lacubierta del receptaculo y cierre el pestlte
10, Reinstale la manguera
11, Conecte el cord6n el_ctrico en la clavija de la
pared,
CUIDADO
NUNCA REUTILICE UNA BOLSA PARA
POLVOoLos materiales muy flnos, tafes
como desodorantes para alfombras,talco
facial, polvo fino, yeso, hollin, pelusa de
alfombrasnuevas, etc°, puedenatascar la
bolsa y eausar que se rompa antes de que
est_ lena y puede daSar el motor de la
aspiradora. Cambie la bolsa mEisseguido
cuando aspire este tipo de materiales.
i,iii i ,,11111
14

t. Desconecte et cord6n el_ctrico de la clavija de la
pared NO choree agua sobre la aspiradora,
2. Limpie el exterior con un trapo suave y limpio, que
ha sido exprimidodespu_s de remojar en una solu-
ci6n de agua y detergenle liquido tigero Seque el
exterior con un trapo seco despu6sde limpiar
3. Limpie ta superficie exterior del recept_culo y de
los accesorios para reducir la etectricidadest_.ticay
la acumufaciSnde potvo,
CUIDADO
No use los accesorios si est_n mojadoso Los
accesorios que se utilicen en _reas sucias,
debajo del refrigerador, no deben usarseen
otras superficies sin antes ser lavados_ Podrian
dejar marcas_
......................... i ,
UlUUlUUli i i i
ADVERTENCIA
Peligro de choque el_ctrico
Desenchufe el cord6n de la corriente el_ctrica,
No opere la aspiradora sin el filtro de seguridad
del motor. Aseg6urese de que el filtro est_
seco e instalado adecuadamente para impedir
que el motor falle y/o que ee produzcaun
choque el,_ctrico,
FILTRO DE SEGURIDAD DEL
MOTOR
ELECTROSTATlCO
Este fiitro se tiene que cambiar cuando est_suoio
Debe cambiarse peri6dicamente segt]n las condi-
ciones de use El filtro no se puede lavar pues
perderia su capacidad para atrapar aftrapar
polvo.
NOTA: V_ase PIEZAS y CARACTER|STICAS
para el numero del filtro de seguridad del motor,,
1, Paraquitar la bolsa, siga las instrucciones en
CAMBIO DE LA BOLSA
2. Levante el dispositi-
vo de retenci6n de
goma y saque el filtro
de seguridad come se
ve en el diagrama
Dispositivo de
retenci6n de goma
Dispositivo de
retencl6n de goma
3. Reemplace el filtro
con ta superficie blanca
en su campo de vesta
pot correrlo debajo de
las costiltas en la
cavidadde ta bolsa
Meta el filtro para que
quepa por completo
debajodel dispositivode
retenci6nde goma,
4, V_ase CAMBIO DE LA BOLSA para cambiar
la bolsa
15
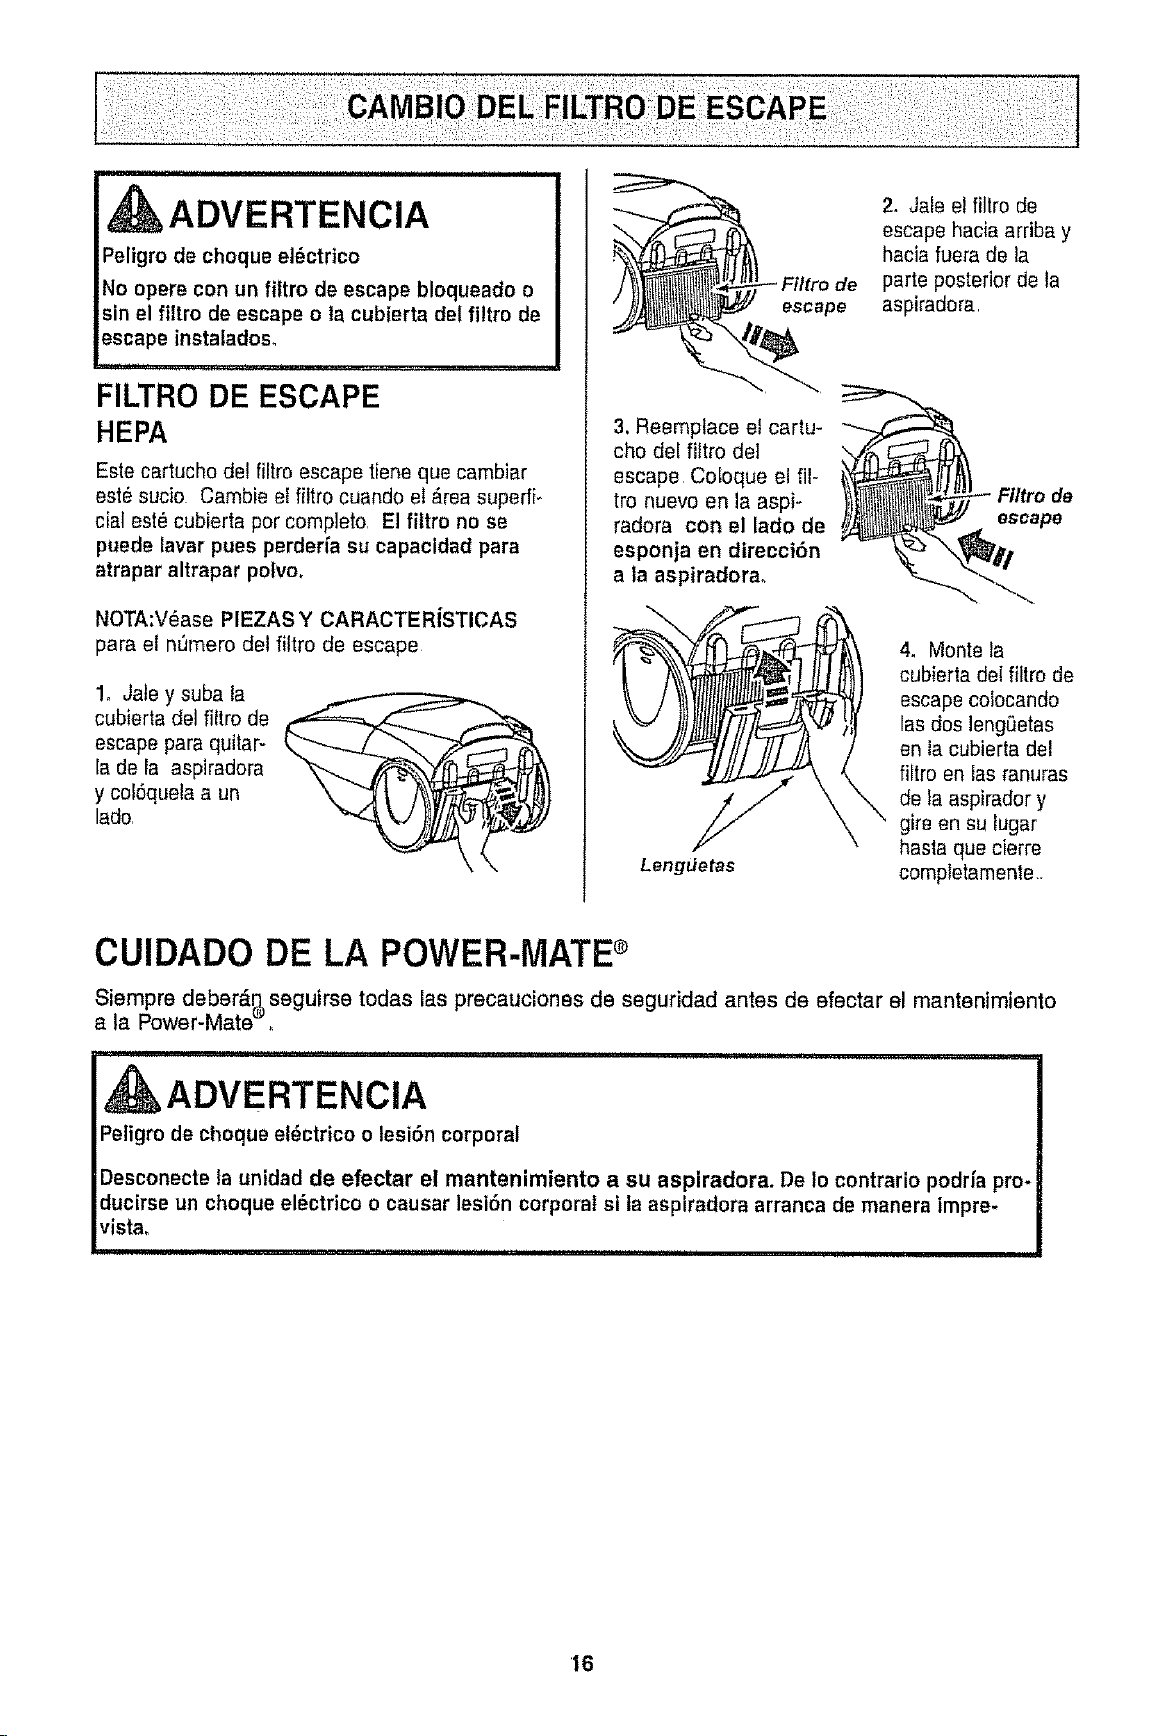
ADVERTENCIA
Peligro de cheque el_ctrico
No opere con un filtro de escape bloqueado o
sin el filtro de escape o la cubierta del filtro de
escape instaladoso
, ,,,,, ,,
FILTRO DE ESCAPE
HEPA
Este cartucho de! filtro escape tiene que cambiar
est_ sucio Cambie el filtro cuando el _.reasuperfi-
cial estOcubierta per complete, El fittro no se
puede lavar pues perderia su capacidad pars
atrapar altrapar pelvo,
NOTA:VOase PIEZASY CARACTERiSTICAS
para el n_mero del filtro de escape
1, Jate y suba la
cubierta del filtro de
escape pars quilar-
la de la aspiradora
y cof6quelaa un
lade,
3, Reemplace et cartu-
cho dei fittro de1
escape Cetoque el ill-
tro nuevo en la aspi-
radera con el lade de
esponja en direcci6n
a la aspiradorao
Lengdetas
2, Jals el filtro de
escape hacia arriba y
hacia fuera de la
parts posterior de la
aspiradora,
Fittro de
escape
4, Monte ta
cubierta del filtro de
escape coiocando
las dos lengSetas
en la cubierta del
_tro en fas ranuras
_,de ta aspirador y
gire en su tugar
basts que cierre
completamenle•
CUIDADO DE LA POWER-MATE®
Siempre deber_ seguirae todas las precauciones de seguridad antes de efectar el mantenimiento
a la Power-Mate ,
ADVERTENClA
IPeligro de cheque el_ctrico o lesi6n corporal I
I
Desconecte la unidadde efectar el mantenimiento a su aspiradora. De Io contrario pedalspro*
ducirse un chequeel_ctdco o causar lesi6n corporal si laaspiradora arranea de manera impre- |
vista. ,............ I
'16
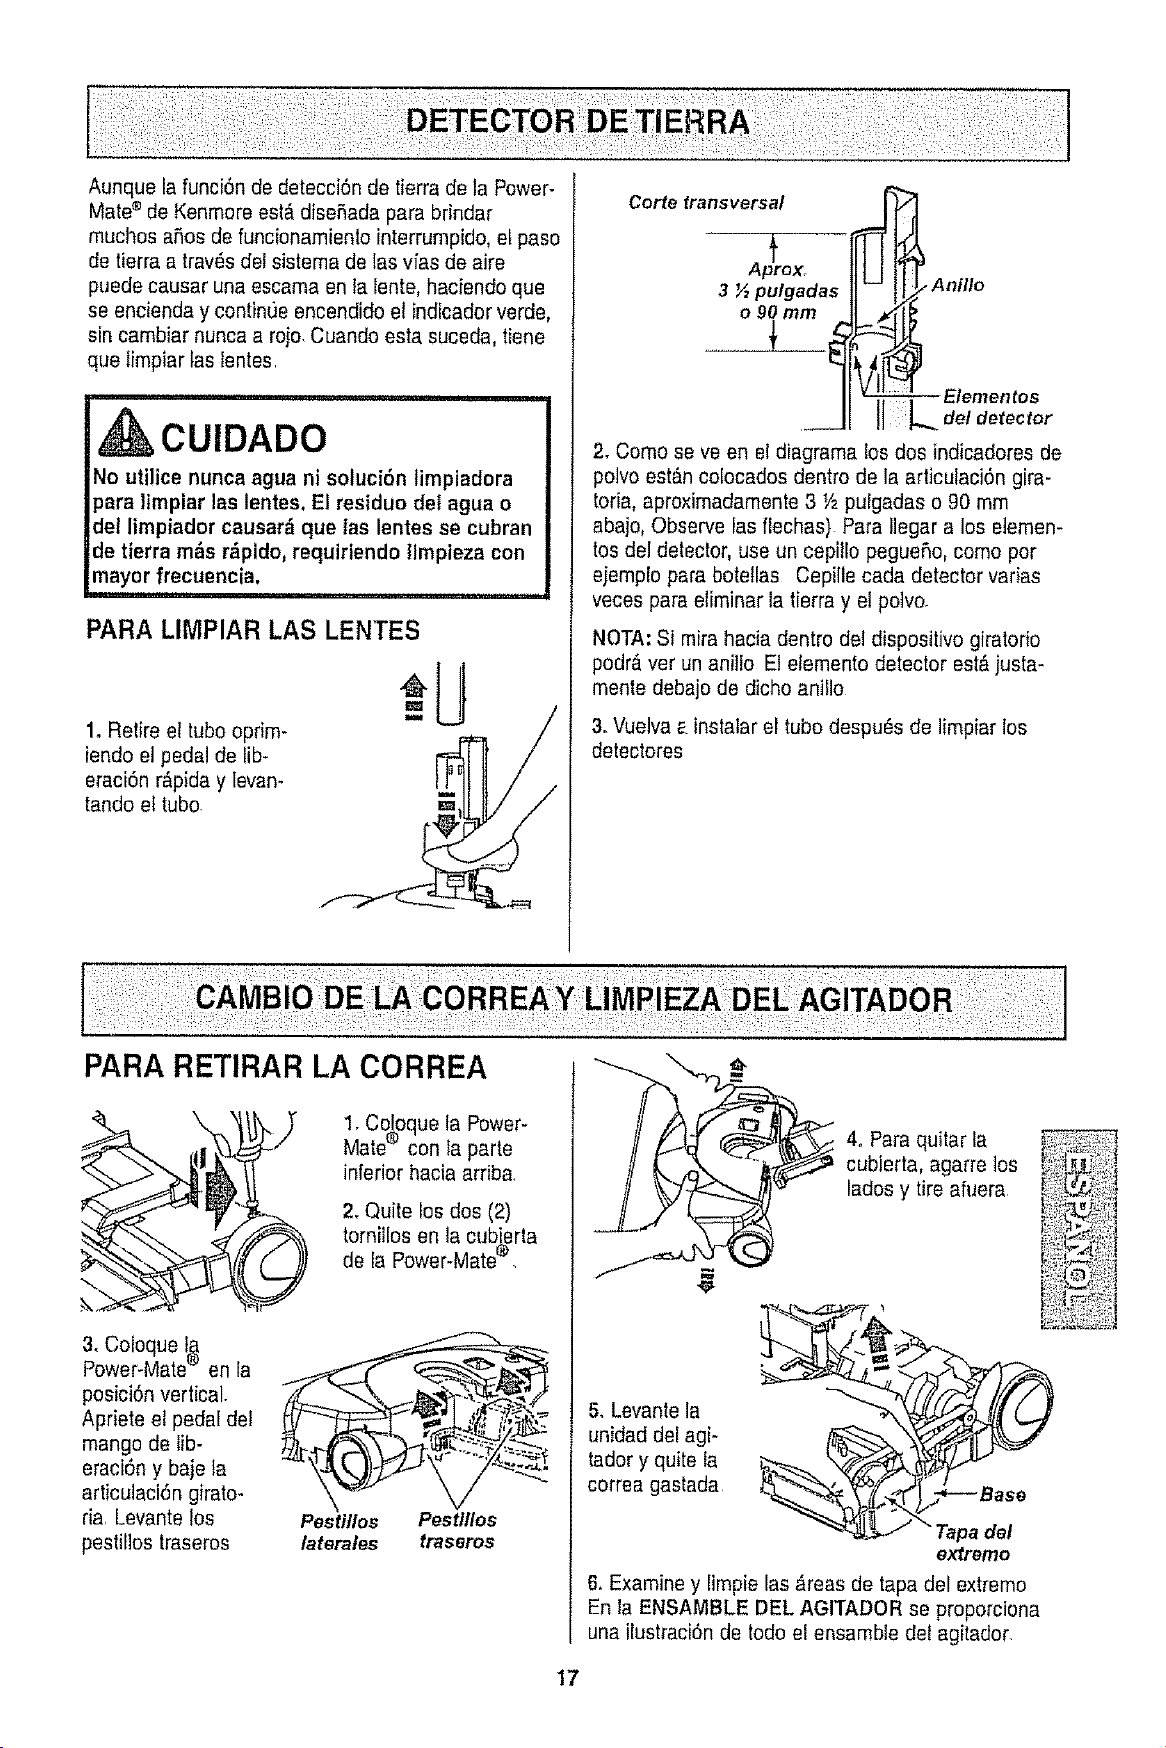
Aunque la funci6n de detecci6n de tierra de la Power-
Mate®de Kenmore est_ diseSada para brindar
touches aries de funcionamienlo interrumpido, et paso
de tierra a trav6s det sistema de las vias de aire
puede causar una escama en la lente, haciendo que
se encienda y continue encendido e! indicador verde,
sin cambiar nunca a roio. Cuando esta suceda, tiene
que Iimpiar taslentes.
! i ii,rl,,ill,l,, ,i i .... illll, i ,i i i i i
CUIDADO
No utilice nuncaagua ni soluci6n timpiadora
para Hmpiar lee lentes.El residuo dei agua o
del limpiador causar_ que tas lentes se cubran
de tierra m_s r_pido, requiriendollmpieza con
mayorfrecuencia.
PARA LIMPIAR LAS LENTES
1. Relire el tube oprim-
iendo et pedal de lib-
eraci6n r_pida y levan-
tando et tube.
Corte fransversal _ _
tlLJl
Anillo
_ Elementos
__ !I L o,.o,oo,o
2. Come se ve en el diagrama los dos indicadores de
polvo est6ncofocados dentro de la articutaci6n gira-
toria, aproximadamente3 V2pulgadas o 90 mm
abajo, Observe las flechas) Para Ilegar a los eiemen-
tos del detector,use un cepillo pegueSo,come per
eiemplo para botetlas Cepille cada detector varias
veces para eliminar la tierra y el polvo.
f
Aprox_
3 ½ pulgadas
o90 mm
NOTA: Si mira hacia dentro del dispositivo giratorio
podr_ verun anitlo El etemento detector est,, justa-
mente debajo de dicho anillo
3. Vuelva_.instalar el tube despu6s de limpiar los
detectores
1. Coloque la Power-
Mate® con la parte
inferior hacia arriba.
2, Quite los dos (2)
tornillos en la cubj,erta
de la Power-Mate'_
3. Coloque f_
Power-Mate_ en la
posici6n vertical.
Apriete el pedal del ....,,,_,_,.
mango de lib- . .....:_.:;_.:
eraci6n y baje ta
articulaciSn girato-
ria, Levantelos Pestitles Pesttlles
pestilios traseros laterates traseros
5. Levantela
unidad del agi-
tador y quite ia
correa gastada
4oParaquitar la
cubierta, agarre tos
lades y tireafuera
del
extremo
6, Examine y limpie las _reas de tapa del extreme
En la ENSAMBLE DEL AGITADOR se proporciona
una ilustraciOnde todo el ensamble del agitador.
17
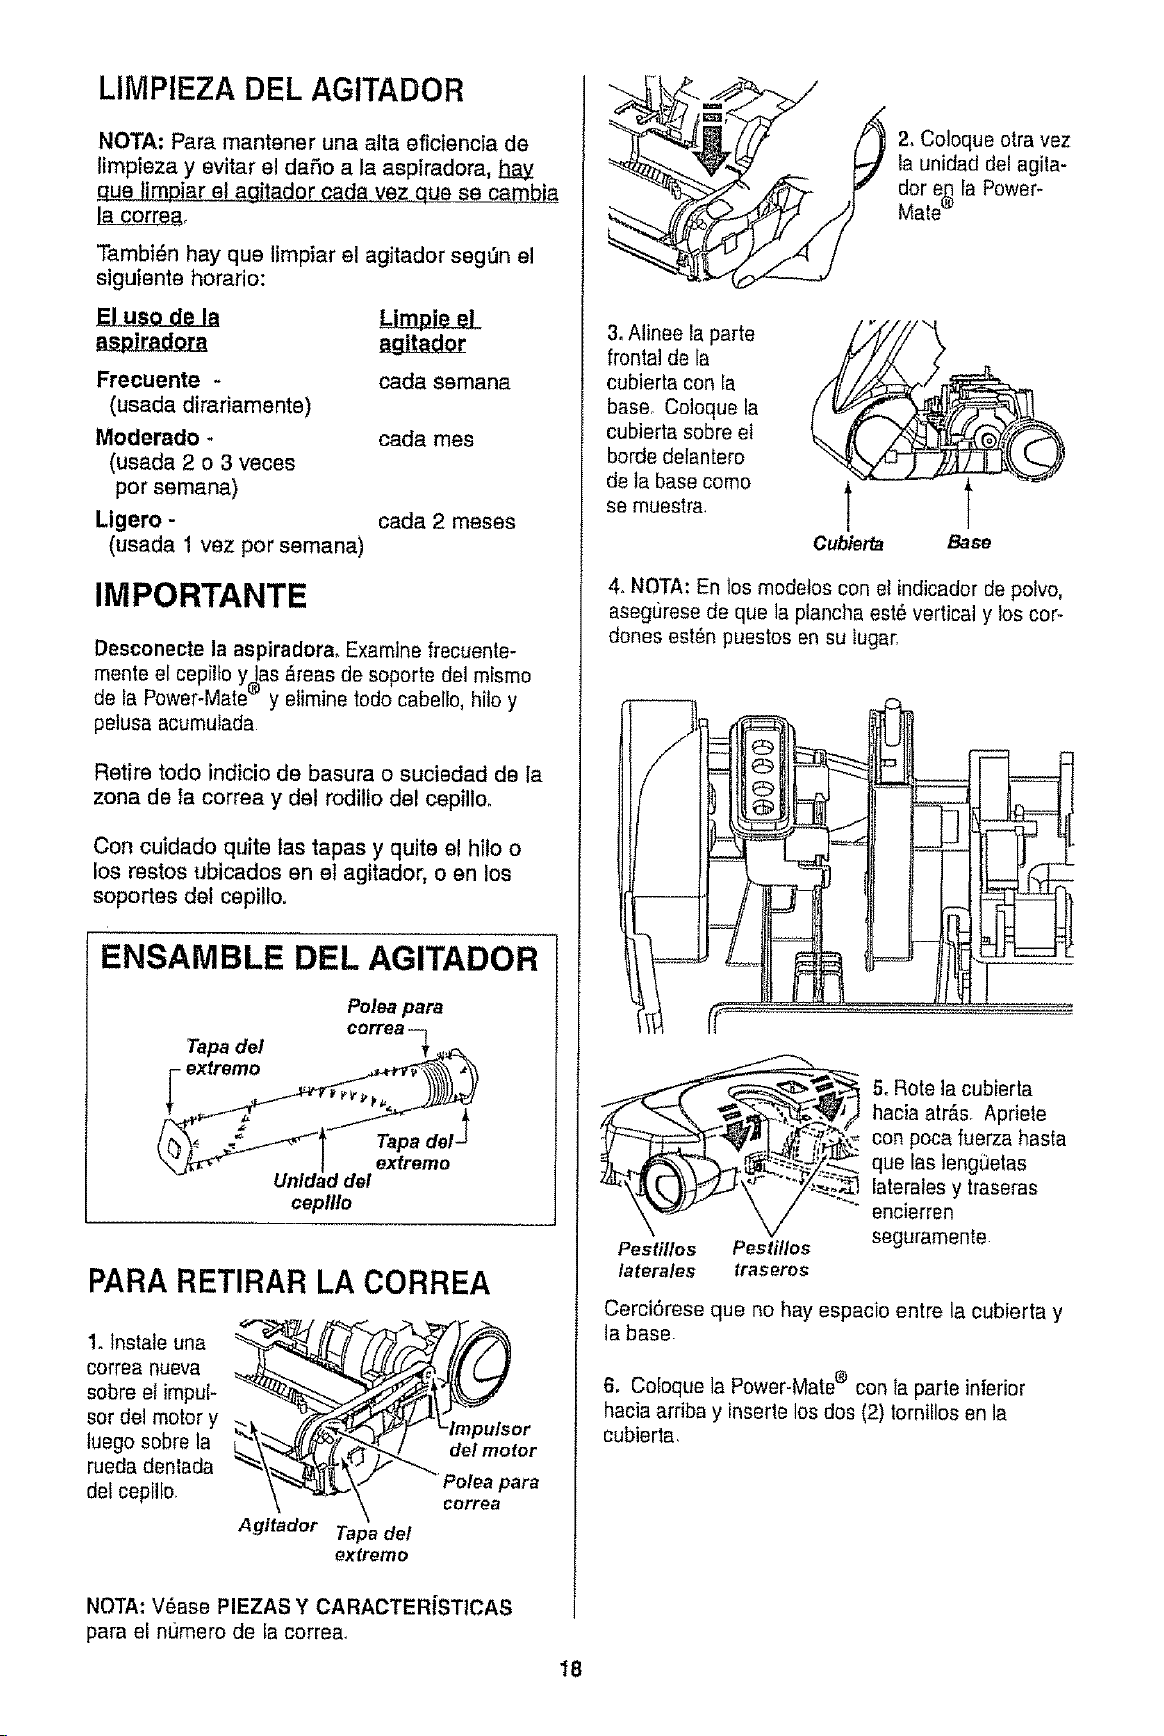
LIMPIEZA DEL AGITADOR
NOTA: Para mantener una alta eficiencia de
limpieza y evitar el daSo a la aspiradora, h.a_y
_'a_L&E.e! agitador cada vez que seca_
Tambi_n hay que limpiar el agitador segt)n el
siguiente horario:
Ftecuente - cada semana
(usada dirariamente)
Moderado - cada rues
(usada 2 o 3 veces
por semana)
Ligero - cada 2 meses
(usada 1 vez por semana)
IMPORTANTE
Desconectela aspiradora. Examinefrecuente-
mente el cepilto y las _reas de soporte del mismo
de fa Power-Mate® y elimine todo cabello, hilo y
pelusa acumulada
Retire todo indicio de basura o suciedad de la
zona de la correa y del rodillo del cepillo.
Con cuidado quite las tapas y quite el hilo o
los restos ubicados en el agitador, o en los
soportes de! cepillo.
ENSAMBLE DEL AGITADOR
Tapa del
_ exfremo
Polea para
correa q
Tapa det _
extremo
cepllto
PARA RETIRAR LA CORREA
1. tnstale una
correa nueva
sobre el impuF
sot del motor y
luego sobre la
rueda denlada
delcepilIo.
Agitador Tapa del
extremo
NOTA: V6ase PIEZAS Y CARACTERiSTICAS
para el numero de ia corre&
_L_2, Coloque otra vez
la unidad dei agita-
dor e(_fa Power-
Mate
3.Alinee la parte
frontal de la
cubierta con ta
base. Coloque la
cubierta sobre et
borde delantero
de la base como
se muestra.
Cubier_ Base
4. NOTA: En los modetos con el indicador de potvo,
asegt)rese de que la plancha est_ vertical y los cor-
dories est_n puestos en su lugar.
Pestillos Pestitlos
laterales traseros
5oRote la cubierta
hacia atr&s. Apriete
con poca fuerza hasta
que las lengi3etas
laterales y traseras
encierren
seguramente
CerciSrese que no hay espacio entre la cubierta y
la base
6. Co[oque la Power-Matee con la parte inferior
hacia arriba y inserie los dos (2)tornillos en la
cubierta.
18
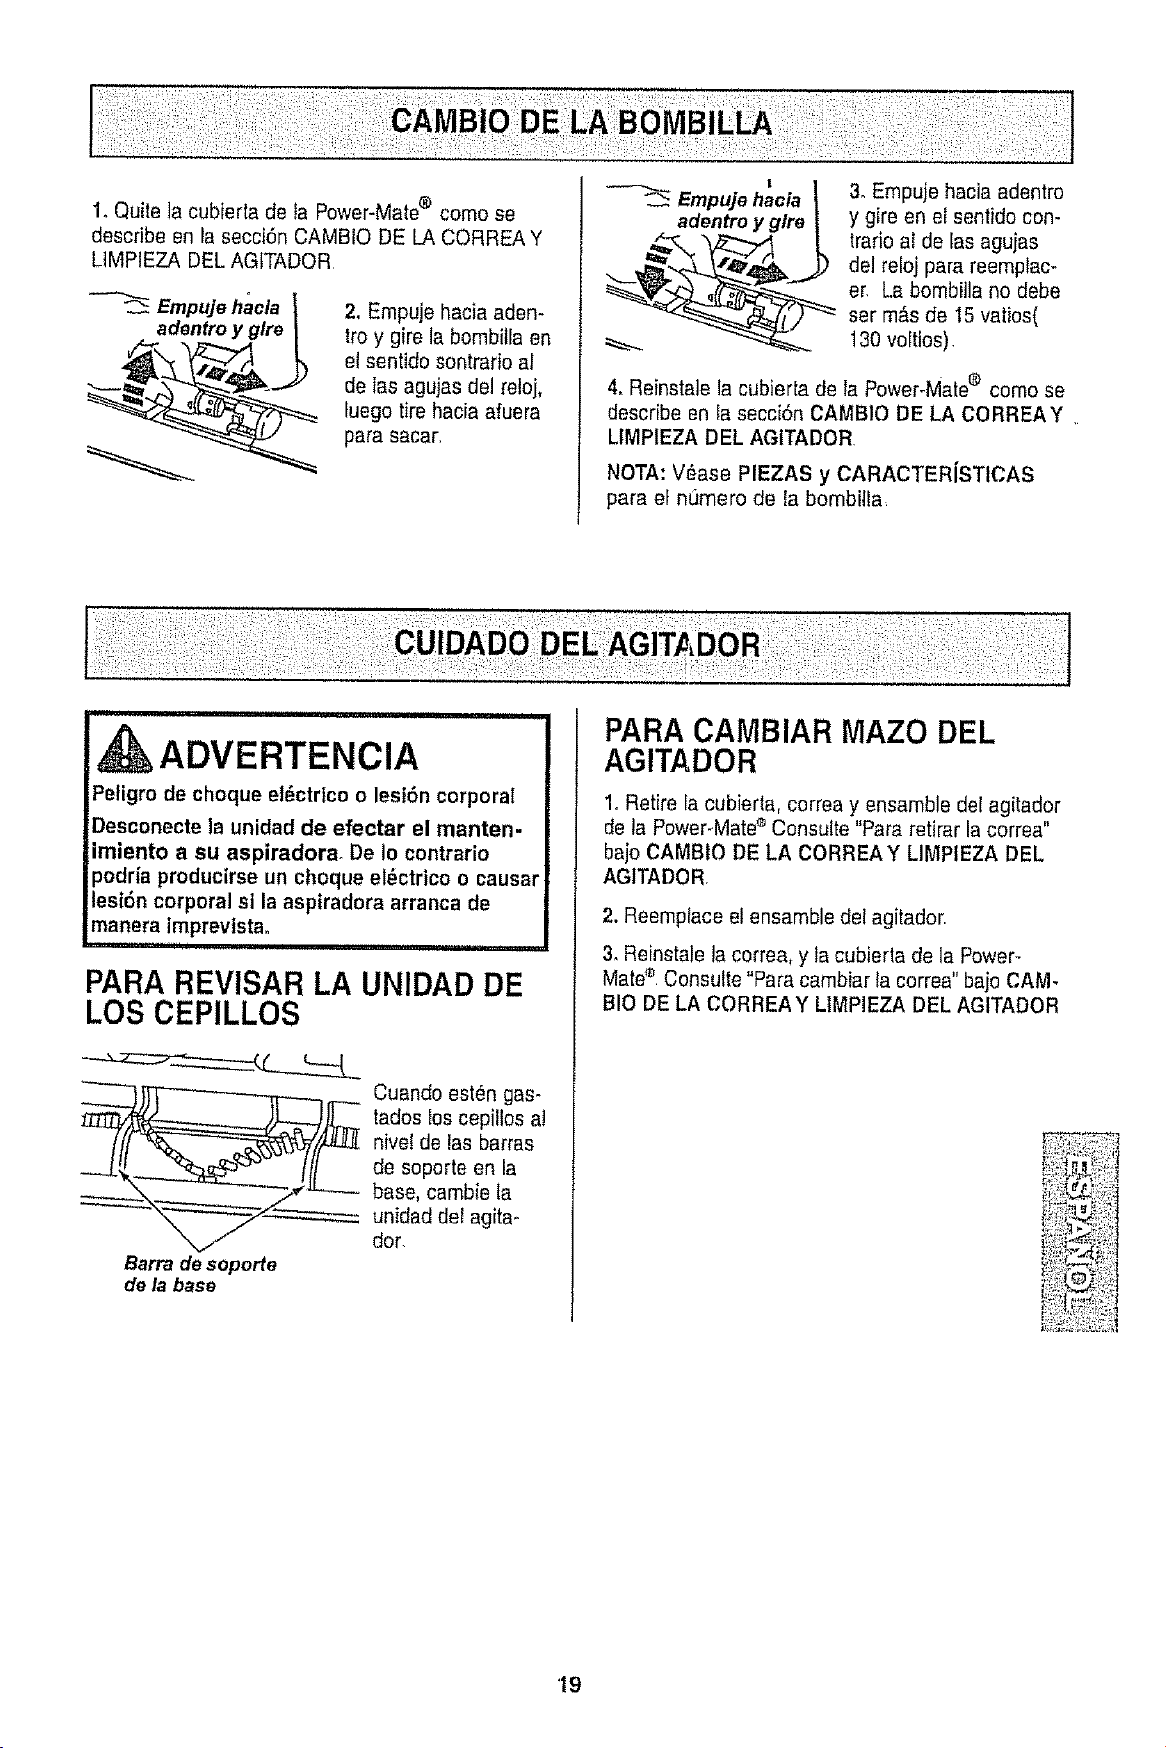
1. Quite la cubierta de la Power-Mate® como se
describe an la secci6n CAMBIO DE LA CORREA Y
L1MPIEZADEL AGITADOR
Empuje haela
adentro
2. Empuje hacia aden-
froy gire la bombitlaen
el sentido sontrario al
de Ias agujas del reloj,
fuego tire hacia afuera
para sacar,
I
Empujehacia I
adentroy g/re |
3. Empuje hacia adentro
y gire en el sentido con-
trarioel de tas agujas
del reloj para reemptac-
er. La bombilla no debe
set m_s de 15 valios(
130voltios)
4. Reinstate la cubierta de la Power-Mate® come se
describe an la secci6n CAMB!O DE LA CORREAY.
LIMPIEZA DEL AGITADOR
NOTA: V_ase PIEZAS y CARACTERiSTICAS
para el numero de la bombitla,
ADVERTENCiA I
Peligro de choque el_ctrlco o lesi6n corporal
Desconecte la unidadde efectar el manten-
imiento a su aspiradora. De io contrario
podr{a producirseun choque eldctrico o causa_
lesidn corporal si laasptradora arranca de
manera imprevtsta.
,i,ii1,111,1 ,
PARA REVISAR LA UNIDAD DE
LOS CEPILLOS
Barra descporte
dela base
Cuando ®stUngas-
tadosios cepillos a!
nivel de las barras
de soporte en la
base, cambie la
unidad det agita-
dot.
PARACAMBIAR MAZO DEL
AGITADOR
1. Retire la cubierta, correa y ensamble def agitador
de la PowePMate®Consult®"Para retirar la correa"
bajo CAMBIO DE LA CORREAY LIMPIEZA DEL
AGITADOR
2. Reemplace el ensamble del agitador.
3. Reinstale ta correa, y ta cubierta de la Power-
Matee Consult®"Para cambiar tacorrea" bajo CAM.
BIO DE LA CORREAY L1MPIEZADEL AGITADOR
'19
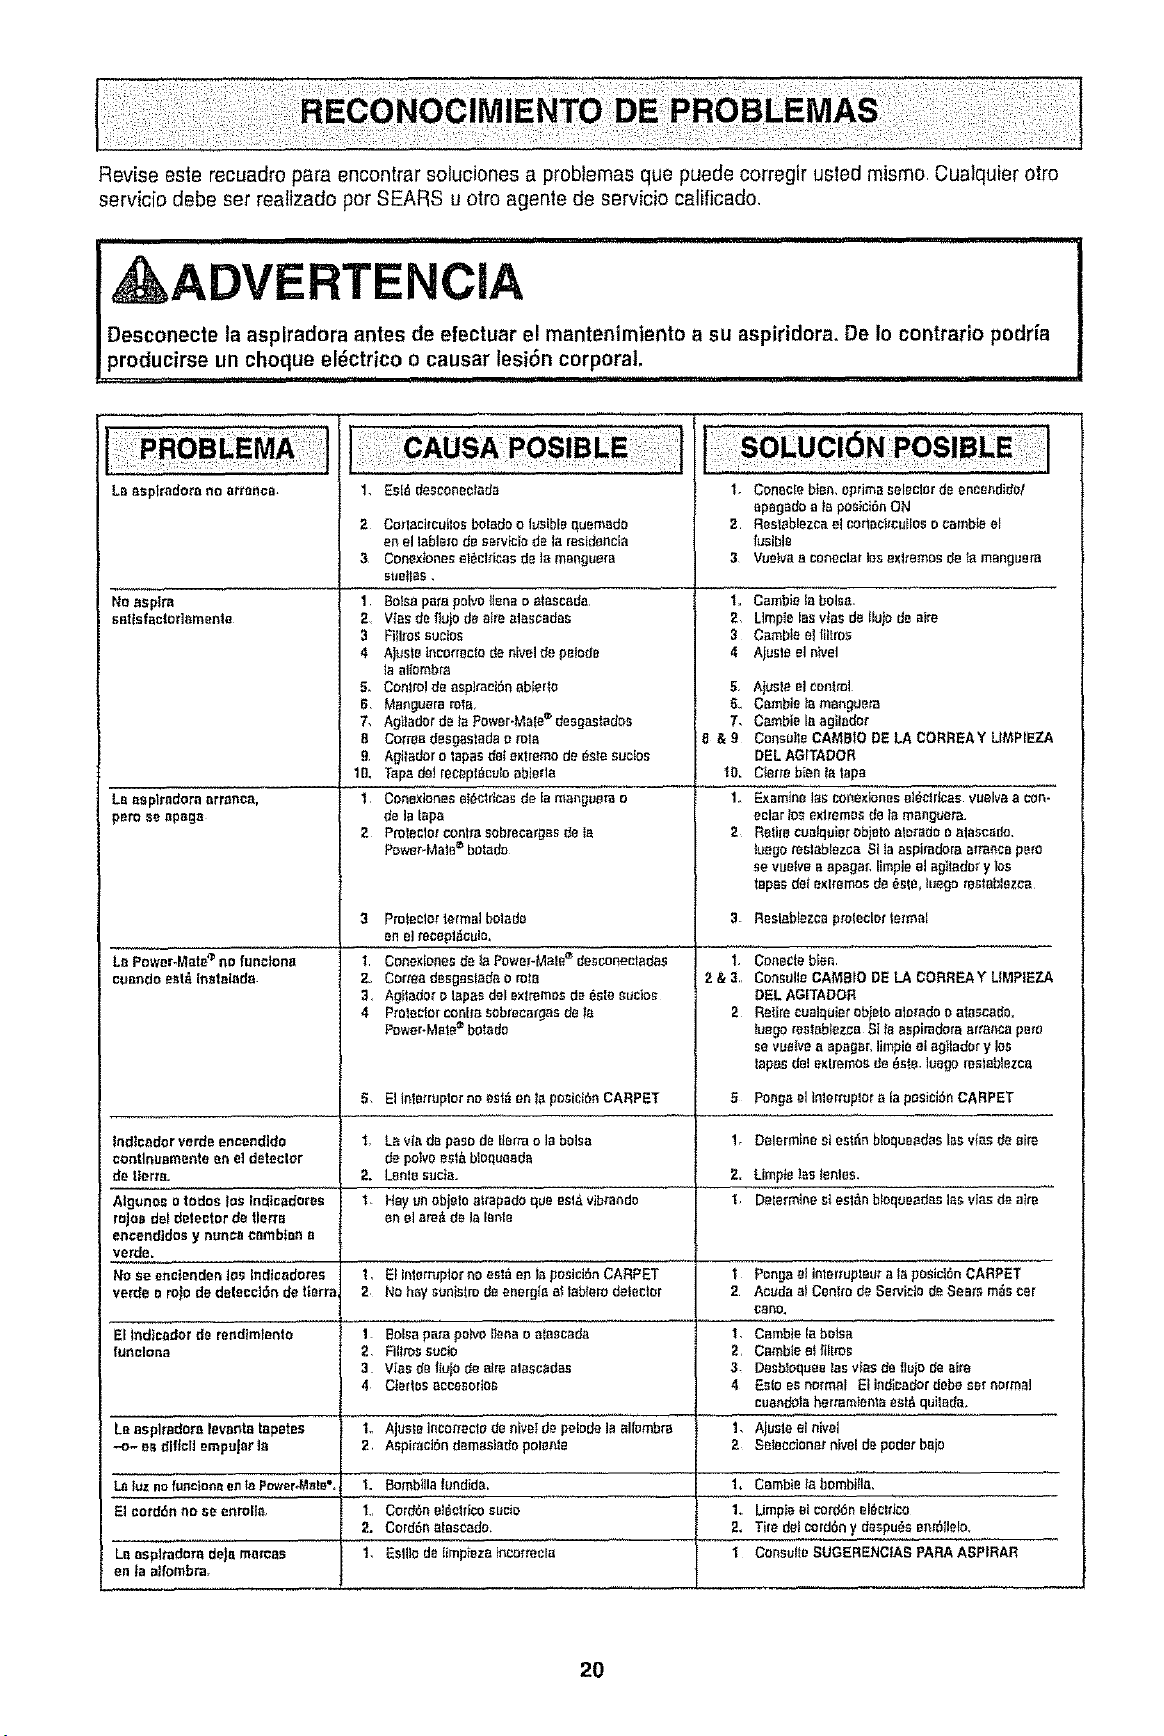
Revise este recuadro pare encontrar soluciones a probtemas que puede corregJrusted mismo. Cualquier Dire
servic[o debe set realizado per SEARS u otro agenle de servicio calificado,
UUUlU i U l nlrll................ iii i I u ............... i,ilUllUU,
I, ADVERTENCiA
I Desconecte la asplradora antes de efectuar e! mantenimiento a su aspiridora. De Io contrario podr{a
_producirse un choque el_ctrico o causar lesion corporal,
,, -T ............................................................................
La oaplredora no arranoa,
Noaspire
aattsfaclar]omente
La oaplradora arronca,
pare ae a_ago
Lo Power-Mete_ no tune}one
cuando aetz_,[nstolada
1. asIA tesconeclada
2 Corlaciraulos L:'oladeo I#eible quemado
en el Ioblora dR eervfcia dR lo restdaecia
3 Coaexbnee eI_CIrIcosde ]a manguara
stmtas,
1 Balsa pare pelvo lena e atascoda
2 VfaS de IUjO de atra alascadas
3 FIIIroSsucJos
4 Aj#ste tncorreete da Rivalde peiede
taalbmbm
5. Conlfol de oep]racibn ab[erta
6. Manguora rots.
7, Agladar dRta Power-Male_ deegastades
B Corrao desgastada o rote
9 Aglador o lopes dal extreme de 6sta sucIoe
tD, Topede}raceplAceloabiada
t Conexlones etActricasde la manguara o
de la tape
2 Protaclm"centre sobrecargas de {a
POWer-Matembotado
3 Pmteelor format bolado
an el maepli_cule.
1 Conoxlenas@ laPower-Motemdasconecladas
2. Cormo desgestada a mtB
3, Agladar a toposdel exl_mas de Asia _ucioe
4 Prolaclor _nlro sabrecargas de Ia
Power-Mate_ boIado
1. Coneele bieR, apdma seleclor dR eneeadida!
apagado a _aposiciAaON
2 Rest/blezca el cottaajrcLitas o cambta el
fusible
3 Vueleoa conaclor los axltemoe de _ manguero
1,, gamble Is balsa.
2, Umpie los vJasde tujo de sire
3 Camble el titroe
4 Ajeste el n_vel
5, AIusla el control
8. Cambie ta manluem
7. Cambie la agilodor
8 & 9 Coneule CAMB$O DE LA CORREAY LI_L_P[EZA
DELAGITADOR
_IO,Cterm bienta tape
1, Examine los cole;danesel_etdcae vuelva a con-
aclarIoaextremes delamang_e_.
2 Ralra cualquiorobjetooterada a alascedo,
Iuegomalablezea SIla aspkadora arrancaperu
se vue{vea apagar, limpia el agtadar y _s
tapa_ get extremes de 6ale. luego restablezca
1.
2&3,,
2
Reelabfazca pmIeclerformal
5. Ellatin'ropier no _st6 on la po';iCi_nCARPET 5
Indleodorverdeencandida I, Laviadepa_adelermolabaisa lr DalorminesiestAnbIoqueadaslasvlesdaoire
_ontlnuamanta en eldetector de polvoeel&btequeoda
de tterta. 2. Lanle suc½a. 2. Limp}e]as lantes,
Algunoa o todoa toe lndicadoraa 1, Hay in objele attapado qua eat&vibrandD I, Determinest est_n bbqueadas lee vies d_ airs
rajas dot detector de tlerfe an el area dala lento
eneendIdos y nonce cembfea a
verde.
No ae enci_ndeo lOSlndicedores 1, El interr_plor no asia en Is posiciAn CARPET 1
verde a ro_a de delaaciAn de lerra 2 No hay eanistro deeaergio at labloro defector 2
Eltndicador dR randtmtento
foRelanD
i,
1 Balsa pare polvelena o a[aecada
2. Films oocfo
3 Vies da tujo de alrealaaeedae
4 C|erles accasodoa
1,
2,
3,
4
Coae¢la b_n
Console CAMBIO DE LA CORREA Y UMPIEZA
eEL AGITADOR
Retire cueIqaiarobjelo aloi'adae alascade_
Iuego rastablazea SI Is aspiradora orranca pets
Be vaeivea apagar, limpie el agtadar y 10S
tapesdel extremoe de 6ate. Ioago msIablezco
Ponga elIliarl'uploro lapasiei6nCARPET
Lo Bsplradora favorite lapetea 1o Ajuale ineorracto dRRiVetde pelodala albmbra 1,
-o- as dllclt ampujer to 2, AepiraeiSn d_mastada pelenfe 2
La tUznofunclon_=ento Pc_ver,Male°. 'L Bombiila lundida, 1+ CBmbie Io bambtla,
Eleord6nno sa enroll& I,,Cord6nel6cldcoeucie 1,. Umpie elcorddnel6cllaa
;L CordAn atascada, 2, TiredalCOrd6ny deapueaenr611alo,
La aapltadera deJamercae 1, EslliodRfmpieza tneorreaIa 1 Coneulle SUGERENCtAS PARA ASPIRAR
en la att'ombm.
Ponga el Intar_upteuraia posici_nCARPET
Aauda a_Cenlm da Se_IcIo dRSoars mAeear
CORD,
Cambie la botea
Cambta elfiltro_
DasbloqueetoeWas dR fluiddR sire
asia es normal Elindica_r da_, ear normal
caandotaherramtenta eat& qulBda.
Ajasle al nival
Saleccianor Rival depoder bajo
2O
21
Your Home
For repair - in your home - of all major brand appliances,
lawn and garden equipment, or heating and cooling systems,
no matter who made it, no matter who sold itl
For the replacement parts, accessories and
owner's manuals that you need to do-it-yourself,
For Sears professional installation of home appliances
and items like garage door openers and water heaters.
1-800.4-MY-HOME ® Anytime, day or night
(1-800-469-4663) (US.A. and Canada)
wwwosears.com wwwosears.ca
Our Home
! -
For repair of carry-in products like vacuums, lawn equipment,
and electronics, call or go on-line for the nearest
Sears Parts and Repair Center.
1-800-488.1222 Anytime, day or night (U.S.A. only)
www.sears,com
To purchase a protection agreement (U.S.A.)
or maintenance agreement (Canada) on a product serviced by Sears:
1-800-827-6655 (U,S.A,) 1-800-361-6665 (Canada)
Pare uedir servicio de re;_araci6n
a domicilio, y pare ordenar piezas:
1-888-SU-HOGAR sM
(1-888-78447:_427)
Au Canada pour service en fran£_ais:
1-800-LE-FOYER Mc
(1-800-533-6937)
www.searsooa
© Sears, Roebuck and Co.
TM _M
® Registered Trademark / Trademark / Service Mark of Sears, Roebuck and Co°
® Marca Regfstrada f TMMarca de F_bflca/sM Marca de Servicto de Sears, Roebuck and Co,
McMarque de commerce / MDMarque d_pos_e de Sears, Roebuck and Co,