Loading ...
Loading ...
Loading ...
14
15
MAINTENANCE INSTRUCTIONS FOR
FAN POWERED HUMIDIFIER
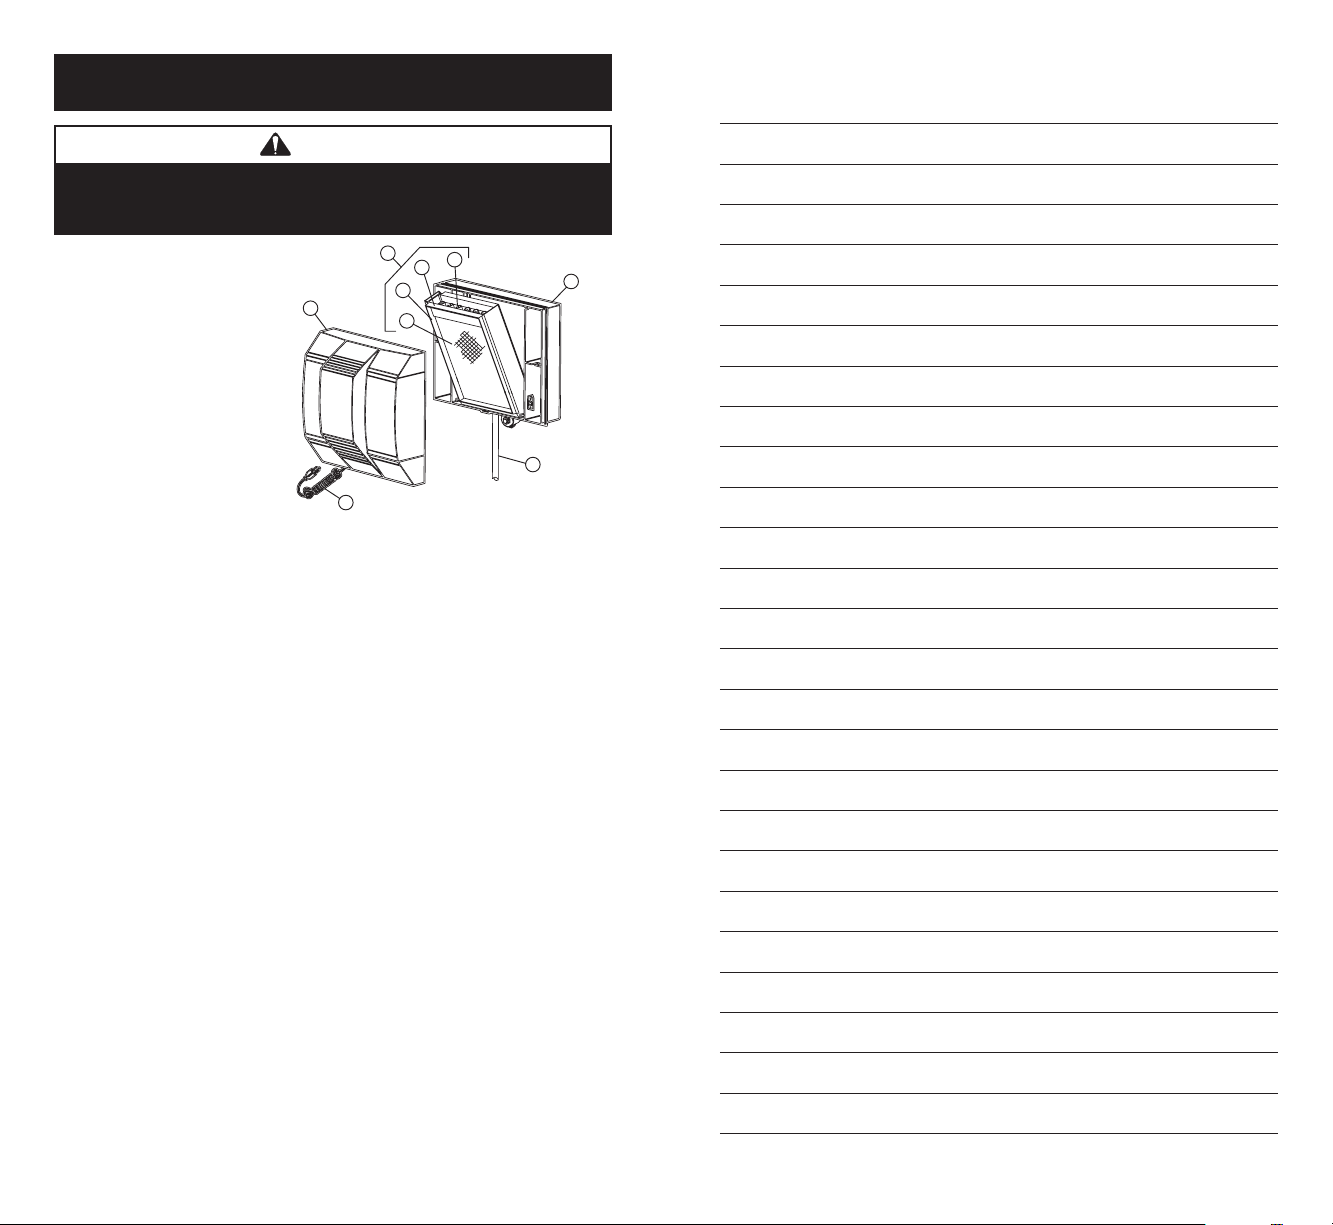
5
4
7
2
6
8
1
3
9
1. Humidifier Cover Assembly
2. Base Assembly
3. Evaporative Assembly
4. Distribution Tray
5. ”V” Notches
6. Humidifier Pad
7. Scale Control Insert
8. Drain Line
9. Power Cord
1. Note Humidifier Control setting and turn dial to the “OFF” position.
2. Disconnect electrical power and turn off water supply.
3. Unlatch humidifier front cover assembly (1) from base assembly (2) at the bottom of the cover,
lift, and set aside.
4. Pull out the evaporative assembly (3) by grasping at the top and tipping out.
5. Unsnap the distribution tray (4) from the scale control insert (7). Follow the instructions below
depending upon the type of distribution tray in your humidifier:
For trays with a synthetic fabric liner: Lightly scrape out or brush off any mineral deposits, being
careful not to stretch or loosen the synthetic fabric liner. Soaking the tray in vinegar or a lime‑
removing agent is helpful when trying to remove stubborn mineral deposits.
For trays with granular coating: Do not scrape off the granular coating, but lightly scrape out any
mineral deposits and clean the “V” notches (5). This textured surface helps ensure even water flow
for maximum performance. If the granular coating has been removed, replace distribution tray.
6. Slide the Humidifier Pad (6) out from the scale control insert (7). Clean the scale control insert
of mineral deposits. Replace the Humidifier Pad (Part No. P110‑3545) with a new Humidifier Pad.
Slide the Humidifier Pad back into the scale control insert with the colored spot up and snap the
distribution tray (4) back into place.
7. Inspect the plastic feed tube by gently flexing it and looking for cracks or signs of wear. Replace
tube if it is cracked, brittle, or has been damaged.
8. Reinstall the evaporative assembly (3) into the humidifier by fitting its drain into the round
receptacle at the base of the humidifier. Push the assembly in at the top between the retaining
ribs that hold the assembly in place in a vertical position.
9. Remove the drain line (8) from the bottom of the humidifier. If applicable, flex it to loosen any
mineral deposits or blockage. Then flush it with water under pressure. If it does not clear,
replace it. Slip drain line back onto the drain fitting. Make sure the drain line has a constant
downward slope and is not flattened or blocked.
10. Reinstall front cover assembly (1) by hooking at the top of the base assembly (2) and latching at
the bottom.
11. Reconnect electrical power (9) and turn on the water supply.
12. Check system operation:
Manual Humidifier Control: With the furnace blower operating and the furnace calling for heat,
turn up Control and check system operation.
Humiditrac
™
Humidifier Control: (Automatic or Manual mode) Check system operation and
reset Change Humidifier Pad indicator by setting the knob to “Test/Reset”. With furnace blower
operating and furnace calling for heat, humidifier will operate for one minute. DO NOT LEAVE IN
TEST MODE AS HUMIDIFIER WILL NOT OPERATE.
13. Set Humidifier Control to its original position.
NOTE: The motor is permanently lubricated and does not need to be oiled.
WARNING
ELECTRICAL SHOCK HAZARD. Can cause injury or death. Disconnect all
electrical power supplies before servicing. Shut off water supply before
disconnecting or tapping into any water supply line.
90-1075
Notes:
Loading ...