
S£/.4R8
Owner's Manual
Manual de Instrucciones
Manuel d'instructions
SEWING MACHINE
MAQUINA DE COSER
'l
MACHINE A COUDRE
Model }
Modelo
Mod61e
385.17324
CAUTION:
Before using this sewing
machine, read this manual
and follow all Safety Rules
and Operating Instructions.
• Safety Instructions
• Warranty
• Specifications
• Operation
e Care and Maintenance
• Troubleshooting
Sears, Roebuck and Co., Hoffman Estates, IL 60179 U.S.A.
IMPORTANT SAFETY INSTRUCTIONS
Your sewing machine is designed and constructed only for HOUSEHOLD user
Read all instructions before using this sewing machine.
DANG ER-To reducetheriskofelectricshock:
1 This sewing machine should never be left unattended when plugged in. Always unplug this sewing machine from the
electric outlet immediately after using and before cleaning.
2o Always unplug before replacing a sewing machine bulb. Replace bulb with some type rated 15 Watts_
3 Do not reach for a sewing machine that has fallen into water_ Unplug immediately.
4o Do not place or store this sewing machine where it can fall or be pulled into a tub or sink Do not place or drop it into water
or other liquid.
WA RN ING - To reduce the risk of burns, fire, electric shock, or injury" to persons:
1_ Do not allow this sewing machine to be used as a toy. Close attention is necessary when this sewing machine is used by
or near children°
2, Use this sewing machine only for its intended use as described in this owner's manual°
Use only attachments recommended by the manufacturer as contained in this owner's manual°
3. Never operate this sewing machine if it has a damaged cord or plug, if it is not working properly, if it has been dropped
or damaged, or dropped into water.
Return this sewing machine to the nearest Sears store or service center for examination, repair, electrical or mechanical
adjustment.
4o Never operate this sewing machine with any air opening blocked. Keep ventilation openings of this sewing machine and
foot controller free from accumulation of lint, dust and loose cloth.
5. Never drop or insert any object into any opening,
6. Do not use outdoors.
7. De not operate where aerosol (spray) products are being used or where oxygen is being administered_
8. To disconnect, turn all controls to the off (" O") position, then remove plug from outlet,
9. Do not unplug by pulling on cord. To unplug, grasp the plug, not the cord.
10. Keep fingers away from all moving parts. Special care is required around the sewing machine needle.
11. Always use the proper needle plate., The wrong plate can cause the needle to break.
12. Do not use bent needles.
13. Do not pull or push fabric while stitching. It may deflect the needle causing it to break_
14, Switch this sewing machine off (" O") when making any adjustment in the needle area, such as threading the needle,
changing the needle, threading the bobbin or changing the presser foot, and the like.
15. Always unplug this sewing machine from the electrical outlet when removing covers, lubricating, or when making any
other adjustments mentioned in this owner's manual.
SAVE THESE INSTRUCTIONS
u..........................................
sing your sewing machine for the first few times, place a waste fabric under the presser foot
! the machine without thread for a few minutes_ Wipe away any oil which may appear.
INSTRUCCIONES DE SEGURIDAD IMPORTANTES
Su mdquina de coser estd disefiada y construida s6to para uso dom6stico.
Lea todas las instrucciones antes de usar esta mdquina de coser.
PELIGRO - Parareducirelriesgo de descarga el6ctrica:
1. La rndquina nunca se debe desatender cuando se ha conectadoo
Siempre debe desconectada de la toma el8ctrica tan pronto termine de usarla y antes de limpiarla.
2. Siempre debe desconectada antes de cambiar la bombilla.
Reemplazar la bombilla con una del mismo tipo de 15 vatios.
3. No debe recogerla si se ha caido al agua, descondctela inmediatamente..
4. No coloque o guarde la mdquina donde pueda caer o ser tirada dentro de una baSera o sumidero_
No colocar o dejar caer en agua u otro Ifquido.
ADVERTENCIA- Para reducir el riesgo de quemaduras, incendio, descarga el6ctrica o daSo a ,as
personas:
1_ No permita que su mdquina de coser sea usada como juguete_ Preste mucha atenci6n cuando la utilice cerca de
niSos.
2. Utilice esta mdquina s61o para el uso que se le ha destinado como queda indicado en el manual.
Use solamente accesorios recomendados por el fabricante como los contenidos en este manual.
3. Nunca opere esta mdquina si hay un cable o clavija daSada, si no funciona apropiadamente, si se ha
cafdo o daSado, o si ha cafdo en agua Devuelva la m_iquina al centro de servicio o punto de venta autorizado
mds cercano para examinar, reparar o realizar ajuste mec&nico o eldctricoo
44 Nunca opere la mdquina con cualquier salida de aire bloqueada. Mantenga las aberturas de ventilaciSn de la m_quina
de coser y el pedal de control libre de acumulaci6n de pelusa, polvo y residues de tela
5. Nunca deje caer o introduzca objetos en ninguna abertura de la mdquina°
6.. No la utilice en exteriores.
7. No opere donde se utilizan aerosoles o sitios de administraciSn de oxfgeno°
8. Para desconectar, coloque todos los controles en posiciSn de apagado ("O"), luego retire el enchufe de la toma
el_ctrica.
9,. No desconecte tirando del cable. Para desconectar, tire det enchufe, no del cable.
10. Mantenga los dedos fuera de las partes en movimiento. Se requiere especial cuidado alrededor de la aguja
de la m_quina de coser.
11, Siempre utilice la placa de aguja adecuada. La placa equivocada puede causar que se rompa la aguja,
12.. No utilice agujas dobladas
13. No jale o empuje la tela mientras cose. Esto puede desviar la aguja ocasionando que se rompa.
14. Apague la mdquina cuando tenga que hater cualquier ajuste en la drea de la aguja, como enhebrar la aguja,
cambiar la aguja, ensartar el carrete o cambiar el prensatelaso
15_ Siempre desconecte ta mdquina de coser de la toma el6ctrica cuando retire las cubiertas, al engrasar o cuando
hace otros ajustes mencionados en el manual de instrucciones,
CONSERVE ESTAS INSTRUCCIONES
Cuando utilice por primera vez su mdquina de coser, coloque una pieza de tela debajo del el prensatelas
y haga funcionar la mdquina sin hilo, durante unos pocos minutos. Es normal que aparezcan salpicaduras de
aceite, I[mpielas y cosa normalmenteo
f f
INiPOFITANTES CONSIGNES DE SECURITE
Votre machine & coudre n'est congue et constnJite que pour rusage domestique.
Lisez toutes ces consignes avant d'utiliser cette machine & coudre.
DAN GER-Commentr_duire le risque de choc _lectrique:
1. Une machine ne devrait jamais _tre laiss_e sans surveillance Iorsqu'elle est branch_e. D_branchez cette machine
de la prise _lectrique imm_diatement apr_s I'avoir utilis_e et avant d'entreprendre son entretien.
2_ D_branchez toujours la machine avant de changer I'ampoule. Remplacez !'ampoule par una ampoule identique
de 15 watts.
3 N'essayez pas de rattraper une machine qui est tomb_e dans I'eau. D_branchez-la imm_diatement.
4, Ne placez pas la machine & un endroit o_Jelle risque de tomber ou d'etre entrain_e dans un bassin ou un _vier.
Ne placez pas la machine dans de t'eau ou tout autre liquide.
AVERTIS S EMENT- Comment r6duire le risque de brm31ure,d'incendie, de choc _lectrique, ou de blessure:
1. Cette machine n'est pas un jouet. Une attention particuti_re dolt _tre apport_e lots de rutitisation de cette machine
pros ou par des enfants.
2 N'utilisez cette machine que pour l'usage pr6vu d_crit dans ce manuel°
N'utilisez que les accessoires recommand6s par le fabricant, comme indiqu_ dans ce manuel°
3. N'utilisez jamais une machine dent te cordon d'alimentation ou la prise sent endommag_s, si elle ne fonctionne
pas correctement, si elle est tomb_e ou est endommag_e, ou si elle est tomb_e & I'eau..
Rapportez la machine au magasin Sears le plus proche pour une v_(rfication, une r_paration, un r_glage _lectrique
ou m_canique.
4. N'utilisez jamais une machine dent les ouvertures de ventilation sent obstru6es. Maintenez les conduits d'a_ration
libres de toute accumulation de charpie, de poussi_re et de fibres de tissu.
5. Ne laissez tomber et n'introduisez aucun objet dans les ouvertures de la machine.
6. N'utilisez pas la machine en plein air.
7o Ne faites pas fonctionner la machine en presence de produits a_rosols, ou d'oxyg_ne_
8. Avant de d6brancher la machine, placez tousles cotrSles & OFF (ou &" O" ), puis retirez la prise_
9o Ne d_branchez pas la machine en tirant sur le cordon d'alimentation. Prenez ta prise & la main, pas le cordon.
10. I_leignez les doigts des parties mobiles., Faites particuli_rement attention autour de l'aiguille.,
11. Utitisez toujours la plaque d'aiguille appropri_e, Une mauvaise plaque peut provoquer la cassure de
I'aiguitleo
12. N'utilisez aucune aiguille tordueo
13. Ne tirez et ne poussez pas ie tissu pendant la couture_ Ceta risque de courber ou de casser raiguille.
14. I_teignez la machine chaque fois que vous effectuez des r_glages dans la r_gion de t'aiguille, tels que: enfiler
I'aiguilie, changer raiguille, enfiler ta canette, changer ie pied presseur, etc.
15. D_branchez syst_matiquement la machine torsque vous entevez les plaques, tubrffiez ta machine ou lorsque
vous effectuez les operations d'entretien d_cr*rtes dans ce manuel
CONSERVEZ CES CONSIGNES
Les premieres fois que vous utilisez votre machine, placez une chute de tissu sous ie pied presseur et faites
fonctionner la machine sans fil pendant quelques minutesr Essuyez les traces d'huile le cas ichianto
J
tll
WARRANTY
FULL 25 YEAR WARRANTY ON DEFECT IN MATERIAL OR WORKMANSHIP
For 25 years from the date of purchase, Sears will, free of charge, repair defects in material or workmanship which
appear in the internal mechanical part of the sewing machine°
FULL TWO YEAR WARRANTY ON ELECTRICAL EQUIPMENT OF SEWING MACHINE
For two years from the date of purchase, Sears will, free of charge, repair defects in material or workmanship which
appear in the electrical and electronic equipment of the sewing machine, includingmotor, wiring, electronic components,
switch and speed control.
FULL 90-DAY WARRANTY ON ALL PARTS AND MECHANICAL ADJUSTMENTS
For 90 days from the date of purchase, Sears will, free of charge, replace any parts and provide mechanical service
necessa_ for proper operation of !he sewing machine except for normal maintenance_ Warranty service is available by
returning the sewing machine to the nearest Sears Serv ce Center in the United States.
IF THIS MACHINE IS USED FOR COMMERCIAL OR RENTAL PURPOSES, THE ABOVE WARRANTY
COVERAGES APPLY FOR ONLY 90 DAYS FROM THE DATE OF PURCHASE
This warranty gives you specific legal rights, and you may also have other rights which vary from state to state.
Sears, Roebuck and Co., DI817 WA, Hoffman Estates, IL 60179
GARANTIA
GARANTIA COMPLETA POR 26 A_IOS EN LA CABEZA DE LA MAQUINA DE COSER
Durante 25 aSosdesde la fecha de la compra,Sears ofrece, librade costo, reparar los defectos en material o de manufactura que
puedanpresentarse en los componentesmec_nicos de la cabeza de la m&quinade coser.
GARANTIA COMPLETA POR 2 ANOS EN EQUIPO ELECTRICO DE LA MAQUINA DE COSER
Durante2 a_os desde la fecha de la compra,Sears efface, librede costo,reparar los defectos en material o de manufactura que
puedanpresentarseen el equipoel_ctrico de la m_quina de coser,incluyendocompenentesel_ctricos,motor,conexionesel_ctricas,
interruptery controlde vetocidado
GARANTIA COMPLETA POR 90 DIAS SOBRE TODAS LAS PARTES Y AJUSTES MECANICOS
Durante90 dfasdesde lafecha de ta compra,Sears ofrece,libra de costo,reemplazarcualquieraparle y proveerel serviciomecanico
necesario para la apropiadaoperaci6nde la m_quina de cosel',exceptopara mantenimiento normal. El servicio de garantia se puede
obtener enviandota m&quina de coser ai centro/departamento de Servicios Sears mas cercano an los Estados Unidos.
S! ESTA MAQUINA DE COSER SE t,ITILIZA PARA PROP6SITOS COMERCIALES O DE ALQUILER, LA COBERTURA DE
GARANTIA CITADA MAS ARRIBA ES VALIDA UNICAMENTE DURANTE 90 D|AS A PARTIR DE LA FECHA DE COMPRA
Esta garanti_le da a usted derechos legatesespecfficos,pero usted puedetenertambi_n otros derechos los cuales varfan de estado
a estado.
Sears, Roebuck and Co., !:)/817WA Hoffman Estates, IL 60179
GARANT1E
GARANTIE TOTALE DE 25 ANS SUR LE MI_CANISME DE LA MACHINE
Pendant25 ans, & partirde la date d'achat,Sears rdpareragratuitementtoutddfautde mat_riau oude fabricationquiapparaTtradans
le m_canisme de votremachine.
GARANTIE TOTALE DE DEUX ANS SUR UI_QUIPEMENT I_LECTRIQUE
Pendant deux ans, _,partir de la date d'achat, Sears r,_pareragratuitementtout ddfautde materiauou de fabricationquiappara_ra
dansle moteur, le c,_blage,t'interrupteurou la commandede vitesse de marche, dane lescircuitselectriquesou _lectroniques.
GARANTIE TOTALE DE 90 JOURS SUR TOUTES LES PIt:CES ET LAMISE AU POINT DU M¢CANISME
Pendant90 jours, _ partirde la date d'achat,Sears effectueragratuitement toutremplacementde piece et r_glage n_cessaires
au ben fonctionnement de la machine;I'entretien ordinaire8tant & la chargede rutilisateuro Pourbdndficier des avantages qu'offre la
garantieci*dessus,adressez-vous a votremagasin habitualou au serviceapr_s-vente Sears,partoutaux Etats*Unis,
SI CETTE MACHINE _, COUDRE SERT _, DES FINS COMMERCIALES OU DE LOCATION, LA GARANTIE CI-DESSUS SE
uMrrE _ 90 JOURS A COMPTER DE LA DATE D'ACHAT.
Cette garantie vous donne des droits t_gaux precis, et _ventuellement d'autres droits, ce[_-ci pouvant varier d'une _tat ,_ une autre,
Sears, Roebuck and Coo,D/817 WA, Hoffrnan Estates, IL 60179
IV
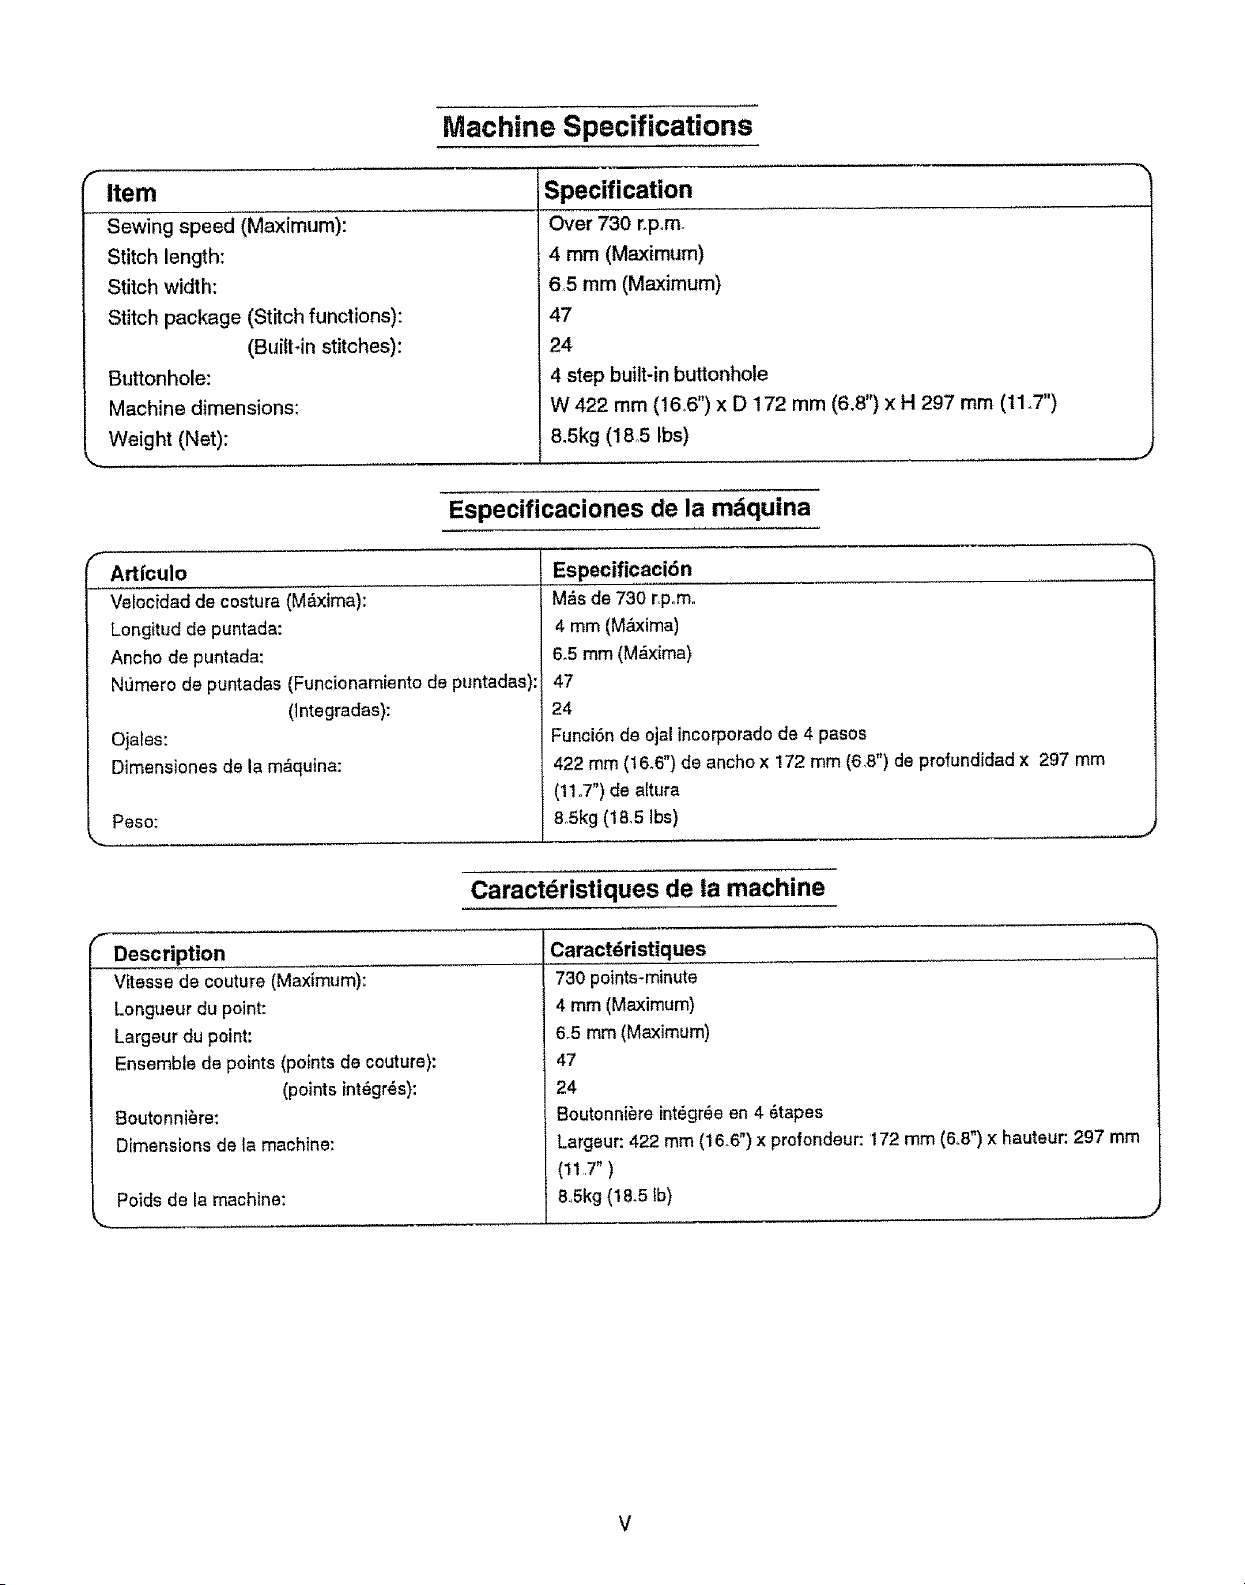
Machine Specifications
Item
Sewing speed (Maximum):
Stitch length:
Stitch width:
Stitch package (Stitch functions):
(Built.in stitches):
Buttonhole:
Machine dimensions:
Weight (Net):
Specification
Over 730 r.pm.
4 mm (Maximum)
6,5 mm (Maximum)
47
24
4 step built-in buttonhole
W 422 rnm (16,6") x D 172 mm (6.8") x H 297 mm (11.7")
8,5kg (18o5 Ibs)
Especificaciones de la mdquina
Artfculo
Velocidad de costura (M&xima):
Longitud de puntada:
Ancho de puntada:
Numero de puntadas (Funeionamiento de puntadas):
(lntegradas):
Ojates:
Dimensiones de la m&quina:
Peso;
Especificaci6n
M_s de 730 r,p°m°
4 mm (M_xima)
6_5 mm (M_xima)
47
24
Funci6n de ojal incorporado de 4 pasos
422 mm (t6.6") de ancho x 172 mm (6,8") de profundidad x 297 mm
(11,,7") de altura
85kg (t6,5 Ibs)
J
Caractdristiques de la machine
Description
Vitesse de couture (Maximum):
Longueur du point:
Largeur du point'.
Ensemble de points (points de couture):
(points int_gr_s):
Boutonniere:
Dimensions de la machine:
Poids de la machine:
Caractdristiques
730 points-minute
4 rnm (Maximum)
6_5 mm (Maximum)
47
24
Boutonniere int_gr_e en 4 _tapes
Largeur: 422 mm (16.6") x profondeur: '172 mm (6,8") x hauteur: 297 turn
(11,7° )
8.,Skg (18.5 lb)
V
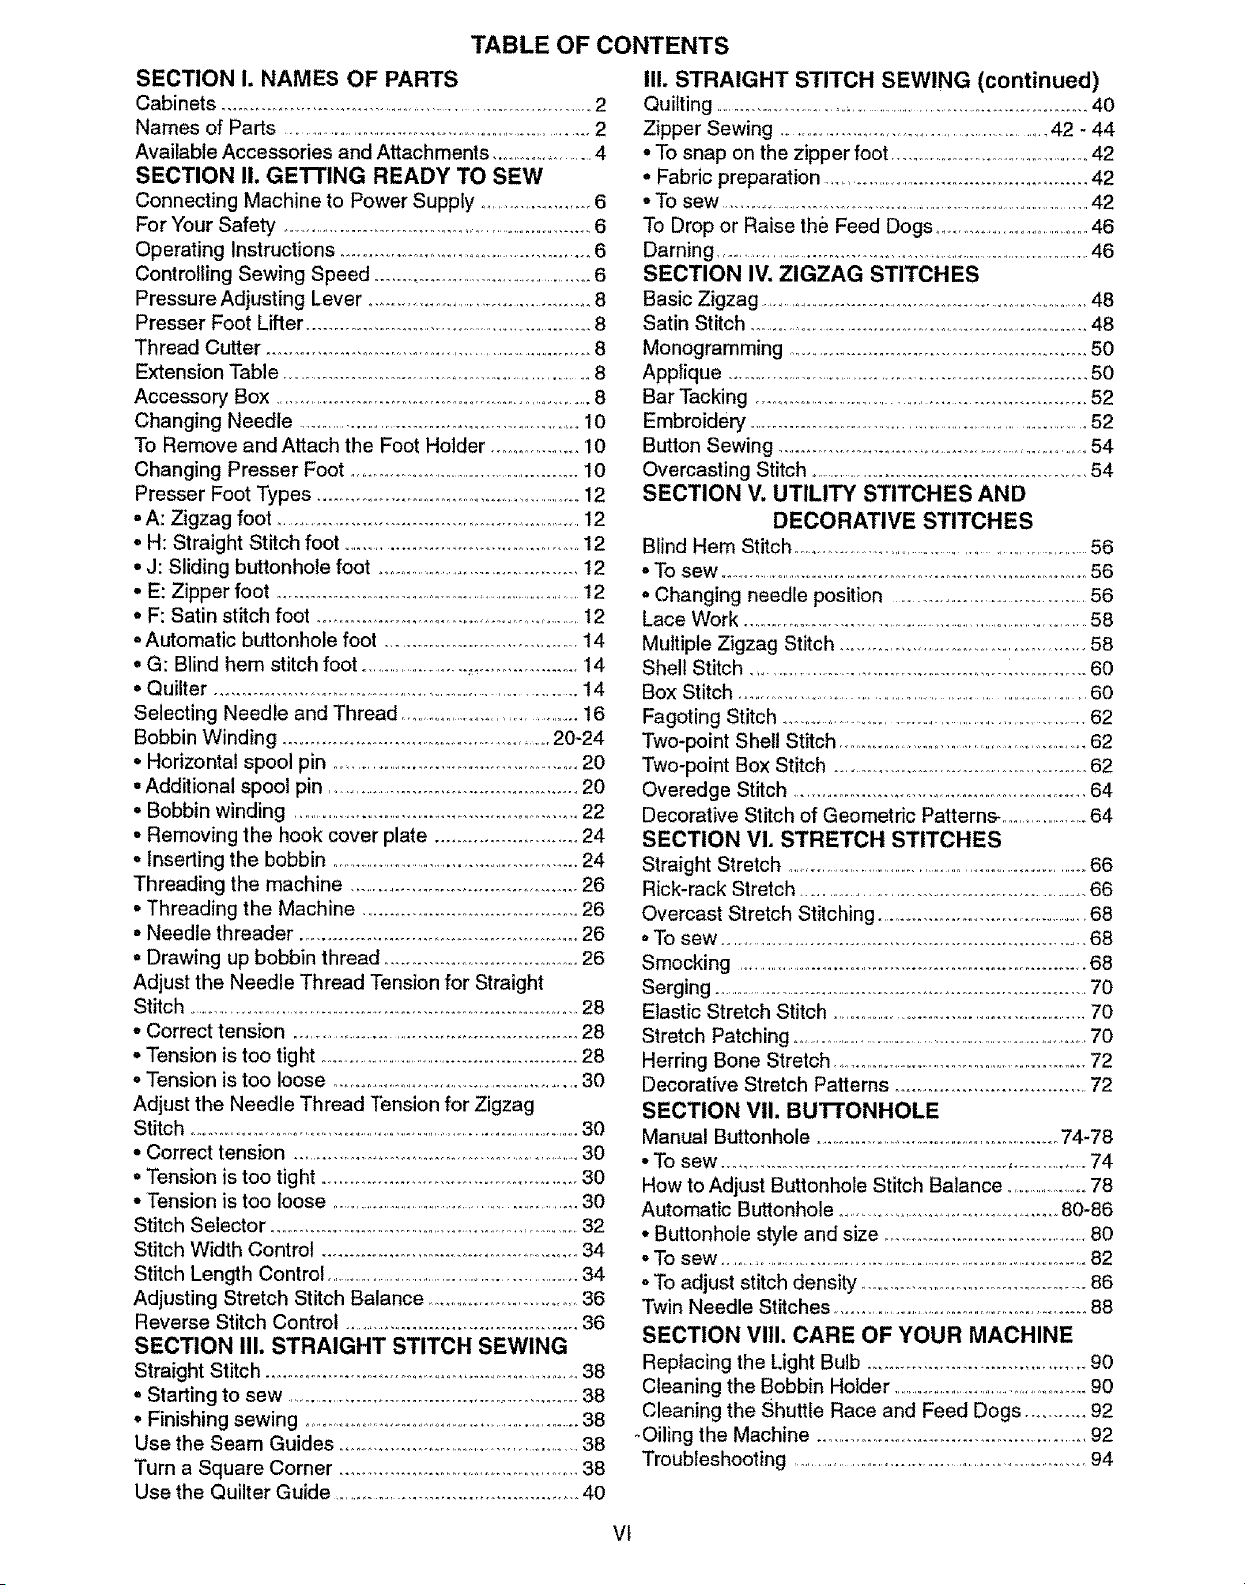
TABLE OF CONTENTS
SECTION i. NAMES OF PARTS
Cabinets ...........................................................................2
Names of Pads .....................................................................2
Available Accessories and Attachments .........................4
SECTION II. GE'rFING READY TO SEW
Connecting Machine to Power Supply ...................... 6
For Your Safety ...................................................................... 6
Operating Instructions ................................................ 6
Controlling Sewing Speed .............................................6
Pressure Adjusting Lever ..............................................8
Presser Foot Lifter ............................................................8
Thread Cutter .............................................................. 8
Extension Table .....................................................................8
Accessory Box ....................................................................8
Changing Needle ...........................................................10
To Remove and Attach the Foot Holder .................. 10
Changing Presser Foot ........................................................10
Presser Foot Types ........................................................12
=A: Zigzag foot ..................................................................... 12
• H: Straight Stitch foot ............................................ 12
• J: Sliding buttonhole foot ...........................................!2
• E: Zipper foot .......................................................................12
• F: Satin stitch foot .........................................................I2
=Automatic buttonhole foot ..................................... 14
,, G: Blind hem stitch foot .......................: .................... t4
° Quilter .......................................................................... 14
Selecting Needle and Thread .....................................t6
Bobbin Winding ...........................................................20-24
• Horizontal spool pin ................................................. 20
• Additional spool pin ................................................ 20
• Bobbin winding ................................................................22
° Removing the hook cover plate .......................... 24
• Inseding the bobbin .........................................................24
Threading the machine ..............................................26
• Threading the Machine ....................................... 26
° Needle threader ....................................................... 26
= Drawing up bobbin thread ................................... 26
Adjust the Needle Thread Tension for Straight
Stitch ....................................................................................28
° Correct tension
...........................................................
28
• Tension is too tight ................................................................28
o Tension is too loose .......................................................30
Adjust the Needle Thread Tension for Zigzag
Stitch ..........................................................................................30
• Correct tension .................................................................. 30
° Tension is too tight ................................................. 30
• Tension is too loose .............................................................30
Stitch Selector .......................................................................32
Stitch Width Control .............................................. 34
Stitch Length Control .................................................................. 34
Adjusting Stretch Stitch Balance ............................. 36
Reverse Stitch Control .............................................. 36
SECTION III, STRAIGHT STITCH SEWING
Straight Stitch ...................................................................38
° Starting to sew ......................................................... 38
• Finishing sewing .....................................................................38
Use the Seam Guides ................................................... 38
Turn a Square Corner ............................................... 38
Use the Quilter Guide ............................................... 40
III. STRAIGHT STITCH SEWING (continued)
Quilting ................................................................................40
Zipper Sewing ..........................................................42 - 44
• To snap on the zipper foot ...............................................42
° Fabric preparation .....................................................42
• To sew ...............................................................................................42
To Drop or Raise the Feed Dogs .........................................46
Darning
........................................................................................
46
SECTION IV. ZIGZAG STITCHES
Basic Zigzag ....................................................................................48
Satin Stitch .........................................................................48
Monogramming ............................................................50
Applique .............................................................................50
Bar Tacking .................................................................. 52
Embroidery ............................................................................ 52
Button Sewing ...............................................................54
Overcasting Stitch .........................................................54
SECTION V. UTILITY STITCHES AND
DECORATIVE STITCHES
Blind Hem Stitch .................................................................... 56
° To sew ................................................................................. 56
= Changing needle position ...........................................56
Lace Work .........................................................................58
Multiple Zigzag Stitch .............................................. 58
Shell Stitch ................................................................. 60
Box Stitch ....................................................................................60
Fagoting Stitch ...................................................................62
Two-point Shell Stitch ..........................................................62
Two-point Box Stitch ......................................................62
Overedge Stitch .......................................................... 64
Decorative Stitch of Geometric Patterns_ ....................64
SECTION Vl. STRETCH STITCHES
Straight Stretch ................................................................................... 66
Rick-rack Stretch ...............................................................66
Overcast Stretch Stitching ............................................68
=To sew ........................................................................ 68
Smocking .......................................................................68
Serging ................................................................................70
Elastic Stretch Stitch ...............................................................70
Stretch Patching ...........................................................................70
Herring Bone Stretch ................................................................ 72
Decorative Stretch Patterns .................................... 72
SECTION Vii. Bu'rrONHOLE
Manua! Buttonhole ....................................................74-78
° To sew .................................................................... 74
How to Adjust Buttonhole Stitch Balance .........................78
Automatic Buttonhole ....................................................80-86
• Buttonhole style and size ........................................ 80
oTo sew ...........................................................................................82
° To adjust stitch density .......................................... 86
Twin Needle Stitches ...........................................................88
SECTION VIII, CARE OF YOUR MACHINE
Replacing the Light Bulb ........................................ 90
Cleaning the Bobbin Holder ............................................................ 90
Cleaning the Shuttle Race and Feed Dogs ............ 92
•Oiling the Machine ................................................... 92
Troubleshooting .........................................................................94
Vt

INDICE
SECCION I. NOMBRE DE LAS PARTES
Gabinete ...................................................................................... .......... 3
Nombre de las partes .......................................................................3
Accesorios y refacciones disponibtes ..............................................5
SECCION I1. PREPARACION DE LA MAQUINA
PARA COSER
Conexi6n de la m&quina a !a rad el_ctrica .......................... 7
Para su seguridad ...........................................................................7
tnstrucciones para la operacien ................................................ 7
Control de la ve!ocidad de costura ............................................7
Ajuste de la presi6n del prensatelas ........................................ 9
Palanca de elevaciSn del prensatelas .........................................9
Cortahilos ..................................................................................... 9
Amptiacion m6vil de la supefficie de costura ........................ 9
Estuche de accesorios ........................................................................9
Cambio de aguja ................... .......................................................... 11
C6mo quitar/poner el enmangue del prensate_as .............. 11
CSmo quitar/poner et prensatelas ................................................11
Tipos de prensatelas ...................................................................t3
.A: Prensatelas para zig-zag ................................................. 13
• H: Prensatelas para puntada recta ........................................13
• J: Prensatelas para corredizo .......................................................13
o E: Prensatelas para crematleras ..............................................13
• F: Prensatelas para puntada decorativa ..............................13
• Prensatelas para oja! autom#,tico .............................................15
. G: Prensatalas para puntada invisible ...................................15
• Gufa de acolchado ...........................................................................15
Se]eccidn de aguja e hilo ........... .................................................. 17
Bobinado de la canilla ................................................................21 -25
• Portacarretes horizontal ...............................................................21
o Portacarretes adicional ................................................................21
° Bobinado de la canilla .................. ..................................................... 23
, C6mo sacar la canilla ....................................................................25
• Colocaci6n de la canilla en el portacanillas .................... 25
Enhebrado del hilo de la aguja ..................................................27
. Enhebrado del hilo de la aguja .................................................27
• Ensartador de aguja autom#,tico ................................................27
• Extracci6n del hilo de la canilla ............................................. 29
Ajuste de la tension del h]lo de ta aguja para
puntada recta ...............................................................................29
• Tensi6n correcta
.......................................................................
29
• Et hilo est_ demasiado tenso .....................................................29
,, El hUoestd demasiado flojo ...................................................31
Ajuste de la tensi6n del hilo della aguja para puntada
zig-zag ..............................................................................................31
• Tenst6n correcta ....................................................................... 31
• El hilo estd demasiado tenso ................................................ 31
• El hi!o estd demasiado flojo ................................................. 3t
Selector de puntada .....................................................................33
Control de la anchura de puntada ...............................................35
Control de la Iongitud de puntada ....................................... 35
Equilibria de los patrones distorstonados ...............................37
Control de puntada inverl!da .................................................. 37
SECCION !11.COSTURA DE PUNTADA RECTA
Puntada recta .................................................................................39
• Para empezar a coser ....................................................... 39
- Para terminar la costura ............................................................39
Usa de las gu[as de costura ....................................................39
Para girar en esquinas de dngulo recto ................................ 41
Usa de las gufas del acolchador ..............................................39
VII
SECCION III. COSTURA DE PUNTADA RECTA
(continuaci6n)
Costura a la vista .............................................................................. 41
Acolchado ................................................................................... 4t
Costura de cremalteras
......................
..................................
43-45
. C6mo cotocar el pie para cremalleras ...................................43
• Preparaci6n de la tela ........................................................ 43
o Para coser .....................................................................................43
Coma bajartsubir los dientes det transporte ...................... 47
Zurcido .............................................................................. .................. 47
SEGClON IV. PUNTADAS DE ZlG-ZAG
Puntada de zig-zag ....................................................................49
Puntada en satfn .........................................................................49
Monogramas ............................................................................. ......... 51
Aplicaciones ....................................................................................... 51
Puntada de refuerzo ..................................................................53
Bordado ............................. ................................................................ 53
Costura de botones ...........................................................................55
Punteda de sobrehilado oremate ...........................................55
SEOGION V, PUNTADAS UTILES Y PUNTADAS
DECORATIVAS
Dobladillo invisible ............................................................................57
• Para coser ...................................................................................57
• C6mo cambiar la posici6n de la aguja .............................. 57
Trabajos con lazos ..............................................................................59
Puntada de meltiple zig-zag .............................................................59
Puntada en forma de concha ................................................... 6t
Puntada de caja ......................................................................................61
Puntada para deshilachados .......................................................63
Puntada de concha de dos puntos ...........................................63
Puntada de caja de dos puntos ................................................63
Puntada para rebordados .........................................................65
Puntadas decorativas de disefios geomdtricos .................. 65
SEGGION VI. PUNTADAS ELASTiOAS
Puntada recta triple .................................................................. 67
ExtensiSn d_ "Rick-rack" (zig-zag) ........................................ 67
Puntada e!dstica de remate o sobrehilado .......................... 69
• Para coser .....................................................................................69
Puntada de pluma ................................................................... 69
Puntada de dobladillo ................................................................ 71
Puntada el_stica de extensi6n .....................................................71
Remiendos eldsticos ............................................................. 71
Puntada de espiga el&st!ca ............... ...................................... 73
Disefos decorativos el_st!cos ............................................. 73
SECOION Vii. OJALES
Ojal manual ........................................................................ 75-79
• Para coser ............................................................................... 75
C6mo aquilibrar las puntadas de los ojates ...........................79
Ojal autom&tico .............................................................._.o,,o81-87
• Estilo y tama5o del ojal ..............................................................81
• Para coser ..................................................................................83
- Para ajustar la densidad de las puntadas ........................ 87
Puntadas de doble aguja (Articu!os de opcional) .............. 89
SECClON Viii, MANTENliVtlENTO DEL LA MAQUINA
Cambiando la bombi!la ..............................................................91
Limpiando el portacanil!as .........................................................91
Limpieza del gafffo y los diantes del transporte ................ 93
Engrasando la m&quina ................................... ............................... 93
Soluciones de problamas de tuncionamiento ...................... 95
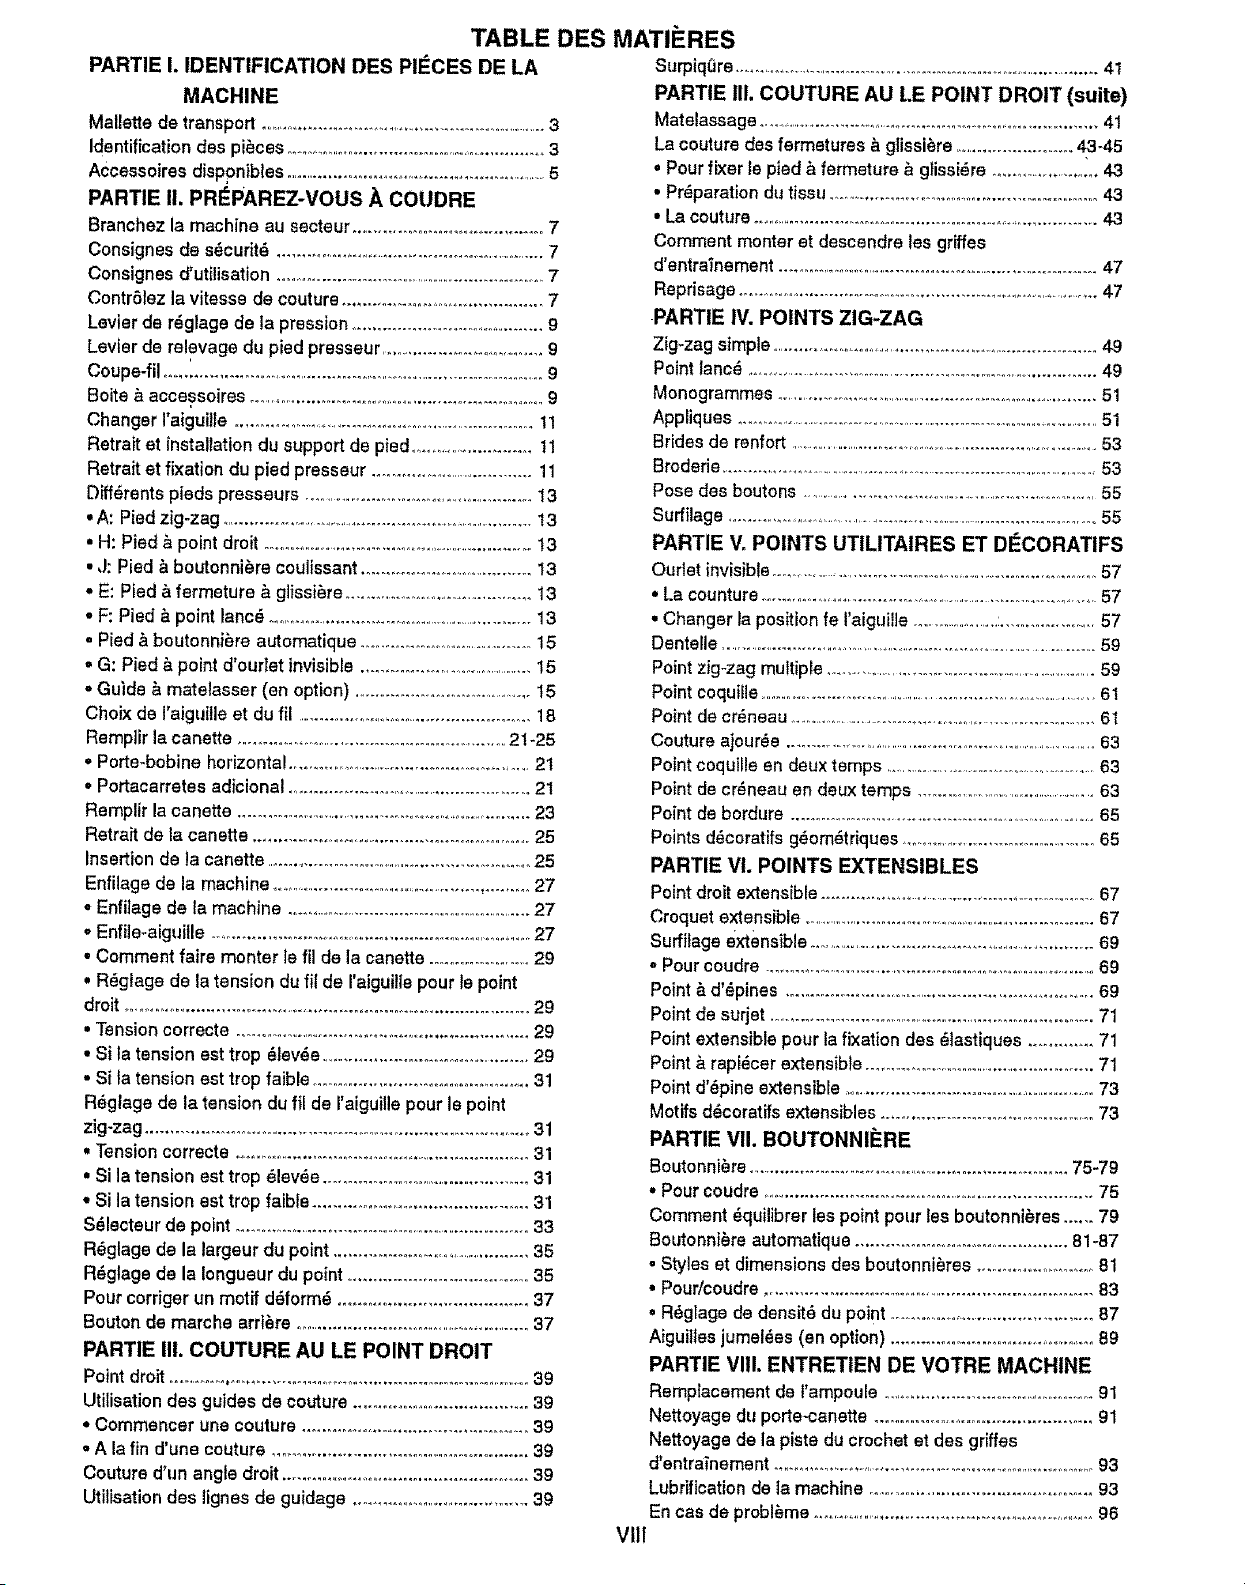
TABLE DES MATII=RES
PARTIE I. IDENTIFICATION DES PII_CES DE LA
MACHINE
Mallette de transport ...................................................................... 3
Identification des pi_ces .......................................................... 3
Accessoires disponibles ............................................................5
PARTIE II. PR_PAREZ-VOUS A COUDRE
Branchez la machine au secteur ........................................ 7
Consignee de sdcurit_ .............................................................. 7
Consignee d'utilisation ..............................................................7
Contr6tez la vitesse de couture ............................................. 7
Levier da r_glage de ta pression ......................................... 9
Levier de relevage du pied presseur .....................................9
Coupe-fil ........................................................................................9
Bolts _ accessoires ...................................................................9
Changer I'aiguille ...................................................................... 1 1
Retrait et installation du support de pied .......................... 1!
Retrait et fixation du pied presseur ......................................11
Diff6rents pieds presseurs .................................................. 13
• A: Pied zig-zag ..........................................................................13
• H: Pied & point droit ...............................................................13
• J: Pied & boutonniere coulissant ....................................... t3
• E: Pied & fermeture ,_glissi_re .......................................... 13
• F: Pied & point lanc_ .................................................................13
= Pied & boutonnii_ra automatique ...................................... 15
• G: Pied & point d'oudet invisible ...........................................15
- Guide & matelasser (en option) ........................................ 15
Choix de I'aiguitle et du fil ................................................... 18
Rempiir la canette .............................................................21-25
• Porte-bobine horizontal ...................................................... 21
• Portacarretes adfcional ..........................................................21
Remplir la canette ......................................................................23
Retrait de la canette ............................................................. 25
Insertion de la canette .............................................................25
Enfilage de la machine ...................................................................27
• Enfilage de la machine ............................................................27
• Enfi]e-aiguiUe ....................................................................... 27
• Comment fairs monter le ffi de la canette ........................29
• R_glage de la tension du fil de I'aiguitle pour te point
droit ....................................................................................... 29
• Tension corrects ................................................................. 29
• Si la tension est trop _levde ............................................... 29
• Si la tension est trop faible ............................................. 31
R+glage de la tension du fit de raiguille pour le point
zig-zag .................................................................................. 31
• Tension correcte .................................................................. 31
• Si la tension est trop 81evSe.............................................. 31
• Si la tension est trop faible ............................................. 31
S_lecteur de point ............................................................... 33
R_glage de la largeur du point ........................................... 35
R_glage de le Iongueur du point ....................................... 35
Pour corriger un motif dSform_ ...................................... 37
Bouton de marche arri_re ......................................................37
PART1E ii!. COUTURE AU LE POINT DROIT
Point droit ............................................................................... 39
Utitisation des guides de couture ..................................... 39
• Commencer une couture .................................................. 39
• A la fin d'une couture ......................................................... 39
Couture d'un angle droit ...................................................... 39
Utilisation des lignes de guidage ...................................... 39
Surpiq_ire .......................................................................................41
PARTtE ill. COUTURE AU LE POINT DROIT (suite)
Matelassage .............................................................................41
La couture des fermetures & glissiSre .......................... 43-45
, Pour fixer le pied ,_ fermeture & glissi_re .........................43
• Preparation du tissu ............................................................ 43
• La couture .......................................................................... 43
Comment monter et descendre lee grilles
d'entrainement ...................................................................... 47
Reprisage ...................................................................................47
PARTIE IV. POINTS ZlG-ZAG
Zig-zag simple ......................................................................... 49
Point lanc_ .................................................................................. 49
Monogrammes ................................................................................51
Appliques ..................................................................................................51
Brides de renfort ..........................................................................53
Broderie .................................................................................................53
Pose des boutons ...........................................................................55
Surfilage .........................................................................................55
PARTIE Vo POINTS UTILITAIRES ET DECORATIFS
Ourlet invisible .................................................................................57
• La counture .................................................................................57
• Changer la posffion fe I'aiguiile .........................:................... 57
Denteile .............................................................................................59
Point zig-zag multiple ....................................................................59
Point coquille ........................................................................................ 61
Point de cr_neau .........................................................................61
Couture ajour_e ...............................................................................63
Point coquille en deux temps .............................................................63
Point de cr_neau en deux temps ....................................................63
Point de bordure ..........................................................................65
Points d6coratifs g_om_triques ...............................................65
PARTIE VI. POINTS EXTENSIBLES
Point droit extensible ...................................................................67
Croquet extensible ............................................................................ 67
Suffilage extensible .....................................................................69
o Pour coudre ................................................................................. 69
Point & d'_pines ...................................................................... 69
Point de surjet ...........................................................................71
Point extensible pour la fixation des _lastiques ............. 71
Point & rapi_cer extensible ......................................................71
Point d'_pine extensible .............................................................73
Motifs d_coratifs extensibles ............................................... 73
PARTIE VII. BOUTONNIERE
Boutonniere ........................................................................ 75-79
• Pour coudre .......................................................................... 75
Comment _quilibrer lee point pour lee boutonnieres ...... 79
BoutonniSre automatique ............................................. 81-87
• Styles et dimensions des boutonnieres .......................... 81
• Pour/coudre ......................................................................... 83
• R6glage de densit6 du point ............................................. 87
Aiguiiles jumel_es (en option) ............................................ 89
PARTIE VIII. ENTRETIEN DE VOTRE MACHINE
Remplacement de l'ampoule .............................................. 91
Nettoyage du porte.canette ................................................. 91
Nettoyage de la piste du crochet et des griffes
d'entra_nement ............................................................................. 93
Lubrification de la machine ............................................... 93
En cas de problSme .............................................................. 96
Vlll
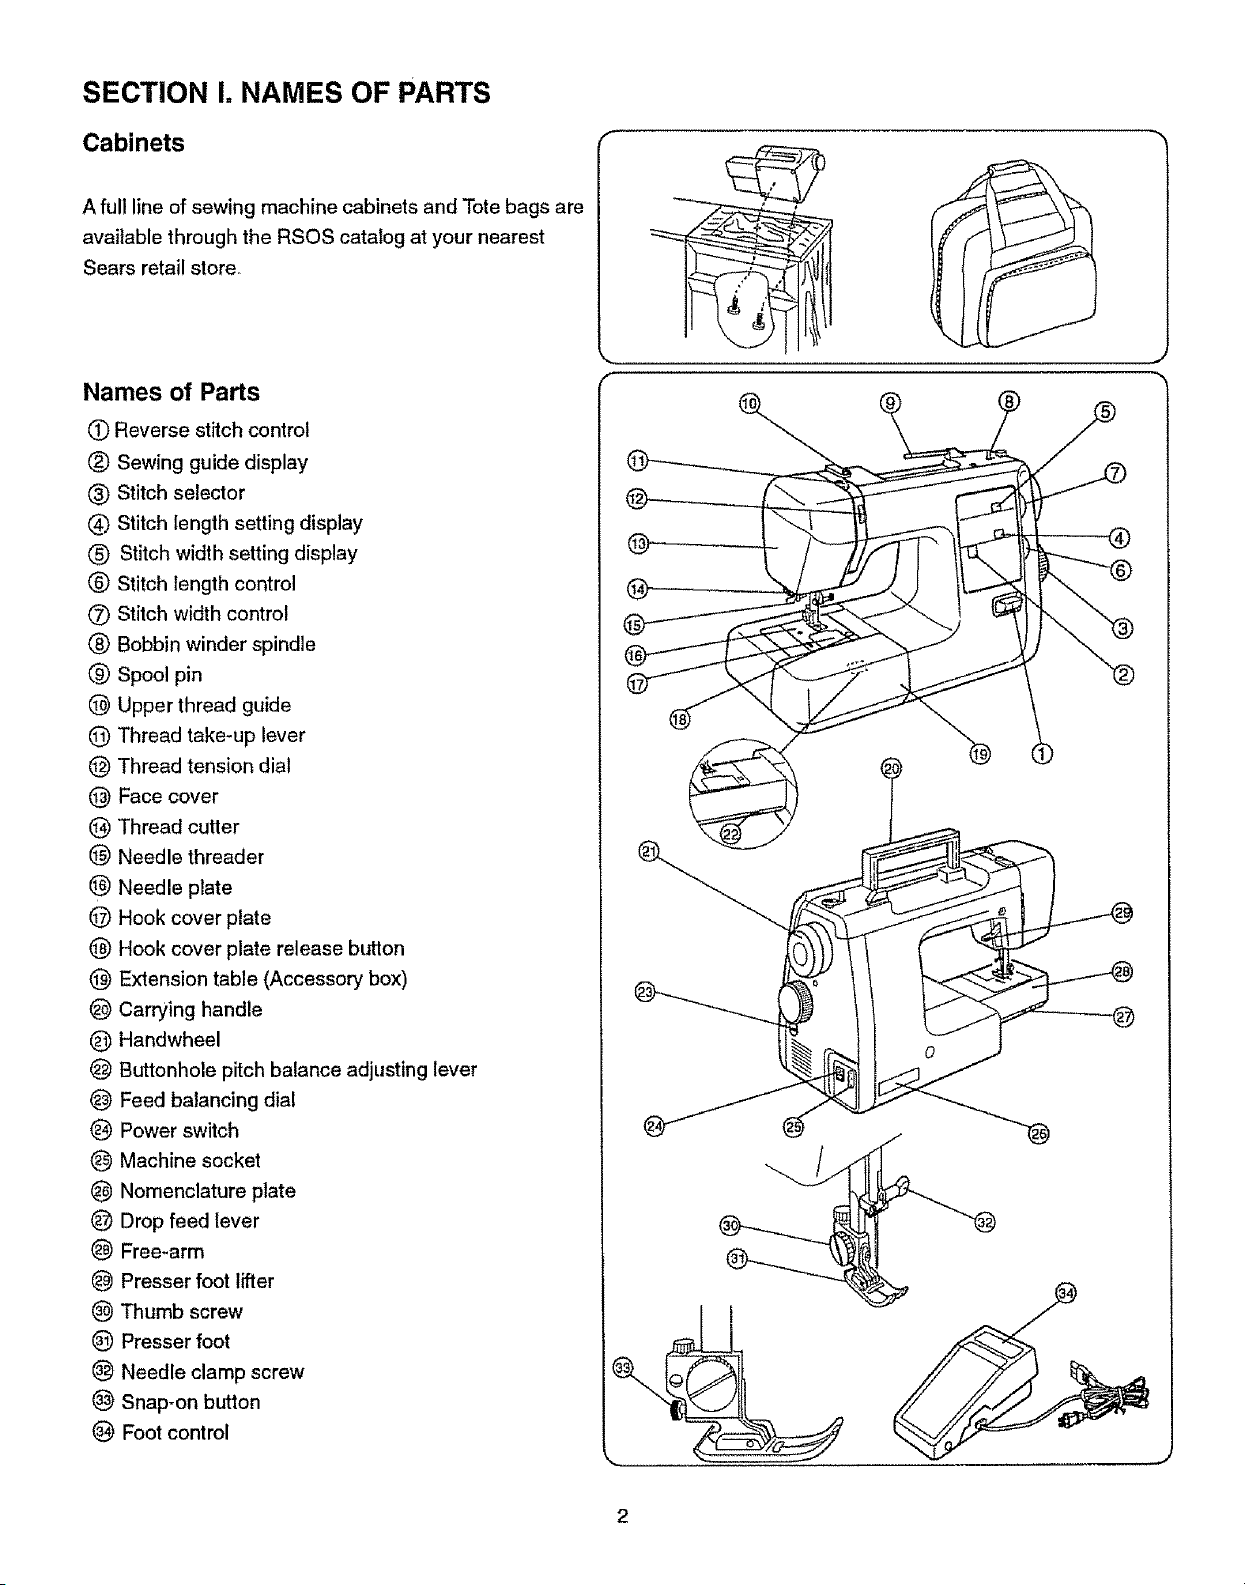
SECTION I. NAMES OF PARTS
Cabinets
A full line of sewing machine cabinets and Tote bags are
available through the RSOS catalog at your nearest
Sears retail store.
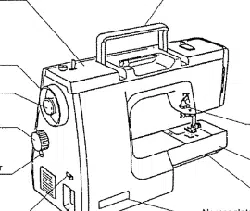
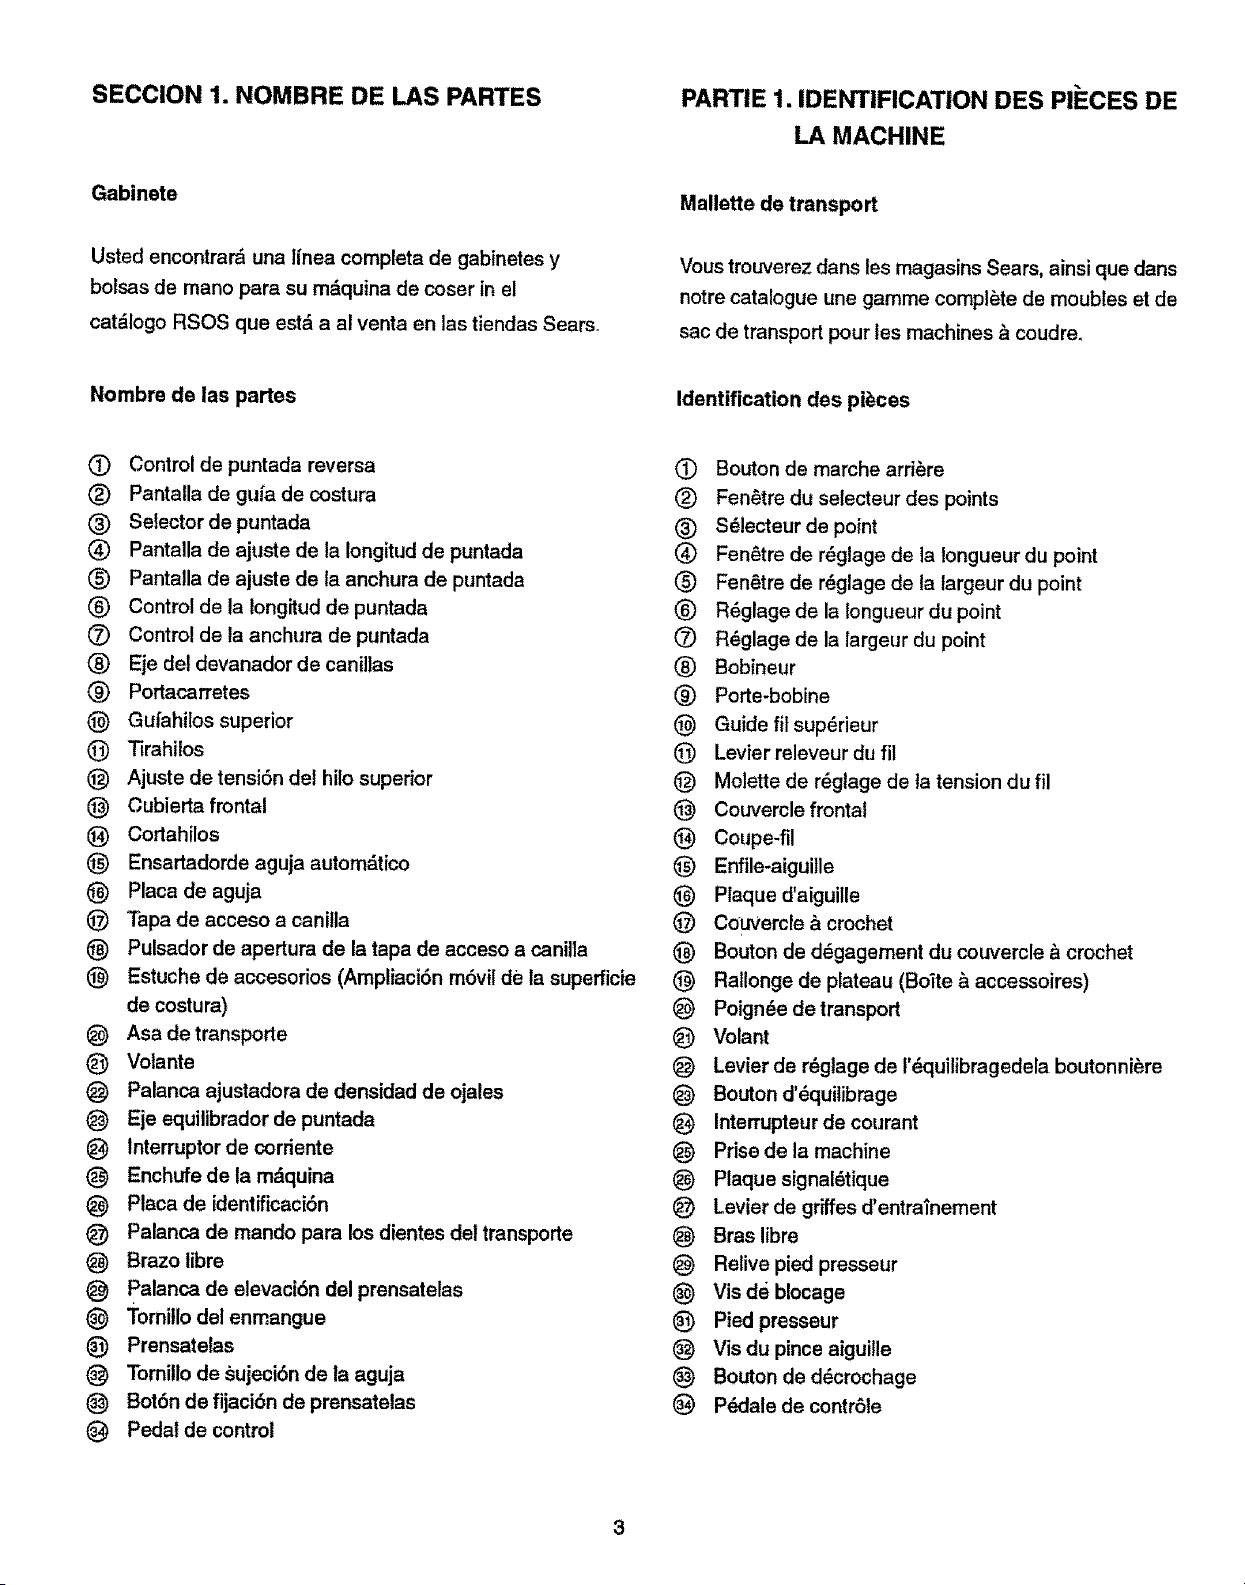
Names of Parts
(_) Reverse stitch control
(_) Sewing guide display
(_) Stitch selector
Stitch length setting display
(_) Stitch width setting display
(_) Stitch length control
(_) Stitch width control
(_) Bobbin winder spindle
(_ Spool pin
(_) Upper thread guide
Q Thread take-up lever
0 Thread tension dial
(_ Face cover
(_) Thread cutler
(_) Needle threader
Needle plate
0 Hook cover plate
(_) Hook cover plate release button
(_) Extension table (Accessory box)
Carrying handle
(_ Handwheel
Buttonhole pitch balance adjusting lever
_) Feed balancing dial
(_) Power switch
(_ Machine socket
_) Nomenclature plate
(_ Drop feed lever
Free-arm
(_ Presser foot lifter
Thumb screw
(_ Presser foot
(_ Needle clamp screw
Snap-on button
Foot control
2
SECCION 1. NOMBRE DE LAS PARTES
PARTIE 1. IDENTIFICATION DES Pli=CES DE
LA MACHINE
Gabinete
Usted encontrarfi una linea completa de gabinetes y
bolsas de mano para su m&quina de coser in el
catdlogo RSOS que estd a al venta en las tiendas Sears_
Mallette de transport
Vous trouverez dans les magasins Sears, ainsi que dans
notre catalogue une gamme complete de moubles et de
sac de transport pour les machines & coudre,
Nombre de las partes
Identification des pii_ces
O Control de puntada reversa
(_) Pantalla de gu[a de costura
(_) Selector de puntada
(_ Pantalla de ajuste de la Iongitud de puntada
(_) Pantalla de ajuste de ta anchura de puntada
(_) Control de la !ongitud de puntada
(_) Control de la anchura de puntada
(_) Eje del devanador de canillas
(_) Portacarretes
(_) Gufahi!os superior
(_) Tirahilos
Q Ajuste de tensi6n del hilo superior
(_) Cubierta frontal
(_) Cortahilos
(_) Ensartadorde aguja automfitico
(_) Placa de aguja
(_ =l'apade acceso a cani!la
_) Pulsador de apertura de la tape de acceso a canilla
Estuche de accesorios (Ampliaci6n m6vil de la supefficie
de costura)
(_ Asa de transporte
(_ Volante
Palanca ajustadora de densidad de ojales
Eje equilibrador de puntada
_) Interruptor de corriente
_) Enchufe de la m_quina
Placa de identificaci6n
Palanca de mando para los dientes del transporte
(_) Brazo libre
palanca de elevaci6n del prensatelas
(_ Tornillo del enmangue
(_ Prensate_s
(_ Tomi!lo de sujeci6n de la aguja
Bot6n de fijaci6n de prensatelas
(_ Pedal de control
(_) Bouton de marche arri_re
(_) Fen#_tredu selecteur des points
(_) S_lecteur de point
(_) Fen_tre de r_glage de la Iongueur du point
(_) Fen6tre de r_glage de la largeur du point
(_) R_glage de la iongueur du point
(Z) R_glage de la largeur du point
(_ Bobineur
(_) Porte*bobine
(_ Guide fit supdrieur
_) Levier releveur du fil
(_) Molette de r_giage de ta tension du fil
_) Couvercle frontal
(_) Coupe-ill
(_) Enfile-aiguille
_) Plaque d'aiguille
_) Couvercle & crochet
_) Bouton de d_gagement du couvercle & crochet
(_ Rallonge de plateau (Boite & accessoires)
Poign_e de transport
(_) Volant
Levier de r_glage de t'_quilibragedela boutonniere
_) Bouton d'_quiiibmge
Interrupteur de courant
Prise de la machine
Plaque signal6tique
(_ Levier de gr_es d'entrainement
_) Bras libre
(_) Relive pied pressmJr
(_) Vis de blocage
(_) Pied presseur
(_ Vis du pince aiguille
(_ Bouton de d_crochage
(_) PL=dalede contr61e
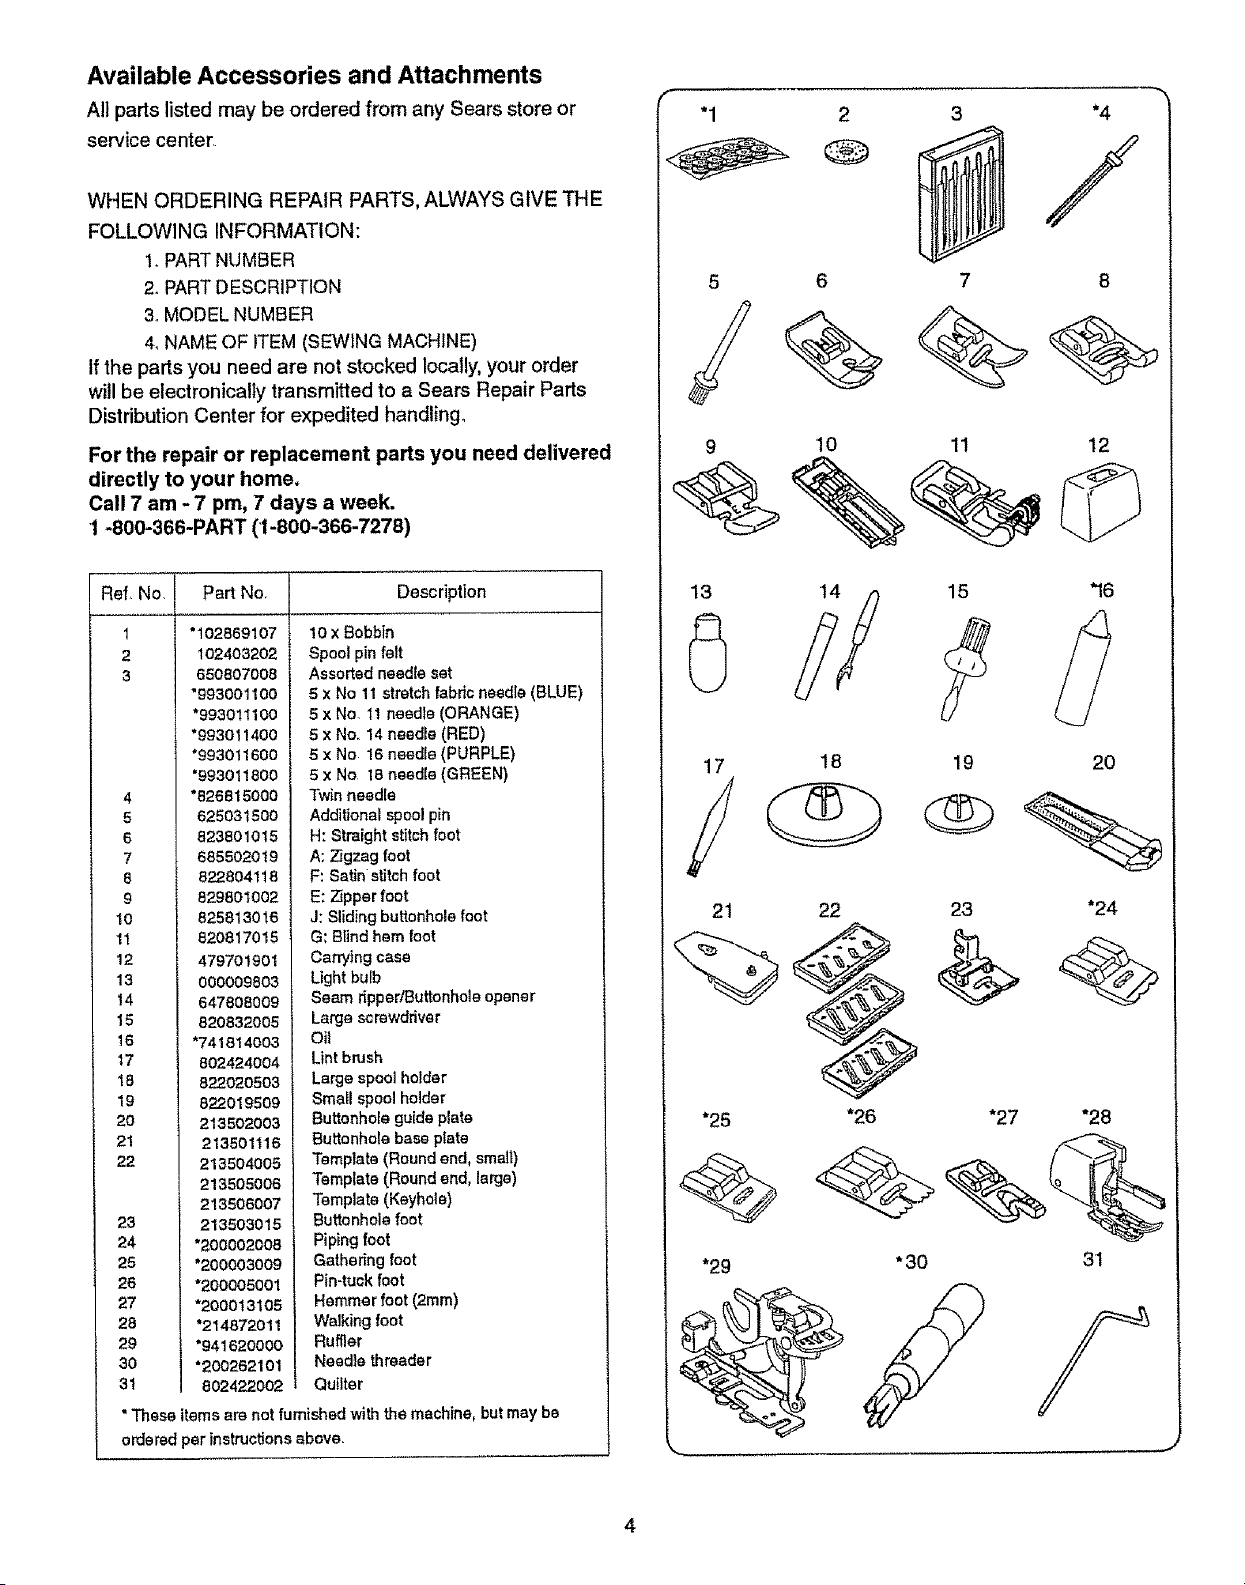
Available Accessories and Attachments
All parts listed may be ordered from any Sears store or
service center
WHEN ORDERING REPAIR PARTS, ALWAYS GIVE THE
FOLLOWING INFORMATION:
1. PARTNUMBER
2. PARTDESCRIPTION
3. MODEL NUMBER
4, NAME OF ITEM (SEWING MACHINE)
If the parts you need are not stocked locally, your order
will be electronically transmitted to a Sears Repair Parts
Distribution Center for expedited handling,
For the repair or replacement parts you need delivered
directly to your home.
Call 7 am - 7 pm, 7 days a week.
1 -800-366-PART (1-800-366-7278)
Ref, No, Part No. Description
1
2
3
4
5
6
7
8
9
lO
11
12
13
14
15
16
17
18
19
20
21
22
23
24
25
26
27
28
29
30
31
*102869107
1024O3202
680807008
"993001100
*9930111OO
*993011400
*993011600
*993011800
*82681500O
625031500
823801015
685502019
822804118
829801002
825813016
820817015
479701901
000009803
647808009
820832005
*741814003
802424004
822020503
822019509
213802003
213501116
213504005
213505006
213506007
213503015
"200002008
'200003009
*200005001
*200013105
"214872011
"941620000
*200262101
802422002
10 X Bobbin
Spool pin felt
Assorted needle sat
5 x No 11 stretch fabric needle (BLUE)
5 x No, 11 needle (ORANGE)
5 x No. 14 needle (RED)
5 x No !6 needle (PURPLE)
5 x No 18 need{e (GREEN)
Twin needle
AddiUonal spool pin
H: Straight stitch foot
A: Zigzag foot
F: Satin stitch foot
E: Z_ppar foot
J: Sliding buttonhole foot
G: Blind hem foot
Carrying case
Ught bulb
Seam rippedButtonhoie opener
Large screwdriver
Oil
Lint brush
Large spool holder
Small spool holder
Buttonhole guide plate
Buttonhole bas_ plate
Template (Round end, smal|)
Template (Round end, large)
Template (Keyhole)
Buttonhole foot
Piping foot
Gathering foot
Pin-tuck foot
Hemmer foot (2ram)
Walking foot
Ruffler
Needle threader
Quilter
"These items are not furnished withthe machine, but may be
orderedper insmJetions above,
2
®
5 6 7 8
9 10 11 12
14 15 "16
17 20
18 19
21 22 23 *24
*29 * 30
31
Accesorios y refacciones disponibles
Todas las partes tistadas se pueden ordanar de cuatquier
tienda de Sears o centre de servicio de Sears.
CUANDO ORDENE REPUESTOS, SIEMPRE
PRORORCIONE LA SIGUIENTE INFORMACION:
1+NUMERO DE PARTE
2+DESCRIPCION DE LA PARTE
3. NUMERO DEL MODELO
4. NOMBRE DEL ARTICULO (MAQUINA DE COSER)
Si las partes qua necesita no se consiguen localmenta, su orden
ser& elactr6nicamente transmitide el Centre de DistribuciSn de
Repuestos Sears pare su envfo inmediato°
Para ordenar piezas con entrega a su domicilio en EEUU.
Llame per teldfono entre 7 AM - 7 PM, 7 dfas a la semana.
1-BOO+659+7084.
Accessoires disponibles
Toutescos pi_cespeuvent6tre commanddesdans unmagasin ou
uncentrede r_parationSears_
JOIGNEZ TOUJOURS A VOTRE COMMANDE LES
RENSEIGNEMENTS SUIVANTS:
1. LE NUMC:RODE LA PI_GE
2. LADt_SIGNATiONDE LA PI_CE
3+LE NUMERO DU MODI_LE
4+LE NOM DE L'ARTrCLE(MACHINE/_ COUDRE)
Si fee pi6ces ne sent pas disponiblessur place, vetre commande
sara transmise81ectroniquement& notre d_pStcentraldespi_cesde
rechang&
Referencia
1
2
3
4
8
6
7
8
9
10
11
12
13
14
18
16
17
18
t9
20
21
22
23
24
25
26
27
28
29
3O
31
N_mero de
la,parte
*102869107
102403202
650807008
*993001100
°99301110o
*993011400
*993011600
*993011800
*826815000
625031500
823801015
685502019
822804118
829801002
825813016
820817015
479701901
000009803
647808009
820632008
*741614003
602424004
822020503
822019509
213502003
213501116
213504005
213505006
213506007
213503015
*200002008
*200003009
*200005001
*200013104
*214872011
*941620000
*200262101
8024220O2
Descr_pciSn
10 x canillas
Fieltro pare portacarretes
Juego de agujas
5 x Aguja No,1 1 de tela el_stica (AZUL)
5 x Aguja No. 11 (NARANJA)
5 x Aguje No 14 (ROJA)
5 x Aguja No,16 (PURPURA)
5 x Aguja NOr18 (VERDE)
Aguja doble
Portacarmtes ediciona!
H: Prensetalas pare puntada recta
A: Prensateles pare zig-zag
F: Prensatelas papa puntada decorative
E, Prensatelas pare cremeUeras
J: Prensatalas pare sial de 4 pases
G: Prensatalas de pentada de dobFadilio
invisible
Maletfn transpertador
Bombitta
Cortade r/Abreoj ales
Destomillador grands
Acaita
Capillo de limpieza
Tapa-carretas granda
Tape-carfares pequeSo
Ptaea gufa de ojaf
Piece base de sial
Plant_lla (Camiserfa redonda, pequeRa)
Piantitla (Camiserfa redonda, grands)
Plantilla (Sastrerfa)
Prensatalas para ojal
Prensatelas pare entubar
Prensatalas resegedor
Prensatelas papa alforzas
Prensatalas pare dobladiflo (2 mm)
Prensatatas de doble arrastre
Prensatalas pare fruncidos
Enhebmdor de aguja
Acoichador
'_Estos artfcutos noso 3roveen conla m_quina, pore pueden
ser ordenados conlas instruccionesarriba descritas.
N°de _f,
1
2
3
4
5
6
7
8
9
10
1t
12
13
14
15
16
17
18
19
20
21
22
23
24
25
26
27
28
29
30
31
N°da piece
*102869107
102403202
650807008
°993001100
"9930t1100
"993011400
*993011600
*993011800
'826815000
625031500
823801015
685502019
822804118
829801002
825813016
620817015
479701901
000009803
647808009
820832005
*741814003
802424O04
822020503
822019509
213502003
2135O1116
213504005
213505006
213506007
213503015
=200002008
*200003009
*200005001
*200013104
*214872011
"941620000
*200262101
802422002
D_signation
10 canaries
Feutre de potte-bobine
Jeu d'aiguilles
5 aiguitles n°l 1 pour tissu extensible
- BLEUE
5 aiguilles n°! t - ORANGE
5 aiguitles n=14 + ROUGE
5 aiguilles n°16 + VIOLET
5 aiguilies n°18 - VERTE
Aiguilles jumel_es
Porta-bobine suppl6mentaire
H: Pied & point droit
A: Pied zig_zag
F: Pied & point de bourdon
E: Pied & fermeture & glissi6re
J: Pied & boutonniere
G: Pied & points d'eudet invisible
Mallette de transport
Ampoule d'_,clairage
D_coud -vite/Ouvre boutonniere
Gros toumevis
Hullo
Bmsse a peluches
Grands mndelle de porta+bobine
Petite rondelle de pode-bobine
Plaque-guide pour boutonniere
Plaque support pour boutonniere
Gabarit (Petite boutonniere & bouts
armndis)
Gabadt (Grands boutonniere & bouts
arrondis)
Gabarit (Boutonniere & eel!let)
Pied & boutonniere
Pied ganseur
Pied froneeur
Pied plisseur
Pied oulieur
Pied niveleur
Pied plisseur fronceur
Enfite+eiguille
Guide & matelasser
*Ces pi6ces ne sent pas fournies avec la machine, mais
peuvent 6tre commandSes comma indiqu_ en haut de page,
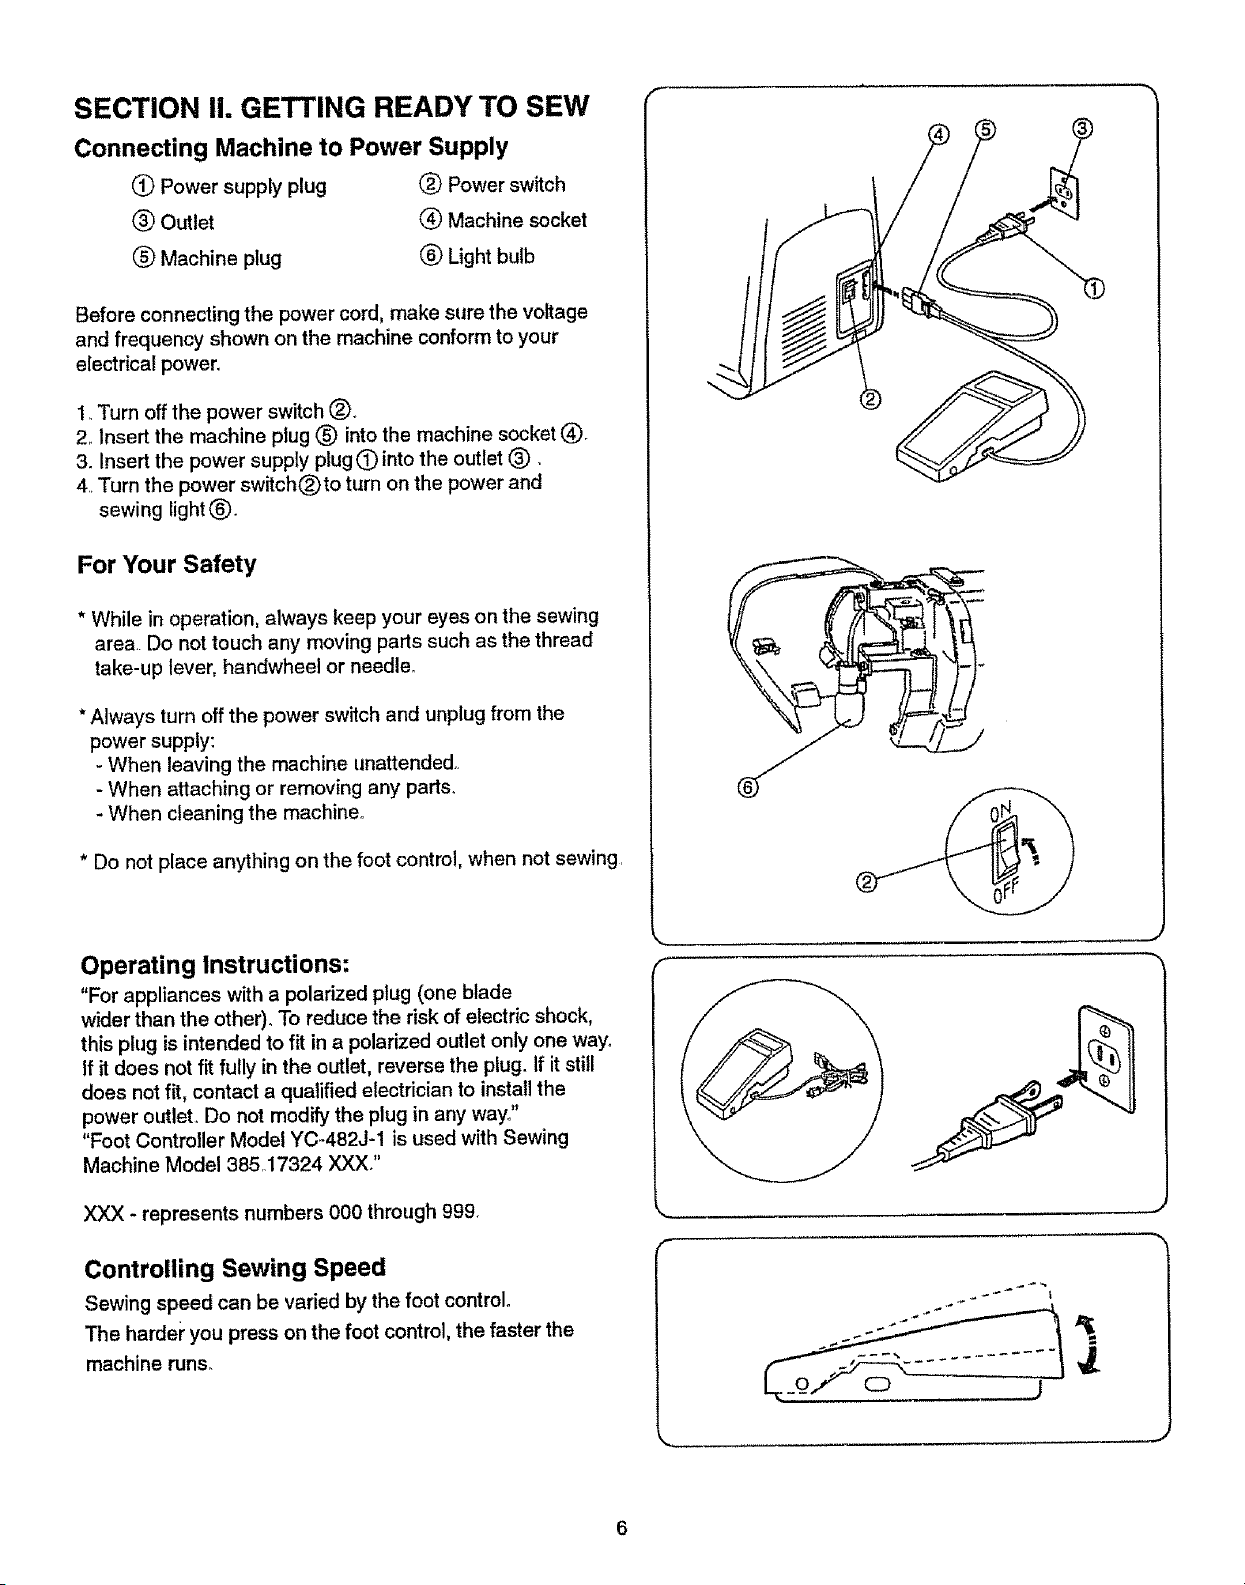
SECTION I|. GETTING READY TO SEW
Connecting Machine to Power Supply
(_) Power supply plug _) Power switch
t_) Outlet Q Machine socket
(_) Machine plug (_ Light bulb
Before connecting the power cord, make sure the voltage
and frequency shown on the machine conform to your
electrical power.
1,,Turn off the power switch _).
2. Insert the machine plug (_) into the machine socket (_.
3. Insert the power supply ptugO into the outlet (_).
4,_Turn the power switch(_)to turn on the power and
sewing light (_.
For Your Safety
* While in operation, always keep your eyes on the sewing
area. Do not touch any moving parts such as the thread
take-up lever, handwheel or needle°
*Always turn off the power switch and unplug from the
power supply:
- When leaving the machine unattended.
- When attaching or removing any parts_
- When cleaning the machine.
* Do not place anything on the foot control, when not sewing,
Operating Instructions:
"For appliances with a polarized plug (one blade
wider than the other). To reduce the risk of electric shock,
this plug is intended to fit in a polarized outlet only one way°
if it does not fit fully in the outlet, reverse the plug. If it still
does not fit, contact a qualified electrician to install the
power outlet. Do not modify the plug in any way."
"Foot Controller Model YC-482J-1 is used with Sewing
Machine Model 385..17324 XXX."
XXX - represents numbers 000 through 999.
Controlling Sewing Speed
Sewing speed can be varied by the foot control°
The harder you press on the foot control, the faster the
machine runs.
SECClON !1. PREPARACION DE LA
MAQUINA PARA COSER
Conexi6n de la mdquina a la red el_ctrica
(_ Clavija de toma de corriente (_) Interrupter de corriente
(_) Red el_ctrica (_) Enchufe de la m,_quina
(_j Clavija de ?am&quina (_) Bombilla
Antes de enchufarel cable de conexi6na la redde corrienteaseg[irese
de qua el voltajey la frecuenciade ta m&quina,mostrados en la plata
de identificaci6n,coincidanconlosde taredde suministroen su hogar.
1. Desconecteet interrupterde corriente(_),
2, Intmduzca laclavijade la m_quina_)en etenchufedela m_quina(_),
3, Introduzca la clavija de tome de corriente_"_ala red (_),
4o Optima el interrupter de corriente(_)para encender la m&quinay la
bombilla(_,
Para su seguridad
* Cuando cosa, no pierdade vistaet _rea de costura_
No toque ningunapieza en movimiento tal comotirahilos,volante
o aguja_
* Apague siempre la m&quina con et interruptor de corriente y
desenchufe la clavija de tome de corriente cuando:
- Deje la m&quina desatendidao
- Vaya a poner o quifar alguna plaza..
- Limpie la m_quina.
* No ponga nada encima det pedal de controlexcepto cuando!o
est8 utilizando°
Instrucciones pare la operaci6n:
"Pare aparatoeconclavijapolarizada (una plaza del enchuferods
ancha qua la otra).
A fin de evifarel riesgode descargasel_ctricas,esta clavijaestd
dise_,adade forma qua s6Iopuede introducirseen un sentido dentro
de unatome de corrientepolarizada.Si no encajacompletamente
en la toma de corriente,inviertala ctavija.Si tampocoencaja de
esta formap6ngase en contactoconun electrieistacuaiificadopare
qua le instalsuna tome de corrienteapropiada.No intents modificar
la clavijade ningunaforma?
"Con esta m_quinade coserModelo385.17324XXX debar&usarse
el pedal de controlModeloYC_482J-1." XXX - representalos
numeros000 a 999.
Control de la veloctdad de costura
El pedal de controesirve para regularla vetocidadde la costurao
La velocidad se regula pulsando el pedal de controlcon la planta
del pie, a m&s presi6n, m&s velocidad,
PARTIE I!. PRI_PAREZ-VOUS A COUDRE
Branchez ia machine
(_ Prise61ectrique
(_) Prisede courant
(_) Fichede raccord_lectrique
_) lnterrupteur
(_ Prisede la machine
(_) Ampouled'(_clairage
Avant de brancher te cordon d'alimentation, assurez-vous qua
la tension et la fr6quence indiqu_es sur la machine sont
conformes & votre installation _lectrique.
1o Tout d'abord, _teignez la machine (Basculez I'interrupteur
(_)_ OFF).
2. Ensuite, branchez la fiche de raccord _lectrique (_)sur la
prise de la machine (_
3o Connectez la prise 81ectrique (_ b la prise de courant(_)
4. Appuyez sur t'interrupteur(_) pour mettre la machine
sous tension et allumer t'ampoule d'_clairage(_,
Consignes de s_curit6
* Pendant la couture,gardez toujoursles yeux sur la couture
en courset ne touchezaucune des partiesmobiles, telles
qua le levier releveurdu ill, le volantou I'aiguille.
Eteignez et debranchez syst_matiquement la machine de
ia prise de courant.
- lorsque vous laissez ta machine sans surveUlanceo
- lorsque vous fixez ou retirez des parties d_tachables.
- lorsque vous nettoyez la machine°
* Ne placez den sur la p_daie de contrGle, sauf pendant
I'utilisation.
Consignes d'utilisation:
"Pour les appareils ayant une prise polarisee (une lame plus
large qua l'autre):
Afin de r_duire les risques de choc _lectrique, cette prise de
branchement est con_ue pour s'adapter & la prise _tectrique
murals dens un seul sans. Si e!le ne rentre pas compl_tement
dans la prise, retournez-la, Si ells ne se branche toujours pas,
faites appel & un 8lectricien quatifid qui installera une prise
appropride. N'essayez pas de modifier la prise."
"La p6dale de contr61e mod_te YC-482J-1s'utilise avec la
machine module 385.17324XXX,"
XXX Reprdsente les nombres de 000 & 999,.
ContrGlez la vitesse de couture
Onchangela vitessa de couture_ l'aide de lapddale de contrele.
Plus vous appuyez sur la pOdale, plus la machine va vite,
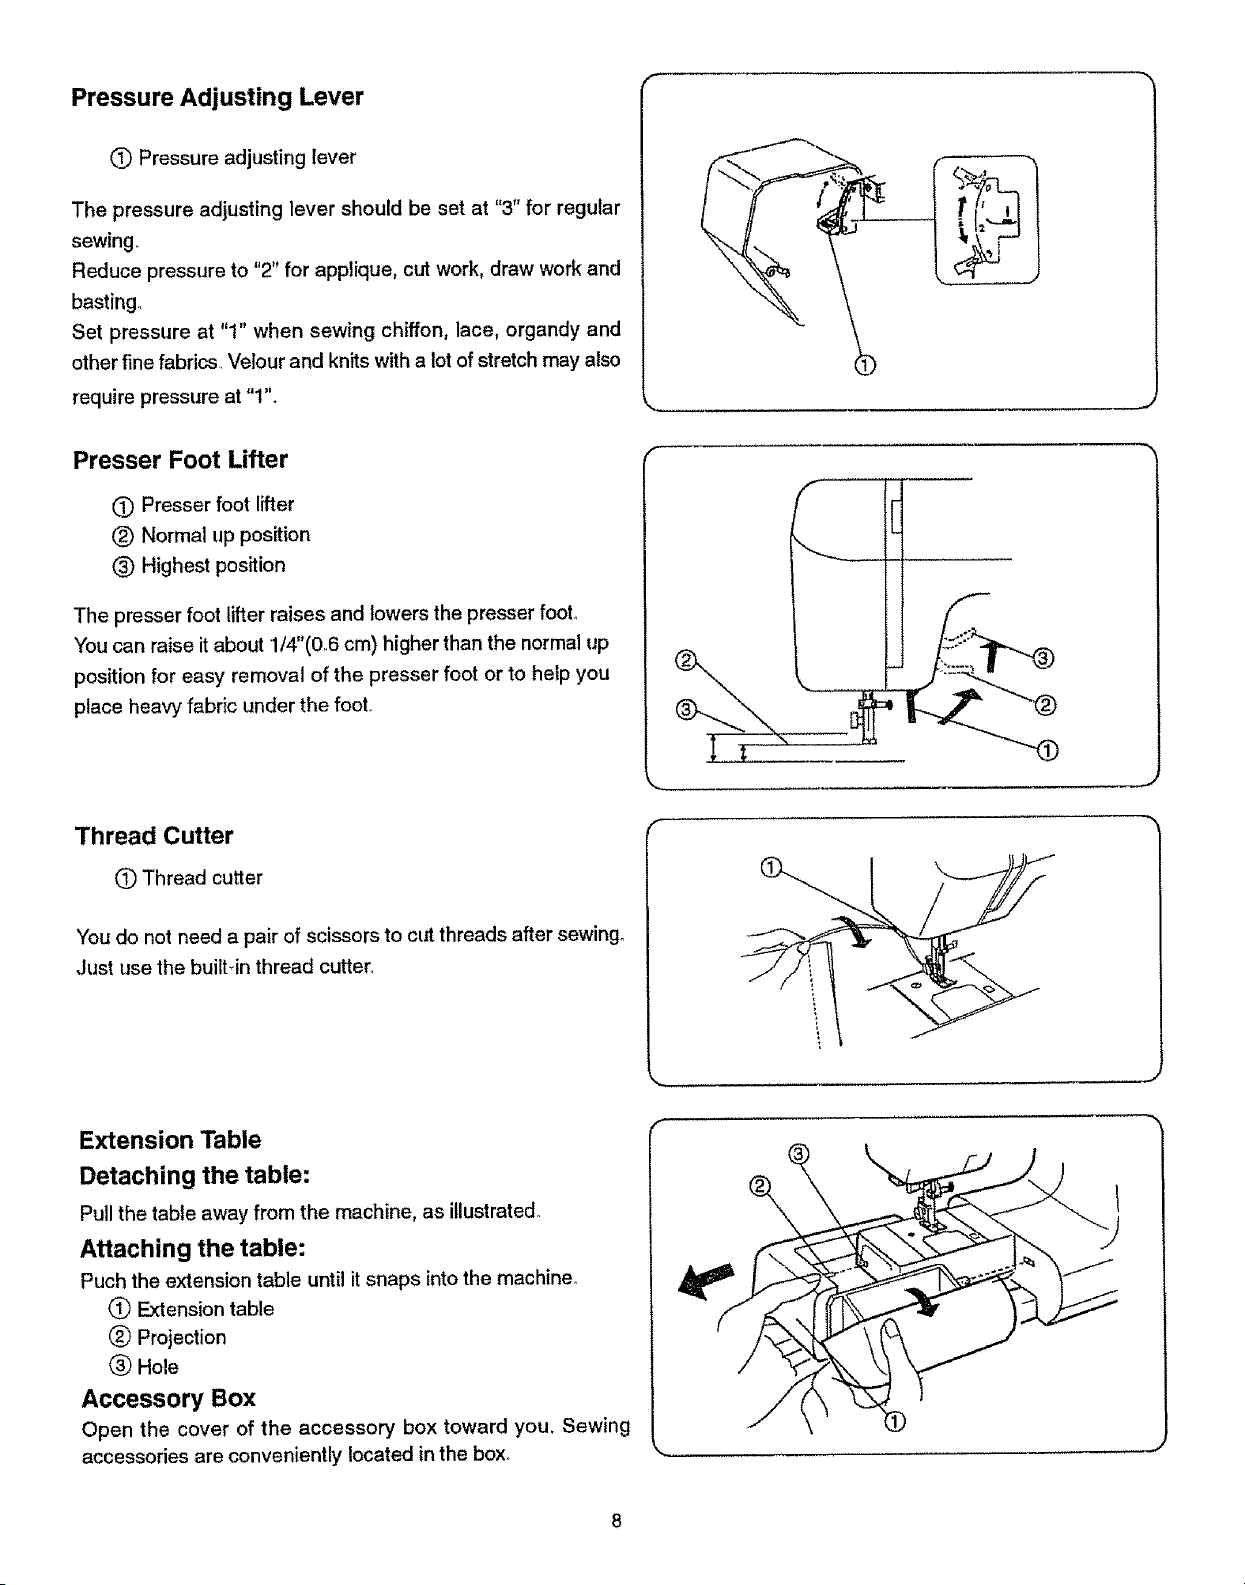
Pressure Adjusting Lever
0 Pressure adjusting lever
The pressure adjusting lever should be set at "3" for regular
sewing°
Reduce pressure to "2" for applique, cut work, draw work and
basting°
Set pressure at "1" when sewing chiffon, lace, organdy and
other fine fabrics Velour and knits with a tot of stretch may also
require pressure at "1".
Presser Foot Lifter
L_ Presser foot lifter
(_) Normal up position
(_) Highest position
The presser foot lifter raises and lowers the presser foot.,
You can raise it about 1/4"(0.6 cm) higher than the normal up
position for easy removal of the presser foot or to help you
place heavy fabric under the foot,,
Thread Cutter
0 Thread cutter
"Youdo not need a pair of scissors to cut threads after sewing°
Just use the built_in thread cutter,
,,,,.-
J
Extension Table
Detaching the table:
Pull the table away from the machine, as illustrated°
Attaching the table:
Puch the extension table until it snaps into the machine°
(_) Extension table
(_ Projection
_) Hole
Accessory Box
Open the cover of the accessory box toward you, Sewing
accessories are conveniently located in the box.
\
Ajuste de la presion del prensatelas Levier de rdglage de la pression
(_) Palanca del ajuste de la presi6n
La palanca del ajuste de la presi6n debe ser situada en el "3"
para costura normal°
Reducir la presi6n a "2" para hacer aplique, calado e hitvanado_
Sit_e la presi6n en "1" cuando cosa gasa, encaje, organdi y
teias finas en general Terciopelo y gSneros de punto el&sticos
tambi_n deben ser cosidos con la presi6n en el "1"_
(_ Levier de r_glage de la pression
Le levier de r,_glage de la pression devrait _tre r_gl_ sur la position "3"
pour la couture normale.
R_duisez la pression & "2" pour les appliques, los dScoupes, los jours
et le b&ti_
R_glez la pression sur "1" pour coudre la mousseline, la dentelle,
I'organdi et autress tissus fins. Le velour et tes tricots tres extensibles
peuvent aussi _tre cousus avec la pression sur "t".
Palanca de elevacidn del prensatelas
I_ Patanca de elevaci6n del prensatelas
(_ Posici6n elevada normal
(_ Posici6n m&s alta
Relbve-pied presseur
(_) Relive-pied presseur
(_ Position relevef normale
(_) Position relevef maximum
La palanca de elevaci6n del prensatelas se emplea para subir
y bajar el prensatelas. Usted puede subirlo aproximadamente
0.6 cm (1/4") m&s de la posici6nelevada normal para que le
resuitem&sf_cil co!ocartelas gruesas o comeayudapara quitar
el prensatelas,,
Le relOvepied presseur remonte et abaisse le pied presseur,, Vous
pouvez le remonterd'environ 0,6 cm(t/4") plus haut que la position
normalepour retirerpiusfacilement le pied presseur ou pour vous
aider _ passerun tissu _pais sous te pied.
Cortahilos
(_ Cortahilos
No necesita tijeras para cortar el hilo despuSs de coser. $61o
necesitael cortahilospr&ctico.
Coupe-ill
O Coupe-fif
Vous n'avez pas besoin d'un paire de ciseaux ,_ ta fin d'une
coutures. Utilisez tout simplement le coupe-fii int_gr_.
Ampliaci6n m6vil de la superficie de costura
Desmontaje de la ampliaci6n m6vil:
"lire de la ampliaci6n m6vil hacia afuera de la m&quinatal come
se ve en la ilustraci6n.
Instalaci6n de la ampliaci6n m6vil:
Emquije la ampliaci6n m6vil hacia que entre completamente
en la m&quina produciendo un chasquido,
(_ Ampliaci6n mOvil de la supefficie de costura
1_)Pasador
(_) AIojamiento
Estuche de accesorios:
Abre la tapa de! estuche de accesoriosgirdndola haciausted.
Los accesorios de costuraestdn Ioealizadosconvenientemente
en el estucheo
Rallonge de plateau
Pour retirer la rallonge:
l_loignez-ia de la machine commeillustr_
Pour fixer la rallonge:
Poussez la raltonge jusqu__ ce qu'elle s'encliqu_te sur la machine.
(_ Rallonge de plateau
(_ Patte
(_) Trou
Bo_e _ accessoires
Ouvrez le couverclede la bo_te& accessoiresen tirantversvous,.Los
accessoires de couturesent Iogdsdans cette bo_te.
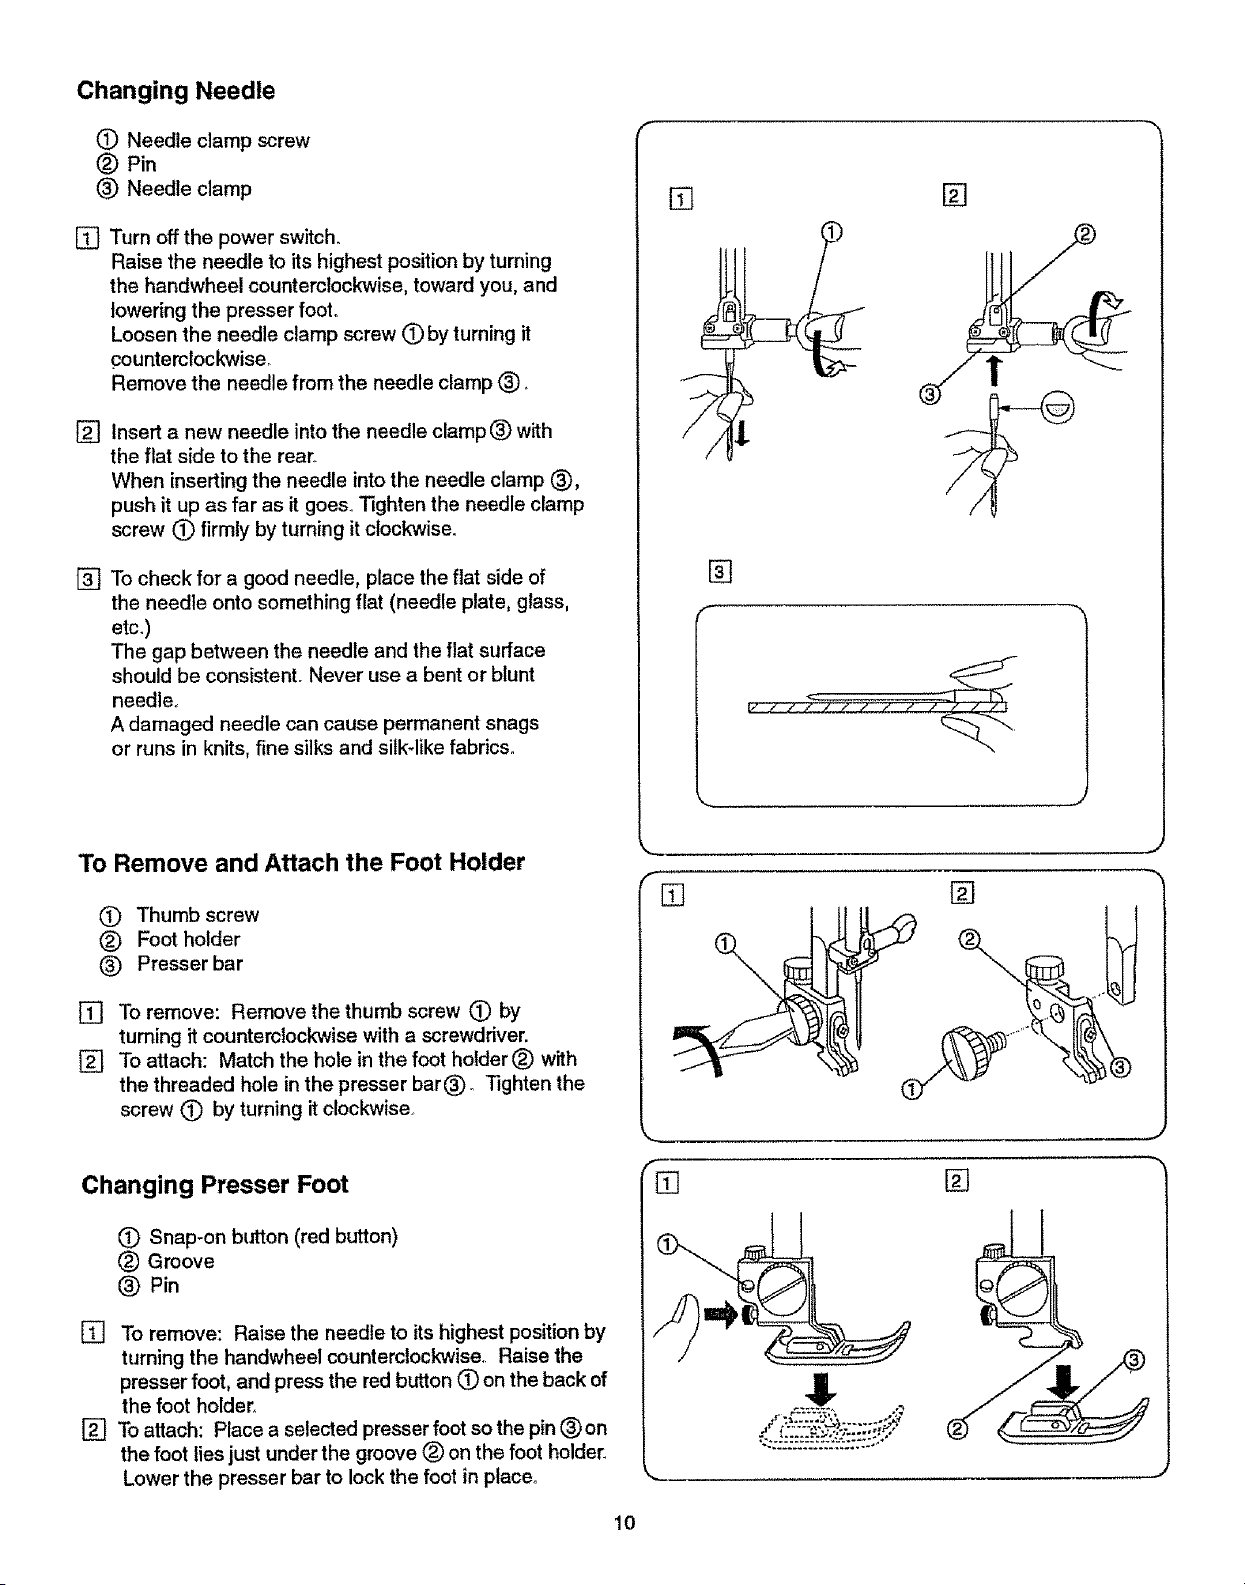
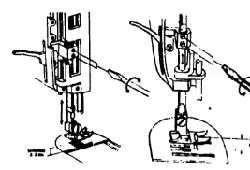
Changing Needle
(i) Needle clamp screw
(_) Pin
(_ Needle clamp
[] Turn off the power switch.
Raise the needle to its highest position by turning
the handwheel counterclockwise, toward you, and
lowering the presser foot°
Loosen the needle clamp screw 0 by turning it
counterclockwise°
Remove the needle from the needle clamp _).
[] Insert a new needle into the needle clamp (_ with
the flat side to the rear°
When inserting the needle into the needle clamp (_),
push it up as far as it goes_ Tighten the needle clamp
screw (_ firmly by turning it clockwise.
[] To check for a good needle, place the flat side of
the needle onto something flat (needle plate, glass,
etc.)
The gap between the needle and the flat surface
should be consistent. Never use a bent or blunt
needle.
A damaged needle can cause permanent snags
or runs in knits, fine silks and silk-like fabrics.
[]
[]
(-
b
[]
To Remove and Attach the Foot Holder
(_ Thumb screw
(_ Foot holder
(_ Presser bar
[] To remove: Remove the thumb screw (_) by
turning it counterclockwise with a screwdriver.
[] To attach: Match the hole in the foot holder (_ with
the threaded hole in the presser bar(_)o Tighten the
screw Q by turning it clockwise._
Changing Presser Foot
(_) Snap-on bL_on (red button)
® Groove
(_) Pin
[] To remove: Raise the needle to its highest position by
turning the handwheel counterclockwise. Raise the
presser foot, and press the red button (_) on the back of
the foot holder_
[] To attach: Place a selected presser foot so the pin (_) on
the foot lies just under the groove (_ on the foot holder_
Lower the presser bar to lock the foot in place°
[] []
10
Cambio de aguja
(_ Tornillode sujeciSnde ia ag_Jja
(_) Topesuperior
(_ Alojamiento de Ia aguja
[] Apague la m&quina con el interrupter de corriente.
Suba la aguja hasta su posici6n m_s etta girando el
volante an el sentido contrario alas agujas dei reloj, y baje
el prensatelaso
Afloje el tornilto de sujeciSn de la aguja C)gir_ndo_o en el
sentido contrario alas agujas del retoj, Retire la aguja de su
alojemiento _)tirando de ella hacia abajo,
[_Inserte una nueva aguja en el aiojamiento de la aguja
(_ con el lade plane mirando hacia atr&s. Empuje }a aguja
hacia arriba tanto come le permita el tope superior(_)y apriete
firrnemente el tornillo de sujeciSn de la aguja (_.
[] Pare verificar qua una aguja est,. bien, ponga el lade plane de
la misma sobre una superficia ptana (place de aguja, crista!,
etco). La separaciSn entre la aguja y la superficie plana deber_,
ser uniforme.. No emplee nunca agujas dobladas o con la punta
en real estado. Las agujas daSadas suelen causar enganches
y carreras irreparables en tejidos de punto, sedas fines y de
im_taci6n seda,
Changer raiguiile
0 Vis du pince raiguille
(_) Broche
(_) Pince I'aigui!le
[!]_teignez la machine, Faites reenter l'aiguille le plus haut
possible en tournant le volant en sens antihoraire et
abaissez le pied presseuro Desserrez la vis du
pince-aigui!le (_ en la tournant en sens antihoraire. Retire
I'aigui!le du pince-aiguiite (_.
[_]lns_rez la nouvelte aiguille dens le du pince-aiguille(_,
avec le m_plat vers I'arri6re. Lorsque vous mettez en place
(_)n s_rez une nouvetle aiguille, poussez-la & fond vers le
haut dans le pince-aiguilre, Serrez fermement la vis de
fixation en la tournanten sens horeire(_).
[]Pour wlrffier la qualit_ d'une aiguille, placez le m_plat
de l'aiguitle sur une surface plate (la plaque d'aiguille,
un morceau de verre_,,) L'espace entre i'aiguille et la
surface do_t 6tre constant. N'utilisez jamais une aiguille
tordue ou _mouss_e,. Une aiguilte d_fectueuse peut _tre
une cause continue d'ennuis et de points sautes, de fiis
tir_s dens les jerseys et les soies naturel{es ou artificielles.
C6mo quitar/poner el enmangue del prensatelas
(_ Tornillo del enmangue
(3(_Enmangue delprensatelas
Barra prensatalas
[] Para quitar: Gire con un destornillador el tornillo del enmangue
Paa(_)ron sentido contrario alas agujas de reloj.
[]
porter: Coloque el afujero del enmangue emparejandolo
con el agujero de la barra prensatelas (_)o Coloque el tornillo
del enmangue C) dentro det agujero_ Apriete el tornillo
girandolo on et sentido de las agujas del retoj,
Retrait et installation du support de pied
(_ Vis de blocage
(_ Support de pied
(_) Barre du pied presseur
[] Retrait: Retirez ia vis de blocage (_ en la tournant dans le
sens antihoraire & raide du tournevis.
r_ Installation: Alignez le trou du support de pied (_ avec le
trou _ete de la barre du pied presseur (_)o Placez la vis
dens le trou, et serrez-la en tournant dens la sans (_
horaire_
C6mo quitar/poner el prensatelas
C) Boron de fijaci6nde prensate]as(bStonrojo)
_ Enelavadura
Pasador
[] Para quitar: Suba la aguja haste su posiciSn m&s alta girando
el voiante en elsentido contrado alas afujas de reloj. Suba el
prensatelas, y pulse el boton rojo C) suituado en la parte
trasera del enmangueo
[] Pare porter: Cotoque un pie prensatelas seleccionado en
posiciSn longitudinal apoyado en su base con el pesador(_
justo per debajo de la enclavadura (_ del enmangue, Baje la
patanca de elevation de! prensatelas para fijar el prensatelas
en el enmangue,
Retrait et fixation du pied presseur
(_) Bouton de d_crochage (boutonrouge)
(_)Encoche
(_ Broche
[] Retrait: Faites monter I'aiguilte le plus haut possible en
tournant le volantdans le sens antihoraire. Relevez le
pied presseur,et appuyezsur te bouton rougeL-T)situ_ _,
I'arri_re du supportde pied,,
[] Fixation: Placez lepied presseurchois afin qua la
broche(_) au pied soil:align6e avec t'encoche (_) sous
le supportde pied_Abaissez la barredu presseurpour
effectuer raccrochage.
11
Presser Foot Types
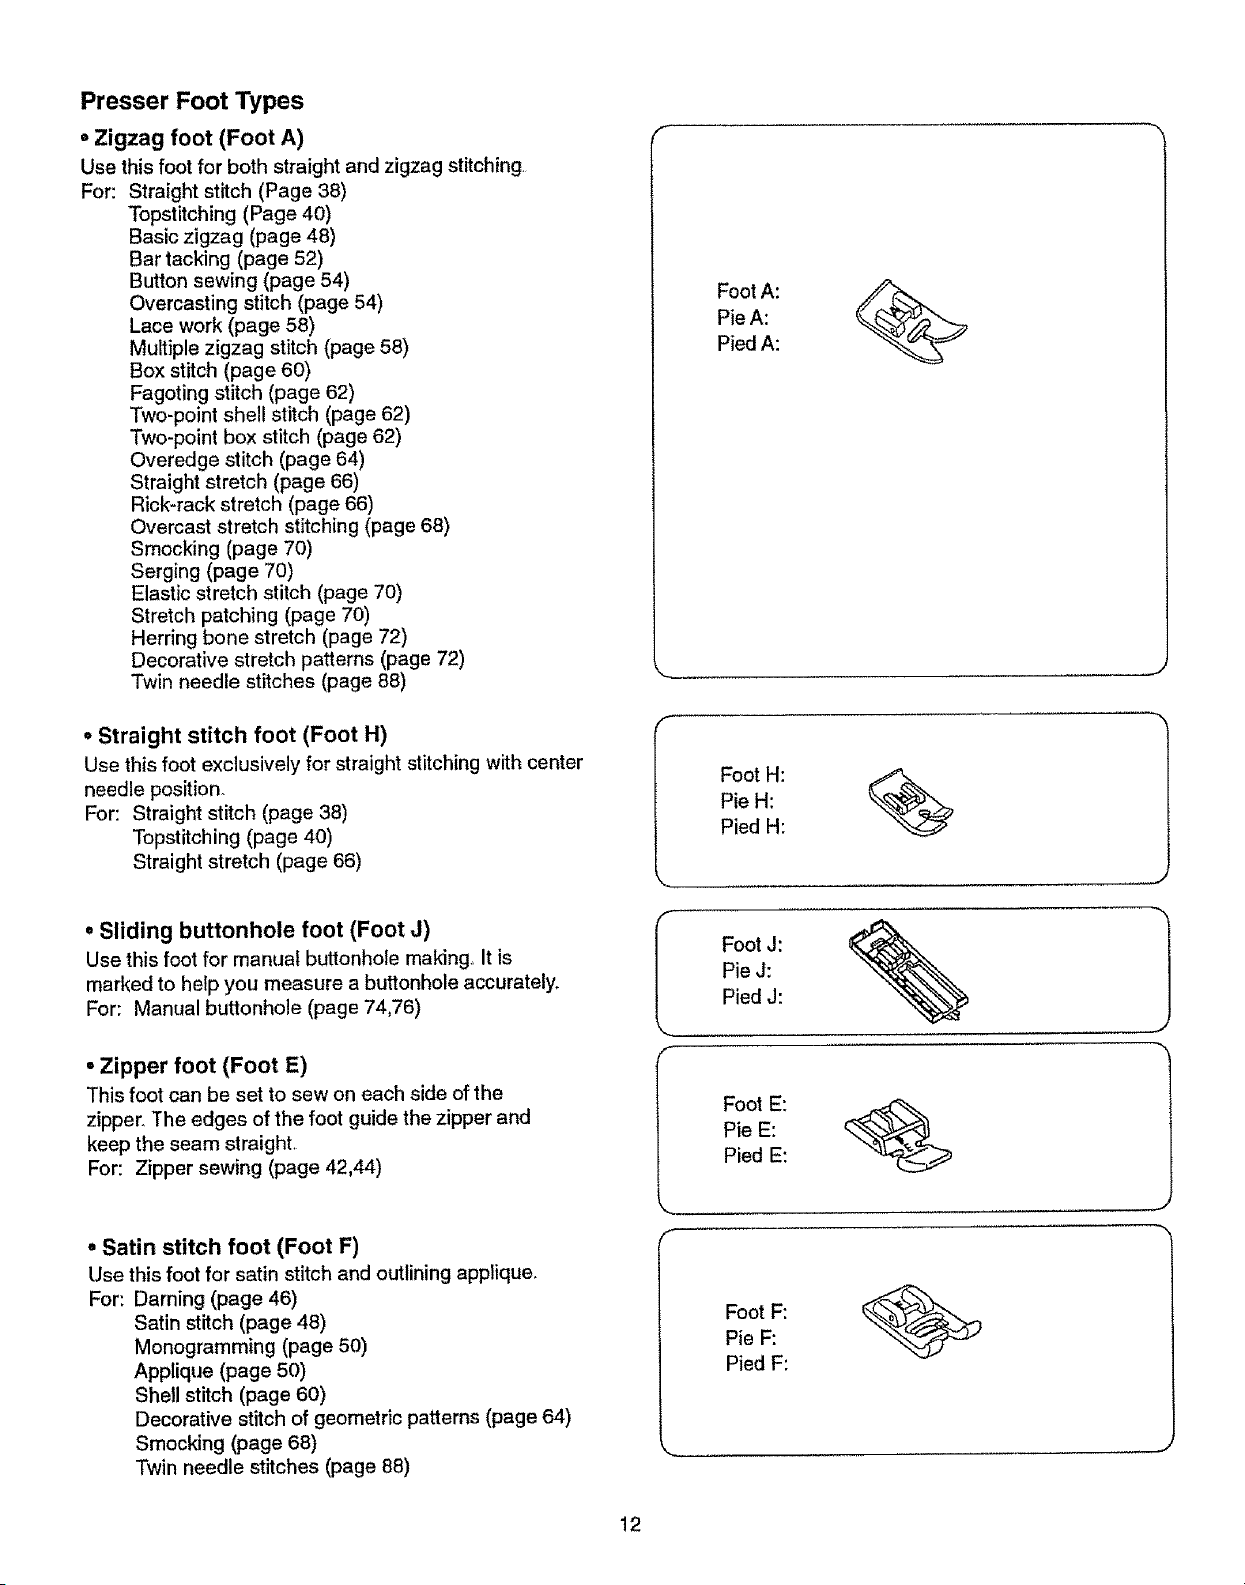
• Zigzag foot (Foot A)
Use this foot for both straight and zigzag stitching
For: Straight stitch (Page 38)
Topstitching (Page 40)
Basic zigzag (page 48)
Bar tacking (page 52)
Button sewing (page 54)
Overcasting stitch (page 54)
Lace work (page 58)
Multiple zigzag stitch (page 58)
Box stitch (page 60)
Fagoting stitch (page 62)
Two-point shell stitch (page 62)
Two-point box stitch (page 62)
Overedge stitch (page 64)
Straight stretch (page 66)
Rick-rack stretch (page 66)
Overcast stretch stitching (page 68)
Smocking (page 70)
Serging (page 70)
Elastic stretch stitch (page 70)
Stretch patching (page 70)
Herring bone stretch (page 72)
Decorative stretch patterns (page 72)
Twin needle stitches (page 88)
• Straight stitch foot (Foot H)
Use this foot exclusively for straight stitching with center
needle position.
For: Straight stitch (page 38)
Topstitching (page 40)
Straight stretch (page 66)
• Sliding buttonhole foot (Foot J)
Use this foot for manual buttonhole making_ It is
marked to help you measure a buttonhole accurately,
For: Manual buttonhole (page 74,76)
° Zipper foot (Foot E)
This foot can be set to sew on each side of the
zipper, The edges of the foot guide the zipper and
keep the seam straight,
For: Zipper sewing (page 42,44)
o Satin stitch foot (Foot F)
Use this foot for satin stitch and outlining applique.
For: Darning (page 46)
Satin stitch (page 48)
Monogramming (page 50)
Applique (page 50)
Shell stitch (page 60)
Decorative stitch of geometric patterns (page 64)
Smocking (page 68)
Twin needle stitches (page 88)
Foot A:
Pie A:
Pied A:
Foot H:
Pie H:
Pied H:
%
Foot J:
Pie J:
Pied J:
Foot E:
Pie E:
Pied E:
Foot F:
Pie F:
Pied F:
.... -J
12
Tipos de prensatelas
• Prensatelas para zig-zag (Pie A)
Uti[ice este prensatelas pare puntada recta y puntada de zig-zag
Pare: Puntada recta e!&stica 6 triple costura (p_gina 39)
Costura ala vista (p_gina 41 )
Puntada de zig-zag (p&gina 49)
Costura de refuerzo (p_,gina 53)
Costura de botches (p_.gina 55)
Puntadada de sobrehltado (p_,gina 55}
Trabajo con lazes (p&gina 59)
Puntada de multiple zig-zag (p&gina 59)
Puntada de caja (p_gina 6t)
Puntada para deshilachado (p&gina 63)
Puntada de concha de dos puntos (p&gina 63)
Puntada de caja de dos puntos (p&gina 63)
Puntada para rebordadcs (p>na 65)
Puntada recta triple (p_gina 67)
Extensi6n de "Rick-rack" (p&gina 67)
Puntada el_stica de sobrehilado (p&gina 69)
Puntada de piuma (p_gina 71)
Puntada de dobladillo (p_gina 71)
Puntada el_stica de extension (p_gina 71 )
Rem_endos etasticos (p&gina 71)
Puntada de espiga e!&stica (p&gina 73)
Disefios decorativos el&sticos (p&gina 73)
Puntada de doble aguja (p_gina 89)
Diff6rents pieds presseurs
• Pied zig-zag (Pied A)
Ce pied convient pour los points zig-zags at les points droits,,
Pour: Point droit extensib]e (page 39)
Surpiq_re (page 41)
Zig-zag simple (page 49)
Brides de renfort (page 53)
Pose des boutons (page 55)
Surfilage (page 55)
Dentelle (page 59)
Point zfg-zag multiple (page 59)
Point de crbneau (page 61)
Couture ajour_e (page 63)
Point coquil_e en deux temps (page 63)
Point de cr_neau an deux temps (page 63)
Point de bordure (page 65)
Point droit extensible (page 67)
Croquet extensible (page 67)
Surfitage extensible (page 69)
Point d'_pines (page 71 )
Point de surjet (page 71)
Point extensible pour la fixation des _tastiques (page 71 )
Point & rapi_cer extensible (page 71 )
Point d'_pine extensible (page 73)
Motifs de points d_coratifs (page 73)
Aiguilles jumet_es (page 89)
• Prensatelas para puntada recta (Pie H)
Utitice este prensatelas exciusivamente para puntada recta con ta
posici6n de la aguja al centre
Pare: Puntada recta (p_gina39)
Costura ata vista (p_gina 41 )
Puntada recta triple (p&gina 67)
• Prensatelas para corredizo (Pie J)
Utilice este prensatelas pare hacerojalesmanualmente Est,, marcado
para ayudafle a medir exactamente los ojales,
Pare: Oja) manual (p&gina 75,77)
• Prensatelas para cremaUeras (Pie E)
Este prensatelas se coloca para coser cada uno de tos lades de tas
cremalleras. Los bordes del prensatelas guian a to largo de la
cremallera para mantener la puntada recta.
Pare: Costura de cremalleras (p&gina 43,45)
• Prensatelas para puntada decorativa (Pie F)
Utilice este prensatelas para puntada decorativa y ap_icacioneso
Para: Zuroido (p&gina 47)
Puntada en satin (p_,gina 49)
Monogramas (p_gina 51)
Aplicaciones (p_gina 51 )
Puntada eh forma de concha (p_gina 61)
Puntada deeorativas de dise_os geometricos (p&gina 65)
Puntada de pluma (p_gina 69)
Puntada de doble ague (p&gina 89)
° Pied _ point droit (Pied H)
Ce pied eat uniquement recommand_ pour la couture & points
droits avecI'aiguiileen positioncentrale
Pour: Point droit (page 39)
SurpiqOre(page 41)
Point droit extensible (page 67)
• Pied b boutonnibre coulissant (Pied J)
Utilisezce piedpourta r_alisationde boutonni6res, 11porte
des reputepour vous aider & mesurer les boutonnieres avec
precision,
Pour: Boutonniere (page 75,77)
• Pied _ fermeture b glissi_re (Pied E)
Ce pied est r_glable pour piquer _ droite et & gauche de la
glissibre_Los bords du pied glissent le longde la fermeture
pour piquer droitoPour:La couture des fermetures _,glissi_re
(page 43,45)
° Pied _ point iancd (Pied F)
Sarvez-vousde ce pied pour le pourtour des appliques et le
point.
Pour: Reprisage (page 47)
Pointlanc_ (page 49)
Monogrammes(page 51)
Appliques (page 51)
Point coquille (page 61)
Points d6coratifs et motifs (page 65)
Point d'6pines (page 69)
AiguiIles jumelcJes(page 89)
13
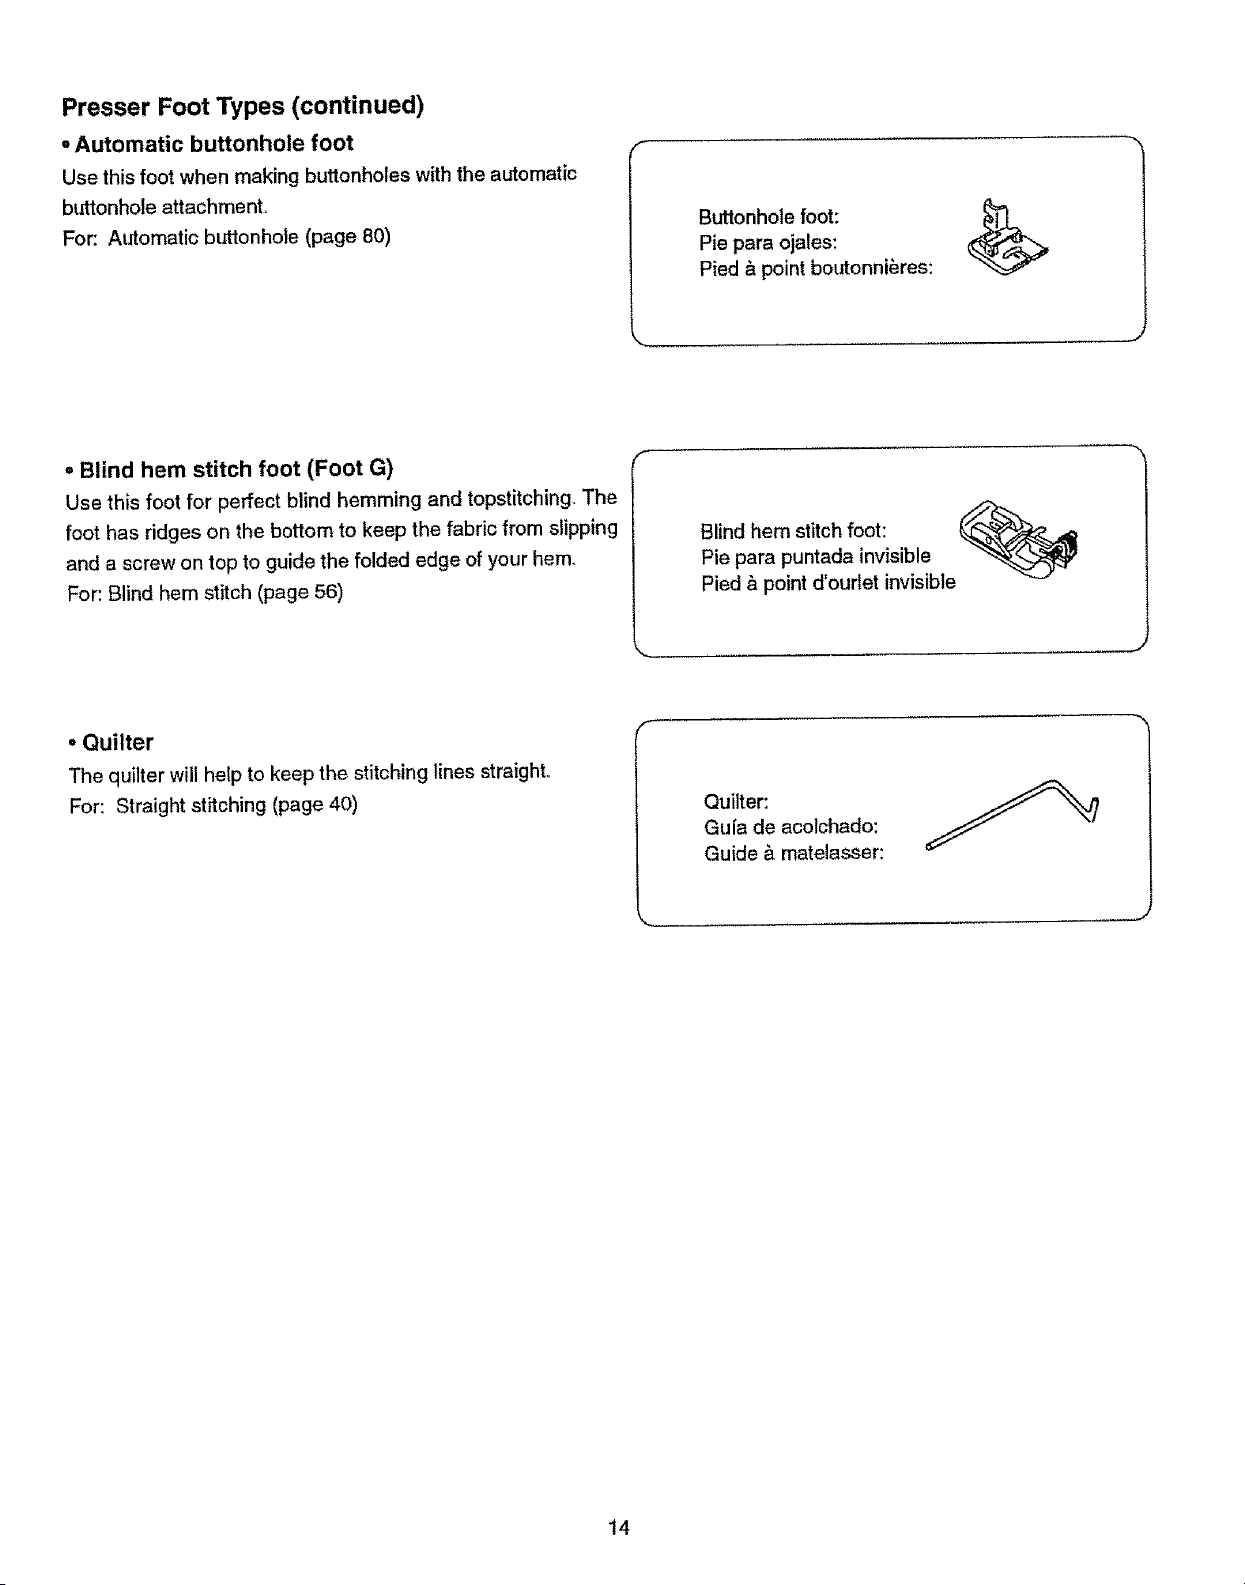
Presser Foot Types (continued)
o Automatic buttonhole foot
Use this foot when making buttonholes with the automatic
buttonhole attachment,_
For: Automatic buttonhole (page 80)
Buttonhole foot:
Pie para ojales:
Pied & point boutonnieres:
° Blind hem stitch foot (Foot G)
Use this foot for perfect blind hemming and topstitching The
foot has ridges on the bottom to keep the fabric from slipping
and a screw on top to guide the folded edge of your hem.
For: Blind hem stitch (page 56)
Blind hem stitch foot: _,,_
Pie para puntada invisible
Pied & point d'ourlet invisible
• Quilter
The quilter will help to keep the stitching lines straight..
For: Straight stitching (page 40)
Quilter:
Gula de acolchado:
Guide & matelasser:
......... J
14
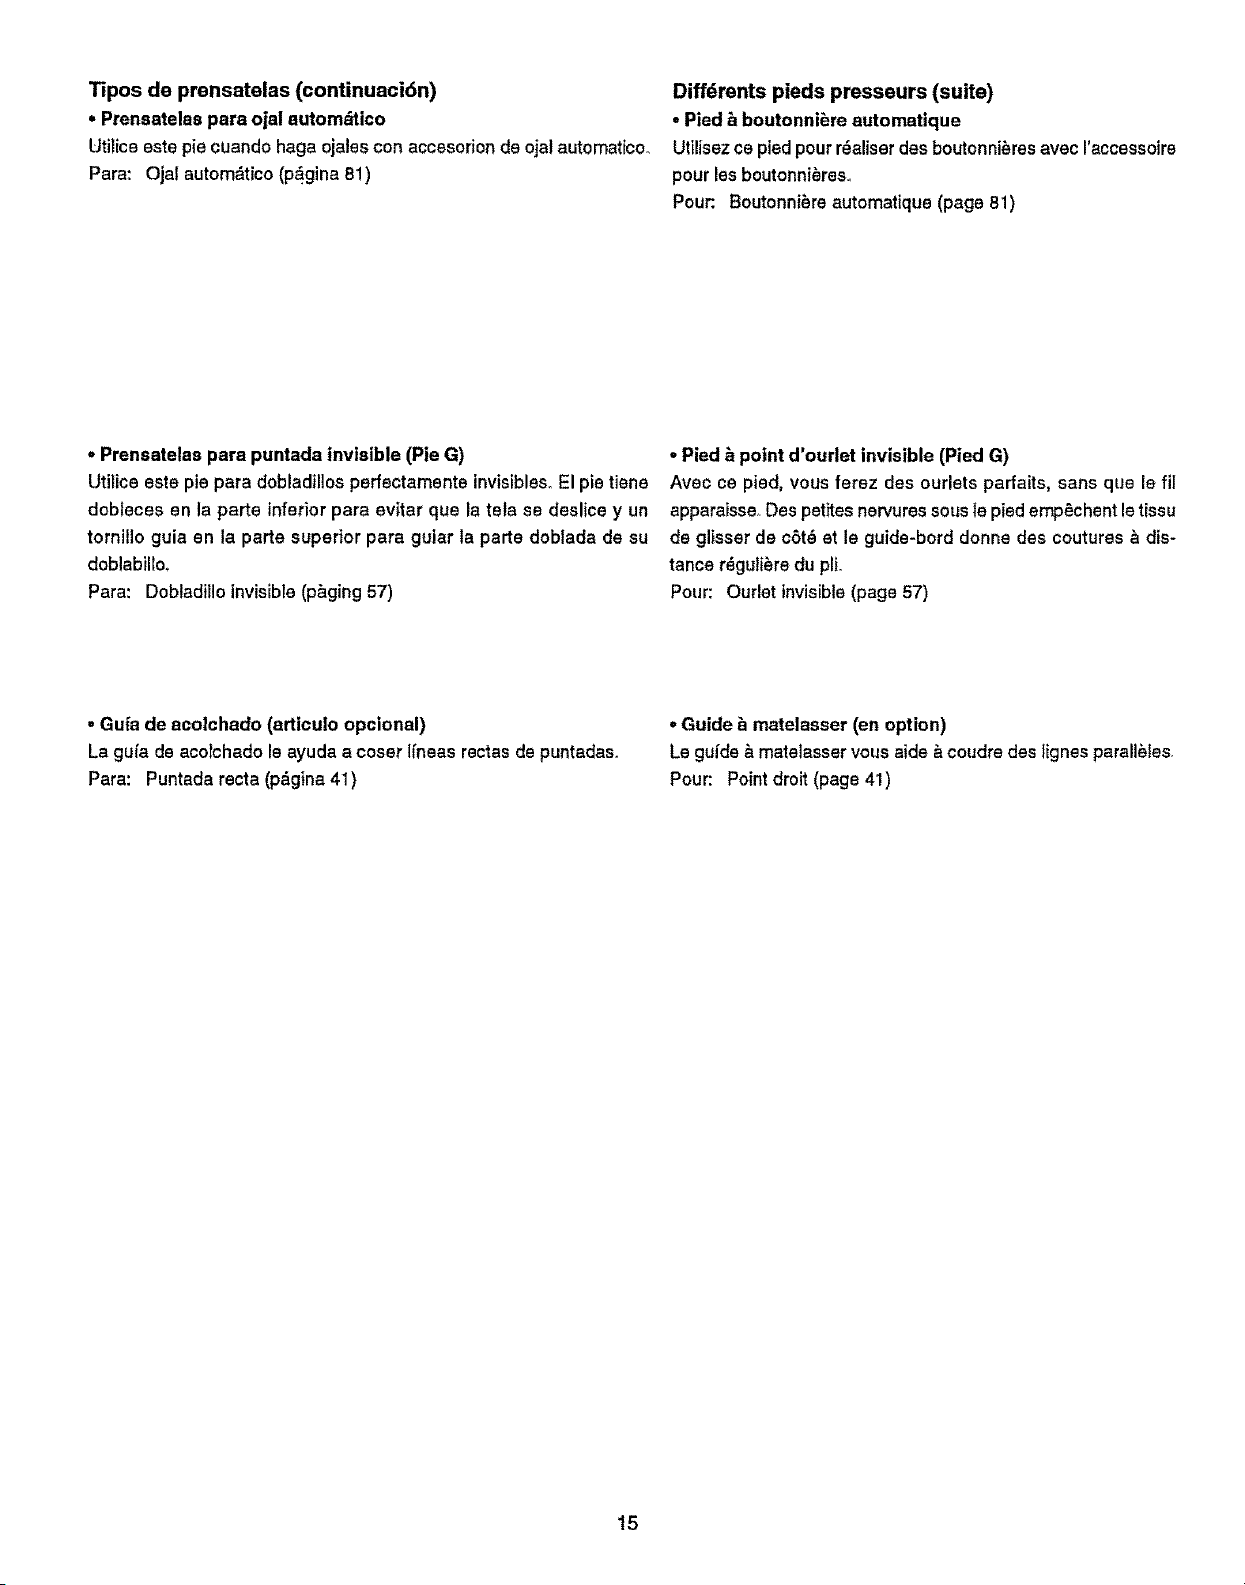
Tipos de prensatelas (continuacidn)
oPrensatelas para ojal automdtico
Utiliceaste pie cuando haga ojales con accesorion de ojal automatfcoo
Para: Ojal automdtico (p_gina 81)
Diffdrents pieds presseurs (suite)
oPied & boutonniere automatique
Utilisezce pied pour r_aliserdes boutonnieres avec I'accassoire
pour lesboutonni_reso
Pour:, Boutonni6re automatique (page 81)
- Prensatelas para puntada invisible (Pie G)
Utiiice este pie para dobladillosperfectamentainvisibles.El pie tiene
dobleces en la parte inferior para evitar qua la tela se deslicey un
tornillo guia an la parts superior para guiar la parts dobfada de su
doblabilto,
Para: Dobladilloinvisible(p_ging57)
- Pied _ point d'ourlet invisible (Pied G)
Avec ce pied, vous ferez des ourlets parfaits, sans qua le fil
apparaisss..Des petitesnervures sousIe piedemp_chentletissu
de glisser de c6t6 at le guide-bord donne des coutures _ dis-
tance r_guli_redu pli.
Pour: Ourletinvisible(page 57)
, Gufa de acolchado (articulo optional)
La gufa de acolchadola ayuda a coser lfneasrectasde puntadas.
Para: Puntadarecta (p_.gina41)
, Guide _ matelasser (an option)
Le gufde _ matelasser vous aide _ coudredes lignes parall_les.
Pour: Pointdroit(page 41)
t5
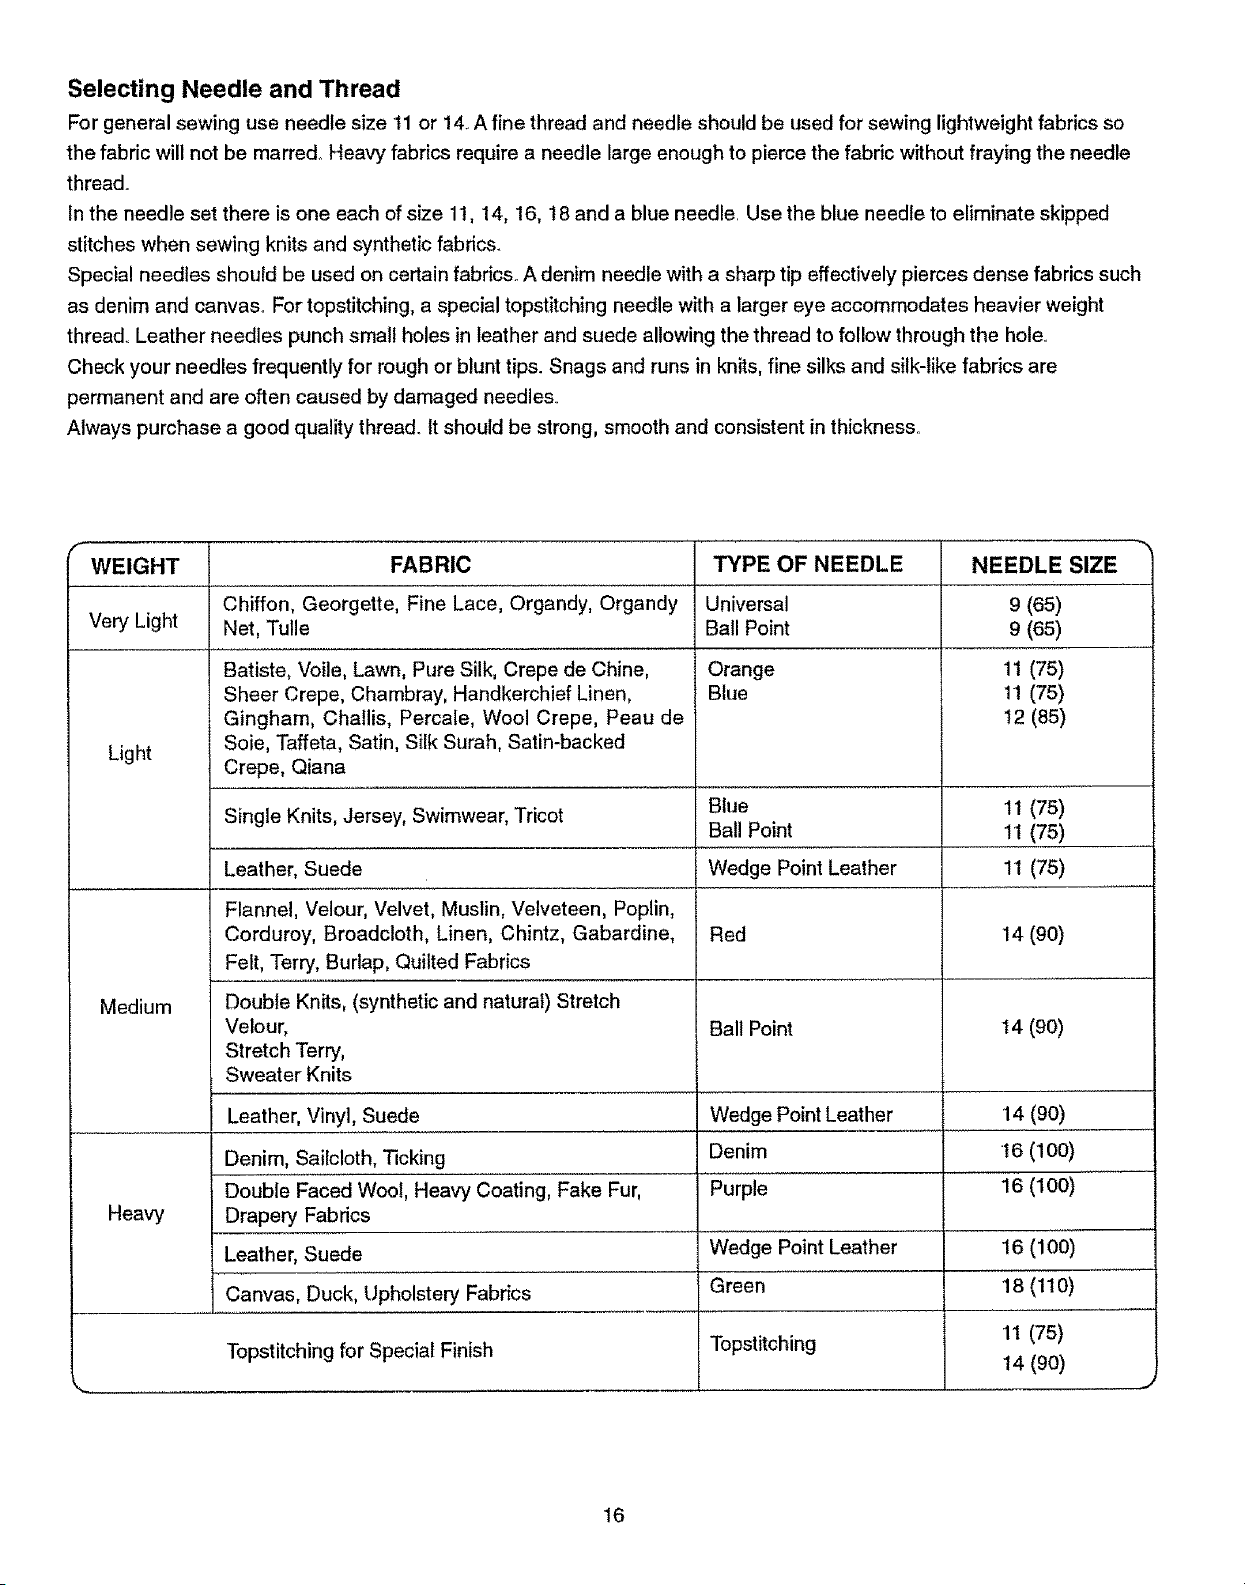
Selecting Needle and Thread
For general sewing use needle size tl or !4. A fine thread and needle should be used for sewing lightweight fabrics so
the fabric will not be marredr Heavy fabrics require a needle large enough to pierce the fabric without fraying the needle
thread.
In the needle set there is one each of size 11, 14, 16, t 8 and a blue needle. Use the blue needle to eliminate skipped
stitches when sewing knits and synthetic fabrics.
Special needles should be used on certain fabrics. A denim needle with a sharp tip effectively pierces dense fabrics such
as denim and canvas. For topstitching, a special topstitching needle with a larger eye accommodates heavier weight
thread. Leather needles punch small holes in leather and suede allowing the thread to follow through the hote_
Check your needles frequently for rough or blunt tips. Snags and runs in knits, fine silks and silk-like fabrics are
permanent and are often caused by damaged needles..
Always purchase a good quality thread, tt should be strong, smooth and consistent in thickness..
WEIGHT
Very Light
Light
Medium
FABRIC
Chiffon, Georgette, Fine Lace, Organdy, Organdy
Net, Tulle
Batiste, Voile, Lawn, Pure Silk, Crepe de Chine,
Sheer Crepe, Chambray, Handkerchief Linen,
Gingham, Challis, Percale, Wool Crepe, Peau de
Sole, Taffeta, Satin, Silk Surah, Satin-backed
Crepe, Qiana
Single Knits, Jersey, Swimwear, Tricot
Leather, Suede
Flannel, Velour, Velvet, Muslin, Velveteen, Poplin,
Corduroy, Broadcloth, Linen, Chintz, Gabardine,
Felt, Terry, Burlap, Quilted Fabrics
Double Knits, (synthetic and natural) Stretch
Velour,
Stretch Terry,
Sweater Knits
Leather, Vinyl, Suede
TYPE OF NEEDLE
Universal
Ball Point
Orange
Blue
Blue
Bal! Point
Wedge Point Leather
Red
Ball Point
!
Wedge Point Leather
Denim
Purple
NEEDLE SIZE
9 (65)
9 (65)
11(75)
11 (75)
t2 (85)
11(75)
11 (75)
11(75)
14(90)
14(90)
14(90)
t6 (lo0)
16 (100)
Denim, Sailcloth, t3cking
Double"Faced Wool, Heavy C'o'aiing, Fake Fur,
Heavy Drapery Fabrics
Leather, Suede ..... Wedge Point Leather 16 (100)
.......Canvas, Duck, Upho!s!.ery Fabrics Green 18 ........(110)
Topstitching for Special Finish Topstitching 11 (75)
14 (90)
16
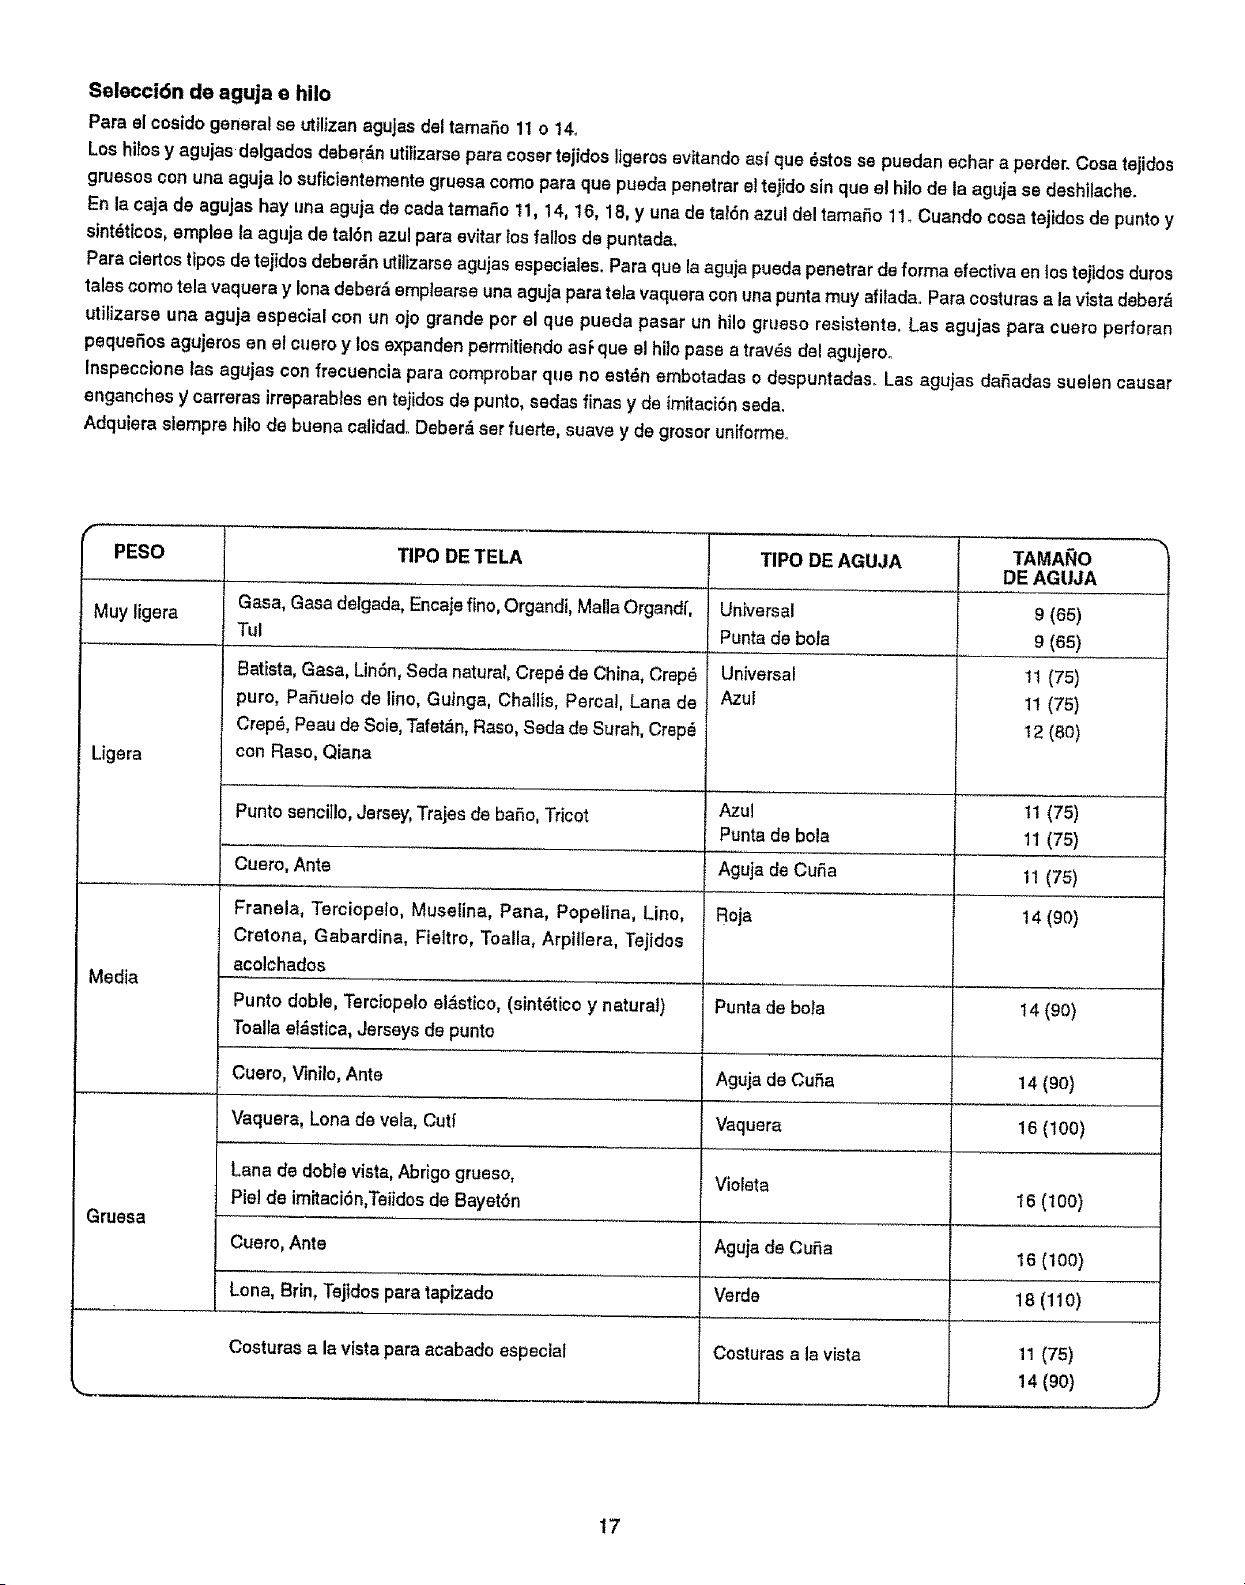
Seleccidn de aguja e hilo
Pare e[ cosidogeneralse L--'ti!izanagujas del tamale 11o 14.
Los hilos y agujas delgados deberdnutiiizarse pare coser tejidos ligeros evitando asf qua 6stos se puedan echar a perder. Cosa tejidos
gnJesos con una aguja Iosuficientementegruesa come pare qua pueda penetrar eltejldo sin qua e! hilo de la aguja se deshilache.
En la caja de agujas hay una aguja de cada tamario 11, 14, 16, 18, y una de tal6n azul del tamaro 1!. Cuando cosa tejidos de punto y
sint6ticos,emplee la aguja de tal6n azul pare evitar los fallos de puntada.
Pare ciertos tipos detejidos deber&n util}zarseagujas especiales. Para qua la aguja pueda penetrar deforma efectlva an los tejides duros
tales come tela vaquera y !onadebar& emplearse una aguja para tela vaquera con una puntamuy afilada..Para costuras ala vista deber&
utilizarseuna aguja especial con un ojo grands per el qua pueda pasar un hilo grueso resistente. Las agujas para cuero perforan
pequeros agujeros en el cueroy los expanden permitiendo asFqua el hi}opaso a travSs dot agujero.
Inspeccione las agujas confrecuencia pare comprobarqua no est_n embotadas o despuntadas. Las agujas daradas suelen causer
enganches y carrarasirreparablesen tejidosde punto,sodasfinas y de imitaci6nsoda.
Adquiera siempre hilode buena ca_idad..Debar6 seriuerta, suave y de grosor uniforms..
PESO TIPO DE TELA TIPO DE AGUJA
Muy ligera Gasa, Gasadelgada, Encajefine,Organdi, Malla Organdf,
Tul
Batista, Gasa, Lin6n, Soda natural, Crep_ de China, Crep_
pure, Pariuelo de line, Guinge, Challis, Percal, Lane de
Crep6, Peau de Soie, Tafet_n, Raso, Soda de Surah, Crep_
con Raso, Qiana
Universal
Punta de bola
Universal
Azul
TAMARO
DE AGUJA
9 (65)
9 (65)
11 (75)
11 (75)
12(80)
Ligera
Punto senci]lo,Jersey,Trajes de ba._o,Tricot Azul 11(75)
Punta de bole 11(75)
Cuero, Ante Aguja de Curia 11(75)
Franela, Terciopelo, Muselina, Pane, Popefina, Line, Roja t4 (90)
Cretona, Gabardine, Fieltro, Toalla, Arpillera, Tejidos
acolchados
Media
Punto doble, Terciopetoel&stico,(sint_ticoy natural) Puntade beta 14 (90)
Toallael_stica, Jerseysde punto
Cuero, Vinilo, Ante Aguja de Curia 14 (90)
Vaquera,Lenade vole, Cutf Vaquera !6 (100)
Lena de doblevista,Abrigo grueso, Violeta
Pie! de imitaci6n,Teiidosde Bayet6n 16 (100)
Gruesa
Cuero, Ante Aguja de Curia 16 (100)
Lone, Brin, Tejidos pare tapizado Verde 18 (110)
Costuras ala vistapare acabado especial Costurasala vista 11 (75)
14(90)
17
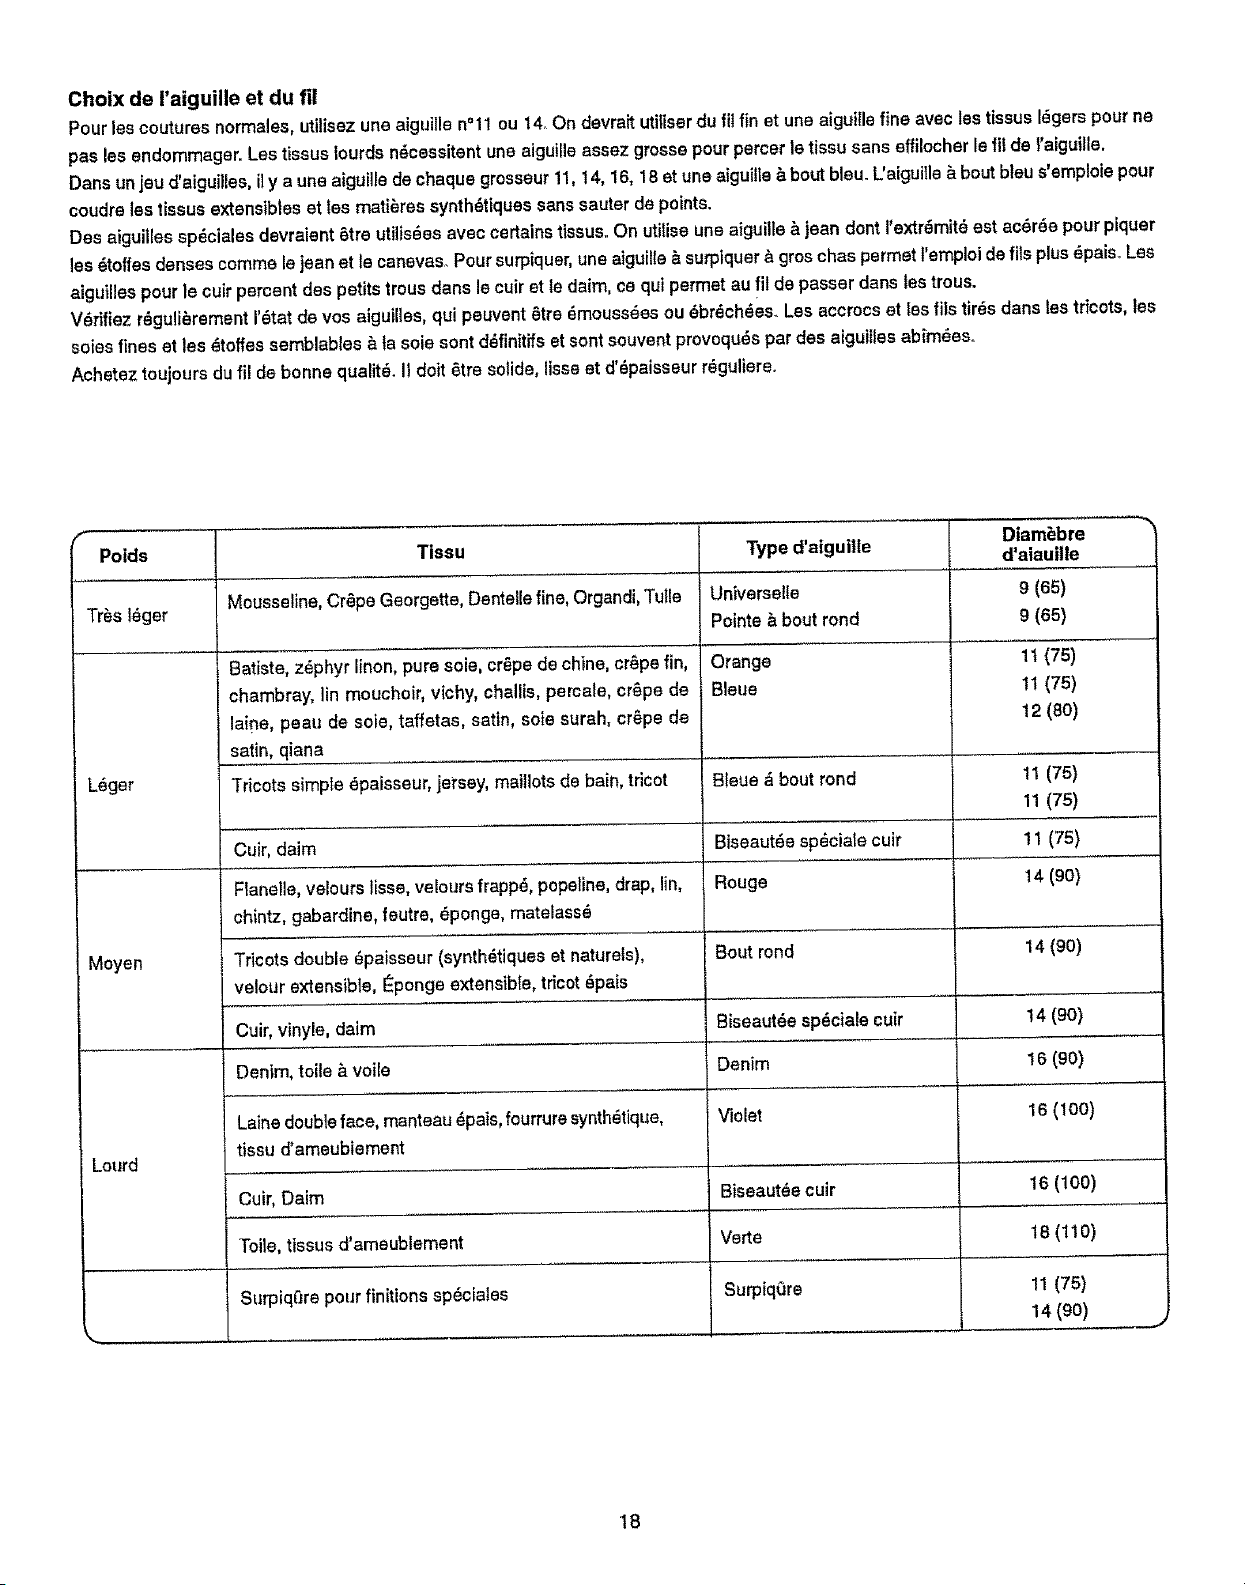
Choix de raiguille et du fil
Pour lea coutures normales, utilisez une aiguille n°11 ou t4o On devrait utiltser dufi{ fin et une aiguiUe fins avec lss tissus I_gers pour ne
pas los endommager. Lea tissus Iourds ndcessitent une aiguille assez grosse pour percer le ttssu sans effilocher le fif de l'aiguille.
Dans un jou d'aiguillas, il y a une aiguillo de cheque grcsseur 11, t 4, 16, 18 etune aiguille _ bout bleu. L'aiguills _ bout bteu s'amploie pour
coudre lee lissus extens}btes etles mati_res synth_tiques sans sauter de points.
Des aiguilles spdciales devraiant 8tre utilisBes avec certains tissuso On utilise une aiguilte & jean dont I'extr_mit8 eat acBr_e pour piquer
lea _toffes denses comma le jean st le canevaso Pour surpiquer, une aiguille _,surptquer & gros chas permet l'ernploi de ills plus 8paiso Los
aiguilles pour le cuir peroent des petits trous dans le cuir et le dairn, ce qui permet au fil de passer dana los trous.
V_rifiez r_guli_rement 1'Star de vos aiguilles, qui peuvent 6tre _mouss_es ou _br_ch_es. Los accrocs etlss ills tir_s dane lea tricots, los
soies fines et los _toffes semblables _ la sole sont dBfinitifs et sont souvent provoqu_s par des aiguiiles abim_es.
Achetez toujours du fil de bonne qualitY. I1 doit _tre solids, lisse et d'_paisseur r_guliereo
f Diam_bre _
Poids Tissu Type d'aiguille d'aiauille
Tr_s I_ger Mousseline, Cr_pe Georgette, Dantelie fine, Organdi, Tulle Universelle 9 (65)
Pointe ,_ bout fond 9 (65)
Batiste, z_phyr linen, pure sole, cr_pe de chine, cr_pe fin, Orange 1t (75)
chambray, lin mouchoir, vichy, challis, percale, cr_pe de Bleue 11 (75)
loins, peau de soie, taffetas, satin, sole surah, cr_pe de 12 (80)
satin, qiana
L_ger Tricots simple dpaisseur, jersey, maitlots de bain, tricot Bleue _ bout rend 11 (75)
11 (75)
Biseaut_e sp_ciale cuir 11 (75)
Rouge 14 (90)
Moyen Bout rond 14 (90)
Biseaut6e spdciale cuir 14 (90)
Denim 16 (90)
Violet 16 (100)
Lourd
Cuir, daim
Flanelle,velours lisse, velours frappe, popeline, drop, lin,
chintz,gabardine, feutre, dponge, matelass8
Tricots double _paisseur (synthdtiquas et naturals),
velour extensible, _ponge extensible, tricot dpais
Cuir,vinyle, daim
Denim, toils & voile
Lainedoubleface, manteau_pais,fourrure synth_tique,
tissu d'ameubiement
Cuir, Daim
Toite, tissus d'ameublement
Surpiq£Jrepourfinitions sp_cialss
Biseaut_e cuir
Verte
Surpiq_3re
16 (100)
t8(110)
11 (75)
14(90)
J
18
(blankpage)
(p_ginablanca)
(pageblanche)
t9
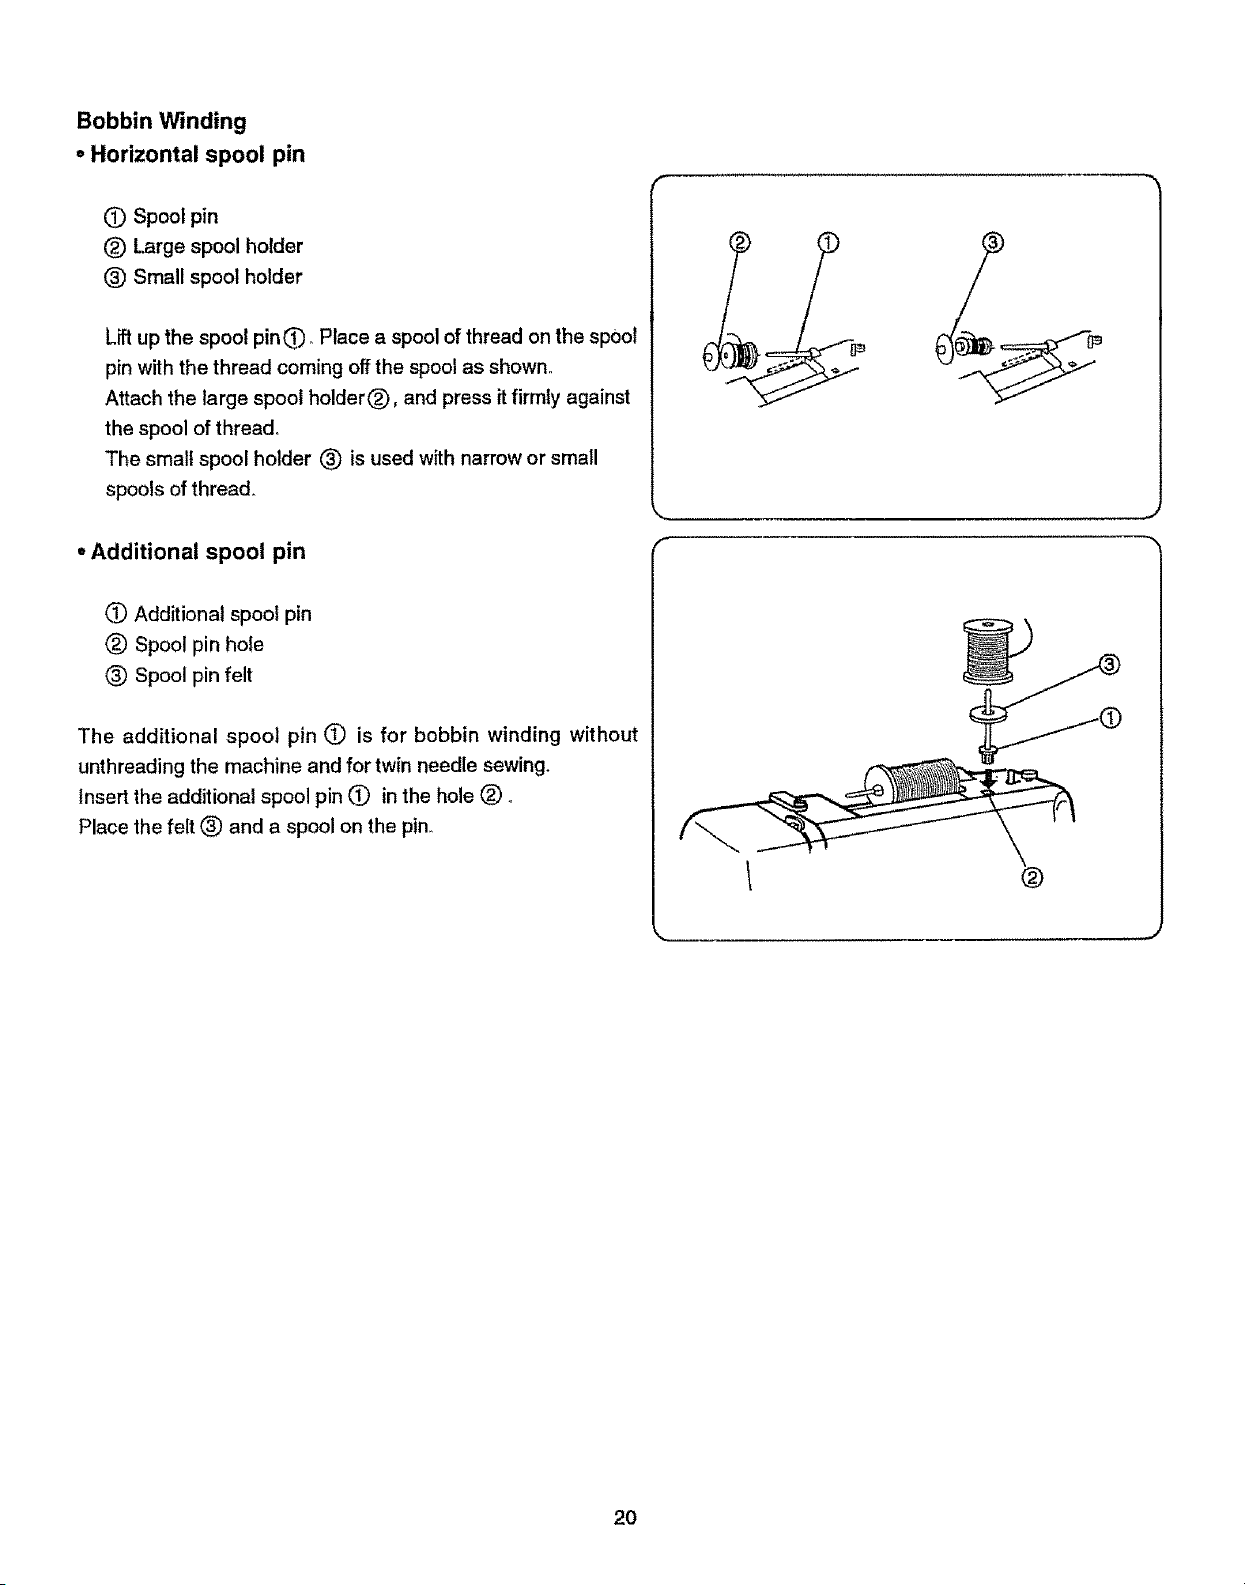
Bobbin Winding
• Horizontal spool pin
(_ Spool pin
® Large spool holder
(_ Small spool holder
Lift up the spool pinQ. Place a spool of thread on the spool
pin with the thread coming off the spool as shown.
Attach the large spool holder®, and press it firmly against
the spool of thread°
The small spool holder €_) is used with narrow or small
spools of thread.
• Additional spool pin
(_) Additional spool pin
® Spool pin hole
(_ Spool pin felt
The additional spool pin 0 is for bobbin winding without
unthreading the machine and for twin needle sewing.
Insert the additional spool pin L'_ in the hole ®o
Place the felt (_ and a spool on the pin.,
®
k.= _
2O
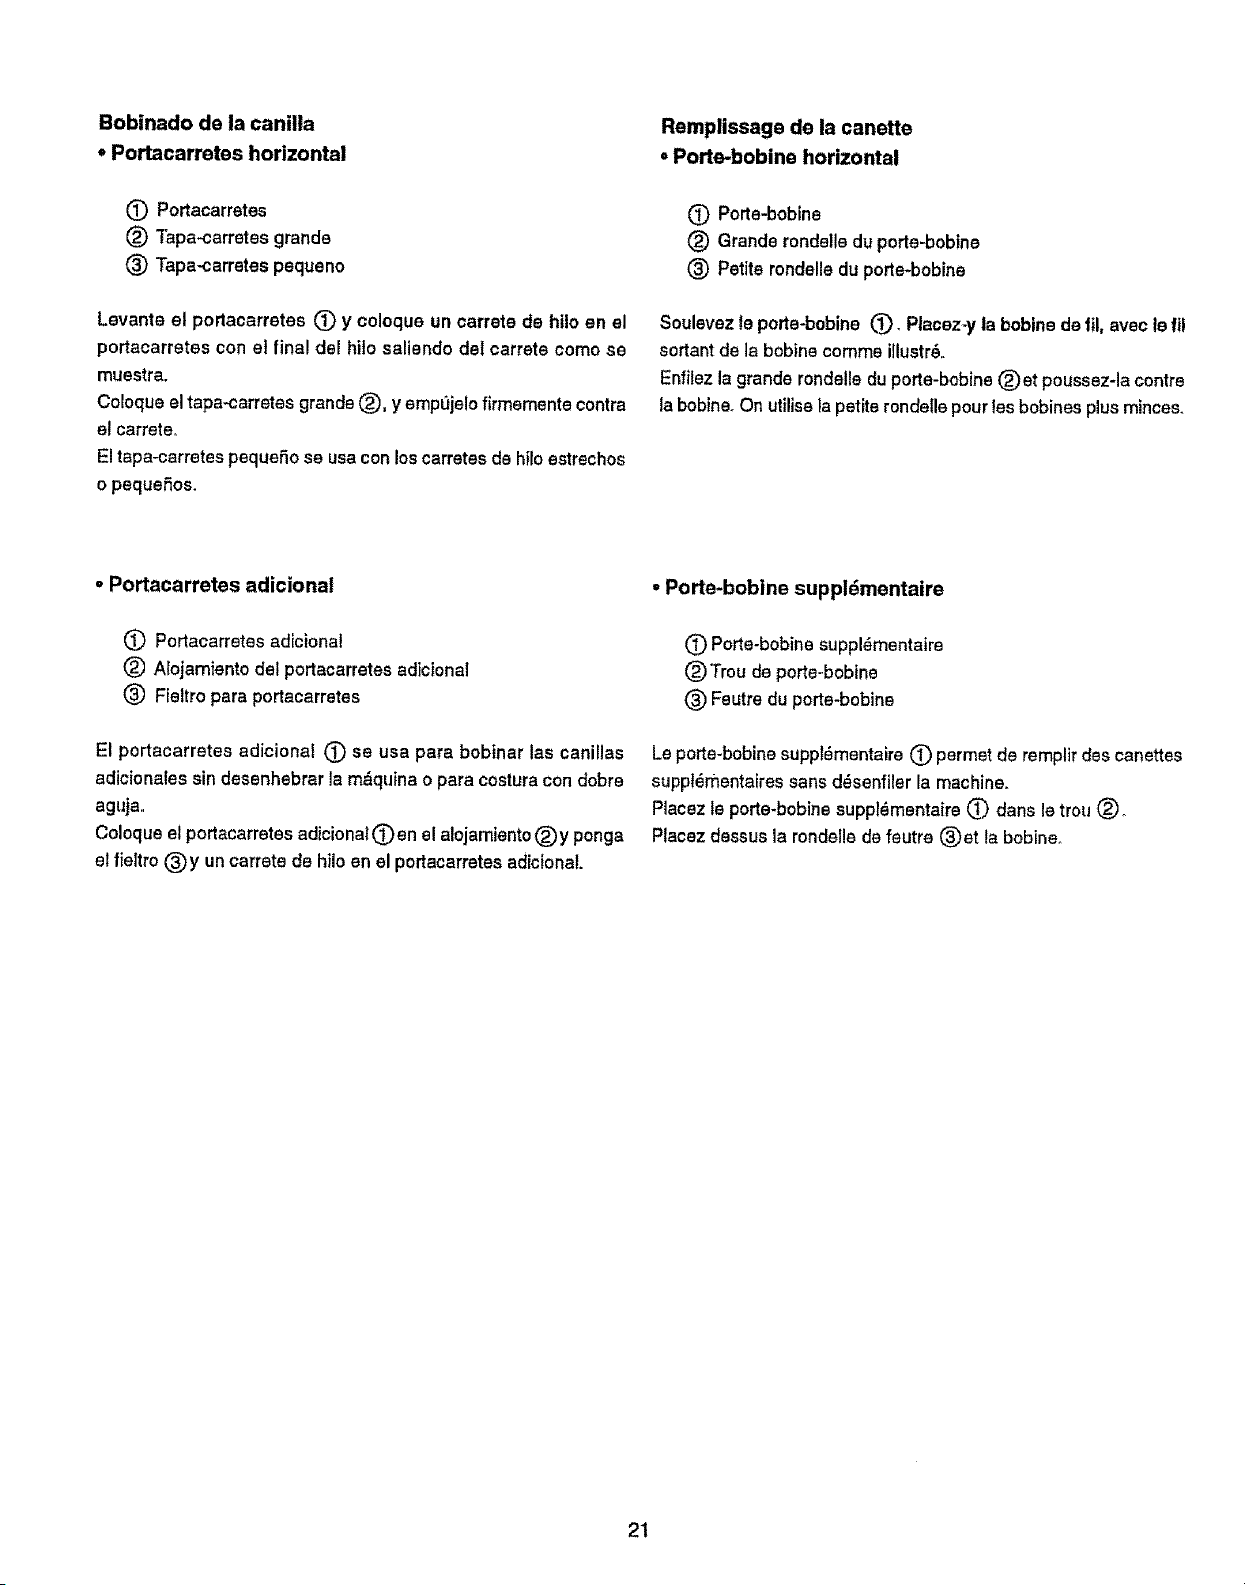
Bobinado de la canilla
o Portacarretes horizontal
(_ Portacarretes
(_) 7apa-carretes grande
(_) Tapa-carretes pequeno
Levante el portacarretes 1_ y coloque un carrete de hilo en el
portacarretes con el final del hilo saliendo del carrete come se
muestra.
Coloqueel tapa-carretesgrande(_), y emp_jelo firmemente centre
el carreteo
El tapa-carretespequefiose usa conloscarretesde bile estrechos
o peque5os.
Remplissage de la canette
• Porte-bobine horizontal
(!) Porte-bobine
(_) Grande ronde!ledu porte-bobine
(_) Petite rondelledu porte-bobine
Soulevez le porte-bobine 0_, Ptacez-yla bobine de til, avec lefll
sortant de la bobinecomme illustrS.L
Enffiezla grande rondelledu porte-bobine(_)et poussez-lacentre
la bobine.On utilisela petiterondellepourlee bobinesplusminces.
• Portacarretes adicional
(_ Portacarretes adicional
(_ Nojamiento del portacarretes adicional
(_) Fieltro pare portacarretes
El portacarretes adicienel 0 se usa pare bobinar las canillas
adicionales sin desenhebrar la m_quina opara costura con debre
aguja,,
Celoque el portacarretes adicionat(_en el alojamiento(_)y ponga
el fie_tre(_)y un carrete de hilo en el portacarretes adicional.
° Porte-bobine suppl_mentaire
(_) Porte-bobine suppl_mentaire
(_)Trou de porte-bobine
(_) Feutre ctuporte-bobine
Leperte-bobine suppl_mentaire C) permet de remplir des canettes
supp1_mentairessans d_senfiler la machine.
Placez le porte-bobine suppl_mentaire_ dens le trou (_
Placezdessus la rondelle de feutre (_)et la bobine°
21
• Bobbin winding
® For horizontal spool pin
® For additional spool pin
[] Pull the handwheel out to the right.
[] Draw thread from the spool
[] Guide the thread around the thread guide.
[] Thread through the hole in the bobbin from the inside to
the outside,
[] Put the bobbin on the bobbin winder spindle.
[_ Push the bobbin to the dghL
[] With free end of the thread held in your hand, depress the
foot control Stop the machine when it has made a few
turns and cut the thread close to the hole in the bobbin.
[] Depress the foot control again. When the bobbin is fully
wound, it stops automatically. Return the bobbin winder
to its original position by moving the spindle to the left and
cut the thread as shown,
[] Push the handwheet in_The machine will not function until
the clutch is engaged.
• The machine does not function until the clutch is
engaged.
NOTE:
Position of the bobbin winder stopper is adjustable
for the required amount of thread on the bobbin
(example 1/2 full or ful! etc.,)o
Use a screwdriver and loosen the screw one turn
or tess so that you can adjust the position of the
bobbin winder stopper.
Do not take out the screw all the way.
[]
®
................ J
®
[]
[]
[]
[]
.J
22
• Bobinado de |a canilla
_) Para el portacarreteshorizontal
(_ Para el prortacarretesadicional
[] Halo la volantemanual a la dorecha._
[] Saque el hilo dot caretteo
[] Gu[e el hilo alrededor del gufahitos de bebinado_
[] Paso el bile per el agujero de la canilla desda dentro hacia
afuora tal come se indiea on la itustraci6no
[] Coloque la canillaon el oje del devanador de caniUas_
[] Empuje la canitlala derecha°
[] Coja elfinal delhiIocon los dodosy ptseel pedalde control,
Cuan'dohaya dado unascuantas vueltas,parela m_.quina
y corteel hi_oque sale de la caniIla_
[] Pise unavamente e! pedalde control Cuandola canillaest6
liana dejar_,de girar autom_ticamente.
Empujeel ejedel devanador hacia la izquierdaparavolverlo
a poneren su posici6noriginal,y corte el hilocome se
muestra.
[] Empuje la volante manual a la izquierda
• Remplissage de la canette
(_) Pour porte-bobinehorizontal
(_ Pour porte-bobine supplSmentaire
[] Tirez le volant vers la droite.
[] "r}rezsur le fil de la bobine.
[] Passezle fil autour duguidefile
[] Passezle fil dansle troude la canette,de rint_rieur vers
rext_rieur.
[] Placez ta canettesur i'enrouleurde canette_
[] Poussezla canettevers la droite.
[] Entenanti'extrSmit8 libra du fil & la main, appuyez sur la
p_dalede contrSle_Arr_tez lamachineapr_squelquestours,
et coupezle fil auras du trou dans la canette.
[] Appuyez de nouveau sur la p_dale de contrSle_
Lorsquela canetteestpleine,elle s'arr_teautomatiquement
Remettezl'enmuleur de la canettedans la positiond'origine,
en poussant l'axe vers la gauche, et coupez le fil comma
indiqu_.
[] Poussez le volant vers l'intSrieuro
* La m&quina no coser_,hasta qua el embragueest_
engranadocon la m&quinao
* La machine ne fonctionnera pasrant qua rembrayage n'est
pas engage.
NOTA:
El topedel devanador de caniIlas puede ser ajustado
a la cantidad de hilo que requiereen la canilla (per
ejemplo,la mitad o Ileno, etc.)o
Afloje el tornillo dando una o manes de una vuelta
con el destornillador grande para ajustar la posici6n
deltope de! devanador de canillas_
No quite el torniilo completamente de su posici6n.
REMARQUE:
La butte d'enroutement de la canette petit
6tre r_gle8 salon la guantit6 de fil dSsir_e sur la
canette (par exomple, fa canette _ moiti_ remplie,
compl6tement remplie, A t'aide du tournevis,
desserrez la vis d'un tour ou moins, de fa_on
pouvoir r_gler ]a position de la butSe de
l'enrouleur de canetteo Ne retirez pas la vis
complStement°
23
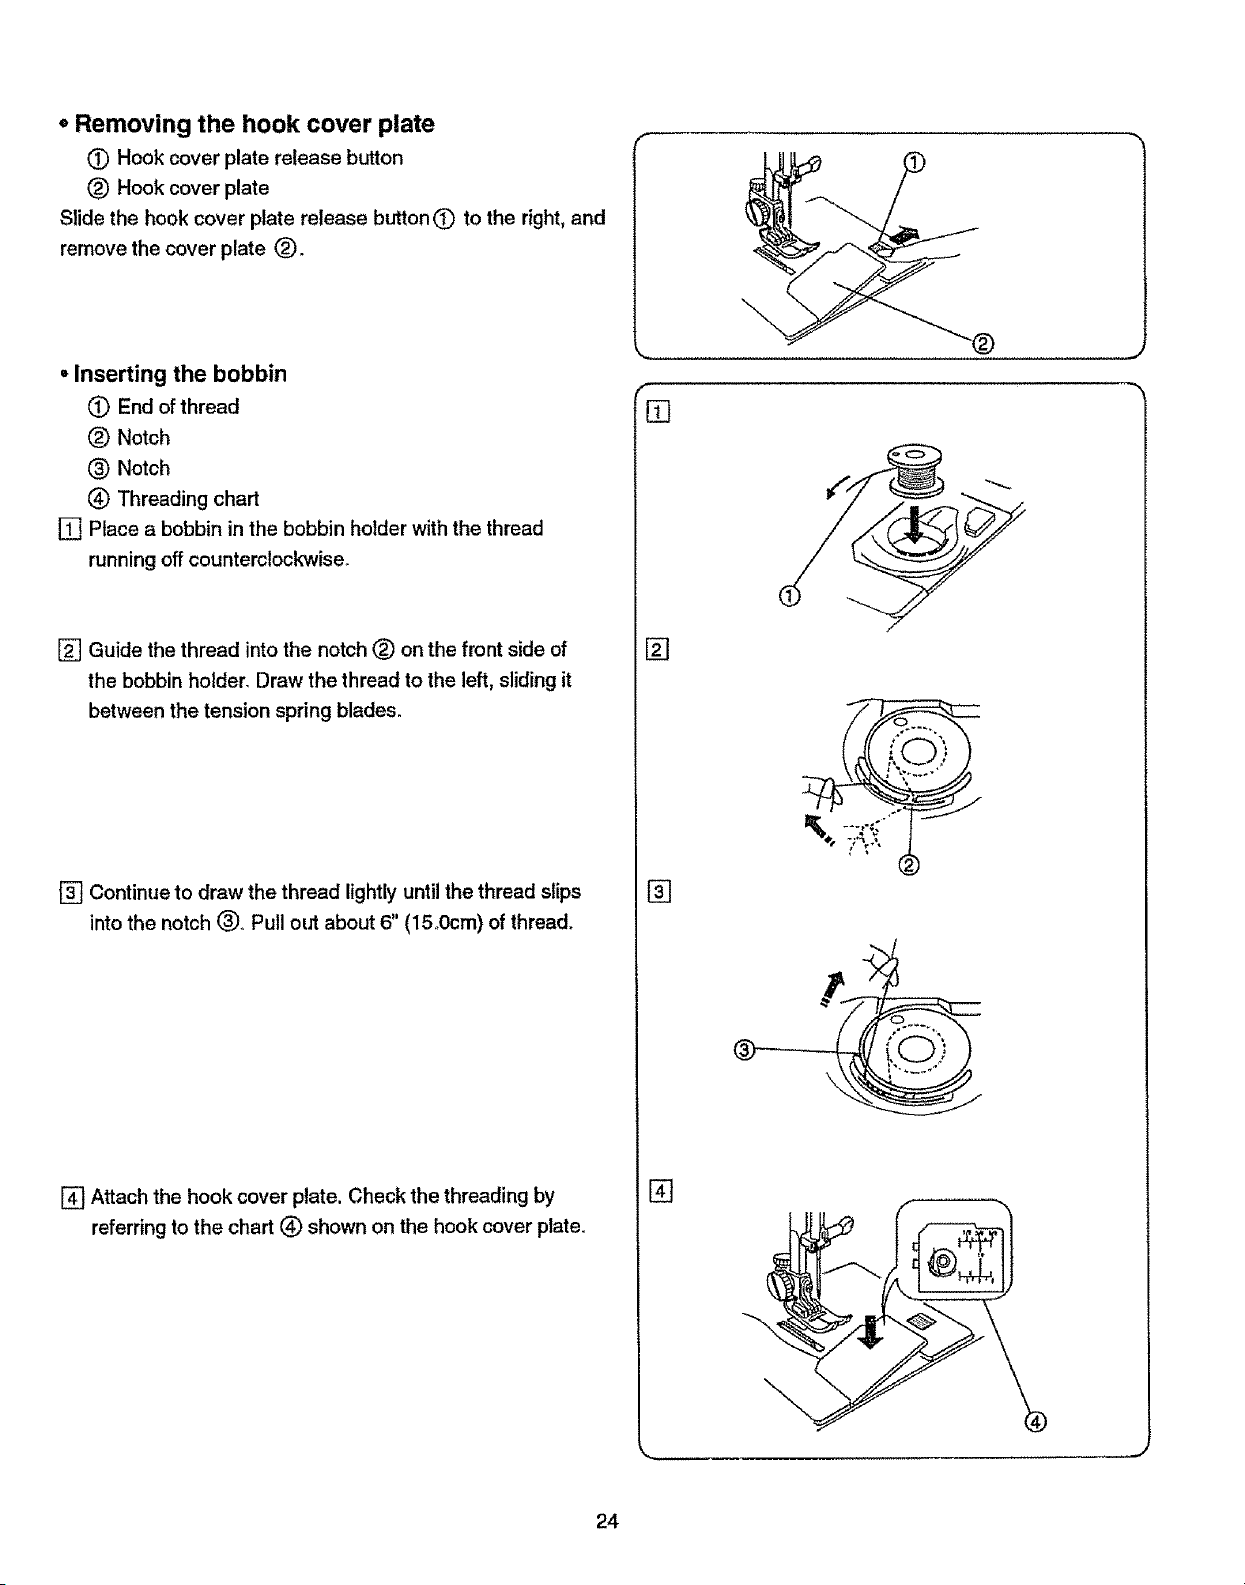
• Removing the hook cover plate
(_) Hook cover plate release button
(_) Hook cover plate
Slide the hook cover plate release button 0 to the right, and
remove the cover plate (_).
• Inserting the bobbin
(_) End of thread
(_) Notch
(_) Notch
(_ Threading chart
[] Place a bobbin in the bobbin holder with the thread
running off counterclockwise.
[] Guide the thread into the notch (_) on the front side of
the bobbin holder. Draw the thread to the left, sliding it
between the tension spring blades.
[] Continue to draw the thread lightly until the thread slips
into the notch (_). Pull out about 6" (15o0cm) of thread.
[] Attach the hook cover plate. Check the threading by
referring to the chart (_ shown on the hook cover plate.
f
[]
[]
[]
[]
\
24
• C6mo sacar la canilla
(_ Puleadorde aperturade la tape do accesoa canilla
(_) Tapa do accesoa canifla
Deslice e] pulsadorO haciala derechay quite la tapa (_
o Retrait de la canette
O Bouton de d_gagementdu couverclede navette
(_ Couverclede navette
Coulissezle bouton de d_gagement du couvercleQ vers la
droite,et retirezle couvercle(_.
• Colocaci6n de la canilla en el portacanillas
Q Extremede hito
(_) Ranura
(_ Ranura
Esquema de enhebrado
[] Pongauna canilladontrodotportacanillasde mode que el bile
se sueltoon el sentidocontrarioalas agujasdel reloj.
[] Pesedel hireper la ranura(_)en la partefrontal dei portacanillas_
Tire del hi{o haciala izquierdapas_ndoloentre la chapa-muelle
de tensi6ndet portacanillas.
• Insertion de la canette
(_ ExtrEimit_du fil
(_ Encoche
(_ Encoche
(_ Guided'enfilage
[] Ptacezla canette dens sonsupport,le fil se d_roulant en
eens antihoraireo
[] Guidez le fil dens I'encoche (_) _. I'avant du support de canette., o
Tirez le fil vers la gauche en le glissant entre lee lames du ressort
do tension,
[] ContinSetirando del hilo ligeramentehaeiaatr&shastequa pase [] Continuez,_tirerdoucementsur le fil jusqu'_,ce qu'il giisse dans
per ta ranura(_o Dejesobresaliraproximadamente15.0 cm(6") I'encoche (_o
de hilo. Tirez environ15,0 cm(6")de illo
[] Coloque la tape de accesoa canilladejandoel hilo haciaatr_s
y per encimede la place de aguja. Observeel esquemade
enhebrado (_)situade en la tape de acceso a canillay
compruebesi ha enhebradocorrectamente.
[] Replacez en place to couverclede navetteoPlacez lee deux
languettos dens les fentes do la plaque de navette ot
enc!iquetezqaon place. Vous trob'verez un guide d'enfilage
(_ de la canettosur to couvercle de navetteo
25
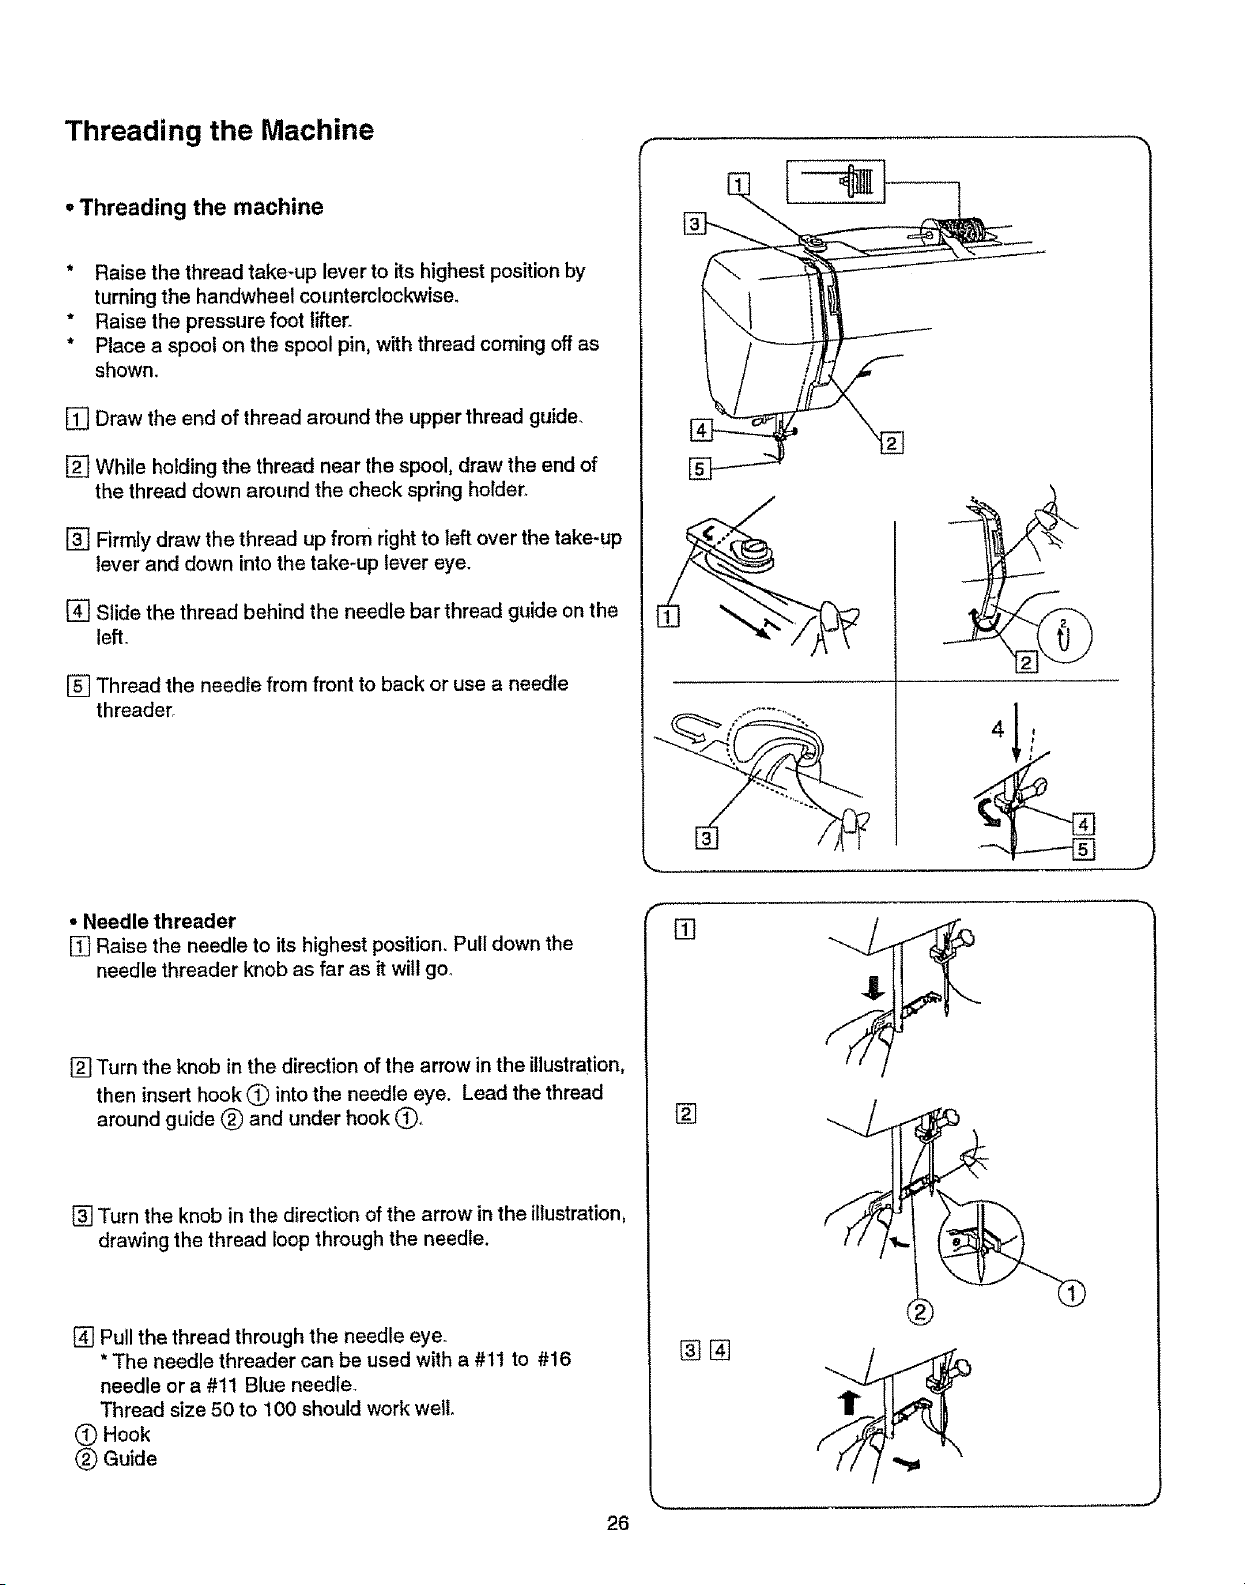
Threading the Machine
=Threading the machine
* Raise the thread take-up lever to its highest position by
turning the handwheel counterclockwise.
* Raise the pressure foot lifter_
* Place a spool on the spool pin, with thread coming off as
shown.
[] Draw the end of thread around the upper thread guide.
[] While holding the thread near the spool, draw the end of
the thread down around the check spring holder_
[] Firmly draw the thread up from right to left over the take-up
lever and down into the take-up lever eye.
[] Slide the thread behind the needle bar thread guide on the
left.
[] Thread the needle from front to back or use a needle
threader.
° Needle threader
[] Raise the needle to its highest position. Pull down the
needle threader knob as far as it will go_
[] Turn the knob in the direction of the arrow in the illustration,
then insert hook (_ into the needle eye. Lead the thread
around guide (_) and under hook _,
[] Turn the knob in the direction of the arrow in the illustration,
drawing the thread loop through the needle,
[] Pull the thread through the needle eye.
* The needle threader can be used with a #11 to #16
needle or a #11 Blue needle.
Thread size 50 to 100 should work well.
0 Hook
(_ Guide
r
[]
J
%,,,
26
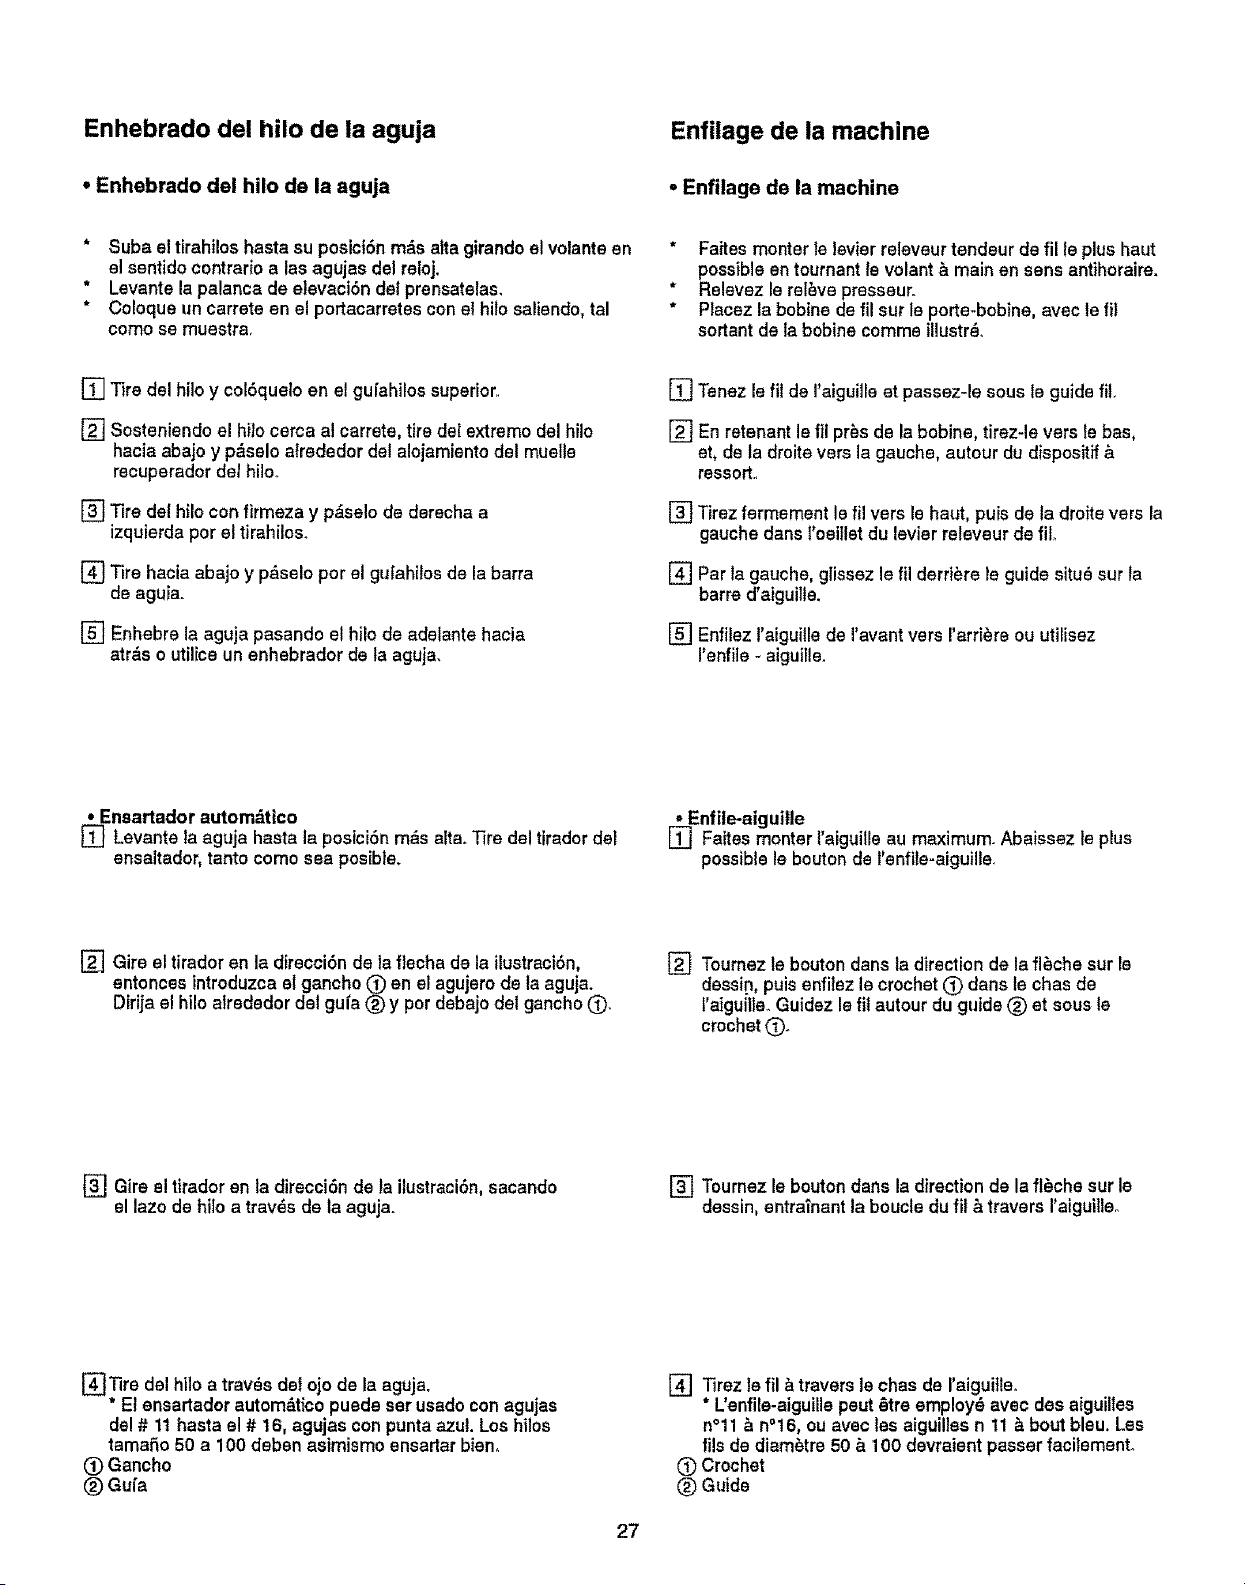
Enhebrado del hilo de la aguja
° Enhebrado de! hilo de la aguja
Enfilage de la machine
• Enfilage de la machine
* Suba el tirahiloshaste su posici6nmrs aitagirandoel volanteen
el sentido contrarioalas agujasdel reloj.
* Levante la palanca de elevaci6ndel prensatelas,
* Coloque un carrate en el portacarretes con el hilo saliendo,tel
como se muestra,
* Fa_tesmonterle levier releveur tandeur de fil le plus haut
possibleen tournantla volant_ main en sens antihoraire.
* Relevez le relive presseur.
* Placezla bobine de fil surta porte*bobine,avec le fil
sortantde la bobine commaillustrS,.
[] Tire del hilo y col6qualo en el gufahilos superior,,
[] Sosteniendo el hilo cerca al carrete, tire de/extramo del hilo
haciaabajo y p_salo atradedor del alojamiento del muelle
recuparadordel hi!o_
[] Tire del hilo confirmeza y p_selo de derechaa
izquierda por el tirahilos.
[] Tire haole abajo y p&se!o por el gufahilos de la barra
de aguia.
[] Enhebre la aguja pasando el hilo de adelante hacia
atr&s o utilice un enhebrador de la aguja.
[] Tenez le fil de I'aiguille et passez-le sous te guide ill.
[] En retenant le fil pros de la bobine, tirez-le vers te bas,
at, de la droite vers la gauche, autour du dispositif &
ressort.,
[] Tirez fermement le fil vers le haut, puis de la droite vers la
gauchedens l'oeitletdu levierreleveur de illo
[] Par la gauche, gtissez le fil derri6re le guide situs sur la
barre d'aiguilte.
[] Enfilez l'aiguille de l'avant vers I'arri_re ou utilisez
I'enffie - aiguille.
* Ensartador autom&tico
[] Levante la aguja haste la posici6n mrs alta° Tire del tirador de_
ensaltador, tanto como sea posibte,
• Enfile-aiguille
[] Faites monter I'aiguille au maximum,,Abaissez le plus
possible le bouton de l'enfile-aiguille.
[] Gire el tirador en la diracciSn de la flecha de la ilustraci6n,
entonces introduzcael ganchoQ en el agujerode la aguja.
Dirijael hilo alradedor del gufa (_y pordebajodel gancho Q.
[] Toumez le bouton dans la direction de la fl_che sur le
dessin, puis enffiez le crochet (_ dens lachas de
f'aiguille_Guidez le fil autour du guide (_ et sous le
crochet Q.
[] Gireel tirador en la direcci6nde la ilustraci6n,sacando
el lazo de hilo a trav_s de la aguja.
[] Tournezle bouton dans la direction de la fl_che sur le
dessin, entraTnantla boucledu fit ,_traversI'aiguilleo
[]Tire del hilo a trav_s dal ojo de la aguja.
* El ensartadorautom_,ticopuede ser usadocon agujas
del # 11 haste el # 16, agujas con punta azuL Los hilos
tamafio 50 a 100 deben astmismo ensartarbien,
(_)Gancho
(_)Gufa
[] Tirez te fil _ travers lechas de I'aiguiIleo
* Uenfila-aiguillepaut_tre employ8 avec des aiguiltes
n°11& n°16, ouavec tesaiguillesn 11 _ bout bleu. Les
ills de diam6tre50 & 1O0davraient passer faciiemento
(_)Crochet
(_ Guide
27
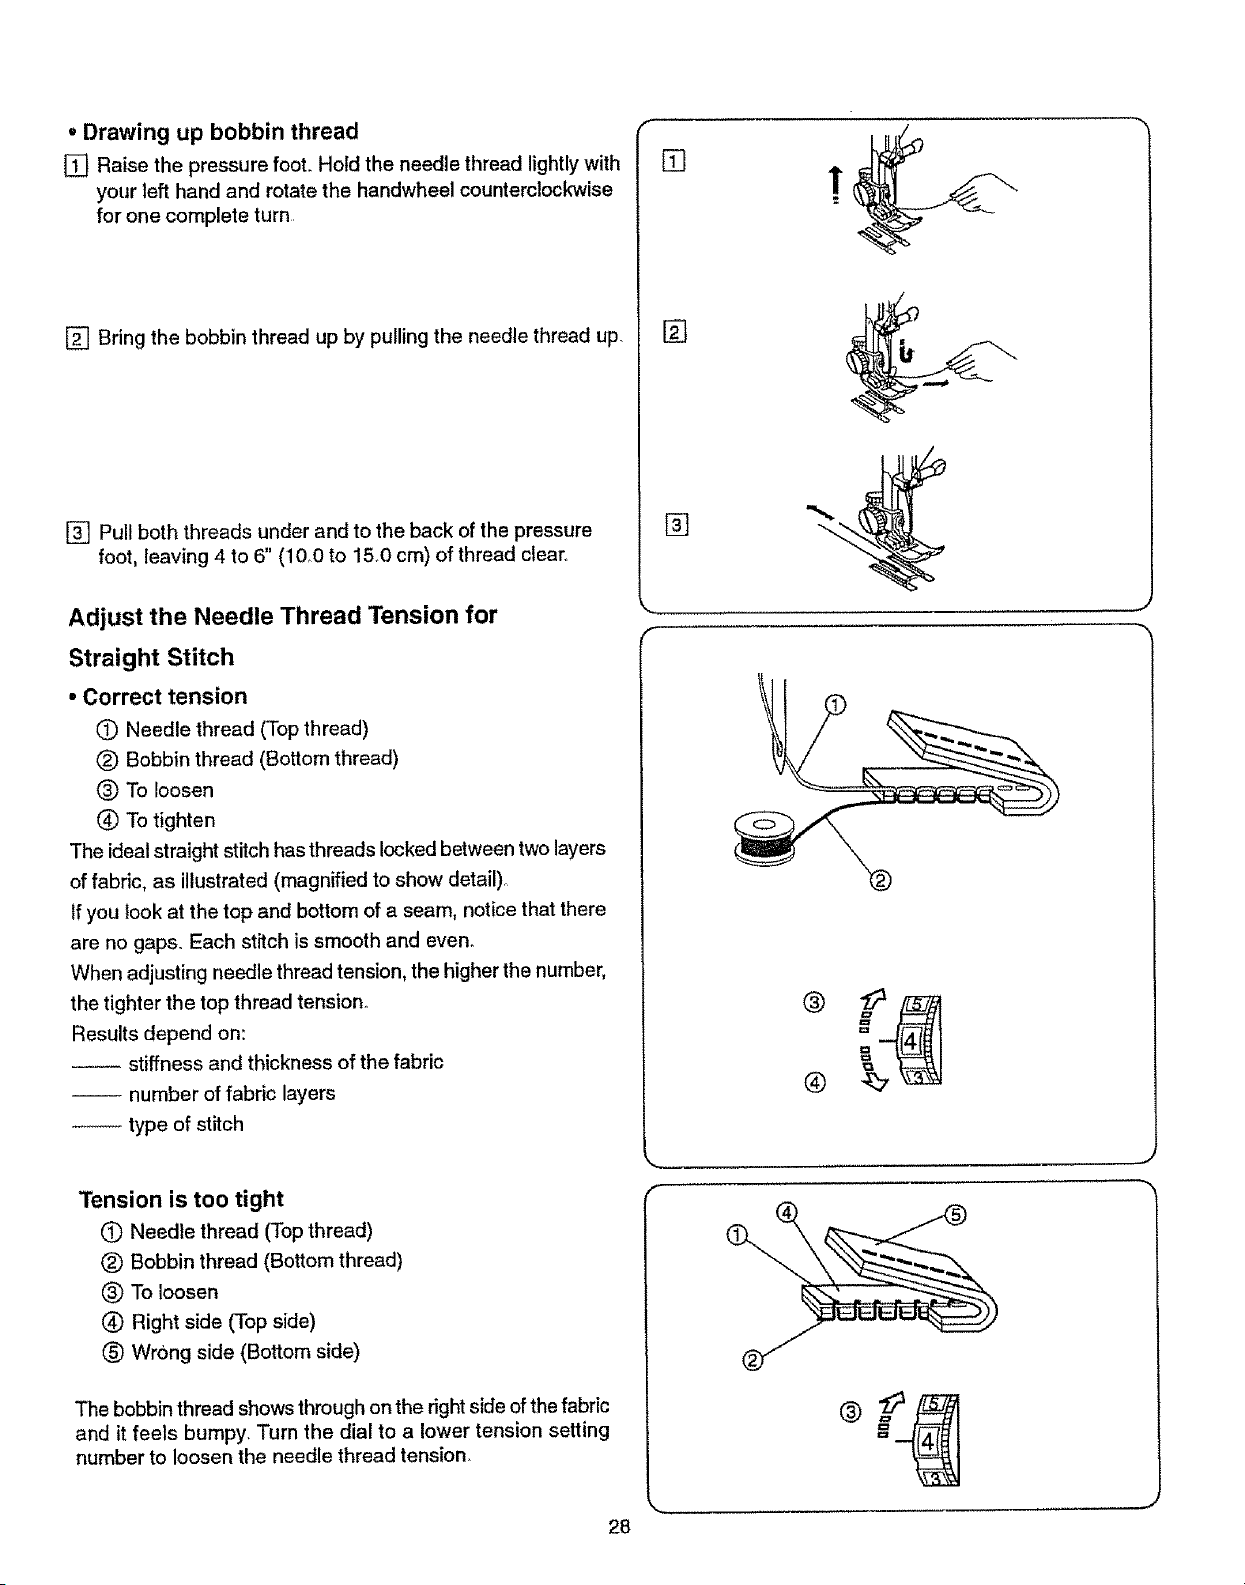
, Drawing up bobbin thread
[] Raise the pressure foot. Hold the needle thread lightly with
your left hand and rotate the handwheel counterclockwise
for one complete turn,
[] Bring the bobbin thread up by pulling the needle thread up.
[] Pull both threads under and to the back of the pressure
foot, leaving 4 to 6" (10_0 to 15o0 cm) of thread clea_.
Adjust the Needle Thread Tension for
Straight Stitch
• Correct tension
0 Needle thread (Top thread)
_) Bobbin thread (Bottom thread)
® To loosen
(_ To tighten
The ideal straight stitch has threads locked between two layers
of fabric, as illustrated (magnified to show detail)_
If you look at the top and bottom of a seam, notice that there
are no gaps. Each stitch is smooth and even.
When adjusting needle thread tension, the higher the number,
the tighter the top thread tension..
Results depend on:
-- stiffness and thickness of the fabric
-- number of fabric layers
type of stitch
Tension is too tight
(_) Needle thread (Top thread)
_) Bobbin thread (Bottom thread)
® To loosen
Q Right side (Top side)
(_ Wrong side (Bottom side)
The bobbin thread shows through on the right side of the fabric
and it feels bumpy. Turn the dial to a lower tension setting
number to loosen the needle thread tension.
[]
!
[]
[]
®
®
28
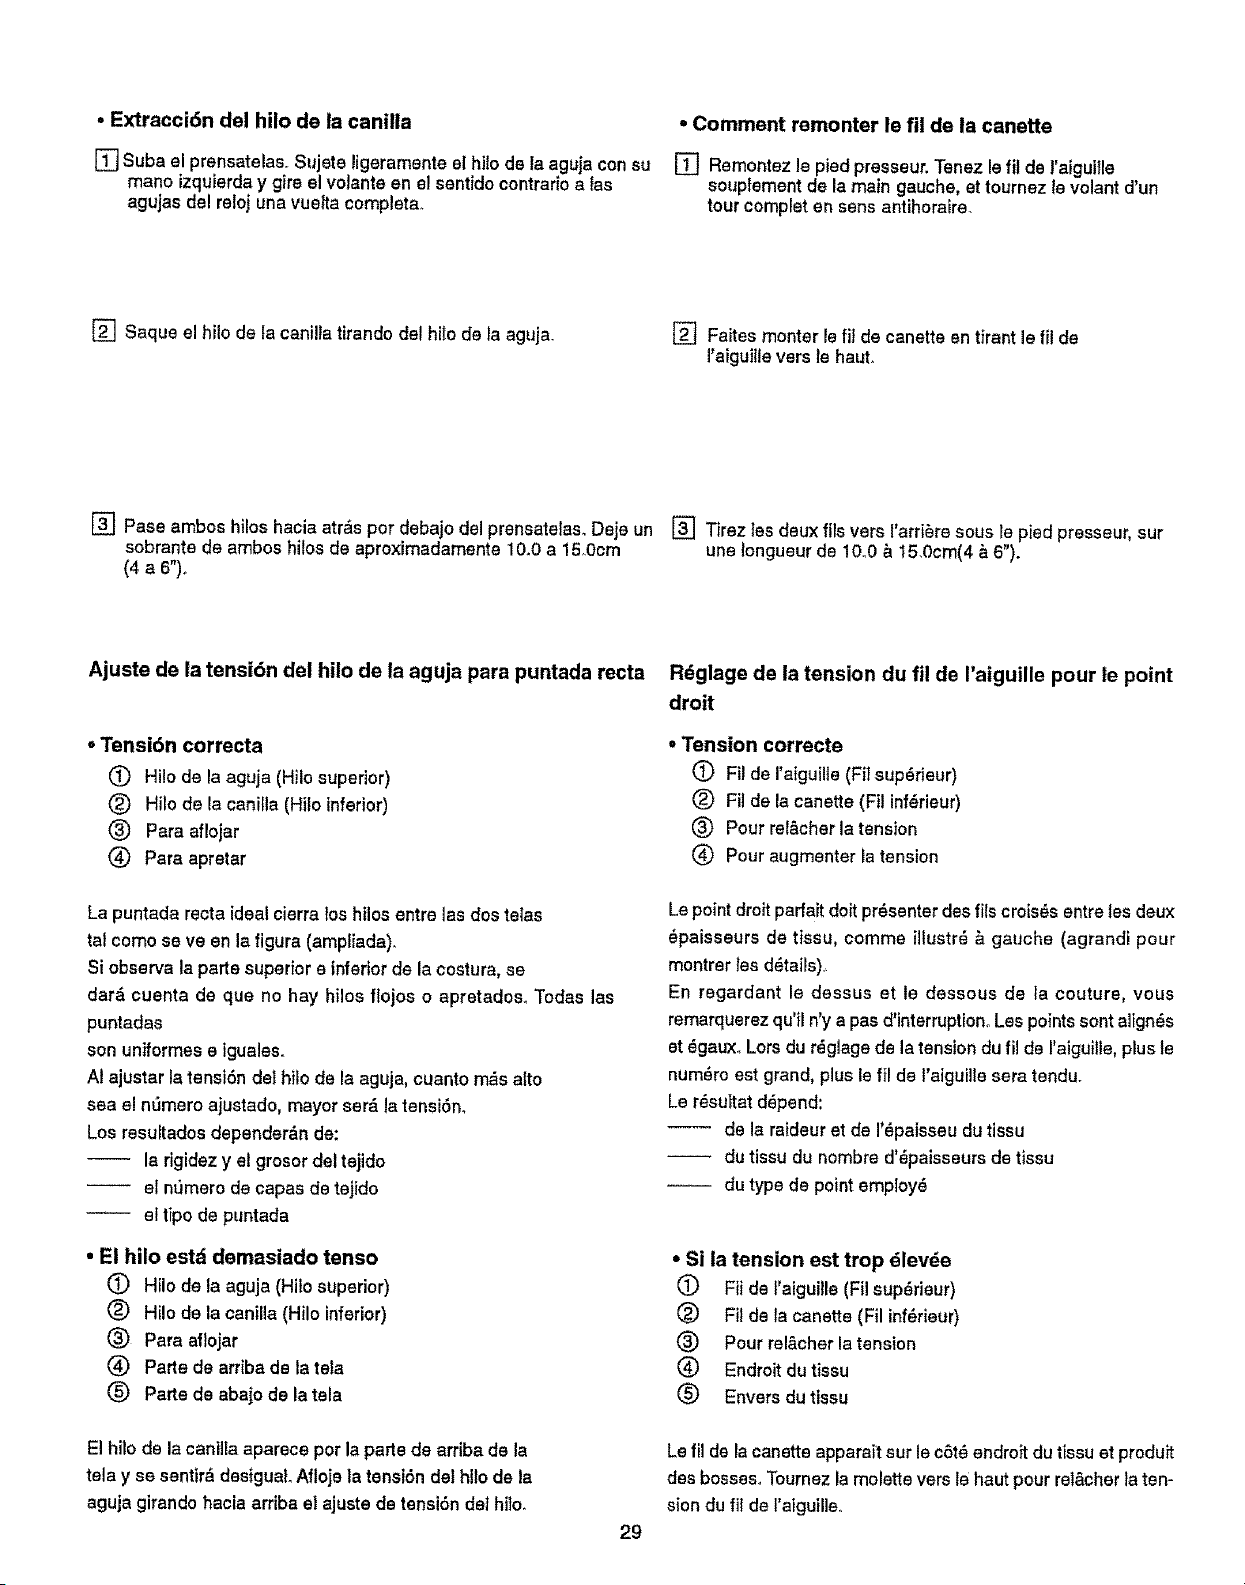
• Extracci6n del hilo de la canilla
[_ Suba el prensatelas+Sujete ligeramenteel hilo de la agujaconsu
mane izquierday gire el volanteen el sentido contrarioalas
agujas del reloj una vuettacomplete+
• Comment remonter le fil de la canette
[] Remontez le pied presseur, Tenez le fil de !'aiguille
souptementde la main gauche,et tournez le volantd'un
tourcompleten sensantihoraire.
[] Saque el hilo de ta canilla tirando del hilo de la aguja. [] Faites reenter le fii de canette en tirant le fil de
Paiguille vers te haul
[] Pase ambos hilos hacia atr_s por debajo del prensatelas. Deje un [] Tirez tes deux file vers l'arri6re sous le pied presseur, sur
sobrante de ambos hilos de aproximadamente 10+0 a 15.0cm une longueur de 10o0 & 15.0cm(4 _,6").
(4 a 6")+
Ajuste de la tensi6n del hilo de la aguja para puntada recta
• Tensi6n correcta
(_) Hilo de la aguja (Hilo superior)
(_) Hilo de la caniIla(Hito inferior)
(_ Para aflojar
Para apretar
La puntada recta ideal cierra tos hilos entre las dos telae
tal como se ve en la figura (ampliada).
Si observe la parte superior e inferior de la costura, se
dar_ cuenta de que no hay hilos flojos o apretadoso Todas las
puntadas
son uniformes e iguales+
AI ajustar la tensiSn de1 hilo de la aguja, cuanto m=_salto
sea el nt_mero ajustado, mayor ser& la tensi6n.
Los resuftados dependerdn de:
-- la rigidez y el grosor det tejido
el n_mero de capes de tejido
el tfpo de puntada
• El hilo estd demasiado tense
(_ Hilo de la aguja (Hilo superior)
(_) Hi!ode la canilla(Hiloinferior)
(_) Para aflojar
(_ Parte de arribade la tela
(_) Parte de abajo de la tela
El hilo de la caniila aparece per la parte de arriba de la
telay se sentird desiguaL Af!oje la tensi6n det htlo de la
aguja girando hacla arriba el ajuste de tensi6n de1 hilo_
29
Rdglage de la tension du fll de I'aiguille pour le point
droit
• Tension correcte
(_) Filde I'aiguiUe(Fitsup_rieur)
(_) Filde la canette (Fil inf_rieur)
(_) Pour rel&cher la tension
(_ Pouraugmenter la tension
Le point droit padait doit presenter des ills crois_s entre tes deux
_paisseurs de tissu, comme illustr_ & gauche (agrandi pour
montrer les d_tails),,
En regardant le dessus et le dessous de Ia couture, vous
remarquerez qu'il n'y a pas d'interruption. Les points sent aJign_s
et _gaux+ Lore du r_giage de la tension du fil de I'aiguille, plus le
num_ro est grand, plus le fil de I'aiguille sere tendu+
Le r_sultat d_pend:
-- de la raideur et de I'_paisseu du tissu
--- du tissu du nombre d'_paisseurs de tissu
-- du type de point emptoy_
• Si ia tension est trop dlevde
(_) Fii de l'aigui_le (Fil sup6rieur)
(_) Fil de la canette (Fil inf_rieur)
(_ Pour tel&chef la tension
(_ Endroit du tissu
(_) Envers dU tissu
Le fil de la canette apparai't sur le c6t8 endro_t du tissu et produit
des bosses° Tournez la molette vers le haut pour rel&cher la ten-
sion du fil de f'aiguil]e+
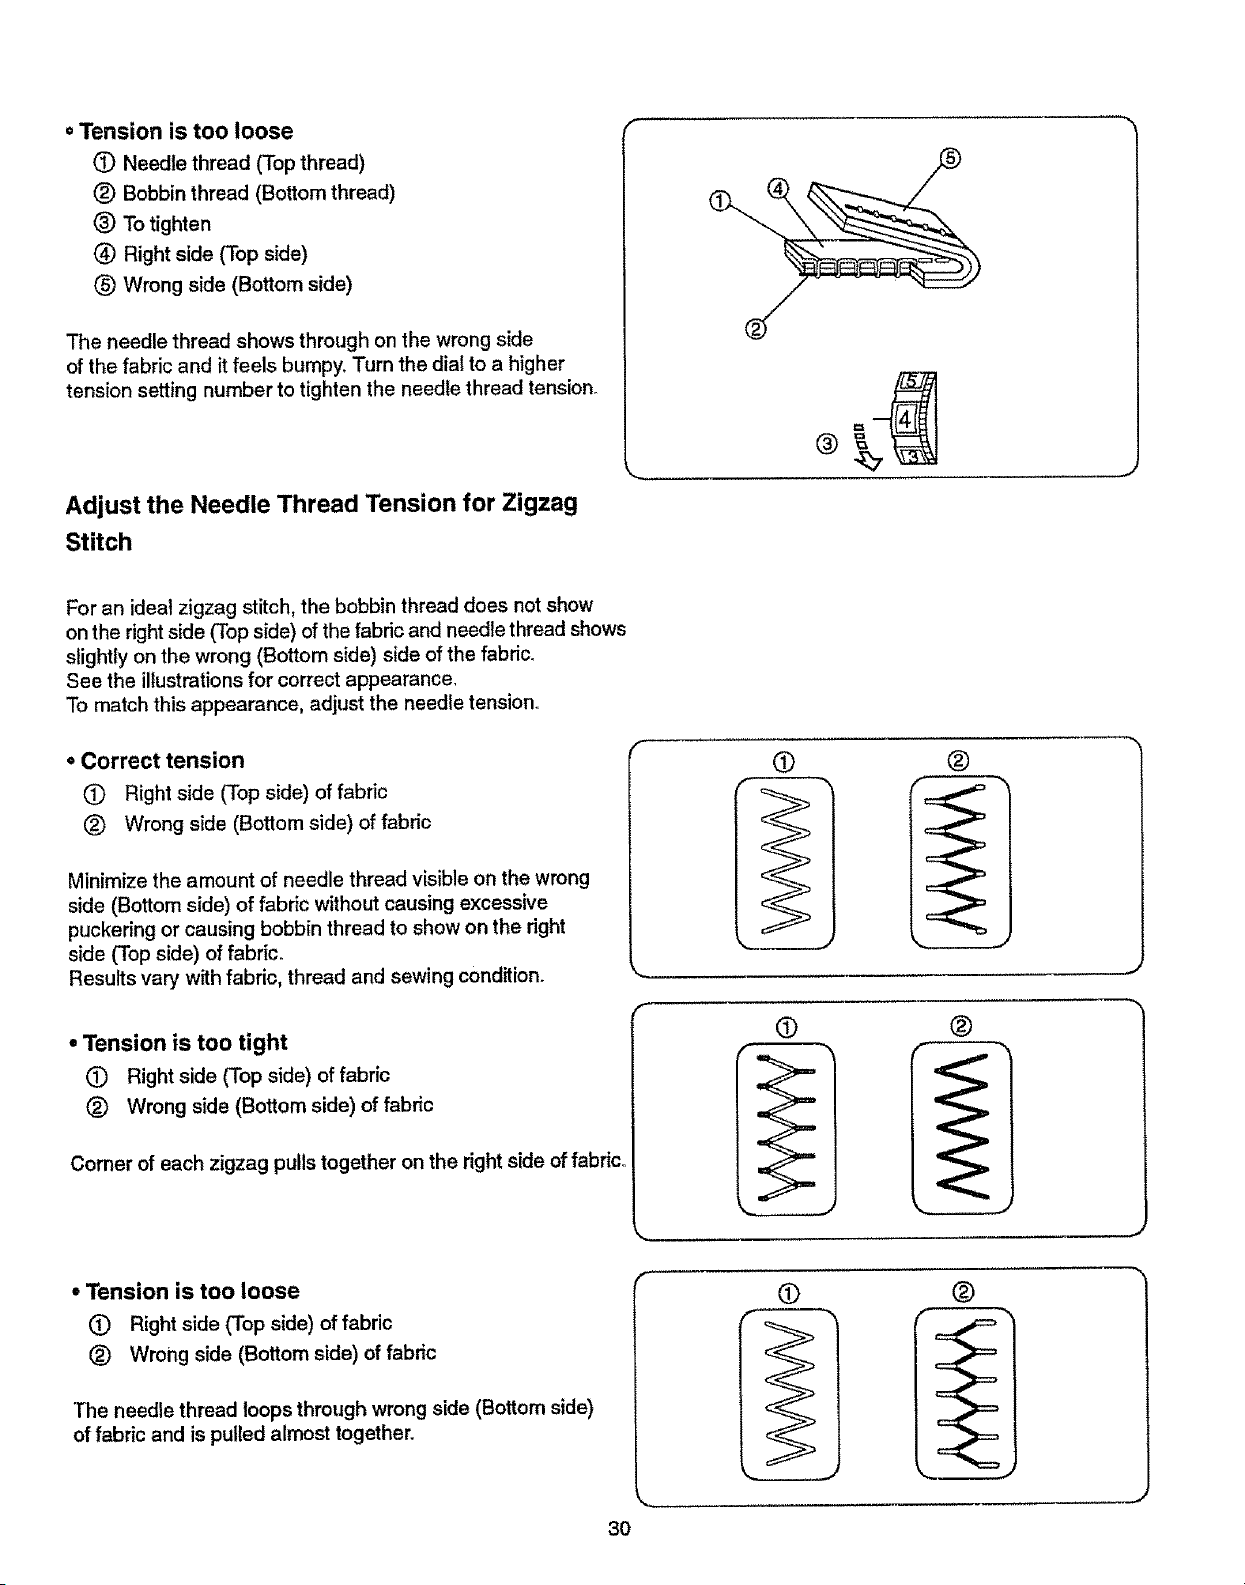
° Tension is too loose
(_ Needle thread (Top thread)
_) Bobbin thread (Bottom thread)
To tighten
(_) Right side (Top side)
(_) Wrong side (Bottom side)
The needle thread shows through on the wrong side
of the fabric and it feels bumpy. Turn the dial to a higher
tension setting number to tighten the needle thread tension,
Adjust the Needle Thread Tension for Zigzag
Stitch
For an ideal zigzag stitch, the bobbin thread does not show
on the right side (Top side) of the fabric and needle thread shows
slightly on the wrong (Bottom side) side of the fabdc_
See the illustrations for correct appearance.
To match this appearance, adjust the needle tension..
= Correct tension
(_) Right side (Top side) of fabric
® Wrong side (Bottom side) of fabric
Minimize the amount of needle thread visible on the wrong
side (Bottom side) of fabric without causing excessive
puckering or causing bobbin thread to show on the right
side (Top side) of fabric.
Results vary with fabric, thread and sewing condition.
• Tension is too tight
(_) Right side (Top side) of fabric
® Wrong side (Bottom side) of fabric
Comer of each zigzag pulls together on the right side of fabric°
• Tension is too loose
(_) Right side (Top side) of fabric
® Wrong side (Bottom side) of fabric
The needle thread loops through wrong side (Bottom side)
of fabric and is pulled almost together.
30
0 ®
®
®
J
• El hilo estd demasiado flojo
(_ Hilo de la aguja (Hitosuperior)
(_) Hilo de la canilla (H+loinferior)
(_) Para apratar
(_) Parte de arriba de la tela
(_) Parte de abajo de ta teta
El hUode la aguja aparece per la partede abajo de la tela
y se sentir& desigual+Tense la tensi6n del hilo de la aguja
g+randohacia abajo el ajuste de tensi6n del hilo.
, Si la tension est trop faible
(_ Fit de i'aiguitle (Fil du sup_rieur)
(_) Fil de la canette (Fil du infSrieur)
(_) Pouraugmenterlatension
(_ Endroit du tissu
_) Enversdu tissu
Le fil de I'aiguille apparait _l'envers du tissu, et produit des
bosses,Toumez la molette vers le bas pour augmenter latension
du fil de I'aiguille..
Ajuste de la tensidn del hilo de la aguja para puntada
zig-zag
En ta puntada zig-zag ideal, el hilo de la canitla no aparecer,_ en la
parte de arriba de la tela y el hi!o de la aguja se ver& ligeramente
en la parte de abajo de ia tela+ Vea el aspecto oorrecto en las
ilustraciones siguientes_ Para igualar esta apariencia, ajuste la
tensi6n del hilo de la aguja..
oTensi6n correcta
(_) Parte de arriba de la tela
(_) Parte de abajo de ta tela
Reduzca al m[nimo el hilo de la aguja visible en ta parte de abajo
de la tela sin qua se frunza en forma excesiva o naciendo qua el
hi!o de la canilla se yea en la parte de arriba de la tela. Los resultados
pueden variar segun la tela, hito y condiciones de eostura.
• El hilo estd demasiado tenso
Parte de arriba de la tela
(_) Parte de abajo de la tela
Las esquinasde cada zig-zag quedar&n demasiado tensas
y amontonadas en la parte de arriba de la tela+
, El hUo estd demasiado flojo
(_ Parte de arriba de la tela
(_) Parte de aSajo de la tela
El hilo de la aguja pasar& por ta parte de abajo de la tela y se jalar&
quedando casf junto.
3t
R_glage de la tension du fil de I'aiguille pour le point
zig-zag
Lorsqu'un point zig-zag est effectu_ correctement, le fil de la canette
ne parait jamais sur le cSt_ endroit du tissu et Je fit de I'aiguille
apparaff _ paine sur le cSt_ envers du tissu o
Reportez+vous aux figures ci-dessous pour voir & quoi ressembie
un point ex6cut_ correctement+ R_glez la tension du fii de dessus
pour obtenir l'aspect d_sir_+
• Tension correcte
C) Endroit du tissu
(_) Envers du tissu
R6duisez la quantit_ de fil de raiguille visible sur t'envers du tissu
sans pour autant piisser excessivement le tissu et sans qua le fil de
la canette n'apparaisse sur I'endroit du tissuo Lee r_suttats variant
salon fe tissu, te fit et lee r_glages utilis_s+
• Si la tension est trop dlevde
L_ Endroit du tissu
(_) Envers du tissu
Les pointes du motif zig-zag ont tendance bse rapprocher sur
t'endroit du tissuo
° Si la tension est trop faible
Endroit du tissu
(_ Envers du tissu
Le fil de Paiguille & tendance _ faire des boucles sur I'enversdu
tissuet les pointssont d_form_s.
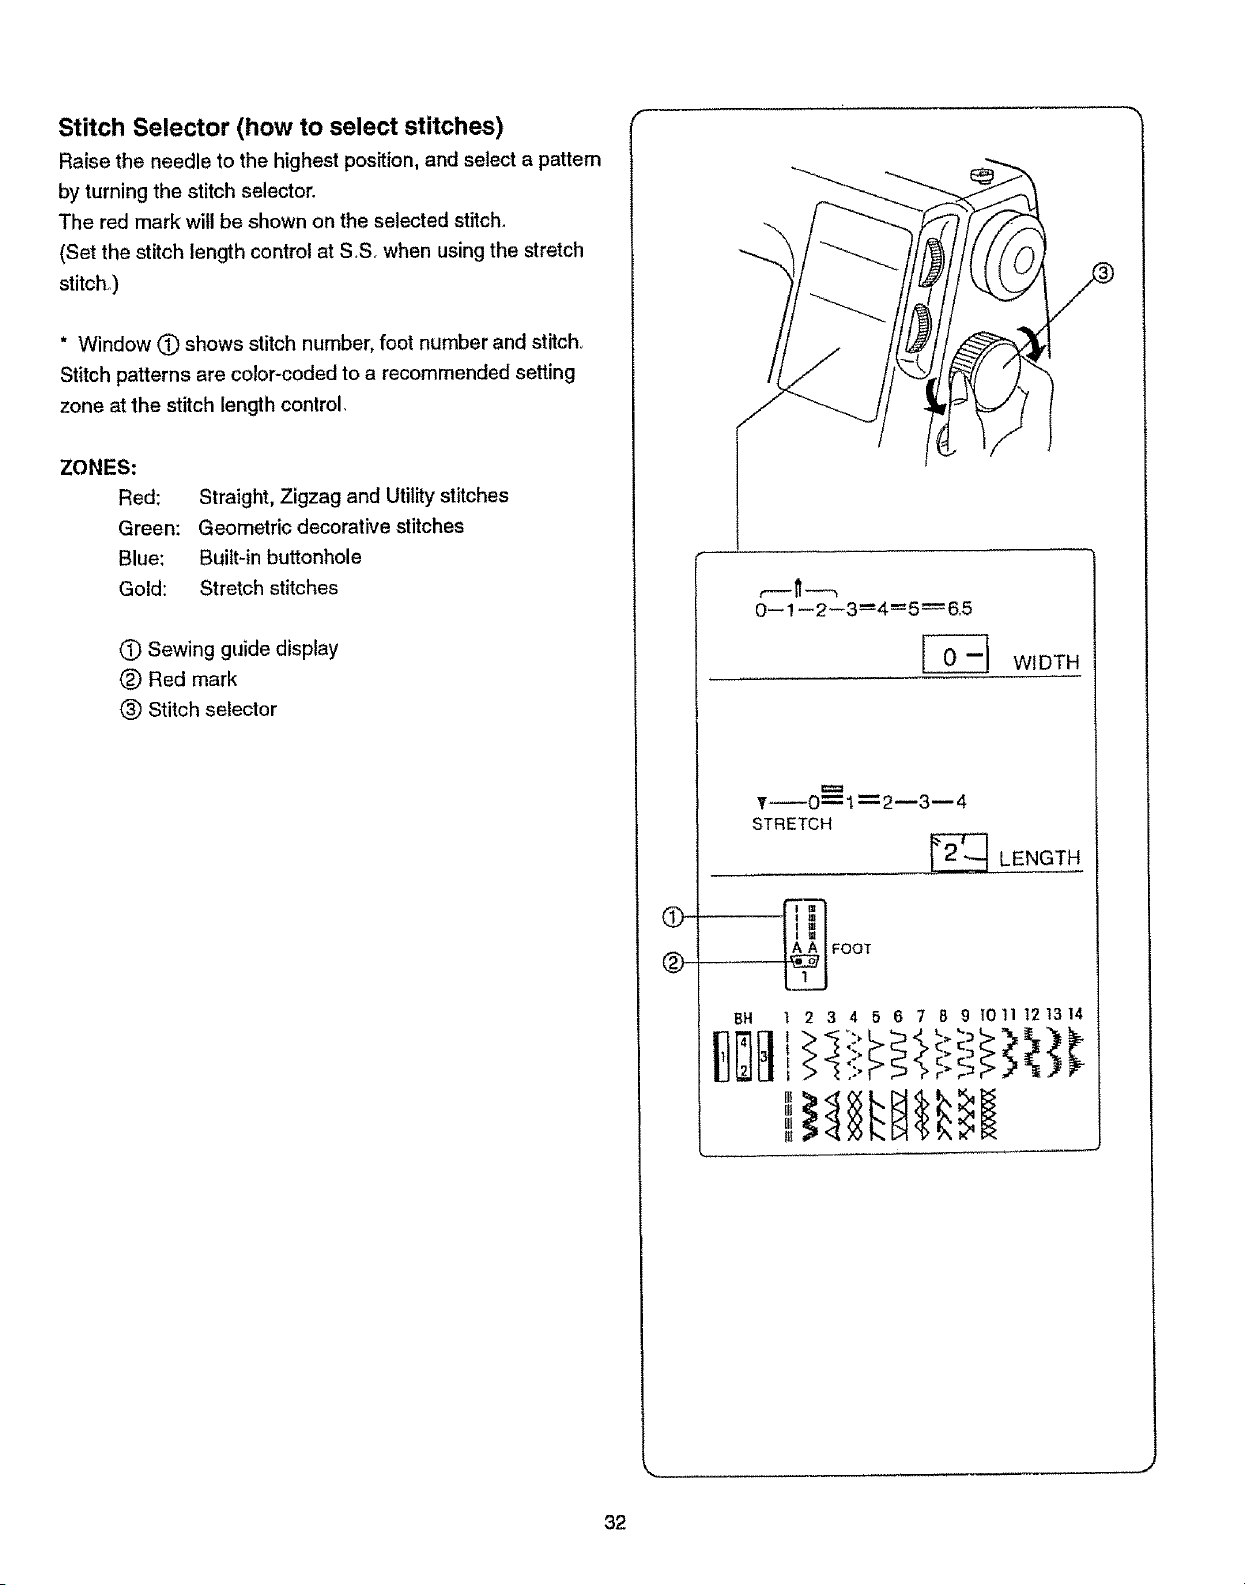
Stitch Selector (how to select stitches)
Raise the needle to the highest position, and select a pattern
by turning the stitch selector.
The red mark will be shown on the selected stitch.
(Set the stitch length contro! at S.,Sr when using the stretch
stitch_)
* Window (_) shows stitch number, foot number and stitch.
Stitch patterns are color-coded to a recommended setting
zone at the stitch length control.
ZONES:
Red:
Green:
Blue:
Gold:
Straight, Zigzag and Utility stitches
Geometric decorative stitches
Built-in buttonhole
Stretch stitches
(_) Sewing guide display
(_) Red mark
(_ Stitch selector
O
®
0--1 --2--3=4=5_6.5
[_ WIDTH
T--O'-I --2--3--4
STRETCH
_'_ LENGTH
FOOT
1 2 3 4 5 6 7 8 9 I011 I21314
32
Selector de puntada (cdmo seleccionar de puntadas)
Levants la aguja hasta la posici6n m_s alta, y seleccione de
puntadas girando el selector de puntadao
La marca roja ser& mostrada en el puntada elegido,.
(SitL_eel control de transporte en la posici6n SoS. cuando use
puntadas el&sticas)
* La ventana C) muestra et nemero de puntadas, el n_mero de
pie y puntada.
Los patrones de puntada tienen claves de color para recomendar
zonas de ajuste en el control de la Iongitud de puntada.
Sdlecteur de point (comment choisir les points)
Remontez I'aiguille le plus haut possible, et s61ectionnezles
points en tournant le s61ecteurde point°
Le repSrerouge indique le pointchoisL
(RSglezla Iongueur du point sur SrS pour tes points extensibles)
* La fenStre (_) indique {e num6ro du point, le num6ro du pied et
le point,,
Les points de couture sont cod_s par couleur, ce qui correspond
& une zone de r_giage recommand6e pour la Iongueur du point,
ZONES:
Roja: Puntada recta, puntadazig_zagy puntadasutiles
Verde: Pintadas decorativas geomdtricas
Azuk Oja[ incorporado
Oro: Puntadael&stica
C) Pantalta de guia de costura
(_) Marca roja
(_) Selector de puntada
ZONES:
Rouge: Points droits, zig-zag et utilitaires
Verte: Points g_om_triques d8coratifs
Bleue: Boutonniere int6gr_e
Dorde: Points extens[bles
(_) FenStre du selecteur des points
(_) Rep6re rouge
(_) S_lecteur de point
33
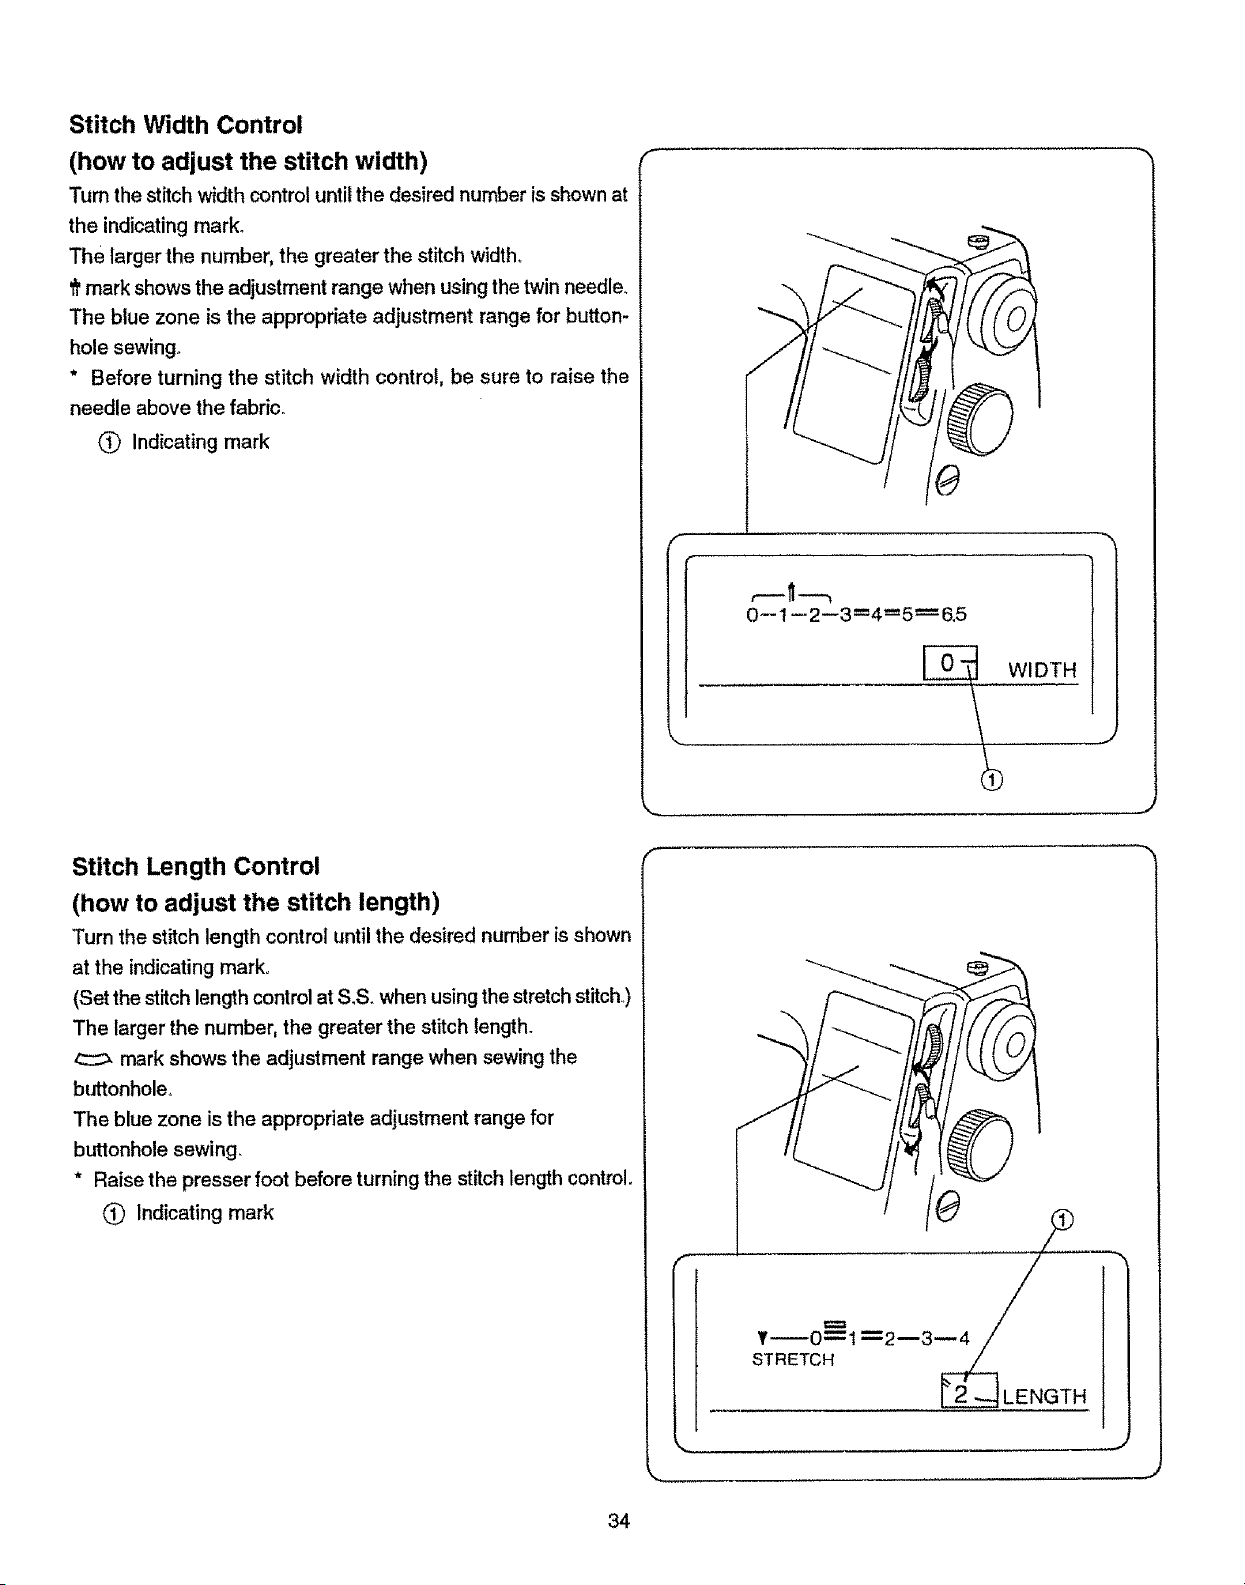
Stitch Width Control
(how to adjust the stitch width)
Turn the stitch width control until the desired number is shown at
the indicating mark.
The larger the number, the greater the stitch width_
_tmark shows the adjustment range when using the twin needler
The blue zone is the appropriate adjustment range for button-
hole sewing.
* Before turning the stitch width control, be sure to raise the
needle above the fabric_
Q Indicating mark
Stitch Length Control
(how to adjust the stitch length)
Turn the stitch length control until the desired number is shown
at the indicating mark..
(Set the stitch length control at S.S. when using the stretch stitch.)
The larger the number, the greater the stitch length.
mark shows the adjustment range when sewing the
buttonhole.
The blue zone is the appropriate adjustment range for
buttonhole sewing
* Raise the presser foot before turning the stitch length control.
Indicating mark
,--fl--,
0--1 --2--3--4--'--5_---6.5
o /o
¥10---_1 _2--3_4 / /
STRETCH _ LENGTH
34
Control de la anchure de puntada (c6mo ajustar la
anchure de las puntadas)
Gire el controlde la anchura haste qua el numero deseado se vea
la marca indicativa_
NLimeros m_s afrosproporcionardnmayor anchura de puntada_
esta marca ind{cael radiode ajustescuandousa unaaguja doble.
La zone azul as e! radio de ajustes aprepiado para la costura de
ojales.
* Antes de girar el control de la anchura de puntada asegt_resede
alzar la aguja per encima de la tela.
(_ Mama indicativa
Rdglage dela largeur du point(comment r_glerla largeur
du point)
Tournezle r_glage de la largeur du point jusqu'_ ce qua le num_ro
choisiapparaisse en face du rep6re.
Plusle num_roeat grand,plusle pointeatlarger
Lesymbole_ indiquela plagede r_glagepour lea aiguillesjumal_eso
La zone bleue eat ta plage de r_glage ad6quate pour la couture
des bouLonni6res_
* Avant de tourner le rdglage de la targeur du point,assurez-vous
qua vous avez relay6 I'aiguille au-dessus du tissu_
Marque de rep6re
Control de la Iongitud de puntada (c6mo ajustar la
Iongitud de puntadas)
Gire el controlde la Iongitudhaste qua el numerodeseado se vea
la mama tndicativao
(Situe el controlde Iongitudde puntadaen laposici6n SoS,cuando
use p_.mtadasel_sticas),
Nemeros mds altos prcporcionaranmayor Iongitud de puntada.
esta mama indica el radio de ajustescuandocase ojaleso
* Antes de girar el control,aseg_rese de alzar el pie preneatelas.
Mama indicativa
Rdglage de la Iongueur du point (comment r_gler |a
Iongueur du point)
Tournez le r_glagede la Iongueurdu pe}nt jusqu',_ce qua _enumSro
choisi apparaisse en face du repute°
(Rciglez la !ongueur du point sur SS. pour les points extensibles.)
Plus le numSroest grand, plus te point est long,
Le symbole _ indiquele plage de r_glage pour la couture des
boutonnieres.
* Avant de tourner le r_glaga de I_ Iongueurdu point,essurez-vous
qua vous avez relev_ le pied presseuro
(_ Marque de repSre
35

Adjusting Stretch Stitch Balance
If stretch stitch patterns are uneven when you sew on a
particular fabric, adjust them with the feed balancing dial.
To adjust distorted patterns
[_] If patterns are drawn out, correct by turning the dia! in the
direction of "-"
[] If patterns are compressed, correct by turning the dial in
the direction of "+".
0
Reverse Stitch Control
Sewing will be made in reverse while the reverse stitch control is
pressed
36
Equilibrio de los patrones distorsionados
Si observaalgunadistorsi6nal coserpatrones de puntada el=_stica
an unatela especffica,ajSste!os con el eje equilibrader depuntada.
Equilibrador de patrones de puntada distorsionada
Pour corriger un motif ddformd
Comment r_gler I'_quitibre d'un motifeXtensible:
Si lee motif extensibles sont irr_gutiers Iorsque vous piquez un
tissu particulier, corrigez-les avec le bouton d'dquii}brageo
[] Si los patronesestdnexpand}dos,corrtjalosgirando el eje
equilibradorde puntada hacia el signo "-"_
[] Si toepatrones estdn comprimidos, corr_jalosgirando el eje
equitibrador de puntada hacia el signo %"°
[] Si les motifs sontdtir6s, corrigezla d_faut en tournant le
bouton en directiondu "-".
[] Si les motifs sont comprimSs,corrigez le d_faut en tournant
le bouton en direction du "+"_
Control de puntada invertida
La m&quina coser&hacia atr_s hasta qua suetteel botch.
Bouton de marche arri_re
La machine coud en marche arri_re tant qua I'on appuie sur te
bouton de marche arri_re.
37
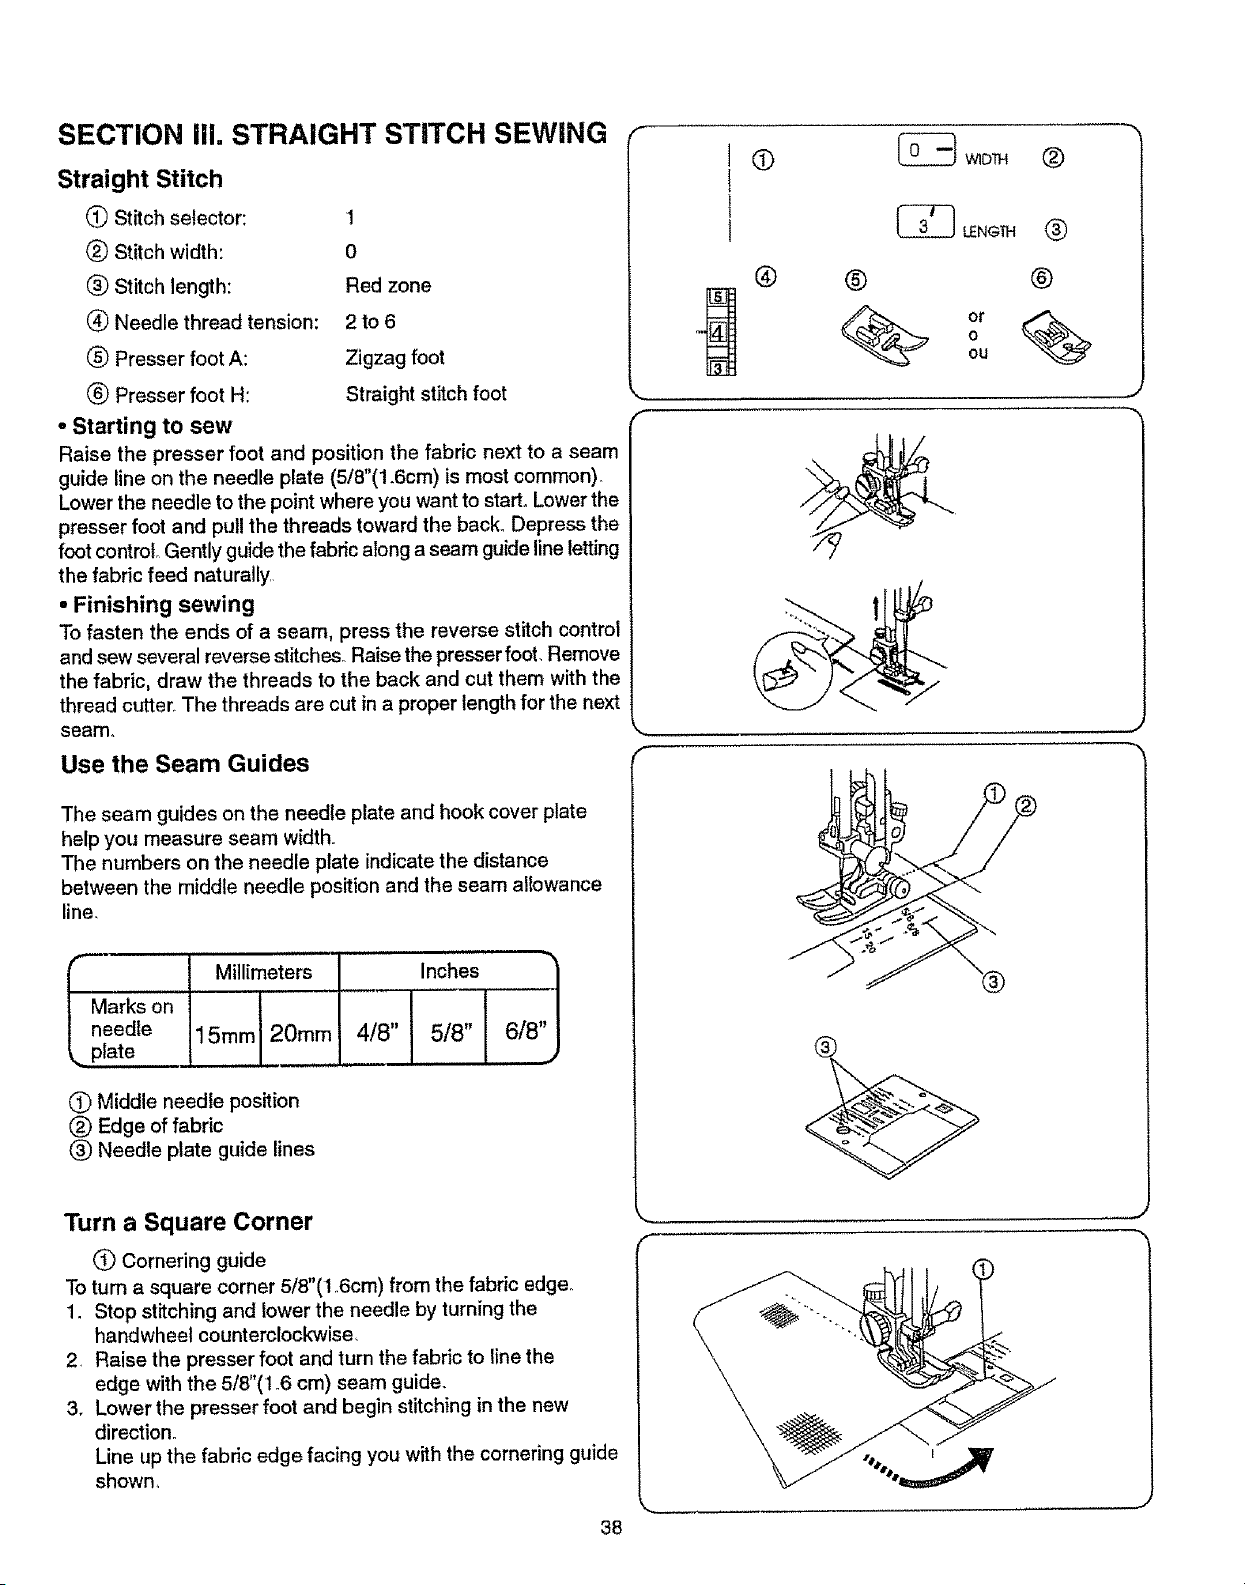
SECTION Iii. STRAIGHT STITCH SEWING
Straight Stitch
(_) Stitch selector: 1
(_) Stitch width: 0
(_) Stitch length: Red zone
(_ Needle thread tension: 2 to 6
(_) Presser foot A: Zigzag foot
_) Presser foot H: Straight stitch foot
• Starting to sew
Raise the presser foot and position the fabric next to a seam
guide line on the needle plate (5/8"(1.6cm) is most common)°
Lower the needle to the point where you want to start° Lower the
presser foot and pull the threads toward the back° Depress the
foot control° Gently guide the fabric along a seam guide line letting
the fabric feed naturally.
• Finishing sewing
To fasten the ends of a seam, press the reverse stitch control
and sew several reverse stitches_ Raise the presser foot. Remove
the fabric, draw the threads to the back and cut them with the
thread cutter. The threads are cut in a proper length for the next
seam.
Use the Seam Guides
The seam guides on the needle plate and hook cover plate
help you measure seam width.,
The numbers on the needle plate indicate the distance
between the middle needle position and the seam allowance
line.
Millimeters Inches
, i ......
Marks on
needle 15mm 20mm 4/8" 5/8" 6/8"
.. plate .....
(_ Middle needle position
(_) Edge of fabric
(_) Needle plate guide lines
I
l
1
1
@
®
®
®
or
O
ou
,J
Turn a Square Corner
Q Cornering guide
To turn a square corner 5/8"(I o6cm) from the fabric edge°
1. Stop stitching and lower the needle by turning the
handwheel counterclockwise,
2. Raise the presser foot and turn the fabric to line the
edge with the 5/8"(t .6 cm) seam guide.
3. Lower the presser foot and begin stitching in the new
direction°
Line up the fabric edge facing you with the cornering guide
shown,
38
f
SECCION I!1. COSTURA DE PUNTADA RECTA
Puntada recta
_) Selector de patrSn: 1
(_ Control de la anchura: 0
(_ Control de ta Iongitud: Zone roja
Tensi6n del hilo de la aguja: 2 a 6
(_ Prensateias A: Prensatelas para zig-zag
(_) PrensateTas H: Prensatelas para puntada
recta
* Para empezar a coser
Levante el pie prensatelas y posicione la tela junto alas lfneas
gut'asen laplaca de aguja (5/8"(1o6cm))o
Baje la agujaal punto donde quieracomenzar la cestura°Baje el
piey pase loshilos hacia atr&s per debajodelprensatelas,Piseel
pedal de control.Gufe la tela concuidado a Io largo de la guia de
costura dejando que iatela avance sole de forma natural.
o Pare terminar la costura
Pare rematar etfinal de las costuras, pulsee( controlde puntada
invertiday cosa unas puntadas hacia atr&s,
Levante et pie. Saquela tela, tire de los hilos hacia atr&sy c6rtelos
con el cortahUos, A( cortar Ice hilos con el cortahUosquedar_ el
sobrante de hilo adecuado pare comenzar una nueva costura
directamenteo
PARTIE Iil. COUTURE AU POINT DROIT
Point droit
(_ S_lecteur de point: 1
_) Largeur du point: 6_5
(_) Longueur du point: Zone rouge
(_ Tension du fil de I'aiguUle: 2 & 6
(_) Pied presseur A: Pied zig-zag
(_ Pied presseur H: Pied _, point droit
o D_butd' une couture
Levez le pied presseur et placez le tissule long de la ligne de rep_re
sur la plaque d'aiguUle(la p(us ut}lis_eest _ 5/8"(1o6cm)).
Abaissez ('aiguille&I'endroiteli voussouhaitez commencer facouture.
Abaissez le pied presseur et tirez tee ills vers l'arri_re. Appuyez
doucement sur la p_dale de contr6ie. Guidez te tissu ie long de la
lignede rep_re en laissant Ie tissu avancer natureUemento
• Finitfon d'une couture
Pour arr_ter i'extr_mit_ des coutures, appuyez sur le bouton de
marche arri_re et piquez piusieurs points en arri_reo
Relevez le piedpresseur..Retirez letissu, tirez les ills vers ]'arri_reet
coupez-les &I'aidedu coupe-fiL Lesills sentainsicoup_s & la bonne
!ongueur pour le d_but de la prochaine couture°
Use de las gufas de costura
La I(nea de gula de costura en el plato de la aguja y
en la place cubre gancho, le ayudar& a medir el ancho
de la costura° El numero en la place de la aguja indican
la distancia desde el centre de (a aguja y la IInea
marcada de costura.
j M!!!me!ros
arcas en I I
plato de (15ram I 20ram
.ujaI I
Pulgada
Utilisation des guides de couture
Lee }ignes de repute sur Ia plaque d'aiguilIe et sur le
couvercIe du crochet vous aident _ mesurer la ressource de ta
couture. Le num_ro sur la plate d'aiguiiIe indique la distance
entre la position eentrale de I'aiguille et la ligne de repute..
I Rep_res
urla
laque
MiUim_tres
l-5mm_Omm
(_ Centre de la posiciSn de la aguja
Borde de la tela
L(nea gufa del plato de aguja
Para girar en esquinas de dngulo recto
O Gufa pare esquinas
Para girar en una esquina de &ngufo recto a 5/8"(1,6 cm) del borde
de la teta.
t ,,Deie de dar puntadas y baje la aguja girando el volante
en el sentido contrario a tas agujas del reloj.
2. Eleve er pie y gire la tela de forma que su borde quede
alineado con la. gul'a de costura 5/8"(I o6Cm),
3. Baje e( pie y continue cosiendo en la nueva direcciSno
O Position centrale de I'aiguille
Bord du tissu
Lignes de rep_re sur la plaque d'aiguille
Couture d'un angle droit
Q Guide-coin
Pour piquet un angle droit & 5/8" (1,,6cm) du bord du tissu,,
1. ArrOtez de piquer et abaissez raiguille en tournent )e volant
en sens antihoraire,
2. Relevez le pied presseur et tournez le tissu en alignant le
bord avec la ligne de repute _ 5/8"(1.6cm)_
3, Abaissez le pied presseur et commencez _, coudre dens la
nouvelle direction.
39
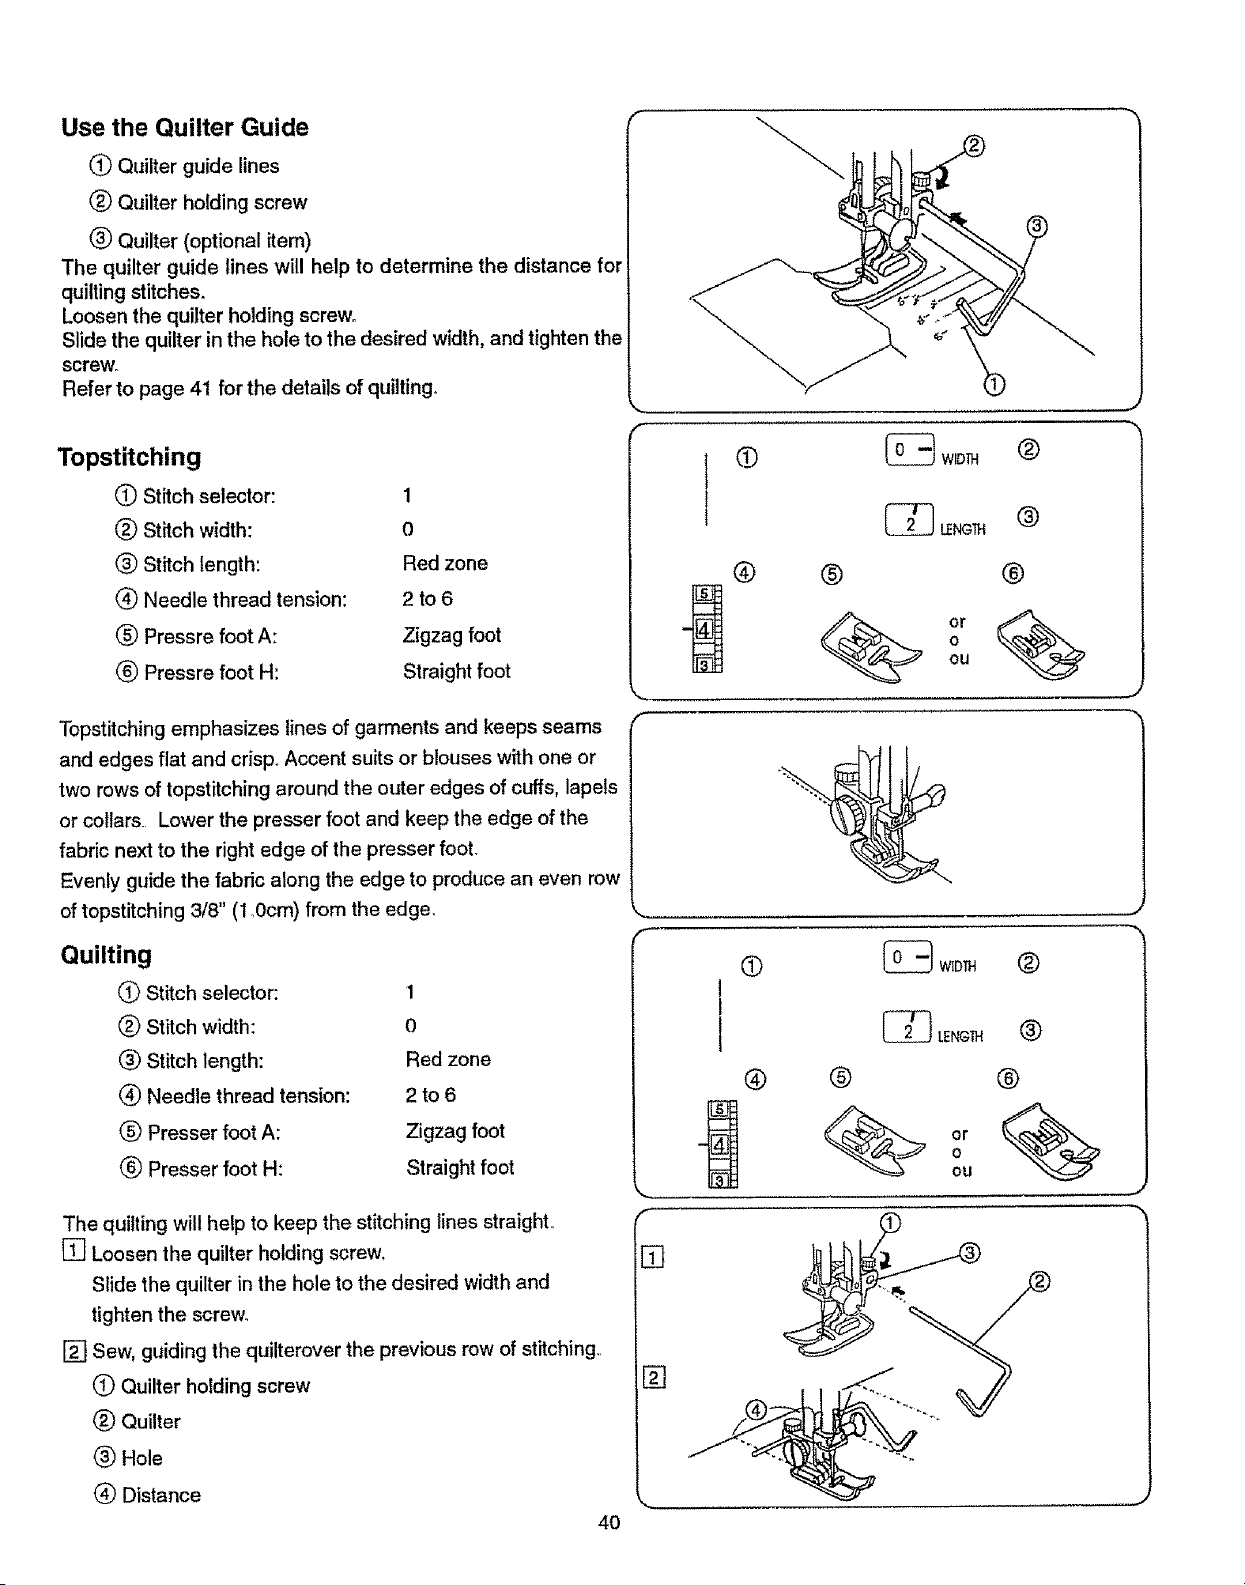
Use the Quilter Guide
('_ Quilter guide lines
(_) Quilter holding screw
(_) Quilter (optional item)
The quilter guide lines will help to determine the distance for
quilting stitches.
Loosen the quilter holding screw,,
Slide the quilter in the hole to the desired width, and tighten the
screw,,
Refer to page 41 for the details of quilling.
Topstitching
Q Stitch selector: 1
(_) Stitch width: 0
® Stitch length: Red zone
(_ Needle thread tension: 2 to 6
(_) Pressre foot A: Zigzag foot
® Pressre foot H: Straight foot
Topstitching emphasizes lines of garments and keeps seams
and edges flat and crisp.,Accent suits or blouses with one or
two rows of topstitching around the outer edges of cuffs, lapels
or collars. Lower the presser foot and keep the edge of the
fabric next to the right edge of the presser foot,
Evenly guide the fabric along the edge to produce an even row
of topstitching 3/8" (1 rOCm)from the edge.
Quilting
(_ Stitch selector: 1
(_) Stitch width: 0
0 Stitch length: Red zone
(_) Needle thread tension: 2 to 6
(_) Presser foot A: Zigzag foot
® Presser foot H: Straight foot
The quilting will help to keep the stitching tines straight°
[] Loosen the quilter holding screw,
Slide the quilter in the hole to the desired width and
tighten the screw.
[] Sew, guiding the quilterover the previous row of stitching..
(_) Quilter holding screw
Quilter
(_ Hole
(_ Distance
4O
_ WIDI}-I (_)
f
r
®
_ LENOTH
®
O
ou
@
®
%
O
I_ WIDTH (_
®
r
® ®
>Or o
oi.I
,.J
Use de las gufas del acolchador(articulo opcional)
(_) Gu_asdel acolchador
(_) Tomillo sujetador del acolchador
(_ Acolohador(articoulo opcional)
Las gufas del acolchador ayudar&n a determinar la distancia de
las puntadas de acolchar,
Afloje el tornillo qua sujeta el acolchadoc
Deslice el acolchador en el agujero hasta conseguir el ancho
deseado y apriete el tornllro.
Los la p&gina 41 para ver instrucctonesde acelchado_
Costura a la vista
(_ Selector de patr6n:
(_ Control de la anchura:
k'_ Control de la longitud:
(_ TensiSn det hilo de la aguja:
(_ Prensatelas A:
(_) Prensatelas H:
1
0
Zona roja
2a6
Prensatelas para zig-zag
Prensatelas para puntada
recta
La costura a la vista resalta las Ifnaas de prendas y mantiene las
costuras y los hordes pianos y derechos.
Acentua los vestidos y las blusas con una hilera o dos de costura a
la vista alredador de los bordes de los puSos, solapas o cuel!es.
Baje el pie prensatelas y mantenga el borde de ia tela junto at
horde derecho del prensatelas.
Gufe en forma pareja Ia tela para qua la hilera del pespunta quads
igual, a t.0cm (3/8") del borden
Acolchado
(_ Selector de patrSn:
(_ Control de la anchura:
(_) Control de la Iongitud:
(_ TensiSn del hilo de ta aguja:
(_ Prensatelas A:
(_ Prensatelas H:
I
0
Zona roja
2a6
Prensatelas para zig-zag
Prensatetas para puntada
recta
La gufa de acolchado le ayuda a coser lineas de puntadas.
[] Afloje el tornillo de sujeci6n de ta gufao
Deslice la gufa dentro de su a]ojamiento hasta conseguir el
ancho dsseado y apriete el tornillo,
[] Cosa Ilevando la gufa sobre la anterior I_nea de puntada.
Tornil!o sujetador del acolchador
(_ Acolchador (articoulo opcional)
(_) Alojamiento
(_ Distancia
Utillsation des lignes de guidage (on option)
Lignesde guidage
(_) Vis de fixation
(_) Guide _ matalasser (an option)
Les tignesde guidaga du pied & matelasser vous aident &d_finir los
distances pour te matelassageo
Desserrez la vis de fixation.
Faites coulisser le guide & travers le trou jusqu' & la distance
souhaitcieat resserrez la vis.
pour plus de d6tails concernantlos techniques du matalassage,
rSf_raz-vous &la page 41,
SurpiqQre
(_ S61ecteurde point: 1
(_) Largeur du point: 0
(_ Longueur du point: Zone rouge
Tension du fil de l'aiguiile: 2 _ 6
(_) Pied presseur A: Pied zig-zag
(_) Pied presseur H: Pied &point droit
Los surpiqQres permettent de faire des coutures d_coratives et de
garder los herds plats et rigides_ Vous pouvez orner los ensembles
eties blouses avec une ou deux surpiqQres autour des poignets,
revers etcols.
Abaissez le pied presseur et gardez le bord du tissu pros du bord
droit du pied°
Cousez ainsi pour fairs une surpiqQre r_guli_re _ 1.0cm (3/8") du
bord.
Matelassage
_) Sdlecteur de point: 1
(_ Largeur du point: 0
_) Longueur du point: Zone rouge
(_) Tension du fii de I'aiguille: 2 _ 6
(_) Pied presseur A: Pied zig-zag
(_) Pied presseur H: Pied & point droit
Le guide & matelasser vous aidera _ coudre des lignes paralleles_
[] Desserrz la vis, enfilez le guide & matelasser dans l'ouverture
jusqu'& ta largeur souhaitSe, puis resserrez la vis_
[]
41
Effectuez votre couture en dJrigeant la tige du guide le long de
la couture pr_c_dente,.
(_) Vis de blocage du guide ,_ matelasser
(_ Guide & matelasser (en option)
(_ Troy
(_ Distance entre deux coutures
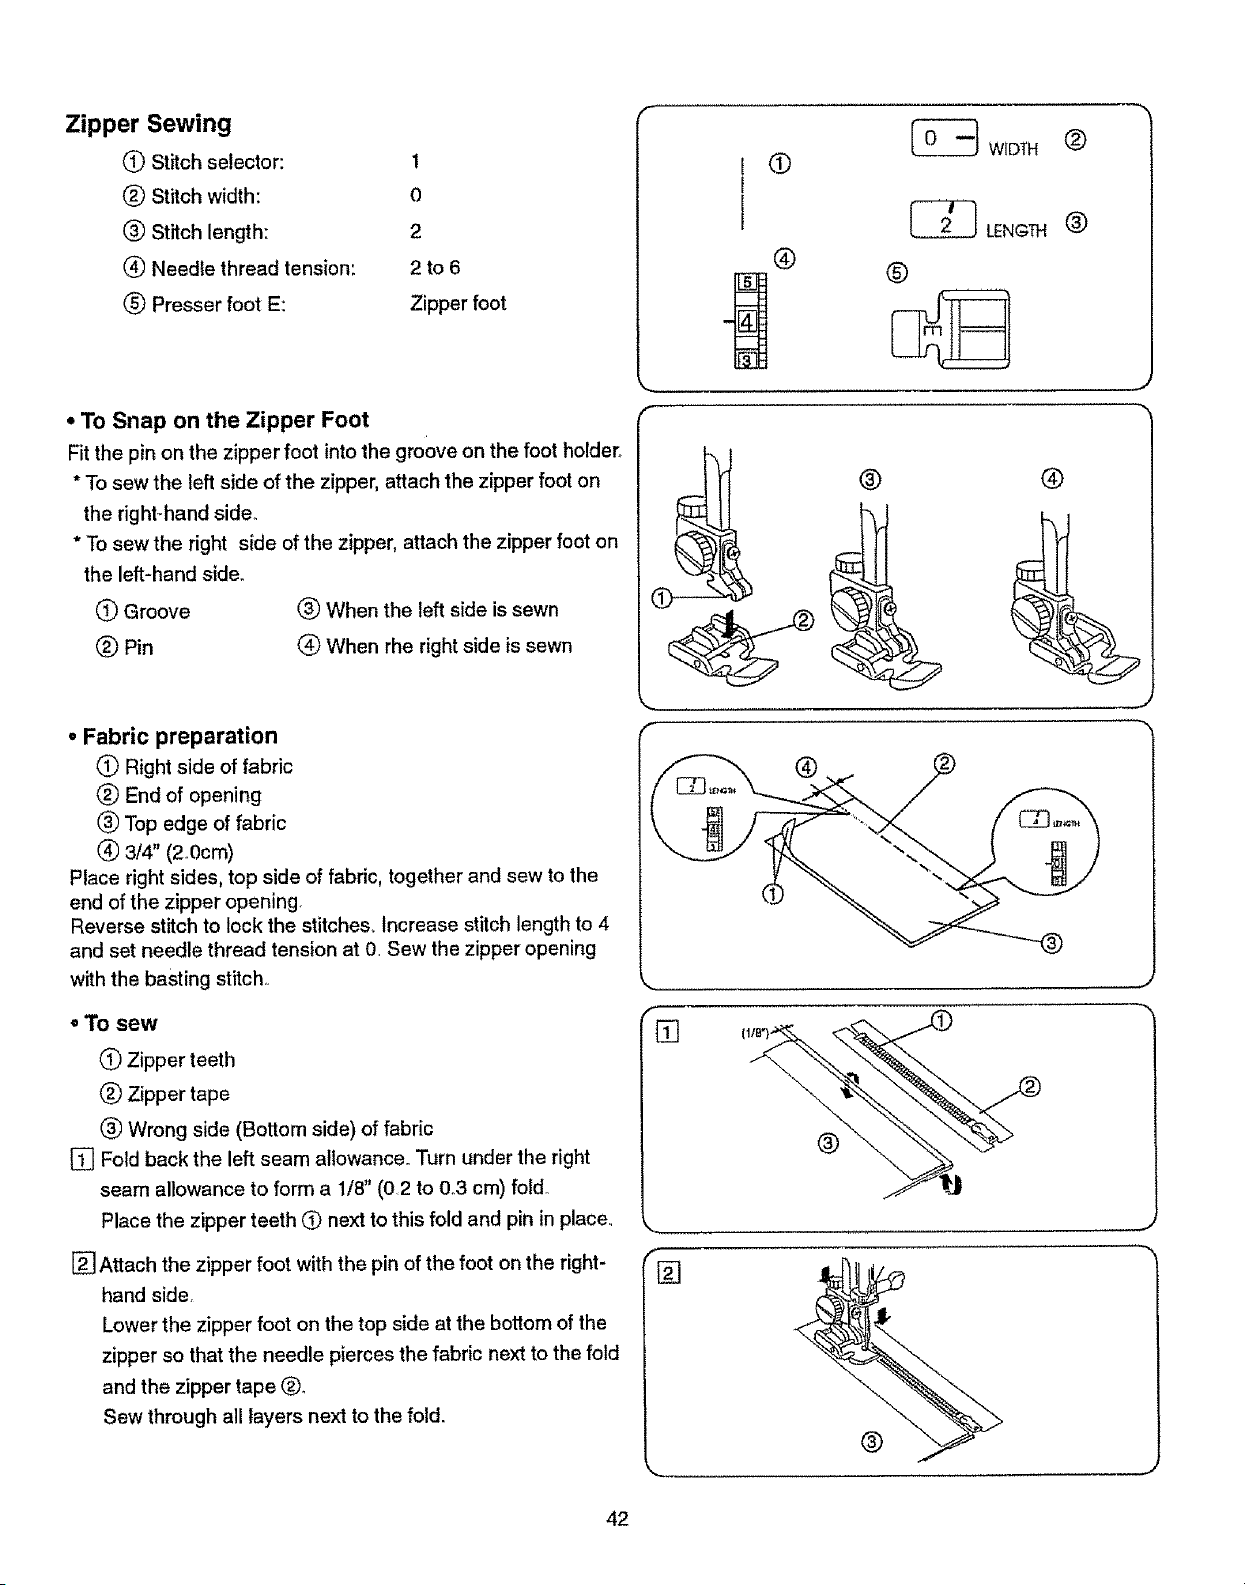
Zipper Sewing
Q Stitch selector: 1
(_ Stitch width: 0
(_ Stitch length: 2
(_ Needle thread tension: 2 to 6
(_) Presser foot E: Zipper foot
• To Snap on the Zipper Foot
Fit the pin on the zipper foot into the groove on the foot holder.
• To sew the left side of the zipper, attach the zipper foot on
the right-hand side.
• To sew the right side of the zipper, attach the zipper foot on
the left-hand side.
0 Groove (_) When the left side is sewn
Pin _ When rhe right side is sewn
° Fabric preparation
(_ Right side of fabric
(_ End of opening
(_ Top edge of fabric
(_ 3/4" (2oecm)
Place right sides, top side of fabric, together and sew to the
end of the zipper opening.
Reverse stitch to lock the stitches. Increase stitch length to 4
and set needle thread tension at O. Sew the zipper opening
with the basting stitch.
• To sew
(_ Zipper teeth
(_ Zipper tape
(_ Wrong side (Bottom side) of fabric
[] Fold back the left seam allowance. Turn under the right
seam allowance to form a 1/8" (02 to 0_3 cm) fold..
Place the zipper teeth 0 next to this fold and pin in place..
[] Attach the zipper foot with the pin of the foot on the right-
hand side,
Lower the zipper foot on the top side at the bottom of the
zipper so that the needle pierces the fabric next to the fold
and the zipper tape (_)o
Sew through all layers next to the fold.
®
_ WIDTH
_ LENGTH
@
®
®
r,'
®
2_
®
®
[]
[]
j_
®
42
Costura de cremalleras 6 cierres
(_ Selectorde patr6n: 1
(_) Control de la anchura: 0
(_) Controlde la longitud: 2
(_ TensiSndel hi}ode la aguja: 2 a 6
(_) PrsnsatelasE: Prensatslaspara crema,eras
La couture des fermetures b glissibre
(_ S61scteurde point: 1
(_) Largsurdu point: 0
(_) Longueurdupoint: 2
(_) Tensiondu fil de I'atguille: 2 & 6
(_) Pied presseurE: Pied,_ferrneture& giissi_re
oC6mo colocar el prensatelas para cremalleras
sncaje el pasador de! pie para cremallerasen ta enclavadura del
enrnangue.
* Para coserel lado izquisrdode ta crsrnallera,enganche el
prsnatslasper la parte dsrechadel pasador_
* Para coserel lado derechode la cremallera,enganchsel
prenatelasper la parte izquierdode! pasador.
(_ Enclavadura (_) Para coser el lade izquisrdo
(_) Pasador (_) Para coser el lado derecho
• Pour fixer le pied & fermeture i_gUssii_re
Placez la broche du pied dans rencoche du supportde pied.
• Pourcoudreie cStdgauche de la ferrneture, fixez le pied du
c6t6 droiL
• PourcoudrsIs cStddroffde la ferrneture,fixez le pied duc5t8
gauche.
Encoche (_ Quand on coud le c8t6 gauche
(_) Broche (_ Quand on coud le c6t_ droit
* Preparaci6n de la tela
(_ Parte arriba de la tsla
(_) Finalde abertura
(_) Bordersuperiorde la tela
(_ 2.0cm(314")
Junta las partes de arriba de la tela y cosa hasta el final de la
abertura (_) de la crernallera.
Cosa hacia atrdspara rernatar las puntadasoAumente la Iongitud
de puntada hasta 4 y ajuste la tensi6n dal hilo de la aguja a O,
luegocosa la aberturade la cremallera,
• Para coser
(_) Disntss de la crernallera
(_) Cinta de la cr_ernallera
Parte de abajo de la tela
[] Dobletatela superiorde la costuraizquierda haciaarribatodo
lo posibleoDoble la tela inferiorhaciaabajode forrna qua
sobresalgade 0.2 a 0.3 cm(1/8")respectoa la tela superior,
Pongalosdientssde lacremallera0 contrael ssgundo doblez
y s_jetelos.
[] Engancheel pie por la patte derwchadel pasador.Bajeel
prensatatascontrala cremallerade formaquala aguja coincida
encirnadel doblszqua sobresaley de la ctntade la crernallera
(_). Cosatodas las ca,pas de tela juntoal doblez.
- Prdparation du tissu
(_) cstd endroit dutissu
(_) Extrdrnit8 de I'ouverture
(_) BordsupSrieurdu tissu
(_) 2.0cm(3t4")
Placez le tissu endroit contre endroit st piquez jusqu'_, I'extr_mit_
de rouverture (_)de la glissi_re.
Arr_tez la coutureavec quelquespointsen arri_reoAugmentezla
Iongueurdu pointjusqu',_4 et r_glezlatensiondu fil de I'aiguillesur
O,puisb&tissezt'ouverture de la ferrneture.
= La couture
(_ Dents de la fermeture
(_) Ruban de fa fermeture
(_) Enversdu tissu
[] Repliez la ressourcedu cSt_gauche. Repliezla ressourcedu
c6t6 droit pourformerun plide 0.2 &0.3 crn(t/8")o
Placezlee dentsde la fermeture (_ auras de ce pliet
dpinglez-la en place.
[]
F'_:ezIs pieda fermenture&glissi_reavsc la broche ducSt_
droit.Abaissez lepied sur le bas de I'endroitde la ferrnsture,
pourqua i'aiguille percele tissuauras du pli,et du rubande
laferrnsture (_),
Piquez&traversroutesles _paisseurs de tissu auras duplL
43
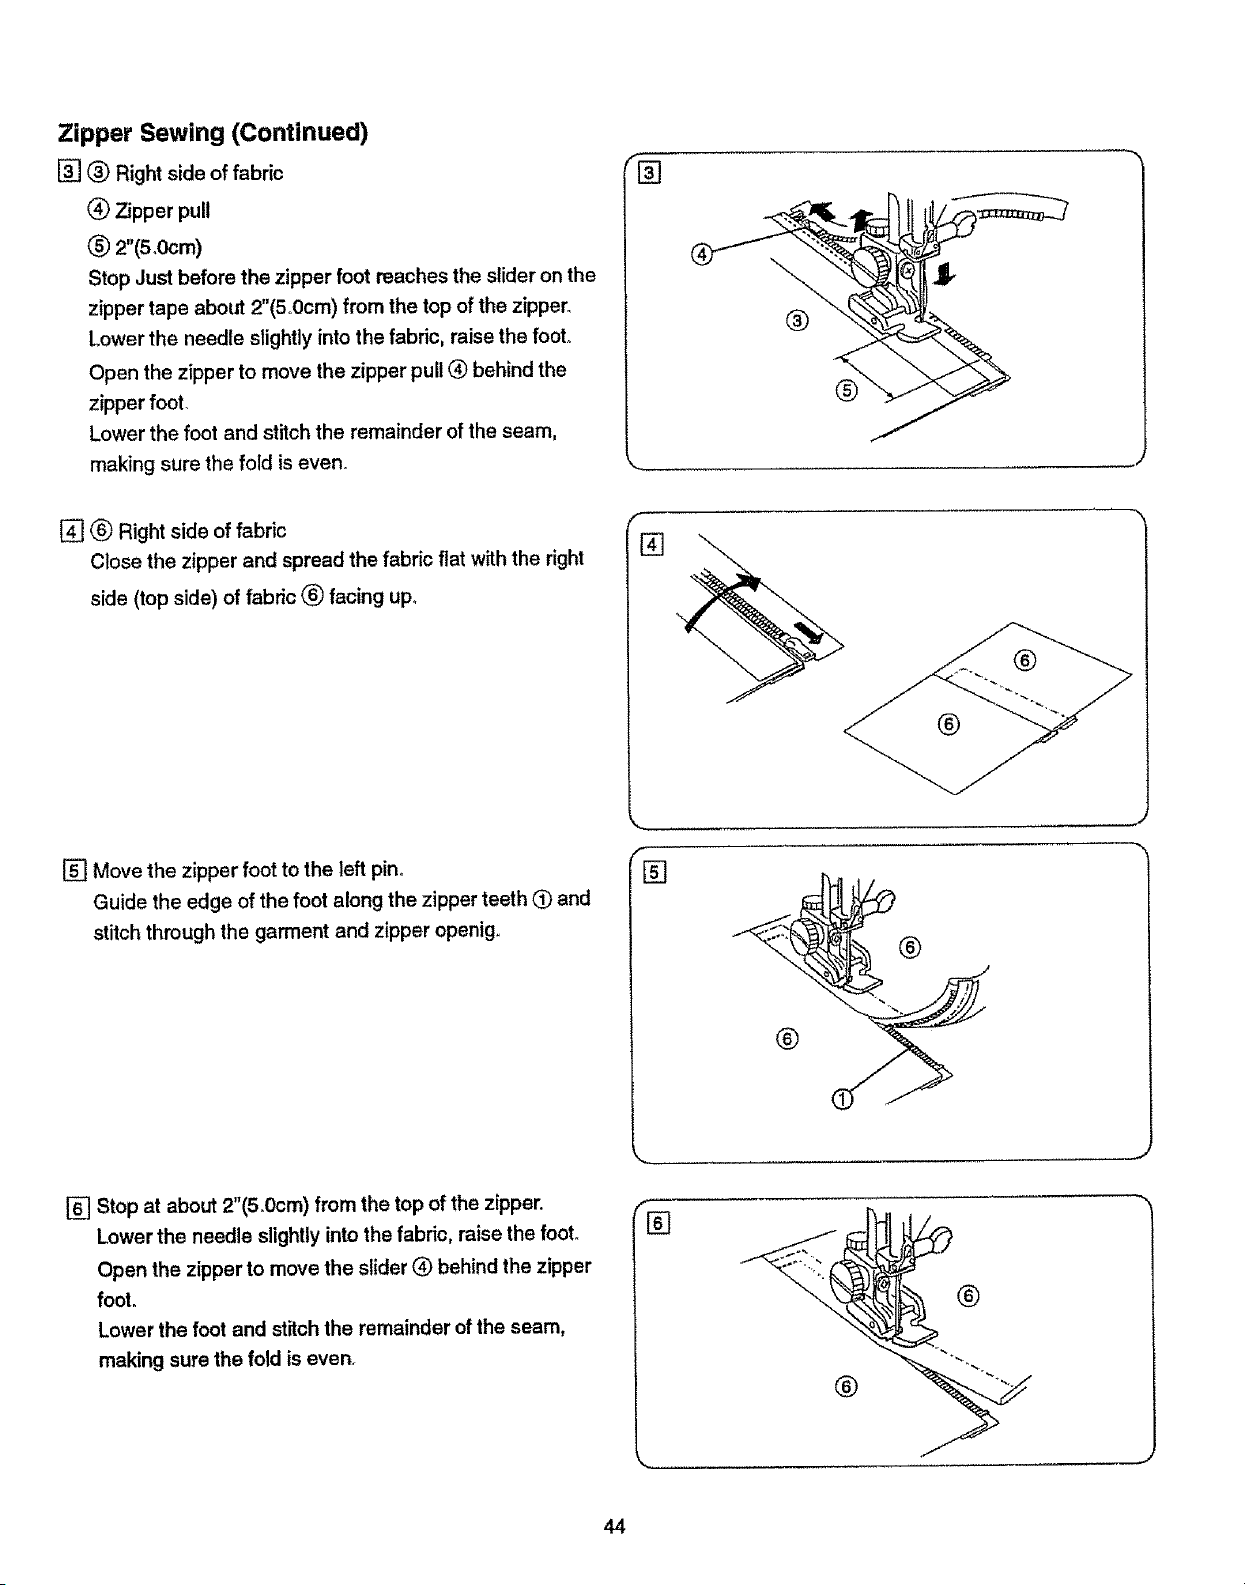
Zipper Sewing (Continued)
[] (_) Right side of fabric
Zipper pull
® 2"(5,0cm)
Stop Just before the zipper foot reaches the slider on the
zipper tape about 2"(5°0cm) from the top of the zipper°
Lower the needle slightly into the fabric, raise the fool
Open the zipper to move the zipper pull (_) behind the
zipper foot.
Lower the foot and stitch the remainder of the seam,
making sure the fold is even.
[] ® Right side of fabric
Close the zipper and spread the fabric flat with the right
side (top side) of fabric ® facing up_
[] Move the zipper foot to the left pin°
Guide the edge of the foot along the zipper teeth Q and
stitch through the garment and zipper openig.
f
[]
[]
®
®
[] Stop at about 2"(5.0cm) from the top of the zipper.
Lower the needle slightly into the fabric, raise the foot,
Open the zipper to move the slider (_) behind the zipper
foot.
Lower the foot and stitch the remainder of the seam,
making sure the fold is even,
f
[]
®
®
44
Costura de cremalleras (continuacidn)
[] (_) Parts de arriba de fa tela
(_ Deskizador
® s,oom(2")
Pare justoantes de que el prensatelasllegueal desfizadorde
la crematleraunis5.0cm(2").Baje ta aguja parasujetarla teia y
subael prensatelas,Abra lacremalleraparamoverel deslizador
(_ detr&s del prensatelas.
Baja el piey terrainslacosturaasequr&ndosede quaetptiegue
est6 parejo,,
La
[]
couture des fermetures _ glissi_re (Suite)
(_) Envers du tissu
(_ Curseur
(_ 5,0cm(2")
Arr_tez vous justs event qua le pied atteigne le curseur sur
le ruban de la fermsture environ5o0cm(2")du haut de ta
fermeturso Piquez i_g6remsnt I'aiguitle darts le tissu,
remontezle pied, Ouvrez la fermeture pour d_placer le
curseur (_ derriere le pied presseur.
Abaissez le pied et piquezle rests de la couture,en vous
assurant qua te pli est r_guliero
[] (_) Parts de arriba de la tale. [] (_) Endroit du tlssu.
Cierre la cremallera y extienda la tela de forma qua la parta de Fermez la fermeture et placez le tissu & plat, c6t6 endroit (_)
arriba de la tela (_) qusde haeia arriba_ vers le haut.
[] Cambie de posiciSnel prensatelas fij&ndo]oen la parts izquierda
del passadoro
Cosa la tela derschay la cinta de la cremalleragufandoel
prensatelascontra los dientes de la cremalleraQo Quite tas
puntadasde hilvando hscho inicialmsnte°
[] Changsz la position du pied et fixez-le sur sa broche du cSt_
gauche,
Guidezle borddu piedIs longdes dentsde la fermeture (_ et
piquezle tissuet le rubende lafermetureoRetirez lee pointsde
b&ti quiferment l'ouverture_,
[] Oars a unos 5.0cm(2") de la parts superior de la cremaltera.
Baje la aguja pare sujetar la telay suba el prensatelas y abra
la crema!iera. Baje el prensatelas y cosa hesta et final.
Aseg_rese de qua cose uniformemente el doblez de la telay
de la cinta de la eremailera.
[] ArrStez-vous _ environ5o0cm(2")du haut de la fermeture,.
Piquez 18g_rementI'aiguills dartsle tissu, remontez le pied_
Ouvrez la fermeture pour d_placer te curseur (_ _,!'arri_re du
pied,
Puis abaissez te pied et piquez le rests de la couture en vous
assurant qua le pli est rSqulier.,
45
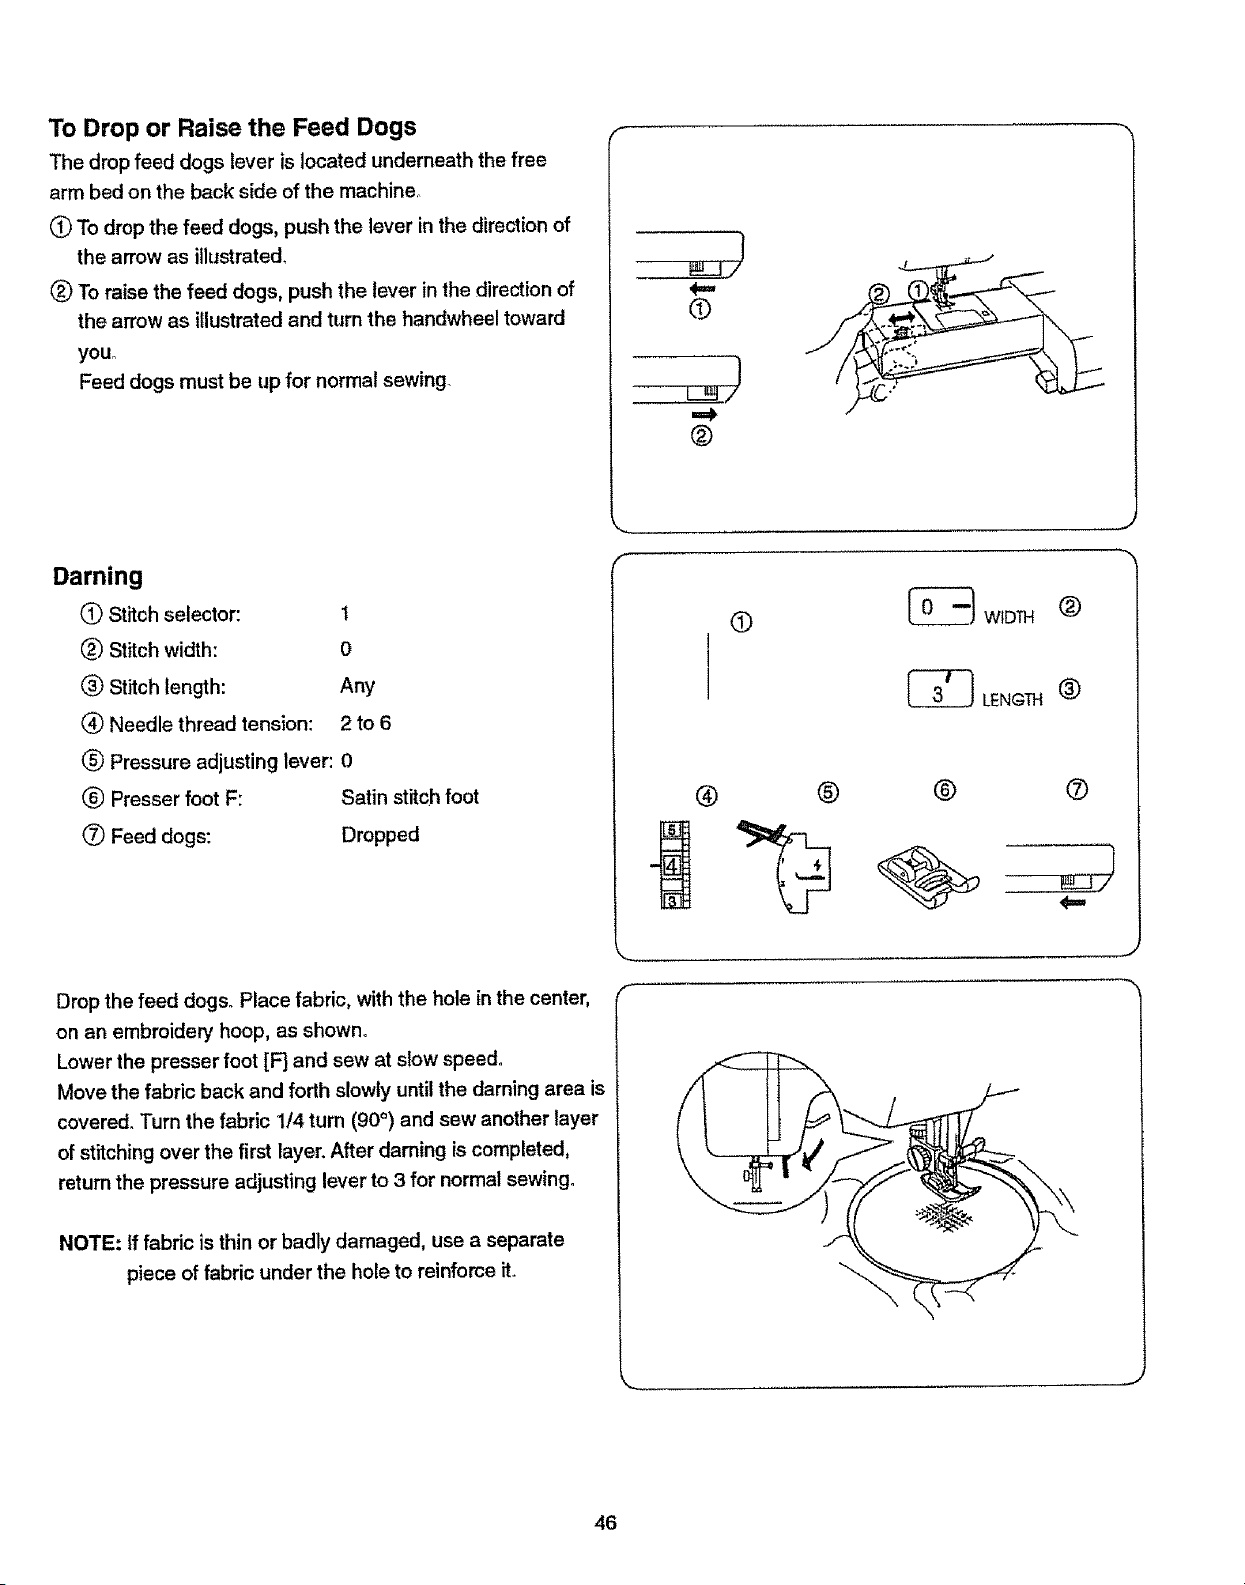
To Drop or Raise the Feed Dogs
The drop feed dogs lever is located underneath the free
arm bed on the back side of the machine_
(_ To drop the feed dogs, push the lever in the direction of
the arrow as illustrated.
(_ To raise the feed dogs, push the lever in the direction of
the arrow as illustrated and turn the handwheel toward
yOU°
Feed dogs must be up for normal sewing.
7
___J/
O
=._
®
Darning
(_ Stitch selector: t
Stitch width: 0
(_ Stitch length: Any
® Needle thread tension: 2 to 6
0 Pressure adjusting lever: 0
(_) Presser foot F: Satin stitch foot
O Feed dogs: Dropped
Drop the feed dogs. Place fabric, with the hole in the center,
on an embroidery hoop, as shown°
Lower the presser foot [FJ and sew at slow speed°
Move the fabric back and forth slowly untilthe daming area is
covered. Turn the fabric 1!4 turn (90 °) and sew another layer
of stitching over the first layer. After darning is completed,
return the pressure adjusting lever to 3 for normal sewing°
NOTE: If fabric is thin or badly damaged, use a separate
piece of fabric under the hole to reinforce it.
f
®
O
_ WIDTH (_)
®
®
®
,,, _/
46
Calms subir I bajar los dientes del tranporte
La palancade mondo pars losdientes deltransportsestd babajo
del brazolibrecolocabosn la parts det rev_sde la mdquina.
(_ Pars bajar los dientes dal transporte empuje la palanca de
mando en la direcci6nindicadapor la flscha cornsss muestraen
la ilustraci6n.
(_) Parssubirlosdisntesdeltranspotteempujalapatancademando
en la dirscci6n indicada por la flecha corns se muestra en la
ilustmci6ny gire et voiante de roans bacia usted.
Los dientes de transportsdeben astar subidospara las costuras
normales_
Comment monter et descendre les griffes
d'entralnement
Le Isvisr des griffesd'entrai'nementest situ_ sousle bsmsau
dubraslibra_ L'arribrede ta mavhine..
(_ Pourfatre dsscsndrsleegriffasd'sntrat"nement,poussszIs
levierdans Is sans de fa flbchs comme illustr_.
(_) Pourlee fairs monter, poussez le levier dans Is sans de la
flbchecomma illustrdst tournez la volantb mainvers vous.
Lee griffesdoivant_tre relev6espendantla couturenormale.
Zurcido
(_ Selectorde patr6n: 1
(_) Controlde la anchura: 0
(_) Controlde la Iongitud: Cualquierndmero
(_) Tensi6ndel hilpde ta aguja: 2 a 6
(_) Palanca delajusteds la presi6n: 0
(_) PrensatelasF: Prensatalaspars
puntadadscorativa
Bajados
O Los dientes de transports:
Reprisage
(_) S_lecteurde point: 1
(_) Largsurdupoint 0
(_) Longueurdupoint Touts
(_ Tension dufil de l'aiguills 2 _ 6
(_ Lsvisr ds r_glage de ia pression 0
(_) Pied pressaurF: Pied _ point bourdon
(_ Grlffssd'entrainement: Descendues
Baje los dientes de transports°Ponga la teia con el agujeroen et
centroentre losaros de bordado, tat come se muestra° Bajs el pie
[F]y cosadespacio. Mueva la tela de para air,is y de para adelante
hastaqua hayacubiertola dreaa zuecir..Volteela tela !/4 wJeltay
cosa otracaps de puntada eobre la primers capa_Cuandohaya
terminadode zurcir,devu_lvala presi6najustandola palancaal 3.
NOTA: Si la tela es muy delgada o estd en muy real estado,
utiliceuntrozo de tela separada dsbajode! agujero pars
refsrzarlo.
Abaissszleegriffesd'entrai'nement.Placszle tissudane lecercls
broder, avec le trou au centre, comma illustr_
Abaissez Is pied presseur [F]et cousez &vitrsse Isnte..
D_placsz lentsment Istissud'avant en arri_re jusqu'_ ce qua ta
pattie _ repriser soitcouverte. Tournez Is tissu d'un quart de
tour et piquez une autre couchs de points par-dessu les pre-
miers. A la fin du reprisage, rSglez de nouveau le levier de
rdglags de la pression sur 3 pour la couture normaleo
REMARQUE: Si le tissu est finou tr_s usS, mettez un
morceaude tissu dessous pourle renforcer.
47
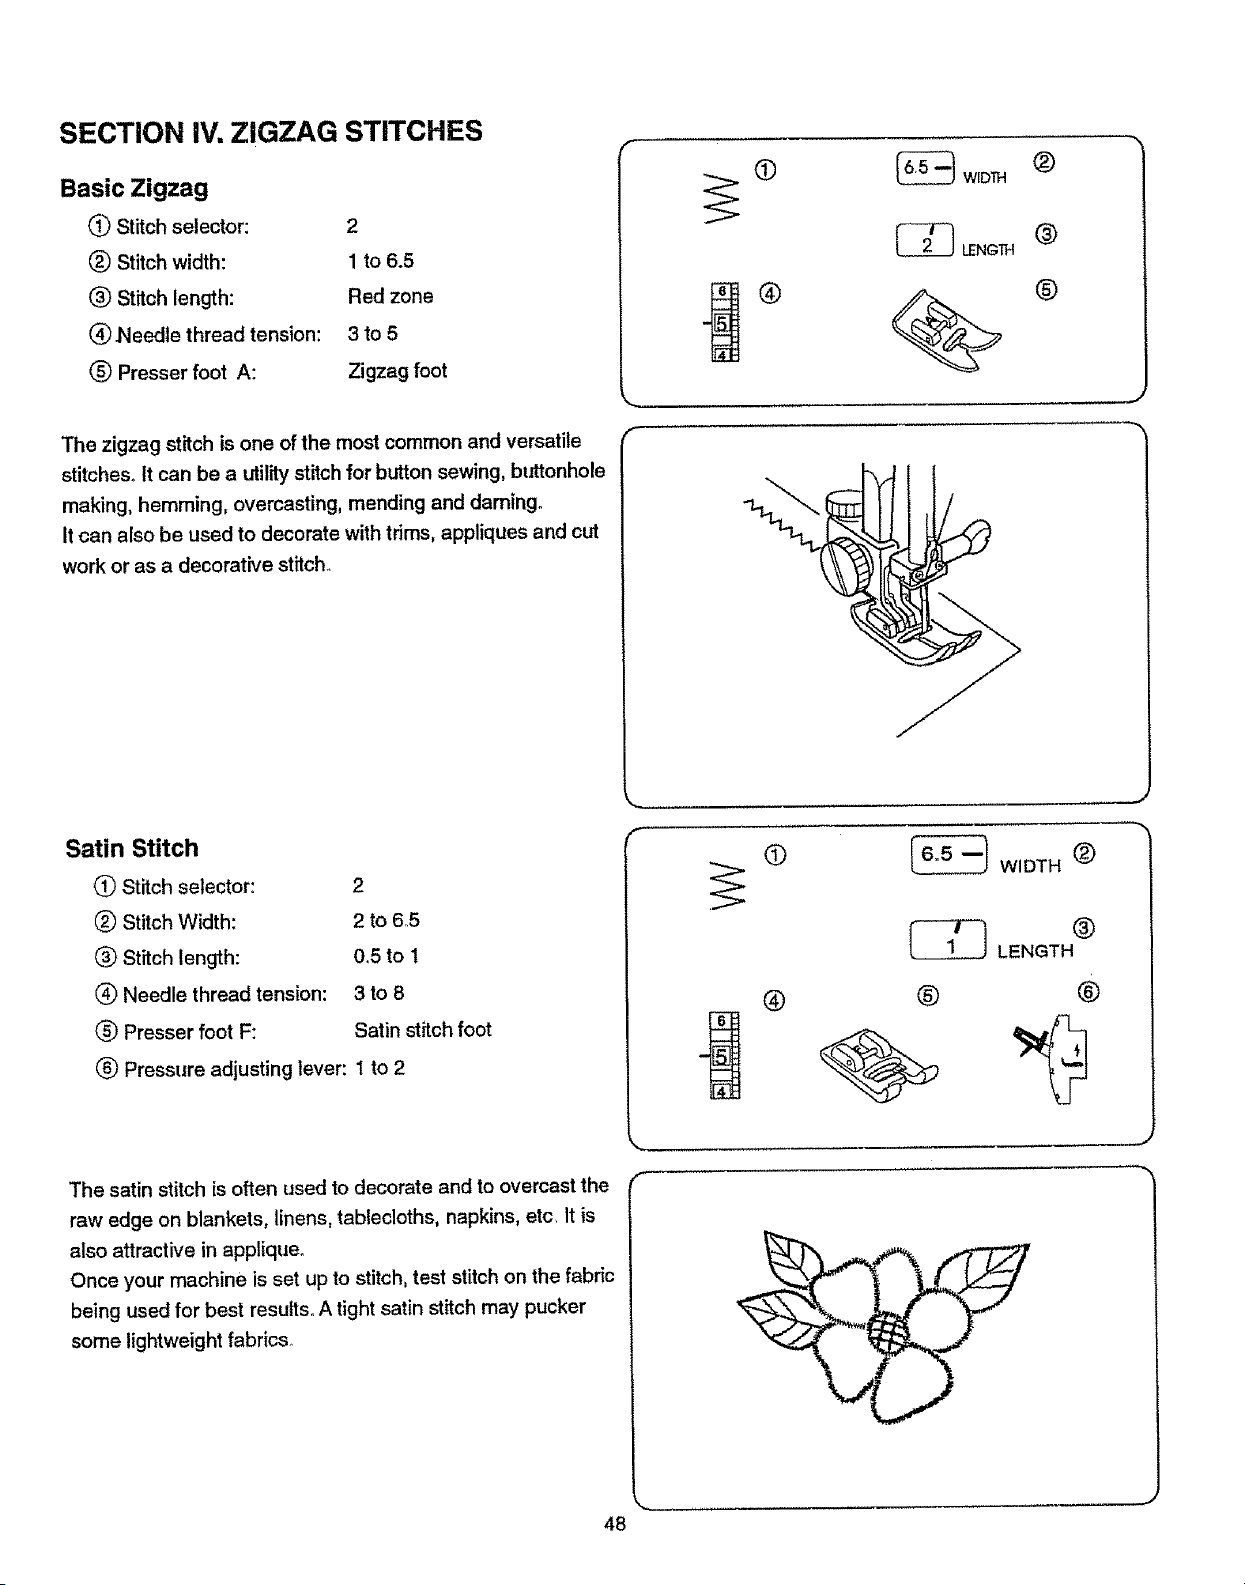
SECTION IV. ZIGZAG STITCHES
Basic Zigzag
(_) Stitch selector: 2
(_ Stitch width: 1 to 6.5
(_ Stitch length: Red zone
® Needle thread tension: 3 to 5
(_) Presser foot A: Zigzag foot
The zigzag stitch is one of the most common and versatile
stitches_It can be a utility stitch for button sewing, buttonhole
making, hemming, overcasting, mending and darning.
It can also be used to decorate with trims, appliques and cut
work or as a decorative stitch_
@
_ WID'i'H _)
®
........-J
Satin Stitch
Q Stitch selector: 2
(_) Stitch Width: 2 to 6°5
(_ Stitch length: 0°5 to 1
(_ Needle thread tension: 3 to 8
O Presser foot F: Satin stitch foot
_) Pressure adjusting lever: I to 2
The satin stitch is often used to decorate and to overcast the
raw edge on blankets, linens, tablecloths, napkins, etc, It is
also attractive in applique.
Once your machine is set up to stitch, test stitch on the fabric
being used for best results. A tight satin stitch may pucker
some lightweight fabrics_
%.,,¸
r"
@
_ WIDTH I_)
f
®
_ LENGTH (_)
®
®
48
SECCION IV. PUNTADAS DE ZIG-ZAG
Puntada de zig-zag
(_ Selectorde patrSn:
(_ Controlde la anchura:
(_ Control de la )ongitud:
(_ TensiSndel hilo de la aguja:
(_ Prensatelas A:
2
1 a6.5
Zone roja
3a5
Pransatelas para zigzag
PARTIE IV. POINTS ZlG-ZAG
Zig-zag simple
(_) S_lecteur de potnt: 2
(_ Largeur dupoint: 1 _ 6.5
Longueur dupoint: Zone rouge
(_ Tensiondu fil de I'aiguille: 3 _ 5
_) PiedprasseurA: Piedzig-zag
La puntada de zig-zag esuna de fas puntadas mds comunesy
m_tsvers&tileso Es una puntada de servicio pare pager botones,
haterojales, para dobladifles, puntada sobrepuesta,pare ramendar
y pare zurcir.Tambi_n puede ser utilizada paredecorarcon fibetes,
aplicaciSnes y como puntada decorative.
Le zig-zag est un point tr_s commun at aux usages multiples. II
est utile pour coudre les boutons, les boutonnieres, les oudets,
atnsi qua pour surfiler et repriser.. On peut dgalement t'utiliser pour
orner avac des gances, des appliques ou des jours, ou comma
point d_coratif.
Puntada en satfn
Q Selecrotde patrSn: 2
(_ Control de la anchura: 2 a 6°5
(_) Control de la Iongitud: 0.5 a 1
TensiSndel hilo de la aguja: 3 a 8
(_ PrensatelasF: Prensatelaspare
puntadadecorative
lo2
(_ Palanca del ajustede la presi6n:
Point de bourdon
(_ S_!ecteur de point: 2
(_) Largeur du point: 2 & 65
(_) Longueur du point: 0.5 & 1
(_) Tension du fil de l'aiguil]e: 3 _ 8
Pied presseur A: Pied _ point de bourden
(_ Levier de rOglage de la tension 1 ou 2
La puntada de satfn es muy vers_,tify frecuentemente utitizada
como puntada decorative y tambidn puade ser usada pare
sobrehilar un ofiUoborde en sdbanas, ropa blanca, manteles y
servilletas.Es especialmentsatractiva pare aplicacioneso
Despudsde ajustar la mdquina, experimenteen un pedazo de la
tela qua planea utilizar.Si la puntada est& demasiadoapretada
puedearrugaro fruncir algunastelas livianas.
Le pointde bourdon est souventutilis_pour d_corer et arrSter le
bord des couvertures, du tinge de maison, des nappes, des
serviettesde table,etc., 11convientaussitr_s bien pourles appli-
ques.
Lorsquevotremachineestr_gl_epourlacouture,faitesunessai
surIstissuquevousallezutiliserpourvousassurerdelaqua]it6
dur_sultat.Un pointde bourdonserr_peutfroncercertainstissus
I_gers.
49

Monogramming
(_ Stitch selector: 2
(_ Stitch width: 3
('_ Stitch length: 0.5 to 1
® Needle thread tension: 1 to 4
_) Presser foot F: Satin stitch foot
(_) Pressure adjusting lever: 1 or 2
Attach a piece of stabilizer on the wrong side (Bottom side)
of the fabric°
Draw letters on the fabric with tailor's chalk, Form each pattern
with satin stitch, adjusting stitch width,,
®
[_ WIDTH (_)
®
Applique
_) Stitch selector:
(_ Stitch width:
(_) Stitch length:
(_ Needle thread tension:
Presser foot F:
(_) Pressure adjusting lever: 2
2
2 to 6,5
0,5 to 1
2 to 6
Satin stitch foot
Baste applique pieces on the fabric, or fuse the applique
pieces with iron-on fabric joiner. Stitch around the applique
making sure the needle falls along the raw edge of the
applique.
%.._.__..__
| W_DTH®
_ LENGTH (_
®
®
®
J
50
Monogramas
(_) Selector de patr6n: 2
(_ Control de la anchura: 3
(_ Control de la _ongitud: 0_5 a t
(_ Tensi6n del hilo de la aguja: 1 a 4
(_) Prensatelas F: Prensatelas para
puntada decorativa
lo2_) Palaca del ajuste de la presi6n:
Coloque la entretela por la parte de abajo de la tela_
Dibuje las letras sobre la tela utilizando t[za de costura. Forme cada
modelo ajustando e! ancho de la puntadao
Monogrammes
_) S_iecteur de point: 2
(_) Largeur du point: 3
Longueur du point: 0°5 & I
(_ Tension du fil de I'aiguille: ! & 4
(_ Pied presseur F: Pied _ point de bourdon
(_) Levier de r_glage de ta tension: I ou 2
Fixez un t[ssu stabilisateur sur ]'envers du tissu.
Dessinez les lettres sur le tissu avec une craie de tailieur, Suivez
chaque motif au point de bourdon en r_giant la largeur du point,
Aplicaciones
(_ Selector de patr6n: 2
Control de la anchura: 2 a 6,5
(_ Control de la longitud: 0.5 a 1
(_ Tensi6n del hilo de la aguja: 2 a 6
(_) Prensatelas F: Prensatelas para
puntada decorativa
2(_ Palaca dei ajuste de la presiSn:
Bastee las piezas de aplicaciSn sobre la tela, o pegue con tela
tSrmica, Cosa alrededor de la aplicaeiSn para asegurarse de que
la aguja cae sobre el horde exterior de la aplicaciSn.,
Appliques
(_ S_lecteur de point: 2
(_) Largeur du point: 2 & 6,5
(_) Longueur du point: 0,5 _ 1
(_ Tension du fil de I'aiguille: 2 & 6
(_ Pied presseur F: Pied & point de bourdon
(_ Levier de r_glage de ta tension: 2
B&tissez lee appliques sur le tissu ou collez-Ies avec de la colle
pour tissu (thermocollant)o Piquez autour des appliques en vous
assurant que t'aiguilie pique is long du bord brut du tissu,,
51
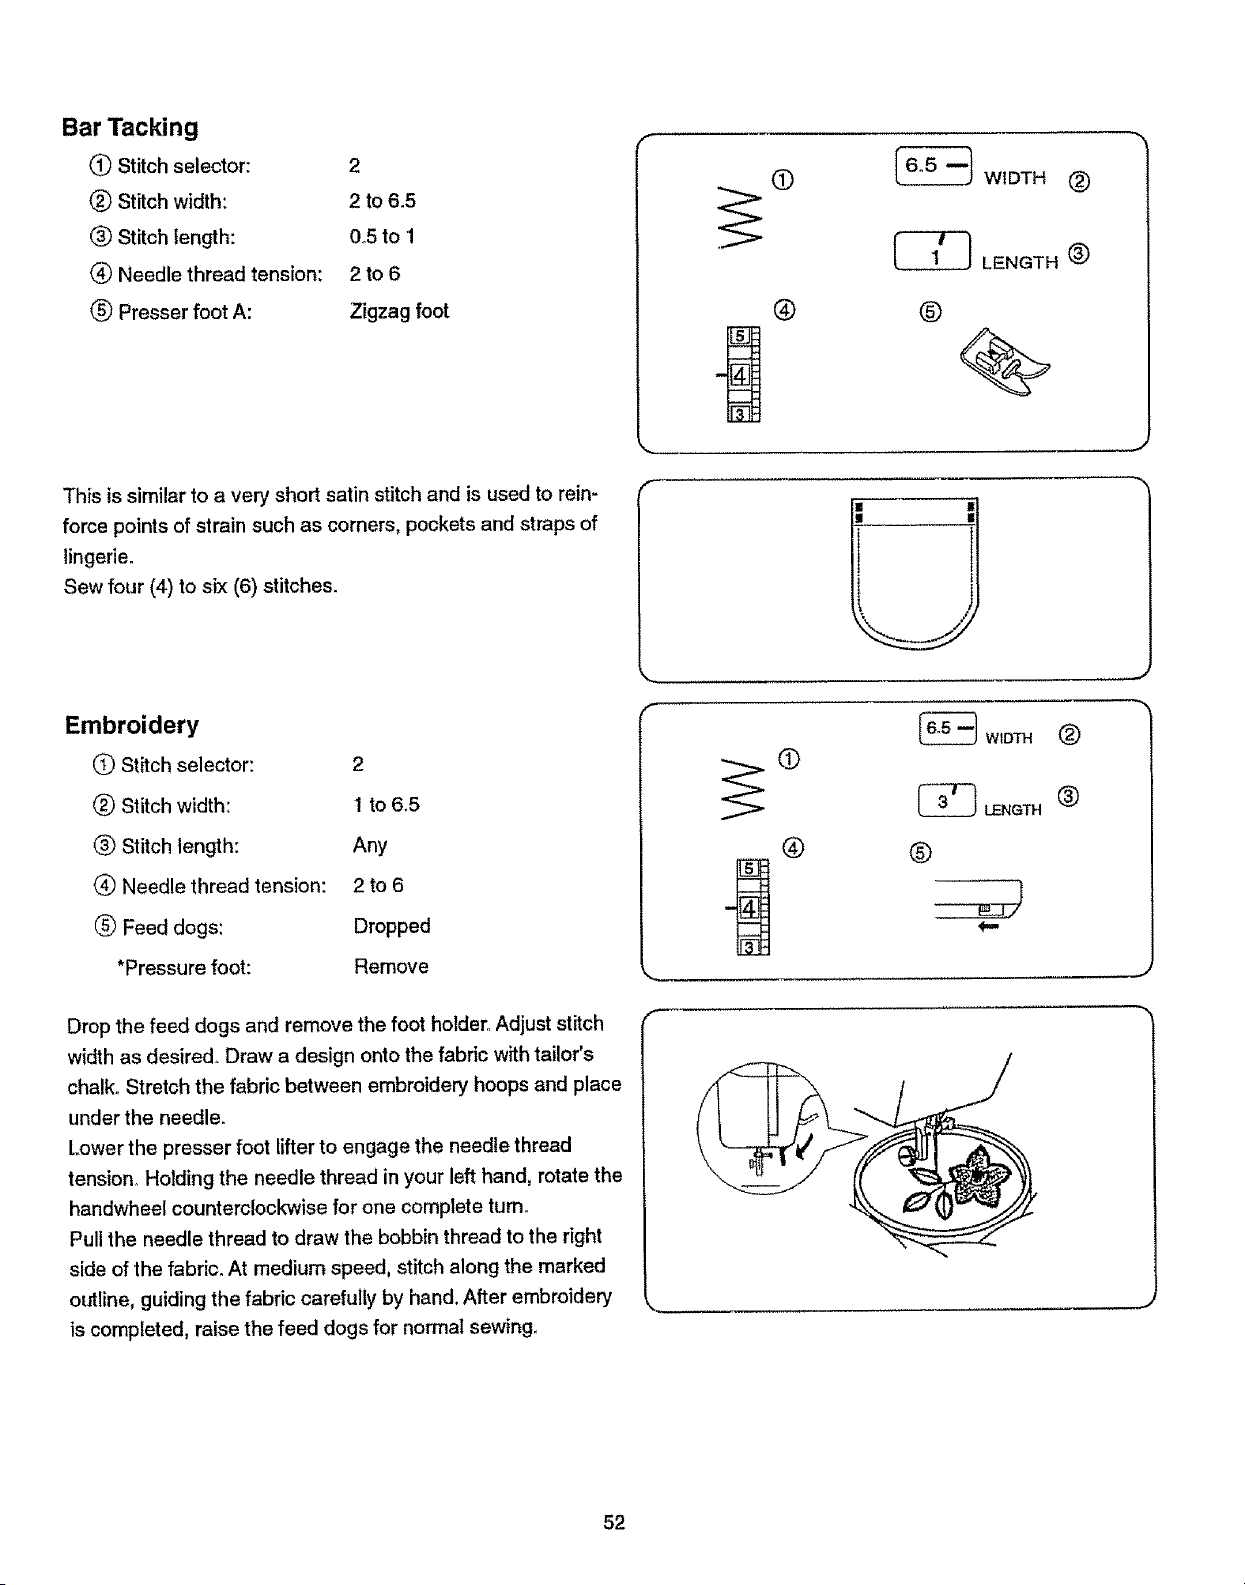
Bar Tacking
Stitch selector: 2
(_) Stitch width: 2 to 6.5
® Stitch length: 0°5 to 1
® Needle thread tension: 2 to 6
(_) Presser foot A: Zigzag foot
This is similar to a very short satin stitch and is used to rein-
force points of strain such as corners, pockets and straps of
lingerie.
Sew four (4) to six (6) stitches.
Embroidery
Stitch selector: 2
(_) Stitch width: 1 to 6.5
® Stitch length: Any
(_) Needle thread tension: 2 to 6
(_) Feed dogs: Dropped
*Pressure foot: Remove
Drop the feed dogs and remove the foot holder..Adjust stitch
width as desired. Draw a design onto the fabric with tailor's
chalk° Stretch the fabric between embroidery hoops and place
under the needle.
Lower the presser foot lifter to engage the needle thread
tension_ Holding the needle thread in your left hand, rotate the
handwheel counterclockwise for one complete turn°
Pull the needle thread to draw the bobbin thread to the right
side of the fabric. At medium speed, stitch along the marked
o_ztline, guiding the fabric carefully by hand. After embroidery
is completed, raise the feed dogs for normal sewing°
f
(-
O
_ WIDTH (_)
®
_LENGTH (_)
®
%
®
_ WIDTH
_ LENGTH
@
=
®
®
J
fl
52
Puntada de refuerzo
(_ Selectorde partr6n:
(_) Control de la anchura:
(_) Control de ta Iongitud:
(_,Tensi6n del hilo de la aguja:
(_) PrensatelasA:
2
2a6o5
0.5a 1
2a6
Prensatalas para zig-zag
Brides de renfort
(_) s_lecteur de point: 2
(_) Largeur du point: 2 _ 6.5
_) Longueurdu point: 0.5 t_1
(_ Tension dufii de t'aiguitle: 2 _ 6
(_) Pied presseur A: Pied zig-zag
Esta puntada as similar a una puntada de realce muy cortay se
utilizapara reforzar los puntos qua reciben el mayor esfuerzo, oomo
esquinas o bolstltos y las tiras en ropa interior,.
Cosa de (4) a (6) puntadas de zig-zag_
li s'agit d'un point de bourdon tr_s court qua t'on utilise pour
renforcer les points de tension tels que les coins de poches etles
bretelies de lingarie_
Piquez quatre (4) & six (6) points,
Bordado
(_ Selector de patrSn: 2
(_) Control de la anchura: 1 a 6°5
(_ Control de la Iongitud: Cualquier mimero
(_ Tensi6n del hilo de la aguja: 2 a 6
(_) Los dientes de transports: Bajados
*Prensatetas: No neoesario
Broderie
(_ s_lecteur de point: 2
(_) Largeurdu point: 1 & 6,5
_) Longueurdu point: "route
(_) Tension dufil de I'aigui/le: 2 _ 6
(_) Griffes d'entra_nement: Abaiss_es
* Pied presseur: Enlev8
Baje los dientes de transporte y retire el sujetador del prensatelas.
Ajuste la anchura de puntada a su gusto° Dibuje e! diseSo sobrela
tela con una tiza de costura. Coloque la tela templada sobre un
aro de botdar y col6que la debajo de la aguja. Baje la planoa de
elevaci6n del prensatelas para qua agarre el hilo de la aguja de
tensi6n. Tomandoel hilo de la aguja con su mano izquierda girando
el volante an el sentido contrario alas agujas del reloi hasta
completar unavuefta oompleta. Hate el hi!o superuorpara sacar el
gilo de la eanilla a trav6s de la superficie de la telao Con una
velocidad media, cosa a trav_s del oritlo marcado, guiando la tela
cuidadosamente conla manooCuando haya terminado el bordado,
sube Ios diantes de transporte para costura normal.
Abaissez les griffes d'entrainement et retirez te support de pied.
R_gfez la largeur du point comma vous te souhaitezo Dessinez
un motif sur le tissu & ta craie de tailleuro Tendez le tissu sur le
cerceau et installez le sous t'aiguille_ Abaissez releveur du pied
presseur pour tendre le fil sup_rieur_ Tout en tenant le fil de la
main gauche, toumez !e volant & main en sans antihoraire, d'un
tour complet. Tirez sur le fil sup_rieur pour amener ]e fil de la
canette sur f'endroit du tissu. A vitesse moyenne, piquez le long
du motif dessin_ en guidant le tissu avec soin.. A la fin de la
broderie,remontez les griffes d'entrainement pour ta couture
normaleo
53
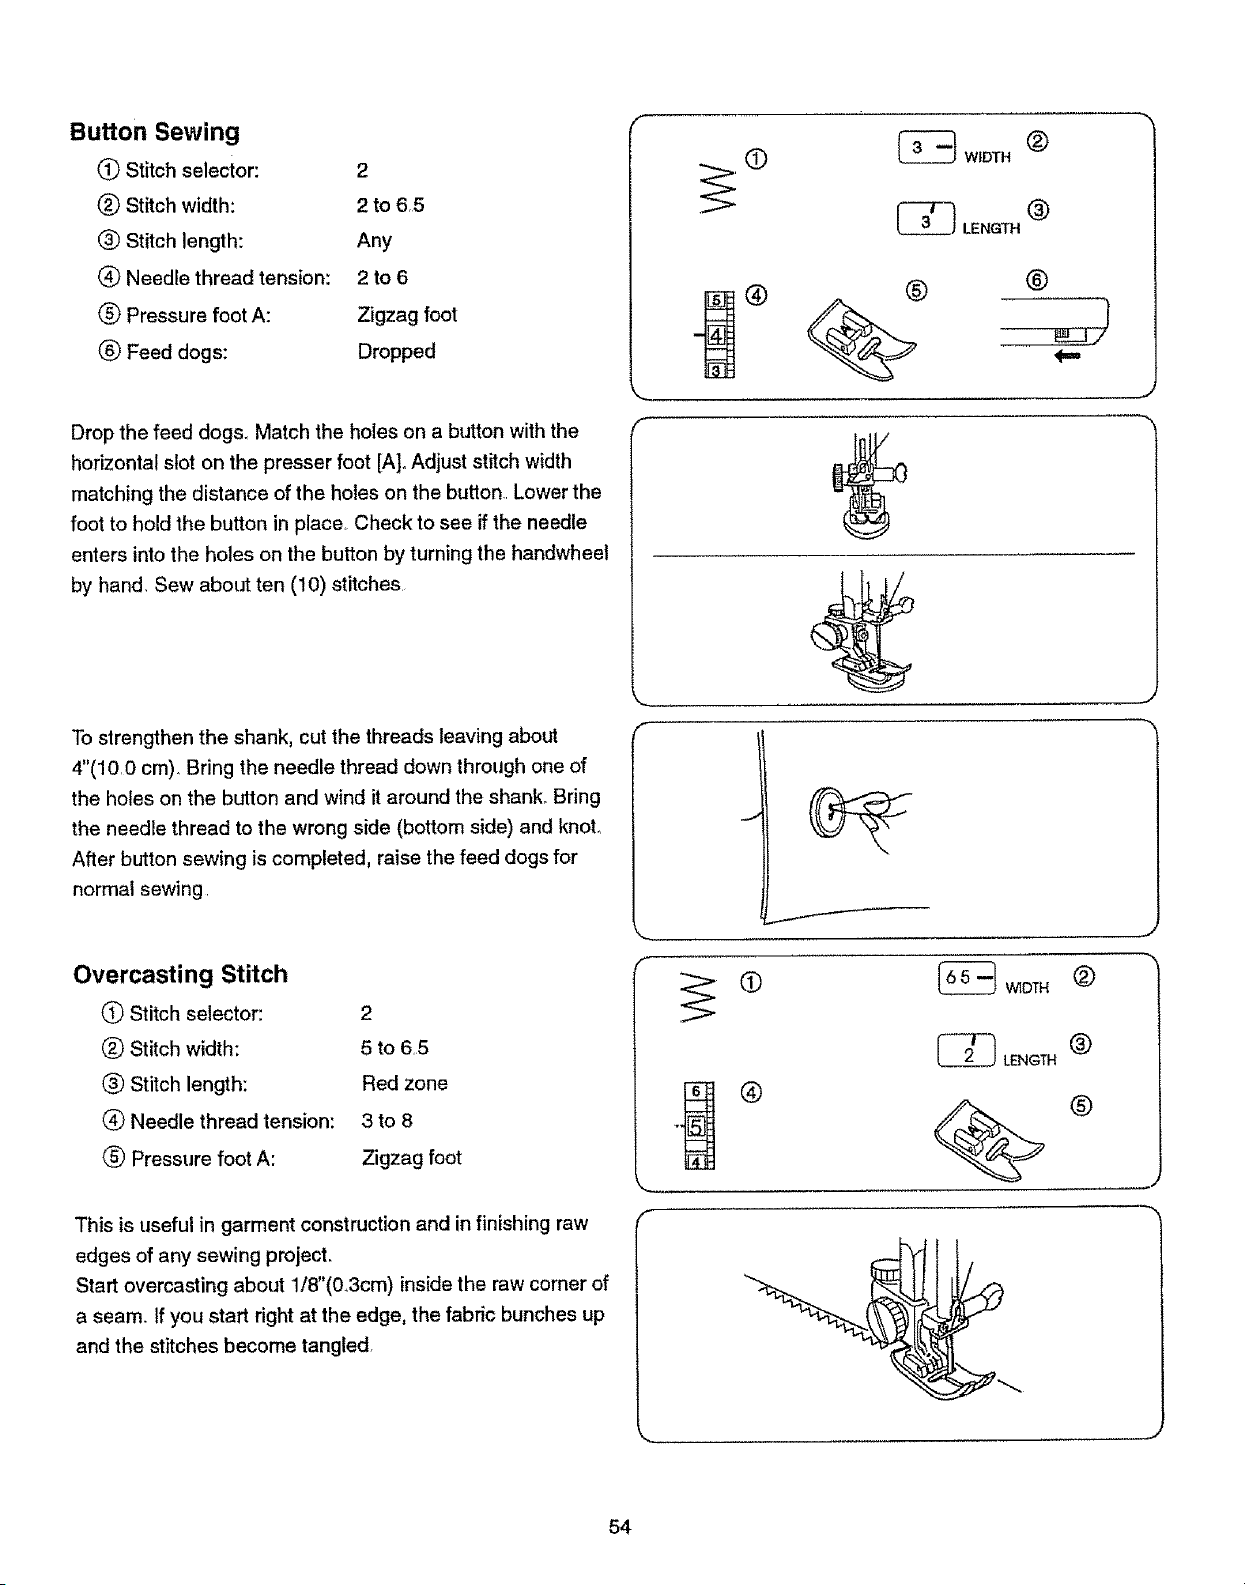
Button Sewing
Stitch selector: 2
(_ Stitch width: 2 to 6,5
Stitch length: Any
Needle thread tension: 2 to 6
Pressure foot A: Zigzag foot
(_ Feed dogs: Dropped
Drop the feed dogs, Match the holes on a button with the
horizontal slot on the presser foot [A]° Adjust stitch width
matching the distance of the holes on the button. Lower the
foot to hold the button in place, Check to see if the needle
enters into the holes on the button by turning the handwheel
by hand. Sew about ten (10) stitches
To strengthen the shank, cut the threads leaving about
4"(10.0 cm). Bring the needle thread down through one of
the holes on the button and wind it around the shank° Bring
the needle thread to the wrong side (bottom side) and knot,
After button sewing is completed, raise the feed dogs for
normal sewing
Overcasting Stitch
Q Stitch selector: 2
Stitch width: 5 to 6,5
(_) Stitch length: Red zone
(_ Needle thread tension: 3 to 8
Pressure foot A: Zigzag foot
This is useful in garment construction and in finishing raw
edges of any sewing project.
Start overcasting about 1/8"(0.3cm) inside the raw corner of
a seam. If you start right at the edge, the fabric bunches up
and the stitches become tangled.
@
(-
f
f
_ WIDTH (_
®
®
_-- J,,.)
€,,.,
@ _ WIDTH
®
LENGTH (_
®
54
Costura de botones
(_ Selector de patr6n:
Anchura de la puntada:
(_) Longitudde la puntada:
_ Tensi6n del hilo de la aguja:
(_ Prensatelas A:
(_) Dientes de transporte:
2
2a 6,5
Cuatquier nOmero
2a6
Prensateias para zig-zag
Bajades
Pose des boutons
Q S_lecteur de point: 2
(_) Largeurdu point: 2 & 3
(_) Longueur du point: Toute
(_ Tension dufil superieur: 2 & 6
(_ Pied presseur A: Pied zig-zag
Griffesd'entraTnement: Abaiss_es
Bajelos dientes de transporte. Haga coincidir los agtljeros enbot6n
con ka ranura horizontal en el prensatelas(A) Ajuste la anchura
de ias puntadas igual&ndoTaa la distanciade los agujeros en et
bot6n. Baje e_ prensatetas para sujetar el bot6n en su sitio.
Comprueboque la aguja entreper uno de losagujerosdelbot6n,
girando et volantecon la mane. Cosa unas diez (10) puntadaso
Abaissez lesgriffes d'entrainemenL Faitescorrespondre lestrous
du bouton avec la fente horizontale du pied presseur [A]. R_glez
la largeurdu point pour qu'elie corresponde _ la distance entre
les trous du bouton_Abaissez le pied presseur pour maintenir le
bouton en place, V_rifiez que I'aiguillepasse dans les trous du
bouton en tournant le volant _ la main, Cousez environ dix (10)
points.
Para reforzar el tallo, corte los hiIos dejando unos 4"(10o0 cm).
Traiga hacia abajo e] hilo de la aguja atrav_s de uno de los agujeros
der bot6n y enrSIlelo alrededor del ta{Io. Traiga el hilo de }a aguja
ensartada hasta la parte opouesta de la tela y anude los hilos.
Despu_s de qua el bot6n sea cosido,levante los dientes de
transporte para coser normalmente.
Pour renforcer la tige du bouton, coupez le fil en laissant environ
4"(10.0 cm)o FaRes passer le fil de I'aiguille dans l'un des trous du
bouton et enroulez-le autour de ta tige du bouton_ Faites passer
te fil de ]'aiguille sur I'envers du tissu et nouez les fils. Ata fin de la
couture du bouton, remontez les griffes d'entraTnement pour la
couture normaleo
Puntada de sobrehilado o remate
Q Selectorde patr6n:
(_ Anchura de la puntada:
(_ LongRudde la puntada:
(_ Tensi6n del hilode la aguja:
(_) PrensatelasA:
2
5a6o5
Zone roja
3a8
Prensatelas para zig-zag
Surfilage
(_ S_lecteur de point:: 2
(_ Largeur du point: 5 ,_ 6.5
(_) Longueur du point: Zone rouge
(_) Tension du fit sup6rieur: 3 ,_ 8
(_ Pied presseur A: Pied zig-zag
Muy _til en la construcci6n de prendas y para sobrehilar o
rematar bordes brutes en cualquier proyecto de costura.
Empiece a rematar un t/8"(0o3cm) dentro del horde brutoo Si
empieza a coser justo al horde, la tela se arrugar& y las puntadas
quedar&n real cruzadas.
Ce point est utile pour Je montage des vStements et pour finir
les bords bruts de tousles ouvrages de couture..
Commencez & surfiler & environ 1/8"(0.3cm) ,_ rinte_rieur du
bord brut du tissue Si vous commencez tout au bord, le tissu se
fronce etles points s'emm_lent..
55
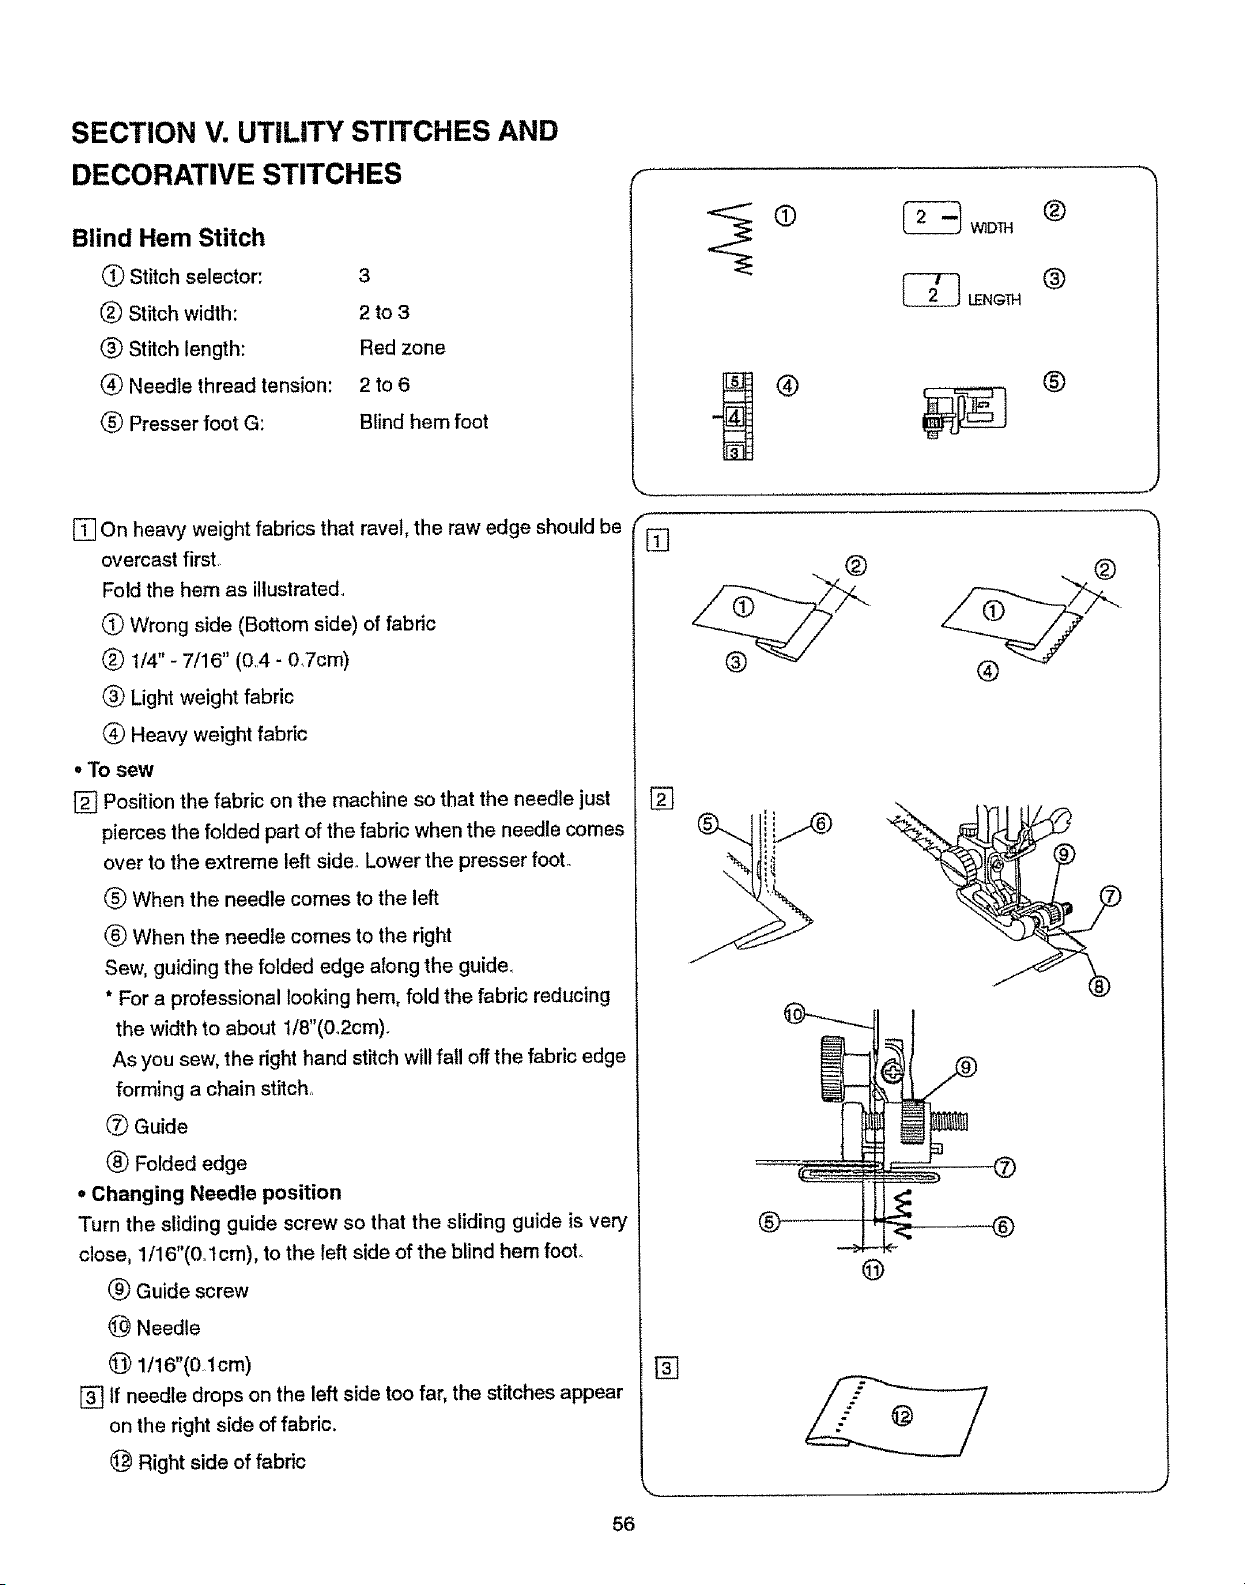
SECTION V. UTILITY STITCHES AND
DECORATIVE STITCHES
Blind Hem Stitch
Stitch selector: 3
Stitch width: 2 to 3
Stitch length: Red zone
_) Needle thread tension: 2 to 6
Q Presser foot G: Blind hem foot
@
®
_ WIDTH (_)
®
_] LENGTH
®
E] On heavy weight fabrics that ravel, the raw edge should be
overcast first.
Fold the hem as illustrated..
Wrong side (Bottom side) of fabric
(_ 1/4"- 7/16" (0A- 0,7cm)
_) Light weight fabric
(_ Heavy weight fabric
oTo sew
[] Position the fabric on the machine so that the needle just
pierces the folded part of the fabric when the needle comes
over to the extreme left side. Lower the presser foot..
_) When the needle comes to the left
(_) When the needle comes to the right
Sew, guiding the folded edge along the guide,
* For a professional looking hem, fold the fabric reducing
the width to about 1/8"(0o2cm).
As you sew, the right hand stitch will fall off the fabric edge
forming a chain stitch.,
0 Guide
(_ Folded edge
o Changing Needle position
Turn the sliding guide screw so that the sliding guide is very
close, 1/16"(0.1cm), to the left side of the blind hem foot.
(_ Guide screw
(_ Needle
_) 1/16"(0.1cm)
[] If needle drops on the left side too far, the stitches appear
on the right side of fabric,
Right side of fabric
f
[]
[]
®
[]
%_ _
®
@
@
56
SECCION V. PUNTADAS UTILES Y PUNTADAS
DECORATIVAS
PARTIE V. POINTS UTILITAIRES ET
DI CORATIFS
Dobladillo invisible
Selector de patr6n: 3
(_) Anchura de la puntada: 2 a 3
(_) Longitud de ta puntada: Zona roja
(_ Tension del bile de la aguja: 2 a 6
(_ Prensatelas G: Prensatelas de puntada de
dobladillo invisible
Ourlet invisible
I_ S_lecteur de point: 3
(_) Largeur du point: 2 & 3
(_ Longueur du point: Zone rouge
(_Tension dufil de I'aiguille: 2A6
Pied presseur G: Pied & outlet invisible
[] En telas gruesas que se enredan, primeramente deber&
rematarse el borde brute°
Per _lltimo d6blelas de la forma indicada en ta ilustraci6n.
(_) Parte de abajo de la tela
(_ 0.4 a 0.7 cm(114" a 7/16")
(_) Tela ligera
Tela gruesa
° Para coser
[] Posicione la teia de forma que el doblez se sit_e centra el lade
izquierdo de la agujao
Baje el prensatelas.
(_) Cuando la aguja va hacia la izquierda
_') Cuando la aguja va hacia la derecha
Cosa guiando el borde doblado contra la gufa del prensatelas.
Para que el dobiadilto tenga aspecto profesional, doble la tsla
reduciendo el ancho a unos 02 cm(1/8")o
AI coser, la puntada de la derecha set& dada fuera del borde
de la tela formando una puntada de cadeneta.
(_ Guia
(_) Borde doblado
°C6mo cambiar la posici6n de la aguja
Gire el tornillo de la gufa para que la gufa quede muy arrimada
0ol cm(1/!6") al lade izquierdo del pie para puntada invisible.
(_ Tornillo de la gufa
1_ Aguja
(_ !/16" (0oi cm)
[] Si la aguja est& demasiado a la izquierda, ins puntadas se
ver_n per la parts de arriba de la tel&
@ Parts de arriba de la tela
[] Sur les tissus _pais qui ont tendance & s'effilocher, le bord
brut devrait 6tre surfil_ d'abordo
Puis pliez I'ourlet comme illustr8
(_) Envers du tissu
(_ 0°4 & 0,7 cm(1/4" & 7/16")
(_) Tissu fin
Tissu _pais
• La couture:
[] Placez le tissu sur la machine, de fa_on & ce que raiguille
ne perce que la pattie plies du tissu lorsque raiguille arrive
en position extr6me gauche..
Abaissez le pied presseur.
(_ Aiguille & gauche
(_) Aiguille & droite
Piquez en dirigeant le bord pli8 le long du guide.
Pour obtenir un outlet & !'allure professionnelle,r_duisez la
largeur du tissu pti8 & 0.2 cm(1/8").
,_,la couture, le point du c6t6 droit d6bordera du tissu, formant
une chaTnette.
(2_)Guide
(_) Le bord plid
• Changer la position de raiguille
Tournez la vis du guide coulissant de fa_on & ce que celui-ci se
trouve tr_s pros 0,1 cm(I/16") du c6t_ gauche du pied & ourlet
invisible.
(_) Vis du guide
(_ Aiguille
@ 1116" (0ol cm)
[] Si I'aigui!le tombe trop loin du c6td gauche, lee points
apparaissent sur l'endroit du tissu.
@ Endroit du tissu
57
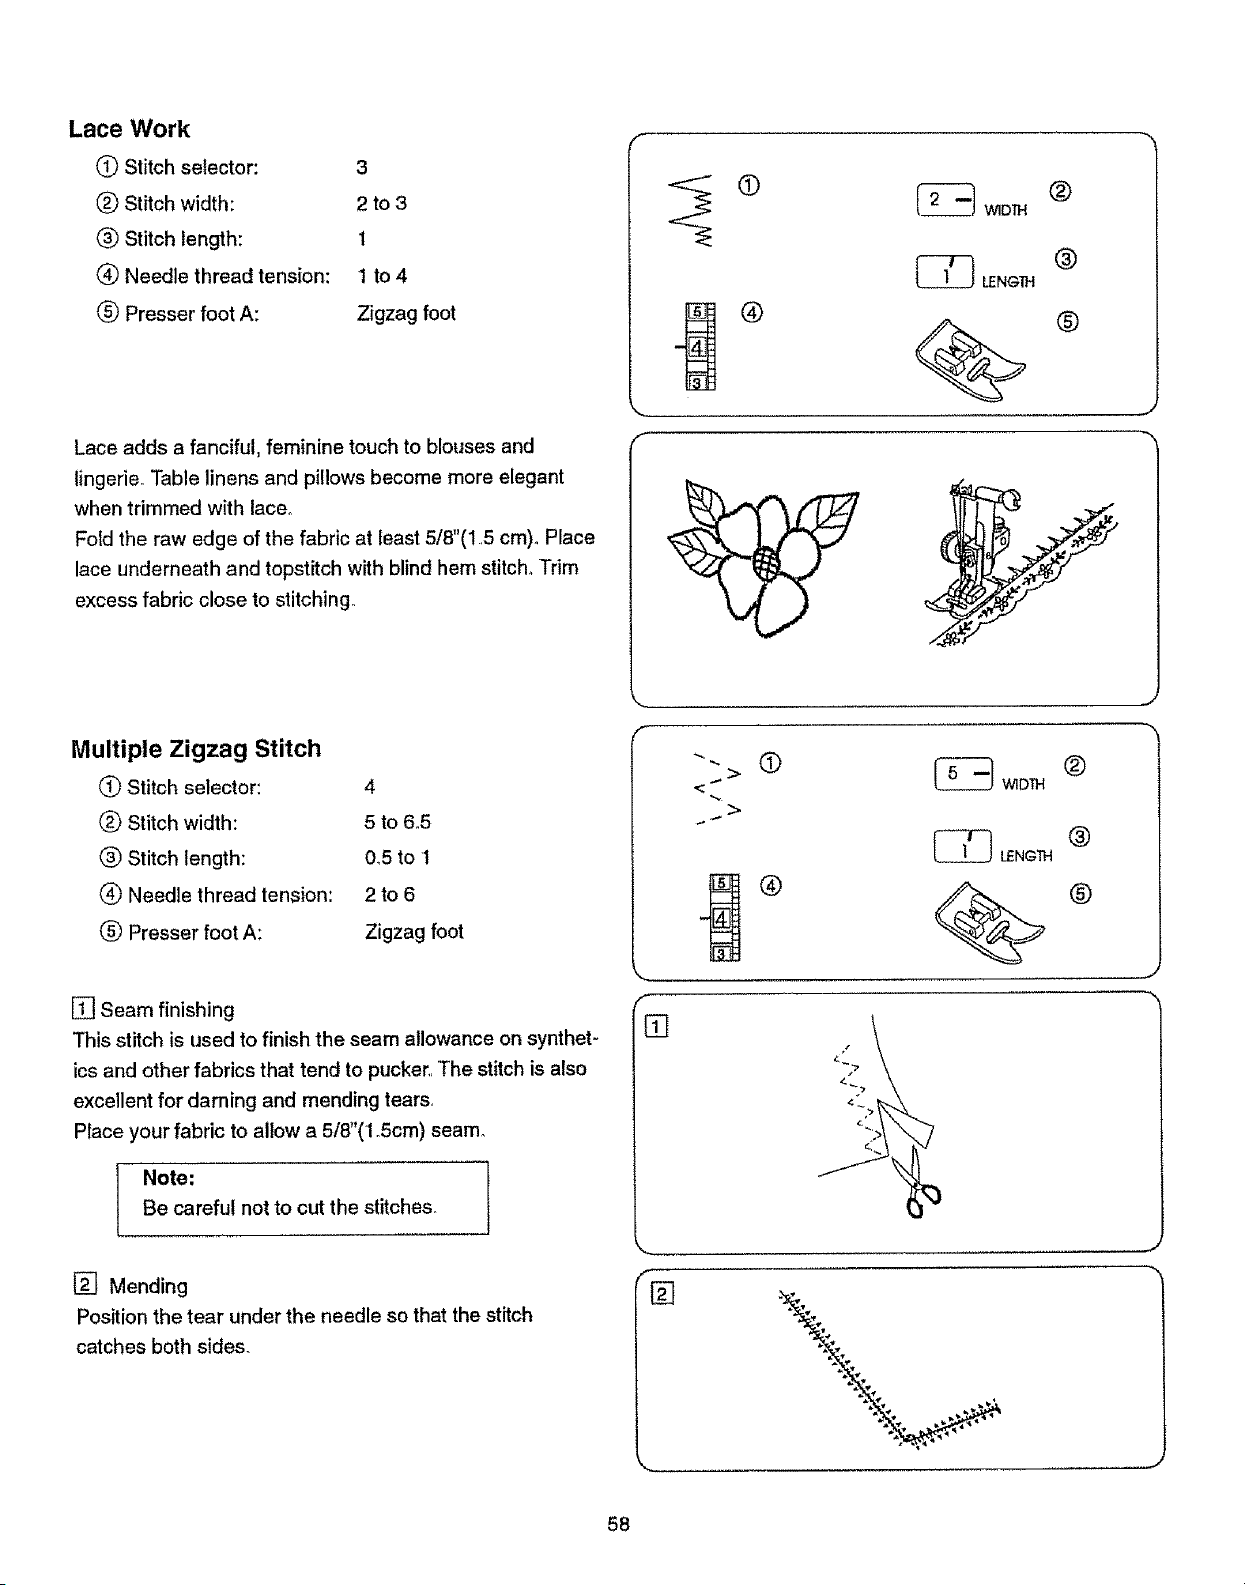
Lace Work
(_ Stitch selector: 3
(_ Stitch width: 2 to 3
Stitch length: 1
® Needle thread tension: 1 to 4
Presser foot A: Zigzag foot
Lace adds a fanciful, feminine touch to blouses and
lingerie° Table linens and pillows become more elegant
when trimmed with laceo
Fold the raw edge of the fabric at least 5/8"(15 cm)o Place
lace underneath and topstitch with blind hem stitch_ Trim
excess fabric close to stitching°
%_
f
(D
_ WIDTH 1_)
®
_ LENGTH
Multiple Zigzag Stitch
(_ Stitch selector: 4
(_ Stitch width: 5 to 6.5
(]_)Stitch length: 0_5 to 1
(_ Needle thread tension: 2 to 6
1_ Presser foot A: Zigzag foot
[] Seam finishing
This stitch is used to finish the seam allowance on synthet-
ics and other fabrics that tend to pucker.. The stitch is also
excellent for darning and mending tears.
Place your fabric to allow a 5/8"(I oScm) seam°
Note:
Be careful not to cut the stitches.
[] Mending
Position the tear under the needle so that the stitch
catches both sides.
L.
r
"_" (D
_ I_NGTH
f
[]
÷
.,J
®
®
®
.J
58
Trabajos con lazos
(_ Selector de patr6n: 3
(_)Anchura de la puntada: 2 a 3
(_ Longitudde la puntada: I
(_ Tensi6n del hilode ta aguja: 2 a 6
(_) Prensatelas A: Prensatelas para zig-zag
Dentelle
(_ S_lacteurde point: 3
(_) Largeur du point: 2 _ 3
(_) Longueurdu point: 1
(_) Tensiondu fil de I'aiguitle: 2 & 6
(_ Pied presseur A: Pied zig_zag
Lazes aSaden un toque fino y femenino a blusas y lencerfa.
Manteles y fundas de almohadas quedar_n m_iselegantascuando
los adorns con lazoso
Doble el borde por 1omenos 1.5 cm(5/8"). Coloque el lazo por
debajo y cosa sobre _1con la puntada de dobladilto invisible.
Recorte el exceso de tela cerca de la costura.
La dentelle ajoute une touche f_minine aux chemisiers et & la
1Fngerie,Le linge de table et tes oreitlers deviennent plus raffin_s
Iorsqu'on les borde de dentelleo
Repliez Is bord brut du tissu sur 1,,5cm(5/8") au moins. Placez
la dentelle dessous at surpiquez au point d'ourlet {nvisibleo
Recm_pez le tissu auras des points,,
Puntada de mdltiple zigzag
(_ Selector de patr6n:
(_) Anchura de la puntada:
(_) Longitudde la puntada:
(_) TensiSndel hilo de la aguja
(_ Prensatelas A:
4
5a6,5
0.,5at
2a6
Pmnsate_aspa_zig-zag
Point zig-zag multiple
(_ S_lecteur de point: 4
_) Largeur du point: 2 & 3
_) Longueur du point: t
(_) Tension du fil de l'aiguille: 2 & 6
(_) Pied presseur A: Pied zig-zag
[_Cosido fical
La puntada el_sticaes muy Otilpara lacosturade telas qua tienden
a fruncir.Es excelentepara ponerremiendosy arreglar desgarros
y sietes (zurcir)°
Coloquela tela de tal forrnaquapueda coser unacosturaa
I .5cm(5/8")del borde.
Despudsde coser recorteel margensobrante.
NOt,,: 1
Tenga cuidadode no cortarlas puntadas.
[] Zurciendo o remendando
Coloque la parte rota debajo de laagujaparaquala puntada alcance
ambos ladoso
[] Finftiondes coutures
Ce point est utilis6pour finir les rassources des coutures sur
les tissuesynth_tiquesou !asautres tissusquionttendance
ee froncer. Ce pointest excellentpourrepriseret r_parer
les d_chirures_
Mettez votretissu en place en prSvoyant une ressourcede
couturede 1o5cm(5/8").
Recoupezla ressource& la fin de la piq0reo
Remarque: ]
Faites attention de ne pas couper las points°
[] Reprisar
Placezta d_chirure sousI'aiguille de mani_re & ce qua tepoint
attrape {as daux c6t_s.
59

Shell Stitch
(_ Stitch selector:
(_ Stitch width:
(_ Stitch length:
(_ Needle thread tension:
(_) Presser foot F:
5
3 to 6.5
Red zone
4 to 9
Satin stitch foot
Use a lightweight fabric such as tricoL Fold the fabric and
stitch on the bias. You may need to increase the needle thread
tension slightly. Allow the needle to just clear the folded edge
of the fabric at the zigzag stitches.
If you sew rows of shell stitches, space the rows at least 5/
8"(1 _5cm) apart. You can also sew shell stitches on knits or
soft silky woven fabrics in any direction
@
®
®
" , •
I
Box Stitch
(_) Stitch selector: 6
(_ Stitch width: 3 to 6.5
Stitch length: Red zone
Needle thread tension: 3to 8
(_ Presser foot A: Zigzag foot
Overlap two raw edges of heavy weight interlining and use this
stitch to join them.,
@
®
[_ W_DTN
[_ LENGTM
%
®
®
6O
Puntada en forma de concha
(_ Selector de patr6n: 5
(_ Anchura de la puntada: 3 a 6,5
(_) Longitud de la puntada: Zona roja
(_ Tensi6n del hilo de ta aguja: 4 a 9
(_ Prensatelas F: Prensatelas para raso
Point coquille
S_lecteur de point:
(_ Largeur de point:
(_) Longueur du point:
(_ Tensiondu fii de t'aiguille:
(_ Pied presseur F:
5
3&6o5
Zone rouge
4_,9
Pied & point de bourdon
Use telas ligeras como son las prendas de tricot,
Doble la tela y puntSela en diagonal. Quiz&s tenga que incrementar
ligeramente la tensi6n del hilo de la aguja. Cosa de tal forma que
ta aguja justo libre el horde doblado a! coser con puntadas en zig-
zag.
Si quiere coser filas de puntadas de conchas, deje un espacio
entre elias de al menos 1.5 cm(5/8"). Tambi_n podr& coser con
puntadas en forma de concha en telas de punto y tejidos de seda
ligeros en cualquier direcci6n_
Utifisez un tissu I_ger comme du jersey. Ptiez le tissu et piquez
sur le biaiso Vous aurez peut 6tre besoin d'augmenter t_g_rement
la tension du til de I'aiguille. Laissez I'aiguilIe tomber juste en
dehors du bord pti_ du tissu Iors du zig-zag.
Si vous cousez des rang_es de points coquille, espacez les
rang_es d'au moins 1.5 cm(5/8"), Vous pouvez 8galement coudre
des points coqutlles sur tes tricots et les _toffes soyeuses dans
toutes les directions,
Puntada de caja
(_ Selector de patr6n: 6
(_ Anchura de la puntada: 3 a 6.5
(_ Longitud de la puntada: Zona roja
(_ Tensi6n del hilo de la aguja: 3 a 8
(_ Prensatelas A: Prensatelas para raso
Point de crdneau
(_ Sdlecteur de point: 6
(_) Largeur du point: 3 & 6°5
(_ Longueur du point: Zone rouge
(_ Tension du fi} sup_rieur: 3 & 8
Pied presseur A: Pied zig-zag
Sobreponga dos bordes brutos de form pesado y use esta puntada
para uiflos.
Superposez tes bords bruts de dm_bture_paisse et cousez-les
ensemble & t'aide de ce point,
61
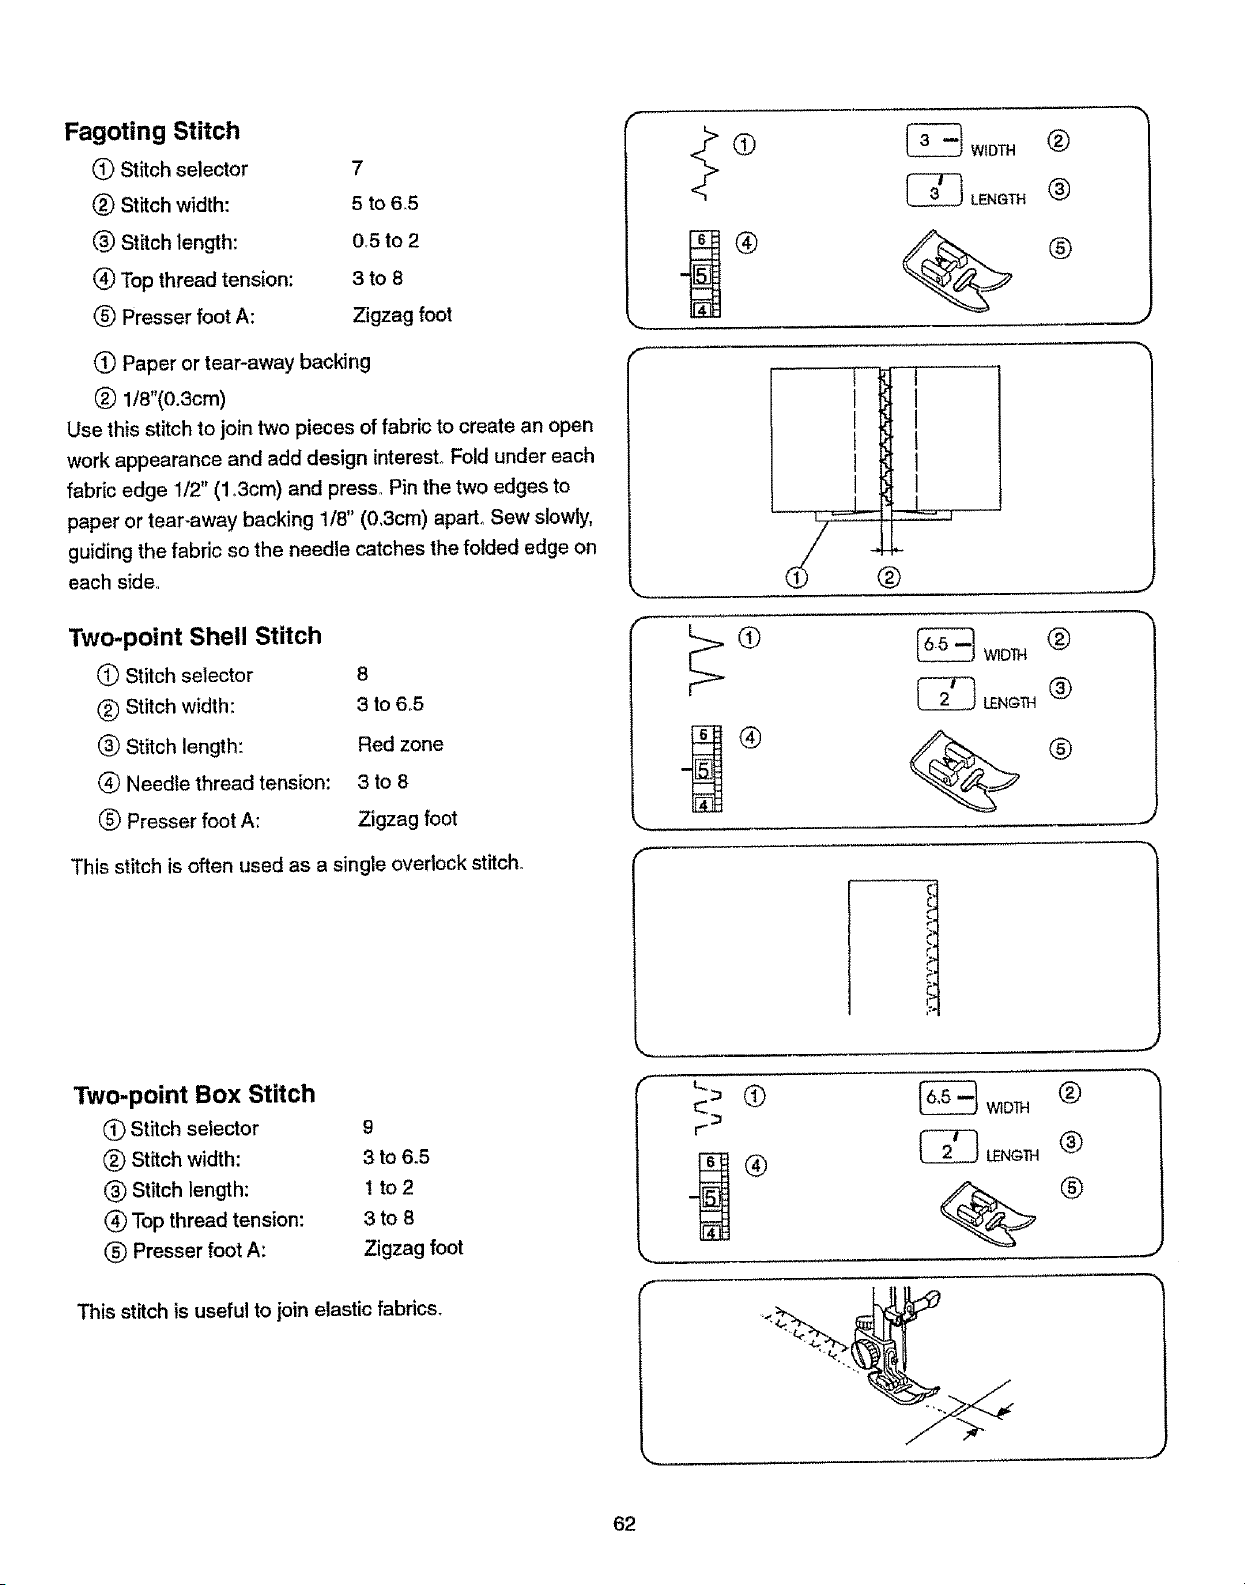
Fagoting Stitch
0 Stitch selector 7
® Stitch width: 5 to 6_5
(_ Stitch length: 0,5 to 2
_) Top thread tension: 3 to 8
(_ Presser foot A: Zigzag foot
(_) Paper or tear-away backing
® lm"(0.3crn)
Use this stitch to join two pieces of fabric to create an open
work appearance and add design interest. Fold under each
fabric edge 1/2" (1.3cm) and press Pin the two edges to
paper or tear-away backing 1/8" (O,3cm) apart° Sew slowly,
guiding the fabric so the needle catches the folded edge on
each side°
Two-point Shell Stitch
1_ Stitch selector 8
® Stitch width: 3 to 6,5
(_ Stitch length: Red zone
(_ Needle thread tension: 3 to 8
(_ Presser foot A: Zigzag foot
This stitch is often used as a single overlock stitch°
Two-point Box Stitch
(_ Stitch selector 9
® Stitch width: 3 to 6.5
(_) Stitch length: ! to 2
(_ Top thread tension: 3 to 8
Q Presser foot A: Zigzag foot
This stitch is useful to join elastic fabrics.
f
f
,,._.._
f
_ WIDTH (_
LE" TH®
J I
I I
t t
I J
_ WIDTH _)
_ W;DTH ®
62
Puntada para deshilachados
(_ Selector de patrSn:
(_) Anchura de la puntada:
(_ Longitudde puntada:
(_ Tensi6ndel hilosuperior:
(_) PrensatelasA:
7
5a6.5
0.5a2
3a8
Prensatelas para zig-zag
(_ Papal o cinta desprendibfe
(_ 0.3cm(1/8")
Use seta puntada de costura para unir dos telas y crear una
apariencia de trabajo abierto (deshilachado) y afiadir interSs al
disefio. Haga un dobtez de uno 1,3cm(1/2") en cada uno de los
bordes de las tetas y pl_inchelos.Sujete con atfileres los dos bordes
a un papal o cinta desprendible, separ&ndoloe unos 0,,3cm(1/8").
Cosa despacio guiando la tela para qua la aguja alcance los dos
bordes°
Puntada de concha de dos puntos
(_ Selector de patr6n:
(_ Anchura de la puntada:
Longitud de puntada:
(_ TensiSn det hilo superior:
(_) Prensatelas A:
8
3a65
Zone roja
3aB
Prensatelas para zig-zag
Esta puntadade costura escomunmente usada come puntadade
remate individua!.
Couture ajour6e
(_) S_lecteurde point: 7
(_) Largeurdu point: 5 _ 6°5
(_) Longueurdu point: 0_5_ 2
(_ Tensiondu fil sup_rieur: 3 _ 8
(_) Pied presseur A: Pied zig-zag
(_) Papier de soie
® o..3cm0/8")
Utilisez ce point pour relier avec cr_ativit6 deux morceaux de tissu
par une couture ajour_e. Repliez chaque herd du tissu surl_3cm
(1/2") et repassez-les, t_pinglez les deux c6t_s sur du papier de
sole en laissant un espace de 0.3cm(1/8"), Cousez tentement, en
guidant le tissu pour que I'aiguille attrape les bords replies de chaque
c6t_.
Point coquille double points
(_) Sdlecteur de point: 8
(_ Largeurdu point: 3 _.6°5
(_ Longueurdu point: Zone rouge
_) Tensiondu fil sup_rieur: 3 _ 8
(_ PiedpresseurA: Pied zig-zag
Ce point est utilis_ habituellement comma surfilage & piq6re simple.
Puntada de caja de dos puntos
(_ Selector de patr6n: g
(_) Anchura de la puntada: 3 a 6.5
(_) Longitudde puntada: 1a 2
(_ Tensi6n del bile superior: 3 a 8
(_ PrensatelasA: Prensatelaspara zig-zag
Esta puntada es muy Otilpara unir telas el_sticas.
Point de cr6neau double points
_) S_lecteur de point: 9
_) Largeurdupoint: 3 _ 6,,5
(_) Longueurdu point: 1 &2
(_ Tensiondu fii sup_rieur: 3 _,8
(_) Pied presseurA: Pied zig-zag
Ce point est utilie6 pour joudre des tissus extenstbleso
63
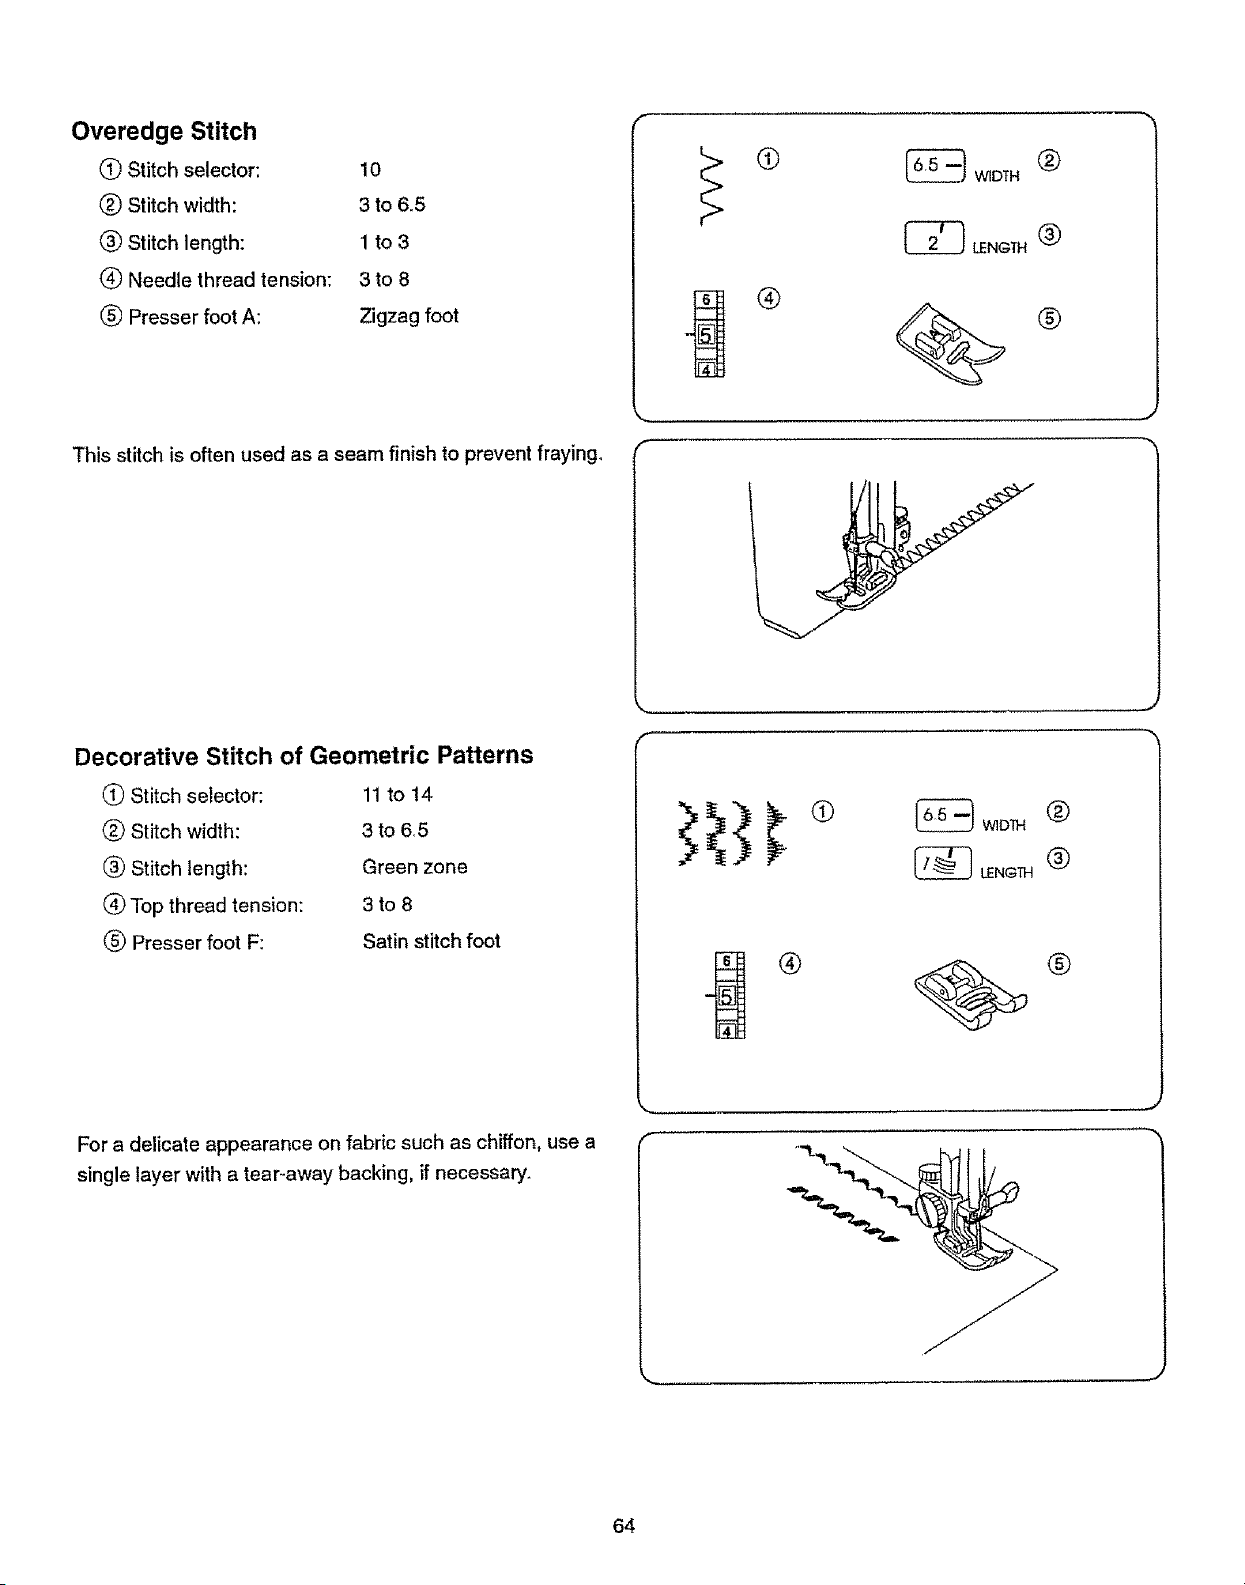
Overedge Stitch
(_ Stitch selector: 10
® Stitch width: 3 to 6°5
(_ Stitch length: 1 to 3
(_ Needle thread tension; 3 to 8
(_ Presser foot A: Zigzag foot
This stitch is often used as a seam finish to prevent fraying_
f
_ LENGTH (_)
®
Decorative Stitch of Geometric Patterns
(_ Stitch selector:
® Stitch width:
® Stitch length:
(_ Top thread tension:
(_ Presser foot F:
11 to 14
3 to 6.5
Green zone
3to8
Satin stitch foot
For a delicate appearance on fabric such as chiffon, use a
single layer with a tear-away backing, if necessary.
v,,1
64
Puntada para rebordados
(_ Selectorde patrSn: 10
(_ Anchura de la puntada: 3 a 6.5
(_) Longitud de puntada: t a 3
(_) Tensi6n del bile superior: 3 a 8
(_) Pronsatelas A: Prensatelas para zig-zag
Point de bordure
(_ S_lecteur de point: 10
(_) Largeur dupoint: 3 _, 6°5
(_) Longueur du point: 1 _ 3
(_ Tension du fil sup_rieur: 3 & 8
(_) Pied presseur A: Pied zig-zag
Esta puntadaes comL_nmenteusada en el cosidofinal para evitar Ce point est utilis_ pour finirlee coutureset dviter que le bord ne
que es deshilacheo s'effirocheo
Puntadas decorativas de dise_os geomdtricos
(_ Selector de patrSn:
(_) Anchura de la puntada:
(_) Longitud de puntada:
(_) Tensi6n del hito superior:
Prensatelas F:
Points ddcoratifs gdom_triques
11 a 14 (_ S61ecteur de point: 11 & 14
3 a 65 (_) Largeur dupoint: 3 _,6.5
Zone verde (_ Longueur du point: Zone verte
3 a 8 (_ Tension du fil sup_rieur: 3 _ 8
Prensatetas para raso (_ Pied presseur F: Pied ,_ point de bourdon
(puntada decorativa)
Para conseguir una apariencia dolicada on tefas come la soda o el Pour obtenir un aspect raffin8 sur lee tissus tels que la mousseIine,
chifl6n, use una sola capa con una cinta desprendible si es utiIisez une seu[o _paisseuravec un renfort & d_chirersin_icessairo.
necesario.
65
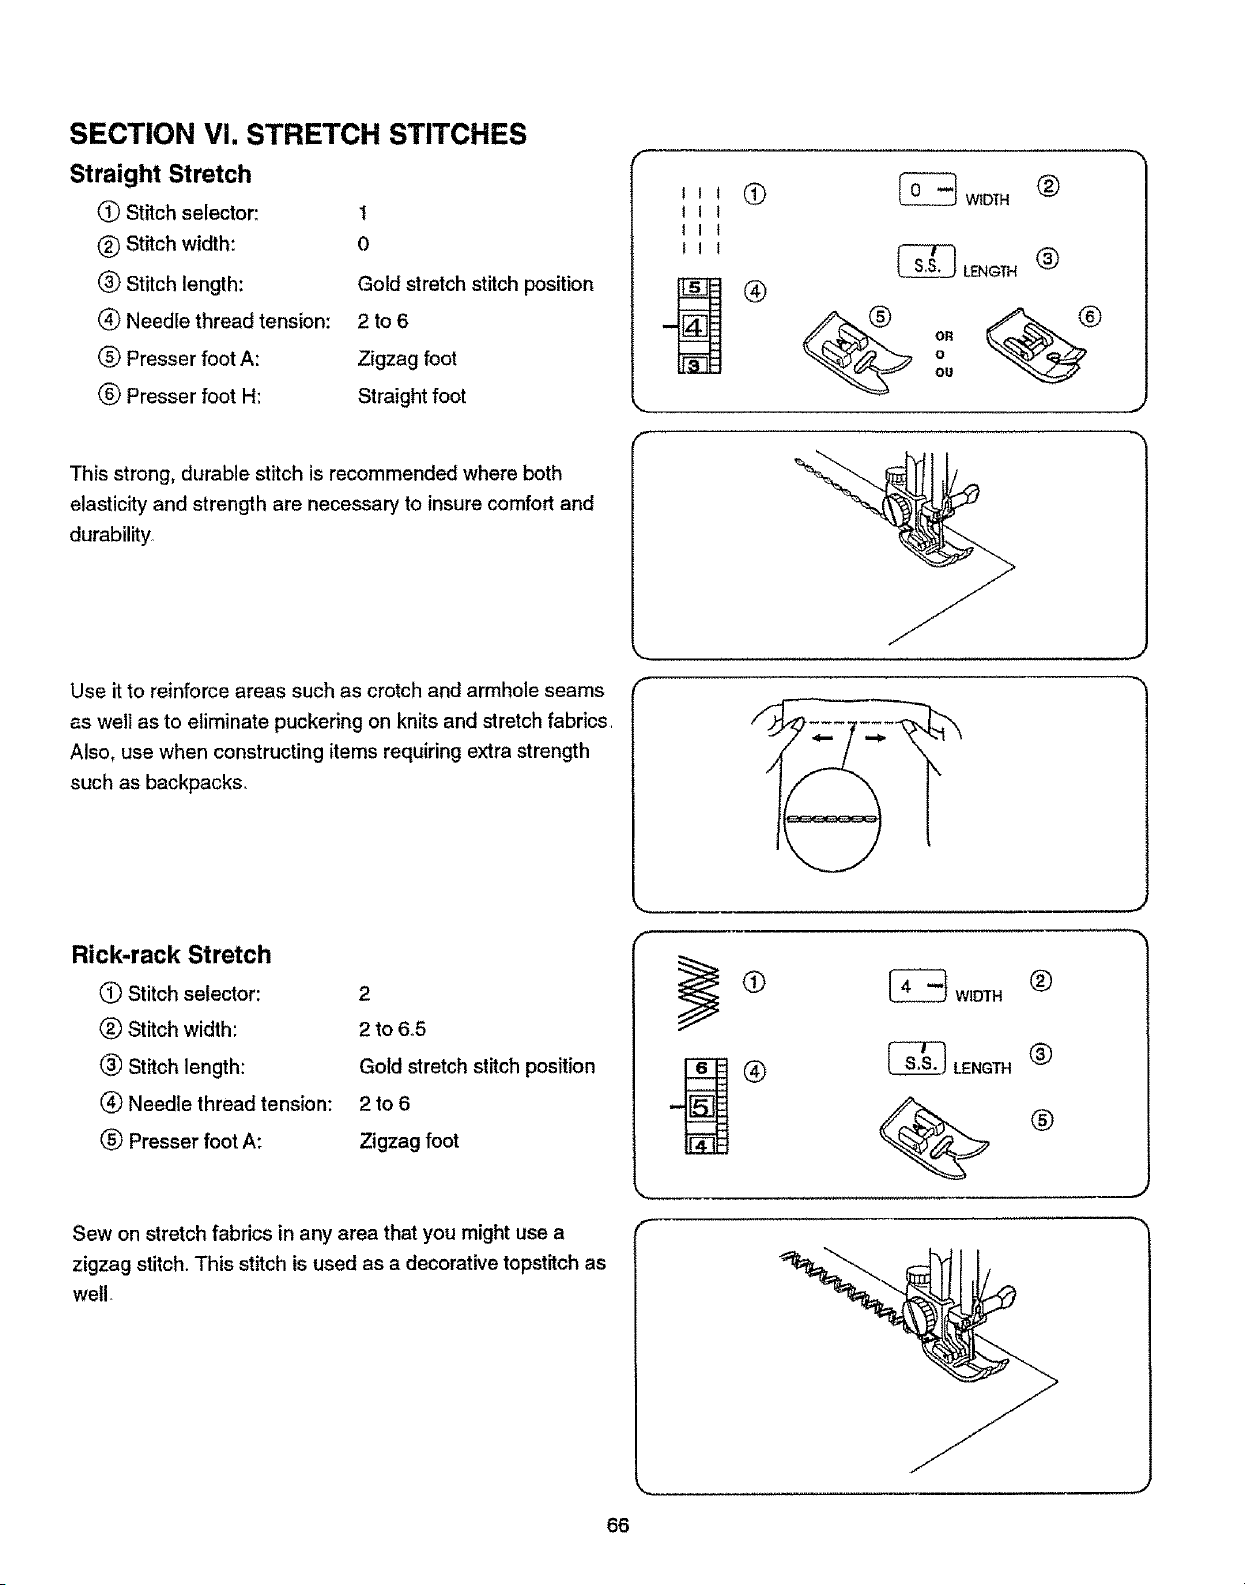
SECTION VI. STRETCH STITCHES
Straight Stretch
(_ Stitch selector:
(_) Stitch width:
_) Stitch length:
(_ Needle thread tension:
_) Presser foot A:
Presser foot H:
1
0
Gold stretch stitch position
2 to6
Zigzag foot
Straight foot
I I I
I i I
I I I
I I I
@
®
_ WtD_,H (_
_ LENGTH (_
o
ou
J
This strong, durable stitch is recommended where both
elasticity and strength are necessary to insure comfort and
durability,
Use it to reinforce areas such as crotch and armhole seams
as well as to eliminate puckering on knits and stretch fabrics.
Also, use when constructing items requiring extra strength
such as backpacks.
H_
Rick-rack Stretch
(_ Stitch selector:
Stitch width:
(_ Stitch length:
(_ Needle thread tension:
_) Presser foot A:
2
2 to 65
Gold stretch stitch position
2to 6
Zigzag foot
Sew on stretch fabrics in any area that you might use a
zigzag stitch. This stitch is used as a decorative topstitch as
well
@ wloTH®
J
®
_ LENGTH
66
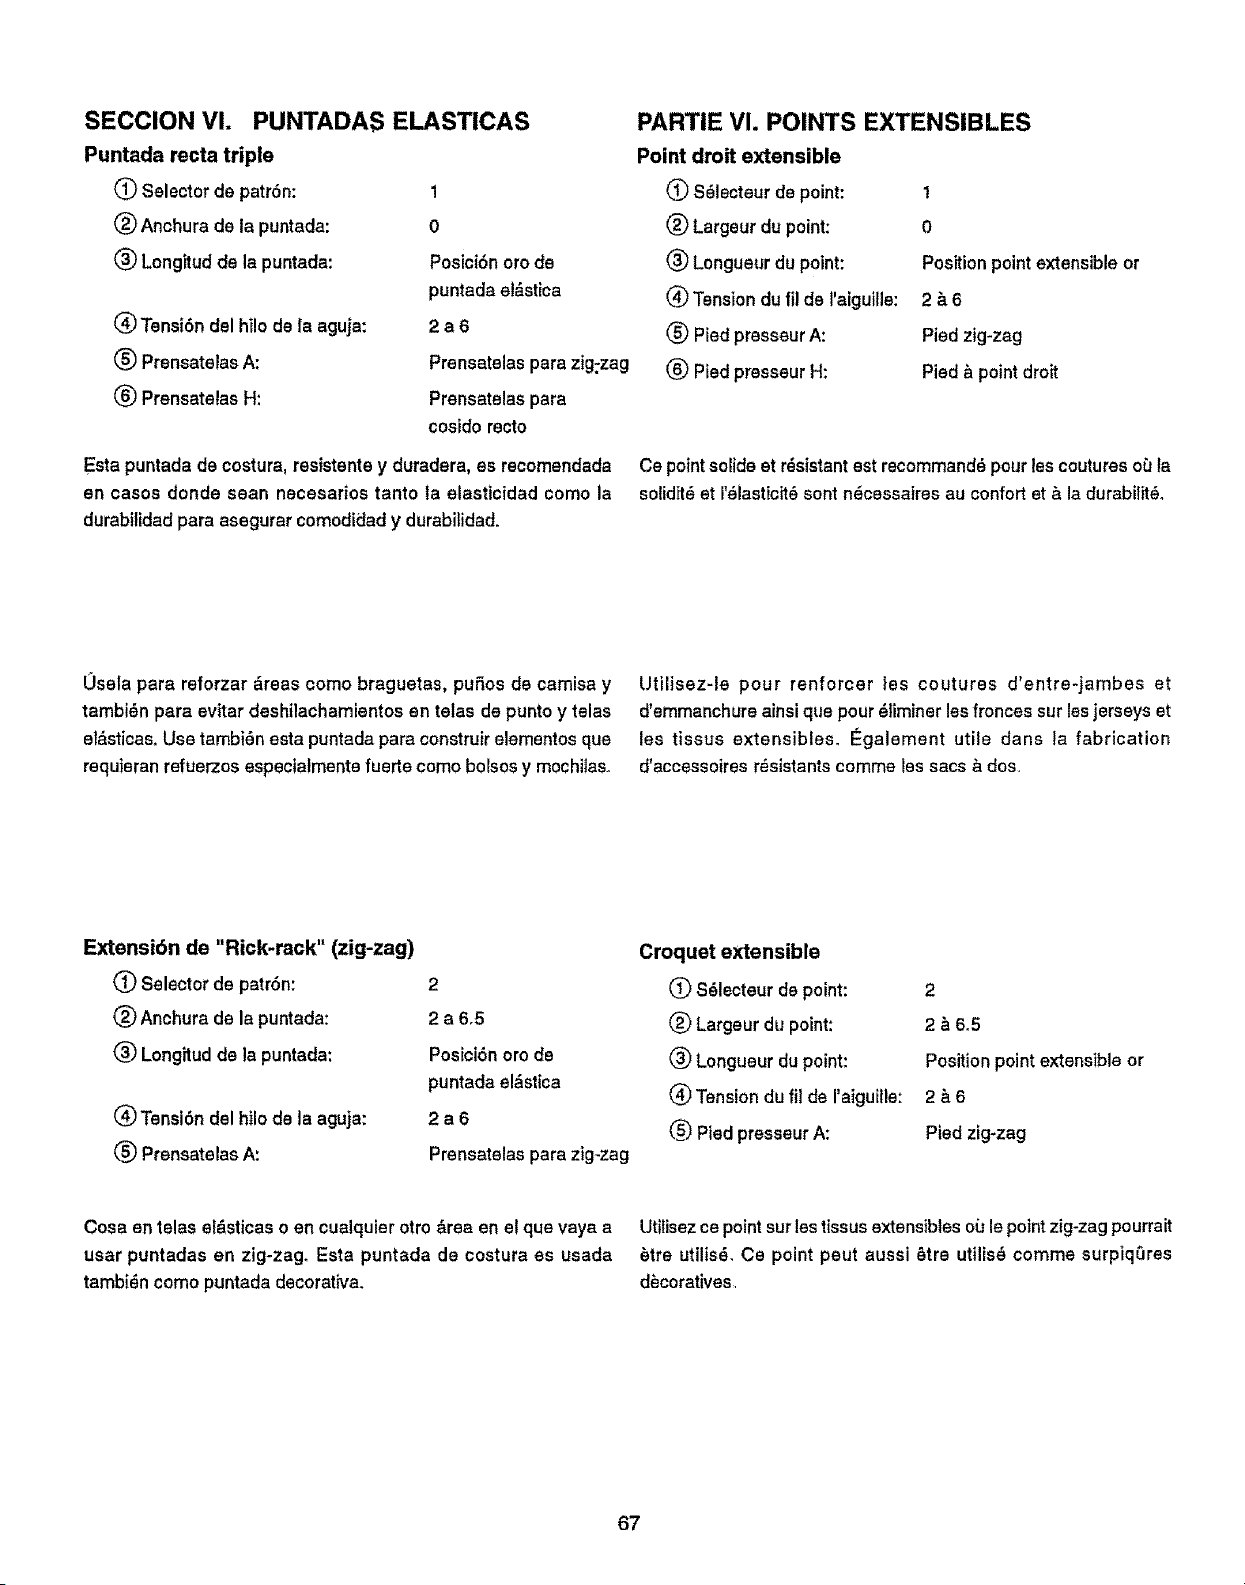
SECCION VI.
Puntada recta triple
(_ Selectorde patr6n:
(_ Anchura de la puntada:
(_ Longitudde la puntada:
PUNTADAS ELASTICAS
(_ Tensi6n del hi!o de la aguja:
(_ PrensatelasA:
_) PrensatelasH:
1
0
Posici6n orode
puntada e!&stiea
2a6
Preneatelaspara zig:.zag
Pronsatolas para
cosidorecto
Esta puntadade costura,resistentey duradera, es recomendada
en casos donde soan necesarios tanto ta elasticidad como la
durabilidadpara asegurarcomodidady durabitidad.
PARTIE VL POINTS EXTENSIBLES
Point droit extensible
(_) S_lecteurde point:
€_)Largeurdu point:
(_) Longueurdupoint:
_) Tensiondu fi! de I'aiguilie:
(_) Piedpresseur A:
_) PiedpresseurH:
1
0
Position pointextensibleor
2&6
Pied zig-zag
Pied & point droit
Ce pointsolidset r_sistantest recommand_ pour teecoutureso_Jta
solidit_ et I'_lasticit6sent n_cessaires au confortet _ la durabiitt_.
0sela para reforzar &reas como braguetae, pufios de camisa y
tambi_n para evitar deshilachamiantos en tetas de punto y telas
ei&sticas. Use tambiSn esta puntada para construir elementos qua
requieran refuerzos especialmentefuerte como bolsos y mochiias.
Utilisez-le pour renforcer lee coutures d'entre-jambes et
d'emmanchure ainsi qua pour 8]iminer los fronces sur los jerseys et
lee tissue extensibles, Egalement utile dane ta fabrication
d'accessoires r_sistants comma lss sacs & dos.
Extensi6n de "Rick-rack" (zig-zag)
Selectorde patr6n:
(_ Anehurade la puntada:
_') Longitudde la puntada:
(4_Tensi6n del hilode la aguja:
(_ PrensatelasA;
Croquet extensible
2 (_ S_lecteur de point: 2
2 a 6,5 (_ Largeur du point: 2 _ 6°5
Posici6n ore de (_) Longueur du point: Position point extensible or
puntada el&stica (_ Tension du fil de raiguille: 2 & 6
2 a 6 _ Pied prosseur A: Pied zig-zag
Prensatelas para zig-zag
Coea en telas el&sticas o on cualquierotro &rea en et qua vaya a Utilisezce point sur leetissus extensibles oiJle pointzig-zagpourrait
usar puntadas en zig-zag. Esta puntada de costura es usada _tre utilisS. Ce point pout aussi 6tre utilis_ comma surpiqOres
tambi_ineomo puntada decorativa, d_coratives.
67
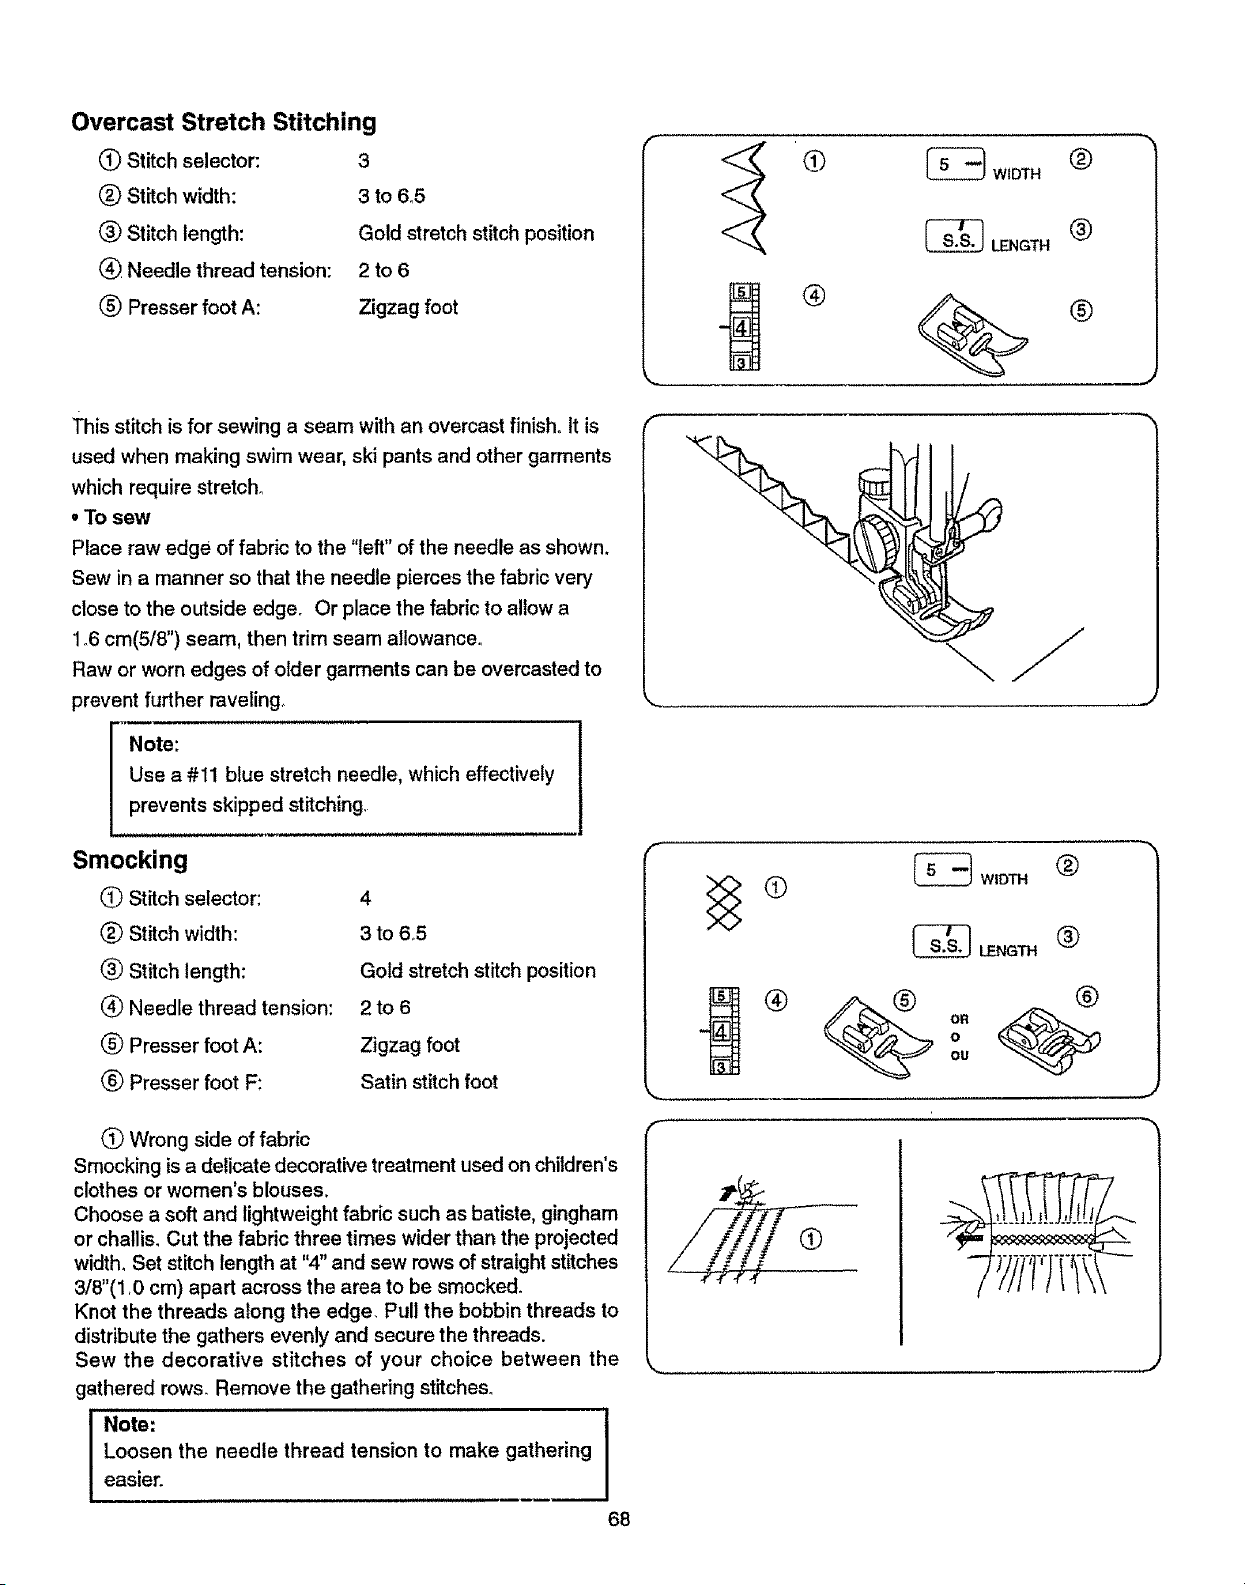
Overcast Stretch Stitching
(_) Stitch selector:
® Stitch width:
® Stitch length:
(_ Needle thread tension:
(_) Presser foot A:
3
3 to 6°5
Gold stretch stitch position
2 to6
Zigzag foot
® iA3 w,oT.®
.GT.®
This stitch is for sewing a seam with an overcast finish. It is
used when making swim wear, ski pants and other garments
which require stretch°
• To sew
Place raw edge of fabric to the "left" of the needle as shown.
Sew in a manner so that the needle pierces the fabric very
close to the outside edge° Or place the fabric to allow a
1o6cm(5/8") seam, then trim seam allowance°
Raw or worn edges of older garments can be overcasted to
prevent further raveling,
J
Note:
Use a #I1 blue stretch needle, which effectively
prevents skipped stitching,
Smocking
Stitch selector: 4
® Stitch width: 3 to 6,5
® Stitch length: Gold stretch stitch position
Q Needle thread tension: 2 to 6
_) Presser foot A: Zigzag foot
(_) Presser foot F: Satin stitch foot
F"
w,o .
_ LENGTH
®
®
OR
0
OU
(_ Wrong side of fabric
Smocking is a delicate decorative treatment used on children's
clothes or women's blouses.
Choose a soft and lightweight fabric such as batiste, gingham
or challis. Cut the fabric three times wider than the projected
width. Set stitch length at 'W' and sew rows of straight stitches
3/8"(1,0 cm) apart across the area to be smocked.
Knot the threads along the edge. Pull the bobbin threads to
distribute the gathers evenly and secure the threads.
Sew the decorative stitches of your choice between the
gathered rows. Remove the gathering stitches.
Note:
Loosen the needle thread tension to make gathering
easier.
68
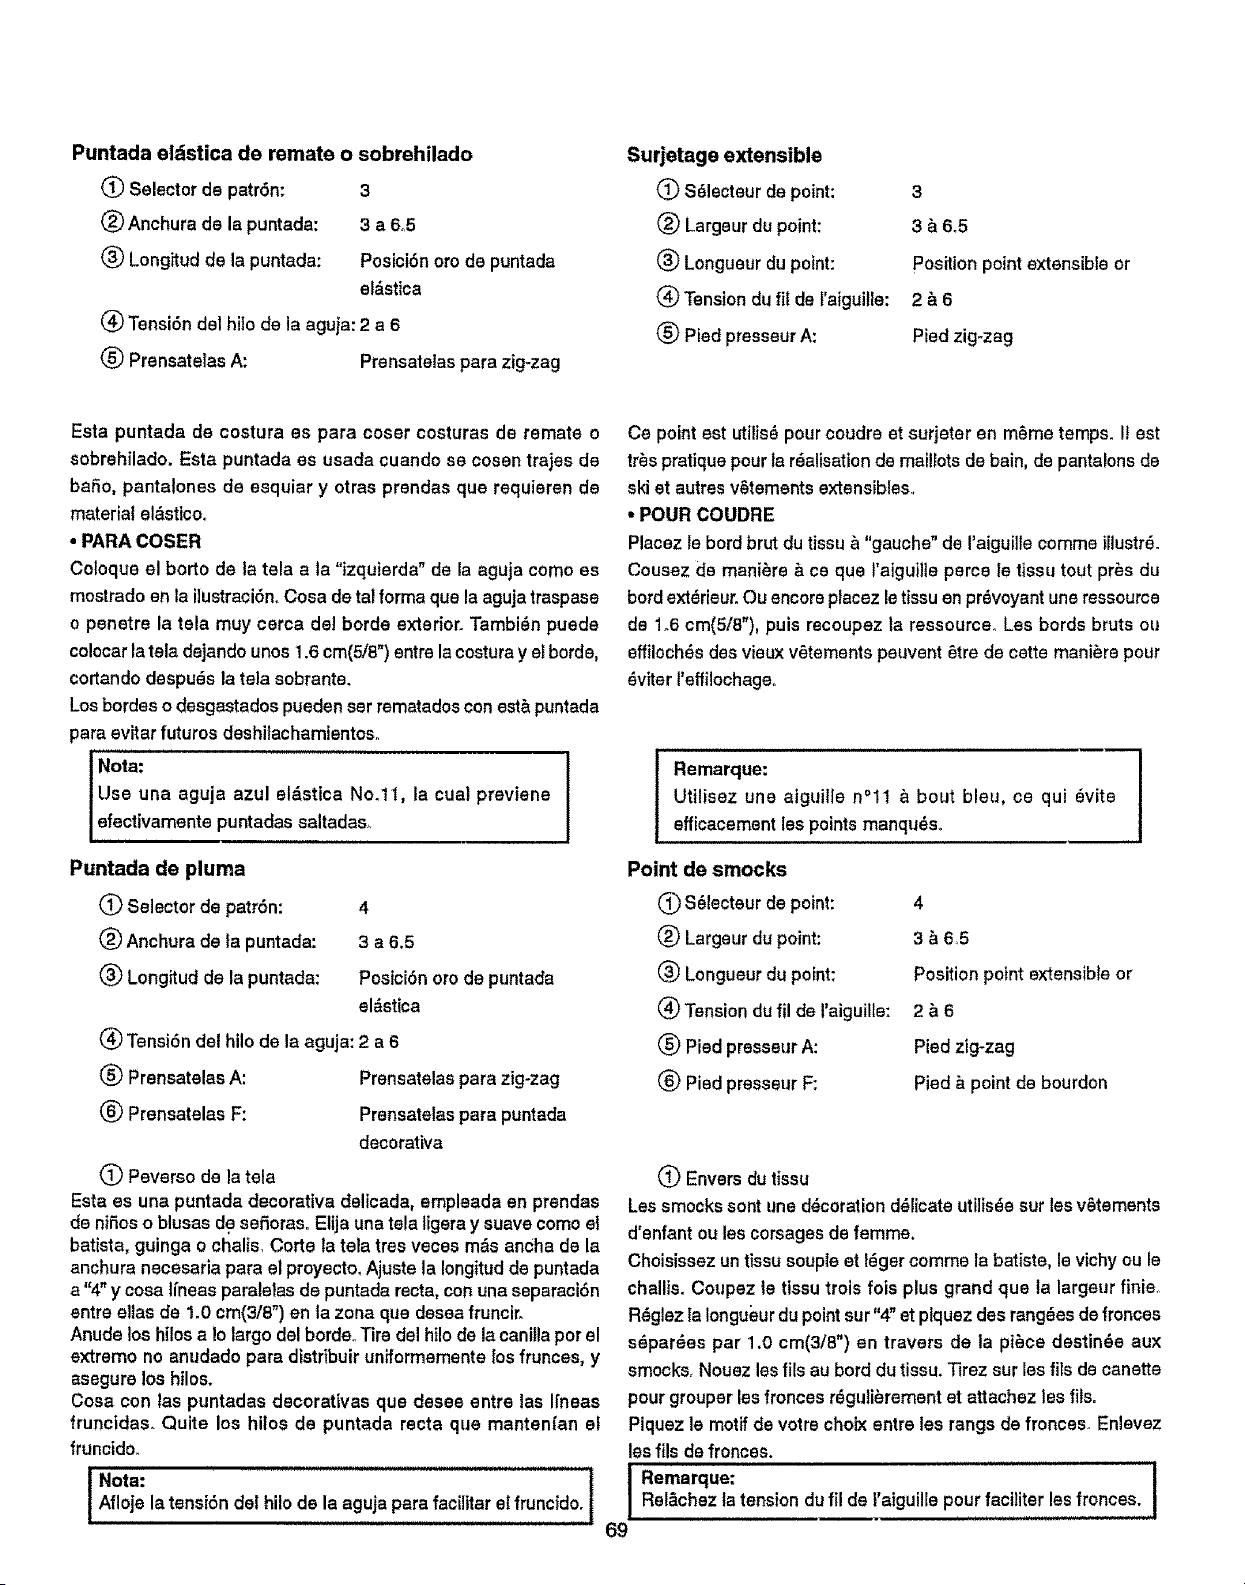
Puntada eldstica de remate o sobrehilado
Selector de patrbn:
(_) Anchura de la puntada:
(_ Longitud de la puntada:
3
3a6o5
Posicidn ore de puntada
el_stica
(_ Tensi6n del bile de la aguja: 2 a 6
(_) Prensatelas A: Prensatelas para zig-zag
Surjetage extensible
S_lecteurde point:
(_ Largeurdupoint:
(_) Longueur du point:
(_ Tension du fil de l'aiguille:
(_) Pied presseur A:
3
3_6o5
Position point extensible or
2&6
Pied zig*zag
Esta puntada de costura es para coser costuras de remate o
sobrehilado. Esta puntada es usada cuando se cosen traies de
babe, pantalones de esquiar y otras prendas qua requieren de
material el_,stico.
• PARA COSER
Coioque el borto de la tela a la "izquierda" de la aguja come es
mostrado en la i]ustraci6noCosa de tel forma que la agujatraspase
o penetre la tela muy cerca del borde exterior. Tambi_n puede
co!ocar la tela dejando unos 1.6 cm(5/8") entre lacosturay ei borde,
cortando despuds la tela sobrante.
Losbordes o desgastadospueden ser rematadoscon est,. puntada
para evitar futures deshilachamientoso
i.e. I
Use una agula azul et&stica No.tt, la cual previene
efectivamente puntadas saltadas_
Puntada de pluma
(_) Selectorde patr6n:
(_) Anchura de la puntada:
(_) Longitud de la puntada:
4
3a6,5
Posici6n ore de puntada
eldstica
(_) Tensi6n del hilo de la aguja:2 a 6
(_ Prensatelas A: Prensatelas para zig-zag
(_ Prensatelas F: Prensatelas para puntada
decorativa
(_ Peverso de la tela
Esta es una puntada decorativa delicada, empleada en prendas
de nibos o blusas de seboraso Elija unatela ligeray suave comeel
batista, guinga o chalis, Corte la te_atres veces mds anchade la
anchuranecesaria para el proyecto, Ajuste la Iongitud de puntada
a "4" y cosa Ifneas paralelas de puntada recta, con una separacibn
entre elias de 1.0 cm(3/8") en ta zona que desea frunciro
Anude los hilos a iolargo del bordeoTiredel bilede la canilla per el
extreme no anudado para dtstribuir uniformemente ios frunces, y
asegure los hilos.
Cosa con las puntadas decorativas qua desee entre las Ifneas
frunctdas. Quite los hilos de puntada recta qua manten{an et
fruncido.
Nota: 1
Afloje la tensi6n del hilo de la aguja para facilttarel fruncido.
Ce point est utilis8pour coudre et surjeter en m_me temps. !! est
tr_spratique pour la r_alisation de mailiots de bain, de pantalons de
ski et autres v_tements extensibleso
• POUR COUDRE
Placez le bord brut du tissu_ "gauche" de I'aiguille comma iliustr6.
Cousez de mani_re & co qua l'aigui!te percele tissutout pros du
bord extSrieur.Ou encoreplacez letissuon pr_voyant uneressource
de 1.6 cm(5/8"), puis recoupez la rassource, Les herds bruts ou
offiloch6s desvieuxv_tementspeuvent6tre de carte mani_re pour
_viter I'effilochageo
Remarque:
Utilisez une aiguille n°1! _ bout bleu, ce qui _vite
efficacement les points manqu_so
Point de smocks
(_ S_lecteur de point:
(_) Largeur du point:
(_) Longueur du point:
(_ Tension dufil de I'aiguille:
(_) Pied presseurA:
_) Pied presseur F:
4
3&6,5
Position point extensible or
2_6
Pied ztg-zag
Pied & point de bourdon
_) Envers du tissu
Les smockssent une d_coration d_licate utilis_e sur les v6tements
d'enfant ou les corsages de femme,
Choisissez un tissu souple et I_ger comma la batiste, le vichy ou le
challis. Coupez le tissu trois fois plus grand qua la largeur finie,
R_glezfa Iongueurdu point sur"4" et ptquez des tangles defronces
s_par_es par 1.0 cm(3/8") en travers de la piece destin_e aux
smocks, Nouez les fils au herd du tissu. Tirez sur les fiIs de canette
pour grouper les fronces r_iguli_rementat attachez lea ills.
Piquez le motif de votre choix entre les rangs de fronces. Enlevez
les ills de fronces.
Remarque:
Rel&chezta tension dufit de raiguille pour faciliter lesfronces.
69
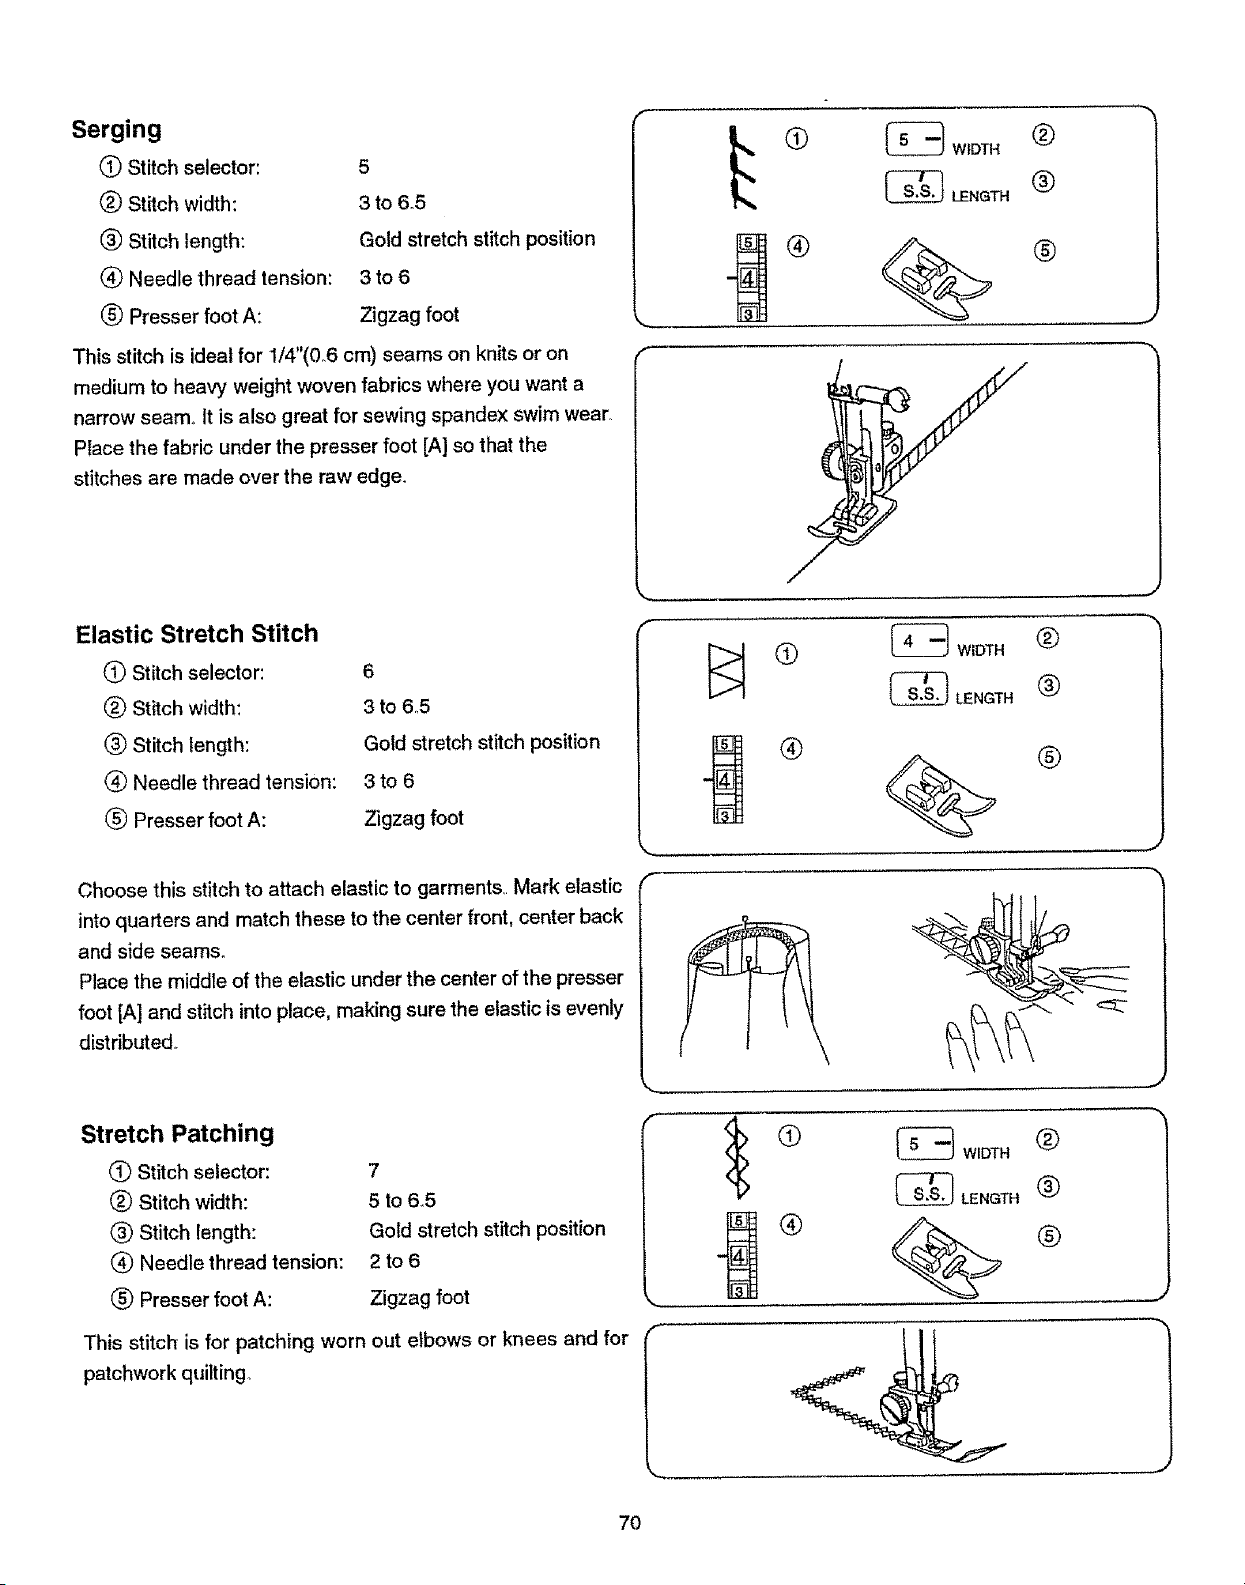
Serging
(_ Stitch selector:
(_) Stitch width:
® Stitch length:
(_) Needle thread tension:
(_) Presser foot A:
This stitch is ideal for 1/4"(0.6 cm) seams on knits or on
medium to heavy weight woven fabrics where you want a
narrow seam. It is also great for sewing spandex swim wear.
Place the fabric under the presser foot [A] so that the
stitches are made over the raw edge.
5
3 to 6°5
Gold stretch stitch position
3to 6
Zigzag foot
f
WIDTH (_)
_ LENGTH (_
Elastic Stretch Stitch
(_ Stitch selector:
(_ Stitch width:
® Stitch length:
Needle thread tension:
® Presser foot A:
6
3 to 6,5
Gold stretch stitch position
3to 6
Zigzag foot
Choose this stitch to attach elastic to garments.. Mark elastic
into quarters and match these to the center front, center back
and side seams.
Place the middle of the elastic under the center of the presser
foot [A] and stitch into place, making sure the elastic is evenly
distributed.
Stretch Patching
(_ Stitch selector:
(_) Stitch width:
® Stitch length:
(_ Needle thread tension:
® Presser foot A:
7
5 to 6.5
Gold stretch stitch position
2 to6
Zigzag foot
This stitch is for patching worn out elbows or knees and for
patchwork quilting
f
@
®
®
®
®
_ WIDTH (_
_--_ LENGTH ®
70
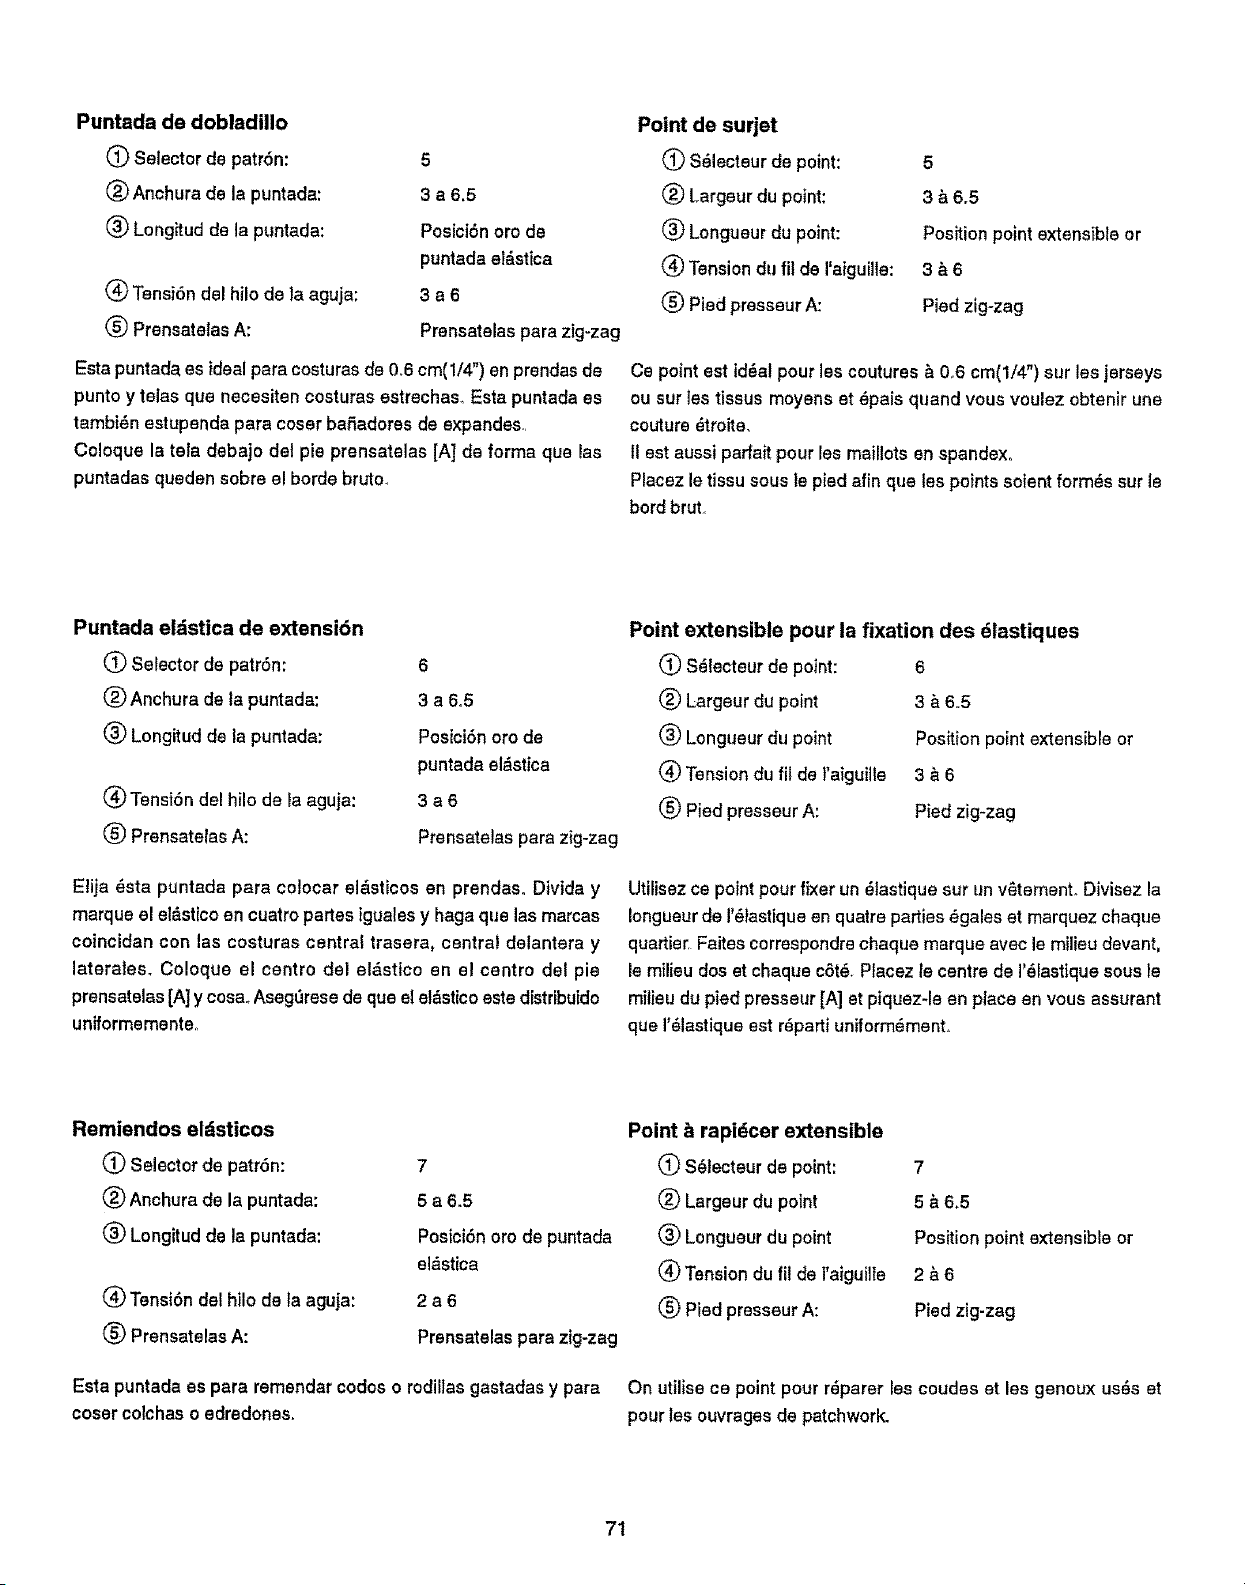
Puntada de dobladillo
O Selectorde patr6n:
(_ Anehurade la puntada:
(_) Long_tudde la puntada:
(_ Tens}6ndel bile de la aguja:
(_) Prensatelas A:
5
3a6.5
Posici6n ore de
puntada el_stica
3a6
Prensatelas para zig-zag
Esta puntada es ideal pare costuras de 0.6 cm(1/4") en prendas de
punto y tales qua necesiten costuras estrechas_ Esta puntada es
tambiSn estupenda pare coser bafiadores de expandes..
Coloque la te_a debajo del pie prensatelas [A] de forma qua las
puntadas queden sobre e! horde brute.
Point de surjet
(_ S_lecteur de point:
(_) Largeur du point:
(_ Longueurdu point:
Tensiondu filde I'aiguille:
(_) Pied presseur A:
5
3 _,6.5
Positionpoint extensibleor
3&6
Piedzigzag
Ce point est ideal pour lea coutures _ 0..6 cm(1/4") sur les jerseys
ou sur les tissus moyens et _pais quand vous voulez ebtenir une
couture _troite.
It est aussi parfait pour lea maillots en spandex°
Placez le tissu sous le pied afin qua les points soient form,s sur be
bord brut.
Puntada eldstica de extensi6n
(_ Selector de patr6n:
(_) Anchura de ta puntada:
(_) Longitud de la puntada:
(_) Tensi6n del hilo de ta aguja:
_) PrensatelasA:
6
3a6o5
Posici6n ore de
puntada el&stica
3a6
Prensatelas pare zig-zag
Elija _sta puntada para colocar el_sticos en prendas° Divide y
marque el el&stico en cuatro partes iguales y haga qua las marcas
coincidan con las costuras central trasera, central delantera y
laterales. Coloque el centre del el_,stice en el centre del pie
prensatelas [A] y cosa_ Aseg_rese de qua el et&sticoeste distribuido
uniformemente,.
Point extensible pour la fixation des dlastiques
(_) Sdlecteurde point:
(_) Largeurdu point
(_) Longueur du point
_) Tension du fil de }'aiguitle
(_) Pied presseur A:
6
3_6.5
Position point extensible or
3&6
Pied zig-zag
Utilisez ce point pour fixer un _lastique sur un v_tement. Divisez la
Iongueur de I'_lastique en quatre parties _gales et marquez chaque
quertier, Faites correspondre cheque marque avec le milieu devant,
le milieu dos et cheque cSt_. Placez le centre de 1'81astique sous le
milieu du pied presseur [A] et piquez-le en place en vous assurant
qua 1'81astique est rdparti unfformEiment.
Remiendos eldsticos
(_ Selector de patr6n:
(_ Anchura de la puntada:
(_ Longitudde la puntada:
(_ Tensi6ndelhilode la aguja:
(_) Prensatelas A:
7
5a6.5
Posici6n ore de puntada
el,_stica
2a6
Prensatelas pare zig-zag
Esta puntada es pare remendar codes o rodillasgastadas y pare
cosercolchas o edredones.
Point b rapidcer extensible
(_ S_lecteurde point:
(_ Largeurdupoint
(_ Longueur du point
(_ Tension du fil de l'aiguille
(_ Pied presseurA:
7
5 &6_5
Position point extensible or
2&6
Pied zig-zag
On utilise ce point pour r8parer les coudes etles genoux uses et
pour les ouvrages de patchwork.
71
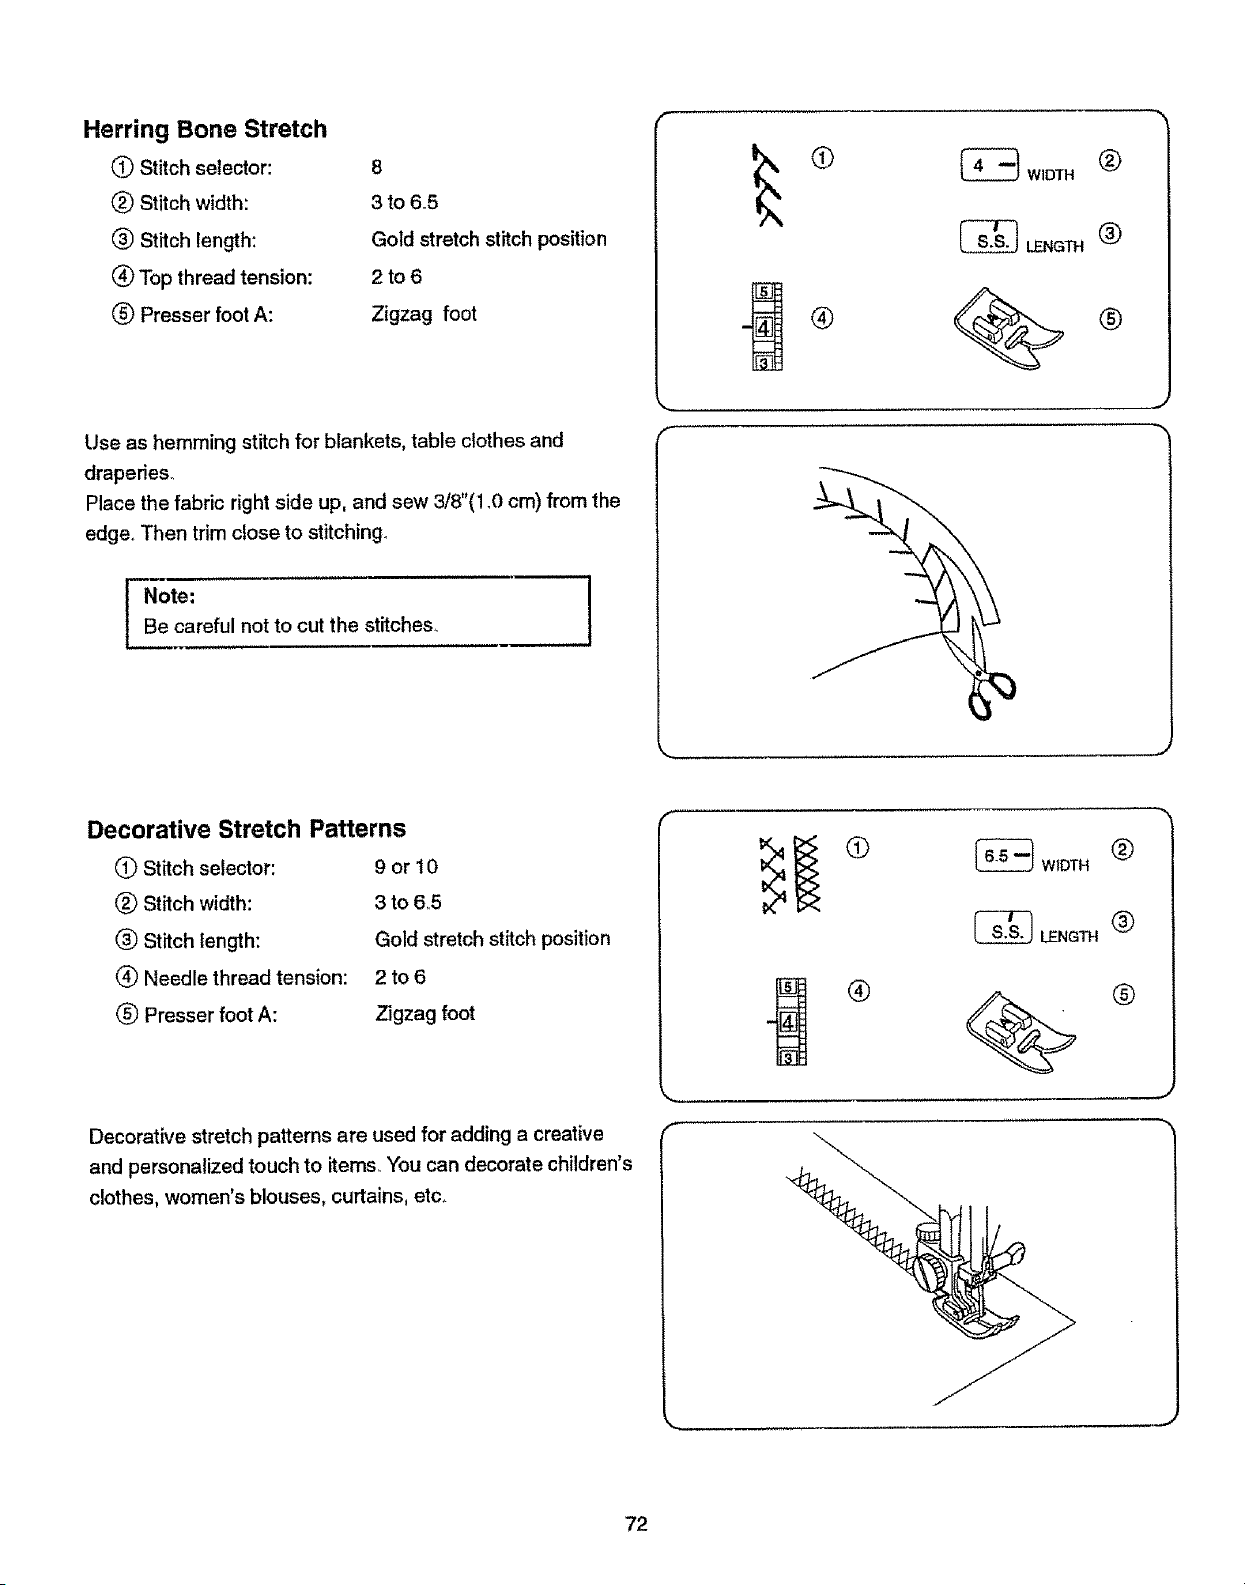
Herring Bone Stretch
(_ Stitch selector:
(_) Stitch width:
(_ Stitch length:
® Top thread tension:
(_) Presser foot A:
8
3 to 6.5
Gold stretch stitch position
2 to6
Zigzag foot
Use as hemming stitch for blankets, table clothes and
draperies_
Place the fabric right side up, and sew 3/8"(1.0 cm) from the
edge,. Then trim close to stitching°
Note:
Be careful not to cut the stitches_
l
{_ WID3"H
_ LENGTH
%
®
®
®
Decorative Stretch Patterns
_) Stitch selector:
(_ Stitch width:
(_ Stitch length:
® Needle thread tension:
(_ Presser foot A:
9or10
3 to 6.,5
Gold stretch stitch position
2 to6
Zigzag foot
Decorative stretch patterns are used for adding a creative
and personalized touch to items. You can decorate children's
clothes, women's blouses, curtains, etc.
_,,,,
f
_ WIDTH (_)
LENGT.®
72
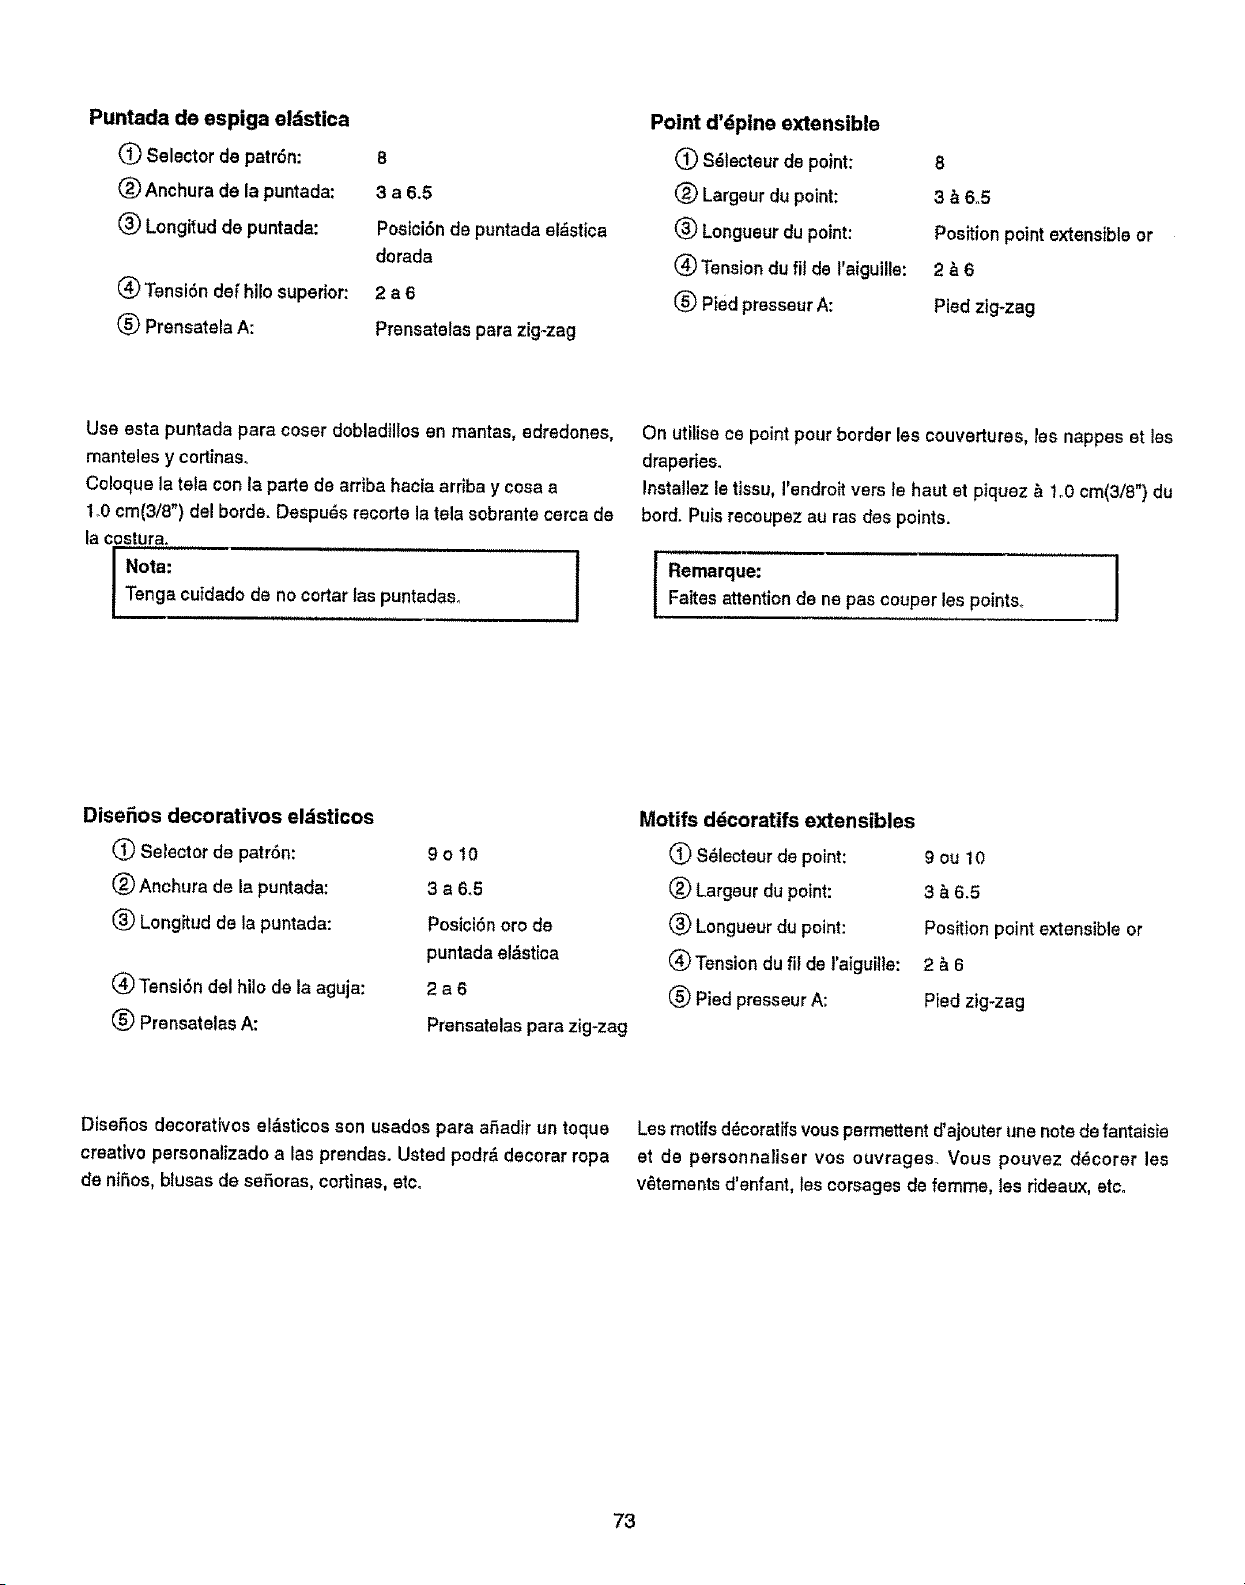
Puntada de espiga oldstica
_'_ Selector de patr6n:
(_) Anchura de la puntada:
(_) Longitudde puntada:
(_ Tensi6ndef hilo superior:
(_) Prensatela A:
8
3 a6.5
Posici6nde puntadaeldstica
dorada
2a6
Pransatelaspara zig_zag
Point d'dpine extensible
S_tecteurde point:
(_ Largeurdu point:
(_) Longueurdu point:
(_ Tensiondu fit de I'aiguille:
1_)Pied presseurA:
8
3 _6,.5
Positionpoint extensibleor
2_6
Pied zig_zag
Use esta puntada para coser dobladiltos en mantas, edredones,
manteles y cortinas.
Coloquela tela conla parte de arriba haciaarriba y cosaa
1_0cm(3/8") del horde. Despudsrecortela tela sobranto cerca de
la costura.
Nora: I
Tenga cuidadode nocortartaspuntadas_
On utilisece pointpour border les couvertures,lea nappes etles
draperies.
Installezle tissu,]'endroit vers le haut et piquez ,_1o0cm(3/8") du
bord. Pl,isrecoupezauras des points.
i Remarque: 1
Faitesattention de ne pas couper les points_
Disefios decorativos eldsticos
(_ Selector de patr6n:
{_ Anchura de la puntada:
Longitud de la puntada:
(_ TensiSndel hilo de la aguja:
(_) Prensatelas A:
Motifs ddcoratifs extensibles
9 o 10 (_ S_lecteur de point: 9 ou 10
3 a 6.5 (_) Largeurdu point: 3 _ 6.5
Posici6noro de (_) Longueurdu point: Positionpointextensibleor
puntadael.Sstica (_ Tensiondu fil de l'aiguitle: 2 & 6
2 a 6 (_) Pied presseur A: Pied zig-zag
Prensatelaspara zig-zag
DiseSos deoorativosel_.sticos son usados para aSadir un toque Les motffs ddcoratifsvous permettent d'ajouter une note defantaisfe
creativo personalizadoalas prendas. Ustedpodr_decorar ropa et de personnalissr vos ouvrages. Vous pouvez ddcorer les
de niSos,blusasde sefioras,cortinas,etco vStementsd'enfant,les corsagesde femme, las rideaux,etco
73
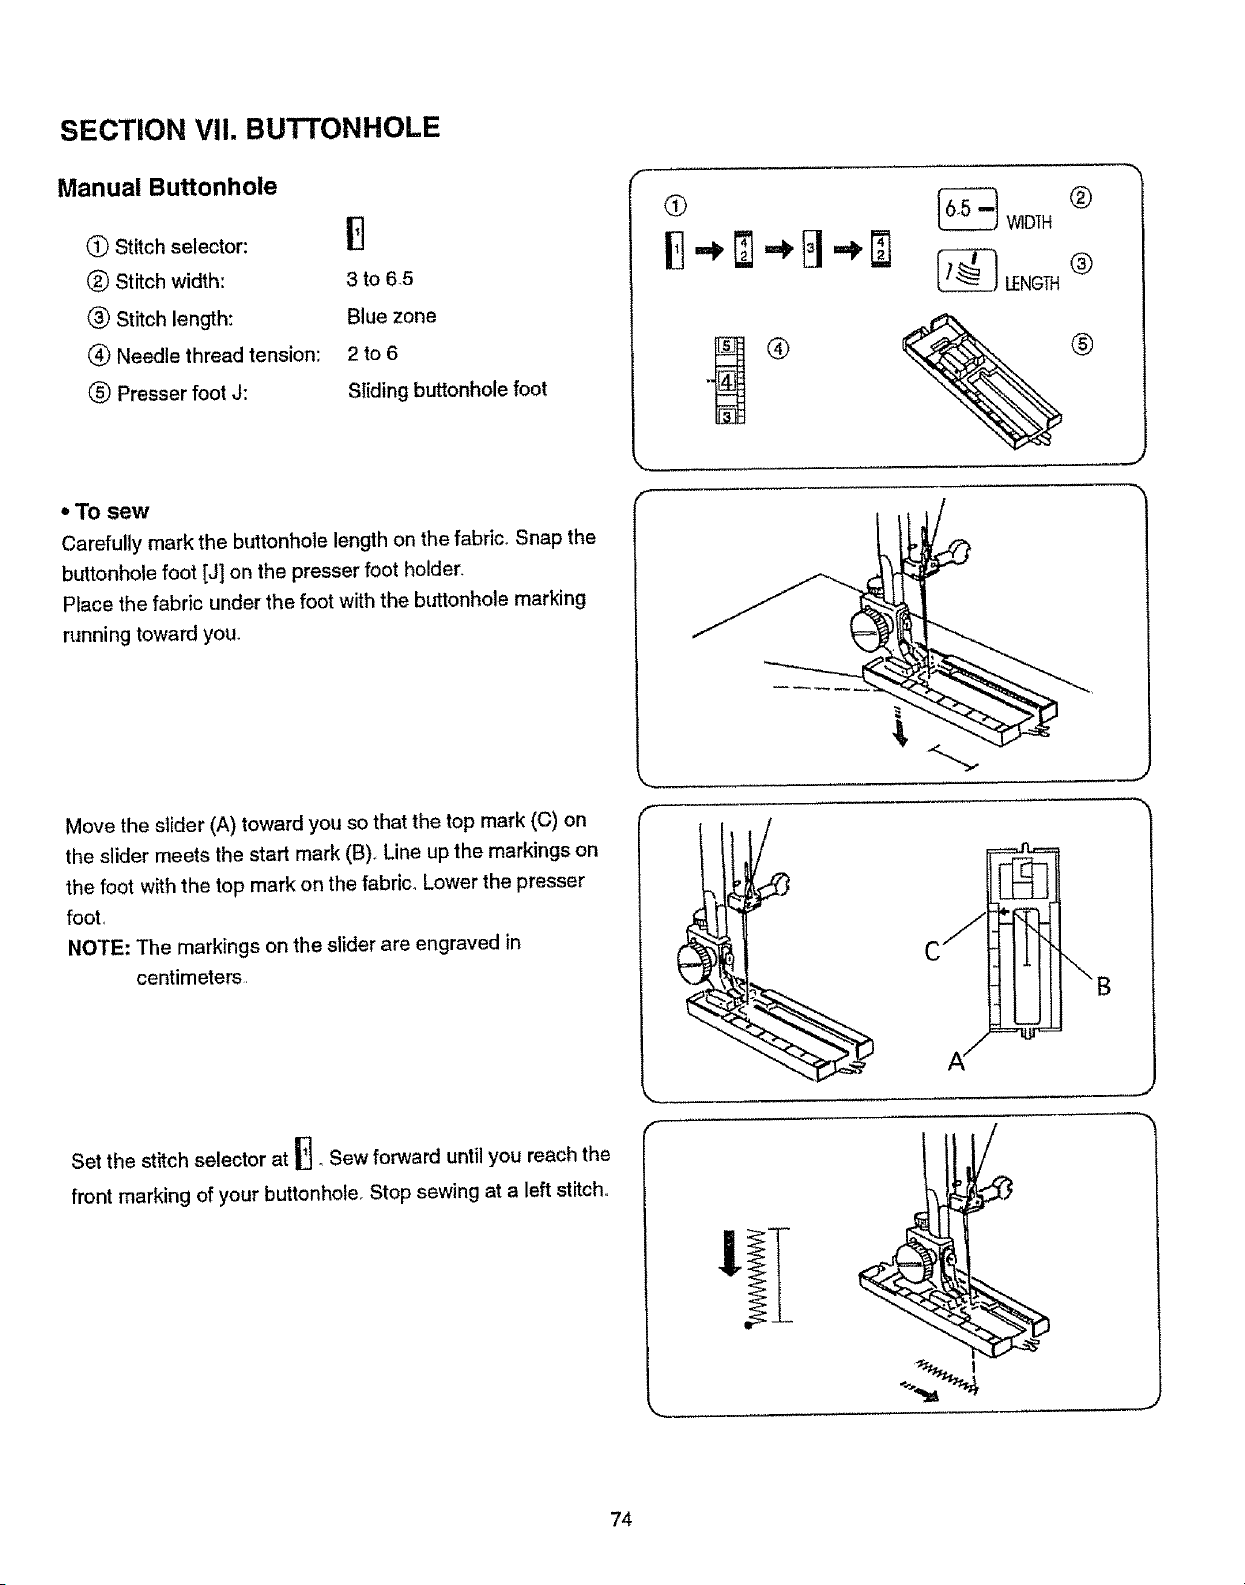
SECTION VII. BUTTONHOLE
Manual Buttonhole
(_ Stitch selector:
(_ Stitch width:
(_) Stitch length:
(_ Needle thread tension:
(_) Presser foot J"
3 to 6.5
Blue zone
2to 6
Sliding buttonhole foot
_ W]D'fH (_
LEmTH®
®
• To sew
Carefully mark the buttonhole length on the fabric° Snap the
buttonhole foot [J] on the presser foot holder.
Place the fabric under the foot with the buttonhole marking
running toward you.
Move the slider (A) toward you so that the top mark (C) on
the slider meets the start mark (B),, Line up the markings on
the foot with the top mark on the fabric. Lower the presser
fool
NOTE: The markings on the slider are engraved in
centimeters.
!3
Set the stitch selector at _ oSew forward untilyou reach the
front marking of your buttonhole. Stop sewing at a left stitch,,
%,..==,= ....
74
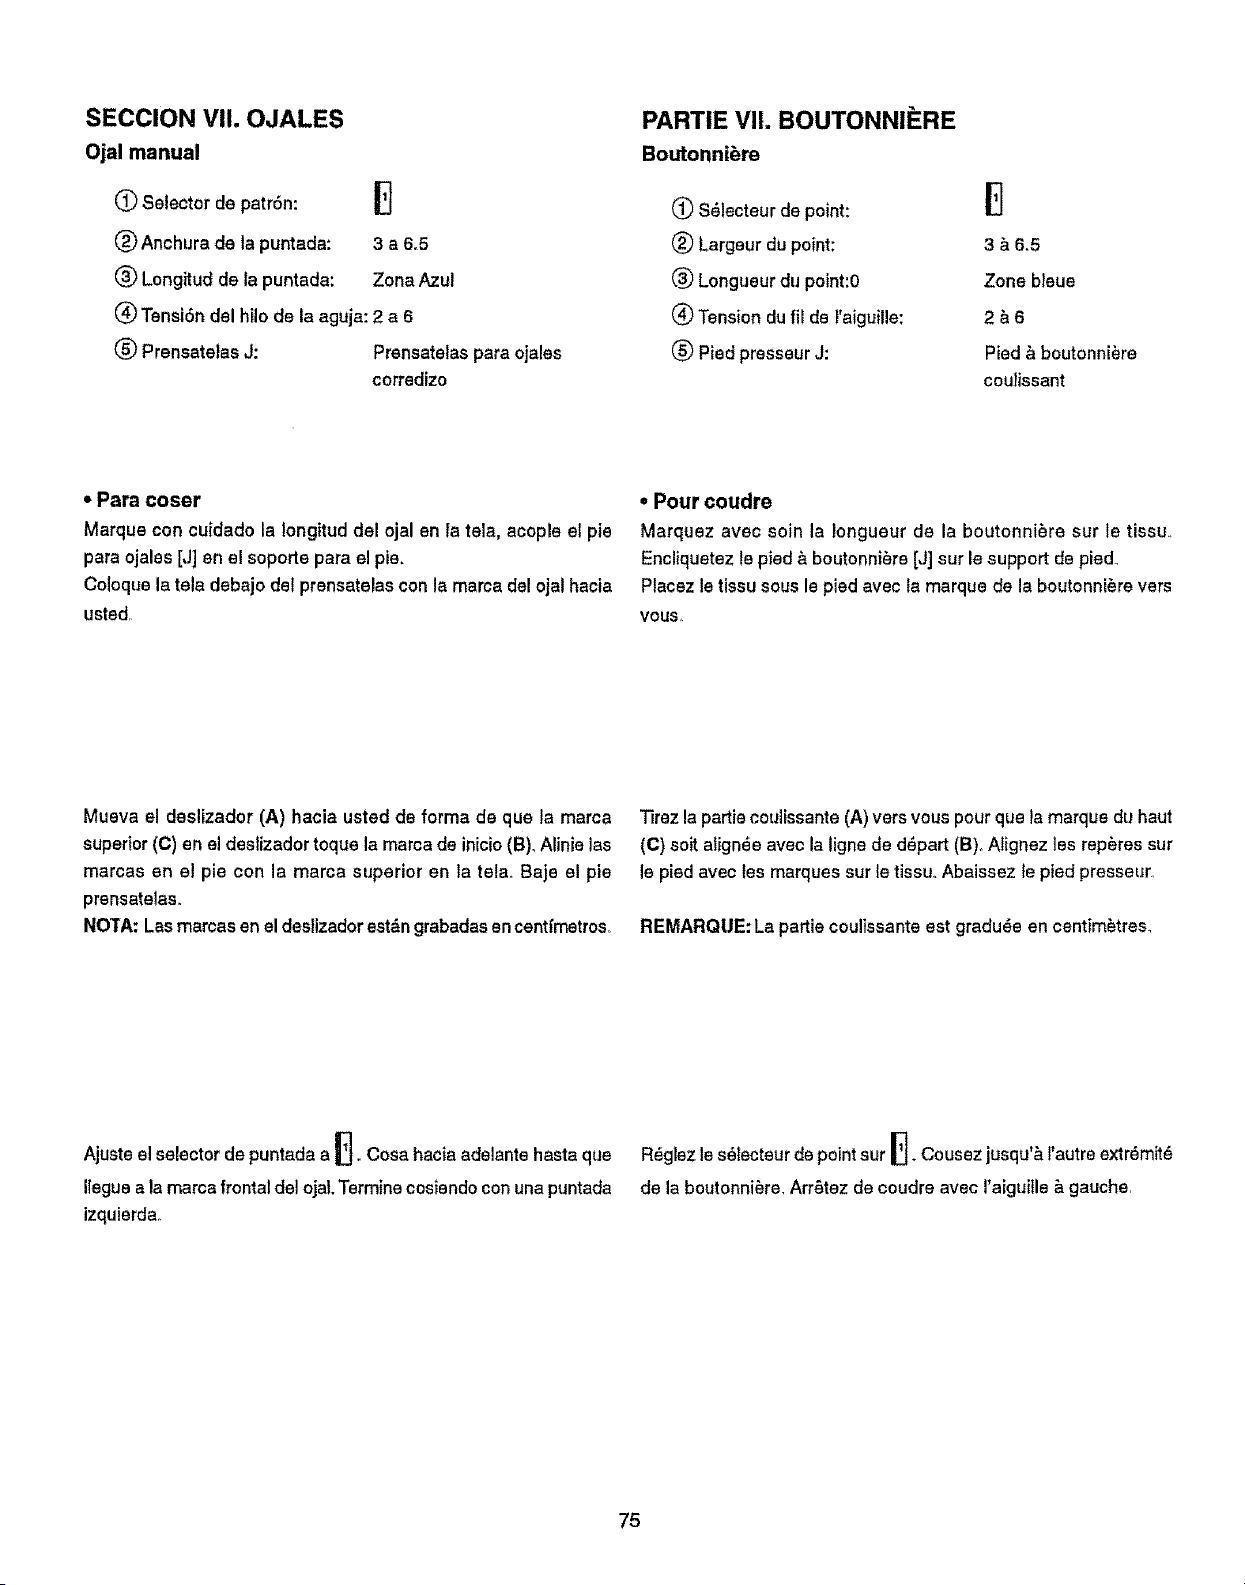
SECCION VII. OJALES
Ojal manual
(_ Selector de patrSn: _]
(_) Anchura de la puntada: 3 a 6.5
(_) Longitud de la puntade: Zone Azul
(_) Tensi6n del hilo de la aguja: 2 a 6
(_) Prensatelas J: Prensatelas pare ojales
corredizo
PARTIE VII. BOUTONNif=RE
Boutonnibre
S_lecteur de point:
(_) Largeur du point:
Longueurdu point:0
Tensiondufii de t'aiguille:
(_ PiedpresseurJ:
!]
3&6.5
Zone bleue
2_6
Pied & boutonniere
coulissant
• Para coser
Marque con cuidado la Iongituddel ojal en la tela, acople el pie
paraojales[J] en el soporte para el pie.
Coioquela tale debajo del prensatelascon la marca del ojal haeia
usted
• Pour coudre
Marquez avec soin la iongueur de la boutonniere sur le tissu.,
Encliquetez te pied & boutonniere[J]sur le supportde pied.
Placezle tissusousle pied avec tamarque de la boutonniere vers
VOUS,
Mueva el deslizador (A) hacia usted de forma de que la marca
superior (C) en el deslizador toque la marca de inicio(B)_Alinie las
marcas en el pie con la marca superior en la telao Baje el pie
prensatelas.
NOI'A: Las marcas en el destizador est&ngrabadas en centfmetros,
_rez la partie coulissante (A) vers vous pour qua la marque du haut
(C) soit align_e avec la ligne de d_part (B)o Alignez ]es rep6res sur
le pied avec tes marques sur le tissuo Abaissez le pied presseur,
REMARQUE: La pattie cou!issante est gradu6e en centim6tres_
13
Ajuste e! selectorde puntadaa I'J, Cosa hacia adelante hastaqua
ITegueala marca frontal del ojaLTermine cosiendo con unapuntada
izquierda.
R6giezle s_lecteur de pointsur . Cousez jusqu'_,rautre extr6mit6
de la boutonniere, Arr6tez de coudre avec I'aiguille & gauche,
75
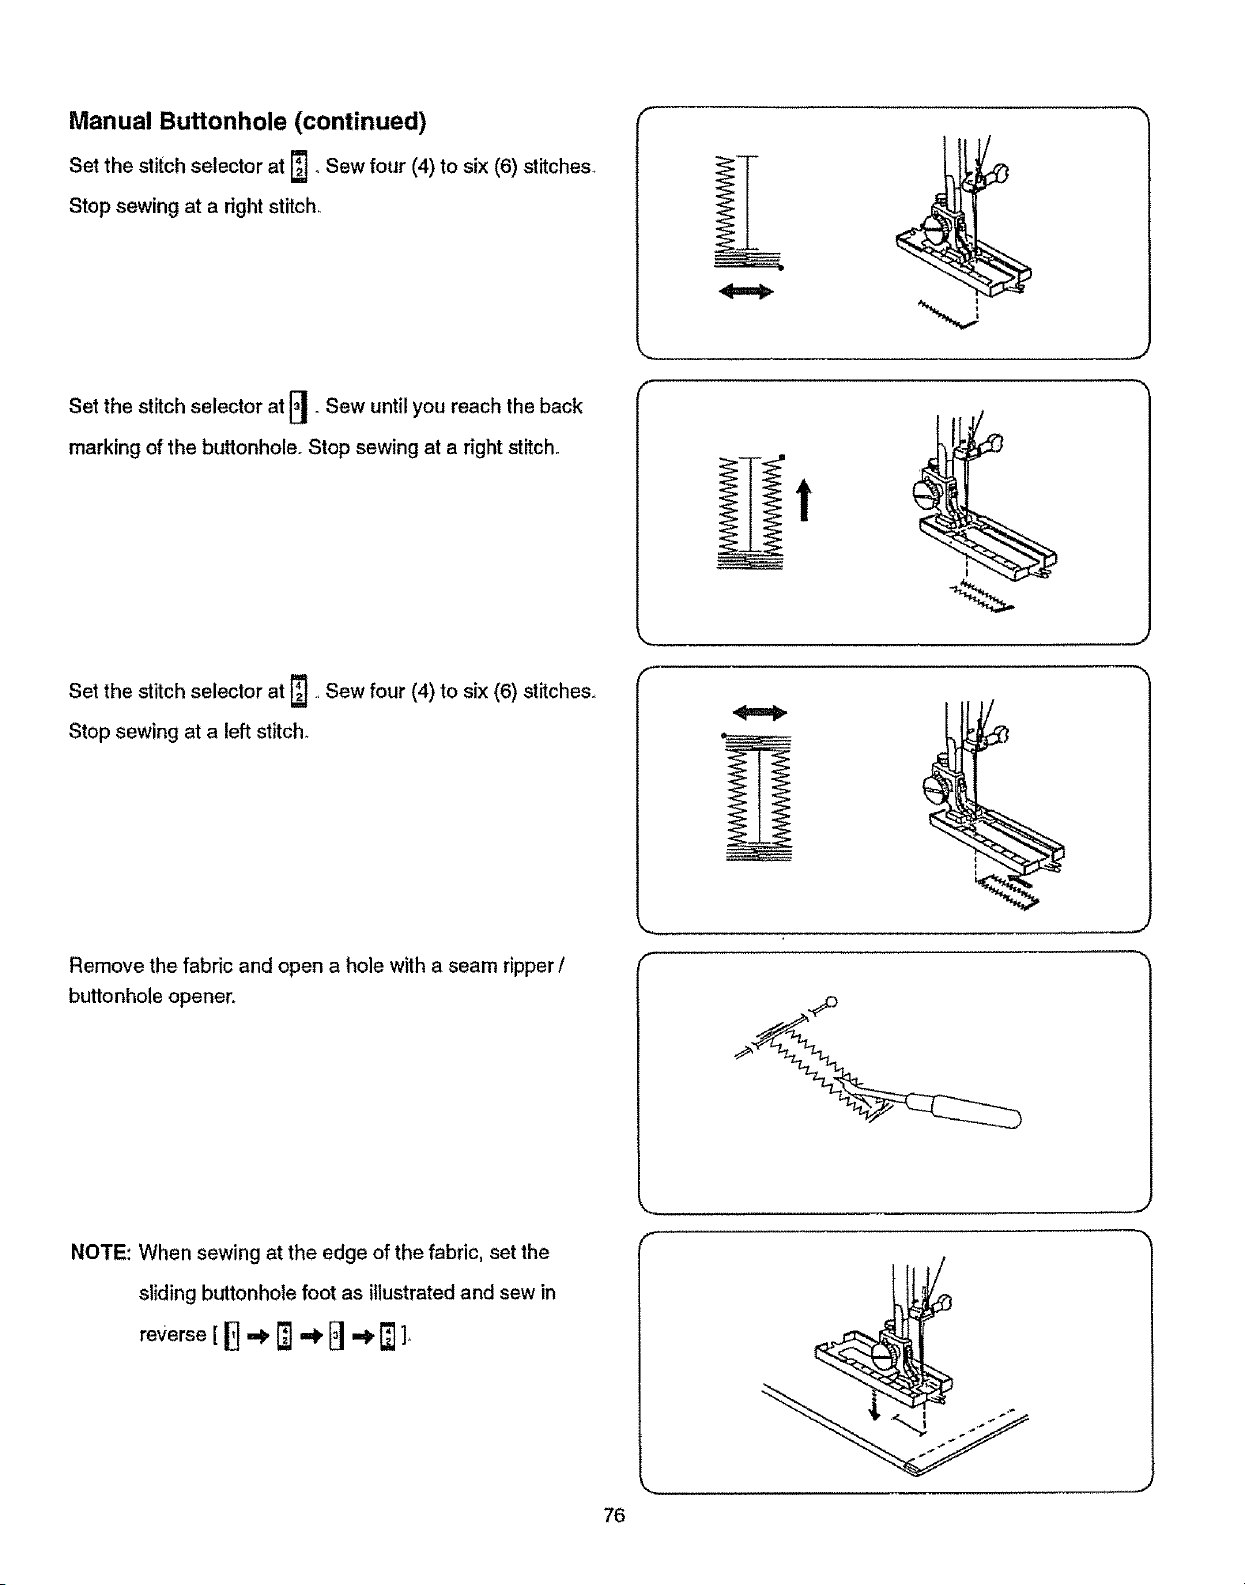
Manual Buttonhole (continued)
Set the stitch selector at [_ oSew four (4) to six (6) stitches_
Stop sewing at a right stitch,,
Set the stitch selector at El. Sew until you reach the back
marking of the buttonhole° Stop sewing at a right stitch.
t
Set the stitch selector at _j, sew four (4) to six (6) stitches,
Stop sewing at a left stitch_
Remove the fabric and open a hole with a seam ripper /
buttonhole opener,
%,,
f
J
NOTE: When sewing at the edge of the fabric, set the
sliding buttonhole foot as illustrated and sew in
reverse [ _] =,_ [_ .=1__ .d_ [_ ],
f
76
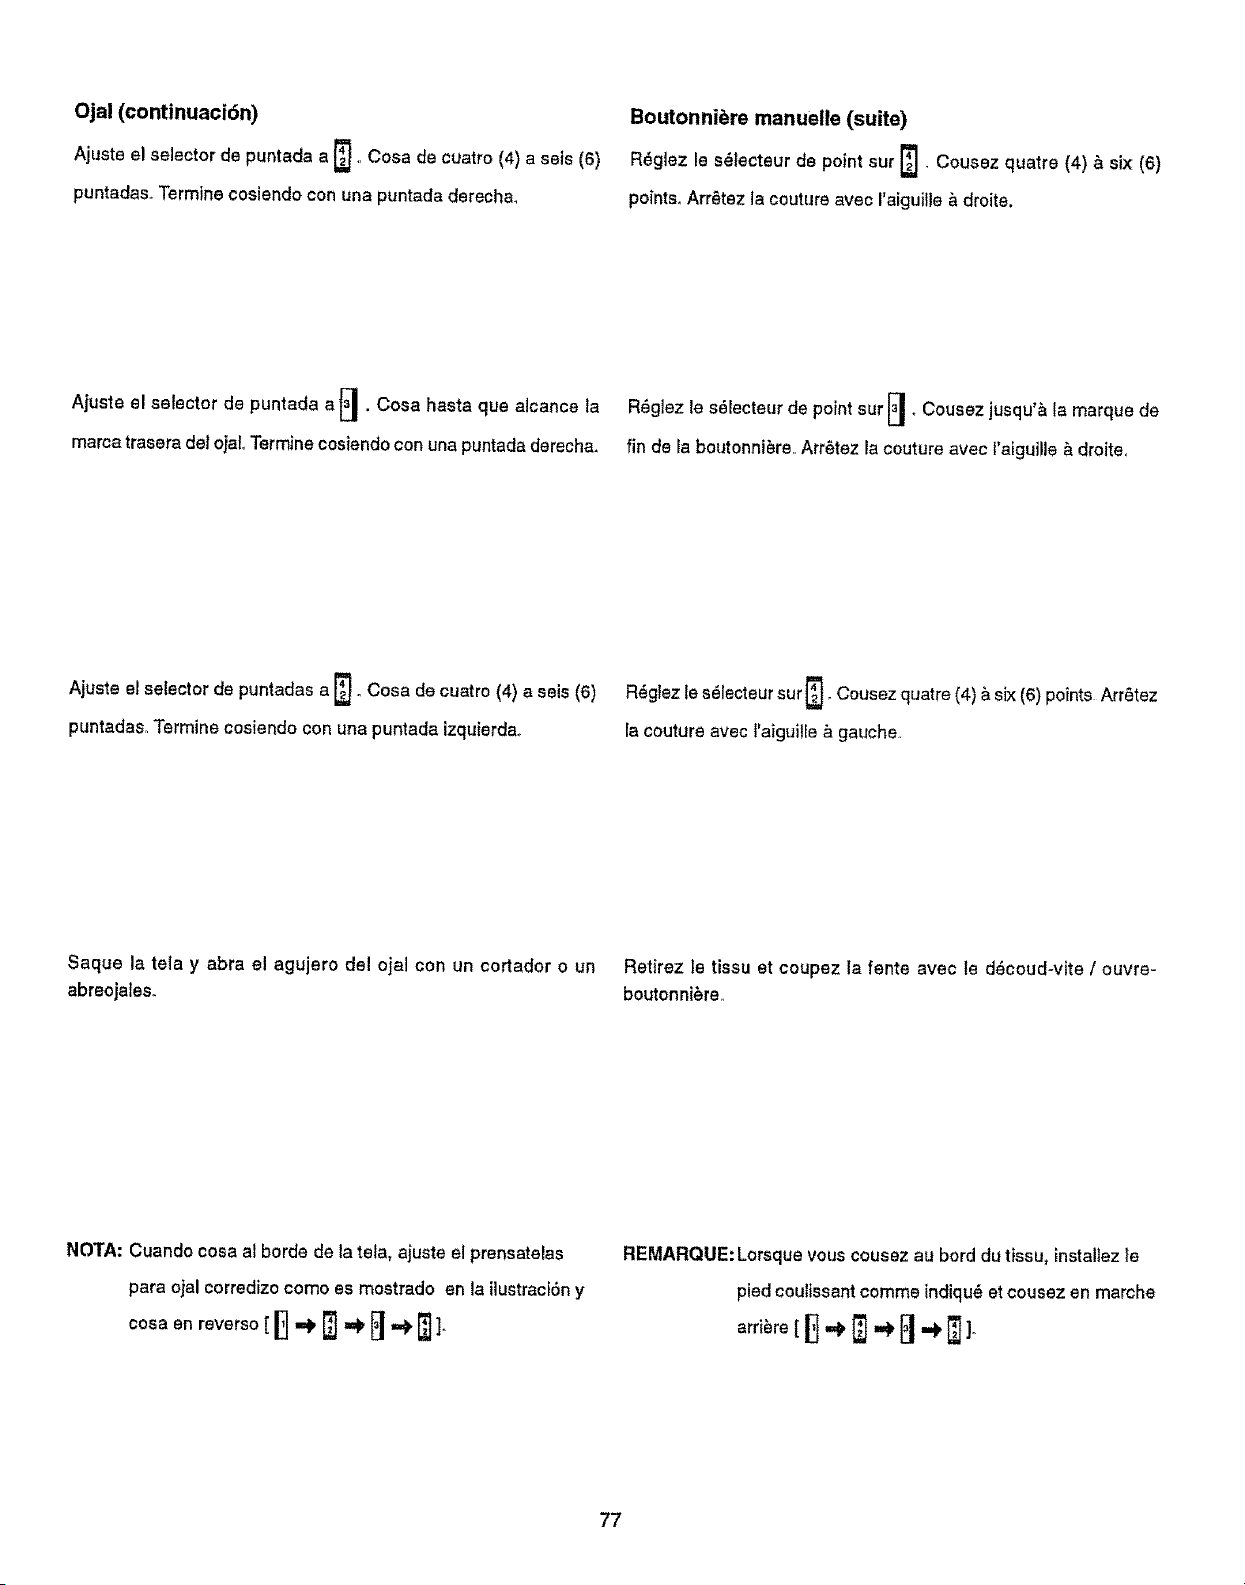
Ojal (continuaci6n)
Ajuste el selector de puntada a ,, Cosa de cuatro (4) a seis (6)
puntadas, Termine cosiendo con una puntada derecha_
Boutonnibre manuelle (suite)
point sur _. Cousez quatre (4) & six (6)
R_glez
le
s_lecteur de
points° Arr_tez la couture avec I'aiguille & droite.
Ajuste el selector de puntada a El. Oosa hasta que alcance ta a_glez le s_lecteur de point sur [_ Cousez jusqu'& la marque de
marca trasera det ojaL Termine cosiendo con una puntada derecha, fin de la boutonniere., ArrStez la couture avec raiguille & droite.,
Ajuste el selector de puntadas a r_. Cosa de cuatro (4) a seis (6) R_glez le s61ecteur sur [_], Cousez quatre (4) _ six (6) points Arr6tez
puntadaso Termine eosiendo con una puntada izquierd& la couture avec l'aiguille & gauche_
Saque la tela y abra el agujero del ojal con un cortador o un Retirez le tissu et coupez la fente avec le d_coud-vite / ouvre-
abreojaleso boutonniere,,
NOTA: Cuando cosa at borde de la tela, ajuste el prensatelas
para ojal corredizo como es mostrado en la ilustraciSn y
cosa en reverso [ _] -dl, r_ =0__ =._ _ ],
REMARQUE: Lorsque vous cousez au bord du tissu, installez }e
pied coulissant cornme indiqu6 et cousez en marche
77
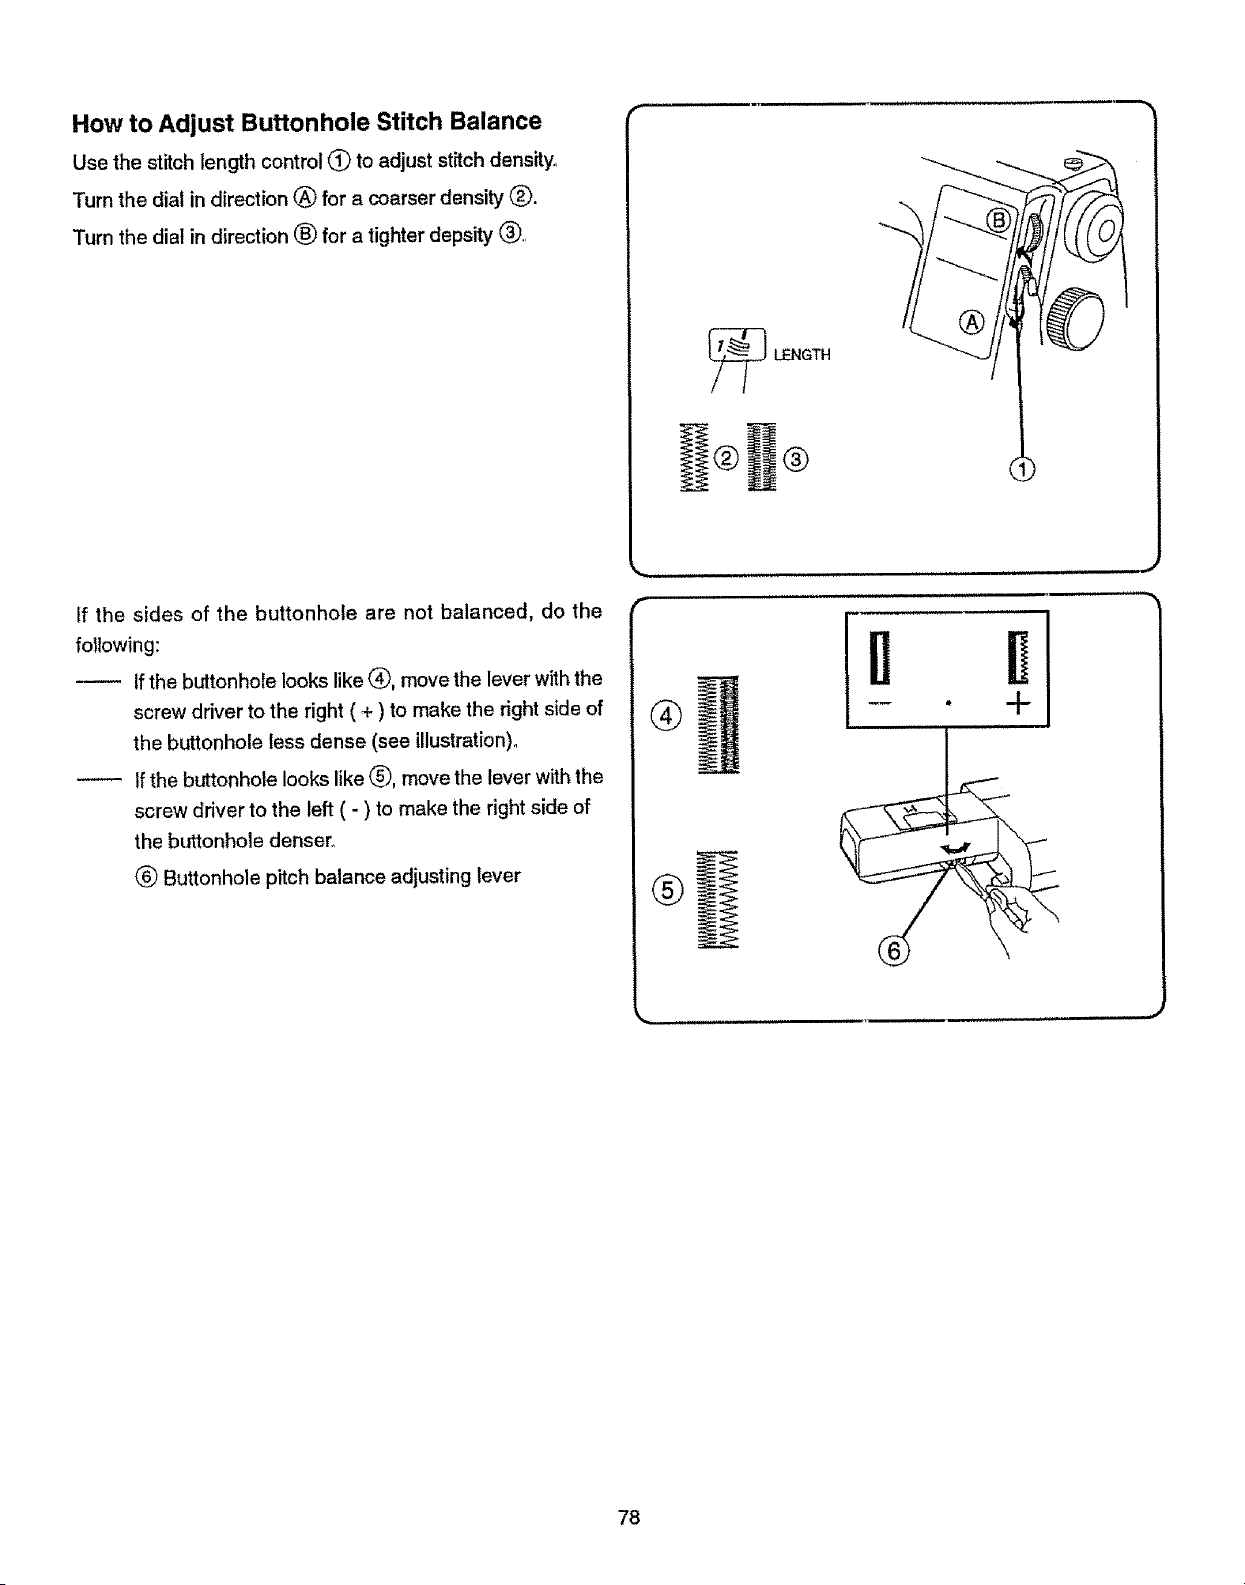
How to Adjust Buttonhole Stitch Balance
Use the stitch length control (_ to adjust stitch density°
Turn the dial in direction (&) for a coarser density (_).
Turn the dial in direction (_ for a tighter depsity (_),,
_ UENGTH
If the sides of the buttonhole are not balanced, do the
following:
If the buttonhole looks like _, move the lever with the
screw driver to the right ( + ) to make the right side of
the buttonhole tess dense (see illustration)°
If the buttonhole looks like _, move the lever with the
screw driver to the left ( - ) to make the right side of
the buttonhole denser..
(_) Buttonhole pitch balance adjusting lever
_,, JL....
®
®
i,uu,,,
- . -t-
78
C6mo equilibrar las puntadas de los ojales
Use etcontrol de Iongffud do puntadas(_) pars ajustar ia densidad,
Gire el dial en direcci6n _ pars hacedas menos densas (_),.
Gire el dial en direcci6n _ pars hacedas m_s densas _,
Comment dquilibrer les points pour les boutonnibres
Utilisez le r_glage de la Iongueur de point (_) pour r_gler la densit_
du point.
Tournez la molette en direction du (_) pour des points moths
denses (_),,
Tournez la moTette en direction du (_ pour des points plus
dansas®,
Haga Io siguiente, si loslades del ojal no quedan equilibrados:
Si et ojal se parece a el (_ mueva Is palanca con un
destornillador (come es mostrado en la ilustraci6n)hacis la
derecha ( + ) para hater el lade derecho do ojal menos
dense.
Si e! ojal se parece a el (_) mueva la palanca con un
destornillador (comees mostradoen la ilustraci6n)hacis la
izquierda ( - ) pars hacer el lade derechodel ojal m_s densoL,
Si les c6t_s de la boutonniSre ne sent pss _quilibr_s, faffes ce qui
suit:
Sita boutonniere ressemble &t_), d_p]acez le levier
(voir I'iliustration) vers ta droite ( + ) & raide du tournevis,
pour rendre le c6t_ dreit de la boutonniere moins dense.
Sita boutonniere ressemble &(_, d_placez le levier
(voir I'illustration) vers la gauche ( - ) ,_raide du tournevis,
pour rendre le c6t_ droit de la boutonniere plus dense.
(_) Palancs ajustadora de densidad de ojales
(_) Levier de r_glage de i'_quilibrage de la boutonni_reo
79
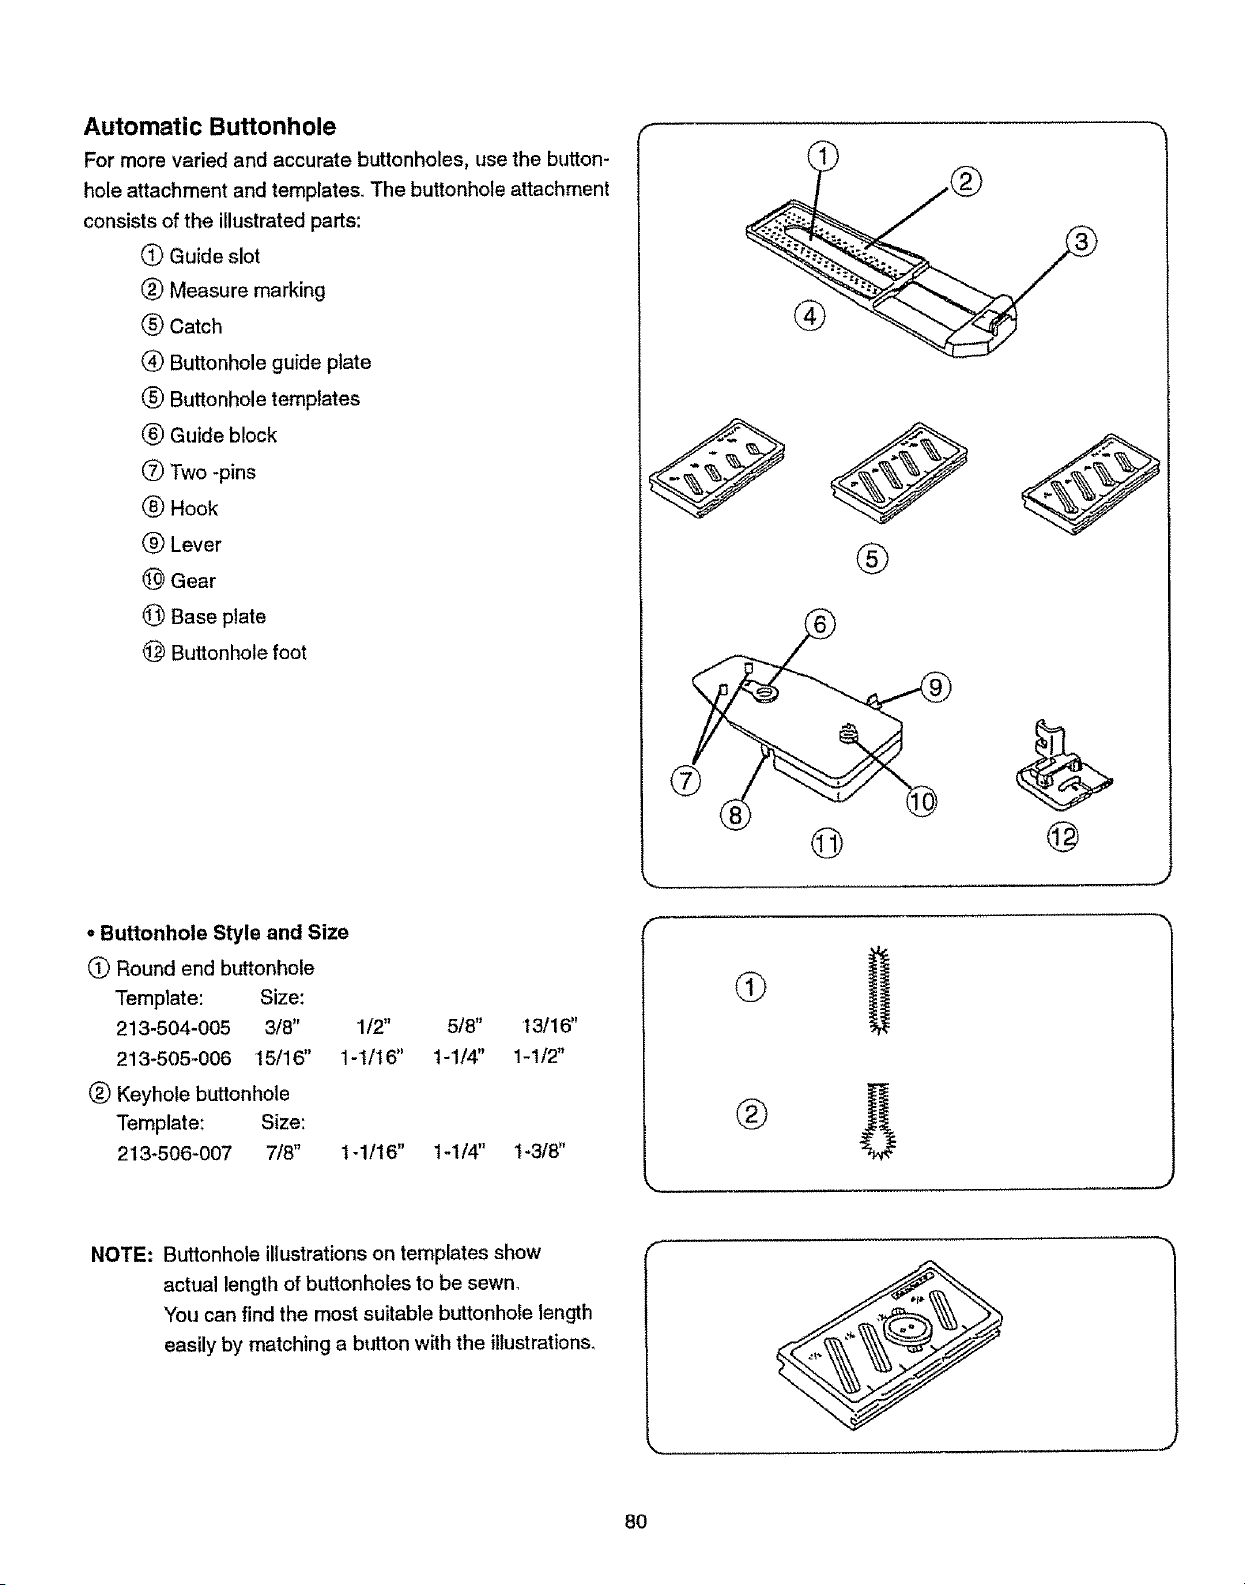
Automatic Buttonhole
For more varied and accurate buttonholes, use the button-
hole attachment and templates,, The buttonhole attachment
consists of the illustrated parts:
(_) Guide slot
(&) Measure marking
(_ Catch
(_) Buttonhole guide plate
(_ Buttonhole templates
(_) Guide block
0 Two -pins
(_ Hook
(_) Lever
(_ Gear
(_) Base plate
@ Buttonhole foot
• Buttonhole Style and Size
(_ Round end buttonhole
Template: Size:
213-504-005 3/8" 1/2" 5/8" 13/16"
213-505.006 15/16" 1-t/16" I-1/4" 1-1/2"
(_) Keyhole buttonhole
Template: Size:
213-506-007 7/8" 1-1/16" t-1/4" 1-3/8"
%,,,
f
@
k____
NOTE: Buttonhole illustrations on templates show
actual length of buttonholes to be sewn_
You can find the most suitable buttonhole length
easily by matching a bison with the illustrations,
%=
8O
Ojalautomdtico
Paramayor variedad y ojaiesm&s precisss, use el accessriopara
ojales,el cue! consistede las partesilustradas_
(_ Ranura gufa
(_) Marcas de medida
(_ Enganshe
(_ Placa gufa de ojalss
(_ Plantillas ds ojares
(_) Bloqus guia
(_ Dos pasadores
(_ Garfio
(_) Palanca
(_ Dentada
Placa base
(_ Prensatelas para ojales
Boutonniere automatiqus
Utilisez le guide pour les boutonnieres avec les gabarits pour r_aliser
des boutonnieres vari_ss et plus prSciseso Le guide pour les
boutonni_rss est constitu_ des pisces d_crites c{-dessous:
Q Fente de guidage
(_) Marques de mssurs
Ctiqust
(_) Plaque-guide de boutonniere
Gabarits de boutonnieres
(_) Blos-guido
(_ _ges
(_ Crochet
(_ Levier
Engrsnage
_) Plaque de base
Pide pour boutonni_rs
o Estilo y tamaSo del ojal
(_ Ojal de punta redsnda
Plantilla: Tamafio:
213-504-005 3t8" 1/2" 5/8" 13/16"
213-505-006 15/t6" t-1/t3" 1-1/4" 1-1/2"
(_) Ojal de cerradura
Planti]la: TamaSo:
213-506-007 7/8" 1-1/16" 1-1/4" 1-3/8"
• Styles et dimensions des boutonnieres
(_ Boutonniere _ bouts arrondis
Gabarit Dimensions
213-504-005 3/8" 1/2" 5/6" 13/16"
213_505-006 15/16" I_1/16" t_t/4" 1-1/2"
(_ Boutonni6re& oeil!et
Gabarit Dimensions
213-506-007 7/8" 1-1/16" t-1/4" 1-3/8"
NOTA: Lasilustraciones de ojales en las plantillasmusstran
la !ongitud actual de los ojales a coser. Ustsd podr&
encontrarla iongitud m&sadecuada para su ojal
emparejando los botones con las ilustraciones_
REMARQUE: Les boutonnieres repr_sentdes sur les
gabarits sontgrandeurnature_
Vousddterminerez facilsment la boutonniere
quiconvisntle mieuxen comparantIs bouton
aux dessins.
8t
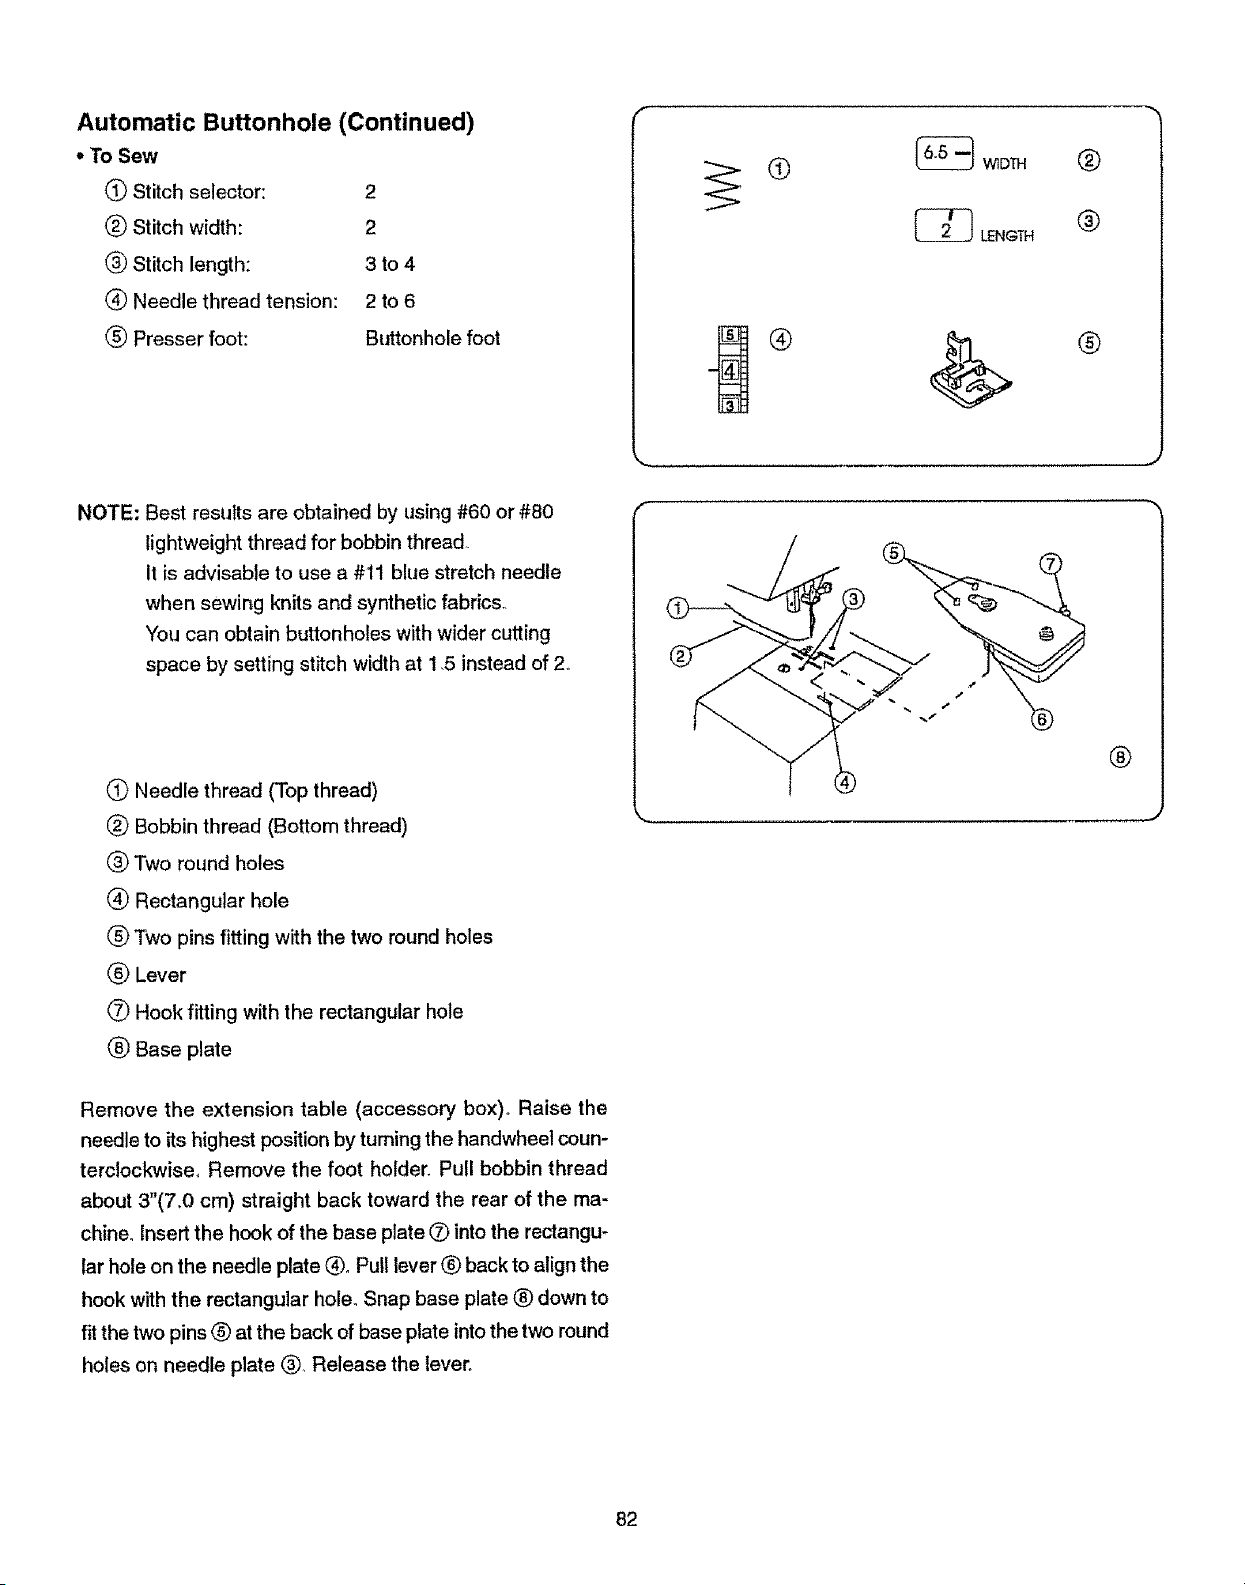
Automatic Buttonhole (Continued)
• To Sew
(_ Stitch selector: 2
(_ Stitch width: 2
(_ Stitch length: 3 to 4
(_ Needle thread tension: 2 to 6
(_) Presser foot: Bt_onhole foot
NOTE: Best results are obtained by using #60 or #80
lightweight thread for bobbin thread
It is advisable to use a #11 blue stretch needle
when sewing knits and synthetic fabrics°
You can obtain buttonholes with wider cutting
space by setting st;tch width at 1,5 instead of 2,,
Needle thread (Top thread)
(_ Bobbin thread (Bottom thread)
_) Two round holes
(_ Rectangular hole
Two pins fitting with the two round holes
(_ Lever
0 Hook fitting with the rectangular hole
(_ Base plate
Remove the extension table (accessory box). Raise the
needle to its highest position by turning the handwheel coun-
terclockwise° Remove the foot holder. Pull bobbin thread
about 3"(7,0 cm) straight back toward the rear of the ma-
chine. Insert the hook of the base plate 0 into the rectangu-
lar hole on the needle plate 6)° Pull lever ® back to align the
hook with the rectangular hole. Snap base plate ® down to
fit the two pins ® at the back of base plate into the two round
holes on needle plate (_ Release the lever°
Q
LENGTH®
f
®
®
J
82
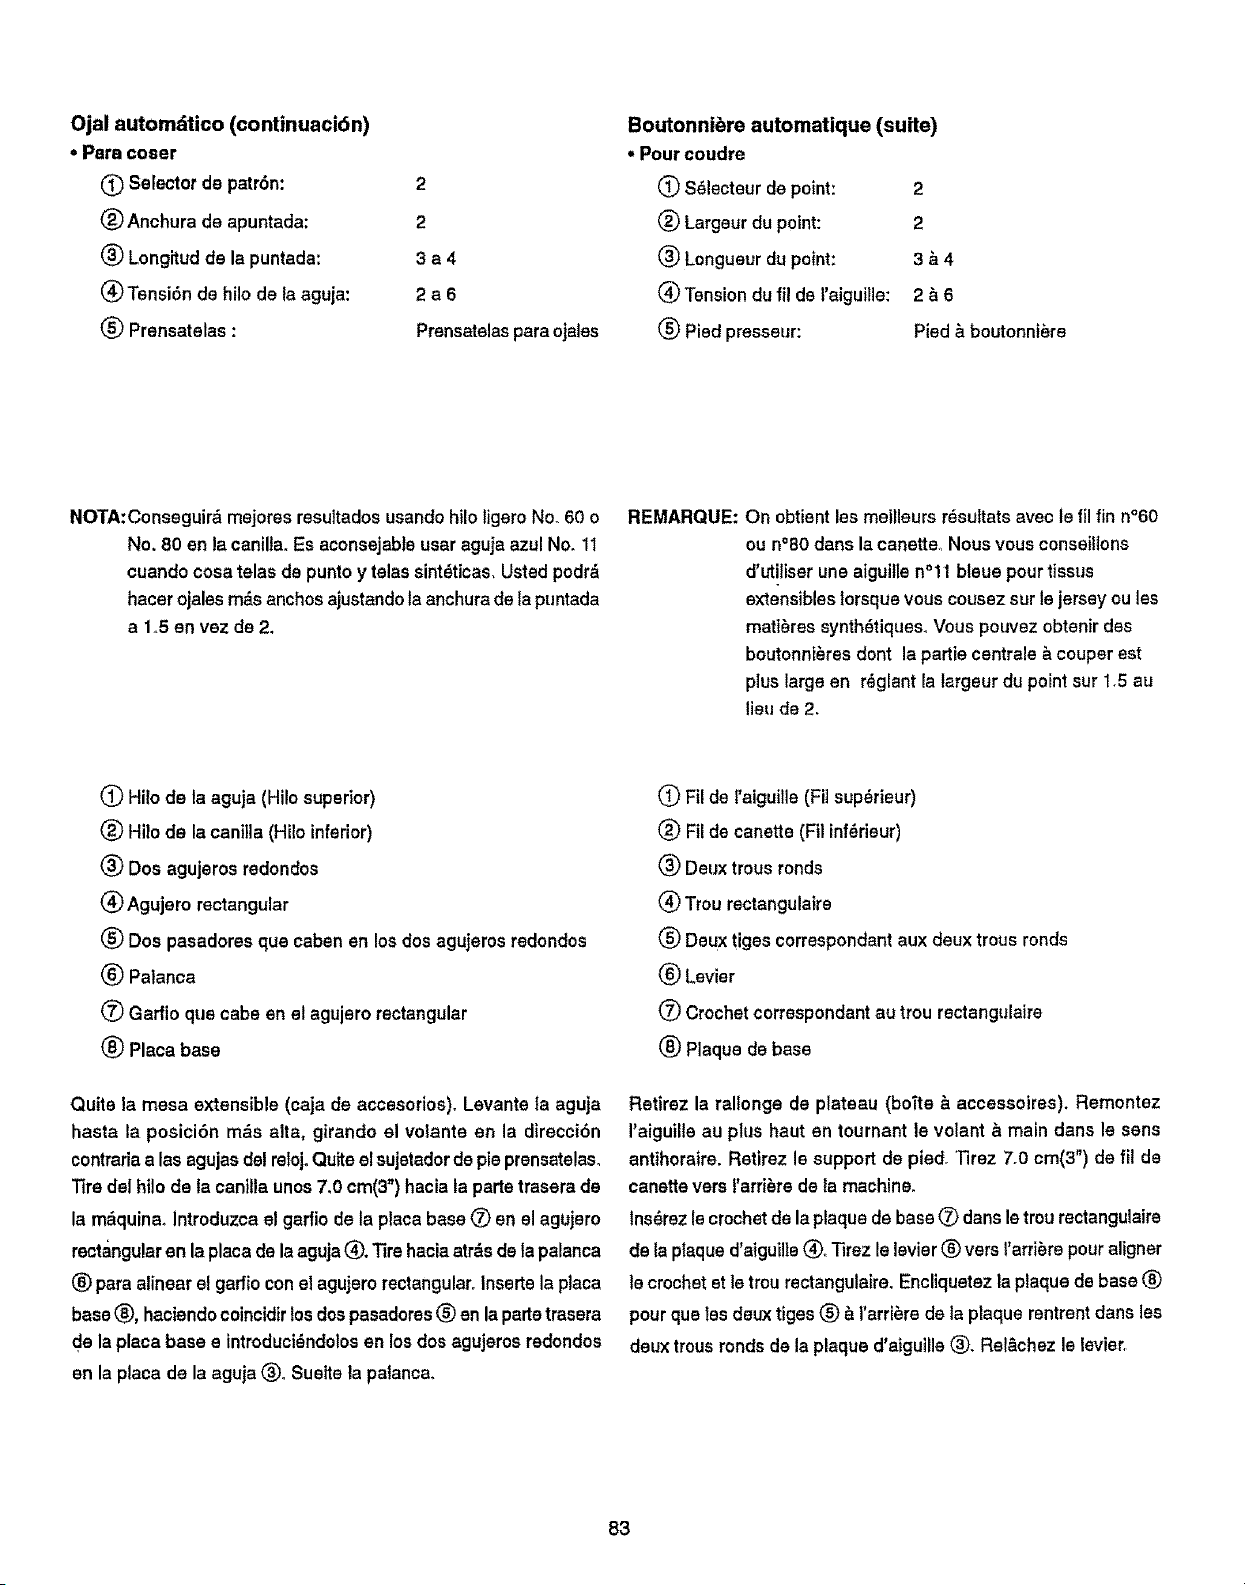
Ojal automdtico (continuacidn)
• Para coeer
Selectorde patr6n: 2
(_ Anchurade apuntada: 2
(_ Longitud de la puntada: 3 a 4
(_ Tensi6n de hilode la aguja: 2 a 6
(_) Prensatelas : Prensatelaspara ojales
Boutonnibre automatique (suite)
, Pour coudre
(_ S_lecteurde point:
(_) Largeurdu point:
(_ Longueurdu point:
@ Tension du fil de t'aiguille:
(_) Pied presseur:
2
2
3_,4
2&6
Pied b boutonnibre
NOTA:Conseguir,'_mejores resuitadosusando hilo tigem No. 60 o
No. 80 en la canilla.Es aconsejabteusaraguja azu! No. 11
cuandocosa telas de puntsy telas sint_ticas, Usted podrd
hacerojalesrods anchosajustandola anchura de la puntada
a 1.5 en vez de 2.
REMARQUE: On obtientlee meilleurs risuitats avec le fil fin n°60
ou n°80 darts la canette. Nousvousconseilions
d'utiliserune aiguitien°lt bleuepour tissue
extensibles lorsque vouscousezsur le jerseyou les
mati6res synthitiques.Vouspouvezobtenir des
boutonn[bresdent la partiecentrale_ couperest
plus largeen rig[ant [a largeur du pointsur 1.5 au
lieu de 2.
(_ Hi[o de la aguja (Hi[o superior)
(_) Hilo de la canilla(Hiloinferior)
(_ Dos agujerosredondos
(_) Agujem rectangular
(_) Dos pasadoresqua caben en losdos agujemsredondos
(_) Palanca
O Gafflo qua cabe en el agujero rectangular
(_) Placa base
Quite la mesa extensible (caja de accesorios)o Levante ta aguja
hasta la posici6n mils alta, girando el volante en la direcci6n
contrariaalas agujaedel refoj,Quiteel sujotadorde pie prensatelaeo
Tire del hilo de la canilla unos7,0 cm(3")hacia la partetrasera de
la m&quinaointroduzcael garfio de la plata base (_) en el agujero
recta_ngularen la placade la aguja(_), Tire heciaatr&sde tapalanca
_) para alinearel gadio con el agujerorectangular°Insertela placa
base(_, haciendocoincidirlosdospasadores(_ en lapartetrasera
de la placa base e fntmduciindolosen los dosagujeros rationales
en la plaea de la aguja (_, Suelte la patanca,
(_ Fil de l'aiguille (Fil sup_rieur)
(_) Fi[de canette (Fil [nf_rieur)
(_ Deuxtrousrends
(_ Trourectangulaire
(_) Deux tiges correspondantaux deux trous rends
(_) Levier
(_ Crochetcorrespondantau tmu rectangulaire
(_ Plaque de base
Retirez la rallonge de plateau (boite & accessoires). Remontez
I'aiguilleau plus haut en tournant le volant _ main dans le sens
antihoraire,Retirez le supportde pied. Tirez 7.0 cm(3") de fil de
canettevers I'arri_re de la machine.
lns_rez le crochetde la plaquede base(2) dansle trou rectangulaire
de la plaqued'aiguille(_o Tirezle levier (_ vers t'arri6re pouraligner
le crochetst le trou rectangutaire.Encliquetezla plaquede base (_
pourqua les deuxtiges(_ _ rarrl_ra de la plaque rentrentdans les
deuxtrousrendsde la plaqued'aiguille(_. Re!&chezle levier,
83
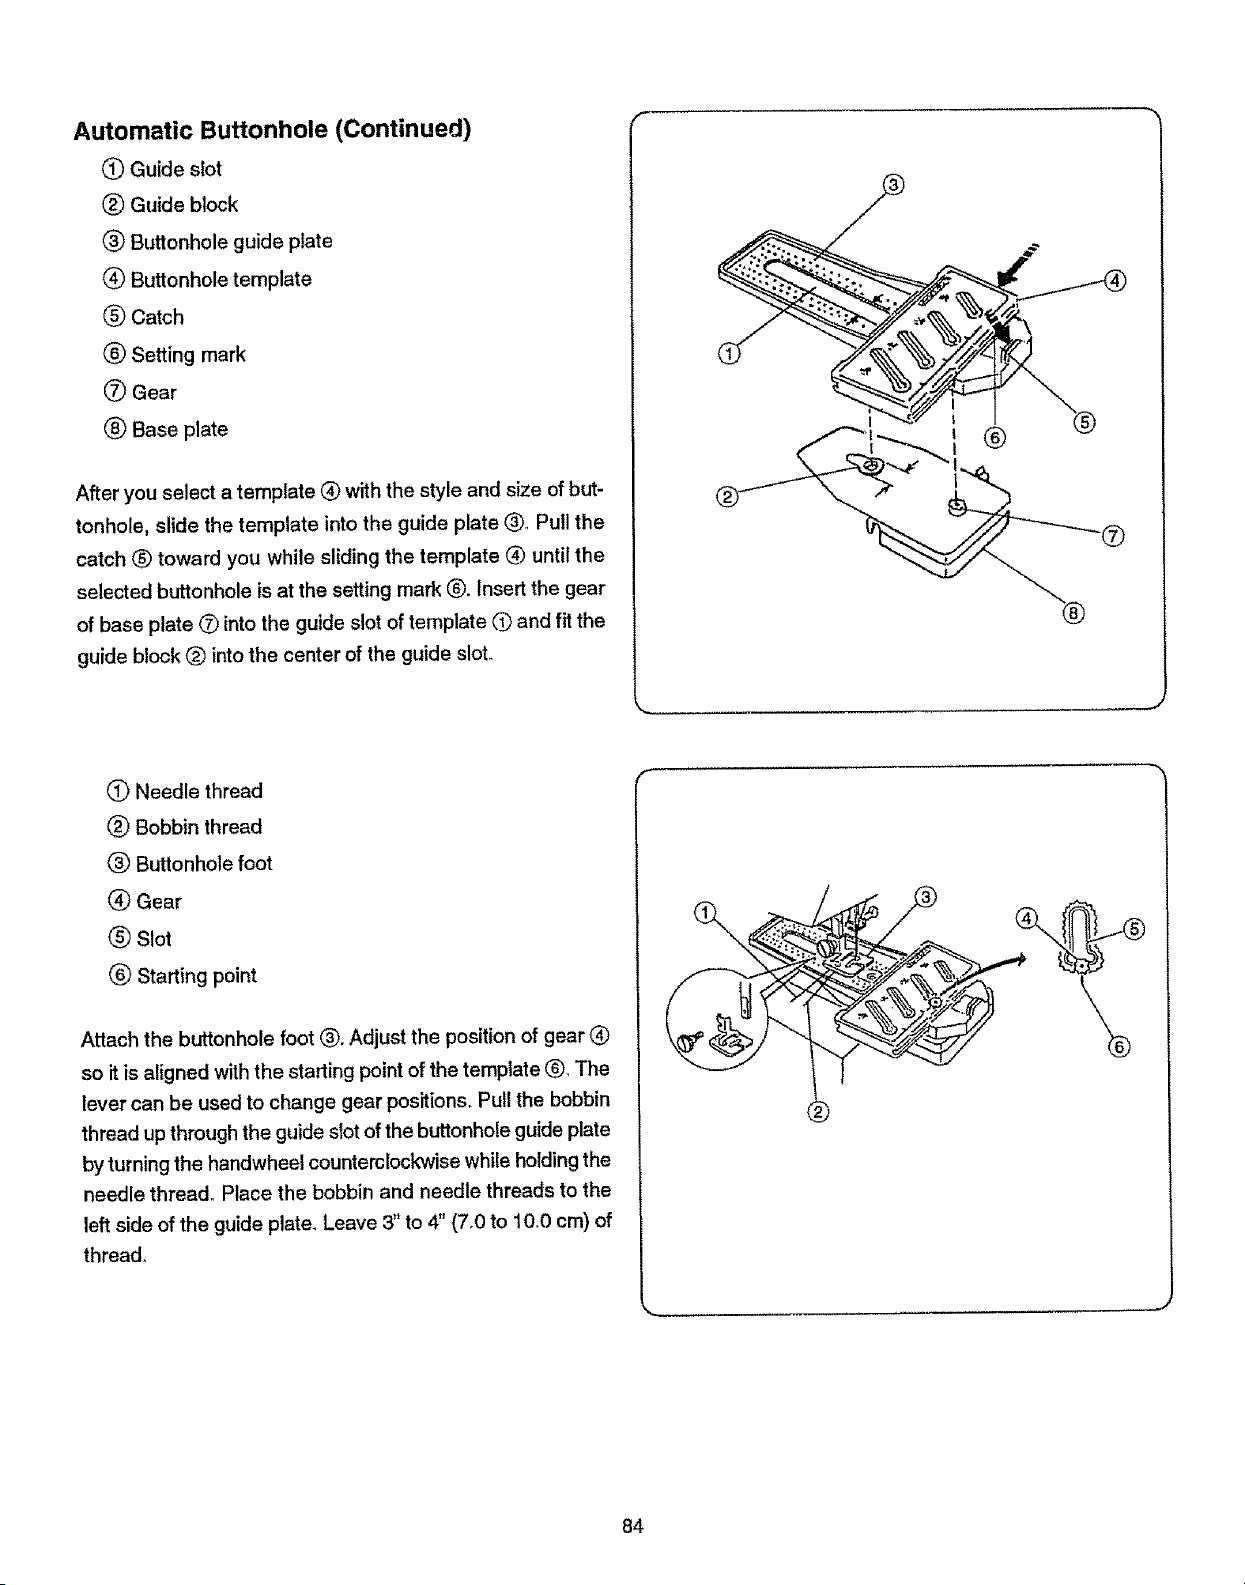
Automatic Buttonhole (Continued)
Q Guide slot
Q Guide block
Q Buttonhole guide plate
(_ Buttonhole template
® Catch
® Setting mark
® Gear
® Base plate
After you select a template (_)with the style and size of but-
tonhole, slide the template into the guide plate (_, Pull the
catch (_ toward you while sliding the template Q until the
selected buttonhole is at the setting mark ®. Insert the gear
of base plate 0 into the guide slot of template ('_ and fit the
guide block (_) into the center of the guide sloL
®
®
.®
(_ Needle thread
(_) Bobbin thread
® Buttonhole foot
(_) Gear
® Slot
® Starting point
Attach the buttonhole foot (_). Adjust the position of gear (_)
so it is aligned with the starting point of the template ®, The
lever can be used to change gear positions. Pull the bobbin
thread up through the guide slot of the buttonhole guide plate
by turning the handwheel counterclockwise while holding the
needle thread. Place the bobbin and needle threads to the
left side of the guide plate. Leave 3" to 4" (7,0 to 10.0 cm) of
thread.
%. .....
84
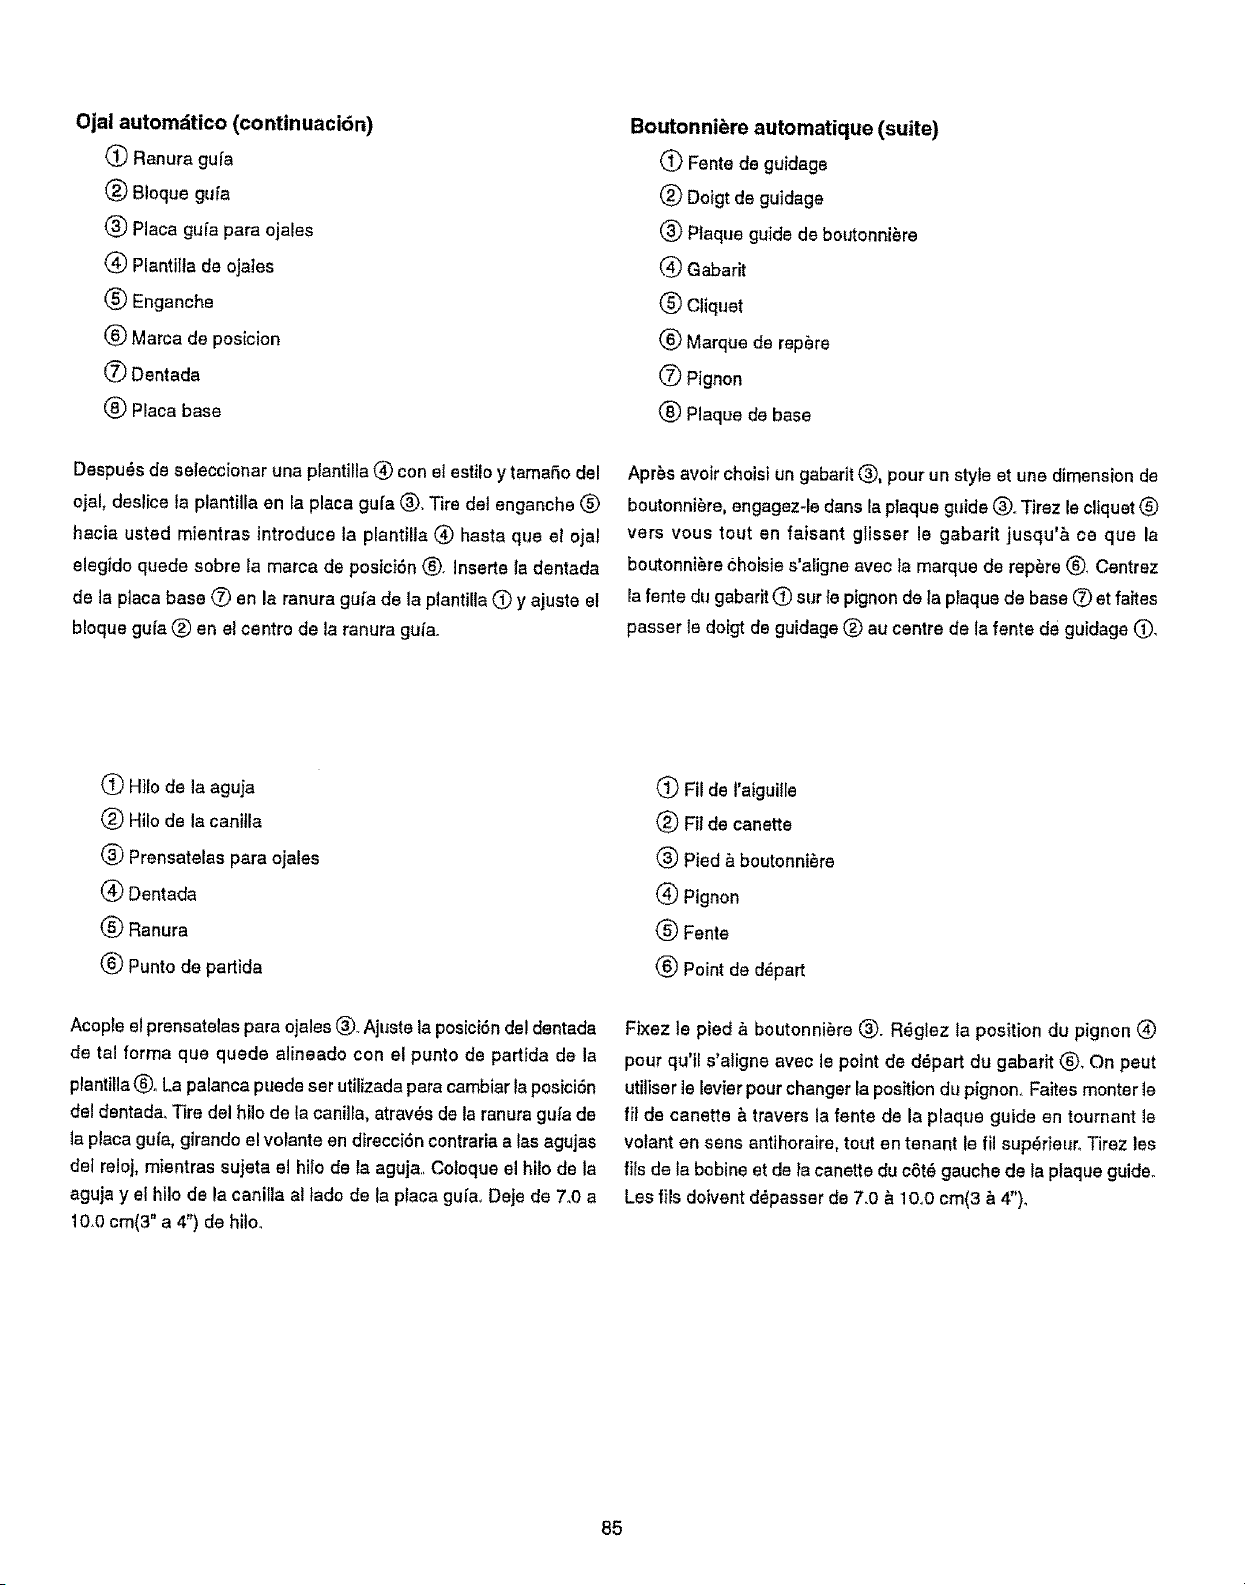
Ojal automdtico (continuaci6n)
Ranura gufa
(_) Bleque gufa
(_ Placa gufa para ojales
_) PlantiHa de oja]es
(_ Enganche
(_ Marca de posicion
(_ Dentada
(_ Placa base
Despu_s de seleccionar una plantilla (_ con el estilo y tamaSo del
ojal, deslice la plantiJla en la placa gufa (_. Tire del enganche (_)
hacia usted mientras introduce la plantilla Q hasta qua el ojal
eleg}do quede sobre la marca de posici6n (_). Inserte ia dentada
de la ptaca base O en la ranura gu_a de la plantilla (_ y ajuste el
bloque gufa (_) en el centre de la ranura gufa.
Boutonniere automatique (suite)
(_ Fente de guidage
(_) Doigt de guidage
(_ Plaque guide de boutenniSre
('_ Gabarit
(_ Cliquet
(_) Marque de repSre
(_ Pignon
(_) Plaque de base
Apr_s avoir choisi un gabarit (_), pour un style et une dimension de
boutonni6re, engagez-le dans la plaque guide (_)..Tirez le cliquet (_
vers vous tout en faisant glisser le gabarit jusqu',_ ce qua la
boutonniere choisie s'aligne avec ]a marque de repute (_), Centrez
la fente du gabarit Q sur le pignon de la plaque de base (_ et faites
passer le doigt de guidage (_) au centre de la fente de guidage C).
(_ Hilo de la aguja
(_) Hilo de la canilla
Prensatelas para ojales
(_ Dentada
(_ Ranura
_) Punto de partida
Acople el prensatelas para ojales (_ Ajuste la posici6n del dentada
de tal forma qua quede alineado con el punto de partida de la
plantilla (_)oLa palanca pueda set utilizada para cambiar la posici6n
del dentada. Tire del bile de la canilla, atrav_s de la ranura gufa de
la placa gufa, girando e! volante en direcciSn contraria alas agujas
det reloj, mientras sujeta el hilo de la aguja. Cotoque el hilo de la
aguja y el hilo de la canifla al lade de la plaea guia, Deje de 7°0 a
10.0 cm(3" a 4") de hilo_
(_ Fil de l'aiguille
(_) Fit de canette
(_) Pied & boutonniere
(_ Pignon
(_) Fente
(_ Point de d_part
Fixez te pied & boutonniere (_. R_glez la position du pignon Q
pour qu'il s'atigne avec le point de d6part du gabarit (_)_On peut
utiliser le levier pour changer la position du pignon. Faites monter le
fil de canette & travers la fente de la plaque guide en tournant le
volant en sans antihoraire, tout en tenant le fil sup_rieuro Tirez les
fils de la bobine et de ta canette du c6t_ gauche de ta plaque guide°
Les ills doivent d_passer de 7.0 & 1OoOcm(3 & 4"),
85

Automatic Buttonhole (Continued)
(_) Marked buttonhole on fabric
(_) Center marking on buttonhole foot
(_ Measure marking on the guide plate
® Fabric
Mark the buttonhole position carefully on the fabric. Place
the fabric behind the machine, insert the fabric between the
guide plate and the buttonhole foot as illustrated. Align
marked buttonhole (T_with center marking on buttonhole foot
(_0. Line up the fabric edge with the measure marking on
the guide plate (_ just infront of the buttonhole foot as shown.
Pierce the fabric with the needle at the beginning of the but-
tonhole.
NOTE: If you want buttonholes to be sewn at t/2" (12 cm)
from the fabric edge, line up the fabric with the 1/2
markings each time you start to sew a buttonhole,,
Interfacing is recommended when making button
holes, if fabric is not fed smoothly from the start,
increase stitch length.
Lower the buttonhole foot. Start sewing slowly. Allow the
machine to do the work by itself, Le., do not try to guide
fabric. Stop sewing when the needle returns to the position
where it began. To release the buttonhole base plate, pull
the lever toward you and lift the base plate off the machine.
• To adjust stitch density
(_ Fine stitches for lightweight fabrics
(_) Stitch length between 3 and 4
(_ Coarse stitches for heavyweight fabrics
Stitch density is altered by turning stitch length between 3
and 4.
_ LENGTH
_ LENGTH
Q
®
86
Ojal autormdtico (continuaci6n)
(_ Ojal mamado en la tela
(_) Marea central en et pie pare ojales
(_) Marca de medida en la place gufa
(_ Tela
Marque ta posici6n del ojal cuidadosamente on la telao Colecando
la tela detr&s de fa mdquina, introduzcala entre la place gu_a y el
prensatelas pare ojales come es demostrado en la ilustraci6n.Alines
el ojal marcado con la marca central en el prensate_as pare ojales
_o Alines e! horde de su tela con la marca de medida en la place
gufa (_ justo en frente del prensatelas para ojales come muestra
en la JiustraciSn, Punce la tela con la aguja al principle del ojaL
Boutonnibre automatique (suite)
(_ Trac_ de la boutonniere sur le tissu
(_) Repbre central sur le pied _ boutonnibre
(_ Rep8re de dimension sur la plaque guide
(_ Tissu
Marquez soigneusement I'emplacement de la boutonnibre sur le
tissu. En passant le tissu par-derribre la machine, glissez*le entre la
plaque guide et le pied b boutonniere comma sur I'itlustration.Alignez
le trac_ Q at le rep6re central sur le pied & boutonni6re (_o Alignez
le bord du tissu et le rep_re de dimension sur la plaque guide (_) _,
t'avant du pied comma sur L'illustration_ Descendez f'aiguille dens le
tissu ou la boutonni6re dolt commencer°
NOTA: Si quiere coser el oja! 1_2 cm(1/2") del borde de la tela,
alines la tela con las marcas de 'I/2 cada vez qua empiece
a coser un ojal. Si la tela ne es transpertada suavemente
desde el principle, aumente la longitud de las puntadas.
Baje et prensatelas pare ojales. Empiece a coser lentamente. Deje
que la m&quina haga el trabajo per si soEay no intente guiar la tale.,
Pare de coser cuando la aguja regress ala posioiSn en la qua
empez6_ Para setter la place base del pie pare ojales, tire de la
palanca hacia usted y levante laplaca base de la m&quina de coser,
REMARQUE: Si vos boutonni6res commencent &1.2 cm(1/2") du
bord du tissu, alignez le tissu avec les rep_res 1/2
cheque fois qua vous cemmencez une nouvelle
boutonniSre. II est recommand_ d'appliquer une
triplure sur le tissu Iorsque vous marquez les
boutonni6res, Si le tissu n'avance pas r_guli_rement
d6s le d_but, augmentez la Iongueur du point.
Abaissez le pied & boutonniOre. Commencez & piquet lentemenL
Laissez la machine fairs le travail, c'est & dire n'essayez pas de
guider te tissu. ArrStez de piquer quand l'aiguille est revenue au
point de d_part. Pour retirer ta pfaque de base, tirez le levier vers
vous et soulevez la plaque.
• Pare ajustar la densidad de las puntadas
(_ Puntadas fines para telas ligeras
_) Longitud de puntada entre 3 y 4
(_) Puntadas mds gruesas pare tales m&s pesadas
La densidad de las puntadas es alterada girando la longitud de
estas entre 3 y 4.
• R_glage de la densitd du point
(_ Points serrds pour 1astissus fins
(_) Longueur du point entre 3 et 4
(_ Points I&ches pour les tissus _pais
On modifie la densit_ du point en tournant le r_gtage de longueur
du point entre 3 et 4,
87
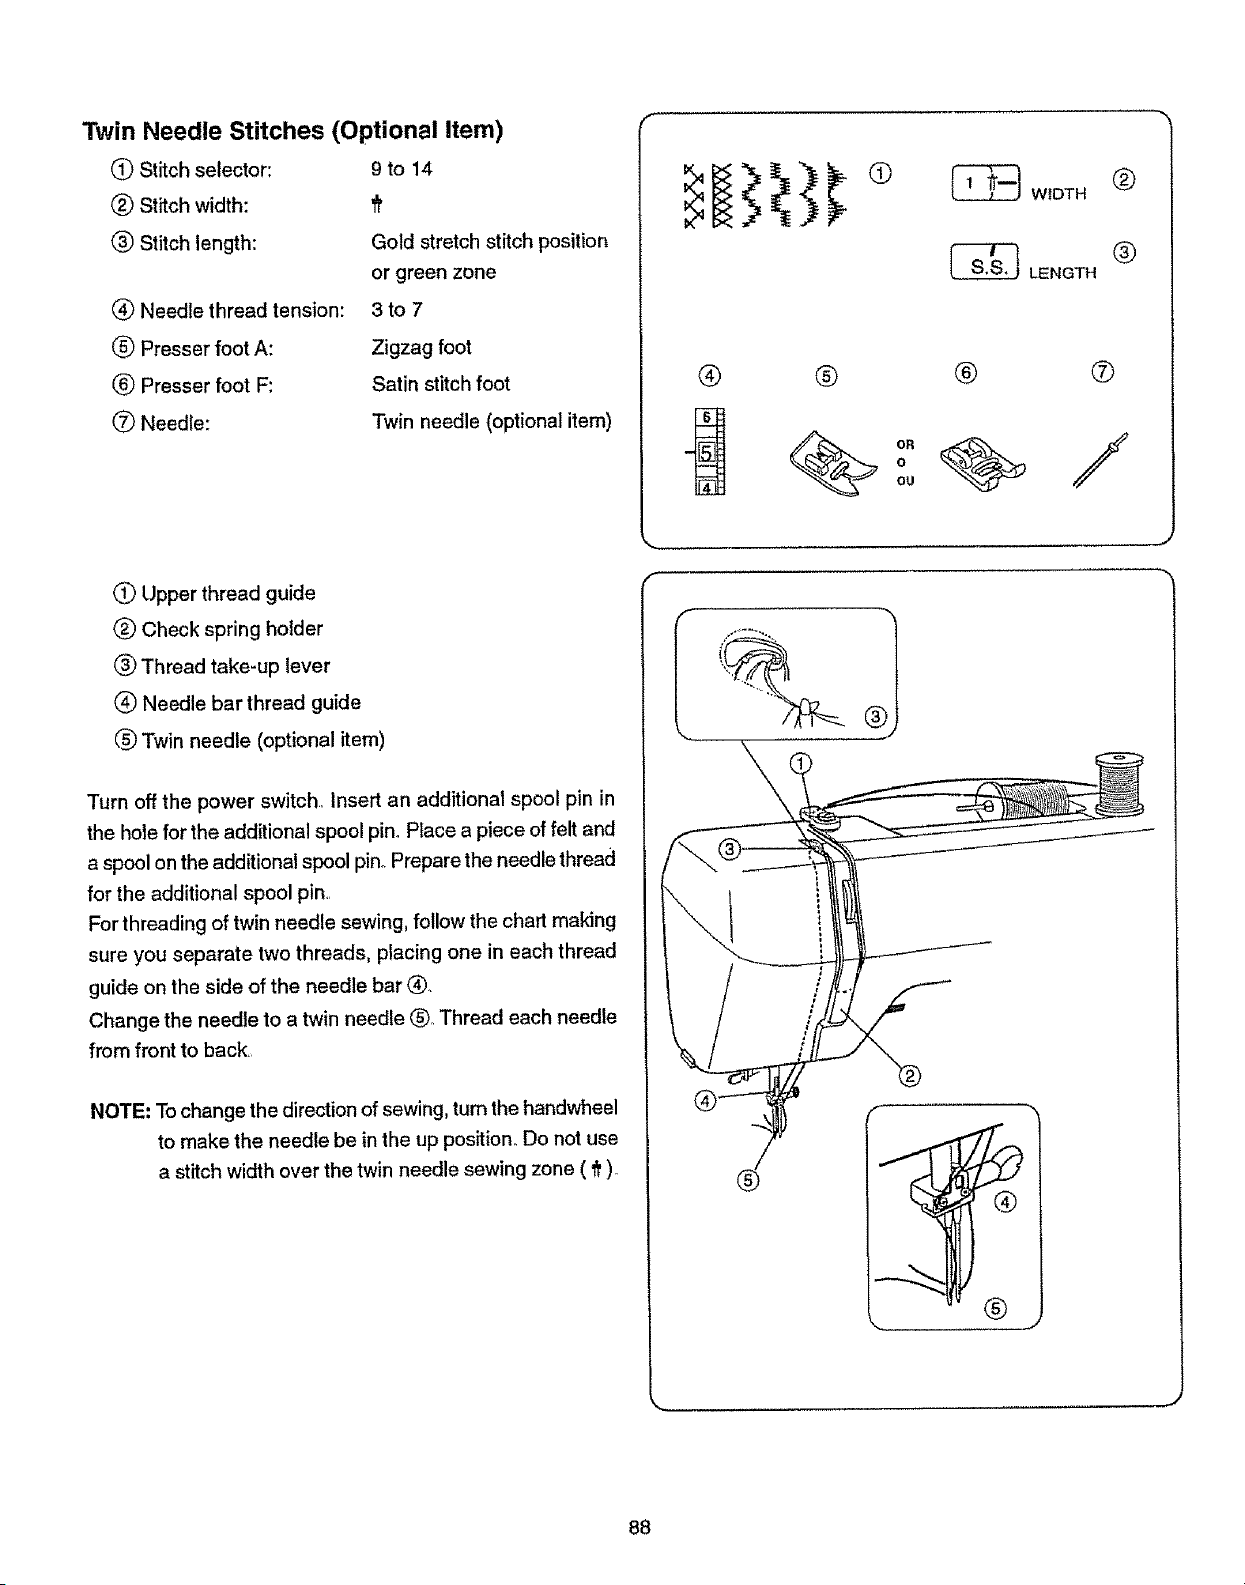
Twin Needle Stitches (Optional Item)
(_ Stitch selector:
(_) Stitch width:
(_ Stitch length:
® Needle thread tension:
® Presser foot A:
(_ Presser foot F:
(_) Needle:
9to 14
Gold stretch stitch position
or green zone
3to7
Zigzag foot
Satin stitch foot
Twin needle (optional item)
® ®
OR
0
OU
_ W1DTH @
® ®
(_ Upper thread guide
Q Check spring holder
® Thread take-up lever
(_ Needle bar thread guide
® Twin needle (optional item)
Turn off the power switch, Insert an additional spool pin in
the hole for the additional spool pin. Place a piece of felt and
a spool on the additional spool pin° Prepare the needle thread
for the additional spool pin..
For threading of twin needle sewing, follow the chart making
sure you separate two threads, placing one in each thread
guide on the side of the needle bar (_
Change the needle to a twin needle ®o Thread each needle
from front to back..
NOTE: To change the direction of sewing, turn the handwheel
to make the needle be in the up position. Do not use
a stitch width over the twin needle sewing zone ( ft ).
f'
f
\
88
Puntadas de doble aguja (Artfculo opcional)
(_ Selector de patr6n:
(_) Anchura de la puntada
(_ Longitud de la puntada
9a14
Posioi6n oro de puntada
el&stica o zona verde
(_ Tensi6n de hilo de la aguja: 3 a 7
(_) Prensatelas A: Prensatelas para zig-zag
(_) Prensatelas F: Prensatelas para raso
O Aguja: Doble aguja (objeto optional)
Aiguilles jumeldes (en option)
(_) S_lecteur de point:
(_ Largeur du point:
(_ Longueur du point:
(_ Tension du Ill de I'aiguille:
(_ Pied presseur A:
(_) Pied presseur F:
(_ Aiguille:
9_,14
Position dor_e point extensible
ou zone verte
3&7
Pied zig-zag
Pied & point lanc_
Aiguilles jumel_es (en option)
(_ Guiahilos superior
(_ Alojamiento det muelle recuperador del bile
(_ Tirahilos
(_ Guiahifos de la barra de aguja
(_ Doble aguja (objeto optional)
Apague la m&quina, Inserts un portacarrete adicional en el agujero
para el portacarrete adicional_ Coloque el fieltro y el carrete de hiFo
adicional. Prepare el hilo de la aguja para el portacarrete adicional.
Para hilar la doble aguja, siga el esquema asegur&ndose de separar
los dos hilos, cotocando uno en cada gufa de hilo a los tados de la
barra de aguja Q. Cambie la aguja por una doble aguja (_, Hile
cada una de las agujas de atr&s a adelante..
NOTA: Para cambiar la direcci_n de cosido, gire el volante para
subir la aguja hasta la posici6n m&s afta. La anchura de la
puntada no debe ser mayor que la zona de oostura de la
doble aguja ( 'tt )_
(_ Guide du fil sup_rieur
(_ Dispositff & ressort
(_ Releveur du fil
(_ Guide-fil de la barre & aiguiile
Aiguilles jumel_es (en option)
I_teignez ta machine,. Aioutez le porte-bobine suppr6mentaire dans
le trou qui lui est destin_, Placez un feutre etune bobine de fit sur la
broths. Pr6parez ensuite le fil de l'aiguille pour la bobine
suppl_mentaireo Pour l'enfitage des aiguilles jumel6es, suivez le
guide en vous assurant que vous s_parez les deux ills, en passant
ehaeun d'eux dans chaque guide sur les c6tSs de la barre d'aiguiile
(_).. Remplacez I'aiguitle par des aiguilles jumel_es(_)_ Enfilez chaque
aiguille de ['avant vers f'arri_re
RIEMARQUE: Pour modifier la direction de la couture, faites monter
les aiguiltes en tournant le volanL Na rdglez pas la
largeur de point au del_ de la zone pour les aiguilles
jumel_es ( _ )
89
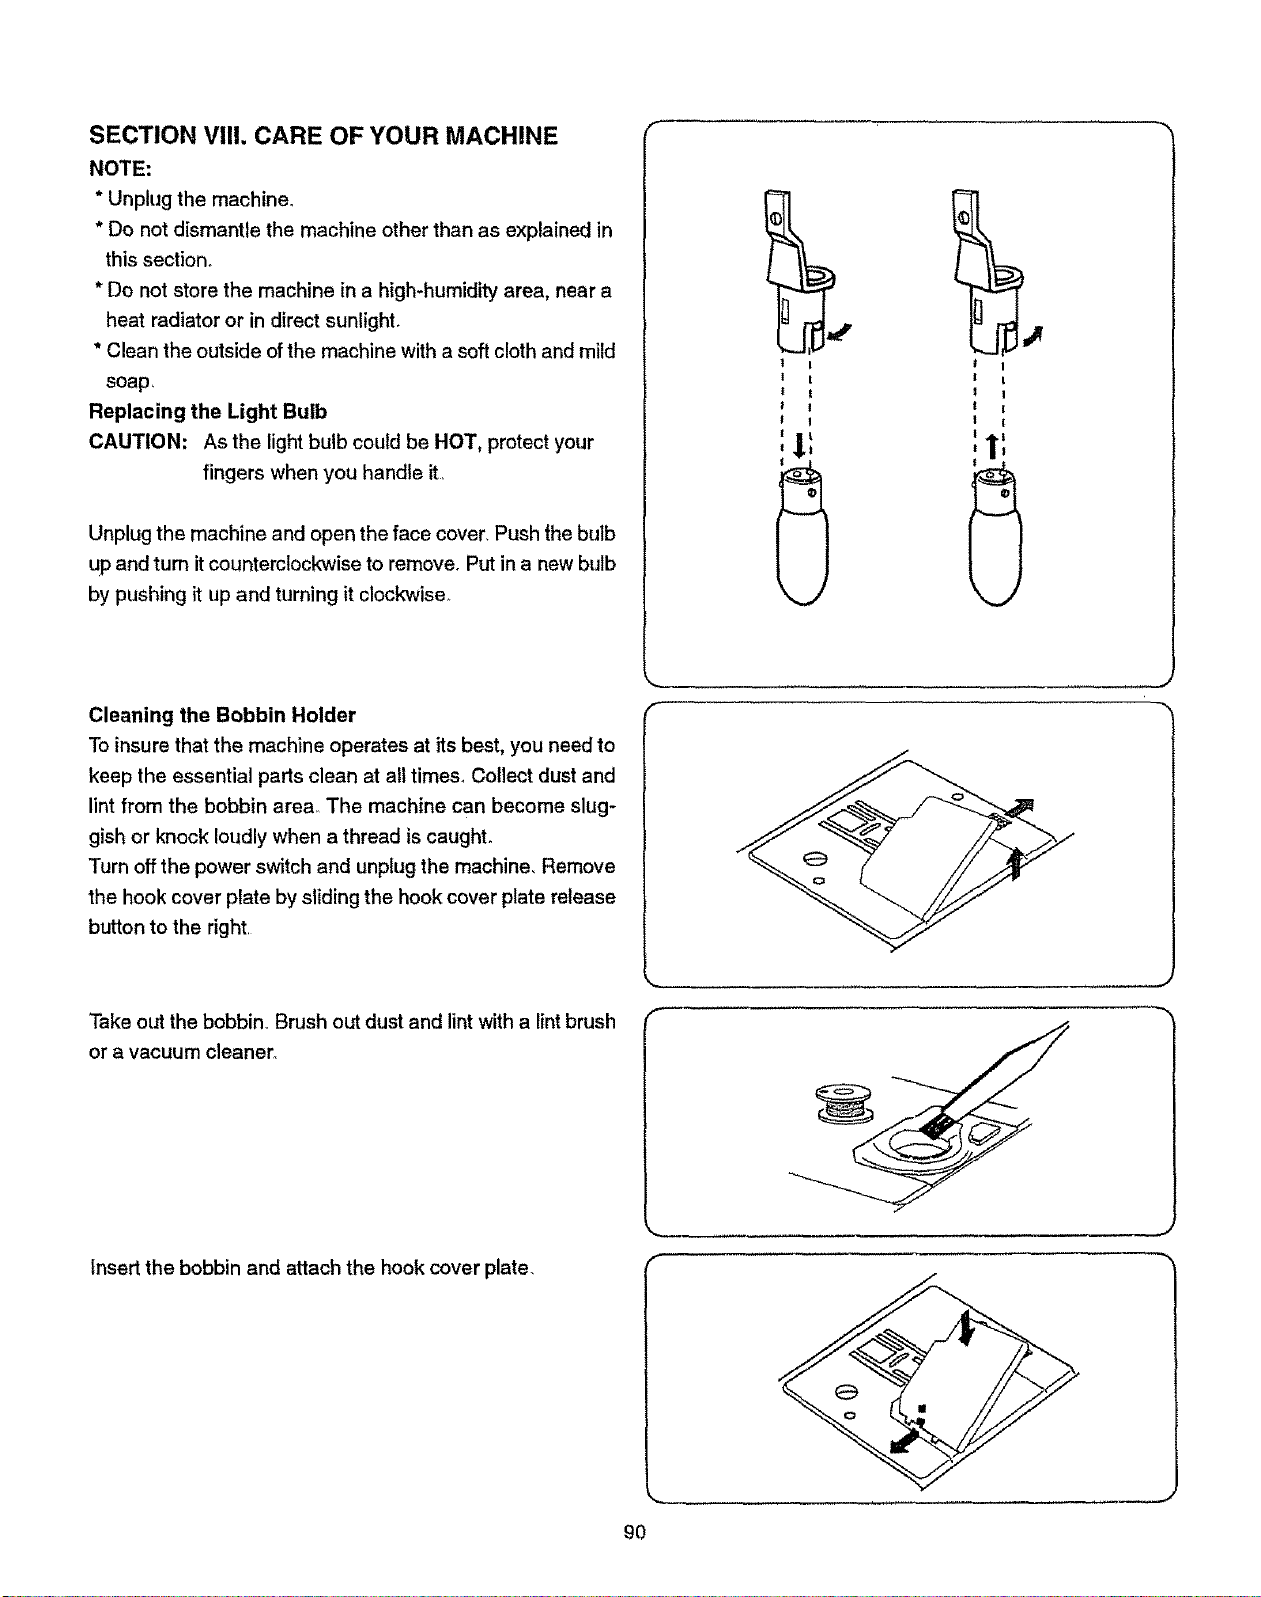
SECTION VII!. CARE OF YOUR MACHINE
NOTE:
* Unplug the machine,
* Do not dismantle the machine other than as explained in
this section°
* Do not store the machine in a high-humidity area, near a
heat radiator or in direct sunlight°
* Clean the outside of the machine with a soft cloth and mild
soap
Replacing the Light Bulb
CAUTION; As the light bulb could be HOT, protect your
fingers when you handle it,
Unplug the machine and open the face cover, Push the bulb
UPand turn it counterclockwise to remove. Put in a new bulb
by pushing it up and turning it clockwise.
Cleaning the Bobbin Holder
To insure that the machine operates at its best, you need to
keep the essential parts clean at all times_ Collect dust and
lint from the bobbin area, The machine can become slug-
gish or knock loudly when a thread is caught°
Turn off the power switch and unplug the machine, Remove
the hook cover plate by sliding the hook cover plate release
button to the right,
Take out the bobbin,. Brush out dust and lint with a lint brush
or a vacuum cleaner,
(-
,.,,.*
I
I
I
I
!
|
J
"N
, ,, J
Insert the bobbin and attach the hook cover plate.
9O
SECCION VIII. MANTENIMIENTO DEL LA
MAQUINA
NOTA:
* Desenchufe la m_quina,
* No desmonte la m,_quina de ninguna otra forma que la expticada
en esta seccien.
* No guarde la m_quina en un lugar muy h['_medo, cerca de un
radiador o bajo la luz dirscta de los rayos del sol+
* Limpie e{ exterior de la m&quina con un patio suave y jab6n
neutro
Carnbiando la bombilla
CUIDADO: La bombilla puede estar CAUENTE. Proteja sue
dedos cuando la cambie.
Desenchufs la m_.quina y abra la tapa+ Empuje y gire la bombilla
en st sentids contrario a tas agujas del reloj_ Coloqus la bombilta
nueva empuj&ndola y girbndola en la misma direcciSn de las agujas
del reloj_
PARTIE VIII. ENTRETIEN DE VOTRE MACHINE
REMARQUE:
* D6branchez la machine.
* Ne d_mentez rien d'autre que ce qui est d_crit dans ce chapitre.
* N'entrepssez pas la machine dane un endroit humide, pros d'un
radiatsur de chauffage central ou expos6e _ la lumi_re directe du
soleiL
* Nettoyez I'sxt_rieur avsc un chiffon st du savon doux+
Remplacement de l'ampoule
ATTENTION: L'ampoule peut _tre CHAUDE, donc protSgez vss
deigts avant d'y toucher+
Debranchez la machins et suvrsz te couvercls frontal Poussez
I'ampoule vers le haut et tournez-la en sens antihoraire pour la retirsr.
Installez une nouvetle ampoule en la psussant vers le haut et en
tournant dans le sens horaire.
Limpiando el portacanillas
Para asegurarss de que la m_quina funcione en 6ptima condici6n,
necesitar& mantener siempre limpias las partes esenciateso Limpie
el polvo y la pelusa de] &rea de la bobina+ La m_,quina trabajar_
m&s lenta, y har_ ruidos cuando Be hatla enganchado el hiloo
Apague la m_quina y des_nch_fela de la toma de cocrfente.. Quite
la tapa de acceso a camilla deslizando el bot6n de desenganche
de la placa hacia a fa derecha.
Nettoyage du porte-canette
Pour que votre machine fonctcionne bien, vous devez entrstenir la
propret_ des parties sssentielIss. Retirez la poussi_rs et Ies peluches
de la bsite & canette, La machine peut s'user ou cogner viotemment
quand un fil sst coinc6+
_teignez la machine et d6branchez-lao Retirez is couvsrcle en
psussant vers la droite le bouton de d6gagement de la plaque.
Saque la bobina y ffmpiela con un eepillo o con una aspiradsrao Retirez la canetteo Enlerez la poussibre et la charpie avec une brosse
ou un aspirateur.
tnserte ta bobina y eoloque la tapa de nuevo en su sitio. Remettez la canette st la plaque.
91
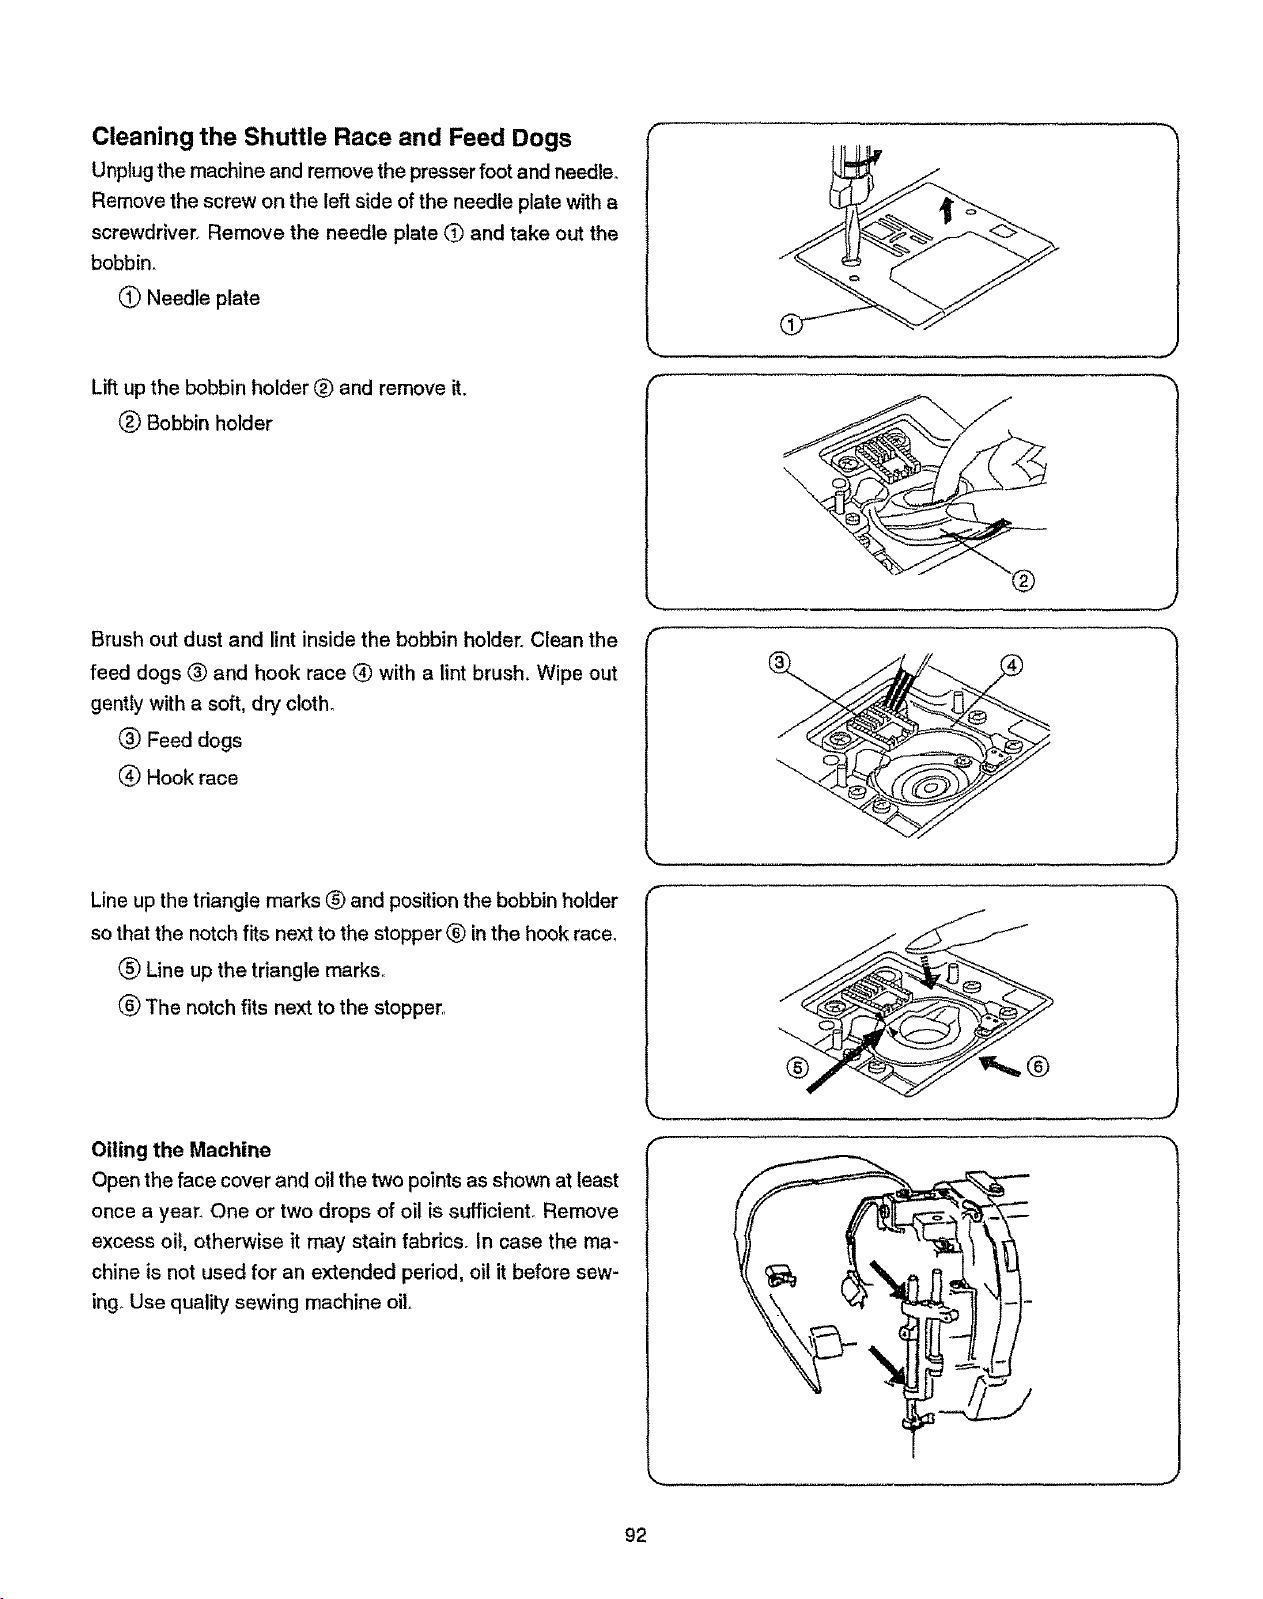
Cleaning the Shuttle Race and Feed Dogs
Unplugthe machine and remove the presser foot and needle°
Remove the screw on the left side of the needle plate with a
screwdriver_ Remove the needle plate O and take out the
bobbin.
(_ Needle plate
Liftup the bobbin holder _) and remove it.
(_) Bobbin holder
J
Brush out dust and lint inside the bobbin holder° Clean the
feed dogs <_ and hook race (_ with a lint brush+ Wipe out
gently with a soft, dry cloth.
(_) Feed dogs
(_ Hook race
Line up the tdangle marks (_) and position the bobbin holder
so that the notch fits next to the stopper (_) in the hook race_
(_) Line up the triangle marks,,
(_ The notch fits next to the stopper,
%,,, ,,
_)
®
Oiling the Machine
Open the face cover and oil the two points as shown at least
once a year+ One or two drops of oil is sufficient_ Remove
excess oil, otherwise it may stain fabrics. In case the ma+
chine is not used for an extended period, oil it before sew-
ing+Use qualib/sewing machine oil+
J
92
Limpieza del garfio y los dientes del transporte Nettoyage de la coursibre et des griffes d'entrainement
Desenchufe la m_quina y quite el prensatelas y la aguja_ Destorniffe
el tornillo que sujeta la placa de aguja con un destornillador. Quite
la placa de aguja (_ y saque la canilla,
Q Placa de aguja
D_branchez la machine et retirez I'aiguille et le pied presseur. Retirez
la vis situ_e du c6t_ gauche de la plaque & aiguille avec un tournevis_
Retirez la plaque d'aigui]ls (_ st la canette.
(_ Plaque _ aiguille
Levante el portacanillas (_ y s&quelo
(_) Portacanillas
Soulevez le support de la canette (_)et rstirez-leo
(_) Supportde la canette
Cepille el polvo y la pelusa dentro de portacanittas_Limpie los
dientes del transporte (_) yet garfio (_ con el cepilto. Limpie
cuidadosamente con un paso suave y seco, Tambi_n puede
utilizarse una aspiradora.
(_ Dientes deltransports
Garfio
Nettoyez & la brosse les poussi_res et la charpie dans la boffe
canette. Nettoyez los griffes d'entrainement (_) et la coursier_ (_)
avec la brosseo Essuyez doucement avec un chiffon doux et sec.,
_) Griffesd'entraTnement
(_ Corsier_
Alines las mamas triangulares (_ y co[oque el portacanillas de forma
que el salients ajuste junto al tope (_) en la via del gaffio.
Alines las marcas triangulares
(_) El salients ajuste junto al tope.
Alignez los repSres triangulaires (_ et instatlez la boite _ canette
afin que l'encoche se place centre la but_s (_ dans ta piste du cro-
chet,
_) Alignez los rspOres triangulaires._
(_) Uencoche se place centre Ia but_e_
Engrasando la mdquina
Abra la tapa frontal y afiada aceite come es mostrado en la
ilustraciSn,al menos una vez al afio. Una o dos gotas de aceite
ser&n suficiente, Limpie el exceso de aceite o de otra forma
manchard las telas. Si nousa la mdquina per un largo periodode
tiempo, aSada aceite antes de usarla,.Use aceite de buena catidad
para maquinas de coser.
Lubrffication de la machine
Ouvrez le couvercle frontal et lubrifiez los deux points indiquSs, au
moins une fois par an. Une ou deux gouttes d'huile sent suffisantes.
Nettoyez I'excSs d'huile qui pourrait t&cher le tissu, Si veus n'utiiisez
pas la machine pendant un certain temps, tubrifiezIa machine avant
de commencer _ coudre. Utilisez une huile pour machine de bonne
qualitY,,
93
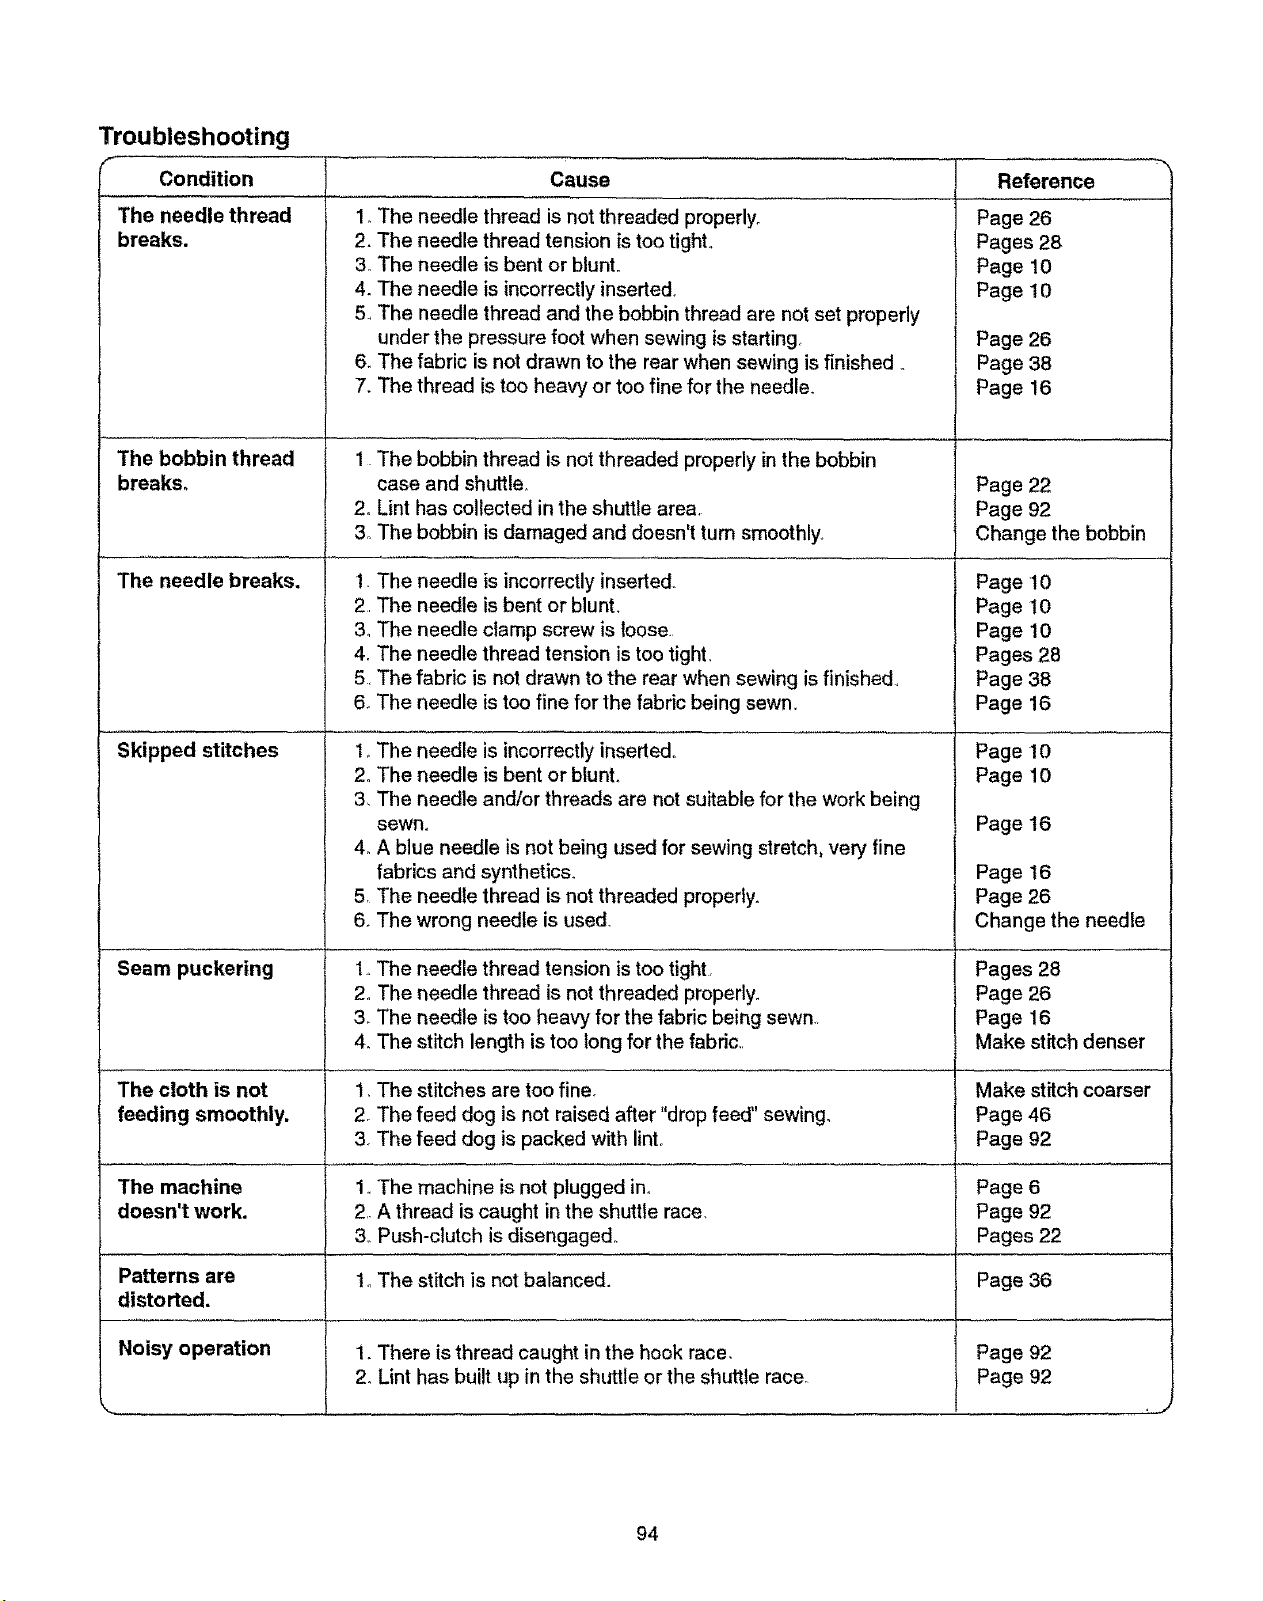
Troubleshooting
f
Condition Cause Reference
The needle thread
breaks.
The bobbin thread
breaks,
The needle breaks.
Skipped stitches
Seam puckering
The cloth is not
feeding smoothly.
1. The needle thread is not threaded properly.
2. The needle thread tension is too tight.
3,,The needle is bent or blunt.
4. The needle is incorrectly inserted.
5_The needle thread and the bobbin thread are not set properly
under the pressure foot when sewing is starting,
6. The fabric is not drawn to the rear when sewing is finished
7. The thread is too heavy or too fine for the needle.
1 The bobbin thread is not threaded properly in the bobbin
case and shuttle.
2oLint has collected in the shuttle area.
3oThe bobbin is damaged and doesn't tum smoothly,
1. The needle is incorrectly inserted.
2, The needle is bent or blunL
3_The needle clamp screw is toose,
4. The needle thread tension is too tight,
5, The fabric is not drawn to the rear when sewing is finished,
6. The needle is too fine for the fabric being sewn,
1,.The needle is incorrectly inserted°
2, The needle is bent or blunt°
3_The needle and/or threads are not suitable for the work being
sewn°
4° A blue needle is not being used for sewing stretch, very fine
fabrics and synthetics.
5 The needle thread is not threaded properly.
6. The wrong needle is used.
1• The needle thread tension is too tight
2, The needle thread is not threaded properly.
3. The needle is too heavy for the fabric being sewn,
4_The stitch length is too long for the fabdc,,
1, The stitches are too fine,
2_The feed dog is not raised after "drop feed" sewing,
3 The feed dog is packed with lint.
Page 26
Pages 28
PagelO
Page lO
Page 26
Page 38
Page 16
Page 22
Page 92
Changethe bobbin
PagelO
Page lO
Page lO
Pages 28
Page 38
Page 16
Page lO
PagelO
Page16
Page 16
Page 26
Changethe needle
Pages 28
Page 26
Page 16
Make stffch denser
Make stitch coarser
Page 46
Page 92
The machine 1, The machine is not plugged ino Page 6
doesn't work. 2 A thread is caught in the shuttle race, Page 92
3oPush-clutch is disengaged° Pages 22
Patterns are to The stitch is not balanced. Page 36
distorted.
Noisy operation 1. There is thread caught in the hook race, Page 92
2. Lint has built up in the sht_le or the shuttle race Page 92
94
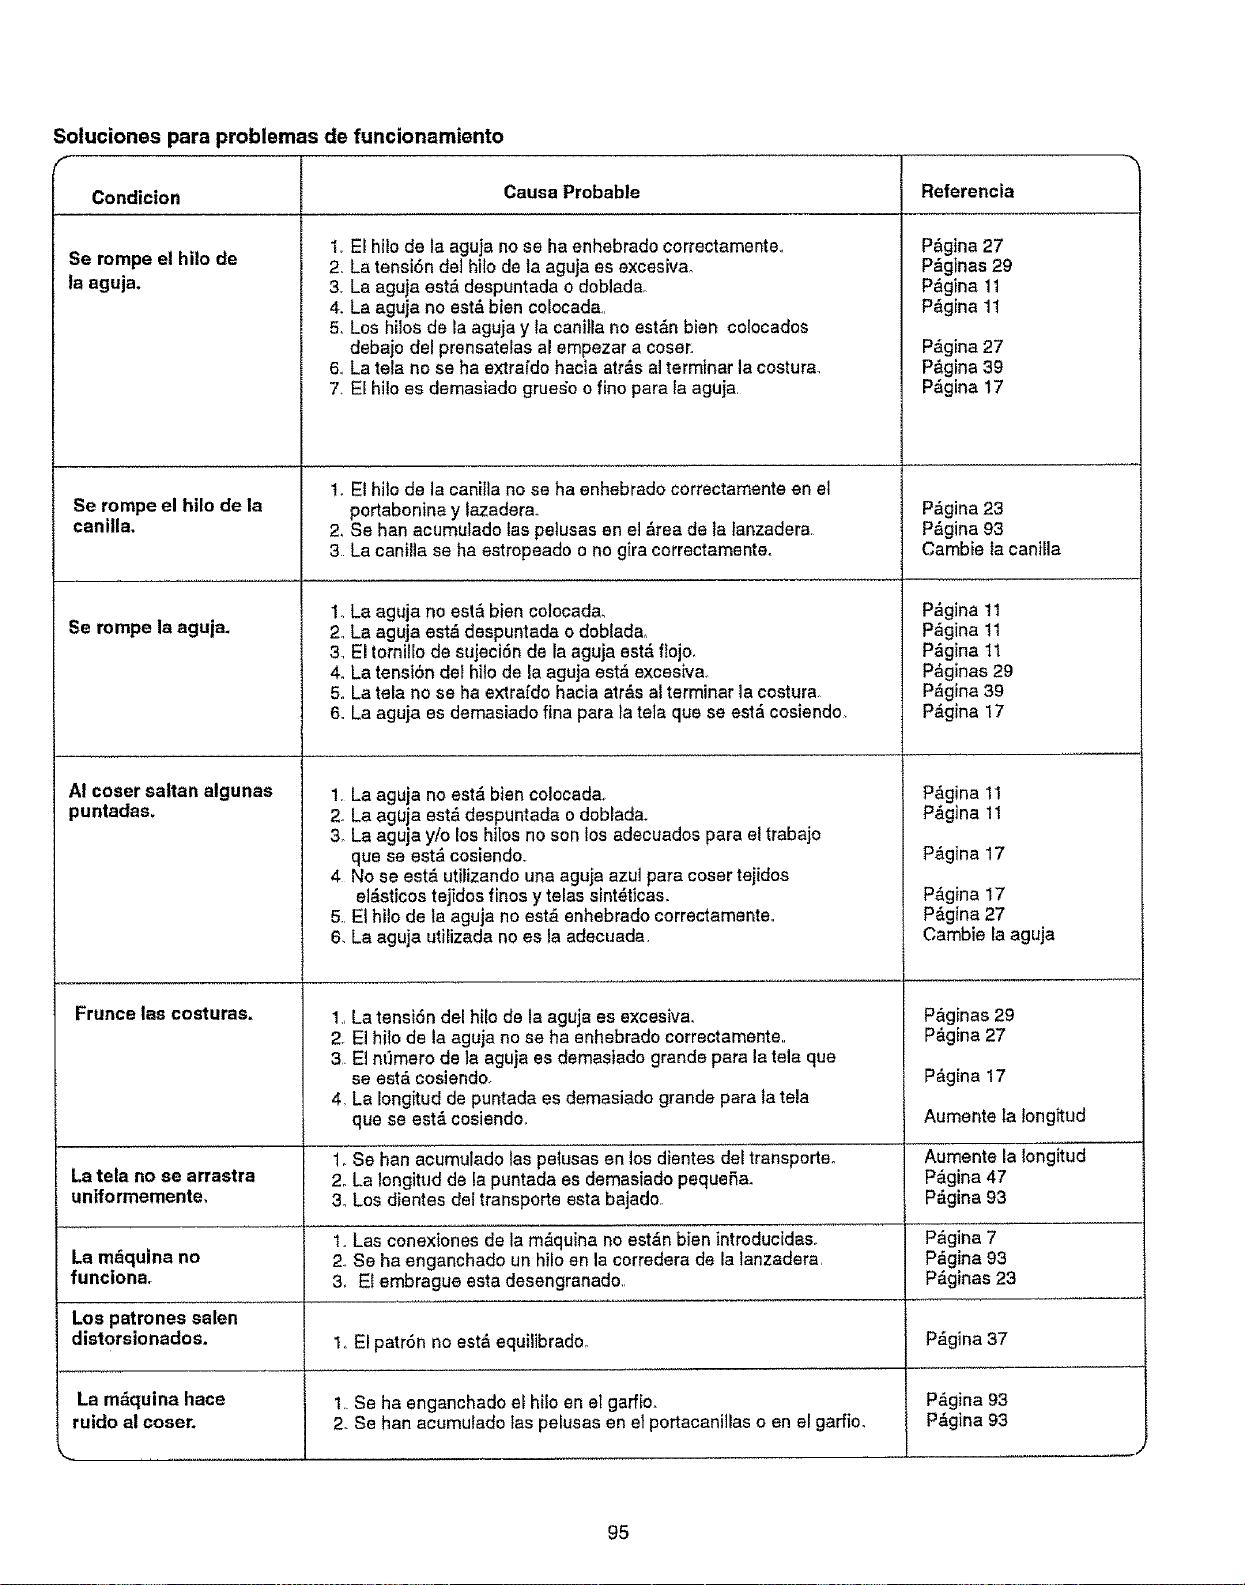
Soluciones para problemas de funcionamiento
F
Condicion
Se rompe el hilo de
la aguja.
Se rompe el hilo de la
canilla.
1o
Se rompe la aguia. 2,
3=,
4.
5.
6.
A! coser saltan algunas 1,
puntadas. Z
3.
4
5,,
6,
Frunce las costuras.
La tela no se arrastra
uniformemente,
La m_quina no
funciona.
Los patrones salen
distorsionados.
La m_quina hace
ruido al coser.
k_ .............................
Causa Probable
t. El hilo de la aguja no se ha enhebrado correctamente.,
2. La tensi6n dei hi{o de la aguja es excesivao
3. La aguja est& despuntada o dobiadao
4. La aguja no est& bien colocada.
5. Los hi!os de la aguja y la caniIla no est#,n bien colocados
debajo del prensatelas al empezar a coser.
6o La tela no se ha extrafdo hacia atr&s al terminar la costura_
7. El hilo es demasiado grue_o o fino para la aguja
t. El hilo de la caniila no se ha enhebrado correctamente en el
portabonina y lazadera.
2, Se ban acumulado las pelusas en el &tea de la lanzadera
3 La canilla se ha estropeado o no gira correctamente.
La aguja no est& bien colocada.
La aguja est& despuntada o doblada,
El tornilro de sujeci6n de la aguja est& flojo.
La tension del hi{o de Kaaguja est& excesiva_
La tela no se ha extrafdo hacia atr&s al terminar la costura
La aguja es demasiado fina para la teIa qua se est& cosiendo_
La aguja no est& bien colocada_
La aguja est& daspuntada o doblada.
La aguja y/o los hi[os no son los adecuados para el trabajo
qua se est& cosiendo.
No se est& utilizando una aguja azut para coser tejidos
el&sticos tejidos finos y telas sintSticas.
El hilo de la aguja no est& enhebrado correctamente.
La aguja utilizada no es la adecuada.
1., La tensi6n del hilo de la aguja es excesiva.
2. El hito de la aguja no se ha enhebrado correctamente.
3 El m_lmero de la aguja es demasiado grande para la tela qua
se est& cosiendo.
4. La Iongitud de puntada es demasiado grande para la tela
qua se est,. cosiendo.
1_ So han acumulado las peiusas en los dientes del transportao
2o La longitud de la puntada es demasiado pequefa.
3_ Los dientes del transporte esta bajado
t.. Las conexiones de la m&quina no est_n bien introducidas.
2. So ha enganchado un hilo en la corredera de la tanzadera
3. E! embrague esta desengranado
Referencia
P&gina 27
P_ginas 29
P&gina 11
P&gina 11
P&gina 27
P#,gina 39
P&gina 17
P&gina 23
P_gina 93
Cambie ta canilla
P&gina 1t
P_gina 1t
P&gina 11
P&ginas 29
P_gina 39
P_gina 17
P__gina 11
P&gina 11
P&gina 17
P&gina 17
P&gina 27
Cambie [a aguja
P&ginas 29
P_gina 27
P&gina 17
Aumente la longltud
Aumente la long'itud
P&gina47
P_,gina93
P_gina
P_gina 93
P&ginas 23
1., El patr6n no est& equilibradoo P_gina 37
1. Se ha enganchado el hiio en el gaffioo P&gina 93
2_ Se hart acumulado las pelusas en el portacanillas o en el garfio. P#,gina 93
........ I'
95
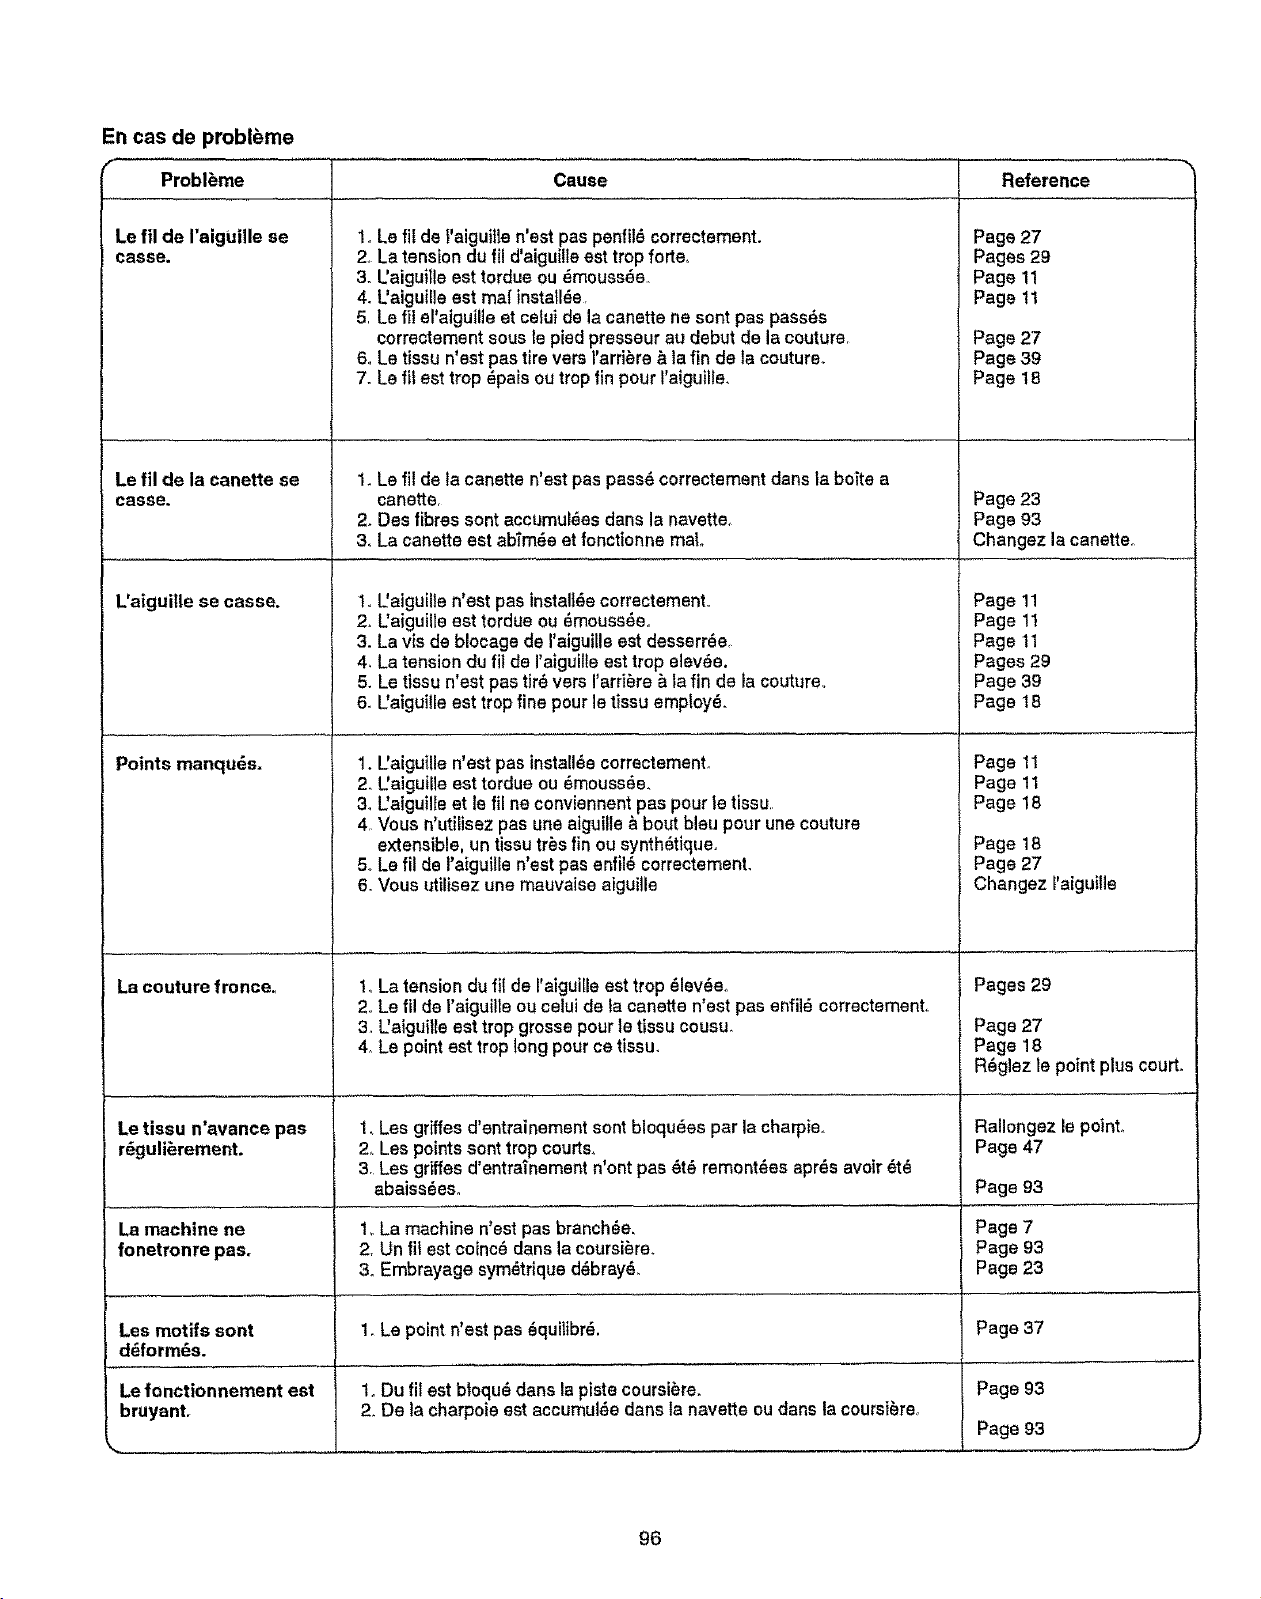
En cas de probl_me
Probl_me
Le fil de I'aiguille se
casse.
Le fil de la canette se
casse.
L'aigui|le se casse.
Points manqu_s.
La couture fronce_
Le tissu n'avance pas
r_gulibrement.
Cause Reference
1. Le fit de f'aiguitle n'est pas penfil8 correctement.
2, La tension du fil d'aiguille est trop forte,,
3. Uaiguille est tordue ou _mouss_e,.
4. Uaiguille est mar instatl_e
5, Le fil e['aiguilte et celuf de la canette ne sent pas passes
correctement sous [e pied presseur au debut de la couture,
6. Le tissu n'est pas tire vers I'arri_re _, ta fin de la couture.
7. Le fil est trop _pais ou trop fin pour I'aiguilfe.
1. Le fil de la canette n'est pas pass6 correctement darts la boite a
canette,
2. Des fibres sent acctJmul_es dens la navette_
3. La canette est ab_mae st fonctionne real
1, L'aiguillen'estpas instaltdecorrectemenL
2oUaiguilte est tordue ou _mouss6eo
3, La visde blocage de I'aiguitle est desserr_e
4, La tension du fil de I'aiguilteest tropelevde.
5. Le tissun'est pes tir_ vers I'arri_re_ latin de la couture.,
6_Uaiguilieest tropfine pourle tissuemployS.
1. UaiguiUe n'est pas insta[l_e correctemento
2o UaiguiUe est tordue ou _mouss_e.
3o Uaiguille et le fi[ ne conviennent pas pour le tissu,
4,, Vous n'utiEisez pas une aiguilte & bout bleu pour une couture
extensible, un tissu tr_s fin ou synth_tiqueo
5. Le fil de I'aiguil[e n'est pas enfil_ correctemenL
6. Vous utilisez une mauvaise aiguille
1,,La tension du ffi de I'aigui[le est trop _lev_eo
2, Le fi! de I'aiguilie ou celui de la canette n'est pas enfil_ correctement,
3. Uaigu{lle est trop grosse pour le tissu cousu.
4,, Le point est trop long pour ce tissu.
1. Les griffes d'entrainement sent bloqu_es par la charpie,,
2,. Les points sent trop courts°
3, Les grfffes d'entrainement n'ont pas _t6 remont_es aprOs avoir Ot_
abaiss6eso
Page 27
Pages 29
Page 11
Page 11
Page 27
Page 39
Page18
Page 23
Page 93
Changezla cane_e,,
Page 11
Page 11
Page 11
Pages 29
Page 39
Page 18
Page 11
Page 11
Page 18
Page 18
Page 27
ChangezI'aiguille
Pages 29
Page 27
Page 18
R_glezle pointplus court.
Rallongezle peint_
Page 47
Page 93
La machine ne 1. La machine n'est pas branch6e. Page 7
fonetronre pas. 2, Un fi_ est coinc_ dane la coursi_ra° Page 93
3. Embrayage sym_trique d_bray_ Page 23
Les motifs sent 1_ Le point n'est pas _quilibr_. Page 37
d_form6s.
Le fonctionnement est 1o Du fit est btoqu_ dans la piste coursi_re_ Page 93
bruyant. 2. De la charpoie est accumul_e dens la navette ou dans la coursi_reo
Page 93
96

97

i i, innlnnn'lUll
In U.S.A or Canada
for in-home major brand repair service:
Call 24 hours a day, 7 days a week
1-800-4-MY-HOME °M(1-800-469-4663)
Para pedir servicio de reparaci6n a domicilio - 1-800-676-5811
Au Canada pour tout le service ou les pi_ces - t-800-469-4663
For the repair or replacement parts you need:
Call 6 am - !t pm CST, 7 days a week
PartsDirect °M
1-800-366-PART(I-800-366-7278)
Para ordenar piezas con entrega a domicilio - 1-800-659-7084
For the location of a Sears Service Center in your area:
Call 24 hours a day, 7 days a week
1-800-488-1222
To purchase or inquire about a Sears Maintenance Agreement
Call 7 am - 5 p.m. CST, Monday - Saturday
1-800-827-6655
IIIII IIII III III
r
HomeCentral °°
II, IIIII ,11
ii ,n n, nnll i, HH,Hn,um
Printed in Taiwan Impreso en Taiwan Impdm_ au Taiwan
756-800-091