User Gudie AEG DUB331110M Oven
Children and vulnerable people safety
- This appliance can be used by children aged from 8 years and above and persons with reduced physical, sensory or mental capabilities or lack of experience and knowledge if they have been given supervision or instruction concerning the use of the appliance in a safe way and understand the hazards involved.
- Children between 3 and 8 years of age and persons with very extensive and complex disabilities shall be kept away from the appliance unless continuously supervised.
- Children of less than 3 years of age should be kept away from the appliance unless continuously supervised.
- Do not let children play with the appliance.
- Keep all packaging away from children and dispose of it appropriately.
- Keep children and pets away from the appliance when it operates or when it cools down. Accessible parts become hot during use.
- If the appliance has a child safety device, it should be activated.
- Children shall not carry out cleaning and user maintenance of the appliance without supervision.
General Safety
- Only a qualified person must install this appliance and replace the cable.
WARNING:
- The appliance and its accessible parts become hot during use. Care should be taken to avoid touching heating elements.
- Always use oven gloves to remove or put in accessories or ovenware.
- Before carrying out any maintenance, disconnect the appliance from the power supply.
WARNING:
- Ensure that the appliance is switched off before replacing the lamp to avoid the possibility of electric shock.
SAFETY INSTRUCTIONS
Installation
- Remove all the packaging.
- Do not install or use a damaged appliance.
- Follow the installation instructions supplied with the appliance.
- Always take care when moving the appliance as it is heavy. Always use safety gloves and enclosed footwear.
- Do not pull the appliance by the handle.
- Install the appliance in a safe and suitable place that meets installation requirements.
- Keep the minimum distance from other appliances and units.
- Before mounting the appliance, check if the oven door opens without restraint.
- The appliance is equipped with an electric cooling system. It must be operated with the electric power supply.
- The built-in unit must meet the stability requirements of DIN 68930.
- Electrical connection
- All electrical connections should be made by a qualified electrician.
- The appliance must be earthed.
- Make sure that the parameters on the rating plate are compatible with the electrical ratings of the mains power supply.
- Always use a correctly installed shockproof socket.
- Do not use multi-plug adapters and extension cables.
- Make sure not to cause damage to the mains plug and to the mains cable. Should the mains cable need to be replaced, this must be carried out by our Authorised Service Centre.
- Do not let mains cables touch or come near the appliance door or the niche below the appliance, especially when it operates or the door is hot.
- The shock protection of live and insulated parts must be fastened in such a way that it cannot be removed without tools.
Use
- This appliance is for household use only.
- Do not change the specification of this appliance.
- Make sure that the ventilation openings are not blocked.
- Do not let the appliance stay unattended during operation.
- Deactivate the appliance after each use.
- Be careful when you open the appliance door while the appliance is in operation. Hot air can release.
- Do not operate the appliance with wet hands or when it has contact with water.
- Do not apply pressure on the open door.
- Do not use the appliance as a work surface or as a storage surface.
- Open the appliance door carefully.
- The use of ingredients with alcohol can cause a mixture of alcohol and air.
- Do not let sparks or open flames to come in contact with the appliance when you open the door.
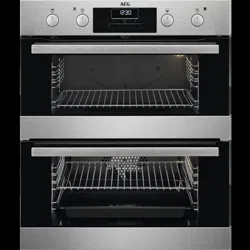
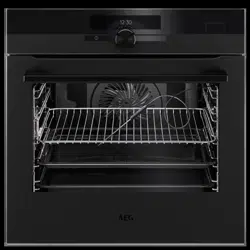
PRODUCT DESCRIPTION

1 Knob for the top oven functions
2 Knob for the top oven temperature
3 Temperature indicator / symbol for the top oven
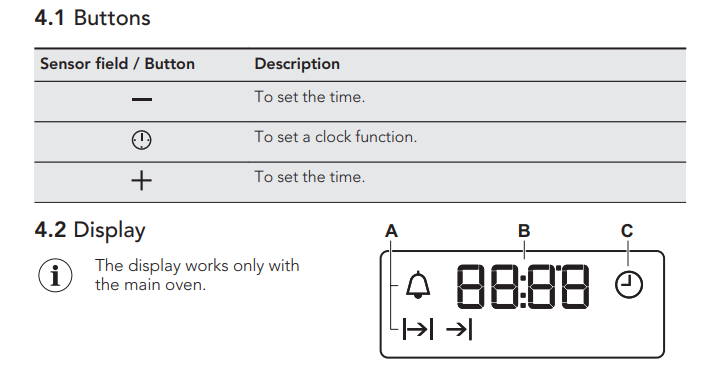
4 Display
5 Knob for the main oven functions
6 Temperature indicator / symbol for the main oven
7 Knob for the main oven temperature
8 Heating element
9 Lamp
10 Fan
11 Shelf support, removable
12 Shelf positions
CONTROL PANEL
BEFORE FIRST USE
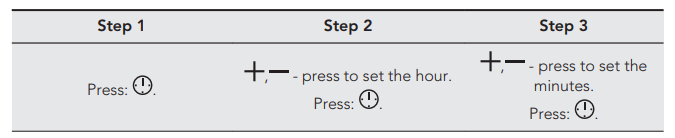
Setting the clock
Initial Cleaning
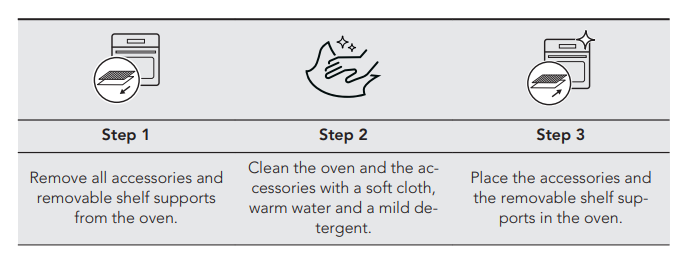
Initial preheating
- Step 1 Remove all accessories and removable shelf supports from the oven. Preheat the two ovens. Heat up one oven at a time.
- Step 2 Set the maximum temperature for the function: . Let the oven operate for 1 h.
- Step 3 Set the maximum temperature for the function: . Let the oven operate for 15 min.
- Step 4 Set the maximum temperature for the function: . Let the oven operate for 15 min.
DAILY USE
Top oven functions
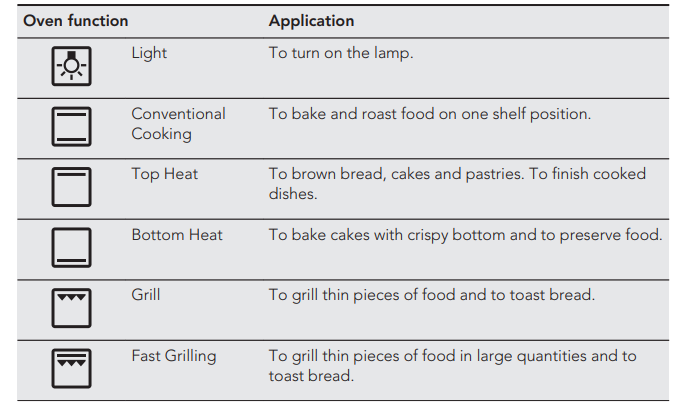
Main oven functions
- True Fan Cooking To bake on up to two shelf positions at the same time and to dry food.
- Set the temperature 20 - 40 °C lower than for Conventional Cooking.
- Defrost To defrost food (vegetables and fruit). The defrosting time depends on the amount and size of the frozen food.
- Turbo Grilling To roast large meat joints or poultry with bones on one shelf position. To make gratins and to brown.
Grill To grill thin pieces of food and to toast bread.
Moist Baking
- This function was used to comply with the energy efficiency class and ecodesign requirements according to EU 65/2014 and EU 66/2014. Tests according to EN 60350-1.
- The oven door should be closed during cooking so that the function is not interrupted and the oven operates with the highest energy efficiency possible.
- When you use this function the lamp automatically turns off. For the cooking instructions refer to "Hints and tips" chapter, Moist Baking. For general energy saving recommendations refer to "Energy Efficiency" chapter, Energy Saving.
CLOCK FUNCTIONS
Clock functions
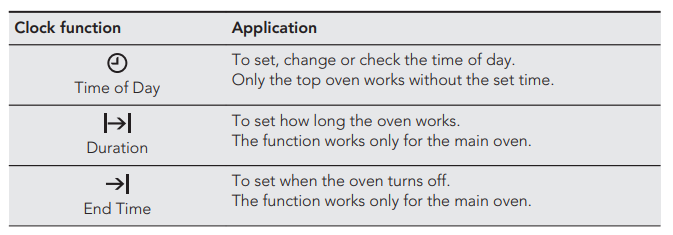
How to set: Time Delay

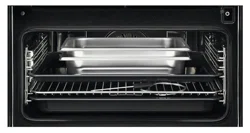
USING THE ACCESSORIES
Wire shelf:
- Push the shelf between the guide bars of the shelf support. Deep pan: Push the deep pan between the guide bars of the shelf support.
- Wire shelf and deep pan together: Push the deep pan between the guide bars of the shelf support and the wire shelf on the guide bars above.
Trivet and Grill- / Roasting pan
Step 1
- Put the trivet into a deep pan.
Step 2
- Put the deep pan on the recommended shelf position. Roasting larger pieces of meat or poultry on one shelf position. Grilling and toasting thin pieces of food in large quantities.
- Make sure the supports of the wire shelf point up. Make sure the supports of the wire shelf point down.
ADDITIONAL FUNCTIONS
Cooling fan
- When the oven operates, the cooling fan turns on automatically to keep the surfaces of the oven cool. If you turn off the oven, the cooling fan can continue to operate until the oven cools down.
HINTS AND TIPS
Top oven
- The top oven is the smaller of the two ovens. It has 4 shelf positions. Use it to cook smaller quantities of food. It gives especially good results when used to cook fruitcakes, sweets and savoury flans or quiche.
Main oven
- The main oven is the bigger of the two ovens. It is particularly suitable for cooking larger quantities of food.
Baking
- For the first baking, use the lower temperature.
- You can extend the baking time by 10 – minutes if you bake cakes on more than one shelf position.
- Cakes and pastries at different heights do not always brown equally. There is no need to change the temperature setting if an unequal browning occurs. The differences equalize during baking.
- Trays in the oven can distort during baking. When the trays are cold again, the distortions disappear.
- The cake sinks and becomes soggy or streaky.
The oven temperature is too high.
- Next time set slightly lower oven temperature.
- The oven temperature is too high and the baking time is too short.
- Next time set a longer baking time and lower oven temperature.
- The cake is too dry. The oven temperature is too low.
- Next time set higher oven temperature.
- The baking time is too long. Next time set shorter baking time.
- The cake bakes unevenly.
- The oven temperature is too high and the baking time is too short.
- Next time set a longer baking time and lower oven temperature.
The cake batter is not evenly distributed.
- Next time spread the cake batter evenly on the baking tray.
- The cake is not ready in the baking time specified in a recipe.
- The oven temperature is too low.
- Next time set a slightly higher oven temperature.
CARE AND CLEANING
Cleaning Agents
- Clean the front of the oven with a soft cloth with warm water and a mild detergent. Use a cleaning solution to clean metal surfaces. Clean stains with a mild detergent. Do not apply it on the catalytic surfaces.
Everyday Use
- Clean the cavity after each use. Fat accumulation or other residue may cause fire. Dry the cavity with a soft cloth after each use
Accessories
- Clean all accessories after each use and let them dry. Use a soft cloth with warm water and a mild detergent. Do not clean the accessories in a dishwasher. Do not clean the non-stick accessories using abrasive cleaner or sharpedged objects.
Catalytic cleaning
- The cavity is coated with catalytic enamel. It absorbs fat during catalysis. Spots or discolouration of the catalytic coating have no effect on the cleaning. Clean one oven at a time.
TROUBLESHOOTING
You cannot activate or operate the oven. The display shows “400” and an acoustic signal sounds
- The oven is incorrectly connected to an electrical supply.
- Check if the oven is correctly connected to the electrical supply (refer to the connection diagram if available).
The oven does not heat up
- The oven is deactivated.
- Activate the oven.
The oven does not heat up.
- The clock is not set.
- Set the clock.
The oven does not heat up.
- The necessary settings are not set.
- Make sure that the settings are correct.
The oven does not heat up.
- The fuse is blown. Make sure that the fuse is the cause of the malfunction.
- If the fuse is blown again and again, contact a qualified electrician.
The lamp does not operate.
- The lamp is defective. Replace the lamp.
- Steam and condensation settle on the food and in the cavity of the oven.
- You left the dish in the oven for too long.
- Do not leave the dishes in the oven for longer than 15 - 20 minutes after the cooking process ends.
- The display shows "12.00". There was a power cut. Reset the clock.
ENERGY EFFICIENCY
- The oven contains features which help you save energy during everyday cooking.
- Make sure that the oven door is closed properly when the oven operates. Do not open the door too often during cooking.
- Keep the door gasket clean and make sure it is well fixed in its position. www.aeg.com
- Use metal cookware to improve energy saving.
- When possible, do not preheat the oven before cooking.
- Keep breaks between baking as short as possible when you prepare a few dishes at one time.
Cooking with fan
- When possible, use the cooking functions with fan to save energy.
Residual heat
- When the cooking duration is longer than 30 minutes, reduce the oven temperature to minimum 3 - 10 minutes before the end of cooking. The residual heat inside the oven will continue to cook.
- Use the residual heat to warm up other dishes.
Keep food warm
- Choose the lowest possible temperature setting to use residual heat and keep a meal warm.
Moist Baking
- Function designed to save energy during cooking.
- When you use this function the lamp is off.