Quick Start Guide
RT-AC68U V4 Dual Band
RT-AC68U V4 Dual Band
3x3 Wireless-AC 1900 Gigabit Router
3x3 Wireless-AC 1900 Gigabit Router
¨
NA17952 / First Edition / May 2021
U17952-2_RT-AC68U_V4_QSG_NA.indb 1U17952-2_RT-AC68U_V4_QSG_NA.indb 1 2021/5/8 17:38:092021/5/8 17:38:09
Table of contents
Table of contents
English .............................................................................................3
Français Canadien
....................................................................... 18
Español
............................................................................................33
Português do Brasil
.....................................................................48
U17952-2_RT-AC68U_V4_QSG_NA.indb 2U17952-2_RT-AC68U_V4_QSG_NA.indb 2 2021/5/8 17:38:092021/5/8 17:38:09
3
English
15
9 10 13118 14127653
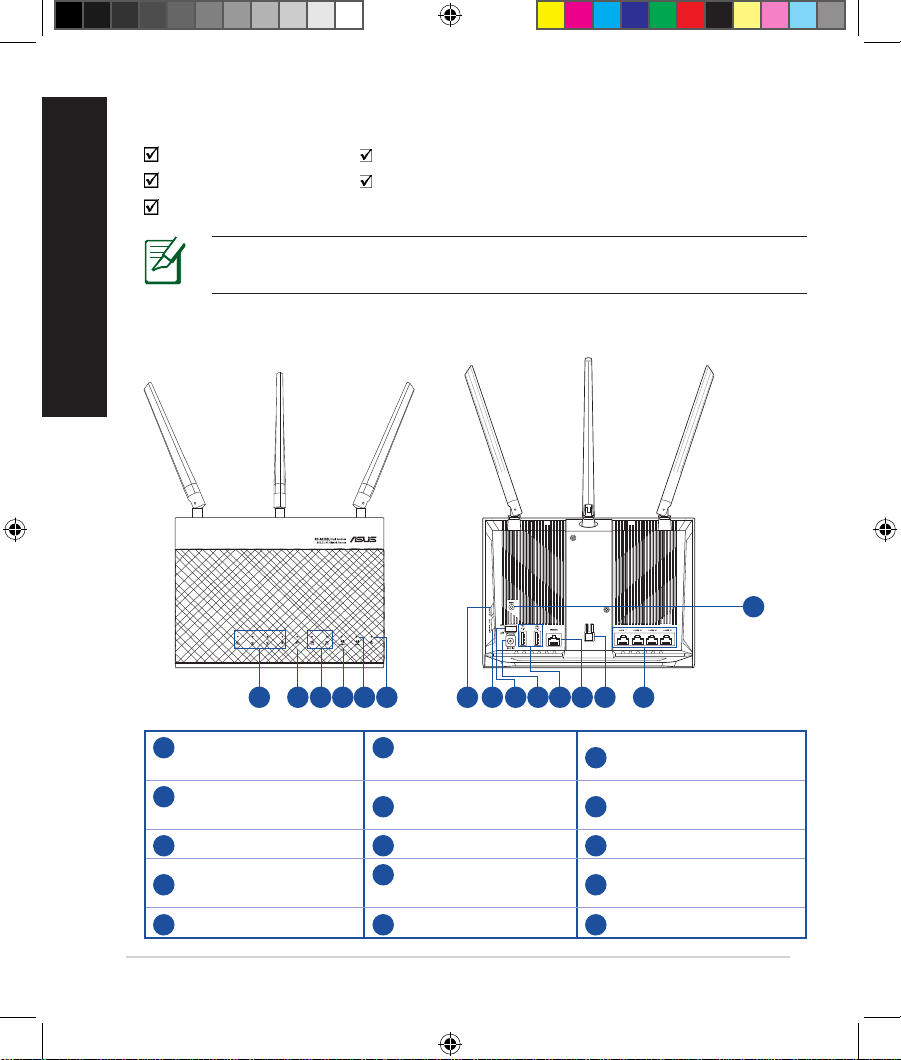
Package contents
Package contents
RT-AC68U AC adapter
Network cable (RJ-45) Quick Start Guide
Warranty Card
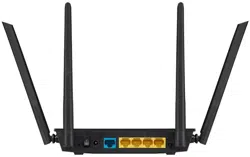
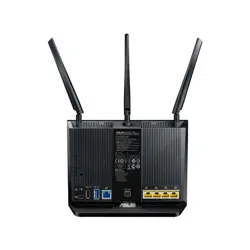
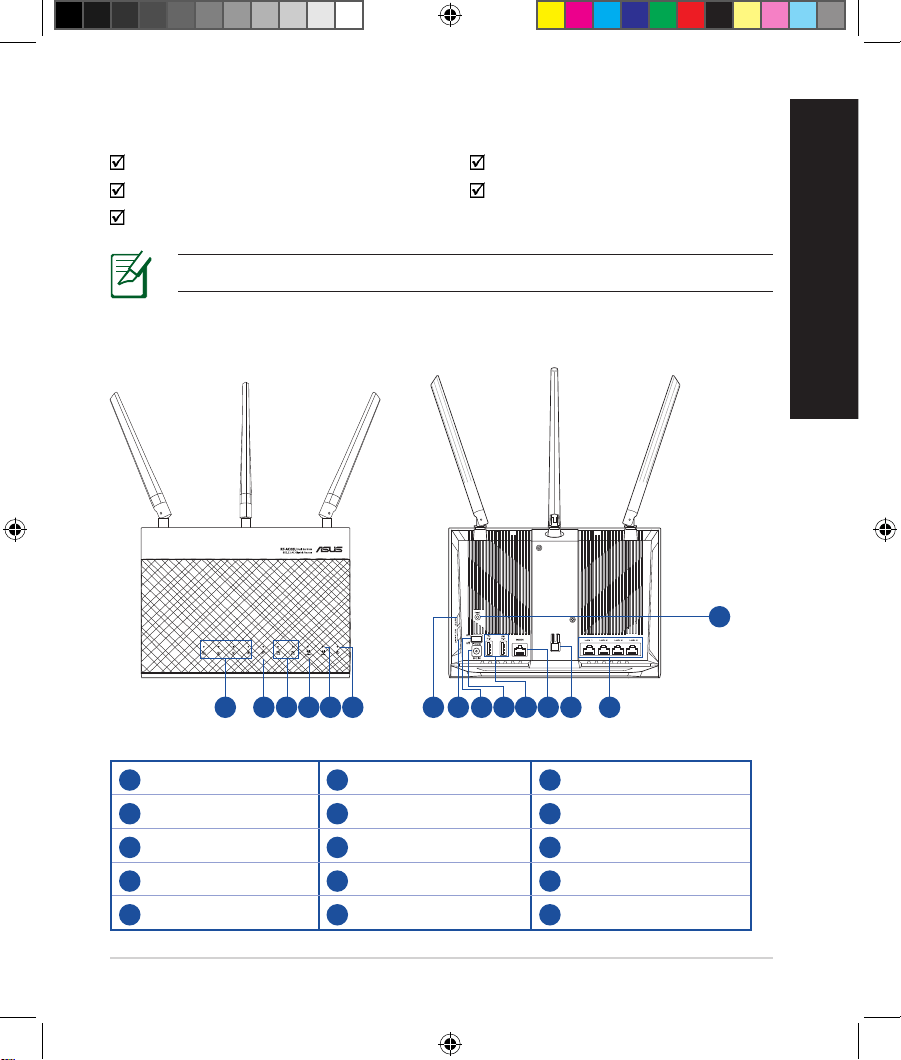
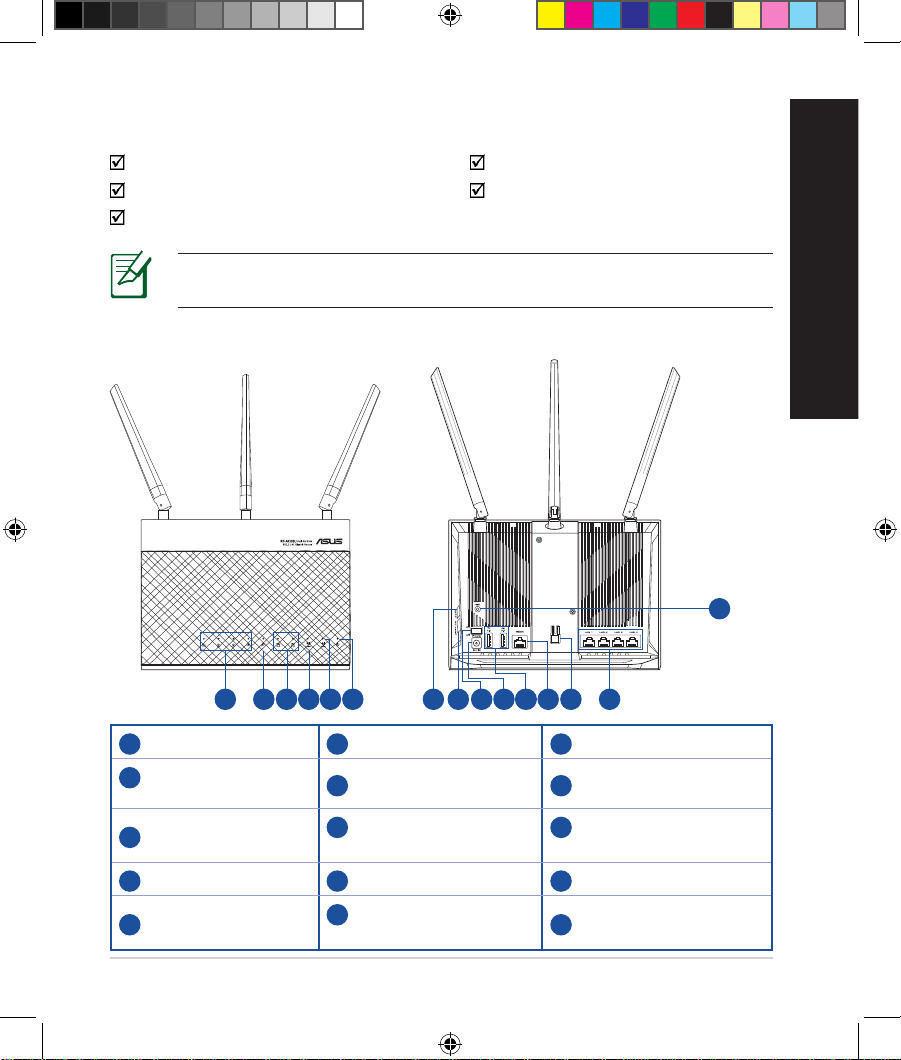
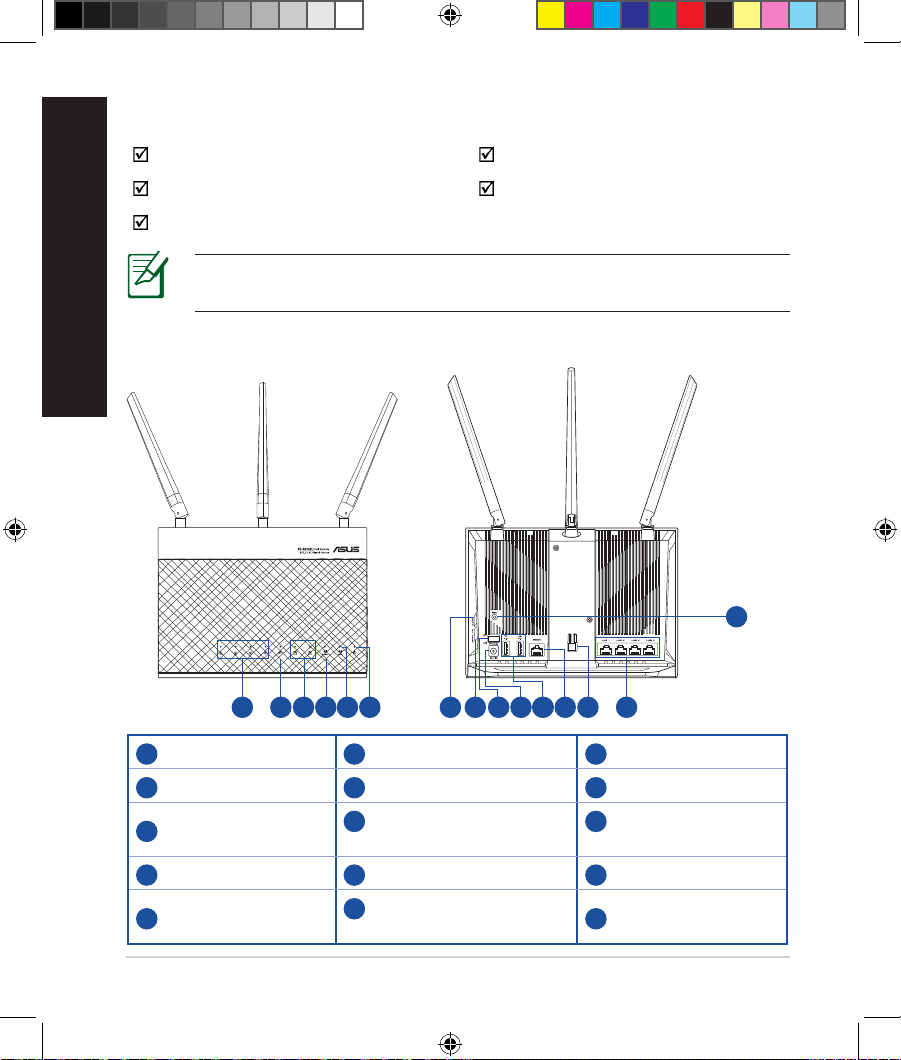
A quick look at your RT-AC68U
A quick look at your RT-AC68U
1
LAN 1~4 LEDs
6
Power LED
11
USB 3.0/2.0 ports
2
WAN (Internet) LED
7
WPS button
12
WAN port
3
USB 3.0/2.0 LEDs
8
Wi-Fi On/O button
13
LED On/O button
4
2.4GHz LED
9
Power switch
14
LAN ports
5
5GHz LED
10
Power (DCIN) port
15
Reset button
NOTE: If any of the items is damaged or missing, contact your retailer.
1 2 4
U17952-2_RT-AC68U_V4_QSG_NA.indb 3U17952-2_RT-AC68U_V4_QSG_NA.indb 3 2021/5/8 17:38:102021/5/8 17:38:10
4
English
NOTES:
• USB External HDD/Flash disk:
• The wireless router works with most USB HDDs/Flash disks up to
2TB and supports read-write access for FAT16, FAT32, EXT2, EXT3,
and NTFS.
• To safely remove the USB disk, launch the web GUI
(http://192.168.1.1), then in the Network Map page's upper right
corner, click the USB icon and click Eject USB 3.0 / USB 2.0.
• Incorrect removal of the USB disk may cause data corruption.
• For the list of le system and hard disk partitions that the wireless
router supports, visit
http://event.asus.com/networks/disksupport
• For the list of printers that the wireless router supports, visit
http://event.asus.com/networks/printersupport
U17952-2_RT-AC68U_V4_QSG_NA.indb 4U17952-2_RT-AC68U_V4_QSG_NA.indb 4 2021/5/8 17:38:102021/5/8 17:38:10

5
English
Installing your router
Installing your router
IMPORTANT: Before installing the router, ensure that Internet
connection is available
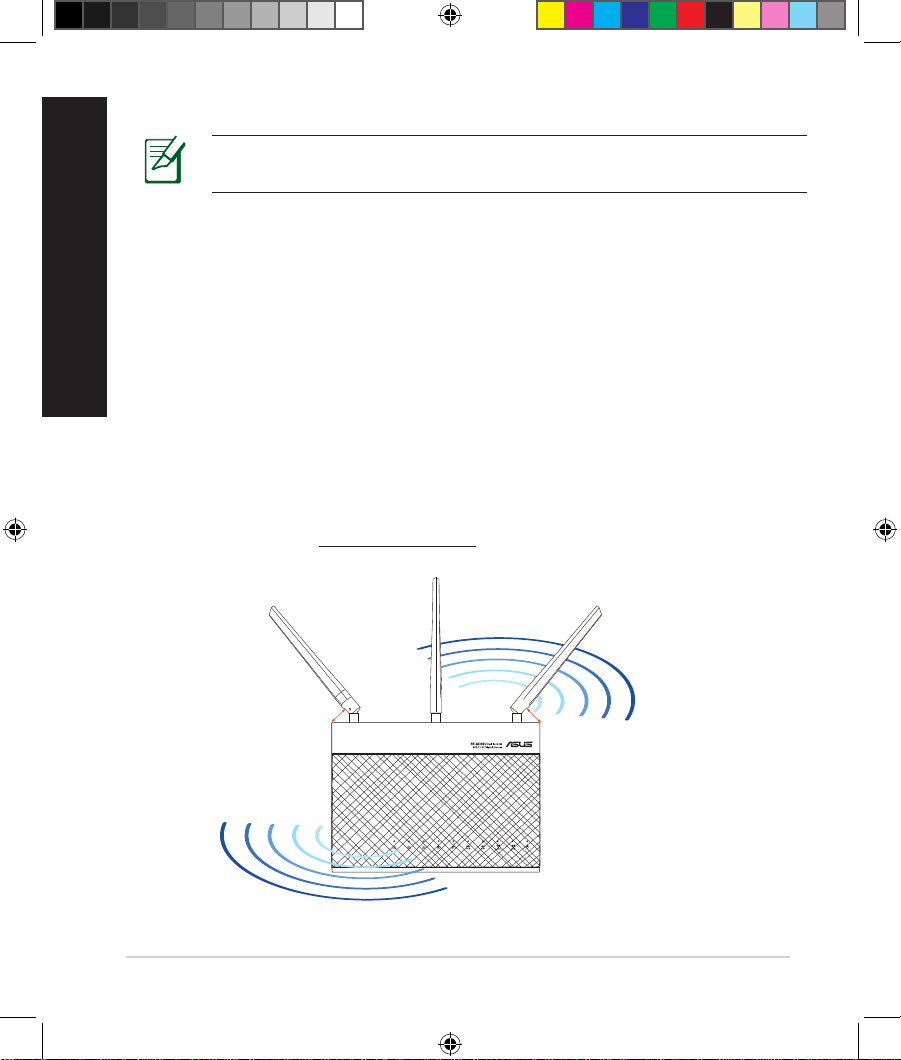
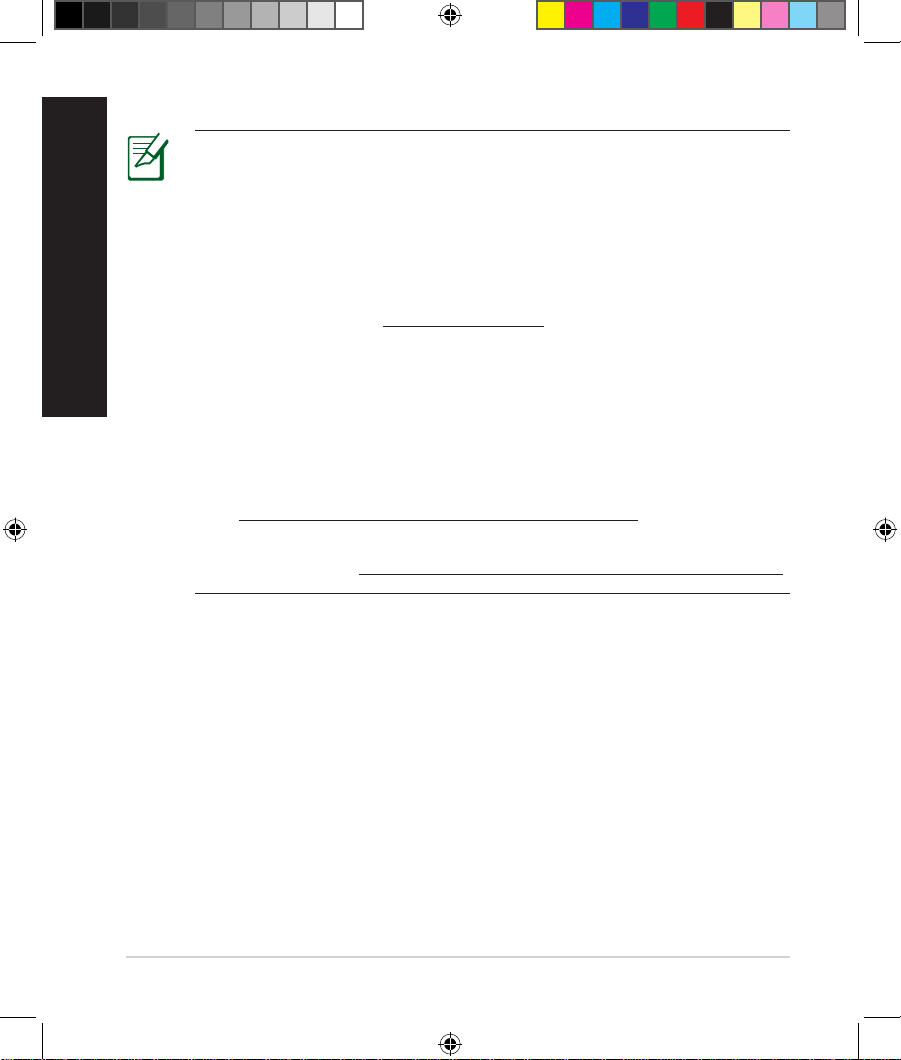
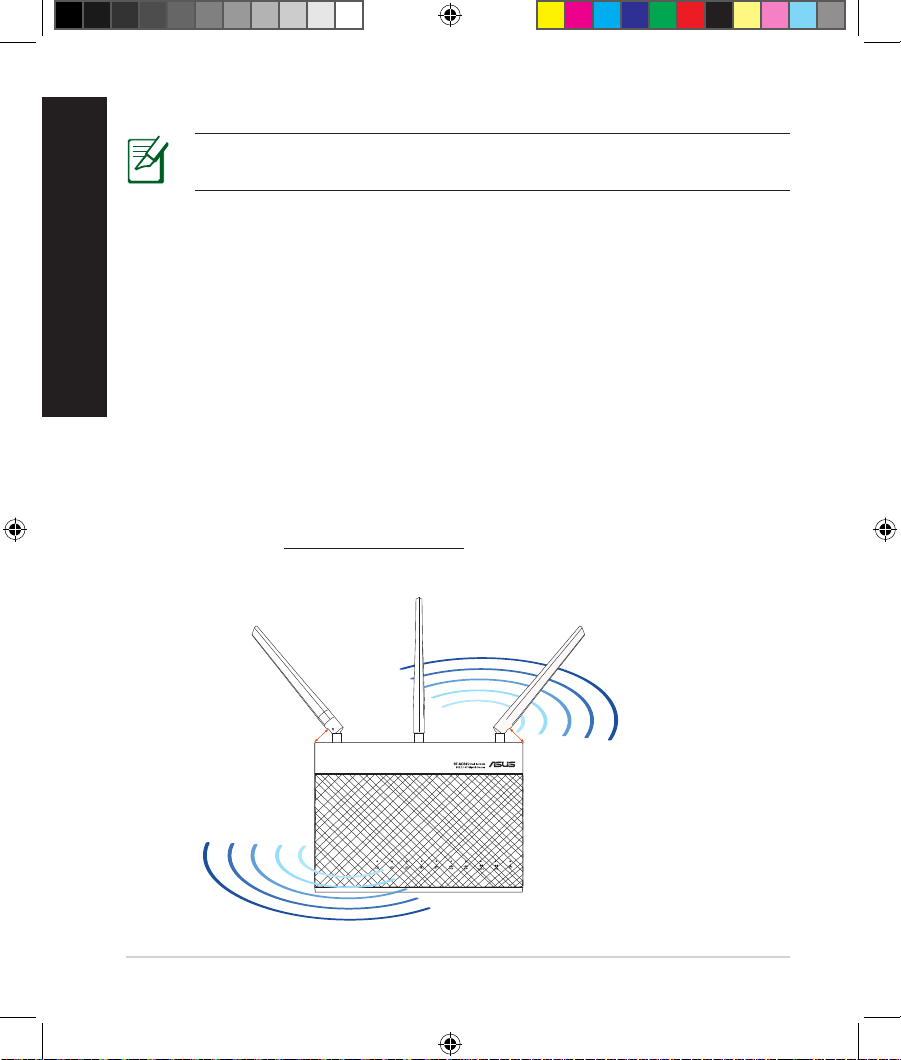
1. Position your wireless router.
For the optimal wireless transmission between the wireless router and
connected wireless devices, ensure that you:
• Place the wireless router in a centralized area for a maximum wireless coverage
for the network devices.
• Keep the wireless router away from metal obstructions and away from direct
sunlight.
• Keep the wireless router away from 802.11g or 20MHz only Wi-Fi devices,
2.4GHz computer peripherals, Bluetooth devices, cordless phones, transformers,
heavy-duty motors, uorescent lights, microwave ovens, refrigerators, and other
industrial equipment to prevent signal interference or loss.
• To ensure the best wireless signal, orient the three detachable antennas as
shown in the drawing below.
• Always update to the latest rmware. Visit the ASUS website at
http://www.asus.com to get the latest rmware updates.
45
°
90
°
45
°
U17952-2_RT-AC68U_V4_QSG_NA.indb 5U17952-2_RT-AC68U_V4_QSG_NA.indb 5 2021/5/8 17:38:102021/5/8 17:38:10
6
English
RT-AC68U
Computer
Wall Power Outlet
LAN
Modem
Power
WAN
a
b
c
d
Modem
OFF!
a
b
c
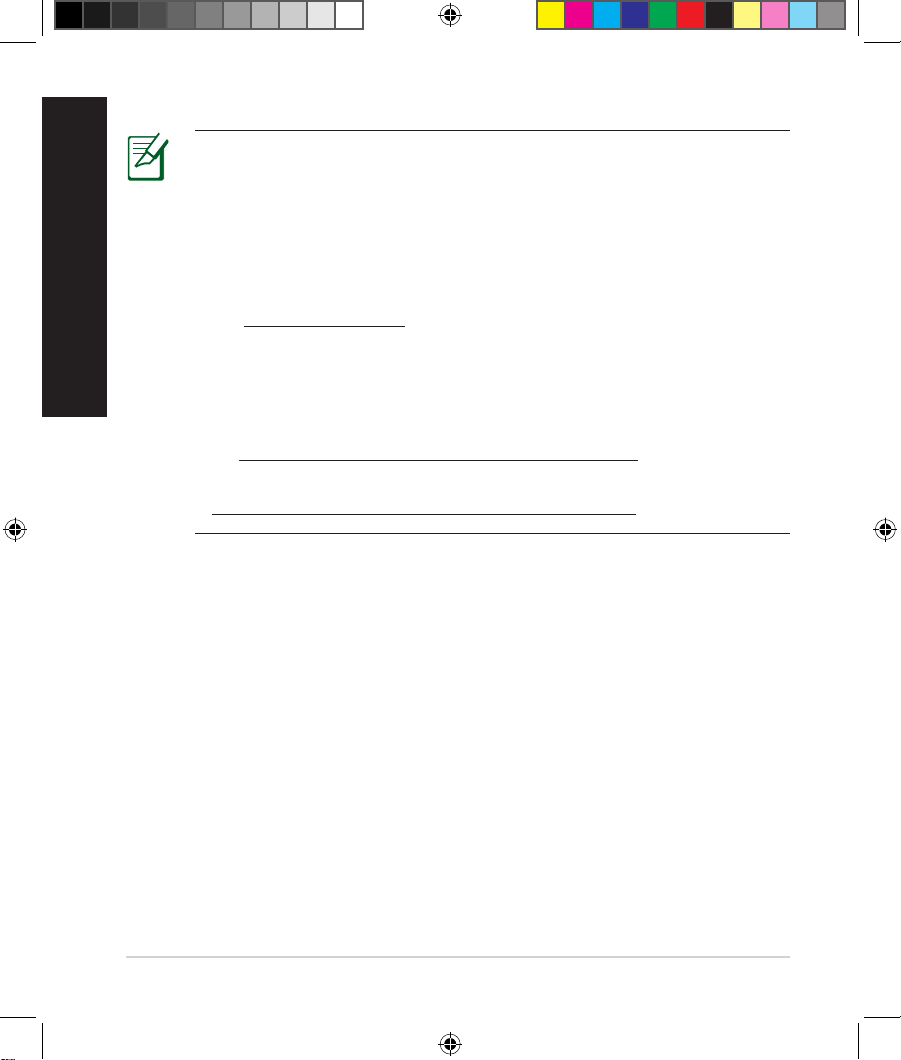
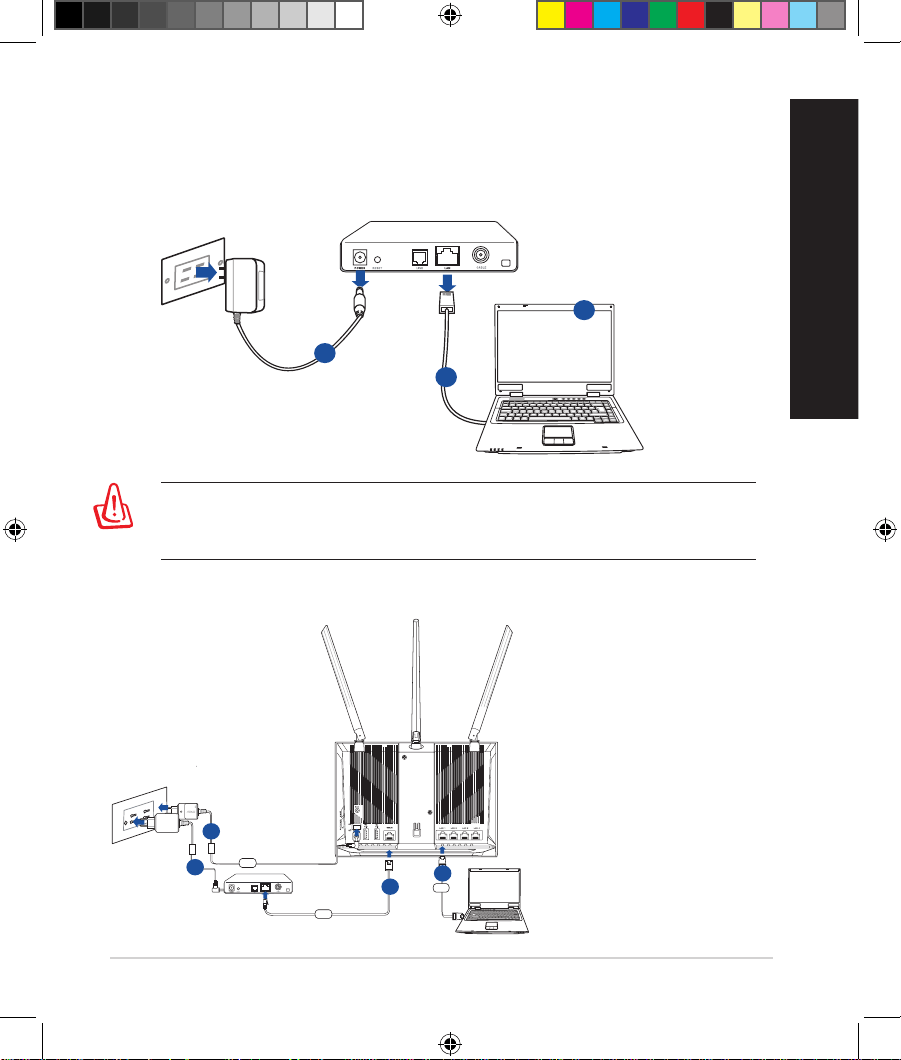
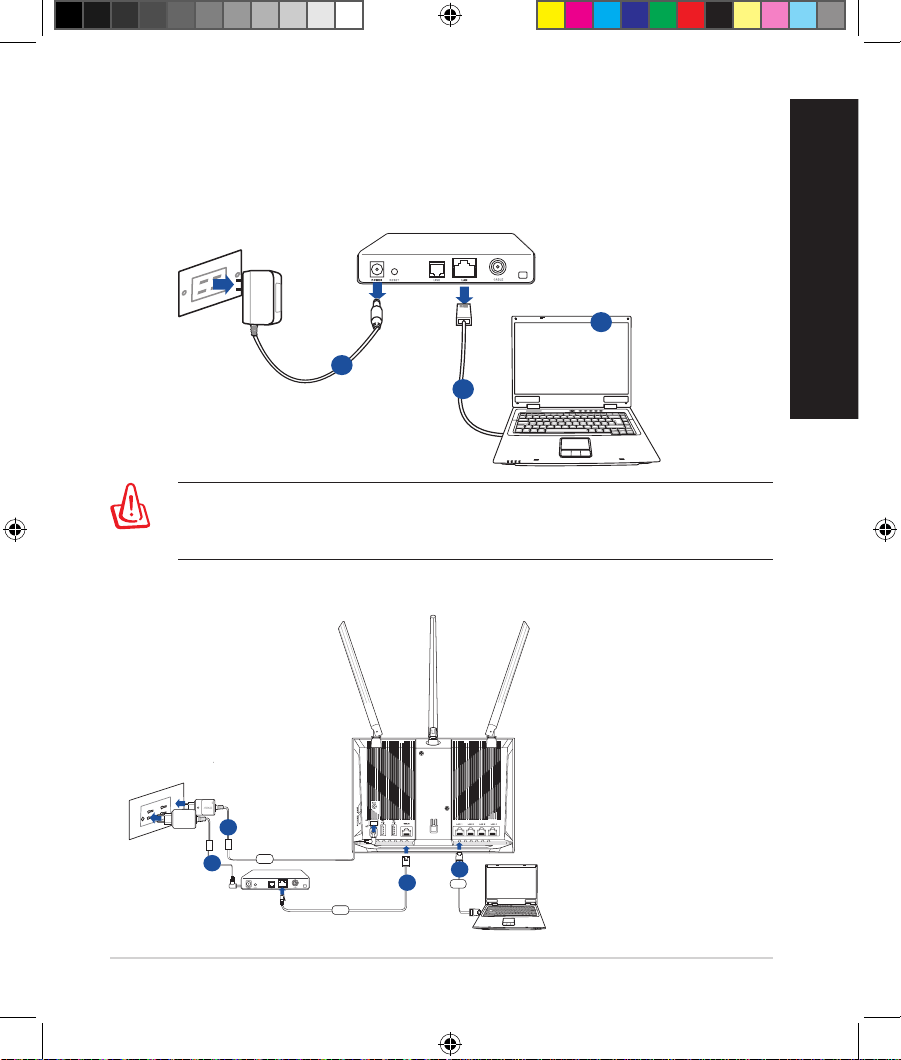
2. Prepare your modem.
a. Unplug the AC adapter from the power outlet and disconnect it from your
cable/ADSL modem.
b. Disconnect the network cable from your cable/ADSL modem.
c. Reboot your computer (recommended).
WARNING! Before disconnecting the wires/cables, ensure that your
cable/ADSL modem has been turned o for at least two minutes. If your
modem has a backup battery, remove it as well.
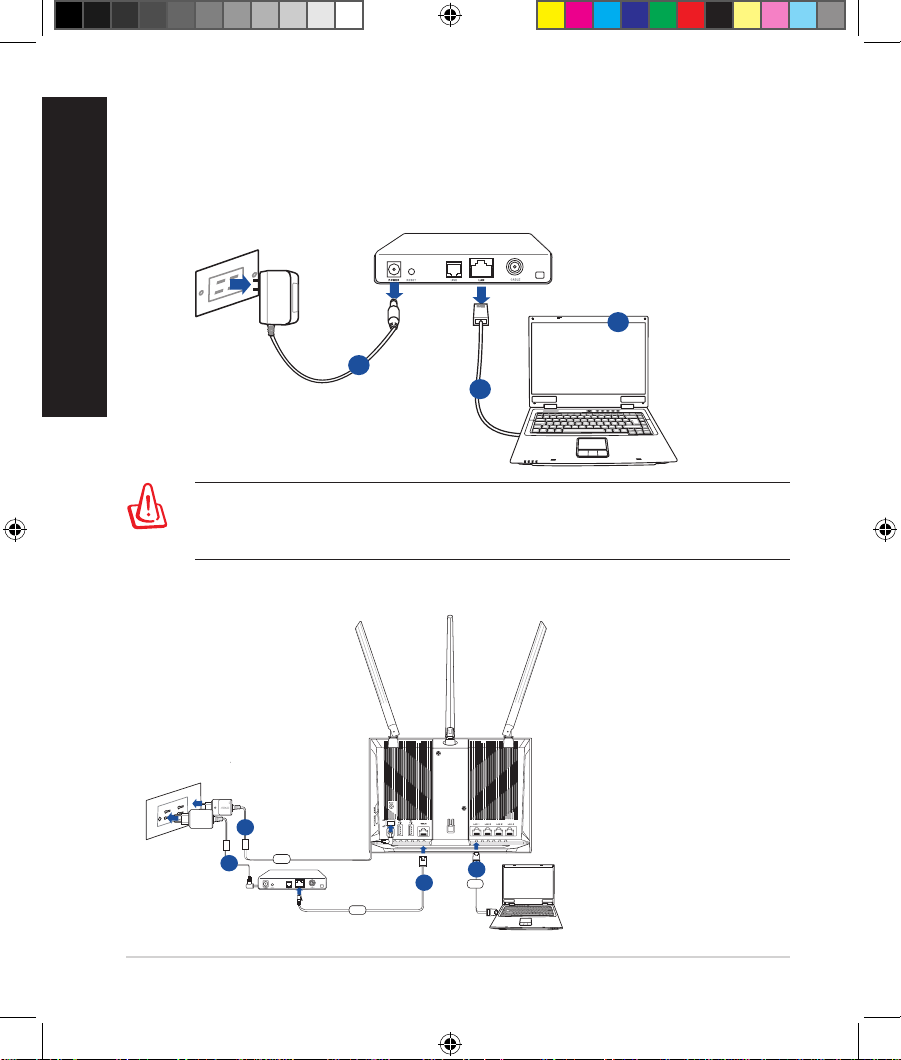
3. Set up your wireless environment.
U17952-2_RT-AC68U_V4_QSG_NA.indb 6U17952-2_RT-AC68U_V4_QSG_NA.indb 6 2021/5/8 17:38:112021/5/8 17:38:11
7
English
a. Insert your wireless router’s AC adapter to the DCIN port and plug it to a
power outlet.
b. Using another network cable, connect your modem to your wireless router’s
WAN port.
c. Insert your modem’s AC adapter to the DCIN port and plug it to a power
outlet.
d. Using the bundled network cable, connect your computer to your wireless
router’s LAN port. Ensure that the WAN and LAN LEDs are blinking.
NOTE: You can also set up RT-AC68U using a mobile device such as
smartphone or tablet PC. To do this, go to Setup your router using a
mobile device for details.
a.
Disable the proxy server, if enabled.
b. Set the TCP/IP settings to automatically obtain an IP address.
c. Disable the dial-up connection, if enabled.
NOTE: For more details on disabling your computer settings, refer to
Frequently Asked Questions (FAQs).
4. Disable some settings on your computer.
U17952-2_RT-AC68U_V4_QSG_NA.indb 7U17952-2_RT-AC68U_V4_QSG_NA.indb 7 2021/5/8 17:38:112021/5/8 17:38:11
8
English
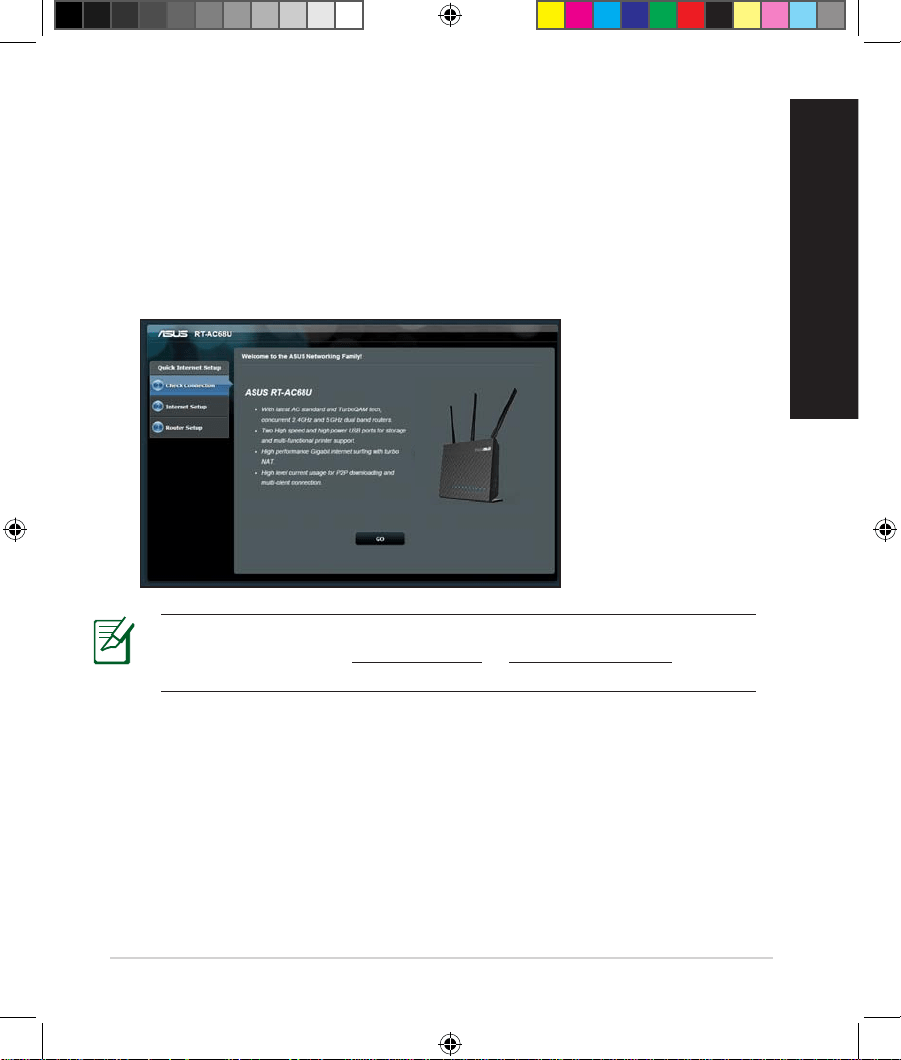
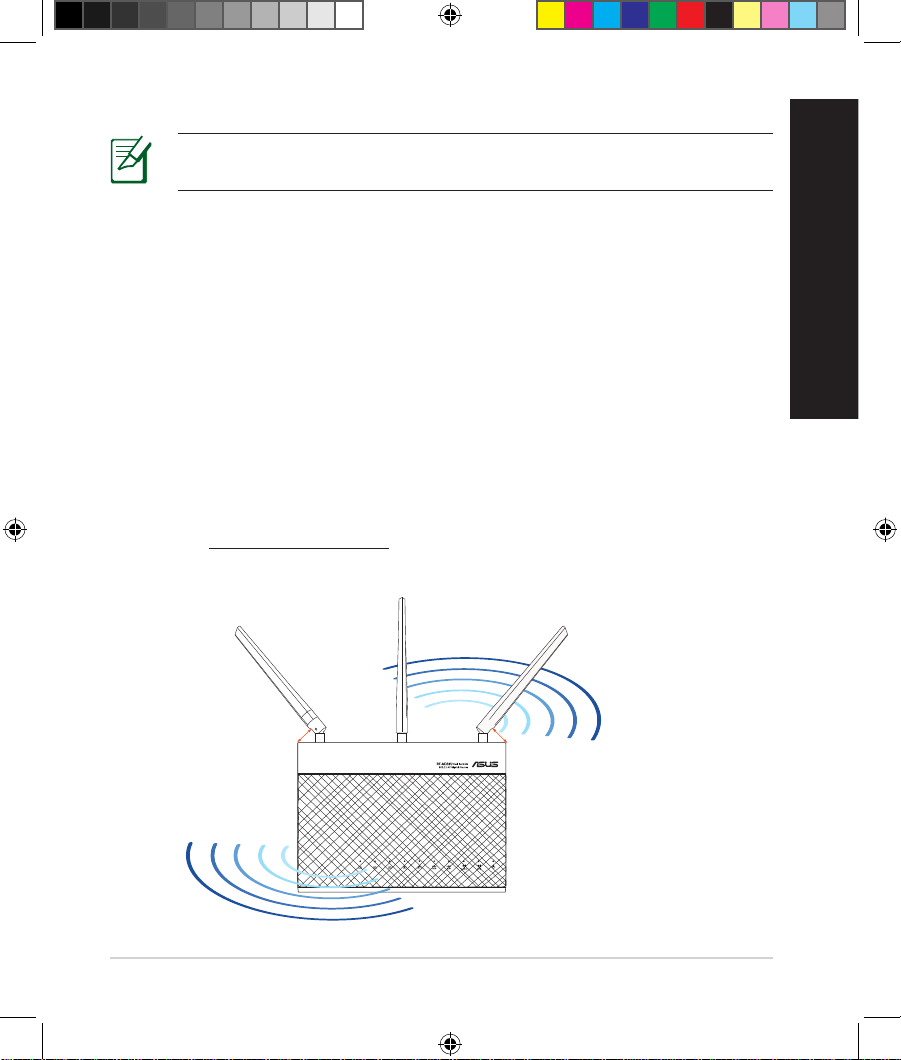
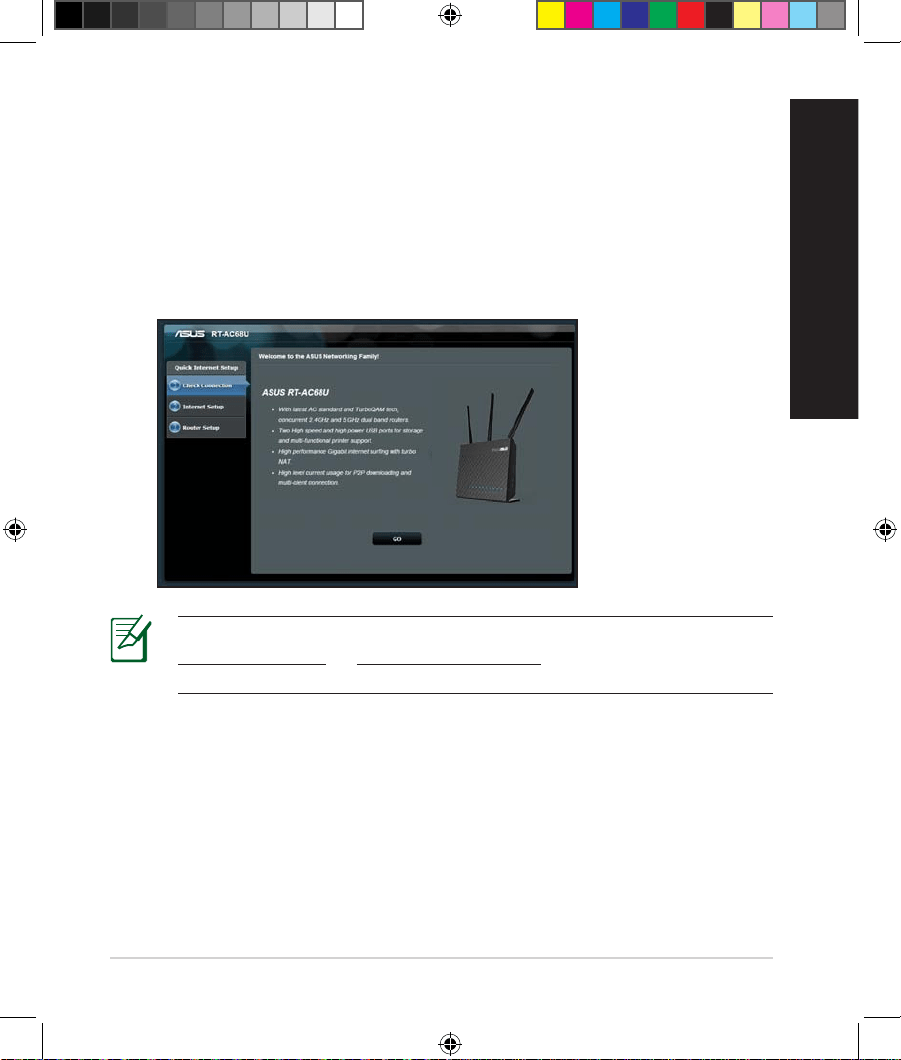
To set up your router using QIS (Quick Internet Setup):
1.
Press the power button at the back of your router. Ensure that the Power,
LAN and WAN LEDs are on.
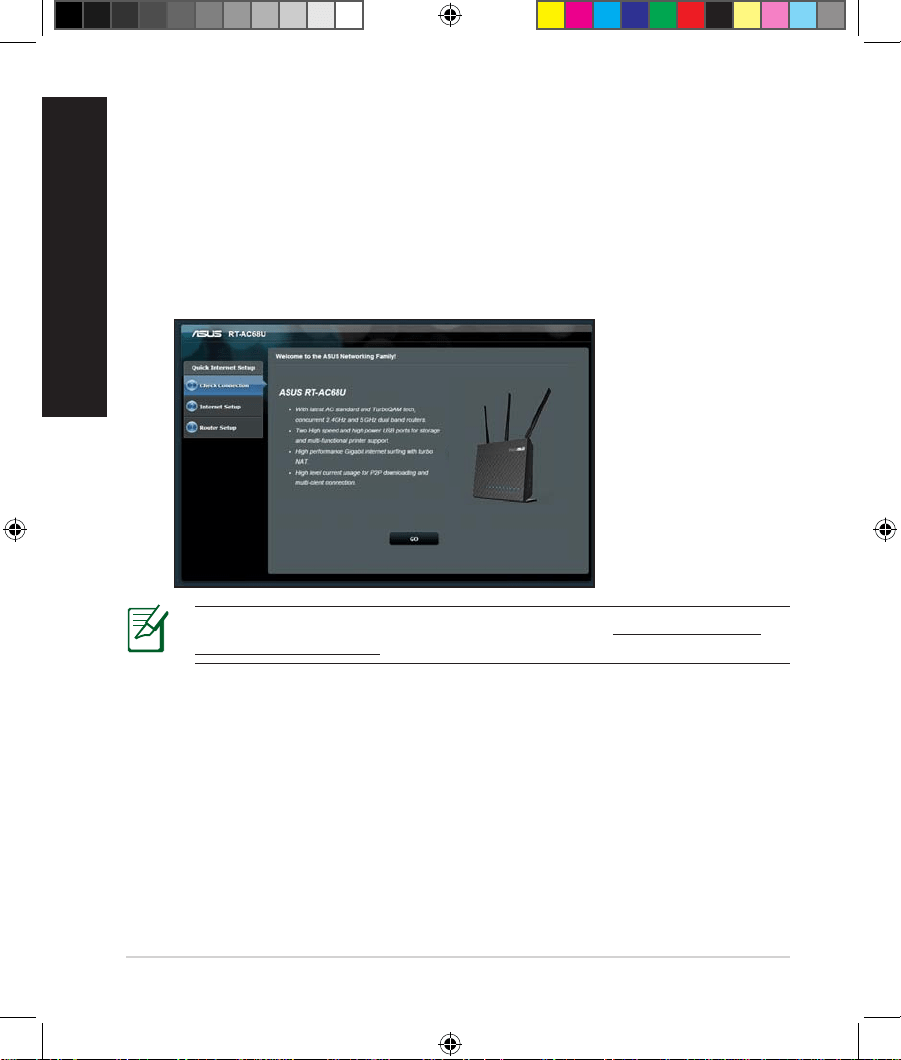
2. Launch your web browser such as Internet Explorer, Firefox, Google Chrome,
or Safari.
Setting up your router using the Quick Internet Setup
Setting up your router using the Quick Internet Setup
Wizard
Wizard
NOTE: If QIS does not launch automatically, enter http://192.168.1.1 or
http://router.asus.com in the address bar and refresh the browser again.
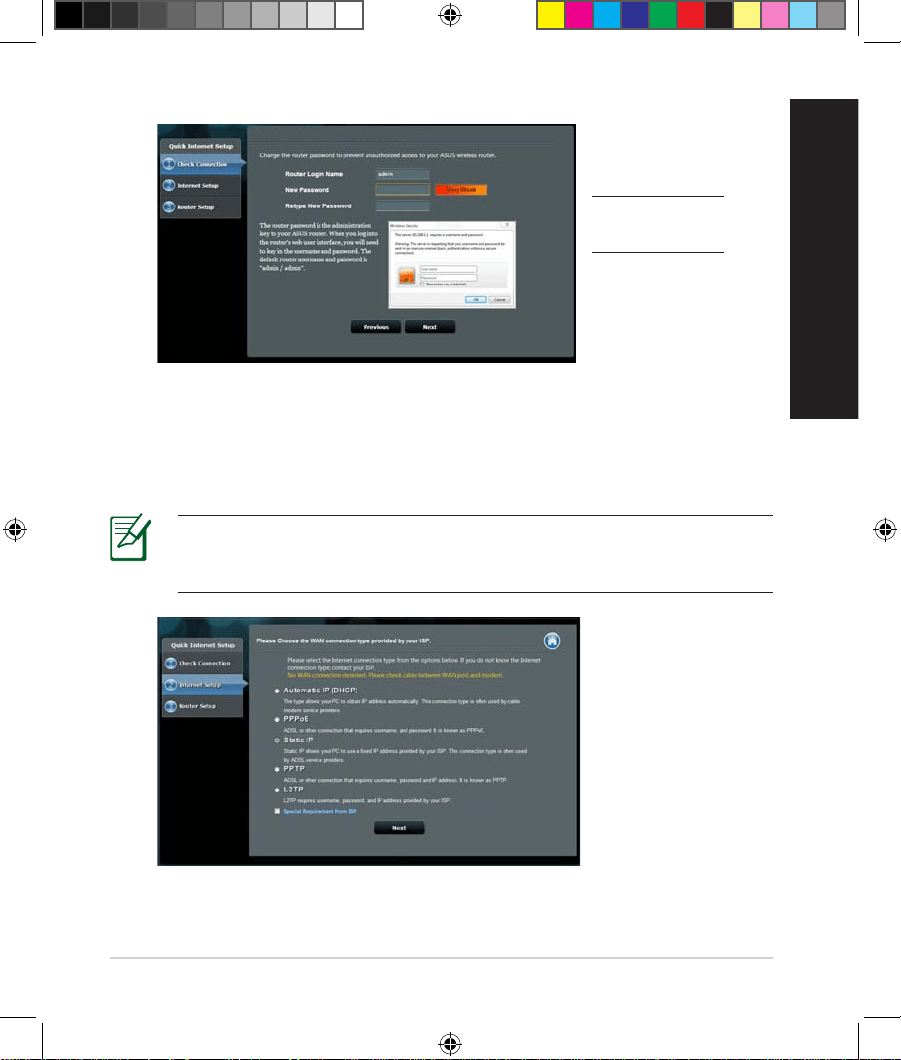
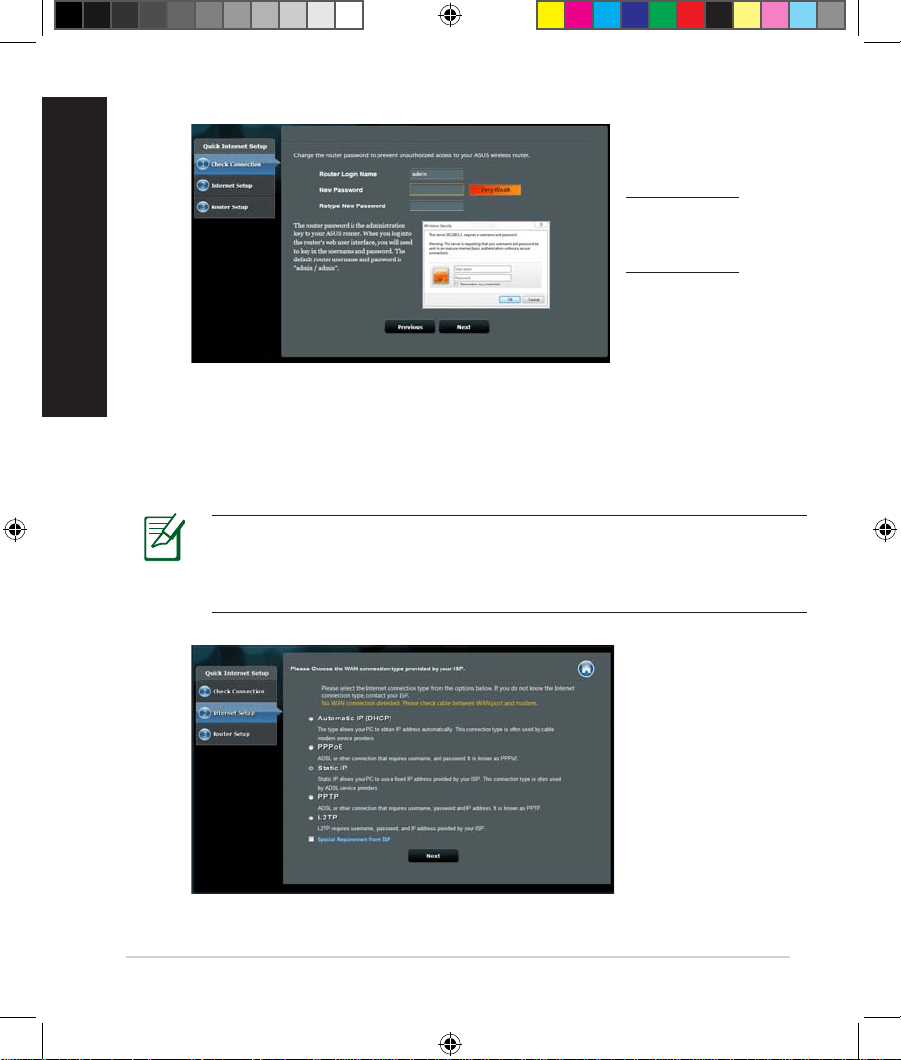
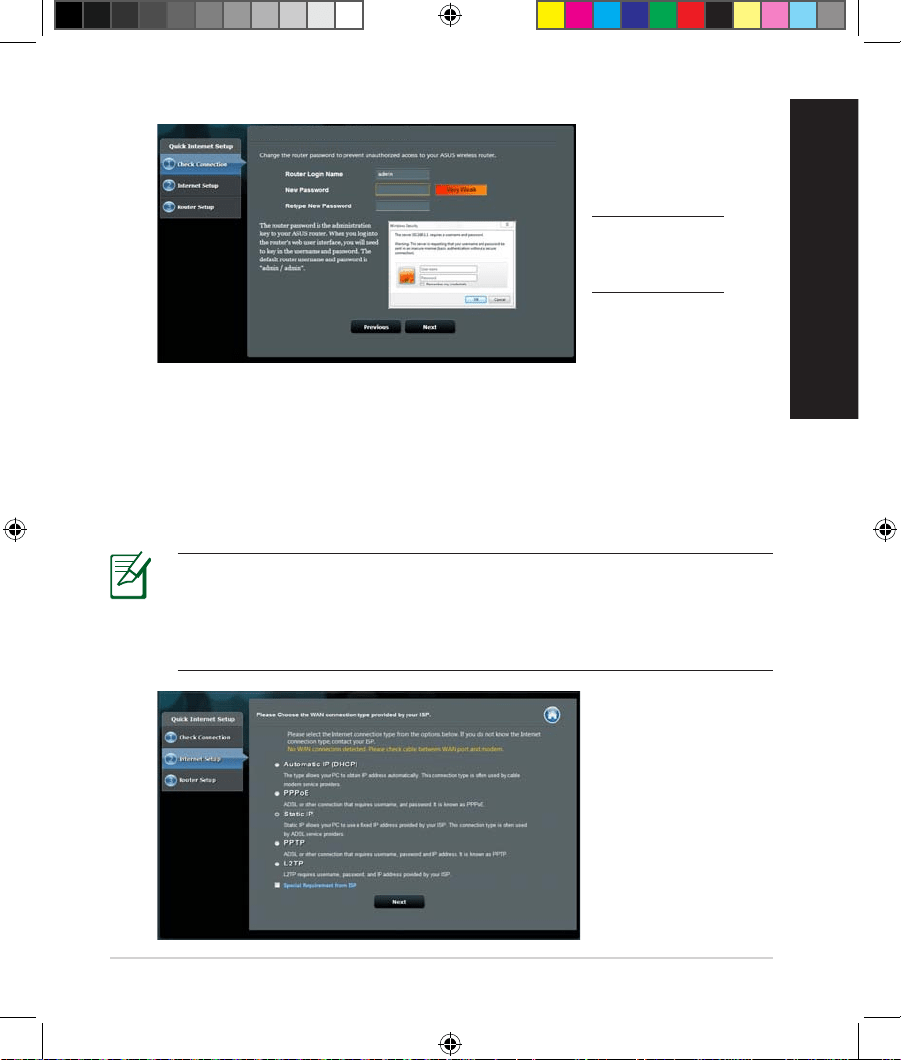
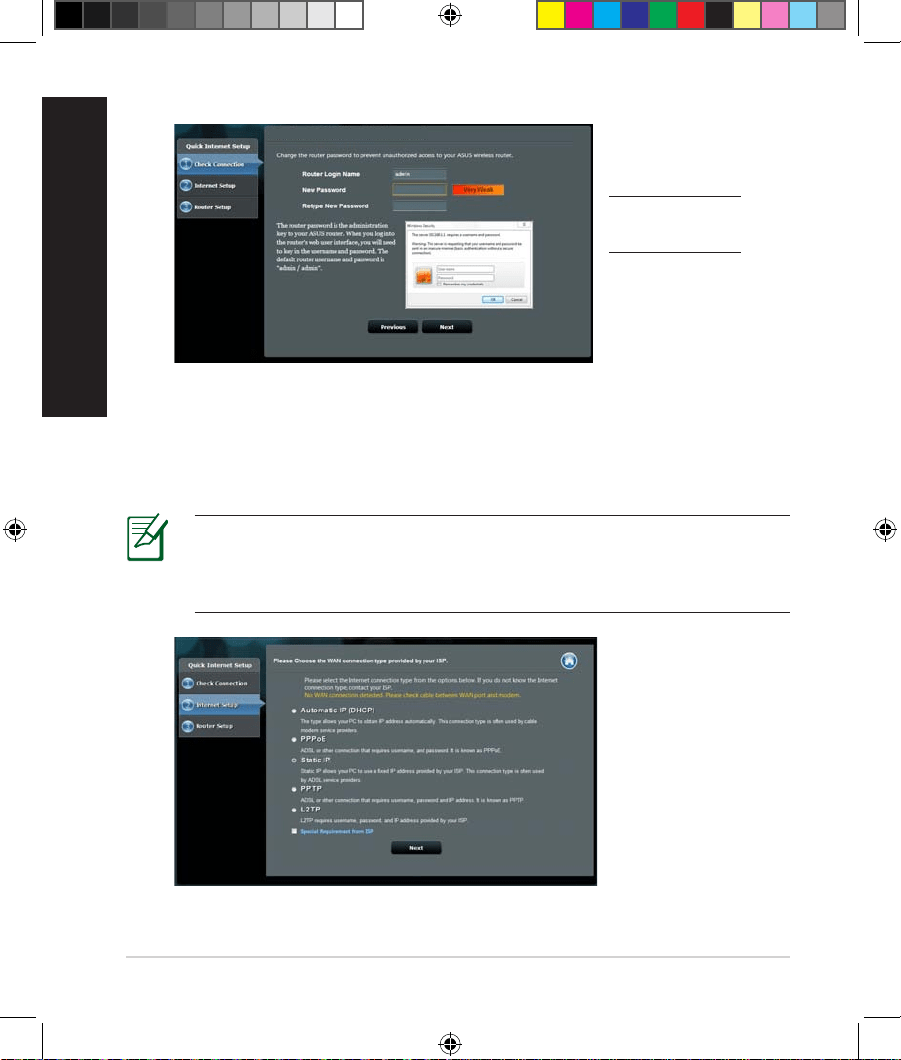
3. Assign your router login name and password and click Next. You will need
this login name and password to log into RT-AC68U to view or change the
router settings. You can take note of your router login name and password
for future use.
U17952-2_RT-AC68U_V4_QSG_NA.indb 8U17952-2_RT-AC68U_V4_QSG_NA.indb 8 2021/5/8 17:38:112021/5/8 17:38:11
9
English
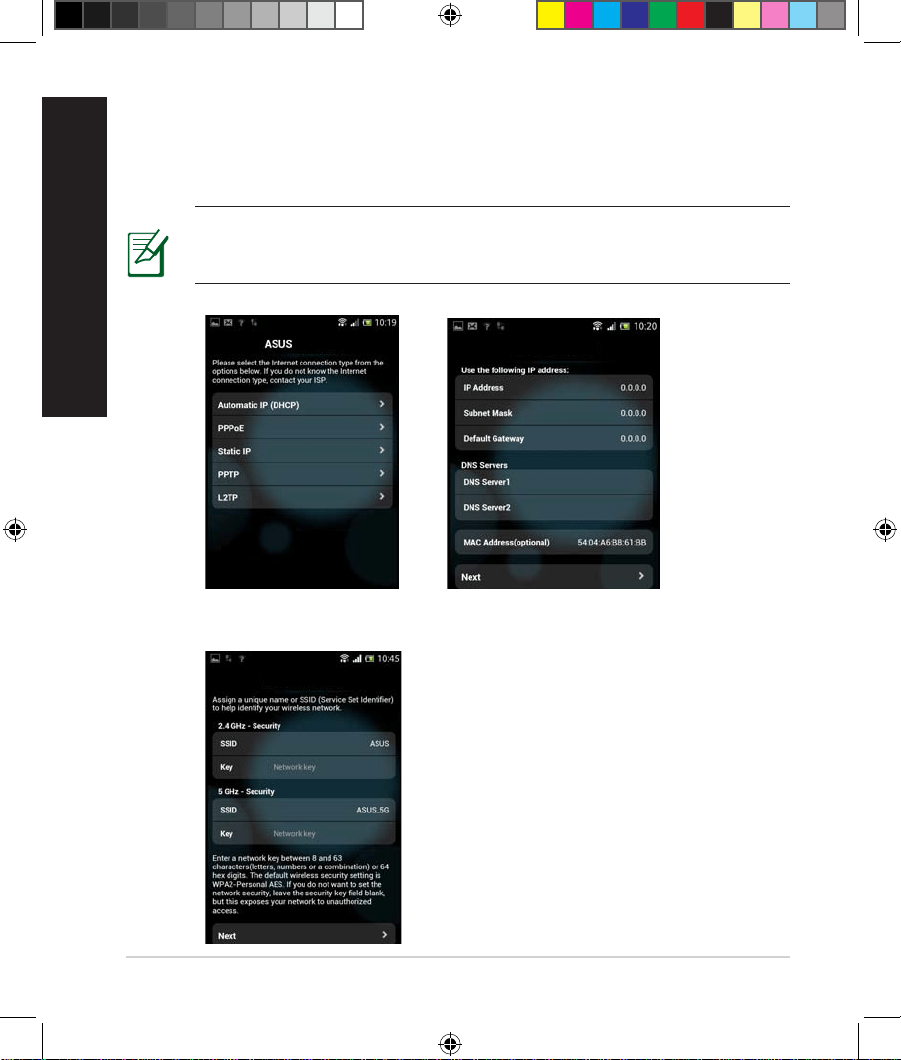
4. The wireless router’s Quick Internet Setup (QIS) feature automatically detects
if your ISP connection type is Dynamic IP, PPPoE, PPTP, L2TP, and Static
IP. Please obtain the necessary information about your Internet connection
type from your Internet Service Provider (ISP). If your connection type is
Dynamic IP (DHCP), QIS wizard will automatically direct you to the next step.
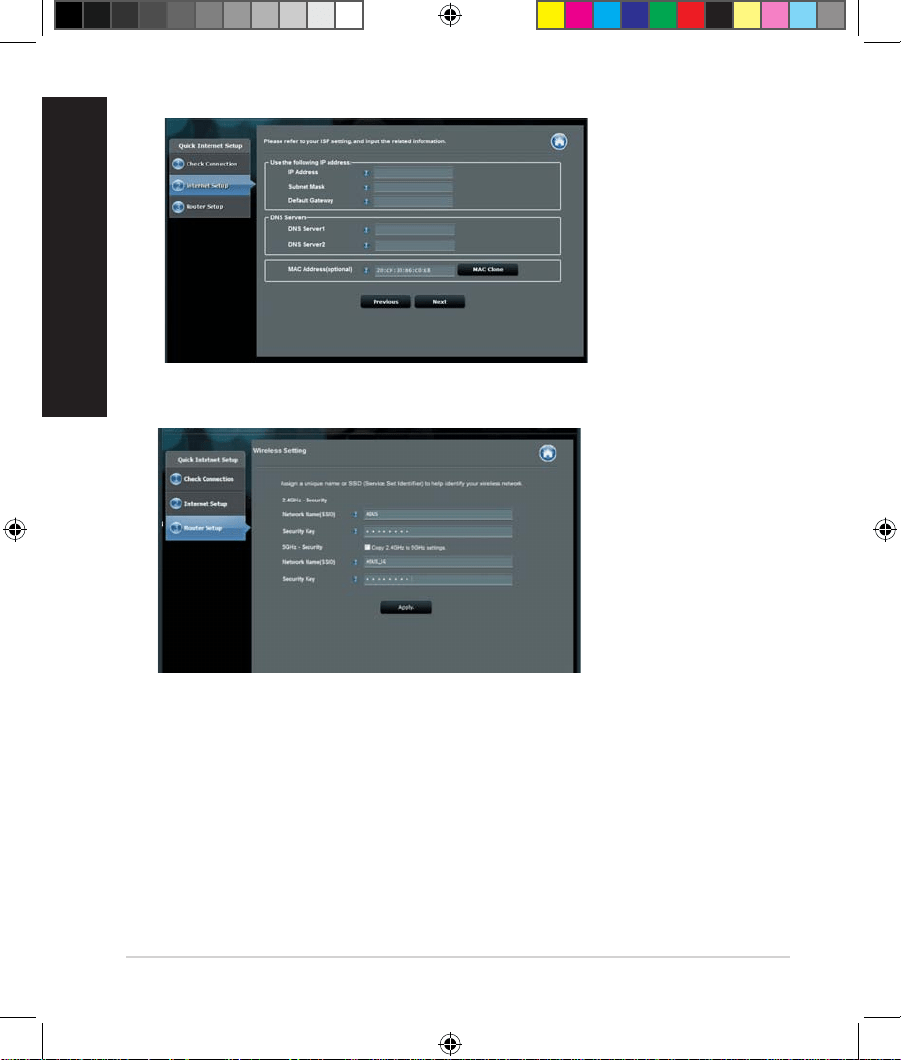
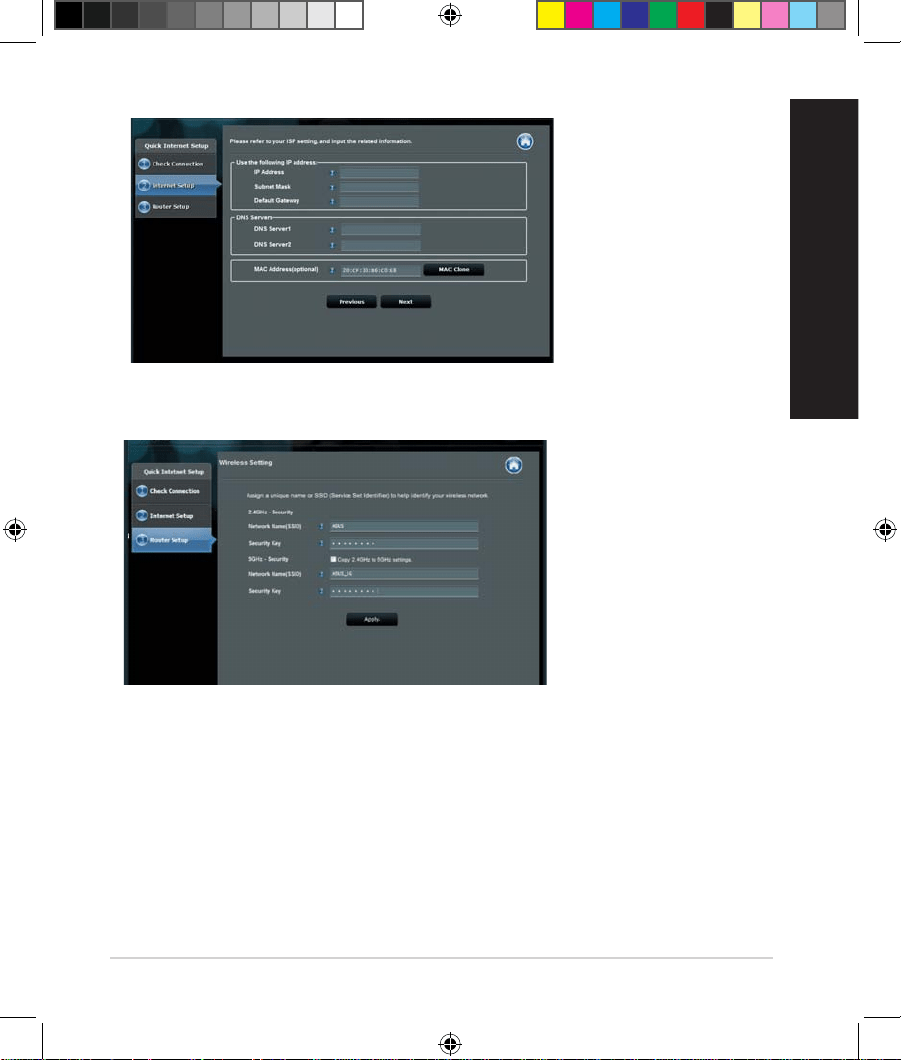
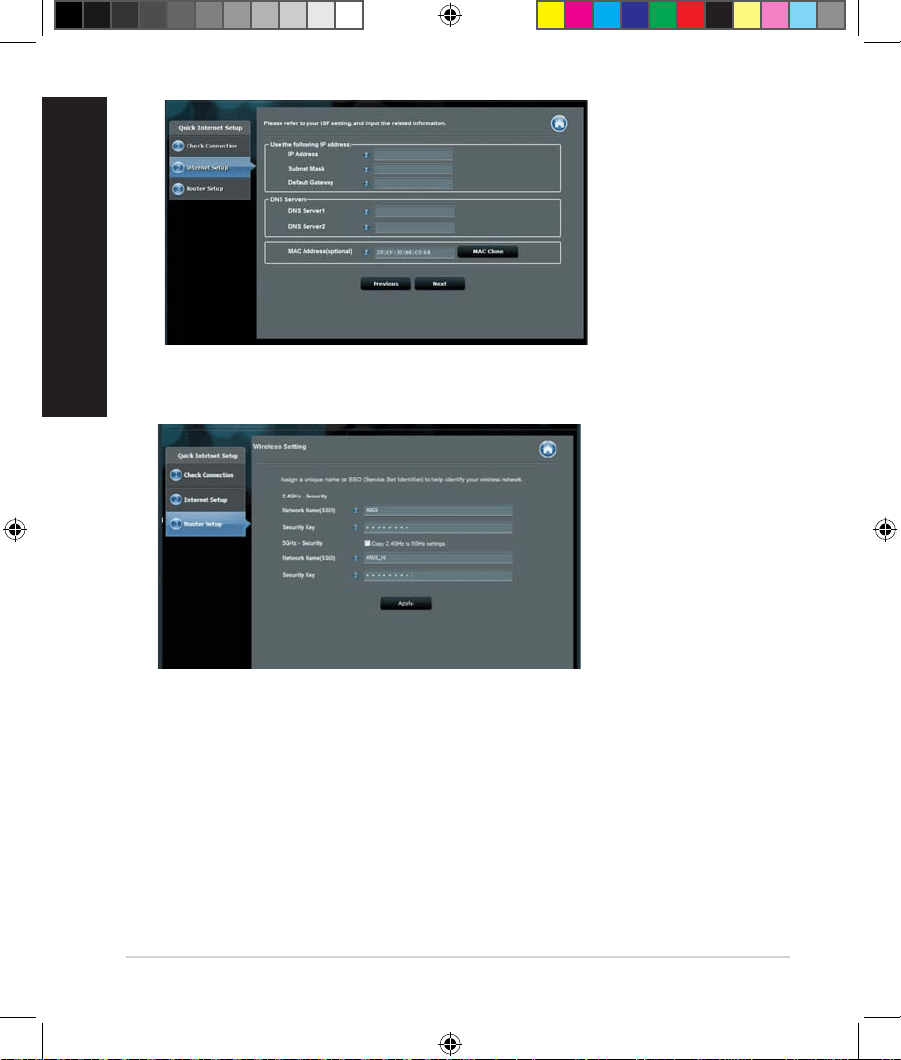
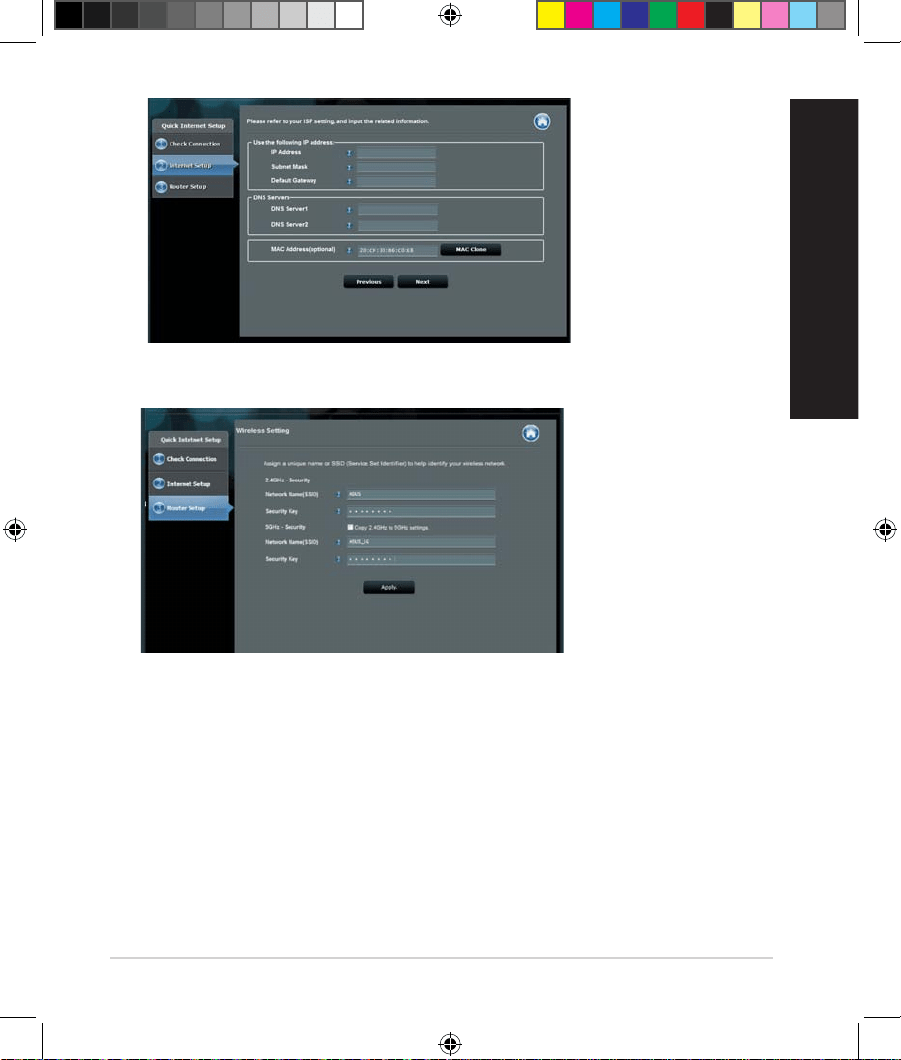
NOTE: If your connection type is Static IP, choose Static IP and click
Next. Key in IP address, subnet mask, default gateway and DNS server
information provided by your ISP. Click Next to proceed.
RT-AC68U
Setup of router (RT-AC68U) administrator password
Login name:
Login password:
U17952-2_RT-AC68U_V4_QSG_NA.indb 9U17952-2_RT-AC68U_V4_QSG_NA.indb 9 2021/5/8 17:38:112021/5/8 17:38:11
10
English
5. Assign the network name (SSID) and security key for your 2.4GHz and 5GHz
wireless connection. Click Apply when done.
6. Your Internet and wireless settings are displayed. Click Next to continue.
7.
Read the wireless network connection tutorial. When done, click Finish.
U17952-2_RT-AC68U_V4_QSG_NA.indb 10U17952-2_RT-AC68U_V4_QSG_NA.indb 10 2021/5/8 17:38:112021/5/8 17:38:11

11
English
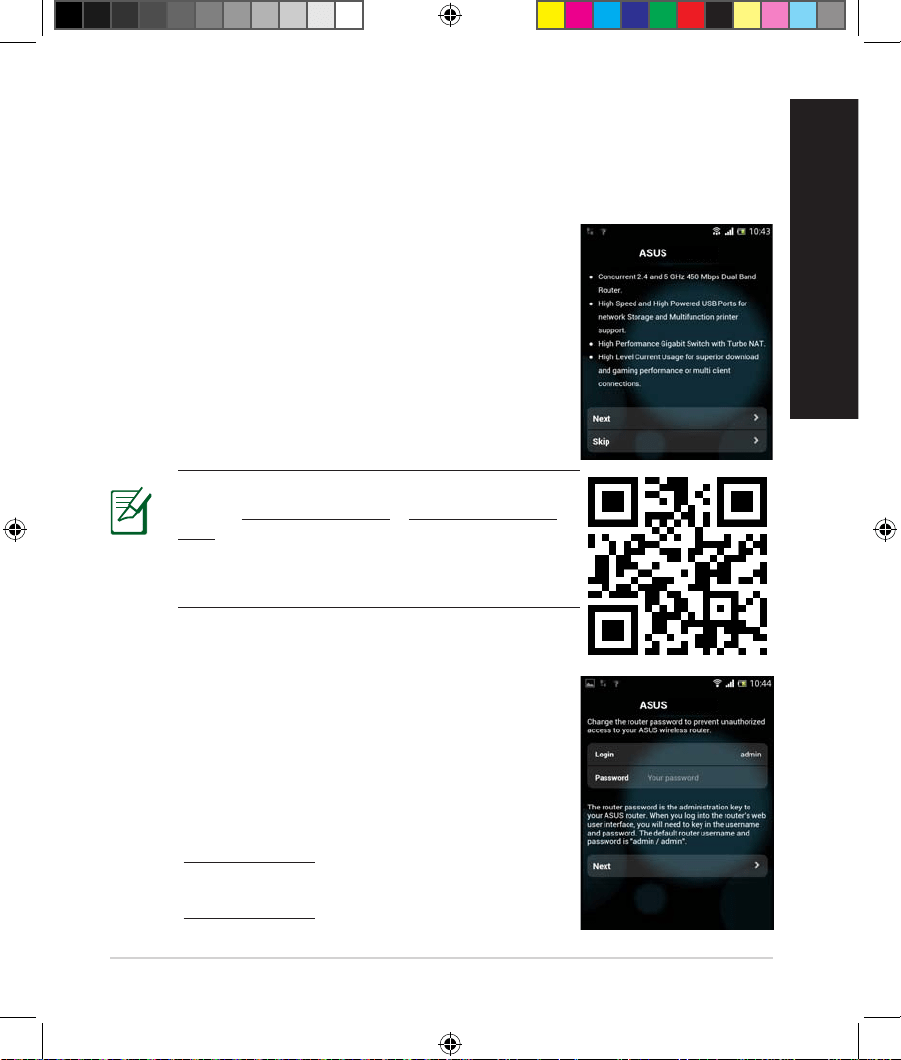
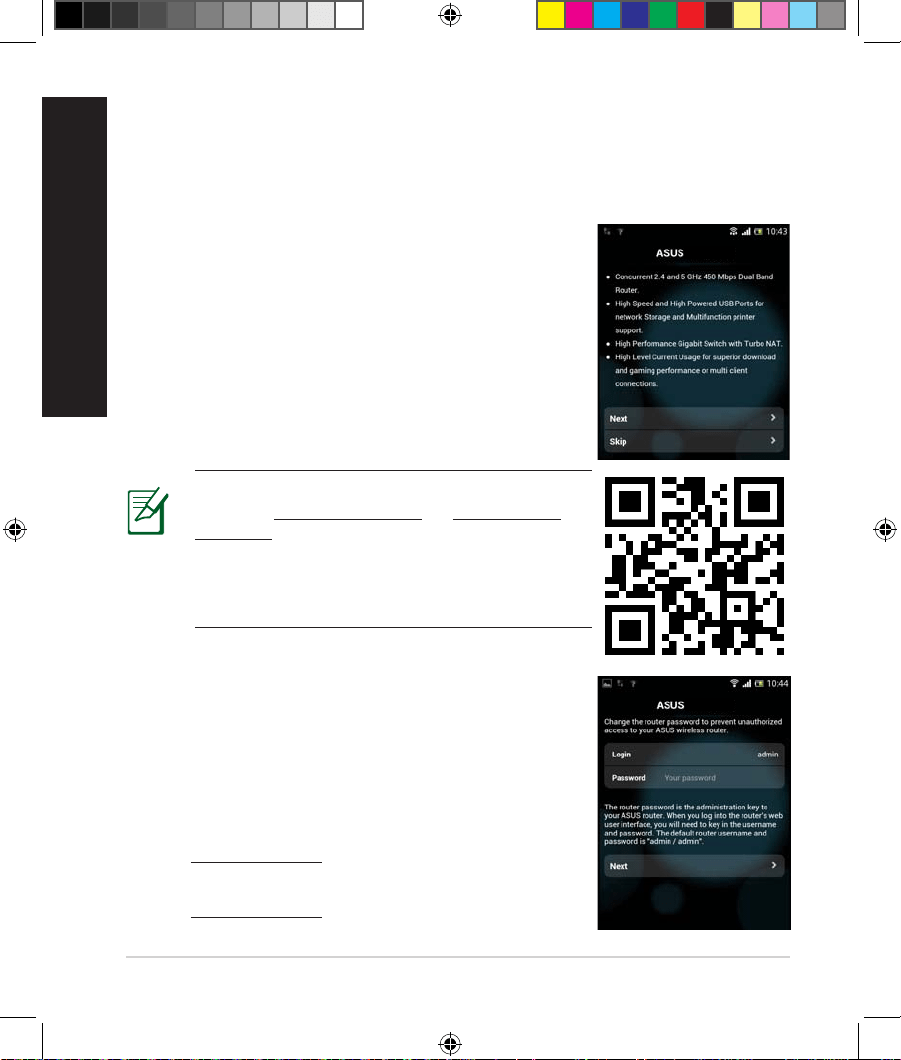
You can also use your mobile device such as a smartphone or a tablet PC to set
up RT-AC68U through QIS wizard. The QIS wizard will automatically switch to
the mobile version if you use a smartphone or a tablet PC to launch it.
To set up your router using a mobile device:
1.
Turn on RT-AC68U.
2. Enable Wi-Fi function of your mobile device.
3. Search for the SSID ASUS, which is the default SSID
of your RT-AC68U wireless network. Click this SSID
to connect and wait for the status to display Wi-Fi
connected.
4.
Launch your mobile device web browser.
Setting up your router using a mobile device (optional)
Setting up your router using a mobile device (optional)
RT-AC68U
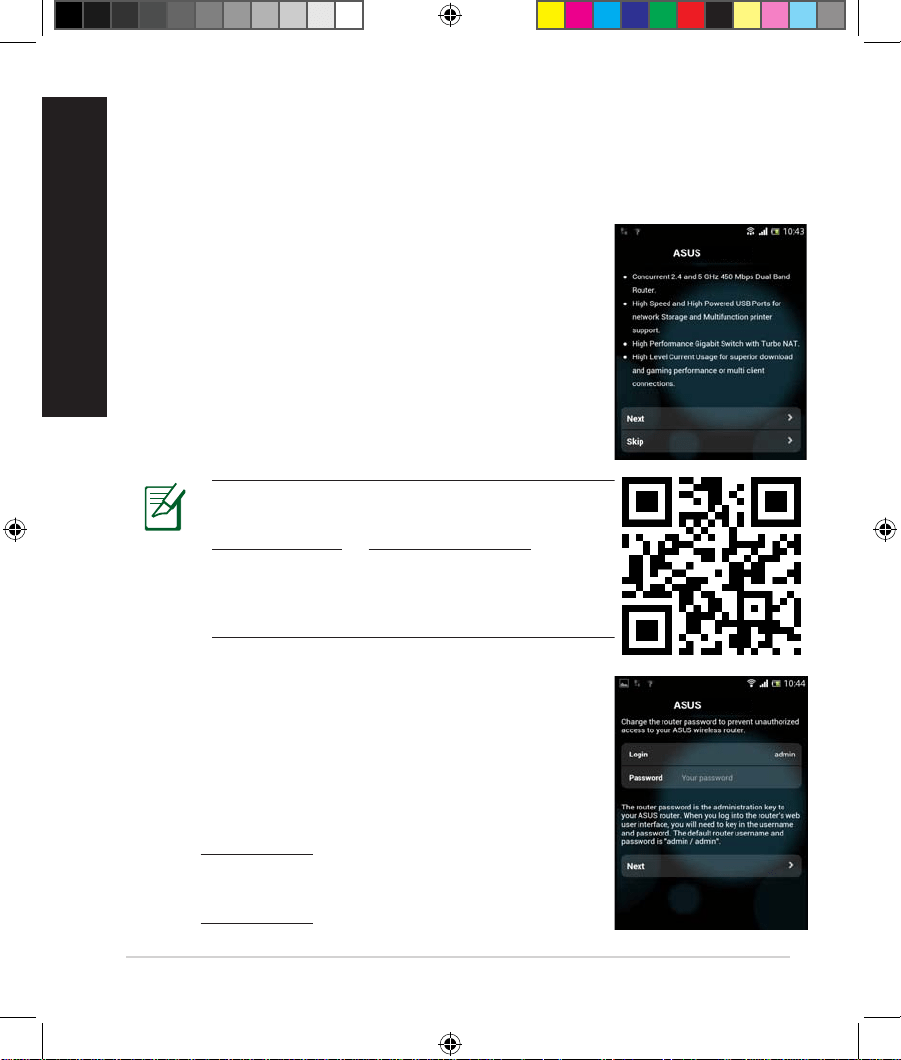
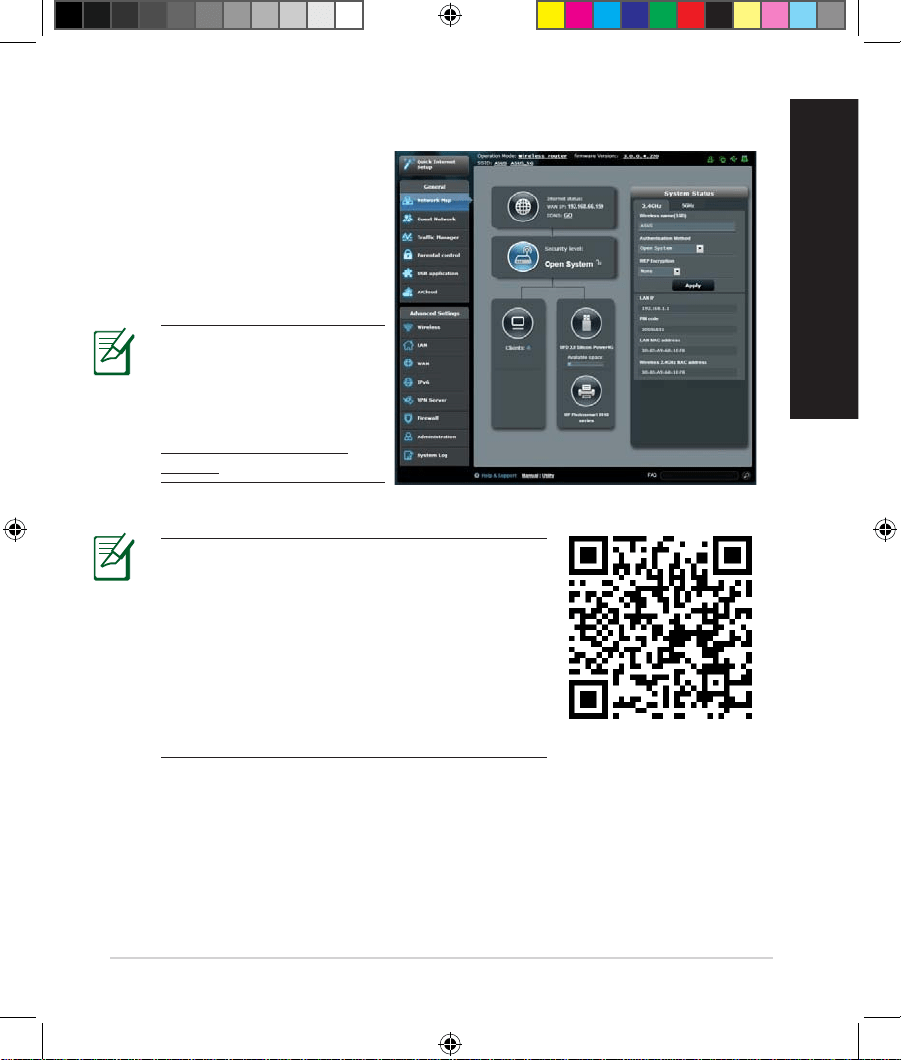
NOTE: If QIS does not launch automatically,
enter http://192.168.1.1 or http://router.asus.
com in the address bar and refresh the browser
again. You can also use your mobile device to
scan for the QR code here to go to RT-AC68U’s
web interface.
5. Assign your router login name and password,
and click Next. You will need this login name and
password to log into RT-AC68U’s web interface to
view or change router settings. Ensure that you take
note of your router login name and password for
future use.
RT-AC68U
Login name:
Login password:
U17952-2_RT-AC68U_V4_QSG_NA.indb 11U17952-2_RT-AC68U_V4_QSG_NA.indb 11 2021/5/8 17:38:112021/5/8 17:38:11
12
English
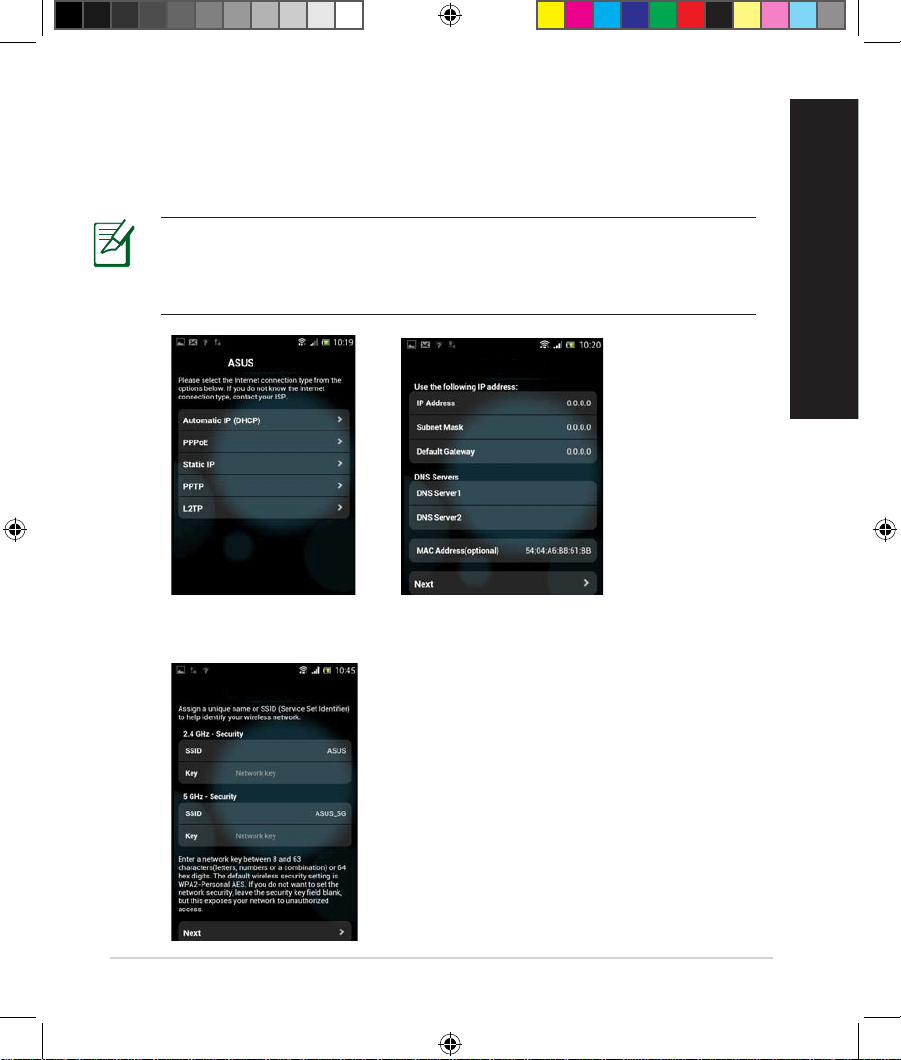
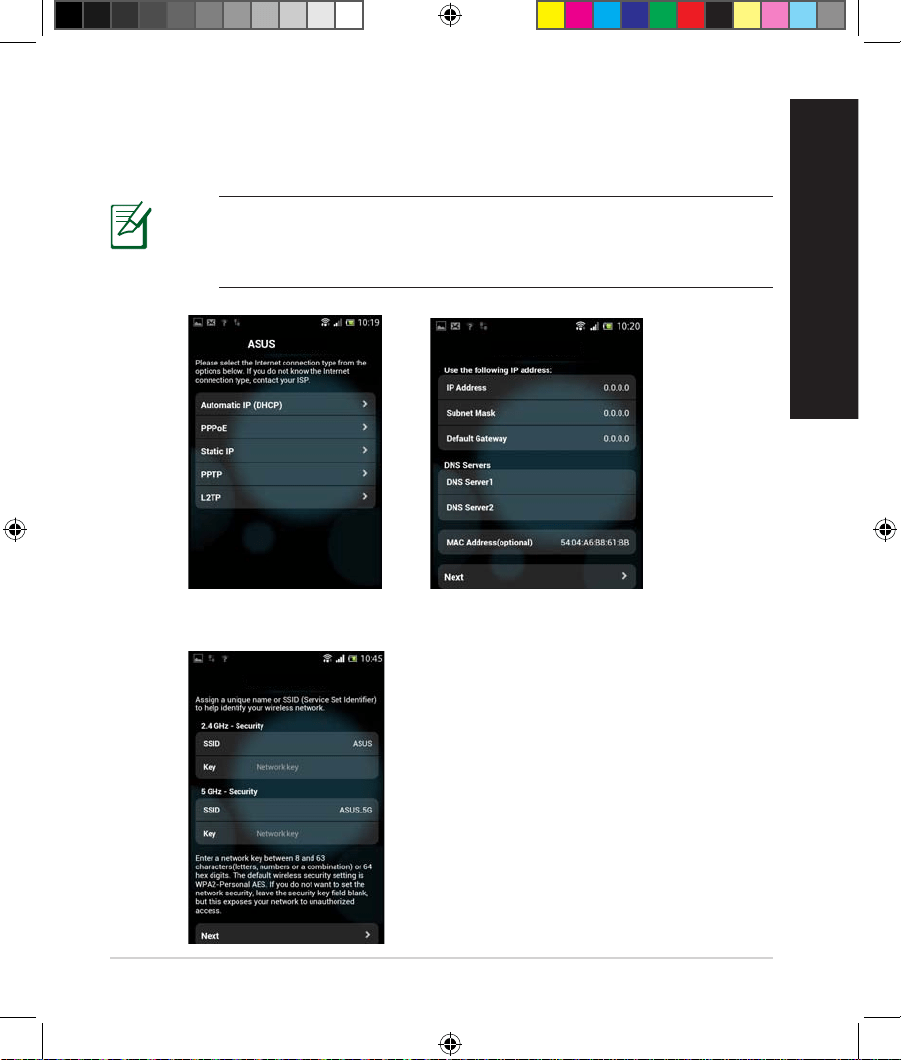
6. The QIS feature automatically detects if your ISP connection type is Dynamic
IP, PPPoE, PPTP, L2TP, and Static IP. Enter the necessary information that
your Internet Service Provider (ISP) has provided. If your connection type is
Dynamic IP (DHCP), QIS wizard will automatically direct you to the next step.
NOTE: If your connection type is Static IP, choose Static IP and click
Next. Enter the IP address, subnet mask, default gateway and DNS
server information provided by your ISP. Click Next to proceed.
RT-AC68U
ASUS RT-AC68U
7. Assign the network name (SSID) and security key for your 2.4GHz and 5GHz
wireless connection. Click Apply when done.
ASUS RT-AC68U
U17952-2_RT-AC68U_V4_QSG_NA.indb 12U17952-2_RT-AC68U_V4_QSG_NA.indb 12 2021/5/8 17:38:112021/5/8 17:38:11

13
English
8. Your Internet and wireless settings are displayed. Click Next to continue.
9. Read the wireless network connection tutorial. When done, click Finish.
NOTE: You can assign a network name with up to 32 characters.
There are two ways for your wireless clients (notebook, tablet PC, smartphone
and so on) to connect to RT-AC68U’s wireless network.
Connect to the wireless network manually
To connect to the wireless network manually:
1.
Enable the Wi-Fi function on your wireless client to scan for available wireless
networks.
2. Select the SSID or network name that you assigned to your RT-AC68U’s
network.
3. Enter the password and click Connect.
Connect to the wireless network through WPS
RT-AC68U has a WPS (Wi-Fi Protected Setup) button for you to connect your
wireless client to RT-AC68U’s network without entering password.
To connect to the wireless network through WPS:
1.
Press the WPS button at the back of RT-AC68U. Refer to the section A quick
look at your RT-AC68U for the location of the WPS button).
2. Press the WPS button of your wireless client within two minutes or follow the
WPS instructions that came with the wireless client. When connecting via
WPS, the Power LED on your router blinks fast.
3. Wait until your router’s Power LED turns into a solid light indicating a
successfully connection between your router and your wireless client.
Connecting to the wireless network
Connecting to the wireless network
U17952-2_RT-AC68U_V4_QSG_NA.indb 13U17952-2_RT-AC68U_V4_QSG_NA.indb 13 2021/5/8 17:38:112021/5/8 17:38:11
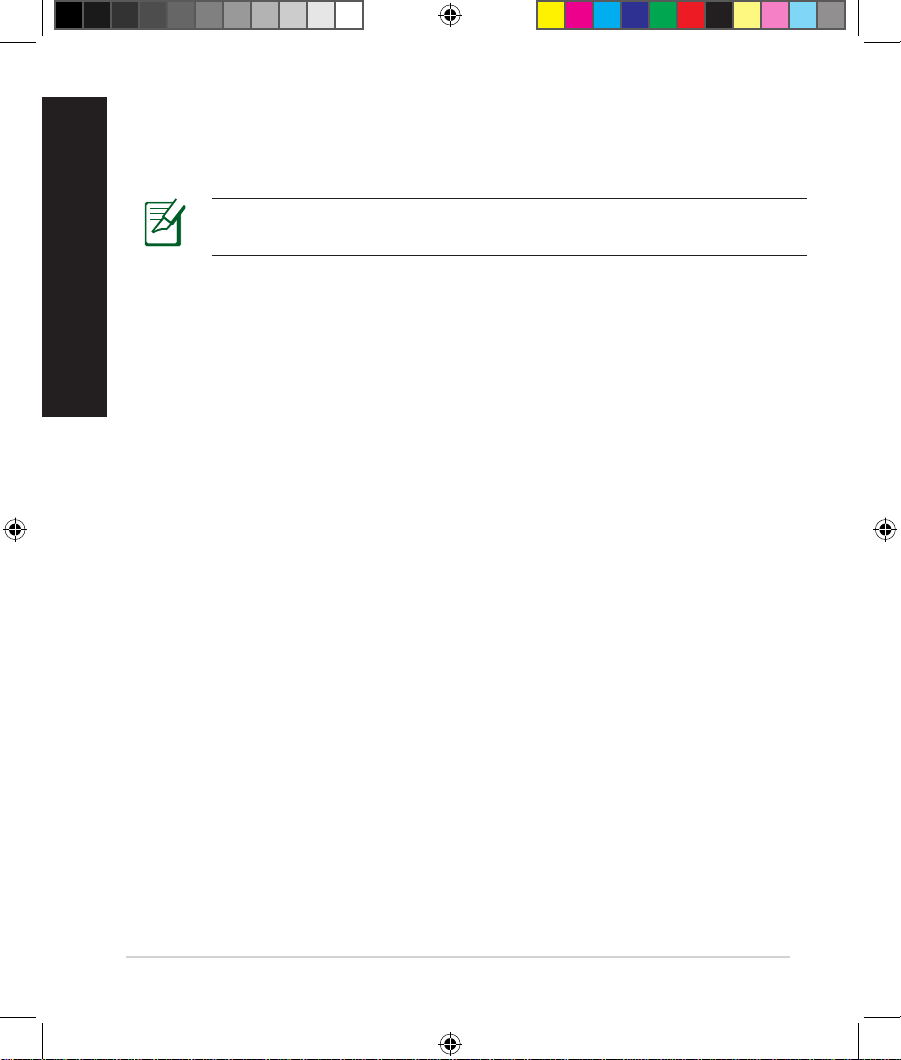
14
English
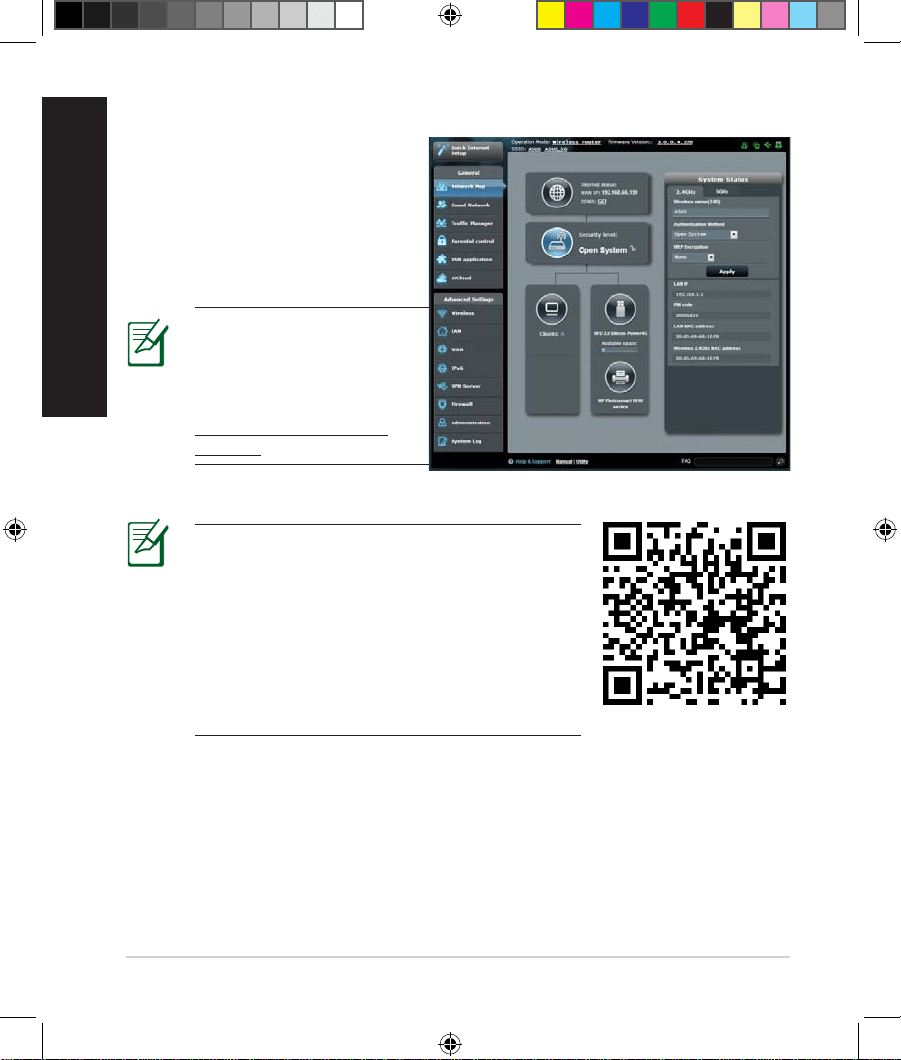
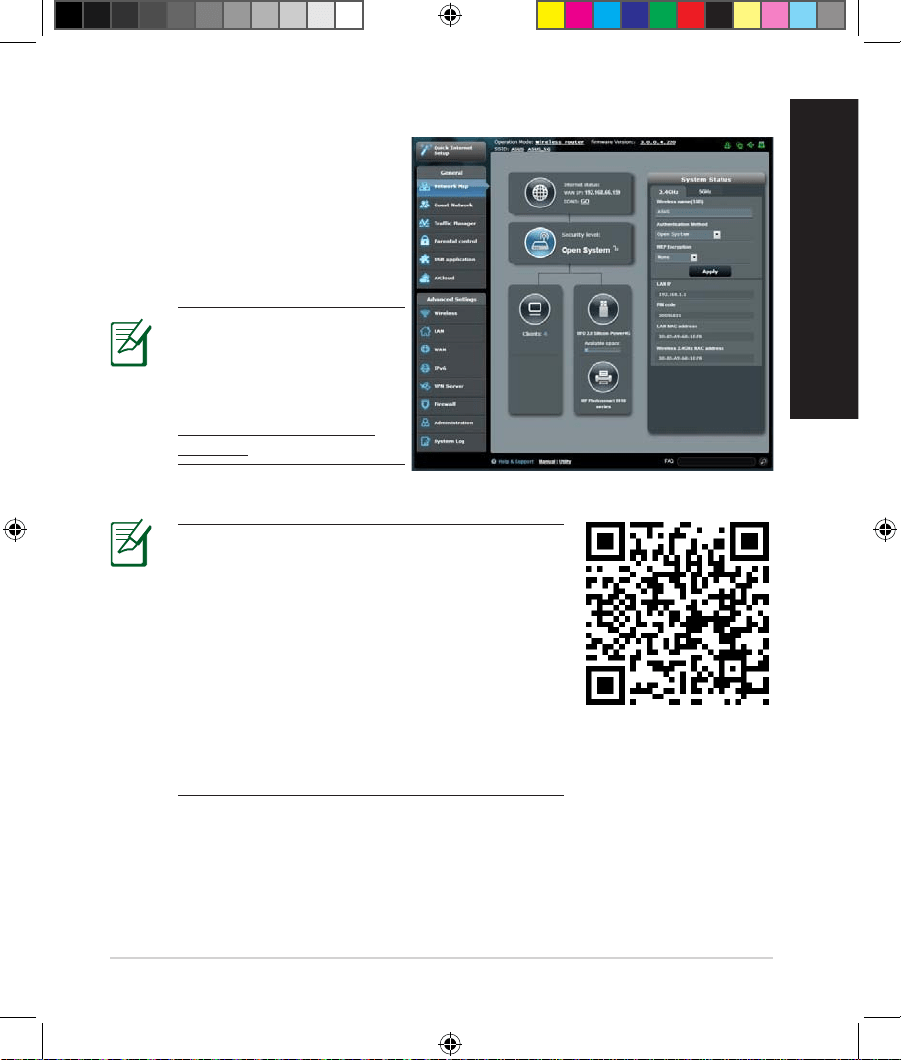
Your wireless router comes with the
intuitive ASUSWRT web graphical
user interface. ASUSWRT allows
you to easily congure its various
features through a web browser
such as Internet Explorer, Firefox,
Safari, or Google Chrome.
Managing the router via the ASUSWRT web GUI
Managing the router via the ASUSWRT web GUI
IMPORTANT:
• For more details on using your router's Web
GUI, refer to the user manual.
• Alway check and upgrade rmware to the
latest version for better experience.
• Visit ASUS Networking video channel for
tutorial videos on featured functions.
NOTE: Use the search
bar on the bottom of the
interface to get more
information from ASUS
technical support site
https://www.asus.com/
support.
U17952-2_RT-AC68U_V4_QSG_NA.indb 14U17952-2_RT-AC68U_V4_QSG_NA.indb 14 2021/5/8 17:38:112021/5/8 17:38:11

15
English
AiCloud
AiCloud
ASUS AiCloud app provides you with access to your data wherever and
whenever you have an Internet connection. It also allows you to access your
ASUS WebStorage account via the AiCloud mobile app on your iOS or Android
device, or via a web browser.
To install AiCloud:
1.
Ensure that your router’s rmware version is the latest one and supports
AiCloud.
2. Download AiCloud app from Google Play or App Store.
3. Install your USB storage device to your router. Refer to section A quick look
at your RT-AC68U for the location of the USB ports.
4. Connect your iOS or Android devices to the router through Wi-Fi. The
AiCloud app will automatically guide you through the setup process.
5. You can now access, stream and share to all les in your USB storage. Search
ASUS AiCloud for more information. Watch tutorial videos for step-by-step
guide.
Google Play
App Store
U17952-2_RT-AC68U_V4_QSG_NA.indb 15U17952-2_RT-AC68U_V4_QSG_NA.indb 15 2021/5/8 17:38:112021/5/8 17:38:11

16
English
Frequently Asked Questions (FAQs)
Frequently Asked Questions (FAQs)
After following the steps, I still cannot access the wireless router’s web
graphics user interface (web GUI) to congure the wireless router settings.
Ensure that your PC's proxy settings are disabled and your PC'S IP address is
obtained from the DHCP server automatically. For details on disabling the proxy
settings, visit the ASUS Support site at https://www.asus.com/support. For
details on using the DHCP server to obtain IP addresses automatically, refer to
your Windows or Mac operating system's help feature.
The client cannot establish a wireless connection with the router.
Out of Range:
• Put the router closer to the wireless client.
• Try to change the channel settings.
Authentication:
• Use wired connection to connect to the router.
• Check the wireless security settings.
• Press the Reset button at the rear panel for more than ve seconds.
Cannot nd the router:
• Press the Reset button at the rear panel for more than ve seconds.
• Check the setting in the wireless adapter such as SSID and encryption
settings.
Cannot access the Internet via wireless LAN adapter.
• Move the router closer to the wireless client.
• Check whether the wireless adapter is connected to the correct wireless
router.
• Check whether the wireless channel in use conforms to the channels
available in your country/area.
• Check the encryption settings.
U17952-2_RT-AC68U_V4_QSG_NA.indb 16U17952-2_RT-AC68U_V4_QSG_NA.indb 16 2021/5/8 17:38:112021/5/8 17:38:11

17
English
• Check if the ADSL or Cable connection is correct.
• Retry using another Ethernet cable.
If the ADSL “LINK” light blinks continuously or stays o, Internet access is
not possible - the Router is unable to establish a connection with the ADSL
network.
• Ensure that all your cables are all properly connected .
• Disconnect the power cord from the ADSL or cable modem, wait a few
minutes, then reconnect the cord.
• If the ADSL light continues to blink or stays OFF, contact your ADSL service
provider.
Network name or encryption keys are forgotten.
• Try setting up the wired connection and conguring the wireless encryption
again.
• Press the Reset button of the wireless router for more than ve seconds.
• Factory default settings:
User name / Password:
admin / admin
IP address:
192.168.1.1
SSID:
ASUS
Where can I nd more information about the wireless router?
• Technical Support site: https://www.asus.com/support
• Customer Hotline: Refer to the Support Hotline in this Quick Start Guide
U17952-2_RT-AC68U_V4_QSG_NA.indb 17U17952-2_RT-AC68U_V4_QSG_NA.indb 17 2021/5/8 17:38:112021/5/8 17:38:11
18
Français nadien
15
9 10 13118 14127653
Contenu de la boîte
Contenu de la boîte
RT-AC68U Adaptateur secteur
Câble réseau (RJ-45) Guide de démarrage rapide
Carte de garantie
Aperçu rapide de votre routeur RT-AC68U
Aperçu rapide de votre routeur RT-AC68U
1
Voyants réseau local
(LAN) 1 à 4
6
Voyant LED
d'alimentation
11
Ports USB 3.0 / 2.0
2
Voyant réseau étendu
(WAN) (Internet)
7
Bouton WPS
12
Port réseau étendu (WAN)
3
Voyants LED USB 3.0/2.0
8
Bouton Wi-Fi
13
Bouton LED
4
Voyant de bande 2,4 GHz
9
Interrupteur
d'alimentation
14
Ports réseau local (LAN)
5
Voyant de bande 5 GHz
10
Prise d'alimentation (CC)
15
Bouton de réinitialisation
REMARQUE : Si l'un des éléments est endommagé ou manquant, veuillez
contacter votre revendeur.
1 2 4
U17952-2_RT-AC68U_V4_QSG_NA.indb 18U17952-2_RT-AC68U_V4_QSG_NA.indb 18 2021/5/8 17:38:122021/5/8 17:38:12
19
Français nadien
REMARQUES :
• Périphérique de stockage USB externe :
• Le routeur Wi-Fi fonctionne avec la plupart des périphériques de stockage
USB d'une capacité maximale de 2 To et prend en charge la lecture/écriture
pour les formats de chiers FAT16, FAT32, EXT2, EXT3 et NTFS.
• Pour retirer un périphérique de stockage USB en toute sécurité, ouvrez
l'interface de gestion du routeur (http://192.168.1.1), puis dans la page
Carte réseau, cliquez sur l'icône USB située dans le coin supérieur droit puis
sur Éjecter le périphérique USB 3.0 / USB 2.0.
• Une mauvaise éjection du périphérique de stockage USB peut endommager
les données contenues sur le disque.
• Pour consulter la liste des systèmes de chiers et des partitions de disques
pris en charge par le routeur Wi-Fi, rendez-vous sur le site
http://event.asus.com/networks/disksupport
• Pour consulter la liste des imprimantes prises en charge par le routeur Wi-Fi,
rendez-vous sur le site http://event.asus.com/networks/printersupport
U17952-2_RT-AC68U_V4_QSG_NA.indb 19U17952-2_RT-AC68U_V4_QSG_NA.indb 19 2021/5/8 17:38:122021/5/8 17:38:12
20
Français nadien
Installer votre routeur
Installer votre routeur
IMPORTANT : Avant d'installer le routeur, assurez-vous que votre connexion
internet est établie
1. Placer le routeur Wi-Fi.
Pour optimiser la transmission du signal Wi-Fi entre votre routeur et les périphériques
réseau y étant connectés, veuillez vous assurer des points suivants :
• Placez le routeur Wi-Fi dans un emplacement central pour obtenir une couverture Wi-Fi
optimale.
• Maintenez le routeur à distance des obstructions métalliques et des rayons du soleil.
• Maintenez le routeur à distance d'appareils ne fonctionnant qu'avec les normes/
fréquences Wi-Fi 802.11g ou 20MHz, les périphériques 2,4 GHz et Bluetooth, les
téléphones sans l, les transformateurs électriques, les moteurs à service intense,
les lumières uorescentes, les micro-ondes, les réfrigérateurs et autres équipements
industriels pour éviter les interférences ou les pertes de signal Wi-Fi.
• Orientez les trois antennes amovibles comme illustré ci-dessous pour améliorer la
qualité de couverture du signal Wi-Fi.
• Mettez toujours le routeur à jour dans la version de rmware la plus récente. Visitez le
site Web d'ASUS sur http://www.asus.com pour consulter la liste des mises à jour.
45
°
90
°
45
°
U17952-2_RT-AC68U_V4_QSG_NA.indb 20U17952-2_RT-AC68U_V4_QSG_NA.indb 20 2021/5/8 17:38:122021/5/8 17:38:12
21
Français nadien
RT-AC68U
Computer
Wall Power Outlet
LAN
Modem
Power
WAN
a
b
c
d
Modem
OFF!
a
b
c
2. Préparez votre modem.
a. Débranchez l'adaptateur secteur de la prise électrique et du modem câble/ADSL.
b. Déconnectez le câble réseau du modem câble/ADSL.
c. Redémarrez votre ordinateur (recommandé).
AVERTISSEMENT ! Avant de débrancher les câbles du modem, assurez-vous que
votre modem câble/ADSL est éteint depuis au moins 2 minutes. Si votre modem
possède une batterie de secours, retirez-la.
3. Congurez votre environnement réseau Wi-Fi.
U17952-2_RT-AC68U_V4_QSG_NA.indb 21U17952-2_RT-AC68U_V4_QSG_NA.indb 21 2021/5/8 17:38:122021/5/8 17:38:12
22
Français nadien
a. Reliez une extrémité de l'adaptateur secteur au port d'alimentation du routeur et
l'autre extrémité à une prise électrique.
b.
À l'aide d'un autre câble réseau, connectez votre modem au port réseau étendu (WAN)
du routeur Wi-Fi.
c.
Reliez une extrémité de l'adaptateur secteur au port d'alimentation du modem et
l'autre extrémité à une prise électrique.
d.
À l'aide du câble réseau fourni, connectez votre ordinateur au port de réseau local
(LAN) du routeur Wi-Fi. Vériez que les voyants dédiés au réseau étendu (WAN) et au
réseau local (LAN) clignotent.
REMARQUE : Vous pouvez aussi congurer le routeur à l'aide d'un appareil
mobile tel qu'un smartphone ou une tablette. Pour ce faire, consultez la section
Congurer votre routeur à l'aide d'un appareil mobile pour plus de détails.
a.
Désactivez le serveur proxy si celui-ci est activé.
b. Congurez les paramètres TCP/IP pour l'obtention automatique d'une adresse IP.
c. Désactivez la numérotation de votre connexion à distance (si applicable).
REMARQUE : Pour plus de détails, consultez la section Foire aux questions
(FAQ) de ce guide.
4. Désactivez certaines fonctionnalités de votre ordinateur.
U17952-2_RT-AC68U_V4_QSG_NA.indb 22U17952-2_RT-AC68U_V4_QSG_NA.indb 22 2021/5/8 17:38:122021/5/8 17:38:12
23
Français nadien
Pour congurer votre routeur à l'aide de l'assistant de conguration internet :
1.
Appuyez sur le bouton d'alimentation situé à l'arrière du routeur. Vériez que les
voyants lumineux dédiés à l'alimentation, au réseau local (LAN) et au réseau étendu
(WAN) sont allumés.
2.
Ouvrez votre navigateur internet (ex : Internet Explorer, Google Chrome, Safari ou
Firefox).
Congurer votre routeur à l'aide de l'assistant de
Congurer votre routeur à l'aide de l'assistant de
conguration internet
conguration internet
REMARQUE : Si l'assistant de conguration internet ne s'exécute pas
automatiquement, entrez http://192.168.1.1 ou http://router.asus.com dans la
barre d'adresse de votre navigateur internet, puis actualisez la page.
3. Attribuez un nom de connexion et un mot de passe au routeur, puis cliquez sur
Suivant. Ces identiants vous seront demandés à chaque tentative de connexion à
l'interface de gestion du routeur. Veuillez noter et conserver vos identiants pour une
utilisation ultérieure.
U17952-2_RT-AC68U_V4_QSG_NA.indb 23U17952-2_RT-AC68U_V4_QSG_NA.indb 23 2021/5/8 17:38:122021/5/8 17:38:12
24
Français nadien
4. Le routeur Wi-Fi détecte automatiquement si votre connexion utilise une IP
dynamique ou statique, le protocole PPPoE, PPTP ou L2TP. Vous pouvez obtenir vos
informations de connexion auprès de votre FAI (Fournisseur d'accès à Internet). Si vous
utilisez une connexion à adresse IP dynamique (DHCP), l'assistant de conguration
internet vous redirigera vers l'étape suivante.
REMARQUE : Si vous utilisez une connexion à adresse IP statique, sélectionnez
Adresse IP statique, puis cliquez sur Suivant. Entrez ensuite les adresses IP, les
informations de masque sous-réseau, de passerelle et de serveur DNS fournies
par votre FAI. Cliquez sur Suivant pour continuer.
RT-AC68U
Setup of router (RT-AC68U) administrator password
Nom d'utilisateur :
Mot de passe :
U17952-2_RT-AC68U_V4_QSG_NA.indb 24U17952-2_RT-AC68U_V4_QSG_NA.indb 24 2021/5/8 17:38:132021/5/8 17:38:13
25
Français nadien
5. Attribuez un nom (SSID) au réseau ainsi qu'une clé de sécurité pour votre connexion
Wi-Fi 2,4 GHz et 5 GHz. Cliquez sur Apply (Appliquer) une fois terminé.
6. Les paramètres de connexion internet et Wi-Fi apparaissent. Cliquez sur Next (Suivant)
pour continuer.
7.
Lisez le didacticiel de connexion réseau. Une fois terminé, cliquez sur Finish (Terminé).
U17952-2_RT-AC68U_V4_QSG_NA.indb 25U17952-2_RT-AC68U_V4_QSG_NA.indb 25 2021/5/8 17:38:132021/5/8 17:38:13
26
Français nadien
Vous pouvez aussi utiliser un appareil mobile tel qu'un smartphone ou une tablette
pour congurer le routeur à l'aide de l'assistant de conguration internet. L'assistant de
conguration basculera automatiquement en version mobile si
vous utilisez un smartphone ou une tablette pour le lancer.
Pour congurer votre routeur à l'aide d'un appareil mobile :
1.
Allumez le routeur.
2. Activez la fonctionnalité Wi-Fi de votre appareil mobile.
3. Recherchez le nom de réseau (SSID) par défaut de votre
routeur, ce nom de réseau est ASUS. Cliquez sur ce dernier
pour établir une connexion, puis patientez le temps que
l'état Wi-Fi connecté apparaisse.
4.
Ouvrez le navigateur internet de votre appareil mobile.
Congurer votre routeur à l'aide d'un appareil mobile
Congurer votre routeur à l'aide d'un appareil mobile
(optionnel)
(optionnel)
RT-AC68U
REMARQUE : Si l'assistant de conguration
internet ne s'exécute pas automatiquement, entrez
http://192.168.1.1 ou http://router.asus.com dans
la barre d'adresse de votre navigateur internet, puis
actualisez la page. Vous pouvez aussi utiliser votre
appareil mobile pour scanner le code QR ci-contre et
vous rendre sur l'interface de gestion du routeur.
5. Attribuez un nom de connexion et un mot de passe au
routeur, puis cliquez sur Suivant. Ces identiants vous
seront demandés à chaque tentative de connexion à
l'interface de gestion du routeur. Veuillez noter et conserver
vos identiants pour une utilisation ultérieure.
RT-AC68U
Nom d'utilisateur :
Mot de passe :
U17952-2_RT-AC68U_V4_QSG_NA.indb 26U17952-2_RT-AC68U_V4_QSG_NA.indb 26 2021/5/8 17:38:132021/5/8 17:38:13
27
Français nadien
6. L'assistant de conguration internet détecte automatiquement si la connexion internet
fournie par votre FAI utilise une IP dynamique ou statique ou le protocole PPPoE,
PPTP ou L2TP. Entrez les informations de connexion nécessaires fournies par votre FAI
(Fournisseur d'accès à Internet). Si vous utilisez une connexion à adresse IP dynamique
(DHCP), l'assistant de conguration internet vous redirigera vers l'étape suivante.
REMARQUE : Si vous utilisez une connexion à adresse IP statique, sélectionnez
Adresse IP statique, puis cliquez sur Suivant. Entrez ensuite les adresses IP, les
informations de masque sous-réseau, de passerelle et de serveur DNS fournies
par votre FAI. Cliquez sur Suivant pour continuer.
RT-AC68U
ASUS RT-AC68U
7. Attribuez un nom (SSID) au réseau ainsi qu'une clé de sécurité pour votre connexion
Wi-Fi 2,4 GHz et 5 GHz. Cliquez sur Apply (Appliquer) une fois terminé.
ASUS RT-AC68U
U17952-2_RT-AC68U_V4_QSG_NA.indb 27U17952-2_RT-AC68U_V4_QSG_NA.indb 27 2021/5/8 17:38:132021/5/8 17:38:13
28
Français nadien
8. Les paramètres de connexion internet et Wi-Fi apparaissent. Cliquez sur Next (Suivant)
pour continuer.
9.
Lisez le didacticiel de connexion réseau. Une fois terminé, cliquez sur Finish (Terminé).
REMARQUE : Vous pouvez aecter un nom réseau composé d'un maximum de
32 caractères.
Il existe deux méthodes de connexion de clients Wi-Fi (ordinateurs portables, tablettes,
smartphones, etc.) au réseau Wi-Fi du RT-AC68U.
Connexion manuelle à un réseau Wi-Fi
Pour vous connecter manuellement à un réseau Wi-Fi :
1.
Activez la fonctionnalité Wi-Fi de votre client.
2. Sélectionnez le SSID attribué au routeur.
3. Entrez le mot de passe et appuyez sur Connecter.
Connexion à un réseau Wi-Fi via WPS
Le RT-AC68U dispose d'un bouton WPS (Wi-Fi Protected Setup) vous permettant de
connecter un client au réseau Wi-Fi géré par le routeur sans avoir à entrer de mot de passe
de connexion.
Pour utiliser la fonctionnalité WPS :
1.
Appuyez sur le bouton WPS situé à l'arrière du routeur. Consultez la section Aperçu
rapide de votre routeur RT-AC68U pour localiser l'emplacement de ce bouton.
2.
Appuyez sur le bouton WPS du client Wi-Fi dans un délai de 2 minutes ou suivez les
instructions fournies avec le client Wi-Fi. Lors d'une tentative de connexion WPS, le
voyant d'alimentation du routeur clignote rapidement.
3.
Le voyant LED d'alimentation s'arrête de clignoter dès lors que la connexion a été
établie entre le routeur et le client Wi-Fi.
Connexion à un réseau Wi-Fi
Connexion à un réseau Wi-Fi
U17952-2_RT-AC68U_V4_QSG_NA.indb 28U17952-2_RT-AC68U_V4_QSG_NA.indb 28 2021/5/8 17:38:132021/5/8 17:38:13
29
Français nadien
Votre routeur Wi-Fi dispose de
l'interface intuitive ASUSWRT. Cette
interface de gestion du routeur
vous permet de congurer en toute
simplicité les fonctionnalités du routeur
par le biais d'un navigateur internet tel
qu'Internet Explorer, Firefox, Safari ou
Google Chrome.
Gestion du routeur via l'interface ASUSWRT
Gestion du routeur via l'interface ASUSWRT
IMPORTANT :
• Pour plus de détails sur l'utilisation de l'interface
de gestion du routeur, consultez le manuel de
l'utilisateur.
• Vériez régulièrement que votre routeur dispose
de la dernière version de rmware disponible.
• Rendez-vous sur la page vidéo d'ASUS pour
visionner de nombreux didacticiels vidéos.
REMARQUE : Utilisez la barre
de recherche située en bas
de l'écran pour obtenir plus
d'informations sur le site
d'assistance technique d'ASUS
https://www.asus.com/fr/
support.
U17952-2_RT-AC68U_V4_QSG_NA.indb 29U17952-2_RT-AC68U_V4_QSG_NA.indb 29 2021/5/8 17:38:132021/5/8 17:38:13
30
Français nadien
AiCloud
AiCloud
ASUS AiCloud est une plateforme vous permettant d'accéder à vos données à tout
moment et où que vous soyez tant qu'une connexion internet est disponible. Vous pouvez
aussi utiliser l'application AiCloud à partir de votre appareil iOS ou Android pour accéder à
votre compte ASUSWebstorage.
Pour installer AiCloud :
1.
Assurez-vous que votre routeur dispose de la dernière version de rmware disponible.
2. Téléchargez l'application AiCloud sur Google Play ou l'App Store.
3. Connectez un périphérique de stockage USB à votre routeur. Consultez la section
Aperçu rapide de votre routeur RT-AC68U pour localiser l'emplacement des ports
USB.
4.
Connectez votre appareil iOS ou Android au routeur via le Wi-Fi. L'application AiCLoud
vous guidera automatiquement au travers des diverses étapes de conguration.
5.
Une fois terminé, vous pouvez ouvrir, lire en streaming et partager les chiers contenus
sur votre périphérique de stockage USB. Plus d'informations sont disponibles sur ASUS
AiCloud. Vous pouvez également accéder aux vidéos dédiées à AiCloud à partir des
codes QR ci-dessous.
Google Play
App Store
U17952-2_RT-AC68U_V4_QSG_NA.indb 30U17952-2_RT-AC68U_V4_QSG_NA.indb 30 2021/5/8 17:38:132021/5/8 17:38:13

31
Français nadien
Foire aux questions (FAQ)
Foire aux questions (FAQ)
Même après avoir suivi les instructions de ce guide, je ne parviens toujours
pas à accéder à l'interface de gestion du routeur.
Assurez-vous que votre proxy est désactivé et que l'adresse IP de votre ordinateur est gérée
par le serveur DHCP. Pour plus de détails sur la désactivation d'un proxy, rendez-vous sur le
site https://www.asus.com/fr/support. Pour plus de détails sur l'utilisation du serveur DHCP,
consultez l'aide de votre ordinateur Windows® ou MAC.
Le client ne peut pas établir de connexion Wi-Fi avec le routeur.
Hors de portée :
• Rapprochez le routeur du client.
• Essayez d'autres paramètres de canaux.
Authentication :
• Utilisez une connexion laire pour vous connecter au routeur.
• Vériez les paramètres de sécurité Wi-Fi.
• Appuyez sur le bouton de réinitialisation situé à l'arrière du routeur pendant plus
de 5 secondes.
Routeur introuvable :
• Appuyez sur le bouton de réinitialisation situé à l'arrière du routeur pendant plus
de 5 secondes.
• Vériez les paramètres SSID et de chirement de l'adaptateur Wi-Fi.
Impossible d'accéder à Internet via un adaptateur Wi-Fi local.
• Rapprochez le routeur du client.
• Vériez que l'adaptateur Wi-Fi est connecté au bon routeur Wi-Fi.
• Vériez que le canal Wi-Fi que vous utilisez appartient aux canaux disponibles dans
votre pays/région.
• Vériez les paramètres de chirement.
U17952-2_RT-AC68U_V4_QSG_NA.indb 31U17952-2_RT-AC68U_V4_QSG_NA.indb 31 2021/5/8 17:38:132021/5/8 17:38:13
32
Français nadien
• Vériez la connexion ADSL ou Câble.
• Utilisez un autre câble Ethernet.
Si le voyant “LINK” du modem ADSL clignote ou reste en permanence éteint,
cela signie alors qu'il n'est pas possible d'accéder à Internet - le routeur n'est
pas en mesure d'établir une connexion au réseau ADSL.
• Vériez que les câbles sont correctement branchés
• Débranchez le câble d'alimentation du modem. Patientez quelques secondes, puis
rebranchez le câble.
• Si le voyant ADSL clignote ou reste en permanence éteint, contactez votre fournisseur
d'accès ADSL.
Nom du réseau et/ou clé de chirement oubliés.
• Essayez de congurer une connexion laire et congurez à nouveau les paramètres de
chirement Wi-Fi.
• Appuyez sur le bouton de réinitialisation situé à l'arrière du routeur pendant plus de 5
secondes.
• Paramètres par défaut :
Nom d'utilisateur / Mot de passe :
admin / admin
Adresse IP :
192.168.1.1
SSID :
ASUS
Où puis-je obtenir plus d'informations sur le routeur Wi-Fi ?
• Site de support technique : https://www.asus.com/fr/support
• Service clientèle : consultez la liste des centres d'appel ASUS en n de guide
U17952-2_RT-AC68U_V4_QSG_NA.indb 32U17952-2_RT-AC68U_V4_QSG_NA.indb 32 2021/5/8 17:38:132021/5/8 17:38:13
33
Español
15
9 10 13118 14127653
Contenido del paquete
Contenido del paquete
RT-AC68U AC adapter
Cable de red(RJ-45 Guía de inicio rápido
Tarjeta de garantía
Un vistazo rápido a su RT-AC68U
Un vistazo rápido a su RT-AC68U
1
LAN LED 1~4
6
LED de alimentación
11
USB 3.0/2.0 Puertos
2
WAN LED
(Internet)
7
Botón WPS
12
WAN Puerto
3
USB 3.0/2.0 LED
8
Botón de encendido/
apagado WiFi
13
Botón de encendido/
apagado LED
4
LED de 2.4 GHz
9
Vypínaè
14
LAN Puertos
5
LED de 5GHz
10
Puerto de
alimentación (DCIN)
15
Botón Restablecer
NOTA: Si alguno de los artículos falta o se encuentra dañado, póngase en
contacto con su distribuidor.
1 2 4
U17952-2_RT-AC68U_V4_QSG_NA.indb 33U17952-2_RT-AC68U_V4_QSG_NA.indb 33 2021/5/8 17:38:142021/5/8 17:38:14
34
Español
NOTAS:
• Disco ash/Disco duro externo USB:
• El router inalámbrico funciona con la mayoría de discos ash
y discos duros USB de hasta 2 TB y admite acceso de lectura y
escritura para los formatos FAT16, FAT32, EXT2, EXT3 y NTFS.
• Para quitar de forma segura el disco USB, inicie la interfaz gráca
del usuario Web (http://192.168.1.1) y, a continuación, en la
página Network Map (Mapa de la red), haga clic en el icono USB
y, a continuación, en Eject USB 3.0 / USB 2.0 (Expulsar USB 3.0 /
USB 2.0).
• Si quita el disco USB de forma incorrecta, los datos pueden resultar
dañados.
• Para conocer la lista del sistema de archivos y las particiones de
disco duro que admite el contador inalámbrico, visite la dirección
http://event.asus.com/networks/disksupport
• Para conocer la lista de impresoras que admite el router inalámbrico,
visite la dirección http://event.asus.com/networks/printersupport
U17952-2_RT-AC68U_V4_QSG_NA.indb 34U17952-2_RT-AC68U_V4_QSG_NA.indb 34 2021/5/8 17:38:142021/5/8 17:38:14
35
Español
Instalar el enrutador
Instalar el enrutador
IMPORTANTE: Pred inštaláciou routera sa uistite o dostupnosti
pripojenia k internetu.
1. Ubicar el router inalámbrico
Para conseguir la mejor transmisión de señal inalámbrica entre el router
inalámbrico y los dispositivos de red conectados a él, asegúrese de:
• Colocar el router inalámbrico en un área centralizada para conseguir la máxima
cobertura inalámbrica para los dispositivos de red.
• Mantenga el dispositivo alejado de obstáculos metálicos y de la luz solar directa.
• Mantenga el producto alejado de dispositivos WiFi de 802.11g o 20 MHz,
equipos periféricos de 2,4 GHz, dispositivos Bluetooth, teléfonos inalámbricos,
transformadores, motores de alto rendimiento, luces uorescentes, hornos
microondas, frigorícos y otros equipos industriales para evitar interferencias o
pérdidas de señal.
• Oriente las tres antenas desmontables tal y como muestra la siguiente
ilustración para maximizar la cobertura de la señal inalámbrica.
• Actualícese siempre a la versión be rmware más reciente. Visite el sitio Web de
ASUS en http://www.asus.com para obtener las actualizaciones de rmware
más recientes.
45
°
90
°
45
°
U17952-2_RT-AC68U_V4_QSG_NA.indb 35U17952-2_RT-AC68U_V4_QSG_NA.indb 35 2021/5/8 17:38:142021/5/8 17:38:14

36
Español
RT-AC68U
Computer
Wall Power Outlet
LAN
Modem
Power
WAN
a
b
c
d
Modem
OFF!
a
b
c
2. Prepare el módem.
a. Desenchufe el adaptador de CA de la red eléctrica y desconéctelo del
módem por cable/ADSL.
b. Desconecte el cable de red del módem por cable/ADSL.
c. Reinicie su PC (recomendado).
ADVERTENCIA! Antes de desconectar todos los cables, asegúrese de
que el módem por cable/ADSL haya permanecido apagado durante, al
menos, dos minutos. Si el módem tiene una batería de reserva, quítela
también.
3. Congure la red inalámbrica.
U17952-2_RT-AC68U_V4_QSG_NA.indb 36U17952-2_RT-AC68U_V4_QSG_NA.indb 36 2021/5/8 17:38:142021/5/8 17:38:14

37
Español
a. Conecte el adaptador de CA del router inalámbrico al puerto DC-IN y
enchúfelo a la red eléctrica.
b. Use otro cable de red para conectar el módem al puerto WAN del router
inalámbrico.
c. Conecte el adaptador de CA del módem al puerto DC-IN y enchúfelo a la red
eléctrica.
d.
Use el cable de red para conectar el equipo a un puerto LAN del router
inalámbrico.
NOTA: También puede congurar su RT-AC68U utilizando un
dispositivo móvil, como por ejemplo un teléfono inteligente o tableta.
Para obtener más detalles sobre ello, vaya a la sección Congurar el
enrutador utilizando un dispositivo móvil.
a.
Deshabilite el servidor proxy si se encuentra habilitado.
b. Establezca la conguración TCP/IP del equipo para que reciba una dirección
IP automáticamente.
c. Deshabilite todas las conexiones de acceso telefónico, si hay alguna
habilitada.
NOTA: Para obtener más detalles sobre cómo deshabilitar la
conguración del equipo, consulte la sección de preguntas más
frecuentes (P+F).
4. Deshabilitar alguna conguración en su PC.
U17952-2_RT-AC68U_V4_QSG_NA.indb 37U17952-2_RT-AC68U_V4_QSG_NA.indb 37 2021/5/8 17:38:142021/5/8 17:38:14
38
Español
Para congurar el enrutador utilizando la conguración rápida para Internet
(QIS, Quick Internet Setup):
1.
Presione el botón de alimentación situado en la parte posterior del
enrutador. Asegúrese de que los LED Alimentación, LAN y WAN están
encendidos.
2. Inicie un explorador web, como por ejemplo Internet Explorer, Firefox,
Google Chrome o Safari.
Congurar el enrutador utilizando el Asistente para
Congurar el enrutador utilizando el Asistente para
conguración rápida para Internet
conguración rápida para Internet
NOTA: si QIS no se inicia automáticamente, escriba http://192.168.1.1
o http://router.asus.com en la barra de direcciones y actualice el
explorador de nuevo.
3. Asigne un nombre de inicio de sesión y una contraseña al enrutador y
haga clic en Next (Siguiente). Necesitará este nombre de inicio de sesión
y esta contraseña para iniciar sesión en su RT-AC68U para ver o cambiar la
conguración del enrutador. Puede anotar el nombre de inicio de sesión en
la contraseña del enrutador para uso futuro.
U17952-2_RT-AC68U_V4_QSG_NA.indb 38U17952-2_RT-AC68U_V4_QSG_NA.indb 38 2021/5/8 17:38:142021/5/8 17:38:14
39
Español
4. La función de conguración rápida de Internet (QIS) del router inalámbrico
detecta si el tipo de conexión ISP es Dynamic IP (Dirección IP dinámica),
PPPoE, PPTP, L2TP y Static IP (Dirección IP estática). Obtenga la
información necesaria sobre el tipo de conexión de Internet de su proveedor
de servicios de internet (ISP, Internet Service Provider). Si el tipo de conexión
es Dynamic IP (Dirección IP dinámica) (DHCP), el asistente QIS le dirigirá
automáticamente al paso siguiente.
NOTA: si el tipo de conexión es Static IP (Dirección IP estática), elija
Static IP (Dirección IP estática) y haga clic en Next (Siguiente).
Escriba la dirección IP, la máscara de subred, la puerta de enlace
predeterminada y la información del servidor DNS proporcionadas por
su ISP. Haga clic en Next (Siguiente) para continuar.
RT-AC68U
Setup of router (RT-AC68U) administrator password
Nombre de inicio de
sesión:
Contraseña de inicio
de sesión:
U17952-2_RT-AC68U_V4_QSG_NA.indb 39U17952-2_RT-AC68U_V4_QSG_NA.indb 39 2021/5/8 17:38:142021/5/8 17:38:14
40
Español
5. Asigne el nombre de ver (SSID) y la clave de seguridad para la conexión
inalámbrica be 2,4 GHz y 5 GHz. Haga clic en Apply (Aplicar) cuando haya
terminado.
6. Se mostrará la conguración de la conexión a Internet y la red inalámbrica.
Haga clic en Next (Siguiente) para continuar.
7.
Lea el tutorial de conexión a una red inalámbrica. Cuando haya terminado,
haga clic en Finish (Finalizar).
U17952-2_RT-AC68U_V4_QSG_NA.indb 40U17952-2_RT-AC68U_V4_QSG_NA.indb 40 2021/5/8 17:38:142021/5/8 17:38:14
41
Español
También puede utilizar un dispositivo móvil, como por ejemplo un teléfono
inteligente o una tableta, para congurar su RT-AC68U a través del asistente
QIS. El asistente QIS cambiará automáticamente a la versión móvil si utiliza un
teléfono inteligente o una tableta para iniciarlo.
Para congurar el enrutador utilizando un dispositivo
móvil:
1.
Encienda su RT-AC68U.
2. Habilite la función Wi-Fi del dispositivo móvil.
3. Busque el SSID ASUS, que es el SSID predeterminado
de la red inalámbrica de su RT-AC68U. Haga clic en
este SSID para conectarse y espere a que el estado
mostrado sea de Wi-Fi conectada.
4.
Inicie el explorador Web del dispositivo móvil.
Congurar el enrutador utilizando un dispositivo móvil
Congurar el enrutador utilizando un dispositivo móvil
(opcional)
(opcional)
RT-AC68U
NOTA: si QIS no se inicia automáticamente,
escriba http://192.168.1.1 o http://router.asus.
com en la barra de direcciones y actualice el
explorador de nuevo. También puede utilizar el
dispositivo móvil para buscar el código QR aquí
para ir a la interfaz Web de su RT-AC68U.
5. Asigne un nombre de inicio de sesión y una
contraseña al enrutador y haga clic en Next
(Siguiente). Necesitará este nombre de inicio de
sesión y esta contraseña para iniciar sesión en la
interfaz Web de su RT-AC68U para ver o cambiar la
conguración del enrutador. Asegúrese de anotar
el nombre de inicio de sesión en la contraseña del
enrutador para uso futuro.
RT-AC68U
Nombre de inicio de sesión:
Contraseña de inicio de sesión:
U17952-2_RT-AC68U_V4_QSG_NA.indb 41U17952-2_RT-AC68U_V4_QSG_NA.indb 41 2021/5/8 17:38:142021/5/8 17:38:14

42
Español
6. La función QIS detecta automáticamente si el tipo de conexión ISP es
Dynamic IP (Dirección IP dinámica), PPPoE, PPTP, L2TP o Static IP (Dirección
IP estática). Especique la información necesaria proporcionada por su
proveedor de servicio de Internet (ISP, Internet Service Provider). Si el tipo de
conexión es Dynamic IP (Dirección IP dinámica) (DHCP), el asistente QIS le
dirigirá automáticamente al paso siguiente.
NOTA: si el tipo de conexión es Static IP (Dirección IP estática), elija
Static IP (Dirección IP estática) y haga clic en Next (Siguiente).
Escriba la dirección IP, la máscara de subred, la puerta de enlace
predeterminada y la información del servidor DNS proporcionadas por
su ISP. Haga clic en Next (Siguiente) para continuar.
RT-AC68U
ASUS RT-AC68U
7. Asigne el nombre de ver (SSID) y la clave de seguridad para la conexión
inalámbrica be 2,4 GHz y 5 GHz. Haga clic en Apply (Aplicar) cuando haya
terminado.
ASUS RT-AC68U
U17952-2_RT-AC68U_V4_QSG_NA.indb 42U17952-2_RT-AC68U_V4_QSG_NA.indb 42 2021/5/8 17:38:152021/5/8 17:38:15
43
Español
8. Se mostrará la conguración de la conexión a Internet y la red inalámbrica.
Haga clic en Next (Siguiente) para continuar.
9. Lea el tutorial de conexión a una red inalámbrica. Cuando haya terminado,
haga clic en Finish (Finalizar).
NOTA: Puede asignar un nombre a la red compuesto por un máximo
de 32 caracteres.
Los clientes inalámbricos (equipos portátiles, tabletas, teléfonos inteligentes,
etc.) pueden conectarse a la red inalámbrica de su RT-AC68U de dos formas.
Conectarse a la red inalámbrica manualmente
Para conectarse a la red inalámbrica manualmente:
1.
Habilite la función Wi-Fi en el cliente inalámbrico para buscar las redes
inalámbricas disponibles.
2. Seleccione el SSID o el nombre de red que asignó a la red de su RT-AC68U.
3. Especique la contraseña y haga clic en Connect (Conectar).
Conectarse a la red inalámbrica a través de WPS
Su RT-AC68U tiene un botón WPS (Wi-Fi Protected Setup, es decir, Conguración
protegida Wi-Fi) mediante el que puede conectar un cliente inalámbrico a la red
de su RT-AC68U sin necesidad de especicar una contraseña.
Para conectarse a la red inalámbrica a través de WPS:
1.
PPresione el botón WPS situado en la parte posterior de RT-AC68U. Consulte
la sección Un vistazo rápido a su RT-AC68U para conocer la ubicación del
botón WPS.
2. Presione el botón WPS del cliente inalámbrico antes de que transcurran dos
minutos o siga las instrucciones de WPS incluidas con dicho cliente. Cuando
realice la conexión a través de WPS, el LED Alimentación del enrutador
comenzará a parpadear rápidamente.
3. Espere a que el LED Alimentación del enrutador se ilumine
permanentemente, lo que indica que la conexión entre dicho enrutador y el
cliente inalámbrico se ha realizado correctamente.
Conectarse a la red inalámbrica
Conectarse a la red inalámbrica
U17952-2_RT-AC68U_V4_QSG_NA.indb 43U17952-2_RT-AC68U_V4_QSG_NA.indb 43 2021/5/8 17:38:152021/5/8 17:38:15

44
Español
El enrutador inalámbrico incluye
una intuitiva interfaz gráca del
usuario Web ASUSWRT. ASUSWRT
permite congurar fácilmente sus
distintas funciones a través de un
explorador Web, como por ejemplo
Internet Explorer, Firefox, Safari o
Google Chrome.
Administrar el enrutador a través de la GUI de ASUSWRT
Administrar el enrutador a través de la GUI de ASUSWRT
IMPORTANTE:
• Para obtener más detalles sobre cómo
utilizar la GUI Web, consulte el manual del
usuario.
• Para mejorar su experiencia, busque
siempre la versión más reciente del rmware
y actualícese a ella.
• Visite el canal de vídeo ASUS Networking
para obtener vídeos de tutoriales sobre
funciones incluidas.
NOTA: Utilice la barra
de búsqueda situada
en la parte inferior de la
interfaz para obtener más
información en el sitio de
soporte técnico de ASUS
(http://www.asus.com/
support).
U17952-2_RT-AC68U_V4_QSG_NA.indb 44U17952-2_RT-AC68U_V4_QSG_NA.indb 44 2021/5/8 17:38:152021/5/8 17:38:15
45
Español
AiCloud
AiCloud
La aplicación ASUS AiCloud proporciona acceso a los datos en cualquier lugar
y momento en el que tenga una conexión a Internet. También permite acceder
a su cuenta de ASUS WebStorage a través de la aplicación móvil AiCloud en su
dispositivo iOS o Android, o través de un explorador Web.
Para instalar AiCloud:
1.
Asegúrese de que la versión de rmware del enrutador es la más reciente y
admite AiCloud.
2. Descargue la aplicación AiCloud de Google Play o App Store.
3. Instale el dispositivo de almacenamiento USB en el enrutador. Consulte la
sección Un vistazo rápido a su RT-AC68U para conocer la ubicación de los
puertos USB.
4. Conecte su iOS o dispositivos Android al enrutador a través de Wi-Fi. La
aplicación AiCloud le guiará automáticamente a través del proceso de
conguración.
5. Ahora puede acceder a todos los archivos de su almacenamiento USB,
transmitirlos por secuencias y compartirlos. Busque ASUS AiCloud para
obtener más información. Vea los vídeos de tutoriales para obtener
instrucciones paso a paso.
Google Play
App Store
U17952-2_RT-AC68U_V4_QSG_NA.indb 45U17952-2_RT-AC68U_V4_QSG_NA.indb 45 2021/5/8 17:38:152021/5/8 17:38:15
46
Español
Preguntas más frecuentes (P+F)
Preguntas más frecuentes (P+F)
Después de seguir los pasos indicados, sigo sin poder acceder a la interfaz
gráca del usuario (GUI) Web del router inalámbrico para denir la
conguración de dicho router.
Asegúrese de que la conguración proxy de su PC está deshabitada y que la
dirección IP de dicho PC se obtiene del servidor DHCP automáticamente. Para
obtener detalles acerca de la conguración proxy, visite el sitio de soporte
técnico de ASUS en https://www.asus.com/support. Para obtener detalles acerca
del servidor DHCP para obtener direcciones IP automáticamente, consulte la
función de ayuda de su sistema operativo Windows® o Mac.
El cliente no puede establecer una conexión inalámbrica con el router.
Se encuentra fuera del alcance de la red:
• Coloque el router más cerca del cliente inalámbrico.
• Intente cambiar el canal.
Autenticación:
• Utilice la conexión por cable para conectarse al router.
• Consulte la conguración de seguridad inalámbrica.
• Presione el botón Restablecer situado en el panel posterior durante más
de cinco segundos.
No se encuentra el router:
• Mantenga pulsado el botón Reset (Restablecer) durante más de cinco
segundos.
• Consulte la conguración del adaptador inalámbrico, como el
identicador SSID y la conguración de cifrado.
No se puede acceder a Internet por medio del adaptador de red LAN
inalámbrica
• Coloque el router más cerca del cliente inalámbrico.
• Compruebe si el adaptador inalámbrico está conectado al router
inalámbrico correcto.
U17952-2_RT-AC68U_V4_QSG_NA.indb 46U17952-2_RT-AC68U_V4_QSG_NA.indb 46 2021/5/8 17:38:152021/5/8 17:38:15
47
Español
• Compruebe si el canal inalámbrico en uso se puede utilizar en su zona/país.
• Consulte la conguración de cifrado.
• Consulte si la conexión de ADSL o Cable es correcta.
• Vuelva a intentarlo utilizando otro cable Ethernet.
Si el indicador luminoso “LINK” del Módem ADSL permanece iluminado o
apagado, signica que no es posible acceder a Internet; el router no puede
establecer una conexión con la red ADSL.
• Asegúrese de que todos los cables estén conectados correctamente.
• Desconecte el cable de alimentación del módem de ADSL o Cable, espere
unos minutos y vuelva a conectarlo.
• Si el indicador ADSL continúa parpadeando o permanece APAGADO,
póngase en contacto con su proveedor de servicios de ADSL.
He olvidado el nombre de la red o las claves de cifrado.
• Intente establecer la conexión por cable y congurar de nuevo el cifrado
inalámbrico.
• Presione el botón Reiniciar del router inalámbrico durante más de cinco
segundos.
• Valores predeterminados de fábrica:
Nombre de usuario /
Contraseña: admin / admin
Dirección IP:
192.168.1.1
SSID: ASUS
¿De qué otros recursos dispongo para obtener más información acerca del
router inalámbrico?
• El sitio web de soporte técnico:https://www.asus.com/support
• Línea Directa: Consulte el número de la línea telefónica de soporte técnico
en esta Guía de inicio rápido.
U17952-2_RT-AC68U_V4_QSG_NA.indb 47U17952-2_RT-AC68U_V4_QSG_NA.indb 47 2021/5/8 17:38:152021/5/8 17:38:15
48
Português Brasil
15
9 10 13118 14127653
1
LEDs LAN 1~4
6
LED de energia
11
Portas USB 3.0/2.0
2
LED WAN (Internet)
7
Botão WPS
12
Porta WAN
3
LEDs USB 3.0 / 2.0
8
Botão Ligar/Desligar
Wi-Fi
13
Botão Ligar/
Desligar LED
4
LED Wi-Fi 2.4GHz
9
Botão Ligar/Desligar
14
Portas LAN
5
LED Wi-Fi 5GHz
10
Porta (Entrada DC) de
força
15
Botão Reset
NOTA: No caso de falta ou dano de qualquer um dos itens, entre em
contato com o seu revendedor.
1 2 4
Conteúdo da embalagem
Conteúdo da embalagem
Roteador Sem Fio RT-AC68U Adaptador AC
Cabo de rede (RJ-45) Guia de Início Rápido
Cartão de garantia
Uma rápida olhada em seu roteador
Uma rápida olhada em seu roteador
U17952-2_RT-AC68U_V4_QSG_NA.indb 48U17952-2_RT-AC68U_V4_QSG_NA.indb 48 2021/5/8 17:38:152021/5/8 17:38:15

49
Português Brasil
NOTAS:
• Disco Flash/HDD externo USB
• O roteador sem o trabalha com a maioria dos discos USB HDDs/
Flash de até 2TB e suporta acesso de leitura-gravação para
FAT16, FAT32, EXT2, EXT3, e NTFS.
• Para remover seguramente o disco USB, inicie o GUI de web
(http://192.168.1.1), em seguida no canto superior direito da
página Network Map (Mapa de Rede), clique no ícone USB e
clique em Ejetar USB 3.0/USB 2.0.
• A remoção incorreta do disco USB pode causar corrupção de
dados.
• Para a lista do sistema de arquivos e partições do disco rígido que
o roteador sem o suporta, visite
http://event.asus.com/networks/disksupport
• Para a lista das impressoras que o roteador sem o suporta, visite
http://event.asus.com/networks/printersupport
U17952-2_RT-AC68U_V4_QSG_NA.indb 49U17952-2_RT-AC68U_V4_QSG_NA.indb 49 2021/5/8 17:38:152021/5/8 17:38:15
50
Português Brasil
Instalando seu roteador
Instalando seu roteador
IMPORTANTE: Antes de instalar o roteador, certique-se de que a
conexão de internet está disponível
1. Posicione seu roteador sem o
Para uma transmissão sem o ideal entre o roteador sem o e os dispositivos
sem o conectados, certique-se que você:
• Colocar o roteador sem o em uma área centralizada para a cobertura máxima
dos dispositivos sem o.
• Evitar obstruções metálicas bem como a incidência direta dos raios solares.
• Evitar dispositivos compatíveis apenas com 802.11g ou 20 Mhz e periféricos
exclusivamente 2.4 Ghz, dispositivos Bluetooth, telefones sem o,
transformadores, motores pesados, lâmpadas orescentes, fornos de micro
ondas, geladeiras e outros equipamentos industriais para evitar interferências
ou a perda do sinal.
• Garanta o melhor sinal, oriente as três antenas destacáveis, conforme mostrado
no desenho abaixo.
• Sempre atualize o rmware para a última versão. Para isso baixe a última versão
do rmware em http://www.asus.com.
45
°
90
°
45
°
U17952-2_RT-AC68U_V4_QSG_NA.indb 50U17952-2_RT-AC68U_V4_QSG_NA.indb 50 2021/5/8 17:38:152021/5/8 17:38:15
51
Português Brasil
RT-AC68U
Computer
Wall Power Outlet
LAN
Modem
Power
WAN
a
b
c
d
Modem
OFF!
a
b
c
2. Prepare seu modem.
a. Desconecte o adaptador AC da tomada de energia e desconecte-o do seu
modem cabo/ADSL.
b. Desconecte o cabo de rede do seu modem cabo/ADSL.
c. Reinicie o seu computador (recomendado).
ALERTA! Antes de desconectar os os/cabos, certique-se de que o seu
modem cabo/ADSL foi desligado há pelo menos dois minutos. Se o seu
modem tem uma bateria de reserva, remova-a também.
3. Congure seu ambiente sem o.
U17952-2_RT-AC68U_V4_QSG_NA.indb 51U17952-2_RT-AC68U_V4_QSG_NA.indb 51 2021/5/8 17:38:162021/5/8 17:38:16
52
Português Brasil
a. Insira seu adaptador AC do roteador sem o à porta de Entrada de DC e
ligue-o a uma tomada elétrica.
b. Usando outro cabo de rede, conecte seu modem à sua porta WAN do
roteador sem o.
c. Insira seu adaptador AC do modem à porta de Entrada DC e ligue-o a uma
tomada elétrica.
d. Usando um cabo de rede (fornecido com o roteador), conecte seu
computador à porta LAN do roteador sem o. Certique-se de que os LEDs
das portas WAN e LAN estão piscando.
NOTA: Você também pode congurar o RT-AC68U usando um
dispositivo móvel como Smartphone ou PC tablet. Para fazer isso, vá
para Congurar seu roteador usando um dispositivo móvel para
detalhes.
a.
Desativar o Proxy, caso esteja ativado.
b. Denir as congurações de TCP/IP para obter automaticamente um
endereço IP.
c. Desative a conexão discada (dial-up) se estiver ativada.
NOTA: Para mais detalhes sobre desabilitar suas congurações do
computador, consulte Perguntas Frequentes (FAQs).
4. Desative algumas congurações do seu computador.
U17952-2_RT-AC68U_V4_QSG_NA.indb 52U17952-2_RT-AC68U_V4_QSG_NA.indb 52 2021/5/8 17:38:162021/5/8 17:38:16
53
Português Brasil
Para congurar seu roteador usando a QIS (Instalação Rápida de Internet):
1.
Pressione o botão liga/desliga na parte traseira do seu roteador. Certique-
se de que o botão Liga/Desliga e os LEDs das portas LAN e WAN estão
ligados.
2. Iniciar um navegador web tal como Internet Explorer, Firefox, Google
Chrome, ou Safari.
Congurando seu roteador usando o assistente de
Congurando seu roteador usando o assistente de
Instalação Rápida de Internet
Instalação Rápida de Internet
NOTA: Se a QIS não iniciar automaticamente, entre em
http://192.168.1.1 ou http://router.asus.com na barra de endereço e
atualize o navegador novamente.
3. Atribua seu nome de login e senha do roteador e clique em Avançar.
Você precisará do nome de login e senha para se conectar no RT-AC68U para
visualizar ou alterar as congurações do roteador. Você pode anotar o nome
de login e senha do roteador para uso futuro.
U17952-2_RT-AC68U_V4_QSG_NA.indb 53U17952-2_RT-AC68U_V4_QSG_NA.indb 53 2021/5/8 17:38:162021/5/8 17:38:16
54
Português Brasil
4. O recurso de Instalação Rápida de Internet (QIS) do roteador sem o detecta
automaticamente se o seu tipo de conexão ISP é IP dinâmico, PPPoE, PPTP,
L2TP e IP estático. Obtenha as informações necessárias sobre seu tipo de
conexão de Internet para seu Provedor de Serviços de Internet (ISP). Se o
seu tipo de conexão é IP Dinâmico (DHCP), o assistente QIS o direcionará
automaticamente para a próxima etapa.
NOTA: Se seu tipo de conexão é IP Estático, escolha o IP Estático
e clique em Next (Avançar). Digite as informações do endereço IP,
máscara de sub-rede, gateway padrão e servidor DNS fornecidas pelo
ISP. Clique em Next (Avançar) para continuar.
RT-AC68U
Setup of router (RT-AC68U) administrator password
Nome de login:
Senha de login:
U17952-2_RT-AC68U_V4_QSG_NA.indb 54U17952-2_RT-AC68U_V4_QSG_NA.indb 54 2021/5/8 17:38:162021/5/8 17:38:16
55
Português Brasil
5. Atribua o nome de rede (SSID) e a chave de segurança para sua conexão sem
o de 2.4Ghz e 5GHz. Clique Aplicar quando pronto.
6. Suas congurações de Internet e wireless são exibidas. Clicar em Next
(Avançar) para continuar.
7.
Leia o tutorial de conexão da rede wireless. Quando pronto, clique em Finish
(Finalizar).
U17952-2_RT-AC68U_V4_QSG_NA.indb 55U17952-2_RT-AC68U_V4_QSG_NA.indb 55 2021/5/8 17:38:162021/5/8 17:38:16
56
Português Brasil
Você também pode usar seu dispositivo móvel como um Smartphone ou PC
tablet para congurar o RT-AC68U através do assistente QIS. O assistente QIS
automaticamente mudará para a versão móvel se usar um Smartphone ou PC
tablet para iniciá-lo. Para congurar seu rotador usando um dispositivo móvel:
1.
Ligue o RT-AC68U.
2. Ative a função Wi-Fi no seu dispositivo móvel.
3. Procure por SSID ASUS, que é o SSID padrão para
sua rede sem o RT-AC68U. Clique neste SSID
para conectar e aguarde pelo status exibir o Wi-Fi
conectado.
4. Inicie o navegador Web do seu dispositivo móvel.
Congurando o seu rotador usando um dispositivo móvel
Congurando o seu rotador usando um dispositivo móvel
(opcional)
(opcional)
RT-AC68U
NOTA: Se a QIS não iniciar automaticamente,
entre em http://192.168.1.1 ou http://router.
asus.com na barra de endereço e atualize o
navegador novamente. Você também pode
usar o dispositivo móvel para digitalizar o
código QR aqui para ir para a interface Web do
RT-AC68U.
5. Atribua seu nome de login e senha do roteador e
clique em Avançar. Você precisará do nome de login
e senha para conectar-se na interface da Web do RT-
AC68U para visualizar ou alterar as congurações do
roteador. Certique-se de anotar o nome de login e
senha do roteador para uso futuro.
RT-AC68U
Nome de login:
Senha de login:
U17952-2_RT-AC68U_V4_QSG_NA.indb 56U17952-2_RT-AC68U_V4_QSG_NA.indb 56 2021/5/8 17:38:162021/5/8 17:38:16
57
Português Brasil
6. O recurso de Instalação Rápida de Internet (QIS) do roteador sem o detecta
automaticamente se o seu tipo de conexão ISP é IP dinâmico, PPPoE,
PPTP, L2TP e IP estático. Insira as informações necessárias fornecidas pelo
Provedor de Serviço de Internet (ISP).
RT-AC68U
ASUS RT-AC68U
7. Atribua o nome de rede (SSID) e a chave de segurança para sua conexão sem
o de 2.4Ghz e 5GHz. Clique Aplicar quando pronto.
ASUS RT-AC68U
NOTA: Se seu tipo de conexão é IP Estático, escolha o IP Estático e clique
em Next (Avançar). Digite as informações do endereço IP, máscara de
sub-rede, gateway padrão e servidor DNS fornecidas pelo ISP. Clique em
Next (Avançar) para continuar.
U17952-2_RT-AC68U_V4_QSG_NA.indb 57U17952-2_RT-AC68U_V4_QSG_NA.indb 57 2021/5/8 17:38:162021/5/8 17:38:16
58
Português Brasil
8. Suas congurações de Internet e wireless são exibidas. Clicar em Next
(Avançar) para continuar.
9. Leia o tutorial de conexão da rede wireless. Quando pronto, clique em Finish
(Finalizar).
NOTA: Você pode atribuir um nome de rede com até 32 caracteres.
Há duas formas de conectar os clientes sem o (notebook, PC tablet,
Smartphone, etc.) à rede sem o do RT-AC68U.
Conectar à rede sem o manualmente
Para se conectar à rede sem o manualmente
1.
Habilite a função Wi-Fi no seu cliente sem o para procurar por redes sem o
disponíveis.
2. Selecione o SSID ou o nome da rede que você atribuiu à sua rede do RT-
AC68U.
3. Insira a senha e clique em Conectar.
Conecte a uma rede sem o através do WPS.
O RT-AC68U tem um botão de WPS (Wi-Fi Protected Setup) para você conectar
seu cliente sem o à rede do RT-AC68U sem inserir a senha. Para conectar a uma
rede sem o através do WPS:
1.
Pressione o botão WPS na lateral do RT-AC68U. Consulte a seção A, olhe
rapidamente no seu RT-AC68U para a localização do botão WPS).
2. Pressione o botão WPS do seu cliente sem o dentro de dois minutos ou siga
as instruções WPS que vem com o cliente sem o. Ao conectar via WPS, o
LED de energia no roteador pisca rapidamente.
3. Aguarde até que o LED de energia do roteador acenda xo, indicando uma
conexão bem-sucedida entre o roteador e o cliente sem o.
Conectar à rede sem o
Conectar à rede sem o
U17952-2_RT-AC68U_V4_QSG_NA.indb 58U17952-2_RT-AC68U_V4_QSG_NA.indb 58 2021/5/8 17:38:162021/5/8 17:38:16
59
Português Brasil
Seu roteador sem o vem com a
interface de usuário gráco Web
ASUSWRT intuitiva. A ASUSWRT
permite que você congure
facilmente seus vários recursos
através de um navegador Web
como Internet Explorer, Firefox,
Safari ou Google Chrome.
Gerenciando o roteador via GUI da Web ASUSWRT.
Gerenciando o roteador via GUI da Web ASUSWRT.
IMPORTANTE:
• Para mais informações sobre o uso do GUI
da Web do rotador, consulte o manual de
usuário.
• Sempre verique e atualize o rmware para
a versão mais recente para uma experiência
melhor.
• Visite o canal de vídeo ASUS Networking
para vídeos tutoriais sobre funções em
destaque.
NOTA: Use a barra de
pesquisa na parte inferior
da interface para obter
mais informações do site
de suporte técnico ASUS
https://www.asus.com/
support.
U17952-2_RT-AC68U_V4_QSG_NA.indb 59U17952-2_RT-AC68U_V4_QSG_NA.indb 59 2021/5/8 17:38:162021/5/8 17:38:16
60
Português Brasil
AiCloud
AiCloud
O app ASUS AiCloud lhe fornece acesso aos seus dados onde e quando você
tenha uma conexão de Internet. Ele também permite que você acesse sua conta
ASUS WebStorage via app móvel AiCloud no seu dispositivo iOS ou Android via
navegador Web.
Para instalar AiCloud:
1.
Certique-se de que a versão de rmware do seu roteador é a mais recente e
suporte o AiCloud.
2. Baixe o app AiCloud do Google Play ou App Store.
3. Instale o dispositivo de armazenamento USB no seu roteador. Consulte a
seção A, olhe rapidamente no seu RT-AC68U para a localização das portas
USB.
4. Conecte seu dispositivo iOS ou Android ao roteador por meio do Wi-Fi. O
app Ai-Cloud o guiará automaticamente pelo processo de conguração.
5. Você agora pode acessar, transmitir e compartilhar todos os arquivos no seu
armazenamento USB. Pesquise ASUS AiCloud para mais informações. Assista
os vídeos tutoriais para um guia passo a passo.
Google Play
App Store
U17952-2_RT-AC68U_V4_QSG_NA.indb 60U17952-2_RT-AC68U_V4_QSG_NA.indb 60 2021/5/8 17:38:172021/5/8 17:38:17
61
Português Brasil
Perguntas Frequentes (FAQs)
Após seguir as etapas, ainda não consigo acessar a interface gráca web do
usuário no roteador sem o (GUI da web) para alterar as congurações do
roteador sem o.
Certique-se de que as congurações de proxy do PC estão desativadas e o
endereço IP do PC é obtido do servidor DHCP automaticamente. Para detalhes
sobre desativar as congurações de proxy, visite o site de Suporte ASUS em
https://www.asus.com/support. Para detalhes sobre o uso do servidor DHCP
para obter os endereços IP automaticamente, consulte o recurso de ajuda do
sistema operacional Windows ou Mac.
O cliente não pode estabelecer uma conexão sem o com o roteador.
Fora de Área:
• Coloque o roteador mais próximo do cliente sem o.
• Tente mudar as congurações do canal.
Autenticação:
• Use uma conexão cabeada para se conectar ao roteador.
• Verique as congurações de segurança sem o.
• Pressione o botão Reset no painel traseiro por mais de cinco segundos.
Não é possível encontrar o roteador:
• Pressione o botão Reset no painel traseiro por mais de cinco segundos.
• Verique a conguração do adaptador sem o, tais como as
congurações do SSID e criptograa.
Não é possível acessar a Internet através de um adaptador LAN sem o.
• Mover o roteador mais próximo do cliente sem o.
• Verique se o adaptador sem o está conectado ao roteador sem o
corretamente.
• Verique se o canal sem o em uso está em conformidade com os canais
disponíveis no seu país/região.
• Verique as congurações de criptograa.
• Verique se a conexão ADSL ou cabo está correta.
• Tente novamente usando outro cabo Ethernet.
U17952-2_RT-AC68U_V4_QSG_NA.indb 61U17952-2_RT-AC68U_V4_QSG_NA.indb 61 2021/5/8 17:38:172021/5/8 17:38:17

62
Português Brasil
Se o “LINK” ADSL pisca continuamente ou permaneçe desligado, o acesso
à Internet não é possível - o roteador não é capaz de estabelecer uma
conexão com a rede ADSL.
• Assegure que todos os seus cabos estão conectados corretamente.
• Desconecte o cabo de energia do modem ADSL ou cabo, espere alguns
minutos e reconecte o cabo.
• Se a luz ADSL continua a piscar ou ca DESLIGADO, contacte o seu
fornecedor de serviços ADSL.
Nome da rede ou chaves de criptograa foram esquecidos.
• Tente conectar-se através da conexão com o e congurar a criptograa sem
o novamente.
• Pressione o botão Reset no painel traseiro do roteador sem o por mais de
cinco segundos para retornar às congurações de fábrica.
• Congurações padrão de fábrica:
Nome do Usuário: / Senha:
admin / admin
Endereço IP:
192.168.1.1
SSID:
ASUS
Onde posso encontrar mais informações sobre o roteador sem o?
• Site de suporte técnico: https://www.asus.com/support
• Linha direta do cliente: consulte a seção de Linha direta do cliente neste guia
de início rápido
U17952-2_RT-AC68U_V4_QSG_NA.indb 62U17952-2_RT-AC68U_V4_QSG_NA.indb 62 2021/5/8 17:38:172021/5/8 17:38:17
63
ASUS Recycling/Takeback Services
ASUS recycling and takeback programs come from our commitment to the highest
standards for protecting our environment. We believe in providing solutions for you
to be able to responsibly recycle our products, batteries, other components, as well as
the packaging materials. Please go to http://csr.asus.com/english/Takeback.htm for the
detailed recycling information in dierent regions.
REACH
Complying with the REACH (Registration, Evaluation, Authorisation, and Restriction of
Chemicals) regulatory framework, we published the chemical substances in our products
at ASUS REACH website at http://csr.asus.com/english/REACH.htm
Federal Communications Commission Statement
This device complies with Part 15 of the FCC Rules. Operation is subject to the following
two conditions:
• This device may not cause harmful interference.
• This device must accept any interference received, including interference that may
cause undesired operation.
This equipment has been tested and found to comply with the limits for a class B digital
device, pursuant to part 15 of the FCC Rules. These limits are designed to provide reason-
able protection against harmful interference in a residential installation.
This equipment generates, uses and can radiate radio frequency energy and, if not
installed and used in accordance with the instructions, may cause harmful interference
to radio communications. However, there is no guarantee that interference will not occur
in a particular installation. If this equipment does cause harmful interference to radio
or television reception, which can be determined by turning the equipment o and on,
the user is encouraged to try to correct the interference by one or more of the following
measures:
• Reorient or relocate the receiving antenna.
• Increase the separation between the equipment and receiver.
• Connect the equipment into an outlet on a circuit dierent from that to which the
receiver is connected.
• Consult the dealer or an experienced radio/TV technician for help.
WARNING! Any changes or modications not expressly approved by the party
responsible for compliance could void the user’s authority to operate the
equipment.
U17952-2_RT-AC68U_V4_QSG_NA.indb 63U17952-2_RT-AC68U_V4_QSG_NA.indb 63 2021/5/8 17:38:172021/5/8 17:38:17

64
Prohibition of Co-location
This device and its antenna(s) must not be co-located or operating in conjunction with
any other antenna or transmitter.
Operations in the 5.15-5.25GHz band are restricted to indoor usage only.
IMPORTANT NOTE:
Radiation Exposure Statement: This equipment complies with FCC radiation
exposure limits set forth for an uncontrolled environment. This equipment should be
installed and operated with minimum distance of 25cm between the radiator and your
body.
Country Code Selection Usage
The country code selection is for non-US models only and is not available to all US
models. Per FCC regulation, all WiFi products that are marketed in US must be xed to
US-operated channels only.
Declaration of Conformity for Ecodesign directive 2009/125/EC
Testing for eco-design requirements according to (EC) No 1275/2008 and (EU) No
801/2013 has been conducted. When the device is in Networked Standby Mode, its I/O
and network interface are in sleep mode and may not work properly. To wake up the
device, press the Wi-Fi on/o, LED on/o, reset, or WPS button.
This equipment complies with EU radiation exposure limits set forth for an uncontrolled
environment. This equipment should be installed and operated with minimum distance
of 20 cm between the radiator and your body.
CE Mark Warning
This is a Class B product, in a domestic environment, this product may cause radio inter-
ference, in which case the user may be required to take adequate measures.Operation
Channels: CH1~11 for N. America; Ch1~14 for Japan; CH1~13 for Europe (ETSI)
This equipment may be operated in AT, BE, CY, CZ, DK, EE, FI, FR, DE, GR, HU, IE, IT, LU, MT,
NL, PL, PT, SK, SL, ES, SE, GB, IS, LI, NO, CH, BG, RO, RT.
Canada, Industry Canada (IC) Notices
This device complies with Industry Canada license-exempt RSS standard(s). Operation is
subject to the following two conditions:
(1) this device may not cause interference, and
(2) this device must accept any interference, including interference that may cause unde-
sired operation of the device.
This device is for indoor use only when operated in the frequency band 5150 ~5250
MHz.
Radio Frequency (RF) Exposure Information
This equipment complies with IC RSS-102 radiation exposure limits set forth for an
U17952-2_RT-AC68U_V4_QSG_NA.indb 64U17952-2_RT-AC68U_V4_QSG_NA.indb 64 2021/5/8 17:38:172021/5/8 17:38:17
65
uncontrolled environment. This equipment should be installed and operated with mini-
mum distance 20 cm between the radiator & your body.
This device has been certi ed for use in Canada. Status of the listing in the Industry Cana-
da’s REL (Radio Equipment List) can be found at the following web address:
http://www.ic.gc.ca/app/sitt/reltel/srch/nwRdSrch.do?lang=eng
Additional Canadian information on RF exposure also can be found at the following web
http://www.ic.gc.ca/eic/site/smt-gst.nsf/eng/sf08792.html
Canada, avis d’Industry Canada (IC)
CLe présent appareil est conforme aux CNR d'Industrie Canada applicables aux appareils
radio exempts de licence. L'exploitation est autorisée aux deux conditions suivantes :
(1) l'appareil ne doit pas produire de brouillage, et
(2) l'utilisateur de l'appareil doit accepter tout brouillage radioélectrique subi, même si le
brouillage est susceptible d'en compromettre le fonctionnement.
Ce dispositif est limité à une utilisation en intérieur seulement dans la bande 5150-5250
MHz.
Informations concernant l’exposition aux fréquences radio (RF)
Cet équipement est conforme aux limites d'exposition aux rayonnements IC établies
pour un environnement non contrôlé. Cet équipement doit être installé et utilisé avec un
minimum de 20cm de distance entre la source de rayonnement et votre corps.
Ce périphérique a été évalué et démontré conforme aux limites SAR (Speci c Absorption
Rate – Taux d’absorption spéci que) d’IC lorsqu’il est installé dans des produits hôtes
particuliers qui fonctionnent dans des conditions d’exposition à des appareils portables
(les antennes se situent à moins de 20 centimètres du corps d’une personne).
Ce périphérique est homologué pour l’utilisation au Canada. Pour consulter l’entrée
correspondant à l’appareil dans la liste d’équipement radio (REL - Radio Equipment List)
d’Industry Canada rendez-vous sur:
http://www.ic.gc.ca/app/sitt/reltel/srch/nwRdSrch.do?lang=eng
Pour des informations supplémentaires concernant l’exposition aux RF au Canada
rendezvous sur :
http://www.ic.gc.ca/eic/site/smt-gst.nsf/eng/sf08792.html
This radio transmitter IC: 3568A-RTACIB00 has been approved by Industry Canada to
operate with the antenna types listed below with the maximum permissible gain and
required antenna impedance for each antenna type indicated. Antenna types not
included in this list, having a gain greater than the maximum gain indicated for that type,
are strictly prohibited for use with this device.
Cet émetteur radio IC: 3568A-RTACIB00 a été approuvé par Industrie Canada pour
U17952-2_RT-AC68U_V4_QSG_NA.indb 65U17952-2_RT-AC68U_V4_QSG_NA.indb 65 2021/5/8 17:38:172021/5/8 17:38:17
66
fonctionner avec les types d'antennes énumérés ci‐dessous avec le gain maximal
admissible et impédance d'antenne requise pour chaque type d'antenne indiqué. Types
d'antennes n'est pas inclus dans cette liste, ayant un gain supérieur au gain maximal
indiqué pour ce type, sont strictement interdits pour une utilisation avec cet appareil.
Antenna List:
Note: The antenna connector is Reverse SMA type.
No. Manufacturer Model No. Antenna Type Peak Gain
1 PSA RFDPA141000SBLB827 Dipole
2GHz:1.33dBi /
5GHz:1.85dBi
2 PSA RFDPA161300SBLB804 Dipole
2GHz:1.32dBi /
5GHz:1.73dBi
3 WHA YU C660-510509-A Dipole
2GHz:1.22dBi /
5GHz:1.49dBi
4 WHA YU C660-510389-A Dipole
2GHz:1.33dBi /
5GHz:1.85dBi
Under Industry Canada regulations, this radio transmitter may only operate using an
antenna of a type and maximum (or lesser) gain (1.33dBi for 2412 to 2462MHz, 1.57dBi
for 5180 to 5240MHz, and 1.85dBi for 5745 to 5825MHz) approved for the transmitter by
Industry Canada. To reduce potential radio interference to other users, the antenna type
and its gain should be so chosen that the equivalent isotropically radiated power (e.i.r.p.)
is not more than that necessary for successful communication.
En vertu de la réglementation de l'industrie du Canada, cet émetteur de radio ne peuvent
fonctionner en utilisant une antenne d'un type et maximum (ou moins) Gain (1.33dBi
for 2412 to 2462MHz, 1.57dBi for 5180 to 5240MHz, and 1.85dBi for 5745 to 5825MHz)
approuvé pour l'émetteur par Industrie Canada. pour réduire risque d'interférence aux
autres utilisateurs, le type d'antenne et son gain doivent être choisis de sorte que la
puissance isotrope rayonnée équivalente (PIRE) ne dépasse pas ce qui est nécessaire
pour la réussite de communication.
User should also be advised that:
(i) the device for operation in the band 5150‐5250 MHz is only for indoor use to reduce
the potential for harmful interference to co‐channel mobile satellite systems;
(ii) the maximum antenna gain permitted for devices in the band 5725‐5825 MHz
shall comply with the e.i.r.p. limits specied for point‐to‐point and non point‐to‐point
operation as appropriate. High‐power radars are allocated as primary users (i.e. priority
users) of the band 5650‐5850 MHz and that these radars could cause interference and/or
damage to LE‐LAN devices.
U17952-2_RT-AC68U_V4_QSG_NA.indb 66U17952-2_RT-AC68U_V4_QSG_NA.indb 66 2021/5/8 17:38:172021/5/8 17:38:17

67
Les utilisateurs devraient aussi être avisés que
(i) les dispositifs fonctionnant dans la bande 5150‐5250 MHz sont réservés uniquement
pour une utilisation à l’intérieur an de réduire les risques de brouillage préjudiciable aux
systèmes de satellites mobiles utilisant les mêmes canaux;
(ii) le gain maximal d’antenne permis (pour les dispositifs utilisant la bande 5725‐5825
MHz) doit se conformer à la limite de p.i.r.e. spéciée pour l’exploitation point à point et
non point à point, selon le cas.
De plus, les utilisateurs de radars de haute puissance sont désignés utilisateurs
principaux (c.‐à‐d., qu’ils ont la priorité) pour les bande 5 650‐5 850 MHz et que ces radars
pourraient causer du brouillage et/ou des dommages aux dispositifs LAN‐EL.
Shielded cables must be used with this unit to ensure compliance with the Class B FCC limits.
Este equipamento não tem direito à proteção contra interferência prejudicial e não
pode causar interferência em sistemas devidamente autorizados.
Para maiores informações, consulte o site da ANATEL: www.anatel.gov.br
Safety Notices
• Use this product in environments with ambient temperatures between 0°C(32°F) and
40°C(104°F).
• Refer to the rating label on the bottom of your product and ensure your power adapter
complies with this rating.
• DO NOT place on uneven or unstable work surfaces. Seek servicing if the casing has
been damaged.
• DO NOT place or drop objects on top and do not shove any foreign objects into the
product.
• DO NOT expose to or use near liquids, rain, or moisture. DO NOT use the modem
during electrical storms.
• DO NOT cover the vents on the product to prevent the system from getting
overheated.
• DO NOT use damaged power cords, accessories, or other peripherals.
• If the Adapter is broken, do not try to x it by yourself. Contact a qualied service
technician or your retailer.
• To prevent electrical shock hazard, disconnect the power cable from the electrical
outlet before relocating the system.
• DO NOT mount this equipment higher than 2 meters.
U17952-2_RT-AC68U_V4_QSG_NA.indb 67U17952-2_RT-AC68U_V4_QSG_NA.indb 67 2021/5/8 17:38:172021/5/8 17:38:17
68
NCC 警語
「取得審驗證明之低功率射頻器材,非經核准,公司、商號或使用者均不得擅自變更頻率、
加大功率或變更原設計之特性及功能。低功率射頻器材之使用不得影響飛航安全及干擾合法
通信;經發現有干擾現象時,應立即停用,並改善至無干擾時方得繼續使用。前述合法通
信,指依電信管理法規定作業之無線電通信。低功率射頻器材須忍受合法通信或工業、科學
及醫療用電波輻射性電機設備之干擾。」 應避免影響附近雷達系統之操作。
「產品之限用物質含有情況」之相關資訊,請參考下表:
單元
限用物質及其化學符號
鉛
(Pb)
汞
(Hg)
鎘
(Cd)
六價鉻
(Cr
+6
)
多溴聯苯
(PBB)
多溴二苯醚
(PBDE)
印刷電路板及電子組件
-
○ ○ ○ ○ ○
結構組件(金屬 / 塑膠) ○ ○ ○ ○ ○ ○
其他組件(如天線/ 指示燈/連接線)
○ ○ ○ ○ ○ ○
其他及其配件(如電源供應器)
-
○ ○ ○ ○ ○
備考1.“○”係指該項限用物質之百分比含量未超出百分比含量基準值。
備考2.“-”係指該項限用物質為排除項目。
安全說明:
- 請在溫度為 0°C (32°F) 至 40°C (104°F) 之間的環境中使用本產品。
- 請依照產品上的電源功率貼紙說明使用正確的電源變壓器,如果使用錯誤規格的電源變壓器有可能
會造成內部零件的損毀。
- 請勿將產品放置於不平坦或不穩定的表面,若產品的機殼毀損,請聯絡維修服務人員。
- 請勿在產品上放置其他物品,請勿將任何物品塞入產品內,以避免引起元件短路或電路損毀。
- 請保持機器在乾燥的環境下使用,雨水、溼氣、液體等含有礦物質將會腐蝕電子線路,請勿在雷電
天氣下使用數據機。
- 請勿堵塞產品的通風孔,以避免因散熱不良而導致系統過熱。
- 請勿使用破損的電源線、附件或其他周邊產品。
- 如果電源已毀損,請不要嘗試自行修復,請將其交給專業技術服務人員或經銷商來處理。
- 為了防止電擊風險,在搬動主機之前,請先將電源線插頭暫時從電源插座上拔除。
U17952-2_RT-AC68U_V4_QSG_NA.indb 68U17952-2_RT-AC68U_V4_QSG_NA.indb 68 2021/5/8 17:38:172021/5/8 17:38:17
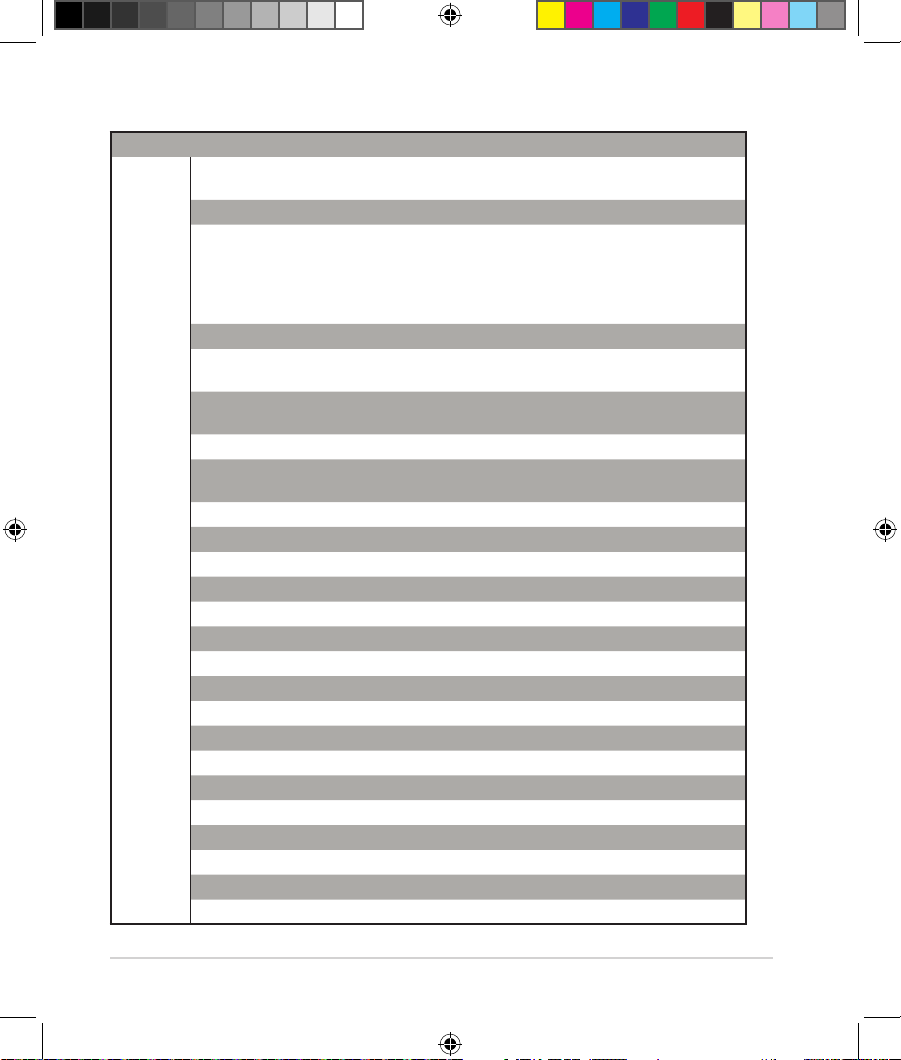
69
Networks Global Hotline Information
Networks Global Hotline Information
Aera Country/ Region Hotline Numbers Service Hours
Europe
Cyprus 800-92491
09:00-13:00 ;
14:00-18:00 Mon-Fri
France 0033-170949400 09:00-18:00 Mon-Fri
Germany
0049-1805010920
09:00-18:00 Mon-Fri
10:00-17:00 Mon-Fri
0049-1805010923
(component support)
0049-2102959911 (Fax)
Hungary 0036-15054561 09:00-17:30 Mon-Fri
Italy 06 97626662
09:00-13:00;
14:00-18:00 Mon-Fri
Greece 00800-44142044
09:00-13:00 ;
14:00-18:00 Mon-Fri
Austria 0043-820240513 09:00-18:00 Mon-Fri
Netherlands/
Luxembourg
0031-591570290 09:00-17:00 Mon-Fri
Belgium 0032-78150231 09:00-17:00 Mon-Fri
Norway 0047-2316-2682 09:00-18:00 Mon-Fri
Sweden 0046-858769407 09:00-18:00 Mon-Fri
Finland 00358-969379690 10:00-19:00 Mon-Fri
Denmark 0045-38322943 09:00-18:00 Mon-Fri
Poland 0048-225718040 08:30-17:30 Mon-Fri
Spain 0034-902889688 09:00-18:00 Mon-Fri
Portugal 00351-707500310 09:00-18:00 Mon-Fri
Slovak Republic 00421-232162621 08:00-17:00 Mon-Fri
Czech Republic 00420-596766888 08:00-17:00 Mon-Fri
Switzerland-German 0041-848111010 09:00-18:00 Mon-Fri
Switzerland-French 0041-848111014 09:00-18:00 Mon-Fri
Switzerland-Italian 0041-848111012 09:00-18:00 Mon-Fri
United Kingdom 0044-1442265548 09:00-17:00 Mon-Fri
Ireland 0035-31890719918 09:00-17:00 Mon-Fri
Russia and CIS 008-800-100-ASUS 09:00-18:00 Mon-Fri
Ukraine 0038-0445457727 09:00-18:00 Mon-Fri
U17952-2_RT-AC68U_V4_QSG_NA.indb 69U17952-2_RT-AC68U_V4_QSG_NA.indb 69 2021/5/8 17:38:172021/5/8 17:38:17
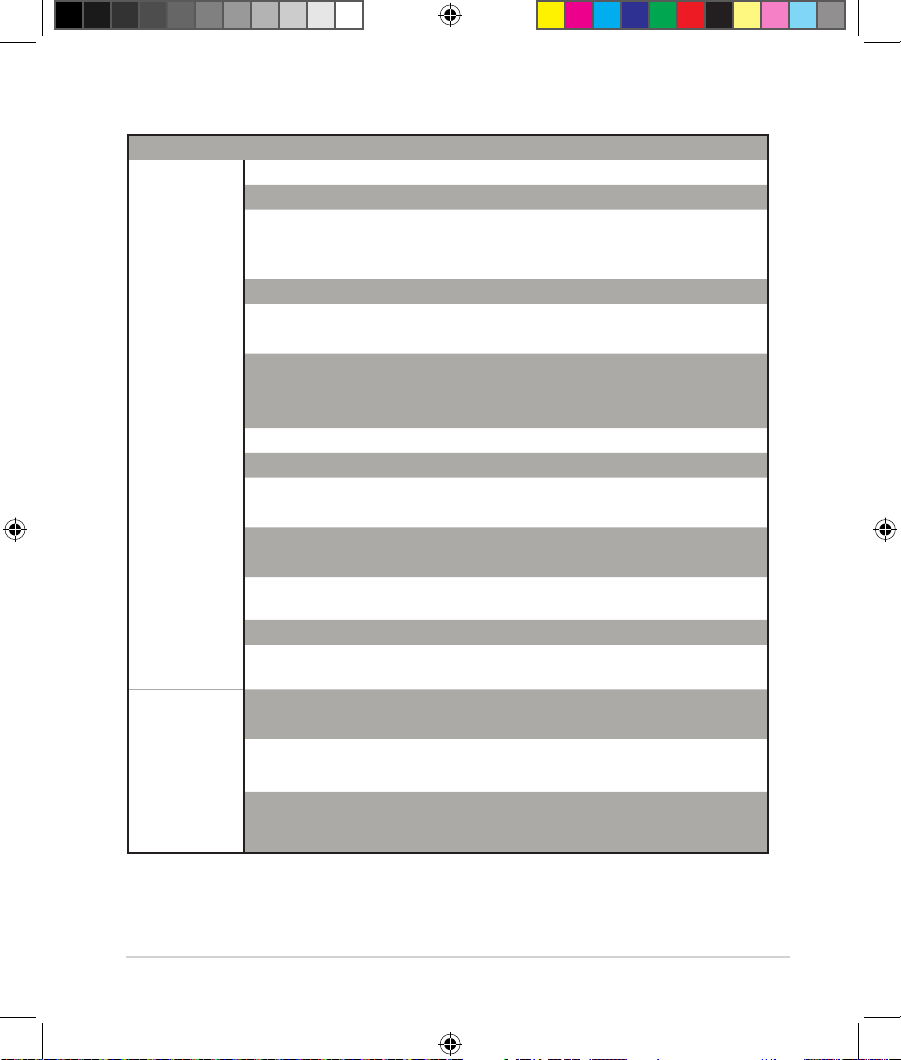
70
Aera Country/ Region Hotline Numbers Service Hours
Asia-Pacic
Australia 1300-278788 09:00-18:00 Mon-Fri
New Zealand 0800-278788 09:00-18:00 Mon-Fri
Japan
0800-1232787 09:00-19:00 Mon-Sun
0081-570783886
(Non-Toll Free)
09:00-19:00 Mon-Sun
Korea 0082-215666868 09:30-17:00 Mon-Fri
Thailand 0066-24011717 09:00-18:00 Mon-Fri
1800-8525201
Singapore
0065-64157917 11:00-19:00 Mon-Fri
0065-67203835 11:00-19:00 Mon-Fri
(Repair Status Only) 11:00-13:00 Sat
Malaysia 1300-88-3495 9:00-18:00 Mon-Fri
Philippine 1800-18550163 09:00-18:00 Mon-Fri
India
1800-2090365
09:00-18:00 Mon-Sat
India(WL/NW) 09:00-21:00 Mon-Sun
Indonesia 0062-2129495000 09:30-17:00 Mon-Fri
500128 (Local Only) 9:30 – 12:00 Sat
Vietnam 1900-555581
08:00-12:00
13:30-17:30 Mon-Sat
Hong Kong 00852-35824770 10:00-19:00 Mon-Sat
Taiwan
0800-093-456;
02-81439000
9:00-12:00 Mon-Fri;
13:30-18:00 Mon-Fri
Americas
USA
1-812-282-2787
8:30-12:00 EST Mon-Fri
Canada 9:00-18:00 EST Sat-Sun
Mexico 001-8008367847 08:00-20:00 CST Mon-Fri
08:00-15:00 CST Sat
Brazil
4003 0988 (Capital)
0800 880 0988
(demais localidades)
9:00am-18:00 Mon-Fri
Networks Global Hotline Information
Networks Global Hotline Information
U17952-2_RT-AC68U_V4_QSG_NA.indb 70U17952-2_RT-AC68U_V4_QSG_NA.indb 70 2021/5/8 17:38:172021/5/8 17:38:17
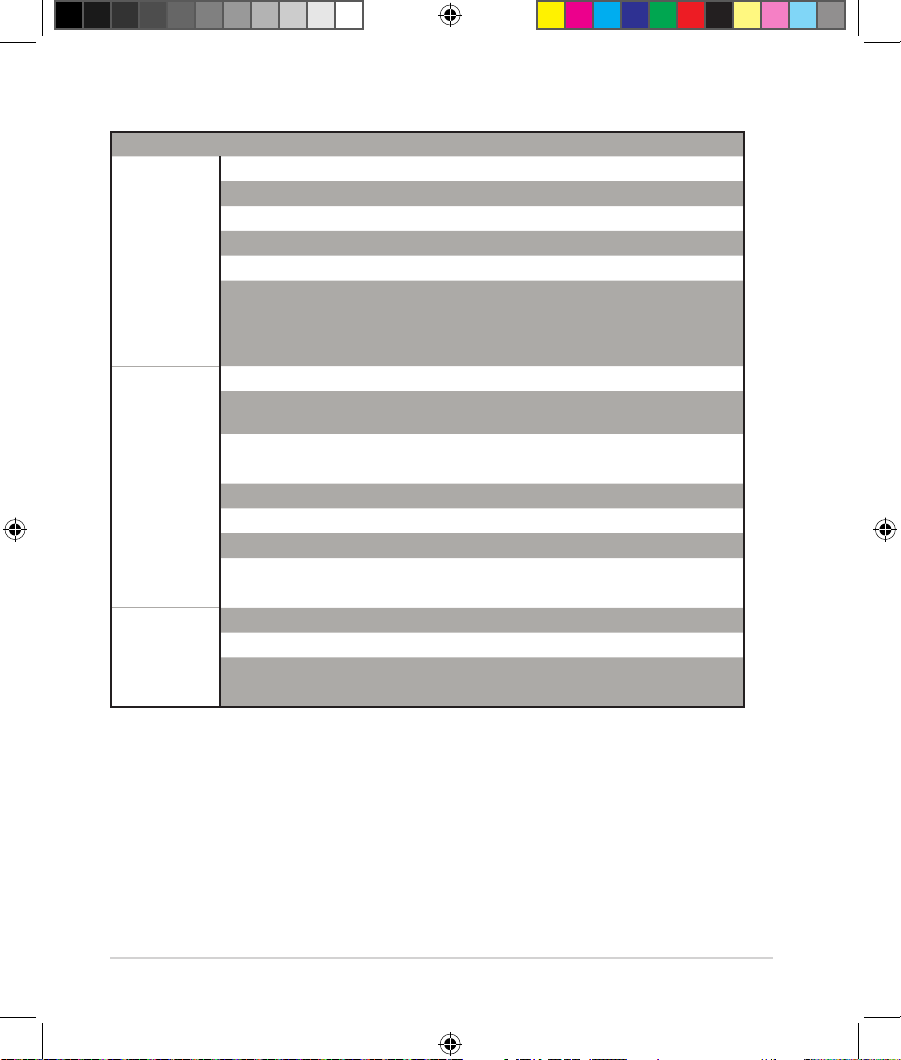
71
Aera Country/ Region Hotline Numbers Service Hours
Middle
East +
Africa
Egypt 800-2787349 09:00-18:00 Sun-Thu
Saudi Arabia 800-1212787 09:00-18:00 Sat-Wed
UAE 00971-42958941 09:00-18:00 Sun-Thu
Turkey 0090-2165243000 09:00-18:00 Mon-Fri
South Africa 0861-278772 08:00-17:00 Mon-Fri
Israel
*6557/00972-
39142800
08:00-17:00 Sun-Thu
*9770/00972-
35598555
08:30-17:30 Sun-Thu
Balkan
Countries
Romania 0040-213301786 09:00-18:30 Mon-Fri
Bosnia
Herzegovina
00387-33773163 09:00-17:00 Mon-Fri
Bulgaria 00359-70014411 09:30-18:30 Mon-Fri
00359-29889170 09:30-18:00 Mon-Fri
Croatia 00385-16401111 09:00-17:00 Mon-Fri
Montenegro 00382-20608251 09:00-17:00 Mon-Fri
Serbia 00381-112070677 09:00-17:00 Mon-Fri
Slovenia 00368-59045400
08:00-16:00 Mon-Fri
00368-59045401
Baltic
Countries
Estonia 00372-6671796 09:00-18:00 Mon-Fri
Latvia 00371-67408838 09:00-18:00 Mon-Fri
Lithuania-Kaunas 00370-37329000 09:00-18:00 Mon-Fri
Lithuania-Vilnius 00370-522101160 09:00-18:00 Mon-Fri
Networks Global Hotline Information
Networks Global Hotline Information
U17952-2_RT-AC68U_V4_QSG_NA.indb 71U17952-2_RT-AC68U_V4_QSG_NA.indb 71 2021/5/8 17:38:172021/5/8 17:38:17
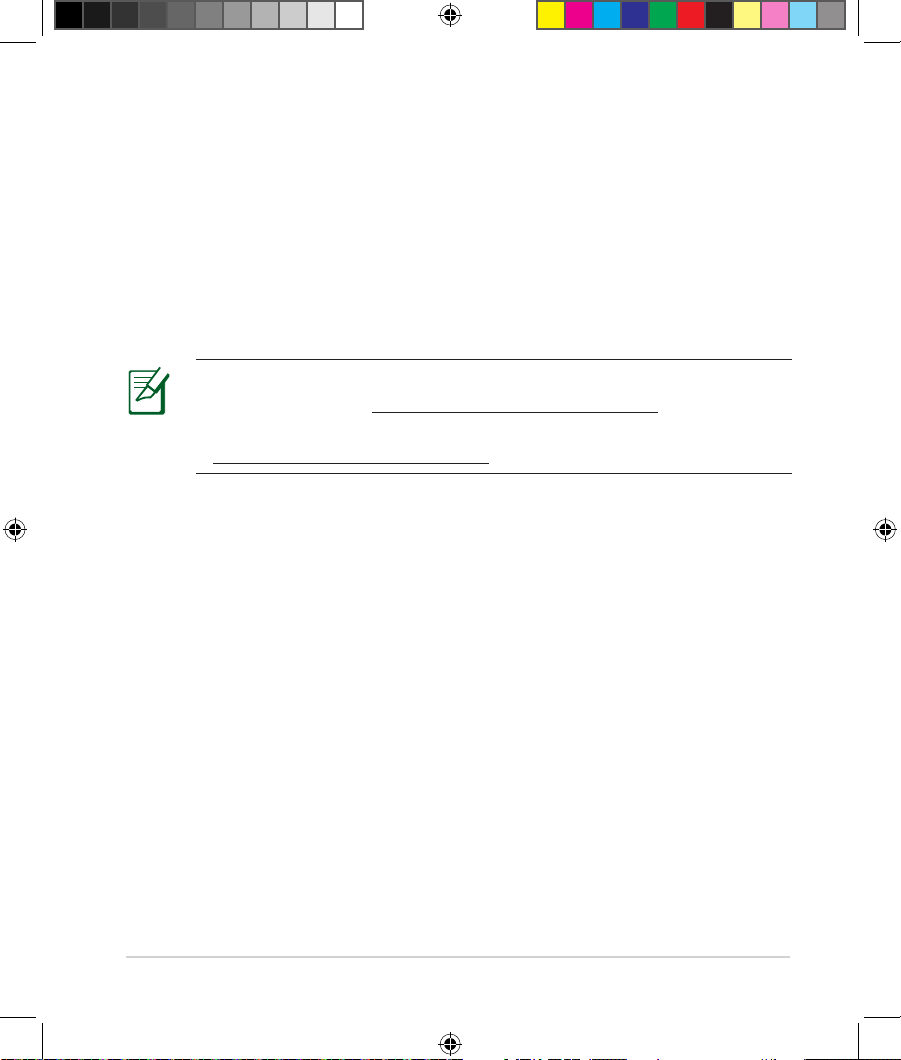
72
NOTE:
• UK support e-mail: [email protected]
• For more information, visit the ASUS support site at:
https://www.asus.com/support
華碩的聯絡信息
華碩的聯絡信息
華碩電腦公司 ASUSTeK COMPUTER INC.(亞太地區)
市場信息
地址:台灣臺北市北投區立德路15號
1樓
電話:+886-2-2894-3447
傳真:+886-2-2893-1687
電子郵件:[email protected]
互聯網:https://www.asus.com.tw
技術支持
電話:+86-21-38429911
傳真:+86-21-58668722,ext.9101#
在 線 支 持:https://www.asus.com/support
U17952-2_RT-AC68U_V4_QSG_NA.indb 72U17952-2_RT-AC68U_V4_QSG_NA.indb 72 2021/5/8 17:38:172021/5/8 17:38:17

73
VIP Member Warranty Notice
VIP會員保固登錄通知
Global Site: http://www.asus.com VIP Registration: http://vip.asus.com
Dearest Customer,
Thank you for purchasing an ASUS product!
Register online* immediately and:
(1) Enjoy total warranty and protection for your ASUS product
(2) Receive exclusive VIP Member privileges like:
• The latest ASUS product news, promotional activities, benets and discounts
exclusive to VIP Members only
• Software / rmware upgrade reminders
* For more inquiries and details regarding guarantee and warranty matters, please visit
the ocial website at http://www.asus.com.
親愛的客戶您好,感謝您購買華碩產品!
現在就上網登錄立即晉升為華碩VIP會員
(1) 享有完整保固權益之保障
(2) 尊爵VIP會員服務:
• 最新的華碩產品訊息、第一手的促銷優惠、VIP會員獨享的專屬折扣
• 軟體/韌體更新即時提醒
• 不同於一般保固均自出場日起為起始日計算,上網註冊成功後,您的保固日期
將以「購買當日」為起始日期(請保留蓋有經銷商店章受或單據或發票影本,於機
台維修時出示,始享有此獨享服務)
* 其他相關的保固說明細節,請上華碩官方網站查詢:http://www.asus.com。
For Australian Warranty Statement Only
* ASUS products come with guarantees that connect be excluded under the Australian
Consumer Law. You are entitled to a replacement or refund for a major failure and
compensation for any other reasonably foreseeable loss or damage. You are also entitled
to have the products repaired or replaced if the goods fail to be of acceptable quality
and the failure does not amount to a major failure. You can nd more information about
the Australian Consumer Law on the ACCC website: www.accc.gov.au (see under “For
Consumers” tab). ASUSTek Computer Inc. oers the Warranty in conjunction with any
guarantees imposed by the Australian Consumer Law.
U17952-2_RT-AC68U_V4_QSG_NA.indb 73U17952-2_RT-AC68U_V4_QSG_NA.indb 73 2021/5/8 17:38:172021/5/8 17:38:17

74
VIP Member Copy VIP 會員收執聯
* To immediately enjoy the VIP Member’s enhanced service, we suggest that you register directly
via the internet at http://vip.asus.com.
* 為即時享有 VIP 會員級服務,建議您直接上網登錄註冊
Product Information 產品資料
Product Model 產品型號: _____________________________
Product Number (P/N) 產品序號: _______________________
Date of Purchase 購買日期: ________dd_______mm______yy
Dealer name/shop seal 經銷商名稱/店章 Paste product barcode 黏貼產品條碼處
Retail sales representative name 門市業務姓名: _______________
* To ensure the validity of the warranty, please ll in the shop name, name of servicing personnel, date of
purchase and other information accurately.
* 為保障您的權益,請確實填寫店名、承辦業務人員、購買日期等資料。
Dealer Copy 經銷商收執聯
* Dealer service partners, ll in the product information as accurately as possible
* 經銷商業務夥伴,請務必填寫產品資料,並確實保管收執,以維護客戶與保障您的個人權益。
Product Information 產品資料
Product Model 產品型號: _____________________________
Product Number (P/N) 產品序號: _______________________
Date of Purchase 購買日期: ________dd_______mm______yy
Dealer name/shop seal 經銷商名稱/店章 Paste product barcode 黏貼產品條碼處
Retail sales representative name 門市業務姓名: _______________
* To ensure the validity of the warranty, please ll in the shop name, name of servicing personnel, date of
purchase and other information accurately.
* 為保障您的權益,請確實填寫店名、承辦業務人員、購買日期等資料
* Please mail back this form to your local ASUS sales representative for ASUS Advantage mileage program point
accumulation (dependent on local sales policies / web availability).
* 本收執聯與經銷商活動積點辦法實際執行,由各區華碩人員公告之
U17952-2_RT-AC68U_V4_QSG_NA.indb 74U17952-2_RT-AC68U_V4_QSG_NA.indb 74 2021/5/8 17:38:172021/5/8 17:38:17