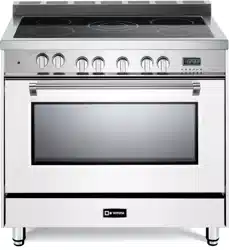

THIS RANGE IS FOR RESIDENTIAL USE ONLY
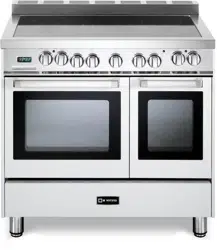
ELECTRIC RANGE
for residential use only
Models: VEFSEE 365 ..
USERS OPERATING INSTRUCTIONS
IMPORTANT - PLEASE READ AND FOLLOW
• Beforebeginning,pleasereadtheseinstructionscompletelyandcarefully.
• Donotremovepermanentlyafxedlabels,warnings,orplatesfromtheproduct.Thismay
voidthewarranty.
• Pleaseobservealllocalandnationalcodesandordinances.
• Pleaseensurethatthisproductisproperlygrounded.
• The installer should leave these instructions with the consumer who should retain
for local inspector’s use and for future reference.
ElectricalinstallationmustbeinaccordancewiththeNationalElectricalCode,ANSI/NFPA70
-latesteditionand/orlocalcodes.
IN CANADA: Electrical installation must be in accordance with the current CSA C22.1
CanadianElectricalCodesPart1and/orlocalcodes.
Some models are supplied with a protective lm on steel and aluminium
parts.Thislmmustberemovedbeforeinstalling/usingtheappliance.
R
2
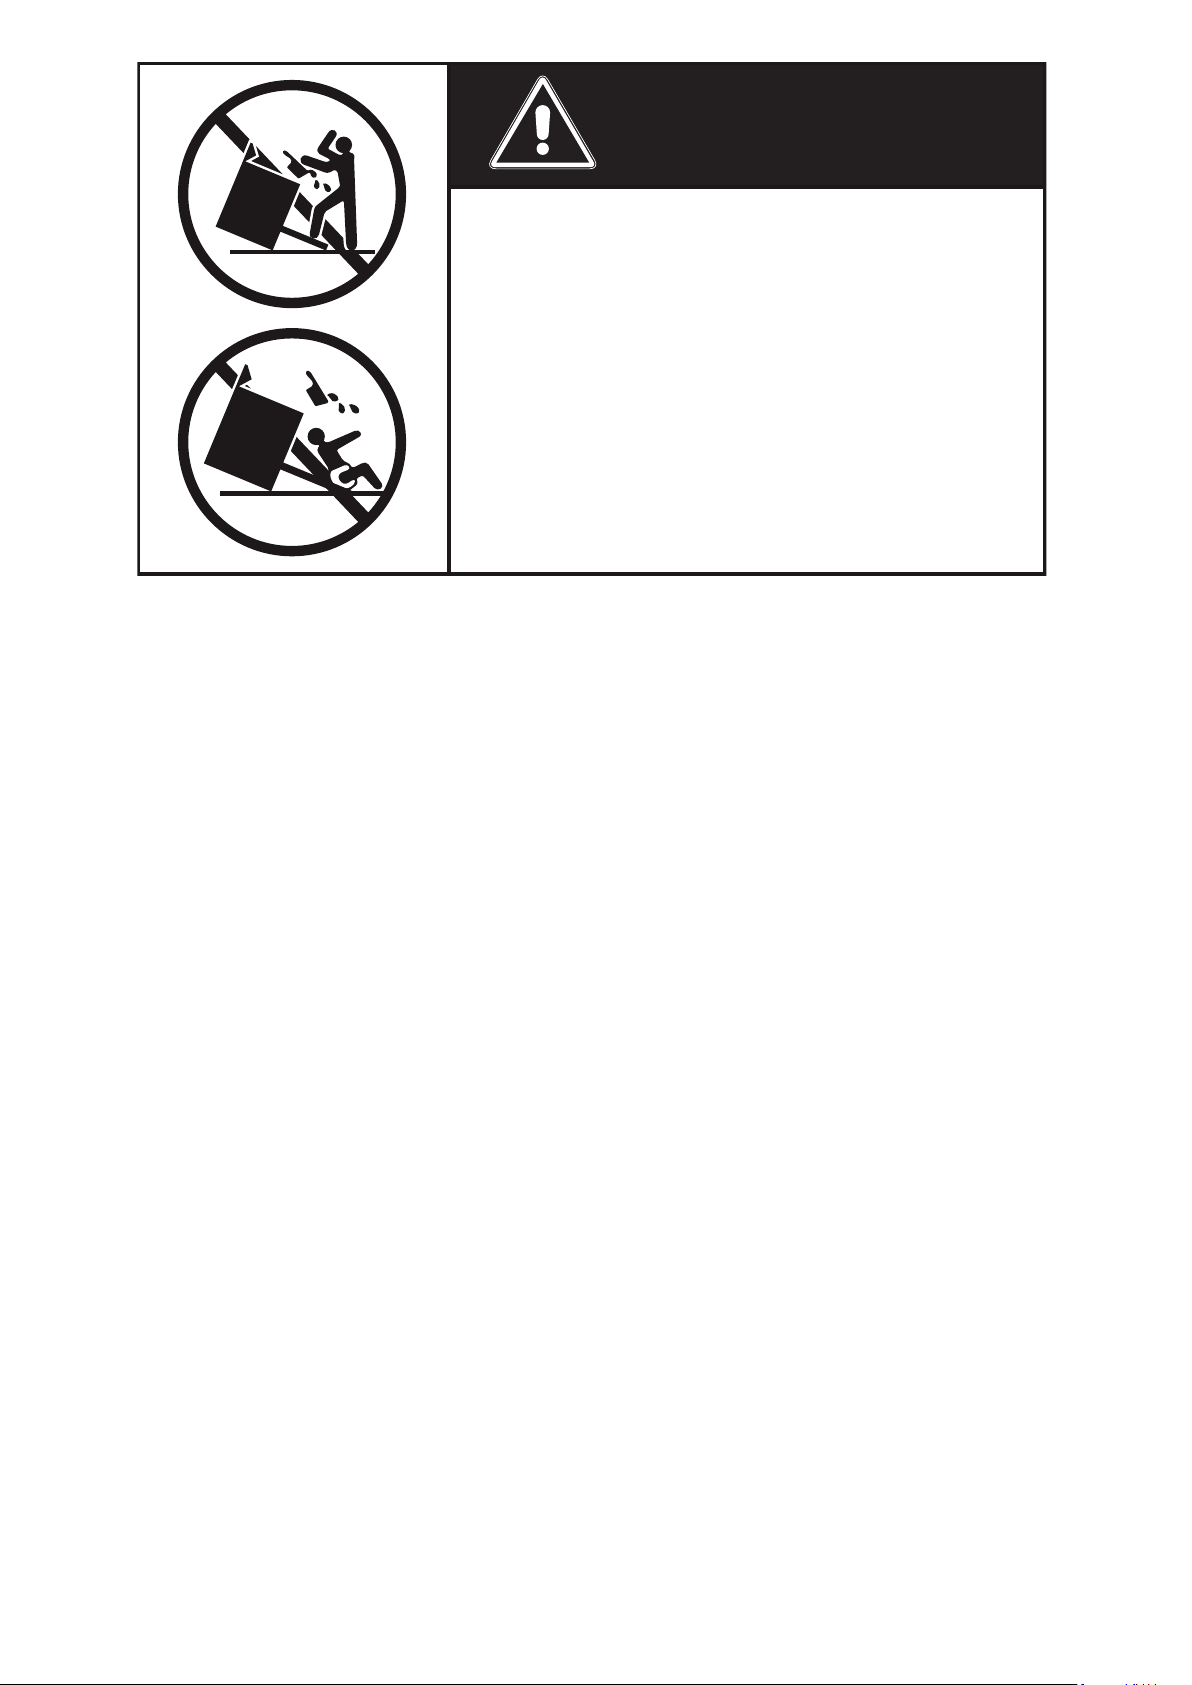
WARNING !
Toreducetheriskoftippingtheappliance,
theappliancemustbesecuredbyproperly
installed anti-tip device packed with the
appliance.
• ALL RANGES CAN TIP
• INJURY TO PERSONS COULD RESULT
• INSTALL ANTI-TIP DEVICE PACKED
WITH RANGE
• SEE INSTALLATION INSTRUCTIONS

3
This appliance is designed and manufactured solely for the cooking of domestic (household)
foodandinnotsuitableforanynonedomesticapplicationandthereforeshouldnotbeusedina
commercialenvironmement.
Theappliancewarrantywillbevoidiftheapplianceisusedwithinanonedomesticenvironmement
i.e.asemicommercial,commercialorcommunalenvironment.
DearCustomer,
Thank you for having purchased and given your preference to our
product.
The safety precautions and recommendations reported below are
for your own safety and that of others. They will also provide a means
by which to make full use of the features offered by your appliance.
Please preserve this booklet carefully. It may be useful in future,
either to yourself or to others in the event that doubts should arise
relating to its operation.
This appliance must be used only for the task it has explicitly been
designed for, that is for cooking foodstuffs. Any other form of usage
is to be considered as inappropriate and therefore dangerous.
The manufacturer declines all responsibility in the event of dama-
ge caused by improper, incorrect or illogical use of the appliance.
4
USER INSTRUCTIONS
GENERAL INFORMATION
1. WARNING!!
Thisapplianceshallnotbeusedforspaceheating.This
informationisbasedonsafetyconsiderations.
2. AlIopeningsinthewallbehindtheapplianceandintheoor
undertheapplianceshallbesealed.
3. Keep appliance area clear and free from combustible
materials,gasoline,andotherammablevapors.
4. Donotobstructtheowofventilationair.
5. Disconnect the electrical supply to the appliance before
servicing.
6. Whenremovingapplianceforcleaningand/orservice;
A. DisconnectACpowersupply.
B. Carefullyremovetherangebypullingoutward.
CAUTION:Rangeisheavy;usecareinhandling.
7. Electrical Requirement
Electrical installation should comply with national and local
codes.
8. Themisuseofovendoor(e.g.stepping,sitting,orleaningon
them)canresultinpotentialhazardsand/orinjuries.
9. Wheninstallingorremovingtherangeforservice,arollinglift
jackshouldbeused.Donotpushagainstanyoftheedgesof
therangeinanattempttoslideitintooroutoftheinstallation.
Pushingorpullingarange(ratherthanusingaliftjack)also
increases the possibility of bending the leg spindles or the
internalcouplingconnectors.
WARNING!!
ELECTRICAL GROUNDING INSTRUCTIONS
Therangemustbeelectricallygroundedinaccordancewith
localcodesor,intheabsenceoflocalcodes,withtheNational
Electrical Code,ANSI/NFPA No.70-latestedition, in Canada
Canadian ElectricalCode.Installation should be madebya
Iicensed electrician.
FOR PERSONAL SAFETY, THIS APPLIANCE MUST BE
PROPERLY GROUNDED.
If an external electrical source is utilized, the installation must
be electrically grounded in accordance with local codes or, in
the absence of local codes, with the national Electrical Code,
ANSI/NFPA70.
REPLACEMENT PARTS
Only authorized replacement parts may be used in performing
serviceontherange.Replacementpartsareavailablefromfactory
authorizedpartsdistributors.Contactthenearestpartsdistributor
inyourarea.

5
IMPORTANT PRECAUTIONS AND RECOMMENDATIONS
Afterhavingunpackedtheappliance,checktoensurethatitisnotdamaged.
Incaseofdoubt,donotuseitandconsultyoursupplieroraprofessionallyqualiedtechnician.
Packingelements(i.e.plasticbags,polystyrenefoam,nails,packingstraps,etc.)shouldnotbe
leftaroundwithineasyreachofchildren,asthesemaycauseseriousinjuries.Thepackaging
materialisrecyclableandismarkedwiththerecyclingsymbol
.
• Donotattempttomodifythetechnicalcharacteristicsoftheapplianceasthismaybecome
dangeroustouse.
• Do not carry out cleaning or maintenance operations on the appliance without having
previouslydisconnecteditfromtheelectricpowersupply.
• Afteruse,ensurethattheknobsarein
OFF
position.
• Donotallowchildrenorotherincapablepeopletousetheappliancewithoutsupervision.
• Duringandafteruseoftherange,certainpartswillbecomeveryhot.Donottouchhotparts.
• Keepchildrenawayfromtherangewhenitisinuse.
• Somemodels aresuppliedwithaprotective lmonsteelandaluminium parts.This lm
mustberemovedbeforeinstalling/usingtheappliance.
• Fire risk!Donotstoreammablematerialintheovenandinthewarmingdrawer.
• Makesurethatelectricalcablesconnectingotherappliancesintheproximityoftherange
cannotcomeintocontactwiththehoborbecomeentrappedintheovendoor.
• Donotlinetheovenwallswithaluminiumfoil.Donotplaceshelves,broilerpan,pansor
othercookingutensilsonthebaseoftheovenchamber.
• Themanufacturerdeclinesallliabilityforinjurytopersonsordamagetopropertycausedby
incorrectorimproperuseoftheappliance.
• Toavoidanypossiblehazard,theappliancemustbeinstalledbyqualiedpersonnelonly.
Any repairsbyunqualied persons may result inelectricshockor short circuit. In order
toavoidpossibleinjuriestoyourbodyortotheappliance,donotattemptanyrepairsby
yourself.Suchworkshouldbecarriedoutbyqualiedservicepersonnelonly.
• Danger of burns! The oven and cooking accessories may become very hot during
operation.Makesurechildrenarekeptoutofreachandwarnthemaccordingly.Toavoid
burnsusekitchenclothesandgloveswhenhandlinghotpartsorutensils.
• Standawayfromtherangewhenopeningovendoor.Hotairorsteamwhichescapescan
causeburnstohands,face,and/oreyes.
• Nevercleantherange,ovenandthewarmingdrawerwithahigh-pressuresteamcleaning
device,asitmayprovokeashortcircuit.
• Thisapplianceisintendedforuseinyourhousehold.Neverusetheapplianceforanyother
purpose!
• If you should decide not to use this appliance any longer (or decide to substitute an
oldermodel),beforedisposingofit,itisrecommendedthatitbemadeinoperativeinan
appropriate manner in accordance to health and environmental protection regulations,
ensuringinparticularthatallpotentiallyhazardouspartsbemadeharmless,especiallyin
relationtochildrenwhocouldplaywitholdappliances.Removethedoorandthewarming
drawerbeforedisposaltoprevententrapment.
IMPORTANT PRECAUTIONS AND RECOMMENDATIONS FOR USE
OF ELECTRICAL APPLIANCES
Useofanyelectricalapplianceimpliesthenecessitytofollowaseriesoffundamentalrules.
Inparticular:
• Nevertouchtheappliancewithwethandsorfeet.
• Donotoperatetheappliancebarefooted.
• Donotallowchildrenordisabledpeopletousetheappliancewithoutyoursupervision.
Themanufacturercannotbeheldresponsibleforanydamagescausedbyimproper,incorrector
unreasonableuseoftheappliance.
6
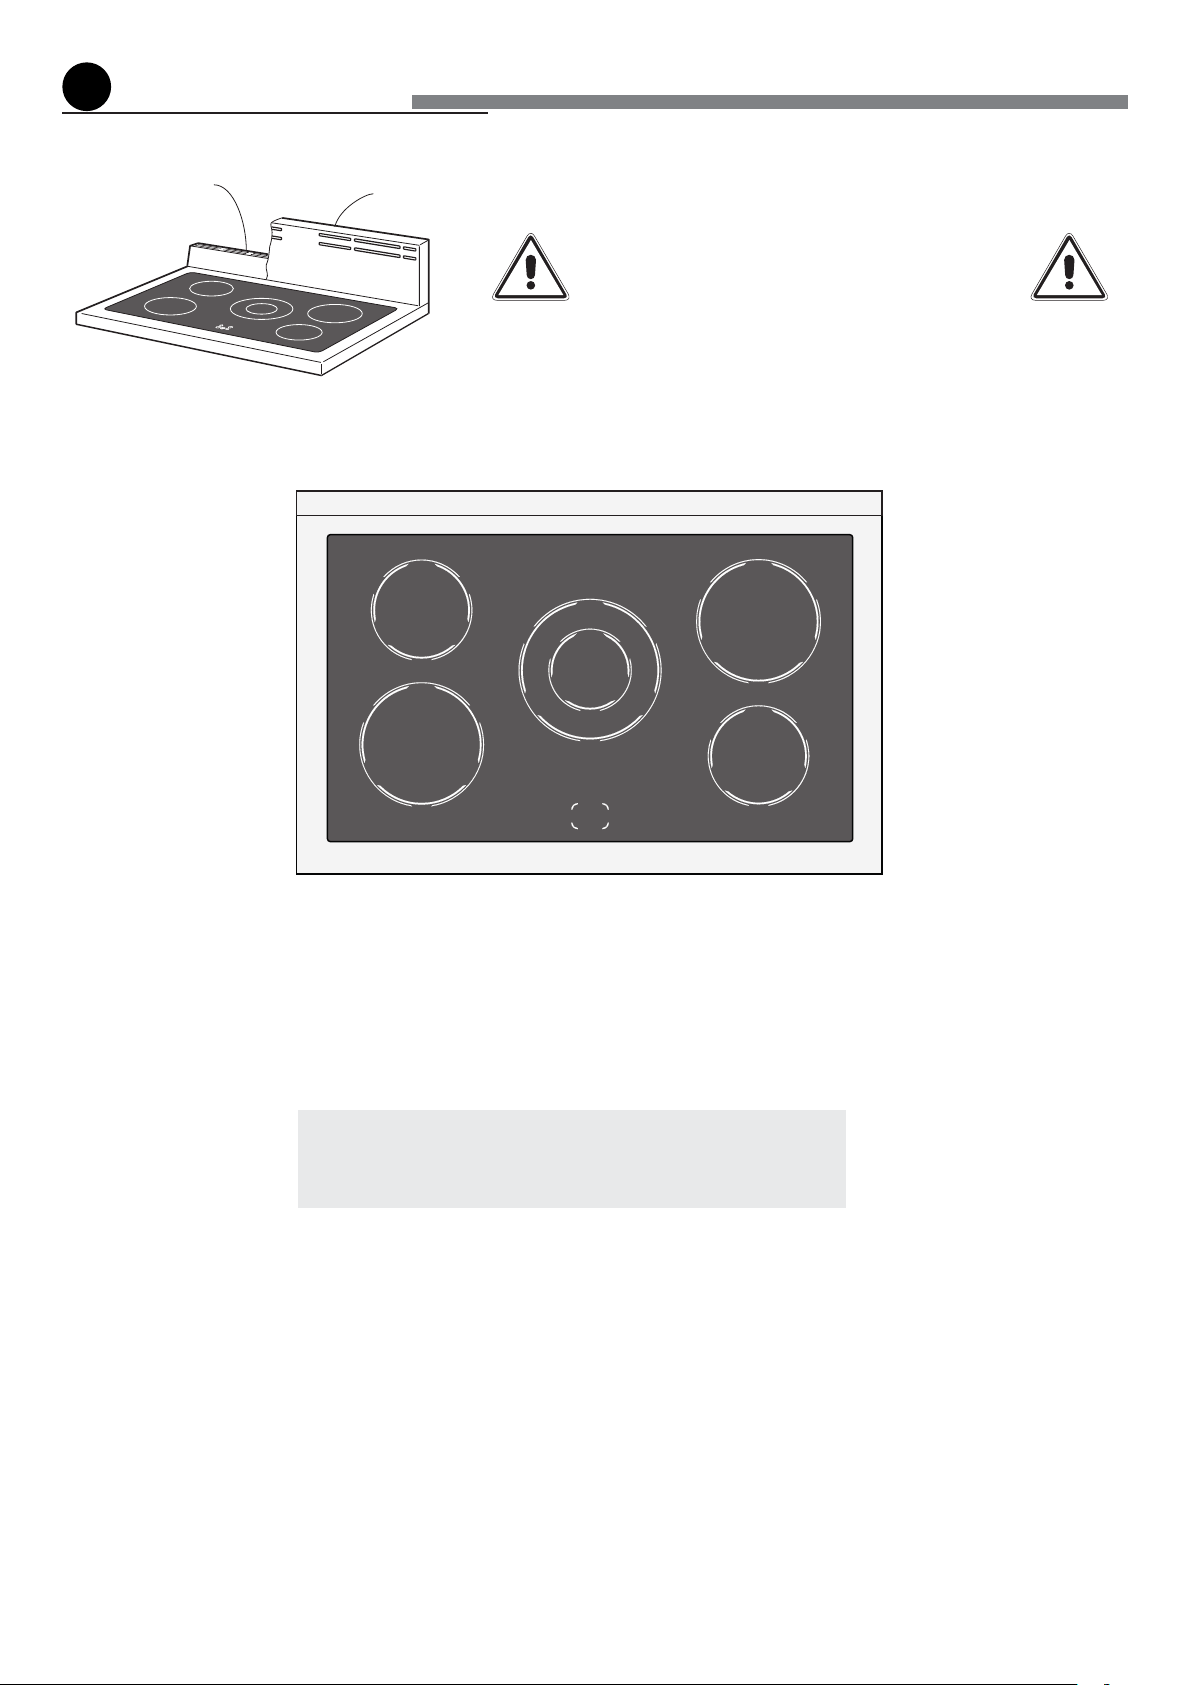
VITROCERAMICCOOKINGHOB
1.CookingzoneØ145mm(5”23/32)-1200W
2.CookingzoneØ180mm(7”3/32)-1700W
3.DoublecookingzoneØ205/110(8”1/16/4”21/64)-2100/700W
4.Cookingzonesresidualheatindicators
WARNING - VERY IMPORTANT NOTICE
Never obstruct the slots on the backguard / island trim.
Backguard fitted
Island trim fitted
features
1
Fig. 1.1
Attention: Disconnect the appliance from the mains if the
ceramichobiscrackedandcalltheAfterSalesService.
2
1 2
1
3
4

7
CONTROLS DESCRIPTION
1. Oventhermostatindicatorlight
2. Multifunctionovenswitchknob
3. Multifunctionoventhermostatknob
4. Frontleftcookingzone(2)controlknob
5. Rearleftcookingzone(1)controlknob
6. Centraldoublecookingzone(3)controlknob
7. Rearrightcookingzone(2)controlknob
8. Frontrightcookingzone(1)controlknob
9. Cookingzonespowerindicatorlight
10. Electronicprogrammer
Please note: This appliance incorporates a safety cooling fan which you will
hearoperatingwhenevertheovenorgrillareinuse.
Thisfanmaycontinuetorunforseveralminutesaftertheappliancehasbeen
switched off.
This fan is to reduce the external temperature of the appliance and cool the
internal components.
Fig. 1.2
1
87654321 109
A
U
T
O
8
howtousethevitroceramichob
2
VITROCERAMICHOB
Theceramicsurfaceofthehoballowsafasttransmissionofheatintheverticaldirection,
fromtheheatingelementsunderneaththeceramicglasstothepanssetonit.
Theheatdoesnotspreadinahorizontaldirection,sothattheglassstays“cool”atonly
afewcentimetersfromthecookingplate.
The5cookingzonesareshownbypainteddisksontheceramicsurface.
IMPORTANT NOTE:
The heating elements incorporate a thermolimiter that switches the element ON/OFF
duringallsettingstoprotecttheceramicglassfromoverheating.
Theuseofincorrectpansand/orwrongpanpositioningwillcausethetemperaturelimiter
tooperatemorefrequently,resultinginareductionofcookingperformance.
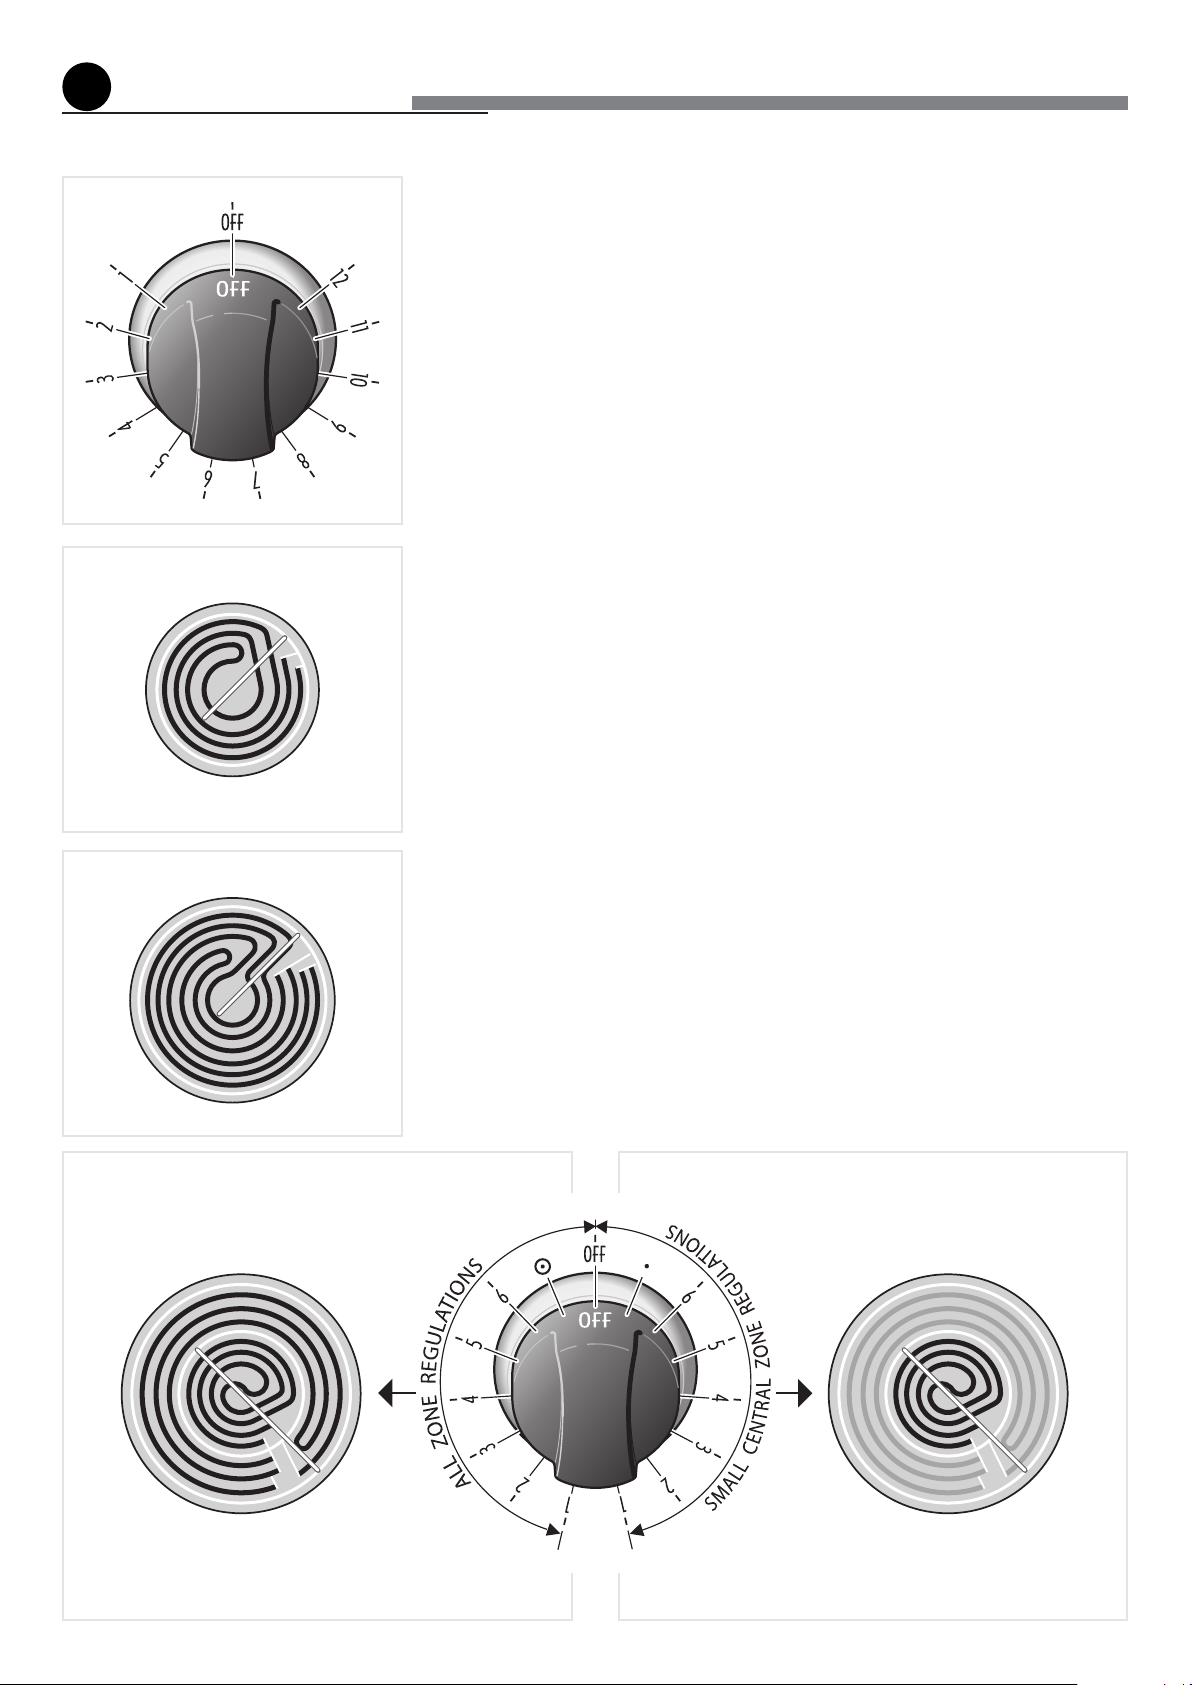
SINGLE COOKING ZONES
Incorporating the heating element (g. 2.2a or 2.2b) you can control and light up by
selectingfromthe12positionsonthecontrolknob(g.2.1).
Theheatintensitycanberegulatedcontinuouslyfrom“OFF”to“12”(max).
VERY IMPORTANT: TO SWITCH ON, ALWAYS LIGHTLY PRESS THE CONTROL
KNOBTHENTURNIT.
Checkthatthehobiscleanandthenswitchonbypressandturningthecontrolknob.
DOUBLECOOKINGZONE
Incorporating2heatingelementsyoucancontrolandlightuptogetherorseparatelyby
turningleftorrightthe6positionscontrolknob(g.2.3).
Theheatintensitycanberegulatedcontinuouslyfrom“1”to“6”(max).
VERY IMPORTANT: TO SWITCH ON, ALWAYS LIGHTLY PRESS THE CONTROL
KNOBTHENTURNIT.
SWITCHONTHESMALLCENTRALZONE(g.2.5)
Pressandturninanticlockwisedirectionthecontrolknobfrom“1”to“6”(max).
SWITCHONTHEALLZONE(g.2.4)
Pressandturninclockwisedirectionthecontrolknobfrom“1”to“6”(max).
Fig. 2.1
Fig. 2.2a
Fig. 2.3
Fig. 2.4 Fig. 2.5
CENTRALZONE
2heatingelementON
FRONTRIGHTANDREARLEFTZONE
CENTRALZONE
CentralheatingelementON
Fig. 2.2b
FRONTLEFTANDREARRIGHTZONE
9
HINTS FOR SAFE USE OF THE VITROCERAMICHOB
• Beforeswitchingon,checkwhichknobcontrolstherequiredcookingzone.Youare
advisedtoplacethesaucepanonthehobbeforeswitchingonandtotakeitoffafter
switchingoff.
• Toswitchon,alwayslightlypressthecontrolknobthenturnit.
• Usesaucepanswithanevenatbottom(becarefulofcastironsaucepans).Uneven
bottomscanscratchthepyroceramsurface.Checkthatthebottomiscleananddry.
• Thediameterofthepanshouldmatchthatofthecookingzone(orbeslightlybigger)
tomakethemostoftheenergy.
• Potswithaluminiumbottomsmayleavesilverstreaksorspotsonthehob.
• Donotleavewetordamplidsonthehob.
• Donotusethetopifthesurfaceisbrokenordamaged.
• Ifyounoteacrackinthecooktop,switchtheapplianceoffimmediatelyand
call the After-Sales Service.
• Donotbendoverthecookingzoneswhentheyareon.
• Donotleavealuminiumfoil,greaseproofpaperetc.orplasticonthehobwhenitis
hot.
• Rememberthatthecookingzonesstayhotforquitealongtime(approx.30min.)
aftertheyhavebeenswitchedoff.
• Scrupulouslyfollowthecleaninginstructions.
• Donotdropheavyorsharpobjectsontheglassceramiccooktop.
• Nevercookthefooddirectlyontheglassceramiccooktop,butinspecialpansor
containers.
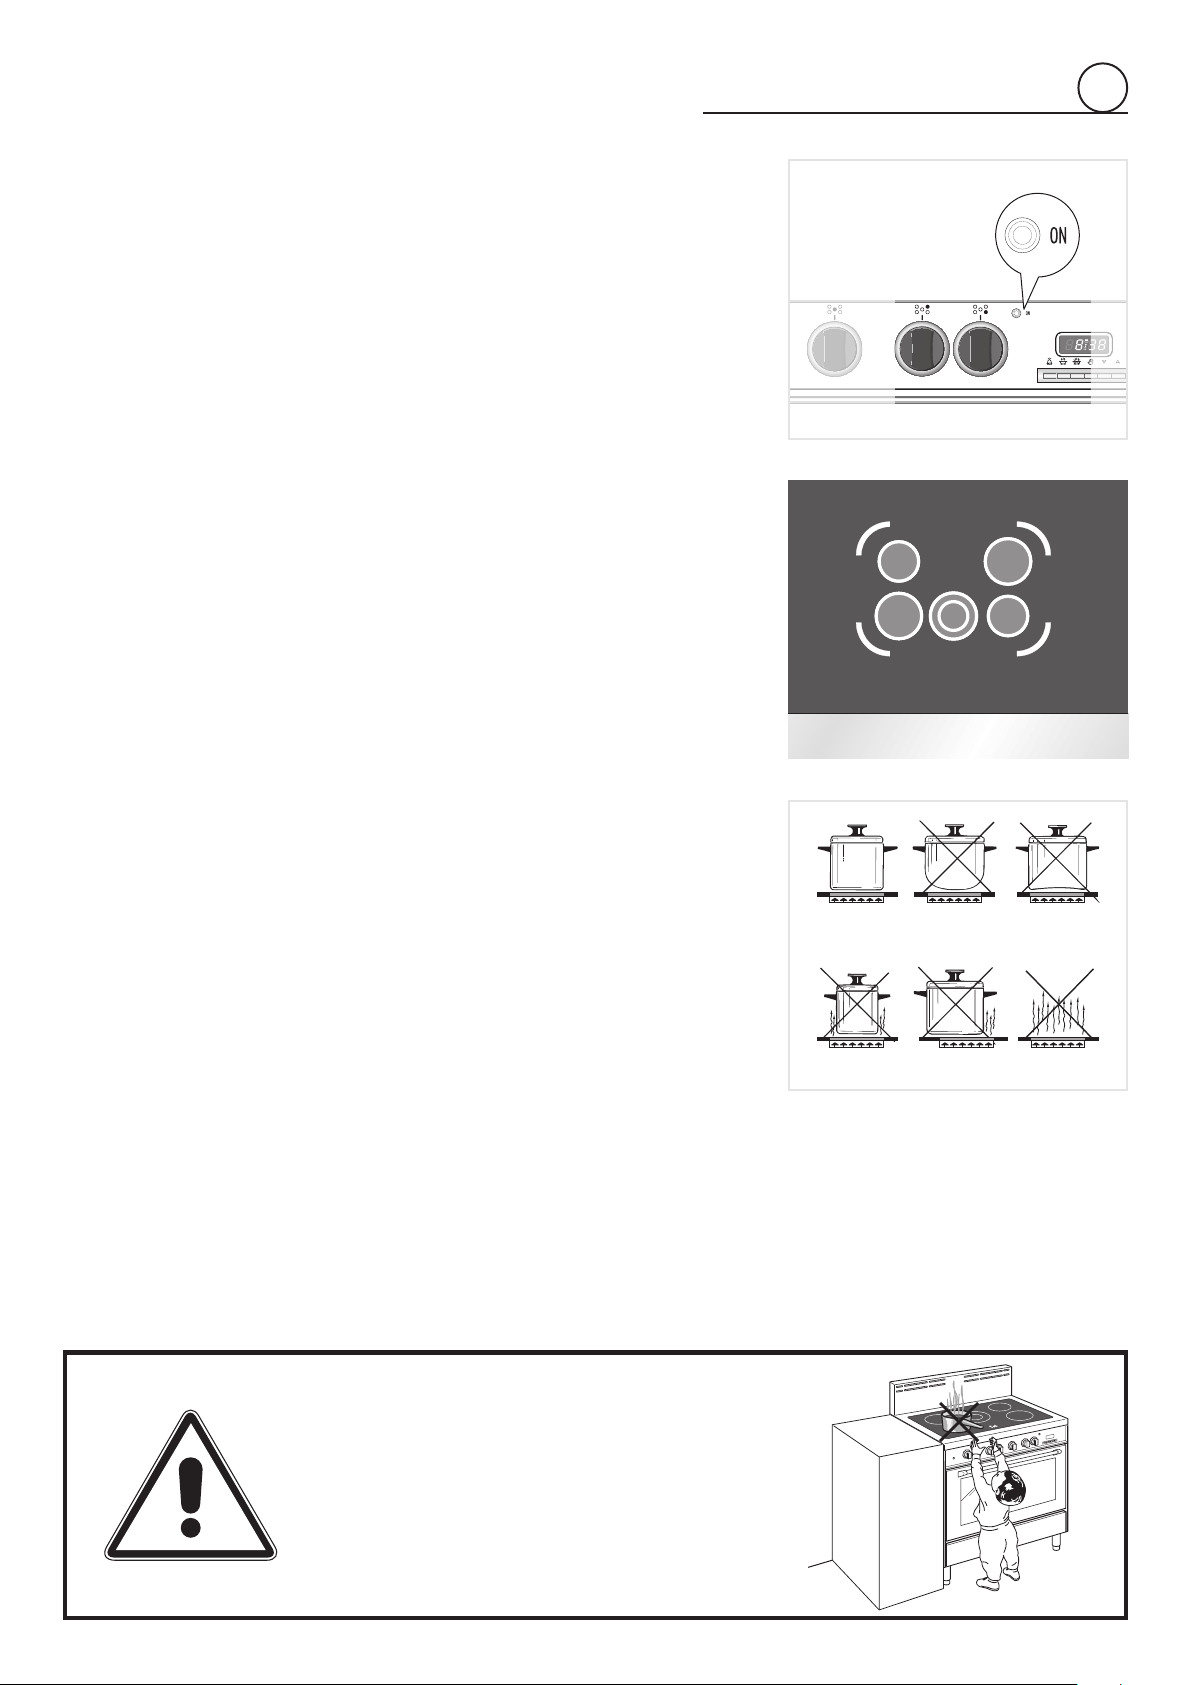
COOKING ZONES POWER INDICATOR LIGHT(g.2.6)
Whentheceramichobisworking,the“ON”pilotlightinthecontrolpanelwillbeon(g.
2.6a).
COOKING ZONES RESIDUAL HEAT INDICATORS
IMPORTANT
Whenthetemperatureofacookingzoneisabove140°F(60°C),therelevant“HOT
SURFACE”warninglightinthevitroceramichob(g.2.6b)willcomeontoindicatethat
thezoneishot.
Thislightwillstayonevenafterthecookingzonehasbeenswitchedofftoindicatethat
thezoneisstillhot.
Theresidualheatpersistsforsometimeafterthecookingzonehasbeenswitchedoff.
During this time avoid touching the hob and take particular care if there are
childrennearby.
Thelightwillgooutautomaticallywhenthecookingzonetemperaturedropsbelow140
°F(60°C).
A
U
T
O
Make sure that the handles of
cookware do not stick out over the
edge of the range, to avoid them
being knocked over by accident.
This also makes it more difficult
for children to reach the cooking
vessels.
2
Fig. 2.7
Fig. 2.6b
Fig. 2.6a
10
USING THE OVEN FOR THE FIRST TIME
• Putintheshelfandthetray.
• Switchtheovenonempty(onacookingfunction)atmaximumpowerforabout2
hourstoremovetracesofgreaseandsmellsfromthecomponents.
• Whentheovenhascooleddownandunpluggingtherange,cleantheinsideofthe
ovenwithaclothsoakedinwaterandneutraldetergentanddryitperfectly.
GENERAL FEATURES
Asitsnameindicates,thisisanoventhatpresentsparticularfeaturesfromanoperational
pointofview.
Infact,itispossibletoinsert7differentprogramstosatisfyeverycookingneed.
The7positions,thermostaticallycontrolled,areobtainedby4heatingelementswhich
are:
• Lowerheatingelement 2050W
• Upperheatingelement 1250W
• Broilheatingelement 2200W
• Circularheatingelement 2450W
VERY IMPORTANT
The oven shall be used always with
the door closed.
OPERATING PRINCIPLES
Heatingandcookinginthemultifunctionoventakesplaceasfollows:
• bynormalconvection-
BAKE
Theheatisproducedbytheupperandlowerheatingelements.
• byforcedconvection-
FAN OVEN
Theheatproducedbythecircularelementisdistributedthroughouttheovenbythe
fan.
• bysemi-forcedconvection-CONV.BAKE
Theheatproducedbytheupperandlowerheatingelementsisdistributedthroughout
theovenbythefan.
• byradiation-BROIL
Theheatisradiatedbytheinfraredbroilelement.
• byradiationandfan-CONV.BROIL
Theradiatedheatfromtheinfraredbroilelementisdistributedthroughouttheoven
bythefan.
• bydoubleradiation-DUAL BROIL
Theheatisradiatedbytheinfraredbroilelementandtheupperheatingelement.
• byventilation-DEFROST
Thefoodisdefrostedbyusingthefanonlyfunctionwithoutheat.
ATTENTION:therangebecomesvery
hotduringoperation.
ATTENTION:theovendoorbecomes
veryhotduringoperation.
KEEP CHILDREN AWAY.
WARNING:
Thedoorishot,usethehandle.
Do not use
Broiling level
Oven cooking level
Oven cooking level
1
st
STEP
2
nd
STEP
3
rd
STEP
4
th
STEP
Fig.3.1
how to use the multifunction electric oven
3
11
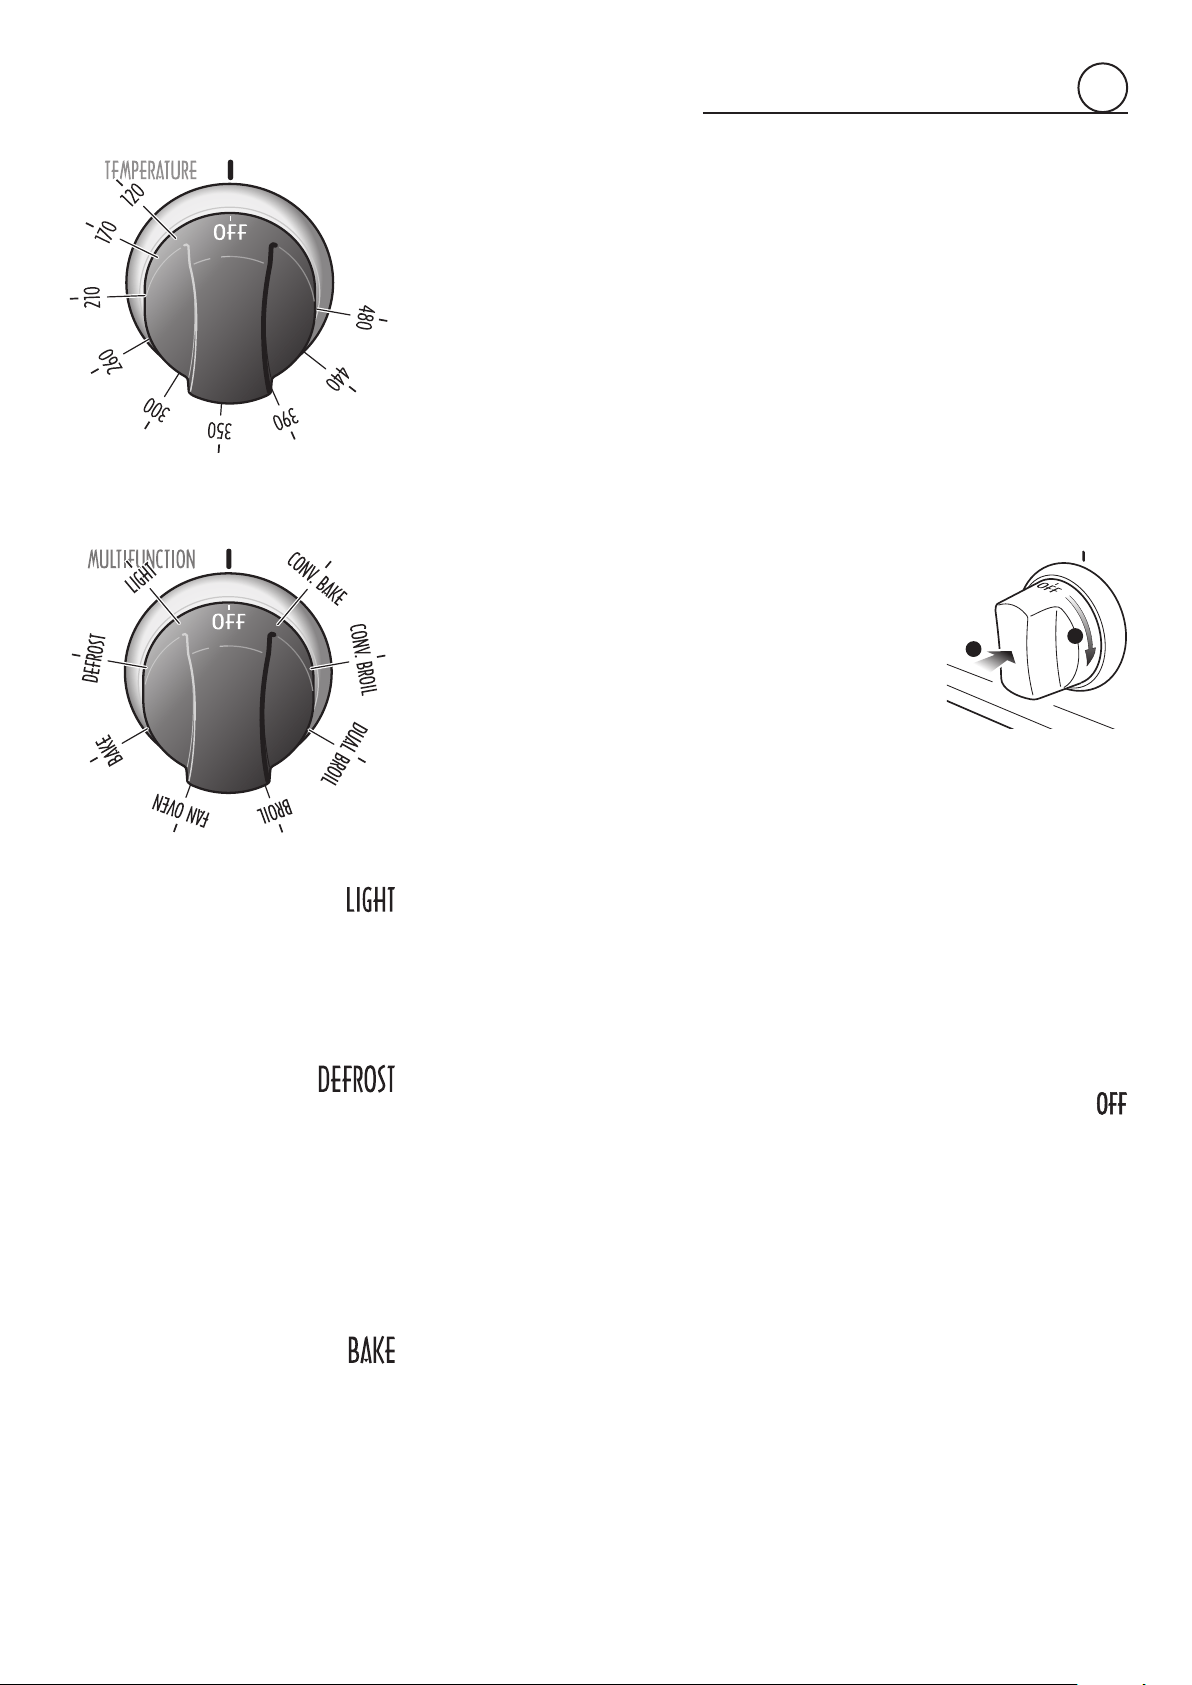
OVEN LIGHT (thisisnotacookingfunction)
Turningtheknobtothisposition,onlytheovenlamplightsup.
Thelampisalwaysoninallthecookingfunctions.
FUNCTIONSELECTORKNOB(g.3.3)
VERY IMPORTANT: ALWAYS LIGHTLY PRESS THE
CONTROLKNOBWHENTURNINGTHEFUNCTIONKNOB
FROM THE OFF POSITION(g.3.4).
Rotatetheknobclockwisetosettheoventooneofthefollowing
functions:
DEFROSTING FROZEN FOODS (thisisnotacookingfunction)
Onlythefanandtheovenlampswitchon.Tobeusedwiththethermostatknobon
becausetheotherpositionshavenoeffect.
Defrostingtakesplacebyfan,withoutheating.
Recommended for:
Torapidlydefrostfrozenfoods;2.2lbs(1kg)requiresaboutonehour.
Thedefrostingtimesvaryaccordingtothequantityandtypeoffoodstobedefrosted.
TRADITIONAL CONVECTION COOKING
Theupperandlowerheatingelementsswitchon.
Theheatis diffusedbynatural convection andthetemperature must be setbetween
120°F(50°C)and480°F(250°C)viathethermostatknob.
Recommended for:
Forfoodswhichrequirethesamecookingtemperaturebothinternallyandexternally,i.
e.roasts,spareribs,etc.
THERMOSTATKNOB(g.3.2)
Toturnontheheatingelementsoftheoven,settheswitchknobonthedesiredprogram
andthethermostatknobontothedesiredtemperature.
Tosetthetemperature,itisnecessarytomakethechosennumber,printedontheknob,
tomatchwiththecontrolpanelindicator.
TheelementswillturnONorOFFautomaticallyaccordingtotheenergyneedwhichis
determinedbythethermostat.
Theindicatorlightwillcycleonandoffduringcooking.
Fig.3.2
Fig.3.3
1
2
3
12
COOKINGWITHDOUBLEBROIL
Theinfraredandthetopheatingelementsswitchon.
Theheatisdiffusedbyradiation.Thetemperaturecanbesetbetween120°F(50°C)and
480°F(250°C)viathethermostatknob.
Forcorrectuseseethe“BROILING&DOUBLEBROIL”section.
Recommended for:
Intensebroilingactionforcookingwiththebroiler;browning,crisping,toasting,etc.
BROILING
Theinfraredheatingelementswitcheson.
Theheatisdiffusedbyradiation.Thetemperaturecanbesetbetween120°F(50°C)and
480°F(250°C)viathethermostatknob.
Forcorrectuseseethe“BROILING&DOUBLEBROIL”section.
Recommended for:
Intensebroilingactionforcookingwiththebroiler;browning,crisping,toasting,etc.
VENTILATEDBROILING
The infrared heating element and the fan switch on. The heat is mainly diffused by
radiationandthefandistributesitinthewholeoven.
The temperature can be set between 120 °F (50 °C) and 480 °F (250 °C) via the
thermostatknob.
Forcorrectuseseethe“VENTILATEDBROILING”section.
Recommended for:
Forgrillcookingwhenafastoutsidebrowningisnecessarytokeepthejuicesin,i.e.veal
steak,steak,hamburger,
etc.
CONVECTION COOKING WITH VENTILATION
Theupperandlowerheatingelementsandthefanturnon.
The heat is dispersed by forced convection and the temperature can be regulated to
between120°F(50°C)and480°F(250°C)viathethermostatknob.
Recommended for:
For foods of large volume and quantity which require the same internal and external
degreeofcooking;forie:rolledroasts,turkey,legs,cakes,etc.
VENTILATED COOKING
Thecircularelementandfancomeon.
The heat is dispersed by forced convection and the temperature can be regulated to
between120°F(50°C)and480°F(250°C)viathethermostatknob.Theovendoesnot
requirepreheating.
Recommended for:
Foodwhichhastobewell-cookedoutsideandsoftorrosyinside,forexamplelasagne,
lamb,roastbeef,wholeshetc.
3
13
COOKING DIFFERENT DISHES AT THE SAME TIME
TheMULTIFUNCTIONovenatpositions or ofthefunctionselector
cancookvariousdifferentfoodsatthesametime.Fish,cakesandmeatcanbecooked
togetherwithoutthesmellsandavoursmixing.
Theonlyprecautionsrequiredarethefollowing:
• Thecookingtemperaturesmustbeascloseaspossiblewithamaximumdifference
of70-80°F(20-25°C)betweenthedifferentfoods.
• Differentdishesmustbeplacedintheovenatdifferenttimesaccordingtothecooking
timerequiredforeachone.Thistypeofcookingobviouslyprovidesaconsiderable
savingontimeandenergy.
COOKING ADVICE
STERILIZATION
Sterilizationoffoodstobeconserved,infullandhermeticallysealedjars,isdoneinthe
followingway:
a. Turntheswitchtoposition
or .
b. Setthethermostatknobtoposition350°F(175°C)andpreheattheoven.
c. Fillthegrillpanwithhotwater.
d. Setthejarsintothegrillpanmakingsuretheydonottoucheachotherandthedoor
andsetthethermostatknobtoposition260°F(130°C).
Whensterilizationhasbegun,thatis,whenthecontentsofthejarsstarttobubble,turn
offtheovenandletcool.
VENTILATEDBROILING
Ventilatedbroilingmaybedonebyselecting withthefunctionselectorknob;
thehotaircompletelyenvelopsthefoodthatistobecooked.
Introducethefoodtobecooked,positioningthegrillpanasclosetotheinfra-redelement
aspossible.
Closethedoorandlettheovenoperateuntilbroilingisdone.
Adding a fewdabsofbutter before the end of thecookingtimegives the golden “au
gratin”effect.
Broilingwiththeovendoorclosed.
Important: Use always suitable protective gloves when inserting/removing the
broilingpanfromtheoven(seenextpage).
Itis advisable to handle
the oven accessories
usingovengloves.
WARNING
VERY IMPORTANT
WARNING!!
REGENERATION
Turn the switch to position or and set the temperature to 300°F
(150°C).
Breadbecomesfragrantagainifwetwithafewdropsofwaterandputintotheovenfor
about10minutes.
ROASTING
Toobtainclassicalroasting,itisnecessarytoremember:
• thepre-settemperatureshouldbemaintained.
• thatthecookingtimedependsonthequantityandthetypeoffoods.
3
14
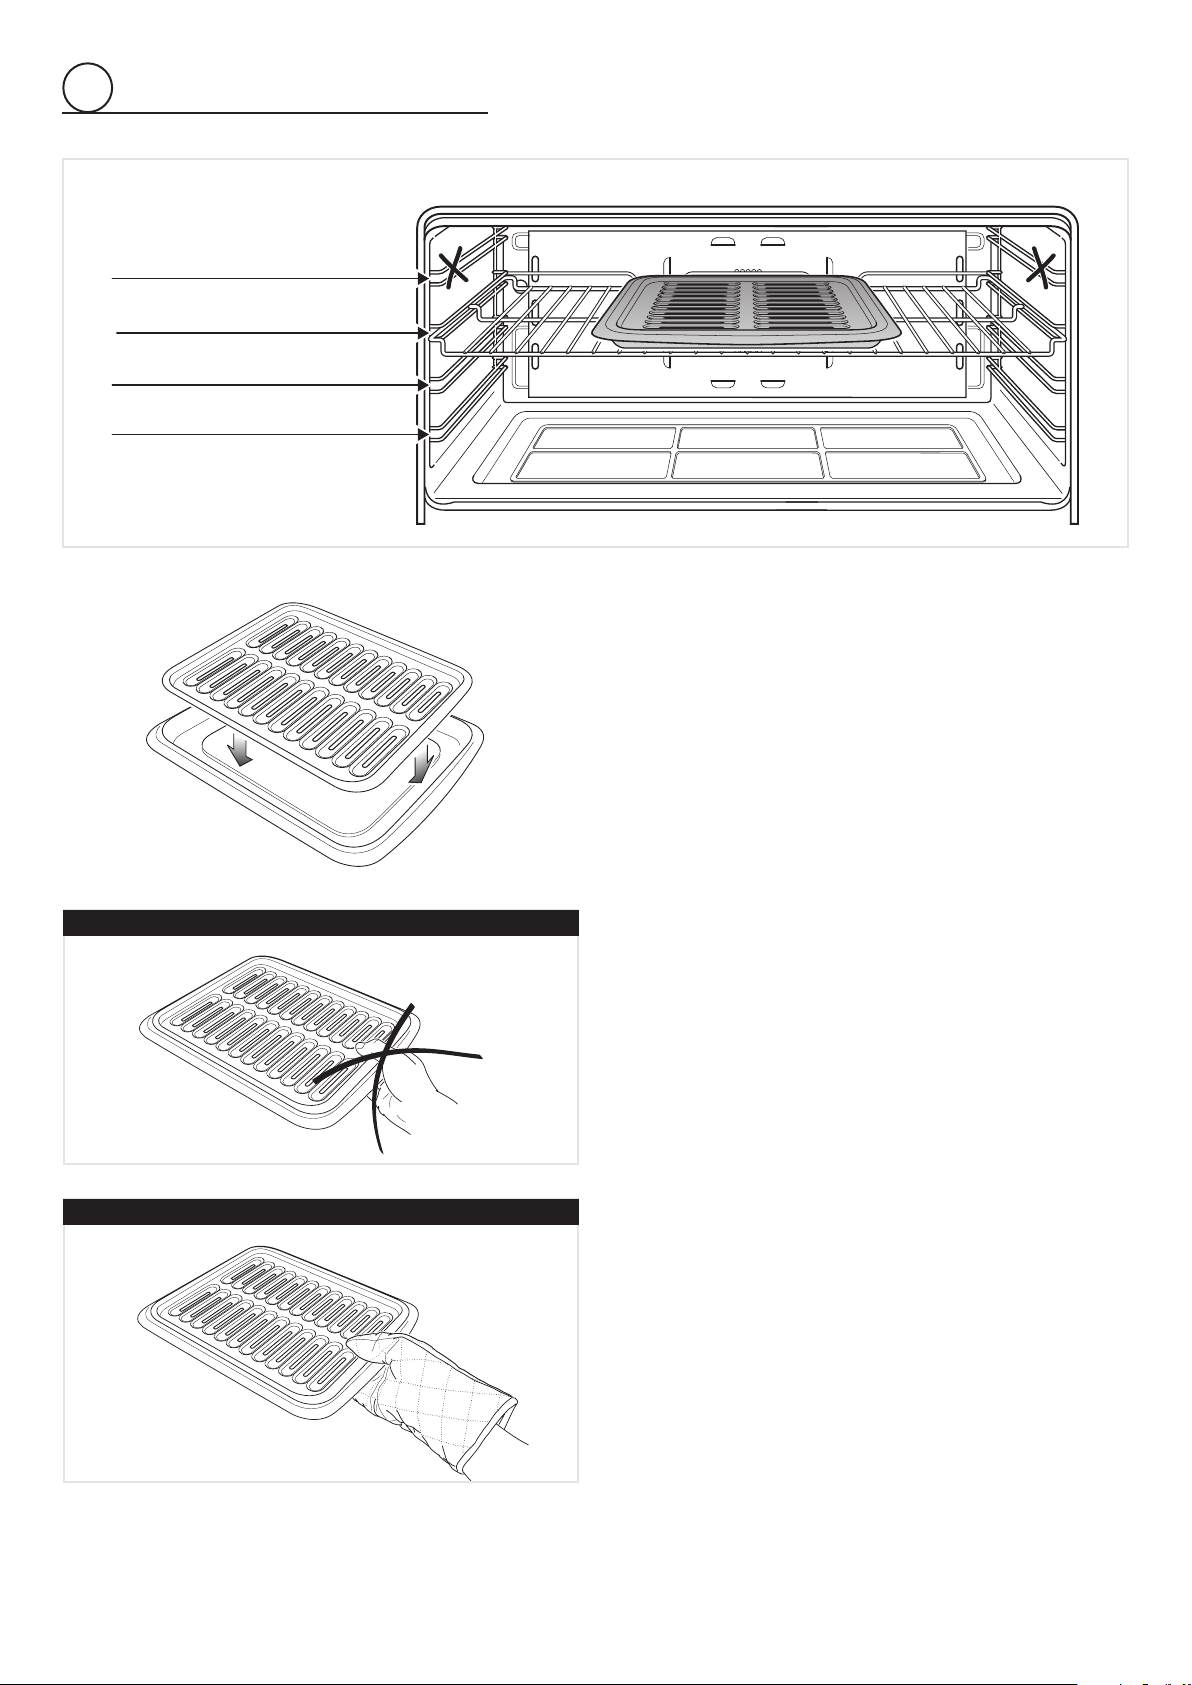
BROILING&DOUBLEBROIL
Veryimportant:thebroilordoublebroilmustalwaysbeused
with the oven door closed.
• Positiontheshelfonthesecondlevelfromthetop(g.3.5).
• Turnonthebroilordoublebroil,asexplainedinthepreceding
paragraphsandlettheovenpreheatforabout5minuteswith
thedoorclosed.
• Placethefoodtobecookedabovethebroilingpan.
• Introducethebroilingpan(g.3.6)intheoven.Thebroiling
pan should be placed above the shelf and it should be
centeredwiththebroilelement(g.3.5).
Donotbroilwithoutusingthebroilingpan.
Important: Use always suitable protective gloves when
inserting/removingthe broilingpan,shelves,pansorother
cookingutensilsfromtheoven.
Fig.3.6
WRONG
CORRECT
Fig.3.7
Fig.3.8
Do not use
Broiling level
Oven cooking level
Oven cooking level
1
st
STEP
2
nd
STEP
3
rd
STEP
4
th
STEP
Fig.3.5
3
15
Descriptionoftheilluminatedsymbols:
AUTO flashing-Programmerinautomaticpositionbutnotprogrammed
AUTO alwayslighted-Programmerinautomaticpositionwithprogrammeinserted.
Automaticcookingtakingplaceoroveninmanualmode.
Timer in operation
and AUTO - flashing - Programme error.
(Thetimeofdayliesbetweenthecalculatedcookingstartandendtime).
Note:Selectafunctionbytherespectivebuttonand,in5seconds,settherequiredtime
withthe
/ buttons(“one-hand”operation).
Apowercutzeroestheclockandcancelsthesetprogrammes.
Theelectronicprogrammerisadevicewhichgroupstogetherthefollowingfunctions:
• 12hoursclockwithilluminateddisplay
• Timer(upto23hoursand59minutes)
• Programforautomaticovencooking
• Programforsemi-automaticovencooking
Descriptionofthebuttons:
Timer
Cookingtime
Endofcookingtime
Manualpositionandcancellationoftheinsertedcookingprogramme
Advancementofthenumbersofallprograms
Turningbackofthenumbersofallprogramsandchangingthefrequencyofthe
audiblesignal.
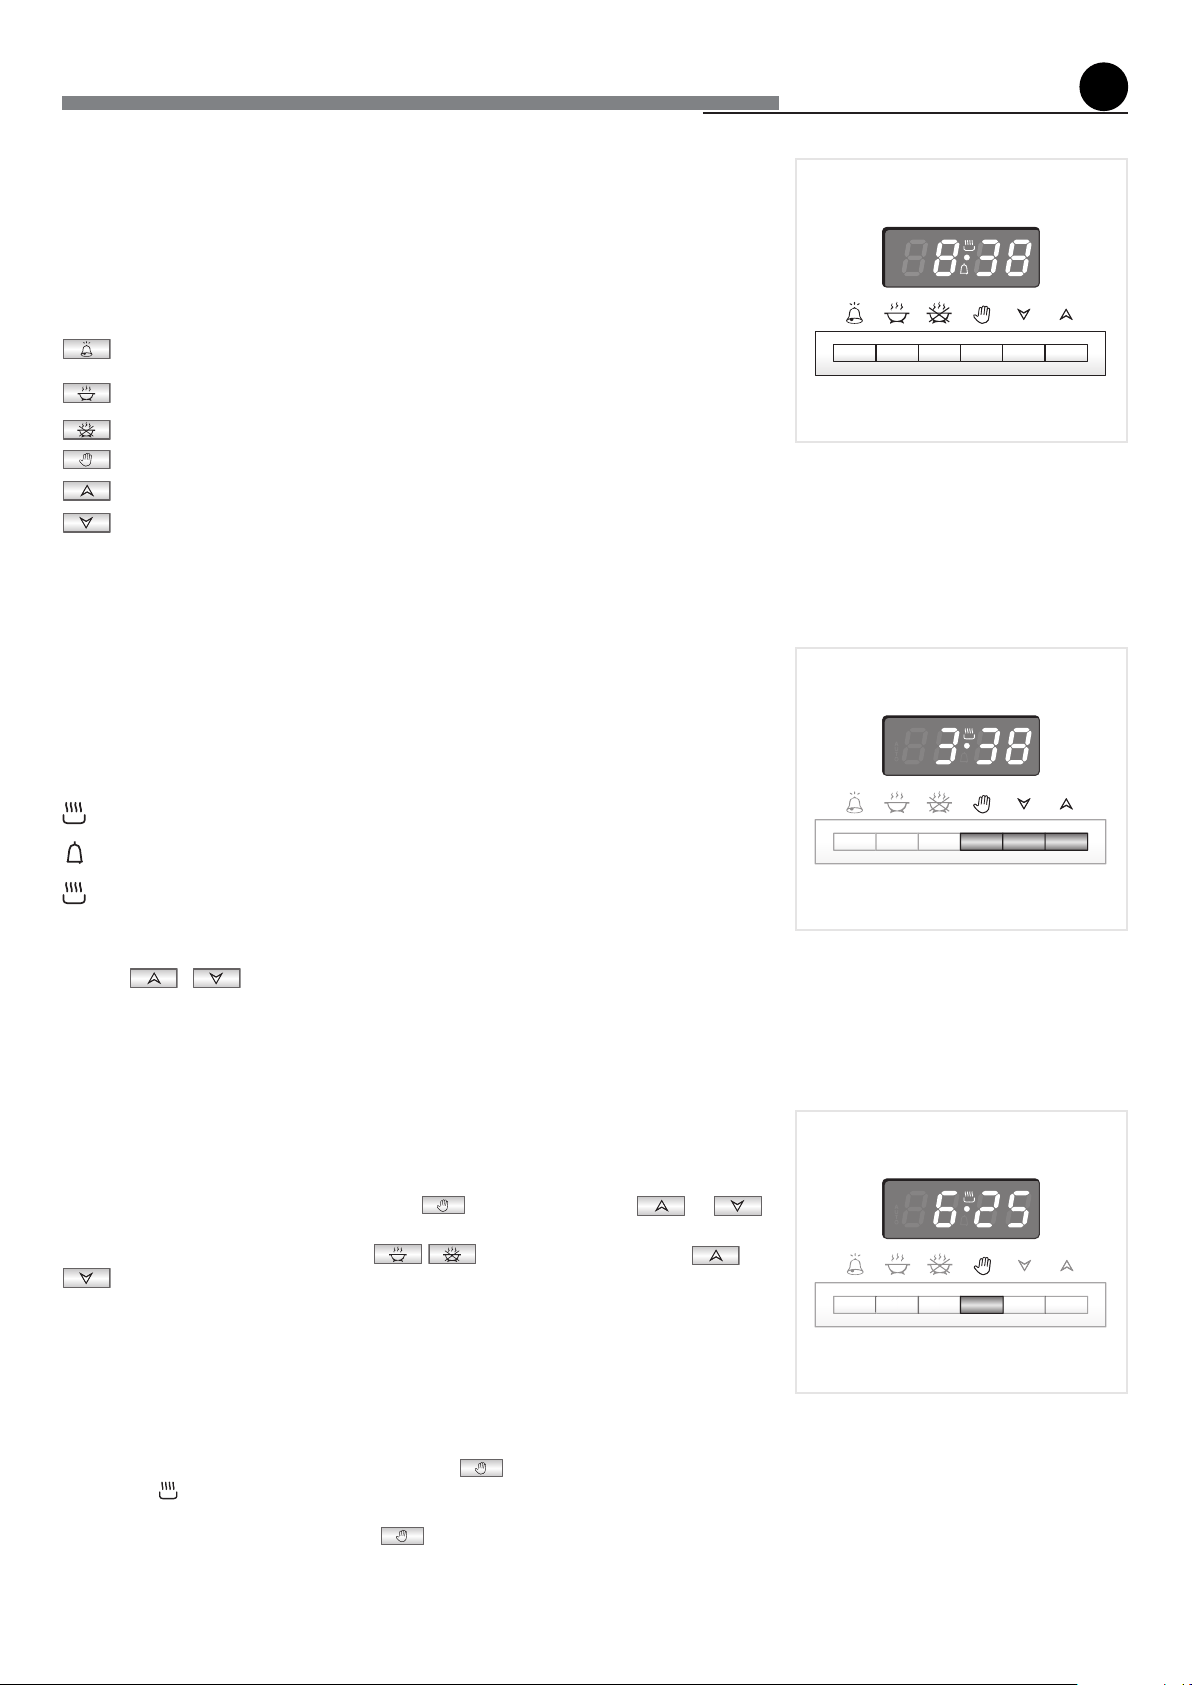
ELECTRONIC CLOCK(fig.4.2)
Theprogrammerisequippedwithanelectronicclockwithlightednumberswhichindi-
catehoursandminutes.
Upon immediate connection of the oven or after a blackout, “12:00” will flash on the
programmerpanel.
Tosetthehouritisnecessarytopushthe
buttonandthenthe or
buttonuntilyouhavesettheexacthour(fig.4.2).
Alternatively,simultaneouslypushthe
twobuttonsandthenthe or
button.
Note:Settingtheclockdeletesanyprogramme.
NORMAL COOKING WITHOUT THE USE OF THE
PROGRAMMER
Tomanuallyusetheoven,thatis,withouttheaidoftheprogrammer,itisnecessaryto
canceltheflashingAUTObypushingthebutton
(AUTOwillbeswitchedoffand
thesymbol
willgoon-Fig.4.3).
Attention:IftheAUTOisnotflashing(whichmeansacookingprogrammehasalready
been inserted), by pushing the button
you have cancelled the programme and
switchedtomanual.
Theovenshallbeswitchedoffmanually.
A
U
T
O
Fig.4.1
Fig.4.2
Fig.4.3
howtousetheelectronicprogrammer
4
16
ELECTRONIC TIMER
Thetimerprogrammeconsistsonlyofabuzzerwhichmaybesetforamaximumperiod
of23hoursand59minutes.
Ifthe
AUTO
isflashingpushthe button.
To set the time, push the
button and the or
until you obtain the
desiredtime(fig.4.4).
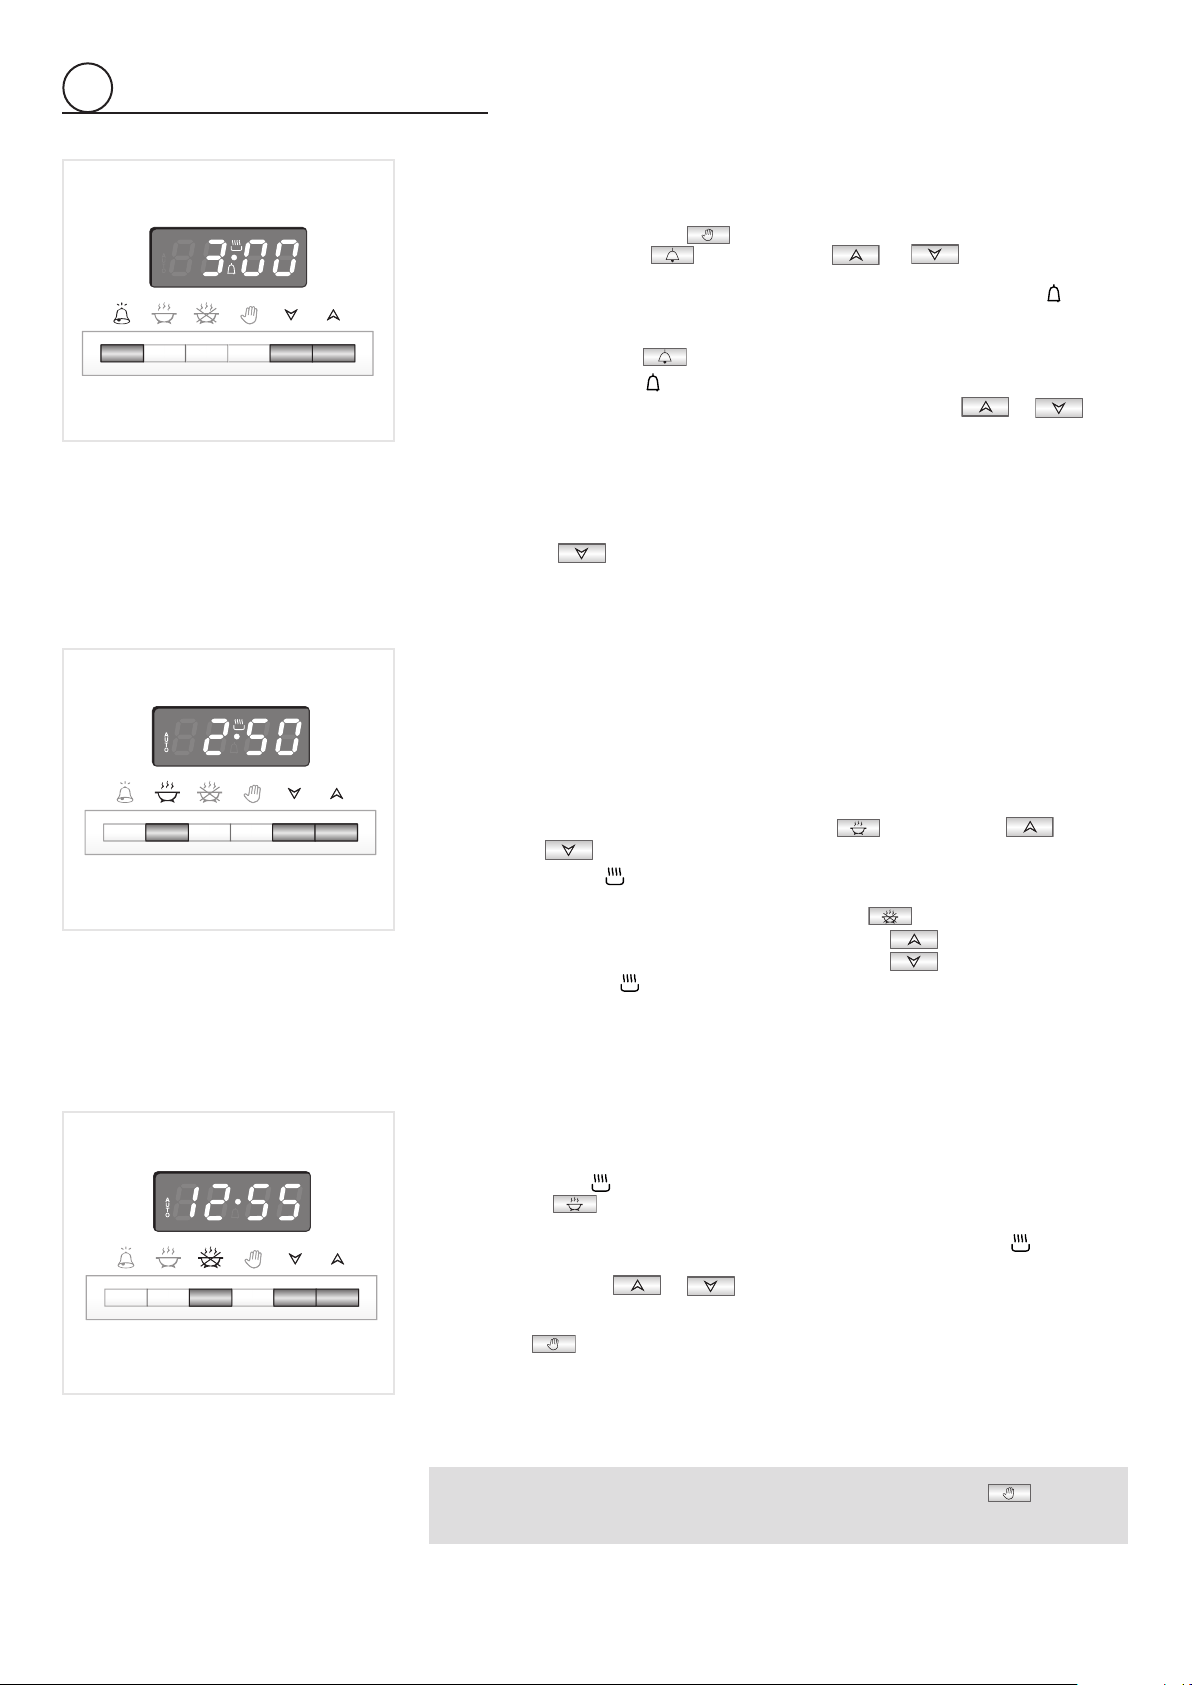
Havingfinishedthesetting,thenormaltimewillappearonthepanelandthe
symbol
willappear.
Thecountdownwillstartimmediatelyandmaybeseenatanymomentonthepanelby
simplypressingthebutton
.
Attheendofthetime,the symbolwillbeswitchedoffandanintermittentbuzzerwill
gooff;thiscanbestoppedbypressinganyoneofthebuttons(not
or
).
Iftheovenisswitchedon,youmustswitchoffmanually.
SETTINGTHEFREQUENCYOFTHEAUDIBLESIGNAL
Bypressingthe buttonyoucanchoosefromthreevariations.
AUTOMATIC OVEN COOKING
Tocookfoodautomaticallyintheoven,itisnecessaryto:
1. Setthelengthofthecookingtime
2. Settheendofthecookingtime
3. Setthetemperatureandtheovencookingprogramme.
Theseoperationsaredoneinthefollowingway:
1.Setthelength ofthecookingtimebypushingthe buttonandthe
buttonto
advance,or
togobackifyouhavepassedthedesiredtime(fig.4.5).
TheAUTOandthe
symbolwillbeon.
2.Set the end of the cooking time by pressing the
button (the cooking time
already added totheclocktimewill appear), and the
button (fig.4.6);ifyou
passthedesiredtimeyoumaygetbackbypushingthe
button.
Afterthissetting,the
symbolwillgooff.Ifafterthissetting,theAUTOflasheson
thepanelandabuzzergoesoff,itmeanstherewasanerrorintheprogramming.
Inthiscase,modifytheendofcookingtimeorthecookingtimeitselfbyfollowingthe
aboveinstructionsagain.
3.Setthetemperatureandthecookingprogrammebyusingtheswitchandthermostat
knobsoftheoven(seespecificchapters).
Nowtheoven isprogrammed andeverythingwill workautomatically,that isthe oven
willturnonattherightmomenttoendthecookingattheestablishedtime.
Duringcooking,the
symbolremainson.
Bypushingthe
buttonyoucanseethetimethatremainsuntiltheendofcooking.
Atthe endof thecooking timetheovenwillturnoffautomatically,the
symbol will
turnoff,AUTOwillflashandabuzzerwillsound,whichcanbeturnedoffbypushing
anyofthebuttons(not
or
).
Turntheswitchandthermostatknobstozeroandputtheprogrammeronto“manual”by
pressingthe
button.
Attention:Apowercutmakestheclockgotozeroandcancelsthesetprogrammes.
Afterapowercut,“12:00”willflashonthepanel.
Fig.4.4
Fig.4.5
Fig.4.6
Thecookingprogrammaybecancelledatanytimebypushing .
Inthiscasetheovenshallbeswitchedoffmanually.
4
17
Fig.4.7
Fig.4.8
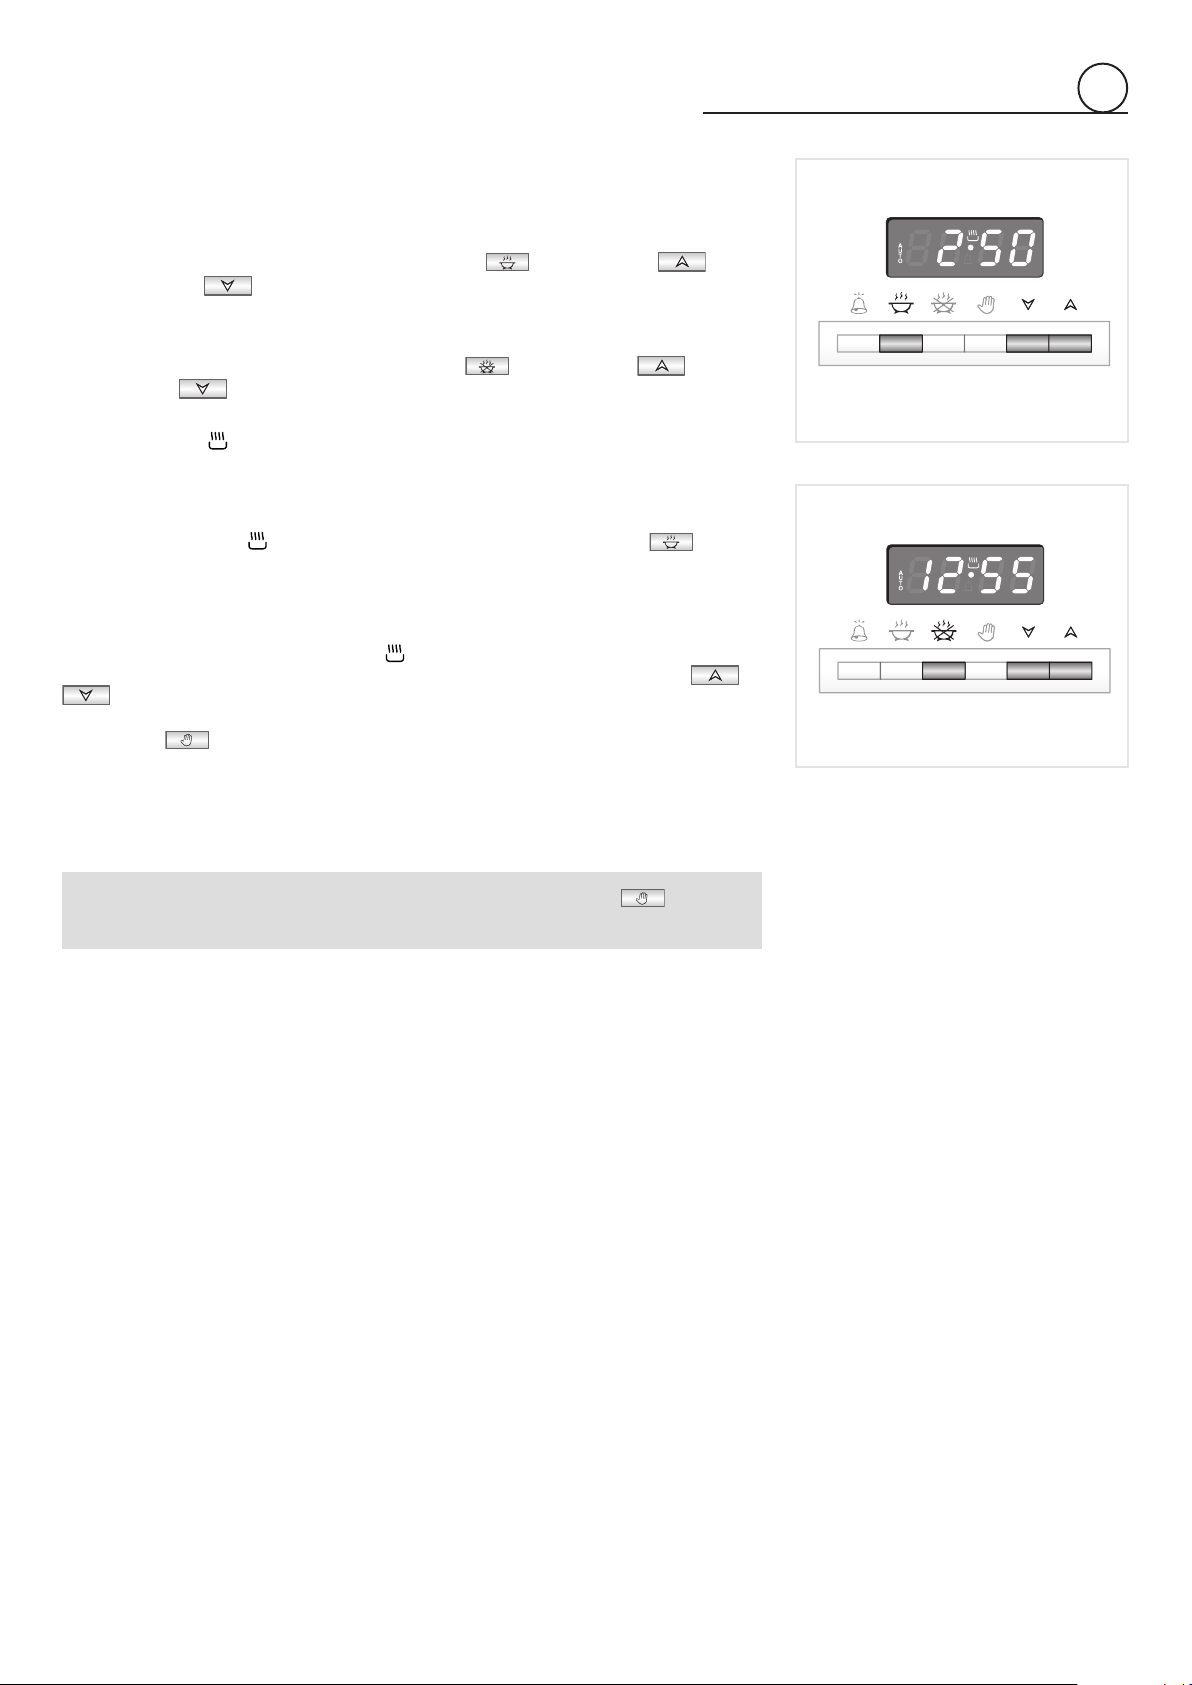
SEMI-AUTOMATIC COOKING
This is used to automatically switch off the oven after the desired cooking time has
elapsed.
Therearetwowaystosetyouroven:
1.Setthelengthofthecookingtimebypushingthe
buttonandthe button
toadvance,or
togobackwardsifyouhavepassedthedesiredtime(fig.4.7).
or
2.
Set the end of the cooking time by pushing the button and the button to
advance,or
togobackwardsifyouhavepassedthedesiredtime(fig.4.8).
AUTOandthe symbolwillbeon.
Then set the temperature and the cooking programme using the oven switch and
thermostatknobs(seespecificchapters).
Theoven is switchedonandit will beswitchedoff automatically attheendof the
desiredtime.
Duringcooking,the
symbolremainsonandbypressingthebutton youcan
seethetimethatremainstilltheendofthecooking.
Attheendofcooking,theovenandthe
symbolwillturnoff,theAUTOwillflashand
abuzzerwillsound;thatcanbestoppedbypushinganyofthebuttons (not
or
).
Turntheswitchandthermostatknobstozeroandputtheprogrammeronto“manual”by
pressingthe
button.
Attention:Apowercutmakestheclockgotozeroandcancelsthesetprogrammes.
Afterapowercut,“12:00”willflashonthepanel.
Thecookingprogrammaybecancelledatanytimebypushing .
Inthiscasetheovenshallbeswitchedoffmanually.
4

18
Do not use steam jet cleaners
because the humidity could
infiltrate into the appliance making
itdangerous.
GENERAL RECOMANDATION
• Important:Beforeanyoperationofcleaningandmaintenancedisconnectthe
appliance from the electrical supply.
• Itisadvisabletocleanwhentheapplianceiscoldandespeciallyforcleaningthe
enamelledparts.
• Avoid leaving alkaline or acidic substances (lemon juice, vinegar, etc.) on the
surfaces.
• Avoidusingcleaningproductswithachlorineoracidicbase.
IMPORTANT:Theuseofsuitableprotectiveclothing/glovesisrecommendedwhen
cleaningandmaintainingtheappliance.
WARNING
When correctly installed, your product meets all safety requirements laid down
forthistypeofproductcategory.Howeverspecial careshouldbe takenaround
therear ortheunderneathof theapplianceastheseareas arenotdesignedor
intendedto betouched andmaycontainsharporroughedges, thatmay cause
injury.
ENAMELLED PARTS
• Alltheenamelledpartsmustbecleanedwithaspongeandsoapywaterorother
non-abrasiveproducts.
• Drypreferablywithamicrofibreorsoftcloth.
• Acidic substances like lemon juice, tomato sauce, vinegar etc. can damage the
enameliflefttoolong.
PAINTED PARTS AND SILK-SCREEN PRINTED SURFACES
• Clean using an appropriate product. Always dry thoroughly.
IMPORTANT: these parts must be cleaned very carefully to avoid scratching and
abrasion.Youareadvisedtouseasoftclothandneutralsoap.
STAINLESS STEEL ELEMENTS
• Stainless steel parts must be rinsed with water and dried with a soft and clean
cloth.
• For difficult dirt, use a specific non-abrasive product available commercially or a
little hot vinegar.
INSIDE OF OVEN
Theovenshouldalwaysbecleanedafterusewhenithascooleddown.
Thecavityshouldbecleanedusingamilddetergentsolutionandwarmwater.
Suitable proprietary chemical cleaners may be used after first consulting with the
manufacturersrecommendationsandtestingasmallsampleoftheovencavity.
Abrasive cleaning agents or scouring pads/cloths should not be used on the cavity
surface.
NOTE: The manufacturers of this appliance will accept no responsibility for damage
causedbychemicalorabrasivecleaning.
Let the oven cool down and pay special attention no to touch the hot heating
elements inside the oven cavity.
Beforeanyoperationofmaintenance
disconnect the appliance from the
electrical mains supply.
WARNING
VERY IMPORTANT
cleaningandmaintenance
5
19
Fig.5.1
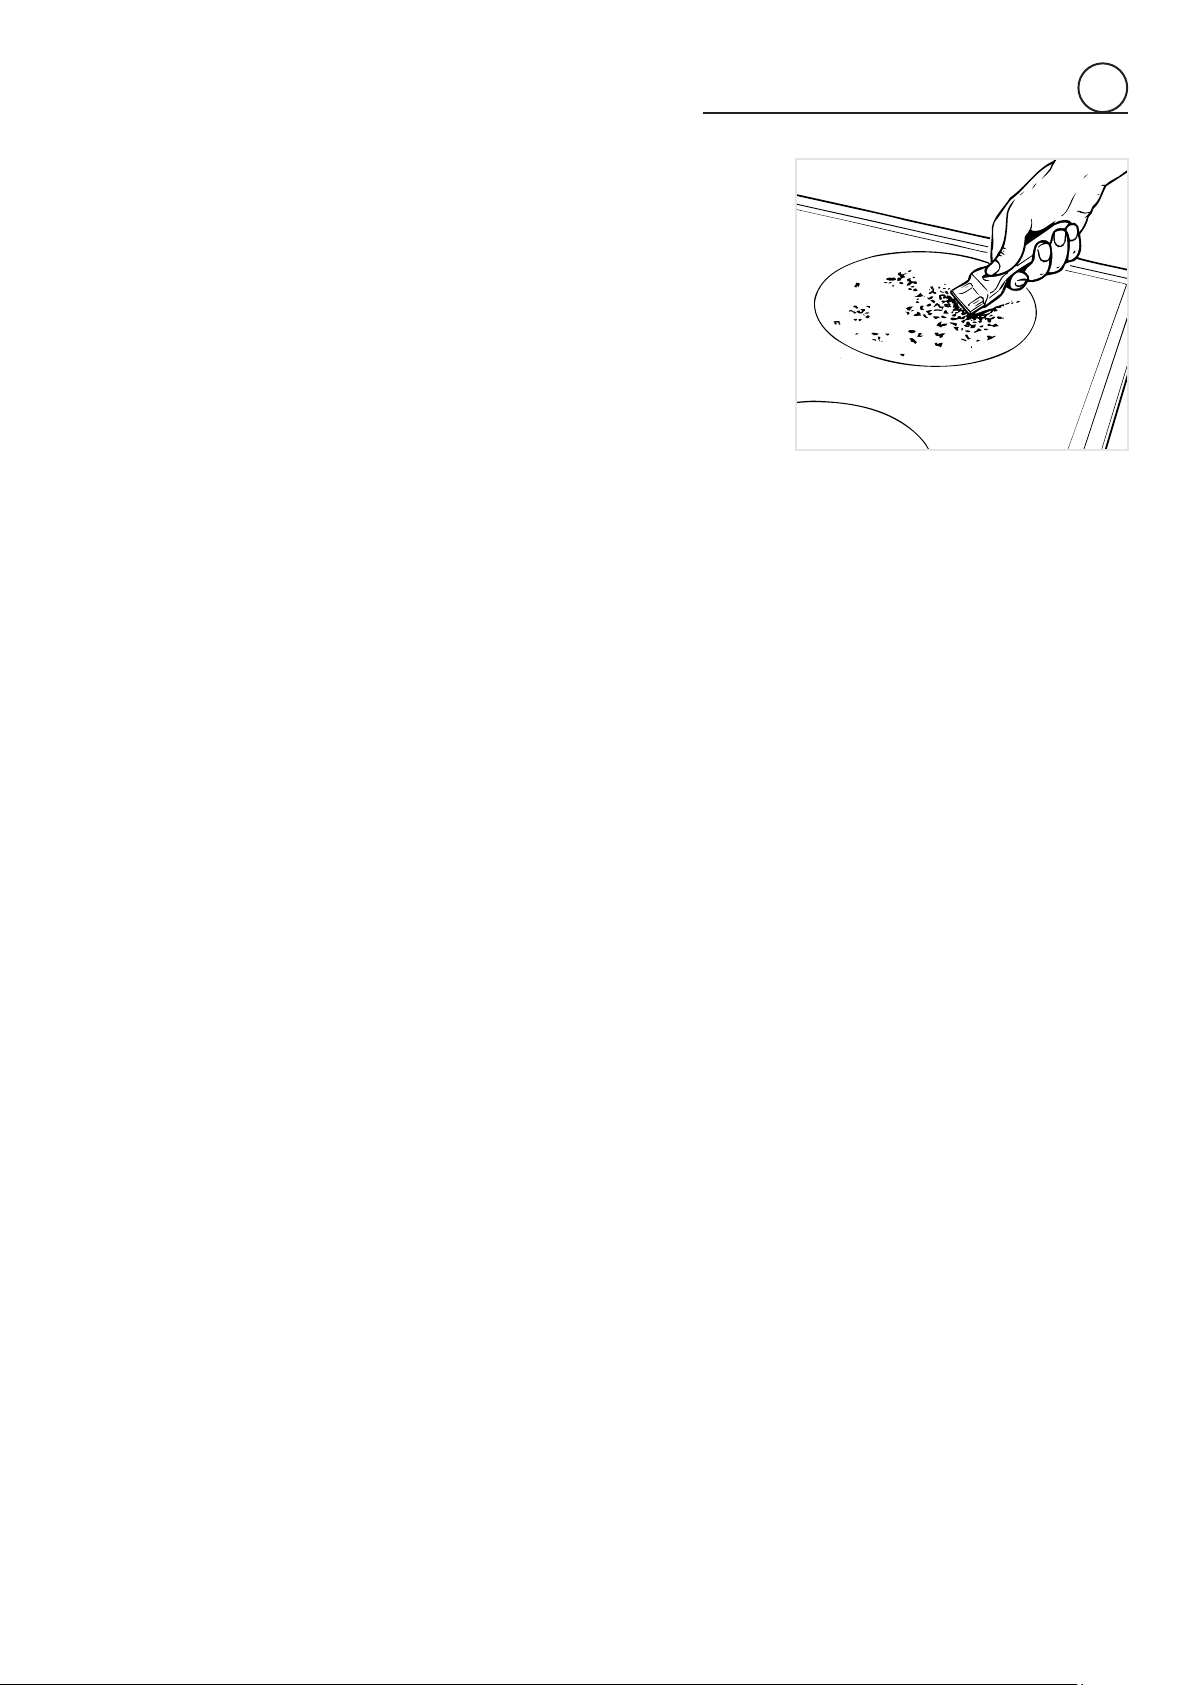
VITROCERAMIC SURFACE
Before cleaning the top, make sure that it is switched off.
Remove any encrustation using a special scraper which can be bought (fig. 5.1).
Remove dust using a damp cloth.
Detergents can be used as long as they are not abrasive or corrosive.
All residues of detergent must be eliminated with a damp cloth.
Keep all objects that could be melted by the heat away from the top: plastic objects,
aluminium foil, sugar or sugary products.
If an object melts on the top, remove immediately (while the top is still hot) using a
special scraper to avoid permanent damage to the pyroceram surface.
Avoidusingknives and pointedobjects as theycoulddamage thesurfaceof thetop.
Also avoid using abrasive sponges or wire wool which can permanently scratch the
pyroceram surface.
ATTENTION: MOST IMPORTANT!
Ifcleaningtheglassceramichobusingaspecialscrapertooltakeextracareto
avoiddamagingtothesealattheedgesoftheglassceramicsurface.
5
20
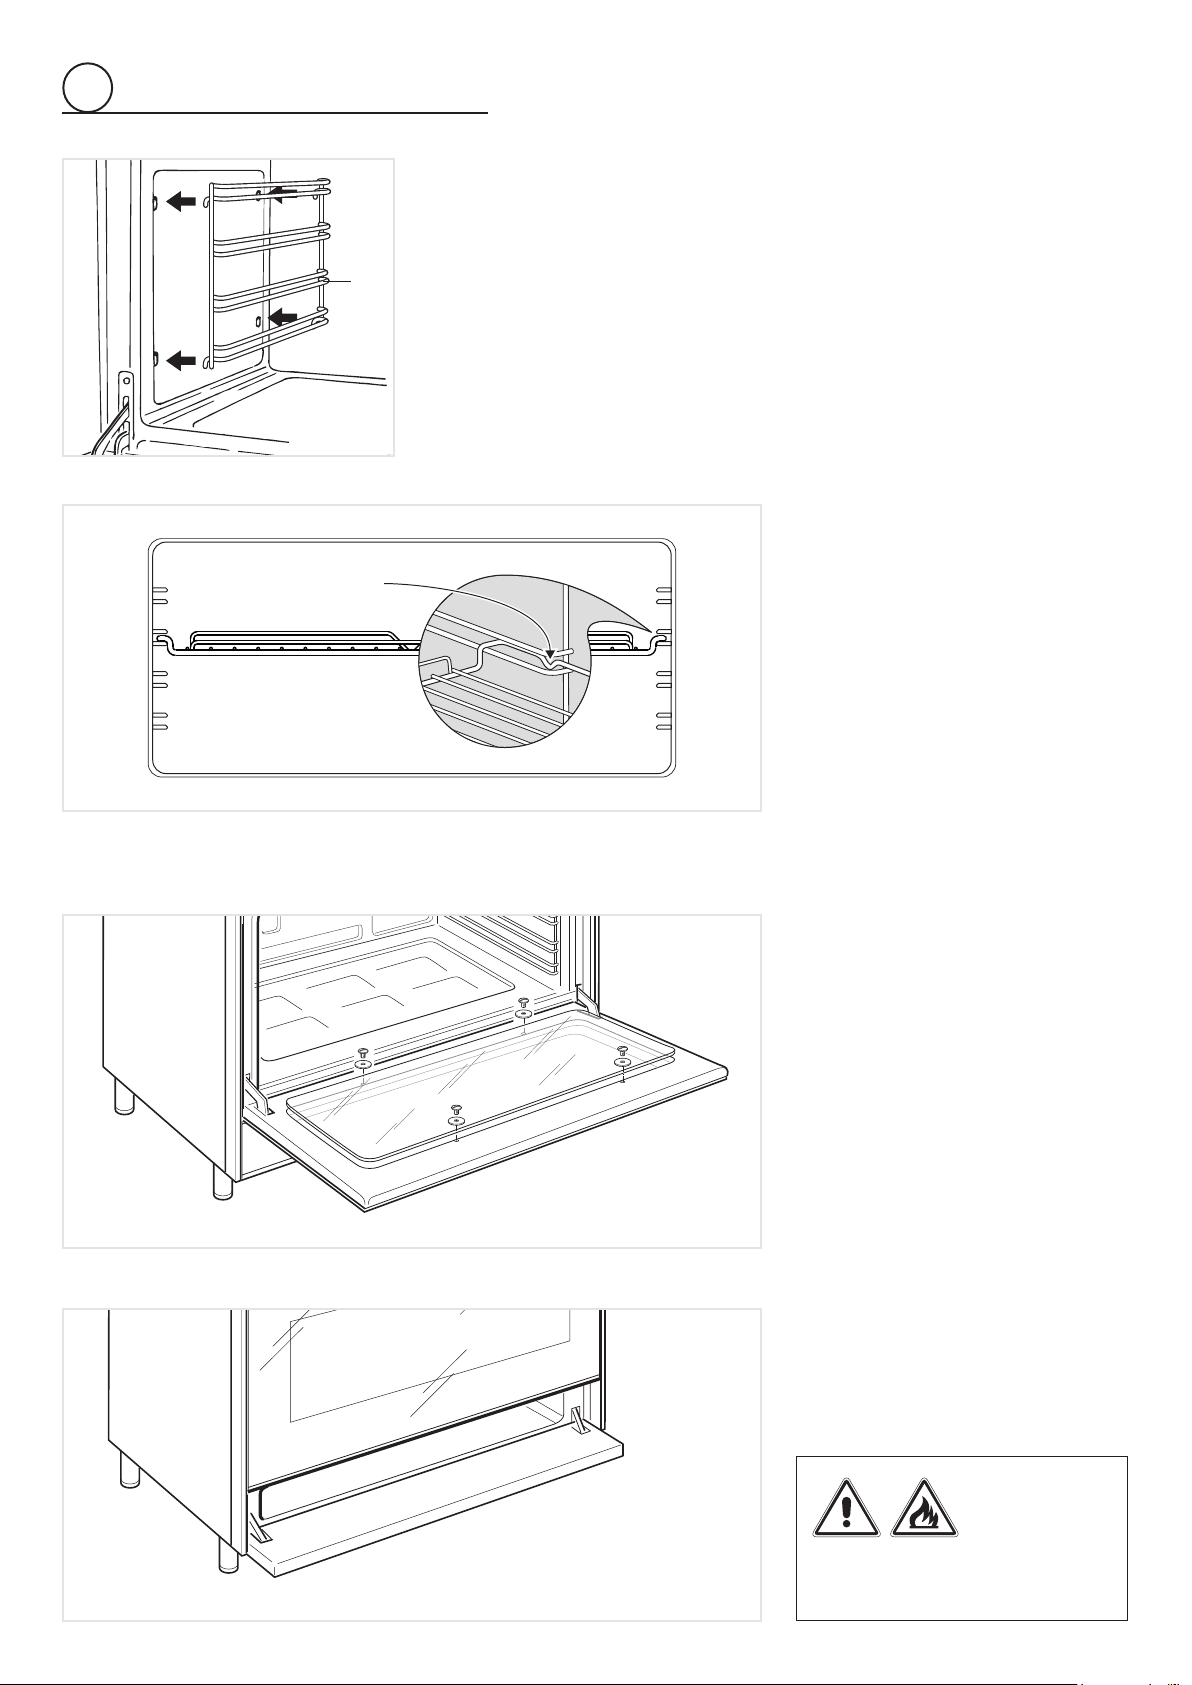
OVEN ACCESSORIES INSTALLATION AND REMOVAL
• Hangupthewireracks“G”ontheovenwalls(fig.5.2).
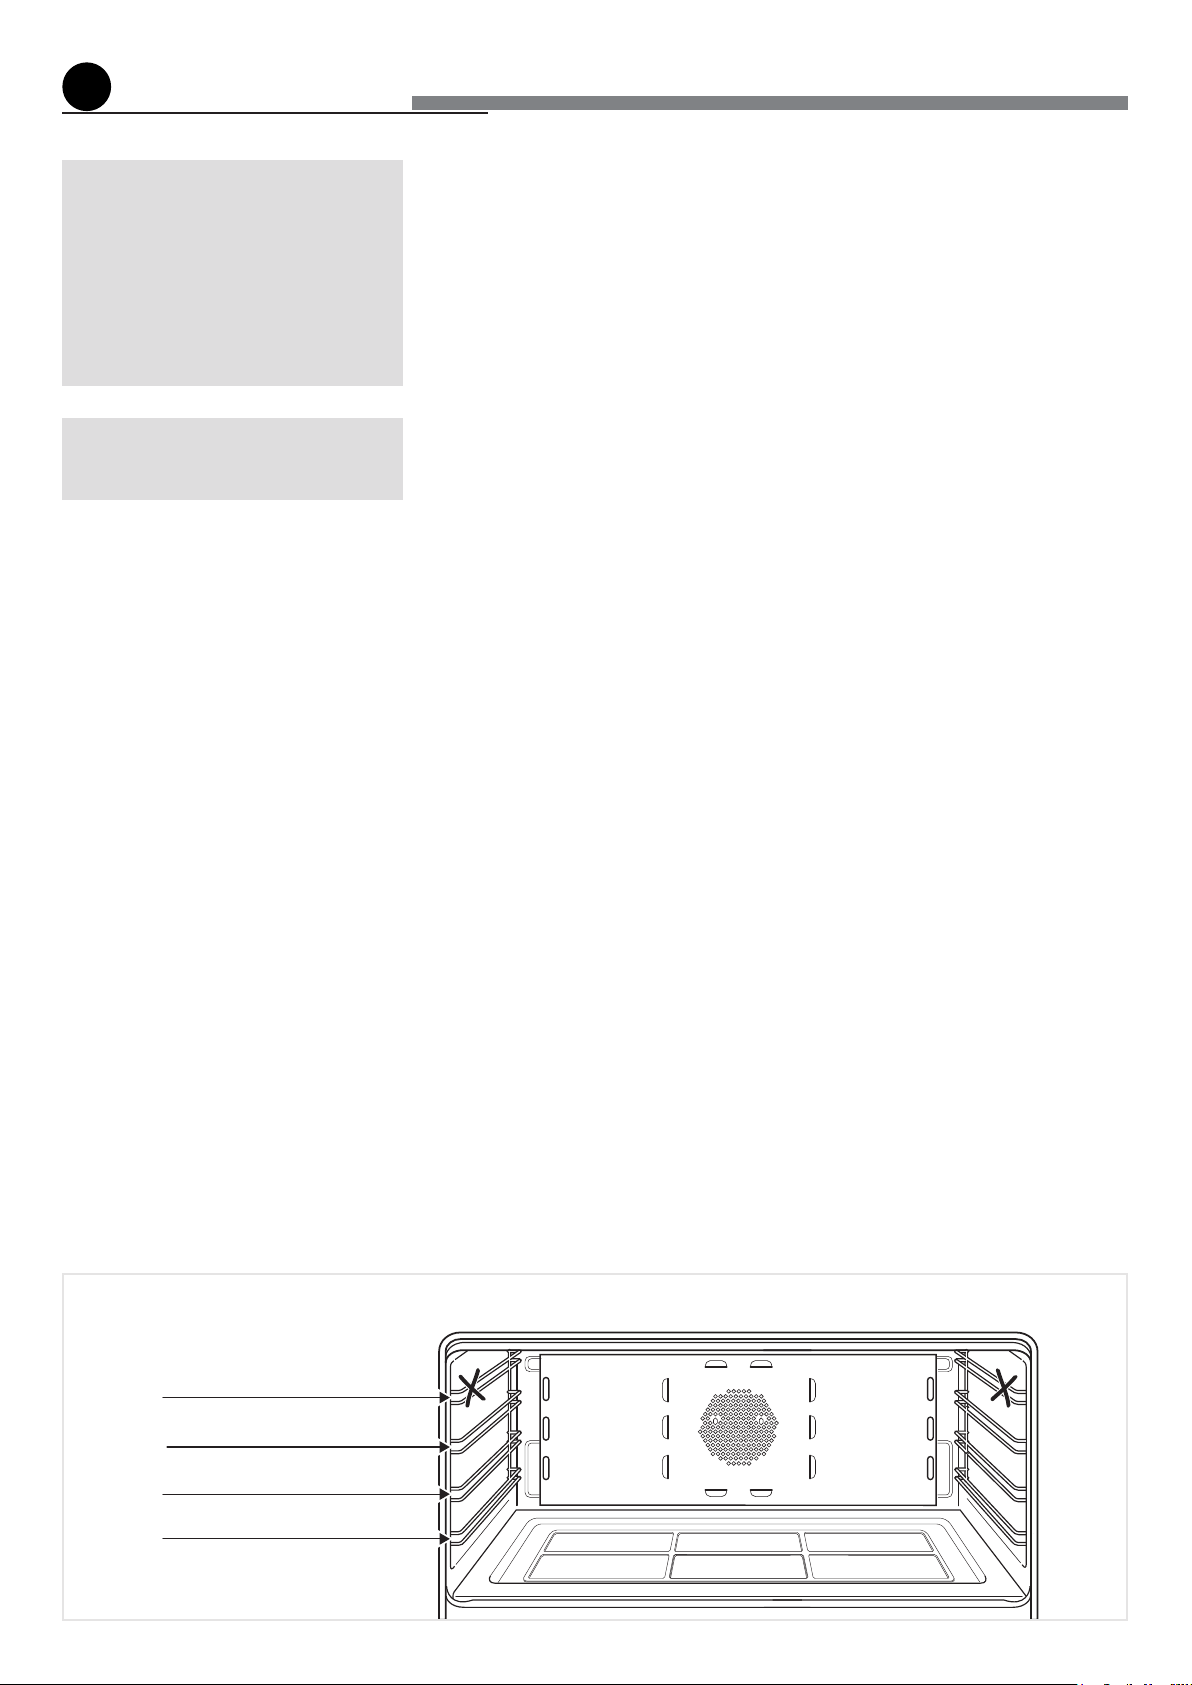
• Slidein,ontheguides,theshelves(fig.5.3).Donotusethefirststepfromthetop.
Therackmustbefittedsothatthesafetycatch,whichstopsitslidingout,facesthe
insideoftheoven.
• Positionthebroilingpanabovetheovenshelf(seepage14).
• Todismantle,operateinreverseorder.
STORAGE COMPARTMENT
The storage compartment is accessible
throughthepivotingpanel(fig.5.5).
OVEN DOOR
The internal glass panel can be easily
removed for cleaning by unscrewing the
retainingscrews(fig.5.4).
Donotuseharshabrasivecleanersor
sharp metal scrapers to clean the oven
doorglass sincetheycanscratchthe
surface,whichmayresultinshattering
oftheglass.
WARNING!!
Do not store flammable material
in the oven or in the storage
compartment.
Fig.5.2
G
Fig.5.4
Fig.5.5
Safety catch
Fig.5.3
5
21
REPLACING THE OVEN LIGHT
Beforeanymaintenanceisstartedinvolvingelectricalpartsoftheappliance,itmustbe
disconnectedfromthepowersupply.
• Lettheovencavityandthebroilelementcooldown;
• Switchofftheelectricalsupply;
• Removetheprotectivecover;
• Unscrew and replace the bulb with a new one suitable for high temperatures
(300°C-570°F)havingthefollowingspecifications:120V60Hz,15W,E14;
• Refittheprotectivecover.
NOTE:Ovenbulbreplacementisnotcoveredbyyourguarantee.
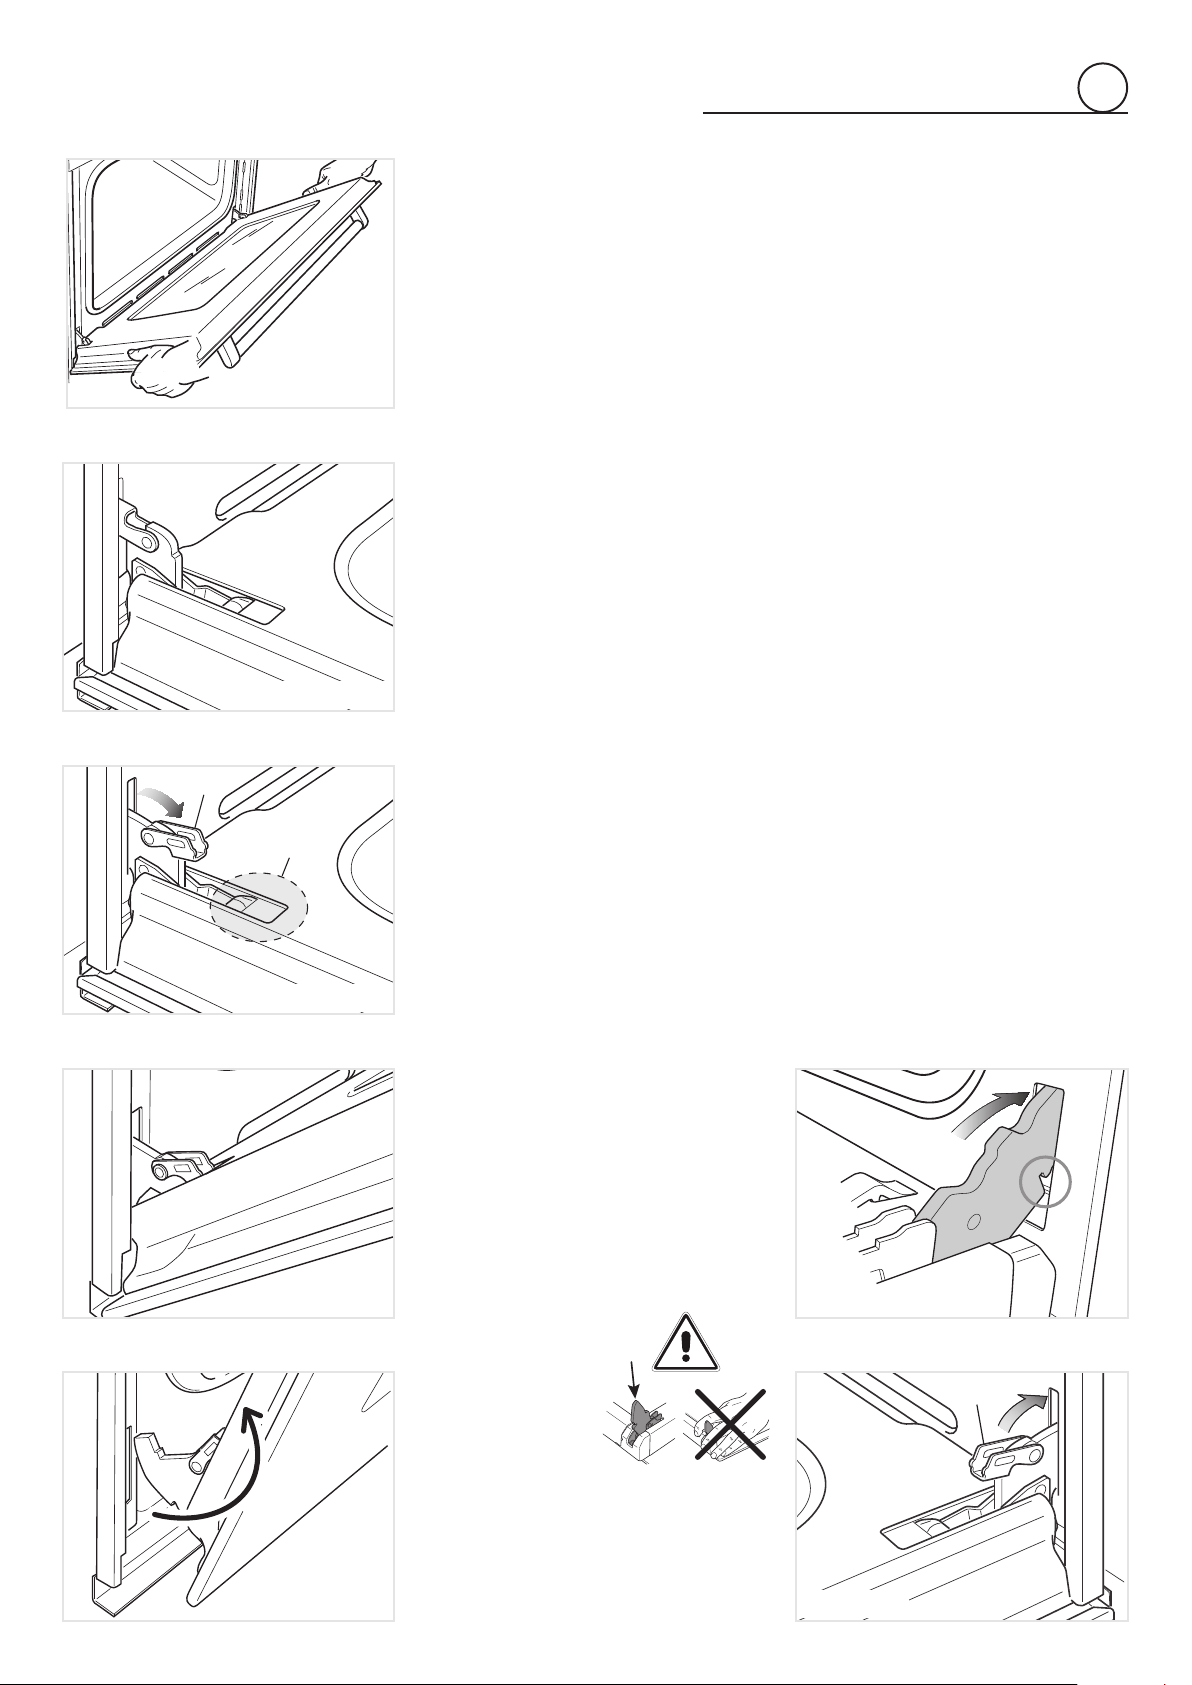
REMOVING THE OVEN DOOR
Theovendoorcaneasilyberemovedasfollows:
• Openthedoortothefullextent(fig.5.6a).
• Openthelever“A”completelyontheleftandrighthinges(fig.5.6b).
• Holdthedoorasshowninfig.5.6.
• Gentlyclosethedoor(fig.5.6c)untilleftandrighthingelevers“A”arehookedto
part“B”ofthedoor(fig.5.6b)
• Withdrawthehingehooksfromtheirlocationfollowingarrow“C”(fig.5.6d).
• Restthedooronasoftsurface.
• Toreplacethedoor,repeattheabovestepsinreverseorder.
REFITTING THE OVEN DOOR
• Holdthedoorfirmly(fig.5.6).
• Insert the hinge tongues into the slots, making sure that the groove drops into
placeasshowninthefig.5.7a.
• Openthedoortoitsfullextent.
• Fullyclosethelevers“A”ontheleftandrighthinges,asshowninthefigure5.7b.
• Closethedoorandcheckthatitisproperlyinplace.
Fig.5.6
Fig.5.6a
B
A
Fig.5.6b
C
A
Fig.5.6d
Fig.5.7b
Fig.5.6c
Fig.5.7a
5
Important!
Alwayskeepasafedistancefromthedoor
hinges,payingspecialattentiontoposition
ofyourhands.
Ifthedoorhingesare
notcorrectlyhooked,
they could unhook
and close suddenly
and unexpectedly
withriskofinjury.

22
DO’S AND DO NOT’S
• Doalwaysusetheovenwiththedoorclosed.
• Doalwaysbroilwiththedoorclosed.
• Doreadtheuserinstructionscarefullybeforeusingtherangeforfirsttime.
• Doallowtheoventoheatforabouttwohours,beforeusingforthefirsttime,in
ordertoexpelanysmellfromthenewoveninsulation,withouttheintroductionof
food.
• Docleanyourovenregularly.
• Doremovespillsassoonastheyoccur.
• Doalwaysuseovengloveswhenremovingfoodshelvesandtraysfromtheoven.
• Donotallowchildrenneartherangewheninuse.
• Donotallowfatoroilstobuildupintheovenbase,orovenaccessories.
• Donotplacecookingutensilsorplatesdirectlyontotheovenbase.
• Donotplacehotenamelpartsinwater.Leavethemtocoolfirst.
• Donotallowvinegar,coffee,milk,saltwater,lemonortomatojuicetoremainin
contactwithenamelparts(i.e.insidetheoven).
• Donotuseabrasivecleanersorpowdersthatwillscratchthesurfaceofthe
stainlesssteelandtheenamel.
• Donotattempttorepairtheinternalworkingsofyourrange.
• Doremovetheprotectivefilmbeforethefirstuse.
• Firerisk!Donotstoreflammablematerialintheovenandinthestorage
compartment.
• Donotusetheovenwiththeovendooropen.
• Donotusetheoventowarmorheataroom.
FOR YOUR SAFETY
Undernocircumstancesshouldanyexternalcoversberemovedforservicingor
maintenanceexceptbysuitablyqualifiedpersonnel
5

23

Cod.1104876-ß1
The manufacturer cannot be held responsible for possible inaccuracies due to
printingortranscriptionerrorsinthepresentbooklet.
Themanufacturerreservestherighttomakeallmodicationstoitsproductsdeemed
necessaryformanufactureorcommercialreasonsatanymomentandwithoutprior
notice,withoutjeopardisingtheessentialfunctionalandsafetycharacteristicsofthe
appliances.