Microwave Hood Combination
Combinaci6n M
icroondas Campana
Models/Modelos 721.80822
721.80823
721.80824
721.80829
\
_J
ill ""
jv
3828W5A8243 Sears, Roebuck and Co., Hoffman Estates, IL 60179 www.sears.com
Table of Contents
Warranty ........................................................................................ 2
Microwave Oven Safety ........................................................ 3~5
Getting To Know Your Microwave Oven ..........................6~10
How your kenmore microwave hood combination works .......6
Radio interference .................................................................... 6
Testing your microwave oven ................................................... 6
Testing your dinnerware or cookware ..................................... 7
Operating safety precautions .................................................... 7
Electrical connection ................................................................ 7
Specifications ............................................................................. 8
Microwave oven features ......................................................... 8
Control panel features ........................................................ 9-10
Microwave Cooking Tips ................................................... 11 ~12
Cooking Comparison Guide .................................................... 13
Cookware Guide ........................................................................ 14
How To Use Accessories ......................................................... 15
Using Your Microwave Oven ............................................ 16~25
Audible Signals ........................................................................ 16
Clock ........................................................................................ 16
Interrupting cooking ................................................................. 16
Child lock ................................................................................. 16
Kitchen timer ............................................................................ 16
Exhaust fan .............................................................................. 17
Cooktop light............................................................................ 17
Light timer ................................................................................ 17
Add 30 sec............................................................................... 18
Timed cooking ......................................................................... 18
Two - stage cooking ................................................................ 18
Microwave power levels .......................................................... 19
Turntable on/off ....................................................................... 20
Option ....................................................................................... 20
Favorite .................................................................................... 20
Melt / Soften ............................................................................. 21
Auto defrost ....................................................................... 22-25
Using Sensor Cooking ...................................................... 26~39
Sensor operating instructions ................................................. 26
Sensor cook guide .................................................................. 26
Sensor popcorn ....................................................................... 26
Sensor cook / Sensor reheat .................................................. 26
Sensor cook table / Sensor reheat table ................................ 27
Auto cook / Auto cook table .................................................... 28
Tips for convection cooking .................................................... 29
Convection ............................................................................... 30
Convection baking guidelines .......................................... 31-32
Meat roasting guidelines for convection cooking ...................33
Tips for combination cooking .................................................. 34
Combination roast ................................................................... 34
Speed auto combination/Speed auto combination chart......35
Combination roast cooking guide .................................... 36-37
Combination bake cooking guide ........................................... 37
HeationiReheating guide ........................................................ 38
Fresh vegetable guide ............................................................ 39
Caring For Your Microwave Oven.................................... 40~42
Caring for the filters ................................................................. 41
Replacing the cooktop and oven lights .................................. 42
Questions And Answers .......................................................... 43
Troubleshooting .................................................................. 44~45
Master Protection Agreements ............................................... 90
Service ........................................................................ Back cover
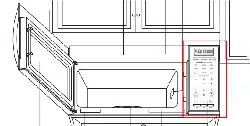
MicrowaveHood
Combination
Warranty
FULL ONE-YEAR WARRANTY ON
MICROWAVE HOOD COMBINATION
For one year from the date of purchase, if this
Kenmore Microwave Hood Combination fails due
to a defect in material or workmanship, Sears will
repair it free of charge.
FOUR YEAR LIMITED WARRANTY ON
MAGNETRON
For the second through the fifth year from the date
of purchase, if the magnetron in this oven fails due
to a defect in material or workmanship, Sears will
supply a new magnetron, free of charge.
Safety regulations, however, require the magnetron
to be installed by Sears, and you must pay the
labor cost of installation.
WARRANTY SERVICE IS AVAILABLE BY
SIMPLY CONTACTING SEARS SERVICE AT
1-800-4-MY-HOME ®
This warranty applies only while this product is in
use in the United States.
This warranty gives you specific legal rights, and
you may also have other rights which vary from
state to state.
Sears, Roebuck and Co.,
Dept. 817WA,
Hoffman Estates, IL 60179
For service call:
1-800-4-MY-HOME ®
(1-800-469-4663)
Please record your model's information.
Whenever you call to request service for your
appliance, you need to know your complete model
number and serial number. You can find this
information on the model and serial number
label/plate at the upper side of cavity front in your
Microwave oven. Also, record the other information
shown below.
Model Number
Serial Number
Purchase Date
Microwave Oven Safety
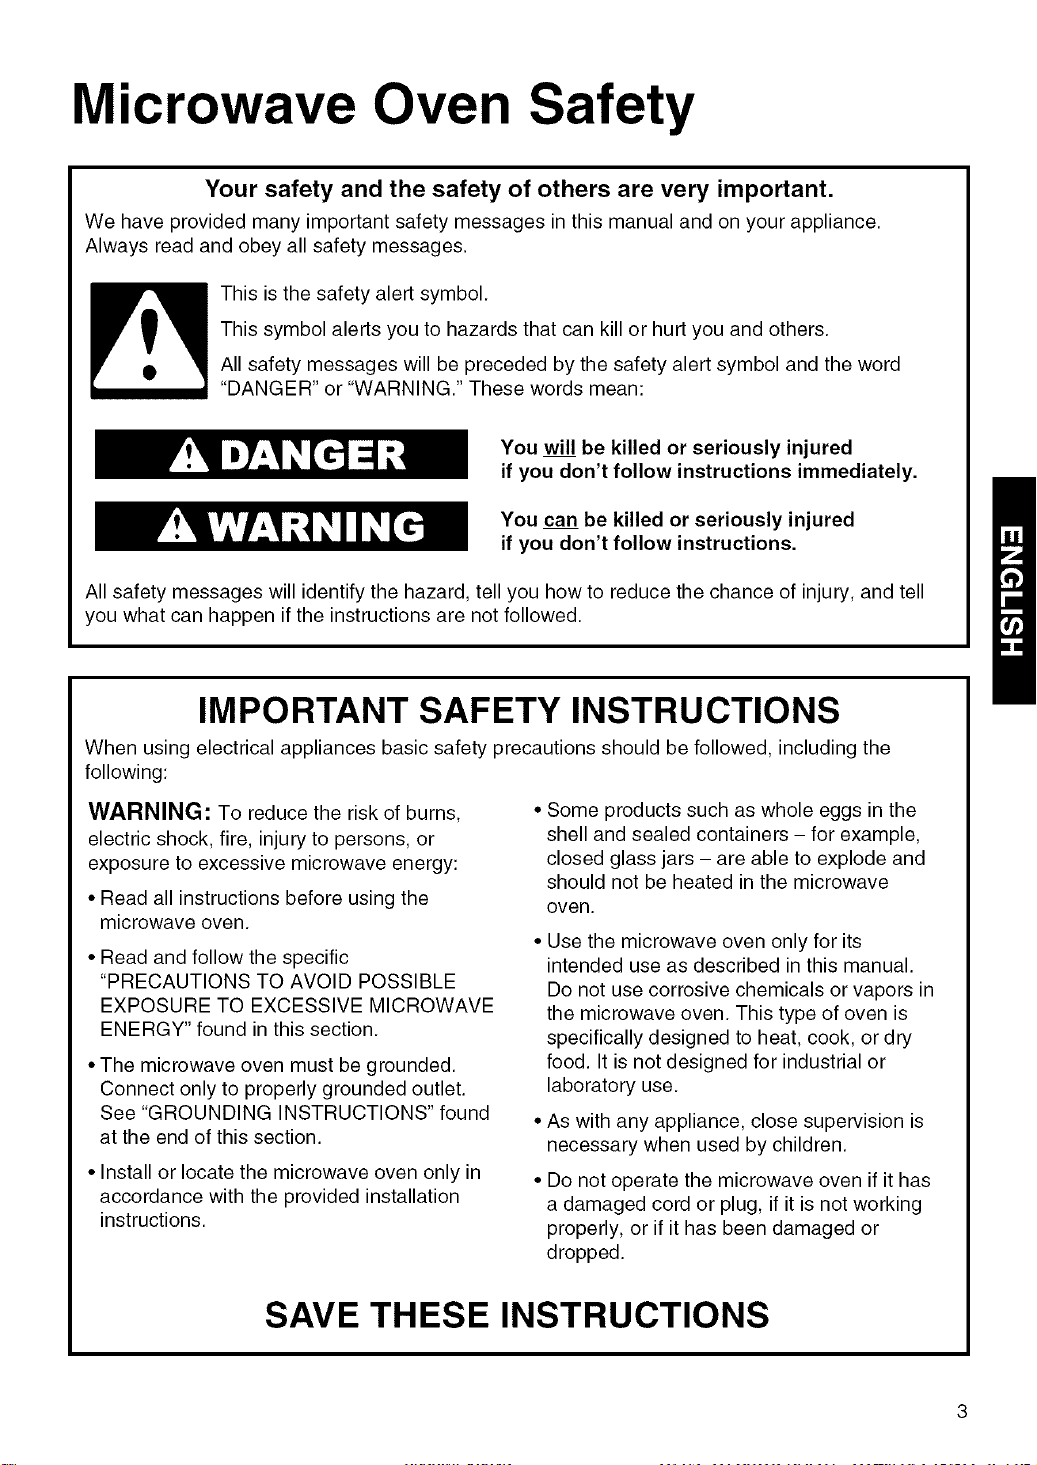
Your safety and the safety of others are very important.
We have provided many important safety messages in this manual and on your appliance.
Always read and obey all safety messages.
This is the safety alert symbol.
This symbol alerts you to hazards that can kill or hurt you and others.
All safety messages will be preceded by the safety alert symbol and the word
"DANGER" or "WARNING." These words mean:
You will be killed or seriously injured
if you don't follow instructions immediately.
You can be killed or seriously injured
if you don't follow instructions.
All safety messages will identify the hazard, tell you how to reduce the chance of injury, and tell
you what can happen if the instructions are not followed.
IMPORTANT SAFETY INSTRUCTIONS
When using electrical appliances basic safety precautions should be followed, including the
following:
WARNING: To reduce the risk of burns,
electric shock, fire, injury to persons, or
exposure to excessive microwave energy:
• Read all instructions before using the
microwave oven.
• Read and follow the specific
"PRECAUTIONS TO AVOID POSSIBLE
EXPOSURE TO EXCESSIVE MICROWAVE
ENERGY" found in this section.
• The microwave oven must be grounded.
Connect only to properly grounded outlet.
See "GROUNDING INSTRUCTIONS" found
at the end of this section.
• Install or locate the microwave oven only in
accordance with the provided installation
instructions.
• Some products such as whole eggs in the
shell and sealed containers - for example,
closed glass jars - are able to explode and
should not be heated in the microwave
oven.
• Use the microwave oven only for its
intended use as described in this manual.
Do not use corrosive chemicals or vapors in
the microwave oven. This type of oven is
specifically designed to heat, cook, or dry
food. It is not designed for industrial or
laboratory use.
• As with any appliance, close supervision is
necessary when used by children.
• Do not operate the microwave oven if it has
a damaged cord or plug, if it is not working
properly, or if it has been damaged or
dropped.
SAVE THESE INSTRUCTIONS
iiiiiiii¸i_ii_iiiii_iiii_iiiiii_i_iliiiiii!i¸iiilil!_ii_ii_iiil¸ii_!iiii_i_,!_i_iiiii_il_;i:iiii_ii_il_ii_ii_iiiiii_ii_i_i_111iiili_i_iiiiiii_ii_i'ii:iiiiiiiiii111_ilii_ii_ii_ii'ii_ii_ii_i!_ii_ii¸iii_il_ii_il_ii:ii_ii_ii_il_ii_ii:ililiiiiiiil¸ii_i_ii_i_i!_ii_;i_ii'ii_ii'iiii_i!_i!_iili_il_i!i_ii_i!_i!illii;ii_:i_ii!iiili_ii_ii_ii_ii_ii_ii:ii_ii_ii_i_ii_il_ii_i!_iiii_iilii__iililiii_il_i!ili_i_i_i_i_i¸ii_illil_i_ii_ilil_ii_iiii_ii_iiiiiiil¸ii_ii_il_ililliiiii¸iii_!_i!_i!_i!_i!_i!_i!_i!_i!_i!_i!_i!_i!_i!_i!_i!_i!_i!_i!_i!_i!_i!_i!_i!_i!_i!_i!_i!_i!_i!_i!_i!_i!_i!_i!_i!_i!_i!_i!_i!_i!_i!_i!_i!_i!_i!_i!_i!_i!_i!_i!_i!_i!_i!_i!_i!_i!_i!_i!_i!_i!_i!_i!_i!_i!_i!_i!_i!_i!_i!_i!_i!_i!_i!_i!_i!_i!_i!_i!_i!_i!_i!_i!_i!_i!_i!_i!_i!_i!_i!_i!_i!_i!_i!_i!_i!_i!_i!_i!_i!_i!_i!_i!_i!_i!_i!_i!_i!_i!_i!_i!_i!_i!_i!_i!_i!_i!_i!_i!_i!_i!_i!_i!_i!_i!_i!_i!_i!_i!_i!_i!_i!_i!_i!_i!_i!_i!_i!_i!_i!_i!_i!_i!_i!_i!_i!_i!_i!_i!_i!_i!_i!_i!_i!_i!_i!_i!_i!_i!_i!_i!_i!_i!_i!_i!_i!_i!_i!_i!_i!_i!_i!_i!_i!_i!_i!_i!_i!_i!_i!_i!_i!_i!_i!_i!_i!_i!_i!_i!_i!_i!_i!_i!_i!_i!_i!_i!_i!_i!_i!_i!_i!_i!_i!_i!_i!_i!_i!_i!_i!_i!_i!_i!_i!_i!_i!_i!_i!_i!_i!_i!_i!_i!_i!_i!_i!_i!_i_,_,_i!'i!_i!'i!'i!';!'i!_!,i!i!
IMPORTANT SAFETY INSTRUCTIONS
•Themicrowaveovenshouldbe servicedonlyby
qualifiedservicepersonnel.Callan authorized
servicecompanyforexamination,repair,or
adjustment.
•See doorsurfacecleaninginstructionsin the"Caring
forYour MicrowaveOven"section.
•To reducethe riskoffireintheovencavity:
- Donotovercookfood.Carefullyattendthe
microwaveovenwhenpaper,plastic,orother
combustiblematerialsareplacedinsidethe oven
to facilitatecooking.
- Removewiretwist-tiesfrom paperor plasticbags
beforeplacingbagsinoven.
- Ifmaterialsinsidetheovenignite,keepovendoor
closed,turnovenoff,anddisconnectthepower
cord,or shutoff poweratthefuseor circuitbreaker
panel.
- Donotusethecavityforstoragepurposes.Donot
leavepaperproducts,cookingutensils,orfoodin
thecavitywhennotinuse.
•Thismicrowaveovenissuitablefor useaboveboth
gasand electriccookingequipment.
•Thismicrowaveovenisintendedtobe usedabove
rangeswith maximumwidthof36 inches(91cm).
•CleanVentilatingHoods Frequently-Greaseshould
notbe allowedtoaccumulateon hoodorfilter.
•Whenflamingfoodsunderthehood,turnthefanon.
•Usecarewhencleaningthevent-hoodfilter.
Corrosivecleaningagents,suchas lye-basedoven
cleaners,maydamagethefilter.
•Oversizedfoodsoroversizedmetalutensilsshould
notbe insertedin themicrowaveovenastheymay
createa fireor riskof electricshock.
• Donotcleanwithmetalscouringpads. Piecescan
burnoff thepadand touchelectricalpartsinvolvinga
riskofelectricshock.
• Donotstoreanythingdirectlyontop ofthe
microwaveovenwhenthemicrowaveovenisin
operation.
• Donotcoveror blockanyopeningson the
microwaveoven.
• Donotstorethismicrowaveovenoutdoors.Donot
usethe microwaveovennearwater- forexample,
near a kitchensink,in a wetbasement,neara
swimmingpool,or similarlocation.
• Donotimmersecordor plug inwater.
• Keepcordaway fromheatedsurfaces.
• Donotletcordhang overedgeoftableor counter.
• Donotmountovera sink.
• Donotcoverracksor anyotherpartofthe ovenwith
metalfoil.Thiswillcause overheatingoftheoven.
• Liquidssuch as water, coffee, or tea are able to
be overheated beyondthe boiling point without
appearing to be boiling due to surface tension of
the liquid.Visible bubbling or boiling when the
container is removed from the microwave oven is
not always present.This could result in very hot
liquids suddenly boiling overwhen a spoon or
other utensil is inserted intothe liquid.To reduce
the risk of injury to persons;
1) Do not overheat the liquid.
2) Stir the liquid bothbefore and halfway through
heating it.
3) Do not use straight-sided containers with
narrow necks.
4) After heating, allowthe container to stand in
the microwave oven for a short time before
removing the container.
5) Use extreme care when inserting a spoon or
other utensil into the container.
SAVE THESE INSTRUCTIONS
i!i!i!i!i!i!i!i!i!i!i!i!i!i!i!i!i!i!i!i!i!i!i!i!i!i!i!i!i!i!i!i!i!i!i!i!i!i!i!i!i!i!i!i!i!i!i!i!i!i!i!i!i!i!i!i!i!i!i!i!i!i!i!i!i!i!i!i!i!i!i!i!i!i!i!i!i!i!i!i!i!i!i!i!i!i!i!i!i!i!i!i!i!i!i!i!i!i!i!i!i!i!i!i!i!i!i!i!i!i!i!i!i!i!i!i!i!i!i!i!i!i!i!i!i!i!i!i!i!i!i!i!i!i!i!i!i!i!i!i!i!i!i!i!i!i!i!i!i!i!i!i!i!i!i!i!i!i!i!i!i!i!i!i!i!i!i!i!i!i!i!i!i!i!i!i!i!i!i!i!i!i!i!i!i!i!i!i!i!i!i!i!i!i!i!i!i!i!i!i!i!i!i!i!i!i!i!i!i!i!i!i!i!i!i!i!i!i!i!i!i!i!i!i!i!i!i!i!i!i!i!i!i!i!i!i!i!i!¸I_II_!IIII_il_ii_i!ill_i_ill¸i!iiii!i!_!i_i!_i!i!i!_!ii_!_!_!_ili!_i!_ii_il_i!_i!_i!_i!_iiiii!_i!_i_i_iii!ili_i:i'iiii_i!_!'iill¸iiiiiiiiiiii_iiii_il_ii_!i'ii_iiii!ii!i!!!¸i!_i!_ii_i!_i!:i!_i!_!_i!_i!_ii_iiiii!_i!_i!i!_i!_iiiiii_ii_i!_i_ii!!iiiii_i!_i!_iiiiii_i!¸ii_i!_i!_!i!_i!il¸i_iill'i!ililiiii!ii_i!_ii_i!_i!_i!i!:i!ii_i!_i!!!iiiiii_iiiiiiil_ii_i!il;iiiiliiii'ili¸II_I!_ii_i!_i!_i!_i!_i_i!_i!iiiiili¸il¸i_iiil¸iiiiiii!_i!_i!_i!_i!_i!_i!_i!_i!_i!_i!_i!_i!_i!_i!'i!
PRECAUTIONS TO AVOID POSSIBLE
EXPOSURE TO EXCESSIVE MICROWAVE
ENERGY
(a) Do not attempt to operate this oven withthe
door open since open-door operation can
result in harmful exposure to microwave
energy. It is important not to defeat or tamper
with the safety interlocks.
(b) Do not place any object between the oven
front face and the door or allow soil or
cleaner residue to accumulate on sealing
surfaces.
(c) Do not operate the oven ifit is damaged. It is
particularly important that the oven door close
properly and that there is no damage to the:
(1) Door (bent),
(2) Hinges and latches (broken or loosened),
(3) Door seals and sealing surfaces.
(d) The oven should not be adjusted or repaired
by anyone except properly qualified service
personnel.
Electrical
requirements
Observe all governing codes and
ordinances. A 120 Volt, 60 Hz, AC only,
15 or 20 amp fused electrical supply is
required. (A time-delay fuse is recommended.)
It is recommended that a separate circuit
serving only this appliance be provided.
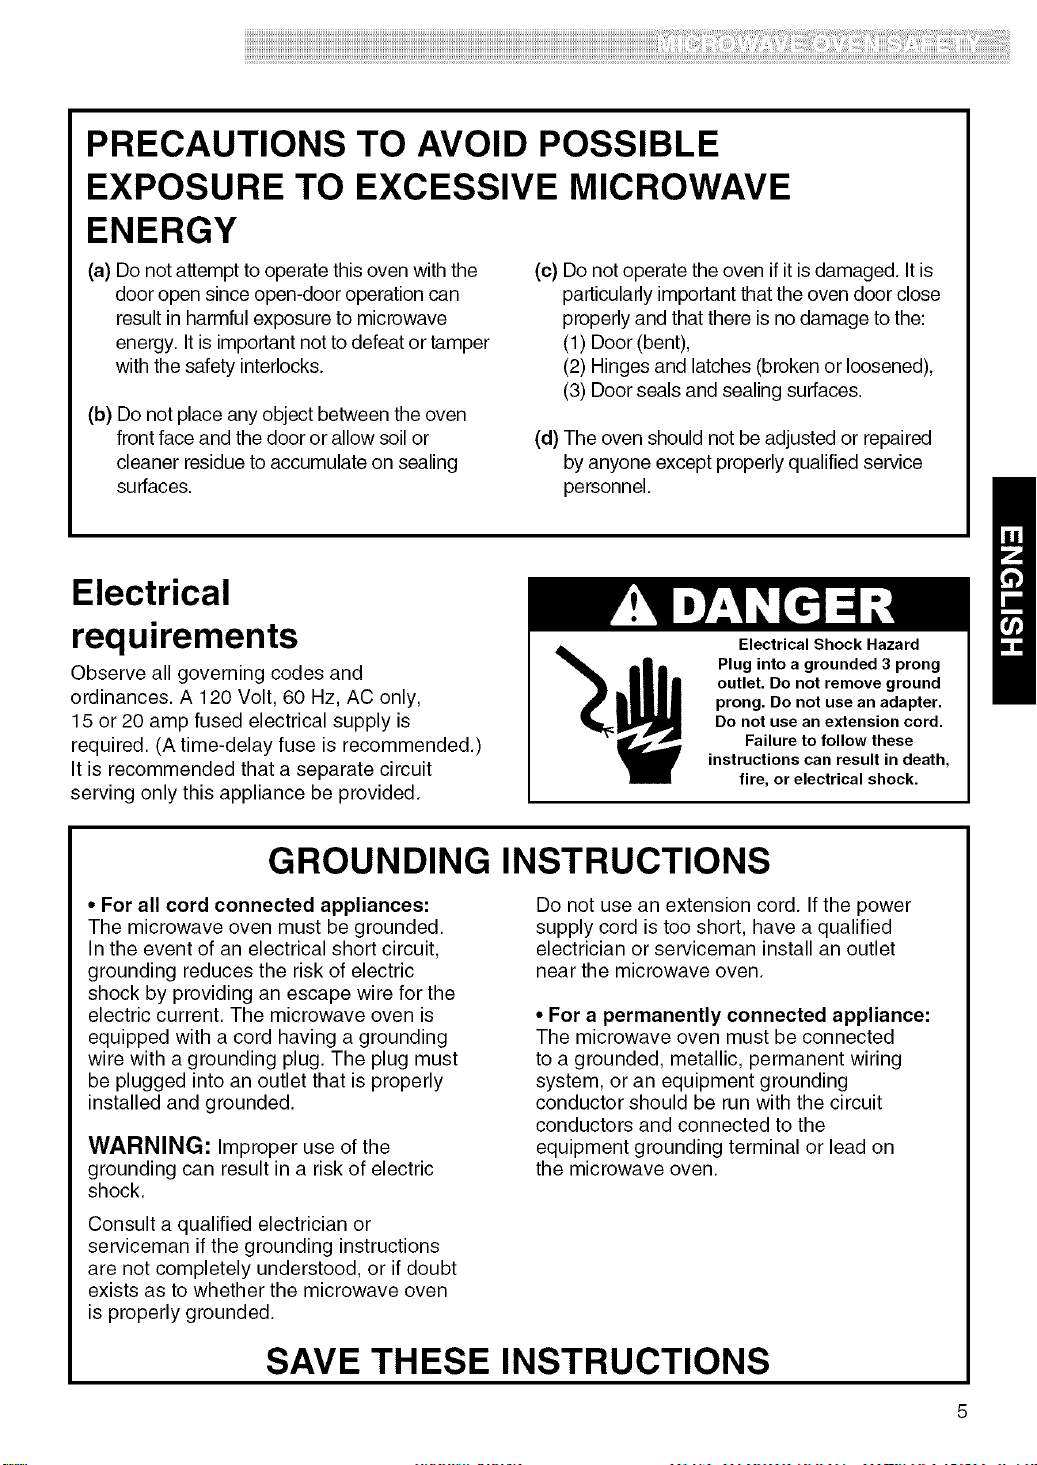
Electrical Shock Hazard
Plug into a grounded 3 prong
outlet. Do not remove ground
prong. Do not use an adapter.
Do not use an extension cord.
Failure to follow these
instructions can result in death,
fire, or electrical shock.
GROUNDING INSTRUCTIONS
• For all cord connected appliances:
The microwave oven must be grounded.
In the event of an electrical short circuit,
grounding reduces the risk of electric
shock by providing an escape wire for the
electric current. The microwave oven is
equipped with a cord having a grounding
wire with a grounding plug. The plug must
be plugged into an outlet that is properly
installed and grounded.
WARNING: Improper use of the
grounding can result in a risk of electric
shock.
Do not use an extension cord. If the power
supply cord is too short, have a qualified
electrician or serviceman install an outlet
near the microwave oven.
• For a permanently connected appliance:
The microwave oven must be connected
to a grounded, metallic, permanent wiring
system, or an equipment grounding
conductor should be run with the circuit
conductors and connected to the
equipment grounding terminal or lead on
the microwave oven.
Consult a qualified electrician or
serviceman if the grounding instructions
are not completely understood, or if doubt
exists as to whether the microwave oven
is properly grounded.
SAVE THESE INSTRUCTIONS
Gettin to Know Your
Microwave Oven
This section discusses the concepts behind microwave cooking. It also shows you the basics you need
to know to operate your microwave oven. Please read this information before you use your oven.
HOW YOUR CAPITALIZE KENMORE MICROWAVE HOOD
COMBINATION WORKS
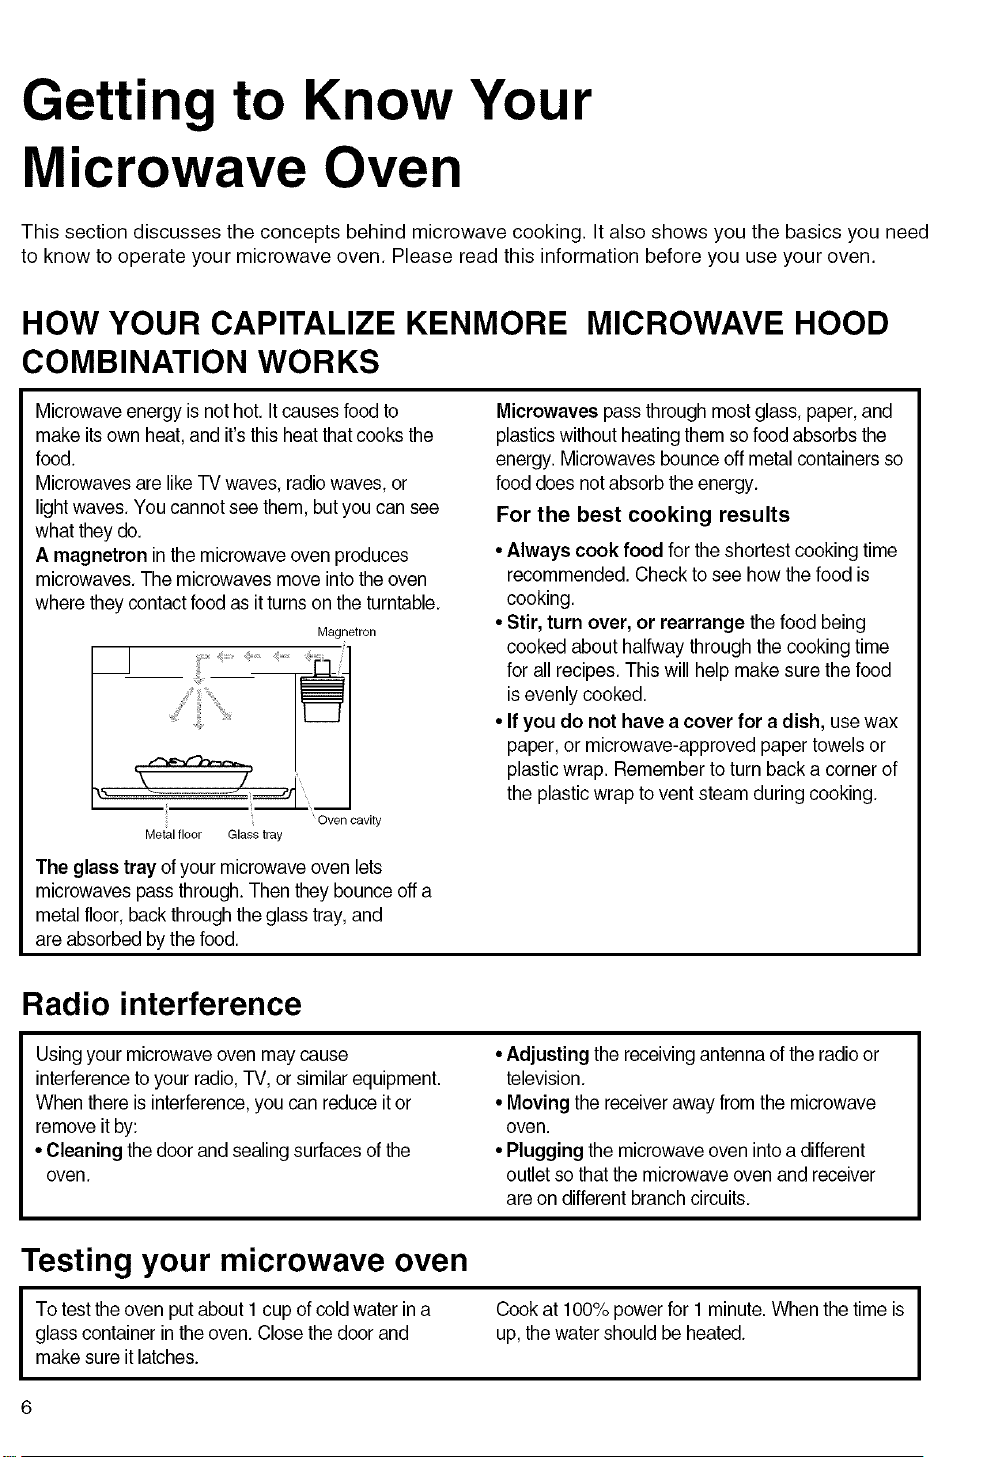
Microwave energy is nothot. It causesfood to
make its own heat, and it's thisheat that cooks the
food.
Microwavesare likeTV waves, radio waves, or
lightwaves. You cannot see them, but you can see
what they do.
A magnetron in the microwave oven produces
microwaves. The microwaves move intothe oven
where they contact food as itturns on the turntable.
Magnetron
i p
Oven cavity
Metal floor Glass tray
The glass tray of your microwave oven lets
microwaves pass through. Then they bounce off a
metal floor, back through the glass tray,and
are absorbed by the food.
Microwaves pass throughmost glass, paper,and
plasticswithout heating them so food absorbs the
energy. Microwaves bounce off metal containers so
food does notabsorb the energy.
For the best cooking results
• Always cook food for the shortest cooking time
recommended. Check to see how the food is
cooking.
• Stir, turn over, or rearrange the food being
cooked about halfway through the cooking time
for all recipes. This will help make sure the food
is evenly cooked.
• If you do not have a cover for a dish, usewax
paper, or microwave-approved paper towels or
plastic wrap. Remember to turn back a corner of
the plastic wrap to vent steam during cooking.
Radio interference
Using your microwave oven may cause
interferenceto your radio,TV, or similar equipment.
When there isinterference, you can reduce itor
remove it by:
• Cleaning the door and sealingsurfaces ofthe
oven.
• Adjustingthe receivingantenna of theradioor
television.
• Moving the receiver away from the microwave
oven.
• Plugging the microwave oven intoa different
outlet so that the microwave oven and receiver
are on differentbranch circuits.
Testing your microwave oven
To test the oven put about 1 cup of coldwater in a Cook at 100% powerfor 1 minute.When the time is
glass container in the oven. Close thedoor and up,the water should be heated.
make sure it latches.
6
i!i!i!i!i!i!i!i!i!i!i!i!i!i!i!i!i!i!i!i!i!i!i!i!i!i!i!i!i!i!i!i!i!i!i!i!i!i!i!i!i!i!i!i!i!i!i!i!i!i!i!i!i!i!i!i!i!i!i!i!i!i!i!i!i!i!i!i!i!i!i!i!i!i!i!i!i!i!i!i!i!i!i!i!i!i!i!i!i!i!i!i!i!i!i!i!i!i!i!i!i!i!i!i!i!i!i!i!i!i!i!i!i!i!i!i!__¸iiiiii!i!iill_iliii'ii_ii_;iiiii_!_i!_i!_i!!!_i!_i!_i!_ii_iiiii!!i!i!i!i!i¸ililili!iiii_iiiiiii_i!_ii_i!!¸ili_ii_ii_i:ili_i!_I!_I!_I!¸ii_i!;i!;i!;i!_i!_i!_i!_i!_!iiiii_il_II_II_ii_iiii_!_!!!!i!iiii_i!_i!_i!_i!_i!_i!_iiii:!iiiiii_!_ii_iiiiiiiiiiii'i!ii_i!!ii:i:i_!!!_i!_!ii:iiiii!_i!,i!iiiiiiiiii_iill_!iiiii_i!ii!ii!ii!ii!ii!ii!_ii_ii:i:iii_il_i!ii_iiiii!i!!!il_i!iiiiii!_ii_iii!_I!_I!I!IIII!!Iil¸i!:!i!:iill¸I!_ii'ii'i!ii_!:i¸iii!i'iiii¸ill!_i!_!iiiii_ii_ii_ii!_i!_i!_!i_:!ii_iii_!iiiiiiii:iiii_iiii_i!_i!_iiii!_i!_i!_i!_i!il¸ii_i!_ii;_!_ii:iiill¸ii¸iiii:iiiiii!_i!_iiiiiili!_iiiill_i!_i!_iiiiii_!!iiiiiii!!I!_I!II_!I!!I_I!_i!_i!_!!_!!_!!_i!_i!ii_iiii_!!!i_!i_iiiiiillii!_i!_iiii_iii!ii_iii_!ii!_ii_ii:!_i!_i!ii_i_i!_i!iiiii_i!:ii_i!!ili_ii_ii_ii_ii_ii_ii_ii_ii_ii_ii_ii_ii_ii_ii
Testing your dinnerware or cookware
Test dinnerware or coolwvarebefore using. To
test a dish for safe use, putit into the ovenwith a
cup of water beside it. Cook at 100% cook power
for one minute.If the dish gets hot, do not use it.
Some dishes (melamine, some ceramic
dinnerware, etc.) absorb microwave energy,
becoming too hotto handle and slowing cooking
times. Cooking in metal containers not designedfor
microwave usecould damage the oven, as could
containerswith hidden metal (twist-ties,foil lining,
staples, metallic glaze or trim).
Operating safety precautions
• Never lean on the door or allow a child to swing
on itwhen thedoor is open.
• Use hot pads. Microwave energy does not heat
containers, butthe heat from the food can make
thecontainer hot.
• Do not use newspaper or other printed paper in
theoven.
• Do not dry flowers, fruit, herbs,wood, paper,
gourds, or clothes in the oven.
• Do not start a microwave ovenwhen it isempty.
Product life may be shortened. If you practice
programming the oven, put a container ofwater in
theoven. It is normalfor the oven door to look
wavy after theoven has been running fora while.
• Do not try to melt paraffinwax in the oven.
Paraffinwax will not melt in a microwave oven
because it allows microwaves to pass through it.
• Do not operate the microwave oven unless the
glass turntable issecurely in placeand can move
freely.The turntable can move in eitherdirection.
Make sure the turntable iscorrect-side up in the
oven. Handle your turntable with care when
removing itfrom the oven toavoid possibly
breakingit. Ifyour turntable cracks or breaks,
contact your dealer fora replacement.
• When you use a browning dish, the browning
dish bottom mustbe at least3/16 inchabove the
turntable.Follow the directionssupplied with the
browningdish.
• Never cook or reheat a whole egg insidethe
shell. Steam buildup inwhole eggs may cause
them to burst,and possiblydamage the oven.
Slice hard-boiled eggs before heating. In rare
cases, poached eggs have been known to
explode. Cover poached eggsand allow a
standing time of one minute beforecutting into
them.
• For best results, stir any liquid several times
during heating or reheating. Liquidsheated in
certain containers(especially containersshaped
likecylinders) may become overheated.The liquid
may splash out with a loud noise during or after
heatingor when adding ingredients (coffee
granules, tea bags, etc.). This can harm you or
damage the oven.
• Microwaves may not reachthe center of a roast.
The heatspreads to thecenter from theouter,
cooked areasjust as in regular oven cooking. This
isone ofthe reasons for lettingsome foods (for
example, roastsor baked potatoes)stand for a
while after cooking, or for stirring some foods
during thecooking time.
• Do not deep fry in the oven. Microwavable
utensilsare notsuitableand it isdifficult to
maintain appropriatedeep-frying temperatures.
• Do not overcook potatoes. At the end of the
recommended cooking time, potatoesshould be
slightly firm because they will continue cooking
during standing time.After microwaving, let
potatoesstand for 5 minutes. They will finish
cooking while standing.
Electrical connection
I If your electric power line or outlet voltage is
less than 110 volts, cooking times may be longer.
I
Have a qualified electrician check your electrical I
system.
I
SPECIFICATIONS
Power Supply
Rated Power Consumption
Power Output
Rated Current
Microwave
Convection
Microwave
Convection
Microwave
Convection
Overall Dimensions(WxHxD)
Oven Cavity Dimensions(WxHxD)
Capacity of Oven Cavity
*IEC 60705 RATING STANDARD
Specifications subject to change without prior notice.
120V AC, 60 Hz
1600W
1700W
"950W
1500W
13.5A
14.0A
29 15/16" X 16 7/16" X 15 3/6"
21 1/4"x 9 7/16" X 14 3/16"
1.7 cu.ft
Microwave oven features
Your microwave oven is designed to make your
cooking experience as enjoyable and productive
as possible. To get you up and running quickly, the
following is a list of the oven's basic features:
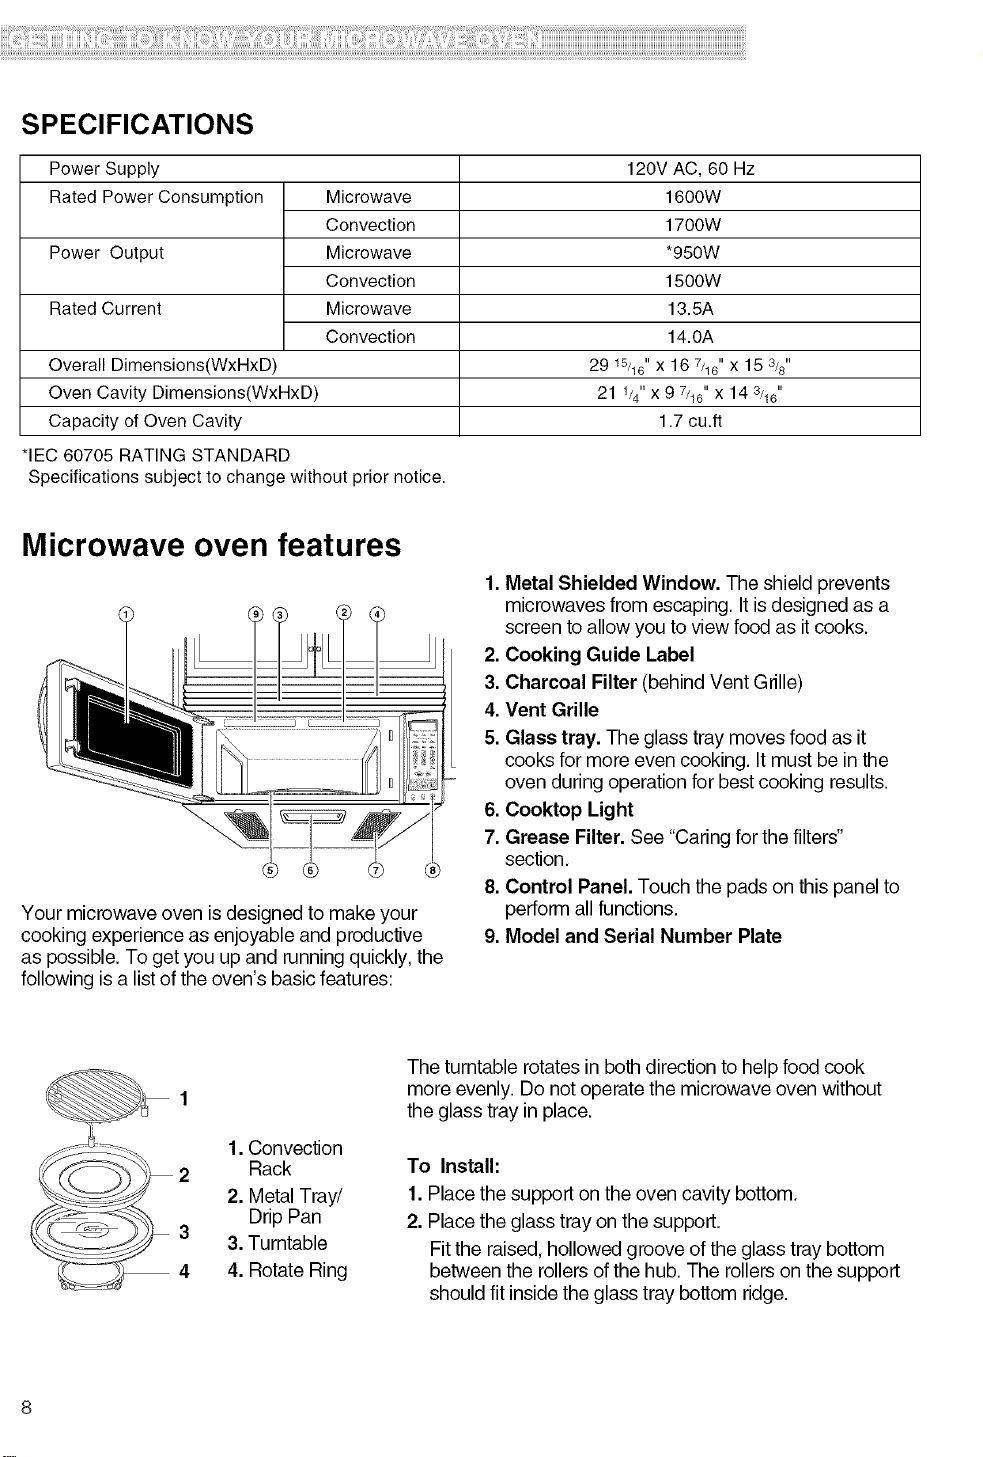
1. Metal Shielded Window. The shield prevents
microwaves from escaping. It is designed as a
screen to allow you to view food as it cooks.
2. Cooking Guide Label
3. Charcoal Filter (behind Vent Grille)
4. Vent Grille
5. Glass tray. The glass tray moves food as it
cooks for more even cooking. It must be in the
oven during operation for best cooking results.
6. Cooktop Light
7. Grease Filter. See "Caring for the filters"
section,
8. Control Panel. Touch the pads on this panel to
perform all functions.
9. Model and Serial Number Plate
1. Convection
Rack
2. Metal Tray/
Drip Pan
3
3. Turntable
4 4. Rotate Ring
The turntable rotates in both direction to help food cook
more evenly. Do not operate the microwave oven without
the glass tray in place.
To Install:
1. Place the support on the oven cavity bottom,
2. Place the glass tray on the support.
Fit the raised, hollowed groove of the glass tray bottom
between the rollers of the hub. The rollers on the support
should fit inside the glass tray bottom ridge.
i!i!i!i!i!i!i!i!i!i!i!i!i!i!i!i!i!i!i!i!i!i!i!i!i!i!i!i!i!i!i!i!i!i!i!i!i!i!i!i!i!i!i!i!i!i!i!i!i!i!i!i!i!i!i!i!i!i!i!i!i!i!i!i!i!i!i!i!i!i!i!i!i!i!i!i!i!i!i!i!i!i!i!i!i!i!i!i!i!i!i!i!i!i!i!i!i!i!i!i!i!i!i!i!i!i!i!i!i!i!i!i!i!i!i!i!__¸iiiiii!i!iill_iliiiii_ii_;iiiii_!_i!_i!_i!!!_i!_i!_i!_ii_iiiii!!i!i!i!i!i¸ililili!iiiiiiiiiii_i!:ii_i!!¸ili_ii_ii_iiiiii!_I!_I!_I!¸iii!;i!;i!;i!i!_i!_i!_i!_!iiiii_il_II_II_ii_iiii_!_!!!!i!iiii_i!_i!i!_i!_i!_i!_iiii:!iiii:i!_ii_iiiiiiiiiiii'i!iii!!ii:i:i_!!!_i!_!iiiiiiii!_i!i!iiiiiiiiii_iill_!iiiii_i!ii!ii!ii!ii!ii!ii!_ii_ii:iiiiiil_i!ii_iiiii!i!!!il_i!iiiiii!_ii_i:i!_I!_I!I!III:!!Iil¸i!i!i!:iill¸I!_iiiii!ii!il¸iii!iiiii¸ill!_i!_!iiiii_ii_ii_ii!i!_i!_!i_:!ii_iii_!:iii:ili:iiii_iiiii!_i!_iiii!_i!_i!_i!_i!il¸ii_i!_ii;!_i::iiill¸ii¸iiii:iiiiii!_i!_iiiiiili!_iiiill_i!_i!_iiiiii!!iiiiiii!!I!_I!II_!I!!I_I!_i!i!_!!_!!_!!_i!_i!ii_iiii_!!!i_!i_iiiiiillii!_i!_iiii_iii!ii_iii!ii!_ii_iii!i!_i!ii_i_i!i!iiiii_i!:ii_i!!ili_ii_ii_ii_ii_ii_ii_ii_ii_ii_ii_ii_ii_ii_ii
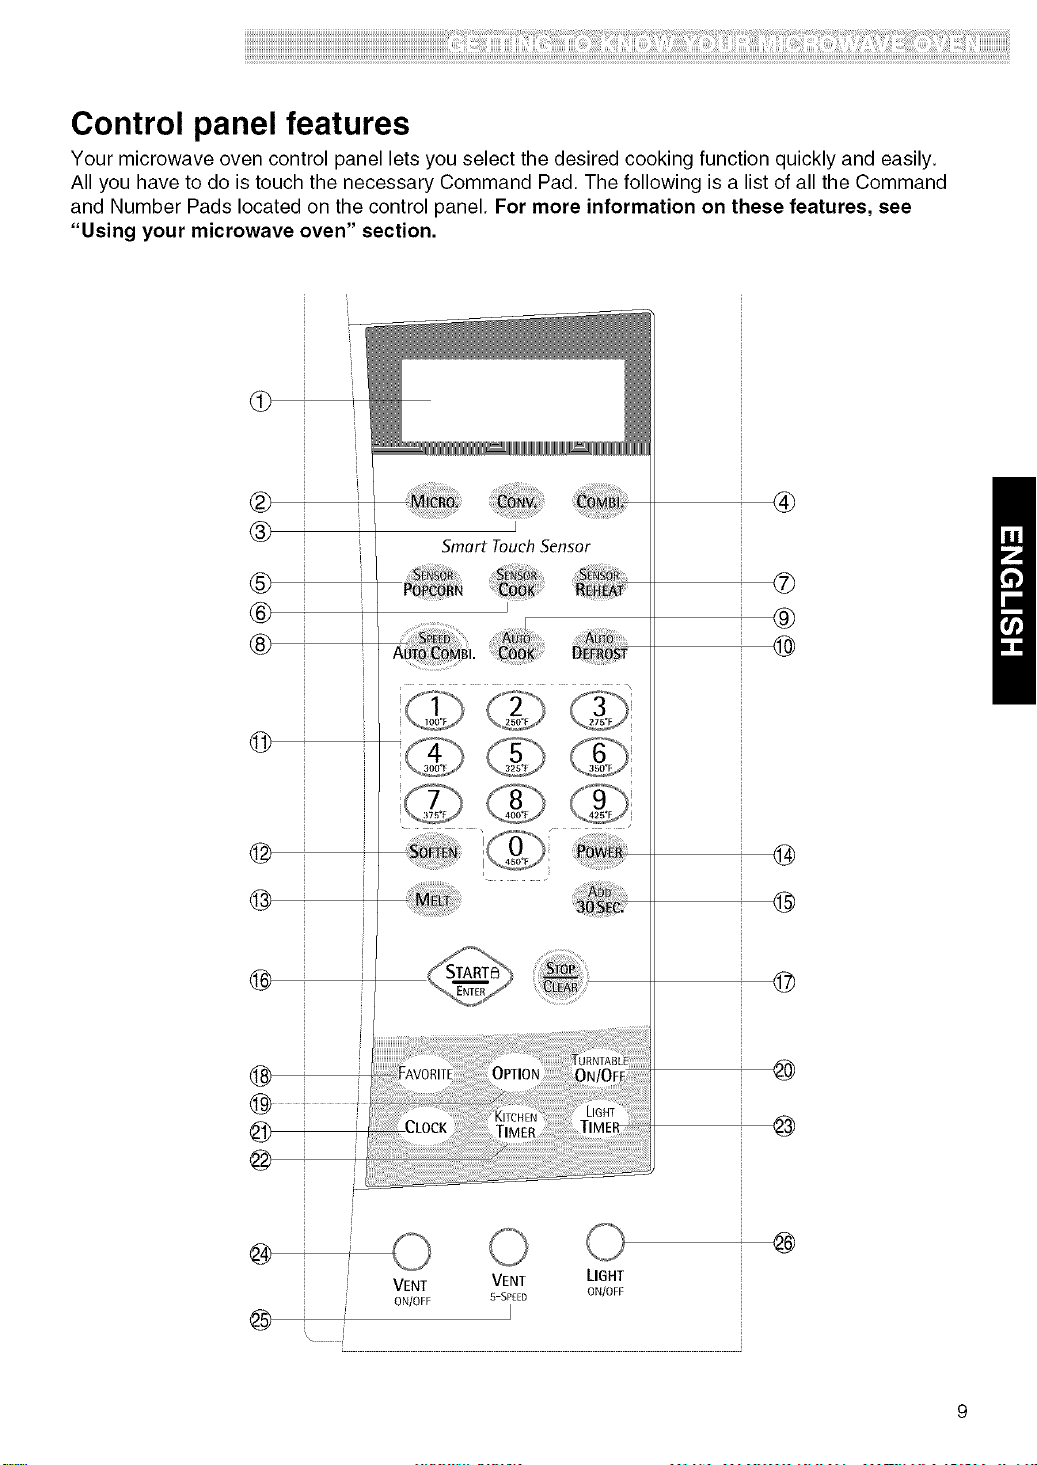
Control panel features
Your microwave oven control panel lets you select the desired cooking function quickly and easily.
All you have to do is touch the necessary Command Pad. The following is a list of all the Command
and Number Pads located on the control panel. For more information on these features, see
"Using your microwave oven" section.
Q_
®
®
®
®
®
©
@
@
®
@
@
I
i
VENT LIGHT
5-SPEED ON/OFF
I
VENT
ON/OFF
®
®
®
@
@
@
©
®
@
@

1. DISPLAY. The Display includes a clock and
indicators to tell you time of day, cooking time
settings and cooking functions selected.
2. MICRO. Touch this pad when setting
Microwave cooking.
3. CONV. Touch this pad when setting Convection
cooking.
4. COMBI. Touch this pad when setting
combination cooking or preheat.
5. SENSOR POPCORN. Touch this pad when
popping popcorn in your microwave oven. The
oven's sensor will tell the oven how long to cook
depending on the amount of humidity it detects
from the popcorn.
6. SENSOR COOK. Touch this pad to cook baked
potato, frozen vegetable, fresh vegetable,
canned vegetable, frozen entree and rice. The
oven's sensor will tell the oven how long to cook
depending on the amount of humidity coming
from the food.
7. SENSOR REHEAT. Touch this pad to reheat
casserole, dinner plate, pizza slice and
soup/sauce. The oven's sensor will tellthe oven
how long to cook depending on the amount of
humidity coming from the food.
8. SPEED AUTO COMBI. Touch this pad when
setting weight combination cooking.
9. AUTO COOK. Touch this pad to cook Bacon,
Fresh Roll & Muffin, Frozen Roll & Muffin,
Beverage, Chicken Pieces, Hot Cereal.
10. AUTO DEFROST. Touch this pad to select
food type and defrost food by weight.
11. NUMBER. Touch number pads to enter
cooking time, power level, quantities, weights,
or cooking temperature.
12. SOFTEN. Touch this pad to soften Butter, Ice
Cream, Cream Cheese or Frozen Juice.
13. MELT. Touch this pad to melt Butter or
Margarine, Chocolate, Cheese or
Marshmallow.
14. POWER. Touch this pad to select a cooking
power level.
15. ADD 30 SEC. Touch this pad to set and start
quickly at 100% power level.
16. START/ENTER. Touch this pad to start a
function or enter all entries. If you open the
door after oven begins to cook, touch
START/ENTER again.
17. STOP/CLEAR. Touch this pad to stop the
oven or to clear all entries.
18. FAVORITE. Touch this pad to recall one
cooking instruction previously programmed
into memory.
19. OPTION. Touch this pad to change the oven's
default settings for sound, clock, display speed
and defrost weight.
20. TURNTABLE ON/OFF. Touch this pad to turn
off the turntable. OFF will appear in the display.
NOTE: This option is not available in sensor
cook and defrost modes.
21. CLOCK. Touch this pad to enter the time of
day.
22. KITCHEN TIMER. Touch this pad to set the
kitchen timer.
23. LIGHT TIMER. Touch this padto set lhe light
timer.
24. VENT ON/OFF. Touch this pad to turn the fan
on/off.
25. VENT 5-SPEED. Touch this pad to choose
one of 5 fan speeds.
26. LIGHT ON/OFF. Touch this pad to turn on the
cooktop/countertop light.
10
¸i !iiii iiii i!il¸i i il¸ii!iiiiii! !i i! iiiii! i! i i ili i:¸iiiii:i! !'ii:iiiiiiill¸iiii iiii ii ii !i'il i! i!iiii!iii:!!! i! i! i!iiiiiiiiiiii i ii ii'i!ii!i¸iiiii!ii i!!!ii ii'ii ii ii'ii ii ii il ii i!ililili111¸I¸19911ilII¸iiiiiiii ii ii:i i! i!'i! iii!i!i!i!i!¸i!i!i!i!i!i!i!i!i!i!i!
MICROWAVE COOKING TIPS
Amount of food
• Ifyou increase or decrease theamount of food
you prepare,the time ittakes to cook that food will
also change, For example, ifyou double a recipe,
add a little morethan half the originalcooking time,
Check fordoneness and, ifnecessary, add more
time in small increments.
Starting temperature of food
• The lowerthe temperature ofthefood beingput
intothe microwaveoven, the longer it takesto cook.
Food at roomtemperature will be re-heatedmore
quicklythan food at refrigeratortemperature.
Composition of food
• Food with a lot of fat and sugarwill be heated
fasterthan food containing a lotof water. Fat and
sugarwill also reach a higher temperature than
water in the cooking process.
• The more dense the food, the longer ittakes to
heat. "Very dense" food likemeat takeslonger to
heatthan lighter,more porous food likesponge
cakes.
Sizeandshape
• Smaller pieces of food willcook fasterthanlarger
pieces,Also, same-shaped pieces cook more
evenly than different-shaped pieces,
• With foods that have different thicknesses, the
thinner partswill cook faster than the thicker parts,
Place thethinner parts of chickenwings and legs in
the center ofthe dish,
Stirring, turning foods
• Stirring and turning foods spreads heat quicklyto
the center ofthe dish and avoids overcooking atthe
outeredges of the food,
Covering food
Cover food to:
• Reduce splattering
• Shorten cooking times
• Keep food moist
You can use any covering that lets microwavespass
through. See "Gettingto KnowYour Microwave
Oven" for materials thatmicrowaveswill pass
through, If you are using the Sensorfunction, be sure
to vent,
Releasingpressure infoods
•Severalfoods (forexample:bakedpotatoes,sausages,
eggyolks,andsomefruits)aretightlycoveredbya skinor
membrane.Steamcanbuildup underthemembrane
duringcooking,causingthefoodtoburst.Torelievethe
pressureandtopreventbursting,piercethesefoods
beforecookingwithafork,cocktailpick,ortoothpick.
Using standing time
•Alwaysallowfoodto standeitherinor outoftheoven
aftercookingpowerstops.Standingtimeafterdefrosting
andcookingallowsthetemperaturetoevenlyspread
throughoutthefood,improvingthecookingresults.For
insideovenstandingtime,youcanprograma" O"power
secondstageofthecookingcycle.SeeTwo-Stage
Cooking.
•Thelengthof thestanding time dependson howmuch
foodyouarecookingandhowdenseitis.Sometimesit
canbeasshortasthetimeittakesyoutoremovethe
foodfromtheovenandtakeittotheservingtable.
However,withlarger,denserfooditem,thestandingtime
maybeaslongas10minutes.
Arranging food
Forbestresults,placefoodevenlyontheplate.Youcando
thisinseveralways:
•If you arecooking severalitemsof thesamefood,
suchasbakedpotatoes,placethemina ringpatternfor
uniformcooking.
•Whencooking foods of unevenshapes or thickness,
such as chickenbreasts,placethesmallerorthinner
areaofthefoodtowardsthecenterofthedishwhereitwill
beheatedlast.
• Layerthin slicesof meaton topofeachother.
•Whenyoucook or reheatwholefish, score theskin-
thispreventscracking.
• Donotletfoodora containertouchthetoporsidesofthe
oven.Thiswillpreventpossiblearcing.
Using aluminumfoil
Metalcontainersshouldnotbeusedina microwaveoven.
Thereare,however,someexceptions.Ifyouhave
purchasedfoodwhichisprepackagedinanaluminumfoil
container,refertotheinstructionsonthepackage.When
usingaluminumfoilcontainers,cookingtimesmaybe
longerbecausemicrowaveswillonlypenetratetheexposed
topofthefoodandnotthebottomorthesides.Ifyouuse
aluminumcontainerswithoutpackageinstructions,follow
theseguidelines:
11
iiiiiiiil 'ii iiiiiii!iii!iiill ii ii ii ii:ii ii ii ii ii ii iiiiii ililiiii!i!ii!i!!iiiiii il¸!i !i iiiiiiiiiiiii!iiiiiiii ii ii!iiiiiill
MICROWAVE COOKING TIPS (CONT.)
Using aluminum foil (cont.)
• Place the aluminum foil container in a glass bowl
and add some Water so that itcovers the bottom of
the container, butnot more than 1/4 in.(,64 cm)
deep, This ensures even heatingof the container
bottom,
•Always remove the container lidto avoid damage
to the oven.
•Use only undamaged containers.
•Do not use containers tallerthan 3_4in.(1.9 cm),
•Container must be at least halffilled.
•To avoid arcing, there must be a minimum 1/4in.
(,64 cm) between thealuminum container and the
walls of the oven and also between two aluminum
containers.
•Always place the container on the turntable,
•Shield parts offood that may cook quickly, such
as wing tips and legends of poultry,with small
pieces of aluminum foil."
•Heating food in aluminum foil containersusually
takes up to double the time compared to reheating
in plastic,glass, china, or paper containers.
The time when food is readywill vary depending
upon the type ofcontainer you use,
•Let food stand for 2 to 3 minutesafter heatingso
that heat is spread evenly throughout container.
Cooking you should notdo in your
microwaveoven
• Do not do canning of foods in theoven, Closed
glass jars may explode, resulting in damage to the
oveR.
• Do not use the microwave oven to sterilizeobjects
(baby bottles, etc,), It isdifficult to keep theoven at
the high temperature needed for sterilization,
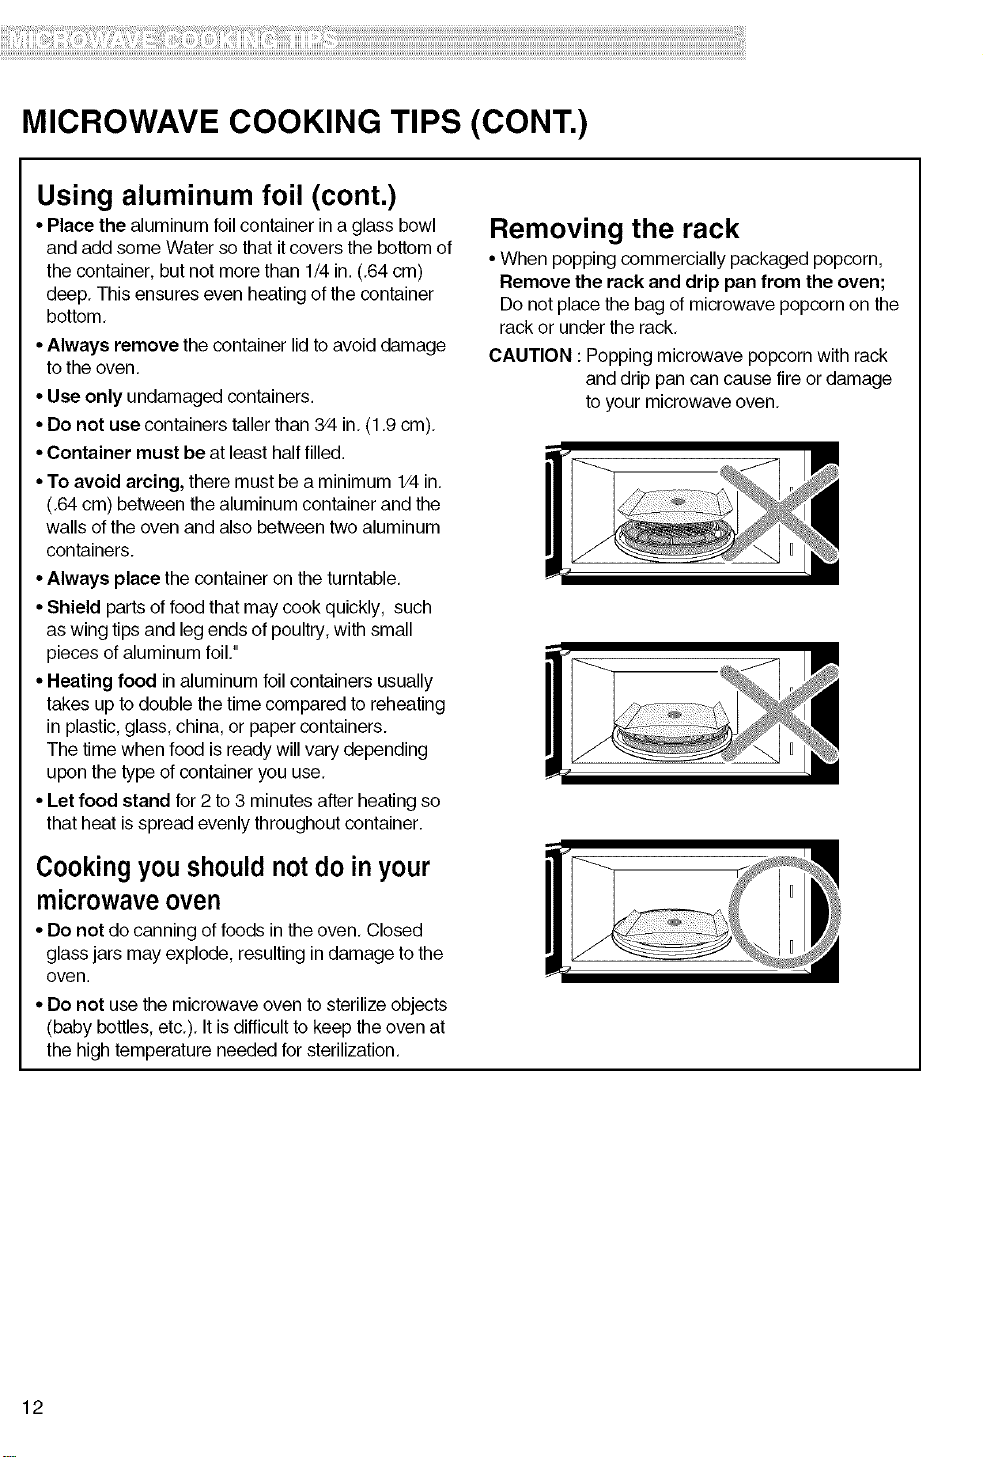
Removing the rack
•When popping commercially packaged popcorn,
Remove the rack and drip pan from the oven;
Do notplace the bag of microwave popcorn on the
rack or under the rack.
CAUTION : Popping microwave popcornwith rack
and drip pan cancause fireordamage
to your microwave oven.
12
¸i!:i! !i;i;iiiii i i ii iii';!;i;iiii iiii!i!i!i!il ii'ii ii ii ii ii ii ,i¸il¸il;i;iiiiiii;;ii i;iiii¸iiiiii ii'i! i!i! i! i!i!iiiili'i!i!i!¸I!I!I!I!I!I!I!'I!¸i!'i!i!,
COOKING COMPARISON GUIDE
Cooking with your newoven offers a wide varietyof
food preparationoptions: microwave cooking,
convection cooking, and combination cooking.
Microwave cooking uses very short, high-frequency
radio waves. The movement of the microwaves
throughthe food generates heatand cooks most
foods faster than regular methods, while retainingtheir
naturaltexture and moisture. Microwave cooking
heats food directly, not thecookware or the interiorof
the oven. Reheating iseasy and defrosting is
particularlyconvenient because lesstime isspent in
food preparation.
Convection cooking constantly circulates heated air
around the food, creating even browning and sealed-
in flavor by the constant motion of hot air over the food
surfaces,
Combination cooking combines microwave energy
with convection to cook with speed and accuracy,
while browning and crisping to perfection,
You can use microwave cooking, convection cooking,
or combinationcooking tocook by time, Simply preset
the length of cooking time desired and your oven turns
off automatically,
The following guide showsat a glance thedifference
between microwave,convection, and combination
cooking,
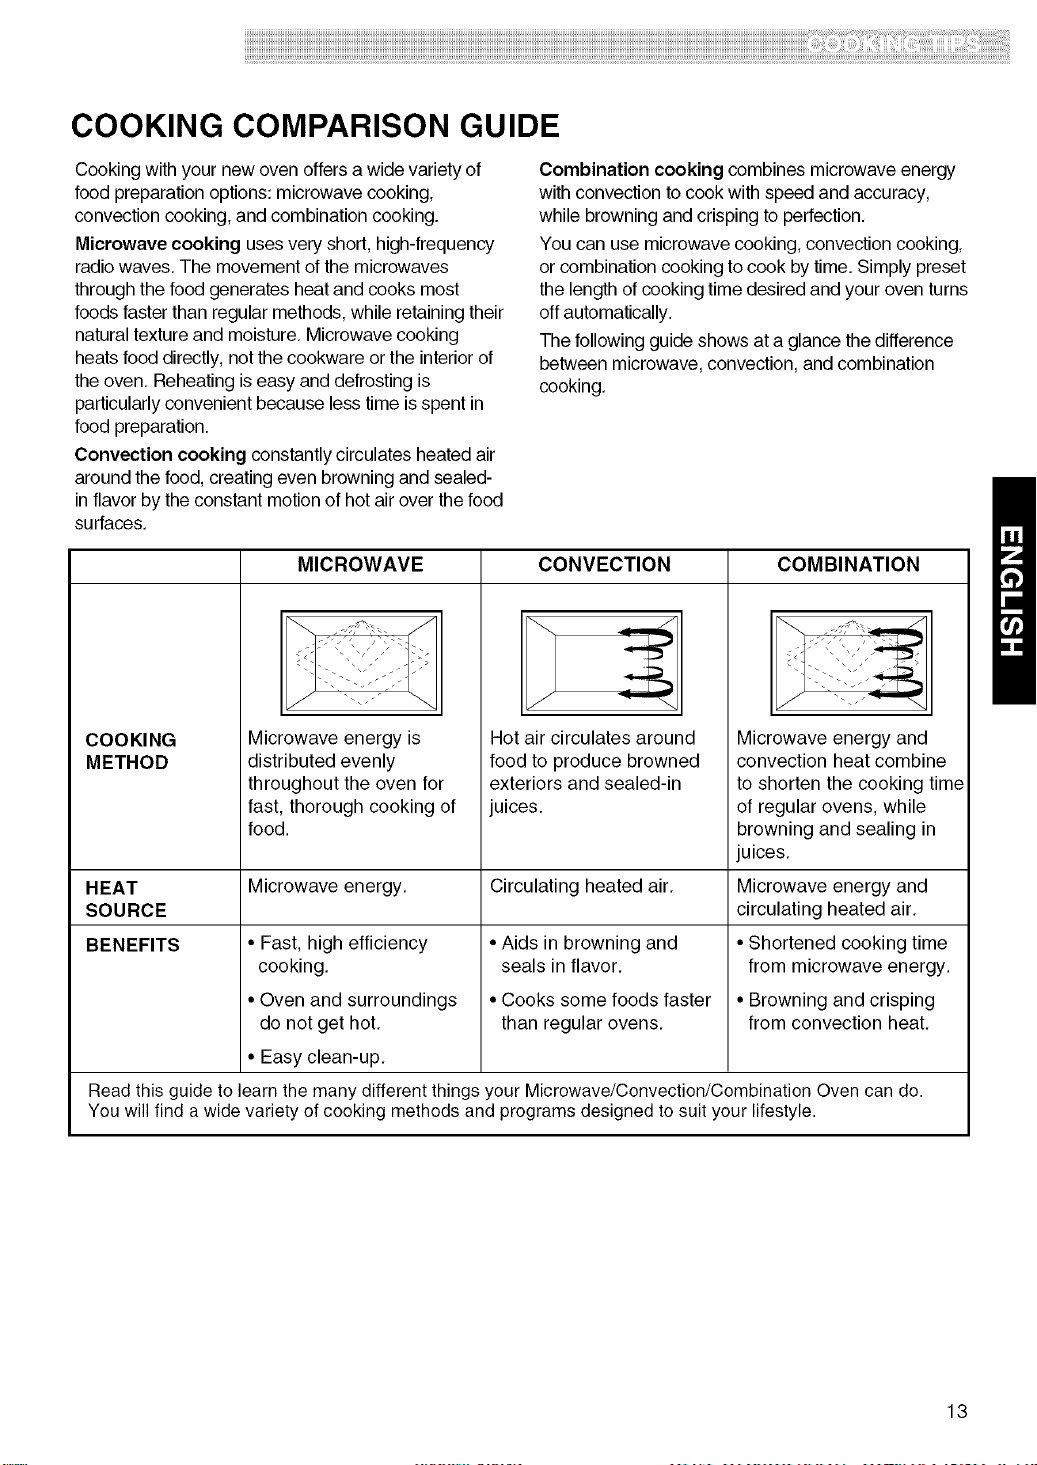
COOKING
METHOD
HEAT
SOURCE
BENEFITS
MICROWAVE
.._.._.-"-!'_--..J
.--".,.'..'.'_:;
Microwave energy is
distributed evenly
throughout the oven for
fast, thorough cooking of
food.
Microwave energy,
• Fast, high efficiency
cooking.
• Oven and surroundings
do not get hot.
• Easy clean-up.
CONVECTION
Hot air circulates around
food to produce browned
exteriors and sealed-in
juices.
Circulating heated air,
•Aids in browning and
seals in flavor,
• Cooks some foods faster
than regular ovens.
COMBINATION
j "._(._**
Microwave energy and
convection heat combine
to shorten the cooking time
of regular ovens, while
browning and sealing in
juices.
Microwave energy and
circulating heated air.
• Shortened cooking time
from microwave energy.
• Browning and crisping
from convection heat,
Read this guide to learn the many different things your Microwave/Convection/Combination Oven can do.
You will find a wide variety of cooking methods and programs designed to suit your lifestyle.
13
COOKWARE GUIDE
Microwave Cooking
Most heat-resistant, non-metalliccookware is safe for
use in your microwave oven,
However,to test cookware before using, follow these
steps:
1,Place theempty cookware in the microwave oven.
2. Measure 1 cup ofwater in a glass measuring cup
and placeit in the oven besidethe cookware,
3, Microwave on 100% power for 1minute. Ifthe dish
iswarm, itshould not be used for microwave
cooking,
Combination Cooking
•Glass or glass-ceramicbaking containers are
recommended, Be sure not touse items with metal
trim as it may cause arcing(sparking)with oven wall
or oven shelf, damaging thecookware, the shelf or
the oven.
• Heat-resistantplastic microwave cookware (safe to
450°F)may be used, but isnot recommended for
foods that requirecrusting or all-around browning,
because plasticis a poor conductor of heat,
Convection Cooking
• Metal Pans are recommended for all types of baked
products, butespeciallywhere browning or crusting
isimportant.
• Dark or dull finish metal pans are best for breads and
piesbecause they absorb heatand produce a
crisper crust.
• Shinyaluminum pans are better for cakes, cookies,
or muffins because these pans reflectheat and help
producea light,tender crust,
• Glass or glass-ceramic casserole or bakingdishes
are best suited for egg and cheese recipes due to
the cleanabilityof glass,
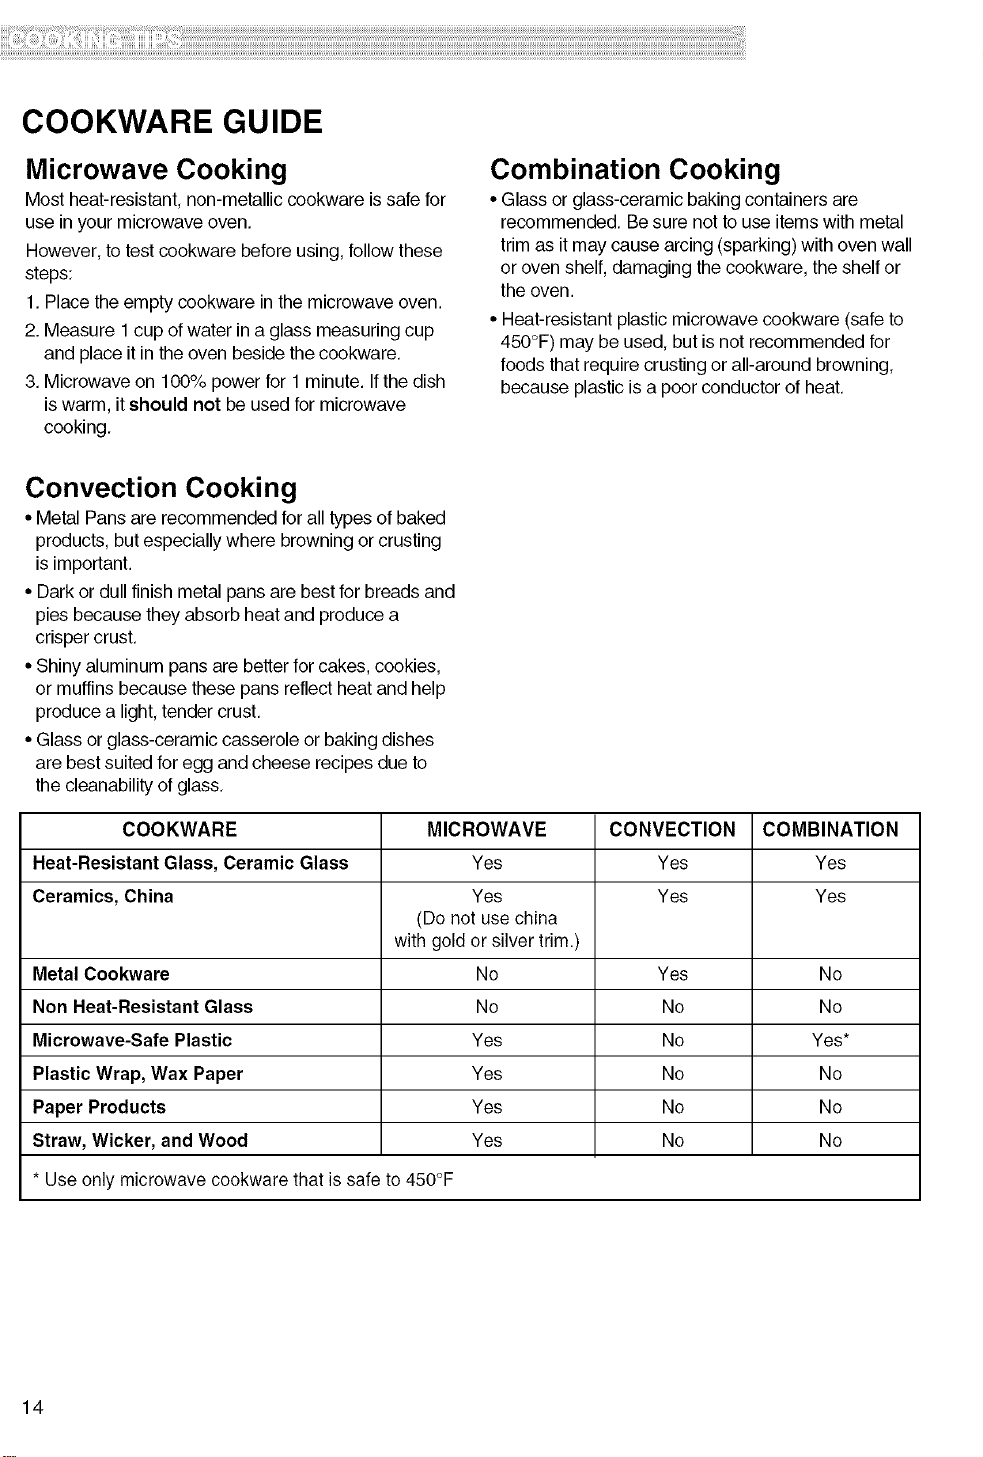
COOKWARE MICROWAVE CONVECTION COMBINATION
Heat-Resistant Glass, Ceramic Glass Yes Yes Yes
Ceramics, China Yes Yes Yes
(Do not use china
with gold or silver trim.)
Metal Cookware No Yes No
Non Heat-Resistant Glass No No No
Microwave-Safe Plastic Yes No Yes*
Plastic Wrap, Wax Paper Yes No No
Paper Products Yes No No
Straw, Wicker, and Wood Yes No No
* Use only microwave cookware that is safe to 450°F
14
i!i!i!i!i!i!i!i!i!i!i!i!i!i!i!i!i!i!i!i!i!i!i!i!i!i!i!i!i!i!i!i!i!i!i!i!i!i!i!i!i!i!i!i!i!i!i!i!i!i!i!i!i!i!i!i!i!i!i!i!i!i!i!i!i!i!i!i!i!i!i!i!i!i!i!i!i!i!i!i!i!i!i!i!i!i!i!i!i!i!i!i!i!i!i!i!i!i!i!i!i!i!i!i!i!i!i!i!i!i!i!i!i!i!i!i!i!i!i!i!i!i!i!i!i!i!i!i!i!i!i!i!i!i!i!i!i!i!i!i!i!i!i!i!i!i!i!i!i!i!i!i!i!i!i!i!i!i!i!i!i!i!i!i!i!i!i!i!i!i!i!i!i!i!i!i!i!i!i!i!i!i!i!i!i!i!i!i!i!i!i!i!i!i!i!i!i!i!i!i!i!i!i!i!i!i!i!i!i!i!i!i!i!i!i!i!i!i!i!i!i!i!i!i!i!i!i!i!i!i!i!i!i!i!i!i!i!i!i!i!i!i!i!i!i!i!i!i!i!i!i!i!i!i!i!i!i!i!i!i!i!i!i!i!i!i!i!i!i!i!i!i!i!i!i!i!i!i!i!i!i!i!i!i!i!i!i!i!i!i!i!i!i!i!i!i!i!i!i!i!i!i!i!i!i!i!i!i!i!i!i!i!i!i!i!i!i!i!i!i!i!i!i!i!i!i!_;_i_;!_i!_i_!_i!_!_;_;_i!:i!!__i!_i!_;i;i_i!_;!_;i;ii!_i!_!!_ii'ii_;i;i_i!_;!_;;I!;I;II!I!¸i!;i!_!iiiiiiiii_i_i_ii_iii';!;i;iiii_;i;i!i!i!;!ii_ii'ii_ii_ii_ii_ii_ii_,i¸il¸iiiiiiiliiiiiiii_i;iiii¸iiii;i_ii'i!:i!i!_i!_i!i!iiiili'i!i!i!¸I!I!I!I!I!I!I!'I!¸i!'i!i!,
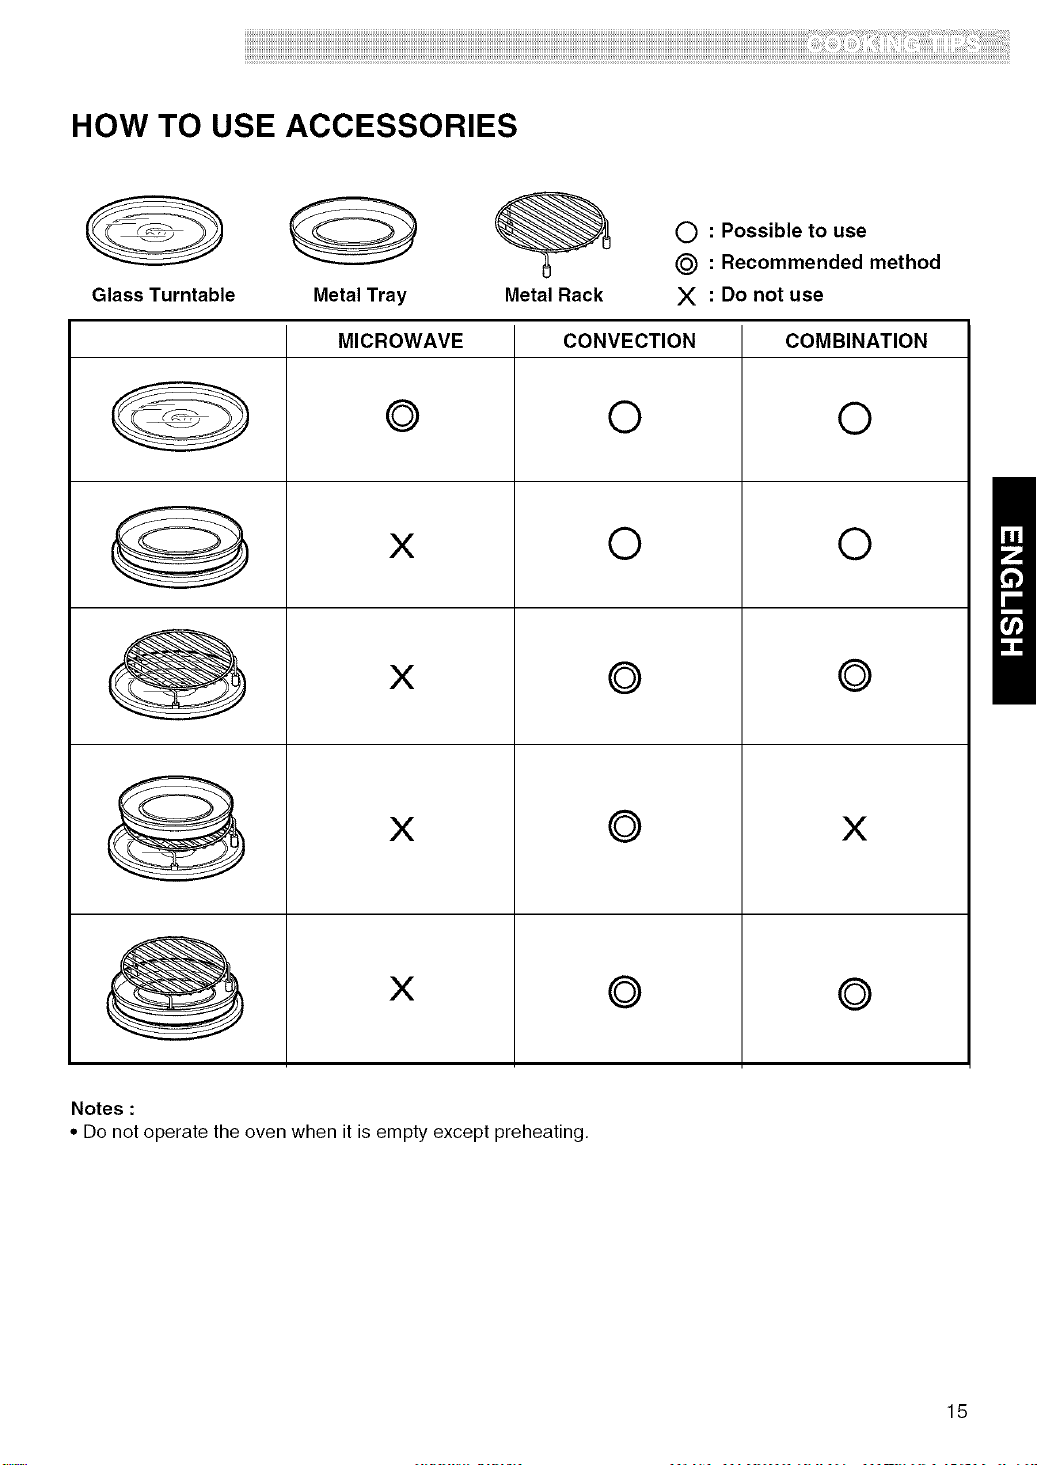
HOW TO USE ACCESSORIES
Glass Turntable
Metal Tray Metal Rack
MICROWAVE
©
X
X
X
X
C) : Possible to use
_) : Recommended method
X :Donotuse
CONVECTION
©
©
©
©
©
COMBINATION
©
©
©
X
©
Notes :
• Do not operate the oven when it is empty except preheating,
15
Using Your Microwave Oven
This section gives you instructions for operating
each function. Please read these instructions
carefully.
AUDIBLE SIGNALS
Audible signals are available to guide you
when setting and using your oven:
•A programming tone will sound each time
you touch a pad.
•Seven tones signal the end of a Kitchen
Timer countdown.
• Four tones signal the end of a cooking cycle.
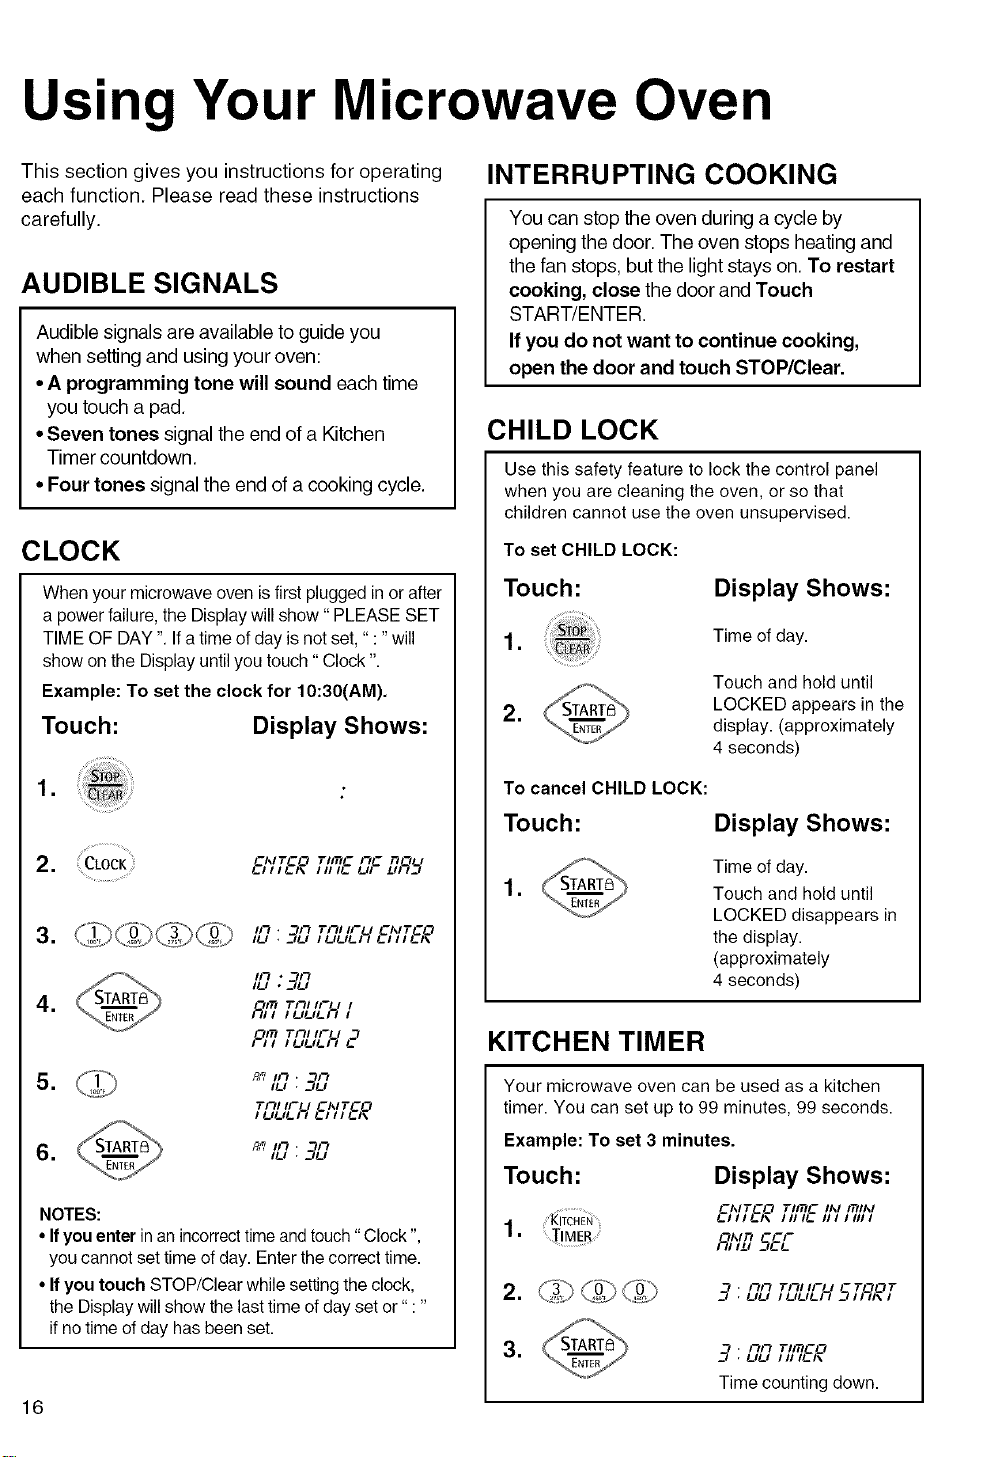
CLOCK
When your microwave oven is first plugged in or after
a power failure, the Display will show" PLEASE SET
TIME OF DAY ". Ifa time of day is not set," :"will
show on the Display until you touch" Clock ".
Example: To set the clock for 10:30(AM).
Touch: Display Shows:
=
2. ::CLOCK ;;:
=
CAITCO TIITtC liE. nrC IJ'l
!_/t/!_/\ lul!_ !_U ultJ
I1") . I") Tf31 IF I CAITCO
ILl _?_J ILII_II_)_ I_IIII_I\
H_I * __£I
-117_ TI-_I IF I
I_,, ,uu_;_I
L'31_ TI'71 IF I
, ,, ,_,_,&_c_
5, R/? IF_.,_, 5_7
Tf31 II- I CAITCO
/ LILILI_ !_/I/!_/\
,_, 5_7
NOTES:
• Ifyou enter in an incorrect time and touch "Clock ",
you cannot set time of day. Enter the correct time.
• Ifyou touch STOP/Clear while setting the clock,
the Display will show the last time of day set or" :"
if no time of day has been set.
16
INTERRUPTING COOKING
You can stop the oven during a cycle by
opening the door. The oven stops heating and
the fan stops, but the light stays on. To restart
cooking, close the door and Touch
START/ENTER.
If you do not want to continue cooking,
open the door and touch STOP/Clear.
CHILD LOCK
Use this safety feature to lock the control panel
when you are cleaning the oven, or so that
children cannot use the oven unsupervised.
To set CHILD LOCK:
Touch:
Display Shows:
1. Time of day.
=
Touch and hold until
LOCKED appears in the
display. (approximately
4 seconds)
To cancel CHILD LOCK:
Touch: Display Shows:
=
Time of day.
Touch and hold until
LOCKED disappears in
the display.
(approximately
4 seconds)
KITCHEN TIMER
Your microwave oven can be used as a kitchen
timer. You can set up to 99 minutes, 99 seconds.
Example: To set 3 minutes.
Touch: Display Shows:
CAITCO TIITtC IAI ITtlAI
......._i_cH_ _, ,, _,_ ,. I_ .,,.,,
1 -_,,,n-o-
• ..... I_,,L,5_
• I")1") TFIIIF I T-tOT
2. _:_:,;_:_::}@ (:_0:} _-7•uu, uu,.;£S,;5,,,
3. _# ,_,_,/,_,co
•t_,t_,/u/_/_
Time counting down.
_i_i_i_i_i_i_i_i_i_i_i_i_i_i_i_i_i_i_i_i_i_i_i_i_i_i_i_i_i_i_i_i_i_i_i_i_i_i_i_i_i_i_i_i_i_i_i_i_i_i_i_i_i_i_i_i_i_i_i_i_i_i_i_i_i_i_i_i_i_i_i_i_i_i_i_i_i_i_i_i_i_i_i_i_i_i_i_i_i_i_i_i_i_i_i_i_i_i_i_i_i_i_i_i_i_i_i_i_i_i_i_i_i_i_i_i_i_i_i_i_i_i_i_i_i_i_i_i_i_i_i_i_i_i_i_i_i_i_i_i_i_i_i_i_i_i_i_i_i_i_i_i_i_i_i_i_i_i_i_i_i_i_i_i_i_i_i_i_i_i_i_i_i_i_i_i_i_i_i_i_i_i_i_i_i_i_i_i_i_i_i_i_i_i_i_i_i_i_i_i_i_i_i_i_i_i.;_:_._i_i__ii:i:i;!;!:i:iii_ii_i_i_':_'ii_ii_ii:iT__;1:1711¸:I'II_;I:I¸;!:!ii:i:i_ii_;i'ii_ii_;i':iii_ii_ii_ii_il_711;::ii_ii_ii_ii_ii::ii_ii_ii_ii_ii_;iii_ii_ii_;i:i:i_:I_II_II:I:I:!!I_;I¸;i:!:ili':i_::I¸ii_ii'ii'i!ii_!;i:i¸il¸:i!i'il;iii:::i_ii_i::::i_;i_:i:i;iil_ii_!i_iiTii_ii:i:i::i_:i:::_::::ii_I_;i;i;iTi:ii:ii:i_ii_ii_i_:,::iii:i¸iiii:iii:ili:ii_il_ii:i;i_ii_;i:iii'il_:i_;i;i'ii_!i':i:;i_ii_ii_;!:i¸;:ii_i!i_;i_;!_i!i!i!_ii_i!_!i_:i¸;i_ii_ii71¸ii_ii_ii:;i:iiii::i:ii_i_ii_;i:i:i_ii_;i¸ii_ii_ii_ii_;:::iiii'IIII_;¸::!:!:!:!:!:!:!:!:!:!:!:!:!7!!!:i!
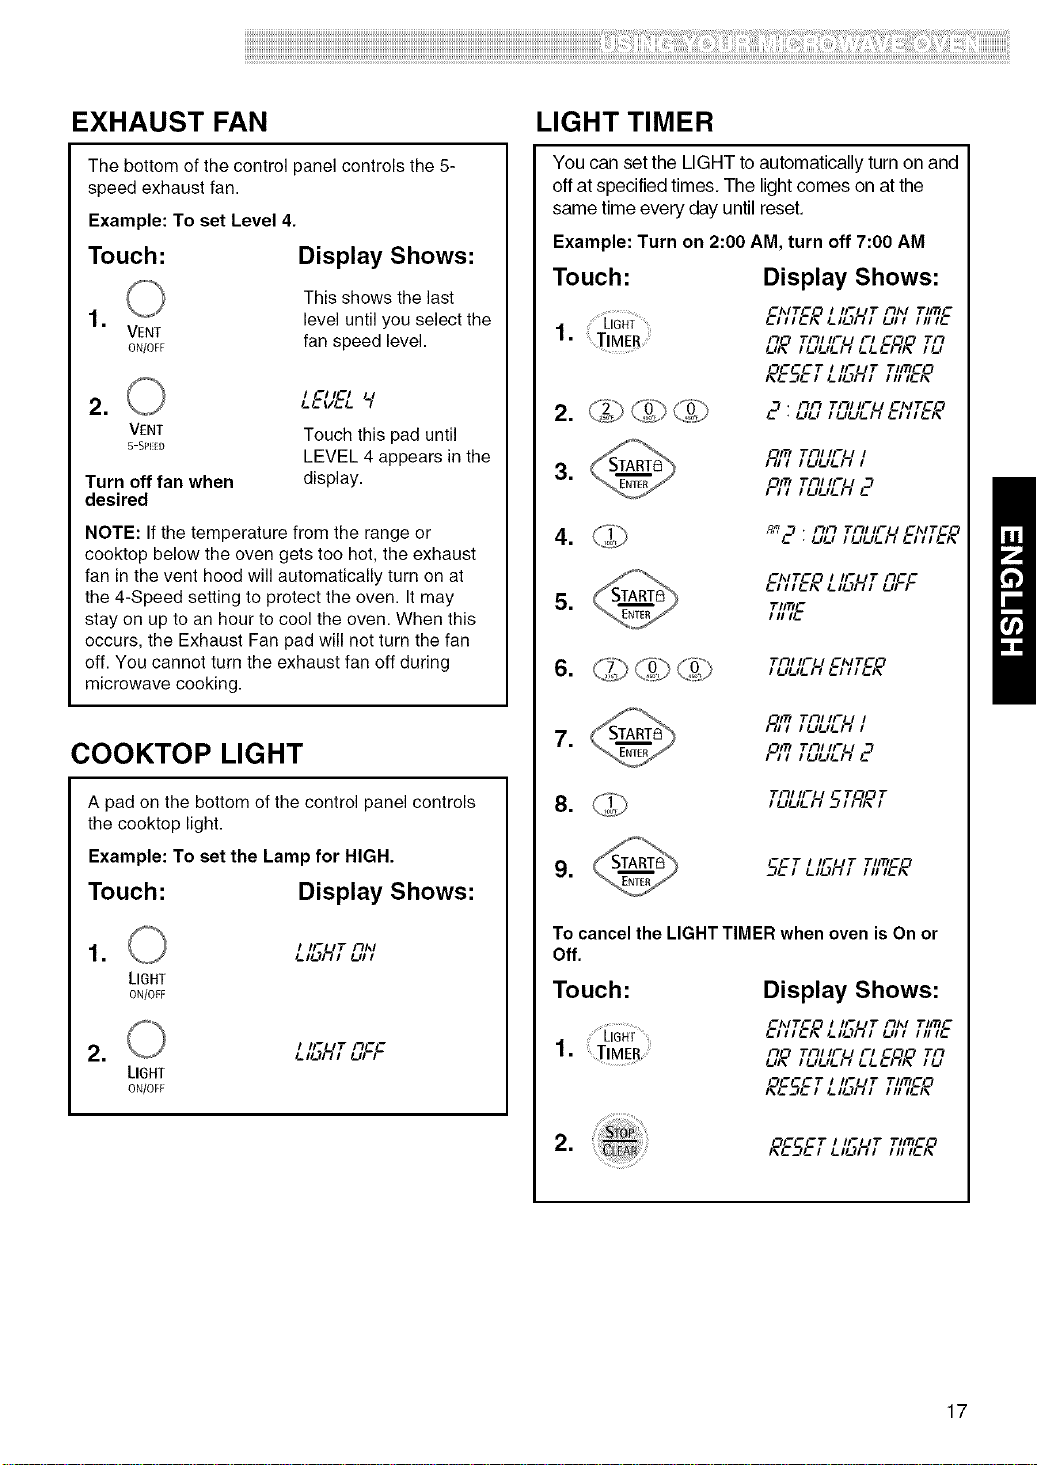
EXHAUST FAN
The bottom of the control panel controls the 5-
speed exhaust fan.
Example: To set Level 4.
Touch: Display Shows:
This shows the last
1. level until you select the
VENT
ON/OFF fan speed level.
=
I CI ICI
L/- t//- L L/I
VENT Touch this pad until
5-SHiD
LEVEL 4 appears in the
Turn off fan when display.
desired
NOTE: If the temperature from the range or
cooktop below the oven gets too hot, the exhaust
fan in the vent hood will automatically turn on at
the 4-Speed setting to protect the oven. It may
stay on up to an hour to cool the oven. When this
occurs, the Exhaust Fan pad will not turn the fan
off. You cannot turn the exhaust fan off during
microwave cooking.
COOKTOP LIGHT
A pad on the bottom of the control panel controls
the cooktop light.
Example: To set the Lamp for HIGH.
Touch: Display Shows:
=
LIGHT
ON/OFF
I IF'L,IT Ilkl
L IL_I_ I LII I
L IL_I_ I LII I2. i ,- 1,i1cc
LIGHT
ON/OFF
LIGHT TIMER
You can set the LIGHT toautomatically turnon and
off at specifiedtimes, The lightcomes on atthe
same time every day until reset.
Example: Turn on 2:00 AM, turn off 7:00 AM
Touch: Display Shows:
1. TIMER
4.
J_
CAITCO I IF'L_IT Ilkl TII_C
LIIILI\ LIL)III Llll IlllL
FILl TIIl IF I F/ C-ILl TI1
Lll\ ILILIL)L_ LLL)G//\ ILI
OC-CT / IF IT TIITICO
1 . llll Till IFL,I CI_ITCL1
L- . LILt 11-11-11-13 LI I I LI\
i_l'i_ TlllIF I II LILILi!'_ I
i!_l'l_ TlllIF I l
I LILILI_ L-
RI_,L1 , Illl Tlll lF I CAITCO
LILI I LILIL;L_ LI I I LI\
CAITCO I IF'L_IT I1CC
GIIIGI\ LIL)III LII I
TIITIC
I II IG
1LILIL;5_l,l _l\
l__i,l,iI,,i-1,
I LILILi/"_ I
7. l_i? Till lI- I
I LILILI_ L-
1LILIL;_511_l,1
5Ll LIL*%
9, -=T i ,- 17"/l'_O
I II IL I\
To cancel the LIGHT TIMER when oven is On or
Off,
Touch:
1. TIMER
2.
Display Shows:
CAITCO I IF'_IT I1AI T/I_C
LIIILI\ LILilII Llll InlL
IlO TIIl IF l FI C-Ill TI1
Lll\ /LILIL_ LLL_l\ /LI
OC-CT / IF IT T/mCO
OC-CT / IF /T T/IT_CO
17
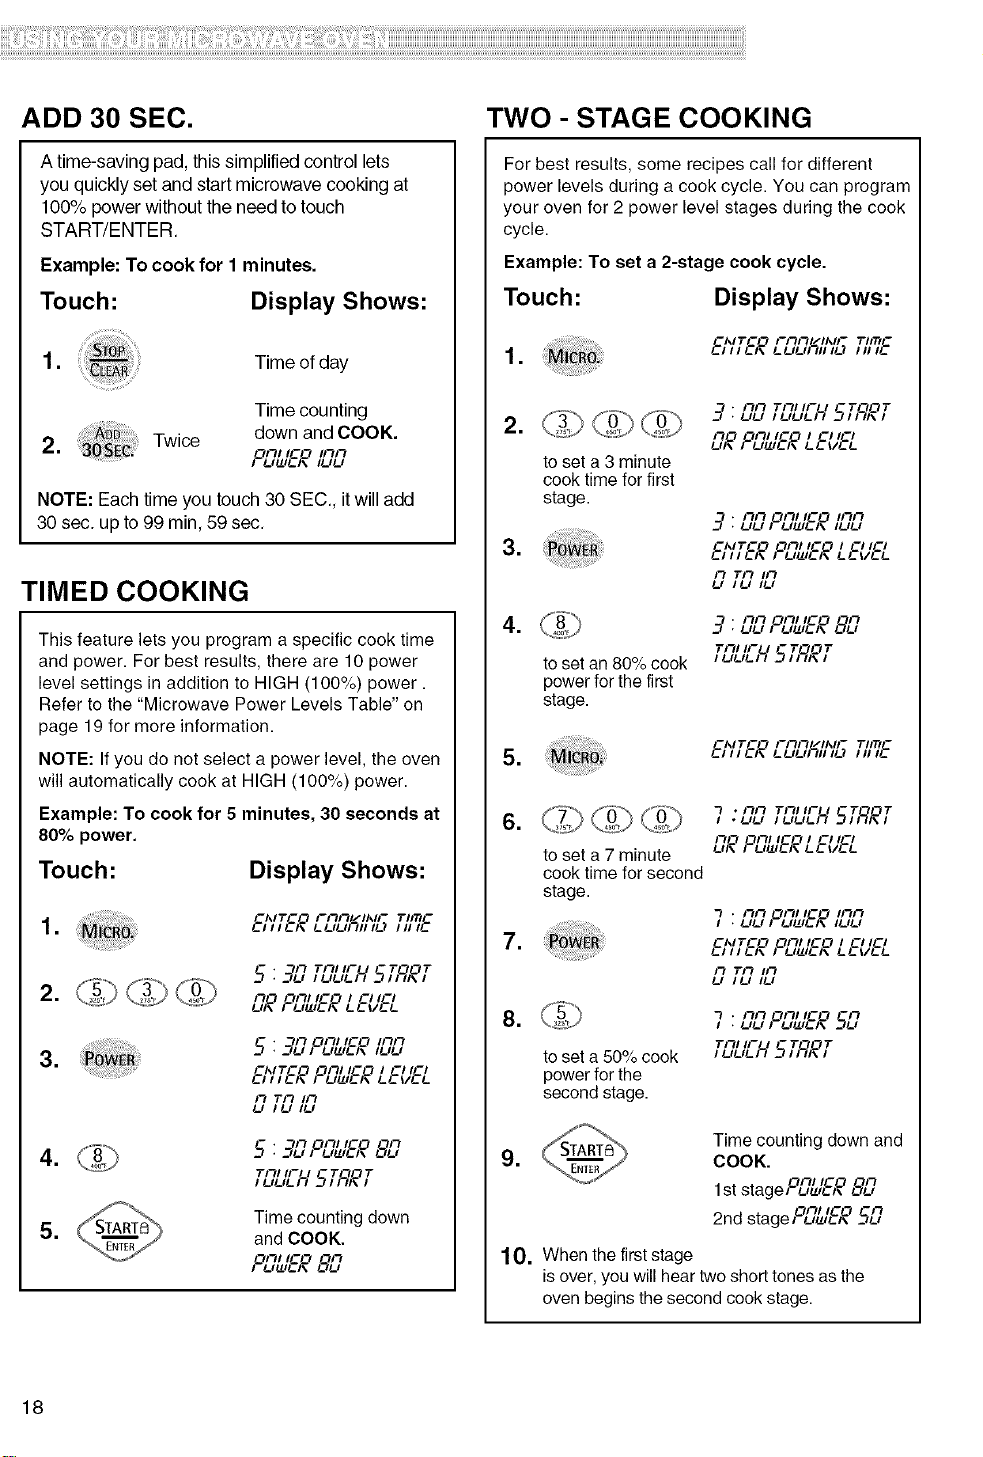
ADD 30 SEC.
A time-saving pad, this simplified control lets
you quicklyset and start microwave cooking at
100% powerwithout the need to touch
START/ENTER.
Example: To cook for 1 minutes.
Touch: Display Shows:
1. Time of day
Time counting
Twice down and COOK.
2. on/Ico ,nn
...... .... I LII.!./LI\ lULl
NOTE: Each time you touch 30 SEC, it will add
30 sec. up to 99 min, 59 sec.
TIMED COOKING
This feature lets you program a specific cook time
and power. For best results, there are 10 power
level settings in addition to HIGH (100%) power.
Refer to the "Microwave Power Levels Table" on
page 19 for more information.
NOTE: If you do not select a power level, the oven
will automatically cook at HIGH (100%) power.
Example: To cook for 5 minutes, 30 seconds at
80% power.
Touch: Display Shows:
1.
I / I _ 1% L LILIRII /L) 1 II /_
• /'_ Tnl IF I
/30 OP_/ IC0 / !Z/ IC/
LII\ 1 LII._/_I\ L_V_L
=
• /"t 013/IC0 i/_n
5 _-7_,I L,_/L/, /UU
CAITCO OF_/ /CO / C/ /C/
L1/ I L1\ 1 LII._/LI\ l-l- tll-l-
/3 T/3 I/3
L/ 1 LI ILl
4. _)
5 :_qL7i°L_5° L-7L7
TL7L#_-H5_'_°,T
Time counting down
and COOK.
I°L7L_5° 8L7
TWO - STAGE COOKING
For best results, some recipes call for different
power levels during a cook cycle. You can program
your oven for 2 power level stages during the cook
cycle.
Example: To set a 2-stage cook cycle.
Touch: Display Shows:
1.
!:AIT!:O F/"H"I ///_IFrlK T//TI!:
L I / 1 L 1\ L LILIR11 /L'I 111 /L
....... • /3/3 T/'3/IF / -T'30T
2.
.............. /30 0/3/I!ZO / !Z/ IC/
ul\ i u_/cl\ cct,'cc
to set a 3 minute
cook time for first
stage.
=
3 • FtF't 0/3/IC0 /F'tF't
J • UU I UUJL/\ /UU
CAITCO 01"3/ICO / C/ IC/
L1/1L1\ I LII._/LI\ LL I/LL
LI ILI ILl
=
to set an 80% cook
power for the first
stage.
• £1£10FI//CO
_-7L,L,IL,_,L,,8L7
TI-I/ II- I -T-lOT
iL,LIL;_5i;£, i
=
!:AIT!:O FI"H"I ///_IFrlK T/ITI!:
L I / 1 L 1\ L LILIR11 ILl 111 /L
=
=
to set a 7 minute
cook time for second
stage.
7 .nn Tn/,,-I -T'_',"•L,L,/L'L'L_5/I';_,
LÁ_ FUU.,_ LL tILL
• Fh'_ OF_/K-.O IFh'_
• UU I U_/L/\ /UU
CAITCO 01"31/CO I CI ICI
LIIILI\ I U_LI\ LLt/LL
U ILI ILl
=
to set a 50% cook
power for the
second stage.
7 " PIP10/311/ZO -FI
• uu I UUJLI\ /_'_u
TI'_I II- I -T'_OT
luu&_ 51;£,i
=
Time counting down and
COOK.
OFII IC0 /'I
1st stage/ u_z/L/\ L-7_/
0/311CO - /_
2nd stage/ u_./L,,\ /__u
10. When the first stage
is over, you will hear two short tones as the
oven begins the second cook stage.
18
iiiiiiiiiiiiiiiiiiiiiiiiiiiiiiiiiiiiiiiiiiiiiiiiiiiiiiiiiiiiiiiiiiiiiiiiiiiiiiiiiiiiiiiiiiiiiiiiiiiiiiiiiiiiiiiiiiiiiiiiiiiiiiiiiiiiiiiiiiiiiiiiiiiiiiiiiiiiiiiiiiiiiiiiiiiiiiiiiiiiiiiiiiiiiiiiiiiiiiiiiiiiiiiiiiiiiiiiiiiiiiiiiiiiiiiiiiiiiiiiiiiiiiiiiiiiiiiiiiiiiiiiiiiiiiiiiiiiiiiiiiiiiiiiiiiiiiiiiiiiiiiiiiiiiiiiiiiiiiiiiiiiiiiiiiiiiiiiiiiiiiiiiiiiiiiiiiiiiiiiiiiiiiiiiiiiiiiiiiiiiiiiiiiiiiiiiiiiiiiiiiiiiiiiiiii_;iiiii'ii_ii_iiiiiii!i!iiiili_ii_i_i_'i_'ii_ii_illiii_i__iiiiiiiiii'ii_iiii¸i!i!illiii_ii_ii'ii_ii_ii'ii'ii_ii_ii_ii_ii_ii;ii_iiiiii'ii:ii_ii_ii_ii_ili_il_ii_ii_ii_ii_iill_ii_ii_iiiiii_ii_ii_ii_iii_,!!i_ii¸iii!iiii_:i_iii¸ii_ii'ii'i!ii_!iiii¸il¸ii!i'iiiiii_ili_ii_iiiili_ii_ii_illi_il_ii_!i_il_iiii_ii_iliiii::i_ii::i_:iiiii__i_;ili_ii_ii_ii_ii:ilii_ii_il_i__iii_iill¸fillilliilli_ii_il_ii_iiii_ii_illi_ii'ii_fillill'ii_!i'ii_ii_ii_ii_i!il¸ilil_i!i_ii_i!_i!i!i!_ii_i!_!i_ii¸ii_ii_il_i_ii_iiii_il¸flail_ii_iiiiiiiili_ii_i_il_iiiiii_ii_ii¸ii_ii_il_ii_iiiiiili'iiii_i¸ii!i!i!i!¸i!i!i!¸i!i!i!i!i!¸i!i!i!i!!!ii!
MICROWAVE POWER LEVELS
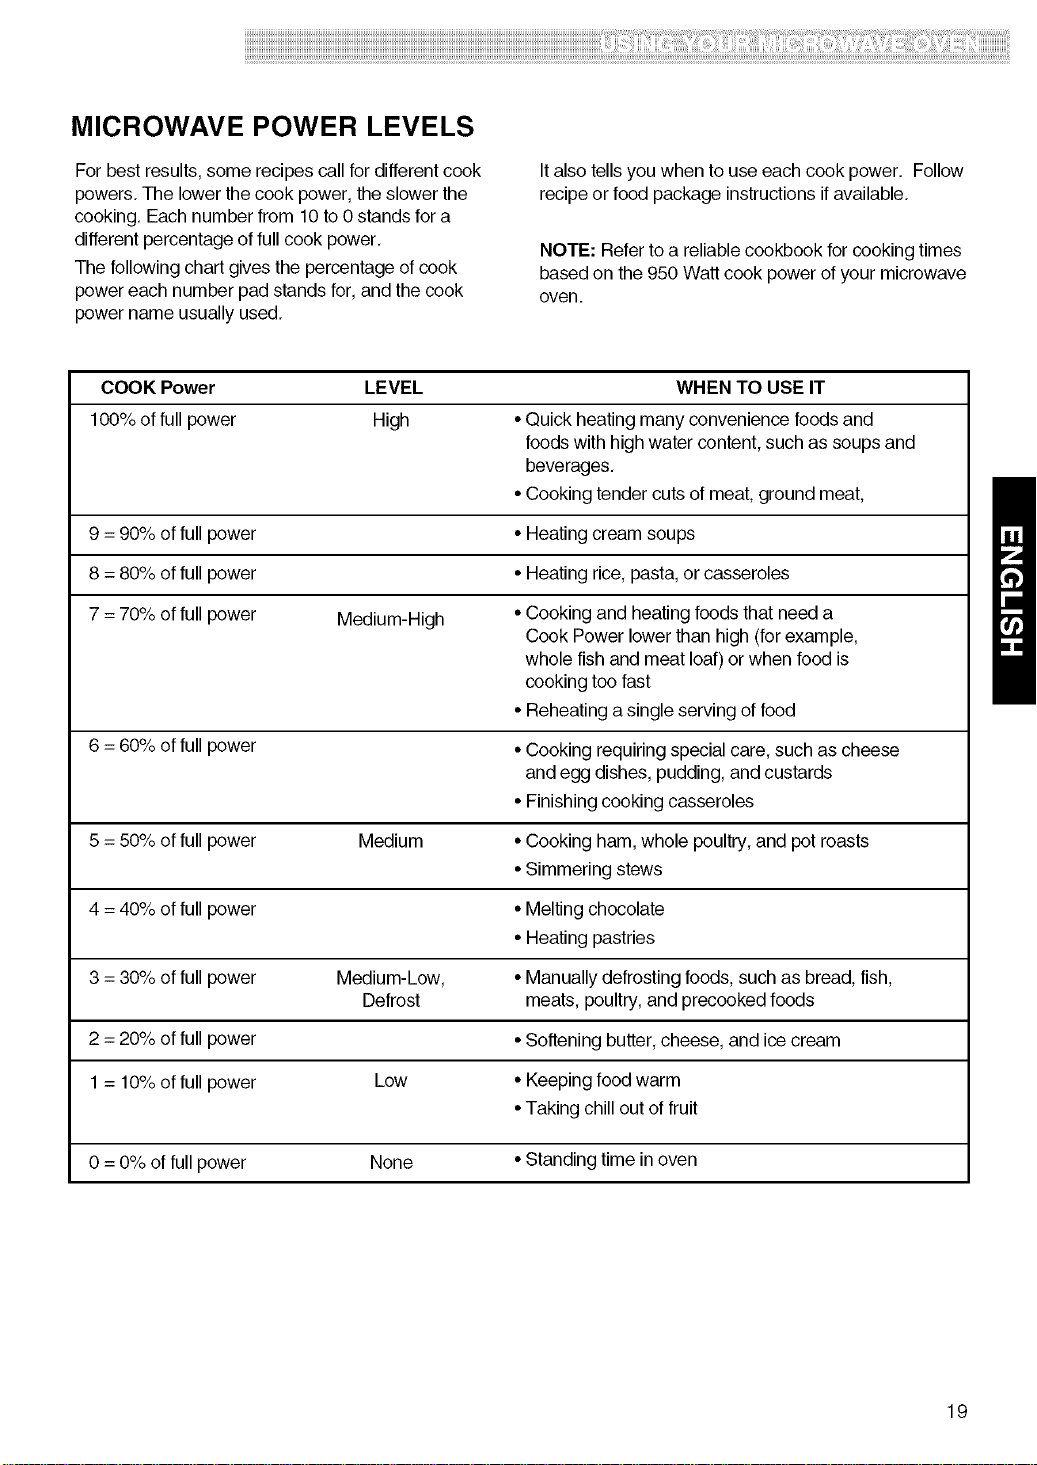
Forbest results, some recipes callfor differentcook
powers. The lowerthe cook power, the slower the
cooking. Each number from 10to 0 stands for a
different percentageof full cook power.
The following chart gives the percentage of cook
power each number pad stands for, and the cook
power name usually used.
It also tells you when to use each cook power. Follow
recipe or food package instructions if available.
NOTE: Refer to a reliablecookbook for cooking times
basedon the 950 Watt cook power of your microwave
oven.
COOK Power LEVEL
100% of full power High
9 = 90% of full power
8 = 80% of full power
7 = 70% of full power Medium-High
6 = 60% of full power
5 = 50% of full power Medium
4 = 40% of full power
3 = 30% of full power Medium-Low,
Defrost
2 = 20% of full power
1 = 10% of full power Low
WHEN TO USE IT
•Quick heating many convenience foods and
foods with high water content, such as soups and
beverages.
• Cooking tender cuts of meat,ground meat,
• Heating cream soups
• Heating rice, pasta,or casseroles
• Cooking and heatingfoods that need a
Cook Power lower than high (forexample,
whole fish and meat loaf)orwhen food is
cooking too fast
• Reheating a single serving of food
• Cooking requiring special care, such as cheese
and egg dishes, pudding, and custards
• Finishingcooking casseroles
• Cooking ham, whole poultry,and pot roasts
• Simmering stews
• Melting chocolate
• Heating pastries
• Manually defrostingfoods, such as bread, fish,
meats, poultry,and precooked foods
• Softening butter,cheese, and icecream
• Keeping foodwarm
•Taking chillout of fruit
0 = 0% of fullpower None • Standingtime in oven
19

TURNTABLE ON/OFF
For best cooking results, leave the turntableon. It
can be turned off for large dishes,
Touch: Display Shows:
_Ni_ ncc _ ,_, c
1. ON/OEF U,' ,' ,' ," ,';_LC
_NTAB_ n,,, T, r_ _, c
2. u,, ,,,;_
Press TURNTABLE ON/OFF to turn the
turntable on or off.
NOTE:
• This option is not available in sensor cook and
defrost modes,
• Sometimes the turntable can become hot to
touch. Be careful touching the turntable during
and after cooking.
• Do not run the oven empty.
OPTION
You can change thedefault values for beep sound,
clock, display speed and defrostweight, See
following chart for more information.
No.
1
2
3
Function No. Result
Beep ON/OFF 1 Sound ON
control 2 Sound OFF
Clock display control 1 Clock ON
2 Clock OFF
Display 1 Slow speed
2 Normal speed
3 Fast speed
Defrost weight mode 1 Lbs,
selected 2 Kg,
Example: To change defrost weight mode
(from Lbs.to Kg).
Touch:
1. :OPTION:
Display Shows:
--I-_111_ln I-_1_111--ICC TI-_I II- I
,uu_.;_I__!J!_ll ILl
I_11 I £ I_11 I
FI IQF IQAI 113CC Till IF I 3
LLULIW U/I; U/ / / UULi_ C
-FOF_I I TF_I IF /
_%,,_.1_,.5,°EED,_.1_.1_.;_9
L85,'_%;TLTL#_-HS'
I "t
I _tF_ TnlIF I I
IWL";Till IF I "_I I_11_11_;_ C
FAVORITE
FAVORITE RECIPE lets you recallone cooking
instruction previouslyplaced in memory and begin
cooking quickly.
Example: To cook for 2 minutes.
Touch: Display Shows:
I * Fh'_ OF_I IC0 IFh'_
I • UU I UIII__I\ IUU
1. FAVOR_T_ TL7L,','_5_'5_£?T L7,?
l_ll_5;"l,qL,WE'_-/
CAITCO FIQIQI_/IAIF TIITIC
!- 1 11 !- I\ L !__1!__11311I!-_ I II I!,.
C") * I"_1"_ T1-_1 IF I -- T "_0 T
130 0131 _CO / C//C/
Time countingdown.
OFII ICO iFtFt
I I,,.11,_11_1\ I1_11_1
Example: To recallthe custom recipe.
Touch: Display Shows:
.......... C'3 * F_F_OFII ICO iF'tFt
• uu _ uu1_ luu
1l FAVORIT_ TRI IF I - r '30 r RO
,uu_;_5,;5,,, u,,
, I_5,I&S_ ,WE'_-/
Time countingdownand
2. cook.
OFII ICO /FtFt
I I--I_11--1_ II..1L1
When the cook time is over, you will hear four beeps
and COOK END will display.
20
iiiiiiiiiiiiiiiiiiiiiiiiiiiiiiiiiiiiiiiiiiiiiiiiiiiiiiiiiiiiiiiiiiiiiiiiiiiiiiiiiiiiiiiiiiiiiiiiiiiiiiiiiiiiiiiiiiiiiiiiiiiiiiiiiiiiiiiiiiiiiiiiiiiiiiiiiiiiiiiiiiiiiiiiiiiiiiiiiiiiiiiiiiiiiiiiiiiiiiiiiiiiiiiiiiiiiiiiiiiiiiiiiiiiiiiiiiiiiiiiiiiiiiiiiiiiiiiiiiiiiiiiiiiiiiiiiiiiiiiiiiiiiiiiiiiiiiiiiiiiiiiiiiiiiiiiiiiiiiiiiiiiiiiiiiiiiiiiiiiiiiiiiiiiiiiiiiiiiiiiiiiiiiiiiiiiiiiiiiiiiiiiiiiiiiiiiiiiiiiiiiiiiiiiiiii_;iiiii'ii_il_iiiiiii!i!iiiiii_ii_i_i_'i_'ii_ii_iiiiii_i__iiiiiiiiii'ii_iill¸i!i!iiiiii_ii_ii'ii_ii_ii'ii'ii_ii_ii_ii_il_ii;ii_iiiiii'ii:ii_ii_ii_ii_iii_ii_ii_ii_ii_ii_iiii_ii_ii_iiiill_II_II_IIIII_,!!I_II¸iii!iiii_:i_ill¸ii_ii'ii'i!ii_!iill¸il¸ii!i'iiiiiiiii_ii_iiiiii_ii_ii_iiii_il_ii_!i_ii_iiii_ii_iiiiii::i_ii::i_:iiiii_I_;ili_ii_ii_ii_ii:iiii_ii_ii_i_iii_iill¸iiiiiiiiiiii_ii_il_ii_iiii_ii_iiii_il'II_ii_iiii'ii_!i'ii_ii_ii_ii_i!il¸iiii_i!i_il_i!_i!i!i!_ii_i!_!i_il¸ii_ii_ii_i_ii_iiii_il¸ii_ii_ii_iiiiiiiiii_ii_i_ii_iiiiii_ii_il¸ii_ii_ii_ii_iiiiiiii'IIII_I¸II!I!I!I!¸I!I!I!¸I!I!I!I!I!¸i!i!i!i!!!ii!
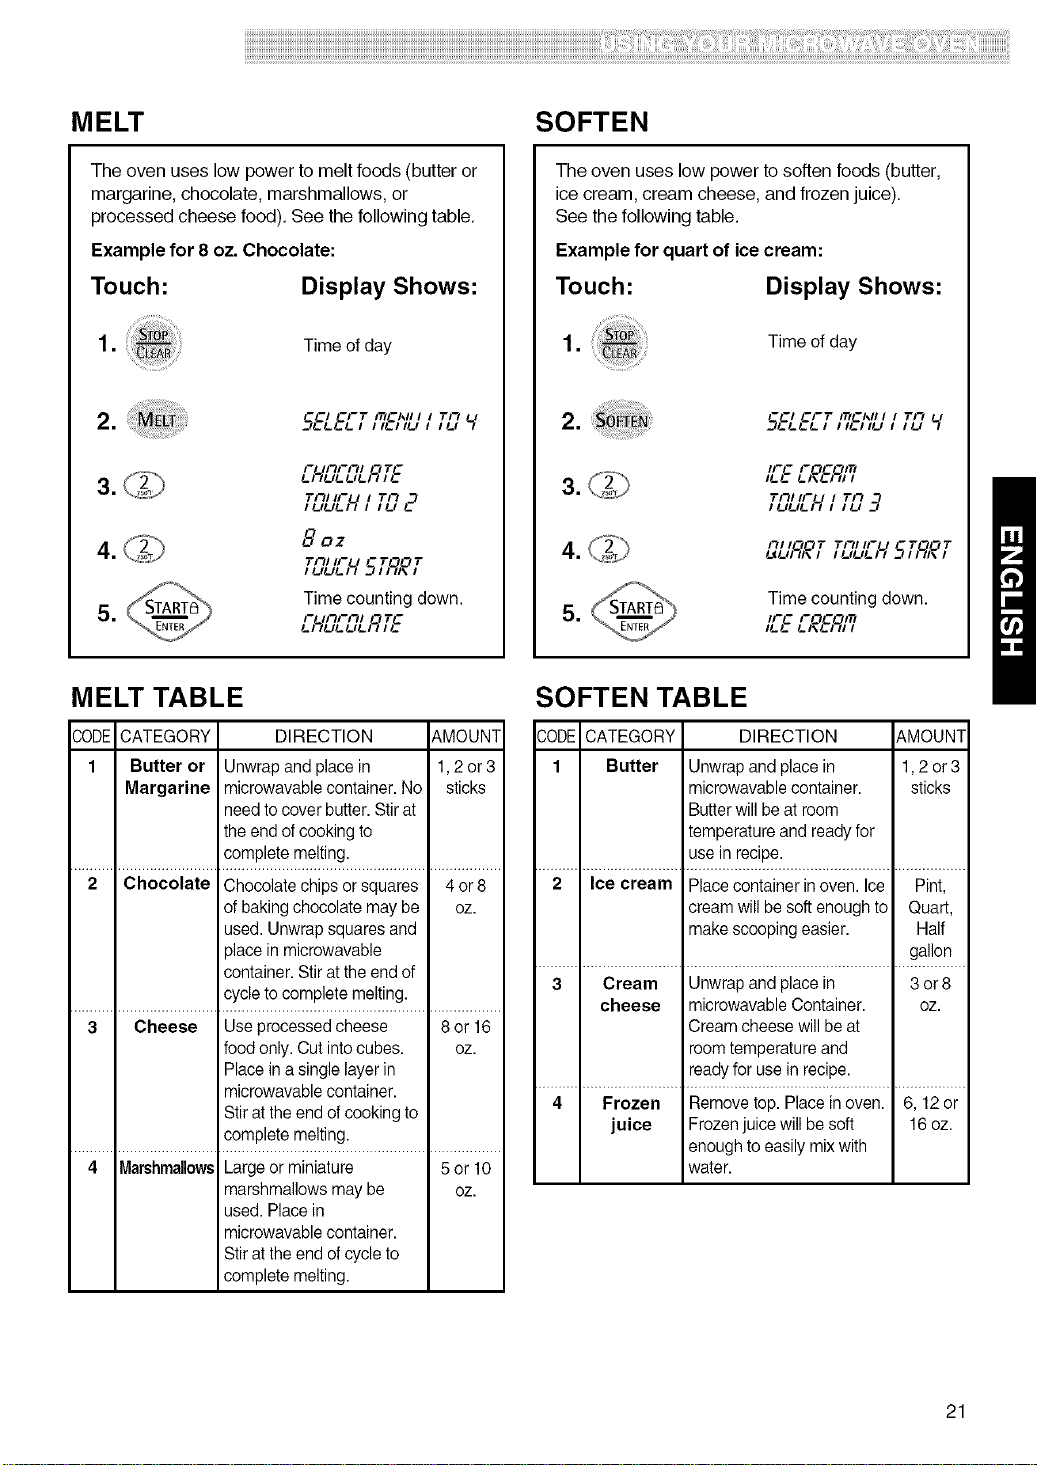
MELT
The oven uses low power to melt foods (butter or
margarine, chocolate, marshmallows, or
processed cheese food), See the following table.
Example for 8 oz. Chocolate:
Touch: Display Shows:
1. Time of day
2. -o o-r mo,,,,, _-n
Till II- I I Tit _"t
ILILILI'_ I ILl i_-
4. (_h 8o_
TmHF _ -r'_or
,uu&_ 5,£,,
5. _L_ Time counting down.
\_/ :,,'_,'zs_,'_L's;__
SOFTEN
The oven uses low power to soften foods (butter,
ice cream, cream cheese, and frozen juice),
See the following table.
Example for quart of ice cream:
Touch: Display Shows:
1. Time of day
2. -o o-r mo,,,,, n-_
5_, ,,_,,u , ,u _;
_FC FOC'_m
3. ___) "_" _'"_';_"
Till II- / / TI3
l /-,/-,/-l_l l U 3
5. _ Time counting down.
_j' ,,-C ,-OC "_,TI
MELT TABLE
30DE CATEGORY DIRECTION &MOUNT
1 Butter or Unwrap and place in 1,2 or 3
Margarine microwavablecontainer. No sticks
need tocover butter.Stir at
the endof cooking to
complete melting.
2 Chocolate Chocolate chips or squares 4 or 8
ofbaking chocolate may be oz.
used. Unwrap squaresand
_lace in microwavable
container. Stir atthe end of
cycle to complete melting.
3 Cheese Use processed cheese 8 or 16
foodonly. Cut into cubes, oz.
Place ina single layer in
microwavable container.
Stir atthe end of cooking to
complete melting.
4 MarshmallowsLargeor miniature 5 or 10
marshmallows may be oz.
used. Place in
microwavable container.
Stir atthe end of cycle to
complete melting.
SOFTEN TABLE
_,ODECATEGORY DIRECTION _,MOUNT
1 Butter Unwrap and place in 1,2 or 3
microwavable container, sticks
Butterwill be at room
temperature and readyfor
use in recipe.
2 Ice cream Place container in oven. Ice Pint,
cream will be soft enough to Quart,
make scooping easier. Half
gallon
3 Cream Unwrap and place in 3or 8
cheese microwavable Container. oz.
Cream cheese will be at
roomtemperature and
readyfor use in recipe.
4 Frozen Removetop. Place in oven. 6, 12 or
juice Frozen juice will be soft 16oz.
enough to easily mixwith
water.
21
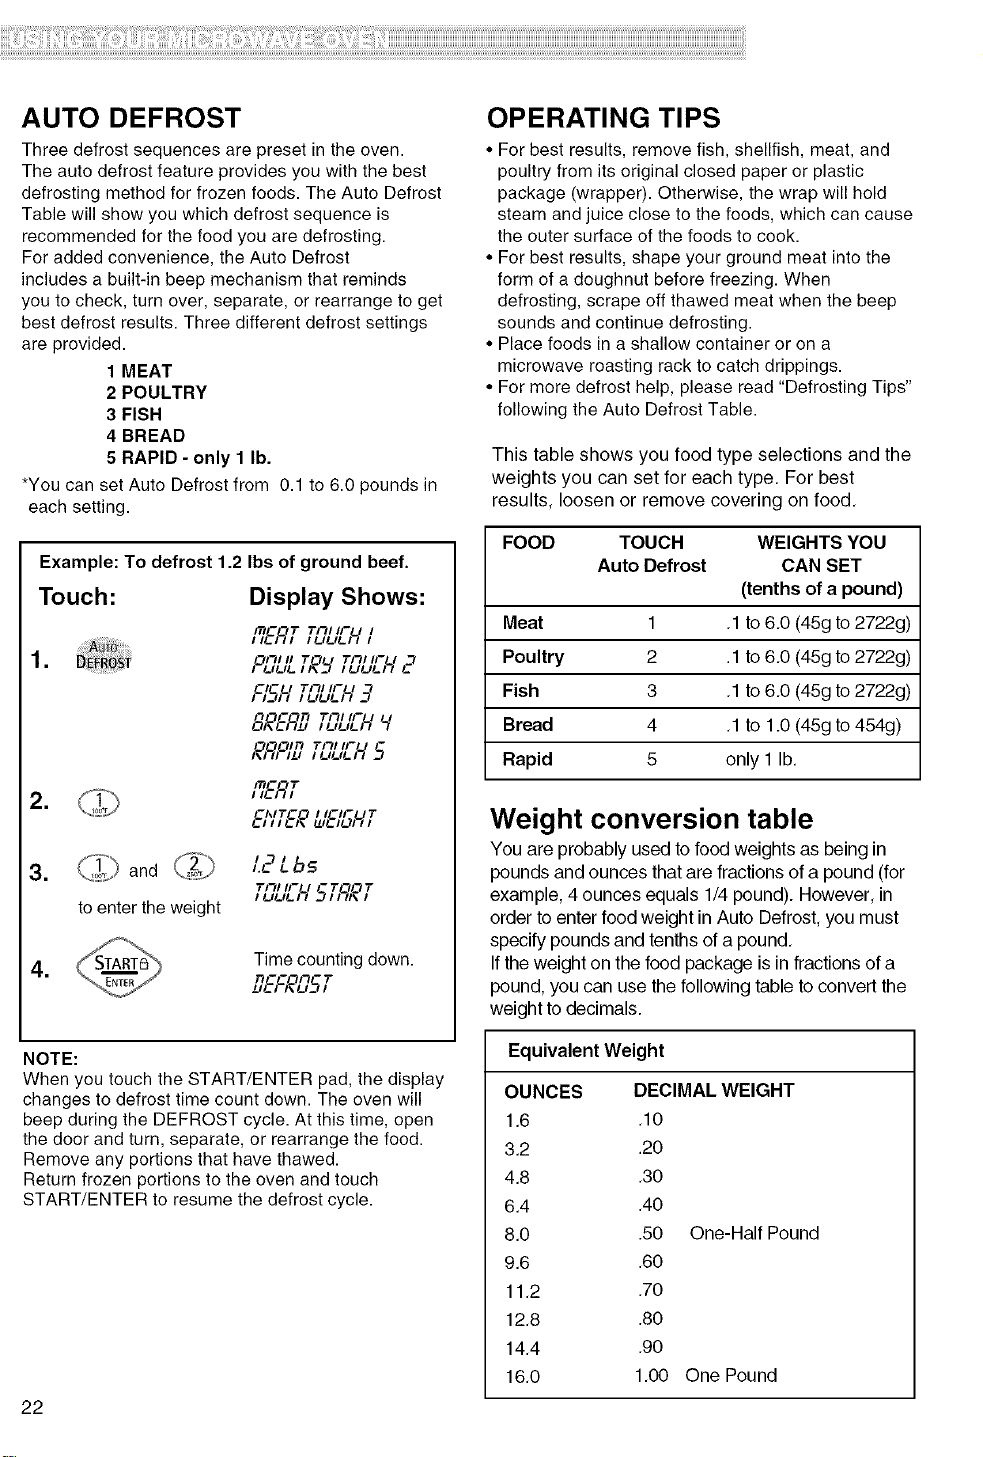
AUTO DEFROST
Three defrost sequences are preset in the oven.
The auto defrost feature provides you with the best
defrosting method for frozen foods. The Auto Defrost
Table will show you which defrost sequence is
recommended for the food you are defrosting.
For added convenience, the Auto Defrost
includes a built-in beep mechanism that reminds
you to check, turn over, separate, or rearrange to get
best defrost results. Three different defrost settings
are provided.
1 MEAT
2 POULTRY
3 FISH
4 BREAD
5 RAPID - only I lb.
*You can set Auto Defrost from 0.1 to 6.0 pounds in
each setting.
Touch:
1.
Example: To defrost 1.2 Ibs of ground beef.
Display Shows:
,'_&qTT,',,- , ,
PLTLIL_o,_-/fl_TU,'_-,£',.-'_
,%'_q,£'TLTL,','_-,£'_q
81&.CR_fl_7U,'_-,£''_'
,°,R,£'_'I,TLTL,','_-,£'5
2. flE-RT
3. 'Z'b,
TL?LI,'_-fl5_£° T
to enter the weight
4. Time counting down.
nCCOF_-T
].,ll_l I\I_/__1
NOTE:
When you touch the START/ENTER pad, the display
changes to defrost time count down. The oven will
beep during the DEFROST cycle. At this time, open
the door and turn, separate, or rearrange the food.
Remove any portions that have thawed.
Return frozen portions to the oven and touch
START/ENTER to resume the defrost cycle.
22
OPERATING TIPS
• For best results, remove fish, shellfish, meat, and
poultry from its original closed paper or plastic
package (wrapper). Otherwise, the wrap will hold
steam and juice close to the foods, which can cause
the outer surface of the foods to cook.
• For best results, shape your ground meat into the
form of a doughnut before freezing. When
defrosting, scrape off thawed meat when the beep
sounds and continue defrosting.
• Place foods in a shallow container or on a
microwave roasting rack to catch drippings.
• For more defrost help, please read "Defrosting Tips"
following the Auto Defrost Table.
This table shows you food type selections and the
weights you can set for each type, For best
results, loosen or remove covering on food.
FOOD TOUCH WEIGHTS YOU
Auto Defrost CAN SET
(tenths of a pound)
Meat 1 .1 to 6.0 (45g to 2722g)
Poultry 2 .1 to 6.0 (45g to 2722g)
Fish 3 .1 to 6.0 (45g to 2722g)
Bread 4 .1 to 1.0 (45g to 454g)
Rapid 5 only 1 lb.
Weight conversion table
You are probably used to food weights as being in
pounds and ounces that are fractions of a pound (for
example, 4 ounces equals 1/4 pound). However, in
order to enter food weight in Auto Defrost, you must
specify pounds and tenths of a pound.
If the weight on the food package is in fractions of a
pound, you can use the following table to convert the
weight to decimals.
Equivalent Weight
OUNCES DECIMAL WEIGHT
1.6 .10
3.2 .20
4.8 .30
6.4 .40
8.0 .50
9.6 .60
11.2 .70
12.8 .80
14.4 .90
16.0 1.00
One-Half Pound
One Pound
iiiiiiiiiiiiiiiiiiiiiiiiiiiiiiiiiiiiiiiiiiiiiiiiiiiiiiiiiiiiiiiiiiiiiiiiiiiiiiiiiiiiiiiiiiiiiiiiiiiiiiiiiiiiiiiiiiiiiiiiiiiiiiiiiiiiiiiiiiiiiiiiiiiiiiiiiiiiiiiiiiiiiiiiiiiiiiiiiiiiiiiiiiiiiiiiiiiiiiiiiiiiiiiiiiiiiiiiiiiiiiiiiiiiiiiiiiiiiiiiiiiiiiiiiiiiiiiiiiiiiiiiiiiiiiiiiiiiiiiiiiiiiiiiiiiiiiiiiiiiiiiiiiiiiiiiiiiiiiiiiiiiiiiiiiiiiiiiiiiiiiiiiiiiiiiiiiiiiiiiiiiiiiiiiiiiiiiiiiiiiiiiiiiiiiiiiiiiiiiiiiiiiiiiiiii_;iiiii'ii_il_iiiiiii!i!iiiiii_ii_i_i_'i_'ii_ii_iiiiii_i__iiiiiiiiiiii_iill¸i!i!iiiiii_ii_ii'ii_ii_ii'iiii_ii_ii_ii_il_ii;ii_iiiiiiii:ii_ii_ii_ii_iii_ii_ii_ii_ii_ii_iiii_ii_ii_iiiill_II_II_IIIII_!!I_II¸iii!iiii_:i_ill¸ii_ii'ii'i!ii_!iill¸il¸ii!i'iiiiiiiii_ii_iiiiii_ii_ii_iiiiil_ii_!i_ii_iiii_ii_iiiiii::i_ii::i_:iiiii_I_;ili_ii_ii_ii_ii:iiii_ii_ii_i_iiiiill¸iiiiiiiiiiii_ii_il_iiiiii_ii_iiiill'II_ii_iiii'ii_!i'ii_ii_ii_ii_i!il¸iiii_i!i_il_i!_i!i!i!_ii_i!_!i_il¸ii_ii_ii_i_ii_iiii_il¸ii_ii_ii_iiiiiiiiii_ii_i_ii_iiiiii_ii_il¸ii_ii_ii_ii_iiiiiiii'IIII_I¸II!I!I!I!¸I!I!I!¸I!I!I!I!I!¸i!i!i!i!!!ii!
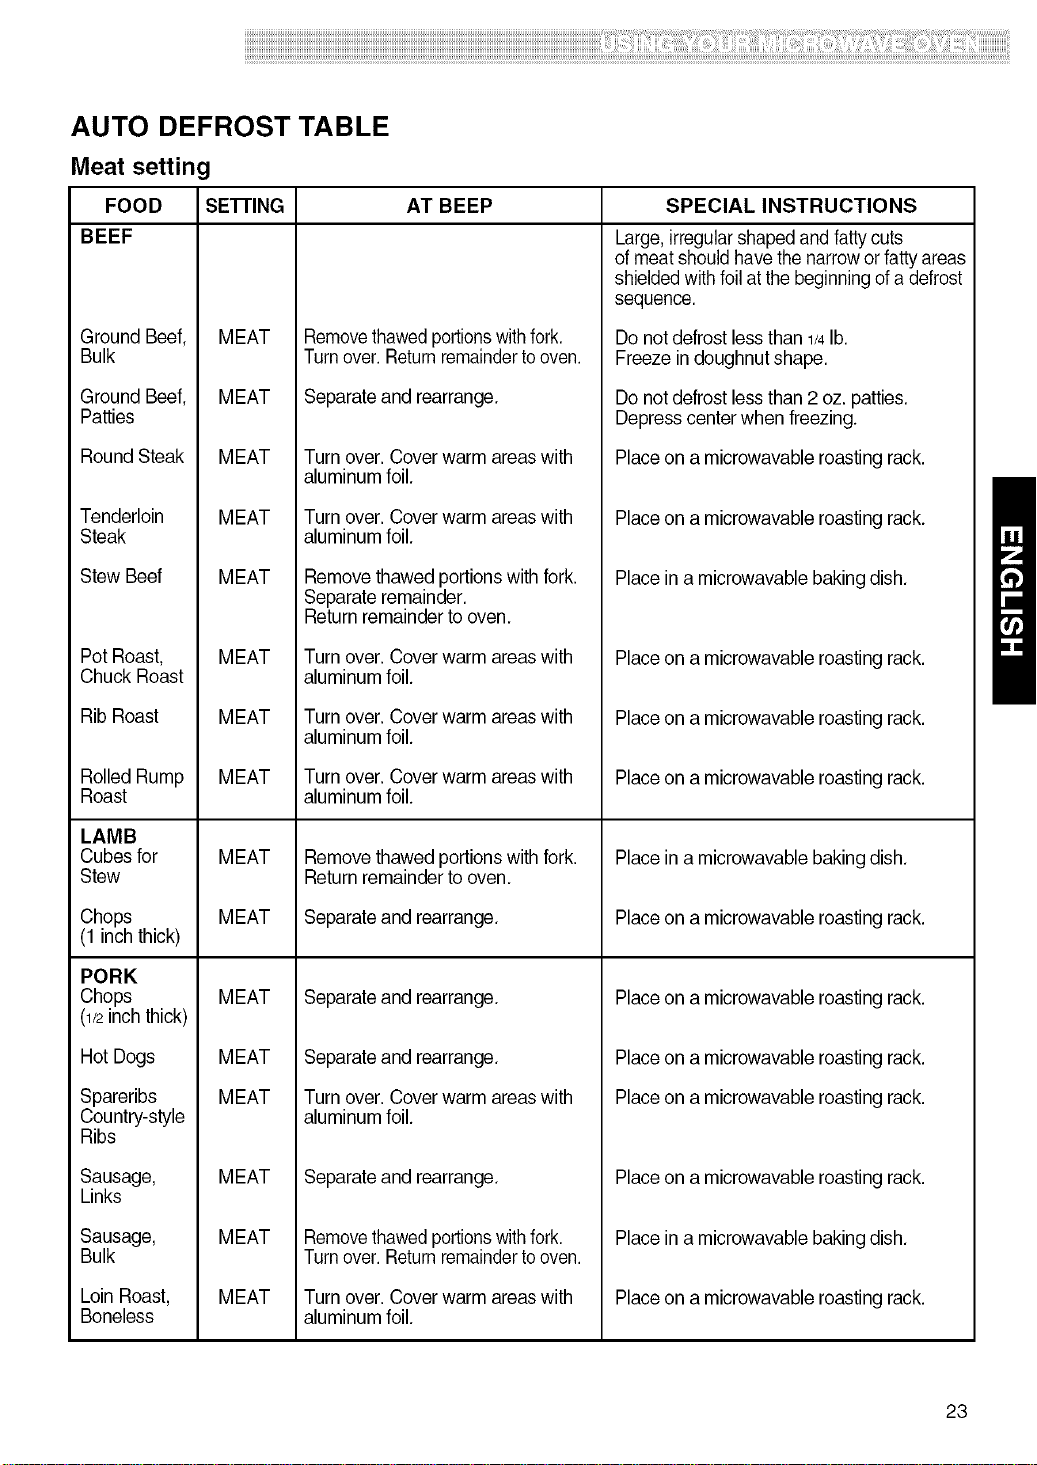
AUTO DEFROST TABLE
Meat setting
FOOD SE'I-FING AT BEEP SPECIAL INSTRUCTIONS
BEEF
Ground Beef,
Bulk
Ground Beef,
Patties
Round Steak
Tenderloin
Steak
Stew Beef
Pot Roast,
Chuck Roast
Rib Roast
Rolled Rump
Roast
LAMB
Cubes for
Stew
Chops
(1 inch thick)
PORK
Chops
(1/2inchthick)
Hot Dogs
Spareribs
Country-style
Ribs
Sausage,
Links
Sausage,
Bulk
Loin Roast,
Boneless
MEAT
MEAT
MEAT
MEAT
MEAT
MEAT
MEAT
MEAT
MEAT
MEAT
MEAT
MEAT
MEAT
MEAT
MEAT
MEAT
Removethawedportionswith fork.
Turnover. Returnremainderto oven.
Separateand rearrange.
Turnover. Cover warm areas with
aluminum foil.
Turnover. Cover warm areas with
aluminum foil.
Remove thawed portions with fork.
Separateremainder.
Return remainder tooven.
Turnover. Cover warm areas with
aluminum foil.
Turnover. Cover warm areas with
aluminum foil.
Turnover. Cover warm areas with
aluminum foil.
Remove thawed portions with fork.
Return remainder tooven.
Separateand rearrange.
Separateand rearrange.
Separateand rearrange.
Turnover. Cover warm areas with
aluminum foil.
Separateand rearrange.
Removethawedportionswith fork.
Turnover. Returnremainderto oven.
Turnover. Cover warm areas with
aluminum foil.
Large,irregularshaped and fattycuts
of meat shouldhavethe narrowor fatty areas
shieldedwith foilat thebeginningof a defrost
sequence.
Donot defrost less than 1/4lb.
Freeze in doughnut shape.
Donot defrost less than 2 oz. patties.
Depresscenter when freezing.
Placeon a microwavable roasting rack.
Placeon a microwavable roasting rack.
Placein a microwavable baking dish.
Placeon a microwavable roasting rack.
Placeon a microwavable roasting rack.
Placeon a microwavable roasting rack.
Placein a microwavable baking dish.
Placeon a microwavable roasting rack.
Placeon a microwavable roasting rack.
Placeon a microwavable roasting rack.
Placeon a microwavable roasting rack.
Placeon a microwavable roasting rack.
Placein a microwavable baking dish.
Placeon a microwavable roasting rack.
23
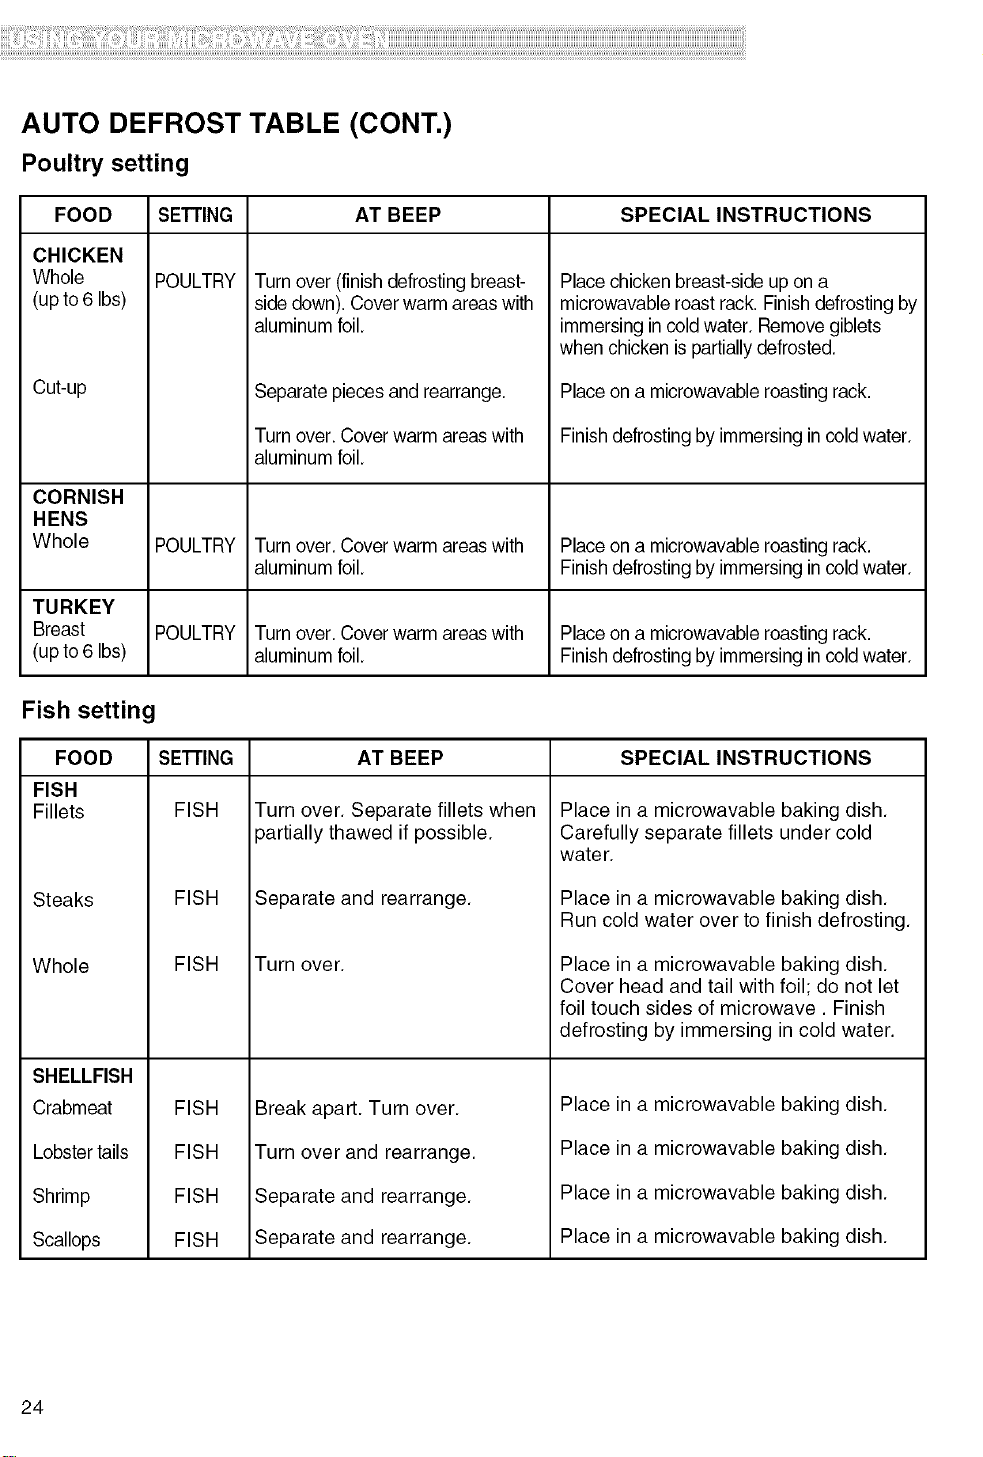
AUTO DEFROST TABLE (CONT.)
Poultry setting
FOOD SE'I-rlNG AT BEEP SPECIAL INSTRUCTIONS
CHICKEN
Whole
(upto 6 Ibs)
Cut-up
POULTRY
Turn over (finishdefrosting breast-
side down). Cover warm areaswith
aluminum foil.
Separate pieces and rearrange.
Turn over. Cover warm areaswith
aluminum foil.
Placechicken breast-side up on a
microwavable roast rack.Finish defrosting by
immersing in coldwater. Removegiblets
when chicken ispartially defrosted.
Placeon a microwavable roasting rack.
Finish defrostingby immersingin cold water.
CORNISH
HENS
Whole POULTRY Turn over. Cover warm areaswith Placeon a microwavable roasting rack.
aluminum foil. Finishdefrostingby immersingin cold water.
TURKEY
Breast POULTRY Turn over. Cover warm areaswith Placeon a microwavable roasting rack.
(up to 6 Ibs) aluminum foil. Finishdefrostingby immersingin cold water.
Fish setting
SPECIAL INSTRUCTIONSFOOD
FISH
Fillets
Steaks
Whole
SHELLFISH
Crabmeat
Lobster tails
Shrimp
Scallops
SE'I-rlNG
FISH
FISH
AT BEEP
Turn over. Separate fillets when
partially thawed if possible.
Separate and rearrange.
FISH Turn over.
FISH
FISH
FISH
FISH
Break apart. Turn over.
Turn over and rearrange.
Separate and rearrange.
Separate and rearrange.
Place in a microwavable baking dish.
Carefully separate fillets under cold
water.
Place in a microwavable baking dish.
Run cold water over to finish defrosting.
Place in a microwavable baking dish.
Cover head and tail with foil; do not let
foil touch sides of microwave. Finish
defrosting by immersing in cold water.
Place in a microwavable baking dish.
Place in a microwavable baking dish.
Place in a microwavable baking dish.
Place in a microwavable baking dish.
24
iiiiiiiiiiiiiiiiiiiiiiiiiiiiiiiiiiiiiiiiiiiiiiiiiiiiiiiiiiiiiiiiiiiiiiiiiiiiiiiiiiiiiiiiiiiiiiiiiiiiiiiiiiiiiiiiiiiiiiiiiiiiiiiiiiiiiiiiiiiiiiiiiiiiiiiiiiiiiiiiiiiiiiiiiiiiiiiiiiiiiiiiiiiiiiiiiiiiiiiiiiiiiiiiiiiiiiiiiiiiiiiiiiiiiiiiiiiiiiiiiiiiiiiiiiiiiiiiiiiiiiiiiiiiiiiiiiiiiiiiiiiiiiiiiiiiiiiiiiiiiiiiiiiiiiiiiiiiiiiiiiiiiiiiiiiiiiiiiiiiiiiiiiiiiiiiiiiiiiiiiiiiiiiiiiiiiiiiiiiiiiiiiiiiiiiiiiiiiiiiiiiiiiiiiiii_;iiiii'ii_il_iiiiiii!i!iiiiii_ii_i_i_'i_ii_ii_iiiiii_i_iiiiiiiiiiii_iill¸i!i!iiiiii_ii_ii'ii_ii_iiiiii_ii_ii_ii_il_ii;ii_iiiiiiii:ii_ii_ii_ii_iii_ii_ii_ii_ii_ii_iiii_ii_ii_iiiill_II_II_IIIII_!!I_II¸iii!iiii_:i_ill¸ii_ii'ii'i!ii_!iill¸il¸ii!i'iiiiiiiii_ii_iiiiii_ii_ii_iiiiil_ii_!i_ii_iiii_ii_iiiiii::i_ii::i_:iiiii_I_;ili_ii_ii_ii_iiiiii_ii_ii_i_iiiiill¸iiiiiiiiiiii_ii_il_iiiiii_ii_iiiill'II_ii_iiiiii_!iii_ii_ii_ii_i!il¸iiii_i!i_il_i!_i!i!i!_ii_i!_!i_il¸ii_ii_ii_i_ii_iiii_il¸ii_ii_ii_iiiiiiiiii_ii_i_ii_iiiiii_ii_il¸ii_ii_ii_ii_iiiiiiii'IIII_I¸II!I!I!I!¸I!I!I!¸I!I!I!I!I!¸i!i!i!i!!!ii!
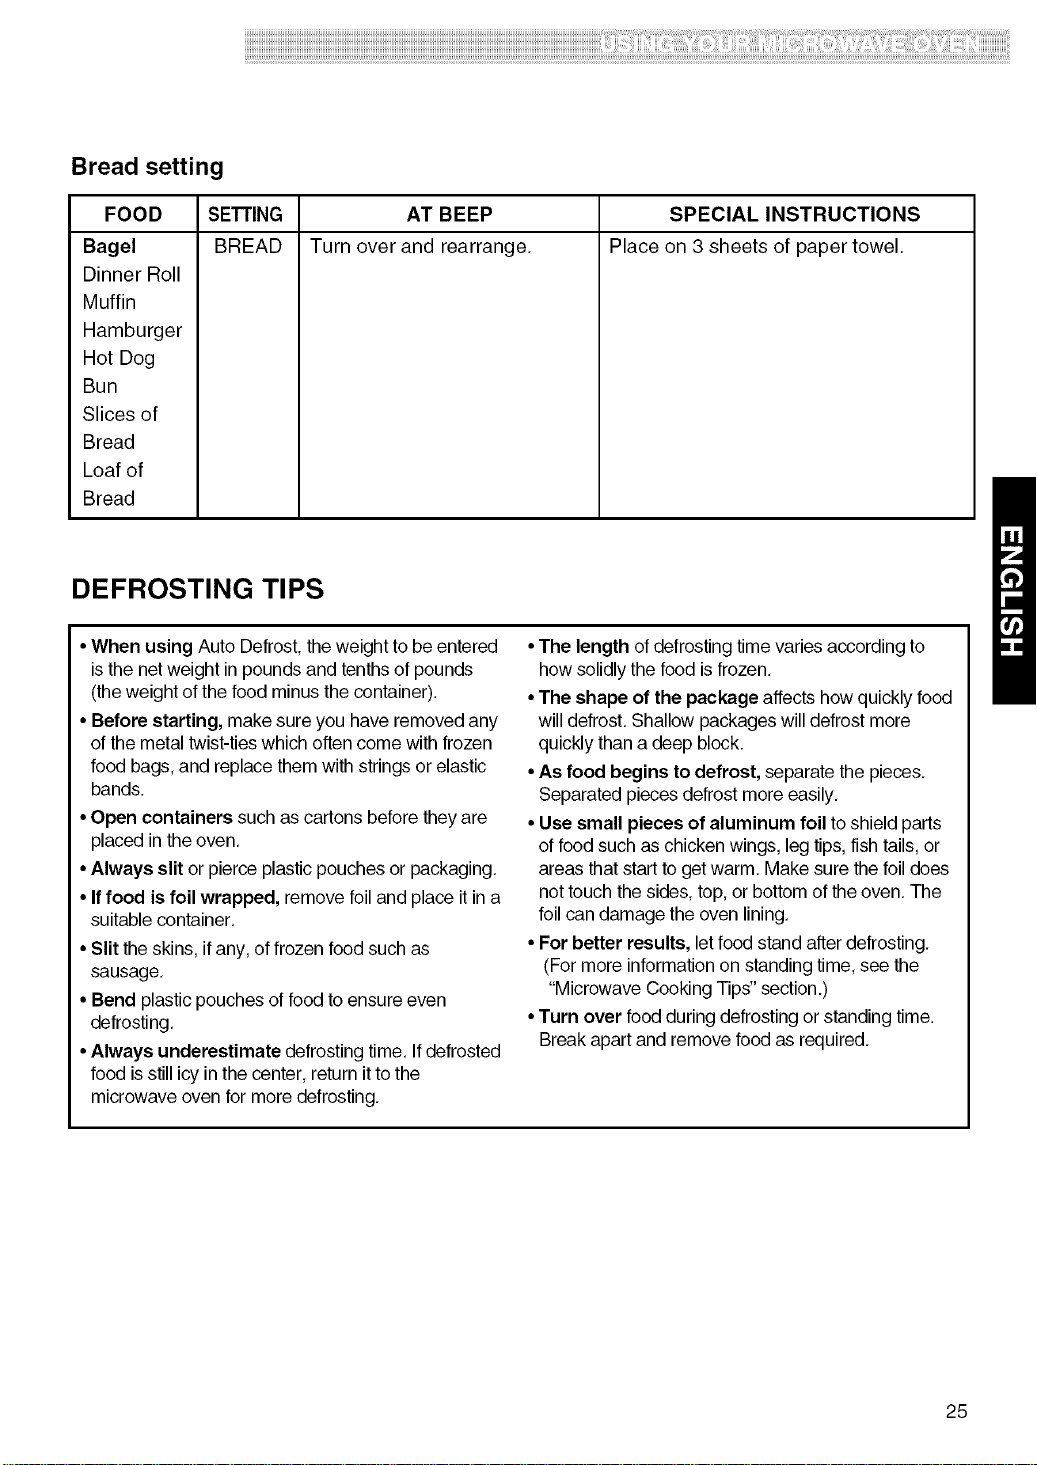
Bread setting
FOOD
Bagel
Dinner Roll
Muffin
Hamburger
Hot Dog
Bun
Slices of
Bread
Loaf of
Bread
SE'FrlNG AT BEEP SPECIAL INSTRUCTIONS
BREAD Turn over and rearrange. Place on 3 sheets of paper towel.
DEFROSTING TIPS
•When using Auto Defrost,theweight to be entered
is the netweight in pounds and tenths of pounds
(theweight of the food minus the container).
• Before starting, make sure you have removed any
of the metal twist-tieswhich often come with frozen
food bags, and replacethem with stringsor elastic
bands.
•Open containers such as cartons beforethey are
placed in the oven.
•Always slit or pierce plasticpouches or packaging,
•If food is foil wrapped, remove foil and place it in a
suitable container,
•Slit the skins, ifany, of frozen food such as
sausage,
• Bend plastic pouches of food toensure even
defrosting,
•Always underestimate defrosting time. If defrosted
food is stillicy in the center,return itto the
microwave ovenfor more defrosting,
•The length of defrostingtime varies according to
how solidly the food isfrozen,
•The shape of the package affects how quicklyfood
willdefrost. Shallow packageswill defrost more
quickly thana deep block.
•As food begins to defrost, separate the pieces.
Separated pieces defrost more easily,
•Use small pieces of aluminum foil to shield parts
of food such as chickenwings, leg tips,fish tails, or
areas that start toget warm, Make sure thefoil does
not touch the sides, top, or bottom of theoven, The
foil candamage the oven lining,
•For better results, let food stand after defrosting,
(Formore information on standing time, see the
"Microwave Cooking Tips" section.)
•Turn over food during defrostingor standing time.
Breakapart and remove foodas required,
25
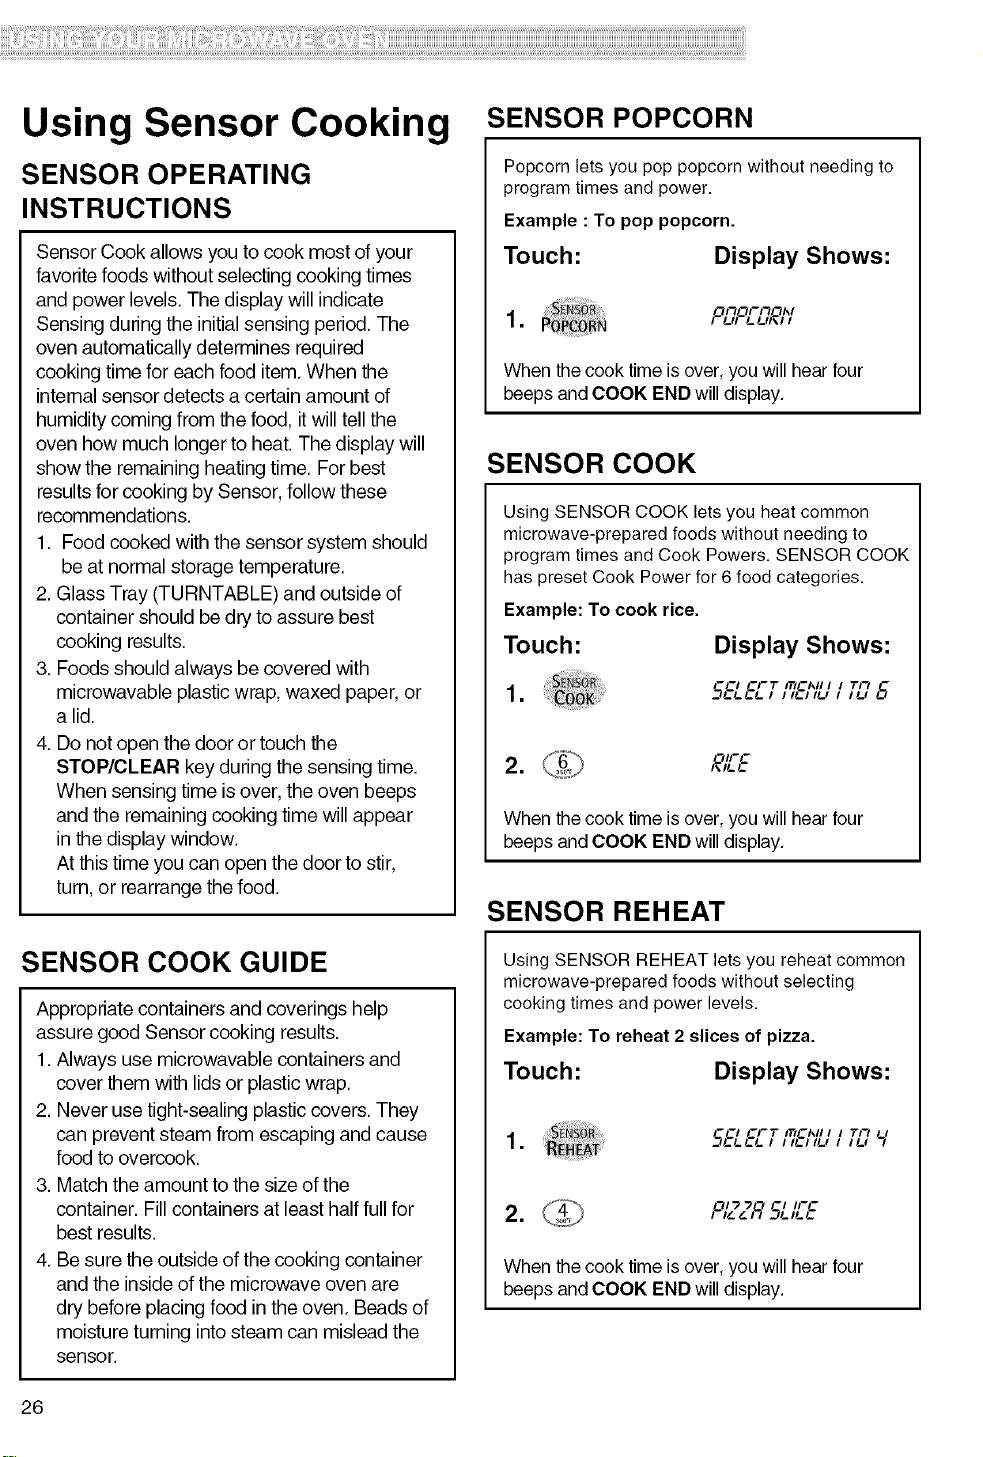
Using Sensor Cooking
SENSOR OPERATING
INSTRUCTIONS
Sensor Cook allows you to cook most of your
favorite foods withoutselecting cooking times
and power levels. The display will indicate
Sensing during the initial sensing period. The
oven automatically determines required
cooking time for each food item. When the
internal sensor detects a certain amount of
humidity coming from the food, itwill tell the
oven how much longer to heat. The display will
show the remaining heating time. For best
results for cooking by Sensor, follow these
recommendations.
1. Food cooked with the sensor system should
be at normal storage temperature.
2. Glass Tray (TURNTABLE) and outside of
container should be dry to assure best
cooking results.
3. Foods should always be covered with
microwavable plastic wrap, waxed paper, or
a lid.
4. Do not open the door or touch the
STOP/CLEAR key during the sensing time.
When sensing time is over, the oven beeps
and the remaining cooking time will appear
in the display window.
At this time you can open the door to stir,
turn, or rearrange the food.
SENSOR COOK GUIDE
Appropriate containers and coverings help
assure good Sensor cooking results.
1. Always use microwavable containers and
cover them with lids or plastic wrap.
2. Never use tight-sealing plastic covers. They
can prevent steam from escaping and cause
food to overcook.
3. Match the amount to the size of the
container. Fill containers at least half full for
best results.
4. Be sure the outside of the cooking container
and the inside of the microwave oven are
dry before placing food in the oven. Beads of
moisture turning into steam can mislead the
sensor.
SENSOR POPCORN
Popcorn lets you pop popcorn without needing to
program times and power.
Example : To pop popcorn.
Touch: Display Shows:
OnOrnOl,,
1. _ _ , _.,,_._.,,,,,
When the cook time is over, you willhear four
beeps and COOK END will display.
SENSOR COOK
Using SENSOR COOK letsyou heat common
microwave-prepared foods without needing to
program times and Cook Powers.SENSOR COOK
has preset Cook Powerfor 6 food categories.
Example: To cook rice.
Touch: Display Shows:
1. 5_._._._.,,,_.,,_.,,,_.,6
Ol_-C
When the cook time is over, you willhear four
beeps and COOK END will display.
SENSOR REHEAT
Using SENSOR REHEATlets you reheat common
microwave-prepared foods without selecting
cooking times and power levels.
Example: To reheat 2 slices of pizza.
Touch: Display Shows:
-C, CI-T ITtCMI / I TI'_
5/-L/-/- / IH-IIU I l/-, L[
01"_-)'_ ' II-C
2. (_ , ,_I:_ __L,_._.
When the cook time is over, you willhear four
beeps and COOK END will display.
26
iiiiiiiiiiiiiiiiiiiiiiiiiiiiiiiiiiiiiiiiiiiiiiiiiiiiiiiiiiiiiiiiiiiiiiiiiiiiiiiiiiiiiiiiiiiiiiiiiiiiiiiiiiiiiiiiiiiiiiiiiiiiiiiiiiiiiiiiiiiiiiiiiiiiiiiiiiiiiiiiiiiiiiiiiiiiiiiiiiiiiiiiiiiiiiiiiiiiiiiiiiiiiiiiiiiiiiiiiiiiiiiiiiiiiiiiiiiiiiiiiiiiiiiiiiiiiiiiiiiiiiiiiiiiiiiiiiiiiiiiiiiiiiiiiiiiiiiiiiiiiiiiiiiiiiiiiiiiiiiiiiiiiiiiiiiiiiiiiiiiiiiiiiiiiiiiiiiiiiiiiiiiiiiiiiiiiiiiiiiiiiiiiiiiiiiiiiiiiiiiiiiiiiiiiiii_;iiiii'ii_il_iiiiiii!i!iiiiii_ii_i_i_'i_'ii_ii_iiiiii_i__iiiiiiiiiiii_iill¸i!i!iiiiii_ii_ii'ii_ii_ii'iiii_ii_ii_ii_il_ii;ii_iiiiiiii:ii_ii_ii_ii_iii_ii_ii_ii_ii_ii_iiii_ii_ii_iiiill_II_II_IIIII_!!I_II¸iii!iiii_i_ill¸ii_ii'ii'i!ii_!iill¸il¸ii!i'iiiiiiiii_ii_iiiiii_ii_ii_iiiiil_ii_!i_ii_iiii_ii_iiiiii_:i_ii_:i_:iiiii_I_iiiiii_ii_ii_ii_ii:iiii_ii_ii_i_iiiiill¸iiiiiiiiiiii_ii_il_iiiiii_ii_iiiill'II_ii_iiii'ii_!i'ii_ii_ii_ii_i!il¸iiii_i!i_il_i!_i!i!i!_ii_i!_!i_il¸ii_ii_ii_i_ii_iiii_il¸ii_ii_ii_iiiiiiiiii_ii_i_ii_iiiiii_ii_il¸ii_ii_ii_ii_iiiiiiii'IIII_I¸II!I!I!I!¸I!I!I!¸I!I!I!I!I!¸i!i!i!i!!!ii!
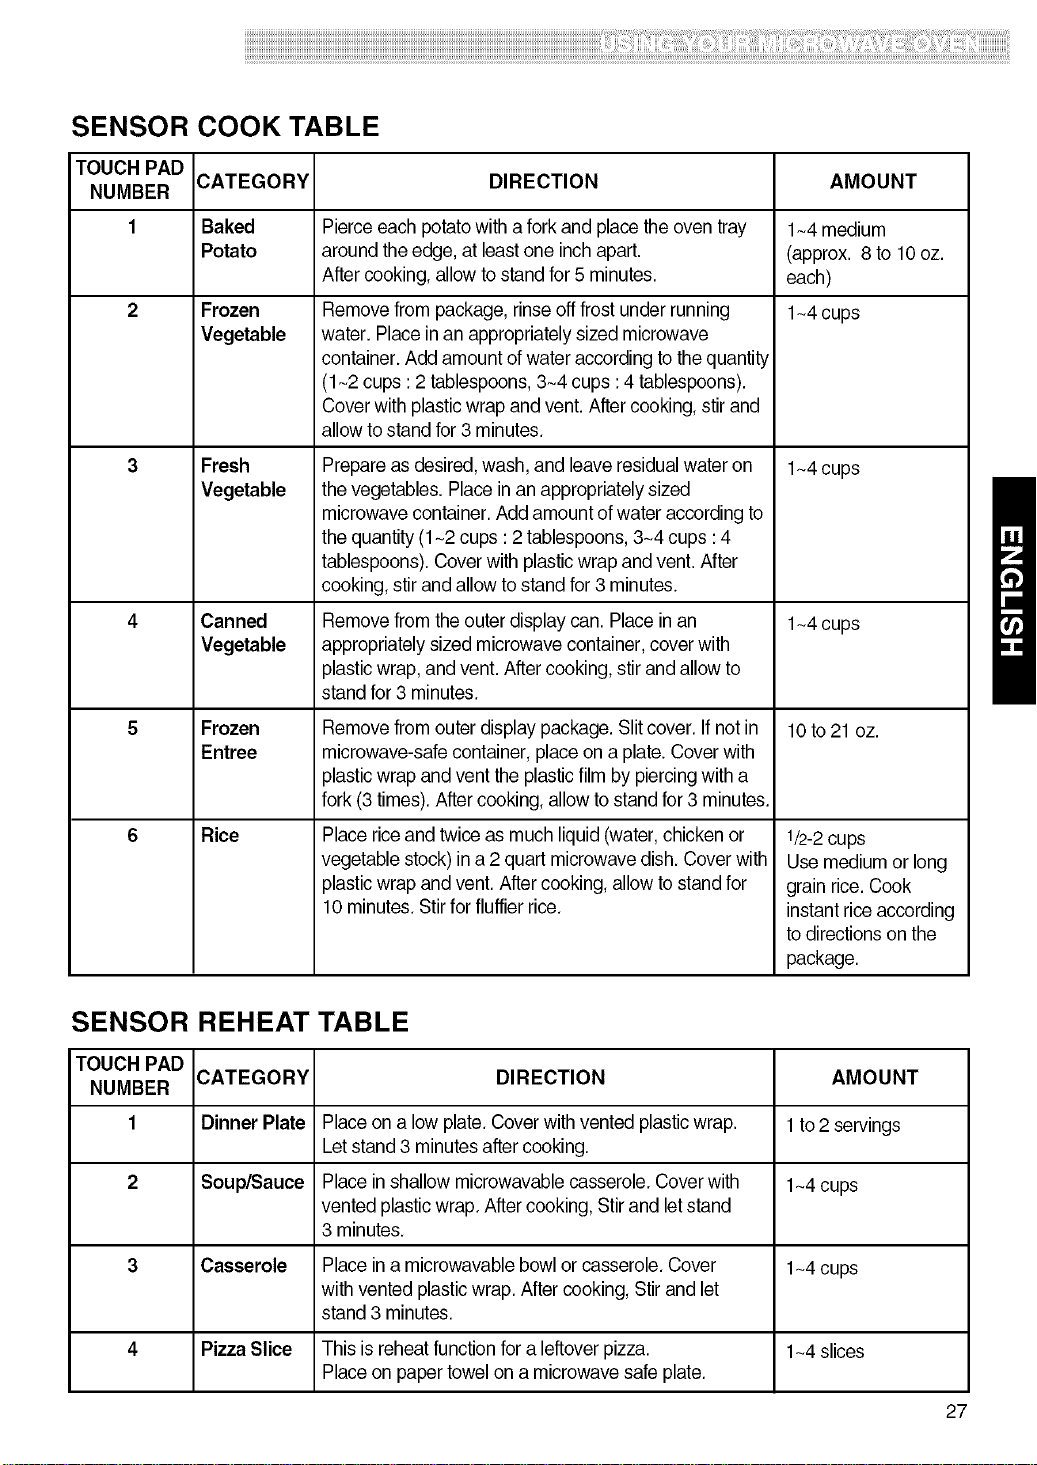
SENSOR COOK TABLE
TOUCH PAD
NUMBER CATEGORY DIRECTION AMOUNT
1 Baked 1~4medium
Potato (approx. 8 to 10 oz.
each)
2 Frozen 1~4cups
Vegetable
Fresh
Vegetable
Canned
Vegetable
Frozen
Entree
Rice
Pierceeach potatowith a fork and placethe oven tray
around the edge, at least one inch apart.
After cooking, allowto stand for 5 minutes.
Remove from package,rinse off frost under running
water. Placein an appropriately sized microwave
container. Add amount of water according to the quantity
(1~2cups :2 tablespoons, 3~4cups :4 tablespoons).
Cover with plasticwrap and vent. After cooking, stir and
allow to stand for3 minutes.
Prepare as desired, wash, and leaveresidualwater on
the vegetables. Place in an appropriately sized
microwave container.Add amount of water according to
the quantity (1~2 cups : 2 tablespoons, 3~4 cups :4
tablespoons). Cover with plasticwrap and vent. After
cooking, stir and allowto stand for3 minutes.
Remove from the outer display can. Placein an
appropriately sized microwave container, cover with
plasticwrap, and vent.After cooking,stir and allowto
stand for 3 minutes.
Remove from outer display package. Slitcover. Ifnot in
microwave-safe container, placeon a plate. Cover with
plasticwrap and vent the plasticfilm by piercingwith a
fork (3 times). After cooking, allow to stand for3 minutes.
Place riceand twiceas much liquid (water,chicken or
vegetable stock) in a 2 quart microwave dish. Cover with
plasticwrap and vent. After cooking, allow tostand for
10 minutes. Stir forfluffier rice.
1~4cups
1~4cups
10to 21 oz.
1/2-2cups
Use medium or long
grain rice. Cook
instant riceaccording
to directionson the
package.
SENSOR REHEAT TABLE
TOUCH PAD
NUMBER CATEGORY DIRECTION AMOUNT
1 Dinner Plate Place on a low plate.Cover with vented plasticwrap. 1 to2 servings
Letstand 3 minutes after cooking.
2 Soup/Sauce Place in shallow microwavable casserole. Coverwith 1~4cups
vented plasticwrap. After cooking, Stirand letstand
3 minutes.
3 Casserole Place ina microwavable bowlor casserole. Cover 1~4 cups
with vented plasticwrap. After cooking, Stirand let
stand 3 minutes.
4 Pizza Slice This is reheatfunction for aleftover pizza. 1~4slices
Place on paper towel on a microwave safe plate.
27
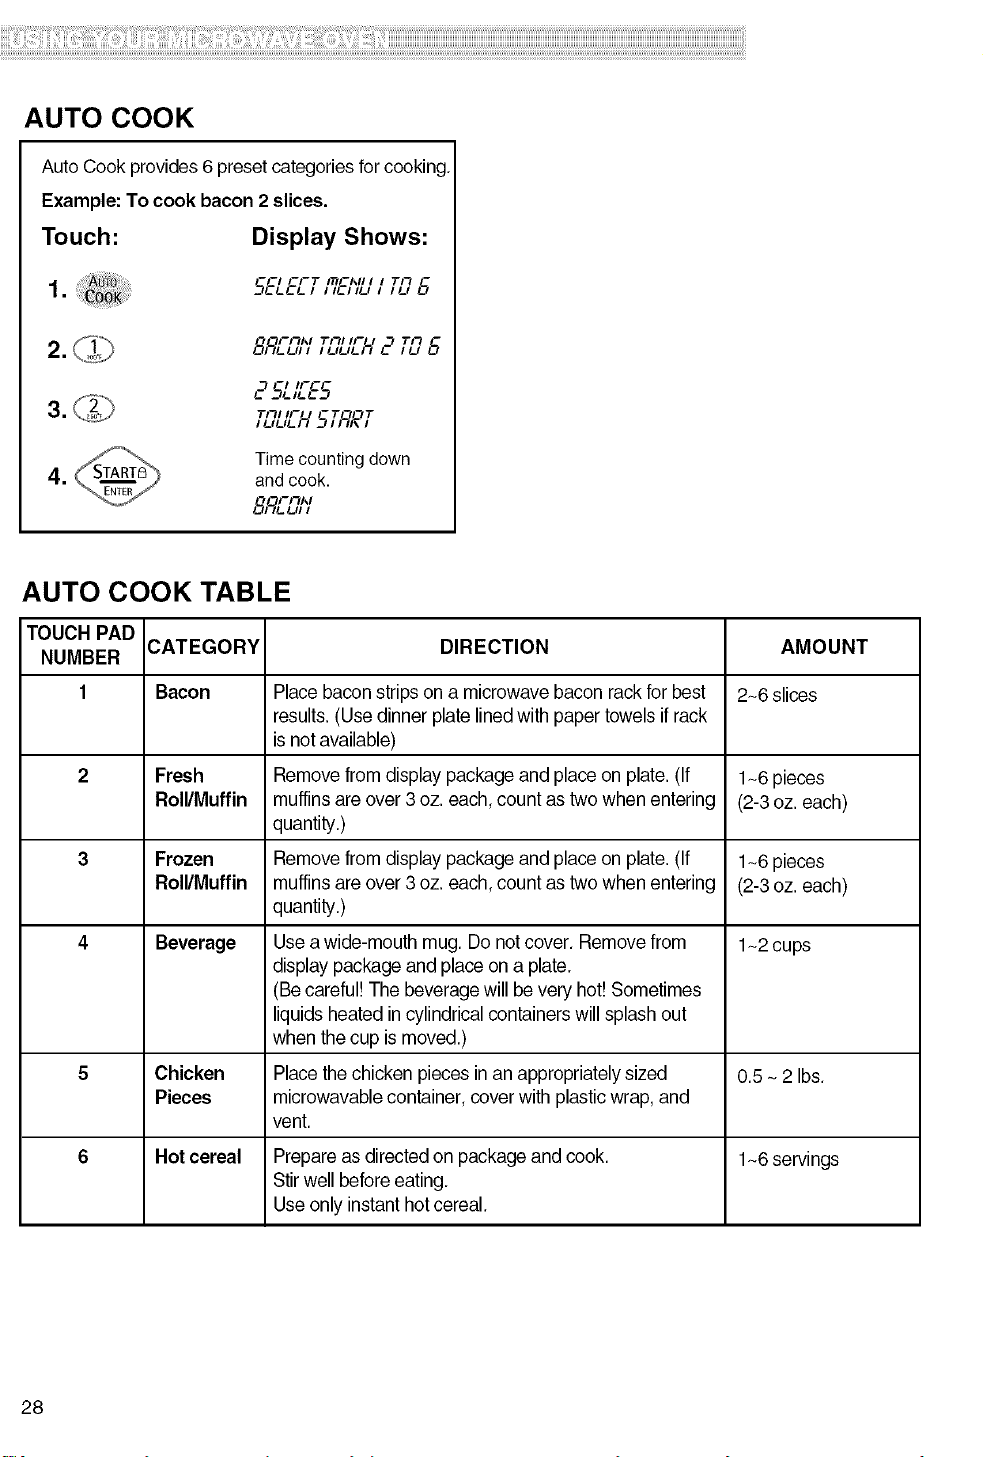
AUTO COOK
Auto Cook provides 6 preset categories for cooking.
Example: To cook bacon 2 slices.
Touch: Display Shows:
--CI CI-T I_CI_II I I Tit
1.
8,qL-,'__"ITL?L/L35'E TL76
,.-"5LI&E5
fl_?LIL-,5'5_o 7
Time countingdown
and cook.
8,qL,'__';I
AUTO COOK TABLE
TOUCH PAD
NUMBER
1
CATEGORY
Bacon
Fresh
Roll/Muffin
Frozen
Roll/Muffin
Beverage
Chicken
Pieces
Hot cereal
DIRECTION
Placebacon stripson a microwave bacon rack for best
results. (Use dinner platelinedwith paper towels ifrack
is notavailable)
Removefrom display package and placeon plate. (If
muffins are over 3 oz. each, count astwo when entering
quantity.)
Removefrom display package and placeon plate. (If
muffins are over 3 oz. each, count astwo when entering
quantity.)
Usea wide-mouth mug. Donot cover. Remove from
display package and place on a plate.
(Be careful! The beveragewill be very hot! Sometimes
liquids heated in cylindricalcontainerswill splash out
when the cup is moved.)
Placethechicken pieces in an appropriately sized
microwavable container, cover with plasticwrap, and
vent.
Prepareas directed on package and cook.
Stirwell before eating.
Useonly instant hotcereal.
AMOUNT
2~6 slices
1~6 pieces
(2-3 oz. each)
1~6 pieces
(2-3 oz. each)
1~2cups
0.5 ~ 2 Ibs.
1~6 servings
28
iiiiiiiiiiiiiiiiiiiiiiiiiiiiiiiiiiiiiiiiiiiiiiiiiiiiiiiiiiiiiiiiiiiiiiiiiiiiiiiiiiiiiiiiiiiiiiiiiiiiiiiiiiiiiiiiiiiiiiiiiiiiiiiiiiiiiiiiiiiiiiiiiiiiiiiiiiiiiiiiiiiiiiiiiiiiiiiiiiiiiiiiiiiiiiiiiiiiiiiiiiiiiiiiiiiiiiiiiiiiiiiiiiiiiiiiiiiiiiiiiiiiiiiiiiiiiiiiiiiiiiiiiiiiiiiiiiiiiiiiiiiiiiiiiiiiiiiiiiiiiiiiiiiiiiiiiiiiiiiiiiiiiiiiiiiiiiiiiiiiiiiiiiiiiiiiiiiiiiiiiiiiiiiiiiiiiiiiiiiiiiiiiiiiiiiiiiiiiiiiiiiiiiiiiiii_;iiiii'ii_il_iiiiiii!i!iiiiii_ii_i_i_'i_ii_ii_iiiiii_i_iiiiiiiiiiii_iill¸i!i!iiiiii_ii_ii'ii_ii_iiiiii_ii_ii_ii_il_ii;ii_iiiiiiii:ii_ii_ii_ii_iii_ii_ii_ii_ii_ii_iiii_ii_ii_iiiill_II_II_IIIII_!!I_II¸iii!iiii_:i_ill¸ii_ii'ii'i!ii_!iill¸il¸ii!i'iiiiiiiii_ii_iiiiii_ii_ii_iiiiil_ii_!i_ii_iiii_ii_iiiiii::i_ii::i_:iiiii_I_;ili_ii_ii_ii_iiiiii_ii_ii_i_iiiiill¸iiiiiiiiiiii_ii_il_iiiiii_ii_iiiill'II_ii_iiiiii_!iii_ii_ii_ii_i!il¸iiii_i!i_il_i!_i!i!i!_ii_i!_!i_il¸ii_ii_ii_i_ii_iiii_il¸ii_ii_ii_iiiiiiiiii_ii_i_ii_iiiiii_ii_il¸ii_ii_ii_ii_iiiiiiii'IIII_I¸II!I!I!I!¸I!I!I!¸I!I!I!I!I!¸i!i!i!i!!!ii!
TIPS FOR CONVECTION COOKING
This section gives you cooking instructionsand
procedures foroperating each convection function,
Please read these instructionscarefully,
Convection cooking circulates hot air through the
ovencavity with a fan. The constantlymoving air
surrounds the foodto heatthe outer portionquickly,
creating even browning and sealed-inflavor bythe
constant motion of hot air over thefood surfaces.
Your oven uses convection cookingwhenever you
use the Convection Button, DO NOT USE THE
OVEN WITHOUT THE TURNTABLE IN PLACE.
1.Always use the metal rack on the turntablewhen
convection cooking.
2, Do not cover turntable or metal rack with
aluminum foil, It interfereswiththe flow ofair that
cooks the food,
3. Round pizza pans are excellentcooking utensils
for many convection-only items,
Choose pans that do not haveextended handles,
4. Use convection cooking for items likesouffles,
breads, cookies, angel food cakes, pizza, and for
some meat and fish cooking,
5.Your oven comes equipped with metal tray which
can be used forcooking in convection mode or
combination mode,
6,You do not need to use any special techniques to
adapt your favoriteoven recipes toconvection
cooking; however, you need to lower oven
temperature by 25°Ffrom recommended
temperature mentioned in package instructions
when cooking packaged food in convection mode.
7.When baking cakes, cookies, breads, rolls,or
other baked foods, most recipes call forpreheating,
Preheatthe empty ovenjust as you do a regular
oven. You can start heavierdense foods such as
meats, casseroles,and poultrywithout preheating,
8,All heatproof cookware or metal utensilscan be
used inconvection cooking,
9.As in conventional cooking, the distanceof the
food from the heatsourceaffects cooking results,
Refer tothe charts in this Use and Care Guide.
10, Use metal utensils onlyfor convection cooking,
Never use for microwave or combination cooking
since arcingand damage to the oven may occur.
11,After preheating, ifyou do notopen the door, the
oven will automatically hold atthe preheated
temperature for 30 minutes.
PRECAUTIONS
•The oven cavity,door, turntable, roller rest,metal
tray, metal rack,and cooking utensilswill become
very hot,
USETHICK OVEN GLOVES when removing the
food, cooking utensils, metal rack, metal tray,and
turntable from the oven after convection cooking,
• Donot use lightweight plasticcontainers, plastic
wraps, or paper productsduring anyconvection
cycle,
29
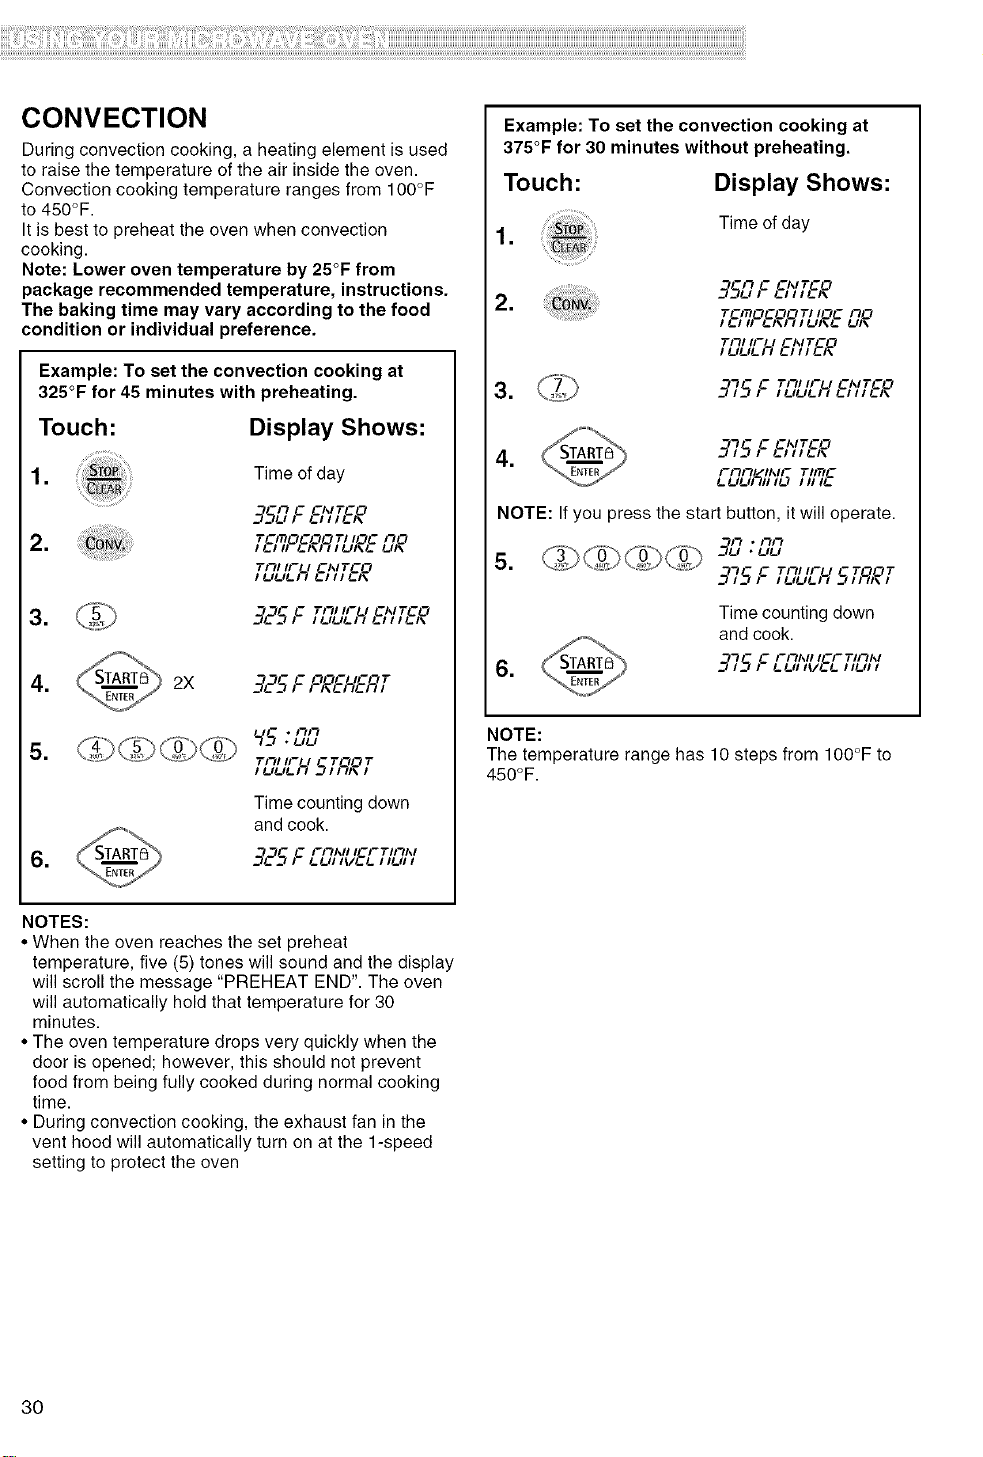
CONVECTION
During convection cooking, a heating element is used
to raise the temperature of the air inside the oven.
Convection cooking temperature ranges from 1O0°F
to 450°F.
It is best to preheat the oven when convection
cooking.
Note: Lower oven temperature by 25°F from
package recommended temperature, instructions.
The baking time may vary according to the food
condition or individual preference.
Example: To set the convection cooking at
325°F for 45 minutes with preheating.
Touch: Display Shows:
1. Time of day
=
-i1 C CMTCO
rcmoco_c-trJIoc mo
i _.1Jl _.l\lt i Ln\_. Ln\
Till II-- 1 CI_ITCO
=
__C._I__ I 1LILIL)_ !-111!-1\
=_- C OOC IC-tT
4. 2X _qE"_:_li 1,_.;%/'_1
5.
Tlll ll- I -T10T
Time counting down
and cook.
=_- C I--II1_11 ICI-TJlII_I
Example: To set the convection cooking at
375°F for 30 minutes without preheating.
Touch: Display Shows:
=
Time of day
=
=
__ I_'_I..11 I_lj11_1\
Tcmoco_c-t T_I0C mO
i LI ii L1\1! i/__1\/_ /Jl\
Till I1-'_1 CI_ITCO
/ LILIL/I !-/I / !-I\
371__F _'n_ii- i c_,n'co
4. 375 c c,,,_co
1 1_1111_1\
I-I111"_II_II- TIITIC
NOTE: If you press the start button, it will operate.
* I111
5.
_q75FT,l,1,-1-T-to_"
Time counting down
and cook.
6. 371_.;c ,-,l,,/,/O-,J,l,,/, _,,v_ ,,_,,
NOTE:
The temperature range has 10 steps from IO0°F to
450°F.
NOTES:
• When the oven reaches the set preheat
temperature, five (5) tones will sound and the display
will scroll the message "PREHEAT END". The oven
will automatically hold that temperature for 30
minutes.
• The oven temperature drops very quickly when the
door is opened; however, this should not prevent
food from being fully cooked during normal cooking
time.
• During convection cooking, the exhaust fan in the
vent hood will automatically turn on at the 1-speed
setting to protect the oven
3O
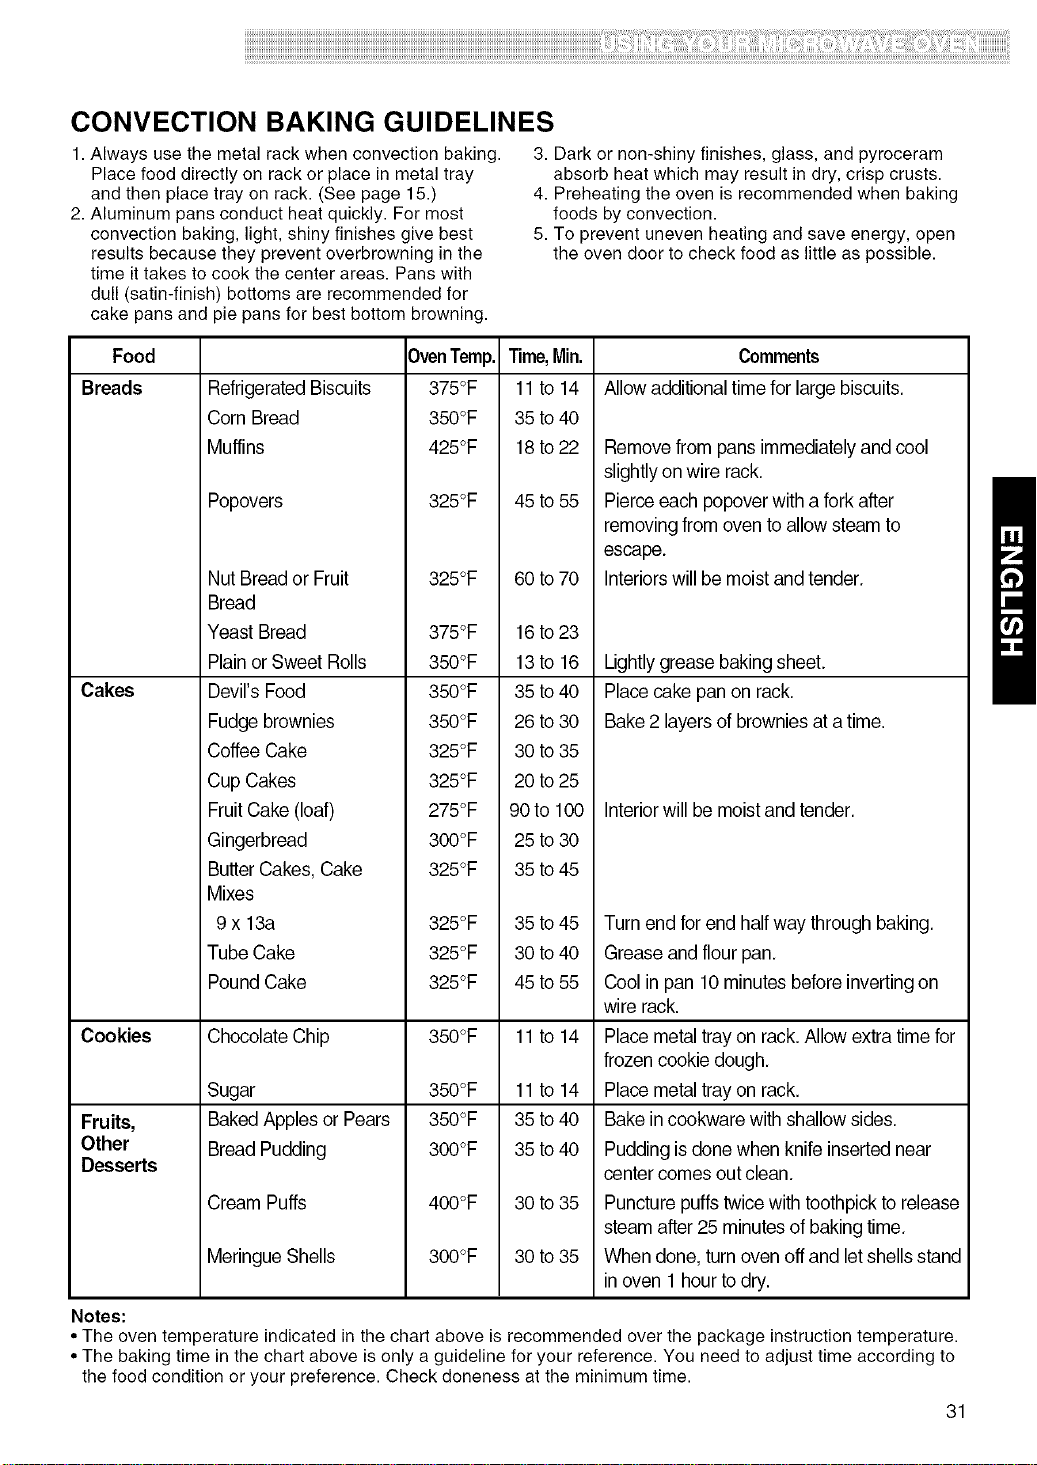
iiiiiiiiiiiiiiiiiiiiiiiiiiiiiiiiiiiiiiiiiiiiiiiiiiiiiiiiiiiiiiiiiiiiiiiiiiiiiiiiiiiiiiiiiiiiiiiiiiiiiiiiiiiiiiiiiiiiiiiiiiiiiiiiiiiiiiiiiiiiiiiiiiiiiiiiiiiiiiiiiiiiiiiiiiiiiiiiiiiiiiiiiiiiiiiiiiiiiiiiiiiiiiiiiiiiiiiiiiiiiiiiiiiiiiiiiiiiiiiiiiiiiiiiiiiiiiiiiiiiiiiiiiiiiiiiiiiiiiiiiiiiiiiiiiiiiiiiiiiiiiiiiiiiiiiiiiiiiiiiiiiiiiiiiiiiiiiiiiiiiiiiiiiiiiiiiiiiiiiiiiiiiiiiiiiiiiiiiiiiiiiiiiiiiiiiiiiiiiiiiiiiiiiiiiii_;iiiii'ii_il_iiiiiii!i!iiiiii_ii_i_i_'i_'ii_ii_iiiiii_i__iiiiiiiiiiii_iill¸i!i!iiiiii_ii_ii'ii_ii_iiiiii_ii_ii_ii_il_ii;ii_iiiiiiii:ii_ii_ii_ii_iii_ii_ii_ii_ii_ii_iiii_ii_ii_iiiill_II_II_IIIII_!!I_II¸iii!iiii_:i_ill¸ii_ii'ii'i!ii_!iill¸il¸ii!i'iiiiiiiii_ii_iiiiii_ii_ii_iiiiil_ii_!i_ii_iiii_ii_iiiiii::i_ii::i_:iiiii_I_;ili_ii_ii_ii_iiiiii_ii_ii_i_iiiiill¸iiiiiiiiiiii_ii_il_iiiiii_ii_iiiill'II_ii_iiiiii_!i'ii_ii_ii_ii_i!il¸iiii_i!i_il_i!_i!i!i!_ii_i!_!i_il¸ii_ii_ii_i_ii_iiii_il¸ii_ii_ii_iiiiiiiiii_ii_i_ii_iiiiii_ii_il¸ii_ii_ii_ii_iiiiiiii'IIII_I¸II!I!I!I!¸I!I!I!¸I!I!I!I!I!¸i!i!i!i!!!ii!
CONVECTION BAKING GUIDELINES
1. Always use the metal rack when convection baking.
Place food directly on rack or place in metal tray
and then place tray on rack. (See page 15.)
2. Aluminum pans conduct heat quickly. For most
convection baking, light, shiny finishes give best
results because they prevent overbrowning in the
time it takes to cook the center areas. Pans with
dull (satin-finish) bottoms are recommended for
cake pans and pie pans for best bottom browning.
3. Dark or non-shiny finishes, glass, and pyroceram
absorb heat which may result in dry, crisp crusts.
4. Preheating the oven is recommended when baking
foods by convection.
5. To prevent uneven heating and save energy, open
the oven door to check food as little as possible.
Food Comments
Breads Allowadditional time for large biscuits.
Cakes
RefrigeratedBiscuits
Corn Bread
Muffins
Fruits,
Other
Desserts
Popovers
Nut Bread or Fruit
Bread
Yeast Bread
Plainor Sweet Rolls
Devil'sFood
Fudgebrownies
Coffee Cake
Cup Cakes
FruitCake (loaf)
Gingerbread
ButterCakes, Cake
Mixes
9x 13a
Tube Cake
Pound Cake
OvenTemp.
375°F
350°F
425°F
325°F
325°F
375°F
350°F
350°F
350°F
325°F
325°F
275°F
300°F
325°F
325°F
325°F
325°F
_me, Min,
11# 14
35 _ 40
18# 22
45to55
60 # 70
16# 23
13# 16
35 # 40
26 # 30
30 # 35
20 # 25
90to 100
25 # 30
35 _ 45
35 to 45
30 to 40
45to55
Cookies Chocolate Chip 350°F 11to 14
Sugar 350°F 11to 14
BakedApples or Pears 350°F 35 to 40
Bread Pudding 300°F 35 to 40
Notes:
Cream Puffs
Meringue Shells
400°F
300°F
30 to 35
30 to 35
Remove from pans immediately and cool
slightlyon wire rack.
Pierceeach popover with a fork after
removing from oven to allow steamto
escape.
Interiorswill be moist and tender.
Lightly grease bakingsheet.
Placecake pan on rack.
Bake2 layers of brownies at a time.
Interiorwill be moistand tender.
Turnend for end halfway through baking.
Grease and flour pan.
Cool in pan 10 minutesbefore inverting on
wire rack.
Place metal tray on rack.Allow extratime for
frozen cookie dough.
Place metal tray on rack.
Bake in cookwarewith shallow sides.
Pudding is done when knife inserted near
center comes outclean.
Puncture puffs twicewith toothpick to release
steamafter 25 minutes of bakingtime.
When done, turnoven off and letshells stand
in oven 1hour to dry.
• The oven temperature indicated in the chart above is recommended over the package instruction temperature.
• The baking time in the chart above is only a guideline for your reference. You need to adjust time according to
the food condition or your preference. Check doneness at the minimum time.
31
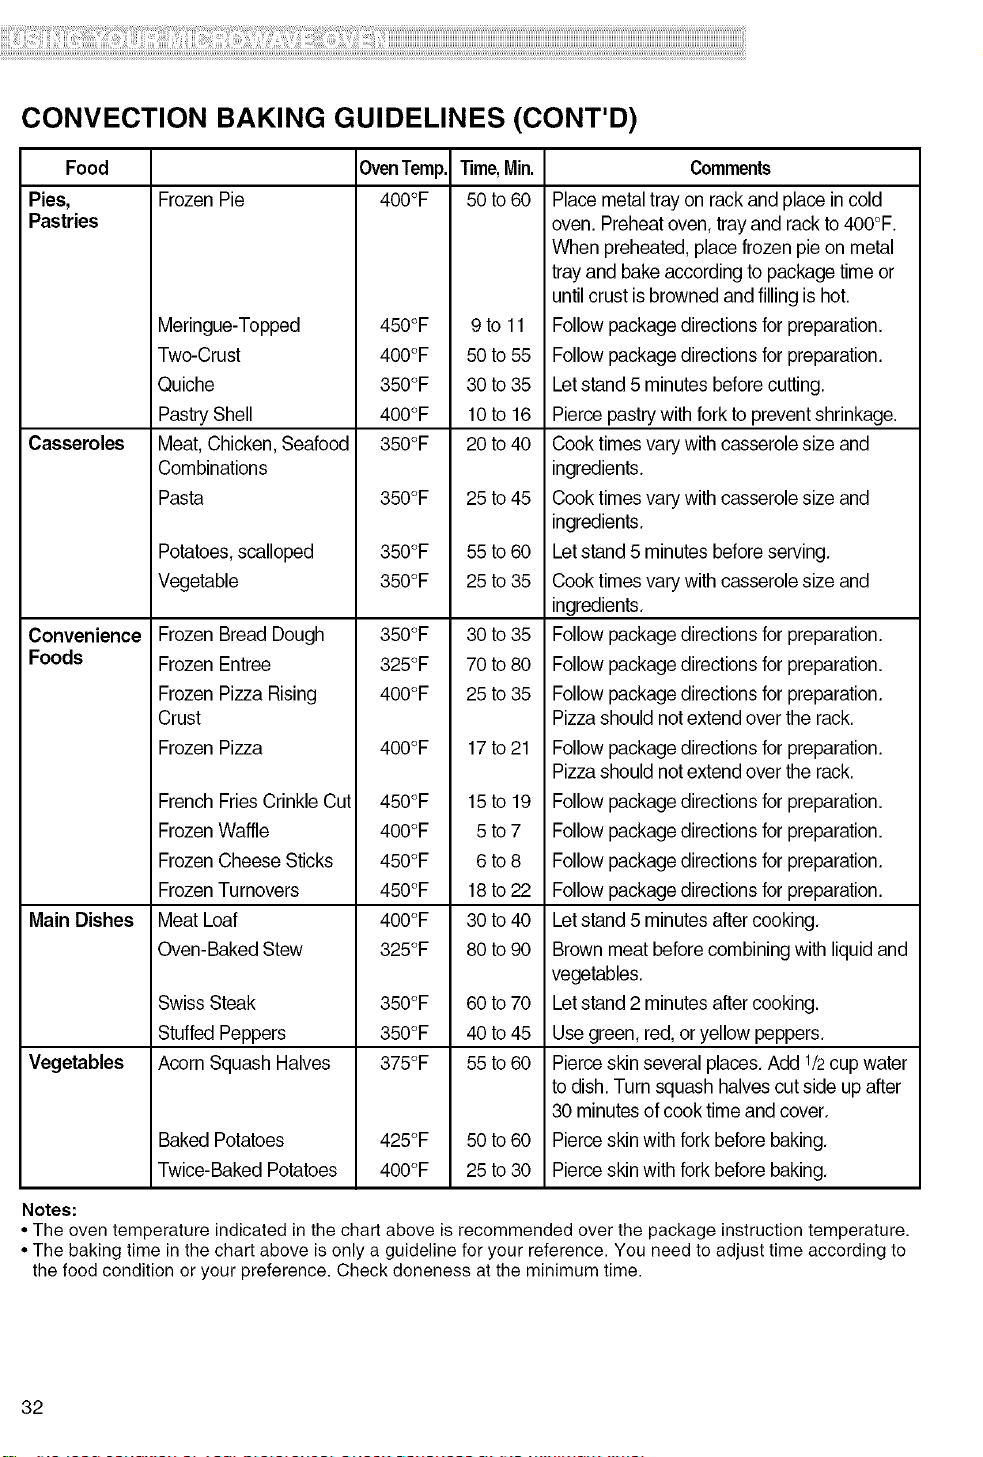
CONVECTION BAKING GUIDELINES (CONT'D)
Food
Pies,
Pastries
Casseroles
Convenience
Foods
Main Dishes
Vegetables
OvenTemp. "l'ime,Min.
Frozen Pie 400°F 50 to 60
Meringue-Topped
Two-Crust
Quiche
PastryShell
Meat,Chicken, Seafood
Combinations
Pasta
Potatoes,scalloped
Vegetable
Frozen Bread Dough
Frozen Entree
Frozen Pizza Rising
Crust
Frozen Pizza
French Fries Crinkle Cut
Frozen Waffle
Frozen Cheese Sticks
Frozen Turnovers
Meat Loaf
Oven-Baked Stew
Swiss Steak
Stuffed Peppers
Acorn Squash Halves
Notes:
Baked Potatoes
Twice-Baked Potatoes
450°F
400°F
350°F
400°F
350°F
350°F
350°F
350°F
350°F
325°F
400°F
400°F
450°F
400°F
450°F
450°F
400°F
325°F
350°F
350°F
375°F
425°F
400°F
9 # 11
50#55
30 # 35
10# 16
20 # 40
25 # 45
55 # 60
25 # 35
30 # 35
70 # 80
25 # 35
17#21
15#19
5#7
6#8
18to 22
30 to 40
80 to 90
60 # 70
40 # 45
55 # 60
50 # 60
25 # 30
Comments
Placemetal tray on rack and place in cold
oven. Preheat oven, tray and rack to400°F.
When preheated, placefrozen pie on metal
tray and bake according to package time or
untilcrust isbrowned and fillingis hot.
Follow package directions forpreparation.
Follow package directions forpreparation.
Letstand 5 minutes beforecutting.
Piercepastry with fork to prevent shrinkage.
Cook timesvary with casserole size and
ingredients.
Cook timesvary with casserole size and
ingredients.
Letstand 5 minutes beforeserving.
Cook timesvary with casserole size and
ingredients.
Follow package directions forpreparation.
Follow package directions forpreparation.
Follow package directions forpreparation.
Pizza should notextend over the rack.
Follow package directions forpreparation.
Pizza should notextend over the rack.
Follow package directions forpreparation.
Follow package directions forpreparation.
Follow package directions forpreparation.
Follow package directions forpreparation.
Letstand 5 minutes after cooking.
Brown meat beforecombining with liquid and
vegetables.
Letstand 2 minutes after cooking.
Use green, red,or yellow peppers.
Pierceskin several places.Add 1/2cup water
to dish. Turn squash halves cut side up after
30 minutesof cook time and cover.
Pierceskin with fork before baking.
Pierceskin with fork before baking.
• The oven temperature indicated in the chart above is recommended over the package instruction temperature.
• The baking time in the chart above is only a guideline for your reference. You need to adjust time according to
the food condition or your preference. Check doneness at the minimum time.
32
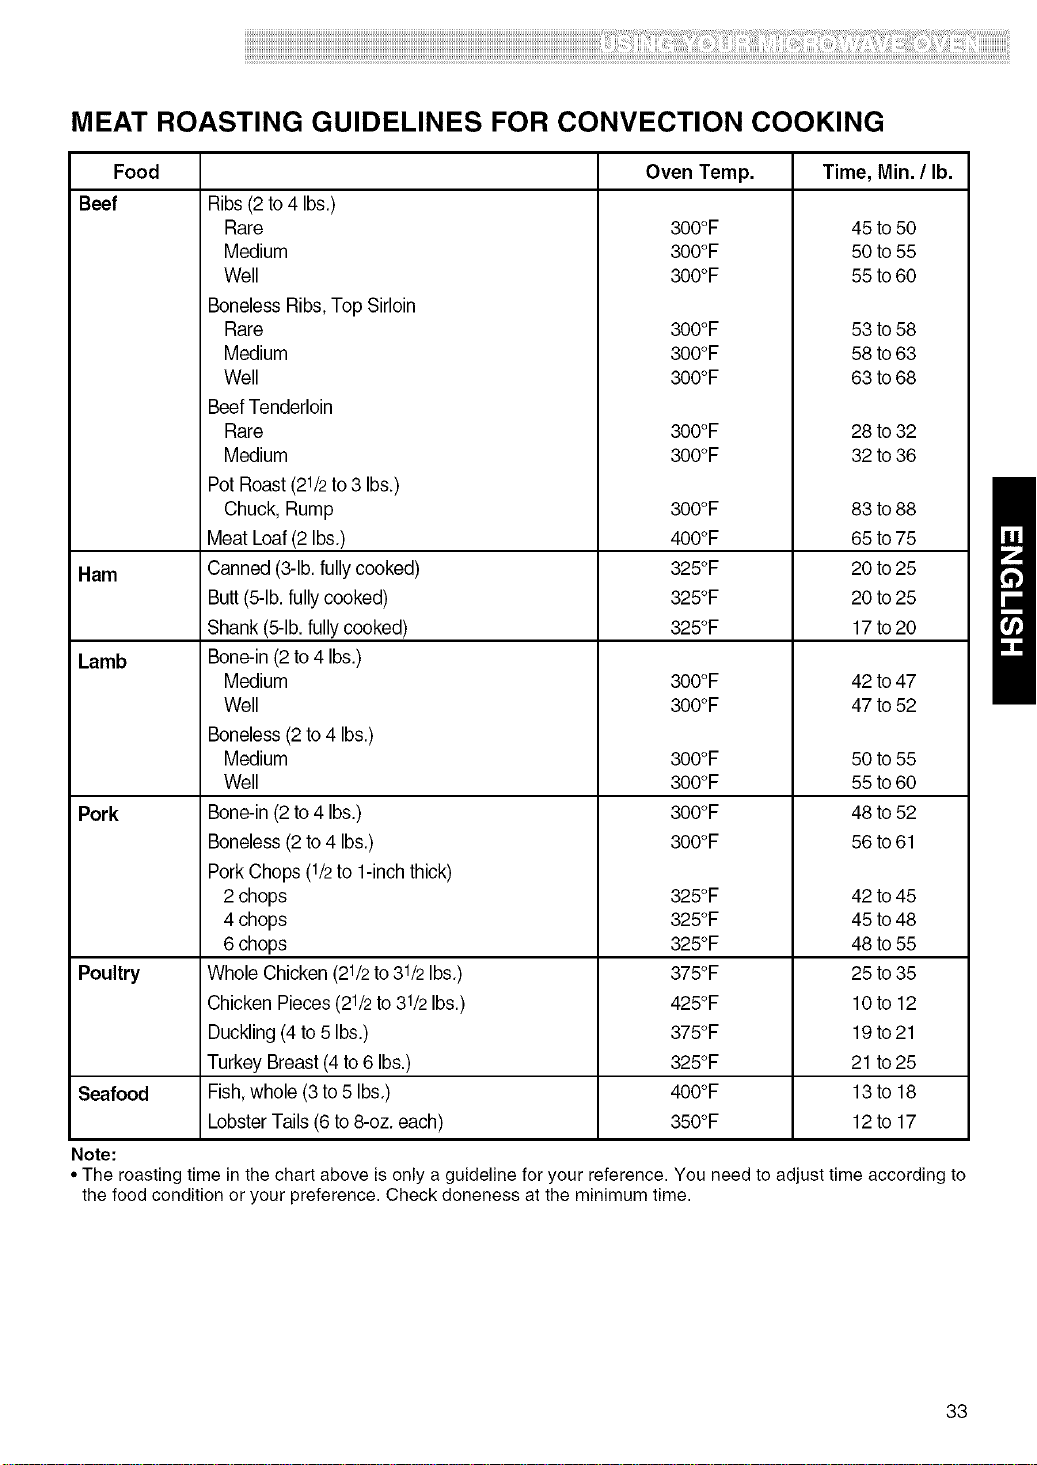
iiiiiiiiiiiiiiiiiiiiiiiiiiiiiiiiiiiiiiiiiiiiiiiiiiiiiiiiiiiiiiiiiiiiiiiiiiiiiiiiiiiiiiiiiiiiiiiiiiiiiiiiiiiiiiiiiiiiiiiiiiiiiiiiiiiiiiiiiiiiiiiiiiiiiiiiiiiiiiiiiiiiiiiiiiiiiiiiiiiiiiiiiiiiiiiiiiiiiiiiiiiiiiiiiiiiiiiiiiiiiiiiiiiiiiiiiiiiiiiiiiiiiiiiiiiiiiiiiiiiiiiiiiiiiiiiiiiiiiiiiiiiiiiiiiiiiiiiiiiiiiiiiiiiiiiiiiiiiiiiiiiiiiiiiiiiiiiiiiiiiiiiiiiiiiiiiiiiiiiiiiiiiiiiiiiiiiiiiiiiiiiiiiiiiiiiiiiiiiiiiiiiiiiiiiii_;iiiii'ii_il_iiiiiii!i!iiiiii_ii_i_i_'i_'ii_ii_iiiiii_i__iiiiiiiiiiii_iill¸i!i!iiiiii_ii_ii'ii_ii_iiiiii_ii_ii_ii_il_ii;ii_iiiiiiii:ii_ii_ii_ii_iii_ii_ii_ii_ii_ii_iiii_ii_ii_iiiill_II_II_IIIII_!!I_II¸iii!iiii_:i_ill¸ii_ii'ii'i!ii_!iill¸il¸ii!i'iiiiiiiii_ii_iiiiii_ii_ii_iiiiil_ii_!i_ii_iiii_ii_iiiiii::i_ii::i_:iiiii_I_;ili_ii_ii_ii_iiiiii_ii_ii_i_iiiiill¸iiiiiiiiiiii_ii_il_iiiiii_ii_iiiill'II_ii_iiiiii_!i'ii_ii_ii_ii_i!il¸iiii_i!i_il_i!_i!i!i!_ii_i!_!i_il¸ii_ii_ii_i_ii_iiii_il¸ii_ii_ii_iiiiiiiiii_ii_i_ii_iiiiii_ii_il¸ii_ii_ii_ii_iiiiiiii'IIII_I¸II!I!I!I!¸I!I!I!¸I!I!I!I!I!¸i!i!i!i!!!ii!
MEAT ROASTING GUIDELINES FOR CONVECTION COOKING
Food Time, Min. / lb.
Beef
Ham
Lamb
Pork
Poultry
Seafood
Note:
Ribs (2 to 4 Ibs.)
Rare
Medium
Well
Boneless Ribs,Top Sirloin
Rare
Medium
Well
BeefTenderloin
Rare
Medium
Pot Roast(21/2to 3 Ibs.)
Chuck, Rump
Meat Loaf (2 Ibs.)
Oven Temp.
300°F
300°F
300°F
300°F
300°F
300°F
300°F
300°F
45 to 50
50 to 55
55 to 60
53 to 58
58 to 63
63 to 68
28 to 32
32 to 36
Canned (3-lb. fullycooked)
Butt (5-lb.fully cooked)
Shank (5-lb. fullycooked)
Bone-in (2 to4 Ibs.)
Medium
Well
Boneless (2 to 4 Ibs.)
Medium
Well
Bone-in (2 to4 Ibs.)
Boneless (2 to 4 Ibs.)
PorkChops (1/2to 1-inchthick)
2 chops
4 chops
6 chops
Whole Chicken (21/2 to31/2Ibs.)
Chicken Pieces(21/2 to 31/2Ibs.)
Duckling(4 to 5 Ibs.)
Turkey Breast (4 to 6 Ibs.)
Fish,whole (3 to 5 Ibs.)
LobsterTails (6 to 8-oz. each)
300°F
400°F
325°F
325°F
325°F
300°F
300°F
300°F
300°F
300°F
300°F
83 to 88
65 to 75
20 to 25
20 to 25
17t020
42 to 47
47 to 52
50 to 55
55 to 60
48 to 52
56 to 61
325°F
325°F
325°F
375°F
425°F
375°F
325°F
400°F
350°F
42 to 45
45 to 48
48 to 55
25 to 35
lOto 12
19t021
21 to 25
13to 18
12to 17
• The roasting time in the chart above is only a guideline for your reference. You need to adjust time according to
the food condition or your preference. Check doneness at the minimum time.
33
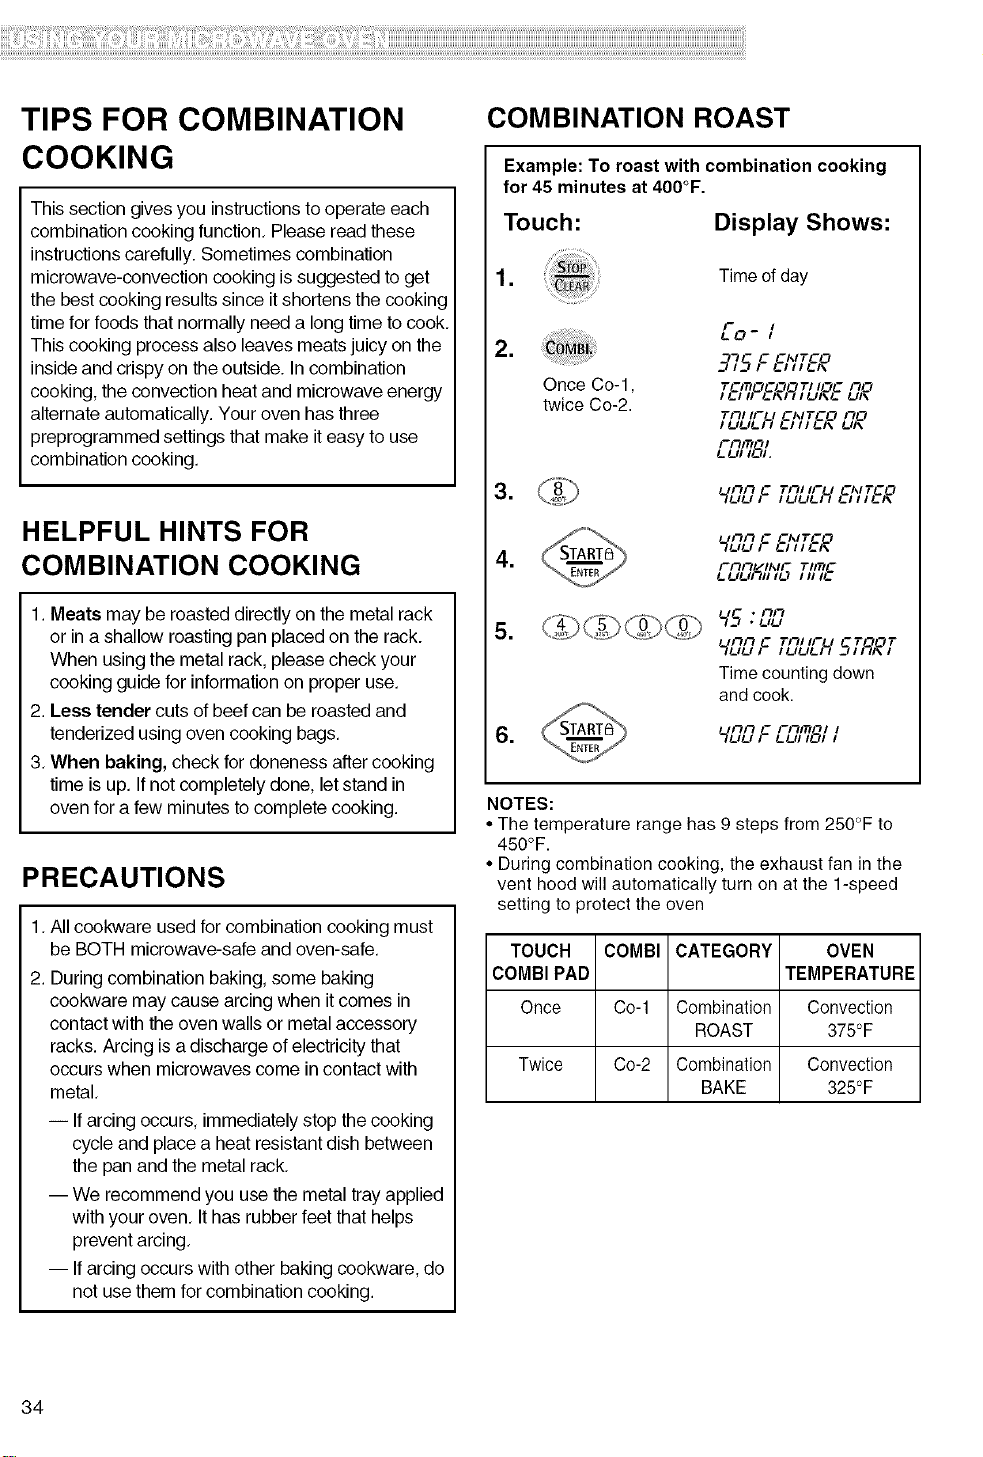
TIPS FOR COMBINATION
COOKING
This section gives you instructionsto operate each
combinationcooking function, Please read these
instructionscarefully. Sometimes combination
microwave-convection cooking is suggested to get
the best cooking results since it shortensthe cooking
time for foods that normally need a long time to cook,
This cooking processalso leaves meats juicy on the
insideand crispy on the outside. Incombination
cooking,the convection heatand microwave energy
alternate automatically. Your oven has three
preprogrammed settings that make it easy to use
combinationcooking,
HELPFUL HINTS FOR
COMBINATION COOKING
1.Meats may be roasted directlyon the metal rack
or in a shallow roasting pan placed on the rack.
When usingthe metal rack,please check your
cooking guide for informationon proper use.
2. Less tender cuts of beef can be roasted and
tenderized using ovencooking bags,
3, When baking, check fordoneness after cooking
time is up, If notcompletely done, letstand in
ovenfor a few minutes to completecooking.
PRECAUTIONS
1,All cookware used forcombination cooking must
be BOTH microwave-safe and oven-safe.
2. Duringcombination baking, some baking
cookware may cause arcingwhen itcomes in
contactwith the ovenwalls or metalaccessory
racks. Arcing isa discharge of electricitythat
occurswhen microwavescome in contact with
metal,
-- If arcing occurs, immediately stop the cooking
cycle and place a heat resistant dish between
the pan and the metal rack,
-- We recommend you use the metal tray applied
with your oven, Ithas rubber feet that helps
prevent arcing,
-- If arcing occurswith other bakingcookware, do
not usethem for combinationcooking.
COMBINATION ROAST
Example: To roast with combination cooking
for 45 minutesat 400°F.
Touch: Display Shows:
1. Timeof day
,
,
,
Once Co-1,
twice Co-2.
975F _;_T_°
T_q fl_IPEL_o
TLTLIL-H_';'T_° L_°
L-,'_71r,;91.
'-,'L?L?F fl_TLILH_;,__c,o
LII5 * 1"11"1
• UU
/I"_I"_ C "r_/ ll- ! -T-tOT
Time counting down
and cook.
6. '-,'LTLTFL-,'_71;_911
NOTES:
• The temperature range has 9 steps from 250°F to
450°F.
• During combination cooking, the exhaust fan in the
vent hood will automatically turn on at the 1-speed
setting to protect the oven
TOUCH COMBI CATEGORY
COMBIPAD
Once Co-1 Combination
ROAST
Twice Co-2 Combination
BAKE
OVEN
TEMPERATURE
Convection
375°F
Convection
325°F
34
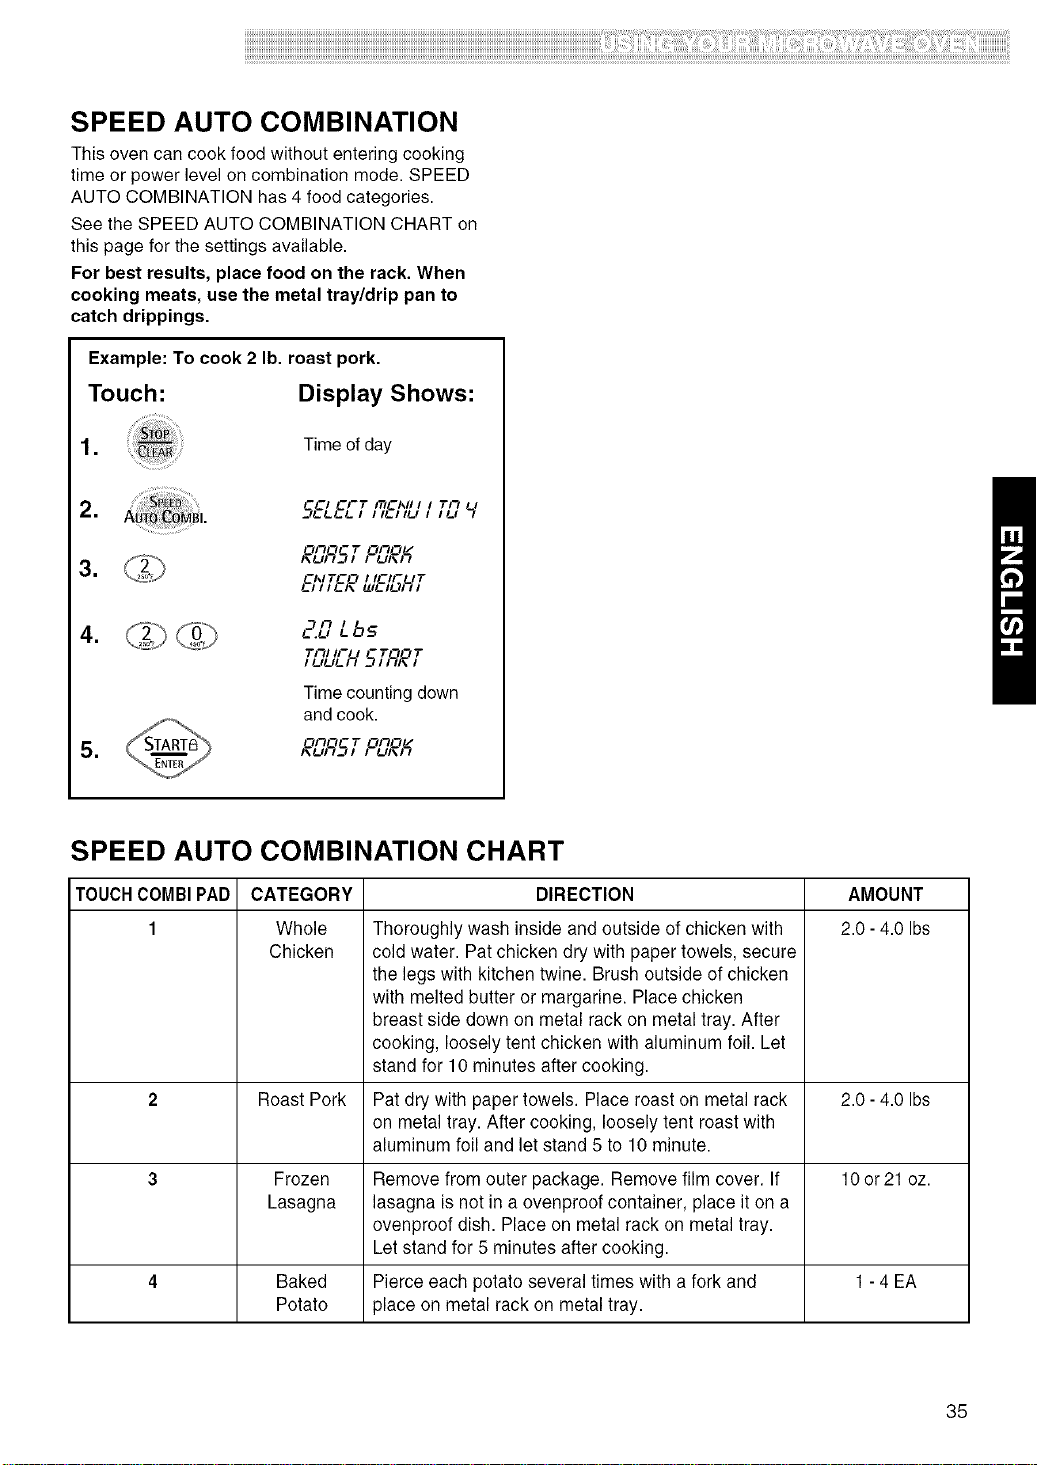
iiiiiiiiiiiiiiiiiiiiiiiiiiiiiiiiiiiiiiiiiiiiiiiiiiiiiiiiiiiiiiiiiiiiiiiiiiiiiiiiiiiiiiiiiiiiiiiiiiiiiiiiiiiiiiiiiiiiiiiiiiiiiiiiiiiiiiiiiiiiiiiiiiiiiiiiiiiiiiiiiiiiiiiiiiiiiiiiiiiiiiiiiiiiiiiiiiiiiiiiiiiiiiiiiiiiiiiiiiiiiiiiiiiiiiiiiiiiiiiiiiiiiiiiiiiiiiiiiiiiiiiiiiiiiiiiiiiiiiiiiiiiiiiiiiiiiiiiiiiiiiiiiiiiiiiiiiiiiiiiiiiiiiiiiiiiiiiiiiiiiiiiiiiiiiiiiiiiiiiiiiiiiiiiiiiiiiiiiiiiiiiiiiiiiiiiiiiiiiiiiiiiiiiiiiii_;iiiii'ii_il_iiiiiii!i!iiiiii_ii_i_i_'i_'ii_ii_iiiiii_i__iiiiiiiiiiii_iill¸i!i!iiiiii_ii_ii'ii_ii_ii'iiii_ii_ii_ii_il_ii;ii_iiiiiiii:ii_ii_ii_ii_iii_ii_ii_ii_ii_ii_iiii_ii_ii_iiiill_II_II_IIIII_!!I_II¸iii!iiii_:i_ill¸ii_ii'ii'i!ii_!iill¸il¸ii!i'iiiiiiiii_ii_iiiiii_ii_ii_iiiiil_ii_!i_ii_iiii_ii_iiiiii::i_ii::i_:iiiii_I_;ili_ii_ii_ii_ii:iiii_ii_ii_i_iiiiill¸iiiiiiiiiiii_ii_il_iiiiii_ii_iiiill'II_ii_iiii'ii_!i'ii_ii_ii_ii_i!il¸iiii_i!i_il_i!_i!i!i!_ii_i!_!i_il¸ii_ii_ii_i_ii_iiii_il¸ii_ii_ii_iiiiiiiiii_ii_i_ii_iiiiii_ii_il¸ii_ii_ii_ii_iiiiiiii'IIII_I¸II!I!I!I!¸I!I!I!¸I!I!I!I!I!¸i!i!i!i!!!ii!
SPEED AUTO COMBINATION
This oven can cook food without entering cooking
time or power level on combination mode. SPEED
AUTO COMBINATION has 4 food categories.
See the SPEED AUTO COMBINATION CHART on
this page for the settings available.
For best results, place food on the rack. When
cooking meats, use the metal tray/drip pan to
catch drippings.
Example: To cook 2 lb. roast pork.
Touch: Display Shows:
1. Time of day
SPEED AUTO COMBINATION CHART
TOUCHCOMBIPAD
1
CATEGORY
Whole
Chicken
DIRECTION
Thoroughly wash inside and outside of chicken with
cold water. Pat chicken dry with paper towels, secure
the legs with kitchen twine. Brush outside of chicken
with melted butter or margarine. Place chicken
breast side down on metal rack on metal tray. After
cooking, loosely tent chicken with aluminum foil. Let
stand for 10 minutes after cooking.
Pat dry with paper towels. Place roast on metal rack
on metal tray. After cooking, loosely tent roast with
aluminum foil and let stand 5 to 10 minute.
AMOUNT
2.0 - 4.0 Ibs
2 Roast Pork 2.0 - 4.0 Ibs
3 Frozen Remove from outer package. Remove film cover. If 10 or 21 oz.
Lasagna lasagna is not in a ovenproof container, place it on a
ovenproof dish. Place on metal rack on metal tray.
Let stand for 5 minutes after cooking.
4 Baked Pierce each potato several times with a fork and 1- 4 EA
Potato place on metal rack on metal tray.
35
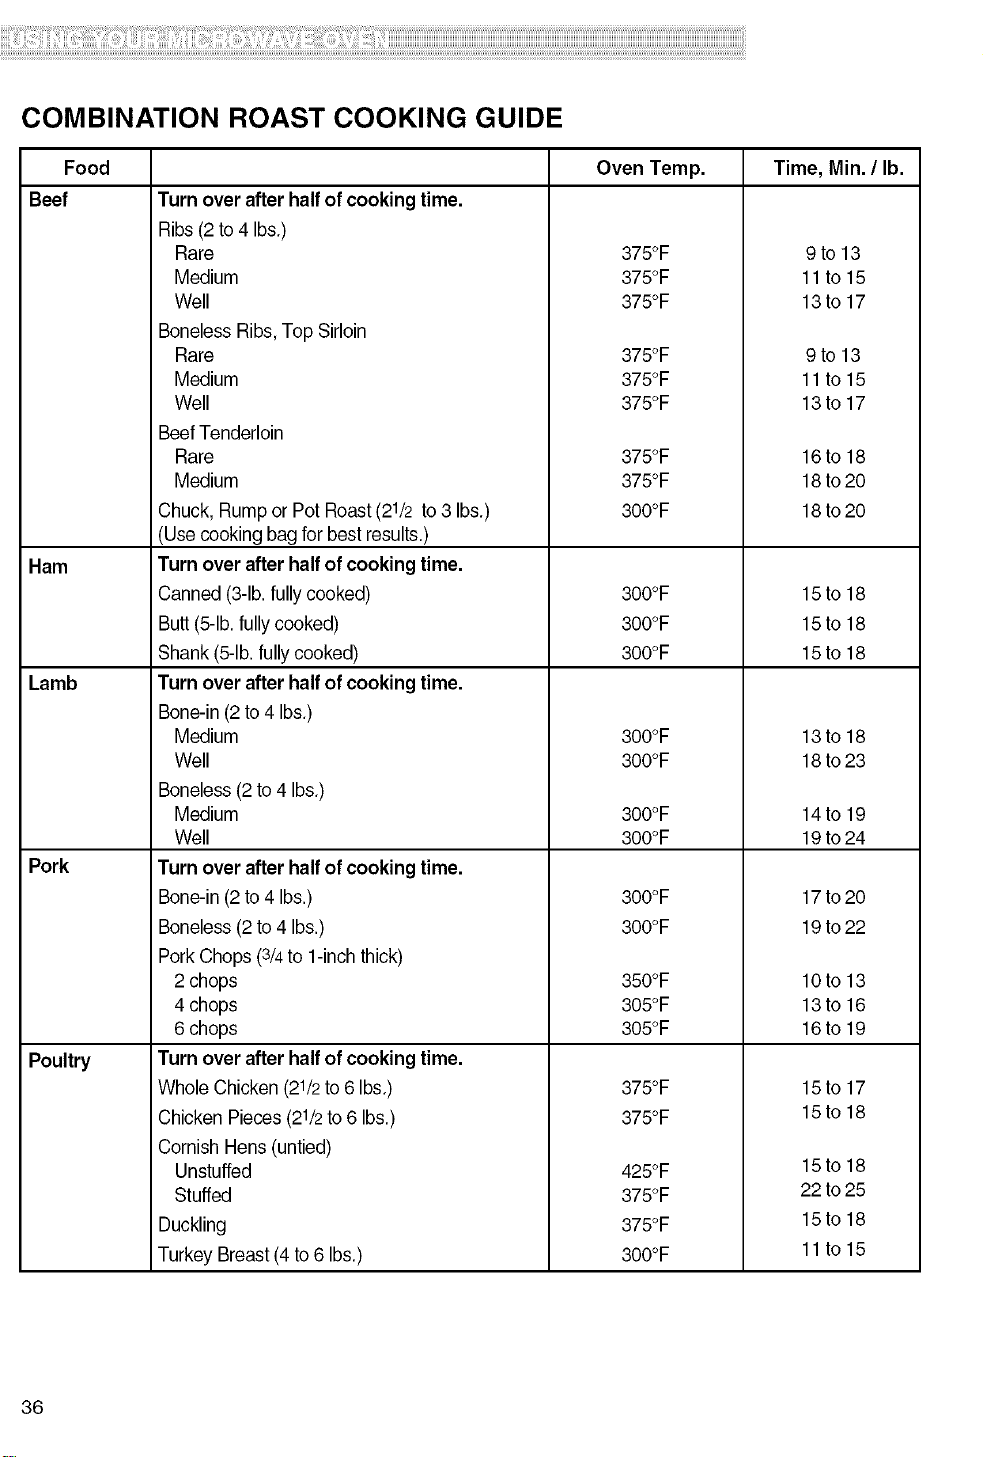
COMBINATION ROAST COOKING GUIDE
Food Oven Temp. Time, Min. / lb.
Beef
Ham
Lamb
Pork
Poultry
Turn over after half of cooking time.
Ribs (2 to4 Ibs.)
Rare
Medium
Well
Boneless Ribs,Top Sirloin
Rare
Medium
Well
BeefTenderloin
Rare
Medium
Chuck, Rump or Pot Roast (21/2to 3 Ibs.)
(Use cooking bag for best results.)
Turn over after half of cooking time.
Canned (3-lb.fully cooked)
Butt (5-lb.fully cooked)
Shank (5-lb.fully cooked)
Turn over after half of cooking time.
Bone-in (2 to 4 Ibs.)
Medium
Well
Boneless (2 to 4 Ibs.)
Medium
Well
Turn over after half of cooking time.
Bone-in (2 to 4 Ibs.)
Boneless (2 to 4 Ibs.)
PorkChops (3/4to 1-inchthick)
2 chops
4 chops
6 chops
Turn over after half of cooking time.
Whole Chicken(21/2to 6 Ibs.)
Chicken Pieces (21/2to 6 Ibs.)
Cornish Hens (untied)
Unstuffed
Stuffed
Duckling
Turkey Breast (4 to6 Ibs.)
375°F
375°F
375°F
375°F
375°F
375°F
375°F
375°F
300°F
300°F
300°F
300°F
300°F
300°F
300°F
300°F
300°F
300°F
350°F
305°F
305°F
375°F
375°F
9t013
11t015
13t017
9to13
11t015
13t017
16to 18
18to 20
18to 20
15t018
15to 18
15to 18
13t018
18to 23
14to 19
19to 24
17to 20
19to 22
10
13
16
15
15
425OF 15
375OF 22
375OF 15
300OF 11
to 13
to 16
to 19
to 17
to 18
to 18
to 25
to 18
to 15
36
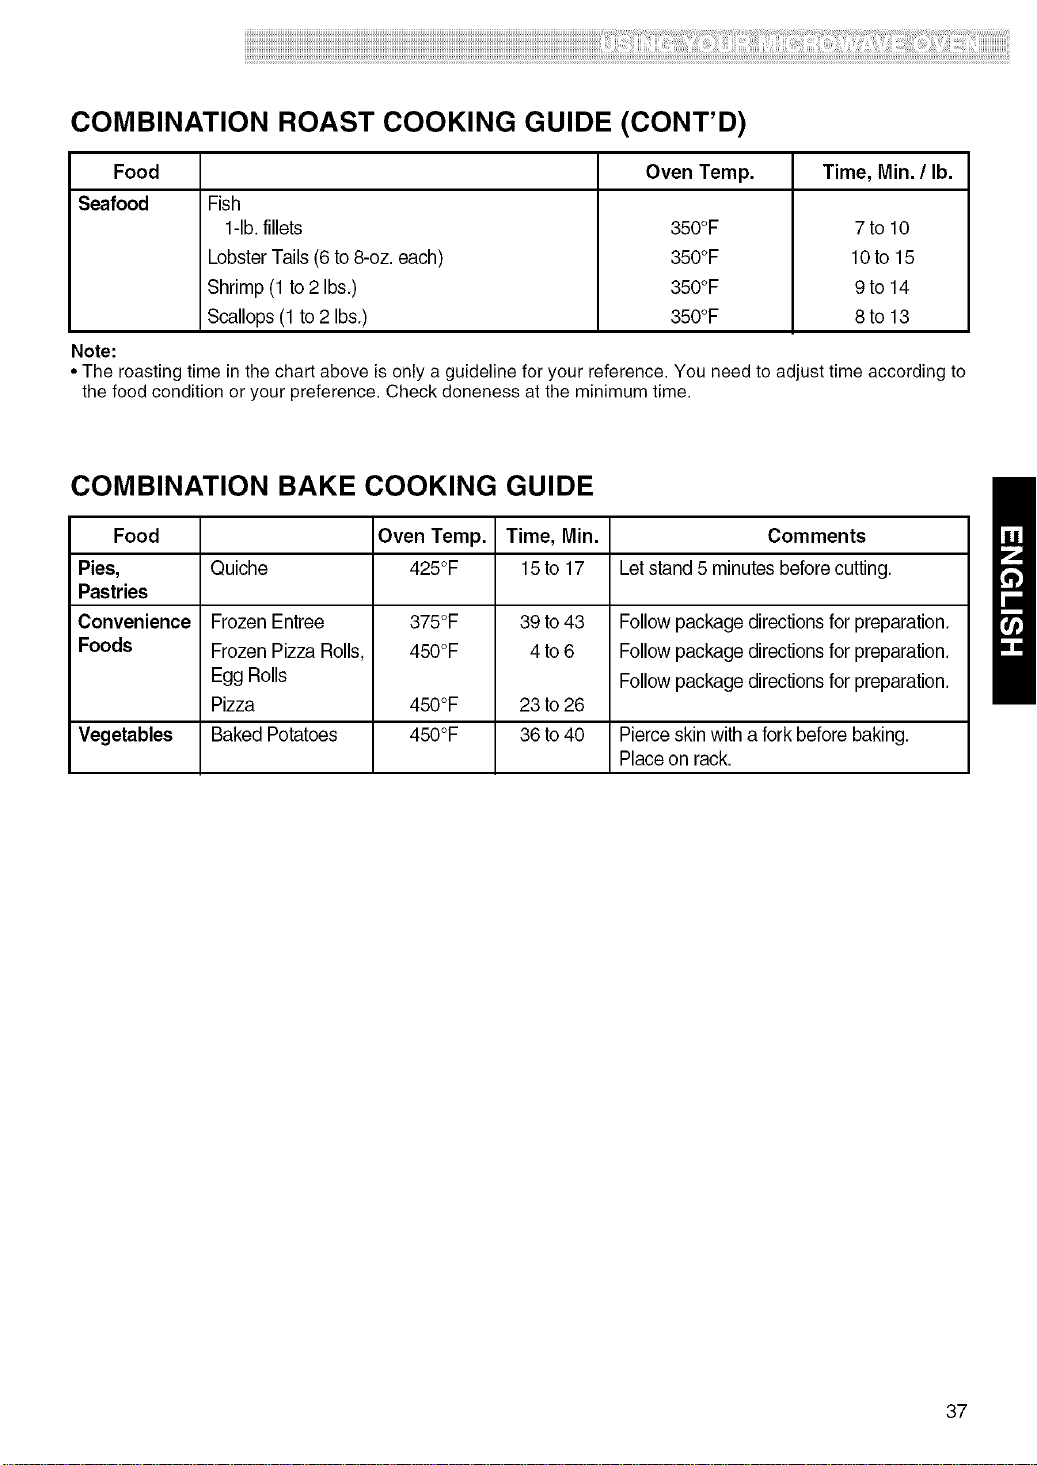
iiiiiiiiiiiiiiiiiiiiiiiiiiiiiiiiiiiiiiiiiiiiiiiiiiiiiiiiiiiiiiiiiiiiiiiiiiiiiiiiiiiiiiiiiiiiiiiiiiiiiiiiiiiiiiiiiiiiiiiiiiiiiiiiiiiiiiiiiiiiiiiiiiiiiiiiiiiiiiiiiiiiiiiiiiiiiiiiiiiiiiiiiiiiiiiiiiiiiiiiiiiiiiiiiiiiiiiiiiiiiiiiiiiiiiiiiiiiiiiiiiiiiiiiiiiiiiiiiiiiiiiiiiiiiiiiiiiiiiiiiiiiiiiiiiiiiiiiiiiiiiiiiiiiiiiiiiiiiiiiiiiiiiiiiiiiiiiiiiiiiiiiiiiiiiiiiiiiiiiiiiiiiiiiiiiiiiiiiiiiiiiiiiiiiiiiiiiiiiiiiiiiiiiiiiii_;iiiii'ii_il_iiiiiii!i!iiiiii_ii_i_i_'i_'ii_ii_iiiiii_i__iiiiiiiiiiii_iill¸i!i!iiiiii_ii_ii'ii_ii_iiiiii_ii_ii_ii_il_ii;ii_iiiiiiii:ii_ii_ii_ii_iii_ii_ii_ii_ii_ii_iiii_ii_ii_iiiill_II_II_IIIII_!!I_II¸iii!iiii_:i_ill¸ii_ii'ii'i!ii_!iill¸il¸ii!i'iiiiiiiii_ii_iiiiii_ii_ii_iiiiil_ii_!i_ii_iiii_ii_iiiiii::i_ii::i_:iiiii_I_;ili_ii_ii_ii_iiiiii_ii_ii_i_iiiiill¸iiiiiiiiiiii_ii_il_iiiiii_ii_iiiill'II_ii_iiiiii_!i'ii_ii_ii_ii_i!il¸iiii_i!i_il_i!_i!i!i!_ii_i!_!i_il¸ii_ii_ii_i_ii_iiii_il¸ii_ii_ii_iiiiiiiiii_ii_i_ii_iiiiii_ii_il¸ii_ii_ii_ii_iiiiiiii'IIII_I¸II!I!I!I!¸I!I!I!¸I!I!I!I!I!¸i!i!i!i!!!ii!
COMBINATION ROAST COOKING GUIDE (CONT'D)
Food Oven Temp. Time, Min. / lb.
Seafood
Note:
Fish
1-lb.fillets
LobsterTails (6 to 8-oz. each)
Shrimp (1 to 2 Ibs.)
Scallops (1 to2 Ibs.)
350°F
350°F
350°F
350°F
7 to 10
lOto 15
9t014
8 to 13
• The roasting time in the chart above is only a guideline for your reference. You need to adjust time according to
the food condition or your preference. Check doneness at the minimum time.
COMBINATION BAKE COOKING GUIDE
Food Oven Temp. Time, Min. Comments
Pies, Quiche 425°F 15 to 17 Letstand 5 minutes beforecutting.
Pastries
Convenience Frozen Entree 375°F 39 to 43 Follow package directionsfor preparation.
Foods Frozen Pizza Rolls, 450°F 4 to 6 Follow package directionsfor preparation.
Egg Rolls Follow package directionsfor preparation.
Pizza 450°F 23 to 26
Vegetables Baked Potatoes 450°F 36 to 40 Pierceskinwith a fork before baking.
Placeon rack.
37
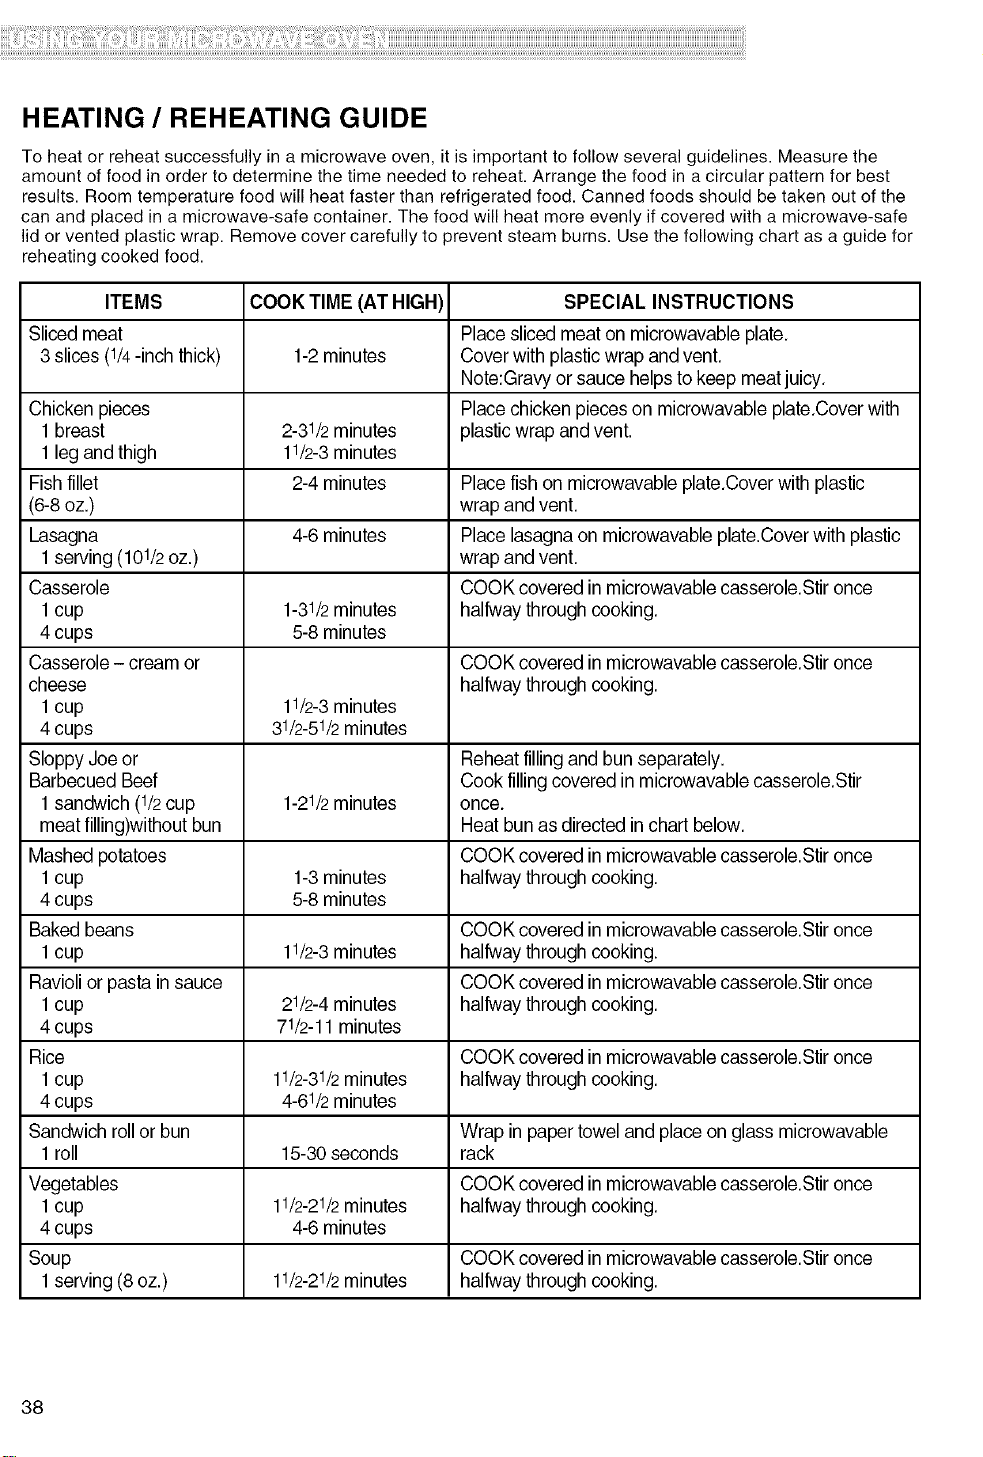
HEATING / REHEATING GUIDE
To heat or reheat successfully in a microwave oven, it is important to follow several guidelines. Measure the
amount of food in order to determine the time needed to reheat. Arrange the food in a circular pattern for best
results. Room temperature food will heat faster than refrigerated food. Canned foods should be taken out of the
can and placed in a microwave-safe container. The food will heat more evenly if covered with a microwave-safe
lid or vented plastic wrap. Remove cover carefully to prevent steam burns. Use the following chart as a guide for
reheating cooked food.
ITEMS COOK TIME (AT HIGH) SPECIAL INSTRUCTIONS
Sliced meat Place sliced meat on microwavable plate.
3 slices (1/4-inch thick) 1-2minutes Cover with plasticwrap andvent.
Note:Gravyor sauce helpsto keep meatjuicy.
Chicken pieces Place chicken pieceson microwavable plate.Coverwith
1breast 2-31/2minutes plasticwrap and vent.
1leg and thigh 11/2-3minutes
Fish fillet 2-4 minutes Place fish on microwavable plate.Coverwith plastic
(6-8 oz.) wrap and vent.
Lasagna 4-6 minutes Place lasagnaon microwavable plate.Cover with plastic
1serving (101/2oz.) wrap and vent.
Casserole COOK covered in microwavable casserole.Stironce
1cup 1-31/2minutes halfwaythrough cooking.
4 cups 5-8 minutes
Casserole- cream or COOK covered in microwavable casserole.Stironce
cheese halfwaythrough cooking.
1cup 11/2-3minutes
4 cups 31/2-51/2minutes
Sloppy Joe or Reheat fillingand bun separately.
Barbecued Beef Cook fillingcovered in microwavable casserole.Stir
1 sandwich (1/2cup 1-21/2minutes once.
meat filling)without bun Heatbun as directed in chart below.
Mashed potatoes COOK covered in microwavable casserole.Stironce
1cup 1-3minutes halfwaythrough cooking.
4 cups 5-8 minutes
Baked beans COOK covered in microwavable casserole.Stironce
1cup 11/2-3minutes halfwaythrough cooking.
Ravioli or pasta in sauce COOK covered in microwavable casserole.Stironce
1cup 21/2-4minutes halfwaythrough cooking.
4 cups 71/2-11minutes
Rice COOK covered in microwavable casserole.Stironce
1cup 11/2-31/2minutes halfwaythrough cooking.
4 cups 4-61/2minutes
Sandwich rollor bun Wrap in paper towel and place on glass microwavable
1roll 15-30seconds rack
Vegetables COOK covered in microwavable casserole.Stironce
1cup 11/2-21/2minutes halfwaythrough cooking.
4 cups 4-6 minutes
Soup COOK covered in microwavable casserole.Stironce
1serving (8 oz.) 11/2-21/2minutes halfwaythrough cooking.
38
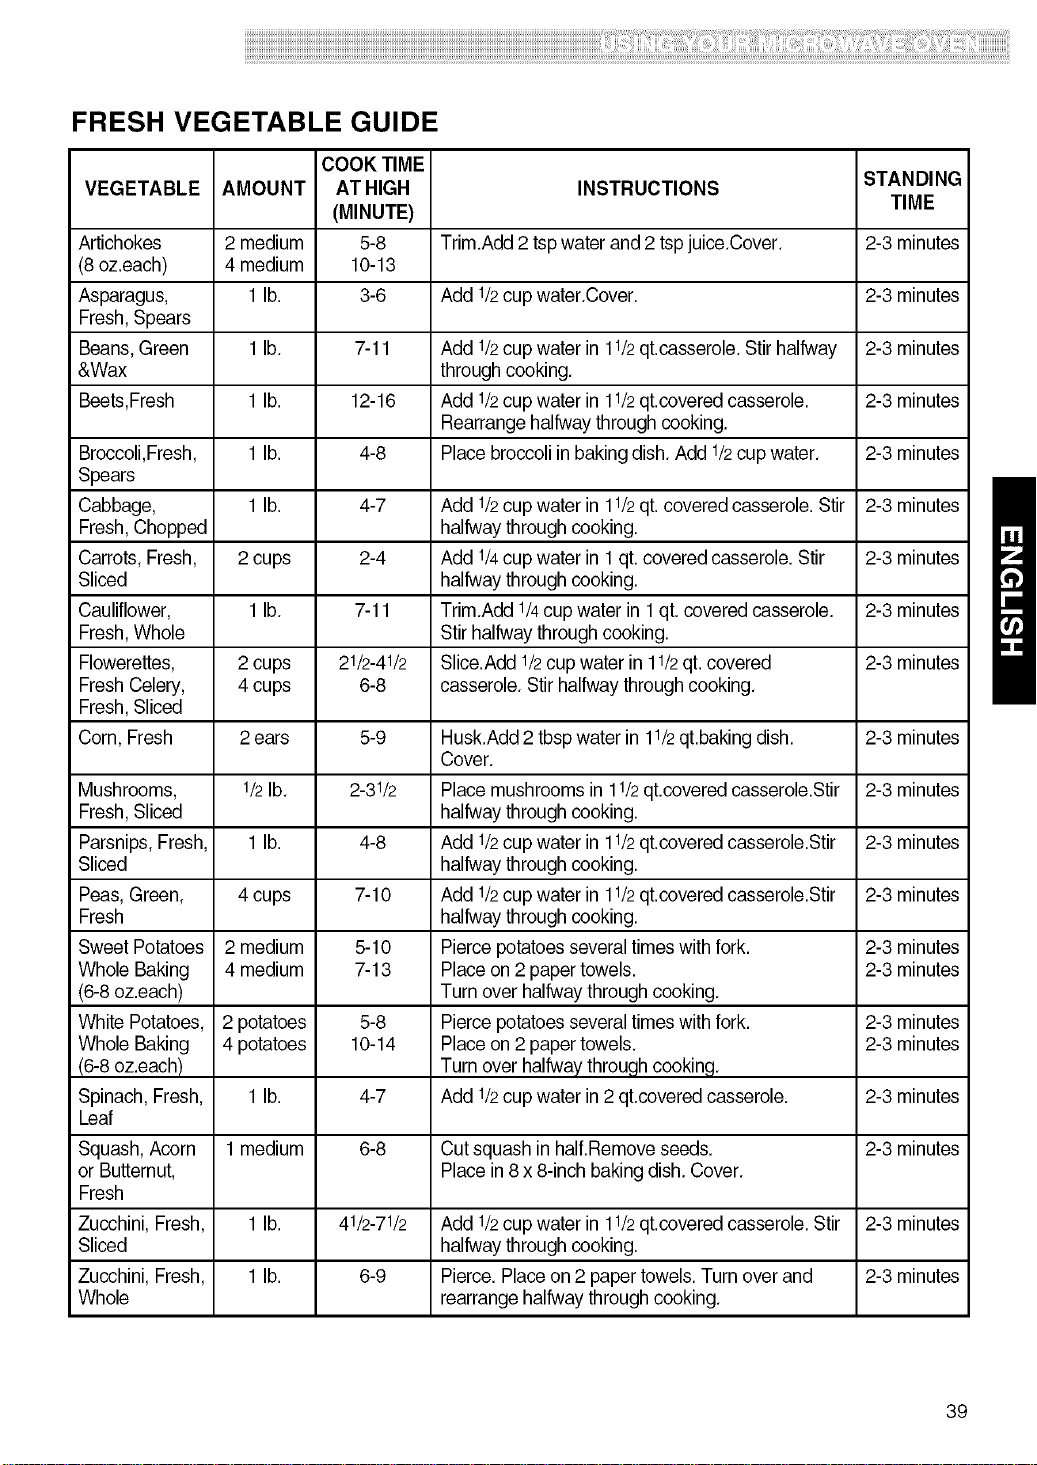
iiiiiiiiiiiiiiiiiiiiiiiiiiiiiiiiiiiiiiiiiiiiiiiiiiiiiiiiiiiiiiiiiiiiiiiiiiiiiiiiiiiiiiiiiiiiiiiiiiiiiiiiiiiiiiiiiiiiiiiiiiiiiiiiiiiiiiiiiiiiiiiiiiiiiiiiiiiiiiiiiiiiiiiiiiiiiiiiiiiiiiiiiiiiiiiiiiiiiiiiiiiiiiiiiiiiiiiiiiiiiiiiiiiiiiiiiiiiiiiiiiiiiiiiiiiiiiiiiiiiiiiiiiiiiiiiiiiiiiiiiiiiiiiiiiiiiiiiiiiiiiiiiiiiiiiiiiiiiiiiiiiiiiiiiiiiiiiiiiiiiiiiiiiiiiiiiiiiiiiiiiiiiiiiiiiiiiiiiiiiiiiiiiiiiiiiiiiiiiiiiiiiiiiiiiii_iiiiii'ii_il_iiiiiii!i!iiiiii_ii_i_i_'i_'ii_ii_iiiiii_i__iiiiiiiiiiii_iill¸i!i!iiiiii_ii_ii'ii_ii_iiiiii_ii_ii_ii_il_ii_ii_iiiiiiii:ii_ii_ii_ii_iii_ii_ii_ii_ii_ii_iiii_ii_ii_iiiill_II_II_IIIII_!!I_II¸iii!iiii_i_ill¸ii_ii'ii'i!ii_!iill¸il¸ii!i'iiiiiiiii_ii_iiiiii_ii_ii_iiiiil_ii_!i_ii_iiii_ii_iiiiii_:i_ii_:i_:iiiii_I_iiiiii_ii_ii_ii_iiiiii_ii_ii_i_iiiiill¸iiiiiiiiiiii_ii_il_iiiiii_ii_iiiill'II_ii_iiiiii_!i'ii_ii_ii_ii_i!il¸iiii_i!i_il_i!_i!i!i!_ii_i!_!i_il¸ii_ii_ii_i_ii_iiii_il¸ii_ii_ii_iiiiiiiiii_ii_i_ii_iiiiii_ii_il¸ii_ii_ii_ii_iiiiiiii'IIII_I¸II!I!I!I!¸I!I!I!¸I!I!I!I!I!¸i!i!i!i!!!ii!
FRESH VEGETABLE GUIDE
VEGETABLE
Artichokes
(8 oz.each)
Asparagus,
Fresh, Spears
Beans, Green
&Wax
Beets,Fresh
Broccoli,Fresh,
Spears
Cabbage,
Fresh, Chopped
Carrots, Fresh,
Sliced
Cauliflower,
Fresh,Whole
Flowerettes,
Fresh Celery,
Fresh, Sliced
Corn, Fresh
Mushrooms,
Fresh, Sliced
Parsnips, Fresh,
Sliced
Peas, Green,
Fresh
Sweet Potatoes
Whole Baking
(6-8 oz.each)
White Potatoes,
Whole Baking
(6-8 oz.each)
Spinach, Fresh,
Leaf
Squash, Acorn
or Butternut,
Fresh
Zucchini, Fresh,
Sliced
Zucchini, Fresh,
Whole
AMOUNT
2 medium
4 medium
1 lb.
1 lb.
1 lb.
1 lb.
1 lb.
2 cups
1 lb.
2 cups
4 cups
2 ears
1/2lb.
1 lb.
4 cups
2 medium
4 medium
2 potatoes
4 potatoes
1 lb.
1 medium
COOK TIME
AT HIGH
(MINUTE)
5-8
10-13
3-6
7-11
12-16
4-8
4-7
2-4
7-11
21/2-41/2
6-8
5-9
2-31/2
4-8
7-10
5-10
7-13
5-8
10-14
4-7
6-8
INSTRUCTIONS
Trim.Add 2 tsp water and 2 tspjuice.Cover.
Add 1/2cup water.Cover.
Add 1/2cup water in 11/2qt.casserole. Stir halfway
through cooking.
Add 1/2cup water in 11/2qt.covered casserole.
Rearrange halfway throughcooking.
Place broccoli in baking dish. Add 1/2cup water.
Add 1/2cup water in 11/2qt. covered casserole. Stir
halfway throughcooking.
Add 1/4cup water in 1 qt. covered casserole. Stir
halfway throughcooking.
Trim.Add 1/4cup water in 1qt. covered casserole.
Stir halfwaythrough cooking.
Slice.Add 1/2cup water in 11/2qt. covered
casserole. Stir halfwaythrough cooking.
Husk.Add 2 tbsp water in 11/2qt.baking dish.
Cover.
Place mushrooms in 11/2qt.covered casserole.Stir
halfway throughcooking.
Add 1/2cup water in 11/2qt.covered casserole.Stir
halfway throughcooking.
Add 1/2cup water in 11/2qt.covered casserole.Stir
halfway throughcooking.
Pierce potatoesseveral times with fork.
Place on 2 paper towels.
Turn over halfwaythrough cooking.
Pierce potatoesseveral times with fork.
Place on 2 paper towels.
Turn over halfwaythrough cooking.
Add 1/2cup water in 2 qt.covered casserole.
STANDING
TIME
2-3 minutes
2-3 minutes
2-3 minutes
2-3 minutes
2-3 minutes
2-3 minutes
2-3 minutes
2-3 minutes
2-3 minutes
2-3 minutes
2-3 minutes
2-3 minutes
2-3 minutes
2-3 minutes
2-3 minutes
2-3 minutes
2-3 minutes
2-3 minutes
2-3 minutes
Cut squash in half.Remove seeds.
Place in 8 x 8-inch baking dish. Cover.
1 lb. 41/2-71/2 Add 1/2cup water in 11/2qt.covered casserole. Stir 2-3 minutes
halfway throughcooking.
1 lb. 6-9 Pierce. Placeon 2 paper towels. Turn over and 2-3 minutes
rearrange halfway through cooking.
39
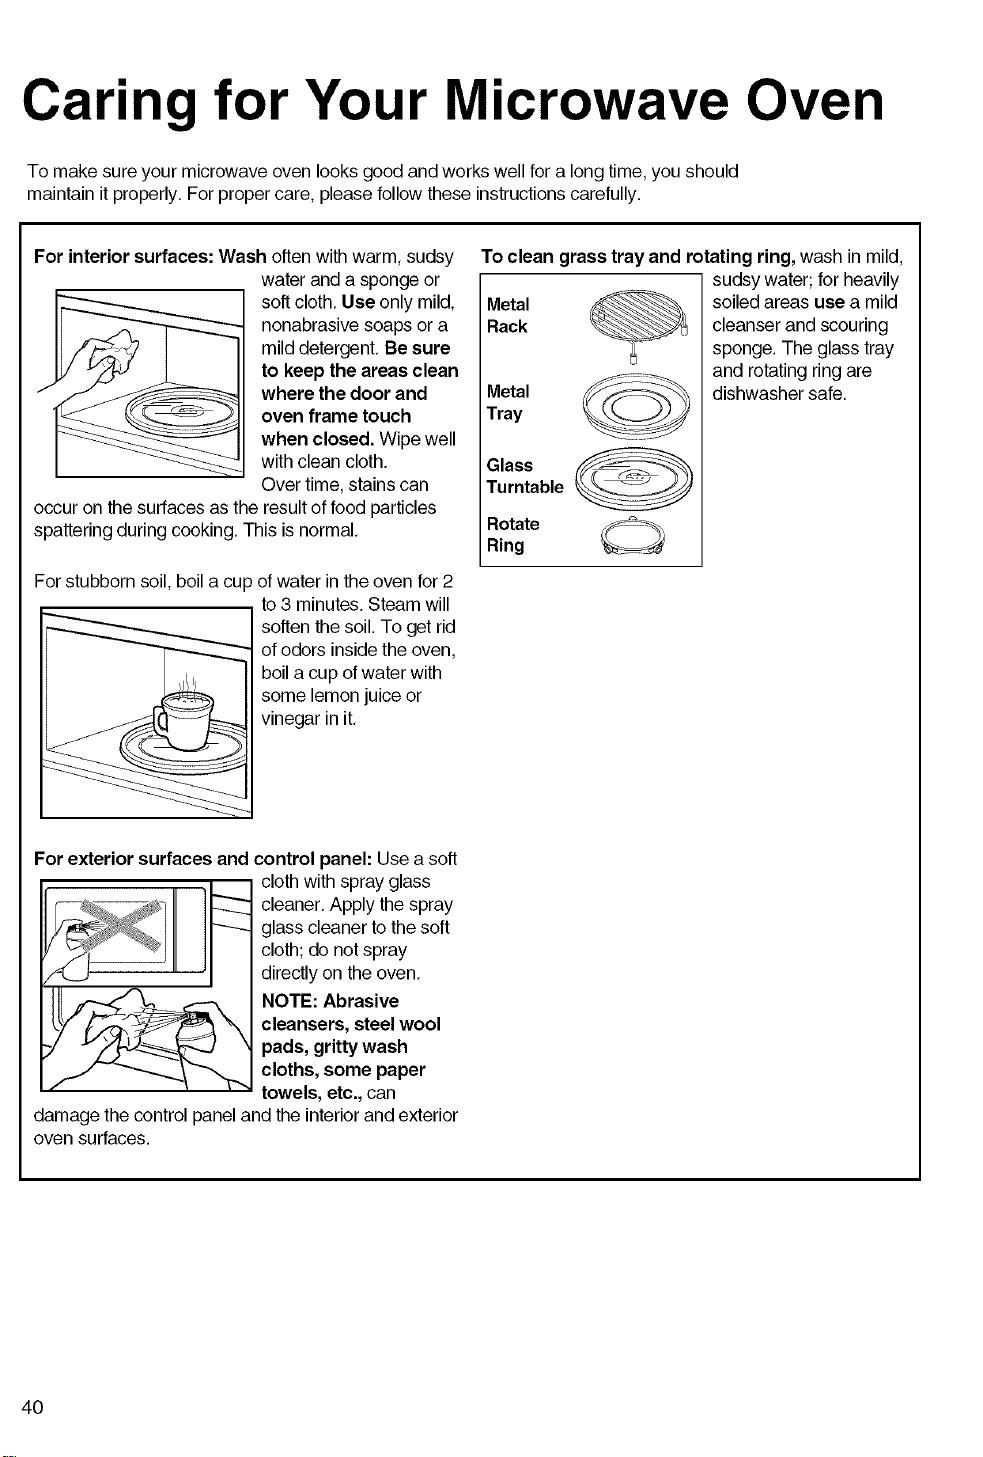
Carin for Your Microwave Oven
To make sureyour microwave oven looks good and works well for a long time,you should
maintain itproperly, For proper care, pleasefollow these instructionscarefully.
For interior surfaces: Wash often with warm, sudsy
water and a spongeor
soft cloth. Use only mild,
nonabrasive soaps or a
milddetergent. Be sure
to keep the areas clean
where the door and
oven frame touch
when closed. Wipe well
with clean cloth,
Over time, stainscan
occur on the surfaces as the result of food particles
spattering during cooking. This isnormal,
For stubborn soil, boil a cup of water inthe oven for 2
to 3 minutes. Steam will
soften the soil. To get rid
of odors inside the oven,
boil a cup of water with
some lemon juice or
vinegar in it,
To clean grass tray and rotatingring,wash in mild,
Metal
Rack
TrayMetal __ ......... -_
Glass
Turntable
Rotate
Ring
sudsywater; for heavily
soiledareas use a mild
cleanser and scouring
sponge. The glass tray
and rotating ring are
dishwasher safe,
For exterior surfaces and
Lt!
control panel: Use a soft
cloth with spray glass
cleaner, Apply the spray
glass cleanerto the soft
cloth; do notspray
directly on the oven,
NOTE: Abrasive
cleansers, steel wool
pads, gritty wash
cloths, some paper
towels, etc., can
damage the control panel and the interior and exterior
oven surfaces.
4O
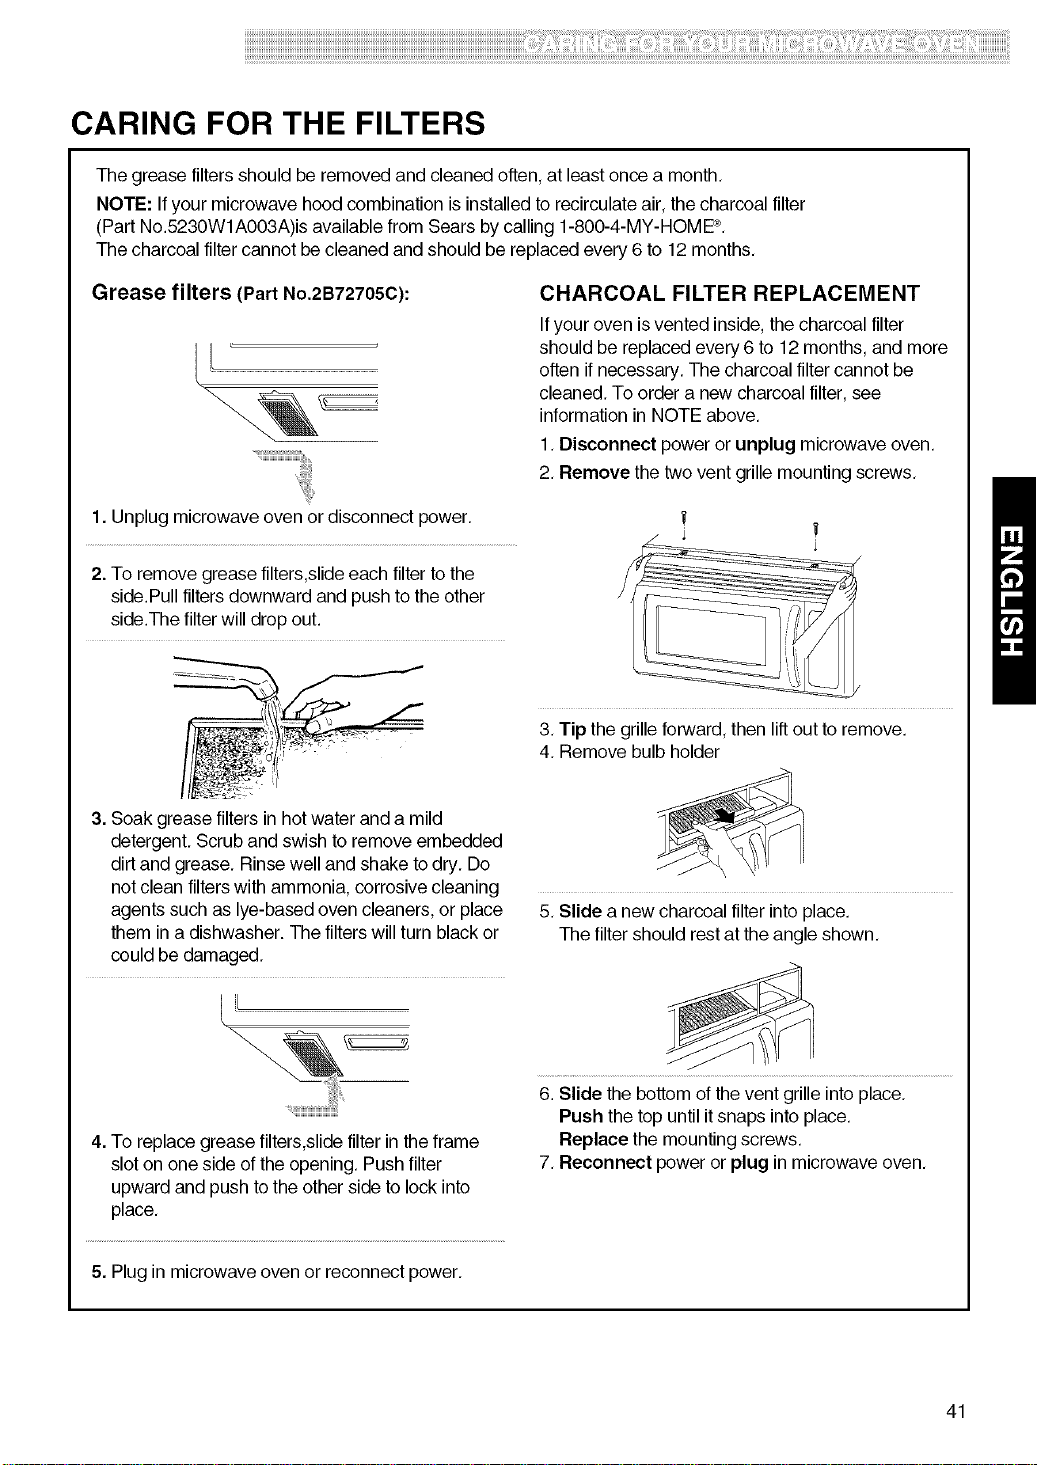
iiiiiiiiiiiiiiiiiiiiiiiiiiiiiiiiiiiiiiiiiiiiiiiiiiiiiiiiiiiiiiiiiiiiiiiiiiiiiiiiiiiiiiiiiiiiiiiiiiiiiiiiiiiiiiiiiiiiiiiiiiiiiiiiiiiiiiiiiiiiiiiiiiiiiiiiiiiiiiiiiiiiiiiiiiiiiiiiiiiiiiiiiiiiiiiiiiiiiiiiiiiiiiiiiiiiiiiiiiiiiiiiiiiiiiiiiiiiiiiiiiiiiiiiiiiiiiiiiiiiiiiiiiiiiiiiiiiiiiiiiiiiiiiiiiiiiiiiiiiiiiiiiiiiiiiiiiiiiiiiiiii i ii ii ii iiiiii ii ii ii iiii ii ii ii ii ii ii ii ii iiiiiiiiii iiiiiiiiii ii ii i !i ii ii i! ii iiiiii ii i iiiiiii!ii iiiiililili iiii ii'ii'ii'ii'ii'i!iii iiiii'iii iiiii ii iiiiii ii ii iiii ii iii i iiiiiiii il ii i:ii ii iiiiiiiiiii iiiii!i!i!i!i!i!i!i!i!i!i!i!i!i!i!i!i!i !
CARING FOR THE FILTERS
Thegrease filters should be removed and cleaned often,at least once a month,
NOTE: Ifyour microwave hood combination is installedto recirculateair, the charcoal filter
(Part No.5230W1A003A)is availablefrom Sears bycalling 1-800-4-MY-HOME®,
Thecharcoal filtercannot be cleaned and should be replaced every 6 to 12 months,
Grease filters (Part No.2B72705C):
CHARCOAL FILTER REPLACEMENT
Ifyouroven isventedinside,thecharcoal filter
should be replacedevery 6 to 12 months, and more
often if necessary,The charcoal filter cannot be
cleaned, To order a newcharcoal filter, see
informationin NOTE above,
1,Disconnect power or unplug microwave oven.
2, Remove the two vent grille mounting screws,
1. Unplugmicrowave oven or disconnect power,
2. To remove greasefilters,slideeach filter to the
side.Pull filtersdownward and push to the other
side.The filterwill drop out.
3. Soak grease filtersin hotwater and a mild
detergent, Scruband swish to remove embedded
dirtand grease. Rinsewell and shake to dry. Do
not clean filterswith ammonia, corrosivecleaning
agents such as lye-based oven cleaners,or place
them in a dishwasher. The filterswill turn black or
could be damaged,
[!.................................................................................................
4. To replace greasefilters,slidefilter in the frame
slot on one side of theopening, Pushfilter
upward and push tothe other sideto lock into
place,
3, Tip the grille forward,then liftout to remove,
4, Remove bulb holder
5, Slide a newcharcoal filter intoplace,
The filter should rest at theangle shown,
6. Slide the bottom ofthe vent grille into place,
Push the top untilitsnaps into place,
Replace the mounting screws,
7, Reconnect power or plug in microwave oven,
5. Plug in microwave oven or reconnectpower,
41
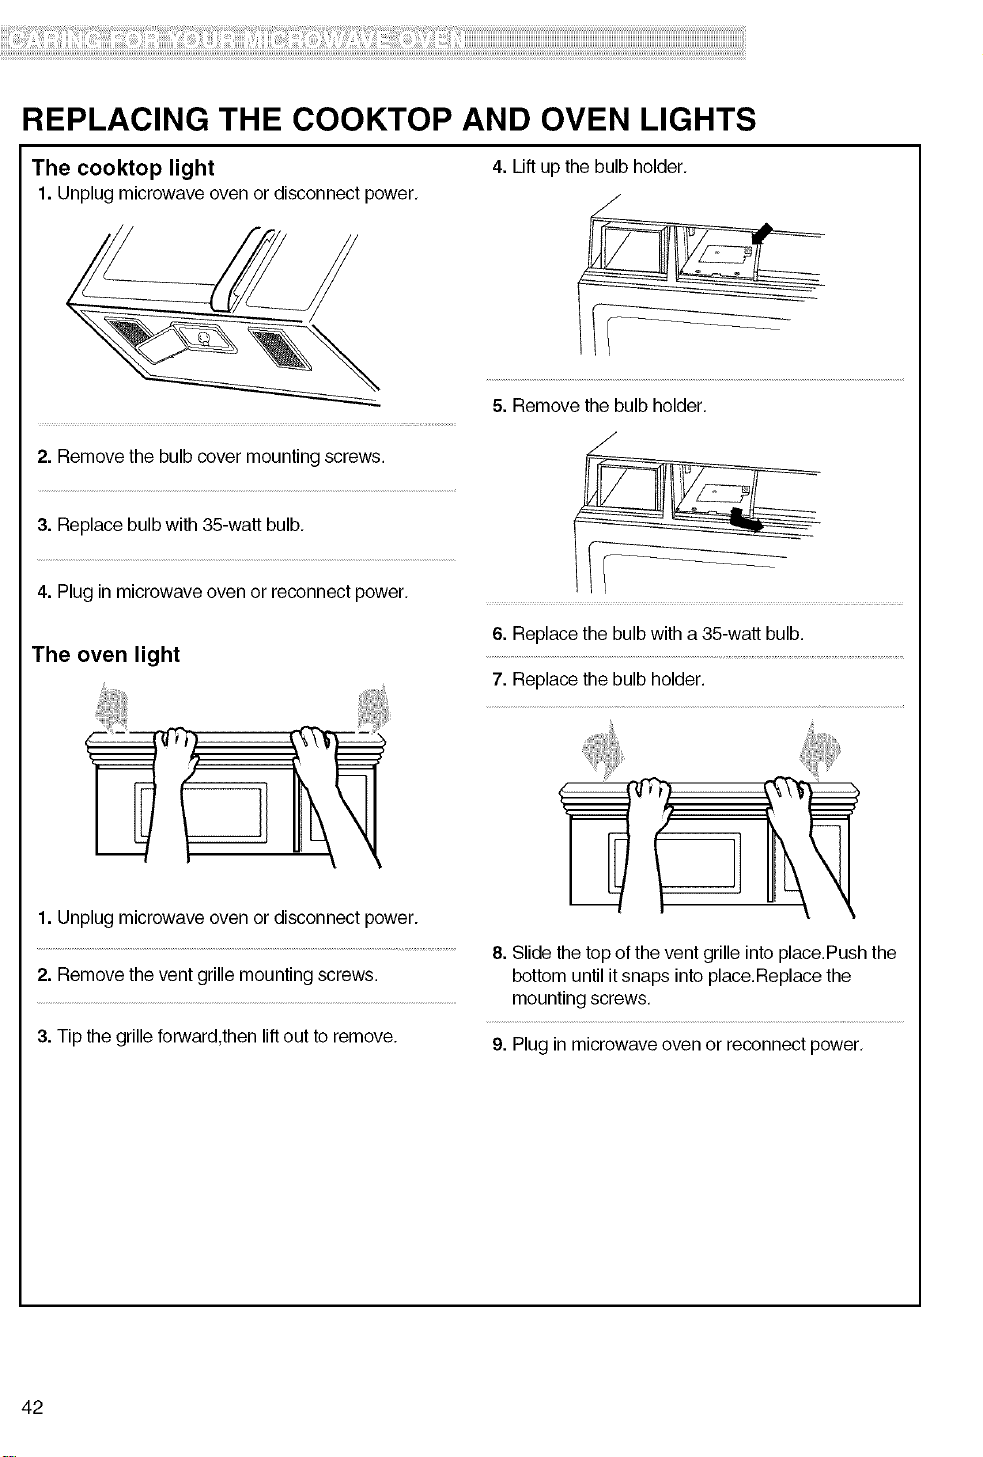
REPLACING THE COOKTOP AND OVEN LIGHTS
The cooktop light 4. Lift up the bulb holder,
1. Unplugmicrowave oven or disconnect power,
2. Removethe bulb cover mounting screws.
3. Replacebulb with 35-watt bulb,
4. Plug in microwave oven or reconnect power,
The oven light
1. Unplugmicrowave oven or disconnect power.
2. Removethe vent grille mounting screws.
3. Tip the grilleforward,then liftout to remove.
5. Remove the bulb holder,
./
6. Replace the bulb with a 35-watt bulb.
7. Replace the bulb holder.
8. Slide thetop of the vent grille into place.Pushthe
bottomuntil itsnaps into place.Replacethe
mounting screws,
9. Plug in microwave oven or reconnect power,
42
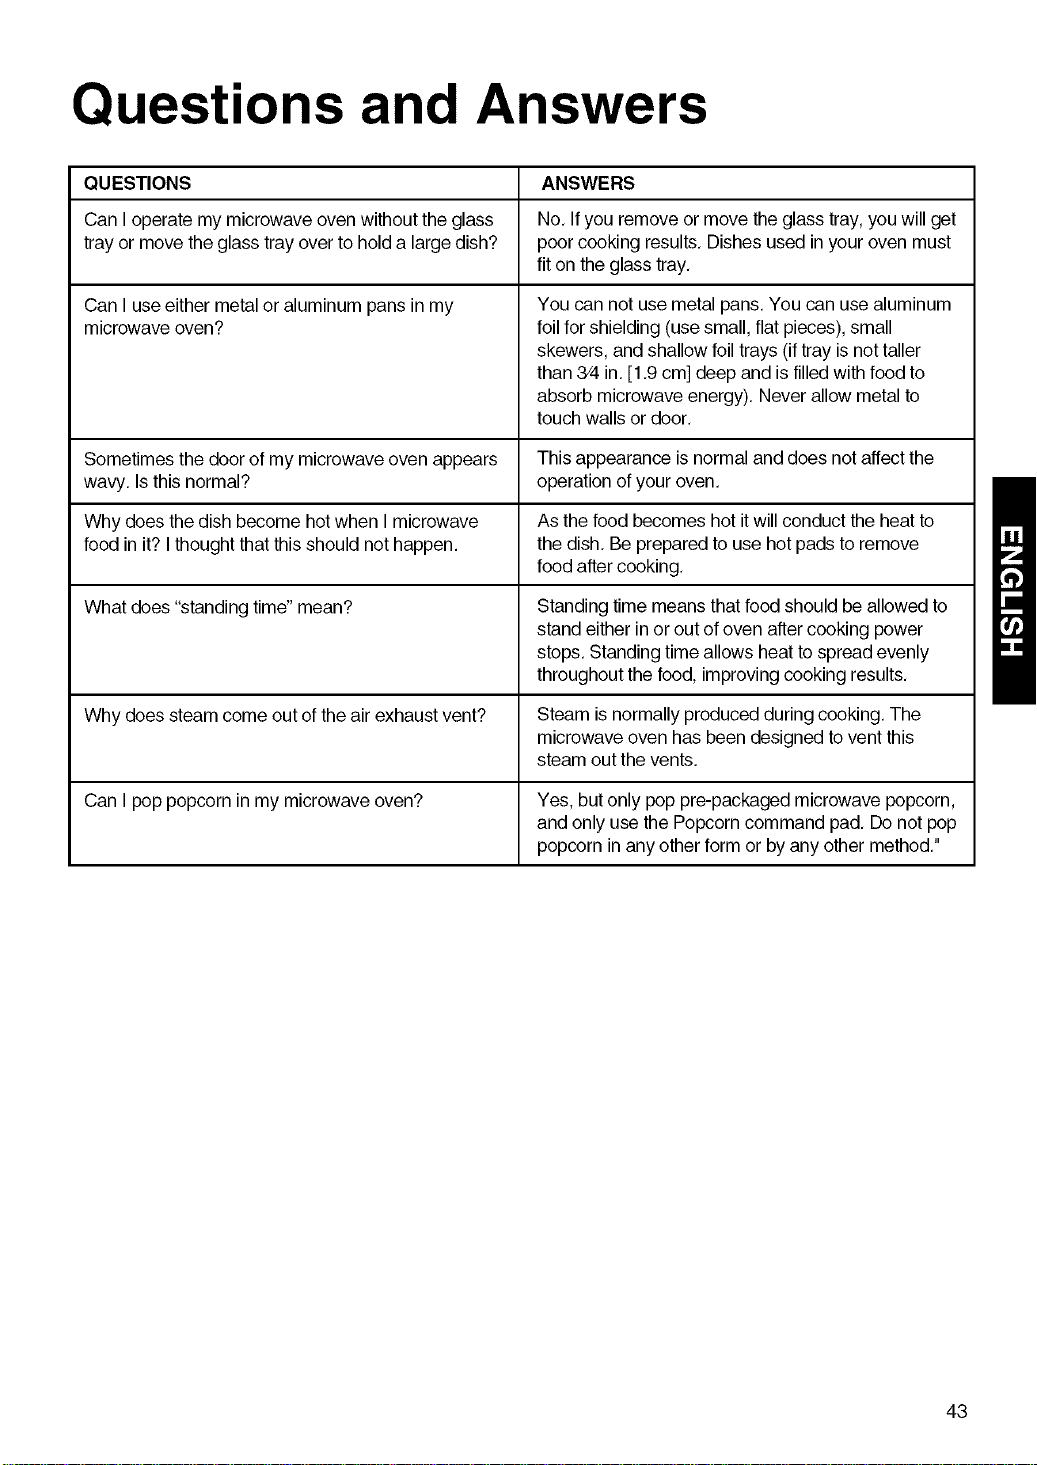
Questions and Answers
QUESTIONS ANSWERS
Can Ioperate my microwave oven without the glass No, If you remove or move the glass tray, youwill get
tray or move theglass tray over to hold a large dish? poor cooking results, Dishes used in your oven must
fit on theglass tray,
Can I useeither metal or aluminum pans in my
microwave oven?
You can not use metal pans, You can usealuminum
foil forshielding (use small,flat pieces),small
skewers, and shallow foiltrays (iftray is nottaller
than 3/4in. [1,9 cm] deep and isfilledwith food to
absorb microwave energy), Never allow metal to
touch walls or door,
Sometimes the door of my microwave oven appears This appearance is normaland does notaffect the
wavy, Is this normal? operation of your oven.
Why does the dish become hotwhen Imicrowave As the food becomes hot itwill conduct the heatto
food in it? Ithought that this should nothappen, the dish. Be prepared to use hot padsto remove
food after cooking,
What does "standing time" mean? Standing time means that food should be allowed to
stand eitherin or outof oven after cooking power
stops, Standingtime allows heat tospread evenly
throughout the food, improving cooking results,
Why does steam come outof the air exhaust vent? Steam is normally produced during cooking,The
microwave oven has been designed tovent this
steam out the vents,
Can I pop popcorn in my microwave oven? Yes, butonly pop pre-packaged microwave popcorn,
and only usethe Popcorncommand pad, Donot pop
popcorn in anyother formor by any other method,"
43
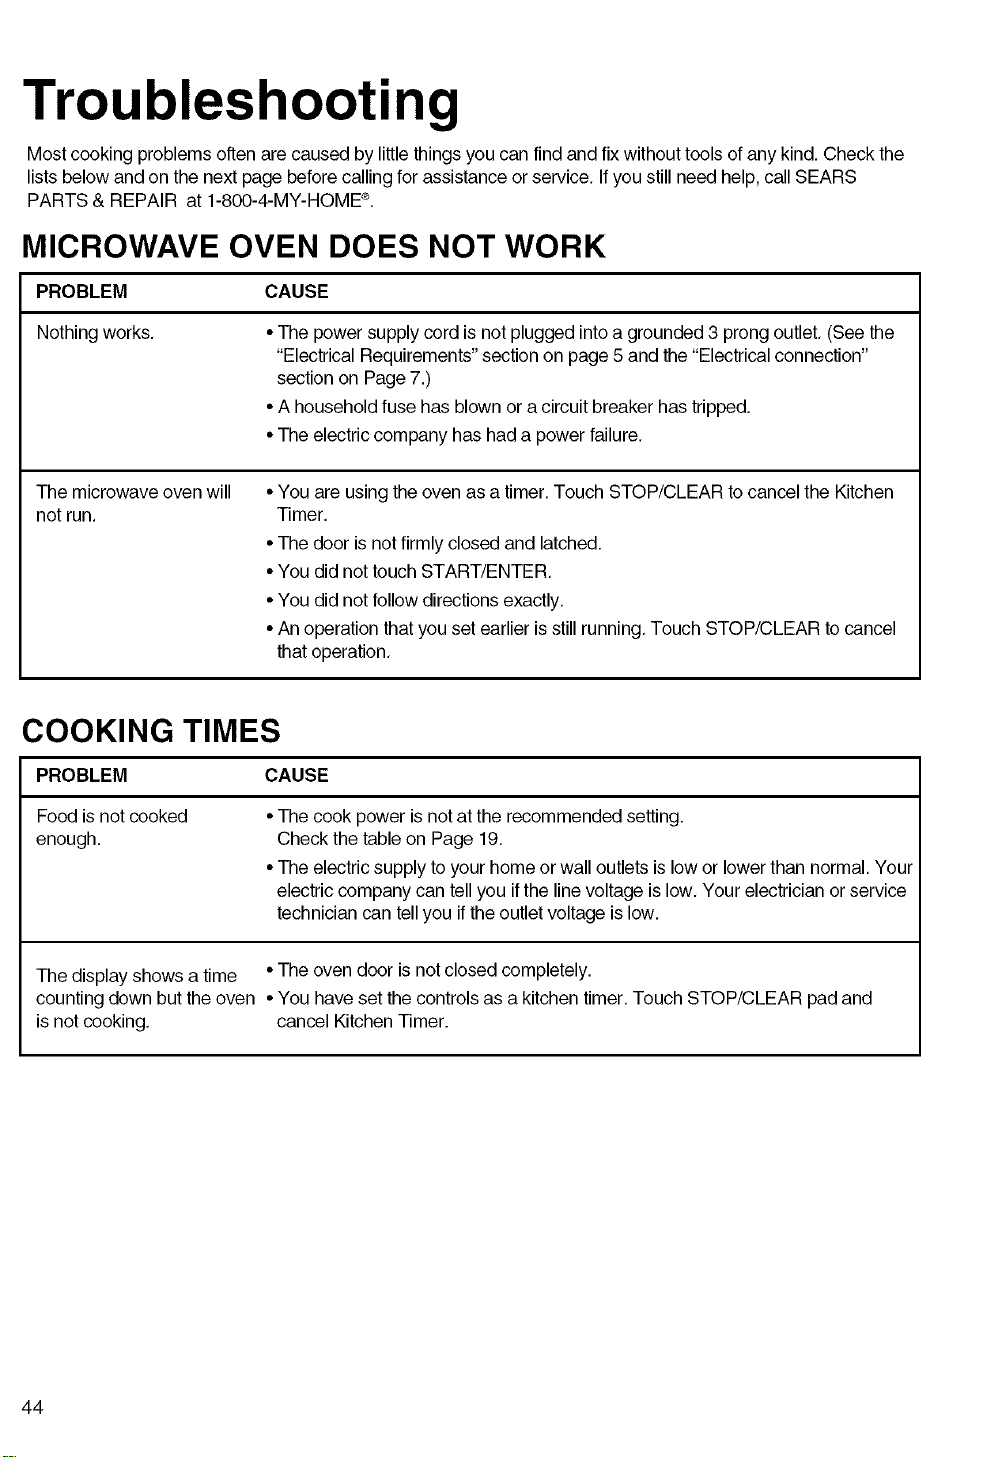
Troubleshootin
Most cooking problems often are caused by little things you can find and fix without tools of any kind. Check the
lists below and on the next page before calling for assistance or service. If you still need help, call SEARS
PARTS & REPAIR at 1-800-4-MY-HOME ®.
MICROWAVE OVEN DOES NOT WORK
PROBLEM CAUSE
Nothing works. • The power supply cord is not plugged into a grounded 3 prong outlet. (See the
"Electrical Requirements" section on page 5 and the "Electrical connection"
section on Page 7.)
• A household fuse has blown or a circuit breaker has tripped.
• The electric company has had a power failure.
The microwave oven will
not run.
•You are using the ovenas a timer.Touch STOP/CLEAR tocancel the Kitchen
Timer.
•The door is notfirmly closed and latched.
•You did not touch START/ENTER.
•You did not follow directionsexactly.
•An operationthat youset earlier isstillrunning. Touch STOP/CLEAR to cancel
that operation.
COOKING TIMES
PROBLEM CAUSE
Food is notcooked
enough.
• The cook power is not at the recommended setting.
Check the table on Page 19.
• The electric supply to your home or wall outlets is low or lower than normal. Your
electric company can tell you if the line voltage is low. Your electrician or service
technician can tell you if the outlet voltage is low.
The display shows a time • The oven door isnot closed completely.
counting down but theoven • You have set the controlsas a kitchentimer. Touch STOP/CLEAR pad and
is notcooking, cancel Kitchen Timer.
44
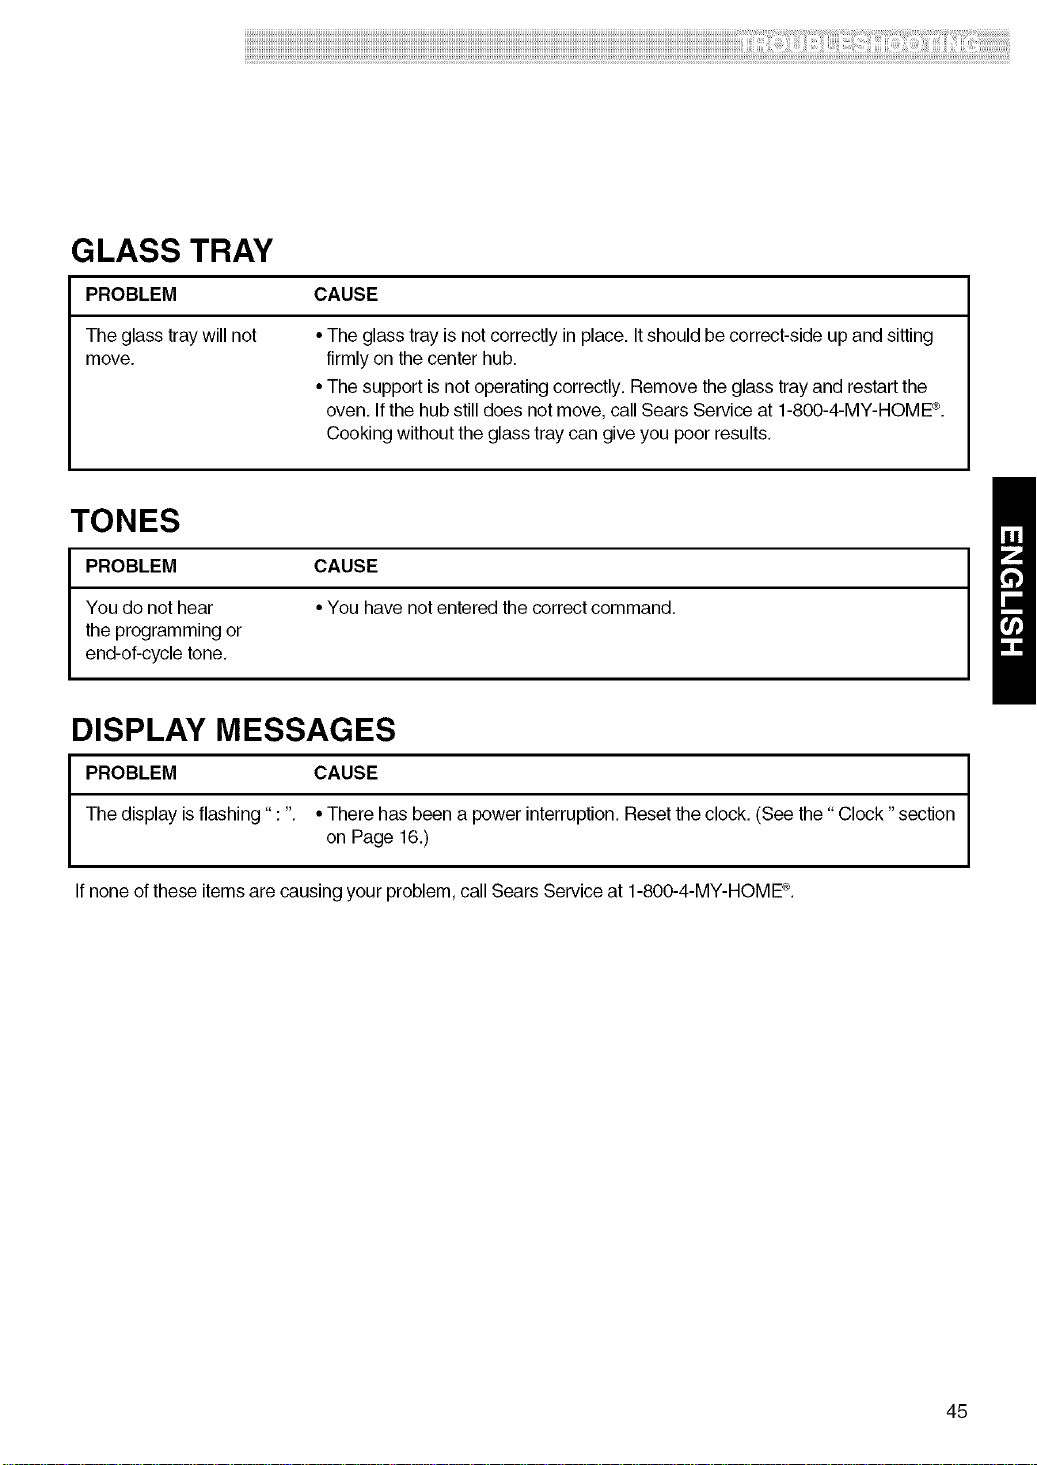
i!i!i!i!i!i!i!i!i!i!i!i!i!i!i!i!i!i!i!i!i!i!i!i!i!i!i!i!i!i!i!i!i!i!i!i!i!i!i!i!i!i!i!i!i!i!i!i!i!i!i!i!i!i!i!i!i!i!i!i!i!i!i!i!i!i!i!i!i!i!i!i!i!i!i!i!i!i!i!i!i!i!i!i!i!i!i!i!i!i!i!i!i!i!i!i!i!i!i!i!i!i!i!i!i!i!i!i!i!i!i!i!i!i!i!i!i!i!i!i!i!i!i!i!i!i!i!i!i!i!i!i!i!i!i!i!i!i!i!i!i!i!i!i!i!i!i!i!i!i!i!i!i!i!i!i!i!i!i!i!i!i!i!i!i!i!i!i!i!i!i!i!i!i!i!i!i!i!i!i!i!i!i!i!i!i!i!i!i!i!i!i!i!i!i!i!i!i!i!i!i!i!i!i!i!i!i!i!i!i!i!i!i!i!i!i!i!i!i!i!i!i!i!i!i!i!i!i!i!i!i!i!i!i!i!i!i!i!i!i!i!i!i!i!i!i!i!i!i!i!i!i!i!i!i!i!i!i!i!i!i!i!i!i!i!i!i!i!i!i!i!i!i!i!i!i!i!i!i!i!i!i!i!i!i!_i!i!__il;!!ii_ii_i_iiiii!_ii_!iii!'!!_i!_i!_i!_i!iiii_i!!iiii'!!_!!i_iiii_i!iii_!_i!_i!_iiiii_i!iiiiii_ii_ii_ii_i!ii_i_ii!i!_i!_i!_!_!!_i!_i!_i!_i!_i!_il_i_iii!_i!_iiill_ii_:!_:i_:iiii_i_i!_ii!i!_i!_i!_i!iill¸i!_i!_iiiii!i!i!il¸i!¸iiii!_ii;i!_i;iiii_ii_il_ii_iiii_!iiiii_i!:ii_i!!ii_ii_i_ii!i!_il_iii_iiii'i!_i!_i!_i!_i!_i!_i!_i!_i!_i!_i!_i!_i!_i!_i!iill
GLASS TRAY
PROBLEM CAUSE
The glass tray will not
move.
•The glass tray isnot correctly in place. Itshould be correct-side up and sitting
firmlyon thecenter hub.
•The support is not operatingcorrectly. Remove the glass tray and restartthe
oven, Ifthe hub still does notmove, call Sears Service at 1-80O-4-MY-HOME®.
Cooking without the glass tray can give you poor results,
TONES
PROBLEM CAUSE
You do nothear •You have notentered the correctcommand,
the programming or
end-of-cycle tone,
DISPLAY MESSAGES
PROBLEM CAUSE
The display isflashing" :", •There has been a power interruption,Reset theclock. (See the" Clock" section
on Page 16.)
Ifnone of these items are causing your problem, call Sears Service at 1-800-4-MY-HOME ®.
45