Owner's Manual and
Installation Instructions
Electronic
Three-Speed
AUTOMATIC WASHERS
IMPORTANT:
Read and follow all safety
and operating instructions
before first use of this product.
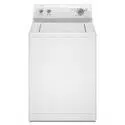
Your washer may look different
from the washer shown.
Sears, Roebuck and Co., Hoffman Estates, IL 60179 U.S.A.
PART NO. 3950148 Rev. A PRINTED IN U.S.A.
g
g
g
g
H
g
g
BEFORE USING YOUR NEW WASHER
SEARS AUTOMATIC WASHER WARRANTY
IMPORTANT SAFETY INSTRUCTIONS
INSTALLATION INSTRUCTIONS
OPERATING YOUR WASHER
LAUNDRY TIPS
CARING FOR YOUR WASHER
TROUBLESHOOTING
SEARS MAINTENANCE AGREEMENT
2
3
4
5
20
37
39
41
46
Please read this manual. It will help
you install and operate your new
Kenmore washer in the safest and
most economical way.
For more information about the care
and operation of Kenmore appliances call
your nearest Sears store. You will need
the complete model and serial
numbers when requesting information.
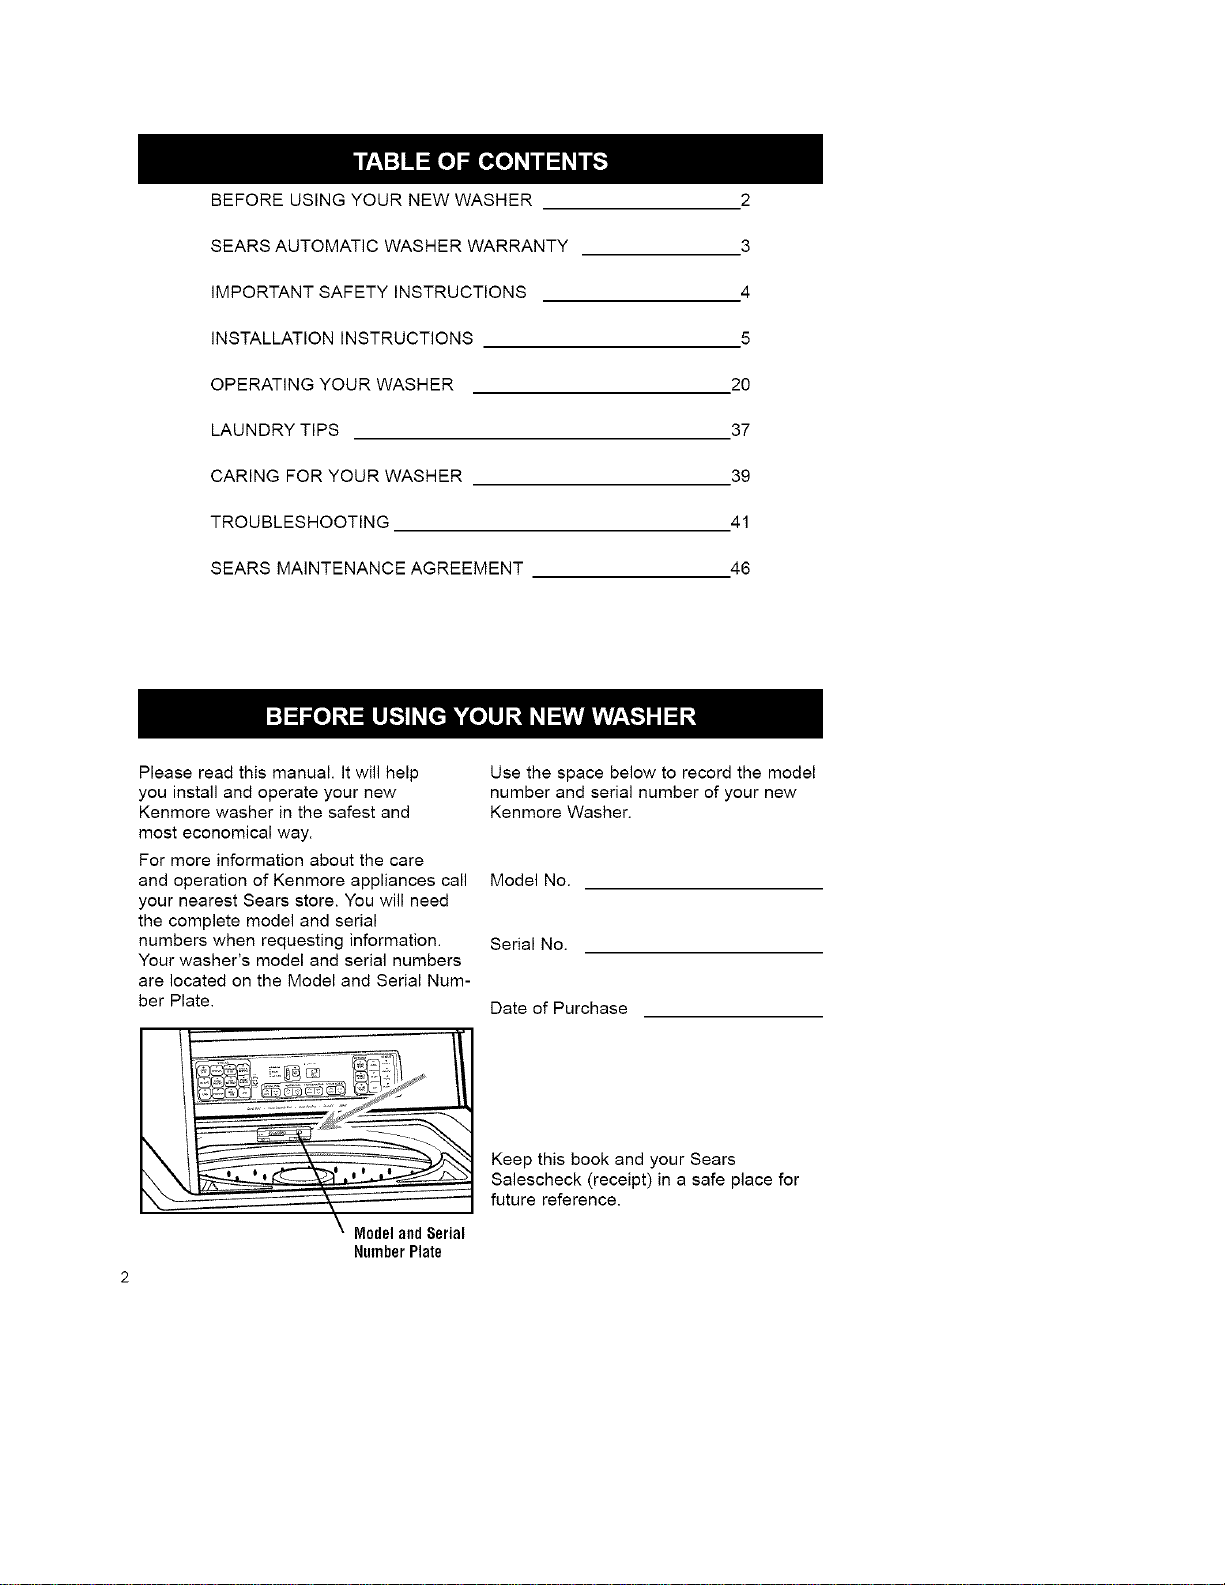
Your washer's model and serial numbers
are located on the Model and Serial Num-
ber Plate.
Use the space below to record the model
number and serial number of your new
Kenmore Washer.
Model No.
Serial No.
Date of Purchase
ModelandSerial
NumberPlate
Keep this book and your Sears
Salescheck (receipt) in a safe place for
future reference.
FULL 1-YEAR WARRANTY
ON MECHANICAL AND
ELECTRICAL PARTS
For one year from the date of purchase,
when the washer is installed and operated
in accordance with the instructions in
the Owner's Manual, Sears will repair or
replace any mechanical or electrical parts
in this washer, if defective in material or
workmanship.
LIMITED 5-YEAR WARRANTY
ON GEARCASE PARTS
After one year and until five years from the
date of purchase, Sears will furnish re-
placement parts for any defective gearcase
parts. You will be charged for labor.
LIMITED 10-YEAR WARRANTY
ON PLASTIC TUB
After one year and until ten years from
date of purchase, Sears will furnish a
replacement plastic tub for any plastic tub
which is defective in material or workman-
ship. You will be charged for labor.
If the washer is subjected to other than pri-
vate family use, the above warranty cover-
age is effective for only 90 days.
WARRANTY SERVICE IS AVAILABLE
BY CONTACTING THE NEAREST SEARS
SERVICE CENTER IN THE UNITED
STATES.
This warranty applies only while this
product is in use in the United States. This
warranty gives you specific legal rights,
and you may also have other
rights which vary from state to state.
Sears, Roebuck and Co., Dept. 817WA,
Hoffman Estates, IL 60179.
Your safety and the safety of others is very important.
We have provided many important safety messages in this manual and on
your appliance. Always read and obey all safety messages.
This is the safety alert symbol. This symbol alerts
you to hazards that can kill or hurt you and others.
All safety messages will be preceded by the safety
alert symbol and the word "DANGER" or "WARNING." These
words mean:
You will be killed or seriously
injured if you don't follow
instructions.
You can be killed or seriously
injured if you don't follow
instructions.
All safety messages will identify the hazard, tell you how to reduce the
chance of injury, and tell you what can happen if the instructions are not fol-
lowed.
YOURSAFETYISIMPORTANTTOUS.
WARNING:Toreducetheriskoffire,
electricshock,orinjurytopersons
whenusingyourwasher,followbasic
precautions,includingthefollowing:
•Readallinstructionsbeforeusing
thewasher.
•Donotwasharticlesthathavebeen
previouslycleanedin,washedin,soaked
in,orspottedwithgasoline,dry-cleaning
solvents,otherflammableorexplosive
substancesastheygiveoffvaporsthat
couldigniteorexplode.
•Donotaddgasoline,dry-cleaning
solvents,orotherflammableorexplosive
substancestothewashwater.Thesesub-
stancesgiveoffvaporsthatcould
igniteorexplode.
•Undercertainconditions,hydrogengas
maybeproducedinahotwatersystem
thathasnotbeenusedfor2weeksor
more.HYDROGENGASISEXPLOSlVE.
Ifthehotwatersystemhasnotbeenused
forsuchaperiod,beforeusingawashing
machine,turnonallhotwaterfaucetsand
letthewaterflowfromeachforseveral
minutes.Thiswillreleaseanyaccumulat-
edhydrogengas.Asthegasisflammable,
donotsmokeoruseanopenflameduring
thistime.
•Donotallowchildrentoplayonorin
thewasher.Closesupervisionofchildren
isnecessarywhenthewasherisused
nearchildren.
•Beforethewasherisremovedfrom
serviceordiscarded,removethelid.
•Donotreachintothewasherifthetub
oragitatorismoving.
•Donotinstallorstorethiswasherwhereit
willbeexposedtotheweather.
•Donottamperwithcontrols.
•Donotrepairorreplaceanypartofthe
washerorattemptanyservicingunless
specificallyrecommendedintheOwner's
Manualorinpublisheduser-repair
instructionsthatyouunderstandandhave
theskillstocarryout.
SAVE THESEINSTRUCTIONS
IMPORTANT: Observe all governing codes and ordinances.
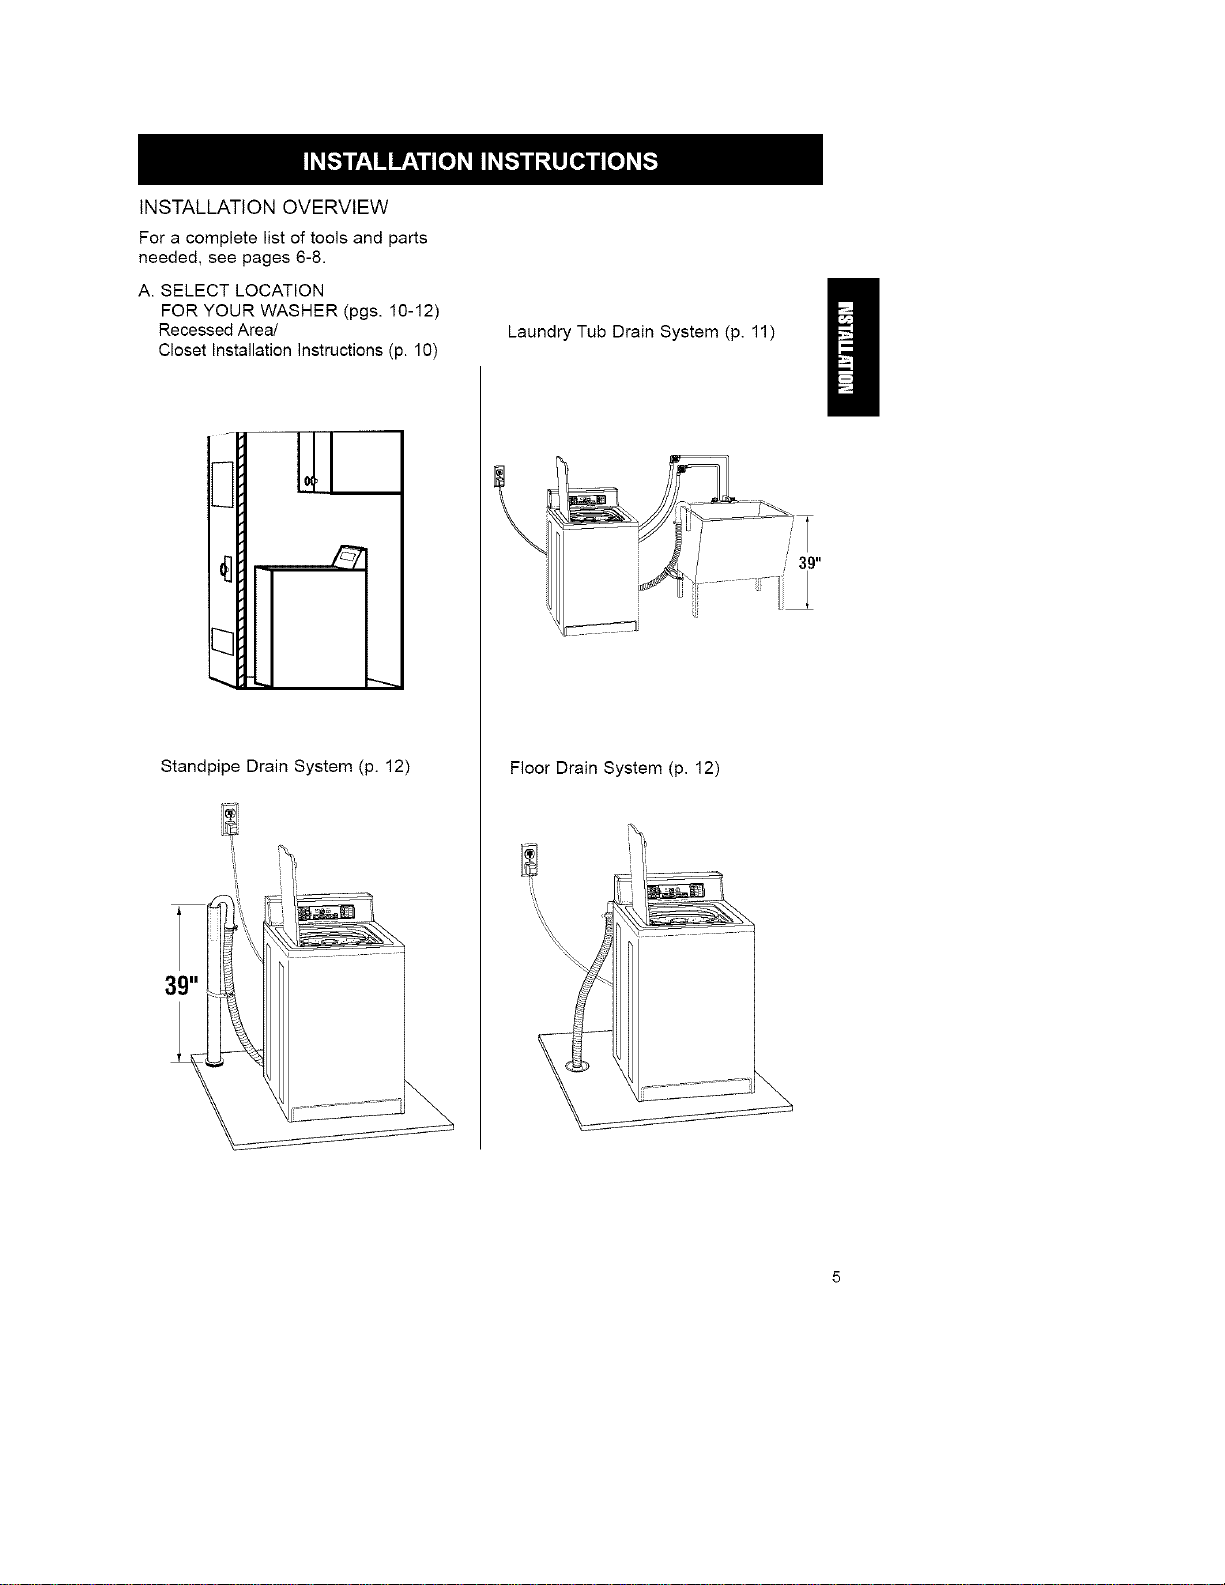
INSTALLATIONOVERVIEW
Foracompletelistoftoolsandparts
needed,seepages6-8.
A.SELECTLOCATION
FORYOURWASHER(pgs.10-12)
RecessedAreal
ClosetInstallationInstructions(p.10)
LaundryTubDrainSystem(p.11)
g
Standpipe Drain System (p. 12)
Floor Drain System (p. 12)
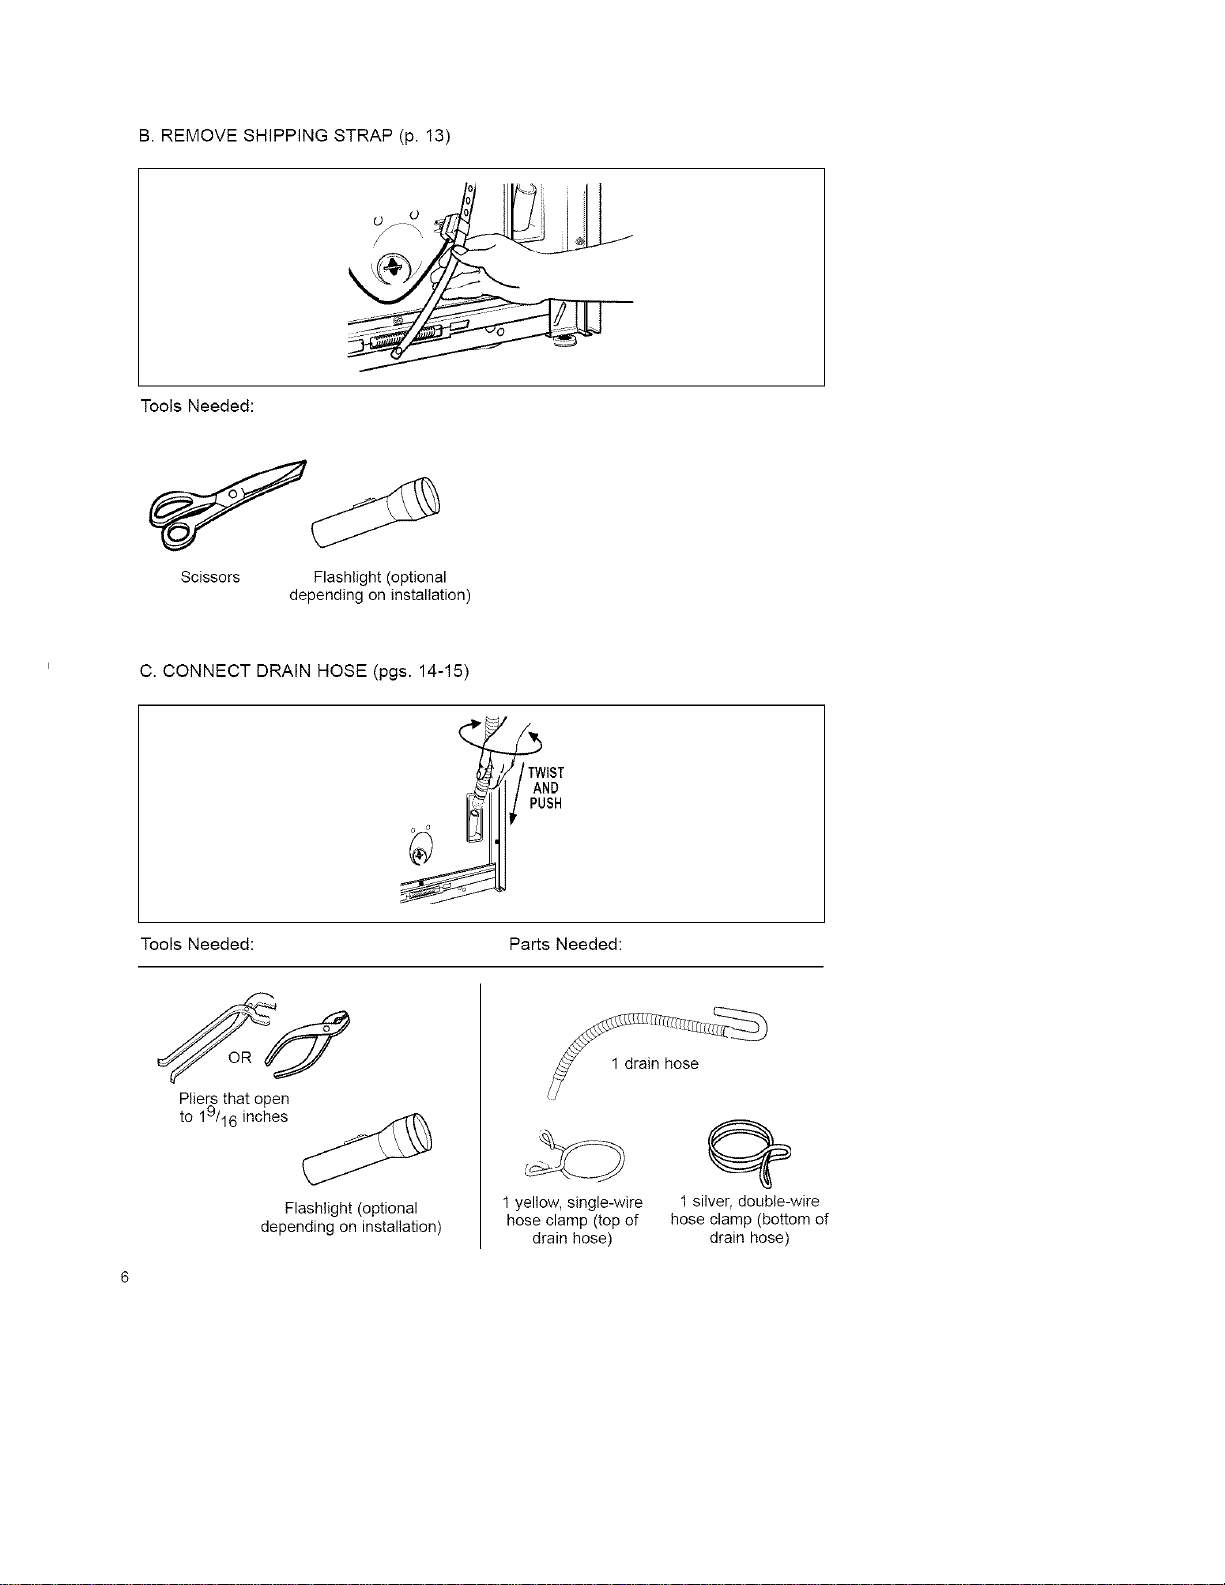
B.REMOVESHIPPINGSTRAP(p.13)
ToolsNeeded:
Scissors Flashlight(optional
dependingoninstallation)
C.CONNECTDRAINHOSE(pgs.14-15)
ToolsNeeded:
_IST
PartsNeeded:
Su
Pliers that open
to 19/16 inches
Flashlight (optional
depending on installation)
1 yellow, single-wire
hose clamp (top of
drain hose)
1 silver, double-wire
hose clamp (bottom of
drain hose)
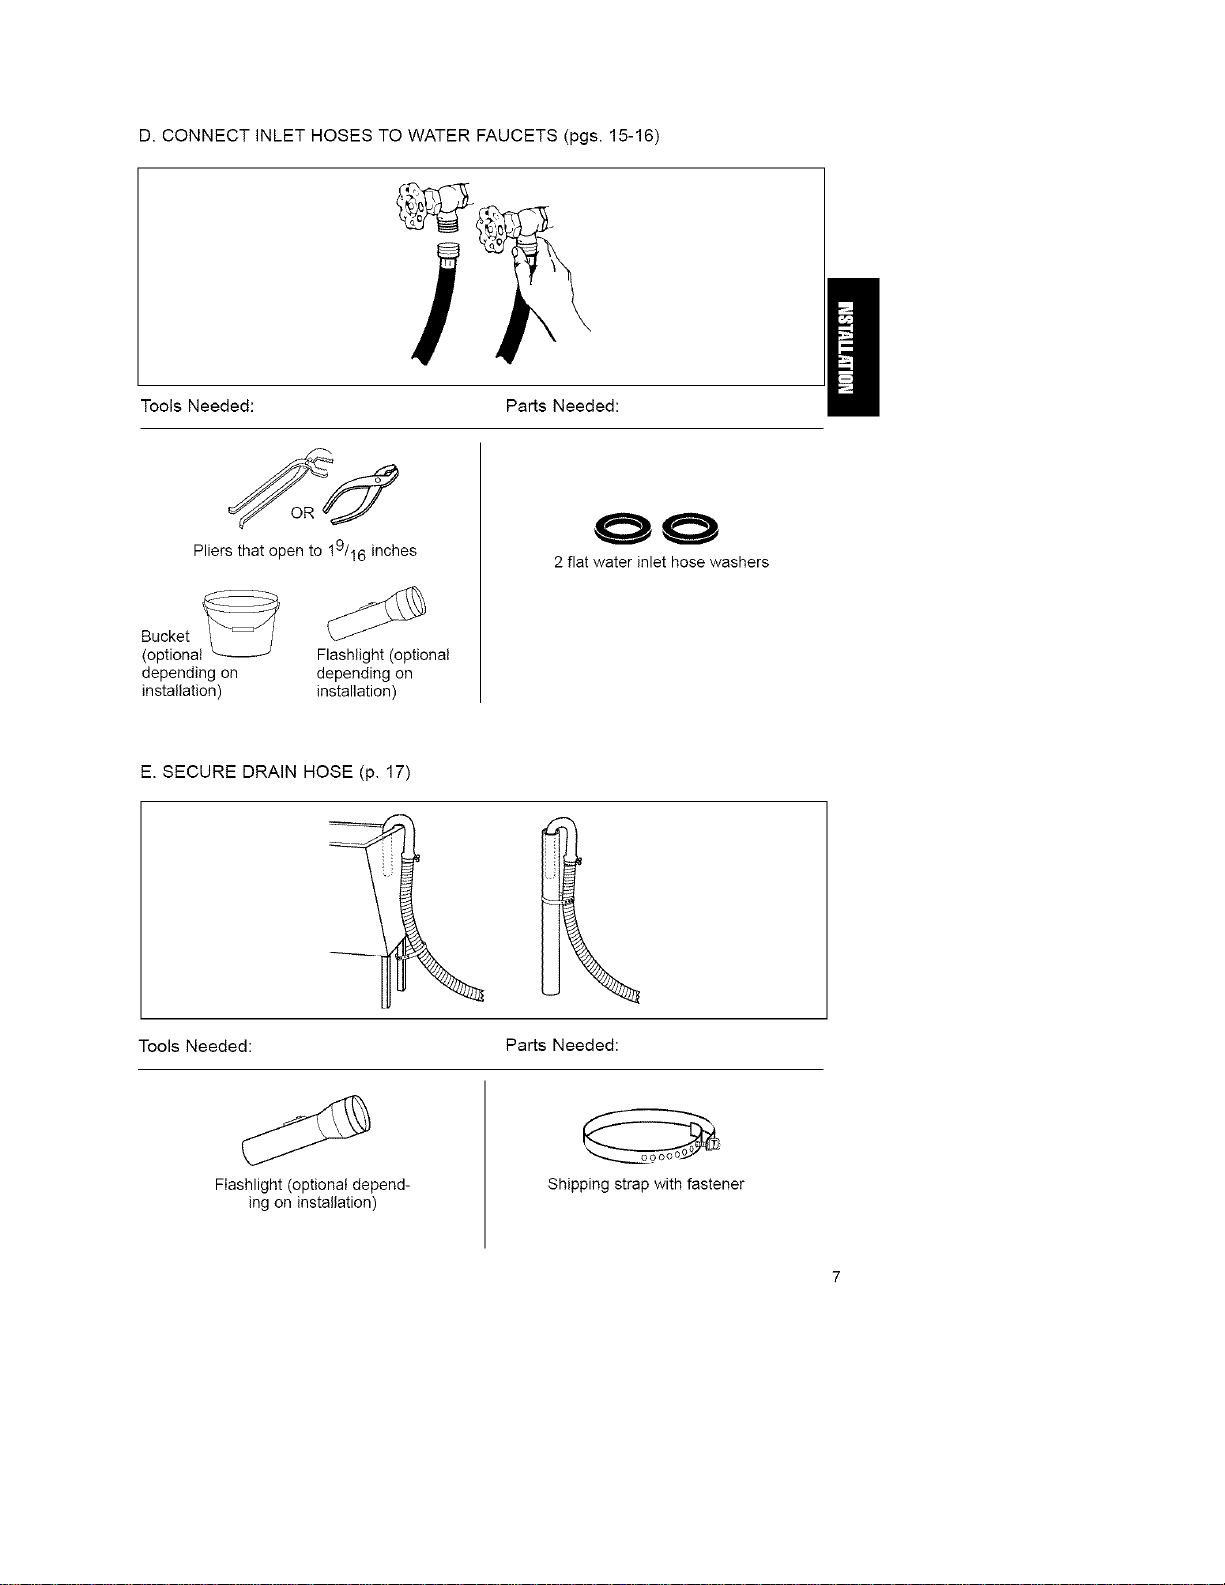
D.CONNECTINLETHOSESTOWATERFAUCETS(pgs.15-16)
ToolsNeeded: PartsNeeded:
Pliersthatopento!9/16inches
dependingon
installation)
Flashlight(optional
dependingon
installation)
OO
2 flat water inlet hose washers
E. SECURE DRAIN HOSE (p. 17)
Tools Needed: Parts Needed:
Flashlight (optional depend-
ing on installation)
Shipping strap with fastener
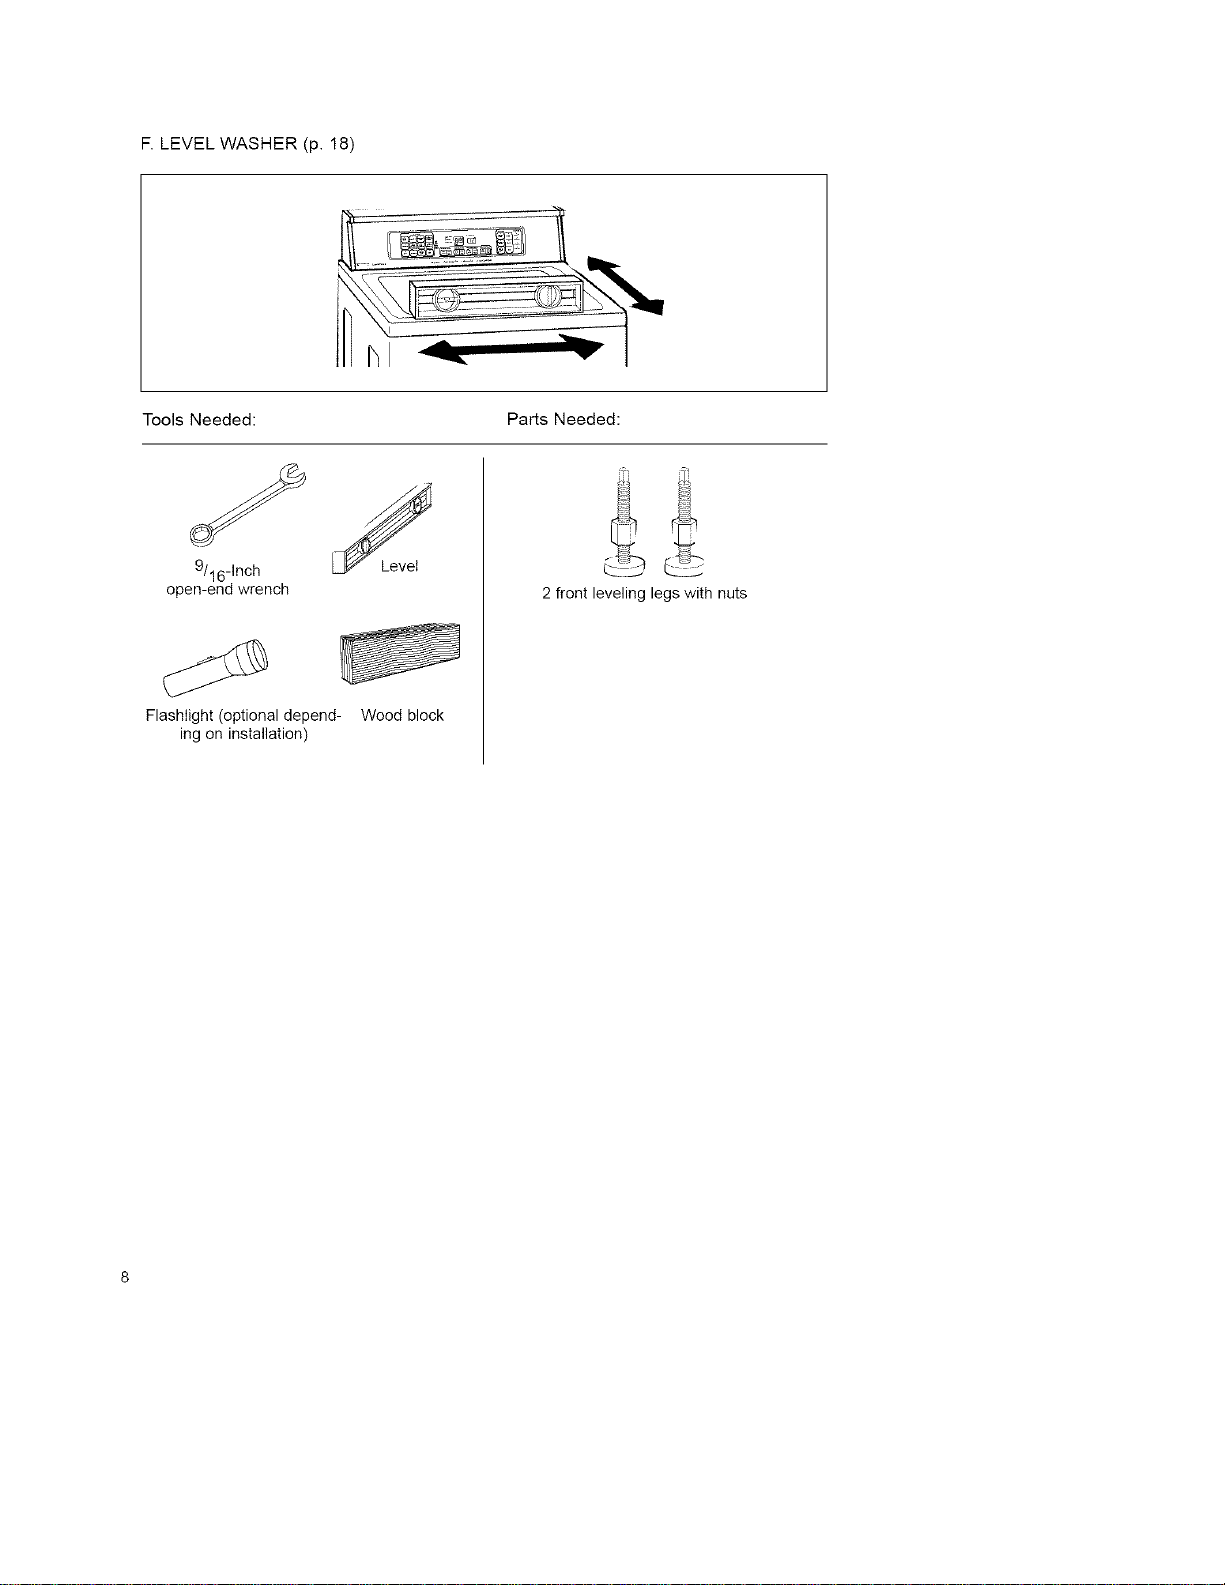
F.LEVELWASHER(p.18)
ToolsNeeded: PartsNeeded:
9/16-Inch
open-endwrench
Flashlight(optionaldepend-
ingoninstallation)
Woodblock
2frontlevelinglegswithnuts
Selectingtheproperlocationforyour
washerwillimproveitsperformanceand
minimizeconcernslikewasherwalkor
noise.
ELECTRICALREQUIREMENTS
120-Volt,60-Hz.,AC-only,15-or
20-amperefusedelectricalsupplyis
required.(Time-delayfuseorcircuit
breakerisrecommended.)Connectto
individualbranchcircuit.
ElectricalShockHazard
Plugintoagrounded3-prong
outlet.
Donotremovegroundprong.
Donotuseanadapter.
Donotuseanextensioncord.
Failuretofollowtheseinstructions
canresultindeath,fire,or
electricalshock.
GROUNDING INSTRUCTIONS
WARNING: Improper connection of
the equipment grounding conductor can
result in a risk of electric shock. Check
with a qualified electrician or serviceman
if you are in doubt as to whether the
appliance is properly grounded. Do not
modify the plug provided with the appli-
ance - if it will not fit the outlet, have
a proper outlet installed by a qualified
electrician.
For your personal safety, this washer
must be grounded. In the event of
malfunction or breakdown, grounding
will reduce the risk of electric shock
by providing a path of least resistance for
electric current.
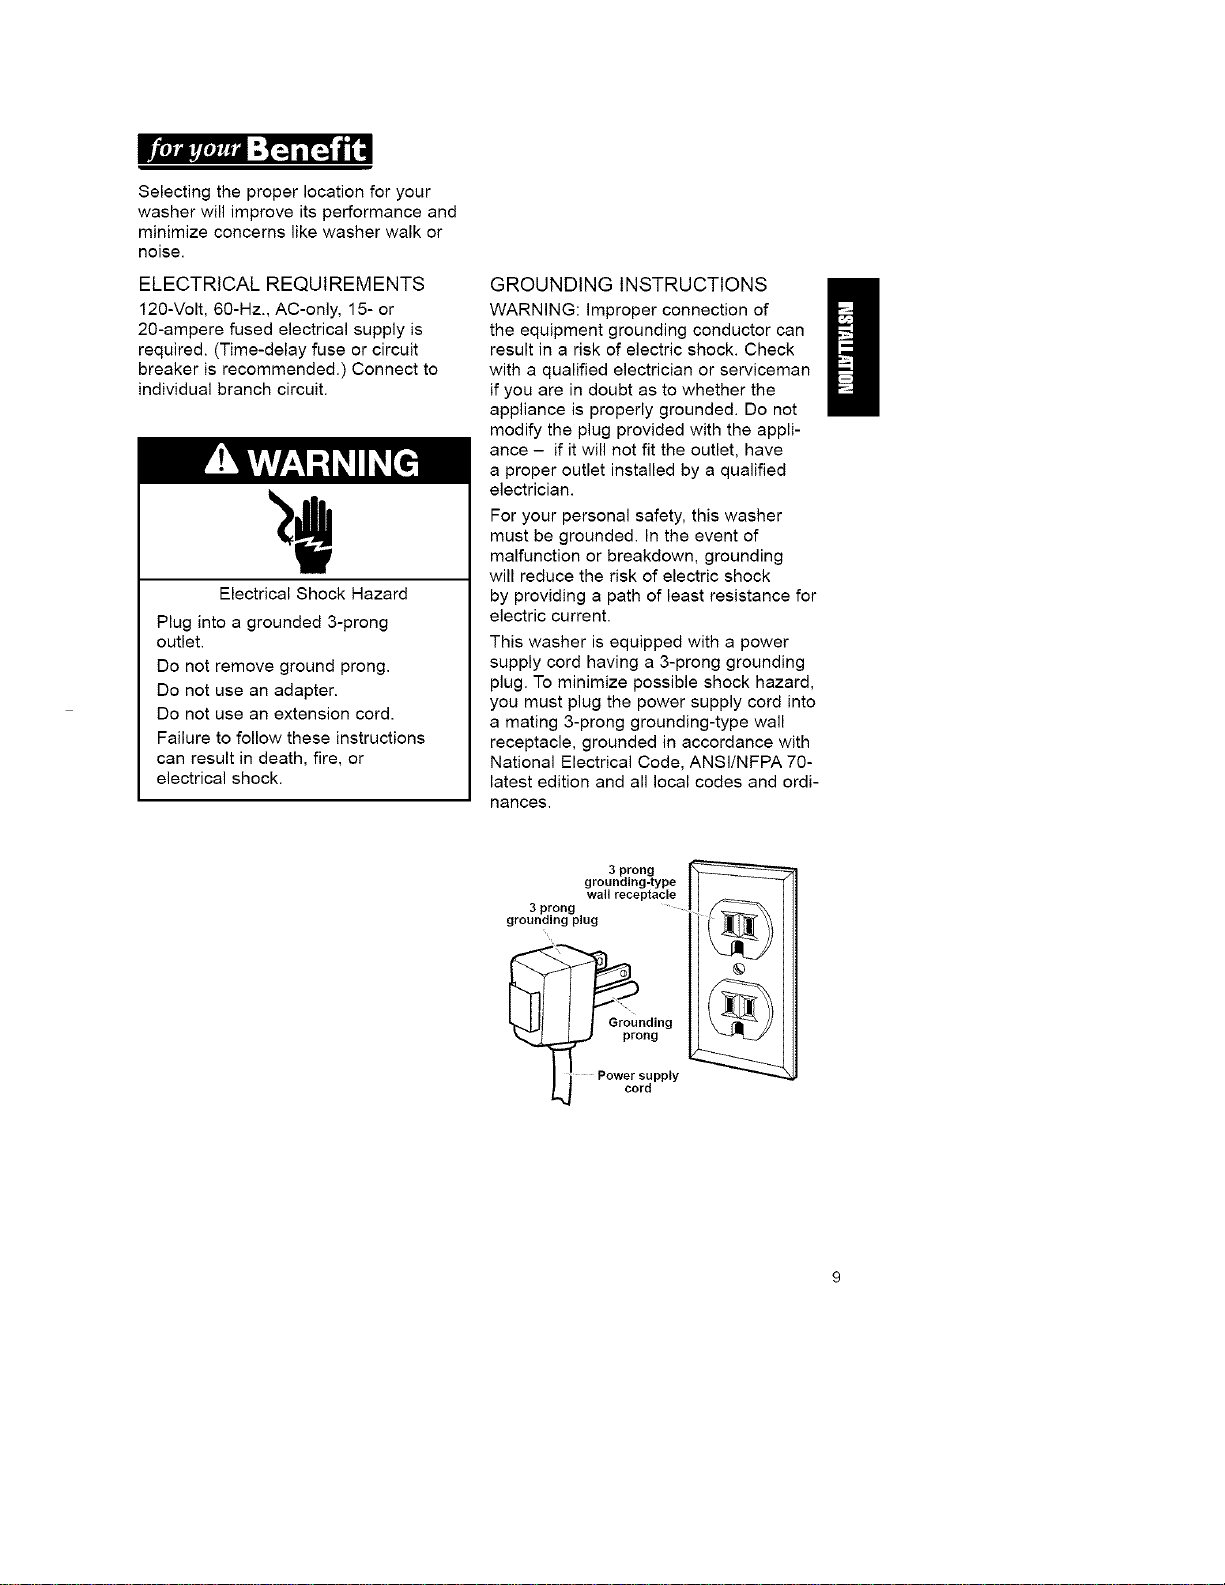
This washer is equipped with a power
supply cord having a 3-prong grounding
plug. To minimize possible shock hazard,
you must plug the power supply cord into
a mating 3-prong grounding-type wall
receptacle, grounded in accordance with
National Electrical Code, ANSl/NFPA 70-
latest edition and all local codes and ordi-
nances.
g
3 prong
grounding-type
wall receptacle
3 prong
grounding plug
Grounding
prong
Power supply
c_rd
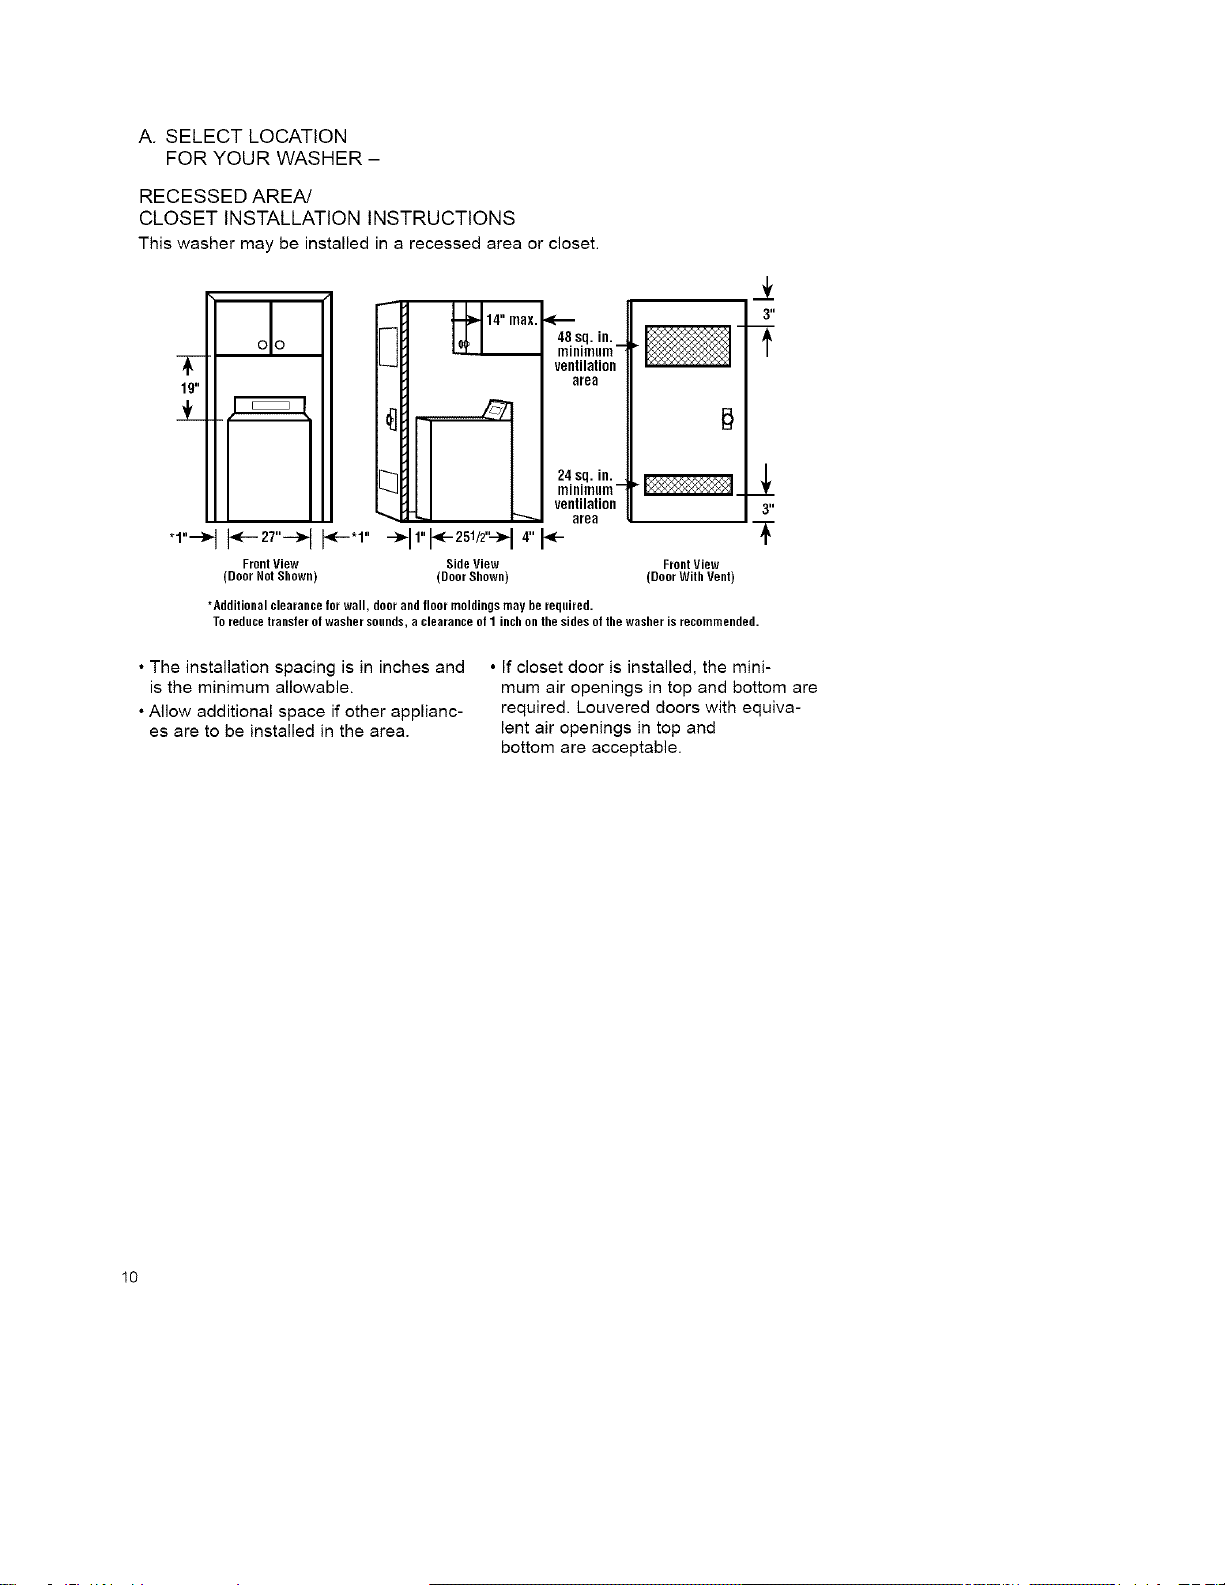
A. SELECT LOCATION
FOR YOUR WASHER -
RECESSED AREA/
CLOSET INSTALLATION INSTRUCTIONS
This washer may be installed in a recessed area or closet.
19"
"1"--'_
olo
48sq.in._
minimum
ventilation
area
._ 14"max.
Io 1
- 11" 4"
SideView
(DoorShown)
3"
1'
Front View Front View
(Door Not Shown) (Door With Vent)
i
24sq.in. J.
minimum-
ventilation 3"
area
*Additionalclearanceforwall, doorandfloormoldingsmay berequired.
Toreducetransferofwashersounds,a clearanceofI inchonthe sidesofthewasherisrecommended.
• The installation spacing is in inches and
is the minimum allowable.
• Allow additional space if other applianc-
es are to be installed in the area.
• If closet door is installed, the mini-
mum air openings in top and bottom are
required. Louvered doors with equiva-
lent air openings in top and
bottom are acceptable.
10
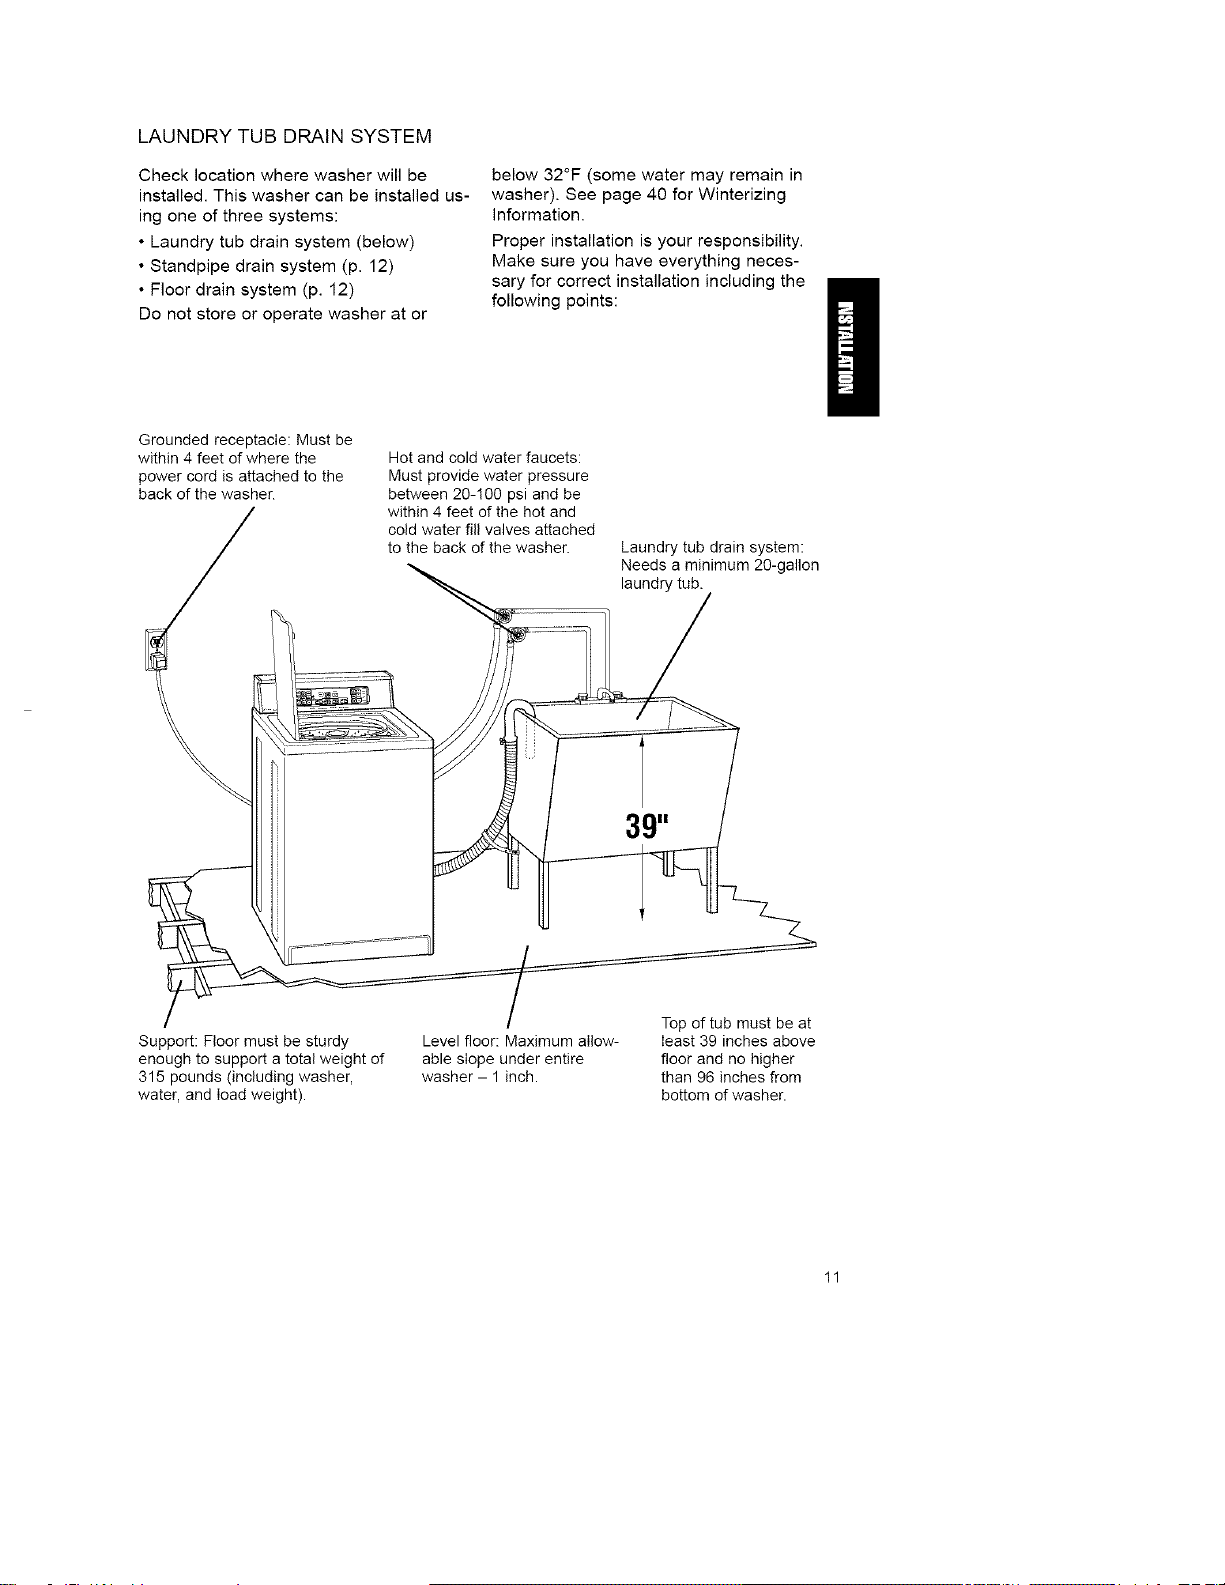
LAUNDRY TUB DRAIN SYSTEM
Check location where washer will be
installed. This washer can be installed us-
ing one of three systems:
• Laundry tub drain system (below)
• Standpipe drain system (p. 12)
• Floor drain system (p. 12)
Do not store or operate washer at or
below 32°F (some water may remain in
washer). See page 40 for Winterizing
information.
Proper installation is your responsibility.
Make sure you have everything neces-
sary for correct installation including the
following points:
Grounded receptacle: Must be
within 4 feet of where the
power cord is attached to the
back of the washer.
Hot and cold water faucets:
Must provide water pressure
between 20-100 psi and be
within 4 feet of the hot and
cold water fill valves attached
to the back of the washer.
Laundry tub drain system:
Needs a minimum 20-gallon
laundry tub.
Support: Floor must be sturdy
enough to support a total weight of
315 pounds (including washer,
water, and load weight).
Level floor: Maximum allow-
able slope under entire
washer - 1 inch.
Top of tub must be at
least 39 inches above
floor and no higher
than 96 inches from
bottom of washer.
11
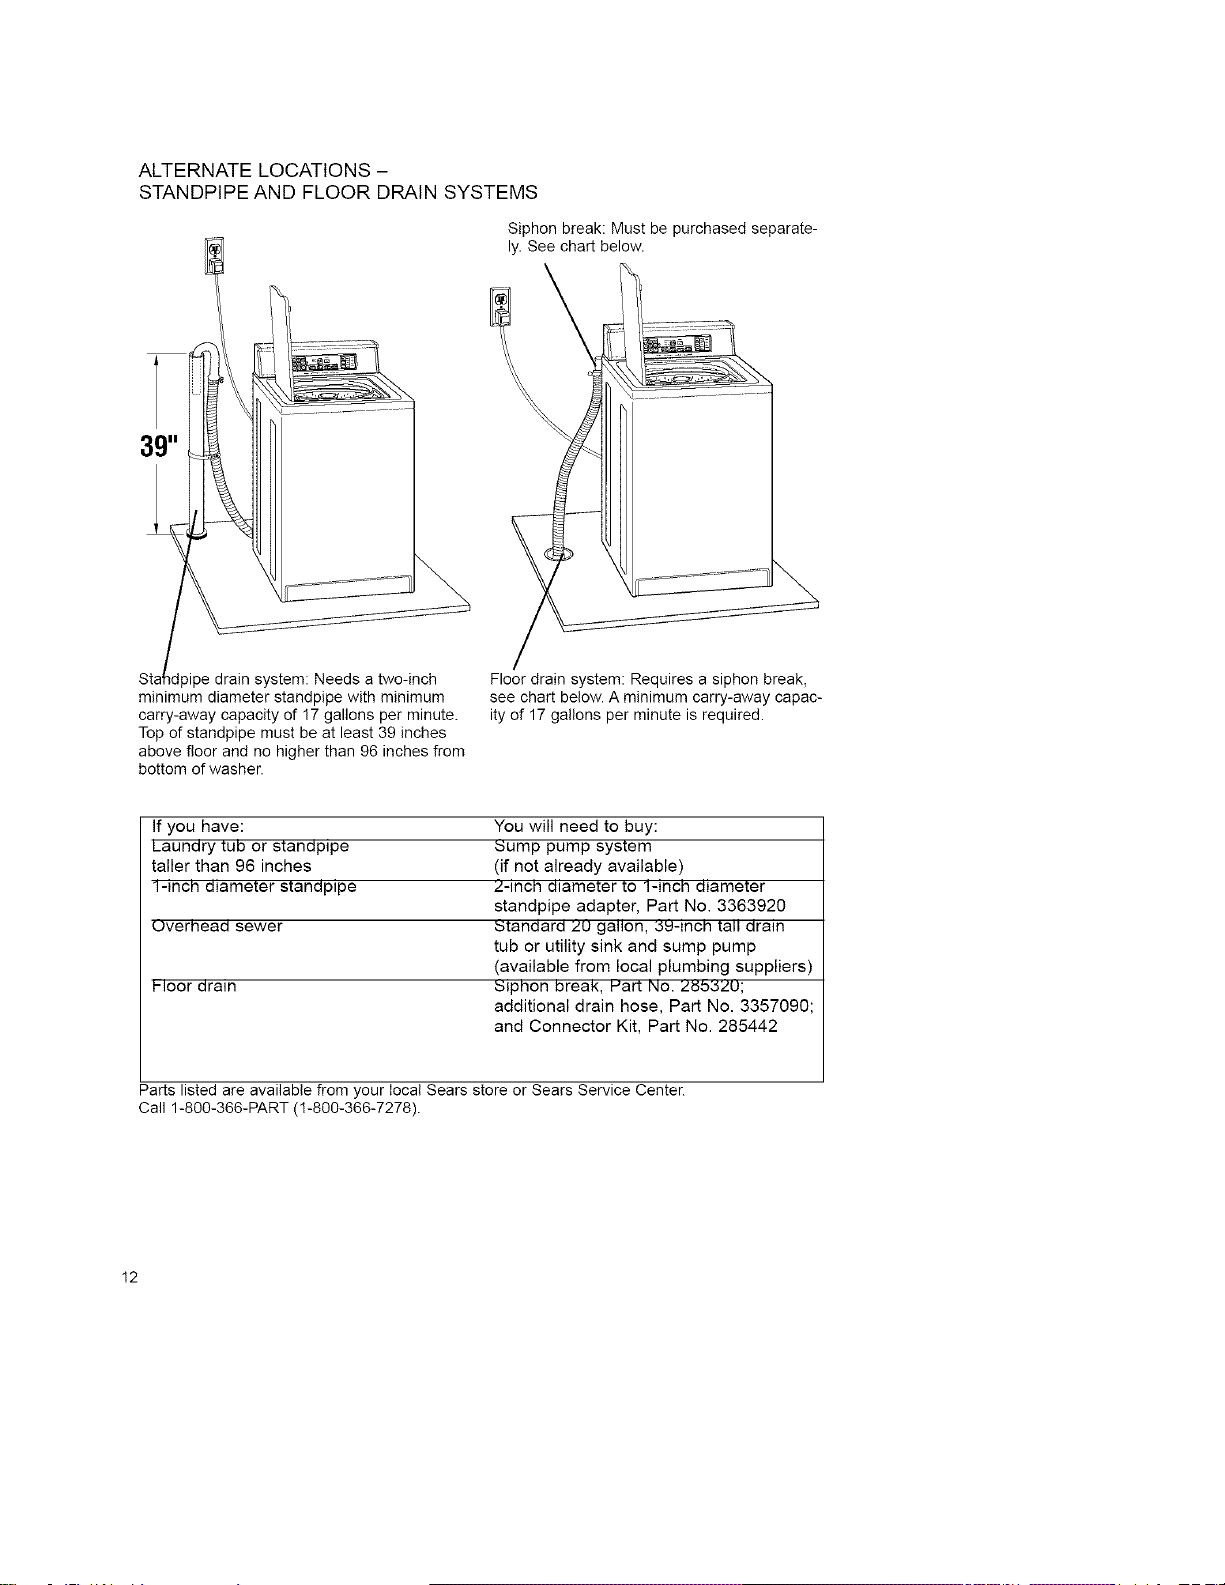
ALTERNATE LOCATIONS -
STANDPIPE AND FLOOR DRAIN SYSTEMS
pipe drain system: Needs a two-inch
minimum diameter standpipe with minimum
carry-away capacity of 17 gallons per minute.
Top of standpipe must be at least 39 inches
above floor and no higher than 96 inches from
bottom of washer.
Siphon break: Must be purchased separate-
ly. See chart below.
Floor drain system: Requires a siphon break,
see chart below. A minimum carry-away capac-
ity of 17 gallons per minute is required.
If you have:
Laundry tub or standpipe
taller than 96 inches
l-inch diameter standpipe
Uverhead sewer
l-loot drain
You will need to buy:
_ump pump system
(if not already available)
z-incrl diameter to 1-1ncrl diameter
standpipe adapter, Part No. 3363920
,'Standard Zu gallon, :5_-Inch tall drain
tub or utility sink and sump pump
(available from local plumbing suppliers)
,'Sipl_on breaK, Hart NO. Z_b_ZU;
additional drain hose, Part No. 3357090;
and Connector Kit, Part No. 285442
Parts listed are available from your local Sears store or Sears Service Center.
Call 1-800-366-PART (1-800-366-7278).
12
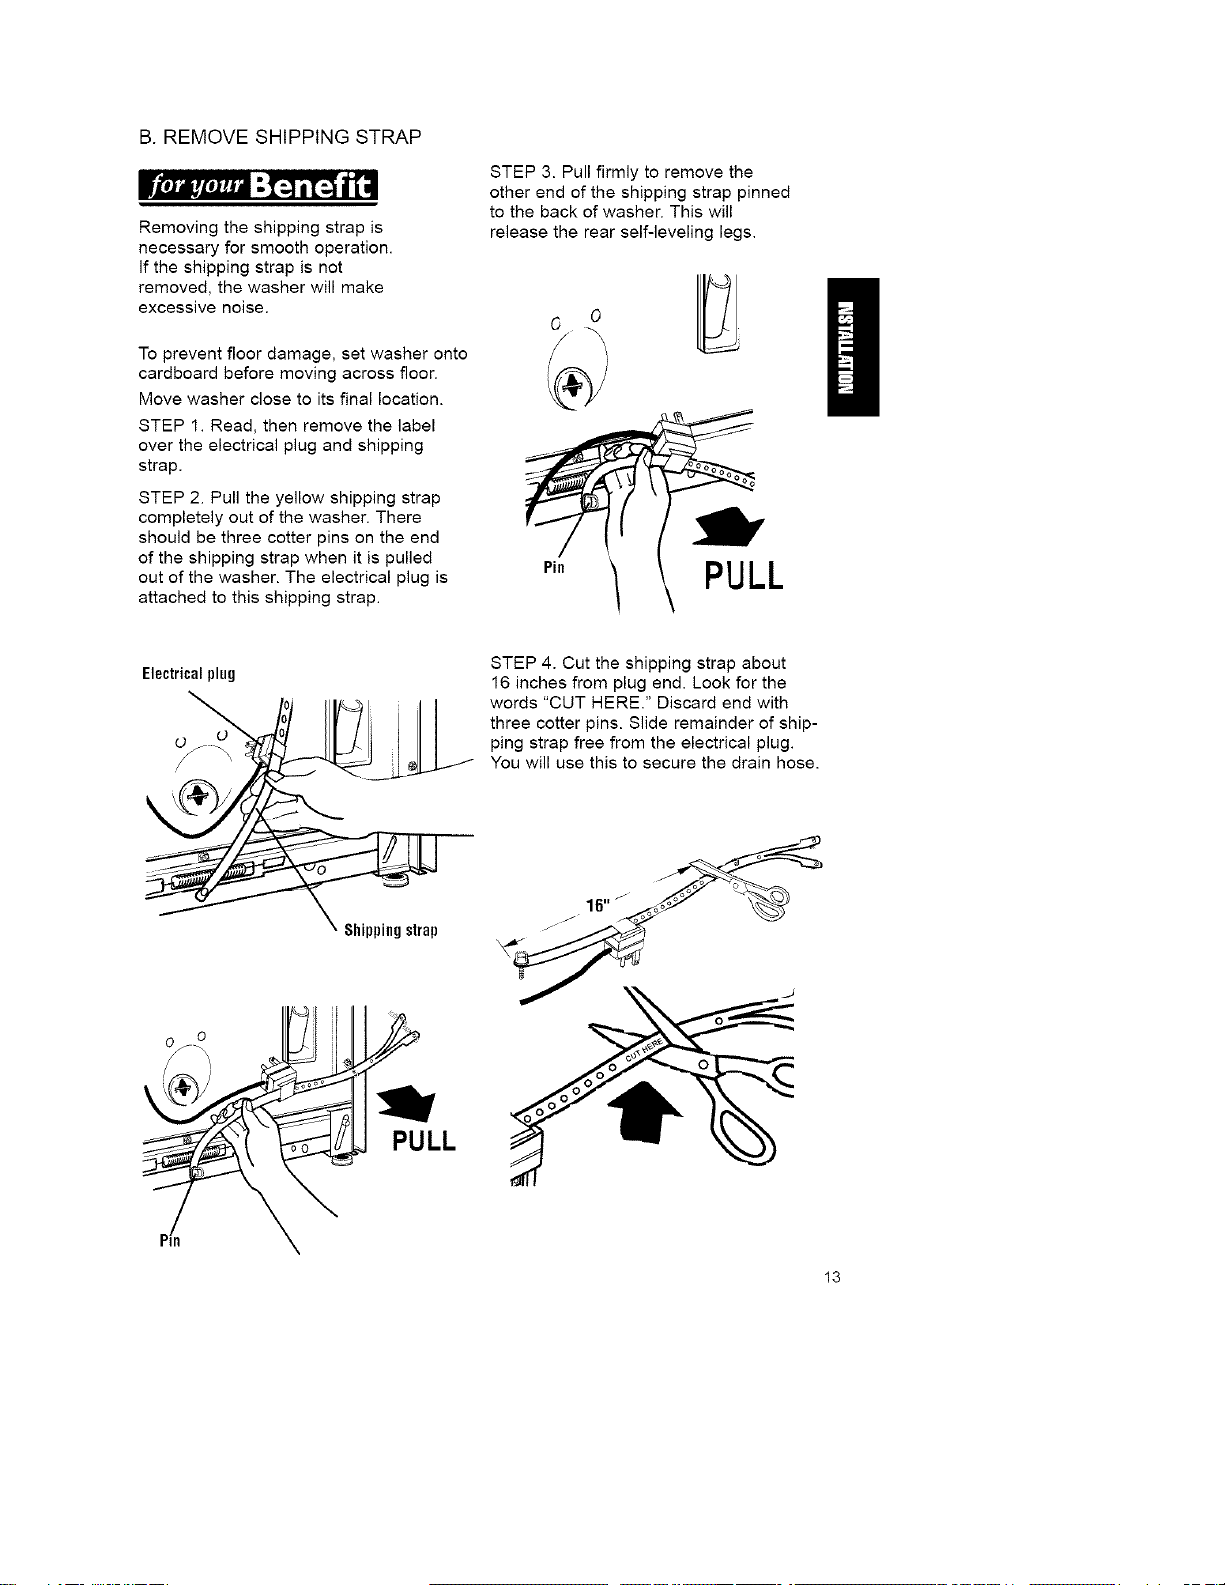
B. REMOVE SHIPPING STRAP
Removing the shipping strap is
necessary for smooth operation.
If the shipping strap is not
removed, the washer will make
excessive noise.
To prevent floor damage, set washer onto
cardboard before moving across floor.
Move washer close to its final location.
STEP 1. Read, then remove the label
over the electrical plug and shipping
strap.
STEP 2. Pull the yellow shipping strap
completely out of the washer. There
should be three cotter pins on the end
of the shipping strap when it is pulled
out of the washer. The electrical plug is
attached to this shipping strap.
STEP 3. Pull firmly to remove the
other end of the shipping strap pinned
to the back of washer. This will
release the rear self-leveling legs.
Pie
PULL
\
g
Electricalplug
\
Shippingstrap
lb
PULL
STEP 4. Cut the shipping strap about
16 inches from plug end. Look for the
words "CUT HERE." Discard end with
three cotter pins. Slide remainder of ship-
ping strap free from the electrical plug.
You will use this to secure the drain hose.
13
3950148A.q 5/31/2000 4:24 PM Page 14
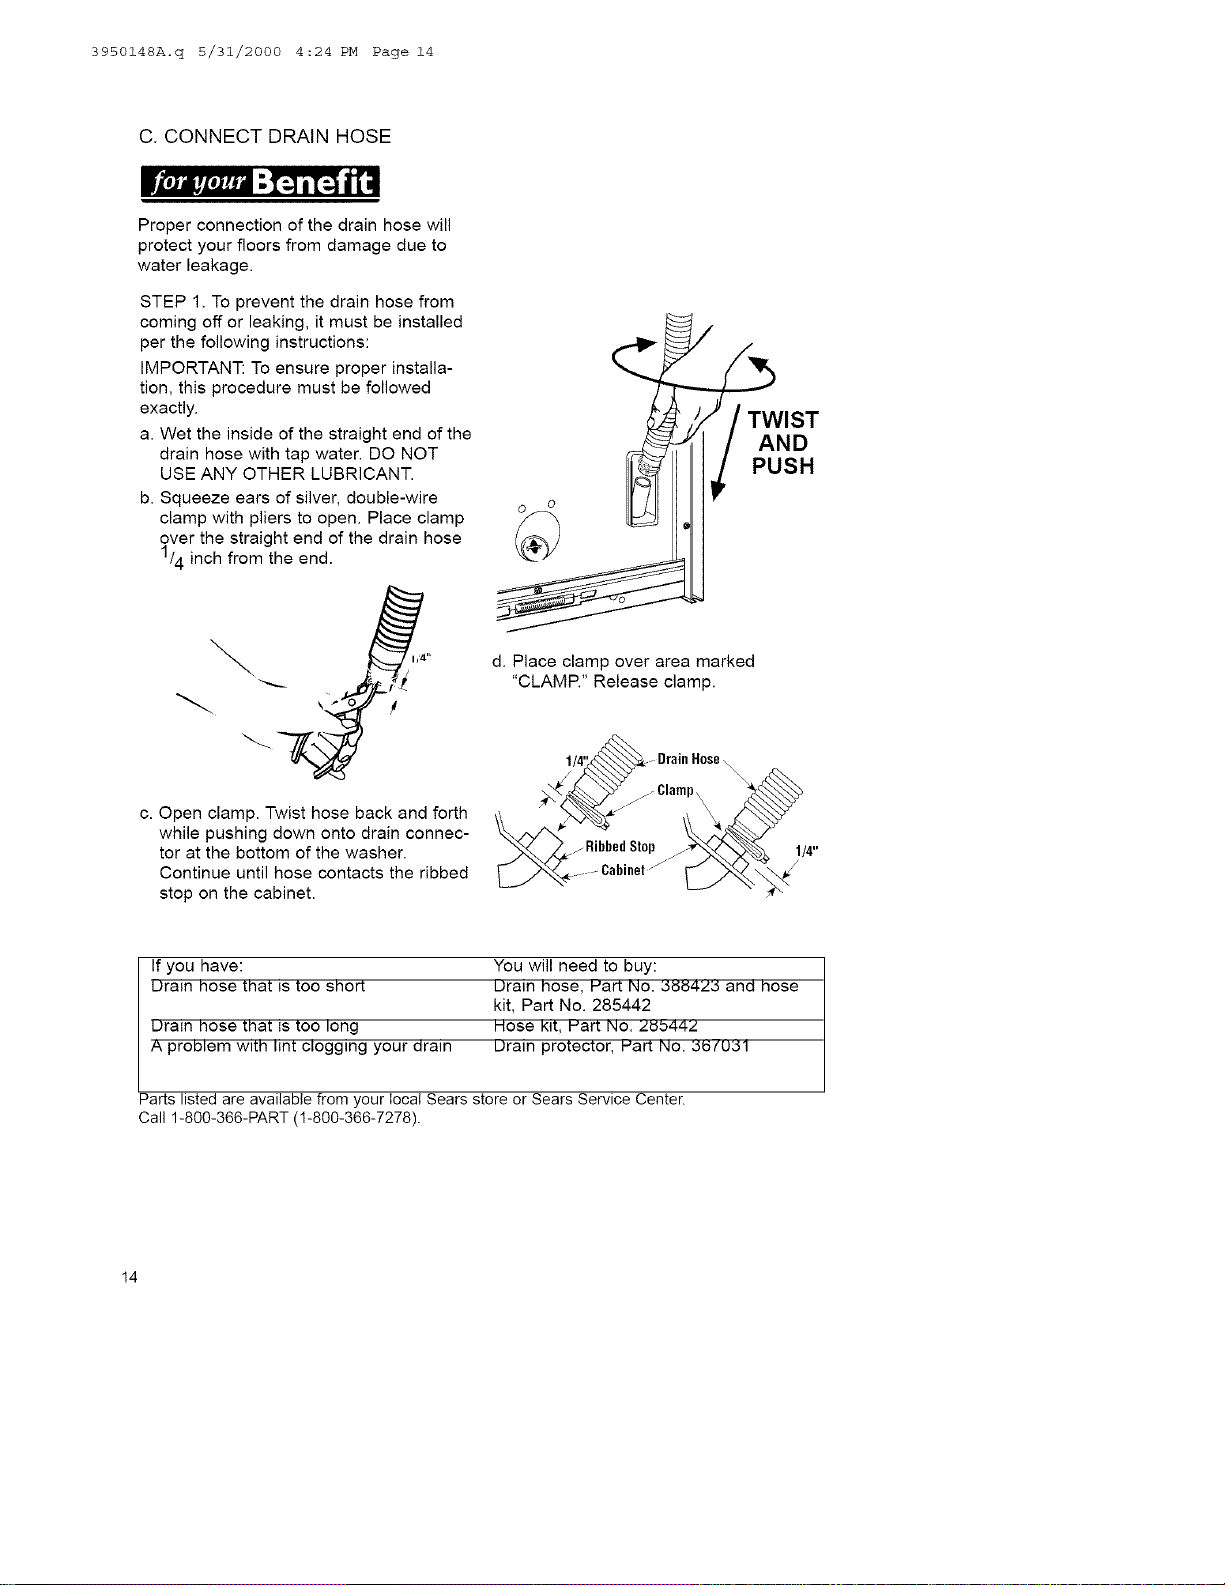
C. CONNECT DRAIN HOSE
Proper connection of the drain hose will
protect your floors from damage due to
water leakage.
STEP 1. To prevent the drain hose from
coming off or leaking, it must be installed
per the following instructions:
IMPORTANT: To ensure proper installa-
tion, this procedure must be followed
exactly.
a. Wet the inside of the straight end of the
drain hose with tap water. DO NOT
USE ANY OTHER LUBRICANT.
b. Squeeze ears of silver, double-wire
clamp with pliers to open. Place clamp
over the straight end of the drain hose
1/4 inch from the end.
c. Open clamp. Twist hose back and forth
while pushing down onto drain connec-
tor at the bottom of the washer.
Continue until hose contacts the ribbed
stop on the cabinet.
<
d. Place clamp over area marked
"CLAMR" Release clamp.
Hose
/Ribbed Stop
1/4"
If you have:
uraln I_ose tl_at is too sl_ort
uraln nose tl_at is too long
A problem w_tn lint clogging your dra{n
You will need to buy:
Uraln nose, Hart NO. 5_4Z5 and nose
kit, Part No. 285442
Hose Kit, Hart NO. Z_b44Z
Uram protector, Hart NO. :_5[U:_1
Parts listed are available from your local Sears store or Sears Service Center.
Call 1-800-366-PART (1-800-366-7278).
14
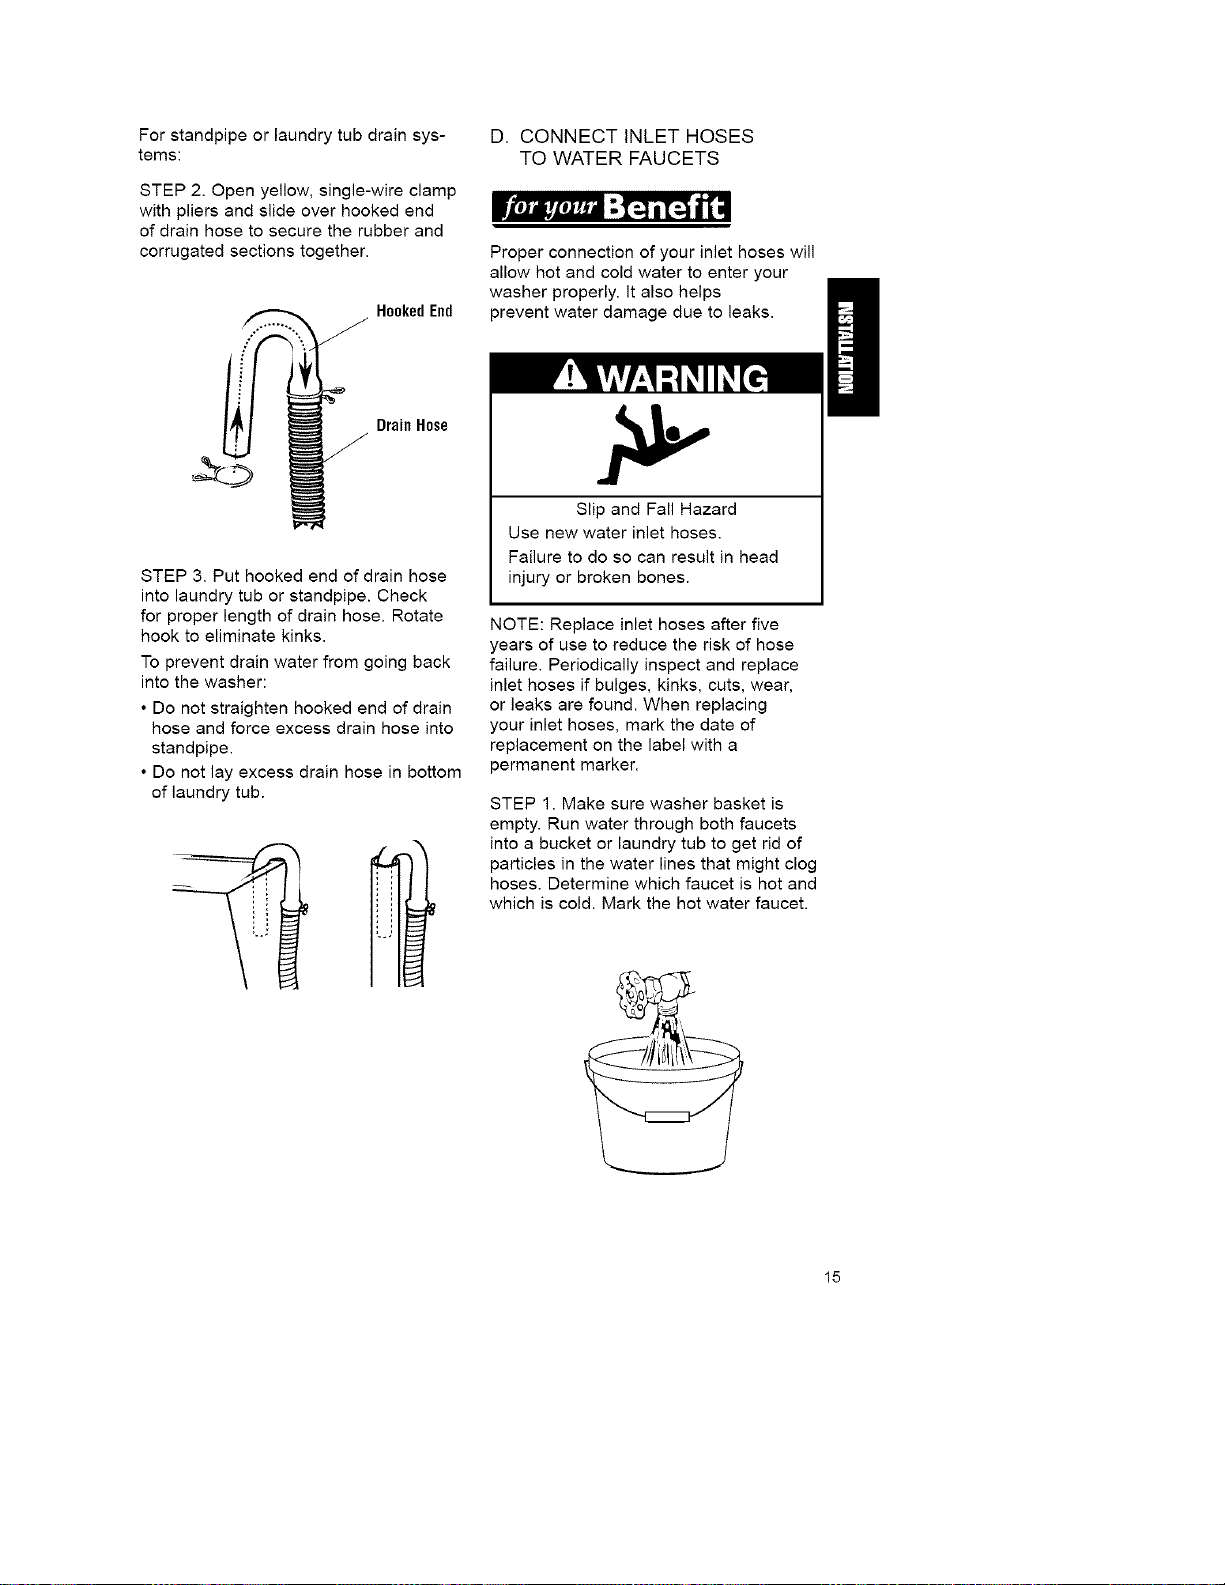
Forstandpipeorlaundrytubdrainsys-
tems:
STEP2.Openyellow,single-wireclamp
withpliersandslideoverhookedend
ofdrainhosetosecuretherubberand
corrugatedsectionstogether.
HookedEnd
D. CONNECT INLET HOSES
TO WATER FAUCETS
Proper connection of your inlet hoses will
allow hot and cold water to enter your
washer properly. It also helps
prevent water damage due to leaks.
Drain Hose
STEP 3. Put hooked end of drain hose
into laundry tub or standpipe. Check
for proper length of drain hose. Rotate
hook to eliminate kinks.
To prevent drain water from going back
into the washer:
• Do not straighten hooked end of drain
hose and force excess drain hose into
standpipe.
• Do not lay excess drain hose in bottom
of laundry tub.
Slip and Fall Hazard
Use new water inlet hoses.
Failure to do so can result in head
injury or broken bones.
NOTE: Replace inlet hoses after five
years of use to reduce the risk of hose
failure. Periodically inspect and replace
inlet hoses if bulges, kinks, cuts, wear,
or leaks are found. When replacing
your inlet hoses, mark the date of
replacement on the label with a
permanent marker.
STEP 1. Make sure washer basket is
empty. Run water through both faucets
into a bucket or laundry tub to get rid of
particles in the water lines that might clog
hoses. Determine which faucet is hot and
which is cold. Mark the hot water faucet.
15
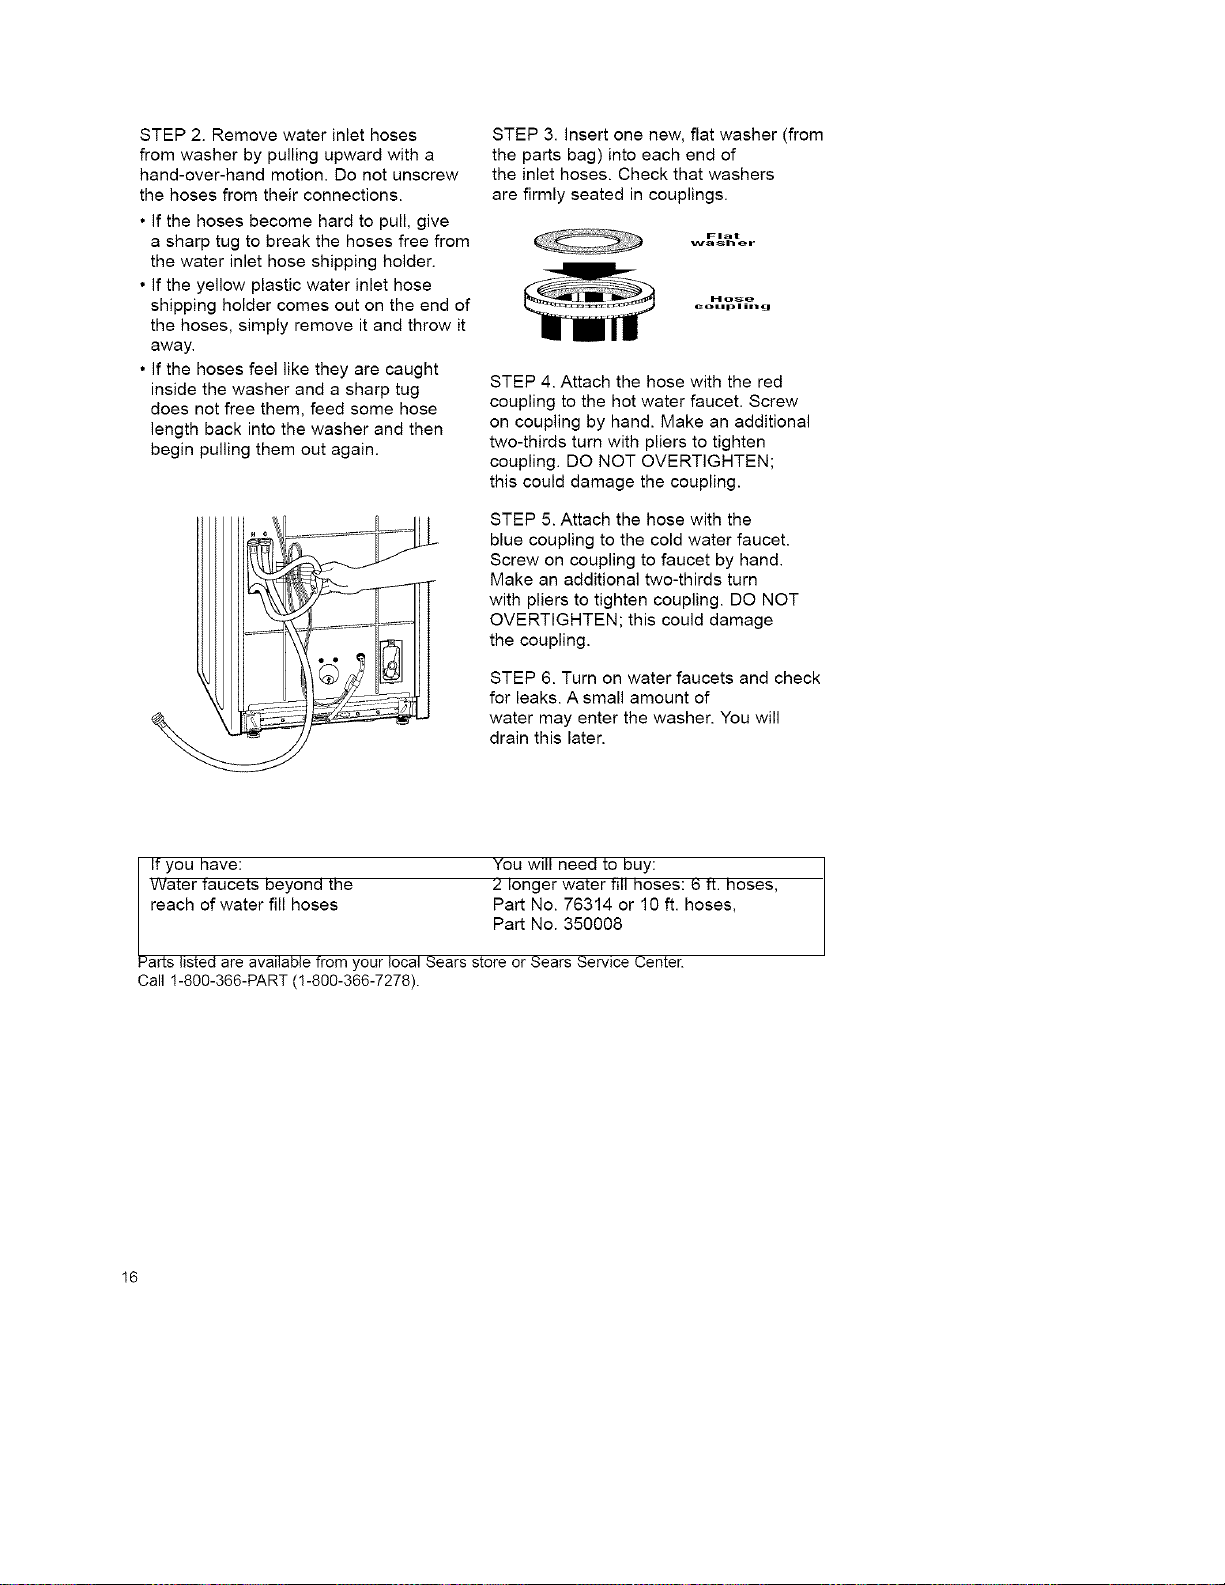
STEP2.Removewaterinlethoses
fromwasherbypullingupwardwitha
hand-over-handmotion.Donotunscrew
thehosesfromtheirconnections.
• Ifthehosesbecomehardtopull,give
asharptugtobreakthehosesfreefrom
thewaterinlethoseshippingholder.
• Iftheyellowplasticwaterinlethose
shippingholdercomesoutontheendof
thehoses,simplyremoveitandthrowit
away.
• Ifthehosesfeelliketheyarecaught
insidethewasherandasharptug
doesnotfreethem,feedsomehose
lengthbackintothewasherandthen
beginpullingthemoutagain.
STEP3.Insertonenew,flatwasher(from
thepartsbag)intoeachendof
theinlethoses.Checkthatwashers
arefirmlyseatedincouplings.
Fm_t
w_hor
Ho_o
colmpmhlU
STEP 4. Attach the hose with the red
coupling to the hot water faucet. Screw
on coupling by hand. Make an additional
two-thirds turn with pliers to tighten
coupling. DO NOT OVERTIGHTEN;
this could damage the coupling.
STEP 5. Attach the hose with the
blue coupling to the cold water faucet.
Screw on coupling to faucet by hand.
Make an additional two-thirds turn
with pliers to tighten coupling. DO NOT
OVERTIGHTEN; this could damage
the coupling.
STEP 6. Turn on water faucets and check
for leaks. A small amount of
water may enter the washer. You will
drain this later.
If you have: You will need to buy:
iwater taucets beyond the z longer water till noses: _ tt. noses,
reach of water fill hoses Part No. 76314 or 10 ft. hoses,
Part No. 350008
Parts listed are available from your local Sears store or Sears Service Center.
Call !-800-366-PART (1-800-366-7278).
16
E. SECURE DRAIN HOSE
Securing the drain hose properly will pro-
tect your floors from damage due to water
leakage.
STEP 1. Move washer to its final
location.
-4
I
/
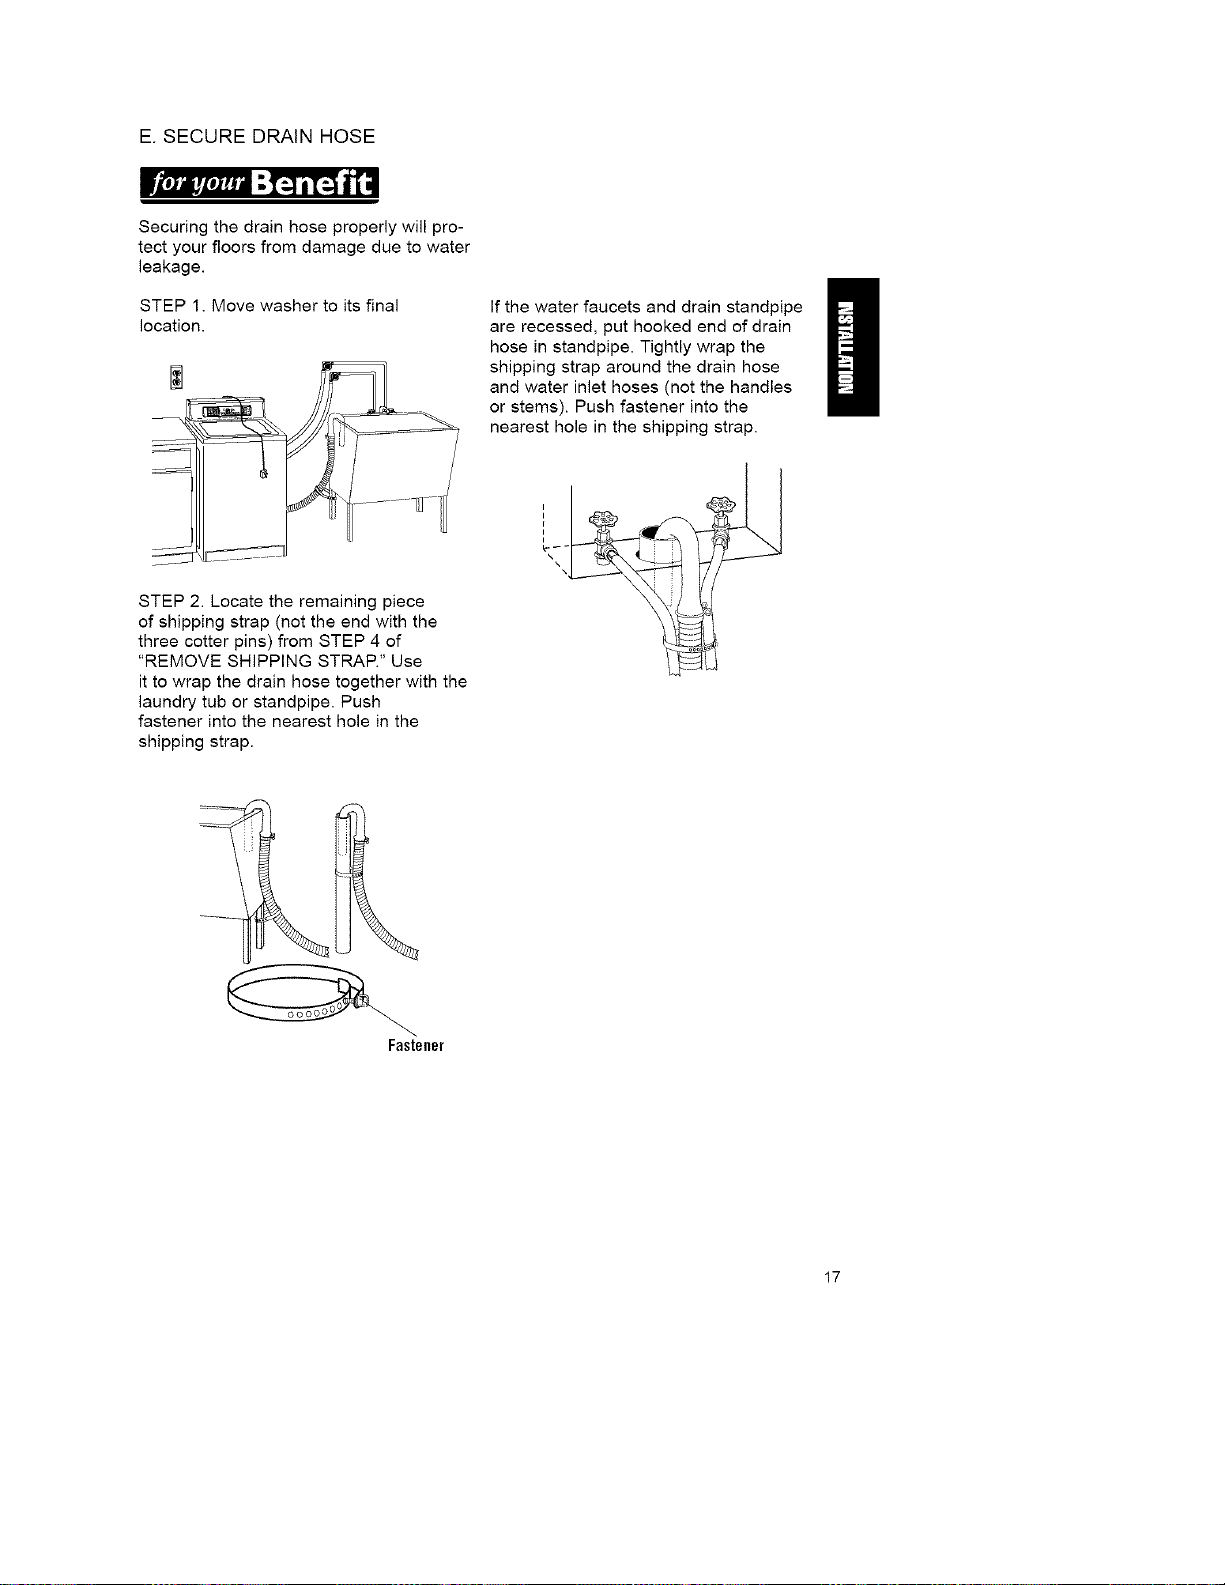
STEP 2. Locate the remaining piece
of shipping strap (not the end with the
three cotter pins) from STEP 4 of
"REMOVE SHIPPING STRAR" Use
it to wrap the drain hose together with the
laundry tub or standpipe. Push
fastener into the nearest hole in the
shipping strap.
/
If the water faucets and drain standpipe
are recessed, put hooked end of drain
/
hose in standpipe. Tightly wrap the
shipping strap around the drain hose
and water inlet hoses (not the handles
or stems). Push fastener into the
nearest hole in the shipping strap.
_,--F _ 4.
Fastener
17
R LEVEL WASHER
Leveling your washer properly prevents
excessive noise and vibration.
To install front legs:
STEP 1. Prop front of washer up (about 4
inches). Use a wood block or another
object that will support the weight of the
washer. If washer was placed against
a wall, move the washer out slightly
before tipping it up.
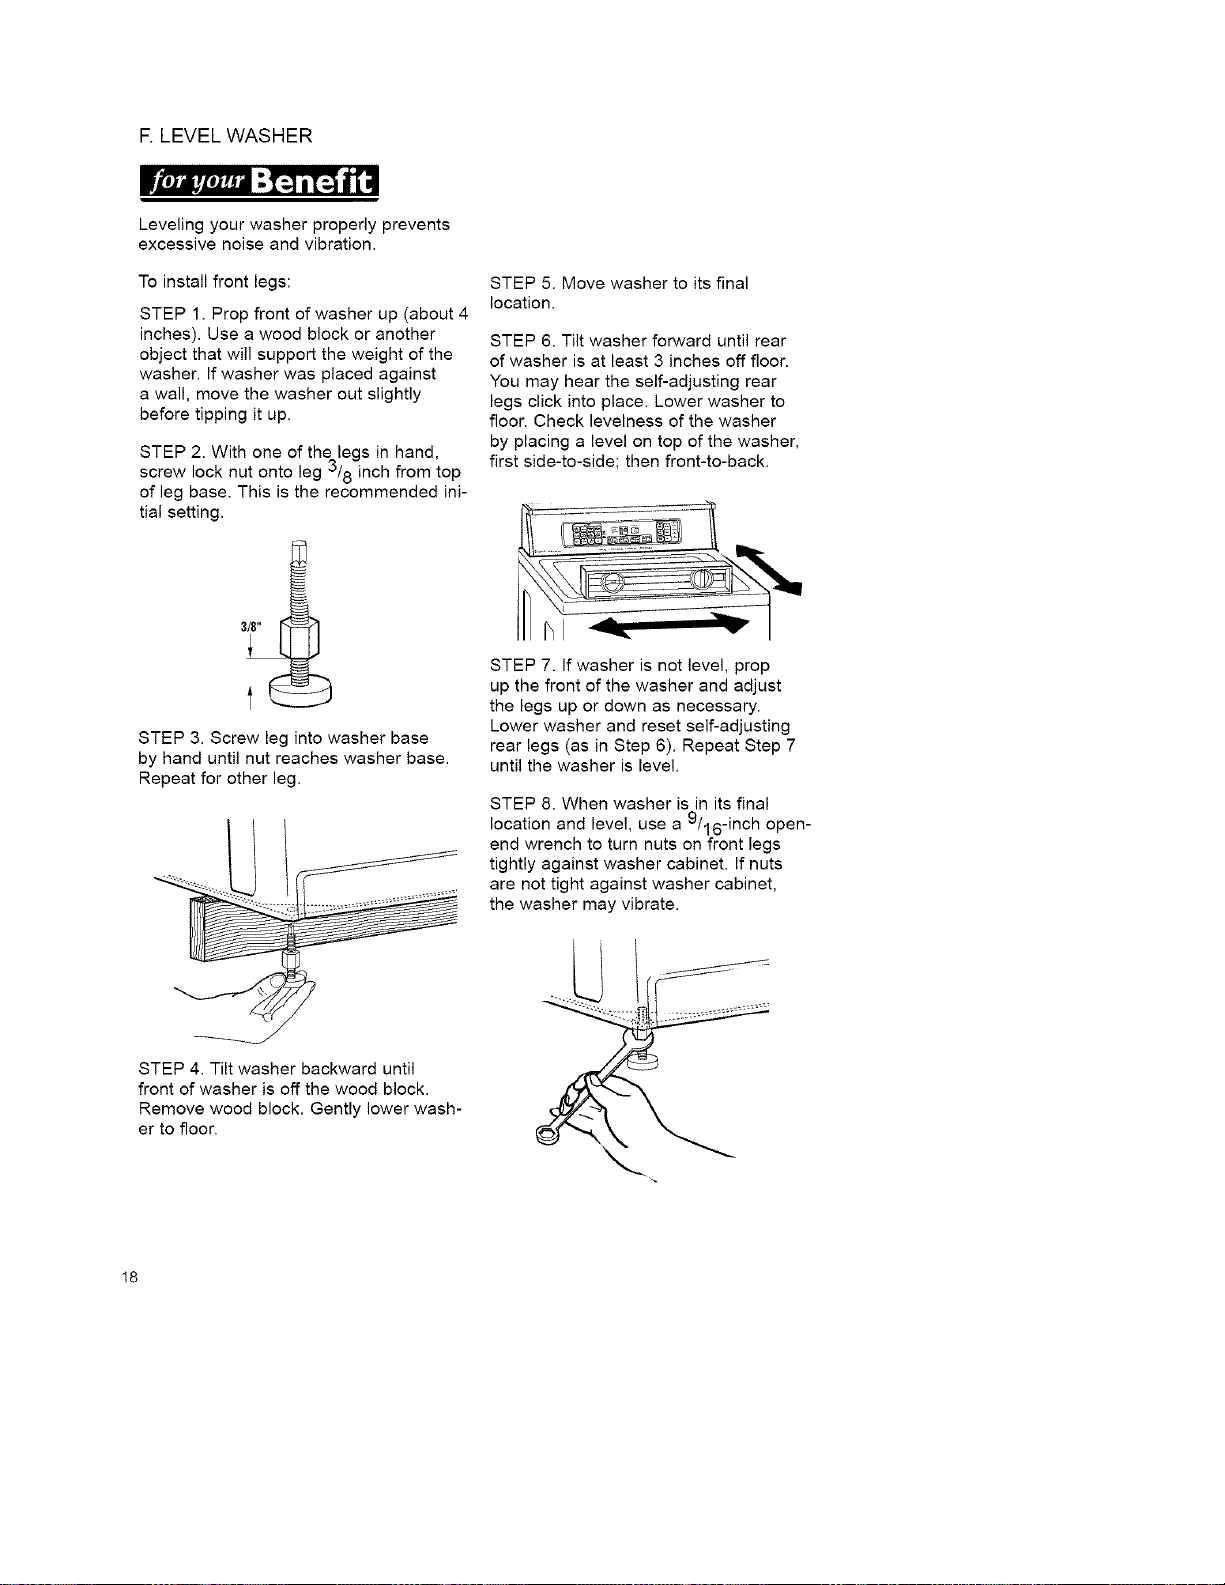
STEP 2. With one of the legs in hand,
screw lock nut onto leg 3/8 inch from top
of leg base. This is the recommended ini-
tial setting.
STEP 3. Screw leg into washer base
by hand until nut reaches washer base.
Repeat for other leg.
STEP 5. Move washer to its final
location.
STEP 6. Tilt washer forward until rear
of washer is at least 3 inches off floor.
You may hear the self-adjusting rear
legs click into place. Lower washer to
floor. Check levelness of the washer
by placing a level on top of the washer,
first side-to-side; then front-to-back.
STEP 7. If washer is not level, prop
up the front of the washer and adjust
the legs up or down as necessary.
Lower washer and reset self-adjusting
rear legs (as in Step 6). Repeat Step 7
until the washer is level.
STEP 8. When washer is in its final
location and level, use a 9/16-inch open-
end wrench to turn nuts on front legs
tightly against washer cabinet. If nuts
are not tight against washer cabinet,
the washer may vibrate.
STEP 4. Tilt washer backward until
front of washer is off the wood block.
Remove wood block. Gently lower wash-
er to floor.
18
REVIEW INSTALLATION
I llJii_IIj_lil ;[_ i[_,,] _Ld
Take a few minutes to complete
this checklist. It will help assure you that
you have a proper installation
and increase your satisfaction with your
Kenmore washer.
[] Check electrical requirements.
Be sure you have correct electrical
supply and recommended grounding
method.
[] Check that you have:
• All the tools you started with.
• Removed all packaging materials.
• Removed shipping strap with
three cotter pins.
• Installed all parts listed on
pages 6-8.
[] Check that:
• The washer is level.
• The nuts on the front legs are tight.
[] Check that the water faucets are
turned on.
g
FINAL STEPS
[] Plug power supply cord into
grounded outlet.
[] Remove the blue protective film on the
console and any tape remaining on
washer.
[] Take a few minutes and read the
Operating instructions (pages 20-36)
to fully understand your new washer.
Then, start the washer and allow it to
complete the HEAVY DUTY Cycle.
19
Togetthemaximumcleaningand
fabriccarefromyourwasher,pleaseread
andfollowtheseinstructions.
ExplosionHazard
Neverplaceitemsinthewasherthat
aredampenedwithgasolineorother
flammablefluids.
Nowashercancompletely
removeoil.
Donotdryanythingthathaseverhad
anytypeofoilonit(includingcooking
oils).
Failuretofollowtheseinstructions
canresultindeath,explosion,
orfire.
STARTING YOUR WASHER
STEP 1. Place a load of sorted clothes
in the washer. Add measured detergent
directly into dispenser (see pages 33-34).
STEP 2. (OPTIONAL STEP) If desired,
add measured liquid chlorine bleach to
the liquid bleach dispenser (see pages 34-35).
STEP 3. (OPTIONAL STEP) If desired,
add measured liquid fabric softener to
the fabric softener dispenser (see page 35).
STEP 4. Close washer lid.
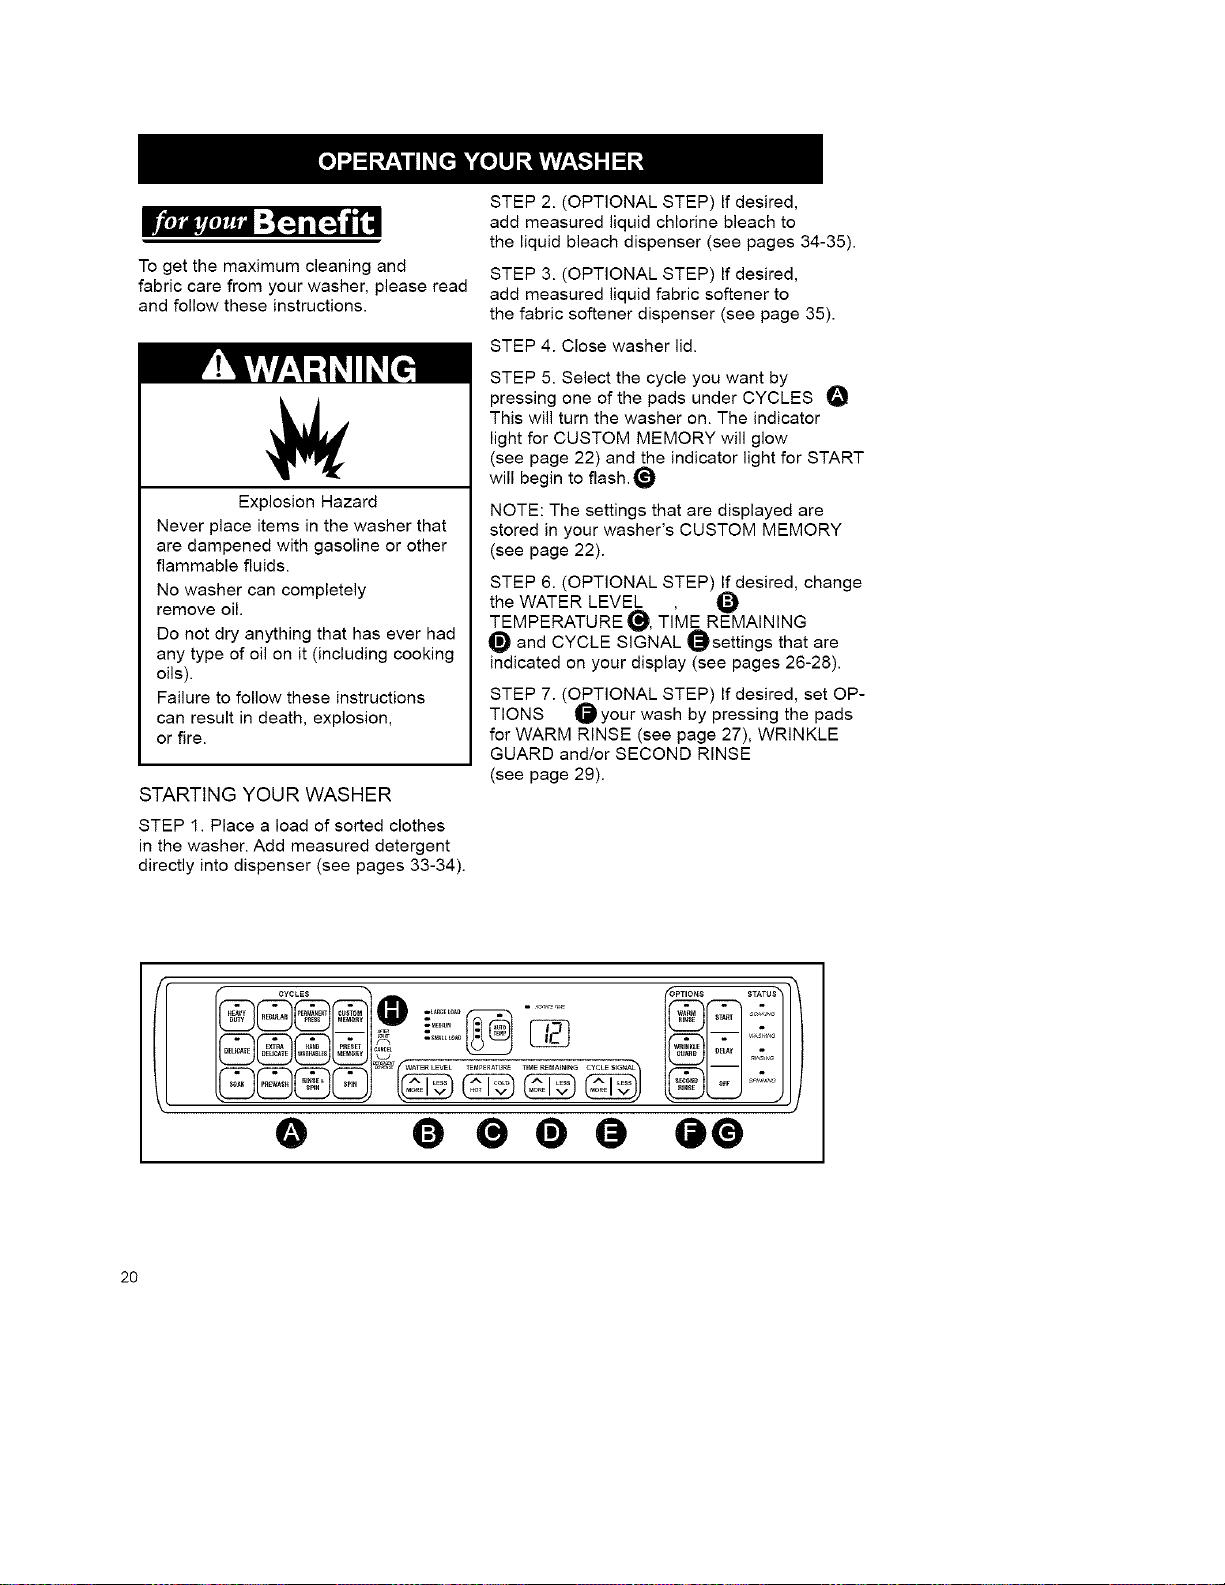
STEP 5. Select the cycle you want by
pressing one of the pads under CYCLES O
This will turn the washer on. The indicator
light for CUSTOM MEMORY will glow
(see page 22) and the indicator light for START
will begin to flash._
NOTE: The settings that are displayed are
stored in your washer's CUSTOM MEMORY
(see page 22).
STEP 6. (OPTIONAL STEP) If desired, change
the WATER LEVEL
TEMPERATURE _, TIME REMAINING
and CYCLE SIGNAL _settings that are
indicatedon your display(see pages 26-28).
STEP 7. (OPTIONAL STEP) If desired, set OP-
TIONS O your wash by pressing the pads
for WARM RINSE (see page 27), WRINKLE
GUARD and/or SECOND RINSE
(see page 29).
0 0®®0 00
2O
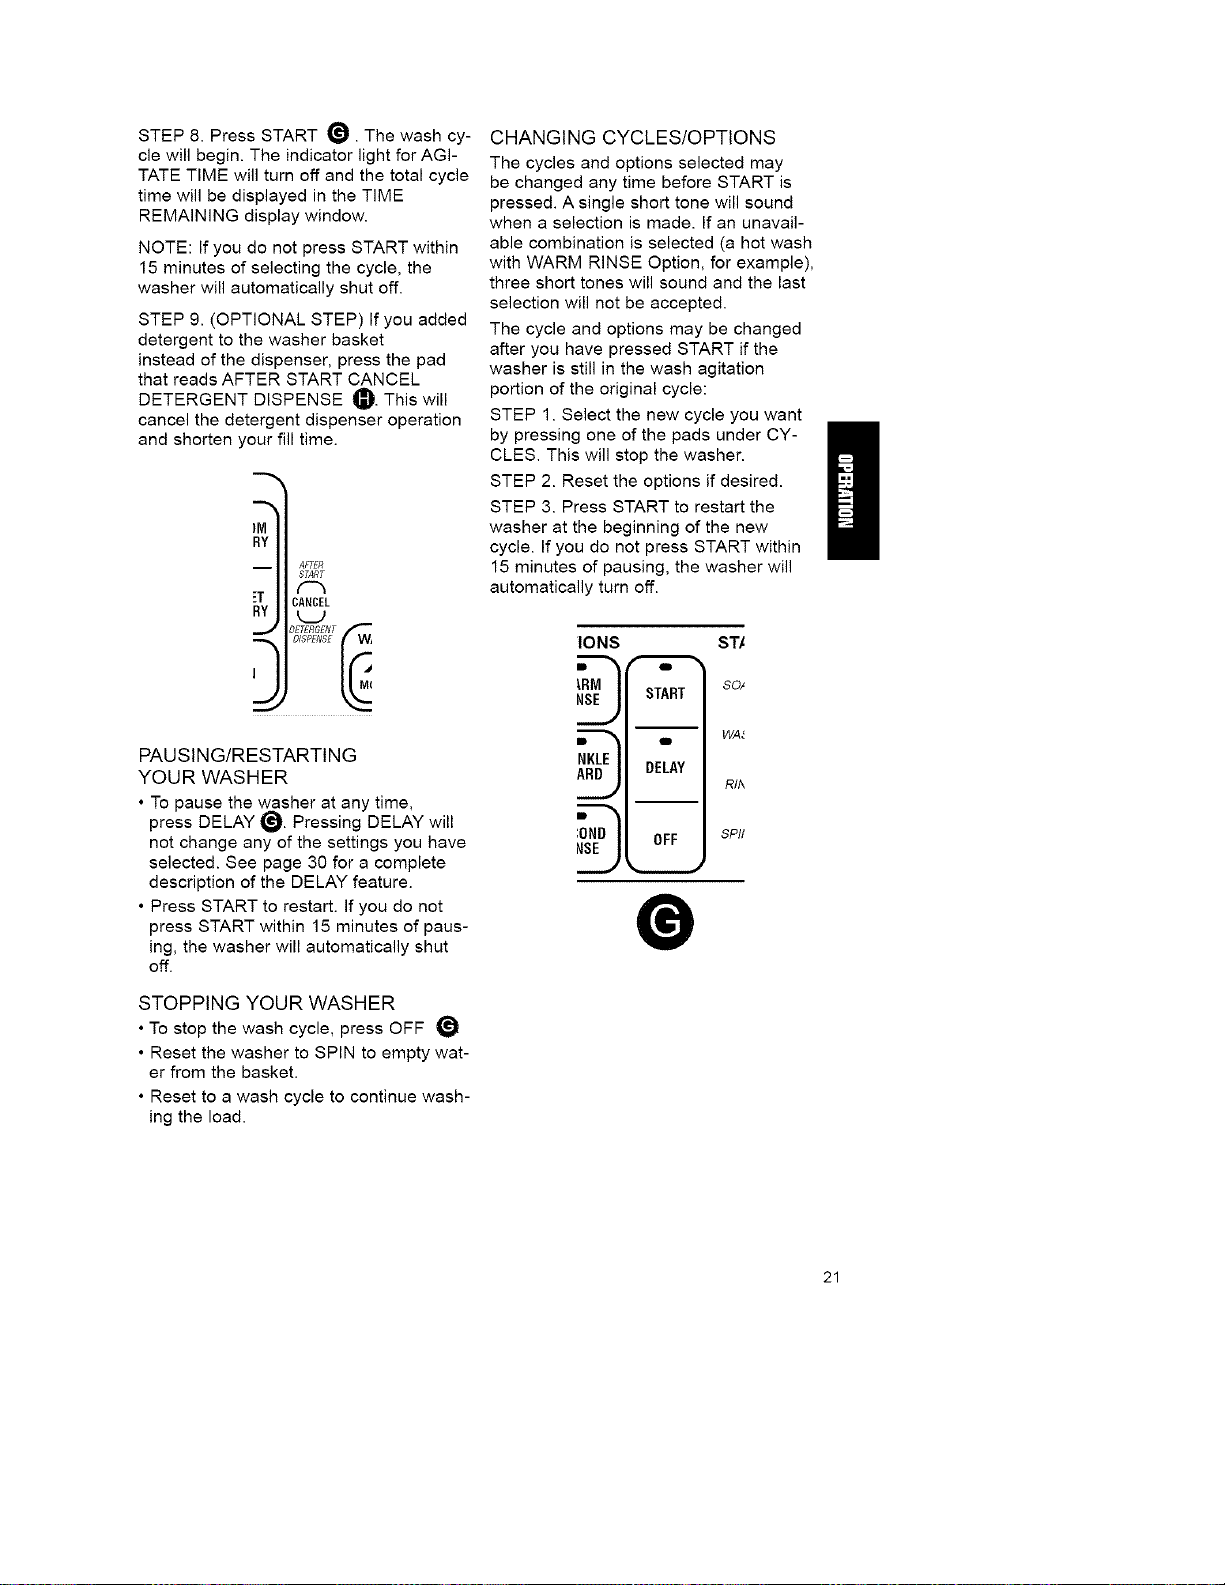
STEP 8. Press START _. The wash cy-
cle will begin. The indicator light for AGI-
TATE TIME will turn off and the total cycle
time will be displayed in the TIME
REMAINING display window.
NOTE: If you do not press START within
15 minutes of selecting the cycle, the
washer will automatically shut off.
STEP 9. (OPTIONAL STEP) If you added
detergent to the washer basket
instead of the dispenser, press the pad
that reads AFTER START CANCEL
DETERGENT DISPENSE O. This will
cancel the detergent dispenser operation
and shorten your fill time.
-m
JM
RY
i A_FR
START
("-h
ET CANCEL
RY
_ETESGENT _DISPENSE
PAUSING/RESTARTING
YOUR WASHER
• To pause the washer at any time,
press DELAY _. Pressing DELAY will
not change any of the settings you have
selected. See page 30 for a complete
description of the DELAY feature.
• Press START to restart. If you do not
press START within 15 minutes of paus-
ing, the washer will automatically shut
off.
STOPPING YOUR WASHER
• To stop the wash cycle, press OFF _1
• Reset the washer to SPIN to empty wat-
er from the basket.
• Reset to a wash cycle to continue wash-
ing the load.
CHANGING CYCLES/OPTIONS
The cycles and options selected may
be changed any time before START is
pressed. A single short tone will sound
when a selection is made. If an unavail-
able combination is selected (a hot wash
with WARM RINSE Option, for example),
three short tones will sound and the last
selection will not be accepted.
The cycle and options may be changed
after you have pressed START if the
washer is still in the wash agitation
portion of the original cycle:
STEP 1. Select the new cycle you want
by pressing one of the pads under CY-
CLES. This will stop the washer.
STEP 2. Reset the options if desired.
STEP 3. Press START to restart the
washer at the beginning of the new
cycle. If you do not press START within
15 minutes of pausing, the washer will
automatically turn off.
IONS ST/
START so/
I
DELAY
RtlX
I
OFF SPIt
®
21
Thispagedescribesthetwowaysyou
canoperateyourwasher.Onewayisto
usethePRESETMEMORY.Thiswill
providetherecommendedfabriccare
settingsforeachcycle.Thesesettings
havebeenpresetatthefactoryand
cannotbechanged.
Thesecondwaytooperateyourwasher
istousetheCUSTOMMEMORY.Using
CUSTOMMEMORYletsyouchange
andstorethewashersettingsthatyou
usemostfrequentlyforeachcycle.
PRESETMEMORY
TousethePRESETMEMORY
settings:
STEP1.Selectthecycleyouwantby
pressingoneofthepadsunderCYCLES.
STEP2.PressPRESETMEMORY.The
indicatorlightforPRESETMEMORYlight
willglowandtherecommended
settings(chartbelow)willbedisplayed.
NOTE:OnceyouselectPRESETMEM-
ORY,anychangesmadeto
therecommendedsettingswillnot
beremembered.
STEP3.PressSTART.Thewashcycle
willbegin.
CUSTOMMEMORY
Eachtimeyouselectacycle,the
indicatorlightforCUSTOMMEMORY
willglowandtheconsolewilldisplayall
oftheadjustmentsthatweremadeto
theCYCLESandOPTIONSsettings
thelasttimethatcyclewasstarted.
•Tousethesesettings,press
START.Thewashcyclewillbegin.
•Tochangeanysetting,ortoadd
options,presstheappropriatepad
andpressSTART.Thewasherwilluse
thenewsettingsinCUSTOMMEMORY
thenexttimeyouusethatcycle.
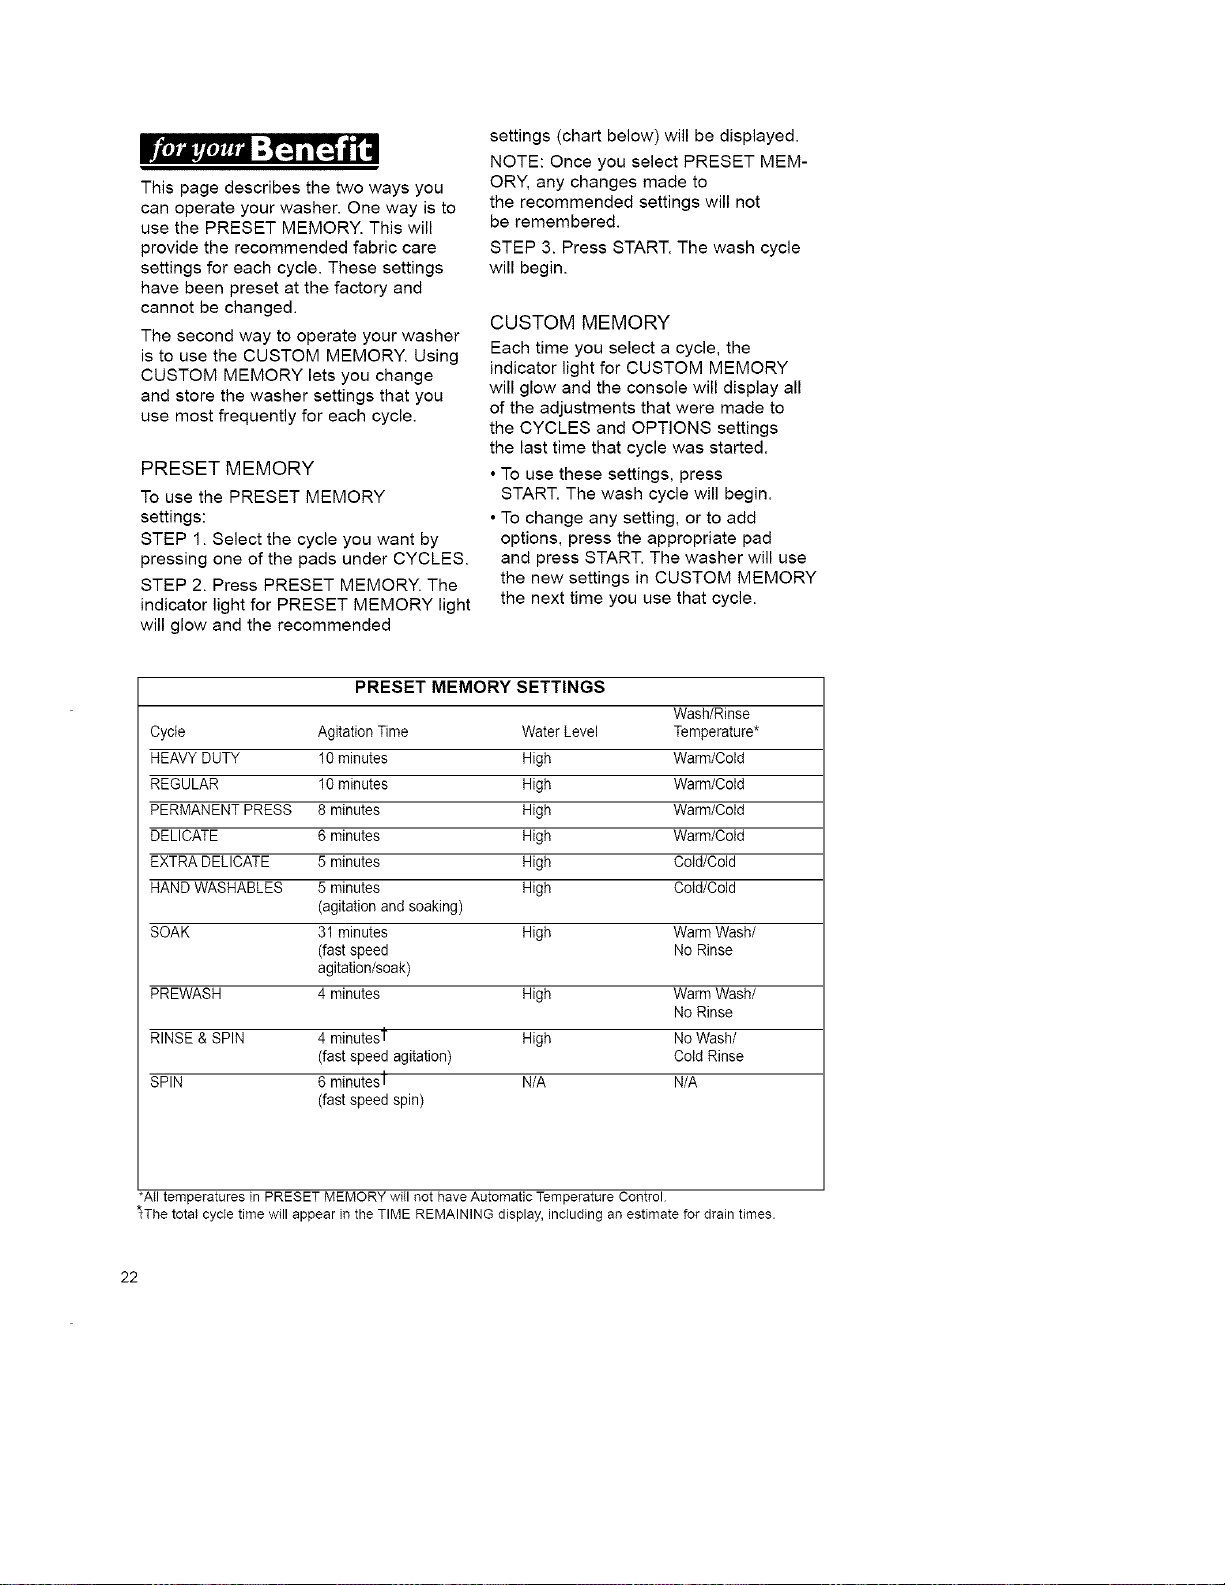
PRESET MEMORY SETTINGS
Wash/Rinse
Cycle Agitation Time Water Level Temperature*
HEAVYDUTY 10 minutes High Warm/Cold
REGULAR 10 minutes High Warm/Cold
PERMANENT PRESS 8 minutes High Warm/Cold
DELICATE 6 minutes High Warm/Cold
EXTRA DELICATE 5 minutes High Cold/Cold
HAND WASHABLES 5 minutes High Cold/Cold
(agitation and soaking)
SOAK 31 minutes High Warm Wash/
(fastspeed No Rinse
agitation/soak)
PREWASH 4 minutes High Warm Wash/
No Rinse
RINSE & SPIN 4 minutest High No Wash/
(fastspeed agitation) Cold Rinse
SPIN 6 minutesI N/A N/A
(fastspeed spin)
*Atl temperatures in PRESET MEMORY wiII not have Automatic Temperature Control
_The total cycle time will appear in the TIME REMAINING display, including an estimate for drain times.
22
CHOOSING YOUR CYCLES
(Cycle Selection Pads)
Use this control to choose the right
wash cycle for the type of fabrics you are
washing.
For improved fabric care at water
levels below MEDIUM, the wash
action will automatically change.
This change will happen in every cycle
except HEAVY DUTY and
EXTRA DELICATE.
• For most loads, use the time recom-
mended in the PRESET MEMORY.
• For heavy soil and sturdy fabrics,
use the full time.
• For light soil and delicate fabrics,
use less time.
HEAVY DUTY
Use this cycle to get between 6 and 14
minutes of wash time for loads of sturdy,
colorfast fabrics such as work clothes and
diapers. Cycle combines fast speed agita-
tion and fast spin speeds.
REGULAR
Use this cycle to get between 6 and 14
minutes of wash time for normally soiled
cottons and linens. Cycle combines slow
speed agitation and fast spin speeds.
PERMANENT PRESS
The PERMANENT PRESS Cycle
includes a load cooling process
that reduces wrinkling compared
to other cycles.
You can select 6 to 10 minutes of wash time
for use with no-iron fabrics, sport shirts,
blouses and cotton slacks. The first 2
minutes of the wash cycle have fast speed
agitation followed by the remainder at slow
speed. Next, the washer will drain and
pause for no more than two minutes while
some of the wash water is drained and
replaced with rinse water. For maximum ben-
efit in reducing wrinkles, do not use the
WARM RINSE Option.
The cycle is completed with a deep rinse at
fast speed agitation with "stepped" spin
speeds (spins start at an extra-slow speed
and gradually move to slow speed before fin-
ishing at a fast speed to reduce wrinkling).
DELICATE
Use this cycle to get between 4 and
8 minutes of slow speed agitation for deli-
cate fabrics and bulky knits that wrinkle
easily. The agitation is followed by a deep
rinse and a slow spin speed.
EXTRA DELICATE
Use this cycle to get 4 to 6 minutes
of extra-slow speed agitation for sheer
fabrics and lingerie. The agitation is
followed by a deep rinse and a slow
spin speed.
HAND WASHABLES
Use this cycle to get 4 to 6 minutes
of wash time for hand washable and
special-care items. Garments are
labeled "Hand Wash" because:
• The fiber or construction may be
sensitive to agitation.
• The fabric contains sensitive dyes
that may bleed.
The wash action mirrors the way you
would treat hand washable garments in a
sink. It does this by repeating periods of
extra-slow speed agitation (10 seconds)
and soaking (20 seconds). Slow spin
speeds help reduce wrinkling. Do not use
HAND WASHABLES for large
items like blankets. To protect fabrics,
bleach is not dispensed during the HAND
WASHABLES Cycle.
NOTE: Some "HAND WASH" items,
particularly wool, naturally shrink
when washed either in the sink or in
the washer HAND WASHABLES Cycle.
Keep this in mind when you purchase
items labeled "HAND WASH." Items
that shrink should be dried flat. Block
these items by gently stretching to
original measurements.
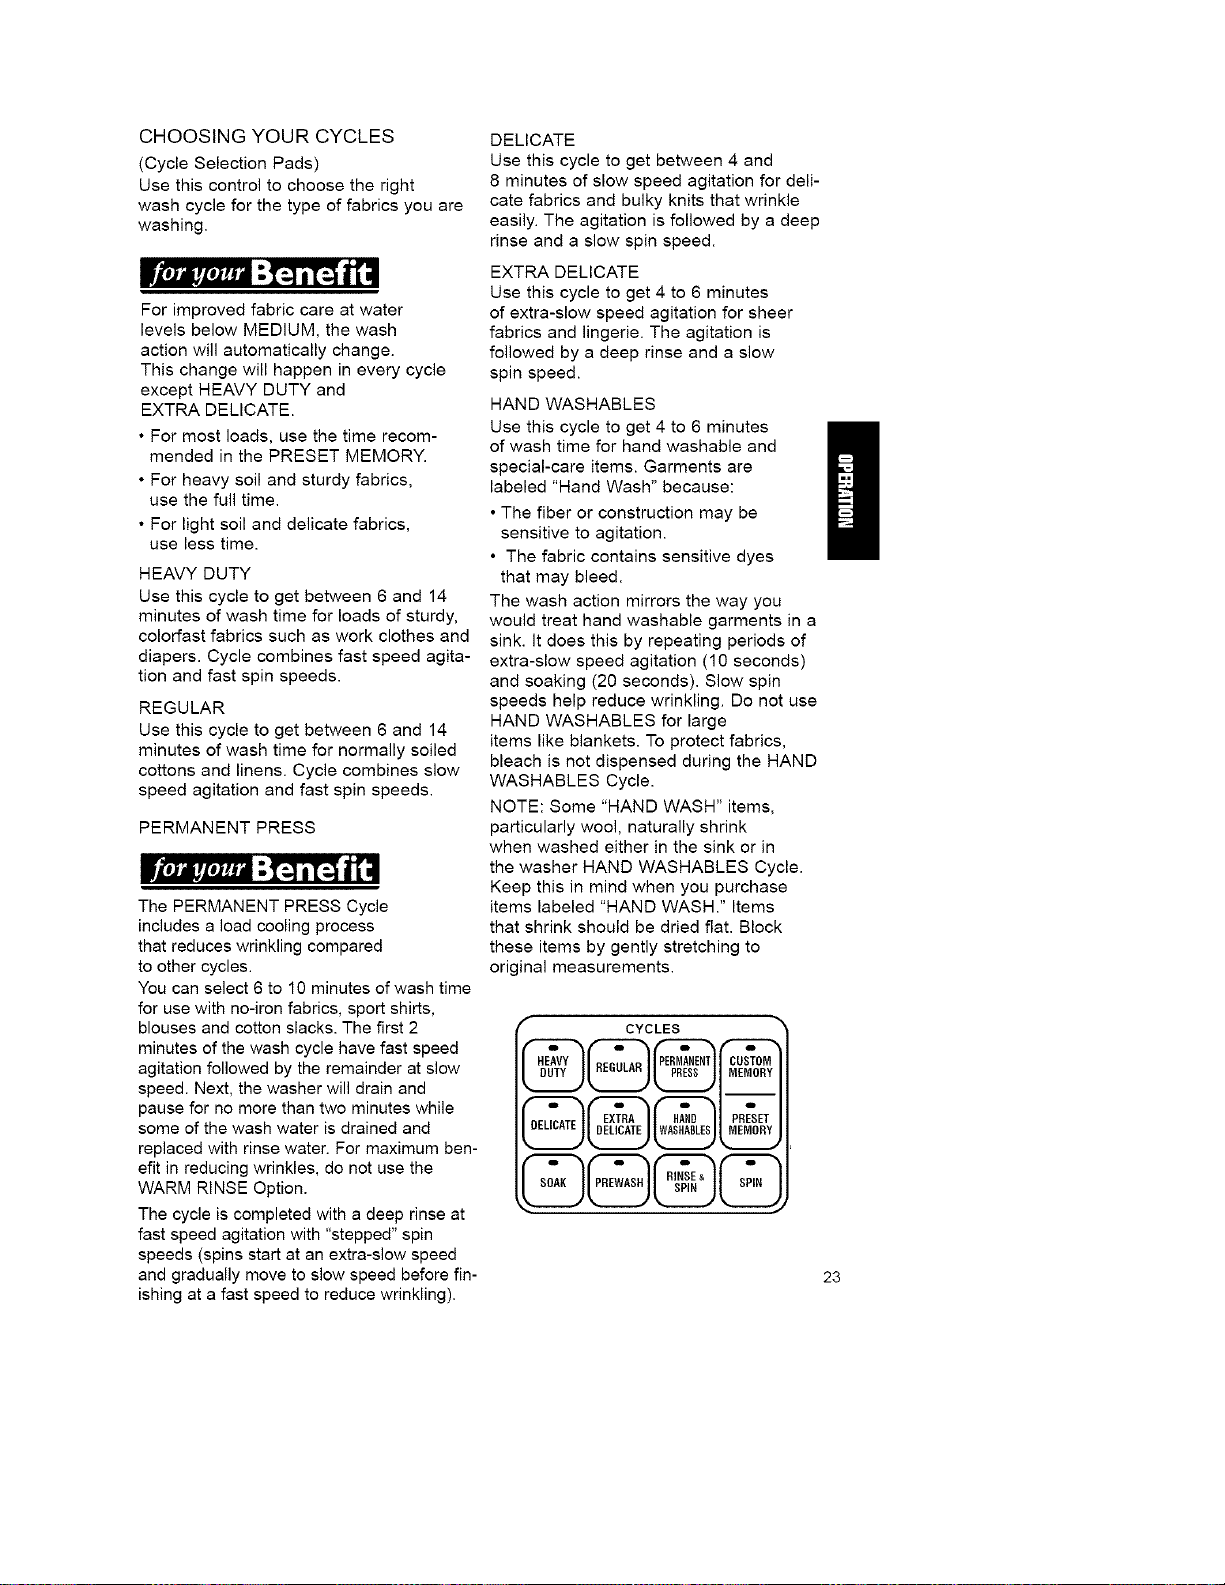
r
CYCLES
g
23
CHOOSING YOUR CYCLES
(Continued)
PREWASH
Use this cycle to get from 3 to 6 minutes
of agitation to help remove heavy soils
and stains that need pretreatment. The
agitation and spin will be at fast speed
unless another speed combination is
selected as described below.
SOAK
SOAK Cycle provides from 11 to
61 minutes of soaking with brief periods
of agitation to help remove heavy soils
and stains that need pretreatment.
Clothes are not rinsed following the
SOAK Cycle. The agitation and spin will
be at fast speed unless another speed
combination is
selected as described below.
NOTE: PREWASH and SOAK Cycles
should be followed by a wash cycle with
additional detergent.
To select a different speed combination
for PREWASH or SOAK:
NOTE: These steps must be followed
in the order listed.
STEP 1. Add detergent to washer basket
for the PREWASH or SOAK Cycle.
STEP 2. Select the cycle you want by
pressing one of the pads under CYCLES
(see chart at right).
STEP 3. Press PREWASH or SOAK.
STEP 4. Make adjustments (if desired) to
WATER LEVEL, TEMPERATURE and
TIME REMAINING.
STEP 5. Press START. The wash cycle
will begin.
To automatically follow PREWASH
or SOAK with a main wash cycle:
NOTE: These steps must be followed
in the order listed.
STEP 1. Add detergent to washer basket
for the PREWASH or SOAK Cycle.
STEP 2. Add detergent for main wash
to dispenser.
STEP 3. Press PREWASH or SOAK.
STEP 4. Make adjustments (if desired) to
AGITATE TIME for PREWASH or SOAK
Cycle.
STEP 5. Select the cycle you want by
pressing one of the pads under CYCLES
(see chart below).
STEP 6. Make adjustments (if desired) to
WATER LEVEL and TEMPERATURE.
STEP 7. Make adjustments (if desired) to
AGITATE TIME for main wash cycle.
STEP 8. Press START. The wash cycle
will begin.
NOTE: The water level and temperature
will be the same for PREWASH or SOAK
and the main wash cycle.
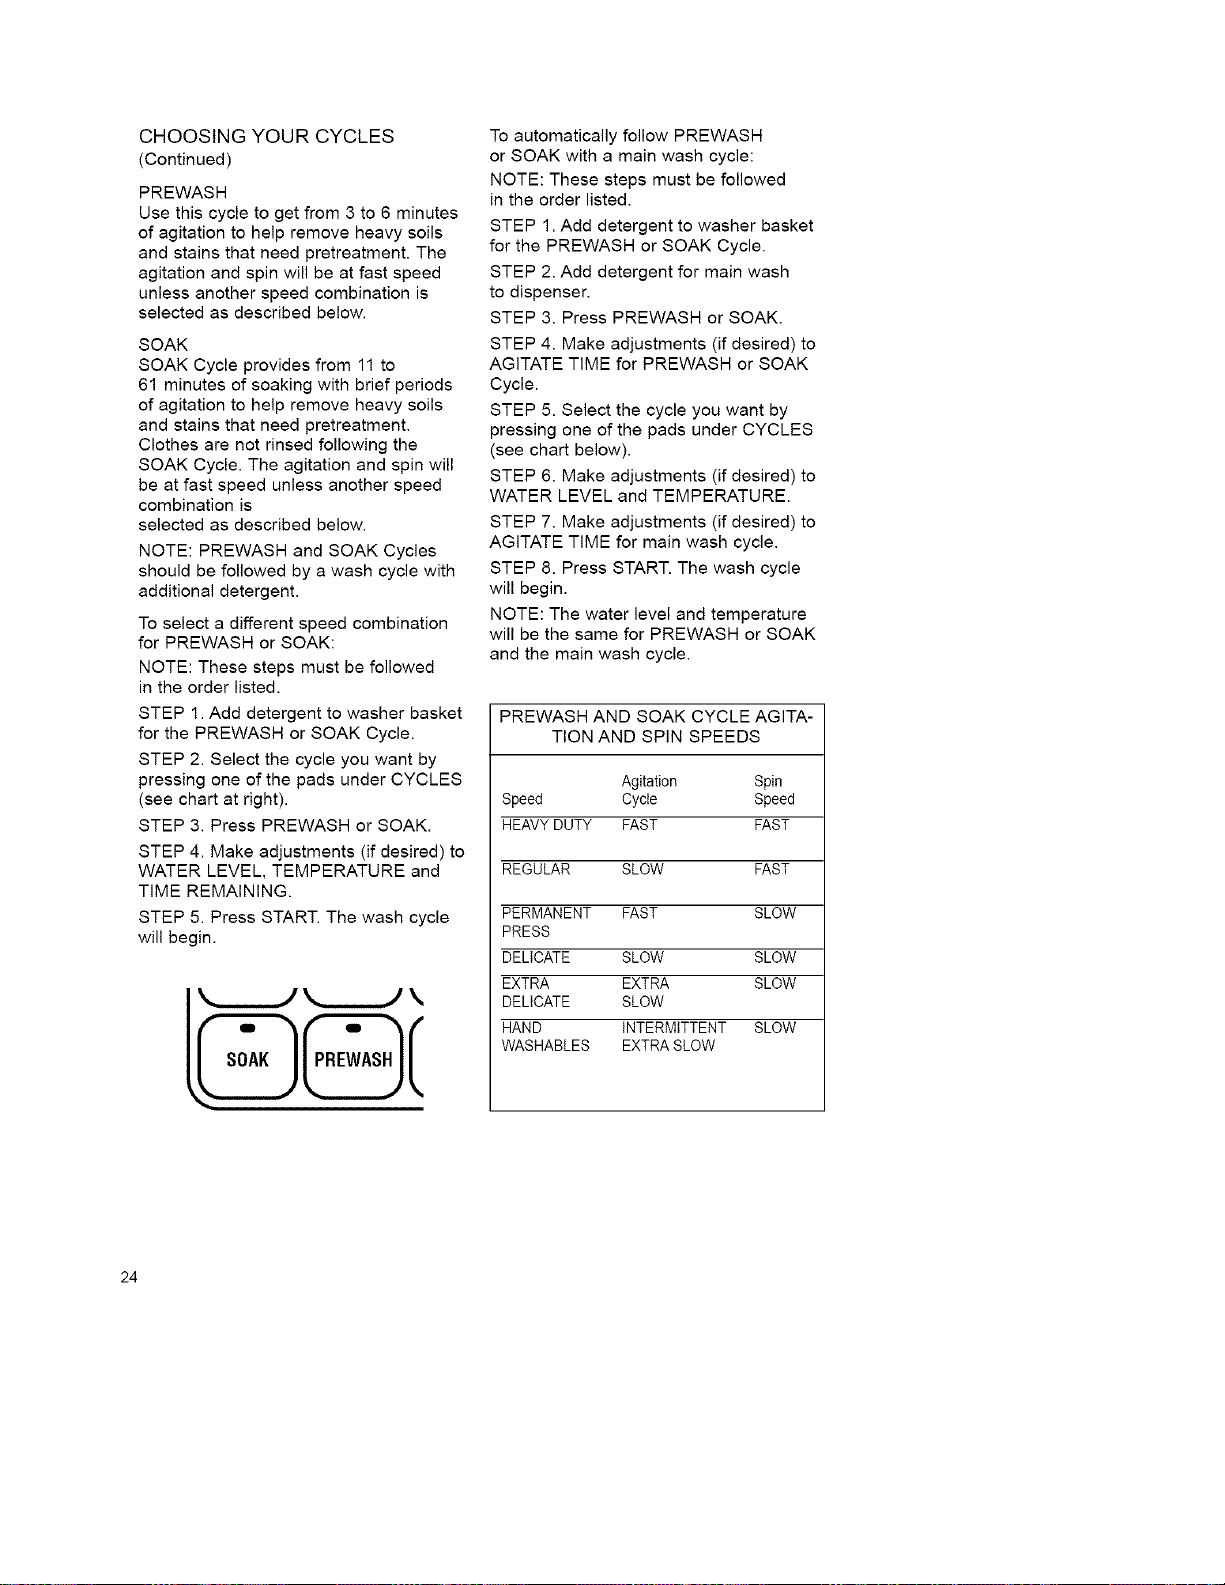
PREWASH AND SOAK CYCLE AGITA-
TION AND SPiN SPEEDS
Agitation Spin
Speed Cycle Speed
HEAVYDUTY FAST FAST
REGULAR SLOW FAST
PERMANENT FAST SLOW
PRESS
DELICATE SLOW SLOW
EXTRA EXTRA SLOW
DELICATE SLOW
HAND INTERMITTENT SLOW
WASHABLES EXTRASLOW
24
CHOOSING YOUR CYCLES
(Continued)
RINSE AND SPiN
Use this cycle to get a deep rinse with ag-
itation followed by a drain and spin. The
agitation and spin will be at fast speed
unless another speed combination is se-
lected as described below.
The TIME REMAINING display will
include an estimate of how long it will
take to fill and drain the washer.
When to use RINSE & SPIN
• For loads that need rinsing only.
• When using extra detergent with
a load.
• For completing a cycle after the
power has been off.
• To add fabric softener to clothes.
To use or change RINSE & SPIN
settings:
STEP 1. Add fabric softener to
the dispenser (if desired).
STEP 2. Select the cycle you want by
pressing one of the pads under CYCLES.
STEP 3. Press RINSE & SPIN.
STEP 4. Select WARM RINSE, WRIN-
KLE GUARD and/or SECOND RINSE
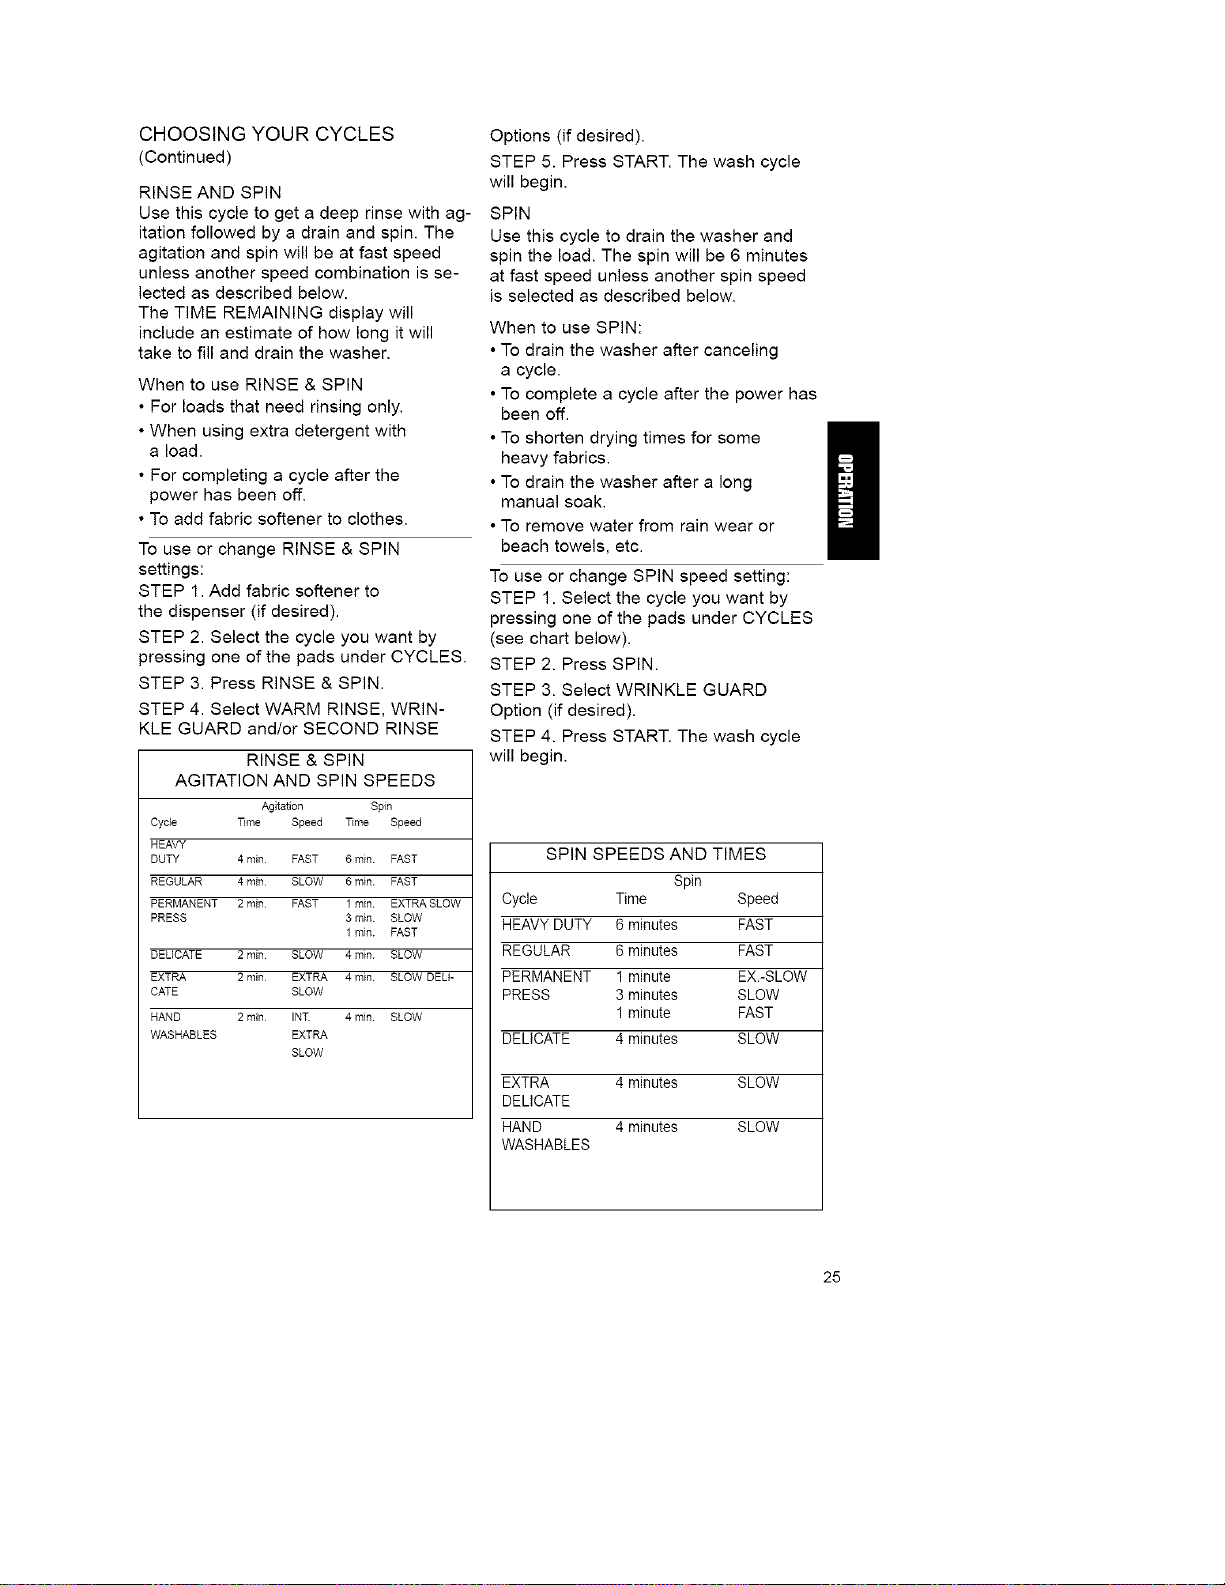
RINSE & SPIN
AGITATION AND SPIN SPEEDS
Agitation Spin
Cycle Time Speed Time Speed
HEAVY
DUTY 4 rain FAST 6 min FAST
REGULAR 4 rain SLOW 6 min FAST
PERMANENT 2 rain FAST 1 min EXTRA SLOW
PRESS 3 rain SLOW
1 min PAST
DELICATE 2 rain SLOW 4 min SLOW
EXTRA 2 rain EXTRA 4 min SLOW DELI-
CATE SLOW
HAND 2 rnJn INT 4 min SLOW
WASHABLES EXTRA
SLOW
Options (if desired).
STEP 5. Press START. The wash cycle
will begin.
SPIN
Use this cycle to drain the washer and
spin the load. The spin will be 6 minutes
at fast speed unless another spin speed
is selected as described below.
When to use SPIN:
• To drain the washer after canceling
a cycle.
• To complete a cycle after the power has
been off.
• To shorten drying times for some
heavy fabrics.
• To drain the washer after a long
manual soak.
• To remove water from rain wear or
beach towels, etc.
To use or change SPIN speed setting:
STEP 1. Select the cycle you want by
pressing one of the pads under CYCLES
(see chart below).
STEP 2. Press SPIN.
STEP 3. Select WRINKLE GUARD
Option (if desired).
STEP 4. Press START. The wash cycle
will begin.
SPIN SPEEDS AND TIMES
Spin
Cycle Time Speed
HEAVYDUTY 6 minutes FAST
REGULAR 6 minutes FAST
PERMANENT 1 minute EX.-SLOW
PRESS 3 minutes SLOW
1minute FAST
DELICATE 4 minutes SLOW
EXTRA 4 minutes SLOW
DELICATE
HAND 4 minutes SLOW
WASHABLES
25
TIMEREMAINING
Thesepadsallowyoutoincreaseor
decreasetheagitationtimeforanywash
cycle.Minimumandmaximumagitation
timesvarydependingonthecycle
selected(seepages23-25).
Onceacycleisselected,theagitation
timefromthelasttimethecyclewasused
willbedisplayedandtheAGITATETIME
willglow.
•Toincreasethetime,pressMORE
undertheTIMEREMAININGdisplay.
•Todecreasethetime,pressLESS
undertheTIMEREMAININGdisplay.
•Whenawashcycleisstarted,the
approximatetimeforthecomplete
cycle,includinganestimatefordrain
times,willappearintheTIME
REMAININGdisplay.Thetimewill
countdowntotheendofthecycle.
•Oncethecyclehasstarted,youcannot
changethecycletimeusingtheTIME
REMAININGadjustmentpads.
• Ifyouareusingthedelayfeature,
thehoursofdelaytimewillappearinthe
TIMEREMAININGdisplayuntil
thedelaytimeiscomplete(seepage
30forinstructionsonusingtheDELAY
feature).
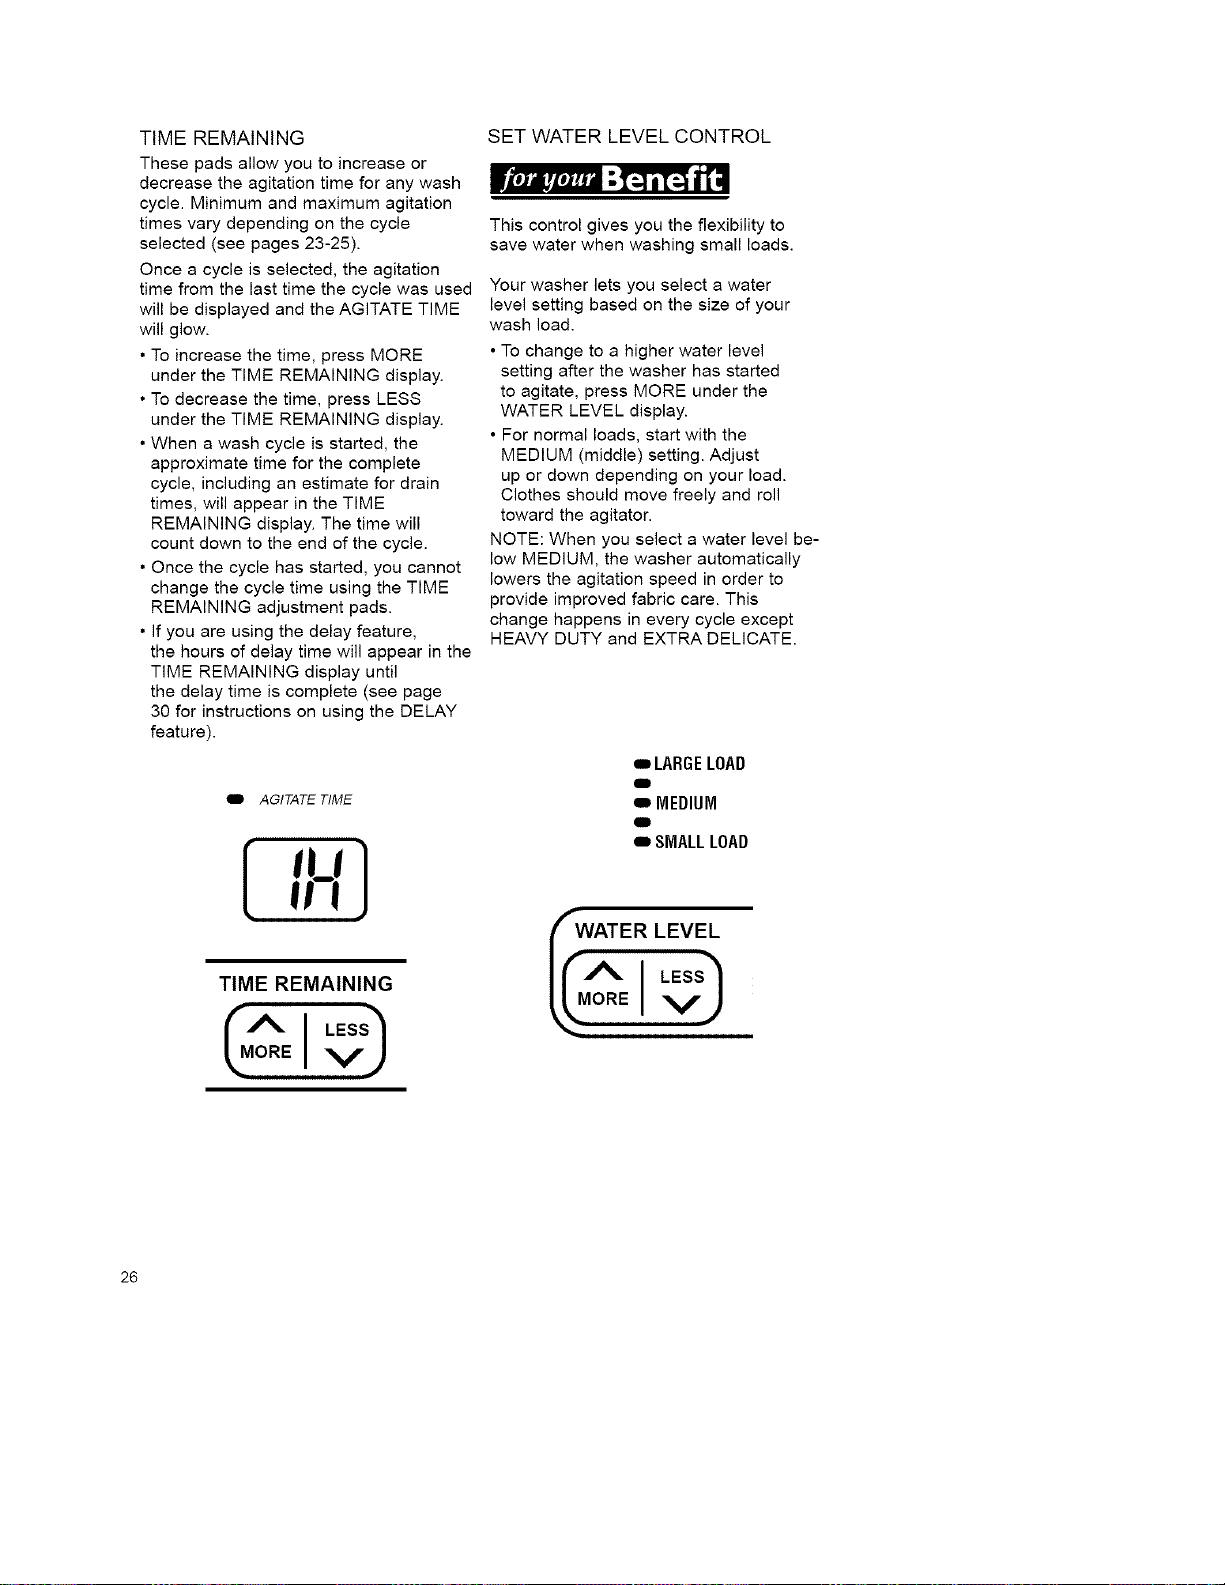
m AGITATE TIME
[ ,,-:]
If!
TIME REMAINING
SET WATER LEVEL CONTROL
This control gives you the flexibility to
save water when washing small loads.
Your washer lets you select a water
level setting based on the size of your
wash load.
• To change to a higher water level
setting after the washer has started
to agitate, press MORE under the
WATER LEVEL display.
• For normal loads, start with the
MEDIUM (middle) setting. Adjust
up or down depending on your load.
Clothes should move freely and roll
toward the agitator.
NOTE: When you select a water level be-
low MEDIUM, the washer automatically
lowers the agitation speed in order to
provide improved fabric care. This
change happens in every cycle except
HEAVY DUTY and EXTRA DELICATE.
mLARGE LOAD
MEDIUM
m SMALL LOAD
26
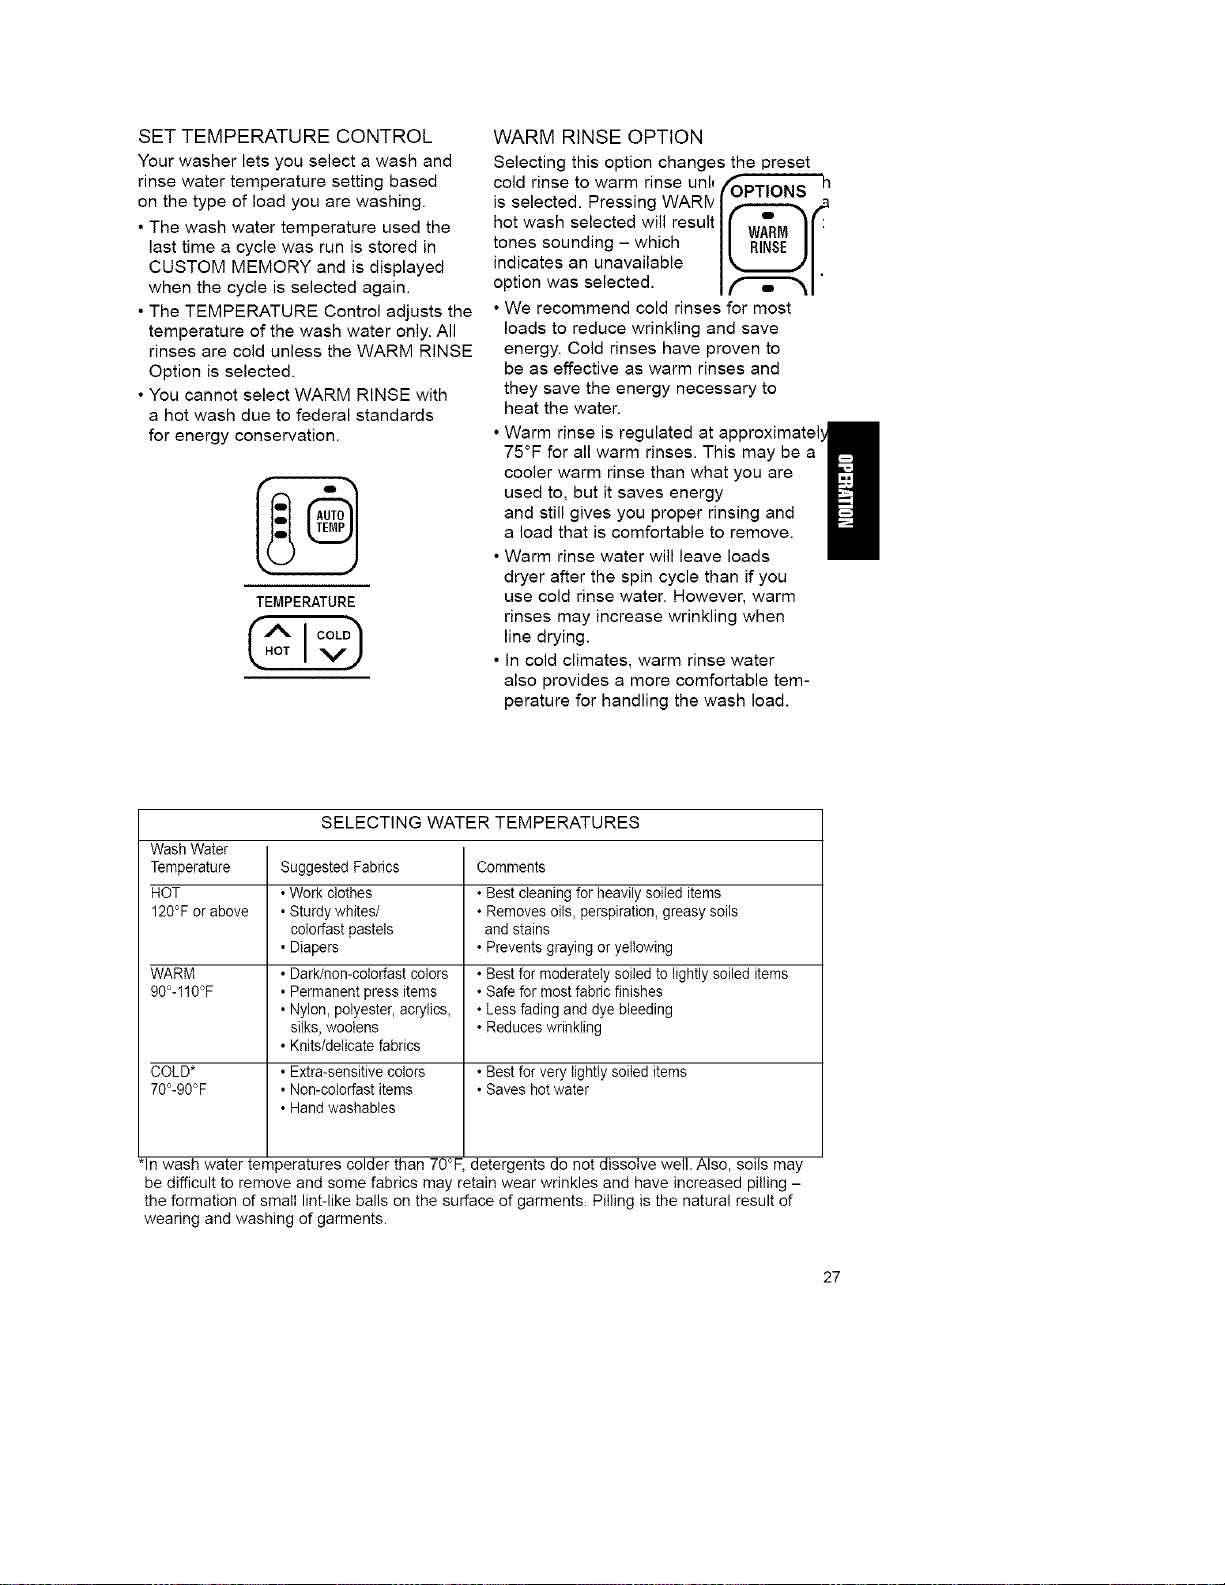
SET TEMPERATURE CONTROL
Your washer lets you select a wash and
rinse water temperature setting based
on the type of load you are washing.
• The wash water temperature used the
last time a cycle was run is stored in
CUSTOM MEMORY and is displayed
when the cycle is selected again.
• The TEMPERATURE Control adjusts the
temperature of the wash water only. All
rinses are cold unless the WARM RINSE
Option is selected.
• You cannot select WARM RINSE with
a hot wash due to federal standards
for energy conservation.
TEMPERATURE
WARM RINSE OPTION
Selecting this option changes the preset
cold rinse to warm rinse unl_ ,.,_PTIONS _n
is selected. Pressing WARty ,,,_ ,a
hot wash selected will result
tones sounding - which
indicates an unavailable
option was selected.
• We recommend cold rinses for most
loads to reduce wrinkling and save
energy. Cold rinses have proven to
be as effective as warm rinses and
they save the energy necessary to
heat the water.
• Warm rinse is regulated at approximatel
75°F for all warm rinses. This may be a
cooler warm rinse than what you are
used to, but it saves energy
and still gives you proper rinsing and
a load that is comfortable to remove.
• Warm rinse water will leave loads
dryer after the spin cycle than if you
use cold rinse water. However, warm
rinses may increase wrinkling when
line drying.
• In cold climates, warm rinse water
also provides a more comfortable tem-
perature for handling the wash load.
SELECTING WATER TEMPERATURES
Wash Water
Temperature Suggested Fabrics Comments
HOT • Work clothes • Best cleaning for heavily soiled items
120°F or above • Sturdy whites/ • Removes oils, perspiration, greasy soils
colorfast pastels and stains
• Diapers • Prevents graying or yellowing
WARM • Dark/non-colorfast colors • Best for moderately soiled to lightly soiled items
90°-110°F • Permanent press items • Safe for most fabric finishes
• Nylon, polyester, acrylics_ • Less fading and dye bleeding
silks, woolens • Reduces wrinkling
• Knits/delicate fabrics
COLD* • Extra-sensitive colors • Best for very lightly soiled items
70°-90°F • Non-colorfast items • Saves hot water
• Handwashabtes
•In wash water temperatures colder than 70°F detergents do not dissolve well. Also, soils may
be difficult to remove and some fabrics may retain wear wrinkles and have increased pilling -
the formation of small lint-like balls on the surface of garments. Pilling is the natural result of
wearing and washing of garments.
27
AUTOMATIC TEMPERATURE
CONTROL (ATC)
ATC takes away the worry
of undissolved detergent and
ensures consistent cleaning
results from season to season
with warm and cold washes.
ATC electronically senses and maintains
a uniform water temperature by regulating
incoming hot and cold water.
• Even in cold wash, some warm water
is let into the washer to maintain a
temperature of approximately 75°F.
In very cold water, detergent may not
dissolve and clothes will not be cleaned
completely.
• ATC does not control the hot wash
water temperature.
• Warm wash is regulated at approximate-
ly 100°F.
• Warm rinse is regulated at approxi-
mately 75°F for all warm rinses. This
may be
a cooler warm rinse than what you are
used to, but it saves energy and still
gives you proper rinsing and a load
that is comfortable to remove.
• The second fill in the PERMANENT
PRESS Cycle is for cooling the load and
uses unregulated cold water.
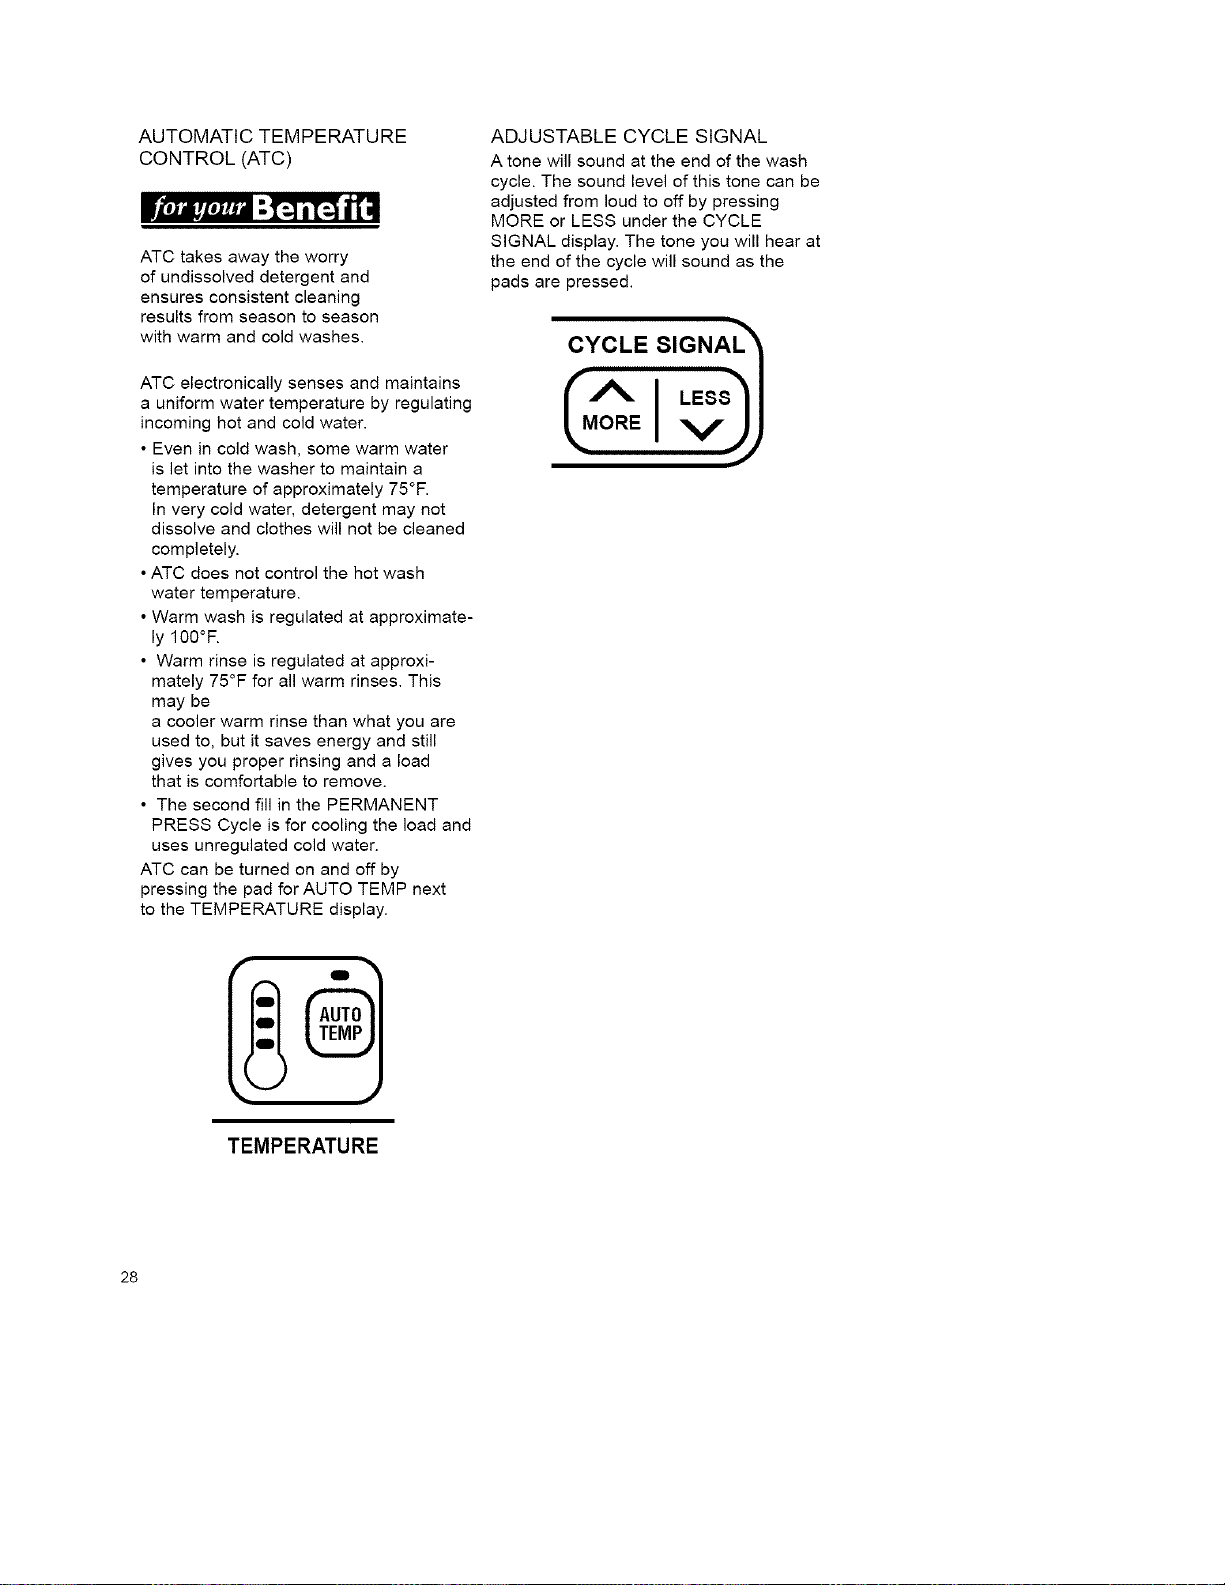
ATC can be turned on and off by
pressing the pad for AUTO TEMP next
to the TEMPERATURE display.
ADJUSTABLE CYCLE SIGNAL
A tone will sound at the end of the wash
cycle. The sound level of this tone can be
adjusted from loud to off by pressing
MORE or LESS under the CYCLE
SIGNAL display. The tone you will hear at
the end of the cycle will sound as the
pads are pressed.
TEMPERATURE
28
CHOOSING OPTIONS
WARM RINSE
For more information on WARM RINSE,
see page 27.
WRINKLE GUARD
Selecting WRINKLE GUARD changes the
final spin in any cycle to a shorter time
and/or a lower speed to reduce wrinkling.
WRINKLE GUARD can be used with
RINSE & SPIN and SPIN. We do
not recommend WARM RINSE with
WRINKLE GUARD. The difference
between final spins in cycles with
and without WRINKLE GUARD are
shown below.
SECOND RINSE
Selecting this option provides a
second deep rinse with the same
water temperature as selected
for the first rinse.
SECOND RINSE can be added to any
main wash cycle and RINSE & SPIN.
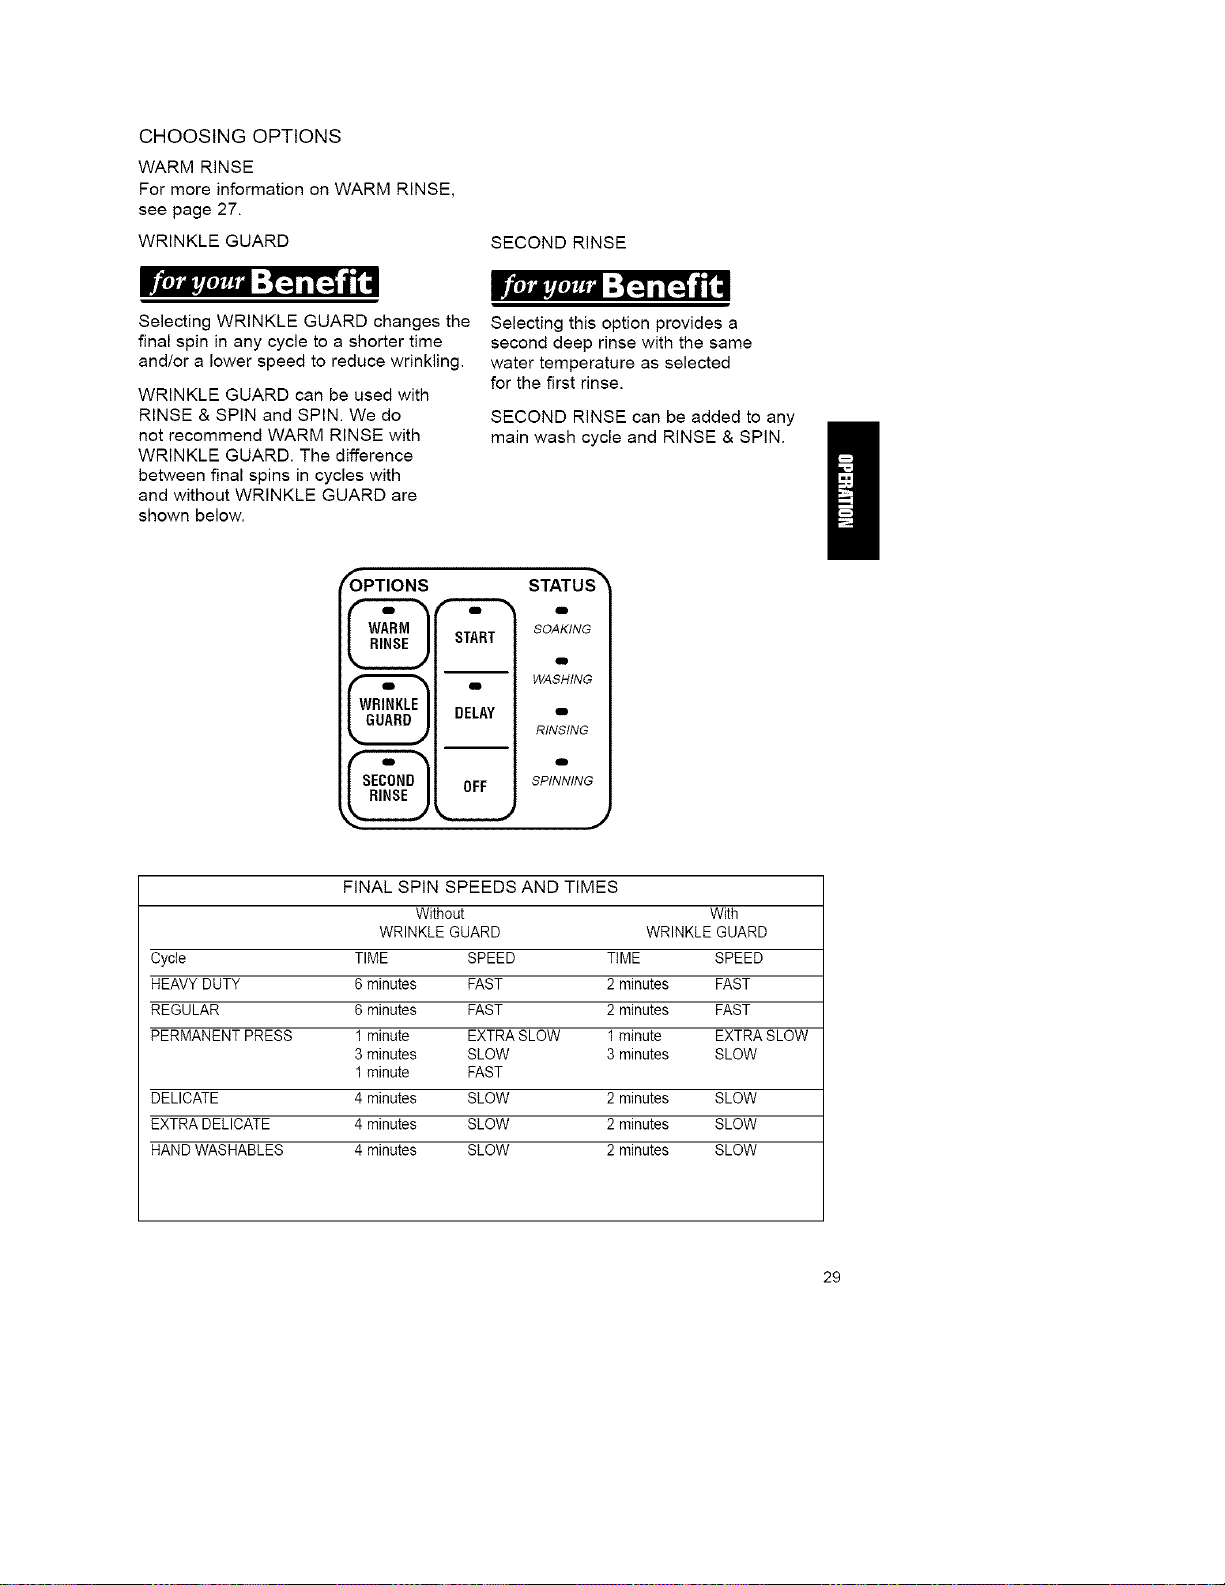
("OPTIONS STATUS_'_
@ ""
START SOAKING
e
-- WASHING
OFF
o
RINSING
I
SPINNING
g
FINAL SPiN SPEEDS AND TIMES
Without With
WRINKLE GUARD WRINKLE GUARD
Cycle TIME SPEED TIME SPEED
HEAVY DUTY 6 minutes FAST 2 minutes FAST
REGULAR 6 minutes FAST 2 minutes FAST
PERMANENT PRESS 1 minute EXTRA SLOW 1 minute EXTRA SLOW
3 minutes SLOW 3 minutes SLOW
1 minute FAST
DELICATE 4 minutes SLOW 2 minutes SLOW
EXTRA DELICATE 4 minutes SLOW 2 minutes SLOW
HAND WASHABLES 4 minutes SLOW 2 minutes SLOW
29

OPERATINGCONTROLS
START
PressSTARTtostartyourwasherafter
acyclehasbeenselected.Besureallde-
siredcycleadjustmentsandoptionshave
beenselected.
DELAY
YoucanusetheDELAYfeaturetotempo-
rarilystopthewashercycle
ortodelaythestartofawashcyclefor
uptoninehours.
Totemporarilystopthewashcycle:
STEP1.PressDELAY.Theindicatorlight
forSTARTwillblink.Continuation
ofthecyclecanbedelayedforupto
15minutes.
STEP2.PressSTARTtoresumethecy-
cle.IfyoudonotpressSTARTwithin15
minutes,thewasherwillautomatically
shutoff.
Todelaythestartofthewashcycle:
STEP1.Loadthewasherandfillthe
dispensers.
STEP2.Closethewasherlid.
STEP3.Selectthedesiredcyclefabric
caresettingsandoptionselections.
STEP4.PressDELAY.1H(onehour)will
bedisplayedintheTIMEREMAINING
window.TheindicatorlightsforSTART
andDELAYwillglow.
STEP5.Foralongerdelaytime,press
MOREbelowtheTIMEREMAINING
displaywindow.Thetimewillincrease
inonehourstepsuptoninehours.
STEP6.Forashorterdelaytime,press
LESSbelowtheTIMEREMAINING
displaywindow.Thetimewilldecreasein
onehoursteps.
NOTE:DonotpressSTART.Thewasher
willautomaticallystartafter
theselecteddelaytimehaspassed.
TocancelDELAYdoany
ofthefollowing:
•PressSTARTtobeginthecycle
immediately.
•PressOFFtoturnthewasheroff.
•PressoneofthepadsunderCYCLES
toselectanewcycle.
OFF
Selectingthiscontrolturnsthewasheroff.
Itcannotberestartedfromwhere
itwasstoppedinthecycle.
•ResetthewashertoSPINtoempty
waterfromthebasket.
•Resettoawashcycletocontinuewash-
ingtheload.
_PTIONS
WARM
RINSE
WRINKLE
GUARD
SECOND
RINSE
START
g
DELAY
OFF
STATUS
qlD
SOAKING
D
WASHING
D
RINSING
m
SPINNING
3O
INDICATOR LIGHTS
CYCLE LIGHTS
Located above each pad under CYCLES,
these lights show the cycle you have se-
lected.
MEMORY LIGHTS
These lights show if the washer is operat-
ing in CUSTOM MEMORY or PRESET
MEMORY. See page 22 for a complete
description of PRESET and CUSTOM
MEMORY.
OPTION LIGHTS
These lights show the setting of the
WATER LEVEL, TEMPERATURE and
TIME REMAINING.
RINSE OPTION LIGHTS
These lights show when WARM RINSE,
WRINKLE GUARD and/or SECOND
RINSE have been added to the cycle.
START AND DELAY LIGHTS
These lights show that the washer has
started or temporarily stopped or that
DELAY has been selected.
STATUS LIGHTS
Located on the right side of the
console, these lights show in what
portion of the cycle the washer is
operating: SOAKING, WASHING,
RINSING or SPINNING.
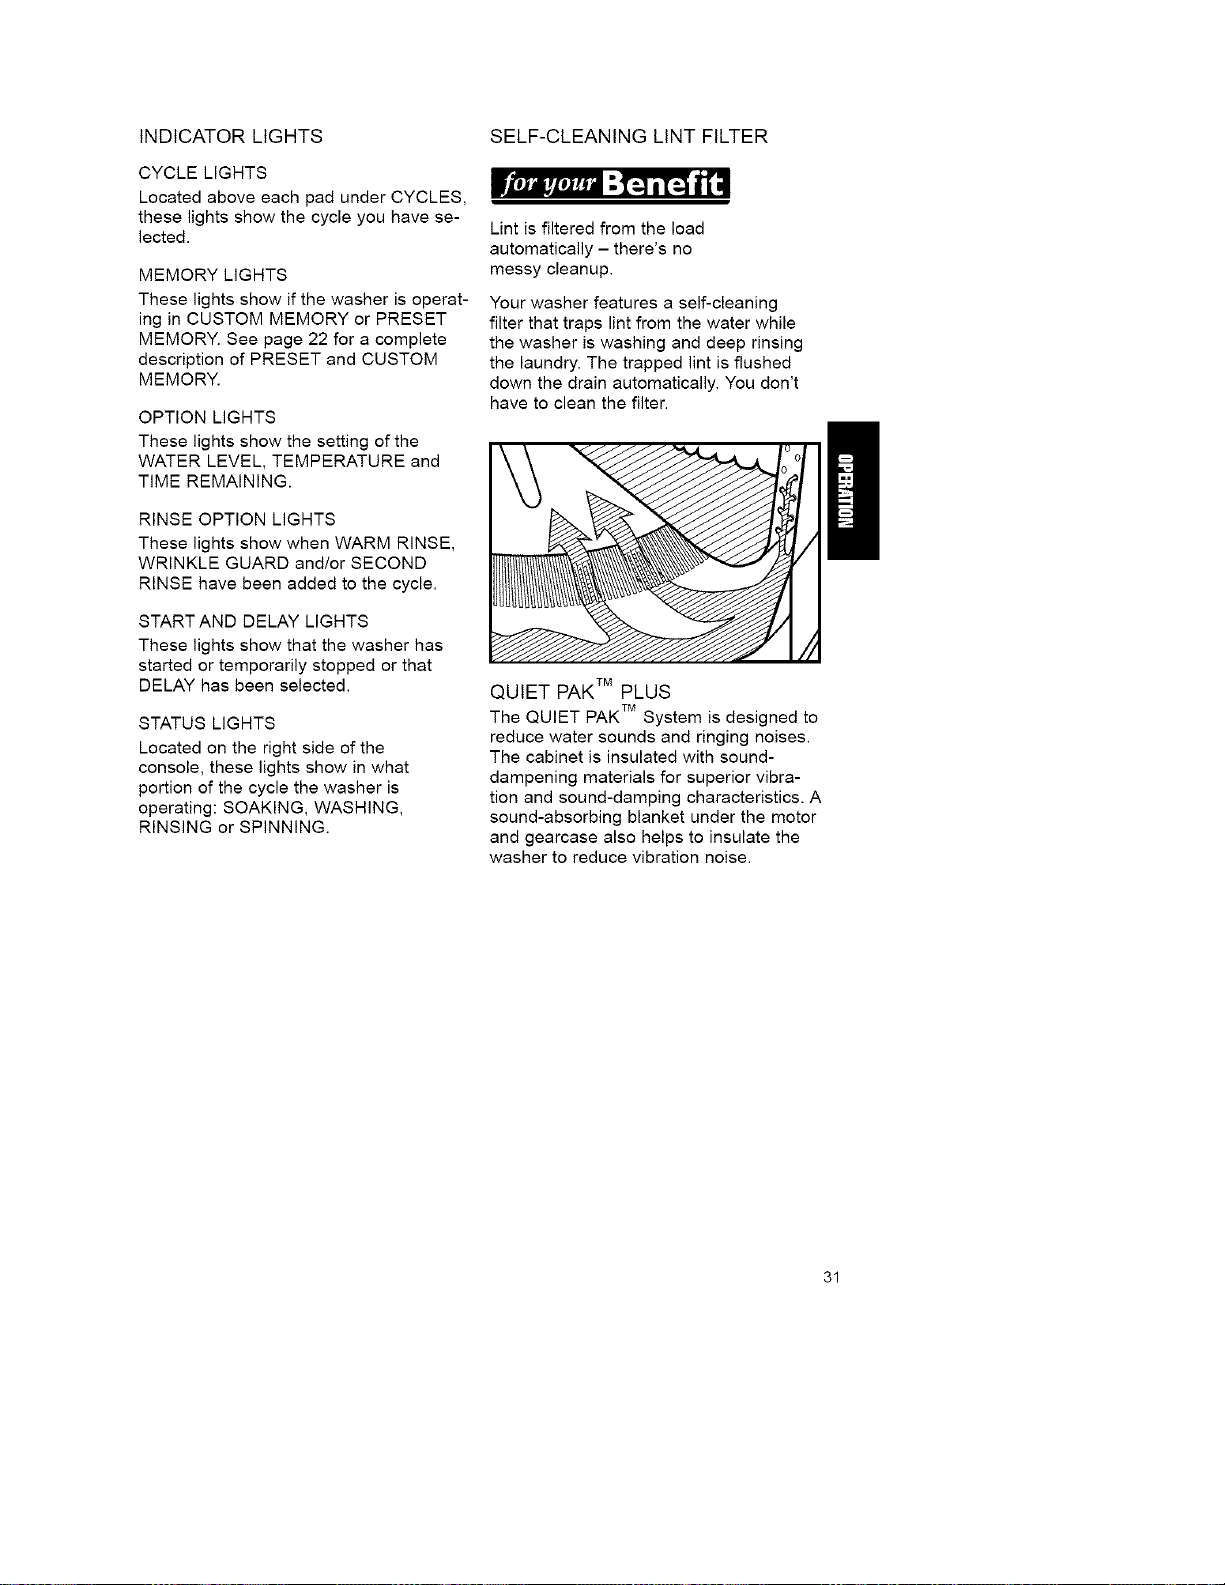
SELF-CLEANING LINT FILTER
_t, Ji, m_,Jil"-I_ i[_ i'[il
Lint is filtered from the load
automatically - there's no
messy cleanup.
Your washer features a self-cleaning
filter that traps lint from the water while
the washer is washing and deep rinsing
the laundry. The trapped lint is flushed
down the drain automatically. You don't
have to clean the filter.
QUIET PAK TM PLUS
The QUIET PAK TM System is designed to
reduce water sounds and ringing noises.
The cabinet is insulated with sound-
dampening materials for superior vibra-
tion and sound-damping characteristics. A
sound-absorbing blanket under the motor
and gearcase also helps to insulate the
washer to reduce vibration noise.
31
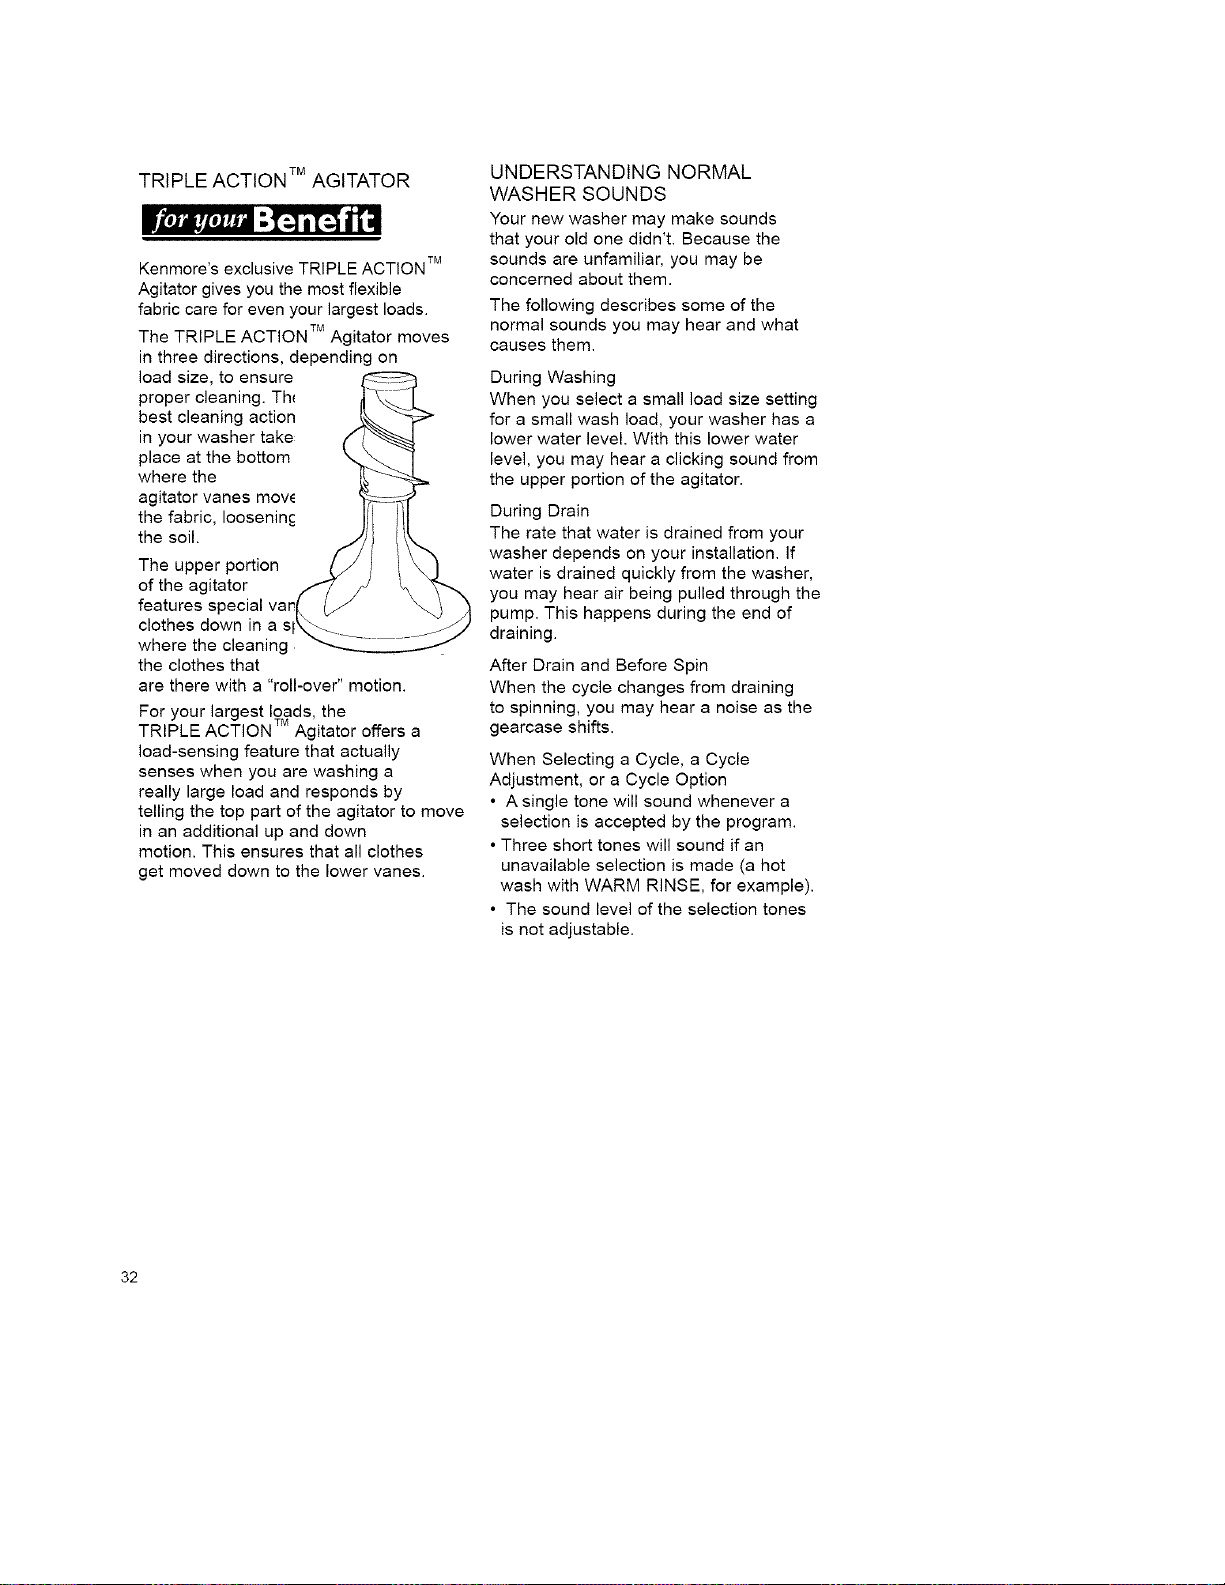
TRtPLE ACTION TMAGITATOR
I't, Jm "• 11 i'[ "
Kenmore's exclusive TRIPLE ACTION TM
Agitator gives you the most flexible
fabric care for even your largest loads.
The TRIPLE ACTION TM Agitator moves
in three directions, depending on
load size, to ensure
proper cleaning. Th_
best cleaning action
in your washer take
place at the bottom
where the
agitator vanes mow
the fabric, Iooseninc
the soil.
The upper portion
of the agitator
features special vat"
clothes down in a
where the cleaning
the clothes that
are there with a "roll-over" motion.
For your largest loads, the
TRIPLE ACTION TM Agitator offers a
load-sensing feature that actually
senses when you are washing a
really large load and responds by
telling the top part of the agitator to move
in an additional up and down
motion. This ensures that all clothes
get moved down to the lower vanes.
UNDERSTANDING NORMAL
WASHER SOUNDS
Your new washer may make sounds
that your old one didn't. Because the
sounds are unfamiliar, you may be
concerned about them.
The following describes some of the
normal sounds you may hear and what
causes them.
During Washing
When you select a small load size setting
for a small wash load, your washer has a
lower water level. With this lower water
level, you may hear a clicking sound from
the upper portion of the agitator.
During Drain
The rate that water is drained from your
washer depends on your installation. If
water is drained quickly from the washer,
you may hear air being pulled through the
pump. This happens during the end of
draining.
After Drain and Before Spin
When the cycle changes from draining
to spinning, you may hear a noise as the
gearcase shifts.
When Selecting a Cycle, a Cycle
Adjustment, or a Cycle Option
• A single tone will sound whenever a
selection is accepted by the program.
• Three short tones will sound if an
unavailable selection is made (a hot
wash with WARM RINSE, for example).
• The sound level of the selection tones
is not adjustable.
32
USING YOUR
TRIPLE DISPENSER
The triple dispenser makes your washer
truly automatic by making
it unnecessary for you to return to
the washer during the cycle to put in de-
tergent, bleach, or fabric softener.
By using the triple dispenser, you are
assured of proper fabric care by ensuring
that detergent, bleach, and fabric softener
are introduced into the washer at the
proper time and properly diluted.
How It Works
The triple dispenser directs fresh
water from the washer inlet valve to
the dispensers.
The water directed to the dispenser
will be warm if both faucets are turned on
fully, regardless of wash or rinse
temperature selections. This is to ensure
good dilution of laundry products. The
amount of warm water is not enough to
harm delicate or non-colorfast fabrics.
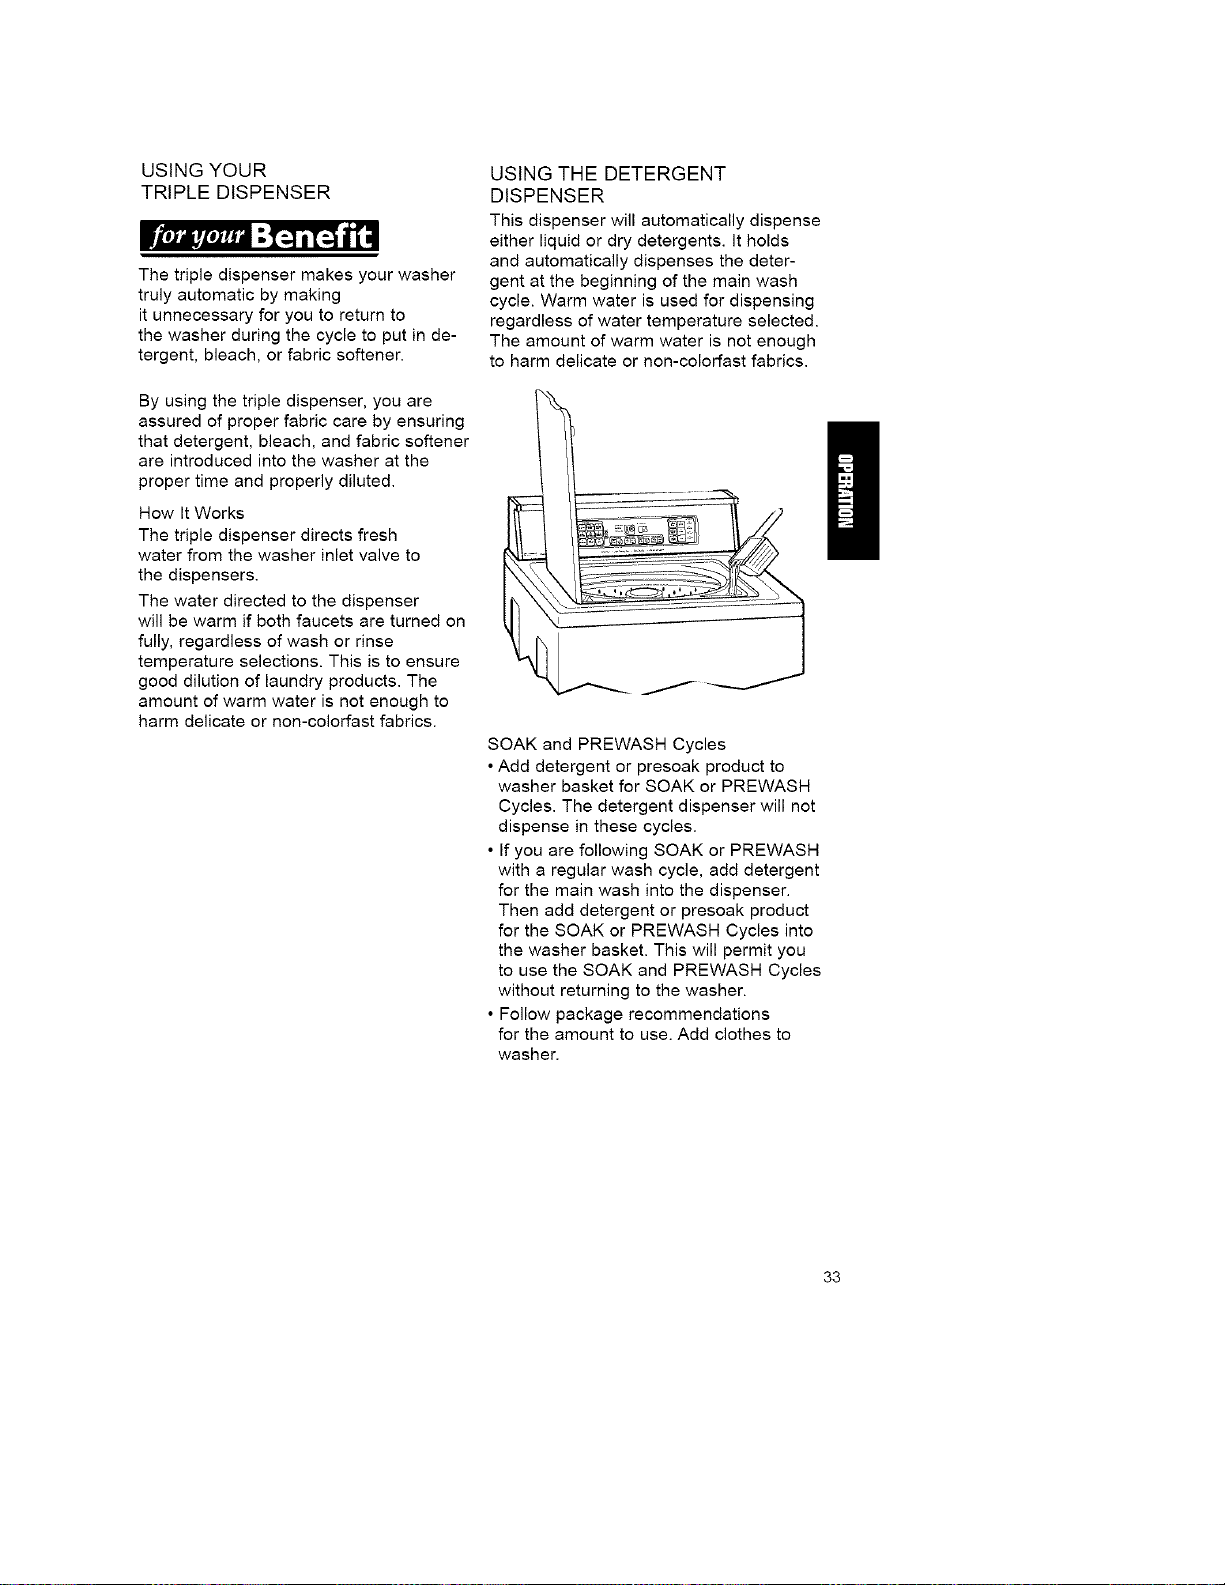
USING THE DETERGENT
DISPENSER
This dispenser will automatically dispense
either liquid or dry detergents. It holds
and automatically dispenses the deter-
gent at the beginning of the main wash
cycle. Warm water is used for dispensing
regardless of water temperature selected.
The amount of warm water is not enough
to harm delicate or non-colorfast fabrics.
SOAK and PREWASH Cycles
• Add detergent or presoak product to
washer basket for SOAK or PREWASH
Cycles. The detergent dispenser will not
dispense in these cycles.
• If you are following SOAK or PREWASH
with a regular wash cycle, add detergent
for the main wash into the dispenser.
Then add detergent or presoak product
for the SOAK or PREWASH Cycles into
the washer basket. This will permit you
to use the SOAK and PREWASH Cycles
without returning to the washer.
• Follow package recommendations
for the amount to use. Add clothes to
washer.
33
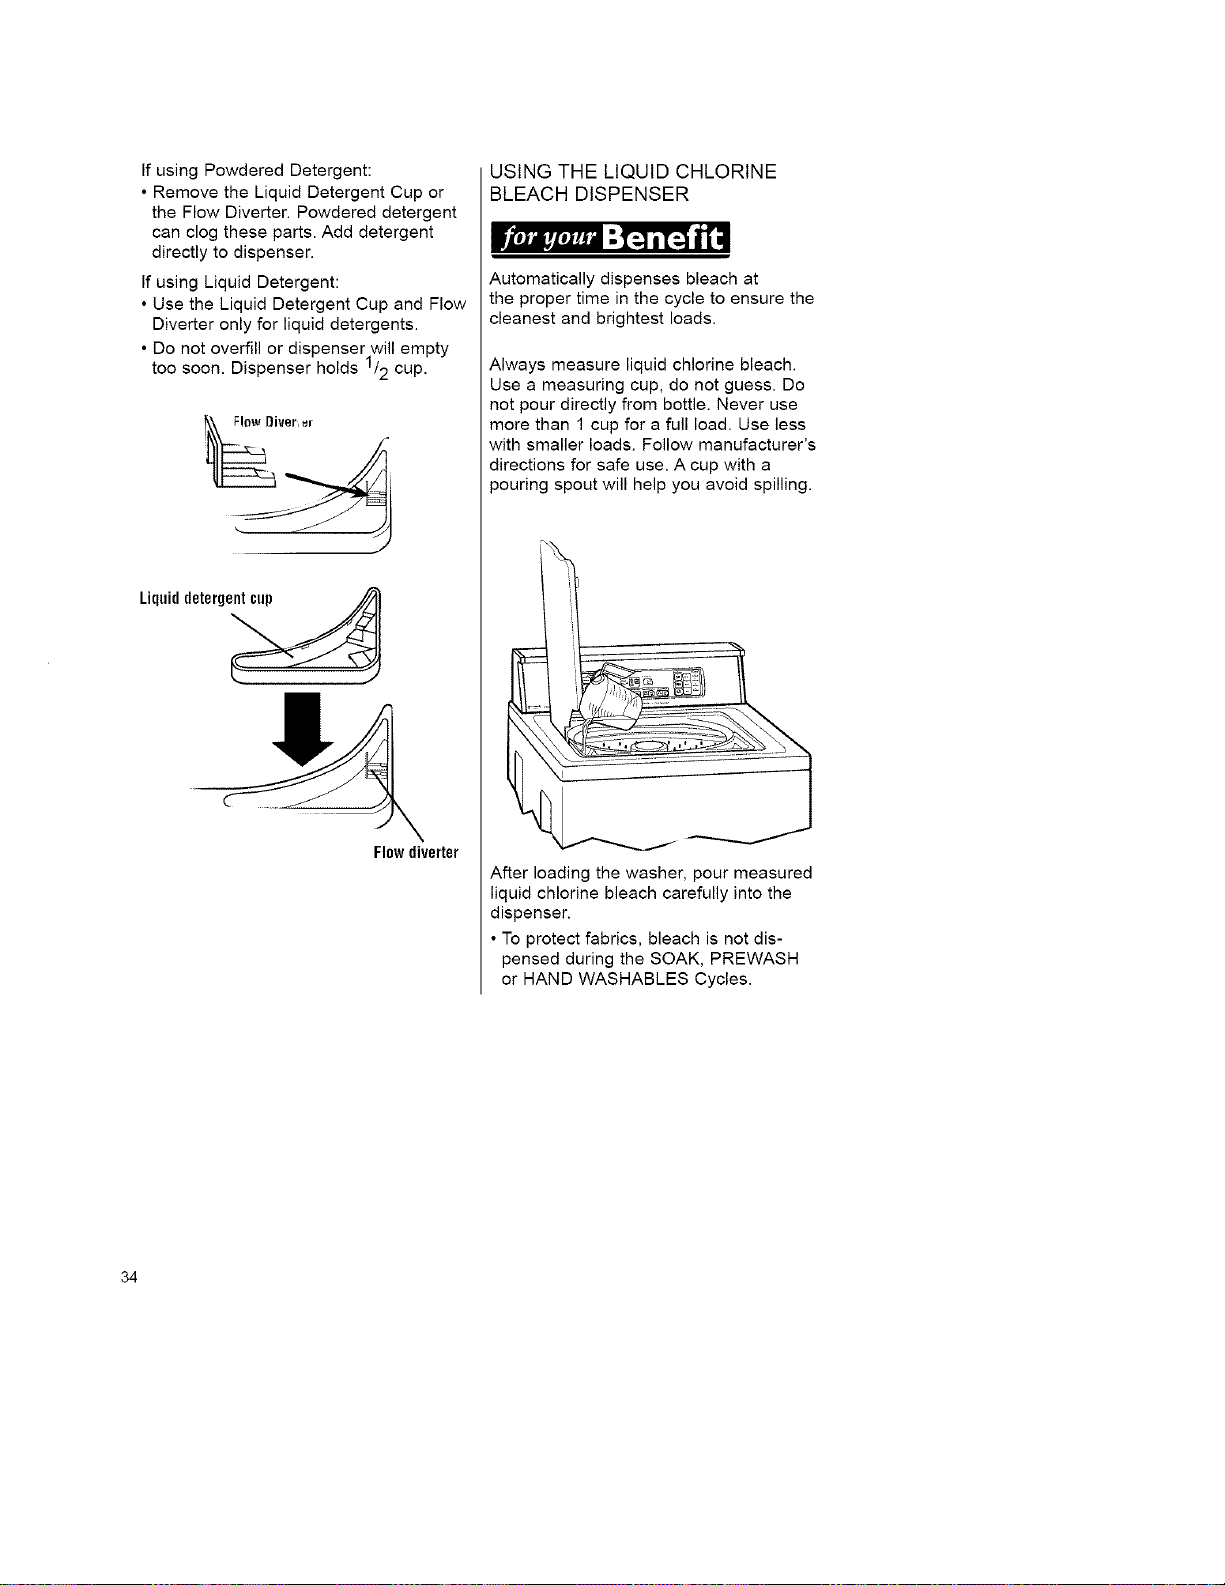
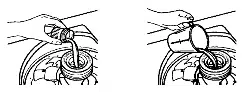
IfusingPowderedDetergent:
•RemovetheLiquidDetergentCupor
theFlowDiverter.Powdereddetergent
canclogtheseparts.Adddetergent
directlytodispenser.
IfusingLiquidDetergent:
•UsetheLiquidDetergentCupandFlow
Diverteronlyforliquiddetergents.
•Donotoverfillordispenserwillempty
toosoon.Dispenserholds1/2cup.
Liquid deterge_
Flow diverter
USING THE LIQUID CHLORINE
BLEACH DISPENSER
Automatically dispenses bleach at
the proper time in the cycle to ensure the
cleanest and brightest loads.
Always measure liquid chlorine bleach.
Use a measuring cup, do not guess. Do
not pour directly from bottle. Never use
more than 1 cup for a full load. Use less
with smaller loads. Follow manufacturer's
directions for safe use. A cup with a
pouring spout will help you avoid spilling.
L
After loading the washer, pour measured
liquid chlorine bleach carefully into the
dispenser.
• To protect fabrics, bleach is not dis-
pensed during the SOAK, PREWASH
or HAND WASHABLES Cycles.
34
•Donotletbleachsplash,drip,orrun
downintowasherbasket.Undiluted
bleachwilldamageanyfabricittouches.
•Startthewasher.Bleachwillbe
dispensedautomaticallyafterthe
detergenthashadtimetowork.
NOTE:Donotusethisdispensertoadd
powderedchlorineorcolor-safebleachto
yourwashload.Thedispenserisforliq-
uidchlorinebleachonly.
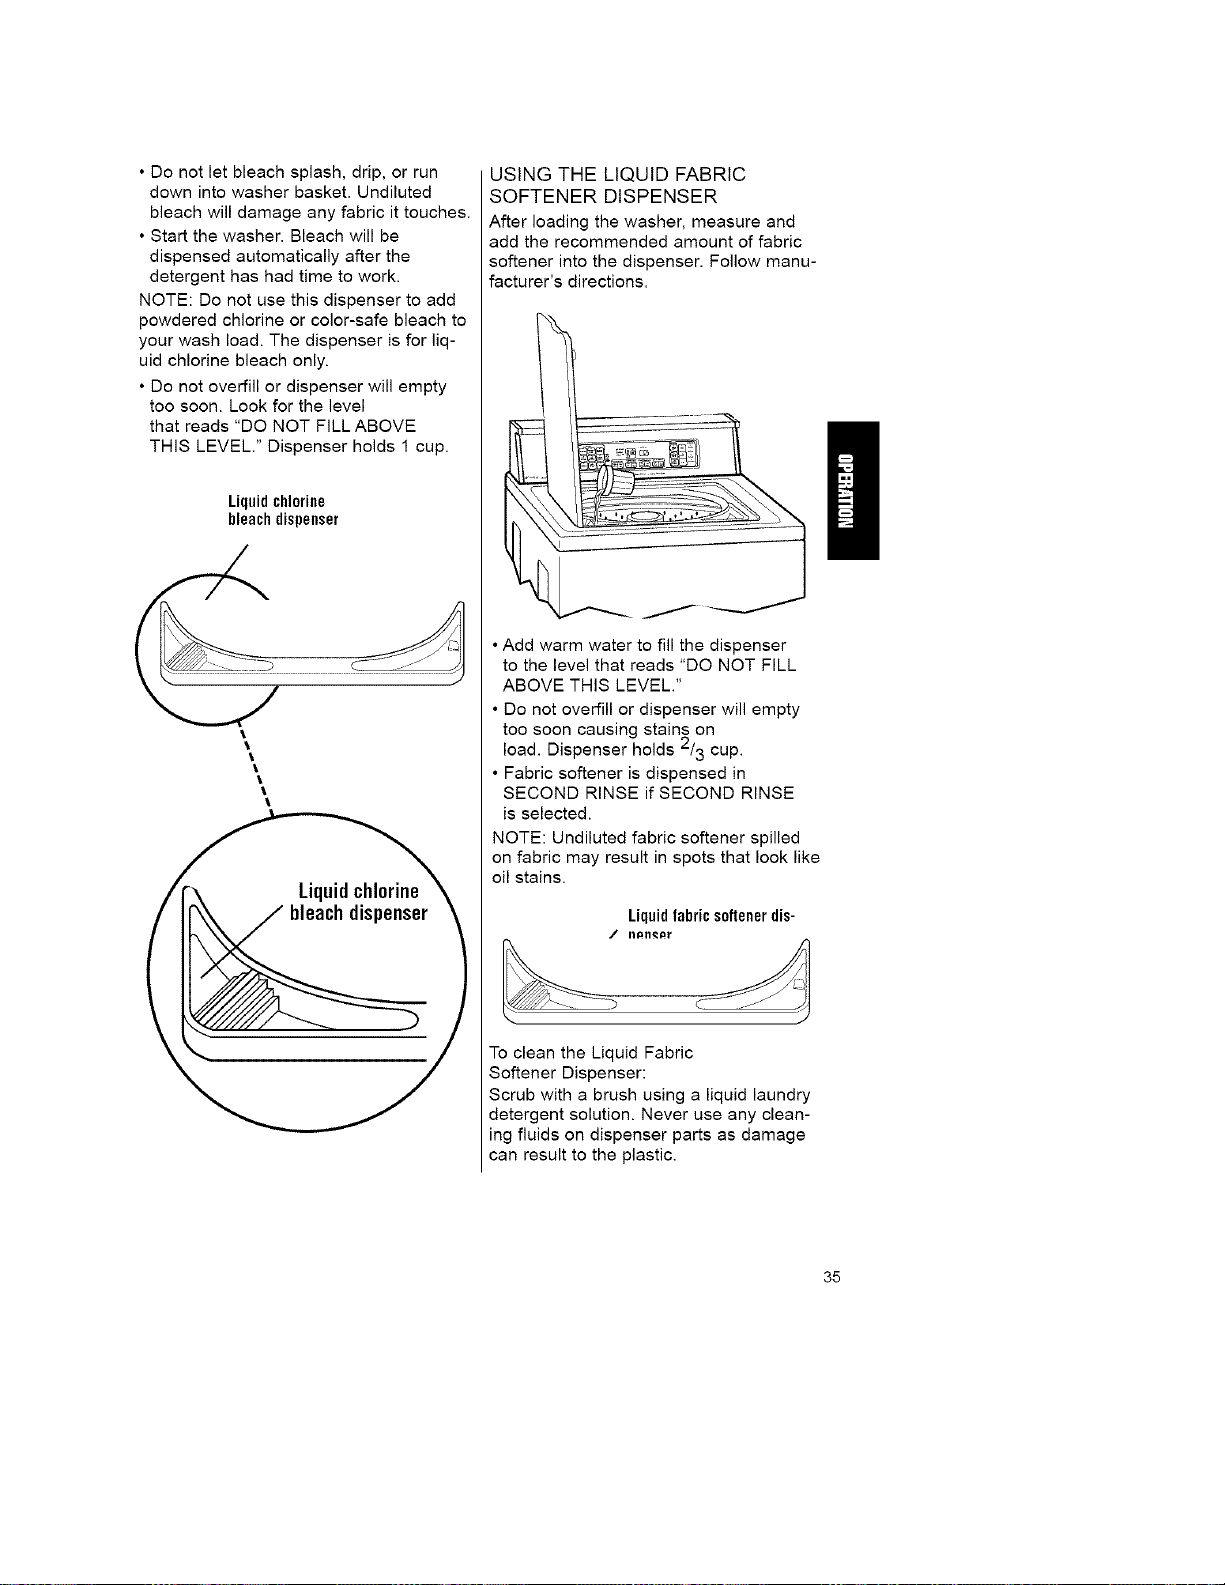
•Donotoverfillordispenserwillempty
toosoon.Lookforthelevel
thatreads"DONOTFILLABOVE
THISLEVEL."Dispenserholds1cup.
Liquidchlorine
bleachdispenser
j
%
I
I
I
I
I
USING THE LIQUID FABRIC
SOFTENER DISPENSER
After loading the washer, measure and
add the recommended amount of fabric
softener into the dispenser. Follow manu-
facturer's directions.
• Add warm water to fill the dispenser
to the level that reads "DO NOT FILL
ABOVE THIS LEVEL."
• Do not overfill or dispenser will empty
too soon causing stains on
load. Dispenser holds 2/3 cup.
• Fabric softener is dispensed in
SECOND RINSE if SECOND RINSE
is selected.
NOTE: Undiluted fabric softener spilled
on fabric may result in spots that look like
oil stains.
Liquidfabricsoftener dis-
J
To clean the Liquid Fabric
Softener Dispenser:
Scrub with a brush using a liquid laundry
detergent solution. Never use any clean-
ing fluids on dispenser parts as damage
can result to the plastic.
35
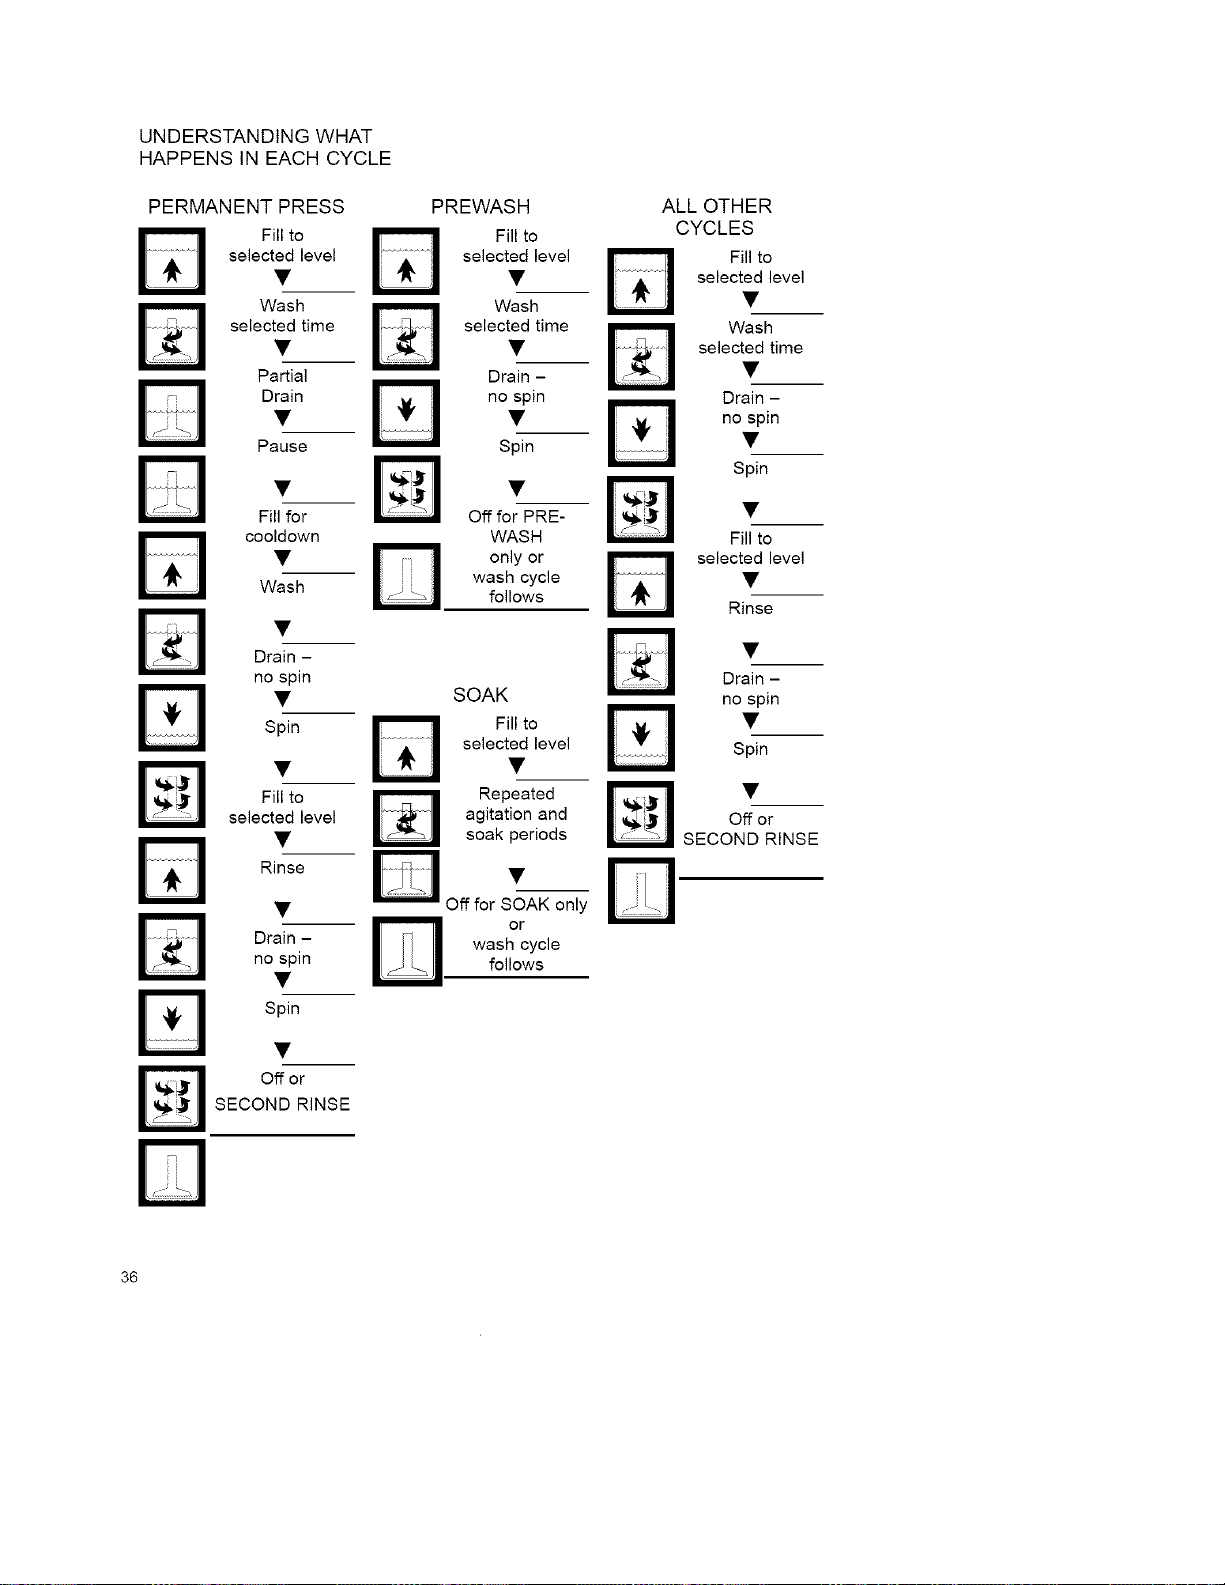
UNDERSTANDING WHAT
HAPPENS IN EACH CYCLE
PERMANENT PRESS
Fill to
selected level
Wash
selected time
Partial
Drain
Pause
Fill for
cooldown
Wash
Drain -
no spin
Spin
Fill to
selected level
Rinse
Drain -
no spin
Spin
off or
SECOND RINSE
PREWASH ALL OTHER
Fill to CYCLES
selected level _ Fill to
• W selected level
Wash •
selected time Wash
• selected time
Drain - •
no spin Drain -
• no spin
Spin •
Spin
Off for PRE-
WASH
only or
wash cycle
follows
SOAK
Fill to
selected level
Repeated
agitation and
soak periods
DOff for S_AK only
or
wash cycle
follows
Fill to
selected level
Rinse
Drain -
no spin
Spin
Off or
SECOND RINSE
D
36
PREPARING CLOTHES
FOR WASHING
Follow these recommendations
to help you prolong the life of
your garments.
• Close zippers, snaps, and hooks to
avoid snagging other items. Remove
pins, buckles, and other hard objects
to avoid scratching the washer interior.
Remove non-washable trim and
ornaments.
• Empty pockets and turn them
inside out.
• Turn down cuffs, brush away lint
and dirt.
• Turn synthetic knits inside out to
avoid pilling.
• Tie strings and sashes so they will
not tangle.
• Mend tears, loose hems, and seams.
• Treat spots and stains.
• Stained or wet garments should be
washed promptly for best results.
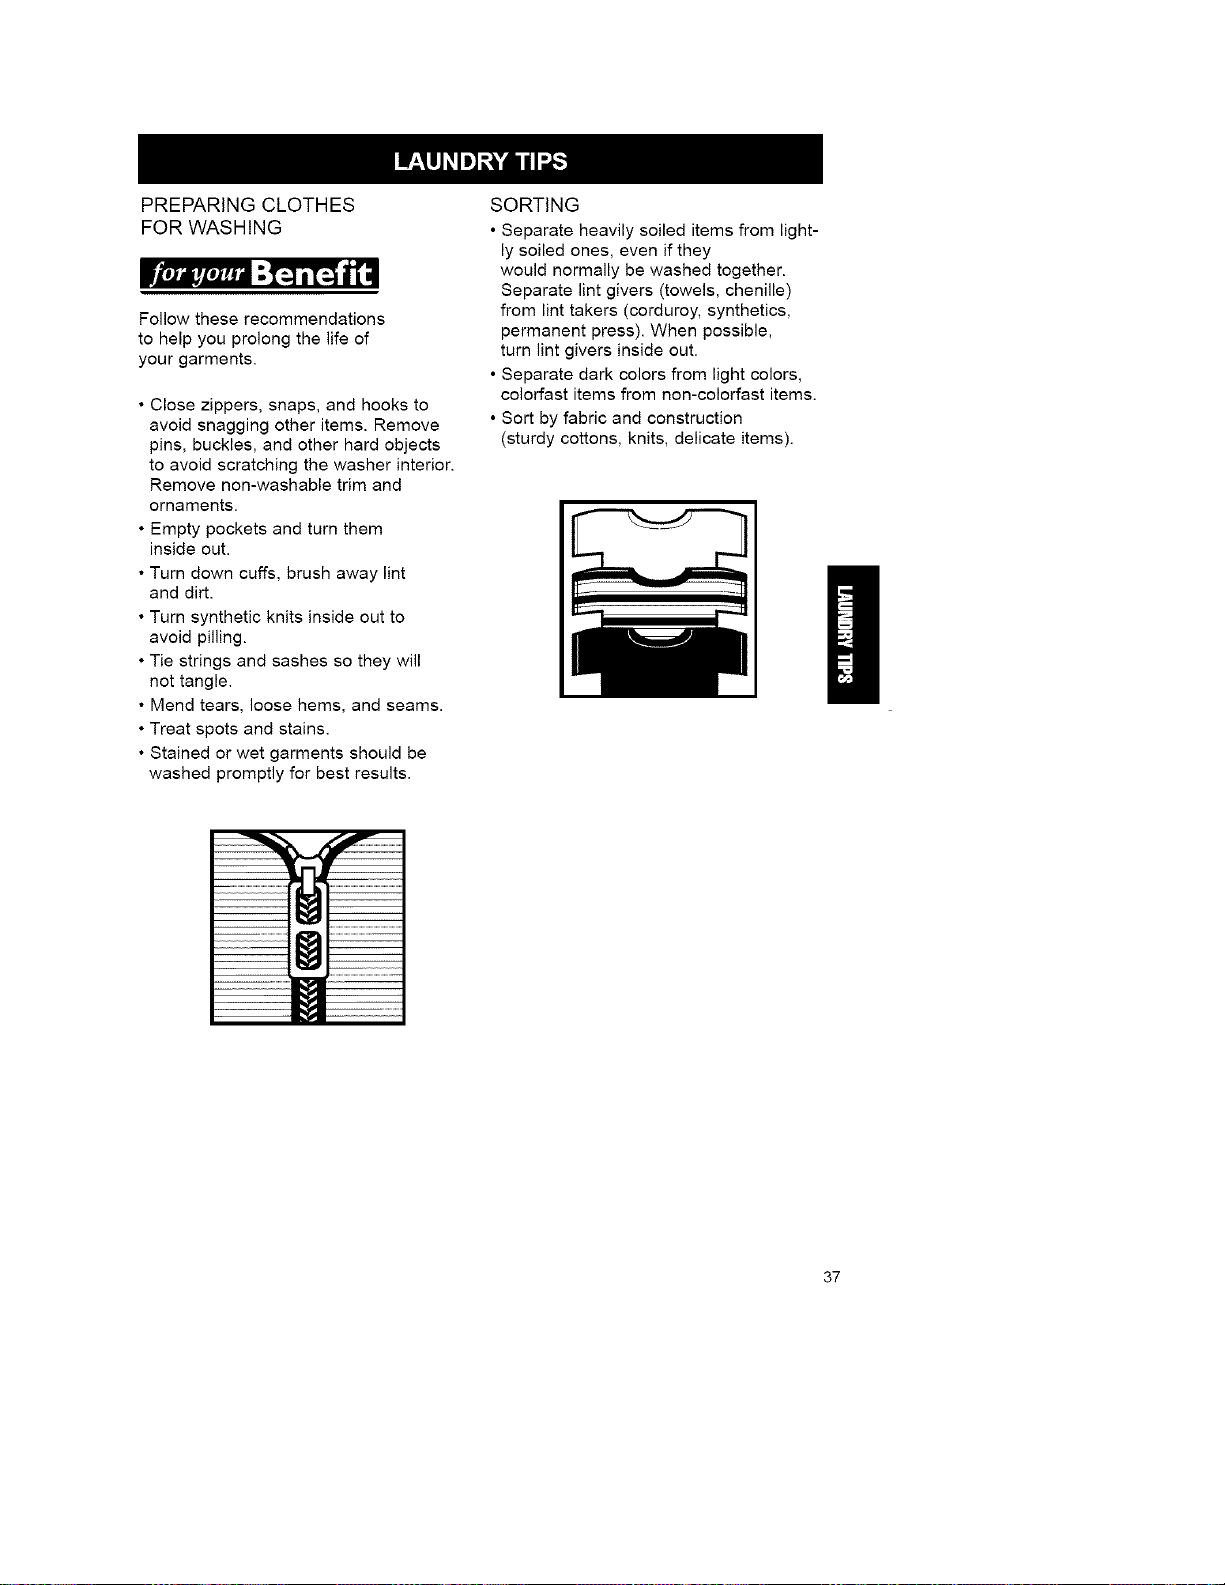
SORTING
• Separate heavily soiled items from light-
ly soiled ones, even if they
would normally be washed together.
Separate lint givers (towels, chenille)
from lint takers (corduroy, synthetics,
permanent press). When possible,
turn lint givers inside out.
• Separate dark colors from light colors,
colorfast items from non-colorfast items.
• Sort by fabric and construction
(sturdy cottons, knits, delicate items).
37
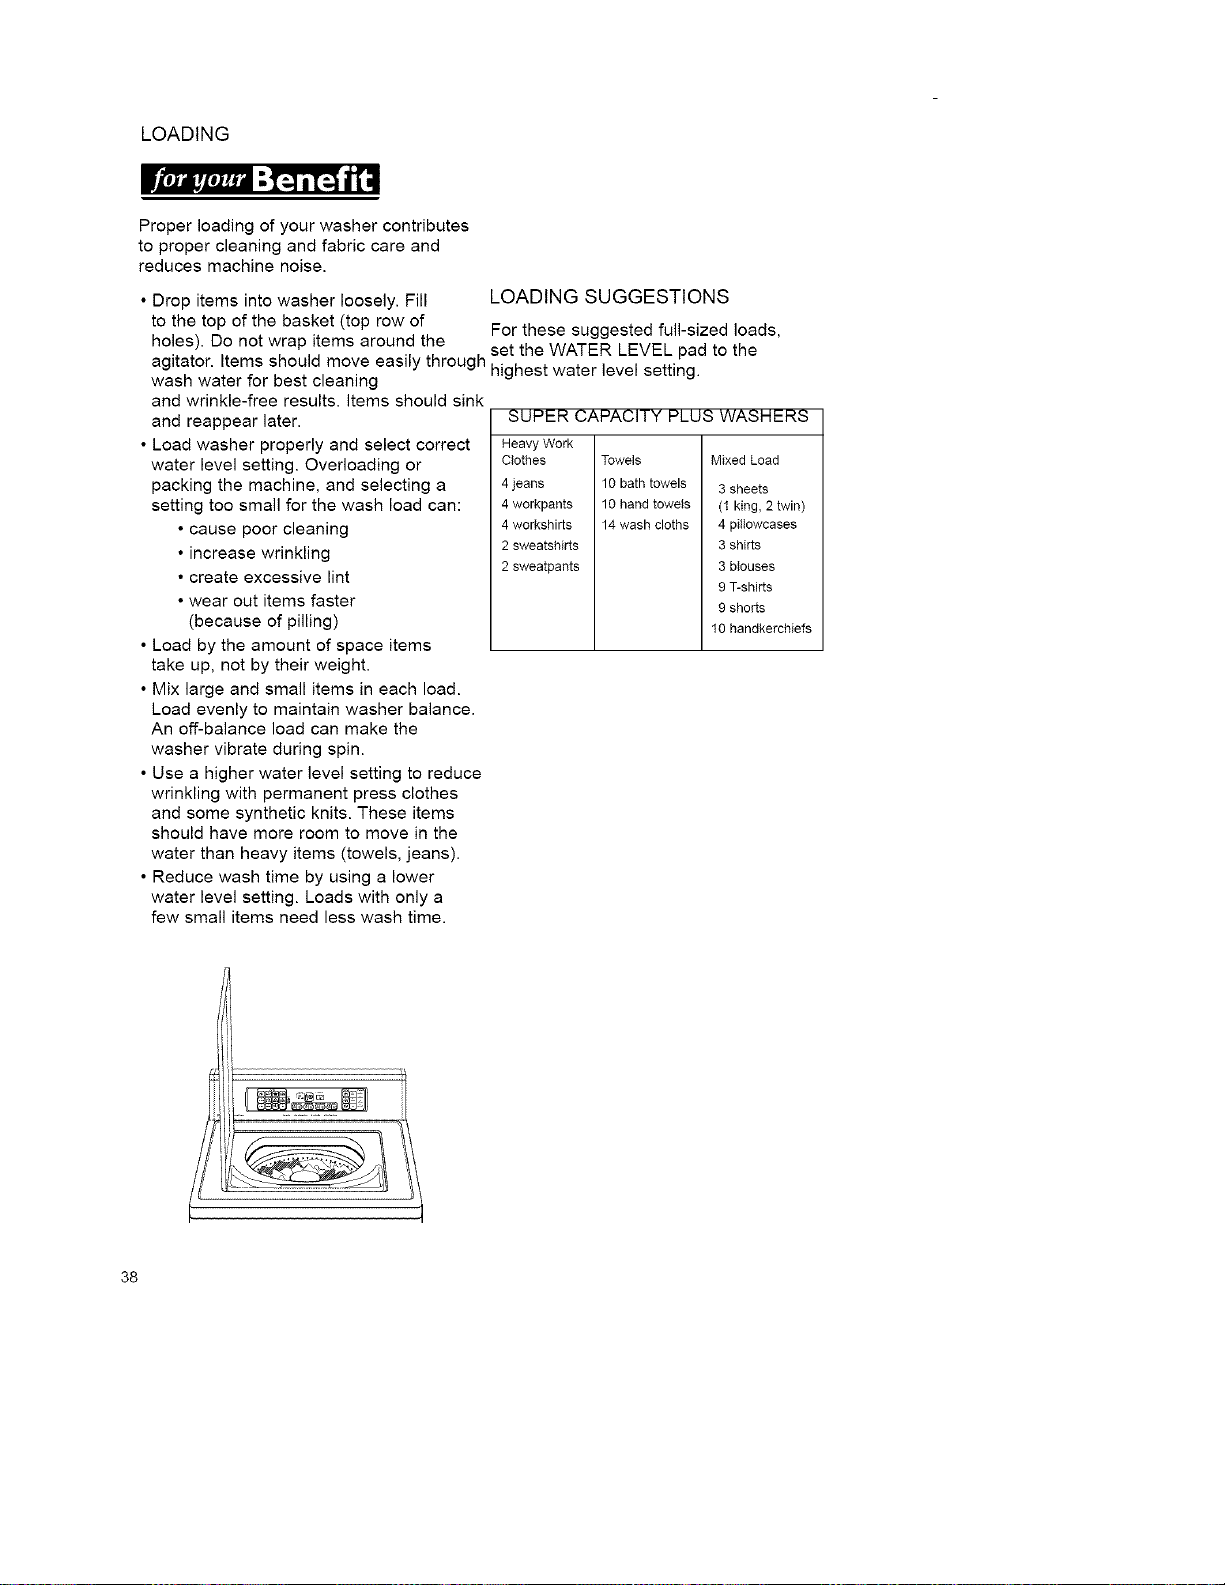
LOADING
Proper loading of your washer contributes
to proper cleaning and fabric care and
reduces machine noise.
• Drop items into washer loosely. Fill LOADING SUGGESTIONS
to the top of the basket (top row of
For these suggested full-sized loads,
holes). Do not wrap items around the
. , set the WATER LEVEL pad to the
agitator. Items should move easy througn highest water level setting.
wash water for best cleaning
and wrinkle-free results, items should sink
and reappear later.
• Load washer properly and select correct
water level setting. Overloading or
packing the machine, and selecting a
setting too small for the wash load can:
• cause poor cleaning
• increase wrinkling
• create excessive lint
• wear out items faster
(because of pilling)
• Load by the amount of space items
take up, not by their weight.
• Mix large and small items in each load.
Load evenly to maintain washer balance.
An off-balance load can make the
washer vibrate during spin.
• Use a higher water level setting to reduce
wrinkling with permanent press clothes
and some synthetic knits. These items
should have more room to move in the
water than heavy items (towels, jeans).
• Reduce wash time by using a lower
water level setting. Loads with only a
few small items need less wash time.
SUPER CAPACITY PLUS WASHERS
Heavy Work
Clothes
4 jeans
4 workpants
4 workshirts
2 sweatshirts
2 sweatpants
Towels Mixed Load
10 bath towels 3 sheets
10 hand towels (1 king, 2 twin)
14 wash cloths 4 pillowcases
3 shirts
3 blouses
9 T-shirts
9 shorts
10 handkerchiefs
38
CLEANING YOUR WASHER Changing the Fluorescent Light Bulb:
Proper care of your washer can extend STEP 1. Unplug the washer power
its life. This section explains how to care for supply cord from the electrical supply.
your washer properly and safely.
Exterior
Wipe up detergent, bleach, and other
spills with a soft, damp cloth or sponge
as they occur. Occasionally wipe the
outside of the washer to keep it looking like
new.
Do not put sharp or metal objects in your
washer. They can damage the finish. Check
all pockets for pins, clips, money,
bolts, nuts, etc. Do not lay these objects on
your washer after emptying pockets.
Interior
Clean interior with 1 cup of chlorine
bleach mixed with 2 cups of detergent. Run
washer through a complete cycle
using hot water. Repeat process if
necessary.
NOTE: Remove hard water deposits using
only cleaners labeled as washer safe.
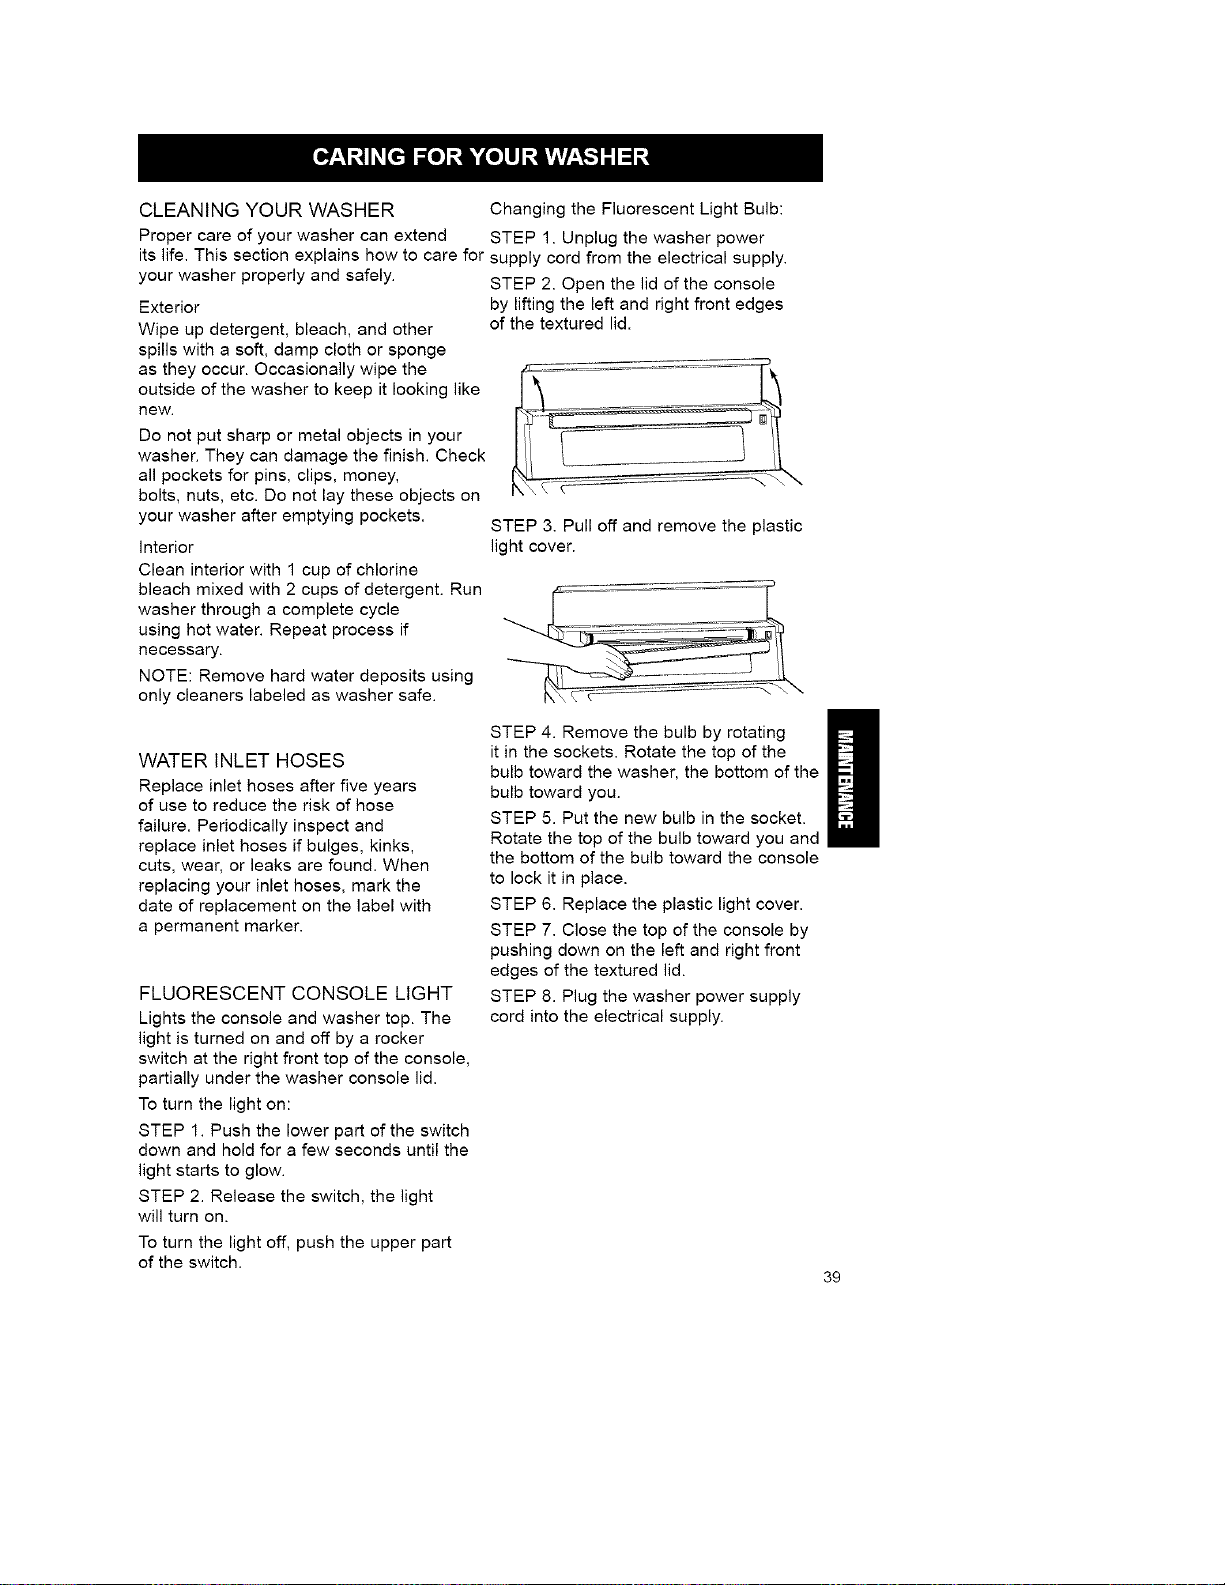
STEP 2. Open the lid of the console
by lifting the left and right front edges
of the textured lid.
STEP 3. Pull off and remove the plastic
light cover.
WATER INLET HOSES
Replace inlet hoses after five years
of use to reduce the risk of hose
failure. Periodically inspect and
replace inlet hoses if bulges, kinks,
cuts, wear, or leaks are found. When
replacing your inlet hoses, mark the
date of replacement on the label with
a permanent marker.
FLUORESCENT CONSOLE LIGHT
Lights the console and washer top. The
light is turned on and off by a rocker
switch at the right front top of the console,
partially under the washer console lid.
To turn the light on:
STEP 1. Push the lower part of the switch
down and hold for a few seconds until the
light starts to glow.
STEP 2. Release the switch, the light
will turn on.
To turn the light off, push the upper part
of the switch.
STEP 4. Remove the bulb by rotating
it in the sockets. Rotate the top of the
bulb toward the washer, the bottom of the
bulb toward you.
STEP 5. Put the new bulb in the socket.
Rotate the top of the bulb toward you and
the bottom of the bulb toward the console
to lock it in place.
STEP 6. Replace the plastic light cover.
STEP 7. Close the top of the console by
pushing down on the left and right front
edges of the textured lid.
STEP 8. Plug the washer power supply
cord into the electrical supply.
39
WINTER STORAGE
OR MOVING CARE
Install and store your washer where
it will not freeze. Because some water
may stay in the hoses, freezing can dam-
age your washer. If storing or
moving your washer during freezing
weather winterize it.
To winterize washer:
1. Shut off both water faucets.
2. Disconnect and drain water inlet hoses.
3. Put 1 quart of R.V.-type antifreeze
in the basket.
4. Run washer on a SPIN setting for
about 30 seconds to mix the antifreeze
and water. Some of the mixture will
pump out while the washer spins.
5. Unplug the power supply cord.
To use washer again:
1. Flush water pipes and hoses.
2. Reconnect water inlet hoses.
3. Turn on both water faucets.
4. Reconnect power supply cord.
5. Run the washer through a complete
cycle with 1 cup of detergent to clean
out antifreeze.
NON-USE OR VACATION CARE
Operate your washer only when you
are at home. If you will be on vacation or
not using your washer for an extended
period of time, you should:
• Unplug the power supply cord or turn off
electrical power to the washer.
• Turn off the water supply to the washer.
This helps avoid accidental flooding (due
to a water pressure surge) while you are
away.
4O

Mostlaunderingproblemsareeasily
solvedifyouunderstandthecause.
Checktheselistsforcommonlaundry
andwasherproblems.Ifyouneed
furtherassistance,seepage47.
Problem
iviessage _,ooes
"LF"
(Long Fill)
"LD"
(Long Drain)
"FF"
(Fill Failure)
"OL"
(Open Lid)
"PF"
(Power Failure)
vvasner LeaKs
Possible Cause Solution
Inlet hoses are kinked or
clogged.
Water valve screens are not clear.
Dra_n hose _sKinKed or clogged.
Straighten inlet hoses.
Clear screens of any foreign material.
_tra_gnten or unplug nose.
Problem with water level Uall for service.
sensing system.
Lid Is open during drain or spin. Glose IId.
Power to washer went oft
during cycle.
i.lousenola plumbing IS leaKing.
Inlet hoses not tight.
Inlet nose washers not
properly seated.
Drain nose not properly
clamped or is off.
Drain is clogged.
Tub moved forward during
unloading, causing water to
deflect off of tub ring.
Unit not level causing water
to deflect off of tub ring.
Load is unbalanced. Spray
rinses are deflecting off of load.
Washer is overloaded. Pills or
spray rinses are deflecting
off of load.
Press any pad to clear the display.
Restart the washer from the beginning
of the cycle.
_epalr piumolng.
lighten noses
(see "INSTALLATION," Section D).
F.eseat washers.
(see "INSTALLATION," Section D).
ulamp drain nose.
(see "INSTALLATION," Section C).
btemove drain clogs. _lnK, standpipe,
or floor drain must be able to handle
17 gallons of water per minute.
_-nsure tub is centered before
starting washer.
_-nsure front feet are installed and
nuts are tightened. Level washer.
Reset rear legs
(see "INSTALLATION," Section F).
Redistribute the load.
_educeload size,
41
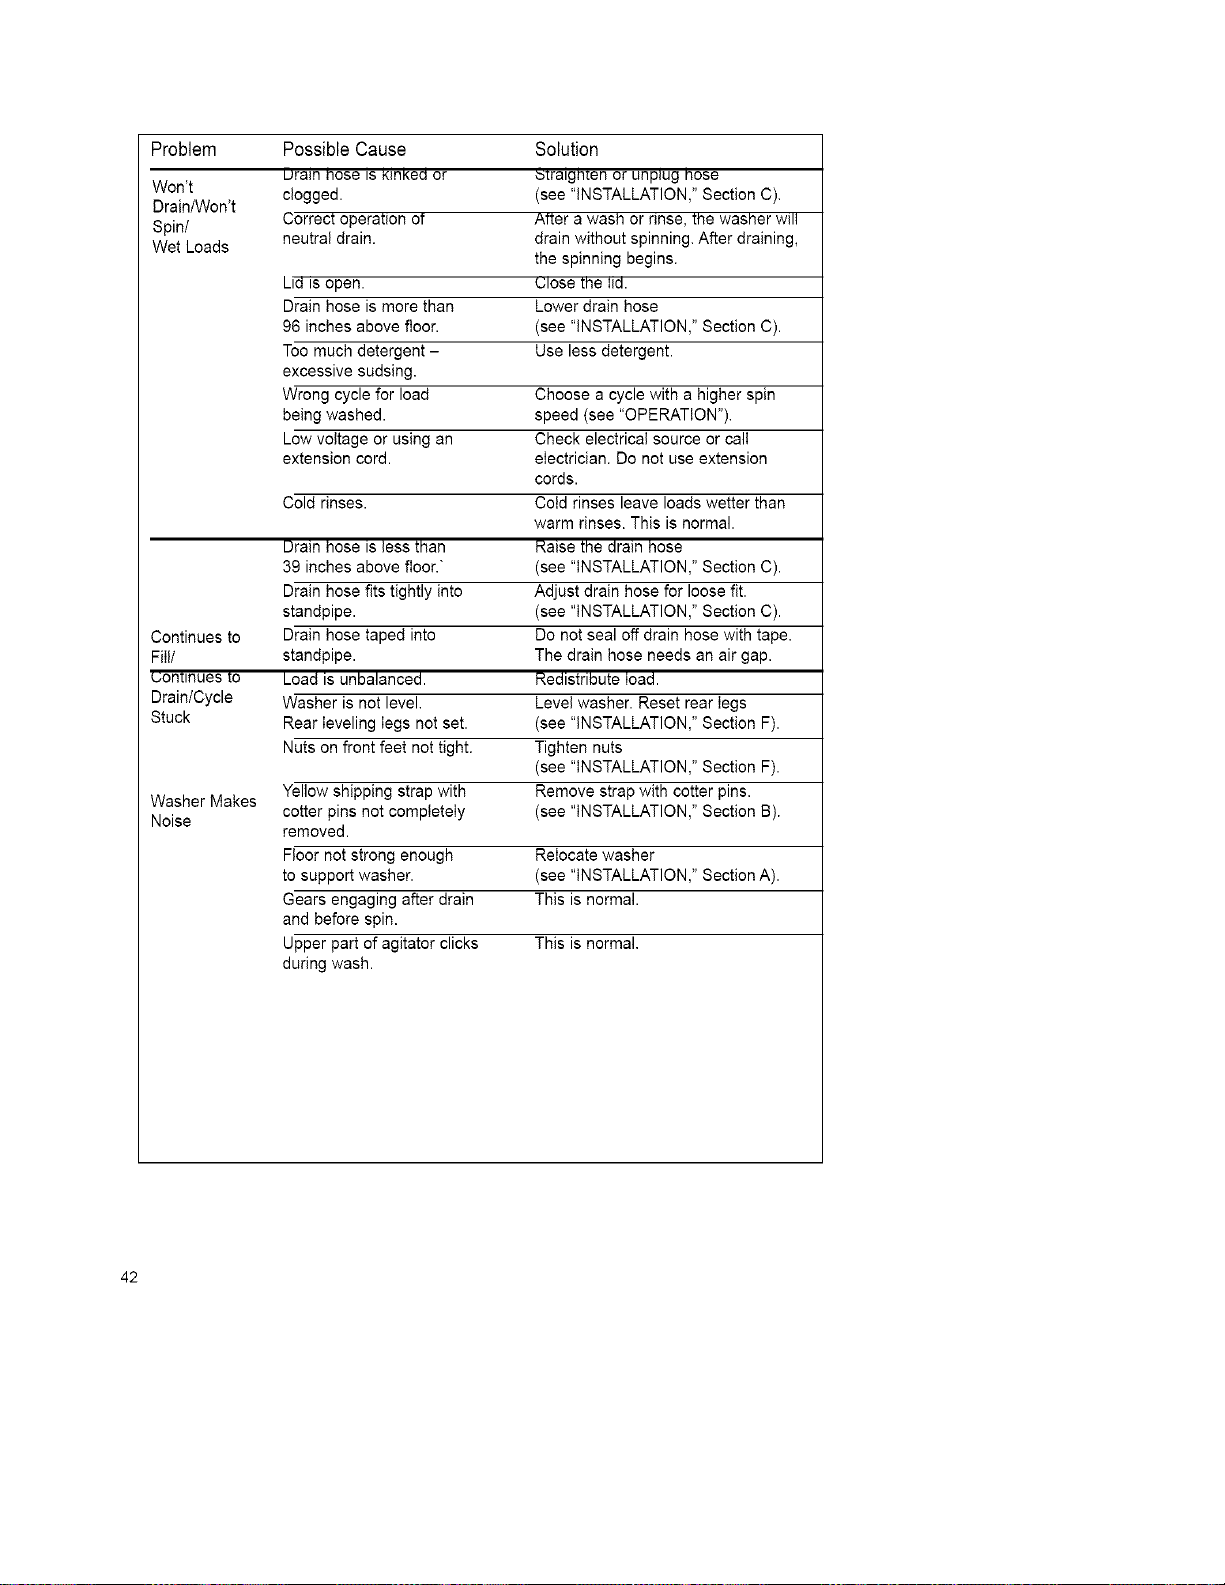
Problem
Won't
Drain/Won't
Spin/
Wet Loads
Continues to
Fill/
UOntlnues to
Drain/Cycle
Stuck
Washer Makes
Noise
Possible Cause
uraln nose is KinKed or
clogged.
Correct operation ot
neutral drain.
Lid is open.
Drain hose is more than
96 inches above floor.
Too much detergent -
excessive sudsing.
Wrong cycle for load
being washed.
Low voltage or using an
extension cord.
Cold rinses.
Drain hose is less than
39 inches above floor."
Drain hose fits tightly into
standpipe.
Drain hose taped into
standpipe.
Load is unbalanced.
Washer is not level.
Rear ieveling iegs not set.
Nuts on front feet not tight.
Yellow shipping strap with
cotter pins not compteteiy
removed.
Floor not strong enough
to support washer.
Gears engaging after drain
and before spin.
Upper part of agitator clicks
during wash.
Solution
_tralgmen or unplug nose
(see "INSTALLATION," Section C).
Atter a wash or rinse, the washer will
drain without spinning. After draining,
the spinning begins.
Ulose the lid.
Lower drain hose
(see "INSTALLATION," Section C).
Use less detergent.
Choose a cycle with a higher spin
speed (see "OPERATION").
Check electrical source or call
eiectrician. Do not use extension
cords.
Cotd rinses leave loads wetter than
warm rinses. This is normal.
Raise the drain hose
(see "INSTALLATION," Section C).
Adjust drain hose for loose fit.
(see "INSTALLATION," Section C).
Do not seal off drain hose with tape.
The drain hose needs an air gap.
Redistribute load.
Level washer. Reset rear Iegs
(see "INSTALLATION," Section F).
Tighten nuts
(see "INSTALLATION," Section F).
Remove strap with cotter pins.
(see "INSTALLATION," Section B).
Relocate washer
(see "INSTALLATION," Section A).
This is normal.
This is normal.
42
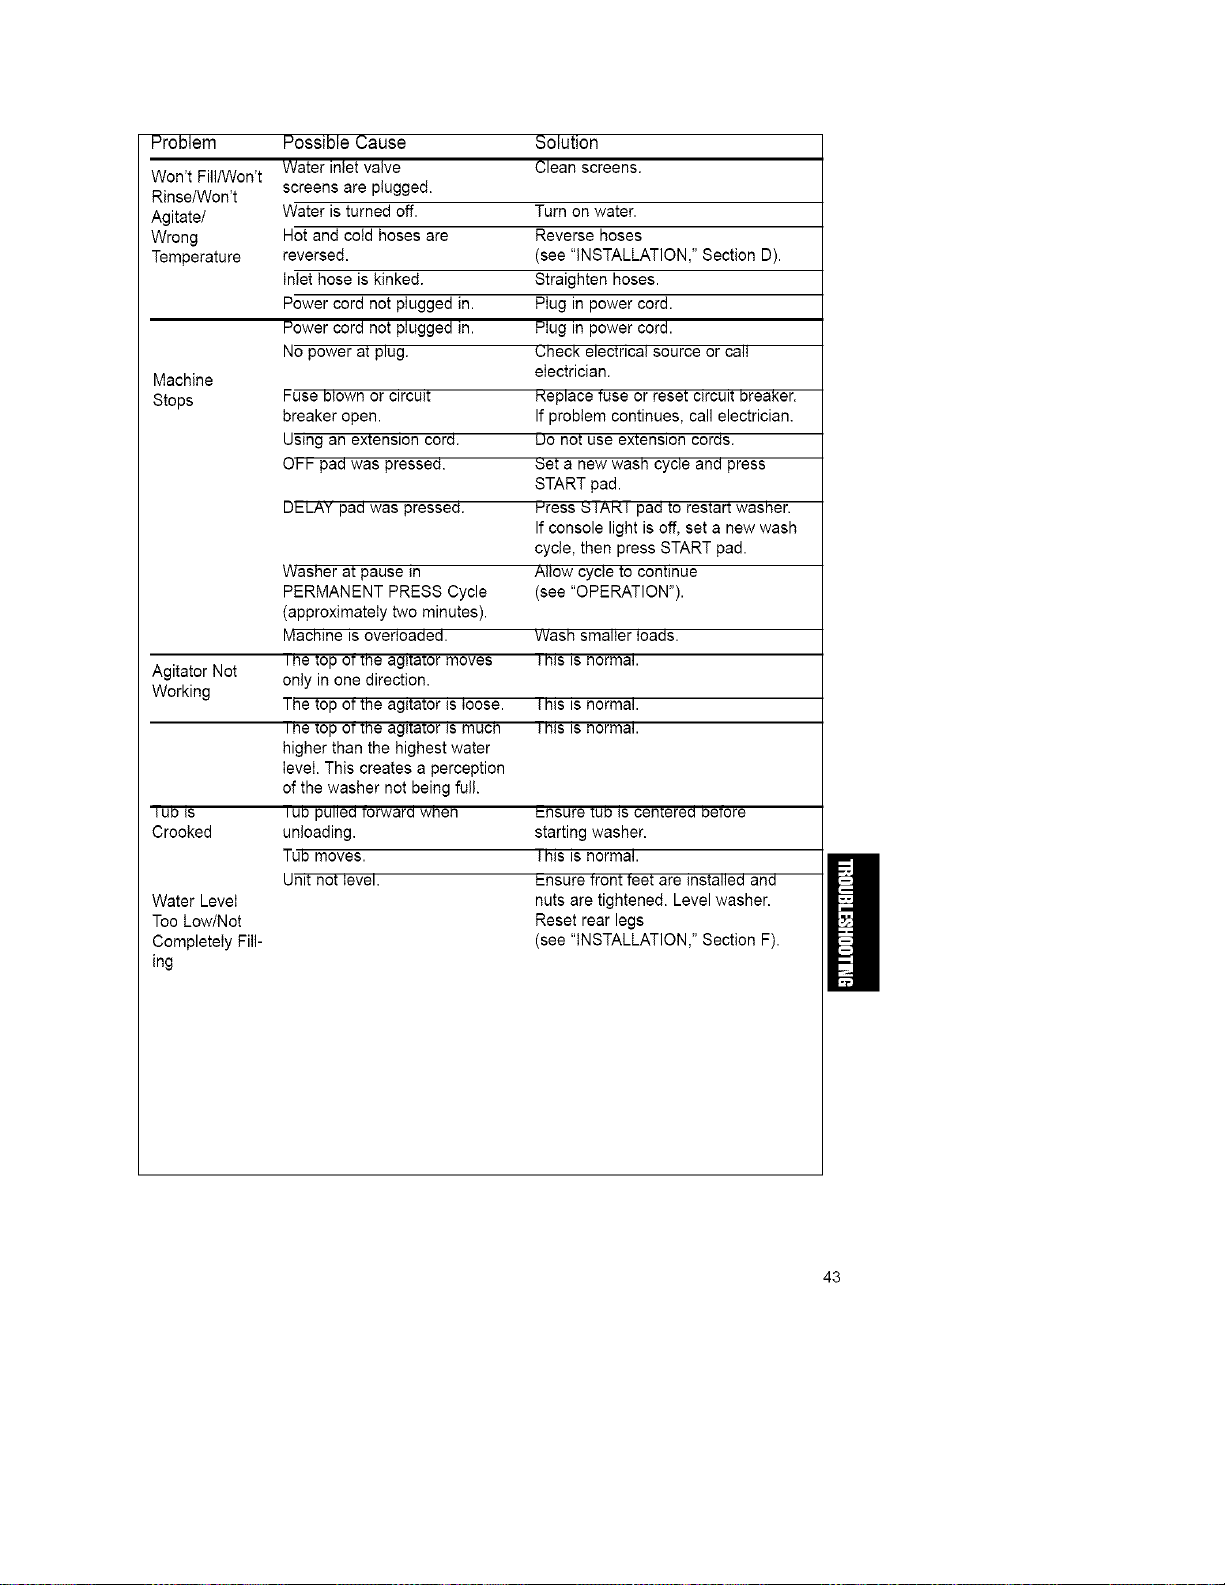
Problem Solution
Clean screens.
Won't Fill/Won't
Rinse/Won't
Agitate/
Wrong
Temperature
Machine
Stops
Agitator Not
Working
I Ub IS
Crooked
Water Level
Too Low/Not
Completely Fill-
ing
Possible Cause
Water inlet valve
screens are plugged.
Water is turned off.
Hot and cold hoses are
reversed.
Inlet hose is kinked.
Power cord not plugged in.
Power cord not plugged in.
No power at plug.
Fuse blown or circuit
breaker open.
Using an extension cord.
O1"-I'-pad was pressed.
DP--LAYpad was pressed.
Washer at pause in
PERMANENT PRESS Cycle
(approximately two minutes).
Machine is overloaded.
iRe lop of the agitator moves
only in one direction.
T!qe top o1the agitator is loose.
iRe lop of the agitator is mucn
higher than the highest water
level. This creates a perception
of the washer not being full.
I UD pulleO forware when
unloading.
Tub moves.
Unit not Ievel.
Turn on water.
Reverse hoses
(see "INSTALLATION," Section D).
Straighten hoses.
Plug in power cord.
Plug in power cord.
UlqeCKelectrical source or call
eiectrician.
_eplace fuse or reset circuit breaker.
If problem continues, call electrician.
uo not use extension cords.
_et a new wash cycle and press
START pad.
Hress _5IAIXI pad to restart washer.
If console light is off, set a new wash
cycle, then press START pad.
Allow cycle to continue
(see "OPERATION").
Wash smaller loads.
I hiS IS normal.
I his IS normal.
i his is normal.
_-nsure tub is cemereo before
starting washer.
I his is normal.
t-nsure front feet are installed and
nuts are tightened. Level washer.
Reset rear legs
(see "INSTALLATION," Section F).
43
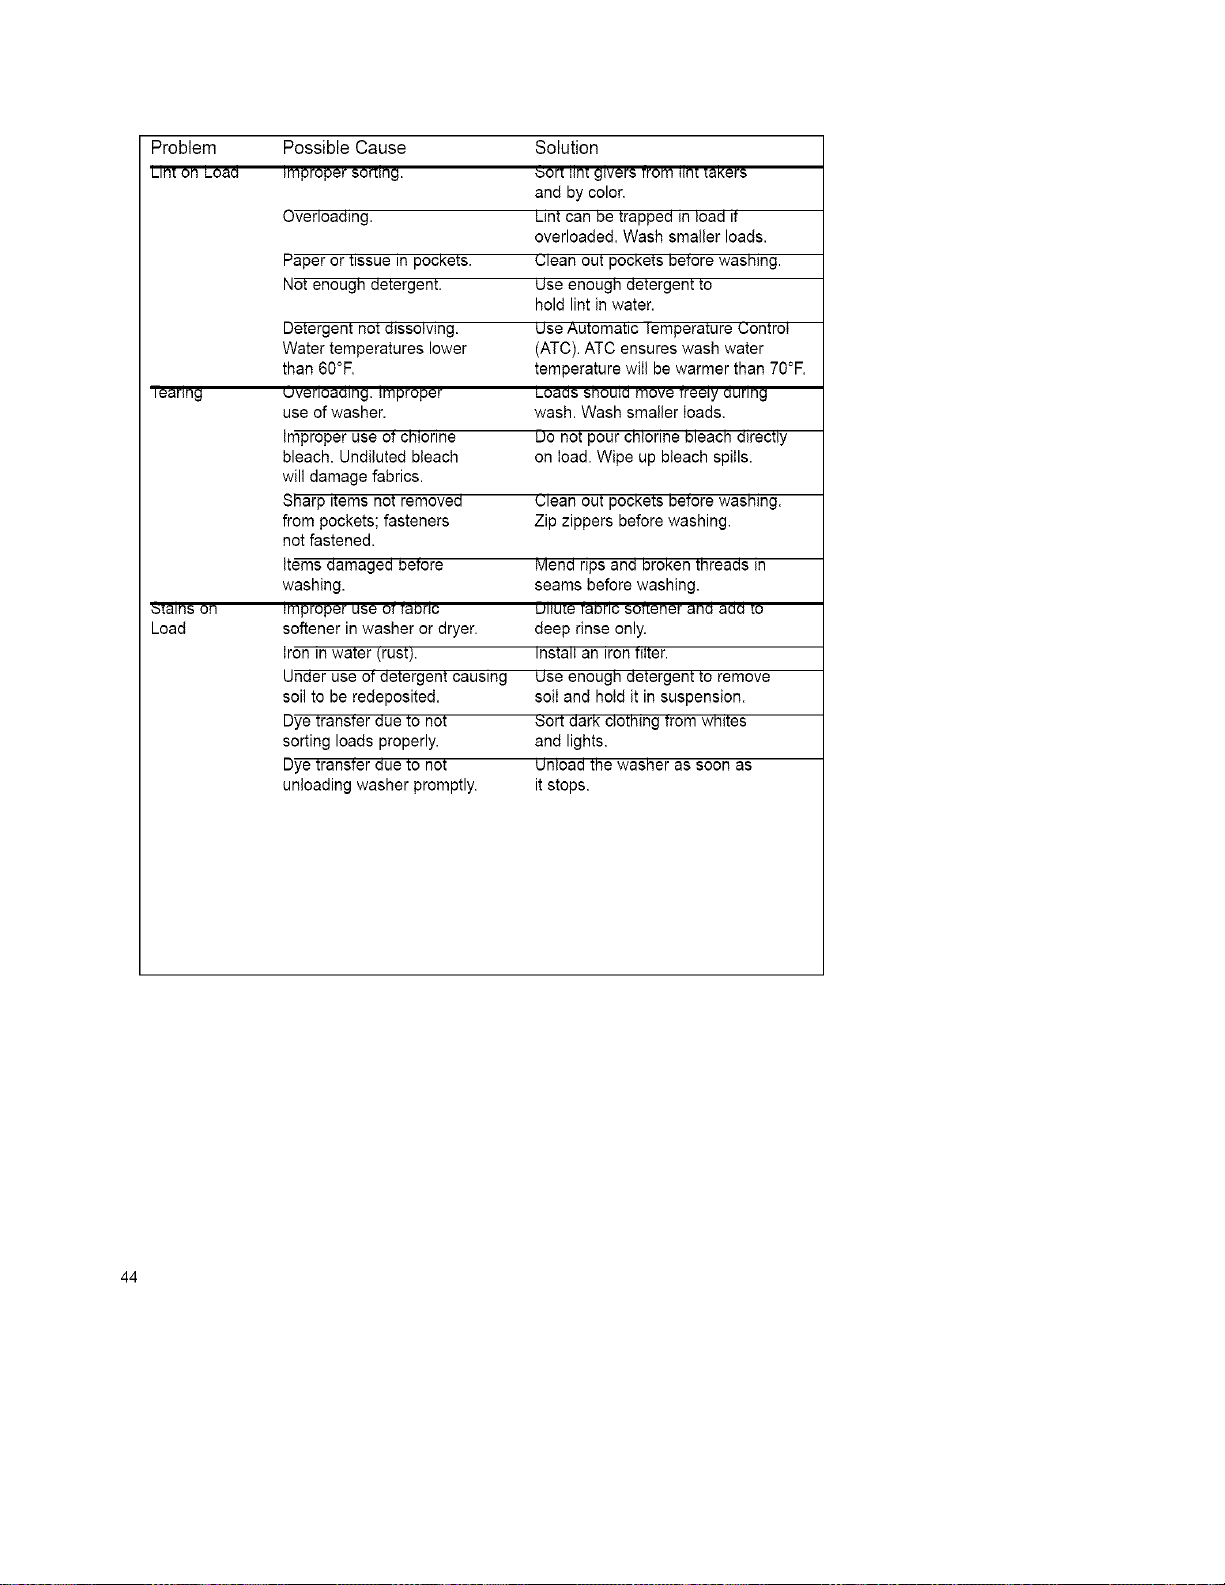
Problem
Lint on Loam
leanng
b_alns on
Load
Possible Cause
improper sorting.
Overloading.
Paper or tissue in pockets.
Not enough detergent.
Detergent not dmsolwng.
Water temperatures lower
than 60°F,
uverloaalng, improper
Solution
bortllmgiversfrom lln[[aKers
and by color,
Lint can be trapped in load It
overloaded. Wash smaller loads.
{_;lean out pockets before washing.
Use enough detergent to
hold lint in water.
Use Automatic lemperature UontroI
(ATC). ATC ensures wash water
temperature will be warmer than 70°F.
Loaas snouia move Treety aurlng
use of washer.
Improper use ot cmonne
bleach. Undiluted bleach
will damage fabrics.
Sharp _tems not removed
from pockets; fasteners
not fastened.
Items damaged before
washing,
improper use oTTaDnc
softener in washer or dryer.
Iron in water (rust),
Under use ot detergent causing
soil to be redeposited,
Dye transter due to not
sorting loads properly.
Dye transter due to not
unloading washer promptly,
wash. Wash smaller loads,
uo not pour cnlonne bleach directly
on load. Wipe up bleach spills.
ulean out pockets before washing.
Zip zippers before washing,
Ivlend rips and broken rereads in
seams before washing,
Ullu[e fabric sor[ener ana aaa [o
deep rinse only.
Install an iron tilter.
Use enouglq detergent to remove
soiI and hold it in suspension.
_ort clark clotmng from wmtes
and lights,
Unload the washer as soon as
it stops,
44
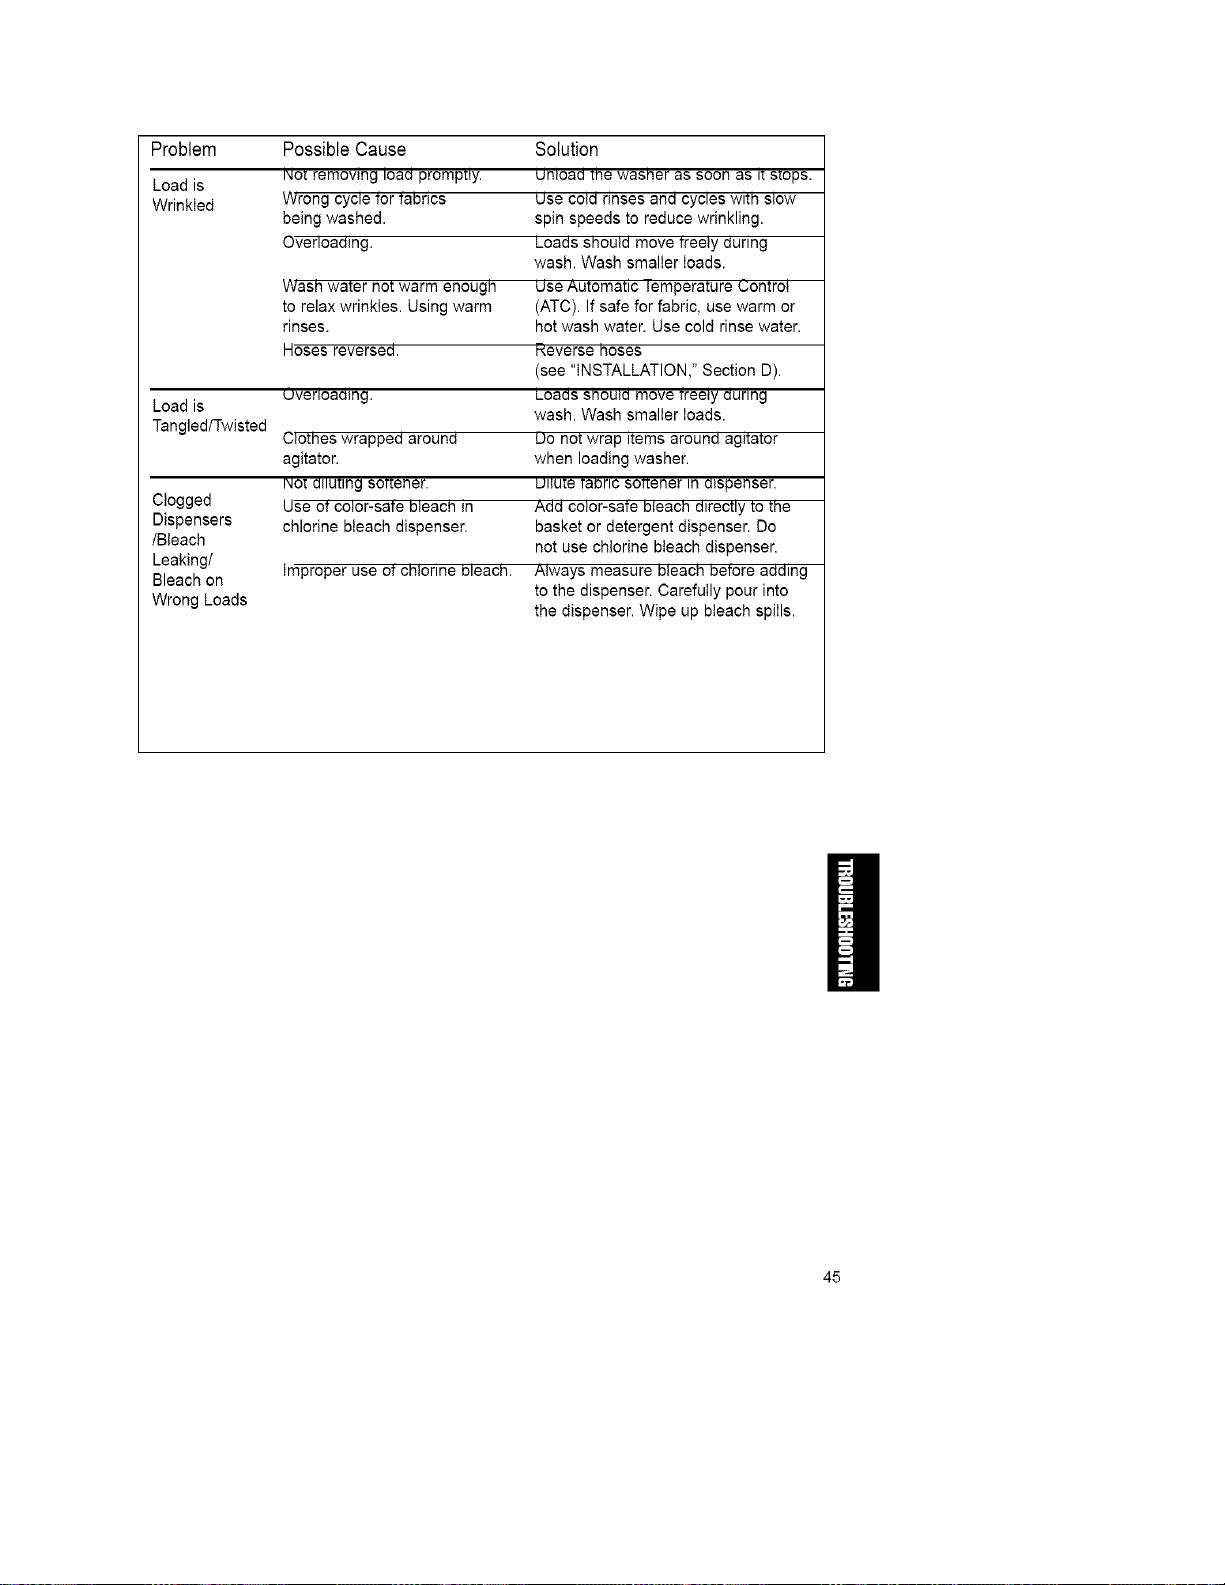
Problem Possible Cause Solution
Load is r4o_removing load prompuy.
Wrinkled Wrong cycle tor tabncs
being washed.
Overloading.
Load is
Tangled/Twisted
Clogged
Dispensers
/Bleach
Leaking/
Bleach on
Wrong Loads
Wash water not warm enough
to relax wrinkles. Using warm
rinses.
Hoses reversed.
uverloaaing.
Clothes wrapped around
agitator.
1".4o'[allU,[ing sor,[ener.
Use ot color-sate bleach in
chlorine bleach dispenser.
Improper use ot chlorine bleach.
unload ,[ne wasner as soon as i,[s,[ops.
Use cold rinses and cycles With SlOW
spin speeds to reduce wrinkling.
Loads should move treely during
wash. Wash smaller loads.
use Automatic lemperature Gontrot
(ATC). If safe for fabric, use warm or
hot wash water. Use cold rinse water.
Reverse hoses
(see "INSTALLATION," Section D).
Loaas snoula move Treely during
wash. Wash smaller ioads.
uo not wrap Items around agitator
when loading washer.
LJIIu[e faorlc sottener in dispenser.
Add color-sate bleach directly to the
basket or detergent dispenser. Do
not use chlorine bleach dispenser.
Always measure bleach betore adding
to the dispenser. Carefully pour into
the dispenser. Wipe up bleach spills.
45
KENMOREWASHERS
WeServiceWhatWeSell
"WeServiceWhatWeSell"isour
assuranceyoucandependonSears
forservice.Yourwasherhasaddedvalue
whenyouconsiderthatSears
hasserviceunitsnationwide,staffed
withprofessionaltechniciansspecifically
trainedonSearsappliancesandhaving
parts,toolsandequipmenttoensure
thatwemeetourpledgetoyou...
"WeServiceWhatWeSell."
SearsMaintenanceAgreement
MaintainthevalueofyourKenmore
WasherwithaSearsMaintenanceAgree-
ment.Kenmorewashersare
designed,manufactured,andtested
foryearsofdependableoperation.
Yetanyappliancemayrequireservice
fromtimetotime.
TheSearsMaintenanceAgreement
•Isyourwaytobuytomorrow's
serviceattoday'sprices.
•Eliminatesrepairbillsresulting
fromnormaluse.
•Allowsforasmanyservicecalls
asrequired.
•Providesforservicebyprofessional
SearsTrainedTechnicians.
• Evenifyoudon'tneedrepairs,the
MaintenanceAgreementoffersan
annualpreventativemaintenancecheck-
upatyourrequest!
For more information,
call 1-800-827-6655.
46
Forthe repair orreplacementparts you
needdelivereddirectlytoyourhome
Call7 am - 7 pm, 7 daysaweek
1-800-366-PART
(1-800-366-7278)
Forin-homemajorbrandrepairservice
Call24 hoursa day,7 daysa week
1-800-4-REPAIR
(1-800-473-7247)
Forthe locationofa Sears Partsand
F
RepairCenterinyourarea t
Call24 hoursa day,7 daysaweek [mm
1-800-488-1222
- ]
mm mmmmmm
mmmmmm
Forinformationonpurchasinga Sears _.--.11_,
MaintenanceAgreementorto inquire
aboutanexistingAgreement
Call9 am - 5 pm, Monday - Saturday
1-800-827-6655
Whenrequestingserviceorordering
parts, alwaysgivethe following
information:
• Product Name • Part Name
• Model Number • Part Number
SEARS
America's Repair Specialists
47