Loading ...
Loading ...
Loading ...

4
Fig. 4
6. Remove the two filters by pulling the
tabs to release. (Fig. 5)
Fig. 5
7. Remove the trim kit body by
unscrewing the four screws. Leave
the metal bracket and mounting
screws attached.(Fig. 6)
Fig. 6
Install the Heat Strip
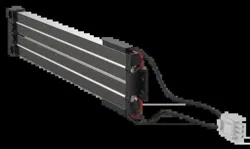
8. Align the 4 screw holes on the heat
strip with that on the evaporator, 2
holes on each side. (Fig. 7)
9. Insert four screws with washers into
these holes. And then fasten them.
(Fig. 7)
Heat Strip
Evaporator
Wire of the Heat Strip
Fig. 7
NOTE: Use ST4 x 9mm screws
(provided) only. Use of other type of
screws may pierce/damage the copper
tubing in the evaporator.
10. Fix the harnesses together with nylon
cable ties (not provided). Then pass
the 2 harnesses down through the air
intake vent to the RV (Fig. 8).
NOTE: Retain wire harnesses away
from the electric heater element and
evaporator to prevent being damaged.
Heat strip wire
Motor wire
Cable tie
Fig. 8
11. Install the EPP top cover of the
evaporator back, and ensure the pipe
outlet is sealed well with the existing
silicon sealant.
NOTE: Make sure the top cover is
aligned with the lower cover of the
evaporator when installing back.
Loading ...
Loading ...
Loading ...