Loading ...
Loading ...
Loading ...
Ice Service (continued)
Icemaker Water Line
Installation Requirements
You will need a shutoff valve, two
1/4" O, D compression nuts, two
compression sleeves and enough
1/4" OD copper tubing to connect
refrigerator to water source, (Your
Sears Store or Catalog Sales Office
has a kit available with a saddle-
type shutoff valve and copper
tubing, Before purchasing, make
sure a saddle-type valve complies
with your local plumbing codes.)
CAUTION: Do not install icemaker
tubing in areas where temperatures
fall below freezing.
1o Find a 3/8" ( 10 ram) to I"
(25 mm) vertical COLD water pipe
near the refrigerator When it is
necessary to connect into a
horizontal water pipe, make the
connection to the top or side, rather
than at the bottom to avoid drawing
off any sediment from the water pipe_
2. Measure from INLET on rear of
refrigerator to water pipe, Add 7'
(2 m) to allow Formoving refrigerator
Forcleaning, This is lhe length of
1/4" O, D_copper tubing you will
need for the job (length from water
valve to water pipe PLUS 7' [2 m])
Be sure both ends of copper tubing
are cut square.
3. Turn OFF main water supply,
Turn on nearest faucet long enough
to clear line of water,
CAUTION: When using any
electrical device (such as a power
drill) to facilitate installation, be
sure the device is insulated or wired
in a manner to prevent the hazard
of electrical shock,
4. Using a grounded drill, drill a
3/16" hole in the vertica! cold
water pipe you have selected.
Typical
ways to
connect
to water
supply
PIPE
CLAMP \
SHUTOFF
INLET
END
5. Fasten shutoff valve to cold water
pipe with pipe clamp, Be sure inlet
end is solidly in 3/16" drilled hole
in water pipe and washer is under
pipe clamp, Tighten packing nut,,
Tighten pipe clamp screws carefully
and evenly so washer makes a
watertight connection Do not
overtighten or you may crush
copper tubing, especially if soft
copper tubing isused, Now you are
ready to connect the copper tubing
SHV
PACKINGNUT /
OUTLEI'
VALVE
i COMPRESSION
NUT
SLEEV I:
6. Slip compression sleeve and
compression nut on copper tubing
as shown above Insert end of
tubing into outlet end squarely as far
as it wilI go, Screw compression nut
to outlet end with adjustable
wrench_ Do not overtighten, Turn
ON main water supply and flush out
tubing until water is dear, Turn OFF
shutoffvalve on water pipe You are
now ready to connect other end of
]/4" copper tubing to water valve
on back of reffigerator_
ThToughflour Under sink to Throughwail tn crcwl
to basemenl coid water to ut_fftyroom space under
cetd wa_er pipe pipe co_d water pipe house
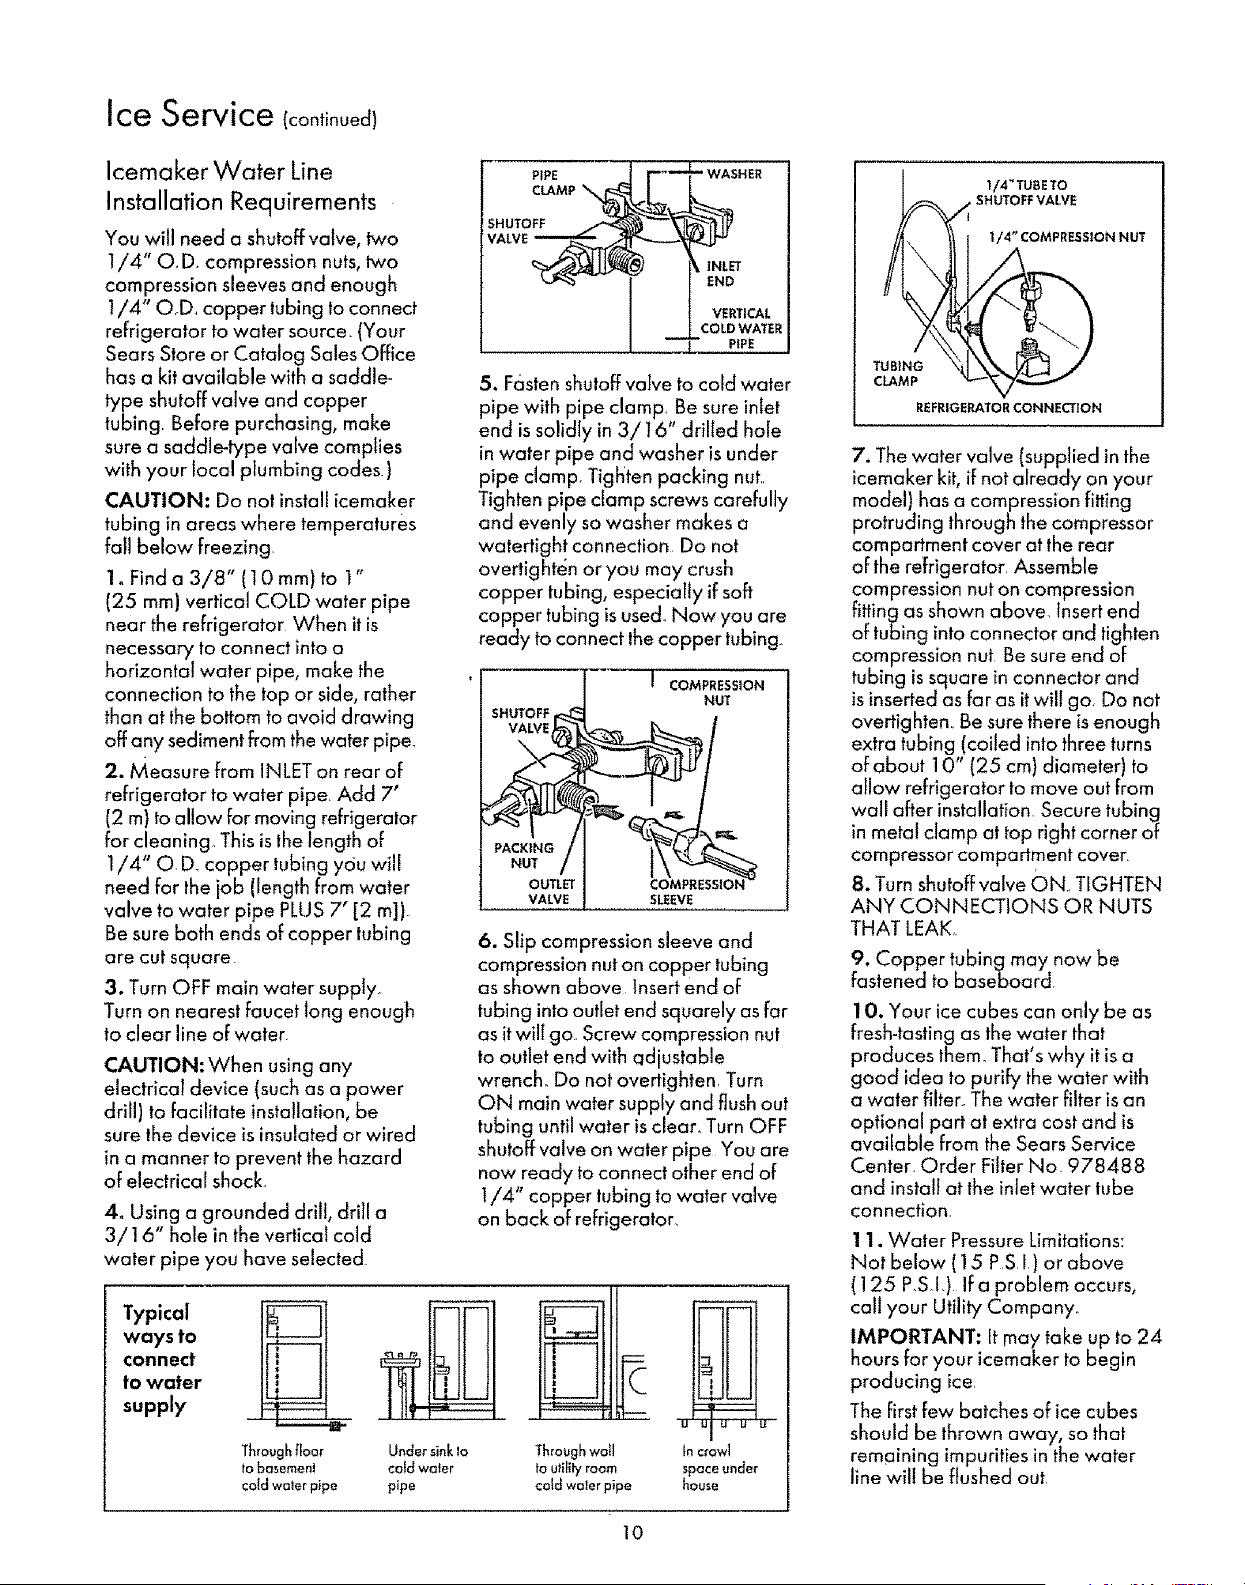
I/4" COMPRESSION NUT
TUBING
CLAMP
REFRIGERATOR CONNECTION
7. The water valve (supplied in the
icemaker kit, if not already on your
model) has a compression fitting
protruding through the compressor
compartment cover at the rear
of the refrigerator, Assemble
compression nut on compression
fitting as shown above, Insert end
of tubing into connector and tighten
compression nut Be sure end of
tubing is square in connector and
is inserted as far as it will go, Do not
overtighten., Be sure there is enough
extra tubing (coiled into three turns
of about 10" (25 cm) diameter) to
allow refrigerator to move out From
wall after installation Secure tubing
in metal clamp at top right corner of
compressor compartment cover.
8. Turn shutoff valve 0Nr, TIGHTEN
ANY CONNECTIONS OR NUTS
THAT LEAK
9. Copper tubingmay now be
fastened to Baseboard
10. Your ice cubes can only be as
fresh-tasting as the water that
produces them_ That s why it is a
good idea to purify the water with
a water filter The water fitter is an
optional part at extra cost and is
available from the Sears Service
Center Order Filter No 978488
and install at the inlet water tube
connection
11. Water Pressure Limitations:
Not below (15 PS I) or above
(125 P,S I_) If a problem occurs,
call your Utility Company_
IMPORTANT: It may take up to 24
hours for your icemaker to begin
producing ice,
The first few batches of ice cubes
should be thrown away, so that
remaining impuritiesin the water
line Will be flushed out,
10
Loading ...
Loading ...
Loading ...