CD Stereo System
SC-AK25
Operating Instructions
r-_
DIGITAL AUDIO
a)
m
Dear_ customer
Thank you for pumhasing this product. __ _ ::
For optimum performance and safety, please road these instructions
carefully.
These operating instructions are applicable to the following system.
System SC-AK25
Main unit SA-AK25
Speakers SB-AK25
The modelnumberand serialnumberofthis productcan be
found oneitherthe backorthebottomofthe unit.
Please notethem in the spaceprovidedbelow and keep for
futurereference.
MODEL NUMBER
SERIAL NUMBER
User memo:
I
DATE OFPURCHASE
DEALER NAME
DEALER ADDRESS
TELEPHONE NUMBER
Supplied accessories ..................... 2
Precautions ............................. 4
Placement of speakers .................... 5
Concerning the remote control ...... ,.r ..... 5
Battery installation .................................. 5
Correct method of use ............................... 5
Connections ............................. 6
Basic connections (for supplied accessories) ............. 6
Optional antenna connections ......................... 7
External unit connection ............................. 7
Front panel controls ...................... 8
Demo function ........................... 10
Setting the time .......................... 10
Presetting radio broadcasts ..... :-. ......... 11
Listening to radio broadcasts .............. 12
Listening to compact discs ................ 13
Loading and checking CDs ........................... 13
Sequential play .................................... 14
Direct access play .................................. 15
Repeat play ....................................... 15
Random play ...................................... 15
Program play ...................................... 16
To listen to special CDs and tracks
(CD Manager function) ............................ 17
Listening to tapes ........................ 18
Before recording (Deck 2 only) ............. 20
Recording from radio broadcasts ........... 21
Recording from compact discs ............. 22
To record special CDs and tracks (CD Manager function)... 23
Tape-to-tape recording .................... 24
CAUTION!
THIS PRODUCT UTILIZES A LASER.
USE OF CONTROLS OR ADJUSTMENTS OR PERFORM-
ANCE OF PROCEDURES OTHER THAN THOSE SPECI-
FIED HEREIN MAY RESULTIN HAZARDOUS RADIATION
EXPOSURE.
DO NOT OPEN COVERS AND DO NOT REPAIR
YOURSELF. REFER SERVICING TO QUALIFIED
PERSONNEL.
WARNING:
TO REDUCE THE RISK OF FIRE, ELECTRIC
SHOCK OR PRODUCT DAMAGE, DO NOT
EXPOSE THIS APPLIAI_ICE TO RAIN,
SPLASHING, DRIPPING OR MOISTURE.
CAUTION:
TO PREVENT ELECTRIC SHOCK MATCH
WIDE BLADE OF PLUG TO WIDE SLOT, FUL-
LY INSERT.
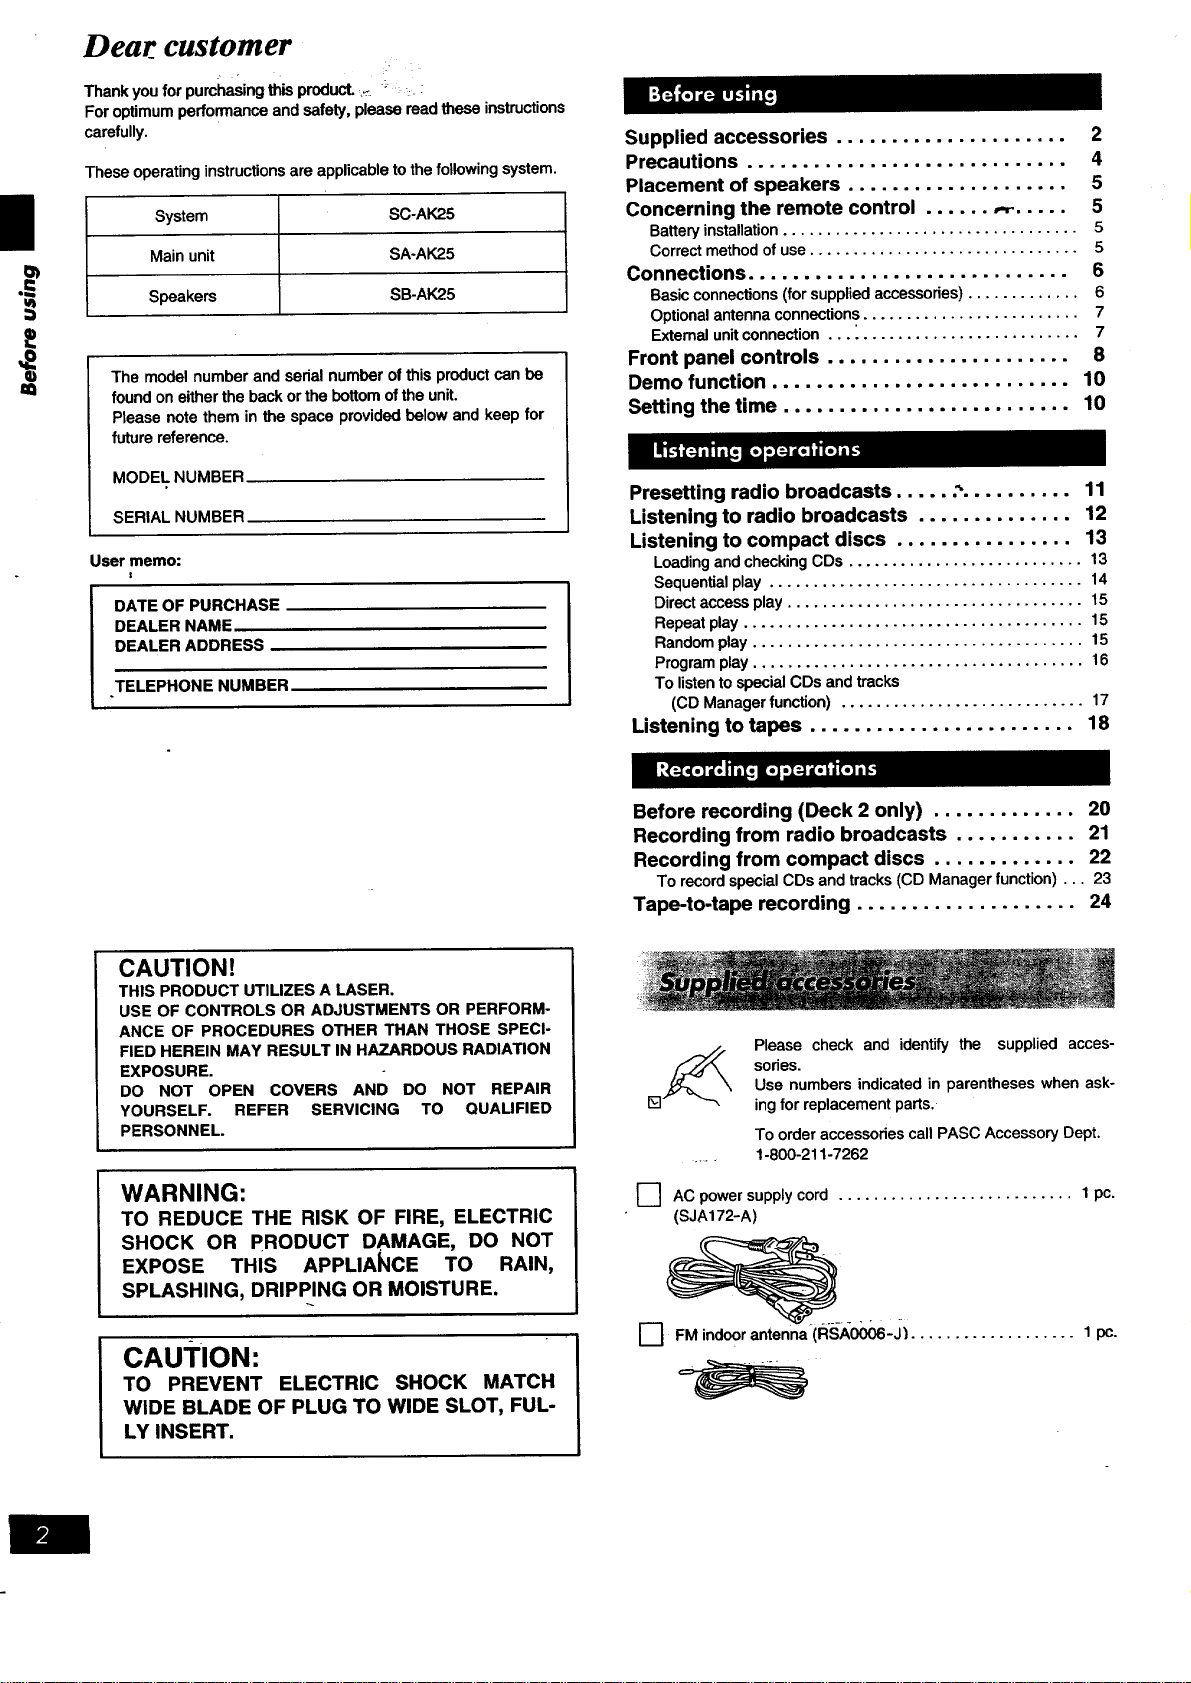
Please check and identify the supplied acces-
sories.
Use numbers indicated in parentheses when ask-
ing for replacement parts.
To order accessories call PASC Accessory Dept.
1-800-211-7262
--] AC power supply cord ........................... 1 pc.
(SJA172-A)
[--[ FM indoor antenna (RSA0006-Ji ................... 1 pc.
Using the built-in sound quality/
sound field settings ..................... 25
Boosting the super woofer .... ............. 25
Varying the sound quality with
the acoustic image (AI) equalizer .......... 26
Varying the sound quality with the manual
equalizer .............................. 27
Using the timer .......................... 28
Using the play timer ................................. 28
Using the record timer ............................... 29
Using the play/record timer ........................... 30
Using the sleep timer ................................ 31
Using an external unit ..................... 31
Convenien,t functions ..................... 32
Concerning CDs ......................... 33
Concerning cassette tapes ................. 33
Troubleshooting guide .................... 34
Maintenance, ............................ 35
Technical specifications ........... Back Cover
Product Service .................. Back Cover
Before moving or shipping
this system. ................... Back Cover
CAUTION:
This equipment has been tested and found to comply with
the limits for a Class B digital device, pursuant to Part 15 of
the FCC Rules.
These limits are designed to provide reasonable protection
against harmful interference in a residential installation. This
equipment generates, uses and can radiate radio frequency
energy and, if not installed and used in accordance with-the
instructions, may cause harmful interference to radio commu-
nications. However, there is no guarantee that interference
will not occur in a particular installation. If this equipment
does cause harmful interference to radio or television
reception, which can be determined by tuming the equipment
off and on, the user is encouraged to try to correct the
interference by one of the following measures:
eReodent or relocate the receiving antenna.
elncrease the separation between the equipment and ra-
caiver.
*Connect the equipment into an outlet on a circuit different
from that to which the receiver is connected.
eConsult the dealer or an experienced radio/IV technician
for help.
FCC Notice: This system complies with new Part 15, except
for the radio receiver, which complies with old Part 15,
Subpart C of the FCC Rules. Operation is subject to the
following two conditions: (1) This device may not cause
harmful interference, and (2) this device must accept any
interference received, including interference that may cause
undesirable operation. The radio receiver is not subject to
above item (2).
Any unauthorized changes or modifications to this equipment
would void the user's authority to operate this device.
.==
ul
==
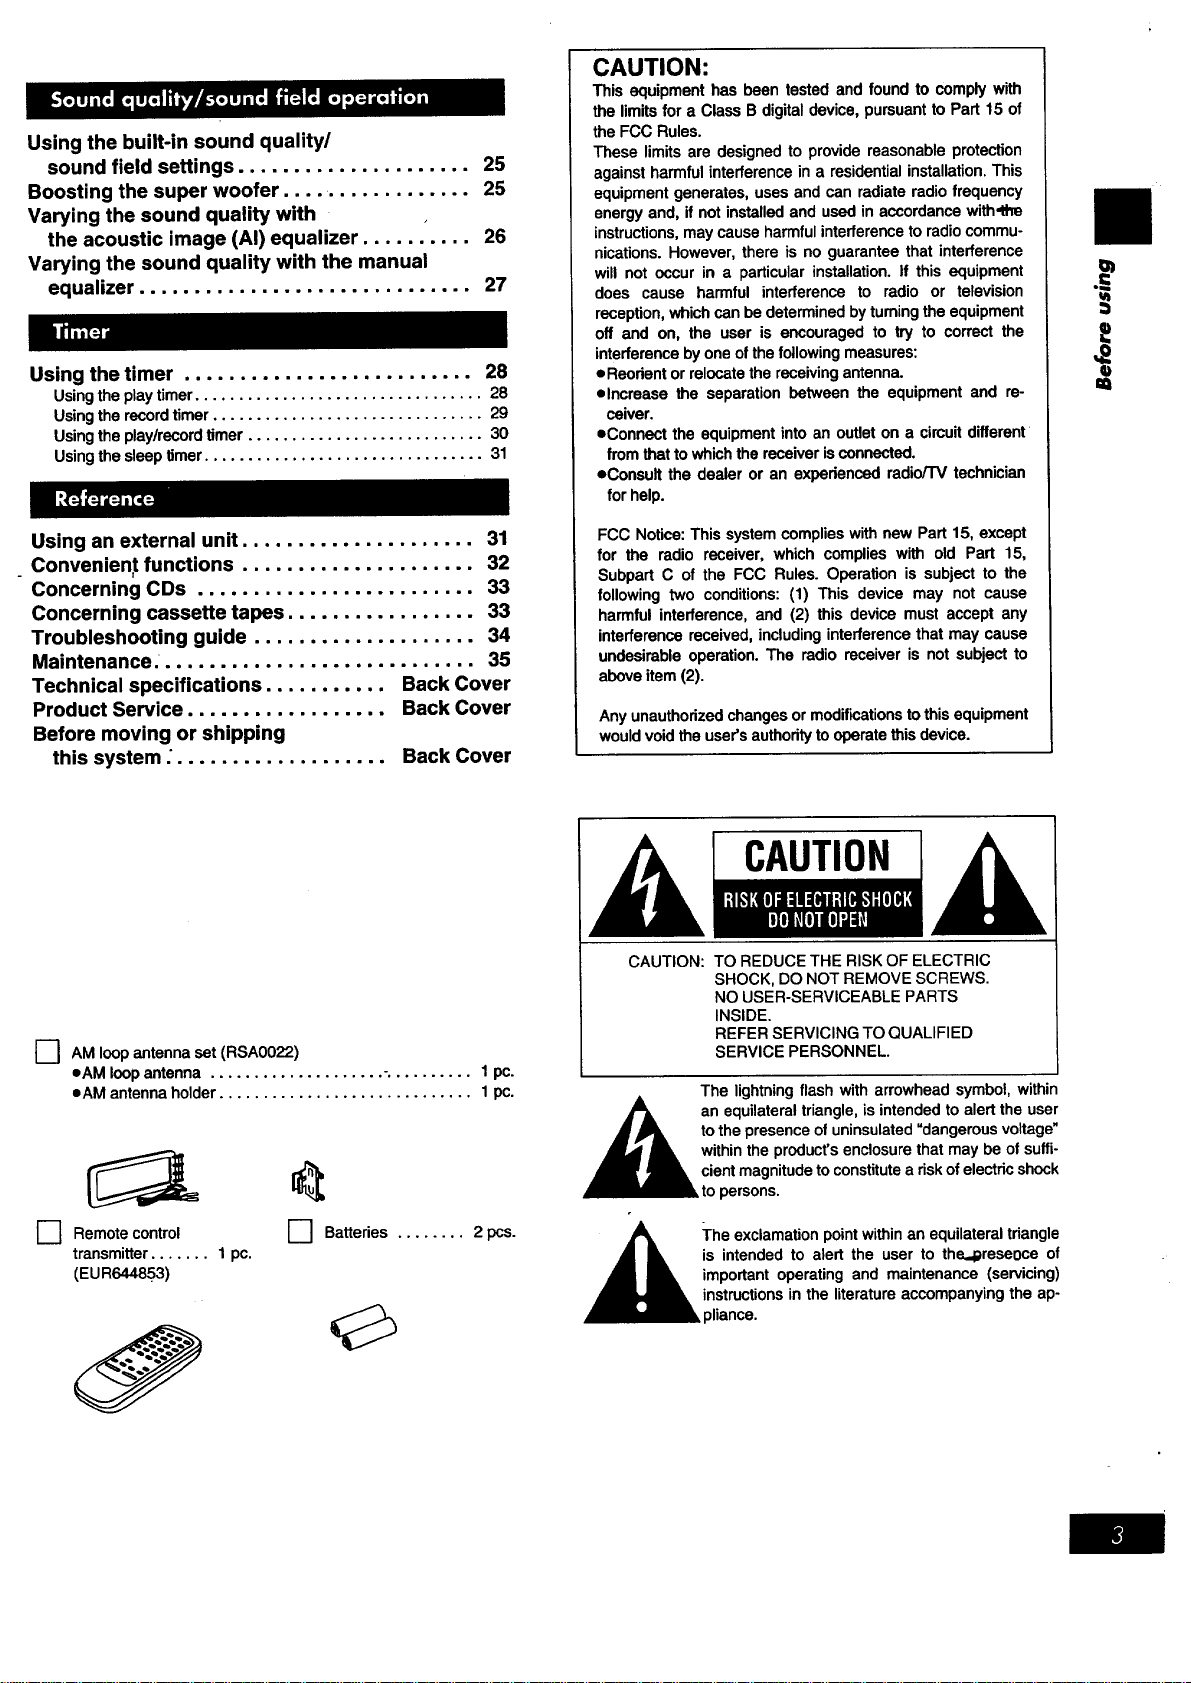
[] AM loop antenna set (RSA0022)
eAM loop antenna .................... -.......... 1 pc.
*AM antenna holder ............................. 1 pc.
[3
Remote control
transmitter ....... 1 pc.
(EUR644853)
0
D Batteries ........ 2 pcs.
CAUTION: TO REDUCE THE RISK OF ELECTRIC
SHOCK, DO NOT REMOVE SCREWS.
NO USER-SERVICEABLE PARTS
INSIDE.
REFER SERVICING TO QUALIFIED
SERVICE PERSONNEL.
The lightning flash with arrowhead symbol, within
___[L an equilateral triangle, is intended to alert the user
to the presence of uninsulated "dangerous voltage"
within the product's enclosure that may be of suffi-
cient magnitude to constitute a risk of electric shock
to persons.
A :The exclamation point within an equilateral triangle
• • is intended to alert the user to the,_reseoce of
_k important operating and maintenance (servicing)
instructions in the literature accompanying the ap-
pliance.
|
u_
m
Before using this unit please read these operating instructions care-
fully. Take special care to follow the warnings indicated on the unit
itself as well as the safety suggestions listed below.
Afterwards keep them handy for future reference.
1. Power Source--The unitshouldbe connectedtopowersupply
onlyof the type describedin the operatinginstructionsor as
markedonthe unit.
2. Polarization--If the unitisequippedwitha polarizedAC power
plug(a plughavingonebladewiderthanthe other),thatplugwill
fit intotheAC outletonlyone way.This isa safetyfeature. Ifyou
are unabletoinsertthe plugfullyintothe outlet,tryreversingthe
plug.If the plugshouldstillfallto fit, contactyouralectrician to
replaceyourobsoleteoutlet.Do notdefeatthe safetypurposeof
thepoladzedplug.
3. Power Cord Protection--AC power supplycordsshould be
routedso that theyare notlikelyto be walkedonor pinchedby
itemspiecedupon or againstthem. Nevertake holdofthe plug
or cord if your hand is wet, and always graspthe plug body
whenconnectingordisconnectingit.
4. Nonuse Periods--When theunitisnotused,turnthepoweroff.
When left unusedfor a longperiod oftime, the unitshouldbe
unpluggedfrom thehouseholdACoutlet.
1
1.
Environment
I
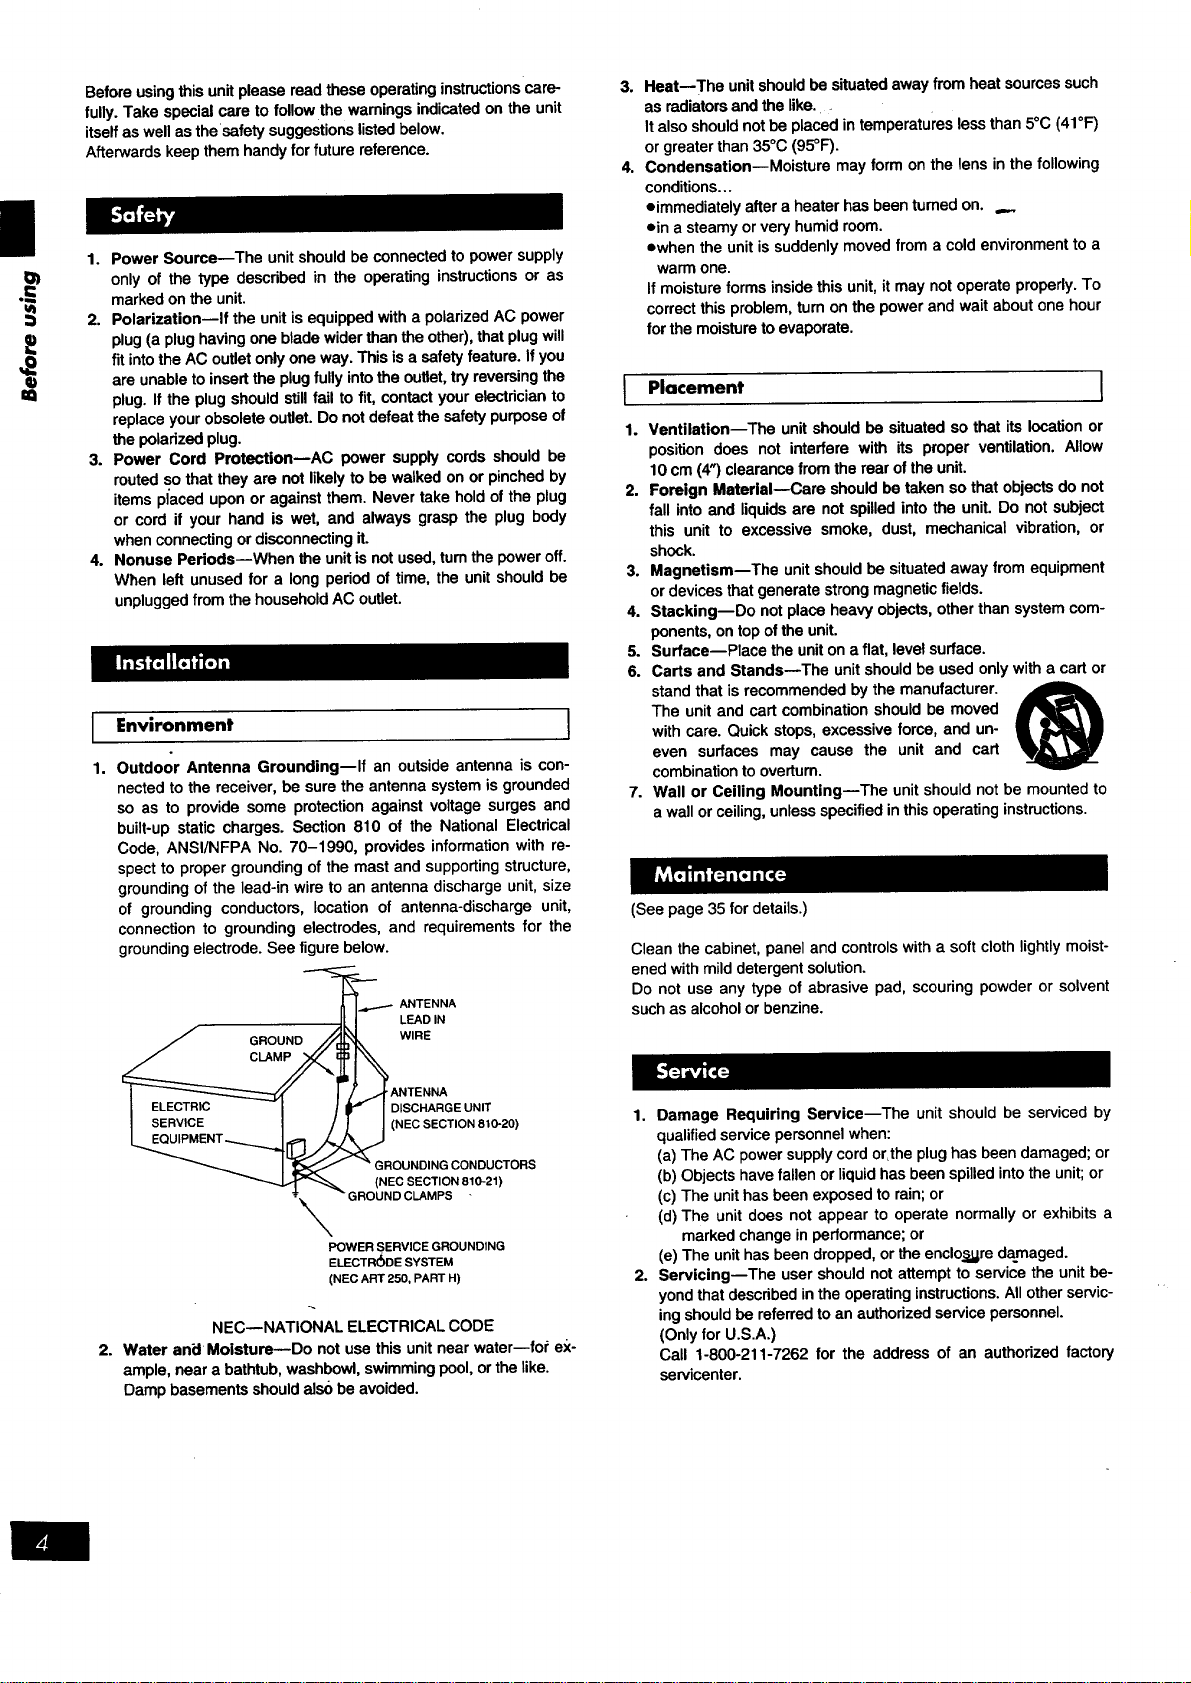
Outdoor Antenna Grounding--If an outside antenna is con-
nected to the receiver, be sure the antenna system is grounded
so as to provide some protection against voltage surges and
built-up static charges. Section 810 of the National Electrical
Code, ANSI/NFPA No. 70-1990, provides information with re-
spect to proper grounding of the mast and supporting structure,
grounding of the lead-in wire to an antenna discharge unit, size
of grounding conductors, location of antenna-discharge unit,
connection to grounding electrodes, and requirements for the
grounding electrode. See figure below.
-_.._...._ ANTENNA
II I LEAD IN
/ GROUND /_L_ WIRE
I _._ I !-/)f ANTENNA
I __LI=__;.!H_IU I / r I DISCHARGEUNIT
_MENT _1[]__ (NEC SECTION 810"20)
I _ " GROUNDINGCONDUCTORS
o-2"
POWER SERVICE GROUNDING
ELECTRODE SYSTEM
(NEC ART 250, PART H)
NEC--NATIONAL ELECTRICAL CODE
2. Water an_lMoisture--Do notusethis unitnearwater--for ex-
ample, neara bathtub,washbowl,swimmingpool,orthelike.
Dampbasementsshouldalso be avoided.
3.
4°
I
1.
Heat--The unit should be situated away from heat sources such
as radiators and the like.
It also should not be placed in temperatures less than 5°C (41°F)
or greater than 35°C (95°F).
Condensation--Moisture may form on the lens in the following
conditions...
*immediately after a heater has been turned on. ,._
*in a steamy or very humid room.
owhen the unit is suddenly moved from a cold environment to a
warm one.
If moisture forms inside this unit, it may not operate properly. To
correct this problem, turn on the power and wait about one hour
for the moisture to evaporate.
Placement 1
Ventilation--The unit should be situated so that its location or
position does not interfere with its proper ventilation. Allow
10 cm (4") clearance from the rear of the unit.
2. Foreign Material--Care should be taken so that objects do not
fall into and liquids are not spilled into the unit. Do not subject
this unit to excessive smoke, dust, mechanical vibration, or
shock.
3. Magnetism--The unit should be situated away from equipment
or devices that generate strong magnetic fields.
4. Stacking--Do not place heavy objects, other than system com-
ponents, on top of the unit.
5. Surface--Place the unit on a flat, level surface.
6. Carts and Stands--The unit should be used only with a cart or
stand that is recommended by the manufacturer.
The unit and cart combination should be moved
with care. Quick stops, excessive force, and un-
even surfaces may cause the unit and cart
combination to overturn.
7. Wall or Ceiling Mounting--The unit should not be mounted to
a wall or ceiling, unless specified in this operating instructions.
(See page 35 for details.)
Clean the cabinet, panel and controls with a soft cloth lightly moist-
ened with mild detergent solution.
Do not use any type of abrasive pad, scouring powder or solvent
such as alcohol or benzine.
1. Damage Requiring Service--The unit should be serviced by
qualified service personnel when:
(a) The AC power supply cord or,the plug has been damaged; or
(b) Objects have fallen or liquidhas been spilled intothe unit; or
(c) The unit has been exposed to rain; or
(d) The unit does not appear to operate normally or exhibits a
marked change in performance; or
(e) The unit has been dropped, or the enclo_.gredamaged.
2. Servicing--The user should not attempt to service the unit be-
yond that described in the operating instructions. All other servic-
ing should be referred to an authorized service personnel.
(Only for U.S.A.)
Call 1-800-211-7262 for the address of an authorized factory
servicenter.
®
Selecting fine audio equipment such as the unit you've just pur-
chased is only the start of your musical enjoyment. Now it's time to
consider how you can maximize the fun and excitement your equip-
ment offers. This manufacturer and the Electronic Industries Associ-
ation's Consumer Electronics Group want you to get the most out of
your equipment by playing it at a safe level. One that lets the sound
come through loud and clear without annoying blaring or
distortion--and, most importantly, without affecting your sensitive
hearing.
We recommendyou to avoid prolongedexposureto excessive
noise.
Sound can be deceiving. Over time your hearing "comfort level"
adaptsto highervolumesof sound.So what sounds"normal" can
actuallybe loudandharmfultoyourhearing.
Guard against this by setting your equipment at a safe level
BEFORE yourheadngadapts.
To establishasafe level:
=Startyourvolumecontrolat alowsetting.
eSIowly increasethe sounduntilyou can hear it comfortablyand
clearly,andwithoutdistortion.
Once you haveestablisheda comfortablesoundlevel:
eSet thedialand leave itthere.
Taking a minute to de this now will help to prevent hearing damage
or loss in the future. After all, we want you listening for a lifetime.
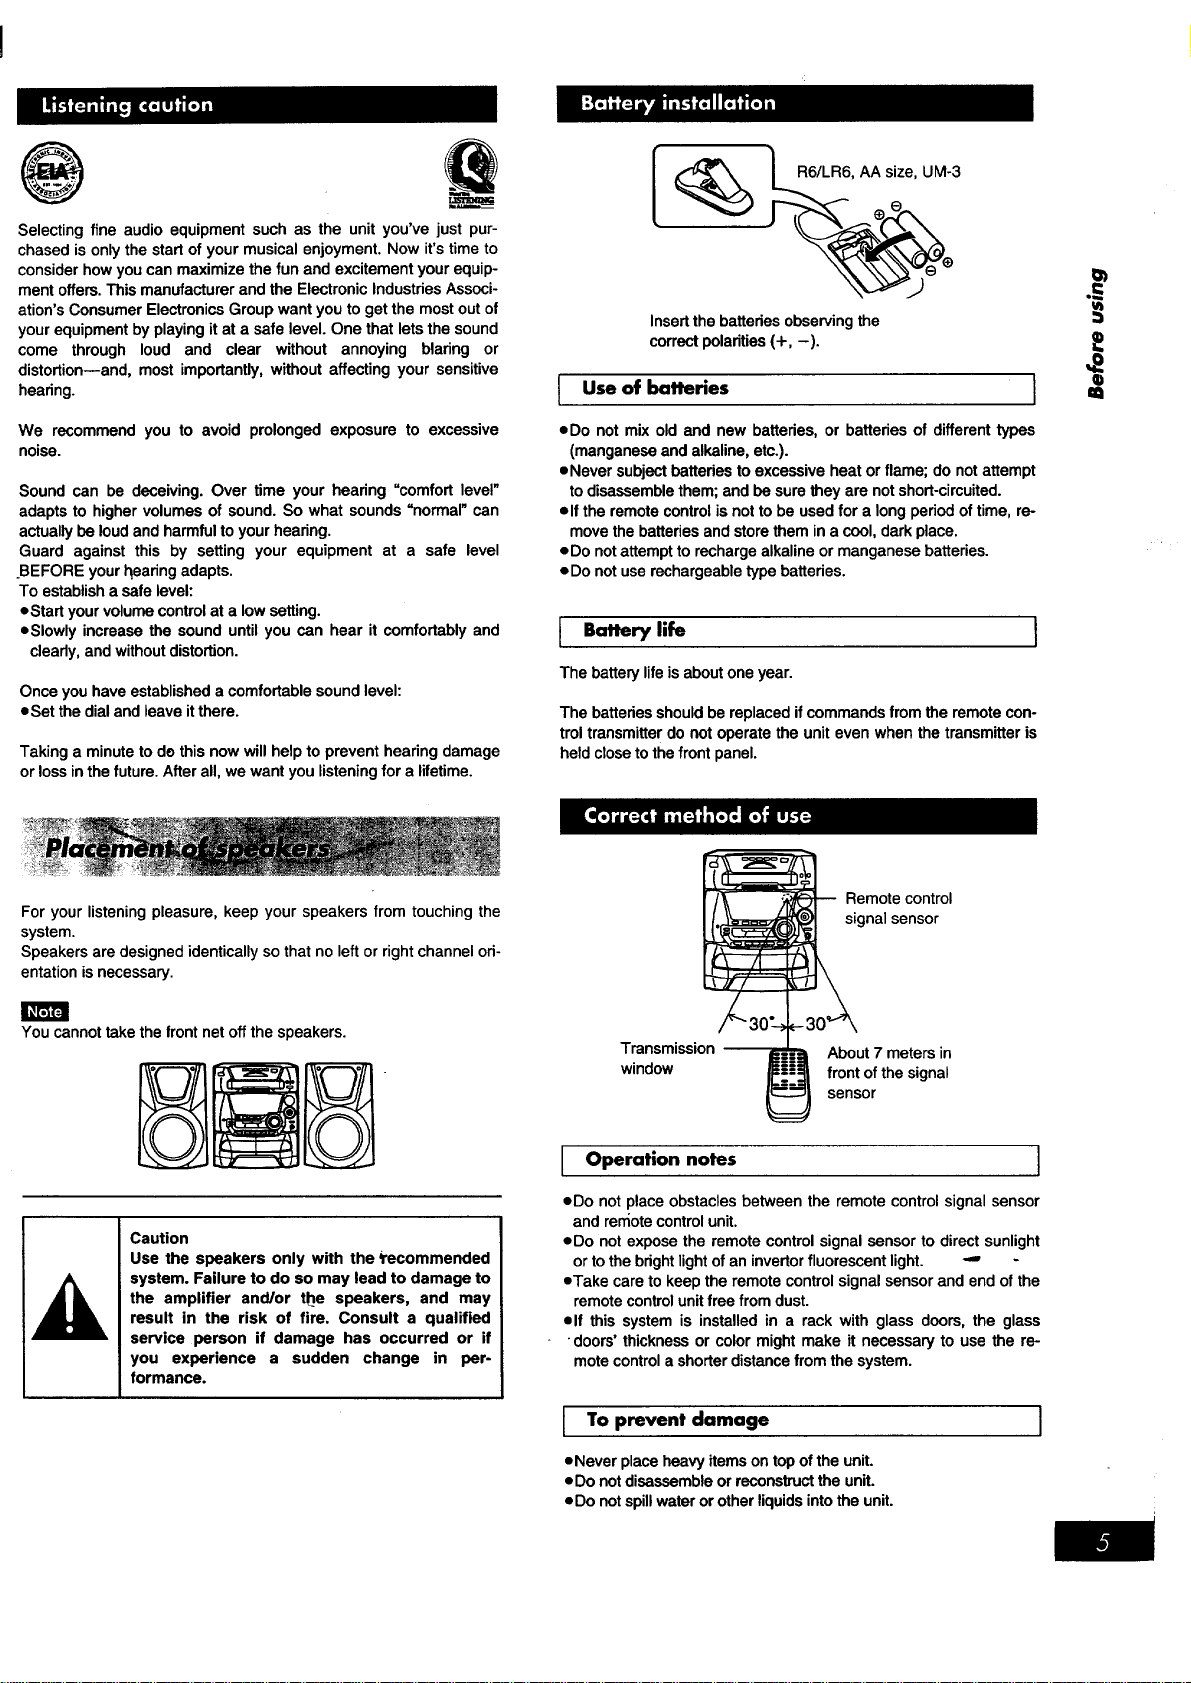
I _ "]._/LR6' AA size, UM'3
Insert the batteries observing the
correct polarities (+, -).
..==
I Use of batteries I =_
• Do not mixold and new batteries,or batteriesof differenttypes
(manganeseandalkaline,etc.).
eNever subjectbettedes toexcessiveheat or flame; donotattempt
todisassemblethem;andbe surethey are notshort-circuited.
elf the remotecontrolis nottobeusedfor alongperiodoftime,re-
movethebatteriesandstorethemina cool,darkplace.
=Do notattemptto rechargealkalineormanganesebatteries.
oDo notuserechargeabletype batteries.
I Battery life
Thebatterylifeisaboutoneyear.
]
The batteries should be replaced if commands from the remote con-
trol transmitter do not operate the unit even when the transmitter is
held close to the front panel.
For your listening pleasure, keep your speakers from touching the
system.
Speakers are designed identically so that no left or right channel ori-
entation is necessary.
You cannot take the front net off the speakers.
Caution
Use the speakers only with the _recommended
system. Failure to do so may lead to damage to
the amplifier and/or the speakers, and may
result in the risk of fire. Consult a qualified
service person if damage has occurred or if
you experience a sudden change in per-
formance.
Transmission
window
Remote control
gnal sensor
About 7 meters in
front of the signal
sensor
Operation notes ]
eDo not place obstacles between the remote control signal sensor
and ren_otecontrol unit.
eDo not expose the remote control signal sensor to direct sunlight
or to the bright lightof an invertor fluorescent light. -" -
eTake care to keep the remote control signal sensor and end of the
remote controlunit free from dust.
elf this system is installed in a rack with glass doors, the glass
"doors' thickness or color might make it necessary to use the re-
mote control a shorter distance from the system.
I o prevent damage
eNeverplaceheavyitems ontopoftheunit.
eDo notdisassembleorreconstructthe unit.
eDo notspillwaterorotherliquidsintothe unit.
I
®
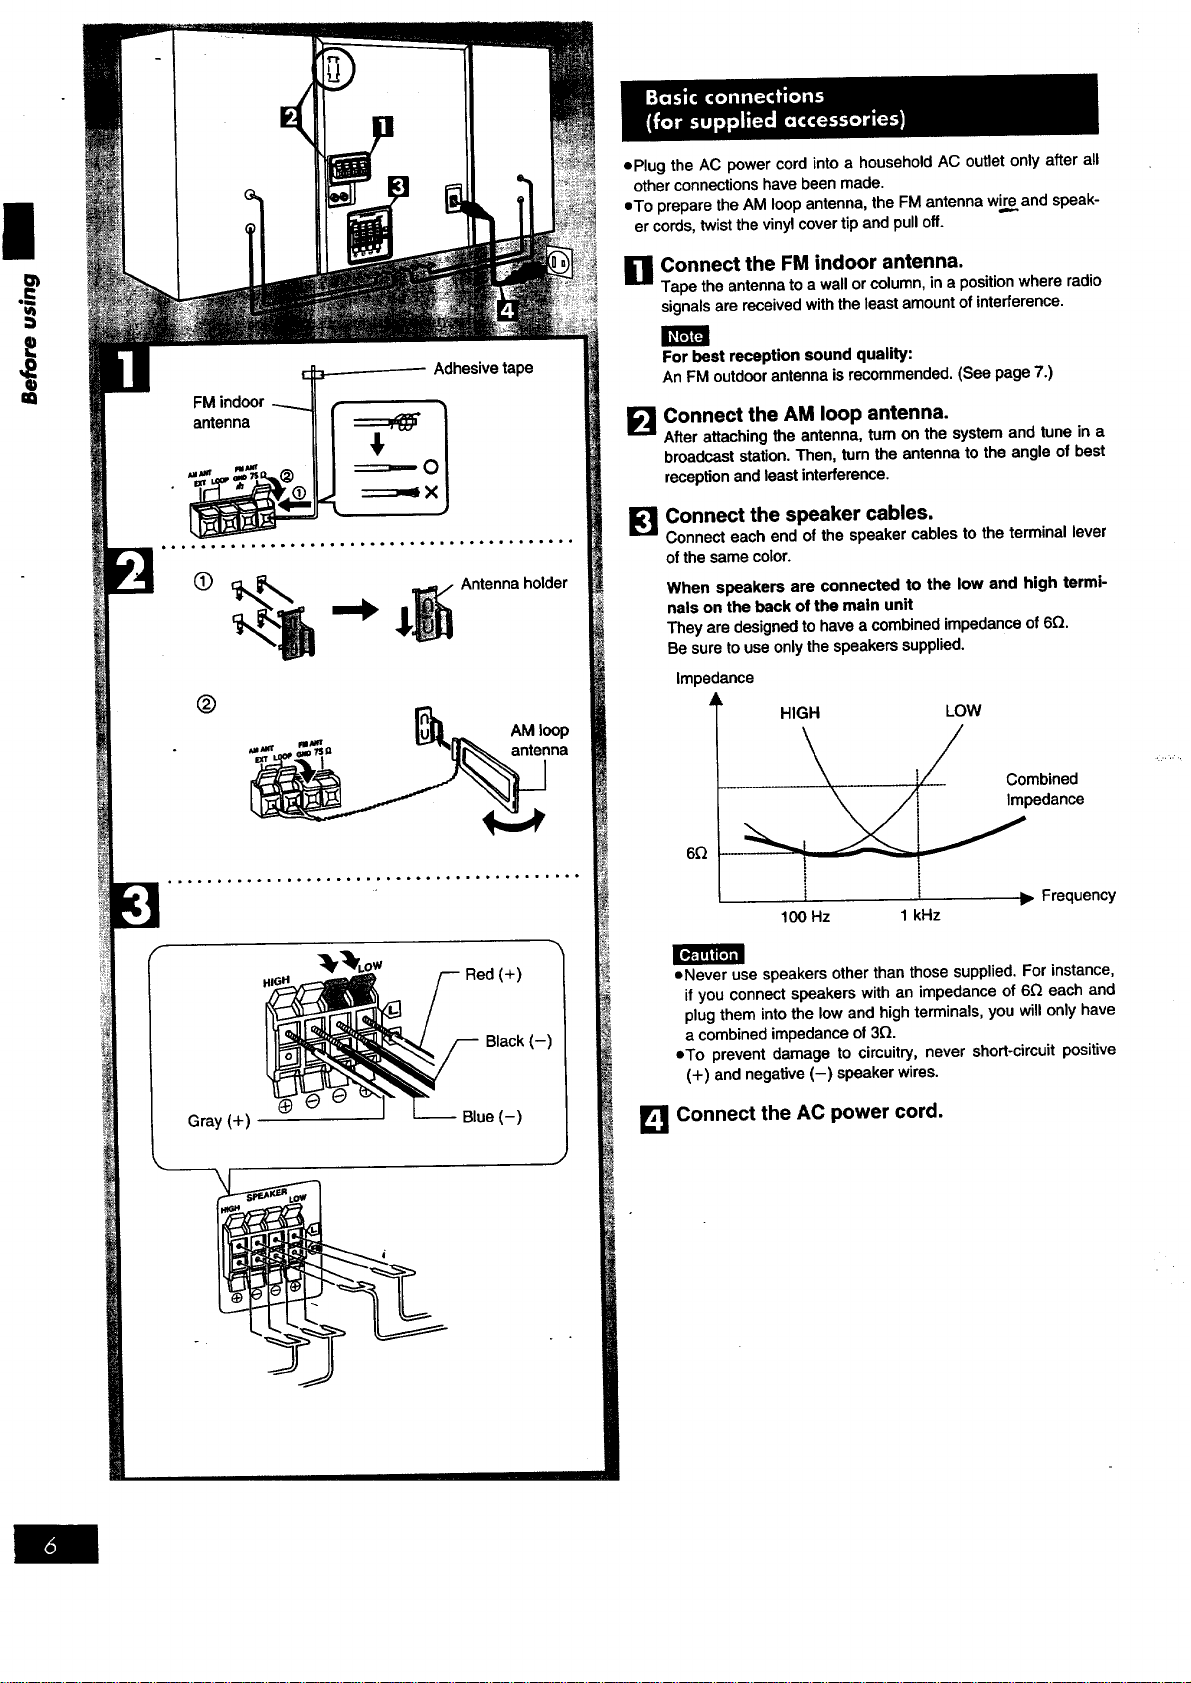
AM loop
"" antenna
Black (-)
Gray (+) Blue (-)
J
oPlug the AC power cord into a household AC outlet only after all
other connections have been made.
eTo prepare the AM loop antenna, the FM antenna wir_eand speak-
er cords, twist the vinyl cover tip and pull off.
O Connect the FM indoor antenna.
Tape the antenna to a wall or column, in a position where radio
signals are received with the least amount of interference.
E!
Forbest reception soundquality:
An FMoutdoorantennaisrecommended.(See page7.)
Connect the AM loop antenna.
After attaching the antenna, turn on the system and tune in a
broadcast station. Then, turn the antenna to the angle of best
reception and least interference.
Connect the speaker cables.
Connect each end of the speaker cables to the terminal lever
of the same color.
When speakers are connected to the low and high termi-
nals on the back of the main unit
They are designed to have a combined impedance of 6Q.
Be sure touse only the speakers supplied,
impedance
HIGH LOW
6Q
Combined
Impedance
t I _- Frequency
100 Hz 1 kHz
• Never use speakers other than those supplied. For instance,
it you connect speakers with an impedance of 6Q each and
plug them into the low and high terminals, you will only have
a combined impedance of 3_.
oTo prevent damage to cimuitry, never short-circuit positive
(+) and negative (-) speaker wires.
Connect the AC power cord.
AUANT FUANT /_
EXT GND75
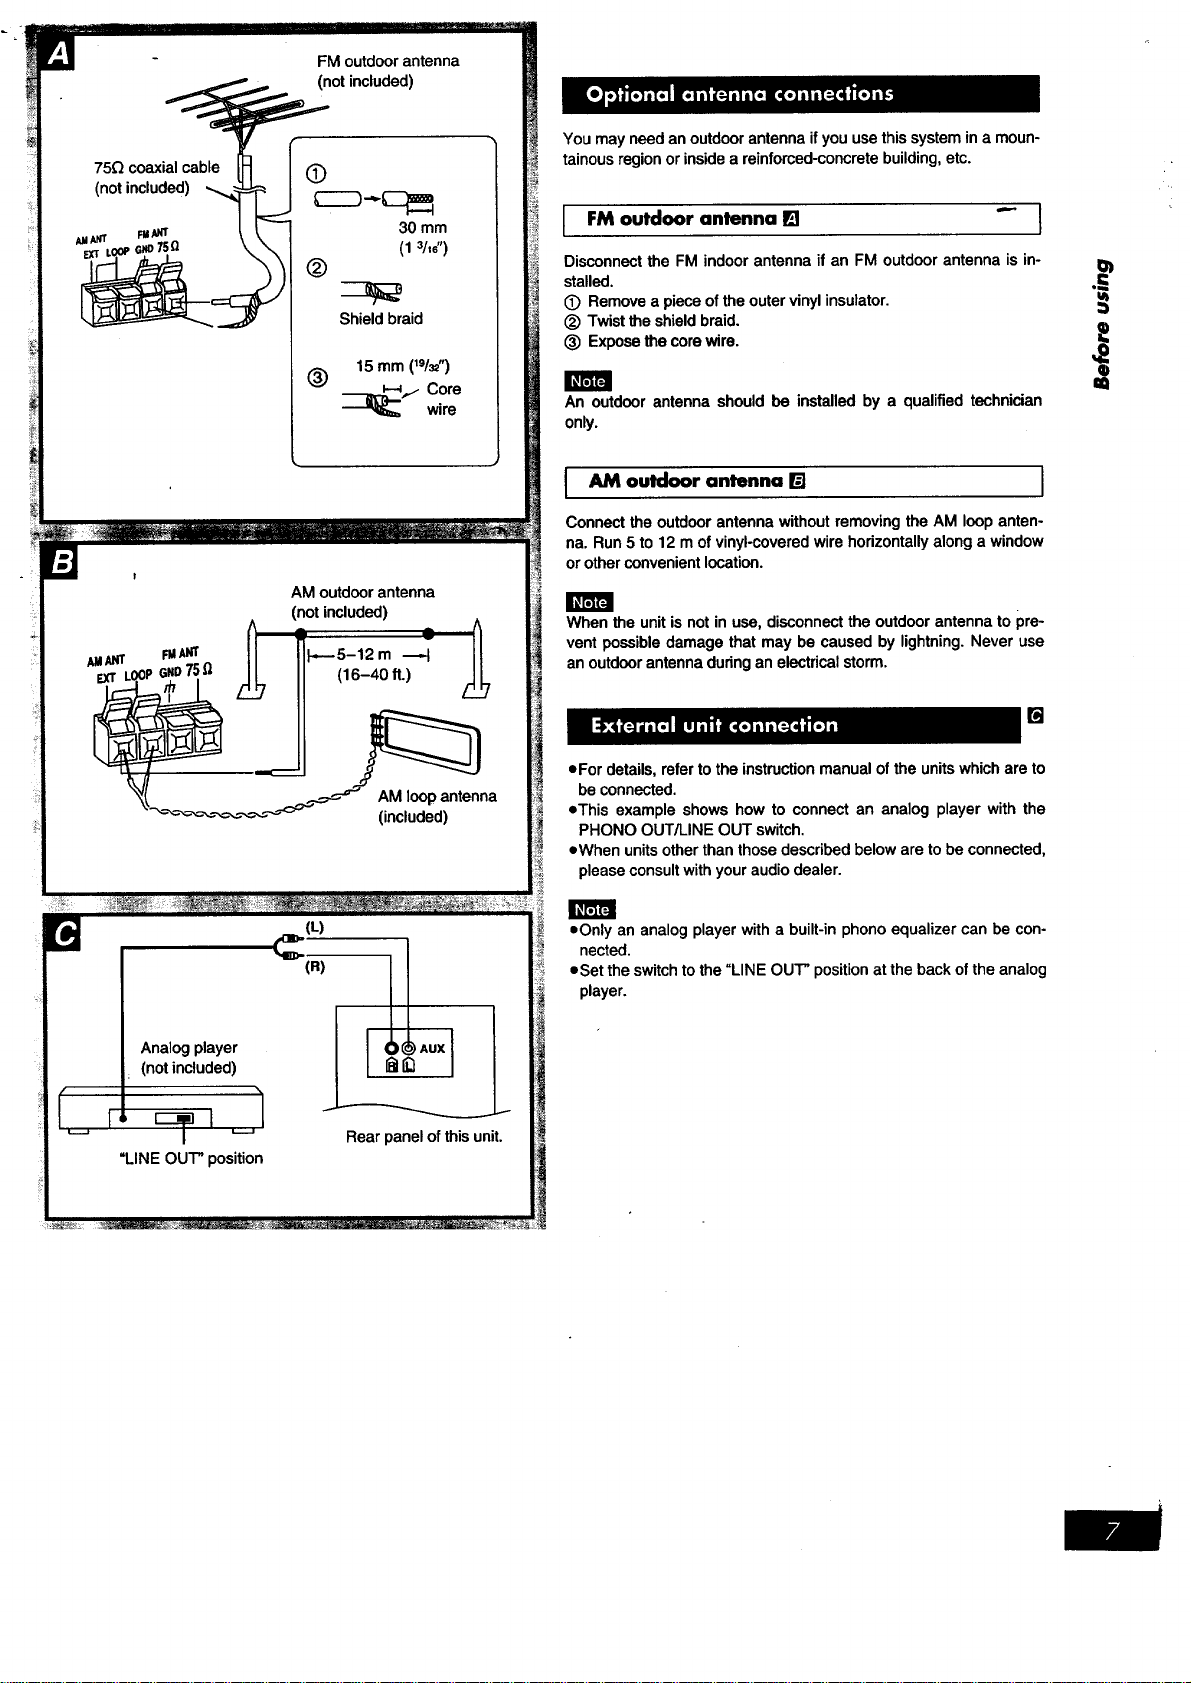
AM outdoor antenna
(not included)
v
----5-12 m
(16-40 ft.)
AM loopantenna
(included)
Analogplayer
(notincluded)
"LINE OUT" position
Rear panel of this unit•
You may need an outdoor antenna if you use this system in a moun-
inside a reinforced-concrete building, etc.
tainous region or
_ outdoor antenna I_1 "_ ]
Disconnect the FM indoor antenna if an FM outdoor antenna is in- I_
stalled. ..._"
(_ Remove a piece of the outer vinyl insulator.
_) Twist the shield braid. 0_
(_) Expose the core wire.
Q
a=
An outdoor antenna should be installed by a qualified technician
only.
I AM outdoor antenna [] I
Connectthe outdoorantennawithoutremovingthe AM loop anten-
na. Run5 to 12 mof vinyl-coveredwirehorizontallyalonga window
or otherconvenientlocation.
When the unitisnotin use,disconnectthe outdoorantennato pre-
vent possibledamage thatmay be causedby lightning•Never use
an outdoorantennaduringan electricalstorm.
[]
• For details, refer to the instruction manual ofthe units which are to
be connected.
oThis example shows how to connect an analog player with the
PHONO OUT/LINE OUT switch.
eWhen unitsother than those described below are to be connected,
please consult with your audio dealer.
oOnly an analog player with a built-in phono equalizer can be con-
nected.
eSet the switch to the "LINE OUT" position at the back of the analog
player.

|
q)
m
l Main unit[] I
No. Name Ref. page
(_ Power "STANDBY (_/ON" switch
(POWER, STANDBY (_/ON) ............. 10
Press to switch the unitfrom on to standby mod_"orvice versa.
In standby mode, the unit is still consuming a small amount of
power.
(_) Disc tray
(_) Disc select buttons and indicators
(DISC 1-DISC 5) ...................... 13
CD manager button
(CD MANAGER) .................... 17, 23
(_) Disc tray open/close button
(_ OPEN/CLOSE) ..................... 13
(_) Disc check open button
(_ NEXT OPEN) ...................... 13
(_) Random play button (RANDOM) ......... 15
I Center console [] }
No. Name Ref. page
(_) Clock/timer button
(CLOCK/TIMER) ................. 10, 28, 29
(_) AUX button (AUX) ..................... 31
(_) Tape/deck select button
(TAPE, DECK 1/2) ..................... 18
(_) CD button (CD) ....................... 14
(_ Tuner/band select button
(TUNER, BAND) ....................... 11
(_) Display
(_) Volume control (VOLUME) .............. 12
Play timer/record timer button
(_ PLAY/_ REC) ................... 28, 29
(_) Basic operating buttons
Functions change according tothesource.
(_ Deck I open button
(_ OPEN, DECK 1) .................... 18
(_) Tape edit button (TAPE EDIT) ........... 24
(_) Recording start/stop button
(0 REC/STOP) ........................ 21
Reverse mode select button
(REv MODE) ......................... 18
(_) Deck 2 open button
(_ OPEN, DECK 2) .................... 18

I Main unit (continued) [] I
No. Name Ref. page
(_ Display select/demonstration button
(-DISPLAY/-DEMO) ................. 10._32
(_) Deck I cassette holder ................. 18
(_) Acoustic image equalizer display
(AI EQ) .............................. 26
_) Sound equalizer control/indicators
(SOUND EQ) ......................... 25
(_) Super woofer on/off button
(S. WOOFER) ......................... 25
(_) Headphone jack (PHONES) ............. 31
(_ Deck 2 cassette holder ................. 18
Remote control [] 1
Buttons such as O function in exactly the same way as the buttons
onthemainunit.
No. Name Ref.page
Sleep button (SLEEP) .................. 31
Power button (POWER) ................ 10
Numeric buttons ............... . ...... 16
Program button (PROGRAM) ............ 16
Cancel button (CANCEL) ............... 16
Input selection buttons
(AUX, TAPE, CD, TUNER) ...... 11, 14, 18, 31
Muting button (MUTING) ............... 32
<l/v button (<l/v) .................. 12, 18
Equalizer button (EQ) .................. 25
Super woofer on/off button
(S. WOOFER) ......................... 25
Disc button (DISC) .................... 16
Random button (RANDOM) ............. 15
®
O
@
@
@
®
@
®
@
®
@
®
(_ Repeat button (REPEAT) ............... 15
_) I.<</_P< I_1_/1_1 buttons
(l<_/<P< _./ZHH) ................. 14, 19
(_) I_/11/^ button (1_/111/^) .......... 12, 14, 18
(_) Stop button (11) .................... 14, 18
_) Volume buttons (- VOLUME +) ......... 12
€)
m
Ii
=;
J
o
m
.o_.o.oooo,,,,,oo,°o.o..ooo°°°,o.o..,,'o.'.o
...... .,..... ....._........:. ....
i. d'bc -*..t]
: _J, _..._ _- .1
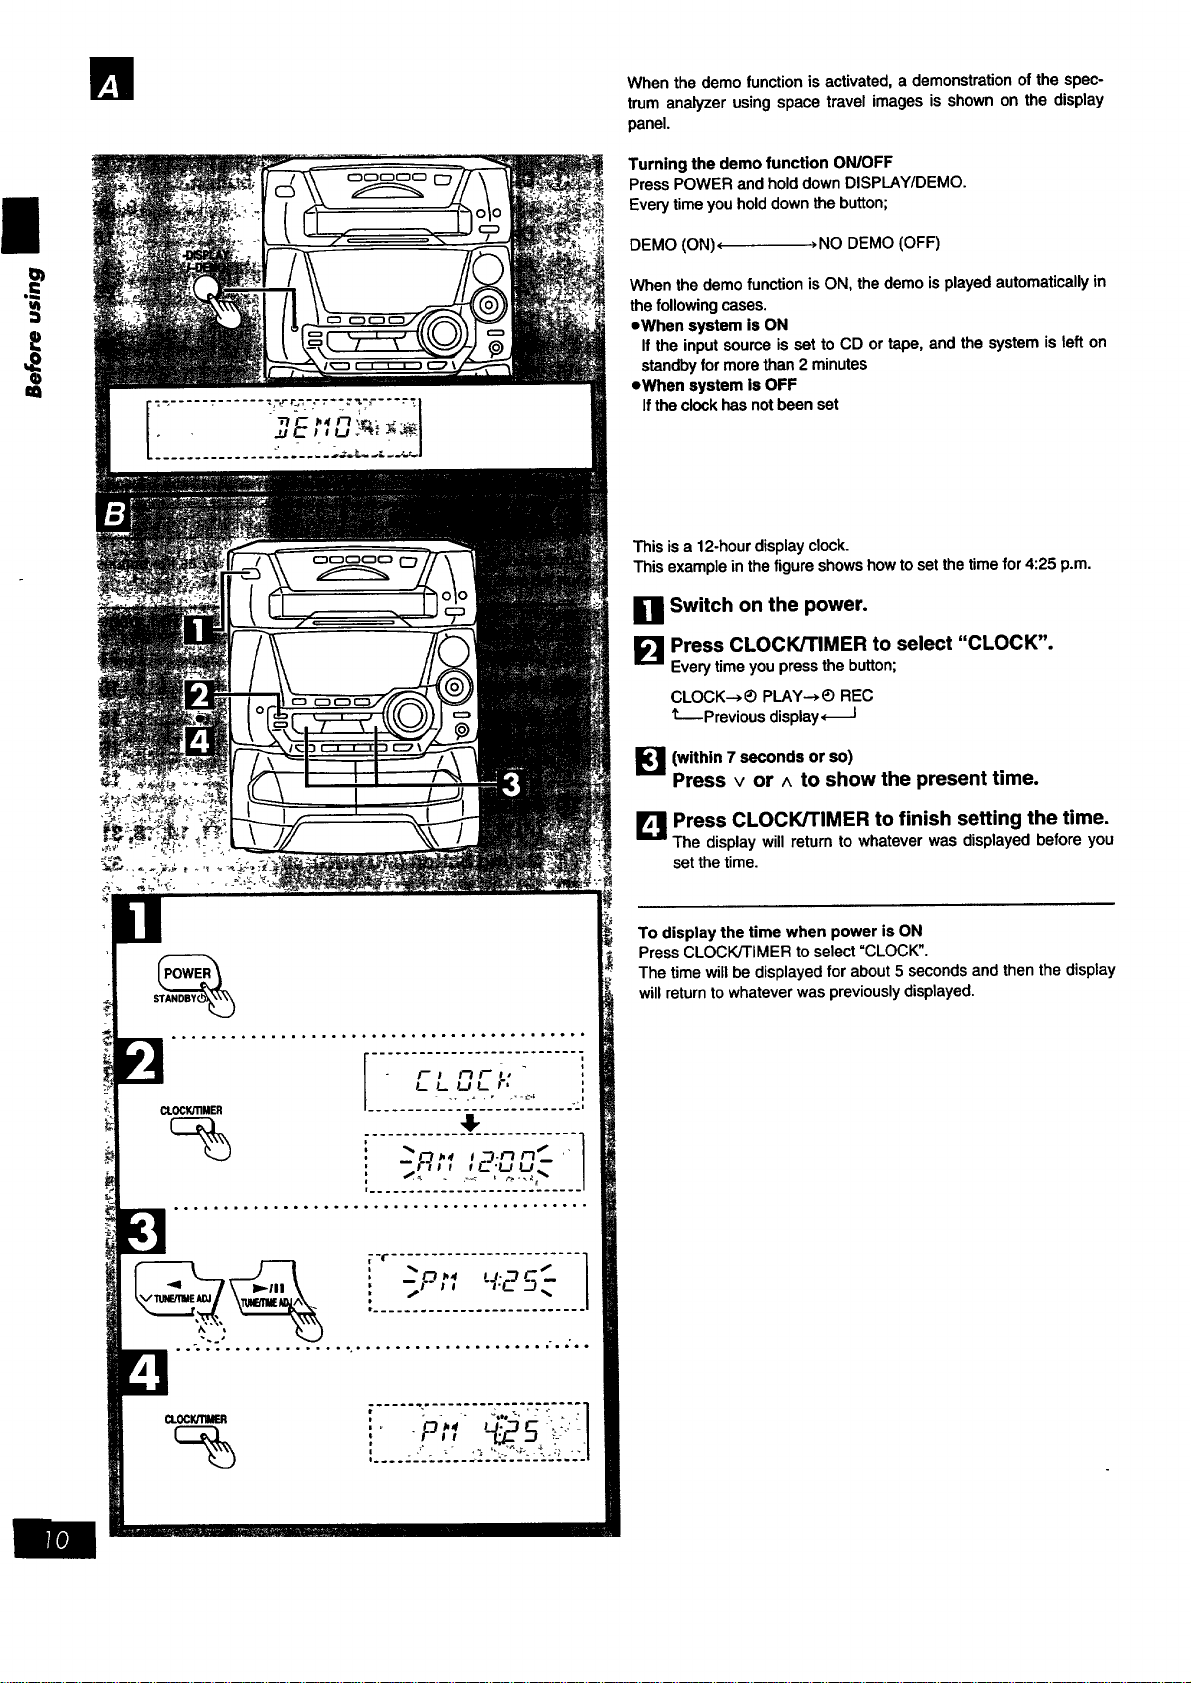
Whenthe demofunctionis activated,a demonstrationofthe spec-
trumanalyzer usingspace travelimages is shownon the display
panel.
Turning the demo function ON/OFF
Press POWER and hold down DISPLAY/DEMO.
Every time you hold down the button;
DEMO (ON)( >NO DEMO (OFF)
When thedemofunctionisON, thedemo isplayedautomaticallyin
the followingcases.
=Whensystem isON
If the inputsourceisset toCD ortape, and the systemisleft on
standbyformorethan 2 minutes
eWhen system is OFF
Iftheclockhasnotbeenset
Thisisa 12-hourdisplayclock.
This exampleinthe figureshowshowto setthetimefor 4:25 p.m.
Switch on the power.
Press CLOCK/TIMER to select "CLOCK".
Every time you press the button;
CLOCK---*_ PLAY--*_) REC
t---Previous display,_-I
[_']1 (within 7 seconds or so)
Press v or ^ to show the present time.
LI_IJPress CLOCK/TIMER to finish setting the time.
The display will return to whatever was displayed before you
set the time.
To display the time when power is ON
Press CLOCK/TIMER to select =CLOCK".
The time will be displayed for about 5 seconds and then the display
will return to whatever was previously displayed.
oUp to 12 stationscan be set in each band withthe automaticor
manualmemorypresetting.
olf broadcastfrequencies are presetin the memory,you caneasily
tuneinany ofthesefrequenciesfrom thesystemor remotecontrol
uniL
oYou can presetjustthose stationsyou like.(See "Presettingonly
yourfavoritestations"below.)
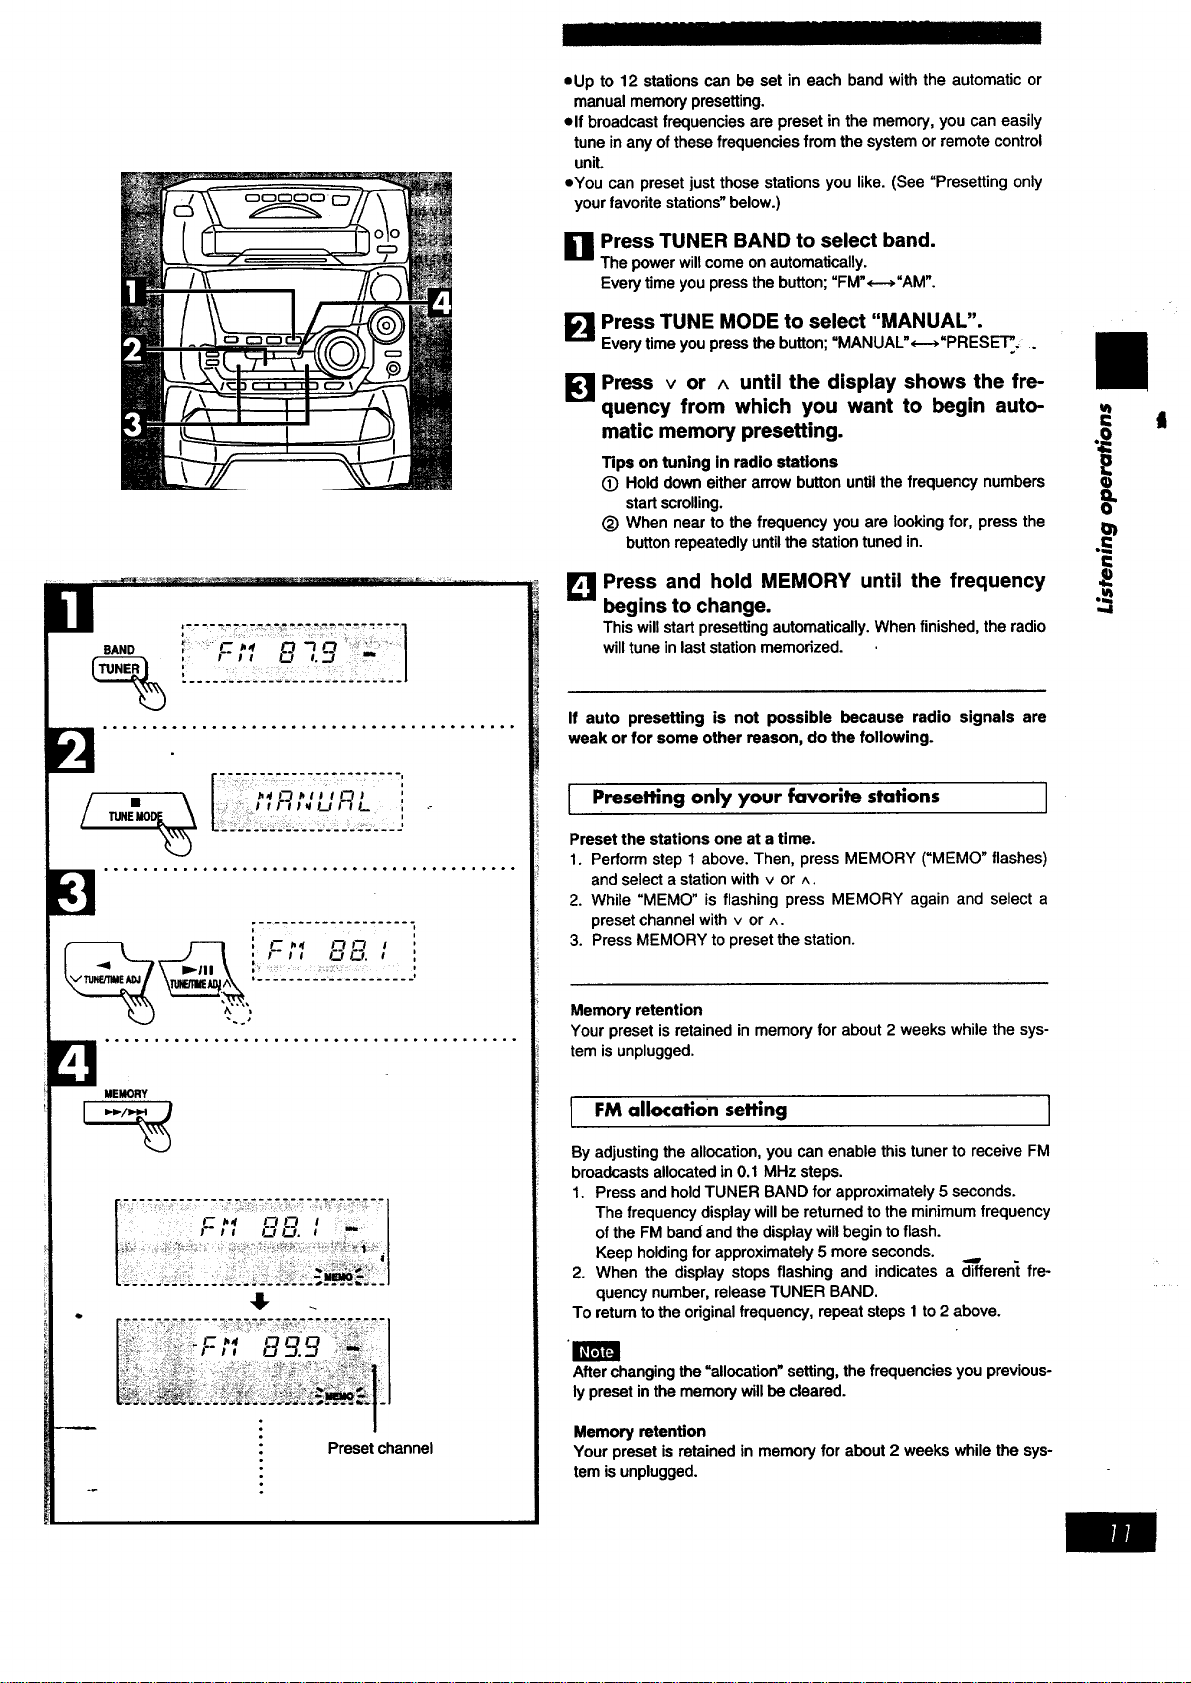
I_1 Press TUNER BAND to select band.
U
The power will come on automatically.
Every time you press the button; "FM",----_"AM".
I_ Press TUNE MODE to se!ect "MANUAL".
Every time you press the button; MANUAL ,---, PRESE'I'_, .
':__ _'_ .....................
s,.o
, F I I ___ I...J I
i:: I t I'1 I_ LIt t L {
... ...... .,**..,.,= ...... ....,,,.,,..,..°.
;--___ ...... , ........
I----1 ', F _,I n FI 1
J t , Fll C.)_. i
',2221._:_22....
°°°...°oo°°°°°°.°.°°°...°....,°°°°°.°°°°..
MEMORY
Preset channel
Press v or ^ until the display shows the fre-
quency from which you want to begin auto-
matic memory presetting.
Tips on tuning in radio stations
O Hold down either arrow button untilthe frequency numbers
start scrolling.
(_) When near to the frequency you are looking for, press the I_
button repeatedly until the station tuned in. .
,,,,.,L_Press and hold MEMORY until the frequency ._
begins to change.
This will start presetting automatically. When finished, the radio
will tune in last station memorized.
= t
I
If auto presetting is not possible because radio signals are
weak or for some other reason, do the following.
I Presetting only your favorite stations
Preset the stations one at a time.
1. Perform step 1 above. Then, press MEMORY (_MEMO" flashes)
and select a station with v or ^.
2. While "MEMO" is flashing press MEMORY again and select a
preset channel with v or ^.
3. Press MEMORY to preset the station.
Memory retention
Your preset is retained in memory for about 2 weeks while the sys-
tem is unplugged.
I
FM allocation setting
I
By adjusting the allocation, you can enable this tuner to receive FM
broadcasts allocated in 0.1 MHz steps.
1. Press and hold TUNER BAND for approximately 5 seconds.
The frequency display will be returned to the minimum frequency
of the FM band and the display will begin to flash.
Keep holding for approximately 5 more seconds.
2. When the display stops flashing and indicates a _lfferent fre-
quency number, release TUNER BAND.
To return tothe original frequency, repeat steps I to 2 above.
m
After changing the =allocation" setting, the frequencies you previous-
ly preset in the memory will be cleared.
Memoryretention
Your presetis retainedin memoryforabout2 weeks whilethe sys-
tem isunplugged.
|
I=
i
r
,,,,I
s,.o "-";:-;;'--;D-:,-2"-;:---1
:-,,o ,.:J- 1......= j
TUNED •
STEREO
i
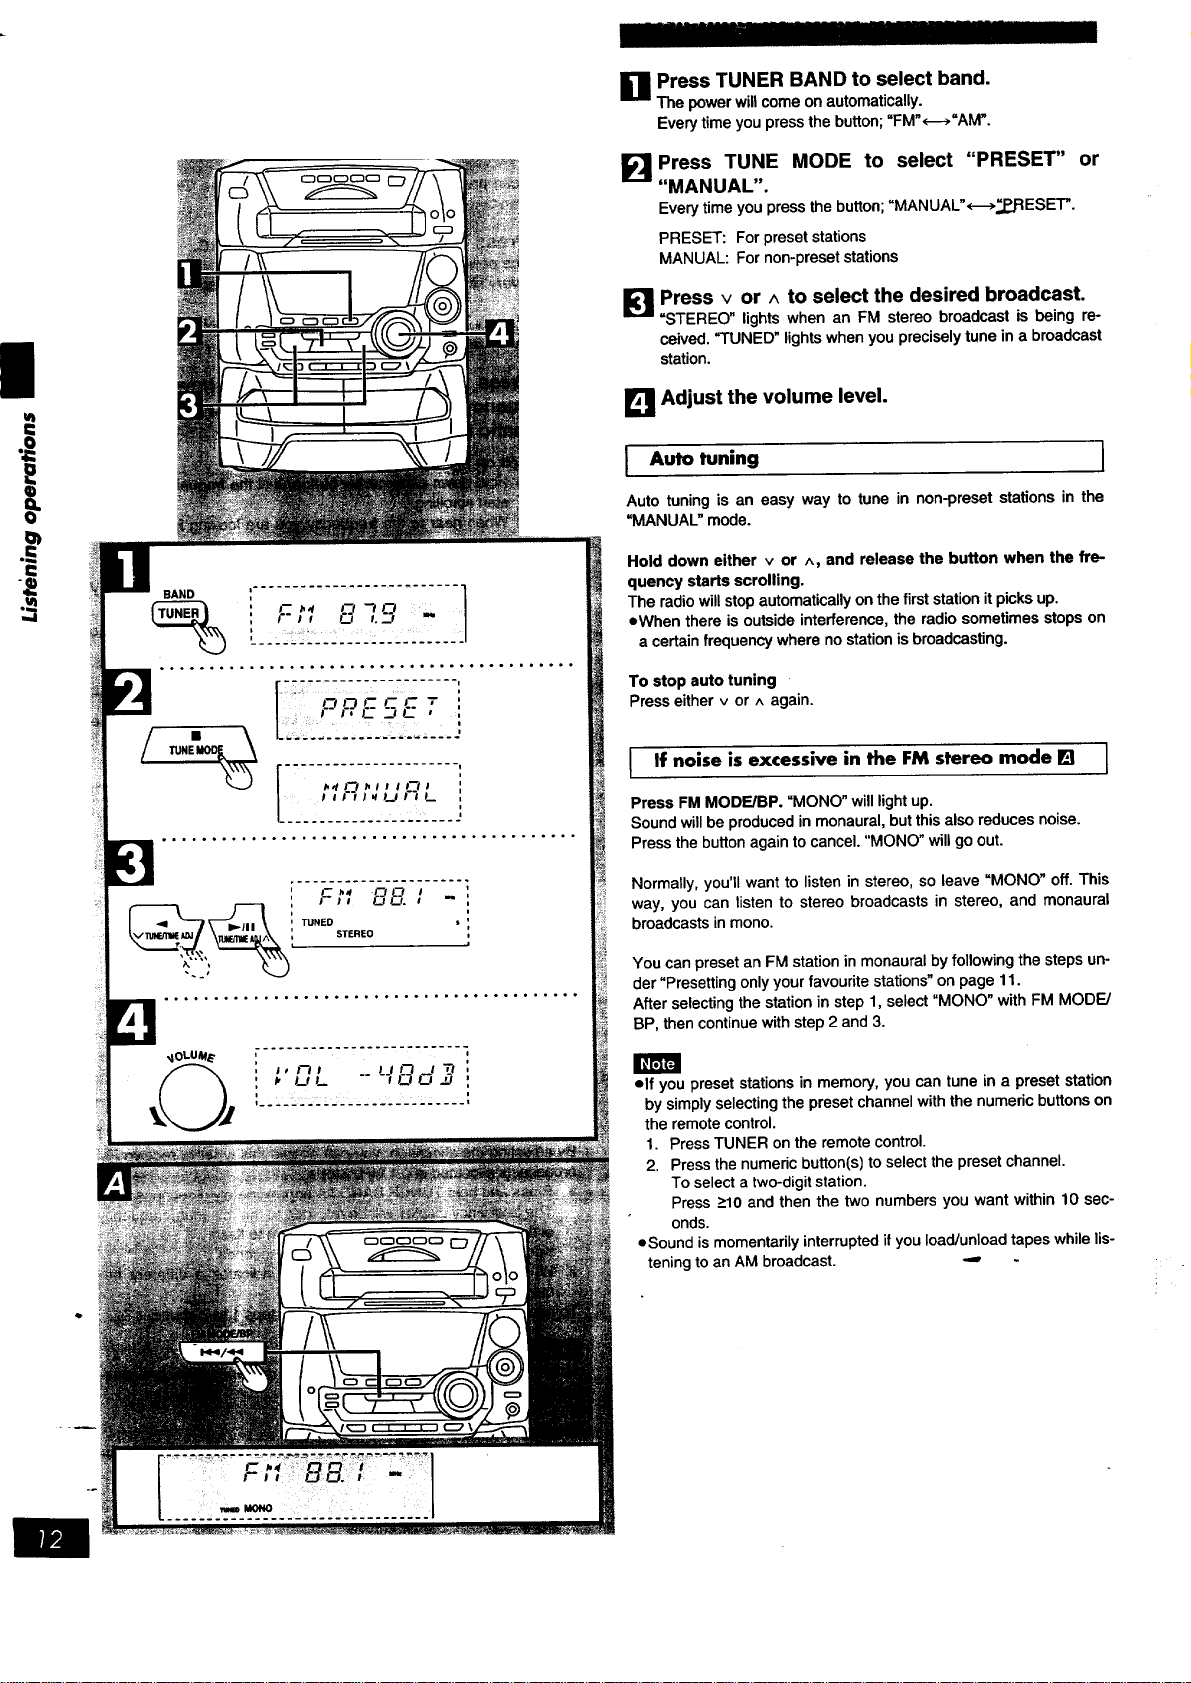
_1 Press TUNER BAND to select band.
The power will come on automatically.
Every time you press the button; =FM"<--->=AM".
E!
Press TUNE MODE to select "PRESET" or
"MANUAL".
Every time you press the button; "MANUAL'<-->_..J:IESET'.
PRESET: For preset stations
MANUAL: For non-preset stations
Press v or ^ to select the desired broadcast.
"STEREO" lights when an FM stereo broadcast is being re-
ceived. "TUNED" lights when you precisely tune in a broadcast
station.
I_1 Adjust the volume level.
I uto tuning I
Auto tuningis an easy way to tune in non-presetstationsin the
=MANUAL"mode.
Hold down either v or ^, and release the button when the fre-
quency starts scrolling.
The radio will stop automatically on the first station it picks up.
=When there is outside interference, the radio sometimes stops on
a certain frequency where no station is broadcasting.
To stop auto tuning
Press either v or ^ again.
If noise is excessive in the FM stereo mode [] ]
Press FM MODE/BP. "MONO" will light up.
Sound will be produced in monaural, but this also reduces noise.
Press the button again to cancel. "MONO" will go out.
Normally, you'll want to listen in stereo, so leave "MONO" off. This
way, you can listen to stereo broadcasts in stereo, and monaural
broadcasts in mono.
You can preset an FM station in monaural by following the steps un-
der "Presetting only your favourite stations" on page 11.
After selecting the station in step 1, select "MONO" with FM MODE/
BP, then continue with step 2 and 3.
elf you preset stations in memory, you can tune in a preset station
by simply selecting the preset channel with the numeric buttons on
the remote control.
1. Press TUNER on the remote control.
2. Press the numeric button(s) to select the preset channel.
To select a two-digit station.
Press >10 and then the two numbers you want within 10 sec-
onds.
=Sound is momentarily interrupted if you load/unload tapes while lis-
tening to an AM broadcast. -,,,,
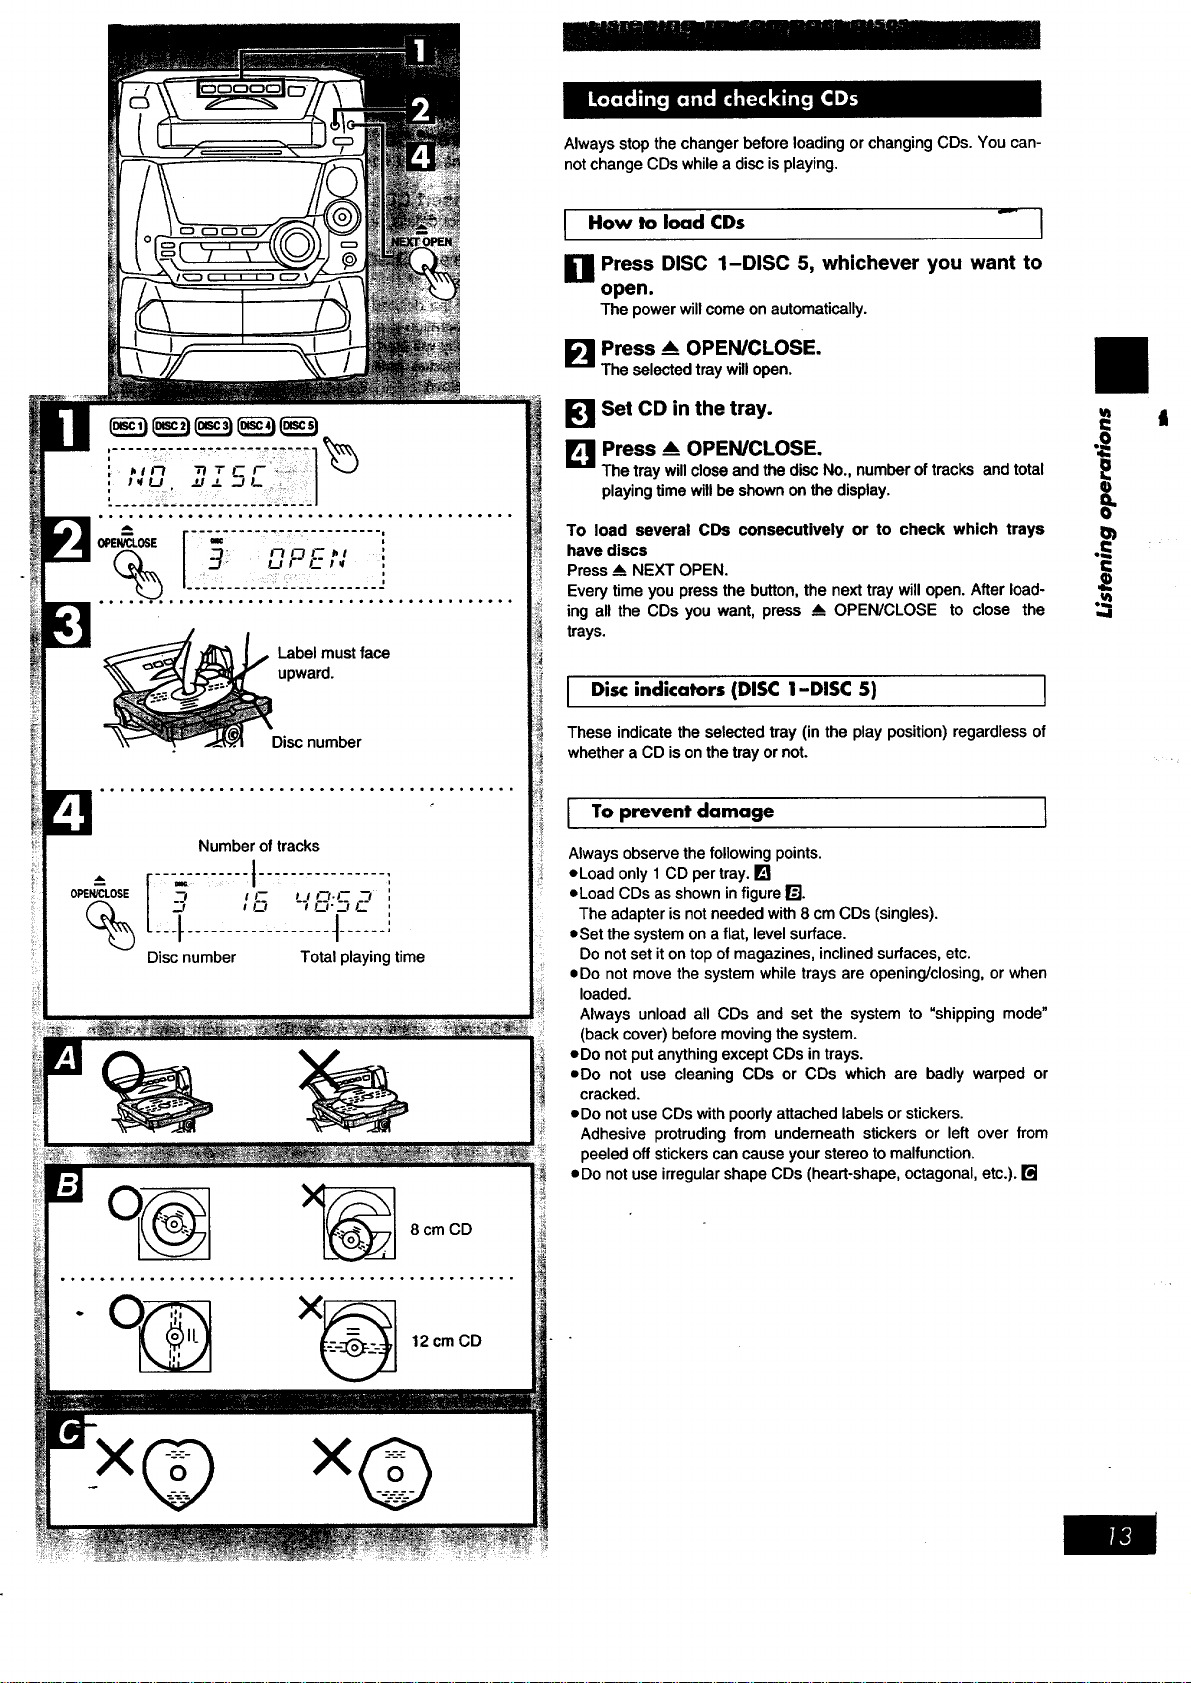
Labelmustface
upward.
Disc number
Number of tracks
Discnumber Totalplayingtime
8 cm CD
o°°°° ..... °°°.°.°°°o,°°°o°°°°°°°°°°°°o°°° .....
" O_ X_ 12 cm CD
x@ xG
Always stop the changer before loading or changing CDs. You can-
not change CDs while a disc is playing.
I How to load CDs _ I
Press DISC 1-DISC 5, whichever you want to
open.
The power will come on automatically.
I_J Press _ OPEN/CLOSE.
The selected tray will open.
_] Set CD in the tray.
Press _ OPEN/CLOSE.
The tray will close and the disc No., number of tracks and total
playing time will be shown on the display.
To load several CDs consecutively or to check which trays
have discs
Press --_NEXT OPEN.
Every time you press the button, the next tray will open. After load-
ing all the CDs you want, press _ OPEN/CLOSE to close the
trays.
I Disc indicators (DISC 1-DISC 5) I
These indicate the selected tray (in the play position) regardless of
whether a CD is on the tray or not.
I To prevent damage I
Always observe the following points.
eLoad only 1 CD per tray. []
oLoad CDs as shown in figure r_J.
The adapter is not needed with 8 cm CDs (singles).
eSet the system on a flat, level surface.
Do not set it ontop of magazines, inclined surfaces, etc.
=Do not move the system while trays are opening/closing, or when
loaded.
Always unload all CDs and set the system to "shipping mode"
(back cover) before moving the system.
=Do not put anything except CDs in trays.
eDo not use cleaning CDs or CDs which are badly warped or
cracked.
eDo not use CDs with poorly attached labels or stickers.
Adhesive protruding from underneath stickers or left over from
peeled off stickers can cause your stereo tomalfunction.
• Do not use irregular shape CDs (heart-shape, octagonal, etc.). []
l=
,,,.I
I
I=
o=
--,-,-,---.-,-,,-,,,-,--,
r..; ,-,-,,,
/ o c._,
I _. .... i
41-
• t,rU _ _ J/._
°.°°....°. .... °°°° .... ..°. .... .°........o.
_e
,._, ,,-,,,,,-
t F_ F_ J,r U _-
41.
Irm,_
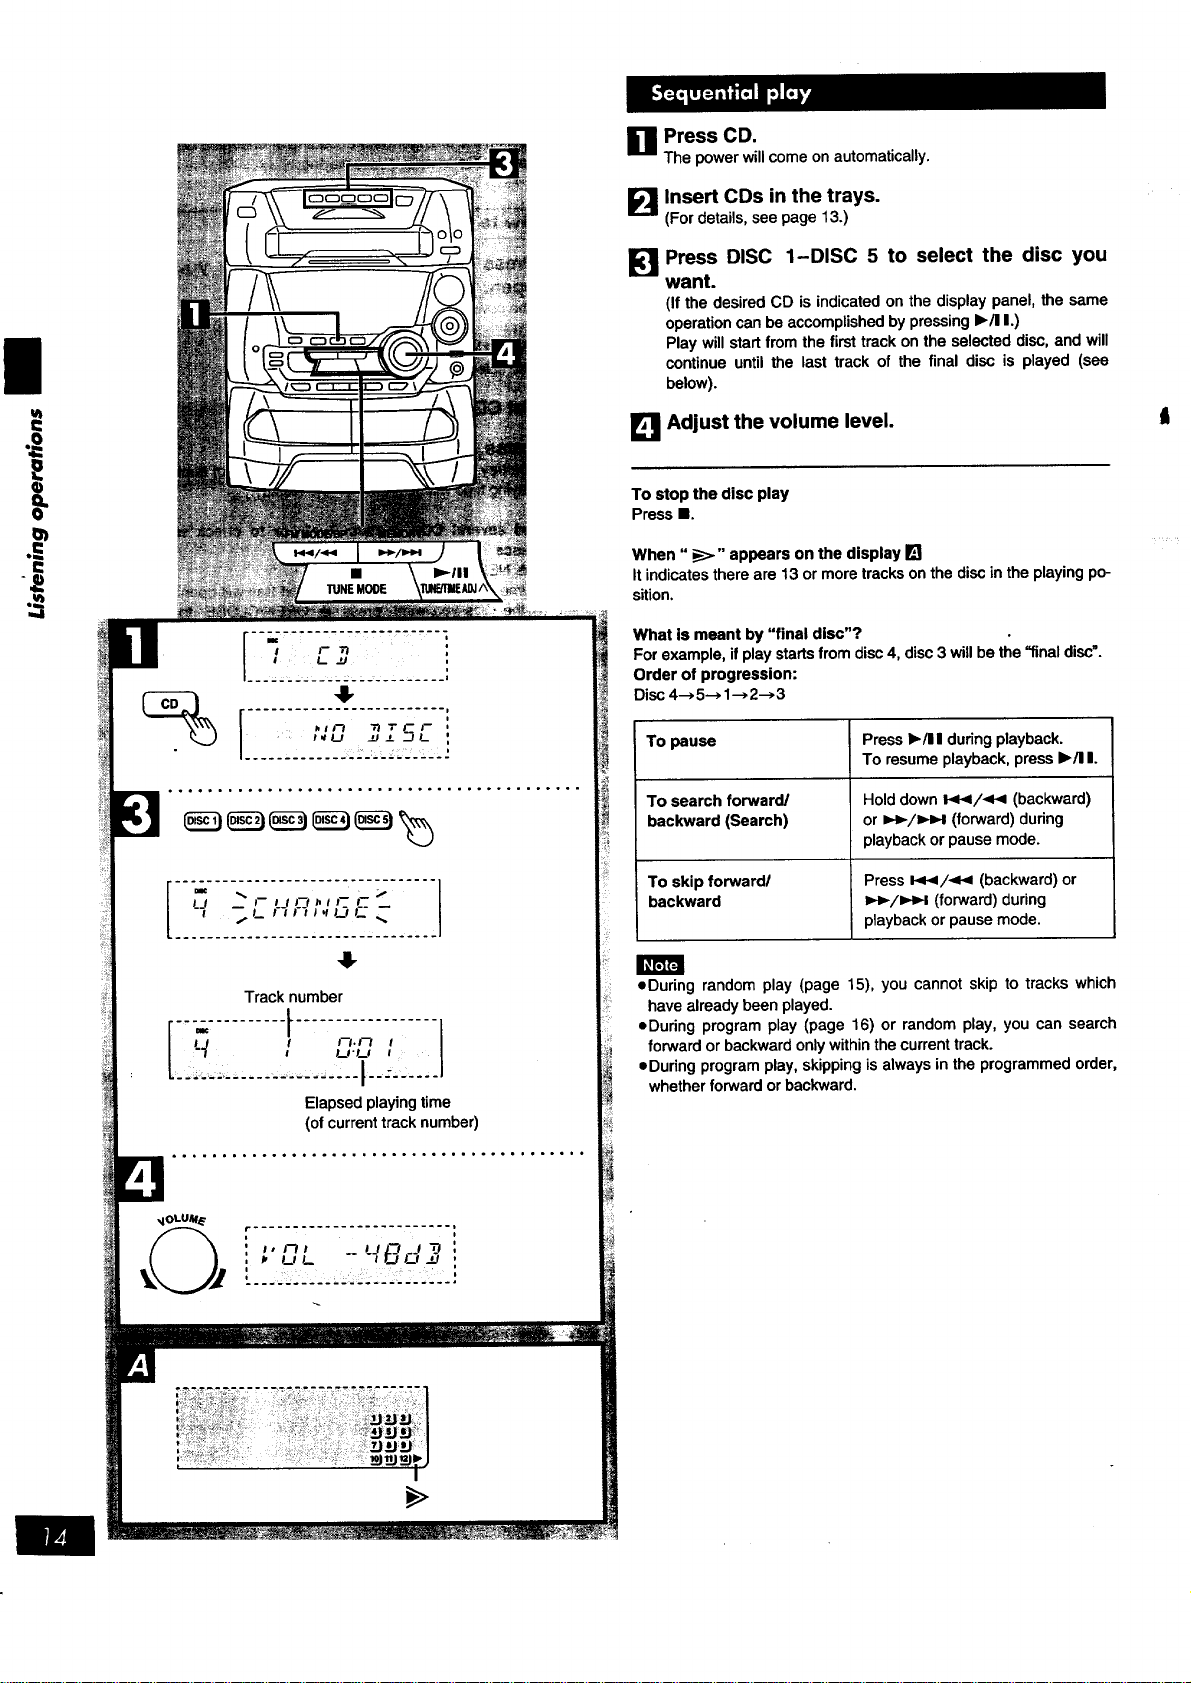
Track number
[i'.)ii.liiilli!iii- i!'iiiiliiiill
Elapsed playing time
(of current track number)
r ......................... I
, i
' " '_' '_'B,d_ :
U Press CD.
The power will come on automatically.
I_ Insert CDs in the trays.
IG,.II
(For details, see page 13.)
F!
Press DISC 1-DISC 5 to select the disc you
want.
(If the desired CD is indicated on the display panel, the same
operation can be accomplished by pressing I_/11I.)
Play will start from the first track on the selected disc, and will
continue until the last track of the final disc is played (see
below).
[] Adjust the volume level.
To stop the disc play
Press I.
When "_" appears on the display []
It indicates there are 13 or more tracks on the disc in the playing po-
sition.
What is meant by "final disc"?
For example, if play starts from disc 4, disc 3 will be the =final disc'.
Order of progression:
Disc 4--,5-.1-->2--,3
To pause
To search forward/
backward (Search)
To skip forward/
backward
Press b./I I during playback.
To resume playback, press I_/11I.
Hold down 141</<< (backward)
or I,_-/I_H (forward) during
playback or pause mode.
Press It_</_ (backward) or
I_,-/l_-I (forward) during
playback or pause mode.
• During random play (page 15), you cannot skip to tracks which
have already been played.
eDuring program play (page 16) or random play, you can search
forward or backward only within the current track.
eDuring program play, skipping is always in the programmed order,
whether forward or backward.
t
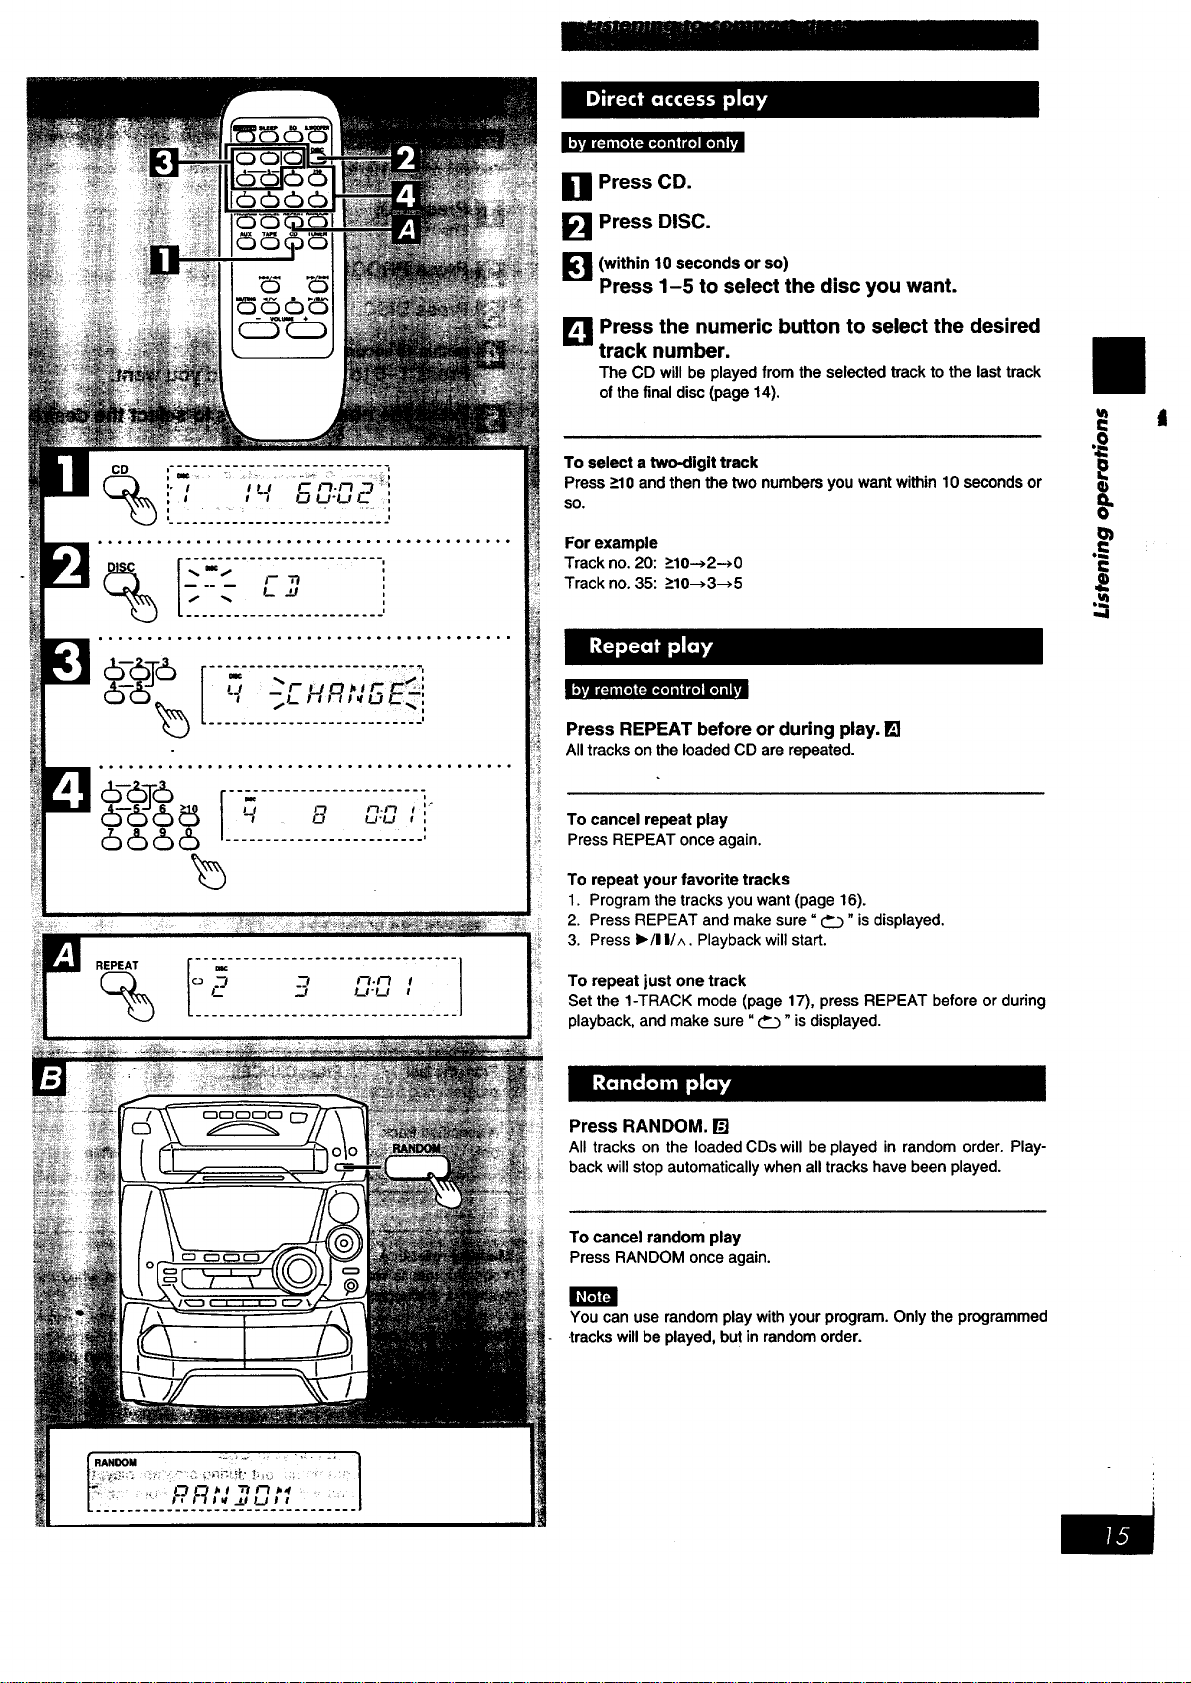
_v anI[_] i hTel (:.][ _o] l| IId[o]i[o] |11
o,_Mi L:] n [o) (:][_o] ii _l'_] [e] i I I
%
!1
_7. N.Ft
L .J LPLt
[] Press CD.
[] Press DISC.
[_'1 (within 10 seconds or so)
Press 1-5 to select the disc you want.
LK'IJPress the numeric button to select the desired
track number.
The CD will be played from the selected track to the last track
of the final disc (page 14).
To select a two-digit track
Press >10 and then the two numbers you want within 10 seconds or
so.
For example
Track no. 20:>10-->2->0
Track no. 35:>10-->3-->5
Press REPEAT before or during play. []
Alltracksonthe loadedCD are repeated.
To cancel repeat play
PressREPEATonceagain.
To repeat your favorite tracks
1. Program the tracks you want (page 16).
2. Press REPEAT and make sure" _" is displayed.
3. Press I_/I I/^. Playback will start.
To repeat just one track
Set the 1-TRACK mode (page 17), press REPEAT before or during
playback, and make sure "_" is displayed.
Press RANDOM. []
All tracks on the loaded CDs will be played in random order. Play-
back will stop automatically when all tracks have been played.
To cancel random play
Press RANDOM once again.
You can use random play with your program. Only the programmed
•trackswill be played, but in random order.
o=
I),vJ 1_ ii [l]l(:.][l(I] II I I[I] [I] i I I
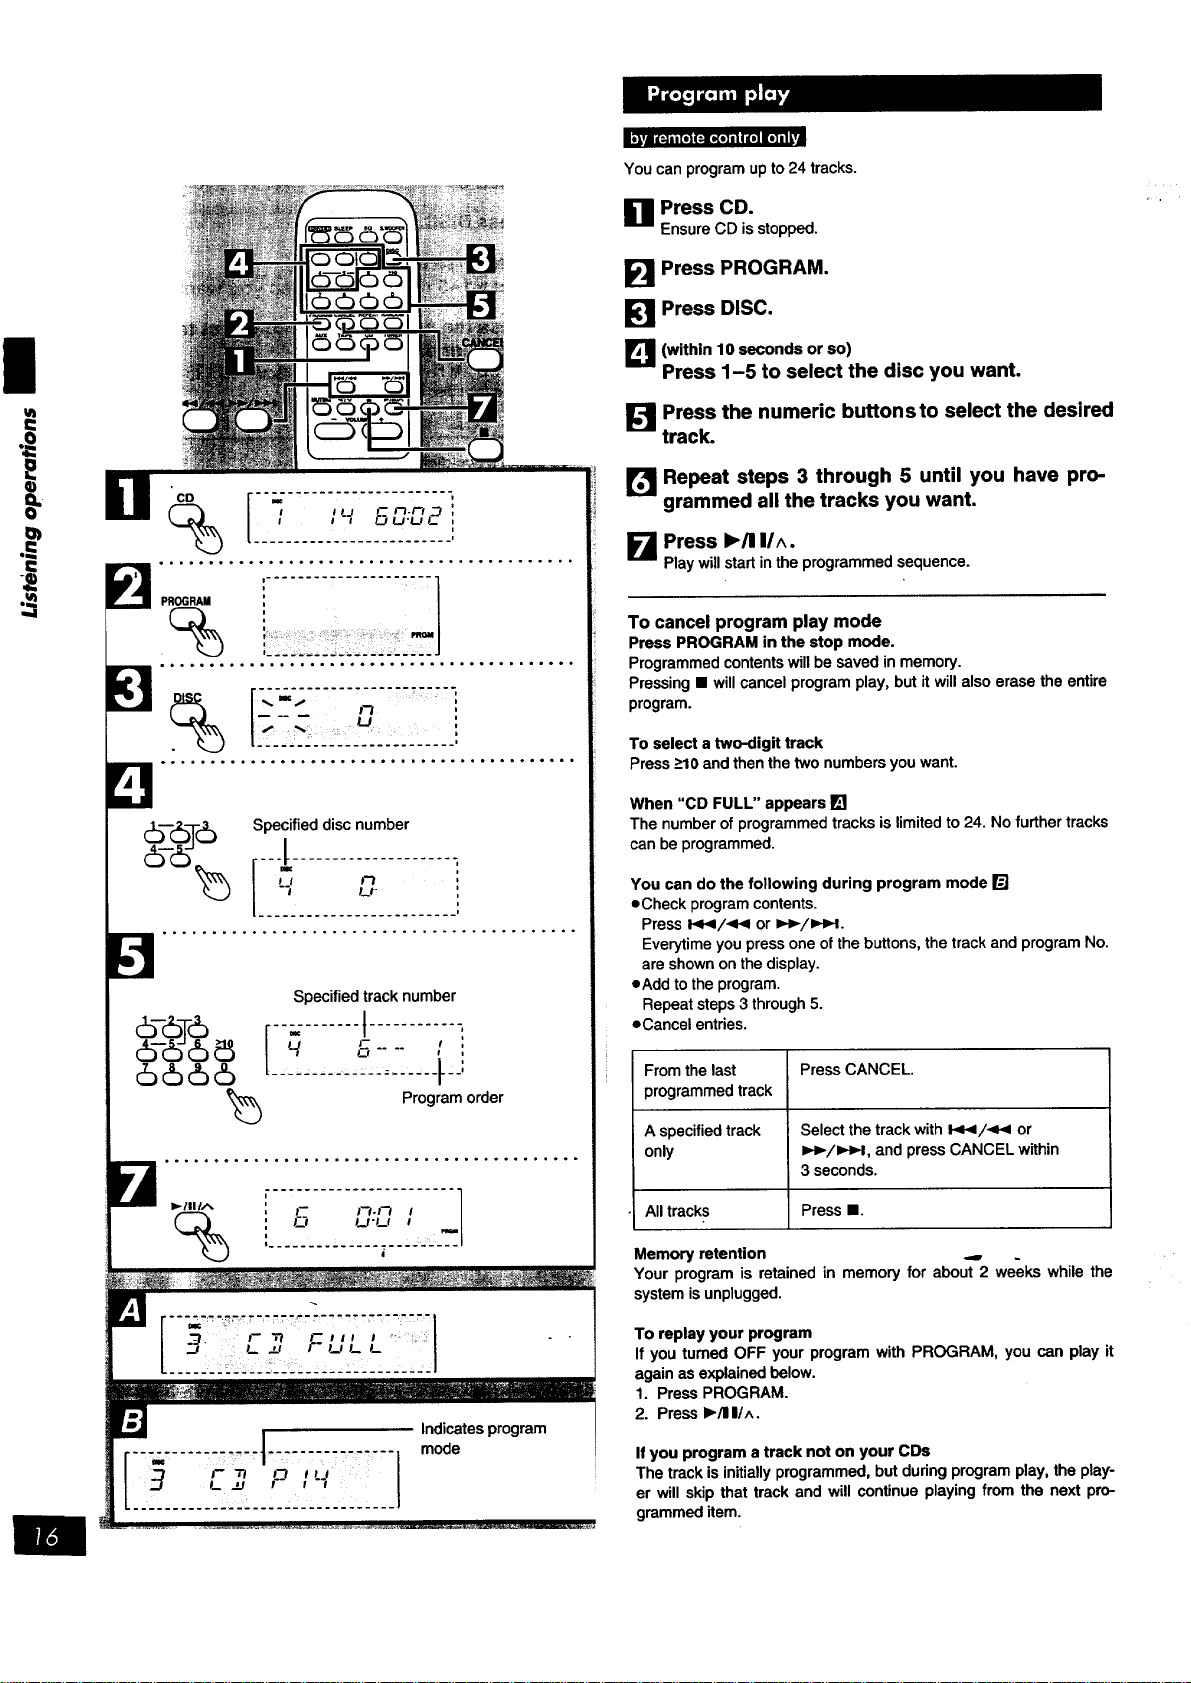
You can program up to 24 tracks.
[] Press CD.
Ensure CD isstopped.
/
u_
6-66
6666
)5
_ ,° ....... .. .......................... .....
Specified track number
m
U, F
|
Program order
I_/IIIA
%
i........................F- ["f-f-I I ]
11 ' ....... ; -- i ...... ,.;__..I
i
[] Press PROGRAM.
Press DISC.
L_ (within 10 seconds or so)
Press 1-5 to select the disc you want.
I_ Press the numeric buttonsto select the desired
track.
[I_ Repeat steps 3 through 5 until you have pro-
grammed all the tracks you want.
Press I,,/11IIA.
K,m
Play will start in the programmed sequence.
To cancel program play mode
Press PROGRAM in the stop mode.
Programmed contents will be saved in memory.
Pressing • will cancel program play, but it will also erase the entire
program.
To select a two-digit track
Press _>10and then the two numbers you want.
When "CD FULL" appears[]
The number of programmedtracksislimited to 24. Nofurther tracks
can beprogrammed.
You can do the following during program mode 13]
eCheck program contents.
Press l._,9/-qF_ or t,€,-/_l.
Everytime you press one of the buttons, the track and program No.
are shown on the display.
eAdd to the program.
Repeat steps 3 through 5.
eCancel entries.
From the last Press CANCEL.
programmed track
A specified track Select the track with I<</<v_ or
only =,-_/_1, and press CANCEL within
3 seconds.
All tracks Press •.
Memory retention ... .
Your program is retained in memory for about 2 weeks while the
system is unplugged,
To replay your program
If you tumed OFF your program with PROGRAM, you can play it
again as explained below.
1. Press PROGRAM.
2. Press I_/1111A.
If you program a track not on your CDs
The track is initially programmed, butduring program play, the play-
er will skip that track and will continue playing from the next pro-
grammed item.

.....
L '
o...°°..°....°.°.°.......,,...°°....o.°..°
[
(
- o,-_,- l_:
_- _'_%L
I
I._ TI ";"F F
I
I
I
"-FiL L
I
.. .... . ........... • .... . .... ,..°._..,,,..°
Specified disc number
... ............... .°..°.,,...°....°...,...
FM MODFJBP MEMORY I
_,_; F,_ --Specified track number
'--;-:.........;-...........J......1
...°.,... .... ......° °.. _.°°.,.. o......o°..
This function makes it easier for you to select special CDs and
tracks from amongst those loaded in the player.
You can use this function to make recordings as well.
There are 3 CD/track selection modes.
• For playing back 1 track only from all loaded CDs
1-Track mode (1-TRACK)
eFor playing back 1 CD only from all loaded CDs
1-Disc mode (1-DISC)
eFor playing back I track on all loaded CDs
1-Track All-Disc mode (1-ALL)
v_
Press CD. a= it
Ensure CD is stopped. "_
Press CD MANAGER to select the desired •
mode.
Every time you press the button;
1-TRACK--, 1-DISC--> 1-ALL
_--NORMAL <-_J
(OFF)
1-TRACK: Only one particular track isplayed,
1-DISC: The tracks on only one particular disc are played.
1-ALL: The same track numbers on each of the CDs are
played in succession.
(NORMAL: The original display is restored in about
3 seconds.)
=;
[_1 Press DISC 1-DISC 5 to select the disc you
want.
E!
This step is not required if 1-ALL was selected in step 2.
Press _/,<< or _,._/_,._H to select the de-
sired track.
This step is not required if 1-DISC was selected in step 2.
Press I_/! I.
The selected track will start.
To stop play
PressI.
When playback ends
"NORMAL" will appear on the display for about 3 seconds, then the
CD MANAGER function will turn OFF automatically.
During play in the 1-ALL mode:
eit is not possibleto skip backto a CD whosetrack has already
been played. -'-
elf a CD doesnothave the designated tracknumber,it isskipped
and playcontinues.
You can use the repeat function (page 15) and random play
(page 15) at the sametime. However,in 1-TRACKmode, random
playisnotavailable.
|
,,4
Front side
DECK1 DECK2
i.................... 1
:: r_ _ F_
:,___,.
..,,.....,........ .... ,.. ..... ...,......,,
Tape direction
L
: PL&Y
"- f_ _- -- /
*.___ __ ._. _ _ _-'_ . _. _,
.................... .... .... ...... ......=.
Il_r;rFJ
,_OLUM_
I, t--t l LJ L--J _J _t
# UL " aLILt
................. L.........
OECK1/2
Deck£n ise
......J
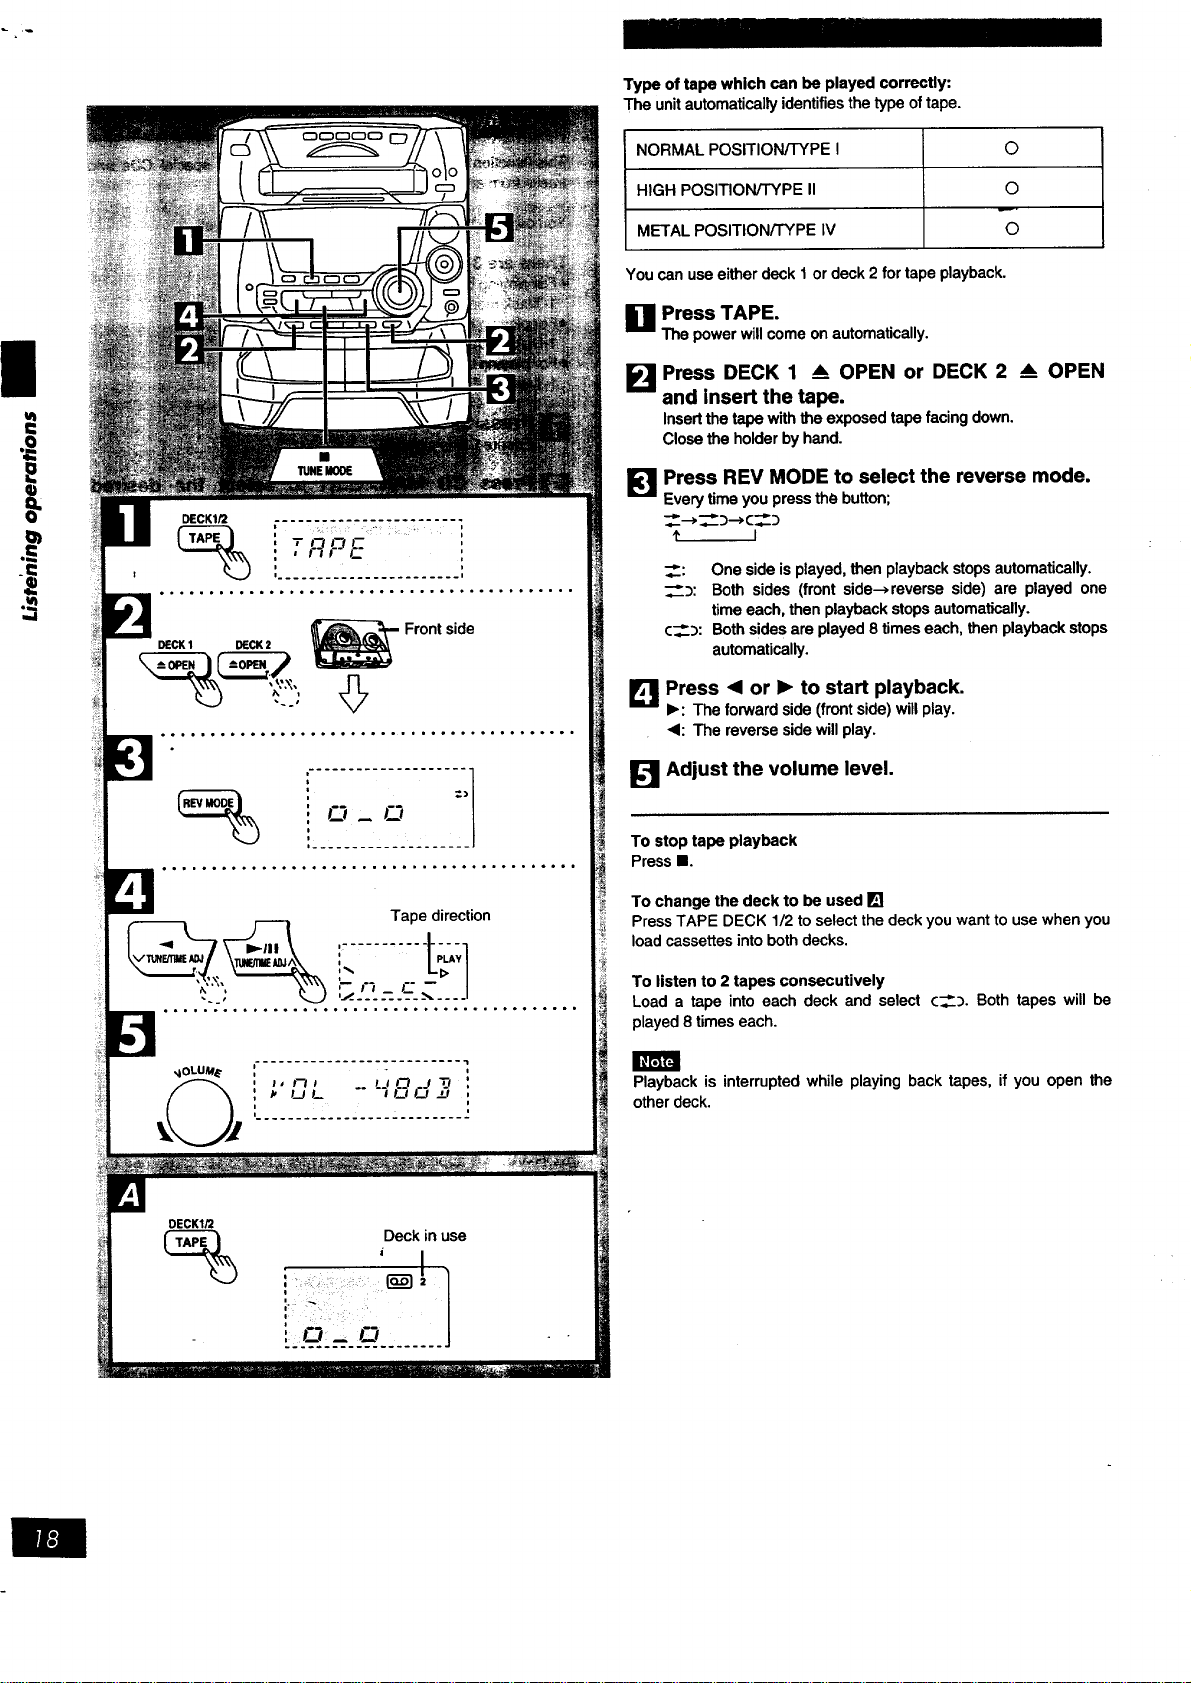
Type oftape whichcan be played correctly:
The unitautomaticallyidentifiesthe type oftape.
NORMAL POSITION/TYPE I O
HIGH POSITION/TYPE II O
METAL POSITION/TYPE IV O
Youcanuseeitherdeck 1 ordeck 2for tapeplayback.
_1 Press TAPE.
Thepowerwillcomeonautomatically.
I_1 Press DECK 1 & OPEN or DECK 2 _ OPEN
and insert the tape.
Insertthe tapewiththe exposedtapefacing down.
Closethe holderby hand.
I_ Press REV MODE to select the reverse mode.
Every time you press the button;
_:_c_._
I
_: Onesideisplayed, then playbackstopsautomatically.
_:_: Both sides (frontside-->reverseside) are played one
timeeach, then playbackstopsautomatically.
¢__:): Bothsidesareplayed8 timeseach,thenplaybackstops
automatically.
[] Press <1or 1_ to start playback.
•: The forward side (front side) will play.
<1: The reverse side will play.
I_1 Adjust the volume level.
To stop tape playback
Press II.
To change the deck to be used []
Press TAPE DECK 1/2 to select the deck you want to use when you
load cassettes into both decks.
To listen to 2 tapes consecutively
Load a tape into each deck and select c___. Both tapes will be
played 8 times each.
Playbackis interruptedwhile playingback tapes, if you open the
otherdeck.
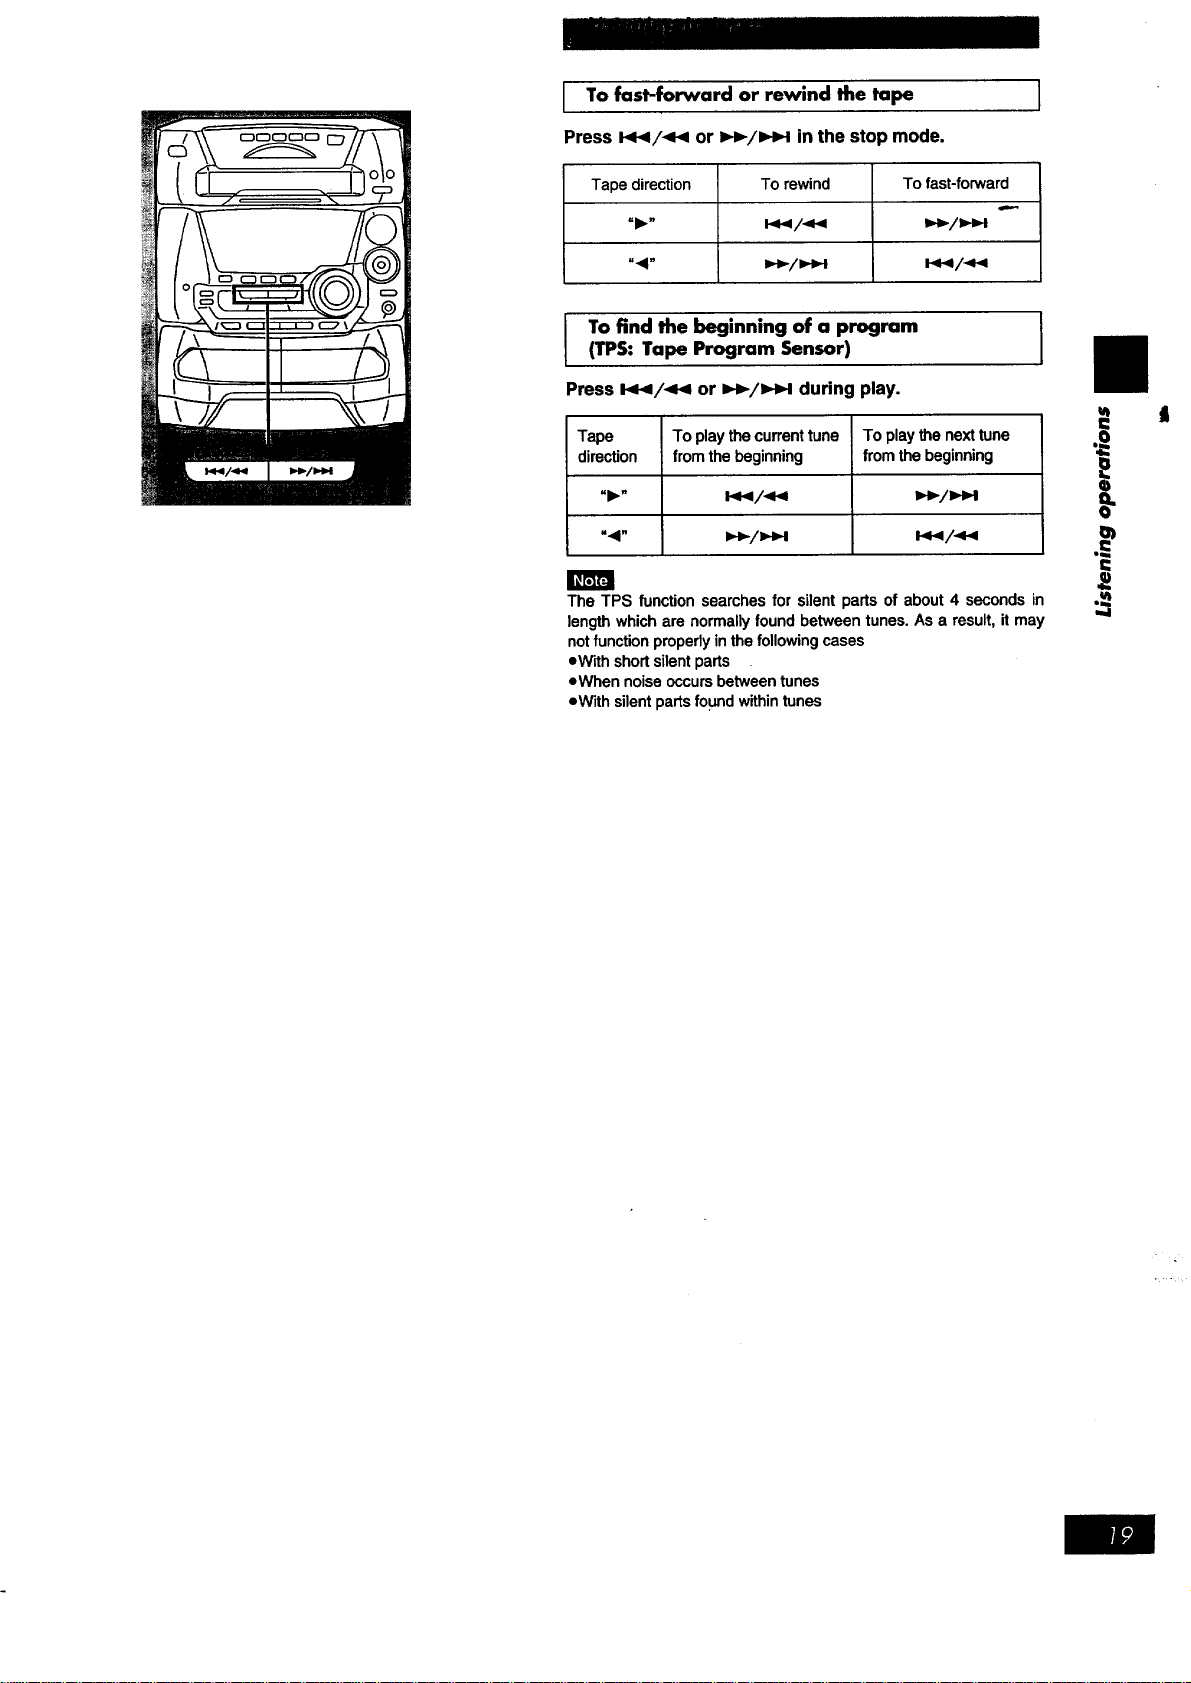
I To fast-forward rewind the ]
or
tape
Press _/_ or _/_ in the stop mode.
Tapedirection Torewind Tofast-forward
"1_" l._,i/-_,i _,_/i.t_i
".4" i,_/I,i_l i_.l/.ql.i
I T°findthebeglnning°fapr°gram I
(TPS: Tape Program Sensor)
Press 144/_ or _-/_1 during play.
Tape Toplaythecurrenttune Toplaythenexttune
direction from thebeginning from thebeginning
"41" i,,_/=,,_ I_/._
The TPS function searchesfor silentpartsof about4 secondsin
lengthwhichare normallyfound betweentunes.As a result,it may
notfunction properlyinthefollowing cases
=Withshortsilentparts
eWhen noiseoccursbetweentunes
eWithsilentpartsfound withintunes
ul
i=
i
II
.==
I
,,,,i
tl
I
ul
-I=
q)
==
0
q)
0€
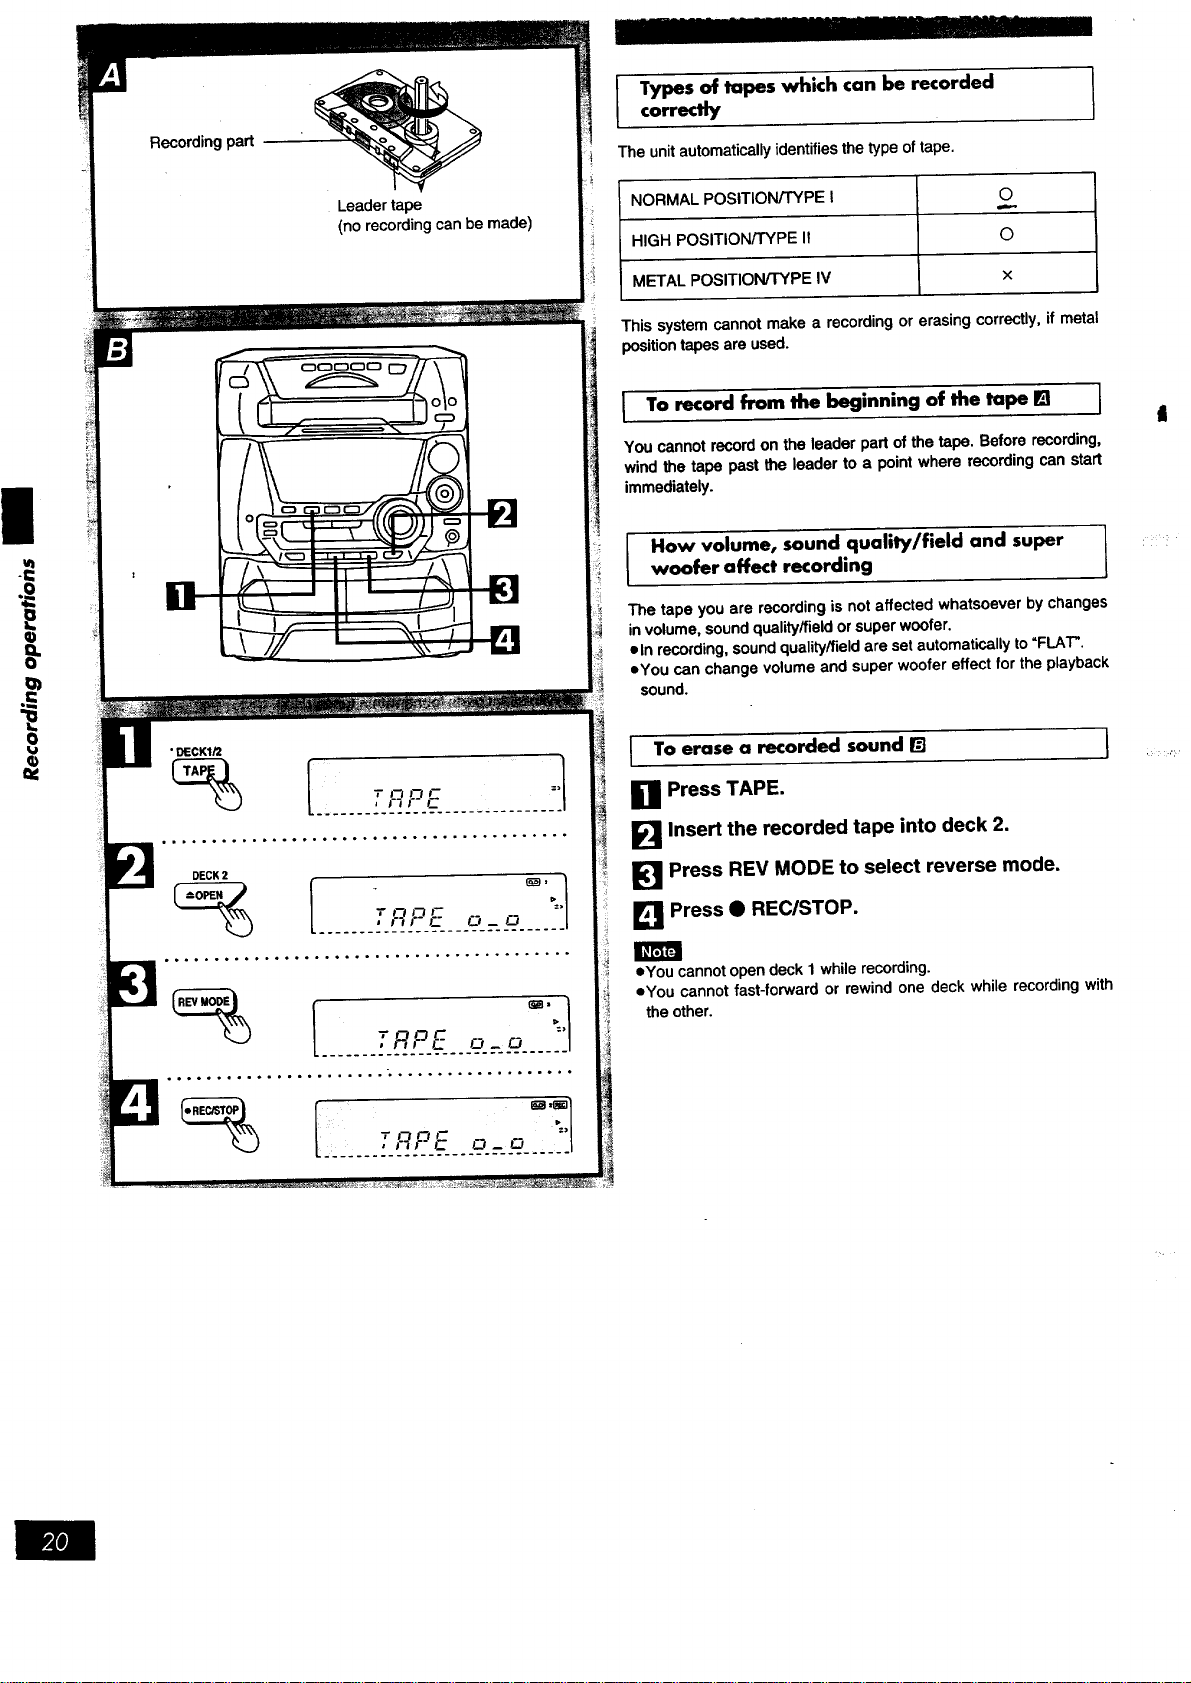
Leader tape
(no recording can be made)
• DECKIQ
"1" F'I F'I t" :+l
1
....... •.'-]_'--._................ I
DECK2
"r t'-+J_ F _ :'1
L....... '.."_-'.."-_r.---____c_-'_=_H..... __
I ypes of tapes which can be recorded I
correctly
I
The unit automatically identifies the type of tape.
NORMAL POSITION/TYPE I O
HIGH POSITION/TYPE It ©
METAL POSITION/TYPE IV x
This system cannot make a recording or erasing correctly, if metal
position tapes are used.
I To record from the beginning of the tape [] I
You cannot record on the leader part of the tape. Before recording,
wind the tape past the leader to a point where recording can start
immediately.
How volume, sound quality/field and super I
woofer affect recording
L
The tape you are recording is not affected whatsoever by changes
in volume, sound quality/field or super woofer.
eln recording, sound quality/field are set automatically to "FLAT".
eYou can change volume and super woofer effect for the playback
sound.
I o erase a recorded sound r_
_1 Press TAPE.
_'_ Insert the recorded tape into deck 2.
[_1 Press REV MODE to select reverse mode.
[] Press • REC/STC)P.
]
oYou cannot open deck 1 while recording.
eYou cannot fast-forward or rewind one deck while recording with
the other.
NIl]
DECK2
i _ __i[................... _ 1
.... ...o..o.. ..... .°o.°°o..°.o..._°°o,..°.
F 1,4 FI _ F ='/
,__'_-2.'_'_t5:--_'___-___.1
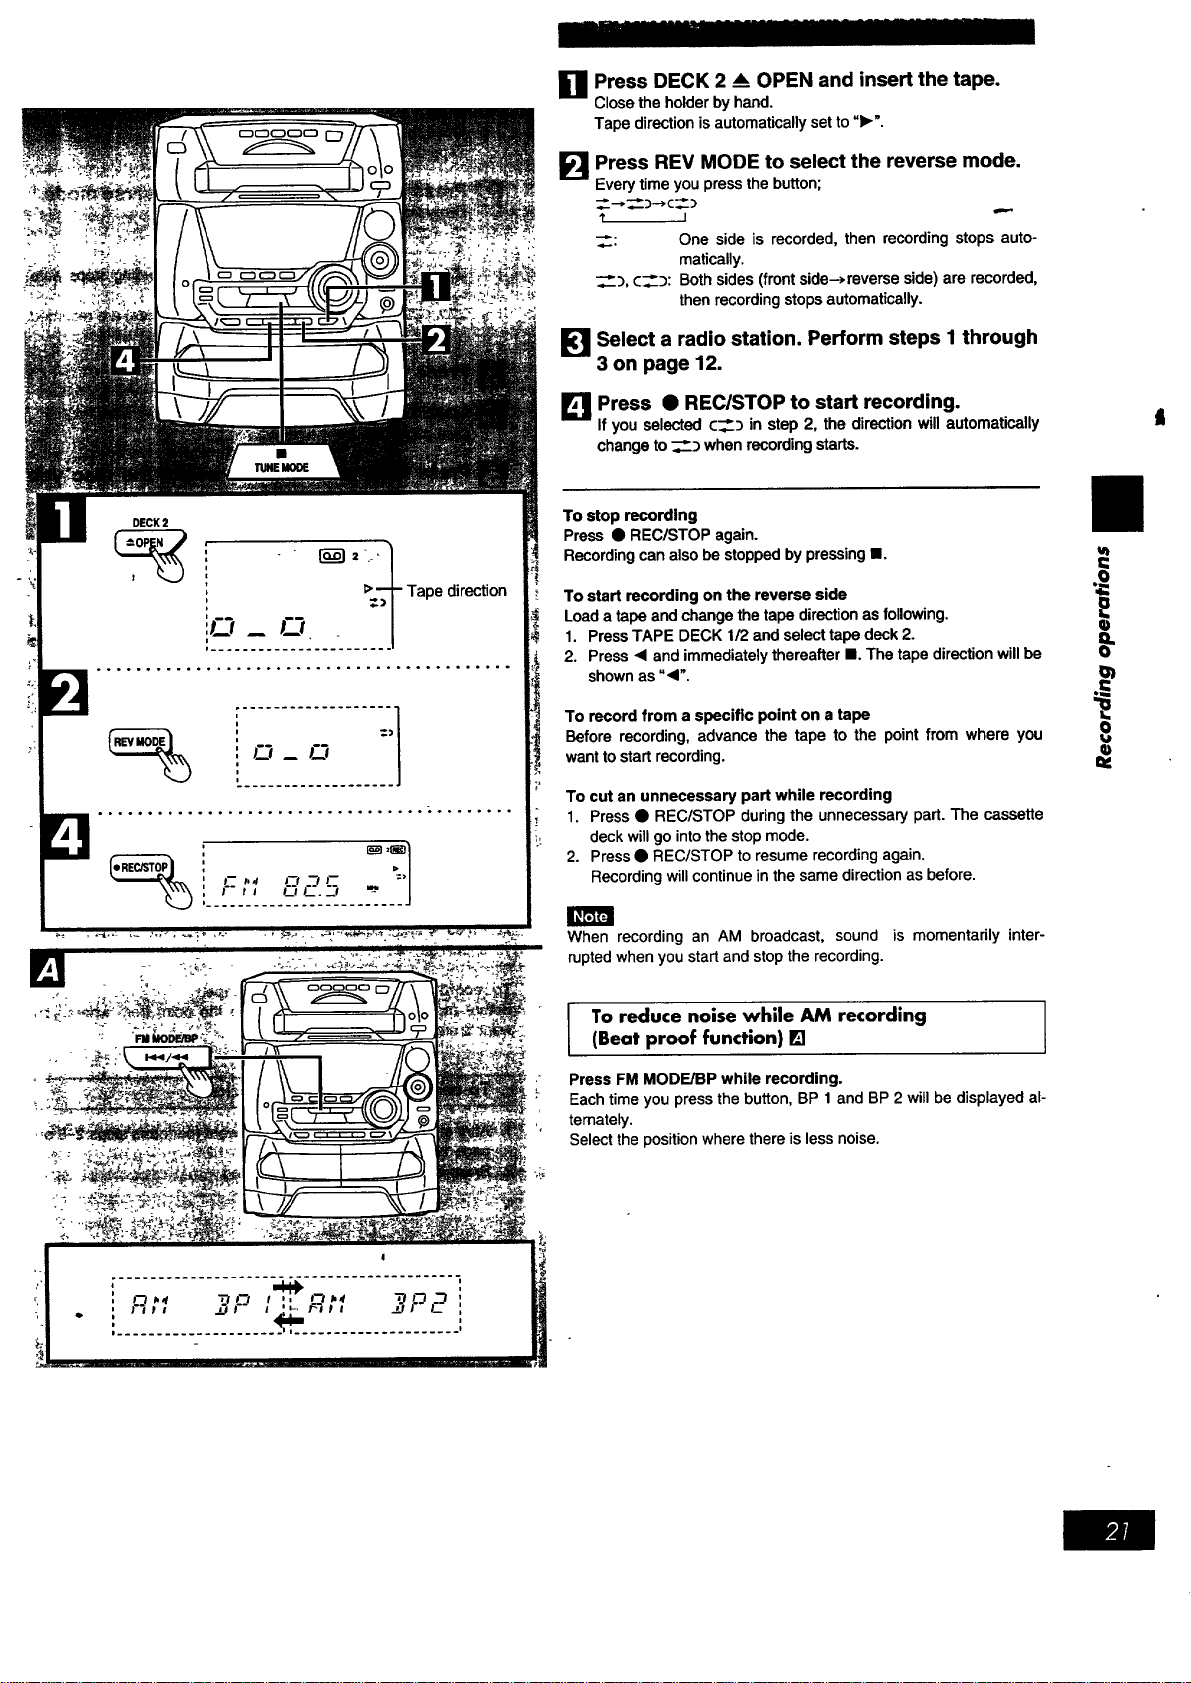
Press DECK 2 _ OPEN and insert the tape.
Close the holder by hand.
Tape direction is automatically set to "1_'.
FI
Press REV MODE to select the reverse mode.
Every time you press the button;
--* _)---->C :)
I
_: One side is recorded, then recording stops auto-
matically.
_, ¢__:_: Both sides (front side-,reverse side) are recorded,
then recording stops automatically.
[_1 Select a radio station. Perform steps I through
3 on page 12.
Press • REClSTOP to start recording.
_llf you selected ¢___ in step 2, the direction will automatically
change to _ when recording starts.
To stop recording
Press • REC/STOP again.
Recording can also be stopped by pressing II.
To start recording on the reverse side
Load a tape and change the tape direction as following.
1. Press TAPE DECK 1/2 and select tape deck 2.
2. Press <1and immediately thereafter II. The tape direction will be
shown as "<".
To recordfrom a specificpoint on a tape
Before recording,advance the tape to the pointfrom where you
wanttostartrecording.
To cut an unnecessary part while recording
_ 1. Press • REC/STOP during the unnecessary part. The cassette
_._ deck will go into the stop mode.
2. Press • REC/STOP to resume recording again.
Recording will continue in the same direction as before.
When recording an AM broadcast, sound is momentarily inter-
rupted when you start and stop the recording.
u_
0
ta
=€
t
I To reduce noise while AM recording I
(Beat proof function) []
I
Press FM MODE/BP while recording.
Each time you press the button, BP 1 and BP 2 will be displayed al-
ternately.
Select the position where there is less noise.
ut
DECK2
: _ 1
' .
, +Tape direction
!_r _ • I
,.,o,o.,....o.......o....o,o..oo.o..,..o..
..°.°.,,°,o°°°,,,°°o,.,,,,.,..°,,.., ..... •
r : I f- 7./ i
TUNEMODE
r I
l :3 ,_, ",O'_L
_..-........ :: .'.-: _...._.- :._.:J..............
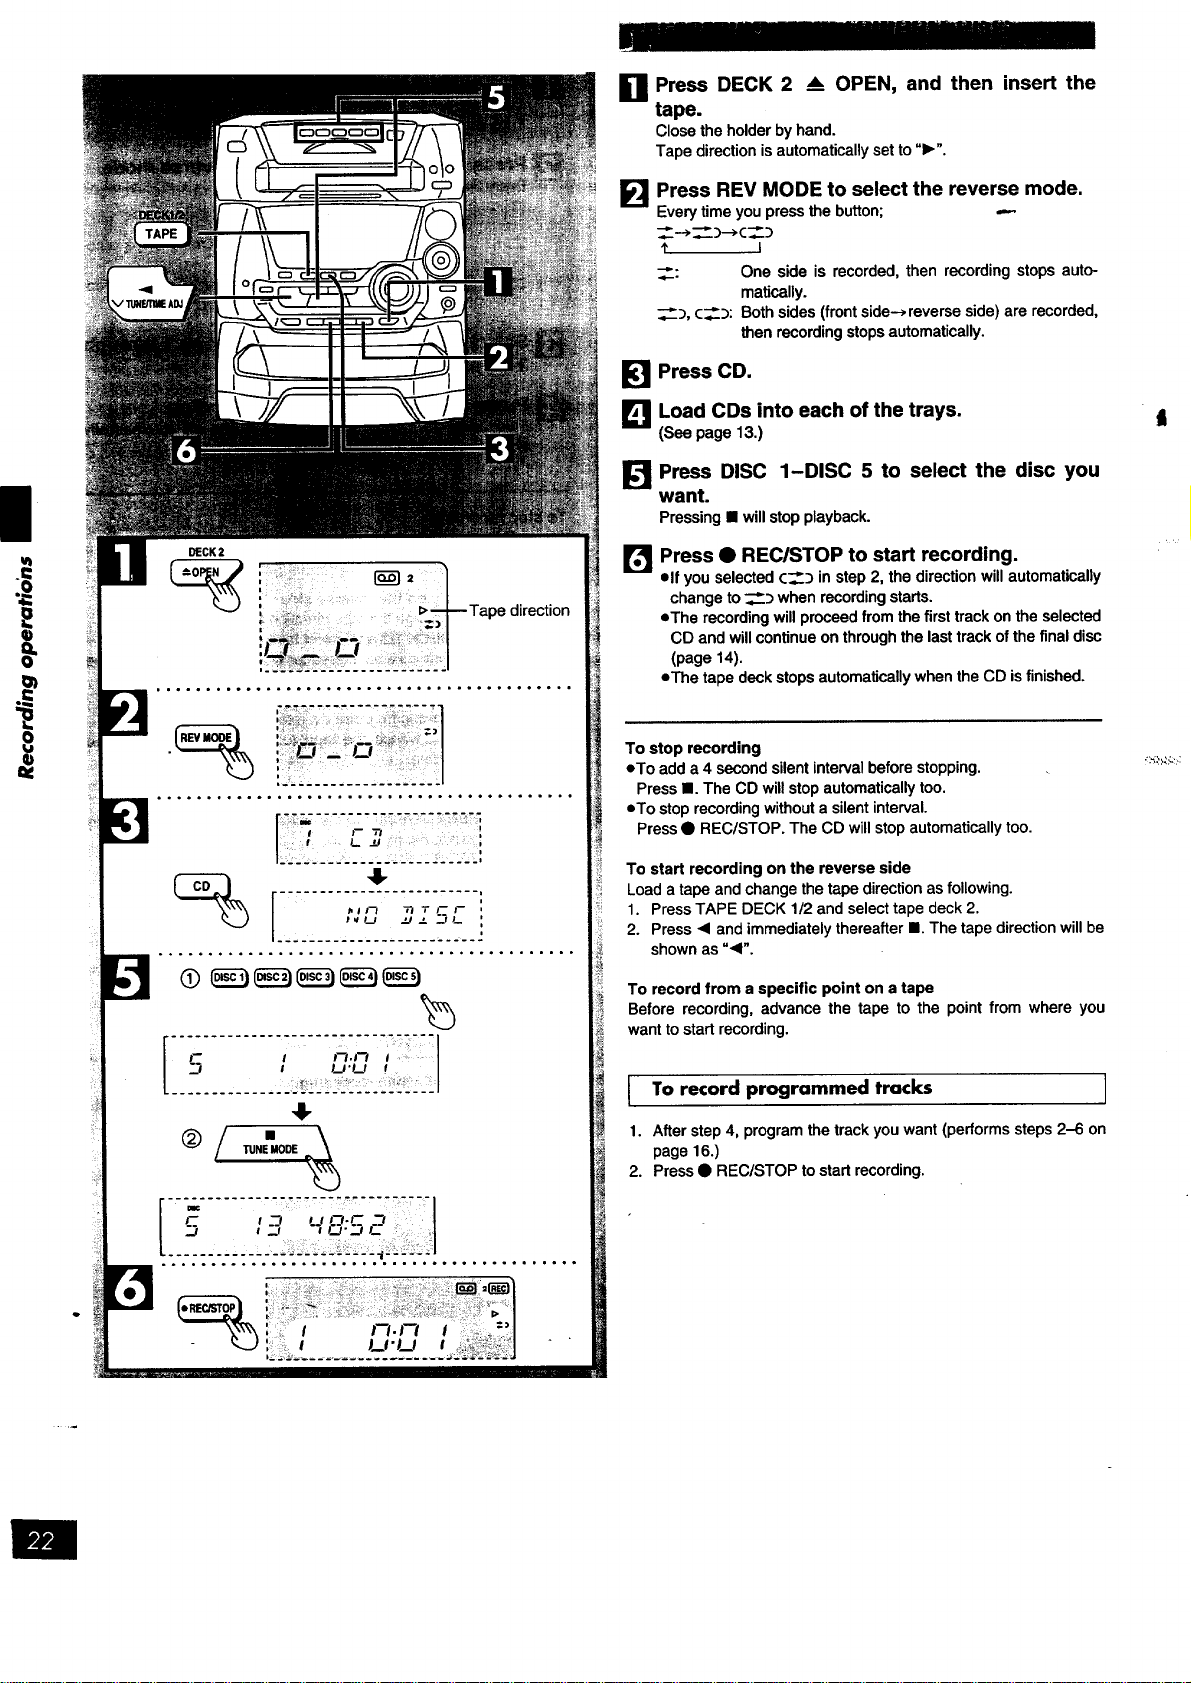
0 Press DECK 2 _ OPEN, and then insert the
tape.
Closetheholderbyhand•
Tapedirectionisautomaticallysetto"1_".
FI
Press REV MODE to select the reverse mode.
Every time you press the button; ---
1' I
__: One side is recorded, then recording stops auto-
ma_o_lly.
_, c___:Bothsides(frontside-_,reverseside)arerecorded,
then recording stops automatically.
Press CD.
J_l Load CDs into each of the trays.
(See page 13.)
J_ Press DISC 1-DISC 5 to select the disc you
want.
Pressing • will stop playback.
f:l
Press • REC/STOP to start recording.
elf you selected c___ in step 2, the direction will automatically
change to _:_ when recording starts.
eThe recording will proceed from the first track on the selected
CD and will continue on through the last track of the final disc
(page 14).
eThe tape deck stops automatically when the CD isfinished.
To stop recording
eTo add a 4 second silent interval before stopping.
Press •. The CD will stop automatically too.
eTo stop recording without a silent interval.
Press • REC/STOP. The CD will stop automatically too.
To start recording on the reverse side
Load a tape and change the tape direction as following.
1. Press TAPE DECK 1/2 and select tape deck 2.
2. Press • and immediately thereafter III. The tape direction will be
shown as "•".
To record from a specific point on a tape
Before recording, advance the tape to the point from where you
want to start recording.
To record programmed tracks ]
1. After step 4, program the track you want (performs steps 2-6 on
page 16.)
2. Press • REC/STOP to start recording.
•_'.,_>_::,.,:
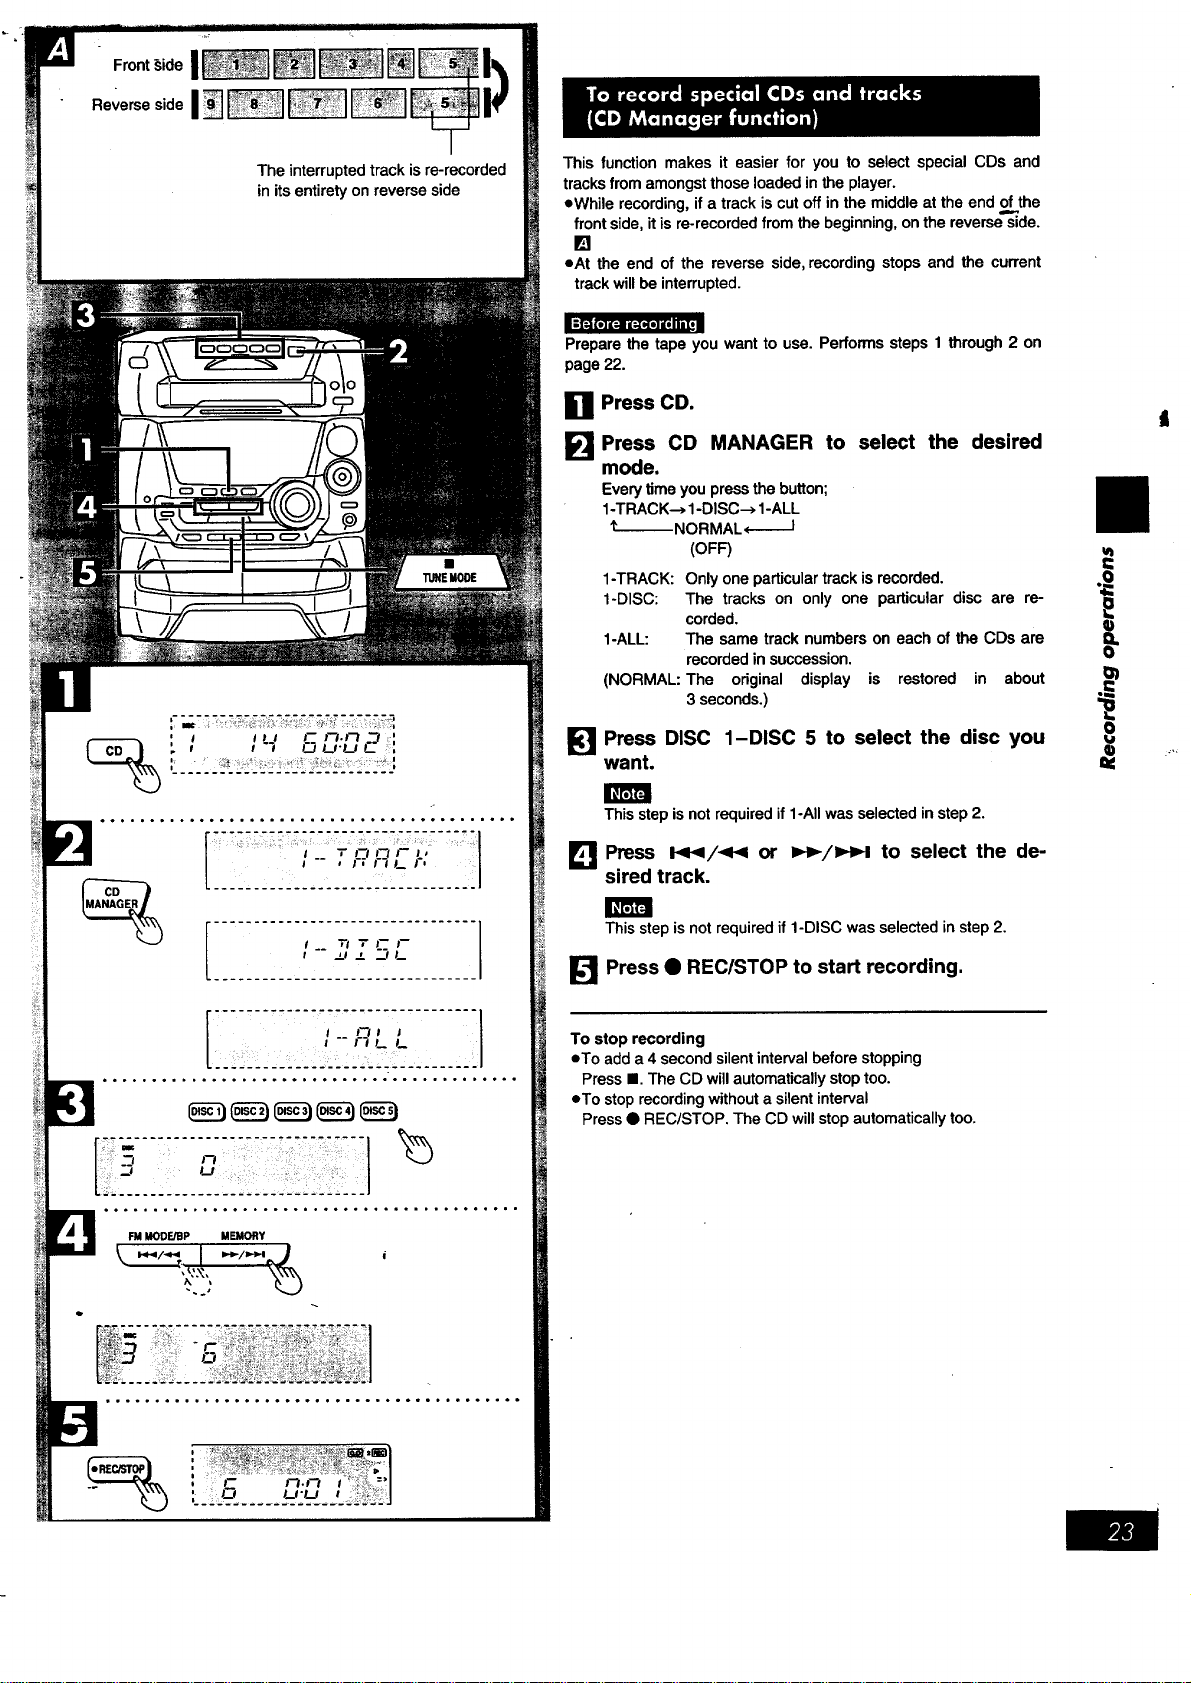
Front _,ide ........... _,i. I I_k
.... ;;'J_@'N_"
Reverseside
The interrupted track is re-recorded
in its entirety on reverse side
°°°°°o°°°.°°°°.°. ......... °o°°°°.°°°...°oo
7" 7ZT---'--'----,- 77- 7"_ 77-7-'---;
[ rmmF,,: I
....... _1_1.... _ ...... ,,'........ '.
t__ Tt "rL--.F
t _.,i_ ._if_
L
"----'" I FI I J
o° .... °..° ........ _°o°°°°°° ....... °°.°o°°°
°° ........ oo°° ...... .°°o°°°°°° ..... °°o°°.,
FM MODE/BP MEMORY
I-_l<-,i I
L.: Q)
This function makes it easier for you to select special CDs and
tracks from amongst those loaded in the player.
eWhile recording, if a track is cut off in the middle at the end of,,the
front side, it is re-recorded from the beginning, on the reverse side.
[]
oat the end of the reverse side, recording stops and the current
track will be interrupted.
Preparethe tape you want to use. Performssteps 1 through 2 on
page22.
n Press CD.
Press CD MANAGER to select the desired
EEmmm
mode.
Every time you press the button;
1-TRACK--, 1-DISC--> 1-ALL
_--- NORMAL,--I
(OFF)
1-TRACK: Only one particular track is recorded.
1-DISC: The tracks on only one particular disc are re-
corded.
1-ALL: The same track numbers on each of the CDs are
recorded in succession.
(NORMAL: The original display is restored in about
3 seconds.)
[] Press DISC 1-DISC 5 to select the disc you
want.
This step is not required if 1-All was selected in step 2.
Ll_ Press I_/_ or l,_,-/_M,,_to select the de-
sired track.
This step is not required if 1-DISC was selected in step 2.
[] Press • REC/STOP to start recording.
To stop recording
oTo add a 4 second silent interval before stopping
Press I. The CD will automatically stop too.
oTo stop recording without a silent interval
Press • REC/STOP. The CD will stop automatically too.
u_
I=
==
1
I)
TUNEMODE
Tape direction of the tape
you are recording onto
_1
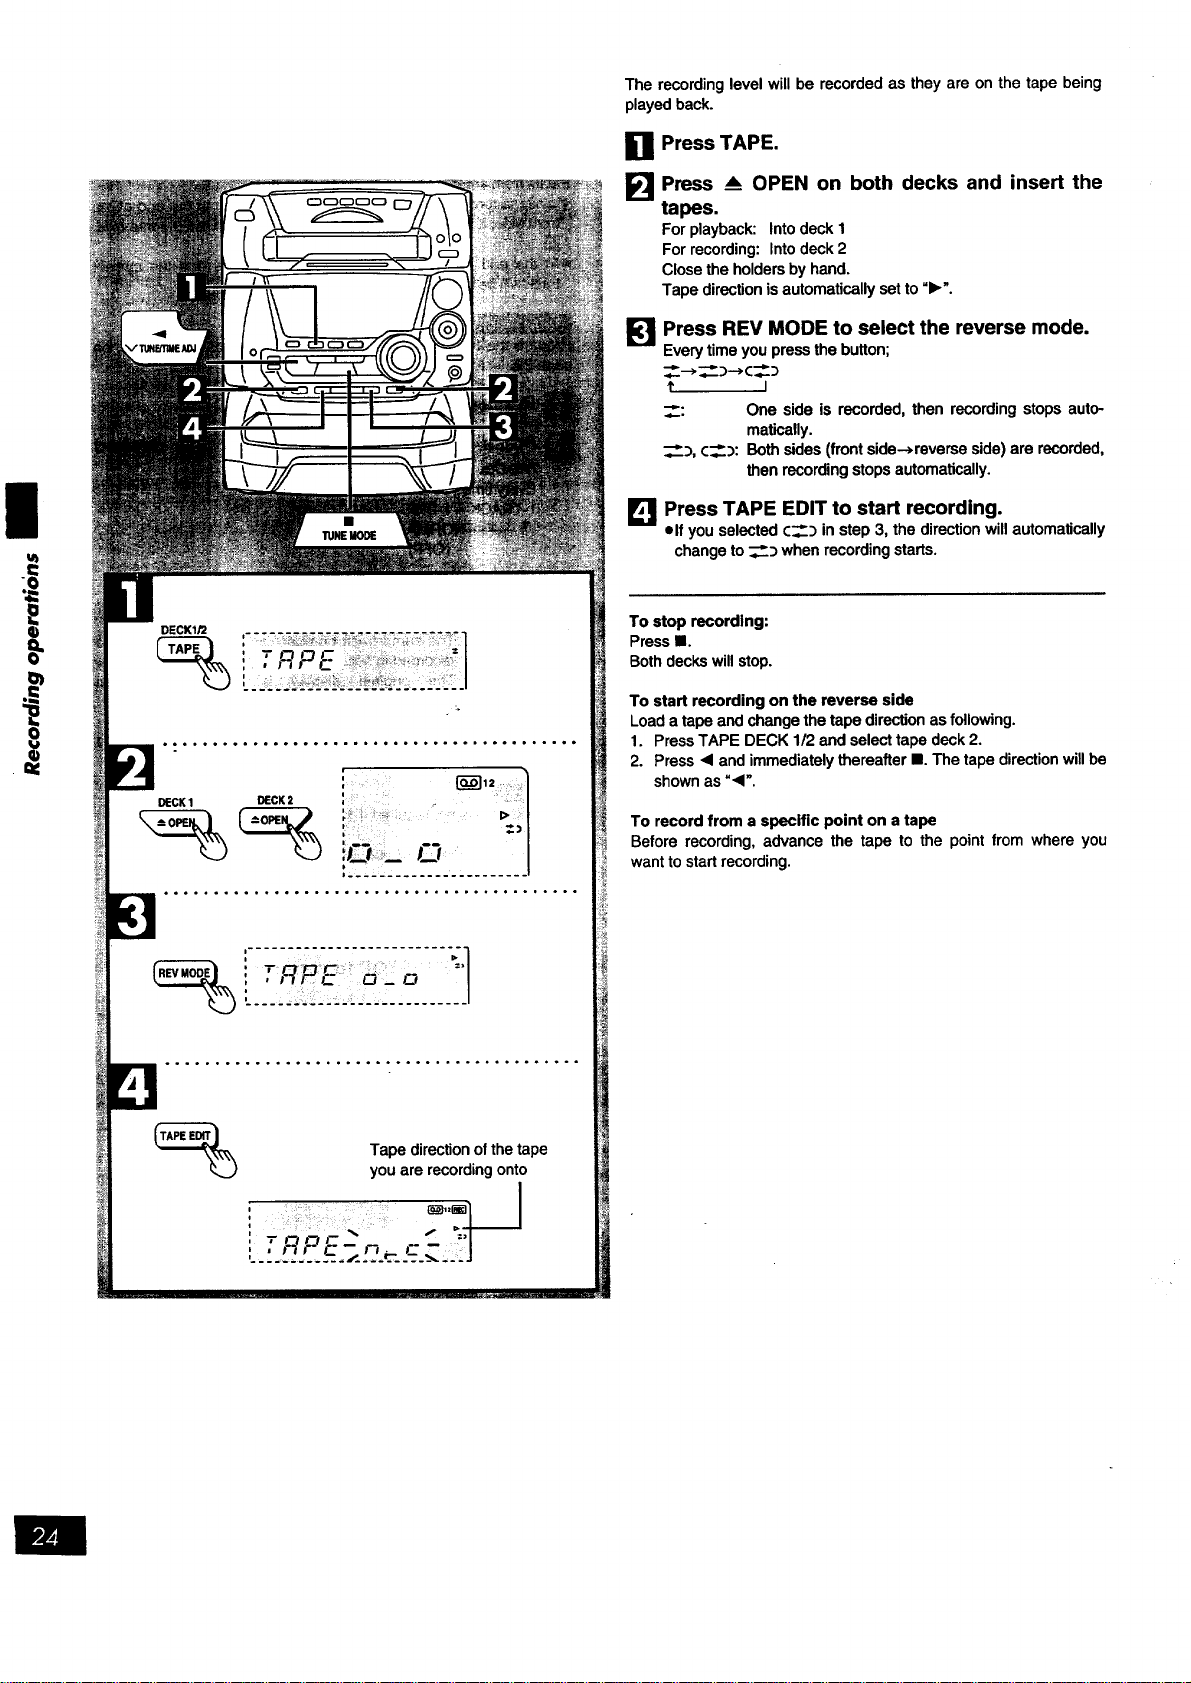
The recordinglevel willbe recordedas theyare onthe tape being
playedback.
III1 Press TAPE.
I_1 Press _ OPEN on both decks and insert the
tapes.
For playback: Into deck 1
For recording: Into deck 2
Close the holders by hand.
Tape direction isautomatically set to "1_'.
lq
Press REV MODE to select the reverse mode.
Every time you press the button;
__-->__::)---*C_:_
f I
__: One side is recorded, then recording stops auto-
matically.
_), c__:): Both sides (front side->reverse side) are recorded,
then recording stops automatically.
L_ Press TAPE EDIT to start recording.
elf you selected c__) in step 3, the direction will automatically
change to ___:_when recording starts.
To stop recording:
Press lB.
Both decks will stop.
To start recording on the reverse side
Load a tape and change the tape direction as following.
1. Press TAPE DECK 1/2 and select tape deck 2.
2. Press "< and immediately thereafter II. The tape direction will be
shown as =<'.
To record from a specific point on a tape
Before recording, advance the tape to the point from where you
want to start recording.
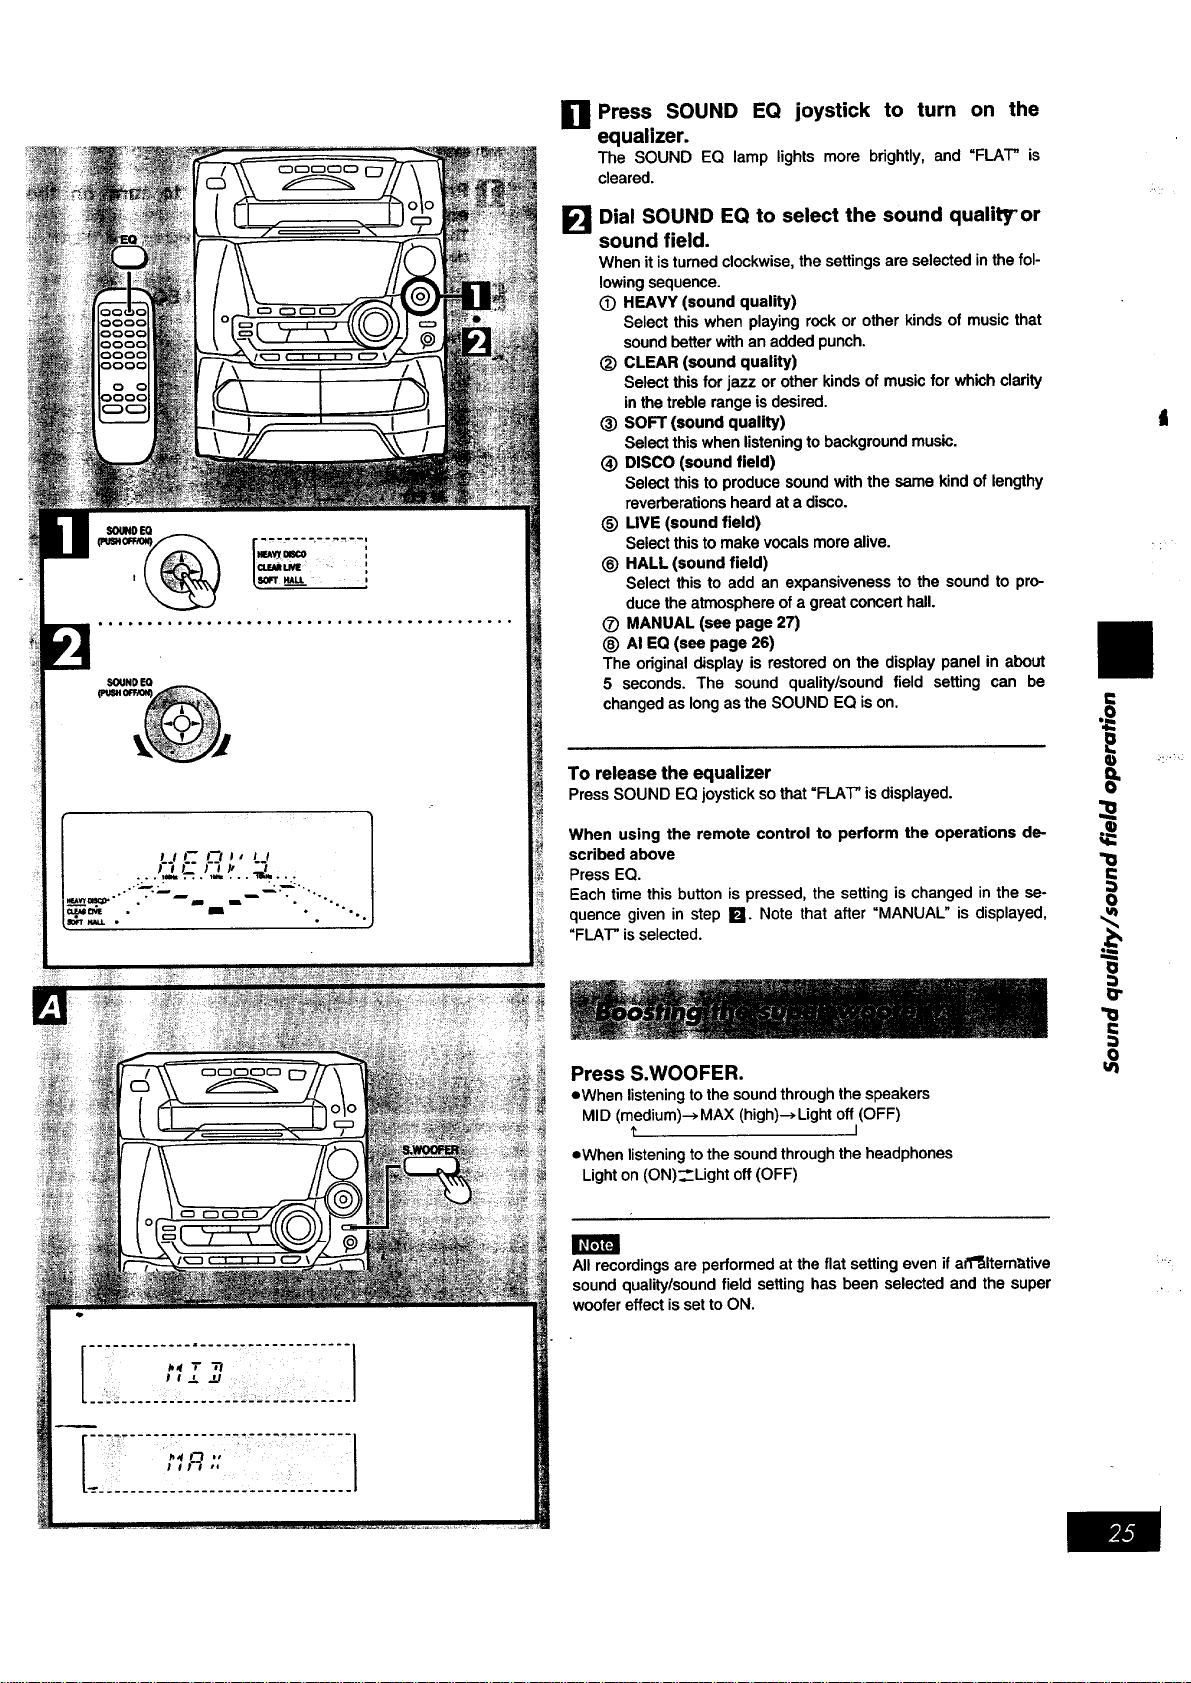
Press SOUND EQ joystick to turn on the
equalizer.
The SOUND EQ lamp lights more brightly, and "FLAT" is
cleared.
El
Dial SOUND EQ to select the sound quality" or
sound field.
When it is turned clockwise, the settings are selected in the fol-
lowing sequence.
(_) HEAVY (sound quality)
Select this when playing rock or other kinds of music that
sound better with an added punch.
_) CLEAR (sound quality)
Select this for jazz or other kinds of music for which clarity
in the treble range is desired.
(_ SOFT (sound quality)
Select this when listeningto background music.
(_ DISCO (sound field)
Select this to produce sound with the same kind of lengthy
reverberations heard at a disco.
(_ LIVE (sound field)
Select this to make vocals more alive.
(_) HALL (sound field)
Select this to add an expansiveness to the sound to pro-
duce the atmosphere ofa great concert hall.
(_ MANUAL (see page 27)
_) AI EQ (see page 26)
The original display is restored on the display panel in about
5 seconds. The sound quality/sound field setting can be
changed as long as the SOUND EQ is on.
To release the equalizer
PressSOUND EQjoysticksothat"FLAT"isdisplayed.
When using the remote control to perform the operations de-
scribed above
Press EQ.
Each time this button is pressed, the setting is changed in the se-
quence given in step Ikl. Note that after "MANUAL" is displayed,
"FLAT" is selected.
Press S.WOOFER.
eWhen listening to the sound through the speakers
MID (medium)--> MAX (high)-* Light off (OFF)
I
eWhen listening to the sound through the headphones
Light on (ON)_Light off (OFF)
All recordings are performed at the flat setting even if aff_lternative
sound quality/sound field setting has been selected and the super
woofer effect is set to ON.
t=
o=
i
0
:)
O"
"!0
o
ul
:,,.
u
q)
o=
I_r_FJ
o
SOUND EQ
SOUND EQ
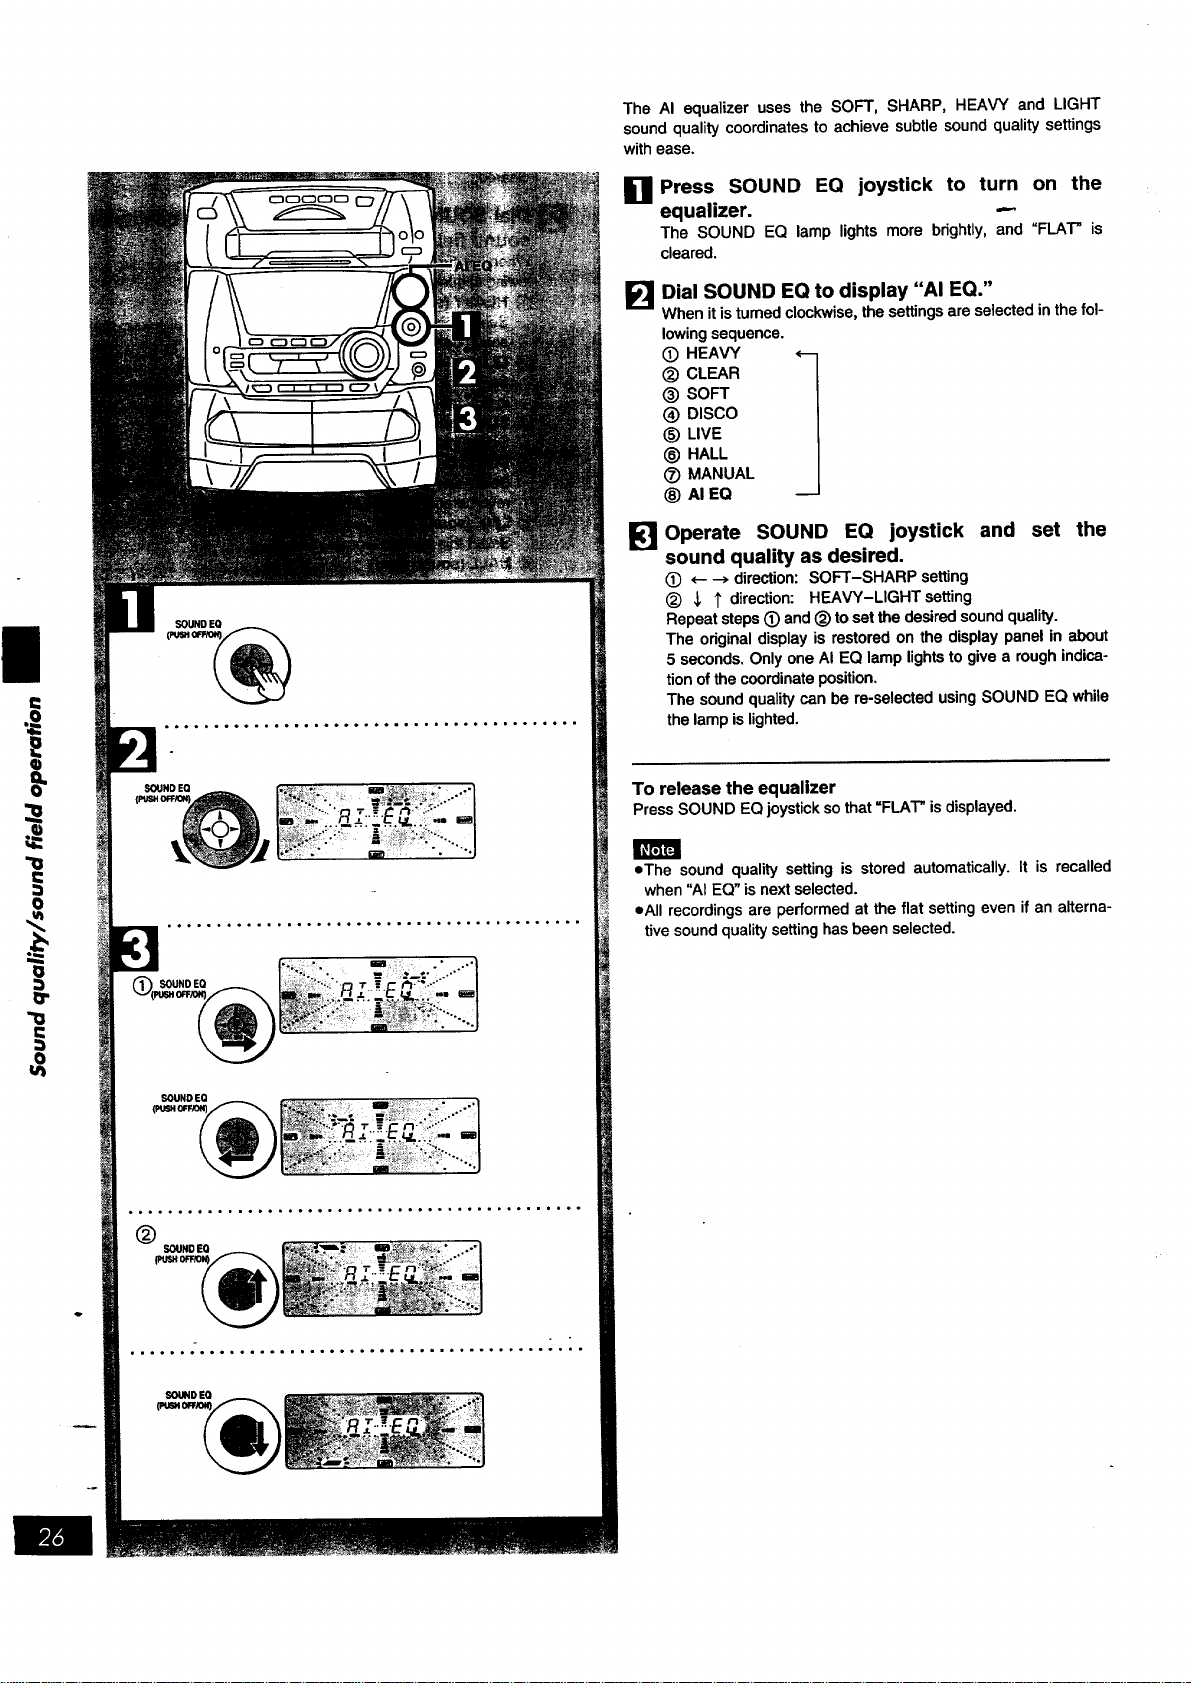
The AI equalizer uses the SOFT, SHARP, HEAVY and LIGHT
sound quality coordinates to achieve subtle sound quality settings
with ease.
D Press SOUND EQ joystick to turn on the
equalizer. ---
The SOUNDEQ lamplightsmorebrightly,and"FIAT" is
cleared.
F_I Dial SOUND EQ to display "AI EQ."
When it is turned clockwise, the settings are selected in the fol-
lowing sequence.
(_ HEAVY 1
(_) CLEAR
® SOFT
® DISCO
_) LIVE
_) HALL
(_ MANUAL
® AI EQ
Operate SOUND EQ joystick and set the
sound quality as desired.
(_ ,- --_ direction: SOFT-SHARP setting
<_ _, 1' direction: HEAVY-LIGHTsetting
Repeat steps (_) and (_) to set the desired sound quality.
The odginal display is restored on the display panel in about
5 seconds. Only one AI EQ lamp lights to give a rough indica-
tion of the coordinate position.
The sound quality can be re-selected using SOUND EQ while
the lamp islighted.
To release the equalizer
PressSOUND EQjoystickso that=FIAT" isdisplayed.
eThe sound quality setting is storedautomatically.It is recalled
when"AIEQ"is nextselected.
call recordingsare performedat the flat settingeven if an alterna-
tivesoundqualitysettinghasbeenselected.

SOUNDEO
I.
SOUND EO : , w : r 1
PU_I OFFiO_ I! :
•....
oo ..... .o°°.° .... ,°°°,.°°°.°°° ...... o°,,o°°°°.
®
-o, l I....
pUSH0_10_
J R J ,_t,J F_ 4_ !
°°,°,°°...°°°_o°°°..,,°°°°°°°.°o..,.-,,°ooo---
El Press SOUND EQ joystick to turn on the
equalizer.
The SOUND EQ lamp lights more brightly, and "FLAT" is
cleared.
[] Dial SOUND EQ to display "MANUAL." -.-
Whenit isturned clockwise, the settings are selected in the fol-
lowing sequence.
(_) HEAVY t
(_) CLEAR
@ SOFT
@ DISCO
@ LIVE
(_) HALL
(_) MANUAL
_) AI EQ
_] Operate SOUND EQ joystick and set the
sound quality as desired.
(_ <---->direction:For selectingthe rangeofthe soundto be
adjusted
Characteristicsofeach sound range
Under100 Hz: Superwooferrange
Around330 Hz: Basstomidrange
Around1kHz: Midrange
Around3.3 kHz: Midrangetotreble
Above10 kHz: Treble
(_) J, 1' direction:Foradjusting the level(7 steps)
When the level is in the center, the dot flashes rapidly.
Repeatsteps(_ and (_)tosetthedesiredsoundquality.
The originaldisplayis restoredon the displaypanelin about
5 seconds.When the manualequalizerisON, all four AI EQ
lampslight.
The soundqualitycan be re-selectedusingSOUND EQ while
thelampislighted.
To release the equalizer
PressSOUND EQjoysticksothat"FLAT"isdisplayed.
• The sound quality setting is stored automatically. It is recalled
when "MANUAL" is next selected.
eAII recordings are performed at the flat setting even if an alterna-
tive sound qualitysetting has been selected.
==
=o
I
CLOCWT1MER
......,.....,.........°...,,.............-
F---', ............. 7-,,-7"-,'--'
@ / LJ,, -_n_, o'-J,-,.. ,,
®
............... "............... 1
_C C _ #7 .# 7-)J F'/_ ,
CLOCK[rIMERI UV /- _7 t I I-'r /._t% ,
C_L__. :_........ ,......... ,..... ]
_oLUU_
* " I t
i ,i
,,; ,_,,_"_'- '-',P__,d,3i
': i _ -- : ......... - - - ..... - -'
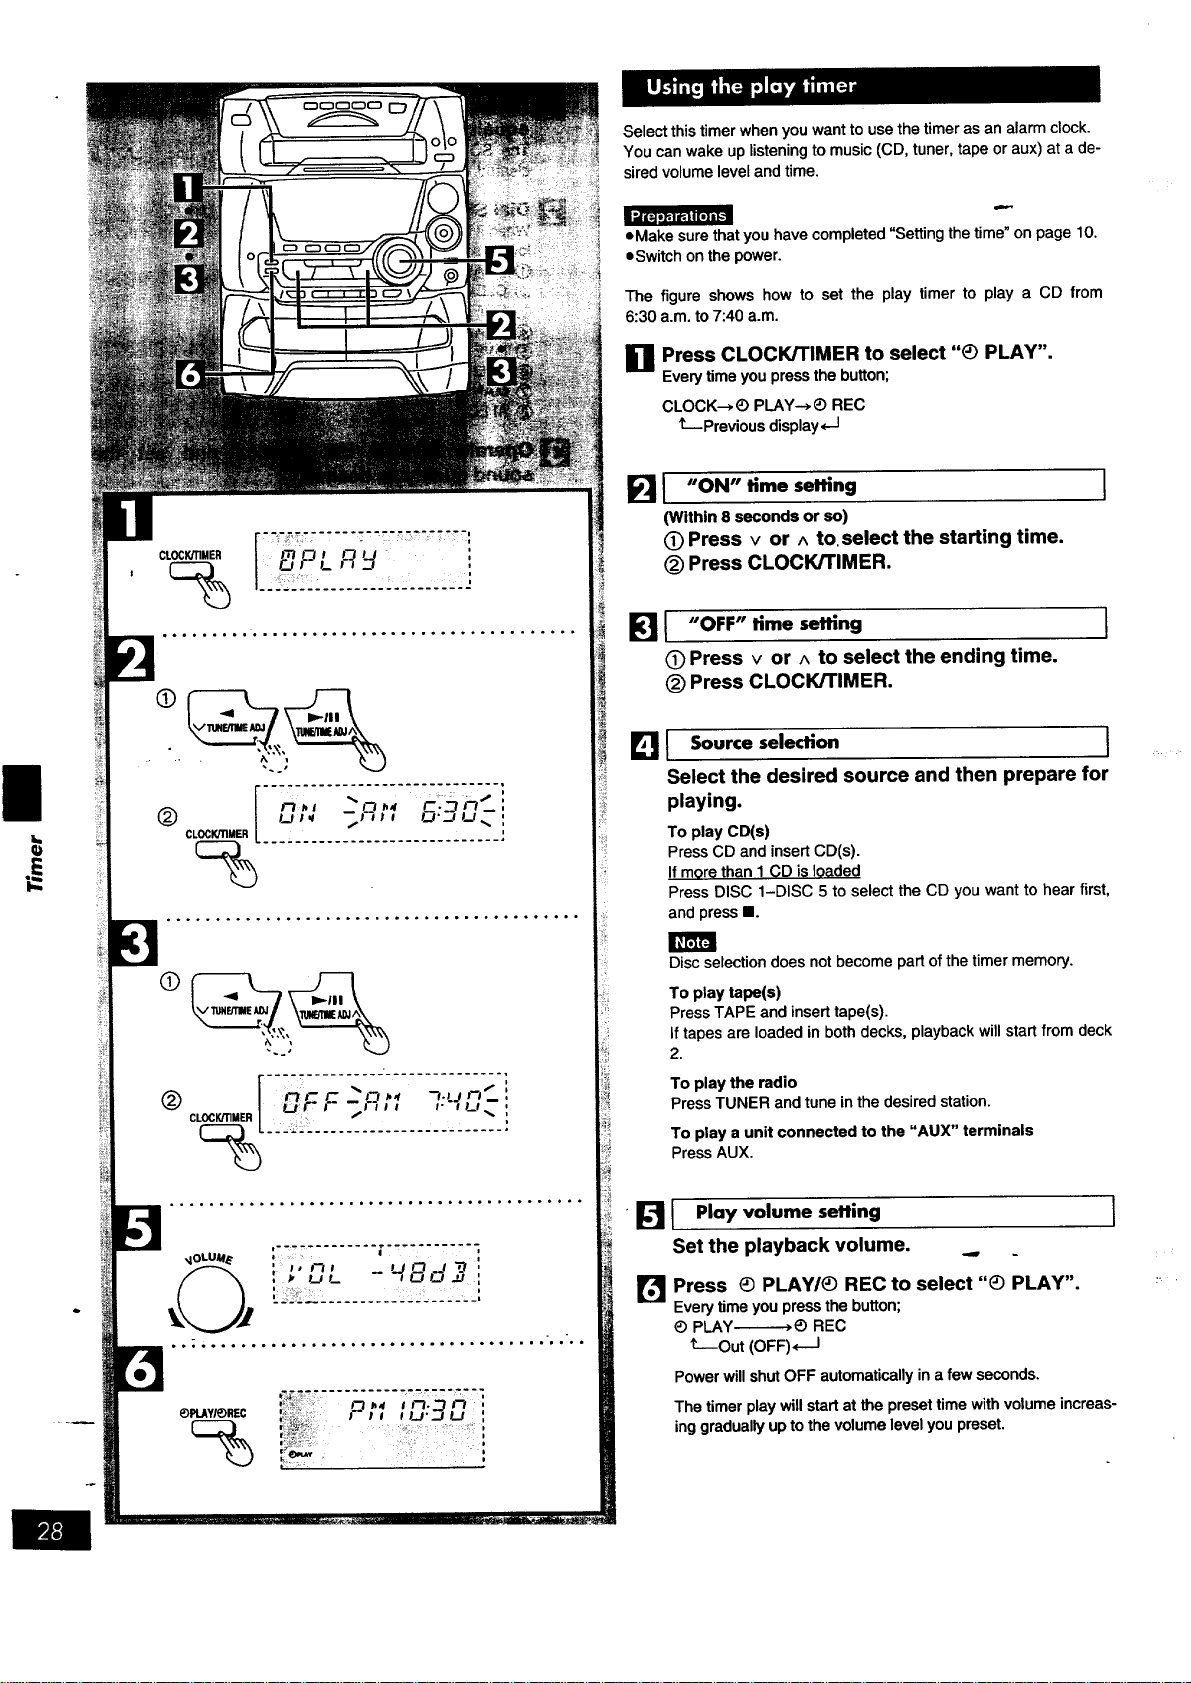
Select this timer when you want to use the timer as an alarm clock.
You can wake up listening to music (CD, tuner, tape or aux) at a de-
sired volume level and time.
=Make sure that you have completed "Setting the time" on page 10.
=Switch on the power.
The figure shows how to set the play timer to play a CD from
6:30 a.m. to 7:40 a.m.
g Press CLOCK/TIMER to select "_) PLAY".
M
Every time you press the button;
CLOCK--*_) PLAY-->_) REC
t--Previous display,--I
FII "ON" time setting
(Within 8 seconds or so)
(D Press v or ^ to.select the starting time.
(_) Press CLOCK/TIMER.
I
I "OFF" time setting
C) Press v or ^ to select the ending time.
(_) Press CLOCK/TIMER.
I
Eli Source,eled{on I
Select the desired source and then prepare for
playing.
To play CD(s)
Press CD and insert CD(s).
If more than I CD is loaded
Press DISC 1-DISC 5 to select the CD you want to hear first,
and press I.
Disc selection does not become part of the timer memory.
To play tape(s)
Press TAPE and insert tape(s).
If tapes are loaded in both decks, playback will start from deck
2.
To play the radio
Press TUNER and tune in the desired station.
To play a unit connected to the "AUX" terminals
Press AUX.
• _ I Play volume seffing
Set the playback volume,
I
Press _) PLAW_) REC to select "_) PLAY".
Every time you press the button;
_) PLAY-------_) REC
t---Out (OFF) <___1
Power will shut OFF automatically in a few seconds.
The timer play will start at the preset time with volume increas-
ing gradually up to the volume level you preset.
I:,i L_ p_l d.:.I q[o) m[,,."']
®
CLOCK/TIMER
..o°....... ..... .....°.......°...., .. ,....
®
(9 ®
DECK2
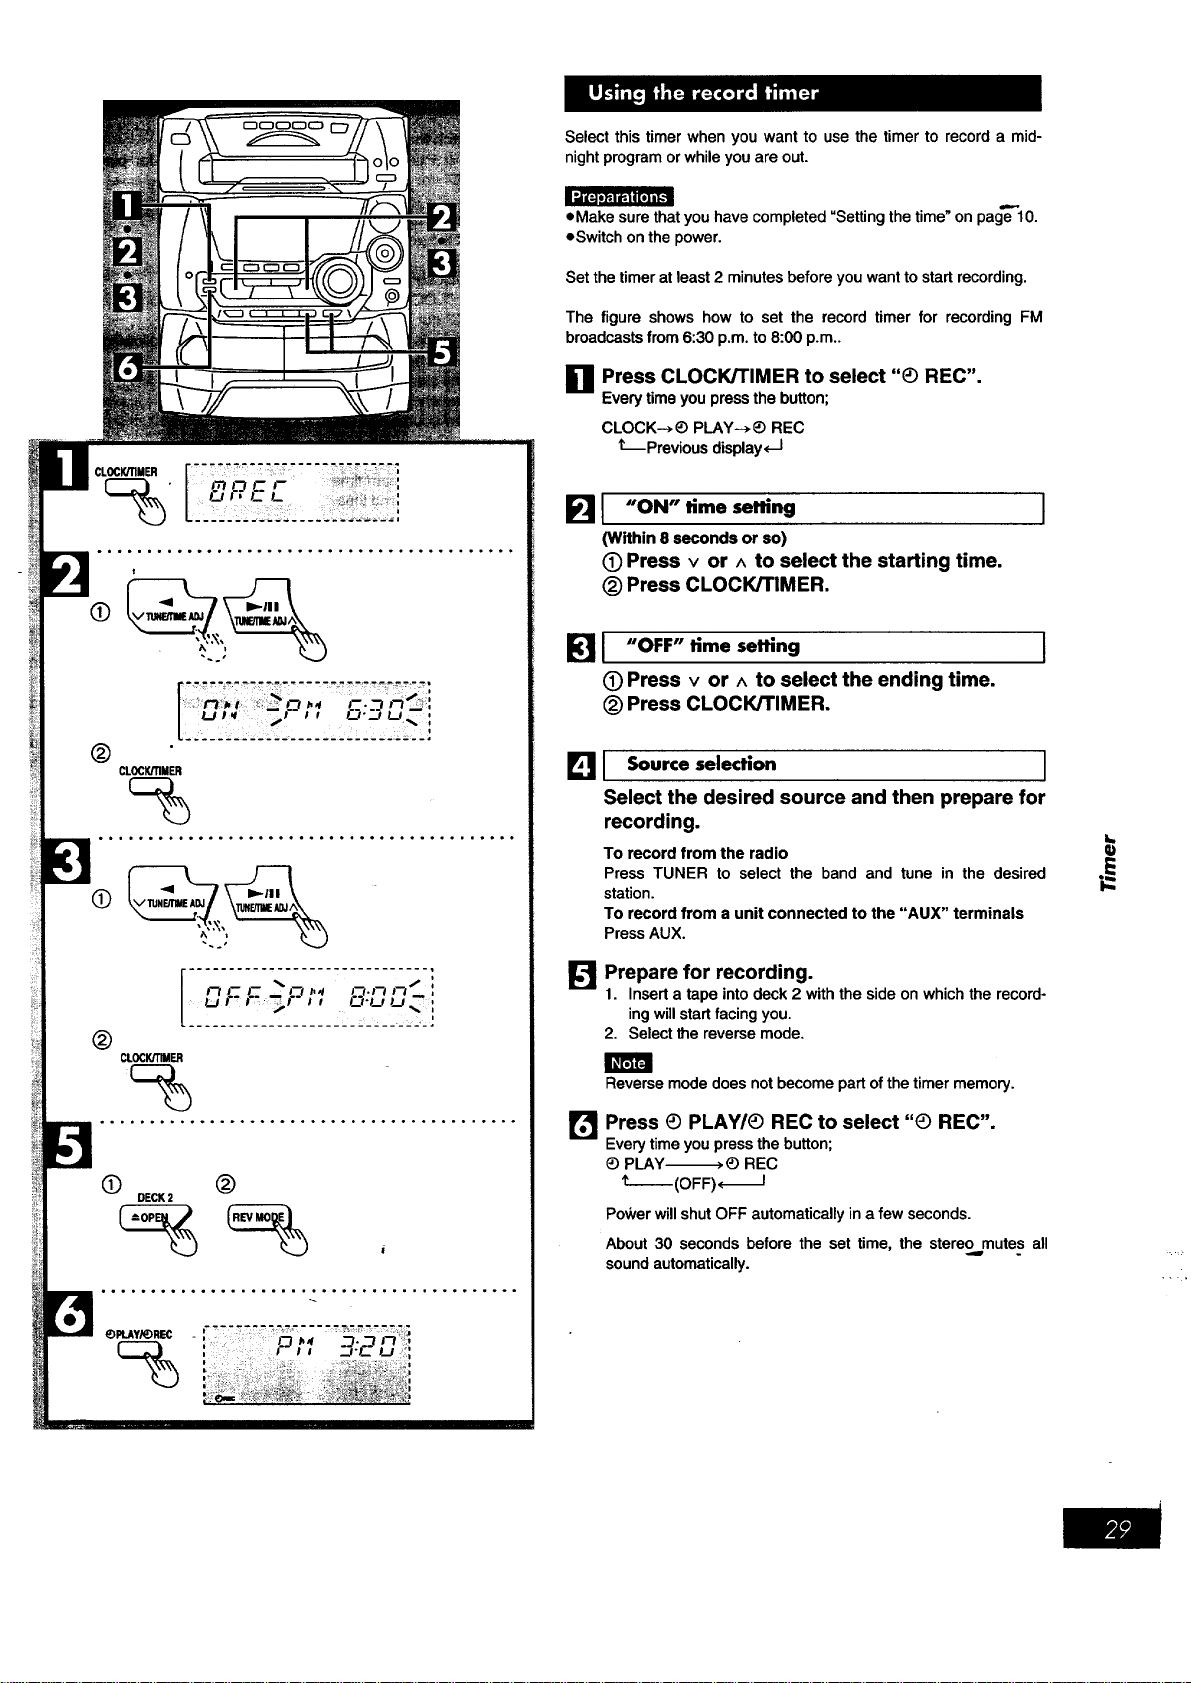
Select this timer when you want to use the timer to record a mid-
night program or while you are out.
eMake sure that you have completed "Setting the time_on page 10.
eSwitch on the power.
Set the timer at least 2 minutes before you want to start recording.
The figure shows how to set the record timer for recording FM
broadcasts from 6:30 p.m. to 8:00 p.m..
Ell Press CLOCK/TIMER to select "_ REC".
M
Every time you press the button;
CLOCK--*_) PLAY--*_) REC
kprevious display, -I
B I "ON" time setting
(Within 8 seconds or so)
(9 Press v or ^ to select the starting time.
(_) Press CLOCK/rIMER.
1
B I "OFF" time setting
(9 Press v or A to select the ending time.
(_)Press CLOCK/TIMER.
I
I_1 1 Source selection I
Select the desired source and then prepare for
recording.
To record from the radio
Press TUNER to select the band and tune in the desired
station.
To record from a unit connected to the "AUX" terminals
Press AUX.
B
Prepare for recording.
1. Insert a tape into deck 2 with the side on which the record-
ing will start facing you.
2. Select the reverse mode.
Reverse mode does not become part of the timer memory.
Press (_ PLAY/_ REC to select "_ REC".
Every time you press the button;
_) PLAY_) REC
t--(OFF)*_I
Power will shut OFF automatically in a few seconds.
About 30 seconds before the set time, the stere9 mutes all
sound automatically.
q}
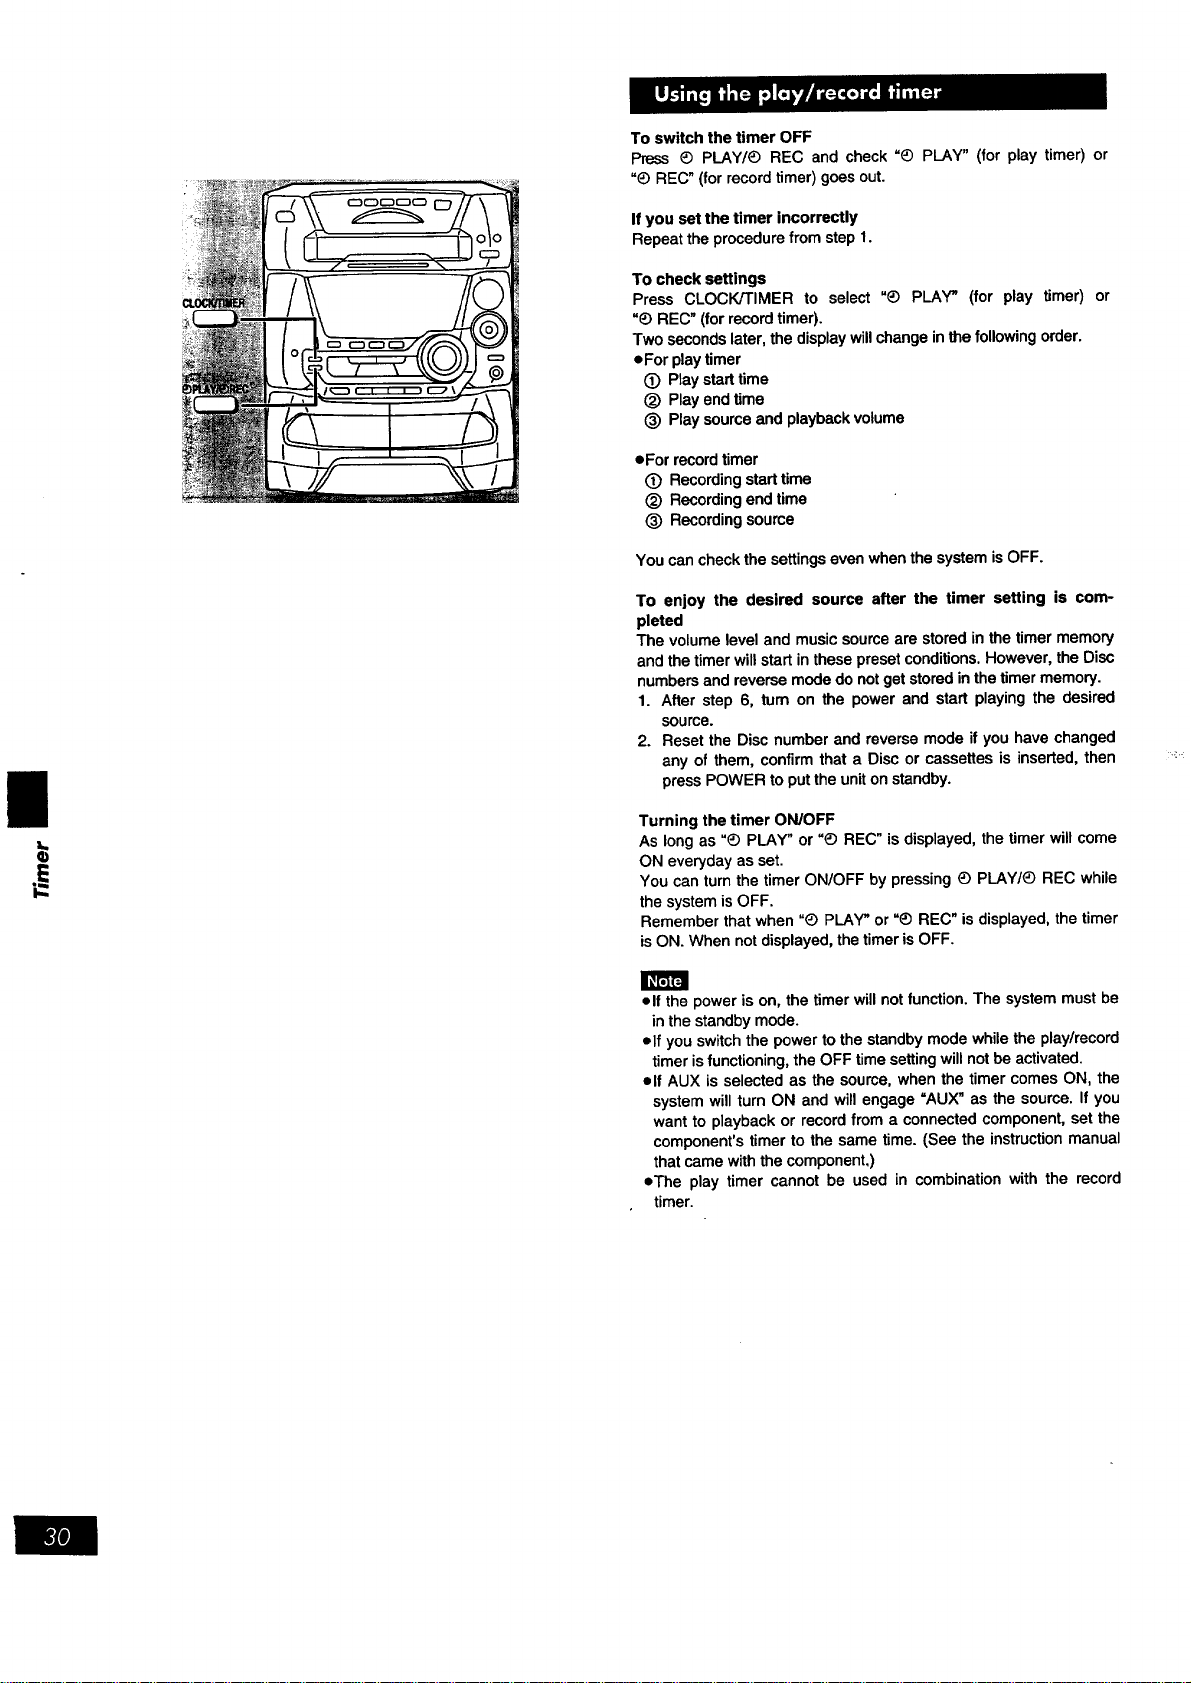
ToswitchthetimerOFF
Press_ PLAY/_ REC and check =_) PLAY" (for play timer) or
"_) REC" (for record timer) goes out.
If you set the timer incorrectly
Repeat the procedure from step 1.
To check settings
Press CLOCK/TIMER to select "@ PLAY" (for play timer) or
"_) REC" (for record timer).
Two seconds later, the display will change in the following order.
eFor play timer
(_ Play start time
(_ Play end time
_) Play source and playback volume
• Forrecordtimer
(_ Recordingstarttime
(_) Recordingend time
(_) Recordingsource
You can check the settings even when the system is OFF.
To enjoy the desired source after the timer setting is com-
pleted
The volume level and music source are stored in the timer memory
and the timer will start in these preset conditions. However, the Disc
numbers and reverse mode do not get stored in the timer memory.
1. After step 6, tum on the power and start playing the desired
source.
2. Reset the Disc number and reverse mode if you have changed
any of them, confirm that a Disc or cassettes is inserted, then
press POWER to put the uniton standby.
Turning the timer ON/OFF
As long as "_ PLAY" or _) REC" is displayed, the timer will come
ON everyday as set.
You can turn the timer ON/OFF by pressing _) PLAY/_ REC while
the system is OFF.
Remember that when "_) PLAY" or =_) REC" is displayed, the timer
is ON. When not displayed, the timer is OFF.
I_FJF4
elf the power is on, the timer will not function. The system must be
in the standby mode.
olf you switch the power to the standby mode while the play/record
timer isfunctioning, the OFF time setting will not be activated.
elf AUX is selected as the source, when the timer comes ON, the
system will turn ON and will engage =AUX" as the source. If you
want to playback or record from a connected component, set the
component's timer to the same time. (See the instruction manual
that came with the component,)
eThe play timer cannot be used in combination with the record
timer.
[]
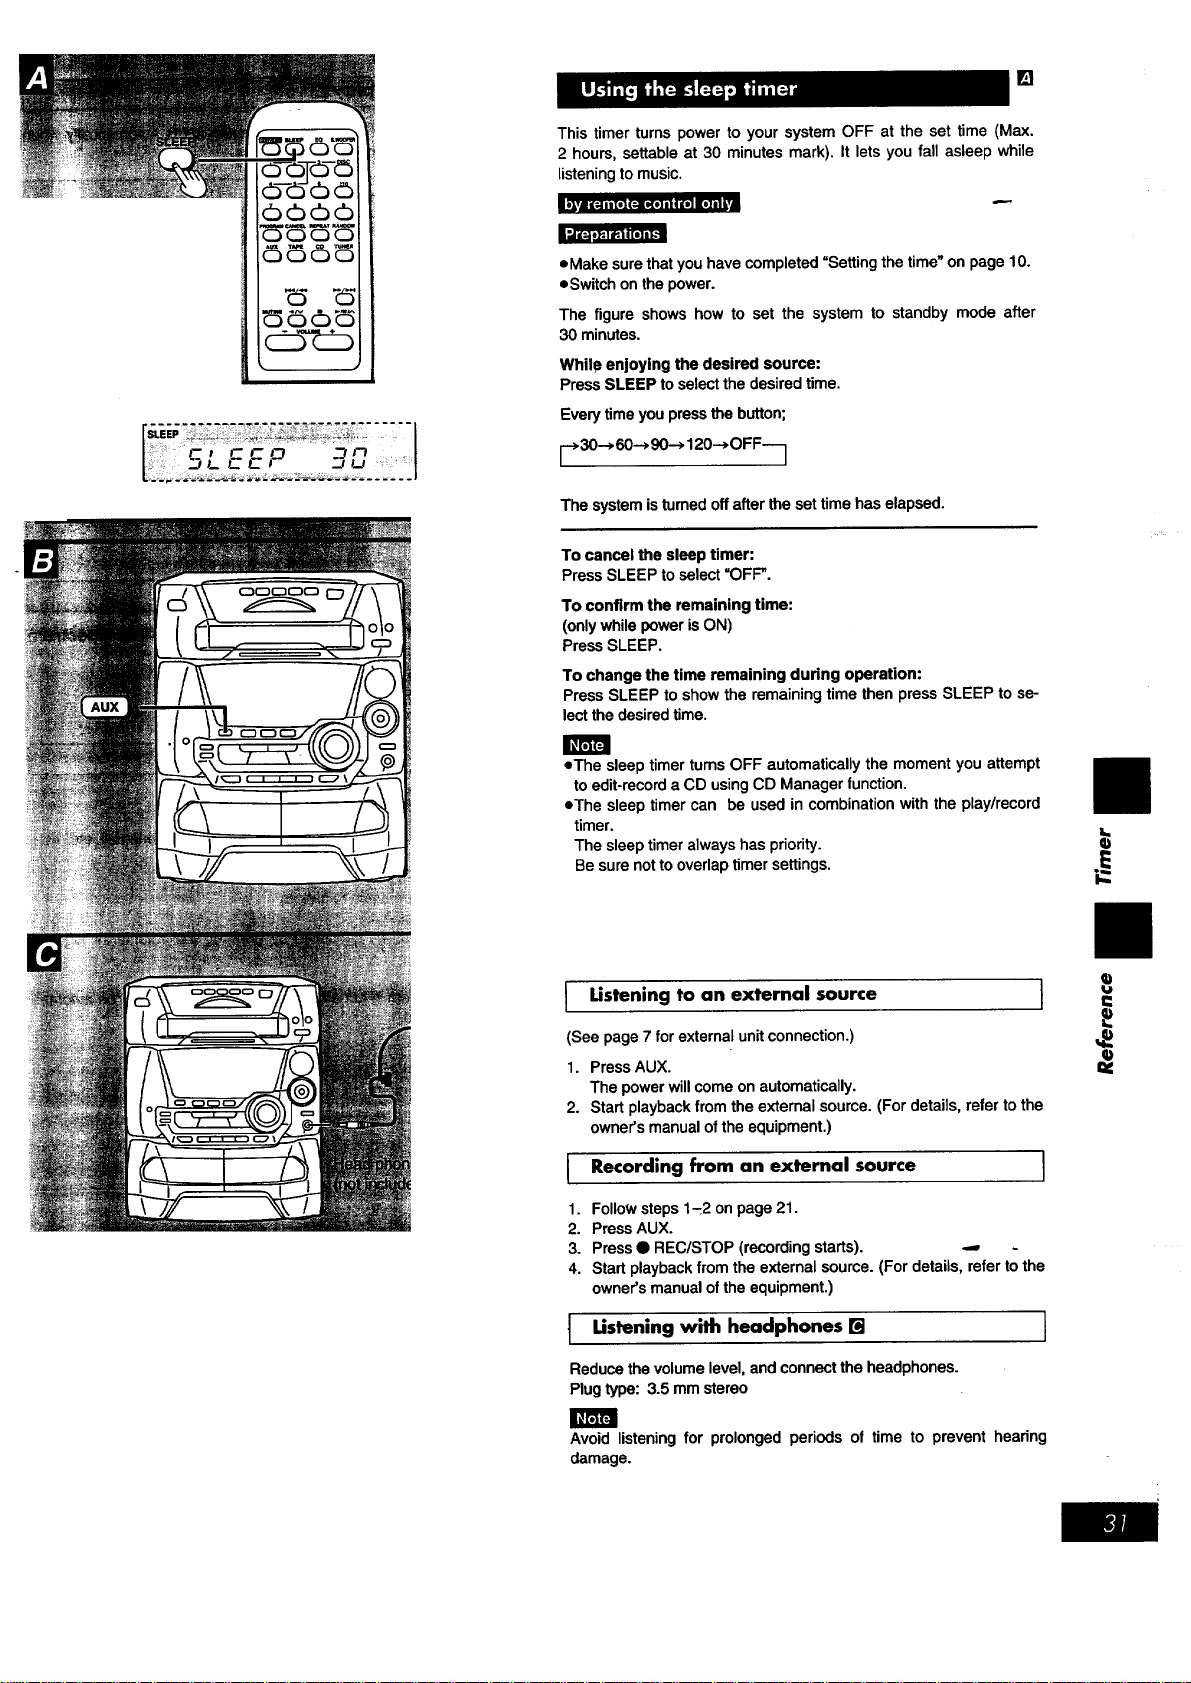
This timer turns power to your system OFF at the set time (Max.
2 hours, settable at 30 minutes mark). It lets you fall asleep while
listeningto music.
_vJ I[_.111 [1| (:ill(t] l I I"_ it] ilI
L_ll_l _|ll[I]l_ _]
eMake sure that you have completed =Setting the time_on page 10.
eSwitch on the power.
The figure shows how to set the system to standby mode after
30 minutes.
While enjoying the desired source:
Press SLEEP toselect the desired time.
Every time you press the button;
r 30--> 60--> 90--->120-->OFF---]
The system isturned off after the set time has elapsed.
To cancel the sleep timer:
Press SLEEP to select =OFF".
To confirm the remaining time:
(only while power is ON)
Press SLEEP.
To change the time remaining during operation:
Press SLEEP to show the remaining time then press SLEEP to se-
lect the desired time.
• The sleep timer tums OFF automatically the moment you attempt
to edit-record a CD using CD Manager function.
eThe sleep timer can be used in combination with the play/record
timer.
The sleep timer always has priority.
Be sure not to overlap timer settings.
I Ustening to an external source I
(See page 7 for external unitconnection.)
1. Press AUX.
The power will come on automatically.
2. Start playback from the external source. (For details, refer to the
owner's manual of the equipment.)
I Recording from an external source ]
1. Followsteps1-_2onpage21.
2. PressAUX.
3. Press• REC/STOP(recording starts). -,,,
4. Start playbackfrom theexternalsource.(Fordetails,refertothe
owner'smanualoftheequipment.)
t Ustening with headphones [] I
Reducethe volumelevel,and connectthe headphones.
Plugtype: 3.5 mmstereo
Avoid listening for prolonged periods of time to prevent hearing
damage.
E
,E
==
IJvl I[ ;1 li[t] {:i1{I] I I ir_ il| i i i
|
6
sa
G)
TUNER
lil_lJ,,, ++.__ C'l_, -'...ll I
liP. + .A_ ialm_i'lm.. Tj_j_ l
l-_imi,'. Air m • _ -3
4-
{" 1
# j F-_j--
_..J,J
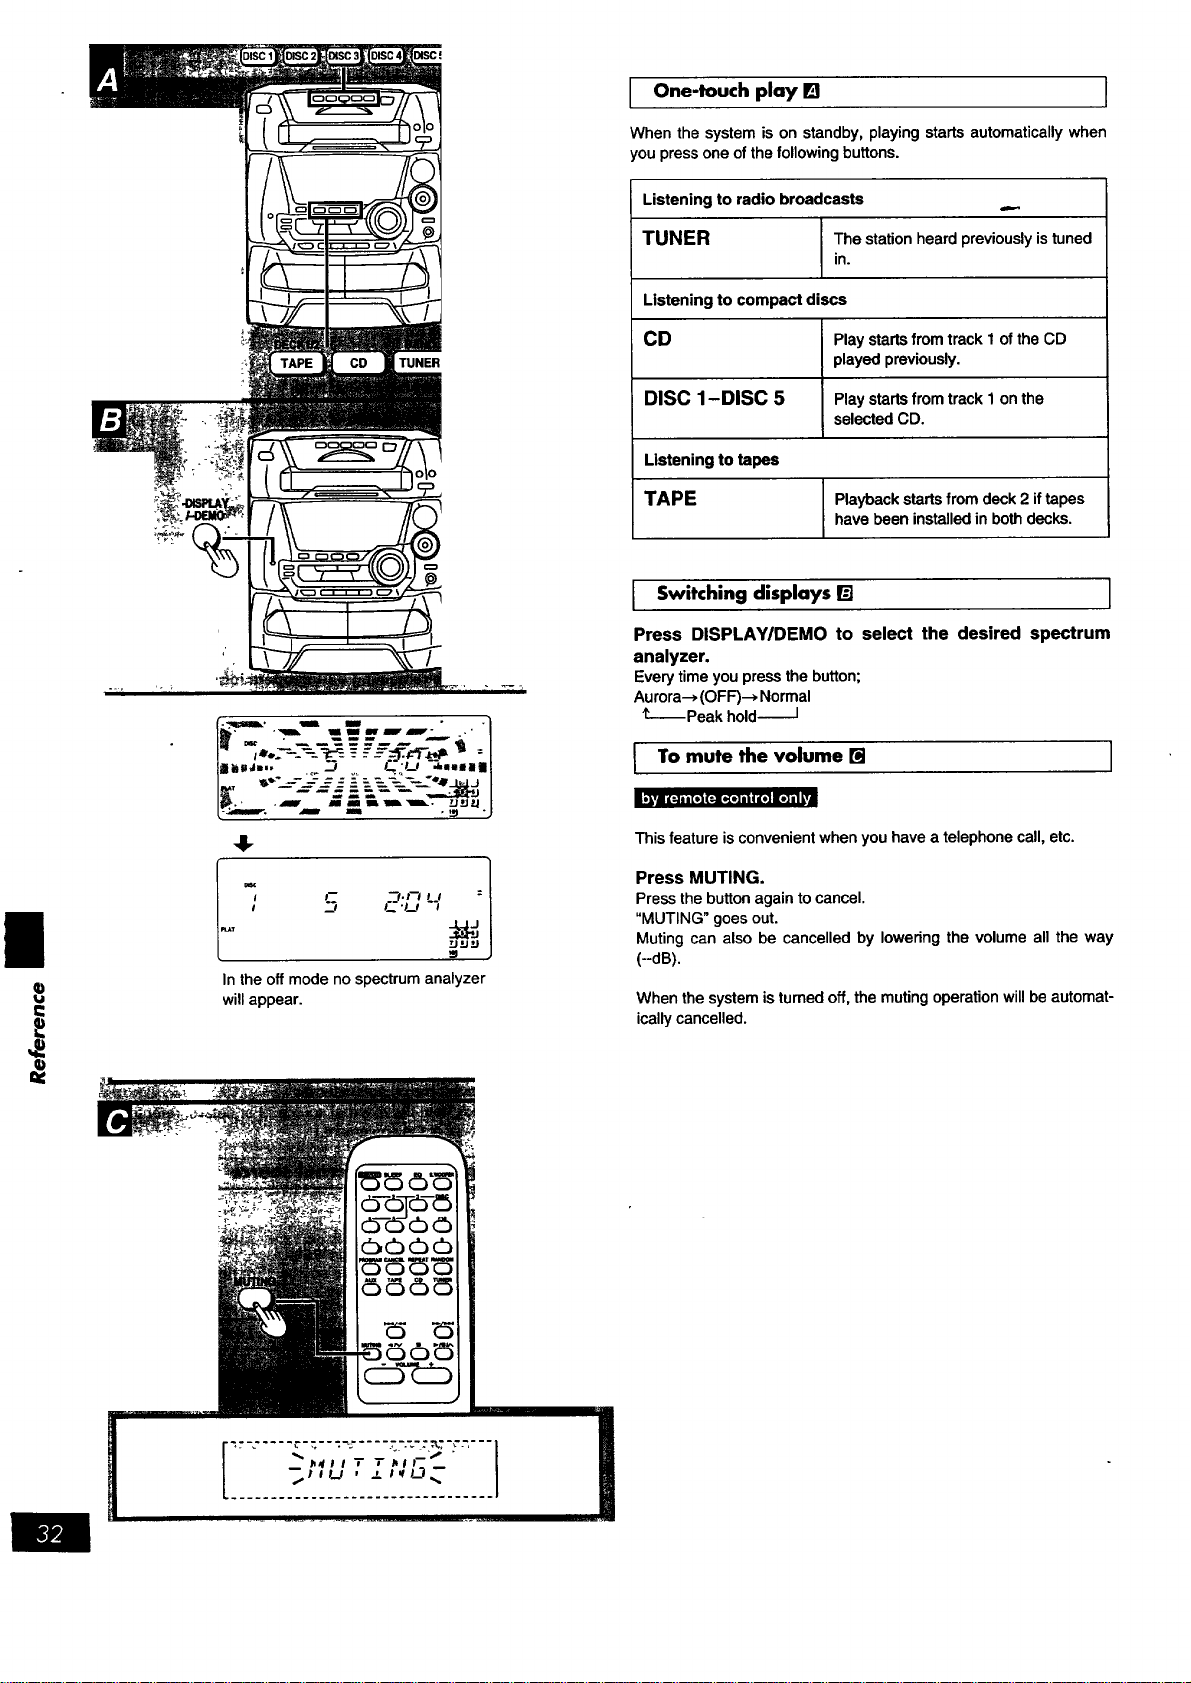
In the off mode no spectrum analyzer
will appear.
One-touch play B I
When the system is on standby, playing starts automatically when
you press one of the following buttons.
Listening to radio broadcasts
TUNER The station heard previously is tuned
in.
Listening to compact discs
CD Play starts from track I of the CD
played previously.
DISC 1-DISC 5 Play starts from track 1 on the
selected CD.
Listening to tapes
TAPE
Playback starts from deck 2 if tapes
have been installed in both decks.
I Switching displays [] I
Press DISPLAY/DEMO to select the desired spectrum
analyzer.
Every time you press the button;
Aurora--_ (OFF)--, Normal
I-- Peak hold-I
I To mute the volume [] I
This feature is convenient when you have a telephone call, etc.
Press MUTING.
Press the button again to cancel.
"MUTING" goes out.
Muting can also be cancelled by lowering the volume all the way
(--dB).
When the system is tumed off, the muting operation will be automat-
ically cancelled.
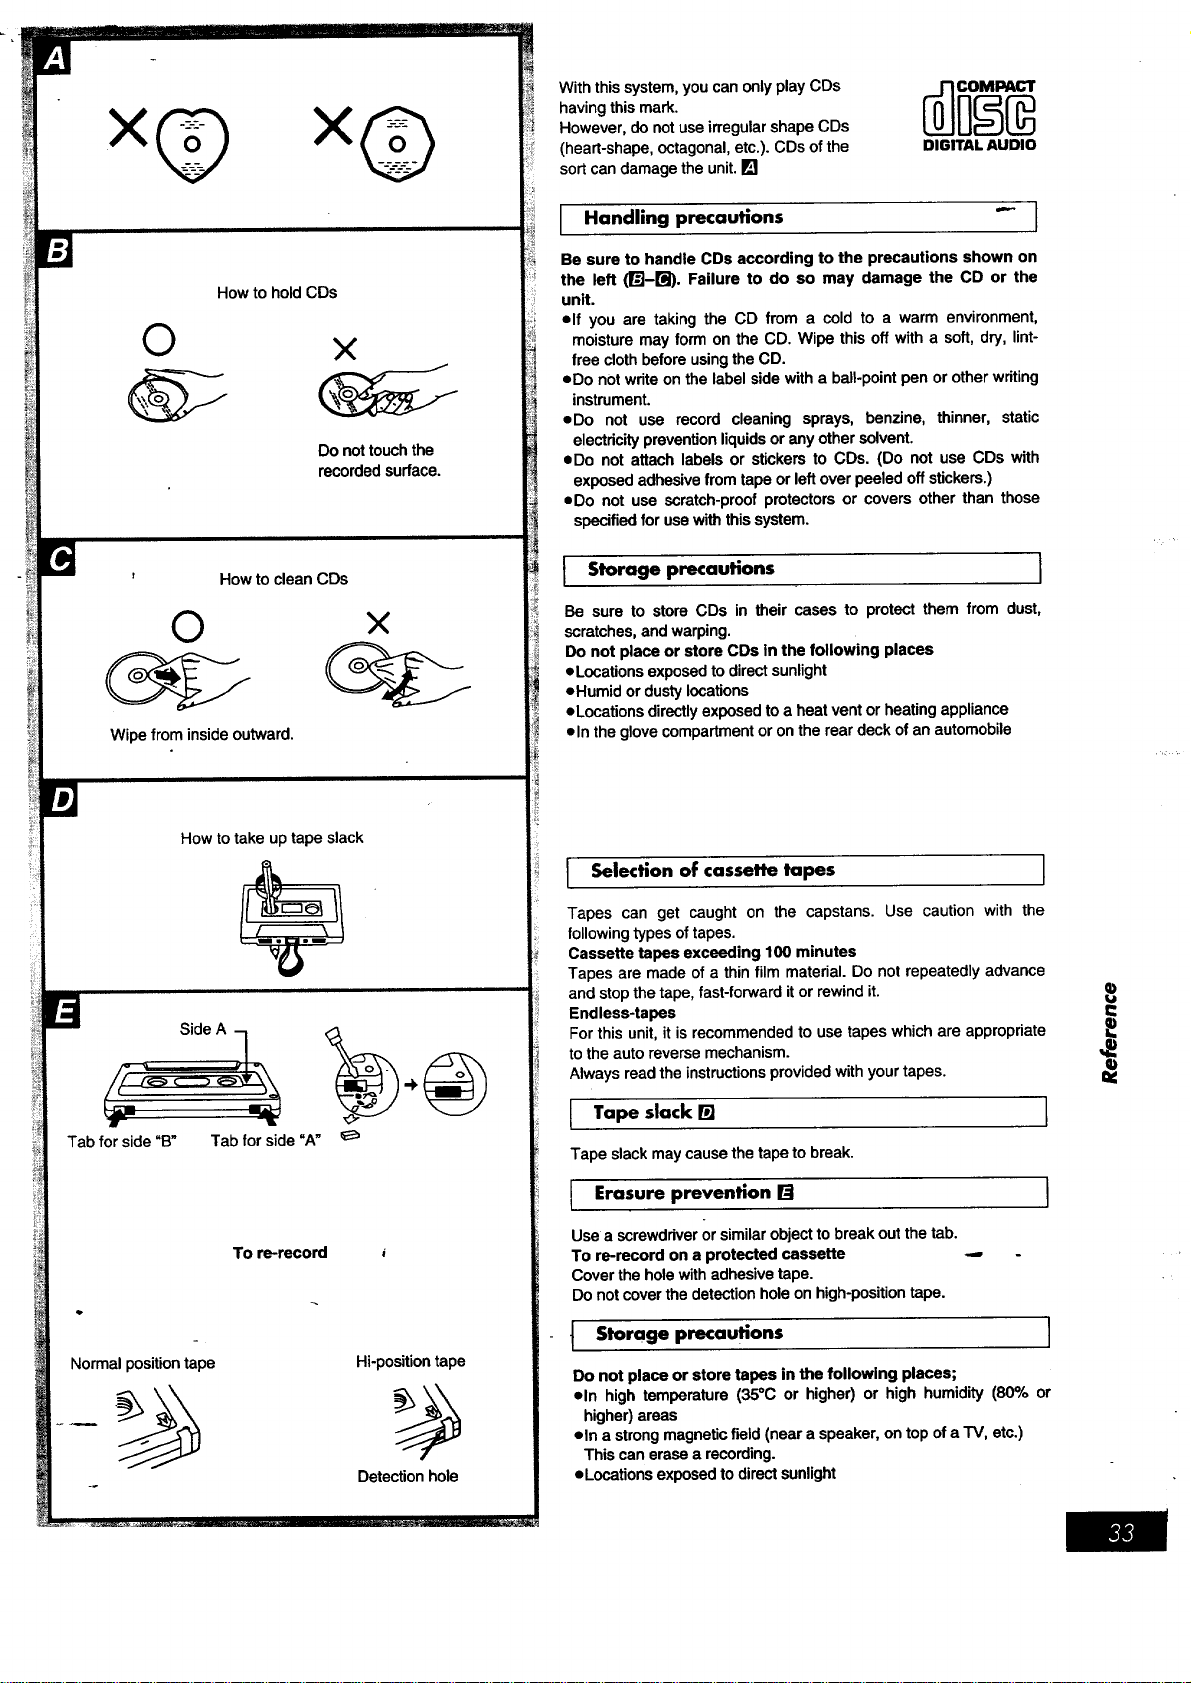
HowtoholdCDs
©
×
Donottouchthe
recordedsurface.
©
Wipe from inside outward.
How to clean CDs
×
How to take up tape slack
Tab for side "B" Tab for side "A"
To re-record
Normal position tape Hi-position tape
Detection hole
With this system, you can only play CDs
having this mark.
However, do not use irregular shape CDs
(heart-shape, octagonal, etc.). CDs of the
sort can damage the unit. []
DIGITAL AUDIO
Handling precautions "- I
Be sure to handle CDs accordingto the precautions shown on
the left (_-_). Failure to do so may damage the CD or the
unit.
elf you are taking the CD from a cold to a warm environment,
moisture may form onthe CD. Wipe this off witha soft,dry,lint-
free clothbeforeusingtheCD.
• Do notwriteonthe labelsidewitha ball-pointpen orotherwriting
instrument.
• Do not use record cleaning sprays, benzine, thinner, static
electricitypreventionliquidsor anyothersolvent.
• Do not attachlabelsor stickersto CDs. (Do notuse CDs with
exposedadhesivefrom tapeor leftoverpeeledoffstickers.)
• Do not use scratch-proofprotectorsor coversotherthan those
specifiedforusewiththissystem.
I Storage precautions I
Be sure to store CDs in their cases to protect them from dust,
scratches, and warping.
Do not place or store CDs in the following places
eL•cations exposed to direct sunlight
eHumid or dusty locations
eL•cations directly exposed to a heat vent or heating appliance
• In the glove compartment or on the rear deck of an automobile
I Selection of cassette tapes ]
Tapes can get caught on the capstans. Use caution with the
following types of tapes.
Cassette tapes exceeding 100 minutes
Tapes are made of a thin film material. Do not repeatedly advance
and stop the tape, fast-forward it or rewind it.
Endless-tapes
For this unit, it is recommended to use tapes which are appropriate
to the auto reverse mechanism.
Always read the instructions provided with your tapes.
Tape slack [] 1
Tape slack may cause the tape to break.
I ErasureP revention ra ]
Use a screwdriver or similar object to break out the tab.
To re-record on a protected cassette ,..-
Cover the hole with adhesive tape.
Do not cover the detection hole on high-position tape.
t Storage precautions I
Do not place or store tapes in the following places;
eln high temperature (35°C or higher) or high humidity (80% or
higher) areas
• In a strong magnetic field (near a speaker, on top of a TV, etc.)
This can erase a recording.
• Locations exposed to direct sunlight
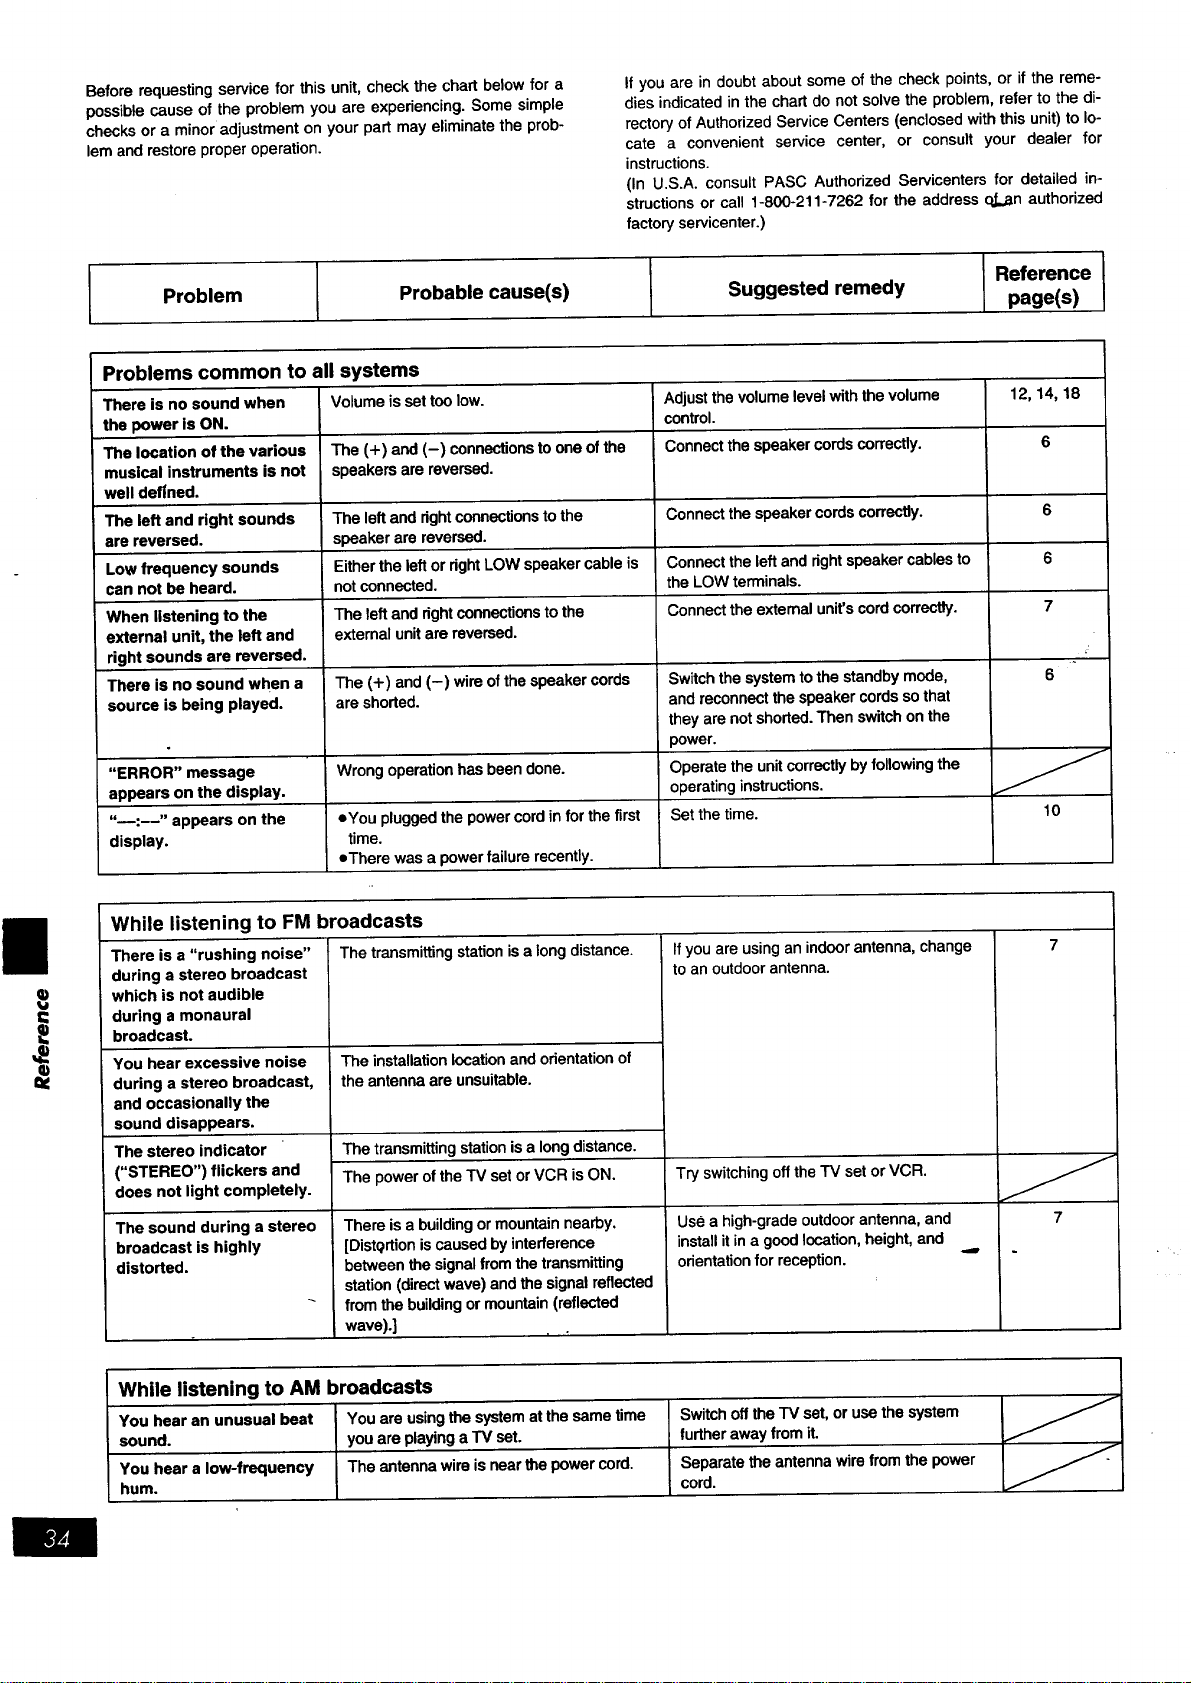
Beforerequestingservice for this unit, check the chart below for a
possible cause of the problem you are experiencing. Some simple
checks or a minor adjustment on your part may eliminate the prob-
lem and restore proper operation.
Problem
If you are in doubt about some of the check points, or if the reme-
dies indicated in the chart do not solve the problem, refer to the di-
rectory of Authorized Service Centers (enclosed with this unit) to lo-
cate a convenient service center, or consult your dealer for
instructions.
(In U.S.A. consult PASC Authorized Servicenters for detailed in-
structions or call 1-800-211-7262 for the address o.Lan authorized
factory servicenter.)
E
Probable cause(s) Suggested remedy
Reference
page(s)
Problems common to all
There is no sound when
the power is ON.
The location of the various
musical instruments is not
well defined.
The left and right sounds
are reversed.
Low frequency sounds
can not be heard.
When listening to the
external unit, the left and
right sounds are reversed.
There is no sound when a
source is being played.
"ERROR" message
appears on the display.
"_:--" appears on the
display.
systems
Volume is set too low.
The (+) and (-) connections to one of the
speakers are reversed.
The left andrightconnectionstothe
speakerarereversed.
Either theleft ordghtLOWspeakercableis
notconnected.
The leftandrightconnectionsto the
external unitarereversed.
The (+) and(-) wireofthe speakercords
are shorted.
Wrong operation has been done.
eYou plugged the power cord infor the first
time.
eThere was a power failure recently.
Adjust the volumelevelwiththe volume
control.
Connectthe speakercordscorrectly.
Connect the speaker cords correctly.
Connect the left and right speaker cables to
the LOW terminals.
Connect the external unit's cord correctly.
Switch the system to the standby mode,
and reconnect the speaker cords so that
they are not shorted. Then switch on the
power.
Operate the unit correctly by following the
operating instructions.
Set the time.
12, 14, 18
6
6
6
7
6
10
While listening to FM broadcasts
There is a "rushing noise"
during a stereo broadcast
which is not audible
during a monaural
broadcast.
You hear excessive noise
during a stereo broadcast,
and occasionally the
sound disappears.
The stereo indicator
("STEREO") flickers and
does not light completely.
The sound during a stereo
broadcast is highly
distorted.
The transmitting station is a long distance.
The installation location and orientation of
the antenna are unsuitable.
The transmitting station is a long distance.
The power of the TV set or VCR is ON.
Thereis a buildingormountainnearby.
[Distqrtion iscausedbyinterference
between thesignalfromthetransmitting
station(directwave)andthe signalreflected
from thebuildingormountain(reflected
wave).]
If you are usingan indoor antenna, change
to an outdoor antenna.
Try switching off the TV set or VCR.
Use a high-grade outdoor antenna, and
install it ina good location, height, and
orientation for reception.
7
While listening to AM broadcasts
You hear an unusual beat You are using the system at the same time
sound, you are playing a TV set.
You hear a low-frequency The antenna wire is near the power cord.
hum.
Switchoftthe TVset,orusathesystem
furtherawayfromit.
Separatetheantennawire from thepower
cord.
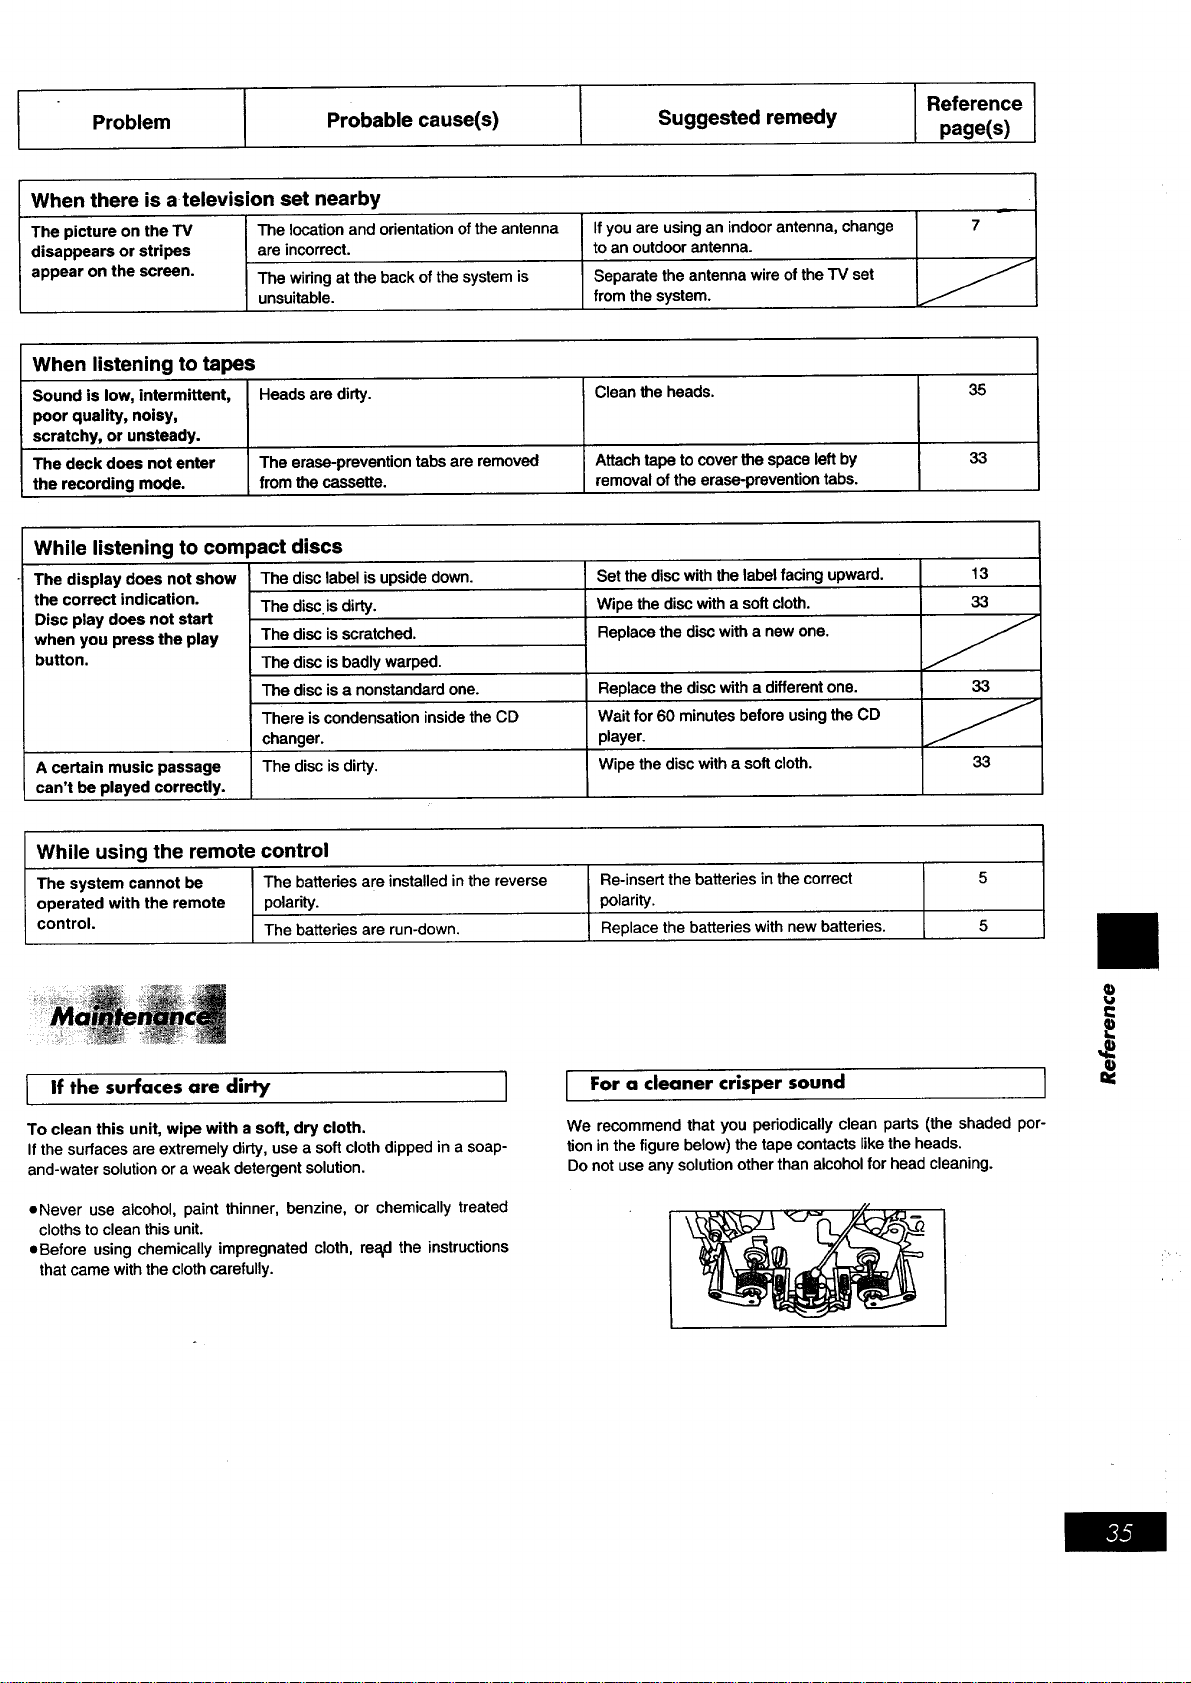
Problem
I
Probable cause(s)
I
Suggested remedy
I Reference
page(s)
When there is a television set nearby
The picture on the TV The location and orientation of the antenna
disappears or stripes are incorrect.
appear on the screen. The wiring at the back of the system is
unsuitable.
If you are using an indoor antenna, change
to an outdoor antenna.
Separate the antenna wire of the TV set
from the system.
7
When listening to tapes
Sound is low, intermittent, Heads are dirty.
poor quality, noisy,
scratchy, or unsteady.
The deck does not enter The erase-prevention tabs are removed
the recording mode. from the cassette.
Clean the heads.
Attach tape to cover the space left by
removal of the erase-prevention tabs.
35
33
While listening to compact discs
Set the disc with the label facing upward.
Wipe the disc with a soft cloth.
Replace the disc with a new one.
The display does not show
the correct indication.
Disc play does not start
when you press the play
button.
A certain music passage
can't be played correctly.
The disc label is upside down.
The disc is dirty.
The disc is scratched.
The disc is badly warped.
The disc is a nonstandard one.
There is condensation inside the CD
changer.
The disc is dirty.
Replace the disc with a different one.
Wait for 60 minutes before using the CD
player.
Wipe the disc with a soft cloth.
13
33
33
33
While using the remote control
The system cannot be The batteries are installed in the reverse
operated with the remote polarity.
control. The batteries are run-down.
Re-insert the batteries in the correct
polarity.
Replace the batteries with new batteries.
5
5
I If the surfaces are dirty I
To clean this unit, wipe with a soft, dry cloth.
If the surfaces are extremely dirty, use a soft cloth dipped in a soap-
and-water solution or a weak detergent solution.
oNever use alcohol, paint thinner, benzine, or chemically treated
cloths to clean this unit.
oBefore using chemically impregnated cloth, rea_dthe instructions
that came with the cloth carefully.
For a cleaner crisper sound I
We recommend that you periodically clean parts (the shaded por-
tion in the figure below) the tape contacts like the heads.
Do not use any solution other than alcohol for head cleaning.
t=
q)
=€
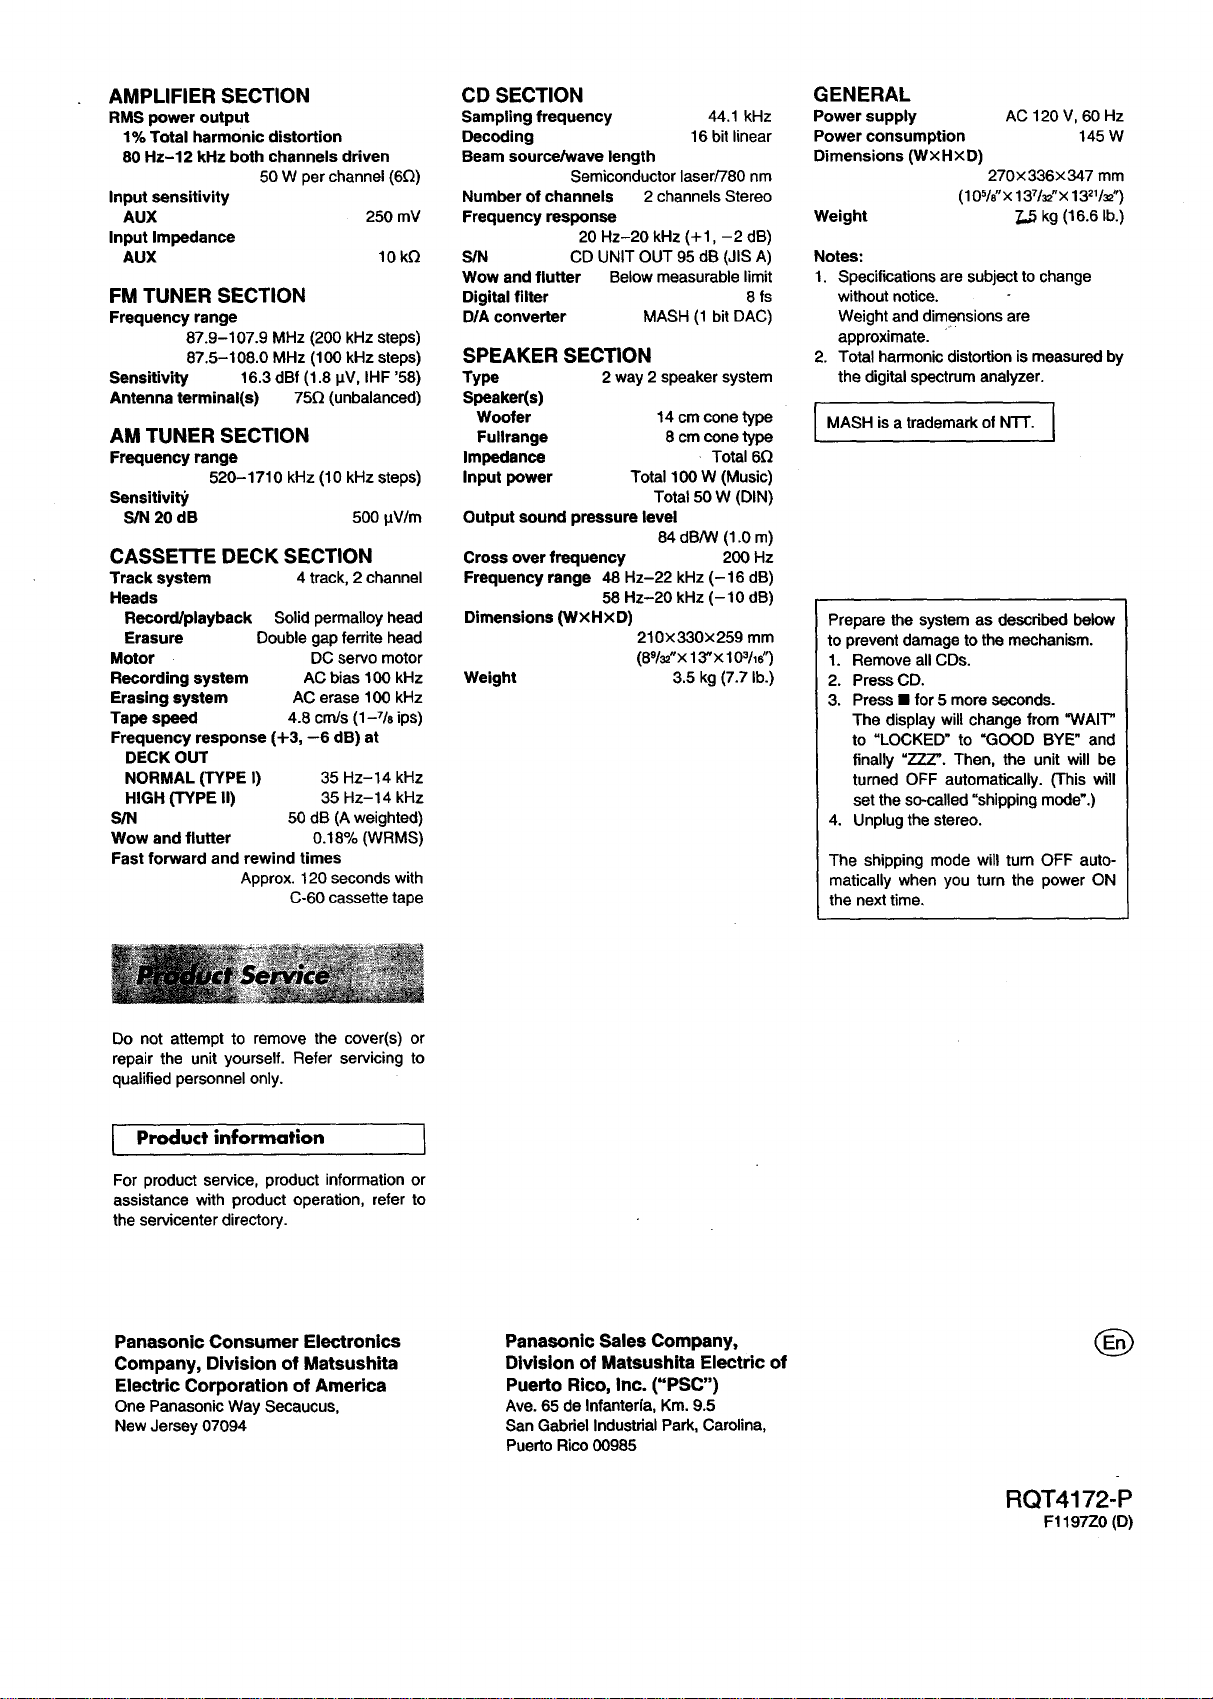
AMPLIFIER SECTION
RMS power output
1% Total harmonic distortion
80 Hz-12 kHz both channels driven
50 W per channel (6£/)
Input sensitivity
AUX 250 mV
Input Impedance
AUX 10 k£!
FM TUNER SECTION
Frequency range
87.9-107.9 MHz (200 kHz steps)
87.5-108.0 MHz (100 kHz steps)
Sensitivity 16.3 dBf (1.8 IJV, IHF '58)
Antenna terminal(s) 75£/(unbalanced)
AM TUNER SECTION
Frequency range
520-1710 kHz (10 kHz steps)
Sensitivity
S/N 20 dB 500 _V/m
CASSE'n'E DECK SECTION
Track system 4 track, 2 channel
Heads
Record/playback Solid permalloy head
Erasure Double gap ferrite head
Motor DC servo motor
Recording system AC bias 100 kHz
Erasing system AC erase 100 kHz
Tape speed 4.8 cm/s (1-7/8 ips)
Frequency response (+3, --6 dB) at
DECK OUT
NORMAL (TYPE I) 35 Hz-14 kHz
HIGH (TYPE II) 35 Hz-14 kHz
S/N 50 dB (A weighted)
Wow and flutter 0.18% (WRMS)
Fast forward and rewind times
Approx. 120 seconds with
C-60 cassette tape
CD SECTION
Sampling frequency 44.1 kHz
Decoding 16 bit linear
Beam source/wave length
Semiconductor laser/780 nm
Number of channels 2 channels Stereo
Frequency response
20 Hz-20 kHz (+1, -2 dB)
S/N CD UNIT OUT 95 dB (JIS A)
Wow and flutter Below measurable limit
Digital filter 8 fs
D/A converter MASH (1 bitDAC)
SPEAKER SECTION
Type 2 way 2 speaker system
Speaker(s)
Woofer 14 cm cone type
Fullrange 8 cm cone type
Impedance Total 6£/
Input power Total 100 W (Music)
Total 50 W (DIN)
Output sound pressure level
84 dB/W (1.0 m)
Cross over frequency 200 Hz
Frequency range 48 Hz-22 kHz (-16 dB)
58 Hz-20 kHz (-10 dB)
Dimensions (WXHXD)
210x330x259 mm
(89/_"x 13"x 103/16")
Weight 3.5 kg (7.7 lb.)
GENERAL
Power supply AC 120 V, 60 Hz
Power consumption 145 W
Dimensions (W×HxD)
270x 336× 347 mm
(105/o"x 137/_'x 13_1/_")
Weight 7,5 kg (16.6 lb.)
Notes:
1. Specifications are subject to change
without notice.
Weight and dimensions are
approximate.
2. Total harmonic distortion is measured by
the digital spectrum analyzer.
I MASH is a trademark of N'I-F. I
Prepare the system as described below
to prevent damage to the mechanism.
1. Remove all CDs.
2. Press CD.
3. Press • for 5 more seconds.
The display will change from "WAIT"
to "LOCKED" to "GOOD BYE" and
finally "ZZZ'. Then, the unit will be
turned OFF automatically. (This will
set the so-called "shipping mode'.)
4. Unplug the stereo.
The shipping mode will turn OFF auto-
matically when you turn the power ON
the next time.
Do not attempt to remove the cover(s) or
repair the unit yourself. Refer servicing to
qualified personnel only.
Product information 1
For product service, product information or
assistance with product operation, refer to
the servicenter directory.
Panasonic Consumer Electronics
Company, Division of Matsushita
Electric Corporation of America
OnePanasonicWay Secaucus,
NewJersey07094
Panasonic Sales Company,
Division of Matsushita Electric of
Puerto Rico, Inc. ("PSC")
Ave.65 de Infanteria,Km.9.5
San GabrielIndustrialPark, Carolina,
PuertoRico00985
RQT4172-P
F1197Z0 (D)