Loading ...
Loading ...
Loading ...
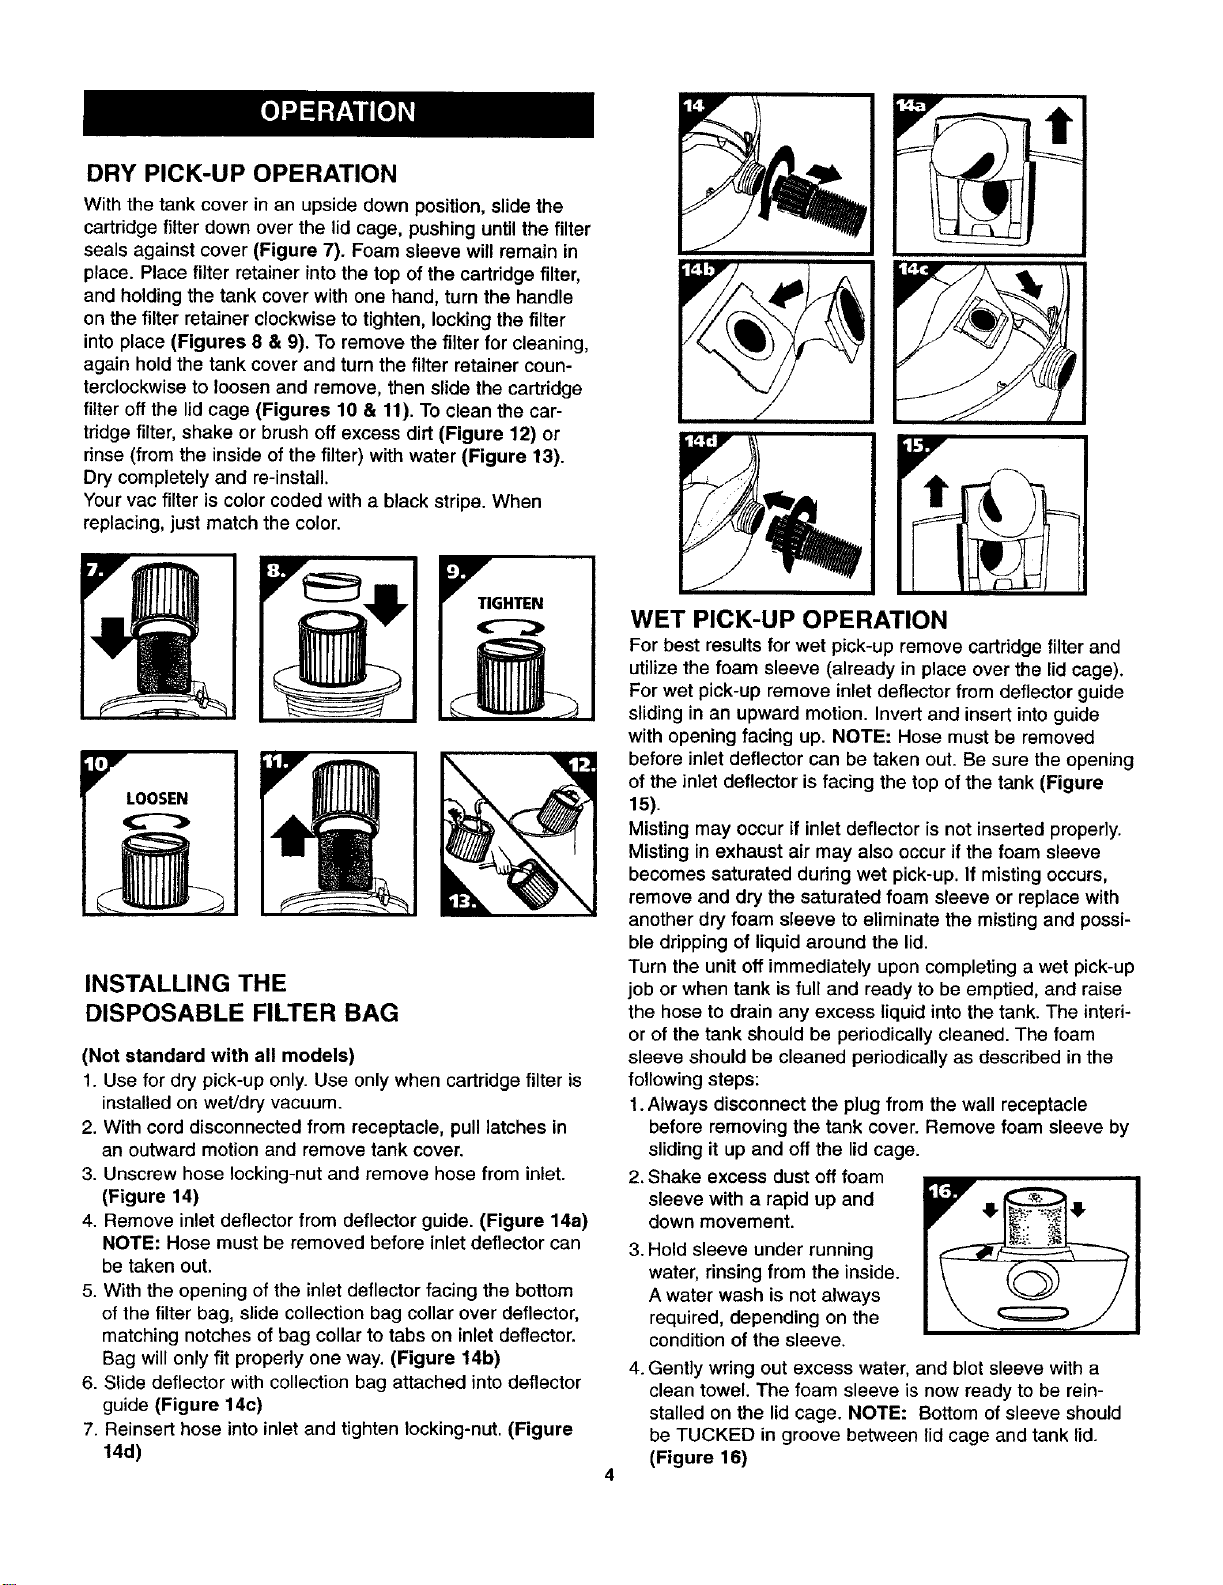
DRY PICK-UP OPERATION
With the tank cover in an upside down position, slide the
cartridge filter down over the lid cage, pushing until the filter
seals against cover (Figure 7). Foam sleeve will remain in
place. Place filter retainer intothe top of the cartridge filter,
and holding the tank cover with one hand, turn the handle
on the filter retainer clockwise to tighten, locking the filter
into place (Figures 8 & 9). To remove the filter for cleaning,
again hold the tank cover and turn the filter retainer coun-
terclockwise to loosen and remove, then slide the cartridge
filter off the lid cage (Figures 10 & 11). TOclean the car-
tridge filter, shake or brush off excess dirt (Figure 12) or
rinse (from the inside of the filter) with water (Figure 13).
Dry completely and re-install.
Your vac filter is color coded with a black stripe. When
replacing, just match the color.
INSTALLING THE
DISPOSABLE FILTER BAG
(Not standard with all models)
1. Use for dry pick-up only. Use only when cartridge filter is
installed on wet/dry vacuum.
2. With cord disconnected from receptacle, pull latches in
an outward motion and remove tank cover.
3. Unscrew hose locking-nut and remove hose from inlet.
(Figure 14)
4. Remove inlet deflector from deflector guide. (Figure 14a)
NOTE: Hose must be removed before inlet deflector can
be taken out.
5. With the opening of the inlet deflector facing the bottom
of the filter bag, slide collection bag collar over deflector,
matching notches of bag collar to tabs on inlet deflector.
Bag will only fit properly one way. (Figure 14b)
6. Slide deflector with collection bag attached into deflector
guide (Figure 14c)
7. Reinsert hose into inlet and tighten locking-nut. (Figure
14d)
WET PICK-UP OPERATION
For best results for wet pick-up remove cartridge filter and
utilize the foam sleeve (already in place over the lid cage).
For wet pick-up remove inlet deflector from deflector guide
sliding in an upward motion. Invert and insert into guide
with opening facing up. NOTE: Hose must be removed
before inlet deflector can be taken out. Be sure the opening
of the inlet deflector is facing the top of the tank (Figure
15).
Mistingmay occurif inlet deflectoris not inserted properly.
Mistingin exhaust air may also occurifthe foam sleeve
becomes saturated duringwet pick-up.If misting occurs,
remove and dry the saturatedfoam sleeve or replace with
another dry foam sleeve to eliminate the mistingand possi-
ble dripping of liquidaround the lid.
Turn the unitoff immediately upon completinga wet pick-up
job or when tank isfull and ready to be emptied, and raise
the hose to drain any excess liquidintothe tank. The interi-
or of the tank shouldbe periodicallycleaned. The foam
sleeve should be cleaned periodicallyas describedinthe
following steps:
1.Always disconnect the plug from the wall receptacle
before removingthe tank cover.Remove foam sleeve by
sliding it up and offthe lidcage.
2. Shake excess dust offfoam
sleeve with a rapid up and
down movement.
3. Hold sleeve under running
water, rinsingfrom the inside.
Awater wash is not always
required, depending on the
condition of the sleeve.
4. Gently wring out excess water, and blot sleeve with a
clean towel. The foam sleeve is now ready to be rein-
stalled on the lid cage. NOTE: Bottom of sleeve should
be TUCKED in groove between lid cage and tank lid.
(Figure 16)
Loading ...
Loading ...
Loading ...