II IIIIIII
Save This Manual
For Future Reference
Owner's
Manual
MODEL NO.
338.17920
338.17921
338.17922
338.17929
Model Number
The model number may be found
on the nameplate. You should
record the model number in a safe
place for future use.
_lb CAUTION: Before using this
vacuum, read this manual and
follow all its Safety Rules and
Operating Instructions.
II
ICR.FTS...I
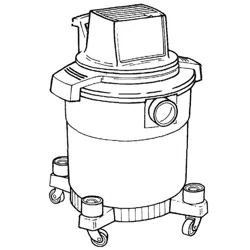
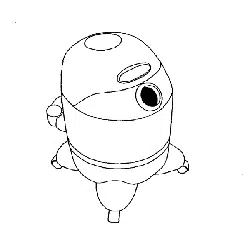
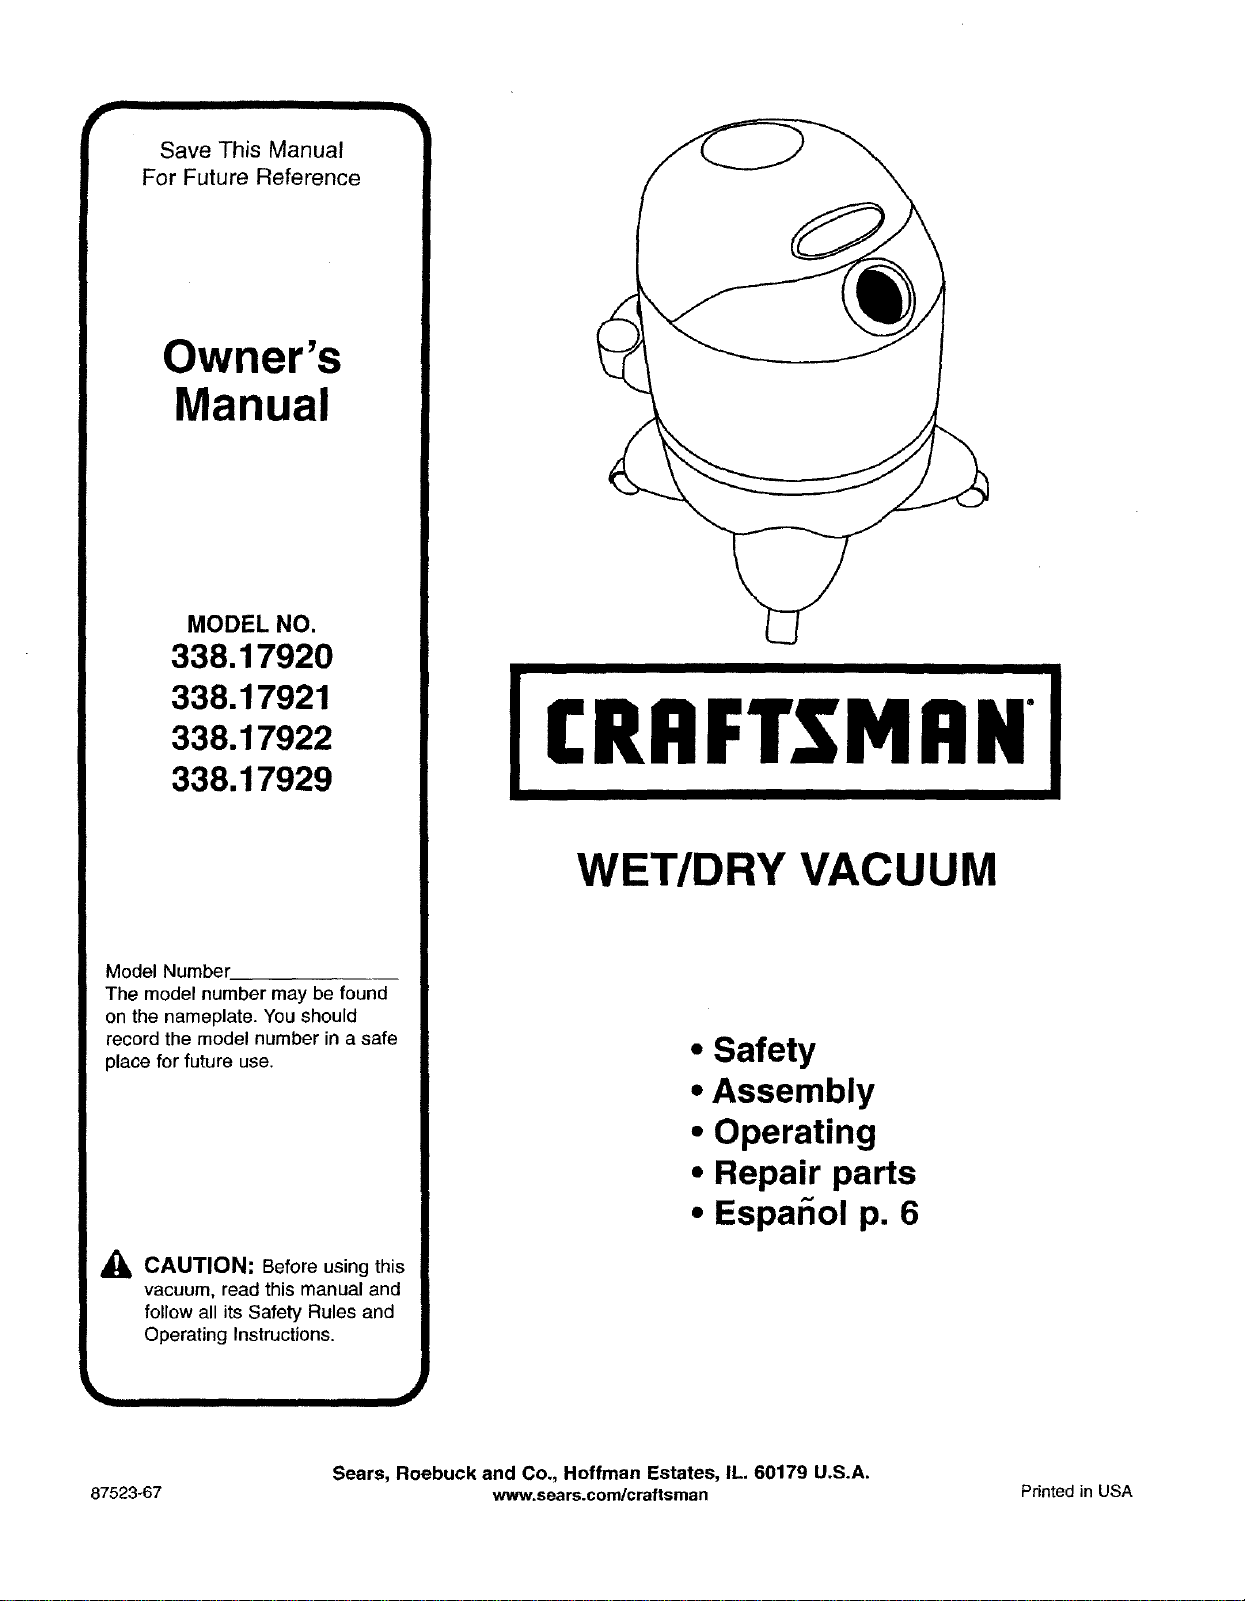
WET/DRY VACUUM
• Safety
• Assembly
• Operating
• Repair parts
• EspaSol p. 6
Sears, Roebuck and Co., Hoffman Estates, IL. 60179 U.S.A.
87523-67 www.sears.com/craftsman Printed in USA
Item Page
Warranty Information........................... 2
Safety Instructions ............................ 2,3
UnpackingCarton Contents ..................... 3
Assembly ................................... 3
Operation ................................... 4
Storage ..................................... 5
Troubleshooting .............................. 5
Repair Parts ........................... See Insert
FULL ONE YEAR WARRANTY ON
CRAFTSMAN WET/DRY VACUUM
Ifthis Craftsman Wet/Dry Vacuum failsdue to a defect in materi-
als or workmanship withinone year from the date of purchase,
Sears will repair or replace it, at Sears option, free ofcharge. For
warranty service, retum the Wet/Dry Vacuum toyour nearest
Sears Service Center or Sears Store in the United States.
ff this Craftsman Wet/Dry Vacuum is used for commercial enter-
prise of any sod, including rental use, this warranty coverage
applies for only 90 days from the date of purchase.
This warranty applies only while this product is used in the United
States.
This warranty gives you specific legal rights, and you may also
have other rights which vary from state to state.
Seam, Roebuck and Co., Dept. 817WA, Hoffman Estates,
IL 60179
When using an electrical appliance, basic precautions
should always be followed, including the following:
Read all instructions before using this product,
_, WARNING: To reduce the risk of fire, electric
shock or injury.
• Do not leave appliance when plugged in. Unplug from
outlet when not in use and before servicing. Connect to a
properly grounded outlet only. See Grounding
Instructions.
• Do not expose to rain - store indoors.
• Do not allow to be used as a toy. Close attention is nec-
essary when used by or near children.
• Use only as described in this manual. Use only
Craftsman attachments.
• Do not use with damaged cord or plug. If appliance is not
working as it should, has been dropped, damaged, left
outdoors or dropped into water, return it to a Sears
service center.
• Do not pull or carry by cord, use cord as a handle, close
a door on cord or pull cord around sharp edges or cor-
ners. Do not run appliance over cord. Keep cord away
from heated surfaces.
• Do not unplug by pulling on cord. To unplug, grasp the
plug, not the cord.
• Do not handle plug or appliance with wet hands.
• Do not put any object intoopenings. Do not use withany
openings blocked; keep free of dust, lint, hair and any-
thing that may reduce air flow.
• Keep hair, loose clothing, fingers and all parts of body
away from openings and moving parts.
• Do not pick up anything that isburning or smoking, such
as cigarettes, matches or hot ashes.
• Do not use without dust bag and/or filters in place.
• Turn off all controls before unplugging.
• Use extra care when cleaning on stairs.
• Do not use to pick up flammable or combustible liquids
such as gasoline or use in areas where they may be pres-
ent.
• Do not use your cleaner as a sprayer of flammable liquids
such as oil base paints, lacquers, household cleaners,
etc.
• Do notvacuum toxic, carcinogenic, combustible or other
hazardous materials such as asbestos, arsenic, barium,
beryllium, lead, pesticides or other health endangering
materials.
• Do not pick up soot, cement, plaster or drywall dust with-
out cartridge filter and collection filter bag in place. These
are very fine padicles that may pass through the foam
and affect the performance of the motor or be exhausted
back intothe air.Additional collection filter bags are avail-
able from Sears.
• Do not leave the cord lying on the floor once you have fin-
ishedthe cleaning job. It can become a tripping hazard.
• Use special care when emptying heavily loaded tanks.
• To avoid spontaneous combustion, empty tank after each
use.
• The operation of a utility vac can result in foreign objects
being blown intoeyes, which can result in eye damage.
Always wear safety goggles when operating vacuum.
• STAYALERT. Watch what you are doing and use com-
mon sense. Do not use vacuum cleaner when you are
tired, distracted or under the influence of drugs, alcohol or
medication causing diminished control.
GROUNDING INSTRUCTIONS
This vacuum cleaner is equipped with a cord having an
equipment-grounding conductor and grounding plug. If vac-
uum cleaner should malfunction or breakdown, grounding
provides a path of least resistance for electric current to
reduce the risk of electric shock. The plug must be inseded
into an appropriate outlet that is properly installed and
grounded in accordance with all local codes and ordinances.
,_ WARNING: Improper connection of the equip-
ment-grounding conductor and grounding plug can
result in a risk of electric shock. Check with a quali-
fied electrician or service person if you are in doubt
as to whether the outlet is properly grounded. Do not
modify the plug provided with the vacuum cleaner -
if it will not fit the outlet, have a proper outlet
installed by a qualified electrician.
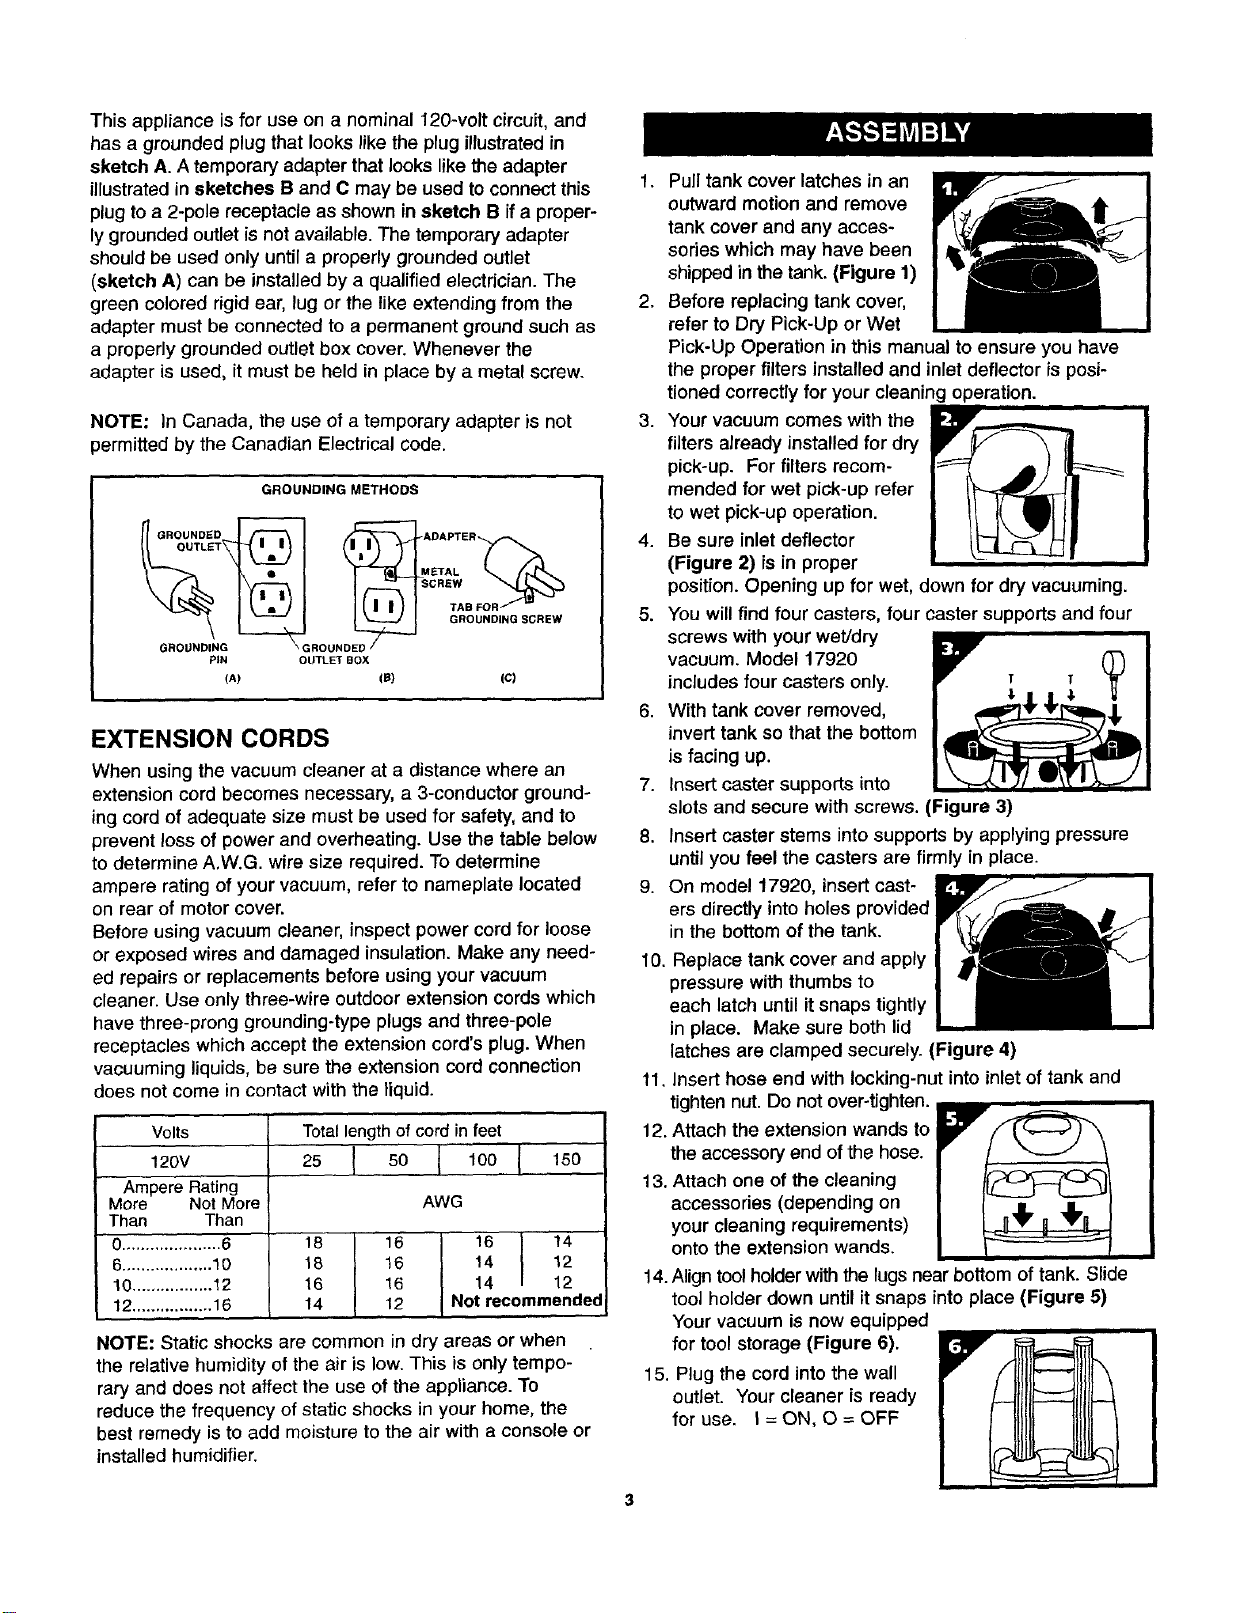
This appliance is for use on a nominal 120-volt circuit, and
has a grounded plug that looks like the plug illustrated in
sketch A. A temporary adapter that looks like the adapter
illustrated in sketches B and C may be used to connect this
plug to a 2-pole receptacle as shown in sketch B if a proper-
ly grounded outlet is not available. The temporary adapter
should be used only until a properly grounded outlet
(sketch A) can be installed by a qualified electrician. The
green colored rigid ear, lug or the like extending from the
adapter must be connected to a permanent ground such as
a properly grounded outlet box cover. Whenever the
adapter is used, it must be held in place by a metal screw.
NOTE; in Canada, the use of a temporary adapter is not
permitted by the Canadian Electrical code.
GROUNDING METHODS
GROUNDED ADAPTER
OUTLET FOR_
SCREW
TAB
GROU;_NG _'_--_GROUNDED L_ GROUNDING SCREW
PIN OUTLET BOX
(A) (B) (C)
EXTENSION CORDS
When using the vacuum cleaner at a distance where an
extension cord becomes necessary, a 3-conductor ground-
ing cord of adequate size must be used for safety, and to
prevent loss of power and overheating. Use the table below
to determine A.W.G. wire size required. To determine
ampere rating of your vacuum, refer to nameplate located
on rear of motor cover.
Before using vacuum cleaner, inspect power cord for loose
or exposed wires and damaged insulation. Make any need-
ed repairs or replacements before using your vacuum
cleaner. Use only three-wire outdoor extension cords which
have three-prong grounding-type plugs and three-pole
receptacles which accept the extension cord's plug. When
vacuuming liquids, be sure the extension cord connection
does not come in contact with the liquid.
Volts Total length of cord in feet
120V 25 50 1100 1150
Ampere Rating
More Not More AWG
Than Than
O..................... 6 18 16 16 14
6................... 10 18 16 14 12
10 ................. 12 16 16 14 12
12................. 16 14 12 Not recommended
NOTE: Static shocks are commonin dry areas or when
the relativehumidityof the air is low.This is onlytempo-
rary and does not affect the use ofthe appliance. To
reducethe frequency of static shocks in your home, the
best remedy is to add moisture tothe air with a console or
installedhumidifier.
1. Pull tank cover latches in an
outward motion and remove
tank cover and any acces-
sories which may have been
shipped in the tank. (Figure 1)
2. Before replacing tank cover,
refer to Dry Pick-Up or Wet
Pick-Up Operation in this manual to ensure you have
the proper filters installedand inlet deflector is posi-
tioned correctly for your cleaning operation.
3. Your vacuum comes with the
filters already installed for dry
pick-up. For filters recom-
mended for wet pick-up refer
to wet pick-up operation.
4. Be sure inlet deflector
(Figure 2) isin proper
position. Opening up for wet, down for dry vacuuming.
5. You will find four casters, four caster supportsand four
screws with your weVdry
vacuum. Model 17920
includesfour casters only.
6. Withtank cover removed,
inverttank so that the bottom
is facing up.
7. Insert castersupports into
slots and secure with screws. (Figure 3)
8. Insert caster stems intosupports by applying pressure
untilyou feel the castersare firmly in place.
9. On model 17920, insertcast-
ers directly intoholes provided
in the bottom of the tank.
10. Replace tank cover and apply
pressurewith thumbs to
each latch untilitsnaps tightly
in place. Make sure both lid
latches are clamped securely.(Figure 4)
11. Insert hose end with locking-nutinto inletoftank and
tightennut.Do not over-tighten.
12. Attach the extension wands to
the accessoryend ofthe hose.
13. Attach one ofthe cleaning
accessories (dependingon
your cleaningrequirements)
ontothe extension wands.
14.Align toolholderwiththe lugs near bottom oftank. Slide
toolholder down untilit snaps intoplace (Figure 5)
Yourvacuum isnow equipped
for toolstorage (Figure 6).
15. Plug the cord intothe wall
outlet. Yourcleaner is ready
for use. I=ON, O=OFF
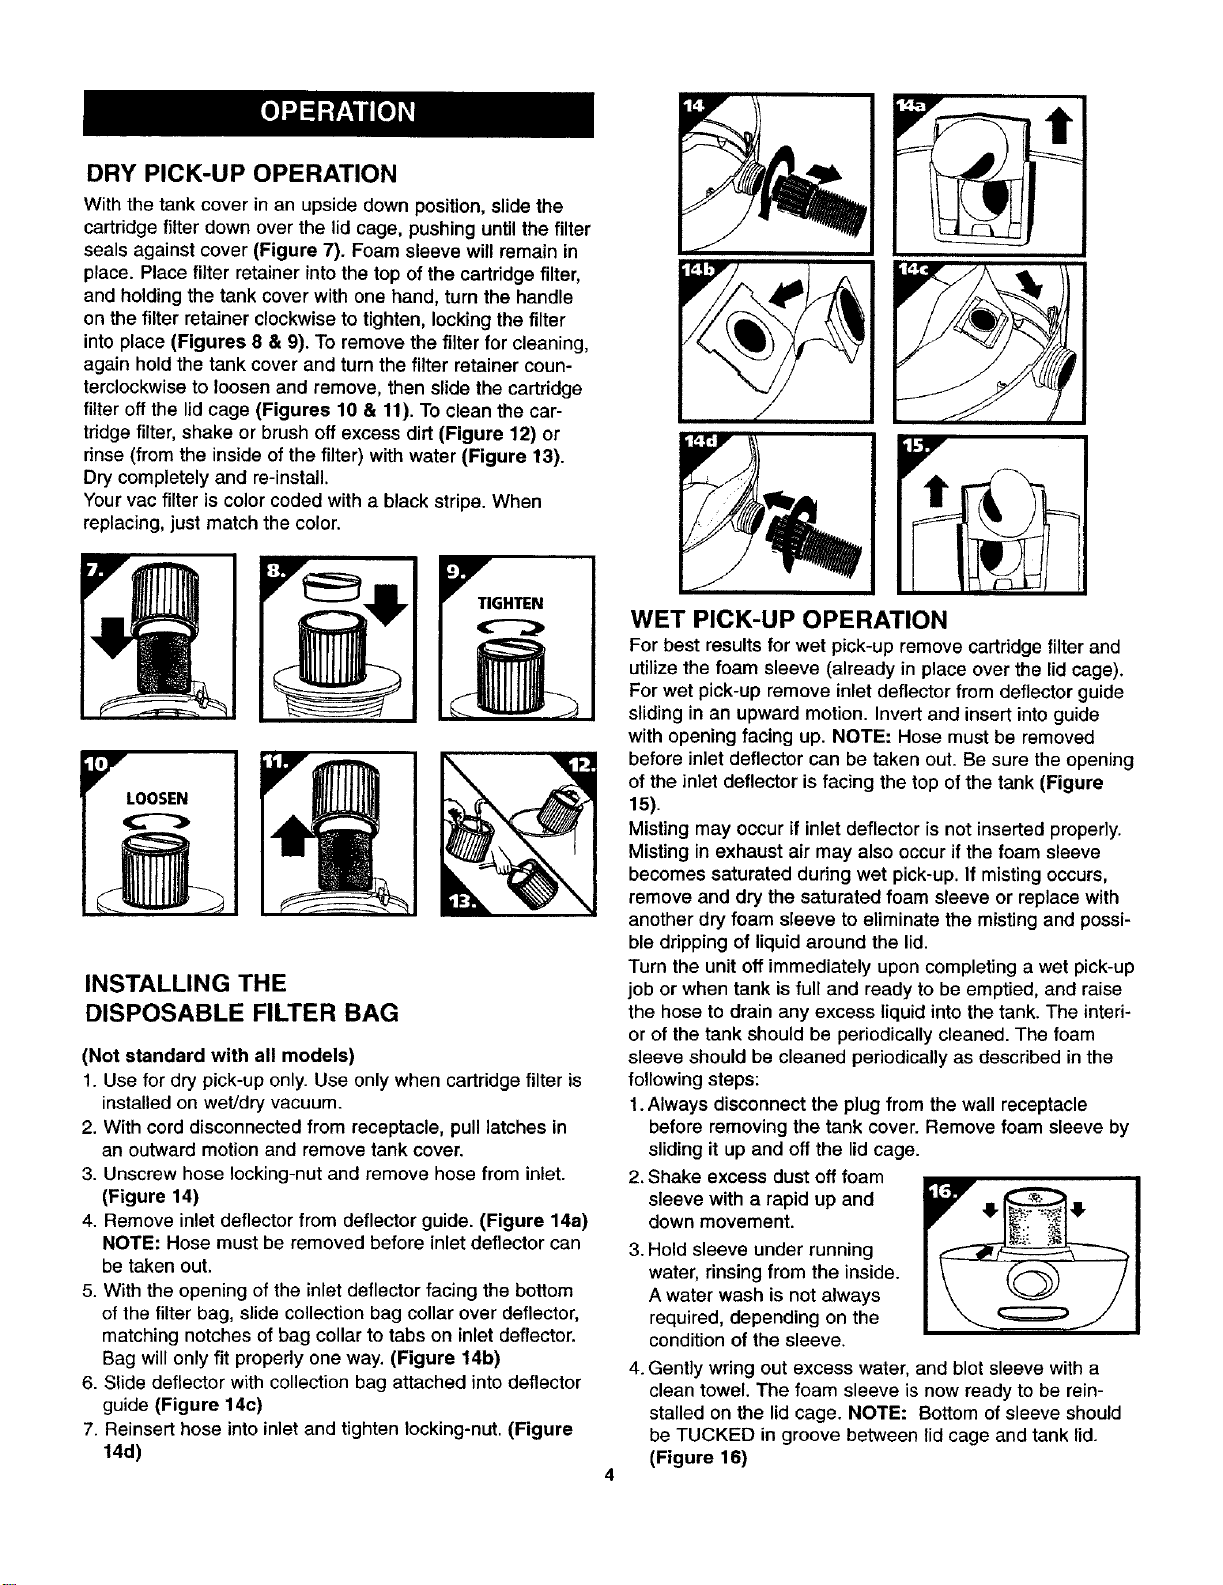
DRY PICK-UP OPERATION
With the tank cover in an upside down position, slide the
cartridge filter down over the lid cage, pushing until the filter
seals against cover (Figure 7). Foam sleeve will remain in
place. Place filter retainer intothe top of the cartridge filter,
and holding the tank cover with one hand, turn the handle
on the filter retainer clockwise to tighten, locking the filter
into place (Figures 8 & 9). To remove the filter for cleaning,
again hold the tank cover and turn the filter retainer coun-
terclockwise to loosen and remove, then slide the cartridge
filter off the lid cage (Figures 10 & 11). TOclean the car-
tridge filter, shake or brush off excess dirt (Figure 12) or
rinse (from the inside of the filter) with water (Figure 13).
Dry completely and re-install.
Your vac filter is color coded with a black stripe. When
replacing, just match the color.
INSTALLING THE
DISPOSABLE FILTER BAG
(Not standard with all models)
1. Use for dry pick-up only. Use only when cartridge filter is
installed on wet/dry vacuum.
2. With cord disconnected from receptacle, pull latches in
an outward motion and remove tank cover.
3. Unscrew hose locking-nut and remove hose from inlet.
(Figure 14)
4. Remove inlet deflector from deflector guide. (Figure 14a)
NOTE: Hose must be removed before inlet deflector can
be taken out.
5. With the opening of the inlet deflector facing the bottom
of the filter bag, slide collection bag collar over deflector,
matching notches of bag collar to tabs on inlet deflector.
Bag will only fit properly one way. (Figure 14b)
6. Slide deflector with collection bag attached into deflector
guide (Figure 14c)
7. Reinsert hose into inlet and tighten locking-nut. (Figure
14d)
WET PICK-UP OPERATION
For best results for wet pick-up remove cartridge filter and
utilize the foam sleeve (already in place over the lid cage).
For wet pick-up remove inlet deflector from deflector guide
sliding in an upward motion. Invert and insert into guide
with opening facing up. NOTE: Hose must be removed
before inlet deflector can be taken out. Be sure the opening
of the inlet deflector is facing the top of the tank (Figure
15).
Mistingmay occurif inlet deflectoris not inserted properly.
Mistingin exhaust air may also occurifthe foam sleeve
becomes saturated duringwet pick-up.If misting occurs,
remove and dry the saturatedfoam sleeve or replace with
another dry foam sleeve to eliminate the mistingand possi-
ble dripping of liquidaround the lid.
Turn the unitoff immediately upon completinga wet pick-up
job or when tank isfull and ready to be emptied, and raise
the hose to drain any excess liquidintothe tank. The interi-
or of the tank shouldbe periodicallycleaned. The foam
sleeve should be cleaned periodicallyas describedinthe
following steps:
1.Always disconnect the plug from the wall receptacle
before removingthe tank cover.Remove foam sleeve by
sliding it up and offthe lidcage.
2. Shake excess dust offfoam
sleeve with a rapid up and
down movement.
3. Hold sleeve under running
water, rinsingfrom the inside.
Awater wash is not always
required, depending on the
condition of the sleeve.
4. Gently wring out excess water, and blot sleeve with a
clean towel. The foam sleeve is now ready to be rein-
stalled on the lid cage. NOTE: Bottom of sleeve should
be TUCKED in groove between lid cage and tank lid.
(Figure 16)
EMPTYING LIQUID WASTE
FROM THE TANK
Your Craftsman Wet'Dry Vacuum can be emptied of liquid
waste by removing the drain cap. To empty, turn unit off
and remove plug from wall receptacle. Remove the drain
cap, located on front of vacuum at bottom of tank, and
deposit the liquid waste contents into a suitable drain. After
the tank is empty, return the drain cap to its original posi-
tion. To continue use, plug the cord into the wall receptacle
and turn unit on. Model No. 17920 does not have a drain
cap. To empty, remove lid, and pour water out into a suit-
able drain.
AUTOMATIC SHUT-OFF
The vacuum is equipped with an automatic suction shut-off
that operates when picking up liquids. As the level of the
liquid rises in the tank, an internal float rises until it seats
itself against a seal at the intake of the motor, shutting off
suction. When this happens, the motor will develop a high-
er than normal pitch noise and the suction is drastically
reduced. If this occurs, turn unit off immediately. Failure to
turn unit off after float rises and shuts off suction will result
in extensive damage to the motor. To continue use, empty
the liquid waste from the tank as outlined in the previous
paragraph.
NOTE: If accidentally tipped over, the vacuum could lose
suction. If this occurs, place vac in upright position and
turn switch off. This will allow the float to return to its nor-
mal position, and you will be able to continue operation.
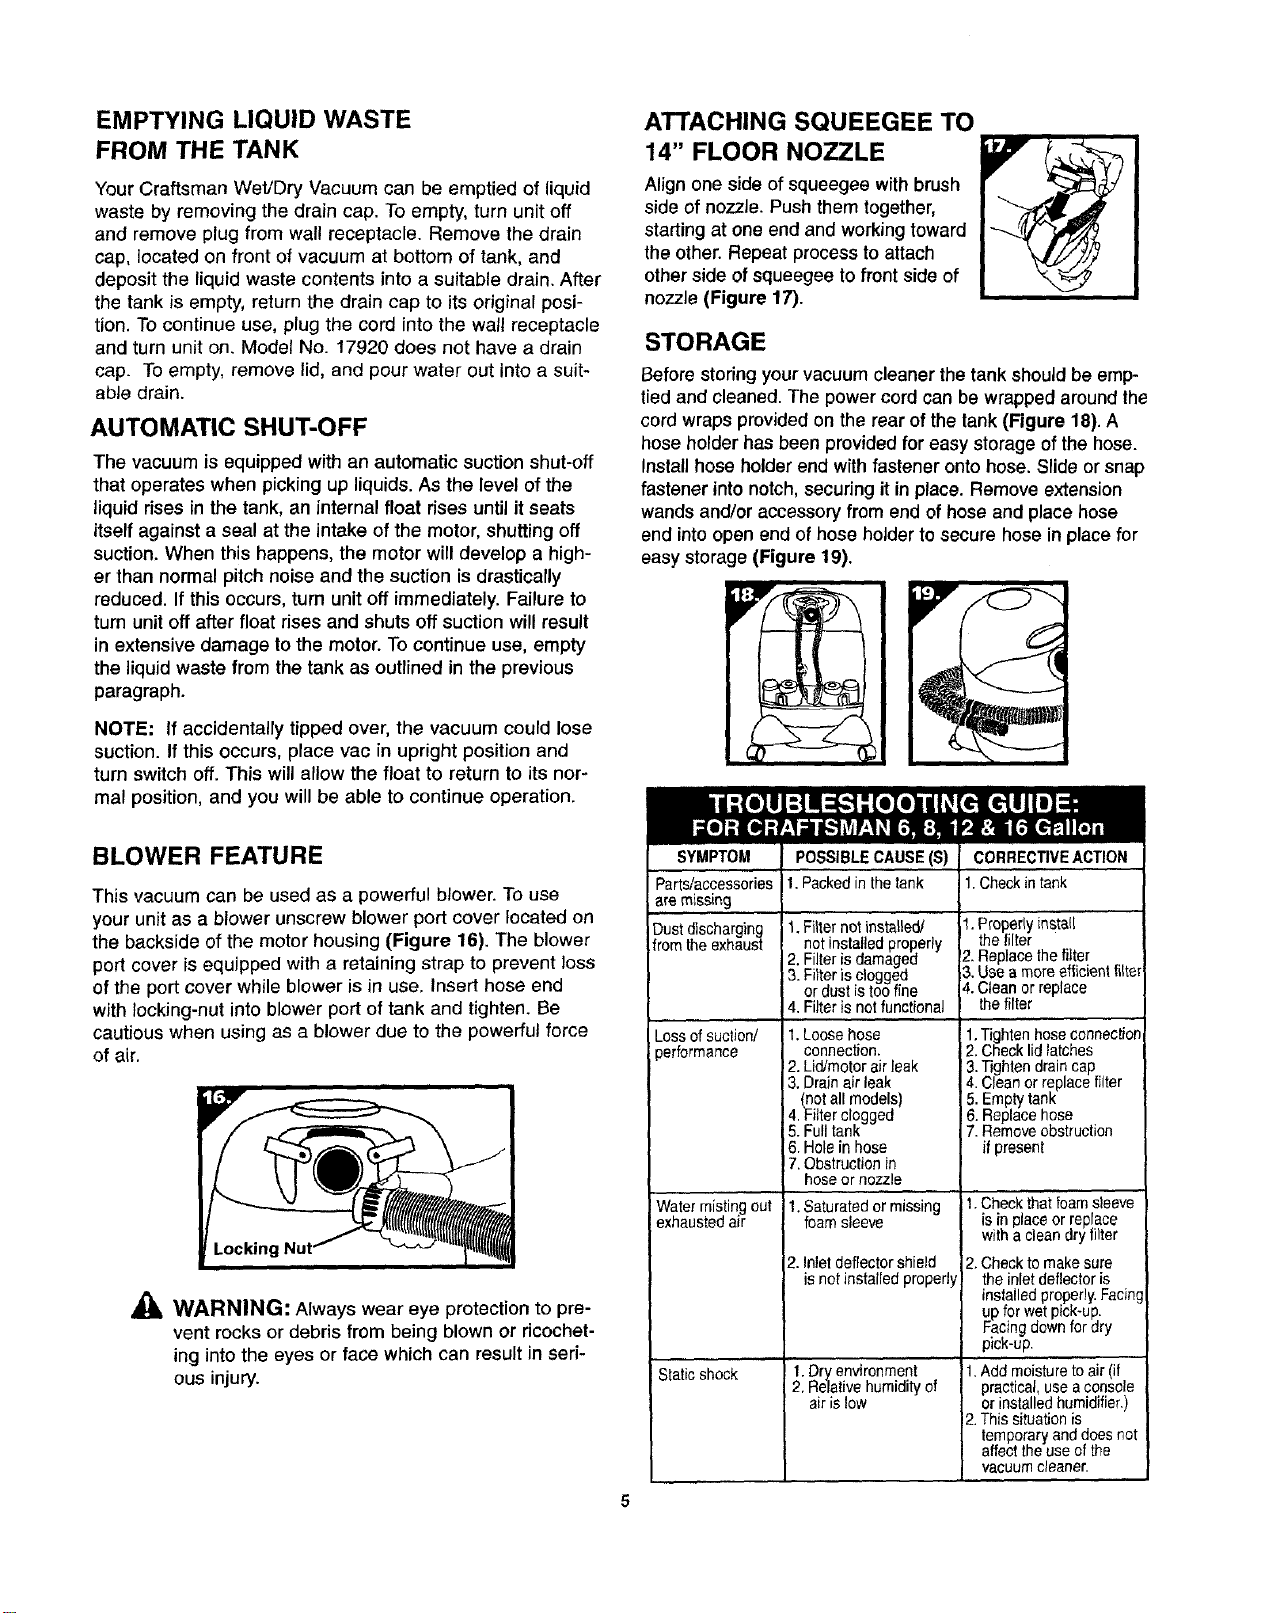
BLOWER FEATURE
This vacuum can be used as a powerful blower. To use
your unit as a blower unscrew blower port cover located on
the backside of the motor housing (Figure 16). The blower
port cover is equipped with a retaining strap to prevent loss
of the port cover while blower is in use. Insert hose end
with locking-nut into blower port of tank and tighten. Be
cautious when using as a blower due to the powerful force
of air.
_1= WARNING: Always wear eye protection to pre-
vent rocks or debris from being blown or ricochet-
ing into the eyes or face which can result in seri-
ous injury.
ATTACHING SQUEEGEE TO
14" FLOOR NOZZLE
Align one side of squeegee with brush
side of nozzle. Push them together,
starting at one end and working toward
the other. Repeat process to attach
other side of squeegee to front side of
nozzle(Figure 17).
i
STORAGE
Before storing your vacuum cleaner thetank should be emp-
tied and cleaned. The power cord can be wrapped around the
cord wraps provided on the rear of the tank(Rgure 18). A
hose holder has been provided for easy storage of the hose.
Install hose holder end with fastener onto hose. Slide or snap
fastener into notch, securing it in place. Remove extension
wands and/or accessory from end of hose and place hose
end into open end of hose holder to secure hose in place for
easy storage (Figure 19).
SYMPTOM POSSIBLECAUSE(S) CORRECTIVEACTION
1.Packedin thetank 1.Checkin tankParts/accessories
aremissing
Dustdischarging
Fromtheexhaust
Lossofsuction/
performance
Water misting out
exhaustedair
Static shock
1. Filter not installed/
not installed properly
2. Filter is damaged
3. Filter is clogged
or dust is too fine
4, Filter is not functional
1. Loose hose
connection.
_2.Lid/motor air leak
3. Drain air leak
(not all models)
4,Filter clogged
5. Full tank
6. Hole in hose
7. Obstruction in
hose or nozzle
1.Saturatedormissing
foamsleeve
2. Inletdeflectorshield
isnet installedproperly
1.Dry' environment
2. Relative humidity of
air is low
1. Properlyinstall
the filter
2. Replace the filter
3. Use a mere efficient filter
4. Clean or replace
the filter
1.Tighten hose connection
2. Check lid latches
3.Tighten drain cap
4. Clean or replace filter
5. Empty tank
6. Replace hose
7. Remove obstruction
if present
t. Check that foam sleeve
is in place or replace
with a clean dry tilter
2. Check to make sure
the inlet deflector is
installedproperly. Facing
up for wet pick-up.
Facing down for dry
pick-up.
1.Add moisture to air (if
practical use a console
or installed humid tier,)
2. This situation is
temporary and does not
affect theuse of the
vacuumcleaner,
Artfculo Pdgina
Informaci6nsobra garantfa ...................... 6
Instrucciones de seguridad ...................... 6,7
Contenidos del cart6n desempaquetado ............ 7
Montaje .................................... 7
Funcionamiento .............................. 8
Almacenamiento .............................. 10
Soluci6n de problemas ......................... 10
Piezas de repuesto ...................... Ver inserto
LA ASPIRADORA PARASERVICIO EN HUMEDO/SECO DE
CRAFTSMAN TIENE UN ANO COMPLETe DE GARANTfA
Siesta aspiradorapara servicioen hL_medo/secodeCraftsman
falla debidoa un defectoen losmateriales oen la mane de
obradentrode un perfodode un a_oa partirde la fecha de
compra,Sears lareparardo lacambiard,seg_n elcdteriode
Sears,sin cargoalgunopara elcliente.Parautilizarelservicio
degarantia,devuelvalaaspiradorapara servicioen
h_medo/secoa suserviciode reparaci6nSearsm_s cercano
o alalmac_nde Sears enlos EstadosUnidos.
Si esta aspiradora para servicio en hL'Jmedo/secode Craftsman
se utiliza con propbsitos comerciales de cualquier ripe,
incluyendo el alquiler del aparato, la cobertura de esta garantfa
s61otendr¢_validez durante 90 dfas a partir de la fecha de la
compra.
Esta garanfia s61otendr_,validez mientras el producto se utilice
en los Estados Unidos.
Esta garantia le otorga derachos legales especfficos ademds
de otros adicionales que varian en cada estado.
Sears, Roebuck and Co., Dept. 817WA, Hoffman Estates, IL
60179
Cuando se utilicen aparatos el_ctricos, deben tomarse algu-
nas precauciones b_.sicas incluyendo las siguientes:
Lea todas las instrucciones antes de utilizar este produc-
to.
£k ADVERTENCIA: Para reducir el riesgo de incen-
die, descargael@ctricao lesiones.
• No deje el aparatoconectadosi ustedest&ausente.
Descon_ctelo del tomacordentecuandono est6 en use y
antesde realizartareasde mantenimiento. Con_ctelo
solamentea un tomacorrientedebidamenteconectadoa
tierra.Consulte las instruccionesde conexi6na tierra.
• No Io expongaa la Iluvia,gu&rdeloen un sitio cubierto.
• No permitaque se utilicecornoun juguete.Se requiera
unaatenta supervisi6n cuandoun aparato elg_tricoest@
siendo usadoper niSoso cercade ellos.
• Utilicela aspiradoratalcomese describe en este manual,
usando6nicamente accesorios de Craftsman.
• No la utilicesi tieneel cable oel enchufedaSado.Si el
aparato no funcionacome deberfa, se ha caido, presenta
alg_n da_o, se ha dejado a la intemperie o se ha caido al
agua, devu_lvalo al centre de servicio de Sears.
• No cargue la unidad per el cable ni tire de 51,no utilice el
cable come una manija, no cierra una puerta sobre el
cable, no fire del cable alrededor de los bordes filososni
de las esquinas. No pase la aspiradora sobre el cable.
Mantenga el cable alejado de las superficies calientes.
• No desconecte la aspiradora tirando del cable, para hac-
erie sujete el cable per el enchufe.
• No manipule el enchufe ni la aspiradora con las manes
hemedas.
• No introduzca ningen objeto en las aberturas. No utilice la
aspiradora si tiene obstruida cualquiera de las aberturas;
mant_ngala libra de polvo, pelusa, cabello o de cualquier
otro objeto extraSo que reduzca la circulaci6n del aire.
• Mantenga el cabello, la ropa suelta, los dedos y todas las
partes del cuerpo alejados de las aberturas y de las
partes m6viles.
• No aspire materiales que se est_n quemando o pro-
duciendo humo, tales come cigarrillos, f6sforos o cenizas
calientes.
• No utilice el aparato sin la bolsa para polvo y/o los filtros
colocados en su lugar correcto.• Apague tedos los con-
troles antes de desconectar el aparato.
• Tenga mucha precauci6n cuando est_ aspirando
escaleras.
• No utilice la aspiradora para Iimpiar Uquidosinflamables ni
combustibles, come la gasolina, ni la utilice en zonas
donde pudiera haber este fipo de sustancias.
• No utilice el aparato come pulverizador de Ifquidos inflam-
ables, come pinturas al 6leo, lacas, limpiadoresdel hogar,
etc.
• No aspire materiales t6xicos, cancedgenos, combustibles
u otros materiales peligrosos, come amianto, ars_nico,
bade, berilio, plomo, pesticidas u otros materiales peli-
grosos para la salud.
• No aspire hell{n, cemento, yeso o polvo de muro de mam-
posteria sin el filtro de cartucho y la bolsa colectora ill-
trante en su lugar, ya que se trata de partfculas muy finas
que podrfan traspasar la espuma y afectar al rendimiento
del motor o ser expelidas nuevamente al aire. Sears
dispone de bolsas colectoras filtrantes adicionales.
• No deje el cable en el suelo cuando haya terminado el tra-
bajo de limpieza. Puede resultar peligroso si se tropieza
con el mismo.
• Tenga un especial cuidado cuando vacie dep6sitos que
esten muy cargados.
• Para evitar una combusti6n espont&nea, vac{e el dep6sito
despu@sde cada use.
• AI utilizar una aspiradora de servicio pueden saltar
partfculas extrar3asa los ojos y provocar una lesi6n ocular.
Use siempre gafas protectoras cuando est@manejando la
aspiradora.
• MANTI_NGASEALERTA. Preste atenci6n a Io que est_
haciendo y utilice el sentido com_n. No utilice la aspirado-
ra si est_ cansado, distrafdo o bajo la influencia de dro-
gas, alcohol o medicamentos que puedan disminuir su
6 capacidad de controlar el aparato.
INSTRUCCIONES DE CONEXION A TIERRA
Este aparato esta equipado con un cable que cuenta con
un conductor a tierra para el equipo y un enchufe a tierra.
Si por algOn motivo falla o se descompone, la conexi6n a
tierra proporciona una vfa de menor resistencia para la cor-
riente electrica reduciendo el riesgo de una descarga el_c-
trica. El enchufe debe ser insertado en el tomacorriente
adecuado que est_ debidamente instalado y conectado a
tierra de acuerdo con todos los c6digos y reglamentos
locales.
dk ADVERTENCIA: : Una conexi6n inadecuadadel
,.,=
conductor a tierra para el equipo y del enchufe a
tierra puede resultar en un riesgo de descarga el_c-
trica. Verifique con un electricista calificado o t_cnico
si tiene dudas con respecto a si el tomacorriente
est_ adecuadamente conectado a tierra. No haga
modificaciones en el enchufe del aparato. Si no se
ajusta al tomacorriente, haga que un electricista cali-
ficado le instale un tomacorriente apropiado.
Este aparato es para utilizarse en un circuito de 120-voltios
nominal y cuenta con un enchufe con conexi6n a tierra que
se ve como el que aparece en la ilustraci6n A. Puede usar
un adaptador provisorio como el que se muestra en las
ilustraciones B y C para conectar este enchufe a un toma-
corriente de 2 polos como el que se exhibe en la ilustraci6n
B si no tiene disponible un tomacorriente debidamente
conectado a tierra. El adaptador provisorio debe ser utiliza-
do solamente hasta que un electricista pueda instalar un
tomacorriente debidamente conectado a tierra (ilustraci6n
A). La espiga rfgida de color verde, lengeeta o accesorio
similar que sale del adaptador debe conectarse a una
conexi6n a tierra permanente tal como una cubierta de caja
de tomacorriente con adecuada conexi6n a tierra. Siempre
que se utilice un adaptador, debe ser sujetado en su lugar
por un tornillo met&lico.
NOTA: EN CANADA NO SE PERMITE EL USO DE UN
ADAPTADOR PROVISORIO DE ACUERDO CON EL
REGLAMENTO DE ELECTRIClDAD CANADIENSE
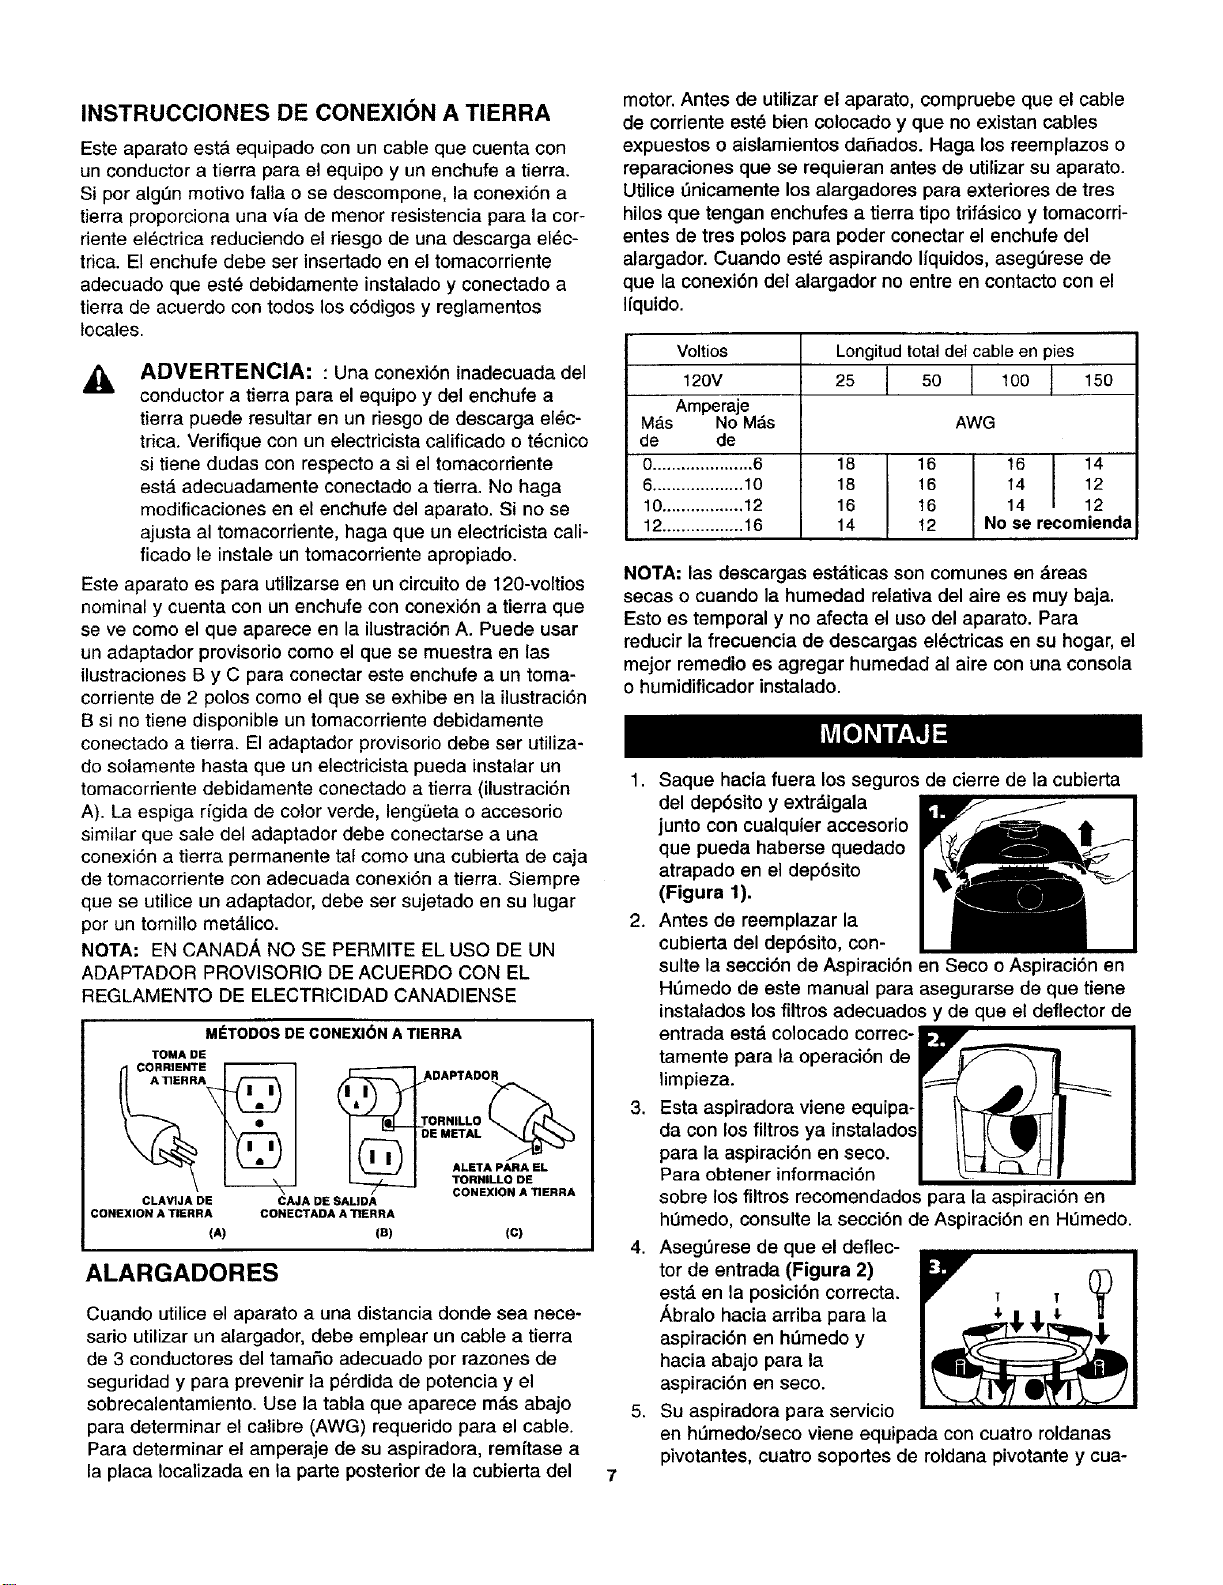
MI_TODOS DE CONEXI(_N A TIERRA
TOMA DE
CLAVIJA DE CAJA DE SALIDA
:ONEXION A TIERRA CONECTADA A TIERRA
(A) (B)
ADAPTADOR
ALETA PARA EL
TORNILLO DE
CONEXION A TIERRA
(c)
ALARGADORES
Cuando utilice el aparato a una distancia donde sea nece-
sario utilizar un alargador, debe emplear un cable a tierra
de 3 conductores del tamar3o adecuado por razones de
seguridad y para prevenir la p_rdida de potencia y el
sobrecalentamiento. Use la tabla que aparece m&s abajo
para determinar el calibre (AWG) requerido para el cable.
Para determinar el amperaje de su aspiradora, remftase a
la placa Iocalizada en la parte posterior de la cubierta del
motor. Antes de utilizar el aparato, compruebe que el cable
de corriente est_ bien colocado y que no existan cables
expuestos o aislamientos da_ados. Haga los reemplazos o
reparaciones que se requieran antes de utilizar su aparato.
Utilice _nicamente los alargadores para exteriores de tres
hilos que tengan enchufes a tierra tipo tdf_sico y tomacorri-
entes de tres polos para poder conectar el enchufe del
alargador. Cuando este aspirando Ifquidos, aseg_rese de
que la conexi6n del alargador no entre en contacto con el
Ifquido.
Voltios
120V
Amper_e
M&s No M&s
de de
0..................... 6
6................... 10
10 ................. 12
12 ................. 16
Longitudtotaldetcable en pies
25 50 ] 100 150
I
AWG
18
18
16
14
16 16 14
16 14 12
16 14 12
t2 No serecomienda
NOTA: las descargas est&ticas son comunes en _reas
secas o cuando la humedad relativa del aire es muy baja.
Esto es temporal y no afecta el uso del aparato. Para
reducir la frecuencia de descargas el6ctricas en su hogar, el
mejor remedio es agregar humedad al aire con una consola
o humidificador instalado.
1,
2,
.
4.
5.
Saque hacia fuera los seguros de cierre de la cubierta
del dep6sito y extr_,igala
junto con cualquier accesorio
que pueda haberse quedado
atrapado en el dep6sito
(Figura 1).
Antes de reemplazar la
cubierta del dep6sito, con-
suite la secci6n de Aspiraci6n en Seco o Aspiraci6n en
H6medo de este manual para asegurarse de que tiene
instalados los filtros adecuados y de que el deflector de
entrada est,. colocado correc-
tamente para la operaci6n de
limpieza.
Esta aspiradora viene equipa-
da con los filtros ya instalados
para la aspiraci6n en seco.
Para obtener informaci6n
sobre los filtros recomendados para la aspiraci6n en
hemedo, consulte la secci6n de Aspiraci6n en Hemedo.
AsegL_resede que el deflec-
tor de entrada (Figura 2)
est,. en la posici6n correcta.
Abralo hacia arriba para la
aspiraci6n en hdmedo y
hacia abajo para la
aspiraci6n en seco.
Su aspiradora para servicio
en hL_medo/secoviene equipada con cuatro roldanas
pivotantes, cuatro soportes de roldana pivotante y cua-
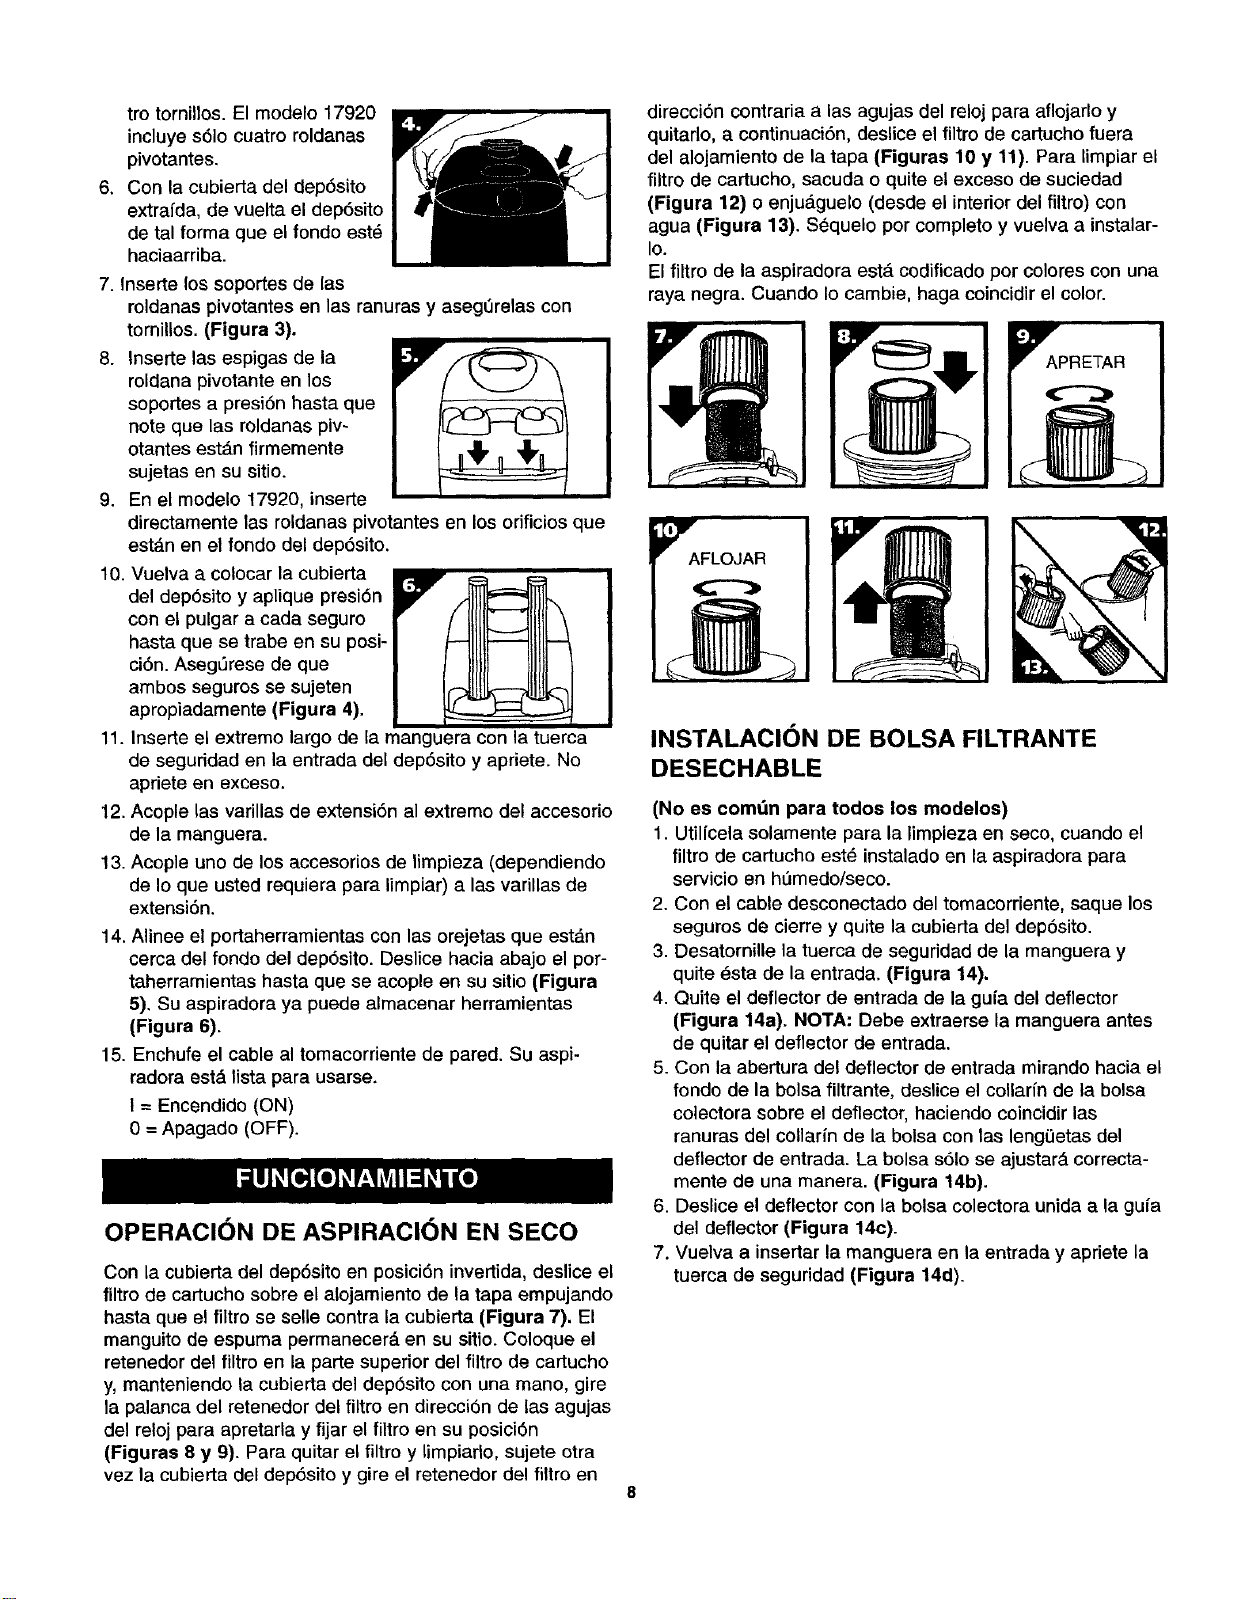
trotornillos.Elmodelo17920
incluyes61ocuatroroldanas
pivotantes.
6. Conlacubiertadeldep6sito
extrafda, de vuelta el dep6sito
de tal forma que el fondo est_
haciaarriba.
7. Inserte los soportesde las
roldanas pivotantes en las ranuras y asegerelas con
tornillos. (Figure 3).
8. Inserte las espigas de la
roldana pivotante en los
soportes a presi6n hasta que
note que las roldanas piv-
otantes est_,nfirmemente
sujetas en su sitio.
9. En el modelo 17920, inserte
directamente las roldanas pivotantes en los orificios que
est_.nen el fondo del dep6sito.
10. Vuelva a colocar la cubierta
del dep6sito y aplique presi6n
con el pulgar a cada seguro
hasta que se trabe en su posi-
ci6n. AsegL_resede que
ambos seguros se sujeten
apropiadamente (Figure 4).
11. Inserte el extreme largo de la manguera con la tuerca
de seguddad en la entrada del dep6sito y apriete. No
apriete en exceso.
12. Acople las varillas de extensi6n al extreme del accesorio
de la manguera.
13. Acople uno de los accesorios de limpieza (dependiendo
de Io que usted requiera para limpiar) alas varUlas de
extensi6n.
14. Alinee el portaherramientas con las orejetas que est_,n
cerca del fondo del dep6sito. Deslice hacia abajo el por-
taherramientas hasta que se acople en su sitio (Figura
5), Su aspiradora ya puede almacenar herramientas
(Figure 6).
15. Enchufe el cable al tomacorriente de pared. Su aspi-
radora est_ listapara usarse.
I = Encendido (ON)
0 =Apagado (OFF).
OPERACION DE ASPIRACION EN SECO
Con la cubierta del dep6sito en posici6n invertida, deslice el
filtro de cartucho sobre el alojamiento de la tapa empujando
haste que el filtro se selle centre la cubierta (Figure 7), El
manguito de espurna permanecer& en su sitio. Coloque el
retenedor del filtro en la parle superior del filtro de cartucho
y, manteniendo la cubierta del dep6sito con una mane, gire
la palanca del retenedor del filtro en direcci6n de las agujas
del reloj para apretarla y fijar el filtro en su posici6n
(Figures 8 y 9). Para quitar el filtro y limpiado, sujete otra
vez la cubierta del dep6sito y gire el retenedor del filtro en
direcci6n contraria alas agujas del reloj para aflojarlo y
quitarlo, a continuaci6n, deslice el filtro de cartucho fuera
del alojamiento de la tapa (Figuras 10 y 11). Para limpiar el
filtro de cartucho, sacuda o quite el exceso de suciedad
(Figura 12) o enju_guelo (desde el interior del filtro) con
agua (Figura 13). SOquelo per complete y vuelva a instalar-
Io.
El filtro de la aspiradora est_ codificado per colores con una
raya negra. Cuando Io cambie, haga coincidir el color.
INSTALACION DE BOLSA FILTRANTE
DESECHABLE
(No es com_n para todos los modelos)
1. Utilfcela solamente para la limpieza en seco, cuando el
filtro de cartuchoest_ instaladoen la aspiradora pare
servicio en h_medo/seco.
2. Con el cable desconectado del tomacorriente,saque los
seguros de cierre y quite la cubierta del dep6sito.
3. Desatornille la tuerca de seguridadde la manguera y
quite _sta de la entrada. (Figura 14).
4. Quite el deflector de entrada de la guia del deflector
(Figure 14a). NOTA: Debe extraerse la manguera antes
de quitarel deflector de entrada.
5. Con la abertura del deflector de entrada mirandohacia el
fondo de la bolsa filtrante, deslice el collarfnde la boise
colectora sobre el deflector,haciendo coincidirlas
ranuras del colladnde la bolsacon las leng0etas del
deflector de entrada. La bolsa s61ose ajustar& correcta-
mente de una manera. (Figura 14b).
6. Deslice el deflector con la bolsacolectoraunida a la guia
del deflector (Figura 14c).
7. Vuelva a inserterla manguera en la entrada y apriete la
tuerca de seguridad (Figura 14d).
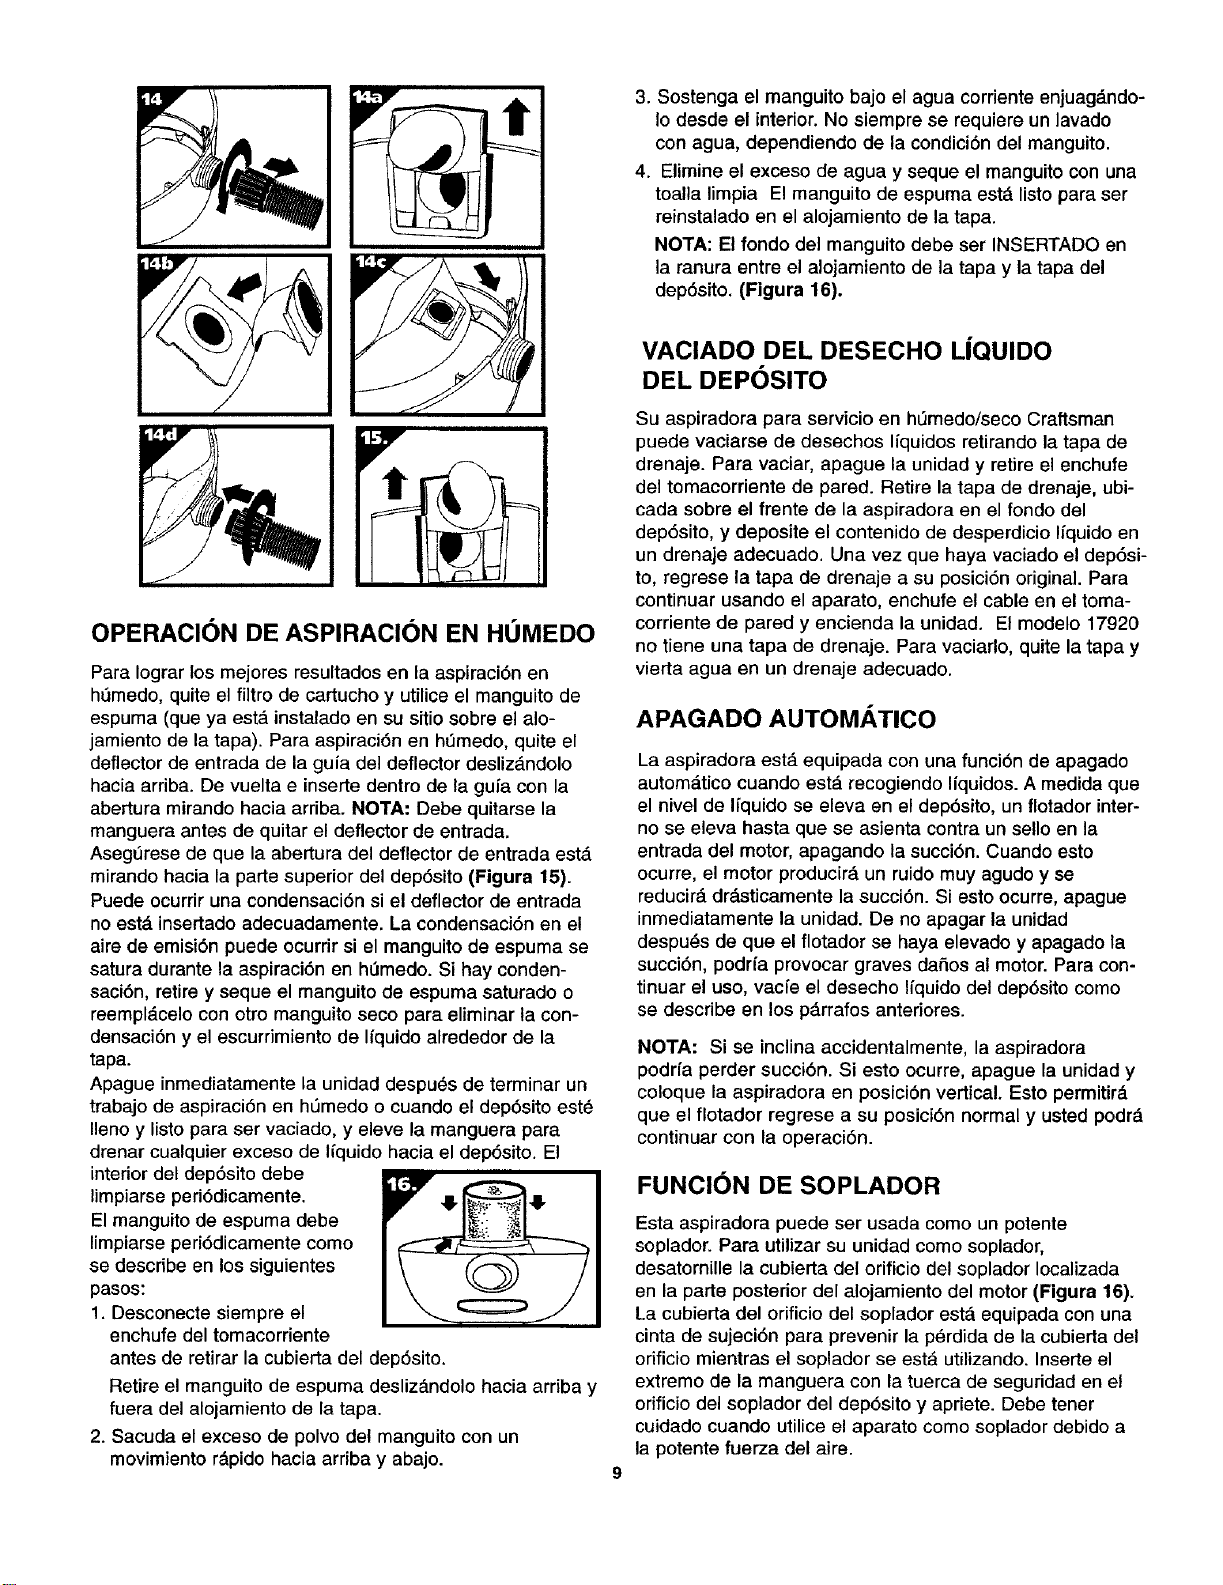
OPERACION DE ASPIRACION EN HOMEDO
Para Iograr los mejores resultados en la aspiraci6n en
hemedo, quite el filtro de cartucho y utilice el manguito de
espuma (que ya est_ instalado en su sitio sobre el alo-
jamiento de la tapa). Para aspiraci6n en hemedo, quite el
deflector de entrada de la guia del deflector desliz_ndolo
hacia arriba. De vuelta e inserte dentro de la gufa con la
abertura mirando hacia arriba. NOTA; Debe quitarse la
manguera antes de quitar el deflector de entrada.
AsegLirese de que la abertura del deflector de entrada est,.
mirando hacia la parte superior del dep6sito (Figura 15).
Puede ocurrir una condensaci6n si el deflector de entrada
no est,. insertado adecuadamente. La condensaci6n en el
aire de emisi6n puede ocurrir si el manguito de espuma se
satura durante la aspiraci6n en hOmedo. Si hay conden-
saci6n, retire y seque el manguito de espuma saturado o
reempl_celo con otro manguito seco para eliminar la con-
densaci6n y el escurrimiento de liquido alrededor de la
tapa.
Apague inmediatamente la unidad despu_s de terminar un
trabajo de aspiraci6n en h_medo o cuando el dep6sito est_
Ileno y listo para ser vaciado, y eleve la manguera para
drenar cualquier exceso de Ifquido hacia el dep6sito. El
interior del dep6sito debe
Umpiarseperi6dicamente.
El manguito de espuma debe
limpiarse peri6dicamente como
se describe en los siguientes
pasos:
1. Desconecte siempre el
enchufe del tomacorriente
antes de retirar la cubierta del dep6sito.
Retire el manguito de espuma desliz_ndolo hacia arriba y
fuera del alojamiento de la tapa.
2. Sacuda el exceso de polvo del manguito con un
movimiento r&pido hacia arriba y abajo.
.
4,
Sostenga el manguitobajo el agua corriente enjuag_.ndo-
Io desde el interior. No siempre se requiere un lavado
con agua, dependiendo de la condici6n del manguito.
Elimine el exceso de agua y seque el manguito con una
toalla limpia El manguito de espuma est_ listo para ser
reinstalado en el alojamiento de la tapa.
NOTA: El fondo del manguito debe ser INSERTADO en
la ranura entre el aiojamiento de la tapa y la tapa del
dep6sito. (Figura 16).
VACIADO DEL DESECHO LiQUIDO
DEL DEPOSITO
Su aspiradora para servicio en hL_medo/secoCraftsman
puede vaciarse de desechos liquidos retirando la tapa de
drenaje. Para vaciar, apague la unidad y retire el enchufe
del tomacorriente de pared. Retire la tapa de drenaje, ubi-
cada sobre el frente de la aspiradora en el fondo del
dep6sito, y deposite el contenido de desperdicio Ifquido en
un drenaje adecuado. Una vez que haya vaciado el dep6si-
to, regrese la tapa de drenaje a su posici6n original. Para
continuar usando el aparato, enchufe el cable en el toma-
corriente de pared y encienda la unidad. El modelo 17920
no tiene una tapa de drenaje. Para vaciarlo, quite la tapa y
vierta agua en un drenaje adecuado.
APAGADO AUTOMATICO
La aspiradora est_ equipada con una funci6n de apagado
autom_tico cuando esta recogiendo liquidos. A medida que
el nivel de Ifquido se eleva en el dep6sito, un flotador inter-
no se eleva hasta que se asienta contra un sello en la
entrada del motor, apagando la succi6n. Cuando esto
ocurre, el motor producira un ruido muy agudo y se
reducir_ dr&sticamente la succi6n. Si esto ocurre, apague
inmediatamente la unidad. De no apagar la unidad
despu_s de que el flotador se haya elevado y apagado la
succi6n, podrfa provocar graves da_os al motor. Para con-
tinuar el uso, vacfe el desecho liquido del dep6sito como
se describe en los p_rrafos anteriores.
NOTA: Si se inclina accidentalmente, la aspiradora
podrfa perder succi6n. Si esto ocurre, apague la unidad y
coloque la aspiradora en posici6n vertical. Esto permitir_.
que el flotador regrese a su posici6n normal y usted podra
continuar con la operaci6n.
FUNCION DE SOPLADOR
Esta aspiradora puede ser usada como un potente
soplador. Para utilizar su unidad como soplador,
desatornille la cubierta del orificio del soplador Iocalizada
en la parte posterior del alojamiento del motor (Figura 16).
La cubierta del orificio del soplador est_ equipada con una
cinta de sujeci6n para prevenir la p_rdida de la cubierta del
odficio mientras el soplador se est_ utilizando. Inserte el
extremo de la manguera con la tuerca de seguridad en el
orificio del soplador del dep6sito y apriete. Debe tener
cuidado cuando utilice el aparato como soplador debido a
la potente fuerza del aire.
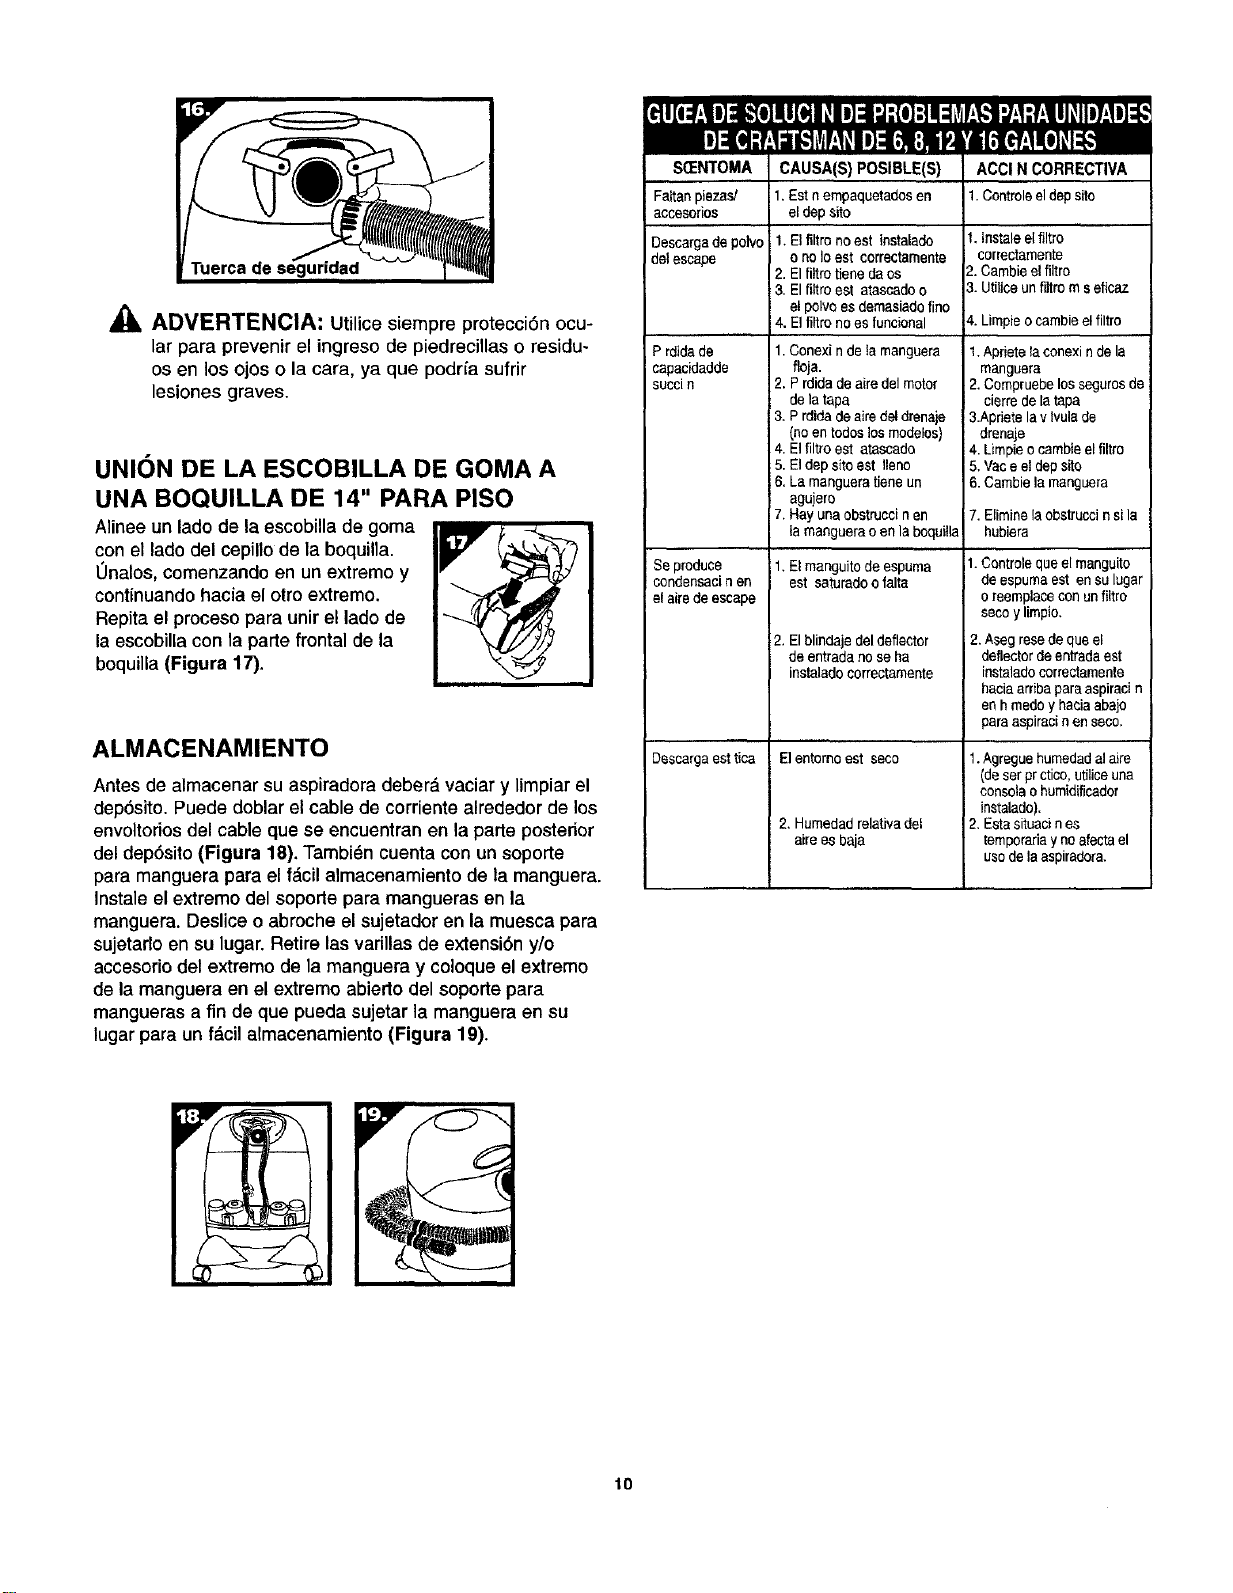
_1_ADVERTENCIA: Utilicesiempre protecciOnocu-
lar para prevenir el ingreso de piedrecillas o residu-
es en los ojos o la cara, ya que podda sufrir
lesiones graves.
UNION DE LA ESCOBILLA DE GOMA A
UNA BOQUILLA DE 14" PARA PISO
Alinee un lade de la escobilla de goma
con el lade del cepillo de la boquilla.
0halOs, comenzando en un extreme y
continuando hacia el olro extreme.
Repita el proceso para unir el lade de
la escobilla con la parte frontal de la
boquilla (Figura 17).
ALMACENAMIENTO
Antes de almacenar su aspiradora deber& vaciar y limpiar el
dep6sito. Puede doblar el cable de corriente alrededor de los
envoltorios del cable que se encuentran en la parle posterior
del dep6sito (Figure 18). Tambi6n cuenta con un soporte
para manguera para el f_cil almacenamiento de la manguera.
Instale el extreme del soporte para mangueras en la
manguera. Deslice o abroche el sujetador en la muesca para
sujetado en su lugar. Retire las varillas de extensi6n y/o
accesorio del extreme de la manguera y coloque el extreme
de la manguera en el extreme abierto del soporte para
mangueras a fin de que pueda sujetar la manguera en su
lugar para un f&cil almacenamiento (Figura 19).
S(ENTOMA
Faltanpiezas/
aecesorios
Descargadepolvo
de escape
P rdida de
capacidadde
SUCCiFI
Seproduce
condensacinen
el aim deescape
Descargaesttica
CAUSA(S) POSIBLE(S)
1 Est nempaquetadosen
el depsite
1,Elfiltrono est instalado
ono Ioest correctamente
2. Elfiltro tiene daos
3. Elfittroeel atascadoo
el polvoesdemasiadofine
4. El filtrono es funcional
1.Conexi nde la manguera
floja.
2. P rdida deaire del motor
dela tapa
3. P rdidade aire deldrenaje
(no enlodes losmodelos)
4. Elfiltro est atascado
5. Eldepsite est Ileno
6, LamanguemUeneun
agujero
7.Hay una obstruccinen
ta manguerao enlaboquilla
1.El manguitodeespuma
est satumdoo falta
2.El blindajedel deflector
de entrada nose ha
inslaladoeorrectamente
El entomo est seco
2, Humedadrelativadel
aireesbaja
ACCI N CORRECTIVA
1.Controleel depsite
1. Instaleelfiltro
correctamente
2.Cambieel filtro
3. Utiliceunflltro m seficaz
4. Limpieocambie el filtro
1.Aprietelaconexi ndela
manguera
2. Compruebelossegurosde
cierrede la tapa
3.Aprietelav Ivulade
drenaje
4. Limpieo cambieel filtro
5, Vace eldepsilo
6. Cembiela manguera
7. Eliminelaobstruccineila
hubiera
1.Cantroleque el menguito
de espumaest ensu lugar
o reemplacecon unfiltro
secoy limpio,
2,Asegrese dequeel
deflectordeentredaest
instaladocorrectamenle
haciaarribaparaaspiracin
enhmedoyhaeiaabajo
paraaspiracinen seco.
1.Agreguehumedadal aire
(deserpr ctico,utiliceuna
censolao humidificador
instelado),
2, Eetasituacines
lemporadaynoafecteel
usedela aspiradora.
10
Your Home
For repair-in your home-of all major brand appliances,
lawn and garden equipment, or heating and cooling systems,
no matter who made it, no matter who sold it!
For the replacement parts, accessories and
owner's manuals that you need to do-it-yourself.
For Sears professional installation of home appliances
and items like garage door openers and water heaters.
1-800-4-MY-HOME ® (1-800-469-4663)
Call anytime, day or night (U.S.A. and Canada)
www.sears.com www.sears.ca
Our Home
For repair of carry-in items like vacuums, lawn equipment,
and electronics, call or go on-line for the location of your nearest
Sears Parts & Repair Center.
1-800-488-1222
Call anytime, day or night (U.S.A. only)
www.sears.com
To purchase a protection agreement on a product serviced by Sears:
1-800-827-6655 (U.S.A.) 1-800-361-6665 (Canada)
Para pedir servicio de reparaci6n
a domicilio, y para ordenar piezas:
1-888-SU-HOGAR _
(1-888-784-6427)
Au Canada pour service en fran_ais:
1-800-LE-FOYER Mc
(1-800-533-6937)
www.sears.ca
TM SM
® Registered Trademark / Trademark / Service Mark of Sears, Roebuck and Co.
® Mama Registrada / TM Marca de Fdbrica / SMMarca de Servieio de Sears, Roebuck and Co.
MCMarque de commerce / _ Marque d_pos_e de Sears, Roebuck and Co.
© Sears, Roebuck and Co.