Loading ...
Loading ...
Loading ...
EN-8
EN
Pedestal Fan
SFN 4040SL
2019 12/2019
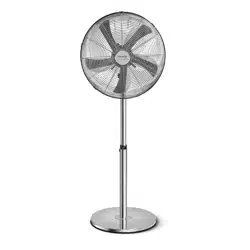
DESCRIPTION OF THE APPLIANCE
A1 Protective grille (consists of two parts: front and rear)
A2 Fan blades with adiameter of 40 cm
A3 Motor unit
A4 Horizontal oscillation toggle switch
A5 Speed selector 0 - o, 1 - low speed, 2 - medium speed, 3 - high speed
A6 Screw for attaching the motor unit to the pole
A7 Fan head tilt angle adjustment screw
A8 Extensible pole
A9 Pole extension lock
A10 Base
Note:
The accessories include ascrew and anut for joining the protective grills.
BEFORE FIRST USE
■ Take the appliance and its accessories out of the packaging materials. Before disposing of the packaging materials,
make sure that no part of the appliance is missing.
ASSEMBLING AND DISASSEMBLING THE APPLIANCE
■ Before assembling or disassembling the appliance, make sure that it is turned o and disconnected from the
power socket.
■ Remove the nut from the underside of the extensible pole A8. Seat the extensible pole A8 on the base A10 so that
the opening of the extensible pole A8 is aligned with the hole in the base A10. Secure the extensible pole A8 in
place using the nut. Check that it is correctly tightened.
■ Remove the four screws A3 from the motor unit. Place the rear part of the protective grille A1 on to the motor unit
A3 so that the holes in the motor unit A3 are aligned with the holes in the protective grille A1. Secure the rear part
of the protective grille A1 using the screws.
■ Place the fan blades A2 on to the shaft of the motor unit A3 and rmly tighten the screws.
■ Now attach the front part of the protective grille A1 and fasten both parts together using the metal clamps and
asmall screw, which is apart of the grille assembly.
■ Place the motor unit A3 with the attached fan head on the extensible pole A8 and secure the fan head using the
screw A6.
■ Before putting the fan into operation, check that it is correctly assembled and that the protective grills are rmly
joined.
■ To disassemble, proceed in reverse sequence.
OPERATING THE APPLIANCE
Setting the speed and turning o the fan
■ Place the fan on an even, dry and smooth surface within reach of apower socket. Connect the power cord to
apower socket. To set the air ow speed, use the speed selector A5.
0 – turn o the fan;
1– set alow air ow speed;
2 – set amedium air ow speed;
3– set ahigh air ow speed.
■ When you have nished using the fan, always turn it o and disconnect it from the power socket.
Setting horizontal oscillation
■ The horizontal oscillation of the motor unit A3 can be set using the toggle switch A4. To start the horizontal
oscillation, push the toggle switch A4 down. The motor unit A3 will oscillate from side to side at an angle of
approximately 90°.
■ To turn o the oscillation, pull the toggle switch A4 up. This will turn o the oscillation.
Loading ...
Loading ...