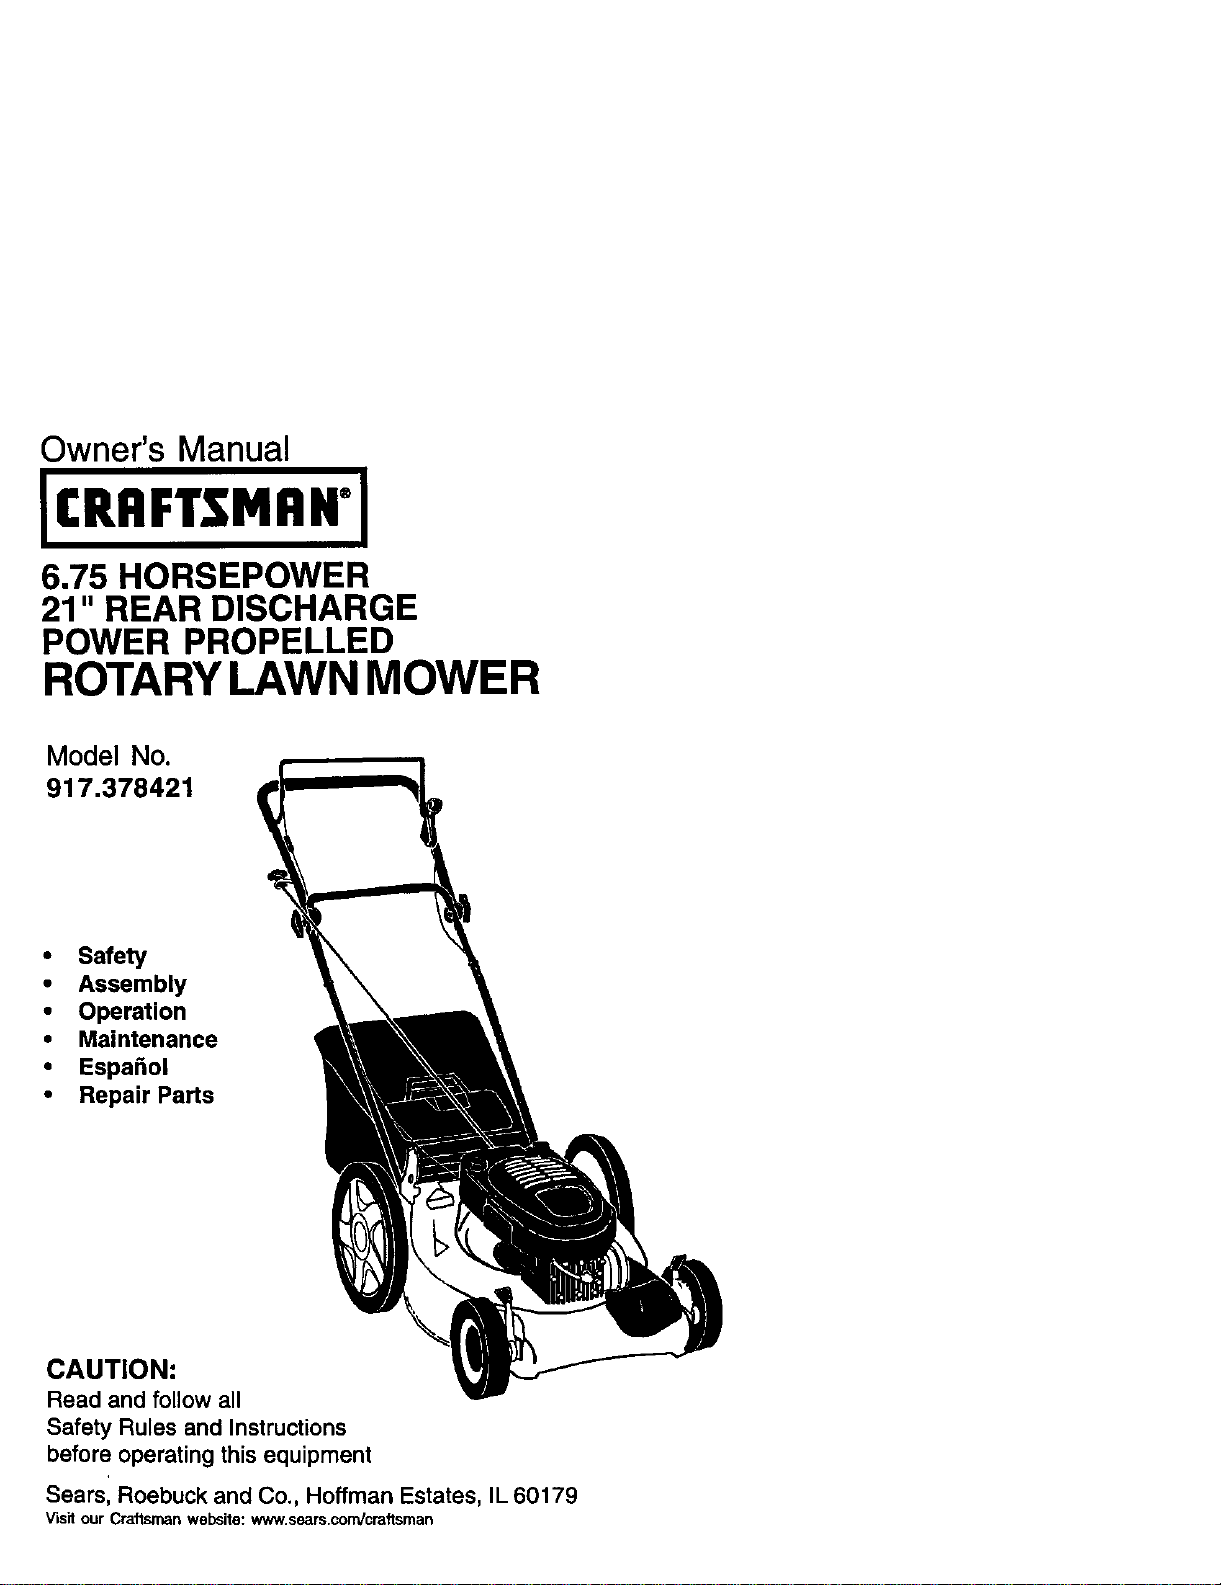
Owner's Manual
6.75 HORSEPOWER
21" REAR DISCHARGE
POWER PROPELLED
ROTARYLAWN MOWER
Model No.
917,378421
• Safety
• Assembly
• Operation
• Maintenance
• EspaSol
• Repair Parts
CAUTION:
Read and followall
Safety Rules and Instructions
before operatingthisequipment
Sears, Roebuck and Co., Hoffman Estates, IL 60179
Visit our Cmftsrnan website: www.sears.com/cmflsman

Warranty ................................................. 2 Product Specifications.......................... 11
Safety Rules ........................................ 2.4 San'ice and Adjustments................. 14-15
Assembly ................................................ 5 Storage ............................................ 15-16
Operation ............................................. 6-9 Troubleshooting .............................. 17-18
Maintenance Schedule ........................ 10 Repair Parts..................................... 35°43
Maintenance .................................... 10-13 Parts Ordedng ........................ Back Cover
LIMITED TWOYEAR WARRANTY ON CRAFTSMAN POWER MOWER
For two years from date of pumhase, when this Craftsman Lawn Mower is maintained,
lubdcated, and tuned up according to the operating and maintenance instructionsin
the owner's manual, Sears will repair free of charge any defect in matedal or workman-
ship.
Ifthis Craftsman Lawn Mower is used for commercial or rental purposes, this warranty
appliesfor only 90 days from the date of purchase.
This Warranty does not cover:
• Expendable items which become worn dudng normal use, such as rotary mower
blades, blade adapters, beks, air cleaners and spark plug.
• Repairs necessary because of operator abuse or negligence, including bent
crankshaftsand the failure to maintain the equipment according to the Instructions
contained in the owner's manual.
Warranty service is available by returningthe Craftsman power mower to the nearest
Sears Service Center/Department in the United States. This warranty applies only
while this productis in use in the United States.
This Warranty gives you specific legal rights, and you may also have other dghts which
vary from state to state.
Sears, Roebuck and Co., D/817 WA, Hoffman Estates, Illinois60179
IMPORTANT: This cutting machine is capable of amputating hands and feet and
throwingobjects. Failure to observe the following safety instructionscould resultin
sedous injuryor death.
I.GENERAL OPERATION
• Read, understand, and follow all
instructionson the machine and in the
manual(s) before starting. Be thor-
oughly familiar with the controls and
the proper use of the machine before
starting.
• Do not put hands or feet near or under
rotating parts. Keep clear of the
discharge opening at all times.
• Only allow responsible individuals,
who are familiar with the instructions, to
operate the machine.
• Clear the area of objects such as
recks, toys, wire, bones, sticks, etc.,
which could be picked up and thrown
by the blade.
2
• Be sure the area is clear of other
people before mowing. Stop machine it
anyone enters the area.
• Do not operate the mower when
barefoot or weadng open sandals.
Always wear substantialfoot wear.
• Do not pull mower backwards unless
absolutely necessary. Always look
down and behind before and while
moving backwards.
• Do not operate the mower without
proper guards, plates, grass catcher or
other safety protective devices in place.
• Sea manufacturer's instructions for
proper operation and installation of
accessories. Only use acoessodes
approved by the manufacturer.
• Stop the blade(s) when crossing gravel
drives, walks, or roads.
• Stop the engine (motor) whenever you
leave the equipment, before cleaning
the mower or uncloggingthe chute.
• Shut the engine (motor) off and wait
untilthe blade comes to complete stop
before removing grass catcher.
• Mow only in daylightor good artificial
light.
• Do not operate the machine while
under the influence of alcohol or drugs.
• Never operate machine in wet grass.
Alwaysbe sure ofyour footing: keep a
firm hold on the handle and walk; never
run.
• Disengage the serf-propelled mecha-
nismor ddve clutch on mowers so
equipped before starting the engine
(motor).
• If the equipment should start to vibrate
abnormally, stop the engine (motor)
and check immediately for the cause.
Vibration is generally a warning of
trouble.
• Always wear safety goggles or safety
glasses with side shields when
operating mower.
II. SLOPE OPERATION
Slopes are a major factor related to slip
and fall accidents which can result in
severe injury. All slopes require extra
caution. If you feel uneasy on a slope, do
not mow it.
DO:
• Mow acrossthe face of slopes: never
up end down. Exercise extreme caution
when changing direction on slopes.
• Remove obstacles such as rocks,tree
limbs,etc.
• Watch forholes, ruts, or bumps.Tall
grass can hide obstacles.
DO NOT:
• Do not tdm near drop-offs, ditches or
embankments. The operator could lose
footing or balance.
• Do not tdm excessively steep slopes.
• Do not mow on wet grass. Reduced
footing could cause slipping.
IlL CHILDREN
Tragic accidents can occur if the operator
is not alert to the presence of children.
Children are oftenattracted to the
machine and the mowing activity.Never
assume that children will remain where
you last saw them.
• Keep children outof the tdmming area
and under the watchful care ofanother
responsible adult.
• Be alert and turn machine off ifchildren
enter the area.
• Before and while walking backwards,
look behind and down for small
children.
• Never allow children to operate the
machine.
• Use extra care when approaching blind
comers, shrubs, trees, or other objects
that may obscure vision.
IV. SERVICE
• Use extra care in handling gasoline
and other fuels. They are flammable
and vapors are explosive.
- Use only an approved container.
- Never remove gas cap or add fuel
with the engine running.Allow
engine to cool before refueling. Do
not smoke.
-Never refuelthe machine indoors.
-Never store the machine or fuel
container inside where there is an
open flame, such as a water heater.
• Never run a machine inside a closed
area.
• Never make adjustments or repairs with
the engine (motor) running. Disconnect
the spark plugwire, and keep the wire
away from the plug to prevent acciden-
tal starting.
• Keep nuts and belts, especially blade
attachment belts, tightand keep
equipment in good condition.
• Never tamper with safety devices.
Check their proper operation regularly.
• Keep machine free of grass, leaves, or
other debds build-up. Clean oil or fuel
spillage. Allow machine to cool before
storing.
• Stop and inspect the equipment if you
strike an object. Repair, if necessary,
before restarting.
• Never attempt to make wheel height
adjustments while the engine (motor) is
running.
• Grass catcher components are subject
to wear, damage, and detedoratien,
which could expose moving parts or
allow objects to be thrown. Frequently
check components and replace with
manufacturer's recommended parts,
when necessary.
• Mower blades are sharp and can cut.
Wrap the blade(s) or wear gloves, and
use extra caution when servicingthem.
• Do notchange the engine governor
setting or overspeed the engine.
3
ALook for this symbol to point out
importantsafety precautions. Itmeans
CAUTIONI!! BECOME ALERTIII YOUR
SAFETY IS INVOLVED.
A CAUTION: In order to prevent
accidental starting when setting up,
transporting, adjusting or making repairs,
always disconnect spark plug wire and
place wire where it cannot contactspark
plug,
AWARNING: Battery posts, terminals and
related accassodes contain lead and
lead compounds, chemicals known to the
State of California to cause cancer and
birthdefects or other reprodustJveharm.
Wash hands after handling.
£WARNING: Engine exhaust,some of its
constituents, and certain vehicle
components contain or emit chemicals
known to the State of California to cause
cancer and birthdefects or other
reproductive harm.
CAUTION: Muffierand other engine
parts become extremely hot dudng
operation and remain hotafter engine has
stopped. To avoid severe burns on
contact, stay away from these areas.
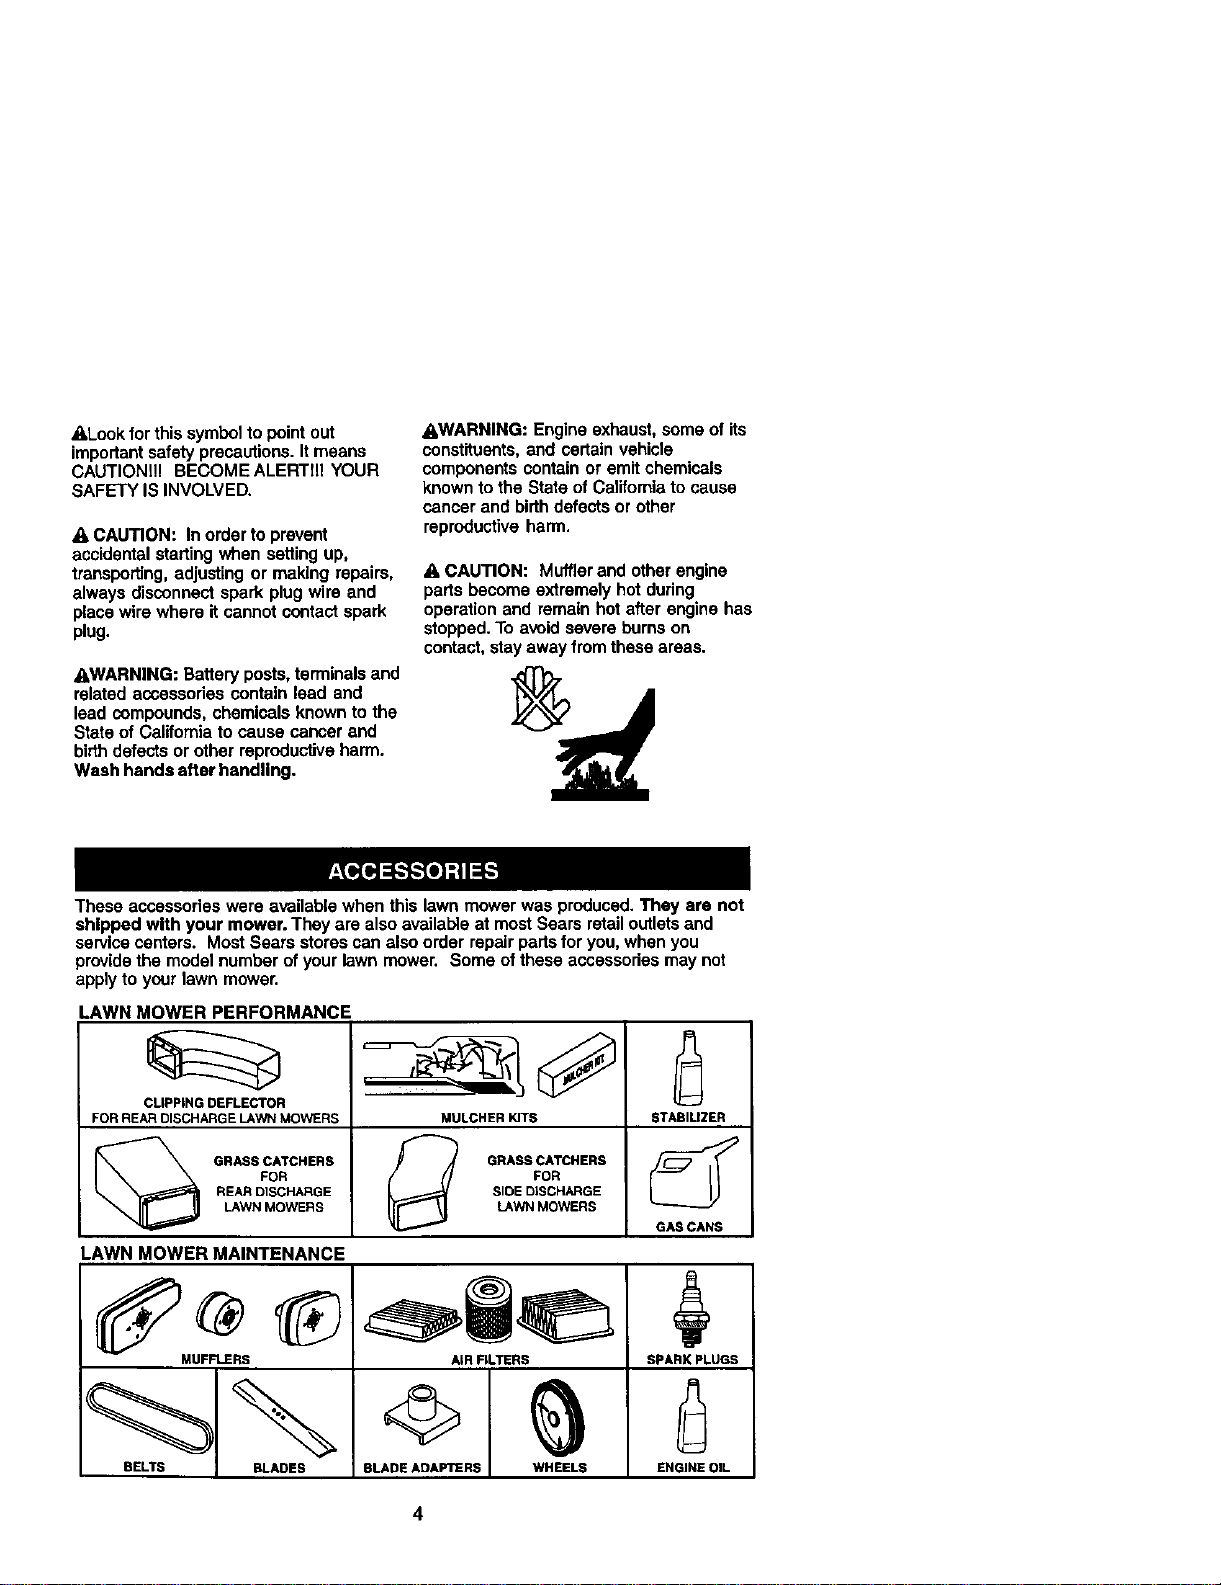
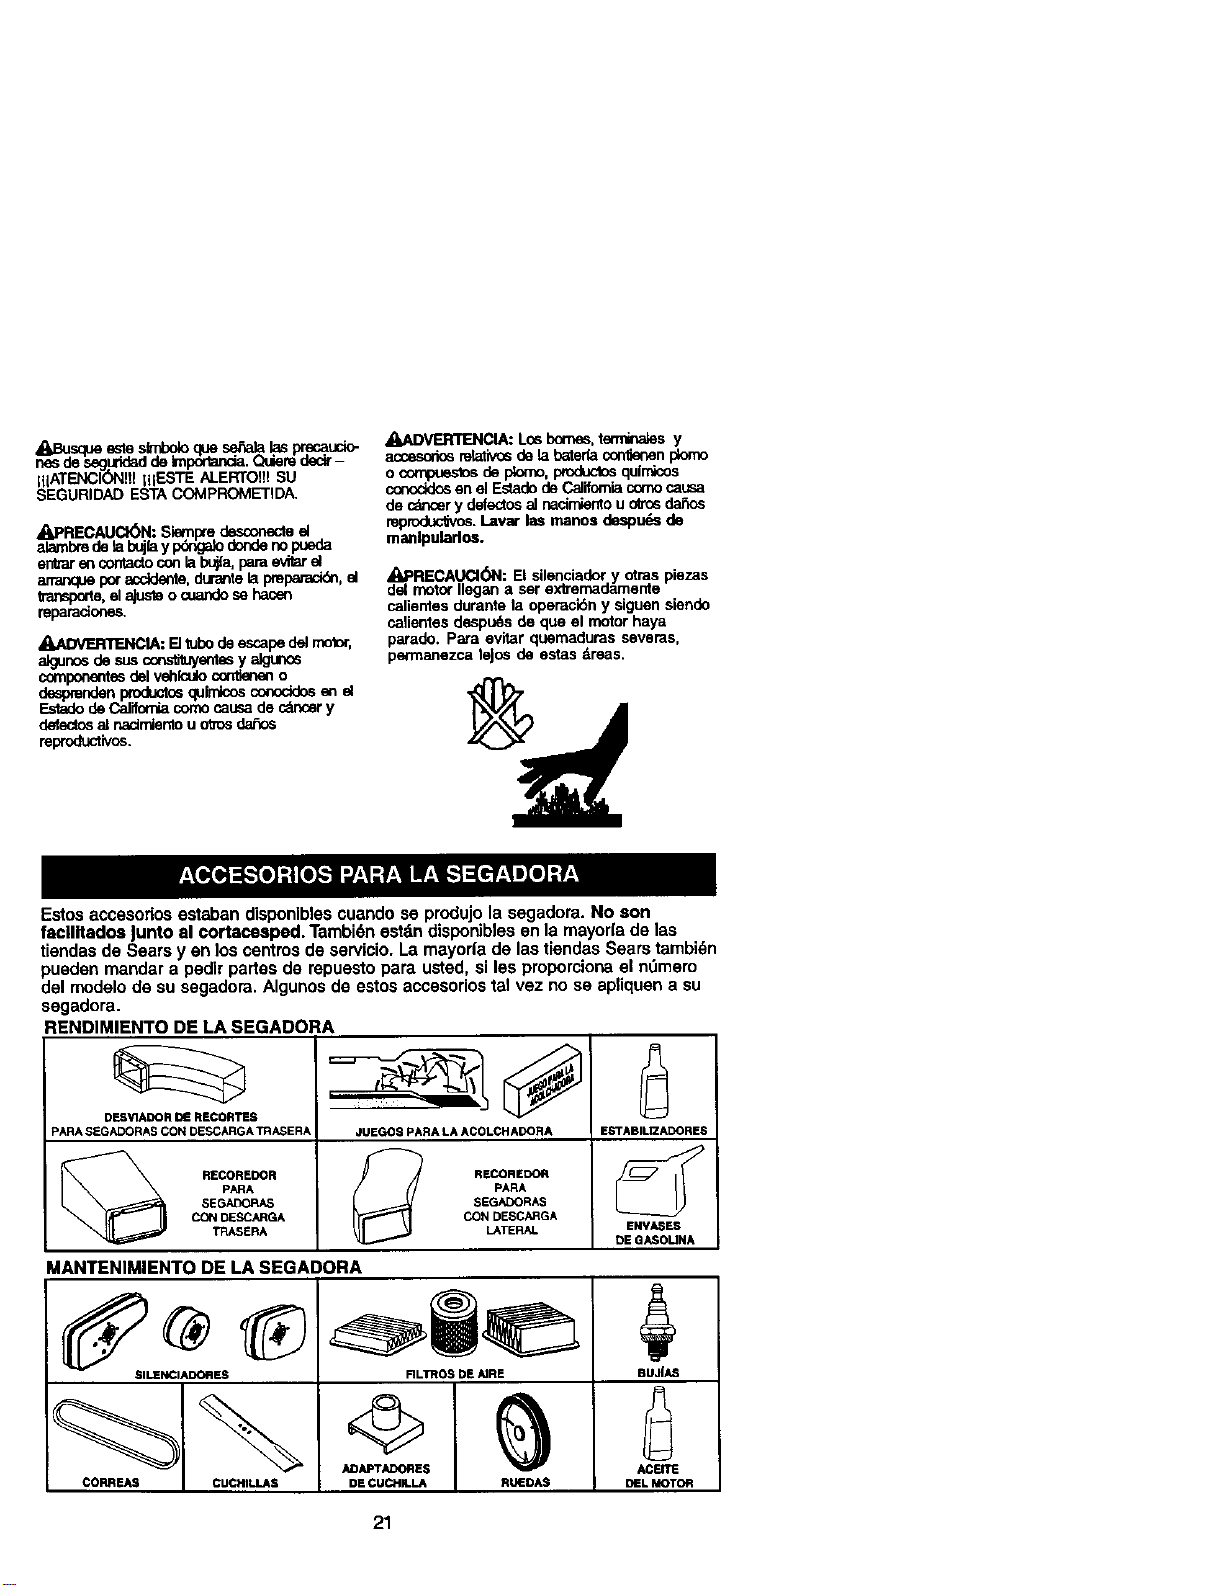
These accessories were available when this lawn mower was produced.They are not
shipped with your mower. They are also available at most Sears retail outlets and
service centers. Most Sears stores can also order repair partsfor you, when you
provide the model number of your lawn mower. Some ofthese accessories may not
apply to your lawn mower.
LAWN MOWER PERFORMANCE
FOR REAR DISCHARGE LAWN MOWERS MULCHER KITS STABIUZER
REAR D]SCHARGE SIDE DISCHARGE
LAWN MOWERS LAWN MOWERS
GAS CANS
LAWN MOWER MAINTENANCE
MUFFLERS AIR ALTERS SPARK PLUGS
BELTS BLADES BLADE ADAPTERS WHEELS ENGINE OIL
4
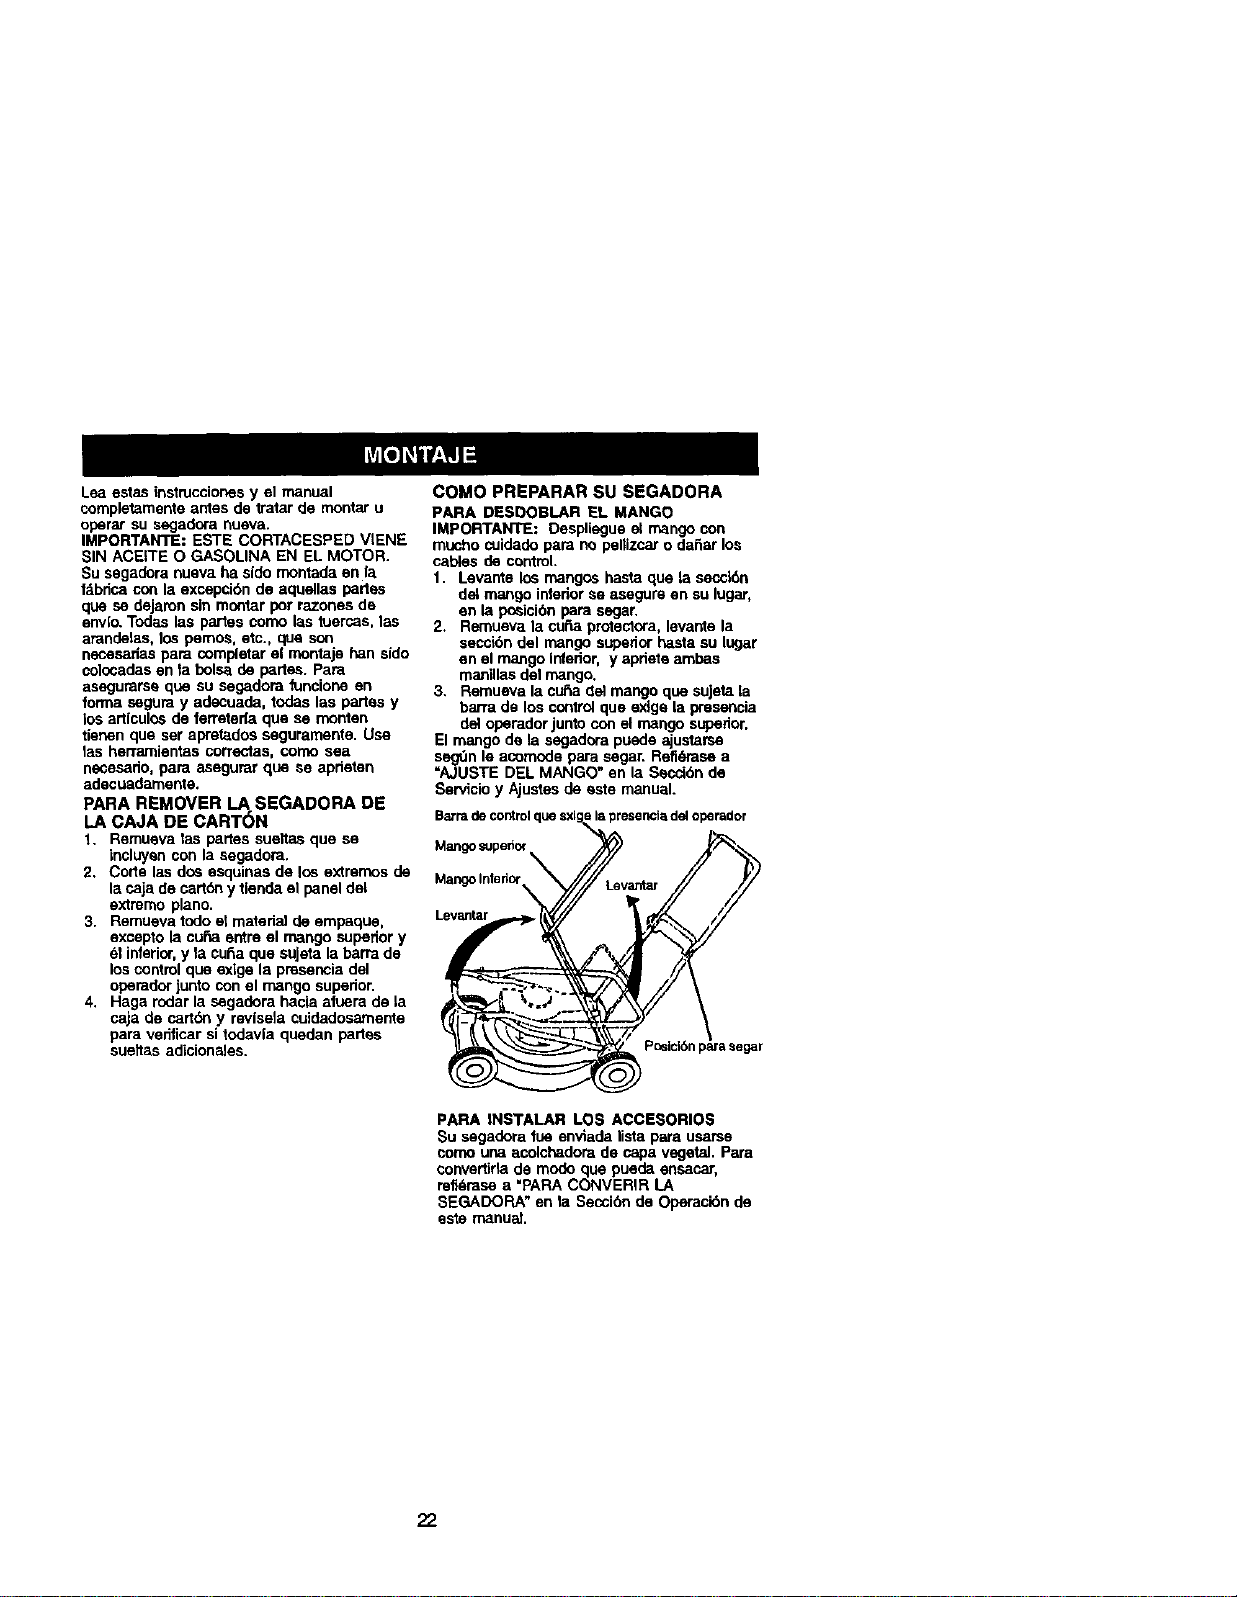
Readtheseinstructionsandthismanual
initsentiretybeforeyouattempt to
assemble or operate your new lawn
mower.
IMPORTANT: This lawn mower is
shippedWITHOUT OiL OR GASOLINE in
the engine.
Your new lawn mower has boon as-
sembled at the factory with the exception
of those parts left unassembled for
shipping purposes. All parts such as nuts,
washers, bolts, etc., necessary to com-
plete the assembly have boon placed in
the parts bag. To ensure safe and proper
operationof your lawn mower, all parts
and hardware you assemble must be
tightened securely. Use the correct tools
as necessary to ensure proper tightness.
TO REMOVE LAWN MOWER FROM
CARTON
1. Remove loose parts included with
mower.
2. Cut down two end comers of carton
and lay end panel down flat.
3. Remove all packing materials except
padding between upper and lower
handle and padding holding operator
presence control bar to upper handle.
4. Roll lawn mower out of carton and
check carton thorouglyfor additional
loose parts.
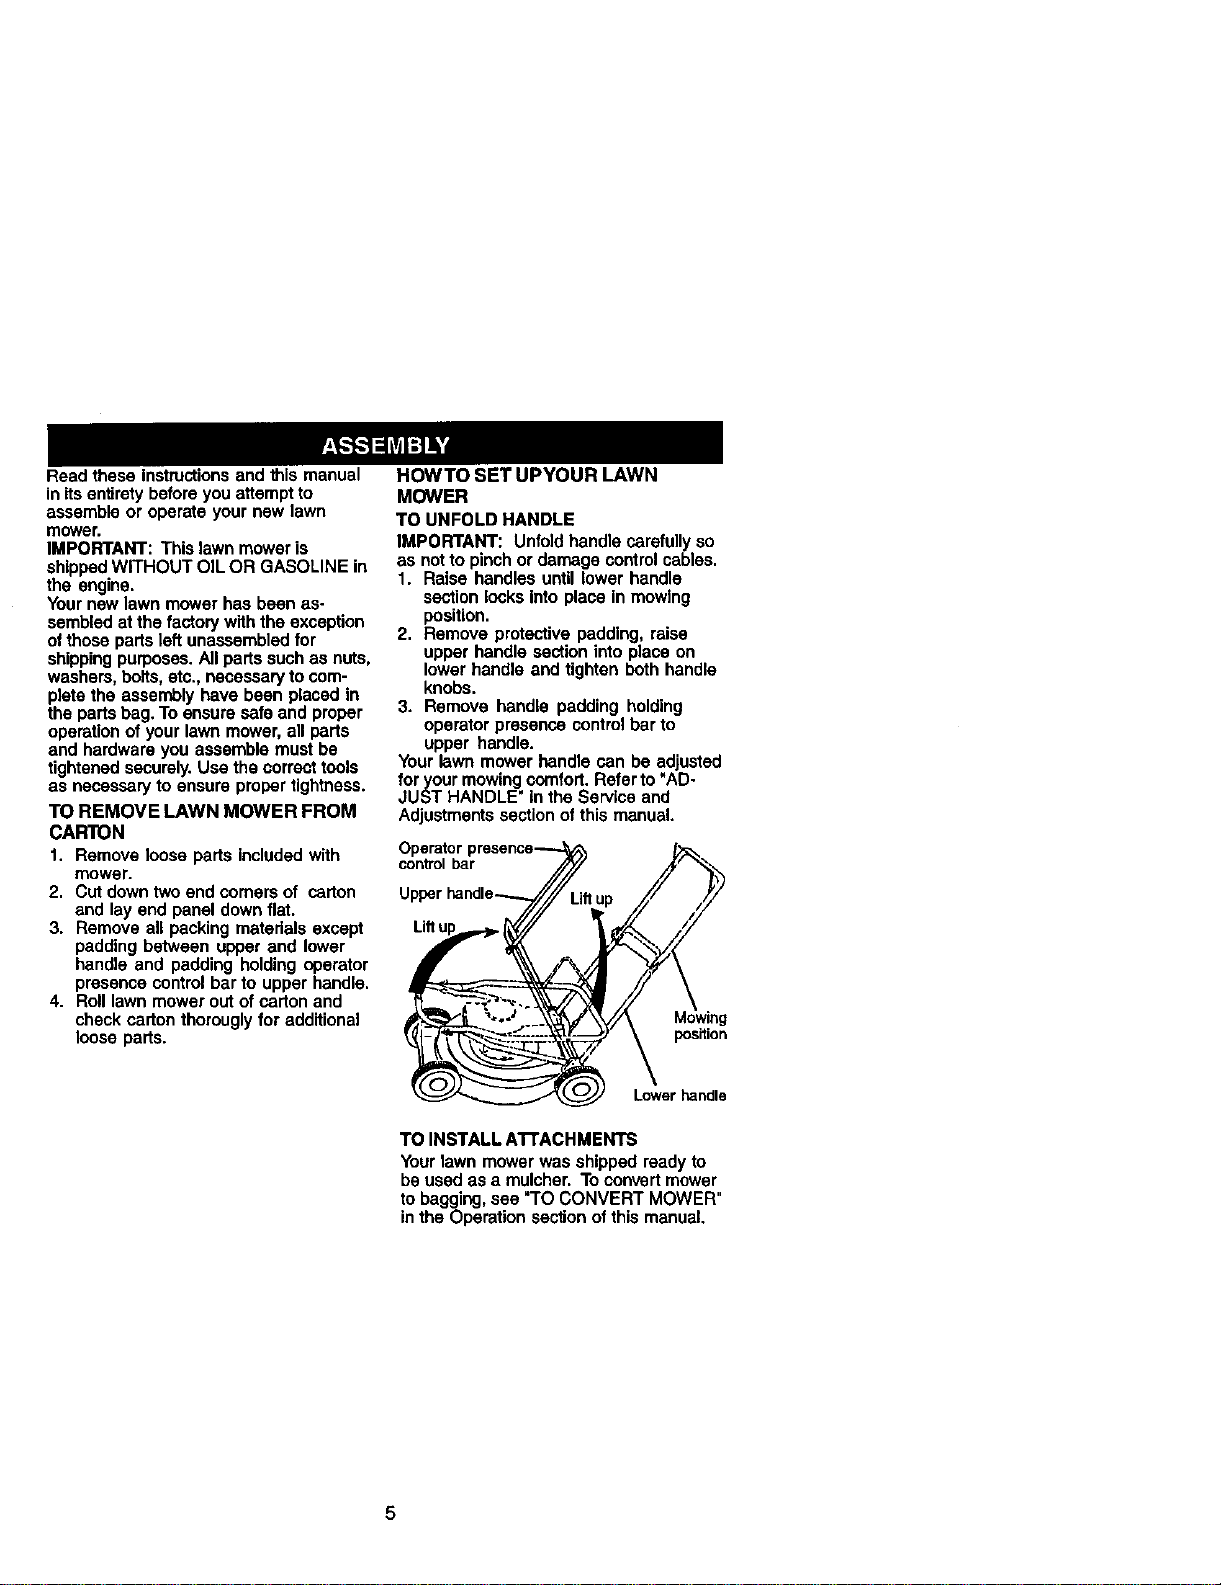
HOWTO SET UPYOUR LAWN
MOWER
TO UNFOLD HANDLE
IMPORTANT: Unfold handle carefully so
as not to pinch or damage control cables.
1. Raise handles until lower handle
section locksinto place in mowing
position.
2. Remove protective padding, raise
upper handle section into place on
lower handle and tighten both handle
knobs.
3. Remove handle padding holding
operator presence control bar to
upper handle.
Your lawn mower handle can be adjusted
foryour mowing comfort. Refer to "AD-
JUST HANDLE" in the Service and
Adjustmentssection ofthis manual.
control bar
Lift L
position
Lower handle
TO INSTALL AI"rACHMENTS
Your lawn mower was shipped ready to
be used as a mulcher. To convert mower
to bagging, see "TO CONVERT MOWER"
in the Operation section of this manual.
5
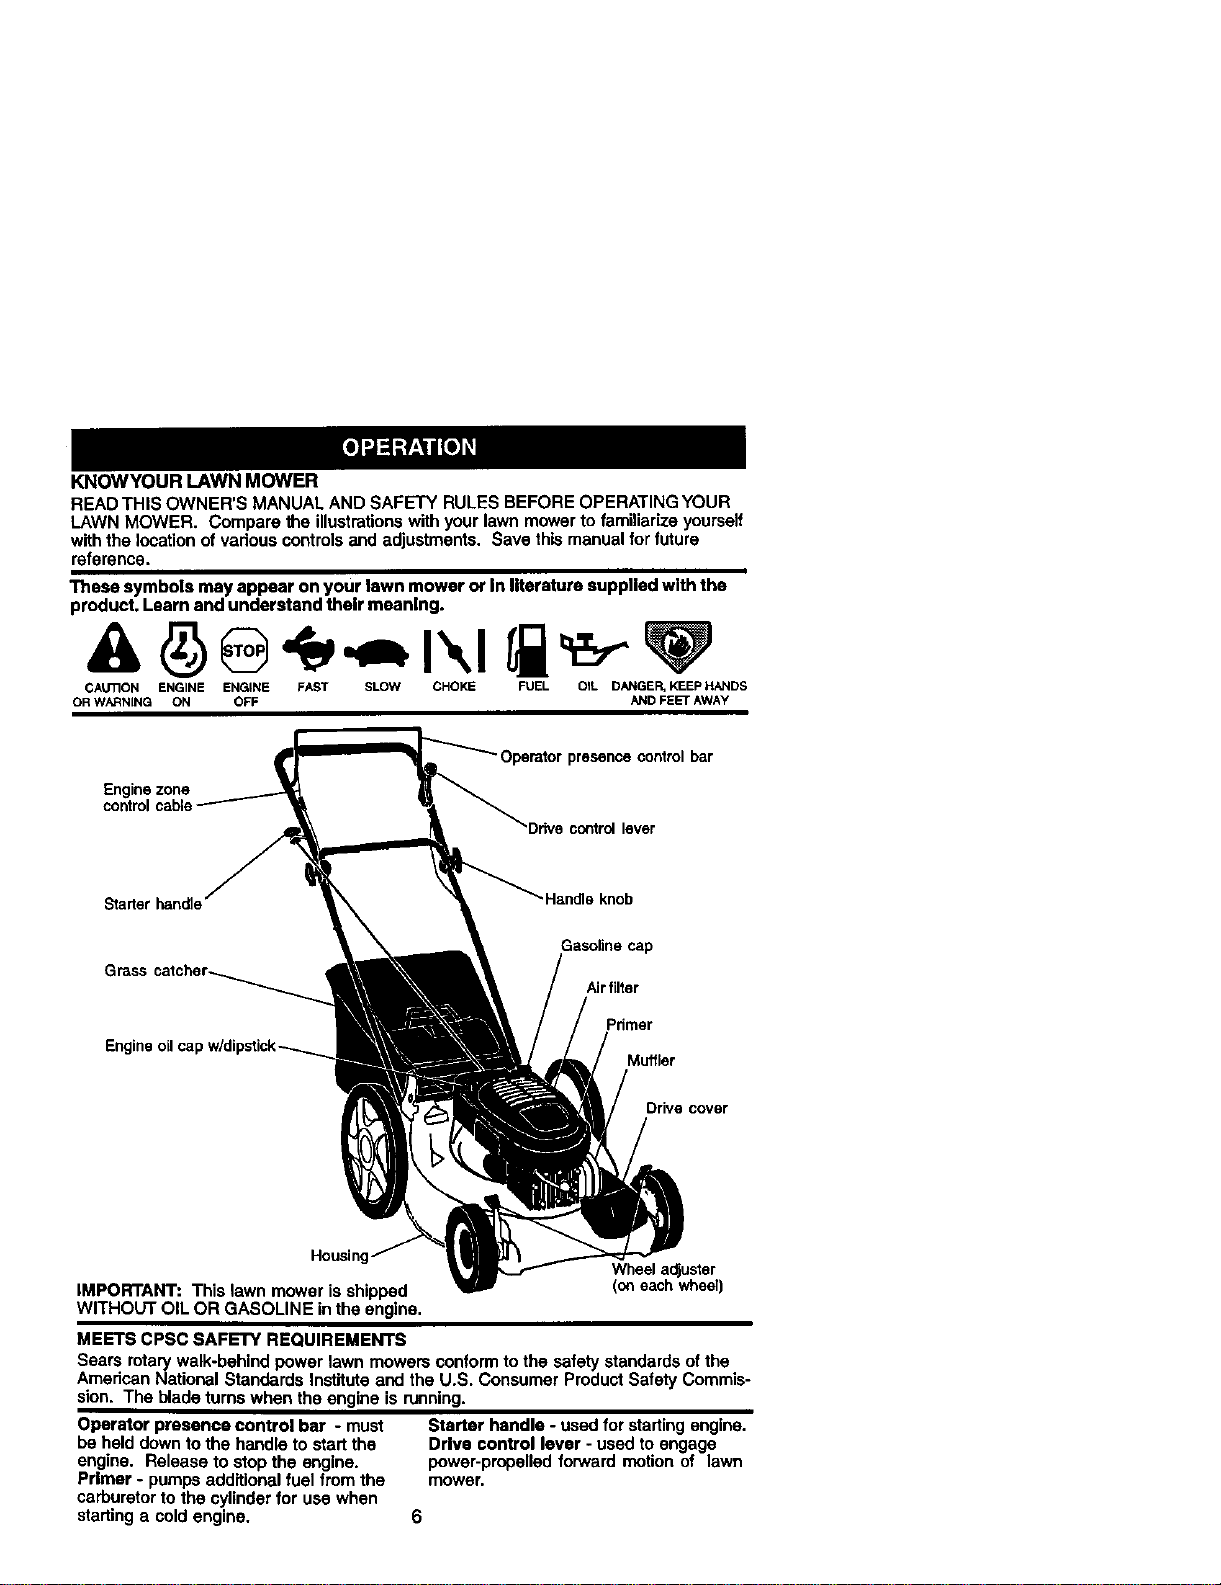
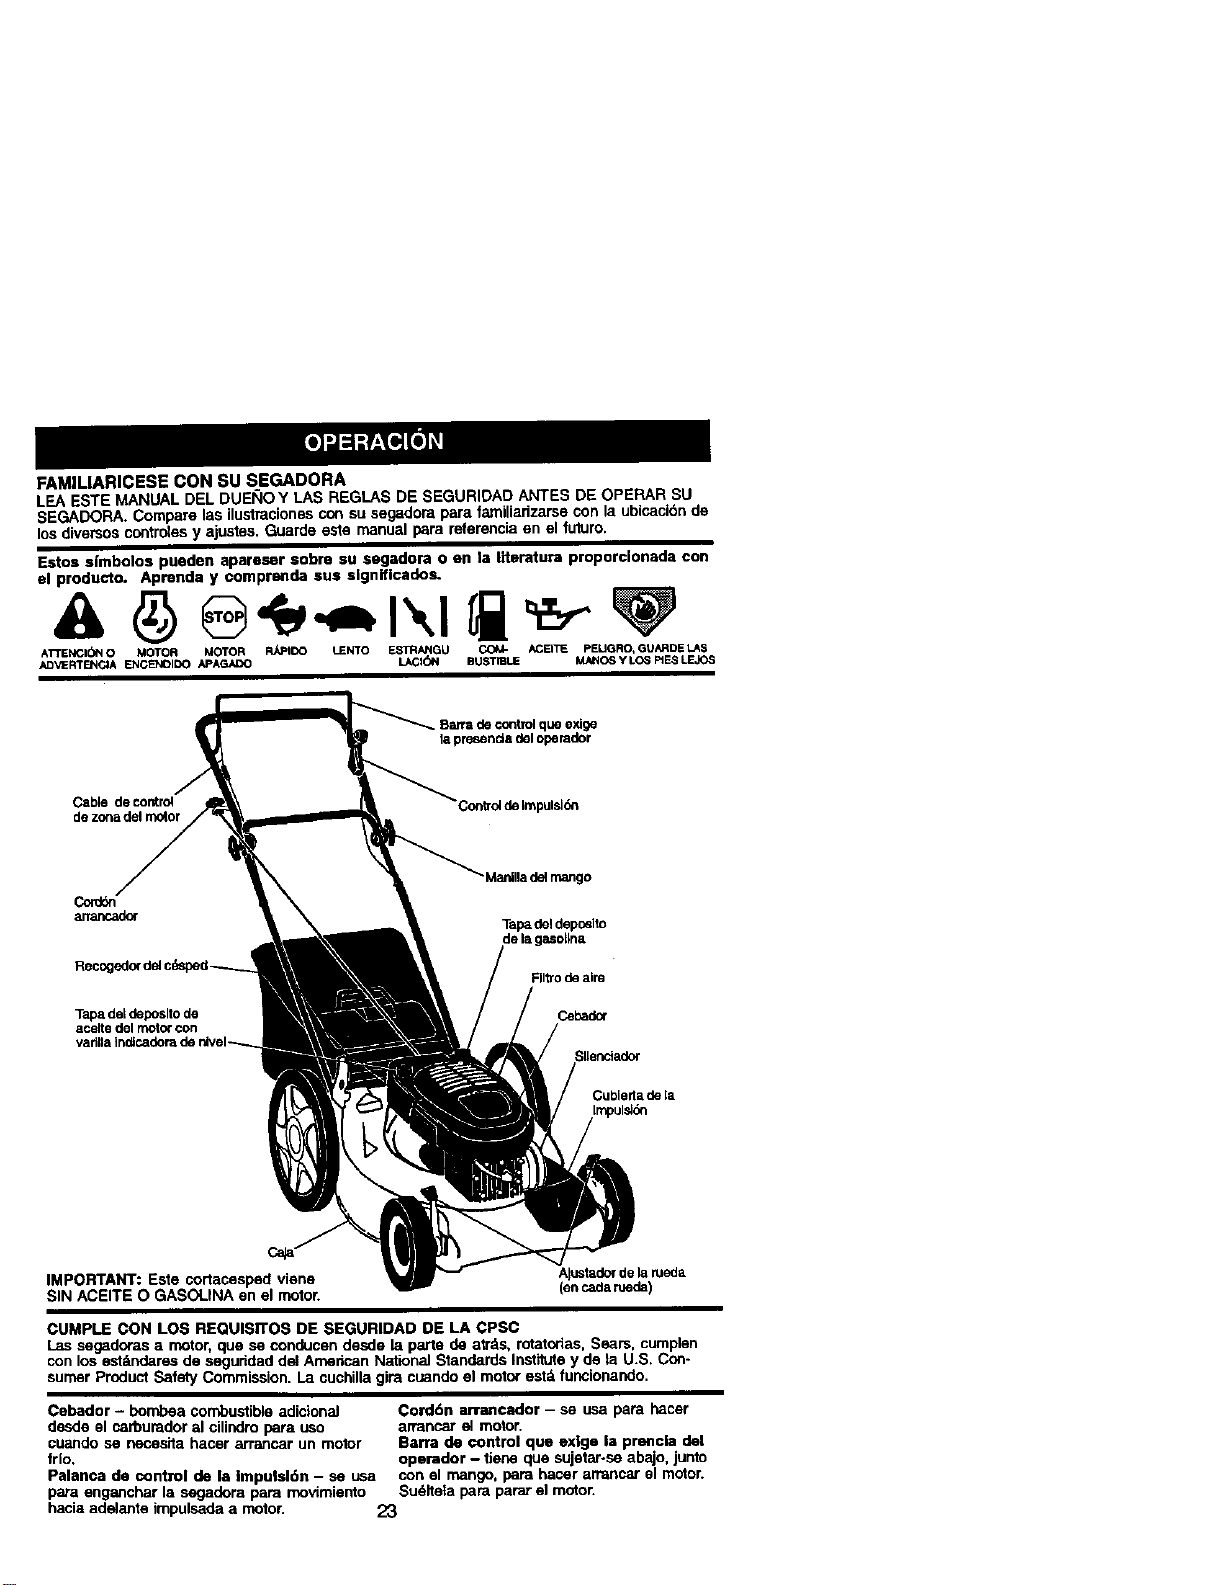
KNOWYOUR LAWN MOWER
READ THIS OWNER'S MANUAL AND SAFETY RULES BEFORE OPERATING YOUR
LAWN MOWER. Compare the illustrationswith your lawn mower to familiarize yourseff
withthe locationof various controlsand adjustments. Save this manual for future
reference.
These symbols may appear on your lawn mower or in literature supplied with the
product. Learn and understand their meaning.
CAUTION ENGINE ENGINE FAST SLOW CHOKE FUEL OIL DANGER, KEEP HANDS
OR WARNING ON OFF AND FEET AWAY
Enginezone
controlcable
lever
Starterhandle
G
Engine oil cap w/di
knob
Gasoline cap
Airfiller
Pdmer
Muffler
Dr_e cover
Housir
IMPORTANT: This lawn mower is shipped
WITHOUT OIL OR GASOLINE inthe engine.
Wheel a_uster
(on eachwhe_)
MEETS CPSC SAFETY REQUIREMENTS
Sears rotarywalk-behind power lawn mowers conform to the safety standards of the
Amedcan National Standards Institute and the U.S. Consumer Product Safety Commis-
sion. The blade turns when the engine is running.
Operator presence control bar - must Starter handle - used for starting engine.
be held down to the handle to start the Drive control lever - used to engage
engine. Release to stop the engine, power-propelled forward motion of lawn
Primer - pumps additional fuel from the mower.
carburetor to the cylinderfor use when
starting a cold engine. 6
Theoperationofanylawn
mowerconresultinforeign
objectsthrownintothe
eyes,whichcon resultin
severe eye damage.
Always wear safety glasses or eye
shields while operating your lawn mower
or performingany adjustments or repairs.
We recommend a wide vision safety
mask over spectacles or standard safety
glasses.
HOWTO USEYOUR LAWN MOWER
ENGINE SPEED
The engine speed was set at the factory
for optimum performance. Speed is not
adjustable.
ENGINE ZONE CONTROL
_,CAUTION: Federal regulations require
an engine controlto be installed on this
lawn mower in order to minimize the risk
of blade contact injury.Do not under any
circumstancesattempt to defeat the
functionof the operator control.The blade
turns when the engine is running.
• Your lawn mower is equipped with an
operator presence control bar which
requires the operator to be positioned
behind the lawn mower handle to start
and operate the lawn mower.
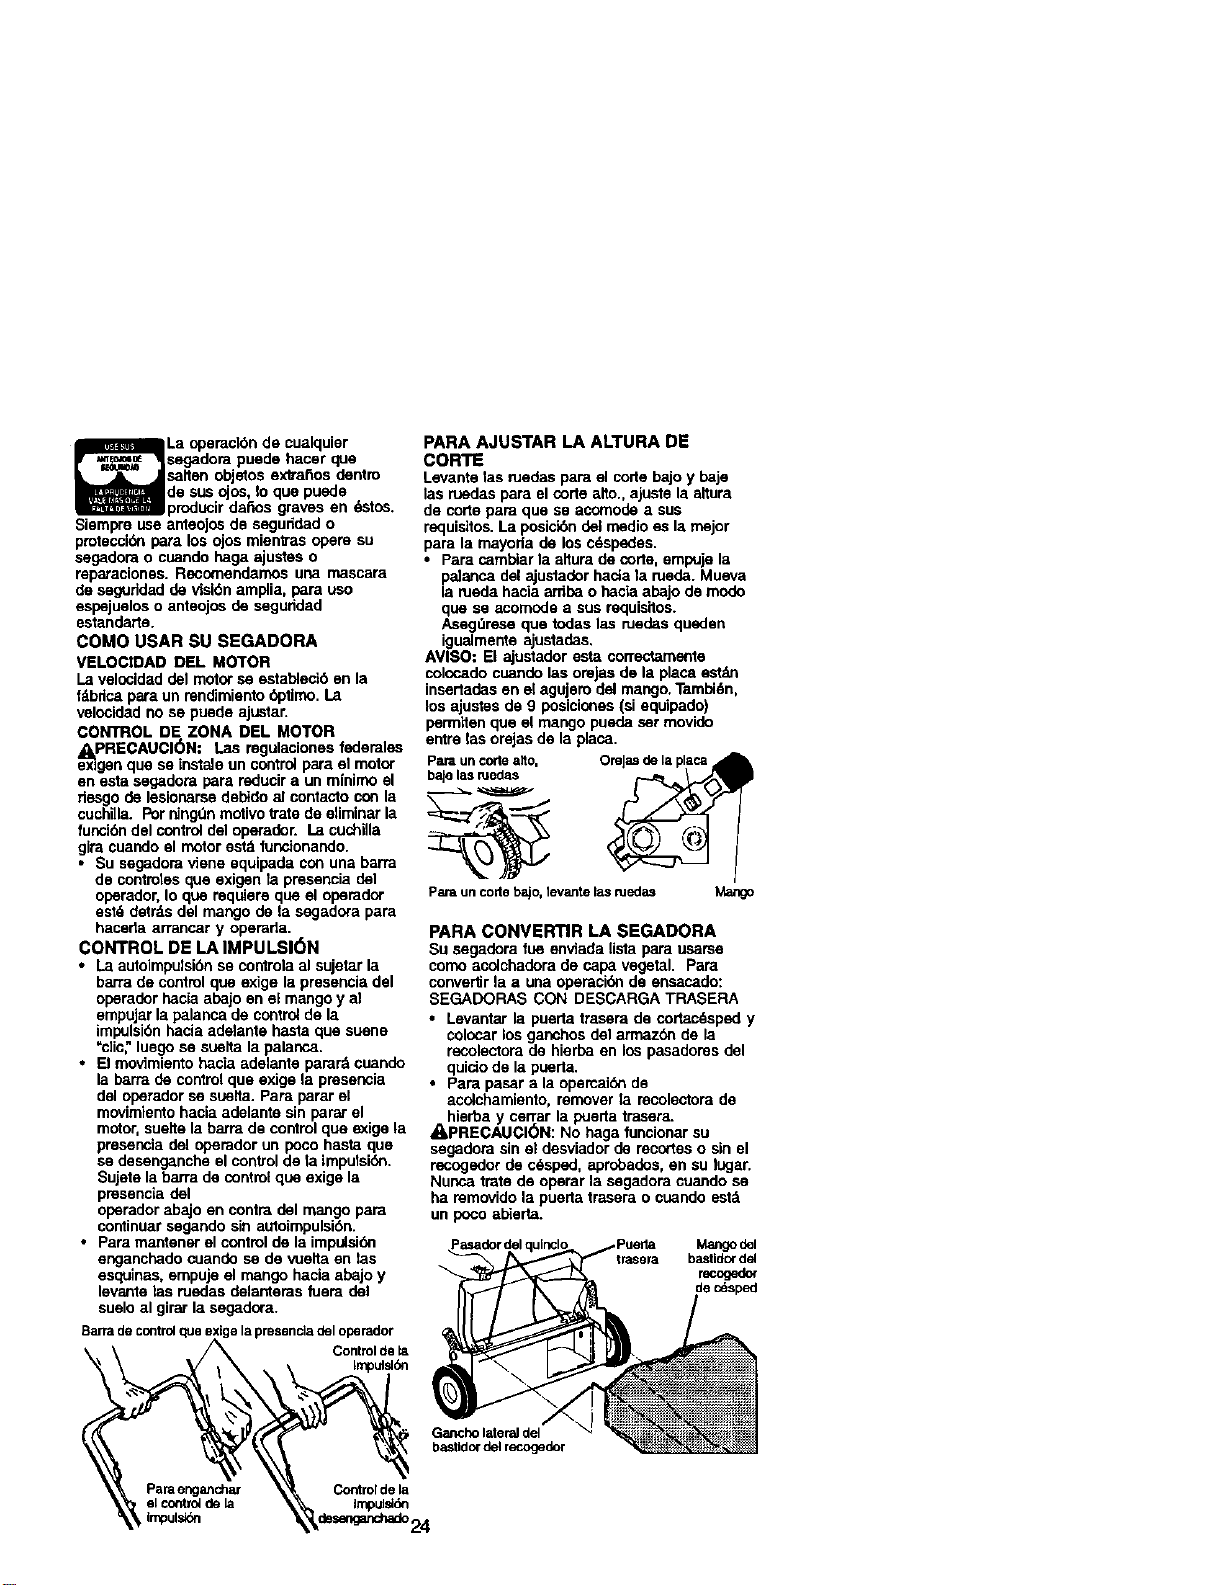
DRIVE CONTROL
• Self-propelling is controlled by holding
the operator presence control her down
to the handle and pushing the drive
control lever forward until it clicks;then
releasing the lever.
• Forward motionwill stop when the
operator presence control bar is
released. To stop forward motion
withoutstopping engine, release the
operator presence control bar slightly
until the ddve control disengages. Hold
operator presence control bar down
against handle to continue mowing
without self-propelling.
• To keep drive control engaged when
turning comers, push down on handle
end liftfront wheels off ground while
turning lawn mower.
Operatorpresencecontrolbar
Ddve
control
TO ADJUST CU'rFING HEIGHT
Raise wheels for low cut and lower
wheels for high cut, adjust cuttingheight
to suit your requirements. Medium
position is best for most lawns.
To change cutting height, squeeze
adjuster lever toward wheel. Move
wheel up or down to suit your require-
ments. Be sure ell wheels are in the
same setting.
NOTE: Adjusteris propedy positioned
when plate tab inserts intohole in lever.
Also, 9-posiiton adjusters (if so equipped)
allow laver to be positioned between the
plate tabs.
LowerWheelsforHighCut r_e Tab_
RaiseWheelsforLowCut Lever
TO CONVERT MOWER
Yourlawn mowerwas shippedreadyto be
ussdas amulcher.Toconverttohegging:
REAR BAGGING
• Liftreardoorofthe iswnmower and place
thegrasscatcherframe hooksontothe
doorpivotpk_.s.
• To conve_ tomulchingopera,on, remove
grassc_cher and dose rear door.
ACAUTION: Do not run your lawn mower
without clippingdeflector or approved
grass catcher in place. Never attempt to
operate the lawn mower with the rear
door removed or propped open.
pivot " Rear Grass
catcher
_. handle
-\
Catcherframe
To engage Drive control
drive control disengaged 7
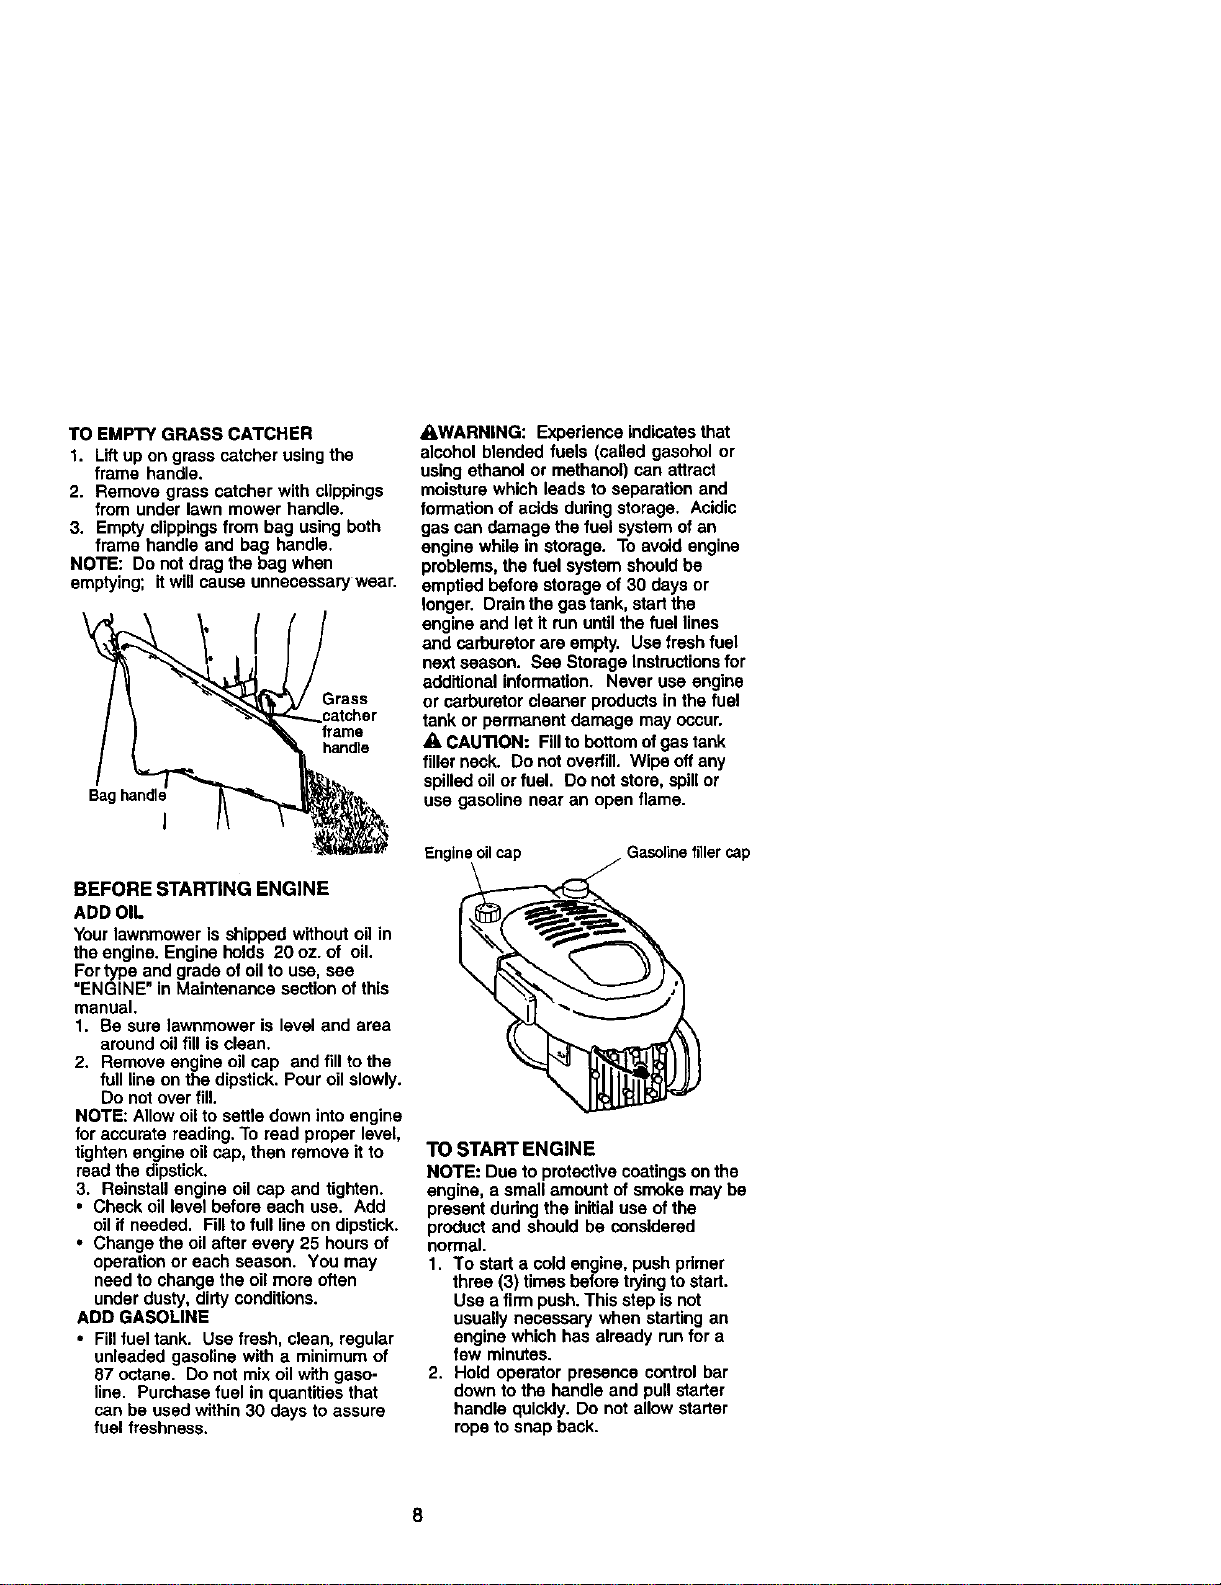
TO EMPTY GRASS CATCHER
1. Lift up on grass catcher using the
frame handle.
2. Remove grass catcher with clippings
from under lawn mower handle.
3. Empty clippingsfrom bag using both
frame handle and bag handle.
NOTE: Do not drag the bag when
emptying; itwill cause unnecessary wear.
Grass
frame
handle
Bag
I
BEFORE STARTING ENGINE
ADD OIL
Your lawnmower is shipped without oil in
the engine. Engine holds 20 oz. of oil.
Fortype and grade of oil to use, see
=ENGINE" in Maintenance section of this
manual.
1. Be sure lawnmower is level and area
around oil fill is clean.
2. Remove engine oil cap and fill to the
full line on the dipstick. Pour oil slowly.
Do notover fill.
NOTE: Allow oilto settle down into engine
for accurate reading. To read proper level,
tighten engine oil cap, then remove it to
read the dipstick.
3. Reinstall engine oil cap and tighten.
• Check oil level before each use. Add
oil if needed. Fillto full line on dipstick.
• Change the oil after every 25 hours of
operation or each season. You may
need to change the oil more often
under dusty,dirty conditions.
ADD GASOLINE
• Fill fuel tank. Use fresh, clean, regular
unleaded gasoline w_tha minimum of
87 octane. Do not mix oil with gaso-
line. Pumhase fuel in quantities that
can be used within 30 days to assure
fuel freshness.
_WARNING: Experience indicatesthat
alcohol blended fuels (called gasohel or
using ethanol or methanol) can attract
moisture which leads to separation and
formation of acids dudng storage. Acidic
gas can damage the fuel systemof an
engine while in storage. To avoid engine
problems, the fuel system should be
emptied before storage of 30 days or
longer. Drain the gastank, start the
engine and let it run untilthe fuel lines
and carburetor are empty. Use fresh fuel
next season. See Storage Instructionsfor
additional information. Never use engine
or carburetor cleaner products in the fuel
tank or permanent damage may occur.
_, CAUTION: Fillto bottom of gas tank
filler neck. Do not overfill. Wipe off any
spilled oil or fuel. Do not store, spillor
use gasoline near an open flame.
Engine oil cap
TO START ENGINE
NOTE: Due to protective coatingson the
engine, a small amount of smoke may be
present duringthe initialuse of the
product and should be considered
normal.
1. To start a cold engine, push primer
three (3) times before trying to start.
Use a firm push.This step isnot
usually necessary when starting an
engine which has already run for a
few minutes.
2. Hold operator presence control bar
down to the handle and pull starter
handle quickly. Do not allow starter
rope to snap back.
8
TO STOP ENGINE
• To stop engine, release operator
presence control bar.
NOTE: In cooler weather it may be
necessary to repeut priming steps. In
warmer weather over pdming may cause
floodingand engine will not start. If you
do flood engine, wait a few minutes
before attempting to start and do not
repeat pdmingsteps.
MOWINGTIPS
• Under certain conditions,such as very
tall grass, it may be necessary to raise
the height of cutto reduce pushing
effortand to keep from ovedoedlng the
engine and leaving clumps of grass
clippings. It may also be necessary to
reduce ground speed and/or run the
lawn mower over the area a second
time.
• For extremely heavy cutting, reduce the
width of cut by overlapping previously
cut path and mow slowly.
• For better grass bagging and most
cutting conditions,the engine speed
should be set in the fast position.
• When using a rear discharge lawn
mower in moist, heavy grass, clumps of
cut grassmay not enter the grass
catcher. Reduce ground speed
(pushing speed) and/or run the lawn
mower over the area a second time.
• If a trail of clippingsis left on the right
side of a rear discharge mower, mow in
a clockwise direction with a small
ovedap to collect the clippings on the
next pass.
• Pores in cloth grass catchers can
become filled with dirt and dust with
use and catchers will collect less grass.
To prevent this, regulady hose catcher
off with water and let dry before using.
• Keep top of engine around starter clear
and clean of grass clippings and chaff.
This will help engine air flow and
extend engine life.
MULCHING MOWINGTIPS
IMPORTANT: For bestperformance,
keep mower housing free of built-up
grass and trash. See =CLEANING" in the
Maintenance section of this manual.
• The special mulching blade will racut
the grass clippings many times and
reduce them in size so that as they fall
onto the lawn they willdisperse intothe
grass and not be noticed. Also, the
mulched grass will biodegrade quickly
to providenutdents for the lawn.
Always mulch with your highest engine
(blade) speed as this will providethe
best recutting actionof the blades.
• Avoid cuttingyour lawn when it is wet.
Wet grass tends to form clumps and
interferes with the mulching action.
The best time to mow your lawn is the
eady afternoon, At this Umethe grass
has dded and the newly cut area will
not be exposed to the direct sun.
• For best results, adjustthe lawn mower
cutting height sothat the lawn mower
cuts off only the top one-third ofthe
grass blades. If the lawn is overgrown
itwill be necessary to raise the height
ofcut to reduce pushingeffort end to
keep from overloading the engine and
leaving dumps of mulched grass. For
extremely heavy mulching, reduce your
width of cut by ovedapping previously
cut path and mow slowly.
• Certain types of grass and grass
conditionsmay require that an area be
mulched a second time to completely
hide the clippings. When doing a
second cut, mow across or perpendicu-
lar tothe first cut path.
• Change your cutting pattern from week
to week. Mow northto south one week
then change to east to west the next
week. This will help prevent matting
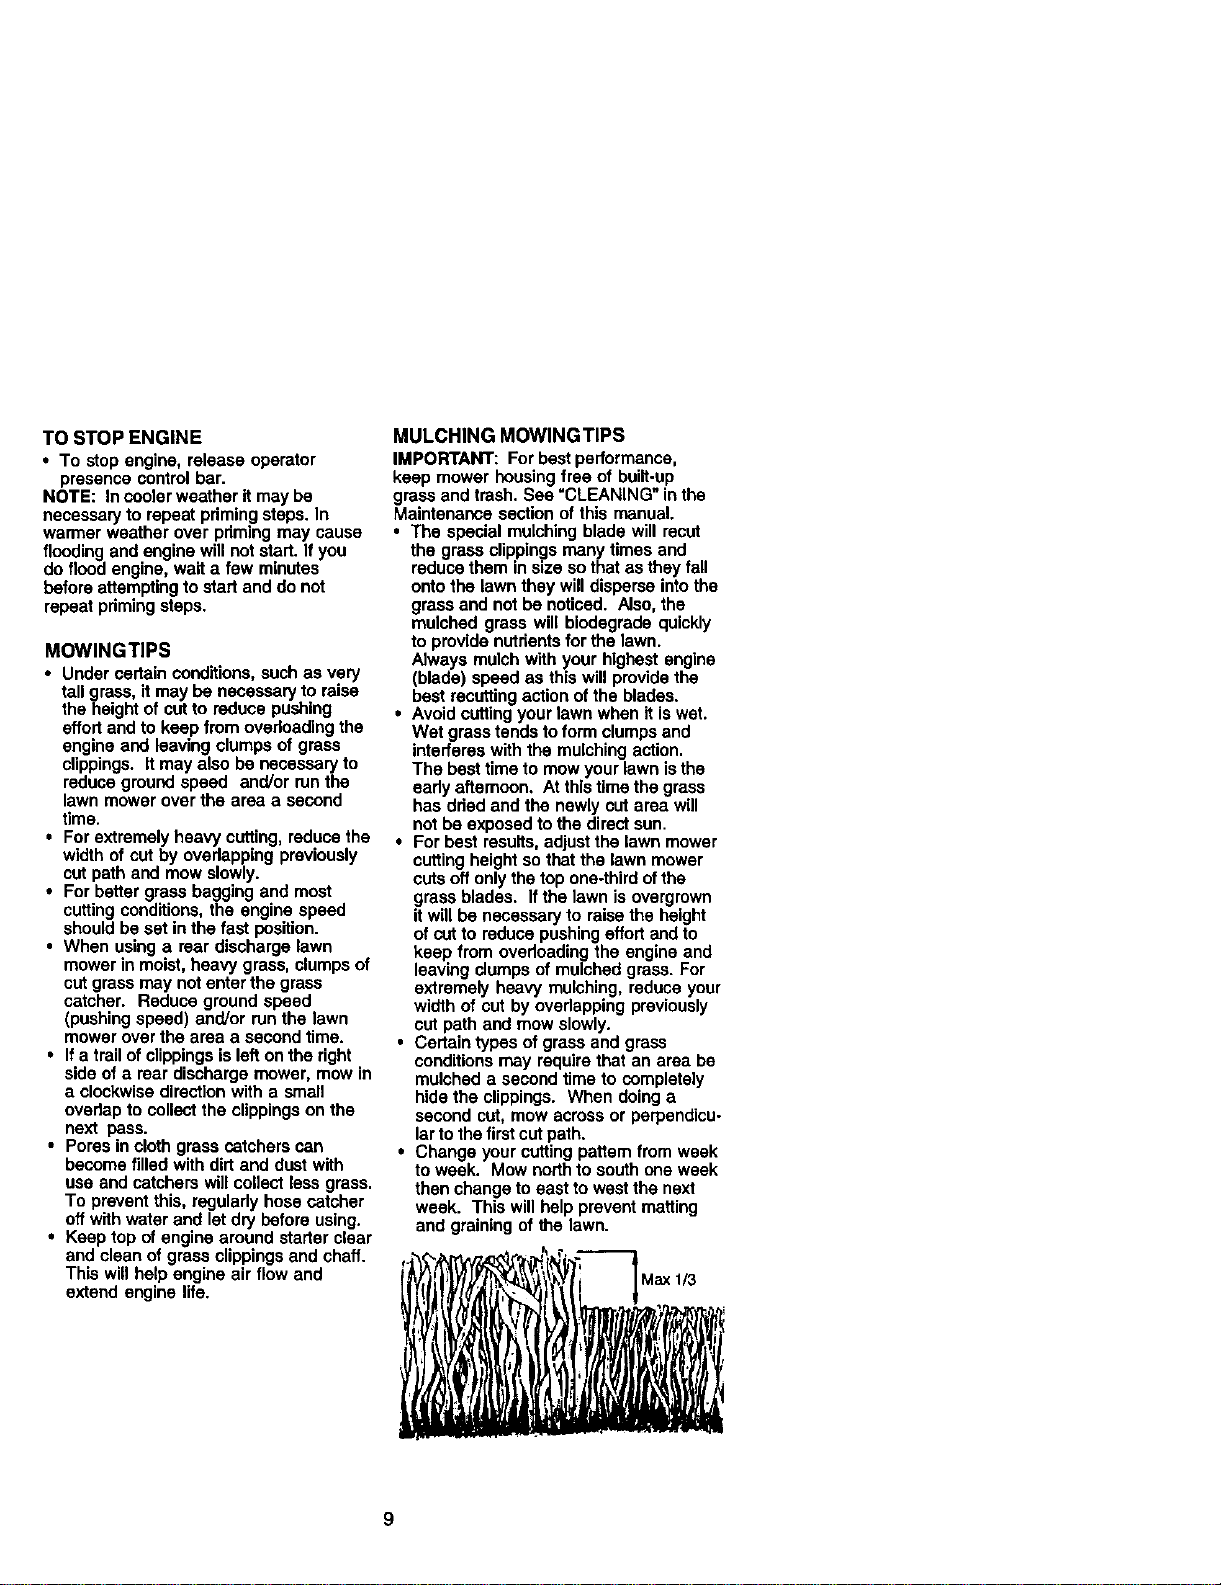
and graining of the lawn.
9
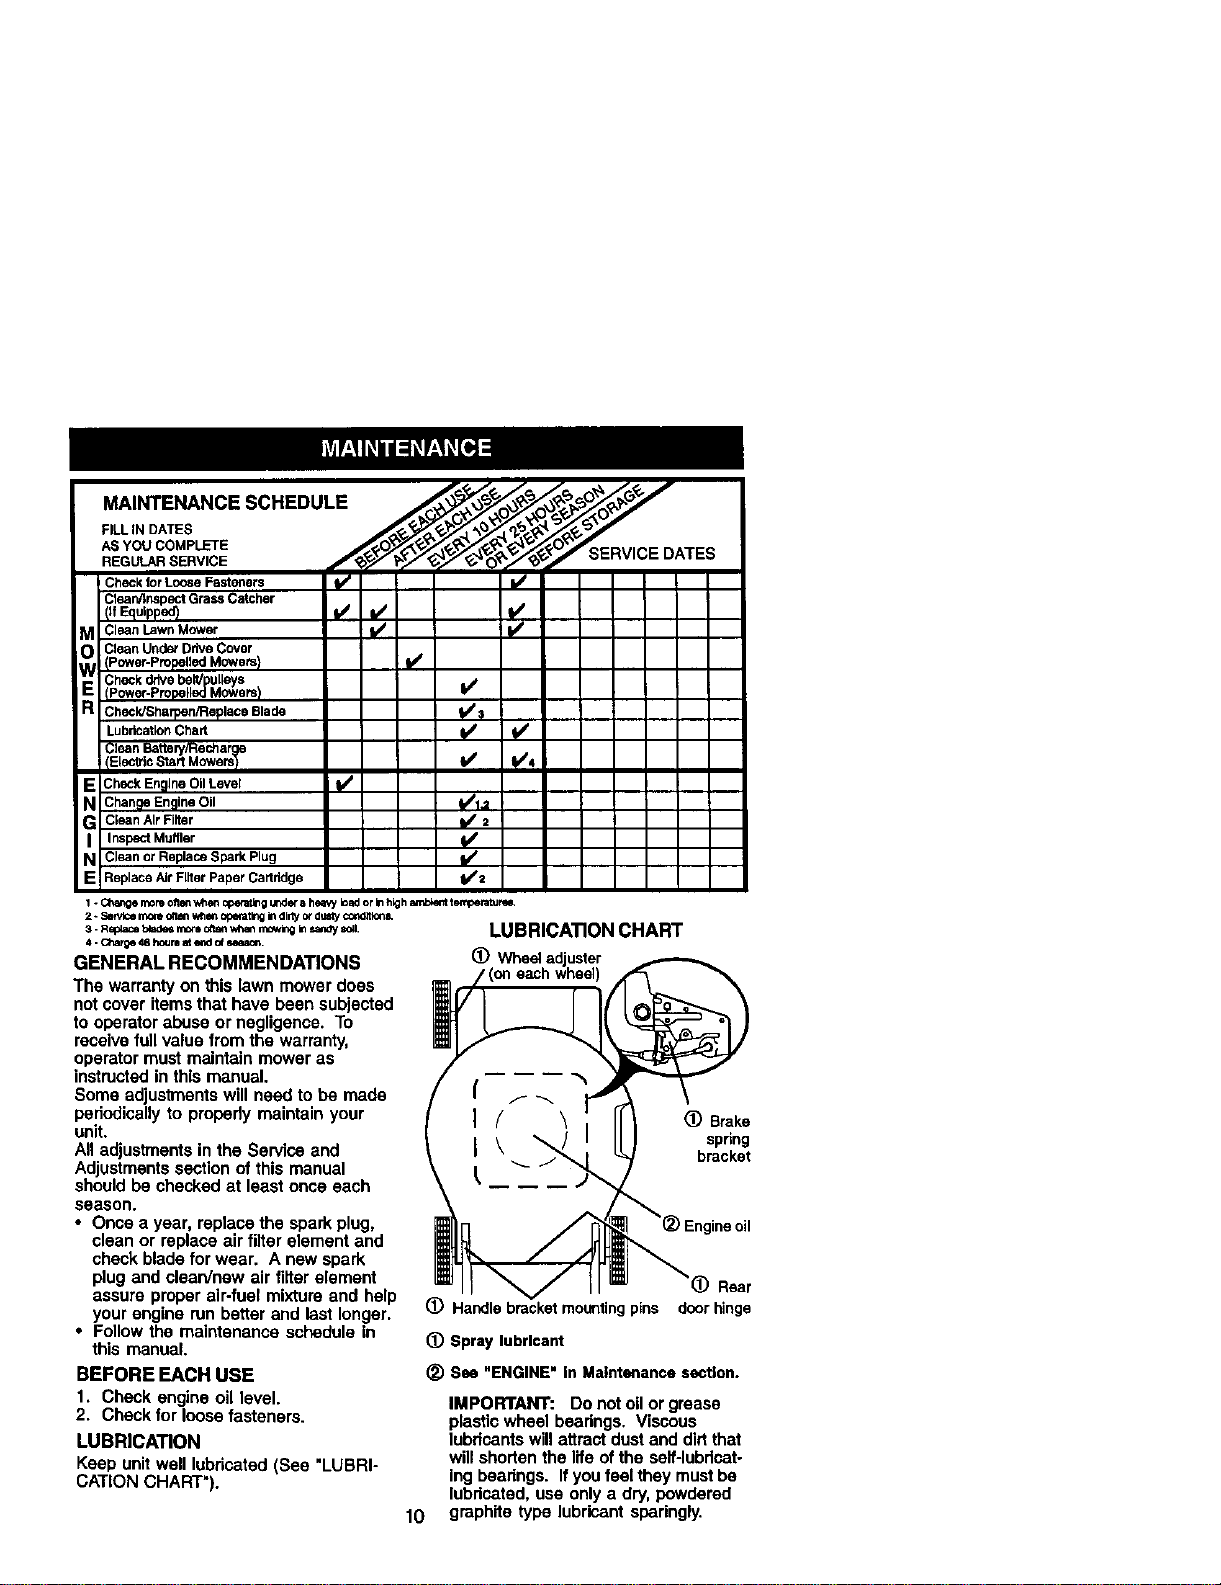
.A,NTE" NCESC.EDULE "
EO E V'OE
ERVICE DATES
Check for Loose Fasteners Ii/ kJ
Clean/Inspect Grass Catcher
(IfEquIpped_ _/ I,/ I,/
;leanLawnMower k/ !
CleanUnderDriveCover
<Power-PropelledMowers) l#/
Checkdrive ulleys
Power.p ropel_]PMowe rs)hew b/
R ChecldSharpen/Replace Blade 1_3
Lubrication Chart l/ I/
Clean Batteri/Rechar
E Check Engine 011Lever fl/
N Change Engine Oil 11/1,,1
Clean Air Filter IJ 2
IN Inspact Muffler
Clean or Replace Spark Plug
E Replace AirFilter Paper Cartridge if=
1 oCt_r_e moreone_ _ operat_g unders heavy bad or inhigh a,T2:_er_ternpetatumL
2 * Ser,/k_ mon_oftmnW_mtopmatingin dirty ordustycoqditlons,
3 -Rep_c6_ rnon,o_n wi_n mow_g_ sar_ysea,
4 - CP_ge 48 houm atend _ aeuon.
GENERAL RECOMMENDATIONS
The warranty on this lawn mower does
notcover items that have been subjected
to operator abuse or negligence. To
receivefull value from the warranty,
operator must maintain mower as
instructedin this manual.
Some adjustments will need to be made
periodicallyto properly maintain your
unit.
All adjustments in the Service and
Adjustmentssection of this manual
should be checked at least once each
season.
• Once a year, replace the spark plug,
clean or replace air filter element and
check blade for wear. A new spark
plug and clean/new air filter element
assure proper air-fuel mixture and help
your engine run better and last longer.
• Follow the maintenance schedule in
this manual.
LUBRICATION CHART
(_) Wheeladjuster
oneachwheel)
BEFORE EACH USE
1. Check engine oil level.
2. Check for loose fasteners.
LUBRICATION
Keep unit well lubricated (See "LUBRI-
CATION CHART").
I (_ Brake
spring
I bracket
@
10
(_ Rear
Handle bracket mounting pins door hinge
Spray lubricant
See "ENGINE" In Maintenance section.
IMPORTANT: Do not oil or grease
plastic wheel bearings. Viscous
lubricants will attractdust and dirt that
will shorten the life of the saif-lubdcat-
lag bearings. If youfeel they mustbe
lubricated,use only a dry,powdered
graphite type lubricant sparingly.
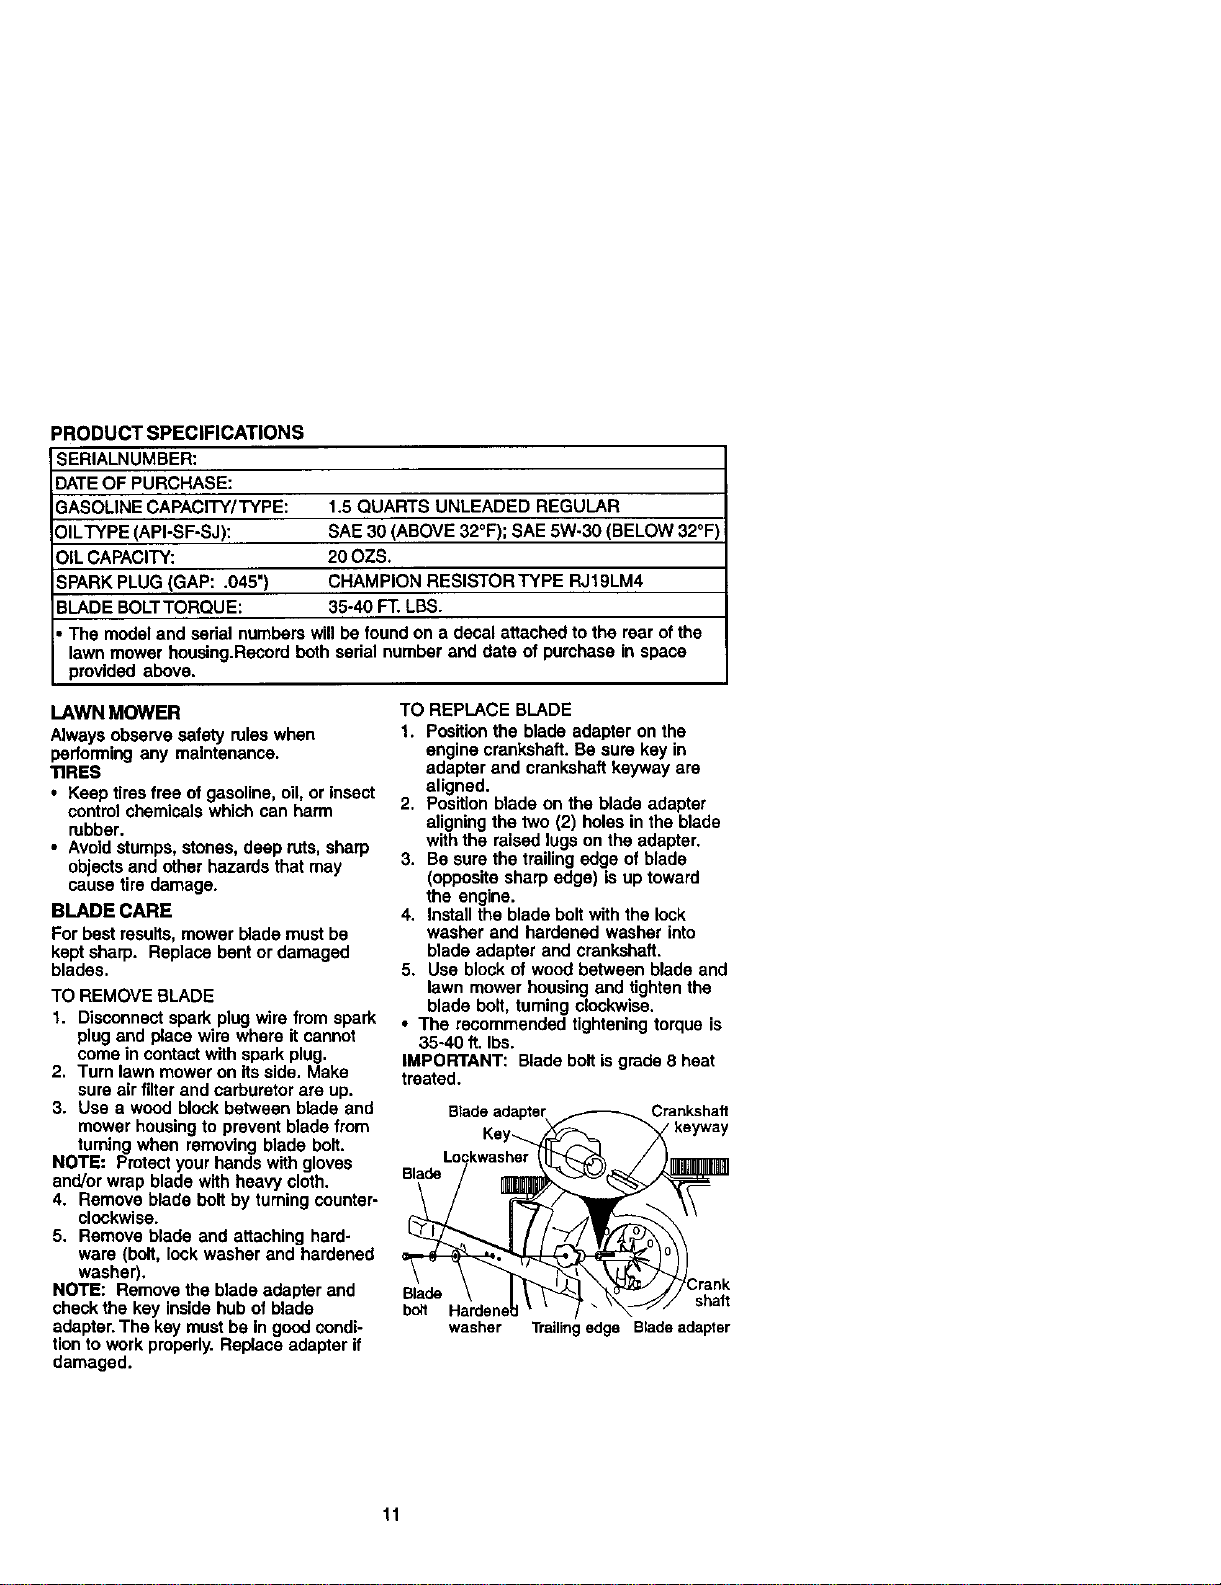
PRODUCTSPECIFICATIONS
SERIALNUMBER:
DATEOFPURCHASE:
3ASOLINE CAPACITY/TYPE: 1,5 QUARTS UNLEADED REGULAR
DILTYPE (API-SF-SJ): SAE 30 (ABOVE 32°F); SAE 5W-30 (BELOW 32°F
OIL CAPACITY: 20 OZS.
SPARK PLUG (GAP: .045") CHAMPION RESISTOR TYPE RJ19LM4
BLADE BOLTTORQUE: 35-40 FT. LBS.
• The model and sedal numbers will be found on a decal attached to the rear ofthe
lawn mower housing.Record both serial number and date of purchase in space
provided above.
LAWN MOWER
Always observe safety roles when
performing any maintenance.
TIRES
• Keep tires free of gasoline, oil, or insect
control chemicals which can harm
robber.
• Avoid stumps, stones, deep ruts, sharp
objects and other hazards that may
cause tire damage.
BLADE CARE
For best results, mower blade must be
kept sharp. Replace bent or damaged
blades.
TO REMOVE BLADE
1. Disconnect spark plug wire from spark
plug and place wire where it cannot
come in contactwith spark plug.
2. Turn lawn mower on its side. Make
sure air filter and carburetor are up.
3. Use a wood block between blade and
mower housingto prevent blade from
fuming when removing blade bolt.
NOTE= Protect your hands with gloves
and/or wrap blade with heavy cloth.
4. Remove blade bolt by turning counter-
clockwise.
5. Remove blade and attaching hard-
wars (bolt, lock washer and hardened
washer),
NOTE: Remove the blade adapter and
check the key inside hub of blade
adapter. The key must be in goodcondi-
tionto work properly. Replace adapter if
damaged.
TO REPLACE BLADE
1. Positionthe blade adapter on the
engine crankshaft, Be sure key in
adapter and crankshaft keyway are
aligned.
2. Position blade on the blade adapter
aligningthe two (2) holes in the blade
with the raised lugs on the adapter.
3. Be sure the trailing edge of blade
(opposite sharp edge) is up toward
the engine.
4, Install the blade bolt with the lock
washer and hardened washer into
blade adapter and crankshaft.
5. Use block of wood between blade and
lawn mower housing and tighten the
blade bolt, turning clockwise.
• The recommended tighteningtorque is
35-40 ft.Ibs.
IMPORTANT: Blade bolt isgrade 8 heat
treated.
Crankshaft
/ keyway
Blade
Blade shaft
bolt
washer Trailing edge Blade adapter
11
TO SHARPEN BLADE
NOTE: We do not recommend sharpen-
ing blade - but if you do, be sure the
blade is balanced.
Care should be taken to keep the blade
balanced. An unbalanced blade will
cause eventual damage to lawn mower
or engine,
• The blade can be sharpened with a file
or on a gdnding wheel. Do not attempt
to sharpen while on the mower.
• To check blade balance, drive a nail
intoa beam or wall. Leave about one
inch ofthe straight nail exposed. Place
center hole of blade over the head of
the nail. If blade is balanced, it should
remain in a horizontal position. If either
end of the blade moves downward,
sharpen the heavy end until the blade
is balanced.
GRASS CATCHER
• The grass catcher may be hosed with
water, but must be dry when used.
• Check your grass catcher often for
damage or detedoration. Through
normal use it will wear. If catcher
needs replacing, replace only with a
manufacturer approved replacement
catcher. Give the lawn mower model
number when ordering.
DRIVE WHEELS
Check front drive wheels each time
before you mow to be sure they move
freely.
The wheels not turning freely means
trash, grass cuttings,etc. are inthe ddve
wheel area and must be cleaned to free
ddve wheels.
If necessary to clean the ddve wheels,
check both front wheels.
1. Remove hubcaps, hairpincotters and
washers.
2. Remove wheels from wheel adjusters.
3. Remove any trash or grass cuttings
from inside the dust cover, pinion and/
or ddve wheel gear teeth.
4. Put wheels back in place.
NOTE: If after cleaning, the drive wheels
do notturn freely,contact a Sears or other
qualified service center.
GEAR CASE
• To keep your drive system working
properly, the gear case and area
around the drive should be kept clean
and free oftrash build-up. Clean under
the drive cover twice a season.
• The gear case is filledwith lubricantto
the proper level at the factory. The only
time the lubricantneeds attention isif
service has been performed on the
gear case.
• If lubricant is required, use onlyTexaco
Starplax Premium 1 Grease, Part No.
750369. Do not subst'dute.
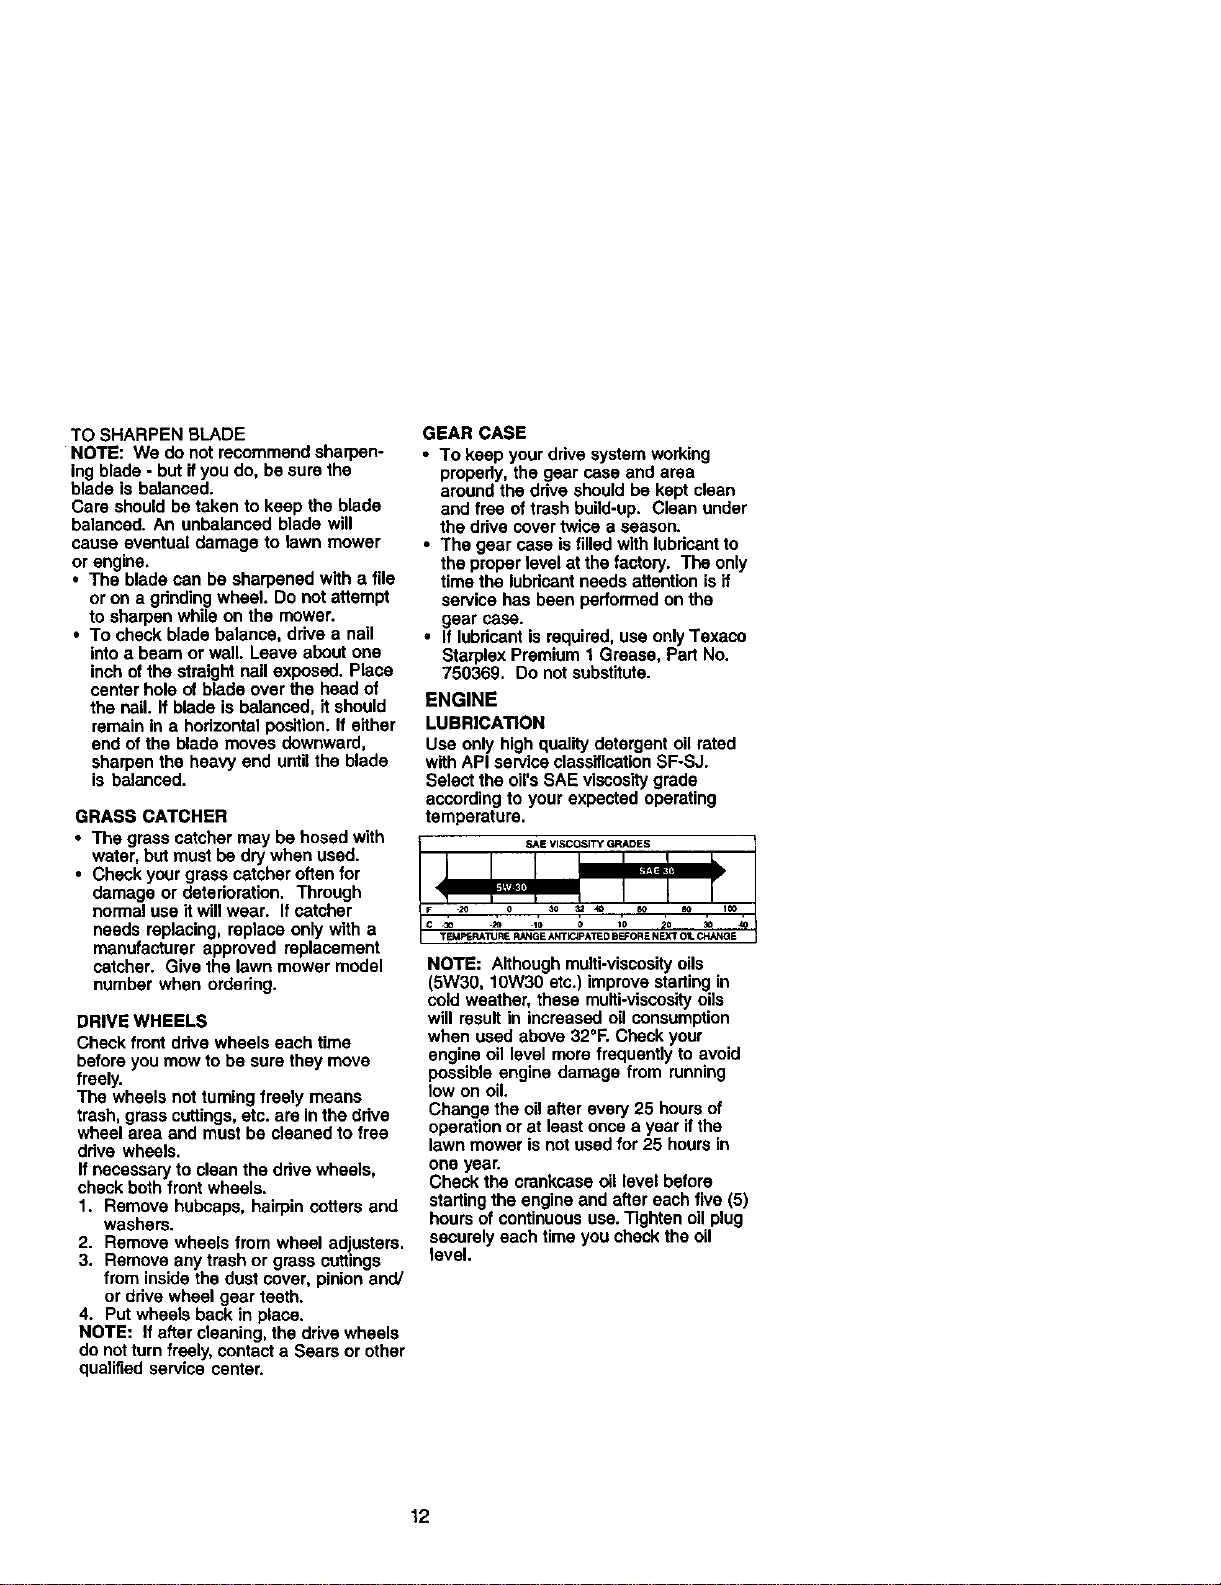
ENGINE
LUBRICATION
Use only high quality detergent oil rated
with API service classificationSF-SJ.
Select the oil'sSAE viscositygrade
according to your expected operating
temperature.
NOTE: Although multi-viscosityoils
(5W30, 10W30 etc.) improve starting in
cold weather, these multi-viscosity oils
will result in increased oil consumption
when used above 32°R Check your
engine oil level more frequentlyto avoid
possible engine damage from running
low on oil.
Change the oil after every 25 hours of
operation or at least once a year ifthe
lawn mower is not used for 25 hours in
one year.
Check the crankcasealllevelbefore
startingtheengineand aftereach five(5)
hours of continuous use.Tighten oil plug
securely each time you check the oil
level.
12
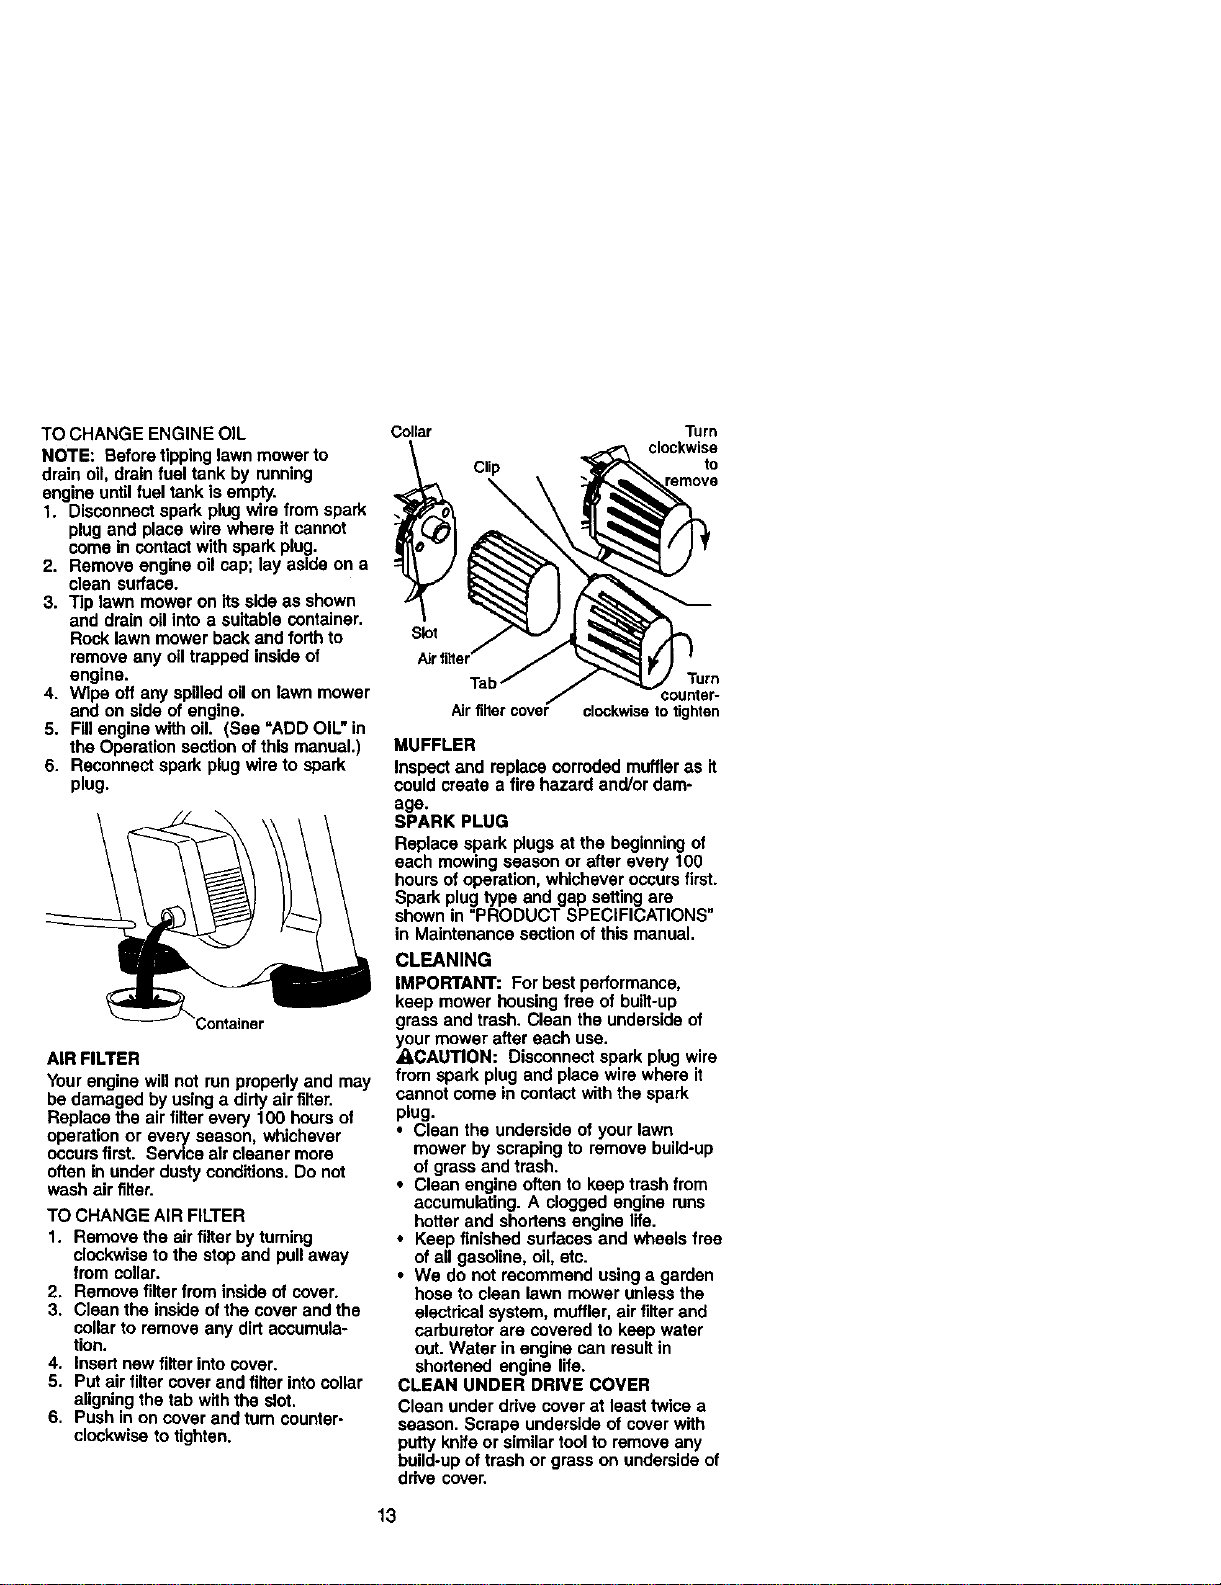
TO CHANGE ENGINE OIL
NOTE: Before tipping lawn mower to
drain oil, drainfuel tank by running
engine until fuel tank is empty.
1. Disconnect spark plug wire from spark
plug and place wire where it cannot
come in contactwith spark plug.
2. Remove engine oil cap; lay aside on a
clean surface.
3. Tip lawn mower on its side as shown
and drain oil into a suitable container.
Rook lawn mower back and forth to
remove any oil trapped inside of
engine.
4. Wipe off any spilled oil on lawn mower
and on side of engine.
5. Fillengine with oil. (See =ADD OIL" in
the Operation section of this manual.)
6. Reconnect spark plug wire to spark
plug.
Container
AIR FILTER
Your engine will not run properly and may
be damaged by using a dirty air filter.
Replace the air filter every 100 hours of
operation or every season, whichever
occurs first. Service air cleaner more
often in under dusty conditions. Do not
wash air filter.
TO CHANGE AIR FILTER
1. Remove the air filter by turning
clockwise to the stop and pull away
from collar.
2. Remove filter from inside of cover.
3. Clean the inside ofthe cover and the
collar to remove any dirt accumula-
tion.
4. Insert new filter into cover.
5. Put air filter cover and filter intocollar
aligningthe tab with the slot.
6. Push in on cover and turn counter-
clockwise to tighten.
Collar
Clip
Slot
Airtitter"
Air filter cover
Turn
clockwise
to
Turn
counter-
clockwise to tighten
MUFFLER
Inspect and replace corroded muffler as it
could create a fire hazard and/or dam-
age.
SPARK PLUG
Replace spark plugs at the beginning of
each mowing season or after every 100
hours of operation, whichever occurs first.
Spark plug type and gap setting are
shown in "PRODUCT SPECIFICATIONS"
in Maintenance section of this manual.
CLEANING
IMPORTANT: For best performance,
keep mower housing free of built-up
grass and trash. Clean the underside of
your mower after each use.
• i,CAUTION: Disconnect spark plug wire
from spark plug and place wire where it
cannot come in contact with the spark
plug.
• Clean the underside of your lawn
mower by scraping to remove build-up
of grass and trash.
• Clean engine often to keep trash from
accumulating. A clogged engine runs
hotter and shortens engine life.
• Keep finished surfases and wheels free
of all gasoline, oil, etc.
° We do not recommend using a garden
hose to clean lawn mower unless the
electrical system, muffler, air filter and
carburetor are covered to keep water
out. Water in engine can result in
shortened engine life.
CLEAN UNDER DRIVE COVER
Clean under drive cover at least twice a
season. Scrape underside of cover with
puttyknife or similar toolto remove any
build-upof trash or grass on underside of
drive cover.
13
_,CAUTION: Before performing any
service or adjustments:
1. Release control bar and stop engine.
2. Make sure the blade and all moving
parts have completely stopped.
3. Disconnect spark plug wire from spark
plug and place where it cannot come
in contact with plug.
LAWN MOWER
TO ADJUST CLrt'rlNG HEIGHT
See '3"0ADJUST CU'I-I'ING HEIGHT" in
the Operation section ofthis manual.
REAR DEFLECTOR
The rear deflector, attached between the
rear wheels of your mower, is provided to
minimize the possibilitythat objects will
be thrown out of the rear of the mower
intothe operator mowing position. If the
deflector becomes damaged, it should be
replaced.
TO REMOVE/REPLACE DRIVE BELT
1. Remove drive cover. Remove belt
from gearcase pulley by pushing
down on pulley and rollingbolt off it.
2. Turn lawn mower on its side with air
filter and carburetor up.
3. Remove blade.
4. Remove debds shield.
5. Remove belt from engine pulley on
crankshaft.
6. Install new belt by reversing above
steps.
7. Always use factory approved belt to
assure fit and long life.
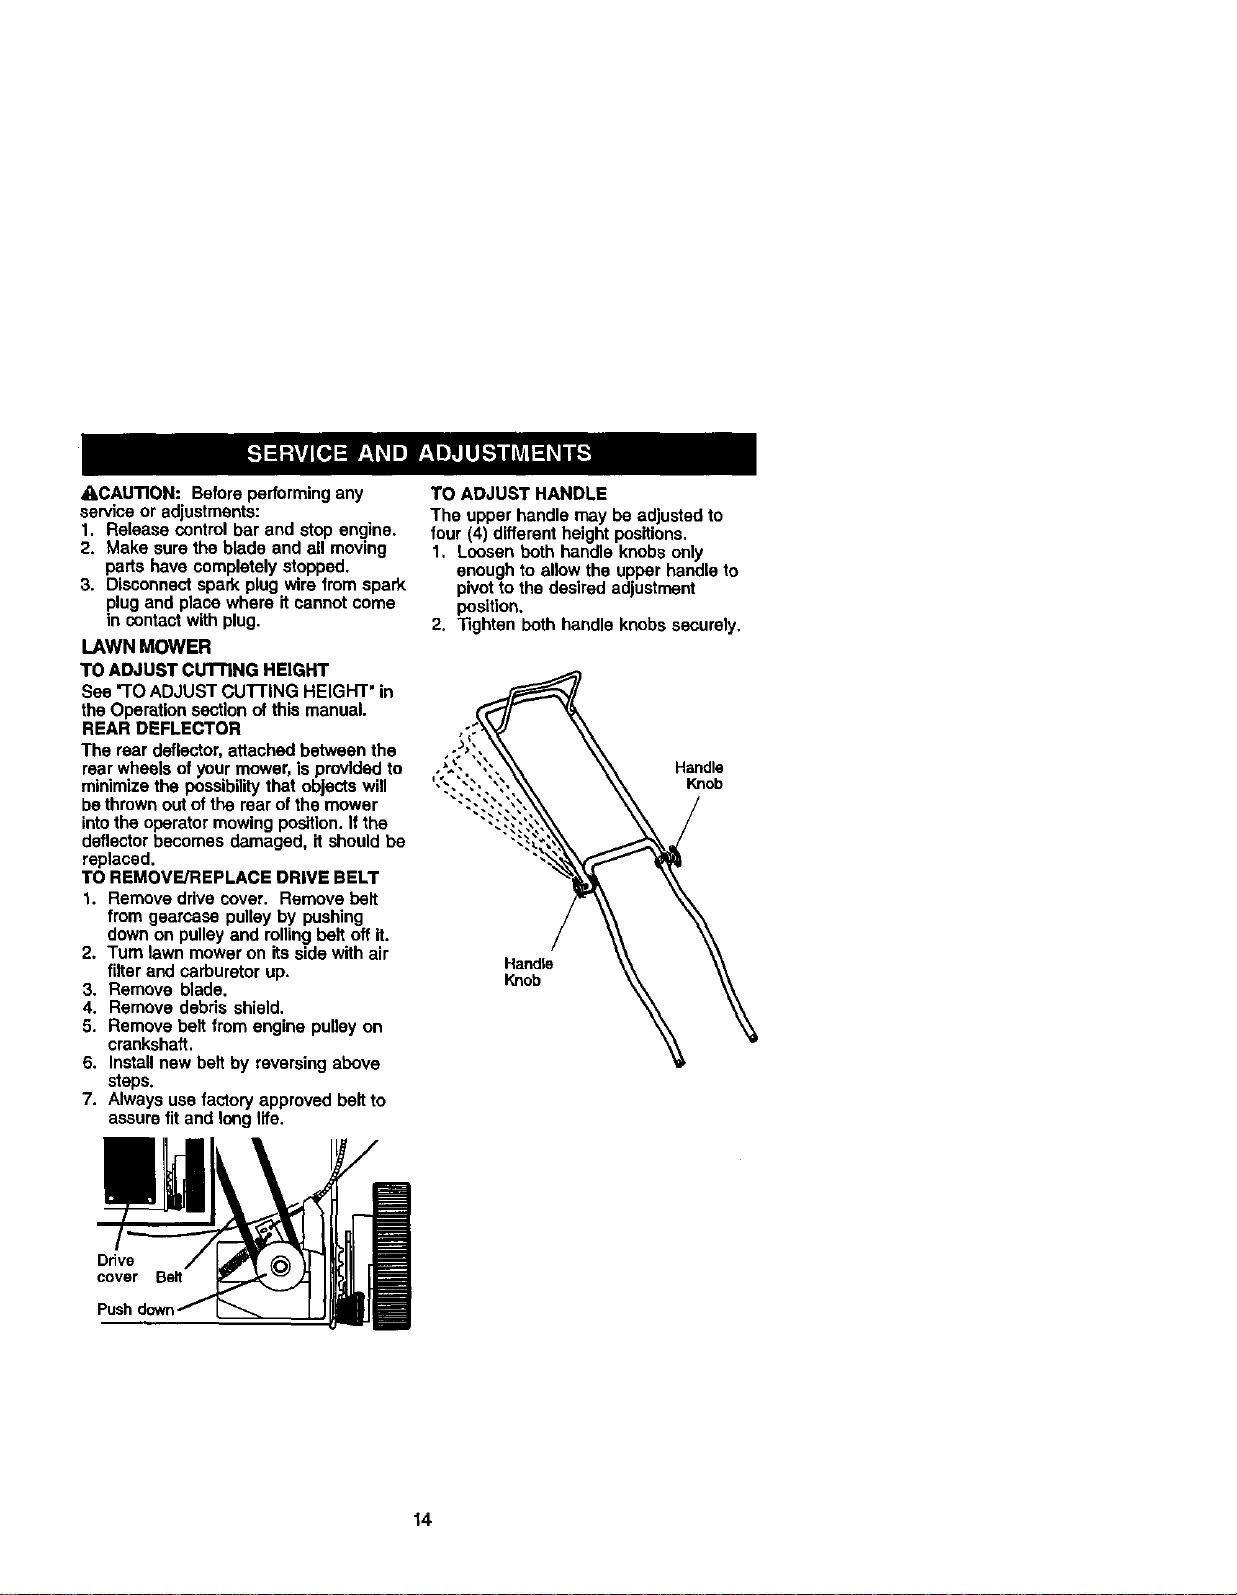
TO ADJUST HANDLE
The upper handle may be adjusted to
four (4) different height positions.
1, Loosen both handle knobs only
enough to allow the upper handle to
pivot to the desired adjustment
position.
2. Tighten both handle knobs securely.
Handle
Knob
Handle
Knob
Dl_vo
cover Belt
Push
14
TO ASSEMBLE GRASS CATCHER
1. Put grass catcher frame i_o grass bag
with rigidpart of bag on the bottom.
Make sure the frame handle is outside
ofthe bag top.
2. Slip vinyl bindings over frame.
NOTE: Ifvinyl bindings are too stiff,hold
them in warm water for a few minutes. If
bag gets wet, let it dry before using.
ACAUTION: Do not run your lawn mower
without clipping deflector or approved
grass catcher in place. Never attemptto
operate the lawn mower with the rear
door removed or propped open.
Catcher__
frame"_
handle
ENGINE
ENGINE SPEED
Your engine speed has been factory set.
Do not attempt to increase engine speed
or it may result In personal injury, ffyou
believe that the engine is runningtoo fast
or too slow, take your lawn mower to a
Sears or other qualified service center for
repair and adjustment.
CARBURETOR
Your carburetor has a oon-adjustable
fixed mainjet for mixturecontrol. Ifyour
engine does not operate properly due to
suspected carburetor problems, take your
lawn mower to a Sears or other qualified
service center for repair and/or adjust-
ment.
IMPORTANT: Never tamper with the
engine governor,which is factory setfor
proper engine speed. Overepeeding the
engine above the factory high speed
setting can be dangerous. If you thinkthe
engine-governed high speed needs
adjusting, contact a Sears or other
qualified service center, which has proper
equipment and experience to make any
necessary adjustments.
Immediately prepare your lawn mower for
storage at the end ofthe season or ifthe
unitwill notbe used for 30 days or more.
LAWN MOWER
When lawn mower isto be storedfor a
period oftime, clean it thoroughly,remove
all dirt,grease, leaves, etc. Store in a
clean, dryarea.
1. Clean entire lawn mower (See
"CLEANING" in the Maintenance
section of this manual).
2. Lubricate as shown in the Mainte-
nance section of this manual.
3. Be sure that all nuts, bolts, screws,
and pins are securely fastened.
Inspect moving partsfor damage,
breakage and wear. Replace if
necessary,
4. Touch up all rusted or chipped paint
surfaces; sand lightly before painting.
15
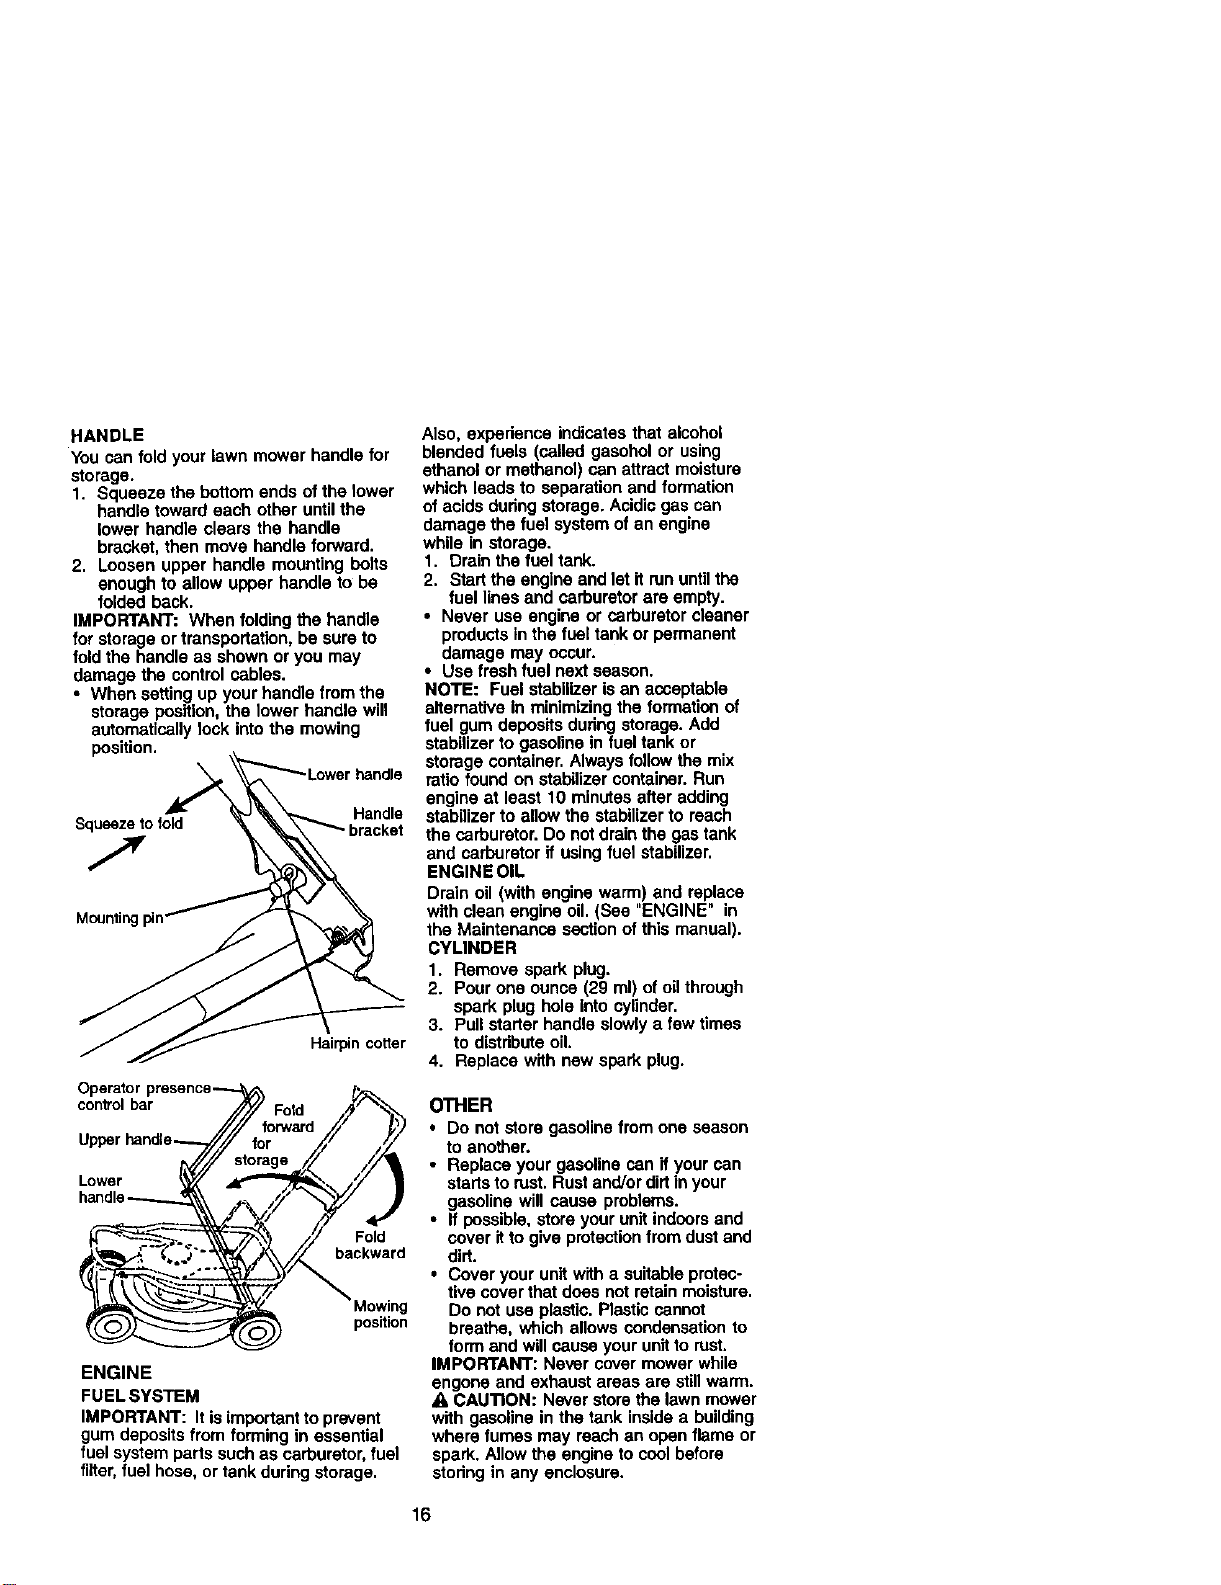
HANDLE
You can fold your lawn mower handle for
storage.
1. Squeeze the bottom ends of the lower
handle toward each other untilthe
lower handle clears the handle
bracket, then move handle forward.
2. Loosen upper handle mounting bolls
enough to allow upper handle to be
folded back.
IMPORTANT: When folding the handle
for storage or transportation, be sure to
foldthe handle as shown or you may
damage the control cables.
• When setting up your handle from the
storage posllion, the lower handle will
automatically lock into the mowing
position.
ower handle
Squeeze to fold
Handle
Hairpin cotter
Operatorpresence.-_ f_,.
controlbarupperhandle.._//_f° -'r_larddj'_F/_'_
Lower /
handle /_
t_._'_--.. %.-_ /Y Fold
bockword
__--------->_ Mowing
position
ENGINE
FUELSYSTEM
IMPORTANT: It is importantto prevent
gum depositsfrom forming in essential
fuel system parts such as carburetor, fuel
filler,fuel hose, or tank during storage.
Also, experience indicates that alcohol
blended fuels (called gasohol or using
ethanol or methanol) can attract moisture
which leads to separation and formation
of acids dudng storage. Acidic gas can
damage the fuel system of an engine
while in storage.
1. Drain the fuel tank.
2. Start the engine and let it run untilthe
fuel lines and carburetor are empty.
• Never use engine or carburetor cleaner
products inthe fuel tank or permanent
damage may occur.
• Use fresh fuel next season.
NOTE: Fuel stabilizer isan acceptable
alternative in minimizingthe formation of
fuel gum deposits duringstorage. Add
stabilizer to gasoline in fuel tank or
storage container. Always followthe mix
ratio found on stabilizer container. Run
engine at least 10 minutes after adding
stabilizerto allow the stabilizer to reach
the carburetor. Do notdrainthe gas tank
and carburetor if using fuel stabilizer.
ENGINE OIL
Drain oil (with engine warm) and replace
with clean engine oil. (See "ENGINE" in
the Maintenance section ofthis manual).
CYLINDER
1. Remove spark plug.
2. Pour one ounce (29 ml) of oil through
spark plug hole into cylinder.
3. Pull starter handle slowly a few times
to distribute oil.
4. Replace with new spark plug.
OTHER
• Do not store gasoline from one season
to another.
• Replace your gasoline can if your can
startsto rust. Rust and/ordirtin your
gasoline will cause problems.
• If possible, store yourunit indoors and
cover itto give protectionfrom dust and
dirt.
• Cover your unitwith a suitable protec-
tive cover that does not retain moisture.
Do not use plastic. Plastic cannot
breathe, which allows condensation to
form and will cause your unitto rust.
IMPORTANT: Never cover mower while
engone and exhaust areas are stillwarm.
• , CAUTION: Never storethe lawn mower
with gasoline in the tank inside a building
where fumes may reach an open flame or
spark. Allow the engine to cool before
storing in any enclosure.
16

ROUBLESHOOTING CHART
PROBLEM CAUSE
Does not start 1. Dirty air filter.
2. Out offuel.
3. Stale fuel,
Loss of power
Poor cut -
uneven
Excessive
vibration
4. Water infuel.
5. Spark plug wire is
disconnected.
6. Bad spark plug.
7. Loose blade or broken
blade adapter.
8. Control bar in released
pealtlon.
9. Control bar defective.
1. Rear of lawn mower
housing or cutting blade
dragging in heavy grass.
2. Cuttingtoo much grass.
3. Dirty air filter.
4. Buildupof grass, leaves,
and trash under mower.
5. Toomuch oil in engine.
6. Walking speed too fast.
1. Worn, bent or loose blade.
2. Wheel heights uneven.
3. Buildupof grass, leaves
and trash under mower.
1. Wom, bent or loose blade.
2. Bent engine crankshaft.
1. Engine flywheel brake is on
when control bar is released
2. Bent engine crankshaft.
3. Blade adapter broken.
4. Blade dragging in grass.
Starter rope hard
topull
CORRECTION
1. Clean/replace air filter.
2. Fillfuel tank.
3. Drain tank and refillwith
fresh clean fuel.
4. Drain fuel tank and
carburetor and refilltank
with fresh gasoline.
5. Connect wire to plug.
6. Replace spark plug.
7. Tighten blade belt or
replace blade adapter.
8. Depress control bar to
handle.
9. Replace control bar.
1. Set to "Higher Cut"
position.
2. Set to =Higher Cut"
position.
3. Cleenireplace air filter.
4. Clean underside of mower
housing.
5. Check oil level.
6. Cut at slower walking
speed.
1. Replace blade. Tighten
blade bolt.
2. Set all wheels at same
height.
3. Clean underside of
mower housing.
1. Replace blade. Tighten
blade bolt.
2. Contact a Sears or other
qualified service center.
1. Depress control barto
upper handle before
pulling starter rope.
2. Contact a Sears or other
qualified service center.
3. Replace blade adapter.
4. Move lawn mower to cut
grass or to hard surface.
Loss of drive 1. Drive wheels not turning t. Adjust or replace drive
with drive control engaged, control cable.
2. Belt not driving. 2. Put belt on pulleys or
replace belts if broken.
17
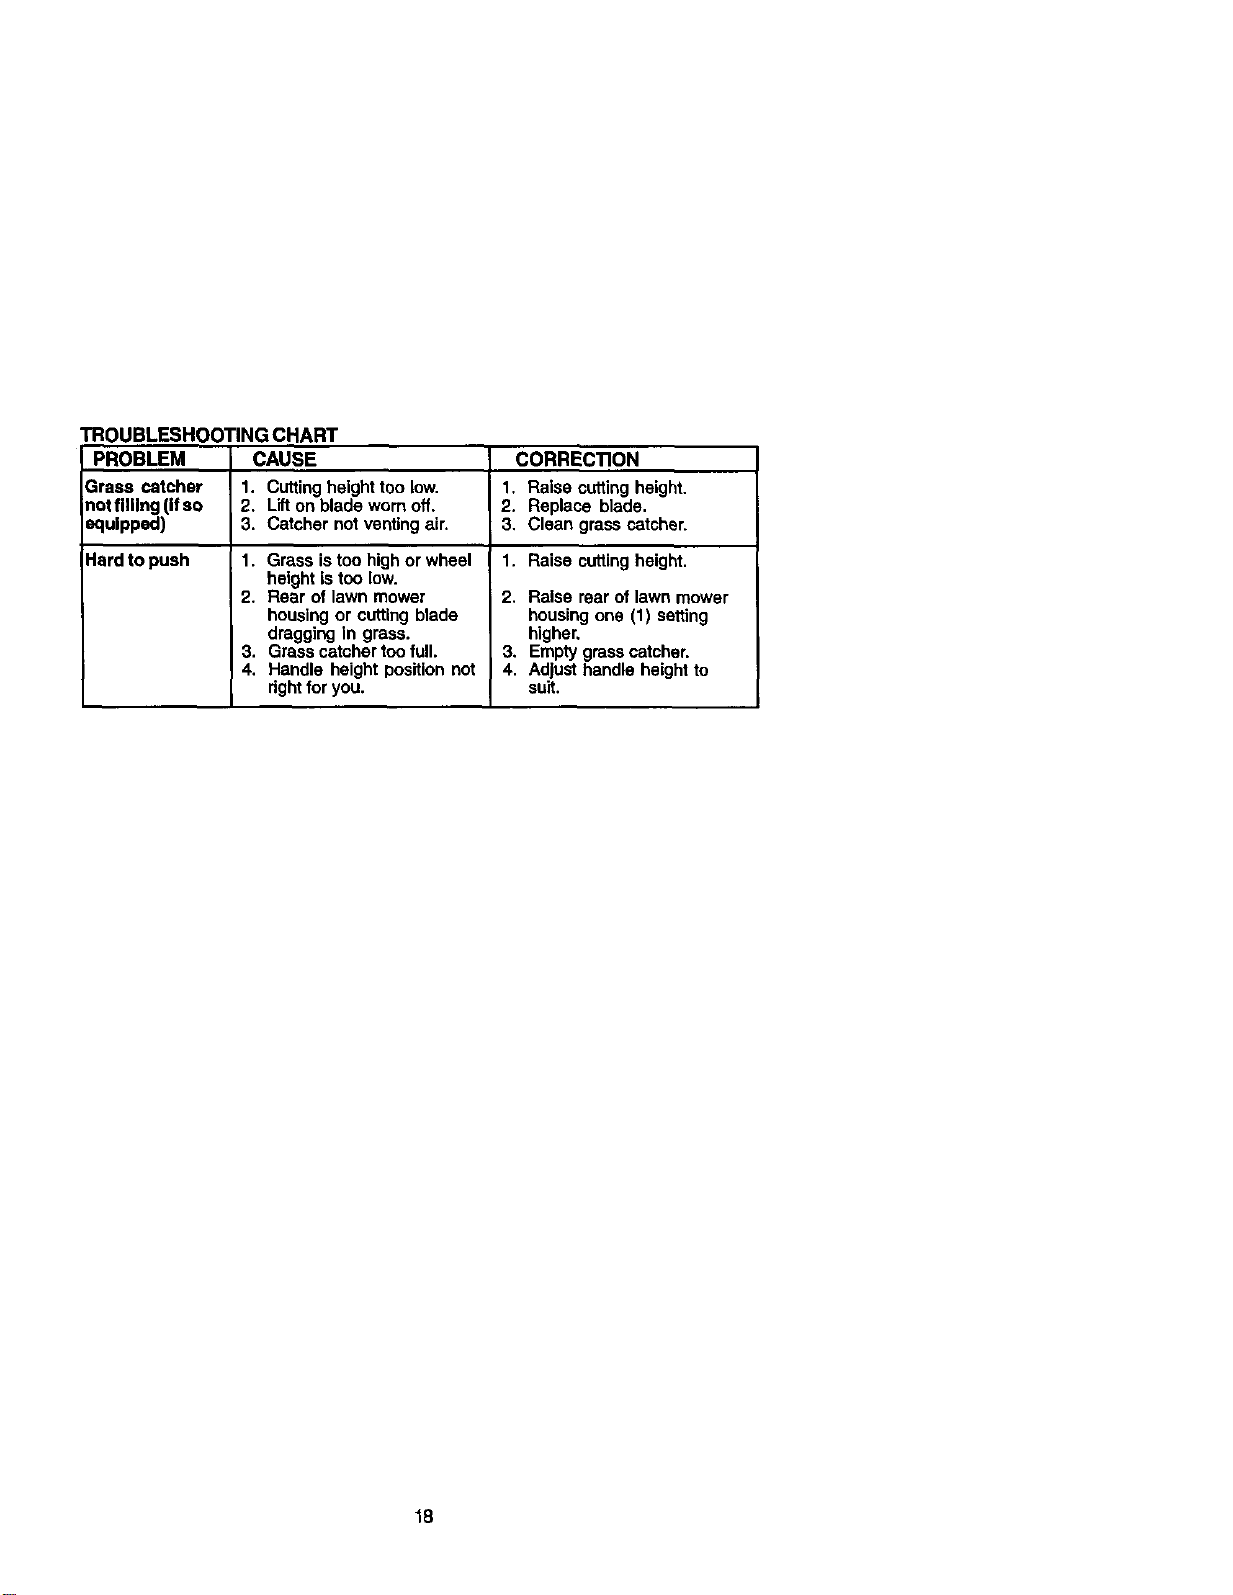
TROUBLESHOOTINGCHART
PROBLEM CAUSE CORRECTION
Grasscatcher 1. Cuttingheighttoolow. 1.Raisecuttingheight.
notflnlng(ifso 2. Uitonbladewornoff. 2. Replaceblade,
equipped) 3. Catchernotventingair, 3, Clean grass catcher,
Hard to push 1. Gross is too high or wheel 1. Raise cuttingheight.
height istoo low.
2, Rear of lawn mower 2. Raise rear of lawn mower
housing or cutting blade housing one (1) setting
dragging in grass, higher,
3. Grass catcher too full. 3. Empty grass catcher.
4. Handle height position not 4. Adjust handle height to
rightforyou. suit.
18
Garant|a ................................................ 19
Reglas de Seguddad ...................... 19-21
Montaje ................................................. 22
Operaci6n ........................................ 23-26
Mantenimiento ...................................... 27
Programa de Mantenimiento ........... 27-30
Especificaciones del Producto............. 28
Servicio y Adjustes .......................... 31-32
AImacenamiento ............................. 32-33
Identificaci6n de problemas ............ 33-34
Partes de repuesto ............ Vea el manual
ingl_ del due_o
GARANT(A LIMITADA DE DOS _S PARA LA SEGADORA A MOTOR CRAFTSMAN
Pot dos (2) anos, a parUr de la _echa de compra, cuando esta Segadom Craftsman se
mantanga, lubdque y aline segOn las instrucciones pare la opemci6n y el mantenimian_o en el
manual del due5o, Sears reparar_ gratis todo dalecto en el material y la mano de dora.
Si la Segadora Craftsman se usa para fines comarclales o de ardendo, esta gamntla selo se
aplica pot novanta (90) dlas a partir de la fecha de compra.
Esta Garantla no cubra:
• Artfculos qua se desgastan durante el uso normal tales corno las cuchillas segadoras
rotatorias, los adaptadores de la cuchilta, las correas, los filtros de aim y las bujlas.
• Reparaciones necesadas debido at abuso o a la negligancia del opemdor, incluydndose a los
cigQenales ddolados y a la faJ'tade mantenimiento del equipo seg_n las instrucciones qua se
incluyan en el manual del dueno.
EL SERVICIO DE GARANTIA ESTA DISPONIBLE el devolver la segadora a motor Craftsman al
Centro/Departmento de Servielo Sears mas cercano en los Estados Unidos. Esta garantla se
aplica solamante mientras el producto este en uso en los Estados Unidos.
Esta Garantia le otorga derechos legales especlficos, y puede qua tarnbi6n tenga olros
derechos qua varfan de estado a estado.
Sears, Roebuck and Co., D/817 WA, Hoffman Estates, Illinois60179 USA
IMPORTANTE: Esta maquina cortadaom es capaz de amputar las manos y los manos y los
pies y de lanzar objetos. Si no se obsenlan las instrucciones de segudded siguiantes se pueden
pmduelr lesiones graves o la rauarte.
I. OPERACION
• Antes de empezar, debe Jamiliarizarse
completamante con los contreles y el uso
correcto de la maquina. Para esto, debe leer
y comprender todas las instrucciones qua
aparecen en la maquina yen los manuales
de opemcibn.
• No ponga las manos o los pies cerca o
debajo de las partes rotatorias. Mant_ngase
siempre lejos de la abertum de la descarga.
• Permita qua selamante las personas
responsables que esten farniliarizadas con
las instrucciones operan la m_quina.
• Despeje el _rea de objetos tales como
piedzas, juguetes, elambres, huesos, palos,
etc. qua puaden ser recogidos y lanzados
pot las cuchilles.
• Asegdrese qua el _rea no se hallen
personas, antes de segar. Pare la m_quina
si alguien entra en el drea.
• No opera la maquina sin zapatos o con
sandalias abiertas. Pdegase siempre
zapatos sblidos.
• No tire de la ssgadora hacia atria a menos
qua sea absolutamante necesario. Mire
siempre hacia abajo y hacia detrds antes y
mieotras qua se mueve hacia atrzts.
• No opera la segadora sin los respeclivos
resguardos, las placas, al recogedor de
cdsped u otros aditamantos dise ados pare
su protecel_n y seguddad.
• Refi6rase alas instrucciones del fabr_cante
para el funcionamiento e instalaelbn de
accesorios. Use t_Ricaraenteaccesorios
aprobados por el fabdcante.
• Detenga la cuchilla o las cuchillas cuando
cruce por calzadas, celles o osminos de
grava.
• Parar el motor cada vez qua se abandona
el aparato, antes de lirapiar la segadera o de
remover residuos del tubo.
• Apagar el motor y esperar basra qua las
cuchillas est_n completamante parades
antes de remover el receptor de hierb&
• Segar solarnente con luz del dia o con ur_t
buena luz artificial,
• No opere la mdquina bajo la influencia del
alcohol o de las drogas,
19
• Nunca opere la maquina cuando la hierba
estd mojada. AsegOrese siempre de tenar
buena tracci6n ensus pies; mantenga el
mango finnementa y camine; nunca corm.
• Desconectar el mecanismo de propulsibn
autbnoma o el embmgue de tmnsmislbn en
tas segadoras que Io tienen antes de poner
en mamha el motor.
• Si el equipo empezara a vibrar de una
manera anorrnal, pars el motor y revise de
inrnedlatopara averiguar la causa.
Generalmente la vibraci6n suele indicar que
existe alguna avsda.
• Sismpre use gafas de seguddad o anteojos
con pmteccibn lateral cuando opare ta
segadora.
II. OPERACION SOBRE LAS CUESTAS
Los aceldentes ocurmn con rods frecuencia
en las cuestas. Estos accidentes ocurren
debido a reshalados o caldas, las cuales
pueden resuttar sn graves lesiones. Oderar la
recortadora en cuestas requisre mayor
concentmci6n. Si se siente inseguro en una
CUest_, no la rscorta,
HACER:
• Puede recortar a troves de la superficle de
la cuesta, nunca hacia ardba y hacia abujo.
proceda con extrerna precaucien oJando
cambie de d]mccibn en las cuestas.
• Renueva todos los objetos extmSos, tales
como guijan-os, mmas, etc.
• Dsbe prestar atenclbn a hoyos, baches o
pmtuderancias, Recuerde que la hierba alta
posde esconder obst_culos.
NO HACER:
• No recorte carca de pend[entes, zanjas o
terraplenos. El operador puede perder ta
traccibn en los piss o el squilibrio.
• No recorte cuestas dsmesiado inclinadas.
• No recorts en hisrba mojada. La reduccibn
en la tmccibn de la pisada puede causar
resbelones.
III.NINOS
Se pueden producir accidentes trdgicos si el
operador no presta atenci6n a la presencia de
los niRos. A menudo, los niSos se sienten
atmfdos por la mdquina y por la actividad de la
siega. Nunca suponga que los niSosvan a
permanecer en el mismo lugar donds los vio
pot _ltima vez.
• Mantenga a los elfios alejados del &rea de la
siega y bajo el cuidado estdnto ds otto
persona adutta responsable.
• Est6 alarta y apague la m_quina si hay nifios
que entmn al drea.
• Antes y cuando este retrocediendo, mire
hacia atr_s y hacia abajo para vedficar si
hay niSos peque_os.
• Nunoa perrnita que los niRos operen la
mdquina.
• Tenga un cuidado exlm cuando se acarqos
a esquinas donde no hay visibilidad, a los
arbustos, drboles u otros objelos que
pueden intededr con su IInea de visibn.
IV. SERVIClO
• Tenga cuidado extra el manejar la gasolina
y los den_s combustibles. Son inflamables
y los gases son explosivos.
- Use solarnenta un envase aprobado.
- Nunca mmueva la tapa del depbsito de
gasolina o agregue combustible con el
motorfuncionando. Parmha que el motor
se enfde antes de volver a pone
combustible. No fume.
- Nunca vuelva a porter combustible sn la
m_quina en recintos csrmdos.
- Nunca elmacene la mdqulna o el envase
del combustible dentin de elgQn lugar en
donde haya una llama expussta, tat corno
la del calsntador de agua.
• Nunca haga funelonar _a rndquina dentin
de un _rea cen'ada.
• Nunca haga ajustes o reparaciones
mlentms el motor est6 en marcha.
Desconente el cable de la bujla, y
mantengalo a derta distanela de dsta para
prevenir un ananque accidental.
• Mantenga las tuercas y los psmos,
especialmente los pemos del accesorio de
ta cuchilla, apretados y mantenga el equipo
en buenas condiciones.
• Nunca maelpule de forma indebida los
dispositivosde seguddad. Controls
regularmente su funcionamiento correcto.
• Mantenga la n_quina li_e de hierba, hojas
u ntras acumulaciones de desperdicio.
Limple los darrames de acsits o combus-
tible. Parn_ta que la mdquina se enfde antes
de elmacenada.
• Pars e inspeccione el equipo si le pega a un
objeto. Repdrelo, si es nesesade, antes de
hacsrio arranoar.
• En ningdn caso hay que regular la attura de
las ruedas misntras e[ motor est& en
marcha.
• Los componentes del receptor de la hierba
van sujstos a desgesta, daeos y dstadom.
que pueden exporter las partes en
movimiento o permilJrque objetos sean
disparados. Contmlar frecusntemente y
cuando sea necesado sustituir con partes
aconsajades por el fabdosnle.
• Las cuchitlas de la segadora estdn afiladas
y pueden cortar. Cubdr les hojas o nesar
guantes, y ntilizar presaucionss especieles
cuando se efent0a mantsnimiento sobre las
mismas.
• No camble el ajuste del regulador del motor
ni exceda su velocided.
2O
A_sque esle s_lo ope sepia laspr_vdo-
nesde seguridadde ]ml_landa. Otiere dedr -
IIIATENOI_)N!!! IIIESTE ALERTO!!! SU
SEGURIDAD ESTA COMPROMETIDA.
_=PRECAUC_.N: Siempredesconecte el
alarnbrede labujlay ix_ga;o dondeno pueda
en_ar en contactocon b b_a, para evitar el
por accldente,dur_te la pmparack_, el
lxa_sporte, el aJusteo cuandose hacen
reparaciones.
_ADVER1T=NCIA:[] lubodeescapedelmolcr,
elgunosde susccns_werrtesy elgun_;
componentesdelvehlculocontleneno
_F_s_ndenpmductoso/JIn_cosconoddese_ el
deCaliforniacomocausade cdncery
defectosalnadmlentou o_osda_s
reproductivos.
A_DVERTENCIA: Los bernes,terminaJesy
aocesoriosndativosde la I_terla contienenIt_no
o compueslosde ptomo,pmductosqui_
ccnocidosen el Es_adode Californiacomocausa
de cdncery defectosal nacirr_entou ¢fa'os
reproductvos.Lavar las manos de.spudsde
manlpulados.
_PRECAUCI(_I: [] silenciador y otras piezas
del motor Ilegan a ser ex_emadamente
calientes durante la operacibn y siguen siendo
calientes despu_s de que el motor haya
parado, para evitar quemadums sevems,
permanezca teJosde estas dreas.
Estos accesorios estaban disponibles cuando se produjo la segadora. No son
facllltados Junto al cortaceaped. Tambidn estdn disponibles en la mayor[a de las
tiendas de Sears y en los centms de servicio. I.a mayor|a de las tiendas Sears tambi_n
pueden mandar a pedlr partes de repuesto para usted, si les proporcionael nt_mem
del rnodelode su segadora. Algunos de estos accesorios tal vez no se apliquen a su
segadora.
RENDIMIENTO DE LA SEGADORA
PARA SEGADORAS CON DESCARGA TRASERA JUEGOS PARA LA ACOLCHADORA ESTABlUZADORE8
_ RECOREI_R _ RECORE_ _
P._A P_A
CONDESCARGA CONDESCARGA
TR,_I_RA I_TERN. ENVIES
DEG_OMNA
MANTENIMIENTO DE LA SEGADORA
RLTROS DE JURE BUJJAS
CORREAS CUCHILLAS DE CUCHILLA RUEOAS DEL MOTOR
21
Lea estas instrucciones y el manual
completamente a_es de tratar de rnontar u
opera# su segadora nueva.
IMPORTANTIE: ESTE CORTACESPED VtENE
SIN ACEITE O GASOLINA EN EL MOTOR.
Su segadera nueva ha side rnontada en la.
t_bdca con la excepci6n de aquellas partes
que se dejaron sin montar per razones de
env[o.Todes las partes como las tuercas, las
arandelas, los pemos, etc., qua son
necanades para completar el montaje ban side
colocadas en la bolsa de parian. Para
asegurarse que su segadom _uncione en
forrns segura y adecuada, todas las partes y
los articulos de ferreteda qua se rnonten
tienan qua set apretados seguramente. Use
1asherramientas correctas, como sea
necesado, para asegurar que se aprieten
adecuadamente.
PARA REMOVER LA SEGADORA DE
LA CAJA DE CART6N
1. Remueva tas partes sueltas que se
inclwan con la segadora.
2, Corle las dos esquinas de los extremos de
Is caja de cark_ny denda el panel del
extrerno piano.
3. Remueva todo et matedal de empaque,
excepto la cuba entre el mango superior y
6t inferior,y la cuRa que suJeta la barra de
loscontrol que ex_gela presencis del
operador junto con el mango superior.
4. Haga rodar la segadora hacla afuera de la
caja de cartcYny revisela cuidadosarnente
para venficar si todavla quedan partes
sueilas adicionales.
COMO PREPARAR SU SEGADORA
PARA DI=SDOBLAR EL MANGO
IMPORTANTE: Despliegue el mango con
mucho cuidade pare no pellizcar o daRar los
cables de contml.
1. Levante los mangos hasta que la secck_n
del mango infedor se asegure en su lugar,
en la p(_icibn pera segar.
2. Remueva la cu_, protectora, levante la
secelbn del mango supedor basra su Iugar
en el mango inferior, y apdete ambas
manillas del mango.
3. Remueva la cuba Gel mango que suJeta la
barra de los control que exlge ia presencia
del operador junto con el mango superior.
El mango de la segsdora puede ajustame
seg0n le aoomode para segar. Refi_rase a
=AJUSTE DEL MANGO" en la Seccibn de
Servicio y Ajustes de este manual.
Barradecontrolquesxl e la presencladeloperador
Mangosupedor
MangoInlador Levantar
Levantar //
PARA INSTALAR LOS ACCESORIOS
Su segadora tos enviada Iista para usame
coma una aoslchadora de capa vegetal. Para
convertida de modo que puede ensacar,
ret_dmsea "PARA CONVERIR LA
SEGADORA" en la Seccibn de Operacibn de
este manuel.
22
FAMILIARICESE CON SU SEGADORA
LEA ESTE MANUAL DEL DUEllO Y LAS REGLAS DE SEGURIDAD ANTES DE OPERAR SU
SEGADORA. Compare las ilustraciones con su segadora para familiarizarse con la ubicacVande
los diversos controles y ajustes. Guarde esta manual para referencia en el futuro.
Estos sfmbolos pueden aparoser sobre su segadora o en ta literatura proporclonada con
el producto. Aprellda y comprende sus slgnlflcados.
ATTENCK_N O MOTOR MOTOR la_PlDO LENTO E51_ANGU COM- ACEITE pEUGRO, GUARDE LAS
AOVIERTFJ_JA ENCEND/DO APAG,_DO L4_3/_ BUST_LE MM_OSlfLOSPfF_SLEJOS
]ue exige
laprelenda deloperador
Cable de control
de zona del m_or
Corddn
anancador
Tapa dei deposlto de
acelte del mot(x con
varlll=
/Ttarlgo
Taw, del deposito
de la ga_otlna
Filtro de aire
Cebader
Sllenciador
Cubleda de la
lmpul._6n
Ca_
IMPORTANT: Este cortacesped viene AJustadofdelarueda
SIN ACEITE O GASOLINA en el motor. (encadaruede)
CUMPLE CON LOS REQUIS/TOS DE SEGURIDAO DE LA CPSC
Las segadoras a motor, que se conducen desde la parle de arras, rotatorias, Sears, cumplen
con los estAndares de seguddad del Arnedcan National Standards Institute y de ta U.S, Con.
sumor Product Safety Commission. I.a cuchilla gira cuando el motor est_ funcionando.
Cebador - bombea combustible adicional Cord6n arrancador - se usa para hacer
desde el cafoumdor al cilindro para uso arrancar el motor.
cuando se necesita hacer arrancar un motor Barra de control qua exige la prencia del
frlo, operador - tiene que sujstar.se abajo, junto
Palanca de control de la #mpu|s/dn - se usa con el mango, pare hacer arrancar el motor.
para enganchar la segadora para movimiento Sudltata pare parar el motor.
hacia adelanta impulsada a motor. 23
Laopemclbn de cualquier
segadora puede hacer que
salten objetos exlraRos denim
de sus ojos, Io que puede
producir dahos graves en dstos.
Siempre use anteojos de snguddad o
protecci_ para los ojos mientras opera su
segadora o cuando haga ajustes o
roparaciones. Recomendamos una mascara
de seguridad de visi6n amp, a, para uso
espejuelos o anteojos de seguddad
estandarte.
COMO USAR SU SEGADORA
VELOCIDAD DEL MOTOR
La velGcided del motor se establecib en la
fdbdca para un rendimiento bptimo. La
Velocidad no se puede ajustar.
CONTROL DE ZONA DEL MOTOR
_PRECAUCI(_N: Las regulaciones federales
exlgen que se inst_Je un control para el motor
en esta segadora para reducir a un minimo el
desgo de lesionarse deb_doal contacto con la
cuchilla. Por rdng_nmotivo b'ate de eliminar la
funcl6n del controldel operador. La cuchilla
gim cuando el motor estd funcionando.
• Su segadora viene equipada con una barra
de contmtes que exigen la presencia del
operador, Io que requiere que el operador
estd detrds del mango de ta segadora para
hacerta arrancar y opemde.
CONTROL DE LA IMPULSION
• La autoimpulsibnse controla al sujetar la
ban'a de control que exige la presencla del
operador hacia abajo en el mango y al
empujar la palanca de control de la
impulsibn hacia adelante basra que suene
=clic,"luego se suelta la palanca.
• Et mo,Amiento hacia adelanle parar_ cuando
la barm de controlque exige la pmsencia
del operador se suelta. Para parar el
movimiento hacia adelante sin parar el
motor, sue;Is la barm de controlque _0<igela
presencia del operador un poco hasta que
se desengonche el control de ta impulsi_.
Sujete la barra de controlque exige la
presencia del
oderador abajo en contra del mango para
continuar segando sin autoimpulsibn.
• Para mantener el control de la impulsibn
enganchade cuande se de vuelta en tas
esquinas, empuje el mango hacia abajo y
levante las ruedas delanteras fuem del
suelo al girar la segadora.
PARA AJUSTAR LA ALTURA DE
CORTE
Levante tas ruedas para el code bajo y baje
las ruedas para el corte alto., ajuste la altura
de corte para que se acomode a sus
requisitos. La posici6n del modio es la mojor
para la mayoria de los cdspedes.
• Para cambiar la altura de corte, empuje la
pelanca del ajustader hacia la ruede. Mueva
la rueda hacia ardba o hacia abajo de modo
que se acomode a sus requisitos.
Asegdrese que todas las ruedes queden
iguelmente ajustadas.
AVISO: El ajustador esta correctamente
colocado cuando las oreJasde la placa estdn
insertadas en el agujem del mango. Tambi_n,
los ajustes de 9 posiciones (si equipado)
perm_tenque el mango pueda set movido
entre las orejas de la placa.
Para uncodea;to, OmJasdela r
baJelasruedas
Pazauncorteba]o,levantelasruedas Mango
PARA CONVERTIR LA SEGADORA
Su segadora rue enviada lista para usarse
como anolchadera de capa vegetal. Para
converlir la a una opemci6n de ensacado:
SEGADORAS CON DESCARGA TRASERA
• Levantar la puerta trasem de onrlac_sped y
colocar los ganchos del arrnazbn de la
recolectora de hierba en los pasadores del
quido de la puerta.
• Para pasar a la opercai_ de
anolchamiento, remover [a recolectom de
hierba y cerrar la puerta trasera.
_,PRECAUCI(_N: No haga funcionar su
segadom sin el desviador de recortes o sin el
recogedor de c_sped, aprobados, an su tugar.
Nunca irate de operar la segadora cuando se
ha removido la puerta trasera o cuando est_
un poco abierta.
Pasador del c
Barrade controlqueexlgelapmsencladel operador
Controlde
Gancholateraldel
bastidordel r_,eder
Paraenganchar Controldela
_\ impul_ _deser_arx:hade24
Mangodel
bastidordel
recked,
de c_sped
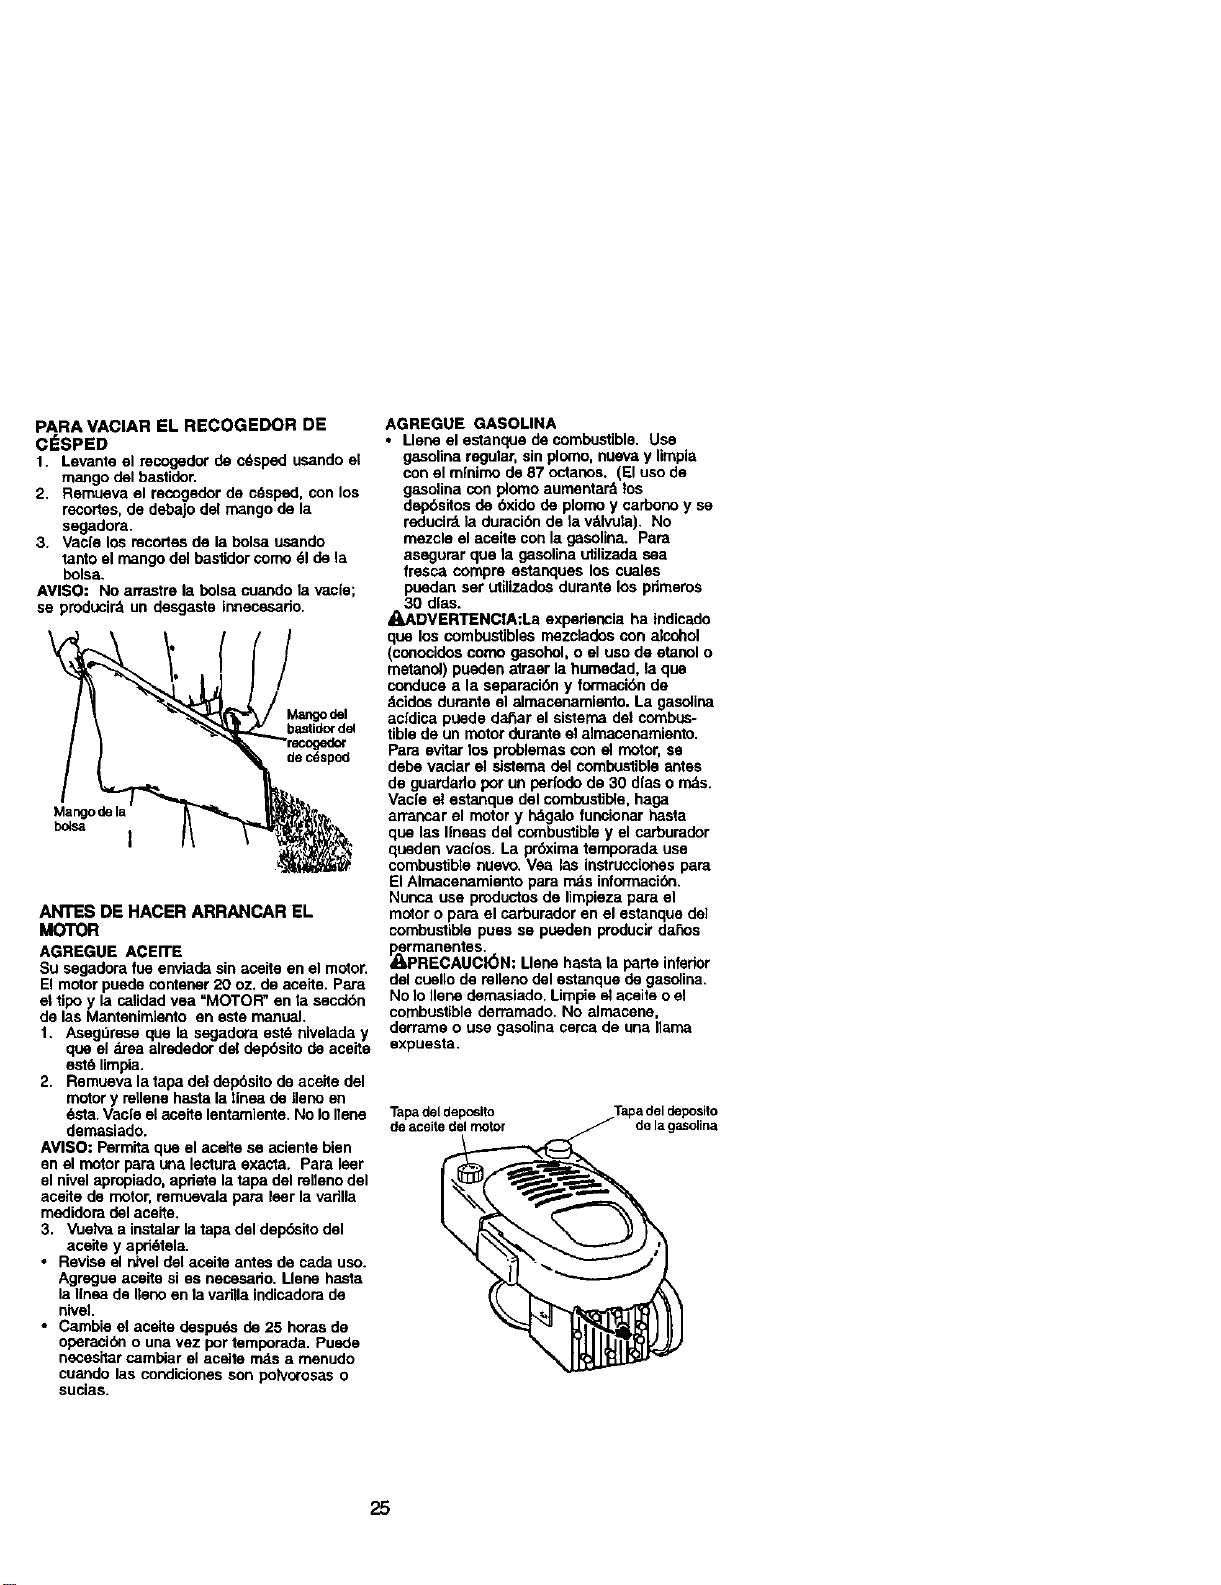
PARAVACIARELRECOGEDORDE
ClaSPED
1.Levanteelrecogedordec6spedusandoel
mangodelbastidor.
2. Remuevaelrecogedordec6sped,conlos
recortes,dedebaJodelmango de la
segadora.
3. Vacfe los recorles de la bolsa usando
tanto el mango del bastidor como 61de la
bolsa.
AVISO: No arrastre la bolsa cuando la vacle;
se producirA un desgaste innecesado.
/
ANTES DE HACER ARRANCAR EL
MOTOR
AGREGUE ACEITE
Su segadora fue enviade sin aceite en el motor.
El motor puede contener 20 oz. de aceite. Para
el lipo y la calidad yea =MOTOR" en la secct6n
de las Mantenimianto en este manual.
1. Asegdrese que la eegadora est_ nivelada y
que el drea alrededor del dep6sito de aceite
estd limpia.
2. Remueva la tapa del dep6sito de aceile del
motory rellene hasta la linea de llano en
6sta. Vac[e el aceite lentam]ente. No Io IIene
demasiado.
AVISO: Permita qee el aceite se aciente bien
en el motor para ana lectura exacta. Para leer
el nivel apropiado, apdste la tapa del relleno del
aceite de motor, remuevala para leer la varilla
medidora del aceite.
3. _Jelva a instalar la tapa del delxSsitodel
aceite y apd_tela.
• Revise el r_vel del acelte antes de cada uso.
Agregue aceite si ee necesado. Lleee hasta
la Ilnea de Ileno en la varilla indicadora de
nivel.
• Cambie el acelte despu_s de 25 horas de
opemcide o una vez por temporade. Puede
necesitar cambiar el acelte rods a menudo
cuando las condiciones son po_vorosaso
sucias.
AGREGUE GASOLINA
• Llene el estanque de combustible. Use
gasolina regular, sin plomo, nueva y limpia
con el mfnimo de 87 octanos. (El uso de
gasolina con plomo aumontar_ los
dep6sitos de 6xido de plomo y carbono y se
reduci_ la duraci6n de la v_lvula). No
mezcle el aceite con la gasolina. Pare
asegurar que la gasolina utilizada sea
fresca compre estanques los cuales
puedan ser utilizados dumnte los primeros
30 d[as.
_,ADVERTENCIA;La experiencia ha indicado
que los combustibles mozclados con alcohol
(conocidos coma gasohol, o el uso de etanol o
melanol) pueden atraer la humeded, la que
conduce a la eepamci6n y formaci6n de
dcidos durante el almacenamlanto. La gasolina
acfdica puede da_ar el sistema dst combus-
tible de un motor durante el almacenamiento.
Pare evitar los problemas con el molor, se
debe vaciar el sistema del combustible antes
de guardado por un pedodo de 30 dlas o rods.
Vacle el estanque del combustible, haga
arrancar el motor y hdgelo funcionar hasta
que las llneas del combustible y el carburador
queden vacios. La pr6xima temporada use
combustible nuevo. Vee las instruccianes pare
El Almacenamiento para rods informackYa.
Ncoca use produstos de limpieza para el
motor o para el carburador en el estanque de]
combustible pues se pueden producir dafios
permaneRtes.
_=PRECAUCI_N: Lleee hasta la parte inferior
del cuello de rstleno del estanque de gaselina.
No Io Ilene demasiado. Limpie el aceite o el
combustible derramado. No almacene,
derrame o use gasolina cerca de ana llama
expuesta.
Tapa del deposito
de aceite del motor de la gasollna
25
PARA HACER ARRANCAR EL MOTOR
NOTA; Dabide alas capes pmtectoras del
motor, una cantidad pequeSa de humo puede
ester presente durante el uso inicialdel
pmducto y se debe considerar normal.
1. Pare hacer arrancar un motor 1do, empuje
el cebader tres (3) VaCeSantes de tratado.
Empuje firmemente. Este paso
normalmente no es necesario cuande se
hace arrancar un motor qua ya ha estedo
funcionando per unos cuantos minutos.
2. Sujete la barta de controles que exigen la
presencia del operador abajo en el mango
y tire el mango del armncador
rztpidamente. No permita qua el cordbndel
arrancador se devuelva abruptamente.
PARA PARAR EL MOTOR
• Pare parer el motor, suelte la barm de
controles qua exigon la presencla del
operador.
AVISO: En climas n_s frios puede qua sea
necesado repetir los pesos del cebado. En
climas m_Lscalurosos el cebar demasiado
puede producir el ahogo y el motor no va a
arrancar. Si se ahoga el motor espere unos
cuantos minutos antes de tmtar de hacedo
arrancar y no repita los pesos del cebade.
CONSEJOS PARA SEGAR
• Bajo ciertas condiciones, tal como c_spsd
muy alto, puede sar nocesado el elevar la
altura del corte pare reducir el esfuerzo
necesado para empujar la segadora y pare
evitar sobrecargar el motor, dejando
montones de recortes de c_sped. Puede
qua sea necesado reducir la velocidad del
recorrido y/o haga funcionar la segadora
sobre el drea pot segunda vez.
• Para un corte muy pesado, reduzca el
ancho del code pesando parcielmente por
enelma del lugar anteriormente cortado y
siegue lentamente.
• Para un major ensacado del cesped y pare
la mayoda de las condiciones de code, la
velocided del motor dede ajustame a la
posici0n de r_pido.
• Cuando use una segadora con doscarga
trasera en c6sped h0medo y pesado, los
montones del cdsped cortado puede qua no
entrenen el recogedor de c_sped. Reduzca
la velocidad del recorddo (velocidad de
empuje) y/o haga funcionar la segadom
sobre el drea por segunde vez.
• Si queda una huella de cortes en el lado
derecha de una segadora con descarga
trasera, siegue en la direccibn en qua giran
las manillas del reloj, solapando un poco
pare recauder los mcortes en la pr6xima
pasada.
• Los poros en los recogedores de cdsped
de tela pueden Ilenarse con mugre y polvo
con el uso y los recogedores mcauderdn
menos c_specl. Pare eVitar _sto, rocle el
recogedor con la rnanguera de agua
regularmente y d_jelo secarse antes de
usarlo.
• Mantenga la parts supedor del motor,
atrededer del armncador, despejeda y sin
recortes de cdsped y paja. Esto ayudar_ el
ltujo del airs del motory extender_ su
duracibn.
CONSEJOS PARA $EGAR Y ACOLCHAR
IMPORTANTE: Para obtener el major
rendimeinto mantenga la caja de la segador a
sin acumlacion de cesped y basura. Vea
=LIMPIEZA" en seccion de Mantenimanto de
este manu_.
• La cuchilla acolchadora especial va a volver
26
a cortar los recortes de c6sped muchas
veces, y los reduce en tamai_o, de modo
qua si se caen en el c6sped se van a
dispesar entre 6ste y no se van a notar,
Tambidn, el cdsped acolchado sew a
deshacer r_pidamente entregando
substancias nutdtivas para el crisped.
Siempre acolche con la VelOCldaddel motor
(cuchilla) rods alia, puss as( se obtendr_tla
major accide de recorte de tas cuchillas.
• Evite cortar el cdsped cuando es16 mojado.
El cdsped mojado tiende a former montones
e intediere con la acci_ de acolchado. La
major hora pare segar el cdsped es
tempmno en la tarde. A esa hora _ste se ha
secado y el drea mcidn cort_da no quedard
expuesta al sol directo.
• Pare obtener los rnejores resultados, ajuste
la altura del corte de la segadora de modo
qua dsta corte solamente el tercio superior
de tas hojas de c6sped. En el caso de qua
el cesped haya crecido demasiado, puede
ser necesado ei elev_r la altura del code
para reducir et esfuerzo necesado pare
empujar la segadora y pare evitar
sobrecargar el motor, dejande montones de
recodes de c_sped. Pare un acolchamiento
muy pesado, reduzca el ancha del corte
pasando por encima del lugor antedormente
cortado y siegos lentarnente.
• Ciertos tipos de c6sped y sus condidones
pueden exigirqua un _rea tenga qua ser
acolchada per segunda vez pare esconder
completamente los recortes. Cuando se
haga el segundo code, siegue atravesedo o
en forma perpendicular ala pasada del
primer code.
• Cambie su patron de code de semana a
sernana. Siegue de node a sur una semana
y luego cambie de este a oeste la prbxtma
semana. Esto evitar_ qua el c6sped se
enrede y cambie de dimccibn.
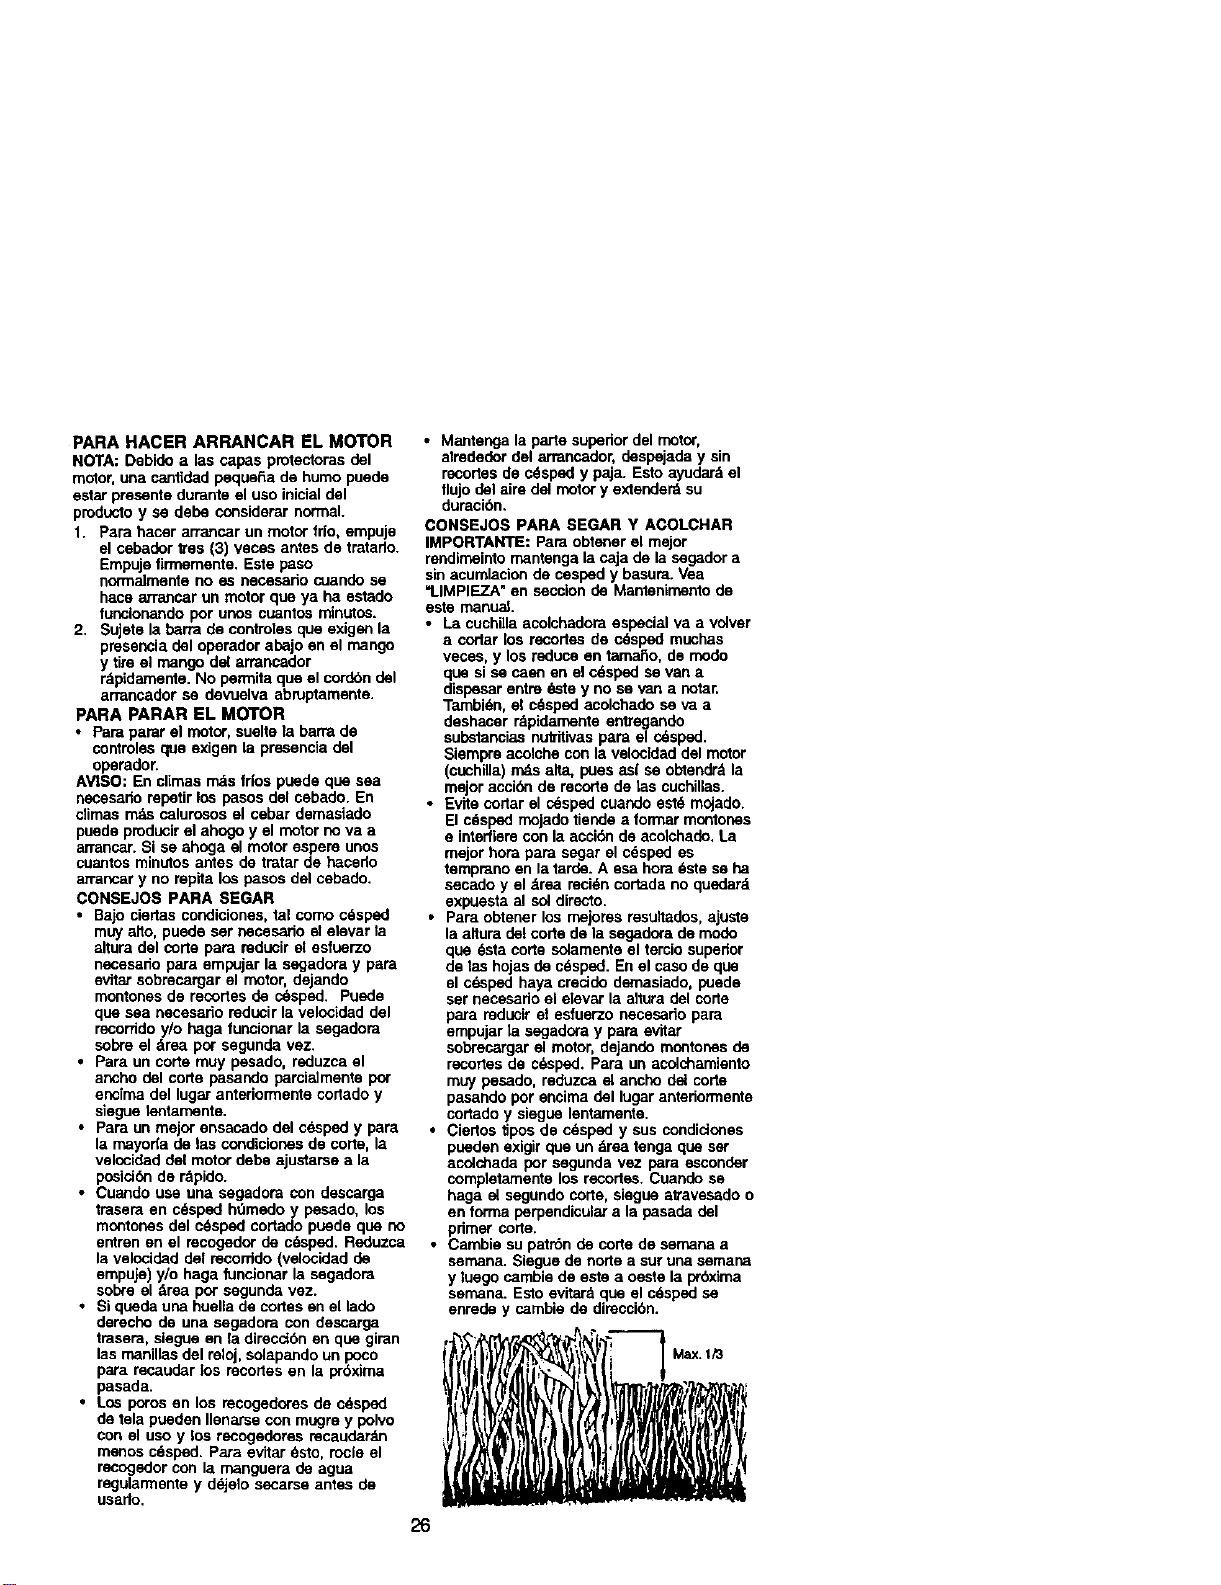
• f'__ _ =,..Max'ti3°_ ' !
PROGRAMADEMANTENIMIENTO
LLENE LAS FECHAS A MEDIDA
QUECOMPLETESUSERVICIOREQULAR
FECHASDESERVICIO
Rev]sar sl hay sujetadoms sue_tos 'V ' " "
Llmpiadt nspeccionar el recogedor de
c6_(=_ equ_eo) I/ t/ V°
Llmpiarla segadera i_
k_rdebaJodelacublertadelatnms-
mLm_ln(=,g_as conpoderp_u_or) !/
Revi_mr IM con-eas y ]as pote_sskT, pot-
t/
Revisar o/afllar/_m_ar la cuchlna I//3
rabladelubdcadbn _
LlmplarlaI_tedadrecargat
(segederasconarranqueel6otrico) I_ $/4
Revisarelniveqdotacelte _1
Cambiarelaceltedelmotor I_1
Lirnplarelfll_odealre {k/2
Ins_ecotonarelslleaclad_ ft/
Limplar c_camblarlabuj_a I_
Can_larelcartuchodepapal delfiltro 11_2
deaim
1 - _ rn_ a n_nudo cuando _ openPba)o _ peead_ 0 en arnt:_ntes co_ alias te,mper_ura_
2 * DQteaJn,k_o mdaa menudocuando eoopexeemc_r_dick_ee suctM 0 polvo_c_m.
3 - Carnble las=Jddlkm rn_sa rnemudocuando sklgue en ten_o arergo,
4 - Ca,'gar por 48 horamal f_ de latemporad&
RECOMENDAClONES GENERALES
La garantfa de esta segadora no cubre los
artlculos que han estado sujetos al abuso o a
la negligencia del operador, Para recibirrode el
valor de la gamntla, el operador tieua qua
mantener la segadora seg_n las instrucciouas
descritas en este manual.
Hay algunos ajustes qua se tienen que hacer
en forma pedc_lica para poder mantener su
unidad adecuadarnente,
Todos los ajustes en la secci6n de Servicio y
Ajustes de este manual tienen qua set
revisados por Io rnenos un vez por cada
tempomda.
• Una vez al afio, cambie la buj[a, limp_eo
cambie el elemento del filtrode aim y revise
al la cuchilla est_ desgastada. Una bujla
nuava y un elemento del filtm de aim limplo/
nuavo aseguran la mezcla de alre-
combuslible adecuada y ayudan a qua su
motor lunclone meJory qua dure rods.
• Siga el progmma de maotenimiento en este
manual.
ANTES DE CADA USO
I. Revise el nivel del ace_tedel motor.
2. Revise si hay sujetadores sueltos.
LUBRICACI(_N
Mantenga launidad bien lubdcada (yea la
"rABLA DE LUBRICACI_N').
27
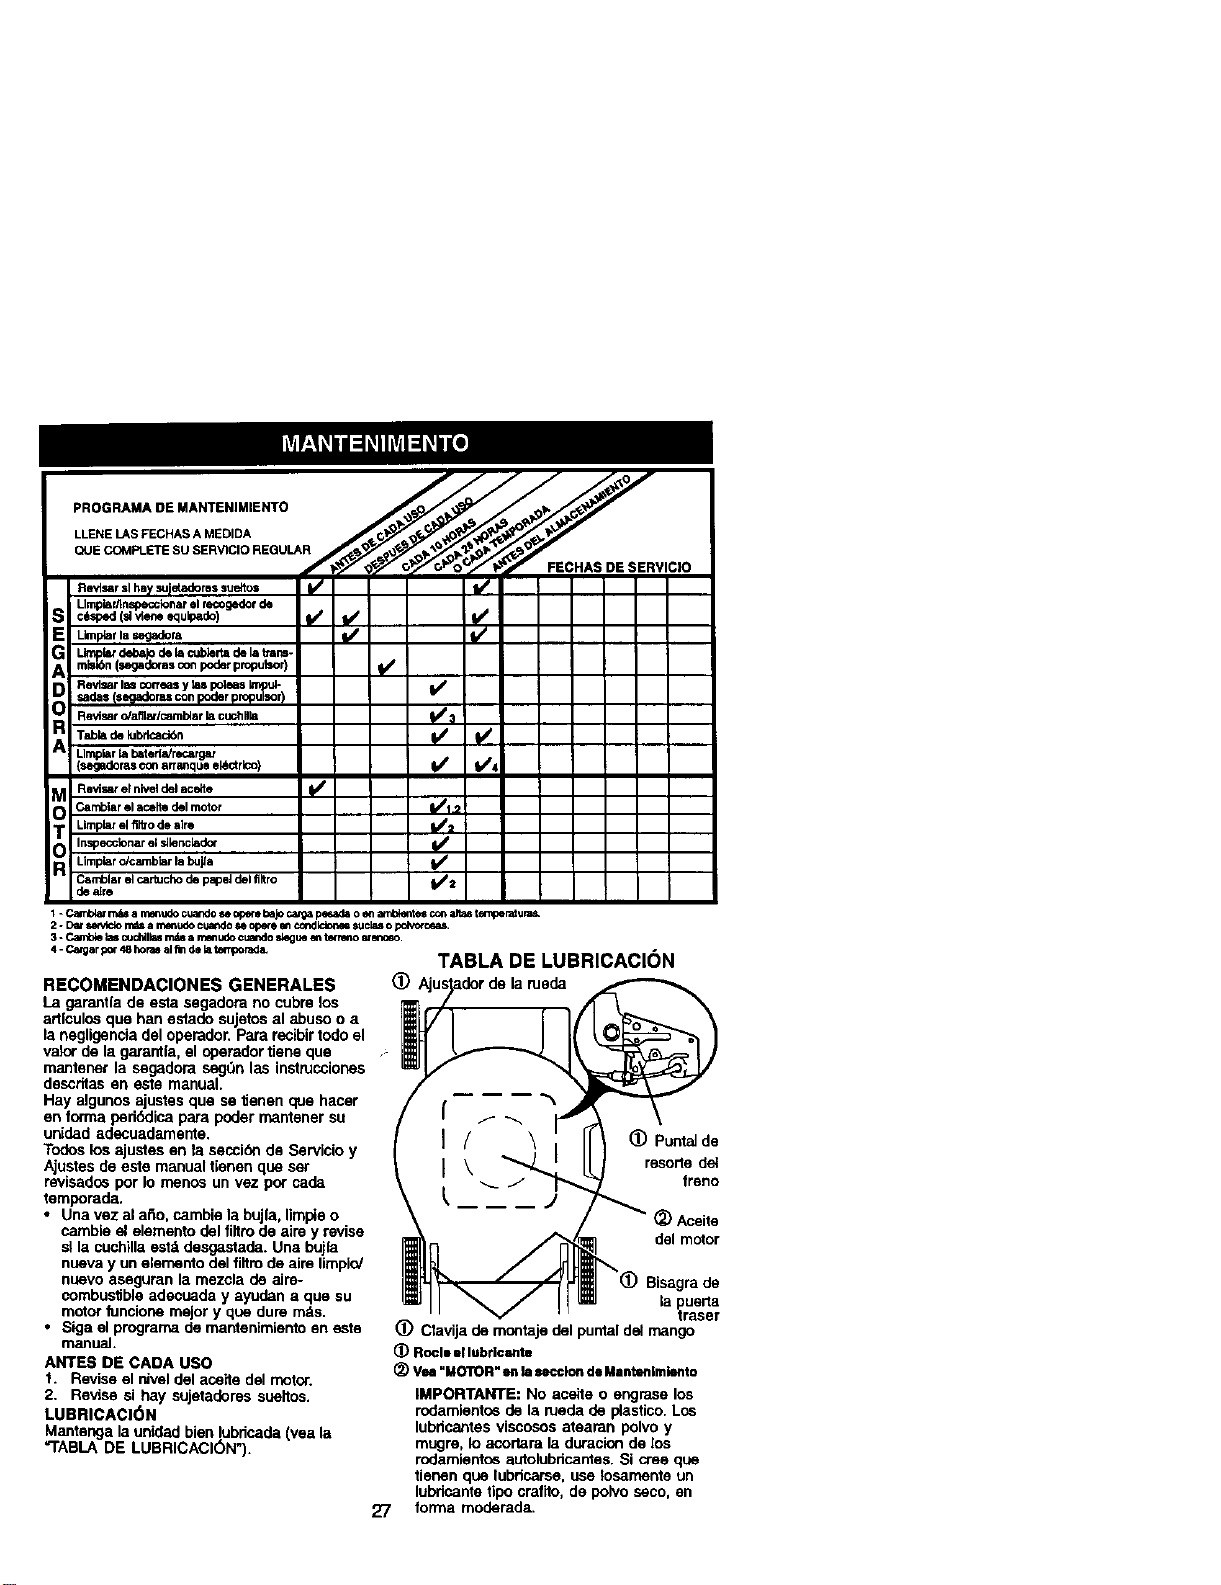
TABLA DE LUBRICACI(_N
(_ Punt_ de
resorte dal
freno
Aceite
del motor
Bis_gra de
la puerta
fraser
(_ CIavija de montaje del puotal dal mango
(_ Roclm_1lubrlcant_
_) Veto"MOTOR"enlasecclondeMantenlmlento
IMPORTANTE: No acalte o engrase los
rodamientos de la rueda de plastico. Los
lubdcantes viscosos atearan polvo y
mugre, lo acortara la duracion de los
rodamientos autolubdcantes. Si cree qua
tienen que lubricarse, use losamente un
lubricants tipo crafito, de polvo seco, en
forrna moderada,
ESPECIRCACIONES DEL PRODUCTO
_IOMERO DE SERtE:
=ECHA DE COMPRA:
_,APACIDADYT]PO DE GASOLINA: 1.5 CUARTOS REGULAR SIN PLOMO
TIPO DE ACEITE IAPI-SF-SJ): SAE 30 (SOBRE 32°F); SAE 5W-30 (DEBAJO 32_F)
3APACIDAD DE ACEITE: 20 OZ. DE CAFACIDAD
BUJ[A(ABERTU RA: .045") CHAMPION FU19{M4
FORSI(_N DEL PERNO DE LA CUCHILIJ_ 35-40 F_ LBS.
El num_o del nodelo y el de sede se encuentran en la calcomania adjunta a la parts tmsera
de la caja de la segadora. Debe registrar tanto el numdro de sede come la fecha de compra y
mantongalos en un lugar seguro para refenc[a en el fvluro.
SEGADORA
Siempre observe las reglas de seguridad
cuando haga el mantenimiento,
LLANTAS
• Mantenga las Ilantas eln gasolir,a, aceite o
substanclas qu|micas para control de
insectos qua pueden daRar la goma,
• Evite los tocones, las piedras, tas gdelas
pmfundas, los objetos afilados y otros
peligms que pueden da_ar alas Ilantas,
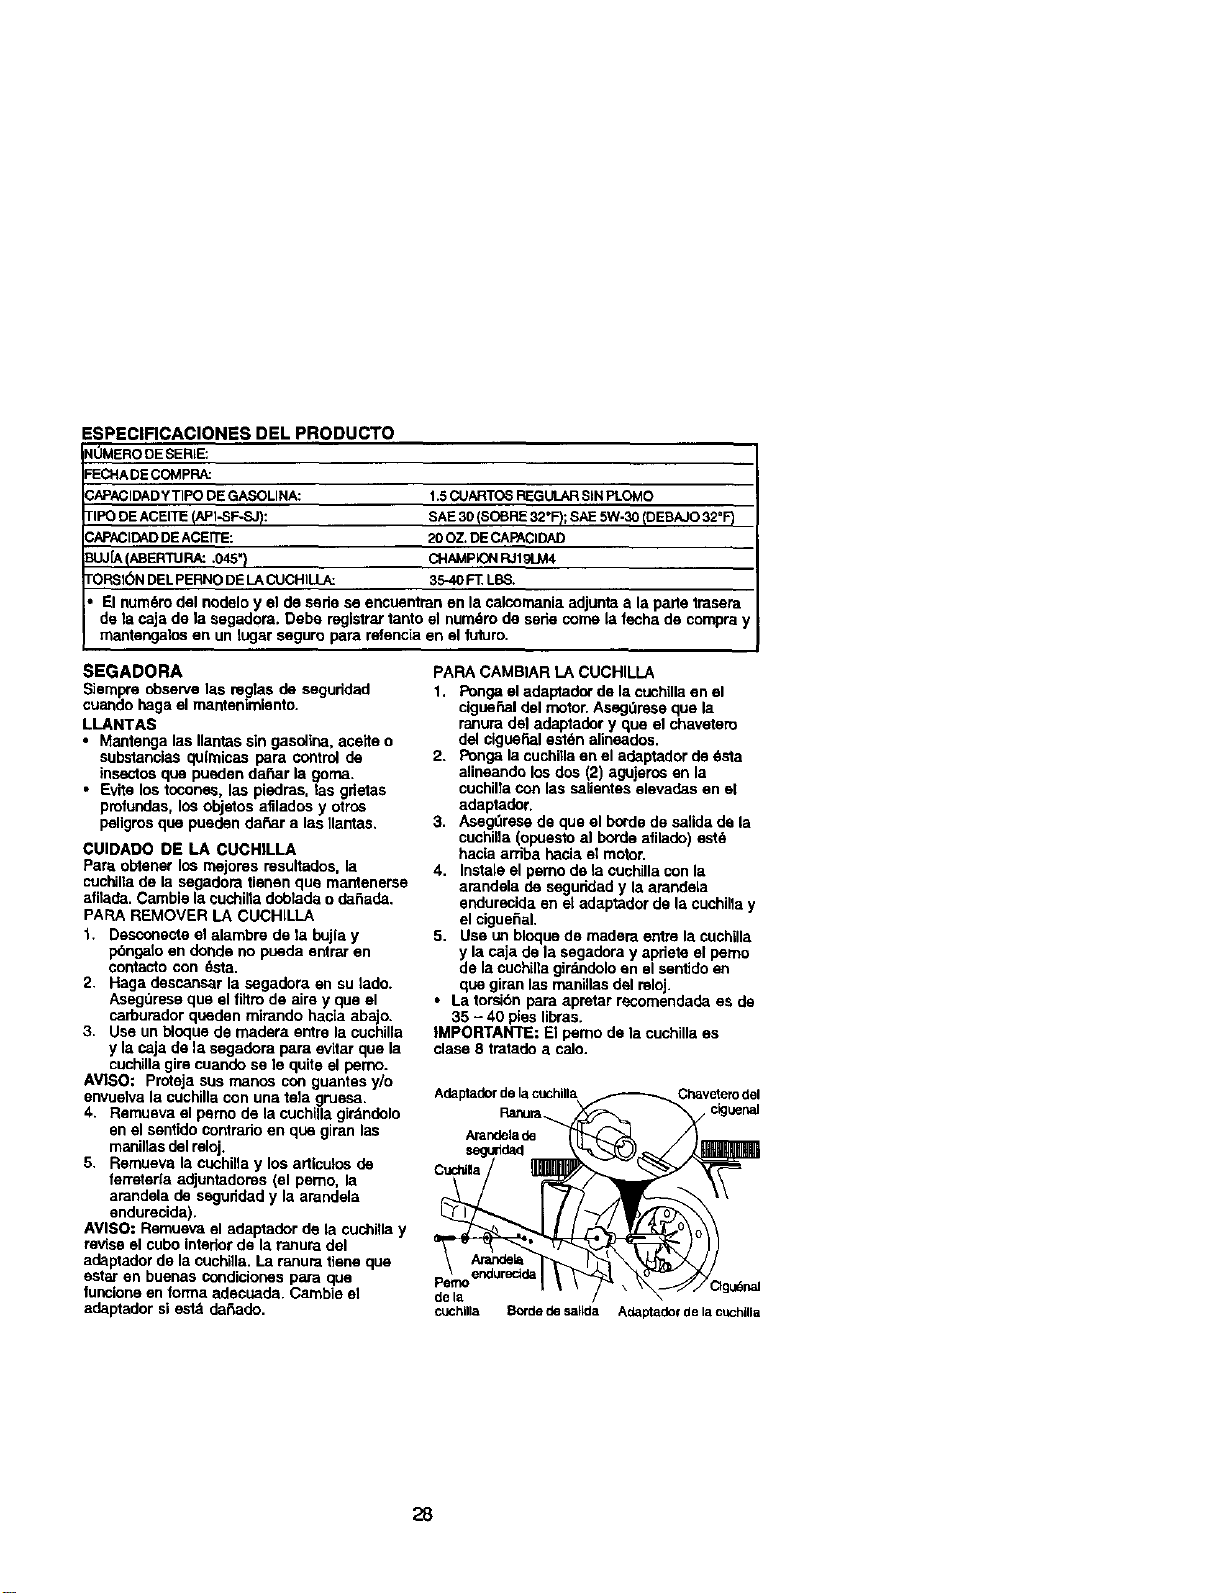
CUIDADO DE LA CUCHILLA
Pars obtener los mejores resultados, la
cuchilla de la segadom tienen qua mantenerse
afnada. Cambie la cuchilta ddolada o daRada.
PARA REMOVER LA CUCHILLA
1. Desconecte el alambre de ta bujia y
pbngato en donde no pueda sntrar en
contacto con dsta.
2. Haga descansar la segadora en su tado.
AsegOrese que el filtm de airs y que el
carbumdor queden mirando hac[a abajo.
3. Use un bloque de readers entre la cuchilla
y la caja de la segadom pars ev'[tarque la
cuchilla gire cuando se le quits el pemo.
AVISO: proteja sus manos con guantes y/o
envueiva la cuchilla con una tela gnJesa.
4.. Remueva el perno de la cuchilla girdndolo
en el sentido contrario en que giran las
m_iltas del reloj.
5. Remueva la cuchilla y los articulos de
ferreterfa adjuntadores (el pemo, la
arandela de seguiidad y la arandela
endurecida).
AVISO: Rernueva el adaptador de la cuchilla y
revtseel cubo interior de la ranura del
adaptador de la cuchilla. La ranura tiene que
estar en buenas condiciones para que
tuncione en forms adecuada. Cambie st
adaptador si estd daRado.
PARA CAMBIAR LA CUCHILLA
1, Ponga el adaptador de la cuchilla en el
cigueRal del motor. Asegdrese que la
ranura del adaptader y que el chavetero
del cigueSal estdn alineados.
2. Ponga la cuchitlaen el adaptador de _sta
alineando los dos (2) _,gujeros en la
cuchilfa con las salientes elevades en el
adaptador,
3. Asegdrese de que el borde de salida de la
cuchilla (opuesto el horde afilado) estd
hacia arriba hacia el motor.
4.. Instals el pemo de la cuchilla con la
arandela de seguddad y la arandela
endurecida en eLadaptador de la cuchilla y
elcigueRel.
5. Use u_ bloque de readers entre la cuchilla
y la caja de la segadora y apdete el pemo
de la cuch[lla girdndolo en el sentido en
que giran las manillas del reloj.
• La torsi6n para apretar recomendada es de
35 - 40 pies libras.
IMPORTANTE: El pemo de la cuchilla es
class 8 tratado a calo.
AdaptadordeIRa_ cuchilla Chaveterodel
dela
cuchilla _orde desaHda Adeptado¢delacuchllla
28
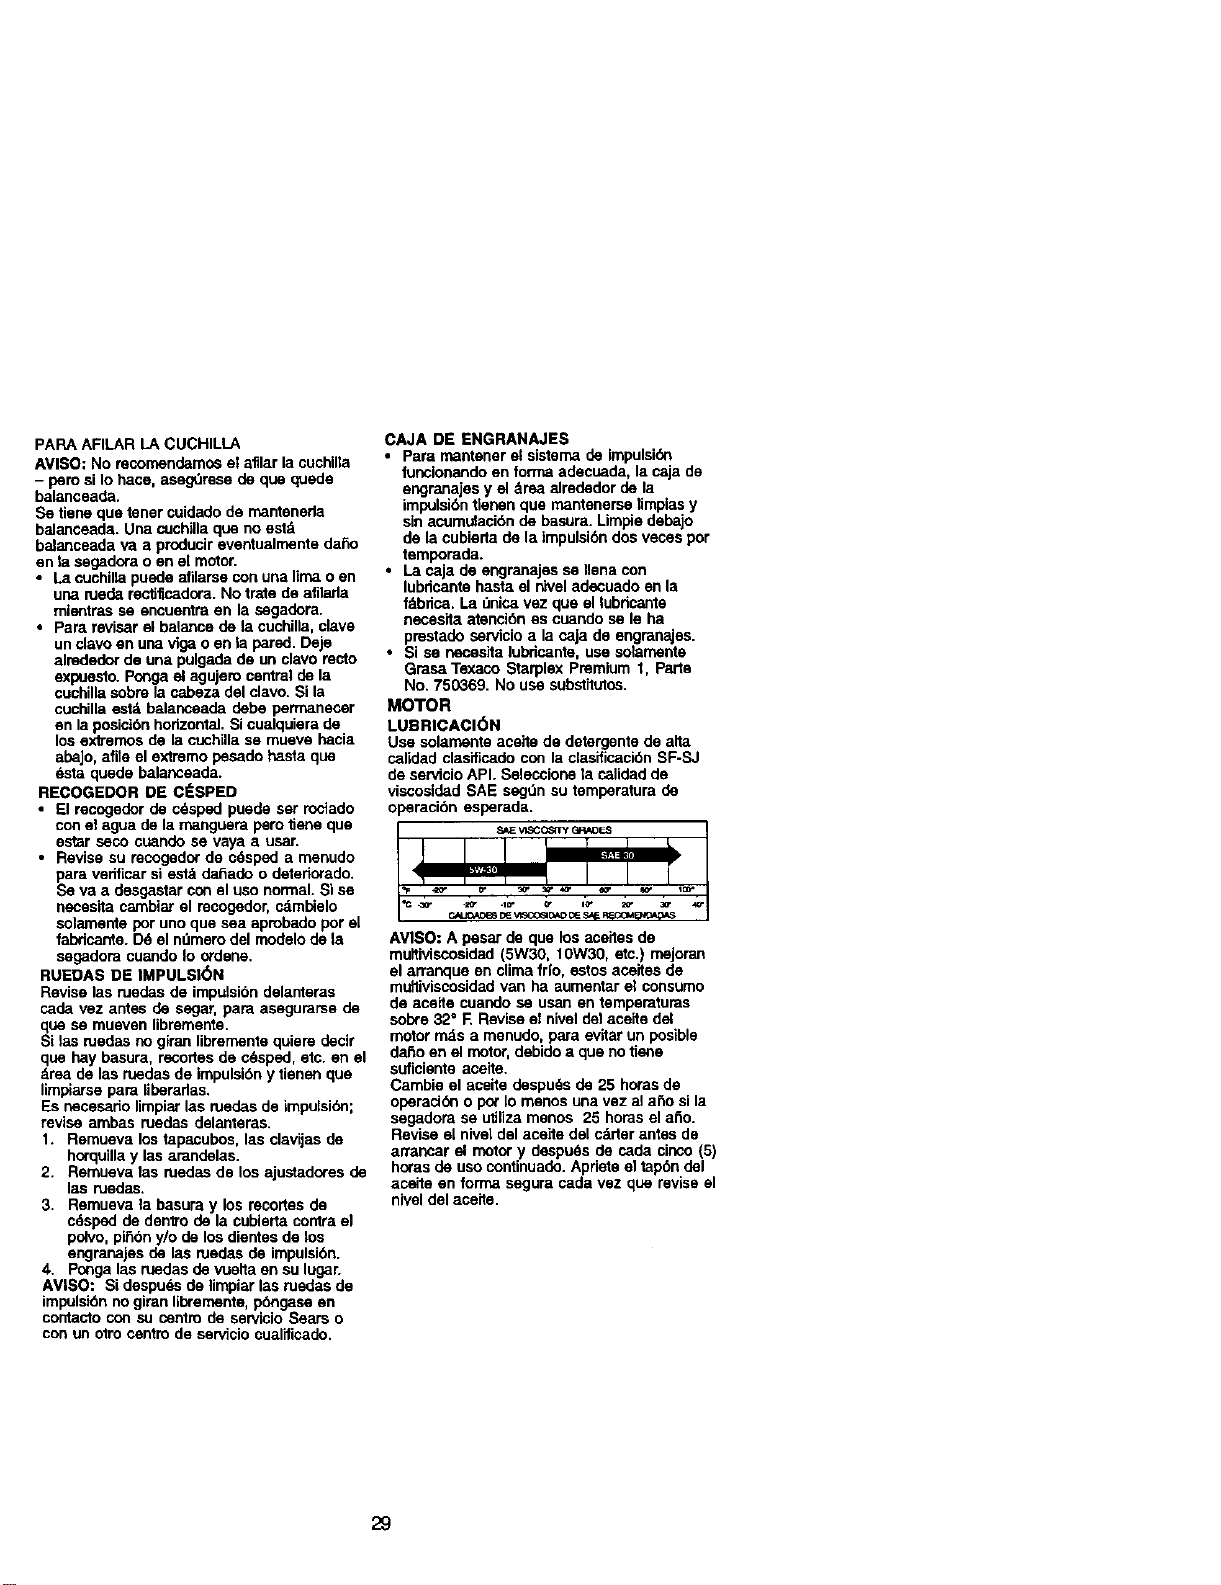
PARA AFILAR LA CUCHILLA
AVISO: No recornendamos et afllar la cuchilla
- pare si Io hace, aseg0rese de que quede
balanceade.
Se tiene que tener cuidado de manteneda
balanceada. Una cuchilla que no estA
balanceada va a producir eventualrnente da_o
en la segadora o en el motor.
• La cuchilla puede afilarse con una lima o en
una luede recUficadora. No irate de afilada
mientras se encuentra en la segadora.
• Para revisar el balance de la cuchilla, clave
un clavo en una viga o en ta pared. Deje
alrededor de una pulgada de un clavo recto
expuesto. Ponga el agujero central de la
cuchilla sobre la cabeza del clavo. Si la
cuchilla es_ balanceada debe perrnanecer
en la posicibn horizontal. Si cuelquiera de
los extremos de la cuchilla se mueve becia
abaJo,afile el extremo pasado besta que
Asta quede balanceada.
RECOGEDOR DE ClaSPED
• El recogedor de cAsped puede ser rociado
con el agua de la manguera pero tiene que
estar seco cuando se vaya a usar.
• Revise su recogedor de c_spad a menudo
para verificar siestA dafiade o detedorado.
Se va a desgastar con el uso normal. Si se
nesesita cambiar el recogedor, cambielo
solamente par uno que sea aprobedo par el
fabdcante. D6 el ndmero del modelo de la
segadora cuando Io ordene.
RUEDAS DE IMPULSK_N
Revise las ruedas de impulsibn delanteras
cade vez antes de segar, pare asegurarse de
que se mueven libremente.
Si las ruedes no giran libremente quiere declr
que bay basura, rscortes de cAsped, etc. en el
Area de las ruedas de impulsi6n y tlenen que
limpiarse para liberadas.
Es necesedo limpiar las ruedas de impulsibn;
revise ambas ruedas delanteras.
1. Remueva los tapacubos, las clavijas de
horquilla y las arandelas.
2. Remueva las ruedas de los ajustadores de
las ruedas.
3. Remueva la basura y los recortes de
cAsped de denvo de la cublerta contra el
polvo, piSbn y/o de los dientes de los
engranajes de las ruedas de impulsibn.
4. Ponga las ruedas de vuelta en su lugar.
AVlSO: Si despuds de limpiar las medas de
impulsi6n no giran libremente, pbngase en
contanto con su centro de servicio Sears o
con un otro centro de seeAcio cualificado.
CAJA DE ENGRANAJES
• Para rnantener el sistema de impulsi_'_
funcionando en forma adecuada, la caja de
engranajes y el Area alrededor de la
impalsibn tlenen que mantenerse timpias y
sin acumu_ackSnde besura. Limpie debejo
de la cubierta de la lmpulsibn dos veces par
temporade.
• La caja de engranajes se Ilena con
lubdcante besta el rib/el adecuado en la
fAbdca. La dnica vez que el lubricante
neces'_a atencibn es cuando se le ha
pmstado servicio a la caja de engranajes.
• Si se necesita lubdcante, use solamente
Gmsa Texaco Starplex Premium 1, Parte
No. 750369. No use substitutos.
MOTOR
LUBRICACI(_N
Use solamente aceite de detergente de alta
calidad clas'dicedocon la clasificaci(_nSF-SJ
de servicio API. Seleccione la calidad de
viscosided SAE segOn su temparatura de
oparacibn esparada.
AV1SO: A pesar de que los aceites de
multiviscosidad (5W30, 10W30, etc.) mejoran
el arranque en clima fr[o, estos aceltes de
muttiviscosidad van ha aumentar el consumo
de acelte cuando se usen en temperaturas
sobre 32° F. Revise el nivel del aceite del
motor mAs a menudo, para evitar un posible
daRo en el motor,debido a que no t_one
suficiente aceite.
Cambie el aceite despuAs de 25 horas de
oparackSno po_ Io menos una vez al aRo si la
segadom se u_liza menos 25 horas el ano.
Revise el nivet del acede del carter antes de
arrancar el motor y despuAs de cada cinco (5)
horas de uso continuado. Apdete el tapbn del
acelte en forma segura cada ves que revise el
nivel del aceite.
29

PAPA CAMBtAR EL ACEITE DIZL MOTOR
AVISO: Antes de inclinar la segadora pare
drenar el aceite, drene el tanque de combus-
tible haciendo cotter el motor hasta qua el
tanque est6 vacio.
1. Desconecte e! alambre de la bujia y
p6ngalo de modo que no pueda entrar en
contacto con 6sta.
2. Remueva latapa dai depbsito del aceite;
dejela a un lado en una supedicie Utopia.
3. incline la cortadora de c_sped por este
costado tal como se muestra y purgue el
acaite en un recipiente id6neo. Mueva la
segadora de atrds para adelante para
remover todo el aceite qua se haya
quededo alrapado dentro del motor.
4. Limpie todo el aceite dermmado en la
segadora yen el lade del motor.
5. Rellene el motor con aceite. (Vea =PAPA
AGREGAR EL ACEITE" en la seccibn de
Operaci(_n de este manual.)
6. Vuelva a conectar el alambre de la bujfa a
dsta.
Erlvase
FILTRO DE AIRE
Su motor puede sufrir averlas y funcionar de
manem incorrenta con un filtro del airs sucio.
Sustituir el papal del carfucho una vez ai a5o o
tins 100 horas de funcionamiento, rnds a
menudo ai se utiliza en condiciones de
suciedad y polvo particulares. No lave el filtm
de aire.
PARA CAMBIAR EL FILTRO DE AIRE
1. Remueva el filtro de aim girdndolo en el
sentido en qua glrela de las mannlas del
reloj para apretade, basra el tope, y retlrelo
de] collar.
2. Remueva el filtm de la parle interiorde la
cubierta.
3. Limple la parte interior de la cublerta y el
collar para remover toda acumulacibn de
mugre.
4. Inserte el filtro nuevo en la cubierta.
5. Ponga la cubierta det fittro de aire dentin
dai collar alineando la oreja con la ranura.
6. Empuje la cubierta hacia adentro y gfraia
en el sentido contmrio de lasmanillas del
relojpara apretada.
Colar
i _razadera
Ranura
Gire en el sentldo a 1as manillas del
relcj para
roar
Filtrode aim
Glreen
31sentldo
contrado las rnar_llas
Cubierta del filtro de aim del reloJpara apreLar
SILENCIADOR
Inspeccione y cambie el snenciador ai est&
corroido puede producir un peligro de incendio
y/o daSo.
BUJJAS
Cambie las bujlas ai comienzo de cada
tempomda de slega o despuds de cada 100
horas de operacibn, Io qua suceda pdrnero. El
tipo de bujla y el ajuste de la abertura
aparacen en "ESPECIFICACIONES DEL
PRODUCTO" secclbn de este manual.
LIMPIEZA
IMPORTANTE: Para obtener el major
rendimlento, mantenga la caja de la segadora
sin acumulaclon de cesped y basura. Limpin la
parle de abajo de su segadora despues de
cada uso.
_PRECAUCI(_N: Desconecte el alambre de
la bujla y pdngalo an donde no pueda entrar
en contacto con 6sta.
• Ltmpie la parle infedorde su segadora
raspdndela para remover la acumulaci6n de
c6sped y basura.
• Limpie el motor a menudo para avitar qua
se acumule la basura. Un motor tapado
funclona rn_s caiienta y se acorta su
duracl6n.
• Mantenga las superficies pulides y las
ruedas sin gasolina, aceite, etc.
• No recomendarnos el uso de una manguera
de jardln para limpiar la segadora a menos
qua el sistema el_ctdco, el silenclader, el
filtro de aim y el carburador asterntapados
para evitar qua les entre el agua. El agua en
el motor puede acorfar la duracibn de _ste.
LIMPIE DEBAJO DE LA CUBIERTA DE LA
IMPULSION
Ltmpiedebajo de la cubierta de la impulslbn
pot Io menos dos veces cada temporada.
Raspe debajo de la cubierta con un cuchillo
para masnla o con una herramienta parecida,
para remover toda acumulack_n de c6sped o
basura en la parle lnfedor de ta cubierta de la
impulsi6n.
3O
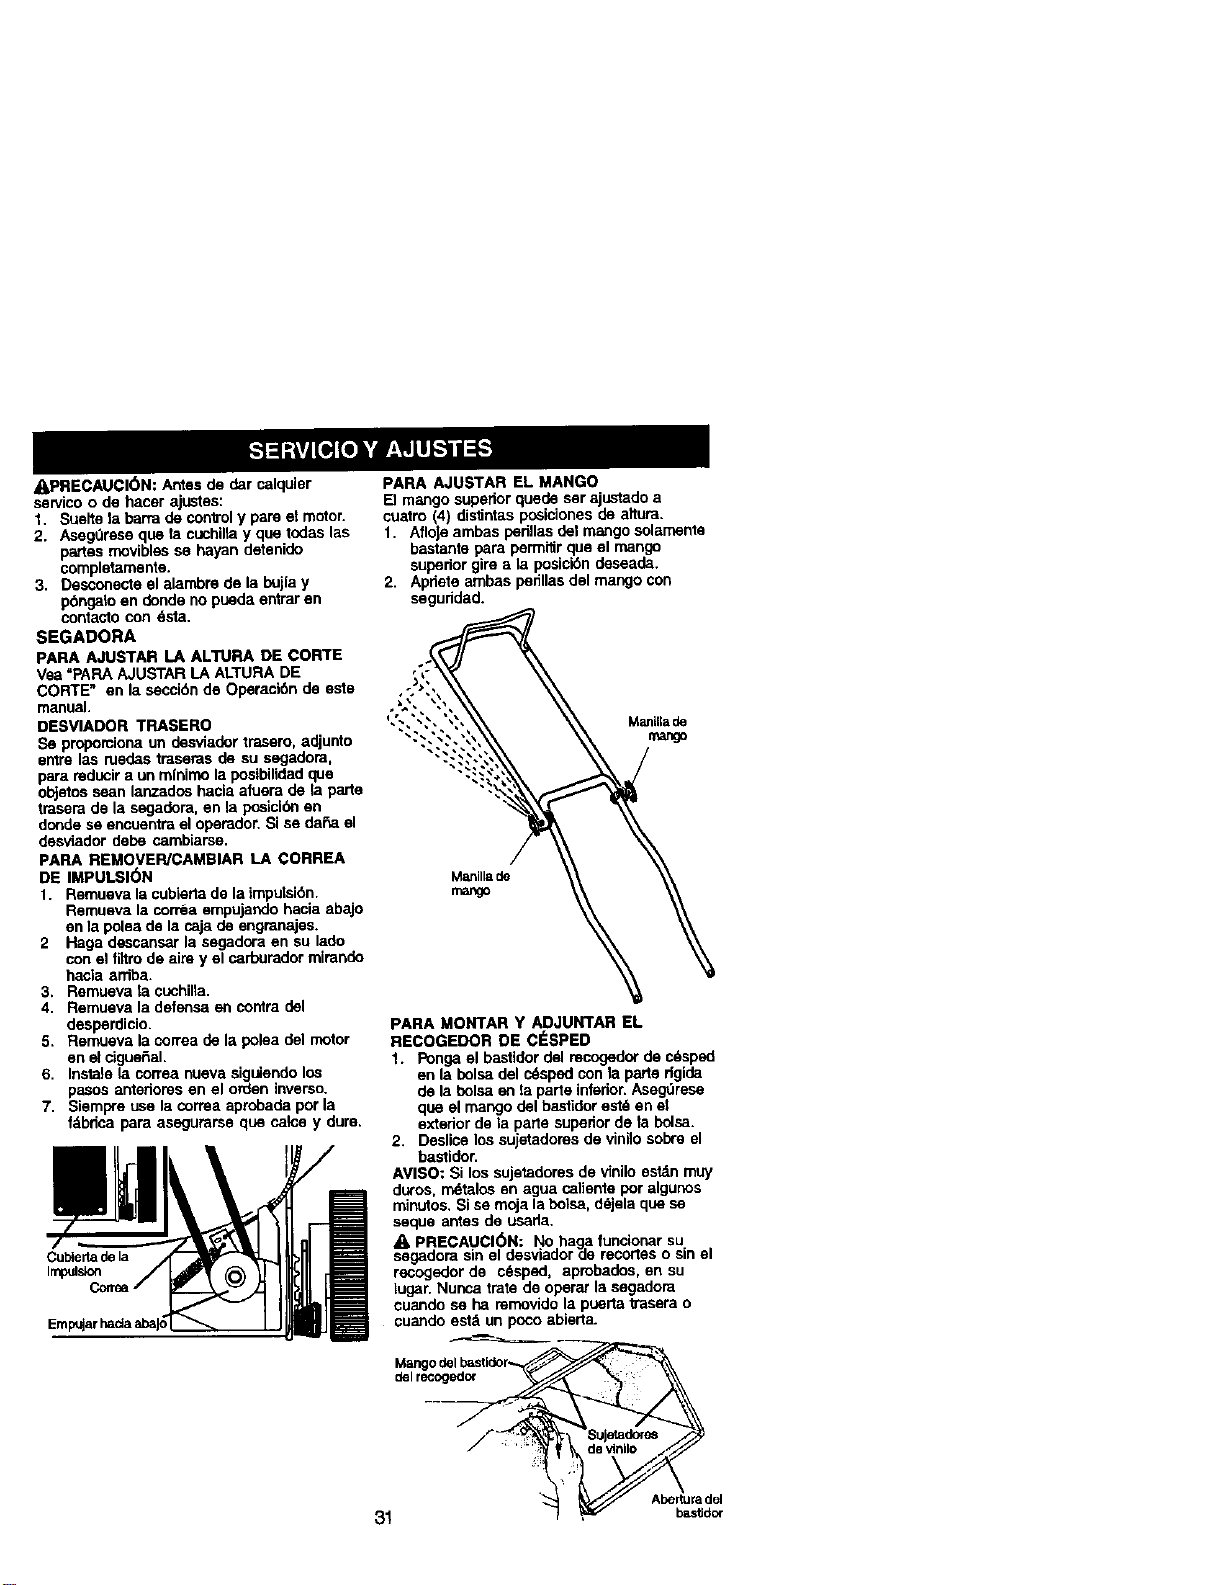
_I,PRECAUCl6N: Antes de dar calquier
sewico o de hacer ajustes:
1. Suelte la barra de conltol y pare el motor.
2. AsegQrese qos ta cuchina y que todas las
partes movibles se hayan detenido
completamante.
3. Desconecte el alambre de la bujla y
pbngelo an dende no puede entrar en
contacto con dsta.
SEGADORA
PARA AJUSTAR LA AL'_JRA DE CORTE
Vea =PAPA AJUSTAR LA ALTURA DE
CORTE" en la secci6n de Operaci6n de este
manuel.
DESVIADOR "FPASERO
Se proporciona un desviador trasero, adjunto
entre las ruedas traseras de su segadom,
para mducir a un mlnimo la poelbilidad que
objetos sean lanzados hacia afuera de la parte
trasera de la segadora, en la peelcibn an
donde se encuentra el opemdor. Si se da_a el
desviador dede cambiarse.
PARA REMOVER/CAMBIAR LA CORREA
DE IMPULSION
1. Remueva la cubierta de la imputsibn.
Remueva la cornta empujando hacia abajo
en la polea de la caja de engranajes.
2 Haga descansar la segadora en su lado
con el filtro de aim y el carburador mirando
hacla ardba.
3. Remueva la cuchilla.
4. Remueva la defensa en contra del
desperdicio.
5. Remueva la correa de la polea del motor
en el cigueRal.
6. Instale la correa nueva siguiendo los
pasos anteriores en el orden inverso.
7. Siempre use la correa aprobada per la
fdbdca para asegurarse que celce y dure.
Cubtertadela
Irr,puJs_on
PARA AJUSTAR EL MANGO
[] mango superior quede ser ajustado a
cuatro (4) dislJntaspoelciones de a;lum.
1. AtloJeambas pedllas del mango solamente
bastante para permitir que el mango
superior gire a la pesici6n deseade.
2. Apriete ambas perillas del mango con
seguddad.
Manlltade
mango
Manillade
mango
PARA MONTAR Y ADJUNTAR EL
RECOGEDOR DE ClaSPED
1. Ponga el bastldor del recogedor de c_sped
en la bolsa del c_sped con la parte dgide
de la bolsa an ta parte inferior.Asegt_rese
que el mango del bastidor est_ en e_
exterior de la parte supedor de ta bolsa.
2. Deslice los sujetadoms de vinilo sobre el
bastidor.
AVISO: Si los sujetadores de vinilo estdn muy
duros m_telos en agua osliente per elgunos
minutos. Si se moja la bolsa, ddje a que se
seque antes de usarla.
_, PRECAUCI(_N: No haga.funcionar su
segadora sin el desviador _le recortes o sin el
recogedor de cdsped, aprobados, en su
lugar. Nunca trate de operar la segadora
cuando se ha mmovido la puerta trasera o
cuando est& un poco ablerta.
Mangode_ -
del recog_ _+
/ _,v). _Je_doms /'/,_
/ " ':_ devtnilo , i///
31 w/ basUdor
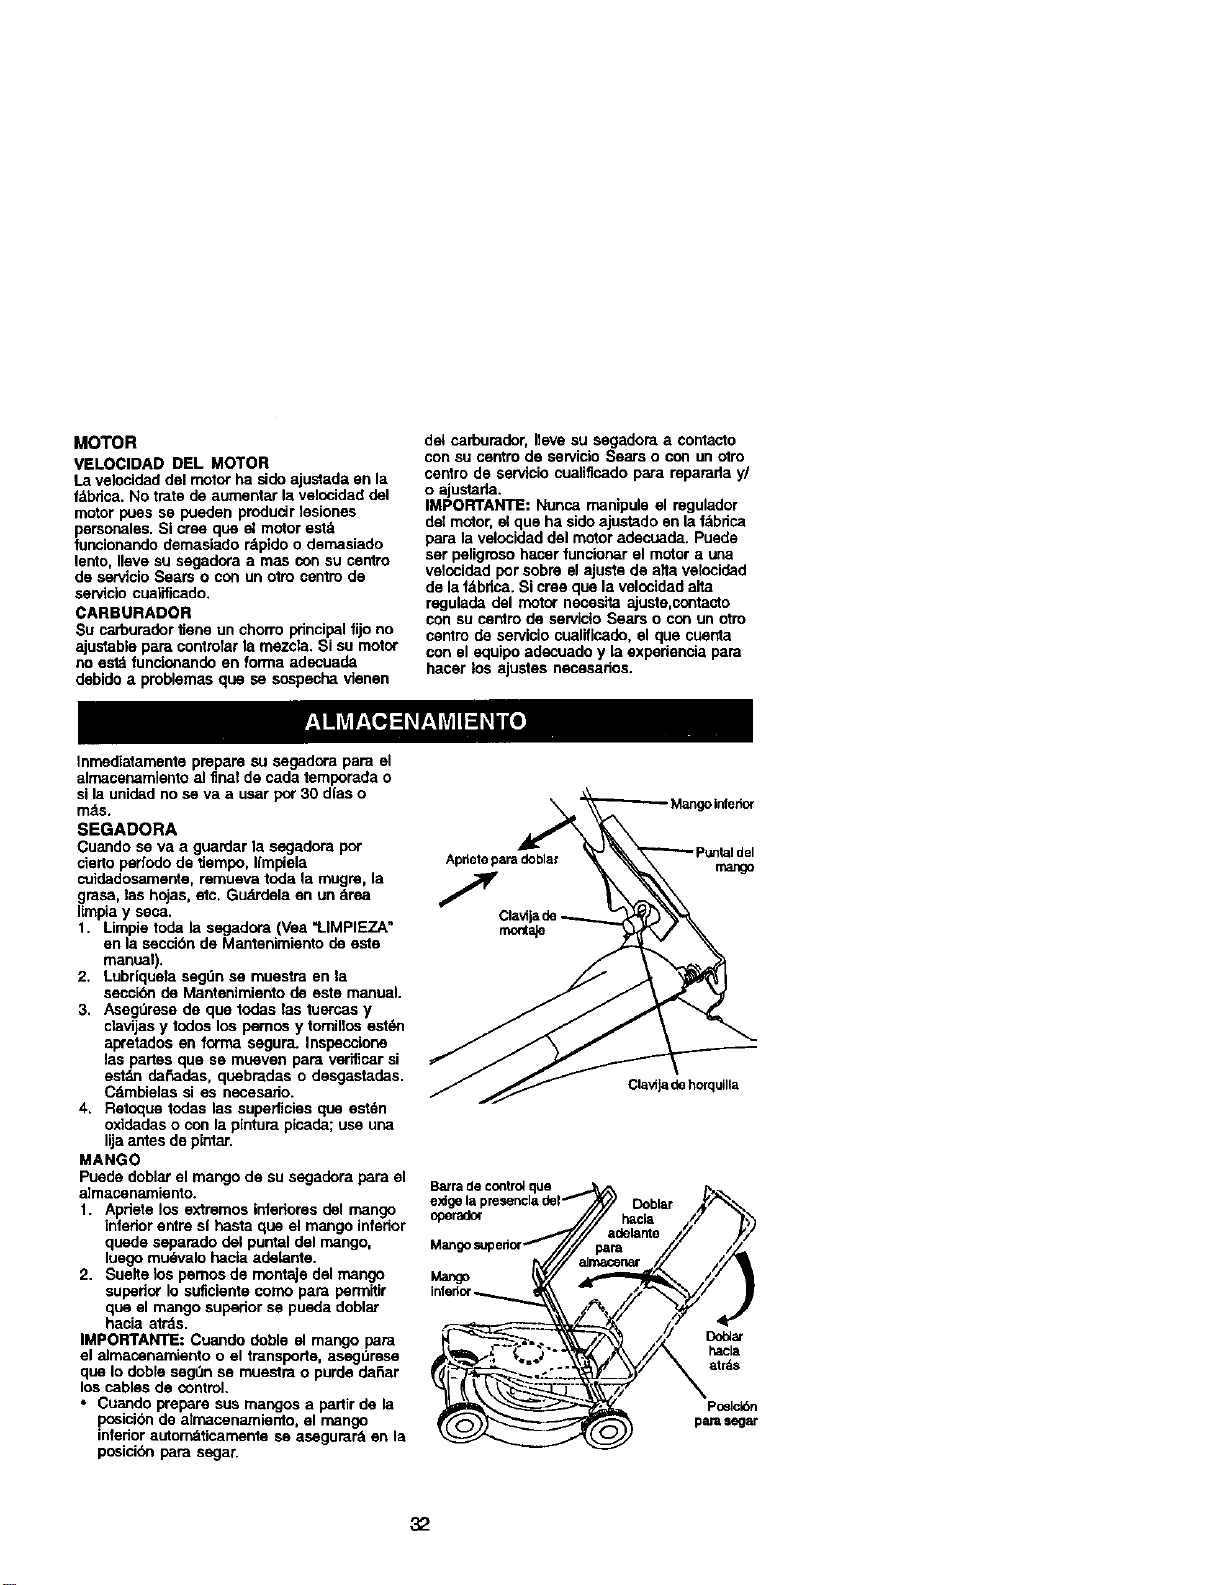
MOTOR
VELOCIDAD DEL MOTOR
La velocidad del motor ha side ajustada en la
f_tbrica.No tmte de aumentar la velocidad del
motor pues se pueden producir lesiones
personales. Si cree que el motor est_
funcionando dernasiado r_pido o demasiado
lento, Ileve su segadora a mas con su centro
de se,'vicio Sears o con un otro centro de
servtcio cualificado.
CARBURADOR
Su carburador rene un chorro principal fijono
ajustable para contmtar la mezcla. Si su motor
no estd funcionando en forma adecuada
debido a problemas que se sospecha vienen
del carburader, Ileve su segadom a contacto
con su centro de servicio Sears o con un otro
centro de servicio cualificado para reparade y/
o ajustade.
IMPORTANTE: Nunca manipule el regulador
del motor, el que ha sido ajustado en lafdbrica
para la velocidad del motor adecuada. Puede
set peligroso hacer funcionar el motor a una
velocided por sobre el ajuste de alta velocided
de la f_tbdca.Si cree que la velocidad ara
regulade del motor necesita ajuste,contacto
con su centro de servicfo Sears o con un otro
centro de servicio cualificade, el que cuenta
con el equipo adecuado y la expedencia para
hacer los ajustes necesades.
Inrnediatamente prepare su segadora para el
almacenamiento al _nal de cade temporada o
si la unided no se va a usar por 30 dlas o
rrt_ts.
SEGADORA
Cuando se va a guardar la segadora pot
cierto perfodo de lJempo, Ifmpiela
cuidadosamente, remueva toda la mugm, la
giasa, las hojas, etc. Gudrdela en un _lrea
limpia y seca.
1. Limple tode la segadora (Vea "LIMPIEZA"
en la seccibn de Mantenimiento de este
manual).
2. Lubriqueta segdn se muestm en la
seccibn de Mantenimiento de este manual.
3. Asegt_rese de que todas las tuercas y
clavijas y todos los pernos y tomillos estl_n
apretados en forma segura_ Inspeccione
las partes que se mueven pare verfficar si
est_ daF.ades, quebmdas o desgostadas.
Cdmbielas si es necesado.
4. Retoque todas las superficies que est6n
oxidadas o con la pintum picada; use una
lijaantes de pintar.
MANGO
Puede doblar el mango de su segadera para el
almacenamiento.
1. Apriete los extremos infedores del mango
inferior entre sf basra que el mango inferior
quede sepamdo del puntal del mango,
luego mudvalo hscia adelante.
2. Suelte los pemos de montaje del mango
superior Io suficiente corno pare permitir
que el mango superior se pueda doblar
hacia atrds.
IMPORTANTE: Cuando doble el mango para
el almacenamiento o el tmnsporte, asegdrese
que Io doble seg0n se muestm o purde darar
los cables de control.
• Cuando prepare sus mangos a partir de la
posicibn de atrnacenarniento, el mango
inferior autorr_rcarnente se asegurar_ en la
posick_n para segar.
)infedo_
Apdeteparadoblar mango
7
Clavlja de horqoll{a
Barradecontrolque_ ,/V/_,._P_
exigela presencladel Doblar
Mangosupedo_ para //
-J//= //
Mayo t
<'TA/A
' _.*'+ ... atrds
32
MOTOR
SISTEMA DE COMBUSTIBLE
IMPORTANTE: Es importante evitar qua se
formen depbsitos de goma en partes
fundarnentaJes del elstema de combustible
tales como el carburador, el filtm del combus-
tible, la manguera del combustible o en el
estanque durante el elmacenamiento. La
expedencia tambidn indica que los combus-
tibles rnezcZadoscon alcohol (con_'Ldo como
gasohol o que tienen etanol o metanol) pueden
atraer humedad, Io que conduce a la
separacion y a la formacion de acidos durante
el almacenamiento. La gasolina acidica puede
da_ar el s_stemade combustible de un motor
durante el periodo de almacenamiento.
1. Drene el estanque de combustible.
2. Haga arrancar el motor y d_jelo tuncionar
hasta que TasIfneas del combUstible y el
carburador estdn vaclos.
• Nunca use los productos para ILmpiezadel
carborador o del motor en el estanque de
combuslJble pues se pueden producir
da_os permanentes.
• Use combustible nuevo la prbxima
temporada.
AVISO: Et estabilizador de combustible es una
afiemativa aceptable para mducir a un minimo
la formackY_lde dep6sitos de goma en el
combustible durante el periodo de
almacenamiento. Agregue establlizador a la
gasol]na an el estanque de combustible o en el
envase para el almacenamiento. Siempre siga
la pmpomide de rnezcta que se encuentra en
el envase del estabilizador. Haga funcionar el
motor por Io menos 10 minutos despu_s de
agregar el estabi[izador, para permitir que este
Ilegue al cafourador. No drene la gaso]ina del
estanque de gasolina y el carburador si se
esta usando estabilizadot de combustible.
ACEITE DEL MOTOR
Drene el aceite (con el motor celiente) y
c_mblelo con aceite de motor Umpio. (Vea
=MOTOR" an la secci6n de Mantenimiento de
este manual.)
CILINDRO
1. Remueva la bujia.
2. Vacie 29 ml (una onza) de acelte a tray,s
del agujero de la buj|a an el cilindro.
3. Tire la manilla de arranque lentameote
unas cuantas veces para distdbuir el
aceite.
4. Cambie por una bujia nueva.
OTROS
• No guarde la gasolina de una temporada a
la otra.
• Cambie el envase de la gasolina sise
empieza a oxidar. La c0ddacibny/o la mugre
en su gasolina producir_n problernas.
• Si as posible, guarde su unidad en un
rec]nto cerrado y cObrala para protegeda
contra el polvoy la rnugre.
• Cubra su unldad con un forro protector
adecuado que no retenga la humedad. No
use pldstico. El pldstico no puede respirar, Io
que permite ta formackSnde conderksacid_n,
Io que producir_ la oxidaci6n de su unidad.
IMPORTANTE; Nunca cubra la segadora
mientras el motor y las areas de escape to
davia eslan calientes.
APRECAUCION: Nunca alrnacene la
segadora con gasolina en el estanque dentro
de un edificio en donde los gases pueden
alcanzar una llama expuesta o una chispa.
Permita que se enfrfe el motor antes de alms-
cenada en aFgLinmcinto cenado.
IDENTIFICACI(_N DE PROBLEMAS
PROBLEMA CAUSA
No arranca 1. Fillro de aim suelo.
2. Sin combustible.
3. Combustible rancio.
4. Agua an el combustible.
5. Alambre de bujla desconectado
i 6. Bujia rnala.
I 7. Cuchilla suelta o adaptador
de la cuchiHaquebrado.
8. Barra de controlen la
posic_n suelta.
9. Barra de control defectuosa.
CORRECCI(SN
1. Limpie/camble el l_fitode aJre.
2. Llene el estanque de combustible.
3. Drene el estanque y vuelva a
Ilenado con combustible limpio
y nuevo.
4. Drene el estanque de combustible
y el carburador y vuelva a Ilenar
el estanque con gasolina nueva.
5. Conecte el alambre a la bujla.
6. Camble la bujla.
7. Apdete el perno de la cuchilla
cambie el adaptador de la cuchilla.
8. Presione la barra de control
hacia el mango.
9. Camble la barra de control.
33
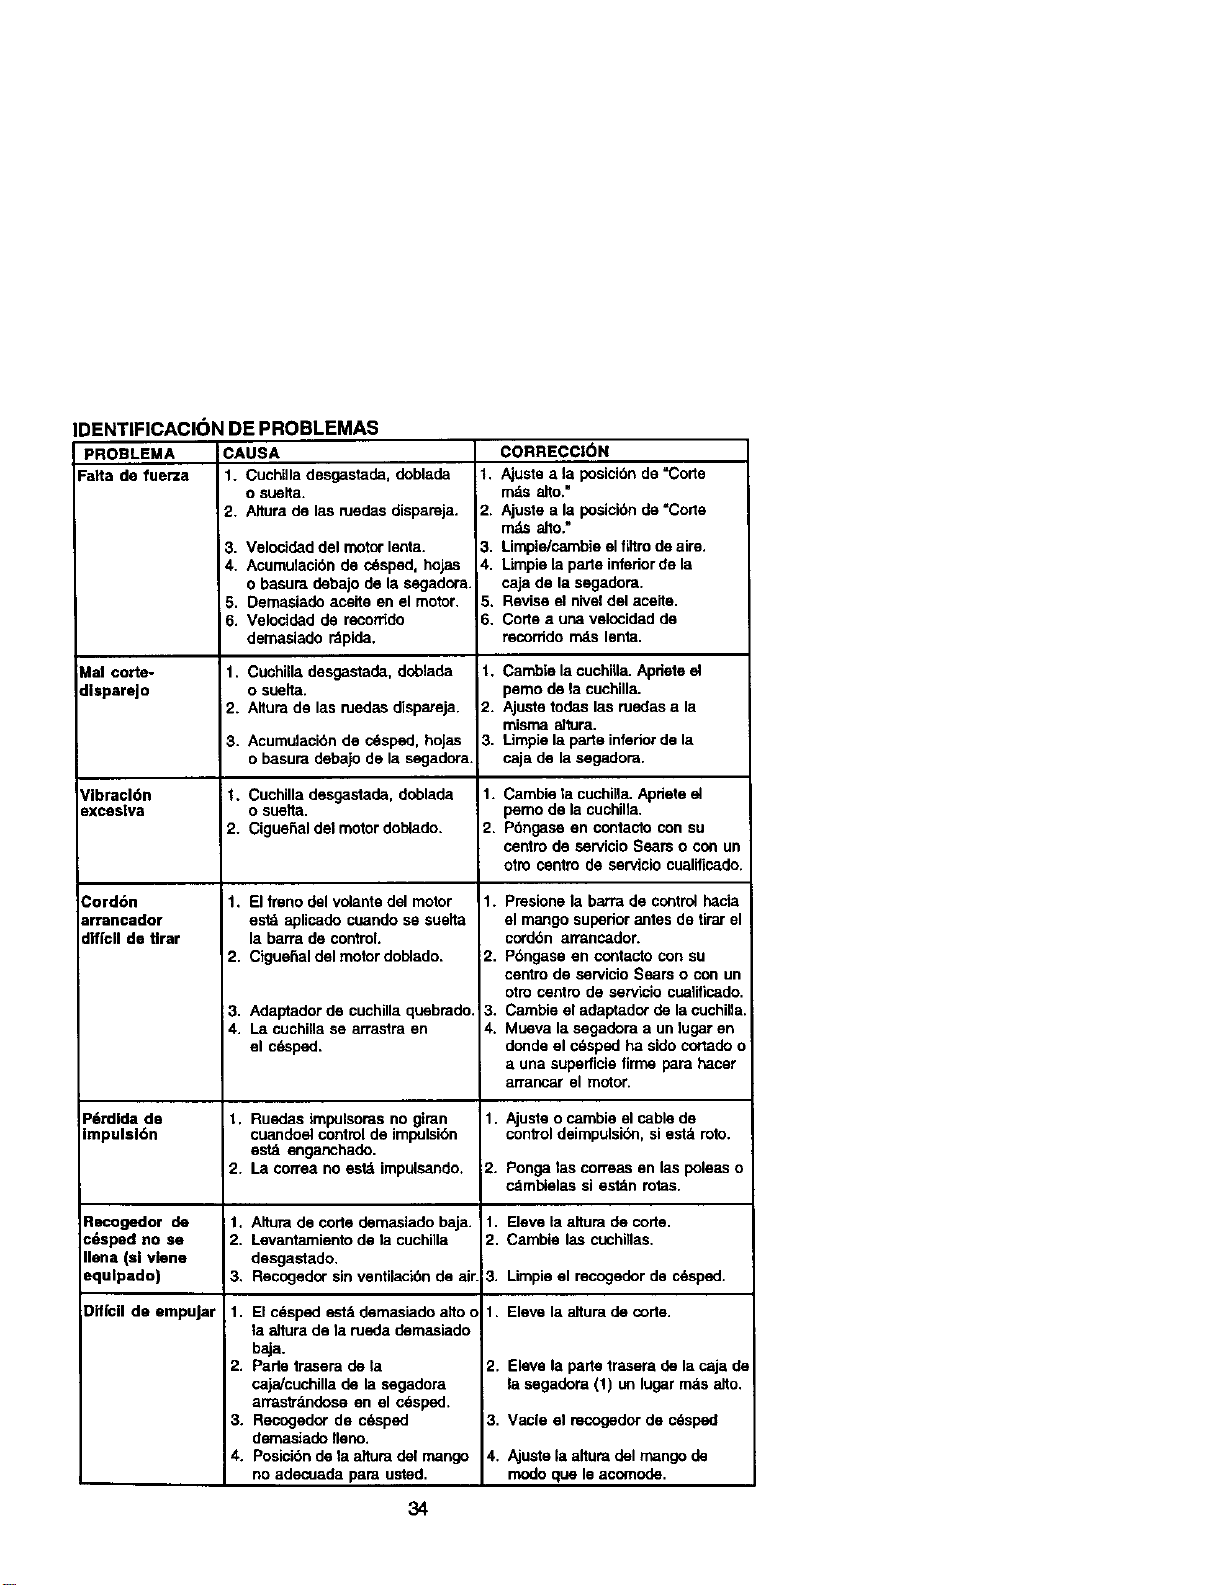
IDENTIFICACI(_NDEPROBLEMAS
PROBLEMA CAUSA
=alta de fuerza 1. Cuchilla desgastada, doblada
0 suelta.
2. Altura de las ruedas dispareja.
Mal corte-
dlspareJo
Vibracldn
exces|v;3
3. Velocidad del motor lenta.
4. Acumulaci6n de crisped, hojas
o basura debajo de la segadora.
5. Demasiado acelte en el motor.
1. Velocldad de recorddo
demaslado _pida.
1. Cuchilla desgastada, doblada
o suelta.
2. Altura de las ruedes dispateja.
3. Acumulacibn de cdsped, hoJas
o basura debajo de la segadora.
I. Cuchilla desgastada, doblada
o suetta.
2. CigueRal del motor doblado.
1. El fmno del volante del motor
estd aplicado cuando se suelta
la barra de control.
2. CigueRal del motor doblado.
3. Adaptador de cuchi]la quebmdo. _
4. La cuchilla se arrastra en
el cdsped.
Cord6n
arrancador
dlffcll de Urar
CORRECCION
1. Ajuste a la posicibn de =Code
mds alto."
2. Ajuste a la posioibnde =Code
m_s alto."
3. Limpie/cambie el filtm de aim.
4. Limpie la parte infedor de la
caja de la segadora.
5. Revise el nivel del aceite.
6. Code a una velocidad de
recorddo rnds lenta.
1. Cambie la cuchiga. Apdete el
pemo do la cuchilla.
2. Ajuste todas las ruedas a la
misma eltura.
3. Limpie la parte infedor de la
caja de la segadora.
1. Cambie la cuchilla. Apdete el
pemo de la cuchilla.
2. P6ngase en contacto con su
centro do servicio Seam o con un
otto centre de servicio cualificado.
1. Presione la barra de control hacia
el mango superior antes do tirar el
cord6n arrancador.
2. Pbngase en contacto con su
centro do servicio Sears o con un
otro centre de servicio cualificado.
3. Cambie el adaptador de la cuchifla.
4. Mueva la segadora a un lugar en
donde el c6sped ha sido cortado o
a una supedicie tirme para hacer
arrancar el motor.
P6rdlda do 1. Ruedas impulsoras no gimn 1. Ajuste o cambie el cable de
Impulsl6n cuandoel control de impulsi6n controldeimpulsibn, si est_ into.
estd enganchado.
2. La correa no estd impulsando. 2. Ponga las correas en las poleas o
cdmblelas si estdn rotas.
Racogedor de 1. AltuPade code demasiado baja. 1. Eleve la altum de code.
cdsped 11ose 2. Levantamiento de la cuchilla 2. Cambie las cuchiIlas.
Ilena (sl vlene desgastado.
equlpado) 3. Recogedor sin ventilaci6n de air. 3. Limpie el recogedor de c6sped.
:)iffcll do empuJar 1. El cdsped estd demasiado ailo o 1. Eleve la altura de code.
la aJturade la meda demasiado
baja.
2. Parte trasera de la
cajaJcuchillade la segadora
arrasITdndose an el cdsped.
3. Recogedor de c6sped
demasiado fleno.
4. Posielbn do la attura del mango
no adecuada para usted.
2. Eleve la parte trasera de la caja de
la segadora (1) un lugar mSs alto.
3. Vacle el recogedor de c_sped
4. Ajuste la altum del mango de
modo que le acomode.
34
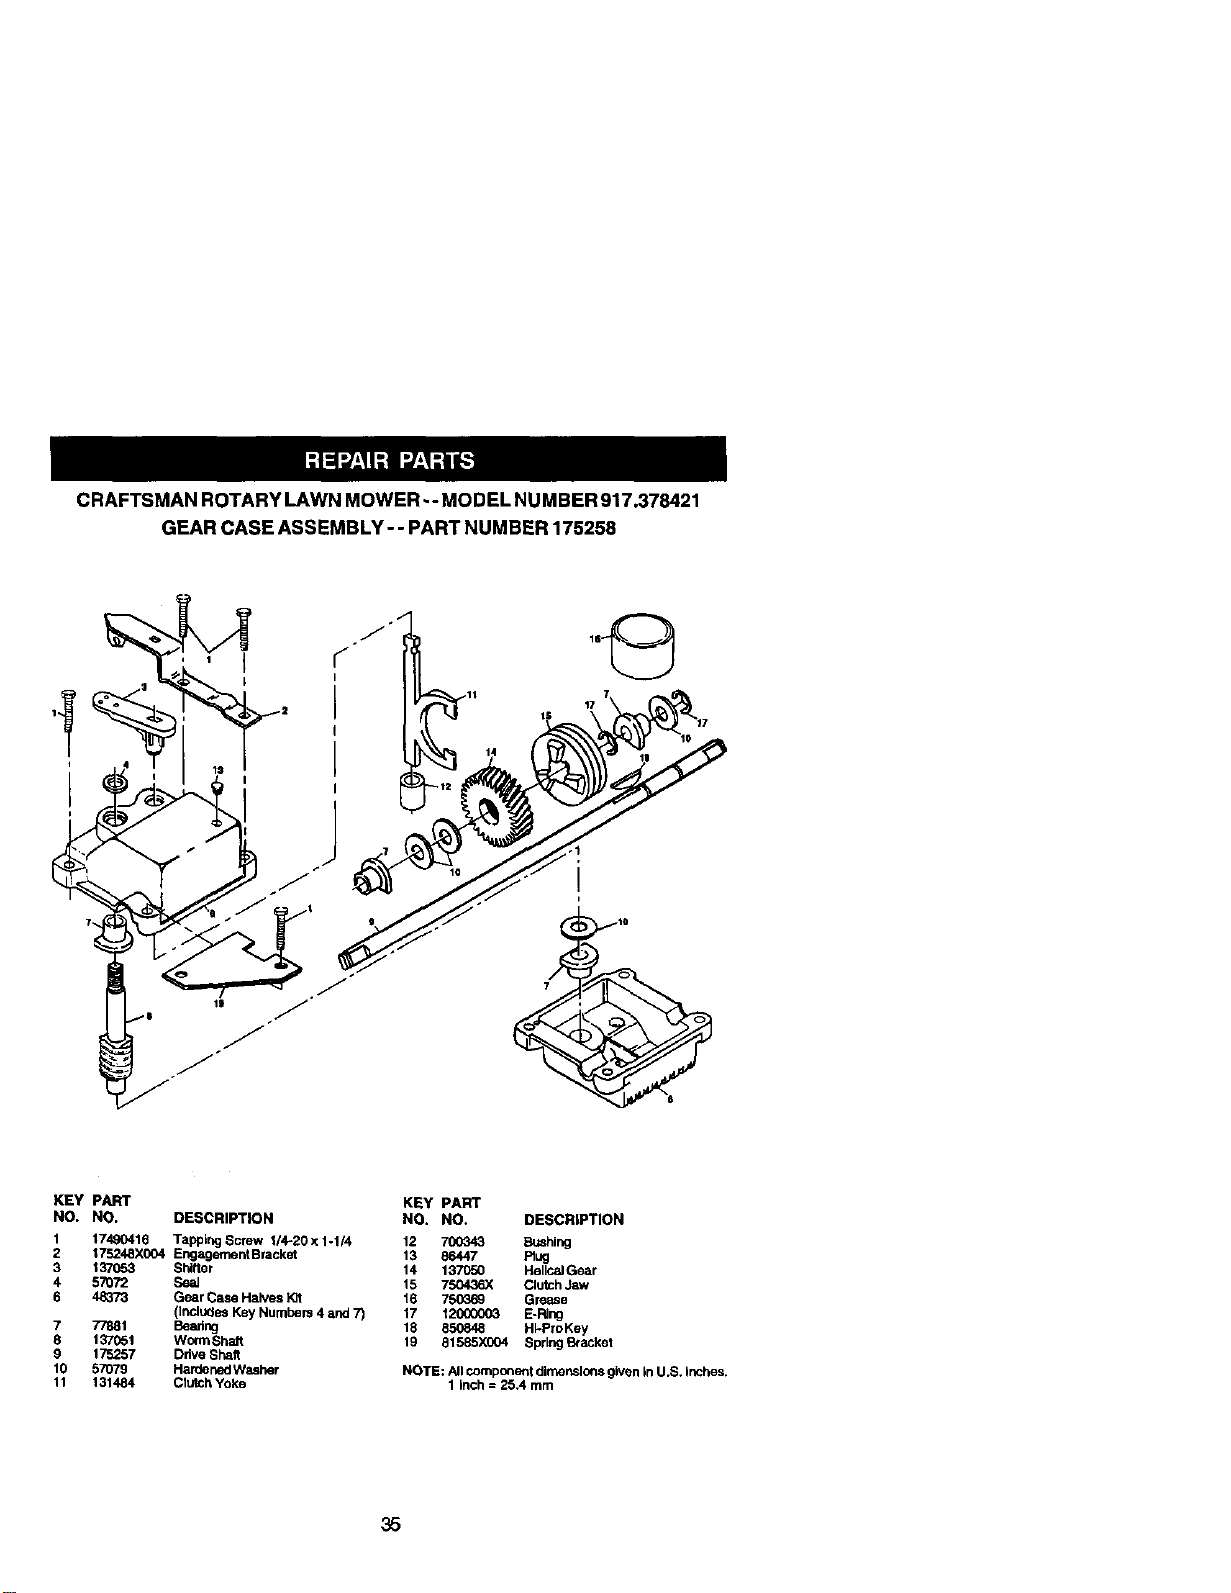
CRAFTSMANROTARYLAWNMOWER-- MODEL NUMBER 917.378421
GEAR CASE ASSEMBLY- - PART NUMBER 175258
1
i
7
8
9
10
11
KEY PART
NO. NO. DESCRIPTION
1 17490416 Tapping Screw 1/4-20x 1-1/4
2 t75248X(_4 Engagement Bracket
3 1_ Shifter
4 57O72 SeaJ
6 483/3 Gear Case Halves Kit
(IrzcludesKey Numbers 4 and 7)
7-/881 _mt_
137051 WormShalt
175257 Drive Shaft
57079 Hardened Wasber
131484 Clutch Yoke
KEY PART
NO. NO. DESCRIPTION
12 700343 Bushing
13 86447 Ptug
14 137050 HellcaJGear
15 750436X ClUtChJaw
16 750369 Grease
17 120_000_ E-Ring
18 850848 HI-ProKey
19 81585XCO4 Spring Bracket
NOTE: All component dimensions given in U.S, inches.
1 inch : 25.4 mm
35
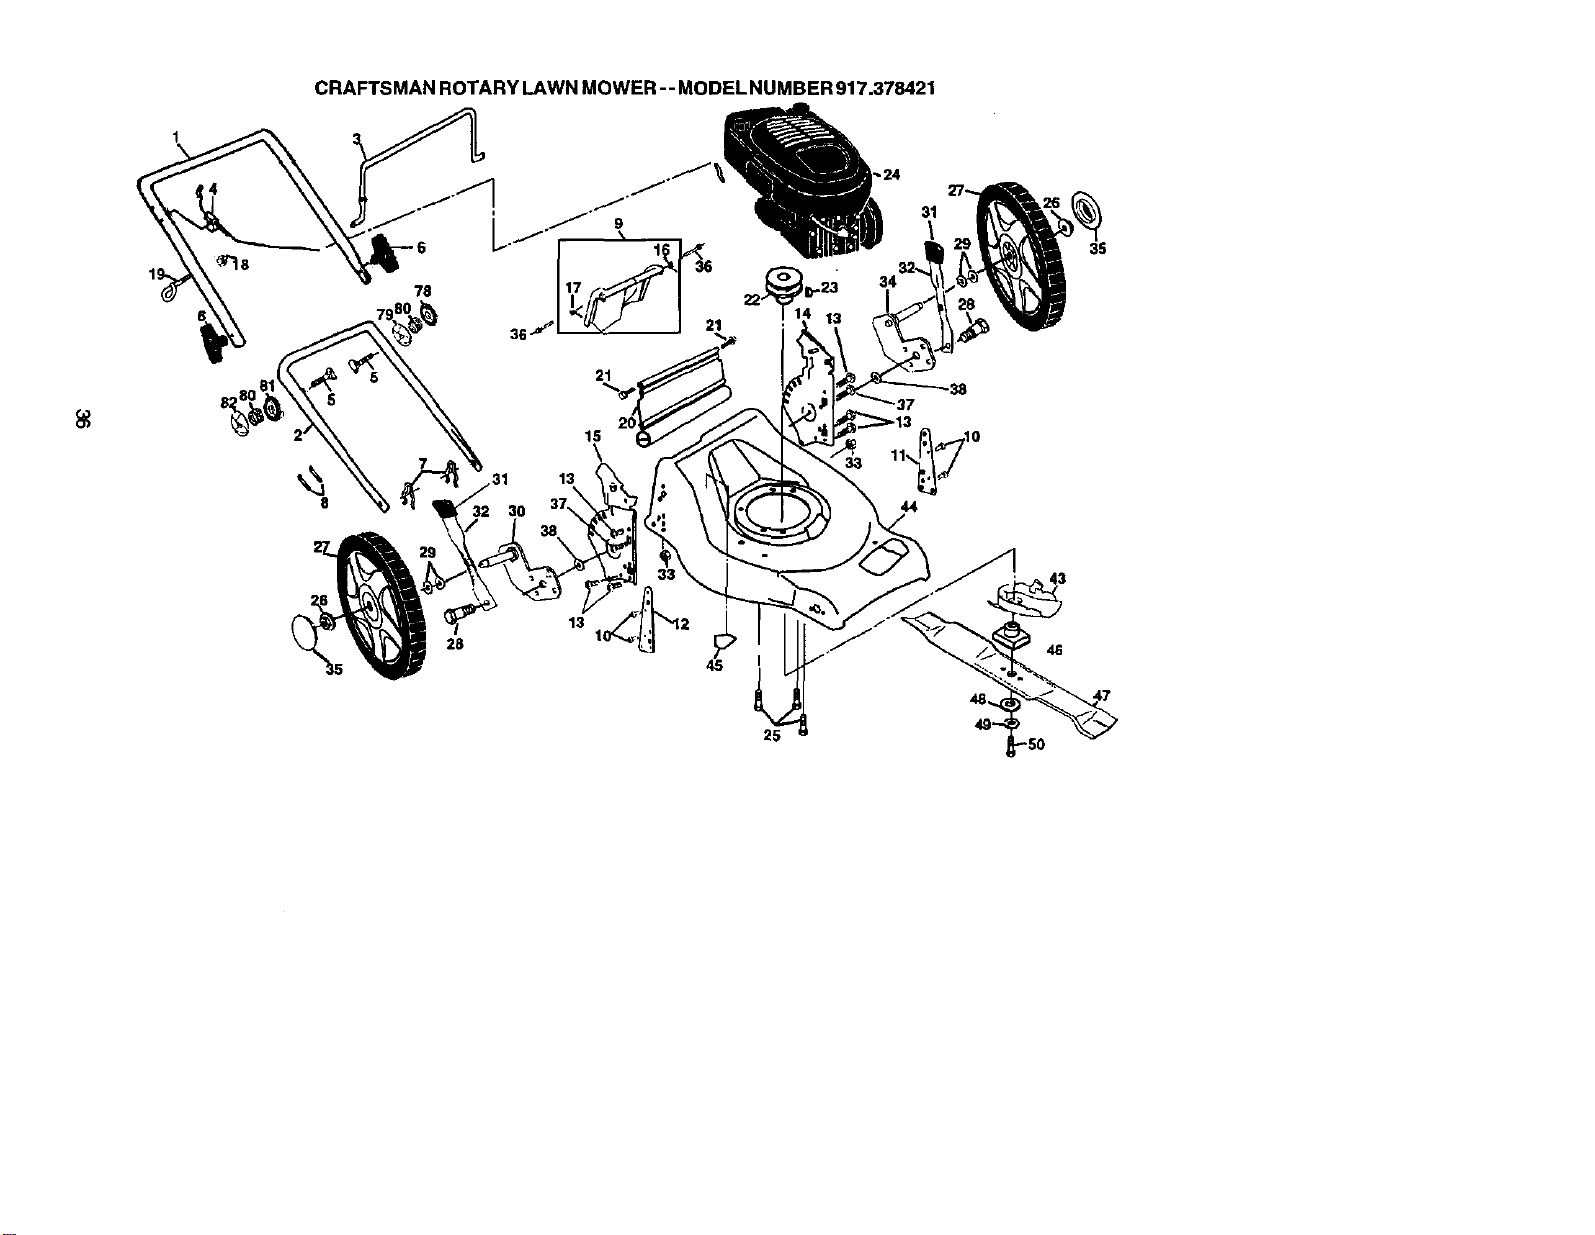
CRAFTSMANROTARYLAWNMOWER-- MODEL NUMBER91?,378421
3O
28
45
44
43
48

CRAFTSMAN ROTARY LAWN MOWER- - MODEL NUMBER 917.378421
KEY PART
NO. NO. DESCRIPTION
1
2
3
4
5
6
7
8
9
10
11
12
13
14
15
10
17
18
10
20
21
22
23
24
25
26
27
2_
29
3O
31
1753OLX479 Upper Handle
151721X479 Lower Handle
169780 CordrolBar
156577 Engine Zone ControlCable
171407 HandieBoft
136376 Handle Knob
51793 Haiq)la Cotter
66426 WireTie
175794 Rear Door Kit(Incl, Key #16 & 17)
128415 Pop RNet
175069X470 Support BracketLH
175070X479 Suppod Bracket RH
17060410 Screw 14-20 x 5/8
175576X479 Handle BmcketAssembly (Left)
175577X479 Handle Bracket Assembly (Rig ht)
175243 SpdngLH
175244 Spdng RH
13_)04 Keps Locknut 1/4-20
153638 RopeGuide
173O_ Rear Skirt
88652 Hinge Screw 1/4-20 x 1-1/4
85543 Engine Pulley
87677 Hi-Pro Key #505
- - - Engine, Craftsman, Model Number
143.016"/'28 (See Breakdewn)
150406 Hex Head Thread Rolling Stew 3/8-16 x 1-1/8
83_3O Hex Range Nut
177320 Whe_
160828 Shoulder Bott 5/16-18 x .33
57143 WaveWasher
175574X004 Axle Arm AsSembly RR
161961 Selector Knob
KEY PART
NO. NO. DESCRIPTION
32 175653X004 Setector Spdng
33 63124 Nut 5/16-18
34 175575X004 Axle Arm Assembly LR
35 177"321 Hubcap
36 165912 BoEt
37 150078 Thread Cuteng Screw w/Sems 5/16-18 x 3/4
38 19112222 Washer
43 175083 Bottom Belt Cover
44 176289 Lawn Mower Housing (Incl. Key #10, 11, 12& 45)
45 85463 De_gerDete
46 851514 Blade Adapter
47 175064 Blsde21"
48 851074 HaldenedW_sher
49 _ Helical Washer 3/8-24 x 1-3/8 Gr, 8
50 851084 Hex Head Machine Screw 3/8-24 x 1-3/8 Gr. 8
78 170954 Handle Adjuster, Outside, LH
79 170953 Handle Adjust_r, Inside, LH
80 178574 Handle Adjuster Spring
81 170955 Handle Adjuster, Inside, RH
82 170956 Handle Adjuster, Outside, RH
- - 161058 Warning Decal (Not Shown)
- - 179374 Owner's Manual (EnglisWSpanlsh)
Available acceasodes not included with lawn mower:
- - 917.33314 Clipping Deftector (Available in Service Dept. only)
-- 71 33623 GasCan
-- 71 33500 FuelStabllzer
-- 71 33000 SAE 30W Oil (20 oz.)
NOTE: All component dimensions given in U.S. inches
I inch = 25.4 mm
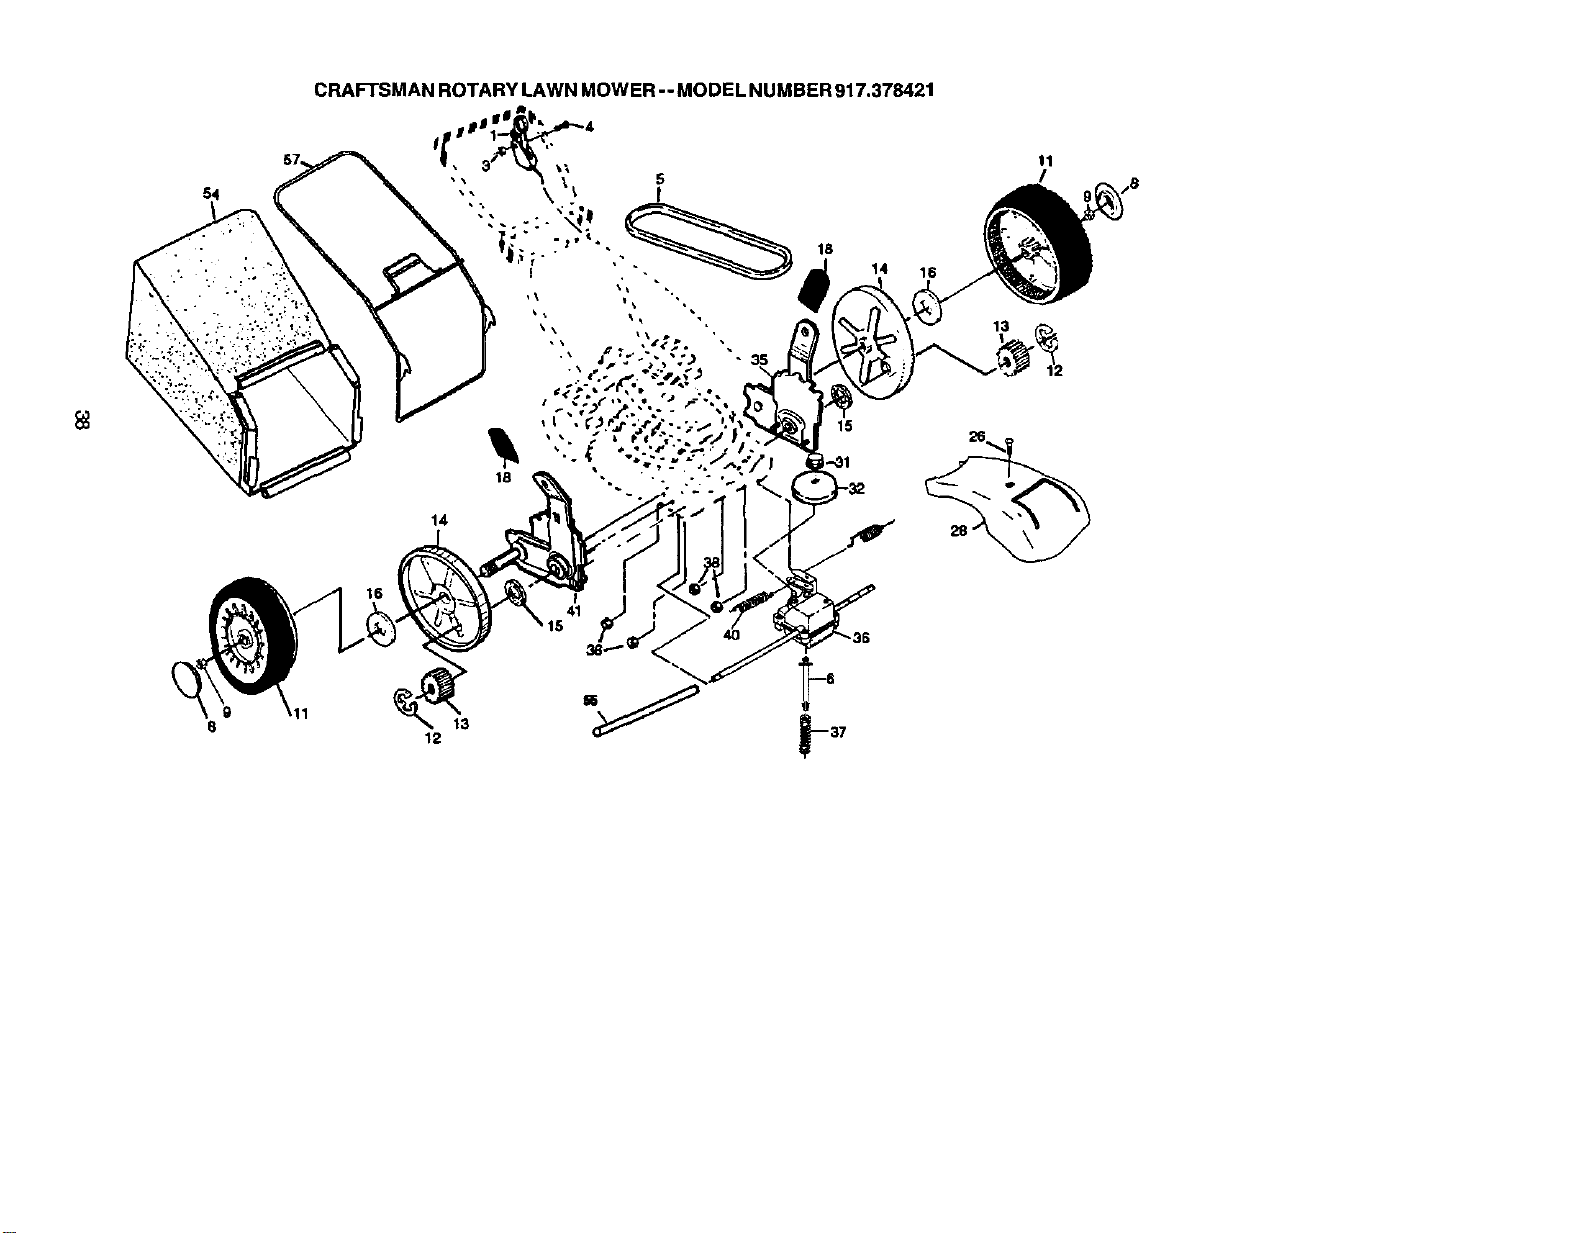
,,8
14
13
12
t
18
15

CRAFTSMAN ROTARY LAWN MOWER- - MODEL NUMBER 917.378421
PART KEY PART
NO. NO. DF_C_P_ON NO. NO, DESCRIPTIQN
1 145755 Con_ol Cable Assembly 28 175065
3 75t152 Locknut #10-24 31 132010
4 158755 HeX Washer Head Screw 1/4-2g x 2,12 32 137052
5 1"/5436 V-Belt 35 151521
6 150495 Spdng Retainer 36 175258
8 175012 Hubcap 37 137090
9 145212 Locknut 38 63601
11 150340 Wheel & "FireAssembly 40 75192
12 12000058 E-Ring 41 151520
13 137(Y'.>4 Piton 54 175084
14 88060 Dust Cover 55 175739
15 88118 FeltWasher 57 17'3058
16 67725 Washer 1/2x1-1/2 x.134
1B 7010_7 Sstestor Knob
26 175262 Pan Head Tapping Screw #10-24 x 2-3J4
DfiveCover
HexFlange Nut
DrivePulley
Wheel AdjusterAssembly (Left)
Gear Case Assembly
Spnng
Locknut 1/4-20
Sprig
Wheel Adjuster Assembly (Right)
Grassbng Assembly
Drtv_ Cover
Frame
NOTE: All component dimensions given in U.S. inches
1 inch = 25.4 rnm
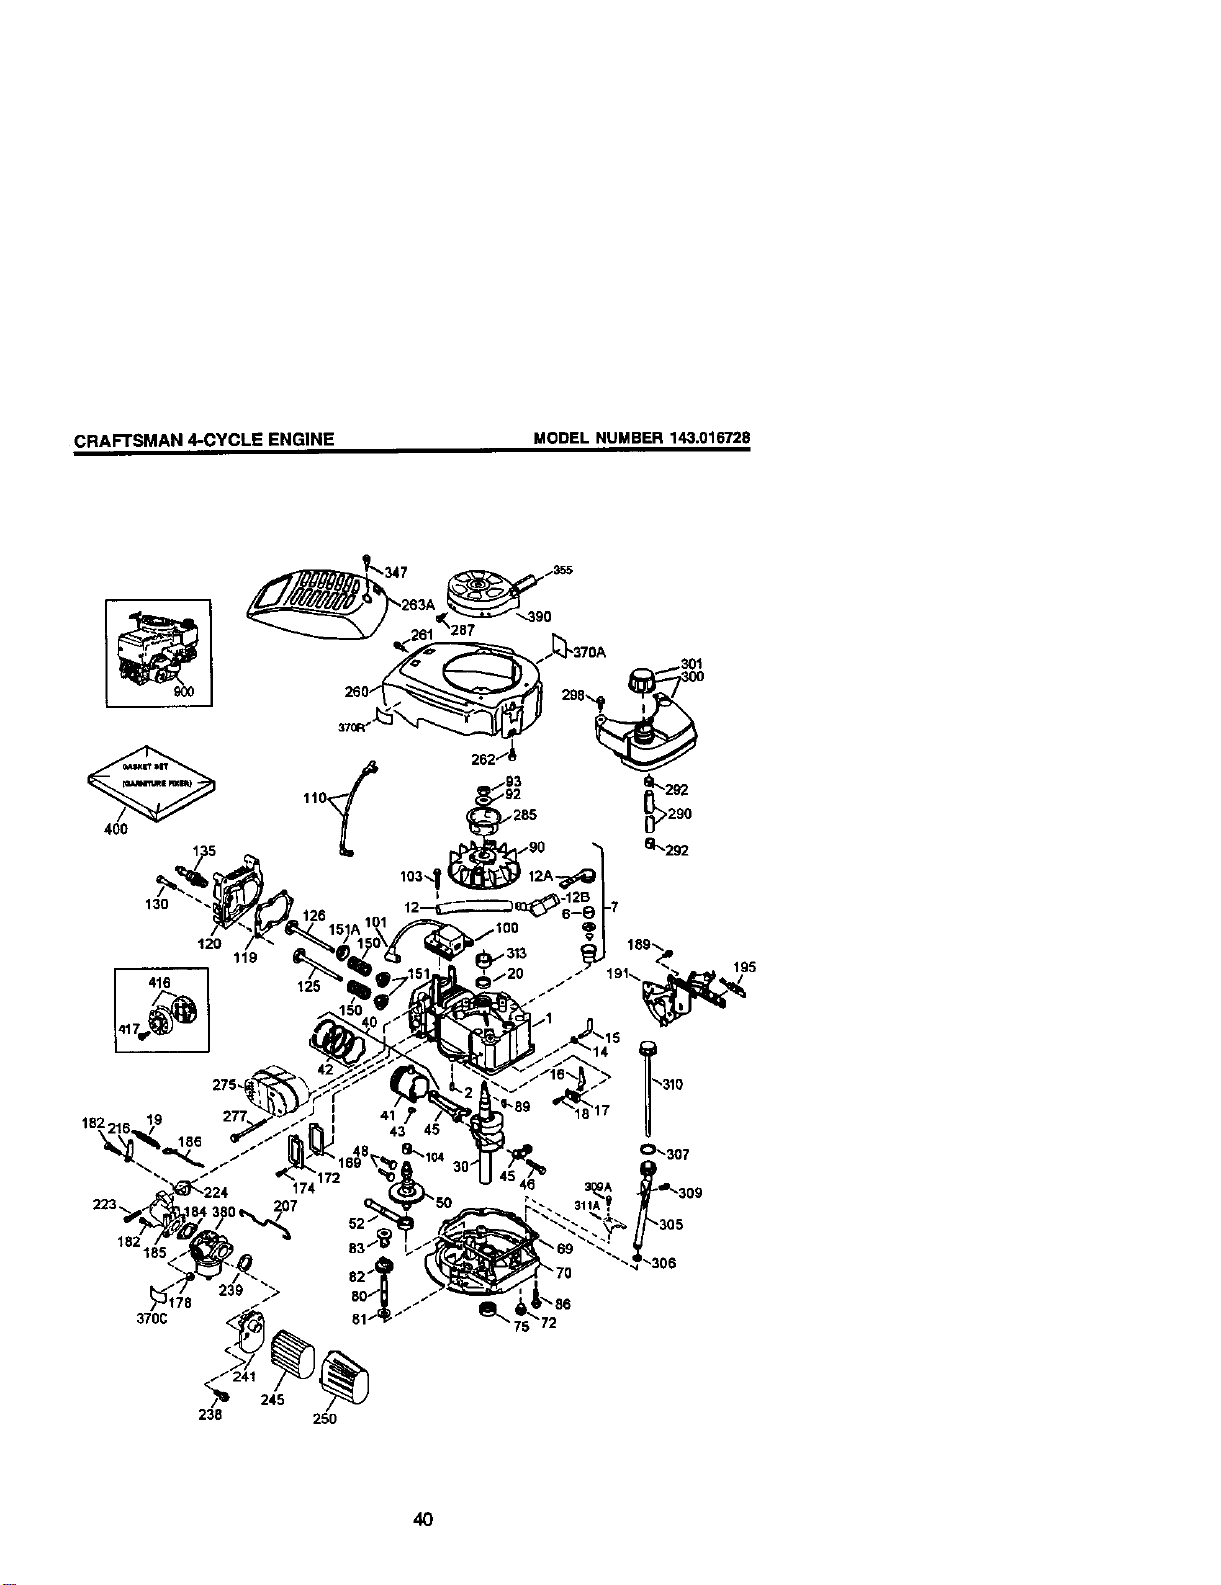
CRAFTSMAN 4-CYCLE ENGINE
MODEL NUMBER 143.016728
40O
,285
,39O
130
120
275,
119
125
4O
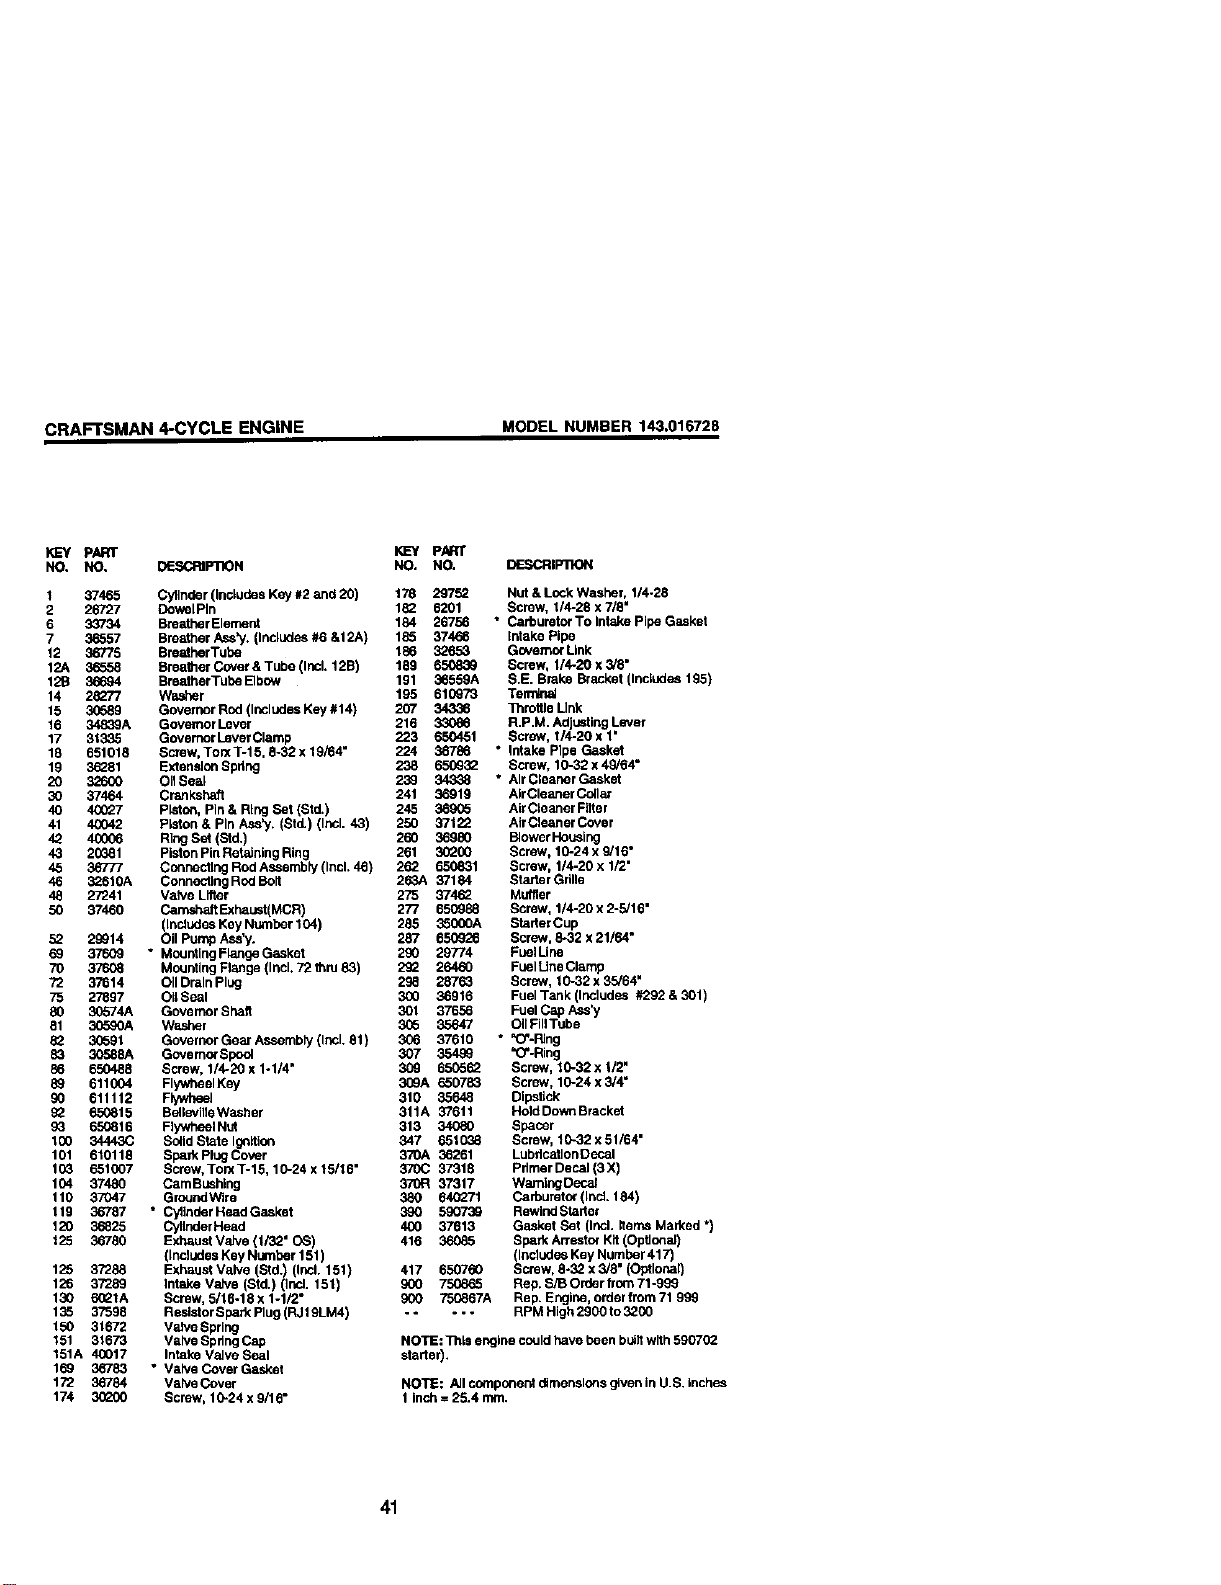
CRAFTSMAN 4-CYCLE ENGINE
MODEL NUMBER 143.016728
I_Y PART
NO. NO, DESCRIPIX)N
1 37465
2 26727
6 33734
7 36557
12 36776
12A 36558
12B 36694
14 28277
15 30589
16 34839A
17 31335
18 651018
19 3_81
20 326OO
3O 37464
40 40027
41 40042
42 4OO06
43 20Q81
45 36777
46 3_610A
48 27241
50 37460
52 29914
69 376O9
70 37608
72 37614
75 27897
8O 30574A
81 3_o90A
82 30591
83 30588A
86 650488
89 611004
90 611112
92 650815
93 650816
100 34443(3
101 610118
103 651(:O7
104 37480
110 37047
119 36787
120 36825
125 36780
125 37288
126 37289
130 6(_1A
135 37598
150 31672
151 31673
151A 40017
169 _'83
172 36784
174 3_o00
KLm£p_RT
NO. NO. DESCRIP11ON
Cylinder (includes Key #2 and 20) 178 29752 Nut & Lock Washer, 1/4-28
DowelPIn 182 6201 Screw, 1/4-28 x 7/8"
BreatherElement 184 26756 " CarburetorTolntakepipeGesket
Breather Ass_/. (Includes #6 &l 2A) 185 37466 Intake Pipe
BmetherTube 186 32653 Governor Link
Srea_lerCover&Tube(Incl, 12B) 169 650839 Screw, 1/4-2Ox5/8"
BreatherTubeEIbow 191 36559A S.E. Brake Bracket (Inaludes 195)
Washer 195 610973 Tem_a_
Governor Rod (Includes Key #14) 207 34336 TnretUe Link
Governor Lever 216 33086 R.P.M. Ad unting Lever
QovernorLeverClamp 223 650451 Screw, I/4-20 x 1
Screw, Torx 1--15.6-32 x 19/64" 224 36786 " Intake Pipe Gasket
Extension Sprtng 238 650G32 Screw, 10-32 x 49/64"
OiISeal 239 34.338 * AIrCieanerGasknt
Crankshaft 241 36919 AirCleaner Callar
Piston, Pin & Ring Set (Std.) 245 369G5 AirCleaner Filter
Piston & Pin Aes_/. (Std.) (Inel. 43) 250 371_'> AIrCleanerCover
Ring Set (Std.) 260 36980 BlowerHou_ing
Piston Pin Retalntng Ring 261 30200 Screw, 10-24 x 9/16 °
Connecting Rod Assembly (Incl. 46) 262 650831 Screw, 1/4-20 x 1/2"
Conneetlng RUd Boit 263A 37184 Starter Grille
Valve Litter 275 37462 Muffler
CamshaftExhaust(MCR) 277 650988 Screw, 1/4-20 x 2-5/16"
(IncJudesKey Number 104) 265 350O0A Stader Cup
Oil Pump Ass'y. 287 650926 Screw, 8*32 x 21/64"
• MountlngFlangeGasket 290 29774 FuelUne
Mounting Flange (Incl. 72 thru 83) 29_ 26460 Fuel LineClamp
OII Drain Plug 298 28763 Screw, 10-32 x 35/64"
Ol_Seal 300 36916 Fuel Tank (Includes #292 & 301)
Governor Shaft 301 37656 Fuel Cap h.ss'y
Washer 305 35647 OIIFilITube
GovernorGearAssembly(mcl. 61) 306 37610 ° _O'-RIng
GovernorSpoet 307 _ "O_-Ring
Screw, 1/4-20 x 1-1/4" 30g 650562 Screw, 10-32 x I/2"
Flywheel Key 309A 650783 Screw, 10.24 x 3/4"
Flywheel 310 35648 Dipstick
BallevnleWasher 311A 37611 Hold Down Bracknt
FlywhentNUt 313 34080 Spacer
Salid State Ignltlon 347 651038 Screw, 10-32 x 51/64"
Spark Plug Cover 370A 36261 Lubrication Decal
Screw, To_ T-15, 10.24 x 15/16" 370C 37318 Pdmer Decal (3 X)
Carn Bushing 370Ft 37317 Warntng Decal
Ground'Wire 380 640271 Carbumto_ (Ind. 184)
• Cyl]nderHeadGasket 390 590739 RewiudStarter
CyllnderHead 400 37613 Gasket Set (Ind. items Marked *)
Exhaust Valve (1/32" OS) 416 36085 Spark Arrestor Kit (Opbenal)
(Includes Key Number 151) (Includes Key Number 417)
Exhaust Valve (Std.) (Incl. 151) 417 650760 Screw, 8°32 x 3/8" (Optlonar)
Intake VaJve (Std.) (Ind. 151) 900 75_865 Rep. S/BOrderfrom71o999
Screw, 5/16-18 x 1-1/2" 900 750867A Rep. Engine, orderfrom 71 999
Resintor Spark Plug (P,J19LM4) ..... RPM High 2900 to 3200
Valve Spring
Valve Spdng Cap NOTE: This engine couldhave been builtwith 590702
Intake Valve Seal starter).
• Valve Cover Gasket
Valve Cover NOTE: AJlcomponent dimensions given in U.S. inches
Screw, 10-24 x 9/16" 1 inch = 25.4 mm.
41
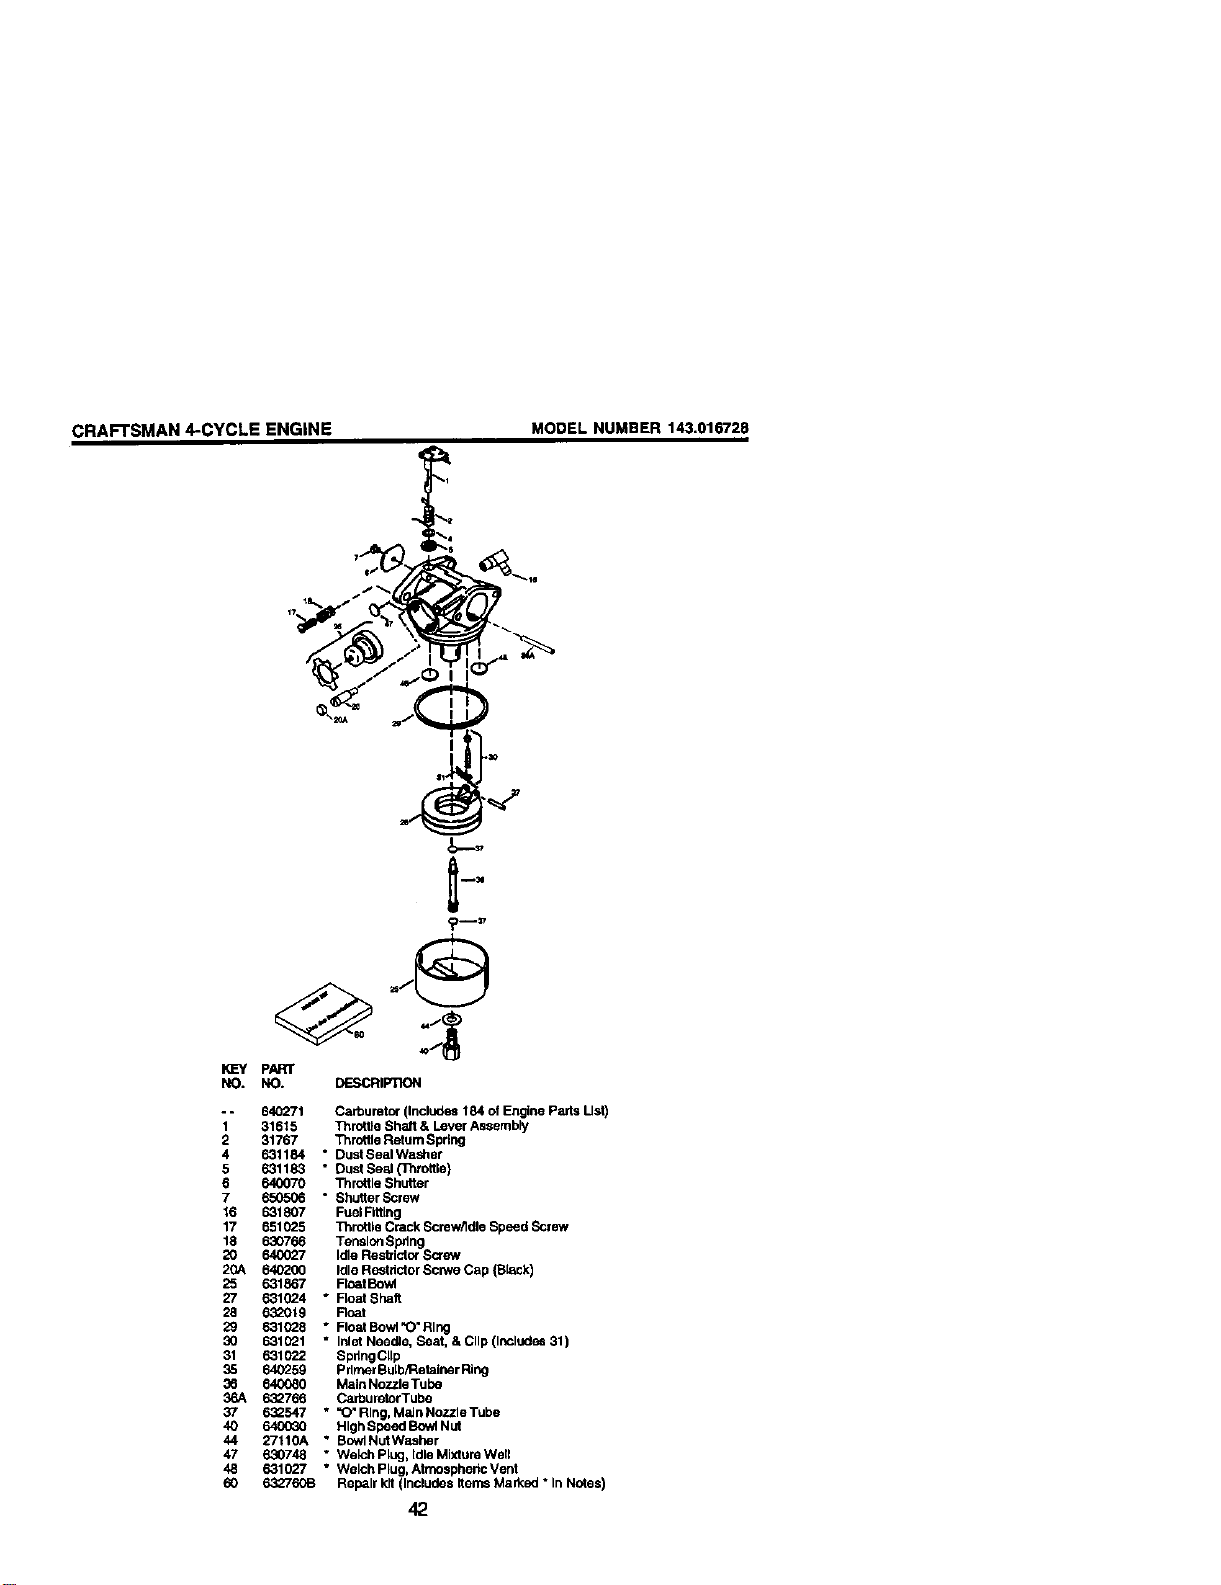
CRAFTSMAN 4-CYCLE ENGINE
MODEL NUMBER 143.016728
I
NO.
°.
1
2
4
5
6
7
16
17
18
2O
20A
25
27
28
29
30
31
35
36
36A
37
4O
44
47
48
6O
J;_..,-rt
?--=,
PARr
NO. DESCRIP13ON
640271 Carburetor (Includes 184 of Engine Parts List)
31615 Throttle Shaft & Lever Assembty
31767 Throttle Retum Spring
631184 * DustSealWasher
631183 * DuotSe_l(]_rottle)
640070 Throttle Shutter
650506 * ShutterScrew
631807 Fuel Fiitlng
651025 Threttle Crack Screw/Idle Speed Screw
630766 Tension Spdng
640027 Idle Resb'ictor Screw
640200 Idle Restdotor Scrwe Cap {B_lck)
631867 Fl_t Bowl
631(_4 * F_oatShalt
632019 Roar
631(_8 * FloatBowl_O'Rlng
631021 " Inlet Needle, Seat, & Clip (InClUdes31 )
631022 SpdngCllp
640259 p rifler Bulb/RetairmrRing
640080 Main Nozzle Tued
63_766 CarburetorTube
632547 * =O'Rlng, MaJnNozzleTube
64(;030 High Speed Bowl N_
27110A * BowlNutWasher
630748 * Welch Plug, Idle Mixture Well
631027 * WelchPlug, AtmosphedcVenl
6O276OB Repair kit (Includes Items Marked * In Notes)
42
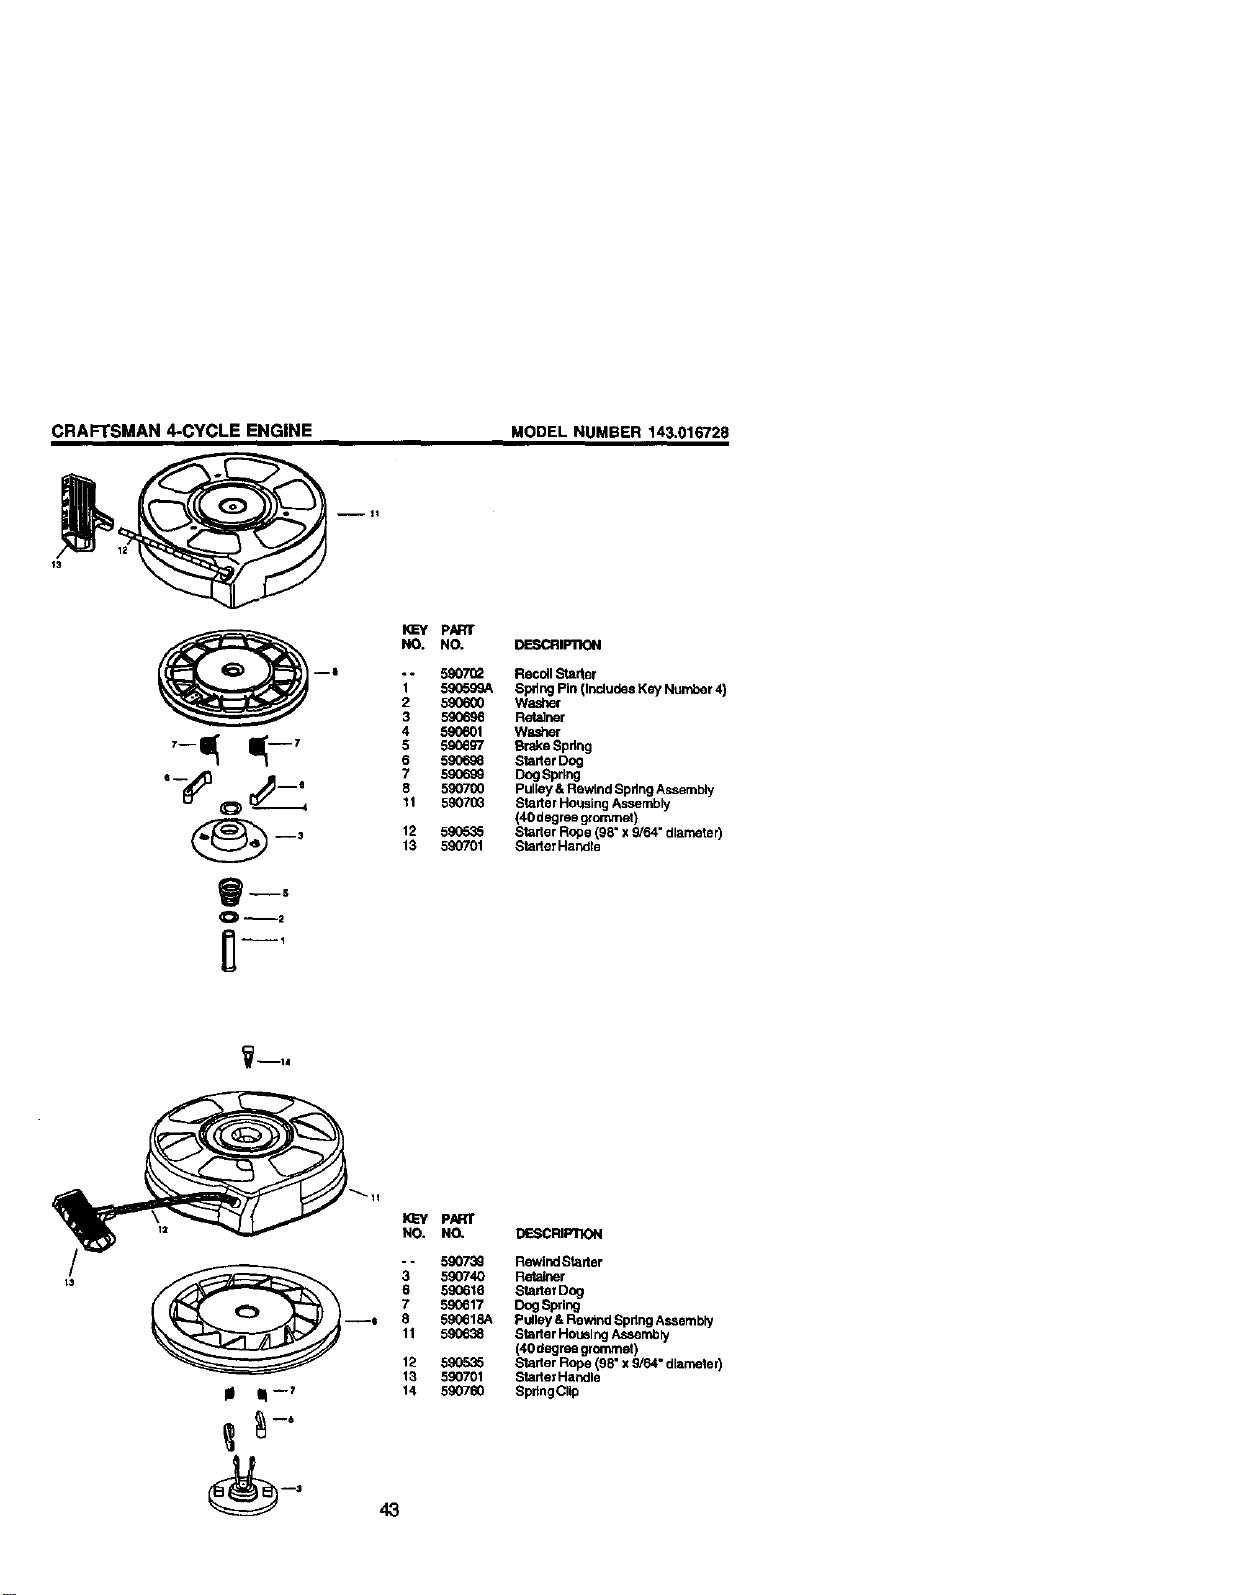
CRAFTSMAN 4-CYCLE ENGINE
MODEL NUMBER 143.016728
-- I1
_ PARr
NO. NO. DIESCRIPI10N
--i - - 5907_ Recoil Starter
1
590599A Spdng Pin (Includes Key Number 4)
2 590600 Washer
3 590696 Retainer
4 590601 Wa.sher
,--_ _--' 5 590697 Brake Spdng
6 59(_8 Starter Dog
.__ ,_ 7 5906_ DogSprlng
8 590700 Pulley & Rew;nclSpdng Assembly
O 11 59070_ Sta,der Housing Assembly
(40 degree grommet)
--3 12 59(To35 Stader Rope (98" x 9/64" diameter)
13 590701 Starlet Handle
--5
9--14
I(L=Y PART
NO. NO, DESCRIPTION
3" 590739 Rewind Starter
5_0740 Retainer
6 590616 Stalter Dog
7 590617 Dog Spring
--_ 8 590618A Pulley & Rewind Spdng Assembly
11 590638 Stade r Housl ngAssembty
(40 degree grommet)
12 590535 Stader Rope (98" x 9/64" diameter)
13 5!_K)701 Starter Ha_lle
_ --7 14 590760 SprfngClip
_--' 4,3
ForrepairofmajorbrandappliancesInyourown home...
nomatterwhomadeit,nomatterwhosoldit]
1.8OO-4-MY-HOME _ An,/*n__ay_ ri_t
(l-ax)._a) (u.s_.andCanal)
Www.li_,,p_xn www._ea_.ca
Forrepairofcarry-inproductslikevacuums,lawnequipment,and
eleclmnics,canforthenearestSearsPads and RepairCenter.
1-800-488-1222 ,_-_=ne,dayornig_(U.SJ_od,A
'A,_t.sears.cofn
Forthereplacementparts,accessoriesandownersmanuals
thatyouneed todo-it-yourealf,callSearsPartsDirect_t
1-800-366-PART 6a.m.- 11 p.rn.,7claysa week
(_-8oo_8-72-/8) (u.s.__y)
www.M_t_m_o_,tKIImct
Topurchaseorinquireabouta SearsServiceAgreement
or SearsMaintenanceAgreement:
1-800-827-6655 (u.sA) 1-800-361-6665 (Canada)
7 &m. -5 p.n_,CST, Mort.- SaL 9 a.m.- 8 p.m.EST, M- F,4 p.m.SaL
Parapedr seni,ciodemparaddna AuCar,adapeur_ enfian_is:
dornicio,yparaoKJer,ar plezas: 1.8(X).I.E.FOYERMc
1-888-SU-HOGAR_ (1-800-533-6987)
(1-888-784-6427) _vw.,seam.ca
H°meCent ®
® Registered Trademark / waTrademark / SMSewIce Mark of Sears, Roebuck and Co.
® MarCa Reglstrada / "rMMama de Fdbdca / suMama de Servlclo de Sears, Roebuck and Co.
McMarque de commerce / MDMarque depos6e de Sears, Roebuck and Co.
179374 04.19.01 BY Printed inU.S.A.