h ncj
user manual
the possibilities
Thank you br purchasN_g this Samsung product.
To receive nlore complete service or accessory
parts, please register your product at or contact
www.samsung.com!register
1-800-SAMSUNG (726-7864_
1. VRT PLUS TM (Vibration Reduction Technology)
This Samsung washer minimizies noise and vibration with dual 3D vibration sensors and
smart control technology, ensuring quiet operation.
2. The Largest Capacity
Samsung's extra-large capacity laundry machine can wash a full set of your bedding, a
kingsize comforter, or up to 32 bath towels in a single load. Since you don't have to do as
many loads, you save time, money, water, and energy.
3. PowerFoam TM
Samsung's effective PowerForm delivers improved cleanliness with advanced fabric care.
PowerFoam allows detergent to distribute evenly and penetrate fabrics faster and deeper.
4. PureCycleTM(Tub Cleaning cycle)
Clean your drum with one button! This Pure Cycle is specially designed to remove
detergent residue & dirt bulidup in the tub, diaphragm and door glass without the need for
special chemical detergents.
5. SpeedSpray TM
Samsung's new Speed Spray technology saves you up to 25%* more time when doing
laundry by shortening wash times while still keeping all segments of the washing process
and getting your clothes clean.
*Based on 8 pounds loads, Normal cycle (under Normal Soil level without any options),
on previous and existing 4.3 cu.ft. Samsung front loading washers released until 2011
without Speed Spray.
**Speed Spray performs in Normal, Bedding PLUS, Deep Steam, Stain Away and
Eco Cold cycle and the saving time may vary by cycles and various load and option
compositions.
6. Deep steam
The Deep Steam feature boosts cleaning performance and loosens grime and dirt, thus
providing superior cleaning results.
7. Smart Control
Samsung's innovative Smart Control technology enables you to control your washer
through personal technologies such as smart phones. You don't have to be on standby
until the cycle ends. Smart Control allows you to monitor the washing process and let you
know when the cycle is complete.
8. Smart Care
Samsung's Smart Care, an automatic error-monitoring system, detects and diagnoses
problems at an early stage and provides a quick and easy solution. With the innovative
Smart Control technology, you can also be alerted when the problem occurs via your smart
phones.
9. Stylish design
The stylish design of this washer blends well with your environment.
10. Digital Display & Center jog dial
The Jog dial enables you to select cycles in both directions with ease, and the display is
easy to use and understand.
2 key' features of your new Smart PowerFoam rM washer
11. DD Motor
The power to handle anything! Our direct-drive inverter motor delivers power right to the
washer tub from a variable speed, reversible motor. A beltless direct-drive motor generates
a higher spin speed of 1,300rpm for more effective, quiter operation. The washer also has
fewer moving parts, meaning fewer repairs.
12. Sanitize
When selecting this cycle, the water heats to an extra high temperature to remove 99.9%
of certain bacteria typically found on clothing, bedding, or towels. This certification is
conducted by NSF International, an independent third-party testing and certification
organization.
Please check the garment care label to avoid garment damage. Only sanitizing cycles have
been designed to meet the requirements of this protocol for sanitization efficacy.
_S_ I NSF Protocol P172
Sanitization Performance of Residential and
Commercial, Family-Sized Clothes Washers
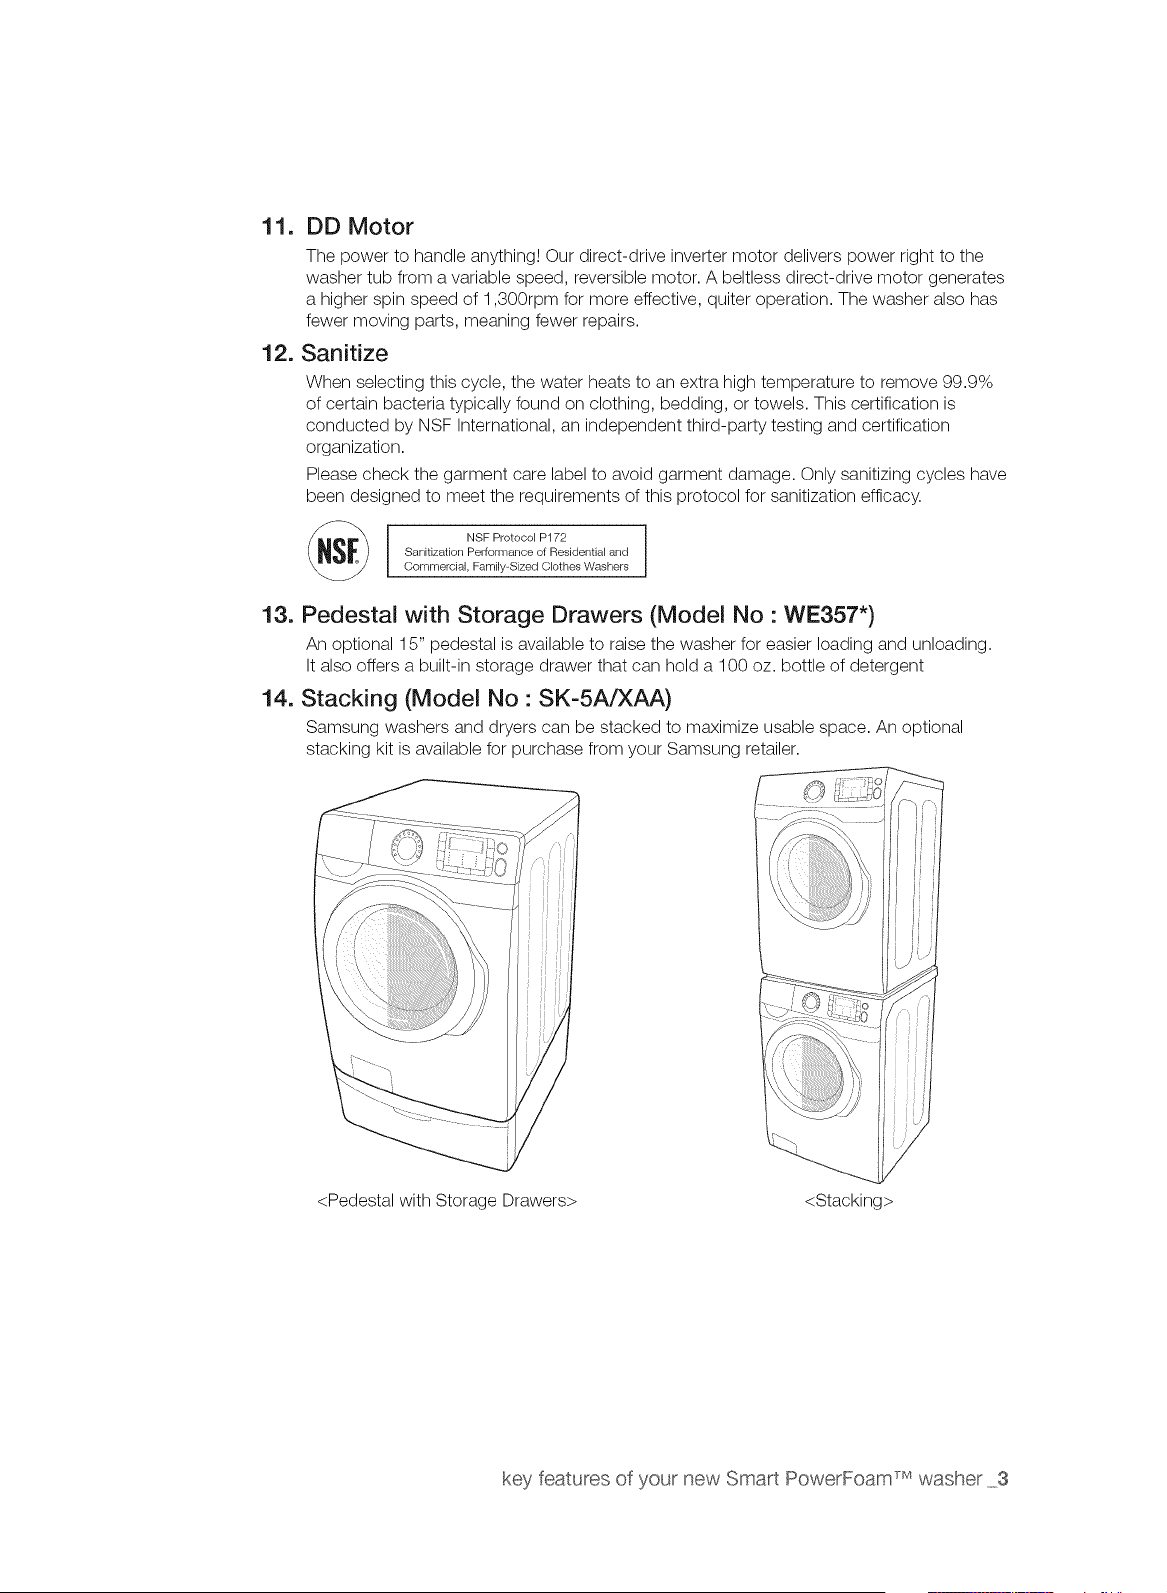
13. Pedestal with Storage Drawers (Model No • WE357")
An optional 15" pedestal is available to raise the washer for easier loading and unloading.
It also offers a built-in storage drawer that can hold a 100 oz. bottle of detergent
14. Stacking (Model No" SK-5A/XAA)
Samsung washers and dryers can be stacked to maximize usable space. An optional
stacking kit is available for purchase from your Samsung retailer.
<Pedestal with Storage Drawers> <Stacking>
key features of your new Smart PowerFoam rMwasher 3
Congratulations on your new Samsung washer. This manual contains important
information on the installation, use and care of your appliance. Please take time to
read this manual to take full advantage of your washer's many benefits and features.
WHAT YOU NEED TO KNOW ABOUT SAFETY INSTRUCTIONS
The Warnings and Important Safety Instructions in this manual do not cover all possible conditions and
situations that may occur. It is your responsibility to use common sense, caution, and care when installing,
maintaining and operating your washer.
IMPORTANT SAFETY SYMBOLS AND PRECAUTIONS
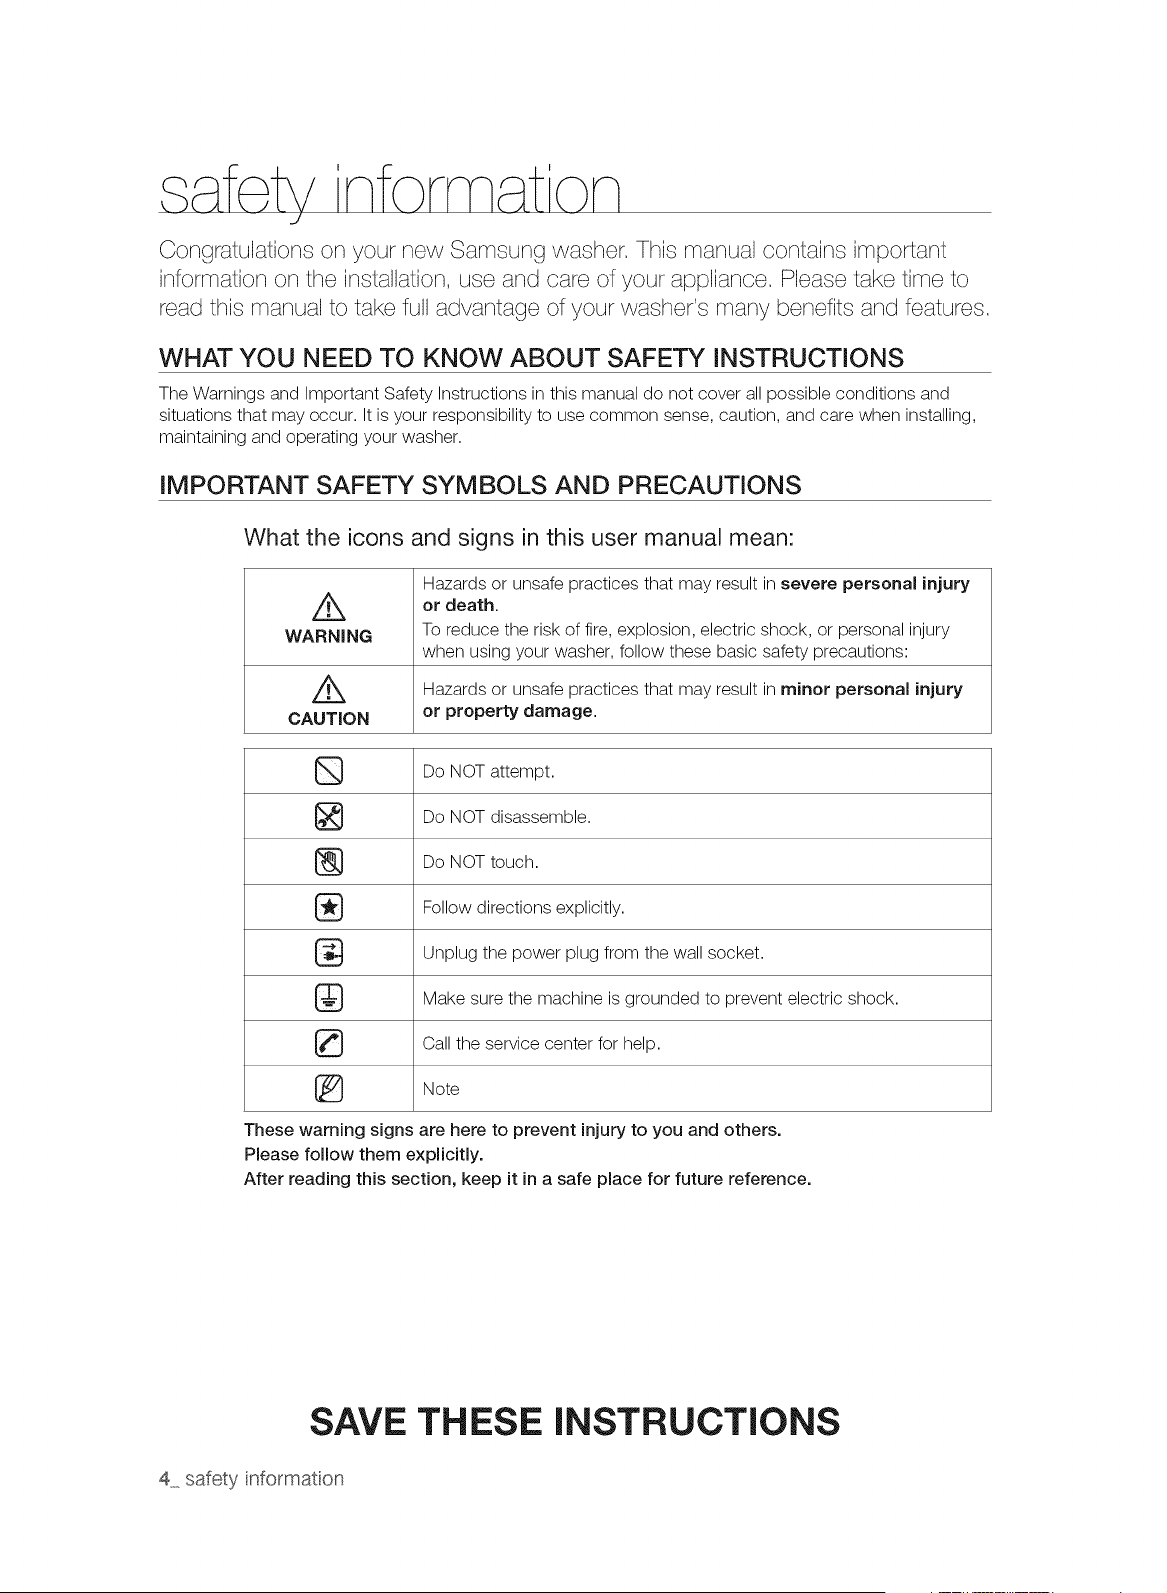
What the icons and signs in this user manual mean:
Hazards or unsafe practices that may result in severe personal injury
//_ or death.
WARNING To reduce the risk of fire, explosion, electric shock, or personal injury
when using your washer, follow these basic safety precautions:
Z_ Hazards or unsafe practices that may result in minor personal injury
CAUTION or property damage.
Do NOT attempt.
[_ Do NOT disassemble.
Do NOT touch.
Follow directions explicitly.
Unplug the power plug from the wall socket.
Make sure the machine is grounded to prevent electric shock.
Call the service center for help.
[_ Note
These warning signs are here to prevent injury to you and others.
Please follow them explicitly.
After reading this section, keep it in a safe place for future reference.
SAVE THESE INSTRUCTIONS
4 safety informaton
WARNING
WARNING
To reduce the risk of fire, electric shock, or injury to persons when using your appliance, follow
basic precautions, including the following:
1=
2.
Read all instructions before using the appliance.
Do not wash or dry articles that have been previously cleaned in, washed in, soaked in, or
spotted with gasoline, dry-cleaning solvents, other flammable or explosive substances as
they give off vapors that could ignite or explode.
3. Do not allow children to play on or in the appliance. Close supervision of children is
necessary when the appliance is used near children.
4. Before the appliance is removed from service or discarded, remove the door to the washing
or drying compartment.
5. Do not reach into the appliance if the drum is moving.
6. Do not install or store this appliance where it will be exposed to the weather.
7. Do not tamper with controls.
8. Do not repair or replace any part of the appliance or attempt any servicing unless specifically
recommended in the user-maintenance instructions or in published user-repair instructions
that you understand and have the skills to carry out.
9. Do not add gasoline, dry-cleaning solvents, or other flammable or explosive substances to
the wash water. These substances give off vapors that could ignite or explode.
WARNING
10. Under certain conditions, hydrogen gas may be produced in a hot water system that has not
been used for 2 weeks or more. HYDROGEN GAS IS EXPLOSIVE. If the hot water system
has not been used for such a period, before using a washer or combination washer-dryer,
turn on all hot water faucets and let the water flow from each for several minutes. This will
release any accumulated hydrogen gas. As the gas is flammable, do not smoke or use an
open flame during this time.
State of California Proposition 65 Warnings:
WARNING:This product contains chemicals known to the State of California to cause cancer and
reproductive toxicity.
SAVE THESE INSTRUCTIONS
safety information 5
CRITICAL INSTALLATION WARNINGS
WARNING
®
Plug the power cord into an AC 120 V / 60 Hz / 15 A wall socket or higher and use the
socket for this appliance only. In addition, do not use an extension cord.
Sharing a wall socket with other appliances, using a power strip, or using an extension
cord may result in electric shock or fire.
Do not use an electric transformer. It may result in electric shock or fire.
Ensure that the voltage, frequency, and amperage provided at the wall socket match the
power specifications of the product.
The installation of this appliance must be performed by a qualified technician or service
company.
Failing to do so may result in electric shock, fire, an explosion, problems with the
product, or injury.
Remove all foreign substances such as dust or water from the power plug terminals and
contact points using a dry cloth on a regular basis.
Unplug the power plug and clean it with a dry cloth.
Failing to do so may result in electric shock or fire.
Plug the power plug into the wall socket in the right direction so that the cord runs towards
the floor.
If you plug the power plug into the socket in the opposite direction, the electric wires
within the cable may be damaged and this may result in electric shock or fire.
This appliance must be properly grounded.
Do not ground the appliance to a gas pipe, plastic water pipe, or telephone line.
Improper grounding may result in electric shock, fi re, an explosion, or problems with the
product.
Never plug the power cord into a socket that is not grounded correctly and make sure
that it is in accordance with local and national codes.
@
Do not install this appliance near a heater or inflammable material.
Do not install this appliance in a humid, oily or dusty location, or in a location exposed to
direct sunlight and water (rain drops).
Do not install this appliance in a location where gas may leak.
This may result in electric shock or fire.
Plug the power plug into the wall socket firmly. Do not use a damaged power plug,
damaged power cord, or loose wall socket.
This may result in electric shock or fire.
Do not pull or excessively bend the power cord.
Do not twist or tie the power cord.
Do not hook the power cord over a metal object, place a heavy object on the power cord,
insert the power cord between objects, or push the power cord into the space behind the
appliance.
This may result in electric shock or fire.
SAVE THESE INSTRUCTIONS
6 safety informaton
A
CAUTION
Do not pull the power cord when unplugging the power plug.
Unplug the power plug by holding the plug.
Failing to do so may result in electric shock or fire.
power plug or power damaged, contact your nearest center.
If the cord is service
INSTALLATION CAUTIONS
Position the that the is accessible.
appliance
so
power plug easily
Failing to do so may result in electric shock or fire due to electric leakage.
Install your appliance on a level and hard floor that can support its weight.
Failing to do so may result in abnormal vibrations, noise, or problems with the product.
Unplug the power plug when the appliance is not being used for long periods of time or
during a thunder/lightning storm.
Failing to do so may result in electric shock or fire.
A CRITICAL USAGE WARNINGS
WARNING
If the appliance is flooded, cut the power immediately and contact your nearest service
center.
If the appliance emits a strange noise, a burning smell, or smoke,, unplug the power plug
immediately and contact your nearest service center.
Failing to do so may result in electric shock or fire.
In the event of a gas leak (such as propane gas, LP gas, etc.), ventilate immediately without
touching the power plug. Do not touch the appliance or power cord.
Do not use a ventilating fan.
A spark may result in an explosion or fire.
Do not wash items contaminated with gasoline, kerosene, benzene, paint thinner, alcohol or
other flammable or explosive substances.
This may result in electric shock, fire or an explosion.
Do not open the washer door by force while the washer is operating (high-temperature
washing/drying/spinning).
Water flowing out of the washer may result in burns or cause the floor to be slippery.
This may result in injury.
Opening the door by force may result in damage to the product or personal injury.
Make sure to remove the packaging (sponge, styrofoam) attached to the bottom of the
washer before using it.
Do not insert your hand under the washer.
This may result in injury.
SAVE THESE INSTRUCTIONS
safety information 7
Do touch the with hands.
not
power
plug
wet
This may result in electric shock.
Do not turn the appliance off by unplugging the power plug while an operation is in
progress.
Plugging the power plug into the wall socket again may cause a spark and result in
electric shock or fire.
Keep all packaging materials well out of the reach of children, as packaging materials can
be dangerous to children.
If a child places a bag over its head, it may result in suffocation.
Do not let children or infirm persons use this washer unsupervised.
Failing to do so may result in electric shock, burns or injury.
Do not insert your hand or a metal object under the washer while it is operating.
This may result in injury.
Make sure the detergent drawer is closed before you put laundry into the washer or remove
laundry from the washer.
If the detergent drawer is open, you could strike the drawer with your head and injure
yourself.
attempt repair, disassemble, or modify appliance yourself.
Do not to the
Do not use any fuse (such as cooper, steel wire, etc.) other than the standard fuse.
If you need to repair or reinstall the appliance, contact your nearest service center.
Failing to do so may result in electric shock, fire, problems with the product, or injury.
If water has enters the appliance anywhere but the drum, unplug the power plug and
contact your nearest service center.
Failing to do so may result in electric shock or fire.
When the water supply hose comes loose from the faucet and floods the appliance, unplug
the power plug.
Failing to do so may result in electric shock or fire.
If any foreign substance enters the appliance, unplug the power plug and contact you
nearest service center.
Failing to do so my result in electric shock or fire.
USAGE CAUTIONS
CAUTION
®
If the the washer is contaminated by a foreign substance such as detergent, dirt, food
waste, etc., unplug the power plug and clean the washer using a damp, soft cloth.
Failing to do so may result in discoloration, deformation, damage or rust.
If struck hard, the front glass can break. Take care when using the washer.
If the glass is broken, it may result in injury.
SAVE THESE INSTRUCTIONS
8 safety informaton
After a water supply failure or when reconnecting the water supply hose, open the faucet
slowly.
Open the faucet slowly after a long period of non-use.
The air pressure in the water supply hose or the water pipe may result in damage to a
part or in water leakage.
If a drain error occurs during an operation, check if there is a drainage problem.
If the washer is used when it is flooded because of a drainage problem,, it may result in
electric shock or fire due to electric leakage.
Insert the laundry into the washer completely so that laundry does not get caught in the
door.
If laundry gets caught in the door, it may result in damage to the laundry or the washer,
or result in water leakage.
Ensure that the faucet is turned off when the washer is not being used.
Ensure that the screw on the water supply hose connector is firmly connected to the
faucet and properly tightened.
Failing to do so may result in property damage or injury.
Take care that the Rubber Seal and the Front Door Glass are not contaminated by a foreign
substance (e.g. waste, thread, hair, etc.)
If a foreign substance is caught in the door or the door is not completely closed, it may
cause water leakage.
Open the faucet and check if the water supply hose connector is firmly tightened and that
there is no water leaking before using the product.
If the water supply hose connectors are loose, it may result in water leakage.
The product you have purchased is designed for domestic use only.
The use for business purposes qualifi es as product misuse. In this case, the product will
not be covered by the standard warranty provided by Samsung and no responsibility can
be attributed to Samsung for malfunctions or damages resulting from such misuse.
If the wash is not performed and the laundry is left for a period of time after adding
detergent or applying stain remover or pre-treatment onto the laundry, the laundry may be
discolored.
Select the recommended cycle and temperature on the basis of the laundry items, sort the
laundry by color on the basis of its colorfastness and select the appropriate cycle.
Make sure that foreign objects such as pins, buttons and coins are removed from clothing
items when adding laundry into the washer. Wash dirty laundry separately from relatively
clean items and wash fragile items separately from tougher textiles.
If an item is stained, wash it as fast as possible. Use stain remover or detergent only after
testing the colorfastness of the item by applying a small quantity to an inside seam.
SAVE THESE INSTRUCTIONS
safety information 9
@
Do not stand on top of the appliance or place objects (such as laundry, lighted candles,
lighted cigarettes, dishes, chemicals, metal objects, etc.) on the appliance.
This may result in electric shock, fire, problems with the product, or injury.
Do not operate the appliance with wet hands.
This may result in electric shock.
Do not spray volatile material such as insecticide onto the surface of the appliance.
As well as being harmful to humans, it may also result in electric shock, fire or problems
with the product.
Do not place an object that generates a electromagnetic field near the washer.
This may result in injury due to a malfunction.
Since the water drained during a high-temperature wash or drying cycle is hot, do not touch
the water.
This may result in burns or injury.
Do not wash, spin or dry water-proof seats, mats or clothing (*).
Do not wash thick, hard mats even if the washer mark is on the care label.
This may result in injury or damage to the washer, walls, floor or clothing due to
abnormal vibrations.
* Woolen bedding, rain covers, fishing vests, ski pants, sleeping bags, diaper covers,
sweat suits, and bicycle, motor cycle, car covers, etc.
Do not operate the washer when the detergent box is removed.
This may result in electric shock or injury due to water leakage.
Do not touch the inside of the tub during or just after drying as it is hot.
This may result in burns.
Do not insert your hand into the detergent dispenser after opening it.
This may result in injury as your hand may be caught.
Do not place any non-laundry objects, such as shoes, food waste, or animals into the
washer.
This can cause abnormal vibrations that can damage the washer, and, in the case of
pets, cause severe injury or death.
Do not press the buttons using sharp objects such as pins, knifes, fingernails, etc.
This may result in electric shock or injury.
Do not wash laundry contaminated by oils, creams or lotions usually found in skincare
shops or massage clinics.
This may result in the rubber seal becoming deformed and water leakage.
Do not leave metal objects (safety pins, hair pins, etc.) or bleach in the tub for long periods
of time.
This may cause the tub to rust.
If rust appears on the surface of the tub, apply a neutral cleansing agent to the surface
and use a sponge to clean it. Never use a metal brush.
SAVE THESE INSTRUCTIONS
10 safety informaton
Do not use dry cleaning detergent directly and do not wash, rinse, or spin laundry
contaminated by dry cleaning detergent.
This may result in spontaneous combustion or ignition due to the heat from the oxidation
of the oil.
Do not use hot water from water cooling/heating devices.
This may result in problems with the washer.
Do not use natural hand-washing soap in the washer.
If it hardens and accumulates inside the washer, it may result in problems with the
product, discoloration, rust or bad odors.
Do not wash large laundry items such as bedding in the washing net.
Failing to do so may result in injury due to abnormal vibrations.
Place smaller items, such as lace socks and lingerie in the washing net.
Do not use hardened detergent.
If it accumulates inside the washer, it may cause water leakage.
Do not wash throw rugs or doormats.
If you wash throw rugs or doormats, sand will accumulate inside the washer. It may
result in errors such as no draining.
Take care that children's fingers are not caught in the door when closing it.
This may result in injury.
CRITICAL CLEANING INSTRUCTIONS
WARNING
Do not clean the appliance by spraying water directly onto it.
Do not use the strong acid cleaning agent.
Do not use benzene, thinner or alcohol to clean the appliance.
This may result in discoloration, deformation, damage, electric shock or fire.
Before cleaning or performing maintenance, unplug the appliance from the wall socket.
Failing to do so may result in electric shock or fire.
SAVE THESE INSTRUCTIONS
safety informaton 11
1, FCC Notice
_FCC CAUTION:
CAUTION
Any changes or modifications not expressly approved by the party responsible for compliance
could void the user's authority to operate the equipment.
This device complies with Part 15 of FCC Rules. Operation is Subject to following two
conditions:
1. This device may not cause harmful interference, and
2. This device must accept any interference received including interference that cause
undesired operation.
For product available in the USA/Canada market, only channel 1-11 can be operated. Selection
of other channels is not possible.
FCC STATEM ENT:
This equipment has been tested and found to comply within the limits for a Class B digital
device, pursuant to part 15 of the FCC Rules. These limits are designed to provide reasonable
protection against harmful interference in a residential installation.
This equipment generates, uses, and can radiate radio frequency energy and, if not installed
and used in accordance with the instructions, may cause harmful interference to radio
communications. However, there is no guarantee that interference will not occur in a particular
installation. If this equipment does cause harmful interference to radio or television reception,
which can be determined by turning the equipment off and on, the user is encouraged to try to
correct the interference by one or more of the following measures:
,, Reorient or relocate the receiving antenna
,, Increase the separation between the equipment and receiver
,, Connect the equipment into an outlet on a different circuit from that to which the receiver is
connected
,, Consult the dealer or an experienced radio/TV technician for help.
FCC RADIATION EXPOSURE STATEMENT:
This equipment complies with FCC radiation exposure limits set forth for an uncontrolled
environment. This equipment should be installed and operated with a minimum distance of 20cm
between the radiator and your body. This device and its antenna(s) must not be co-located or
operation in conjunction with any other antenna or transmitter.
SAVE THESE iNSTRUCTiONS
12 safety informaton
2. IC Notice
The term "IC" before the radio certification number only signifies that Industry Canada technical
specifications were met. Operation is subject to the following two conditions: (1) this device may
not cause interference, and (2) this device must accept any interference, including interference
that may cause undesired operation of the device.
This Class B digital apparatus complies with Canadian ICES-003.
Cet appareil num_rique de la classe Best conforme _tla norme NMB-003 du Canada.
For product available in the USA/Canada market, only channel 1-11 can be operated. Selection
of other channels is not possible.
IC RADIATION EXPOSURE STATEMENT:
This equipment complies with IC RSS-102 radiation exposure limits set forth for an uncontrolled
environment. This equipment should be installed and operated with minimum distance 20cm
between the radiator & your body. This device and its antenna(s) must not be co-located or
operation in conjunction with any other antenna or transmitter.
SAVE THESE INSTRUCTIONS
safety informaton 13
content
INSTALLING YOUR WASHER
i
16 Unpacking your washer
16 Overview of your washer
17 Electrical
17 Grounding
17 Water
17 Drain facility
18 Flooring
18 Location considerations
18 Alcove or closet installation
18 Undercounter installation(washer only)
19 With optional pedestal base or stacking kit
20 Important note to installer
20 Installation flow chart
OPERATING INSTRUCTIONS 23 Loading your washer
23 Getting started
WASHING A LOAD OF LAUNDRY
i
ii
24 Overview of the control panel
26 Delay Start
27 Child Lock
28 Spin Only
28 Drum Light
28 Garment+
28 My cycle
28 DEEP STEAM
29 Smart Care
30 Washing clothes using the cycle selector
30 ATC (Auto Temperature Control)
31 Setting the Smart Control
31 Configuring the wired/wireless router
31 Check before installation
32 Connecting to the network using the WPS
setting
33 Connecting to the network using the AP
setting
34 Using the mobile app (Android)
34 Downloading the phone application
40 Device certification
44 Using the mobile app
46 Using the mobile app (iOS)
46 Downloading the phone application
50 Device certification
54 Using the mobile app
56 Registering your washer
58 Detergent use
58 Features
14 contents
MAiNTAiNiNG YOUR WASHER
60 Cleaning the exterior
60 Cleaning the interior
61 Cleaning the dispensers
61 Storing your washer
62 Cleaning the debris filter
63 Cleaning the door seal/bellow
63 Preserving the top cover and the front frame
64 Pure Cycle TM
TROUBLESHOOTING
65 Check these points if your washer.,.
67 Information codes
69 Network Setup Q&A
APPENDIX
71 Fabric care chart
72 Cycle chart
74 Helping the environment
74 Declaration of conformity
74 Specification
75 Open Source Announcement
87 OpenSSL
contents 15
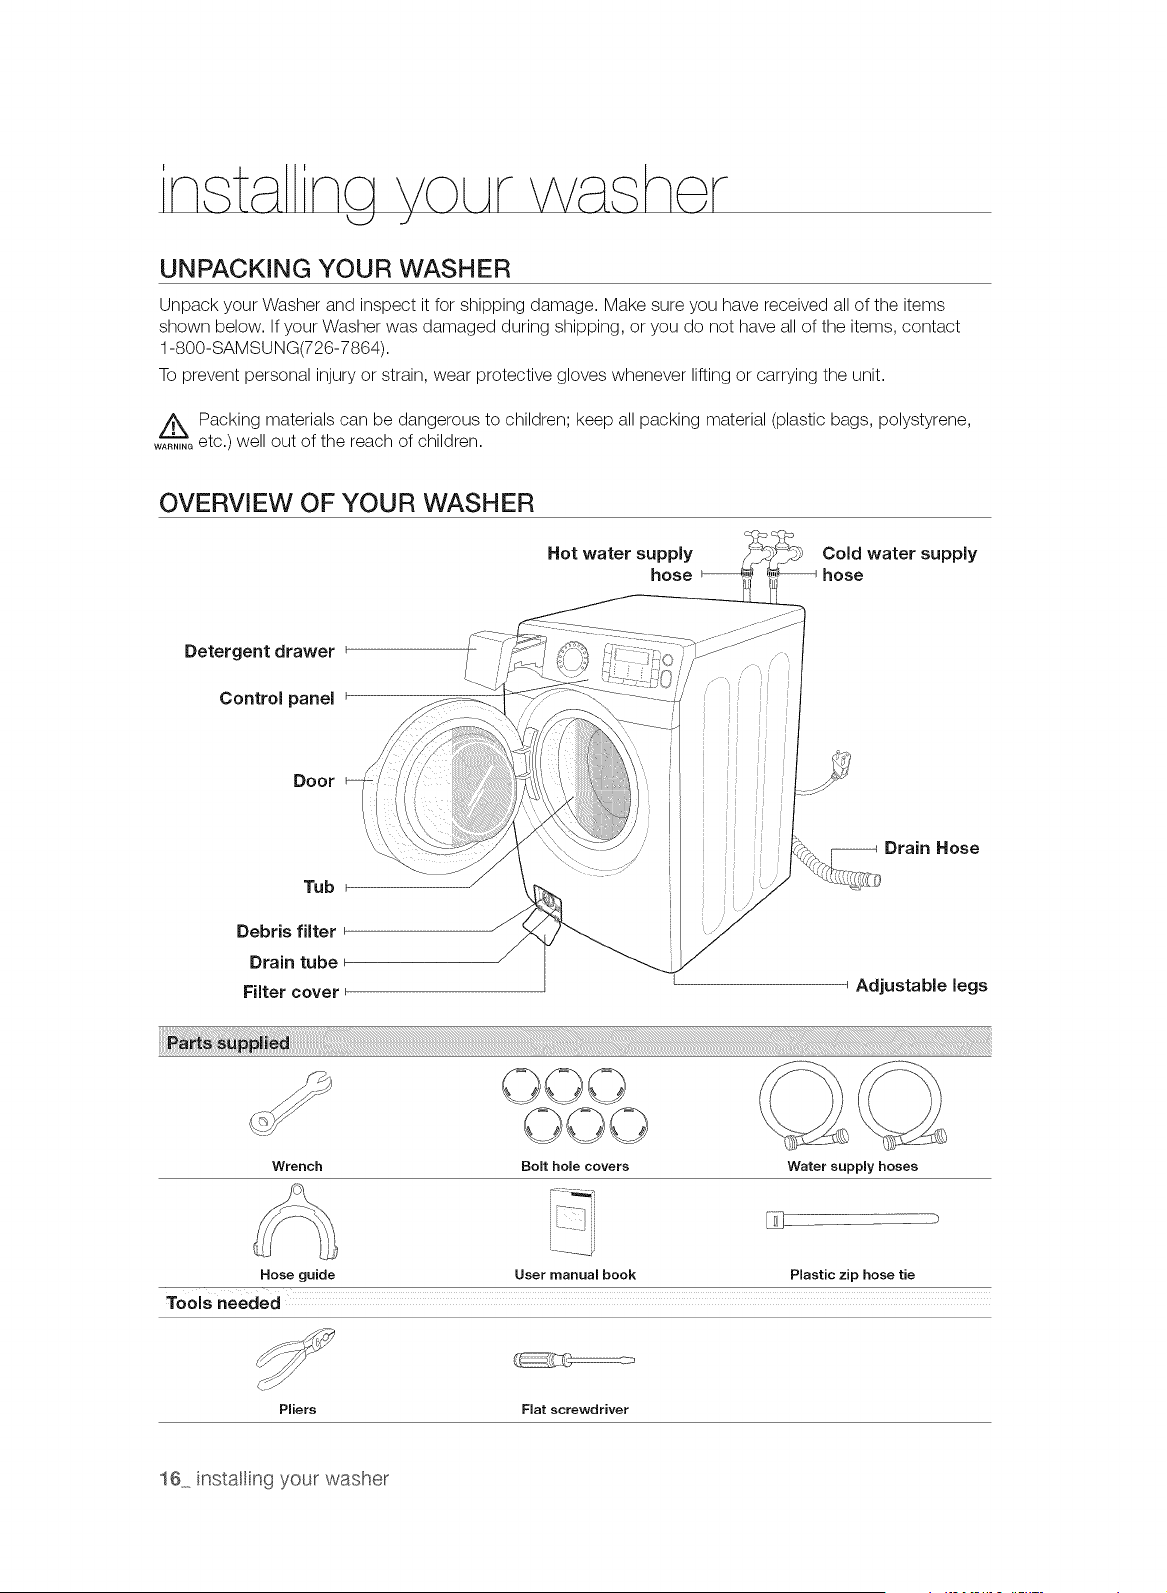
UNPACKING YOUR WASHER
Unpack your Washer and inspect it for shipping damage. Make sure you have received all of the items
shown below. If your Washer was damaged during shipping, or you do not have all of the items, contact
1-800-SAMSU NG(726-7864).
To prevent personal injury or strain, wear protective gloves whenever lifting or carrying the unit.
w_,,G Packing materials can be dangerous to children; keep all packing material (plastic bags, polystyrene,
etc.) well out of the reach of children.
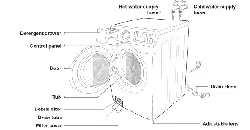
OVERVIEW OF YOUR WASHER
Hot water supply Cold water supply
hose hose
Detergent drawer
Control panel
Door
Tub
Debris filter
Drain tube
Filter cover _
Drain Hose
Adjustable legs
©©©
Wrench Bolt homecovers
Water supply hoses
Hose guide User manual book Plastic zip hose tie
Tools needed
Pliers Flat screwdriver
16 instaling your washer
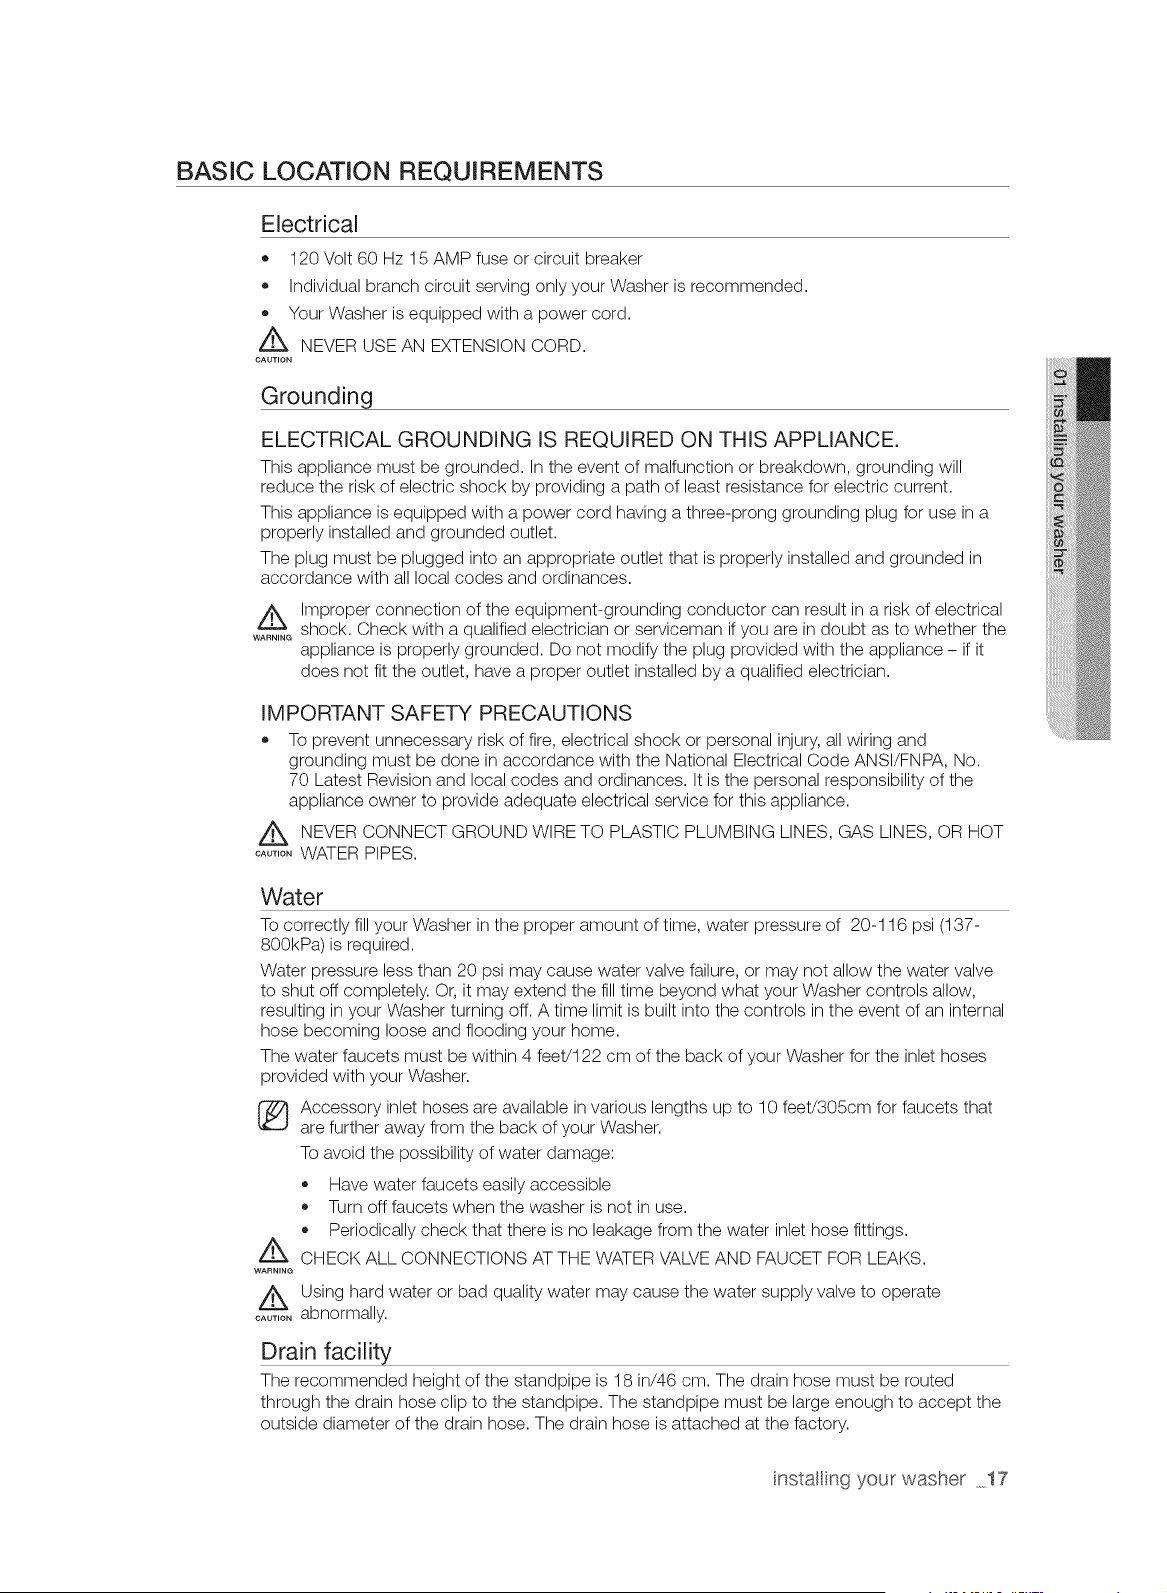
BASIC LOCATION REQUIREMENTS
Electrical
• 120 Volt 60 Hz 15 AMP fuse or circuit breaker
Individual branch circuit serving only your Washer is recommended.
Your Washer is equipped with a power cord.
NEVER USE AN EXTENSION CORD.
CAUTION
Grounding
ELECTRICAL GROUNDING IS REQUIRED ON THIS APPLIANCE.
This appliance must be grounded. In the event of malfunction or breakdown, grounding will
reduce the risk of electric shock by providing a path of least resistance for electric current.
This appliance is equipped with a power cord having a three-prong grounding plug for use in a
properly installed and grounded outlet.
The plug must be plugged into an appropriate outlet that is properly installed and grounded in
accordance with all local codes and ordinances.
WARNING
Improper connection of the equipment-grounding conductor can result in a risk of electrical
shock. Check with a qualified electrician or serviceman if you are in doubt as to whether the
appliance is properly grounded. Do not modify the plug provided with the appliance - if it
does not fit the outlet, have a proper outlet installed by a qualified electrician.
IMPORTANT SAFETY PRECAUTIONS
To prevent unnecessary risk of fire, electrical shock or personal injury, all wiring and
grounding must be done in accordance with the National Electrical Code ANSI/FNPA, No.
70 Latest Revision and local codes and ordinances. It is the personal responsibility of the
appliance owner to provide adequate electrical service for this appliance.
NEVER CONNECT GROUND WIRE TO PLASTIC PLUMBING LINES, GAS LINES, OR HOT
....... WATER PIPES.
Water
To correctly fill your Washer in the proper amount of time, water pressure of 20-116 psi (137-
800kPa) is required.
Water pressure less than 20 psi may cause water valve failure, or may not allow the water valve
to shut off completely. Or, it may extend the fill time beyond what your Washer controls allow,
resulting in your Washer turning off. A time limit is built into the controls in the event of an internal
hose becoming loose and flooding your home.
The water faucets must be within 4 feet/122 cm of the back of your Washer for the inlet hoses
provided with your Washer.
/k
WARNING
CAUTION
Accessory inlet hoses are available in various lengths up to 10 feet/305cm for faucets that
are further away from the back of your Washer.
To avoid the possibility of water damage:
,, Have water faucets easily accessible
Turn off faucets when the washer is not in use.
• Periodically check that there is no leakage from the water inlet hose fittings.
CHECK ALL CONNECTIONS AT THE WATER VALVE AND FAUCET FOR LEAKS.
Using hard water or bad quality water may cause the water supply valve to operate
abnormally.
Drain facility
The recommended height of the standpipe is 18 in/46 cm. The drain hose must be routed
through the drain hose clip to the standpipe. The standpipe must be large enough to accept the
outside diameter of the drain hose. The drain hose is attached at the factory.
instaling your washer 17

Flooring
For best performance, your Washer must be installed on a solidly constructed floor. Wood floors
may need to be reinforced to minimize vibration and/or unbalanced load situations. Carpeting
and soft tile surfaces are contributing factors in vibration may cause your washer to move slightly
during the spin cycle.
Never install your washer on a platform or weakly supported structure.
Location considerations
Do not install your washer in areas where water may freeze, since your washer will always
maintain some water in its water valve, pump, and hose areas. This can cause damage to the
pump, hoses and other components.
Alcove or closet installation
MINIMUM CLEARANCES FOR CLOSET AND ALCOVE INSTALLATIONS:
Sides - 1 in / 25 mm Top - 17 in / 432 mm
Rear - 5.9 in / 150 mm Closet Front - 2 in / 51 mm
If the washer and dryer are installed together, the closet front must have at least a 72 in2 (465
cm _)unobstructed air opening. Your washer alone does not require a specific air opening.
A
1 in.
(2.5cm)
I_-
CCL__
,,o 27,o 27,o4,- ,,o
(2.5cm) (68.6 cm) (68.6 cm) (2.5cm)
17in. f
(43.2 cm)
2in.-_l_tr:_ 34.1in. --_1_-5.9in.
(5cm) (86.5cm) (15cm)
A. Recessed area
B. Side view - closet or confined area
Undercounter installation(washer only)
T
-1 o ImJ
39.6 in. (
(100.6 cm)
_!L
l io 27i. l io
(2.5 cm) (68.6 crn) (2.5 crn)
18 instaling your washer

With optional pedestal base or stacking kit
Required Dimensions for installation With Pedestal
51.2 in. (130 cm) to clear open door_
i i i i i
i i i i i
i i i i i
1
I_-- 34.1io.---_1_-5.9io.
(86.5 cm) (15 cm)
t
39.0 ir
(99 cn"
..........._ ............ 53.6 ir
(136.2 c 1)
27in.
(68.6cm)
Closet or Door
Required Dimensions for Installation With Stacking Kit
78 in.
(198 cm
©
©
It is not recommended to stack DV457" on
your washer.
(it might be hard to control dryer LCD
because of the viewing angle.)
* Required spacing
** External exhaust elbow requires additional space.
instaling your washer 19
IMPORTANT NOTE TO INSTALLER
Please read the following instructions carefully before installing your Washer.
These instructions should be retained for future reference.
We recommend you hire a professional for installation of this washer.
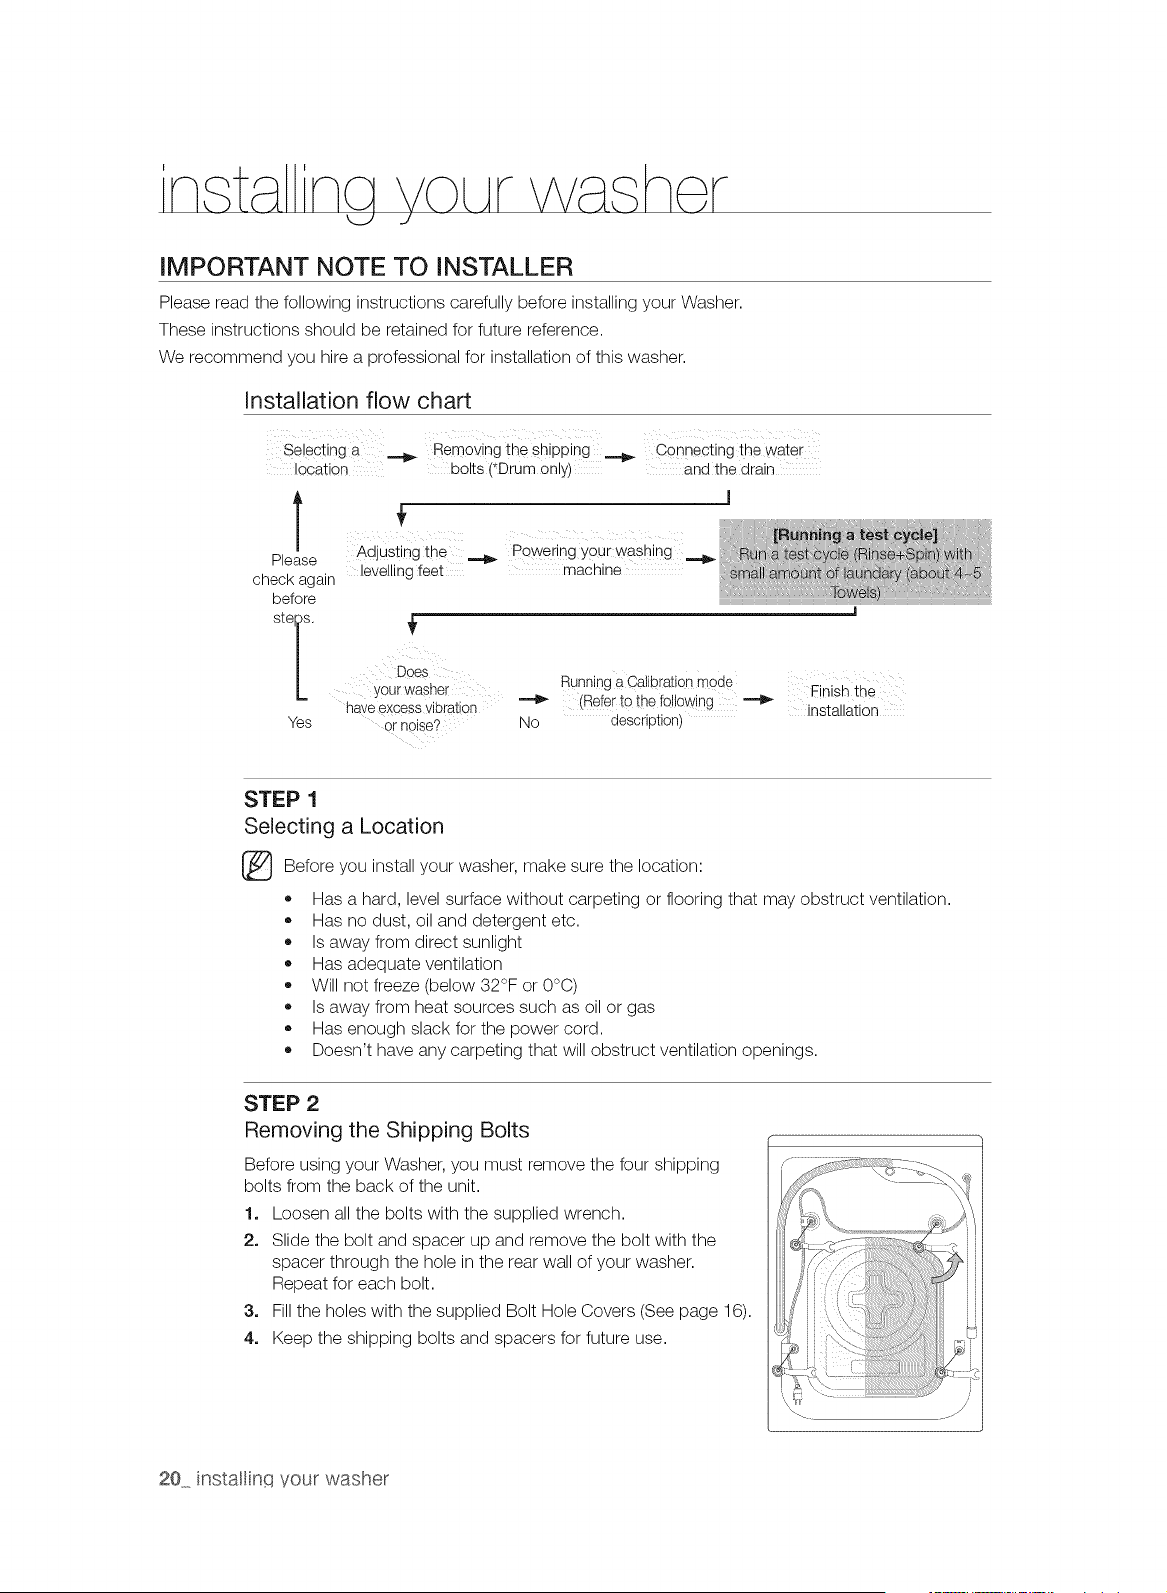
Installation flow chart
Selectinga _ Removing the sh!pping _ Connectingthewater
location bolts (*Drumonly)and the drain
Please
check again levellingfeet
before
st [:
YourWaSher
haveexcessvibration
Yes or noise?
_ii i iii i i ii i _ i
Adjusting the _ powering your washing
machine
Running a Calibration mode
(Referto the following _ Finish the
installation
No description)
STEP 1
Selecting a Location
Before install make the location:
you your
washer, sure
• Has a hard, level surface without carpeting or flooring that may obstruct ventilation.
Has no dust, oil and detergent etc.
Is away from direct sunlight
Has adequate ventilation
Will not freeze (below 32°F or O°C)
Is away from heat sources such as oil or gas
Has enough slack for the power cord.
Doesn't have any carpeting that will obstruct ventilation openings.
STEP 2
Removing the Shipping Bolts
Before using your Washer, you must remove the four shipping
bolts from the back of the unit.
1. Loosen all the bolts with the supplied wrench.
2. Slide the bolt and spacer up and remove the bolt with the
spacer through the hole in the rear wall of your washer.
Repeat for each bolt.
3. Fill the holes with the supplied Bolt Hole Covers (See page 16).
4. Keep the shipping bolts and spacers for future use.
20 instalinq your washer
STEP 3
Installing your Washer
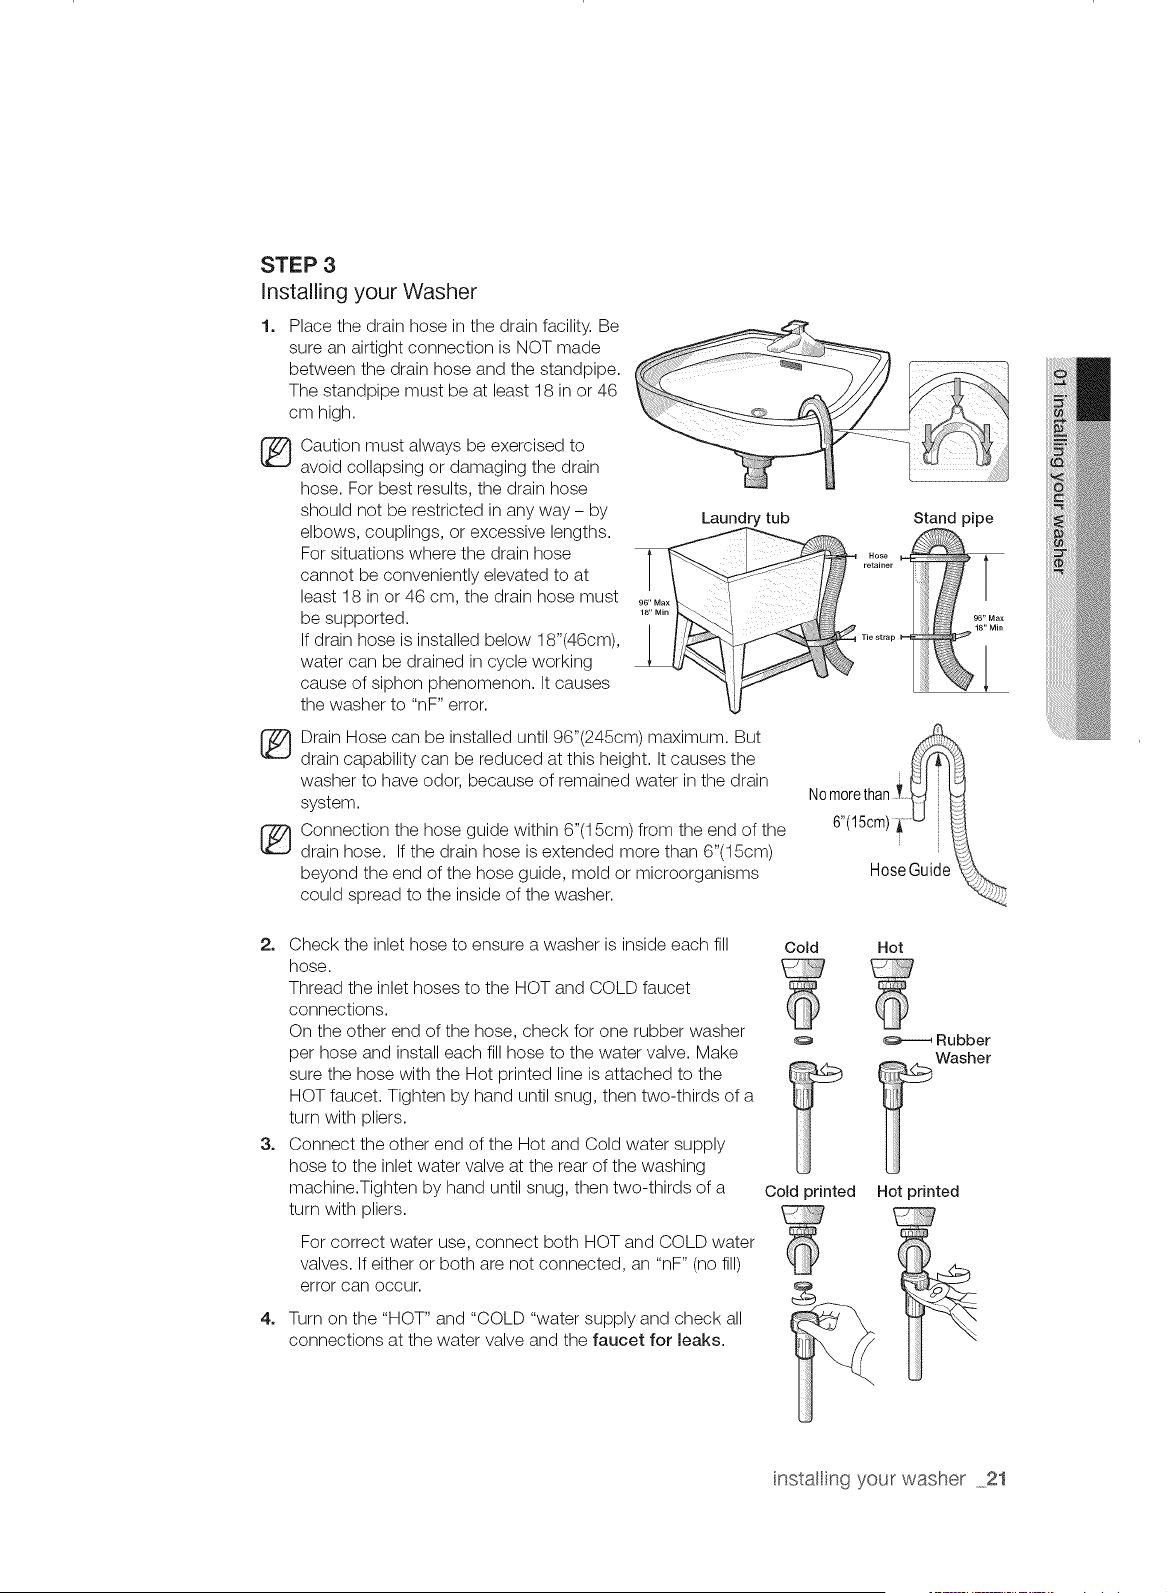
1. Place the drain hose in the drain facility. Be
sure an airtight connection is NOT made
between the drain hose and the standpipe.
The standpipe must be at least 18 in or 46
cm high.
_ aution must always be exercised to
avoid collapsing or damaging the drain
hose. For best results, the drain hose
should not be restricted in any way - by
elbows, couplings, or excessive lengths.
For situations where the drain hose
cannot be conveniently elevated to at
least 18 in or 46 cm, the drain hose must
be supported.
If drain hose is installed below 18"(460m),
water can be drained in cycle working
cause of siphon phenomenon. It causes
the washer to "nF" error.
Laundry tub Stand pipe
_ rain Hose can be installed until 96"(245cm) maximum. But
drain capability can be reduced at this height. It causes the
washer to have odor, because of remained water in the drain
system.
_ onnection the hose guide within 6"(15cm) from the end of the
drain hose. If the drain hose is extended more than 6"(15cm)
beyond the end of the hose guide, mold or microorganisms
could spread to the inside of the washer.
Nomorethan
6"(15cm) }_
HoseGuide
2. Check the inlet hose to ensure a washer is inside each fill Cold
hose.
Thread the inlet hoses to the HOT and COLD faucet
connections.
On the other end of the hose, check for one rubber washer
per hose and install each fill hose to the water valve. Make
sure the hose with the Hot printed line is attached to the
HOT faucet. Tighten by hand until snug, then two-thirds of a
turn with pliers.
3. Connect the other end of the Hot and Cold water supply
hose to the inlet water valve at the rear of the washing
machine.Tighten by hand until snug, then two-thirds of a Cold printed
turn with pliers.
4_
For correct water use, connect both HOT and COLD water
valves. If either or both are not connected, an "nF" (no fill)
error can occur.
Turn on the "HOT" and "COLD "water supply and check all
connections at the water valve and the faucet for leaks.
Hot
Rubber
Washer
Hot printed
instaling your washer 21
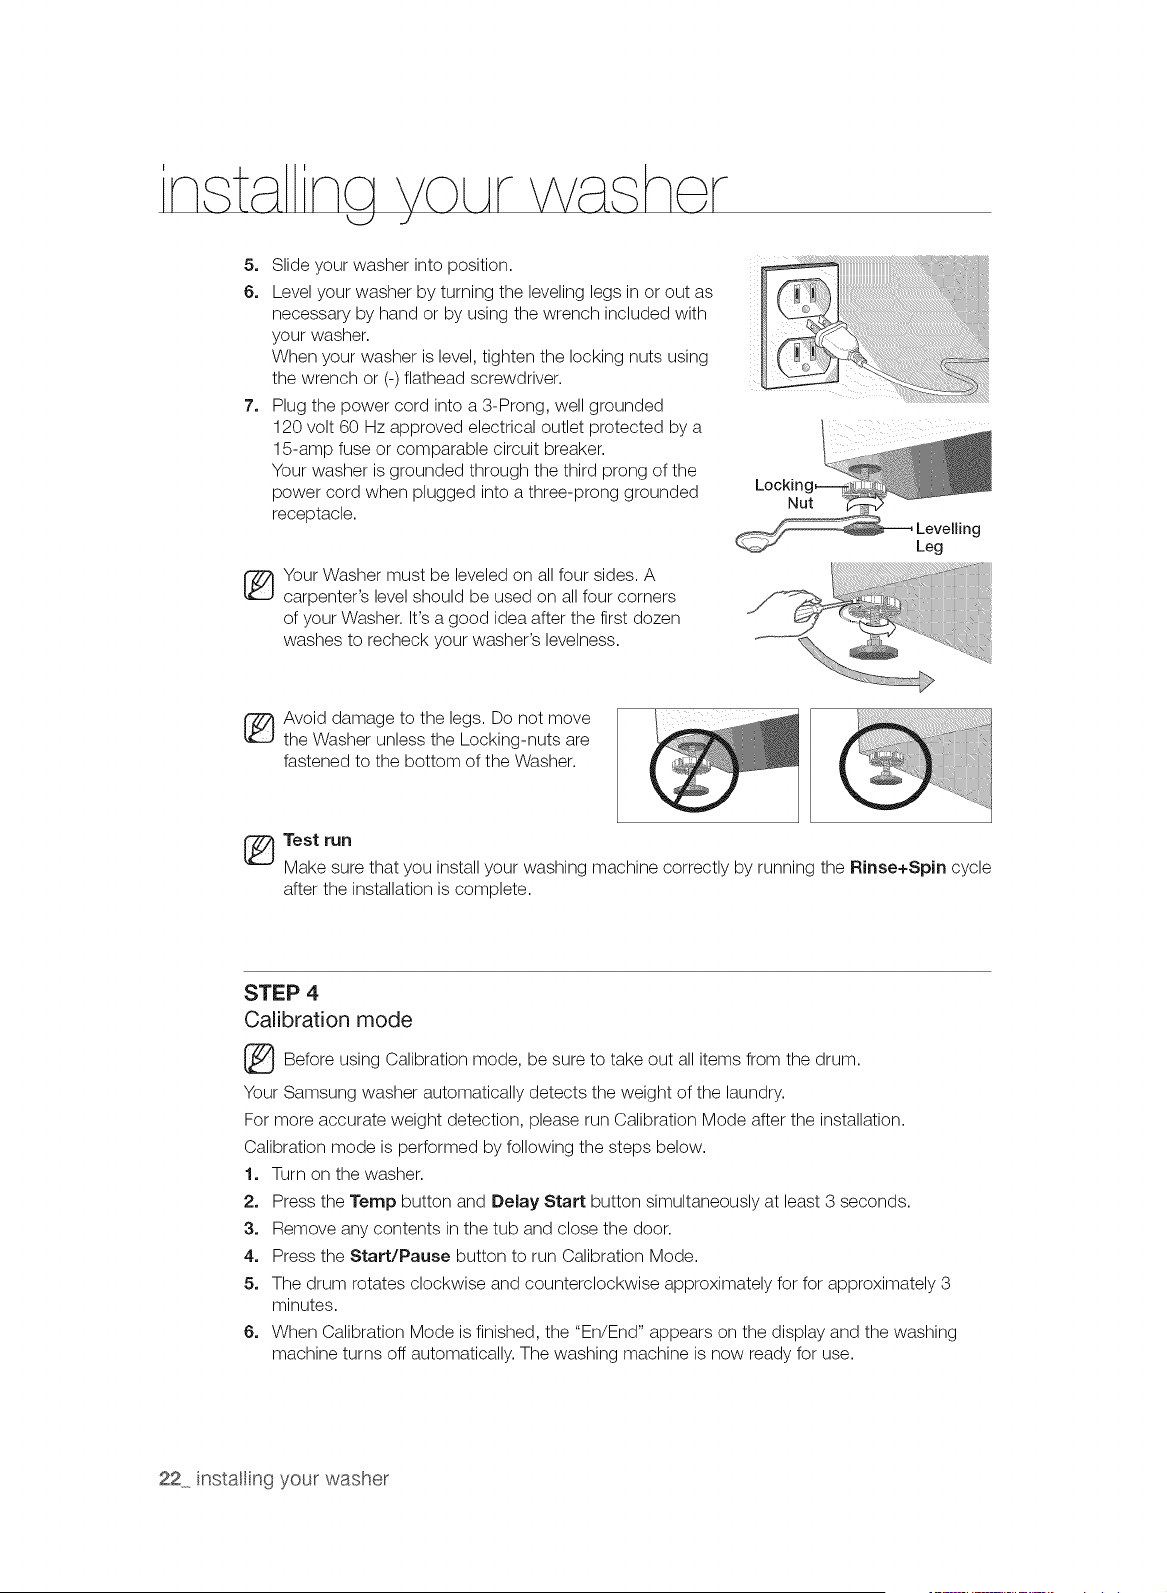
5. Slide your washer into position.
6. Level your washer by turning the leveling legs in or out as
necessary by hand or by using the wrench included with
your washer.
When your washer is level, tighten the locking nuts using
the wrench or (-) flathead screwdriver.
7. Plug the power cord into a 3-Prong, well grounded
120 volt 60 Hz approved electrical outlet protected by a
15-amp fuse or comparable circuit breaker.
Your washer is grounded through the third prong of the
power cord when plugged into a three-prong grounded
receptacle.
®
Your Washer must be leveled on all four sides. A
carpenter's level should be used on all four corners
of your Washer. It's a good idea after the first dozen
washes to recheck your washer's levelness.
Lockinc
Nut
Leg
_ Avoid damage to the legs. Do not move
the Washer unless the Locking-nuts are
fastened to the bottom of the Washer.
Test run
Make sure that you install your washing machine correctly by running the Rinse+Spin cycle
after the installation is complete.
STEP 4
Calibration mode
_ Before using Calibration mode, be sure to take out all items from the drum.
Your Samsung washer automatically detects the weight of the laundry.
For more accurate weight detection, please run Calibration Mode after the installation.
Calibration mode is performed by following the steps below.
1. Turn on the washer.
2. Press the Ternp button and Delay Start button simultaneously at least 3 seconds.
3. Remove any contents irathe tub and close the door.
4. Press the Start/Pause button to run Calibration Mode.
5. The drum rotates clockwise and counterclockwise approximately for for approximately 3
minutes.
6. When Calibration Mode is finished, the "En/End" appears on the display and the washing
machine turns off automatically. The washing machine is now ready for use.
22 instaling your washer
no nstr(]ot©ns
I
LOADING YOUR WASHER
,, You can fill the tub with dry, unfolded clothes; but DO NOT OVERLOAD the tub.
,, Overloading may reduce washing efficiency, cause excess wear, and possibly cause creasing or
wrinkling of the load.
• Wash delicate items such as bras, hosiery, and other lingerie in the Delicates cycle with similar
lightweight items.
When washing big bulky items or a few smaller items that don't fill the tub completely - a rug, a pillow,
stuffed toys, or one or two sweaters, for example - add a few towels to improve tumbling and spin
performance.
During the spin cycle, the washer may add additional water to redistribute the excessive imbalance
inside the drum.
When washing heavily soiled loads, do not overload your Washer in order to assure good cleaning
results.
To add a forgotten item:
1, Press the Start/Pause Button.
2, Wait for the Door Lock light to go out (5 seconds)
3, Add the item, close the door, and press the Start/Pause Button.
After a 10-second pause, the cycle will resume.
GETTING STARTED
1, Load your Washer.
2, Close the door.
Z_ Push the laundry into the drum completely to prevent the laundry from being caught in the door or
....... from falling out of the drum.
3, Add detergent and additives to the dispenser (see page 58).
4, Select the appropriate cycle and options for the load (see page 24).
5. Press the Start/Pause Button.
The drum automatically rotates and measures the weight of the laundry without supplying water in
order to adjust the wash time. (The rotating display on the display panel indicates that the weight of the
laundry is being measured.)
6. The Wash Indicator light will illuminate.
7. The estimated cycle time will appear in the display.
The time may fluctuate to better indicate the time remaining in the cycle.
The actual time required for a cycle may differ from the estimated time in the display depending on the
water pressure, water temperature, detergent, and laundry.
8. Before your washer starts to fill, it will make a series of clicking noises to check the door lock and do a
quick drain.
o
o
Do
WARNING
When the cycle is complete, the Door Lock light will go out and "End" will appear in the display.
DO NOT attempt to open the door until the Door Lock light is off. To add a forgotten item, see
"Loading your Washer" section. (page 23)
When your Washer is restarted after a pause, expect a delay of up to 15 seconds before the cycle
continues.
Pressing the Power button cancels the cycle and stops your washer.
The Pre Wash, Wash, Rinse and Spin indicator lights will illuminate during those portions of the cycle.
not place anything on top of your washer while it is running.
operatng instructions 23
A WARNING: To reduce the risk of fire, electric shock, or injury to persons, read the IMPORTANT
......._ SAFETY INSTRUCTIONS before operating this appliance.
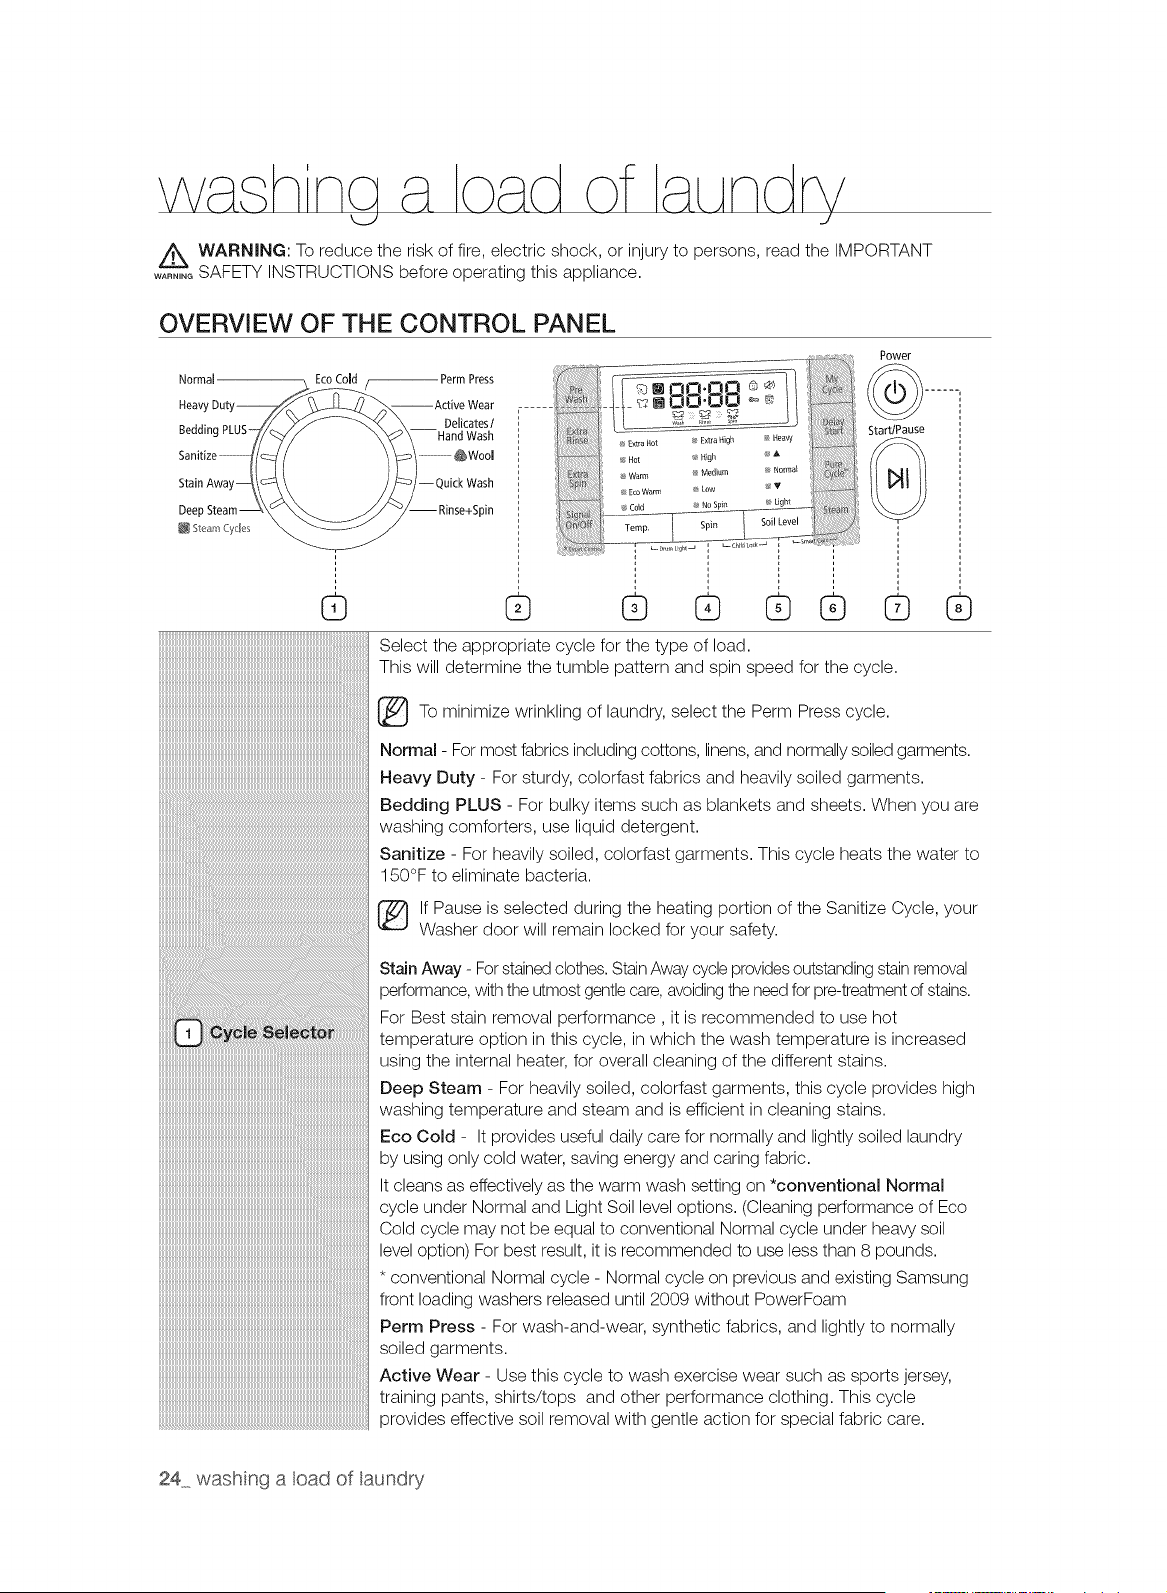
OVERVIEW OF THE CONTROL PANEL
Normal Press
Heav --Active Wear
Delicates I
Bedding PLUS- --Hand Wash
--_Wool
--Quick Wash
Deep
SteamCycles
G
_? Extra Ho _ Extra High S/ Heavy
Hot Hsg
_£ Wa m _ Medium Normal
.............._, _: ...............................
® ® ® ®®
iiiiiiiiiiiiiiiiiiiiiiiiiiiiiiiiiiiiiiiiiiiiiiiiiiiiiiiiiiiiiiiiiiiiiiiiiiiiiiiiiiiiiiiiiiiiiiiiiiiiiiiiiiiiiiiiiiiiiiiiiiiiiiiiiiiii
_______________________________________________________________________________________________________________________________________
iiiiiiiiiiiiiiiiiiiiiiiiiiiiiiiiiiiiiiiiiiiiiiiiiiiiiiiiiiiiiiiiiiiiiiiiiiiiiiiiiiiiiiiiiiiiiiiiiiiiiiiiiiiiiiiiiiiiiiiiiiiiiiiiiiiiiii
__________________________________________________________________________________________________________________________________________
iiiiiiiiiiiiiiiiiiiiiiiiiiiiiiiiiiiiiiiiiiiiiiiiiiiiiiiiiiiiiiiiiiiiiiiiiiiiiiiiiiiiiiiiiiiiiiiiiiiiiiiiiiiiiiiiiiiiiiiiiiiiiiiiiiiii@_
_______________________________________________________________________________________________________________________________________________
!!!!!!!!!!!!!!!!!!!!!!!!!!!!!!!!!!!!!!!!!!!!!!!!!!!!!!!!!!!!!!!!!!!!!!!!!!!!!!!!!!!!!!!!!!!!!!!!!!!!!!!!!!!!!!!!!!!!!!!!!!!!!!!!!!!!!!!!!!!!!!!
Power
......
StardPause
Q Q
Select the appropriate cycle for the type of load.
This will determine the tumble pattern and spin speed for the cycle.
To minimize of select the Perm Press
wrinkling laundry, cycle.
Normal - For most fabrics including cottons, linens,and normally soiled garments.
Heavy Duty - For sturdy, colorfast fabrics and heavily soiled garments.
Bedding PLUS - For bulky items such as blankets and sheets. When you are
washing comforters, use liquid detergent.
Sanitize - For heavily soiled, colorfast garments. This cycle heats the water to
150°F to eliminate bacteria.
If Pause is selected during the heating portion of the Sanitize Cycle, your
Washer door will remain locked for your safety.
Stain Away - For stainedclothes. StainAway cycle providesoutstanding stain removal
performance,with the utmost gentle care, avoidingthe need for pre-treatmentof stains.
For Best stain removal performance, it is recommended to use hot
temperature option in this cycle, in which the wash temperature is increased
using the internal heater, for overall cleaning of the different stains.
Deep Steam - For heavily soiled, colorfast garments, this cycle provides high
washing temperature and steam and is efficient in cleaning stains.
Eco Cold - It provides useful daily care for normally and lightly soiled laundry
by using only cold water, saving energy and caring fabric.
It cleans as effectively as the warm wash setting on *conventional Normal
cycle under Normal and Light Soil level options. (Cleaning performance of Eco
Cold cycle may not be equal to conventional Normal cycle under heavy soil
level option) For best result, it is recommended to use less than 8 pounds.
* conventional Normal cycle - Normal cycle on previous and existing Samsung
front loading washers released until 2009 without PowerFoam
Perm Press - For wash-and-wear, synthetic fabrics, and lightly to normally
soiled garments.
Active Wear - Use this cycle to wash exercise wear such as sports jersey,
training pants, shirts/tops and other performance clothing. This cycle
provides effective soil removal with gentle action for special fabric care.
24 wash nga load of laundry
Delicates/Hand Wash - For sheer fabrics, bras, lingerie silk, and other
handwash-only fabrics. For best results, use liquid detergent.
Wool - For machine-washable wool. Loads should be under 8 pounds. For
best results, we recommend a load of 4.4 pounds or less.
• The Wool cycle washes laundry by moving the wash drum horizontally
to maintain the characteristics of the wool fibers and to prevent damage
to the cloth. It then stops for a while to allow the laundry to soak in the
water. This pause in the operation of the Wool cycle is normal.
We recommend you use a neutral detergent to prevent damage to the
cloth and to improve the washing results.
WOOl MARK
APPAK_ I CARl
The wool wash cycle of this machine has been approved by
Woolmark for the washing of machine washable Woolmark
products, provided that the products are washed according
to the instructions on the garment label and those issued by
the manufacturer of this washing machine, M1207.
!!!!!!!!!!!!!!!!!!!!!!!!!!!!!!!!!!!!!!!!!!!!!!!!!!!!!!!!!!!!!!!!!!!!!!!!!!!!!!!!!!!!!!!!!!!!!!!!!!!!!!!!!!!!!!!!!!!!!!!!!!!!!!!!!!!!!!!!!!!!!!
___
Quick Wash - For lightly soiled garments needed quickly.
Rinse + Spin - Use for loads that need rinsing only or to add rinse-added
fabric softener to a load.
The large Digital Display is easy to use. It provides instructions and
diagnostics while keeping you updated on the cycle status and time
remaining.
Press the button repeatedly to cycle through the different water temperature
options.
Extra Hot - Heavily soiled, colorfast items. Only available with the Sanitize
cycle.
Hot - Whites and heavily soiled, colorfast items.
Warm - Colorfast items. When warm rinse is selected, only the final rinse will
be warm.
The other rinses will be cold to conserve energy.
Eco Warm - Moderately soiled, colorfast items; most wrinkle-free items.
Cold - Brightly colored, very lightly soiled items.
Press the button repeatedly to cycle through the different spin speed options.
Extra High - Removes more water from loads during spin.
To minimize wrinkling of wrinkle-free and no-iron fabrics, DO NOT use
the Extra High spin option for these loads, nor overload your Washer.
High - Use for underwear, t-shirts, jeans and sturdy cottons.
Medium - Use for jeans, wrinkle-free or wash-and-wear items and synthetics.
Low - Use for delicate items needing a slow spin speed.
No Spin - Drains your Washer without spinning. Use for extremely delicate
items that cannot tolerate any spin.
Press the button to select the soil level/washing time.
(Heavy -> ,& ÷ Normal -> V -> Light)
Heavy - For heavily soiled loads.
,&
Normal - For moderately soiled loads. This setting is best for most loads.
V
Light - For lightly soiled loads.
washng a cad of aundry 25

Press these buttons to select different cycle options.
Pre Wash - To use this feature, add detergent to the pre wash section of the
detergent compartment. When turned on, the washer fills with cold water and
detergent, tumbles, then drains and advances to the selected wash cycle.
Some cycles cannot be selected with with this option.
iiiiiiiiiiiiiiiiiiiiiiiiiiiiiiiiiiiiiiiiiiiiiiiiiiiiiiiiiiiiiiiiiiiiiiiiiiiiiiiiiiiiiiiiiiiiiiiiiiiiiiiiiiiiiiiiiiiiiiiiiiiiiiiiiiiiiiiiiiiiiii
iiiiiiiiiiiiiiiiiiiiiiiiiiiiiiiiiiiiiiiiiiiiiiiiiiiiiiiiiiiiiiiiiiiiiiiiiiiiiiiiiiiiiiiiiiiiiiiiiiiiiiiiiiiiiiiiiiiiiiiiiiiiiiiiiiiiiiiiiiiiiii
iiiiiiiiiiiiiiiiiiiiiiiiiiiiiiiiiiiiiiiiiiiiiiiiiiiiiiiiiiiiiiiiiiiiiiiiiiiiiiiiiiiiiiiiiiiiiiiiiiiiiiiiiiiiiiiiiiiiiiiiiiiiiiiiiiiiiiiiiiiiiii
iiiiiiiiiiiiiiiiiiiiiiiiiiiiiiiiiiiiiiiiiiiiiiiiiiiiiiiiiiiiiiiiiiiiiiiiiiiiiiiiiiiiiiiiiiiiiiiiiiiiiiiiiiiiiiiiiiiiiiiiiiiiiiiiiiiiiiiiiiiiiii
iiiiiiiiiiiiiiiiiiiiiiiiiiiiiiiiiiiiiiiiiiiiiiiiiiiiiiiiiiiiiiiiiiiiiiiiiiiiiiiiiiiiiiiiiiiiiiiiiiiiiiiiiiiiiiiiiiiiiiiiiiiiiiiiiiiiiiiiiiiiiii
iiiiiiiiiiiiiiiiiiiiiiiiiiiiiiiiiiiiiiiiiiiiiiiiiiiiiiiiiiiiiiiiiiiiiiiiiiiiiiiiiiiiiiiiiiiiiiiiiiiiiiiiiiiiiiiiiiiiiiiiiiiiiiiiiiiiiiiiiiiiiii
iiiiiiiiiiiiiiiiiiiiiiiiiiiiiiiiiiiiiiiiiiiiiiiiiiiiiiiiiiiiiiiiiiiiiiiiiiiiiiiiiiiiiiiiiiiiiiiiiiiiiiiiiiiiiiiiiiiiiiiiiiiiiiiiiiiiiiiiiiiiiii
iiiiiiiiiiiiiiiiiiiiiiiiiiiiiiiiiiiiiiiiiiiiiiiiiiiiiiiiiiiiiiiiiiiiiiiiiiiiiiiiiiiiiiiiiiiiiiiiiiiiiiiiiiiiiiiiiiiiiiiiiiiiiiiiiiiiiiiiiiiiiii
iiiiiiiiiiiiiiiiiiiiiiiiiiiiiiiiiiiiiiiiiiiiiiiiiiiiiiiiiiiiiiiiiiiiiiiiiiiiiiiiiiiiiiiiiiiiiiiiiiiiiiiiiiiiiiiiiiiiiiiiiiiiiiiiiiiiiiiiiiiiiii
iiiiiiiiiiiiiiiiiiiiiiiiiiiiiiiiiiiiiiiiiiiiiiiiiiiiiiiiiiiiiiiiiiiiiiiiiiiiiiiiiiiiiiiiiiiiiiiiiiiiiiiiiiiiiiiiiiiiiiiiiiiiiiiiiiiiiiiiiiiiiii
iiiiiiiiiiiiiiiiiiiiiiiiiiiiiiiiiiiiiiiiiiiiiiiiiiiiiiiiiiiiiiiiiiiiiiiiiiiiiiiiiiiiiiiiiiiiiiiiiiiiiiiiiiiiiiiiiiiiiiiiiiiiiiiiiiiiiiiiiiiiiii
!_ii!__i!i__i__ii_!i_!!_i__!i!iiii_ii_ii!i!!i_i!!i_i!_ii!_____!i_!_i!i!!i!!!i!!_!___!!ii_iiiiii!i!!_!!i_!!ii_!!_!!_i_!i!!!____!!!!i!!i!!!!!ii!!!_i!!!!!i!i___i_!_!_!_
You cannot select the prewash option in the Wool, Quick Wash,
Delicates/Handwash and Rinse+Spin cycles.
Extra Rinse - Add an additional rinse at the end of the cycle to more
thoroughly remove laundry additives and perfumes.
Extra Spin - Add additional time to remove more water from loads.
Signal On/Off - When you activate Signal off function, the "Signal off [_]"
lamp illuminate.
IIIIIIIIIIIIIIIIIIIIIIIIIIIIIIIIIIIIIIIIIIIIIIIIIIIIIIIIIIIIIIIIIIIIIIIIIIIIIIIIIIIIIIIIIIIIIIIIIIIIIIIIIIIIIIIIIIIIIIIIIIIII_
My Cycle- Choose your favorite cycle including temperature, spin, soil level,
option, etc.
Delay Start- Any cycle can be delayed for up to 24 hours in one-hour
increments. Displayed hour indicates the time at which the wash will be started.
Pure Cycle TM - Use to clean dirt and bacteria from the drum. Regular use
(after every 40 washes) is recommended. No detergent or bleach is needed
(see page 64).
Steam - Press this button to use the Steam Wash function. Steam Wash is
available with Normal, Heavy Duty, Bedding PLUS, Sanitize, StainAway cycles.
For heavily soiled, colorfast garments, Steam Wash improves stain treatment
and uses less water (See page 29).
Delay Start
Press to pause and restart programs.
Press once to turn your washer on, press again to turn your washer off. If
the washer is left on for more than 10 minutes without any buttons being
touched, the power automatically turns off.
You can set the washing machine to finish your wash automatically at a later time, choosing a
delay of between 1 to 24 hours (in 1 hour increments). The hour displayed indicates the time at
which the wash will be finished.
1. Manually or automatically set your washing machine according to the type of laundry you are
washing.
2. Press the De_ay Start button repeatedly until the delay time is set.
3. Press the Start/Pause button. The "Delay Start [_]" indicator will be lit, and the clock will
begin counting down until it reaches the set time.
4. To cancel a Delay End function, press the Power button and then turn the washing machine
on again.
26 washng a cad of aundry
Child Lock
This function prevents children from playing with your washer.
_ Although the Child Lock function is activated, you must keep an eye on children so that
....... they do not operate your washer.
Activating the Child Lock function
Press and hold both the Spin and Soil Level buttons simultaneously for approximately 3 seconds.
• When you activate the Child Lock function, the door locks and the "Child Lock [@]" lamp
illuminates.
If you press the Start/Pause button after you have activated the Child Lock function, none
of the buttons will work except for the Power button.
If you press a button when the buttons are locked, the "Child Lock [@ ]" lamp blinks.
Pausing the Child Lock function
When the door is locked or the buttons are locked by the Child Lock function, you can pause the
Child Lock operation for 1 minute by pressing and holding both the Spin and Soil Level buttons
simultaneously for approximately 3 seconds.
If you pause the Child Lock mode temporarily, the door lock is released for 1 minute for user
convenience. During this period, the "Child Lock [1_]" lamp blinks.
If you open the door after the minute is over, an alarm sounds for up to 2 minutes.
If you close the door within the 2 minutes, the door is locked and the Child Lock function is
reactivated. If you close the door after the 2 minutes, the door is not locked automatically
and no alarm sounds.
Deactivating the Child Lock function
Press and hold both the Spin and Soil Level buttons simultaneously for approximately 6
seconds.
When you deactivate the Child Lock function, the door is unlocked and the "Child Lock [_]]"
is turned off.
Z_, The Child Lock function prevents children or the infirm from accidently operating the
....... washer and injuring themselves.
If a child enters the washing machine, the child may become trapped and suffocate.
Z_ Once you have activated the Child Lock function, it continues working even if the power
....... is turned off.
Opening the door by force can result in injury due to damage to the product.
To add laundry after you have activated the Child Lock function, you must first pause or
deactivate the Child Lock function.
If you want to open the door of the washing machine when the Child Lock function is
activated:
Pause or deactivate the Child Lock function.
Turn the washing machine off and then on again.
washnQ a oad of aundrv 27
Spin Only
If you press the Power button and then press and hold the Spin button for 2 seconds, the spin
time will be displayed on the display panel.
Then, press the Spin button repeatedly until the required spin level is selected, and then press
the Start/Pause button.
_ efore pressing the Spin Only button, you can select a cycle with the Cycle Selector. If you
have selected a cycle, you can only select the corresponding spin level.
Drum Light
1. If the door is opened when the power is on, the Drum Light is automatically turned on.
2. If the door is closed when the power is on, the Drum Light is automatically turned off.
3. Press the Temp. and the Spin buttons simultaneously to turn the Drum Light on or off.
4. If 4 minutes have passed after the Drum Light is turned on, the Drum Light is automatically
turned off.
Garment+
You can add or take out laundry items even after the wash has started, as long as the
"Garment+" light is on. Pushing the Start/Pause button unlocks the door, unless the water is
too hot or if there is too much water in your Washer. If you are able to unlock the door and wish
to continue the wash cycle, close the door and press the Start/Pause button.
My cycle
Allows you to activate your custom wash (temperature, spin, soil level, etc.) with one-button
convenience.
By pushing the My Cycle button, you activate the settings used during the My Cycle mode.
The "My Cycle" light will indicate activation.
You can select all options as follows in "My Cycle" mode.
1. Select cycle using the Cycle Selector dial.
2. After cycle selection, set each option.
See page 72 for available option settings with each cycle.
3.
Then, you can start "My Cycle" by pushing the Start/Pause button in "My Cycle" mode.
The cycle and options you select will be displayed the next time you choose "My Cycle".
You can change the "My Cycle" settings by repeating the same process above.
The last used setting will be displayed the next time you choose "My Cycle".
DEEP STEAM
®
®
®
DEEP STEAM (Magic Steam)
The Deep Steam feature boosts cleaning performance and loosens grime and dirt,
providing superior cleaning results.
For heavily soiled, colorfast garments, this cycle provides a high washing temperature and
steam and is effective for cleaning stains.
How DEEP STEAM works
If you select steam, the steam acts at the most effective times for the detected amount of
laundry, maximizing the effect of the steam, increasing the wash temperature, enhancing
the Soak effect, and improving wash performance.
Press Steam button to use the Steam Wash function. Steam Wash is available with the
Normal, Heavy Duty, Bedding PLUS, Sanitize, Stain Away and Deep Steam cycles. For
heavily soiled, colorfast garments, Steam Wash improves stain treatment and uses less
water.
28 washng a cad of aundry
Washer takes small amounts of water in tub and Heater heats water into evaporation.
1. Load the washer.
2. Press the Power button.
3. Turn the Cycle Selector and select a steam cycle. (The Deep Steam cycle automatically
selects the Steam Wash function.)
4. Press the Steam button.
5. Add detergent into the dispenser tray for a wash, and add fabric softener up to the marked
line.
6. Press the Start/Pause button.
: The washer automatically selects the optimal wash conditions by sensing the weight of the
laundry.
_ team may not necessarily be visible during the steam cycles.
Steam may not be present during entire steam wash cycle.
Z_o Too much steam could damage clothing. Do not use steam with delicatefabrics such as wool, silk
....... or easilydiscolored fabrics.
Steam may not be present during entire steam wash cycle.
Do not touch the door. The door surface can become very hot.
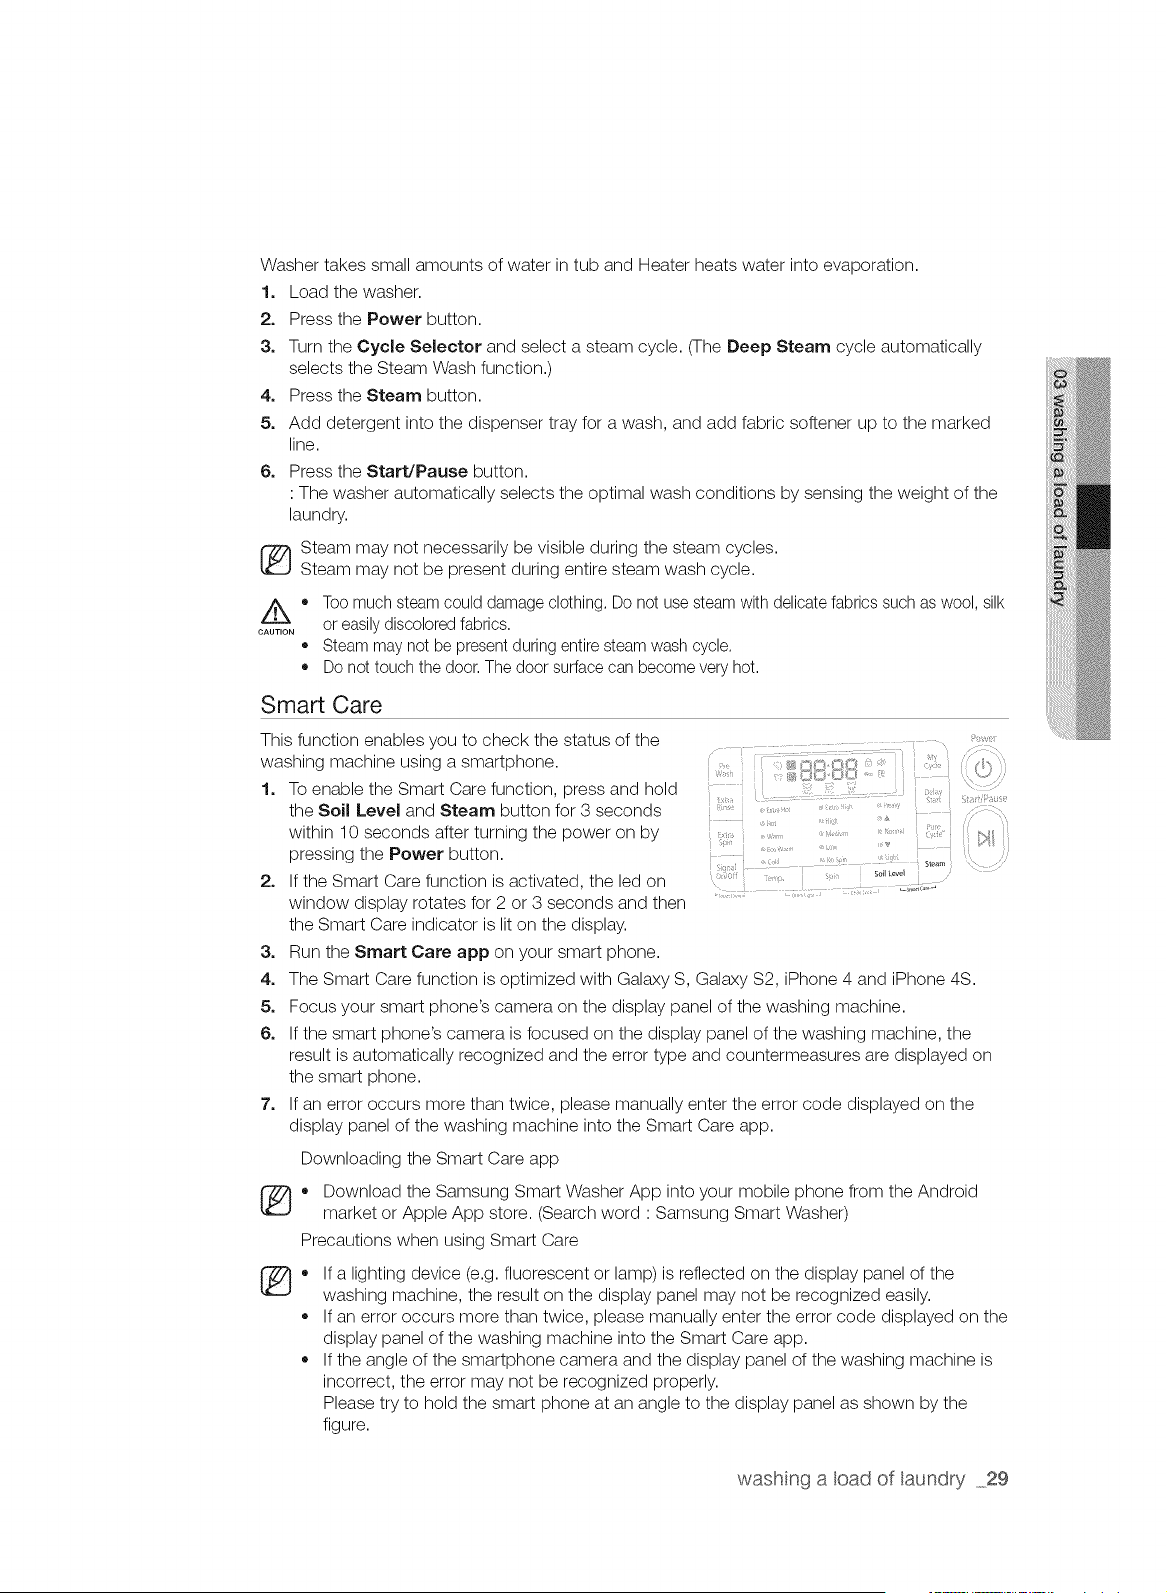
Smart Care
This function enables you to check the status of the
washing machine using a smartphone.
1. To enable the Smart Care function, press and hold
the Soil Level and Steam button for 3 seconds
within 10 seconds after turning the power on by
pressing the Power button.
2_
3_
4.
5.
6.
7_
If the Smart Care function is activated, the led on :':: .....
window display rotates for 2 or 3 seconds and then
the Smart Care indicator is lit on the display.
Run the Smart Care app on your smart phone.
The Smart Care function is optimized with Galaxy S, Galaxy $2, iPhone 4 and iPhone 4S.
Focus your smart phone's camera on the display panel of the washing machine.
If the smart phone's camera is focused on the display panel of the washing machine, the
result is automatically recognized and the error type and countermeasures are displayed on
the smart phone.
If an error occurs more than twice, please manually enter the error code displayed on the
display panel of the washing machine into the Smart Care app.
Downloading the Smart Care app
_ ownload the Samsung Smart Washer App into your mobile phone from the Android
market or Apple App store. (Search word : Samsung Smart Washer)
Precautions when using Smart Care
If a lighting device (e.g. fluorescent or lamp) is reflected on the display panel of the
washing machine, the result on the display panel may not be recognized easily.
If an error occurs more than twice, please manually enter the error code displayed on the
display panel of the washing machine into the Smart Care app.
If the angle of the smartphone camera and the display panel of the washing machine is
incorrect, the error may not be recognized properly.
Please try to hold the smart phone at an angle to the display panel as shown by the
figure.
washng a cad of aundry 29
Washing clothes using the cycle selector
Your new washing machine makes washing clothes easy, using Samsung's "Fuzzy Control"
automatic control system. When you select a wash program, the machine will set the correct
temperature, washing time, and washing speed.
1. Press the Power button.
2. Open the door.
3. Load the articles of clothing one at a time loosely into the drum, without overfilling it.
4. Close the door.
5. Add detergent, softener, and pre-wash detergent (if necessary) into the appropriate
compartments.
_ re-wash is only available when selecting the Normal, Perm Press, Sanitize, Bedding Plus,
Deep Steam and Heavy Duty cycles. It is only necessary if your clothing is heavily soiled.
6. Use the Cycle Selector to select the appropriate cycle according to the type of material:
Normal, Heavy Duty, Perm Press, Sanitize, Bedding Plus, Deep Steam, Eco Cold, Stain
Away, Active Wear, Delicates/Hand Wash, Wool, Quick Wash, Rinse + Spin and Spin Only.
The relevant indicators will illuminate on the control panel.
7. At this time, you can control the wash temperature, the number of rinse cycles, the spinning
speed, and the delay time by pressing the appropriate option button.
8. Press the Start/Pause button on the Cycle Selector and the wash will begin. The process
indicator will light up and the remaining time for the cycle will appear in the display.
Pause Option
1. Within 5 minutes of starting a wash, it is possible to add/remove laundry items to/from the
wash.
2. Press the Start/Pause button to unlock the door.
3. The door cannot be opened when the water is too HOT or the water level is too HIGH.
4. After closing the door, press the Start/Pause button to restart the wash.
When the cycle is finished:
After the total cycle has finished, the power will turn off automatically.
1. Open the door.
2. Remove laundry.
ATC (AUTO TEMPERATURE CONTROL)
ATC is the control function that the washer controls water temperaturewith temperature sensor (thermistor),
_ ecause there are numerous water temperatures depending on the customer's environments(cold
areas, warm areas, various water temperature, settings of heater temperature, etcs), ATC function in
our washer maintains the certain level of wash temperature to output the best washing performance at
each cycle.
lf you select normal & heavy duty course, those courses are the regulation and UL course. Since new
washer must reduce the amount of energy usage at first priority, customer will notice more cold water
entering the washer. But This is Normal, not a problem.
ln those regulation course, Hot temperature is similar to acceptable adult bath-water temperature and
warm temperature is similar to comfortable swimming-pool water temperature.
If customer want to wash clothes in specific water temperature, customer should choose a different
course at each temperature(Hot/Warm/Eco Warm).
30 washng a cad of aundry
SETTING THE SMART CONTROL
Connect a wired/wireless router and the washer through a wireless connection, connect to www.
samsungsmartappliance,com and register the washer to the Smart Control service,
{_ This does not contain wireless router,
product
a
Configuring the wired/wireless router
+ This product supports DHCP (Dynamic Host Configuration Protocol). Therefore, if a user
wants to use an existing wired/wireless router, the router's DHCP server function must be
enabled,
+ Set the channel for the connection with the wired/wireless router to a channel that is not
being used,
+ This washer/dryer only supports OPEN, WPA!TKIP and WPA2/AES modes. If the wireless
router is set to a mode other than these three modes, the washer/dryer may not connect to
it, We recommend that you use WPA2/AES for 802,11 n,
+ The quality of the wireless network may be affected by the surrounding environment,
+ If your Internet service provider has registered and fixed the MAC address (unique
identification number of a device) of the user's PC or modem, you may not be able to
connect the washer to the Internet. Please ask your Internet service provider about the
procedures to connect a device (e,g. washer) other than a computer to the Internet. If your
Internet service provider requires an ID and password to connect to the Internet, you may
not be able to connect the washer to the Internet, In this case, you have to enter the ID and
password to connect to the Internet,
Y0u may not be able to connect to the Internet due to a firewall. In this case, ask your
Internet service provider for assistance.If you cannot connect the washer to the Internet even
after contacting your Internet service provider, please contact a Samsung Electronics dealer
or service center
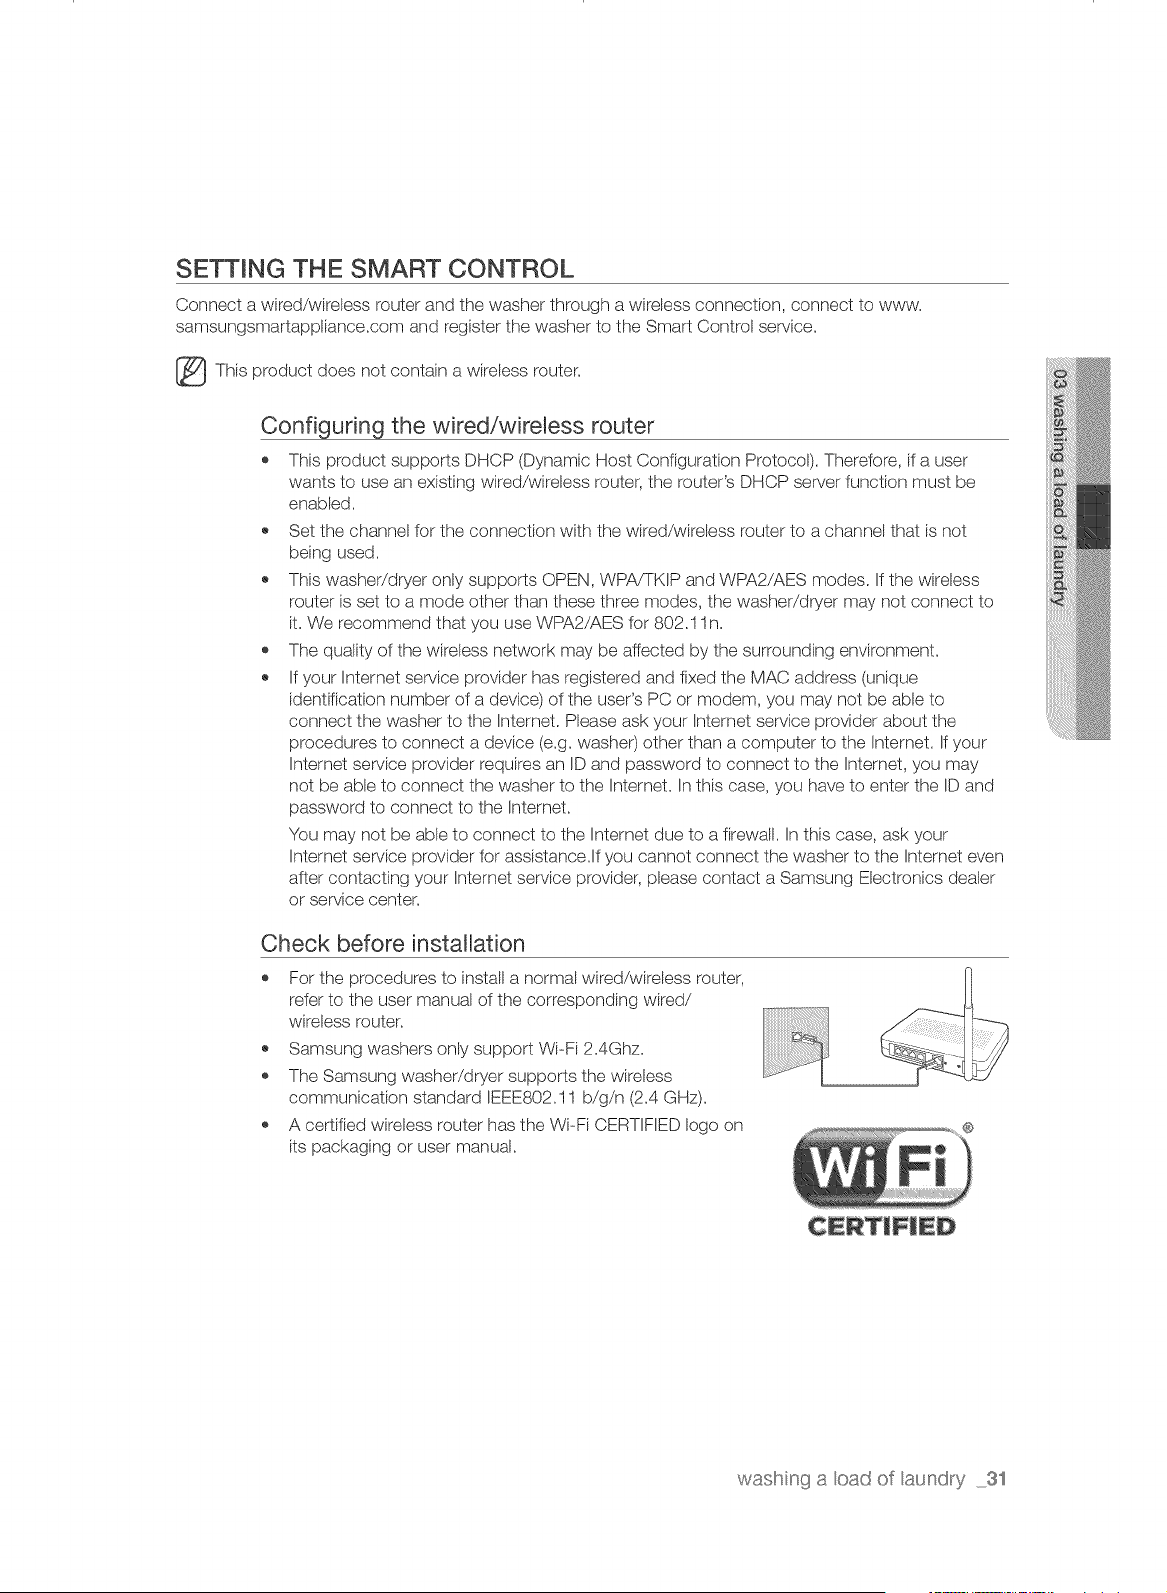
Check before installation
+ For the procedures to install a normal wired/wireless router,
refer to the user manual of the corresponding wired/
wireless router,
+ Samsung washers only support Wi+Fi 2,4Ghz,
+ The Samsung washer/dryer supports the wireless
communication standard IEEE802,11 b/g/n (2,4 GHz).
+ A certified wireless router has the Wi+Fi CERTIFIED logo on
its packaging or user manual,
wasl!+ n++ga cad of aundry 31
Connecting to the network using the WPS setting
o amsung washers use PBC as the WPS type, Check if the current wired/wireless router
supports Wi-Fi Protected Setup:M(WPS).
o Check if the wired/wireless share has a WPS button,
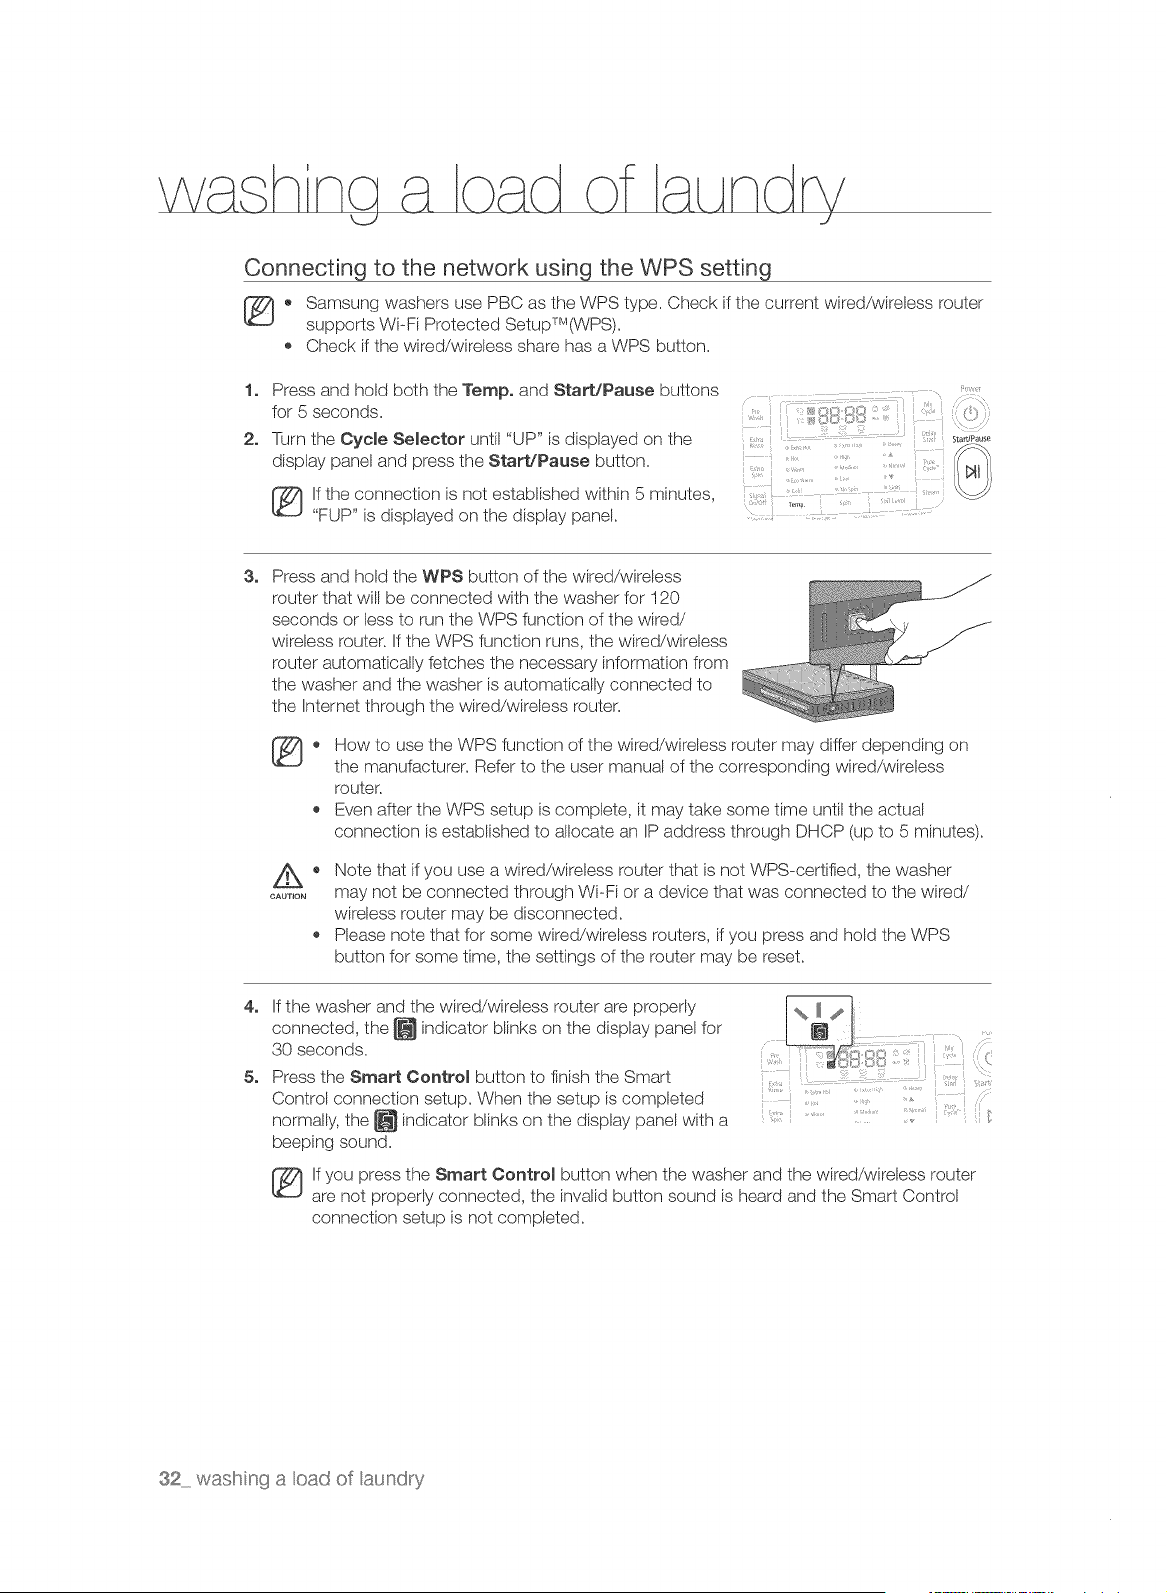
1. Press and hold both the Temp. and Start/Pause buttons
for 5 seconds,
2. Turn the Cycle Selector until "UP" is displayed on the
display panel and press the Start/Pause button,
lf the connection is not established within 5 minutes,
"FUP" is displayed on the display panel.
3_
4_
Press and hold the WPS button of the wired/wireless
router that will be connected with the washer for 120
seconds or less to run the WPS function of the wired/
wireless router, If the WPS function runs, the wired/wireless
router automatically fetches the necessary information from
the washer and the washer is automatically connected to
the Internet through the wired/wireless router,
@
How to use the WPS function of the wired/wireless router may differ depending on
the manufacturer, Refer to the user manual of the corresponding wired/wireless
router,
Even after the WPS setup is complete, it may take some time until the actual
connection is established to allocate an IP address through DHCP (up to 5 minutes),
CAUTION
Note that if you use a wired/wireless router that is not WPS-certified, the washer
may not be connected through Wi-Fi or a device that was connected to the wired/
wireless router may be disconnected,
Please note that for some wired/wireless touters, if you press and hold the WPS
button for some time, the settings of the router may be reset,
If the washer and the wired/wireless router are propedy
connected, the _ indicator blinks on the display panel for
30 seconds.
Press the Smart Controm button to finish the Smart
Control connection setup. When the setup is completed ......
normally, the _ indicator blinks on the display panel with a ...............
beeping sound.
lf you press the Smart Control button when the washer and the wired/wireless router
are not properly connected, the invalid button sound is heard and the Smart Control
connection setup is not completed.
32 wasl!":ng a cad of aundry
Connecting to the network using the AP setting
1. Press and hold the Temp. and Start/Pause buttons for 5 seconds.
2. The AP menu appears on the LED screen.
3. If the Start/Pause button is pressed after approximately 1 minute, the AP blinks.
lf the "AP" display does not blink.
Since the Wi-Fi module is not ready, try again after a moment.
(Approximately 1 minute is needed for the Wi-Fi module to get ready.)
4. Check if the SMARTWASHER is displayed in the list displayed in the mobile Wi-Fi setup
screen. If it is in the list, perform step 5.
5. Launch the app, enter Connection setup and press the Setting Start button.
6. The app attempts to connect to the washing machine that has changed to AP mode.
7. When the connection is established, the AP list is displayed.
8. Select the AP and enter the password.
9. When the setting is completed.
When the setting is successfully completed, "oAP" is displayed on the LED.
When the setting is unsuccessfully completed, "FAP" is displayed on the LED.
washng a oad of aundry 33
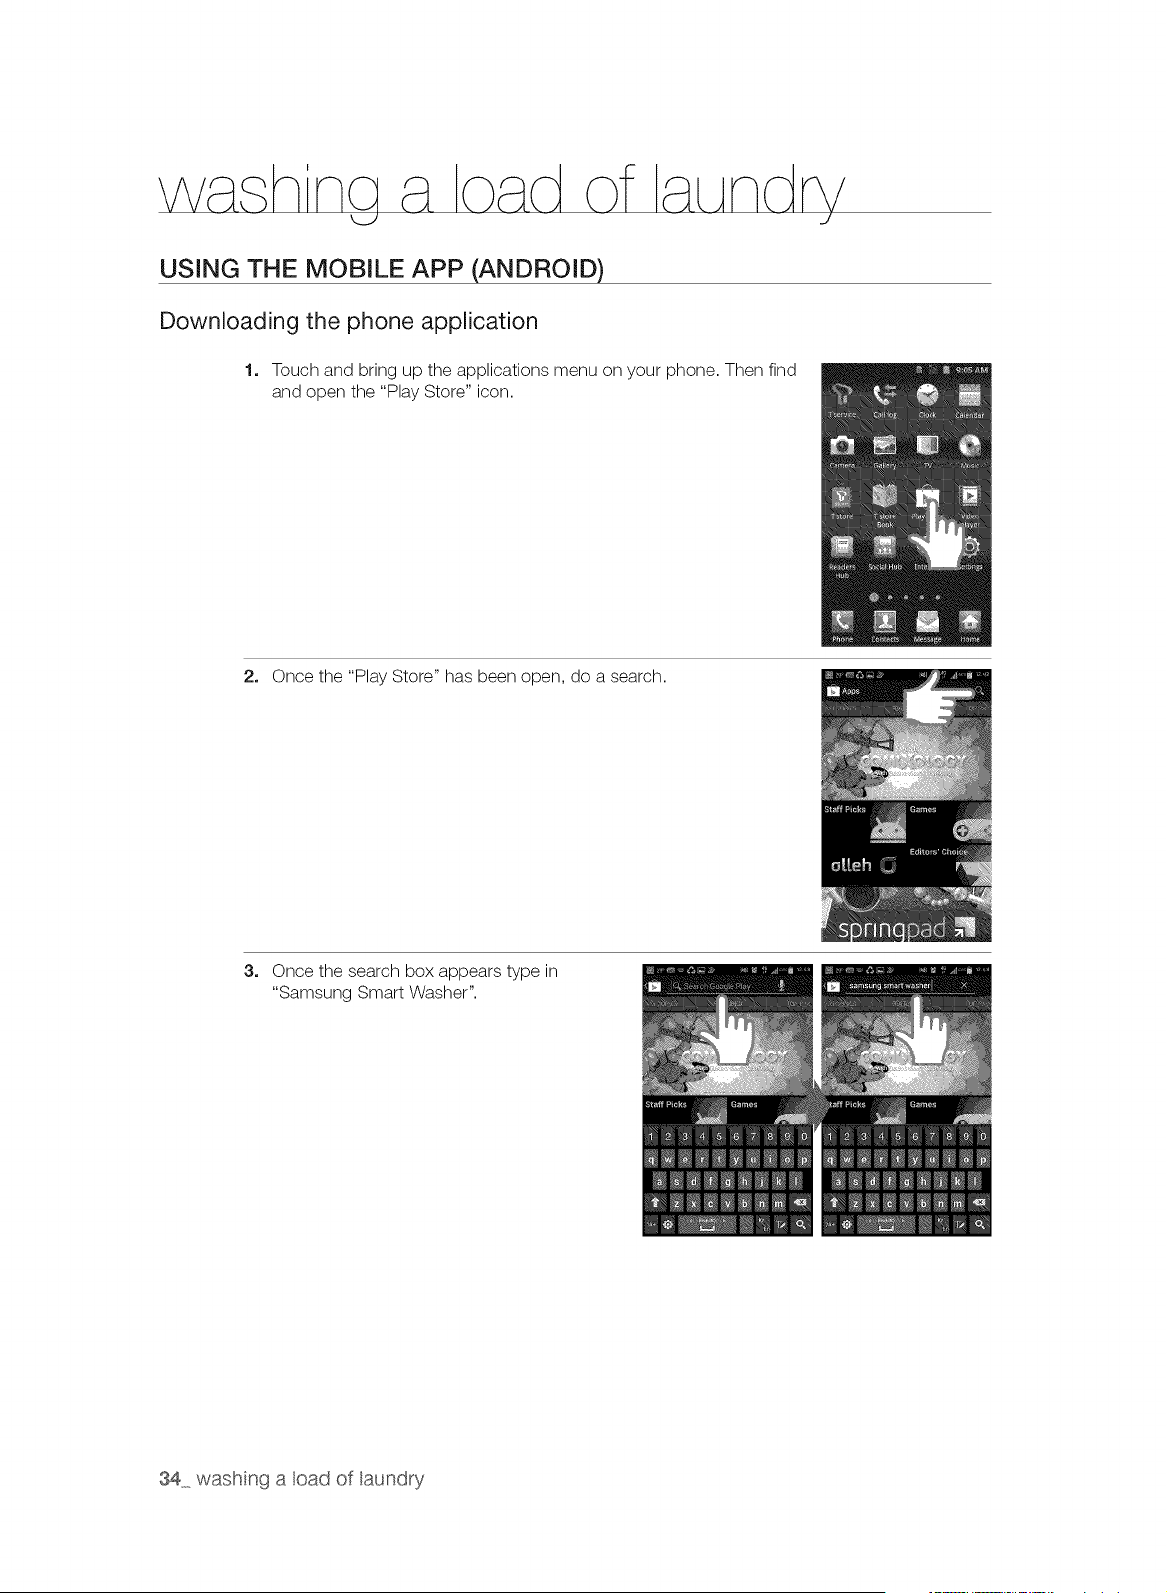
USING THE MOBILE APP (ANDROID)
Downloading the phone application
1. Touch and bring up the applications menu on your phone. Then find
and open the "Play Store" icon.
2. Once the "Play Store" has been open, do a search.
3. Once the search box appears type in
"Samsung Smart Washer".
34 washng a oad of aundry
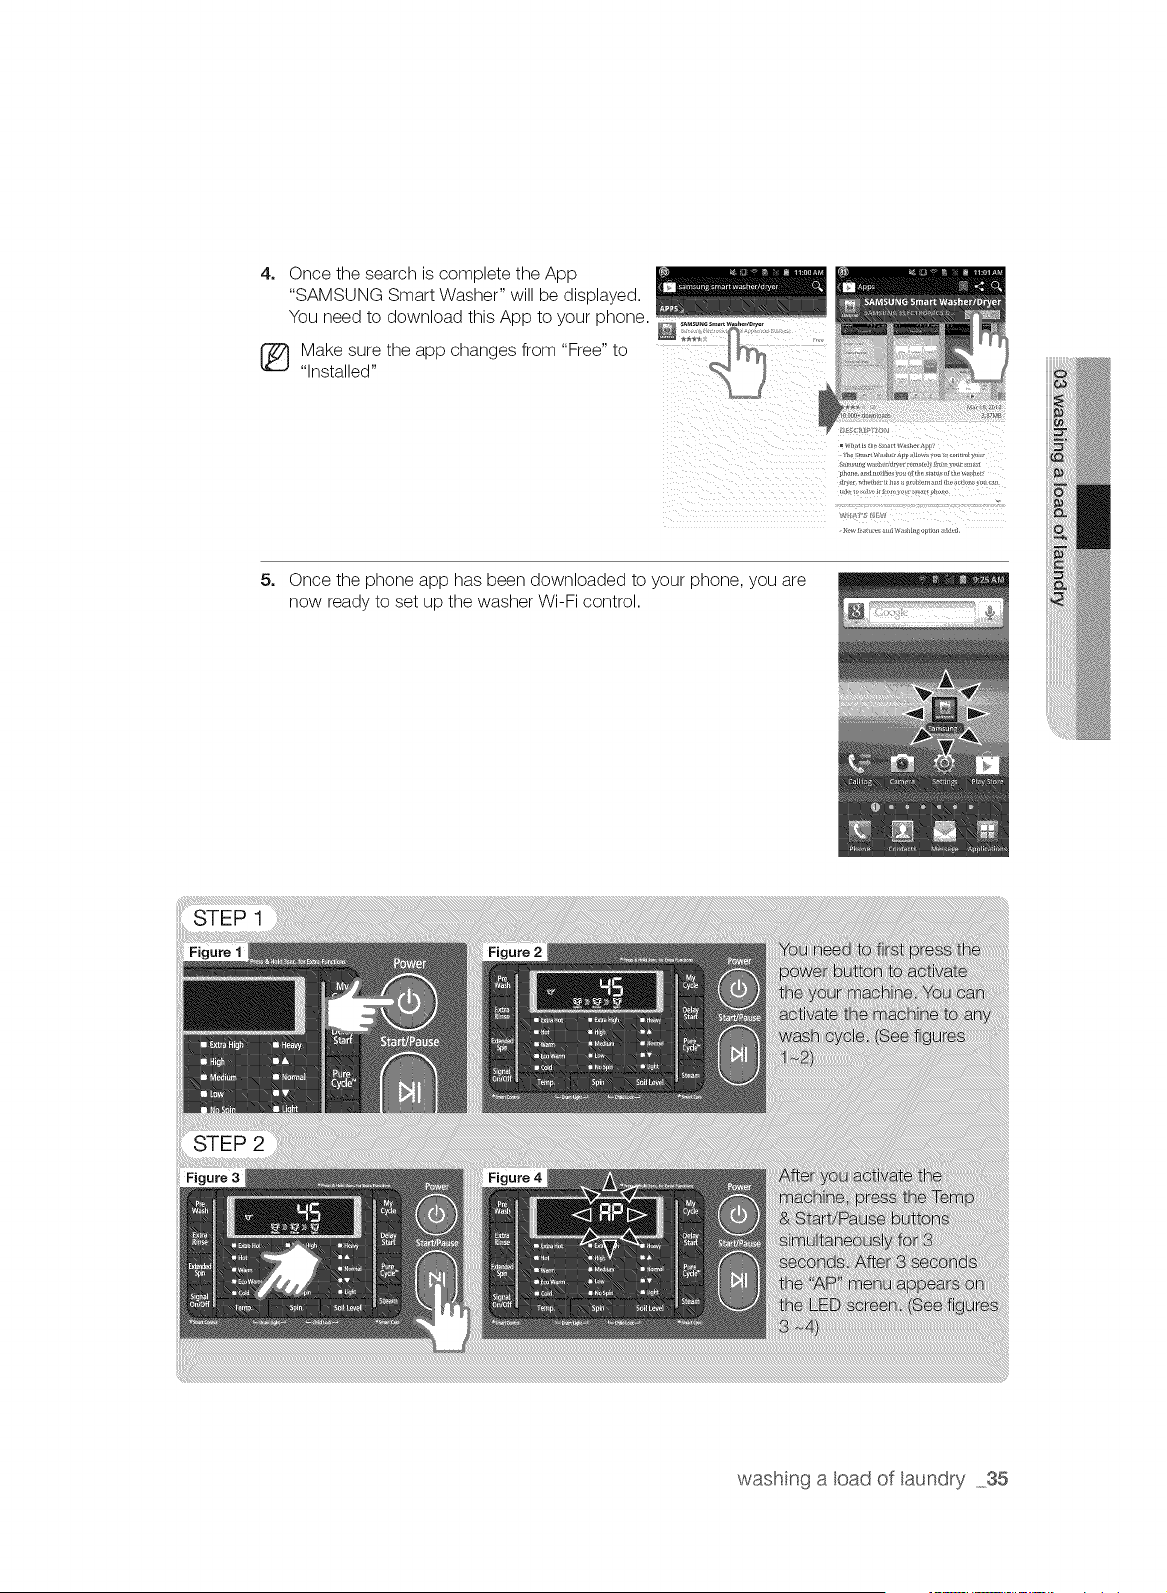
4, Once the search is complete the App
"SAMSUNG Smart Washer" will be displayed.
You need to download this App to your phone.
_} ake sure the app changes from "Free" to
"Installed"
5, Once the phone app has been downloaded to your phone, you are
now ready to set up the washer Wi-Fi control.
STEP 1
STEP 2
wash nga load of laundry 35

STEP 3
Figure 5
STEP 4
Figure 6 Figure 7 I
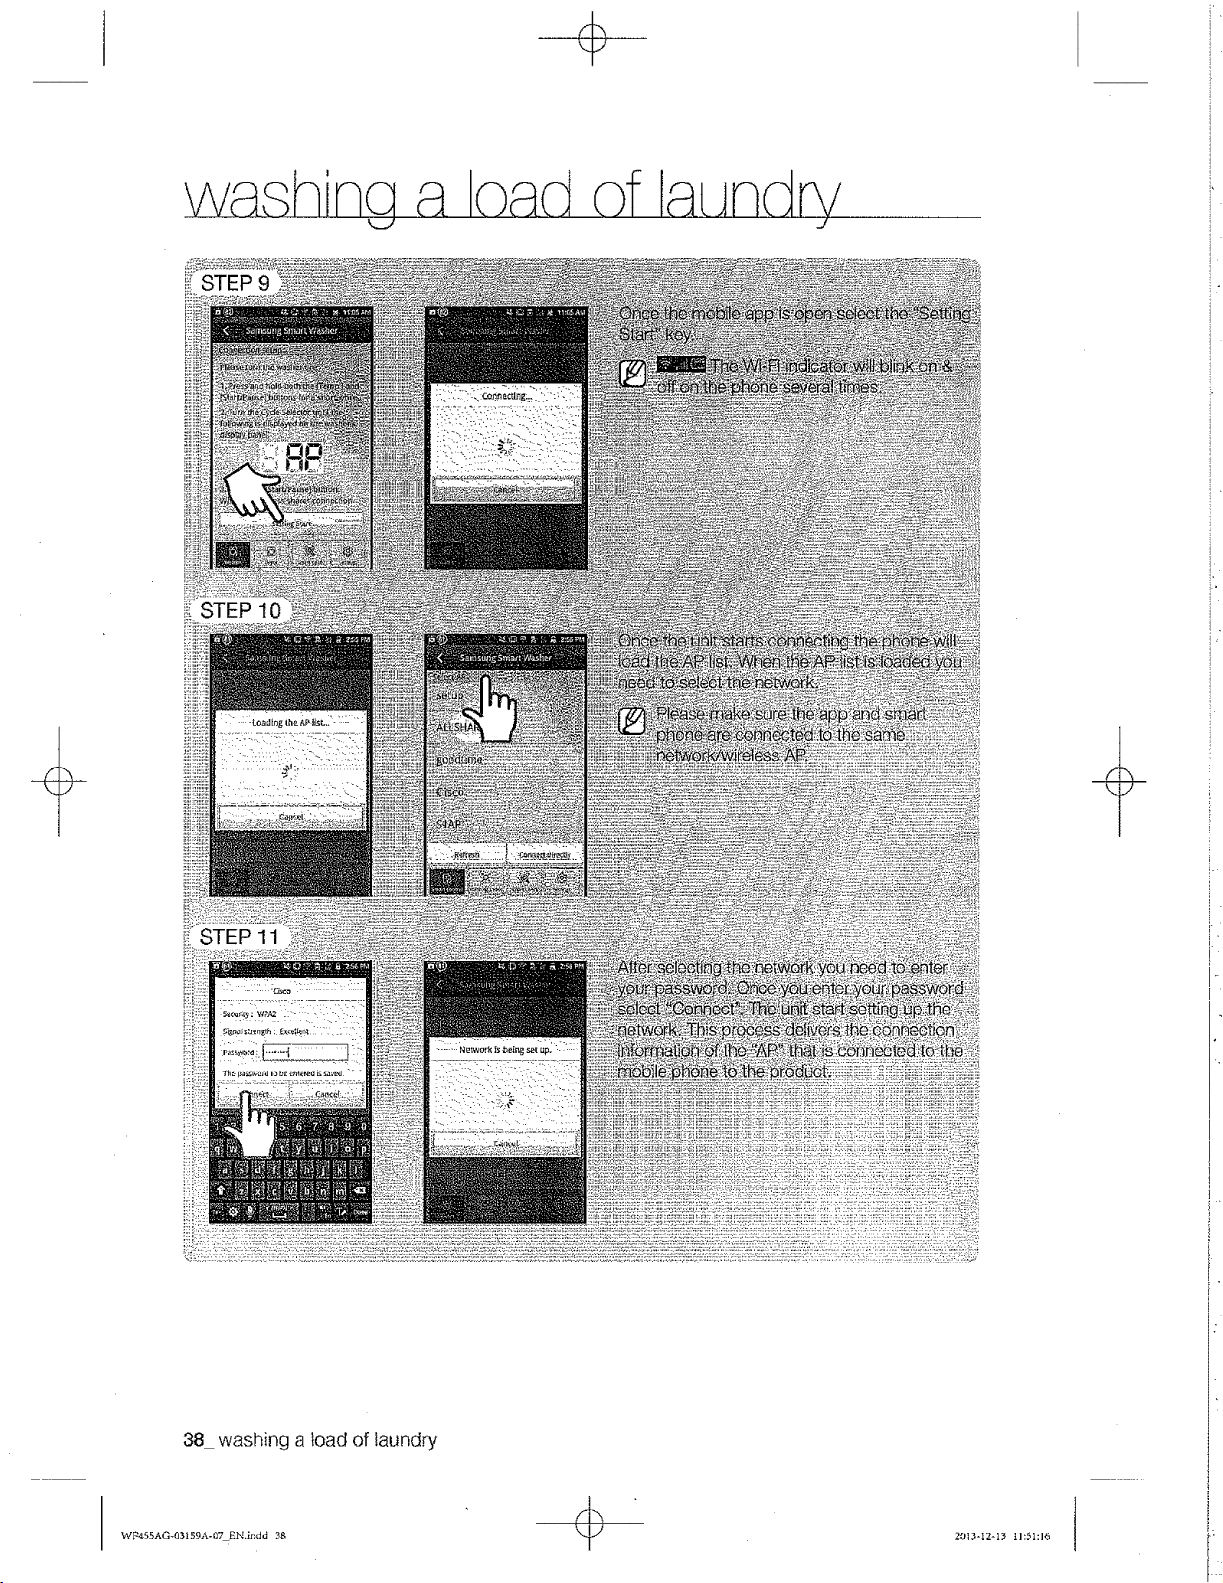
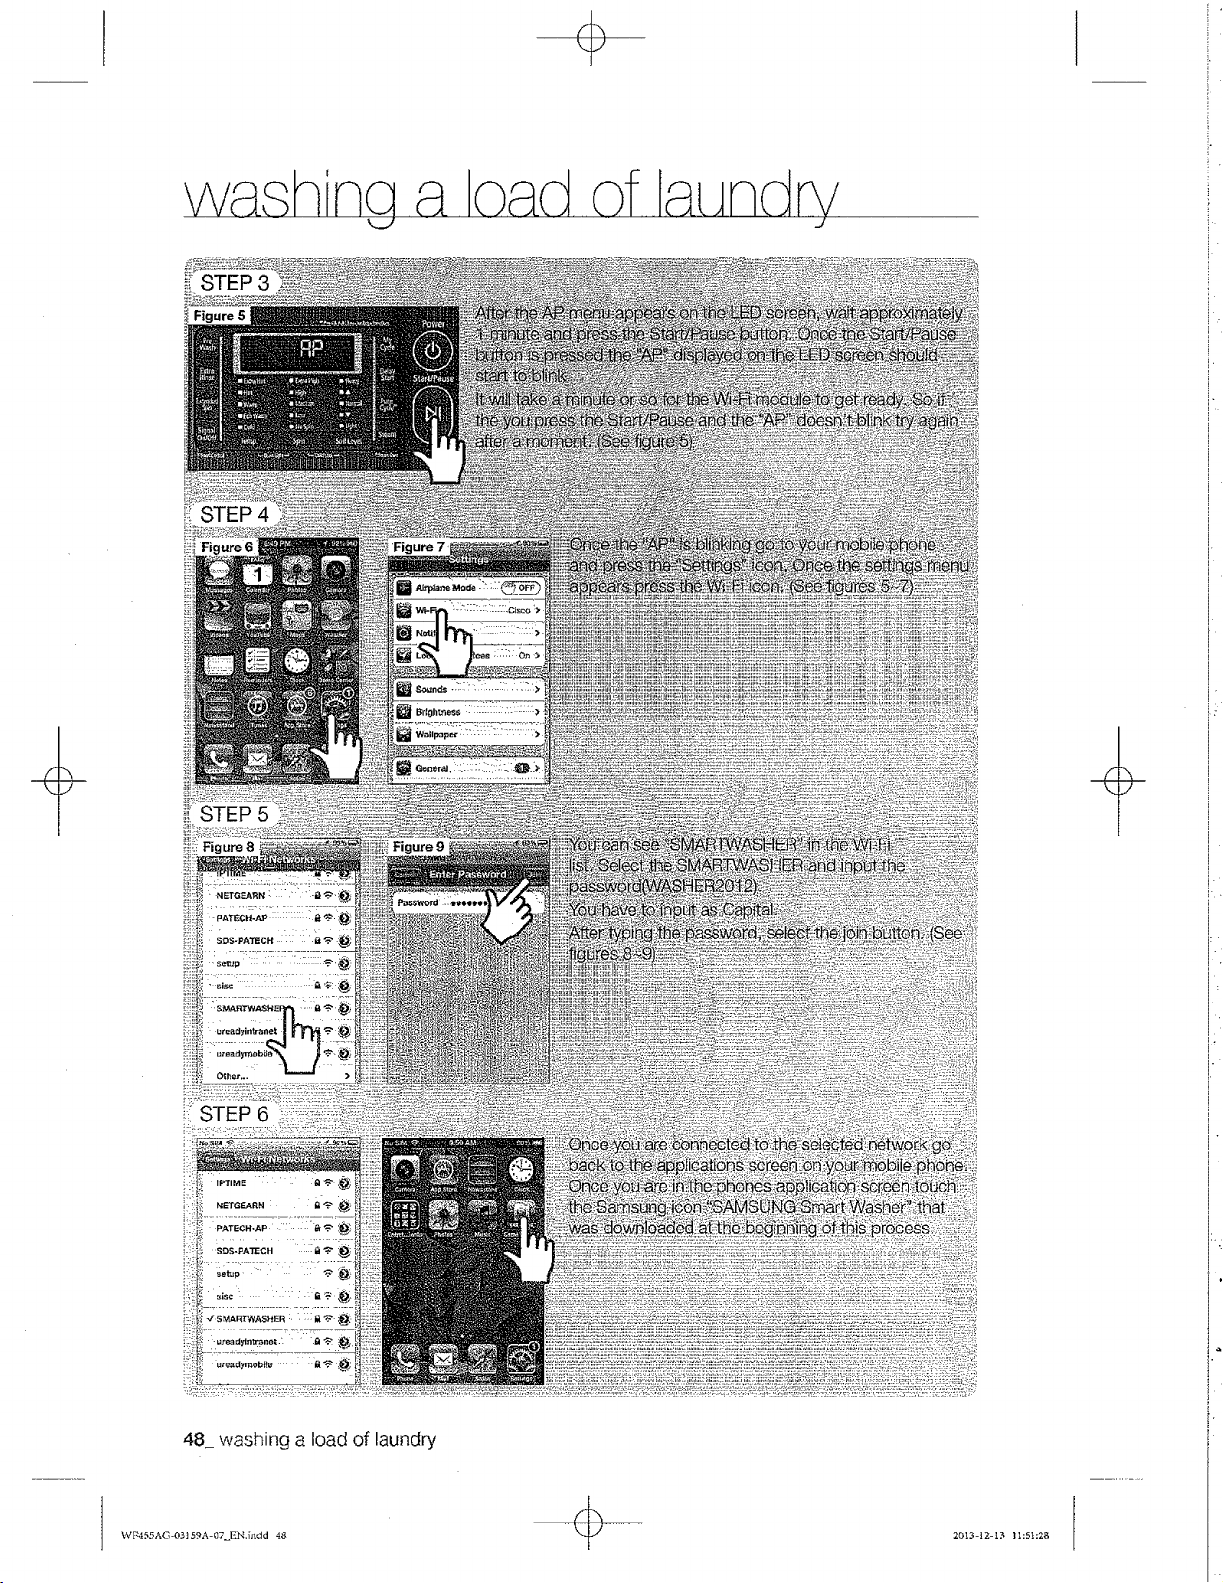
After the AP menu appears on the LED screen, wait approximately
1 minute and press the Start/Pause button. Once the Start/Pause
button is pressed the "AP" displayed on the LED screen should
start to blink.
It will take a minute or so for the Wi-Fi module to get ready. So if
the you press the Start/Pause and the "AP" doesn't blink try again
after a moment. ('Seefigure 5)
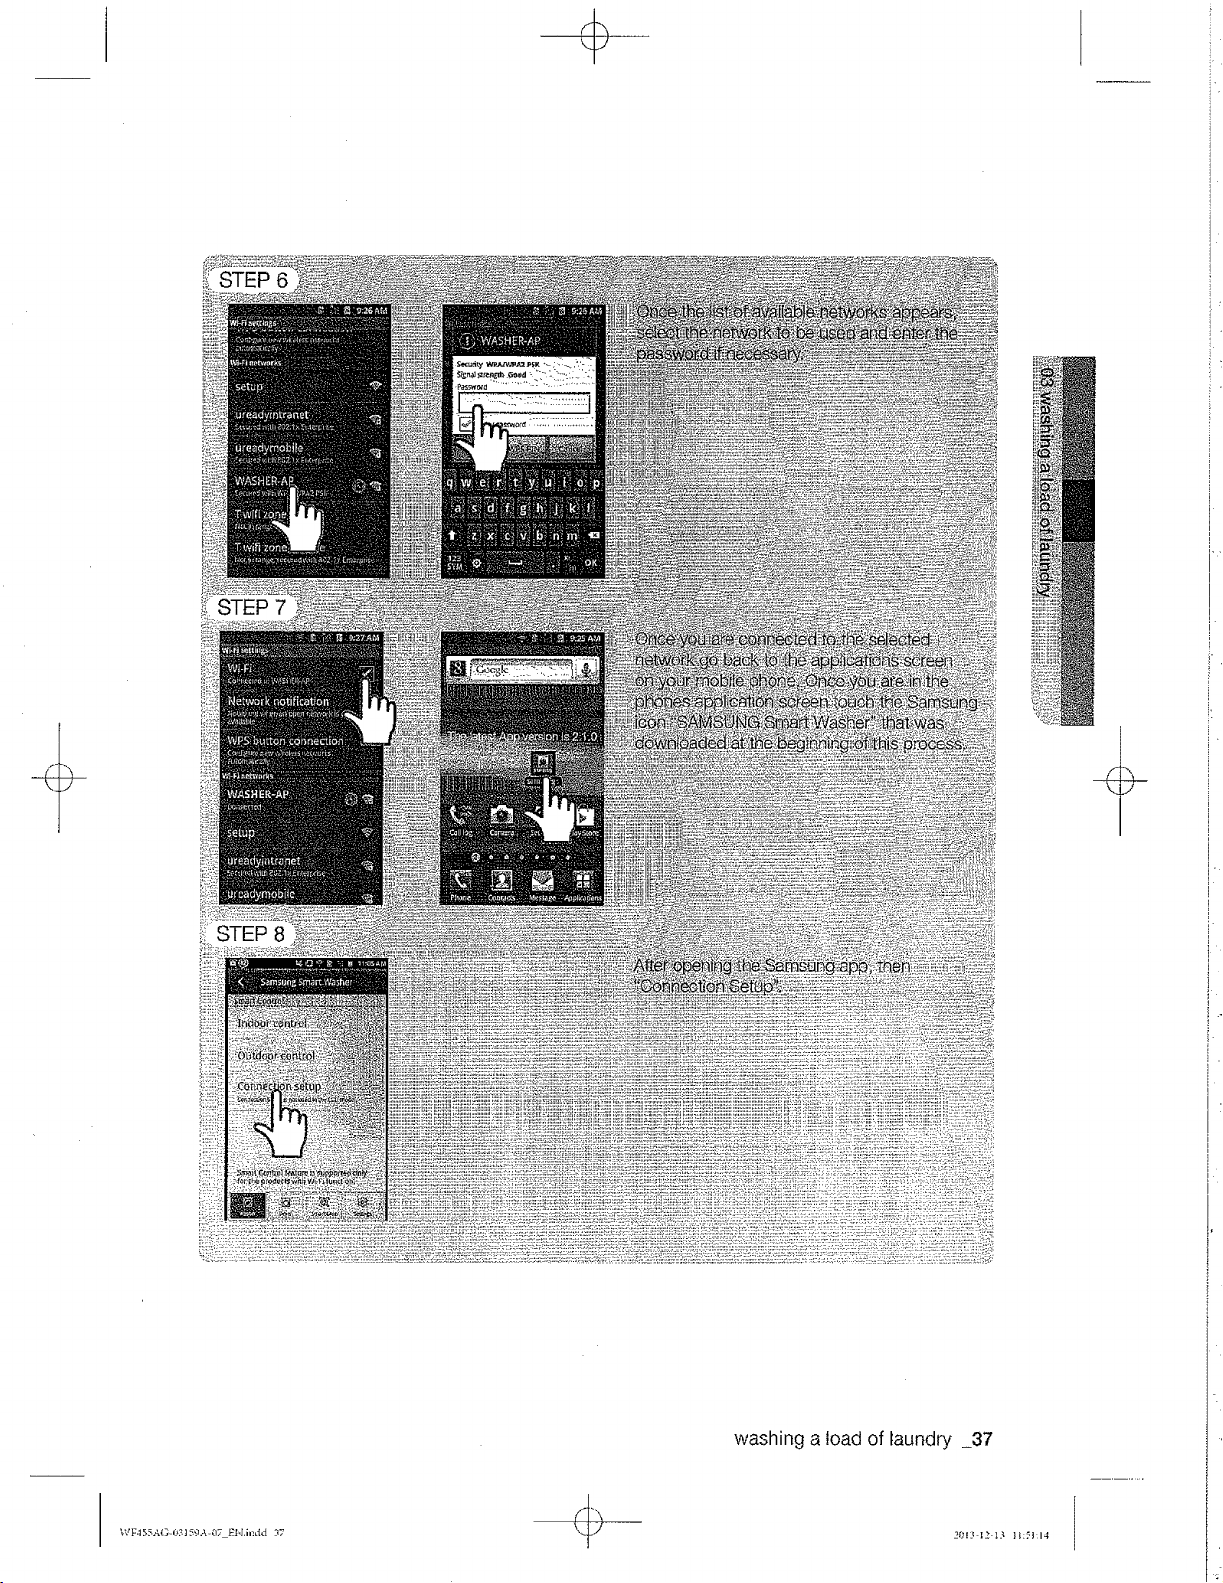
Once the "AP" is blinking go to your mobile
phone and press the "Settings" icon. Once the
settings menu appears press the wireless and
network section. (See figures 5 - 7)
STEP 5
Figure 8 Figure 9
After selecting the wireless and network select
Wi-Fi setting. Then turn on the Wi-Fi. (See
figures 8- 9)
,7¢ ,'....,* ,, / ,-' ,-7 :, - f r_ I[
A
Y
i!_-STEP 7
_ STEP 8
washing a toad of laundry 37
i
Y
washina a_cad of lat_ndr_/
..,/
ili.STEP 10
_i=:i _ii S_}ii!ii_iii;:il;ii!i'iii_i:!!ili:iii!ii!iii!i_ii
38 washing a toad of laundry
V_p455AQ_031SgA-f_TEN,indd 38 29|3-12_1_ 11:51:16
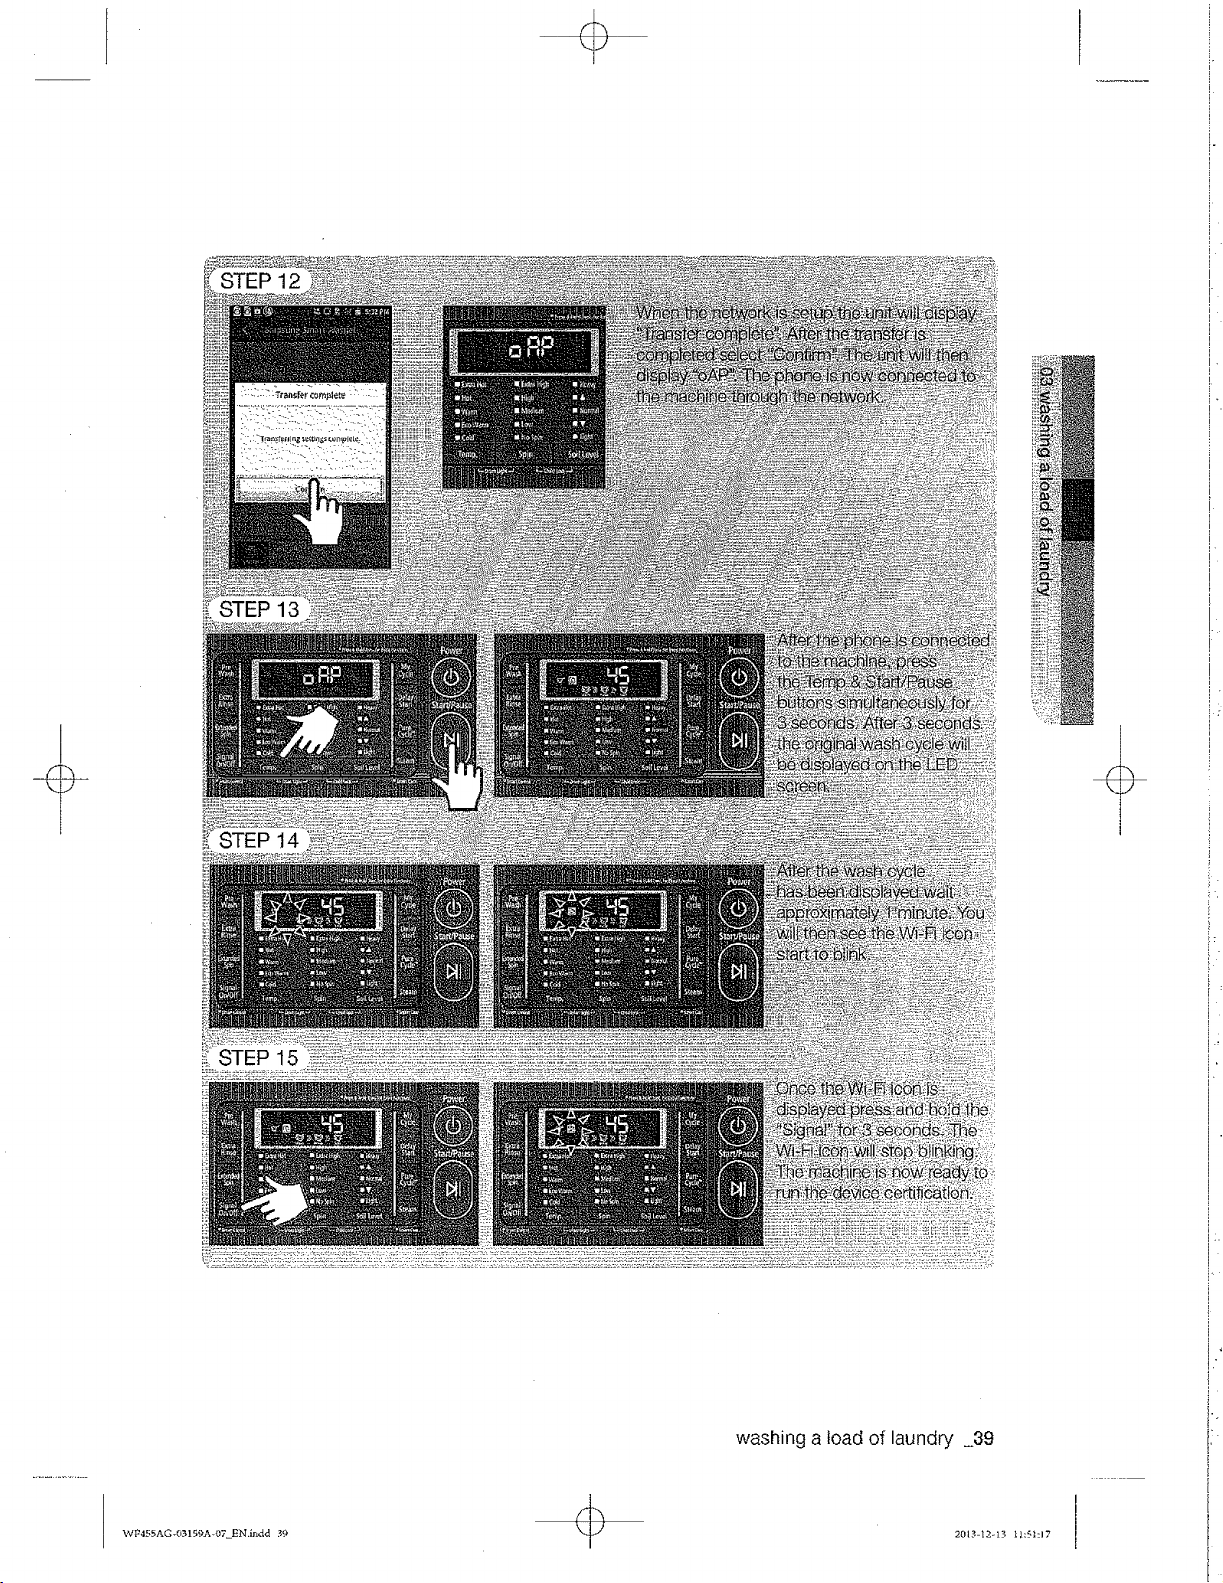
i[ STEP 13
_NF455AG -03159A -07 £N,indd 39
+
washing a load of laundry 39
28|_-12-13 _hSh17
Device certification
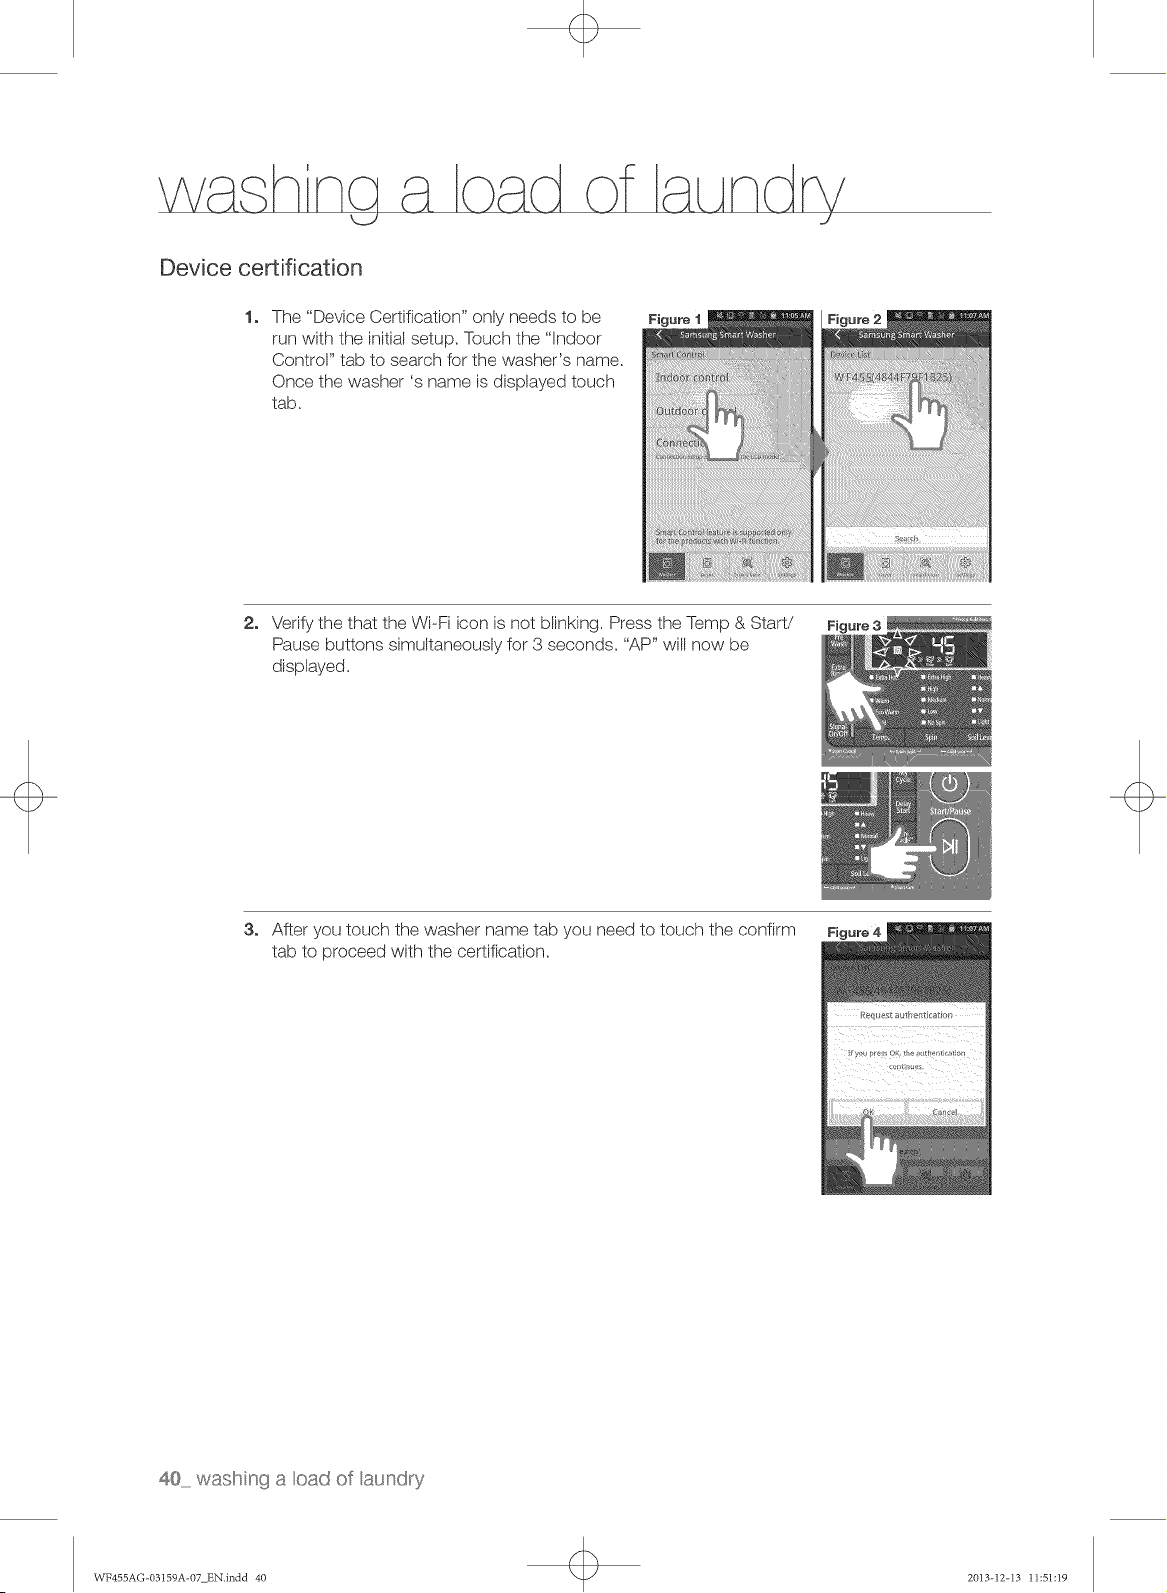
1. The "Device Certification" only needs to be
run with the initial setup, Touch the "Indoor
Contror' tab to search for the washer's name,
Once the washer's name is displayed touch
tab,
Figure 1
2. Verify the that the Wi-Fi icon is not blinking. Press the Temp & Start/
Pause buttons simultaneously for 3 seconds. "AP" will now be
displayed.
3, After you touch the washer name tab you need to touch the confirm Figure4
tab to proceed with the certification,
40 wasl!"_nga oad of aund_'_y
WF455AG-03159A-07 EN.indd 40 2013-12-I3 11:51:I9
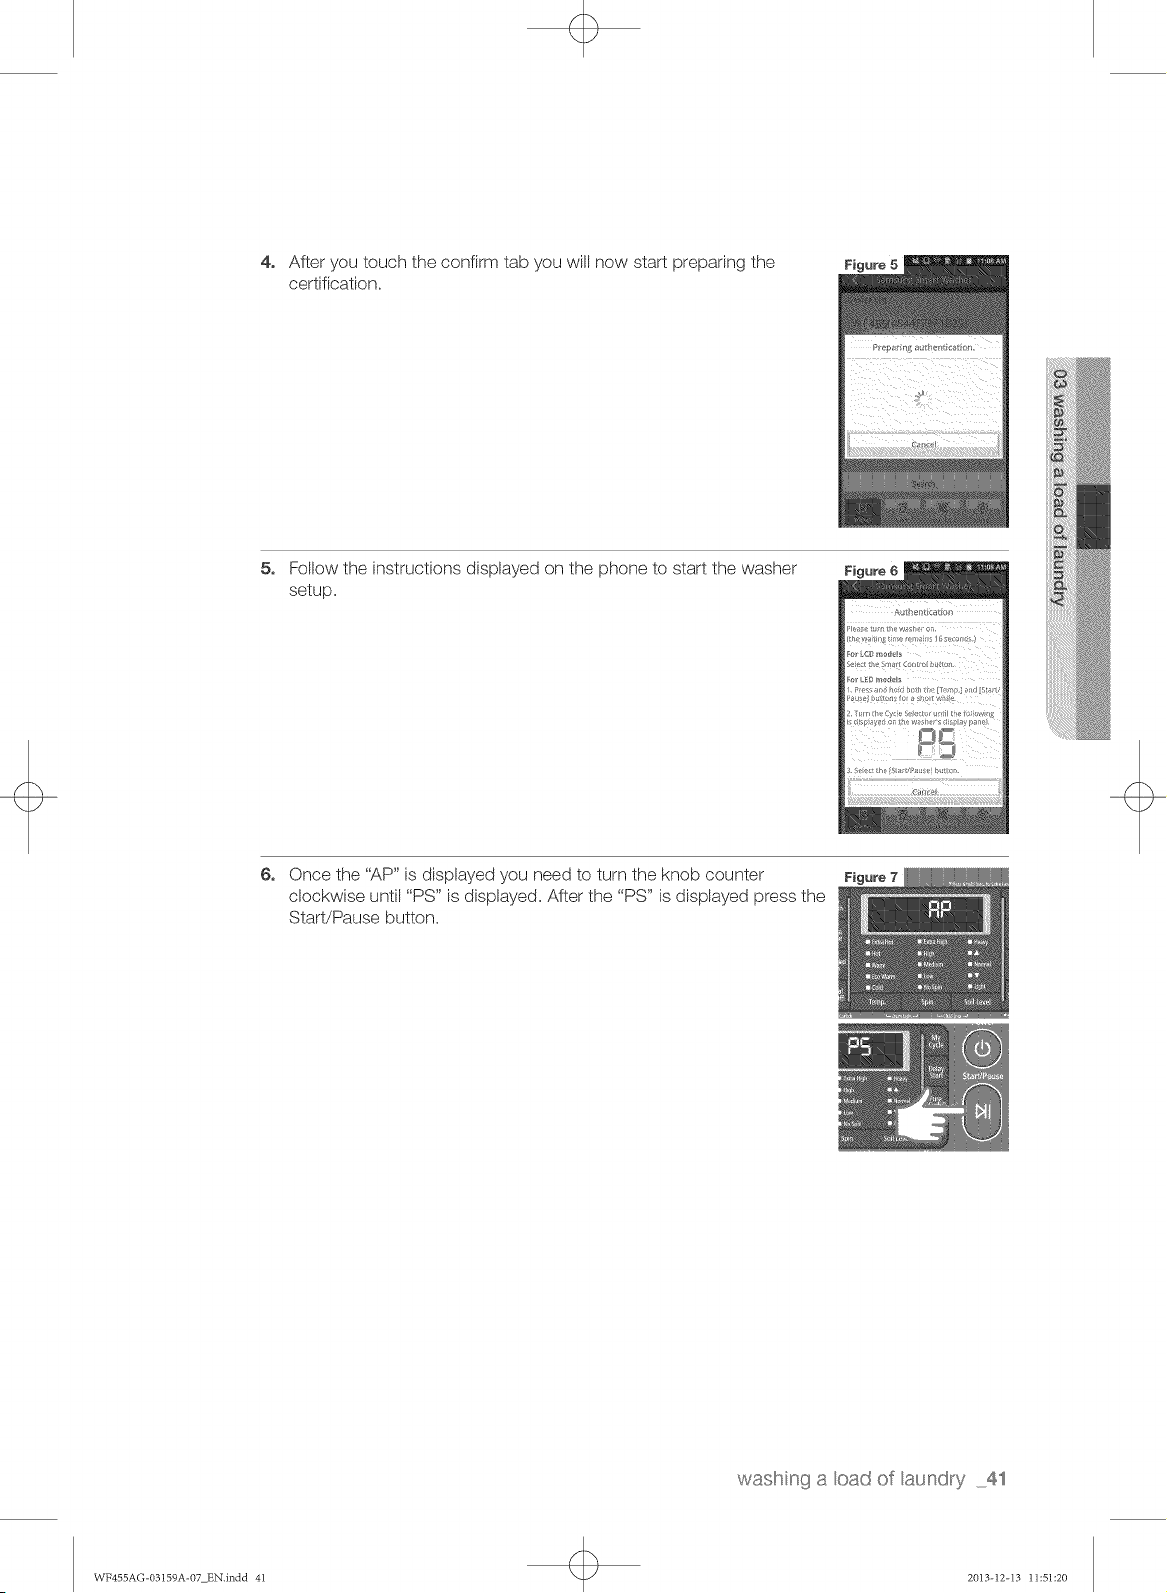
4,
After you touch the confirm tab you will now start preparing the
certification,
gure 5
5,
Follow the instructions displayed on the phone to start the washer
setup,
6, Once the "AP" is displayed you need to turn the knob counter
clockwise until "PS" is displayed. After the "PS" is displayed press the
Start/Pause button.
gure 7
wasI!"_ng a oad of aundry 41
WF455AG-03159A-07 EN.indd 4I 2013-12-I3 11:51:20
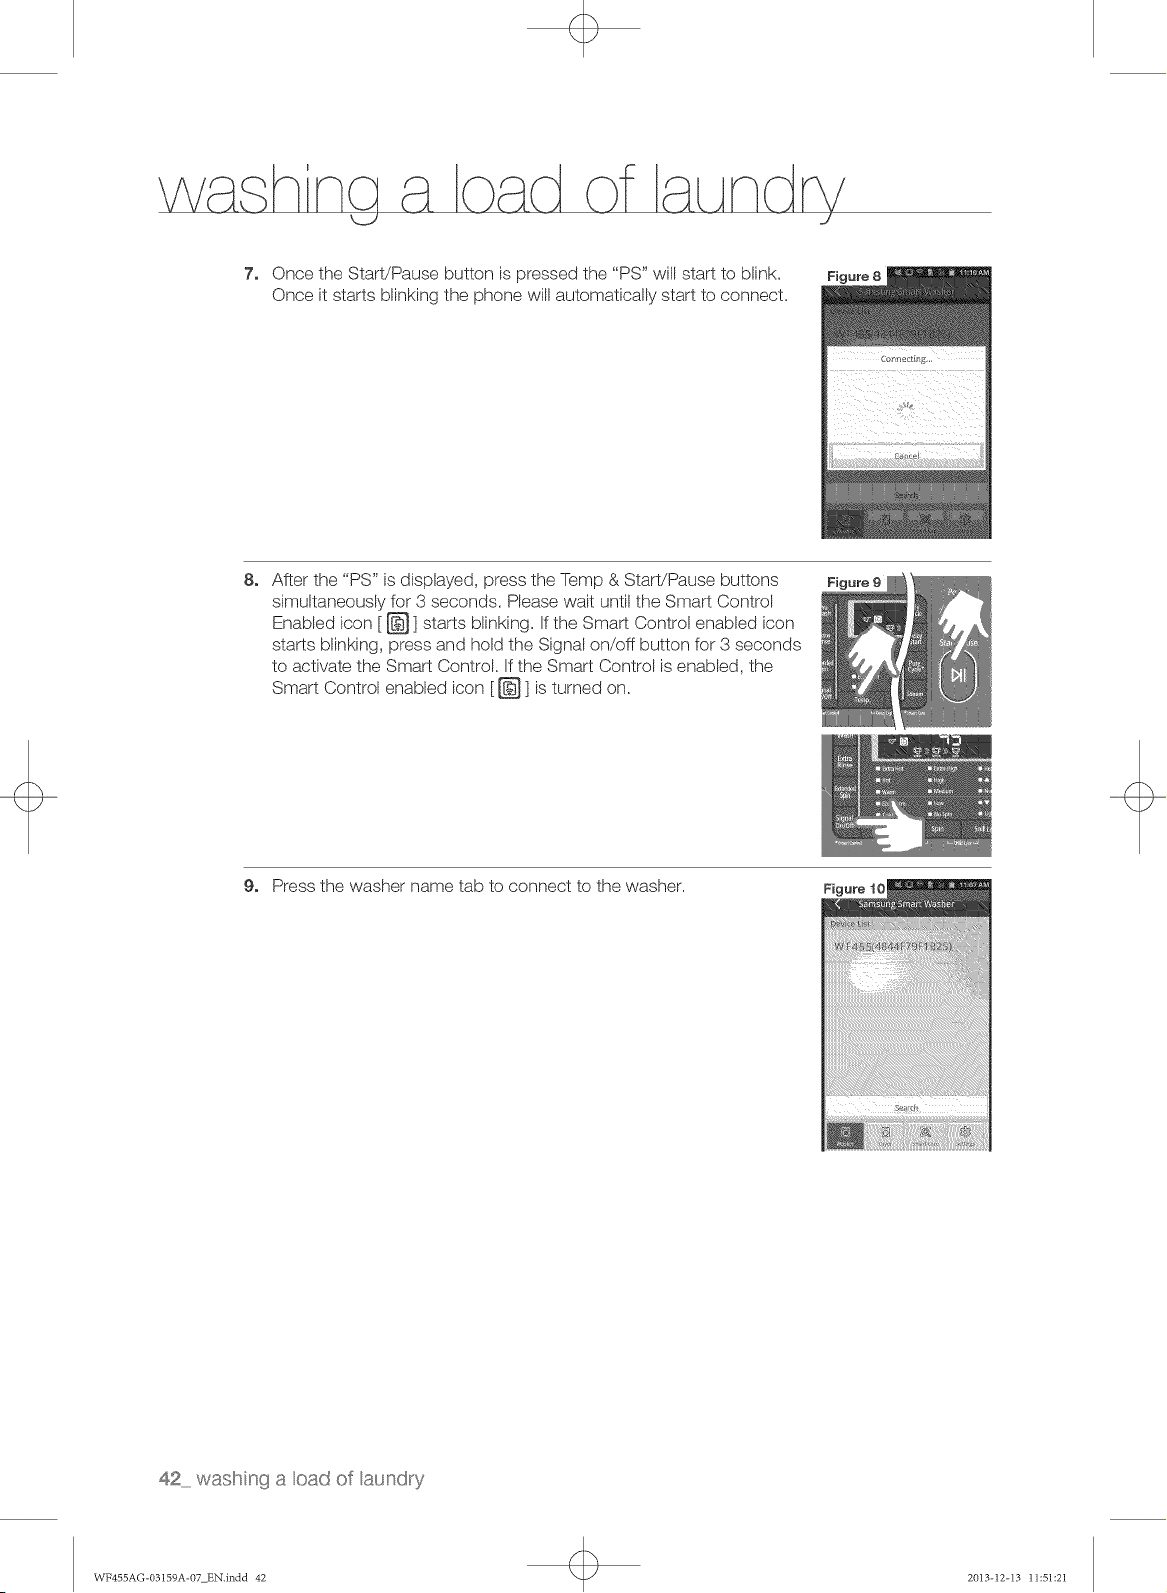
7.
Once the Start/Pause button is pressed the "PS" will start to blink.
Once it starts blinking the phone will automatically start to connect,
8. After the "PS" is displayed, press the Temp & Start/Pause buttons
simultaneously for 3 seconds. Please wait until the Smart Control
Enabled icon [ _ ] starts blinking. If the Smart Control enabled icon
starts blinking, press and hold the Signal on/oft button for 3 seconds
to activate the Smart Control, If the Smart Control is enabled, the
Smart Control enabled icon [ _ ] is turned on,
Figure 9
9. Press the washer name tab to connect to the washer.
42 wasl!"_nga oad of aund_'7
WF455AG-03159A-07 EN.indd 42 2013-12-I3 11:51:21

10. The washer is now connected. Touch the "Course button" and you
can now control the washer from your phone,
11. The Authentication is now completed and the washer is connected to Figure12
your Smartphone.
wasl!"_nga oad of aund_'_y 43
WF455AG-03159A-07 EN.indd 43 2013-12-I3 11:51:22
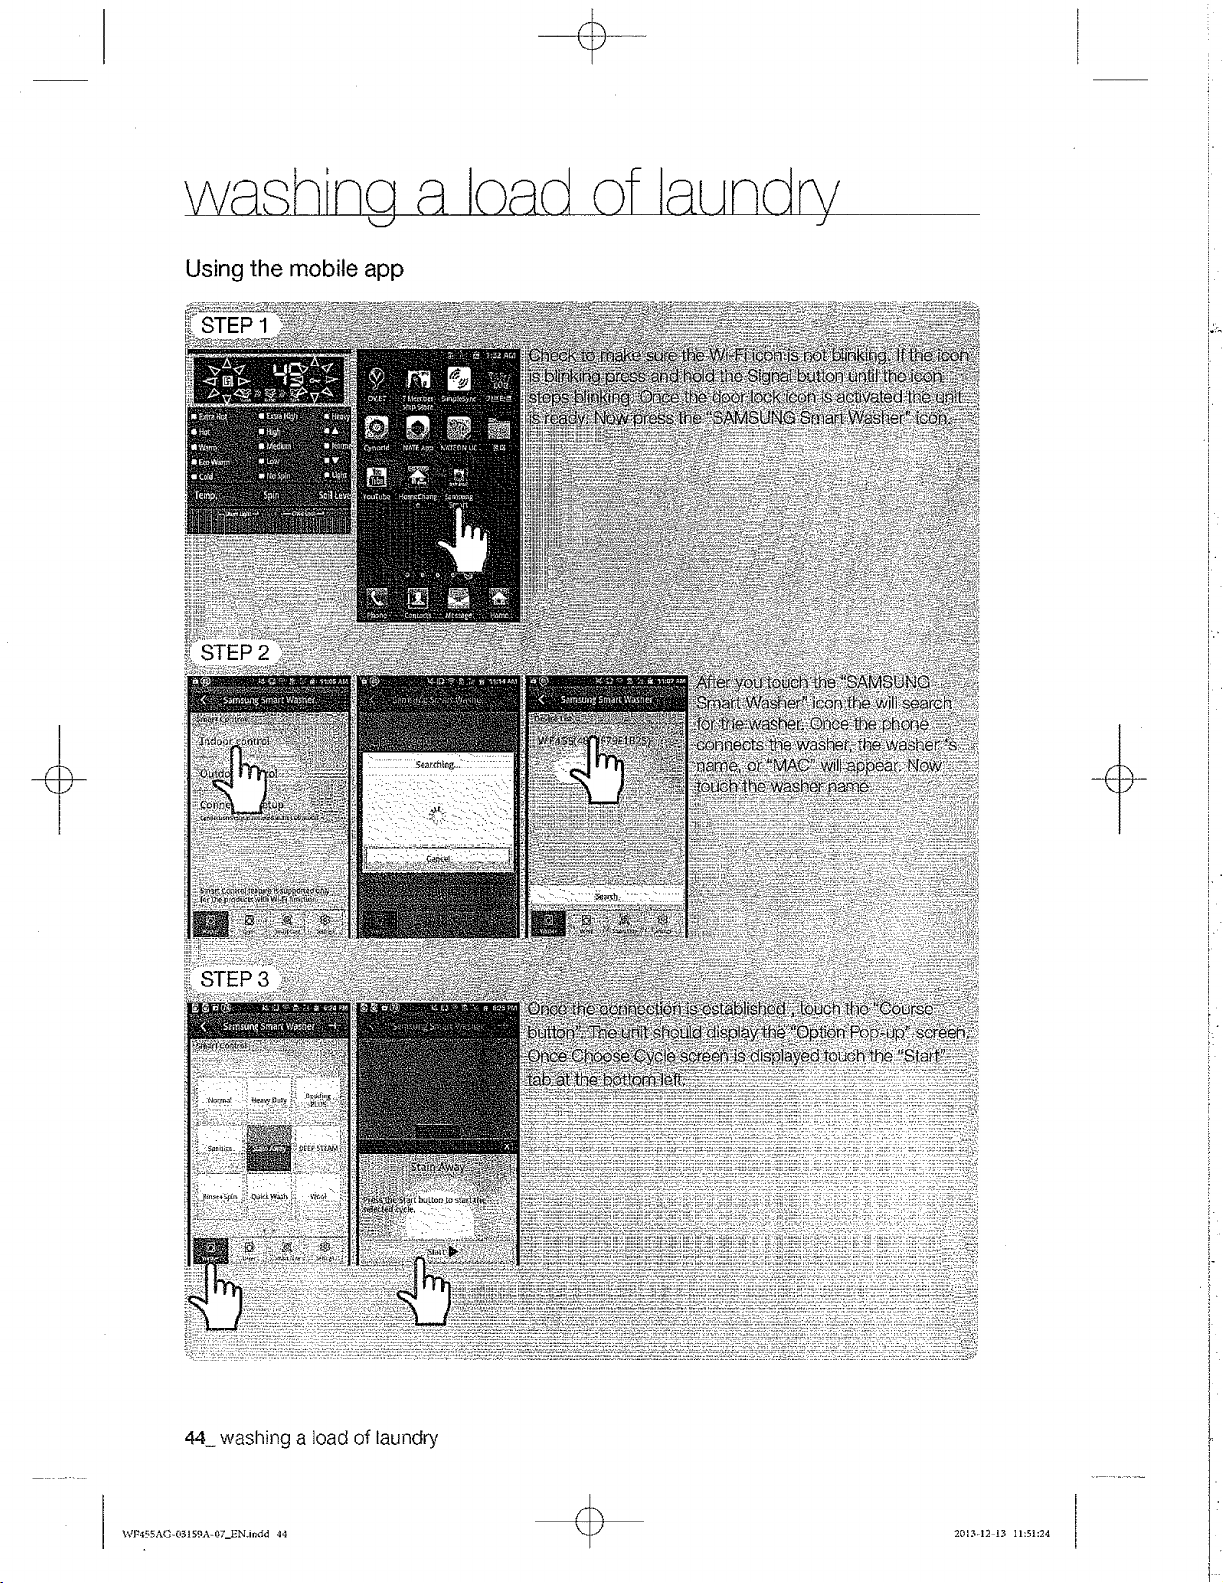
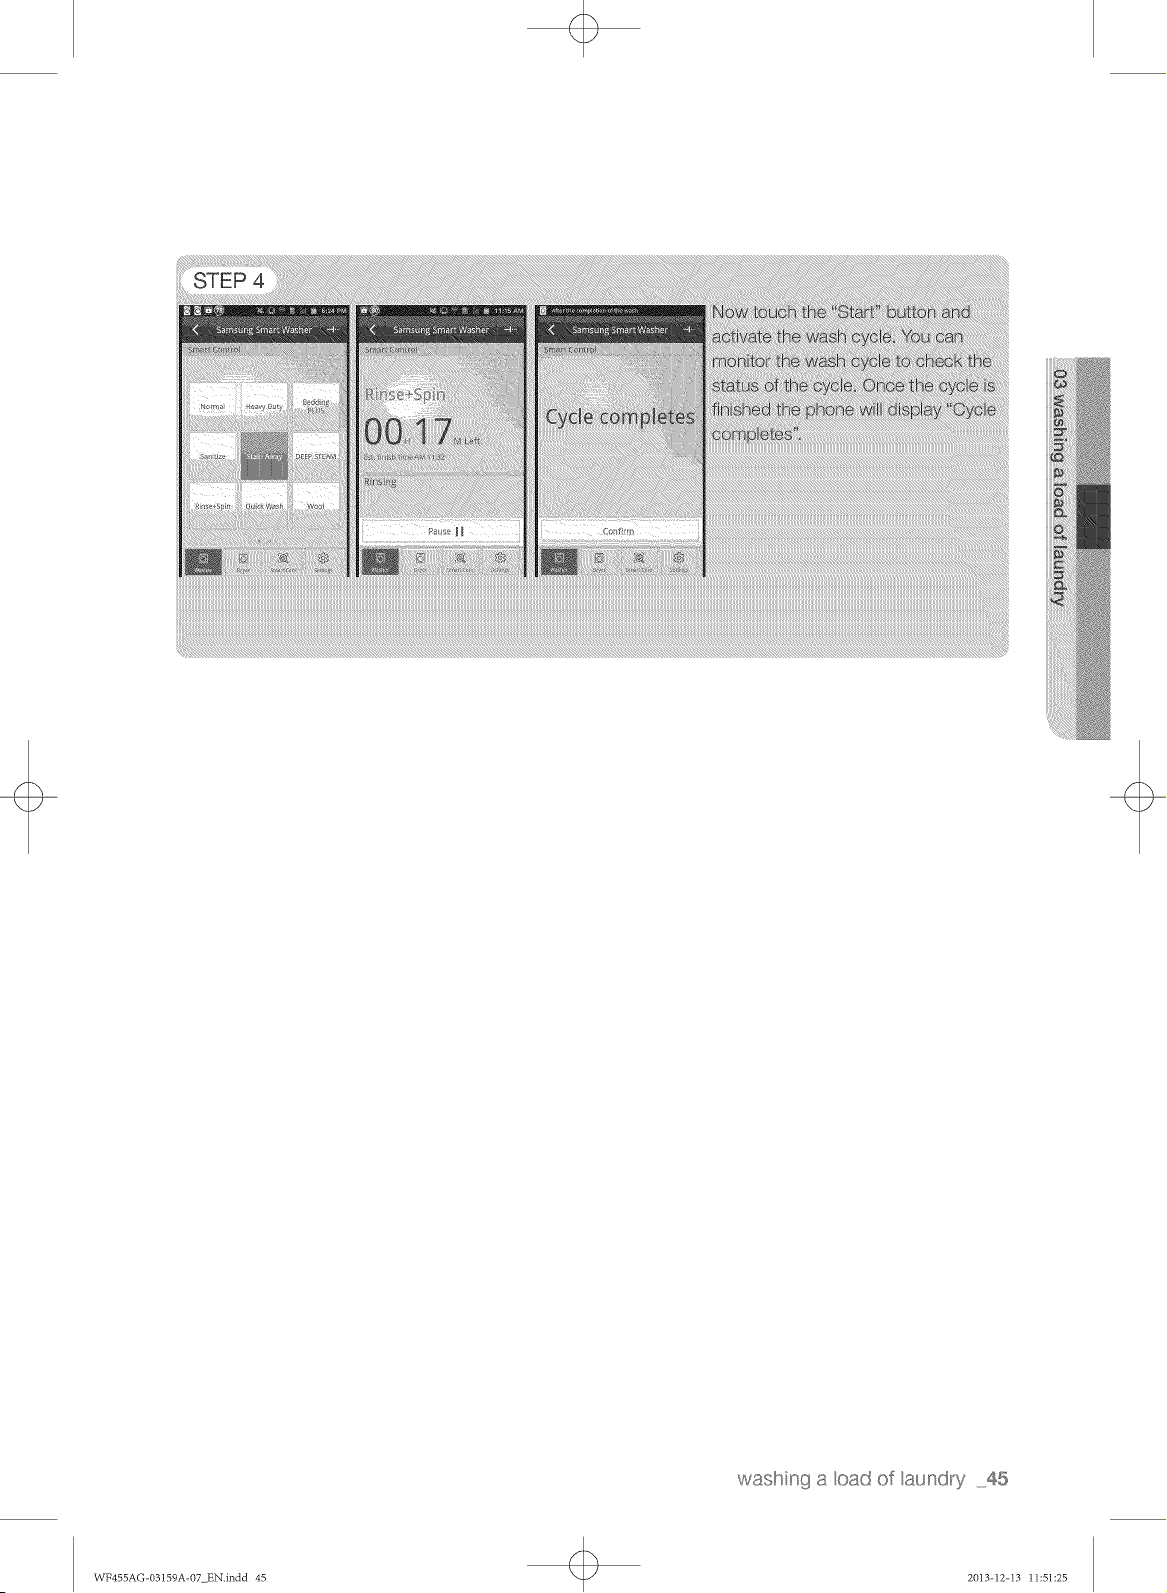
Using the mobile app
44_ washing a load of laundry
I
I
I
!
WP4SSAG-0sISgA-07_EN.indd 44 2013_12 13 ] 1:51:24
STEP 4
wasl!" nga oad of aund_'_y45
WF455AG-03159A-07 EN.indd 45 2013-12-I3 11:51:25

USING THE MOBILE APP (lOS)
Downbading the phone application
1. Find and open the "App Store" icon.
2. Once the "App Store" has been open, do a search.
3. Once the search box appears type in
"Samsung Smart Washer".
46 wasl!"_ng a oad of aundry
WF455AG-03159A-07 EN.indd 46 2013-12-I3 11:51:26

4. Once the search is complete the App
"SAMSUNG Smart Washer" will be displayed.
You need to download this App to your phone.
_} ake sure the app changes from "Free" to
"Installed"
5. Once the phone app has been downloaded to your phone, you
are now ready to set up the washer Wi-Fi control.
washng a oad of aundry 47
\\TF455A(; 03159A 07 ENindd 47 2013 12 13 11:51:27
i
i:!!,,STEP 4
48 washing a toad of laundry
WFt.155AG-03159A-07 E_4,[_.dd 48 2013-12-13 11:51:28
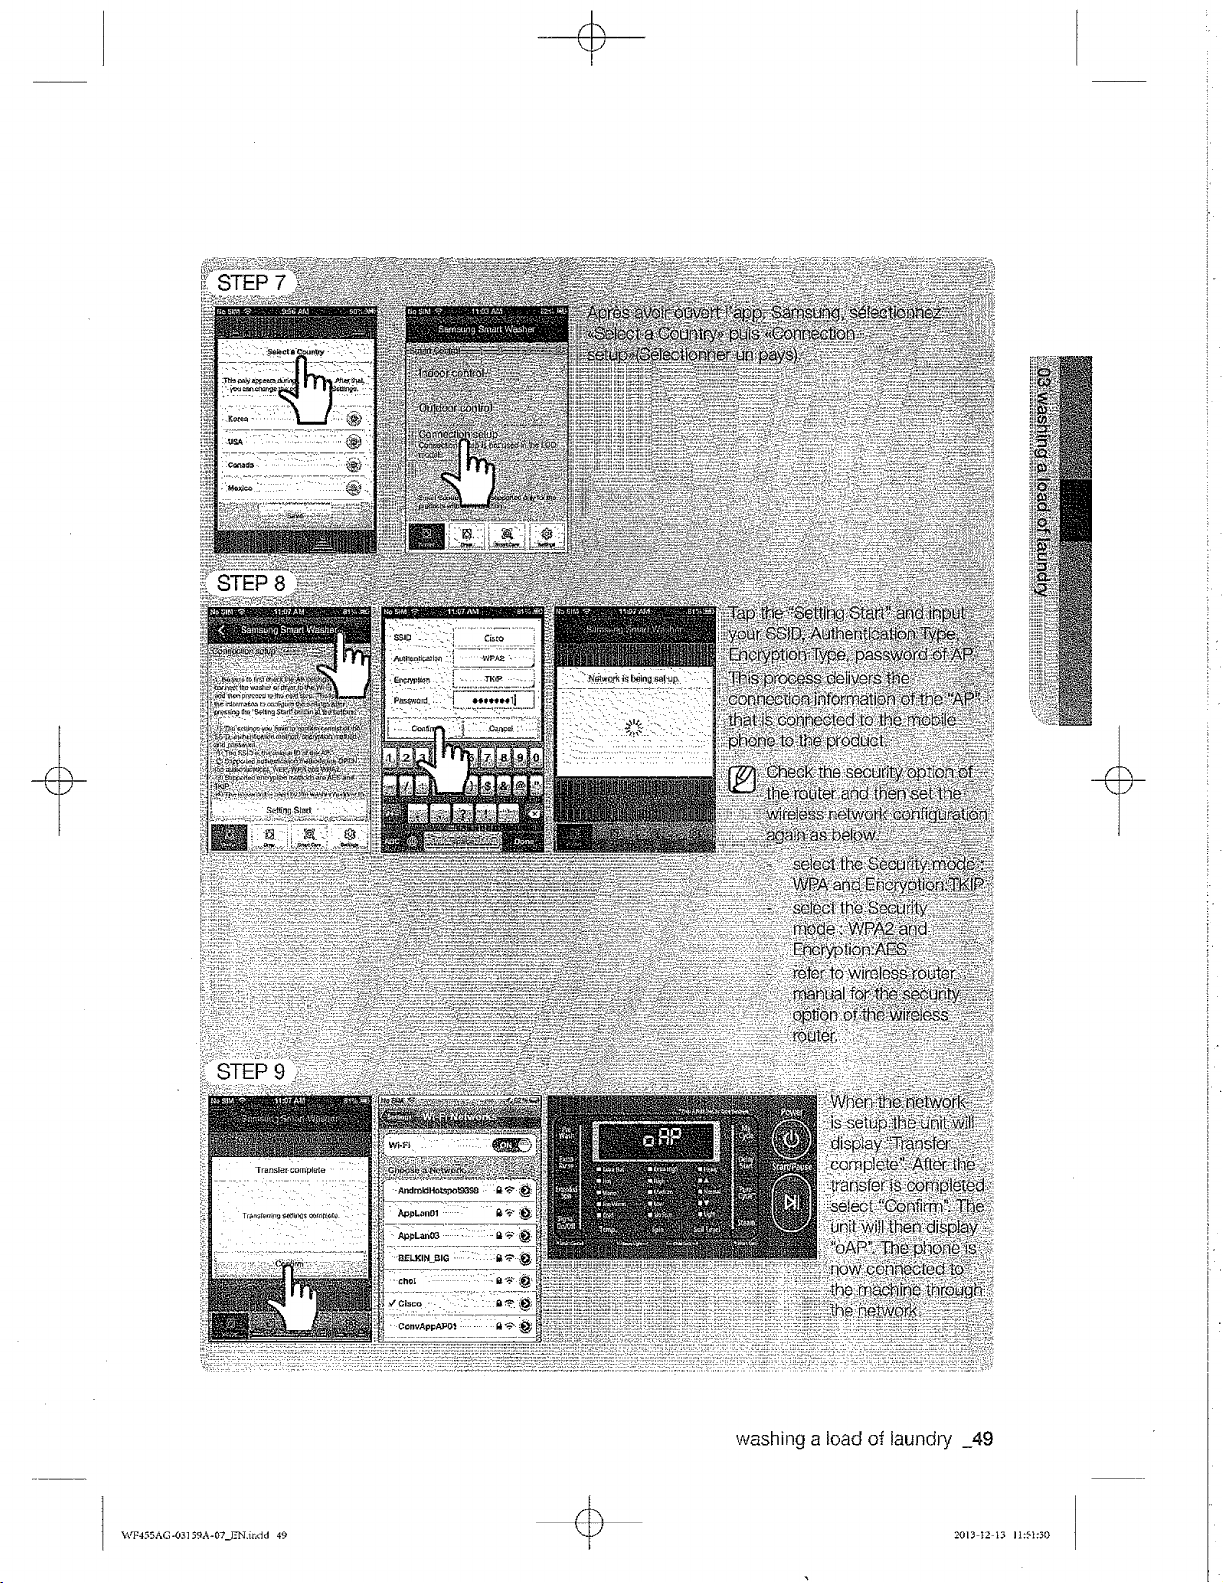
!i!,.STEP 7
washing a Loadof laundry _49
÷¥7 _. '4,
F4. SAG-O_]5. A-OT Y'N.ir, dd 49 2013 t2 13 11:51:_0
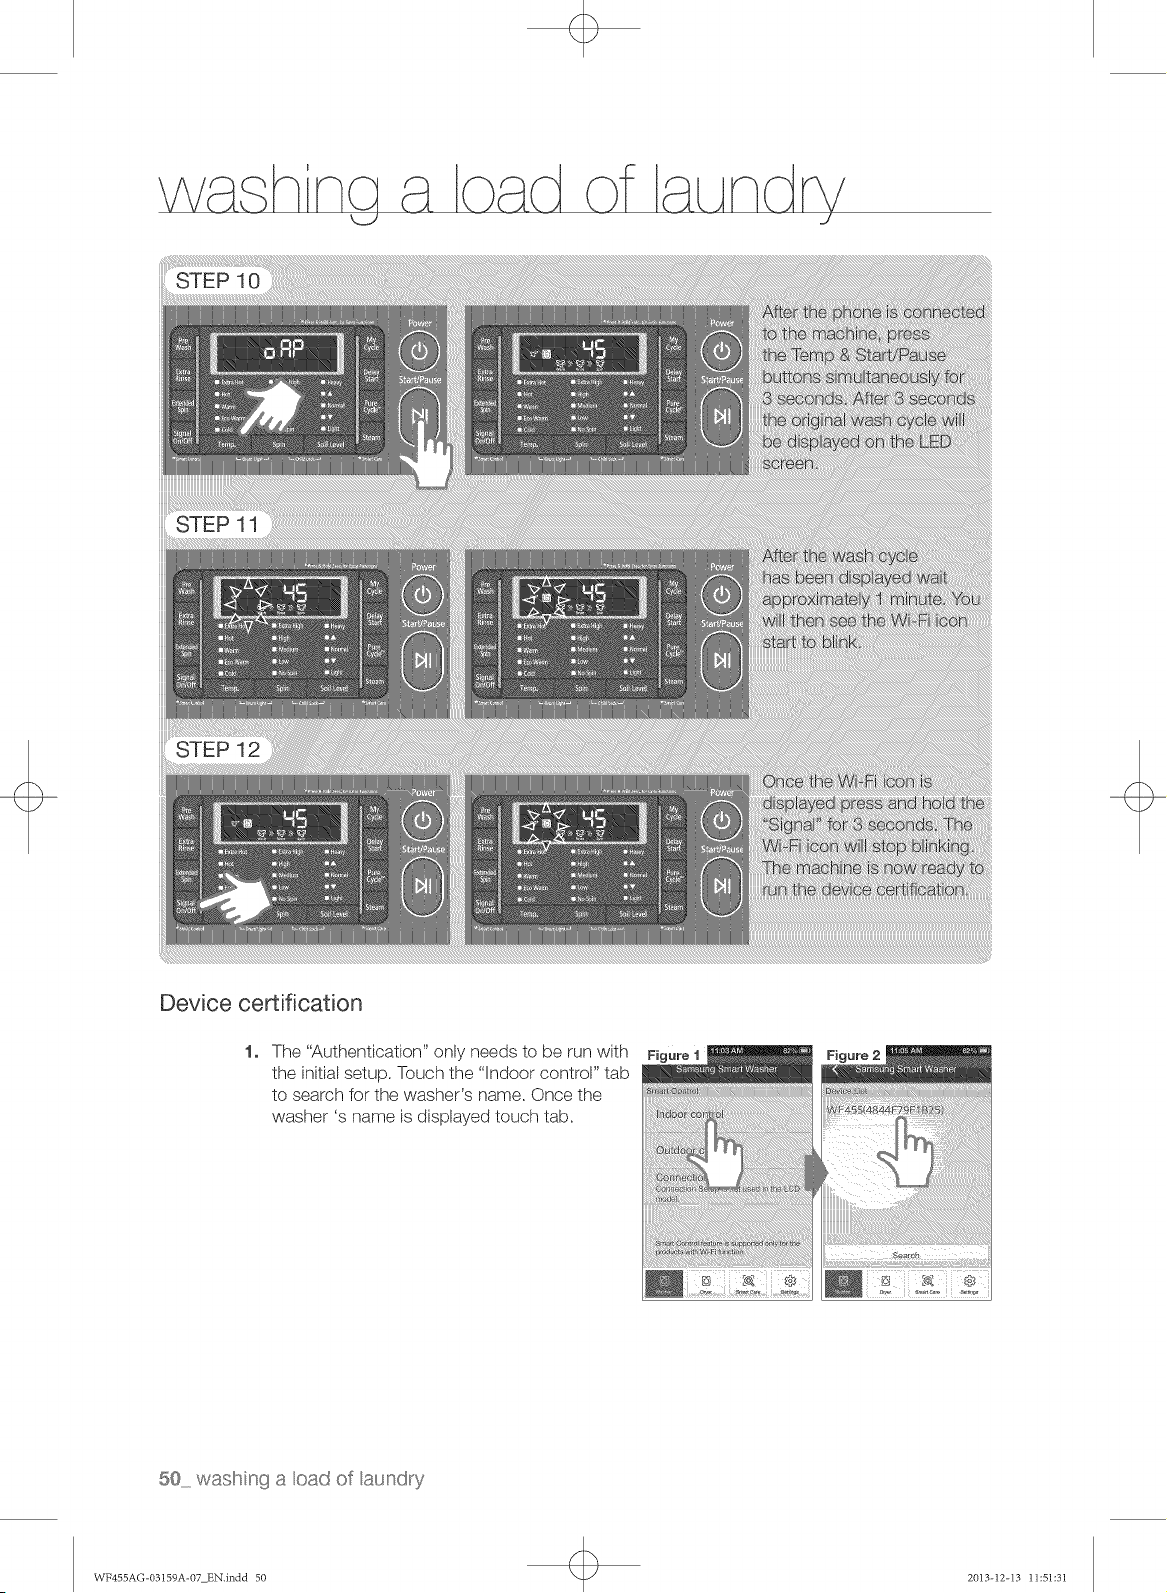
STEP 10
STEP 11
Device certification
1. The "Authentication" only needs to be run with
the initial setup. Touch the "Indoor contror' tab
to search for the washer's name, Once the
washer's name is displayed touch tab,
Figure 1
50 wasl!"_nga oad of aund_'_y
WF455AG-03159A-07 EN.indd 50 2013-12-I3 11:51:31
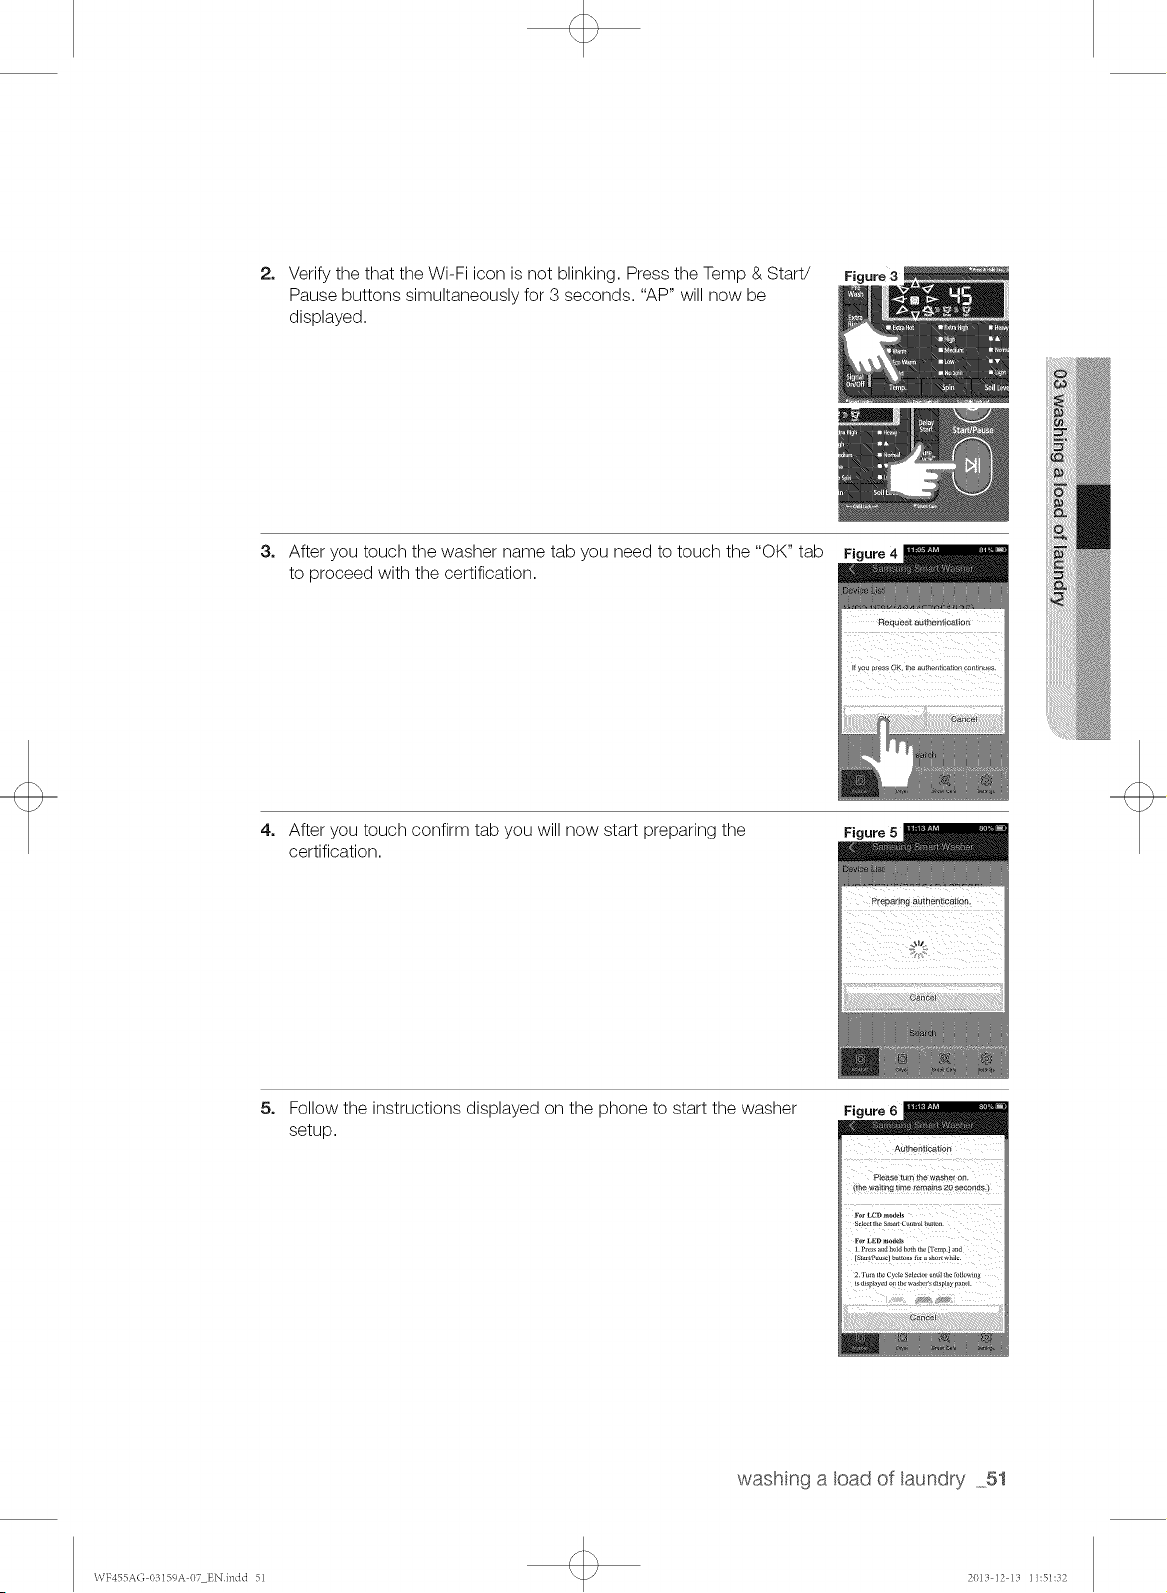
2. Verify the that the Wi-Fi icon is not blinking. Press the Temp & Start/
Pause buttons simultaneously for 3 seconds. "AP" will now be
displayed.
3. After you touch the washer name tab you need to touch the "OK" tab Figure4
to proceed with the certification.
4. After you touch confirm tab you will now start preparing the
certification.
Figure 5
5=
Follow the instructions displayed on the phone to start the washer
setup.
washng a oad of aundry 51
\\TF455A(; 03159A 07 ENindd 51 2013 12 13 11:51:32
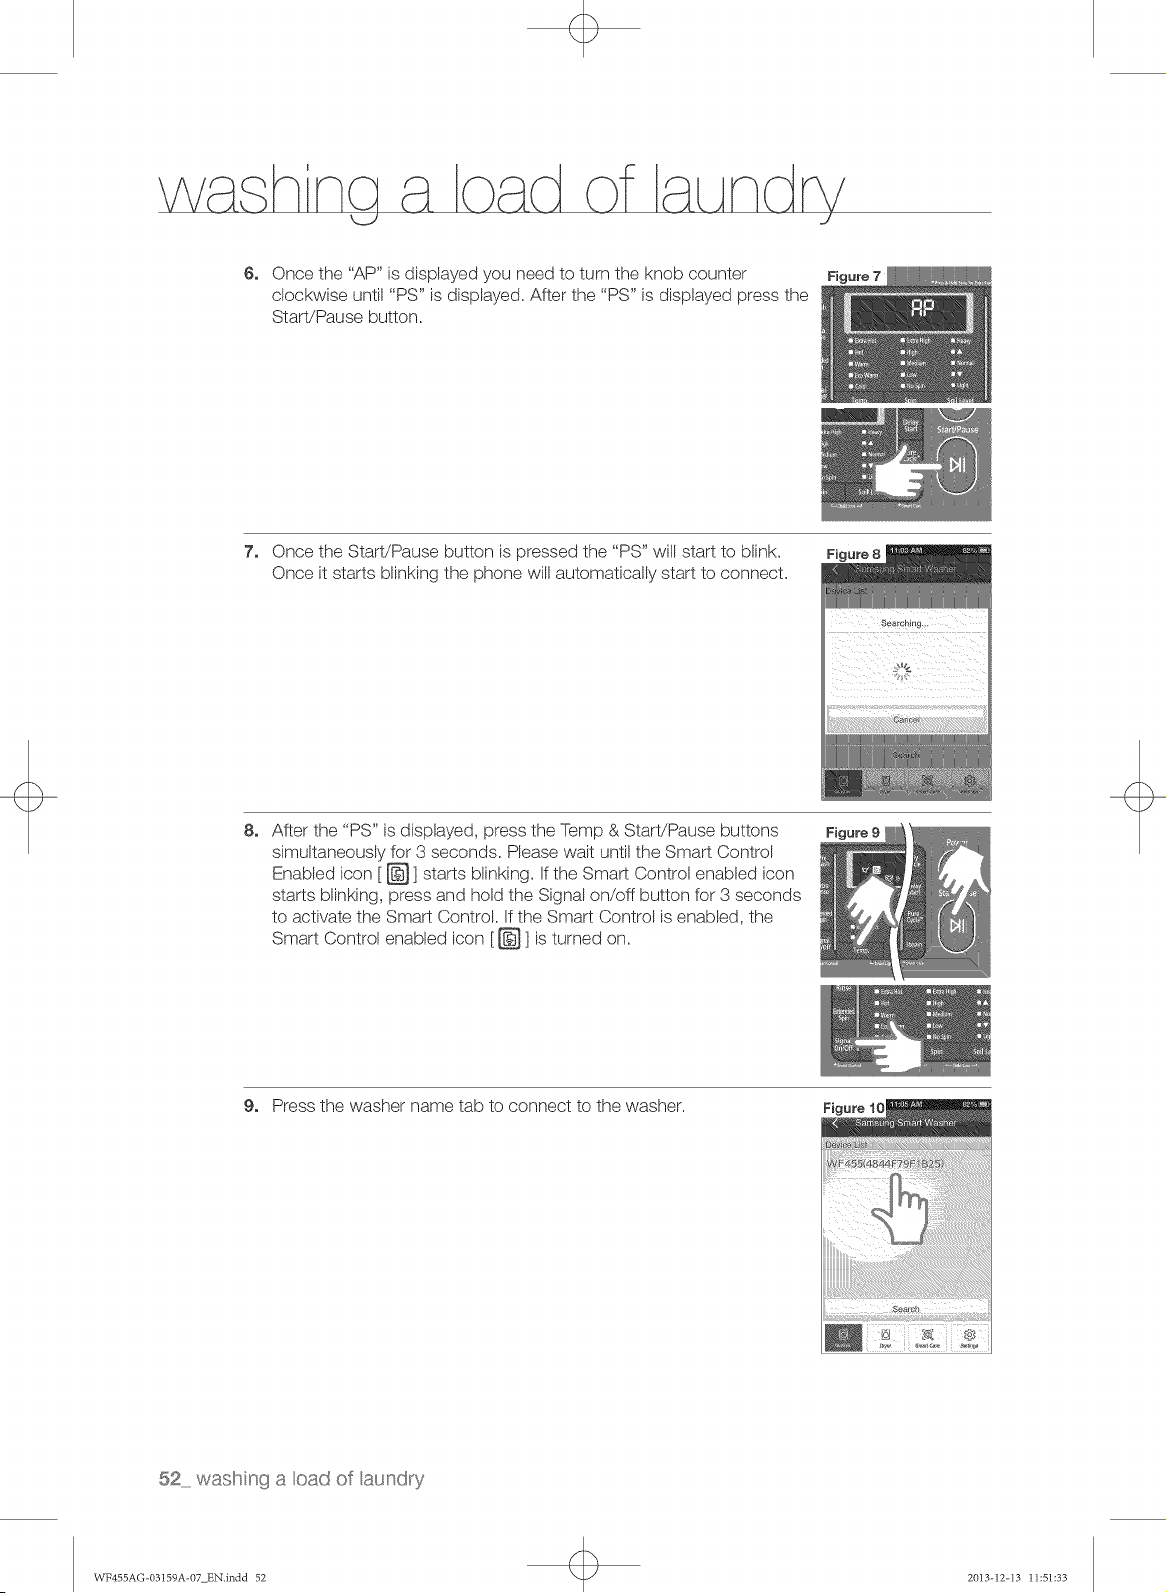
6. Once the "AP" is displayed you need to turn the knob counter Figure7
clockwise until "PS" is displayed. After the "PS" is displayed press the
Start/Pause button.
7,
Once the Start/Pause button is pressed the "PS" will start to blink.
Once it starts blinking the phone will automatically start to connect.
Figure 8
8. After the "PS" is displayed, press the Temp & Start/Pause buttons
simultaneously for 3 seconds. Please wait until the Smart Control
Enabled icon [ _ ] starts blinking. If the Smart Control enabled icon
starts blinking, press and hold the Signal on/oft button for 3 seconds
to activate the Smart Control. If the Smart Control is enabled, the
Smart Control enabled icon [ _ ] is turned on.
9. Press the washer name tab to connect to the washer.
8ca sl_
52 wasl!"_nga oad of aund_'_y
WF455AG-03159A-07 EN.indd 52 2013-12-I3 11:51:33
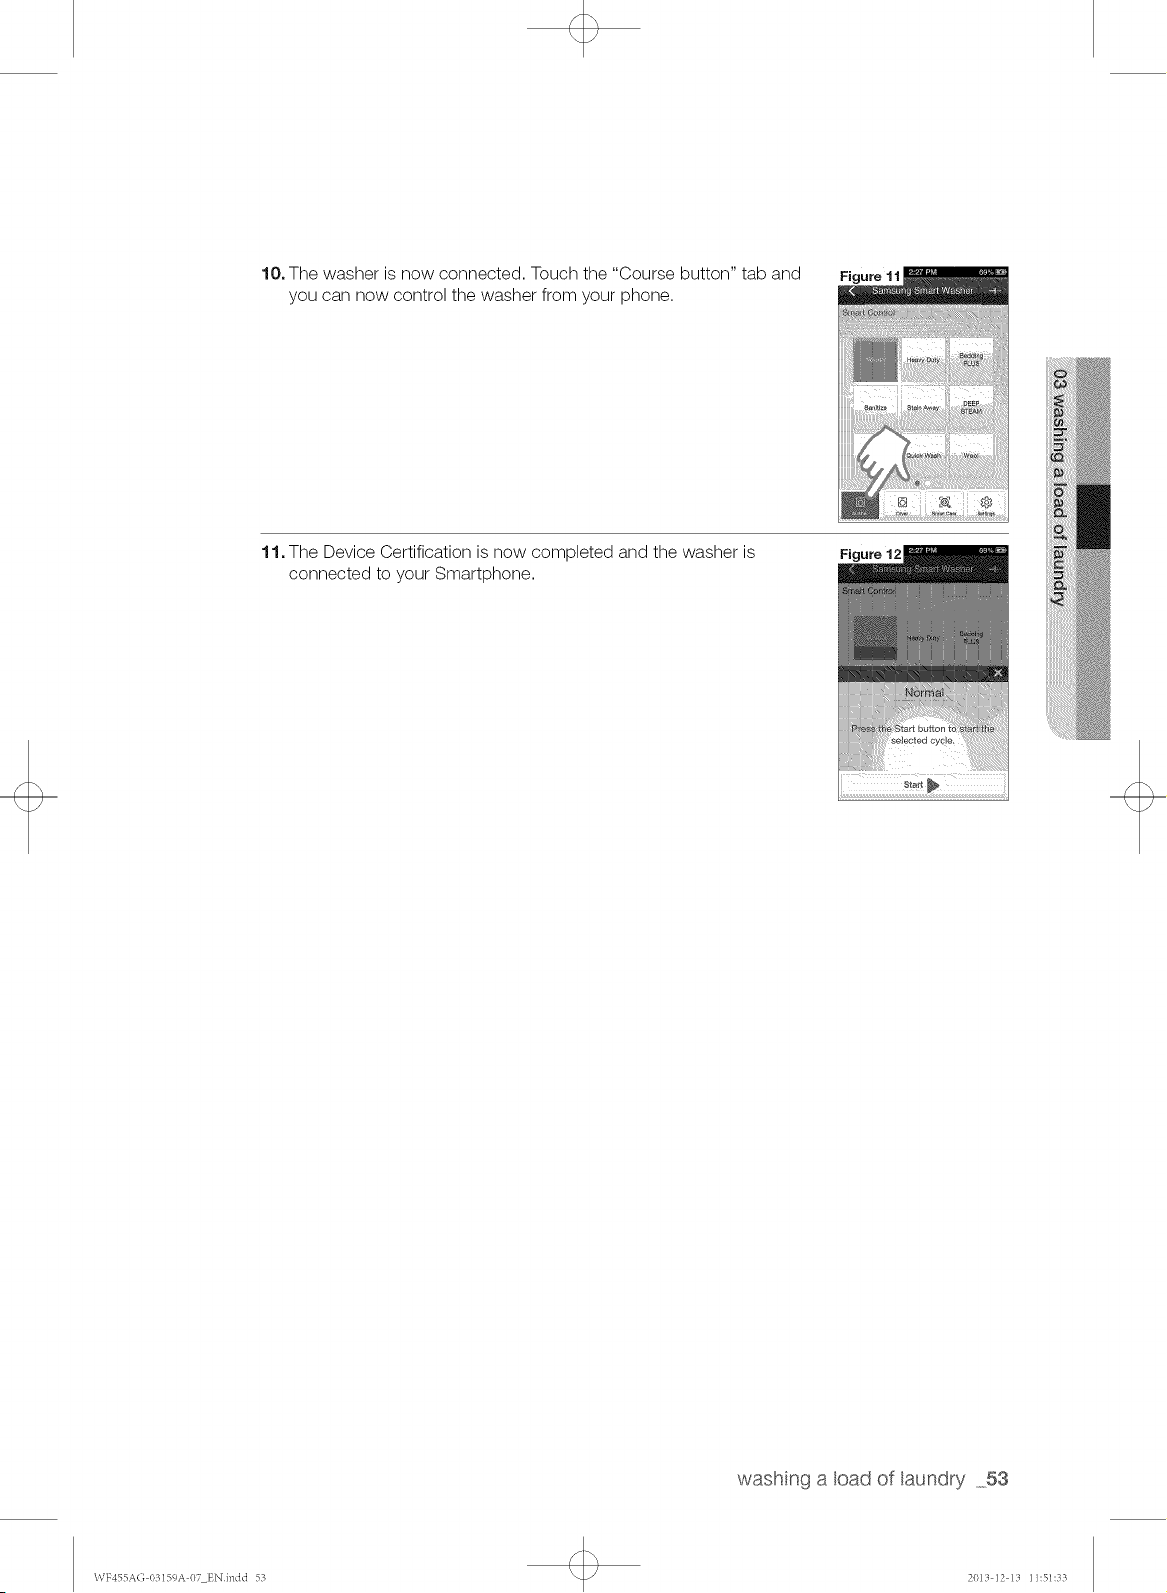
10. The washer is now connected. Touch the "Course button" tab and
you can now control the washer from your phone.
Figure 11
11. The Device Certification is now completed and the washer is
connected to your Smartphone.
Figure 12
washng a oad of aundry 53
\\'1:455A(; 03159A 07 ENindd 53 2013 12 13 11:51:33
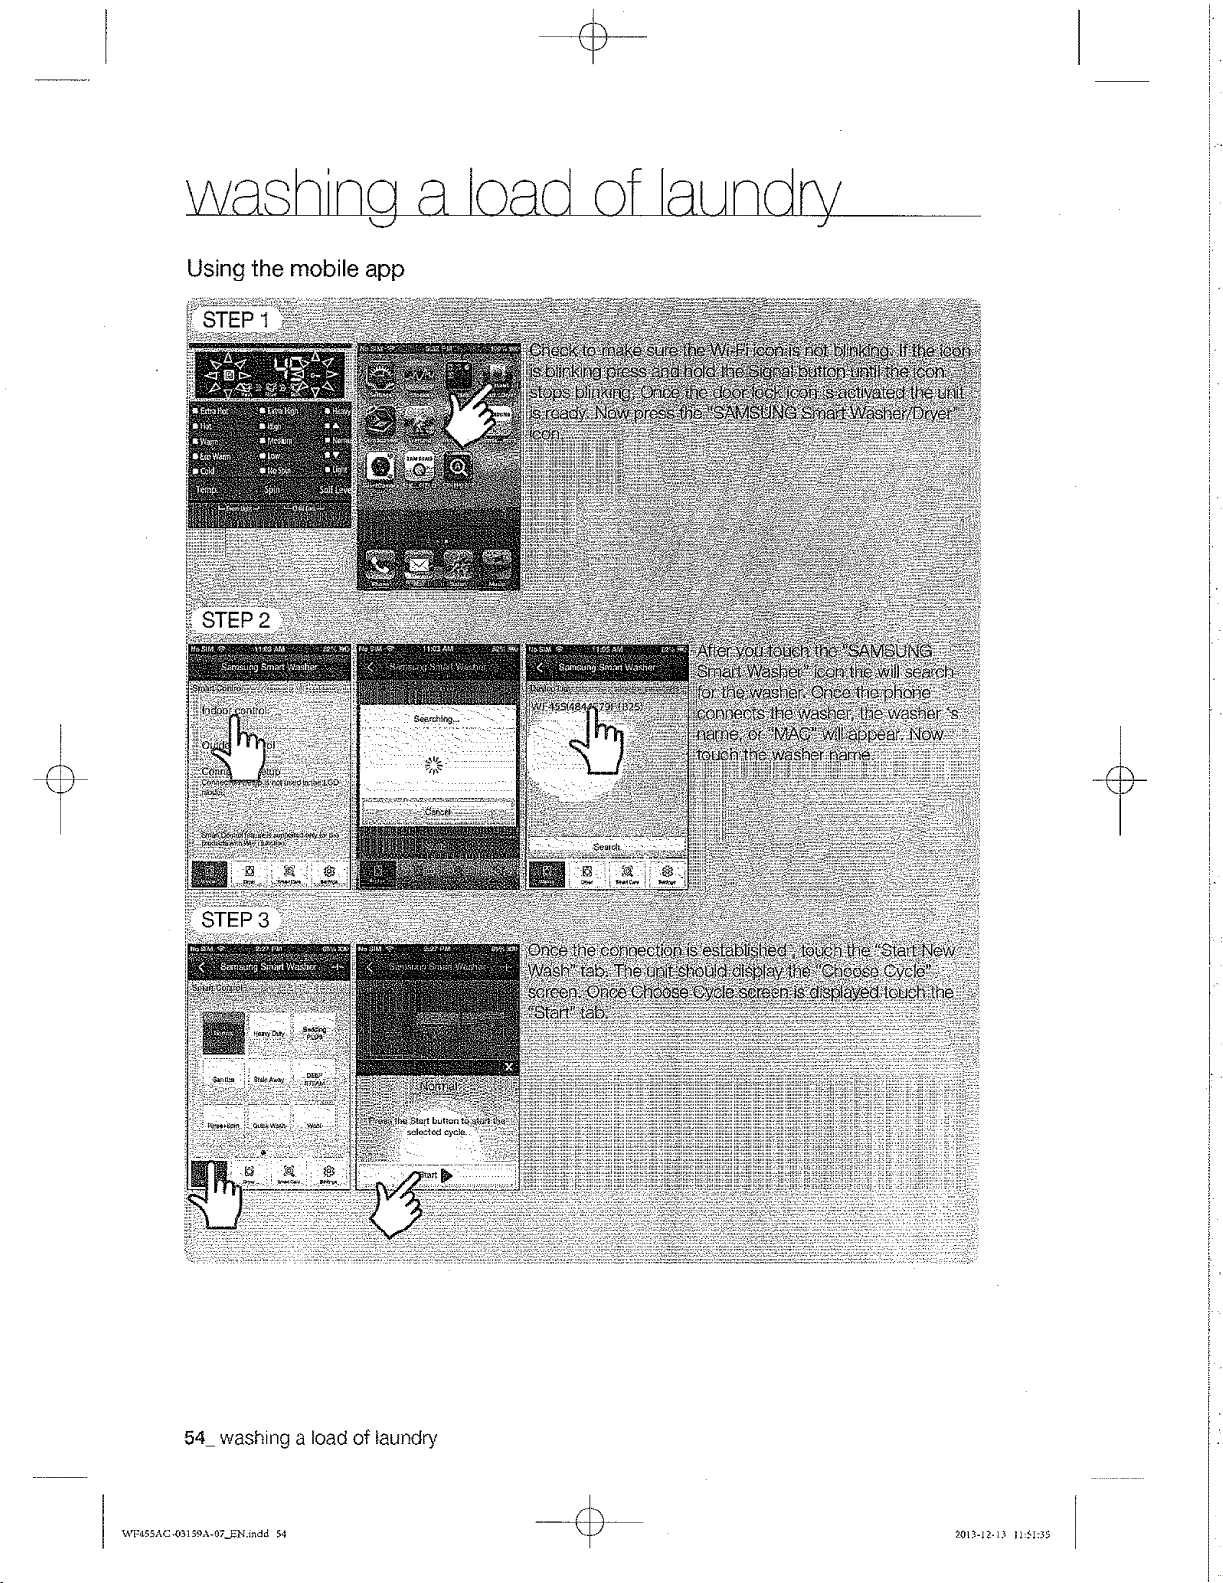
Using the mobile app
54_ washing a toad of laundry
_,¢'F455AC-03159A-07_N.i_dd 54 20|_-|Z-l_ I;:51:35
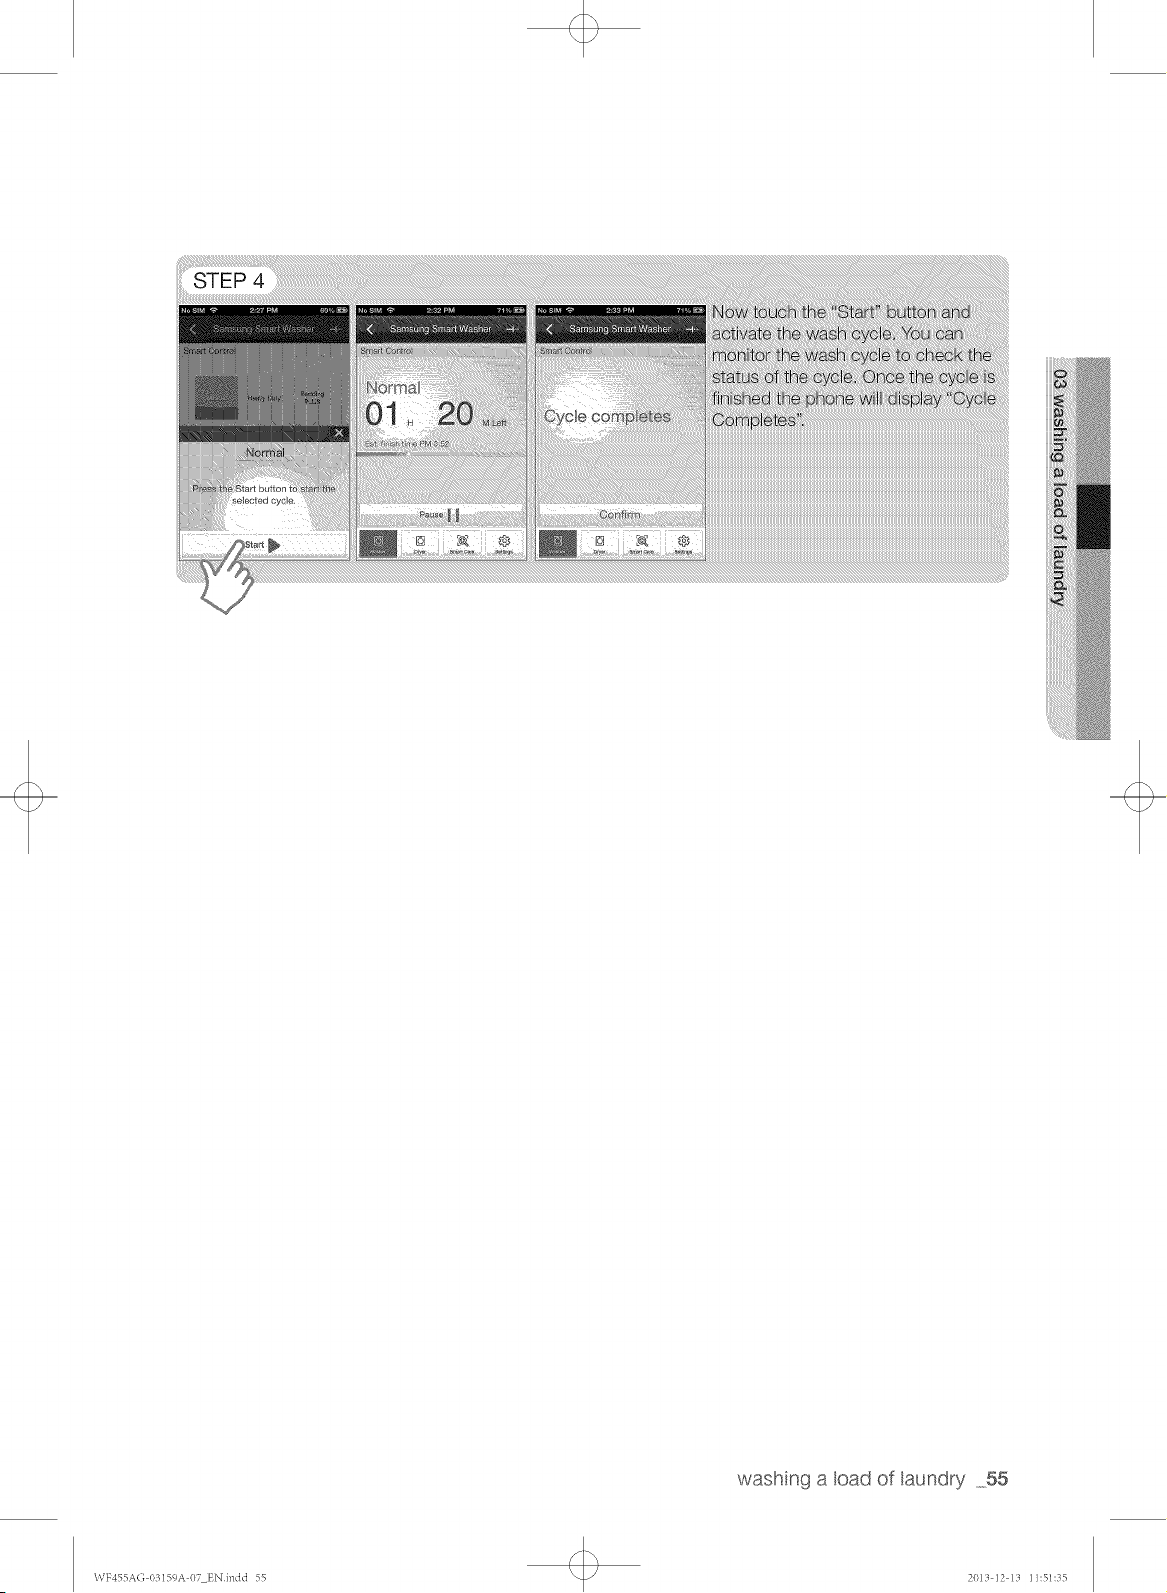
washng a oad of aundry 55
\\TF455A(; 03159A 07 ENindd 55 2013 12 13 11:51:35
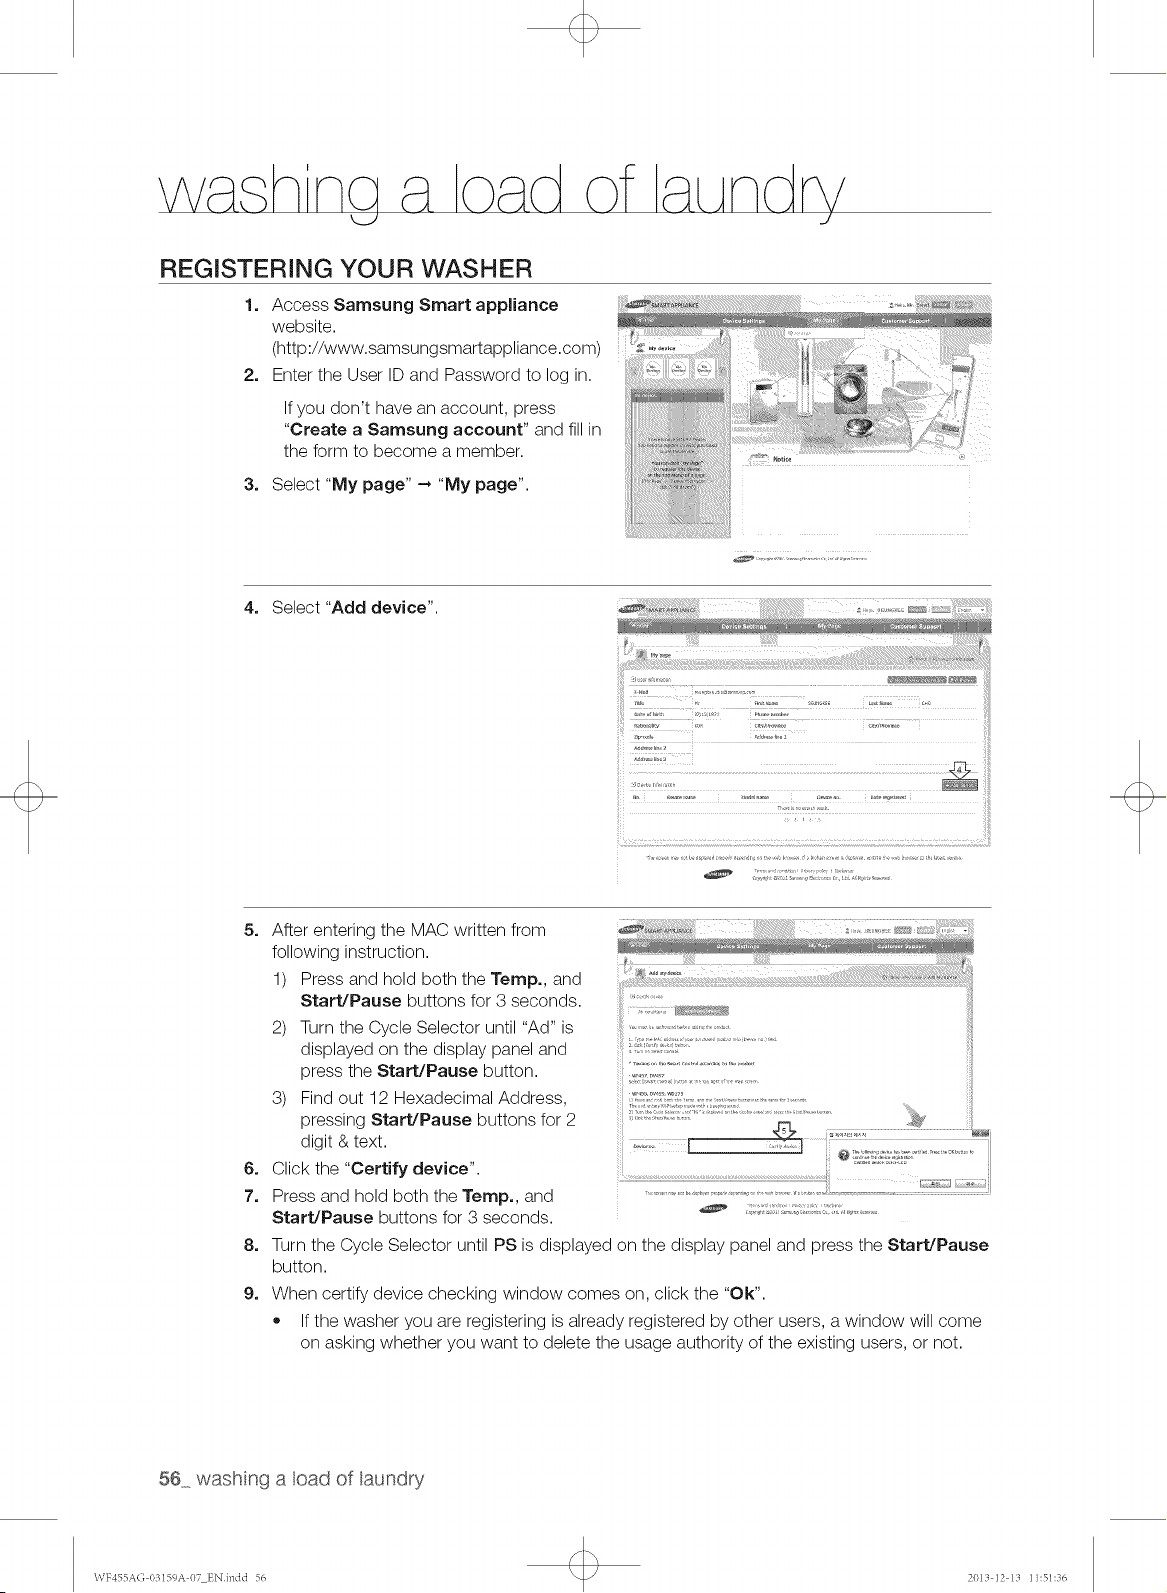
REGiSTERiNG YOUR WASHER
1. Access Samsung Smart appliance
website.
(http://www.samsungsmartappliance.com)
2. Enter the User ID and Password to log in.
If you don't have an account, press
"Create a Samsung account" and fill in
the form to become a member.
3. Select "My page" --_"My page".
4. Select "Add device".
..... r_
5. After entering the MAC written from
following instruction.
1) Press and hold both the Temp., and
Start/Pause buttons for 3 seconds.
2) Turn the Cycle Selector until "Ad" is
displayed on the display panel and
press the Start/Pause button.
3) Find out 12 Hexadecimal Address,
pressing Start/Pause buttons for 2
digit & text.
iiii!..............................................................
i!i
6. Click the "Certify device".
7. Press and hold both the Temp., and
Start/Pause buttons for 3 seconds.
8. Turn the Cycle Selector until PS is displayed on the display panel and press the Start/Pause
button.
9. When certify device checking window comes on, click the "Ok".
If the washer you are registering is already registered by other users, a window will come
on asking whether you want to delete the usage authority of the existing users, or not.
56 washng a oad of aundry
\VF455A(; 03159A 07 ENindd 56 2013 12 13 11:51:36
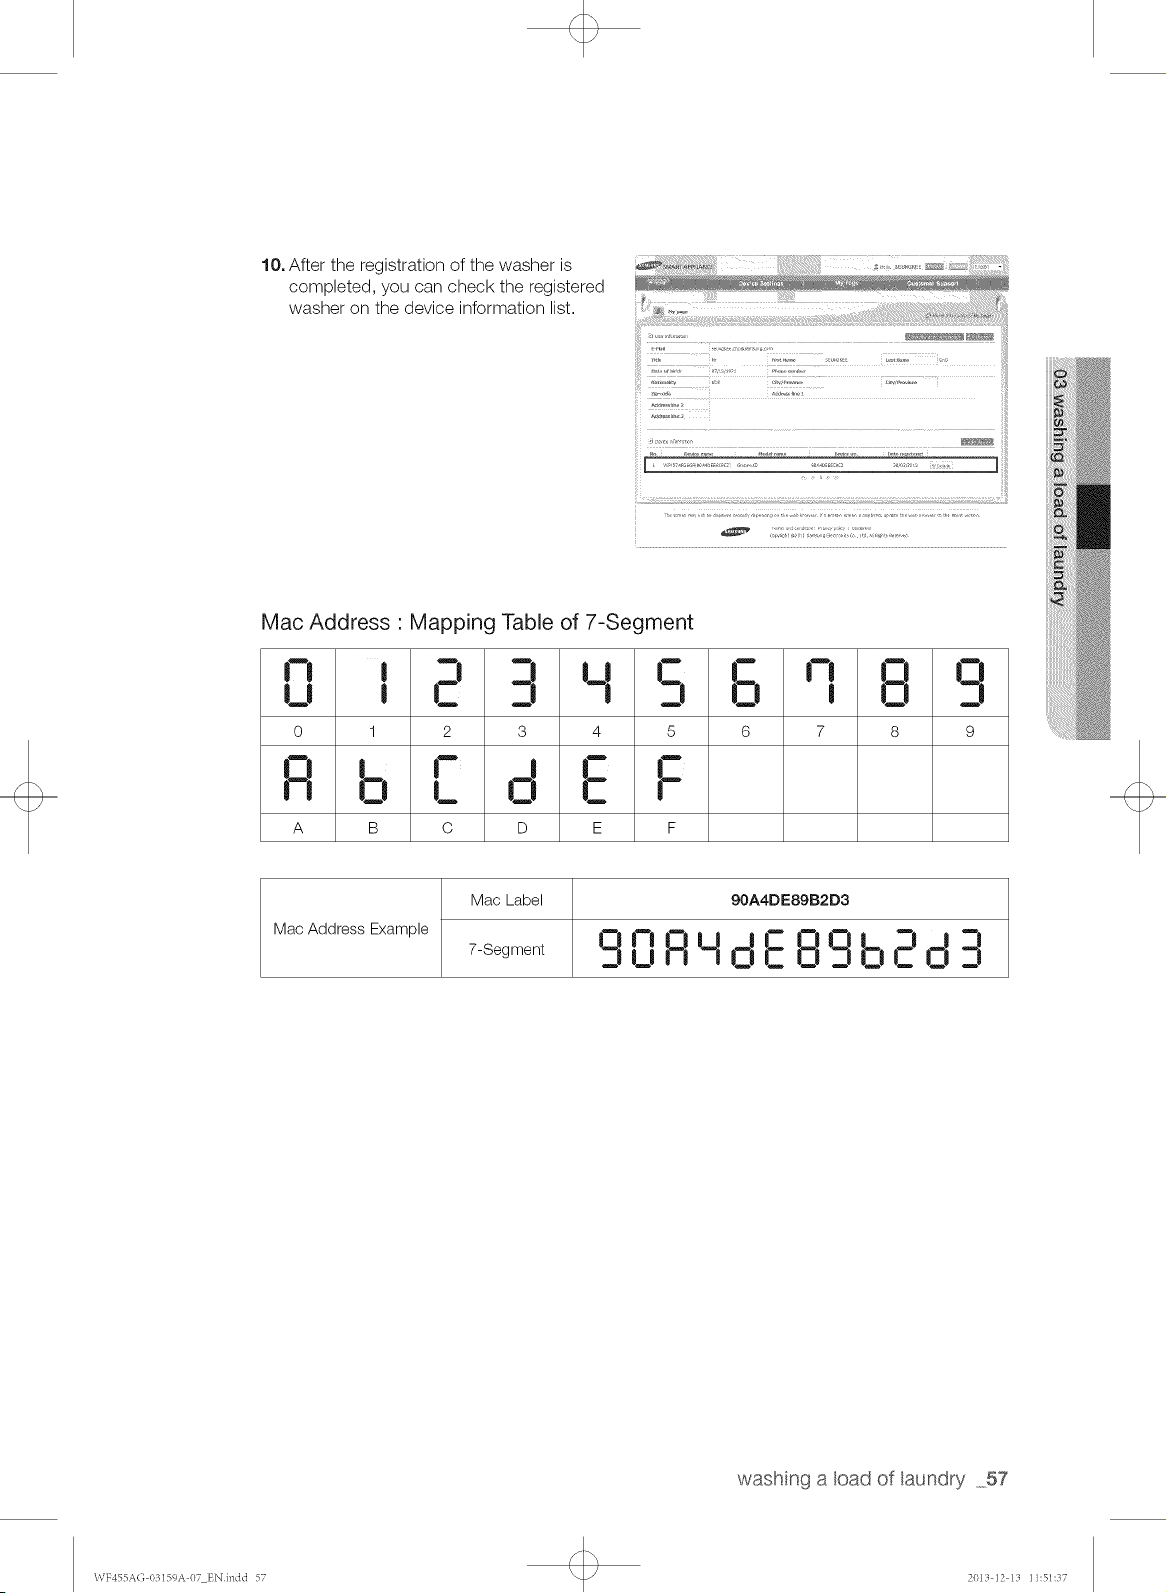
10, After the registration of the washer is
completed, you can check the registered
washer on the device information list.
• • • !!i!iii
[ ]
r
Mac Address " Mapping Table of 7-Segment
n i 3 3 i_I C L- n O 13
u _ C D D 13 _ o D
0 1 2 3 4 5 6 7 8 9
o, ,- -' L: F
ul O i_ O
A B C D E F
Mac Label 90A4DE89B2D3
Mac Address Example
,-,,-,R,_i,:jE,-_,n ,_-,
7-Segment _i |_1
o :,b,-:'o :,
washng a oad of aundry 57
\VF455A(; 03159A 07_ENindd 57 2013 12 13 11:51:37
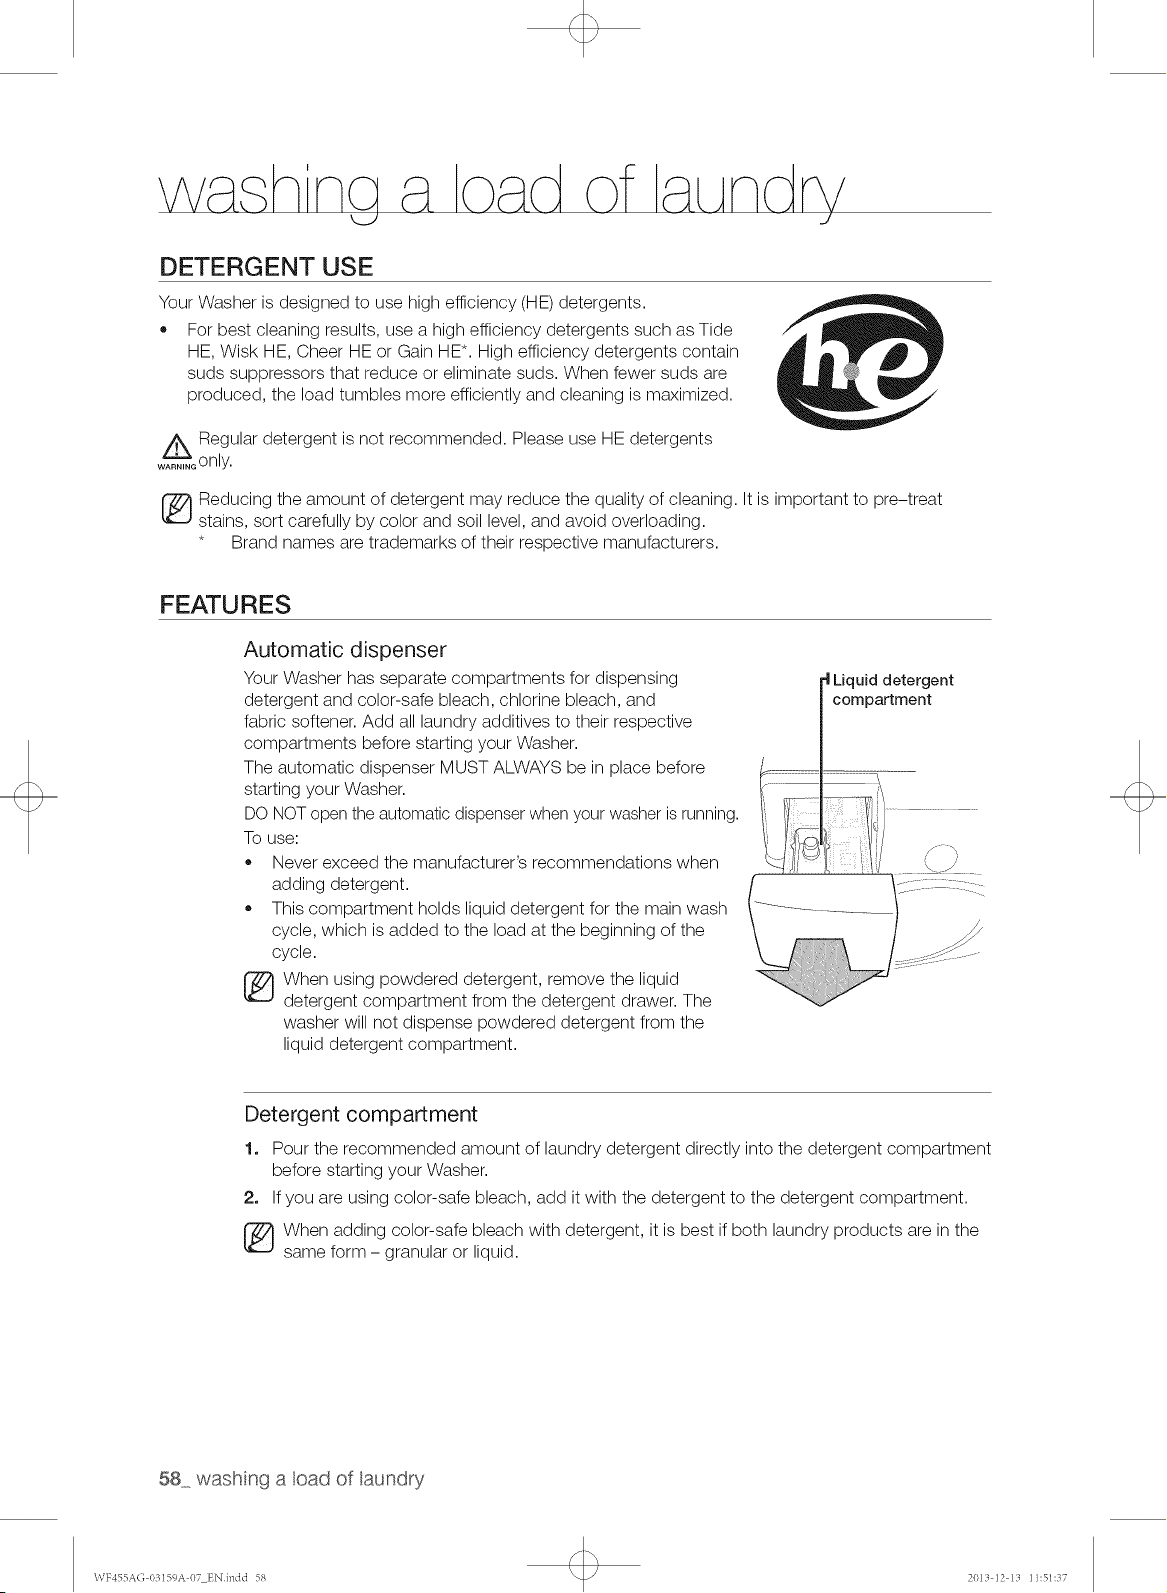
DETERGENT USE
Your Washer is designed to use high efficiency (HE) detergents.
• For best cleaning results, use a high efficiency detergents such as Tide
HE, Wisk HE, Cheer HE or Gain HE*. High efficiency detergents contain
suds suppressors that reduce or eliminate suds. When fewer suds are
produced, the load tumbles more efficiently and cleaning is maximized.
w&GRegular detergent is not recommended. Please use HE detergents
only.
_ educing the amount of detergent may reduce the quality of cleaning. It is important to pre-treat
stains, sort carefully by color and soil level, and avoid overloading.
* Brand names are trademarks of their respective manufacturers.
FEATURES
Automatic dispenser
Your Washer has separate compartments for dispensing
detergent and color-safe bleach, chlorine bleach, and
fabric softener. Add all laundry additives to their respective
compartments before starting your Washer.
The automatic dispenser MUST ALWAYS be in place before
starting your Washer.
DO NOT open the automatic dispenser when your washer is running.
To use:
Never exceed the manufacturer's recommendations when
adding detergent.
This compartment holds liquid detergent for the main wash
cycle, which is added to the load at the beginning of the
cycle.
[_ hen using powdered detergent, remove the liquid
detergent compartment from the detergent drawer. The
washer will not dispense powdered detergent from the
liquid detergent compartment.
detergent
compartment
Detergent compartment
1. Pour the recommended amount of laundry detergent directly into the detergent compartment
before starting your Washer.
2. If you are using color-safe bleach, add it with the detergent to the detergent compartment.
When adding color-safe bleach with detergent, it is best if both laundry products are in the
same form - granular or liquid.
58 washng a oad of aundry
\\TF455A(; 03159A 07 ENindd 58 2013 12 13 11:51:37
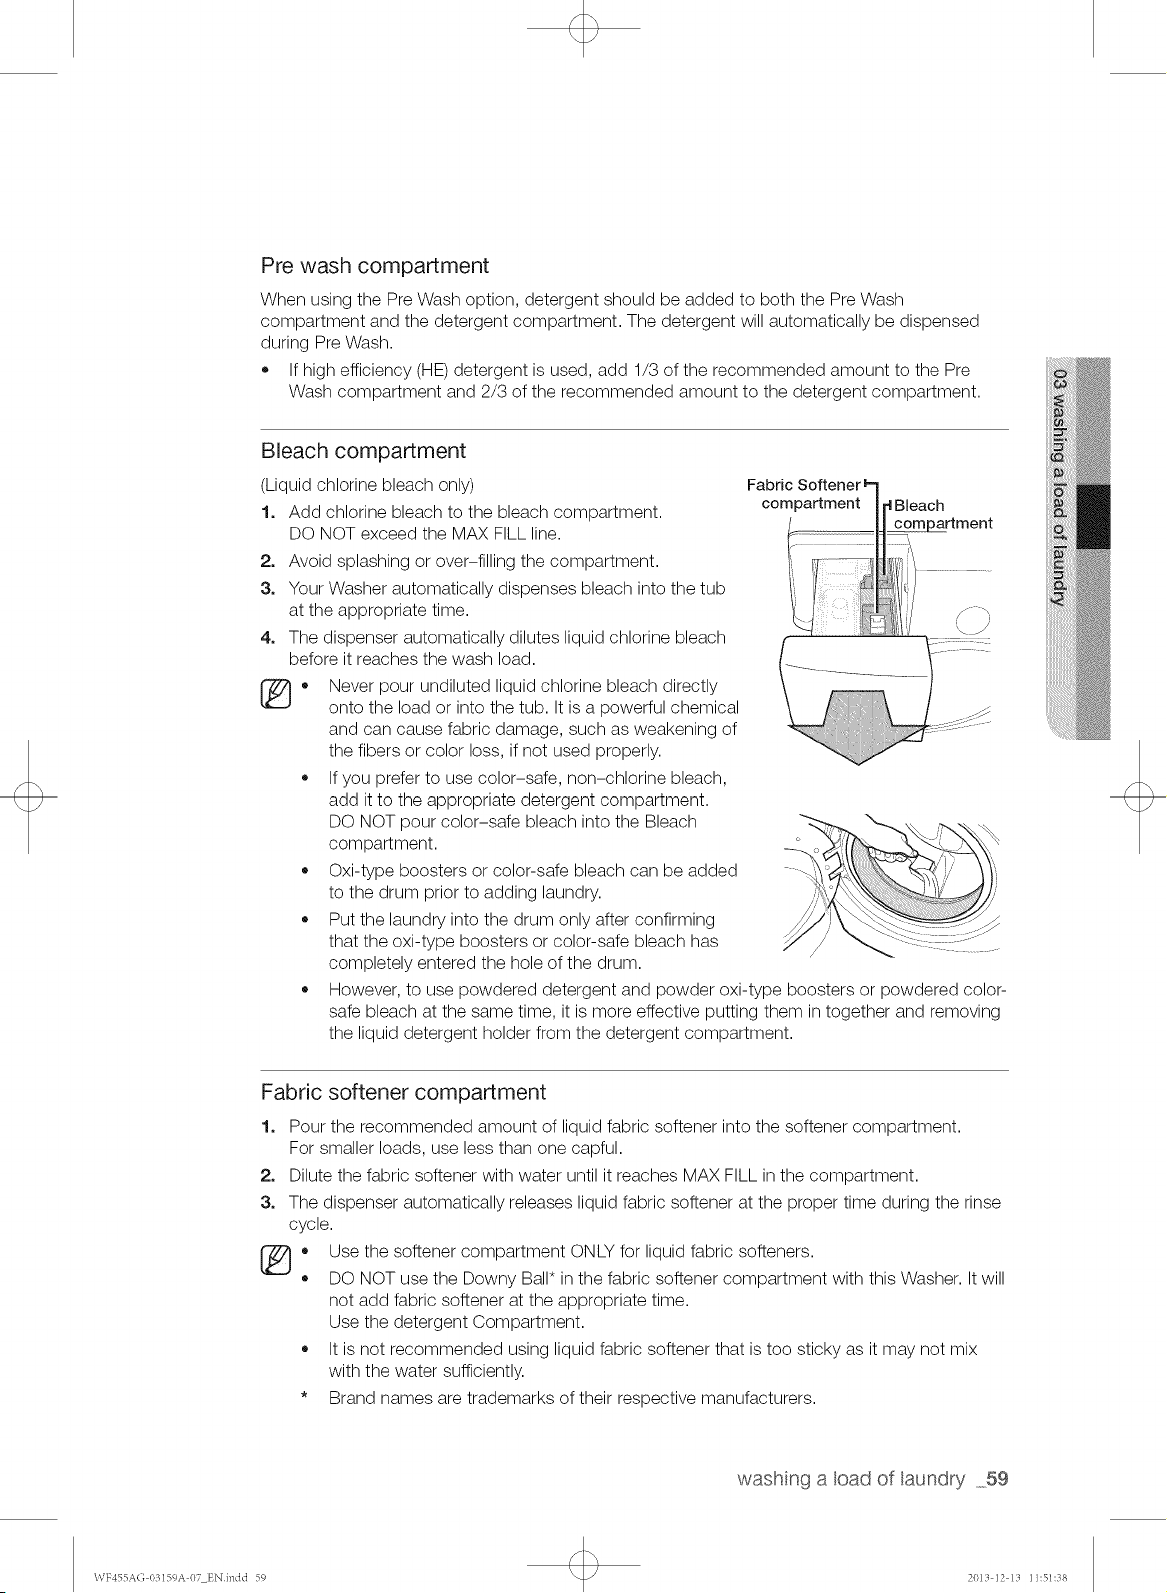
Pre wash compartment
When using the Pre Wash option, detergent should be added to both the Pre Wash
compartment and the detergent compartment. The detergent will automatically be dispensed
during Pre Wash.
• If high efficiency (HE) detergent is used, add 1/3 of the recommended amount to the Pre
Wash compartment and 2/3 of the recommended amount to the detergent compartment.
Bleach compartment
(Liquid chlorine bleach only)
1. Add chlorine bleach to the bleach compartment.
DO NOT exceed the MAX FILL line.
2. Avoid splashing or over-filling the compartment.
3. Your Washer automatically dispenses bleach into the tub
at the appropriate time.
4. The dispenser automatically dilutes liquid chlorine bleach
before it reaches the wash load.
®.
Fabric Softener
compartment |
_rtment
Never pour undiluted liquid chlorine bleach directly
onto the load or into the tub. It is a powerful chemical
and can cause fabric damage, such as weakening of
the fibers or color loss, if not used properly.
If you prefer to use color-safe, non-chlorine bleach,
add it to the appropriate detergent compartment.
DO NOT pour color-safe bleach into the Bleach
compartment.
Oxi-type boosters or color-safe bleach can be added -.
to the drum prior to adding laundry.
Put the laundry into the drum only after confirming
that the oxi-type boosters or color-safe bleach has .................
completely entered the hole of the drum.
However, to use powdered detergent and powder oxi-type boosters or powdered color-
safe bleach at the same time, it is more effective putting them in together and removing
the liquid detergent holder from the detergent compartment.
Fabric softener compartment
1,
2.
3.
®.
o
Pour the recommended amount of liquid fabric softener into the softener compartment.
For smaller loads, use less than one capful.
Dilute the fabric softener with water until it reaches MAX FILL in the compartment.
The dispenser automatically releases liquid fabric softener at the proper time during the rinse
cycle.
Use the softener compartment ONLY for liquid fabric softeners.
DO NOT use the Downy Ball* in the fabric softener compartment with this Washer. It will
not add fabric softener at the appropriate time.
Use the detergent Compartment.
It is not recommended using liquid fabric softener that is too sticky as it may not mix
with the water sufficiently.
* Brand names are trademarks of their respective manufacturers.
wash nga oad of aundry _59
\VF455A(; 03159A 07 ENindd 59 2013 12 13 11:51:38
CLEANING THE EXTERIOR
Turn off the water faucets after finishing the day's washing.
This will shut off the water supply to your Washer and prevent the unlikely possibility of damage from
escaping water. Leave the door open to allow the inside of your Washer to dry out.
Use a soft cloth to wipe up all detergent, bleach or other spills as they occur.
Clean the following as recommended:
Control Panel - Clean with a soft, damp cloth. Do not use abrasive powders or cleaning pads. Do not spray
cleaners directly on the panel.
Cabinet - Clean with soap and water.
CLEANING THE INTERIOR
Clean the interior of your Washer periodically to remove any dirt, soil, odor, mold, mildew, or bacterial
residue that may remain in your Washer as a result of washing clothes.
Failure to follow these instructions may result in unpleasant conditions, including odors and/or permanent
stains on your Washer or laundry.
Hard water deposits may be removed, if needed. Use a cleaner labeled "Washer safe".
60 maintainng your washer
\VY455A(; 03159A 07 ENindd 6(} 2013 12 13 11:51:38
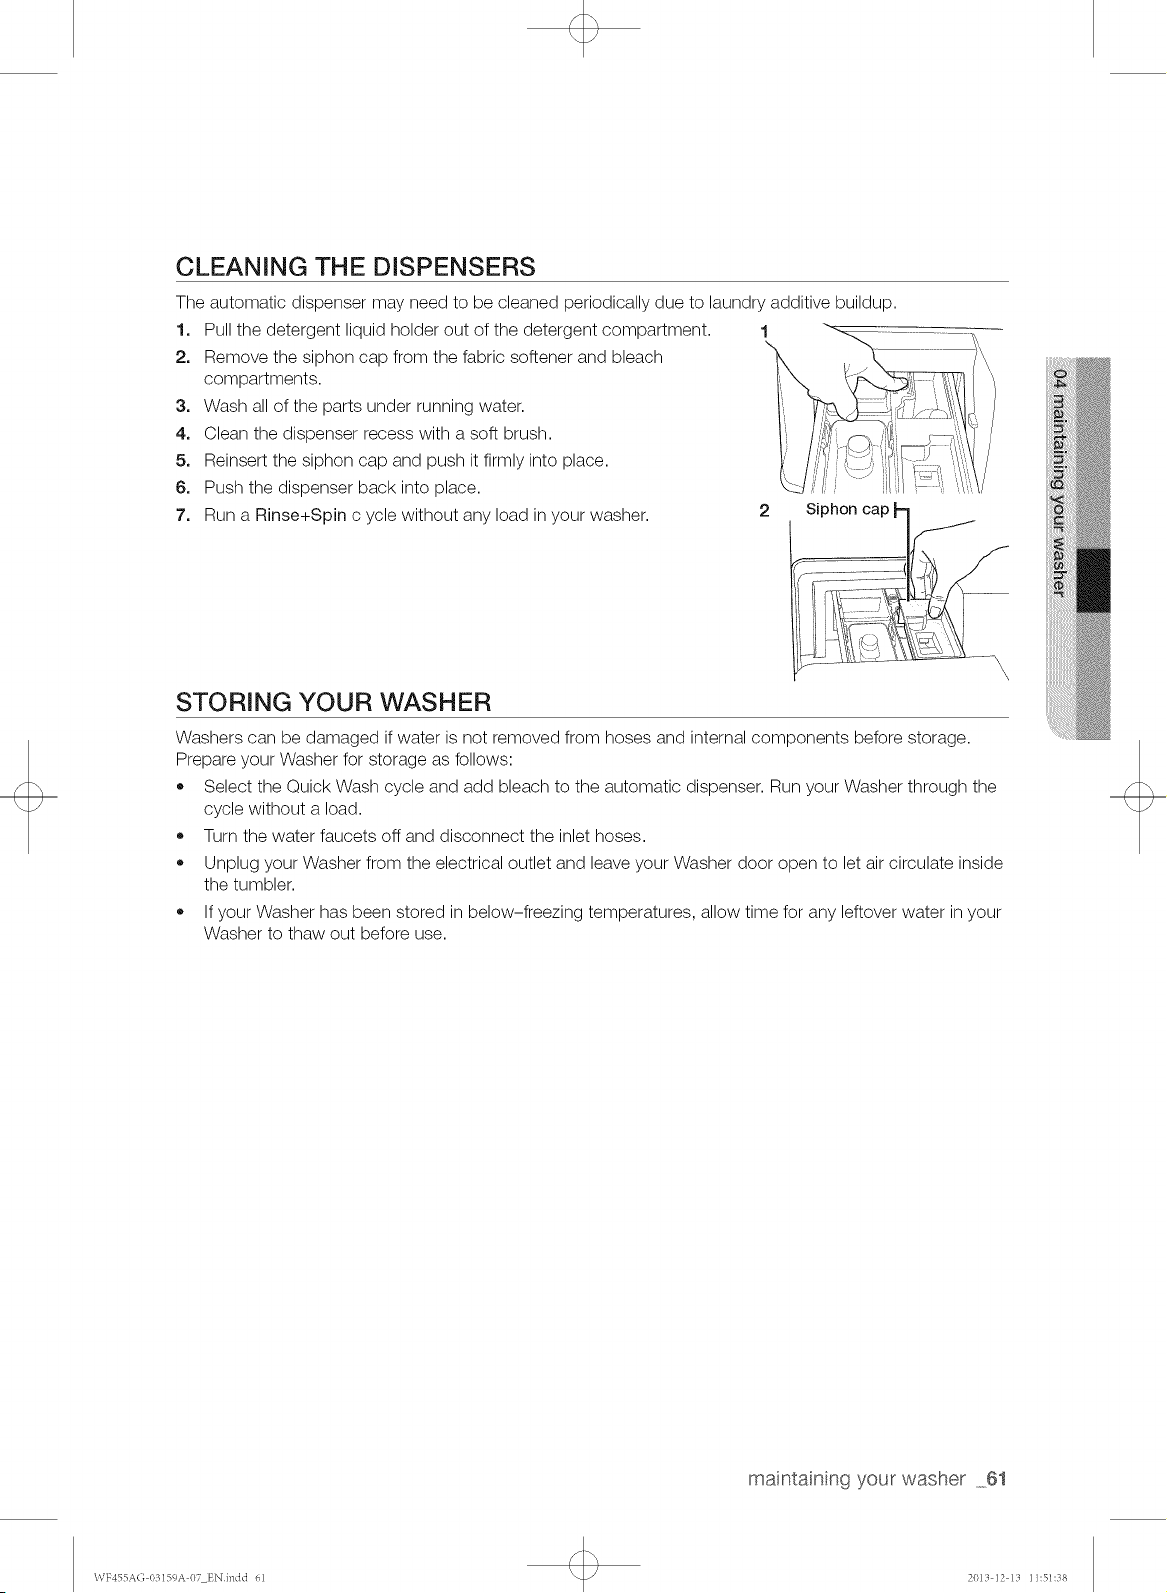
CLEANING THE DISPENSERS
The automatic dispenser may need to be cleaned periodically due to laundry additive buildup.
1. Pull the detergent liquid holder out of the detergent compartment. 1
2. Remove the siphon cap from the fabric softener and bleach
compartments.
3. Wash all of the parts under running water.
4. Clean the dispenser recess with a soft brush.
5. Reinsert the siphon cap and push it firmly into place.
6. Push the dispenser back into place.
7. Run a Rinse+Spin cycle without any load in your washer. 2
STORING YOUR WASHER
Siphon cap
Washers can be damaged if water is not removed from hoses and internal components before storage.
Prepare your Washer for storage as follows:
• Select the Quick Wash cycle and add bleach to the automatic dispenser. Run your Washer through the
cycle without a load.
Turn the water faucets off and disconnect the inlet hoses.
Unplug your Washer from the electrical outlet and leave your Washer door open to let air circulate inside
the tumbler.
If your Washer has been stored in below-freezing temperatures, allow time for any leftover water in your
Washer to thaw out before use.
maintainng your washer 61
WF455A(; 03159A 07 ENindd 61 2013 12 13 11:51:38
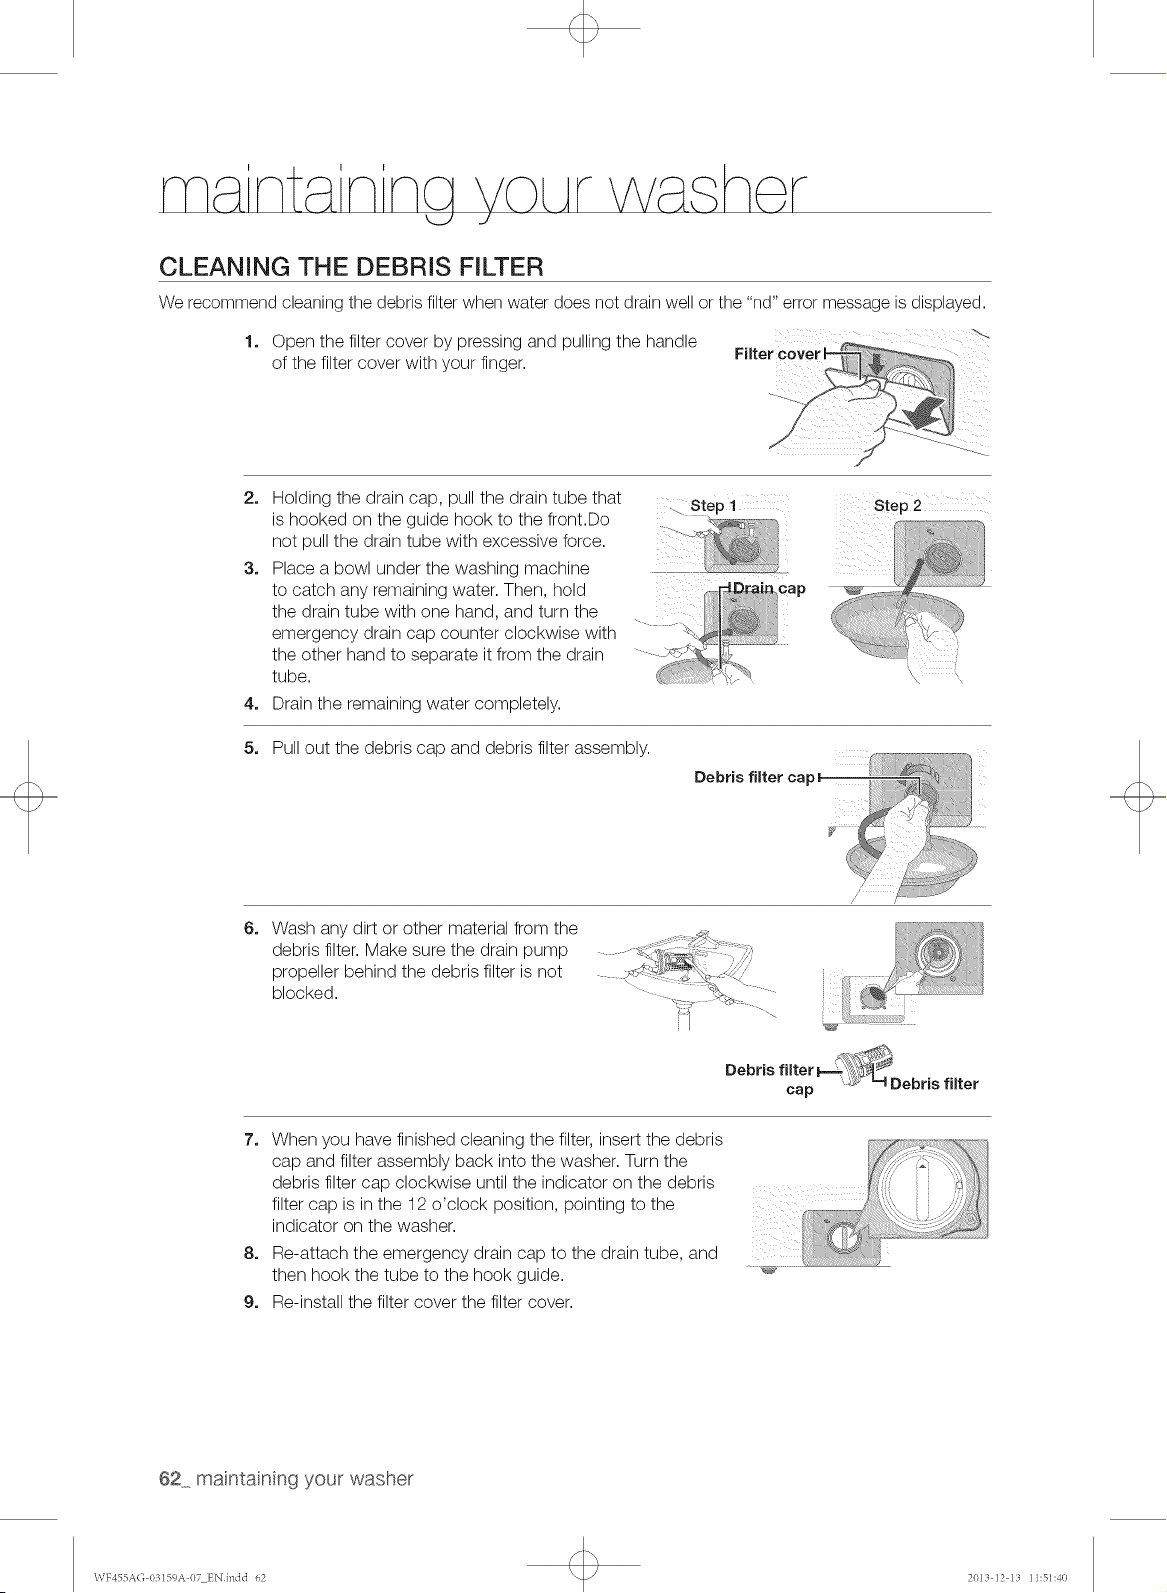
CLEANING THE DEBRIS FILTER
We recommend cleaning the debris filter when water does not drain well or the "nd" error message is displayed.
1. Open the filter cover by pressing and pulling the handle
of the filter cover with your finger.
2. Holding the drain cap, pull the drain tube that
is hooked on the guide hook to the front.Do
not pull the drain tube with excessive force.
3. Place a bowl under the washing machine
to catch any remaining water. Then, hold
the drain tube with one hand, and turn the
emergency drain cap counter clockwise with
the other hand to separate it from the drain
tube.
4. Drain the remaining water completely.
:L Step 1
n,cap
5. Pull out the debris cap and debris filter assembly.
6. Wash any dirt or other material from the
debris filter. Make sure the drain pump
propeller behind the debris filter is not
blocked.
7 h
Debrisf,terc.p, :::!
Debris " " _,_
filter _ ','¢;b_4_
' -':_"t Debr s filter
cap
7. When you have finished cleaning the filter, insert the debris
cap and filter assembly back into the washer. Turn the
debris filter cap clockwise until the indicator on the debris ::/ ,_
filter cap is in the 12 o'clock position, pointing to the
indicator on the washer, i_,,__,_,,,_
8. Re-attach the emergency drain cap to the drain tube, and .
then hook the tube to the hook guide.
9. Re-install the filter cover the filter cover.
62 maintainng your washer
\VF455A(; 03159A 07 ENindd 62 2013 12 13 11:51:40
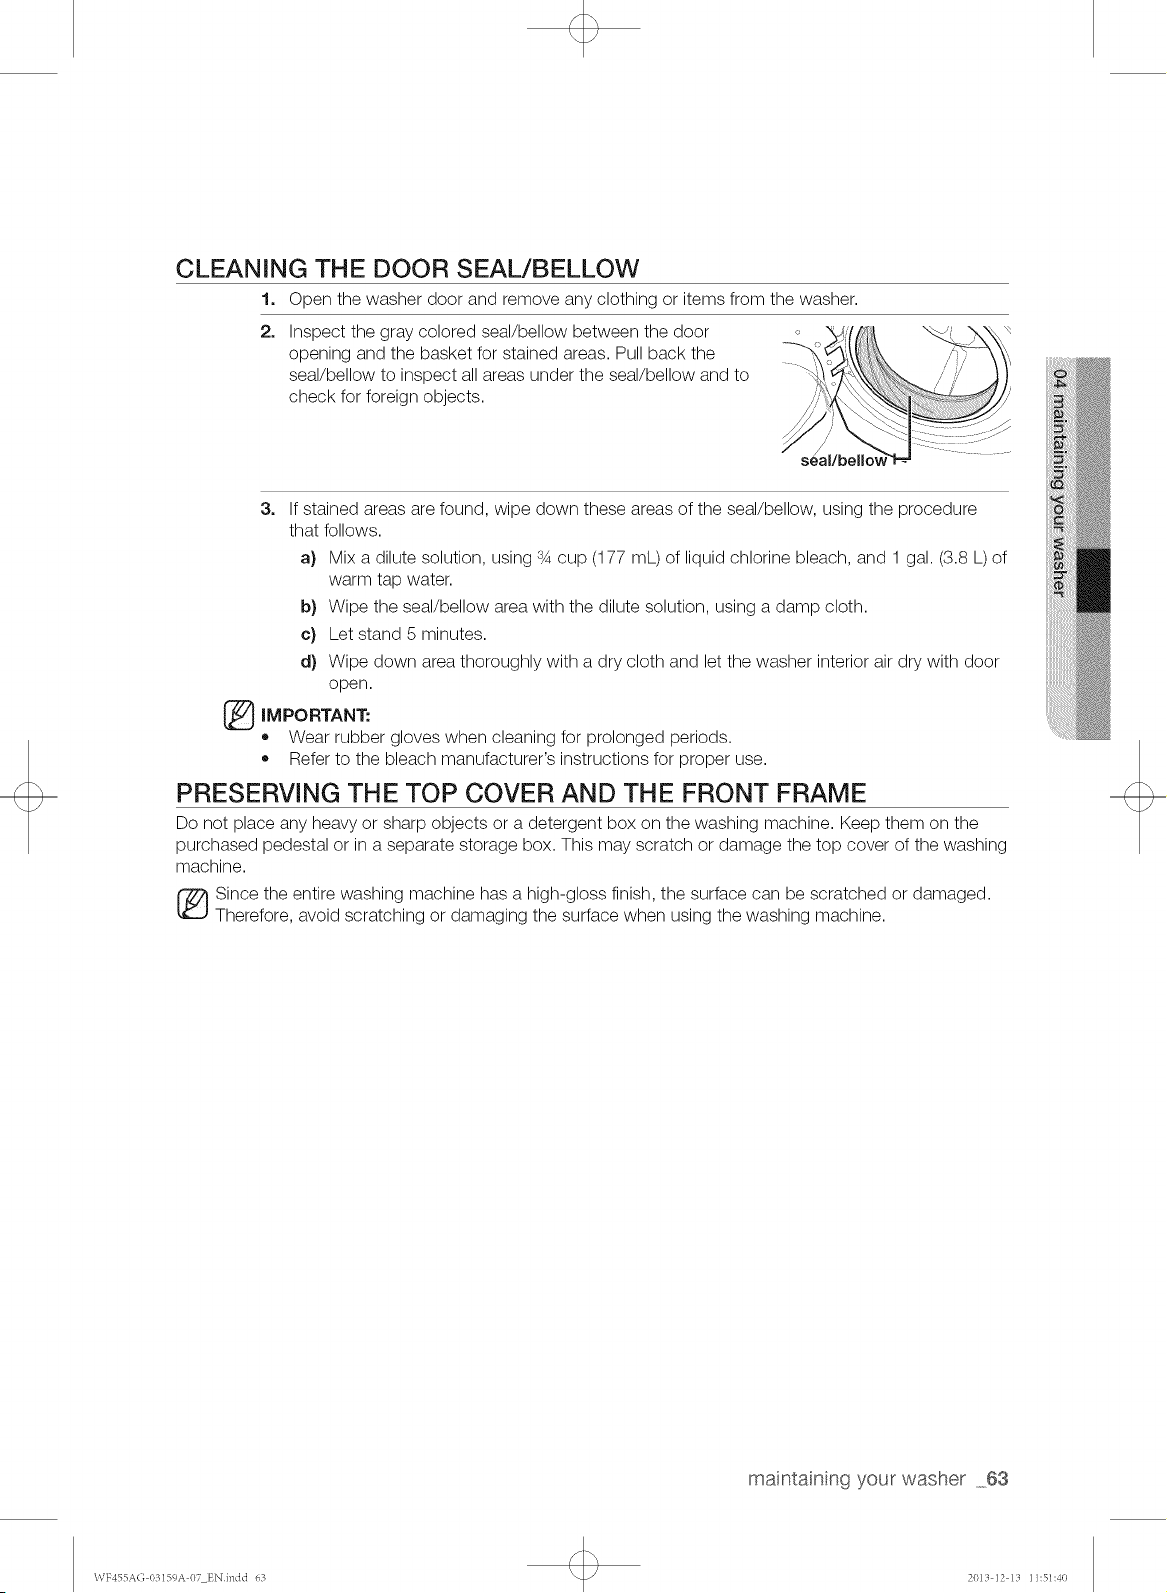
CLEANING THE DOOR SEAL/BELLOW
1. Open the washer door and remove any clothing or items from the washer.
2=
Inspect the gray colored seal/bellow between the door
opening and the basket for stained areas. Pull back the
seal/bellow to inspect all areas under the seal/bellow and to
check for foreign objects.
3. If stained areas are found, wipe down these areas of the seal/bellow, using the procedure
that follows.
a} Mix a dilute solution, using % cup (177 mL) of liquid chlorine bleach, and 1 gal. (3.8 L) of
warm tap water.
b} Wipe the seal/bellow area with the dilute solution, using a damp cloth.
c} Let stand 5 minutes.
d} Wipe down area thoroughly with a dry cloth and let the washer interior air dry with door
open.
_ MPORTANT:
= Wear rubber gloves when cleaning for prolonged periods.
• Refer to the bleach manufacturer's instructions for proper use.
PRESERVING THE TOP COVER AND THE FRONT FRAME
Do not place any heavy or sharp objects or a detergent box on the washing machine. Keep them on the
purchased pedestal or in a separate storage box. This may scratch or damage the top cover of the washing
machine.
_ ince the entire washing machine has a high-gloss finish, the surface can be scratched or damaged.
Therefore, avoid scratching or damaging the surface when using the washing machine.
maintainng your washer 63
\\TF455A(; 03159A 07 ENindd 63 2013 12 13 11:51:40
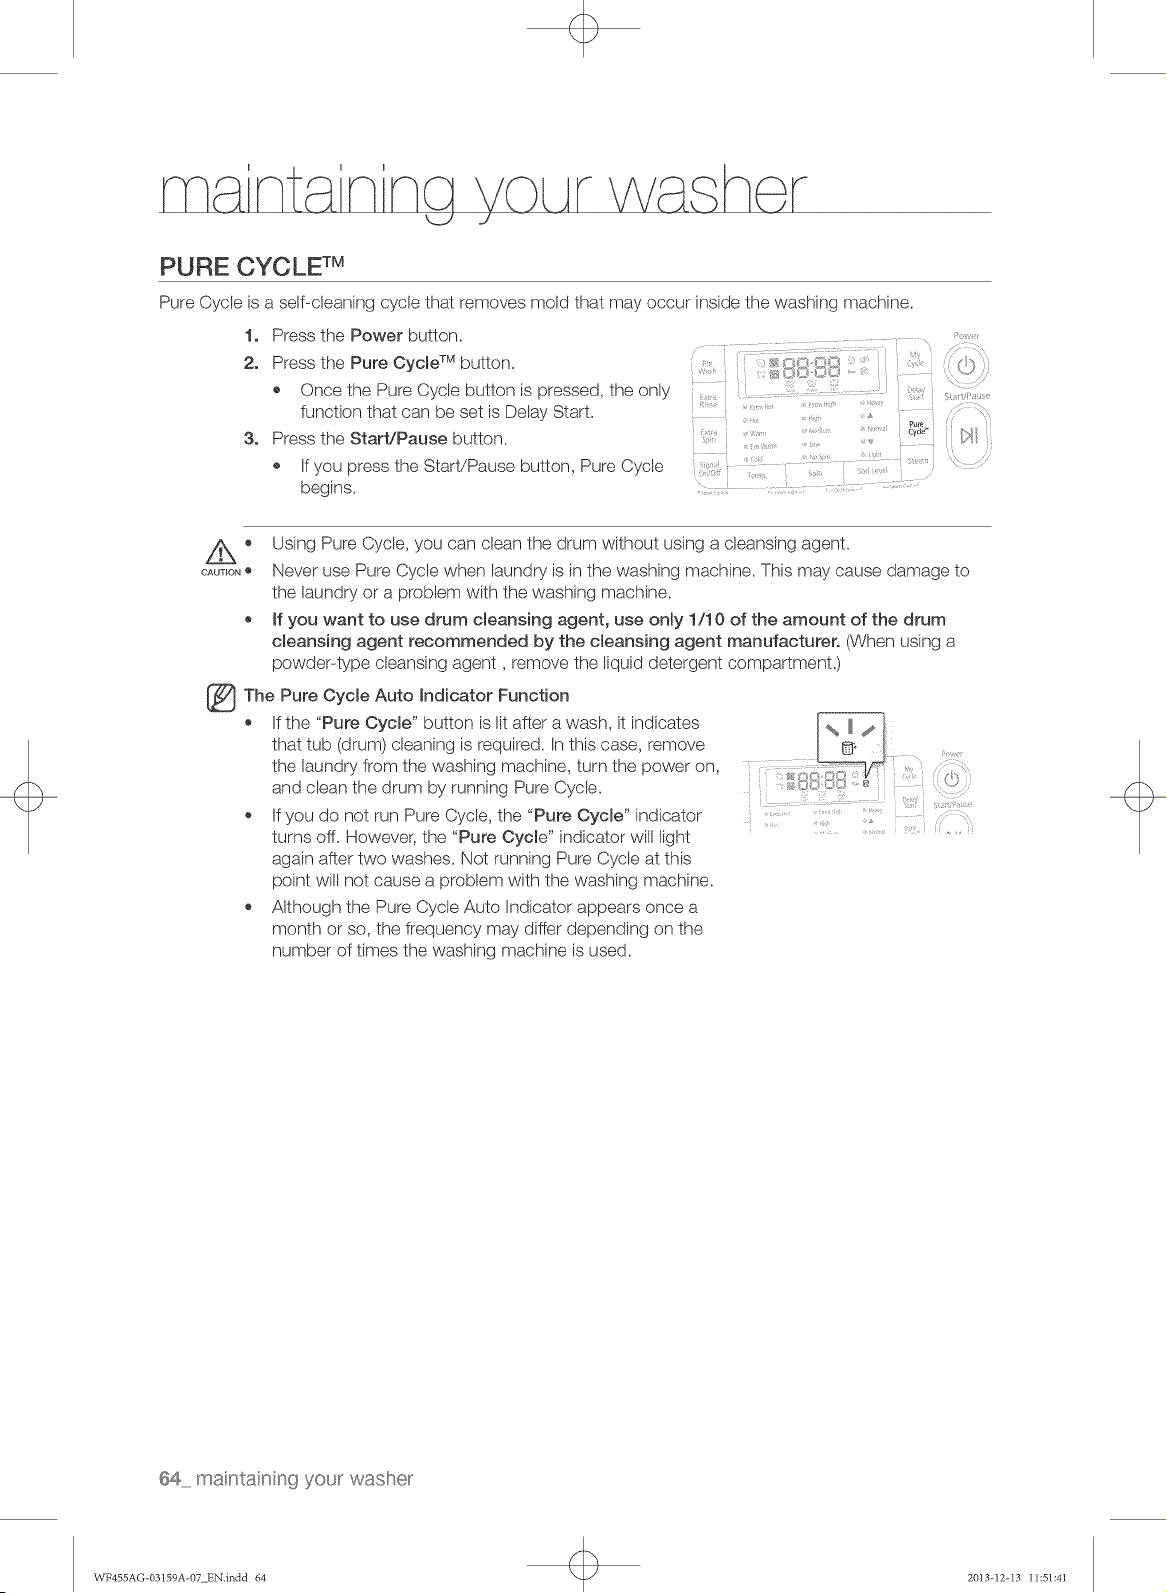
PURE CYCLE rM
Pure Cycle is a self-cleaning cycle that removes mold that may occur inside the washing machine.
1. Press the Power button,
2. Press the Pure Cyome TM button.
. Once the Pure Cycb button is pressed, the only
function that can be set is Delay Start,
3. Press the Start/Pause button,
. If you press the Start/Pause button, Pure Cycle
begins,
Pure
Z_. Using Pure Cycle, you can clean the drum without using a cleansing agent,
CAUTION*Never use Pure Cycle when laundry is in the washing machine, This may cause damage to
the laundry or a problem with the washing machine,
, If you want to use drum cbansing agent, use only 1/10 of the amount of the drum
cleansing agent recommended by the cmeansing agent manufacturer. (When using a
powder-type cleansing agent, remove the liquid detergent compartment,)
The Pure Cycle Auto indicator Function
* If the "Pure Cycle" button is lit after a wash, it indicates
that tub (drum) cleaning is required. In this case, remove
the laundry from the washing machine, turn the power on,
and clean the drum by running Pure Cycle.
. If you do not run Pure Cycle, the "Pure Cycle" indicator
turns off. However, the "Pure Cycle" indicator will light
again after two washes. Not running Pure Cycb at this
point will not cause a problem with the washing machine.
. Although the Pure Cycle Auto Indicator appears once a
month or so, the frequency may' differ depending on the
number of times the washing machine is used.
64, maintain ng your wasl!'er
WF455AG-03159A-07 EN.indd 64 2013-12-I3 11:51:41
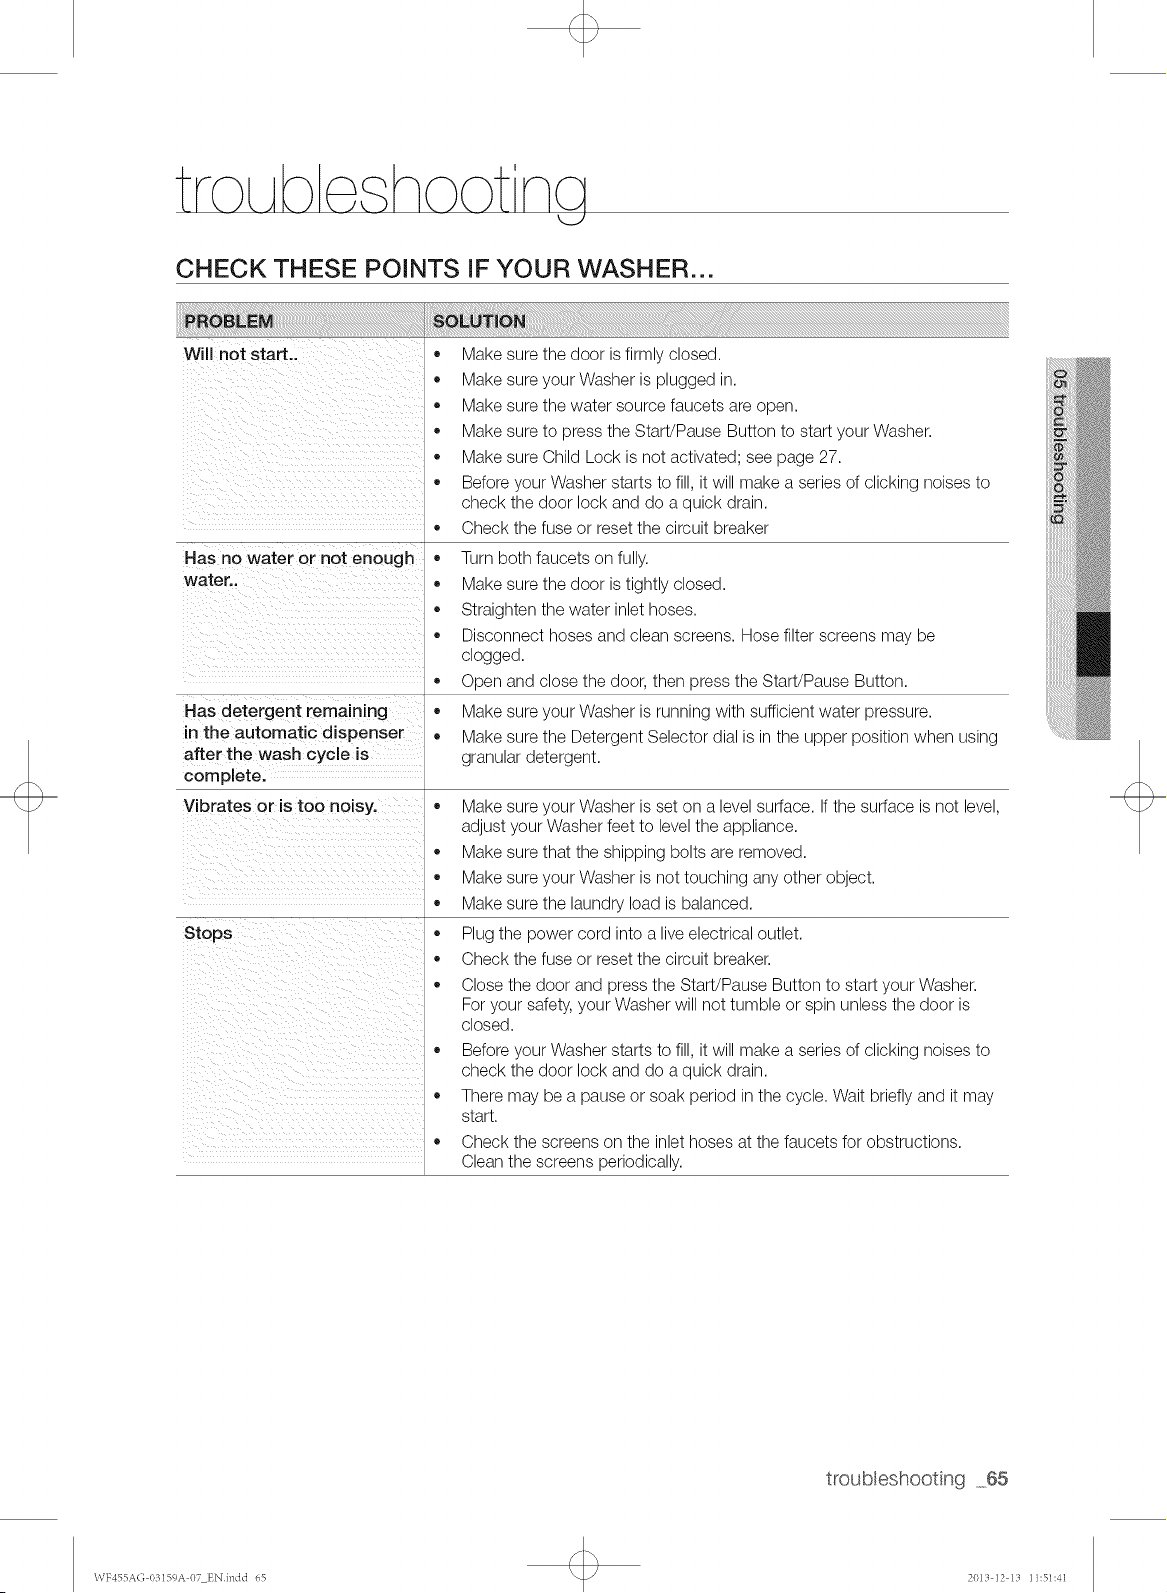
CHECK THESE POINTS iF YOUR WASHER...
Will not start..
Has no water or not enough
water..
Has detergent remaining
in the automatic dispenser
after the wash cycle is
complete.
Vibrates or is too noisy.
Stops
,, Make sure the door is firmly closed.
Make sure your Washer is plugged in.
,, Make sure the water source faucets are open.
Make sure to press the Start/Pause Button to start your Washer.
Make sure Child Lock is not activated; see page 27.
,, Before your Washer starts to fill, it will make a series of clicking noises to
check the door lock and do a quick drain.
,, Check the fuse or reset the circuit breaker
Turn both faucets on fully.
Make sure the door is tightly closed.
,, Straighten the water inlet hoses.
,, Disconnect hoses and clean screens. Hose filter screens may be
clogged.
Open and close the door, then press the Start/Pause Button.
Make sure your Washer is running with sufficient water pressure.
Make sure the Detergent Selector dial is in the upper position when using
granular detergent.
Make sure your Washer is set on a level surface. If the surface is not level,
adjust your Washer feet to level the appliance.
Make sure that the shipping bolts are removed.
Make sure your Washer is not touching any other object.
Make sure the laundry load is balanced.
Plug the power cord into a live electrical outlet.
Check the fuse or reset the circuit breaker.
Close the door and press the Start/Pause Button to start your Washer.
For your safety, your Washer will not tumble or spin unless the door is
closed.
,, Before your Washer starts to fill, it will make a series of clicking noises to
check the door lock and do a quick drain.
There may be a pause or soak period in the cycle. Wait briefly and it may
start.
Check the screens on the inlet hoses at the faucets for obstructions.
Clean the screens periodically.
troubeshooting 65
WF455A(; 03159A 07 ENindd 65 2013 12 13 11:51:4]
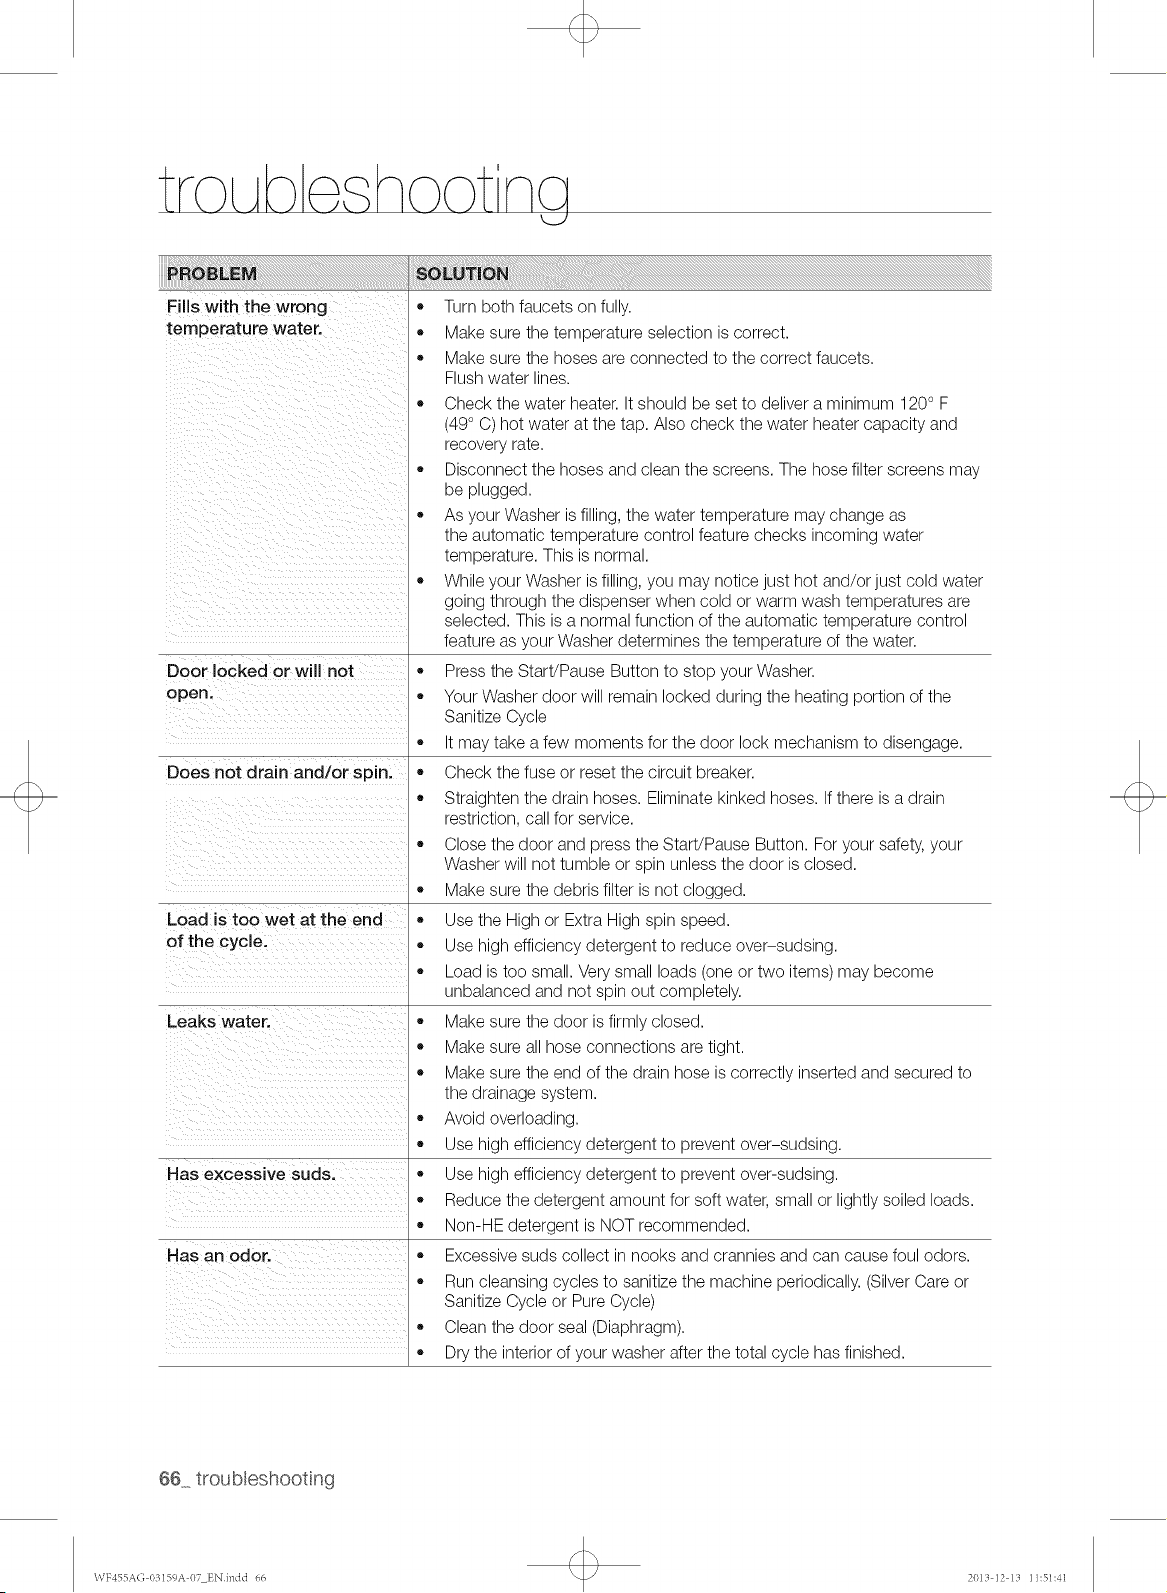
troLAbe hootncj
Fills with the wrong
temperature water.
Door locked or will not
open.
Does not drain and/or s pin.
Load is too wet at the end
of the cycle.
Leaks water.
Has excessive suds.
Has an odor.
Turn both faucets on fully.
Make sure the temperature selection is correct.
_, Make sure the hoses are connected to the correct faucets.
Flush water lines.
Check the water heater. It should be set to deliver a minimum 120° F
(49° C) hot water at the tap. Also check the water heater capacity and
recovery rate.
_, Disconnect the hoses and clean the screens. The hose filter screens may
be plugged.
_, As your Washer is filling, the water temperature may change as
the automatic temperature control feature checks incoming water
temperature. This is normal.
While your Washer is filling, you may notice just hot and/or just cold water
going through the dispenser when cold or warm wash temperatures are
selected. This is a normal function of the automatic temperature control
feature as your Washer determines the temperature of the water.
Press the Start/Pause Button to stop your Washer.
Your Washer door will remain locked during the heating portion of the
Sanitize Cycle
_, It may take a few moments for the door lock mechanism to disengage.
_, Check the fuse or reset the circuit breaker.
Straighten the drain hoses. Eliminate kinked hoses. If there is a drain
restriction, call for service.
Close the door and press the Start/Pause Button. For your safety, your
Washer will not tumble or spin unless the door is closed.
_, Make sure the debris filter is not clogged.
Use the High or Extra High spin speed.
_, Use high efficiency detergent to reduce over-sudsing.
_, Load is too small. Very small loads (one or two items) may become
unbalanced and not spin out completely.
Make sure the door is firmly closed.
_, Make sure all hose connections are tight.
Make sure the end of the drain hose is correctly inserted and secured to
the drainage system.
Avoid overloading.
Use high efficiency detergent to prevent over-sudsing.
Use high efficiency detergent to prevent over-sudsing.
_, Reduce the detergent amount for soft water, small or lightly soiled loads.
Non-HE detergent is NOT recommended.
_, Excessive suds collect in nooks and crannies and can cause foul odors.
Run cleansing cycles to sanitize the machine periodically. (Silver Care or
Sanitize Cycle or Pure Cycle)
Clean the door seal (Diaphragm).
Dry the interior of your washer after the total cycle has finished.
66 troubleshooting
WF455AG 03159A 07 ENindd t56 2013 12 13 11:51:4]
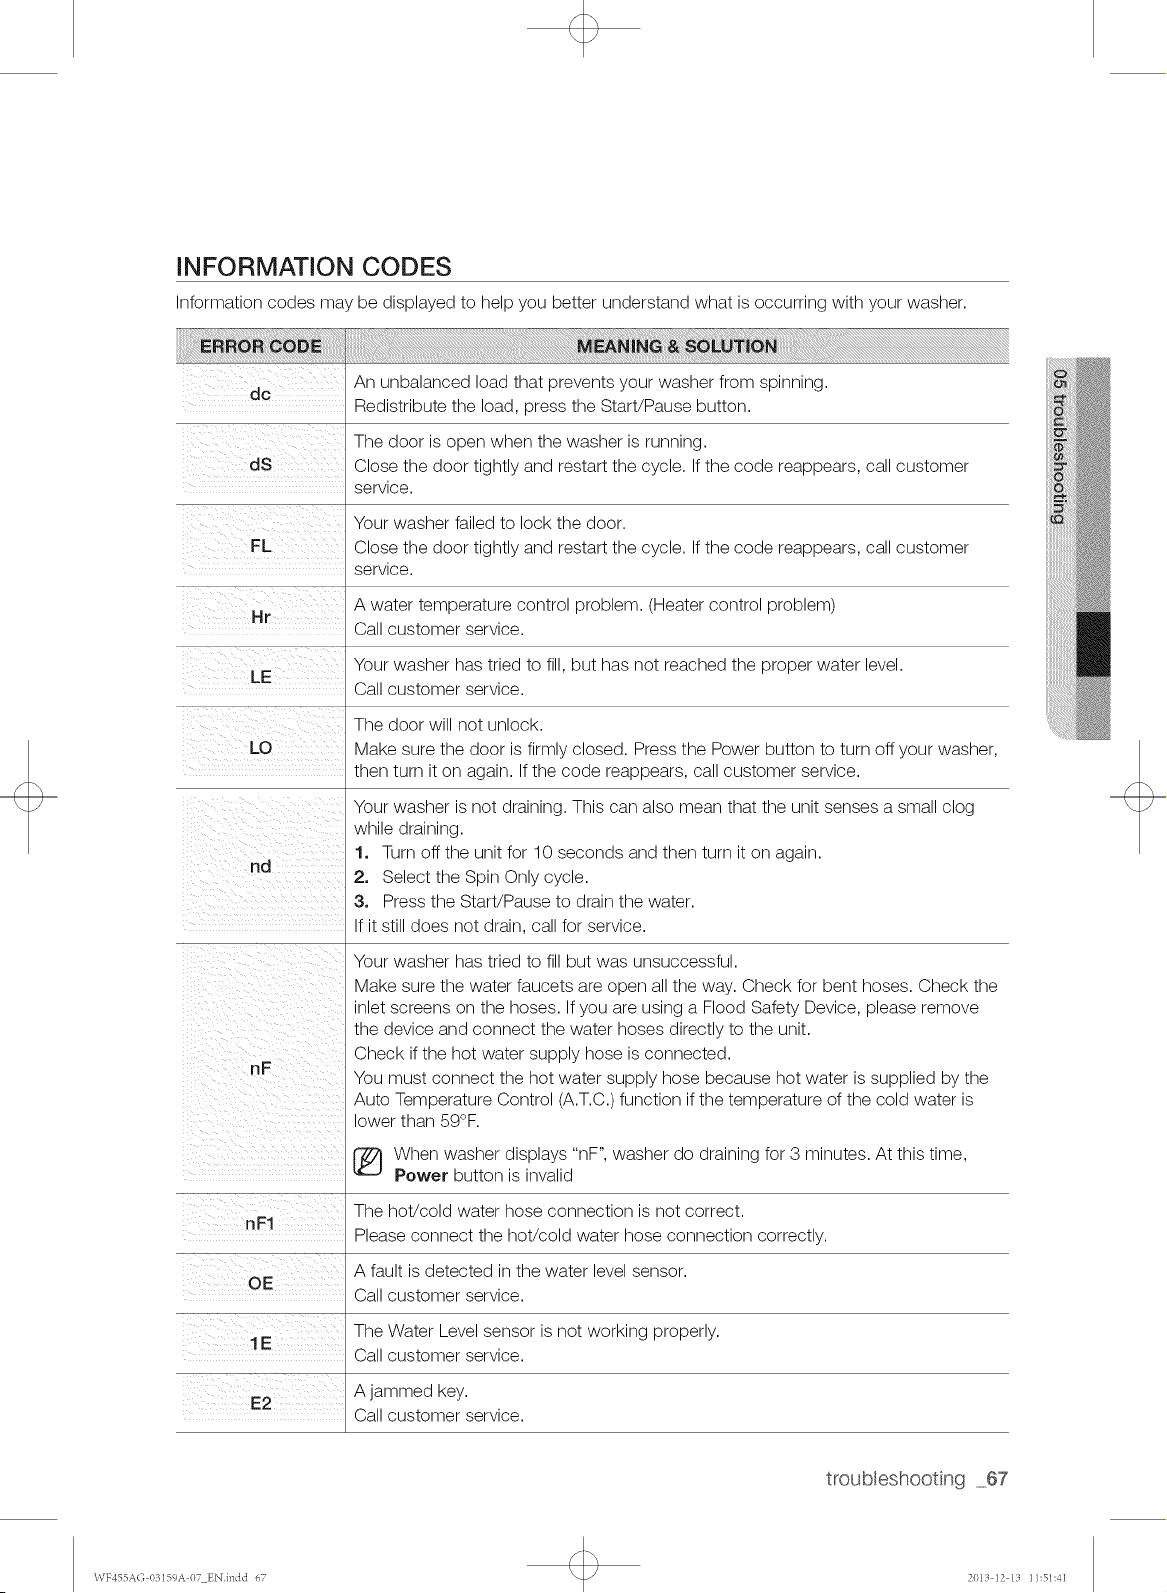
INFORMATION CODES
Information codes may be displayed to help you better understand what is occurring with your washer.
An unbalanced load that prevents your washer from spinning.
dc
Redistribute the load, press the Start/Pause button.
The door is open when the washer is running.
dS Close the door tightly and restart the cycle. If the code reappears, call customer
service.
Your washer failed to lock the door.
FL Close the door tightly and restart the cycle. If the code reappears, call customer
service.
A water temperature control problem. (Heater control problem)
Hr
Call customer service.
Your washer has tried to fill, but has not reached the proper water level.
LE
Call customer service.
The door will not unlock.
LO Make sure the door is firmly closed. Press the Power button to turn off your washer,
then turn it on again. If the code reappears, call customer service.
nd
nF
Your washer is not draining. This can also mean that the unit senses a small clog
while draining.
1. Turn off the unit for 10 seconds and then turn it on again.
2, Select the Spin Only cycle.
3, Press the Start/Pause to drain the water.
If it still does not drain, call for service.
Your washer has tried to fill but was unsuccessful.
Make sure the water faucets are open all the way. Check for bent hoses. Check the
inlet screens on the hoses. If you are using a Flood Safety Device, please remove
the device and connect the water hoses directly to the unit.
Check if the hot water supply hose is connected.
You must connect the hot water supply hose because hot water is supplied by the
Auto Temperature Control (A.T.C.) function if the temperature of the cold water is
lower than 59°F.
When washer displays "nF", washer do draining for 3 minutes. At this time,
Power button is invalid
The hot/cold water hose connection is not correct.
nF1
Please connect the hot/cold water hose connection correctly.
A fault is detected in the water level sensor.
OE
Call customer service.
The Water Level sensor is not working properly.
1E
Call customer service.
A jammed key.
E2
Call customer service.
troubeshooting 67
WF455A(', 03159A 07 ENindd 67 2013 12 13 11:51:41
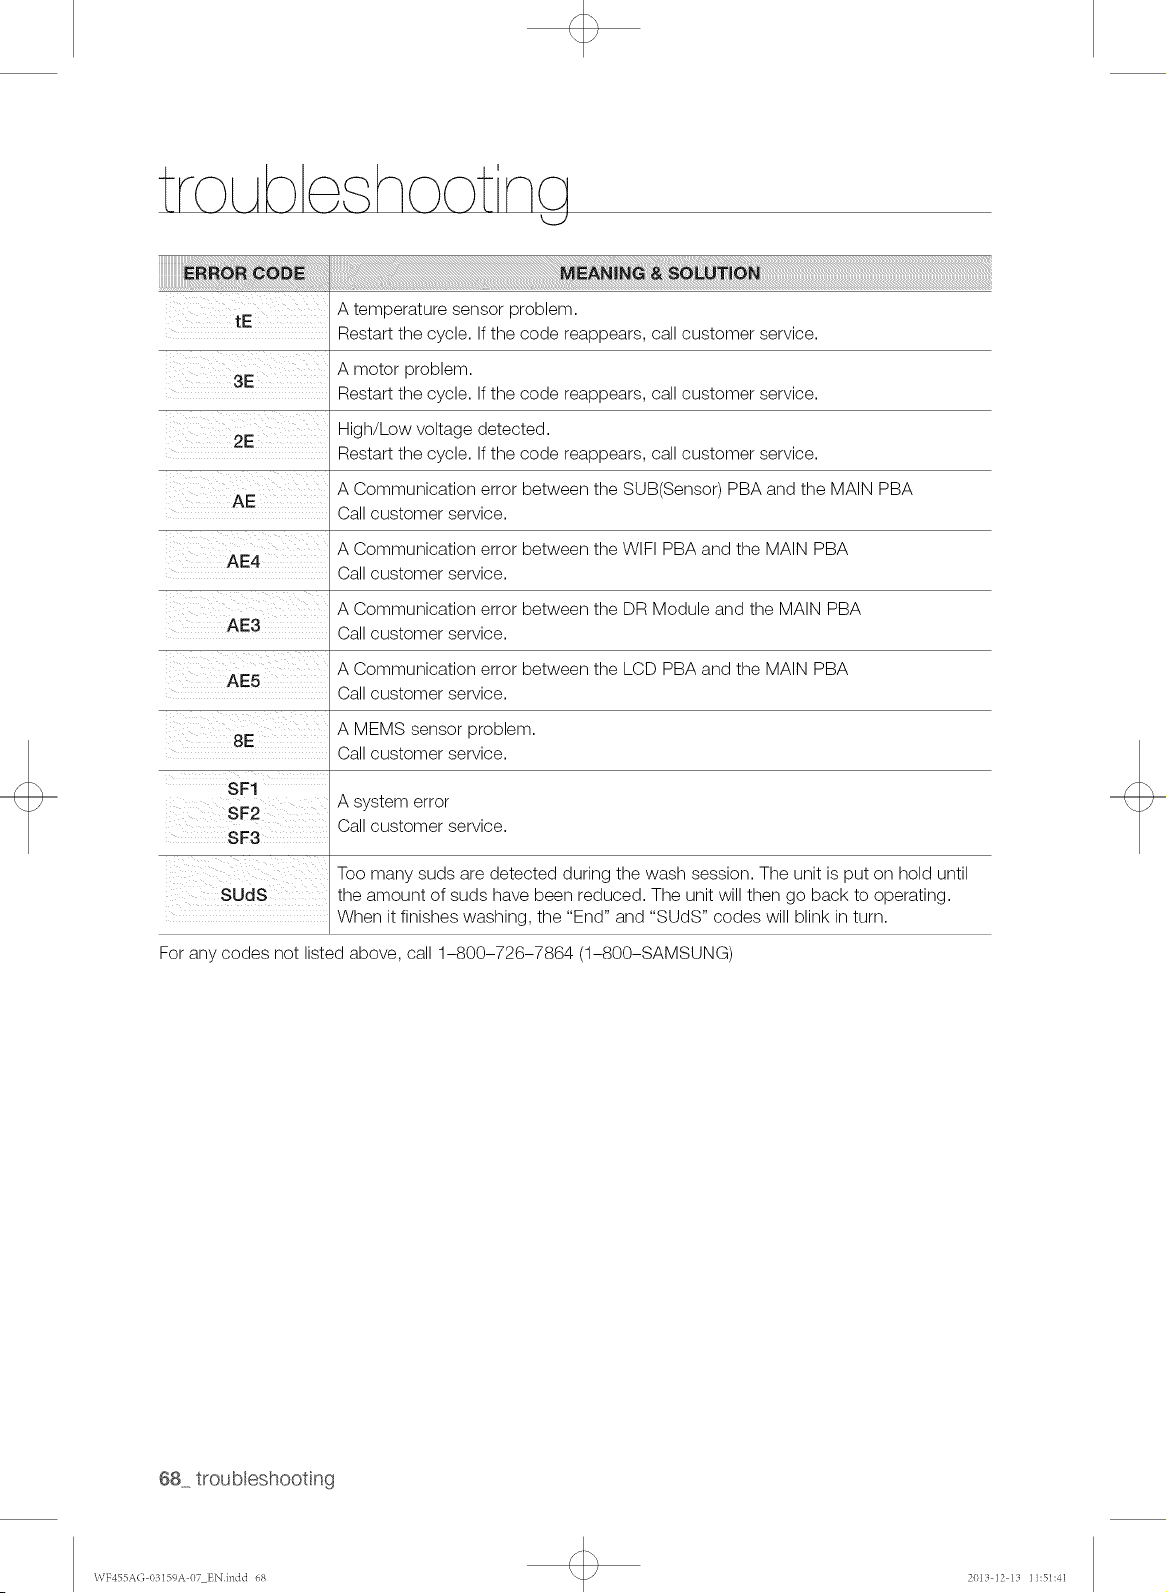
troLAbe hootncj
A temperature sensor problem.
tE
Restart the cycle. If the code reappears, call customer service.
A motor problem.
3E
Restart the cycle. If the code reappears, call customer service.
High/Low voltage detected.
2E
Restart the cycle. If the code reappears, call customer service.
A Communication error between the SUB(Senso0 PBA and the MAIN PBA
AE
Call customer service.
A Communication error between the WIFI PBA and the MAIN PBA
AE4
Call customer service.
A Communication error between the DR Module and the MAIN PBA
AE3 Call customer service.
A Communication error between the LCD PBA and the MAIN PBA
AE5
Call customer service.
A MEMS sensor problem.
8E
Call customer service.
SF1
A system error
SF2
Call customer service.
SF3
Too many suds are detected during the wash session. The unit is put on hold until
SUdS the amount of suds have been reduced. The unit will then go back to operating.
When it finishes washing, the "End" and "SUDS" codes will blink in turn.
For any codes not listed above, call 1-800-726-7864 (1-800-SAMSUNG)
68 troubleshooting
W]z455AG 03159A 07 ENindd t58 2013 12 13 11:51:4]
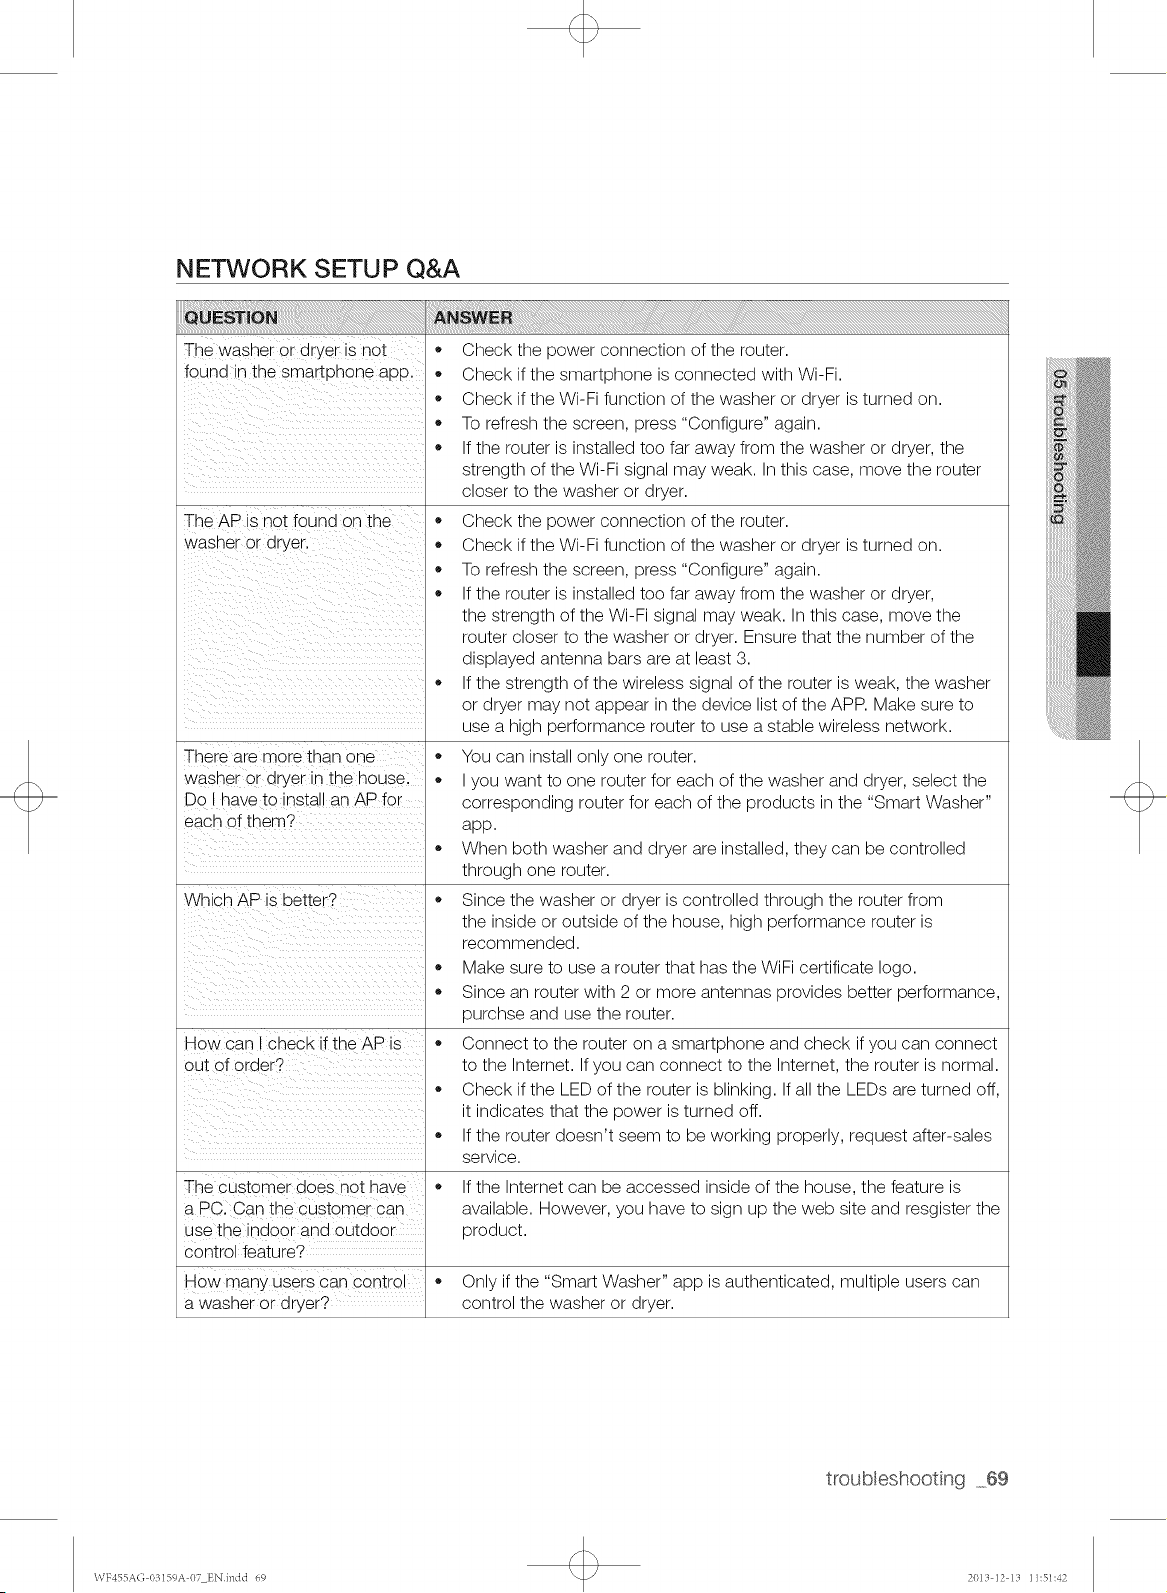
NETWORK SETUP Q&A
THe washer 0r dryei is not
found in the smartphone appl
i_ _ _ii_ iii ii _iiii_i_i_i_i_i_i_i_i_i_i_i_
i i i
i i _ iiiiiiiiiiiiiiiiiii
The AP is not found on the
Washer or dryerl
i_ _ _ii_ iii ii _iiii_i_i_i_i_i_i_i_i_i_i_i_
There are more than one
washer or dryer in the house.
Do I have to install an AP for
each of them?
Which AP is better?
How can check f the AP is
out of order?
The customer does not nave
a PC. Can the customer can
use the indoor and outaoor
control feature?
How many users can contro
a wasner or aryer?
Check the power connection of the router.
Check if the smartphone is connected with Wi-Fi.
Check if the Wi-Fi function of the washer or dryer is turned on.
To refresh the screen, press "Configure" again.
If the router is installed too far away from the washer or dryer, the
strength of the Wi-Fi signal may weak. In this case, move the router
closer to the washer or dryer.
Check the power connection of the router.
Check if the Wi-Fi function of the washer or dryer is turned on.
To refresh the screen, press "Configure" again.
If the router is installed too far away from the washer or dryer,
the strength of the Wi-Fi signal may weak. In this case, move the
router closer to the washer or dryer. Ensure that the number of the
displayed antenna bars are at least 3.
If the strength of the wireless signal of the router is weak, the washer
or dryer may not appear in the device list of the APP. Make sure to
use a high performance router to use a stable wireless network.
You can install only one router.
I you want to one router for each of the washer and dryer, select the
corresponding router for each of the products in the "Smart Washer"
app.
When both washer and dryer are installed, they can be controlled
through one router.
Since the washer or dryer is controlled through the router from
the inside or outside of the house, high performance router is
recommended.
Make sure to use a router that has the WiFi certificate logo.
Since an router with 2 or more antennas provides better performance,
purchse and use the router.
Connect to the router on a smartphone and check if you can connect
to the Internet. If you can connect to the Internet, the router is normal.
Check if the LED of the router is blinking. If all the LEDs are turned off,
it indicates that the power is turned off.
If the router doesn't seem to be working properly, request after-sales
service.
If the Internet can be accessed inside of the house, the feature is
available. However, you have to sign up the web site and resgister the
product.
Only if the "Smart Washer" app is authenticated, multiple users can
control the washer or dryer.
troubeshooting 69
\VF455A(; 03159A 07 ENindd 69 2013 12 13 11:51:42
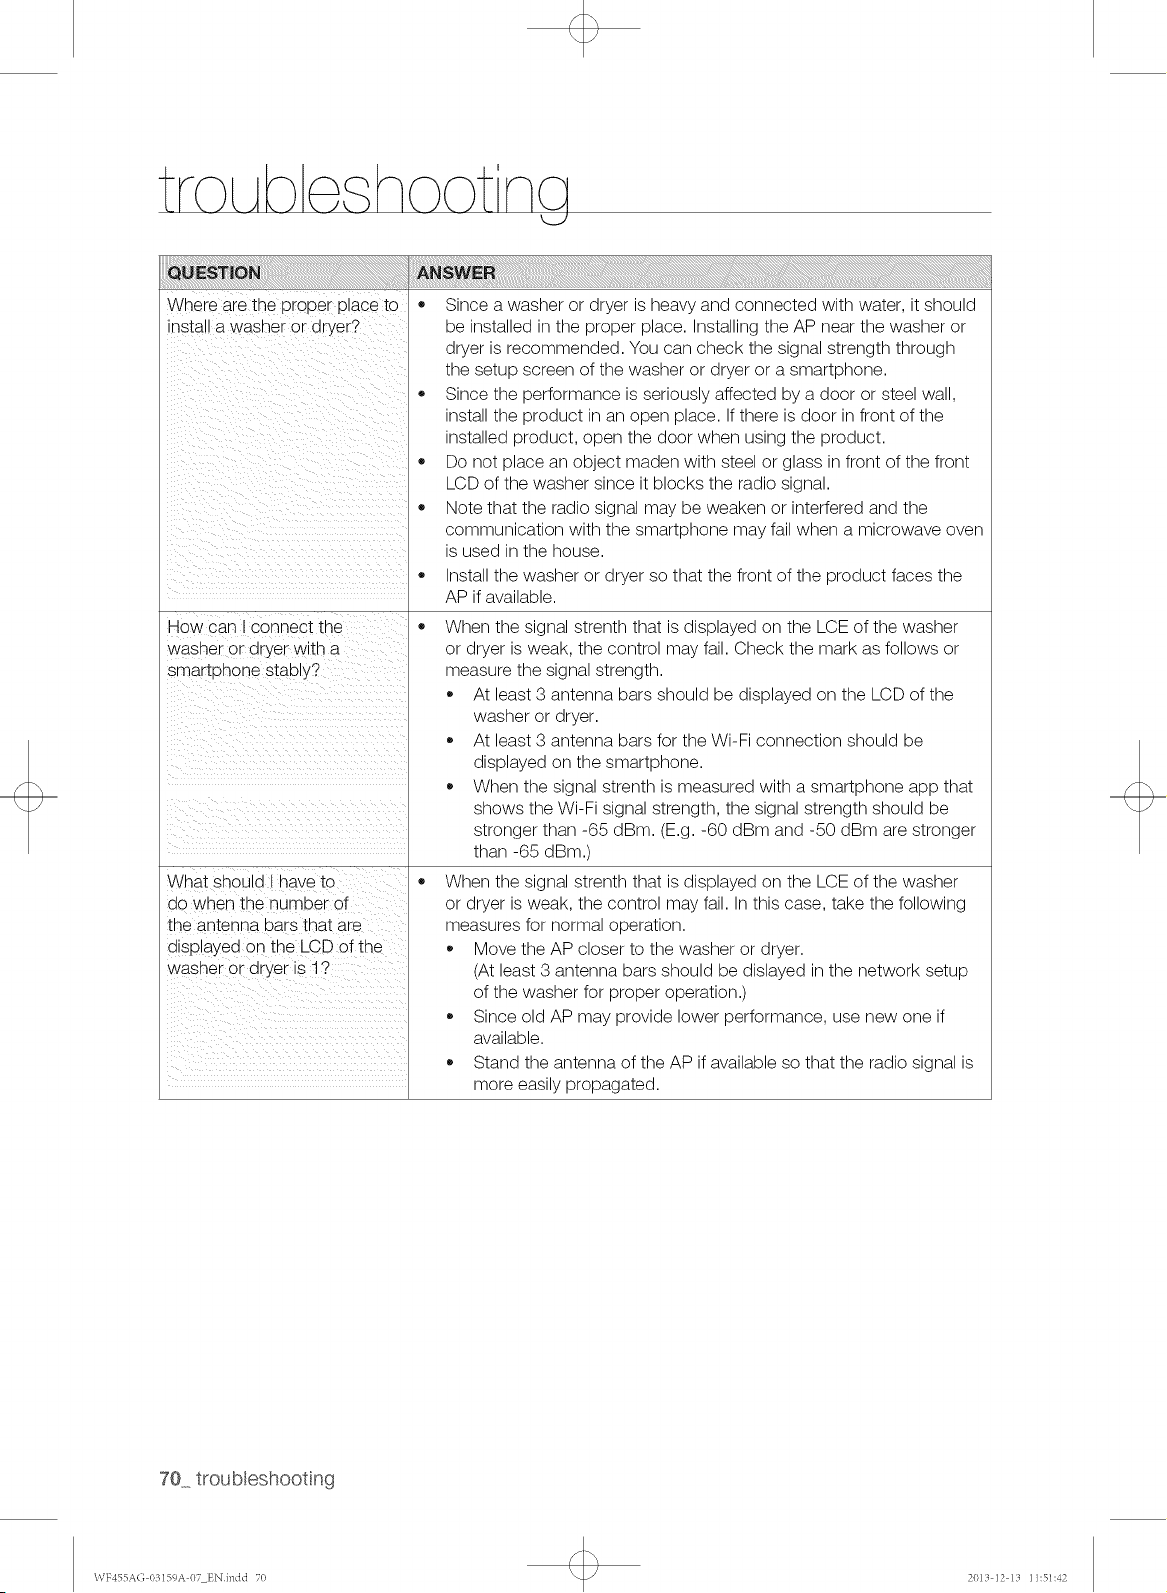
troLAbe hootncj
Where are the proper place to
install a washer or dryer?
How can I connect the
washer or dryer with a
smartphone stably?
Since a washer or dryer is heavy and connected with water, it should
be installed in the proper place. Installing the AP near the washer or
dryer is recommended. You can check the signal strength through
the setup screen of the washer or dryer or a smartphone.
Since the performance is seriously affected by a door or steel wall,
install the product in an open place. If there is door in front of the
installed product, open the door when using the product.
Do not place an object maden with steel or glass in front of the front
LCD of the washer since it blocks the radio signal.
Note that the radio signal may be weaken or interfered and the
communication with the smartphone may fail when a microwave oven
is used in the house.
Install the washer or dryer so that the front of the product faces the
AP if available.
When the signal strenth that is displayed on the LCE of the washer
or dryer is weak, the control may fail. Check the mark as follows or
measure the signal strength.
At least 3 antenna bars should be displayed on the LCD of the
washer or dryer.
At least 3 antenna bars for the Wi-Fi connection should be
displayed on the smartphone.
When the signal strenth is measured with a smartphone app that
shows the Wi-Fi signal strength, the signal strength should be
stronger than -65 dBm. (E.g. -60 dBm and -50 dBm are stronger
than -65 dBm.)
What should I have to
do when the number of
the antenna bars that are
displayed on the LCD of the
washer or dryer is 1?
When the signal strenth that is displayed on the LCE of the washer
or dryer is weak, the control may fail. In this case, take the following
measures for normal operation.
Move the AP closer to the washer or dryer.
(At least 3 antenna bars should be dislayed in the network setup
of the washer for proper operation.)
Since old AP may provide lower performance, use new one if
available.
Stand the antenna of the AP if available so that the radio signal is
more easily propagated.
70 troubleshooting
\\TF455A(; 03159A 07 ENindd 70 2013 12 13 11:51:42
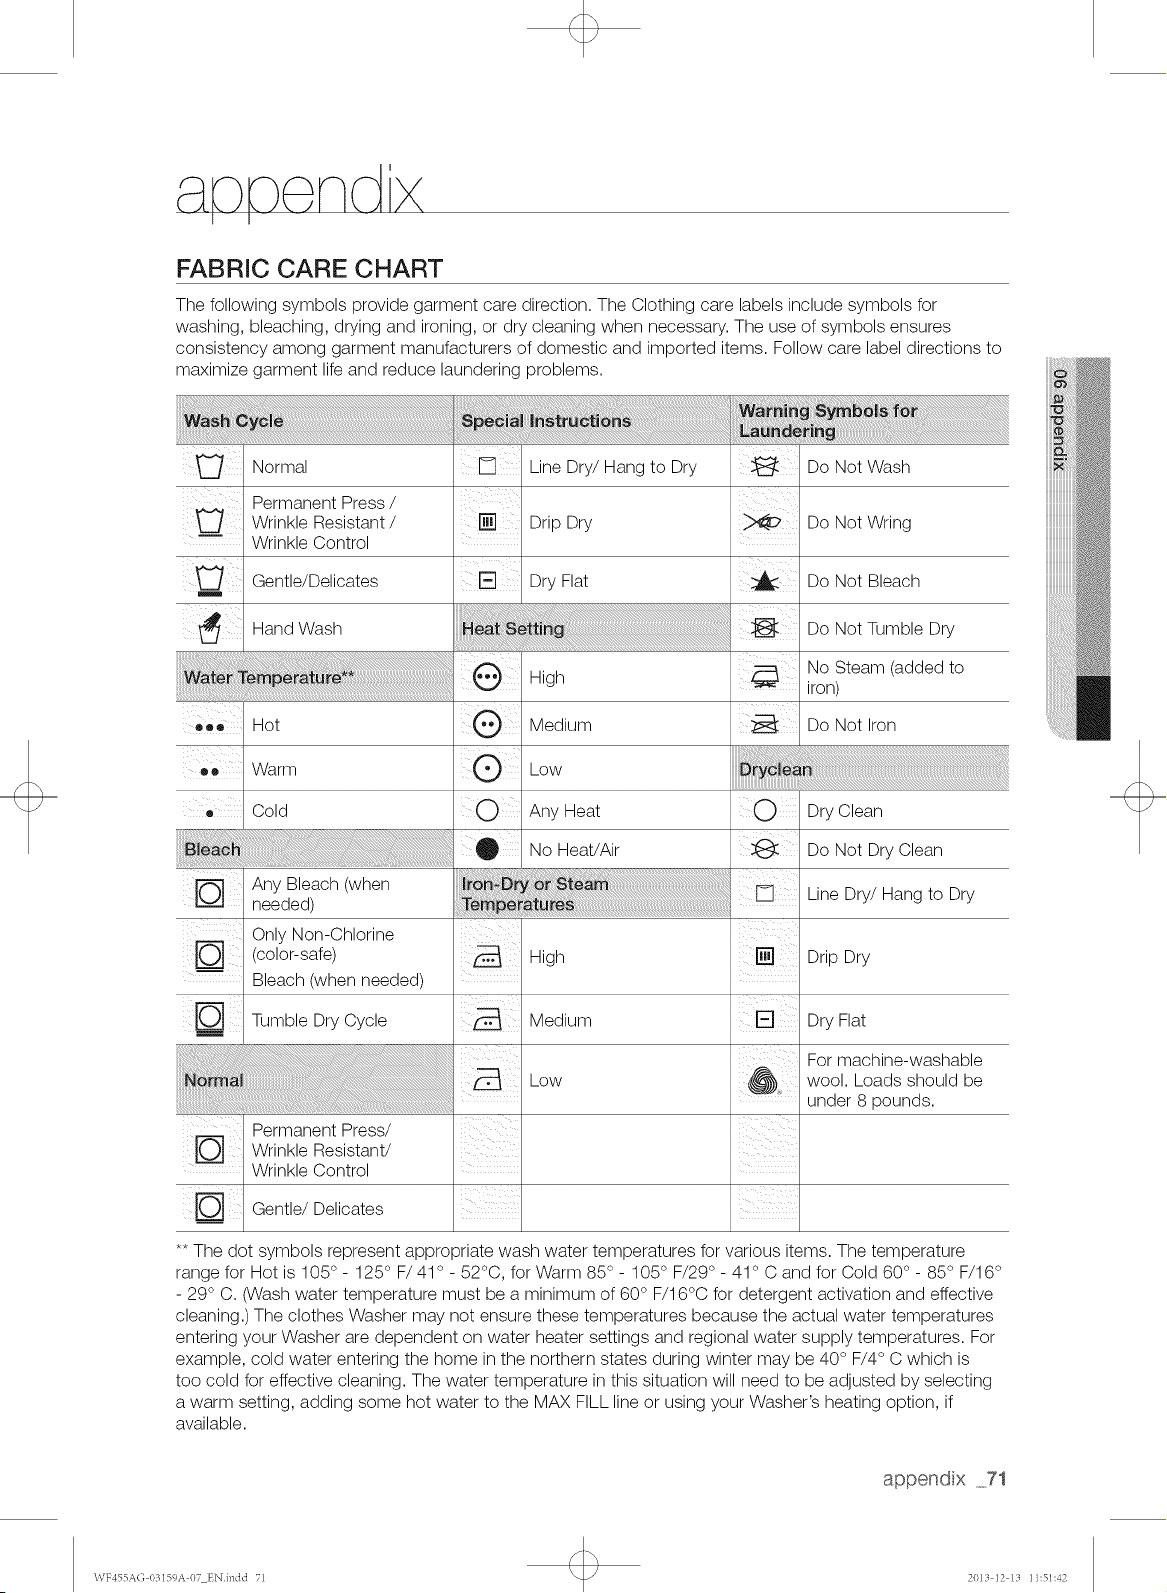
FABRIC CARE CHART
The following symbols provide garment care direction. The Clothing care labels include symbols for
washing, bleaching, drying and ironing, or dry cleaning when necessary. The use of symbols ensures
consistency among garment manufacturers of domestic and imported items. Follow care label directions to
maximize garment life and reduce laundering problems.
Normal Line Dry/Hang to Dry
W Permanent Press/Wrinkle Resistant / [] Drip Dry
m Wrinkle Control
Gentle/Delicates Dry Flat
Hand Wash
Do Not Wash
Do Not Wring
Do Not Bleach
Do Not Tumble Dry
eee Hot
Warm
• Cold
High
Medium
,ow
O Any Heat
No Heat/Air
No Steam (added to
iron)
Do Not Iron
O Dry Clean
Do Not Dry Clean
iii i i
Any Bleach (when
needed)
Only Non-Chlorine
(color-safe)
Bleach (when needed)
Tumble Dry Cycle
High
Medium
Low
Line Dry/Hang to Dry
Drip Dry
Dry Flat
Permanent Press/
Wrinkle Resistant/
Wrinkle Control
Gentle/Delicates
For machine-washable
wool. Loads should be
under 8 pounds.
** The dot symbols represent appropriate wash water temperatures for various items. The temperature
range for Hot is 105 ° - 125° F/41 o _52oc, for Warm 85 ° - 105° F/29° - 41° C and for Cold 60 ° - 85 ° F/16 °
- 29 ° C. (Wash water temperature must be a minimum of 60 ° F/16°C for detergent activation and effective
cleaning.) The clothes Washer may not ensure these temperatures because the actual water temperatures
entering your Washer are dependent on water heater settings and regional water supply temperatures. For
example, cold water entering the home in the northern states during winter may be 40 ° F/4 ° C which is
too cold for effective cleaning. The water temperature in this situation will need to be adjusted by selecting
a warm setting, adding some hot water to the MAX FILL line or using your Washer's heating option, if
available.
append x 71
\VF455A(; 03159A 07 ENindd 71 2013 12 13 11:51:42
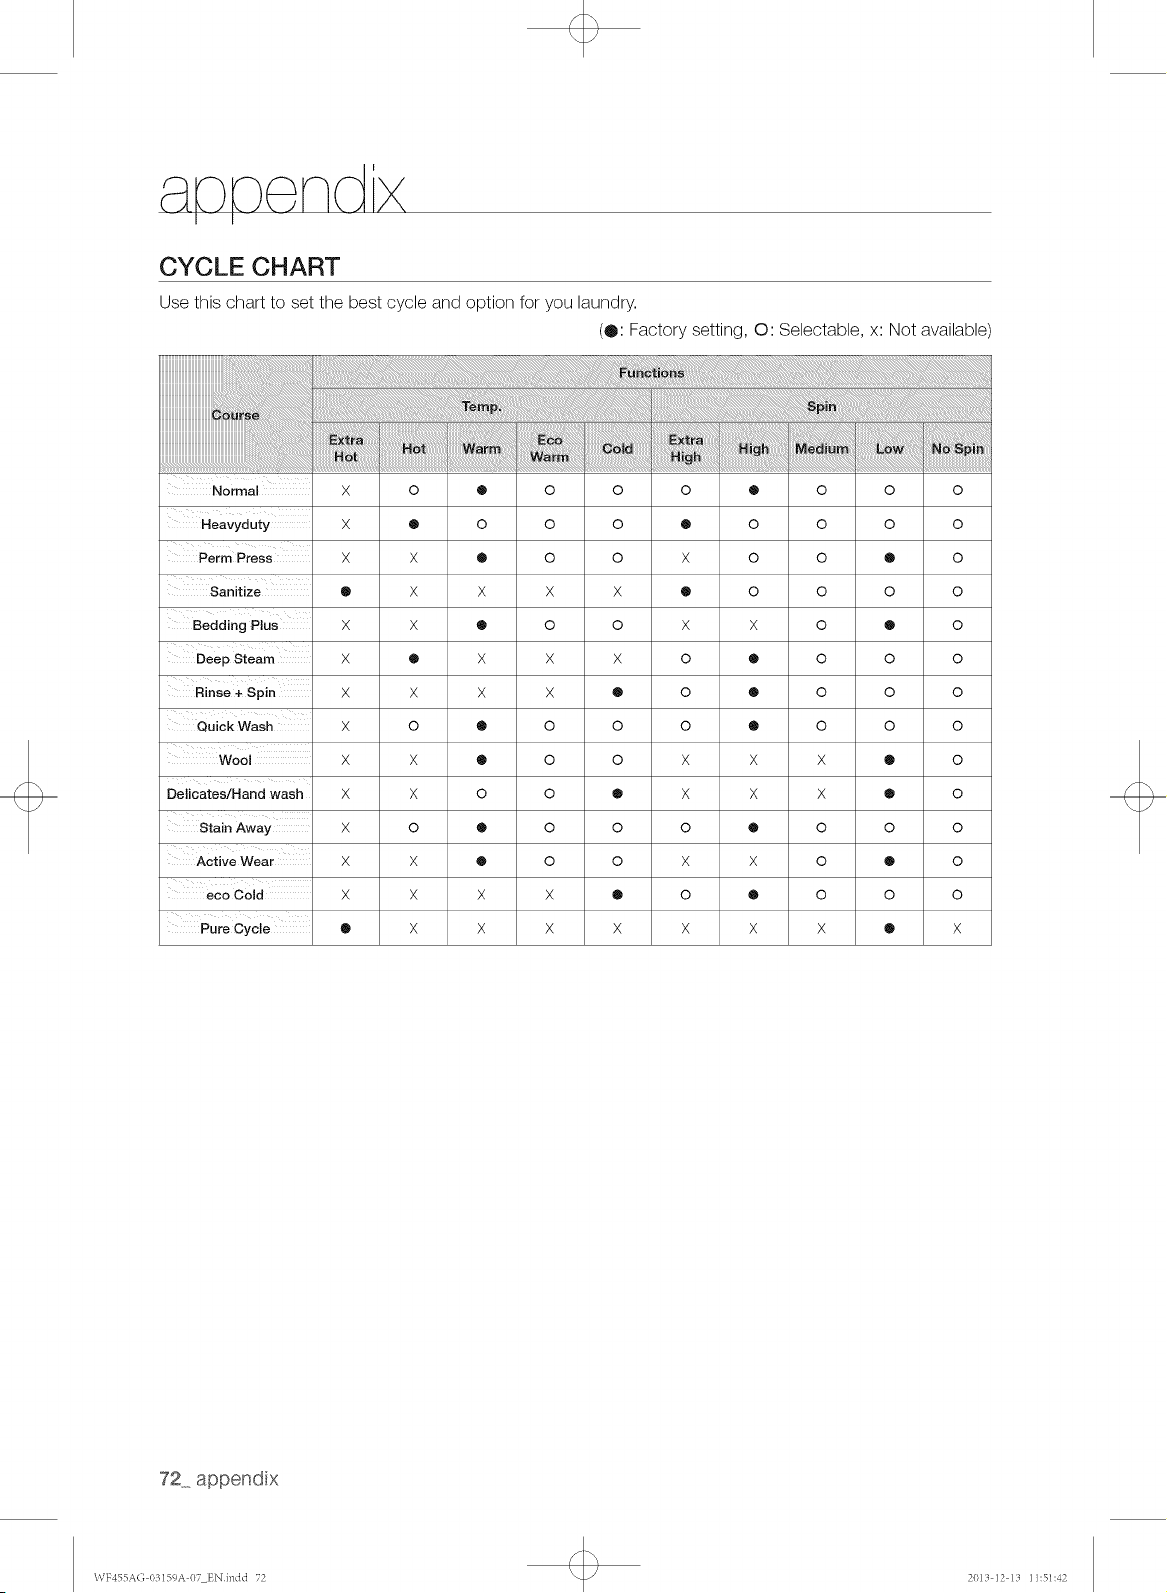
a,,ppondx
CYCLE CHART
Use this chart to set the best cycle and option for you laundry.
(0: Factory setting, O: Selectable, x: Not available)
Normal X O @ O O O @ O O O
Heavyduty X @ O O O @ O O O O
Perm Press X X @ O O X O O @ O
Sanitize @ X X X X @ O O O O
Bedding Plus X X @ O O X X O @ O
Deep Steam X O X X X O • O O O
Rinse + Spin X X X X O O ® O O O
Quick Wash X O • O O O • O O O
Wool X X ® O O X X X ® O
Delicates/Hand wash X X O O ® X X X ® O
Stain Away X O @ O O O @ O O O
Active Wear X X @ O 0 X X O @ 0
eco Cold X X X X @ O @ O O O
Pure Cycle @ X X X X X X X @ X
72 append x
\VF455A(; 03159A 07 ENindd 72 2013 12 13 11:51:42
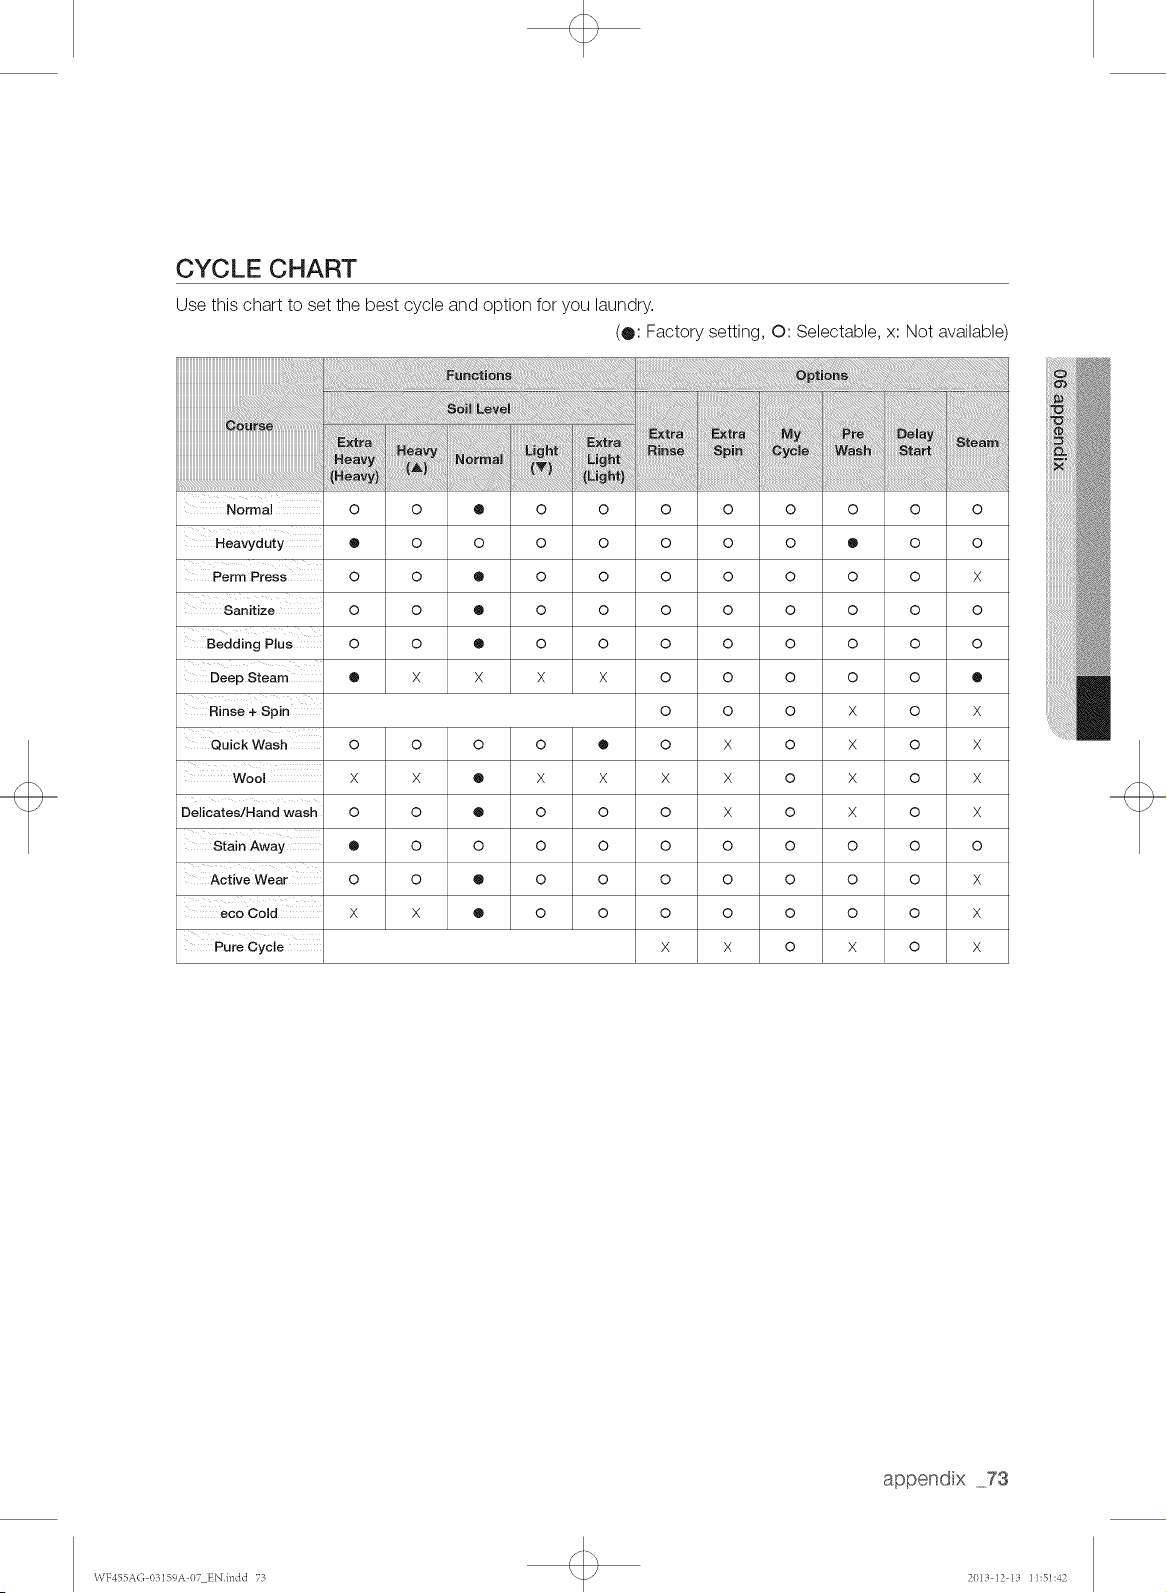
CYCLE CHART
Use this chart to set the best cycle and option for you laundry.
(®: Factory setting, O: Selectable, x: Not available)
Heavyduty @ O O O O O O O @ O O
Perm Press O O @ O O O O O O O X
Sanitize O O @ O O O O O O O O
Bedding Plus O O @ O O O O O O O O
Deep Steam • X X X X O O O O O
Rinse + Spin O O O X O X
Quick Wash O O O O _ O X O X O X
Wool X X _ X X X X O X O X
Delicates/Hand wash O O @ O O O X O X O X
Stain Away @ O O O O O O O O O O
Active Wear O O _ O O O O O O O X
eco Cold X X @ O O O O O O O X
Pure Cycle X X O X O X
appendix 73
\VF455A(; 03159A 07 ENindd 73 2013 12 13 11:51:42
OPEN SOURCE ANNOUNCEMENT
The software included in this product contains copyrighted software that is licensed under the GPL/LGPL.
You may obtain the complete Corresponding Source code from us for a period of three years after our last
shipment of this product by sending email to:
If you want to obtain the complete Corresponding Source code in the physical medium such as CD-ROM,
the cost of physically performing source distribution may be charged.
This offer is valid to anyone in receipt of this information.
GPL Software:
Bridge-Utils, BusyBox, DNRD, dosfstools, iproute2, IPTables, Linux Kernel, ntpclient, Openlx, RSDK
toolchain, rt1819x - Bootloader, samba, squashfs, udhcp Server-Client Package, USB-ModeSwitch,
wireless-tools
LG PL Software"
libnI-Netlink Library, Mini-XML
GNU GENERAL PUBLIC LICENSE
Version 2, June 1991
Copyright (C) 1989, 1991 Free Software Foundation, Inc.
51 Franklin Street, Fifth Floor, Boston, MA 02110-1301, USA
Everyone is permitted to copy and distribute verbatim copies of this license document, but changing it is not
allowed.
Preamble
The licenses for most software are designed to take away your freedom to share and change
it. By contrast, the GNU General Public License is intended to guarantee your freedom to share
and change free software--to make sure the software is free for all its users. This General Public
License applies to most of the Free Software Foundation's software and to any other program
whose authors commit to using it. (Some other Free Software Foundation software is covered by
the GNU Lesser General Public License instead.)
You can apply it to your programs, too.
When we speak of free software, we are referring to freedom, not price. Our General Public
Licenses are designed to make sure that you have the freedom to distribute copies of free
software (and charge for this service if you wish), that you receive source code or can get it if you
want it, that you can change the software or use pieces of it in new free programs; and that you
know you can do these things.
To protect your rights, we need to make restrictions that forbid anyone to deny you these rights
or to ask you to surrender the rights. These restrictions translate to certain responsibilities for you
if you distribute copies of the software, or if you modify it.
For example, if you distribute copies of such a program, whether gratis or for a fee, you must
give the recipients all the rights that you have. You must make sure that they, too, receive or can
get the source code. And you must show them these terms so they know their rights.
We protect your rights with two steps: (1) copyright the software, and (2) offer you this license
which gives you legal permission to copy, distribute and/or modify the software.
Also, for each author's protection and ours, we want to make certain that everyone understands
that there is no warranty for this free software. If the software is modified by someone else and
passed on, we want its recipients to know that what they have is not the original, so that any
appendix 75
WY455A(; 03159A 07 ENindd 75 2013 12 13 11:51:43
a,,ppondx
problems introduced by others will not reflect on the original authors' reputations.
Finally, any free program is threatened constantly by software patents. We wish to avoid the
danger that redistributors of a free program will individually obtain patent licenses, in effect
making the program proprietary. To prevent this, we have made it clear that any patent must be
licensed for everyone's free use or not licensed at all.
The precise terms and conditions for copying, distribution and modification follow.
TERMS AND CONDITIONS FOR COPYING, DISTRIBUTION AND
MODIFICATION
2_
3_
This License applies to any program or other work which contains a notice placed by the
copyright holder saying it may be distributed under the terms of this General Public License.
The "Program", below, refers to any such program or work, and a "work based on the
Program" means either the Program or any derivative work under copyright law: that is to
say, a work containing the Program or a portion of it, either verbatim or with modifications
and/or translated into another language. (Hereinafter, translation is included without limitation
in the term "modification".) Each licensee is addressed as "you".
Activities other than copying, distribution and modification are not covered by this License;
they are outside its scope. The act of running the Program is not restricted, and the output
from the Program is covered only if its contents constitute a work based on the Program
(independent of having been made by running the Program). Whether that is true depends on
what the Program does.
You may copy and distribute verbatim copies of the Program's source code as you receive
it, in any medium, provided that you conspicuously and appropriately publish on each copy
an appropriate copyright notice and disclaimer of warranty; keep intact all the notices that
refer to this License and to the absence of any warranty; and give any other recipients of the
Program a copy of this License along with the Program.
You may charge a fee for the physical act of transferring a copy, and you may at your option
offer warranty protection in exchange for a fee.
You may modify your copy or copies of the Program or any portion of it, thus forming a work
based on the Program, and copy and distribute such modifications or work under the terms
of Section 1 above, provided that you also meet all of these conditions:
1) You must cause the modified files to carry prominent notices stating that you changed
the files and the date of any change.
2) You must cause any work that you distribute or publish, that in whole or in part contains
or is derived from the Program or any part thereof, to be licensed as a whole at no charge
to all third parties under the terms of this License.
3) If the modified program normally reads commands interactively when run, you must
cause it, when started running for such interactive use in the most ordinary way, to print
or display an announcement including an appropriate copyright notice and a notice that
there is no warranty (or else, saying that you provide a warranty) and that users may
redistribute the program under these conditions, and telling the user how to view a copy
of this License. (Exception: if the Program itself is interactive but does not normally print
such an announcement, your work based on the Program is not required to print an
announcement.)
These requirements apply to the modified work as a whole. If identifiable sections of that
work are not derived from the Program, and can be reasonably considered independent
and separate works in themselves, then this License, and its terms, do not apply to those
sections when you distribute them as separate works. But when you distribute the same
sections as part of a whole which is a work based on the Program, the distribution of the
whole must be on the terms of this License, whose permissions for other licensees extend to
the entire whole, and thus to each and every part regardless of who wrote it.
Thus, it is not the intent of this section to claim rights or contest your rights to work written
76 append x
WY455AG 03159A 07 ENindd 76 2013 12 13 11:51:43

entirely by you; rather, the intent is to exercise the right to control the distribution of derivative
or collective works based on the Program.
In addition, mere aggregation of another work not based on the Program with the Program
(or with a work based on the Program) on a volume of a storage or distribution medium does
not bring the other work under the scope of this License.
4. 3. You may copy and distribute the Program (or a work based on it, under Section 2) in
object code or executable form under the terms of Sections 1 and 2 above provided that you
also do one of the following:
1) Accompany it with the complete corresponding machinereadable source code, which
must be distributed under the terms of Sections 1 and 2 above on a medium customarily
used for software interchange; or,
2) Accompany it with a written offer, valid for at least three years, to give any third party,
for a charge no more than your cost of physically performing source distribution, a
complete machine-readable copy of the corresponding source code, to be distributed
under the terms of Sections 1 and 2 above on a medium customarily used for software
interchange; or, c) Accompany it with the information you received as to the offer to
distribute corresponding source code. (This alternative is allowed only for noncommercial
distribution and only if you received the program in object code or executable form with
such an offer, in accord with Subsection b above.)
The source code for a work means the preferred form of the work for making modifications
to it. For an executable work, complete source code means all the source code for all
modules it contains, plus any associated interface definition files, plus the scripts used to
control compilation and installation of the executable. However, as a special exception,
the source code distributed need not include anything that is normally distributed (in either
source or binary form) with the major components (compiler, kernel, and so on) of the
operating system on which the executable runs, unless that component itself accompanies
the executable.
If distribution of executable or object code is made by offering access to copy from a
designated place, then offering equivalent access to copy the source code from the same
place counts as distribution of the source code, even though third parties are not compelled
to copy the source
along with the object code.
5. You may not copy, modify, sublicense, or distribute the Program except as expressly
provided under this License. Any attempt otherwise to copy, modify, sublicense or distribute
the Program is void, and will automatically terminate your rights under this License. However,
parties who have received copies, or rights, from you under this License will not have their
licenses terminated so long as such parties remain in full compliance.
6, You are not required to accept this License, since you have not signed it. However, nothing
else giants you permission to modify or distribute the Program or its derivative works. These
actions are prohibited by law if you do not accept this License. Therefore, by modifying or
distributing the Program (or any work based on the Program), you indicate your acceptance
of this License to do so, and all its terms and conditions for copying, distributing or modifying
the Program or works based on it.
7, Each time you redistribute the Program (or any work based on the Program), the recipient
automatically receives a license from the original licensor to copy, distribute or modify the
Program subject to these terms and conditions. You may not impose any further restrictions
on the recipients' exercise of the rights granted herein. You are not responsible for enforcing
compliance by third parties to this License.
8, If, as a consequence of a court judgment or allegation of patent infringement or for any
other reason (not limited to patent issues), conditions are imposed on you (whether by
court order, agreement or otherwise) that contradict the conditions of this License, they do
not excuse you from the conditions of this License. If you cannot distribute so as to satisfy
simultaneously your obligations under this License and any other pertinent obligations, then
appendix _77
WF455AG 03159A 07 ENindd 77 2013 12 13 11:51:43
a,ppendx
as a consequence you may not distribute the Program at all. For example, if a patent license
would not permit royalty-free redistribution of the Program by all those who receive copies
directly or indirectly through you, then the only way you could satisfy both it and this License
would be to refrain entirely from distribution of the Program.
If any portion of this section is held invalid or unenforceable under any particular
circumstance, the balance of the section is intended to apply and the section as a whole is
intended to apply in other circumstances.
It is not the purpose of this section to induce you to infringe any patents or other property
right claims or to contest validity of any such claims; this section has the sole purpose of
protecting the integrity of the free software distribution system, which is implemented by
public license practices. Many people have made generous contributions to the wide range
of software distributed through that system in reliance on consistent application of that
system; it is up to the author/donor to decide if he or she is willing to distribute software
through any other system and a licensee cannot impose that choice.
This section is intended to make thoroughly clear what is believed to be a consequence of
the rest of this License.
9. If the distribution and/or use of the Program is restricted in certain countries either by patents
or by copyrighted interfaces, the original copyright holder who places the Program under this
License may add an explicit geographical distribution limitation excluding those countries, so
that distribution is permitted only in or among countries not thus excluded. In such case, this
License incorporates the limitation as if written in the body of this License.
10. The Free Software Foundation may publish revised and/or new versions of the General Public
License from time to time. Such new versions will be similar in spirit to the present version,
but may differ in detail to address new problems or concerns.
Each version is given a distinguishing version number. If the Program specifies a version
number of this License which applies to it and "any later version", you have the option of
following the terms and conditions either of that version or of any later version published
by the Free Software Foundation. If the Program does not specify a version number of this
License, you may choose any version ever published by the Free Software Foundation.
11. If you wish to incorporate parts of the Program into other free programs whose distribution
conditions are different, write to the author to ask for permission. For software which is
copyrighted by the Free Software Foundation, write to the Free Software Foundation;
we sometimes make exceptions for this. Our decision will be guided by the two goals of
preserving the free status of all derivatives of our free software and of promoting the sharing
and reuse of software generally.
NO WARRANTY
12. BECAUSE THE PROGRAM IS LICENSED FREE OF CHARGE, THERE IS NO WARRANTY
FOR THE PROGRAM, TO THE EXTENT PERMIN-ED BY APPLICABLE LAW. EXCEPT
WHEN OTHERWISE STATED IN WRITING THE COPYRIGHT HOLDERS AND/OR OTHER
PARTIES PROVIDE THE PROGRAM "AS IS" WITHOUT WARRANTY OF ANY KIND, EITHER
EXPRESSED OR IMPLIED, INCLUDING, BUT NOT LIMITED TO, THE IMPLIED WARRANTIES
OF MERCHANTABILITY AND FITNESS FOR A PARTICULAR PURPOSE. THE ENTIRE RISK
AS TO THE QUALITY AND PERFORMANCE OF THE PROGRAM IS WITH YOU. SHOULD
THE PROGRAM PROVE DEFECTIVE, YOU ASSUME THE COST OF ALL NECESSARY
SERVICING, REPAIR OR CORRECTION.
13. IN NO EVENT UNLESS REQUIRED BY APPLICABLE LAW OR AGREED TO IN WRITING
WILL ANY COPYRIGHT HOLDER, OR ANY OTHER PARTY WHO MAY MODIFY AND/OR
REDISTRIBUTE THE PROGRAM AS PERMIN-ED ABOV E, BE L IABL E TO YOU FOR
DAMAGES, INCLUDING ANY GENERAL, SPECIAL, INCIDENTAL OR CONSEQUENTIAL
DAMAGES ARISING OUT OF THE USE OR INABILITY TO USE THE PROGRAM (INCLUDING
BUT NOT LIMITED TO LOSS OF DATA OR DATA BEING RENDERED INACCURATE OR
LOSSES SUSTAINED BY YOU OR THIRD PARTIES OR A FAILURE OF THE PROGRAM TO
78 append x
WY455AG 03159A 07 ENindd 78 2013 12 13 11:51:43

OPERATE WITH ANY OTHER PROGRAMS), EVEN IF SUCH HOLDER OR OTHER PARTY
HAS BEEN ADVISED OF THE POSSIBILITY OF SUCH DAMAGES.
END OF TERMS AND CONDITIONS
How to Apply These Terms to Your New Programs
If you develop a new program, and you want it to be of the greatest possible use to the public,
the best way to achieve this is to make it free software which everyone can redistribute and
change under these terms.
To do so, attach the following notices to the program. It is safest to attach them to the start of
each source file to most effectively convey the exclusion of warranty; and each file should have at
least the "copyright" line and a pointer to where the full notice is found.
one line to give the program's name and an idea of what it does.
Copyright (C)yyyy name of author
This program is free software; you can redistribute it and/or modify it under the terms of the GNU
General Public License as published by the Free Software Foundation; either version 2 of the
License, or (at your option) any later version.
This program is distributed in the hope that it will be useful, but WITHOUT ANY WARRANTY;
without even the implied warranty of MERCHANTABILITY or FITNESS FOR A PARTICULAR
PURPOSE. See the GNU General Public License for more details.
You should have received a copy of the GNU General Public License along with this program;
if not, write to the Free Software Foundation, Inc., 51 Franklin Street, Fifth Floor, Boston, MA
02110-1301, USA.
Also add information on how to contact you by electronic and paper mail.
If the program is interactive, make it output a short notice like this when it starts in an interactive
mode:
Gnomovision version 69, Copyright (C) year name of author Gnomovision comes with
ABSOLUTELY NO WARRANTY; for details type "show w'. This is free software, and you are
welcome to redistribute it under certain conditions; type "show c' for details.
The hypothetical commands "show w' and "show c' should show the appropriate parts of the
General Public License. Of course, the commands you use may be called something other than
"show w' and "show c'; they could even be mouse-clicks or menu items--whatever suits your
program. You should also get your employer (if you work as a programmer) or your school, if any,
to sign a "copyright disclaimer" for the program, if necessary. Here is a sample; alter the names:
Yoyodyne, Inc., hereby disclaims all copyright interest in the program "Gnomovision' (which
makes passes at compilers) written by James Hacker.
signature of Ty Coon, 1 April 1989
Ty Coon, President of Vice
This General Public License does not permit incorporating your program into proprietary
programs. If your program is a subroutine library, you may consider it more useful to permit
linking proprietary applications with the library. If this is what you want to do, use the GNU Lesser
General Public License instead of this License.
GNU LESSER GENERAL PUBLIC LICENSE
Version 2.1, February 1999
Copyright (C) 1991, 1999 Free Software Foundation, Inc.
51 Franklin Street, Fifth Floor, Boston, MA 02110-1301 USA
Everyone is permitted to copy and distribute verbatim copies of this license document, but changing it is
appendix 79
WY455A(; 03159A 07 ENindd 79 2013 12 13 11:51:43

a,,ppendx
not allowed.
[This is the first released version of the Lesser GPL. It also counts as the successor of the GNU Library
Public License, version 2, hence the version number 2.1 .]
Preamble
The licenses for most software are designed to take away your freedom to share and change it.
By contrast, the GNU General Public Licenses are intended to guarantee your freedom to share
and change free software--to make sure the software is free for all its users.
This license, the Lesser General Public License, applies to some specially designated software
packages--typically libraries--of the Free Software Foundation and other authors who decide to
use it. You can use it too, but we suggest you first think carefully about whether this license or
the ordinary General Public License is the better strategy to use in any particular case, based on
the explanations below.
When we speak of free software, we are referring to freedom of use, not price. Our General
Public Licenses are designed to make sure that you have the freedom to distribute copies of free
software (and charge for this service if you wish); that you receive source code or can get it if you
want it; that you can change the software and use pieces of it in new free programs; and that
you are informed that you can do these things.
To protect your rights, we need to make restrictions that forbid distributors to deny you
these rights or to ask you to surrender these rights. These restrictions translate to certain
responsibilities for you if you distribute copies of the library or if you modify it.
For example, if you distribute copies of the library, whether gratis or for a fee, you must give the
recipients all the rights that we gave you. You must make sure that they, too, receive or can get
the source code. If you link other code with the library, you must provide complete object files
to the recipients, so that they can relink them with the library after making changes to the library
and recompiling it. And you must show them these terms so they know their rights.
We protect your rights with a two-step method: (1) we copyright the library, and (2) we offer you
this license, which gives you legal permission to copy, distribute and/or modify the library.
To protect each distributor, we want to make it very clear that there is no warranty for the free
library. Also, if the library is modified by someone else and passed on, the recipients should
know that what they have is not the original version, so that the original author's reputation will
not be affected by problems that might be introduced by others.
Finally, software patents pose a constant threat to the existence of any free program. We wish to
make sure that a company cannot effectively restrict the users of a free program by obtaining a
restrictive license from a patent holder. Therefore, we insist that any patent license obtained for a
version of the library must be consistent with the full freedom of use specified in this license.
Most GNU software, including some libraries, is covered by the ordinary GNU General Public
License. This license, the GNU Lesser General Public License, applies to certain designated
libraries, and is quite different from the ordinary General Public License. We use this license for
certain libraries in order to permit linking those libraries into nonfree programs.
When a program is linked with a library, whether statically or using a shared library, the
combination of the two is legally speaking a combined work, a derivative of the original library.
The ordinary General Public License therefore permits such linking only if the entire combination
fits its criteria of freedom. The Lesser General Public License permits more lax criteria for linking
other code with the library.
We call this license the "Lesser" General Public License because it does Less to protect the
user's freedom than the ordinary General Public License. It also provides other free software
developers Less of an advantage over competing non-free programs. These disadvantages are
the reason we use the ordinary General Public License for many libraries.
However, the Lesser license provides advantages in certain special circumstances.
For example, on rare occasions, there may be a special need to encourage the widest possible
use of a certain library, so that it becomes a de-facto standard. To achieve this, non-free
80 append x
WY455AG 03159A 07 ENindd 80 2013 12 13 11:51:43
programs must be allowed to use the library.
A more frequent case is that a free library does the same job as widely used non-free libraries.
In this case, there is little to gain by limiting the free library to free software only, so we use the
Lesser General Public License.
In other cases, permission to use a particular library in nonfree programs enables a greater
number of people to use a large body of free software. For example, permission to use the GNU
C Library in non-free programs enables many more people to use the whole GNU operating
system, as well as its variant, the GNU/Linux operating system.
Although the Lesser General Public License is Less protective of the users' freedom, it does
ensure that the user of a program that is linked with the Library has the freedom and the
wherewithal to run that program using a modified version of the Library.
The precise terms and conditions for copying, distribution and modification follow. Pay close
attention to the difference between a "work based on the library" and a "work that uses the
library". The former contains code derived from the library, whereas the latter must be combined
with the library in order to run.
TERMS AND CONDITIONS FOR COPYING, DISTRIBUTION AND
MODIFICATION
1. This License Agreement applies to any software library or other program which contains a
notice placed by the copyright holder or other authorized party saying it may be distributed
under the terms of this Lesser General Public License (also called "this License"). Each
licensee is addressed as "you".
A "library" means a collection of software functions and/or data prepared so as to be
conveniently linked with application programs (which use some of those functions and data)
to form executables.
The "Library", below, refers to any such software library or work which has been distributed
under these terms. A "work based on the Library" means either the Library or any derivative
work under copyright law: that is to say, a work containing the Library or a portion of it, either
verbatim or with modifications and/or translated straightforwardly into another language.
(Hereinafter, translation is included without limitation in the term "modification".)
"Source code" for a work means the preferred form of the work for making modifications to
it. For a library, complete source code means all the source code for all modules it contains,
plus any associated interface definition files, plus the scripts used to control compilation and
installation of the library.
Activities other than copying, distribution and modification are not covered by this License;
they are outside its scope. The act of running a program using the Library is not restricted,
and output from such a program is covered only if its contents constitute a work based on
the Library (independent of the use of the Library in a tool for writing it).
Whether that is true depends on what the Library does and what the program that uses the
Library does.
2. You may copy and distribute verbatim copies of the Library's complete source code as you
receive it, in any medium, provided that you conspicuously and appropriately publish on each
copy an appropriate copyright notice and disclaimer of warranty; keep intact all the notices
that refer to this License and to the absence of any warranty; and distribute a copy of this
License along with the Library.
You may charge a fee for the physical act of transferring a copy, and you may at your option
offer warranty protection in exchange for a fee.
3. You may modify your copy or copies of the Library or any portion of it, thus forming a work
based on the Library, and copy and distribute such modifications or work under the terms of
Section 1 above, provided that you also meet all of these conditions:
1) The modified work must itself be a software library.
2) You must cause the files modified to carry prominent notices stating that you changed
append x 81
WY455AG 03159A 07 ENindd 81 2013 12 13 11:51:43
a,,ppondx
4_
5_
6_
the files and the date of any change.
3) You must cause the whole of the work to be licensed at no charge to all third parties
under the terms of this License.
4) If a facility in the modified Library refers to a function or a table of data to be supplied by
an application program that uses the facility, other than as an argument passed when the
facility is invoked, then you must make a good faith effort to ensure that, in the event an
application does not supply such function or table, the facility still operates, and performs
whatever part of its purpose remains meaningful.
(For example, a function in a library to compute square roots has a purpose that is entirely
well-defined independent of the application. Therefore, Subsection 2d requires that
any application-supplied function or table used by this function must be optional: if the
application does not supply it, the square root function must still compute square roots.)
These requirements apply to the modified work as a whole. If identifiable sections of that
work are not derived from the Library, and can be reasonably considered independent
and separate works in themselves, then this License, and its terms, do not apply to those
sections when you distribute them as separate works. But when you distribute the same
sections as part of a whole which is a work based on the Library, the distribution of the
whole must be on the terms of this License, whose permissions for other licensees extend to
the entire whole, and thus to each and every part regardless of who wrote it. Thus, it is not
the intent of this section to claim rights or contest your rights to work written entirely by you;
rather, the intent is to exercise the right to control the distribution of derivative or collective
works based on the Library. In addition, mere aggregation of another work not based on
the Library with the Library (or with a work based on the Library) on a volume of a storage or
distribution medium does not bring the other work under the scope of this License.
You may opt to apply the terms of the ordinary GNU General Public License instead of this
License to a given copy of the Library. To do this, you must alter all the notices that refer to
this License, so that they refer to the ordinary GNU General Public License, version 2, instead
of to this License. (If a newer version than version 2 of the ordinary GNU General Public
License has appeared, then you can specify that version instead if you wish.) Do not make
any other change in these notices.
Once this change is made in a given copy, it is irreversible for that copy, so the ordinary GNU
General Public License applies to all subsequent copies and derivative works made from that
copy.
This option is useful when you wish to copy part of the code of the Library into a program
that is not a library.
You may copy and distribute the Library (or a portion or derivative of it, under Section 2) in
object code or executable form under the terms of Sections 1 and 2 above provided that you
accompany it with the complete corresponding machine-readable source code, which must
be distributed under the terms of Sections 1 and 2 above on a medium customarily used for
software interchange.
If distribution of object code is made by offering access to copy from a designated place,
then offering equivalent access to copy the source code from the same place satisfies the
requirement to distribute the source code, even though third parties are not compelled to
copy the source along with the object code.
A program that contains no derivative of any portion of the Library, but is designed to work
with the Library by being compiled or linked with it, is called a "work that uses the Library".
Such a work, in isolation, is not a derivative work of the Library, and therefore falls outside the
scope of this License.
However, linking a "work that uses the Library" with the Library creates an executable that
is a derivative of the Library (because it contains portions of the Library), rather than a "work
that uses the library". The executable is therefore covered by this License. Section 6 states
terms for distribution of such executables.
When a "work that uses the Library" uses material from a header file that is part of the
82 append x
WY455AG 03159A 07 ENindd 82 2013 12 13 11:51:43

Library, the object code for the work may be a derivative work of the Library even though
the source code is not. Whether this is true is especially significant if the work can be linked
without the Library, or if the work is itself a library. The threshold for this to be true is not
precisely defined by law.
If such an object file uses only numerical parameters, data structure layouts and accessors,
and small macros and small inline functions (ten lines or less in length), then the use of the
object file is unrestricted, regardless of whether it is legally a derivative work. (Executables
containing this object code plus portions of the Library will still fall under Section 6.)
Otherwise, if the work is a derivative of the Library, you may distribute the object code for
the work under the terms of Section 6. Any executables containing that work also fall under
Section 6, whether or not they are linked directly with the Library itself.
7. As an exception to the Sections above, you may also combine or link a "work that uses the
Library" with the Library to produce a work containing portions of the Library, and distribute
that work under terms of your choice, provided that the terms permit modification of the work
for the customer's own use and reverse engineering for debugging such modifications.
You must give prominent notice with each copy of the work that the Library is used in it
and that the Library and its use are covered by this License. You must supply a copy of
this License. If the work during execution displays copyright notices, you must include the
copyright notice for the Library among them, as well as a reference directing the user to the
copy of this License. Also, you must do one of these things:
1) Accompany the work with the complete corresponding machine-readable source
code for the Library including whatever changes were used in the work (which must be
distributed under Sections 1 and 2 above); and, if the work is an executable linked with
the Library, with the complete machine-readable "work that uses the Library", as object
code and/or source code, so that the user can modify the Library and then relink to
produce a modified executable containing the modified Library. (It is understood that the
user who changes the contents of definitions files in the Library will not necessarily be
able to recompile the application to use the modified definitions.)
2) Use a suitable shared library mechanism for linking with the Library. A suitable
mechanism is one that (1) uses at run time a copy of the library already present on the
user's computer system, rather than copying library functions into the executable, and (2)
will operate properly with a modified version of the library, if the user installs one, as long
as the modified version is interfacecompatible with the version that the work was made
with.
3) Accompany the work with a written offer, valid for at least three years, to give the same
user the materials specified in Subsection 6a, above, for a charge no more than the cost
of performing this distribution.
4) If distribution of the work is made by offering access to copy from a designated place,
offer equivalent access to copy the above specified materials from the same place.
5) Verify that the user has already received a copy of these materials or that you have
already sent this user a copy.
For an executable, the required form of the "work that uses the Library" must include any
data and utility programs needed for reproducing the executable from it. However, as a
special exception, the materials to be distributed need not include anything that is normally
distributed (in either source or binary form) with the major components (compiler, kernel, and
so on) of the operating system on which the executable runs, unless that component itself
accompanies the executable.
It may happen that this requirement contradicts the license restrictions of other proprietary
libraries that do not normally accompany the operating system. Such a contradiction means
you cannot use both them and the Library together in an executable that you distribute.
8. You may place library facilities that are a work based on the Library side-by-side in a single
library together with other library facilities not covered by this License, and distribute such
a combined library, provided that the separate distribution of the work based on the Library
appendix 83
WF455A(; 03159A 07 ENindd 83 2013 12 13 11:51:43
a,,ppondx
and of the other library facilities is otherwise permitted, and provided that you do these two
things:
1) Accompany the combined library with a copy of the same work based on the Library,
uncombined with any other library facilities. This must be distributed under the terms of
the Sections above.
2) Give prominent notice with the combined library of the fact that part of it is a work based
on the Library, and explaining where to find the accompanying uncombined form of the
same work.
9. You may not copy, modify, sublicense, link with, or distribute the Library except as expressly
provided under this License. Any attempt otherwise to copy, modify, sublicense, link with, or
distribute the Library is void, and will automatically terminate your rights under this License.
However, parties who have received copies, or rights, from you under this License will not
have their licenses terminated so long as such parties remain in full compliance.
10. You are not required to accept this License, since you have not signed it. However, nothing
else grants you permission to modify or distribute the Library or its derivative works. These
actions are prohibited by law if you do not accept this License. Therefore, by modifying or
distributing the Library (or any work based on the Library), you indicate your acceptance of
this License to do so, and all its terms and conditions for copying, distributing or modifying
the Library or works based on it.
11. Each time you redistribute the Library (or any work based on the Library), the recipient
automatically receives a license from the original licensor to copy, distribute, link with or
modify the Library subject to these terms and conditions. You may not impose any further
restrictions on the recipients' exercise of the rights granted herein. You are not responsible for
enforcing compliance by third parties with this License.
12. If, as a consequence of a court judgment or allegation of patent infringement or for any
other reason (not limited to patent issues), conditions are imposed on you (whether by
court order, agreement or otherwise) that contradict the conditions of this License, they do
not excuse you from the conditions of this License. If you cannot distribute so as to satisfy
simultaneously your obligations under this License and any other pertinent obligations, then
as a consequence you may not distribute the Library at all. For example, if a patent license
would not permit royalty-free redistribution of the Library by all those who receive copies
directly or indirectly through you, then the only way you could satisfy both it and this License
would be to refrain entirely from distribution of the Library.
If any portion of this section is held invalid or unenforceable under any particular
circumstance, the balance of the section is intended to apply, and the section as a whole is
intended to apply in other circumstances.
It is not the purpose of this section to induce you to infringe any patents or other property
right claims or to contest validity of any such claims; this section has the sole purpose of
protecting the integrity of the free software distribution system which is implemented by
public license practices.
Many people have made generous contributions to the wide range of software distributed
through that system in reliance on consistent application of that system; it is up to the author/
donor to decide if he or she is willing to distribute software through any other system and a
licensee cannot impose that choice.
This section is intended to make thoroughly clear what is believed to be a consequence of
the rest of this License.
13. If the distribution and/or use of the Library is restricted in certain countries either by patents
or by copyrighted interfaces, the original copyright holder who places the Library under this
License may add an explicit geographical distribution limitation excluding those countries, so
that distribution is permitted only in or among countries not thus excluded. In such case, this
License incorporates the limitation as if written in the body of this License.
14. The Free Software Foundation may publish revised and/or new versions of the Lesser
General Public License from time to time. Such new versions will be similar in spirit to the
84 append x
WY455AG 03159A 07 ENindd 84 2013 12 13 11:51:43
present version, but may differ in detail to address new problems or concerns.
Each version is given a distinguishing version number.
If the Library specifies a version number of this License which applies to it and "any later
version", you have the option of following the terms and conditions either of that version or of
any later version published by the Free Software Foundation. If the Library does not specify
a license version number, you may choose any version ever published by the Free Software
Foundation.
15. If you wish to incorporate _arts of the Library into other free programs whose distribution
conditions are incompatible with these, write to the author to ask for permission. For software
which is copyrighted by the Free Software Foundation, write to the Free Software Foundation;
we sometimes make exceptions for this. Our decision will be guided by the two goals of
preserving the free status of all derivatives of our free software and of promoting the sharing
and reuse of software generally.
NO WARRANTY
16. BECAUSE THE LIBRARY IS LICENSED FREE OF CHARGE, THERE IS NO WARRANTY
FOR THE LIBRARY, TO THE EXTENT PERMIN-ED BY APPLICABLE LAW. EXCEPT
WHEN OTHERWISE STATED IN WRITING THE COPYRIGHT HOLDERS AND/OR OTHER
PARTIES PROVIDE THE LIBRARY "AS IS" WITHOUT WARRANTY OF ANY KIND, EITHER
EXPRESSED OR IMPLIED, INCLUDING, BUT NOT LIMITED TO, THE IMPLIED WARRANTIES
OF MERCHANTABILITY AND FITNESS FOR A PARTICULAR PURPOSE. THE ENTIRE RISK
AS TO THE QUALITY AND PERFORMANCE OF THE LIBRARY IS WITH YOU. SHOULD THE
LIBRARY PROVE DEFECTIVE, YOU ASSUME THE COST OF ALL NECESSARY SERVICING,
REPAIR OR CORRECTION.
17. IN NO EVENT UNLESS REQUIRED BY APPLICABLE LAW OR AGREED TO IN WRI T ING
WI L L ANY COPYRIGHT HOLDER, OR ANY OTHER PARTY WHO MAY MODIFY AND/
OR REDISTRIBUTE THE LIBRARY AS PERMIN-ED ABOVE, BE LIABLE TO YOU FOR
DAMAGES, INCLUDING ANY GENERAL, SPECIAL, INCIDENTAL OR CONSEQUENTIAL
DAMAGES ARISING OUT OF THE USE OR INABILITY TO USE THE LIBRARY (INCLUDING
BUT NOT LIMITED TO LOSS OF DATA OR DATA BEING RENDERED INACCURATE OR
LOSSES SUSTAINED BY YOU OR THIRD PARTIES OR A FAILURE OF THE LIBRARY TO
OPERATE WITH ANY OTHER SOFTWARE), EVEN IF SUCH HOLDER OR OTHER PARTY
HAS BEEN ADVISED OF THE POSSIBILITY OF SUCH DAMAGES.
END OF TERMS AND CONDITIONS
How to Apply These Terms to Your New Libraries If you develop a new library, and you want
it to be of the greatest possible use to the public, we recommend making it free software that
everyone can redistribute and change. You can do so by permitting redistribution under these
terms (or, alternatively, under the terms of the ordinary General Public License).
To apply these terms, attach the following notices to the library. It is safest to attach them to the
start of each source file to most effectively convey the exclusion of warranty; and each file should
have at least the "copyright" line and a pointer to where the full notice is found.
one line to give the library's name and an idea of what it does.
Copyright (C)year name of author
This library is free software; you can redistribute it and/or modify it under the terms of the GNU
Lesser General Public License as published by the Free Software Foundation; either version 2.1
of the License, or (at your option) any later version.
This library is distributed in the hope that it will be useful, but WITHOUT ANY WARRANTY;
without even the implied warranty of MERCHANTABILITY or FITNESS FOR A PARTICULAR
PURPOSE. See the GNU
appendix 85
WY455AG 03159A 07 ENindd 85 2013 12 13 11:51:43
a,,ppondx
Lesser General Public License for more details.
You should have received a copy of the GNU Lesser General Public License along with this
library; if not, write to the Free Software Foundation, Inc., 51 Franklin Street, Fifth Floor, Boston,
MA 02110-1301 USA Also add information on how to contact you by electronic and paper mail.
You should also get your employer (if you work as a programmer) or your school, if any, to sign a
"copyright disclaimer" for the library, if necessary. Here is a sample; alter the names: Yoyodyne,
Inc., hereby disclaims all copyright interest in the library "Frob' (a library for tweaking knobs)
written by James Random Hacker.
signature of Ty Coon, 1 April 1990
Ty Coon, President of Vice
That's all there is to it!
BSD LICENSE
flex: the fast lexical analyser
Copyright (c) 2001,2002, 2003, 2004, 2005, 2006, 2007
The Flex Project.
Copyright (c) 1990, 1997 The Regents of the University of California. All rights reserved.
LibNet License
PPP/Debian
Copyright (c) 1989 Regents of the University of California. All rights reserved.
Redistribution and use in source and binary forms, with or without modification, are permitted provided that
the following conditions are met:
1, Redistributions of source code must retain the above copyright notice, this list of conditions and the
following disclaimer.
2, Redistributions in binary form must reproduce the above copyright notice, this list of conditions and the
following disclaimer in the documentation and/or other materials provided with the distribution.
3, Neither the name of the <organization> nor the names of its contributors may be used to endorse or
promote products derived from this software without specific prior written permission.
THIS SOFTWARE IS PROVIDED BY THE COPYRIGHT HOLDERS AND CONTRIBUTORS "AS IS" AND ANY
EXPRESS OR IMPLIED WARRANTIES, INCLUDING, BUT NOT LIMITED TO, THE IMPLIED WARRANTIES
OF MERCHANTABILITY AND FITNESS FOR A PARTICULAR PURPOSE ARE DISCLAIMED. IN NO EVENT
SHALL <COPYRIGHT HOLDER> BE LIABLE FOR ANY DIRECT, INDIRECT, INCIDENTAL, SPECIAL,
EXEMPLARY, OR CONSEQUENTIAL DAMAGES (INCLUDING, BUT NOT LIMITED TO, PROCUREMENT
OF SUBSTITUTE GOODS OR SERVICES; LOSS OF USE, DATA, OR PROFITS; OR BUSINESS
INTERRUPTION) HOWEVER CAUSED AND ON ANY THEORY OF LIABILITY, WHETHER IN CONTRACT,
STRICT LIABILITY, OR TORT (INCLUDING NEGLIGENCE OR OTHERWISE) ARISING IN ANY WAY OUT OF
THE USE OF THIS SOFTWARE, EVEN IF ADVISED OF THE POSSIBILITY OF SUCH DAMAGE.
86 append x
WY455A(; 03159A 07 ENindd 86 2013 12 13 11:51:43
OPENSSL
This product includes software developed by the OpenSSL Project for use in the OpenSSL Toolkit. (http://
www.openssl.org/)
LICENSE ISSUES
The OpenSSL toolkit stays under a dual license, i.e. both the conditions of the OpenSSL License
and the original SSLeay license apply to the toolkit. See below for the actual license texts.
Actually both licenses are BSD-style Open Source licenses. In case of any license issues related
OpenSSL License
Copyright (c) 1998-2008 The OpenSSL Project. All rights reserved.
Redistribution and use in source and binary forms, with or without modification, are permitted
provided that the following conditions are met:
1. Redistributions of source code must retain the above copyright notice, this list of conditions
and the following disclaimer.
2. Redistributions in binary form must reproduce the above copyright notice, this list of
conditions and the following disclaimer in the documentation and/or other materials provided
with the distribution.
3. All advertising materials mentioning features or use of this software must display the following
acknowledgment: "This product includes software developed by the OpenSSL Project for
use in the OpenSSL Toolkit. (http://www.openssl.org/)"
4. The names "OpenSSL Toolkit" and "OpenSSL Project" must not be used to endorse or
promote products derived from this software without prior written permission. For written
5. Products derived from this software may not be called "OpenSSU' nor may "OpenSSU'
appear in their names without prior written permission of the OpenSSL Project.
6. Redistributions of any form whatsoever must retain the following acknowledgment:
"This product includes software developed by the OpenSSL Project for use in the OpenSSL
Toolkit (http://www.openssl.org/)"
THIS SOFTWARE IS PROVIDED BY THE OpenSSL PROJECT "AS IS" AND ANY EXPRESSED
OR IMPLIED WARRANTIES, INCLUDING, BUT NOT LIMITED TO, THE IMPLIED WARRANTIES
OF MERCHANTABILITY AND FITNESS FOR A PARTICULAR PURPOSE ARE DISCLAIMED.
IN NO EVENT SHALL THE OpenSSL PROJECT OR ITS CONTRIBUTORS BE LIABLE FOR
ANY DIRECT, INDIRECT, INCIDENTAL, SPECIAL, EXEMPLARY, OR CONSEQUENTIAL
DAMAGES (INCLUDING, BUT NOT LIMITED TO, PROCUREMENT OF SUBSTITUTE GOODS OR
SERVICES; LOSS OF USE, DATA, OR PROFITS; OR BUSINESS INTERRUPTION) HOWEVER
CAUSED AND ON ANY THEORY OF LIABILITY, WHETHER IN CONTRACT, STRICT LIABILITY,
OR TORT (INCLUDING NEGLIGENCE OR OTHERWISE) ARISING IN ANY WAY OUT OF THE
USE OF THIS SOFTWARE, EVEN IFADVISED OF THE POSSIBILITY OF SUCH DAMAGE.
appendix 87
WY455AG 03159A 07 ENindd 87 2013 12 13 11:51:43
WARRANTY
SAMSUNG WASHER
LiMiTED WARRANTY TO ORiGiNAL PURCHASER
This SAMSUNG brand product, as supplied and distributed by SAMSUNG ELECTRONICS AMERICA, INC.
(SAMSUNG) and delivered new, in the original carton to the original consumer purchaser, is warranted by
SAMSUNG against manufacturing defects in materials and workmanship for a limited warranty period of:
One (1) year part and labor, Two (2) years Control Board Parts, Three (3) years stainless tub part, Ten (10)
years washing motor part
This limited warranty begins on the original date of purchase, and is valid only on products purchased and
used in the United States. To receive warranty service, the purchaser must contact SAMSUNG for problem
determination and service procedures. Warranty service can only be performed by a SAMSUNG authorized
service center. The original dated bill of sale must be presented upon request as proof of purchase to
SAMSUNG or SAMSUNG's authorized service center. SAMSUNG will provide in-home service during the
warranty period at no charge, subject to availability within the contiguous United States. In-home service is
not available in all areas.
To receive in-home service, product must be unobstructed and accessible to the service agent. If service
is not available, SAMSUNG may elect to provide transportation of the product to and from an authorized
service center.
SAMSUNG will repair, replace, or refund this product at our option and at no charge as stipulated herein,
with new or reconditioned parts or products if found to be defective during the limited warranty period
specified above. All replaced parts and products become the property of SAMSUNG and must be returned
to SAMSUNG. Replacement parts and products assume the remaining original warranty, or ninety (90)
days, whichever is longer.This limited warranty covers manufacturing defects in materials and workmanship
encountered in normal, noncommercial use of this product and shall not apply to the following: damage
that occurs in shipment; delivery and installation; applications and uses for which this product was not
intended; altered product or serial numbers; cosmetic damage or exterior finish; accidents, abuse, neglect,
fire, water, lightning, or other acts of nature or God; use of products, equipment, systems, utilities, services,
parts, supplies, accessories, applications, installations, repairs, external wiring or connectors not supplied
or authorized by SAMSUNG that damage this product or result in service problems; incorrect electrical
line voltage, fluctuations and surges; customer adjustments and failure to follow operating instructions,
maintenance and environmental instructions that are covered and prescribed in the instruction book;
product removal and reinstallation; problems caused by pest infestations. This limited warranty does not
cover problems resulting from incorrect electric current, voltage or supply, light bulbs, house fuses, house
wiring, cost of a service call for instructions, or fixing installation errors. SAMSUNG does not warrant
uninterrupted or error-free operation of the product.
88 warranty
W]z455AG 03159A 07 ENindd 88 2013 12 13 11:51:44
EXCEPT AS SET FORTH HEREIN, THERE ARE NO WARRANTIES ON THIS PRODUCT EITHER EXPRESS
OR IMPLIED, AND SAMSUNG DISCLAIMS ALL WARRANTIES INCLUDING, BUT NOT LIMITED TO, ANY
IMPLIED WARRANTIES OF MERCHANTABILITY, INFRINGEMENT OR FITNESS FOR A PARTICULAR
PURPOSE.
NO WARRANTY OR GUARANTEE GIVEN BY ANY PERSON, FIRM, OR CORPORATION WITH RESPECT
TO THIS PRODUCT SHALL BE BINDING ON SAMSUNG. SAMSUNG SHALL NOT BE LIABLE FOR LOSS
OF REVENUE OR PROFITS, FAILURE TO REALIZE SAVINGS OR OTHER BENEFITS, OR ANY OTHER
SPECIAL, INCIDENTAL OR CONSEQUENTIAL DAMAGES CAUSED BY THE USE, MISUSE, OR INABILITY
TO USE THIS PRODUCT, REGARDLESS OF THE LEGAL THEORY ON WHICH THE CLAIM IS BASED,
AND EVEN IF SAMSUNG HAS BEEN ADVISED OF THE POSSIBILITY OF SUCH DAMAGES.
NOR SHALL RECOVERY OF ANY KIND AGAINST SAMSUNG BE GREATER IN AMOUNT THAN THE
PURCHASE PRICE OF THE PRODUCT SOLD BY SAMSUNG AND CAUSING THE ALLEGED DAMAGE.
WITHOUT LIMITING THE FOREGOING, PURCHASER ASSUMES ALL RISK AND LIABILITY FOR LOSS,
DAMAGE, OR INJURY TO PURCHASER AND PURCHASER'S PROPERTY AND TO OTHERS AND THEIR
PROPERTY ARISING OUT OF THE USE, MISUSE, OR INABILITY TO USE THIS PRODUCT. THIS LIMITED
WARRANTY SHALL NOT EXTEND TO ANYONE OTHER THAN THE ORIGINAL PURCHASER OF THIS
PRODUCT, IS NONTRANSFERABLE AND STATES YOUR EXCLUSIVE REMEDY.
Some states do not allow limitations on how long an implied warranty lasts, or the exclusion or limitation
of incidental or consequential damages, so the above limitations or exclusions may not apply to you. This
warranty gives you specific rights, and you may also have other rights, which vary from state to state.
To obtain warranty service, please contact SAMSUNG at:
SAMSUNG ELECTRONICS AMERICA, INC.
85 CHALLENGER ROAD RIDGEFIELD PARK, NJ 07660
1-800-SAMSU NG(726-7864)
www,sa msl..ing,con3
Visits by a Service Engineer to explain functions, maintenance or installation is not covered by warranty.
Please contact your Samsung call agent for help with any of these issues.
warranty 89
W]z455AG 03159A 07 ENindd 89 2013 12 13 11:51:44
SAMSUNG WASHER
LIMITED WARRANTY TO ORIGINAL PURCHASER
This SAMSUNG brand product, as supplied and distributed by SAMSUNG ELECTRONICS CANADA, INC.
(SAMSUNG) and delivered new, in the original carton to the original consumer purchaser, is warranted by
SAMSUNG against manufacturing defects in materials and workmanship for a limited warranty period of:
One (1) year part and labor, Ten (10) years washing motor part
This limited warranty begins on the original date of purchase, and is valid only on products purchased
and used in the Canada. To receive warranty service, the purchaser must contact SAMSUNG for problem
determination and service procedures. Warranty service can only be performed by a SAMSUNG authorized
service center. The original dated bill of sale must be presented upon request as proof of purchase to
SAMSUNG or SAMSUNG's authorized service center. SAMSUNG will provide in-home service during the
warranty period at no charge, subject to availability within the Canada. In-home service is not available in all
areas.
To receive in-home service, product must be unobstructed and accessible to the service agent. If service
is not available, SAMSUNG may elect to provide transportation of the product to and from an authorized
service center.
SAMSUNG will repair, replace, or refund this product at our option and at no charge as stipulated herein,
with new or reconditioned parts or products if found to be defective during the limited warranty period
specified above. All replaced parts and products become the property of SAMSUNG and must be returned
to SAMSUNG. Replacement parts and products assume the remaining original warranty, or ninety (90)
days, whichever is longer.This limited warranty covers manufacturing defects in materials and workmanship
encountered in normal, noncommercial use of this product and shall not apply to the following: damage
that occurs in shipment; delivery and installation; applications and uses for which this product was not
intended; altered product or serial numbers; cosmetic damage or exterior finish; accidents, abuse, neglect,
fire, water, lightning, or other acts of nature or God; use of products, equipment, systems, utilities, services,
parts, supplies, accessories, applications, installations, repairs, external wiring or connectors not supplied
or authorized by SAMSUNG that damage this product or result in service problems; incorrect electrical
line voltage, fluctuations and surges; customer adjustments and failure to follow operating instructions,
maintenance and environmental instructions that are covered and prescribed in the instruction book;
product removal and reinstallation; problems caused by pest infestations. This limited warranty does not
cover problems resulting from incorrect electric current, voltage or supply, light bulbs, house fuses, house
wiring, cost of a service call for instructions, or fixing installation errors. SAMSUNG does not warrant
uninterrupted or error-free operation of the product.
90 warranty
W]z455AG 03159A 07 ENindd 90 2013 12 13 11:51:44
EXCEPT AS SET FORTH HEREIN, THERE ARE NO WARRANTIES ON THIS PRODUCT EITHER EXPRESS
OR IMPLIED, AND SAMSUNG DISCLAIMS ALL WARRANTIES INCLUDING, BUT NOT LIMITED TO, ANY
IMPLIED WARRANTIES OF MERCHANTABILITY, INFRINGEMENT OR FITNESS FOR A PARTICULAR
PURPOSE.
NO WARRANTY OR GUARANTEE GIVEN BY ANY PERSON, FIRM, OR CORPORATION WITH RESPECT
TO THIS PRODUCT SHALL BE BINDING ON SAMSUNG. SAMSUNG SHALL NOT BE LIABLE FOR LOSS
OF REVENUE OR PROFITS, FAILURE TO REALIZE SAVINGS OR OTHER BENEFITS, OR ANY OTHER
SPECIAL, INCIDENTAL OR CONSEQUENTIAL DAMAGES CAUSED BY THE USE, MISUSE, OR INABILITY
TO USE THIS PRODUCT, REGARDLESS OF THE LEGAL THEORY ON WHICH THE CLAIM IS BASED,
AND EVEN IF SAMSUNG HAS BEEN ADVISED OF THE POSSIBILITY OF SUCH DAMAGES.
NOR SHALL RECOVERY OF ANY KIND AGAINST SAMSUNG BE GREATER IN AMOUNT THAN THE
PURCHASE PRICE OF THE PRODUCT SOLD BY SAMSUNG AND CAUSING THE ALLEGED DAMAGE.
WITHOUT LIMITING THE FOREGOING, PURCHASER ASSUMES ALL RISK AND LIABILITY FOR LOSS,
DAMAGE, OR INJURY TO PURCHASER AND PURCHASER'S PROPERTY AND TO OTHERS AND THEIR
PROPERTY ARISING OUT OF THE USE, MISUSE, OR INABILITY TO USE THIS PRODUCT. THIS LIMITED
WARRANTY SHALL NOT EXTEND TO ANYONE OTHER THAN THE ORIGINAL PURCHASER OF THIS
PRODUCT, IS NONTRANSFERABLE AND STATES YOUR EXCLUSIVE REMEDY.
Some provinces do not allow limitations on how long an implied warranty lasts, or the exclusion or limitation
of incidental or consequential damages, so the above limitations or exclusions may not apply to you.
This warranty gives you specific rights, and you may also have other rights, which vary from province to
province.
To obtain warranty service, please contact SAMSUNG at:
Samsung Electronics Canada inc.,
Customer Service 55 Standish Court Mississauga, Ontario L5R 4B2 Canada
1-800-SAMSUNG (726-7864)
www.samsung.com/ca (English)
www.samsung.com/ca_fr (French)
Visits by a Service Engineer to explain functions, maintenance or installation is not covered by warranty.
Please contact your Samsung call agent for help with any of these issues.
warranty 91
WY455AG 03159A 07 ENindd 91 2013 12 13 11:51:44
QUESTIONS OR COMMENTS?
[]
Scan this with your smartphone
Scan the QR code" or visit
www.samsung.com/spsn
to view our hetpfut
How-to Videos and Live Shows
*Requires reader to be installed on your smartphone
U.S.A 1-800-SAMSUNG(726-7864) www.samsung.com
MEXICO 01-800-SAMSUNG(726-7864) www.samsung.com
www.samsung.com/ca (English)
CANADA 1-800-SAMSUNG(726-7864) www.samsung.com/ca fr (French)
Visits by a Service Engineer to explain functions, maintenance or installation is not covered by warranty.
Please contact your Samsung call agent for help with any of these issues.
Code No. DC68-03159A-07_EN
\\TF455A(; 03159A 07 ENindd 92 2013 12 13 11:51:44
L vado a
manual del usuario
las posibilidades
Gracias pot adqulnr este producto Samsung.
Para recibN"un serwc_o mas completo o los
aocesorlos, reglstre SLI produoto er/ o oontaote cola
www.samsung.com!register
1-800-SAMSUNG (726-7864_
• F4 _= ,,, 1 =.... - l[[-'[/,d_l 1 -'_ 1- _ 114 _ "
o r oter t oave de
NUOYc
VRT PLUS TM(Tecnologia de Reducci6n de la Vibraci6n)
Esta lavadora Samsung minimiza el ruido y las vibraciones con sensores de vibraci6n 3D y
tecnologia de control inteligente para garantizar un funcionamiento silencioso.
2. Su Gran Capacidad
La capacidad extra grande de la lavadora Samsung le permite lavar un juego completo
de ropa de cama, un edredon king-size o hasta 32 toallas de baflo en una sola carga. AI
hacer menos cargas, se ahorra tiempo, dinero, agua y energia.
3. PowerFoam TM
Gracias al eficaz PowerFoam de Samsung se consigue una mejor limpieza con los
cuidados ma,s avanzados para el tejido. PowerFoam permite que el detergente se
distribuya uniformemente y que penetre las telas con mayor rapidez y profundidad.
4. PureCycle TM(ciclo de lavado del tambor)
Limpie su tambor con un solo boton. PureCycle se ha disenado especialmente para
eliminar la acumulacion de restos de detergente y suciedad en el tambor, el limitador y el
vidrio de la puerta sin necesidad de usar detergentes especiales.
5. SpeedSpray TM
La nueva tecnologia Speed Spray de Samsung le ahorra hasta un 25%* ma,s de tiempo
en el lavado de la ropa al acortar la duracion del lavado, aunque se mantienen los mismos
segmentos del proceso y la ropa queda igualmente limpia.
*Basado en cargas de 8 libras (3.62 kg), ciclo Normal (con un nivel de suciedad Normal
sin opciones) de las lavadoras de carga frontal de 4.3 pies cubicos anteriores y existentes
fabricadas hasta 2011 sin Speed Spray.
**Speed Spray funciona en los ciclos Normal, Ropa de cama, Vaporizacion profunda,
Eliminacion de manchas y Lavado ecologico fifo y el ahorro de tiempo puede variar de
acuerdo con los ciclos y los diversos tipos de carga y opciones.
6. Vaporizaci6n profunda
La funcion Vaporizacion profunda mejora la calidad de la limpieza y elimina todo tipo de
suciedad, para brindar unos resultados superiores de limpieza.
7. Control inteligente
La tecnologia innovadora del control inteligente de Samsung le permite controlar su
lavadora mediante dispositivos tecnologicos como los telefonos inteligentes. No necesita
esperar a que el ciclo termine. El control inteligente le permite controlar el proceso de
lavado y le informa una vez que el ciclo haya finalizado.
8. Smart Care
El sistema automa, tico de supervision de fallas Smart Care de Samsung detecta y
diagnostica problemas tempranamente y proporciona una solucion fa,cil y ra,pida. Con la
innovadora tecnologia de Control inteligente, tambien puede recibir alertas cuando hay un
problema mediante su telefono inteligente.
9. Dise_o elegante
El diseno elegante de esta lavadora combina armoniosamente con su ambiente.
10. Pantalla digital y jog dial central
Eljog dial central le permite seleccionar ciclos en ambas direcciones con facilidad y la
pantalla es fa,cil de usar y entender.
2 caracter sticas clave de su nueva avadora inteligente PowerFoam rM
WF455AG I%q59A 07 MESfndd 2 2013 12 13 11:49:23
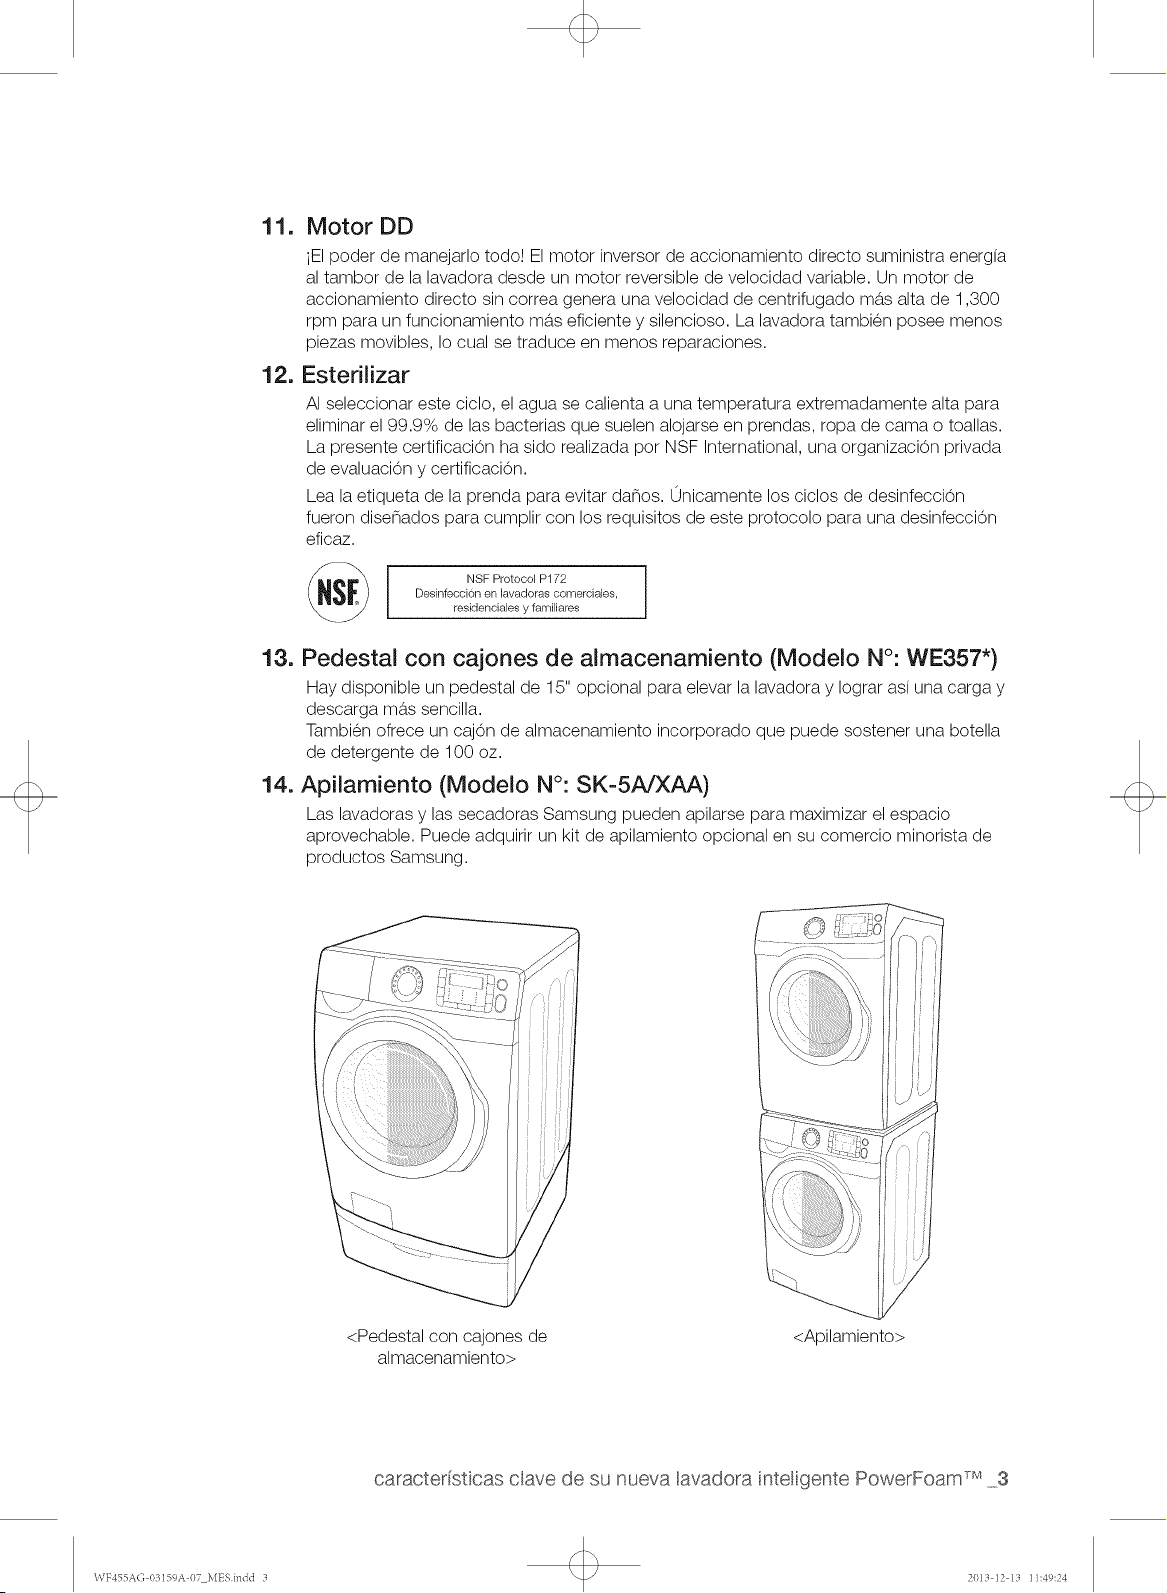
11. Motor DD
iEI poder de manejarlo todo! El motor inversor de accionamiento directo suministra energia
al tambor de la lavadora desde un motor reversible de velocidad variable. Un motor de
accionamiento directo sin correa genera una velocidad de centrifugado ma,s alta de 1,300
rpm para un funcionamiento ma,s eficiente y silencioso. La lavadora tambien posee menos
piezas movibles, Io cual se traduce en menos reparaciones.
12. Esterilizar
AI seleccionar este ciclo, el agua se calienta a una temperatura extremadamente alta para
eliminar el 99.9% de las bacterias que suelen alojarse en prendas, ropa de cama o toallas.
La presente certificaci0n ha sido realizada pot NSF International, una organizaci0n privada
de evaluaci0n y certificaci0n.
Lea la etiqueta de la prenda para evitar danos. 0nicamente los ciclos de desinfecci0n
fueron disenados para cumplir con los requisitos de este protocolo para una desinfecci0n
eficaz.
_S_ i NSF Protocol P172
Desinfeccion en lavadoras comerciales,
residenciales y familiares
13. Pedestal con cajones de almacenamiento (Modelo N°: WE357")
Hay disponible un pedestal de 15" opcional para elevar la lavadora y Iograr asi una carga y
descarga ma,s sencilla.
Tambien ofrece un caj0n de almacenamiento incorporado que puede sostener una botella
de detergente de 100 oz.
14. Apilamiento (Modelo N°: SK-5A/XAA)
Las lavadoras y las secadoras Samsung pueden apilarse para maximizar el espacio
aprovechable. Puede adquirir un kit de apilamiento opcional en su comercio minorista de
productos Samsung.
<Pedestal con cajones de
almacenamiento>
<Apilamiento>
caracter sticas clave de su nueva avadora intel gente PowerFoam rM3
WF455A(] 0fq59A 07 MESindd ft 201_t 12 l:t 11:49:24
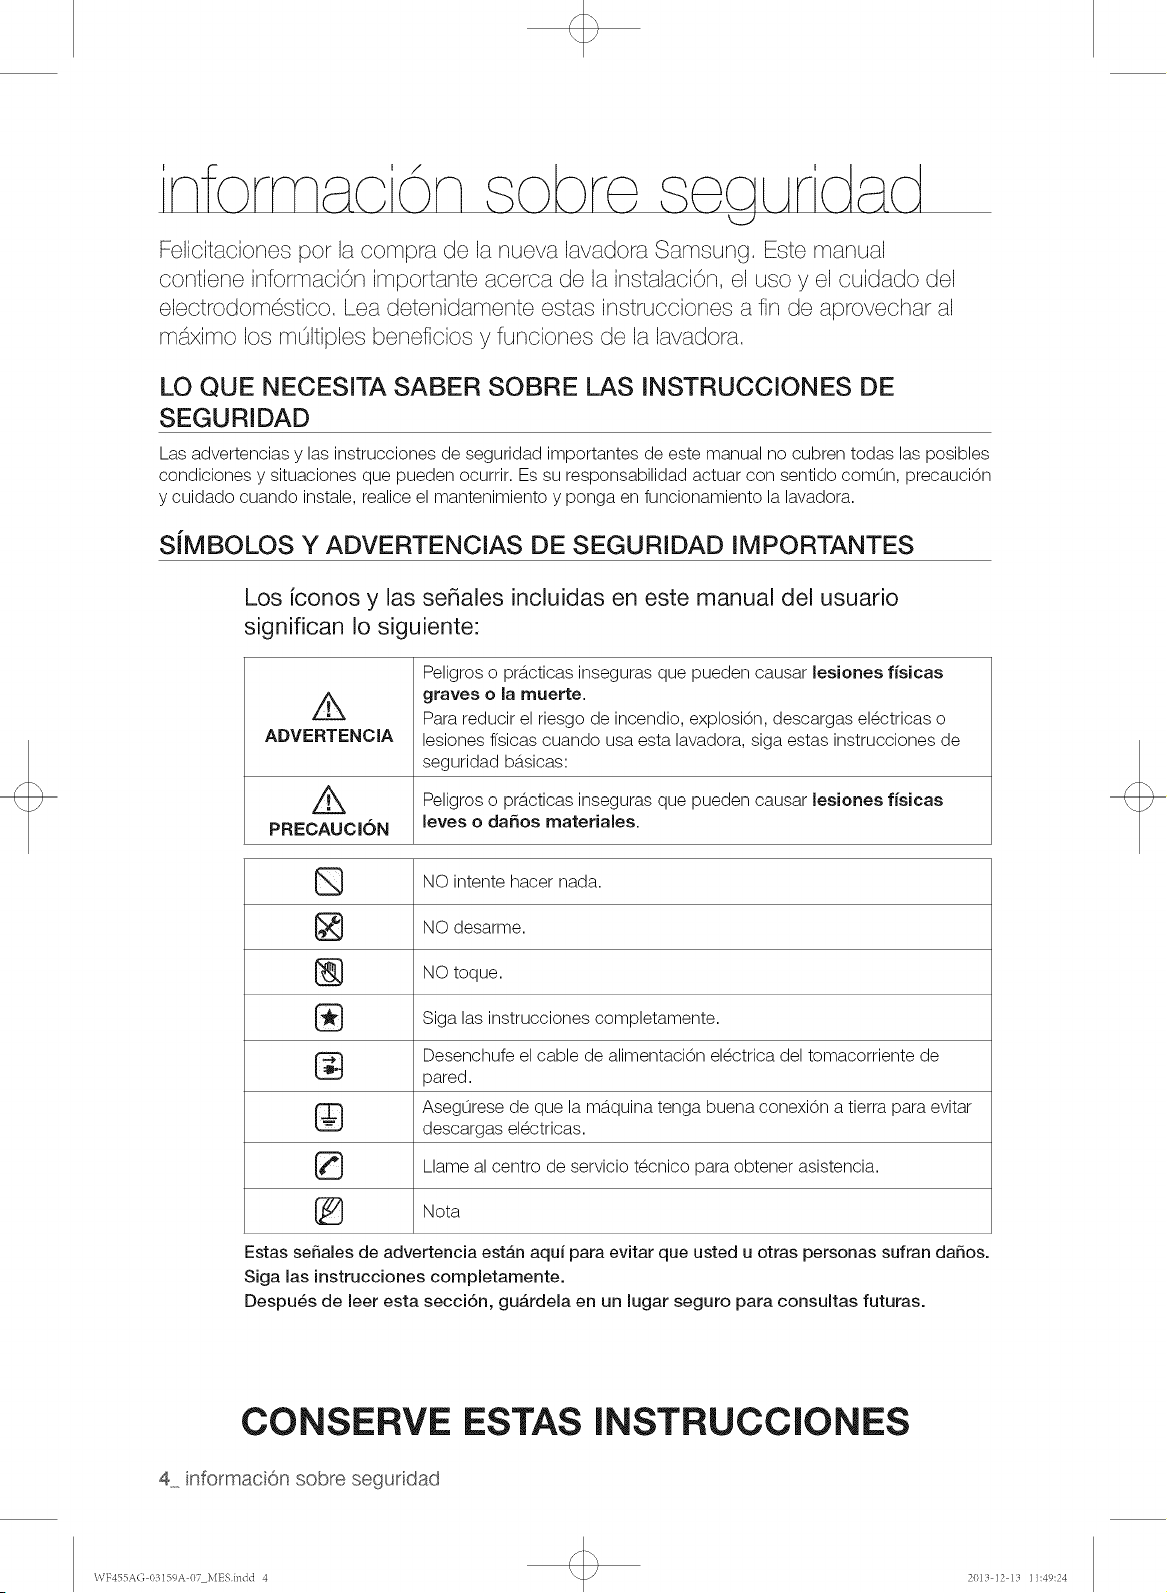
Felicitaciones pot la compra de la nueva lavadora Samsung. Este manual
contiene informaci0n importante acerca de la instalaci0n, el uso y el cuidado del
electrodomOstico. Lea detenidamente estas instrucciones a fin de aprovechar al
m_ximo los m01tiples beneficios y funciones de la lavadora.
LO QUE NECESITA SABER SOBRE [.AS INSTRUCCIONES DE
SEGURIDAD
Las advertencias y las instrucciones de seguridad importantes de este manual no cubren todas las posibles
condiciones y situaciones que pueden ocurrir. Es su responsabilidad actuar con sentido comLin, precaucion
y cuidado cuando instale, realice el mantenimiento y ponga en funcionamiento la lavadora.
SiMBOLOS Y ADVERTENCIAS DE SEGURIDAD IMPORTANTES
Los fconos y las se_ales incluidas en este manual del usuario
significan Io siguiente:
ADVERTENCIA
Peligros o pr_tcticas inseguras que pueden causar lesiones fisicas
graves o la muerte.
Para reducir el riesgo de incendio, explosion, descargas el_ctricas o
lesiones f(sicas cuando usa esta lavadora, siga estas instrucciones de
seguridad bb.sicas:
Peligros o prb.cticas inseguras que pueden causar lesiones fisicas
PRECAUCION leves o da_os materiales.
] NO intente hacer nada.
NO desarme.
NO toque.
Siga las instrucciones completamente.
Desenchufe el cable de alimentacion el_ctrica del tomacorriente de
pared.
AsegOrese de que la mdtquina tenga buena conexion a tierra para evitar
descargas el_ctricas.
Llame al centro de servicio t_cnico para obtener asistencia.
Nota
Estas sefiales de advertencia est#.n aqu{ para evitar que usted u otras personas sufran daSos.
Siga las instrucciones completamente.
Despu_s de leer esta secci6n, guardela en un lugar seguro para consultas futuras.
CONSERVE
4 informacion sobre segurdad
ESTAS INSTRUCCIONES
\VF455A(; 03159A 07 MESindd 4 2013 12 13 11:49:24
ADVERTENCIA
Para reducir el riesgo de incendio, descargas el_ctricas o lesiones fisicas cuando usa este
electrodom_stico, siga las instrucciones de seguridad b_sicas que figuran a continuaci6n:
1. Lea todas las instrucciones antes de usar el electrodom_stico.
2. No lave o seque prendas que han sido previamente limpiadas, lavadas, remojadas o
salpicadas con gasolina, solventes de limpieza en seco u otras sustancias inflamables o
explosivas, ya que emiten vapores que pueden prenderse fuego o explotar.
3. No permita que los ninos jueguen sobre la lavadora o dentro de ella. Se requiere de
supervision cuando el electrodom_stico es utilizado cerca de los ninos.
4. Antes de descartar el electrodom_stico o de trasladarlo para que se le efectOe el servicio
t_cnico, retire la puerta del compartimiento de la lavadora o la secadora.
5. No introduzca la mano en el electrodom_stico si el tambor est&.en movimiento.
6=
7.
8.
9=
No instale o guarde este electrodom_stico donde quede expuesto a factores clim&.ticos.
No modifique los controles.
No repare, reemplace ni intente realizar el mantenimiento de cualquier pieza del
electrodom_stico salvo que est_ recomendado espec(ficamente en las instrucciones de
mantenimiento del usuario o en las instrucciones de reparaciOn para el usuario publicadas y
que, a su juicio, usted tenga la habilidad para Ilevarlas a cabo.
No agregue gasolina, solventes de limpieza en seco u otras sustancias inflamables o
explosivas al agua del lavado. Estas sustancias emiten vapores que pueden prenderse fuego
o explotar.
10. En ciertas circunstancias, puede producirse gas hidrogeno en un sistema de agua caliente
que no se ha usado durante 2 semanas o ma.s. EL GAS HIDR©GENO ES EXPLOSIVO. Si el
sistema de agua caliente no fue utilizado durante dicho perbdo, antes de usar la lavadora o
la lavadora y la secadora combinadas, abra las Ilaves de agua caliente y deje correr el agua
por varios minutos. De esta manera, se eliminar&, el gas hidrogeno acumulado. Dado que el
gas es inflamable, no fume ni use una llama abierta en ese momento.
Z_ Advertencias de la disposici6n 65 del Estado de California:
ADVERTENCIA:Este producto contiene qdmicos que se sabe en el estado de California que
causan cb.ncer y toxicidad reproductiva.
CONSERVE ESTAS INSTRUCCIONES
informacion sobre segurdad 5
\\TF455A(; 03159A 07 MESindd 5 2013 12 13 11:49:24
ADVERTENCIAS FUNDAMENTALES PARA LA INSTALACION
®
Enchufe el cable de alimentaciOn en un tomacorriente de pared de 120 V / 60 Hz / 15 A CA o
superior y utilice el tomacorriente sOlocon este electrodomestico. No use un cable prolongador.
Compartir el tomacorriente de pared con otros electrodomesticos, utilizando un
multicontacto o un cable prolongandor, puede provocar un incendio o una descarga
electrica.
No utilice un transformador electrico. Puede provocar un incendio o una descarga electrica.
Asegurese de que el voltaje, la frecuencia y el amperaje del tomacorriente de pared coincidan
con las especificaciones electricas del producto.
La instalaciOn de este electrodomestico la debe efectuar un tecnico cualificado o una empresa
de servicios.
Si no Io hace, puede provocar una descarga electrica, un incendio, una explosion, problemas
con el producto o lesiones.
Retire regularmente todas las sustancias extraflas, como polvo o agua, de los terminales y los
puntos de contacto de la alimentaciOn con un patio seco.
Desenchufe el cable de alimentaciOn y I(mpielo con un patio seco.
Si no Io hace puede provocar un incendio o una descarga electrica.
Enchufe el cable de alimentaciOn en un tomacorriente de pared en la direcciOn adecuada de
manera que el cable baje hacia el suelo.
Si enchufa el cable de alimentaciOn en el tomacorriente en la direcciOn opuesta, los cables
electricos del interior del cable pueden daflarse y provocar un incendio o una descarga
electrica.
Este electrodomestico debe conectarse a tierra correctamente.
La toma de tierra no se ha de conectar a una conducciOn de gas o de agua ni a la I(nea
telefOnica.
La conexiOn a tierra inadecuada puede provocar un incendio, una descarga electrica, un
incendio o problemas con el producto.
Nunca enchufe el cable de alimentaciOn a un tomacorriente que no este conectado a tierra
correctamente y asegurese de que guarde conformidad con los cOdigos locales y nacionales.
Q
No instale este electrodomestico cerca de un calefactor o materiales inflamables.
No instale este electrodomestico en un lugar humedo, grasiento o cubierto de polvo, ni Io
exponga a la luz directa del sol o al agua (gotas de Iluvia).
No instale este electrodomestico en un lugar donde pueda haber fugas de gas.
Puede provocar un incendio o una descarga electrica.
Enchufe el cable de alimentaciOn firmemente en el tomacorriente de pared. No utilice un cable
de alimentaciOn daflado ni un tomacorriente que este flojo.
Puede provocar un incendio o una descarga electrica.
No tire del cable de alimentaciOn ni Io doble excesivamente.
No tuerza ni ate el cable de alimentaciOn.
No cuelgue el cable de alimentaciOn de un objeto metb.lico, no coloque objetos pesados sobre
el, no inserte el cable de alimentaciOn entre objetos ni Io empuje en un espacio detrb.s del
electrodomestico.
Puede provocar un incendio o una descarga electrica.
CONSERVE
6 informaciOn sobre segurdad
ESTAS INSTRUCClONES
\VF455A(; 1)3159A 07 MESindd 6 2013 12 13 11:49:24
No tire del cable de alimentacion para desenchufarlo.
Desenchufe el cable de alimentacion sujeta.ndolo por el enchufe.
Si no Io hace puede provocar un incendio o una descarga el_ctrica.
_Si el enchufe el cable de alimentacion est&.n el de
o danados,
comun[quese
con centro
servicio ma.s cercano.
PRECAUCIONES PARA LA INSTALACION
PRE_UCJO_
_ Coloque el electrodom_stico de tal acceder f&.cilmente al
manera
que
se
pueda
tomacorriente.
Si no Io hace puede provocar un incendio o una descarga causados por fugas
el_ctricas.
Instale el electrodom_stico sobre una superficie nivelada que pueda soportar su peso.
Si no Io hace pueden producirse vibraciones anormales, ruidos o problemas con el
producto.
_ esenchufe el electrodomestico si no Io va a utilizar durante un per(odo prolongado o
durante una tormenta con aparato el_ctrico.
Si no Io hace puede provocar un incendio o una descarga el_ctrica.
ADVERTENCIAS FUNDAMENTALES PARA EL USO
A_tERTE_
Si el electrodom_stico se inunda, descon_ctelo inmediatamente y Ilame al centro de
, , r
servlclO mas cercano.
Si el electrodom_stico genera ruidos extranos, olores a quemado o humo, descon_ctelo
inmediatamente y Ilame al centro de servicio m&.scercano.
Si no Io hace puede provocar un incendio o una descarga el_ctrica.
En caso de fugas de gas (como propano, LP, etc.), ventile inmediatamente sin tocar el
enchufe. No toque el electrodom_stico ni el cable de alimentacion.
No utilice un ventilador.
Una chispa puede provocar un incendio o una explosion.
No lave prendas contaminadas con gasolina, queroseno, benceno, disolventes de pinturas,
alcohol u otras sustancias inflamables o explosivas.
Puede provocar una descarga el_ctrica, un incendio o una explosion.
No abra la puerta de la lavadora por la fuerza mientras est_ en funcionamiento (lavado a
alta temperatura/secado/centrifugado).
El agua que salga de la lavadora puede causar quemaduras o convertir el suelo en
resbaladizo.
Puede causar lesiones personales.
Abrir la puerta por la fuerza puede danar el producto o causar lesiones personales.
Aseg0rese de quitar el embalaje (goma espuma, poliestireno) del fondo de la lavadora antes
de utilizarla.
No introduzca las manos bajo la lavadora.
Puede provocar lesiones personales.
CONSERVE ESTAS INSTRUCCIONES
informacion sobre segurdad 7
\VF455A(; 03159A 07 MESindd 7 2013 12 13 11:49:24
toque con manos mojadas.
No el enchufe las
Puede causar lesiones personales.
No apague el electrodom_stico desenchuf_tndolo mientras est_ en funcionamiento.
Si vuelve a enchufar el electrodom_stico en el tomacorriente puede originar una chispa y
causar una descarga el_ctrica o un incendio.
Mantenga los materiales del embalaje fuera del alcance de los ninos, ya que son peligrosos
para _stos.
Si un nino introduce la cabeza en una bolsa puede asfixiarse.
No permita que los ninos o las personas inestables utilicen la lavadora sin supervision.
Si Io hace puede provocar una descarga el_ctrica, quemaduras o lesiones.
No introduzca la mano ni objetos de metal bajo la lavadora mientras est_ en
funcionamiento.
Puede provocar lesiones personales.
Antes de poner la ropa a lavar o de sacar la ropa limpia, compruebe que el cajon para
detergente est_ cerrado.
Si el cajon para detergente ester abierto, se podr[a golpear la cabeza con _1y lesionarse.
No trate de desensamblar ni modificar la lavadora usted mismo.reparar,
No utilice un fusible (de cobre, cable de acero, etc) que no est_ normalizado.
Si necesita reparar o volver a instalar el electrodom_stico, comun(quese con el centro de
servicio ma.s cercano.
Si no Io hace puede provocar una descarga electrica, un incendio, problemas con el
producto o lesiones.
Si entra agua en cualquier parte del electrodom_stico que no sea el tambor, desenchufe el
cable de alimentacion y comun(quese con el centro de servicio m_tscercano.
Si no Io hace puede provocar un incendio o una descarga el_ctrica.
Si se afloja la manguera de suministro de agua del grifo y se inunda el electrodom_stico,
desenchufe el cable de alimentacion.
Si no Io hace puede provocar un incendio o una descarga el_ctrica.
Si entra alguna sustancia extrana en la maquina, desenchufe el cable de alimentacion y
comun(quese con el centro de servicio mas cercano.
Si no Io hace puede provocar un incendio o una descarga el_ctrica.
PRECAUCIONES DE USO
_ECA_
®
Si la lavadora esta contaminada por sustancias extranas, tales como detergente, tierra,
restos de alimentos, etc., desenchufe el cable de alimentacion y limpie la lavadora con un
pano suave humedecido.
Si no Io hace puede producirse decoloracion, deformacion, danos u oxido.
Si se Io golpea con fuerza, el vidrio frontal puede romperse. Sea cuidadoso cuando utilice
la lavadora.
La rotura del cristal puede causar lesiones.
CONSERVE
8 informaciOn sobre segurdad
ESTAS INSTRUCClONES
\VF455A(; 03159A 07 MESindd 8 2013 12 13 11:49:24

Ante una falla de suministro de agua o cuando se vuelve a conectar la manguera de
suministro, abra lentamente la Ilave del agua.
Abra lentamente la Ilave del agua tras un periodo prolongado de falta de uso.
La presi0n del aire de la manguera de suministro o de la conduccion de agua puede
danar una pieza o provocar fugas de agua.
Si durante el funcionamiento hay una falla en el drenaje, controlelo.
Si se utiliza la lavadora inundada por una falla en el drenaje, puede provocar una
descarga el_ctrica o un incendio.
Introduzca completamente la ropa en la lavadora para que no pueda quedar atrapada por
la puerta.
Si la ropa queda atrapada por la puerta, puede danarse la ropa o la lavadora, o puede
haber fugas de agua.
AsegOrese de que la Ilave del agua est_ cerrada cuando la lavadora no se utiliza.
AsegOrese de que el tornillo del conector de la manguera de suministro del agua est_
conectado firmemente a la canilla y correctamente apretado.
Si no Io hace puede provocar danos materiales o lesiones.
Procure que la junta de goma y el vidrio de la puerta frontal no est_n contaminados por
sustancias extranas (como restos, hilos, cabellos, etc.)
Si una sustancia extrana queda atrapada en la puerta o si la puerta no est&.bien cerrada,
puede producirse una fuga de agua.
Antes de utilizar el producto, abra la Ilave del agua y compruebe si el conector de la
manguera de suministro del agua esta. firmemente asegurado y que no haya fugas de agua.
Si los conectores de la manguera de suministro del agua est&.n flojos, puede haber fugas
de agua.
El producto adquirido esta. disenado exclusivamente para uso dom_stico.
Su utilizacion con fines comerciales se considera un uso incorrecto del producto. En tal
caso el producto no quedara, cubierto por la garantfa esta.ndar que ofrece Samsung y no se
podra, atribuir a Samsung ninguna responsabilidad por el malfuncionamiento o los danos
resultantes de este uso incorrecto.
Si no se realiza el lavado y la ropa se deja por un tiempo despu_s de agregar detergente o
aplicar productos quitamanchas o de tratamiento previo, la ropa puede decolorarse.
Seleccione el ciclo y la temperatura recomendados dependiendo de la ropa que va a lavar,
clasifique las prendas segOn la solidez del color y seleccione el ciclo apropiado.
AsegOrese de que no haya objetos extranos como clips, botones o monedas en la ropa
que va a lavar. Antes del lavado separe lave la ropa sucia de la que est&.relativamente
limpia, y la delicada de las telas m&.s resistentes.
Si una prenda est&. manchada, IdwelaIo m&.spronto posible. Antes de utilizar productos
quitamanchas o detergente, pruebe la solidez del color aplicando una pequena cantidad en
una costura interior.
CONSERVE ESTAS INSTRUCCIONES
informacion sobre segurdad 9
WF455A(] 0fq59A 07 MESindd 9 2013 12 13 11:49:24
Q
No se para encima del aparato ni coloque objetos (come ropa, velas o cigarrillos
encendidos, plates, productos qufmicos, objetos meta.licos, etc.) encima de _ste.
Puede provocar una descarga el_ctrica, un incendio, problemas con el producto o
lesiones.
No haga funcionar el electrodom_stico con las manes mojadas.
Puede causar lesiones personales.
No roc(e materiales vol&.tiles, come insecticidas, en la superficie del electrodom_stico.
Adema.s de ser perjudiciales para las personas, tambi_n pueden provocar una descarga
el_ctrica, un incendio o problemas con el producto.
No coloque objetos que generen campos electromagn_ticos cerca de la lavadora.
Puede causar lesiones per un malfuncionamiento.
No toque el agua que se drena durante el lavado a alta temperatura o durante el oielo de
secado ya que est&.caliente.
Puede causar lesiones personales o quemaduras.
No lave, centrifugue ni seque alfombrillas o prendas impermeables(*).
No lave alfombrillas gruesas y espesas aunque Ileven la marca de lavado en la etiqueta.
Se pueden causar lesiones o danar la lavadora, las paredes, el suelo o la ropa debido a
vibraciones anormales.
* Ropa de cama de lana, fundas de Iluvia, ropa para pescar, pantalones de esqu(,
bolsas de dormir, cubiertas de panales, cha.ndales, cubiertas de bicicletas, mobs y
automoviles, etc.
No haga funcionar la lavadora sin el cajon del detergente.
Se puede provocar una descarga el_ctrica o lesiones debido a fugas de agua.
No toque el interior de la tina durante o inmediatamente despu_s del secado, ya que est&.
caliente.
Puede causar quemaduras.
No introduzca las manes en el dosificador de detergente despu_s de abrirlo.
Se puede causar lesiones en la mane si _sta queda atrapada.
No introduzca ning0n objeto que no sea ropa (per ejemplo, zapatos, restos de comida o
animales) en la lavadora.
Esto puede causar vibraciones anormales que pueden danar la lavadora y, en el case de
las mascotas, puede provocar lesiones graves, o incluso la muerte.
No presione los botones con objetos afilados, come alfileres, cuchillos, las unas, etc.
Puede provocar una descarga el_ctrica o lesiones personales.
No lave ropa contaminada per aceites, cremas o Iociones que se utilizan normalmente en
los establecimientos para el cuidado de la piel o en las clfnicas de masajes.
Se puede deformar la junta de goma y provocar fugas de agua.
No deje objetos de metal (tales come clips, horquillas, etc.) ni lejfa en el tambor durante
perbdos prolongados.
Se puede oxidar el tambor.
Si aparece 0xido en la superficie del tambor, aplique un agente limpiador neutro sobre la
superficie y utilice una esponja para limpiarla. Nunca utilice un cepillo de metal.
CONSERVE
10 informaciOn sobre segurdad
ESTAS INSTRUCClONES
\\TF455A(; 03159A 07 MESindd 10 2013 12 13 11:49:24
A_E_TEN_
No utilice detergentes de limpieza en seco directamente ni lave, enjuague ni centrifugue
ropa contaminada pot detergentes de limpieza en seco.
Se puede producir una combusti6n esponta.nea o un incendio pot el calor de la
oxidaci6n del aceite.
No utilice agua caliente de los dispositivos de calentamiento o enfriamiento del agua.
Podrfa tenet problemas con la lavadora.
No utilice jab6n natural para lavado a mano en la lavadora.
Si se endurece y se acumula en el interior de la lavadora, puede causar problemas en el
producto, como decoloraci6n, 6xido y malos olores.
No lave prendas grandes como ropa de cama dentro de una red.
De no hacerlo se pueden producir lesiones personales pot las vibraciones anormales.
Coloque los art(culos m&.spequenos, como las medias y la lencer(a, dentro de una red.
No utilice detergente endurecido.
Si se acumula en el interior de la lavadora, puede provocar fugas de agua.
No lave alfombras ni felpudos.
Si lava alfombras o felpudos, se acumulara arena en el interior de la lavadora. Puede
provocar errores como la falta de drenaje.
AI cerrar la puerta tenga cuidado de no atrapar los dedos de los ninos.
Puede provocar lesiones personales.
INSTRUCCIONES FUNDAMENTALES PARA LA LIMPIEZA
No limpie el electrodom_stico rociando directamente agua dentro de _1.
No utilice un agente de limpieza muy &.cido.
No utilice benceno, disolventes ni alcohol para limpiar el electrodom_stico.
Puede provocar decoloraci6n, deformaci6n, danos, incendio o descarga el_ctrica.
Antes de la limpieza o las tareas de mantenimiento, desenchufe el electrodom_stico del
tomacorriente de la pared.
Si no Io hace puede provocar un incendio o una descarga el_ctrica.
CONSERVE ESTAS INSTRUCCIONES
informaci6n sobre segurdad 11
\VF455A(; 03159A 07 MESindd 11 2013 12 13 11:49:25
AVISO REGULATORIO
1, Aviso para FCC
_ PRECAUCI6N FCC:
Todos los cambios y modificaciones que no cuenten con la aprobacion expresa de la parte
responsable del cumplimiento invalidara, la autoridad del usuario para operar el equipo.
Este dispositivo cumple con la Parte 15 de las Normas de la FCC. El funcionamiento se
encuentra sujeto a las siguientes dos condiciones:
1. Este aparato no puede causar interferencia danina, y
2o Este aparato debe aceptar la recepcion de cualquier interferencia, incluidas aquellas que
puedan causar un funcionamiento indeseado.
Producto disponible en el mercado de Estados Unidos/Canadb., sOlo puede operarse el canal
1-11. No es posible seleccionar otros canales.
DECLARACION DE LA FCC:
Este equipo ha sido sometido a pruebas y se ha determinado que se encuentra dentro de los
I(mites para los dispositivos digitales clase B, de acuerdo con la parte 15 de las Normas de la
FCC. Dichos I(mites han sido disenados para proporcionar una proteccion razonables contra la
interferencia danina en una instalacion residencial.
Este equipo genera, utiliza y puede irradiar energfa de frecuencias de radio y, si no se Io
instala y utiliza de acuerdo con las instrucciones, puede provocar interferencia danina alas
comunicaciones de radio. Sin embargo, no existe garant(a alguna de que no habr&,interferencia
en una instalacion determinada. Si el equipo provoca interferencia danina a la recepcion de radio
o television, que puede determinarse al encender y apagar el equipo, se sugiere que el usuario
trate de corregir la interferencia mediante una o m&.sde las siguientes medidas:
• Reoriente o reubique la antena receptora
Aumente la distancia entre el equipo y el receptor
Conecte el equipo en una toma de un circuito diferente de aquel donde est&.conectado el
receptor
Consulte a su distribuidor o a un t_cnico experimentado en radio/TV para obtener ayuda.
DECLARACION DE LA FCC SOBRE LA EXPOSICION A LA RADIACION:
Este equipo cumple con los I(mites de exposicion a la radiacion establecidos por la FCC para
un entorno no controlado. Este equipo debe instalarse y utilizarse con una distancia m(nima de
20cm entre el radiador y su cuerpo. Este aparato y su/s antena/s no deben ubicarse ni utilizarse
junto con cualquier otra antena o transmisor.
CONSERVE
rl2 informacion sobre segurdad
ESTAS INSTRUCCIONES
\\TF455A(; 03159A 07 MESindd 12 2013 12 13 11:49:25
2. Aviso IC
El t_rmino "IC" antes del nOmero de certificaciOn de radio significa Linicamente que se han
cumplido las especificaciones t_cnicas
de la Industria Canadiense. El funcionamiento se encuentra sujeto a las siguientes dos
condiciones: (1) este aparato no puede causar interferencia y (2) este aparato debe aceptar
cualquier interferencia, incluidas aquellas que puedan causar un funcionamiento indeseado.
Este aparato digital Clase B cumple con la norma canadiense ICES-003.
Cet appareil num_rique de la classe Best conforme B.la norme NMB-003 du Canada.
Producto disponible en el mercado de Estados Unidos/Canadb., s01o puede operarse el canal
1-11. No es posible seleccionar otros canales.
DECLARACION DE LA IC SOBRE LA EXPOSICION A LA RADIACION:
Este equipo cumple con los Ifmites de exposiciOn a la radiacion RSS-102 establecidos por la
IC para un entorno no controlado. Este equipo debe instalarse y utilizarse con una distancia
minima de 20cm entre el radiador y su cuerpo. Este aparato y su/s antena/s no deben ubicarse
ni utilizarse junto con cualquier otra antena o transmisor.
CONSERVE ESTAS INSTRUCCIONES
informaci6n sol}re segur dad 13
\\rF455A(; 1)3159A 07 MESindd 13 2013 12 13 11:49:25
contendo
INSTALACION DE LA LAVADORA
i
16 Desembalaje de la lavadora
16 DescripciOn general de la lavadora
17 Instalacion electrica
17 Conexion a tierra
17 Agua
17 Drenaje
18 Suelo
18 Consideraciones acerca de la ubicacion
18 Instalacion del electrodomestico en un
gabinete o en un hueco
18 Instalacion bajo contador (s01olavadora)
19 Con pedestal opcional o kit de apilamiento
20 Nota importante para el instalador
20 Diagrama de instalacion
MANUAL DE INSTRUCCIONES 23 COmo cargar la lavadora
23 COmo comenzar
LAVADO DE UNA CAFIGA DE ROPA
iii
24 DescripciOn general del panel de control
26 Inicio retardado
27 Seguro para ninos
28 S01ocentrifugado
28 Luz del tambor
28 Ma,s prendas
28 Mi Ciclo
29 DEEP STEAM(VAPOR PROFUNDO)
29 Smart Care
30 Lavado de prendas con el selector de
ciclos
30 ATC (control autom_.tico de temperatura)
31 ConfiguraciOn del Control inteligente
31 Configuracion del enrutador ala,mbrico/
inala,mbrico
31 Verifique antes de las instalacion
32 Conectarse a la red utilizando el ajuste
WPS
33 Conectarse a la red utilizando el ajuste AP
34 Uso de la aplicaciOn mOvil (Android)
46 Uso de la aplicaciOn mOvil (iOS)
56 Registrar su lavadora
58 Uso del detergente
58 Funciones
14 contendo
\VF455A(; I)3159A 07 MESindd 14 2013 12 13 11:49:25

MANTENIMIENTO DE LA LAVADORA 60 Limpieza del exterior
60 Limpieza del interior
61 Limpieza de los dosificadores
61 C6mo guardar la lavadora
62 Limpieza del filtro de residuos
63 Limpieza del sello/fuelle de la puerta
63 Mantenimiento de la cubierta superior y del
marco frontal
64 Pure Cycle _M
GUiA DE SOLUCI()N DE PROBLEMAS
\
65 Controle estos puntos si su lavadora...
67 C6digos de informaci6n
69 Preguntas y respuestas sobre la
configuraci6n de red
APENDICE
71 Tabla de indicaciones sobre la tela
72 Tabla de ciclos
74 Ayuda al medioambiente
74 Declaraci6n de conformidad
74 Especificaciones
75 Open Source Announcement
conten do 15
W}:455AG 03159A 07 MESfndd 15 2013 12 13 11:49:25
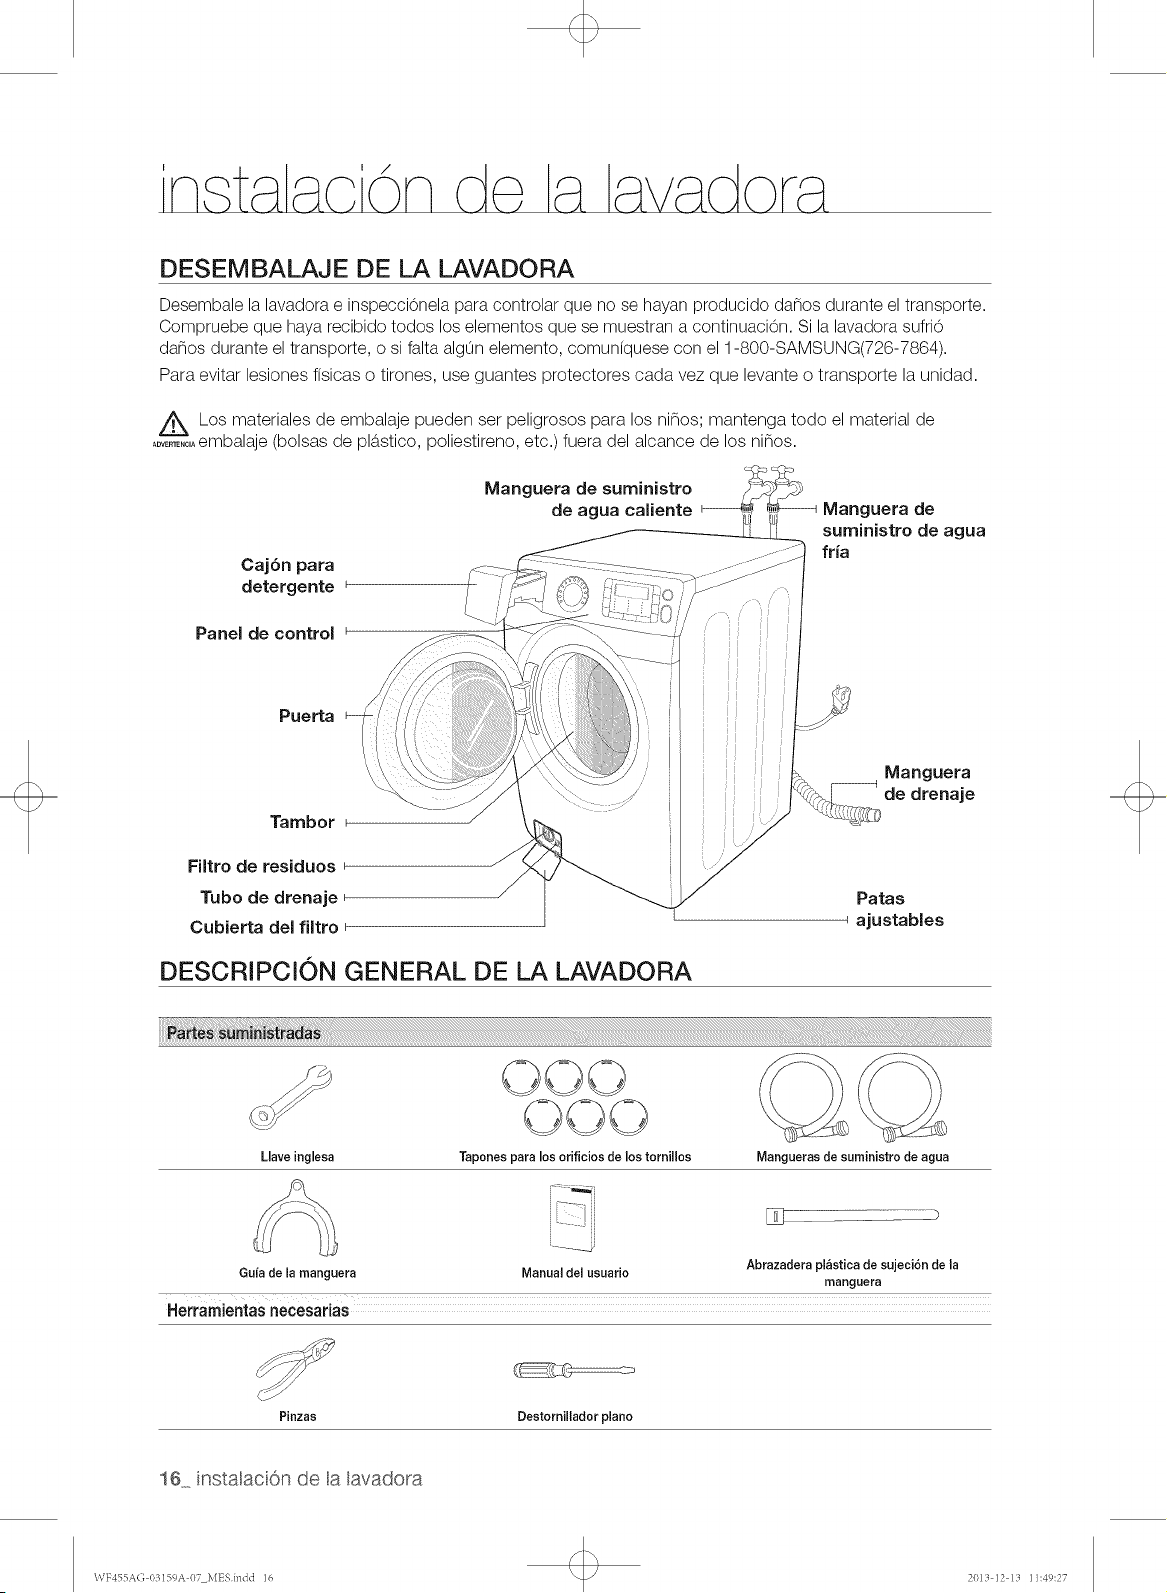
DESEMBALAJE DE LA LAVADORA
Desembale la lavadora e inspecciOnela para controlar que no se hayan producido danos durante el transporte.
Compruebe que haya recibido todos los elementos que se muestran a continuaciOn. Si la lavadora sufri0
danos durante el transporte, o si falta algOnelemento, comunfquese con el 1-800-SAMSUNG(726-7864).
Para evitar lesiones fisicas o tirones, use guantes protectores cada vez que levante o transporte la unidad.
A Los materiales de embalaje pueden set peligrosos para los ninos; mantenga todo el material de
....-"_, ,Aembalaje bolsas de pla.stico, poliestireno, etc.) fuera del alcance de los nines.
Cajon para
detergente
Manguera de suministro
de agua caliente
Manguera de
suministro de agua
fria
Panel de control
Puerta
Tambor
Filtro de residuos
/
Tubo de drenaje J /
Cubierta del filtro
DESCRIPCi0N GENERAL DE LA LAVADORA
Manguera
de drenaje
Paras
ajustables
O©©
Llave inglesa Tapones para losorificios de los tornillos Mangueras de suministro de agua
)
...... _j
Guia de la manguera Manual del usuario Abrazadera pi_stica de sujeci6n de la
manguera
Herramientas necesarias
Pinzas Destornillador piano
16 instalacOn de a avadora
\\TF455A(; 03159A 07 MESindd 16 2013 12 13 11:49:27

REQUISITOS BASICOS ACERCA DE LA UBICACi0N
Instalaci6nelectrica
* Fusibleo disyuntorde 120voltios,60 Hz,15A
Se recomiendacontarconun circuitoderivadoindividualdestinadounicamentea lalavadora.
Lalavadoraest,.equipadacon uncabledealimentaci0n.
A
NUNCAUTUCEUNCABLEPROLONGADOR.
PBECAU¢ION
Conexi6n a tierra
ESPRECISOQUE ESTEELECTRODOMESTICOESTECONECTADOA TIERRA.
Esteelectrodomesticodebeconectarsea tierra.Encasode queelelectrodomesticofuncionerealo sedescomponga,la
conexiOna tierrareducira,el riesgode descargaelectricaal ofrecerunaviade menosresistenciaa lacorrienteelectrica.
Esteelectrodomesticoest,.equipadocon uncabledealimentaci0nquecuentaconun enchufedetrespinescon
conexiOna tierraparautilizarenun tomacorrienteconconexi0na tierra.
Elenchufedebeconectarseaun tomacorrienteadecuadoqueestecorrectamenteinstaladoy conectadoatierraen
conformidadcontodosloscOdigosy ordenanzaslocales.
Z_ La conexi0ninadecuadadelconductordeconexi0na tierradelequipopuededarcomoresultadoun riesgode
......... descargaelectrica.Consultea unelectricistao tecnicocalificadosi lesurgendudasacercade si laconexiona
tierradelelectrodomesticoesadecuada.Nomodifiqueel enchufeprovistoconelelectrodomestico;si noentraen
eltomacorriente,solicitea unelectricistacalificadoqueinstaleeltomacorrienteapropiado.
PRECAUCIONESDE SEGURIDADIMPORTANTES
Paraevitarelriesgode incendio,descargaelectricao lesionesfisicasinnecesarias,todo elcableadoy laconexi0n
a tierradebenrealizarseenconformidadconelC0digoElectricoNacional,ANSI/FNPA,Nro.70,larevisionma.s
reciente,y loscodigosy ordenanzaslocales.Esexchsivaresponsabilidaddelpropietariodelelectrodomestico
proveerlosservicioselectricosadecuadosparaesteelectrodomestico.
/_k NUNCACONECTEUNCABLEA TIERRAATUBERiASDEPLOMERIA,TUBERiASDEGASO CANERiASDE
........_o, AGUACALIENTEDEP_STICO.
Agua
ParaIlenarcorrectamentelalavadoraeneltiempoadecuado,serequiereunapresi0ndeaguade20 a 116psi(137-800kPa).
Unapresionde aguainferiora 20 psipuedeocasionarfallasen lav6Jvuladeaguao impedirquelava.lvulade aguase
cierrecompletamente.O puedeprolongareltiempode Ilenadoma.salia.de Iopermitidoporloscontrolesde la lavadora
y que,comoresultado,lalavadoraseapague.Enloscontrolesseestableceun limitede tiempoen casode queuna
manguerainternase afiojey seinundelacasa.
LasIlavesde aguadebenestarcolocadasdentrode los4 pies(122cm.)de distanciade laparteposteriordela lavadora
paralasmanguerasde entradaprovistasconella.
Lasmanguerasdeentradaaccesoriasesta.ndisponiblesen variaslongitudeshasta10 pies(305cm.)paraIlaves
queseencuentrenalejadasde laparteposteriorde lalavadora.
Paraevitarlaposibilidadde queseproduzcandaflosa causadelagua:
/k
ADVER1EN¢IA
ib,
PRECAUCION
• LasIlavesde aguadebenserdefa.cilacceso.
CierrelasJlavescuandonouseJalavadora.
• VerifiqueperiOdicamentequeno hayaperdidasde aguaqueprovengande losaccesoriosde lamanguerade
entradade agua.
CONTROLEQUETODASLASCONEXIONESDELAVALVULAY DELA LLAVEDEAGUANOPRESENTEN
PERDIDAS.
Usaraguasduraspuedeprovocarquelav6Jvuladesuministrodeaguanofuncionecorrectamente.
Drenaje
Laalturarecomendadade latoma deaguaesde 18pulg.(46cm.).Lamanguerade drenajedebecoJocarsea travesdel
ganchoparadichamangueray dirigirsehacialatomade agua.Latomade aguadebetenerlasuficienteIongitudcomo
paraaceptarel di6.metroexteriorde lamanguerade drenaje.Lamanguerade drenajevieneconectadadefa.brica.
instalaciOn de a avadora 17
\VF455A(; 03159A 07 MESindd 17 2013 12 13 11:49:27
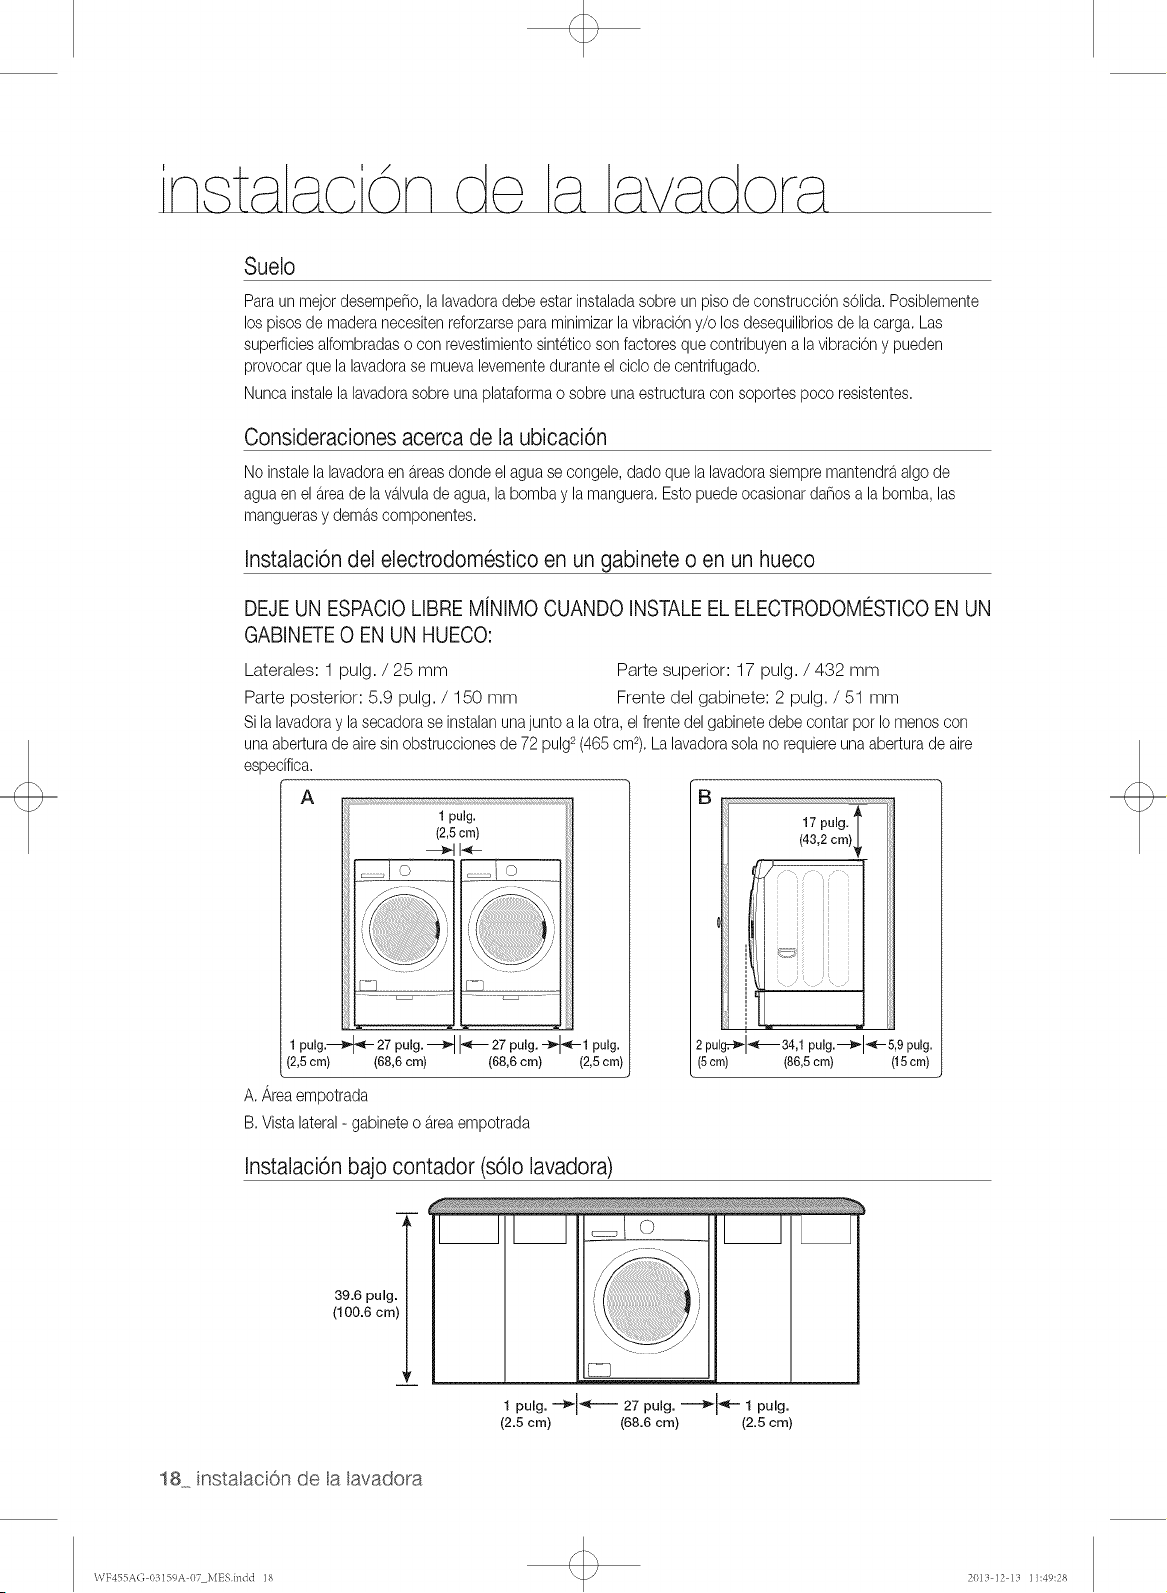
Suelo
Paraun mejordesempefio,la lavadoradebe estarinstaladasobreun pisode construcciOnsolid& Posiblemente
lospisos de maderanecesitenreforzarsepara minimizarlavibraciOny/o los desequilibriosde la carga.Las
superficiesalfombradaso con revestimientosinteticoson factoresque contribuyena lavibraciOny pueden
provocarque lalavadorase muevalevementeduranteel ciclo de centrifugado.
Nuncainstalela lavadorasobre unaplataformao sobre unaestructuracon soportespoco resistentes.
Consideraciones acerca de la ubicaci6n
No instalela lavadoraen areasdondeel aguase congele,dado que la lavadorasiempremantendraalgo de
aguaen el areade lava.lvulade agua,la bombay la manguera.Estopuedeocasionardaflosa labomba, las
manguerasy demascomponentes.
Instalaci6n del electrodomestico en un gabinete o en un hueco
DEJE UN ESPACIO LIBRE MiNIMO CUANDO INSTALE EL ELECTRODOMESTICO EN UN
GABINETE 0 EN UN HUECO:
Laterales: 1 pulg. / 25 mm Parte superior: 17 pulg. / 432 mm
Parte posterior: 5.9 pulg. / 150 mm Frente del gabinete: 2 pulg. / 51 mm
Sila lavadoray lasecadorase instalanunajunto a la otra, elfrentedel gabinetedebe contarpot Iomenos con
unaaberturade airesin obstruccionesde72 pulg2(465cm2).La lavadorasolano requiereunaaberturade aire
especifica.
17 pulg. f
(43,2 cm)_
1
I i ! i i
1
1
2po1_1_--34,1pulg.--_l÷5,9polg.
(5crn) (86,5 cm) (15cm)
A. Areaempotrada
B. Vistalateral- gabineteo &ea empotrada
Instalaci6n bajo contador (s61olavadora)
39.6 pulg.
(100.6 cm)
m
_L
i\ //
1 -- 27 1po,o.
(2.5 cm) (68.6 cm) (2.5 cm)
18 instalacOn de a avadora
\VF455A(; 03159A 07 MESindd 18 2013 12 13 11:49:28
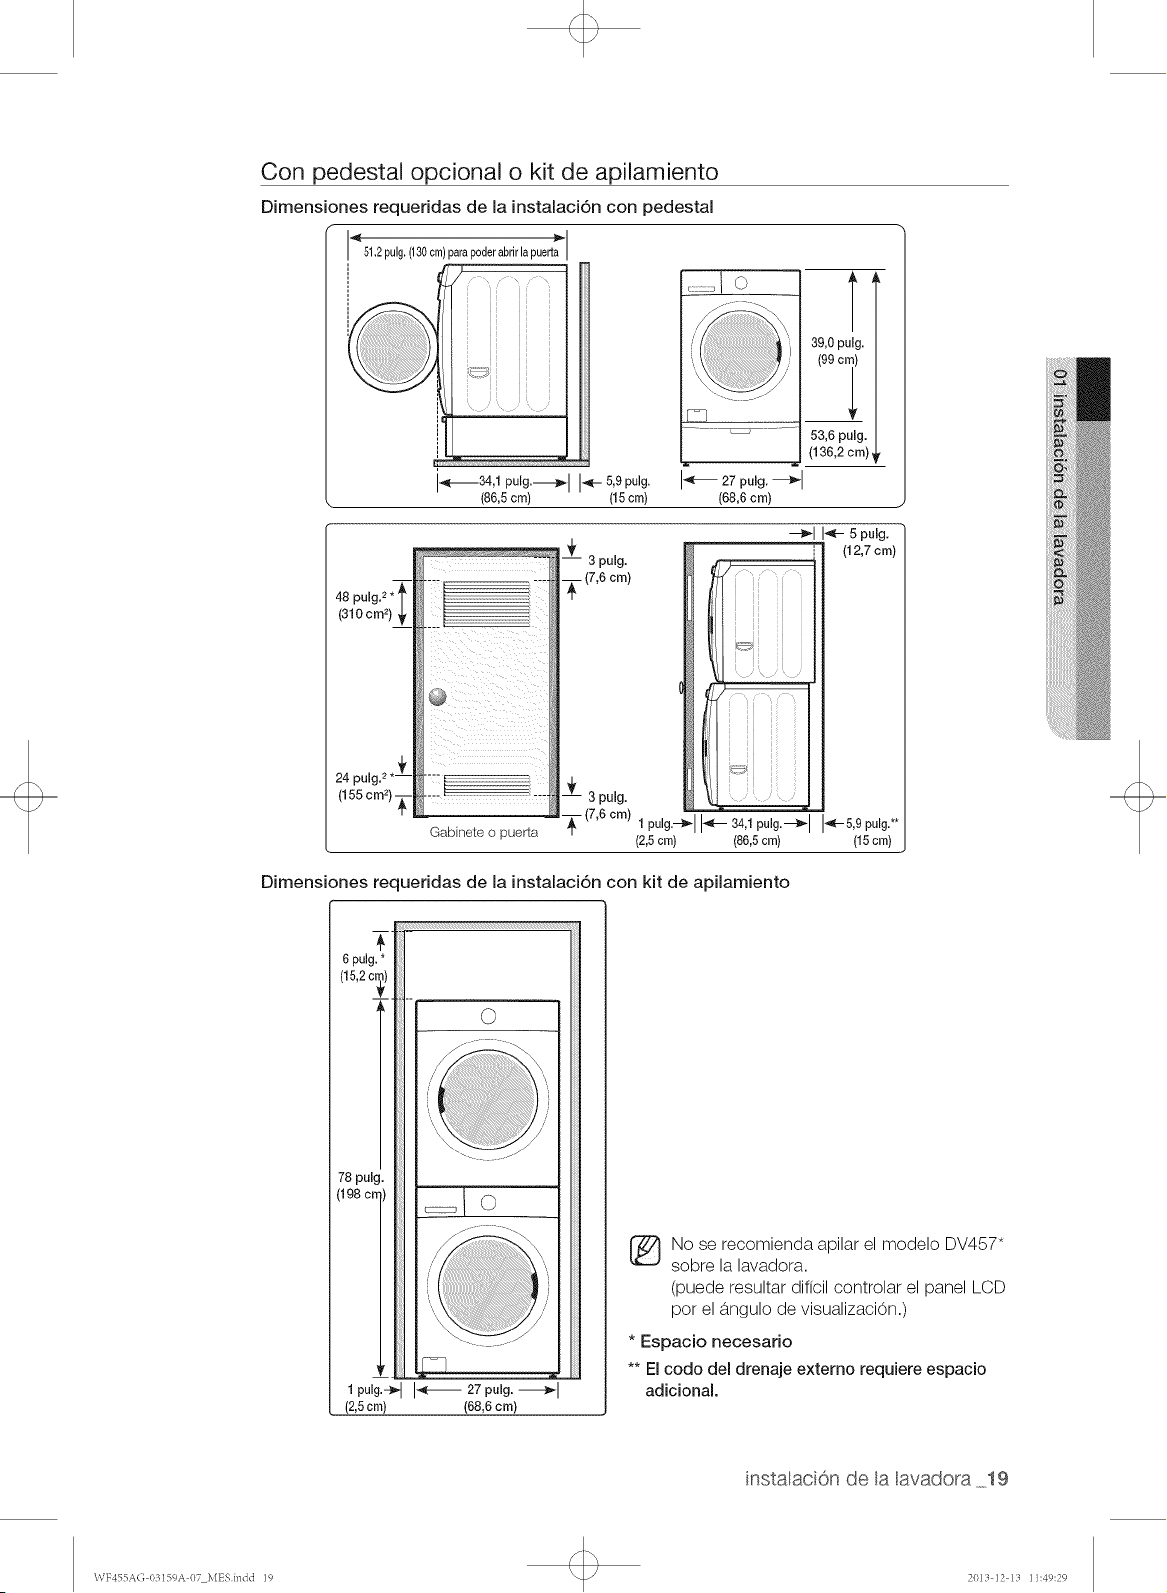
Con pedestal opcional o kit de apilamiento
Dimensiones requeridas de la instalaci6n con pedestal
'_ 51.2pulg.(130cm)parapoderabrirlapuerta_
i i i i i
i i i i i
i i i i i
1
1_----34,1 pulg.-----_ I _-- 5,9 pulg.
(86,5 cm) (15cm)
27 pulg.
(68,6 cm)
A A
39,0 pulg.
(99 cm)
V
53,6 pulg.
(136,2 cm)
24 pulg 2 *
(155 cm 2)_-
Gabinete o puerta
Dimensiones requeridas de la instalaci6n con kit de apilamiento
6 pulg.
(15,2ca
"I
78 pulg
(198 crr
©
©
®
No se recomienda apilar el model© DV457"
sobre la lavadora.
(puede resultar dificil controlar el panel LCD
pot el angulo de visualizaci0n.
* Espacio necesario
** El cod© del drenaje externo requlere espacio
adicional.
instalaciOn de a avadora 19
\VF455A(; I)3159A 07 MESindd 19 2013 12 13 11:49:29
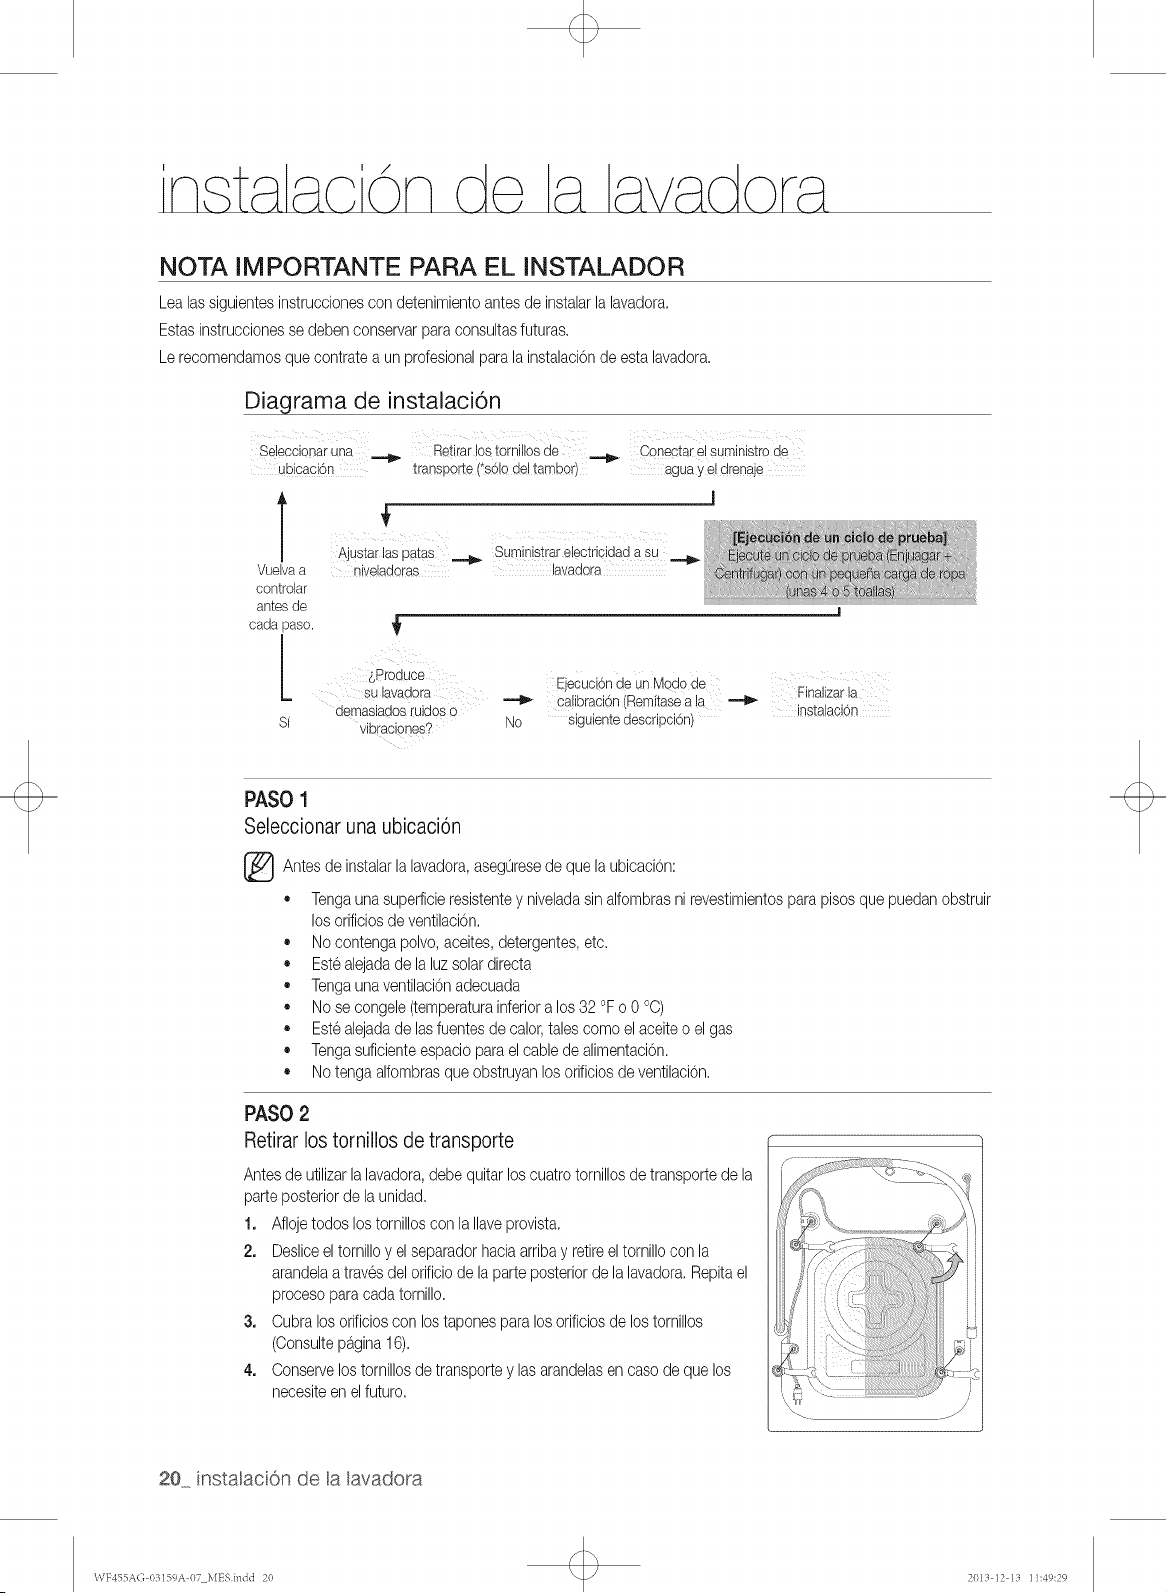
/
NOTA IM PORTANTE PARA EL INSTALADOR
Lealassiguientesinstruccionescon detenimientoantesde instalarlalavadora.
Estasinstruccionesse debenconservarparaconsultasfuturas.
Le recomendamosque contratea un profesionalparala instalaci0nde estalavadora.
Diagrama de instalacion
Seleccienaruna_ Retirarlostornillosde _ Conectarelsuministrode
ubicaciOn transport÷(*s6!odeltambor) aguay eldrenaje
VueLvaa
controlar
antesde
cadapaso.
[
_,Produce
sulavadera
Si demasiados(uidoso
vihraciones2
i i i _ i ii ii ii i ii iii
Ajustar laspatas _ Sum!nistrare!ectricidad asu
niveladoras lavadora
Ejecucbn de un Medode
Finalizarla
Calibracbn(Bemitasea la _ instalaciOn
No siguientedescripciOn)
PASO1
Seleccionaruna ubicacion
_ Antesde instalarlalavadora, de la ubicacion:
aseg0rese que
• Tengaunasuperficieresistentey niveladasinalfombrasni revestimientosparapisos quepuedanobstruir
losorificiosde ventilacion.
Nocontengapolvo,aceites,detergentes,etc.
Estealejadade laluzsolardirecta
Tengaunaventilacionadecuada
Nose congele(temperaturainferiora los32 °Fo 0 °C)
Estealejadade lasfuentesde calor,talescome elaceiteo el gas
Tengasuficienteespacioparaelcable de alimentaci0n.
Notenga alfombrasqueobstruyanlosorificiosde ventilaci0n.
PASO2
Retirarlostornillos detransporte
Antesde utilizarla lavadora,debe quitar loscuatrotornillosde transportede la
parteposteriorde launidad.
1. Aflojetodos lostornilloscon la Ilaveprovista.
2. Desliceeltornilloy elseparadorhaciaarribay retireeltornillocon la
arandelaa travesdelorificiode laparteposteriorde la lavadora.Repitael
procesoparacadatornillo.
3. Cubralosorificioscon los taponespara losorificiosde lostornillos
(Consultepagina16).
4. Conservelostornillosde transportey lasarandelasen casede quelos
necesiteen elfuture.
20 instalacOn de a avadora
\VF455A(; I)3159A 07 MESindd 20 2013 12 13 11:49:29
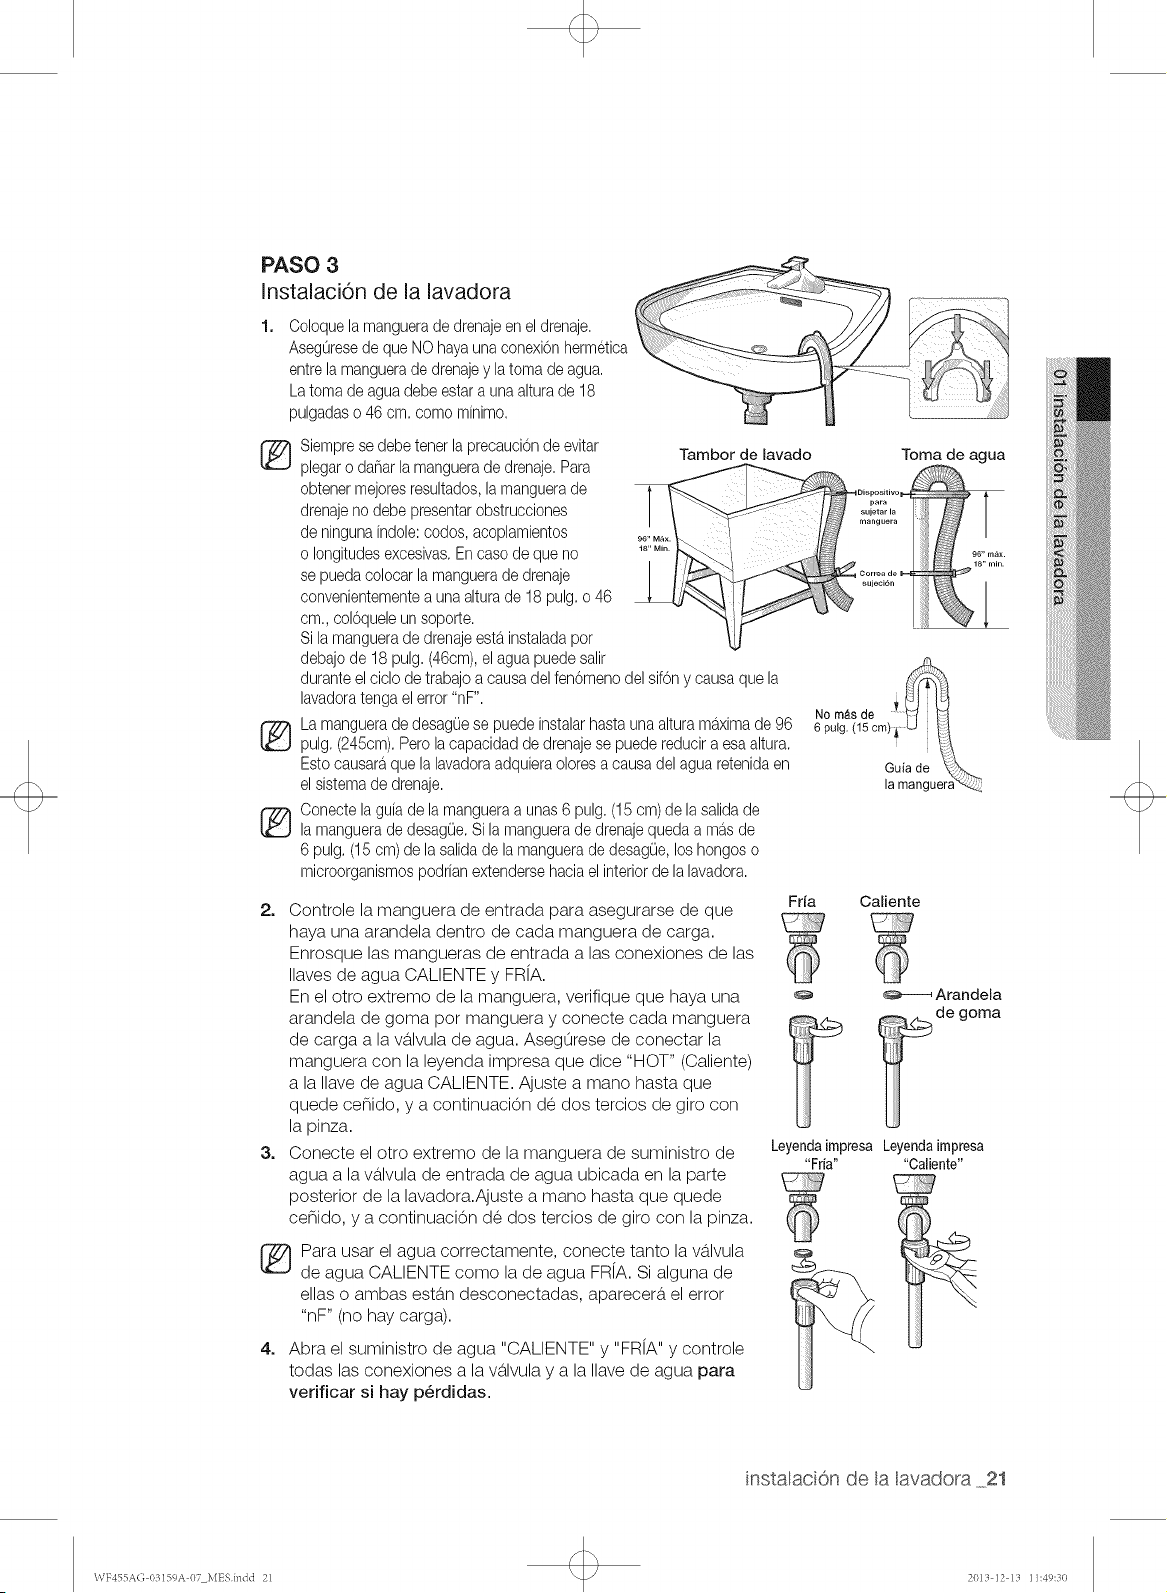
PASO 3
Instalaci6n de la lavadora
Coloquelamanguerade drenajeen eldrenaje.
Aseg0resede que NO hayaunaconexi0nhermetica
entrelamanguerade drenajey latoma de agua.
Latoma de aguadebe estara unaalturade 18
pulgadaso 46 cm. comominimo.
®
®
@
Siemprese debetenerla precaucionde evitar
plegaro da_arla manguerade drenaje.Para
obtenermejoresresultados,lamanguerade
drenajeno debe presentarobstrucciones
de ningunaindole:codos,acoplamientos
o longitudesexcesivas.Encaso de que no
se puedacolocar lamanguerade drenaje
convenientementea unaalturade 18 pulg.o 46
cm., coloqueleun soporte.
Si lamanguerade drenajeestainstaladaper
debajode 18 pulg.(46cm),elagua puedesalir
duranteel ciclo de trabajoa causadel fenOmenodel sifon y causaque la
lavadoratengaelerror "nF".
La manguerade desagOese puedeinstalarhastaunaalturamaximade 96
pulg.(245cm).Perolacapacidadde drenajese puedereducira esa altura.
Esto causaraque lalavadoraadquieraoloresa causadel aguaretenidaen
elsistemade drenaje.
Oonectela guia de la mangueraa unas6 pulg. (15cm)de lasalida de
la manguerade desagOe.Si la manguerade drenajequedaamas de
6 pulg. (15cm) de la salidade la manguerade desagOe,loshongoso
microorganismospodrianextendersehaciael interiorde la lavadora.
Tambor de lavado
I
No m&s de
6 pulg.
2. Controle la manguera de entrada para asegurarse de que
haya una arandela dentro de cada manguera de carga.
Enrosque las mangueras de entrada alas conexiones de las
Ilaves de agua CALIENTE y FR[A.
En el otto extremo de la manguera, verifique que haya una
arandela de goma pot manguera y conecte cada manguera
de carga a la v_tlvula de agua. Asegurese de conectar la
manguera con la leyenda impresa que dice "HOT" (Caliente)
a la Ilave de agua CALIENTE. Ajuste a mano hasta que
quede cenido, y a continuaci0n de dos tercios de giro con
la pinza.
3. Conecte el otto extremo de la manguera de suministro de
agua a la v_tlvula de entrada de agua ubicada en la parte
posterior de la lavadora.Ajuste a mano hasta que quede
cenido, y a continuaci0n de dos tercios de giro con la pinza.
Toma de agua
IDisp°sitiv° I'-"
,L,r;_:;,°
manguera
Para usar el agua correctamente, conecte tanto la v_tlvula
de agua CALIENTE como la de agua FR[A. Si alguna de
elias o ambas est_tn desconectadas, aparecer_t el error
"nF" (no hay carga).
4. Abra el suministro de agua "CALIENTE" y "FR[A" y controle
todas las conexiones a la v_tlvula y a la Ilave de agua para
verificar si hay p6rdidas.
Guia de
la
Fria Caliente
LeyendaimpresaLeyendaimpresa
"Fria.... Caliente"
instalaci6n de a avadora 21
\VF455A(; 03159A 07 i_1ESindd 21 2013 12 13 11:49:30
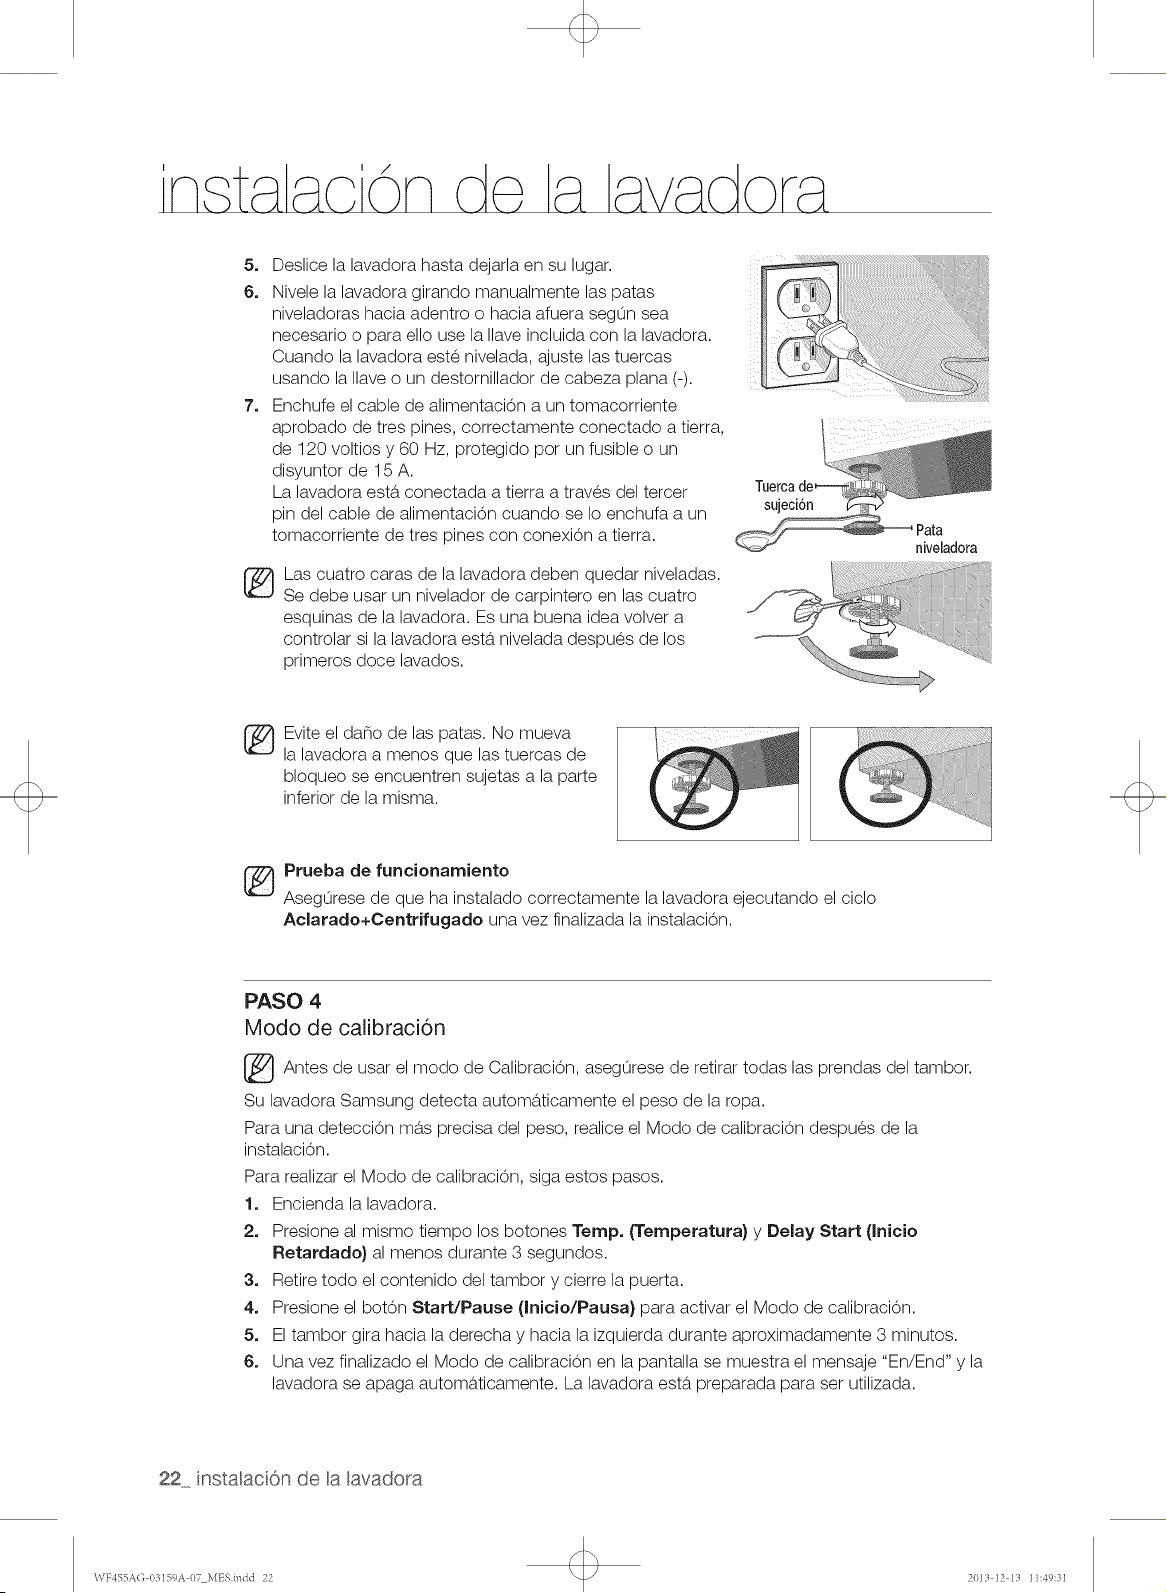
5. Deslice la lavadora hasta dejarla en su lugar.
6. Nivele la lavadora girando manualmente las patas
niveladoras hacia adentro o hacia afuera segun sea
necesario o para ello use la Ilave incluida con la lavadora.
Cuando la lavadora este nivelada, ajuste las tuercas
usando la Ilave o un destornillador de cabeza plana (-).
2. Enchufe el cable de alimentaci0n a un tomacorriente
aprobado de tres pines, correctamente conectado a tierra,
de 120 voltios y 60 Hz, protegido pot un fusible o un
disyuntor de 15 A.
La lavadora esta, conectada a tierra a traves del tercer
pin del cable de alimentaci0n cuando se Io enchufa a un
tomacorriente de tres pines con conexi0n a tierra.
Las cuatro caras de la lavadora deben quedar niveladas.
Se debe usar un nivelador de carpintero en las cuatro
esquinas de la lavadora. Es una buena idea volver a
controlar si la lavadora esta, nivelada despues de los
primeros doce lavados.
Tuerca
sujeci6n
Pata
niveladora
_ vite el dano de las patas. No mueva
la lavadora a menos que las tuercas de
bloqueo se encuentren sujetas a la parte
inferior de la misma.
_ rueba de funcionamiento
Asegurese de que ha instalado correctamente la lavadora ejecutando el ciclo
Aclarado+Centrifugado una vez finalizada la instalaci0n.
PASO 4
Modo de calibraci6n
_ Antes de el modo de Calibraci0n, de retirar todas las del tambor.
usar
asegurese prendas
Su lavadora Samsung detecta automa,ticamente el peso de la ropa.
Para una detecci0n ma,s precisa del peso, realice el Modo de calibraci0n despues de la
instalaci0n.
Para realizar el Modo de calibraci0n, siga estos pasos.
1. Encienda la lavadora.
2. Presione al mismo tiempo los botones Temp. (Temperatura) y Delay Start (Inicio
Retardado} al menos durante 3 segundos.
3. Retire todo el contenido del tambor y cierre la puerta.
4. Presione el bot0n Start/Pause (Inicio/Pausa) para activar el Modo de calibraci0n.
5. El tambor gira hacia la derecha y hacia la izquierda durante aproximadamente 3 minutos.
6. Una vez finalizado el Modo de calibraci0n en la pantalla se muestra el mensaje "En/End" y la
lavadora se apaga automaticamente. La lavadora esta preparada para ser utilizada.
22 instalacOn de a avadora
\VF455A(; 03159A 07 i_1ESindd 22 2013 12 13 11:49:31
C0MO CARGAR LA LAVADORA
* Puede cargar el tambor con ropa seca, sin doblar; pero NO LO SOBRECARGUE.
* La sobrecarga puede reducir la eficacia del lavado, causar desgaste adicionaly posiblemente causar pliegueso
arrugasen las prendas.
* Lave prendas delicadas, tales como los brassieres, los calcetinesy demurslenceria,en el ciclo Delicates (Ropa
delicada)con prendas livianassimilares.
* Cuando lave articulos voluminosos o algunosarticulos mas pequehos, no cargue el tambor completamente,
coloque, pot ejemplo, un tapete, una almohada, muhecos de peluche, o uno o dos sueteres, agregue algunas
toallaspara que el lavadoy el centrifugado resulten mas eficaces.
_ urante el ciclo de centrifugado, la lavadora puede agregaragua adicional para redistribuirel desequilibrio
excesivodentro del tambor.
* Cuando lave ropa muy sucia, no sobrecargue la lavadora para garantizar un lavado de Optimacalidad.
* Para agregar una prenda que se habia olvidado:
1. Presioneel botOn Start/Pause (Inicio/Pausa).
2. Espere hasta que la luz de la traba de la puerta se apague (5segundos)
3. Agregue la prenda,cierre la puerta y presioneel botOn Start/Pause (Inicio/Pausa).
Luego de una pausa de 10 segundos, se reanudar_tel ciclo.
C0MO COMENZAR
1. Carguelalavadora.
2. Cierrelapuerta.
,/_ Introduzea la ropa eompletamente en eltambor para evitar que ninguna prenda quede atrapada en la puerta o se
....."_0o,,desprenda del tambor.
3. Agreguedetergente y aditivos al eajOndosificador (verp_tgina58
4. Seleccioneel eielo y las opciones apropiadas para el tipo de earga (verp_tgina24
5. Presioneel botOn Start/Pause (Inicio/Pausa},
EItambor gira automaticamente y calcula el peso de la carga sin agregar agua para poder ajustar el tiempo de
lavado. (Elindicador giratorio de lapantalla indieaque se estb,ealeulandoel peso de la earga.)
6. Se iluminarala luzdel indicador Wash (Lavado).
7. Eltiempo del ciclo calculado aparecer_ten la pantalla.
Es posible que el tiempo fluctLiepara indicar mejor el tiempo restanteen el ciclo.
EItiempo realrequerido para un ciclo puede diferir del estimado en la pantalla dependiendo de la presiOny la
temperatura del agua, el detergente y la ropa.
8. Antes de que la lavadoracomience a Ilenarse,se escuchar_tuna seriede sonidos semejantes a un "clic" para
controlar latraba de la puerta y que se efectue un drenaje rapido.
,, Cuando hayafinalizado el ciclo, laluz de la traba de la puerta se apagara y lapalabra "End" (Fin)apareceraen
la pantalla.
* NO intente abrir la puerta hasta que la luzde la traba de la puerta se hayaapagado. Para agregar una prenda
que se hayaolvidado, consulte la secciOn"COmocargar la lavadora". (p_tgina23)
* Cuando la lavadora reiniciael funcionamiento despues de una pausa,debera esperar hasta 15 segundos
antes de que el ciclo contint]e.
* Si presionael botOnPower (Encendido),se cancelara el ciclo y la lavadorase detendr&
* Las luces del indicador PreWash (Prelavado),Wash (Lavado), Rinse(Enjuague)y Spin (Centrifugado)se
iluminarandurante dichas fases del ciclo.
No coloque ningun objeto en la parte superior de lalavadora cuando estb,en funcionamiento.
ADVER1ENClA
manua de nstrucciones 23
\VF455A(; 03159A 07 i_1ESindd 23 2013 12 13 11:49:31
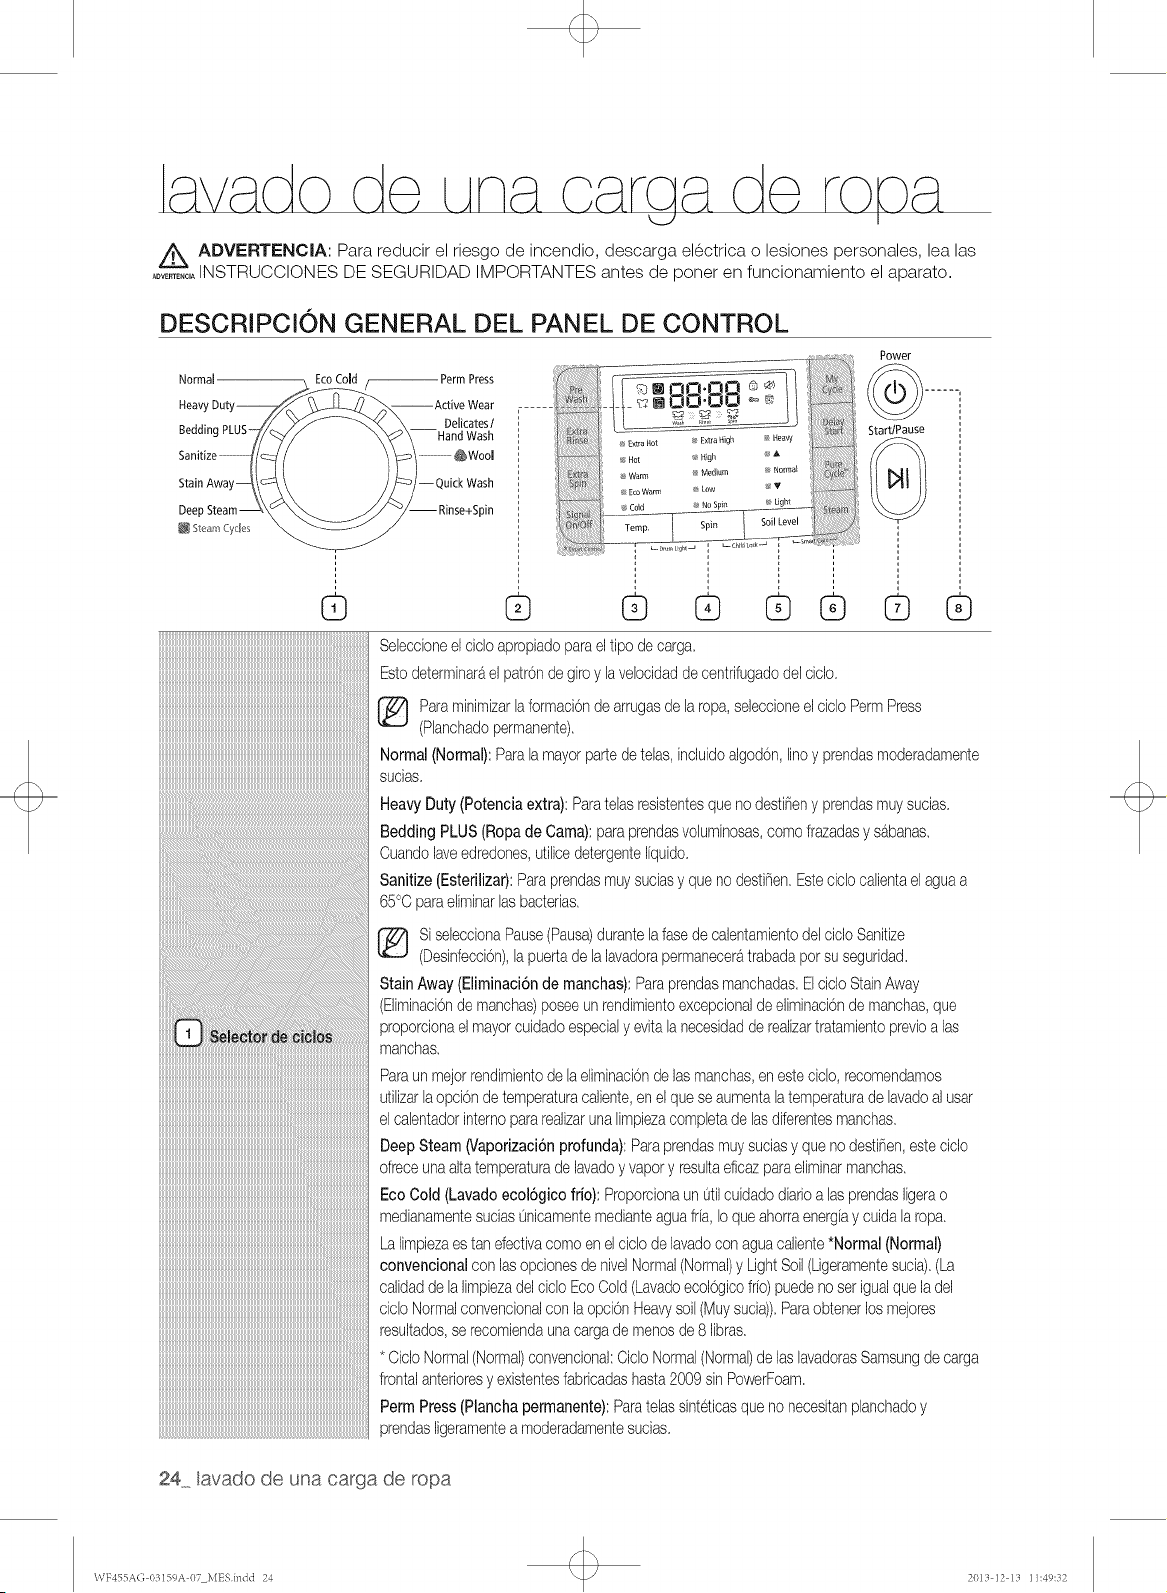
Z_ ADVERTENCIA: Para reducir el riesgo de incendio, descarga electrica o lesiones personales, lea las
..........INSTRUCCIONES DE SEGURIDAD IMPORTANTES antes de poner en funcionamiento el aparato.
DESCRIPCiON GENERAL DEL PANEL DE CONTROL
Normal Press
Heav --Active Wear
Delicates I
Bedding PLUS- --Hand Wash
--_Wool
--Quick Wash
Deep
SteamCycles
G
.....
_? Extra Ho _ Extra High _/ Heavy
Hot Hsg
_ Wa m _ Medium Normal
.............._, _: ...............................
® ® ® ®®
Power
......
StardPause
iiiiiiiiiiiiiiiiiiiiiiiiiiiiiiiiiiiiiiiiiiiiiiiiiiiiiiiiiiiiiiiiiiiiiiiiiiiiiiiiiiiiiiiiiiiiiiiiiiiiiiiiiiiiiiiiiiiiiiiiiiiiiiiiiiiii
_______________________________________________________________________________________________________________________________________
iiiiiiiiiiiiiiiiiiiiiiiiiiiiiiiiiiiiiiiiiiiiiiiiiiiiiiiiiiiiiiiiiiiiiiiiiiiiiiiiiiiiiiiiiiiiiiiiiiiiiiiiiiiiiiiiiiiiiiiiiiiiiiiiiiiiiii
__________________________________________________________________________________________________________________________________________
___
iiiiiiiiiiiiiiiiiiiiiiiiiiiiiiiiiiiiiiiiiiiiiiiiiiiiiiiiiiiiiiiiiiiiiiiiiiiiiiiiiiiiiiiiiiiiiiiiiiiiiiiiiiiiiiiiiiiiiiiiiiiiiiiiiiiiiiiiiiiii
_______________________________________________________________________________________________________________________________________________
!!!!!!!!!!!!!!!!!!!!!!!!!!!!!!!!!!!!!!!!!!!!!!!!!!!!!!!!!!!!!!!!!!!!!!!!!!!!!!!!!!!!!!!!!!!!!!!!!!!!!!!!!!!!!!!!!!!!!!!!!!!!!!!!!!!!!!!!!!!!!!!
Seleccioneel dclo apropiadoparael tipo decarga.
Estodeterminarael patrondegiroy laveloddadde centfifugadodel ciclo.
[_ araminimizarlaformaciOnde arrugasde laropa,selecdoneelcicloPermPress
(Planchadopermanente).
Normal(Normal):Paralamayorpartedetelas,incluidoalgodon,linoyprendasmoderadamente
sudas.
HeavyDuty(Potenciaextra):Paratelasresistentesqueno desti_eny prendasmuysudas.
BeddingPLUS(Ropade Cama):paraprendasvoluminosas,comofrazadasy sabanas.
Cuandolaveedredones,utilicedetergenteI[quido.
Sanitize(Estefilizar):Paraprendasmuysuciasy queno desti_en.Esteciclocalientaelaguaa
65°Cparaeliminarlas bacterias.
SiseleccionaPause(Pausa)durantelafasede calentamientodeldclo Sanitize
(Desinfeccion),lapue_ade lalavadorapermanecera,trabadapotsuseguridad.
StainAway (Eliminaci6nde manchas):Paraprendasmanchadas.ElcicloStainAway
(EliminaciOndemanchas)poseeunrendimientoexcepcionalde eliminaciondemanchas,que
proporcionaelmayorcuidadoespecialy evitalanecesidadde realizartratamientoprevioa las
manchas.
Paraun mejorrendimientode laeliminaciondelasmanchas,en esteciclo,recomendamos
utilizarlaopcionde temperaturacaliente,en elqueseaumentalatemperaturade lavadoalusar
elcalentadorinternopararealizarunalimpiezacompletade lasdiferentesmanchas.
DeepSteam(Vaporizaci6nprofunda):Paraprendasmuysudasy queno desti_en,estedclo
ofreceunaaltatemperaturade lavadoy vapory resultaeficazparaeliminarmanchas.
EcoCold (Lavadoecol6gicofile): Proporcionaun 0tilcuidadodiarioalas prendasIigerao
medianamentesucias0nicamentemedianteaguafr[a,Ioqueahorraenergiay cuidalaropa.
Lalimpiezaestan efectivacomoenelciclode lavadocon aguacaliente*Normal(Normal)
convencionalcon lasopdonesde nivelNormal(Normal)y LightSoil(Ligeramentesucia).(La
calidadde laIimpiezadelcicloEcoCold(LavadoecolOgicofrio)puedeno setigualqueladel
cicloNormalconvencionalcon laopciOnHeavysoil(Muysuda)).Paraobtenerlos mejores
resultados,serecomiendaunacargade menosde 8 Iibras.
*CicloNormal(Normal)conventional:CicloNormal(Normal)de laslavadorasSamsungde carga
frontalanterioresy existentesfabricadashasta2009sinPowerFoam.
PermPress(Planchapermanente):Paratelassinteticasqueno necesitanplanchadoy
prendasligeramentea moderadamentesucias.
24 avado de una carga de ropa
\VF455A(; 1/3159A 07 MESindd 24 2(/13 12 13 11:49:32
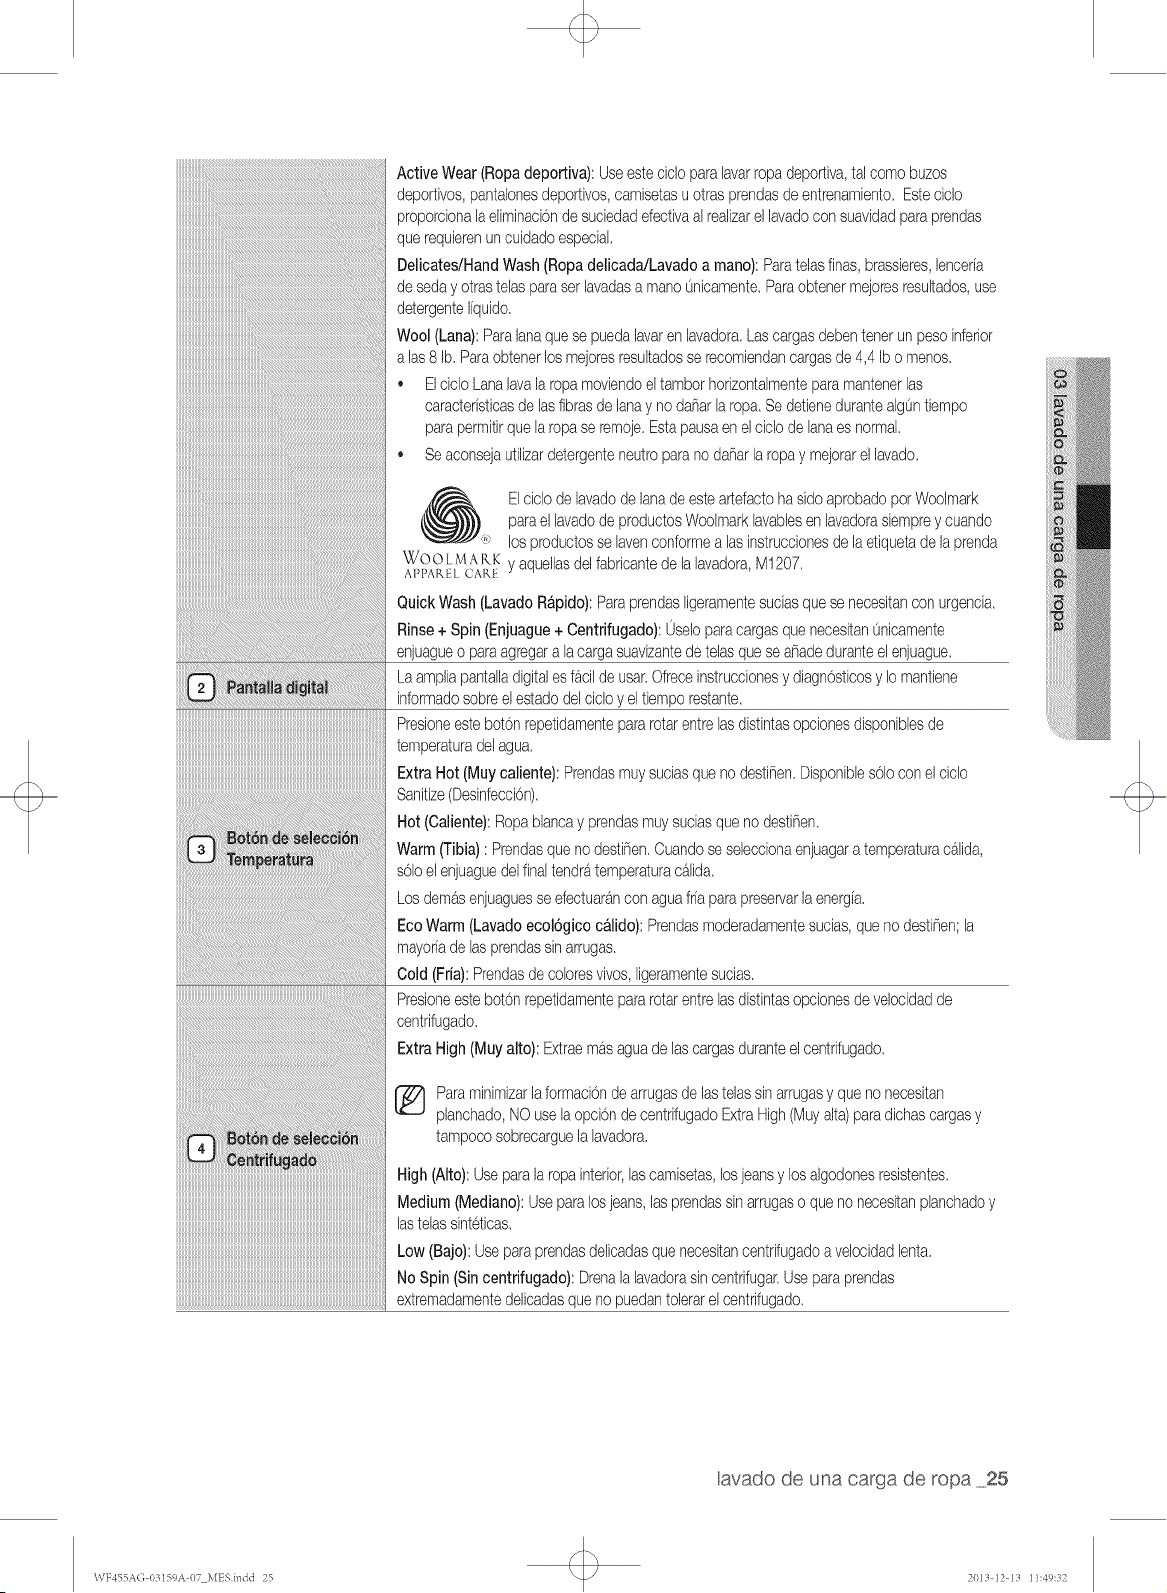
Active Wear(Ropadeportiva):Useestecido paralavarropadeportiva,talcomobuzos
deportivos,pantalonesdeportivos,camisetasuotrasprendasde entrenambnto.Esteddo
proporcionalaeliminadonde sucbdadefectivaal realizarellavadocon suavidadparaprendas
querequbrenuncuidadoespedak
Delbates/HandWash(Ropadelicada/Lavadoa mano):Paratelasfinas,brassbres,bnceria
de sedayotrastehs paraser Bvadasa manounbamente,Paraobtenermejoresresultados,use
detergenteI[quido,
Wool(Lana):ParalanaquesepuedaBvaren hvadora,Lascargasdebentenerunpesoinferior
alas 8 Ib,Paraobtenerlos mejoresresultadosse recomiendancargasde4,4 Ibo menos,
Elddo LanalavalaropamovbndoeltamborhorizontalmenteparamantenerBs
caracteristicasde hs fibrasde lanay no da_arlaropa.SedetbnedurantealgOntiempo
parapermitirquela ropase remoje.Estapausaen elddo de Bnaes normal,
• Seaconsejautilizardetergenteneutroparano danarlaropay mejorarellavado.
(_ El ddo de lavadode lanadeesteartefactohasidoaprobadopot Woolmark
paraellavadode productosWoolmarkBvabbsen lavadorasbmprey cuando
'": losproductosse lavenconformea Bs instrucdonesde la etiquetade laprenda
'7,/oo [ > At_.KyaquelBsdelfabricantede lalavadora,M1207,
APPAREl CARE
QuickWash(LavadoRapido):Paraprendasligeramentesuciasquesenecesitanconurgencia.
Rinse+ Spin (Enjuague+ Centrifugado):0seloparacargasquenecesitan0nicamente
enjuagueo paraagregara lacargasuavizantedetelasquesea_adeduranteelenjuague.
La ampliapantalladigitalesfacilde usar.Ofreceinstruccionesy diagn0sticosy Iomantiene
informadosobreelestadodelddo y eltbmporestante.
PresioneestebotonrepetidamentepararotarentreBsdistintasopcionesdisponibbsde
temperaturadelagua.
Extra Hot (Muycaliente):Prendasmuysuciasqueno desti_en.Disponibbs01oconel ddo
Sanitize(DesinfecciOn),
Hot (Caliente):Ropablancay prendasmuysuciasqueno desti_en.
Warm(Tibia): Prendasqueno destifien,Cuandoseseleccionaenjuagara temperaturac_tlida,
s01oelenjuaguedelfinaltendratemperatura@.lida.
Los dem@enjuaguesseefectuar_tncon aguafriaparapreservarlaenergia,
Eco Warm(LavadoecolOgicocalido):Prendasmoderadamentesucias,queno desti_en;la
mayoriade lasprendassin arrugas,
Cold (Fria):Prendasde coloresvivos,ligeramentesudas.
PresioneestebotonrepetidamentepararotarentreBsdistintasopcionesde velocidadde
centrifugado,
Extra High(Muyalto): Extraema.saguade lascargasduranteelcentrifugado,
[_ Paraminimizarlaformaciondearrugasde lastelassinarrugasy queno necesitan
plan@ado,NOusela opcionde centrifugadoExtraHigh(Muyalta)paradichascargasy
tampocosobrecarguelaBvadora,
High (Alto):Useparalaropainterior,lascamisetas,losjeansylos algodonesresistentes.
Medium(Mediano):Useparalosjeans,lasprendassinarrugaso queno necesitanpBnchadoy
lasteBssinteticas.
Low (Bajo):Useparaprendasdelicadasquenecesitancentrifugadoavelocidadbnta.
No Spin (Sincentrifugado):Drenalalavadorasincentrifugar.Useparaprendas
extremadamentedelicadasqueno puedantolerarelcentrifugado.
lavado de una carga de ropa 25
WF455AG 03159A 07 i\_ESindd 25 2013 12 13 11:49:32
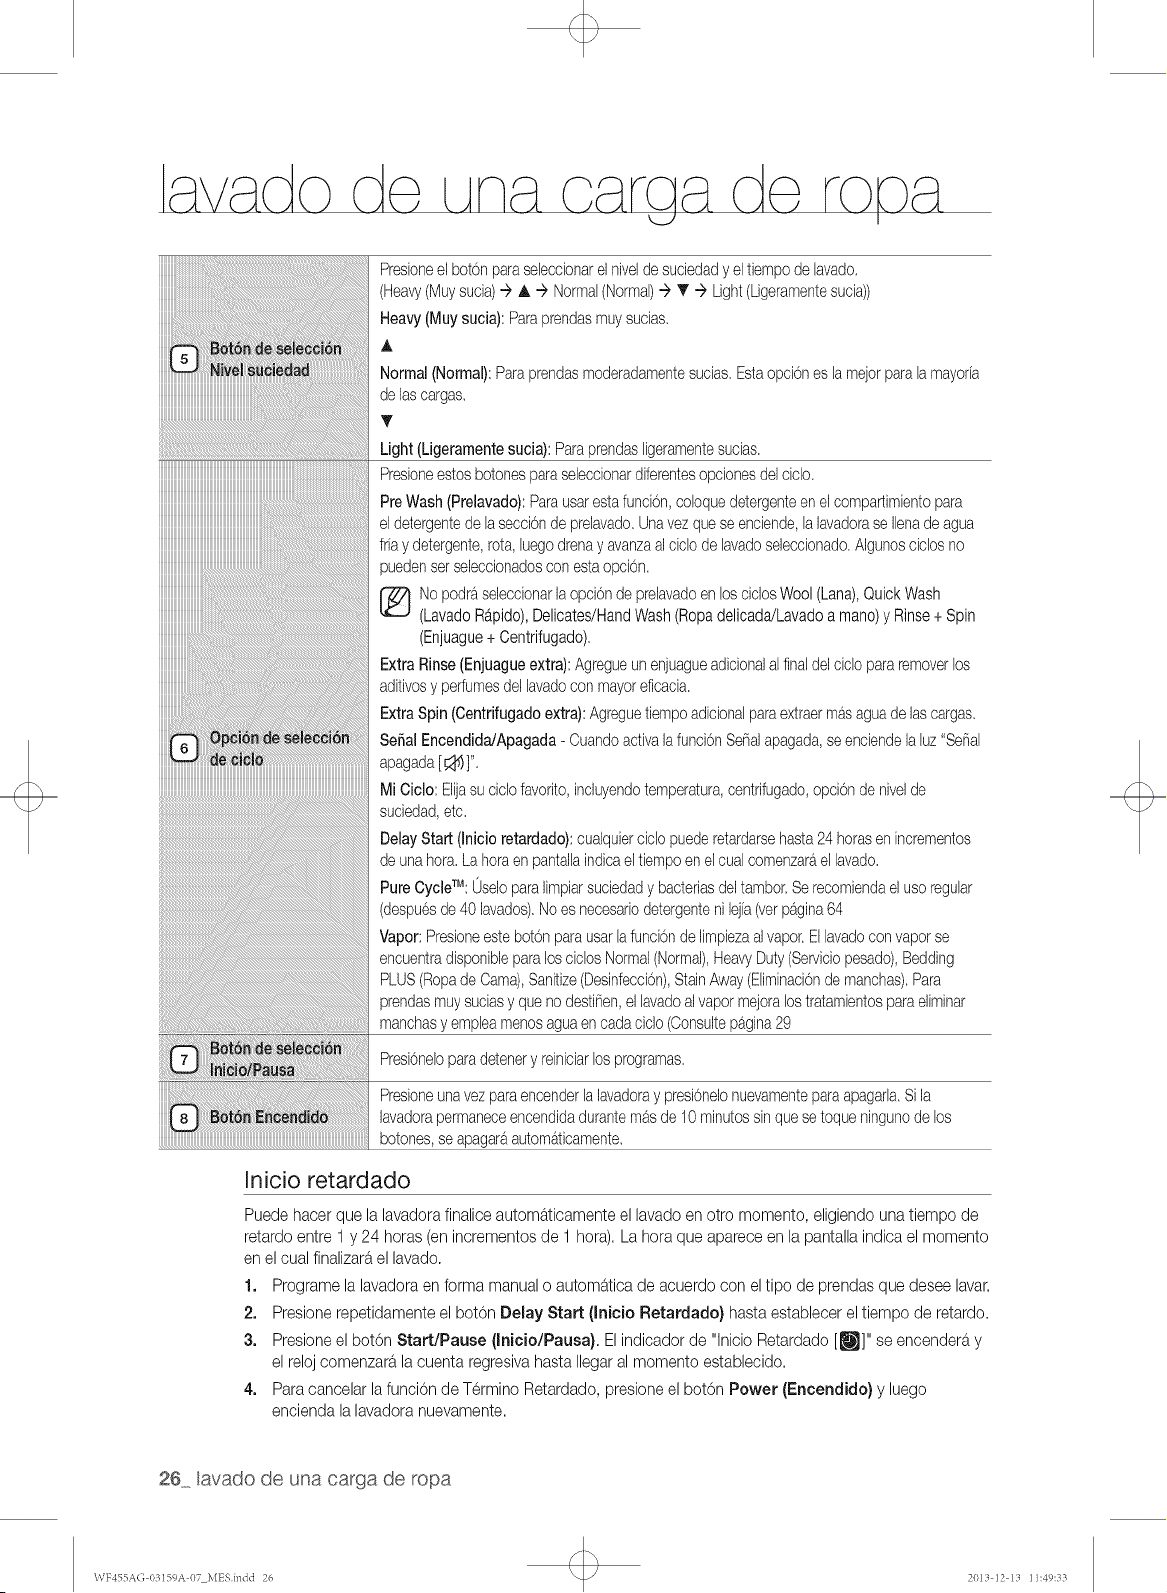
iiiiiiii!iiiiiiiiiii
i' il !ili!i!i
iiiiiiiiiiiiiiiiiiiiiiiiiiiiiii
zzzzzi
zzzzzi
zzzzzi
zzzzzi
zzzzzi
zzzzzi
zzzzzi
zzzzzi
iiiiiiiiiiiiiiiiiiiiiiiiiiiiiiiiiiiiiiiiiiiiiiiiiiiiiiiiiiiiiiiiiiiiiiiiiiiiiiiiiiiiiiiiiiiiiiiiiiiiiiiiiiiiiiiiiiiiiiiiiiiiiiiiiiiiiiiiiiiiiii
iiiiiiiiiiiiiiiiiiiiiiiiiiiiiiiiiiiiiiiiiiiiiiiiiiiiiiiiiiiiiiiiiiiiiiiiiiiiiiiiiiiiiiiiiiiiiiiiiiiiiiiiiiiiiiiiiiiiiiiiiiiiiiiiiiiiiiiiiiiiiii
Presioneel botonparasebcdonarelnivelde suciedady eltiempode hvado,
(Heavy(Muysuda)÷ A ÷ Normal(Normal)÷ T ÷ Light(Ligeramentesucia
Heavy(Muysucia):Paraprendasmuysucias,
A
Normal(Normal):Paraprendasmoderadamentesucias,Estaopcioneslamejorparalamayor[a
de lascargas,
T
Light(Ligeramentesucia):Paraprendasligeramentesucias,
Presioneestosbotonesparasebccionardiferentesopcionesdelciclo,
PreWash(Prelavado):Parausarestafuncion,coloquedetergenteen elcompartimientopara
eldetergentede lasecciOnde prelavado,Unavezqueseenciende,lalavadoraseIlenade agua
friay detergent<iota,luegodrenay avanzaalcido de lavadoseleccionado,Algunoscidosno
puedenset seleccionadoscon estaopcion,
Nopodra,seleccionarlaopciOnde prelavadoen los ciclosWool(Lana),QuickWash
(LavadoR_.pido),Delicates/HandWash(Ropadelicada/Lavadoa mano)y Rinse+ Spin
(Enjuague+ Centrifugado),
ExtraRinse(Enjuagueextra):Agregueunenjuagueadicionalalfinaldelcido pararemoverlos
aditivosy perfumesdellavadocon mayoreficacia,
ExtraSpin (Centrifugadoextra):Agreguetiempoadicionalparaextraermasaguade lascargas,
SePalEncendida/Apagada- CuandoactivalafunciOnSerialapagada,seenciendelaluz"SePal
apagada[_:_I]",
Mi Ciclo: Elijasucido favorito,induyendotemperatura,centrifugado,opciOnde nivelde
sudedad,etc,
BelayStart (Inicioretardado):cualquierciclo puederetardarsehasta24 horasen incrementos
de unahora,La horaen pantallaindicaeltiempoen elcualcomenzara,el lavado,
PureCycbTM:Oseloparalimpiarsuciedady bacteriasdeltambor,Serecomiendael usoregular
(despuesde 40 lavados),Noes necesariodetergentenilejia(verpagina64
Vapor:Presioneestebotonparausarla funcionde limpiezaalvapor.Ellavadocon vaporse
encuentradisponibleparalos ciclosNormal(Normal),HeavyDuty(Servidopesado),Bedding
PLUS(Ropade Cama),Sanitize(Desinfeccion),StainAway(EliminaciOnde manchas),Para
prendasmuysuciasy queno destinen,ellavadoalvapormejoralostratamientosparaeliminar
manchasy empbamenosaguaen cadaciclo (Consultepagina29
Presioneloparadetenery reiniciarlosprogramas,
Presioneunavezparaencenderlalavadoray presiOnelonuevamenteparaapagarla,Si la
lavadorapermaneceencendidadurantemasde 10minutossinquesetoqueningunode los
botones,seapagaraautomaticamente,
Inicio retardado
Puedehacer que la lavadorafinalice automa.ticamenteel lavado enotro momento, eligiendounatiempo de
retardoentre 1 y 24 horas (en incrementosde 1 hora). La hora que aparece en la pantalla indica el momento
en el cual finalizara,el lavado.
1. Programela lavadoraen forma manualo automa.ticade acuerdo con el tipo de prendasque desee lavar.
2. Presionerepetidamente el botOnDelay Start (ini¢io Retardade) hastaestablecer el tiempo de retardo.
3. Presioneel botOnStart/Pause (Inieio/Pausa). El indicadorde "lnicio Retardado[[]]" se encender_,y
el reloj comenzara,lacuenta regresivahasta Ilegaral momento establecido.
4. Para cancelar la funciOnde Termino Retardado, presioneel botOn Power (Eneendido) y luego
encienda lalavadora nuevamente.
26 avado de una carga de ropa
\\TF455A(; 1/3159A 07 i_1ESindd 26 2(/13 12 13 11:49:33
Seguro para nidos
Esta funcion evita que los ninos jueguen con la lavadora.
Z_ Aunque la funcion Seguro para ninos este activada, debe controlar a los ninos para que no
........o,utilicen su lavadora.
Activaci6n de la funcion Seguro para ni_os
Mantenga presionados simulta,neamente los botones Spin (Centrifugado} y
Soil Level (Nivel suciedad) durante aproximadamente 3 segundos
• Cuando se activa la funcion Seguro para ninos, la puerta se bloquea y se enciende la
la,mpara "Seguro para ninos [ 1_ ]"
Si se presiona el boton Start/Pause Inicio/Pausa) despues de activar la funcion de Seguro
para ninos, no funciona ningun boton, excepto Power (Encendido)
Si se presiona un boton cuando los botones esta,n bloqueados, la la,mpara de "Seguro para
ninos [1_1]" parpadea
Pausa en la funci6n Seguro para ni_os
Cuando la puerta esta, bloqueada o los botones esta,n bloqueados pot la funcion Seguro para
ninos, puede hacer una pausa en la funcion de seguro para ninos durante 1 minuto al mantener
presionados simulta,neamente los botones Spin (Centrifugado} y Soil Level (Nivel suciedad}
durante aproximadamente 3 segundos
Si pone en pausa el modo de Seguro para ninos, el bloqueo de la puerta se libera durante 1
minuto para comodidad del usuario Durante este tiempo,
la la,mpara de "Seguro para ninos [@]" parpadea
Si se abre la puerta transcurrido el minuto, suena una alarma durante 2 minutos
Si se cierra la puerta antes de transcurrir los 2 minutos, esta se bloquea y la funcion Seguro
para ninos se reactiva Si se cierra la puerta despues de transcurrir los 2 minutos, esta no se
bloquea automa,ticamente y la alarma no suena
Desactivacion de la funcion Seguro para ni_os
Mantenga presionados simulta,neamente los botones Spin (Centrifugado} y Soil Level (Nivel
suciedad} durante aproximadamente 6 segundos
Si se desactiva la funcion Seguro para ninos, la puerta se desbloquea y la la,mpara de
"Seguro para ninos [@ ]" se apaga
Z_ La funcion Seguro para ninos impide que los ninos o las personas discapacitadas
.......... pongan en funcionamiento la lavadora accidentalmente y se lesionen
Si un nino entra a la lavadora, puede quedar atrapado y asfixiarse
@
A.
PRECAUCl6N
@
Una vez activada la funcion Seguro para ninos, esta continua funcionando aunque la
lavadora este apagada.
Abrir la puerta por la fuerza puede danar el producto y causar lesiones personales.
Para agregar ropa cuando la funcion Seguro para ninos esta, activada, primero se debe
poner en pausa o desactivar dicha funcion.
[_Si desea abrir la puerta de la lavadora cuando la funcion Seguro ninos esta, activada:
para
,, Ponga en pausa o desactive la funcion Seguro para ninos.
,, Apague la lavadora y enciendala de nuevo.
Solo centrifugado
Si presiona el boton Power (Encendido} y luego mantiene presionado el boton Spin
(Centrifugado} durante 2 segundos, se indica el tiempo de centrifugado en la pantalla.
Luego vuelva a presionar el boton Spin (Centrifugado} hasta que se seleccione el nivel de
centrifugado requerido y presione el boton Start/Pause (Inicio/Pausa}.
_ Antes de pulsar el boton Spin Only (S01ocentrifugado), puede seleccionar un ciclo con
el Selector de ciclos. Si ya ha seleccionado un ciclo, sOlo puede seleccionar el nivel de
centrifugado correspondiente.
avado de una carga de ropa 27
\\TF455A(; 1)3159A 07 MESindd 27 2013 12 13 11:49:33
Luz del tambor
1. La Luz del tambor se enciende automa,ticamente si se abre la puerta cuando la lavadora esta,
encendida.
2. La Luz del tambor se apaga automa,ticamente si se cierra la puerta cuando la lavadora esta,
encendida.
3. Presione los botones Temp. (Temperatura) y Spin (Centrifugado} en forma simulta,nea
para encender o apagar la luz del tambor.
4. La luz del tambor se apaga automa,ticamente luego de estar encendida durante ma,s de 4
minutes.
Mas prendas
Puede retirar o agregar prendas para lavar incluso una vez que haya comenzado el lavado,
siempre y cuando este encendida la luz de "Garment+" (M_,s prendas). AI presionar el bot0n
Start/Pause (Inicio/Pausa) se destraba la puerta, salvo que el agua este demasiado caliente o
que haya mucha agua en la lavadora. Si puede destrabar la puerta y desea continuar el ciclo de
lavado, cierra la puerta y presione el boton Start/Pause (Inicio/Pausa).
Mi Ciclo
Le permite activar el lavado a su medida (temperatura, centrifugado, nivel de suciedad, etc.) con
la practicidad de presionar un s01o bot0n.
AI presionar el bot0n My Cycle (Mi ciclo), activa las opciones usadas durante el mode
My Cycle (Mi ciclo}. La luz de "My Cycle" (Mi ciclo) indicara, que esta,active.
Puede seleccionar todas las opciones en el mode "My Cycle" (Mi ciclo) de la siguiente manera:
1. Seleccione el ciclo utilizando el disco Selector de ciclos.
2. Despues de seleccionar el ciclo, elija una opcion.
_ onsulte pa,gina 72 para conocer las configuraciones de las opciones disponibles para
cada ciclo.
3. Luego, puede iniciar "My Cycle" (Mi ciclo) presionando el bot0n
Start/Pause (Inicio/Pausa} en el mode "My Cycle" (Mi ciclo).
El ciclo y las opciones que usted seleccione aparecera,n la pr0xima vez que seleccione
"My Cycle" (Mi ciclo).
_ uede modificar las configuraciones de "My Cycle" (Mi ciclo) repitiendo el proceso
anterior.
Aparecera, la ultima configuraci0n utilizada la pr0xima vez que seleccione
"My Cycle" (Mi ciclo).
DEEP STEAM(VAPOR PROFUNDO)
VAPOR PROFUNDO (Vapor Ma,gico)
La funci0n Vapor Profundo aumenta el rendimiento de limpieza y afloja la mugre y la suciedad,
proporcionando mejores resultados de limpieza.
Este eiclo ofrece una alta temperatura de lavado y el vapor es eficaz para limpiar las manchas de
prendas muy sucias y para piezas que no se decoloran.
El funcionamiento del Vapor Profundo
Si selecciona Vapor, el vapor saldra, para la cantidad detectada de lavanderia durante los
mementos ma,s eficaces maximizando asi el efecto del vapor, aumentando la temperatura de
lavado, mejorando el efecto de Remojo y mejorando tambien el rendimiento del lavado. Pulse
el bot0n de Vapor para usar la funci0n de Lavado de Vapor. El Lavado de Vapor puede estar
en los cities de Normal (Normal), Heavy Duty (Carga Pesada), Bedding PLUS (Ropa de Cama),
Sanitize (Desinfectar), Stain Away (Quitar Manchas) y Deep Steam(Vapor Profundo). Para
prendas muy sucias y no que no se decoloran, el Lavado con Vapor mejora el tratamiento de las
manchas y usa menos agua.
La lavadora toma pequenas cantidades de agua en su tina y el calentador calienta el agua hasta
la evaporaci0n.
28 avado de una carga de ropa
\\TF455A(; 1/3159A 07 i_1ESindd 28 2(/13 12 13 11:49:34
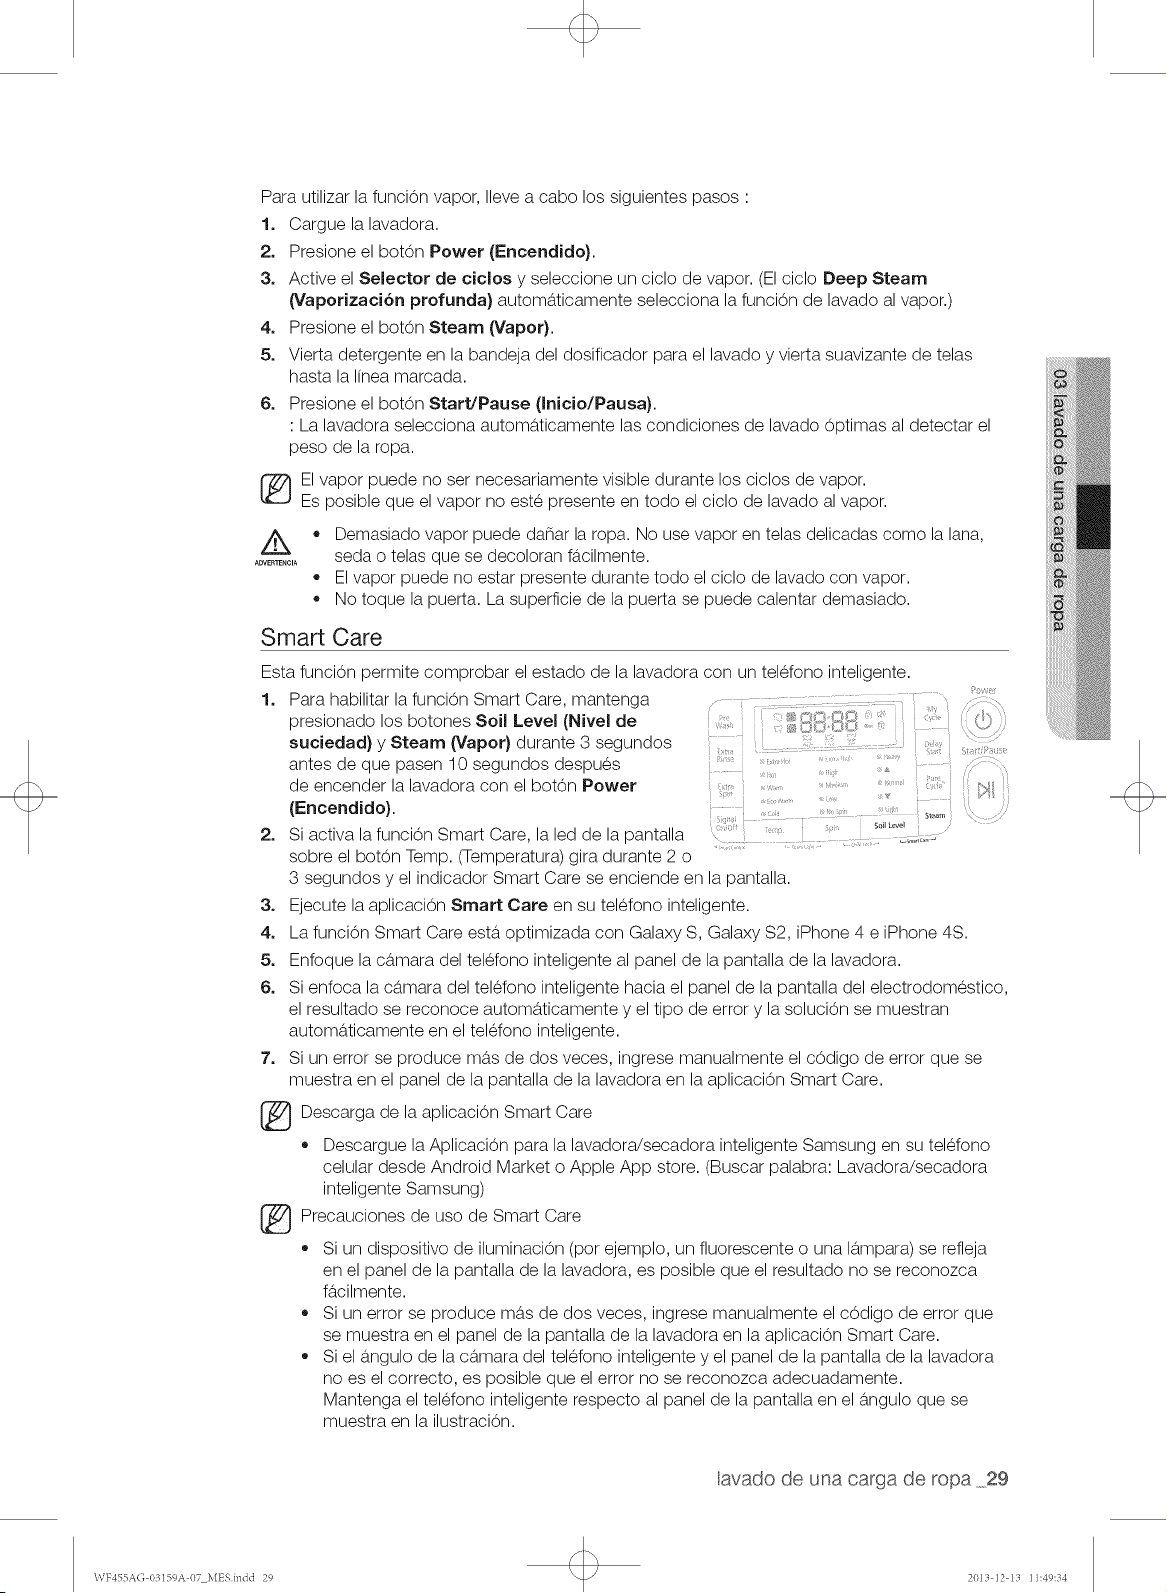
Para utilizar la funci0n vapor, Ileve a cabo los siguientes pasos :
1, Cargue la lavadora.
2, Presione el bot0n Rower (Eneendido}.
3, Active el Selector de ciclos y seleccione un ciclo de vapor. (El ciclo Deep Steam
(vaporizaci6n profunda} automa,ticamente selecciona la funci0n de lavado al vapor.)
4, Presione el bot0n Steam (Vapor}.
5, Vierta detergente en la bandeja del dosificador para el lavado y vierta suavizante de telas
hasta la linea marcada.
6. Presione el bot0n Start/Pause (Inicio/Pausa}.
: La lavadora selecciona automa,ticamente las condiciones de lavado optimas al detectar el
peso de la ropa.
El vapor puede no set necesariamente visible durante los ciclos de vapor.
Es posible que el vapor no este presente en todo el ciclo de lavado al vapor.
ADVER]ENCIA
• Demasiado vapor puede daflar la ropa. No use vapor en telas delicadas como la lana,
seda o telas que se decoloran fa,cilmente.
Elvapor puede no estar presente durante todo el ciclo de lavado con vapor.
No toque la puerta. La superficie de la puerta se puede calentar demasiado.
Smart Care
Esta funci0n permite comprobar el estado de la lavadora con un telefono inteligente.
1, Para habilitar la funci0n Smart Care, mantenga
presionado los botones Soil Level (Nivel de
suciedad} y Steam (Vapor) durante 3 segundos
antes de que pasen 10 segundos despues
de encender la lavadora con el bot0n Power
(Encendido}.
2. Si activa la funci0n Smart Care, la led de la pantalla
sobre el bot0n Temp. (Temperatura) gira durante 2 o
3 segundos y el indicador Smart Care se enciende en la pantalla.
Ejecute la aplicaci0n Smart Care en su telefono inteligente.
>:
#
%J
S (t>, }}
............i;::: b;
Steam
Soil Level
3=
4. La funci0n Smart Care esta,optimizada con Galaxy S, Galaxy $2, iPhone 4 e iPhone 4S.
5. Enfoque la camara del telefono inteligente al panel de la pantalla de la lavadora.
6. Si enfoca la camara del telefono inteligente hacia el panel de la pantalla del electrodomestico,
el resultado se reconoce automaticamente y el tipo de error y la soluci0n se muestran
automa, ticamente en el telefono inteligente.
7. Si un error se produce mas de dos veces, ingrese manualmente el c0digo de error que se
muestra en el panel de la pantalla de la lavadora en la aplicaci0n Smart Care.
Descarga de la aplicaci0n Smart Care
Descargue la Aplicaci0n para la lavadora!secadora inteligente Samsung en su telefono
celular desde Android Market o Apple App store. (Buscar palabra: Lavadora/secadora
inteligente Samsung)
Precauciones de uso de Smart Care
Si un dispositivo de iluminaci0n (pot ejemplo, un fluorescente o una Bmpara) se refleja
en el panel de la pantalla de la lavadora, es posible que el resultado no se reconozca
facilmente.
Si un error se produce mas de dos veces, ingrese manualmente el c0digo de error que
se muestra en el panel de la pantalla de la lavadora en la aplicaci0n Smart Care.
Si el angulo de la camara del telefono inteligente y el panel de la pantalla de la lavadora
no es el correcto, es posible que el error no se reconozca adecuadamente.
Mantenga el telefono inteligente respecto al panel de la pantalla en el a,ngulo que se
muestra en la ilustraci0n.
lavado de una carga de ropa 29
\VF455A(; 03159A 07 i\1ESindd 29 2013 12 13 11:49:34
Lavado de prendas con el selector de ciclos
Su nueva lavadora facilita el lavado de las prendas gracias al sistema de control automa, tico
"Fuzzy Control" de Samsung. Cuando seleccione un programa de lavado, la lavadora elegira,la
temperatura correcta, el tiempo de lavado y la velocidad de lavado.
1. Presione el bot6n Power (Encendido}.
2. Abra la puerta.
3. Coloque las prendas una a una bien extendidas en el tambor, sin Ilenarlo demasiado.
4. Cierre la puerta.
5. Agregue el detergente, el suavizante y el detergente para prelavado (si es necesario) en el
compartimiento adecuado.
El prelavado se encuentra disponible para los ciclos Normal (Normal), Perm Press
(Plancha permanente), Sanitize (Esterilizar), Bedding PLUS (Ropa de Cama), Deep Steam
(Vaporizaci6n profunda) y Heavy Duty (Potencia extra). $61o es necesario si la ropa esta,
muy sucia.
6. Utilice el Selector de ciclos para seleccionar el ciclo adecuado para cada tipo de material:
Normal (Normal), Heavy Duty (Potencia extra), Perm Press (Plancha permanente), Sanitize
(Esterilizar), Bedding PLUS (Ropa de Cama), Deep Steam (Vaporizaci6n profunda), Eco
Cold (Lavado ecol6gico fifo), Stain Away (Eliminaci6n de manchas), Active Wear (Ropa
deportiva), Delicates/Hand Wash (Ropa delicada/Lavado a mano), Wool (Lana), Quick Wash
(Lavado Ra,pido), Rinse + Spin (Enjuague + Centrifugado) y Spin Only ($61o centrifugado). Se
encendera,n los indicadores correspondientes en el panel de control.
7. En ese momento, puede controlar la temperatura del lavado, la cantidad de ciclos de
enjuague, la velocidad de centrifugado y el tiempo de retardo presionando el bot0n de la
opci0n adecuada.
8. Presione el bot6n Start/Pause (Inicio/Pausa) en el selector de ciclos y se iniciara, el lavado.
El indicador de funcionamiento se iluminara, y aparecera, en la pantalla el tiempo restante del
ciclo de lavado.
Opci6n de pausa
1. Dentro de los primeros 5 minutos de iniciado el lavado, es posible agregar/retirar prendas al
lavado.
2. Presione el boton Inicio/Pausa para destrabar la puerta.
3. No es posible abrir la puerta cuando la temperatura del agua es muy ELEVADA o el nivel del
agua esta, muy ALTO.
4. Despues de cerrar la puerta, presione el boton Inicio/Pausa para reiniciar el lavado.
Cuando el ciclo ha finalizado:
AI finalizar el ciclo, la lavadora se apagara, automa,ticamente.
1. Abra la puerta.
2. Saque la ropa limpia.
ATC (CONTROL AUTOMATICO DE TEMPERATURA)
ElATC es la funcion que controla la temperatura del agua en la lavadora mediante un sensor (el
termostato).
Dependiendo de donde este Iocalizado el cliente, hay variantes de temperaturas de agua (zonas frias,
zonas calientes, varias temperaturas de agua, configuraciones de temperatura del calentador, etc.),
por Io tanto, la funci0n ATC de nuestra lavadora es mantener un cierto nivel de temperatura de lavado
para poder Iograr el mejor rendimiento de lavado en cada ciclo.
Si usted selecciona las configuraciones de servicio normal o pesado, esas configuraciones ser_tn
las reglamentarias y tambien las de UL. Ya que esta lavadora nueva tiene como su primera prioridad
reducir el consumo de energia, el cliente se darer cuenta de que estar_t entrando m_ts agua fria a la
lavadora. Pero esto es normal y no es un problema.
Durante el proceso normal de la regulaci0n de la temperatura, la caliente ser_t de una temperatura
similar a la que es aceptable para un adulto durante un bano y la temperatura tibia ser_tsimilar a la
temperatura del agua de una alberca.
Si el cliente quiere lavar la ropa a una temperatura de agua especifica, deber_t seleccionar una
configuracion distinta para cada temperatura (Caliente/Tibia / Eco Tibia)
30 avado de una carga de ropa
\VF455A(; 03159A 07 i_fESindd 3(} 2013 12 13 11:49:34
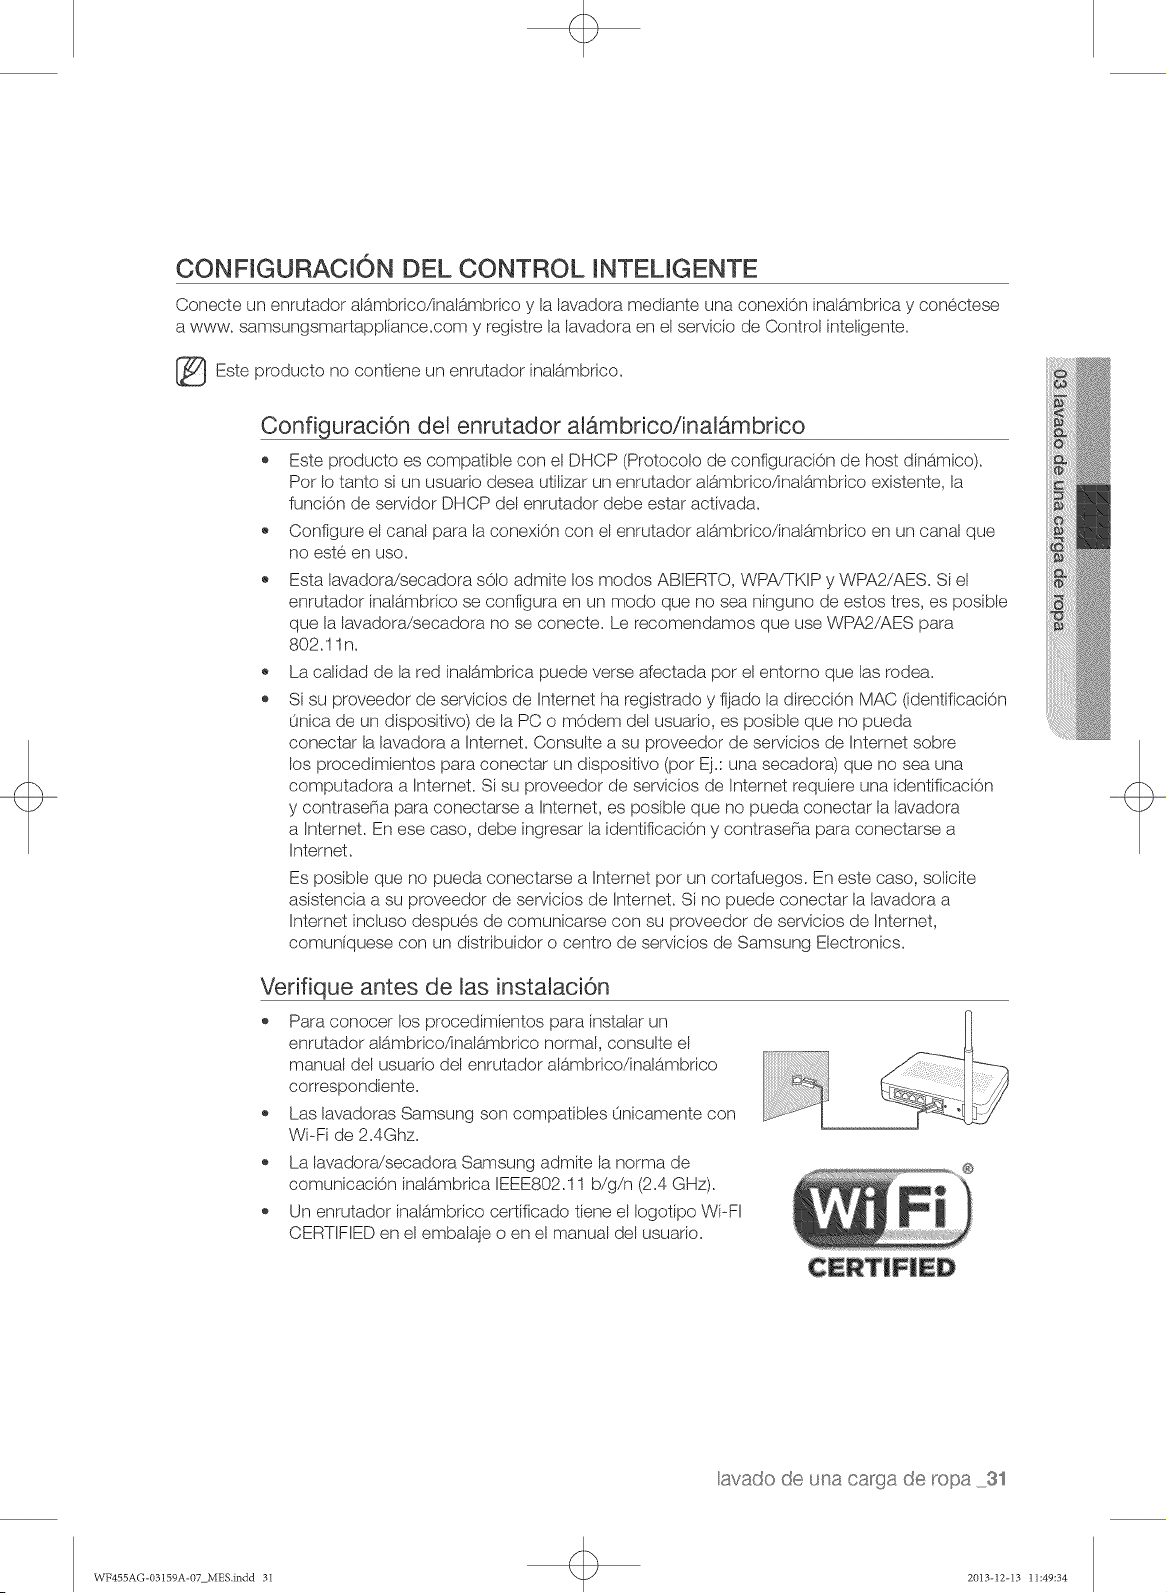
CONFIGURACION DEL CONTROL INTELIGENTE
Conecte un enrutador alambrico/inalambrico y la lavadora mediante una conexion inalambrica y conectese
a www, samsungsmartappiiance,com y registre la lavadora en eI servicio de Control inteiigente,
Este producto no un
oontiene enrutador inalb.mbrico,
Configuraci6n del enrutador atambrico/inatambrico
* Este producto es compatible con eI DHCP (ProtocoIo de configuraciOn de host dinb.mico).
Por Io tanto si un usuario desea utilizar un enrutador alambrico/inalambrico existente, la
funciOn de servidor DHCP del enrutador debe estar activada.
* Configure eI canal para la conexiOn con eI enrutador ai_.mbrico/inaib.mbrico en un canal que
no este en uso.
* Esta lavadora/secadora sOlo admite los modos ABIERTO, WPA!TKIP y WPA2/AES. Si el
enrutador inalambrico se configura en un modo que no sea ninguno de estos tres, es posibie
que la lavadora/secadora no se conecte. Le recomendamos que use WPA2/AES para
802.11 n.
* La calidad de la red inalambrica puede verse afectada por el entomo que las rode&
* Si su proveedor de servicios de Internet ha registrado y fijado la direcciOn MAC (identificaciOn
Onica de un dispositivo) de la PC o modem del usuado, es posible que no pueda
conectar la lavadora a Internet. Consulte a su proveedor de servicios de Internet sobre
los procedimientos para conectar un dispositivo (por Ej.: una secadora) que no sea una
computadora a Internet, Si su proveedor de servicios de Internet requiere una identificaciOn
y contrase_a para coneetarse a Internet, es posibie que no pueda conectar la lavadora
a Internet, En ese caso, debe ingresar la identificaciOn y contrase_a para conectarse a
Internet.
Es posibie que no pueda conectarse a Internet por un cortafuegos. En este caso, soiicite
asistencia a su proveedor de servicios de Internet, Si no puede conectar la lavadora a
Internet inciuso despues de comuniearse con su proveedor de servicios de Internet,
comuniquese con un distribuidor o centro de servicios de Samsung Electronics,
Verifique antes de las instalaci6n
* Para conocer los procedimientos para instaiar un
enrutador aBmbrico/inalambrico normal, consulte el
manual deI usuario deI enrutador ai_.mbrico/inaib.mbrico
correspondiente.
* Las lavadoras Samsung son compatibles Onicamente con
Wi-Fi de 2.4Ghz.
* La lavadora/secadora Samsung admite la norma de
comunicaciOn inalambrica IEEE802.11 b/g/n (2.4 GHz).
* Un enrutador inalambrico certificado tiene el Iogotipo Wi-H
CERTIFIED en eI embaiaje o en eI manual deI usuario.
avado de ura carga de ropa 31
WF455AG-03159A-07 MES.indd 3i 2013-12-I3 11:49:34
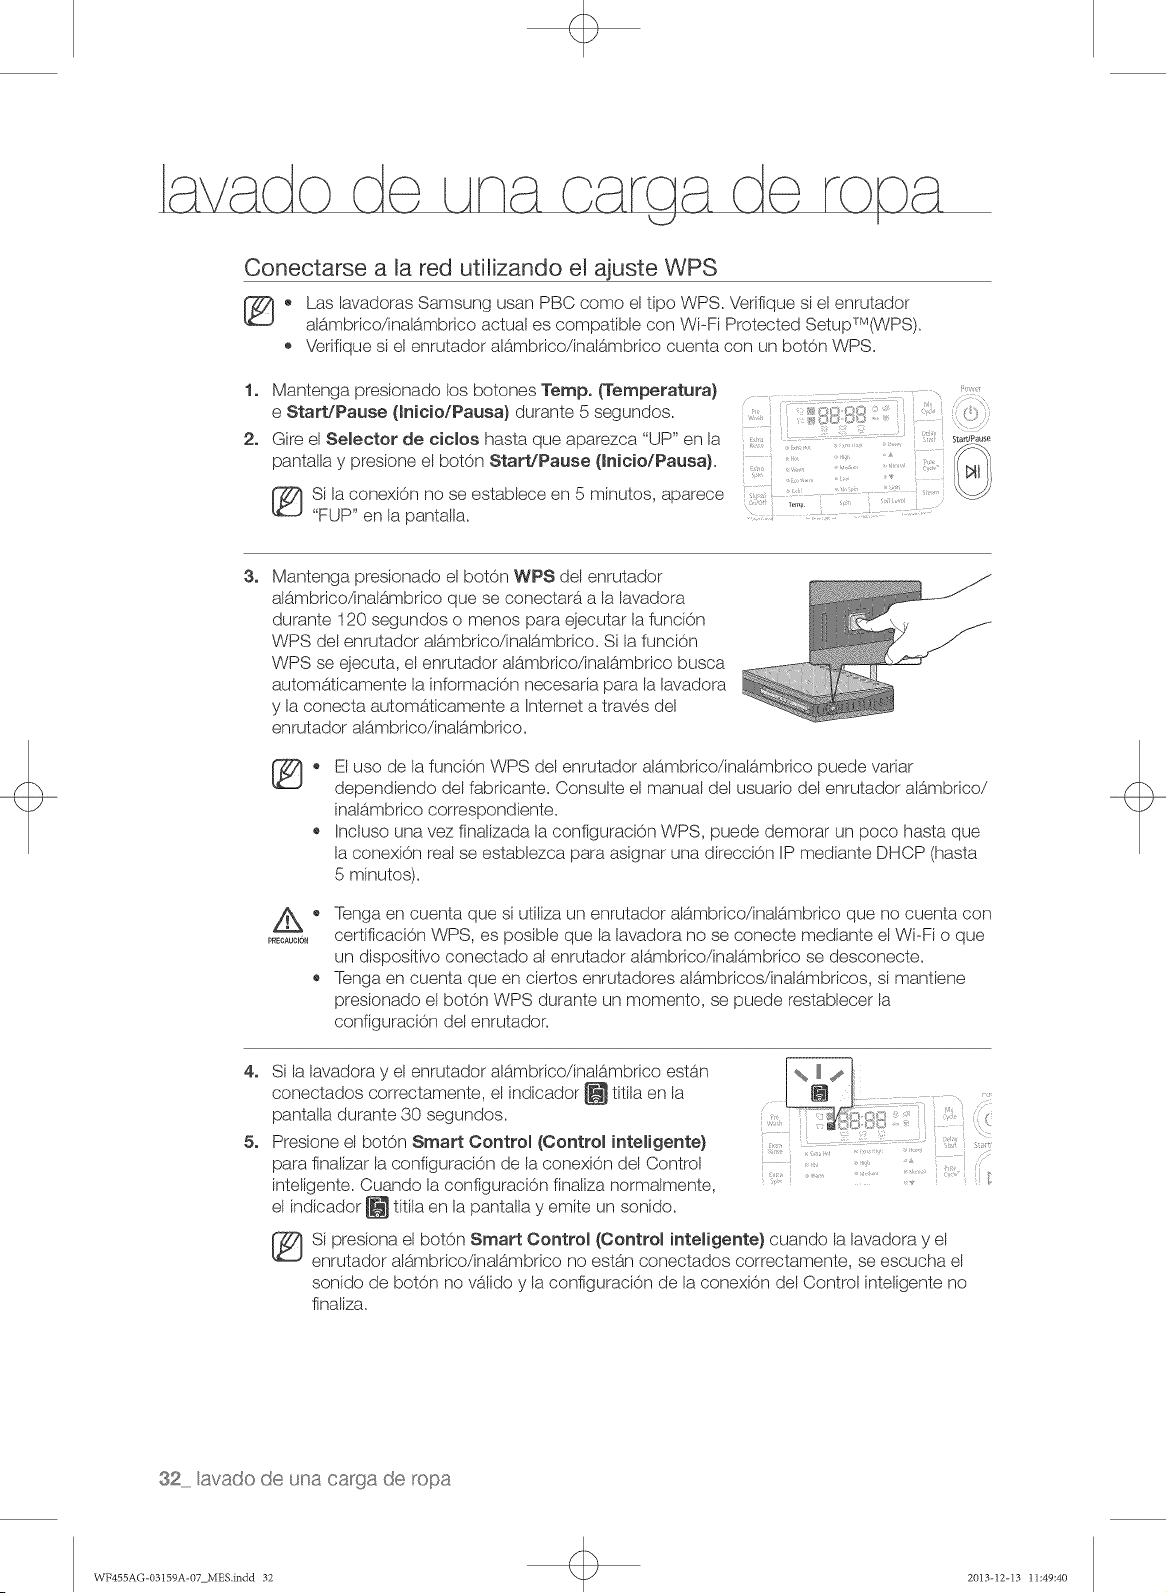
Conectarse a la red utilizando el ajuste WPS
, Las lavadoras Samsung usan PBC como el tipo WPS. Verifique si el enrutador
alambrico/inaBmbrico actual es compatible con Wi-Fi Protected SetuprMOS"PS).
, Verifique si el enrutador alambrico/inalambrico cuenta con un botOn WPS.
1.
2.
Mantenga presionado los botones Temp, _emperatura) ......
e Start/Pause (mnicio/Pausa) durante 5 segundos. ,}'::
eire el Selector de eieios hasta que aparezca "UP" en la ........................................... _0_,P....
pantalla y presione el botOn Start/Pause (lnieio/Pausa). .......... ..... {:
Si la conexiOn no se estabbce en 5 minutos, aparece
"FUP" en la pantalla. ...........................................................
3.
4.
5.
Mantenga presionado el botOn WPS del enrutador
alambrico/inalambrico que se conectara a la lavadora
durante 120 segundos o menos para ejecutar la funciOn
WPS del enrutador alambrico/inalambrico. Si la funciOn
WPS se eiecuta, el enrutador alambrico/inalambrico busca
automaticamente la informaciOn necesaria para la lavadora
y la conecta automaticamente a Internet a traves del
enrutador alambrico/inalambrico.
El uso de la funciOn WPS del enrutador alambrico/inalambrico puede vaHar
dependiendo del fabricante. Consulte el manual del usuario del enrutador alambrico/
inalambrico correspondiente.
Incluso una vez finalizada la configuraciOn WPS, puede demorar un poco hasta que
la conexiOn real se establezca para asignar una direcciOn IP mediante DHCP (hasta
5 minutos).
PRECAUCION
@
Tenga en cuenta que si utiliza un enrutador alambrico/inalambrico que no cuenta con
certificaciOn WPS, es posibb que la lavadora no se conecte mediante el Wi-Fi o que
un dispositivo conectado al enrutador alambrico/inalambrico se desconecte.
Tenga en cuenta queen ciertos enrutadores alambricos/inalambricos, si mantiene
presionado el botOn WPS durante un momento, se puede restablecer la
configuraciOn del enrutador.
Si la lavadora y el enrutador alambrico/inalambrico estan
conectados correctamente, el indicador _ titila en la
pantalla durante 30 segundos.
Presione el botOn Smart Control (Control inteligente)
para finalizar la configuraciOn de la conexiOn del Control
inteligente. Cuando la configuraciOn finaliza normalmente,
el indicador _ titila en la pantalla y emite un sonido.
Si presiona el botOn Smart Control (Control inteiigente) cuando la lavadora y el
enrutador alambrico/inalambrico no estan conectados correctamente, se escucha el
sonido de botOn no valido y la configuraciOn de la conexiOn del Control inteligente no
finaliza.
32 avado de una ca_"gade _opa
WF455AG-03159A-07 MES.indd 32 2013-12-I3 11:49:40
Conectarse a la red utilizando el ajuste AP
1. Mantenga presionado los botones Temp. (Temperatura) e Start/Pause (Inicio/Pausa}
durante 5 segundos.
2. El menu AP aparece en la pantalla LED.
3. Si el boton Start/Pause (Inicio/Pausa} se presiona despues de 1 minuto
aproximadamente, el AP titila.
Si la pantalla "AP" no titila.
Dado que el modulo Wi-Fi no esta listo, intentelo nuevamente mas tarde.
(Se necesita aproximadamente 1 minuto para que el modulo Wi-Fi este listo.)
4. Verifique si la SMARTWASHER aparece en la lista que aparece en la pantalla de
configuracion de Wi-Fi del telefono movil. Si figura en la lista, realice el paso 5.
5. Ejecute la aplicacion, ingrese a Configuraci6n de conexi6n y presione el boton Iniciar
configuraciones.
6. La aplicacion trata de conectarse con la lavadora que ha pasado al modo AP.
7. Una vez establecida la conexion, aparece la lista AR
8. Seleccione la APe ingrese la contrasena.
9. Una vez finalizada la configuracion.
_ uando la configuracion finaliza exitosamente, aparece "oAP" en el LED.
Cuando la configuracion finaliza exitosamente, aparece "FAP" en el LED.
avado de una carga de ropa 33
\\TF455A(; 03159A 07 MESindd 33 2013 12 13 11:49:42
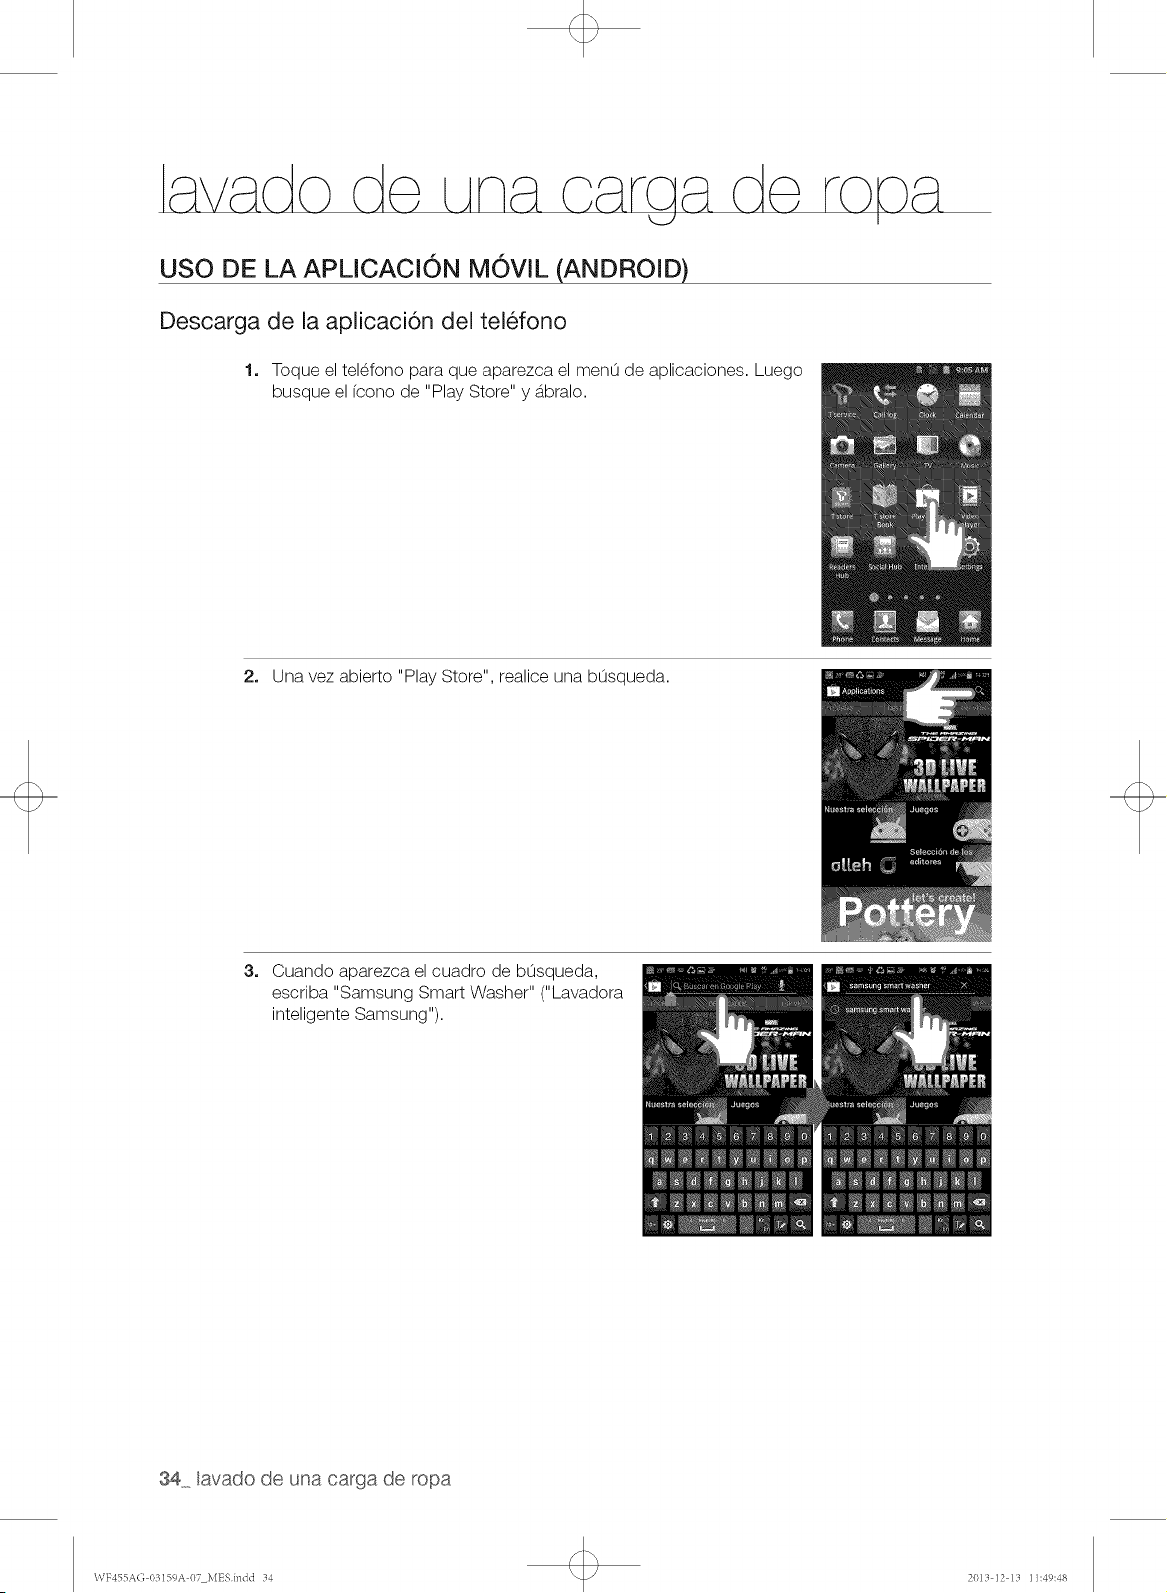
USO DE LA APLICACION MOVIL (ANDROID)
Descarga de la aplicaci6n del telefono
1. Toque el tel_fono para que aparezca el menLi de aplieaciones. Luego
busque el feono de "Play Store" y _tbralo.
2. Una vez abierto "Play Store", realice una bLisqueda.
3. Cuando aparezca el cuadro de bLisqueda,
escriba "Samsung Smart Washer" ("Lavadora
inteligente Samsung").
34 avado de una carga de ropa
\VF455A(; I)3159A 07 MESindd 34 2013 12 13 11:49:48

4,
Una vez finalizada la b0squeda, aparecera, en
pantalla la aplicaci0n para "Samsung Smart
Washer" ("Lavadora inteligente Samsung").
Debe descargar esta aplicacion al tel_fono.
AsegOrese de que la aplicaci0n cambie de
"Free" (Libre)a "Installed" (Instalada)
5,
Una vez que haya descargado la aplicacion en el tel_fono, podr_t
configurar el control Wi-Fi de la lavadora.
PASO 1
lavado de una carga de ropa 35
\\TF455A(; 03159A 07 MESindd 35 2013 12 13 11:49:51
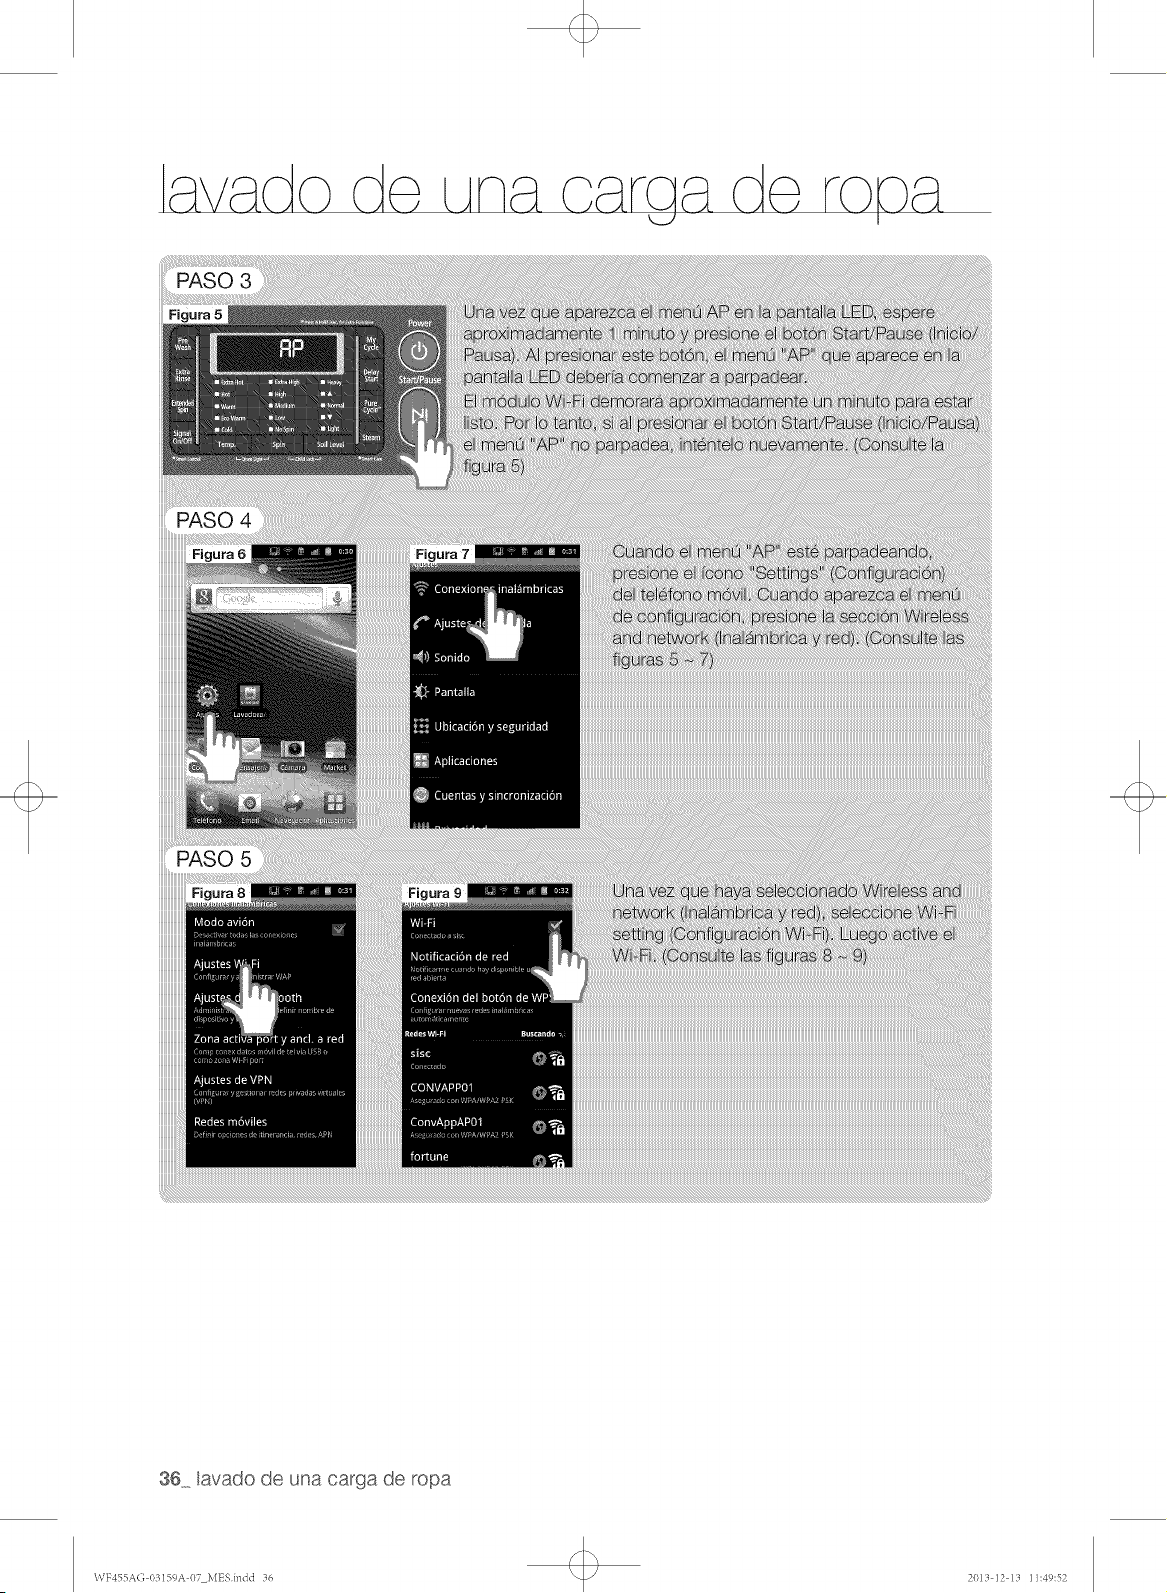
PASO 3
PASO 4
Figura 6
36 avado de una carga de ropa
WF455AG 03159A 07 MESindd 36 2013 12 13 11:49:52

_ PASO 7
tavado de una carga de ropa _37
WF,155AG-O3159A-OT_MES.indd 37 2013-12-13 11:49:54
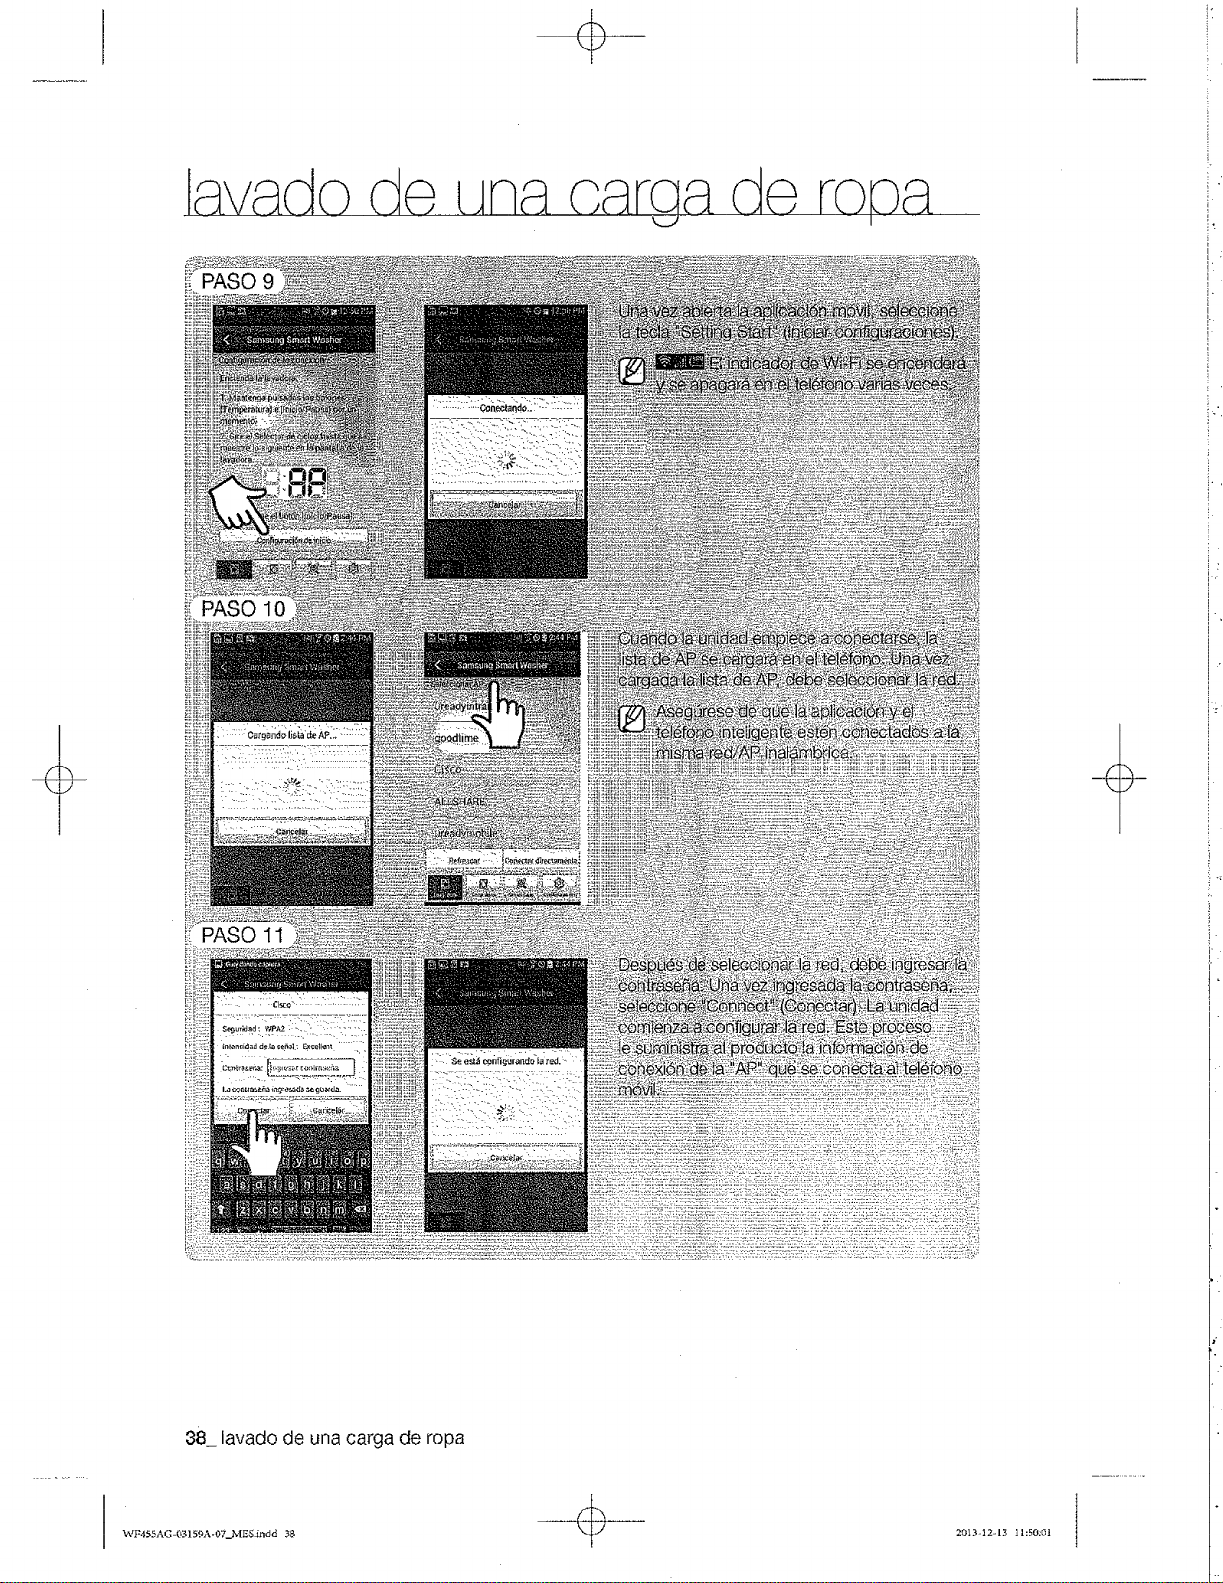
'-F
88_ lavado de una carga de ropa
_&IF45SAG -(_3159A - 07_M E&irId d 38
Y
2013-12-13 1 l:50:01
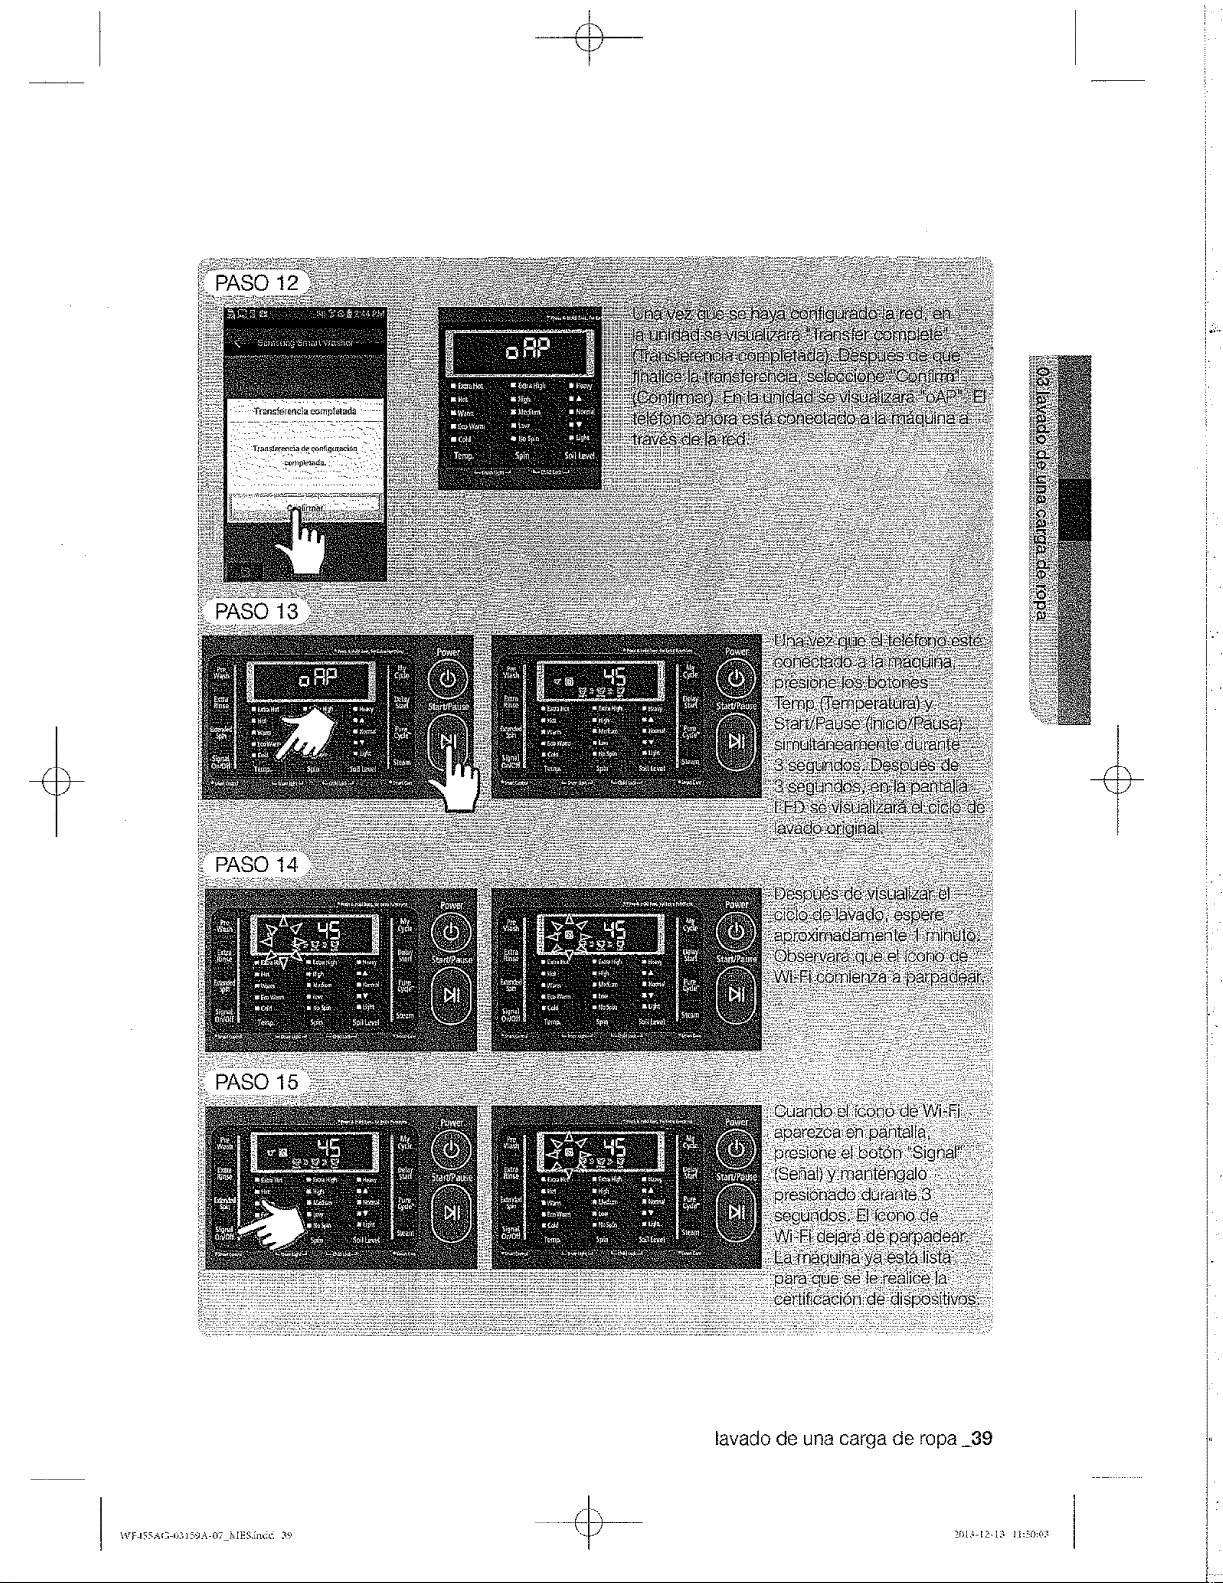
lavado de una carga de ropa 39
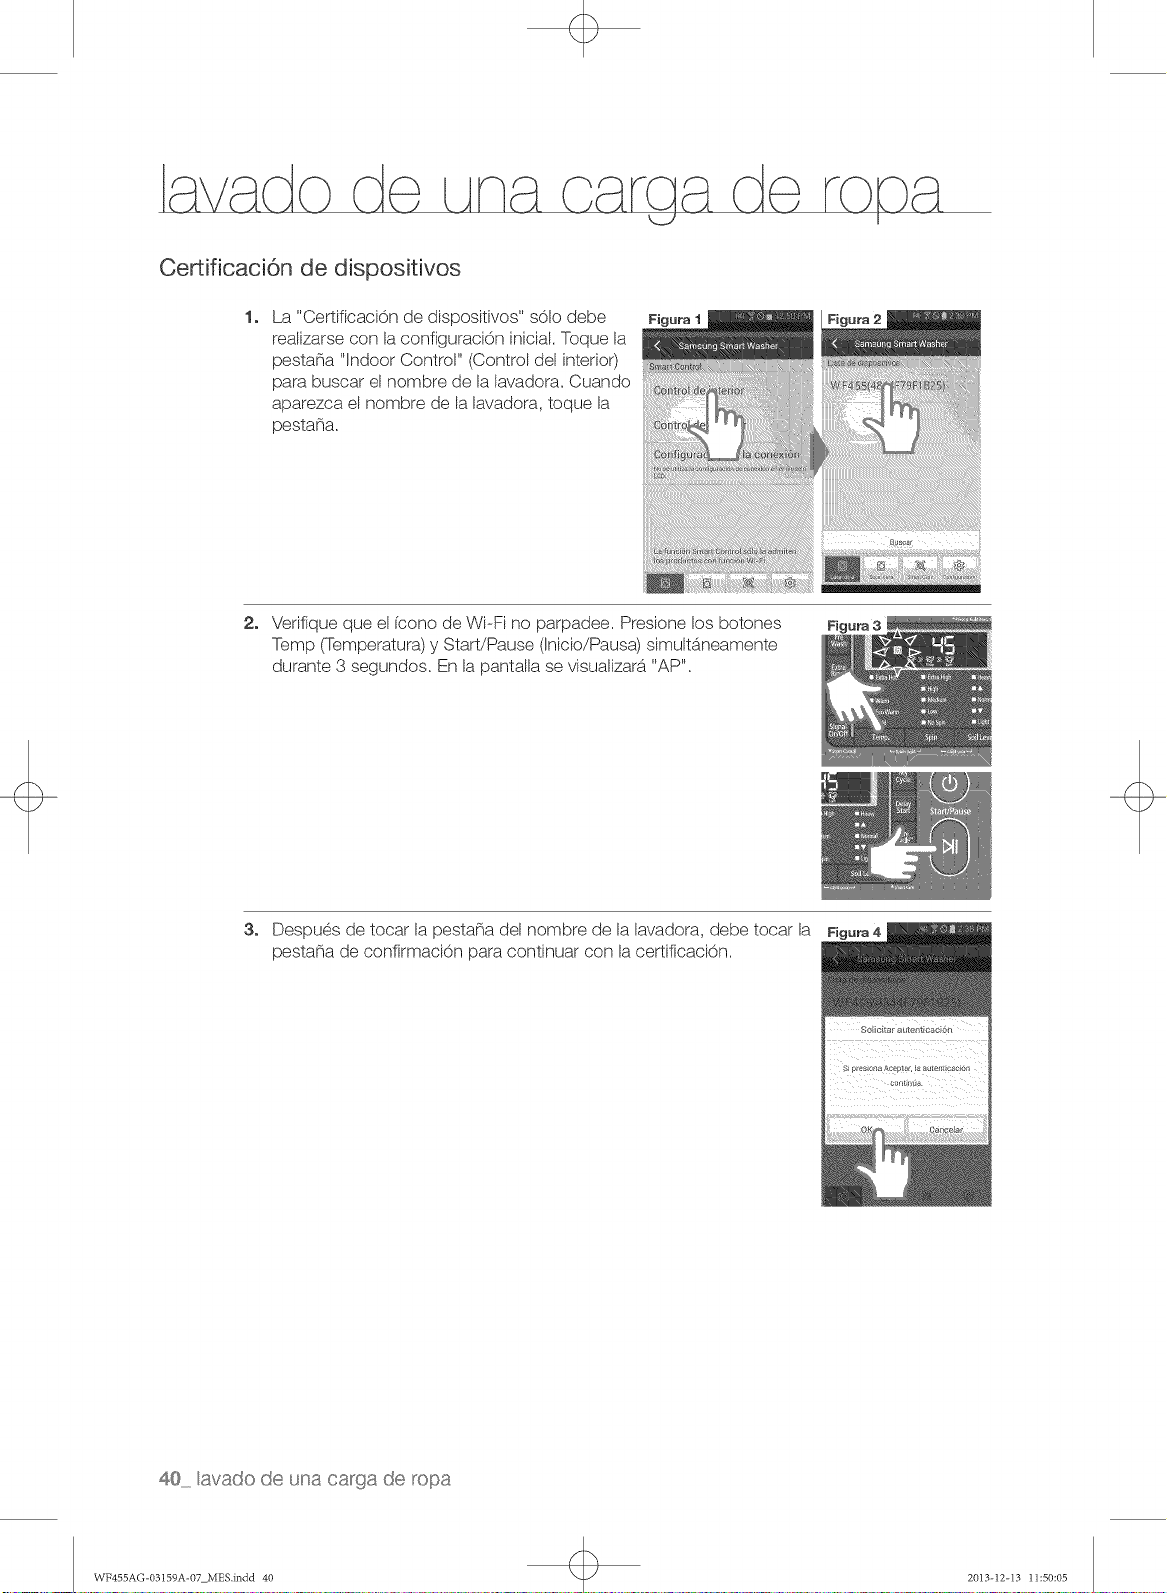
Certificaci6n de dispositivos
La "Certificaci0n de dispositivos" sOlo debe
realizarse con la configuraci6n inicial. Toque la
pestana "Indoor Control" (Control del interior)
para buscar el nombre de la lavadora. Cuando
aparezca el hombre de la lavadora, toque la
pesta_a.
2. Vedfique que el icono de WPFi no parpadee. Presione los botones
Temp (Temperatura) y Start/Pause (Inicio/Pausa) simultaneamente
durante 3 segundos. En la pantalla se visualizar_. "AP".
Figura 3
3_
Despues de tocar la pestana del nombre de la lavadora, debe tocar la
pesta_a de confirmaci0n para continuar con la certificaci0n.
Figu_ 4
So o_ar a_lte_'_ti/:aci /i
8 ptes ona A_p r, _aaute_t 9aci6a
40 avado de una carga de _opa
WF455AG-03159A-07 MES.indd 40 2013-12-I3 11:50:05
avado de una carga de ropa 41
\\TF455A(; I)3159A 07 MESindd 41 2013 12 13 11:51):06
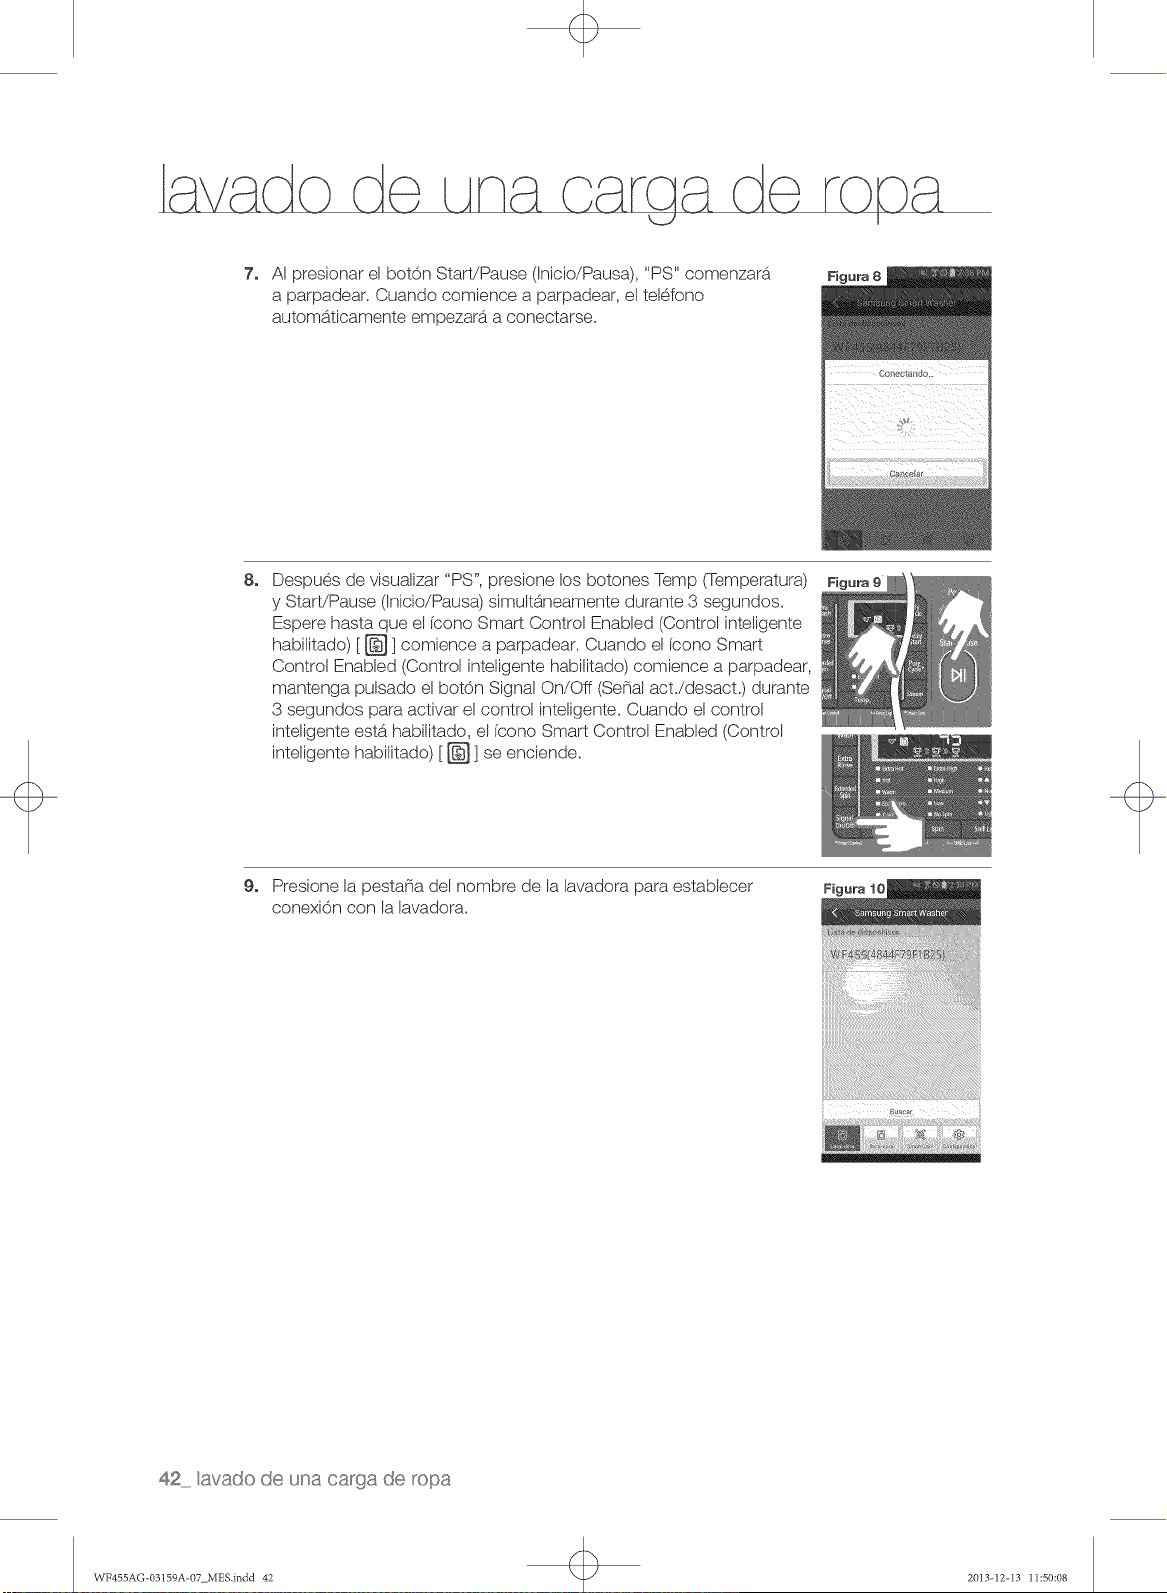
2. AI presionar el botOn Start/Pause (Inicio/Pausa), "PS" comenzar_.
a parpadear. Cuando comience a parpadear, el telefono
autom_.ticamente empezar_, a conectarse.
!7 7_ _} Q}!!}7/i T!Y{!7_77
8.
Despues de visualizar "PS', presione los botones Temp (Temperatura)
y Start/Pause (Inicio/Pausa) simultaneamente durante 3 segundos.
Espere hasta que el icono Smart Control Enabled (Control inteligente
habilitado) [ _ ] comience a parpadear. Cuando el fcono Smart
Control Enabled (Control inteligente habilitado) comience a parpadear,
mantenga pulsado el botOn Signal On/Off (SeSal act./desact.) durante
3 segundos para activar el control inteligente. Cuando el control
inteligente estS.habilitado, el icono Smart Control Enabled (Control
inteligente habilitado) [ _ ] se enciende.
Figura 9
9. Presione la pestaSa del nombre de la lavadora para establecer
conexiOn con la lavadora.
Figura 10
42 avado de una carga de _opa
WF455AG-03159A-07 MES.indd 42 2013-12-I3 11:50:08
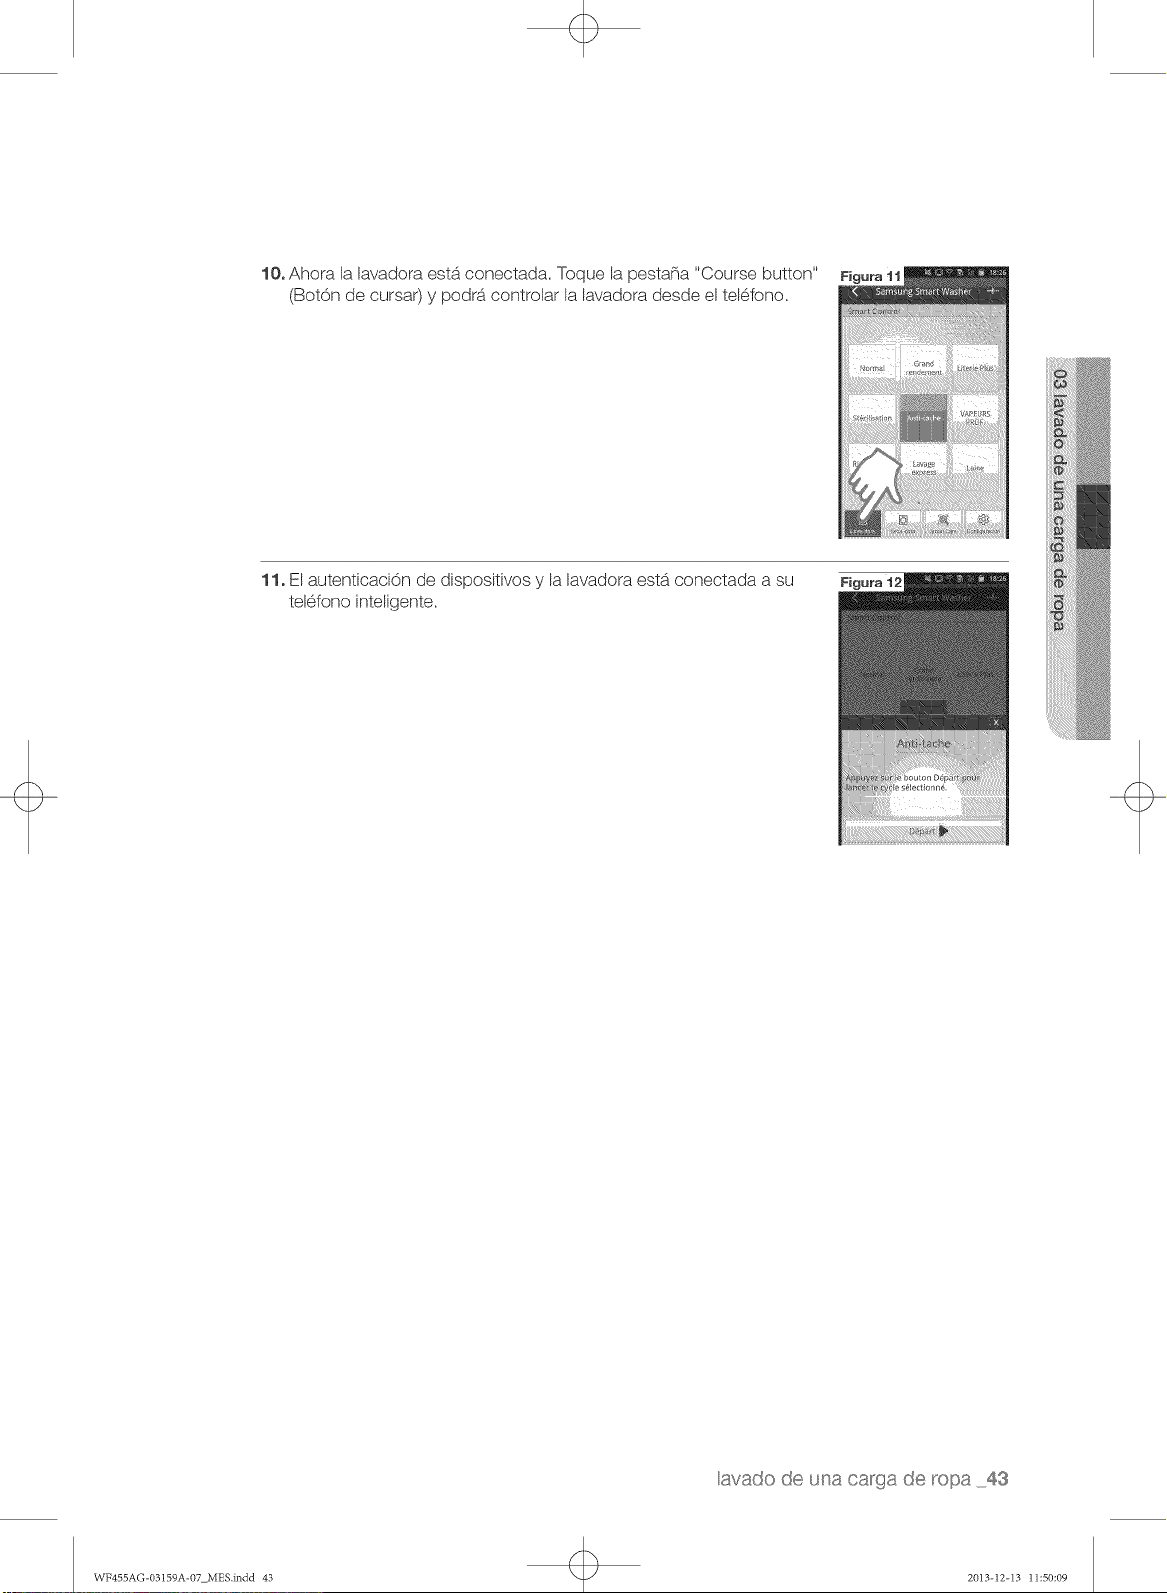
10. Ahora la lavadora est,. conectada. Toque la pestana "Course button"
(BotOn de cursaO y podra controlar la lavadora desde el telefono.
F
........................:}:;
11. El autenticaci6n de dispositivos y la lavadora est,. conectada a su
telefono inteligente.
avado de u_a carga de _opa 43
WF455AG-03159A-07 MES.indd 43 2013-12-I3 11:50:09

Uso de la aplicaci6n m6vil
_:_PASO 2
44 tavado de una carga de ropa
WF455AG _(_3t 59A -07 MES_indd 44 + 2013-12=13 11:.¢,0:11

avado de u_a ca_"gade _opa 45
WF455AG-03159A-07 MES.indd 45 2013-12-I3 11:50:i2
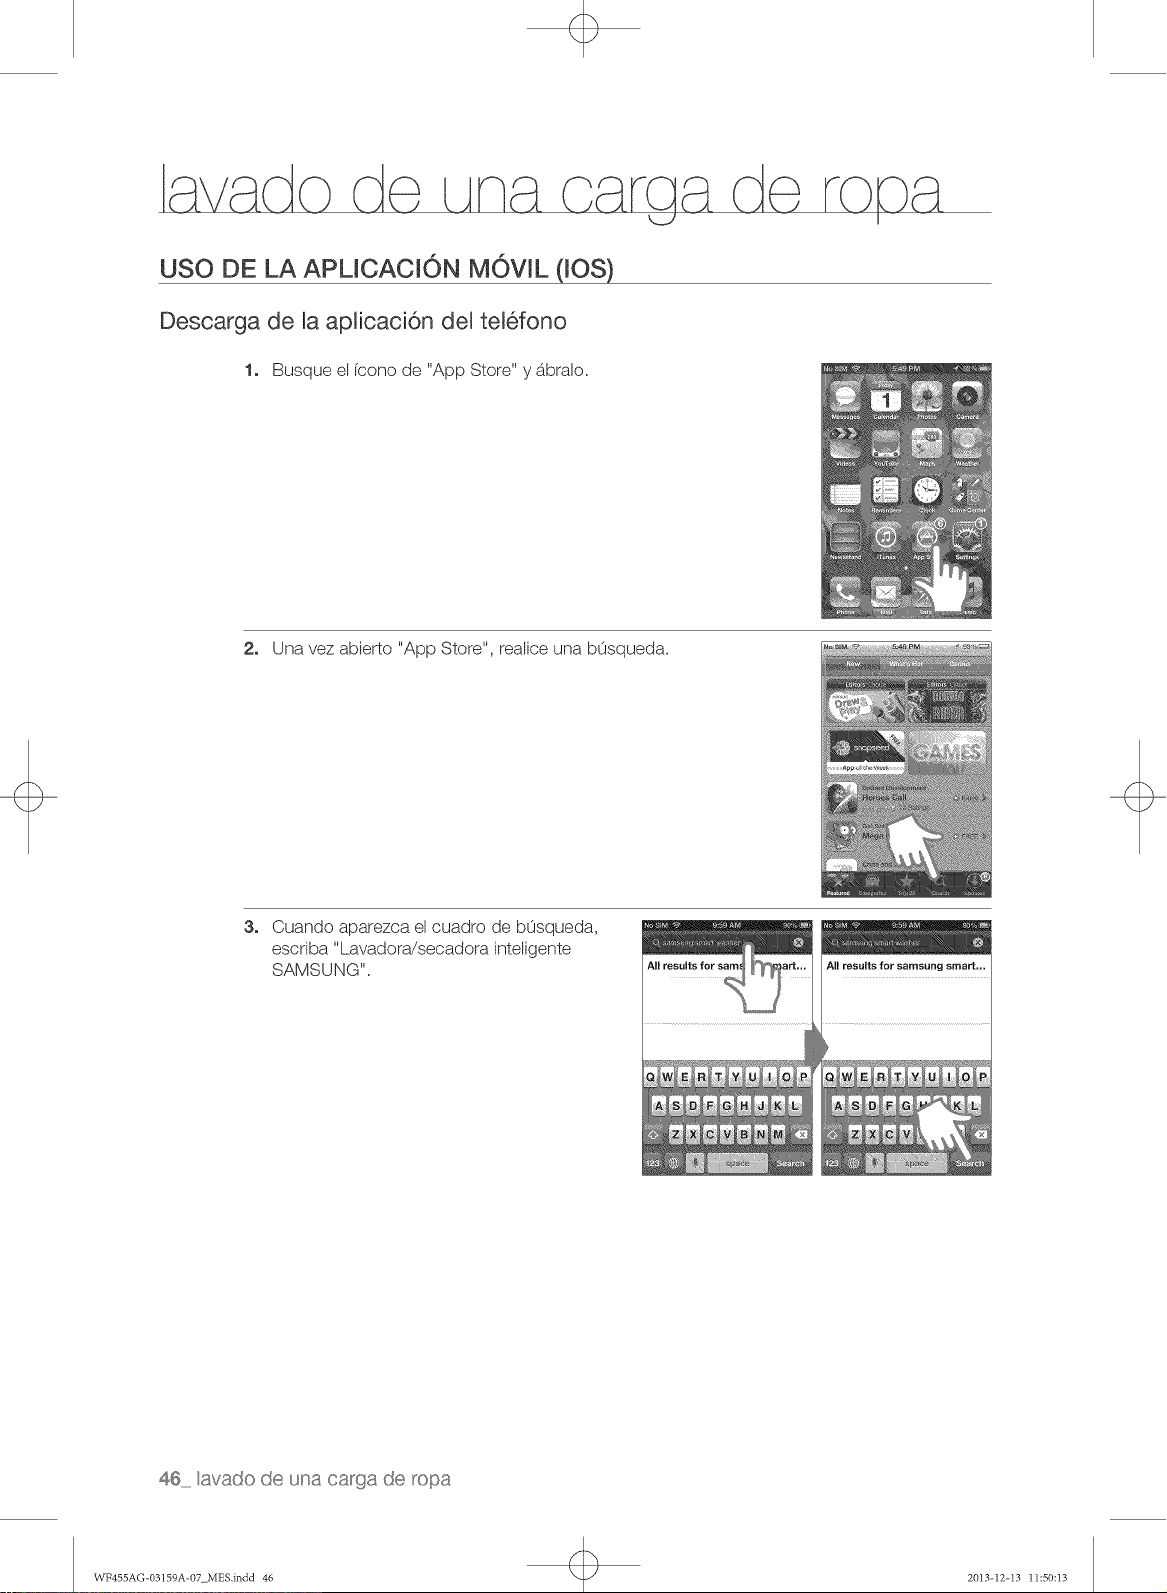
USO DE LA APLICACION MOVIL (lOS)
Descarga de la aplicaci6n del telefono
1. Busque el [cono de "App Store" y abralo.
2. Una vez abierto "App Store", realice una bOsqueda.
3. Cuando aparezca el cuadro de bOsqueda,
escdba "Lavadora/secadora inteligente
SAMSUNG".
46 avado de una ca_'ga de _opa
WF455AG-03159A-07 MES.indd 46 2013-12-I3 11:50:i3
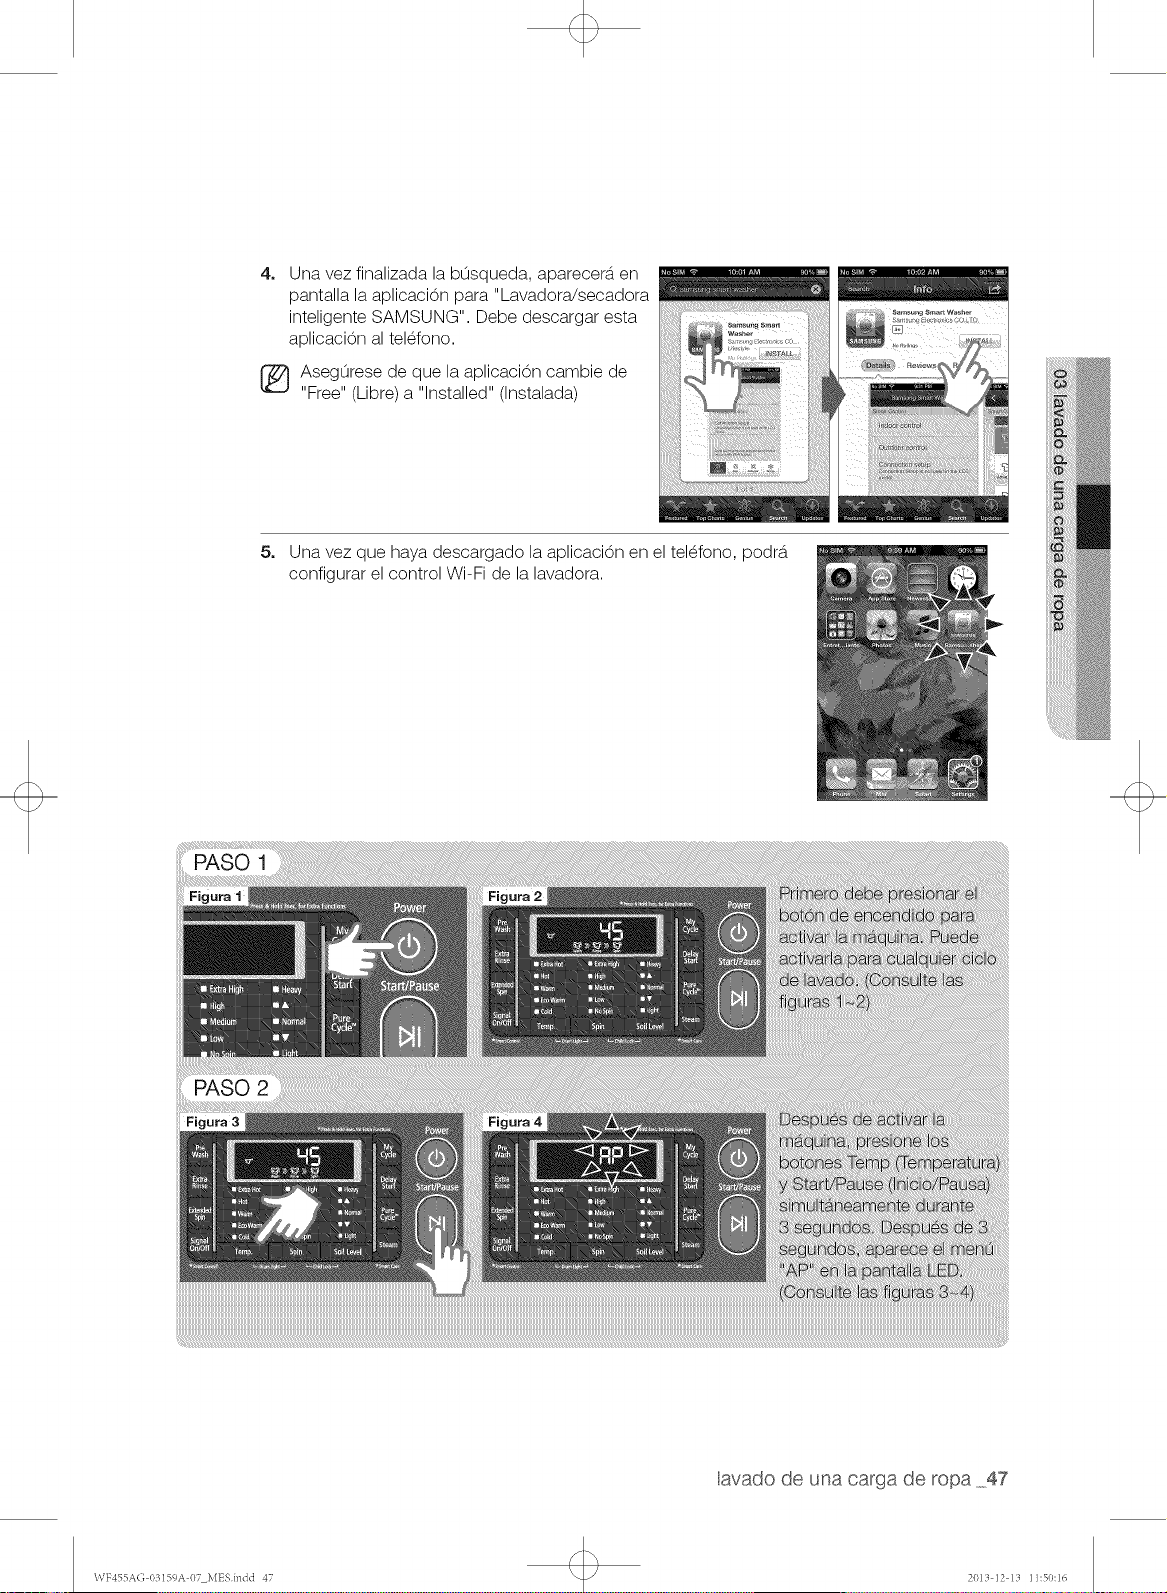
4=
Una vez finalizada la b0squeda, aparecera, en
pantalla la aplicaci0n para "Lavadora!secadora
inteligente SAMSUNG". Debe descargar esta
aplicacion al tel_fono.
AsegOrese de que la aplicaci0n cambie de
"Free" (Libre)a "Installed" (Instalada)
5. Una vez que haya descargado la aplicacion en el tel_fono, podr_t
configurar el control Wi-Fi de la lavadora.
PASO 1
PASO 2
Figura3
lavado de una carga de ropa 47
\\TF455A(; 03159A 07 MESindd 47 2013 12 13 11:50:16
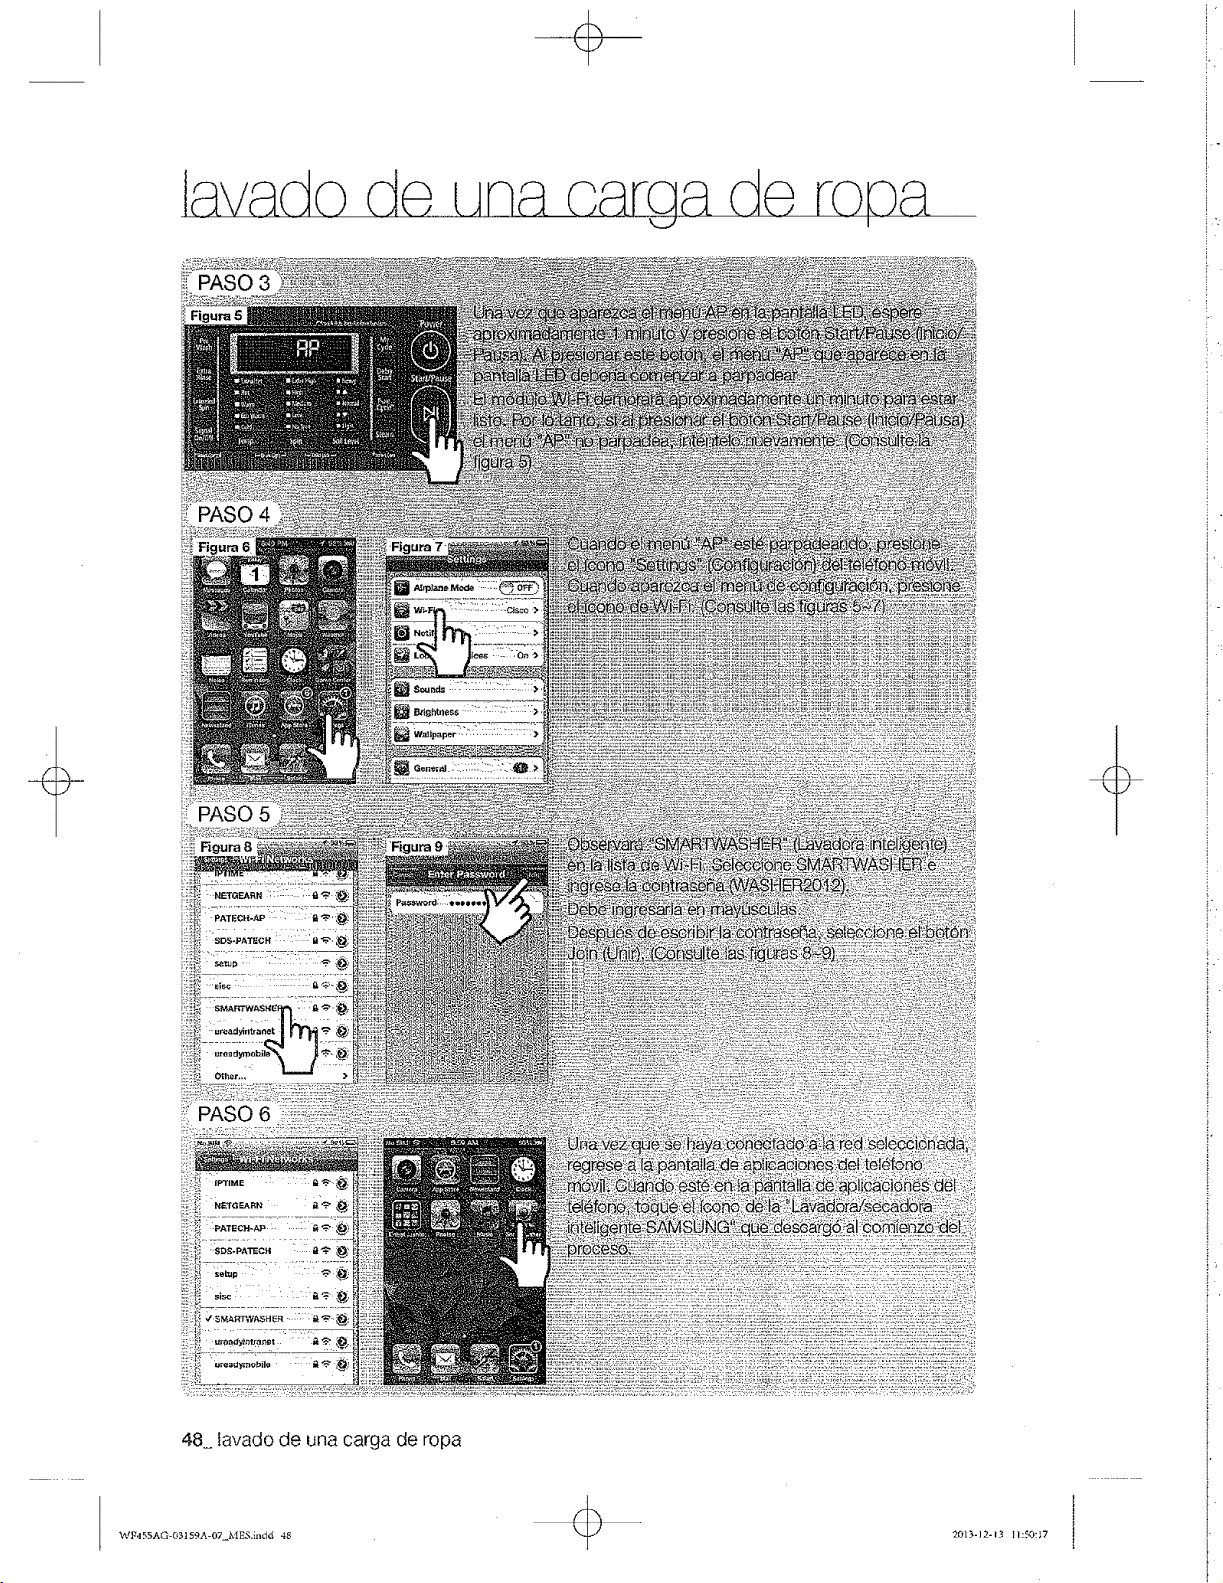
ill PASO 6
48 favado de una carga de ropa
WI%155AG-03159A-07_M E.q.ind 4 48
201 _,-12- I_ I 1:._0tI 7
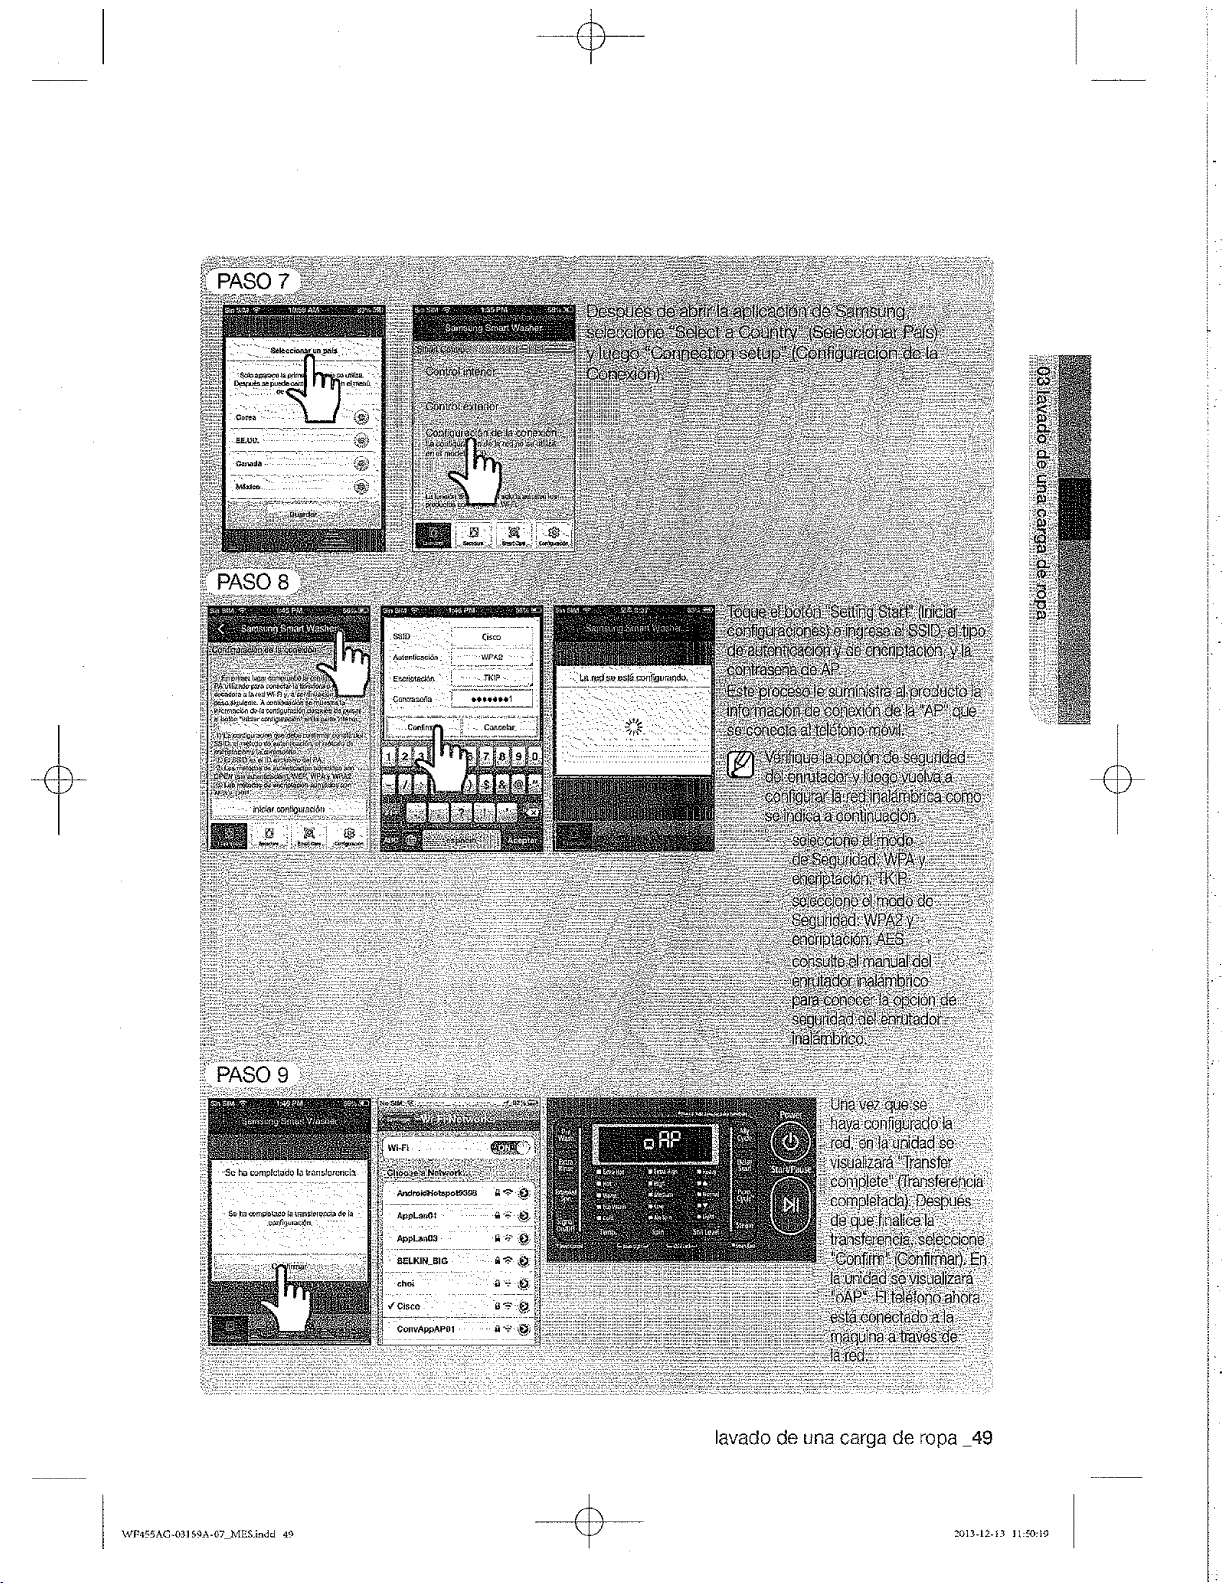
Y
lavado de una carga de ropa 49
"vVP,_55AG_0315_A-07 MESJndd 49 2013-12-13 11:_0:I9
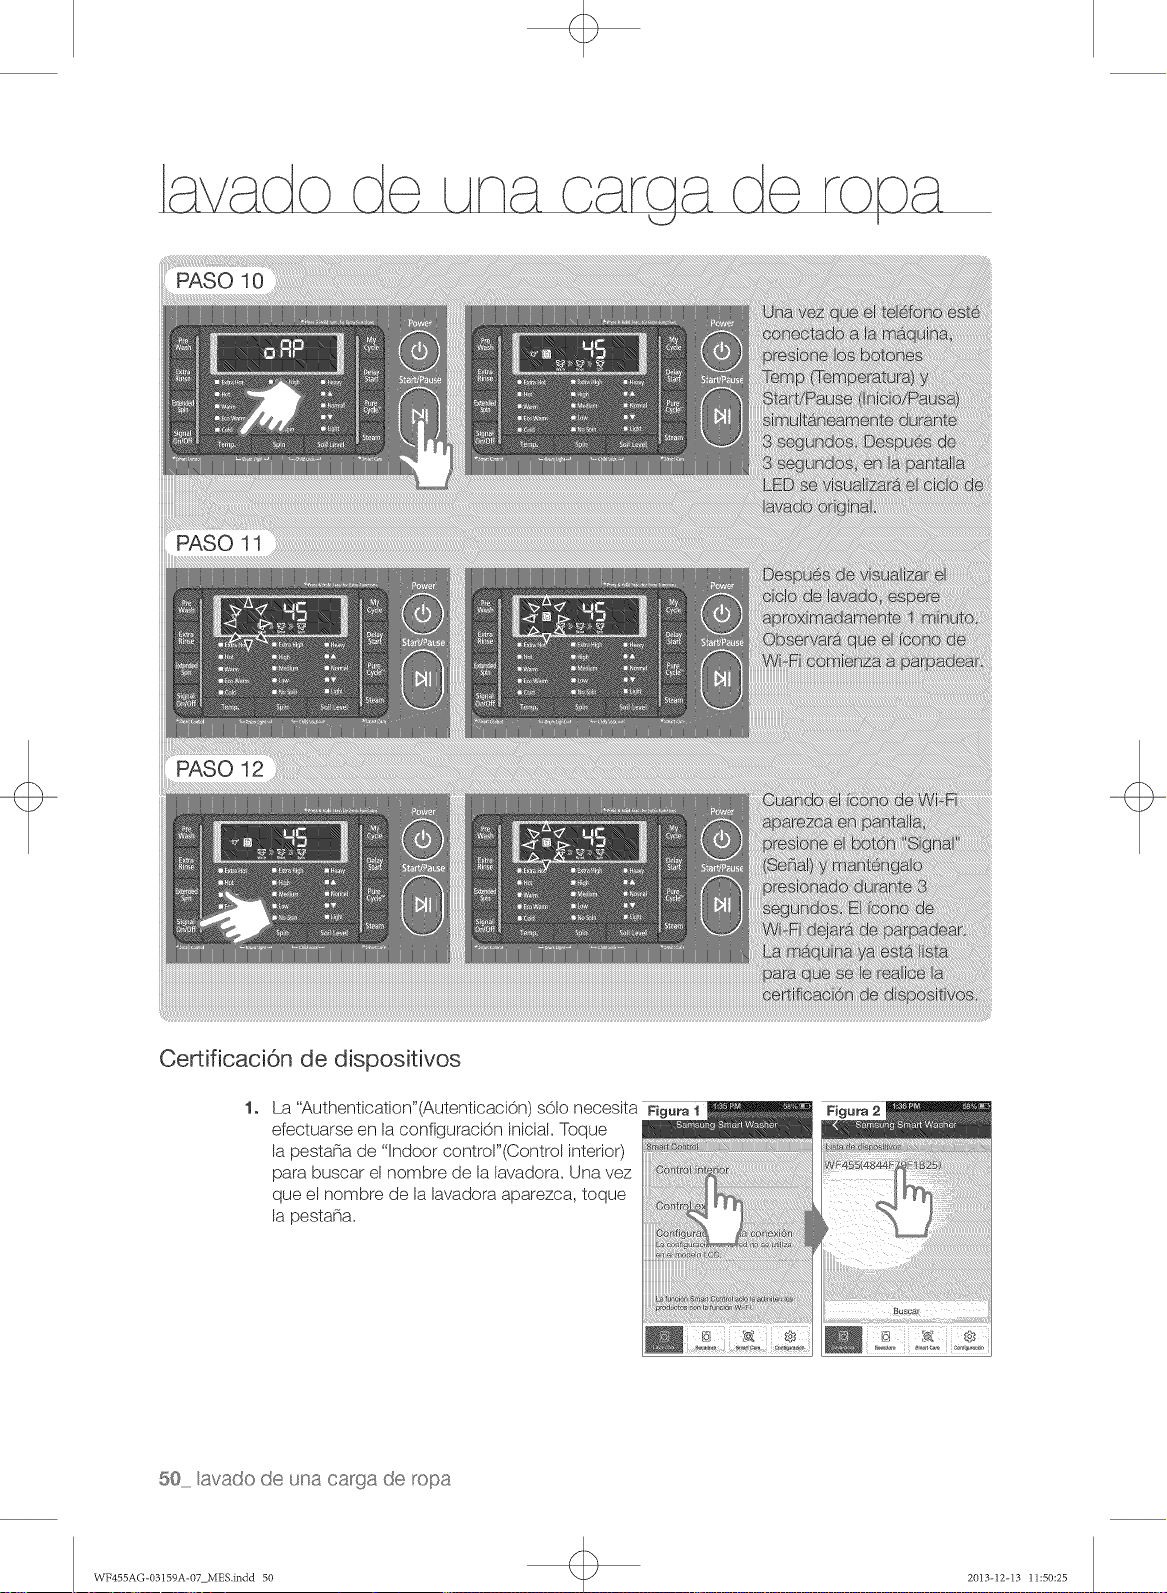
Certificaci6n de dispositivos
La "Authentication'(AutenticaciOn) s61o necesita Figura1
efectuarse en la configuraci0n inicial. Toque
la pestana de "Indoor control"(Control interior)
para buscar el nombre de la lavadora. Una vez
que el nombre de la lavadora aparezca, toque
la pesta_a.
50 avado de una carga de _opa
WF455AG-03159A-07 MES.indd 50 2013-12-I3 11:50:25
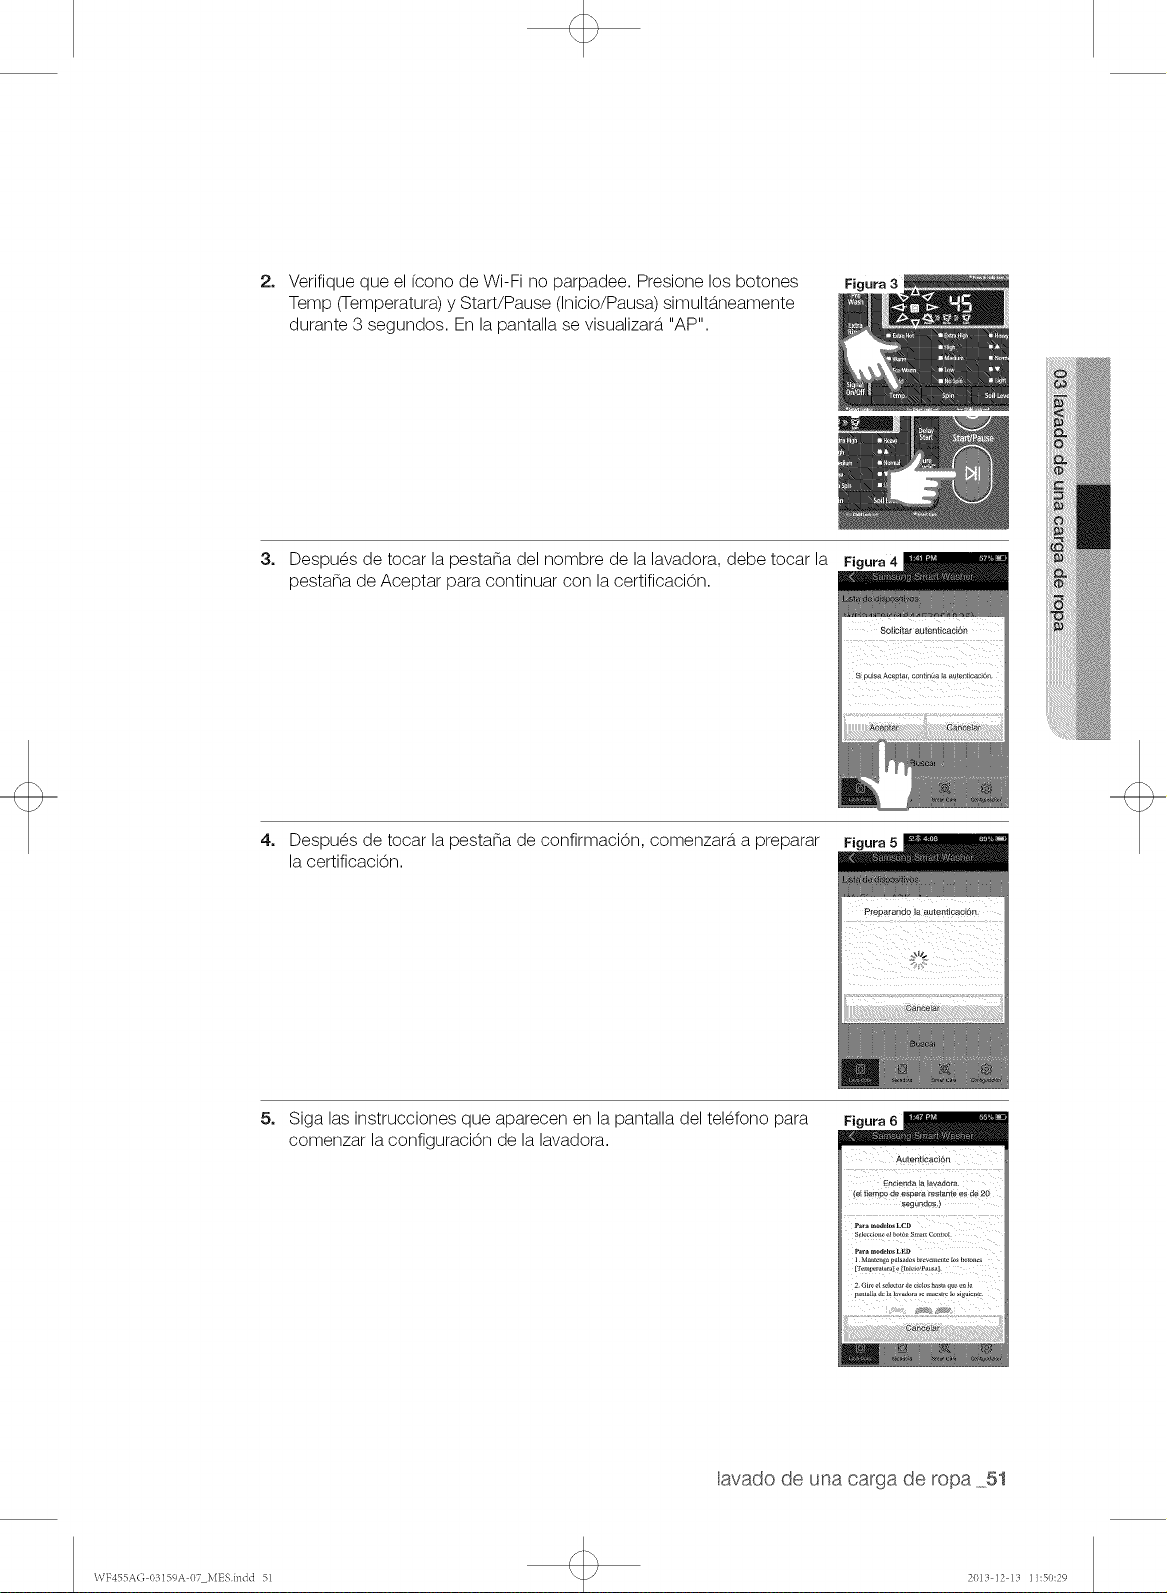
2, Verifique que el (cono de Wi-Fi no parpadee. Presione los botones
Temp (Temperatura) y Start/Pause (Inicio/Pausa) simulta.neamente
durante 3 segundos. En la pantalla se visualizar&. "AP".
3=
Despu_s de tocar la pestana del nombre de la lavadora, debe tocar la
pestana de Aceptar para continuar con la certificaciOn.
Figura 4
Solicitar autenticaci6rl
s_puisaAcep!a,, co,,t_n_aJam,_t_cac_,
4=
Despu_s de tocar la pestana de confirmaciOn, comenzar&, a preparar
la certificaciOn.
Figura 5
pr_parando la aUteniicaci6n:
_{i_Iiii(_i__!i_i_i !7ii_!(_)i(_i
5=
Siga las instrucciones que aparecen en la pantalla del tel_fono para
comenzar la configuraciOn de la lavadora.
Erm_e_da!a !aVadOra
!e/l_po de espe_a _est_te es d_ 20
seg_ndos,)
._.,__oa_to_LeD
lavado de una carga de ropa 51
WF455A(; 03159A 07 MESindd 51 2(}13 12 13 11:50:29

6. Una vez que aparezca "AP", debe girar eI dial en eI sentido de las Figura7
agujas deI reioj hasta visuaiizar "PS" en la pantaila. Cuando visuaiice
"PS", presione el botOn Start/Pause (Inicio/Pausa).
7. AI presionar eI botOn Start/Pause (Inicio/Pausa), "PS" comenzar_.
a parpadear. Cuando comience a parpadear, eI telefono
autom_.ticamente empezar_, a conectarse.
Figura 8
8.
Despues de visuaiizar "PS', presione los botones Temp (Temperatura)
y Start/Pause (Inicio/Pausa) simultaneamente durante 3 segundos.
Espere hasta que el icono Smart Control Enabled (Control inteligente
habiiitado) [ _ ] comience a parpadear. Cuando eI fcono Smart
Control Enabled (Control inteligente habilitado) comience a parpadear,
mantenga puisado el botOn Signal On/Off (SePal act./desact.) durante
3 segundos para activar eI control inteligente. Cuando el control
inteiigente estS.habilitado, eI icono Smart Control Enabled (Control
inteiigente habiiitado) [ _ ] se enciende.
Figura 9
9.
Presione la pestaSa del nombre de la lavadora para estabiecer
conexiOn con la lavadora.
52 avado de una ca_"gade _opa
WF455AG-03159A-07 MES.indd 52 2013-12-I3 11:50:31
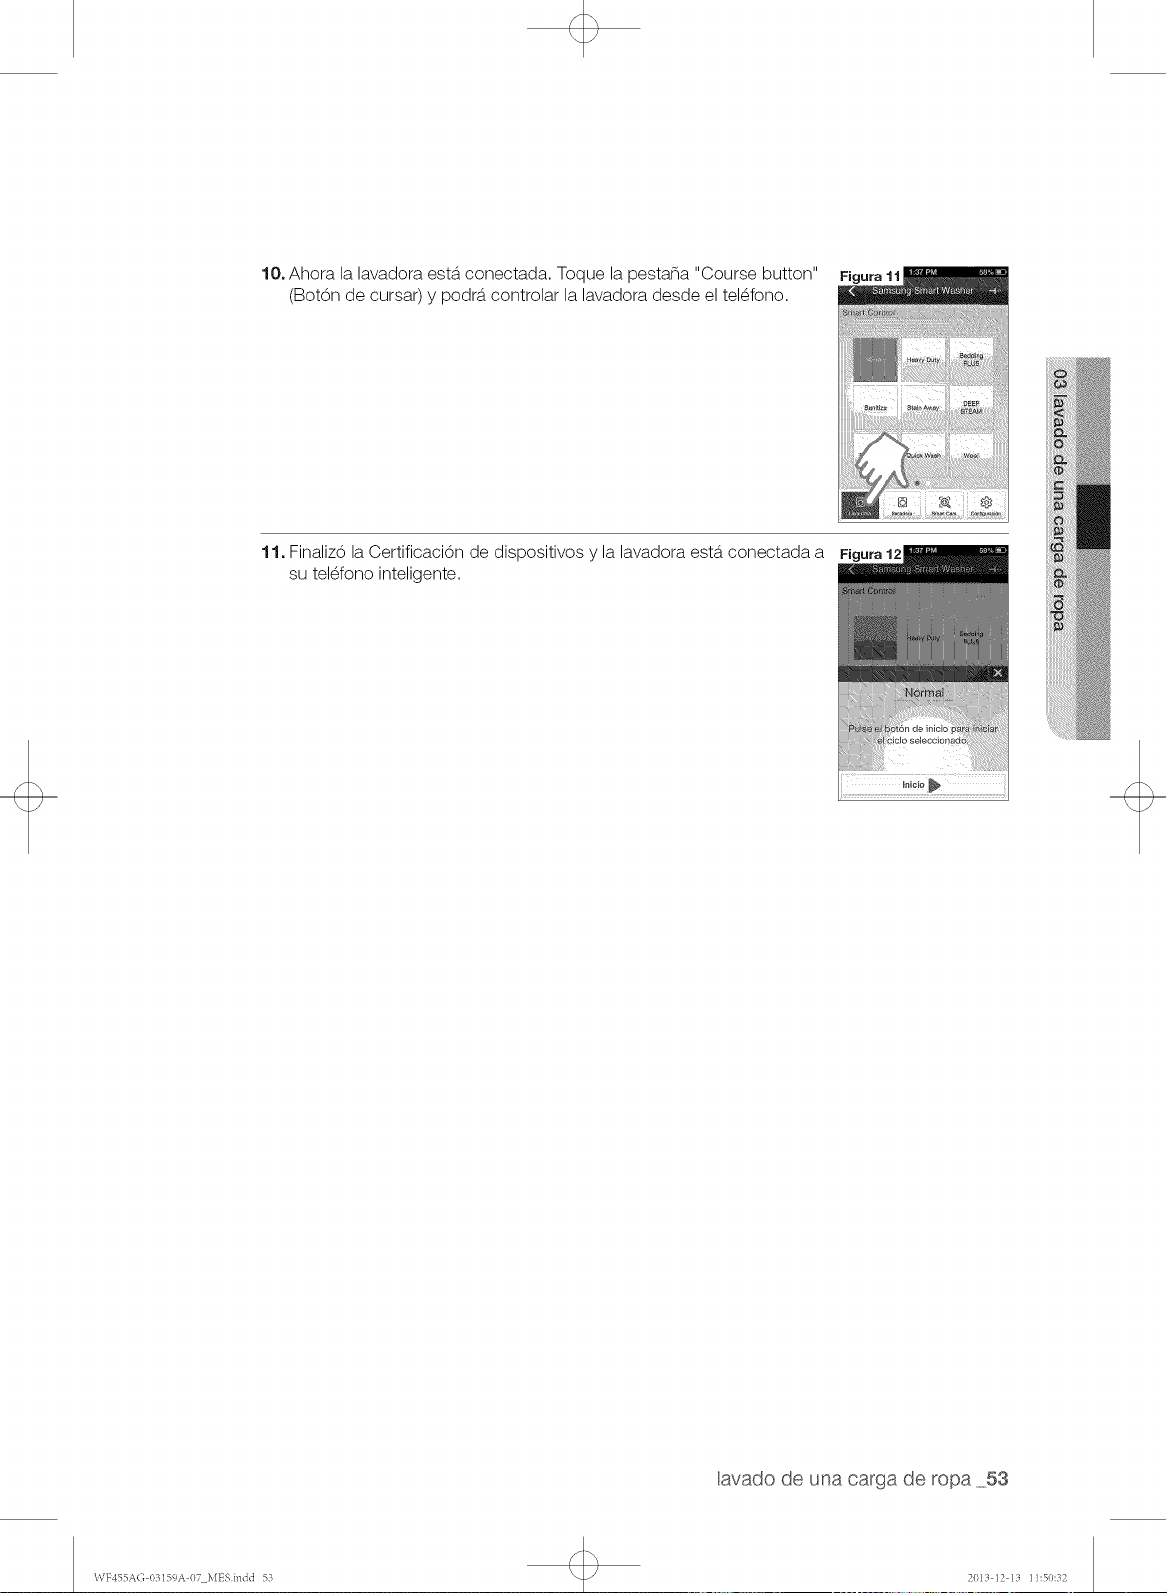
10, Ahora la lavadora est&.conectada. Toque la pestana "Course button"
(Boton de cursaO y podra, controlar la lavadora desde el tel_fono.
Figura 11
11, Finalizo la CertificaciOn de dispositivos y la lavadora est&.conectada a Figura12
SUtel_fono inteligente.
avado de una carga de ropa 53
WF455A(; 03159A 07 MESindd 53 2013 12 13 11:50:32
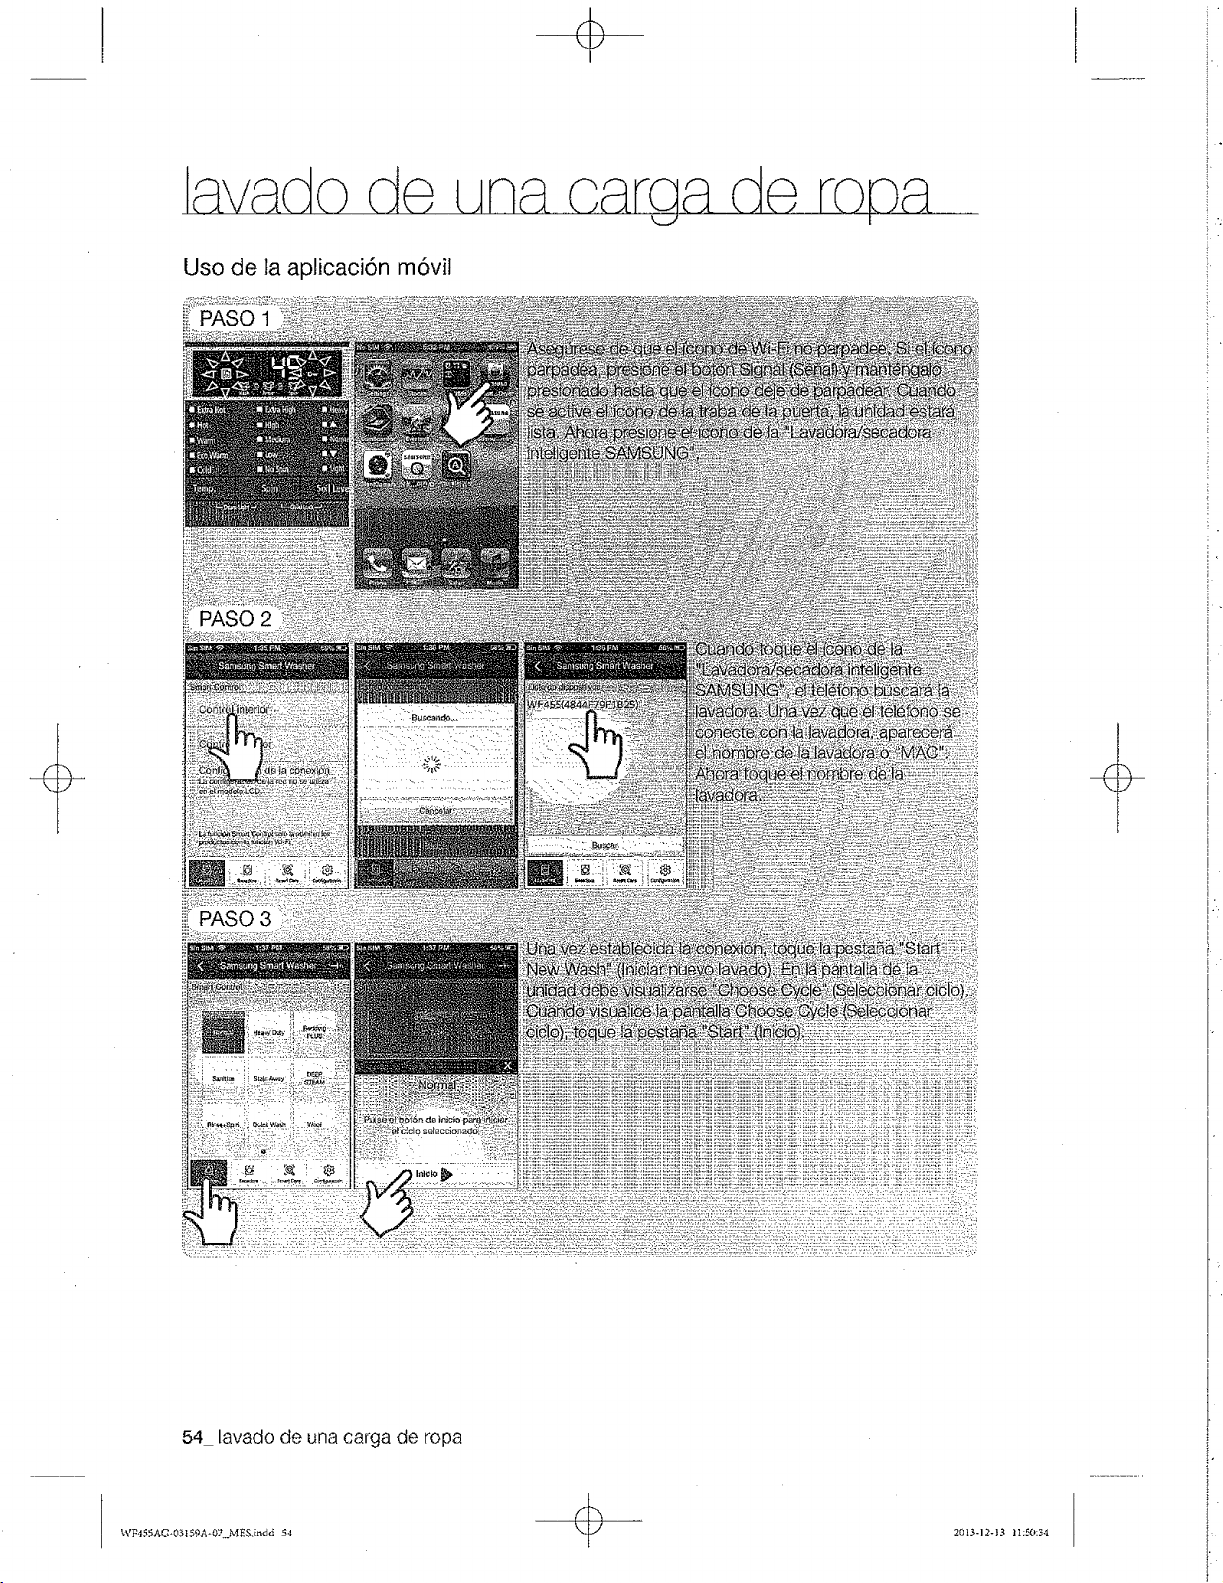
+
Uso de la aplicaci6n m6vil
li_PASO 2
................................................... ::::!i::!
54 lavado de una carga de ropa

avadode unacargade ropa55
WF455A(; 03159A 07 i\1ESindd 55 2(}13 12 13 11:50:36
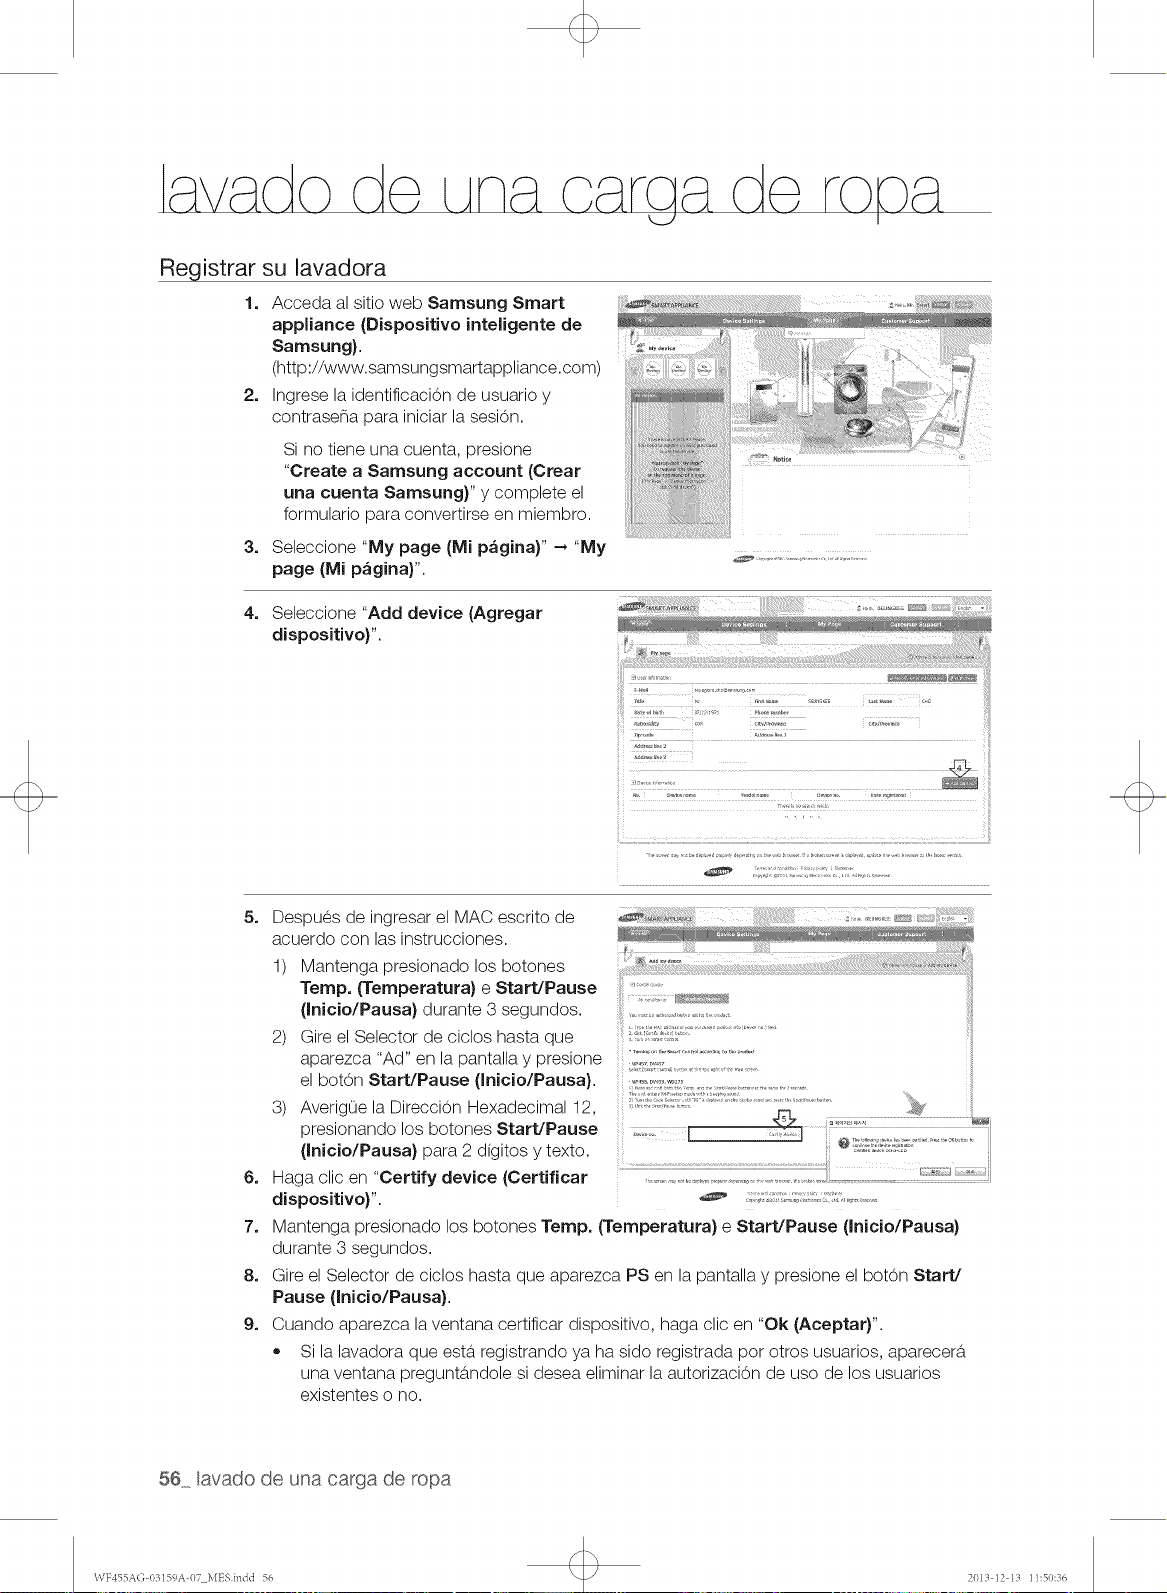
Registrar su lavadora
1. Acceda al sitio web Samsung Smart
appliance (Dispositivo inteligente de
Samsung).
(http://www.samsungsmartappliance.com)
2. Ingrese la identificacion de usuario y
contrasena para iniciar la sesion.
3.
Si no tiene una cuenta, presione
"Create a Samsung account (Crear
una cuenta Samsung}" y complete el
formulario para convertirse en miembro.
Seleccione "My page (Mi p_gina)" --* "My
page (Mi p_gina)".
4.
Selecoione "Add device (Agregar
dispositivo}".
5.
6.
7.
8.
9.
Despues de ingresar el MAC escrito de
acuerdo con las instrucciones _1
1) Mantenga presionado los botones
Temp. (Temperatura) e Start/Pause
(Inicio/Pausa} durante 3 segundos
el bot0n Start/Pause (Inicio/Pausa}.
3) AverigOe la Direcci0n Hexadecimal 12,
presionando los botones Start/Pause
(Inicio/Pausa) para 2 digitos y texto.
Haga cliG en "Certify device (Certificar
dispositivo}".
2) Gire el Selector de ciclos hasta que
aparezca "Ad" en la pantalla y presione .............
Mantenga presionado los botones Temp. {Temperatura} e Start/Pause (Inicio/Pausa)
durante 3 segundos
Gire el Selector de ciclos hasta que aparezca PS en la pantalla y presione el bot0n Start/
Pause (Inicio/Pausa}.
Cuando aparezca la ventana certificar dispositivo, haga clic en "Ok (Aceptar}"
Si la lavadora que esta registrando ya ha sido registrada pot otros usuarios, aparecera
una ventana preguntandole si desea eliminar la autorizaci0n de uso de los usuarios
existentes o no
56 avado de una carga de ropa
\VF455A(; 03159A 07 i_fESindd 56 2013 12 13 11:50:36
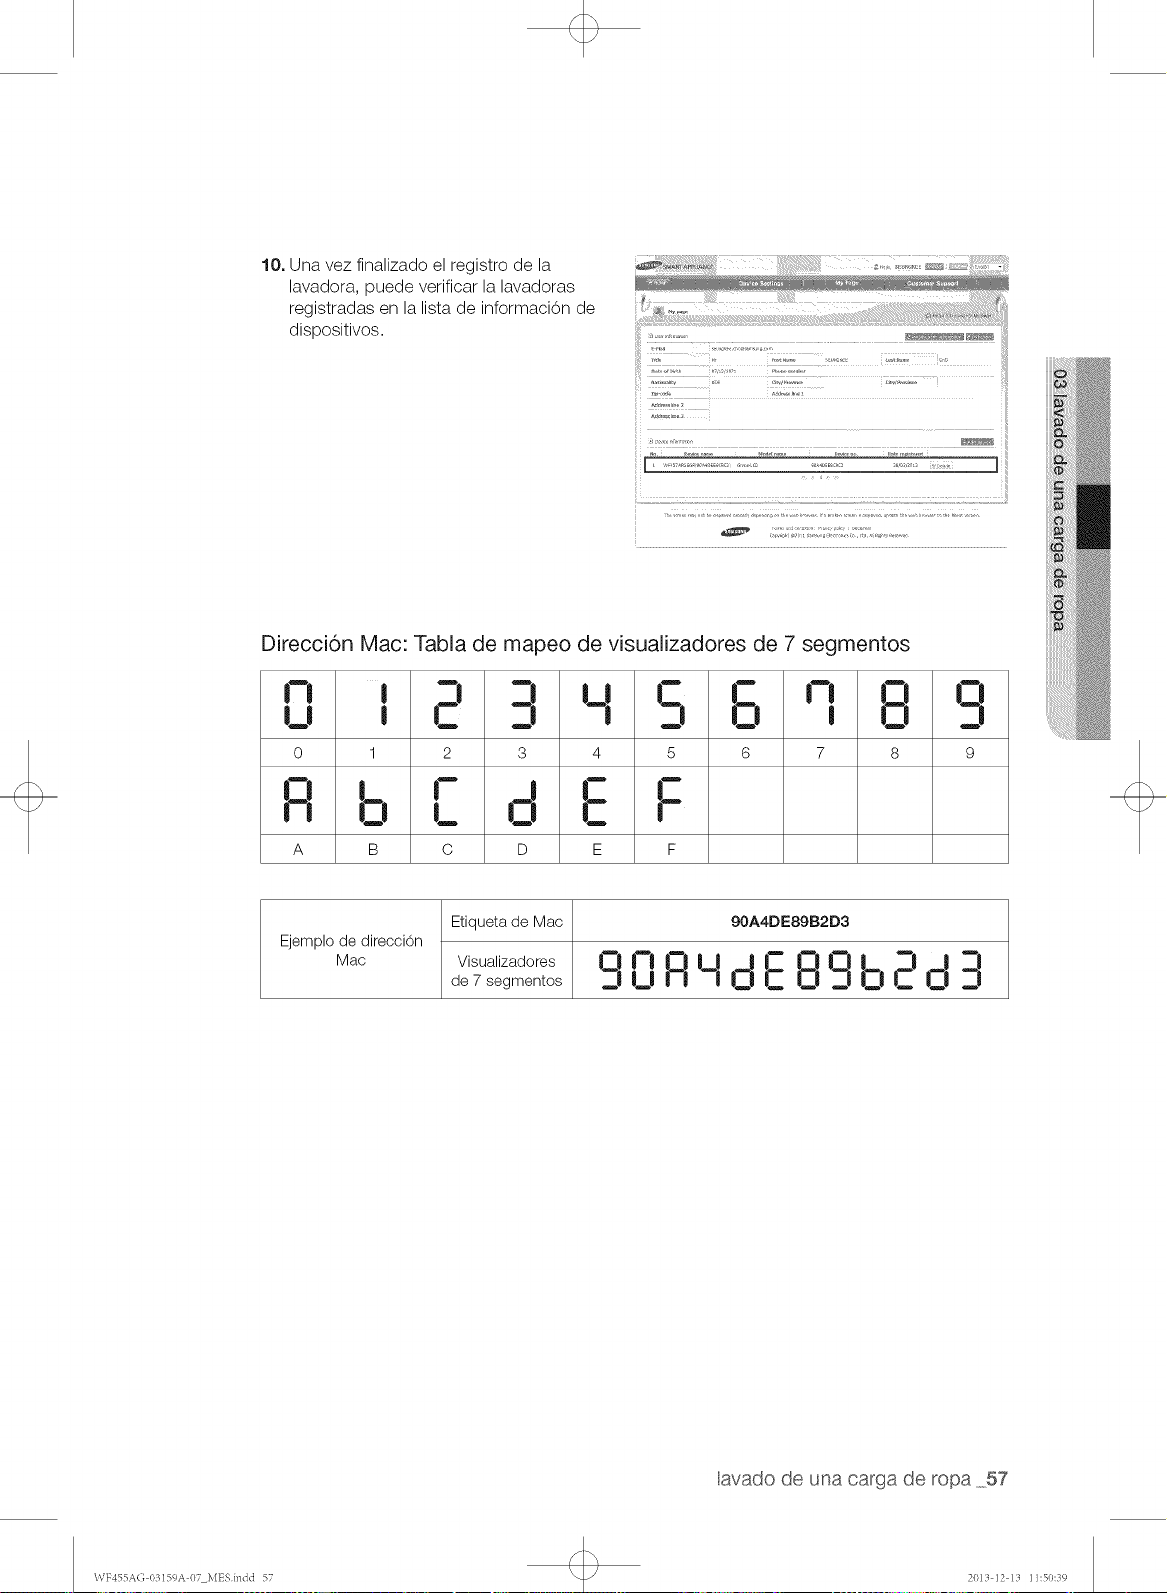
10. Una vez finalizado el registro de la
lavadora, puede verificar la lavadoras
registradas en la lista de informaci0n de
dispositivos.
[ .......................................... ]
Direcci6n Mac: Tabla de mapeo de visualizadores de 7 segmentos
n i 3 3 L I L- L-- n O C!
u _ C D D 0 _ o D
0 1 2 3 4 5 6 7 8 9
R b L. d L: g
A B C D E F
Etiqueta de Mac 90A4DE89B2D3
Ejemplo de direccion
Mac deViSualizad°res7segmentos |_| |_| |_| L| J__i U r'i _| _r. C _"_i _i I_| _ _i _i_,,_ |m,,_ -- | _|
lavado de una carga de ropa 57
WF455A(; 03159A 07_MESindd 57 2013 12 13 11:50:39
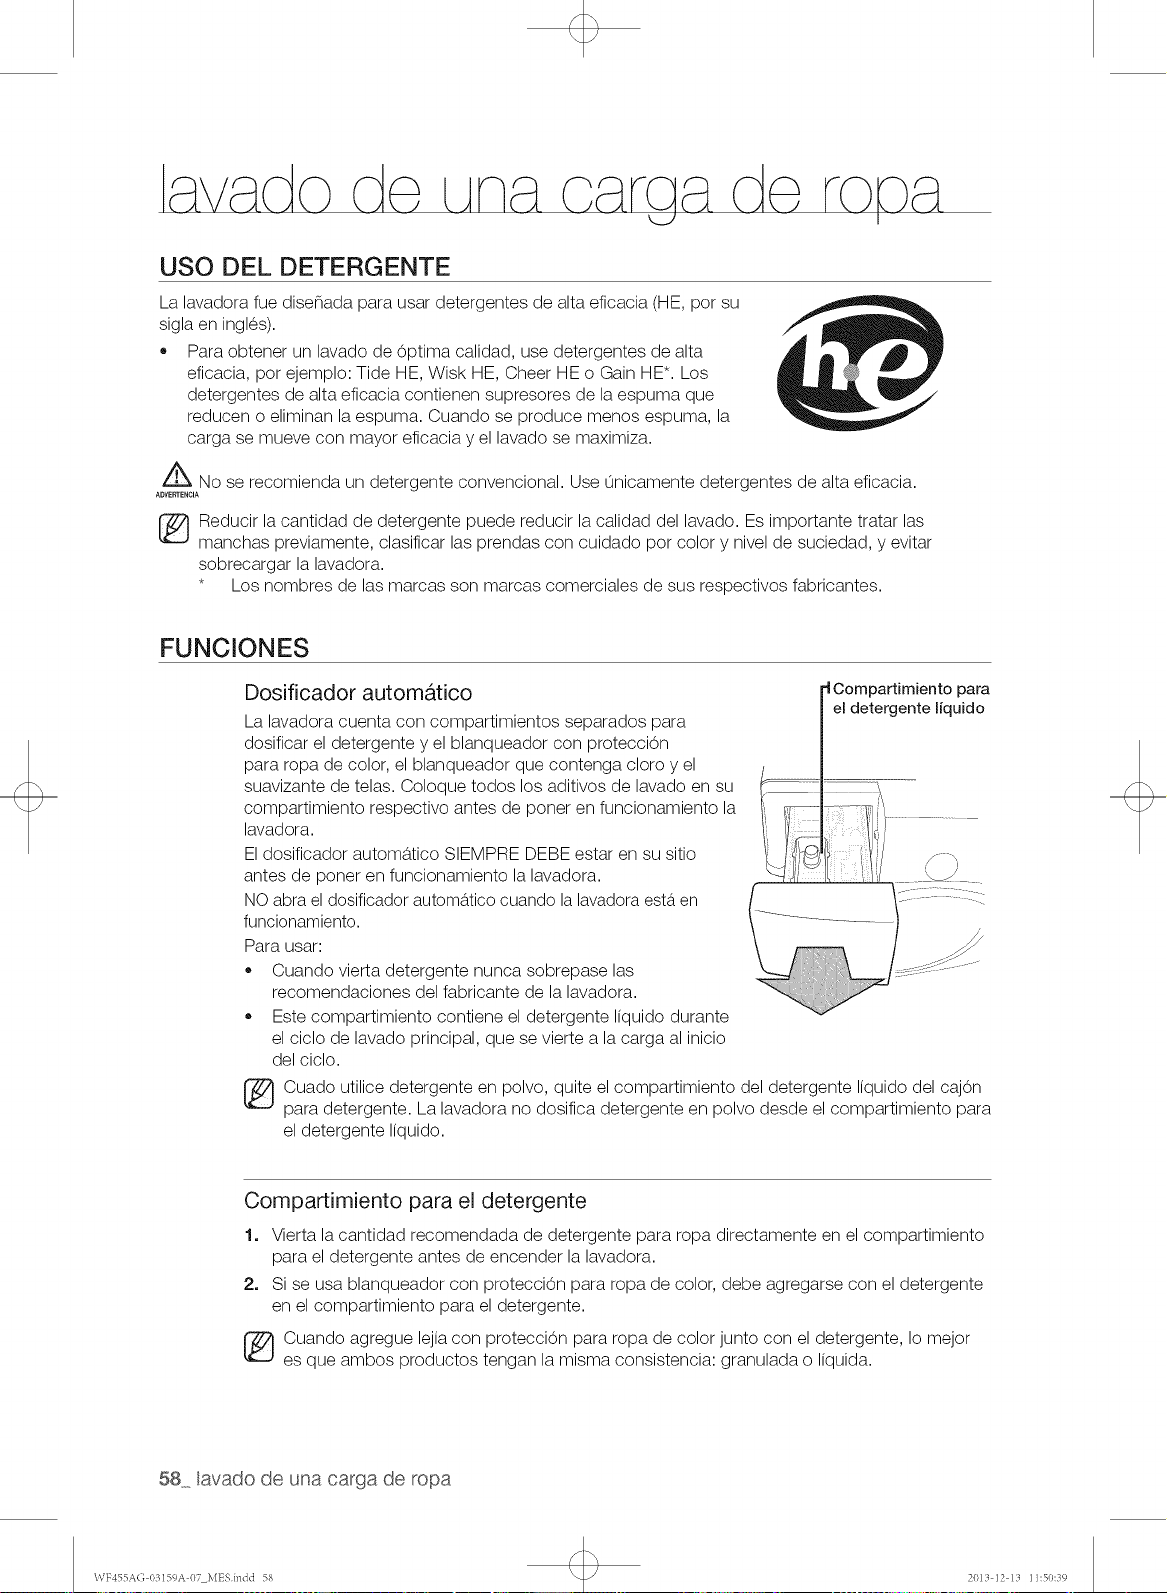
USO DEL DETERGENTE
La lavadora fue disenada para usar detergentes de alta eficacia (HE, pot su
sigla en ingles).
+ Para obtener un lavado de Optima calidad, use detergentes de alta
eficacia, pot ejemplo: Tide HE, Wisk HE, Cheer HE o Gain HE*. Los
detergentes de alta eficacia contienen supresores de la espuma que
reducen o eliminan la espuma. Cuando se produce menos espuma, la
carga se mueve con mayor eficacia y el lavado se maximiza.
_No se recomienda un detergente convencional. Use unicamente detergentes de alta eficacia.
ADVEI_fENCIA
_ Reducir la cantidad de detergente puede reducir la calidad del lavado. Es importante tratar las
manchas previamente, clasificar las prendas con cuidado pot color y nivel de suciedad, y evitar
sobrecargar la lavadora.
* Los nombres de las marcas son marcas comerciales de sus respectivos fabricantes.
FUNCIONES
Dosificador automatico
La lavadora cuenta con compartimientos separados para
dosificar el detergente y el blanqueador con protecci6n
para ropa de color, el blanqueador que contenga cloro y el
suavizante de telas. Coloque todos los aditivos de lavado en su
compartimiento respectivo antes de poner en funcionamiento la
lavadora.
El dosificador automa,tico SIEMPRE DEBE estar en su sitio
antes de poner en funcionamiento la lavadora.
NO abra el dosificador automa.tico cuando la lavadora esta.en
funcionamiento.
Para usar:
+ Cuando vierta detergente nunca sobrepase las
recomendaciones del fabricante de la lavadora.
+ Este compartimiento contiene el detergente liquido durante
el ciclo de lavado principal, que se vierte a la carga al inicio
del ciclo.
®
para
eldetergente liquido
Cuado utilice detergente en polvo, quite el compartimiento del detergente liquido del cajon
para detergente. La lavadora no dosifica detergente en polvo desde el compartimiento para
el detergente liquido.
Compartimiento para el detergente
1. Vierta la cantidad recomendada de detergente para ropa directamente en el compartimiento
para el detergente antes de encender la lavadora.
2. Si se usa blanqueador con proteccion para ropa de color, debe agregarse con el detergente
en el compartimiento para el detergente.
Cuando agregue lejia con proteccion para ropa de color junto con el detergente, Io mejor
es que ambos productos tengan la misma consistencia: granulada o liquid&
58 avado de una carga de ropa
WF455A(; 03159A 07 MESindd 58 2013 12 13 11:50:39
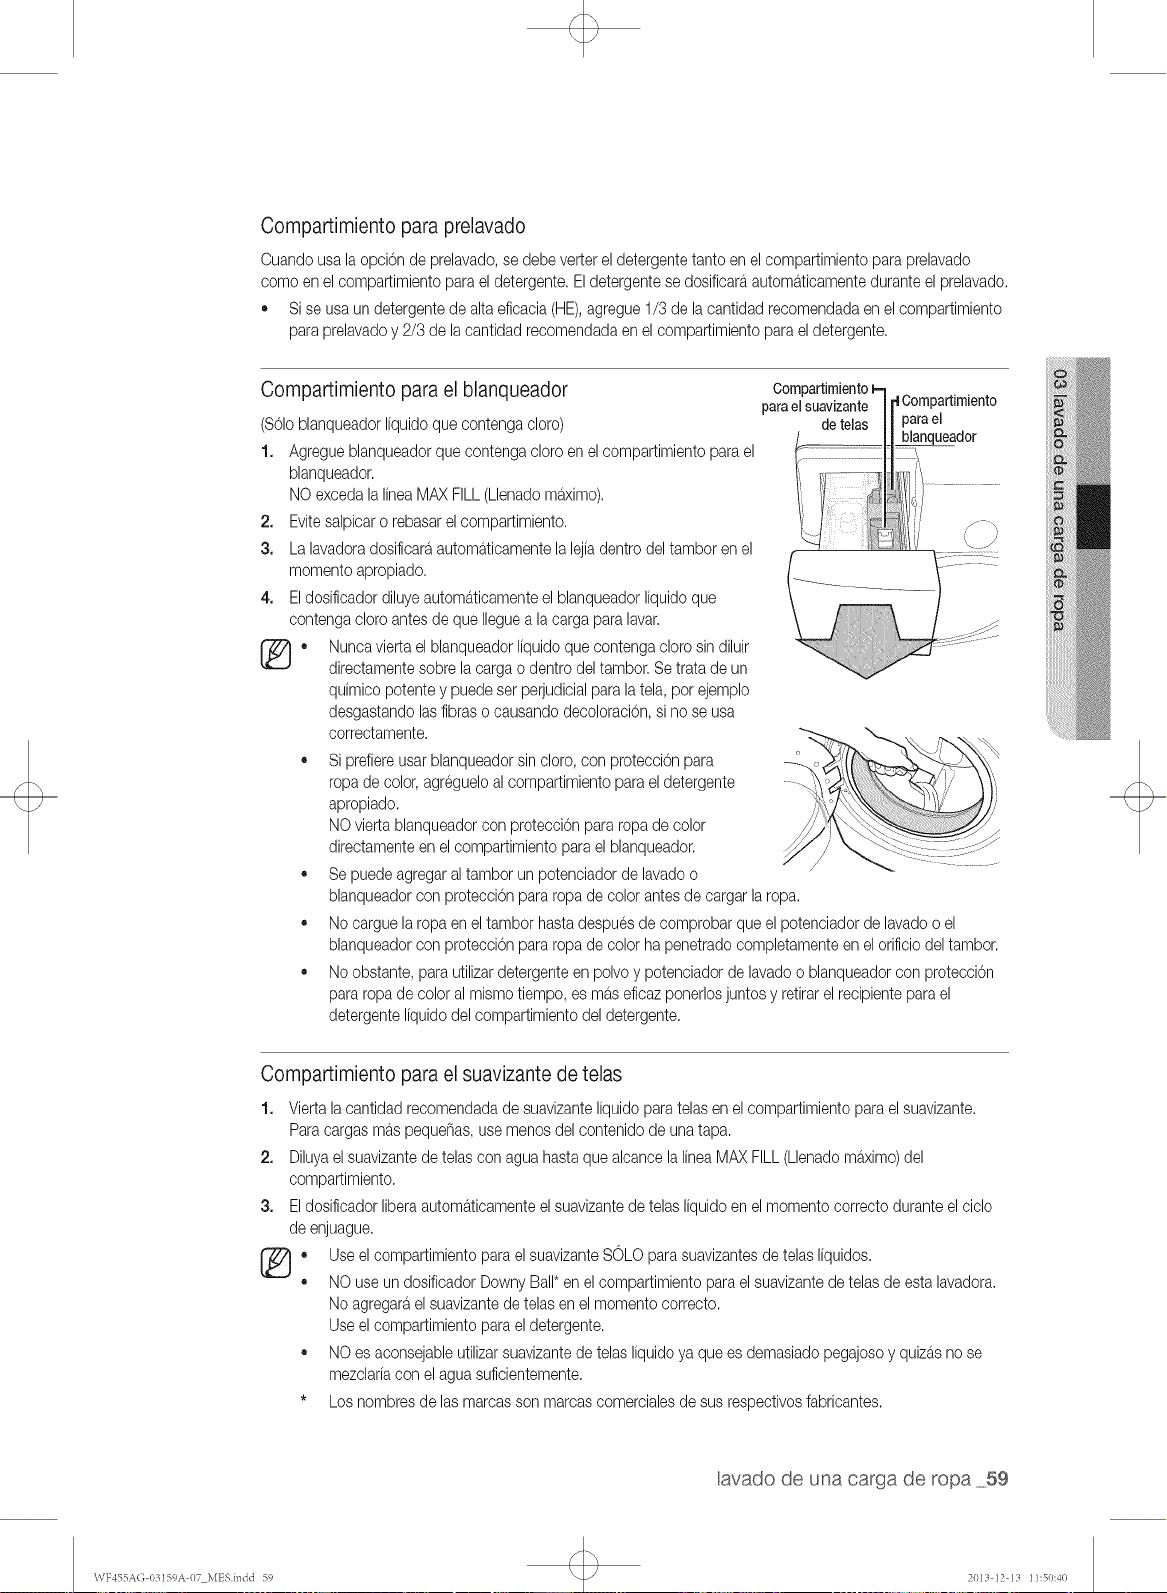
Compartimiento para prelavado
Ouandousa laopcionde prelavado,se debe vertereldetergentetanto en el compartimientoparaprelavado
como en el compartimientoparael detergente.Eldetergentese dosificar_tautom_tticamenteduranteel prelavado,
• Si se usa undetergentede alta eficacia(HE),agregue1/3 de la cantidadrecomendadaen el compartimiento
para prelavadoy 2/3 de lacantidadrecomendadaen el compartimientopara eldetergente.
Compartimiento para el blanqueador
(SOloblanqueadorliquidoque contengacloro)
1. Agregueblanqueadorquecontengacloro en elcompartimientopara el
blanqueador.
NO excedalalineaMAXFILL(Llenadomaximo).
2. Evitesalpicaro rebasarelcompartimiento.
3. La lavadoradosificaraautomaticamentelalejiadentrodel tamboren el
momentoapropiado.
4. Eldosificadordiluyeautom_tticamenteel blanqueadorliquido que
contengacloro antesde que Ileguea la carga paralavar.
®.
Compartimbnto
para elsuavizante
de telas
Compartimiento
para el
blanqueador
Nuncaviertaelblanqueadorliquidoque contengaclorosindiluir
directamentesobre la cargao dentro del tambor.Se trata de un
quimicopotentey puedeser perjudicialparala tela, por ejemplo
desgastandolasfibraso causandodecoloracion,si no se usa
correctamente.
Si prefiereusarblanqueadorsin cloro,con proteccionpara
ropa de color,agregueloal compartimientoparael detergente
apropiado.
NO viertablanqueadorconproteccionpara ropa decolor
directamenteen elcompartimientoparael blanqueador.
Se puedeagregaral tambor un potenciadorde lavadoo
blanqueadorcon proteccionpara ropa de colorantesde cargarlaropa.
No carguelaropa en el tambor hastadespuesde comprobarque el potenciadorde lavadoo el
blanqueadorcon proteccionpara ropa de colorha penetradocompletamenteen elorificiodel tambor.
No obstante,parautilizardetergenteen polvoy potenciadorde lavadoo blanqueadorcon proteccion
para ropa de coloral mismotiempo, es maseficazponerlosjuntosy retirarelrecipientepara el
detergenteliquidodel compartimientodel detergente.
Compartimiento para el suavizante de telas
1.
2.
3.
®.
o
Viertala cantidadrecomendadade suavizanteliquidoparatelas en el compartimientopara elsuavizante.
Paracargasmaspequenas,use menosdel contenidode unatapa.
Diluyael suavizantede telascon aguahastaque alcancelalineaMAXFILL(Llenadomaximo)del
compartimiento,
Eldosificadorliberaautom_tticamenteelsuavizantede telas liquido en elmomentocorrectoduranteelciclo
de enjuague.
Useel compartimientoparaelsuavizanteSOLOpara suavizantesde telasliquidos.
NO useun dosificadorDownyBall*en elcompartimientoparaelsuavizantede telasde estalavadora.
No agregarael suavizantede telasen el momentocorrecto.
Useel compartimientoparael detergente.
NO es aconsejableutilizarsuavizantede telas liquidoya quees demasiadopegajosoy quiz_tsno se
mezclariacon elagua suficientemente.
* Los nombresde las marcasson mamascomercialesde sus respectivosfabricantes.
avado de una carga de ropa 59
\\TF455A(; 03159A 07 MESindd 59 2013 12 13 11:50:40
manten m ento de a vado
LIMPIEZA DEL EXTERIOR
Cierre las Ilaves de agua despues de finalizar el lavado del dia.
Esto cerrara, el suministro de agua a la lavadora y evitara, la improbable posibilidad de que se produzcan
danos a causa del derrame de agua. Deje la puerta abierta para permitir que el interior de la lavadora se
seque.
Use un pano suave para limpiar todo el detergente, el blanqueador u otros derrames a medida que
ocurran.
Limpie Io siguiente tal como se recomienda:
Panel de control: Limpie con un pano suave y humedo. No use polvos abrasivos ni panos de limpieza. No
rode el panel directamente con limpiadores en aerosol.
Gabinete: Lave con agua y jab0n.
LIMPIEZA DEL INTERIOR
Limpie el interior de la lavadora peri0dicamente para eliminar todo vestigio de suciedad, polvo, olor, moho,
hongos o bacterias que pueda permanecer en la lavadora como consecuencia del lavado de ropa.
El incumplimiento de estas instrucciones puede dar como resultado situaciones poco satisfactorias, tales
como olores y/o manchas permanentes en la lavadora o en la ropa para lavar.
Se pueden retirar los dep0sitos de agua dura si fuera necesario. Use un limpiador con el r0tulo "Washer
safe" (Seguro para lavadoras).
60 mantenmentode a avadora
WF455A(} 0fq59A 07 MESindd 60 201_t 12 llt 11:50:40
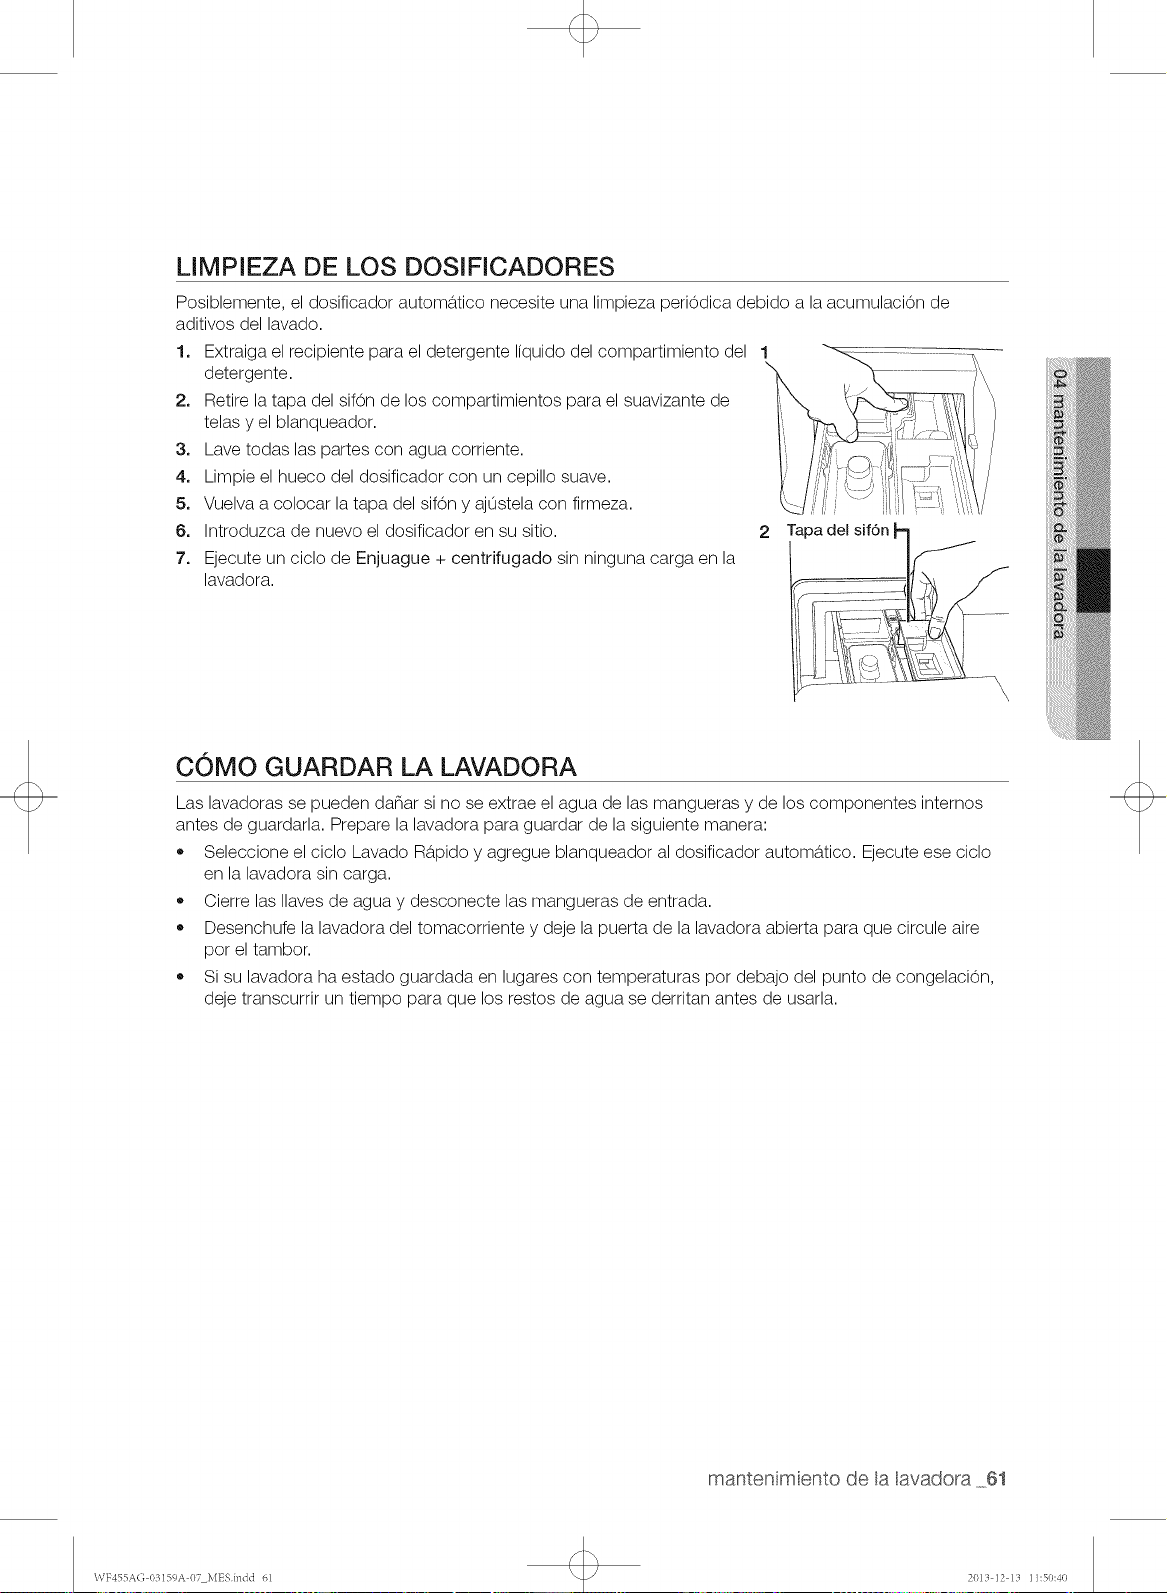
LIMPIEZA DE LOS DOSIFICADORES
Posiblemente, el dosificador automa,tico necesite una limpieza periodica debido a la acumulaciOn de
aditivos del lavado.
1. Extraiga el recipiente para el detergente liquido del compartimiento del 1
detergente.
2. Retire la tapa del sifOn de los compartimientos para el suavizante de
telas y el blanqueador.
3. Lave todas las partes con agua corriente.
4. Limpie el hueco del dosificador con un cepillo suave.
5. Vuelva a colocar la tapa del sifOn y ajOstela con firmeza.
6. Introduzca de nuevo el dosificador en su sitio. 2
7. Ejecute un ciclo de Enjuague + centrifugado sin ninguna carga en la
lavadora.
Tapa del sif6n
COMO GUARDAR LA LAVADORA
Las lavadoras se pueden daSar si no se extrae el agua de las mangueras y de los componentes internos
antes de guardarla. Prepare la lavadora para guardar de la siguiente manera:
• Seleccione el ciclo Lavado Ra,pido y agregue blanqueador al dosificador automa, tico. Ejecute ese ciclo
en la lavadora sin carga.
,, Cierre las Ilaves de agua y desconecte las mangueras de entrada.
• Desenchufe la lavadora del tomacorriente y deje la puerta de la lavadora abierta para que circule aire
pot el tambor.
• Si su lavadora ha estado guardada en lugares con temperaturas pot debajo del punto de congelaciOn,
deje transcurrir un tiempo para que los testes de agua se derritan antes de usarla.
mantenmentode a avadora 61
WF455AG 03159A 07 MESindd 61 2011t 12 llt 11:50:40
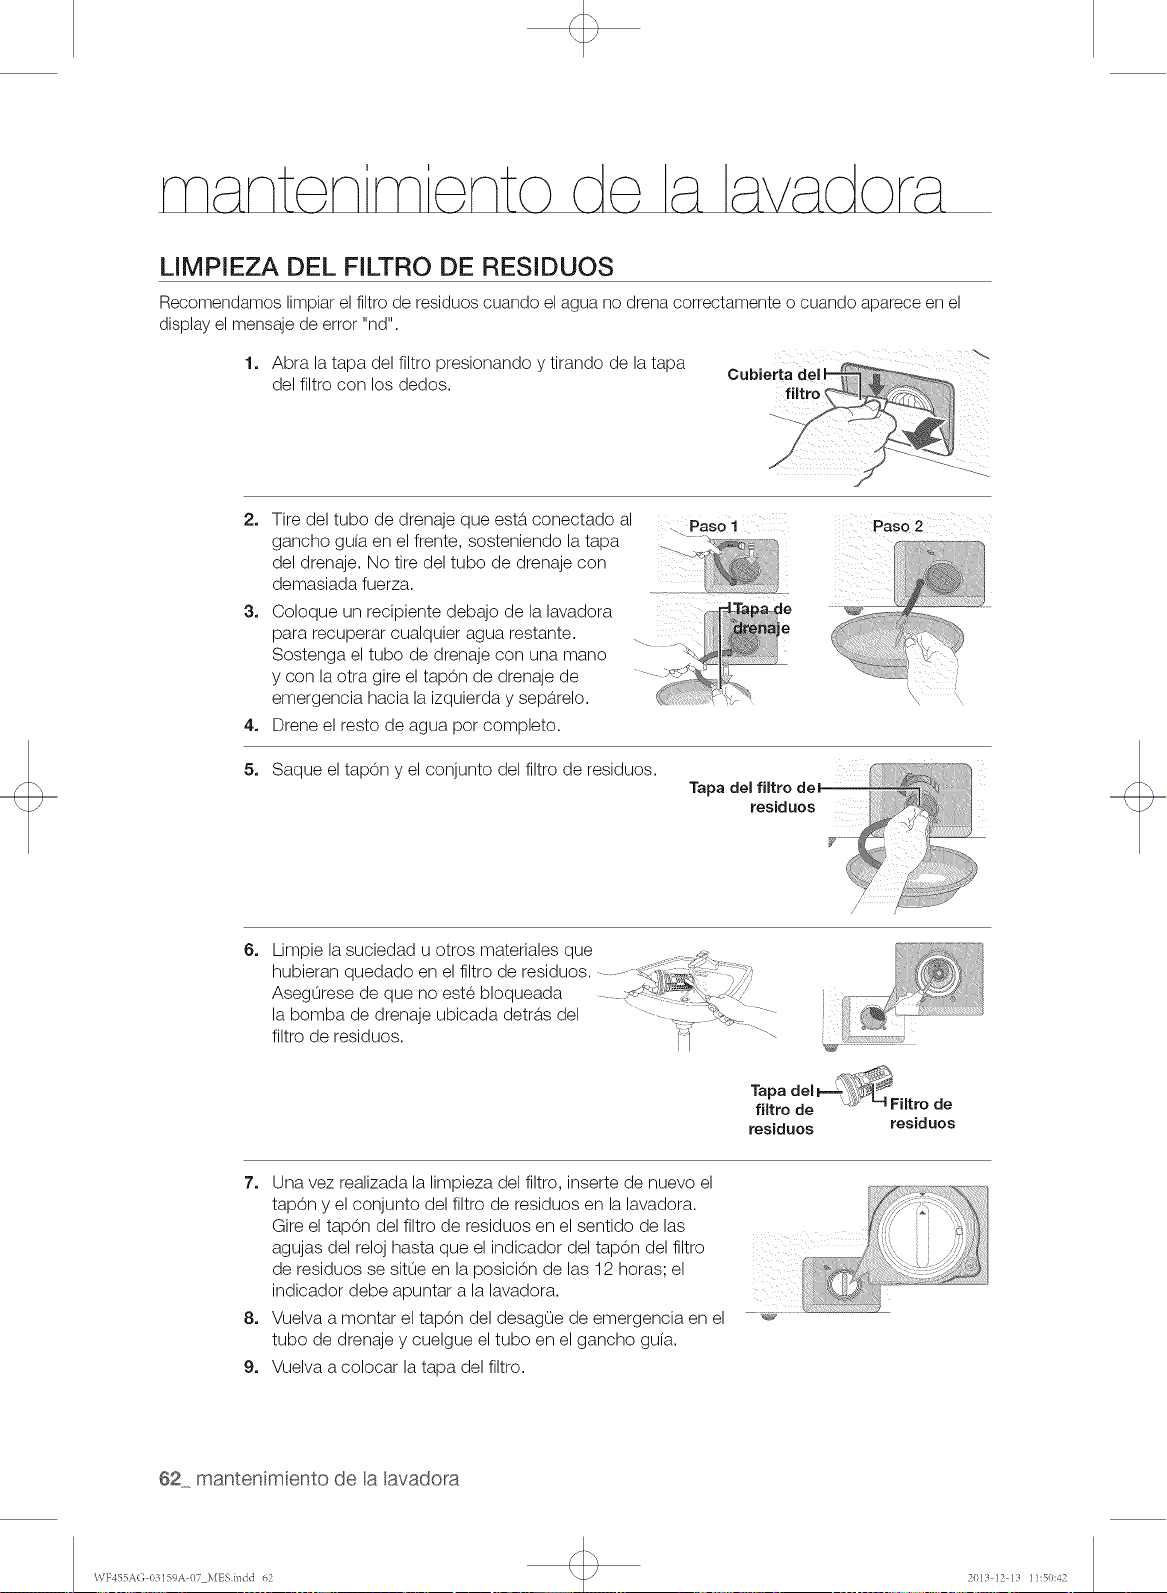
m nt n m nto
LIMPIEZA DEL FILTRO DE RESIDUOS
Recomendamos limpiar el filtro de residuos cuando el agua no drena correctamente o cuando aparece en el
display el mensaje de error "nd".
1. Abra la tapa del filtro presionando y tirando de la tapa
del filtro con los dedos.
Cubierta d_
filtrq
2=
3=
4=
5,
Tire del tubo de drenaje que esta, conectado al Paso1 Pas02
gancho guia en el frente, sosteniendo la tapa "____ ,- -,,,,_,
iiiii_i iiii iiii!!iiilliiiiiiii
del drenaje. No tire del tubo de drenaje con
'_, iii
demasiada fuerza. _ _
Coloque un recipiente debajo de la lavadora __e
e
para recuperar cualquier agua restante ....... __i
Sostenga el tubo de drenaje con una mane
y con la otra gire el tap6n de drenaje de
emergencia hacia la izquierda y sep&elo. ' ......
Drene el resto de agua pot completo.
Saque el tap0n y el conjunto del filtro de residuos.
Tapa del fiRro de}
residuos
6=
//
Limpie la suciedad u otros materiales que
hubieran quedado en el filtro de residuos.
Asegurese de que no este bloqueada
la bomba de drenaje ubicada detra,s del
filtro de residuos.
-. _
Tapa ael v-=.__j_l_ IFiltro de
filtro de
residuos residuos
7=
8=
9,
Una vez realizada la limpieza del filtro, inserte de nuevo el
tapon y el conjunto del filtro de residues en la lavadora.
Gire el tapon del filtro de residuos en el sentido de las _ _.......
agujas del reloj hasta que el indicador del tapon del filtro
de residuos se situe en la posici0n de las 12 horas; el : /
indicador debe apuntar a la lavadora.
Vuelva a montar el tapon del desagOe de emergencia en el
tubo de drenaje y cuelgue el tubo en el gancho guia.
Vuelva a colocar la tapa del filtro.
62 mantenmentode a avadora
\VF455A(; I)3159A 07 MESindd 62 2013 12 13 11:50:42
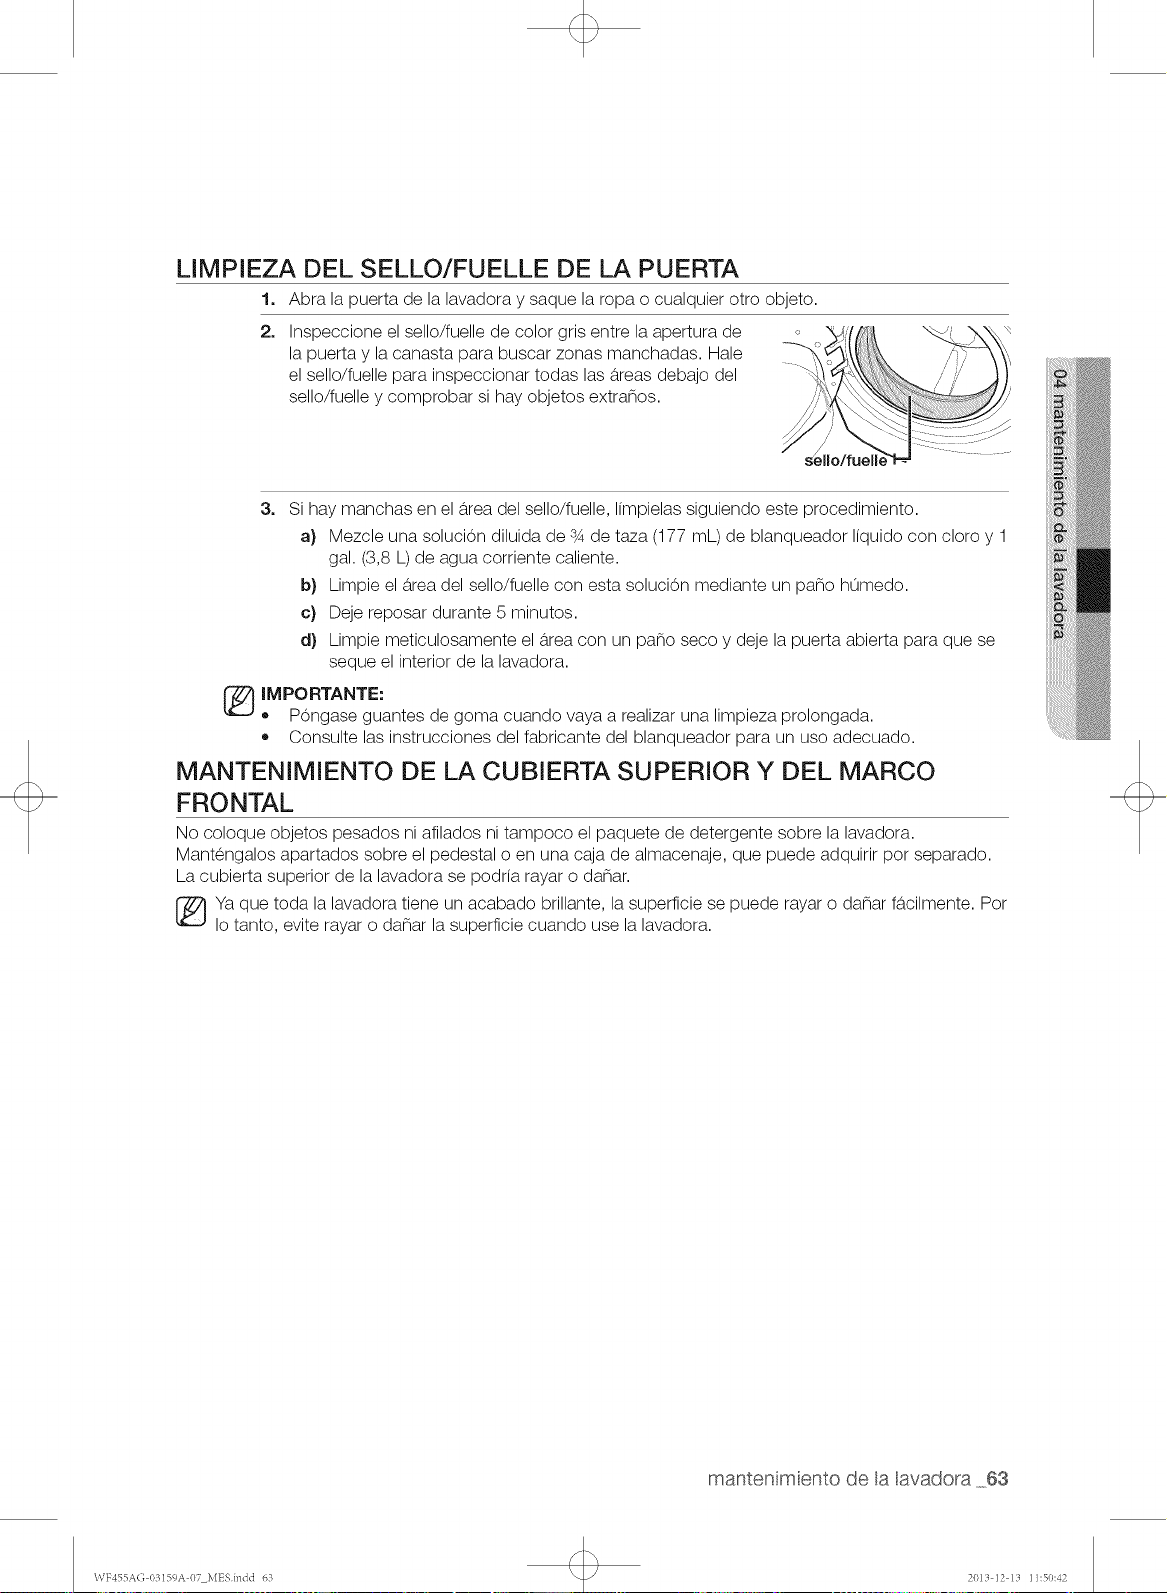
LIMPIEZA DEL SELLO/FUELLE DE LA PUERTA
1. Abra la puerta de la lavadora y saque la ropa o cualquier otto objeto.
2,
Inspeccione el sello/fuelle de color gris entre la apertura de
la puerta y la canasta para buscar zonas manchadas. Hale
el sello/fuelle para inspeccionar todas las &eas debajo del
sello/fuelle y comprobar si hay objetos extranos.
Si hay manchas en el &ea del sello/fuelle, limpielas siguiendo este procedimiento.
Mezcle una soluci0n diluida de s4 de taza (177 mL) de blanqueador liquido con cloro y 1
gal. (3,8 L) de agua corriente caliente.
b} Limpie el &ea del sello/fuelle con esta soluci0n mediante un pano humedo.
c} Deje reposar durante 5 minutos.
d} Limpie meticulosamente el &ea con un pano seco y deje la puerta abierta para que se
seque el interior de la lavadora.
IMPORTANTE:
,, P0ngase guantes de goma cuando vaya a realizar una limpieza prolongada.
• Consulte las instrucciones del fabricante del blanqueador para un uso adecuado.
MANTENIMIENTO DE LA CUBIERTA SUPERIOR Y DEL MARCO
FRONTAL
No coloque objetos pesados ni afilados ni tampoco el paquete de detergente sobre la lavadora.
Mantengalos apartados sobre el pedestal o en una caja de almacenaje, que puede adquirir pot separado.
La cubierta superior de la lavadora se podria rayar o danar.
Ya que toda la lavadora tiene un acabado brillante, la superficie se puede rayar o danar D,cilmente. Pot
Io tanto, evite rayar o danar la superficie cuando use la lavadora.
mantenmento de a avadora 63
\VF455A(; 03159A 07 MESindd 63 2013 12 13 11:50:42
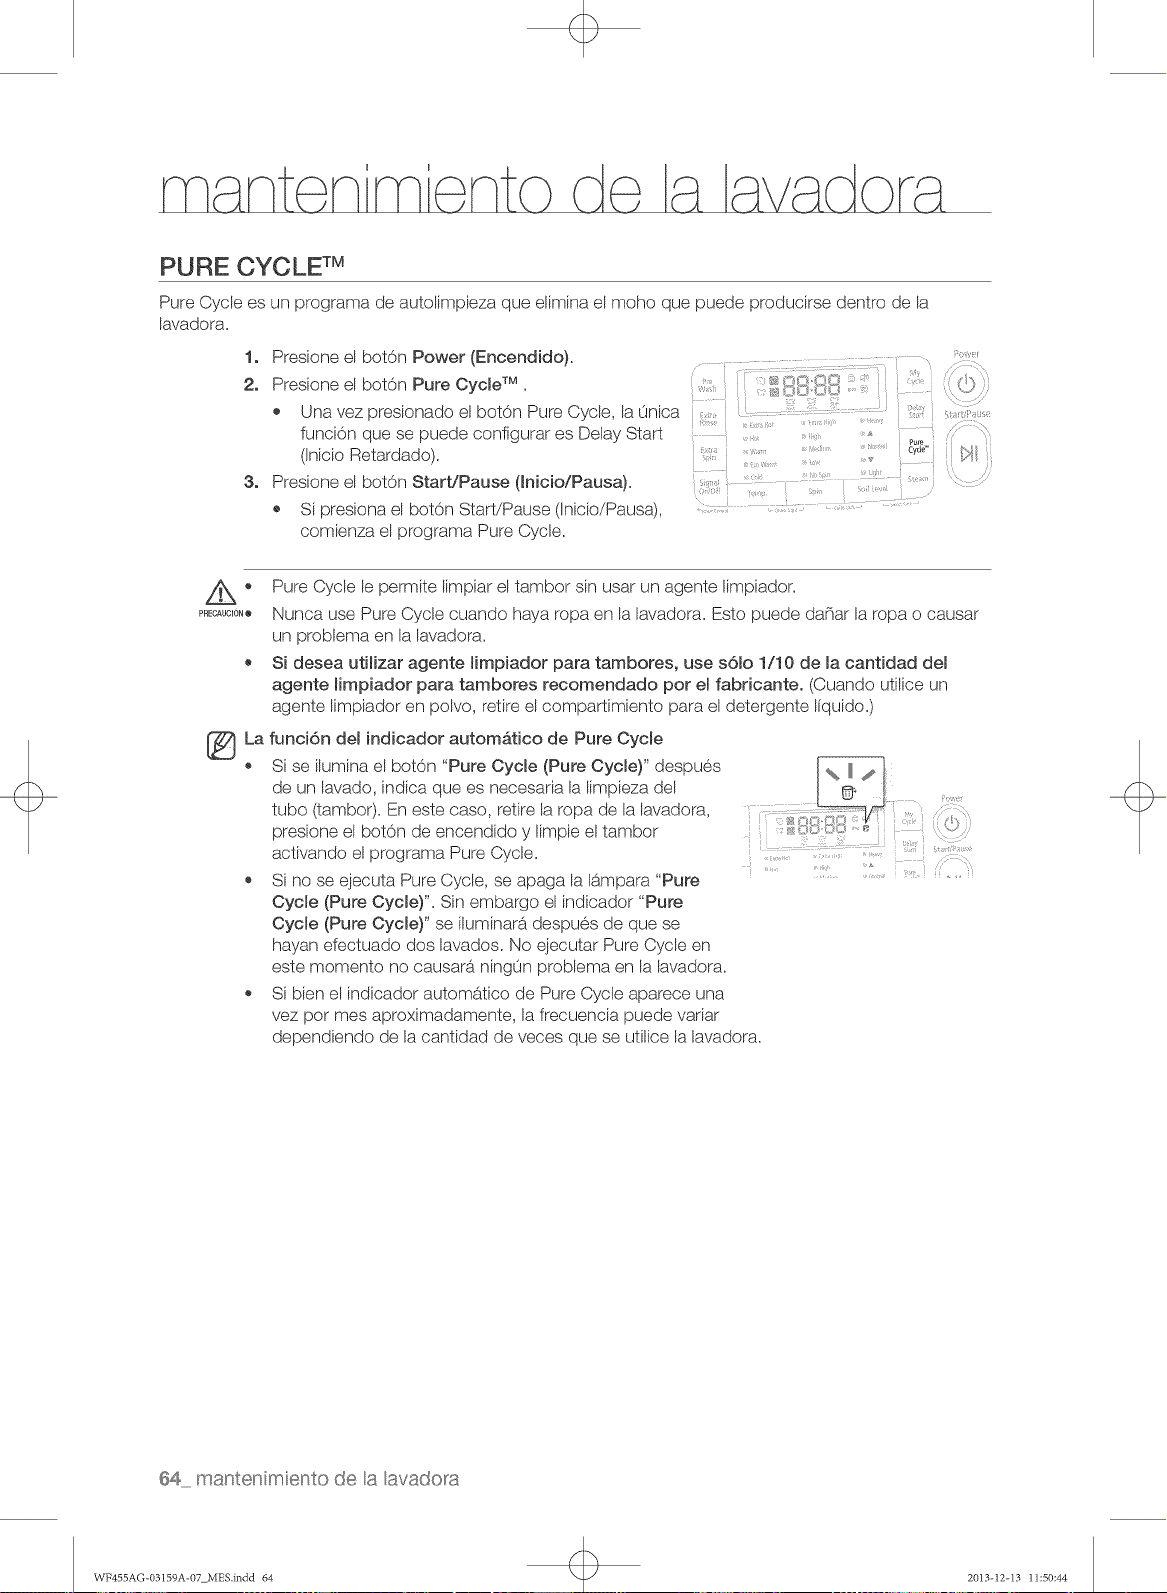
PURE CYCLE rM
Pure Cycle es un programa de autolimpieza que elimina el moho que puede producirse dentro de la
lavadora.
1. Presione el botOn Power (Encendido).
2. Presione el botOn Pure Cycb TM.
, Una vez presionado el botOn Pure Cycle, la Onica
funciOn que se puede configurar es Delay Start
(Inicio Retardado).
3. Presione el botOn Start/Pause (Inicio/Pausa).
, Si presiona el botOn Start/Pause (Inicio/Pausa),
comienza el programa Pure Cycle.
Pure
Cyd_"
PRECAUOION@
La
@
Pure Cycle le permite limpiar el tambor sin usar un agente limpiador.
Nunca use Pure Cycle cuando haya ropa en la lavadora. Esto puede da_ar la ropa o causar
un problema en la lavadora.
Si desea utiHzar agente Hmpiador para tambores, use s6mo1/10 de macantidad dem
agente mimpiador para tambores recomendado por el fabricante. (Cuando utilice un
agente limpiador en polvo, retire el compartimiento para el detergente liquido.)
funci6n demindicador autom_tico de Pure Cycme
Si se ilumina el botOn "Pure Cycb (Pure Cycb)" despues
de un lavado, indica que es necesaria la limpieza del
tubo (tambor). En este caso, retire la ropa de la lavadora,
presione el botOn de encendido y limpie el tambor
activando el programa Pure Cycle.
Si no se ejecuta Pure Cycle, se apaga la lampara "Pure
Cycme (Pure Cycme)". Sin embargo el indicador "Pure
Cycme (Pure Cycme)"se iluminara despues de que se
hayan efectuado dos lavados. No ejecutar Pure Cycle en
este momento no causara ningOn problema en la lavadora.
Si bien el indicador automatico de Pure Cycle aparece una
vez pot mes aproximadamente, la frecuencia puede variar
dependiendo de la cantidad de veces que se utilice la lavadora.
................. .......
64, mantenmento de a avadora
WF455AG-03159A-07 MES.indd 64 2013-12-I3 11:50:44
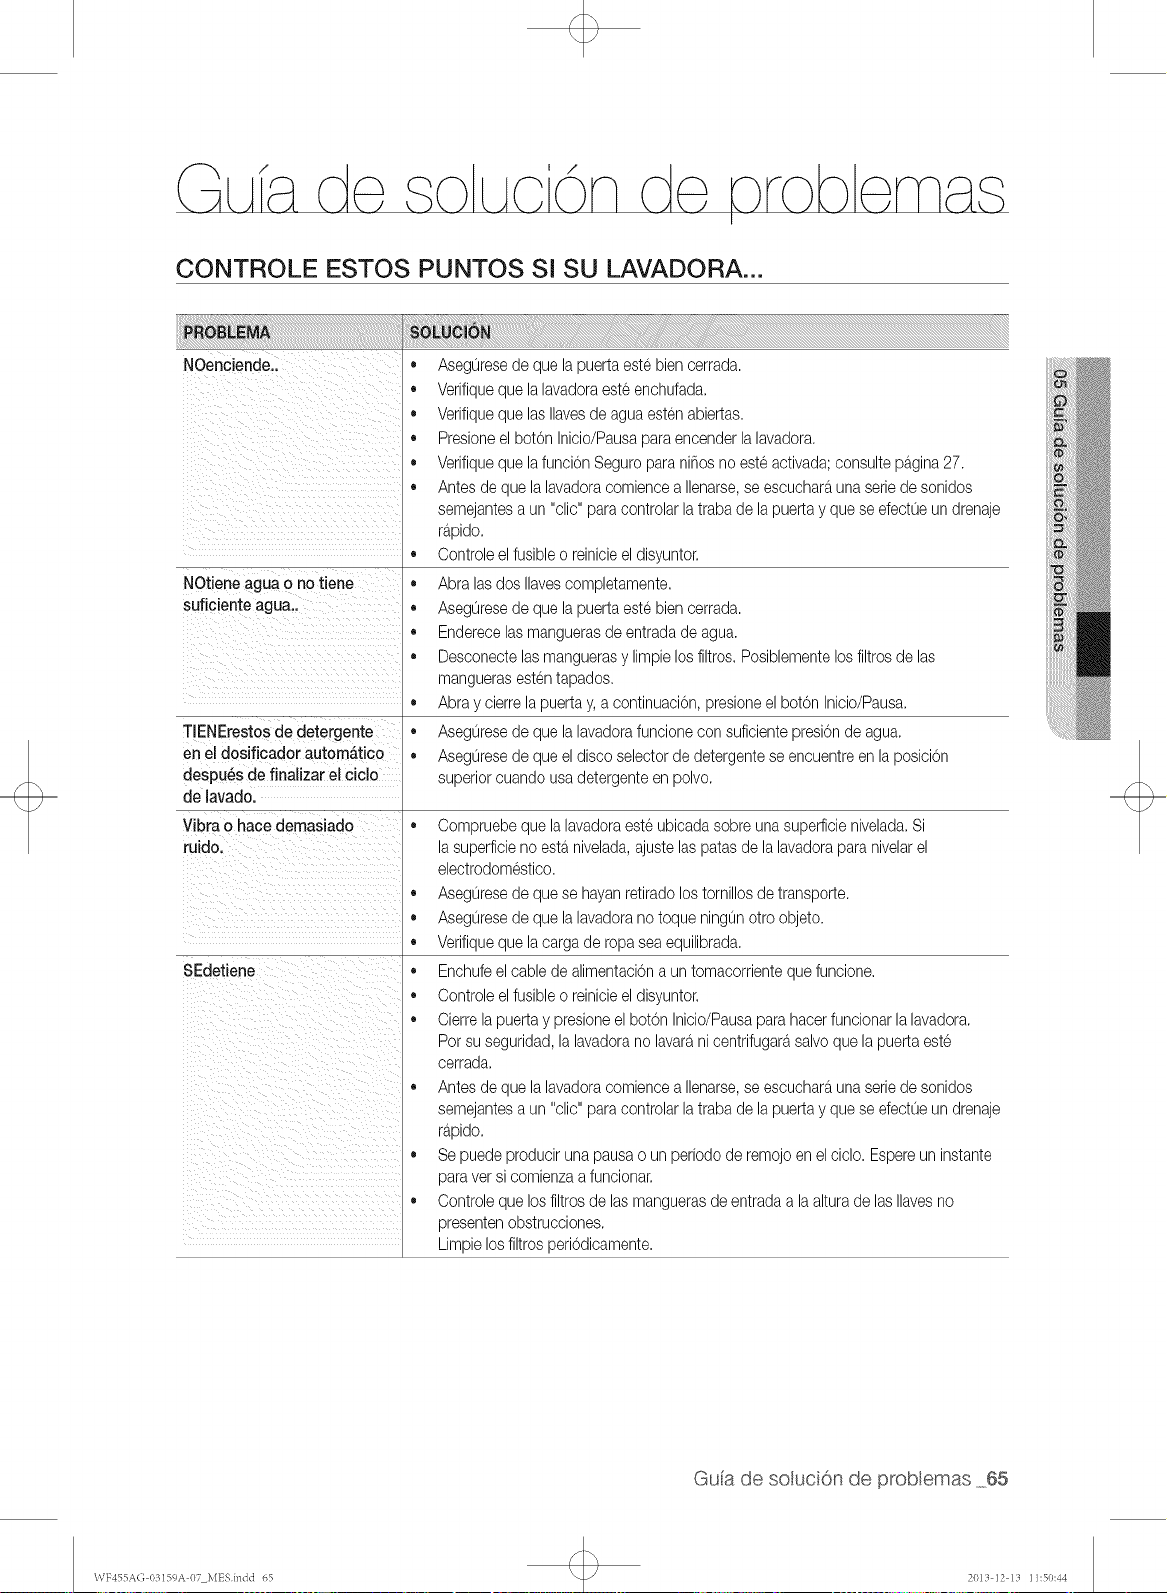
CONTROLE ESTOS PUNTOS SI SU LAVADORA...
NOenciende..
NOtieneagua o no tiene
suficiente agua..
o
TIENErestosde detergente •
en eldosificador autom&tico •
despu6s de finalizar el ciclo
de lavado.
e
Vibra o hace demasiado
ruido.
SEdetiene
• Aseguresede que la puerta estebiencerrada.
Verifiqueque lalavadoraesteenchufada,
Verifiqueque lasIlavesde agua estenabiertas.
PresioneelbotOnInicio/Pausaparaencenderlalavadora.
Verifiqueque lafunciOnSeguropara nifios noesteactivada;consultepa.gina27.
Antesde que la lavadoracomiencea Ilenarse,se escuchar_,unaseriede sonidos
semejantesa un "clic" paracontrolarlatrabade lapuertay quese efectueun drenaje
r@ido.
Controleelfusible o reinicieeldisyuntor.
Abra las dos Ilavescompletamente.
Aseguresede que lapuerta estebiencerrada.
Enderecelas manguerasde entradade agua,
Desconectelasmanguerasy limpielos filtros.Posiblementelos filtros de las
manguerasestentapados.
Abray cierrelapuertay,a continuaciOn,presioneelbotOnInicio/Pausa,
Aseguresede que lalavadorafuncionecon suficientepresi0nde agua,
Aseguresede que eldisco selectorde detergentese encuentreen la posiciOn
superiorcuandousadetergenteenpolvo.
Oompruebeque lalavadoraeste ubicadasobre unasuperficienivelada,Si
lasuperficieno esta nivelada,ajustelaspatas de la lavadoraparanivelarel
electrodomestico,
Aseguresede que se hayanretiradolostornillosde transporte.
Aseguresede que lalavadorano toqueningunotro objeto.
Verifiqueque lacargade ropasea equilibrada,
Enchufeelcablede alimentaci6na un tomacorrienteque funcione.
Controleelfusible o reinicieeldisyuntor,
Oierrelapuertay presioneel bot6n Inicio/Pausapara hacerfuncionarla lavadora.
Por suseguridad,la lavadorano lavaranicentrifugara,salvoque la puertaeste
cerrada,
Antesde que la lavadoracomiencea Ilenarse,se escuchar_,unaseriede sonidos
semejantesa un "clic" paracontrolarlatrabade lapuertay quese efectueun drenaje
r@ido.
Se puedeproduciruna pausao un periodode remojoen elciclo. Espereun instante
para ver si comienzaa funcionar,
Oontroleque losfiltrosde lasmanguerasde entradaa la alturade las Ilavesno
presentenobstrucciones.
Limpielosfiltrosperi6dicamente.
Gua de soluci6n de prob emas 65
WF455A(] 03159A 07 MESindd 65 2013 12 13 11:50:44
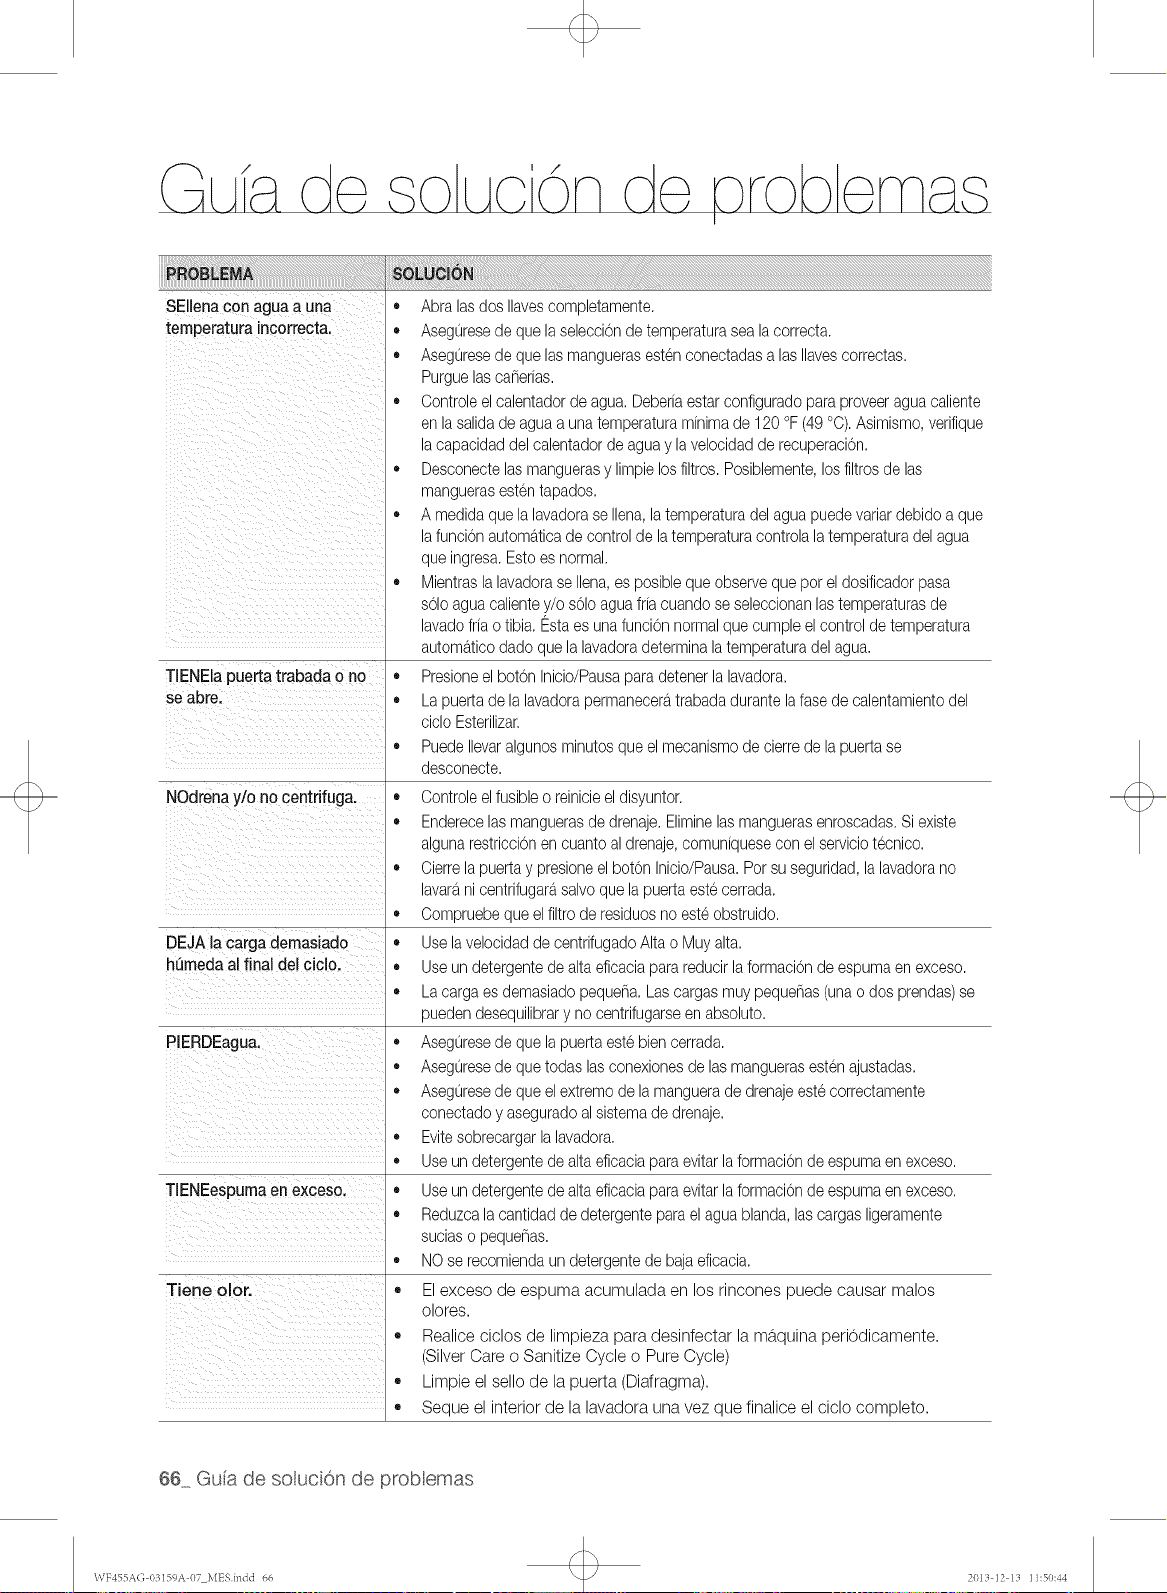
/ /
PROB EMA
SEIlenacon agua a una
temperatura Jncorrecta,
TIENEla puerta trabada o no
se abre.
NOdrena y/o no centrifuga.
DEJA la carga demasiado
hQmedaalfinal del ciclo.
PIERDEagua.
TIENEespuma en exceso.
TJene clot.
• Abra lasdos Ilavescompletamente.
• Aseguresede quela seleccionde temperaturasea la correcta.
• Aseguresede quelas manguerasestenconectadasalas Ilavescorrectas.
Purguelascafierias.
Oontroleel calentadordeagua. Deberiaestar configuradopara proveeraguacaliente
en lasalidade aguaa unatemperaturaminimade 120 °F (49 °O).Asimismo,verifique
la capacidaddel calentadorde aguay lavelocidadde recuperacion.
Desconectelasmanguerasy limpielosfiltros.Posiblemente,losfiltros de las
manguerasestentapados.
A medidaque lalavadorase Ilena,latemperaturadel aguapuedevariardebido a que
la funcionautom_tticade controlde latemperaturacontrolalatemperaturadel agua
que ingresa.Estoes normal.
Mientraslalavadorase Ilena,es posiblequeobservequepor el dosificadorpasa
sOloagua calientey/o sOloaguafria cuandose seleccionanlastemperaturasde
lavadofria o tibia. Estaes unafuncionnormalque cumpleel controlde temperatura
autom_tticodado quela lavadoradeterminalatemperaturadel agua.
Presioneel boton Inicio/Pausapara detenerla lavadora.
La puertade la lavadorapermanecer_ttrabadadurantelafase de calentamientodel
ciclo Esterilizar.
PuedeIlevaralgunosminutosque elmecanismode cierrede lapuertase
desconecte.
e Controleel fusiblee reinicieel disyuntor.
Enderecelasmanguerasde drenaje.Eliminelasmanguerasenroscadas.Siexiste
algunarestriccionen cuantoal drenaje,comuniquesecon elserviciotecnico.
Oierrela puertay presioneelbotOnInicio/Pausa.Porsu seguridad,la lavadorano
lavarani centrifugar_tsalvo quela puertaestecerrada.
Oompruebequeel filtrode residuosno esteobstruido.
Uselavelocidadde centrifugadoAlta o Muy alta.
Useun detergentede alta eficaciaparareducirlaformacionde espumaen exceso.
La cargaes demasiadopequefla.Las cargasmuypequeflas(unao dos prendas)se
pueden desequilibrary no centrifugarseen absoluto.
Aseguresede que lapuertaeste bien cerrada.
Aseguresede quetodas lasconexionesde las manguerasesten ajustadas.
Aseguresede queel extremode la manguerade drenajeeste correctamente
conectadoy aseguradoalsistemade drenaje.
Evitesobrecargarla lavadora.
Useun detergentede alta eficaciaparaevitarlaformacionde espumaen exceso.
Useun detergentede alta eficaciaparaevitarlaformacionde espumaen exceso.
Reduzcalacantidadde detergenteparaelagua blanda,lascargasligeramente
sucias o pequeflas.
• NOse recomiendaun detergentede bajaeficacia.
,, El exceso de espuma acumulada en los rincones puede causar malos
olores.
,, Realice ciclos de limpieza para desinfectar la m_tquina periodicamente.
(Silver Care o Sanitize Cycle o Pure Cycle)
,, Limpie el sello de la puerta (Diafragma).
Seque el interior de la lavadora una vez que finalice el ciclo completo.
66 Gua de soiucion de prob emas
WI_455A(] 03159A 07 MESfndd 66 201_t 12 llt 11:50:44
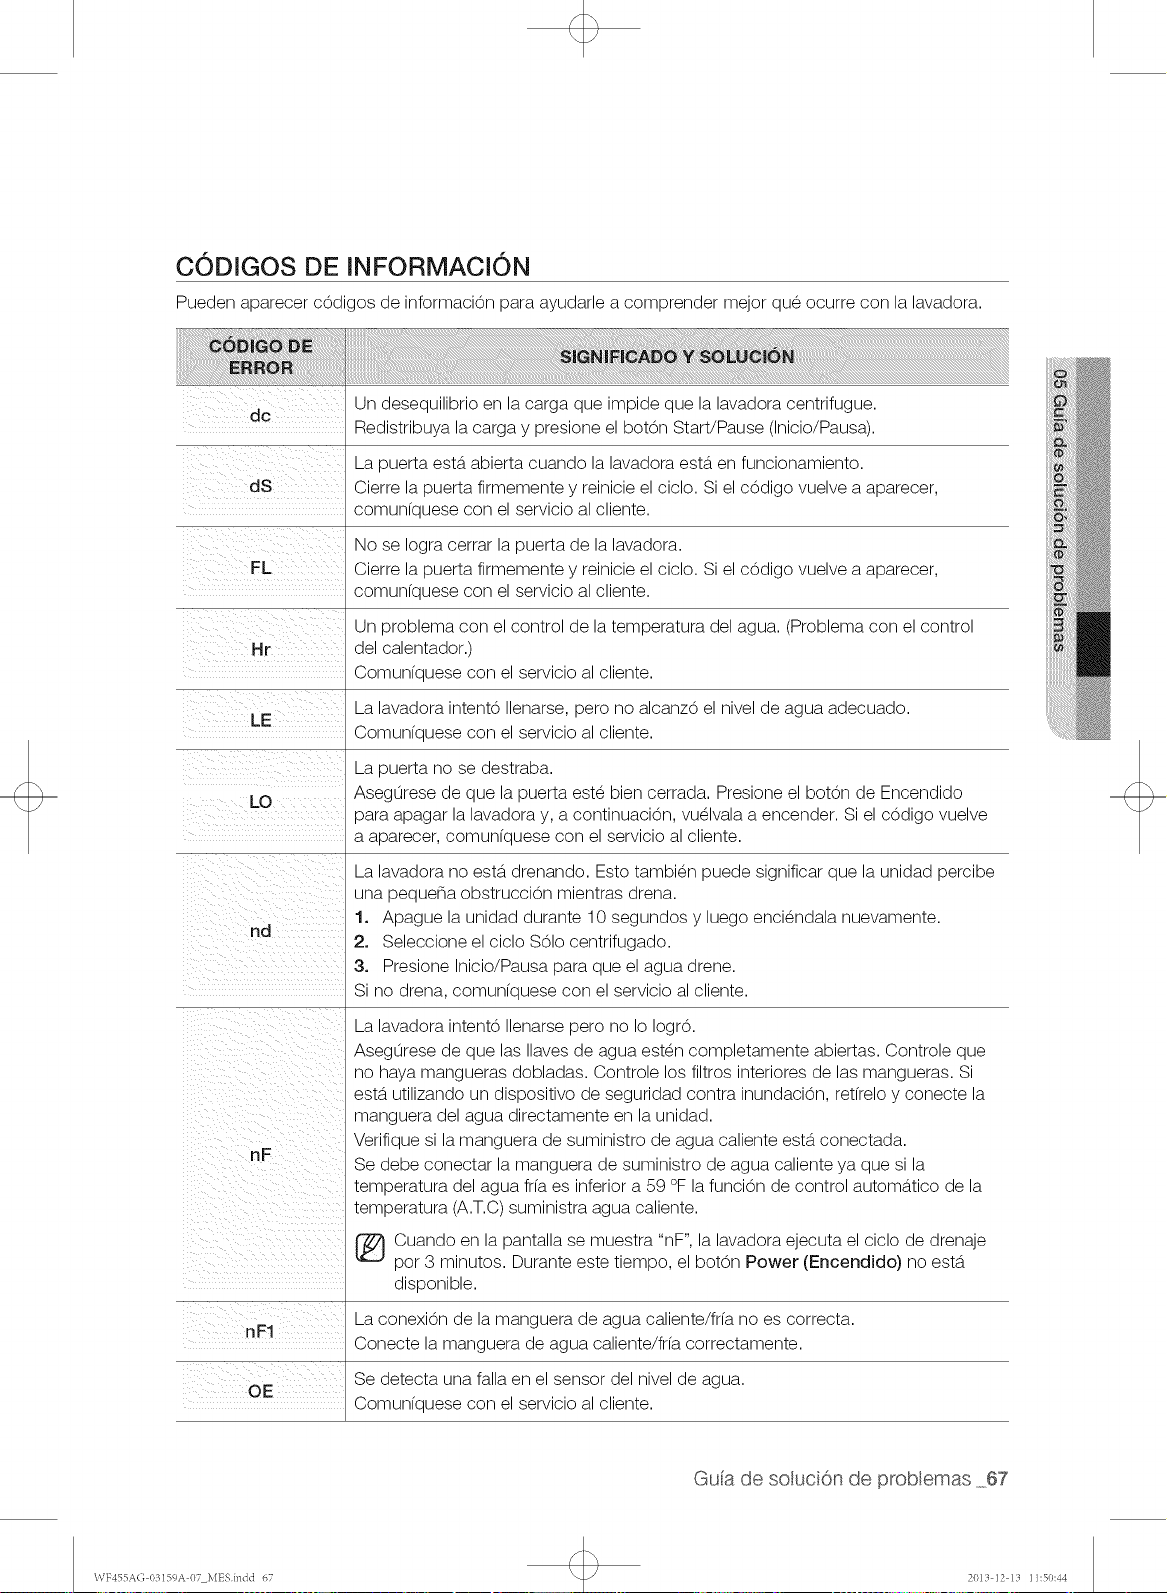
CODIGOS DE INFORMACiON
Pueden aparecer cOdigos de informacion para ayudarle a comprender mejor que ocurre con la lavadora.
dc
dS
FL
Hr
LE
LO
nd
nF
Un desequilibrio en la carga que impide que la lavadora centrifugue.
Redistribuya la carga y presione el boton StaWPause (Inicio/Pausa).
La puerta est&.abierta cuando la lavadora est&.en funcionamiento.
Cierre la puerta firmemente y reinicie el ciclo. Si el codigo vuelve a aparecer,
comun[quese con el servicio al cliente.
No se Iogra cerrar la puerta de la lavadora.
Cierre la puerta firmemente y reinicie el ciclo. Si el codigo vuelve a aparecer,
comun[quese con el servicio al cliente.
Un problema con el control de la temperatura del agua. (Problema con el control
del calentadoQ
Comun[quese con el servicio al cliente.
La lavadora intento Ilenarse, pero no alcanzo el nivel de agua adecuado.
Comun[quese con el servicio al cliente.
La puerta no se destraba.
AsegOrese de que la puerta este bien cerrada. Presione el bot0n de Encendido
para apagar la lavadora y, a continuacion, vu_lvala a encender. Si el codigo vuelve
a aparecer, comun[quese con el servicio al cliente.
La lavadora no est&. drenando. Esto tambi_n puede significar que la unidad percibe
una pequena obstrucci0n mientras drena.
1. Apague la unidad durante 10 segundos y luego enci_ndala nuevamente.
2. Seleccione el ciclo S01o centrifugado.
3. Presione Inicio/Pausa para que el agua drene.
Si no drena, comun[quese con el servicio al cliente.
La lavadora intento Ilenarse pero no Io Iogr0.
Aseg0rese de que las Ilaves de agua est_n completamente abiertas. Controle que
no haya mangueras dobladas. Controle los filtros interiores de las mangueras. Si
est&.utilizando un dispositivo de seguridad contra inundacion, ret[relo y conecte la
manguera del agua directamente en la unidad.
Verifique si la manguera de suministro de agua caliente est&.conectada.
Se debe conectar la manguera de suministro de agua caliente ya que si la
temperatura del agua fr(a es inferior a 59 °F la funcion de control autom&.tico de la
temperatura (A.T.C) suministra agua caliente.
_ uando en la pantalla se muestra "nF", la lavadora ejecuta el ciclo de drenaje
pot 3 minutos. Durante este tiempo, el boton Power (Encendido) no esta.
disponible.
La conexion de la manguera de agua caliente/fr(a no es correcta.
nF1
Conecte la manguera de agua caliente/fr(a correctamente.
Se detecta una falla en el sensor del nivel de agua.
OE
Comun[quese con el servicio al cliente.
Gua de solucion de p_ob emas 67
WF455AG 03159A 07 MESfndd 67 20Kt 12 Kt 11:50:44
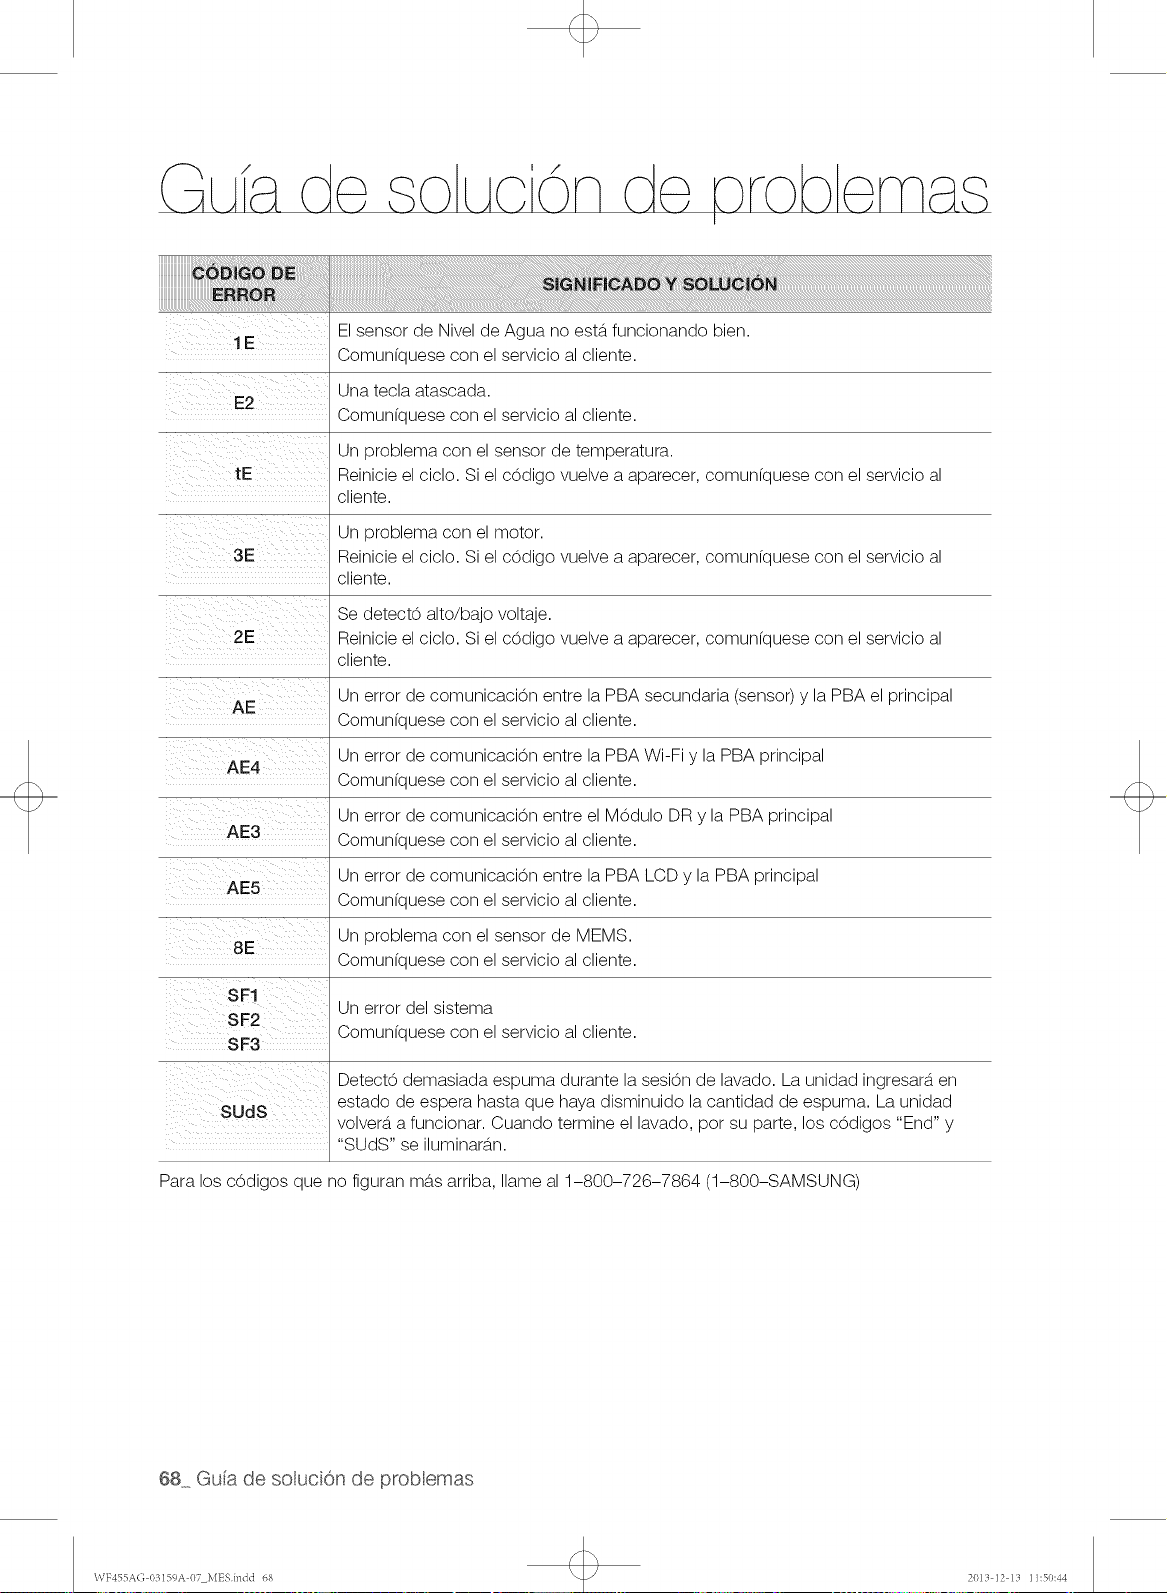
/ /
El sensor de Nivel de Agua no est&.funcionando bien.
1E
Comunfquese con el servieio al cliente.
Una teela ataseada.
E2
Comunfquese con el servieio al cliente.
Un problema con el sensor de temperatura.
tE Reinicie el cielo. Si el codigo vuelve a aparecer, comunfquese con el servieio al
cliente.
Un problema con el motor.
3E Reinicie el cielo. Si el codigo vuelve a aparecer, comunfquese con el servieio al
cliente.
Se deteeto alto/bajo voltaje.
2E Reinicie el cielo. Si el codigo vuelve a aparecer, comunfquese con el servieio al
cliente.
Un error de comunieacion entre la PBA secundaria (senso0 y la PBA el principal
AE
Comunfquese con el servieio al cliente.
Un error de comunieacion entre la PBA Wi-Fi y la PBA principal
AE4
Comunfquese con el servieio al cliente.
Un error de comunieacion entre el MOdulo DR y la PBA principal
AE3 Comunfquese con el servieio al cliente.
Un error de comunieacion entre la PBA LCD y la PBA principal
AE5
Comunfquese con el servieio al cliente.
Un problema con el sensor de MEMS.
8E
Comunfquese con el servieio al cliente.
SF1
Un error del sistema
SF2
Comunfquese con el servieio al cliente.
SF3
Deteeto demasiada espuma durante la sesion de lavado. La unidad ingresar&,en
estado de espera hasta que haya disminuido la cantidad de espuma. La unidad
SUdS
volver_i a funcionar. Cuando termine el lavado, por su parte, los codigos "End" y
"SUDS" se iluminaran.
Para los codigos que no figuran mas arriba, Ilame al 1-800-726-7864 (1-800-SAMSUNG)
68....Gua de so[ucion de prob emas
WF455AG 03159A 07 MESindd 68 2013 12 13 11:50:44
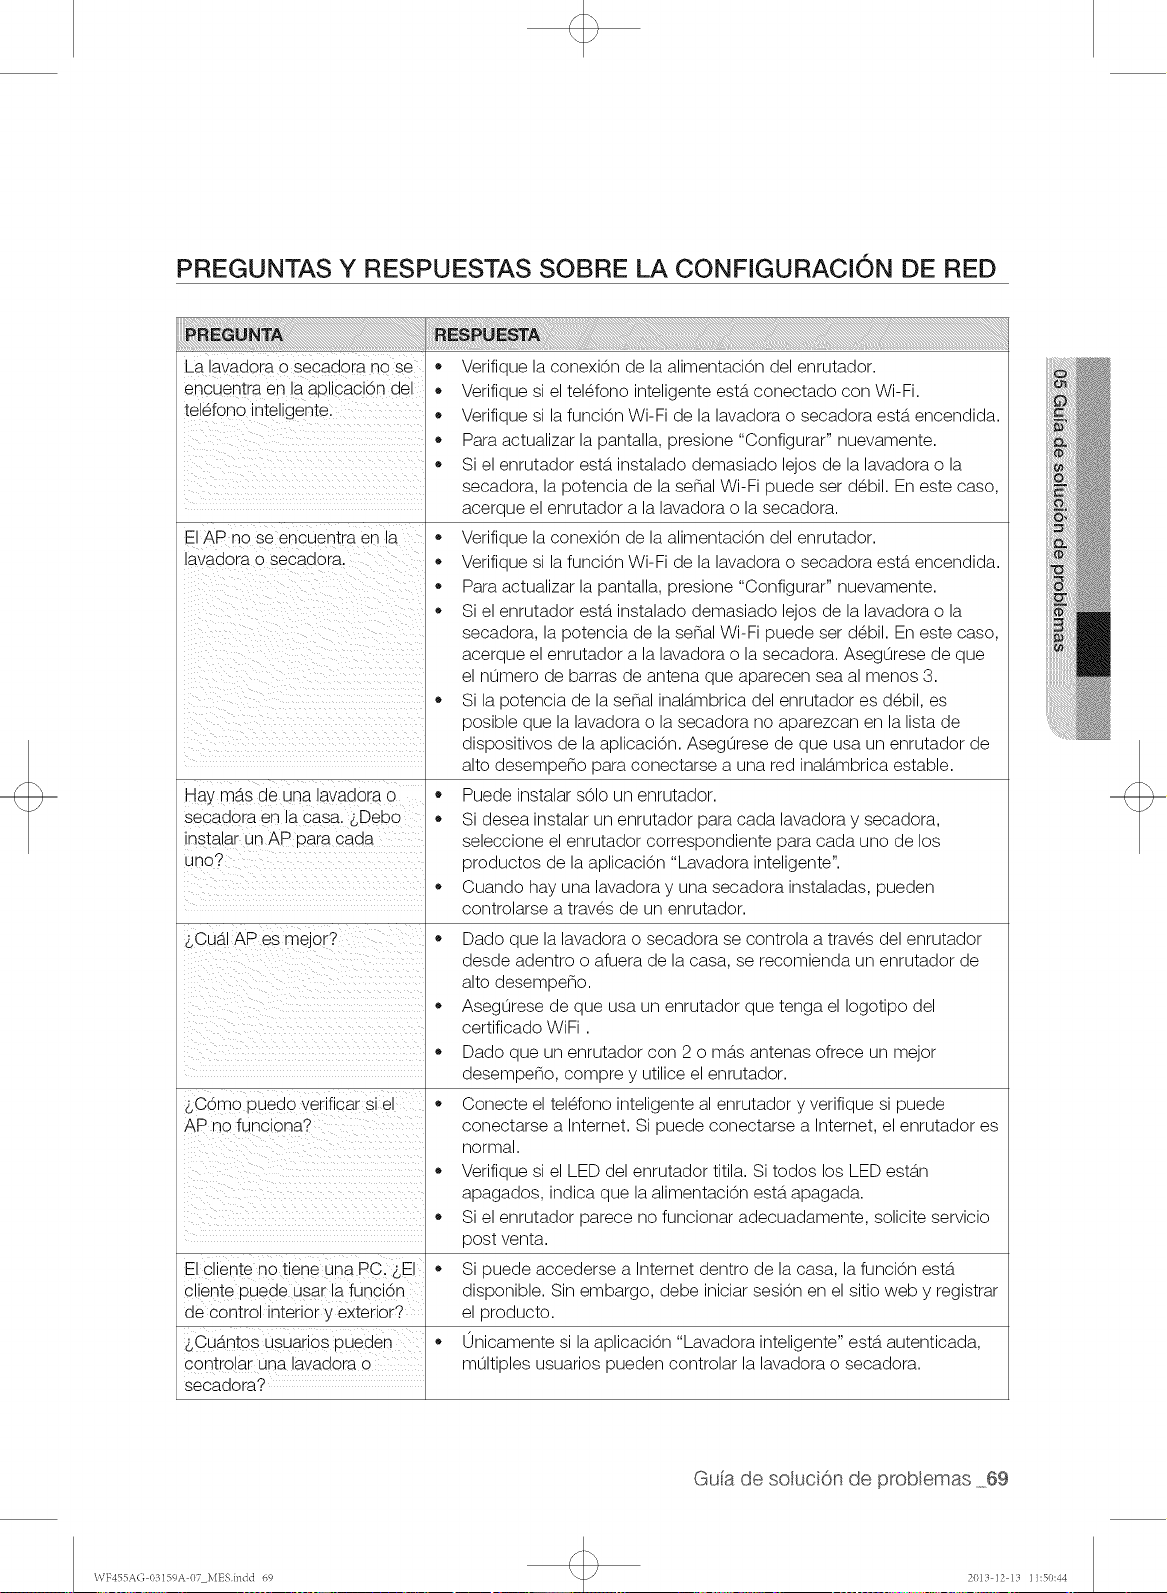
PREGUNTAS Y RESPUESTAS SOBRE LA CONFIGURACi0N DE RED
La lavadora o secadora no se
encuentra en la aplicaci6n del
telefono inteligente.
El AP no se encuentra en la
lavadora o secadora.
Hay ms.s de una lavadora o
secadora en la casa. sDebo
instalar un AP para cada
uno?
&Cus.IAPes mejor?
bC6mo puedo verificar si el
AP no funciona?
El cliente no tiene una PC. sEI
cliente puede usar la funci6n
de control interior y exterior?
$Cus.ntos usuarios pueden
controlar una lavadora 0
secadora?
Verifique la conexion de la alimentacion del enrutador.
Verifique si el tel_fono inteligente est&.conectado con Wi-Fi.
Verifique si la funcion Wi-Fi de la lavadora o secadora est&.encendida.
Para actualizar la pantalla, presione "Configurar" nuevamente.
Si el enrutador ests. instalado demasiado lejos de la lavadora o la
secadora, la potencia de la serial Wi-Fi puede set d_bil. En este caso,
acerque el enrutador a la lavadora o la secadora.
Verifique la conexion de la alimentaci0n del enrutador.
Verifique si la funcion Wi-Fi de la lavadora o secadora est&.encendida.
Para actualizar la pantalla, presione "Configurar" nuevamente.
Si el enrutador ests. instalado demasiado lejos de la lavadora o la
secadora, la potencia de la serial Wi-Fi puede set d_bil. En este caso,
acerque el enrutador a la lavadora o la secadora. AsegOrese de que
el nOmero de barras de antena que aparecen sea al menos 3.
Si la potencia de la serial inal&.mbrica del enrutador es d_bil, es
posible que la lavadora o la secadora no aparezcan en la lista de
dispositivos de la aplicaci0n. AsegOrese de que usa un enrutador de
alto desempeno para conectarse a una red inal_tmbrica estable.
Puede instalar sOlo un enrutador.
Si desea instalar un enrutador para cada lavadora y secadora,
seleccione el enrutador correspondiente para cada uno de los
productos de la aplicacion "Lavadora inteligente".
Cuando hay una lavadora y una secadora instaladas, pueden
controlarse a trav_s de un enrutador.
Dado que la lavadora o secadora se controla a trav_s del enrutador
desde adentro o afuera de la casa, se recomienda un enrutador de
alto desempeno.
AsegOrese de que usa un enrutador que tenga el Iogotipo del
certificado WiFi.
Dado que un enrutador con 2 o ms.s antenas ofrece un mejor
desempeno, compre y utilice el enrutador.
Conecte el tel_fono inteligente al enrutador y verifique si puede
conectarse a Internet. Si puede conectarse a Internet, el enrutador es
normal.
Verifique si el LED del enrutador titila. Si todos los LED est_tn
apagados, indica que la alimentaci0n est&.apagada.
Si el enrutador parece no funcionar adecuadamente, solicite servicio
post venta.
Si puede accederse a Internet dentro de la casa, la funci0n est&.
disponible. Sin embargo, debe iniciar sesion en el sitio web y registrar
el producto.
Unicamente si la aplicaci0n "Lavadora inteligente" est&.autenticada,
mQItiples usuarios pueden controlar la lavadora o secadora.
Gua de soiuci6n de prob emas 69
\VF455A(; 03159A 07 MESindd 69 2013 12 13 11:50:44
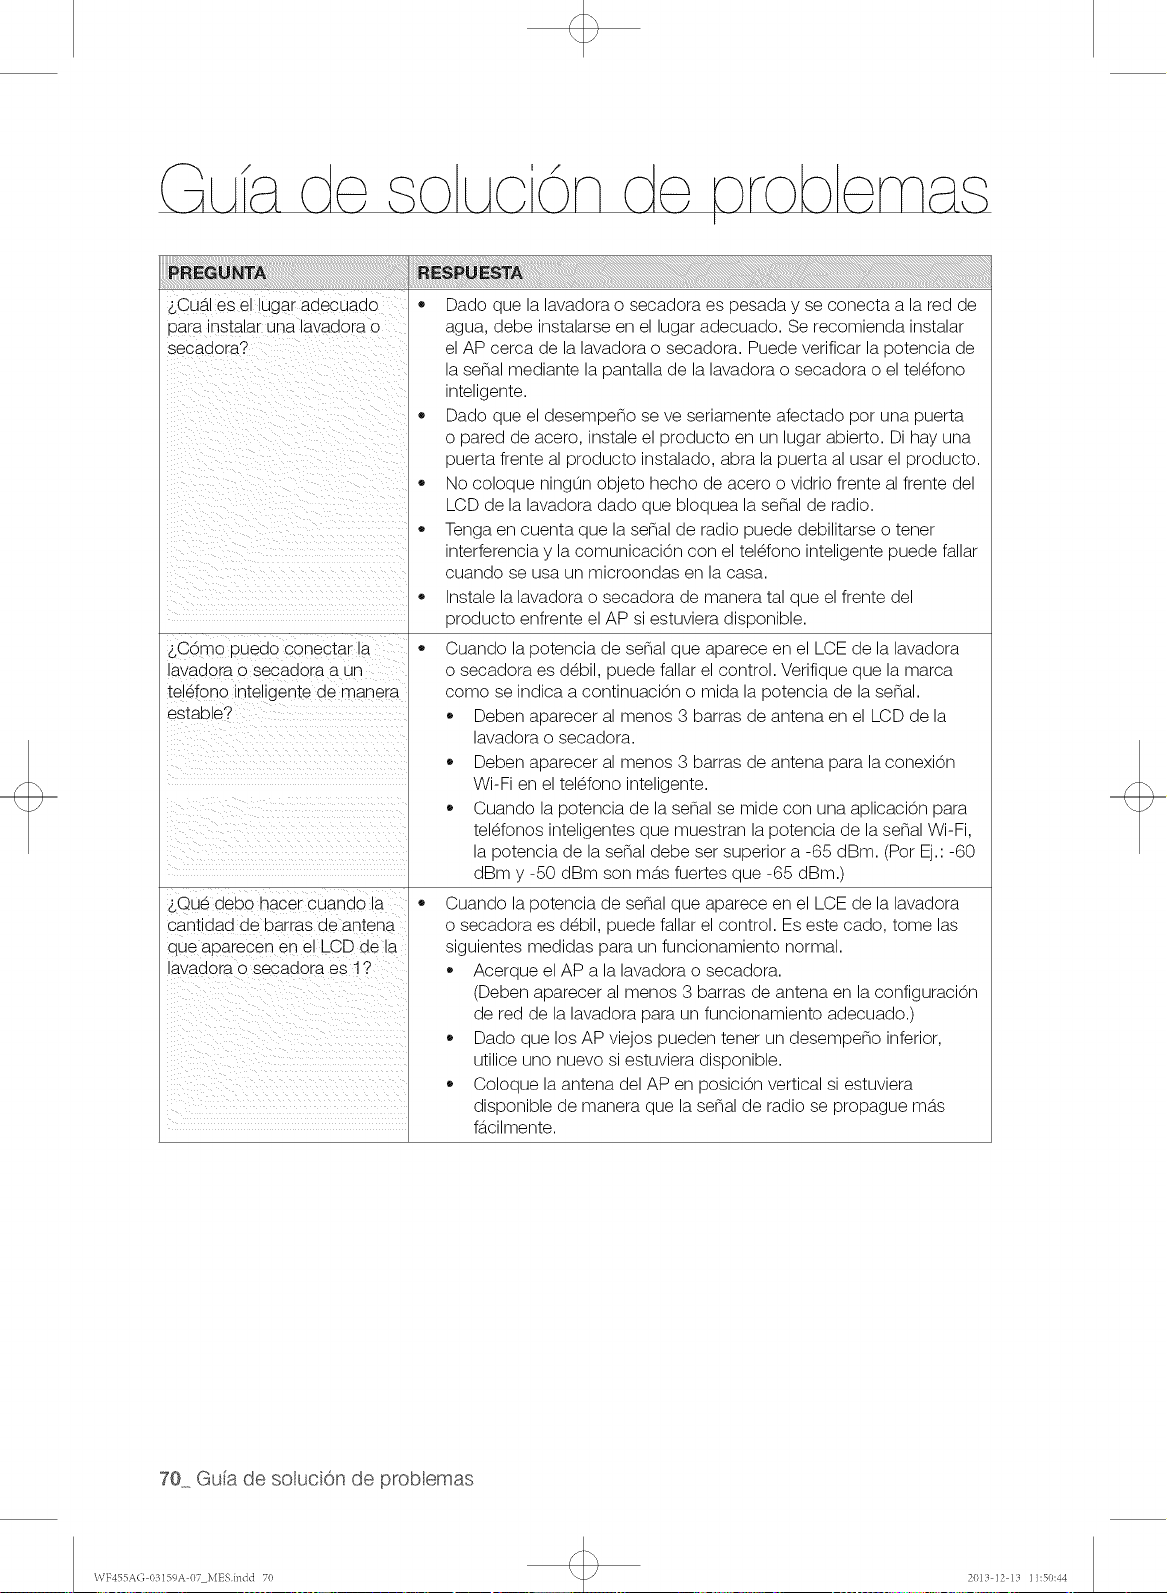
/ /
$Cual es e ugar aaecuaao
oara instalar ur-a lavaaora o
secadora?
$C6mo Duedo conectar la
avaaora o secaaora a ur"
telefono inte gente de manera
estable?
sQue debo hacer cuanao la
cantldad de barras de antena
aue aDarecen en el LCD de la
avaaora o secadora es 1?
Dado que la lavadora o secadora es pesada y se conecta a la red de
agua, debe instalarse en el lugar adecuado. Se recomienda instalar
el AP eerca de la lavadora o secadora. Puede verificar la potencia de
la senal mediante la pantalla de la lavadora o secadora o el tel_fono
inteligente.
Dado que el desempeno se ve seriamente afectado pot una puerta
o pared de acero, instale el producto en un lugar abierto. Di hay una
puerta frente al producto instalado, abra la puerta al usar el producto.
No coloque ningOn objeto hecho de acero o vidrio frente al frente del
LCD de la lavadora dado que bloquea la senal de radio.
Tenga en euenta que la senal de radio puede debilitarse o tenet
interferencia y la comunicaeion con el tel_fono inteligente puede fallar
cuando se usa un microondas en la casa.
Instale la lavadora o secadora de manera tal que el frente del
producto enfrente el AP si estuviera disponible.
Cuando la potencia de senal que apareee en el LCE de la lavadora
o secadora es d_bil, puede fallar el control. Verifique que la marca
como se indica a continuacion o mida la potencia de la senal.
Deben aparecer al menos 3 barras de antena en el LCD de la
lavadora o secadora.
Deben aparecer al menos 3 barras de antena para la conexion
Wi-Fi en el tel_fono inteligente.
Cuando la potencia de la senal se mide con una aplicacion para
tel_fonos inteligentes que muestran la potencia de la senal Wi-Fi,
la potencia de la senal debe ser superior a -65 dBm. (Por Ej.: -60
dBm y -50 dBm son m&.sfuertes que -65 dBm.)
Cuando la potencia de senal que apareee en el LCE de la lavadora
o secadora es d_bil, puede fallar el control. Es este cado, tome las
siguientes medidas para un funcionamiento normal.
Aeerque el AP a la lavadora o secadora.
(Deben aparecer al menos 3 barras de antena en la configuracion
de red de la lavadora para un funcionamiento adecuado.)
Dado que los AP viejos pueden tener un desempeno inferior,
utilice uno nuevo si estuviera disponible.
Coloque la antena del AP en posieion vertical si estuviera
disponible de manera que la senal de radio se propague m&.s
f&.cilmente.
70 Gua de soluci6n de prob emas
WF455A(] 0fq59A 07 MESindd 70 2013 12 13 11:50:44
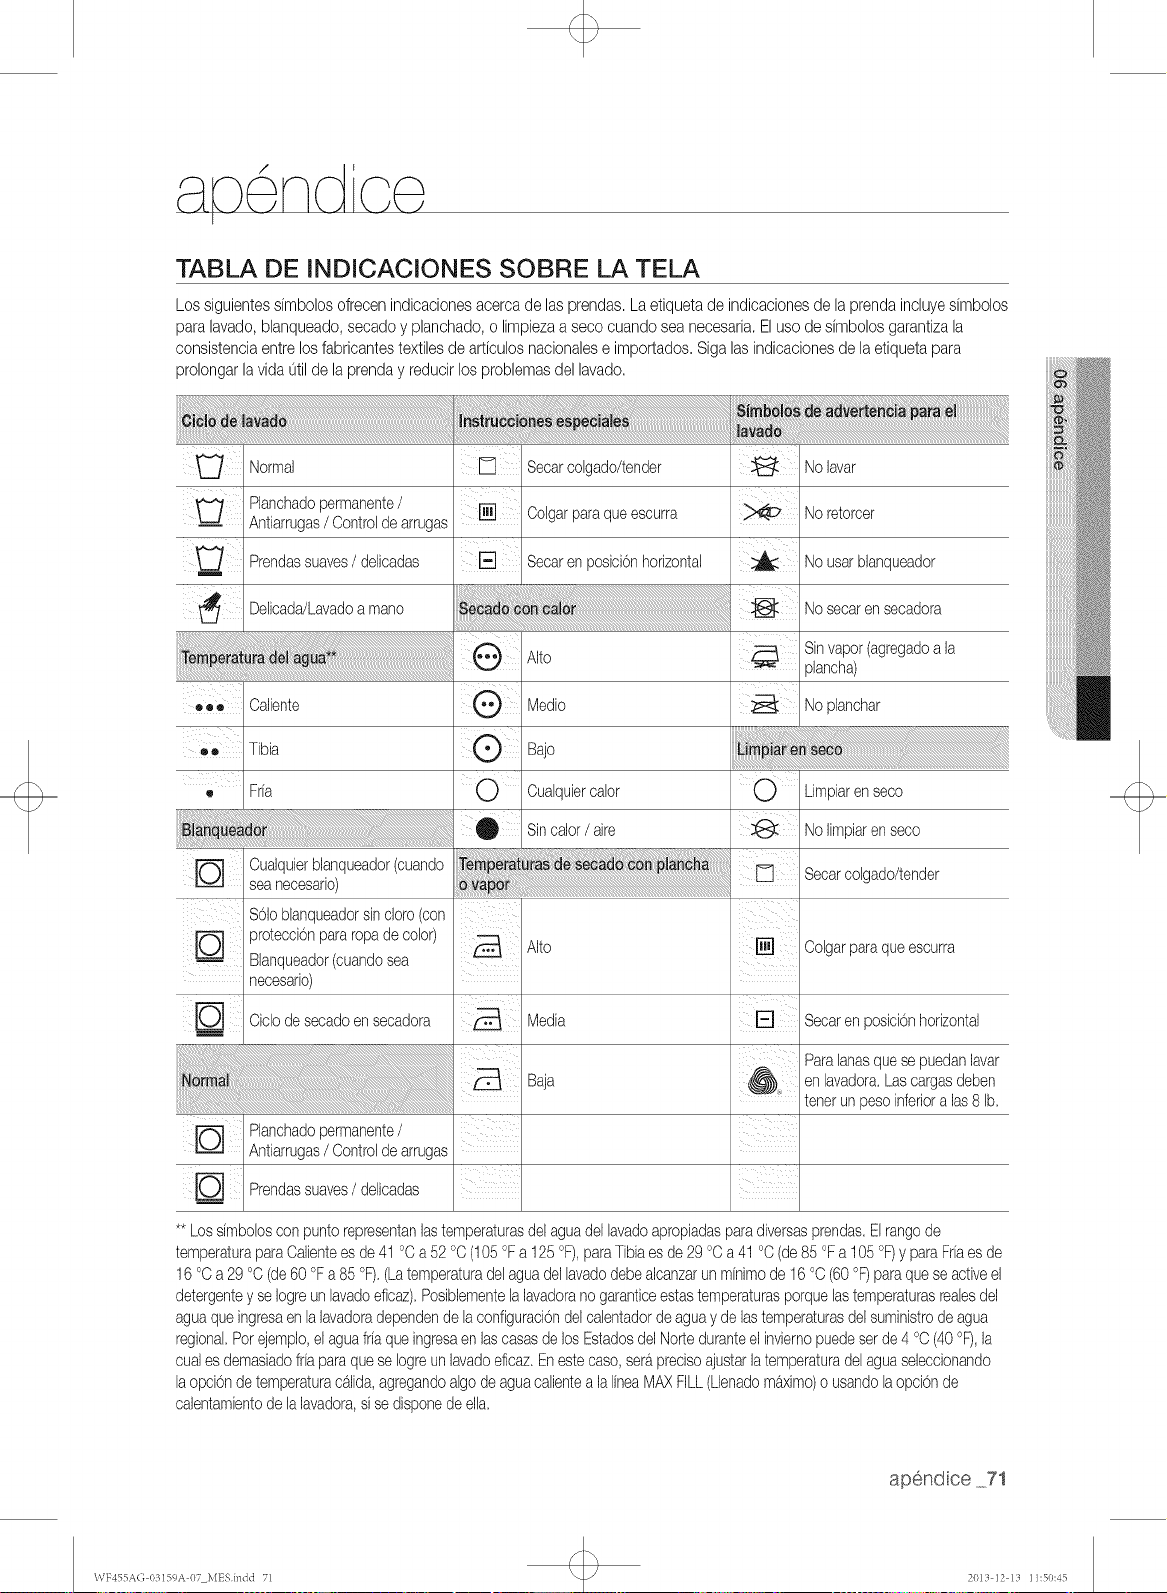
ap ndce
TABLA DE INDICACIONES SOBRE LA TELA
Los siguientessimbolosofrecenindicacionesacercade lasprendas.La etiquetade indicacionesde la prendainchye simbolos
para lavado,blanqueado,secadoy planchado,o limpiezaa seco cuandoseanecesaria.El uso de simbolosgarantizala
consistenciaentrelosfabricantestextilesde articulosnacionalese importados.Siga lasindicacionesde laetiquetapara
prolongarlavida 0til de la prenday reducirlos problemasdel lavado.
Norma,
Planchadopermanente/
-- Antiarrugas/ Controldearrugas
Prendassuaves/ delicadas
Delicada/Lavadoamano
Secarcolgado/tender No lavar
colgarparaqueescurra Noretorcer
Secaren posiciOnhorizontal No usarblanqueador
e_t Calbnte
• • Tibia
Fr[a
Cualqubrblanqueador(cuando
sea necesano)
8oloblanqueadorsincloro(con
proteccionpararopade color)
Blanqueador(cuandosea
necesario)
Ciclode secadoensecadora
Planchadopermanente/
Antiarrugas/ Controldearrugas
Prendassuaves/ delicadas
,,to
Medic
Bajo
Cualqubrcalor
_1 Sincalor/ aire
Nosecaren secadora
Sinvapor(agregadoa la
plancha)
No planchar
O Limpiaren seco
No limpiaren seco
Secarcolgado/tender
Alto []
Media
a,a
Xl i
Colgarparaqueescurra
Secaren posicbnhorizontal
Paralanasquese puedanlavar
en lavadora.Lascargasdeben
tenerunpesoinferioralas 8 lb.
**Lossimbolosconpunto representanlastemperaturasdelaguadel lavadoapropiadasparadiversasprendas.El tangode
temperaturaparaCalientees de41 °C a 52 °C(105°Fa 125°F),paraTibiaes de29 °Ca 41 °C (de85 °Fa 105°F)y paraFr[aesde
16 °C a 29 °C(de60 °Fa85 oF).(Latemperaturadelaguadellavadodebealcanzarunmhimo de I6 °C (60oF)paraquese activeel
detergentey se Iogreun lavadoeficaz).Posiblementelalavadorano garanticeestastemperaturasporquelastemperaturasrealesdel
aguaqueingresaen lalavadoradependende laconfiguraciondelcalentadordeaguay de lastemperaturasdelsuministrode agua
regional.Porejemplo,elaguafriaqueingresaen lascasasde losEstadosdelNorteduranteelinviernopuedeser de4 °C(40oF),la
cuales demasiadofrfaparaqueseIogreun lavadoeficaz.Enestecaso,seraprecisoajustarlatemperaturadelaguaseleccionando
laopci6ndetemperaturacalida,agregandoalgode aguacalientea lalineaMAXFILL(Llenadomaximo)o usandola opci6nde
calentamientode lalavadora,si sedisponede ella.
apend ce 71
\VF455AG 03159A 07 MESindd 71 2013 12 13 11:50:45
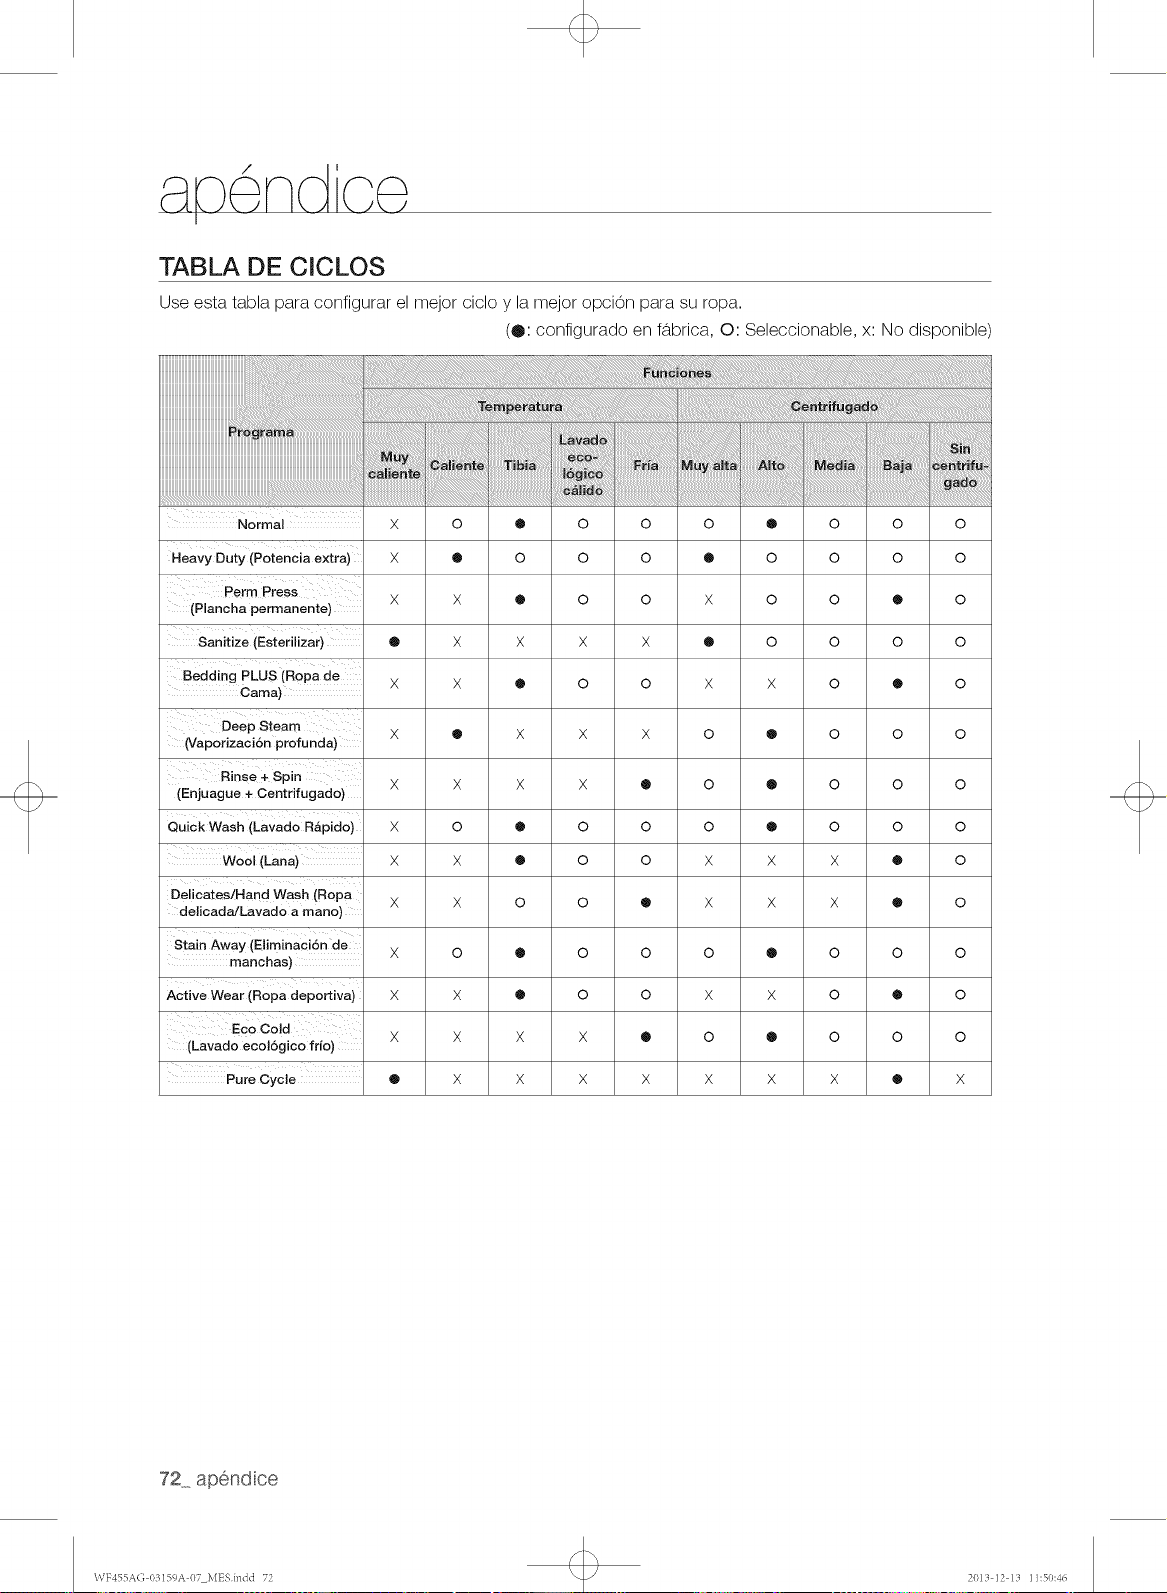
i,p nd ae
TABLA DE CICLOS
Use esta tabla para configurar el mejor ciclo y la mejor opci0n para su ropa.
(0: configurado en fabrica, O: Seleccionable, x: No disponible)
FunciOnes
Programa
Lavado
M sin
uy . e¢o- •
__ ..-.: Calente Tba ,=___ Fra Muyata A_o Meda Baja eentr_u-
c_ ido gad°
I I I I
Normal X O @ O O O @ O O O
Heavy Duty (Potencia extra) X @ O O O @ O O O O
Perm Press X X @ O O X O O @ O
(Plancha permanente)
Sanitize (Esterilizar) @ X X X X @ O O O O
Bedding PLUS (Ropa de X X @ O O X X O @ O
Cama)
Deep Steam X • X X X O O O O O
(Vaporizaci6n profunda)
Rinse + Spin X X X X @ O @ O O O
(Enjuague + Centrifugado)
Quick Wash (Lavado Rb.pido) X O @ O O O @ O O O
Wool (Lana) X X @ O O X X X @ O
Delicates/Hand Wash (Ropa X X O O @ X X X @ O
delicada/Lavado a mano)
Stain Away (Eliminaci6n de
X 0 ® 0 0 0 0 0 0 0
manchas)
Active Wear (Ropa deportiva) X X @ O O X X O @ O
(Lavado ecol6gico frio) X X X X @ O @ O O O
Pure Cycle @ X X X X X X X @ X
72 apend ce
\VF455A(; 03159A 07 MESindd 72 2013 12 13 11:50:46
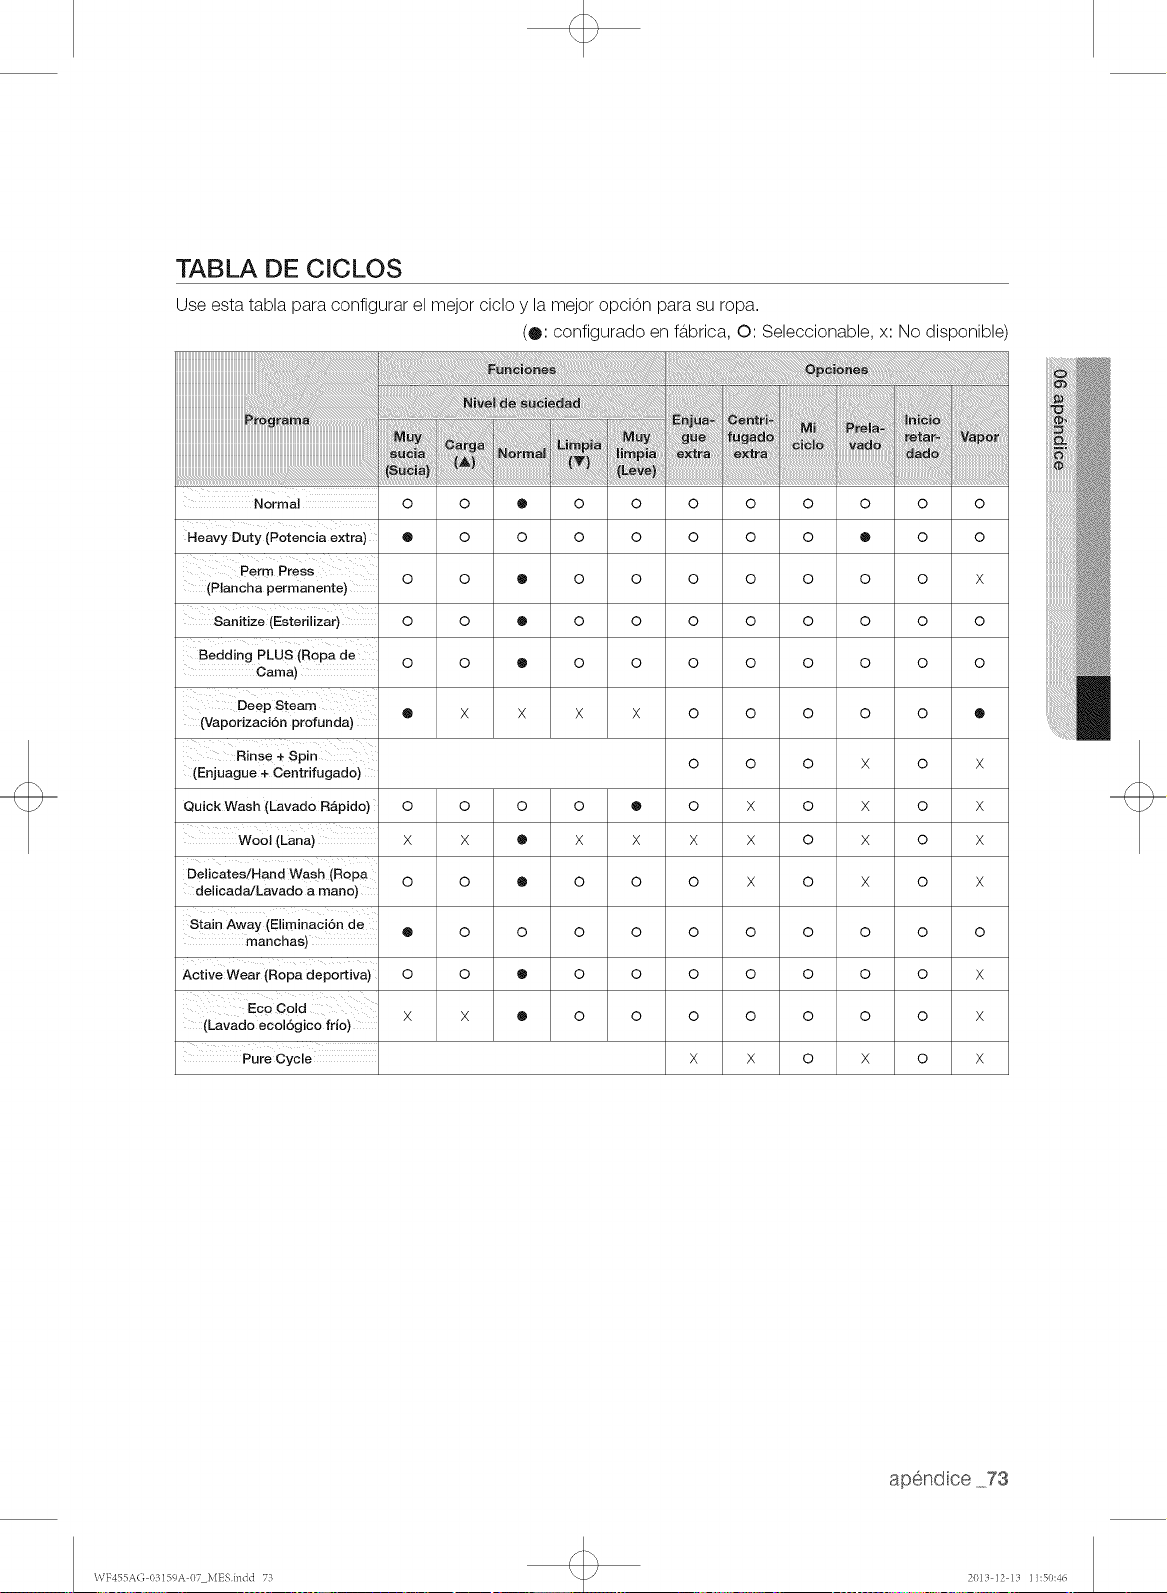
TABLA DE CICLOS
Use esta tabla para configurar el mejor ciclo y la mejor opci0n para su ropa.
(®: configurado en fabrica, O: Seleccionable, x: No disponible)
programa
Normal 0 0 @ 0 0 0 0 0 o o o
Heavy Duty (Potencia extra) @ 0 0 0 0 0 0 0 @ 0 0
Perm Press O O @ O O O O O O O X
(Plancha permanente)
Sanitize (Esterilizar) O O @ O O O O O O O O
Bedding PLUS (Ropa de O O @ O O O O O O O O
Cama)
Deep Steam O X X X X O O O O O •
(Vaporizaci6n profunda)
Rinse + Spin O O O X O X
(Enjuague + Centrifugado)
Quick Wash (Lavado R&pido) O O O O @ O X O X O X
Wool (Lana) X X @ X X X X O X O X
Delicates/Hand Wash (Ropa O O @ O O O X O X O X
delicada/Lavado a mano)
Stain Away (Eliminaci6n de @ O O O O O O O O O O
manchae)
Active Wear (Ropa deportiva) O O • O O O O O O O X
Eco Cold X X ® O O O O O O O X
(Lavado ecol6gico frio)
Pure Cycle X X O X O X
apend ce 73
\VF455A(; 03159A 07 MESindd 73 2013 12 13 11:50:46
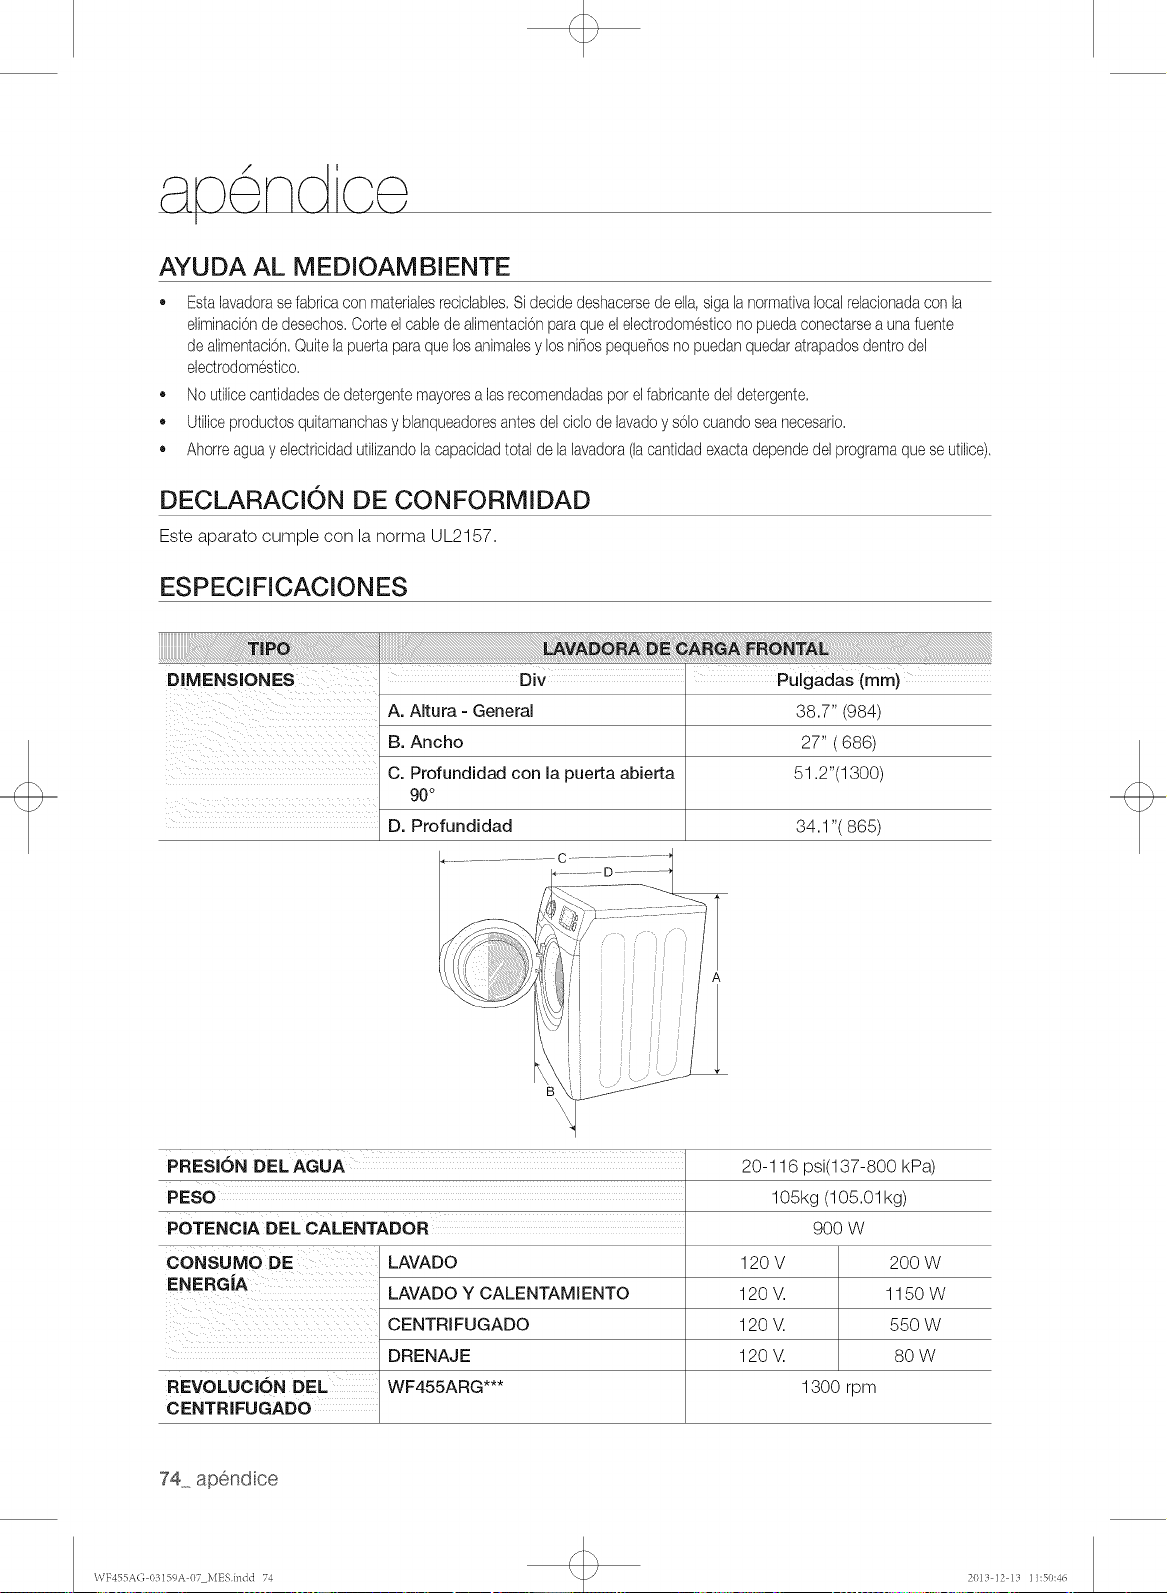
AYUDA AL MEDIOAMBIENTE
o
o
o
o
Estalavadorasefabricacon materialesreciclables,Si decidedeshacersede ella,sigalanormativalocalrelacionadacon la
eliminaci0nde desechos,Corteel cablede alimentacionparaqueelelectrodomesticono puedaconectarsea unafuente
de alimentacion,Quitela puertaparaquelosanimalesy losnifiospequehosno puedanquedaratrapadosdentrodel
electrodomestico,
Noutilicecantidadesde detergentemayoresalas recomendadasporel fabricantedeldetergente,
Utiliceproductosquitamanchasy blanqueadoresantesdelciclo delavadoy s01ocuandoseanecesario,
Ahorreaguay electricidadutilizandolacapacidadtotalde la lavadora(lacantidadexactadependedel programaqueseutilice),
DECLARACION DE CONFORMIDAD
Este aparato cumple con la norma UL2157.
ESPECi Fi CACIO NES
DIMENSIONES
...... Div ......... i .... Pulgadas (mm)
A. Altura - General 38.7" (984)
B. Ancho 27" (686)
C. Profundidad con la puerta abierta 51.2"(1300)
90°
D. Profundidad
34.1 "(865)
ii_ ii
[ j'
ii!iiiii
PRESION DEL AGUA 20-116 psi(137-800 kPa)
PESO 105kg (105.01kg)
POTENCIA DEL CALENTADOR
CONSUMO DE
ENERGIA
REVOLUCION DEL
CENTRIFUGADO
LAVADO
LAVADO Y CALENTAMIENTO
CENTRIFUGADO
DRENAJE
WF455ARG***
9OOW
120V
120V.
120V.
120V.
1300 rpm
2OOW
1150W
550 W
8O W
74 apend ce
\VF455A(; 03159A 07 MESindd 74 2013 12 13 11:50:46

OPEN SOURCE ANNOUNCEMENT
The software included in this product contains copyrighted software that is licensed under the GPL/LGPL.
You may obtain the complete Corresponding Source code from us for a period of three years after our last
shipment of this product by sending email to:
If you want to obtain the complete Corresponding Source code in the physical medium such as CD-ROM,
the cost of physically performing source distribution may be charged.
This offer is valid to anyone in receipt of this information.
GPL Software:
Bridge-Utils, BusyBox, DNRD, dosfstools, iproute2, IPTables, Linux Kernel, ntpclient, Openlx, RSDK
toolchain, rt1819x - Bootloader, samba, squashfs, udhcp Server-Client Package, USB-ModeSwitch,
wireless-tools
LG PL Software"
libnI-Netlink Library, Mini-XML
GNU GENERAL PUBLIC LICENSE
Version 2, June 1991
Copyright (C) 1989, 1991 Free Software Foundation, Inc.
51 Franklin Street, Fifth Floor, Boston, MA 02110-1301, USA
Everyone is permitted to copy and distribute verbatim copies of this license document, but changing it is not
allowed.
Preamble
The licenses for most software are designed to take away your freedom to share and change
it. By contrast, the GNU General Public License is intended to guarantee your freedom to share
and change free software--to make sure the software is free for all its users. This General Public
License applies to most of the Free Software Foundation's software and to any other program
whose authors commit to using it. (Some other Free Software Foundation software is covered by
the GNU Lesser General Public License instead.)
You can apply it to your programs, too.
When we speak of free software, we are referring to freedom, not price. Our General Public
Licenses are designed to make sure that you have the freedom to distribute copies of free
software (and charge for this service if you wish), that you receive source code or can get it if you
want it, that you can change the software or use pieces of it in new free programs; and that you
know you can do these things.
To protect your rights, we need to make restrictions that forbid anyone to deny you these rights
or to ask you to surrender the rights. These restrictions translate to certain responsibilities for you
if you distribute copies of the software, or if you modify it.
For example, if you distribute copies of such a program, whether gratis or for a fee, you must
give the recipients all the rights that you have. You must make sure that they, too, receive or can
get the source code. And you must show them these terms so they know their rights.
We protect your rights with two steps: (1) copyright the software, and (2) offer you this license
which gives you legal permission to copy, distribute and/or modify the software.
Also, for each author's protection and ours, we want to make certain that everyone understands
that there is no warranty for this free software. If the software is modified by someone else and
passed on, we want its recipients to know that what they have is not the original, so that any
apend ce 75
WF455A(; 03159A 07 MESindd 75 2013 12 13 11:50:47
a,,p ndoe
problems introduced by others will not reflect on the original authors' reputations.
Finally, any free program is threatened constantly by software patents. We wish to avoid the
danger that redistributors of a free program will individually obtain patent licenses, in effect
making the program proprietary. To prevent this, we have made it clear that any patent must be
licensed for everyone's free use or not licensed at all.
The precise terms and conditions for copying, distribution and modification follow.
TERMS AND CONDITIONS FOR COPYING, DISTRIBUTION AND
MODIFICATION
1,
2,
3,
This License applies to any program or other work which contains a notice placed by the
copyright holder saying it may be distributed under the terms of this General Public License.
The "Program", below, refers to any such program or work, and a "work based on the
Program" means either the Program or any derivative work under copyright law: that is to
say, a work containing the Program or a portion of it, either verbatim or with modifications
and/or translated into another language. (Hereinafter, translation is included without limitation
in the term "modification".) Each licensee is addressed as "you".
Activities other than copying, distribution and modification are not covered by this License;
they are outside its scope. The act of running the Program is not restricted, and the output
from the Program is covered only if its contents constitute a work based on the Program
(independent of having been made by running the Program). Whether that is true depends on
what the Program does.
You may copy and distribute verbatim copies of the Program's source code as you receive
it, in any medium, provided that you conspicuously and appropriately publish on each copy
an appropriate copyright notice and disclaimer of warranty; keep intact all the notices that
refer to this License and to the absence of any warranty; and give any other recipients of the
Program a copy of this License along with the Program.
You may charge a fee for the physical act of transferring a copy, and you may at your option
offer warranty protection in exchange for a fee.
You may modify your copy or copies of the Program or any portion of it, thus forming a work
based on the Program, and copy and distribute such modifications or work under the terms
of Section 1 above, provided that you also meet all of these conditions:
1) You must cause the modified files to carry prominent notices stating that you changed
the files and the date of any change.
2) You must cause any work that you distribute or publish, that in whole or in part contains
or is derived from the Program or any part thereof, to be licensed as a whole at no charge
to all third parties under the terms of this License.
3) If the modified program normally reads commands interactively when run, you must
cause it, when started running for such interactive use in the most ordinary way, to print
or display an announcement including an appropriate copyright notice and a notice that
there is no warranty (or else, saying that you provide a warranty) and that users may
redistribute the program under these conditions, and telling the user how to view a copy
of this License. (Exception: if the Program itself is interactive but does not normally print
such an announcement, your work based on the Program is not required to print an
announcement.)
These requirements apply to the modified work as a whole. If identifiable sections of that
work are not derived from the Program, and can be reasonably considered independent
and separate works in themselves, then this License, and its terms, do not apply to those
sections when you distribute them as separate works. But when you distribute the same
sections as part of a whole which is a work based on the Program, the distribution of the
whole must be on the terms of this License, whose permissions for other licensees extend to
the entire whole, and thus to each and every part regardless of who wrote it.
Thus, it is not the intent of this section to claim rights or contest your rights to work written
76 apendice
WF455A(; 03159A 07 MESindd 76 2013 12 13 11:50:47
entirely by you; rather, the intent is to exercise the right to control the distribution of derivative
or collective works based on the Program.
In addition, mere aggregation of another work not based on the Program with the Program
(or with a work based on the Program) on a volume of a storage or distribution medium does
not bring the other work under the scope of this License.
4. 3. You may copy and distribute the Program (or a work based on it, under Section 2) in
object code or executable form under the terms of Sections 1 and 2 above provided that you
also do one of the following:
1) Accompany it with the complete corresponding machinereadable source code, which
must be distributed under the terms of Sections 1 and 2 above on a medium customarily
used for software interchange; or,
2) Accompany it with a written offer, valid for at least three years, to give any third party,
for a charge no more than your cost of physically performing source distribution, a
complete machine-readable copy of the corresponding source code, to be distributed
under the terms of Sections 1 and 2 above on a medium customarily used for software
interchange; or, c) Accompany it with the information you received as to the offer to
distribute corresponding source code. (This alternative is allowed only for noncommercial
distribution and only if you received the program in object code or executable form with
such an offer, in accord with Subsection b above.)
The source code for a work means the preferred form of the work for making modifications
to it. For an executable work, complete source code means all the source code for all
modules it contains, plus any associated interface definition files, plus the scripts used to
control compilation and installation of the executable. However, as a special exception,
the source code distributed need not include anything that is normally distributed (in either
source or binary form) with the major components (compiler, kernel, and so on) of the
operating system on which the executable runs, unless that component itself accompanies
the executable.
If distribution of executable or object code is made by offering access to copy from a
designated place, then offering equivalent access to copy the source code from the same
place counts as distribution of the source code, even though third parties are not compelled
to copy the source
along with the object code.
5. You may not copy, modify, sublicense, or distribute the Program except as expressly
provided under this License. Any attempt otherwise to copy, modify, sublicense or distribute
the Program is void, and will automatically terminate your rights under this License. However,
parties who have received copies, or rights, from you under this License will not have their
licenses terminated so long as such parties remain in full compliance.
6. You are not required to accept this License, since you have not signed it. However, nothing
else giants you permission to modify or distribute the Program or its derivative works. These
actions are prohibited by law if you do not accept this License. Therefore, by modifying or
distributing the Program (or any work based on the Program), you indicate your acceptance
of this License to do so, and all its terms and conditions for copying, distributing or modifying
the Program or works based on it.
7. Each time you redistribute the Program (or any work based on the Program), the recipient
automatically receives a license from the original licensor to copy, distribute or modify the
Program subject to these terms and conditions. You may not impose any further restrictions
on the recipients' exercise of the rights granted herein. You are not responsible for enforcing
compliance by third parties to this License.
8. If, as a consequence of a court judgment or allegation of patent infringement or for any
other reason (not limited to patent issues), conditions are imposed on you (whether by
court order, agreement or otherwise) that contradict the conditions of this License, they do
not excuse you from the conditions of this License. If you cannot distribute so as to satisfy
simultaneously your obligations under this License and any other pertinent obligations, then
apend ce 77
WF455A(; 03159A 07 MESindd 77 2013 12 13 11:50:47
a,p nd oe
as a consequence you may not distribute the Program at all. For example, if a patent license
would not permit royalty-free redistribution of the Program by all those who receive copies
directly or indirectly through you, then the only way you could satisfy both it and this License
would be to refrain entirely from distribution of the Program.
If any portion of this section is held invalid or unenforceable under any particular
circumstance, the balance of the section is intended to apply and the section as a whole is
intended to apply in other circumstances.
It is not the purpose of this section to induce you to infringe any patents or other property
right claims or to contest validity of any such claims; this section has the sole purpose of
protecting the integrity of the free software distribution system, which is implemented by
public license practices. Many people have made generous contributions to the wide range
of software distributed through that system in reliance on consistent application of that
system; it is up to the author/donor to decide if he or she is willing to distribute software
through any other system and a licensee cannot impose that choice.
This section is intended to make thoroughly clear what is believed to be a consequence of
the rest of this License.
9. If the distribution and/or use of the Program is restricted in certain countries either by patents
or by copyrighted interfaces, the original copyright holder who places the Program under this
License may add an explicit geographical distribution limitation excluding those countries, so
that distribution is permitted only in or among countries not thus excluded. In such case, this
License incorporates the limitation as if written in the body of this License.
10. The Free Software Foundation may publish revised and/or new versions of the General Public
License from time to time. Such new versions will be similar in spirit to the present version,
but may differ in detail to address new problems or concerns.
Each version is given a distinguishing version number. If the Program specifies a version
number of this License which applies to it and "any later version", you have the option of
following the terms and conditions either of that version or of any later version published
by the Free Software Foundation. If the Program does not specify a version number of this
License, you may choose any version ever published by the Free Software Foundation.
11. If you wish to incorporate parts of the Program into other free programs whose distribution
conditions are different, write to the author to ask for permission. For software which is
copyrighted by the Free Software Foundation, write to the Free Software Foundation;
we sometimes make exceptions for this. Our decision will be guided by the two goals of
preserving the free status of all derivatives of our free software and of promoting the sharing
and reuse of software generally.
NO WARRANTY
12. BECAUSE THE PROGRAM IS LICENSED FREE OF CHARGE, THERE IS NO WARRANTY
FOR THE PROGRAM, TO THE EXTENT PERMIN-ED BY APPLICABLE LAW. EXCEPT
WHEN OTHERWISE STATED IN WRITING THE COPYRIGHT HOLDERS AND/OR OTHER
PARTIES PROVIDE THE PROGRAM "AS IS" WITHOUT WARRANTY OF ANY KIND, EITHER
EXPRESSED OR IMPLIED, INCLUDING, BUT NOT LIMITED TO, THE IMPLIED WARRANTIES
OF MERCHANTABILITY AND FITNESS FOR A PARTICULAR PURPOSE. THE ENTIRE RISK
AS TO THE QUALITY AND PERFORMANCE OF THE PROGRAM IS WITH YOU. SHOULD
THE PROGRAM PROVE DEFECTIVE, YOU ASSUME THE COST OF ALL NECESSARY
SERVICING, REPAIR OR CORRECTION.
13. IN NO EVENT UNLESS REQUIRED BY APPLICABLE LAW OR AGREED TO IN WRITING
WILL ANY COPYRIGHT HOLDER, OR ANY OTHER PARTY WHO MAY MODIFY AND/OR
REDISTRIBUTE THE PROGRAM AS PERMIN-ED ABOV E, BE L IABL E TO YOU FOR
DAMAGES, INCLUDING ANY GENERAL, SPECIAL, INCIDENTAL OR CONSEQUENTIAL
DAMAGES ARISING OUT OF THE USE OR INABILITY TO USE THE PROGRAM (INCLUDING
BUT NOT LIMITED TO LOSS OF DATA OR DATA BEING RENDERED INACCURATE OR
LOSSES SUSTAINED BY YOU OR THIRD PARTIES OR A FAILURE OF THE PROGRAM TO
78 apend ce
WF455A(; 03159A 07 MESindd 78 2013 12 13 11:50:47
OPERATE WITH ANY OTHER PROGRAMS), EVEN IF SUCH HOLDER OR OTHER PARTY
HAS BEEN ADVISED OF THE POSSIBILITY OF SUCH DAMAGES.
END OF TERMS AND CONDITIONS
How to Apply These Terms to Your New Programs
If you develop a new program, and you want it to be of the greatest possible use to the public,
the best way to achieve this is to make it free software which everyone can redistribute and
change under these terms.
To do so, attach the following notices to the program. It is safest to attach them to the start of
each source file to most effectively convey the exclusion of warranty; and each file should have at
least the "copyright" line and a pointer to where the full notice is found.
one line to give the program's name and an idea of what it does.
Copyright (C)yyyy name of author
This program is free software; you can redistribute it and/or modify it under the terms of the GNU
General Public License as published by the Free Software Foundation; either version 2 of the
License, or (at your option) any later version.
This program is distributed in the hope that it will be useful, but WITHOUT ANY WARRANTY;
without even the implied warranty of MERCHANTABILITY or FITNESS FOR A PARTICULAR
PURPOSE. See the GNU General Public License for more details.
You should have received a copy of the GNU General Public License along with this program;
if not, write to the Free Software Foundation, Inc., 51 Franklin Street, Fifth Floor, Boston, MA
02110-1301, USA.
Also add information on how to contact you by electronic and paper mail.
If the program is interactive, make it output a short notice like this when it starts in an interactive
mode:
Gnomovision version 69, Copyright (C) year name of author Gnomovision comes with
ABSOLUTELY NO WARRANTY; for details type "show w'. This is free software, and you are
welcome to redistribute it under certain conditions; type "show c' for details.
The hypothetical commands "show w' and "show c' should show the appropriate parts of the
General Public License. Of course, the commands you use may be called something other than
"show w' and "show c'; they could even be mouse-clicks or menu items--whatever suits your
program. You should also get your employer (if you work as a programmer) or your school, if any,
to sign a "copyright disclaimer" for the program, if necessary. Here is a sample; alter the names:
Yoyodyne, Inc., hereby disclaims all copyright interest in the program "Gnomovision' (which
makes passes at compilers) written by James Hacker.
signature of Ty Coon, 1 April 1989
Ty Coon, President of Vice
This General Public License does not permit incorporating your program into proprietary
programs. If your program is a subroutine library, you may consider it more useful to permit
linking proprietary applications with the library. If this is what you want to do, use the GNU Lesser
General Public License instead of this License.
GNU LESSER GENERAL PUBLIC LICENSE
Version 2.1, February 1999
Copyright (C) 1991, 1999 Free Software Foundation, Inc.
51 Franklin Street, Fifth Floor, Boston, MA 02110-1301 USA
Everyone is permitted to copy and distribute verbatim copies of this license document, but changing it is
apend ce 79
WF455A(; 03159A 07 MESindd 79 2013 12 13 11:50:47
a,p nd oe
not allowed.
[This is the first released version of the Lesser GPL. It also counts as the successor of the GNU Library
Public License, version 2, hence the version number 2.1 .]
Preamble
The licenses for most software are designed to take away your freedom to share and change it.
By contrast, the GNU General Public Licenses are intended to guarantee your freedom to share
and change free software--to make sure the software is free for all its users.
This license, the Lesser General Public License, applies to some specially designated software
packages--typically libraries--of the Free Software Foundation and other authors who decide to
use it. You can use it too, but we suggest you first think carefully about whether this license or
the ordinary General Public License is the better strategy to use in any particular case, based on
the explanations below.
When we speak of free software, we are referring to freedom of use, not price. Our General
Public Licenses are designed to make sure that you have the freedom to distribute copies of free
software (and charge for this service if you wish); that you receive source code or can get it if you
want it; that you can change the software and use pieces of it in new free programs; and that
you are informed that you can do these things.
To protect your rights, we need to make restrictions that forbid distributors to deny you
these rights or to ask you to surrender these rights. These restrictions translate to certain
responsibilities for you if you distribute copies of the library or if you modify it.
For example, if you distribute copies of the library, whether gratis or for a fee, you must give the
recipients all the rights that we gave you. You must make sure that they, too, receive or can get
the source code. If you link other code with the library, you must provide complete object files
to the recipients, so that they can relink them with the library after making changes to the library
and recompiling it. And you must show them these terms so they know their rights.
We protect your rights with a two-step method: (1) we copyright the library, and (2) we offer you
this license, which gives you legal permission to copy, distribute and/or modify the library.
To protect each distributor, we want to make it very clear that there is no warranty for the free
library. Also, if the library is modified by someone else and passed on, the recipients should
know that what they have is not the original version, so that the original author's reputation will
not be affected by problems that might be introduced by others.
Finally, software patents pose a constant threat to the existence of any free program. We wish to
make sure that a company cannot effectively restrict the users of a free program by obtaining a
restrictive license from a patent holder. Therefore, we insist that any patent license obtained for a
version of the library must be consistent with the full freedom of use specified in this license.
Most GNU software, including some libraries, is covered by the ordinary GNU General Public
License. This license, the GNU Lesser General Public License, applies to certain designated
libraries, and is quite different from the ordinary General Public License. We use this license for
certain libraries in order to permit linking those libraries into nonfree programs.
When a program is linked with a library, whether statically or using a shared library, the
combination of the two is legally speaking a combined work, a derivative of the original library.
The ordinary General Public License therefore permits such linking only if the entire combination
fits its criteria of freedom. The Lesser General Public License permits more lax criteria for linking
other code with the library.
We call this license the "Lesser" General Public License because it does Less to protect the
user's freedom than the ordinary General Public License. It also provides other free software
developers Less of an advantage over competing non-free programs. These disadvantages are
the reason we use the ordinary General Public License for many libraries.
However, the Lesser license provides advantages in certain special circumstances.
For example, on rare occasions, there may be a special need to encourage the widest possible
use of a certain library, so that it becomes a de-facto standard. To achieve this, non-free
80 apendice
WF455A(; 03159A 07 MESindd 8(} 2013 12 13 11:50:47

programs must be allowed to use the library.
A more frequent case is that a free library does the same job as widely used non-free libraries.
In this case, there is little to gain by limiting the free library to free software only, so we use the
Lesser General Public License.
In other cases, permission to use a particular library in nonfree programs enables a greater
number of people to use a large body of free software. For example, permission to use the GNU
C Library in non-free programs enables many more people to use the whole GNU operating
system, as well as its variant, the GNU/Linux operating system.
Although the Lesser General Public License is Less protective of the users' freedom, it does
ensure that the user of a program that is linked with the Library has the freedom and the
wherewithal to run that program using a modified version of the Library.
The precise terms and conditions for copying, distribution and modification follow. Pay close
attention to the difference between a "work based on the library" and a "work that uses the
library". The former contains code derived from the library, whereas the latter must be combined
with the library in order to run.
TERMS AND CONDITIONS FOR COPYING, DISTRIBUTION AND
MODIFICATION
1. This License Agreement applies to any software library or other program which contains a
notice placed by the copyright holder or other authorized party saying it may be distributed
under the terms of this Lesser General Public License (also called "this License"). Each
licensee is addressed as "you".
A "library" means a collection of software functions and/or data prepared so as to be
conveniently linked with application programs (which use some of those functions and data)
to form executables.
The "Library", below, refers to any such software library or work which has been distributed
under these terms. A "work based on the Library" means either the Library or any derivative
work under copyright law: that is to say, a work containing the Library or a portion of it, either
verbatim or with modifications and/or translated straightforwardly into another language.
(Hereinafter, translation is included without limitation in the term "modification".)
"Source code" for a work means the preferred form of the work for making modifications to
it. For a library, complete source code means all the source code for all modules it contains,
plus any associated interface definition files, plus the scripts used to control compilation and
installation of the library.
Activities other than copying, distribution and modification are not covered by this License;
they are outside its scope. The act of running a program using the Library is not restricted,
and output from such a program is covered only if its contents constitute a work based on
the Library (independent of the use of the Library in a tool for writing it).
Whether that is true depends on what the Library does and what the program that uses the
Library does.
2. You may copy and distribute verbatim copies of the Library's complete source code as you
receive it, in any medium, provided that you conspicuously and appropriately publish on each
copy an appropriate copyright notice and disclaimer of warranty; keep intact all the notices
that refer to this License and to the absence of any warranty; and distribute a copy of this
License along with the Library.
You may charge a fee for the physical act of transferring a copy, and you may at your option
offer warranty protection in exchange for a fee.
3. You may modify your copy or copies of the Library or any portion of it, thus forming a work
based on the Library, and copy and distribute such modifications or work under the terms of
Section 1 above, provided that you also meet all of these conditions:
1) The modified work must itself be a software library.
2) You must cause the files modified to carry prominent notices stating that you changed
apend ce 81
WF455A(; 03159A 07 MESindd 81 2013 12 13 11:50:47

a,p nd oe
4,
5,
6,
the files and the date of any change.
3) You must cause the whole of the work to be licensed at no charge to all third parties
under the terms of this License.
4) If a facility in the modified Library refers to a function or a table of data to be supplied by
an application program that uses the facility, other than as an argument passed when the
facility is invoked, then you must make a good faith effort to ensure that, in the event an
application does not supply such function or table, the facility still operates, and performs
whatever part of its purpose remains meaningful.
(For example, a function in a library to compute square roots has a purpose that is entirely
well-defined independent of the application. Therefore, Subsection 2d requires that
any application-supplied function or table used by this function must be optional: if the
application does not supply it, the square root function must still compute square roots.)
These requirements apply to the modified work as a whole. If identifiable sections of that
work are not derived from the Library, and can be reasonably considered independent
and separate works in themselves, then this License, and its terms, do not apply to those
sections when you distribute them as separate works. But when you distribute the same
sections as part of a whole which is a work based on the Library, the distribution of the
whole must be on the terms of this License, whose permissions for other licensees extend to
the entire whole, and thus to each and every part regardless of who wrote it. Thus, it is not
the intent of this section to claim rights or contest your rights to work written entirely by you;
rather, the intent is to exercise the right to control the distribution of derivative or collective
works based on the Library. In addition, mere aggregation of another work not based on
the Library with the Library (or with a work based on the Library) on a volume of a storage or
distribution medium does not bring the other work under the scope of this License.
You may opt to apply the terms of the ordinary GNU General Public License instead of this
License to a given copy of the Library. To do this, you must alter all the notices that refer to
this License, so that they refer to the ordinary GNU General Public License, version 2, instead
of to this License. (If a newer version than version 2 of the ordinary GNU General Public
License has appeared, then you can specify that version instead if you wish.) Do not make
any other change in these notices.
Once this change is made in a given copy, it is irreversible for that copy, so the ordinary GNU
General Public License applies to all subsequent copies and derivative works made from that
copy.
This option is useful when you wish to copy part of the code of the Library into a program
that is not a library.
You may copy and distribute the Library (or a portion or derivative of it, under Section 2) in
object code or executable form under the terms of Sections 1 and 2 above provided that you
accompany it with the complete corresponding machine-readable source code, which must
be distributed under the terms of Sections 1 and 2 above on a medium customarily used for
software interchange.
If distribution of object code is made by offering access to copy from a designated place,
then offering equivalent access to copy the source code from the same place satisfies the
requirement to distribute the source code, even though third parties are not compelled to
copy the source along with the object code.
A program that contains no derivative of any portion of the Library, but is designed to work
with the Library by being compiled or linked with it, is called a "work that uses the Library".
Such a work, in isolation, is not a derivative work of the Library, and therefore falls outside the
scope of this License.
However, linking a "work that uses the Library" with the Library creates an executable that
is a derivative of the Library (because it contains portions of the Library), rather than a "work
that uses the library". The executable is therefore covered by this License. Section 6 states
terms for distribution of such executables.
When a "work that uses the Library" uses material from a header file that is part of the
82 apend ce
WF455A(; 03159A 07 MESindd 82 2013 12 13 11:50:47
Library, the object code for the work may be a derivative work of the Library even though
the source code is not. Whether this is true is especially significant if the work can be linked
without the Library, or if the work is itself a library. The threshold for this to be true is not
precisely defined by law.
If such an object file uses only numerical parameters, data structure layouts and accessors,
and small macros and small inline functions (ten lines or less in length), then the use of the
object file is unrestricted, regardless of whether it is legally a derivative work. (Executables
containing this object code plus portions of the Library will still fall under Section 6.)
Otherwise, if the work is a derivative of the Library, you may distribute the object code for
the work under the terms of Section 6. Any executables containing that work also fall under
Section 6, whether or not they are linked directly with the Library itself.
7. As an exception to the Sections above, you may also combine or link a "work that uses the
Library" with the Library to produce a work containing portions of the Library, and distribute
that work under terms of your choice, provided that the terms permit modification of the work
for the customer's own use and reverse engineering for debugging such modifications.
You must give prominent notice with each copy of the work that the Library is used in it
and that the Library and its use are covered by this License. You must supply a copy of
this License. If the work during execution displays copyright notices, you must include the
copyright notice for the Library among them, as well as a reference directing the user to the
copy of this License. Also, you must do one of these things:
1) Accompany the work wi th the complete corresponding machine-readable source
code for the Library including whatever changes were used in the work (which must be
distributed under Sections 1 and 2 above); and, if the work is an executable linked with
the Library, with the complete machine-readable "work that uses the Library", as object
code and/or source code, so that the user can modify the Library and then relink to
produce a modified executable containing the modified Library. (It is understood that the
user who changes the contents of definitions files in the Library will not necessarily be
able to recompile the application to use the modified definitions.)
2) Use a suitable shared library mechanism for linking with the Library. A suitable
mechanism is one that (1) uses at run time a copy of the library already present on the
user's computer system, rather than copying library functions into the executable, and (2)
will operate properly with a modified version of the library, if the user installs one, as long
as the modified version is interfacecompatible with the version that the work was made
with.
3) Accompany the work with a written offer, valid for at least three years, to give the same
user the materials specified in Subsection 6a, above, for a charge no more than the cost
of performing this distribution.
4) If distribution of the work is made by offering access to copy from a designated place,
offer equivalent access to copy the above specified materials from the same place.
5) Verify that the user has already received a copy of these materials or that you have
already sent this user a copy.
For an executable, the required form of the "work that uses the Library" must include any
data and utility programs needed for reproducing the executable from it. However, as a
special exception, the materials to be distributed need not include anything that is normally
distributed (in either source or binary form) with the major components (compiler, kernel, and
so on) of the operating system on which the executable runs, unless that component itself
accompanies the executable.
It may happen that this requirement contradicts the license restrictions of other proprietary
libraries that do not normally accompany the operating system. Such a contradiction means
you cannot use both them and the Library together in an executable that you distribute.
8. You may place library facilities that are a work based on the Library side-by-side in a single
library together with other library facilities not covered by this License, and distribute such
a combined library, provided that the separate distribution of the work based on the Library
apend ce 83
WF455A(; 03159A 07 MESindd 83 2013 12 13 11:50:47
a,p nd oe
and of the other library facilities is otherwise permitted, and provided that you do these two
things:
1) Accompany the combined library with a copy of the same work based on the Library,
uncombined with any other library facilities. This must be distributed under the terms of
the Sections above.
2) Give prominent notice with the combined library of the fact that part of it is a work based
on the Library, and explaining where to find the accompanying uncombined form of the
same work.
9. You may not copy, modify, sublicense, link with, or distribute the Library except as expressly
provided under this License. Any attempt otherwise to copy, modify, sublicense, link with, or
distribute the Library is void, and will automatically terminate your rights under this License.
However, parties who have received copies, or rights, from you under this License will not
have their licenses terminated so long as such parties remain in full compliance.
10, You are not required to accept this License, since you have not signed it. However, nothing
else grants you permission to modify or distribute the Library or its derivative works. These
actions are prohibited by law if you do not accept this License. Therefore, by modifying or
distributing the Library (or any work based on the Library), you indicate your acceptance of
this License to do so, and all its terms and conditions for copying, distributing or modifying
the Library or works based on it.
11. Each time you redistribute the Library (or any work based on the Library), the recipient
automatically receives a license from the original licensor to copy, distribute, link with or
modify the Library subject to these terms and conditions. You may not impose any further
restrictions on the recipients' exercise of the rights granted herein. You are not responsible for
enforcing compliance by third parties with this License.
12, If, as a consequence of a court judgment or allegation of patent infringement or for any
other reason (not limited to patent issues), conditions are imposed on you (whether by
court order, agreement or otherwise) that contradict the conditions of this License, they do
not excuse you from the conditions of this License. If you cannot distribute so as to satisfy
simultaneously your obligations under this License and any other pertinent obligations, then
as a consequence you may not distribute the Library at all. For example, if a patent license
would not permit royalty-free redistribution of the Library by all those who receive copies
directly or indirectly through you, then the only way you could satisfy both it and this License
would be to refrain entirely from distribution of the Library.
If any portion of this section is held invalid or unenforceable under any particular
circumstance, the balance of the section is intended to apply, and the section as a whole is
intended to apply in other circumstances.
It is not the purpose of this section to induce you to infringe any patents or other property
right claims or to contest validity of any such claims; this section has the sole purpose of
protecting the integrity of the free software distribution system which is implemented by
public license practices.
Many people have made generous contributions to the wide range of software distributed
through that system in reliance on consistent application of that system; it is up to the author/
donor to decide if he or she is willing to distribute software through any other system and a
licensee cannot impose that choice.
This section is intended to make thoroughly clear what is believed to be a consequence of
the rest of this License.
13, If the distribution and/or use of the Library is restricted in certain countries either by patents
or by copyrighted interfaces, the original copyright holder who places the Library under this
License may add an explicit geographical distribution limitation excluding those countries, so
that distribution is permitted only in or among countries not thus excluded. In such case, this
License incorporates the limitation as if written in the body of this License.
14. The Free Software Foundation may publish revised and/or new versions of the Lesser
General Public License from time to time. Such new versions will be similar in spirit to the
84 apend ce
WF455A(; 03159A 07 MESindd 84 2013 12 13 11:50:47
present version, but may differ in detail to address new problems or concerns.
Each version is given a distinguishing version number.
If the Library specifies a version number of this License which applies to it and "any later
version", you have the option of following the terms and conditions either of that version or of
any later version published by the Free Software Foundation. If the Library does not specify
a license version number, you may choose any version ever published by the Free Software
Foundation.
15. If you wish to incorporate _arts of the Library into other free programs whose distribution
conditions are incompatible with these, write to the author to ask for permission. For software
which is copyrighted by the Free Software Foundation, write to the Free Software Foundation;
we sometimes make exceptions for this. Our decision will be guided by the two goals of
preserving the free status of all derivatives of our free software and of promoting the sharing
and reuse of software generally.
NO WARRANTY
16. BECAUSE THE LIBRARY IS LICENSED FREE OF CHARGE, THERE IS NO WARRANTY
FOR THE LIBRARY, TO THE EXTENT PERMIN-ED BY APPLICABLE LAW. EXCEPT
WHEN OTHERWISE STATED IN WRITING THE COPYRIGHT HOLDERS AND/OR OTHER
PARTIES PROVIDE THE LIBRARY "AS IS" WITHOUT WARRANTY OF ANY KIND, EITHER
EXPRESSED OR IMPLIED, INCLUDING, BUT NOT LIMITED TO, THE IMPLIED WARRANTIES
OF MERCHANTABILITY AND FITNESS FOR A PARTICULAR PURPOSE. THE ENTIRE RISK
AS TO THE QUALITY AND PERFORMANCE OF THE LIBRARY IS WITH YOU. SHOULD THE
LIBRARY PROVE DEFECTIVE, YOU ASSUME THE COST OF ALL NECESSARY SERVICING,
REPAIR OR CORRECTION.
17. IN NO EVENT UNLESS REQUIRED BY APPLICABLE LAW OR AGREED TO IN WRI T ING
WI L L ANY COPYRIGHT HOLDER, OR ANY OTHER PARTY WHO MAY MODIFY AND/
OR REDISTRIBUTE THE LIBRARY AS PERMIN-ED ABOVE, BE LIABLE TO YOU FOR
DAMAGES, INCLUDING ANY GENERAL, SPECIAL, INCIDENTAL OR CONSEQUENTIAL
DAMAGES ARISING OUT OF THE USE OR INABILITY TO USE THE LIBRARY (INCLUDING
BUT NOT LIMITED TO LOSS OF DATA OR DATA BEING RENDERED INACCURATE OR
LOSSES SUSTAINED BY YOU OR THIRD PARTIES OR A FAILURE OF THE LIBRARY TO
OPERATE WITH ANY OTHER SOFTWARE), EVEN IF SUCH HOLDER OR OTHER PARTY
HAS BEEN ADVISED OF THE POSSIBILITY OF SUCH DAMAGES.
END OF TERMS AND CONDITIONS
How to Apply These Terms to Your New Libraries If you develop a new library, and you want
it to be of the greatest possible use to the public, we recommend making it free software that
everyone can redistribute and change. You can do so by permitting redistribution under these
terms (or, alternatively, under the terms of the ordinary General Public License).
To apply these terms, attach the following notices to the library. It is safest to attach them to the
start of each source file to most effectively convey the exclusion of warranty; and each file should
have at least the "copyright" line and a pointer to where the full notice is found.
one line to give the library's name and an idea of what it does.
Copyright (C)year name of author
This library is free software; you can redistribute it and/or modify it under the terms of the GNU
Lesser General Public License as published by the Free Software Foundation; either version 2.1
of the License, or (at your option) any later version.
This library is distributed in the hope that it will be useful, but WITHOUT ANY WARRANTY;
without even the implied warranty of MERCHANTABILITY or FITNESS FOR A PARTICULAR
PURPOSE. See the GNU
apend ce 85
WF455A(; 03159A 07 MESindd 85 2013 12 13 11:50:47
a,,p ndoe
Lesser General Public License for more details.
You should have received a copy of the GNU Lesser General Public License along with this
library; if not, write to the Free Software Foundation, Inc., 51 Franklin Street, Fifth Floor, Boston,
MA 02110-1301 USA Also add information on how to contact you by electronic and paper mail.
You should also get your employer (if you work as a programmer) or your school, if any, to sign a
"copyright disclaimer" for the library, if necessary. Here is a sample; alter the names: Yoyodyne,
Inc., hereby disclaims all copyright interest in the library "Frob' (a library for tweaking knobs)
written by James Random Hacker.
signature of Ty Coon, 1 April 1990
Ty Coon, President of Vice
That's all there is to it!
BSD LICENSE
flex: the fast lexical analyser
Copyright (c) 2001,2002, 2003, 2004, 2005, 2006, 2007
The Flex Project.
Copyright (c) 1990, 1997 The Regents of the University of California. All rights reserved.
LibNet License
PPP/Debian
Copyright (c) 1989 Regents of the University of California. All rights reserved.
Redistribution and use in source and binary forms, with or without modification, are permitted provided that
the following conditions are met:
1, Redistributions of source code must retain the above copyright notice, this list of conditions and the
following disclaimer.
2, Redistributions in binary form must reproduce the above copyright notice, this list of conditions and the
following disclaimer in the documentation and/or other materials provided with the distribution.
3, Neither the name of the <organization> nor the names of its contributors may be used to endorse or
promote products derived from this software without specific prior written permission.
THIS SOFTWARE IS PROVIDED BY THE COPYRIGHT HOLDERS AND CONTRIBUTORS "AS IS" AND ANY
EXPRESS OR IMPLIED WARRANTIES, INCLUDING, BUT NOT LIMITED TO, THE IMPLIED WARRANTIES
OF MERCHANTABILITY AND FITNESS FOR A PARTICULAR PURPOSE ARE DISCLAIMED. IN NO EVENT
SHALL <COPYRIGHT HOLDER> BE LIABLE FOR ANY DIRECT, INDIRECT, INCIDENTAL, SPECIAL,
EXEMPLARY, OR CONSEQUENTIAL DAMAGES (INCLUDING, BUT NOT LIMITED TO, PROCUREMENT
OF SUBSTITUTE GOODS OR SERVICES; LOSS OF USE, DATA, OR PROFITS; OR BUSINESS
INTERRUPTION) HOWEVER CAUSED AND ON ANY THEORY OF LIABILITY, WHETHER IN CONTRACT,
STRICT LIABILITY, OR TORT (INCLUDING NEGLIGENCE OR OTHERWISE) ARISING IN ANY WAY OUT OF
THE USE OF THIS SOFTWARE, EVEN IF ADVISED OF THE POSSIBILITY OF SUCH DAMAGE.
86 apendice
WF455A(; 03159A 07 MESindd 86 2013 12 13 11:50:47
OPENSSL
This product includes software developed by the OpenSSL Project for use in the OpenSSL Toolkit. (http://
www.openssl.org/)
LICENSE ISSUES
The OpenSSL toolkit stays under a dual license, i.e. both the conditions of the OpenSSL License
and the original SSLeay license apply to the toolkit. See below for the actual license texts.
Actually both licenses are BSD-style Open Source licenses. In case of any license issues related
OpenSSL License
Copyright (c) 1998-2008 The OpenSSL Project. All rights reserved.
Redistribution and use in source and binary forms, with or without modification, are permitted
provided that the following conditions are met:
1, Redistributions of source code must retain the above copyright notice, this list of conditions
and the following disclaimer.
2, Redistributions in binary form must reproduce the above copyright notice, this list of
conditions and the following disclaimer in the documentation and/or other materials provided
with the distribution.
3, All advertising materials mentioning features or use of this software must display the following
acknowledgment: "This product includes software developed by the OpenSSL Project for
use in the OpenSSL Toolkit. (http://www.openssl.org/)"
4, The names "OpenSSL Toolkit" and "OpenSSL Project" must not be used to endorse or
promote products derived from this software without prior written permission. For written
5, Products derived from this software may not be called "OpenSSU' nor may "OpenSSU
appear in their names without prior written permission of the OpenSSL Project.
6, Redistributions of any form whatsoever must retain the following acknowledgment:
"This product includes software developed by the OpenSSL Project for use in the OpenSSL
Toolkit (http://www.openssl.org/)"
THIS SOFTWARE IS PROVIDED BY THE OpenSSL PROJECT "AS IS" AND ANY EXPRESSED
OR IMPLIED WARRANTIES, INCLUDING, BUT NOT LIMITED TO, THE IMPLIED WARRANTIES
OF MERCHANTABILITY AND FITNESS FOR A PARTICULAR PURPOSE ARE DISCLAIMED.
IN NO EVENT SHALL THE OpenSSL PROJECT OR ITS CONTRIBUTORS BE LIABLE FOR
ANY DIRECT, INDIRECT, INCIDENTAL, SPECIAL, EXEMPLARY, OR CONSEQUENTIAL
DAMAGES (INCLUDING, BUT NOT LIMITED TO, PROCUREMENT OF SUBSTITUTE GOODS OR
SERVICES; LOSS OF USE, DATA, OR PROFITS; OR BUSINESS INTERRUPTION) HOWEVER
CAUSED AND ON ANY THEORY OF LIABILITY, WHETHER IN CONTRACT, STRICT LIABILITY,
OR TORT (INCLUDING NEGLIGENCE OR OTHERWISE) ARISING IN ANY WAY OUT OF THE
USE OF THIS SOFTWARE, EVEN IFADVISED OF THE POSSIBILITY OF SUCH DAMAGE.
apend ce 87
WF455A(; 03159A 07 MESindd 87 2013 12 13 11:50:47
GARANTiA
LAVADORA SAMSU NG
GARANTIA LIMITADA PARA EL COMPRADOR ORiGiNAL
El presente producto de la marca SAMSUNG, tal como Io provee y distribuye SAMSUNG ELECTRONICS
AMERICA, INC. (SAMSUNG) y Io entrega nuevo, en su embalaje de carton original al comprador o
consumidor original, esta, garantizado pot SAMSUNG contra defectos de fabricacion de los materiales y la
mano de obra durante el periodo limitado de la garantia de:
Un (1) ano para las piezas y la mano de obra. Dos (2) anos para las piezas del panel de control. Tres (3)
anos para las piezas del tambor inoxidable. Diez (10) anos para las piezas del motor
La presente garantia limitada comienza en la fecha original de compra yes va,lida unicamente para
productos comprados y usados en los Estados Unidos. Para recibir el servicio tecnico de la garantia,
el comprador debe comunicarse con SAMSUNG con el fin de que se determine el problema y los
procedimientos del servicio. El servicio tecnico de la garantia sOlo puede set prestado pot un centro de
servicio tecnico autorizado de SAMSUNG. Se debe presentar la factura de compra original como prueba
de compra a SAMSUNG o al servicio tecnico autorizado de SAMSUNG. SAMSUNG prestara, servicio
tecnico a domicilio durante el periodo de la garantia sin costo, sujeto a la disponibilidad dentro de los
Estados Unidos contiguos. El servicio tecnico a domicilio no esta, disponible en todas las a,reas.
Para recibir el servicio tecnico a domicilio, el producto no debe presentar obstrucciones y debe set
accesible para el agente del servicio tecnico. Si el servicio tecnico no esta,disponible, SAMSUNG puede
optar pot transportar el producto hasta y desde el servicio tecnico autorizado.
SAMSUNG reparar& reemplazara, el producto u ofrecera, un reembolso a su criterio y sin cargo adicional,
tal como se establece en la presente garantia, con piezas o productos nuevos o reacondicionados si se
comprueba que es defectuoso durante el periodo limitado de la garantia especificado anteriormente. Todas
las piezas y los productos reemplazados pasan a set propiedad de SAMSUNG y deben set devueltos a
SAMSUNG. Las piezas y los productos reemplazados asumen la garantia original que testa, o noventa (90)
dias, el periodo que sea el ma,s prolongado. La presente garantia limitada cubre defectos de fabricacion
de los materiales y la mano de obra encontrados durante el uso normal y domestico de este producto y
no sera, va,lida para Io siguiente: danos que ocurran durante el envio; entrega e instalacion; aplicaciones
y usos para los cuales el presente producto no fue destinado; numeros de serie o producto alterados;
dano cosmetico o acabado exterior; accidentes, abuso, descuido, incendio, inundacion, caida de rayos, u
otros casos fortuitos o de fuerza mayor; uso de productos, equipo, sistemas, utilidades, servicios, piezas,
suministros, accesorios, aplicaciones, instalaciones, reparaciones, cableado externo o conectores no
provistos ni autorizados pot SAMSUNG que darien este producto o que acarreen problemas en el servicio;
voltaje de la linea electrica incorrecto, fluctuaciones y sobretension; ajustes del cliente e incumplimiento
de Io establecido en el manual de instrucciones, instrucciones de mantenimiento y ambientales que esta,n
cubiertas y recomendadas en el manual de instrucciones; traslado y reinstalacion del producto; problemas
causados pot plagas. La presente garantia limitada no cubre problemas derivados de la corriente, el voltaje
o el suministro electrico incorrectos, las bombillas de luz, los fusibles de la casa, el cableado de la casa,
el costo del servicio tecnico para recibir instrucciones o corregir errores en la instalacion. SAMSUNG no
garantiza el funcionamiento ininterrumpido o sin errores del producto.
88 Garantia
WF455A(] 0fq59A 07 MESindd 88 201lt 12 llt 11:50:48
SALVO LO ESTABLECIDO EN LA PRESENTE GARANT[A, NO EXISTEN GARANT[AS SOBRE EL
PRESENTE PRODUCTO, YA SEAN EXPRESAS O TACITAS, Y SAMSUNG DESCONOCE TODAS LAS
GARANT[AS QUE INCLUYEN, AUNQUE NO EN CARACTER TAXATIVO, CUALQUIER GARANT[A
TACITA DE QUE EL PRODUCTO SE ENCUENTRA EN CONDICIONES APTAS PARA LA VENTA, DE
DEFRAUDACION DE DERECHOS O DE QUE EL PRODUCTO SE ADECUA A LOS FINES ESPEC[FICOS
PARA LOS CUALES SE ADQUIERE.
NINGON AVAL O GARANT[A OTORGADOS POR PERSONA, COMPAN[A O CORPORACION
ALGUNA CON RESPECTO AL PRESENTE PRODUCTO REVESTIRA CARACTER VINCULANTE PARA
SAMSUNG. SAMSUNG NO SERA RESPONSABLE POR PI2RDIDA DE INGRESOS O LUCRO CESANTE,
IMPOSIBILIDAD DE GENERAR AHORROS U OBTENER OTROS BENEFICIOS, O CUALQUIER DANO
DERIVADO DE CIRCUNSTANCIAS ESPECIALES, DANO IMPREVlSTO O DERIVADO CAUSADO
POR EL USO, USO INCORRECTO, O INCAPACIDAD PARA USAR EL PRESENTE PRODUCTO,
INDEPENDIENTEMENTE DE LA TEOR[A LEGAL EN QUE SE FUNDE EL RECLAMO Y AUN CUANDO SE
LE HAYA NOTIFICADO A SAMSUNG DE LA POSIBILIDAD DE TALES DAi_OS.
NINGON RESARCIMIENTO DE NINGUNA [NDOLE CONTRA SAMSUNG SUPERARA EL MONTO DE
COMPRA DEL PRODUCTO VENDIDO POR SAMSUNG Y CAUSANTE DEL PRESUNTO DANO. SIN
LIMITAR LO PRECEDENTE, EL COMPRADOR ASUME TODO EL RIESGO Y LA RESPONSABILIDAD POR
PI2RDIDA, DANO O LESION AL COMPRADOR Y A LOS BIENES DEL COMPRADOR Y A TERCEROS Y A
SUS BIENES DERIVADOS DEL USO, USO INCORRECTO O INCAPACIDAD PARA USAR EL PRESENTE
PRODUCTO. LA PRESENTE GARANT[A LIMITADA NO SE EXTENDERA A NINGUNA PERSONA DISTINTA
DEL COMPRADOR ORIGINAL DEL PRESENTE PRODUCTO, ES INTRANSFERIBLE Y ESTABLECE SU
EXCLUSIVA REPARACION.
Algunos Estados no permiten limitaciones en cuanto al plazo de una garantia implicita, o la exclusion o
limitacion de daflos imprevistos o derivados, pot Io tanto las limitaciones o exclusiones antedichas pueden
no aplicarse en su caso. Esta garantia le otorga derechos especificos, y adema,s puede tenet otros
derechos que varian segun el Estado en el que se encuentre.
Para recibir un servicio tecnico de garantia, comuniquese con SAMSUNG a:
SAMSUNG ELECTRONICS AMERICA, INC.
85 CHALLENGER ROAD RIDGEFIELD PARK, NJ 07660
I=800=SAMSUNG (726=7864)
www,sarGsung,com
Las visitas del personal de servicio tecnico para explicar funciones, mantenimiento o instalacion no esta,n
cubiertas pot la garantia.
Pongase en contacto con su agente del centro de Ilamadas Samsung para que le asesore.
Garantia 89
WF455A(]; I)fq59A 07 MESfndd 89 201lt 12 llt 11:50:48
LAVADORA SAMSUNG
GARANTIA LIMITADA PARA EL COMPRADOR ORiGiNAL
El presente producto de la marca SAMSUNG, tal como Io provee y distribuye SAMSUNG ELECTRONICS
CANADA, INC. (SAMSUNG) y Io entrega nuevo, en su embalaje de carton original al comprador o
consumidor original, esta, garantizado pot SAMSUNG contra defectos de fabricacion de los materiales y la
mano de obra durante el periodo limitado de la garantia de:
Un (1) ano para las piezas y la mano de obra. Diez (10) anos para las piezas del motor de la lavadora.
La presente garantia limitada comienza en la fecha original de compra yes va,lida unicamente para
productos comprados y usados en Canada,. Para recibir el servicio tecnico de la garantia, el comprador
debe comunicarse con SAMSUNG con el fin de que se determine el problema y los procedimientos
del servicio. El servicio tecnico de la garantia sOlo puede set prestado pot un centro de servicio tecnico
autorizado de SAMSUNG. Se debe presentar la factura de compra original como prueba de compra a
SAMSUNG o al servicio tecnico autorizado de SAMSUNG. SAMSUNG prestara, servicio tecnico a domicilio
durante el periodo de la garantia sin costo, sujeto a la disponibilidad dentro de Canada,. El servicio tecnico a
domicilio no esta, disponible en todas las a,reas.
Para recibir el servicio tecnico a domicilio, el producto no debe presentar obstrucciones y debe set
accesible para el agente del servicio tecnico. Si el servicio tecnico no esta,disponible, SAMSUNG puede
optar pot transportar el producto hasta y desde el servicio tecnico autorizado.
SAMSUNG reparar& reemplazara, el producto u ofrecera, un reembolso a su criterio y sin cargo adicional,
tal como se establece en la presente garantia, con piezas o productos nuevos o reacondicionados si se
comprueba que es defectuoso durante el periodo limitado de la garantia especificado anteriormente. Todas
las piezas y los productos reemplazados pasan a set propiedad de SAMSUNG y deben set devueltos a
SAMSUNG. Las piezas y los productos reemplazados asumen la garantia original que testa, o noventa (90)
dias, el periodo que sea el ma,s prolongado. La presente garantia limitada cubre defectos de fabricacion
de los materiales y la mano de obra encontrados durante el uso normal y domestico de este producto y
no sera, va,lida para Io siguiente: danos que ocurran durante el envio; entrega e instalacion; aplicaciones
y usos para los cuales el presente producto no fue destinado; numeros de serie o producto alterados;
dano cosmetico o acabado exterior; accidentes, abuso, descuido, incendio, inundacion, caida de rayos, u
otros casos fortuitos o de fuerza mayor; uso de productos, equipo, sistemas, utilidades, servicios, piezas,
suministros, accesorios, aplicaciones, instalaciones, reparaciones, cableado externo o conectores no
provistos ni autorizados pot SAMSUNG que darien este producto o que acarreen problemas en el servicio;
voltaje de la linea electrica incorrecto, fluctuaciones y sobretension; ajustes del cliente e incumplimiento
de Io establecido en el manual de instrucciones, instrucciones de mantenimiento y ambientales que esta,n
cubiertas y recomendadas en el manual de instrucciones; traslado y reinstalacion del producto; problemas
causados pot plagas. La presente garantia limitada no cubre problemas derivados de la corriente, el voltaje
o el suministro electrico incorrectos, las bombillas de luz, los fusibles de la casa, el cableado de la casa,
el costo del servicio tecnico para recibir instrucciones o corregir errores en la instalacion. SAMSUNG no
garantiza el funcionamiento ininterrumpido o sin errores del producto.
90 Garant[a
WF455A(] 0fq59A 07 MESindd 9(/ 201_t 12 llt 11:50:48
SALVO LO ESTABLECIDO EN LA PRESENTE GARANT[A, NO EXISTEN GARANT[AS SOBRE EL
PRESENTE PRODUCTO, YA SEAN EXPRESAS O TACITAS, Y SAMSUNG DESCONOCE TODAS LAS
GARANT[AS QUE INCLUYEN, AUNQUE NO EN CARACTER TAXATIVO, CUALQUIER GARANT[A
TACITA DE QUE EL PRODUCTO SE ENCUENTRA EN CONDICIONES APTAS PARA LA VENTA, DE
DEFRAUDACION DE DERECHOS O DE QUE EL PRODUCTO SE ADECUA A LOS FINES ESPEC[FICOS
PARA LOS CUALES SE ADQUIERE.
NINGON AVAL O GARANT[A OTORGADOS POR PERSONA, COMPAN[A O CORPORACION
ALGUNA CON RESPECTO AL PRESENTE PRODUCTO REVESTIRA CARACTER VINCULANTE PARA
SAMSUNG. SAMSUNG NO SERA RESPONSABLE POR PI2RDIDA DE INGRESOS O LUCRO CESANTE,
IMPOSIBILIDAD DE GENERAR AHORROS U OBTENER OTROS BENEFICIOS, O CUALQUIER DANO
DERIVADO DE CIRCUNSTANCIAS ESPECIALES, DANO IMPREVlSTO O DERIVADO CAUSADO
POR EL USO, USO INCORRECTO, O INCAPACIDAD PARA USAR EL PRESENTE PRODUCTO,
INDEPENDIENTEMENTE DE LA TEOR[A LEGAL EN QUE SE FUNDE EL RECLAMO Y AUN CUANDO SE
LE HAYA NOTIFICADO A SAMSUNG DE LA POSIBILIDAD DE TALES DANOS.
NINGON RESARCIMIENTO DE NINGUNA [NDOLE CONTRA SAMSUNG SUPERARA EL MONTO DE
COMPRA DEL PRODUCTO VENDIDO POR SAMSUNG Y CAUSANTE DEL PRESUNTO DANO. SIN
LIMITAR LO PRECEDENTE, EL COMPRADOR ASUME TODO EL RIESGO Y LA RESPONSABILIDAD POR
PI2RDIDA, DANO O LESION AL COMPRADOR Y A LOS BIENES DEL COMPRADOR Y A TERCEROS Y A
SUS BIENES DERIVADOS DEL USO, USO INCORRECTO O INCAPACIDAD PARA USAR EL PRESENTE
PRODUCTO. LA PRESENTE GARANT[A LIMITADA NO SE EXTENDERA A NINGUNA PERSONA DISTINTA
DEL COMPRADOR ORIGINAL DEL PRESENTE PRODUCTO, ES INTRANSFERIBLE Y ESTABLECE SU
EXCLUSIVA REPARACION.
Algunas provincias no permiten limitaciones en cuanto al plazo de una garantia implicita, o la exclusion o
limitacion de daflos imprevistos o derivados, pot Io que las limitaciones o exclusiones antedichas pueden
no aplicarse en su caso. Esta garantia le otorga derechos especificos, y adema,s puede tenet otros
derechos que varian segun la provincia en la que se encuentre.
Para recibir un servicio tecnico de garantia, comuniquese con SAMSUNG a:
Samsung Electronics Canada inc.,
Customer Service 55 Standish Court Mississauga, Ontario L5R 4B2 Canada
1=800=SAMSU NG(726=7864}
www.samsung.com/ca (English)
www.samsung.com/ca_fr (French)
Las visitas del personal de servicio tecnico para explicar funciones, mantenimiento o instalacion no esta,n
cubiertas pot la garantia.
Pongase en contacto con su agente del centro de Ilamadas Samsung para que le asesore.
Garantia 91
WF455A(3 I)fq59A 07 MESfndd 91 201_t 12 llt 11:50:48
sTiENE PREGUNTAS O COMENTARiOS?
U.S.A 1-800-SAMSUNG(726-7864) www.samsung.com
MEXICO 01-800-SAMSUNG (726-7864) www.samsung.com
www.samsung.com/ca (English)
CANADA 1-800-SAMSUNG(726-7864) www.samsung.com/ca fr (French)
Las visitas del personal de servicio tecnico para explicar funciones, mantenimiento o instalaci0n no esta,n
cubiertas pot la garantia.
P0ngase en contacto con su agente del centro de Ilamadas Samsung para que le asesore.
N.° de c0digo DC68-03159A-07_MES
\\TF455A(; 03159A 07 MESindd 92 2013 12 13 11:50:48