
This supplement contains explanations and instructions for correctly
operating the following systems.
· Navigation System
· Audio and Visual System
· Handsfree System
· APPS
If your vehicle contains one of the systems above, be sure to check the
contents of this supplement carefully.
If you transfer the ownership of the vehicle to another person, make
sure that this supplement is provided with the Owner’s Manual inside
the vehicle.
The information, specications and illustrations in this supplement
are valid at the time of publication. SUBARU CORPORATION reserves
the right to change the specications and design without prior notice,
with no obligation to perform the same or equivalent changes to
vehicles sold in the past.
This Owner’s Manual supplement applies to all models, and describes
all devices, including manufacturer-installed options. This means that
information may be included about devices that are not installed in
your vehicle.
Refer to P.14 for details on each of the dierent models.
SUBARU STARLINK is the “in-car connectivity system” available on select
Subaru vehicles.
SUBARU CORPORATION, TOKYO, JAPAN
“
SUBARU
”
and the six-star cluster design are registered trademarks of SUBARU
CORPORATION.
©Copyright 2022, SUBARU CORPORATION
Foreword
1

TABLE OF CONTENTS
Quick Guide
Basic Function
Settings
Phone
Apps
Audio
Navigation System (If equipped)
Voice Recognition System
Appendix / What To Do If / Index
1
2
3
4
5
6
7
8
9
2

· System Types... 14 · Dual 7.0-inch Display System... 15 · 11.6-inch Display System/11.6-inch Display With Navi System... 37
· Basic Information Before Operation... 64
· Registering A Bluetooth Phone/Device For The First Time... 74 · Registering A Bluetooth Phone/Device... 78
· Phone Settings... 77 · General Settings... 83 · Sound Settings... 90 · Radio Settings... 91
· Calling On The Bluetooth Phone... 100 · Receiving On The Bluetooth Phone... 103
· Talking On The Bluetooth Phone... 104 · Bluetooth Phone Message Function... 106
· SUBARU STARLINK... 115 · Apple CarPlay... 121 · Android Auto... 124 · SiriusXM Travel Link... 127
· Basic Operation... 136 · Radio Operation... 143 · Media Operation... 158 · Audio Remote Controls... 173
· Map Screen... 186 · Main Menu Screen... 193 · Route Guidance... 203 · Setup... 207
· SUBARU Map Update... 212
· Voice Recognition System Operation... 218
· Troubleshooting... 231 · Index... 242
13
63
73
95
111
135
185
217
225
3

INTRODUCTION
INTRODUCTION
The symbols described below are found in this instruction
manual as well as on the unit itself to ensure its proper and safe
usage and to prevent injury or damage to property. Make sure
you understand the meaning of these symbols before reading
the rest of this manual.
READ FIRST
We recommend that you wait until the positioning stabilizes
before starting to drive.
If you start to drive while the positioning is not complete, the
indicated position may dier from the actual vehicle position.
The screens shown in this manual may dier from the actual
screens depending on the data type or when the map data was
created.
When maps are created, land surveys are conducted and
informationon road improvements and reopening is collected
to provide the most accurate information possible. However,
modicationsto roads, place names and facilities may be carried
out at any time. Consequently, we cannot guarantee that map
data contains no errors in road positions, conguration and
names, or in facility names.
INTRODUCTION
4

Information in this manual that must be observed for the unit,
and information that is useful to know is indicated as follows.
WARNING
l This sign indicates a situation in which incorrect handling through
disregard of written information might result in death or serious
personal injury.
CAUTION
l This sign indicates a situation in which incorrect handling through
disregard of written information might result in personal injury or
damage to property.
NOTE
l Useful information for the user is described.
l Be sure to read all materials such as manuals and warranties that
come with the product. SUBARU CORPORATION is not responsible
for problems that arise due to failure to follow these instructions.
l Changes to product specications may result in dierences between
the content of the manual and the features of the unit.
SYMBOLS USED IN ILLUSTRATIONS
Safety symbol
The symbol of a circle with a slash through it means “Do
not”, “Do not do this” or “Do not let this happen”.
Arrows indicating operations
Indicates the action
(selecting, turning,
etc.) used to operate
switches and other
devices.
INTRODUCTION
INTRODUCTION
5

PRECAUTIONS FOR USE
WARNING
l The main unit requires a 12 V DC power supply. The main unit
should not be installed in any vehicle which does not have a
12 V power system with a ground-connected negative side.
An installation other than the one intended may cause severe
damage to the main unit, and electric shock or serious injury to
the users.
l Even when using the route guidance of the navigation system, be
sure to drive by following the actual trac regulations. If you drive
by following only the route guidance of the navigation system,
you may violate the actual trac regulations and cause a trac
accident.
l To ensure safety, the driver should not operate the navigation
system while driving. Operating the navigation system while
driving may result in an accidental steering wheel operation or
otherwise cause an accident. Stop the vehicle before operating
the navigation system. Also, do not watch the screen while driving
because doing so may be dangerous (ETC). Inattention to road
conditions ahead may result in an accident.
l The driver should not perform operations such as volume
adjustment while driving. Inattention to road conditions ahead
may result in an accident, so be sure to stop the vehicle in a safe
place before performing the operation.
l The driver should not change discs while driving. Inattention to
road conditions ahead may result in an accident, so be sure to stop
the vehicle in a safe place before performing the operation.*
l The driver should not perform operations such as adding a
location or setting the memory while driving. Inattention to road
conditions ahead may result in an accident, so be sure to stop the
vehicle in a safe place before performing the operation.
l Before viewing a video, be sure to stop the vehicle in a safe place
and apply the parking brake. To ensure safety, videos are not
displayed during driving.
l To ensure safety, never operate a cell phone while driving.
l Do not let foreign objects enter the disc slot. Doing so may result
in a re or electric shock.*
l Do not disassemble or modify the unit. Doing so may result in an
accident, re or electric shock.
l Do not let water or foreign objects enter the internal parts of the
unit. Doing so may result in smoke, re or an electric shock.
l Do not use the unit when it is malfunctioning, such as when the
screen is not lit or no sound comes out. Doing so may result in an
accident, re or electric shock.
l Always replace fuses with fuses of the same specied capacity
(amperage). Using a fuse with a higher capacity than the
specication may result in a re.
INTRODUCTION
6

l If a foreign object or water enters the unit, smoke or a strange
odor may be emitted. If such an abnormality occurs, stop using
the unit immediately and contact your SUBARU dealer. An
accident, re or electric shock may result if you continue to use the
unit under these conditions.
l In a thunderstorm, do not touch the antenna line or the unit.
Lightning may cause an electric shock.
l Do not park or stop in prohibited areas to use the unit.
l If direct sunlight shines into the vehicle, light may reect o the
product. Be very careful while driving.
l Never use headphones or earphones while driving. Driving while
not being able to hear sounds from outside the vehicle may result
in a trac accident.
*: If equipped with a CD player
CAUTION
l Although the unit can be used when the ignition switch is set
to either “ACC” or “ON” position, to protect the battery, start the
engine before using the unit.
l Do not use the unit anywhere other than in a vehicle. Doing so
may result in an electric shock or other injury.
l While driving, keep the volume low enough for you to hear
outside sounds. Driving while not being able to hear sounds from
outside the vehicle may result in an accident.
l Be careful of the volume when turning on the power. If a loud
noise is emitted suddenly when you turn on the power, it may
damage your hearing.
l Do not apply a strong force to the display. Doing so may result in a
malfunction.
l Do not put your ngers or hands into the disc slot. Doing so may
result in an injury.*
l Do not touch the hot parts of the unit. The hot parts may burn you.
l Do not use while there is an abnormality such as sound breakup or
distortion. Doing so may result in a re.
l Using the unit during extremely high or low temperature may
result in mistaken operation or a malfunction. In particular, the
temperature inside the vehicle can often rise to a high level during
the summer. Cool the vehicle, for example by opening a window,
before using the unit.
l Be careful if metal or water enters the unit, or the unit is exposed
to a strong impact, because it may result in a malfunction.
l The touch buttons on the display screen may not operate correctly
if condensation forms inside them. If this happens, do not attempt
to operate the switches until the condensation has disappeared.
l If juice or similar liquid is spilled on the display, wipe o
immediately. Failure to do so may result in product malfunction.
l The screen is easily marked by ngerprints and tends to attract
dust, and should therefore be cleaned occasionally. When
cleaning, turn o the power, and wipe lightly with a soft, dry cloth.
To remove dirt, soak a soft cloth in neutral detergent and squeeze
well before wiping. Do not use a wet oor-cloth, organic solvents
(benzene, ethanol, thinner, etc.), acids, or alkalis. Using such
agents will result in screen deterioration. Furthermore, do not hit
the screen or rub it with hard objects.
*: If equipped with a CD player
INTRODUCTION
INTRODUCTION
7

NOTE
l SUBARU CORPORATION is not responsible for any damages to the
purchaser or third parties that occur from using the map data.
l We do not provide any replacements or refunds for any mistakes
there may be in the map data displays or contents, such as
misspelling, omissions or misaligned positions.
l SUBARU CORPORATION makes no guarantee that the functions
included in the map data will be appropriate for the specic
objectives of the purchaser.
l Functions that cannot be operated while driving have their colors
toned down when the vehicle is being driven, and their operation is
disabled. Touching a disabled switch may result in the display of an
operation prohibited message on the screen.
l During strong vibrations, such as when driving on a poor road
surface, the unit may no longer be able to read the data from the
disc, and it will not operate correctly. When the vibration lessens,
normal operation will return after a short time.*
l Immediately after turning on the heater when the temperature is
low, dew (water drops) may adhere to the lens of the CD reader
(condensation). If this happens, leaving the unit for about an hour
should remove the condensation and return the unit to normal
operation.*
If the unit does not return to normal operation even after several
hours, contact your SUBARU dealer.
l When using the unit for the rst time after purchase, or after the
battery was removed for a long time, the current position may not
be displayed correctly. Wait a short time until the GPS positioning
corrects the displayed position.
NOTE
l This device is precision-engineered equipment and the recorded
data can be lost as a result of static electricity, electrical noise,
vibration, or other inuences. To protect the device against data
loss, we recommend keeping a separate record of the data that you
record after purchase.
l The screen may be adversely aected or disturbed by noise if
electrical equipment that generates powerful electrical noise is used
near the system. In such cases, keep the electrical equipment at a
distance, or refrain from use.
l The display may appear brighter when the temperature is low,
or immediately after starting the engine, however, this is a
characteristic of the LED elements, and does not indicate a fault. The
display will return to its original brightness when the vehicle cabin
has warmed up.
l When you look at the screen through polarized material such as
polarized sunglasses, the screen may be dark and hard to see. If so,
look at the screen from dierent angles, adjust the screen settings on
the general settings screen or take o your sunglasses.
l It may be dicult to view the screen if the display is exposed to
sunlight from an awkward angle.
l The LCD screen may not function normally if covered with a
protective lm. Do not ax a protective lm.
l The touch panel may function incorrectly or fail to respond if
operated with objects other than ngers (nails, operation when
wearing gloves, pens, etc.)
INTRODUCTION
8

NOTE
l If the system functions unexpectedly such as an area other than the
one touched being selected, or failure to respond when touched,
there is a possibility that another nger or part of the hand is in
contact with display.
l Scratches on the system panel surface are easily noticeable, and it
should therefore be handled with care.
*: If equipped with a CD player
SAFETY INSTRUCTION (11.6-inch display
system/Dual 7.0-inch display system only)
To use this system in the safest possible manner, follow all the
safety tips shown below.
Do not use any feature of this system to the extent it becomes
a distraction and prevents safe driving. The rst priority while
driving should always be the safe operation of the vehicle. While
driving, be sure to observe all trac regulations.
Prior to the actual use of this system, learn how to use it and
become thoroughly familiar with it. Read the entire manual
to make sure you understand the system. Do not allow other
people to use this system until they have read and understood
the instructions in this manual.
For your safety, some functions may become inoperable when
driving. Unavailable screen buttons are dimmed.
WARNING
l For safety, the driver should not operate the system while he/she
is driving. Insucient attention to the road and trac may cause
an accident.
INTRODUCTION
INTRODUCTION
9
SAFETY INSTRUCTION (11.6-inch display with
Navi system only)
To use this system in the safest possible manner, follow all the
safety tips shown below.
This system is intended to assist in reaching the destination
and, if used properly, can do so. The driver is solely responsible
for the safe operation of your vehicle and the safety of your
passengers.
Do not use any feature of this system to the extent it becomes
a distraction and prevents safe driving. The rst priority while
driving should always be the safe operation of the vehicle. While
driving, be sure to observe all trac regulations.
Prior to the actual use of this system, learn how to use it and
become thoroughly familiar with it. Read the entire manual
to make sure you understand the system. Do not allow other
people to use this system until they have read and understood
the instructions in this manual.
For your safety, some functions may become inoperable when
driving. Unavailable screen buttons are dimmed. Only when the
vehicle is not moving, can the destination and route selection
be done.
WARNING
l For safety, the driver should not operate the system while he/she
is driving. Insucient attention to the road and trac may cause
an accident.
l While driving, be sure to obey the trac regulations and maintain
awareness of the road conditions. If a trac sign on the road
has been changed, route guidance may not have the updated
information such as the direction of a one way street.
INTRODUCTION
10

While driving, listen to the voice instructions as much as
possible and glance at the screen briey and only when it is safe.
However, do not totally rely on voice guidance. Use it just for
reference. If the system cannot determine the current position
correctly, there is a possibility of incorrect, late, or non-voice
guidance.
The data in the system may occasionally be incomplete. Road
conditions, including driving restrictions (no left turns, street
closures, etc.) frequently change. Therefore, before following
any instructions from the system, look to see whether the
instruction can be done safely and legally.
This system cannot warn about such things as the safety of an
area, condition of streets, and availability of emergency services.
If unsure about the safety of an area, do not drive into it. Under
no circumstances is this system a substitute for the driver’s
personal judgement.
Use this system only in locations where it is legal to do so. Some
states/provinces may have laws prohibiting the use of video and
navigation screens next to the driver.
INTRODUCTION
INTRODUCTION
11

HOW TO READ THIS MANUAL
No. Name Description
Operational Outlines An outline of the operation is explained.
Main Operations The steps of an operation are explained.
Supplemental information Describes supplemental information relating to main operation.
● When a panel button should be selected, button names are shown as
.
● When a touch button on the screen should be selected, button names are shown as
.
INTRODUCTION
12

Quick Guide
13
Quick Guide
(DUAL 7.0-INCH
DISPLAY SYSTEM)
System Types
14
Dual 7.0-inch Display System
Function Overview
15
Main Product Features
16
Basic Function
18
Button Overview
18
Home Screen
19
Car Information/Climate Control Screen
20
Pairing The System
With A Bluetooth Phone/Device
21
Adding A Bluetooth Phone/Device
22
Create A Driver Prole
23
Phone Screen
24
Apps Screen
27
Radio Screen
30
Useful SiriusXM
®
Radio Functions
31
Media Screen
32
Loading And Unloading A Disc
33
Connecting A USB Memory Device/
Portable Device
33
Settings Screen
34
Steering Wheel Controls
36
Steering Wheel Controls
36
11.6-inch Display System/
11.6-inch Display With Navi System
Function Overview
37
Main Product Features
38
Basic Function
40
Overview
40
Home Screen
41
Pairing The System
With A Bluetooth Phone/Device
42
Adding A Bluetooth Phone/Device
43
Create A Driver Prole
44
Car Information Screen
45
Phone Screen
46
Map Screen
50
Radio Screen
52
Useful SiriusXM
®
Radio Functions
53
Media Screen
54
Loading And Unloading A Disc
55
Connecting A USB Memory Device/
Portable Device
55
Apps Screen
56
Settings Screen
59
Steering Wheel Controls
61
Steering Wheel Controls
61
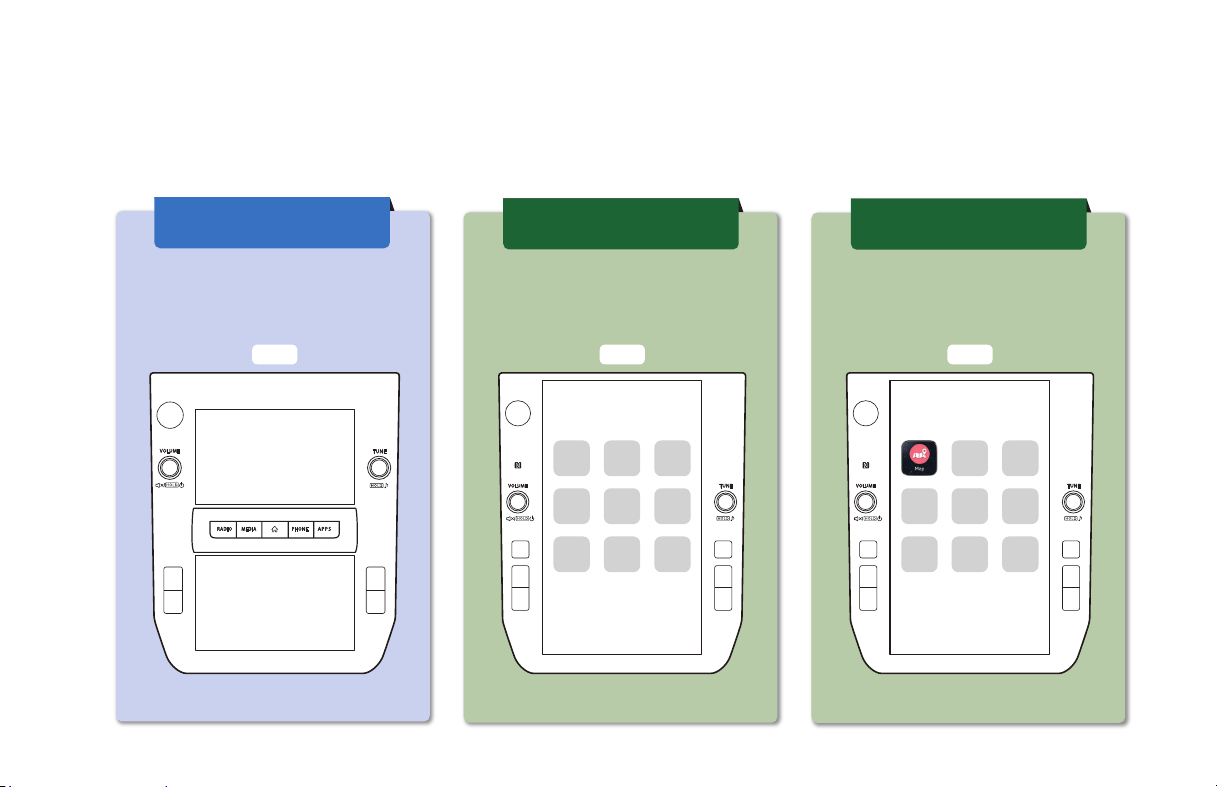
SYSTEM TYPES
14
P.15 P.37
SYSTEM TYPES
This Owner’s Manual describes the following three types of system.
Dual 7.0-inch
display system
11.6-inch display
system
11.6-inch display
with Navi system
Two 7.0-inch touch screen
Display audio system
11.6-inch touch screen
Display audio system
11.6-inch touch screen
Display audio with
Navigation system
P.37
FUNCTION OVERVIEW
15
1
Quick Guide (DUAL 7.0-INCH DISPLAY SYSTEM)
FUNCTION OVERVIEW
FUNCTION OVERVIEW
- Two 7.0-inch touch screens
Features:
7.0-inch touch screen
7.0-inch touch screen
MAIN FUNCTIONS
Pairing (Bluetooth 4.2) P.21
Apps P.27
Apple CarPlay P.121
Android Auto P.124
AM/FM radio P.30
HD Radio receiver P.145
SiriusXM® radio P.31
Media operation
CD*: P.158 USB: P.160 iPod/iPhone: P.162
Bluetooth audio: P.165 AUX: P.168
Phone P.24
Voice recognition system P.218
Steering wheel controls P.36
Rear view camera
Refer to the vehicle Owner’s Manual.Car settings/informations
Climate controls
*: If equipped with a CD player
MAIN PRODUCT FEATURES
16
MAIN PRODUCT FEATURES
Adoption of intuitive and easy-to-use
smartphone-like graphical user interface
Meter cluster linked display
Two 7.0-inch touch screen displays have
been adopted. Information can be displayed
seamlessly between these displays and the
display in the meter cluster.
Function description display function
Function descriptions or operation hints can be
displayed when an
icon displayed next to the
name of a function.

MAIN PRODUCT FEATURES
17
1
Quick Guide (DUAL 7.0-INCH DISPLAY SYSTEM)
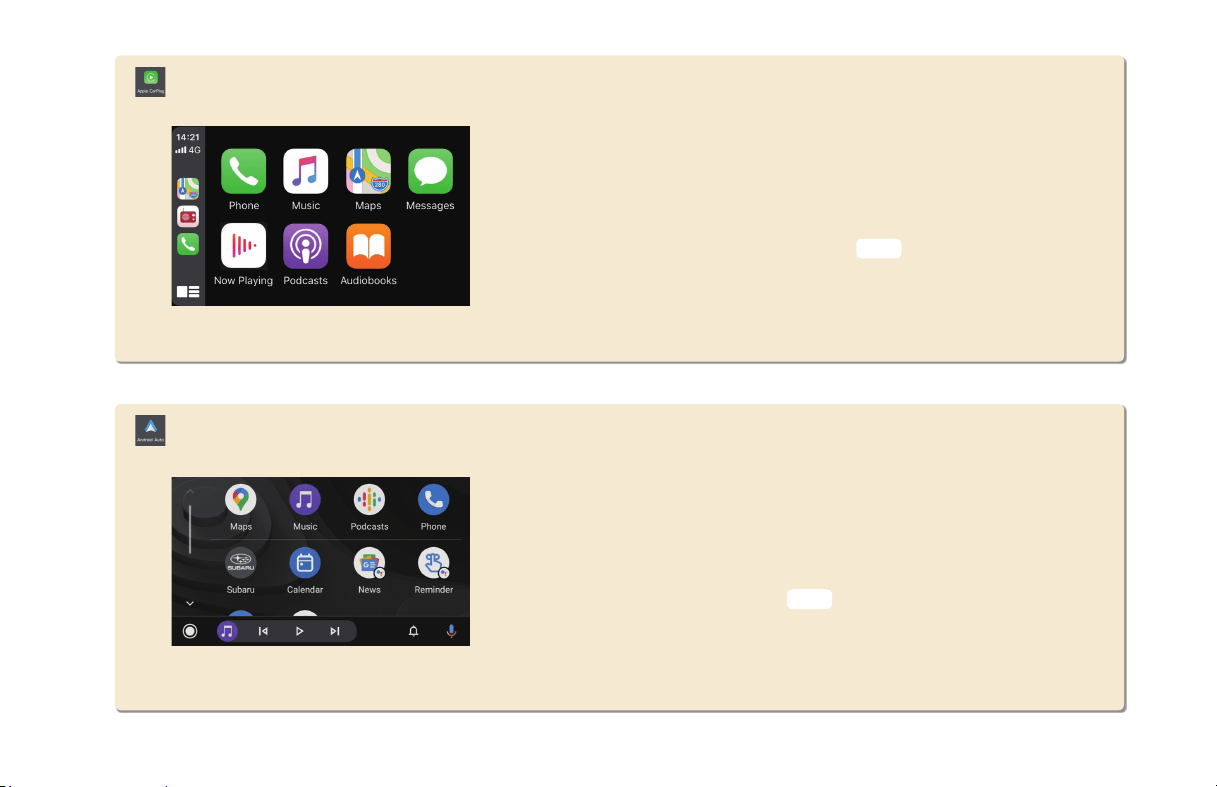
Apple CarPlay / Android Auto
Support for Apple CarPlay and Android Auto allows
access to functions such as maps, phone calls, and music.
P.121 P.124
Customized home screen layout
Frequently used functions and operations can be added to
the home screen.
Example: For calling specic
phone numbers, listening to
specic radio stations, etc.
The position of screen buttons can be changed by selecting
and holding it, then dragging it to the desired position.
P.72
System and Bluetooth phone / device pairing
Functions such as hands-free and applications
can be used by connecting the system with
Bluetooth phones / devices wirelessly.
P.21
BASIC FUNCTION
18
BASIC FUNCTION
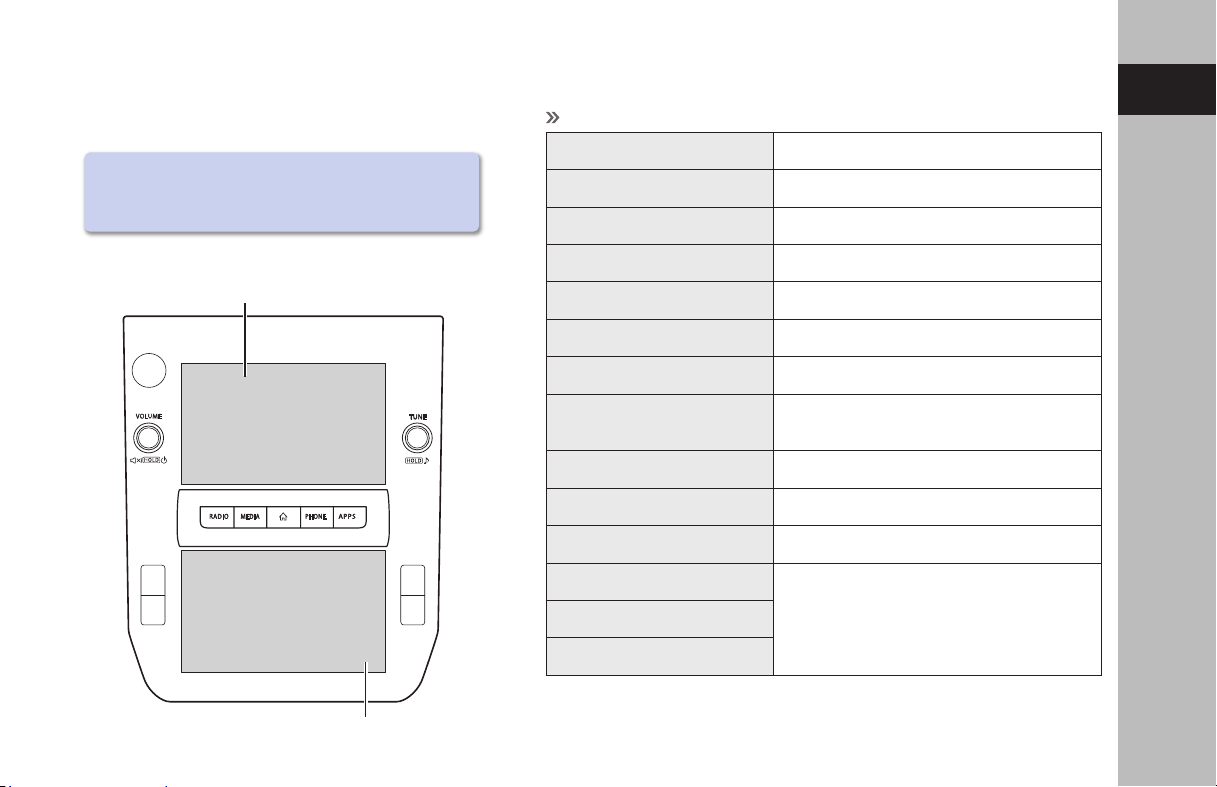
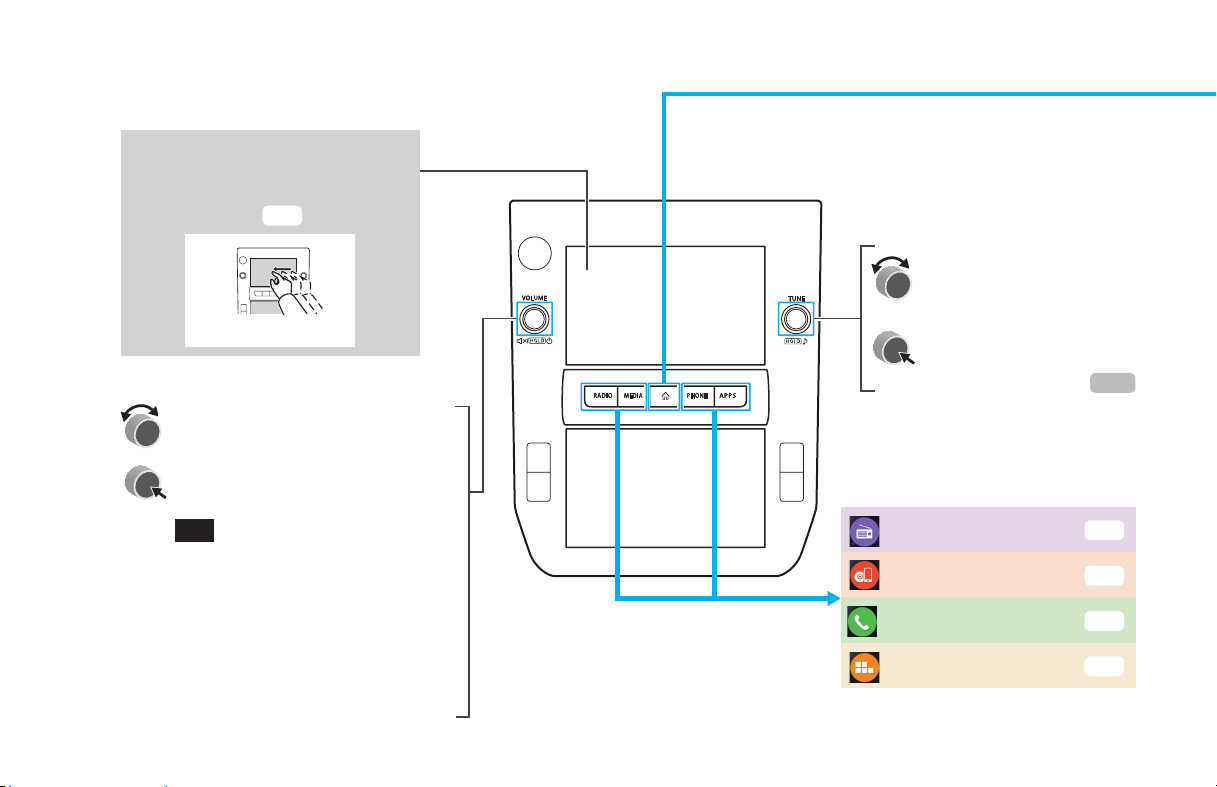
BUTTON OVERVIEW
TOUCH SCREEN
Operations are performed by
touching the touch screen directly
with your nger.
P.66
Drag
Display the home screen.
Turn the knob to adjust the volume.
Press the knob to turn the volume
mute on/o.
Press and hold the knob until a
message is displayed, and then select
OK
(OK) or wait a few seconds for
the audio system to turn o. Press
and hold the knob to turn the audio
system on.
Press and hold the knob for 10
seconds or longer to reset the
system if the touch screens become
unresponsive during operation or if
any other system error occurs.
Shortcut to each screen
Turn the knob to select a
radio station or skip to the
next or previous track/le.
Press and hold the knob
to display the sound
customization screen.
P.138
Radio
P.30
Phone
P.24
Apps
P.27
Media
P.32
BASIC FUNCTION
19
1
Quick Guide (DUAL 7.0-INCH DISPLAY SYSTEM)
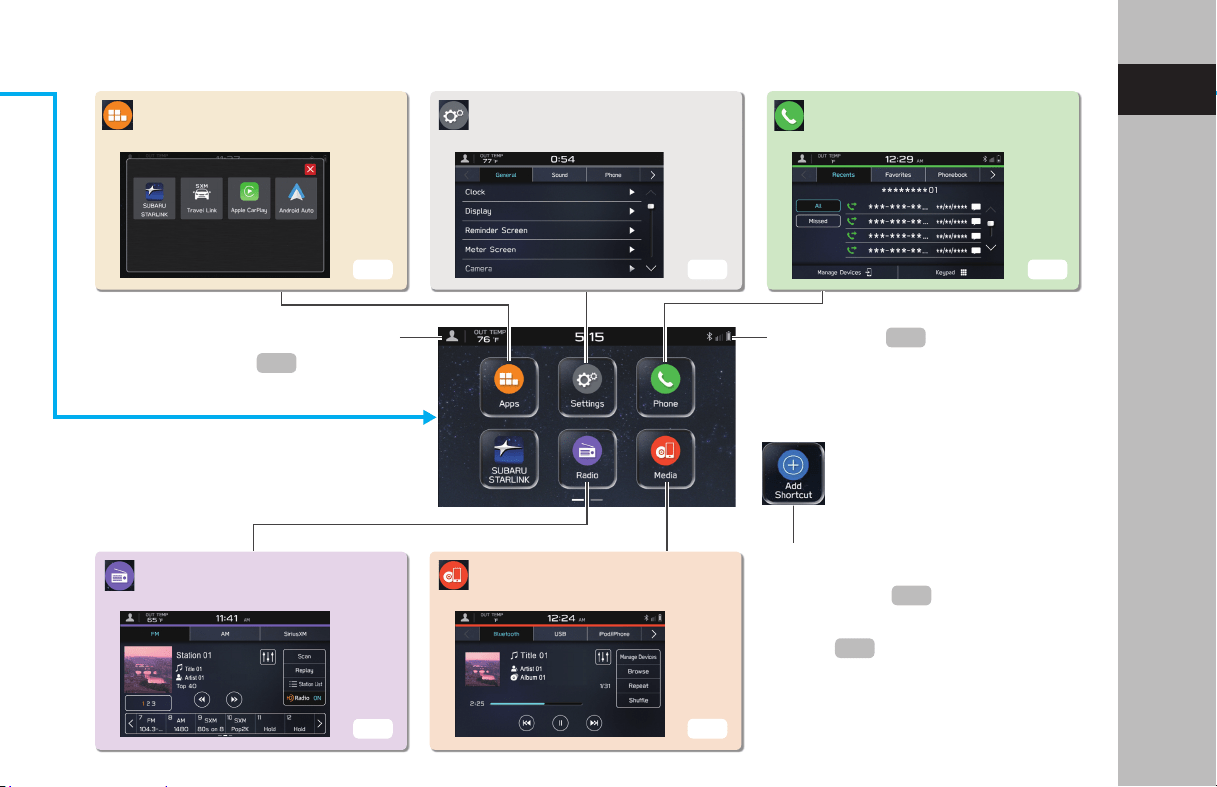
HOME SCREEN
Frequently used functions and
operations can be added to the
home screen.
By connecting an Apple CarPlay device or
Android device to the USB port, an Apple
CarPlay or Android Auto icon will display
on the home screen.
Button positions can be changed
freely.
Radio SCREEN
Apps SCREEN Settings SCREEN
Media SCREEN
Phone SCREEN
P.24P.34P.27
P.32P.30
P.72
P.72
Set a driver prole Status display
P.71
P.23

BASIC FUNCTION
20
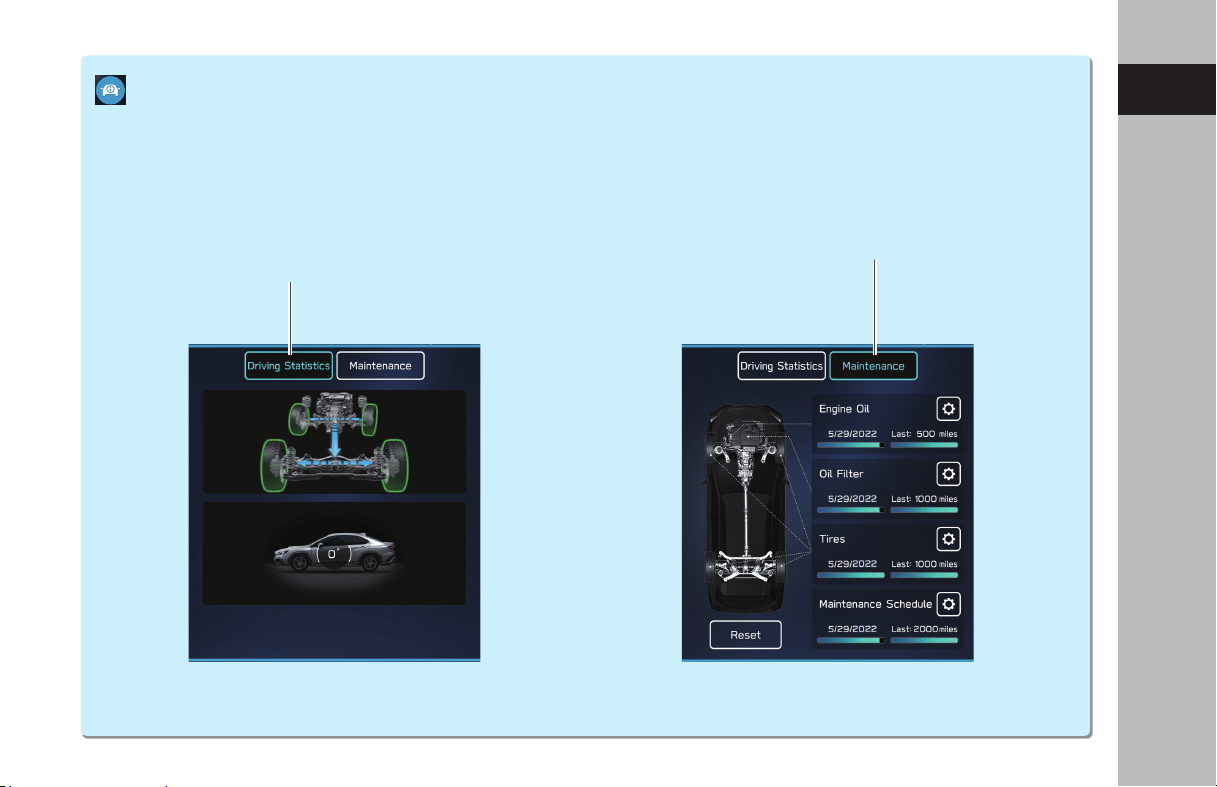
CAR INFORMATION/CLIMATE CONTROL SCREEN
Displays the operating status of
vehicle functions, vehicle status, and
vehicle inclination.
Refer to the vehicle Owner’s Manual.
The settings of driving related functions
etc. can be changed.
Refer to the vehicle Owner’s Manual.
The settings of various vehicle related functions can be
changed.
For settings related to EyeSight, refer to the Owner’s
Manual supplement for the EyeSight system. For all other
functions and settings, refer to the vehicle Owner’s Manual.
Setup and display vehicle part
replacement intervals.
Refer to the vehicle Owner’s Manual.
Displays the operating status of
climate control.
Refer to the vehicle Owner’s Manual.
BASIC FUNCTION
21
1
Quick Guide (DUAL 7.0-INCH DISPLAY SYSTEM)
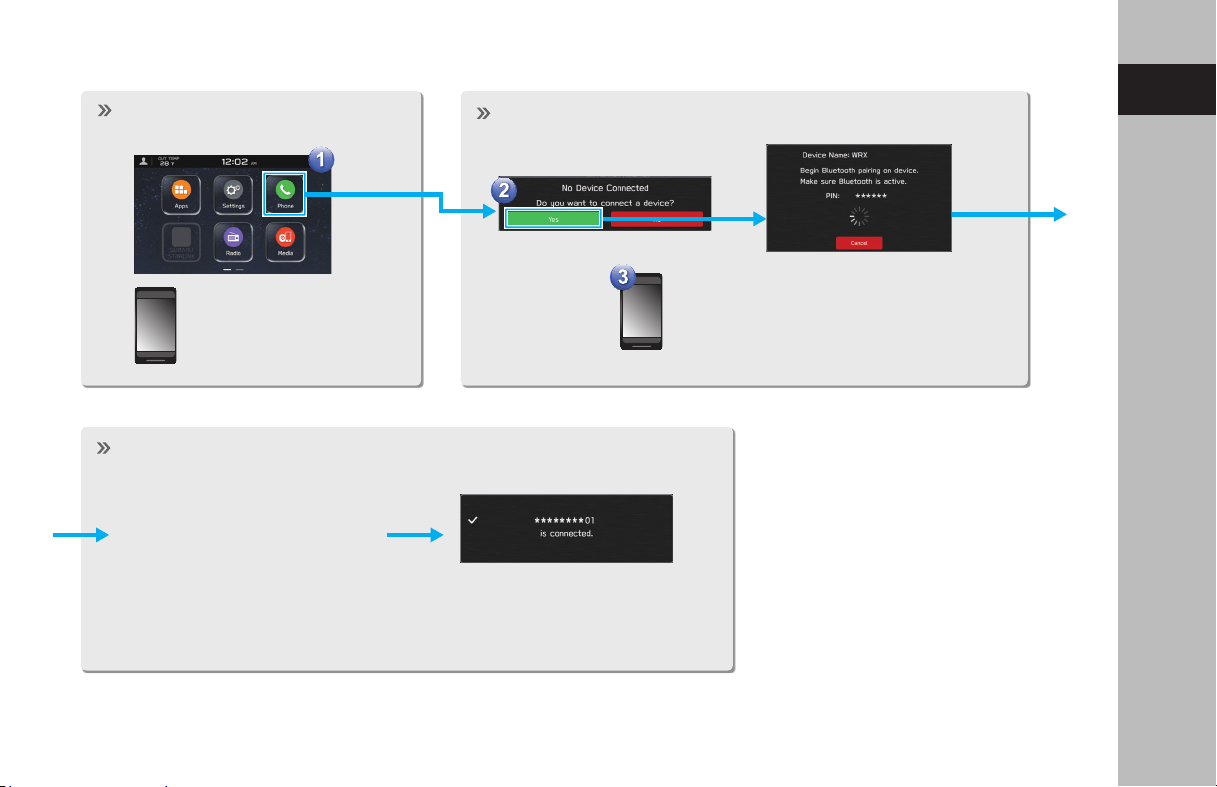
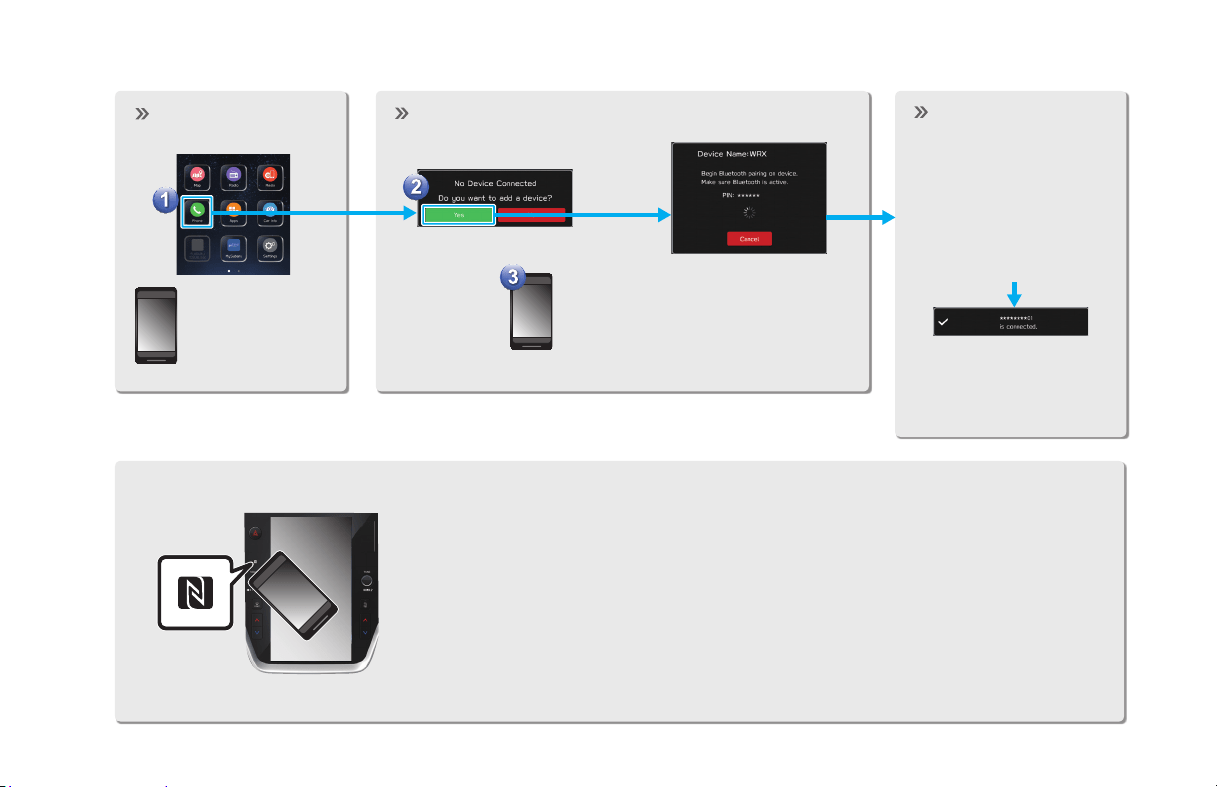
PAIRING THE SYSTEM WITH A Bluetooth PHONE/DEVICE
Display the phone screen.
Prepare the Bluetooth
phone/ device to be paired.
Operate the Bluetooth phone/device.
Turn the Bluetooth function of the
Bluetooth phone/device ON and select
the vehicle’s device name.
Register the Bluetooth phone/device.
If unable to pair, check whether
your Bluetooth phone/device is
compatible with the system.
If a conrmation message appears
asking whether to transfer the
phone’s contact data to the system,
select the appropriate button.
BASIC FUNCTION
22
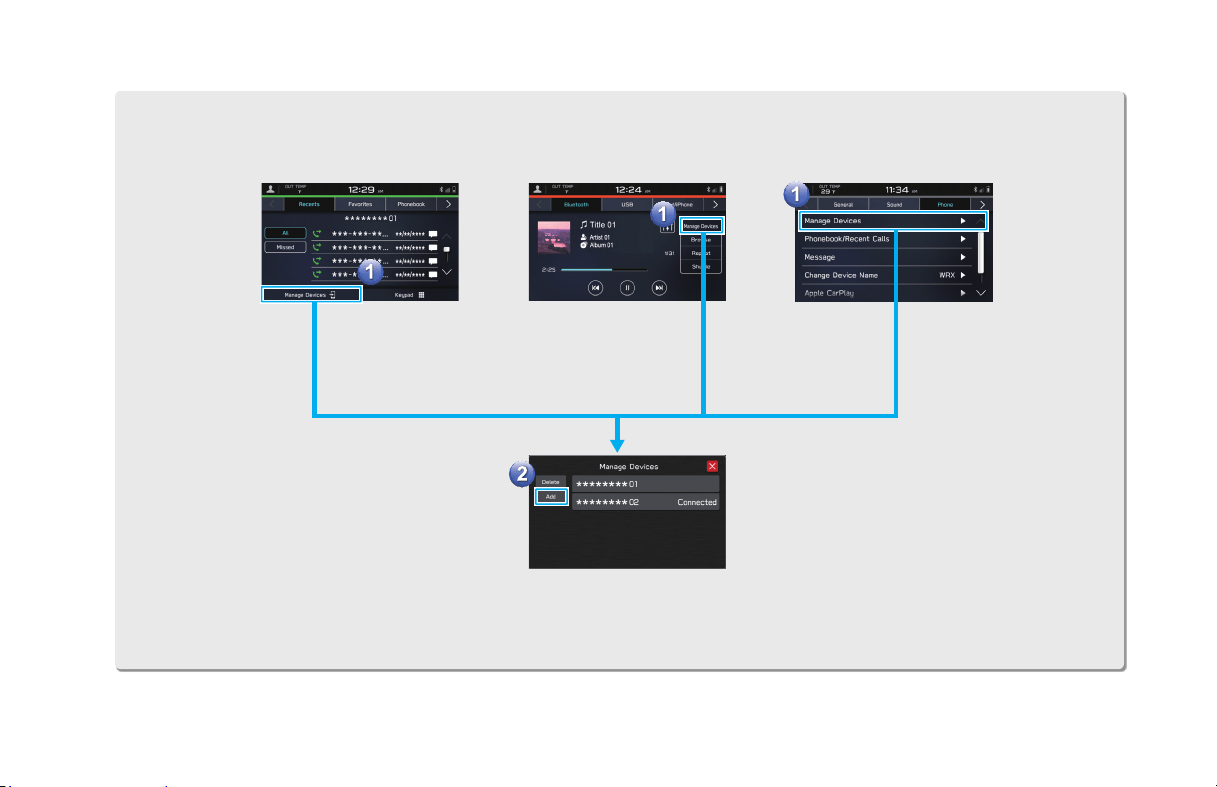
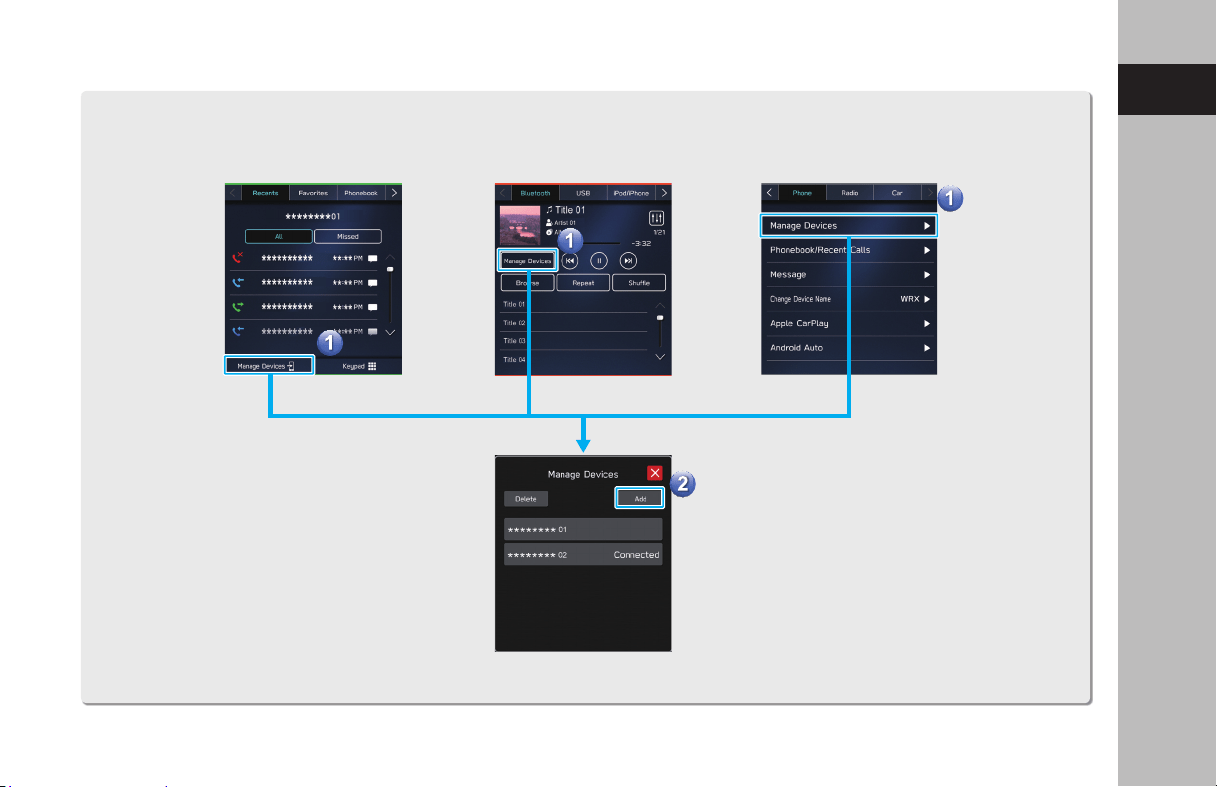
ADDING A Bluetooth PHONE/DEVICE
Adding from the
phone screen
Adding from the
Bluetooth audio screen
Adding from the
settings screen
BASIC FUNCTION
23
1
Quick Guide (DUAL 7.0-INCH DISPLAY SYSTEM)
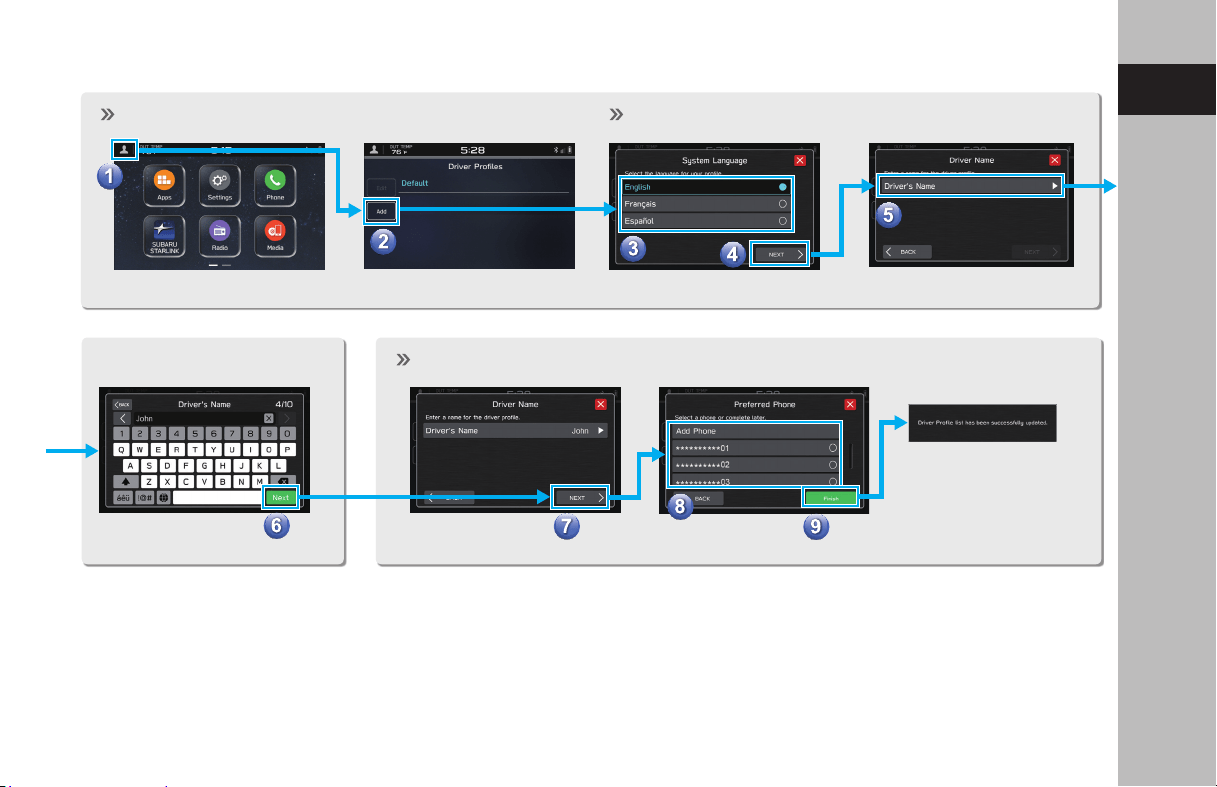
Add a new prole.
Registering a Bluetooth phone
Enter a name.
Procedure complete.
CREATE A DRIVER PROFILE
Select a language.
BASIC FUNCTION
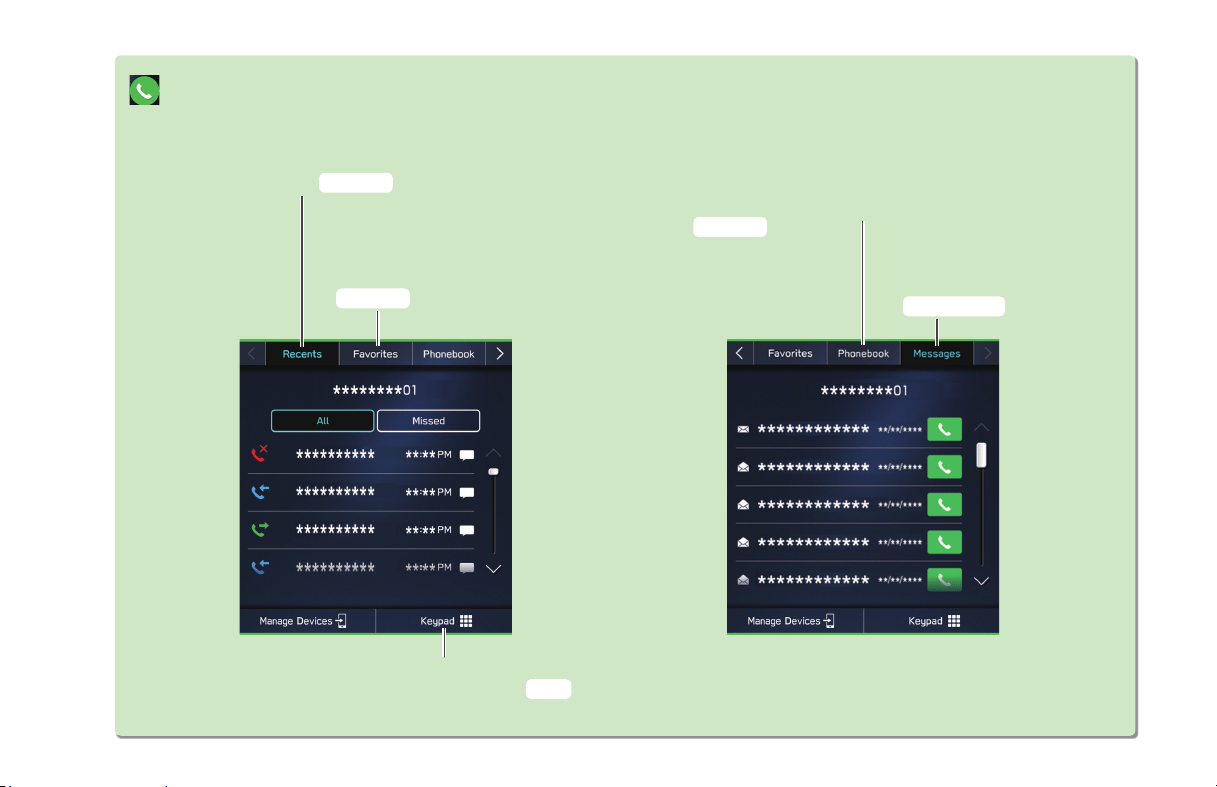
24
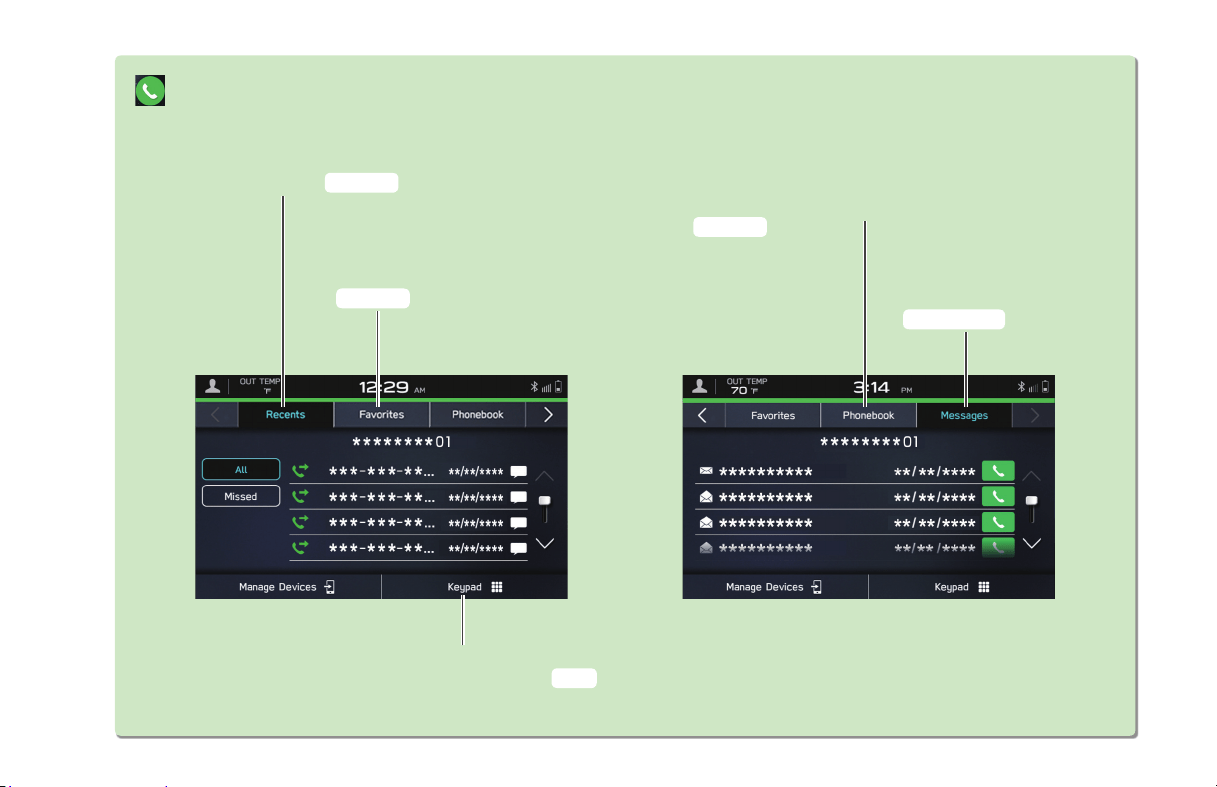
Phone SCREEN
Directly input a number
to place a call
P.102
Call or send a text message* to
a registered favorite
P.102,109
Call or send a text message* to
a recent contact
P.101,109
Call or send a text message* to a
contact in the phonebook on the
Bluetooth connected phone
P.103,109
Check or reply* to
messages/place calls from
received message list
P.108,109,110
*: If available (for iOS only reception possible)
BASIC FUNCTION
25
1
Quick Guide (DUAL 7.0-INCH DISPLAY SYSTEM)
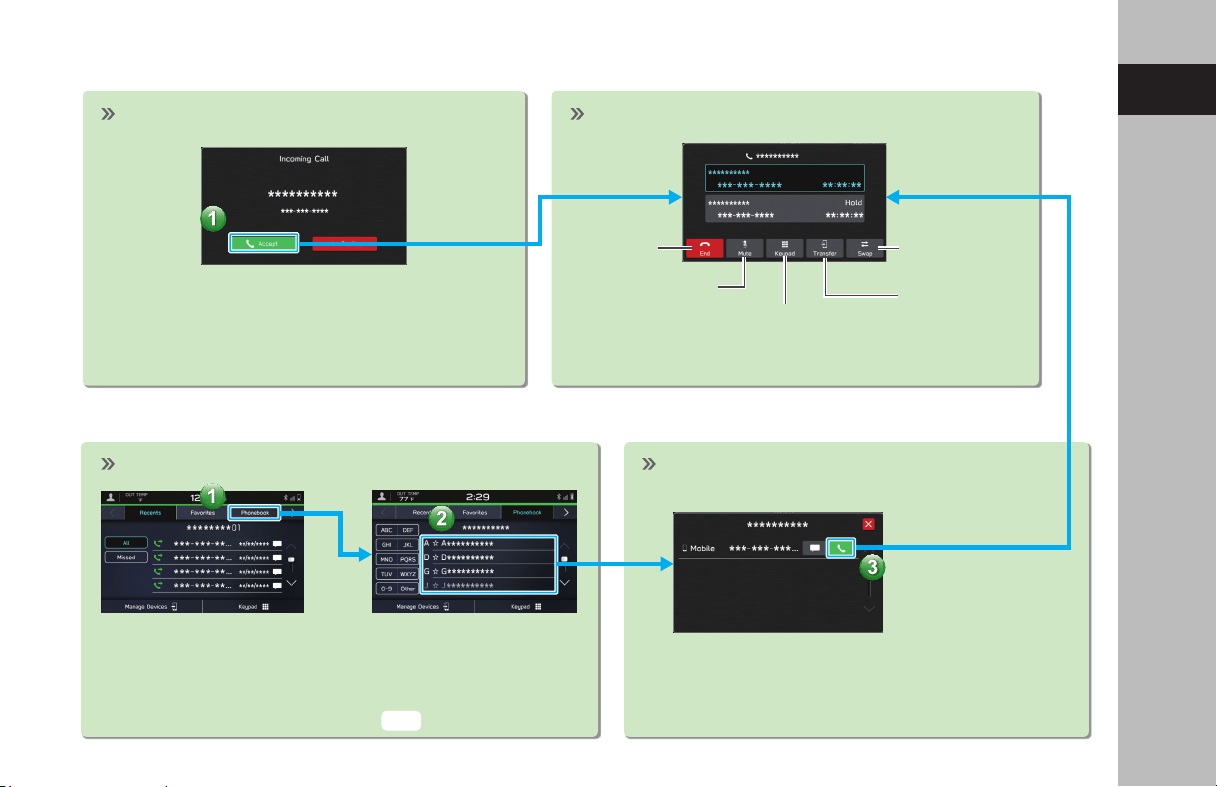
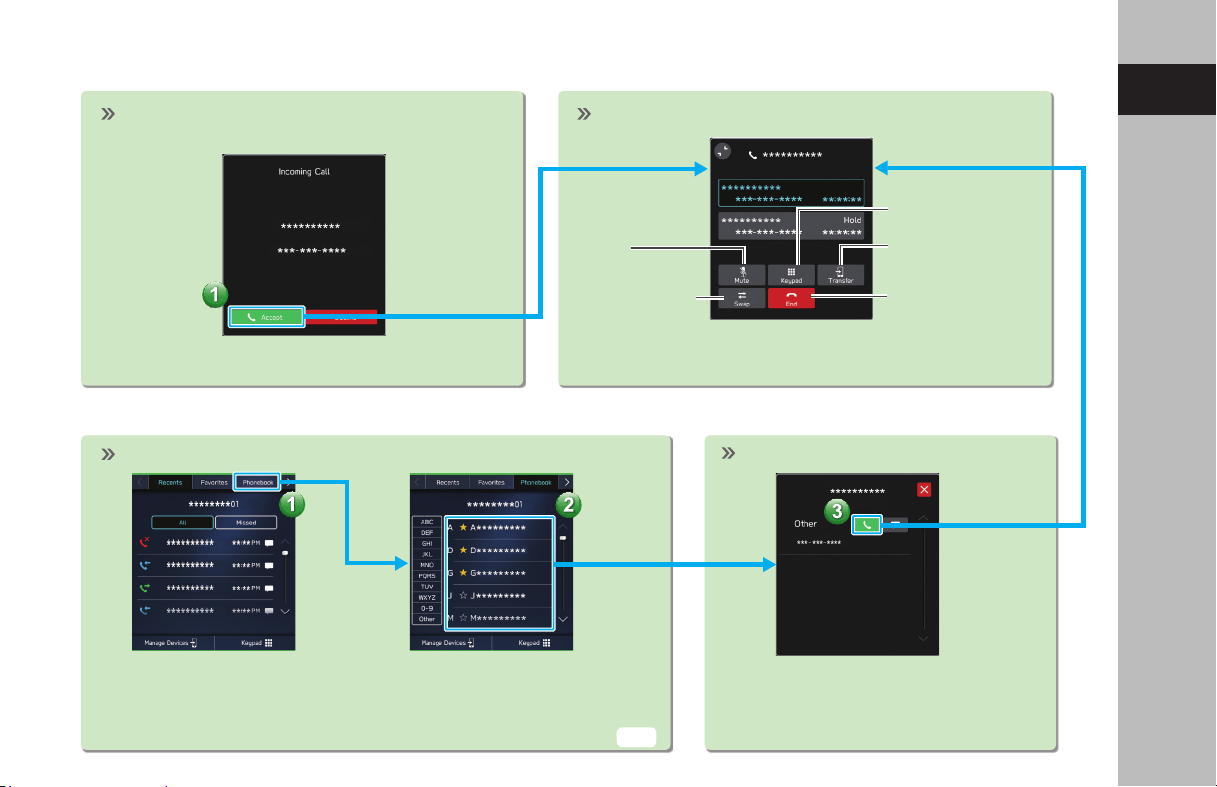
- Operation Flow: Receiving Calls and Using the Bluetooth Phone -
- Operation Flow: Placing Calls from the Phonebook -
Incoming call screen is displayed. In-call screen is displayed.
End call
Mute the connected
smartphone’s voice
Transfer call to
Bluetooth phone
Keypad
Switch to call
with other party
In-call screen display and operation may dier, or may
not be possible depending on the Bluetooth phone used.
Select call recipient from phonebook.
The notication setting on the Bluetooth phone may need to be
activated in order to download the phonebook. If the phonebook
download setting is o and a phonebook has not been downloaded,
a message will be displayed and the phonebook of the connected
Bluetooth phone can be downloaded.
Place call
Select number for making call.
P.82

BASIC FUNCTION
26
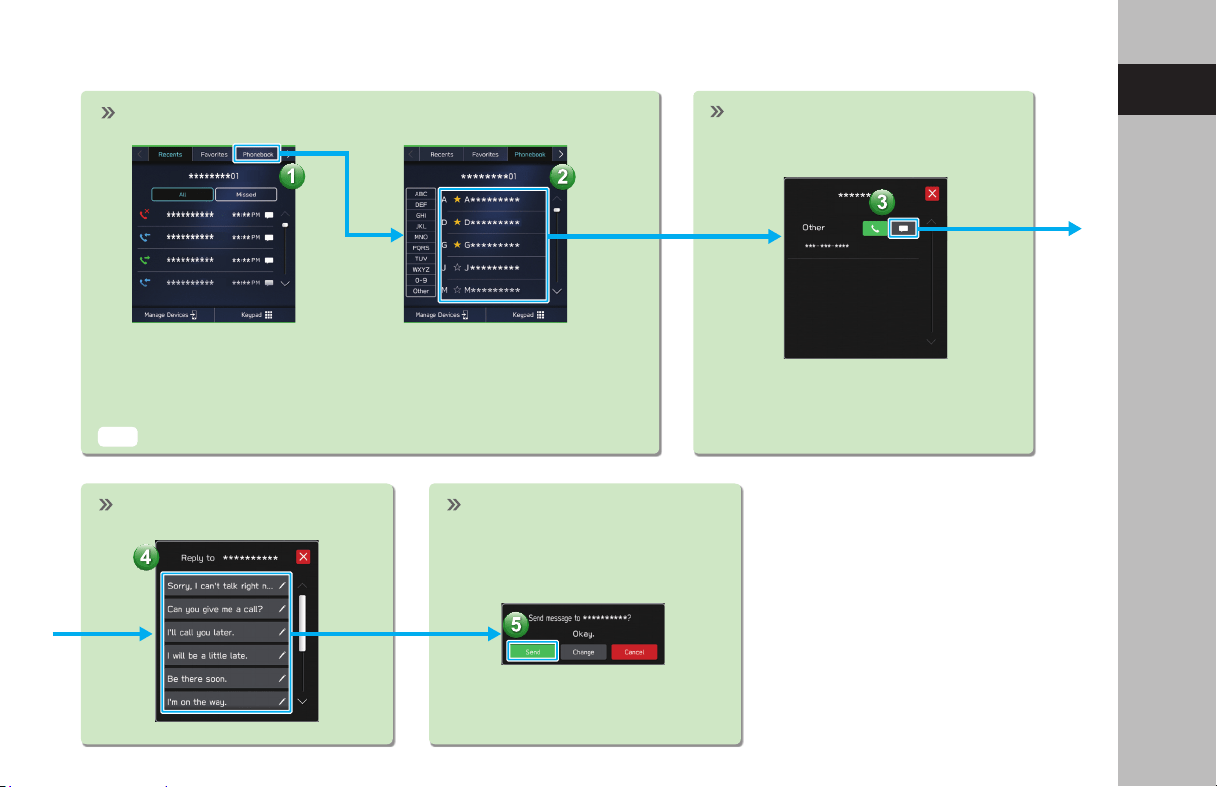
- Operation Flow: Receiving a Message* -
- Operation Flow: Sending a Message* from the Phonebook -
Incoming text screen is displayed. Message screen is displayed.
Having messages
read out
Calling the message
sender
Replying to a message
Select a contact from phonebook.
The notication setting on the Bluetooth phone may need to be
activated in order to download the phonebook. If the phone
-
book download setting is o and a phonebook has not been
downloaded, a message will be displayed and the phonebook
of the connected Bluetooth phone can be downloaded.
Select the message
icon next to the desired
number.
Send message.
When there are unread messages in the message inbox
*: If available (for iOS only reception possible)
Select message.
P.82
BASIC FUNCTION
27
1
Quick Guide (DUAL 7.0-INCH DISPLAY SYSTEM)
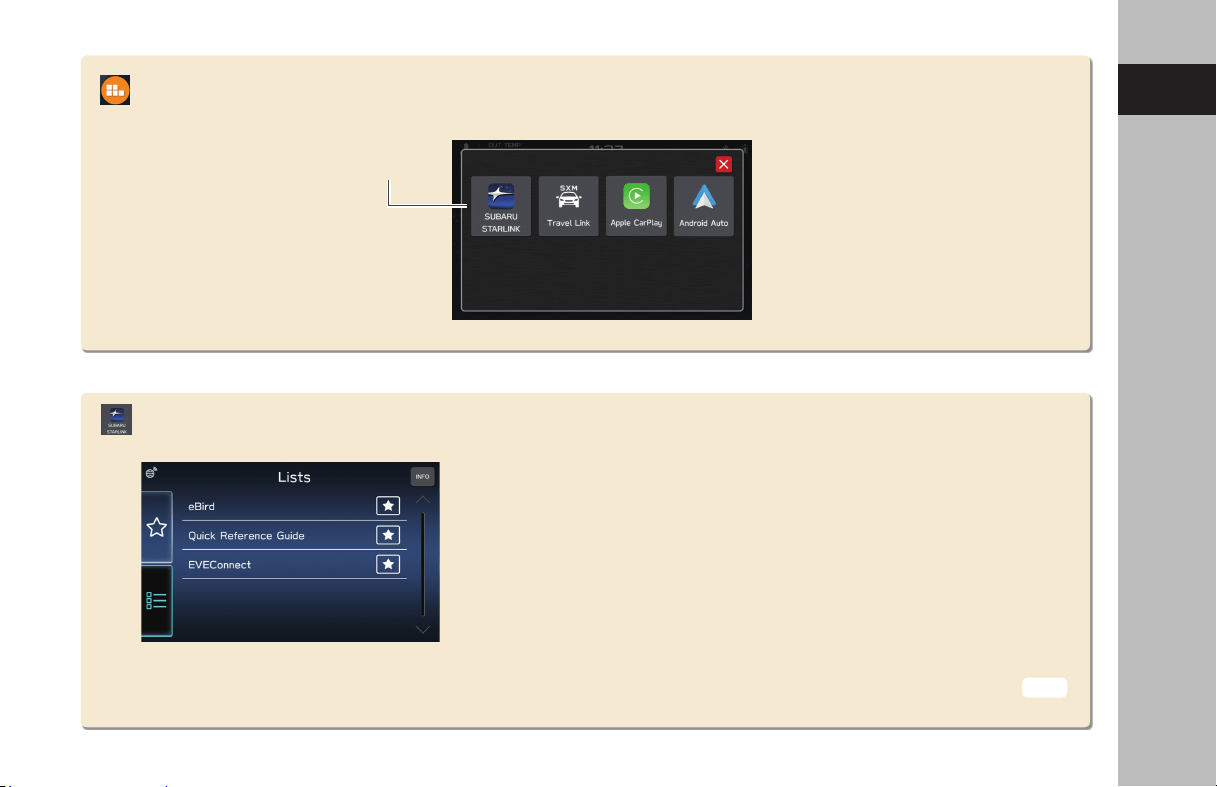
Apps SCREEN
Usable
applications
The SUBARU STARLINK app allows users to connect a smartphone to
the system, using either Bluetooth or undamaged genuine USB cable
(recommended), and access to various music, navigation, vehicle guide
applications, and much more.
Download the SUBARU STARLINK app from the Apple App Store or
Google Play Store.
To use the SUBARU STARLINK application, connect your iPhone to the
USB port or via Bluetooth, or connect your Android device via Bluetooth.
SUBARU STARLINK
P.115
BASIC FUNCTION
28
Android Auto
Apple CarPlay
Apple CarPlay can be used to view Apple Maps, play music, and place calls by
connecting an Apple CarPlay device to the system. Supported applications can
also be run.
To use the Apple CarPlay application, connect an Apple CarPlay device to the
USB port with undamaged genuine USB cable.
For details on the services or the operations, check the Apple CarPlay site
(https://www.apple.com/ios/carplay/).
Android Auto can be used to view Google Maps, play music, and place calls by
connecting your Android device to the system, using USB cable and Bluetooth.
Supported applications can also be run.
To use the Android Auto application, connect your Android device to the USB port
with undamaged genuine USB cable.
For details on the services or the operations, check the Android Auto site
(https://www.android.com/auto/) and (https://support.google.com/androidauto/).
P.121
P.124
BASIC FUNCTION
29
1
Quick Guide (DUAL 7.0-INCH DISPLAY SYSTEM)
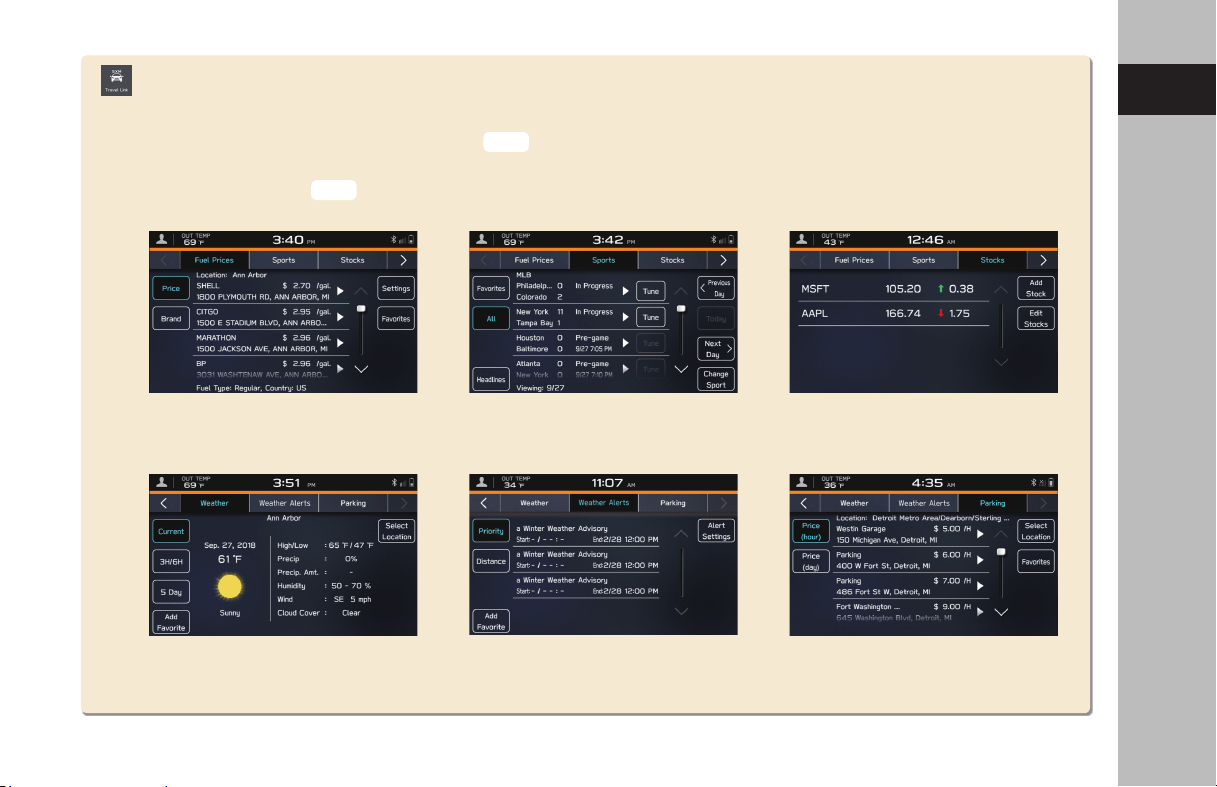
SiriusXM Travel Link is a service provided by SiriusXM® Radio, and can be used to view information on fuel prices, sports,
stocks, weather, weather alerts and parking.
To receive the data service information in the vehicle, a subscription to the SiriusXM® Radio Service is necessary
following a free trial.
SiriusXM Travel Link
Fuel prices
Weather
Sports
Weather alerts
Stocks
Parking
P.150
P.127

BASIC FUNCTION
30
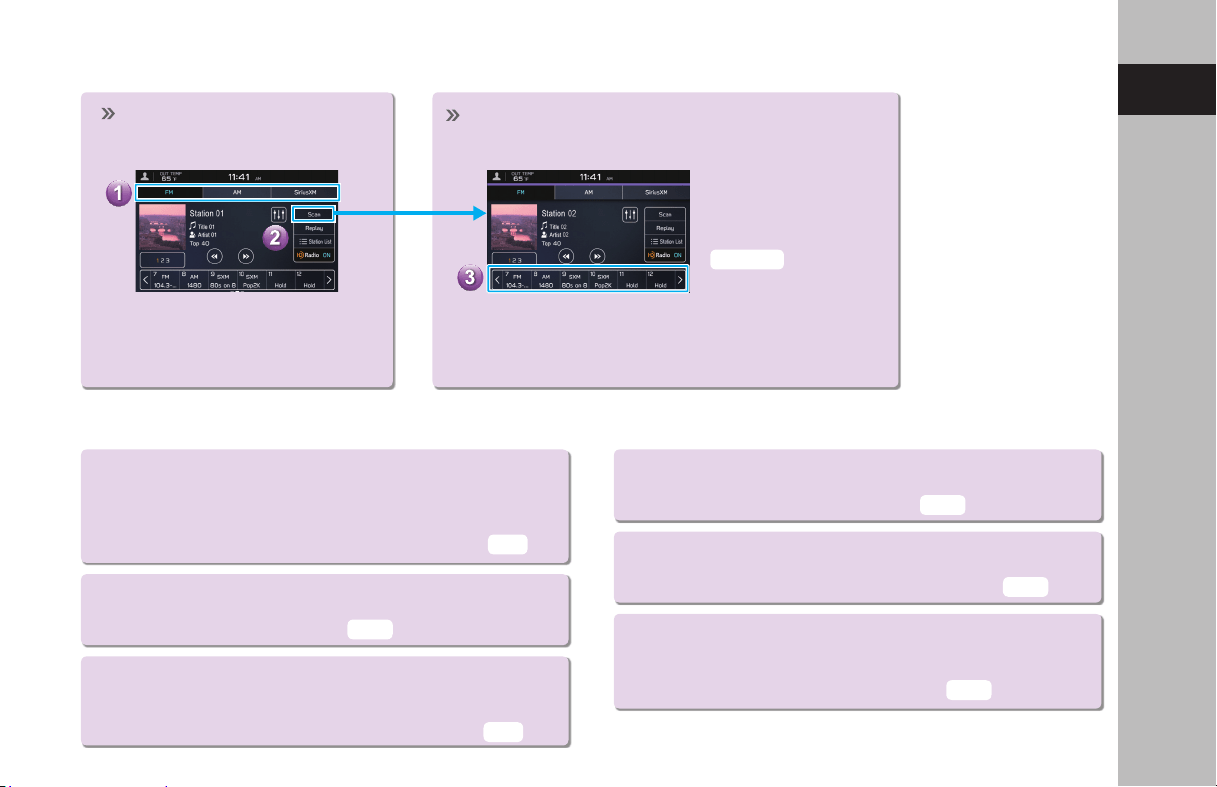
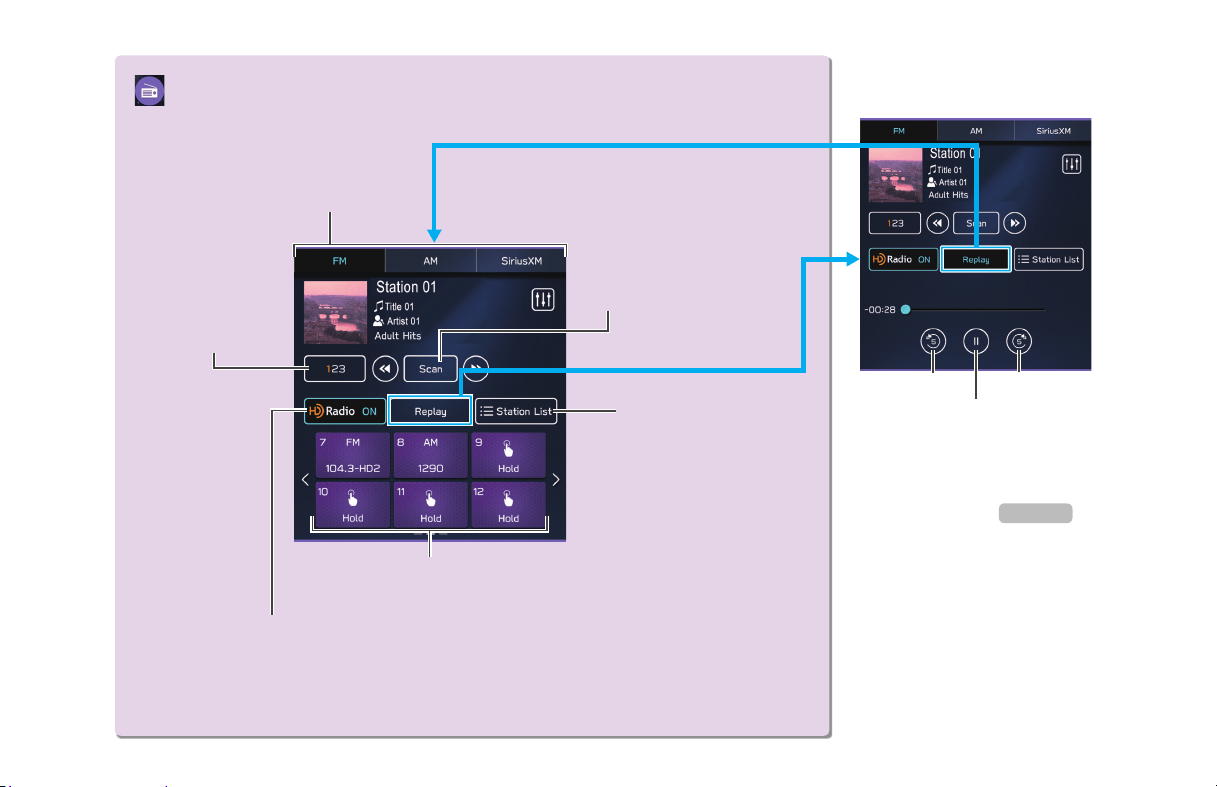
Radio SCREEN
Change
radio mode
Select to scan for
receivable stations/
channels.
Select to turn HD Radio
mode on/o (AM/FM).
Select to display a list
of receivable stations
(AM/FM).
Preset stations/channels
Select to change multicast
channels available (FM).
PAUSE AND PLAYBACK LIVE
RADIO
Depending on the radio
broadcast, the broadcast can
be temporarily saved and
played back later.
Skip backward Skip forward
Pause/play
P.147,153
BASIC FUNCTION
31
1
Quick Guide (DUAL 7.0-INCH DISPLAY SYSTEM)
- Operation Flow: Presetting a Radio Station -
USEFUL SiriusXM® Radio FUNCTIONS
● Smart Favorites:
The rst 10 channels which are registered to a preset
button will automatically be registered to Smart Favorites.
Channels registered to Smart Favorites can be cached and
played back as desired within a certain amount of time.
● Tune Scan:
Channels registered to Smart Favorites can be
scanned to nd a desired channel.
● Tune Start:
When this function is on, channels registered as Smart Favorites
will be cached, and when the channel is changed, the song
on that channel can be listened to from the beginning.
● Trac & Weather Now:
If a city is selected, trac information and
weather news for that city can be heard.
● Favorite Teams:
If you have registered your favorite sports teams, you can
be informed of when games start and their progress.
● TuneMix:
If multiple channels for which TuneMix is possible
have been registered as TuneMix channels, songs from
these channels can be listened to randomly.
Select and hold one of the
preset buttons.
Mix preset function
Multiple stations can be
registered as presets. (AM,
FM or SiriusXM® Radio)
Select the radio band and the
radio station.
A valid subscription to SiriusXM®
Radio is required to receive satellite
radio service.
Register the radio station.
P.144,153
P.149
P.156
P.157
P.93
P.93
P.149
BASIC FUNCTION
32
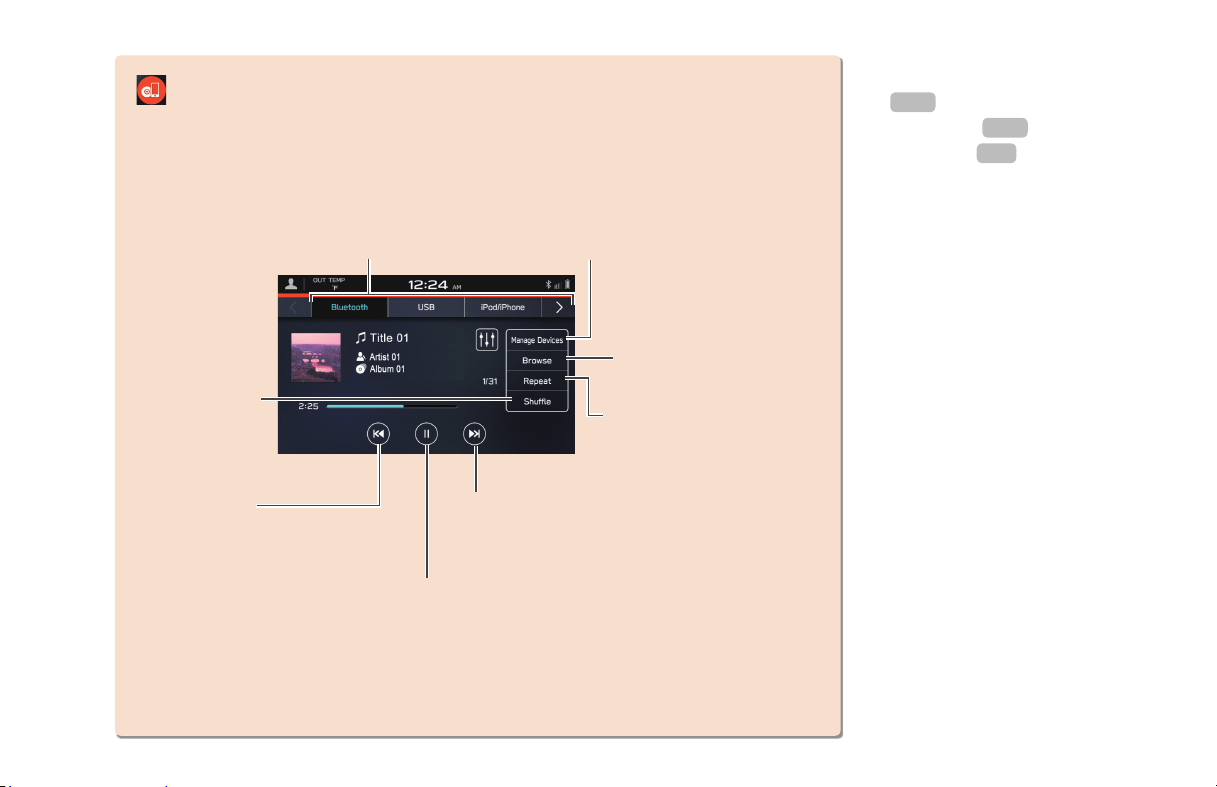
Media SCREEN
Change media source
Random
playback on/o
Change tracks
Select and hold to fast rewind
Change to other
Bluetooth audio device/
register new device
(Bluetooth audio)
Change tracks
Select and hold
to fast forward
Audio CDs*:
Repeat all tracks → repeat
current track → cancel repeat
Media other than audio
CDs:
Repeat current album/folder
→ repeat current track →
cancel repeat
Pause/play
Playback tracks and
programs, etc. in a
variety of playback
modes
SUPPORTED MEDIA
CD*
USB/iPod/iPhone
Bluetooth audio
P.177
P.180
P.75
*: If equipped with a CD player

BASIC FUNCTION
33
1
Quick Guide (DUAL 7.0-INCH DISPLAY SYSTEM)
- Operation Flow: Using Playback Modes -
Display the playback mode list. Select the playback mode. Play a track.
Depending on the audio source, several
items from these categories are displayed
in a list.
LOADING AND UNLOADING A DISC* CONNECTING A USB
MEMORY DEVICE/
PORTABLE DEVICE
*: If equipped with a CD player
Loading a disc Unloading a disc
Insert the disc with the label side
facing the front of the vehicle.

BASIC FUNCTION
34
Settings SCREEN
Phone
P.77
Sound
SCROLL
P.90
General
SCROLL
P.83
Radio
P.91
SCROLL
BASIC FUNCTION
35
1
Quick Guide (DUAL 7.0-INCH DISPLAY SYSTEM)
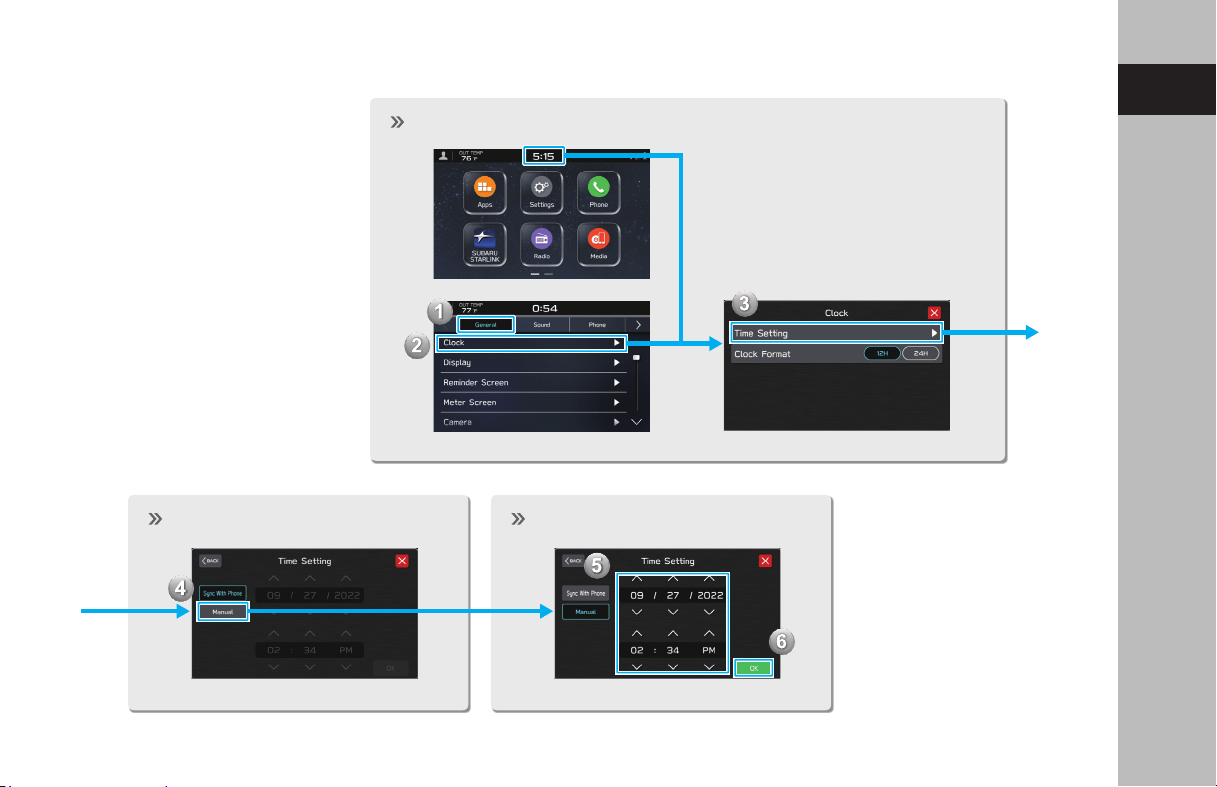
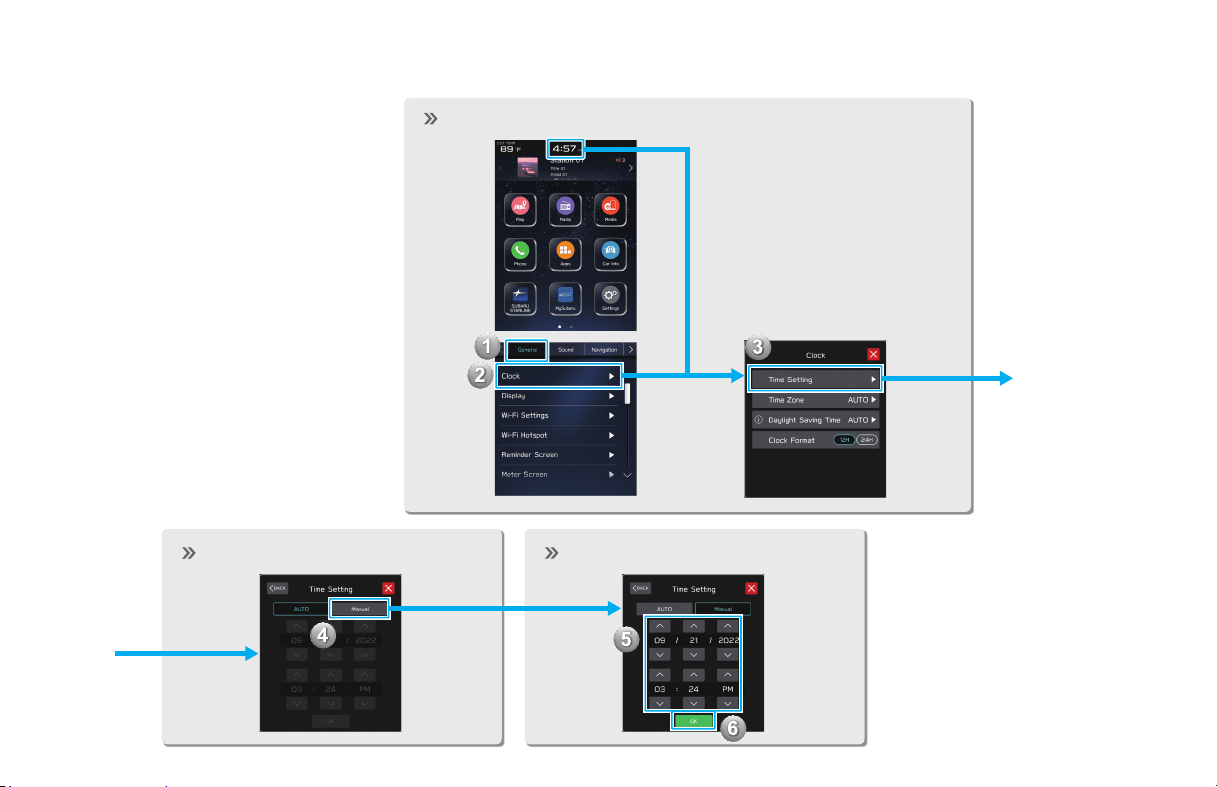
- Operation Flow: Setting the Clock Manually -
Under normal conditions,
when a Bluetooth phone is
connected to the system,
the clock will be adjusted
automatically. If the clock is
not adjusted automatically
or a Bluetooth phone is not
connected, it is necessary to
adjust the clock manually.
Display the clock settings screen.
Select the manual mode. Adjust the clock.
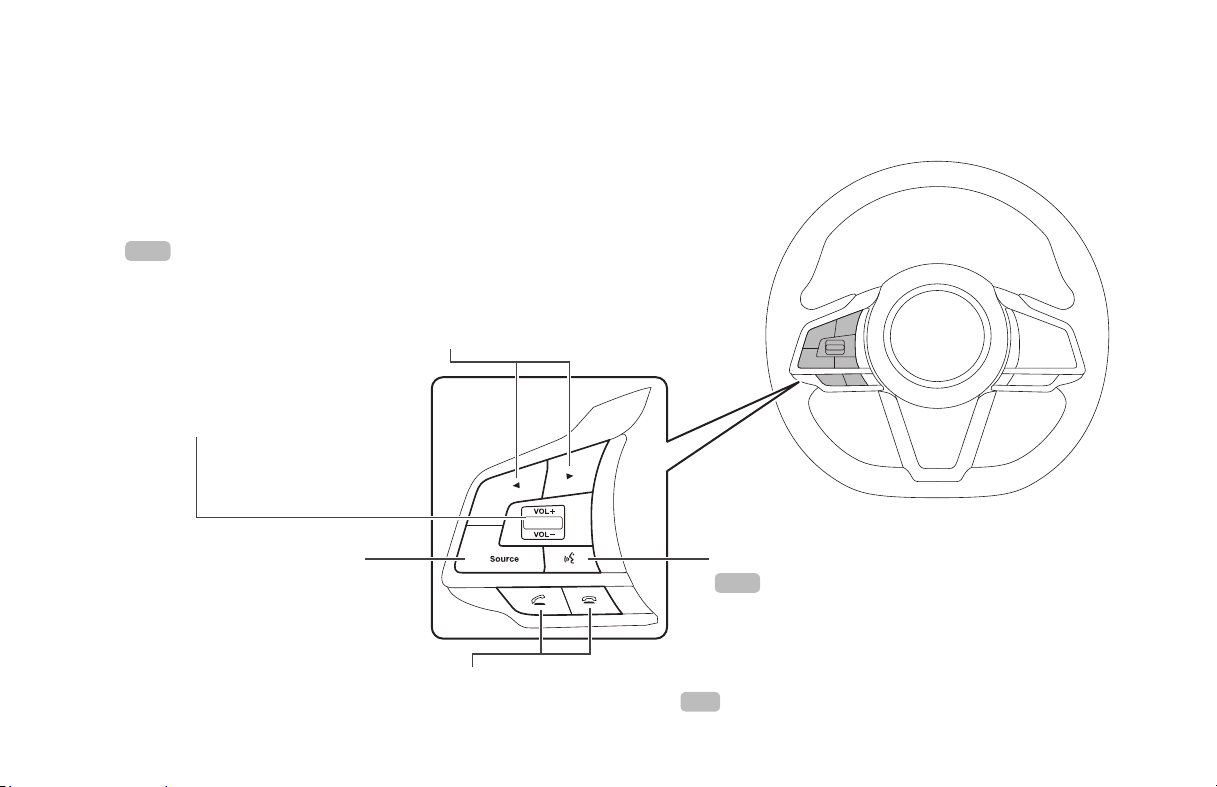
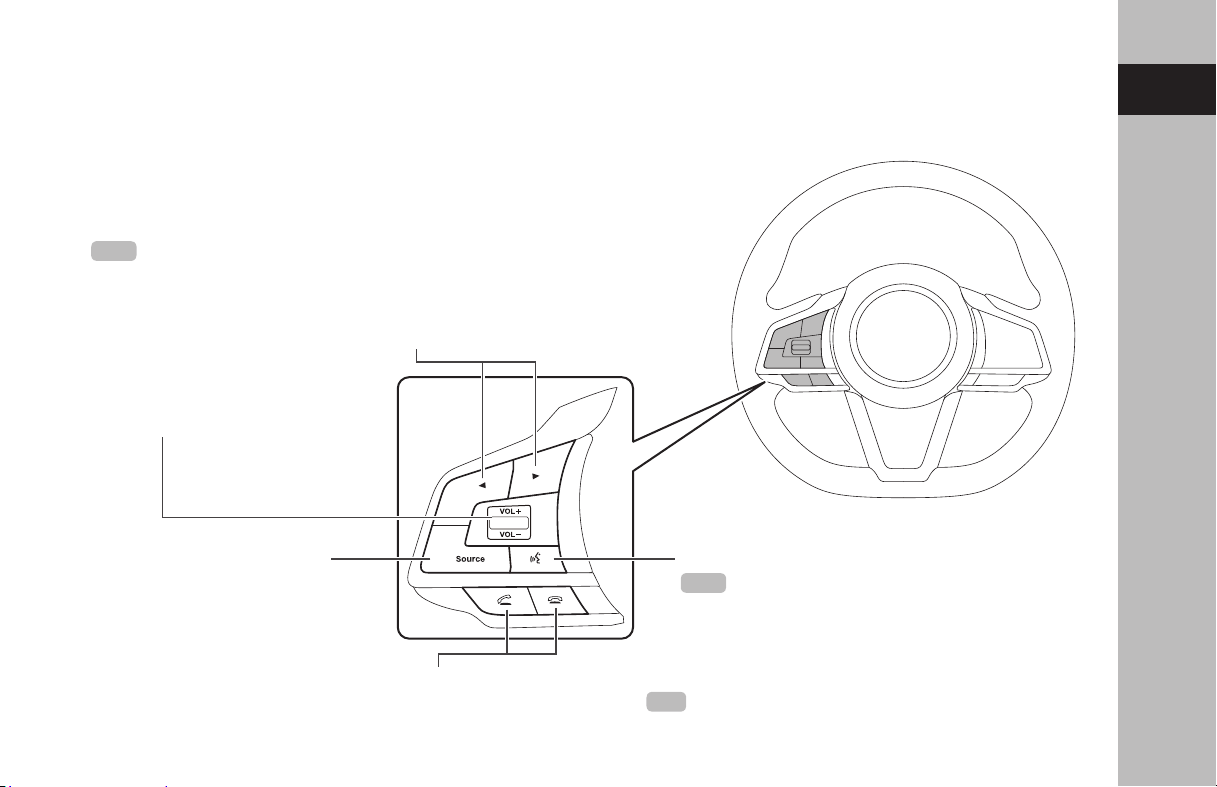
STEERING WHEEL CONTROLS
36
Press: Start the voice recognition system
Press and hold: Start the Apple CarPlay/
Android Auto voice recognition function
STEERING WHEEL CONTROLS
STEERING WHEEL CONTROLS
Some parts of the audio system
can be controlled using
the steering wheel controls.
RADIO
Press: Preset station/channel up/down
Press and hold: Scan and stop at the
rst received station when the switch is
released
MEDIA
Press: Change a track/le
Press and hold: Fast forward/rewind
Press: Volume up/down
Press and hold: Volume
up/down continuously
Press: Receive/end a call without taking
your hands o the steering wheel
Press: Turn on the audio
system or change the audio
source mode
Press and hold: Turn o the
audio system
P.98
P.173
P.218
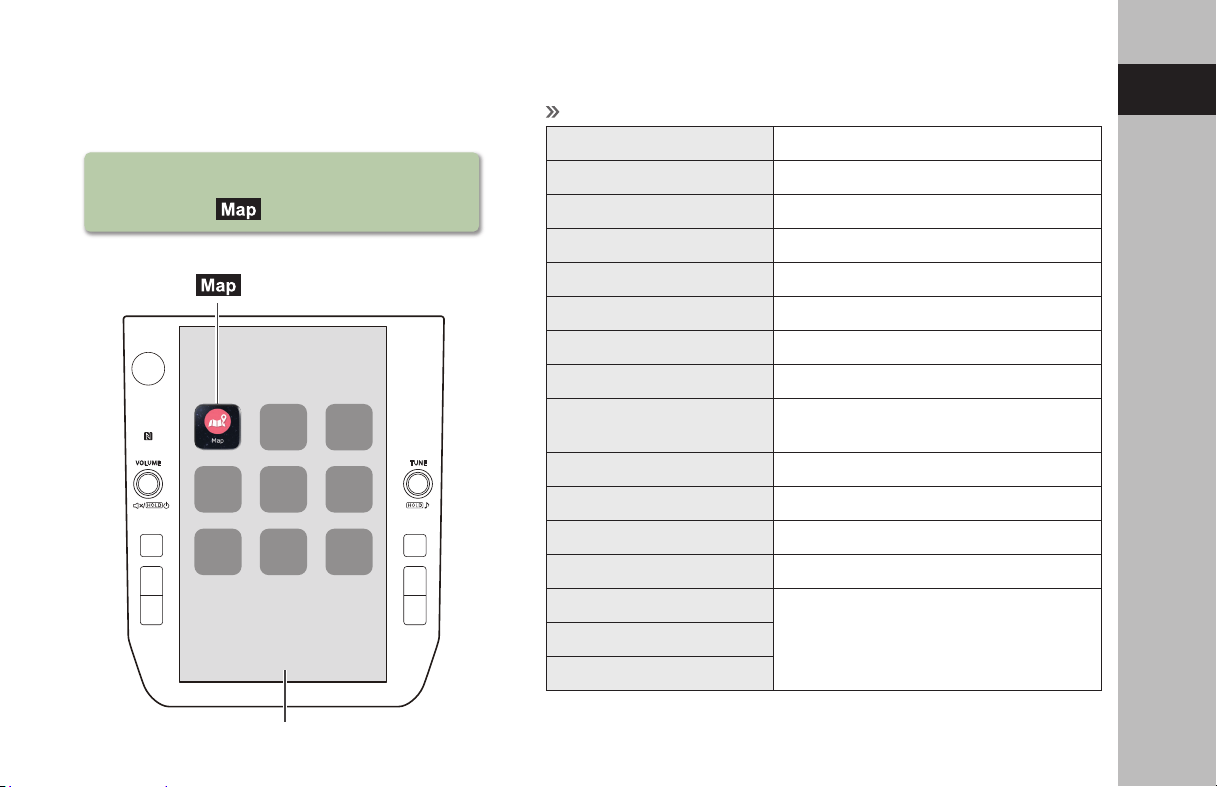
FUNCTION OVERVIEW
37
1
Quick Guide (11.6-INCH DISPLAY SYSTEM/11.6-INCH DISPLAY WITH NAVI SYSTEM)
FUNCTION OVERVIEW
FUNCTION OVERVIEW
- 11.6-inch touch screen
-
(Map) button*
1
*
2
Features:
(Map) button*
1
*
2
11.6-inch touch screen
MAIN FUNCTIONS
Pairing (Bluetooth 4.2) P.42
Navigation system*
1
P.50
Apps P.56
Apple CarPlay P.121
Android Auto P.124
AM/FM radio P.52
HD Radio receiver P.145
SiriusXM® radio P.53
Media operation
CD*
3
: P.158 USB: P.160 iPod/iPhone: P.162
Bluetooth audio: P.165 AUX: P.168
Phone P.46
Voice recognition system P.218
NFC P.42
Steering wheel controls P.61
Rear view camera
Refer to the vehicle Owner’s Manual.Car settings/informations
Climate controls
*
1
: If equipped
*
2
: Displayed position may dier
*
3
: If equipped with a CD player

MAIN PRODUCT FEATURES
38
MAIN PRODUCT FEATURES
Adoption of intuitive and easy-to-use
smartphone-like graphical user interface
Meter cluster linked display
A large 11.6-inch touch screen display has
been adopted. Information can be displayed
seamlessly between this display and the display
in the meter cluster.
Function description display function
Function descriptions or operation hints can be
displayed when an
icon displayed next to the
name of a function.

MAIN PRODUCT FEATURES
39
1
Quick Guide (11.6-INCH DISPLAY SYSTEM/11.6-INCH DISPLAY WITH NAVI SYSTEM)
Customized home screen layout
Frequently used functions and operations can be added to
the home screen.
Example: For calling specic
phone numbers, listening to
specic radio stations, etc.
The position of screen buttons can be changed by selecting and
holding it, then dragging it to the desired position.
System and Bluetooth phone / device pairing
Functions such as hands-free
and applications can be used
by connecting the system with
Bluetooth phones / devices
wirelessly.
Apple CarPlay / Android Auto
Support for Apple CarPlay
and Android Auto allows
access to functions such
as maps, phone calls, and
music.
P.42
Expandable map screen*
The map screen can be expanded to ll more of the
display.
Rough destination search function*
Start a search with a variety of words such as addresses,
facility names, intersection names, or latitude/longitude.
Displays search prediction
· Search results are predicted
and candidates displayed
even if only partial words are
known
· Searches can even be
performed with multiple
keywords.
*: If equipped
P.195
P.72
P.121 P.124

BASIC FUNCTION
40
TOUCH SCREEN
Operations are performed by
touching the touch screen directly
with your nger.
Drag Pinch*
*: If equipped
Status display area
Information display area
Refer to the vehicle Owner’s Manual.
BASIC FUNCTION
OVERVIEW
Turn the knob to adjust the volume.
Press the knob to turn the volume
mute on/o.
Press and hold the knob until a
message is displayed, and then select
OK
(OK) or wait a few seconds for
the audio system to turn o. Press
and hold the knob to turn the audio
system on.
Press and hold the knob for 10
seconds or longer to reset the
system if the touch screen becomes
unresponsive during operation or if
any other system error occurs.
Turn the knob to select a
radio station or skip to the
next or previous track/le.
Press and hold the knob
to display the sound
customization screen.
Display the home screen.
Climate control display area
Refer to the vehicle Owner’s Manual.
Set a driver prole
Display the vehicle settings screen.
Refer to the vehicle Owner’s Manual.
P.66
P.138
P.71
P.44
*: If equipped
BASIC FUNCTION
41
1
Quick Guide (11.6-INCH DISPLAY SYSTEM/11.6-INCH DISPLAY WITH NAVI SYSTEM)
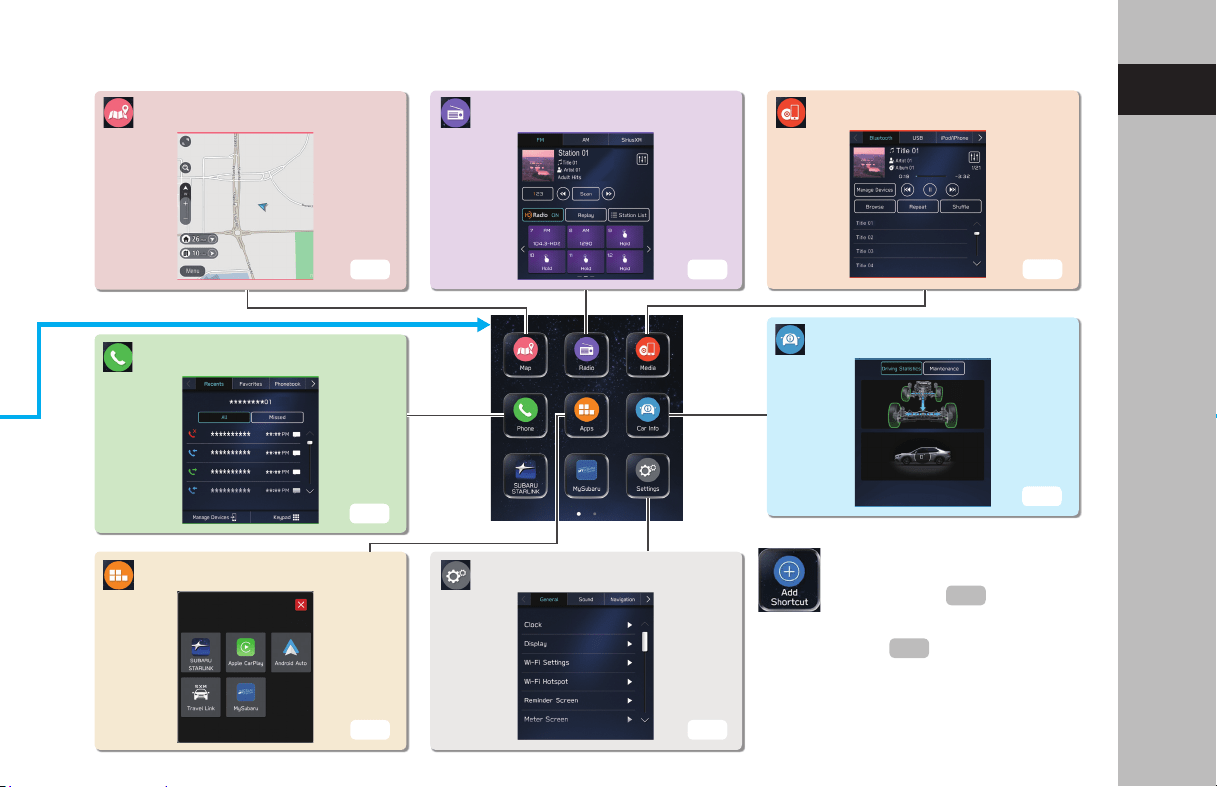
HOME SCREEN
Frequently used functions and
operations can be added to the
home screen.
By connecting an Apple CarPlay device
or Android device to the USB port, an
Apple CarPlay or Android Auto icon
will display on the home screen.
Button positions can be changed
freely.
Radio SCREEN
Apps SCREEN
Settings SCREEN
Media SCREEN
Phone SCREEN
Map SCREEN*
P.46
P.50
P.59P.56
P.54
P.52
Car information SCREEN
P.45
*: If equipped
P.72
P.72
BASIC FUNCTION
42
PAIRING THE SYSTEM WITH A Bluetooth PHONE/DEVICE
Display the phone
screen.
Prepare the
Bluetooth phone/
device to be
paired.
Operate the Bluetooth phone/device.
Turn the Bluetooth function of the
Bluetooth phone/device ON and
select the vehicle’s device name.
Register the
Bluetooth phone/
device.
If unable to pair, check
whether your Bluetooth
phone/device is compatible
with the system.
If a conrmation message
appears asking whether to
transfer the phone’s contact
data to the system, select
the appropriate button.
When using an NFC compatible device, it is not necessary to perform the above
procedure.
Pairing can be performed by holding the device against the NFC logo of the
audio system with the NFC setting on.
BASIC FUNCTION
43
1
Quick Guide (11.6-INCH DISPLAY SYSTEM/11.6-INCH DISPLAY WITH NAVI SYSTEM)
ADDING A Bluetooth PHONE/DEVICE
Adding from the
phone screen
Adding from the
Bluetooth audio screen
Adding from the
settings screen

BASIC FUNCTION
44
Add a new prole.
Registering a Bluetooth phone
Enter a name.
Procedure complete.
CREATE A DRIVER PROFILE
Select a language.
BASIC FUNCTION
45
1
Quick Guide (11.6-INCH DISPLAY SYSTEM/11.6-INCH DISPLAY WITH NAVI SYSTEM)
Displays the operating status of vehicle
functions, vehicle status, and vehicle
inclination.
Refer to the vehicle Owner’s Manual.
Setup and display vehicle part
replacement intervals.
Refer to the vehicle Owner’s Manual.
Car information SCREEN
BASIC FUNCTION
46
Phone SCREEN
Directly input a number
to place a call
Call or send a text message* to
a registered favorite
Call or send a text message* to
a recent contact
Call or send a text message* to a
contact in the phonebook on the
Bluetooth connected phone
Check or reply* to
messages/place calls from
received message list
*: If available (for iOS only reception possible)
P.102
P.102,109
P.101,109
P.103,109
P.108,109,110
BASIC FUNCTION
47
1
Quick Guide (11.6-INCH DISPLAY SYSTEM/11.6-INCH DISPLAY WITH NAVI SYSTEM)
- Operation Flow: Receiving Calls and Using the Bluetooth Phone -
Incoming call screen is displayed. In-call screen is displayed.
End call
Mute the
connected
smartphone’s
voice
Transfer call to
Bluetooth phone
Keypad
Switch to call
with other party
In-call screen display and operation may dier, or may
not be possible depending on the Bluetooth phone used.
- Operation Flow: Placing Calls from the Phonebook -
Select call recipient from phonebook.
The notication setting on the Bluetooth phone may need to be activated in
order to download the phonebook. If the phonebook download setting is o
and a phonebook has not been downloaded, a message will be displayed and
the phonebook of the connected Bluetooth phone can be downloaded.
Select number for making call.
Place call
P.82

BASIC FUNCTION
48
- Operation Flow: Receiving a Message* -
Incoming text screen is displayed. Message screen is displayed.
Having messages
read out
Calling the message
sender
Replying to a message
When there are unread messages in the message inbox
*: If available (for iOS only reception possible)
BASIC FUNCTION
49
1
Quick Guide (11.6-INCH DISPLAY SYSTEM/11.6-INCH DISPLAY WITH NAVI SYSTEM)
- Operation Flow: Sending a Message* from the Phonebook -
Select message.
Send message.
Select a contact from phonebook.
The notication setting on the Bluetooth phone may need to be activated
in order to download the phonebook. If the phonebook download setting is
o and a phonebook has not been downloaded, a message will be displayed
and the phonebook of the connected Bluetooth phone can be downloaded.
Select the message icon next to
the desired number.
*: If available (for iOS only reception possible)
P.82
BASIC FUNCTION
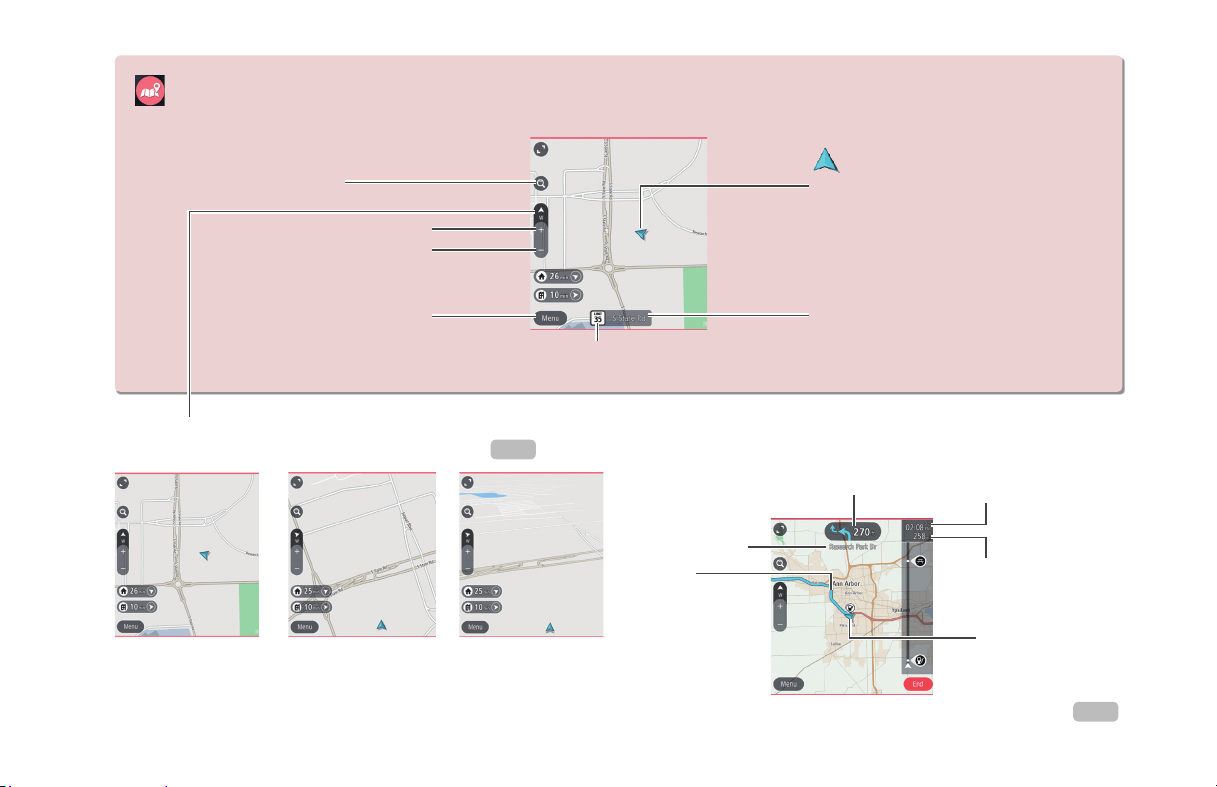
50
Map SCREEN*
CURRENT POSITION MAP
Current vehicle position
(facing direction of travel)
Menu button
Zoom in
Search by address or category
(Points of Interest)
Zoom out
Speed limit
Current street
Touch the current street name to
register your current location as
a favorite or recalculate the route
avoiding that road.
The orientation of the map can be changed between
2D north-up, 2D heading-up and 3D heading-up.
2D North-up screen 2D Heading-up screen 3D Heading-up screen
ROUTE GUIDANCE SCREEN
Next street name
Guidance
route
Current position
Distance to the next turn
and an arrow indicating the
turning direction
Remaining distance and/
or remaining time
Route guidance
P.189
P.203
*: If equipped
Estimated time of arrival
BASIC FUNCTION
51
1
Quick Guide (11.6-INCH DISPLAY SYSTEM/11.6-INCH DISPLAY WITH NAVI SYSTEM)
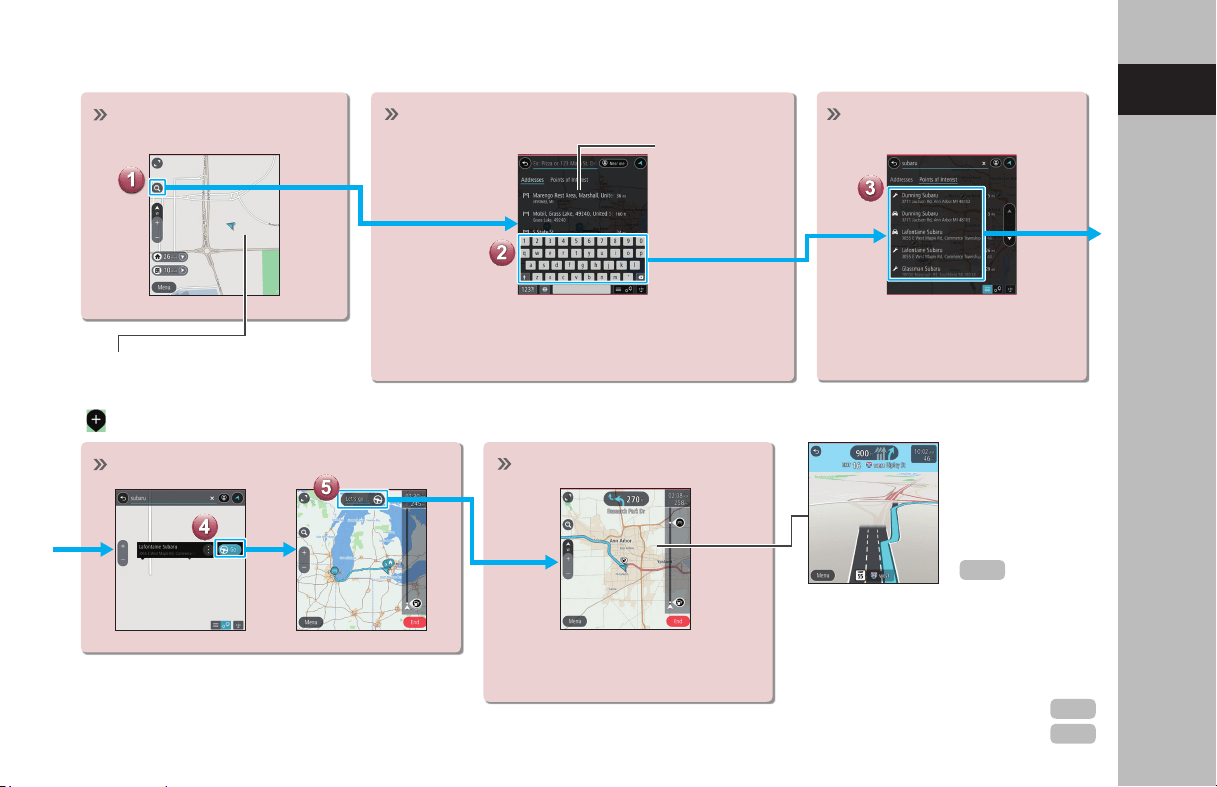
- Operation Flow: Route Guidance -
Display the destination
search menu.
Destinations can also be set directly
from the Map screen by selecting and
holding at the desired position until
is displayed.
Search for your destination.
Start a search by typing an address or category
(Points of Interest).
Predicted search
results will
automatically
appear as you
type.
Select your destination.
Destinations matching the
search words are displayed in
a list.
Start driving.
Route guidance starts.
The travel route is displayed,
and voice guidance starts.
The screen display
automatically
changes to
display travel lanes
at expressway
junctions, etc.
JUNCTION SCREEN
RETURNING HOME
If you register an address as Home, it
can be quickly set as a destination.
Register an address as Home
Setting Home as the destination
P.204
P.200
P.186
BASIC FUNCTION
52
Change
radio mode
Select to scan for
receivable stations/
channels.
Select to turn HD Radio
mode on/o (AM/FM).
Select to display a list
of receivable stations
(AM/FM).
Preset stations/channels
Select to change
multicast channels
available (FM).
Radio SCREEN
PAUSE AND PLAYBACK LIVE
RADIO
Depending on the radio
broadcast, the broadcast can
be temporarily saved and
played back later.
Skip backward Skip forward
Pause/play
P.147,153

BASIC FUNCTION
53
1
Quick Guide (11.6-INCH DISPLAY SYSTEM/11.6-INCH DISPLAY WITH NAVI SYSTEM)
- Operation Flow: Presetting a Radio Station -
Select the radio band and the
radio station.
A valid subscription to SiriusXM®
Radio is required to receive satellite
radio service.
Select and hold one of the
preset buttons.
Mix preset function
Multiple stations can be
registered as presets. (AM,
FM or SiriusXM® Radio)
Register the radio station.
● Smart Favorites:
The rst 10 channels which are registered to a preset
button will automatically be registered to Smart Favorites.
Channels registered to Smart Favorites can be cached and
played back as desired within a certain amount of time.
● Tune Scan:
Channels registered to Smart Favorites can be
scanned to nd a desired channel.
● Tune Start:
When this function is on, channels registered as Smart Favorites
will be cached, and when the channel is changed, the song
on that channel can be listened to from the beginning.
● Trac & Weather Now:
If a city is selected, trac information and
weather news for that city can be heard.
● Favorite Teams:
If you have registered your favorite sports teams, you can
be informed of when games start and their progress.
● TuneMix:
If multiple channels for which TuneMix is possible
have been registered as TuneMix channels, songs from
these channels can be listened to randomly.
USEFUL SiriusXM® Radio FUNCTIONS
P.144,153
P.149
P.156
P.157
P.93
P.93
P.149

BASIC FUNCTION
54
Media SCREEN
Change media source
Random
playback on/o
Change tracks
Select and hold to
fast rewind
Change to other
Bluetooth audio device/
register new device
(Bluetooth audio)
Change tracks
Select and hold to fast
forward
Pause/play
Playback tracks and
programs, etc. in a
variety of playback
modes
SUPPORTED MEDIA
*: If equipped with a CD player
Audio CDs*:
Repeat all tracks → repeat
current track → cancel repeat
Media other than audio
CDs:
Repeat current album/folder
→ repeat current track →
cancel repeat
CD*
USB/iPod/iPhone
Bluetooth audio
P.177
P.180
P.75
BASIC FUNCTION
55
1
Quick Guide (11.6-INCH DISPLAY SYSTEM/11.6-INCH DISPLAY WITH NAVI SYSTEM)
- Operation Flow: Using Playback Modes -
Display the playback mode list. Select the playback mode. Play a track.
Depending on the audio source, several
items from these categories are displayed
in a list.
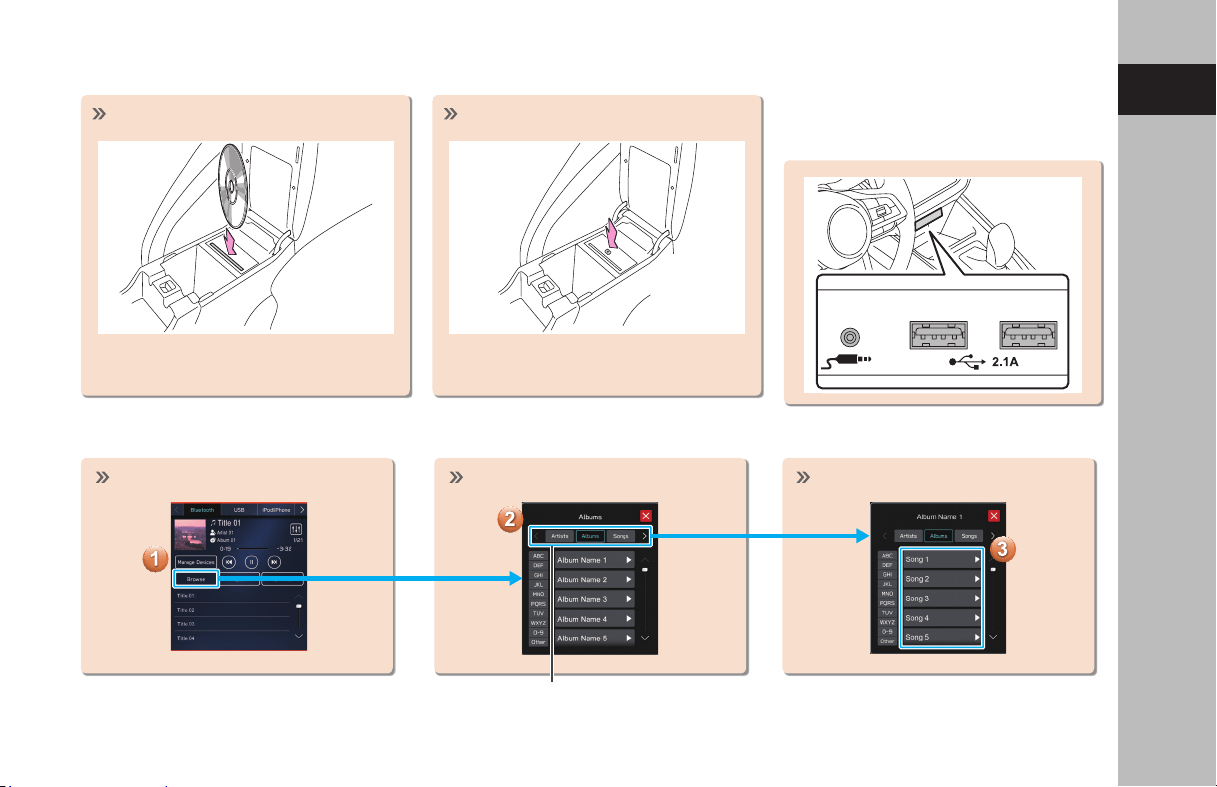
LOADING AND UNLOADING A DISC* CONNECTING A USB
MEMORY DEVICE/
PORTABLE DEVICE
*: If equipped with a CD player
Loading a disc Unloading a disc
Insert the disc with the label side
facing the front of the vehicle.

BASIC FUNCTION
56
Apps SCREEN
Usable
applications
The SUBARU STARLINK app allows users to connect a smartphone to the system,
using either Bluetooth or undamaged genuine USB cable (recommended), and
access to various music, navigation, vehicle guide applications, and much more.
Download the SUBARU STARLINK app from the Apple App Store or Google Play
Store.
To use the SUBARU STARLINK application, connect your iPhone to the USB port or
via Bluetooth, or connect your Android device via Bluetooth.
SUBARU STARLINK
P.115

BASIC FUNCTION
57
1
Quick Guide (11.6-INCH DISPLAY SYSTEM/11.6-INCH DISPLAY WITH NAVI SYSTEM)
Android Auto
Apple CarPlay
Apple CarPlay can be used to view Apple Maps, play music, and place calls by connecting
an Apple CarPlay device to the system. Supported applications can also be run.
To use the Apple CarPlay application, connect an Apple CarPlay device to the USB port
with undamaged genuine USB cable.
For details on the services or the operations, check the Apple CarPlay site
(https://www.apple.com/ios/carplay/).
Android Auto can be used to view Google Maps, play music, and place calls by
connecting your Android device to the system, using USB cable and Bluetooth.
Supported applications can also be run.
To use the Android Auto application, connect your Android device to the USB port with
undamaged genuine USB cable.
For details on the services or the operations, check the Android Auto site
(https://www.android.com/auto/) and (https://support.google.com/androidauto/).
MySubaru
Access SUBARU STARLINK from “SUBARU STARLINK Safety and Security” for a variety of
remote services.
Refer to the Owner’s Manual supplement for “SUBARU STARLINK Safety and Security”
for details.
P.121
P.124
BASIC FUNCTION
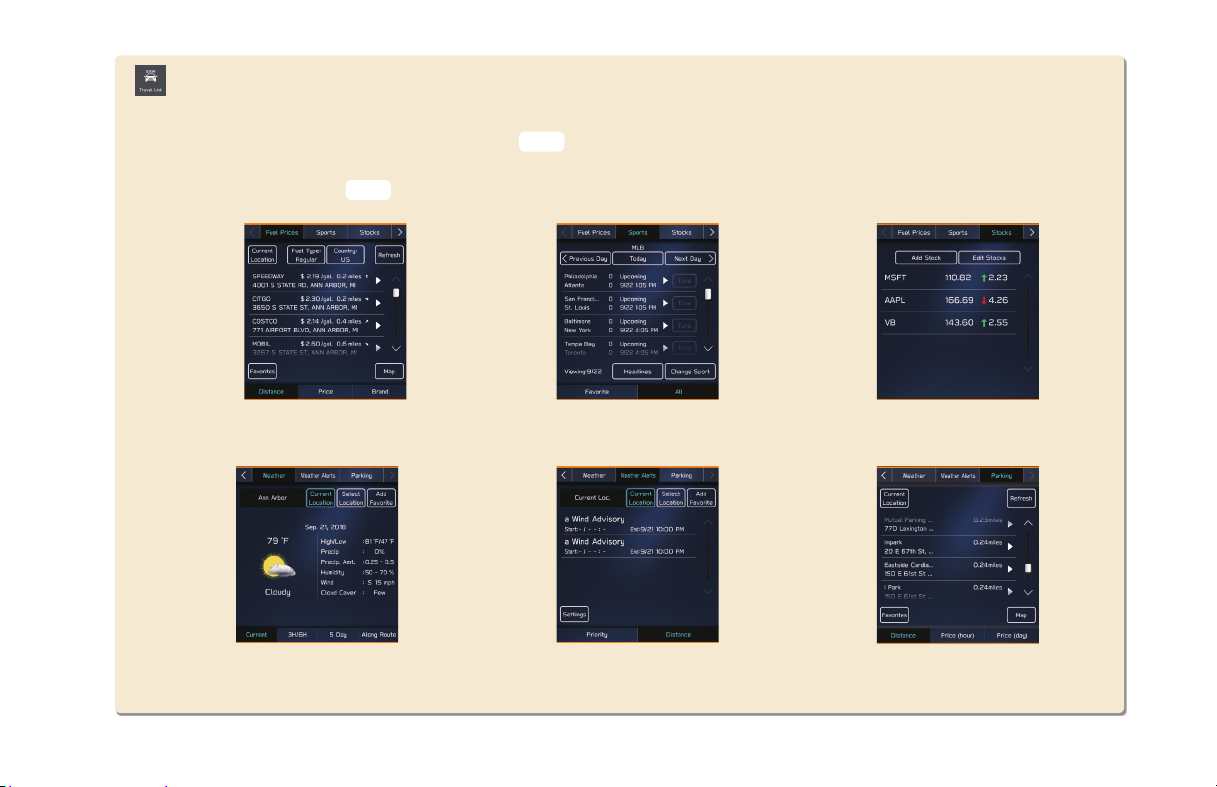
58
SiriusXM Travel Link is a service provided by SiriusXM® Radio, and can be used to view information on fuel prices, sports,
stocks, weather, weather alerts and parking.
To receive the data service information in the vehicle, a subscription to the SiriusXM® Radio Service is necessary
following a free trial.
SiriusXM Travel Link
Fuel prices
Weather
Sports
Weather alerts
Stocks
Parking
P.150
P.127
BASIC FUNCTION
59
1
Quick Guide (11.6-INCH DISPLAY SYSTEM/11.6-INCH DISPLAY WITH NAVI SYSTEM)
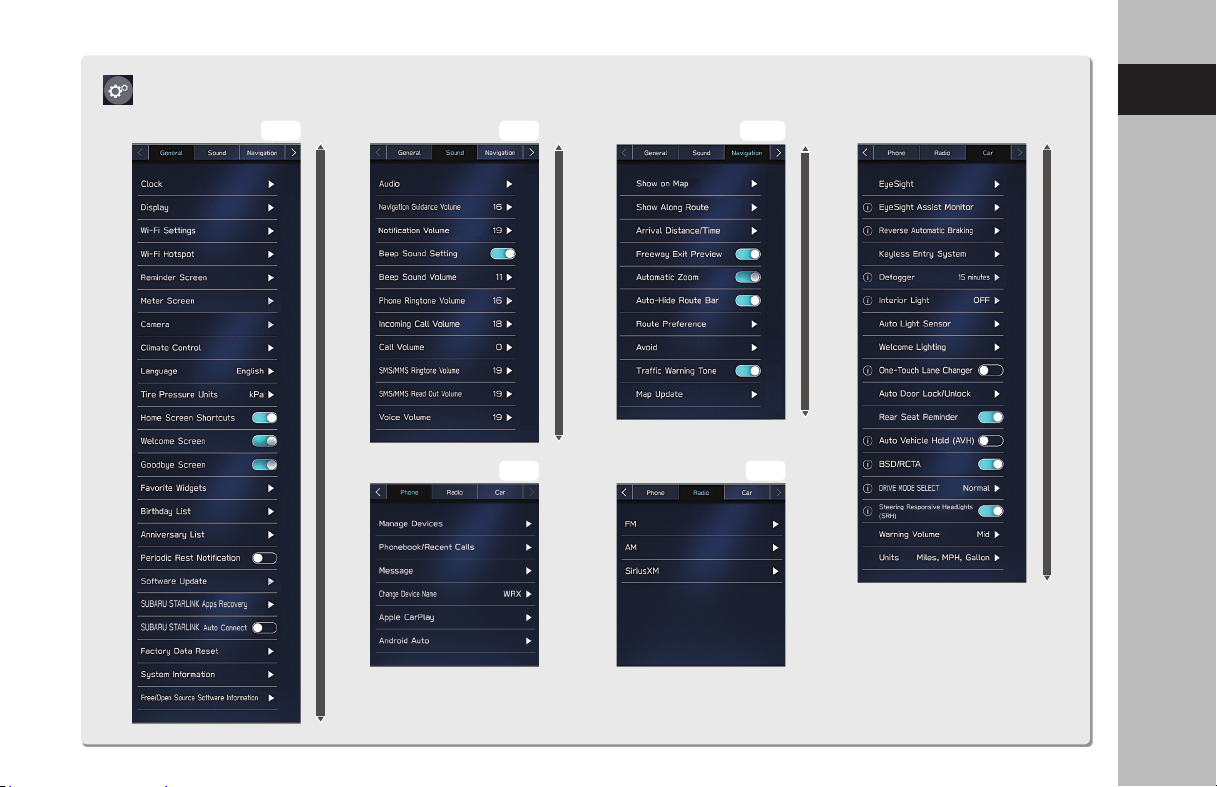
Settings SCREEN
Navigation
SCROLL
Sound
SCROLL
P.207
General
SCROLL
Phone Radio
Car*
SCROLL
P.77
P.90P.83
P.91
*: For settings related to EyeSight, refer to the Owner’s Manual supplement
for the EyeSight system.
For all other functions and settings, refer to the vehicle Owner’s Manual.
BASIC FUNCTION
60
- Operation Flow: Setting the Clock Manually -
Under normal conditions,
the clock is adjusted
automatically when the
system receives GPS
signals*
1
*
2
or when a
Bluetooth phone is connected
to the system*
3
. If the clock is
not adjusted automatically,
it is necessary to adjust the
clock manually.
Display the clock settings screen.
Select the manual mode. Adjust the clock.
*
1
: 11.6-inch display with Navi system
*
2
: 11.6-inch display system with SUBARU
STARLINK Safety and Security
*
3
: 11.6-inch display system without
SUBARU STARLINK Safety and Security
STEERING WHEEL CONTROLS
61
1
Quick Guide (11.6-INCH DISPLAY SYSTEM/11.6-INCH DISPLAY WITH NAVI SYSTEM)
STEERING WHEEL CONTROLS
STEERING WHEEL CONTROLS
Press: Start the voice recognition system
Press and hold: Start the Apple CarPlay/
Android Auto voice recognition function
Some parts of the audio system
can be controlled using
the steering wheel controls.
RADIO
Press: Preset station/channel up/down
Press and hold: Scan and stop at the
rst received station when the switch is
released
MEDIA
Press: Change a track/le
Press and hold: Fast forward/rewind
Press: Volume up/down
Press and hold: Volume
up/down continuously
Press: Receive/end a call without taking
your hands o the steering wheel
Press: Turn on the audio
system or change the audio
source mode
Press and hold: Turn o the
audio system
P.98
P.173
P.218

MEMO
62

Basic Function
63
Basic Function
Basic Information Before Operation
64
Initial Screen
64
Initial Screen
64
Loading And Unloading A Disc
65
Loading A Disc
65
Unloading A Disc
65
Connecting And Disconnecting
A USB Memory Device/Portable Device
66
Connecting A Device
66
Touch Screen Gestures
66
Touch Screen Operation
67
Entering Letters And Numbers/
List Screen Operation
68
Entering Letters And Numbers
68
List Screen Operation
69
Screen Adjustment
70
Adjusting Brightness
70
Changing Between Day And Night Mode
70
Status Display
71
Home Screen Operation
72
Adding Shortcut Icons To The Home Screen
72
Moving And Deleting Shortcut Icons
72

BASIC INFORMATION BEFORE OPERATION
INITIAL SCREEN
INITIAL SCREEN
WARNING
l When the vehicle is stopped with the engine running, always
apply the parking brake for safety.
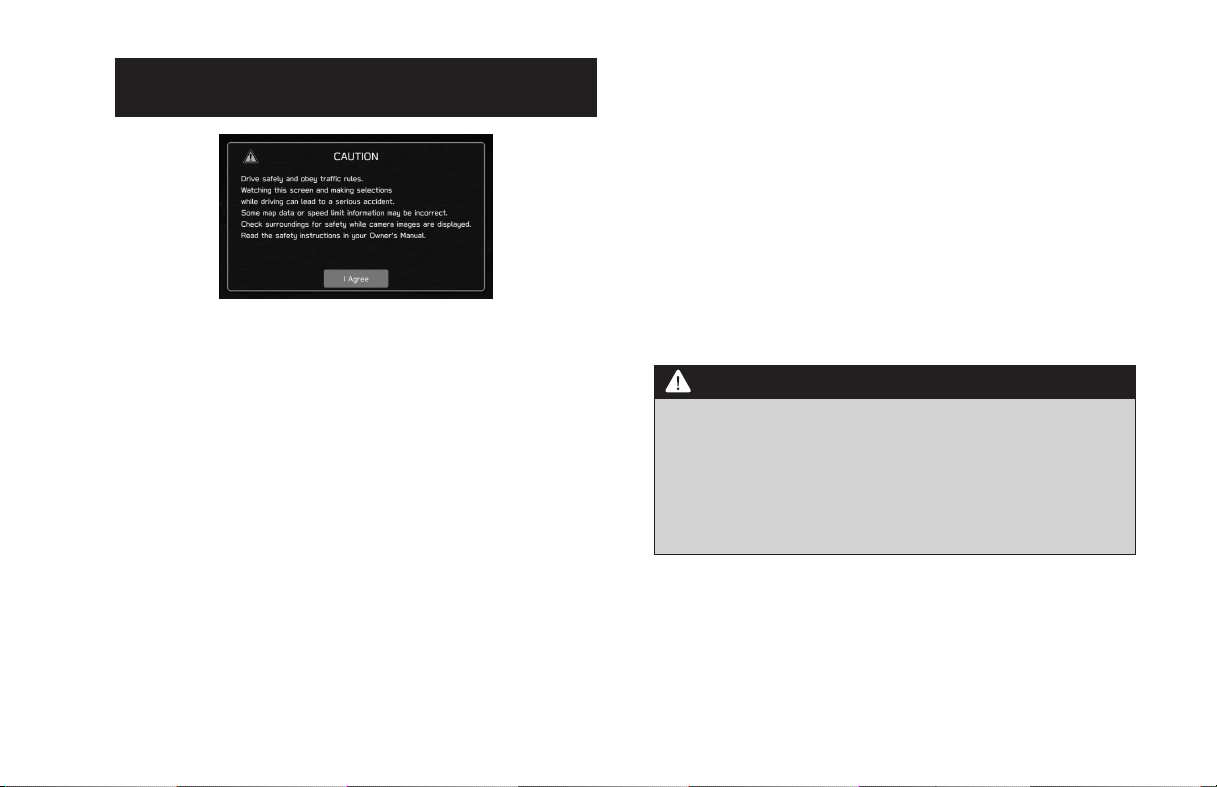
1.
When the ignition switch is turned to the “ACC” or “ON”
position, the initial screen will be displayed and the system
will begin operating.
● After a few seconds, the “CAUTION” screen will be
displayed.
2.
Select
I Agree
(I Agree).
BASIC INFORMATION BEFORE OPERATION
64

LOADING AND UNLOADING A DISC (IF
EQUIPPED WITH A CD PLAYER)
LOADING A DISC
CAUTION
l Never try to disassemble or oil any part of the CD player. Do not
insert anything other than a disc into the slot.
l If coins or other foreign matter have been inserted into the disc
slot, playback or ejection of a disc may be impossible.
If a disc is removed forcibly, the disc or player may be damaged. If
foreign matter has entered the player or a disc cannot be ejected,
contact your SUBARU dealer.
1.
Insert a disc into the disc slot.
● After insertion, the disc is automatically loaded.
NOTE
l Compatible Disc: →P.177
l When inserting a disc, gently insert the disc with the label side facing
the front of the vehicle.
UNLOADING A DISC
1.
Press and remove the disc.
NOTE
l Discs can be unloaded even when the ignition switch is turned o.
l If the disc is not removed from the slot within 10 seconds of being
ejected, it will automatically be pulled back into the slot.
BASIC INFORMATION BEFORE OPERATION
65
Basic Function
2
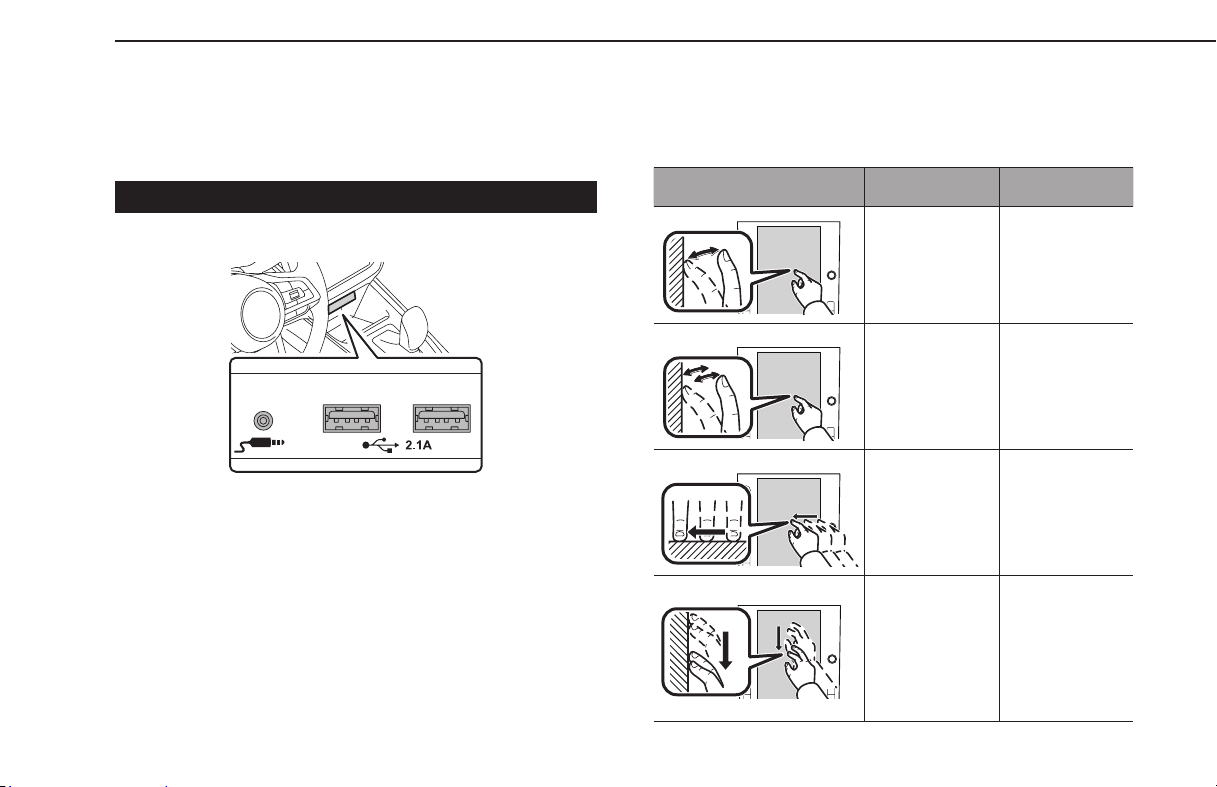
CONNECTING AND DISCONNECTING
A USB MEMORY DEVICE/PORTABLE
DEVICE
CONNECTING A DEVICE
1.
Connecta device.
● Turn on the power of the device if it is not turned on.
NOTE
l Compatible USB memory device: →P.180
l Compatible iPod/iPhone: →P.180
l This unit does not support commercially available USB hubs.
l By connecting a device such as a cellular phone, charging starts
depending on the device.
TOUCH SCREEN GESTURES
Operations are performed by touching the touch screen directly
with your nger.
Operation method Outline Main use
Touch
Quickly touch
and release once.
Changing and
selecting various
settings
Double Touch
with one
nger*
1
Quickly touch
and release twice
with one nger.
Enlarging the
scale of the map
screen
Drag*
2
Touch the screen
with your nger,
and move the
screen to the
desired position.
• Scrolling the
lists
• Scrolling the
map screen*
1
Drag with two
ngers*
1
Touch the screen
with two ngers
and move the
displayed screen
as desired.
Changing the
displayed angle
of the 3D map
screen
BASIC INFORMATION BEFORE OPERATION
66

Operation method Outline Main use
Swipe*
2
Quickly move
the screen by
swiping with
your nger.
• Scrolling the
lists
• Scrolling the
map screen*
1
Pinch*
1
Move your two
ngers further
apart (pinch-out)
to zoom in the
map. Move your
two ngers closer
together (pinch-
in) to zoom out
the map.
Changing the
scale of the map
screen
*
1
: 11.6-inch display with Navi system only
*
2
: The above operations may not be performed on all screens.
NOTE
l Swipe operations may not be performed smoothly in high altitudes.
TOUCH SCREEN OPERATION
This system is operated mainly by the buttons on the screen.
(Referred to as screen buttons in this manual.)
● When a screen button is touched, a tone sounds. The
tone sound can be adjusted. (→P.90)
CAUTION
l To prevent damaging the screen, lightly touch the screen buttons
with your nger.
l Do not use objects other than your nger to touch the screen.
l Wipe o ngerprints using a glass cleaning cloth. Do not use
chemical cleaners to clean the screen, as they may damage the
touch screen.
NOTE
l If the system does not respond to touching a screen button, move
your nger away from the screen and then touch it again.
l Dimmed screen buttons cannot be operated.
l The displayed image may become darker and moving images may
be slightly distorted when the screen is cold.
l When it is extremely cold, screens may not be displayed properly and
the data input by a user may be deleted. Also, the screen buttons
may not operate correctly.
BASIC INFORMATION BEFORE OPERATION
67
Basic Function
2
NOTE
l When is displayed on the screen, select to close a pop-up
screen.
l If the touch screen is operated while wearing gloves, it may be
unresponsive or may not function properly.
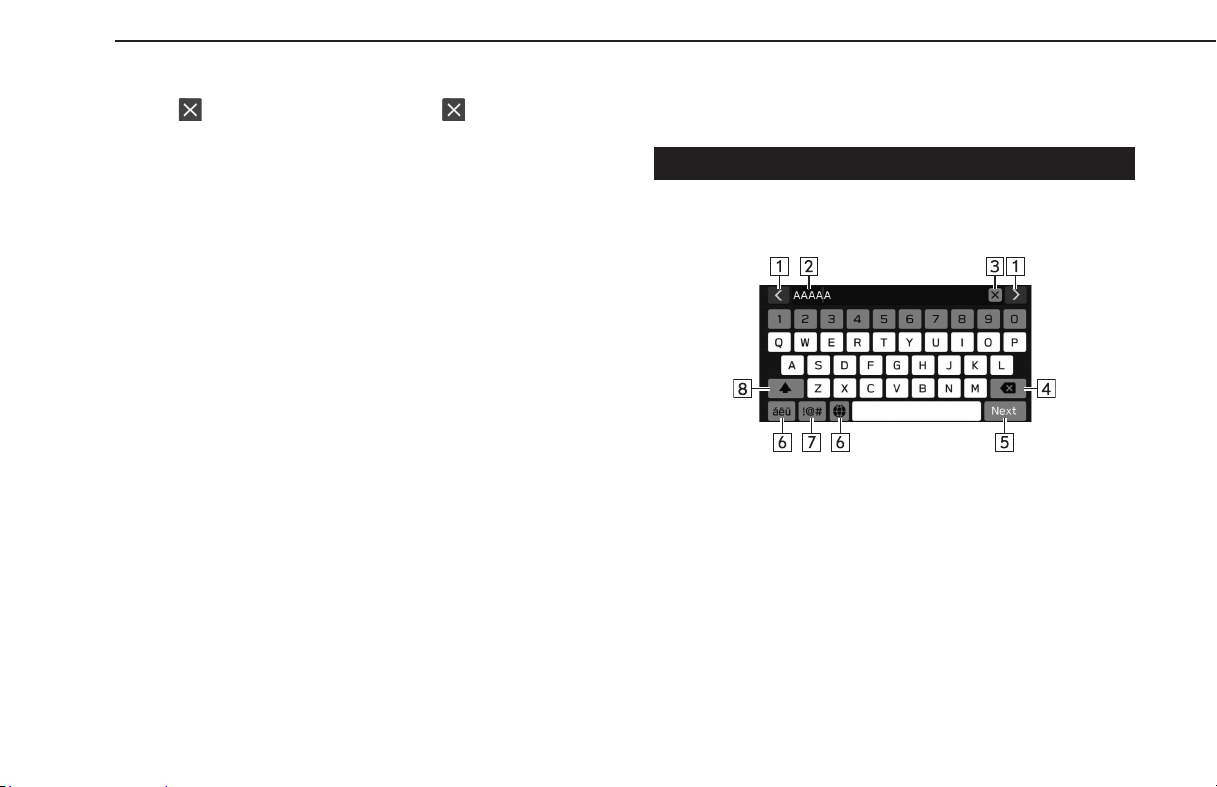
ENTERING LETTERS AND NUMBERS/
LIST SCREEN OPERATION
ENTERING LETTERS AND NUMBERS
When entering data, letters and numbers can be entered via the
screen.
BASIC INFORMATION BEFORE OPERATION
68
Select to move the cursor.
Input eld
• The position of the cursor can be moved by selecting the
desired location in the input eld.
Select to clear the input eld.
Select to erase one character.
Select to enter the item.
Select to change keyboard types.
Select to enter symbols.
Select to enter characters in lower case or in upper case.
NOTE
l The appearance of the keyboard may change or the input method
may be limited depending on the circumstances where the software
keyboard is displayed.
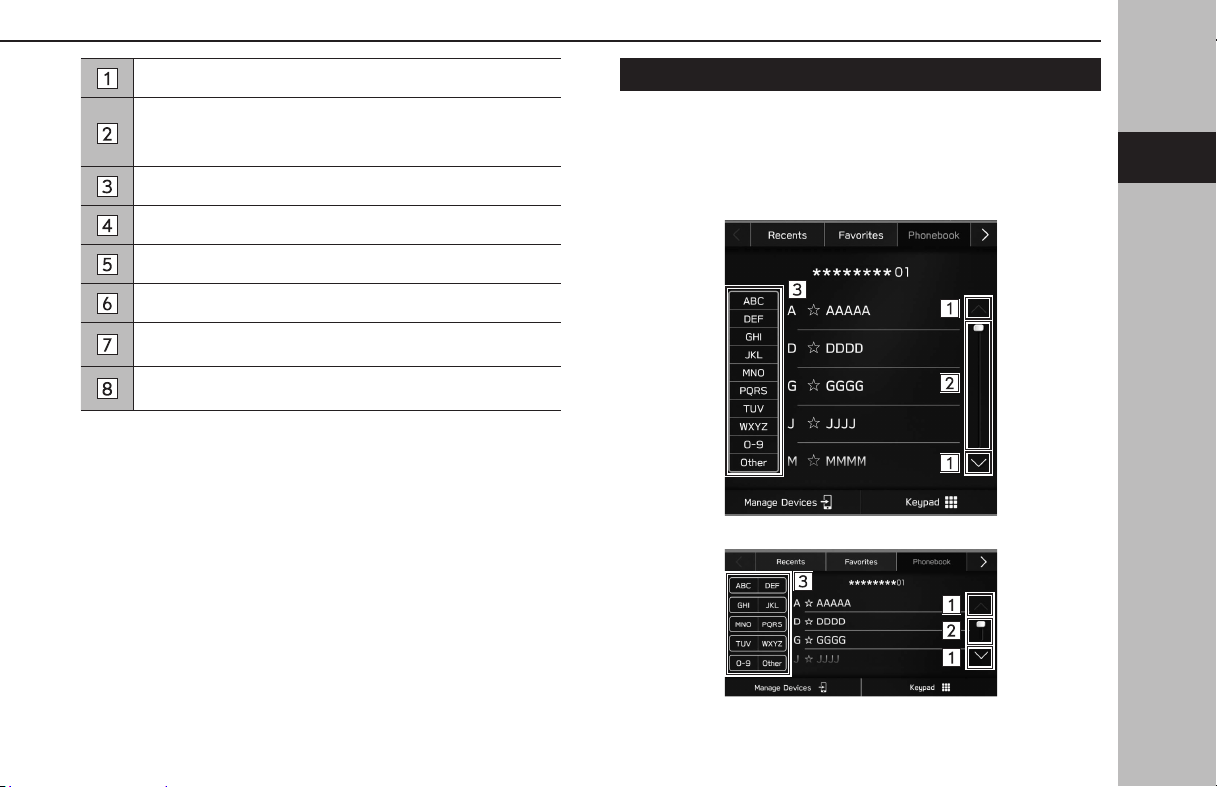
LIST SCREEN OPERATION
The list screen can be scrolled by a swipe gesture.
For detailson the operation: →P. 66
X11.6-inch display system/11.6-inch display with Navi
system
XDual 7.0-inch display system
BASIC INFORMATION BEFORE OPERATION
69
Basic Function
2

Select to skip to the next or previous page.
This indicates the displayed screen’s position.
Faster scrolling is possible by dragging the position indicator.
Some lists contain character screen buttons which allow
users to jump directly to list entries that begin with the same
letter as the character screen button.
Every time the same character screen button is selected, the
list starting with the subsequent character is displayed.
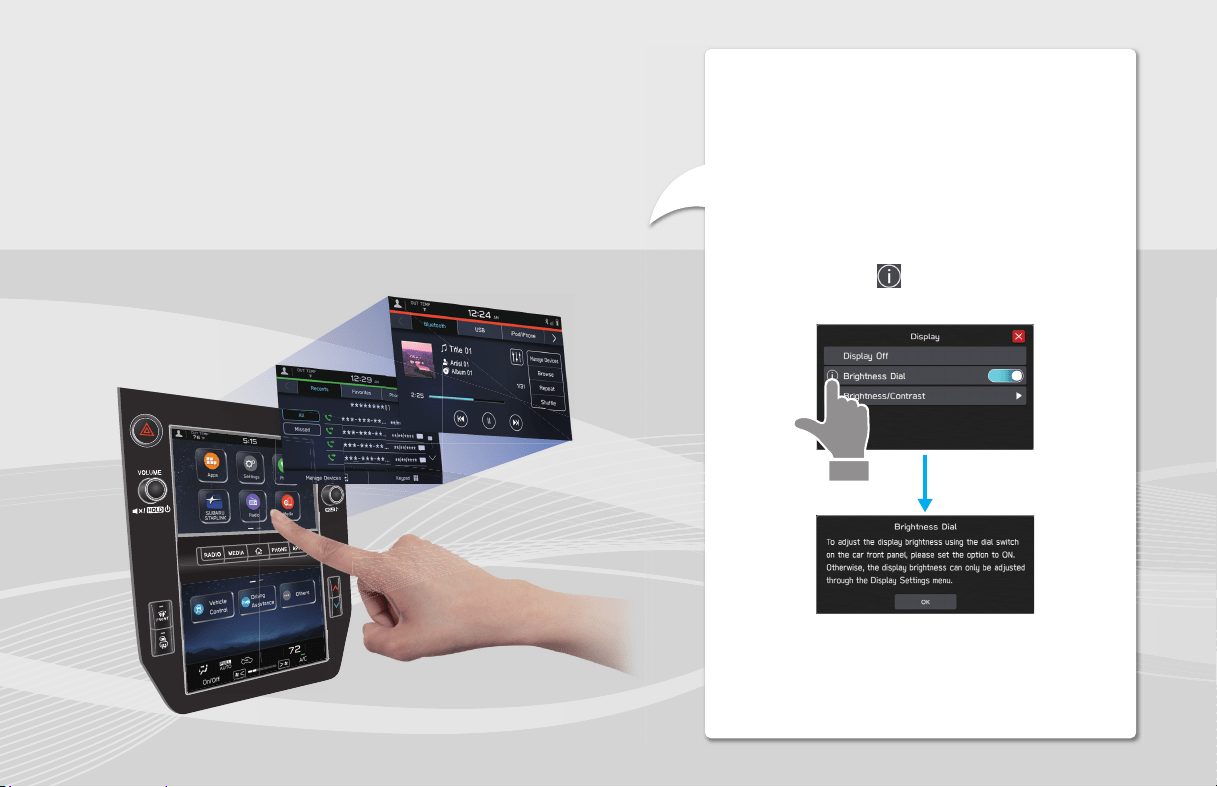
SCREEN ADJUSTMENT
ADJUSTING BRIGHTNESS
The brightness of the screen can be adjusted.
Refer to the vehicle Owner’s Manual for details.
CHANGING BETWEEN DAY AND NIGHT MODE
(11.6-inch display with Navi system only)
The screen mode of the map screen changes to day or night
mode depending on the position of the headlight switch. The
screen’s mode also changes to day or night mode depending
on the position of the illumination brightness control dial, and
surrounding brightness.
BASIC INFORMATION BEFORE OPERATION
70
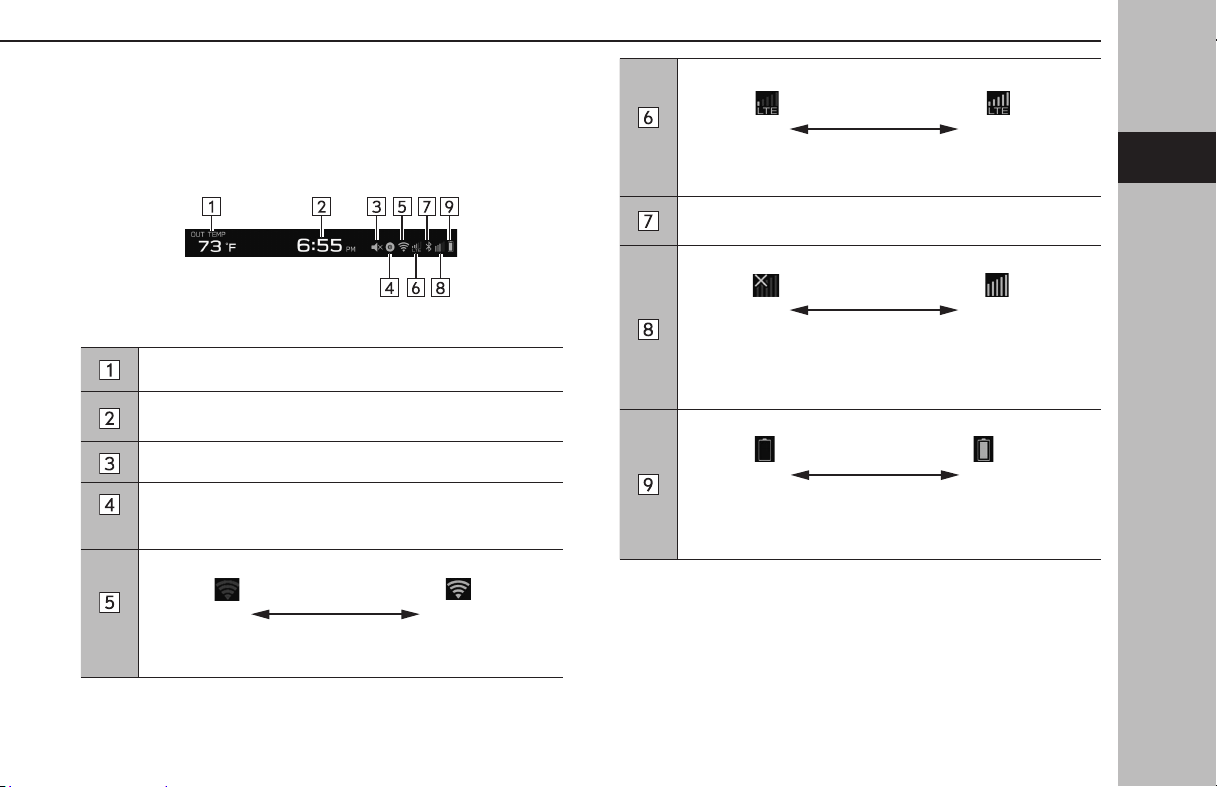
STATUS DISPLAY
The status of the Bluetooth connection, etc. is displayed on the
screen.
Display an outside temperature.
Display a current time.
Select to display the clock setting screen.
This icon is displayed when the audio system volume is mute.
*
1
This icon is displayed when a disc has been inserted.
*
2
Poor Excellent
Display the level of Wi-Fi® reception.
When Wi-Fi® function is o, no item is displayed.
*
2
Poor Excellent
Display the level of Wi-Fi® Hotspot reception.
When Wi-Fi® Hotspot function is o, no item is displayed.
This icon is displayed when the Bluetooth connection is
established.
Poor Excellent
Display the level of phone reception.
The level of reception does not always correspond with the
level displayed on the cellular phone. The level of reception
may not be displayed depending on the phone you have.
Low Full
Display the remaining of Bluetooth device battery charge.
The amount displayed does not always correspond with the
amount displayed on the Bluetooth device.
*
1
: If equipped with a CD player
*
2
: 11.6-inch display system/11.6-inch display with Navi system only
BASIC INFORMATION BEFORE OPERATION
71
Basic Function
2
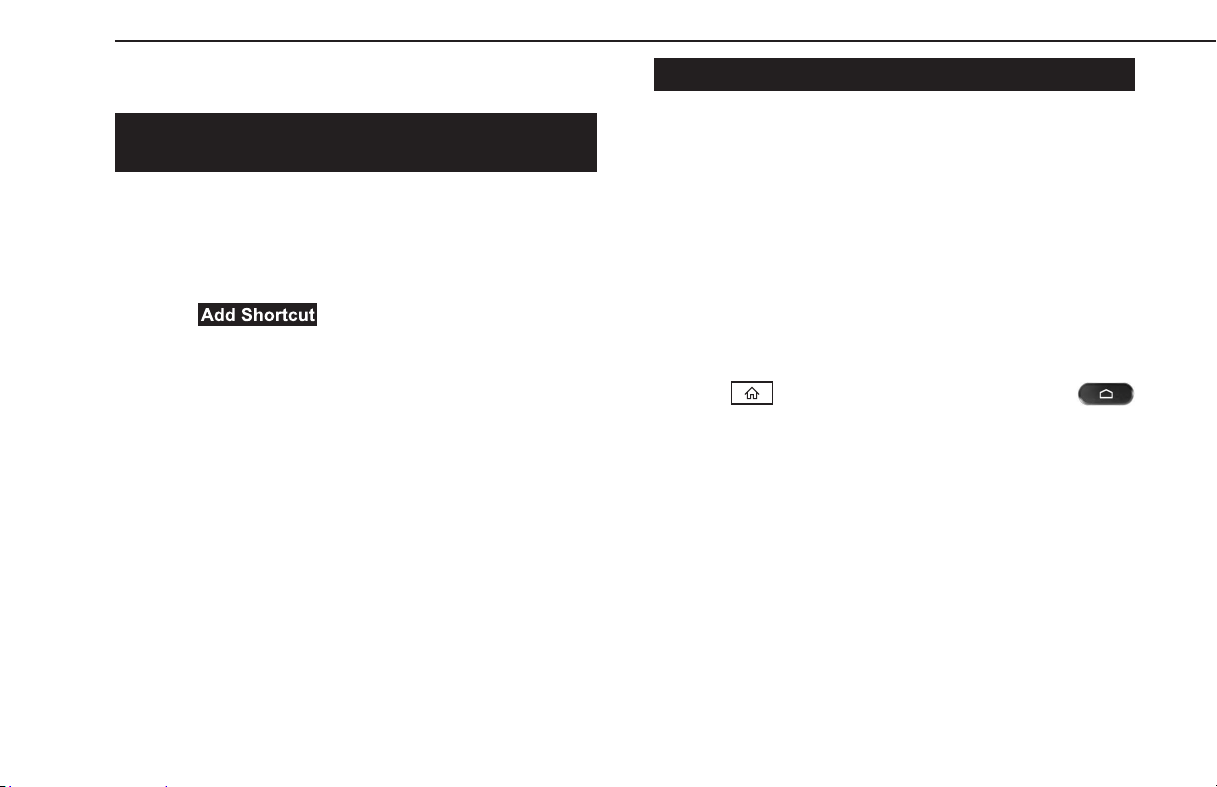
HOME SCREEN OPERATION
ADDING SHORTCUT ICONS TO THE HOME
SCREEN
Shortcut icons for various functions can be added to the home
screen when the home screen shortcut function is turned on.
(→P.83)
1.
Display the home screen. (→P.18, 40)
2.
Select (Add Shortcut).
3.
Select the desired function.
4.
Select the desired shortcut function.
● Depending on the function, select other items and enter
necessary information.
5.
Check that the shortcut icon is displayed on the home
screen.
NOTE
l When shortcuts are added, the home screen can be expanded to up
to 3 pages. The page can be changed by swiping.
MOVING AND DELETING SHORTCUT ICONS
Users can rearrange the home screen buttons when the home
screen shortcut function is turned on. (→P.83)
1.
Select and hold the shortcut icon to enter edit mode.
XWhen moving shortcut icons
2.
Drag the button to the desired position.
● User can move buttons to another page by dragging
them to the corresponding end of the screen if the
number of buttons allows for multiple pages.
XWhen deleting shortcut icons
2.
Drag the button to “DRAG HERE TO DELETE” area.
3.
Press (Dual 7.0-inch display system) or select
(11.6-inch display system/11.6-inch display with Navi
system) to leave the edit mode.
BASIC INFORMATION BEFORE OPERATION
72

73
Settings
Settings
Bluetooth® Settings
74
Registering A Bluetooth Phone/
Device For The First Time
74
Proles
75
Bluetooth Settings
77
Phone Settings Screen
77
Registering A Bluetooth Phone/Device
78
Connecting Or Disconnecting
Bluetooth Phone/Device
79
Deleting Bluetooth Phones/Devices
81
Setting Phonebook/Recent Calls Download
82
Other Settings
83
General Settings
83
General Settings Screen
83
Setting Wi-Fi® Connection
85
Updating The System
88
Sound Settings
90
Sound Settings Screen
90
Radio Settings
91
Setting AM/FM Radio
91
Setting The SiriusXM® Radio
93
Bluetooth® SETTINGS
REGISTERING A Bluetooth PHONE/
DEVICE FOR THE FIRST TIME
To use the hands-free system or the Bluetooth audio system, it is
necessary to register a Bluetooth phone/device with the system.
Once the Bluetooth phone/device has been registered, it is
possible to use the hands-free system and the Bluetooth audio
system.
This operation cannot be performed while driving.
For detailson registering a Bluetooth phone/device: →P.78
1.
Turn the Bluetooth connection setting of your Bluetooth
phone/device on.
● This function is not available when the Bluetooth
connection setting of your Bluetooth phone/device is set
to o.
2.
Display the phone screen. (→P.96)
3.
Select
Yes
(Yes) to register a Bluetooth phone/device.
4.
Follow the “STEPS 4 to 7” in “REGISTERING A Bluetooth
PHONE/DEVICE”. (→P.78)
Bluetooth® SETTINGS
74
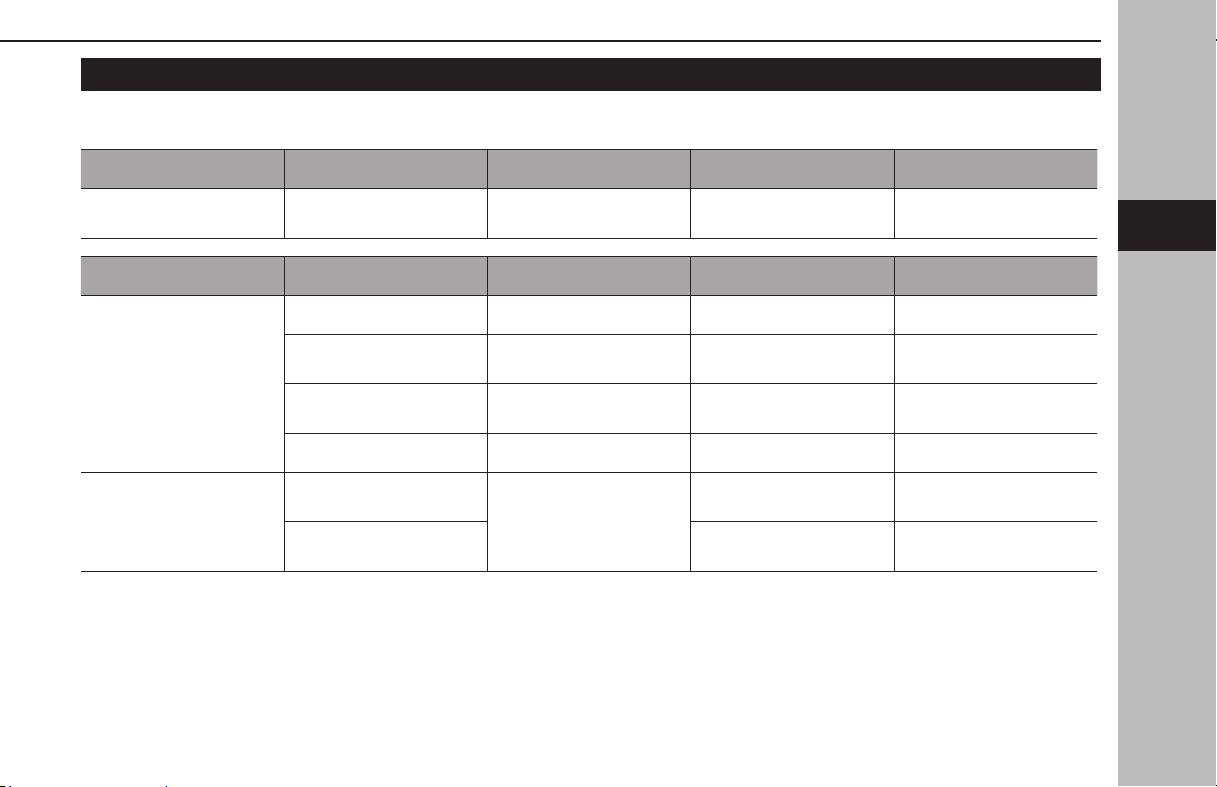
PROFILES
This system supports the following services.
Bluetooth Device Spec. Function Requirements Recommendations
Bluetooth Phone/Device Bluetooth Specication
Registering a Bluetooth
phone/device
Ver. 2.1 Ver. 4.2
Bluetooth Device Prole Function Requirements Recommendations
Bluetooth Phone
HFP (Hands-Free Prole) Hands-free system Ver. 1.0 Ver. 1.7
PBAP (Phone Book Access
Prole)
Transferring the contacts Ver. 1.0 Ver. 1.2
MAP (Message Access
Prole)
Bluetooth phone message - Ver. 1.3
SPP (Serial Port Prole) APPS function - Ver. 1.2
Bluetooth Device
A2DP (Advanced Audio
Distribution Prole)
Bluetooth audio system
Ver. 1.0 Ver. 1.3
AVRCP (Audio/Video
Remote Control Prole)
Ver. 1.0 Ver. 1.6
Settings
3
Bluetooth® SETTINGS
75
Settings
3

NOTE
l If your cellular phone does not support HFP, registering the Bluetooth phone or using PBAP, MAP or SPP proles individually will not be possible.
l If the connected Bluetooth phone/device version is older than recommended or incompatible, the Bluetooth phone/device function may not work
properly.
l If the application is not running smoothly or is unstable, disconnect and reconnect the Bluetooth phone/device via Bluetooth (→P.79) and/or USB
cable (→P.66). If the problem continues, reboot the Bluetooth phone/device.
Bluetooth® SETTINGS
76
Bluetooth SETTINGS
1.
Display the home screen. (→P.18, 40)
2.
Select
Settings
(Settings).
3.
→
Phone
(Phone)
4.
Select the items to be set.
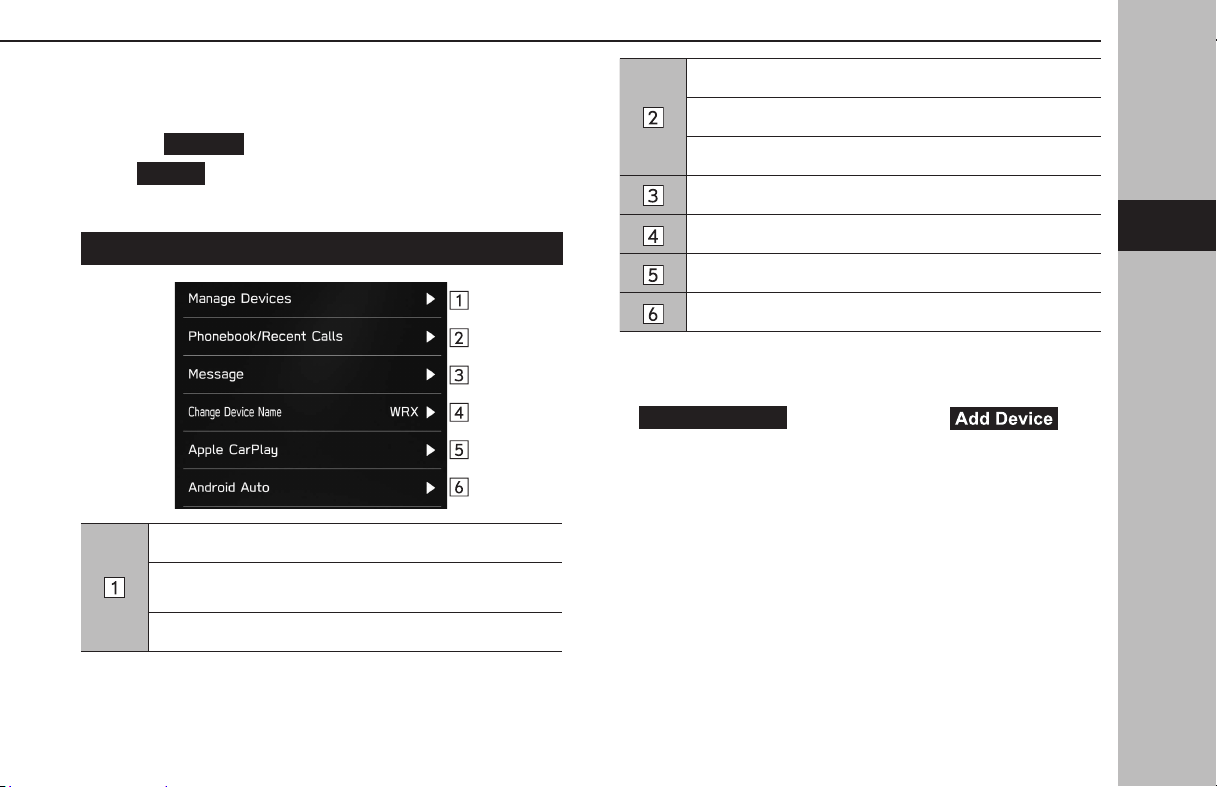
PHONE SETTINGS SCREEN
Registering a Bluetooth phone/device: →P.78
Connecting or disconnecting Bluetooth phones/devices:
→P.79
Deleting Bluetooth phones/devices: →P.81
Setting phonebook/recent calls download: →P.82
Sorting the recent calls list and contacts list: →P.101
Deleting all favorites list: →P.102
Setting the message: →P.107
Changing the device name
Setting Apple CarPlay: →P.122
Setting Android Auto: →P.125
NOTE
l “Manage Devices” screen can also be displayed by selecting
Manage Devices
(Manage Devices) or (Add
Device) on the phone screen (→P.96) or Bluetooth audio control
screen (→P.166).
Settings
3
Bluetooth® SETTINGS
77
Settings
3

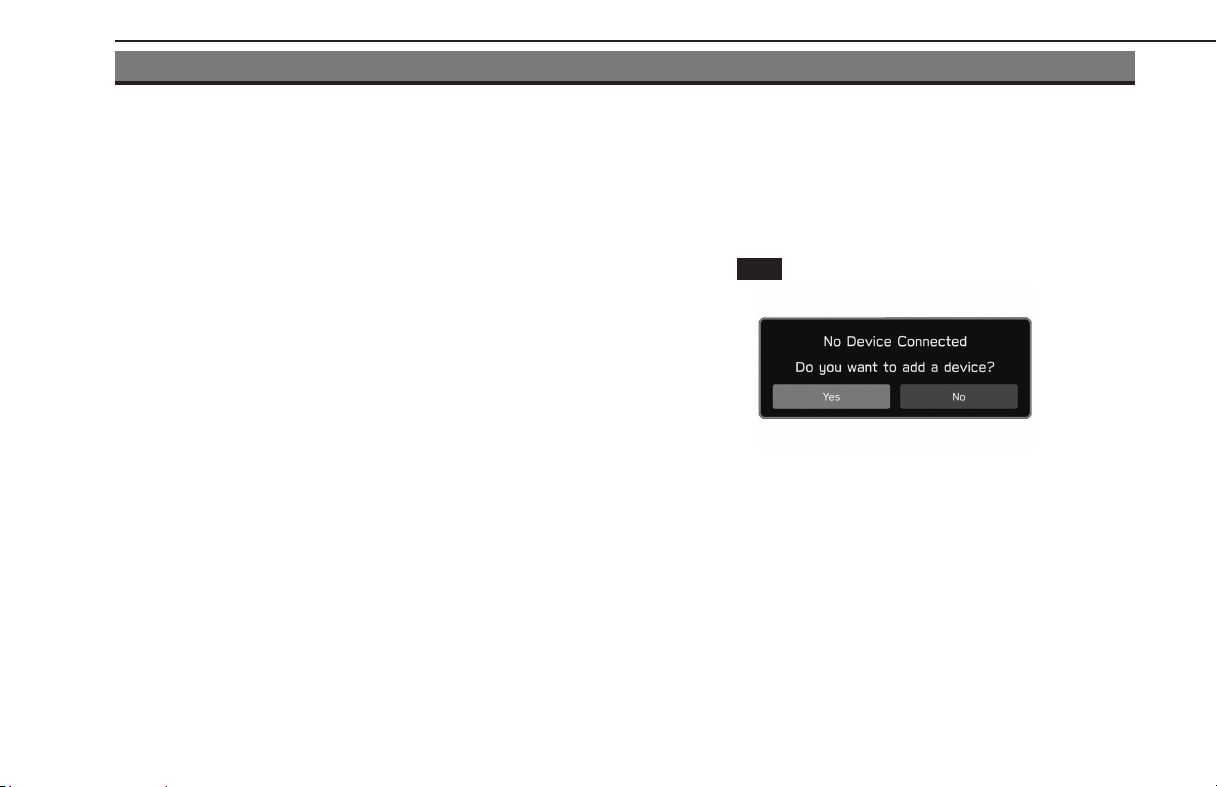
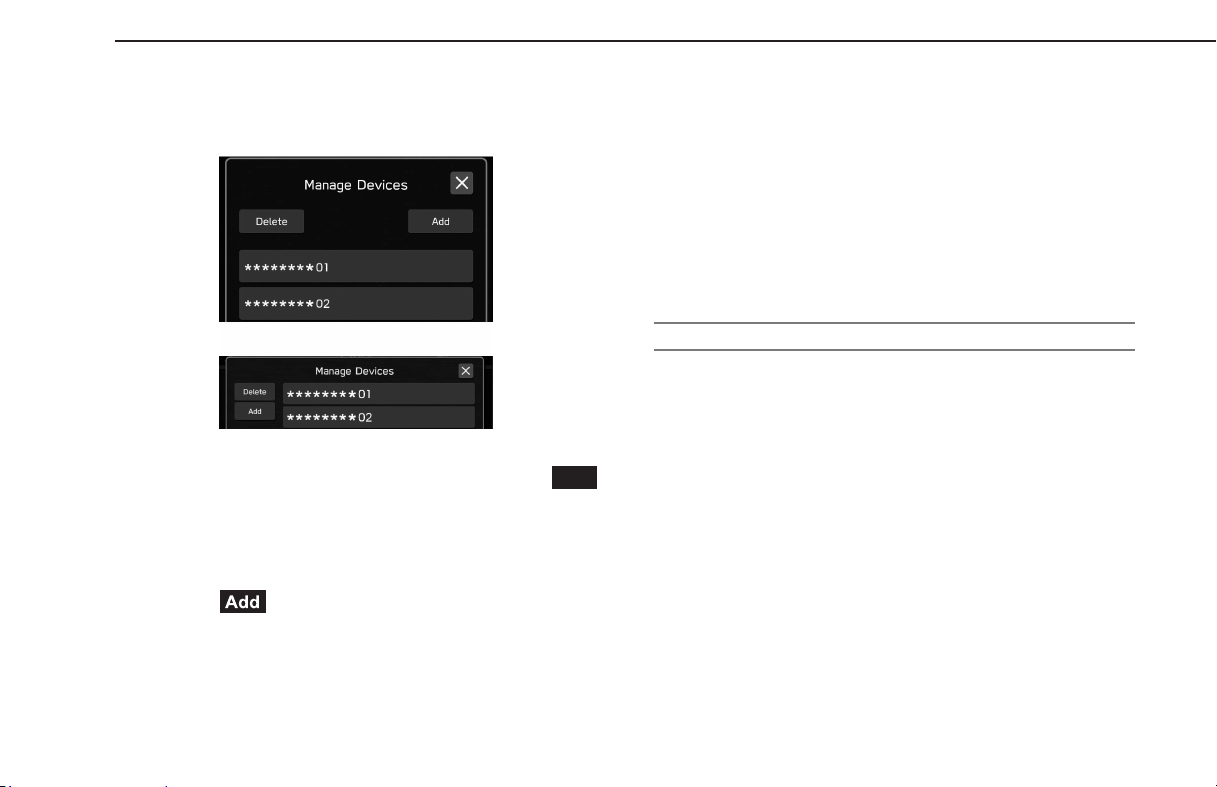
REGISTERING A Bluetooth PHONE/DEVICE
Up to 5 Bluetooth phones/devices can be registered.
Bluetooth compatible phones (HFP) and devices (AVP) can be
registered simultaneously.
This operation cannot be performed while driving.
1.
Display the phone settings screen. (→P.77)
2.
Select
Manage Devices
(Manage Devices).
3.
→ (Add)
● If a message appears, follow the guidance on the screen.
4.
When this screen is displayed, search for the device name
displayed on this screen on the screen of your Bluetooth
phone/device.
●
Cancel
(Cancel): Select to cancel the registration.
● For detailson operating the Bluetooth phone/device, see
the manual that comes with it.
5.
Register using your Bluetooth phone/device.
● A PIN-code is not required for SSP (Secure Simple Pairing)
compatible Bluetooth phones/devices. Depending on
the type of Bluetooth phone/device being connected,
a message conrming registration may be displayed
on the Bluetooth phone’s/device’s screen. Respond and
operate the Bluetooth phone/device according to the
conrmation message.
Bluetooth® SETTINGS
78

NOTE
l To re-register your Bluetooth phone/device after having deleted it
from the system, operate the Bluetooth phone/device and register it
after deleting the previously registered system information from the
Bluetooth phone/device.
6.
Check that the following pop-up screen may be displayed.
●
Cancel
(Cancel): Select to cancel the registration.
● If a conrmation message appears asking whether to
transfer the phone’s contact data to the system, select the
appropriate button.
7.
When the connection is completed, conrm that a
connected device name is displayed.
● If an error message appears, follow the guidance on the
screen to try again.
NOTE
l 11.6-inch display system/11.6-inch display with Navi system
only: When registering an NFC compatible device, registration is
performed when the Bluetooth phone/device is held against the NFC
logo of the audio system until a connection is established.
CONNECTING OR DISCONNECTING Bluetooth
PHONE/DEVICE
Up to 5 Bluetooth phones/devices (Phones (HFP) and devices
(AVP)) can be registered.
If more than 1 Bluetooth phone/device has been registered,
select which Bluetooth phone/device to connect to.
1.
Display the phone settings screen. (→P.77)
2.
Select
Manage Devices
(Manage Devices).
Settings
3
Bluetooth® SETTINGS
79
Settings
3
3.
Select the Bluetooth phone/device to be connected or
disconnected.
X11.6-inch display system/11.6-inch display with Navi
system
XDual 7.0-inch display system
● To disconnect the Bluetooth phone/device, select
Yes
(Yes).
● “Connected” is displayed next to the currently connected
Bluetooth phone/device.
● If the desired Bluetooth phone/device is not on the list,
select
(Add) to register the Bluetooth phone/
device. (→P.78)
4.
Check that “Connected” is displayed next to the Bluetooth
phone/device when the connection is complete.
● If an error message appears, follow the guidance on the
screen to try again.
NOTE
l It may take time if the Bluetooth phone/device connection is carried
out during Bluetooth audio playback.
l Depending on the type of Bluetooth phone/device being connected,
it may be necessary to perform additional steps on the Bluetooth
phone/device.
AUTO CONNECTION MODE
Leave the Bluetooth phone/device in a location where the
connection can be established.
● When the ignition switch is turned to the “ACC” or “ON”
position, the system searches for a nearby registered
Bluetooth phone/device.
● The system will connect with the registered Bluetooth
phone/device that was last connected, if it is nearby.
Bluetooth® SETTINGS
80
CONNECTING MANUALLY
When the auto connection has failed, it is necessary to connect
Bluetooth phones/devices manually.
Follow the “CONNECTING OR DISCONNECTING Bluetooth
PHONE/DEVICE”. (→P.79)
RECONNECTING THE Bluetooth PHONE/DEVICE
If a Bluetooth phone/device is disconnected due to poor
reception from the Bluetooth network when theignition switch
is turned to the “ACC” or “ON” position, the system automatically
reconnects the Bluetooth phone/device.
● If a Bluetooth phone/device is disconnected on purpose,
such as turning it o, this does not happen. Reconnect
the Bluetooth phone/device manually.
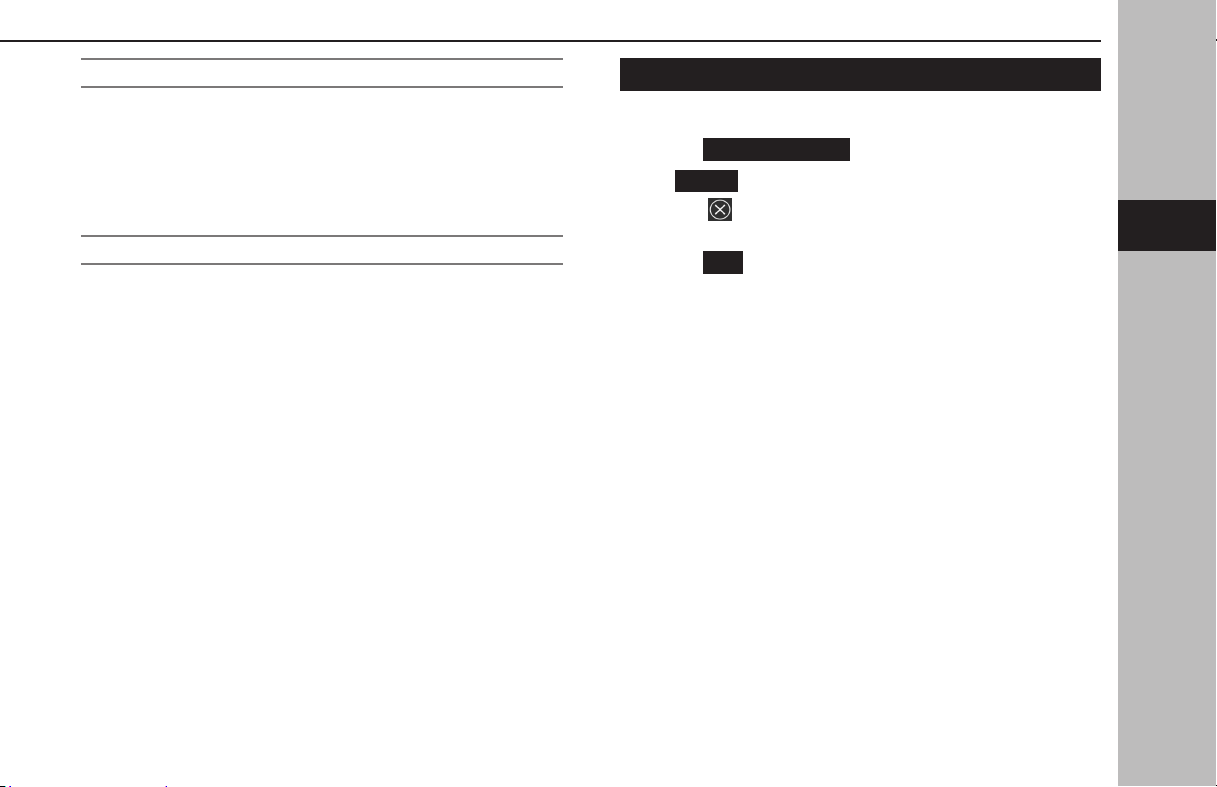
DELETING Bluetooth PHONES/DEVICES
1.
Display the phone settings screen. (→P.77)
2.
Select
Manage Devices
(Manage Devices).
3.
→
Delete
(Delete)
4.
Select for the Bluetooth phone/device you wish to
delete.
5.
Select
OK
(OK) when the conrmation message appears.
NOTE
l The Bluetooth phone/device will still contain information from
this system even after the Bluetooth phone/device has been
deleted. Operate the Bluetooth phone/device to delete the system
information saved inside the Bluetooth phone/device.
Settings
3
Bluetooth® SETTINGS
81
Settings
3

SETTING PHONEBOOK/RECENT CALLS
DOWNLOAD
When this function is activated, the phonebook data of the
connected phone will be downloaded automatically.
1.
Display the phone settings screen. (→P.77)
2.
Select
Phonebook/Recent Calls
(Phonebook/Recent
Calls).
3.
Select to turn “Automatically Download Phonebook/Recent
Calls” on/o.
NOTE
l The prole version of the connected Bluetooth phone may not be
compatible with transferring phonebook data. For details, contact
your SUBARU dealer.
l The notication setting on the Bluetooth phone may need to be
activated in order to download the phonebook. For details, check
the instructions for the connected Bluetooth phone. When the
system’s clock settings are set to auto, the auto-adjustment function
and message function (→P.106) will not function properly if the
phonebook is not downloaded.
l The Bluetooth phone’s favorite list will not be downloaded
automatically even after the phonebook data has been downloaded
from the Bluetooth phone. This system does not currently support
transfer of data from the Bluetooth phone favorites list. To add the
Bluetooth phone’s favorites list to the system’s favorites list, you need
to register it through the system phonebook contacts list. (→P.103)
Bluetooth® SETTINGS
82

OTHER SETTINGS
GENERAL SETTINGS
1.
Display the home screen. (→P.18, 40)
2.
Select
Settings
(Settings).
3.
→
General
(General)
4.
Select the items to be set.
GENERAL SETTINGS SCREEN
For details about the following menu, refer to the vehicle
Owner’s Manual.
●
Clock
(Clock)
●
Display
(Display)
●
Reminder Screen
(Reminder Screen)
●
Meter Screen
(Meter Screen)
●
Camera
(Camera)
●
Climate Control
(Climate Control)
●
Language
(Language)
●
Tire Pressure Units
(Tire Pressure Units)
●
Welcome Screen
(Welcome Screen)
●
Goodbye Screen
(Goodbye Screen)
●
Favorite Widgets
(Favorite Widgets)
●
Birthday List
(Birthday List)
●
Anniversary List
(Anniversary List)
(Wi-Fi Settings)*
1
Select to set the Wi-Fi® function
settings. (→P.85)
Wi-Fi Hotspot
(Wi-Fi Hotspot)*
2
*
3
Select to set the Wi-Fi® Hotspot
settings.
Home Screen Shortcuts
(Home Screen Shortcuts)
Select to turn the home screen
shortcuts function on/o.
(→P.72)
Periodic Rest Notification
(Periodic Rest Notication)*
4
Select to turn the display for the
periodic rest notication pop-up
screen on/o. (→P.192)
OTHER SETTINGS
83
Settings
3

Software Update
(Software Update)*
1
Select to update system software
versions. (→P.88)
SUBARU STARLINK Apps Recovery
(SUBARU STARLINK Apps
Recovery)
Select to recover the SUBARU
STARLINK.
SUBARU STARLINK Auto Connect
(SUBARU STARLINK Auto Connect)*
2
Select to turn the SUBARU
STARLINK auto connect function
on/o. (→P.115)
Factory Data Reset
(Factory Data Reset)
Select to reset all setup items.
The audio system restarts
automatically after resetting
factory data. To complete the
reset process, turn the ignition
switch to the “LOCK”/“OFF”
position after the audio system
has restarted, and then turn to
the “ACC” or “ON” position after
approximately 3 minutes.
System Information
(System Information)
Select to display the system
information.
Free/Open Source Software Information
(Free/Open Source Software
Information)
Select to display the free/open
source software information.
*
1
: 11.6-inch display system/11.6-inch display with Navi system only
*
2
: If equipped
*
3
: Refer to the Owner’s Manual supplement for “SUBARU STARLINK Safety and
Security” for details.
*
4
: 11.6-inch display with Navi system only
OTHER SETTINGS
84

SETTING Wi-Fi® CONNECTION (11.6-inch display
system/11.6-inch display with Navi system only)
CONNECTING TO A Wi-Fi® NETWORK
1.
Display the general settings screen. (→P.83)
2.
Select (Wi-Fi Settings).
3.
→
Available Wi-Fi Networks
(Available Wi-Fi Networks)
4.
Select the desired network.
● When a network with is selected and the password
entry screen is displayed, enter the password, and then
select
OK
(OK).
SETTING UP A CONNECTION QUICKLY
If a Wi-Fi® device is Wi-Fi® Protected Setup compatible, it can be
connected to more quickly.
1.
Display the general settings screen. (→P.83)
2.
Select (Wi-Fi Settings).
3.
→
Wi-Fi Protected Setup
(Wi-Fi Protected Setup)
4.
Select
PIN Setup
(PIN Setup) or
Push Button Setup
(Push Button Setup) as determined by the device.
5.
Operate the Wi-Fi® device to connect.
● When
PIN Setup
(PIN Setup) is selected: Enter the
displayed PIN code into the Wi-Fi® network device.
● When
Push Button Setup
(Push Button Setup) is
selected: Push the WPS button on the Wi-Fi® network
device.
OTHER SETTINGS
85
Settings
3
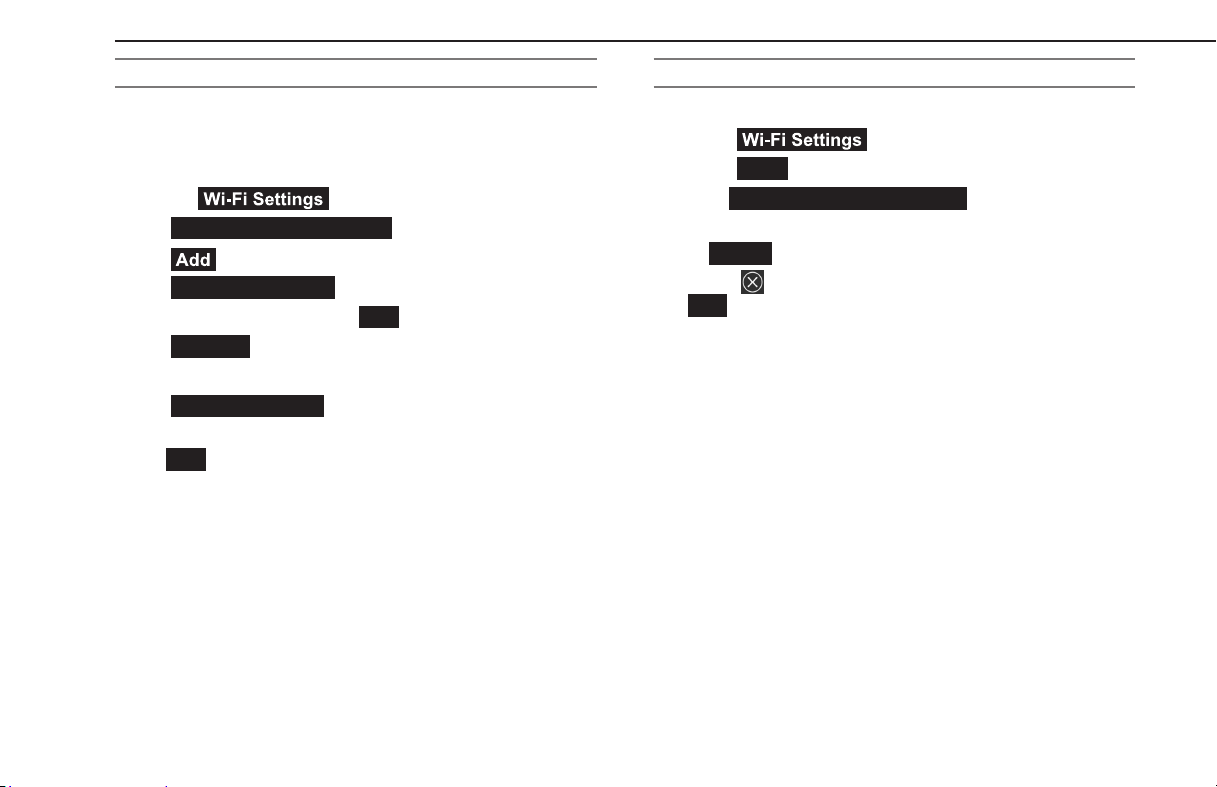
ADDING A Wi-Fi® NETWORK
Available networks which are not displayed by searching can be
added.
1.
Display the general settings screen. (→P.83)
2.
Select (Wi-Fi Settings).
3.
→
Available Wi-Fi Networks
(Available Wi-Fi Networks)
4.
→ (Add)
5.
→
Wi-Fi Name (SSID)
(Wi-Fi Name (SSID))
6.
Enter the network name. →
OK
(OK)
7.
→
Security
(Security)
8.
Select the security type.
9.
→
Start Connection
(Start Connection)
● When a password is required, enter the password. →
OK
(OK)
DELETING A Wi-Fi® NETWORK
1.
Display the general settings screen. (→P.83)
2.
Select (Wi-Fi Settings).
3.
Select
Wi-Fi
(Wi-Fi) to turn the Wi-Fi® function o.
4.
→
Registered Wi-Fi Networks
(Registered Wi-Fi
Networks)
5.
→
Delete
(Delete)
6.
Select for the Wi-Fi® network you wish to delete. →
OK
(OK)
OTHER SETTINGS
86
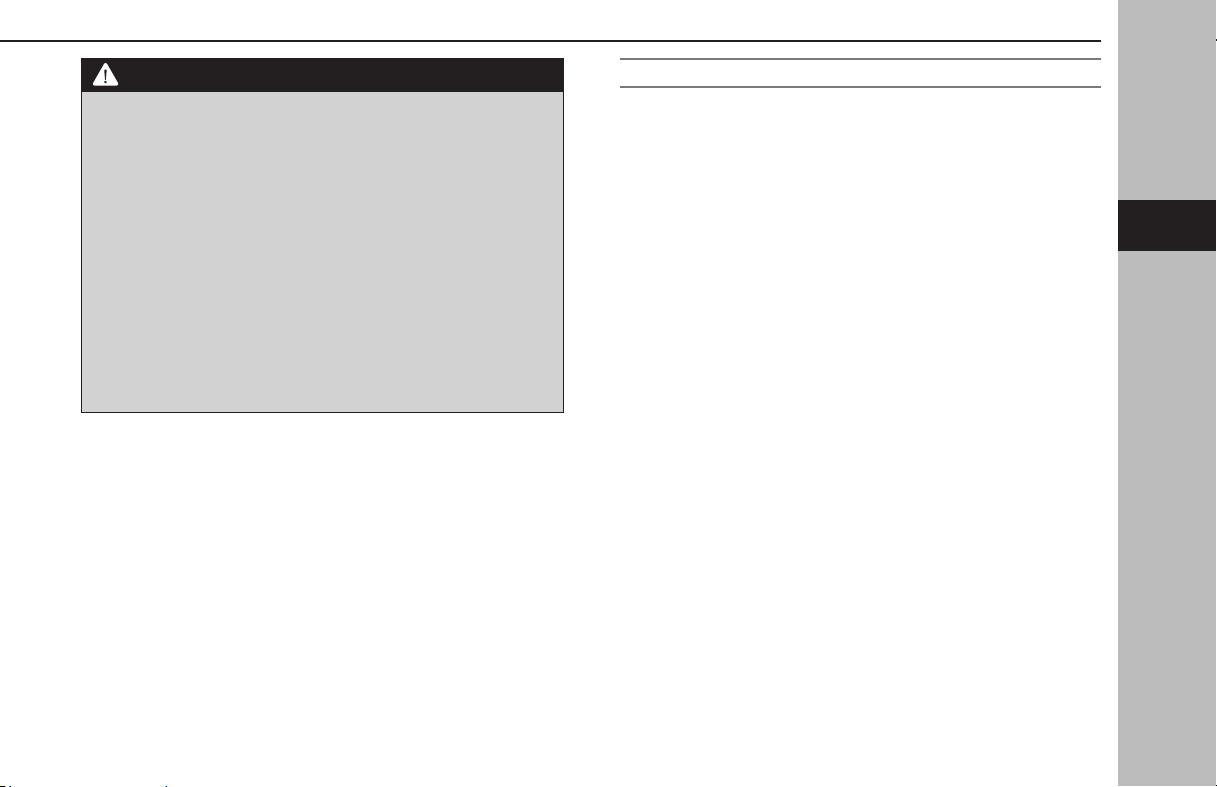
WARNING
l Use Wi-Fi® devices only when safe and legal to do so.
l This system is tted with Wi-Fi® antennas. People with implantable
cardiac pacemakers, cardiac resynchronization therapy-
pacemakers or implantable cardioverter debrillators should
maintain a reasonable distance between themselves and the
Wi-Fi® antennas. The radio waves may aect the operation of such
devices.
l Before using Wi-Fi® devices, users of any electrical medical
device other than implantable cardiac pacemakers, cardiac
resynchronization therapy-pacemakers or implantable
cardioverter debrillators should consult the manufacturer of the
device for information about its operation under the inuence of
radio waves.
Radio waves could have unexpected eects on the operation of
such medical devices.
SUPPORTED Wi-Fi® NETWORK SPECIFICATIONS
The system can connect to a Wi-Fi® network that supports the
following standards.
● Communication standards:
•802.11b
•802.11g
•802.11n (2.4GHz)
● Security:
•WPA
TM
•WPA2
TM
NOTE
l WPA and WPA2 are registered mark of the Wi-Fi Alliance®.
OTHER SETTINGS
87
Settings
3
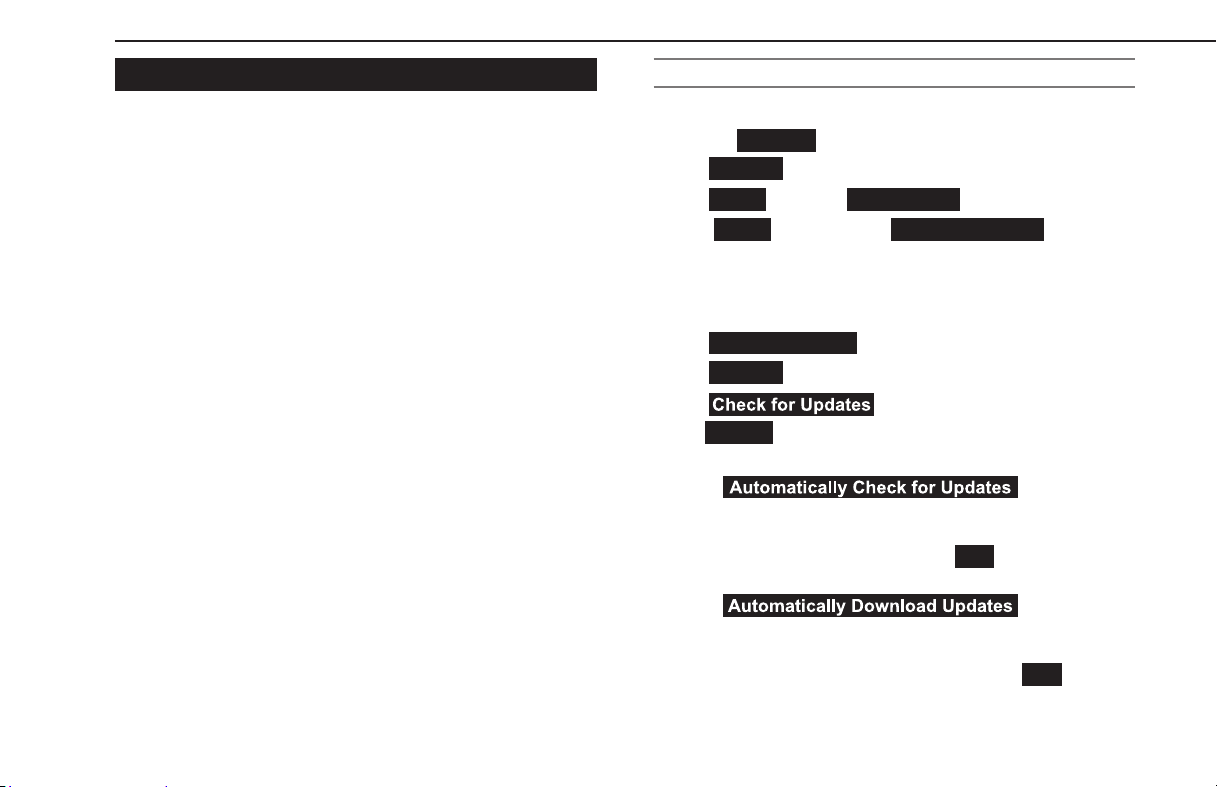
UPDATING THE SYSTEM
Please ask your dealer to update the system software*
1
.
11.6-inch display system/11.6-inch display with Navi system
only: You may also update the system software via Wi-Fi®. The
update process involves downloading and installing a software
update*
2
. Note that system functionality will be restricted
during installation.
*
1
: Please check with your dealer for specic details on the update content.
*
2
: Depending on the software update content, your radio station presets and
volume settings may be reset by the update process.
NOTE
l Update using Wi-Fi® may not be available in some countries.
DOWNLOAD UPDATE
1.
Display the home screen. (→P.40)
2.
Select
Settings
(Settings).
3.
→
General
(General)
4.
→
Clock
(Clock) →
Time Setting
(Time Setting)
5.
→
AUTO
(AUTO)*
1
*
2
or
Sync With Phone
(Sync With
Phone)*
3
6.
Connect to a Wi-Fi® network. (→P.85)
7.
Display the general settings screen. (→P.83)
8.
→
Software Update
(Software Update)
9.
→
Update
(Update)
10.
→ (Check for Updates)
●
Cancel
(Cancel): Select to stop checking for available
updates.
● If
(Automatically
Check for Updates) is on, updates will automatically be
checked for and, if available, a message will be displayed.
If a message is displayed, select
OK
(OK) and proceed
to the next step.
● If
(Automatically
Download Updates) is on, updates will automatically
be downloaded. After the download has completed,
a message will be displayed. Select
OK
(OK) to
start installation and proceed to STEP 3 in “UPDATE
INSTALLATION”. (→P.89)
OTHER SETTINGS
88

11.
Select (Download Now) to begin
downloading the update (if available).
●
Cancel
(Cancel): Select to stop the update process.
● The download status progress is displayed in the
category area.
● If the update procedure fails, refer to the
“TROUBLESHOOTING” section. (→P.238)
*
1
: 11.6-inch display with Navi system
*
2
: 11.6-inch display system with SUBARU STARLINK Safety and Security
*
3
: 11.6-inch display system without SUBARU STARLINK Safety and Security
UPDATE INSTALLATION
CAUTION
l Park your vehicle in a safe place when installing the update.
l The following system functions are restricted during the update
installation.
•It will not be possible to use general system functions.
•Only the rear view camera image will be displayed. Or the
image will disappear temporarily.
1.
Download any available updates.
2.
Select (Install Now) to start installing the
update.
● Installation will take several minutes.
NOTE
l During software update installation, the screen may icker. However,
this is not a malfunction.
3.
When installation is complete, select
OK
(OK) on the
conrmation message to complete the update process.
● If the update procedure fails, refer to the
“TROUBLESHOOTING” section. (→P.238)
4.
Turn the ignition switch to the “LOCK”/“OFF” position →
Open the driver’s side door → Close the door → Wait for 3
minutes or more → Start the engine.
● The new software will be applied.
OTHER SETTINGS
89
Settings
3

SOUND SETTINGS
1.
Display the home screen. (→P.18, 40)
2.
Select
Settings
(Settings).
3.
→
Sound
(Sound)
4.
Select the items to be set.
SOUNDSETTINGS SCREEN
Sound Customization
(Sound Customization): Select
to display the sound customization screen. (→P.138)
Sound Restorer
(Sound Restorer)*
1
: Select to turn the
sound restorer function on/o.
This function plays compressed audio with quality near
original sound by adding the complement signal of high
tone.
Virtual Bass
(Virtual Bass)*
1
: Select to set the virtual
bass function.
This function corrects the bass sound by adding harmonic
sound.
Dynamic Beat Enhancer
(Dynamic Beat Enhancer)*
1
:
Select to set the dynamic beat enhancer function.
This function expands the dynamic range lost in data
compression and creates a sharp beat sound.
Speed Volume Control
(Speed Volume Control)*
1
:
Select to set the speed volume.
The system adjusts to the optimum volume and tone quality
according to vehicle speed to compensate for increased
vehicle noise.
AUX Volume Gain
(AUX Volume Gain): Select to set
AUX volume gain.
*
2
Select to set the navigation prompt volume.
*
3
Select to adjust the interrupt guidance volume.
Select to turn the tone sound on/o.
OTHER SETTINGS
90
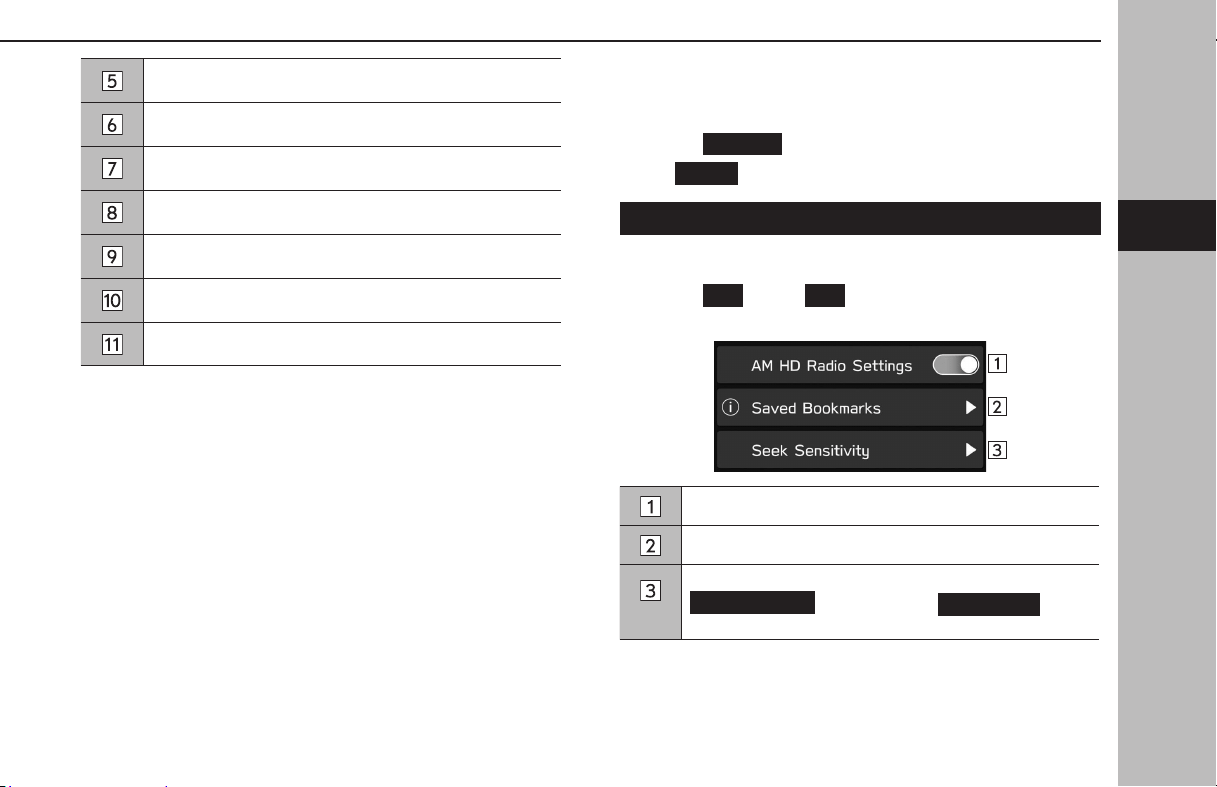
Select to adjust the tone sound volume.
Select to adjust the ringtone volume.
Select to adjust the volume of a received call.
Select to adjust the call volume.
Select to adjust the SMS/MMS ringtone volume.
Select to adjust the SMS/MMS read out volume.
Select to set the voice recognition prompts volume.
*
1
: This setting can be made depending on the connected amplier type.
*
2
: 11.6-inch display with Navi system only
*
3
: 11.6-inch display system/Dual 7.0-inch display system only
RADIO SETTINGS
1.
Display the home screen. (→P.18, 40)
2.
Select
Settings
(Settings).
3.
→
Radio
(Radio)
SETTING AM/FM RADIO
1.
Display the radio settings screen. (→P.91)
2.
Select
AM
(AM) or
FM
(FM).
3.
Select the desired item to be set.
Select to turn the HD Radio mode on/o.
Select to display the saved bookmark list. (→P.92)
*
Select to set seek sensitivity of AM band as
DX (Distance)
(DX (Distance)) or
LO (Local)
(LO
(Local)).
*: AM radio only
OTHER SETTINGS
91
Settings
3

DISPLAYING THE BOOKMARK DETAILS
Cover art/track title/artist/album name are displayed for
bookmarked tracks.
A QR code containing the track title/artist/album name can be
displayed.
1.
Display the AM settings screen or FM settings screen.
(→P.91)
2.
Select
Saved Bookmarks
(Saved Bookmarks).
3.
Select the desired bookmark.
DELETING THE BOOKMARK
1.
Display the AM settings screen or FM settings screen.
(→P.91)
2.
Select
Saved Bookmarks
(Saved Bookmarks).
3.
→
Edit
(Edit)
4.
Select for the bookmark you wish to delete. →
OK
(OK)
● Deleting the bookmark can also be deleted select to
from the bookmark details screen.
OTHER SETTINGS
92
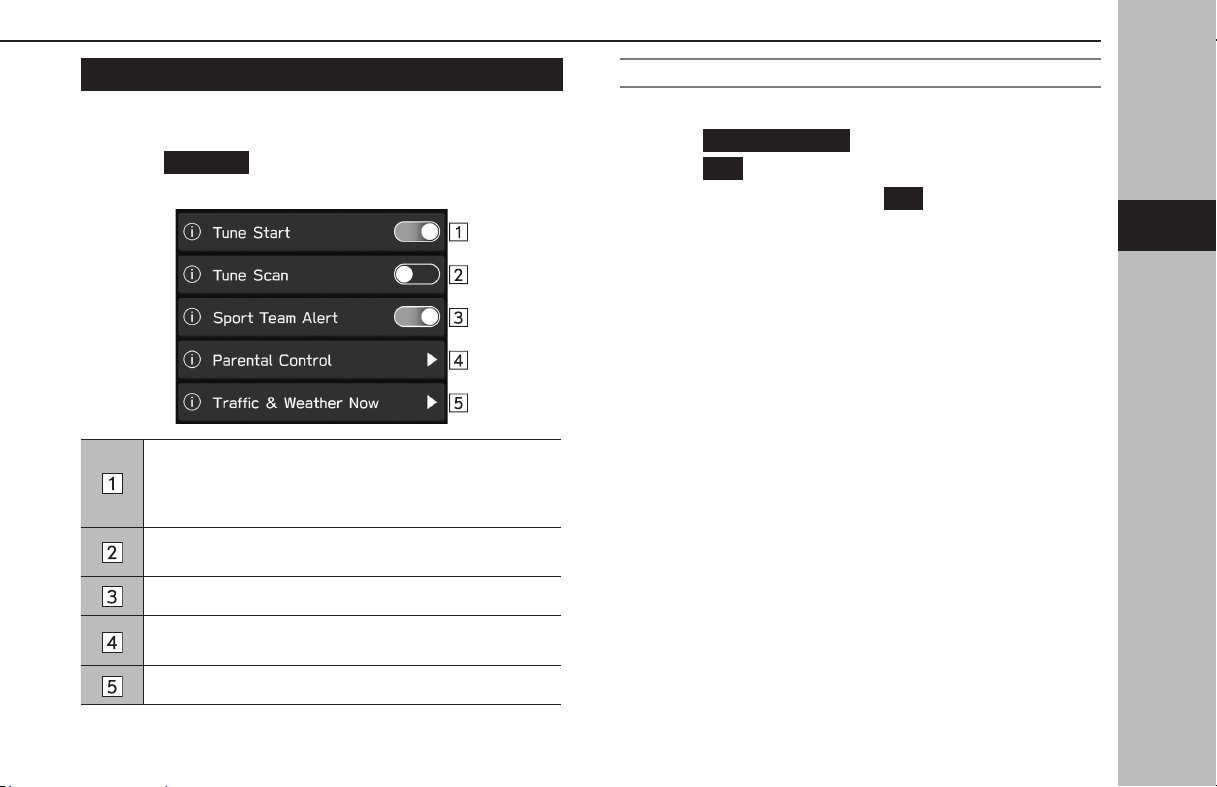
SETTING THE SiriusXM® Radio
1.
Display the radio settings screen. (→P.91)
2.
Select
SiriusXM
(SiriusXM).
3.
Select the desired item to be set.
When this function is on, channels registered as Smart
Favorites will be cached, and when the channel is changed,
the song on that channel can be listened to from the
beginning.
Select to enable/disable the search function for channels
registered to Smart Favorites.
Select to turn the “Sport Team Alert” on/o. (→P.156)
Select to set the parental control passcode and locked
channels. (→P.93, 94)
Select to set the city for which you wish to get information.
SETTING THE PARENTAL CONTROL PASSCODE
1.
Display the SiriusXM settings screen. (→P.93)
2.
Select
Parental Control
(Parental Control).
3.
Select
OK
(OK) when the conrmation message appears.
4.
Enter the 4 digits passcode. →
OK
(OK)
OTHER SETTINGS
93
Settings
3
ADDING THE LOCKED CHANNELS
1.
Display the SiriusXM settings screen. (→P.93)
2.
Select
Parental Control
(Parental Control).
3.
Enter the 4 digits passcode. →
OK
(OK)
4.
→
Channel Lockout Selection
(Channel Lockout
Selection)
● “Lock All Mature Channels”: Select to lock all mature
channels.
● To add the locked channels, it is necessary to set the
“Lock All Mature Channels” to o.
5.
→ (Add)
6.
Select the desired channel to be set.
7.
→
BACK
(BACK)
CHANGING THE PARENTAL CONTROL PASSCODE
1.
Display the SiriusXM settings screen. (→P.93)
2.
Select
Parental Control
(Parental Control).
3.
Enter the 4 digits passcode. →
OK
(OK)
4.
→
Change Passcode
(Change Passcode)
5.
Enter the 4 digits current passcode. →
OK
(OK)
6.
Enter the 4 digits new passcode. →
OK
(OK)
DELETING THE LOCKED CHANNEL
1.
Display the SiriusXM settings screen. (→P.93)
2.
Select
Parental Control
(Parental Control).
3.
Enter the 4 digits passcode. →
OK
(OK)
4.
→
Channel Lockout Selection
(Channel Lockout
Selection)
● To delete the locked channels, it is necessary to set the
“Lock All Mature Channels” to o.
5.
→
Edit
(Edit)
6.
Select for the channel you wish to delete. →
OK
(OK)
7.
→
BACK
(BACK)
OTHER SETTINGS
94

95
Phone
Phone
Phone Operation
96
Phone Screen
96
Some Basics
97
Registering/Connecting A Bluetooth Phone
98
Using The Phone Switch/Microphone
98
Voice Recognition System
99
About The Contacts In The Contact List
99
When Selling Or Disposing Of The Vehicle
100
Calling On The Bluetooth Phone
100
By Recent Calls List
101
By Favorites List
102
By Keypad
102
By Contacts List
103
Receiving On The Bluetooth Phone
103
Incoming Calls
103
Talking On The Bluetooth Phone
104
Bluetooth Phone Message Function
106
Setting The Message
107
Receiving A Message
107
Checking Messages
108
Replying To A Message (Quick Reply)
109
Sending A New Short Message
109
Editing The Quick Reply Message
109
Deleting The Quick Reply Message
110
Adding The Quick Reply Message
110
Calling The Message Sender
110
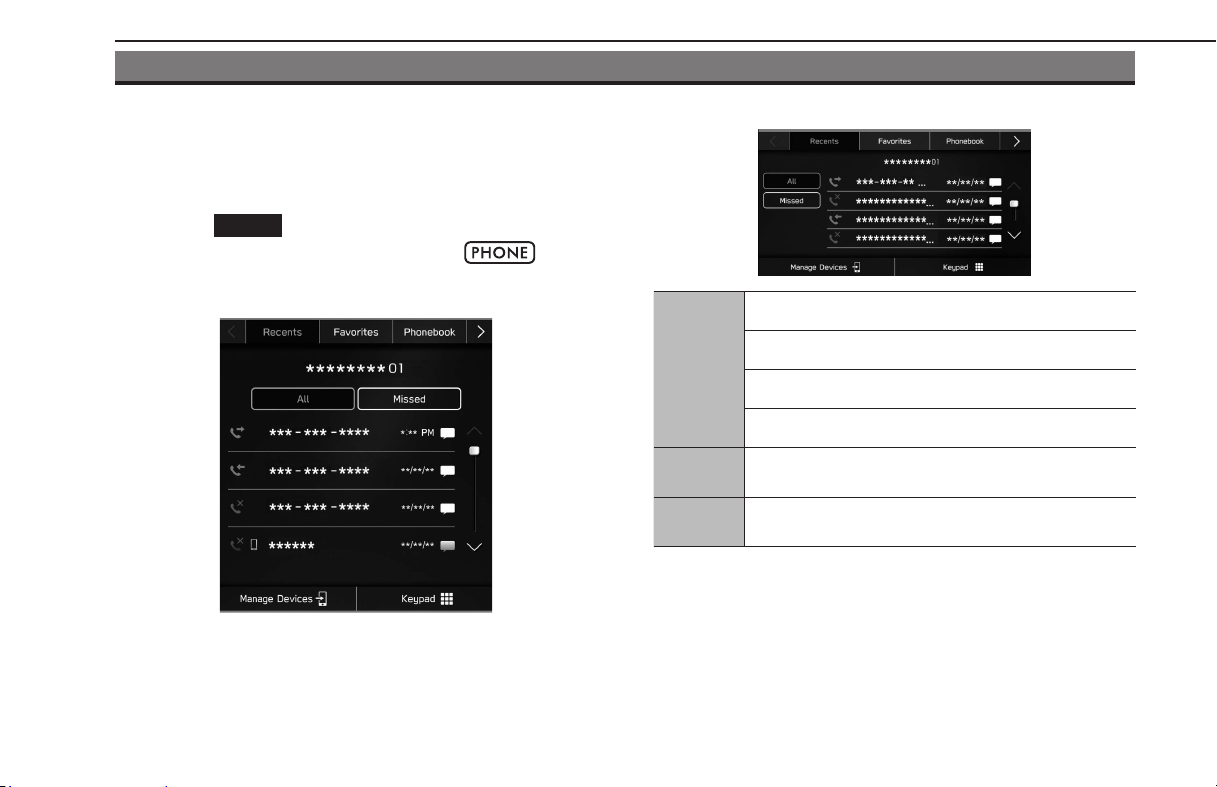
PHONE OPERATION (HANDS-FREE SYSTEM FOR CELLULAR PHONES)
PHONE SCREEN
The phone screen can be accessed with the following methods:
● Display the home screen (→P.18, 40), and then
select
Phone
(Phone).
● Dual 7.0-inch display system only: Press
.
X11.6-inch display system/11.6-inch display with Navi
system
XDual 7.0-inch display system
Phone
operation
Registering a Bluetooth phone/device: →P.74
Calling on the Bluetooth phone: →P.100
Receiving on the Bluetooth phone: →P.103
Talking on the Bluetooth phone: →P.104
Message
function
Using the Bluetooth phone message function: →P.106
Setting up
a phone
Setting the Bluetooth phone/device: →P.77
PHONE OPERATION (HANDS-FREE SYSTEM FOR CELLULAR PHONES)
96
SOME BASICS
The hands-free system enables calls to be made and received
without having to take your hands o the steering wheel.
This system supports Bluetooth. Bluetooth is a wireless data
system that enables cellular phones to be used without being
connected by a cable or placed in a cradle.
The operating procedure of the phone is explained here.
WARNING
l While driving, do not use a cellular phone or connect the
Bluetooth phone.
l This system is tted with Bluetooth antennas. People with
implantable cardiac pacemakers, cardiac resynchronization
therapy-pacemakers or implantable cardioverter debrillators
should maintain a reasonable distance between themselves and
the Bluetooth antennas. The radio waves may aect the operation
of such devices.
l Before using Bluetooth phones, users of any electrical medical
device other than implantable cardiac pacemakers, cardiac
resynchronization therapy-pacemakers or implantable
cardioverter debrillators should consult the manufacturer of the
device for information about its operation under the inuence of
radio waves. Radio waves could have unexpected eects on the
operation of such medical devices.
CAUTION
l Do not leave your cellular phone in the vehicle. The temperature
inside may rise to a level that could damage the phone.
NOTE
l If your cellular phone does not support Bluetooth, this system cannot
function. Certain functions may not be available depending on the
type of cellular phone.
l In the following conditions, the system may not function:
•The cellular phone is turned o.
•The current position is outside the communication area.
•The cellular phone is not connected.
•The cellular phone has a low battery.
l When using the hands-free function and other Bluetooth functions
at the same time, the following problems may occur:
•The Bluetooth connection may be cut.
•Noise may be heard when playing back voice with the Bluetooth
function.
l The other party’s voice will be heard from the front speakers. The
audio system will be muted during phone calls or when hands-free
voice commands are used.
l Talk alternately with the other party on the phone. If both parties
speak at the same time, the other party may not hear what has been
said. (This is not a malfunction.)
l Keep call volume down. Otherwise, the other party’s voice may
be audible outside the vehicle and voice echo may increase. When
talking on the phone, speak clearly towards the microphone.
PHONE OPERATION (HANDS-FREE SYSTEM FOR CELLULAR PHONES)
97
Phone
4
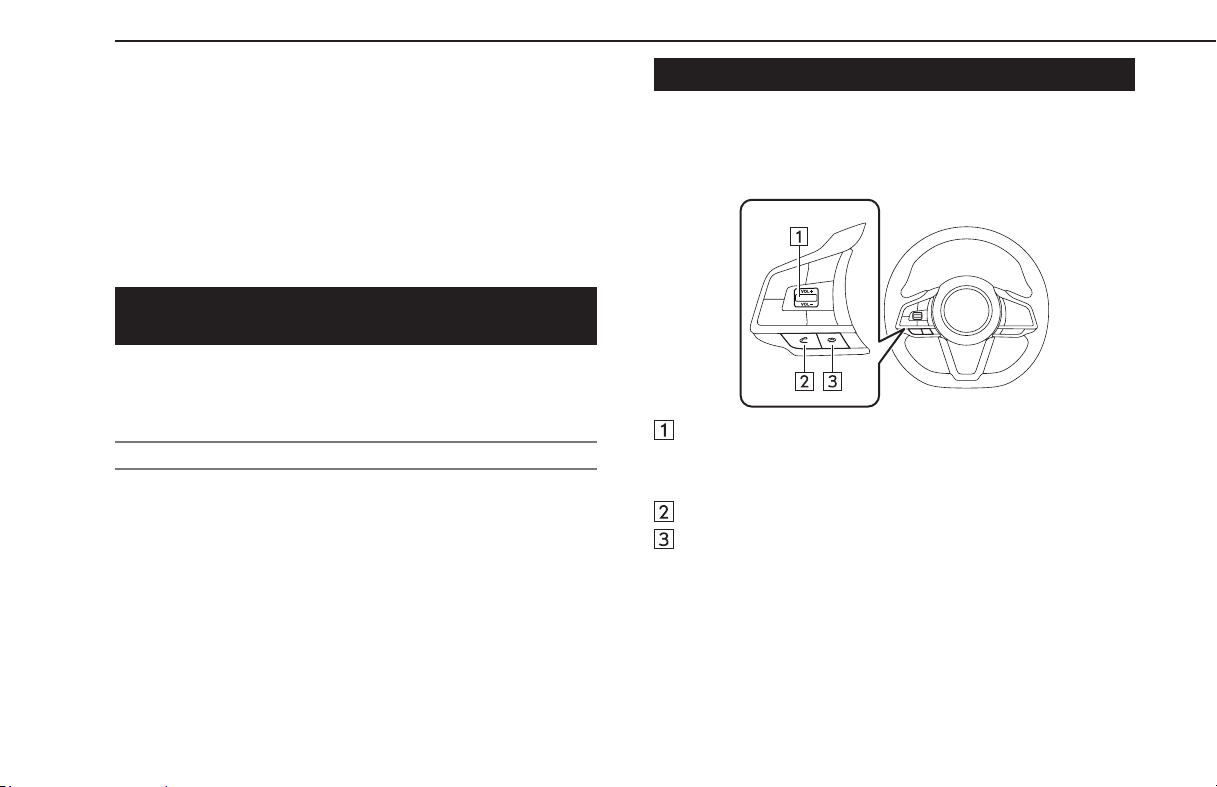
NOTE
l The other party may not hear you clearly when:
•Driving on an unpaved road. (Making excessive trac noise.)
•Driving at high speeds.
•Driving with a window open.
•When air from the ventilator blows directly toward the
microphone.
•The sound of the air conditioning fan is loud.
•There is a negative eect on sound quality due to the phone and/
or network being used.
REGISTERING/CONNECTING A Bluetooth
PHONE
To use the hands-free system for cellular phones, it is necessary
to register a cellular phone with the system. (→P.74)
Bluetooth PHONE CONDITION DISPLAY
The condition of the Bluetooth phone appears on the upper
right side of the screen. (→P.71)
USING THE PHONE SWITCH/MICROPHONE
XSteering switch
By pressing the phone switch, a call can be received or ended
without taking your hands o the steering wheel.
Volume control switch
● Press the switch upwards to increase the volume.
● Press the switch downwards to decrease the volume.
O hook switch
On hook switch
PHONE OPERATION (HANDS-FREE SYSTEM FOR CELLULAR PHONES)
98

XMicrophone
The microphone is used when talking on the phone.
VOICERECOGNITION SYSTEM
Press this switch to operate the voicerecognition system.
● The voice recognition system and its list of commands
can be operated. (→P.218)
ABOUT THE CONTACTS IN THE CONTACT LIST
● The following data is stored for every registered phone.
When another phone is connected, the following
registered data cannot be read:
•Contact data
•Call history data
•Favorites data
•All phone settings
NOTE
l When a phone’s registration is deleted, the above-mentioned data is
also deleted.
PHONE OPERATION (HANDS-FREE SYSTEM FOR CELLULAR PHONES)
99
Phone
4

WHEN SELLING OR DISPOSING OF THE VEHICLE
A lot of personal data is registered when the hands-free system
is used. When selling or disposing of the vehicle, reset all setup
items. (→P.83)
● The following data in the system can be reset:
•Contact data
•Call history data
•Favorites data
•All phone settings
NOTE
l Once reset, the data and settings will be erased. Pay close attention
when resetting the data.
CALLING ON THE Bluetooth PHONE
After a Bluetooth phone has been registered, a call can be made
using the hands-free system. There are several methods by
which a call can be made, as described below.
1.
Display the phone screen. (→P.96)
2.
Select the desired button to call from.
● By recent calls list: →P.101
● Byfavorites list: →P.102
● By keypad*
1
: →P.102
● By contacts list: →P.103
● By SMS/MMS: →P.110
● By POI call*
2
: →P.188
● By voicerecognition system: →P.218
*
1
: The operation cannot be performed while driving.
*
2
: 11.6-inch display with Navi system only
NOTE
l If Siri is activated on an iPhone which is connected to the system via
Bluetooth, a screen displaying an incoming call from the connected
iPhone will be displayed. If the call is accepted, the iPhone can be
operated using Siri.
PHONE OPERATION (HANDS-FREE SYSTEM FOR CELLULAR PHONES)
100
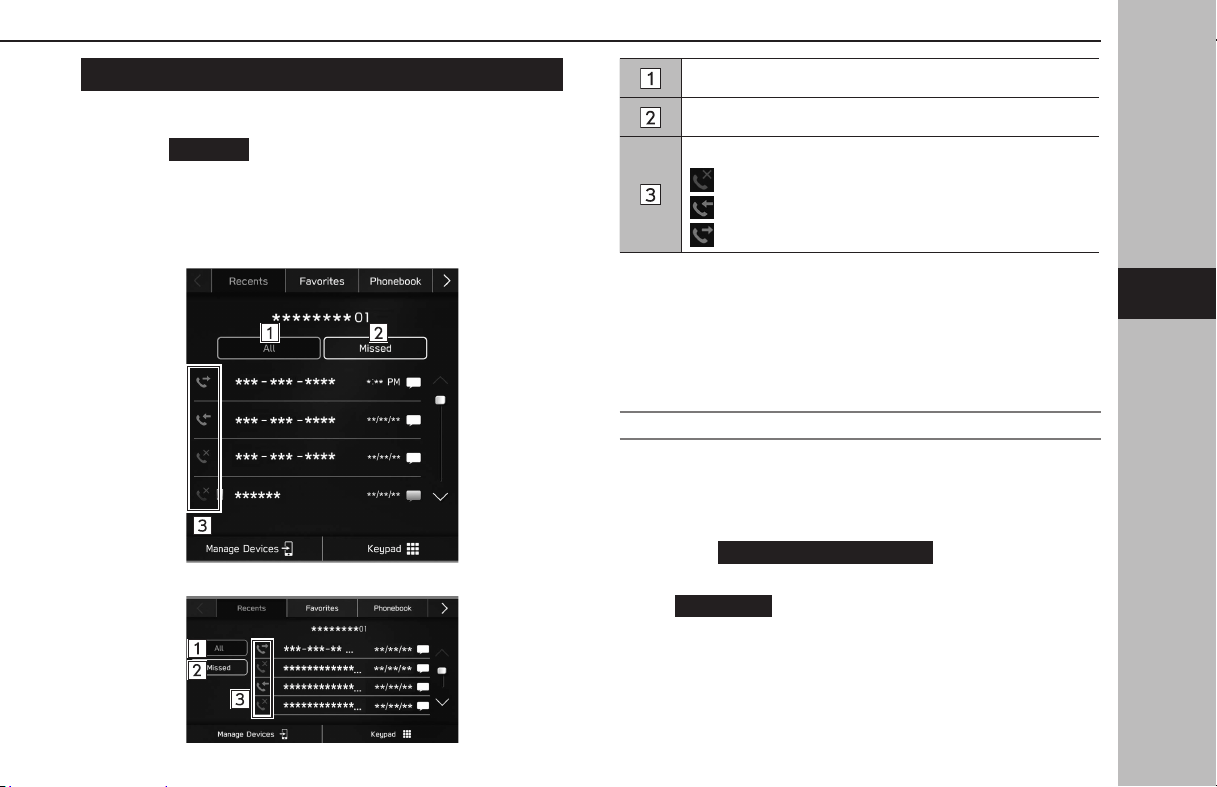
BY RECENT CALLS LIST
1.
Display the phone screen. (→P.96)
2.
Select
Recents
(Recents), and then select the desired
contact.
● The outgoing call screen is displayed.
X11.6-inch display system/11.6-inch display with Navi
system
XDual 7.0-inch display system
Select to display all latest call history items.
Select to display missed calls.
Displays the call type icons.
: Missed call
: Incoming call
: Outgoing call
NOTE
l When a phone number registered in the contact list is received, the
name is displayed.
l International phone calls may not be made depending on the type of
cellular phone you have.
SORTING THE PHONEBOOK LIST
The order of the phonebook list can be sorted by rst name or
last name.
1.
Display the phone settings screen. (→P.77)
2.
Select
Phonebook/Recent Calls
(Phonebook/Recent
Calls).
3.
→
Sort Order
(Sort Order)
4.
Select the desired sorting criteria.
PHONE OPERATION (HANDS-FREE SYSTEM FOR CELLULAR PHONES)
101
Phone
4
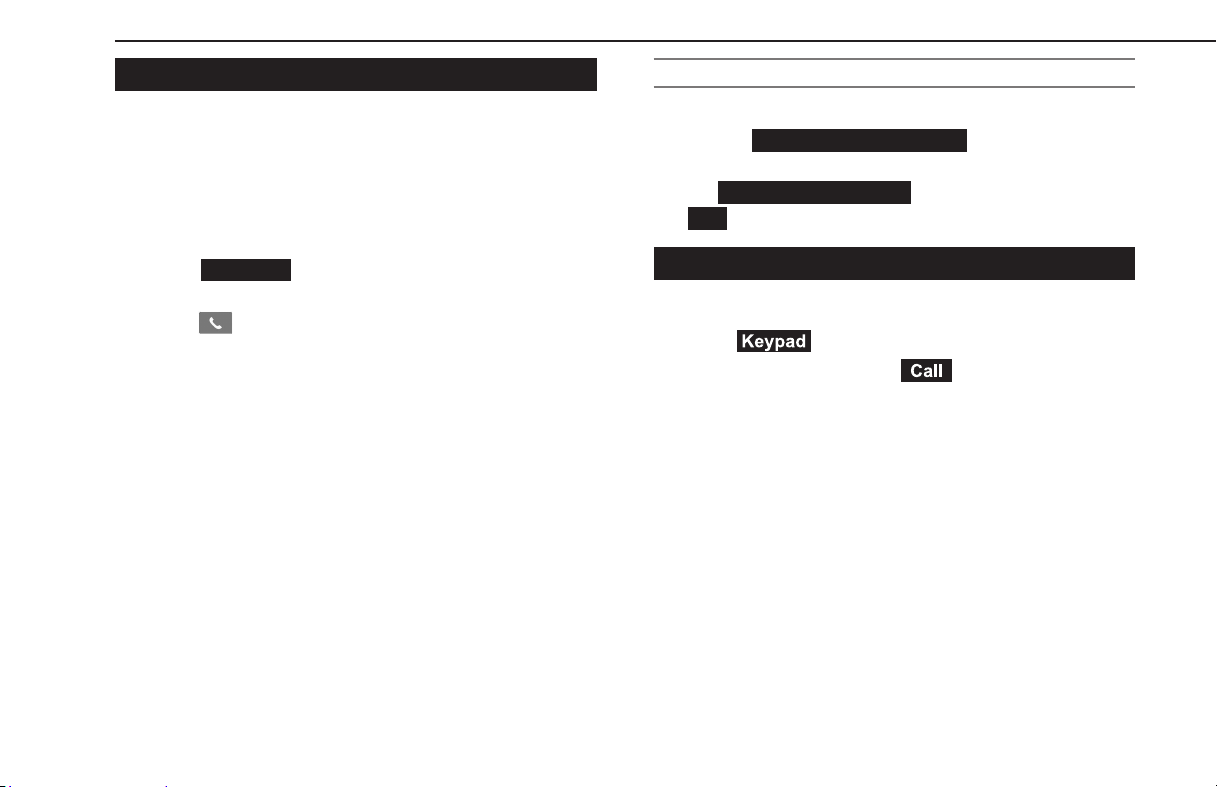
BY FAVORITES LIST
Calls can be made using registered contacts which can be
selected from a contact list.
For details on registering contacts:→P.103
Up to 15 contact lists can be registered in the favorites list.
1.
Display the phone screen. (→P.96)
2.
Select
Favorites
(Favorites), and then select the desired
contact.
3.
Select next to the desired number.
● The outgoing call screen is displayed.
NOTE
l This system’s favorites list and that of your Bluetooth phone are not
synchronized. This system does not currently support transfer of
favorites list data from the Bluetooth phone. To add the Bluetooth
phone’s favorites list to the system’s favorites list, you need to register
it through the system phonebook contacts list. (→P.103)
DELETING ALL FAVORITES LIST
1.
Display the phone settings screen. (→P.77)
2.
Select
Phonebook/Recent Calls
(Phonebook/Recent
Calls).
3.
→
Remove All Favorites
(Remove All Favorites) →
OK
(OK)
BY KEYPAD
1.
Display the phone screen. (→P.96)
2.
Select (Keypad).
3.
Enter the phone number. → (Call)
● The outgoing call screen is displayed.
NOTE
l Depending on the type of Bluetooth phone being connected, it may
be necessary to perform additional steps on the phone.
PHONE OPERATION (HANDS-FREE SYSTEM FOR CELLULAR PHONES)
102
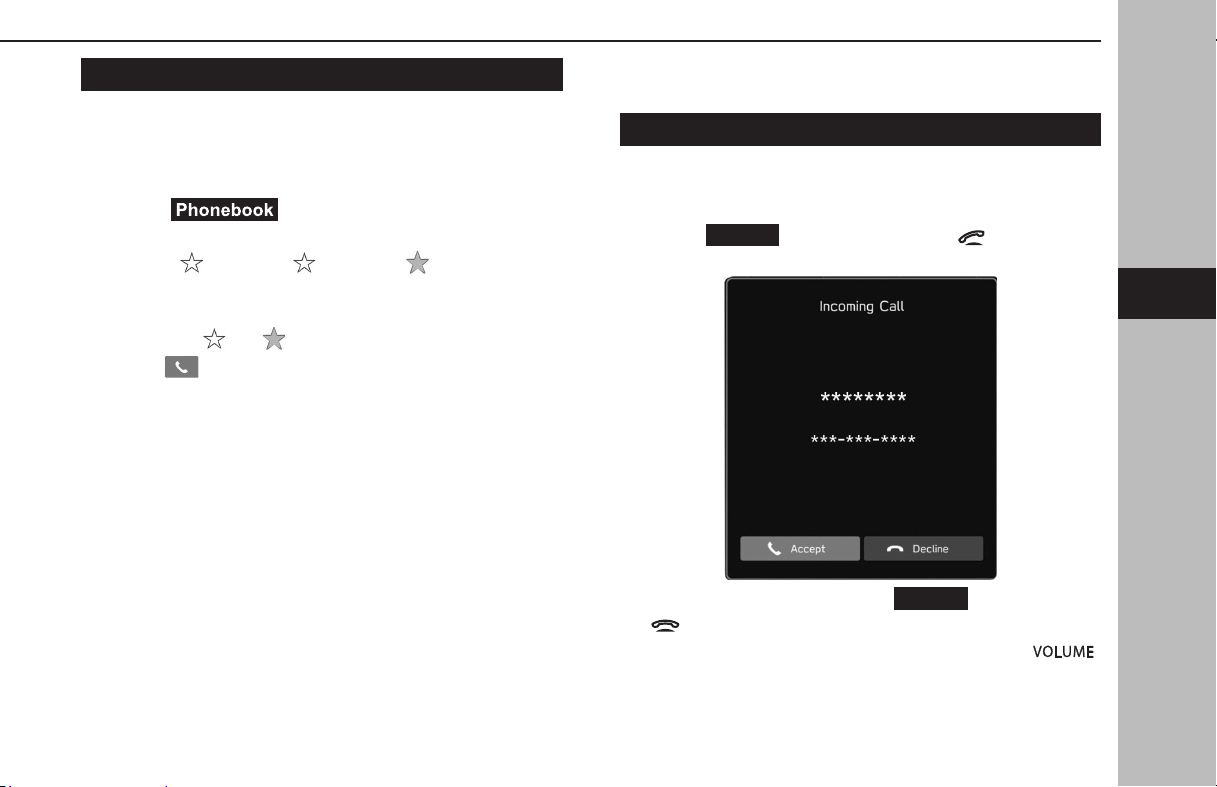
BY CONTACTS LIST
Calls can be made by using contact data which is transferred
from a registered cellular phone.
1.
Display thephone screen. (→P.96)
2.
Select (Phonebook), and then select the
desired contact.
● When
is selected, changes to (yellow).
•The number is registered in the favorites list. (→P.102)
● Each time the symbol is selected, the symbol changes
between and (yellow).
3.
Select next to the desired number.
● Numbers may include Home, Work, Mobile and Other
as categories depending on the phonebook data of the
connected cellular phone.
● The outgoing call screen is displayed.
NOTE
l When “Automatically Download Phonebook/Recent Calls” is set to on,
contacts is transferred automatically. (→P.82)
RECEIVING ON THE Bluetooth PHONE
INCOMING CALLS
When a call is received, the incoming call screen pops up with
sound.
1.
Select
Accept
(Accept) or press the switch on the
steering wheel to talk on the phone.
To refuse to receive the call: Select
Decline
(Decline) or press
the
switch on the steering wheel.
To adjust the volume of a received call: Turn the “
”
knob, or use the volume control switch on the steering wheel.
PHONE OPERATION (HANDS-FREE SYSTEM FOR CELLULAR PHONES)
103
Phone
4

NOTE
l During international phone calls, the other party’s name or number
may not be displayed correctly depending on the type of cellular
phone you have.
l The ringtone volume can also be set from the sound settings screen.
(→P.90)
TALKING ON THE Bluetooth PHONE
While talking on the phone, this screen is displayed. The
operations outlined below can be performed on this screen.
X11.6-inch display system/11.6-inch display with Navi
system
XDual 7.0-inch display system
PHONE OPERATION (HANDS-FREE SYSTEM FOR CELLULAR PHONES)
104
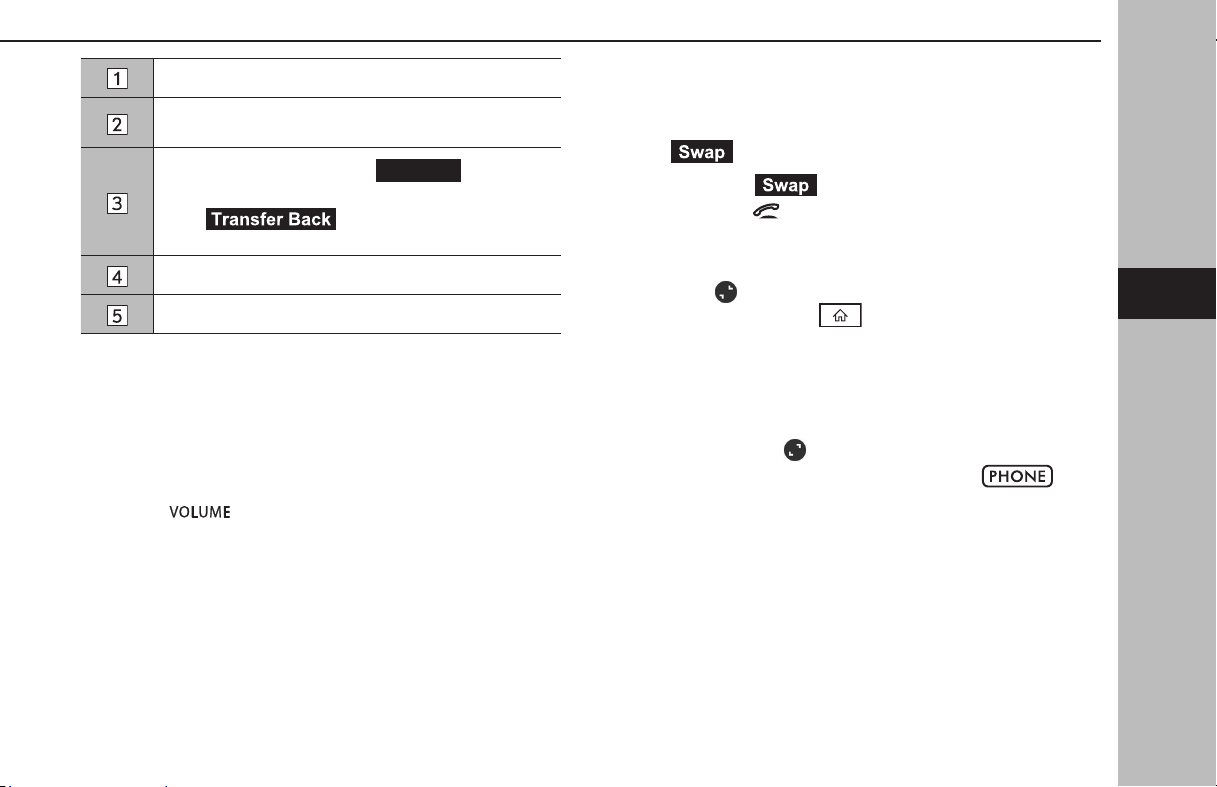
Select to mute your voice to the other party.
Select to enter the desired numbers/output tones.
This operation cannot be performed while driving.
Select to transfer the call. Select
Transfer
(Transfer)
to change from a hands-free call to a cellular phone call.
Select (Transfer Back) to change from
cellular phone call to hands-free call.
Select to hang up the phone.
Select to minimize the active call screen.
NOTE
l Changing between cellular phone call and hands-free call can be
performed by operating the cellular phone directly.
l Transferring methods and operations will be dierent depending on
the type of cellular phone you have.
l For the operation of the cellular phone, see the manual that comes
with it.
l Turn the“
” knob, or use the volume control switch on the
steering wheel to adjust the volume of the other party’s voice.
XIn the case of accepting an interrupt incoming call during
a call
The rst call is put on hold.
●
(Swap): Select to change parties.
● Each time
(Swap) or name area is selected, or
press the
switch on the steering wheel, the party
who is on hold will be switched.
XWhen using another function during a call
By selecting
(11.6-inch display system/11.6-inch display with
Navi system), or pressing
(Dual 7.0-inch display system),
the active call screen will be minimized and other functions can
be used.
● When the active call screen is minimized, only the call
ending operation can be performed.
● By selecting
(11.6-inch display system/11.6-inch
display with Navi system), or pressing
(Dual
7.0-inch display system), the active call screen will be
maximized.
PHONE OPERATION (HANDS-FREE SYSTEM FOR CELLULAR PHONES)
105
Phone
4
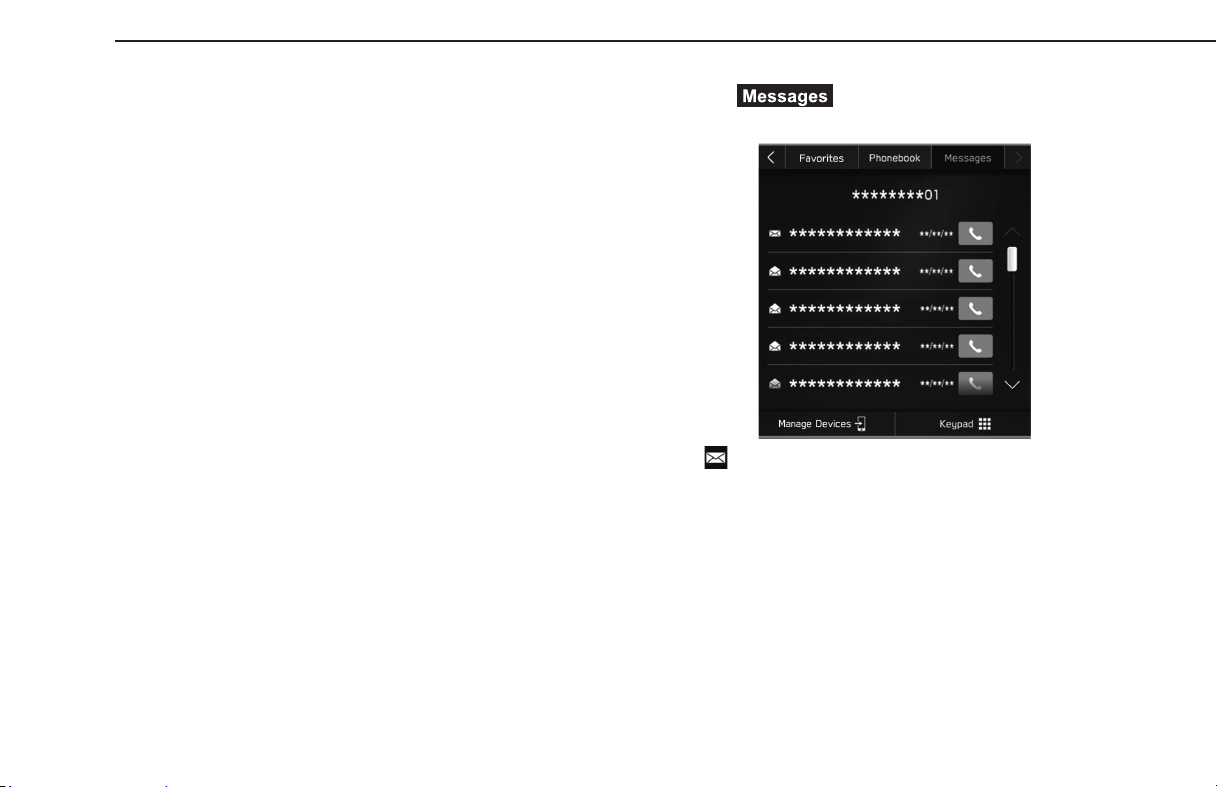
Bluetooth PHONE MESSAGE
FUNCTION
Received messages can be forwarded from the connected
Bluetooth phone, enabling checking and replying using the
system.
Depending on the type of Bluetooth phone connected, received
messages may not be transferred to the message inbox.
If the phone does not support the message function, this
function cannot be used.
Depending on the Bluetooth phone type, the screen display
may dier, and it may not be possible to use certain functions.
To use this function, it is necessary to set the phonebook
download function to on. (→P.82)
NOTE
l Depending on the model of your Bluetooth phone, the setting
of the connected phone may need to be changed. (ex: For iOS or
other models, the notication setting may need to be activated.) For
details, check the instructions for the connected Bluetooth phone.
1.
Display the phone screen. (→P.96)
2.
Select (Messages).
3.
Check that the message inbox screen is displayed.
●
: Unread message icon
● Receiving a message: →P.107
● Checking messages: →P.108
● Replying to a message (quick reply): →P.109
● Sending a new short message: →P.109
● Calling the message sender: →P.110
PHONE OPERATION (HANDS-FREE SYSTEM FOR CELLULAR PHONES)
106

SETTING THE MESSAGE
1.
Display the phone settings screen. (→P.77)
2.
Select (Messages).
3.
Select the items to be set.
Select to set the incoming message notication pop-up on/
o.
Select to set automatically download messages on/o.
Select to edit quick reply messages. (→P.109)
RECEIVING A MESSAGE
When an SMS/MMS is received, the incoming message screen
pops up with sound and is ready to be operated on the screen.
1.
Select (Play).
● Select
(Ignore) to not open the message.
XIf there are any unread messages
The following screen is displayed.
● (Inbox): Select to display the message inbox
screen.
●
(Ignore): Select to not open the message.
PHONE OPERATION (HANDS-FREE SYSTEM FOR CELLULAR PHONES)
107
Phone
4
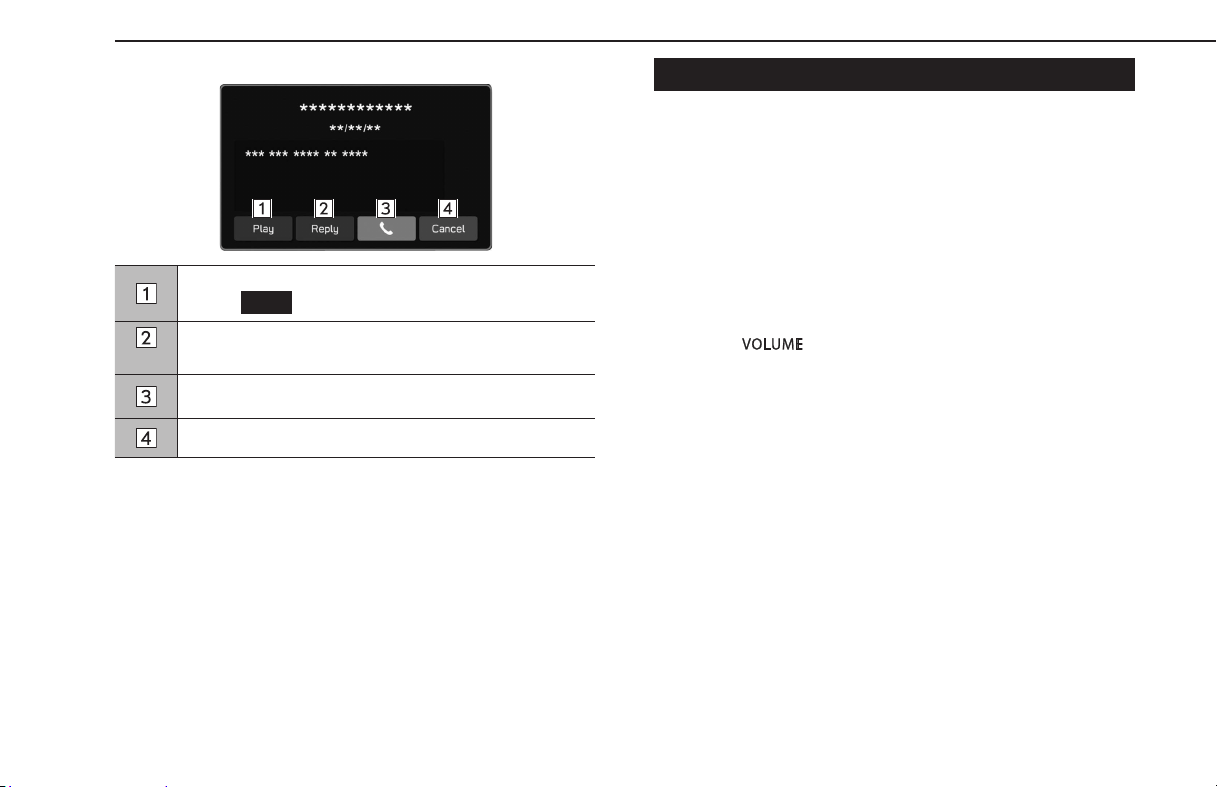
2.
The following screen is displayed.
Select to have messages read out.
• Select
Stop
(Stop) to stop the message read out.
*
Select to reply the message. (→P.109)
Select to call the message sender.
Select to close this screen.
*: Depending on the Bluetooth phone that is connected to the audio system, this
function is not available.
NOTE
l Depending on the cellular phone used for receiving messages, or its
registration status with the system, some information may not be
displayed.
CHECKING MESSAGES
1.
Display the message inbox screen. (→P.106)
2.
Select the desired message from the list.
3.
Check the message. (→P.107)
NOTE
l Depending on the type of Bluetooth phone being connected, it may
be necessary to perform additional steps on the phone.
l Only received messages on the connected Bluetooth phone can be
displayed.
l The text of the message is not displayed while driving.
l Turn the“
” knob, or use the volume control switch on the
steering wheel to adjust the message readout volume.
PHONE OPERATION (HANDS-FREE SYSTEM FOR CELLULAR PHONES)
108

PHONE OPERATION (HANDS-FREE SYSTEM FOR CELLULAR PHONES)
109
Phone
4
REPLYING TO A MESSAGE (QUICK REPLY)*
*: Depending on the Bluetooth phone that is connected to the audio system, this
function is not available.
1.
Display the message inbox screen. (→P.106)
2.
Select the desired message from the list.
3.
→ (Reply)
4.
Select the desired message.
5.
→
Send
(Send)
●
Change
(Change): Select to change the message.
●
Cancel
(Cancel): Select to cancel sending the message.
NOTE
l 10 messages have already been stored.
SENDING A NEW SHORT MESSAGE
1.
Display the favorites detail screen (→P.102), the recent
calls list screen (→P.101) or the contact detail screen
(→P.103).
2.
Select next to the desired number.
3.
Select the desired message.
4.
→
Send
(Send)
●
Change
(Change): Select to change the message.
●
Cancel
(Cancel): Select to cancel sending the message.
EDITING THE QUICK REPLY MESSAGE
XEditing the message in the phone settings screen
1.
Display the phone settings screen. (→P.77)
2.
Select (Messages).
3.
→
Quick Reply Messages
(Quick Reply Messages)
4.
→
Edit
(Edit)
5.
Select the desired message.
6.
Enter the message. →
OK
(OK)
XEditing the message in the message screen
1.
Display the message inbox screen. (→P.106)
2.
Select the desired message from the list.
3.
→ (Reply)
4.
Select next to the desired message.
5.
Enter the message. →
OK
(OK)
DELETING THE QUICK REPLY MESSAGE
1.
Display the phone settings screen. (→P.77)
2.
Select (Messages).
3.
→
Quick Reply Messages
(Quick Reply Messages)
4.
→
Edit
(Edit)
5.
Select next to the desired message.
ADDING THE QUICK REPLY MESSAGE
1.
Display the phone settings screen. (→P.77)
2.
Select (Messages).
3.
→
Quick Reply Messages
(Quick Reply Messages)
4.
→ (Add)
5.
Enter the message. →
OK
(OK)
CALLING THE MESSAGE SENDER
Calls can be made to an SMS/MMS message sender’s phone
number.
1.
Display the message inbox screen. (→P.106)
2.
Select next to the desired sender.
● The outgoing call screen is displayed.
PHONE OPERATION (HANDS-FREE SYSTEM FOR CELLULAR PHONES)
110

111
Apps
Apps
Before Using Applications 112
Before Using Applications
112
Settings Required To Use Applications
113
About App-based Connected Content
113
SUBARU STARLINK
115
SUBARU STARLINK
115
Displaying SUBARU STARLINK Information
116
Legal Notice
116
Apple CarPlay
121
Apple CarPlay
121
Connecting The Apple CarPlay Device
121
Overview
121
Selecting Device To Connect To
Apple CarPlay
122
Deleting The Apple CarPlay Device
123
Android Auto
124
Android Auto
124
Connecting The Android Auto Device
124
Overview
124
Enabling Auto Show Of Android Auto Screen
125
Selecting Android Devices To Connect To
Android Auto
125
Deleting The Android Auto Device
126
SiriusXM Travel Link
127
SiriusXM Travel Link
127
Displaying Sports Information
127
Displaying Weather Information
128
Displaying Weather Alerts
130
Displaying Stocks Information
131
Displaying Fuel Information
132
Displaying Parking Information
133

BEFORE USING APPLICATIONS
BEFORE USING APPLICATIONS
Precautions to be aware of when using applications are shown
below.
In this chapter, iPhone or Android devices will be referred to as a
smartphone.
WARNING
l Do not connect or operate the smartphone while driving.
l Be sure to park the vehicle in a safe place before connecting or
operating the smartphone.
CAUTION
l Do not leave your smartphone in the vehicle. In particular, high
temperatures inside the vehicle may damage the smartphone.
l Do not push down on or apply unnecessary pressure to the
smartphone while it is connected as this may damage the
smartphone or its terminal.
l If connecting your smartphone via USB, do not insert foreign
objects into the USB port as this may damage the smartphone or
its terminal.
NOTE
l Depending on the application, certain functions are not available
while driving for reasons of safety.
l In order to maximize signal reception, performance and precision of
the smartphone, please ensure the smartphone is placed as close to
the system as possible, while ensuring it is stowed and secure while
driving.
l When connecting your smartphone via USB, use the original cables
provided with your smartphone or equivalent third-party (certied)
cables.
l When theignition switch is turned to the “ACC” or “ON” position, the
battery of the connected smartphone is charged.
l If connecting your smartphone via USB, smartphone may not be
recognized when the ignition switch is turned to the “ACC” or “ON”
position. In this case, remove the smartphone and reconnect it.
l The accuracy of the displayed information or the signal reception
performance depends on the smartphone or the connected device,
and its wireless connection.
l For operating the smartphone, see the instruction manual that
comes with it.
l Follow the specic operation procedures for the smartphone
application.
l When connecting the device via Bluetooth, the communication
speed may become slower than via USB.
l If the application is not running smoothly or is unstable, disconnect
and reconnect the smartphone via Bluetooth (→P.79) and/or USB
cable (→P.66). If the problem continues, reboot the smartphone.
BEFORE USING APPLICATIONS
112

SETTINGS REQUIRED TO USE APPLICATIONS
In order to use an application on this system, the application
must be installed on your smartphone.
● Search and download the application from your
smartphone app.
•iPhone: App Store via iTunes
•Android device: Google Play Store
● Create an account and login to the application on the
smartphone.
NOTE
l Please use the latest version of the application.
l Apple CarPlay does not require an application to be installed. Refer
to “Apple CarPlay” for details on Apple CarPlay operation. (→P.121)
ABOUT APP-BASED CONNECTED CONTENT
Requirements for using the connected content services of the
application on this system.
● The latest version of the system is compatible with
connected content application(s) for the smartphones,
and is downloaded to your smartphone.
● A current account with a wireless content service
provider.
● A smartphone data plan: If the data plan for your
smartphone does not provide for unlimited data usage,
additional charges from your carrier may apply for
accessing app-based connected content via 3G, 4G,
Wi-Fi®, or 4G LTE wireless networks.
● Connection to the internet via 3G, 4G, Wi-Fi®, or 4G LTE
networks.
NOTE
l Changes to product specications may result in dierences between
the content of the manual and features of the product.
l Be careful not to exceed the data usage limits for your smartphone.
Doing so will result in additional data usage charges from your
phone carrier.
BEFORE USING APPLICATIONS
113
Apps
5

NOTE
l Limitations:
•Access to app-based connected content will depend on the
availability of wireless cellular and/or Wi-Fi® network coverage
for the purpose of allowing your smartphone to connect to the
internet.
•Service availability may be geographically limited by region.
Consult the wireless connected content service provider for
additional information.
•Ability of this product to access connected content is subject
to change without notice and could be aected by any of the
following: compatibility issues with future rmware versions of
the smartphone; compatibility issues with future versions of the
connected content application(s) for the smartphone; changes
to or discontinuation of the connected content application(s) or
service by its provider.
l Since some applications use signals from GPS satellites and wireless
communication lines, they may not work properly in the following
locations.
•In tunnels
•In underground parking lots
•Outside wireless communication range, such as some countryside
areas
•Where the wireless communication network is congested, or
where communications are restricted
l Depending on the circumstances and environment, the signal may
be weak or not be received. In such cases, an error may occur.
NOTE
l Communication and phone call charges for smartphones should be
paid by the wireless subscriber.
l If you lose the data in a smartphone or other device while using it
with the system, no compensation will be given for the lost data.
l SUBARU CORPORATION does not guarantee content provided by the
application.
l The application may not work due to factors on smartphones,
smartphone applications or stations. SUBARU CORPORATION accepts
no responsibility for this.
BEFORE USING APPLICATIONS
114

SUBARU STARLINK
SUBARU STARLINK
The SUBARU STARLINK app allows users to connect a
smartphone to the system, using either Bluetooth or
undamaged genuine USB cable (recommended), and access to
various music, navigation, vehicle guide applications, and much
more.
Download the SUBARU STARLINK app from the Apple App Store
or Google Play Store.
When connecting iPhone or Android devices with the SUBARU
STARLINK application installed, you can control SUBARU
STARLINK content through the system.
To use the SUBARU STARLINK application, connect your
iPhone to the USB port or via Bluetooth, or connect your
Android device via Bluetooth.
Dual 7.0-inch display system only: It is necessary to pair your
smartphone via Bluetooth (→P.79), set the phonebook
download function to on (→P.82), and then adjust the time so
that it is the same at both your smartphone and the system.
When using the application, read the precautions indicated in
“BEFORE USING APPLICATIONS”. (→P.112)
NOTE
l SUBARU CORPORATION reserves the right, in its sole and absolute
discretion, to add, limit, or remove applications from SUBARU
STARLINK at any time. Applications available at the time you
purchase your vehicle may not remain available throughout your
ownership of the vehicle.
l Review all terms and conditions, including all privacy policies,
for any applications you access via SUBARU STARLINK. SUBARU
CORPORATION is not responsible for any third party applications,
including their use of data, their performance, or any other matter.
l SUBARU CORPORATION is not responsible for any charges, including
any data charges from your carrier, resulting from your use of any
application.
l SUBARU STARLINK may not be able to be used when connecting to
an external Wi-Fi source from this system if the source IP address is
192.168.1.x.
SUBARU STARLINK
115
Apps
5

DISPLAYING SUBARU STARLINK INFORMATION
1.
Run the SUBARU STARLINK application on your smartphone.
2.
Connect the iPhone to the USB port, or connect your
iPhone or Android device by utilizing the Bluetooth
connection.
● For details on connecting your iPhone to the USB port:
→P.66
For details on registering or connecting your iPhone or
Android device: →P.74
3.
Select
SUBARU STARLINK
(SUBARU STARLINK) on the
Apps screen. (→P.27, 56)
NOTE
l There may be times when
SUBARU STARLINK
(SUBARU
STARLINK) does not appear immediately when the ignition switch is
set in the “ACC” or “ON” position. If so, please wait.
ABOUT THE SUPPORTED DEVICES
This system supports the following devices.
● iPhone: iOS 13 or later
● Android: Android 8 or later
NOTE
l To ensure normal operation, updating your smartphone operating
system to the latest version is recommended.
LEGAL NOTICE
XFor iPhone
● Caution
For your safety, do not attempt to operate any feature of
this device unless it is safe to do so without distraction
from safe driving. This device is informational only. Check
and abide by your local laws and always obey safe driving
rules, and posted signs and signals. Operate this device
only in locales in which it is legal. Read the instruction
manual for proper operation of this device. This product
uses the Smart Phone’s data plan for features and
services. Please consult carrier data plan usage, pricing,
data overage charges, limitations and usage guidelines.
● Permission
You may be asked to provide your personal and/or non-
personal information solely for the purpose specied.
SUBARU STARLINK
116

● Warranty Disclaimer
Any use of this product (the “Product”), the SUBARU
STARLINK software, and any applications that are
supported with the Product (collectively with the
Product and the SUBARU STARLINK software, the
“Product System”), including any reliance upon any
of the content displayed by the Product System, shall
be at your sole risk. SUBARU CORPORATION and its
subsidiaries (“SUBARU CORPORATION”) disclaims
any and all responsibility or liability for the accuracy,
content, completeness, legality, reliability, or operability
or availability of any information from the use of the
Product System. The telecommunication network used
and the particular version of the iPhone, Android or
other smart phone (each, a “Smart Phone”) and the
related Apple iOS, Android OS or other smart phone
OS (collectively, the Smart Phone and the OS, the
“Phone System”) used are the responsibility of the
customer, and SUBARU CORPORATION shall have no
responsibility for the interoperability of the Product
System with any telecommunications network/Phone
System combination not explicitly supported by SUBARU
CORPORATION in written documentation of the Product
System.
The user’s sole and exclusive remedies for any app
downloaded from the iTunes Store, Google Play or
other application stores (each, an “Application Store”)
(including the SUBARU STARLINK app), or otherwise
installed on customer’s Smart Phone, shall be as provided
in the Application Store Terms and Conditions or other
similar document and SUBARU CORPORATION assumes
no responsibility for those apps or their operation. Any
services provided by the Product System shall be covered
by a separate Services Agreement.
SUBARU STARLINK
117
Apps
5

TO THE FULLEST EXTENT PERMITTED UNDER APPLICABLE
LAW, THE PRODUCT SYSTEM IS PROVIDED “AS IS” AND “AS
AVAILABLE,” WITHOUT WARRANTY OF ANY KIND, EITHER
EXPRESS OR IMPLIED OR STATUTORY, INCLUDING THE
IMPLIED WARRANTIES OF MERCHANTABILITY, FITNESS
FOR A PARTICULAR PURPOSE, OR NON-INFRINGEMENT.
SUBARU CORPORATION AND ITS AFFILIATES, OFFICERS,
EMPLOYEES, AGENTS, PARTNERS, SUPPLIERS AND
LICENSORS (COLLECTIVELY, “SUBARU CORPORATION
PARTIES”) DISCLAIM ANY AND ALL WARRANTIES
REGARDING THE SECURITY, RELIABILITY, TIMELINESS,
COMPLETENESS, ACCURACY AND PERFORMANCE OF
THE PRODUCT SYSTEM. SUBARU CORPORATION PARTIES
DO NOT WARRANT OR COVENANT THAT ANY DEFECTS
OR ERRORS ASSOCIATED WITH THE PRODUCT SYSTEM
WILL BE CORRECTED, OR THAT THE PRODUCT SYSTEM
IS FREE OF VIRUSES, ERRORS, OR OTHER HARMFUL
COMPONENTS, OR WILL OPERATE UNINTERRUPTED OR
ON ANY SCHEDULE. BECAUSE SOME JURISDICTIONS DO
NOT ALLOW THE EXCLUSION OF IMPLIED WARRANTIES,
THE ABOVE EXCLUSION OF IMPLIED WARRANTIES MAY
NOT APPLY TO YOU.
XFor Android devices
● Caution
For your safety, do not attempt to operate any feature of
this device unless it is safe to do so without distraction
from safe driving. This device is informational only. Check
and abide by your local laws and always obey safe driving
rules, and posted signs and signals. Operate this device
only in locales in which it is legal. Read the instruction
manual for proper operation of this device. This product
uses the Smart Phone’s data plan for features and
services. Please consult carrier data plan usage, pricing,
data overage charges, limitations and usage guidelines.
● Permission
You may be asked to provide your personal and/or non-
personal information solely for the purpose specied.
SUBARU STARLINK
118

● Warranty Disclaimer
Any use of this product (the “Product”), the SUBARU
STARLINK software, and any applications that are
supported with the Product (collectively with the
Product and the SUBARU STARLINK software, the
“Product System”), including any reliance upon any
of the content displayed by the Product System, shall
be at your sole risk. SUBARU CORPORATION and its
subsidiaries (“SUBARU CORPORATION”) disclaims
any and all responsibility or liability for the accuracy,
content, completeness, legality, reliability, or operability
or availability of any information from the use of the
Product System. The telecommunication network used
and the particular version of the iPhone, Android or
other smart phone (each, a “Smart Phone”) and the
related Apple iOS, Android OS or other smart phone
OS (collectively, the Smart Phone and the OS, the
“Phone System”) used are the responsibility of the
customer, and SUBARU CORPORATION shall have no
responsibility for the interoperability of the Product
System with any telecommunications network/Phone
System combination not explicitly supported by SUBARU
CORPORATION in written documentation of the Product
System.
The user’s sole and exclusive remedies for any app
downloaded from the iTunes Store, Google Play or
other application stores (each, an “Application Store”)
(including the SUBARU STARLINK app), or otherwise
installed on customer’s Smart Phone, shall be as provided
in the Application Store Terms and Conditions or other
similar document and SUBARU CORPORATION assumes
no responsibility for those apps or their operation. Any
services provided by the Product System shall be covered
by a separate Services Agreement.
SUBARU STARLINK
119
Apps
5

TO THE FULLEST EXTENT PERMITTED UNDER APPLICABLE
LAW, THE PRODUCT SYSTEM IS PROVIDED “AS IS” AND “AS
AVAILABLE,” WITHOUT WARRANTY OF ANY KIND, EITHER
EXPRESS OR IMPLIED OR STATUTORY, INCLUDING THE
IMPLIED WARRANTIES OF MERCHANTABILITY, FITNESS
FOR A PARTICULAR PURPOSE, OR NON-INFRINGEMENT.
SUBARU CORPORATION AND ITS AFFILIATES, OFFICERS,
EMPLOYEES, AGENTS, PARTNERS, SUPPLIERS AND
LICENSORS (COLLECTIVELY, “SUBARU CORPORATION
PARTIES”) DISCLAIM ANY AND ALL WARRANTIES
REGARDING THE SECURITY, RELIABILITY, TIMELINESS,
COMPLETENESS, ACCURACY AND PERFORMANCE OF
THE PRODUCT SYSTEM. SUBARU CORPORATION PARTIES
DO NOT WARRANT OR COVENANT THAT ANY DEFECTS
OR ERRORS ASSOCIATED WITH THE PRODUCT SYSTEM
WILL BE CORRECTED, OR THAT THE PRODUCT SYSTEM
IS FREE OF VIRUSES, ERRORS, OR OTHER HARMFUL
COMPONENTS, OR WILL OPERATE UNINTERRUPTED OR
ON ANY SCHEDULE. BECAUSE SOME JURISDICTIONS DO
NOT ALLOW THE EXCLUSION OF IMPLIED WARRANTIES,
THE ABOVE EXCLUSION OF IMPLIED WARRANTIES MAY
NOT APPLY TO YOU.
SUBARU STARLINK
120

Apple CarPlay
Apple CarPlay
Apple CarPlay can be used to view Apple Maps, play music, and
place calls by connecting an Apple CarPlay device to the system.
Supported applications can also be run.
● For details on the services or the operations, check the
Apple CarPlay site
(https://www.apple.com/ios/carplay/).
To use the Apple CarPlay application, connect an Apple
CarPlay device to the USB port.
When using the application, read the precautions indicated in
“BEFORE USING APPLICATIONS”. (→P.112)
NOTE
l Use an undamaged genuine USB cable when using this function.
l Enable Apple CarPlay in the Apple CarPlay device’s restriction
settings before using this function.
CONNECTING THE Apple CarPlay DEVICE
1.
Connect an Apple CarPlay device to the USB port. (→P.66)
2.
Check the conrmation message, and then select
Yes
(Yes).
● The Apple CarPlay screen will be displayed.
● If
No
(No) is selected, Apple CarPlay will not start,
and the device will be recognized as an iPod/iPhone.
(→P.162)
● If “Don’t show again.” is selected, the conrmation
message will not be displayed again.
If the connected device cannot be used as an Apple
CarPlay device, change the Apple CarPlay device
connection settings. (→P.122)
OVERVIEW
Select
Apple CarPlay
(Apple CarPlay) on the home screen
or the apps screen (→P.18, 19, 40, 41) to display the
Apple CarPlay screen.
Apple CarPlay
121
Apps
5
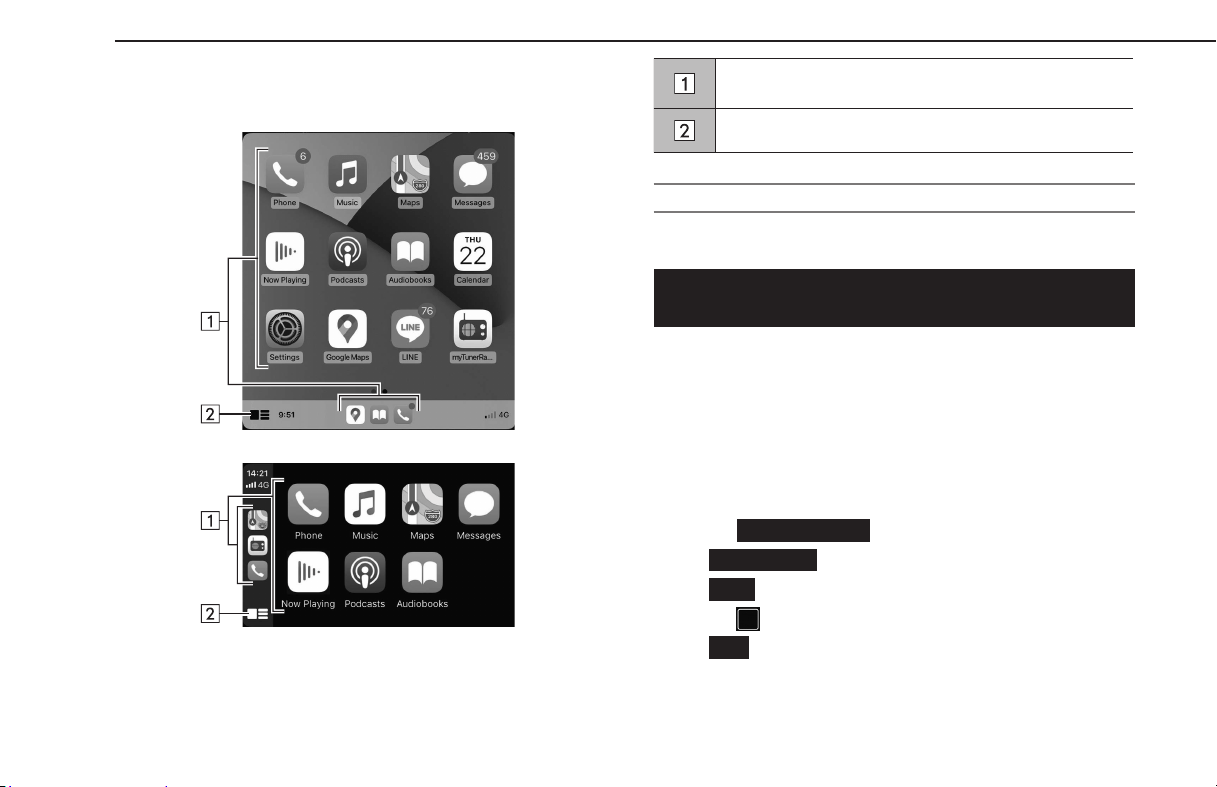
XControl screen
X11.6-inch display system/11.6-inch display with Navi
system
XDual 7.0-inch display system
*: The displayed screen will dier depending on the connected Apple CarPlay
device.
Displays the application buttons.
Select to start the application.
Select to change the home screen of Apple CarPlay.
ABOUT THE SUPPORTED DEVICES
This system compatible with iOS 13.4 or later are supported.
SELECTING DEVICE TO CONNECT TO Apple
CarPlay
Whether a registered device connects as an Apple CarPlay
device or an iPod/iPhone can be set.
This setting can be changed only if “Don’t show again.” was
selected on the conrmation message displayed when an Apple
CarPlay device was connected.
1.
Display the phone settings screen. (→P.77)
2.
Select
Apple CarPlay
(Apple CarPlay).
3.
→
Device List
(Device List)
4.
→
Edit
(Edit)
5.
Select for the desired Apple CarPlay device.
6.
→
OK
(OK)
Apple CarPlay
122

DELETING THE Apple CarPlay DEVICE
This setting can be changed only if “Don’t show again.” was
selected on the conrmation message displayed when an Apple
CarPlay device was connected.
1.
Display the phone settings screen. (→P.77)
2.
Select
Apple CarPlay
(Apple CarPlay).
3.
→
Device List
(Device List)
4.
→
Edit
(Edit)
5.
Select next to the desired device name.
6.
→
Yes
(Yes)
7.
→
OK
(OK)
Apple CarPlay
123
Apps
5

Android Auto
Android Auto
Android Auto can be used to view Google Maps, play music, and
place calls by connecting your Android device to the system,
using USB cable and Bluetooth. Supported applications can also
be run.
● For details on the services or the operations, check the
Android Auto site (https://www.android.com/auto/) and
(https://support.google.com/androidauto/).
To use the Android Auto application, connect your Android
device to the USB port.
When using the application, read the precautions indicated in
“BEFORE USING APPLICATIONS”. (→P.112)
NOTE
l Use an undamaged genuine USB cable when using this function.
l To use this function, check to make sure that your Android device is
set to accept connection with a new vehicle.
l Depending on the model, the talkback volume of the voice
recognition function of Android Auto may dier from the volume
setting of other functions. Set the volume to a level that is easy to
hear.
CONNECTING THE Android Auto DEVICE
1.
Connect an Android Auto device to the USB port. (→P.66)
2.
Check the conrmation message, and then select
Yes
(Yes).
● The Android Auto screen will be displayed.
● If
No
(No) is selected, Android Auto will not start.
● If “Don’t show again.” is selected, the conrmation
message will not be displayed again.
If the connected device cannot be used as an Android
Auto device, change the Android Auto device connection
settings. (→P.125)
OVERVIEW
Select
Android Auto
(Android Auto) on the home screen
or the apps screen (→P.18, 19, 40, 41) to display the
Android Auto screen.
Android Auto
124
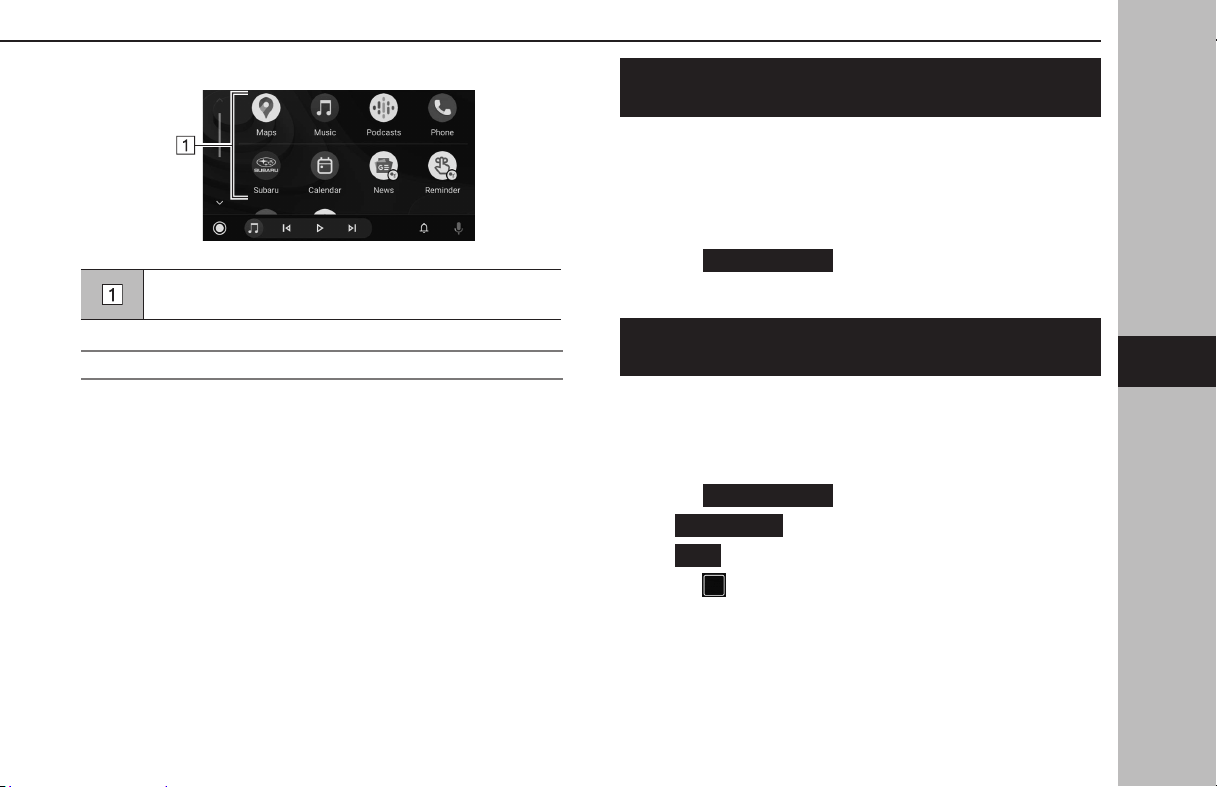
XControl screen
Displays the application buttons.
Select to start the application.
ABOUT THE SUPPORTED DEVICES
This system compatible with Android 8.1 or later are supported.
ENABLING AUTO SHOW OF Android Auto
SCREEN
Automatic display of the Android Auto screen when an Android
device is connected to the system via USB, can be enabled/
disabled.
1.
Display the phone settings screen. (→P.77)
2.
Select
Android Auto
(Android Auto).
3.
Turn “Auto Show Connected Device” on.
SELECTING Android DEVICES TO CONNECT TO
Android Auto
Whether a registered Android device connects as an Android
Auto device or a USB memory device can be set.
1.
Display the phone settings screen. (→P.77)
2.
Select
Android Auto
(Android Auto).
3.
→
Device List
(Device List)
4.
→
Edit
(Edit)
5.
Select for the desired Android device.
Android Auto
125
Apps
5

DELETING THE Android Auto DEVICE
1.
Display the phone settings screen. (→P.77)
2.
Select
Android Auto
(Android Auto).
3.
→
Device List
(Device List)
4.
→
Edit
(Edit)
5.
Select next to the desired device name.
6.
→
Yes
(Yes)
7.
→
OK
(OK)
Android Auto
126
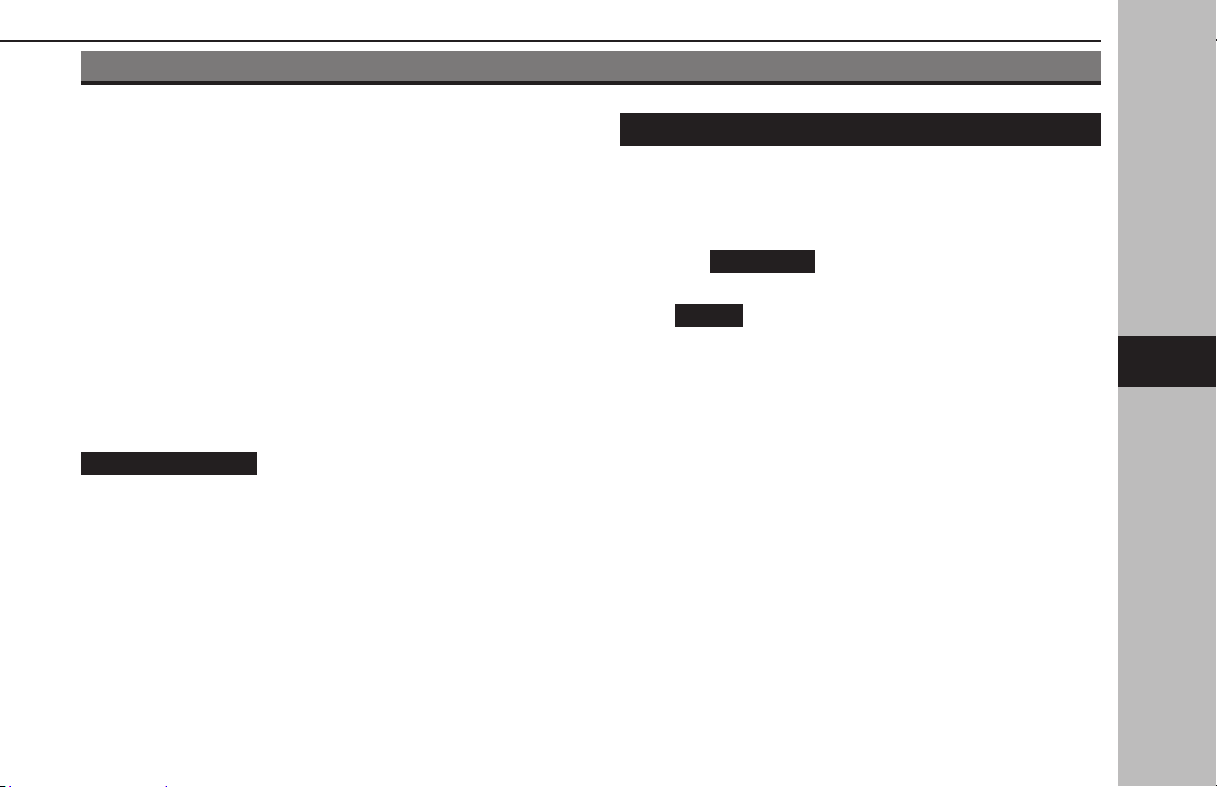
SiriusXM Travel Link
SiriusXM Travel Link*
*: SiriusXM U.S. satellite and data services are available only in the 48 contiguous
USA and DC. SiriusXM satellite service is also available in Canada;
see www.siriusxm.ca.
Data service information, which is comprised of sports
information, weather information, stock information, parking
information and fuel information, can be received via the
SiriusXM® Radio.
To receive the data service information in the vehicle, a
subscription to the SiriusXM® Radio Service is necessary
following a free trial. (→P.150)
Content that uses the SiriusXM® Radio Service is reset
when personal information is initialized by selecting
Factory Data Reset
(Factory Data Reset) at the “GENERAL
SETTINGS SCREEN”. (→P.83)
DISPLAYING SPORTS INFORMATION
Sports information such as games and results, the status of
games still in progress, and future game schedules can be
displayed.
1.
Select
Travel Link
(Travel Link) on the Apps screen.
(→P.27, 56)
2.
→
Sports
(Sports)
SiriusXM Travel Link
127
Apps
5
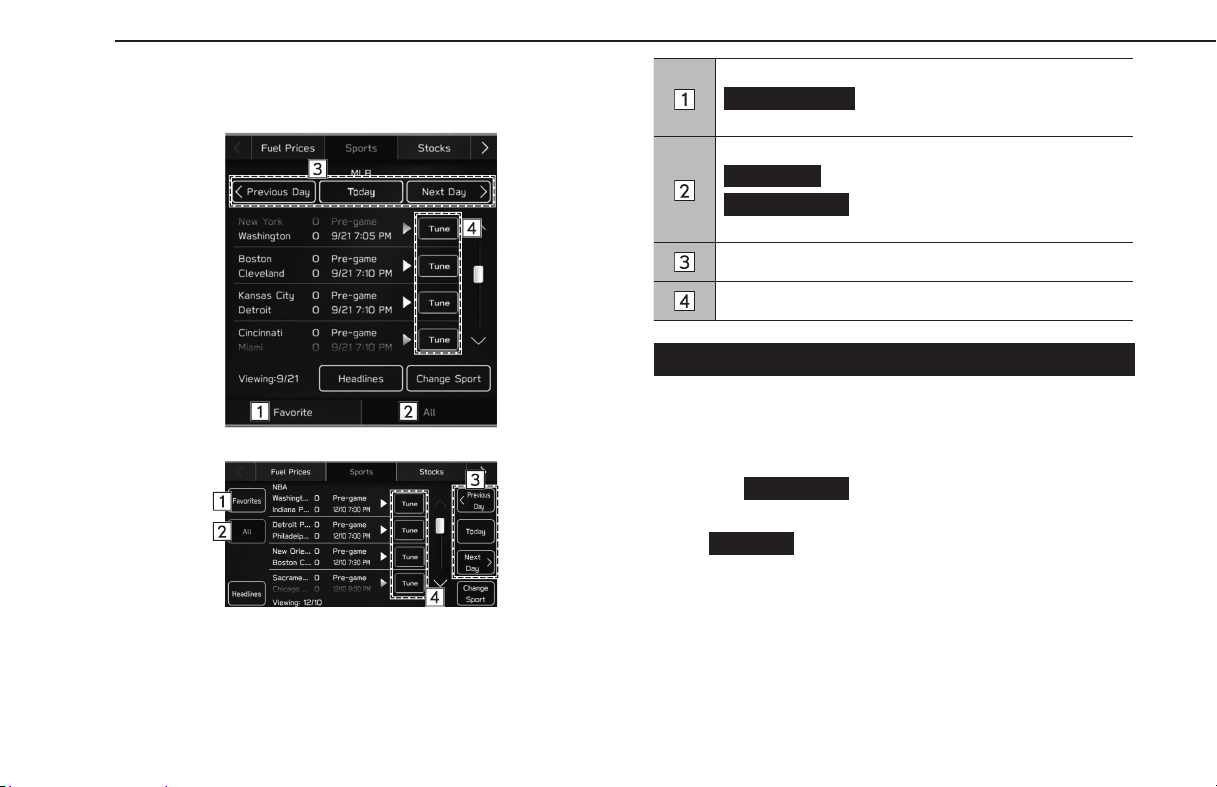
3.
Check that sports information is displayed.
X11.6-inch display system/11.6-inch display with Navi
system
XDual 7.0-inch display system
Select to display the favorite teams information.
Favorite Team
(Favorite Team): Select to register, edit
or select your favorite team.
Select to display all information for a selected sport.
Headlines
(Headlines): Select to display the headlines.
Change Sport
(Change Sport): Select to change the
sport.
Select to change the displayed information.
Select to listen to a broadcast.
DISPLAYING WEATHER INFORMATION
Weather forecasts, forecast temperature or highest/lowest
temperature, and the chances of precipitation, etc. can be
displayed in weather information.
1.
Select
Travel Link
(Travel Link) on the Apps screen.
(→P.27, 56)
2.
→
Weather
(Weather)
SiriusXM Travel Link
128
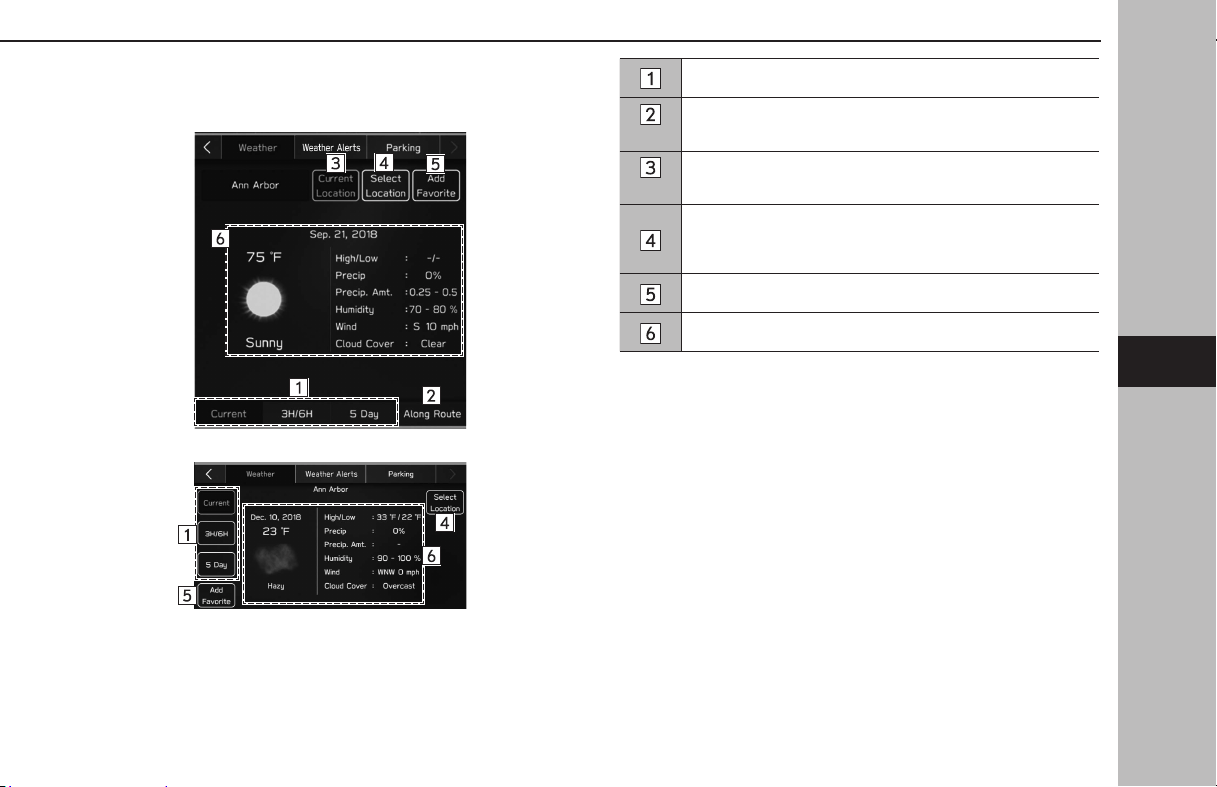
3.
Check that weather information is displayed.
X11.6-inch display system/11.6-inch display with Navi
system
XDual 7.0-inch display system
Select to switch the timing of the displayed forecast.
*
Select to display the weather forecast for the route being
travelled during route guidance.
*
Select to display the weather forecast from your current
location to your destination.
Select to change the region which information will be
displayed. The region can be selected from registered
favorites or a full list of regions.
Select to add the currently displayed location as a favorite.
Weather information is displayed.
*: 11.6-inch display with Navi system only
SiriusXM Travel Link
129
Apps
5
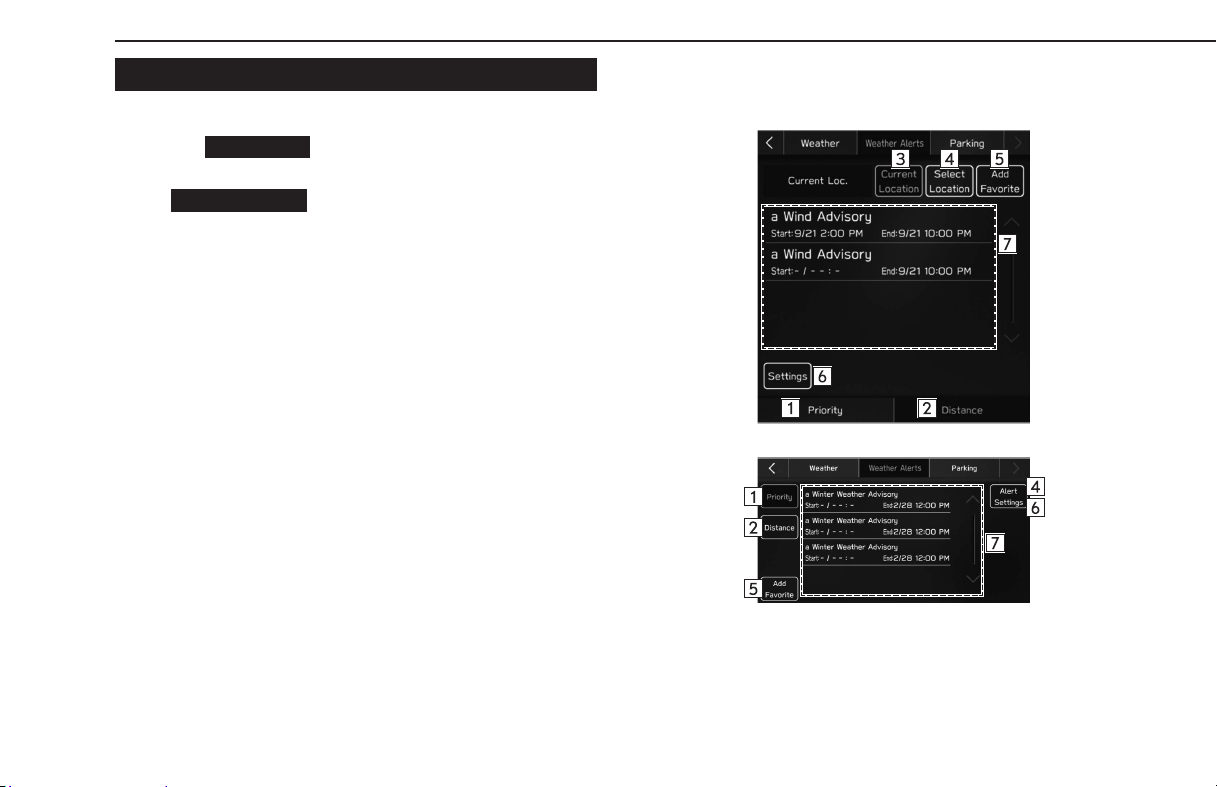
DISPLAYING WEATHER ALERTS
Weather alerts can be displayed.
1.
Select
Travel Link
(Travel Link) on the Apps screen.
(→P.27, 56)
2.
→
Weather Alerts
(Weather Alerts)
3.
Check that weather alerts are displayed.
X11.6-inch display system/11.6-inch display with Navi
system
XDual 7.0-inch display system
SiriusXM Travel Link
130
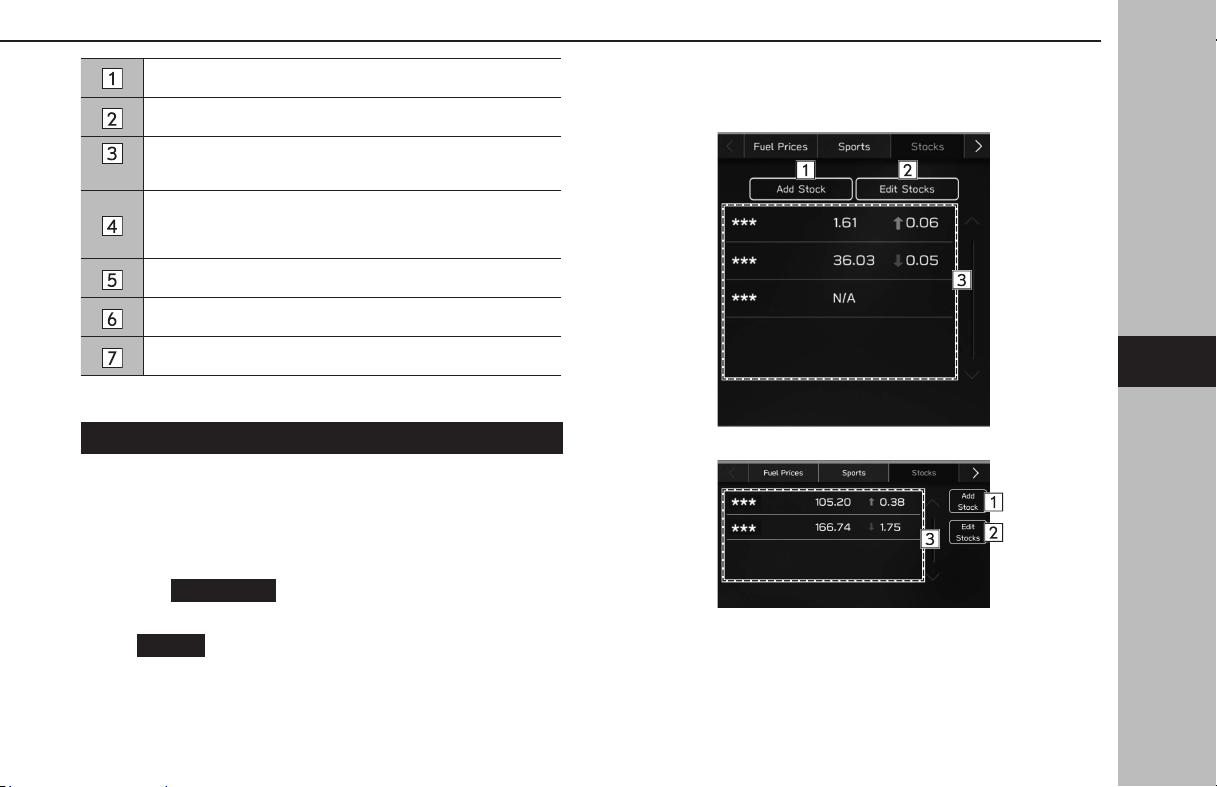
Select to sort weather alerts by priority.
Select to sort weather alerts by distance.
*
Select to display the weather alerts from your current
location to your destination.
Select to change the region which information will be
displayed. The region can be selected from registered
favorites or a full list of regions.
Select to add the favorite regions list.
Select to set the alert types, zone and notications.
Weather alerts are displayed.
*: 11.6-inch display with Navi system only
DISPLAYING STOCKS INFORMATION
Company names, stock prices, and price uctuations can be
displayed in stock information. Fluctuations greater than zero
are displayed with green arrows, and uctuations less than zero
are displayed with red arrows.
1.
Select
Travel Link
(Travel Link) on the Apps screen.
(→P.27, 56)
2.
→
Stocks
(Stocks)
3.
Check that stock information is displayed.
X11.6-inch display system/11.6-inch display with Navi
system
XDual 7.0-inch display system
SiriusXM Travel Link
131
Apps
5
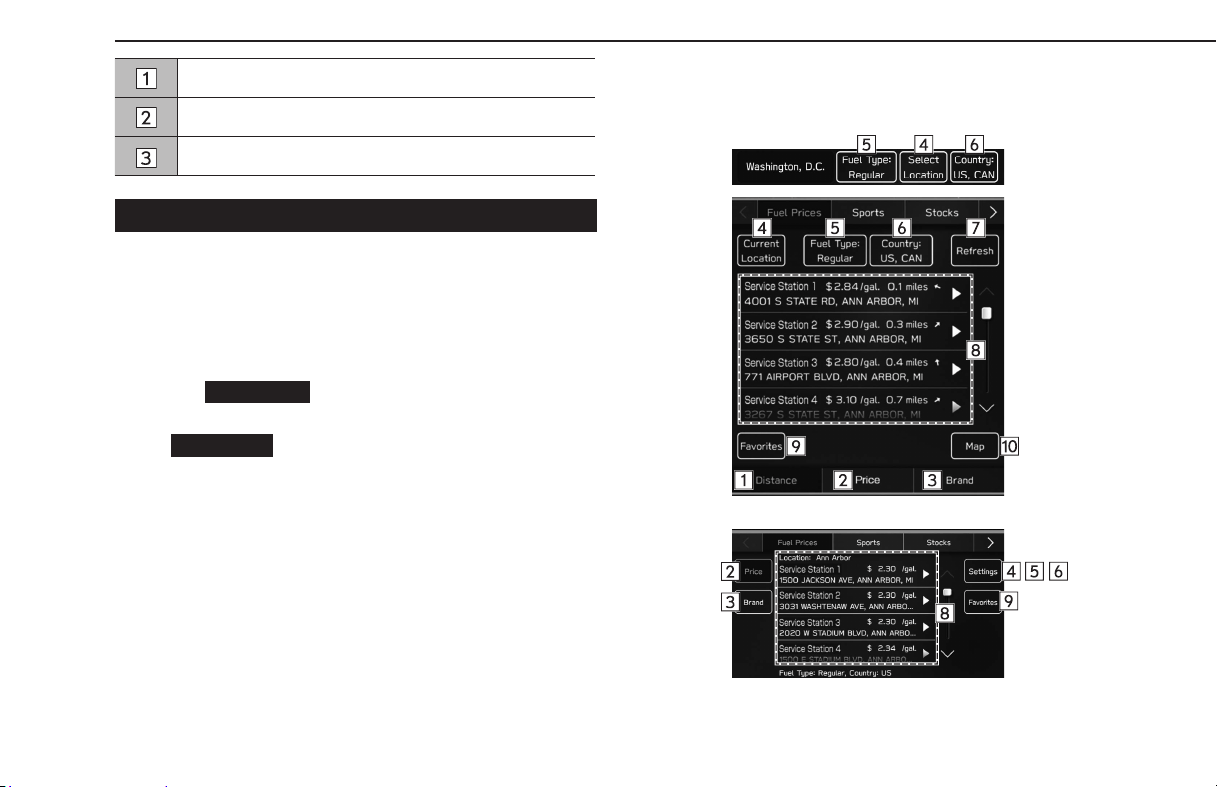
Select to add stocks.
Select to delete stocks.
Stock information is displayed.
DISPLAYING FUEL INFORMATION
Gas station information can be displayed, and gas stations can
be set* as the destination. When Bluetooth is enabled on your
cellular phone, calls can be placed if the displayed information
screen contains phone number information.
*: 11.6-inch display with Navi system only
1.
Select
Travel Link
(Travel Link) on the Apps screen.
(→P.27, 56)
2.
→
Fuel Prices
(Fuel Prices)
3.
Check that fuel information is displayed.
X11.6-inch display system/11.6-inch display with Navi
system
XDual 7.0-inch display system
SiriusXM Travel Link
132
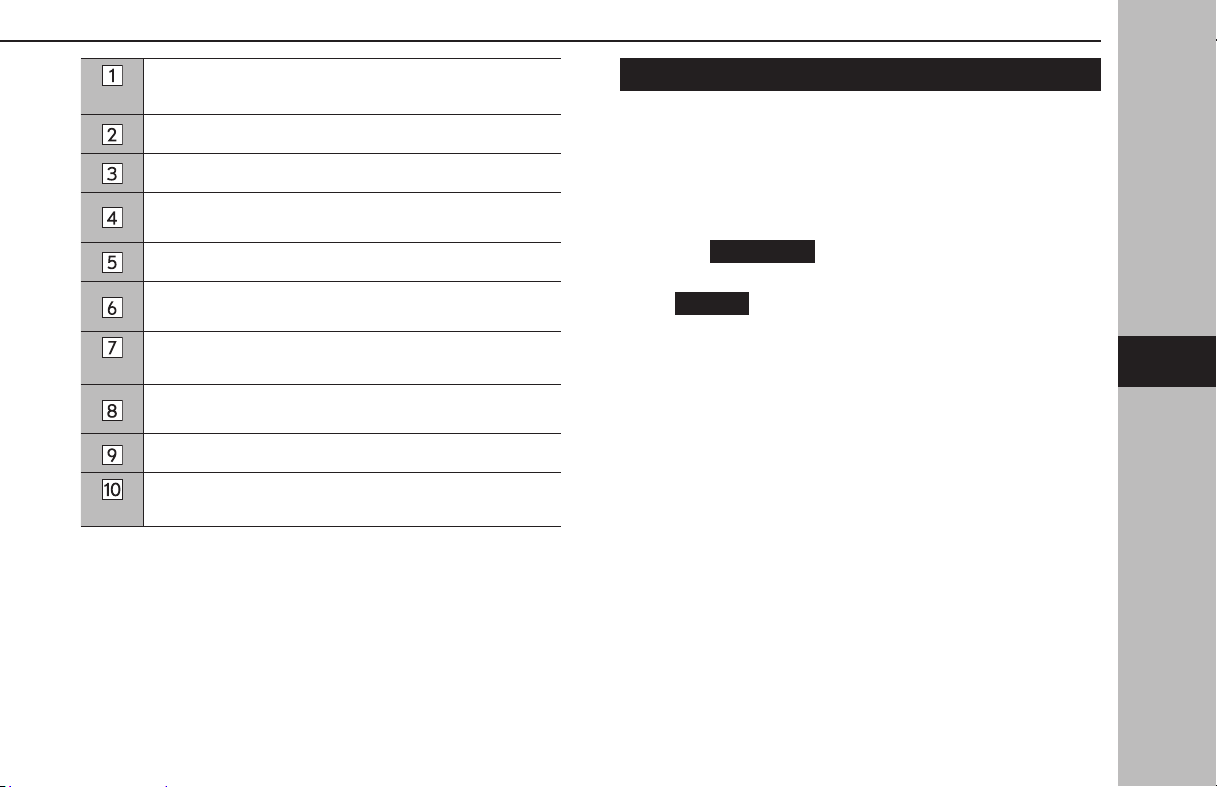
*
Select to sort the display order of gas stations by distance
from the current position.
Select to sort the display order of gas stations by price.
Select to sort the display order of gas stations by brand.
Select to change the location for which fuel information is
displayed.
Select to set the fuel type.
Select to change the country which information will be
displayed.
*
Select to update the gas station information.
Select to display information about a gas station and be
able to add it to favorites.
Select to display the favorite gas stations list.
*
Select to display the currently displayed gas stations on the
map.
*: 11.6-inch display with Navi system only
DISPLAYING PARKING INFORMATION
Parking information can be displayed, and parking can be set*
as the destination. When Bluetooth is enabled on your cellular
phone, calls can be placed if the displayed information screen
contains phone number information.
*: 11.6-inch display with Navi system only
1.
Select
Travel Link
(Travel Link) on the Apps screen.
(→P.27, 56)
2.
→
Parking
(Parking)
SiriusXM Travel Link
133
Apps
5

3.
Check that parking information is displayed.
X11.6-inch display system/11.6-inch display with Navi
system
XDual 7.0-inch display system
Select to change the region which information will be
displayed.
*
Select to update the parking information.
Select to display information about a parking lot and be
able to add it to favorites.
*
Select to display the currently displayed parking lots on the
map.
Select to sort parking lots by price per day.
Select to sort parking lots by price per hour.
*
Select to sort the display order of parking lots by distance
from the current position.
Select to display the favorite parking lots list.
*: 11.6-inch display with Navi system only
SiriusXM Travel Link
134

135
Audio
Audio
Basic Operation
136
Some Basics
136
Turning The System On And O
136
Selecting An Audio Source
137
Sound Settings
138
Voice Recognition System
142
Radio Operation
143
AM/FM Radio
143
Overview
143
Registering A Station As A Preset
144
Selecting A Station From The List
144
Radio Broadcast Data System
145
Available HD Radio
TM
Technology
145
Caching Radio Programs
147
SiriusXM® Radio
149
Overview
149
How To Subscribe To SiriusXM® Radio
150
Displaying The Radio ID
153
Presetting A Channel
153
Caching Radio Programs
153
Selecting A Channel From The List
155
Setting Teams For Notications
156
Setting TuneMix Channels
157
Media Operation
158
CD
158
Overview
158
USB Memory
160
Overview
160
iPod/iPhone
162
Connecting The iPod/iPhone
162
Overview
162
Bluetooth Audio
165
Overview
165
Connecting A Bluetooth Device
168
AUX
168
Overview
168
Android Auto
170
Connecting An Android Auto Device
170
Overview
170
Audio Remote Controls
173
Steering Wheel Controls
173
Tips For Operating The Audio System
175
Operating Information
175
Radio
175
CD Player And Disc
177
USB Memory Device
180
iPod/iPhone
180
File Information
181
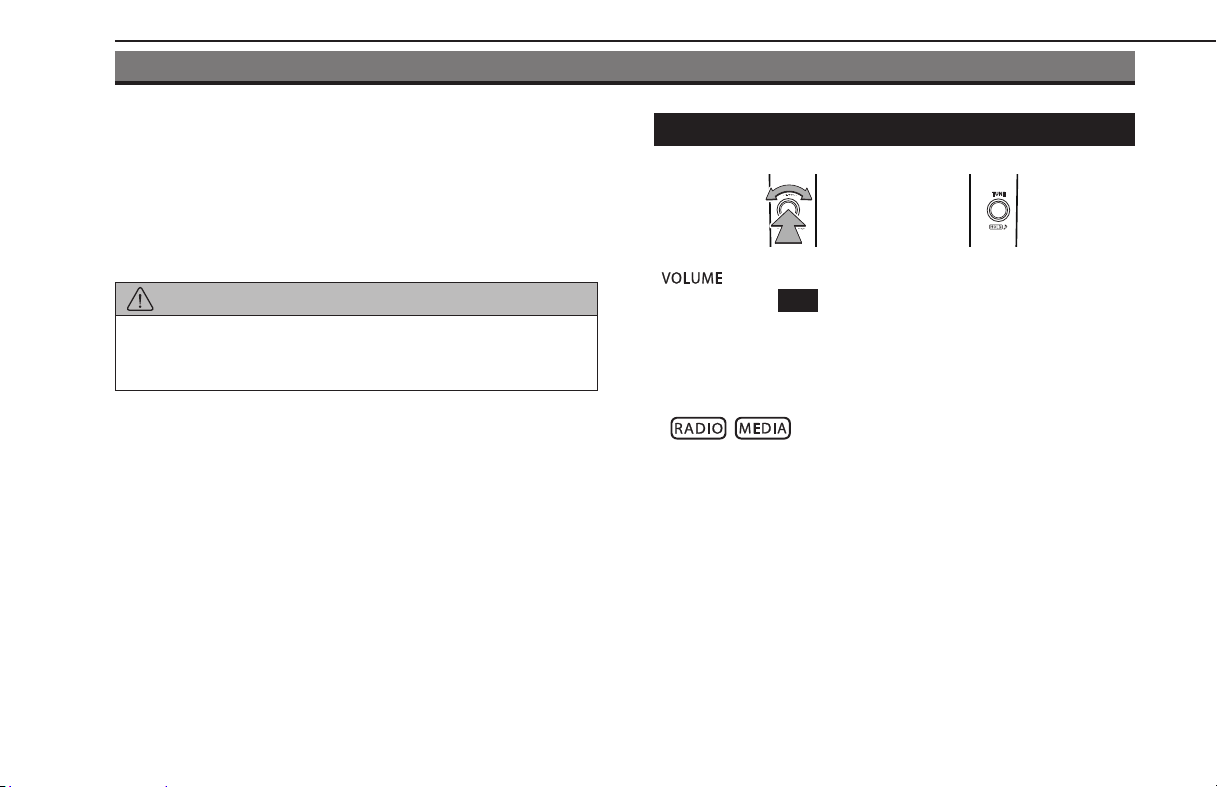
BASIC OPERATION
SOME BASICS
This section describes some of the basic features of the audio
system. Some information may not pertain to your system.
Your audio system works when theignition switch is turned to
the “ACC” or “ON” position.
CAUTION
l To prevent the battery from being discharged, do not leave the
audio system on longer than necessary when the engine is not
running.
TURNING THE SYSTEM ON AND OFF
“ ” knob: Press and hold until a message is displayed,
and then select
OK
(OK) or wait a few seconds for the audio
system to turn o. Press and hold to turn the system on again.
The system will turn on with the last audio source used. Turn this
knob to adjust the volume. Press to mute the audio system.
XDual 7.0-inch display system only
, : Press to display screen buttons for the audio
system.
NOTE
l The audio system will remain o if you change the position of the
ignition switch from “LOCK”/“OFF” to “ACC”/“ON” while the audio
system is o. If you had set the volume to mute, the audio system will
remain mute and the track will start playing from where it was last
stopped.
BASIC OPERATION
136
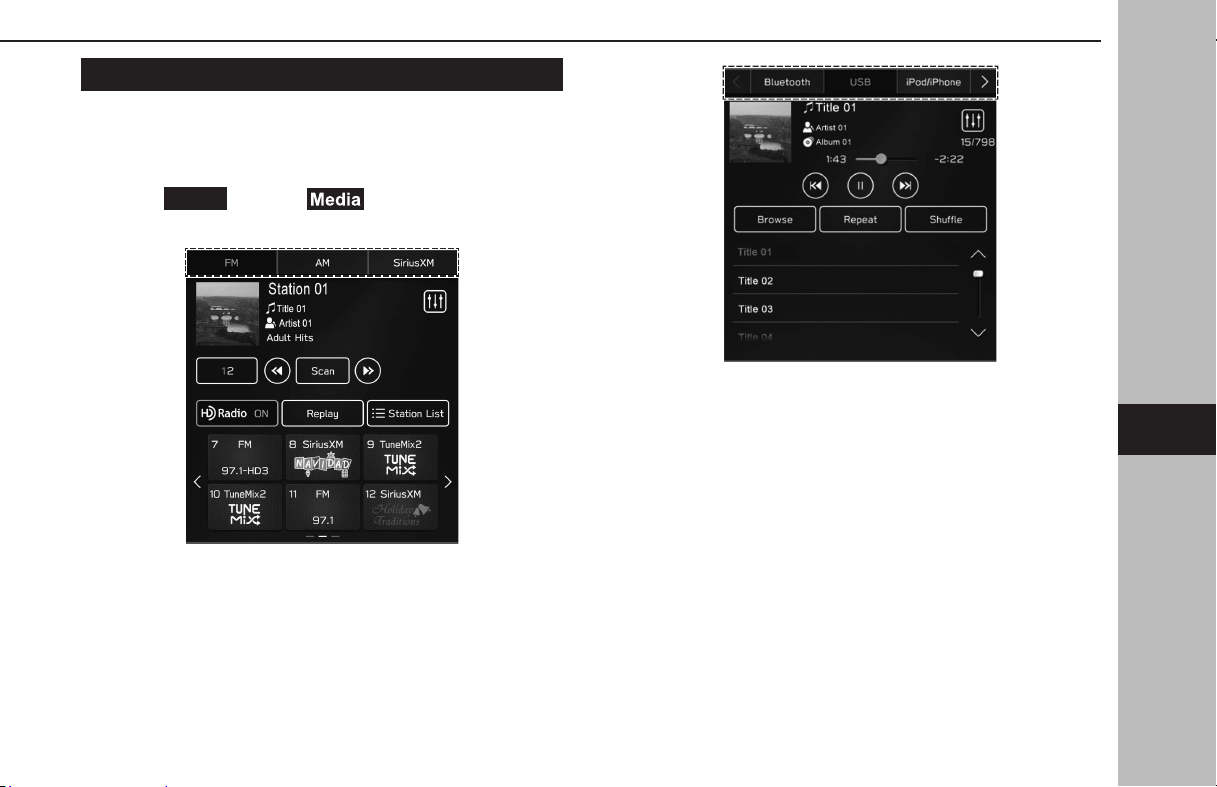
SELECTING AN AUDIO SOURCE
X11.6-inch display system/11.6-inch display with Navi
system
1.
Display the home screen. (→P.40)
2.
Select
Radio
(Radio) or (Media).
3.
Select the desired audio source.
<Radio screen>
<Media screen>
BASIC OPERATION
137
Audio
6
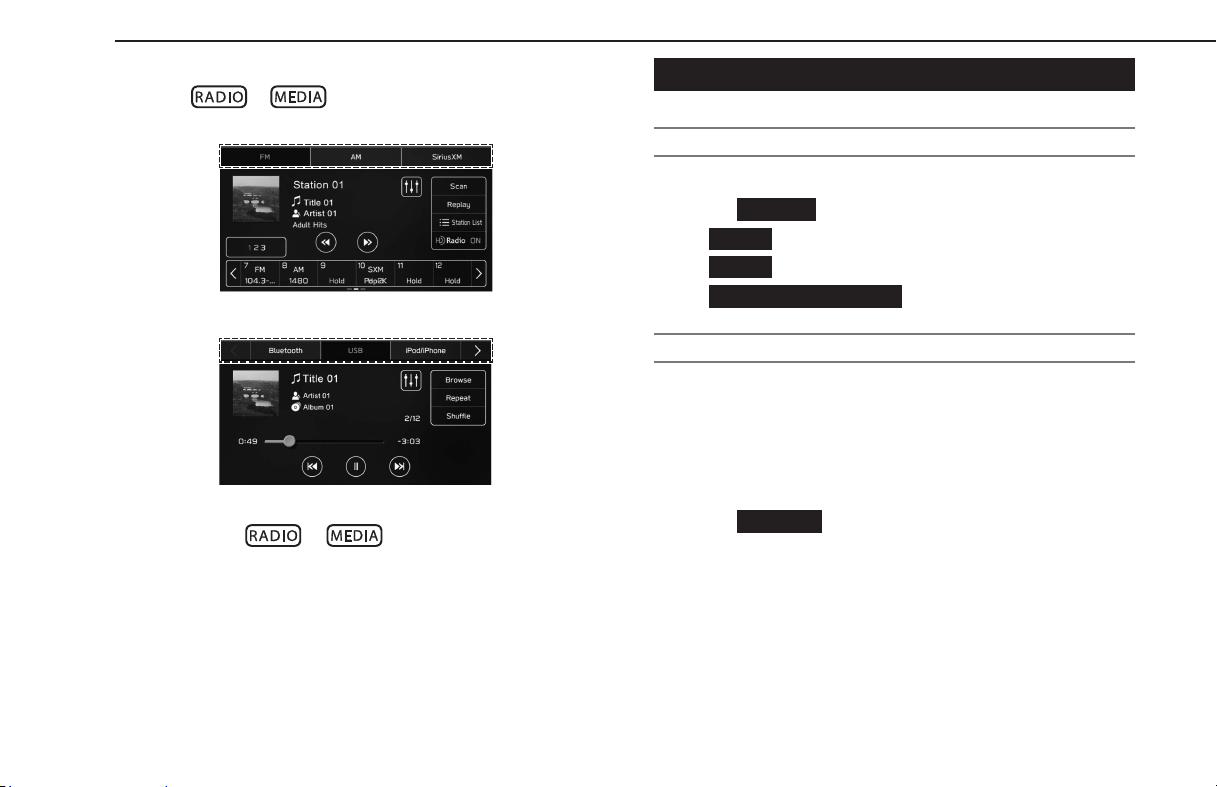
XDual 7.0-inch display system
1.
Press or .
2.
Select the desired audio source.
<Radio screen>
<Media screen>
● Each time
or is pressed, the audio source
can also be changed.
SOUND SETTINGS
DISPLAYING THE SOUND CUSTOMIZATION SCREEN
1.
Display the home screen. (→P.18, 40)
2.
Select
Settings
(Settings).
3.
→
Sound
(Sound)
4.
→
Audio
(Audio)
5.
→
Sound Customization
(Sound Customization)
EQUALIZER SETTINGS
How good an audio program sounds is largely determined by
the mix of the treble, mid and bass levels. In fact, dierent kinds
of music and vocal programs usually sound better with dierent
mixes of treble, mid and bass.
1.
Display the “Sound Customization” screen. (→P.138)
2.
Select
Equalizer
(Equalizer).
BASIC OPERATION
138
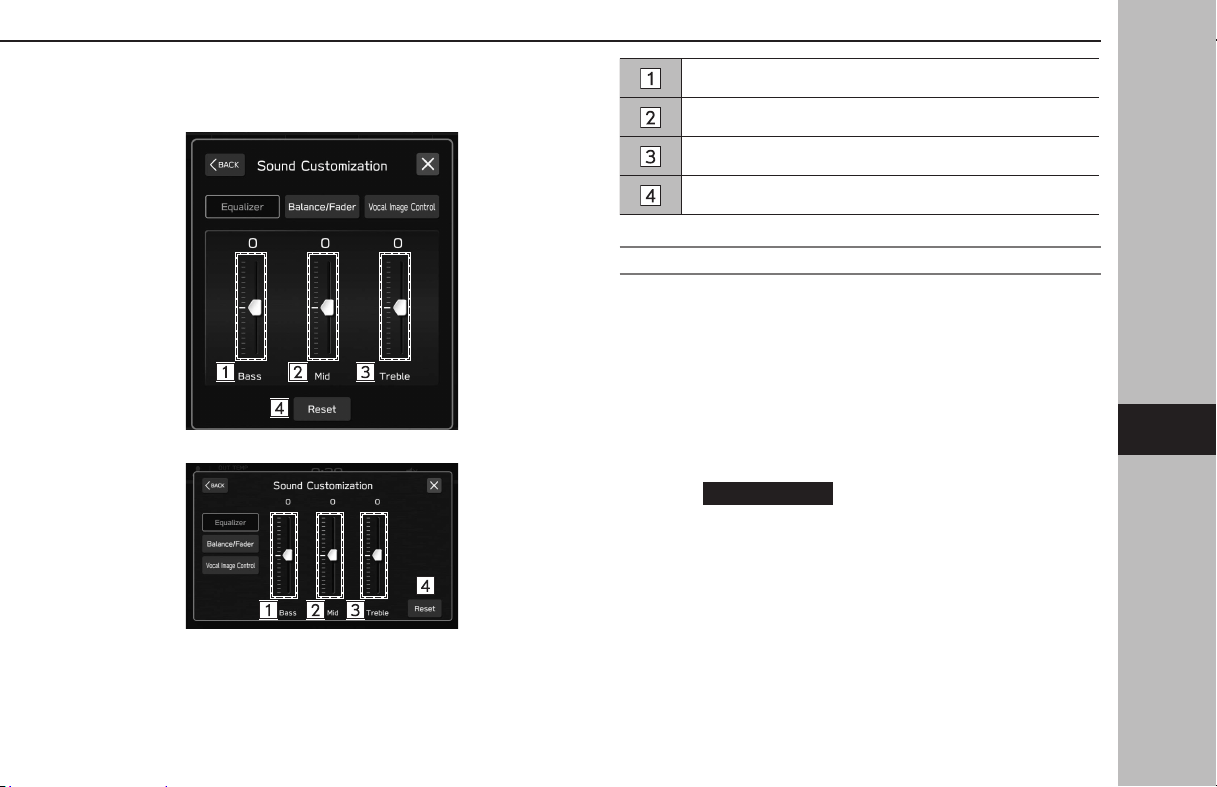
3.
Set the desired item.
X11.6-inch display system/11.6-inch display with Navi
system
XDual 7.0-inch display system
Select the sliders to adjust low-pitched tones.
Select the sliders to adjust mid-pitched tones.
Select the sliders to adjust high-pitched tones.
Select to reset all setup items.
BALANCE/FADER SETTINGS
A good balance of the left and right stereo channels and of the
front and rear sound levels is also important.
Keep in mind that when listening to a stereo recording or
broadcast, changing the right/left balance will increase the
volume of 1 group of sounds while decreasing the volume of
another.
1.
Display the “Sound Customization” screen. (→P.138)
2.
Select
Balance/Fader
(Balance/Fader).
BASIC OPERATION
139
Audio
6
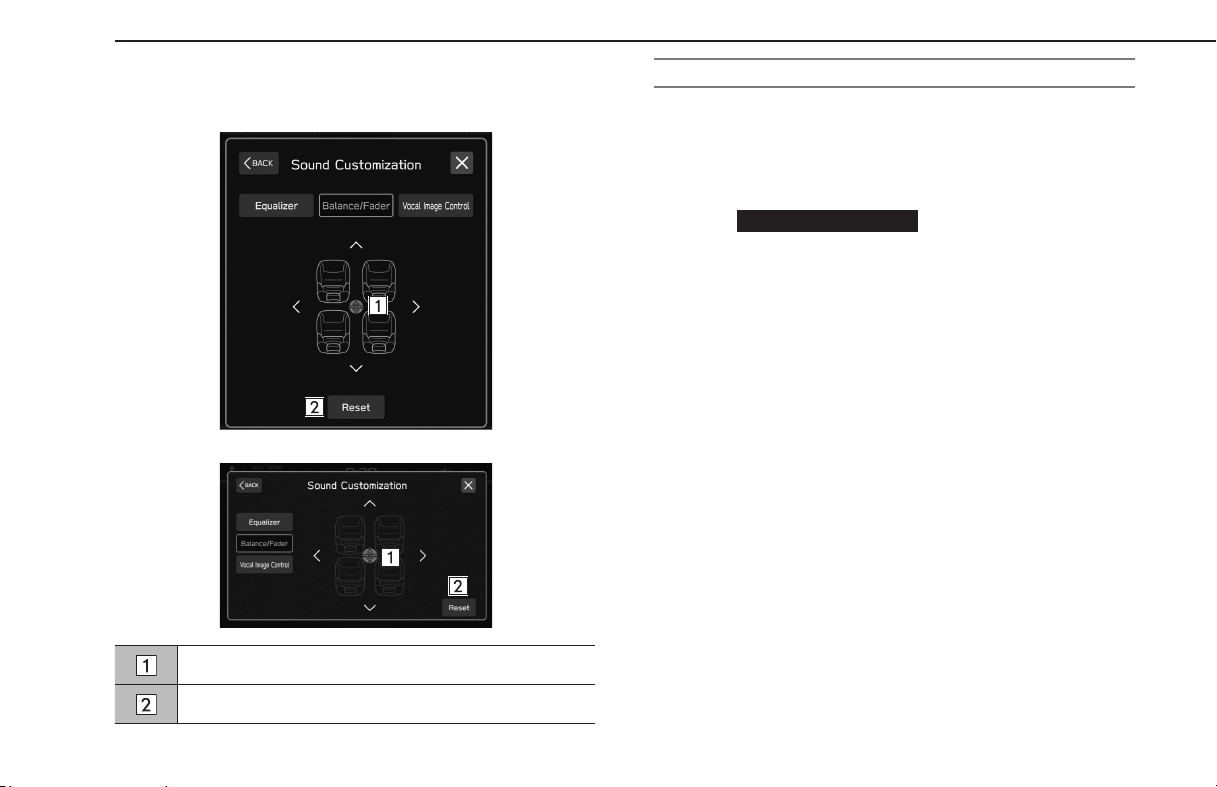
3.
Adjust to the desired position.
X11.6-inch display system/11.6-inch display with Navi
system
XDual 7.0-inch display system
Select the icon to adjust sound balance.
Select to reset the adjusted position.
VOCAL IMAGE CONTROL SETTINGS*
*: This setting can be made depending on the connected amplier type.
Extract only vocal sound from whole sound and adjust volume
balance of it.
1.
Display the “Sound Customization” screen. (→P.138)
2.
Select
Vocal Image Control
(Vocal Image Control).
BASIC OPERATION
140
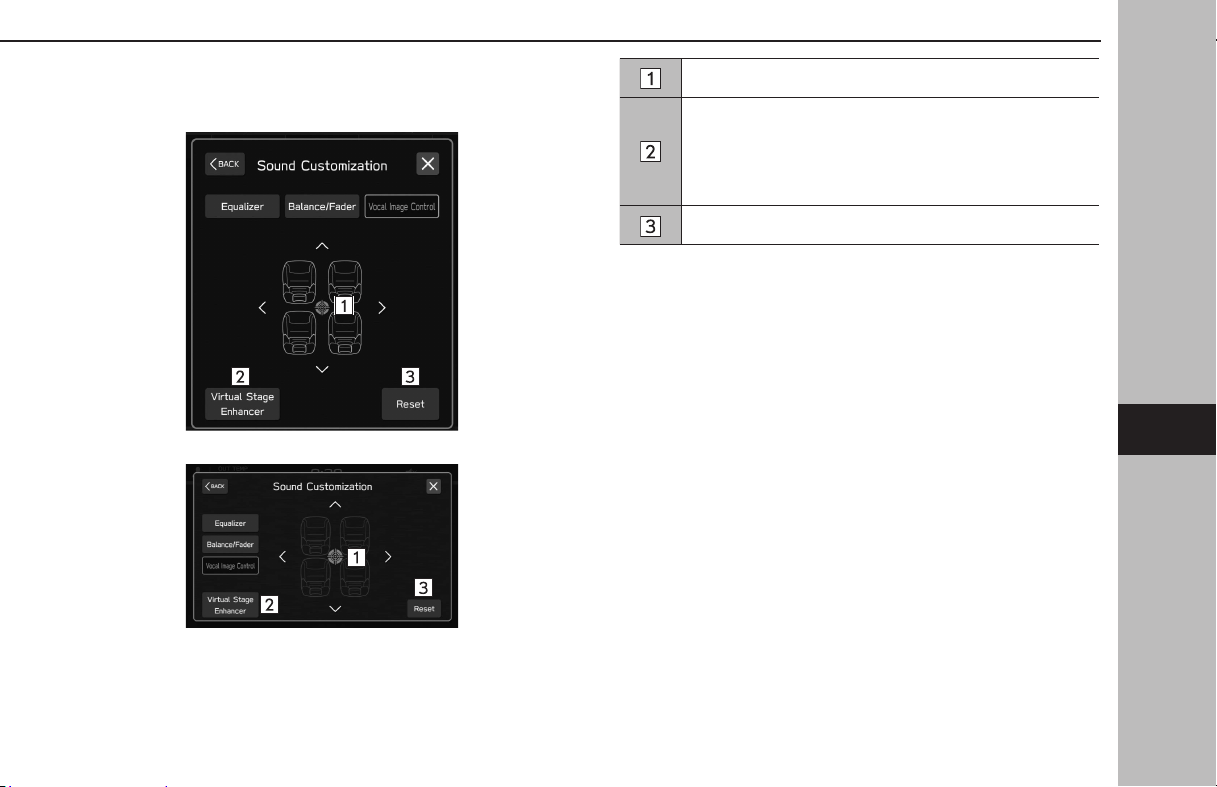
3.
Adjust to the desired position.
X11.6-inch display system/11.6-inch display with Navi
system
XDual 7.0-inch display system
Select the icon to adjust vocal image control.
Select to set the virtual stage enhancer function.
This function adjusts the sounds to the high realistic
surround sound by enhancing the vocals. When this setting
is on, the front and rear setting of “Vocal Image Control”
cannot be set.
Select to reset the vocal image control settings.
BASIC OPERATION
141
Audio
6
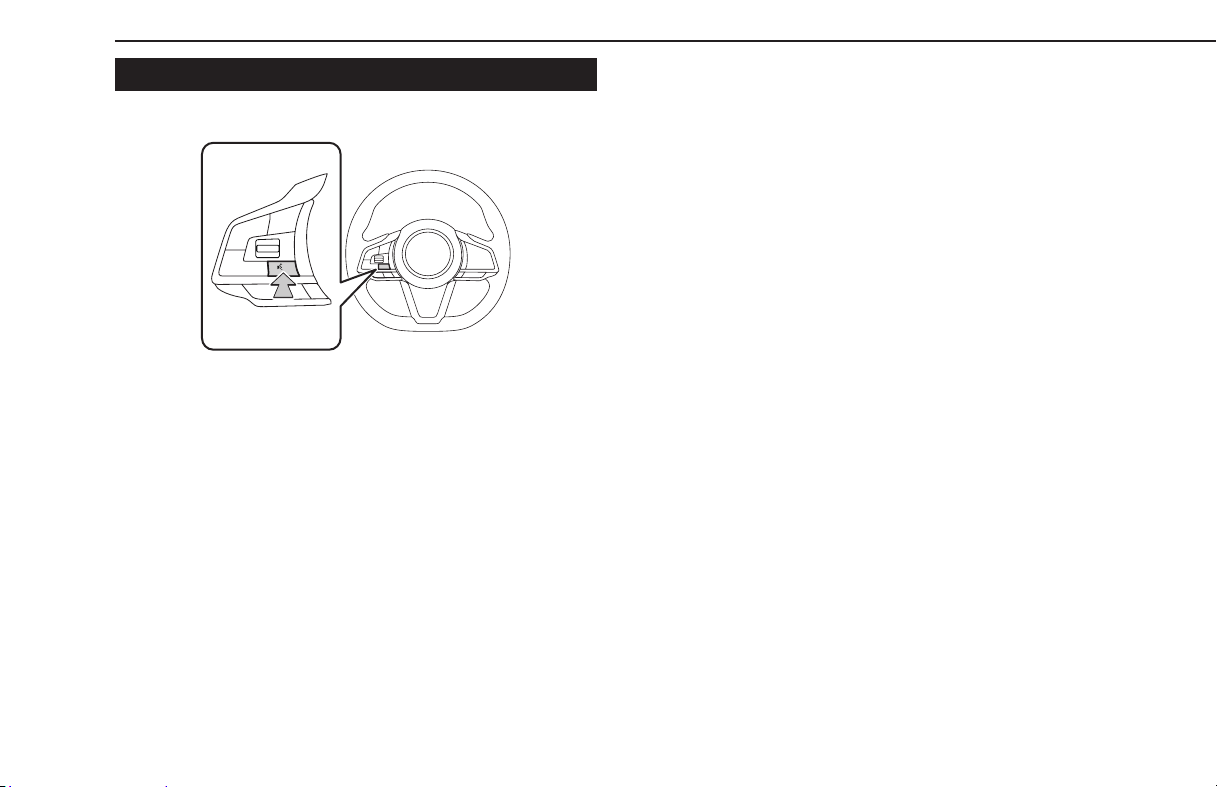
VOICERECOGNITION SYSTEM
1.
Press this switch to operate the voicerecognition system.
● The voice recognition system and its list of commands
can be operated. (→P.218)
BASIC OPERATION
142

RADIO OPERATION
AM/FM RADIO
OVERVIEW
The FM/AM radio operation screen can be accessedby selecting
FM
(FM) or
AM
(AM) on the radio control screen. (→P.137)
XControl panel
Turn to adjust the volume.
Press to mute the audio system.
Press and hold to turn the audio system o, and press and
hold to turn it on again.
Turn to step up/down frequencies.
Press and hold to display the sound customization screen.
(→P.138)
XControl screen
X11.6-inch display system/11.6-inch display with Navi
system
XDual 7.0-inch display system
RADIO OPERATION
143
Audio
6
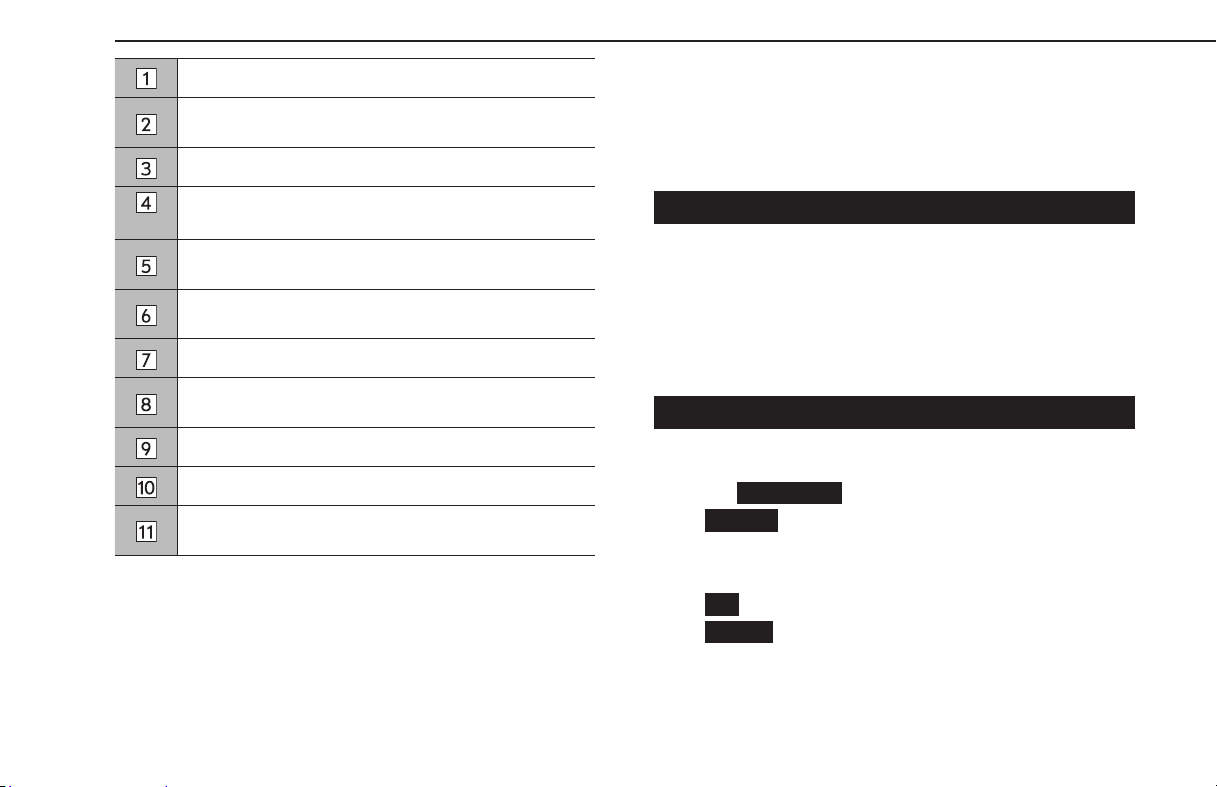
Select to change radio modes.
Press and hold to save a specic song to your Bookmark List.
(→P.91)
Select to display the sound customization screen. (→P.138)
*
Select to change multicast channels available. (→P.146)
Select to step up/down frequencies.
Select and hold to seek frequencies.
Select to scan for receivable stations/channels.
The scan will continue until selected again.
Select to turn HD Radio mode on/o.
Select to display the cache radio operation buttons.
(→P.147)
Select to display a list of receivable stations. (→P.144)
Select to scroll the list of preset buttons.
Select to tune to preset stations/channels.
The preset station list can be scrolled by swiping the list.
*: FM Radio only
NOTE
l The radio automatically changes to stereo reception when a stereo
broadcast is received.
l When the HD Radio mode is on, the radio automatically tunes to an
HD Radio signal in AM or FM where available.
REGISTERING A STATION AS A PRESET
Multiple stations can be registered as presets.
1.
Tune to the desired station.
2.
Selectand hold one of the desired preset station buttons.
● To change the preset station to a dierent one, follow the
same procedure.
SELECTING A STATION FROM THE LIST
A station list can be displayed.
1.
Select
Station List
(Station List).
●
Update
(Update): Select to update the station list.
XFM only
2.
Select the desired list.
●
All
(All): Select to display all stations.
●
Genres
(Genres): Select to display categories.
3.
Select the desired station.
RADIO OPERATION
144
RADIO BROADCAST DATA SYSTEM
This audio system is equipped with Radio Broadcast Data
Systems (RBDS).
RBDS mode allows text messages to be received from radio
stations that utilize RBDS transmitters.
RBDS features are available only when listening to an FM station
that broadcasts RBDS information.
AVAILABLE HDRadio™ TECHNOLOGY
HD Radio Technology manufactured under license from iBiquity
Digital Corporation. U.S. and Foreign Patents. For patents see
http://dts.com/patents. HD Radio, Artist Experience, and the
HD, HD Radio, and “ARC” logos are registered trademarks or
trademarks of iBiquity Digital Corporation in the United States
and/or other countries.
RADIO OPERATION
145
Audio
6

MULTICAST
On the FM radio frequency most digital stations have additional
programs on one FM station.
1.
Select .
● Each time
is selected, the channel can be changed.
● HD Radio
TM
Technology improves the audio quality of your
local stations and delivers a crystal clear digital signal to your
receiver. HD Radio Technology enables local radio stations to
broadcast a clean digital signal. AM sounds like today’s FM
and FM sounds like clear digital.
● FM stations can provide additional digital-only audio
programming on HD2/HD3 Channels.
● EXAMPLE:
101.1 HD1
101.1 HD2
101.1 HD3
NOTE
l HD Radio™ stations can be preset.
l An orange
will be displayed on the screen when in digital. The
will rst appear in a gray color indicating the digital station is
being acquired. Once the digital signal is acquired, the logo will
change to a bright orange color.
l The song title and artist name will appear on the screen when
available by the radio station. The radio station can send album
pictures when available.
l As a user works through the analog radio stations, (where applicable)
the radio receiver will automatically tune from an analog signal to a
digital signal within 5 seconds.
● Program info provides song name, artist, station ID, and other
relevant data to your receiver.
● Visual images of album cover art and station logos are
broadcasted with the audio to your receiver, such as Album
Art, historical photographs, still art from live broadcasts,
station logos, among other related content.
● Allows HD Radio receivers to store content (songs/programs
and data) in a buer. Playback shall start at any point in the
buer and shall continue until the end of the buer or until
the user has selected to stop playback. Live Pause has the
ability to store both analog and digital content in the buer.
RADIO OPERATION
146
CACHING RADIO PROGRAMS
A radio program can be cached and played back in a time-
shifted manner.
AUTOMATIC PLAYBACK OF THE CACHE
If the radio broadcast is interrupted by another audio output,
such as an incoming phone call, the system will automatically
cache the interrupted portion. To manually operate the cache
operation: (→P.147)
NOTE
l The system can store up to 30 minutes. Cached data will be erased
when the radio mode or station is changed or when the audio
system is turned o.
PLAYING BACK THE CACHE MANUALLY
The broadcast cached in the program cache can be played back
manually.
1.
Select (Replay). (→P.143)
RADIO OPERATION
147
Audio
6

2.
Select the desired cache radio operation button.
X11.6-inch display system/11.6-inch display with Navi
system
XDual 7.0-inch display system
Shows the current playback location.
The playback location can be changed by dragging the
sliders.
Select to display the preset stations/channels. (→P.143)
Select: Skips forward5 seconds.
Select and hold: Fast forwards continuously.
Pauses or plays the radio broadcast.
Select: Skips backward5 seconds.
Select and hold: Fast rewinds continuously.
NOTE
l The time displayed on the bar scale may dier from the actual time.
RADIO OPERATION
148
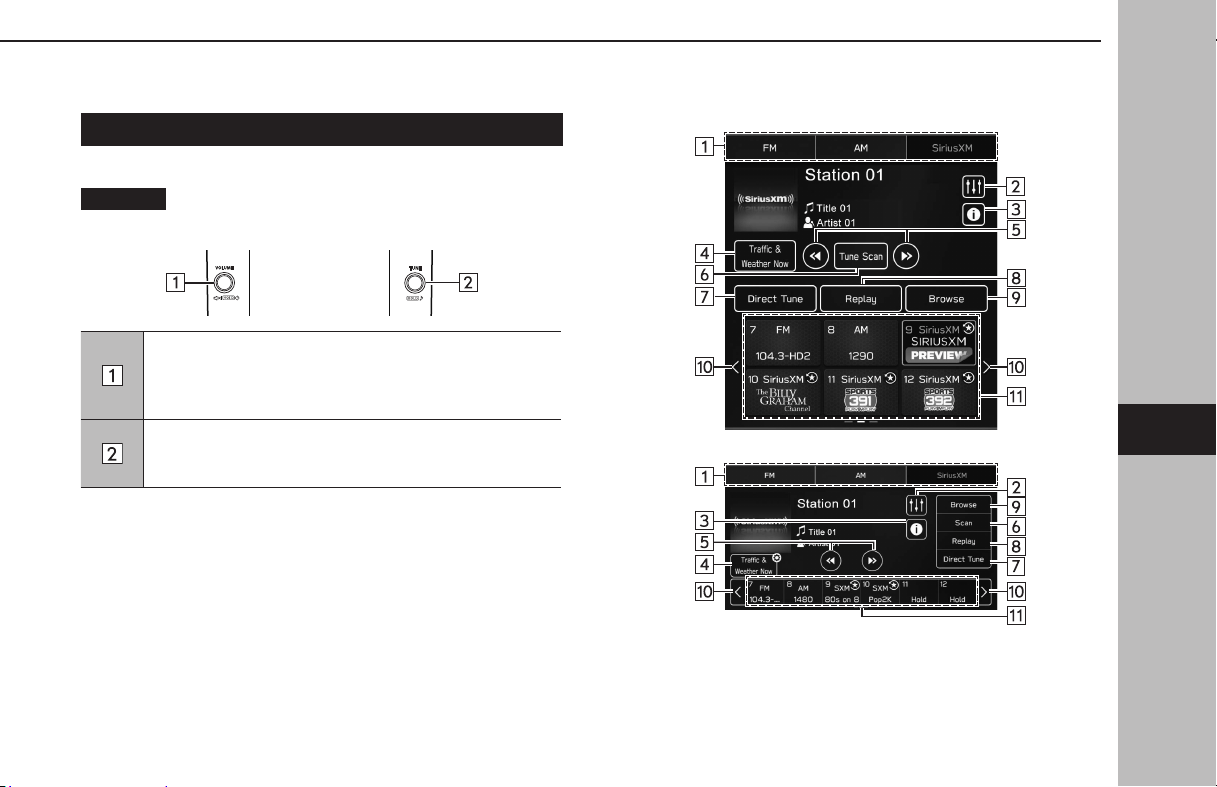
SiriusXM® Radio
OVERVIEW
The SiriusXM® control screen can be accessed by selecting
SiriusXM
(SiriusXM) on the radio control screen. (→P.137)
XControl panel
Turn to adjust the volume.
Press to mute the audio system.
Press and hold to turn the audio system o, and press and
hold to turn it on again.
Turn to step up/down channels.
Press and hold to display the sound customization screen.
(→P.138)
XControl screen
X11.6-inch display system/11.6-inch display with Navi
system
XDual 7.0-inch display system
RADIO OPERATION
149
Audio
6
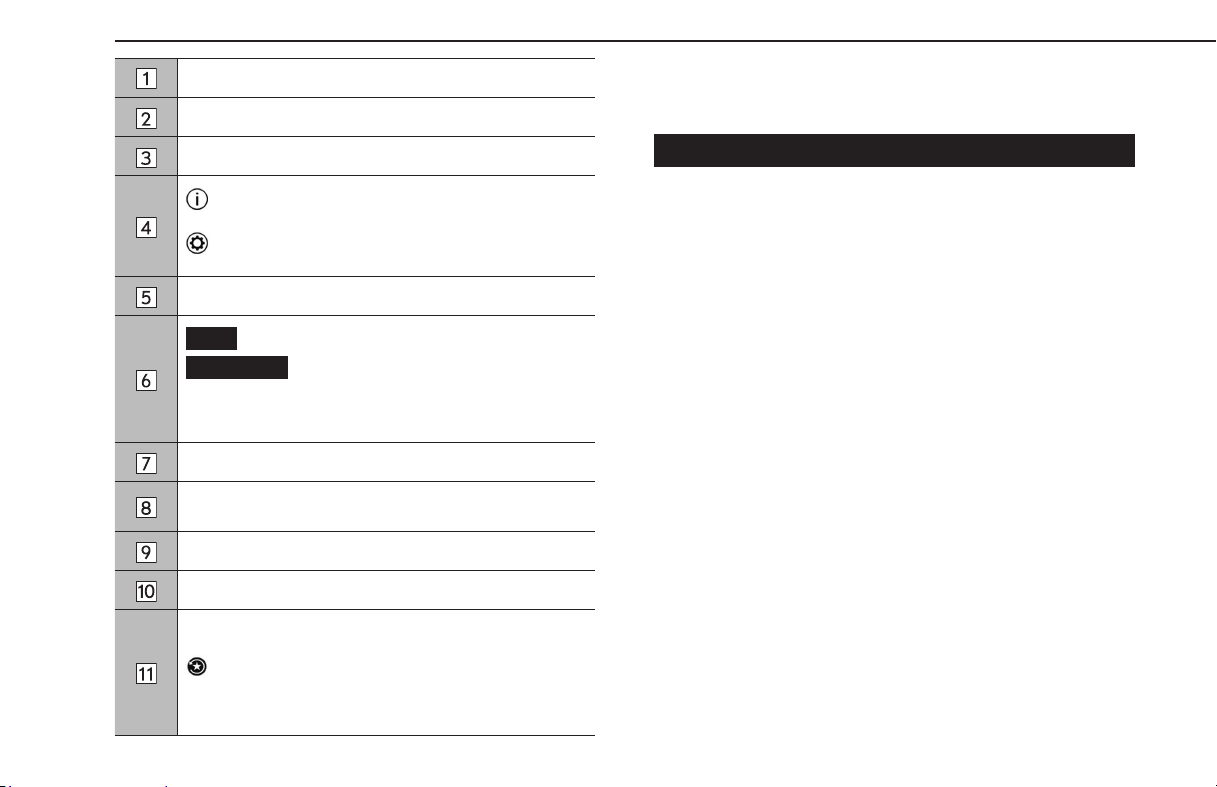
Select to change radio modes.
Select to display the sound customization screen. (→P.138)
Select to display the channel information.
: Select to listen to trac and weather information for
the set city.
: Select to set the city for which you wish to hear trac
and weather information. (→P.93)
Select to step up/down channels.
Scan
(Scan): Select to search subscribed channels.
Tune Scan
(Tune Scan): Select to search channels
registered to Smart Favorites.
This function can be enabled/disabled by the Tune Scan
setting on the SiriusXM settings screen. (→P.93)
Select to search channels by entering the channel number.
Select to display the cache radio operation buttons.
(→P.153)
Select to search channels. (→P.155)
Select to scroll the list of preset buttons.
Select to tune to preset stations/channels.
The preset station list can be scrolled by swiping the list.
: Indicates a channel which has been registered as a
Smart Favorite.
Up to 10 channels can be registered as Smart Favorites, in
the order they are registered as a preset.
NOTE
l Tune Scan is not designed for short tracks.
HOW TO SUBSCRIBE TO SiriusXM® Radio
To listen to a SiriusXM broadcast in the vehicle, a subscription to
SiriusXM service is necessary following a free trial.
A SiriusXM® Radio is a tuner designed exclusively to receive
broadcasts provided under a separate subscription.
The SXM service is only available in the U.S. and Canada.
RADIO OPERATION
150
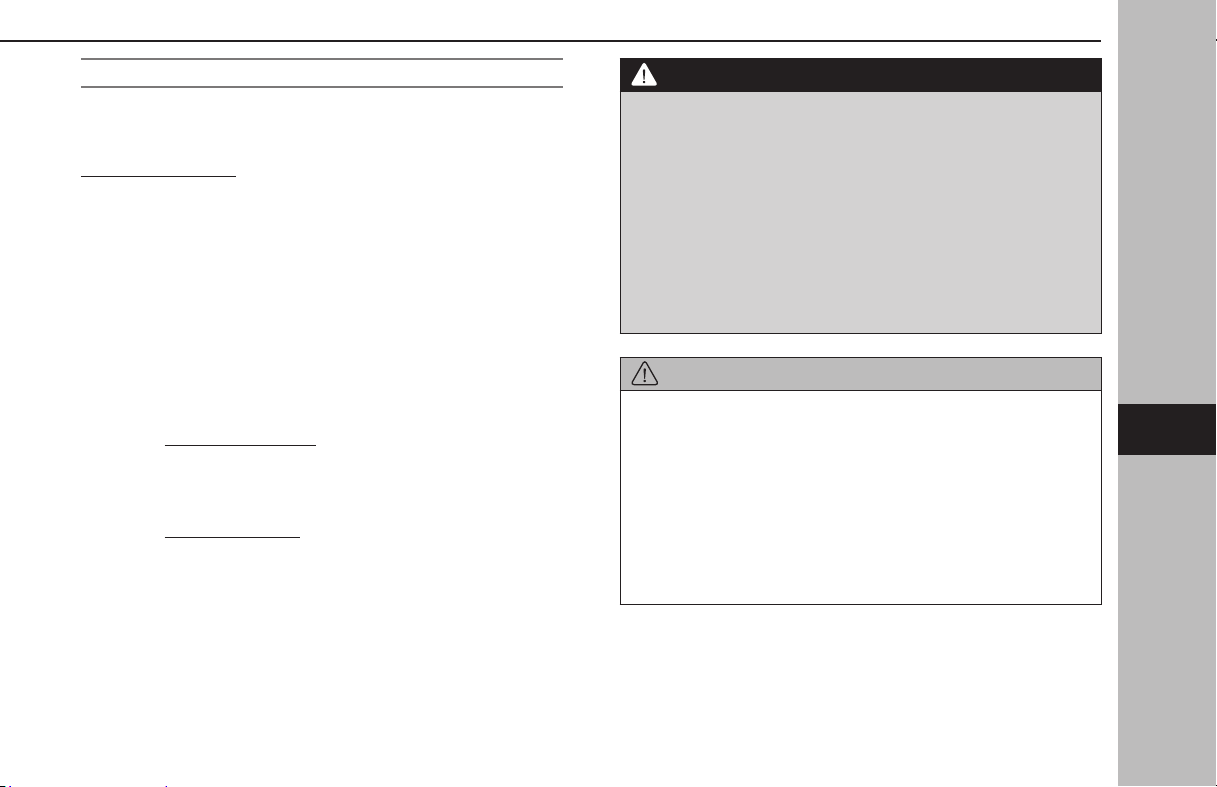
HOW TO SUBSCRIBE
SiriusXM audio services require a subscription sold separately, or
as a package, by Sirius XM Radio Inc.
Subscription Details: Your SiriusXM service will automatically
stop at the end of your trial unless you decide to purchase
another subscription. If you decide to continue service, the
paid subscription plan you choose will automatically renew
thereafter, and you will be charged the rate in eect at that time
and according to your chosen payment method. Fees and taxes
may apply. All fees and programming are subject to change.
● For complete information on subscription rates, to review
the SiriusXM Customer Agreement, or to subscribe to
SiriusXM Radio please refer to the following:
XU.S.A.
Refer to www.siriusxm.com or call
To Subscribe: 1-877-447-0011.
To Cancel: 1-866-635-2349.
XCanada
Refer to www.siriusxm.ca or call
To Subscribe/Cancel: 1-877-209-0079.
WARNING
l Explicit Language Notice — Channels with frequent explicit
language are indicated with an “XL” preceding the channel name.
Channel blocking is available for SiriusXM® Radio receivers by
notifyingSiriusXM at;
U.S.A. Customers:
Visit www.siriusxm.com or calling
1-877-447-0011
Canadian Customers:
Visit www.siriusxm.ca or calling
1-877-209-0079
CAUTION
l It is prohibited to copy, decompile, disassemble, reverse engineer,
hack, manipulate, or otherwise make available any technology
or software incorporated in receivers compatible with the
SiriusXM® Radio Services or that support theSiriusXM website, the
Streaming Service or any of its content. Furthermore, the AMBE®
voice compression software included in this product is protected
by intellectual property rights including patent rights, copyrights,
and trade secrets of Digital Voice Systems, Inc.
l Note: this applies to SiriusXM® Radio receivers only and not
SiriusXM Ready devices.
RADIO OPERATION
151
Audio
6

NOTE
l SiriusXM® Radio Services — Descriptions
ABOUT
SiriusXM Services
Most in-car trials today include SiriusXM’s best package — All Access.
It includes every channel available on your radio, plus streaming.
SiriusXM All Access
With the SiriusXM All Access package, you can enjoy over 150
channels including commercial-free music, plus sports, news, talk,
comedy, entertainment and more inside your vehicle. Plus, streaming
is included so you can listen 200+ channels online, on the app, and at
home on a wide variety of connected devices, plus over 5,000 hours
of On Demand shows, performances and interviews.
Did you know? SiriusXM also delivers a wide variety of services to
certain vehicles’ entertainment and navigation systems such as
Trac, Weather, Sports Scores, Movie Listings, Fuel Prices, Stock
Prices and more. For a list of available features in your vehicle, visit
siriusxm.com/infotainment and get the most out of your driving
experience.
NOTE
RADIO OPERATION
Look for the Sirius, XM, SXM, Band, SAT, AUX, Radio or Source button
and you’re in.
If you can’t hear us, it’s easy to get started:
•Locate your Radio ID/ESN by turning to Channel 0. If you don’t see
your number there, go to Siriusxm.com/activationhelp to nd it.
•Visit siriusxm.com/refresh or call 1-855-MYREFRESH (697-3373) to
send a refresh signal to your radio.
Canadian Customers:
•Locate your Radio ID/ESN by turning to Channel 0.
•Visit siriusxm.ca/refresh to send a refresh signal to your radio or
call 1-888-539-7474 for service.
RADIO OPERATION
152

DISPLAYING THE RADIO ID
Each SiriusXM tuner is identied with a unique radio ID which
is 8 alphanumeric characters. The radio ID is required when
activating SiriusXM Satellite Services or when reporting a
problem.
The radio ID can be checked by tuning to channel “000”.
PRESETTING A CHANNEL
Multiple stations can be registered as presets.
1.
Tune to the desired channel.
2.
Select and hold one of the desired preset station buttons.
● To change the preset station to a dierent one, follow the
same procedure.
CACHING RADIO PROGRAMS
A radio program can be cached and played back in a time-
shifted manner.
The program that is currently being listened to can be cached.
PLAYING BACK THE CACHE
The broadcast cached in theprogram cache can be played back.
1.
Select (Replay). (→P.149)
RADIO OPERATION
153
Audio
6
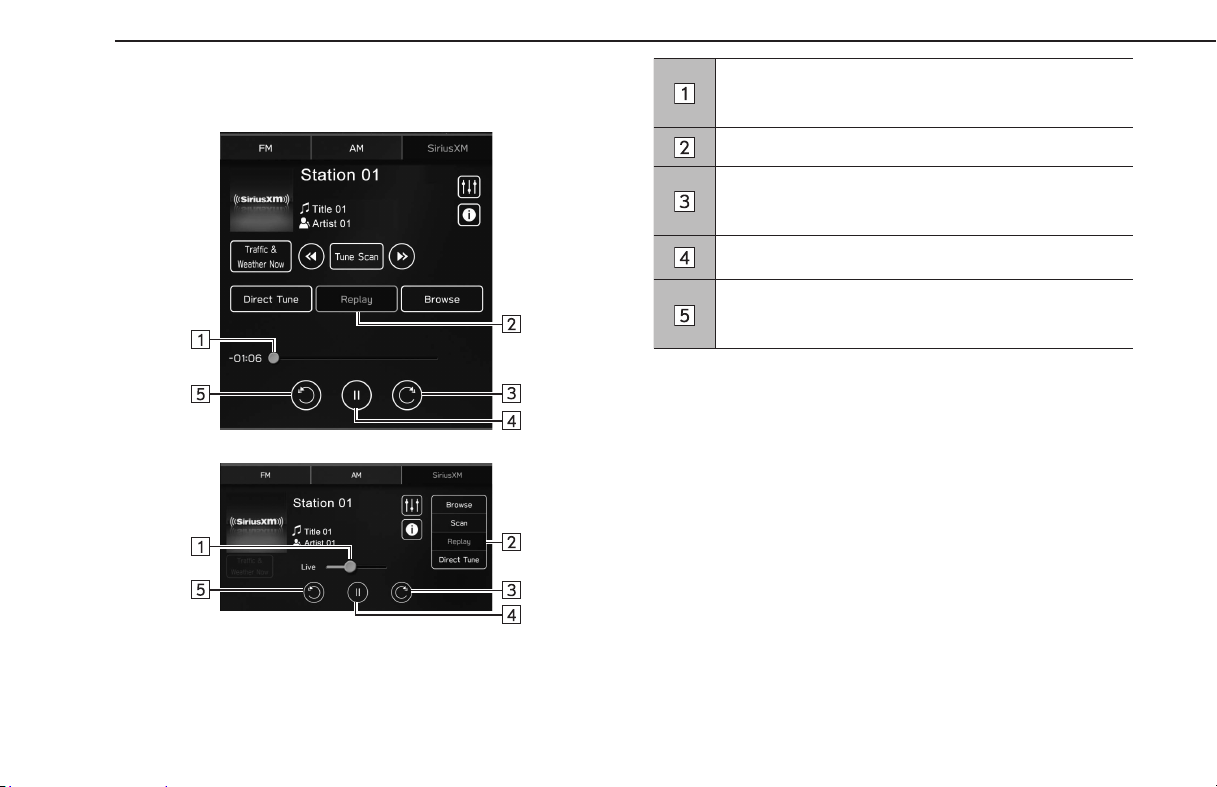
2.
Select the desired cache radio operation button.
X11.6-inch display system/11.6-inch display with Navi
system
XDual 7.0-inch display system
Shows the current playback location.
The playback location can be changed by dragging the
sliders.
Select to display the preset stations/channels. (→P.149)
Select: Access the desired program. Skips forward through
program.
Select and hold: Fast forwards continuously.
Pauses or playsthe radio broadcast.
Select: Access the desired program. Skips back through
program.
Select and hold: Fast rewinds continuously.
NOTE
l The time displayed on the bar scale may dier from the actual time.
RADIO OPERATION
154
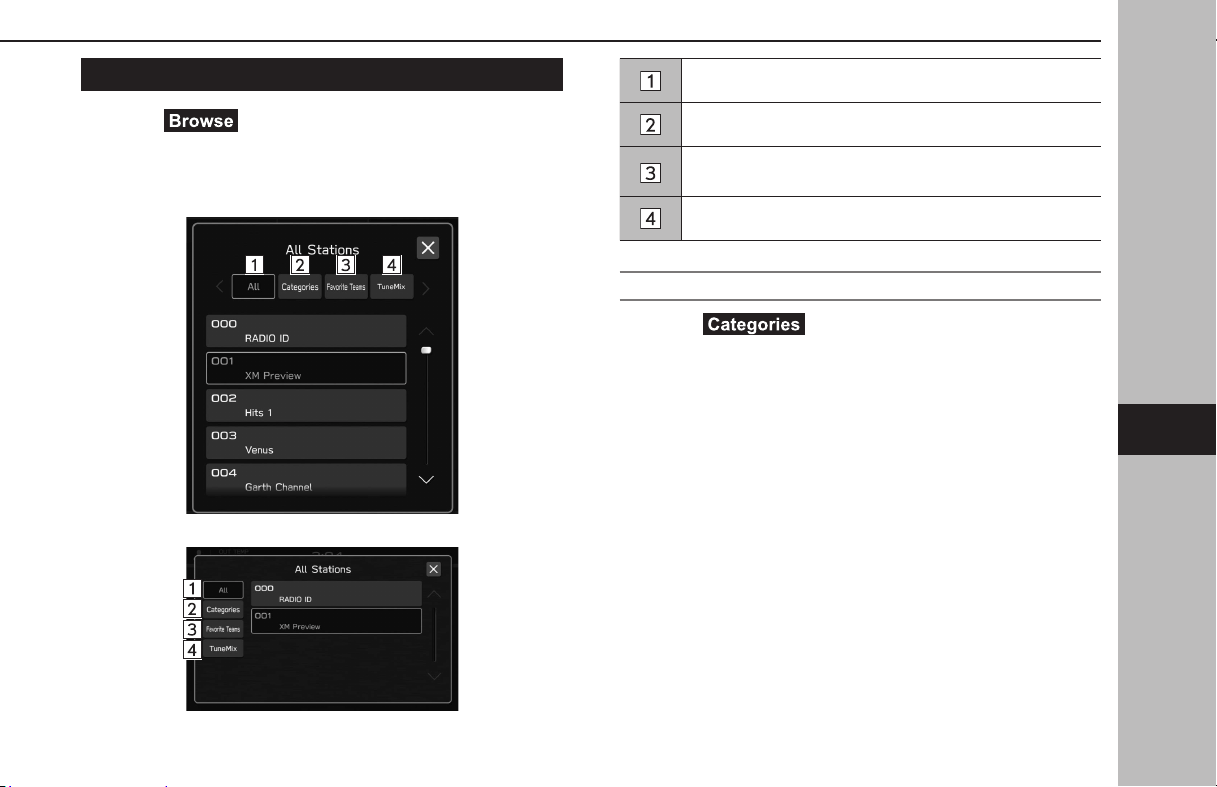
SELECTING A CHANNEL FROM THE LIST
1.
Select (Browse).
2.
Select the desired list, and then select the desired channel.
X11.6-inch display system/11.6-inch display with Navi
system
XDual 7.0-inch display system
Select to display the all channels list.
Select to display categories channel list. (→P.155)
Select to set teams for notifying the user of games starting
and SportsFlash. (→P.156)
Select to display the TuneMix channel. (→P.157)
SELECTING FROM CATEGORIES CHANNEL LIST
1.
Select (Categories).
2.
Select the desired genre.
3.
Select the desired channel.
RADIO OPERATION
155
Audio
6
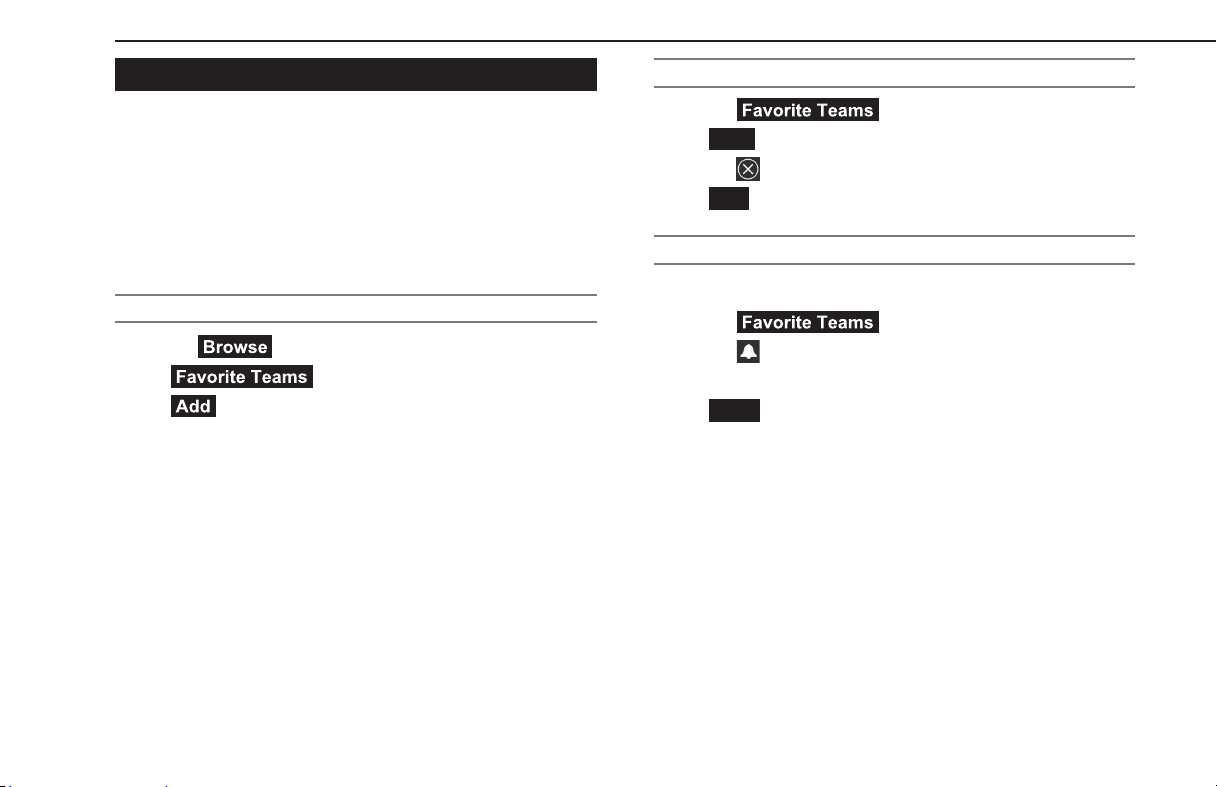
SETTING TEAMS FOR NOTIFICATIONS
By registering teams, a pop-up screen appears notifying
listeners of information on the game progress and so on. You
can return to the original point in the regular broadcast by
exiting the pop-up screen.
To use this function, turn “Sport Team Alert” on in SiriusXM
settings screen. (→P.93)
ADDING TEAMS
1.
Select (Browse).
2.
→ (Favorite Teams)
3.
→ (Add)
4.
Select the desired league.
5.
Select the desired team.
EDITING THE LIST
1.
Select (Favorite Teams).
2.
→
Edit
(Edit)
3.
Select for the item you wish to delete.
4.
→
OK
(OK)
SETTING POP-UP ALERTS
Pop-up alerts can be set to display on the screen.
1.
Select (Favorite Teams).
2.
Select for the desired team.
3.
Select the desired item to be set.
4.
→
Save
(Save)
RADIO OPERATION
156
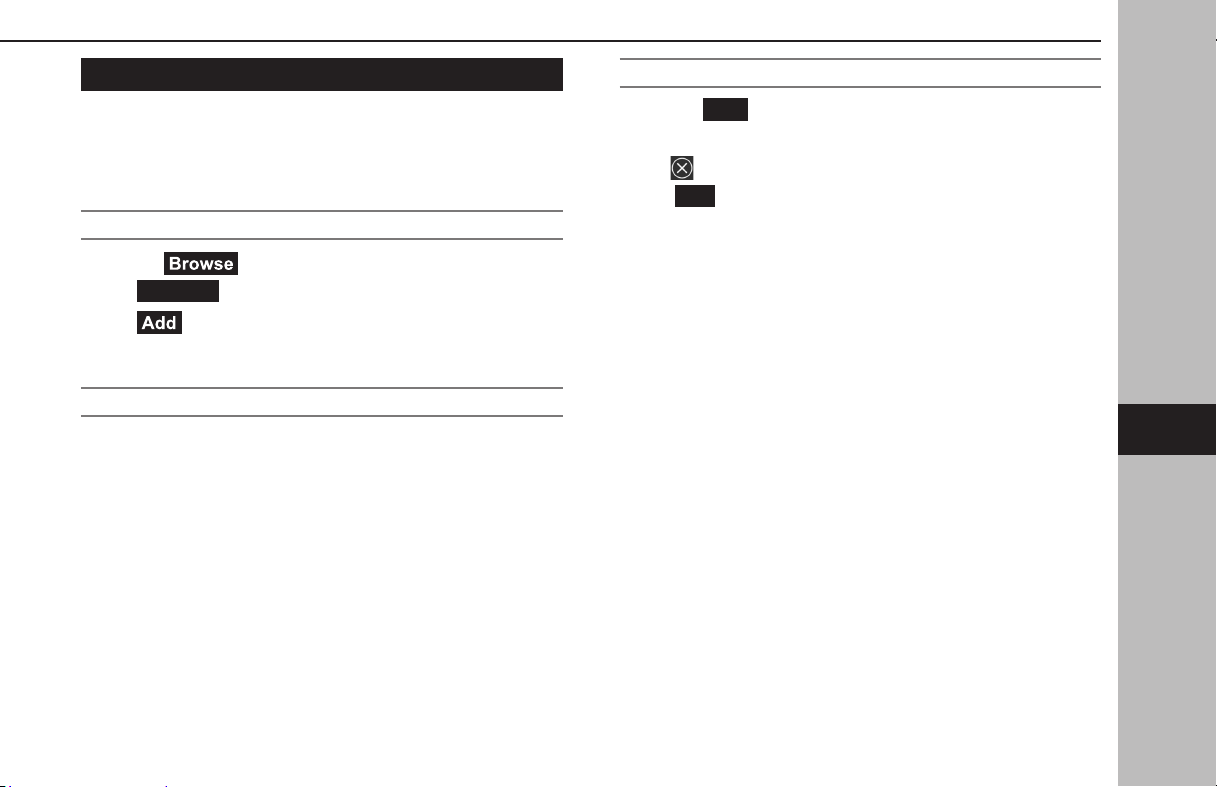
SETTING TUNEMIX CHANNELS
If multiple channels for which TuneMix is possible have been
registered as TuneMix channels, songs from these channels can
be listened to randomly.
REGISTERING CHANNELS
1.
Select (Browse).
2.
→
TuneMix
(TuneMix)
3.
→ (Add)
4.
Select the desired channels.
LISTENING TO TUNEMIXED CHANNELS
1.
Select the desired items on the “TuneMix” screen.
EDITING THE TUNEMIX
1.
Select
Edit
(Edit) on the “TuneMix” screen.
2.
Select the desired item to be set.
●
: Select to delete the item.
3.
→
OK
(OK)
4.
Select the desired channels.
NOTE
l The TuneMix name cannot be changed.
RADIO OPERATION
157
Audio
6

MEDIA OPERATION
CD (IF EQUIPPED WITH A CD PLAYER)
OVERVIEW
The CD control screen can be accessed with the following
methods:
● Insert a disc. (→P.65)
● Select
CD
(CD)on the media control screen. (→P.137)
XControl panel
Turn to adjust the volume.
Press to mute the audio system.
Press and hold to turn the audio system o, and press and
hold to turn it on again.
Turn to change the track.
Press and hold to display the sound customization screen.
(→P.138)
XControl screen
X11.6-inch display system/11.6-inch display with Navi
system
XDual 7.0-inch display system
MEDIA OPERATION
158
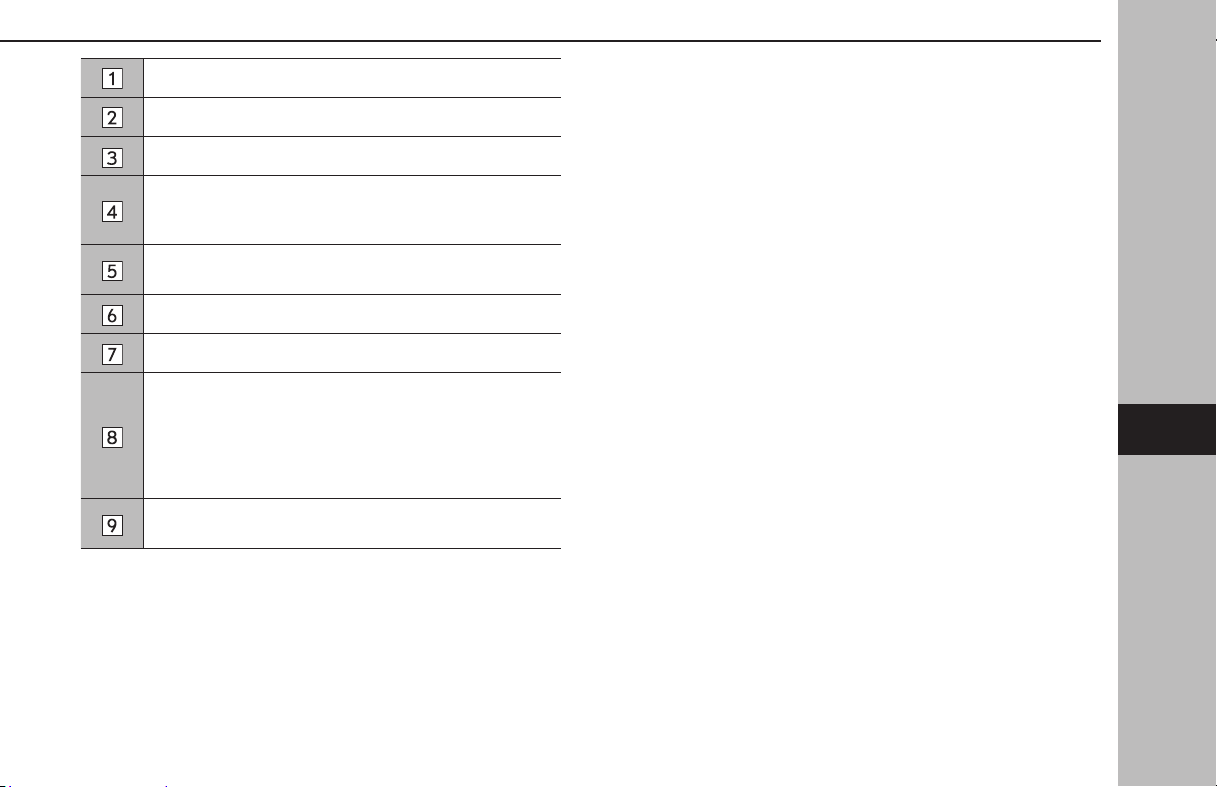
Select to switch between other media sources.
Displays cover art.
Select to display the sound customization screen. (→P.138)
Shows progress.
The playback location can be changed by dragging the
sliders.
Select to change the track.
Select and hold to fast forward/rewind.
Select to pause/play.
Select to search for a track.
Audio CDs: Changes between repeat all tracks → repeat
current track → cancel repeat each time this button is
selected.
MP3/WMA/AAC discs: Changes between repeat current
album/folder → repeat current track → cancel repeat each
time this button is selected.
Select to enable/disable random playback for the tracks
currently playing on the CD.
NOTE
l If a disc contains CD-DA les and MP3/WMA/AAC les, only the CD-
DA les can be played back.
l If a CD-TEXT disc is inserted, the title of the disc and track will be
displayed.
l Depending on the disc or music le being played, the cover art may
not be displayed.
MEDIA OPERATION
159
Audio
6
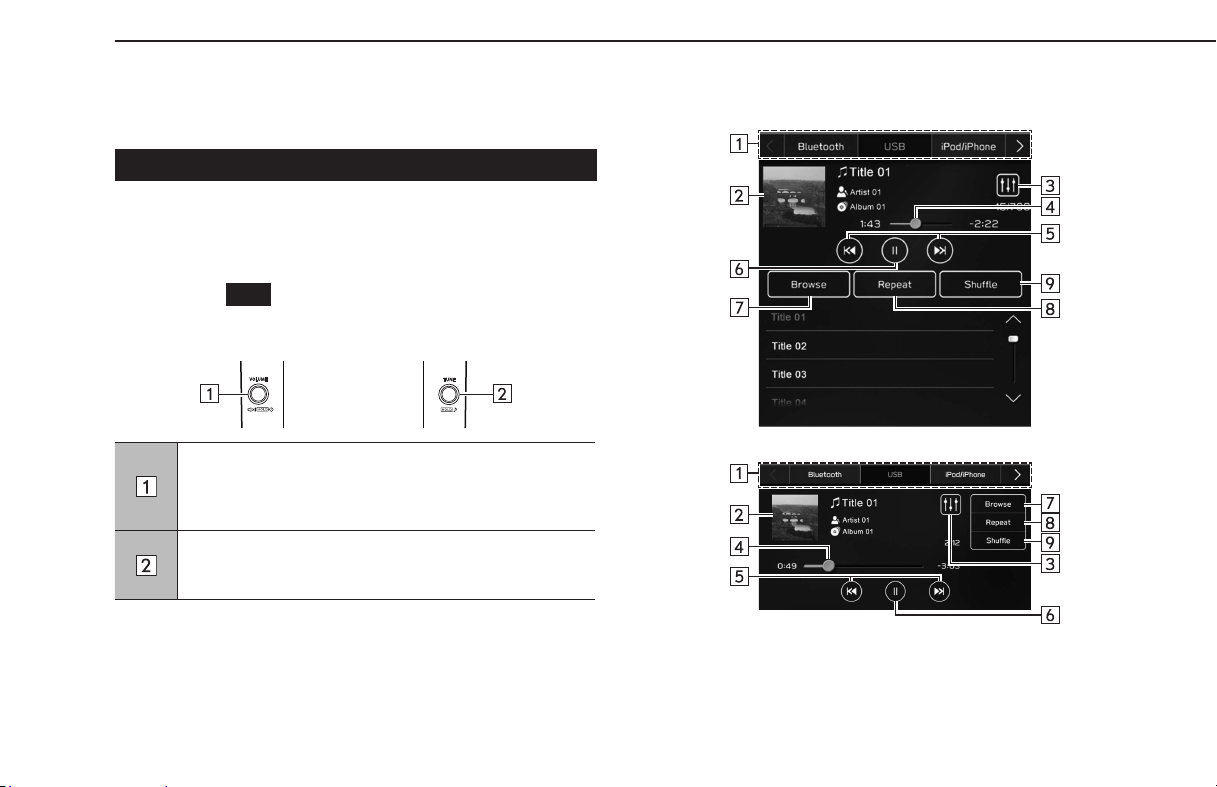
USB MEMORY
Audio les on a USB memory device can be played back.
OVERVIEW
The USB Audio playback screen can be accessed with the
following methods:
● Connect a USB memory device. (→P.66)
● Select
USB
(USB) on the media control screen.
(→P.137)
XControl panel
Turn to adjust the volume.
Press to mute the audio system.
Press and hold to turn the audio system o, and press and
hold to turn it on again.
Turn to change the track.
Press and hold to display the sound customization screen.
(→P.138)
XControl screen
X11.6-inch display system/11.6-inch display with Navi
system
XDual 7.0-inch display system
MEDIA OPERATION
160
Select to switch between other media sources.
Displays cover art.
Select to display the sound customization screen. (→P.138)
Shows progress.
The playback location can be changed by dragging the
sliders.
Select to change the track.
Select and hold to fast forward/rewind.
Select to pause/play.
Select to search for a track.
Changes between repeat current album/folder → repeat
current track → cancel repeat each time this button is
selected.
Select to enable/disable random playback for the tracks
currently playing from the USB memory device.
WARNING
l Do not operate the player’s controls or connect the USB memory
device while driving.
CAUTION
l Do not leave your portable player in the vehicle. In particular, high
temperatures inside the vehicle may damage the portable player.
l Do not push down on or apply unnecessary pressure to the
portable player while it is connected as this may damage the
portable player or its terminal.
l Do not insert foreign objects into the port as this may damage the
portable player or its terminal.
NOTE
l Depending on the device or music le being played, the cover art
may not be displayed.
l If “SUBARU STARLINK Auto Connect” is on, audio les on a connected
USB memory device cannot be played back. To playback audio les
on a USB memory device, connect the USB memory device after
turning “SUBARU STARLINK Auto Connect” o. (→P.83)
MEDIA OPERATION
161
Audio
6
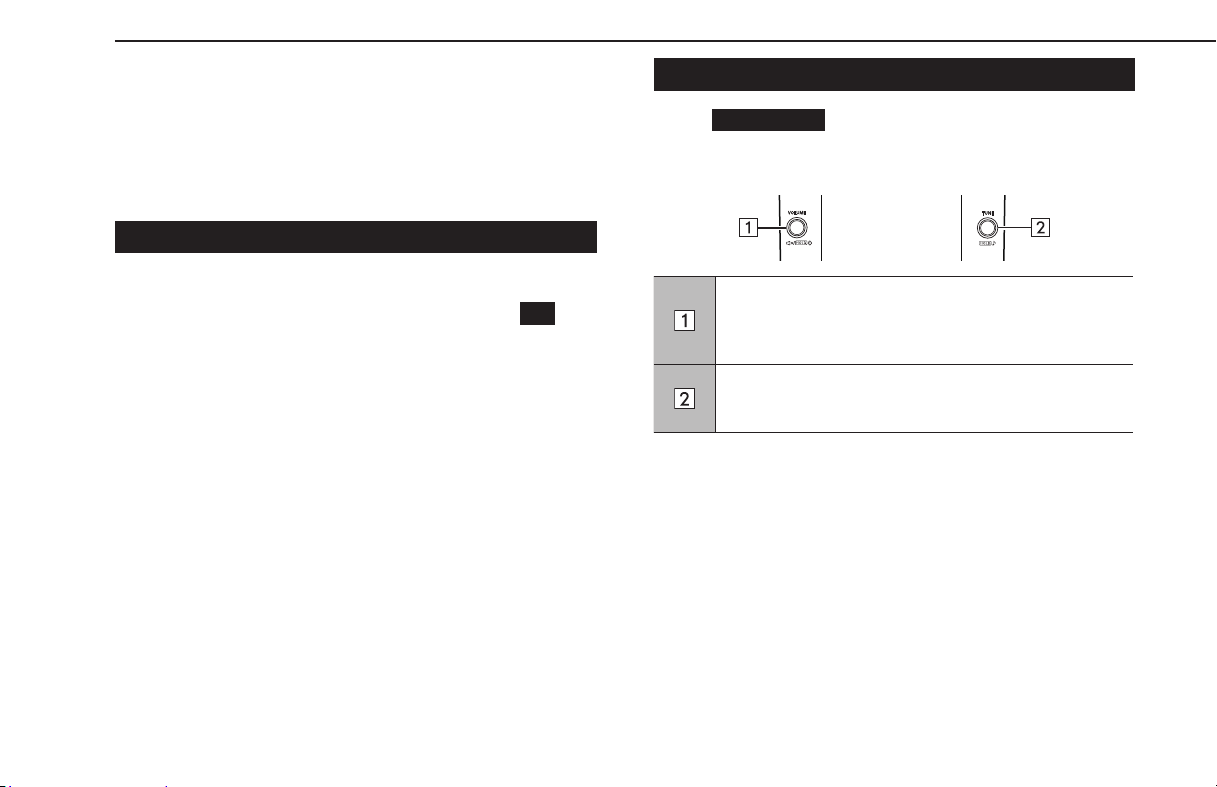
iPod/iPhone
When an iPod/iPhone is connected, you can play iPod/iPhone
music les. On this unit, you can perform operations such as
selecting a le from a list or changing to the random playback
mode.
CONNECTING THE iPod/iPhone
1.
Connect an iPod/iPhone to the USB port. (→P.66)
2.
Check the conrmation message, and then select
No
(No).
● If “Don’t show again.” is selected, the conrmation
message will not be displayed again.
If the connected iPhone is recognized as an Apple
CarPlay device, select the device from the Apple CarPlay
device list to remove the check mark. (→P.122)
OVERVIEW
Select
iPod/iPhone
(iPod/iPhone) on the media control
screen. (→P.137)
XControl panel
Turn to adjust the volume.
Press to mute the audio system.
Press and hold to turn the audio system o, and press and
hold to turn it on again.
Turn to change the track.
Press and hold to display the sound customization screen.
(→P.138)
MEDIA OPERATION
162

XControl screen (When not connected as an Apple CarPlay
device )
X11.6-inch display system/11.6-inch display with Navi
system
XDual 7.0-inch display system
XControl screen (When connected as an Apple CarPlay
device)
X11.6-inch display system/11.6-inch display with Navi
system
XDual 7.0-inch display system
MEDIA OPERATION
163
Audio
6
Select to switch between other media sources.
Displays cover art.
Select to display the sound customization screen. (→P.138)
Shows progress.
The playback location can be changed by dragging the
sliders.
Select to change the track.
Select and hold to fast forward/rewind.
Select to pause/play.
Select to search for a track.
Changes between repeat current album → repeat current
track → cancel repeat each time this button is selected.
Select to enable/disable random playback for the tracks
currently playing on the iPod/iPhone.
*
Select to fast forward the current content item in xed
intervals.
*
Select to rewind the current content item in xed intervals.
*: Display when playing Audiobooks or Podcasts
WARNING
l Do not operate the player’s controls or connect the iPod/iPhone
while driving.
CAUTION
l Do not leave your portable player in the vehicle. In particular, high
temperatures inside the vehicle may damage the portable player.
l Do not push down on or apply unnecessary pressure to the
portable player while it is connected as this may damage the
portable player or its terminal.
l Do not insert foreign objects into the port as this may damage the
portable player or its terminal.
NOTE
l When an iPod/iPhone is connected using an undamaged genuine
iPod/iPhone cable, battery of the iPod/iPhone will be charged.
l When playing music on an iPod/iPhone, operate connect it to
the system using an undamaged genuine iPod/iPhone cable and
operate the iPod/iPhone from the system. Certain functions may
not be available if connected using other methods. Furthermore,
depending on the connected iPod/iPhone, certain functions may not
be available.
l Depending on the iPod/iPhone or music le being played, the cover
art may not be displayed.
l When an iPod/iPhone is connected and the audio source is changed
to iPod/iPhone mode, the iPod/iPhone will resume playing from the
same point it was last used.
l Tracks selected by operating a connected iPod/iPhone may not be
recognized or displayed properly.
MEDIA OPERATION
164
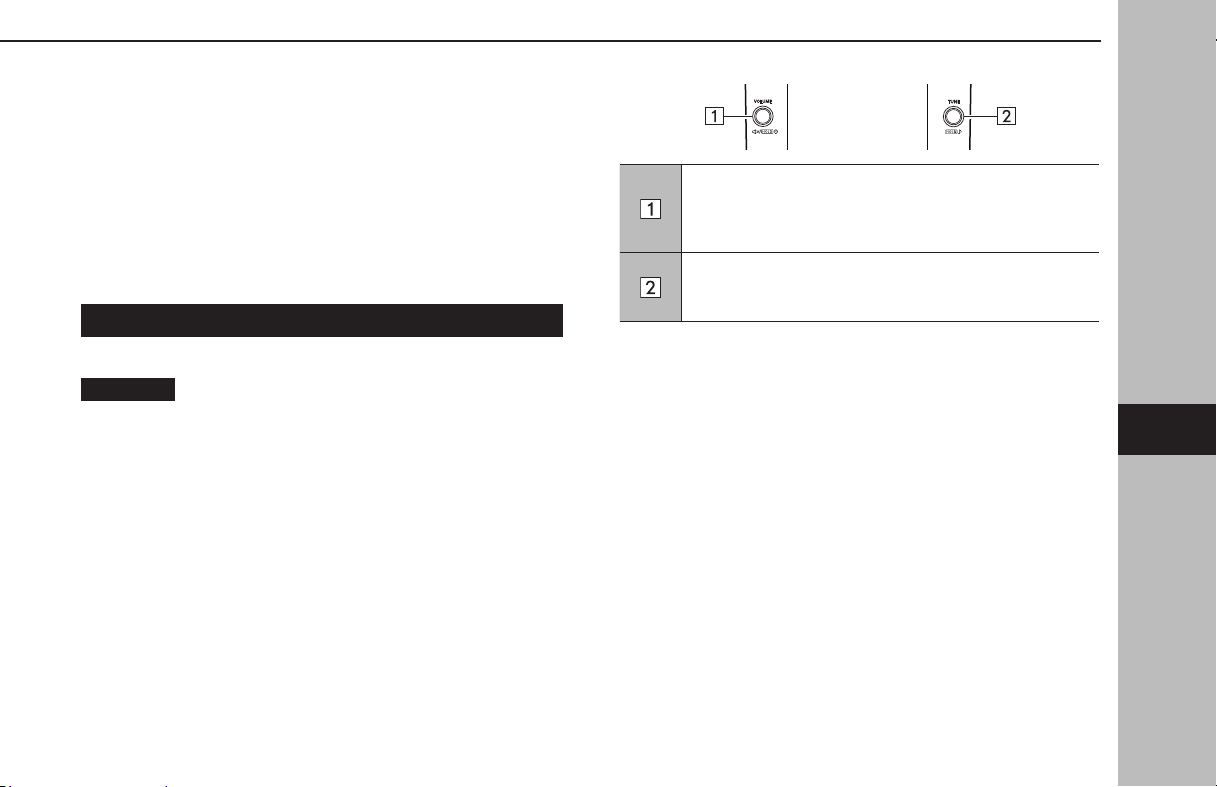
Bluetooth AUDIO
The Bluetooth audio system enables users to play music les
stored on Bluetooth devices through the vehicle speakers via
wireless communication.
This audio system supports Bluetooth, a wireless data system
capable of playing portable audio music without cables. If your
device does not support Bluetooth, the Bluetooth audio system
will not function.
OVERVIEW
The Bluetooth audio control screen can be accessedby selecting
Bluetooth
(Bluetooth) on the media control screen. (→P.137)
Depending on the type of portable player connected, some
functions may not be available and/or the screen may look
dierently than shown in this manual.
XControl panel
Turn to adjust the volume.
Press to mute the audio system.
Press and hold to turn the audio system o, and press and
hold to turn it on again.
Turn to change the track.
Press and hold to display the sound customization screen.
(→P.138)
MEDIA OPERATION
165
Audio
6

XControl screen
X11.6-inch display system/11.6-inch display with Navi
system
XDual 7.0-inch display system
Select to switch between other media sources.
Displays cover art.
Select to display the sound customization screen. (→P.138)
Shows progress.
The playback location can be changed by dragging the
sliders.
Select to display the“Manage Devices” screen. (→P.168)
Select to change the track.
Select and hold to fast forward/rewind.
Select to pause/play.
Select to search for a track.
Changes between repeat current album/folder → repeat
current track → cancel repeat each time this button is
selected.
Select to enable/disable random playback for the tracks
currently playing on the Bluetooth device.
MEDIA OPERATION
166
WARNING
l Do not operate the player’s controls or connect to the Bluetooth
audio system while driving.
l This system is tted with Bluetooth antennas. People with
implantable cardiac pacemakers, cardiac resynchronization
therapy-pacemakers or implantable cardioverter debrillators
should maintain a reasonable distance between themselves and
the Bluetooth antennas. The radio waves may aect the operation
of such devices.
l Before using Bluetooth devices, users of any electrical medical
device other than implantable cardiac pacemakers, cardiac
resynchronization therapy-pacemakers or implantable
cardioverter debrillators should consult the manufacturer of the
device for information about its operation under the inuence of
radio waves. Radio waves could have unexpected eects on the
operation of such medical devices.
CAUTION
l Do not leave your portable player in the vehicle. In particular, high
temperatures inside the vehicle may damage the portable player.
NOTE
l Depending on the Bluetooth device that is connected to the system,
the music may start playing when selecting while it is paused.
Conversely, the music may pause when selecting while it is
playing.
l In the following conditions, the system may not function:
•The Bluetooth device is turned o.
•The Bluetooth device is not connected.
•The Bluetooth device has a low battery.
l It may take time to connect the phone when Bluetooth audio is
being played.
l For operating the portable player, see the instruction manual that
comes with it.
l If the Bluetooth device is disconnected due to poor reception from
the Bluetooth network when the ignition switch is turned to the
“ACC” or “ON” position, the system will automatically reconnect to the
portable player.
l If the Bluetooth device is disconnected on purpose, such as it was
turned o, this does not happen. Reconnect the portable player
manually.
l Bluetooth device information is registered when the Bluetooth
device is connected to the Bluetooth audio system. When selling or
disposing of the vehicle, remove the Bluetooth audio information
from the system. (→P.83)
l Depending on the Bluetooth device or music le being played, the
cover art may not be displayed.
l If the Bluetooth device does not play automatically when connected,
device operation may be necessary.
MEDIA OPERATION
167
Audio
6
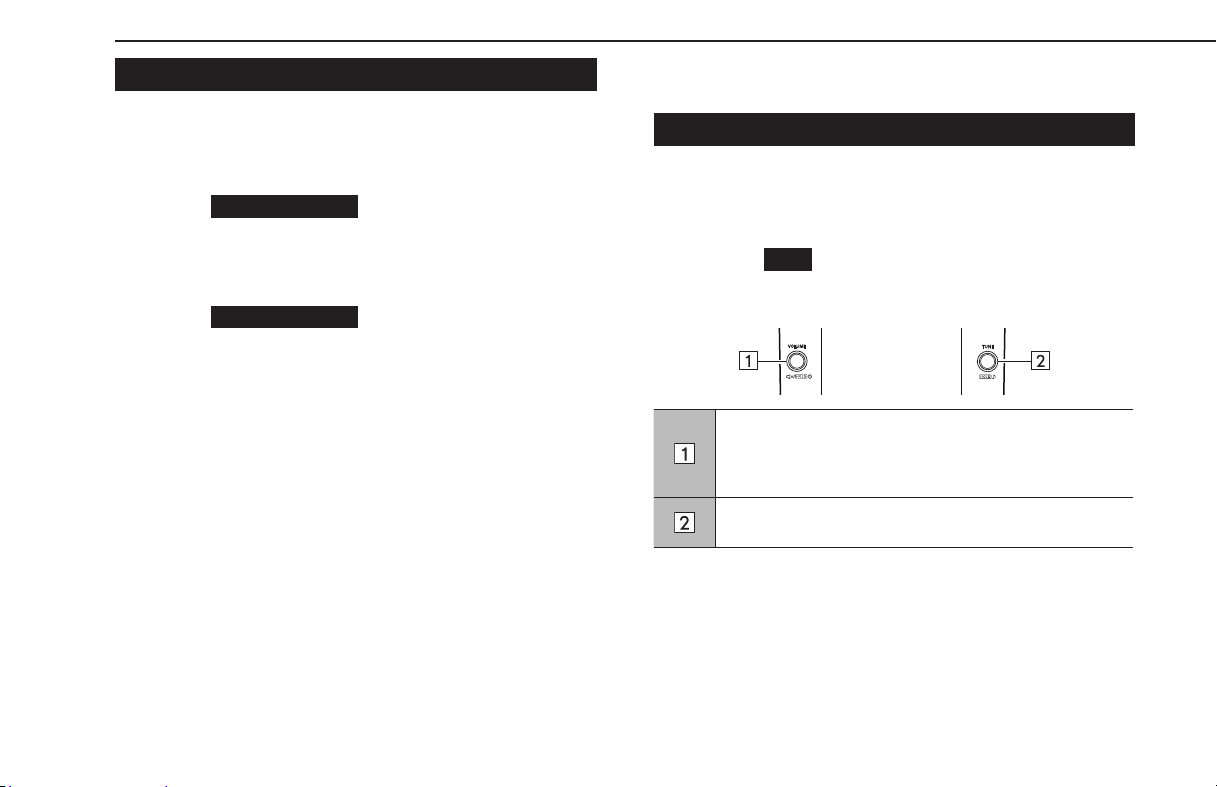
CONNECTING A Bluetooth DEVICE
To use the Bluetooth audio system, it is necessary to register a
Bluetooth device with the system.
XRegistering an additional device
1.
Select
Manage Devices
(Manage Devices) on the
Bluetooth audio control screen.
2.
For more information: →P.78
XSelecting a registered device
1.
Select
Manage Devices
(Manage Devices) on the
Bluetooth audio control screen.
2.
Select the Bluetooth device to be connected.
AUX
OVERVIEW
The AUX control screen can be accessed with the following
methods:
● Connect a portable audio device. (→P.66)
● Select
AUX
(AUX) on the media control screen.
(→P.137)
XControl panel
Turn to adjust the volume.
Press to mute the audio system.
Press and hold to turn the audio system o, and press and
hold to turn it on again.
Press and hold to display the sound customization screen.
(→P.138)
MEDIA OPERATION
168
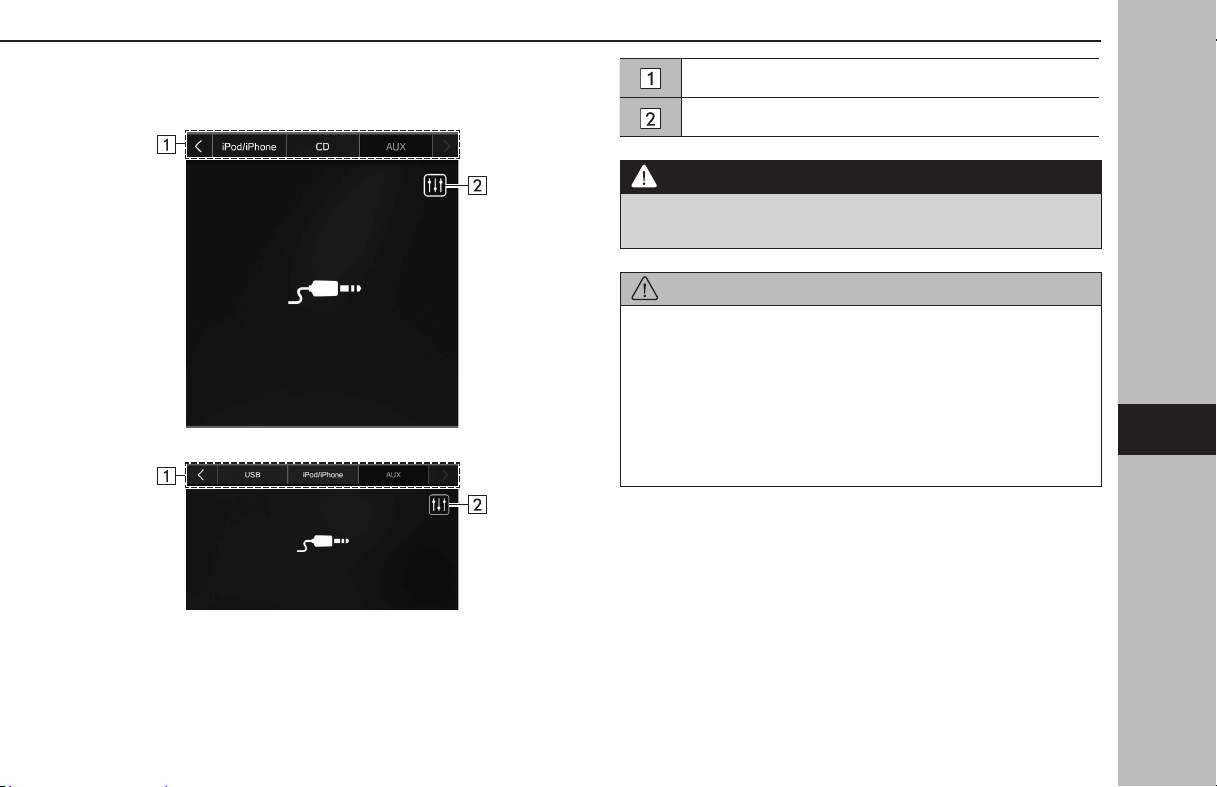
XControl screen
X11.6-inch display system/11.6-inch display with Navi
system
XDual 7.0-inch display system
Select to switch between other media sources.
Select to display the sound customization screen. (→P.138)
WARNING
l Do not operate the player’s controls or connect the portable audio
device while driving.
CAUTION
l Do not leave portable audio device in the vehicle. The temperature
inside the vehicle may become high, resulting in damage to the
player.
l Do not push down on or apply unnecessary pressure to the
portable audio device while it is connected as this may damage
the portable audio device or its terminal.
l Do not insert foreign objects into the port as this may damage the
portable audio device or its terminal.
MEDIA OPERATION
169
Audio
6
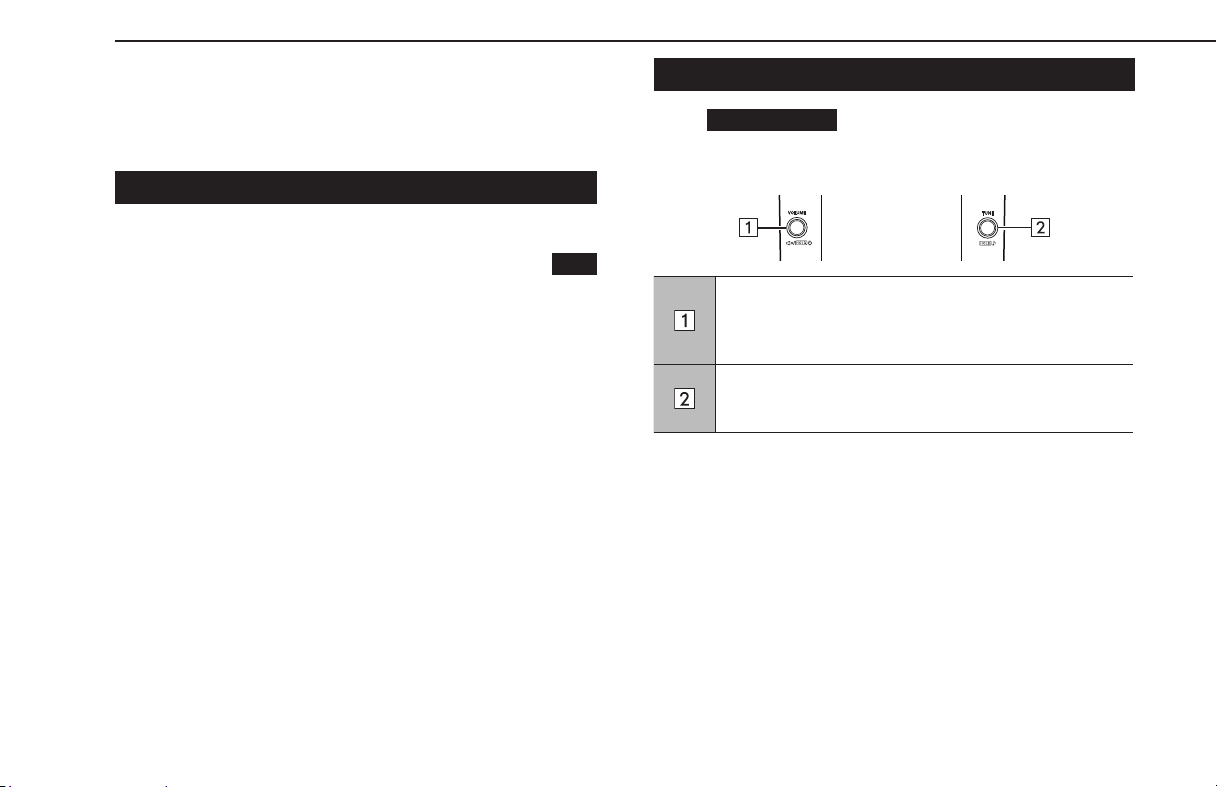
Android Auto*
*: When connected as an Android Auto device
Audio les on an Android Auto device can be played back.
CONNECTING AN Android Auto DEVICE
1.
Connect an Android Auto device to the USB port. (→P.66)
2.
Check the conrmation message, and then select
Yes
(Yes).
● If “Don’t show again.” is selected, the conrmation
message will not be displayed again. If the connected
Android device is not recognized as an Android Auto
device, select the check box for the device on the
Android Auto device list. (→P.125)
OVERVIEW
Select
Android Auto
(Android Auto) on the media control
screen. (→P.137)
XControl panel
Turn to adjust the volume.
Press to mute the audio system.
Press and hold to turn the audio system o, and press and
hold to turn it on again.
Turn to change the track.
Press and hold to display the sound customization screen.
(→P.138)
MEDIA OPERATION
170
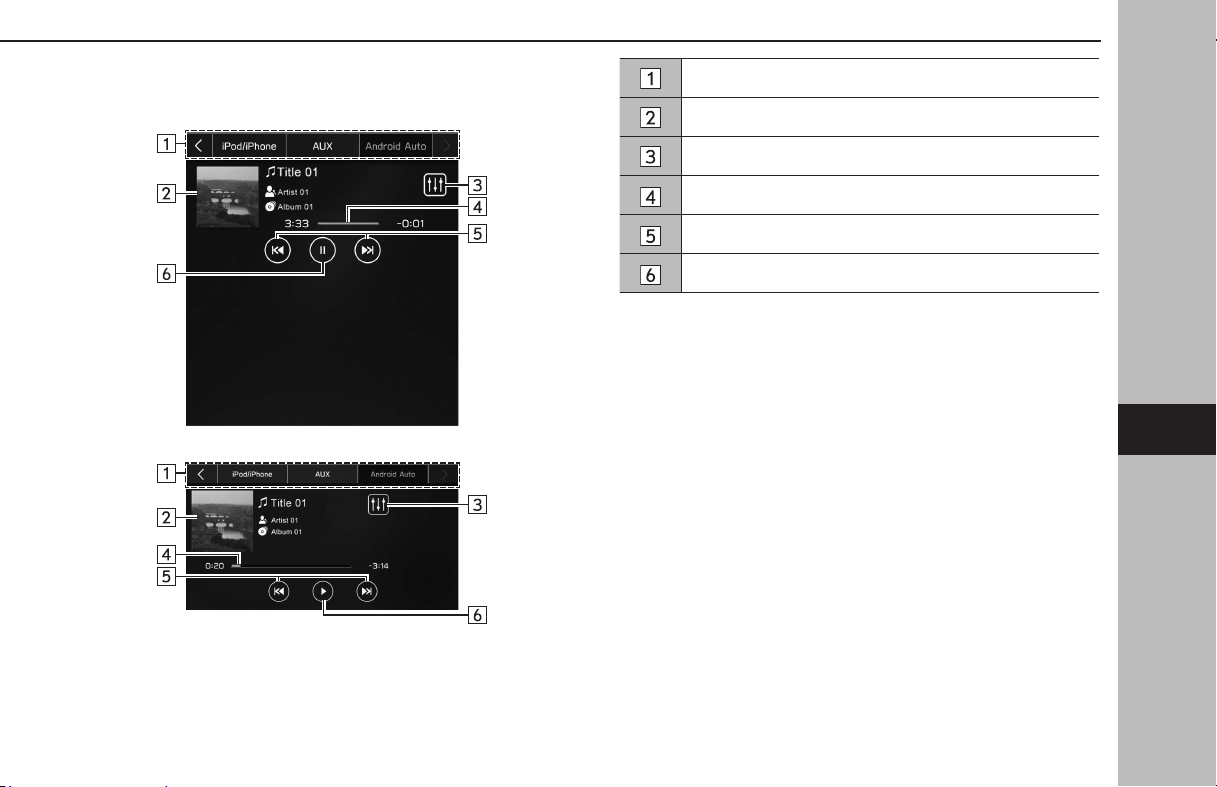
XControl screen
X11.6-inch display system/11.6-inch display with Navi
system
XDual 7.0-inch display system
Select to switch between other media sources.
Displays cover art.
Select to display the sound customization screen. (→P.138)
Shows progress.
Select to change the track.
Select to pause/play.
MEDIA OPERATION
171
Audio
6
WARNING
l Do not operate or connect an Android Auto device while driving.
CAUTION
l Do not leave your Android Auto device in the vehicle. In particular,
high temperatures inside the vehicle may damage it.
l Do not push down on or apply unnecessary pressure to the
connector area of the Android Auto device while it is connected as
this may damage the device or its terminals.
l Do not insert foreign objects into the port as this may damage the
device or its terminals.
NOTE
l Depending on the device or music le being played, the cover art
may not be displayed.
MEDIA OPERATION
172
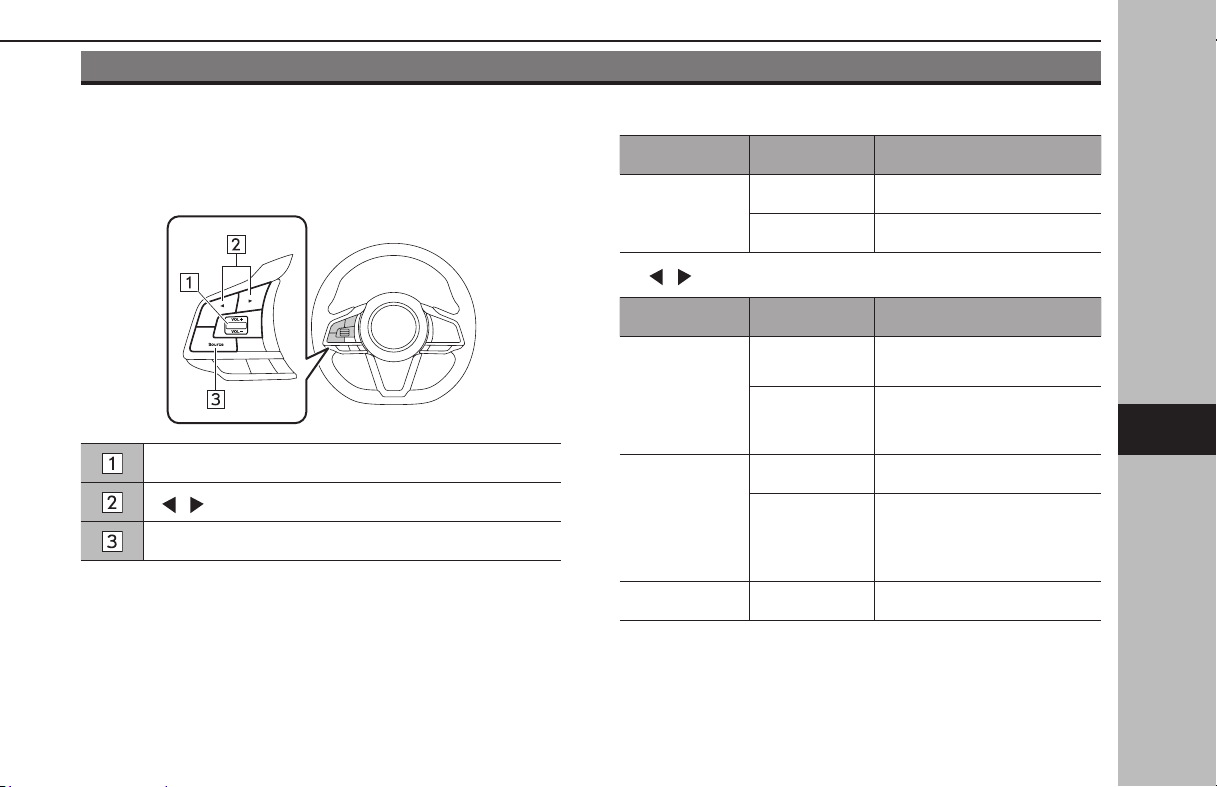
AUDIO REMOTE CONTROLS
STEERING WHEEL CONTROLS
Some parts of the audio system can be controlled using the
steering wheel controls.
“VOL +/VOL -” switch
“ / ” switch
“Source” switch
X“VOL +/VOL -” switch
Mode Operation Function
Volume
Press Volume up/down
Press and hold Volume up/down continuously
X“
/ ” switch
Mode Operation Function
AM/FM Radio,
SiriusXM®
Press
Preset station/channel up/
down
Press and hold
Scan and stop at the rst
received station when the
switch is released
Audio CD*,
MP3/WMA/
AAC disc*, USB,
iPod/iPhone,
Bluetooth audio,
Apple CarPlay
Press Change a track/le
Press and hold Fast forward/rewind
Android Auto Press Change a track
*: If equipped with a CD player
AUDIO REMOTE CONTROLS
173
Audio
6

X“Source” switch
Mode Operation Function
All
Press
Turn on the audio system or
change the audio source mode
Press and hold
Turn o the audio system
NOTE
l In the SUBARU STARLINK mode, some operation may be done on the
screen depend on the selected APPS.
AUDIO REMOTE CONTROLS
174

TIPS FOR OPERATING THE AUDIO SYSTEM
OPERATING INFORMATION
CAUTION
l To avoid damage to the audio system:
•Be careful not to spill beverages over the audio system.
•Do not put anything other than an appropriate disc into the
disc slot.*
*: If equipped with a CD player
NOTE
l The use of a cellular phone inside or near the vehicle may cause a
noise from the speakers of the audio system which you are listening
to. However, this does not indicate a malfunction.
RADIO
Usually, a problem with radio reception does not mean there
is a problem with the radio — it is just the normal result of
conditions outside the vehicle.
For example, nearby buildings and terrain can interfere with
FM reception. Power lines or phone wires can interfere with AM
signals. And of course, radio signals have a limited range. The
farther the vehicle is from a station, the weaker its signal will
be. In addition, reception conditions change constantly as the
vehicle moves.
Here, some common reception problems that probably do not
indicate a problem with the radio are described.
TIPS FOR OPERATING THE AUDIO SYSTEM
175
Audio
6

FM
Fading and drifting stations: Generally, the eective range of
FM is about 25 miles (40 km). Once outside this range, you may
notice fading and drifting, which increase with the distance
from the radio transmitter. They are often accompanied by
distortion.
Multi-path: FM signals are reective, making it possible for
2 signals to reach the vehicle’s antenna at the same time. If
this happens, the signals will cancel each other out, causing a
momentary utter or loss of reception.
Static and uttering: These occur when signals are blocked by
buildings, trees or other large objects. Increasing the bass level
may reduce static and uttering.
Station swapping: If the FM signal being listened to is
interrupted or weakened, and there is another strong station
nearby on the FM band, the radio may tune in the second
station until the original signal can be picked up again.
AM
Fading: AM broadcasts are reected by the upper atmosphere
— especially at night. These reected signals can interfere with
those received directly from the radio station, causing the radio
station to sound alternately strong and weak.
Station interference: When a reected signal and a signal
received directly from a radio station are very nearly the same
frequency, they can interfere with each other, making it dicult
to hear the broadcast.
Static: AM is easily aected by external sources of electrical
noise, such as high tension power lines, lightening or electrical
motors. This results in static.
SiriusXM®
● Cargo loaded on the roof luggage carrier, especially
metal objects, may adversely aect the reception of
SiriusXM® Radio.
● Alternation or modications carried out without
appropriate authorization may invalidate the user’s right
to operate the equipment.
TIPS FOR OPERATING THE AUDIO SYSTEM
176
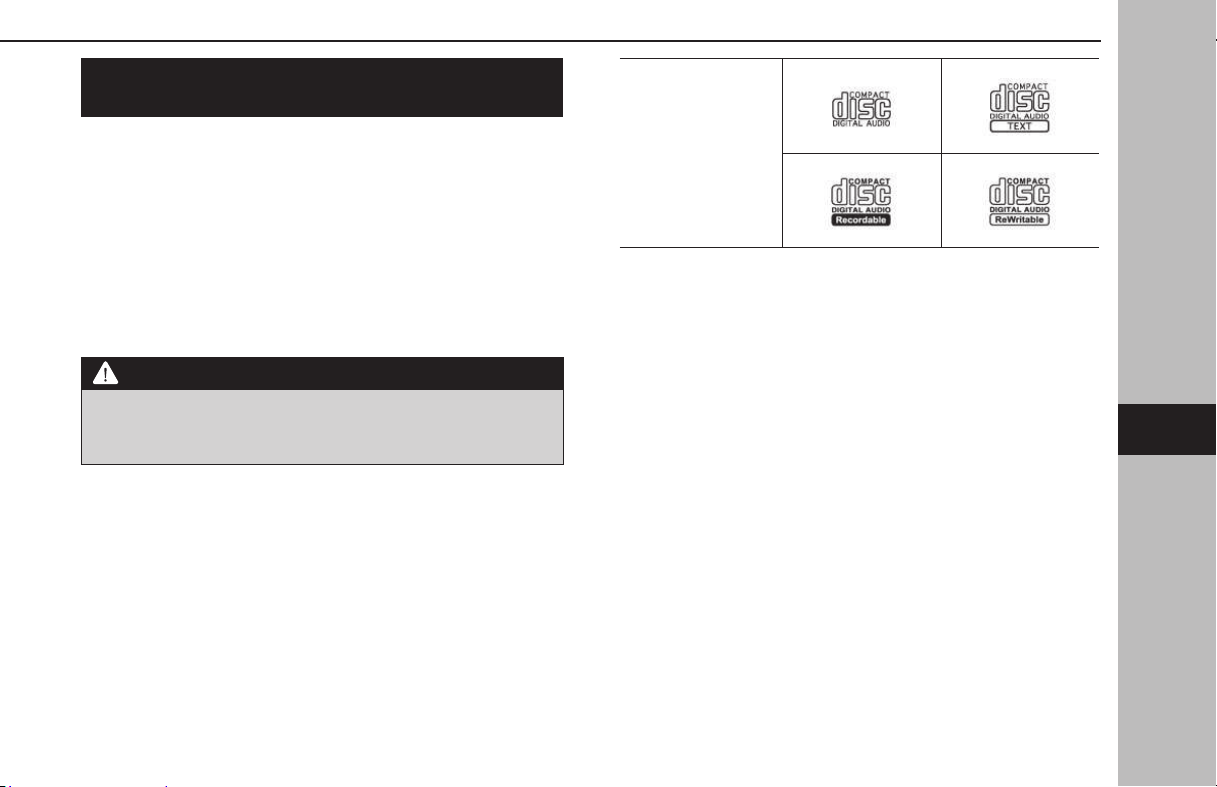
CD PLAYER AND DISC (IF EQUIPPED WITH A CD
PLAYER)
● Extremely high temperatures can keep the CD player
from working. On hot days, use the air conditioning
system to cool the inside of the vehicle before using the
player.
● Bumpy roads or other vibrations may make the CD player
skip.
● If moisture gets into the CD player, the discs may not be
able to be played. Remove the discs from the player and
wait until it dries.
WARNING
l CD players use an invisible laser beam which could cause
hazardous radiation exposure if directed outside the unit. Be sure
to operate the player correctly.
Audio CDs
● Use only discs marked as shown above.
● This CD player is intended for use with 4.7 in. (12 cm)
discs only.
● The following products may not be playable on your
player:
•SACD
•dts CD
•Copy-protected CD
•Video CD
TIPS FOR OPERATING THE AUDIO SYSTEM
177
Audio
6
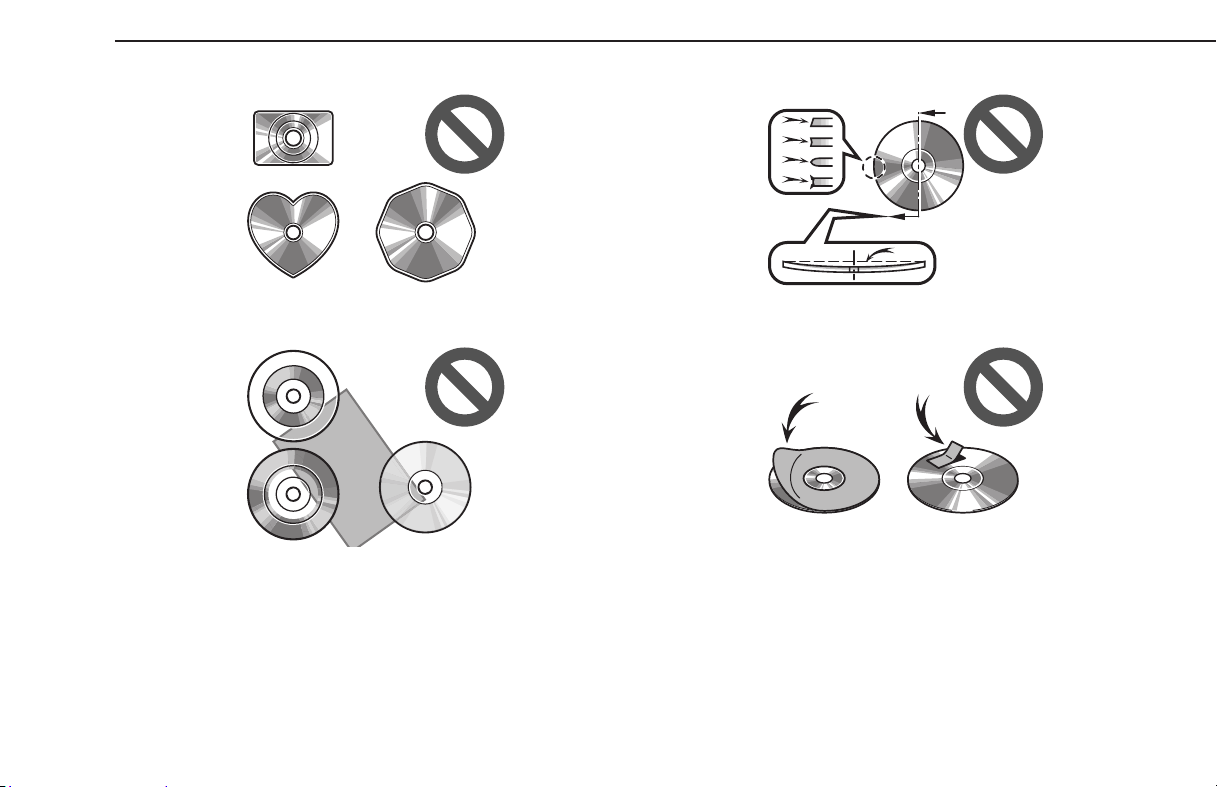
XSpecial shaped discs
XTransparent/translucent discs
XLow quality discs
XLabeled discs
TIPS FOR OPERATING THE AUDIO SYSTEM
178
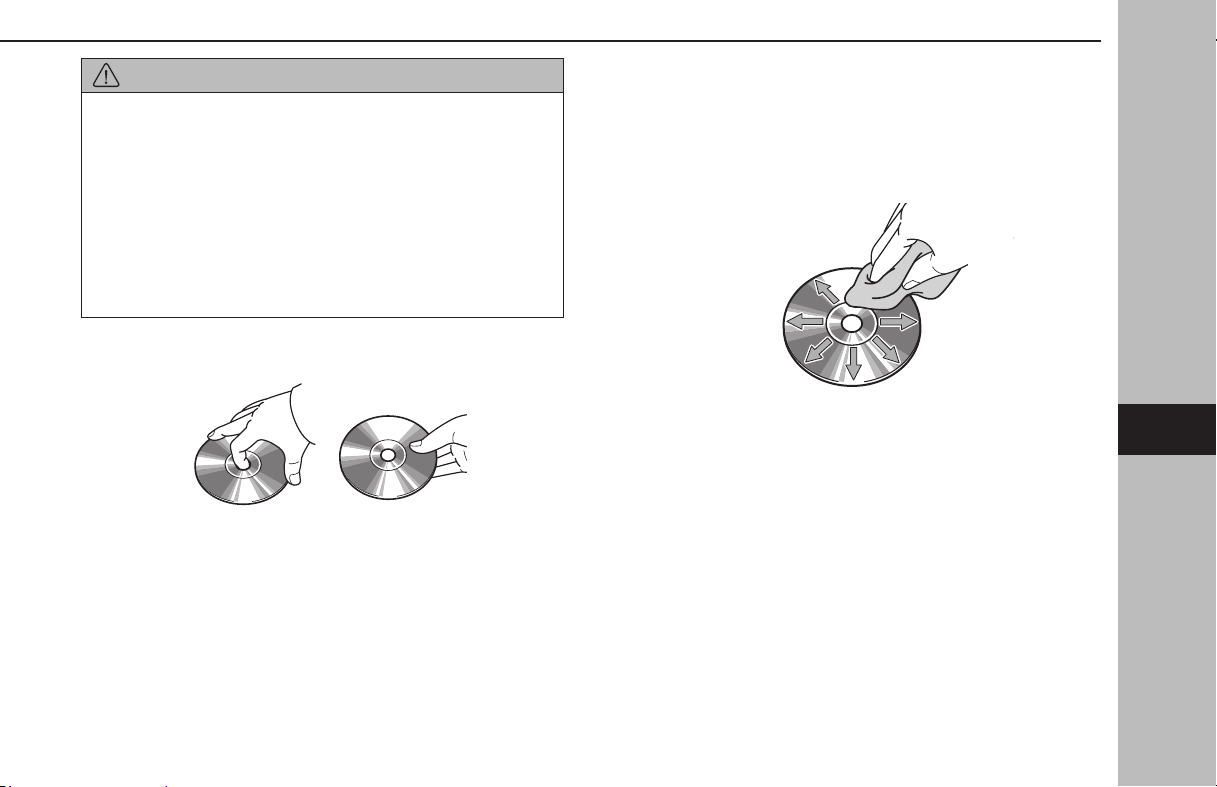
CAUTION
l Do not use special shaped, transparent/translucent, low quality or
labeled discs such as those shown in the illustrations. The use of
such discs may damage the player, or it may be impossible to eject
the disc.
l This system is not designed for use of Dual Discs. Do not use Dual
Discs because they may cause damage to the player.
l Do not use discs with a protection ring. The use of such discs may
damage the player, or it may be impossible to eject the disc.
l Do not use printable discs. The use of such discs may damage the
player, or it may be impossible to eject the disc.
Correct
Wrong
● Handle discs carefully, especially when inserting them.
Hold them on the edge and do not bend them. Avoid
getting ngerprints on them, particularly on the shiny
side.
● Dirt, scratches, warping, pin holes or other disc damage
could cause the player to skip or to repeat a section of a
track. (To see a pin hole, hold the disc up to the light.)
● Remove discs from the players when not in use. Store
them in their plastic cases away from moisture, heat and
direct sunlight.
To clean a disc: Wipe it with a soft, lint-free cloth that has been
dampened with water. Wipe in a straight line from the center
to the edge of the disc (not in circles). Dry it with another soft,
lint-free cloth. Do not use a conventional record cleaner or anti-
static device.
TIPS FOR OPERATING THE AUDIO SYSTEM
179
Audio
6

CD-R/RW DISCS
● CD-R/CD-RW discs that have not been subject to the
“nalizing process” (a process that allows discs to be
played on a conventional CD player) cannot be played.
● It may not be possible to play CD-R/CD-RW discs
recorded on a music CD recorder or a personal computer
because of disc characteristics, scratches or dirt on the
disc, or dirt, condensation, etc. on the lens of the unit.
● It may not be possible to play discs recorded on a
personal computer depending on the application
settings and the environment. Record with the correct
format. (For details, contact the appropriate application
manufacturers of the applications.)
● CD-R/CD-RW discs may be damaged by direct exposure
to sunlight, high temperatures or other storage
conditions. The unit may be unable to play some
damaged discs.
● If you insert a CD-RW disc into the player, playback will
begin more slowly than with a conventional CD or CD-R
disc.
● Recordings on CD-R/CD-RW cannot be played using the
DDCD (Double Density CD) system.
USB MEMORY DEVICE
● USB communication formats: USB 2.0 LS (1.5 Mbps)/FS
(12 Mbps)/HS (480 Mbps)
● File formats: FAT 32
● Correspondence class: Mass storage class
iPod/iPhone
The following iPod touch and iPhone devices can be used with
this system.
Made for
● iPhone 11 Pro Max
● iPhone 11 Pro
● iPhone 11
● iPhone XS Max
● iPhone XS
● iPhone XR
● iPhone X
● iPhone 8 Plus
● iPhone 8
● iPhone 7 Plus
● iPhone 7
● iPhone SE
● iPhone 6s Plus
● iPhone 6s
● iPhone 6 Plus
TIPS FOR OPERATING THE AUDIO SYSTEM
180

● iPhone 6
● iPhone 5s
● iPhone 5c
● iPhone 5
● iPod touch (6th generation)
● For USA customers, please visit www.subaru.com for
details. Outside of the USA customers, contact your local
dealer to arrange a demonstration in order to conrm
whether or not the phone can be paired with the vehicle.
FILE INFORMATION
Codec Description Channels
Container/
Extension
MPEG-4 AAC
LC
8-48 kHz sampling rate
8-320 kbps CBR, VBR
Mono and
stereo
.m4a, .aac
MPEG-4 HE
AAC
16-48 kHz sampling rate
8-320 kbps CBR, VBR
Mono and
stereo
.m4a, .aac
MPEG-4 HE
AAC v2
16-48 kHz sampling rate
8-320 kbps CBR, VBR
Mono and
stereo
.m4a, .aac
MP3
8-48 kHz sampling rate
8-320 kbps CBR, VBR
Mono,
Stereo,
and Joint
.mp3
WMA2/7/8/
9/9.1/9.2
16-48 kHz sampling rate
8-320 kbps CBR, VBR
Mono and
stereo
.wma
PCMWAVE
8 bit and 16 bit
8000, 16000, and 44100 Hz
sampling frequency
Mono and
stereo
.wav
Codec Description Channels
Container/
Extension
FLAC
44.1 kHz, 48 kHz, 88.2 kHz,
96 kHz, 176.4 kHz, 192 kHz
sampling rate
16 bit, 24 bit
Mono and
stereo
.ac
ALAC
44.1 kHz, 48 kHz, 88.2 kHz,
96 kHz, 176.4 kHz, 192 kHz
sampling rate
16 bit, 24 bit
Mono and
stereo
.m4a
● The player is compatible with VBR (Variable Bit Rate).
● MP3 (MPEG Audio Layer 3), WMA (Windows Media
Audio) and AAC (Advanced Audio Coding) are audio
compression standards.
● This system can play AAC/AAC+ v2/MP3/WMA les on
CD-R*, CD-RW discs*, USB memory device, and Bluetooth
device.
*: If equipped with a CD player
● This system can play disc recordings compatible with ISO
9660 level 1 and level 2 and with the Romeo and Joliet
le system.*
*: If equipped with a CD player
● When naming an AAC/AAC+ v2/MP3/WMA le, add an
appropriate le extension (.mp3/.wma/.m4a).
● This system plays back les with .mp3/.wma/.m4a le
extensions as AAC/AAC+ v2/MP3/WMA les respectively.
To prevent noise and playback errors, use the appropriate
le extension.
TIPS FOR OPERATING THE AUDIO SYSTEM
181
Audio
6

● This system can play only the rst session when using
multi-session compatible CDs.*
*: If equipped with a CD player
● MP3 les are compatible with the ID3 Tag Ver. 1.0, Ver. 1.1,
Ver. 2.2 and Ver. 2.3 formats. This system cannot display
disc title* (folder name), track title* (le name) and artist
name in other formats.
*: If equipped with a CD player
● WMA/AAC les can contain a WMA/AAC tag that is used
in the same way as an ID3 tag. WMA/AAC tags carry
information such as track title* (le name) and artist
name.
*: If equipped with a CD player
● This system can play back AAC les encoded by iTunes.
● The sound quality of MP3/WMA les generally
improves with higher bit rates. In order to achieve a
reasonable level of sound quality, discs* (USB memory
device) recorded with a bit rate of at least 128 kbps are
recommended.
*: If equipped with a CD player
● The MP3/WMA player does not play back MP3/WMA les
from discs recorded using packet write data transfer (UDF
format). Discs should be recorded using “pre-mastering”
software rather than packet-write software.*
*: If equipped with a CD player
● m3u playlists are not compatible with the audio device.
● MP3i (MP3 interactive) and MP3PRO formats are not
compatible with the audio device.
● When playing back les recorded as VBR (Variable Bit
Rate) les, the play time will not be correctly displayed if
the fast forward or rewind operations are used.
● It is not possible to check folders that do not include
AAC/AAC+ v2/MP3/WMA les.
● AAC/AAC+ v2/MP3/WMA les in folders up to 3 levels
deep can be played. However, the start of playback may
be delayed when using discs* (USB memory device)
containing numerous levels of folders. For this reason, we
recommend creating discs* (USB memory device) with no
more than 2 levels of folders.
*: If equipped with a CD player
001.mp3
002.wma
Folder 1
003.mp3
Folder 2
004.mp3
005.wma
Folder 3
006.m4a
● The play order of the compact disc* (USB memory device)
with the structure shown above is as follows:
001.mp3 002.wma . . . 006.m4a
The play order will change according to the playback
method.
*: If equipped with a CD player
TIPS FOR OPERATING THE AUDIO SYSTEM
182

● The play order may change depending on the personal
computer and AAC/AAC+ v2/MP3/WMA encoding
software that were used.
● WMA (Windows Media Audio) is an audio compression
format developed by Microsoft®. It compresses les into a
size smaller than that of MP3 les. The decoding formats
for WMA les are Ver. 7, 8 and 9. This product is protected
by certain intellectual property rights of Microsoft
Corporation and third parties. Use or distribution of such
technology outside of this product is prohibited without
a license from Microsoft or an authorized Microsoft
subsidiary and third parties.
● MP3 is an audio compression standard determined by a
working group (MPEG) of the ISO (International Standard
Organization). MP3 compresses audio data to about 1/10
the size of that on conventional discs.
TIPS FOR OPERATING THE AUDIO SYSTEM
183
Audio
6

MEMO
184

185
Navigation System
(11.6-inch with Navi
system only)
Navigation System
(If equipped)
Basic Operation
186
Map Screen
186
Map Screen Overview
186
Map Screen Operation
187
Current Position Display
187
Map Scale
188
Location Menu Pop-up
188
Orientation Of The Map
189
Map Screen Information
191
Gas Station/Parking Lot/Rest Area Icons
191
Trac Information
191
Other Information
192
Main Menu Screen
193
Main Menu Screen Overview
193
Search Screen
195
Current Route Screen
196
Favorites Screen
198
Edit List Screen
200
Route Calculation
201
Route Calculation Screen
201
Route Guidance
203
Route Guidance
203
Route Guidance Screen
203
Standard Map Icon
205
Typical Voice Guidance Prompts
206
Setup
207
Navigation Settings
207
Navigation Settings Screen
207
Tips For The Navigation System
209
GPS (Global Positioning System)
209
Regarding Errors In Current Position Display
209
Limitations Of The Navigation System
209
Map Data
212
Regarding Roads And Place Name Data
212
SUBARU Map Update
212
Updating The Map Data Manually
Using A USB Memory Device
213
Updating The Map Data Manually
Using Wi-Fi®
213
Updating The Map Data Automatically
Using Wi-Fi®
214
Updating The Map Data Manually
Using A Smartphone
214
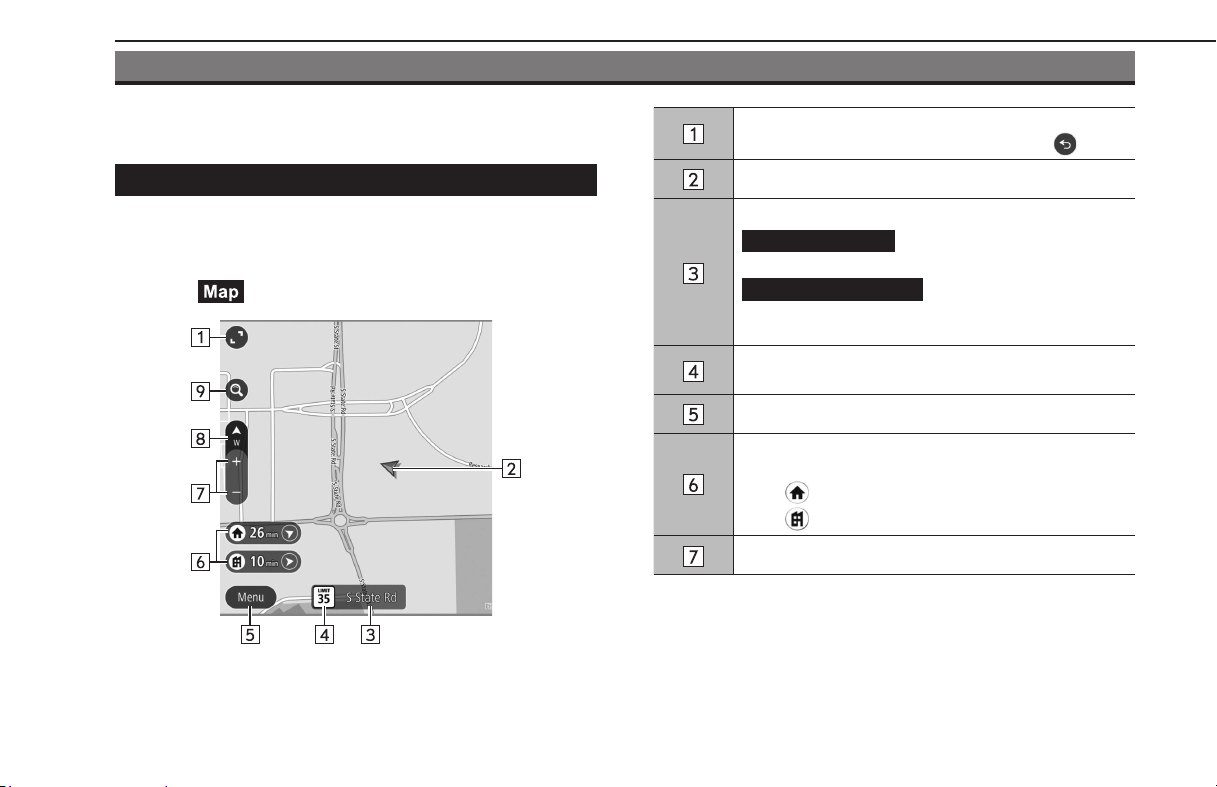
BASIC OPERATION
MAP SCREEN
MAP SCREEN OVERVIEW
The map screen can be displayed using the following method:
1.
Display the home screen. (→P.40)
2.
Select (Map).
Select to increase/reduce the size of the map screen.
If the map is moved, this button will change to
.
Displays the current vehicle position.
Displays the current street name.
Add to Favorites
(Add to Favorites): Select to
register your current location as a favorite.
Avoid Blocked Road
(Avoid Blocked Road): Select
to display the alternate route screen and search for 2
additional routes to the selected destination. (→P.197)
Displays the speed limitfor the road currently being
travelled on.
Select to display the main menu screen.
By registering your home or work (→P.200), the direction
and time required are displayed.
Select to set home as the destination.
Select
to set work as the destination.
Select to change the scale of the map screen.
BASIC OPERATION
186
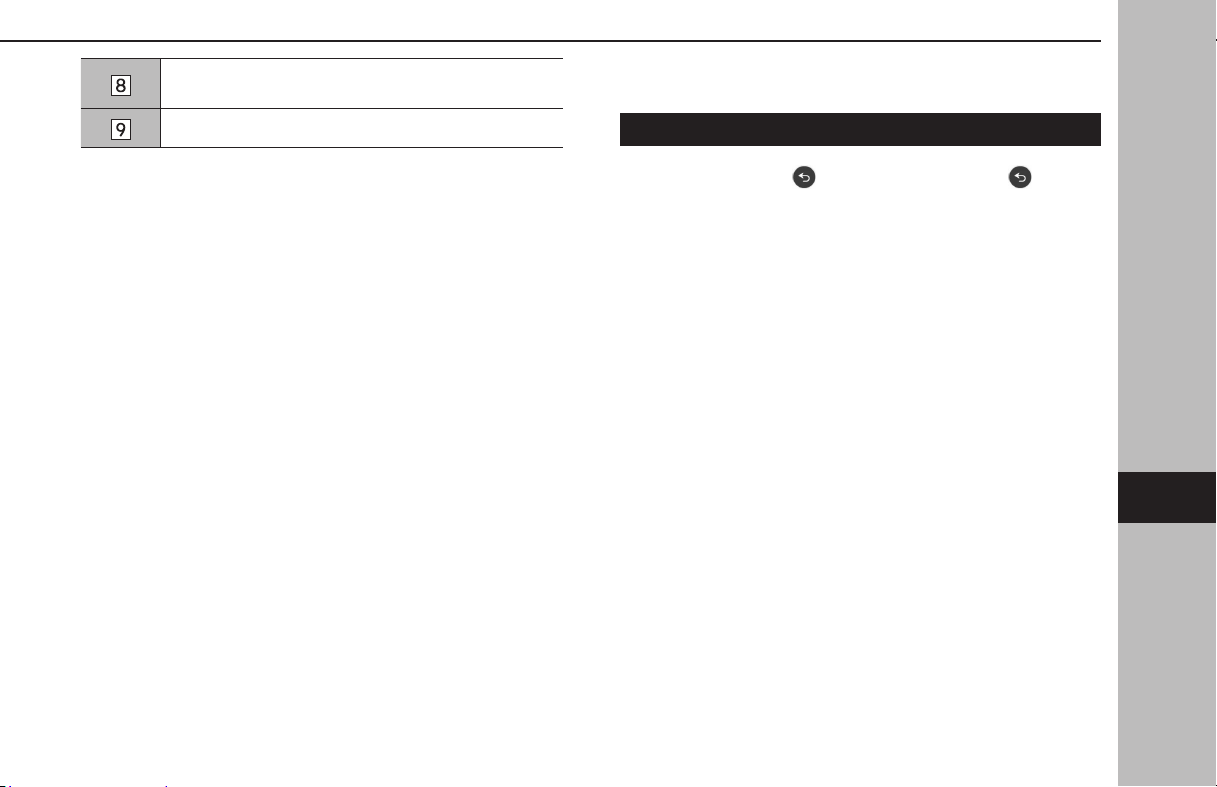
Select to change the map display mode between 2D
north-up, 2D heading-up, or 3D heading-up. (→P.189)
Select to display the search screen.
MAP SCREEN OPERATION
CURRENT POSITION DISPLAY
After moving the map, may be displayed. Select to return
the map to the current position.
NOTE
l While driving, the current position mark is xed on the screen and
the map moves.
l The current position is automatically set as the vehicle receives
signals from the GPS (Global Positioning System). If the current
position is not correct, it is automatically corrected after the vehicle
receives signals from the GPS.
l If the battery has been disconnected or when the vehicle is new, the
current position may not be correct. As soon as the system receives
signals from the GPS, the correct current position will be displayed.
l The map screen can not be moved on the 3D heading-up mode.
l After moving the map, if it is not moved for a certain amount of time,
it will automatically return to the current position.
BASIC OPERATION
187
Navigation System
7
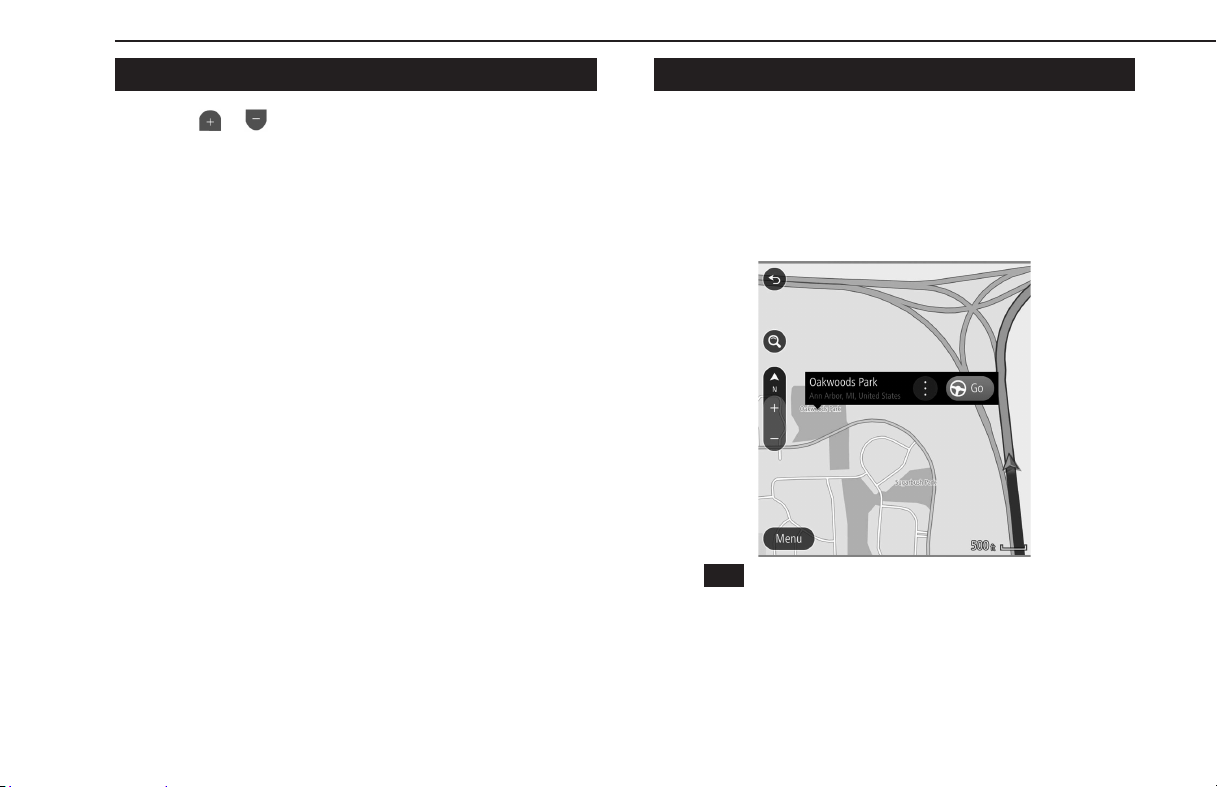
MAP SCALE
1.
Select or to change the scale of the map screen.
● When the automatic zoom function is on (→P.207)
during route guidance, the map is zoomed in
automatically when approaching intersections or turning
points.
NOTE
l The scale of the map screen can also be changed with the double
touch or pinch operation. (→P.66)
l If the map scale has been changed after moving the map, the map
scale will return to previous scale when the map is returned to the
current position.
l The automatic zoom function may not operate if the map scale is
adjusted manually during route guidance. To reenable the automatic
zoom function, change the orientation of the map screen. (→P.189)
LOCATION MENU POP-UP
The location menu pop-up can be displayed using the following
methods:
● Select and hold any point on the map.
● Select a point from a list.
● Select a POI icon.
Select
Go
(Go) to search for a route to the selected point and
display the route calculation screen. (→P.201)
BASIC OPERATION
188
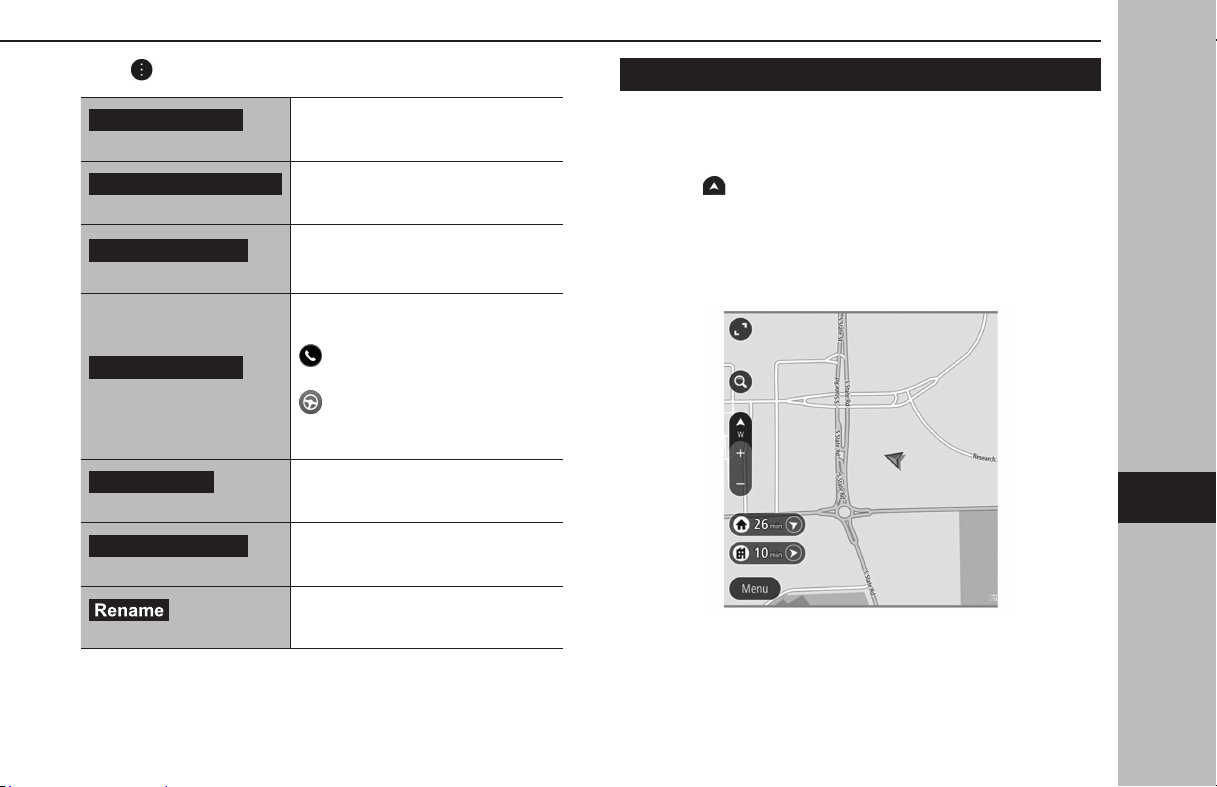
Select to display the following options.
Add to Favorites
(Add to Favorites)
Select to register the selected point as
a favorite.
Add to Current Route
(Add to Current Route)
Select to add the selected point as a
waypoint on the current route.
Search Near Here
(Search Near Here)
Select to display the search screen
and search near the selected point.
(→P.195)
More Information
(More Information)
Select to display detailed information
about the selected point.
: Select to call the registered
phone number.
: Select to search for a route to the
selected point and display the route
calculation screen. (→P.201)
Edit Location
(Edit Location)
Select to edit the point registered as
home/work.
Remove Location
(Remove Location)
Select to erase the point registered as
home/work.
(Rename)
Select to change the name of a
registered favorite.
ORIENTATION OF THE MAP
The orientation of the map can be changed between 2D north-
up, 2D heading-up, and 3D heading-up.
1.
Select .
● Each time the symbol is selected, the orientation of the
map changes.
● The direction of this symbol indicates north.
X2D north-up
● Regardless of the direction of vehicle travel, north is
always up.
● The letter(s) indicate the direction in which the vehicle is
heading (e.g. W for west).
BASIC OPERATION
189
Navigation System
7

X2D heading-up
● The direction of vehicle travel is always up.
X3D heading-up
● The direction of vehicle travel is always up.
BASIC OPERATION
190
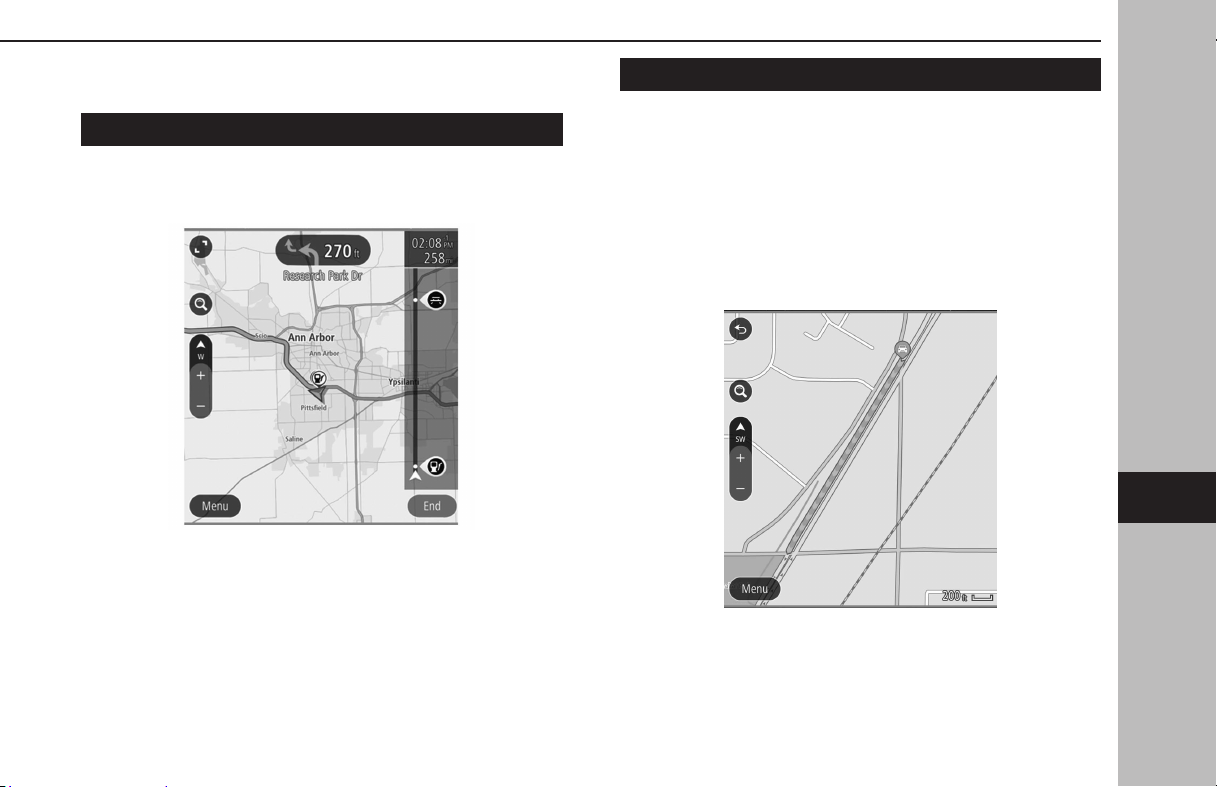
MAP SCREEN INFORMATION
GAS STATION/PARKING LOT/REST AREA ICONS
Gas stations, parking lots and rest areas can be displayed on the
route. Their location can also be set as a destination.
● The display of gas station/parking lots/rest area icons can
be turned on/o. (→P.207)
TRAFFIC INFORMATION
Road sections aected by trac conditions are displayed in a
dierent color on the map, and a small icon representing the
type of trac condition is displayed above the road.
This feature is available at certain map scales.
To receive the data service information in the vehicle, a
subscription to the SiriusXM® Radio Service is necessary
following a free trial. (→P.150)
BASIC OPERATION
191
Navigation System
7
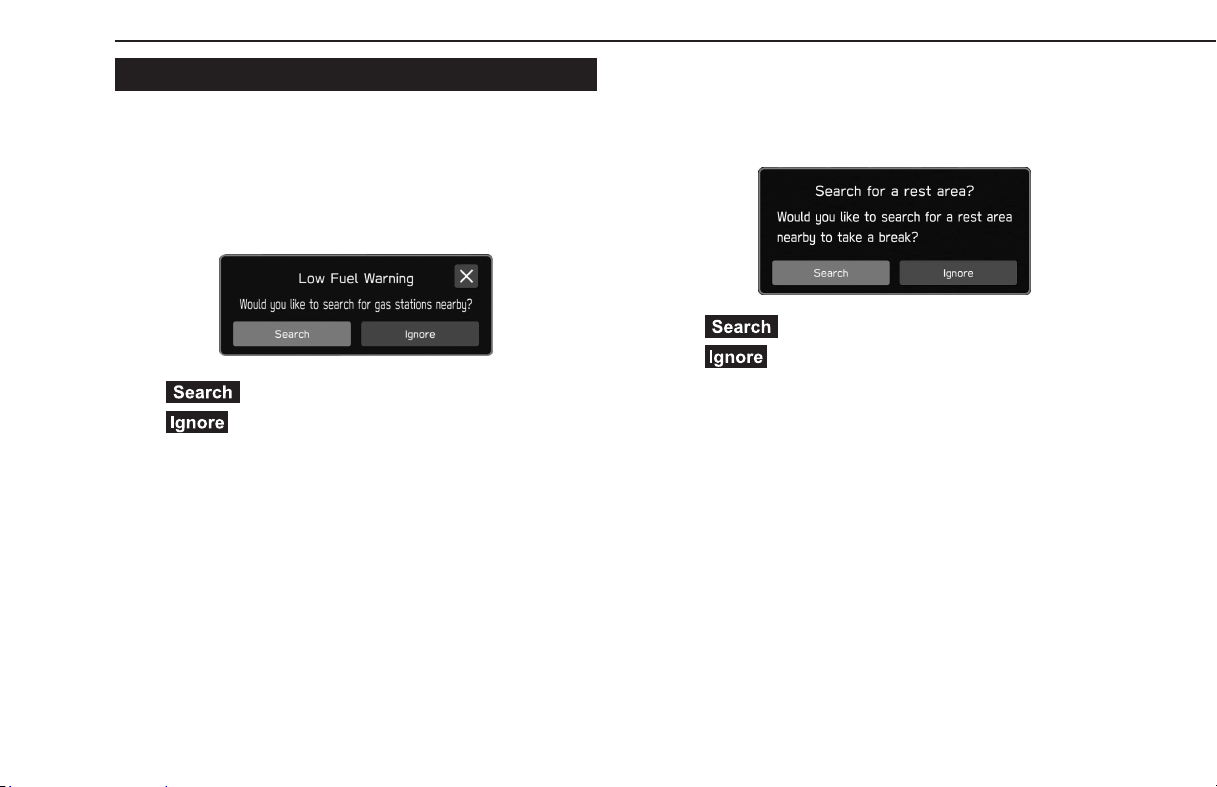
OTHER INFORMATION
A pop-up screen will be displayed based on the driving
situation, etc.
XLow fuel warning
When the fuel level is low, a warning message will pop up on the
screen.
● (Search): Select to search for gas stations.
●
(Ignore): Select to delete the message.
XPeriodic rest notication
If the system determines, based on the driver’s condition, that a
rest may be necessary, a pop-up message will be displayed on
the screen.
● (Search): Select to search for rest areas.
●
(Ignore): Select to delete the message.
● Pop-up screens can be turned on/o using the “Periodic
Rest Notication” setting on the general settings screen.
(→P.83)
BASIC OPERATION
192
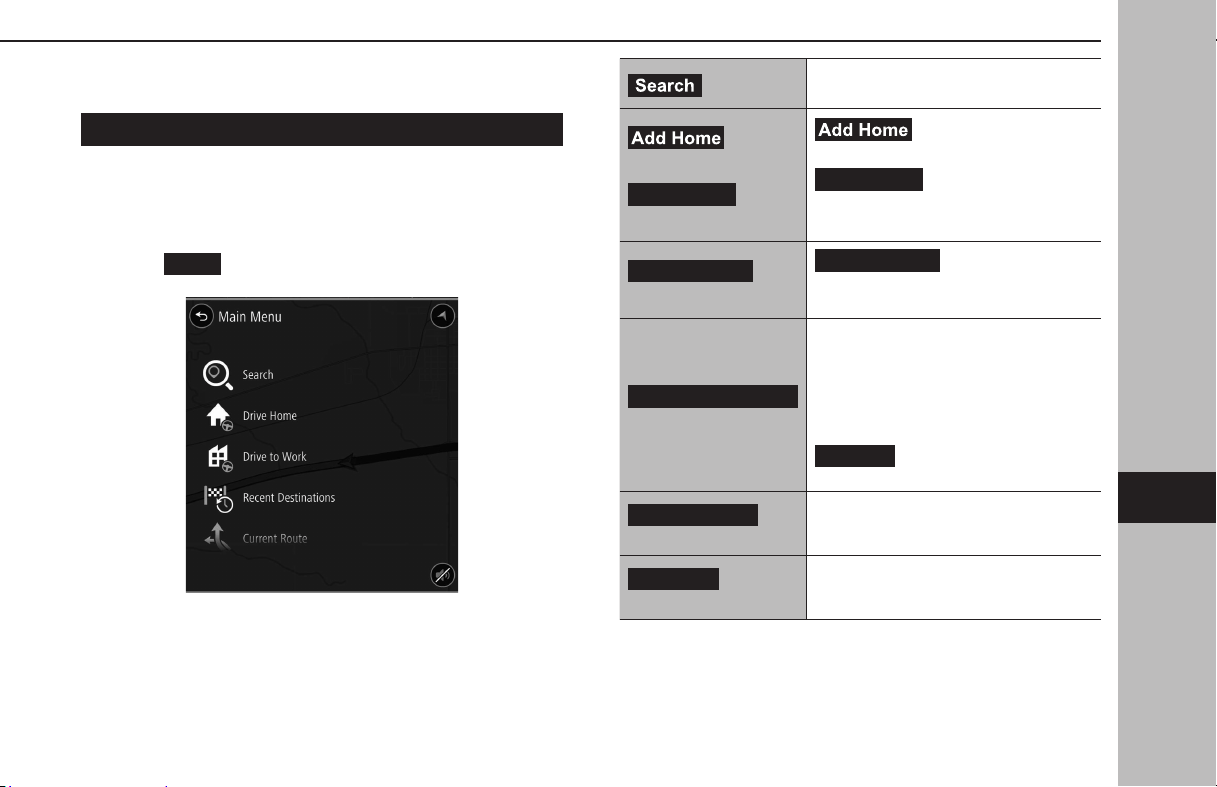
MAIN MENU SCREEN
MAIN MENU SCREEN OVERVIEW
The main menu screen can be displayed using the following
method:
1.
Display the map screen. (→P.186)
2.
Select
Menu
(Menu).
(Search)
Select to display the search screen.
(→P.195)
(Add Home)*
1
/
Drive Home
(Drive Home)*
2
(Add Home): Select to
register a point as home. (→P.200)
Drive Home
(Drive Home): Select to
set the point registered as home as the
destination.
Drive to Work
(Drive to Work)*
3
Drive to Work
(Drive to Work): Select
to set the point registered as work as the
destination.
Recent Destinations
(Recent Destinations)
Select to display the recent destination
screen.
Recent destinations: Select a recent
destination to display the location menu
pop-up for that point on the map screen.
(→P.188)
Edit List
(Edit List): Select to display
the edit list screen. (→P.200)
Current Route
(Current Route)*
4
Select to display the current route edit
screen. (→P.196)
Favorites
(Favorites)
Select to display the favorite screen.
(→P.198)
BASIC OPERATION
193
Navigation System
7

My Routes
(My Routes)*
5
Select to name the current route
and register it so that it can be used
repeatedly. (→P.196)
My route name: Select a registered route
to display it on the map screen.
Select
Drive
(Drive) to display the route
calculation screen.
Edit List
(Edit List): Select to display
the edit list screen. (→P.200)
Points of Interest
(Points of Interest)
Select to display the Points of Interest
screen.
Select a category to display a list of
related points.
Select a point from the list to display the
location menu pop-up for that point on
the map screen. (→P.188)
• To rene the list, select
Show Subcategories
(Show
Subcategories).
Parking lot
(Parking lot)
Select to display parking lot icons on the
map screen near your current location.
Select a displayed icon to display the
location menu pop-up. (→P.188)
Gas Station
(Gas Station)
Select to display gas station icons on the
map screen near your current location.
Select a displayed icon to display the
location menu pop-up. (→P.188)
Maps
(Maps)
Select to display the map update screen.
(→P.213)
Legal Information
(Legal Information)
Select to display the legal information
screen.
*
1
: If a point has not been registered as home.
*
2
: If a point has been registered as home.
*
3
: If a point has been registered as work.
*
4
: This item can only be selected when a route is set.
*
5
: This item can only be selected when a route has been registered to My Routes.
BASIC OPERATION
194
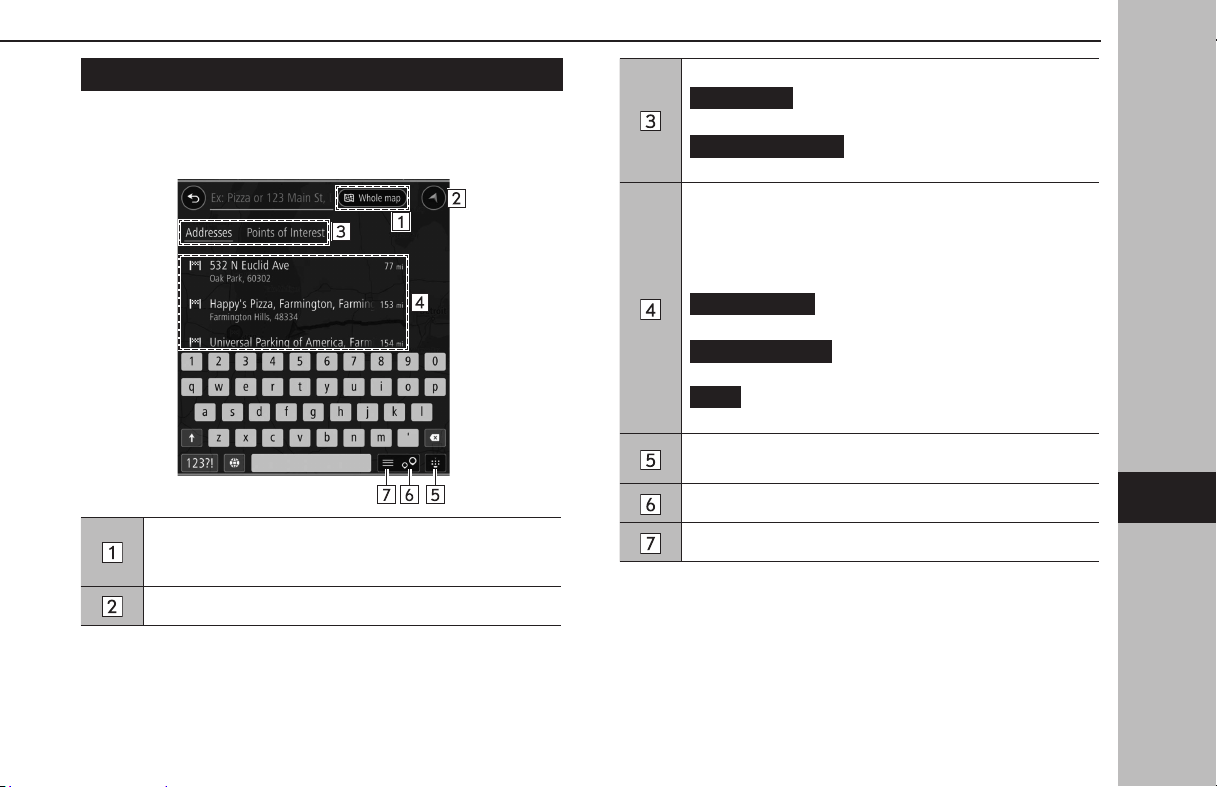
SEARCH SCREEN
The destination can be set by typing an address or category
(Points of Interest).
Select to set the radius lter. Once the radius lter has been
set, a search will only be performed for items within that
radius.
Select to display the current vehicle position.
Select to change the search type.
Addresses
(Addresses): Search for an address by
inputting related words.
Points of Interest
(Points of Interest): Search for a
Points of Interest by inputting related words.
Some candidate destinations are displayed based on the
input characters. The location menu pop-up is displayed on
the map screen when an item is selected. (→P.188)
If a non-specic point is selected, such as a street name, the
following items will be displayed.
Show on Map
(Show on Map): Select to display the
location menu pop-up on the map screen. (→P.188)
Add Crossroad
(Add Crossroad):Select to select an
intersecting road and further rene the results.
Drive
(Drive): Select to search for a route to the selected
destination.
Each time the button is selected, select to display/hide the
keyboard.
Select to display the search map screen.
Select to display the search list screen.
BASIC OPERATION
195
Navigation System
7
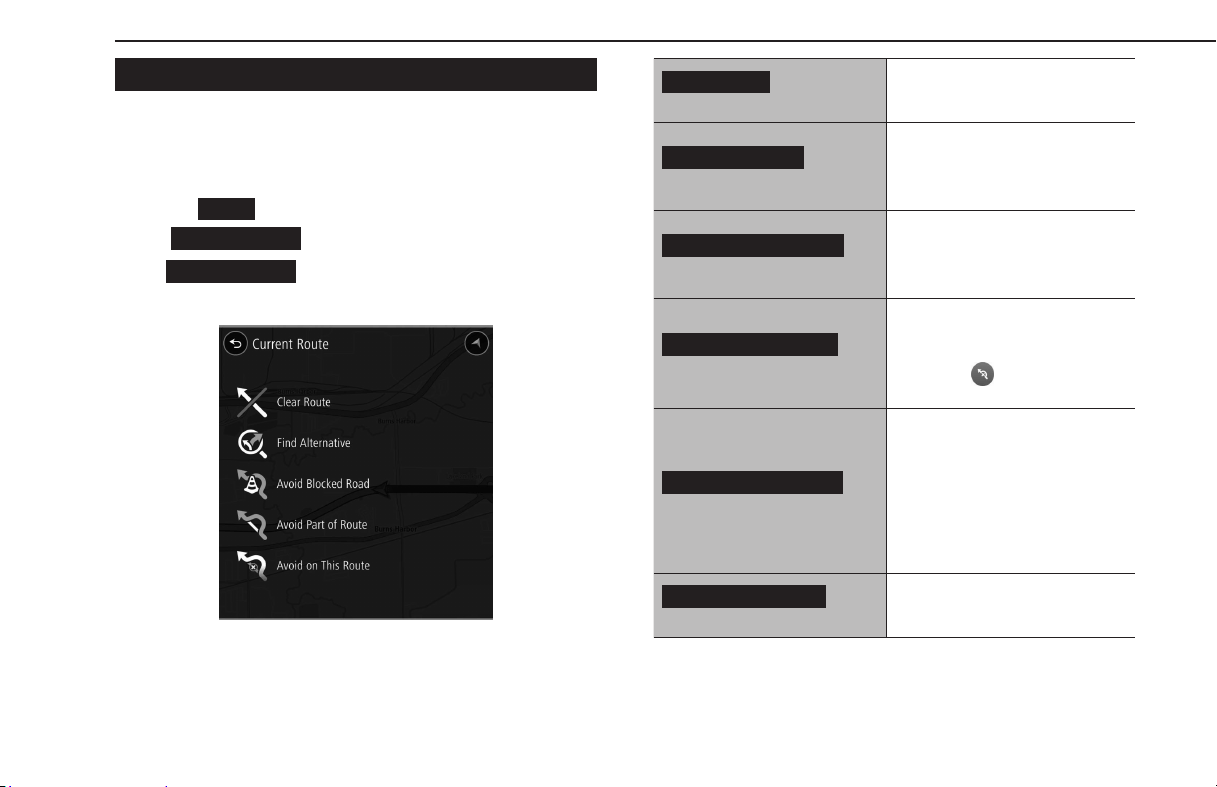
CURRENT ROUTE SCREEN
The current route screen can be displayed using the following
method:
1.
Display the map screen. (→P.186)
2.
Select
Menu
(Menu).
3.
→
Current Route
(Current Route)
●
Current Route
(Current Route) can only be selected
when a route is set.
Clear Route
(Clear Route)
Select to stop the route guidance.
Find Alternative
(Find Alternative)
Select to display the alternate
route screen and search for 2
additional routes to the selected
destination. (→P.197)
Avoid Blocked Road
(Avoid Blocked Road)
Select to display the alternate
route screen and search for 2
additional routes which avoid the
current road. (→P.197)
Avoid Part of Route
(Avoid Part of Route)
Select to display a list of sections
of the current route. Select the
section you wish to avoid and
then select
to search for a new
route.
Avoid on This Route
(Avoid on This Route)
Select to change the avoidance
criteria for the current route
and search for a dierent route.
(→P.201)
This item can only be selected
when the current route has a
section which is included in the
avoidance criteria.
Show Instructions
(Show Instructions)
Select to display the route details
conrmation screen.
BASIC OPERATION
196

Add Stop to Route
(Add Stop to Route)
Select to search for a waypoint
on the map or search screen
(→P.195) and then select
to add it to the current route.
(→P.201)
Add to My Routes
(Add to My Routes)
Select to name the current route
and register it to My Routes.
Change Route Type
(Change Route Type)
Select to change the route type of
the current route and search for a
new route. (→P.201)
Reorder Stops
(Reorder Stops)
Select to change the order of
the currently set destination and
waypoints.
Select a destination, select
or to change its position in
the list, and then select
Done
(Done) to conrm the change.
Edit Stops
(Edit Stops): Select
to display the edit list screen.
(→P. 200)
Play Route Preview
(Play Route Preview)/
Stop Route Preview
(Stop Route Preview)
Select to turn route preview mode
on/o. (→P.198)
SELECTING AN ALTERNATE ROUTE
When the search for an alternate route is complete, the
following screen will be displayed.
Displays the dierence in travel time between the current
route and an alternate route.
Select to display the route conrmation screen for the
selected route. (→P.201)
Current route travel time
BASIC OPERATION
197
Navigation System
7
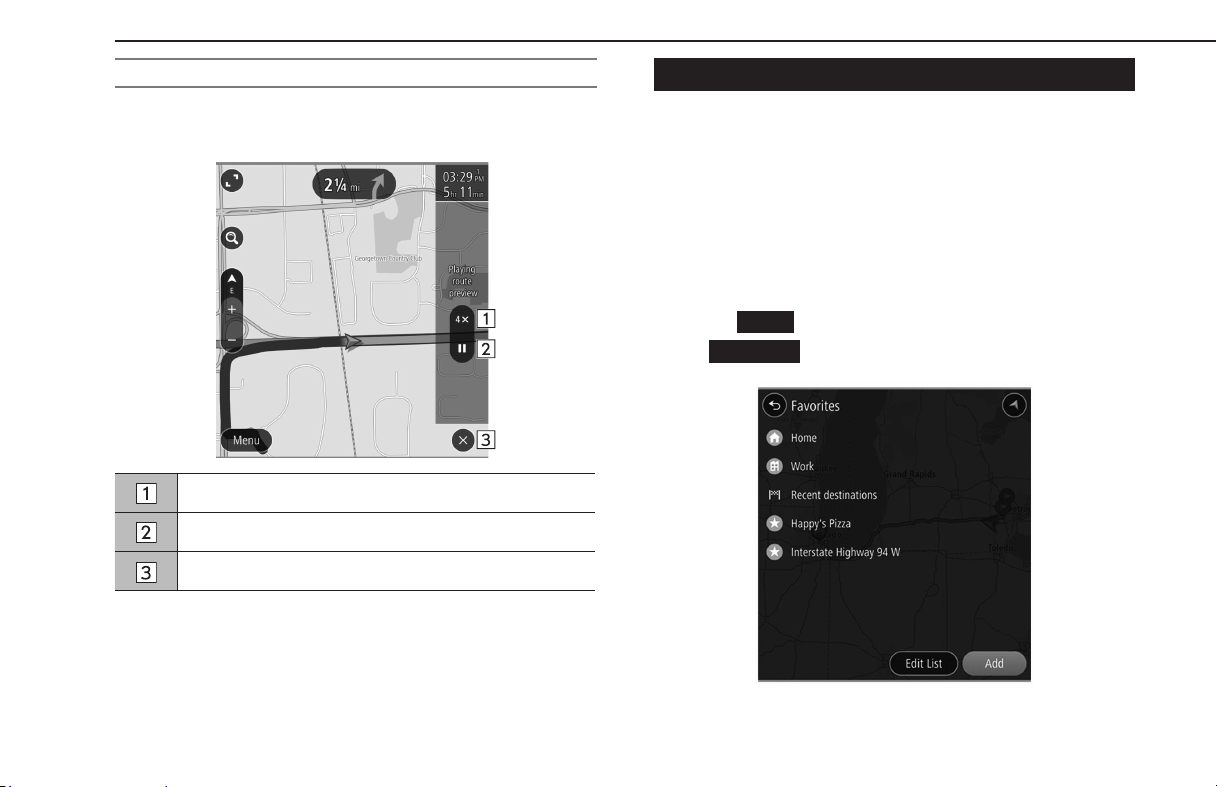
PREVIEWING THE ROUTE
A selected route can be previewed.
The speed of the preview can be changed.
Select to change the preview speed to “1X”/“2X”/“4X”.
Select to temporarily stop the preview.
Select to exit route preview mode.
FAVORITES SCREEN
The desired point can be registered as home, work, or favorite.
The registered points can be set as a destination.
Registered points can be added, changed and deleted on the
favorites screen.
The favorites screen can be accessed with the following
methods:
1.
Display the map screen. (→P.186)
2.
Select
Menu
(Menu).
3.
→
Favorites
(Favorites)
BASIC OPERATION
198
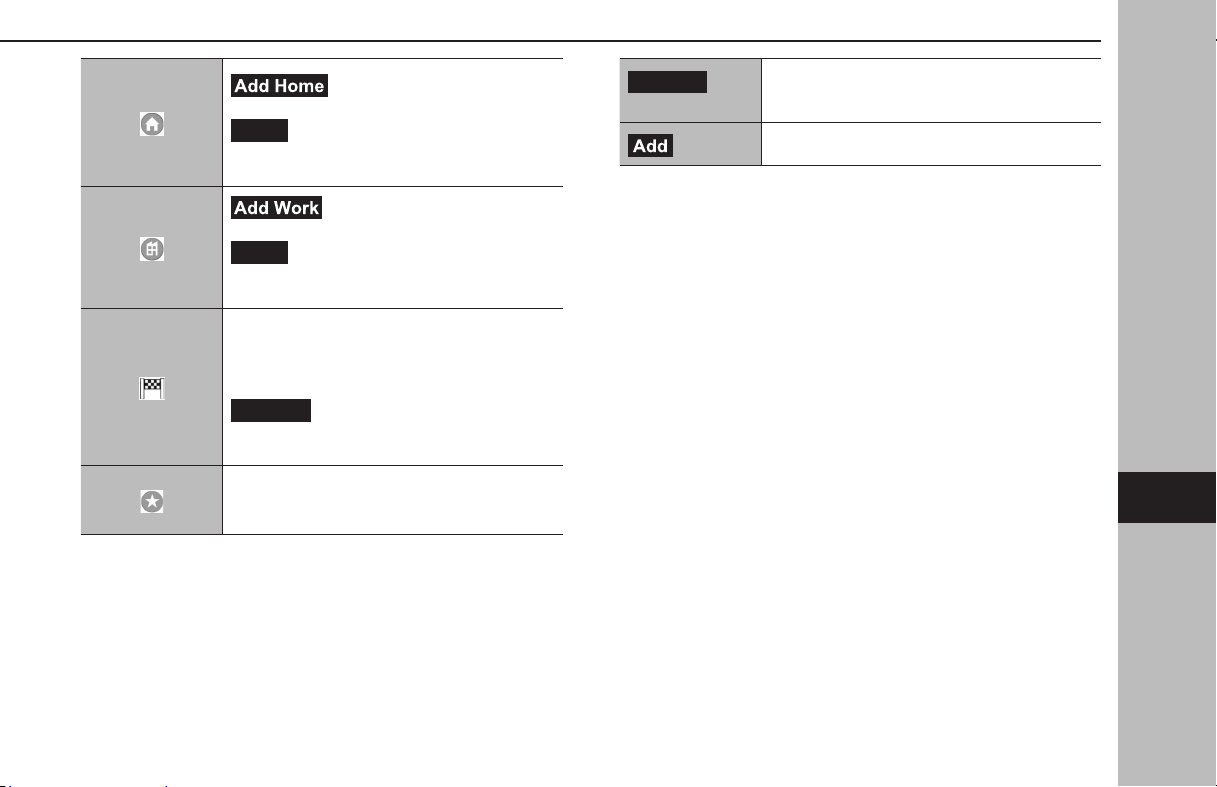
(Add Home): Select to register
the home. (→P.200)
Home
(Home): Select to display the location
menu pop-up for the point registered as home
on the map screen. (→P. 188)
(Add Work): Select to register the
work. (→P. 200)
Work
(Work): Select to display the location
menu pop-up for the point registered as work
on the map screen. (→P. 188)
Select to display the recent destination screen.
Recent destinations: Select a recent destination
to display the location menu pop-up for that
point on the map screen. (→P. 188)
Edit List
(Edit List): Select to display the edit
list screen to delete the recent destinations.
(→P.200)
Select a favorite to display the location menu
pop-up for that point on the map screen.
(→P. 188)
Edit List
(Edit List)
Select to display the edit list screen to delete the
favorites. (→P.200)
(Add)
Select to register the favorite. (→P.200)
BASIC OPERATION
199
Navigation System
7

REGISTERING HOME/WORK/FAVORITE POINT
1.
Select (Add Home)/ (Add Work)/
(Add).
2.
Perform either of the following to display a point you wish
to register:
● Select
(Search) to display the search screen.
(→P.195)
● Select the desired point on the map.
3.
→ / /
● Icons will be displayed on the map to indicate registered
points.
EDIT LIST SCREEN
Unnecessary items can be deleted on the edit list screen.
Select for the item you wish to delete.
Select to skip to the next or previous page.
Select to delete selected item(s).
Select to select all items.
Select again to deselect all items.
BASIC OPERATION
200
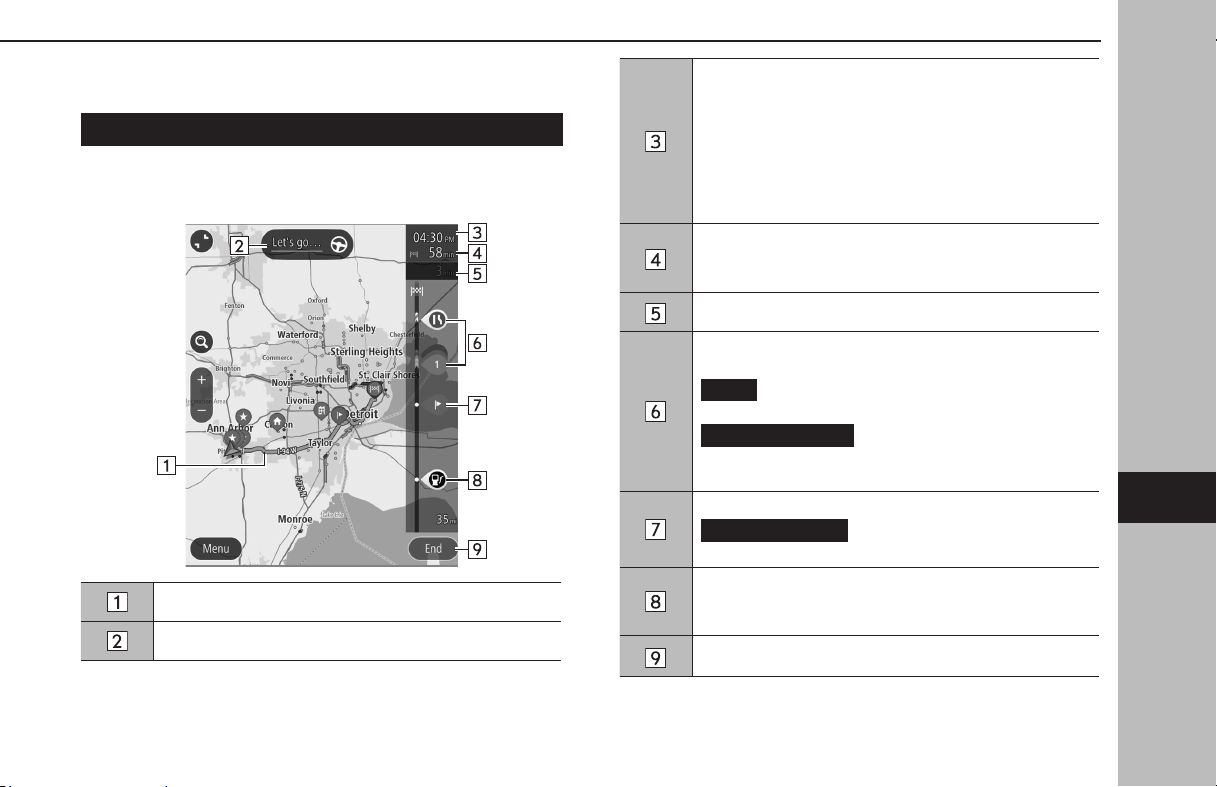
ROUTE CALCULATION
ROUTE CALCULATION SCREEN
After searching for the destination, the route calculation screen
will be displayed.
Displays the route overview.
Select to start route guidance.
Estimated time of arrival
Select to change the displayed information between a
waypoint and the destination.
• Select and hold to turn display of the route bar on/o.
• If “Auto-Hide Route Bar” on the navigation settings
screen is turned on, the route bar will automatically
be hidden and will only be displayed when new route
information is available.
Remaining distance and/or remaining time
The displayed details can be changed on the navigation
settings screen. (→P.207)
Displays the change in travel time.
Trac information icon
Select to display the trac information pop-up.
Avoid
(Avoid): Select to avoid a section of the current
route based on trac information.
More Information
(More Information): Select to
display detailed information for the selected trac
information.
Select to display the waypoint information pop-up.
Delete This Stop
(Delete This Stop) :Select to delete
the selected waypoint from the route.
Displays a POI on the route.
Select a displayed icon to display the location menu pop-
up. (→P.188)
Select to cancel route conrmation.
BASIC OPERATION
201
Navigation System
7
WARNING
l Be sure to obey trac regulations and keep road conditions in
mind while driving. If a trac sign on the road has been changed,
the route guidance may not indicate such changed information.
NOTE
l The route for returning may not be the same as that for going.
l The route guidance to the destination may not be the shortest route
or a route without trac congestion.
l Route guidance may not be available if there is no road data for the
specied location.
l If a destination that is not located on a road is set, the vehicle will be
guided to the point on a road nearest to the destination. The road
nearest to the selected point is set as the destination.
BASIC OPERATION
202
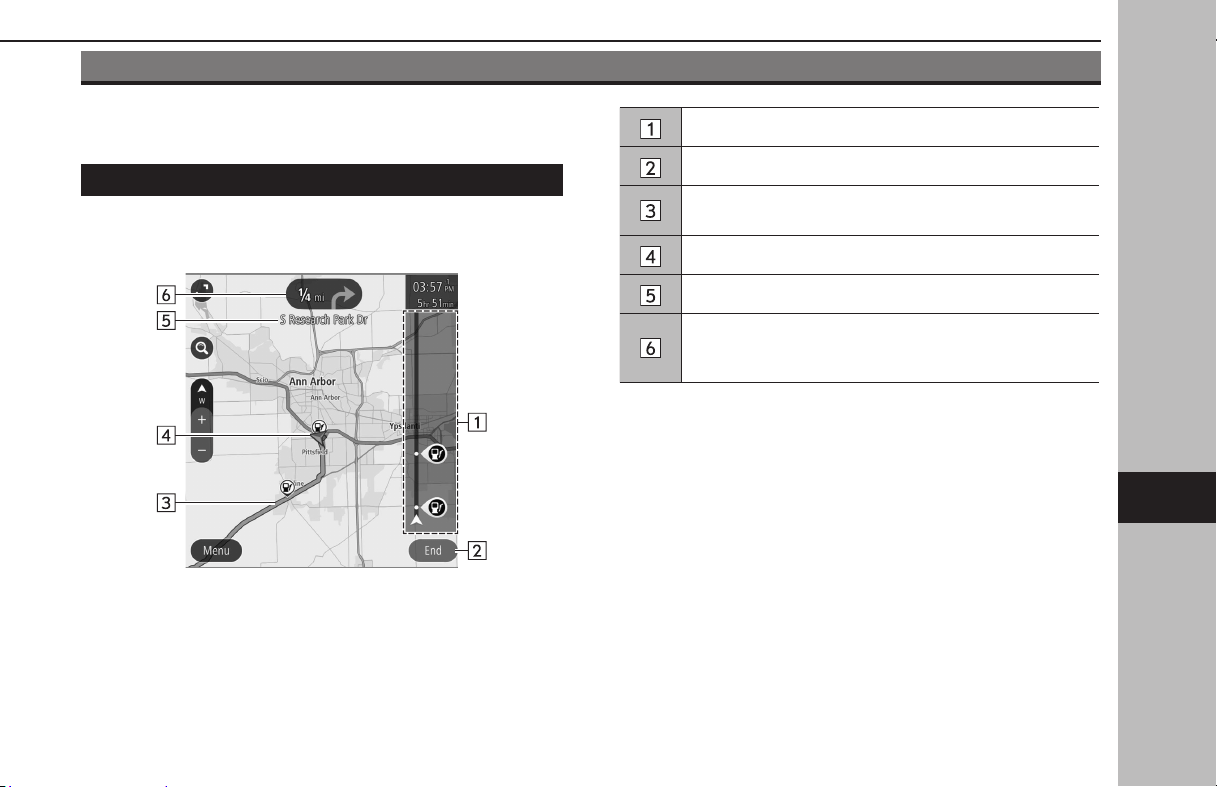
ROUTE GUIDANCE
ROUTE GUIDANCE
ROUTE GUIDANCE SCREEN
During route guidance, various types of guidance screens can
be displayed depending on conditions.
Route bar (→P.201)
Select to stopping route guidance.
Guidance route
Select to display the current route menu pop-up. (→P. 196)
Current position
Next street name
Distance to the next turn and an arrow indicating the
turning direction.
Select to display the route event list screen.
ROUTE GUIDANCE
203
Navigation System
7
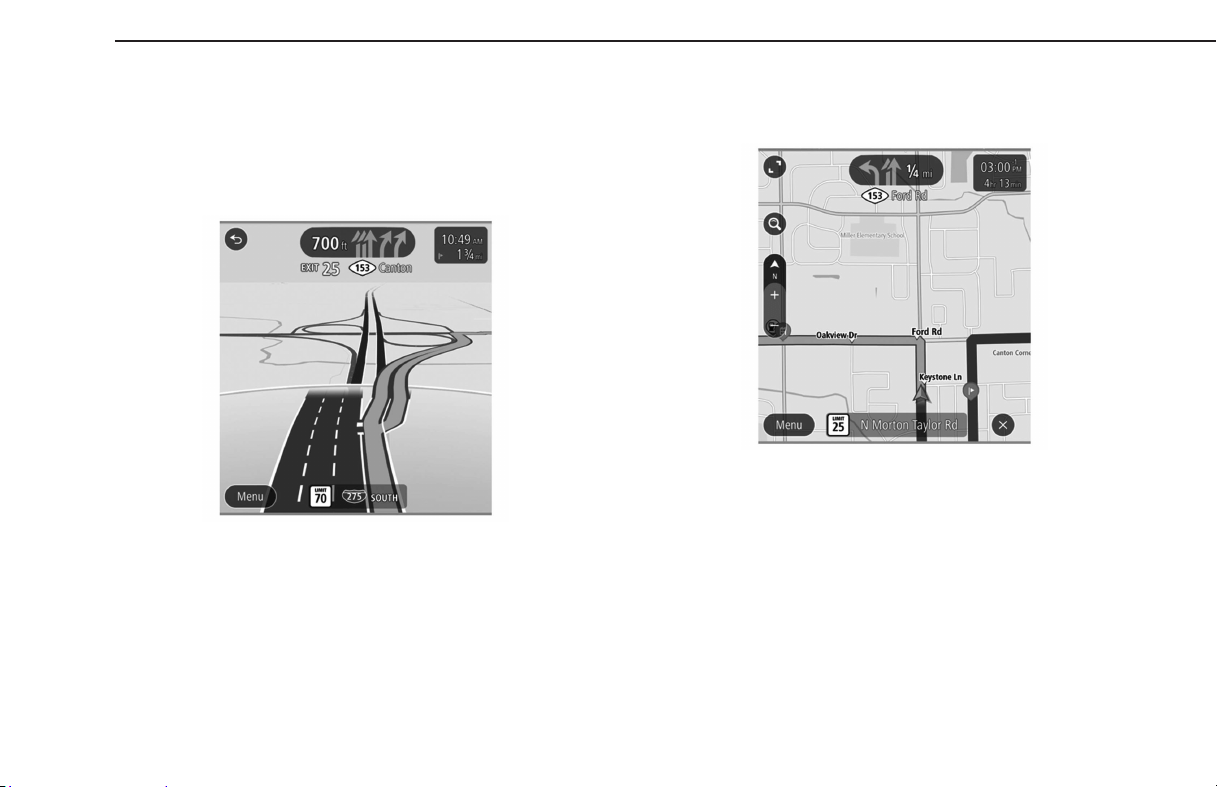
XJunction screen
When approaching an expressway exit or a complicated
intersection, the map switches to a 3D display if the necessary
information can be displayed. An arrow indicates the lane
in which you should drive. Signs are also displayed if the
information is available.
● This function can be turned on/o on the navigation
settings screen. (→P.207)
XLane recommendation screen
When approaching a turning point, the lane recommendation
will be displayed automatically.
ROUTE GUIDANCE
204
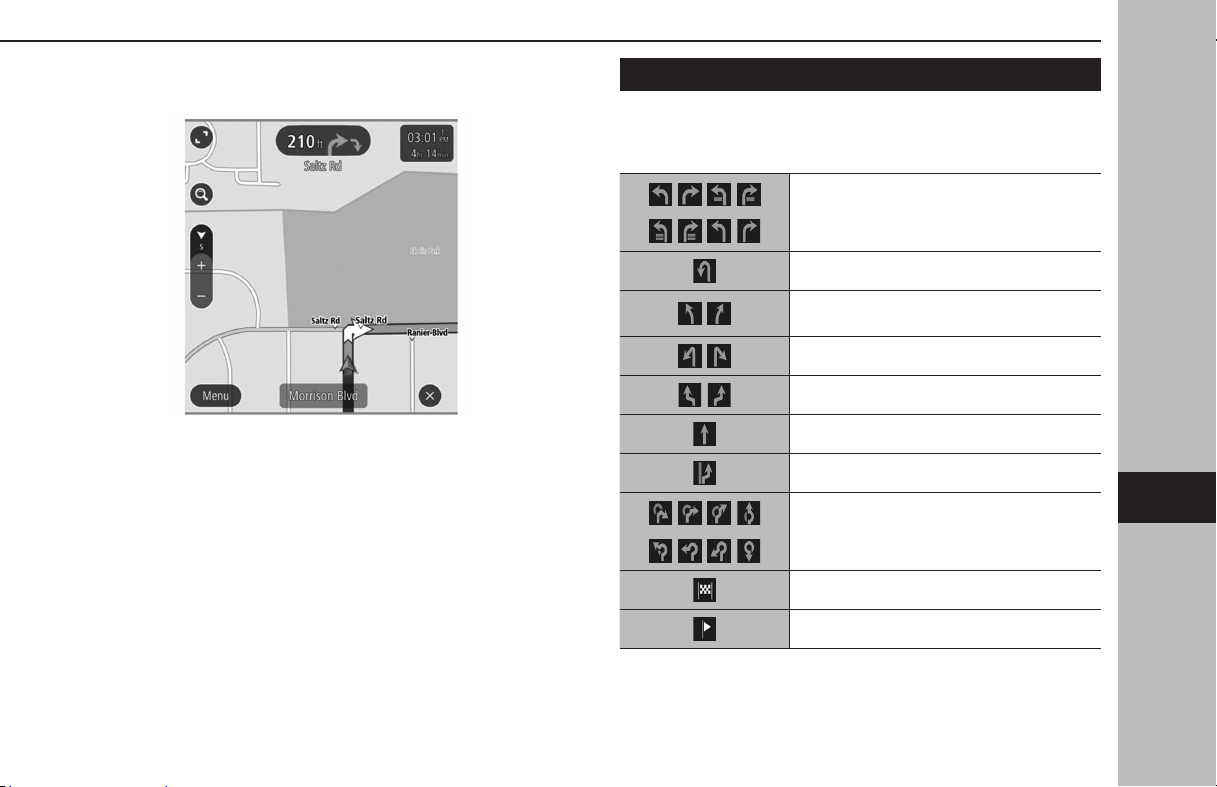
Arrows will be displayed consecutively if necessary to turn again
immediately after a turn.
NOTE
l If the vehicle goes o the guidance route, the route is searched again.
l For some areas, the roads have not been completely digitized in our
database. For this reason, the route guidance may select a road that
should not be traveled on.
STANDARD MAP ICON
The following table shows the most frequently displayed route
events.
Turn left/right
U-turn
Keep left/right at the fork in the road.
Turn left/right & sharp curve.
Stay in the left/right lane.
Go straight ahead at the intersection.
Exit the junction
Roundabout
You have arrived at your destination.
You have arrived at your waypoint.
ROUTE GUIDANCE
205
Navigation System
7
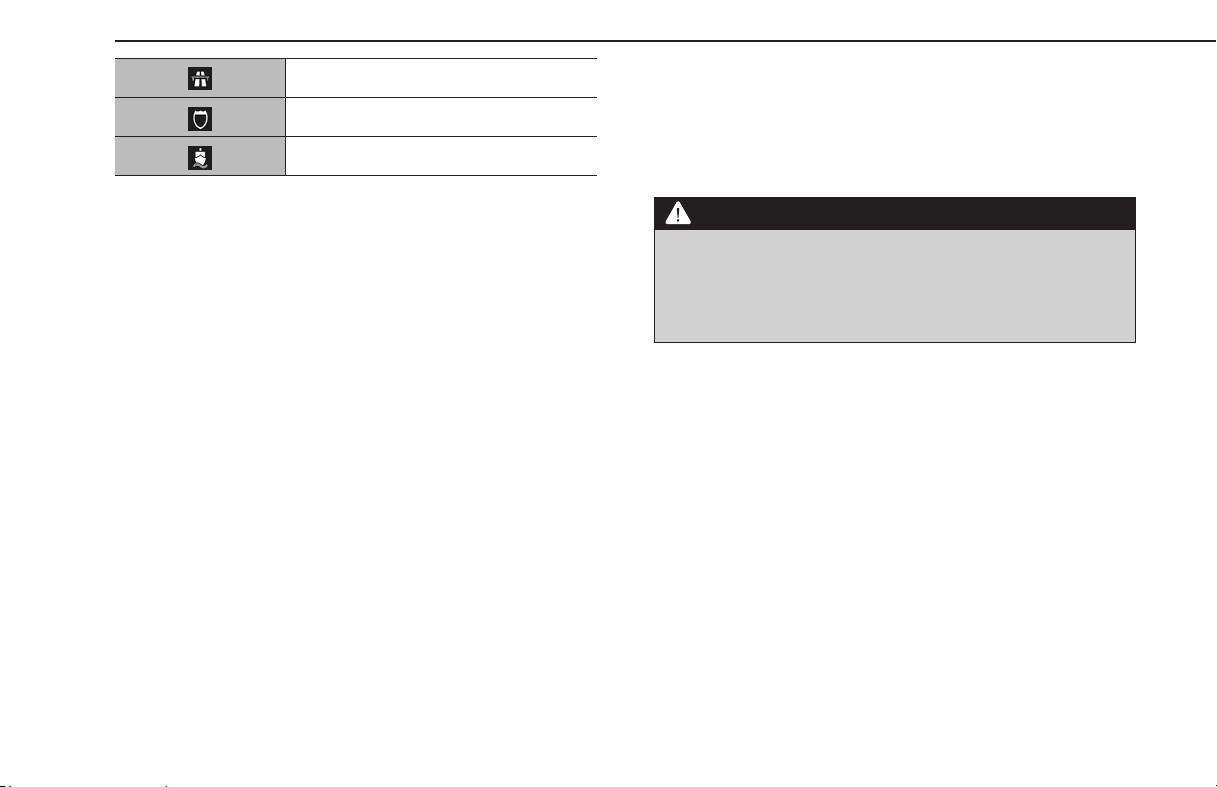
Toll road
Freeway
Ferry trip
TYPICAL VOICE GUIDANCE PROMPTS
As the vehicle approaches an intersection, or point, where
maneuvering the vehicle is necessary, the system’s voice
guidance will provide various messages.
WARNING
l Be sure to obey the trac regulations and keep the road condition
in mind, especially when driving on IPD roads (roads that are not
completely included in the map database). The route guidance
may not have the most up-to-date information, such as the
direction of a one way street.
NOTE
l To adjust the voice guidance volume: →P.90
l Voice guidance may be made early or late.
l If the system cannot determine the current position correctly,
you may not hear voice guidance or may not see the magnied
intersection on the screen.
ROUTE GUIDANCE
206
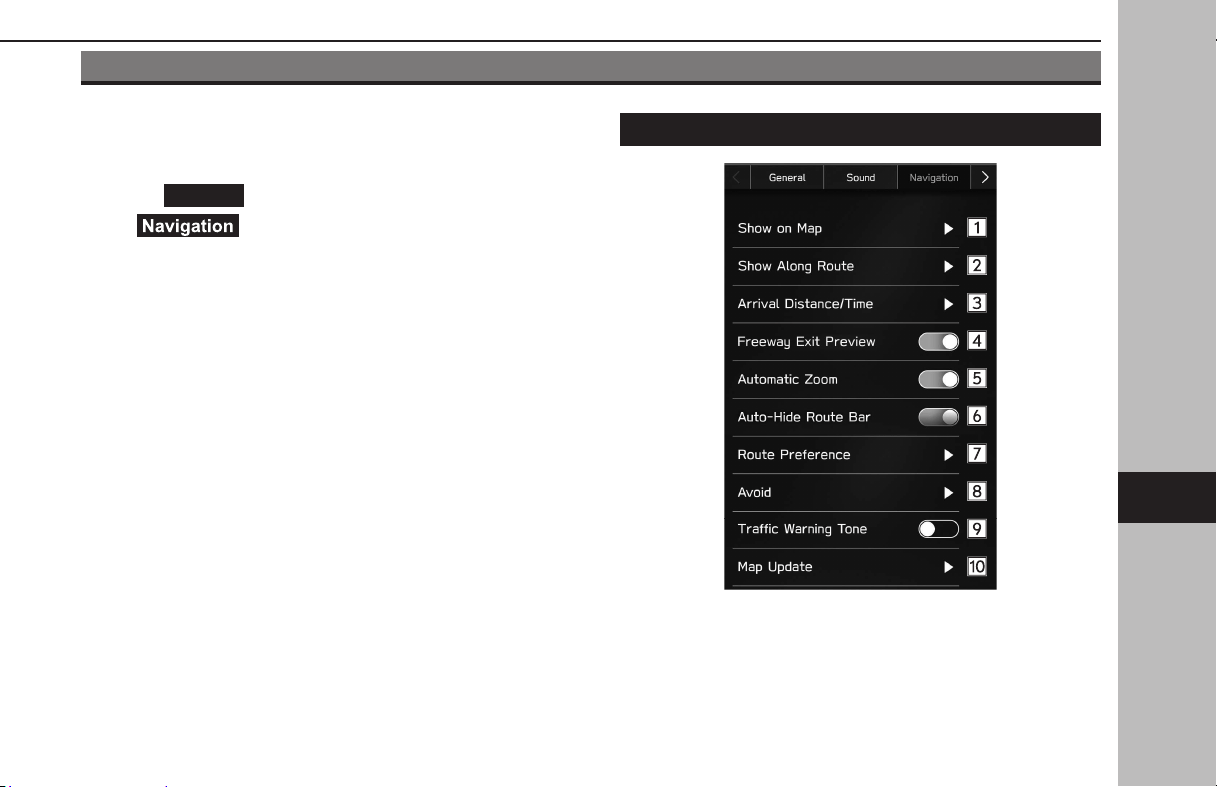
SETUP
NAVIGATION SETTINGS
1.
Display the home screen. (→P.40)
2.
Select
Settings
(Settings).
3.
→ (Navigation)
4.
Select the desired item to be set.
NAVIGATION SETTINGS SCREEN
SETUP
207
Navigation System
7

POI icons can be displayed on the map screen when “Show
POI Icons on Map” is turned on and up to 5 POI icon types
have been selected.
Select to turn the display for parking lots, gas stations and
rest areas on/o for the route being travelled during route
guidance.
Select to set the displays for the estimated remaining
distance and estimated remaining time to the destination.
(→P.201)
Select to turn the freeway exit preview on/o.
Select to set whether to automatically enlarge the map
when approaching intersections or turning points during
route guidance.
Select to turn the route bar auto-hide function on/o.
(→P.201)
Select to change the preferred route type when searching
for a new route.
Select to set avoidance criteria for the route calculation.
Select to turn the trac alert sound on/o.
Select to set the updating of map data. (→P.212)
SETUP
208
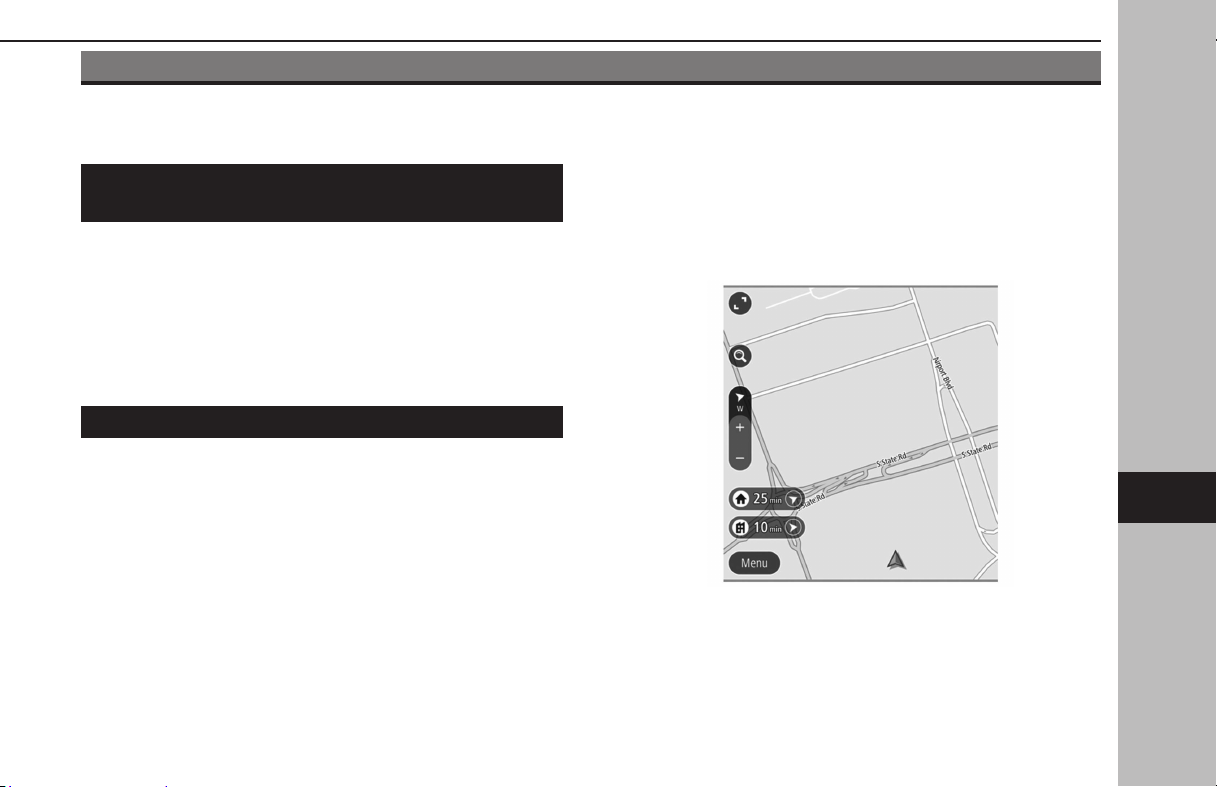
TIPS FOR THE NAVIGATION SYSTEM
GPS (GLOBAL POSITIONING SYSTEM)
REGARDING ERRORS IN CURRENT POSITION
DISPLAY
The system displays the vehicle current position based on GPS
information and data from various sensors and road maps.
However, when the radiowave signals from GPS satellites are
weak or when signals are received from only two satellites or
less, errors may occur in the position. Modifying or adjusting the
system will not prevent these errors.
LIMITATIONS OF THE NAVIGATION SYSTEM
This navigation system calculates the current position using
satellite signals, various vehicle signals, map data, etc. However,
an accurate position may not be shown depending on satellite
conditions, road conguration, vehicle condition or other
circumstances.
The Global Positioning System (GPS) developed and operated
by the U.S. Department of Defense provides an accurate current
position, normally using 4 or more satellites, and in some case 3
satellites. The GPS system has a certain level of inaccuracy. While
the navigation system compensates for this most of the time,
occasional positioning errors of up to 300 feet (100 m) can and
should be expected. Generally, position errors will be corrected
within a few seconds.
The GPS signal may be physically obstructed, leading to
inaccurate vehicle position on the map screen. Tunnels, tall
buildings, trucks, or even the placement of objects on the
instrument panel may obstruct the GPS signals.
The GPS satellites may not send signals due to repairs or
improvements being made to them.
TIPS FOR THE NAVIGATION SYSTEM
209
Navigation System
7

Even when the navigation system is receiving clear GPS
signals, the vehicle position may not be shown accurately or
inappropriate route guidance may occur in some cases.
CAUTION
l The installation of window tinting may obstruct the GPS signals.
Most window tinting contains some metallic content that
will interfere with GPS signal reception of the antenna in the
instrument panel. We advise against the use of window tinting on
vehicles equipped with navigation systems.
● Accurate current position may not be shown in the
following cases:
•When driving on a small angled Y-shaped road.
•When driving on a winding road.
•When driving on a slippery road such as in sand, gravel,
snow, etc.
•When driving on a long straight road.
•When freeway and surface streets run in parallel.
•After moving by ferry or vehicle carrier.
•When a long route is searched during high speed
driving.
•After repeating a change of direction by going forward
and backward, or turning on a turntable in a parking
lot.
•When leaving a covered parking lot or parking garage.
•When a roof carrier is installed.
•When driving with tire chains installed.
•When the tires are worn.
•After replacing a tire or tires.
•When using tires that are smaller or larger than the
factory specications.
•When the tire pressure in any of the 4 tires is not
correct.
● Inappropriate route guidance may occur in the following
cases:
•When turning at an intersection o the designated
route guidance.
•If you set more than 1 destination but skip any of
them, auto reroute will display a route returning to the
destination on the previous route.
•When turning at an intersection for which there is no
route guidance.
•When passing through an intersection for which there
is no route guidance.
•During auto reroute, the route guidance may not be
available for the next turn to the right or left.
•During high speed driving, it may take a long time for
auto reroute to operate. In auto reroute, a detour route
may be shown.
TIPS FOR THE NAVIGATION SYSTEM
210

•After auto reroute, the route may not be changed.
•If an unnecessary U-turn is shown or announced.
•If a location has multiple names and the system
announces 1 or more of them.
•When a route cannot be searched.
•If the route to your destination includes gravel,
unpaved roads or alleys, the route guidance may not
be shown.
•Your destination point might be shown on the
opposite side of the street.
•When a portion of the route has regulations
prohibiting the entry of the vehicle that vary by time or
season or other reasons.
•The road and map data stored in the navigation system
may not be complete or may not be the latest version.
NOTE
l This navigation system uses tire turning data and is designed to work
with factory-specied tires for the vehicle. Installing tires that are
larger or smaller than the originally equipped diameter may cause
inaccurate display of the current position. The tire pressure also
aects the diameter of the tires, so make sure that the tire pressure
of all 4 tires is correct.
TIPS FOR THE NAVIGATION SYSTEM
211
Navigation System
7

MAP DATA
REGARDING ROADS AND PLACE NAME DATA
When maps are created, land surveys are conducted and
informationon road improvements and reopening is collected
to provide the most accurate information possible. However,
modicationsto roads, place names and facilities may be carried
out at any time. Consequently, we cannot guarantee that map
data contains no errors in road positions, conguration and
names, or in facility names.
SUBARU MAP UPDATE
Map data can be updated using the following methods:
● USB memory: All map data can be updated at once.
→P.213
● Wi-Fi®: Individual regions can be selected and their map
data updated.* →P.214
● Smartphone: Individual regions can be selected and
their map data updated. This method is for when the
map update data is to be downloaded to a smartphone
from outside of the vehicle, such as at home, and then
transferred to the system. →P.214
*: Up to 8 regions can be selected for the automatic update function.
NOTE
l Map update using Wi-Fi® or a smartphone may not be available in
some countries.
l For the best possible navigation experience, regularly update
maps for all frequented regions, including nearby states. Failure to
update maps for surrounding states may result in inaccurate map
information during interstate travel. Updates made using a USB
memory device will update map information for all states. Please visit
Subaru.com for more information and the latest updates.
l If the map update fails or cannot be performed when using Wi-Fi®
or a connected smartphone, check the communication status of
the connected device. If there is a problem with communication,
perform the procedure again using a dierent Wi-Fi® access point or
smartphone.
l If the map update procedure fails, refer to the “TROUBLESHOOTING”
section. (→P.240)
l Subaru may terminate or suspend your access to all or part of these
services for any or no reason, including without limitation, any violation
of the terms detailed at:
https://subaru-maps.com/#/termsofuse
TIPS FOR THE NAVIGATION SYSTEM
212

UPDATING THE MAP DATA MANUALLY USING A
USB MEMORY DEVICE
Maps can be updated using a USB memory device.
For details and to download update data, refer to the following
URL:
https://subaru-maps.com/
1.
Connect to a USB memory device. (→P.66)
2.
Select (Map Update) on the navigation
settings screen. (→P.207)
3.
→
USB
(USB)
UPDATING THE MAP DATA
MANUALLY USING
Wi-Fi®
The map data may also be updated via Wi-Fi® network.
1.
Connect to a Wi-Fi® network. (→P.85)
2.
Select (Map Update) on the navigation
settings screen. (→P.207)
3.
→
Wi-Fi
(Wi-Fi)
4.
Select the regions for which maps are to be updated.
XWhen
Update XX MB
(Update XX MB) is selected
5.
The update for the selected region will be automatically
downloaded and installed.
● After installation of the update is completed, a message
will be displayed.
XWhen
Major Update XX MB
(Major Update XX MB) is
selected
5.
The map update data for the selected region will be
automatically downloaded.
● After downloading has completed,
Install All
(Install
All) will be displayed.
TIPS FOR THE NAVIGATION SYSTEM
213
Navigation System
7

6.
→
Install All
(Install All)
7.
→ (Install Now)
● During installation, the navigation function of the system
cannot be used.
●
Cancel
(Cancel): Select to cancel installing the map
data.
8.
→
OK
(OK)
UPDATING THE MAP DATA AUTOMATICALLY
USING Wi-Fi®
1.
Follow “STEPS 1 to 3” in “UPDATING THE MAP DATA
MANUALLY USING Wi-Fi”. (→P.213)
2.
Select
Automatic Update
(Automatic Update).
3.
Set “Update maps automatically (at most 8 maps can be
selected)”.
4.
Select the regions that you would like to be updated.
UPDATING THE MAP DATA MANUALLY USING A
SMARTPHONE
If the system cannot connect to a Wi-Fi® network, the map data
can be updated using a smartphone. Map update data can be
downloaded to a smartphone from outside of the vehicle, such
as at home, and then transferred to the system to perform the
map data update.
When updating the map data using a smartphone, the SUBARU
STARLINK application must be installed on the smartphone.
NOTE
l When using a cellular network to download map update data, only
regions with updates which are 30 MB or less can be downloaded.
To download updates using a cellular network, it is necessary to turn
the mobile data communication setting on the SUBARU STARLINK
application on.
TIPS FOR THE NAVIGATION SYSTEM
214
DOWNLOAD MAP UPDATE DATA TO A SMARTPHONE
1.
Connect a smartphone to the system via Bluetooth.
● When using an iPhone, it can also be connected using a
USB cable.
2.
Start the SUBARU STARLINK application on the smartphone
and download the map update data.
INSTALL MAP UPDATE DATA
1.
Connect a smartphone to the system via Bluetooth.
● When using an iPhone, it can also be connected using a
USB cable.
XWhen the “Map Update Via Mobile” screen is displayed
2.
Select
Update Now
(Update Now).
● If “Auto Update Via Mobile” is enabled, the map update
data will be installed automatically when the smartphone
is connected to the system.
3.
→
Yes
(Yes)
XWhen the “Major Map Updates” screen is displayed
2.
Select (Install Now).
● During installation, the navigation function of the system
cannot be used.
●
Cancel
(Cancel): Select to cancel installing the map
data.
3.
→
OK
(OK)
NOTE
l When downloading map data using the SUBARU STARLINK
application, make sure there is sucient storage space on the
smartphone for the selected region map data.
l When using an iPhone to perform an update, connecting the iPhone
to the system via USB is recommended. In this case, if a genuine
Apple USB cable is used, high speed communication is possible.
l This product uses the smartphone’s data plan for features and
services. Please consult carrier data plan usage, pricing, data overage
charges, limitations and usage guidelines.
ABOUT THE SUPPORTED DEVICES
This system supports the following devices.
● iPhone: iOS 13 or later
● Android: Android 9 or later
NOTE
l To ensure normal operation, updating your smartphone operating
system to the latest version is recommended.
TIPS FOR THE NAVIGATION SYSTEM
215
Navigation System
7

MEMO
216

217
Voice Recognition
System
Voice Recognition System
Voice Recognition System Operation
218
Voice Recognition System
218
Using The Voice Recognition System
218
Voice Recognition System Operation
219
Command List
220
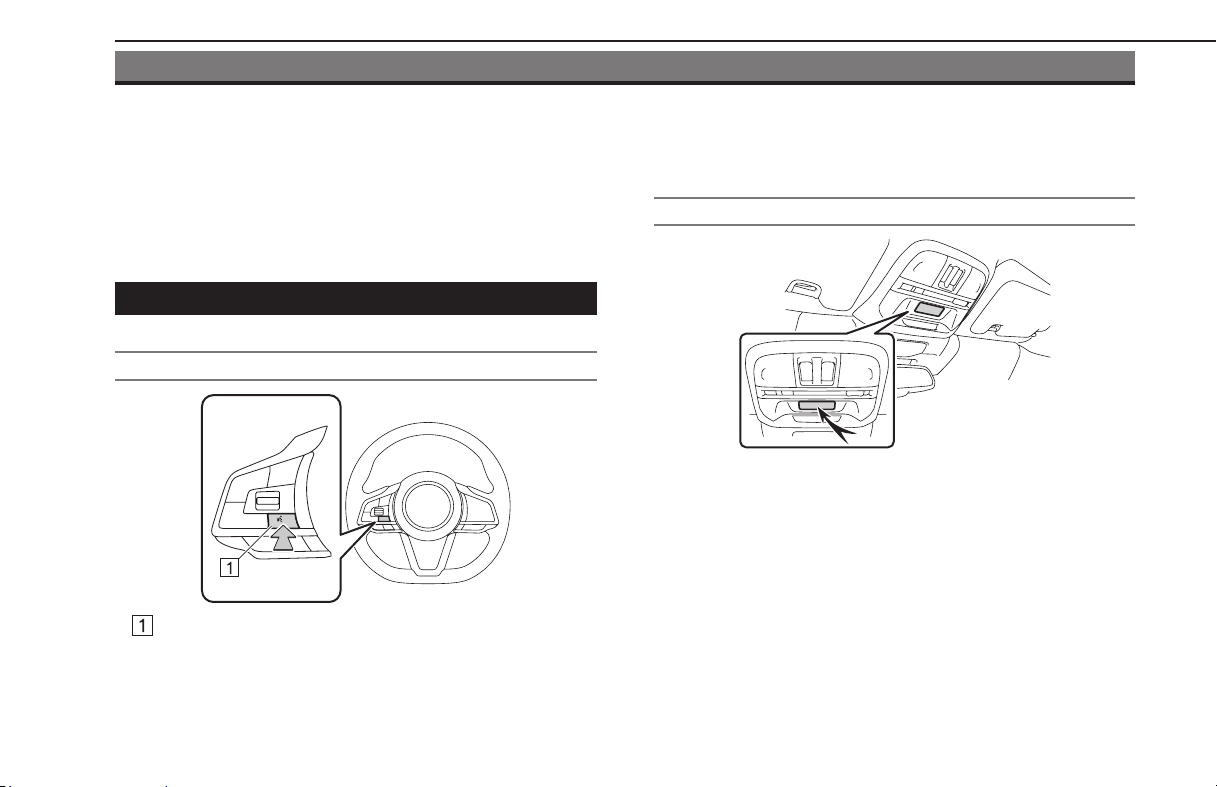
VOICERECOGNITION SYSTEM OPERATION
VOICERECOGNITION SYSTEM
The voice recognition system enables the navigation, audio,
hands-free systems, etc. to be operated using voice commands.
Refer to the command list for samples of voice commands.
(→P.220)
USING THE VOICERECOGNITION SYSTEM
STEERING SWITCH
Talk switch
● Press the talk switch to start the voicerecognition system.
● To cancel voice recognition, press and hold the talk
switch.
MICROPHONE
● It is unnecessary to speak directly into the microphone
when giving a command.
NOTE
l This function or part of this function may not be available in some
languages and countries.
l Wait for the conrmation beep before speaking a command.
VOICERECOGNITION SYSTEM OPERATION
218

NOTE
l Voice commands may not be recognized if:
•Spoken too quickly.
•Spoken at a low or high volume.
•Driving with a window open.
•Passengers are talking while voice commands are spoken.
•The air conditioning speed is set high.
•When air from the ventilator blows directly toward the
microphone.
l In the following conditions, the system may not recognize the
command properly and using voice commands may not be possible:
•The command is incorrect or unclear. Note that certain words,
accents or speech patterns may be dicult for the system to
recognize.
•There is excessive background noise, such as wind noise.
VOICERECOGNITION SYSTEM OPERATION
1.
Press the talk switch.
● After the voice recognition top screen has been
displayed, speech guidance will commence.
2.
Say the command.
X11.6-inch display system/11.6-inch display with Navi
system
XDual 7.0-inch display system
● When selecting
Help
(Help) or saying “Help”, all
commands supported by the system are listed.
● If a category name is selected, the selected category
command list will be displayed.
VOICERECOGNITION SYSTEM OPERATION
219
Voice Recognition System
8
● To cancel voice recognition, select , or press and hold
the talk switch.
NOTE
l Turn the“ ” knob, or use the volume control switch on the
steering wheel to adjust the speech guidance volume.
COMMAND LIST
Recognizable voice commands and their actions are shown
below.
● Frequently used commands are listed in the following
tables.
● For devices that are not installed in the vehicle, the
related commands will not be displayed in the screen.
Also, according to conditions, other commands may not
be displayed in the screen.
● The functions available may vary according to the system
installed.
● If the system language is changed on the general settings
screen, the language of the voice recognition function
will also change.
Refer to the vehicle Owner’s Manual for details.
NOTE
l The notations used in the commands are as follows.
•<○○○>: Numbers, titles, or names to be spoken
VOICERECOGNITION SYSTEM OPERATION
220
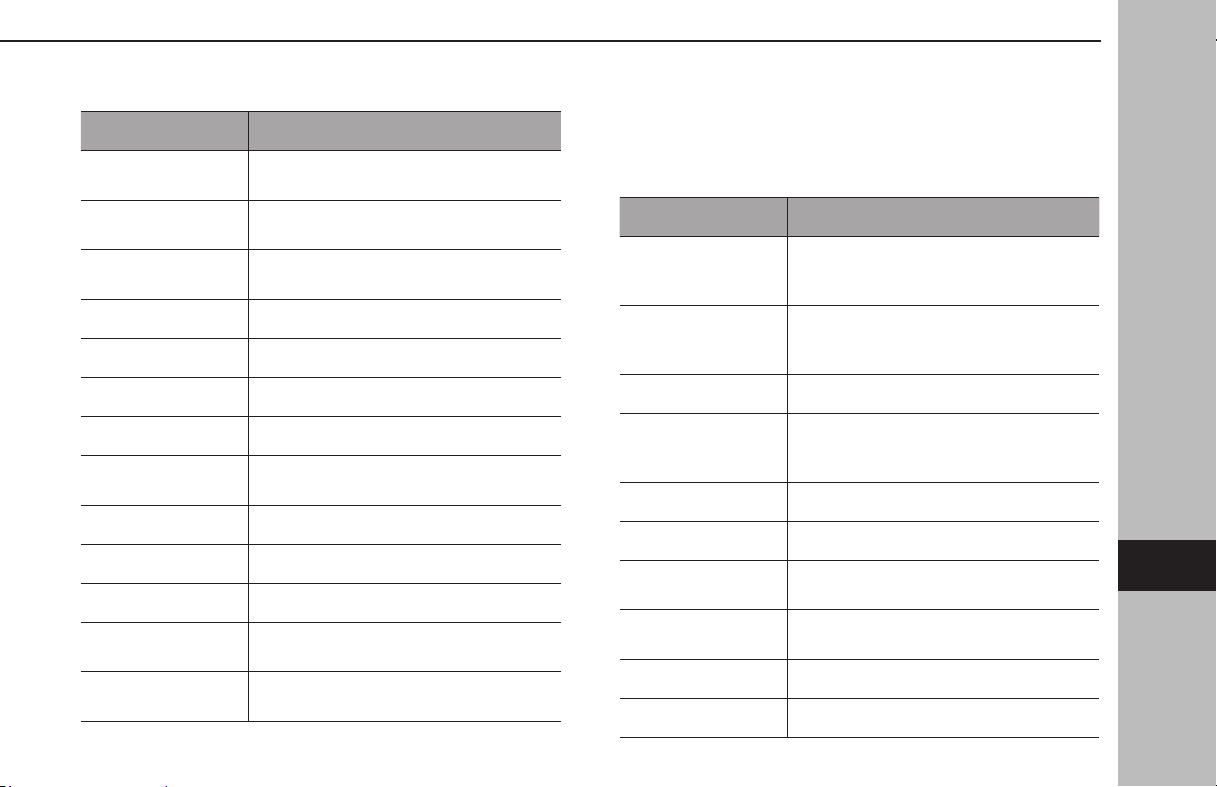
XNavigation commands*
*: If equipped
Voice command Function
Enter an address
Enables setting a destination by saying the
address with city and state
Navigate to <address>
Enables setting a destination by saying the
address with city and state
Find <POI>
Displays a list of POI category near the
current position
Go home Displays the route to home
Go to work Displays the route to work
Cancel route Cancels route guidance
Search favorites Displays the favorite location
Favorite <favorite
name*>
Displays the favorite location
Previous destination Displays the previous destinations
Delete destination Cancels route guidance
Show map Displays the map screen
Find <POI> in a city
Displays a list of POI category near the
current position
Change country
<country>
Changes a country
*: Depending on how the name of a registered favorite is entered, the way it
should be spoken when using the voice recognition function will change.
Lower case letters should be spoken phonetically.
Upper case letters should be spoken as individual letters.
When speaking the name of registered points, be sure to say it as it is
registered.
XPhone commands
Voice command Function
Call a contact
Places a call to the spoken contact name
and phone type of the contact from the
phonebook
Call <name> <phone
type>
Places a call to the spoken contact name
and phone type of the contact from the
phonebook
Pair phone Displays “Manage Devices” screen
Send a text by contact
Sends the preset message to the spoken
contact name and phone type of the
contact from the phonebook
Dial a number Places a call to the spoken phone number
Dial <number> Places a call to the spoken phone number
Call back
Places a call to the phone number of the
latest incoming call
Redial
Places a call to the phone number of the
latest outgoing call
Show messages Displays received text messages
Show recent calls Displays the call history screen
VOICERECOGNITION SYSTEM OPERATION
221
Voice Recognition System
8
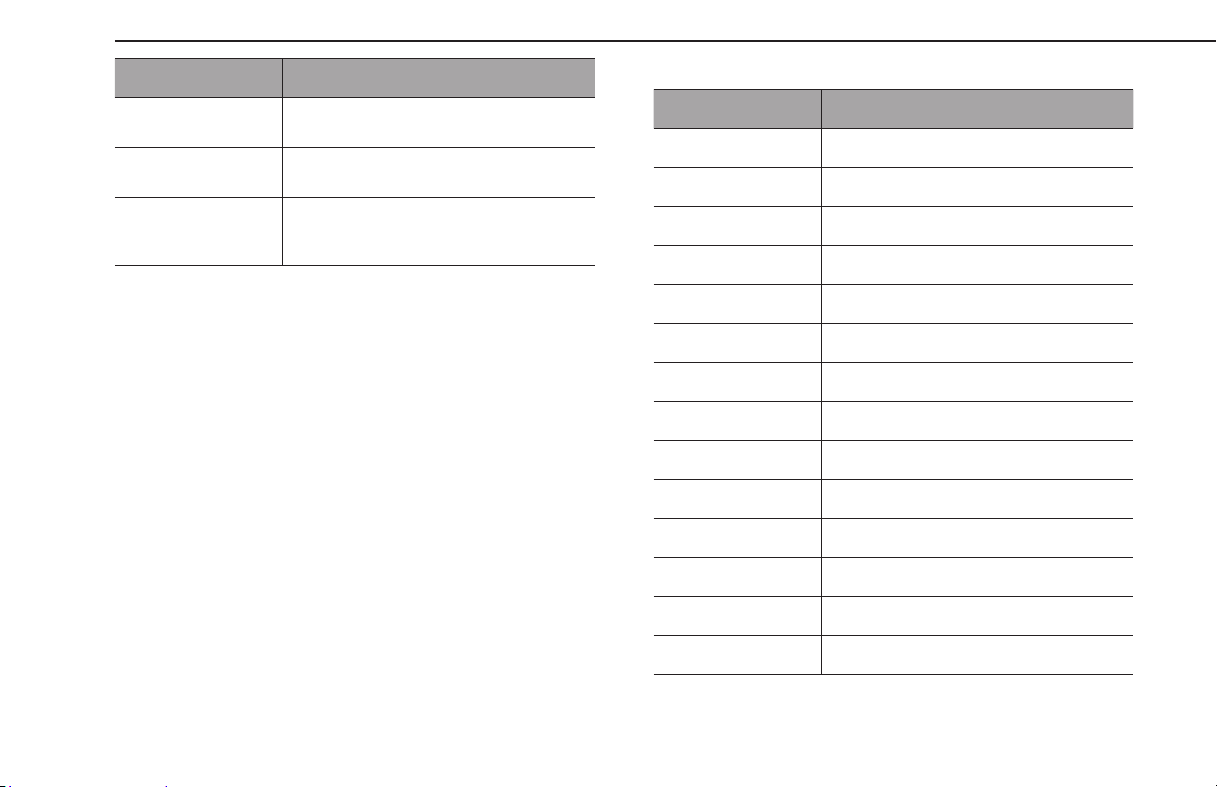
Voice command Function
Send a text to
<number>
Sends a text message to the spoken phone
number
Send a text by recent
calls
Sends a text message by the recent call list
Send a text to
<name> <phone
type>
Sends a text message to the spoken contact
name and phone type of the contact from
the phonebook
XMusic commands
Voice command Function
Turn music on Turns music on
Turn music o Turns music o
Play song <name> Plays the selected song
Play artist <name> Plays tracks from the selected artist
Play playlist <name> Plays tracks from the selected playlist
FM radio Switches to FM radio
AM radio Switches to AM radio
Sirius XM Switches to SiriusXM® Radio
iPod Switches to iPod/iPhone
Radio frequency Tunes radio frequency
Go to a preset Selects a preset
Channel <name> Switches to a selected channel
Play genre <name> Plays tracks from the selected genre
Play album <name> Plays tracks from the selected album
VOICERECOGNITION SYSTEM OPERATION
222
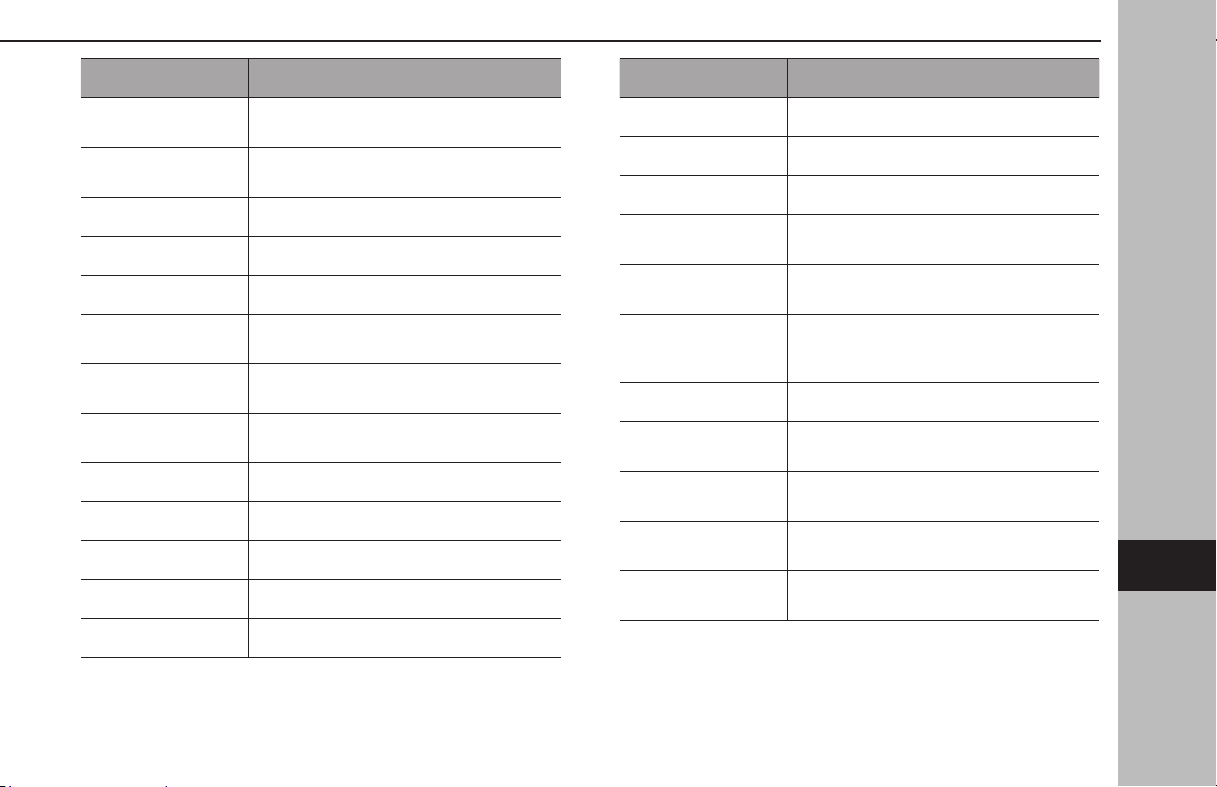
Voice command Function
Play composer
<name>
Plays tracks from the selected composer
Play audiobook
<name>
Plays the selected audiobook
Play podcast <name> Plays the selected podcast
Browse genre <name> Displays the list of artists of genre
Browse artist <name> Displays the list of albums of the artist
Browse album
<name>
Displays the list of songs of the album
Browse playlist
<name>
Displays the list of playlist
Browse composer
<name>
Displays the list of albums from the
composer
Browse songs Displays the list of songs
Browse audiobooks Displays the list of audiobooks
Browse podcasts Displays the list of podcasts
Auxiliary Switches source to auxiliary
USB Switches source to USB
Voice command Function
Bluetooth audio Switches source to Bluetooth audio
Disc* Switches source to disc
Track <number>* Plays the selected track
Tune to <frequency>
AM
Tunes AM radio frequency
Tune to <frequency>
FM
Tunes FM radio frequency
Tune to FM
<frequency> HD
<subchannel>
Tunes FM radio frequency
Listen to a radio genre Selects a radio genre
Listen a <genre> FM
station
Selects a radio genre
Tune to preset
<number>
Selects a preset
Tune to channel
number
Selects a satellite radio channel
Satellite channel
<number>
Selects a satellite radio channel
*: If equipped with a CD player
NOTE
l Depending on the device, your iPod/iPhone may not work when
operated via voice recognition.
VOICERECOGNITION SYSTEM OPERATION
223
Voice Recognition System
8

XClimate commands
Voice command Function
Auto AC on Switches on the Auto AC mode on
Warmer Increases the temperature
Cooler Decreases the temperature
Increase fan speed Increases the fan speed
Decrease fan speed Decreases the fan speed
Set temperature to
<temperature>
Sets the temperature to the spoken
temperature
Fan speed <1 - 7> Sets the fan speed to the spoken fan speed
XApps commands
Voice command Function
Launch <app name> Changes screen to selected application
Weather
Changes screen to SiriusXM Travel Link
Weather
Weather alert
Changes screen to SiriusXM Travel Link
Weather Alerts
Parking
Changes screen to SiriusXM Travel Link
Parking
Sports
Changes screen to SiriusXM Travel Link
Sports
Go to SUBARU
STARLINK
Changes screen to SUBARU STARLINK
Go to CarPlay Changes screen to Apple CarPlay
Go to Android Auto Changes screen to Android Auto
Stocks
Changes screen to SiriusXM Travel Link
Stocks
Fuel prices
Changes screen to SiriusXM Travel Link Fuel
Prices
Show weather for a
city
Changes screen to SiriusXM Travel Link
Weather
Show weather forecast
for <city name>
Changes screen to SiriusXM Travel Link
Weather
VOICERECOGNITION SYSTEM OPERATION
224

225
Appendix/What To Do
If/Index
Appendix/What To Do If/Index
Certication
226
Certication
226
SiriusXM® Radio
226
SiriusXM Data Service
226
Radio Wave Communications
226
Bluetooth
228
iPhone/iPod
228
Apple CarPlay
229
Android Auto
229
Gracenote
229
Others
229
How To Get The Source Code
Using The Open Source
230
What To Do If
231
Troubleshooting
231
Troubleshooting Issues Common
To This System
231
SUBARU STARLINK
231
Radio Operation
232
Phone
233
Updating The System
238
Map Update
240
Index
242
CERTIFICATION
CERTIFICATION
SiriusXM® Radio
● © 2020 Sirius XM Radio Inc. Sirius, XM, SiriusXM and all related
marks and logos are trademarks of Sirius XM Radio Inc. All
other marks, channel names and logos are the property of
their respective owners. All rights reserved.
SiriusXM DATA SERVICE
Neither SiriusXM nor SUBARU CORPORATION is responsible for
any errors or inaccuracies in the SiriusXM data services or its use
in vehicle.
RADIO WAVE COMMUNICATIONS
XU.S.A.
● FCC ID: HYQDNNS117
● FCC ID: HYQDNNS118
● This device complies with part 15 of the FCC Rules. Operation
is subject to the following two conditions: (1) This device
may not cause harmful interference, and (2) this device must
accept any interference received, including interference that
may cause undesired operation.
WARNING
l FCC WARNING:
Changes or modications not expressly approved by the party
responsible for compliance could void the user’s authority to
operate the equipment.
l CAUTION: Radio Frequency Radiation Exposure
This equipment complies with FCC radiation exposure limits set
forth for an uncontrolled environment and meets the FCC radio
frequency (RF) Exposure Guidelines. This equipment should be
installed and operated keeping the radiator at least 20cm or more
away from person’s body.
l Co-location:
This transmitter must not be co-located or operated in
conjunction with any other antenna or transmitter.
CERTIFICATION
226

XCanada
● This device contains licence-exempt transmitter(s)/receiver(s)
that comply with Innovation, Science and Economic
Development Canada’s licence-exempt RSS(s). Operation is
subject to the following two conditions:
(1) This device may not cause interference.
(2) This device must accept any interference, including
interference that may cause undesired operation of the
device.
The antenna cannot be removed (and changed) by user.
Co-location: This transmitter must not be co-located
or operated in conjunction with any other antenna or
transmitter.
L’émetteur/récepteur exempt de licence contenu dans le
présent appareil est conforme aux CNR d’Innovation, Sciences
et Développement économique Canada applicables aux
appareils radio exempts de licence. L’exploitation est autorisée
aux deux conditions suivantes :
(1) L’appareil ne doit pas produire de brouillage;
(2) L’appareil doit accepter tout brouillage radioélectrique
subi, même si le brouillage est susceptible d’en compromettre
le fonctionnement.
L’utilisateur n’est pas autorisé à retirer (ou modier) l’antenne.
Emplacement : Cet émetteur ne doit pas être installé ou utilisé
conjointement avec d’autres antennes ou émetteurs.
WARNING
l CAUTION: Radio Frequency Radiation Exposure
This equipment complies with ISED radiation exposure limits set
forth for an uncontrolled environment and meets RSS-102 of the
ISED radio frequency (RF) Exposure rules. This equipment should
be installed and operated keeping the radiator at least 20 cm or
more away from person’s body.
ATTENTION: exposition aux radiofréquences
- Cet équipement est conforme aux limites d’exposition aux
rayonnements d’ISDE établies pour un environnement non
contrôlé ainsi que la norme CNR-102 de la réglementation d’ISDE
relative à l’exposition aux radiofréquences (RF). Cet équipement
doit être installé et utilisé avec un minimum de 20 cm de distance
entre la source de rayonnement et le corps.
XMéxico
● La operación de este equipo está sujeta a las siguientes dos
condiciones: (1) es posible que este equipo o dispositivo no
cause interferencia perjudicial y (2) este equipo o dispositivo
debe aceptar cualquier interferencia, incluyendo la que pueda
causar su operación no deseada.
CERTIFICATION
227
Appendix/What To Do If/Index
9
Bluetooth
● The Bluetooth® word mark and logos are registered
trademarks owned by Bluetooth SIG, Inc. and any use of such
marks by SUBARU CORPORATION and DENSO Corporation is
under license. Other trademarks and trade names are those of
their respective owners.
iPhone/iPod
● Use of the Made for Apple badge means that an accessory has
been designed to connect specically to the Apple product(s)
identied in the badge and has been certied by the
developer to meet Apple performance standards. Apple is not
responsible for the operation of this device or its compliance
with safety and regulatory standards.
● Please note that the use of this accessory with an Apple
product may aect wireless performance.
● iPhone, iPod, iPod classic, iPod nano, iPod touch, Lightning
and App Store are trademarks of Apple Inc., registered in the
U.S. and other countries and regions.
CERTIFICATION
228

Apple CarPlay
● Use of the Apple CarPlay logo means that a vehicle user
interface meets Apple performance standards. Apple is not
responsible for the operation of this vehicle or its compliance
with safety and regulatory standards. Please note that the
use of this product with iPhone or iPod may aect wireless
performance.
● Apple, iPhone, iPod, iPod touch and Apple CarPlay are
trademarks of Apple Inc., registered in the U.S. and other
countries and regions.
Android Auto
● Android Auto is a trademark of Google LLC.
Gracenote
● Gracenote, the Gracenote logo and logotype are either a
registered trademark or a trademark of Gracenote, Inc. in the
United States and/or other countries.
OTHERS
● QR Code is registered trademarks of DENSO WAVE
INCORPORATED.
● QR Code est une marque déposée de DENSO WAVE
INCORPORATED.
● © 1982-2013, QNX Software Systems Limited. All rights
reserved.
● Cinemo is a trademark of Cinemo GmbH, Karlsruhe.
Please visit http://www.cinemo.com
CERTIFICATION
229
Appendix/What To Do If/Index
9

HOW TO GET THE SOURCE CODE USING THE OPEN SOURCE
This product contains Free/Open Source Software(FOSS).
The license information and/or the source code of such FOSS
can be found at the following URL.
http://www.globaldenso.com/en/opensource/ivi/subaru/
HOW TO GET THE SOURCE CODE USING THE OPEN SOURCE
230
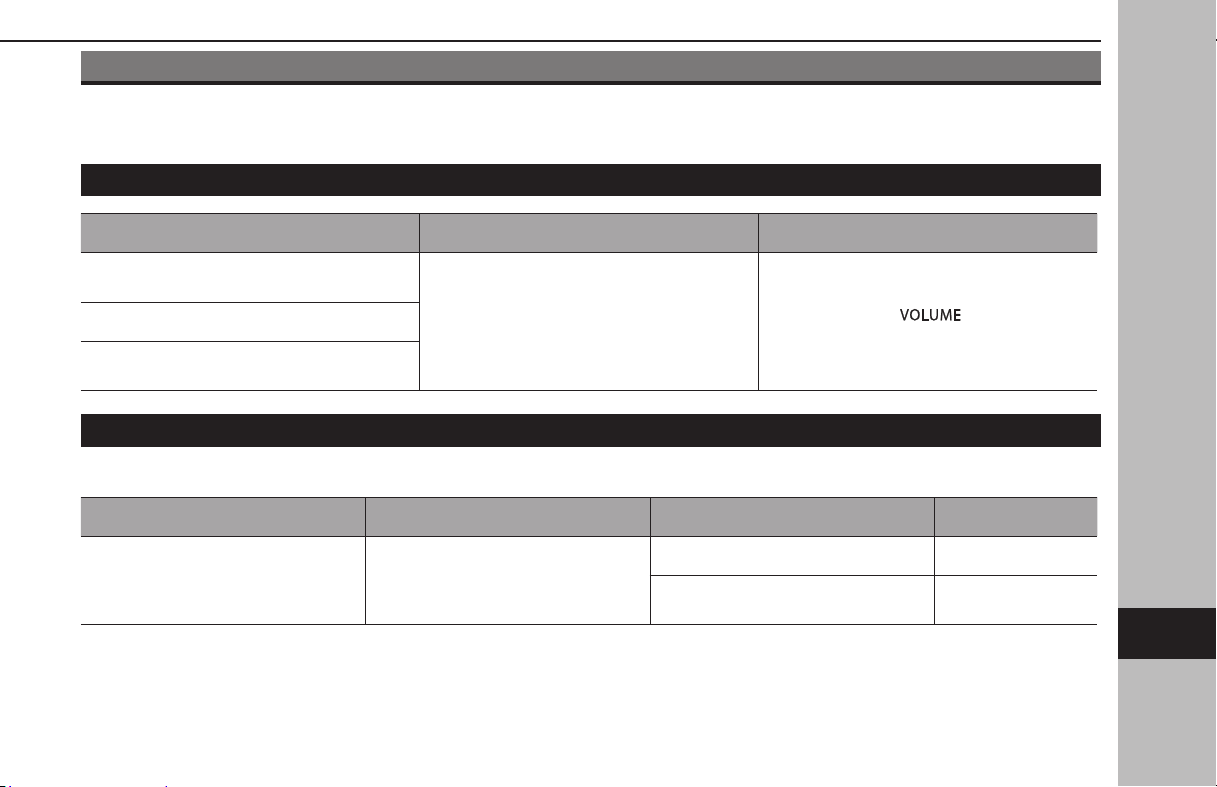
WHAT TO DO IF
TROUBLESHOOTING
TROUBLESHOOTING ISSUES COMMON TO THIS SYSTEM
Symptom Cause Action
The touch screen becomes unresponsive during
operation.
An error has occurred in the system.
Press and hold the “
” knob for 10
seconds or longer to reset the system.
The sound suddenly stops working.
Only the background is displayed on the screen
and no icons appear.
SUBARU STARLINK
XDual 7.0-inch display system only
Symptom Likely cause Solution Page
SUBARU STARLINK does not start. The time does not match.
Connect your smartphone. 79
Set the phonebook download function
to on.
82
WHAT TO DO IF
231
Appendix/What To Do If/Index
9
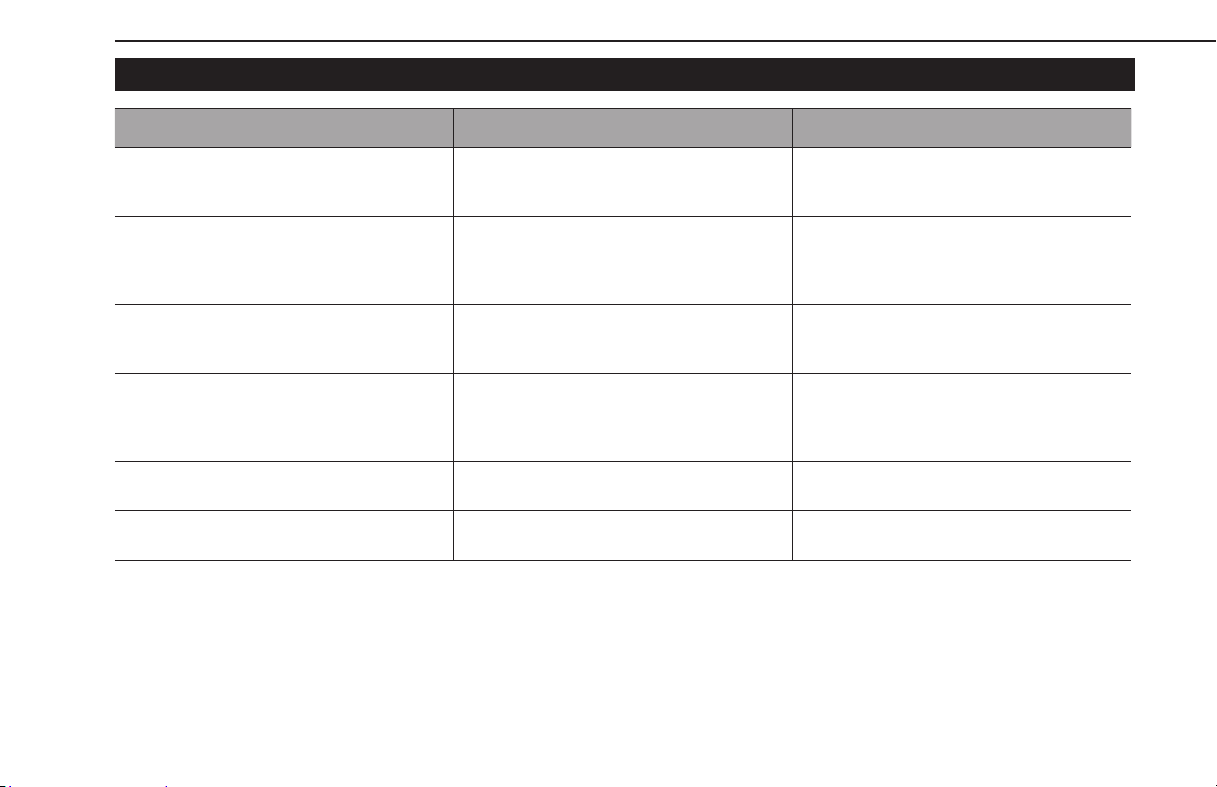
RADIO OPERATION
Symptom Cause Action
Mismatch of time alignment- a user may hear
a short period of programming replayed or an
echo, stutter or skip.
The radio stations analog and digital volume
is not properly aligned or the station is in
ballgame mode.
None, radio broadcast issue. A user can contact
the radio station.
Sound fades, blending in and out.
Radio is shifting between analog and digital
audio.
Reception issue, may clear-up as the vehicle
continues to be driven. Turning the indicator of
the HD Radio button o can force radio in an
analog audio.
Audio mute condition when an HD2/HD3
multicast channel had been playing.
The radio does not have access to digital signals
at the moment.
This is normal behavior, wait until the digital
signal returns. If out of the coverage area, seek a
new station.
Audio mute delay when selecting an HD2/HD3
multicast channel preset.
The digital multicast content is not available
until HD Radio™ broadcast can be decoded and
make the audio available. This takes up to 7
seconds.
This is normal behavior, wait for the audio to
become available.
Text information does not match the present
song audio.
Data service issue by the radio broadcaster. Broadcaster should be notied.
No text information shown for the present
selected frequency.
Data service issue by the radio broadcaster. Broadcaster should be notied.
WHAT TO DO IF
232
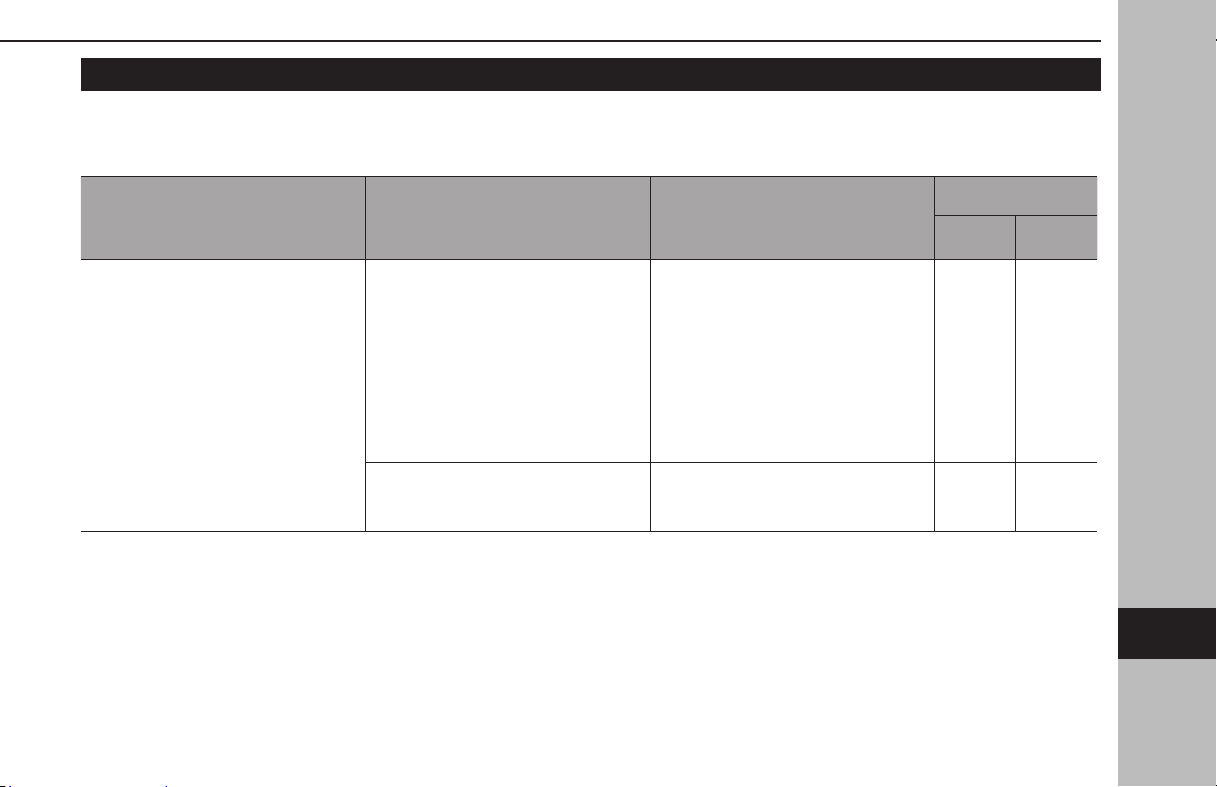
PHONE
If there is a problem with the hands-free system or a Bluetooth phone, rst check the table below.
XWhen using the hands-free system with a Bluetooth phone
Symptom Likely cause Solution
Page
Cellular
phone
This
system
The hands-free system or Bluetooth
phone does not work.
The connected Bluetooth phone may
not be a compatible Bluetooth cellular
phone.
For a list of specic Bluetooth phones
which operation has been conrmed on
this system.
For USA customers, please visit
www.subaru.com for details.
Outside of the USA customers,
contact your local dealer to arrange
a demonstration in order to conrm
whether or not the phone can be paired
with the vehicle.
* 75
The Bluetooth version of the connected
cellular phone may be older than the
specied version.
Use a cellular phone with Bluetooth
version 2.1 or higher.
Recommended: Ver. 4.2 or higher
* 75
*: For details, refer to the owner’s manual that came with the cellular phone.
WHAT TO DO IF
233
Appendix/What To Do If/Index
9

XWhen registering/connecting a cellular phone
Symptom Likely cause Solution
Page
Cellular
phone
This
system
A cellular phone cannot be registered.
An incorrect passcode was entered on
the cellular phone.
Enter the correct passcode on the
cellular phone.
* -
The registration operation has not been
completed on the cellular phone side.
Complete the registration operation on
the cellular phone (approve registration
on the phone).
* -
Old registration information remains on
either this system or the cellular phone.
Delete the existing registration
information from both this system and
the cellular phone, then register the
cellular phone you wish to connect to
this system.
* 81
A Bluetooth connection cannot be
made.
Another Bluetooth phone is already
connected.
Manually connect the cellular phone
you wish to use to this system.
- 79
Bluetooth function is not enabled on
the cellular phone.
Enable the Bluetooth function on the
cellular phone.
* -
*: For details, refer to the owner’s manual that came with the cellular phone.
XWhen making/receiving a call
Symptom Likely cause Solution
Page
Cellular
phone
This
system
A call cannot be made/received. Your vehicle is in a “No Service” area. Move into the service area. - -
WHAT TO DO IF
234

XWhen using the phonebook
Symptom Likely cause Solution
Page
Cellular
phone
This
system
Phonebook data cannot be transferred
automatically.
The prole version of the connected
cellular phone may not be compatible
with transferring phonebook data.
For a list of specic Bluetooth phones
which operation has been conrmed on
this system.
For USA customers, please visit
www.subaru.com for details.
Outside of the USA customers,
contact your local dealer to arrange
a demonstration in order to conrm
whether or not the phone can be paired
with the vehicle.
* 75
Automatic contact transfer function on
this system is set to o.
Set automatic contact transfer function
on this system to on.
- 82
*: For details, refer to the owner’s manual that came with the cellular phone.
WHAT TO DO IF
235
Appendix/What To Do If/Index
9
XWhen using the Bluetooth message function
Symptom Likely cause Solution
Page
Cellular
phone
This
system
Messages cannot be viewed.
Message transfer is not enabled on the
cellular phone.
Enable message transfer on the cellular
phone (approve message transfer on
the phone).
* -
*: For details, refer to the owner’s manual that came with the cellular phone.
WHAT TO DO IF
236
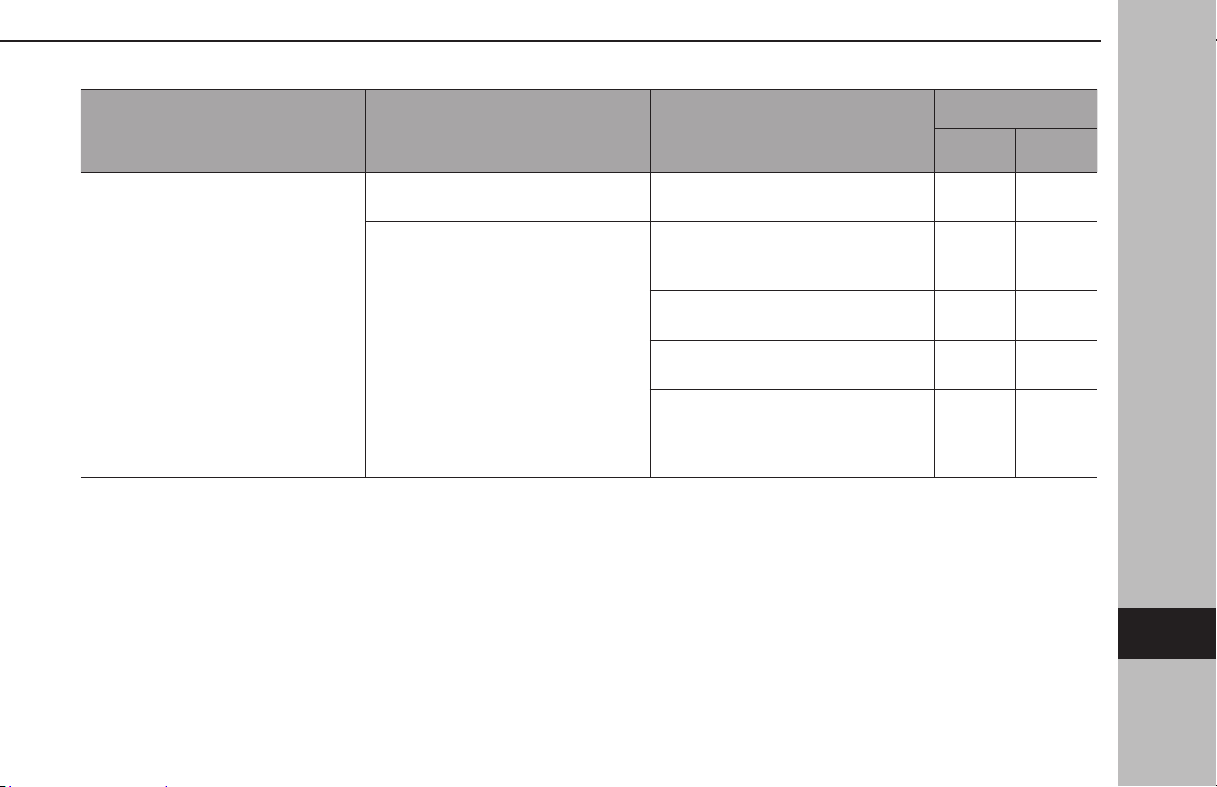
XIn other situations
Symptom Likely cause Solution
Page
Cellular
phone
This
system
Even though all conceivable measures
have been taken, the symptom status
does not change.
The cellular phone is not close enough
to this system.
Bring the cellular phone closer to this
system.
- -
The cellular phone is the most likely
cause of the symptom.
Turn the cellular phone o, remove
and reinstall the battery pack, and then
restart the cellular phone.
* -
Enable the cellular phone’s Bluetooth
connection.
* -
Stop the cellular phone’s security
software and close all applications.
* -
Before using an application installed
on the cellular phone, carefully check
its source and how its operation might
aect this system.
* -
*: For details, refer to the owner’s manual that came with the cellular phone.
WHAT TO DO IF
237
Appendix/What To Do If/Index
9

UPDATING THE SYSTEM
If a problem occurs when attempting to perform a system update, refer to the following table.
Symptom Cause Solution
“A software download error occurred. Please try
again.” is displayed.
The set time of the clock and actual time dier
greatly.
Set the clock to the correct time.
• 11.6-inch display with Navi system/11.6-inch
display system with SUBARU STARLINK Safety
and Security: Move the vehicle to an area
where GPS signals can be received normally.
• 11.6-inch display system without SUBARU
STARLINK Safety and Security: Move the
vehicle to an area where cellular phone
reception is good.
An error occurred at the server. (Server cannot
respond temporarily due to maintenance, etc.)
Wait for the server to return to normal.
“No server response. Please try again.” is
displayed.
The connection between the system and the
Wi-Fi® access point is weak or has been lost.
Connect the system to the Wi-Fi® access point
again and perform the update in an area with
low electrical noise.
Communication between the Wi-Fi® access
point and server has been lost.
Check that the Wi-Fi® access point can connect
to the internet and perform the update in an
area with low electrical noise.
WHAT TO DO IF
238

Symptom Cause Solution
“Connection failed. Unable to check for updates
because no active internet connection has been
detected.” is displayed.
The connection between the system and the
Wi-Fi® access point is weak or has been lost.
Connect the system to the Wi-Fi® access point
again and perform the update in an area with
low electrical noise.
WHAT TO DO IF
239
Appendix/What To Do If/Index
9
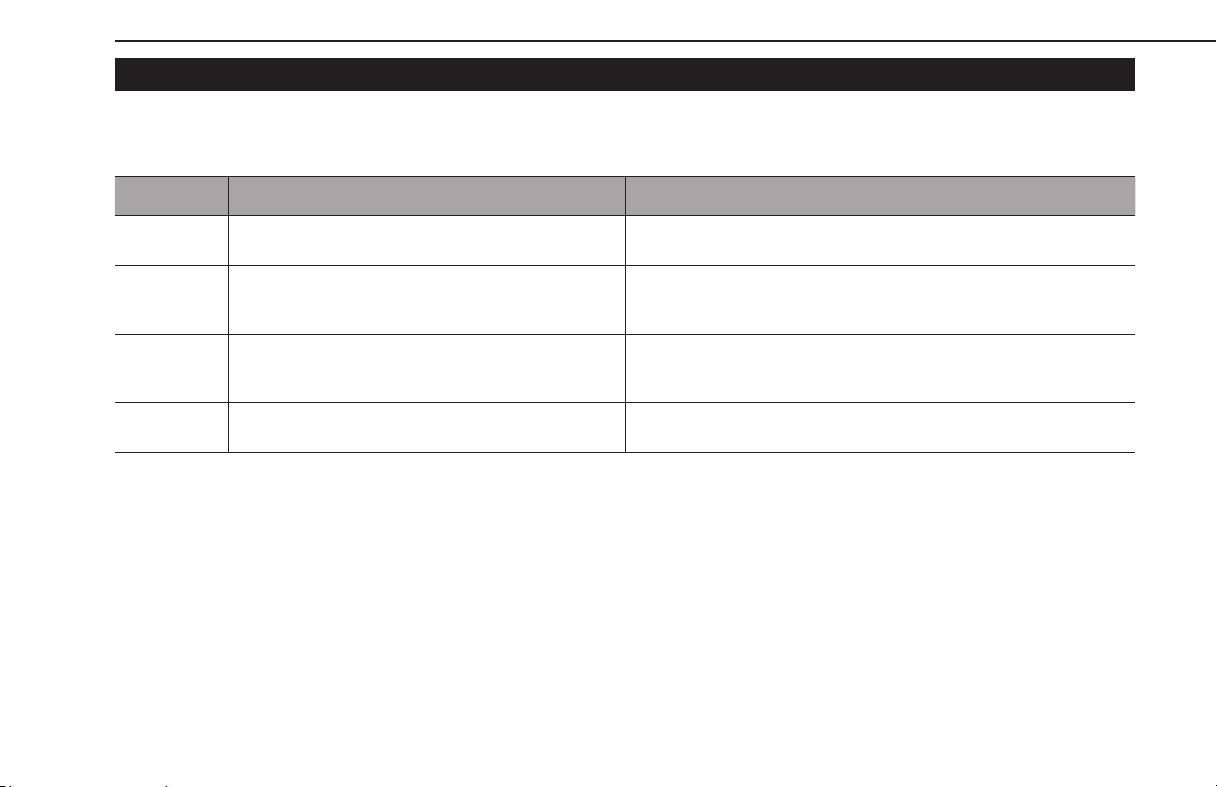
MAP UPDATE (IF EQUIPPED)
If a problem occurs when attempting to perform a map update, refer to the following table.
XErrors when updating via USB
Error code Cause Solution
“Installation
Failed (1)”
Reading of the data on the USB memory device failed.
Disconnect and then reconnect the USB memory device, check that it is
connected correctly, and attempt to perform the update again.
“Installation
Failed (2)”
Corruption of the data on the USB memory device was
detected.
Attempt to perform the update again. If the same error is detected,
download the map update data again, copy it to a dierent USB memory
device and attempt to perform the update again.
“Installation
Failed (5)”
An error in the system data was detected while
performing the update.
Attempt to perform the update again. If the same error is detected,
download the map update data again, copy it to a dierent USB memory
device and attempt to perform the update again.
“Installation
Failed (X)”
An unspecied error has occurred.
Attempt to perform the update again. If the same error is detected,
contact your SUBARU dealer.
WHAT TO DO IF
240

XErrors when updating via Wi-Fi®, smartphone
Error code Cause Solution
404
The system ID number of the center information display
is not registered to the server.
Contact your SUBARU dealer.
XXX An error occurred with the connected server.
Wait for a while and then attempt to perform the update again.
If the update procedure fails again, contact your SUBARU dealer.
WHAT TO DO IF
241
Appendix/What To Do If/Index
9
INDEX
A
AM radio ..................................................................................................................... 143
Android Auto ............................................................................................................ 124
Apple CarPlay ............................................................................................................ 121
AUX ............................................................................................................................... 168
B
Bluetooth ...................................................................................................................... 74
Proles ...................................................................................................................... 75
Registering Bluetooth device .......................................................................... 74
Bluetooth audio ....................................................................................................... 165
Bluetooth phone message ................................................................................... 106
C
Calling on Bluetooth phone ................................................................................ 100
By contacts list ..................................................................................................... 103
By favorites list .................................................................................................... 102
By keypad .............................................................................................................. 102
By recent calls list ............................................................................................... 101
CD .................................................................................................................................. 158
Command list ............................................................................................................ 220
D
Destination search .................................................................................................. 195
Driver prole ........................................................................................................ 23, 44
E
Entering letters, numbers/list screen ................................................................. 68
Entering letters/numbers .................................................................................. 68
List screen operation ........................................................................................... 69
F
Favorites settings ..................................................................................................... 198
FM radio ...................................................................................................................... 143
G
General settings ......................................................................................................... 83
GPS ............................................................................................................................... 209
Limitations ............................................................................................................ 209
H
Hands-free system .................................................................................................... 96
Home screen operation .......................................................................................... 72
Adding shortcut icons ........................................................................................ 72
Moving/deleting shortcut icons ..................................................................... 72
I
Initial screen ................................................................................................................ 64
iPod/iPhone ............................................................................................................... 162
INDEX
242

M
Map data ..................................................................................................................... 212
Update .................................................................................................................... 212
Map screen information ........................................................................................ 191
Map screen operation ............................................................................................ 187
Current position display .................................................................................. 187
Map scale .............................................................................................................. 188
Orientation of the map .................................................................................... 189
Media operation ...................................................................................................... 158
AUX .......................................................................................................................... 168
Bluetooth audio .................................................................................................. 165
CD ............................................................................................................................ 158
iPod/iPhone .......................................................................................................... 162
USB memory ........................................................................................................ 160
Memory points settings ........................................................................................ 198
N
Navigation settings ................................................................................................. 207
P
Phone settings ............................................................................................................ 77
R
Radio operation ....................................................................................................... 143
AM/FM radio ........................................................................................................ 143
SiriusXM® radio .................................................................................................... 149
Receiving on Bluetooth phone .......................................................................... 103
Incoming calls ..................................................................................................... 103
Route guidance ........................................................................................................ 203
Route related functions .............................................................................. 196, 201
S
Screen adjustment .................................................................................................... 70
Adjusting brightness ........................................................................................... 70
Day and night mode ........................................................................................... 70
Search operation ..................................................................................................... 195
Setting ........................................................................................................................... 73
General ..................................................................................................................... 83
Navigation ............................................................................................................ 207
Phone ....................................................................................................................... 77
Radio ......................................................................................................................... 91
Sound ....................................................................................................................... 90
SiriusXM® radio ......................................................................................................... 149
SiriusXM Travel Link ................................................................................................ 127
Sound settings ........................................................................................................... 90
Status display .............................................................................................................. 71
Steering wheel controls ........................................................................................ 173
SUBARU STARLINK .................................................................................................. 115
INDEX
243
Appendix/What To Do If/Index
9
T
Talking on Bluetooth phone ................................................................................ 104
Touch screen gestures ............................................................................................. 66
Touch screen operation .......................................................................................... 67
Trac information ................................................................................................... 191
Troubleshooting ...................................................................................................... 231
Typical voice guidance prompts ........................................................................ 206
U
USB memory ............................................................................................................. 160
V
Voicerecognition system ..................................................................................... 218
INDEX
244