Owner's Guide Vacuum Cleaner
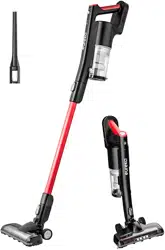
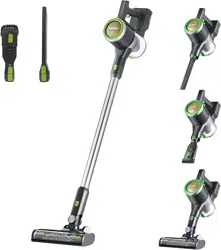
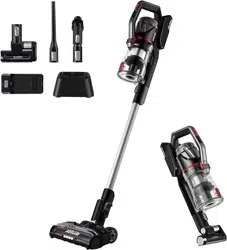
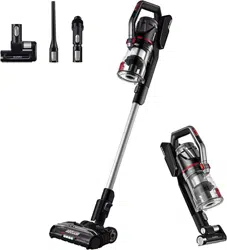
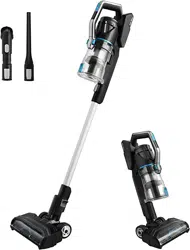
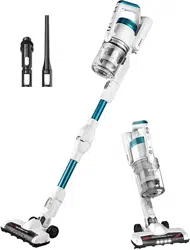
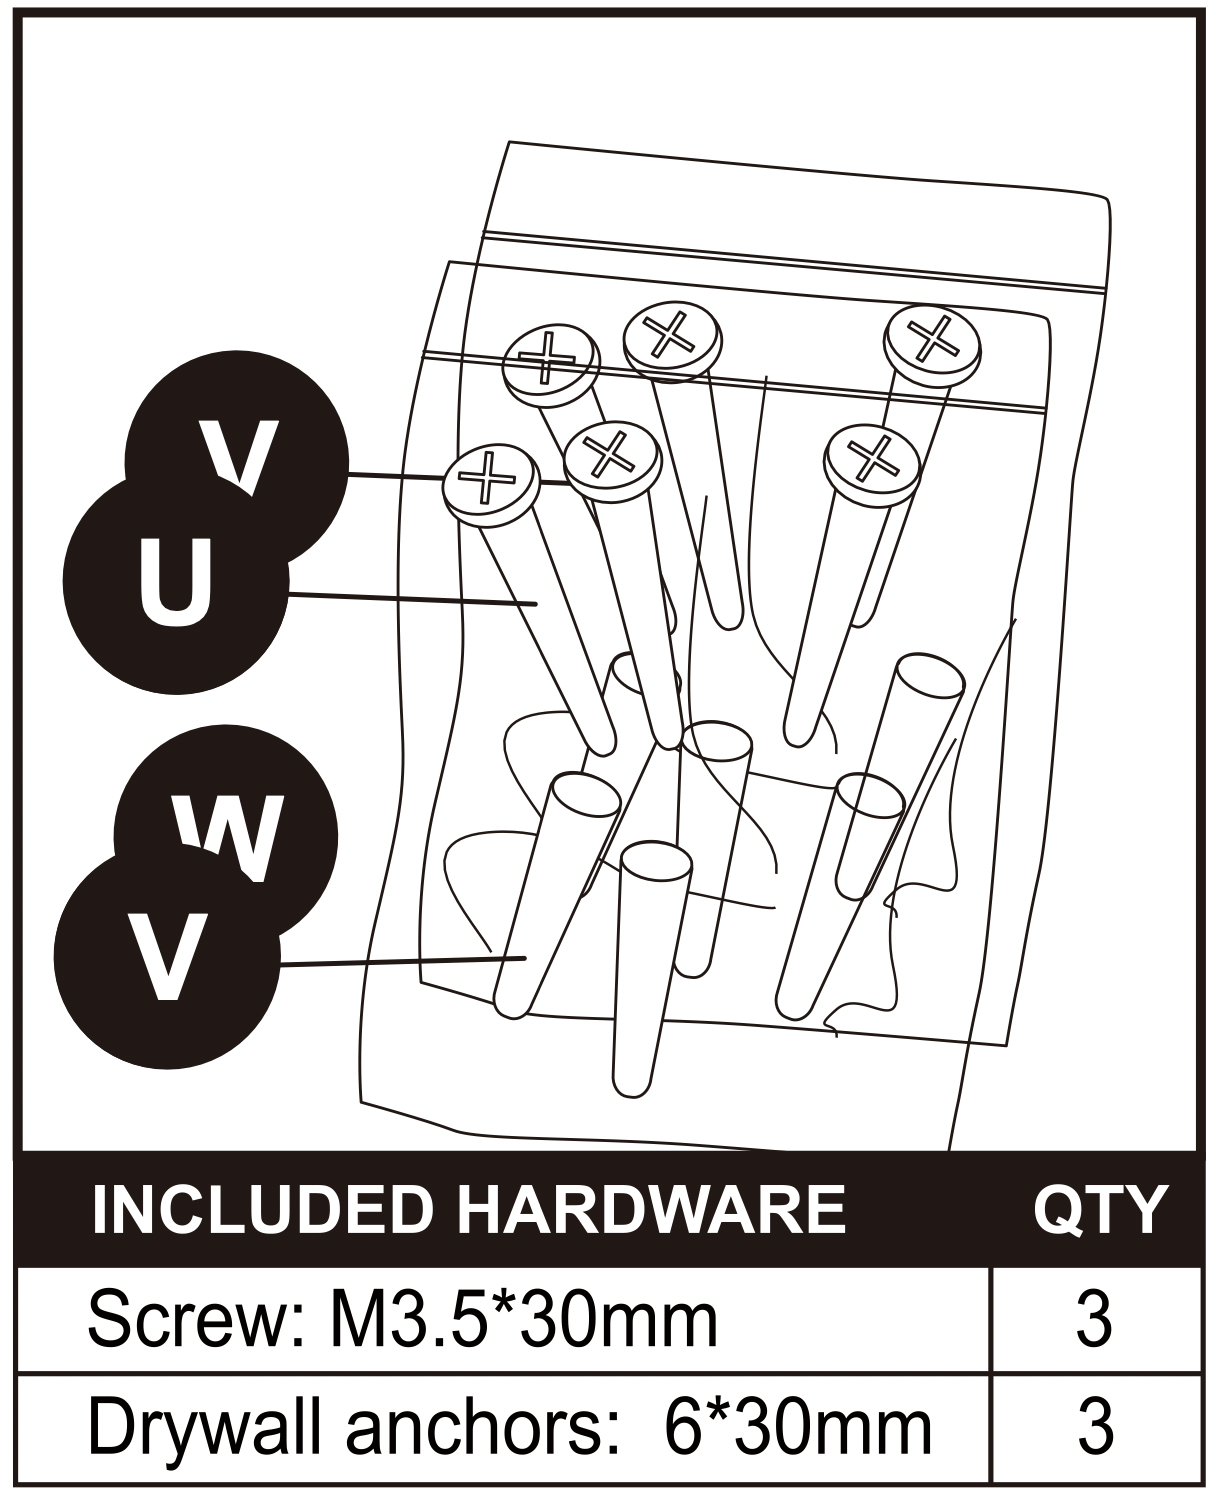
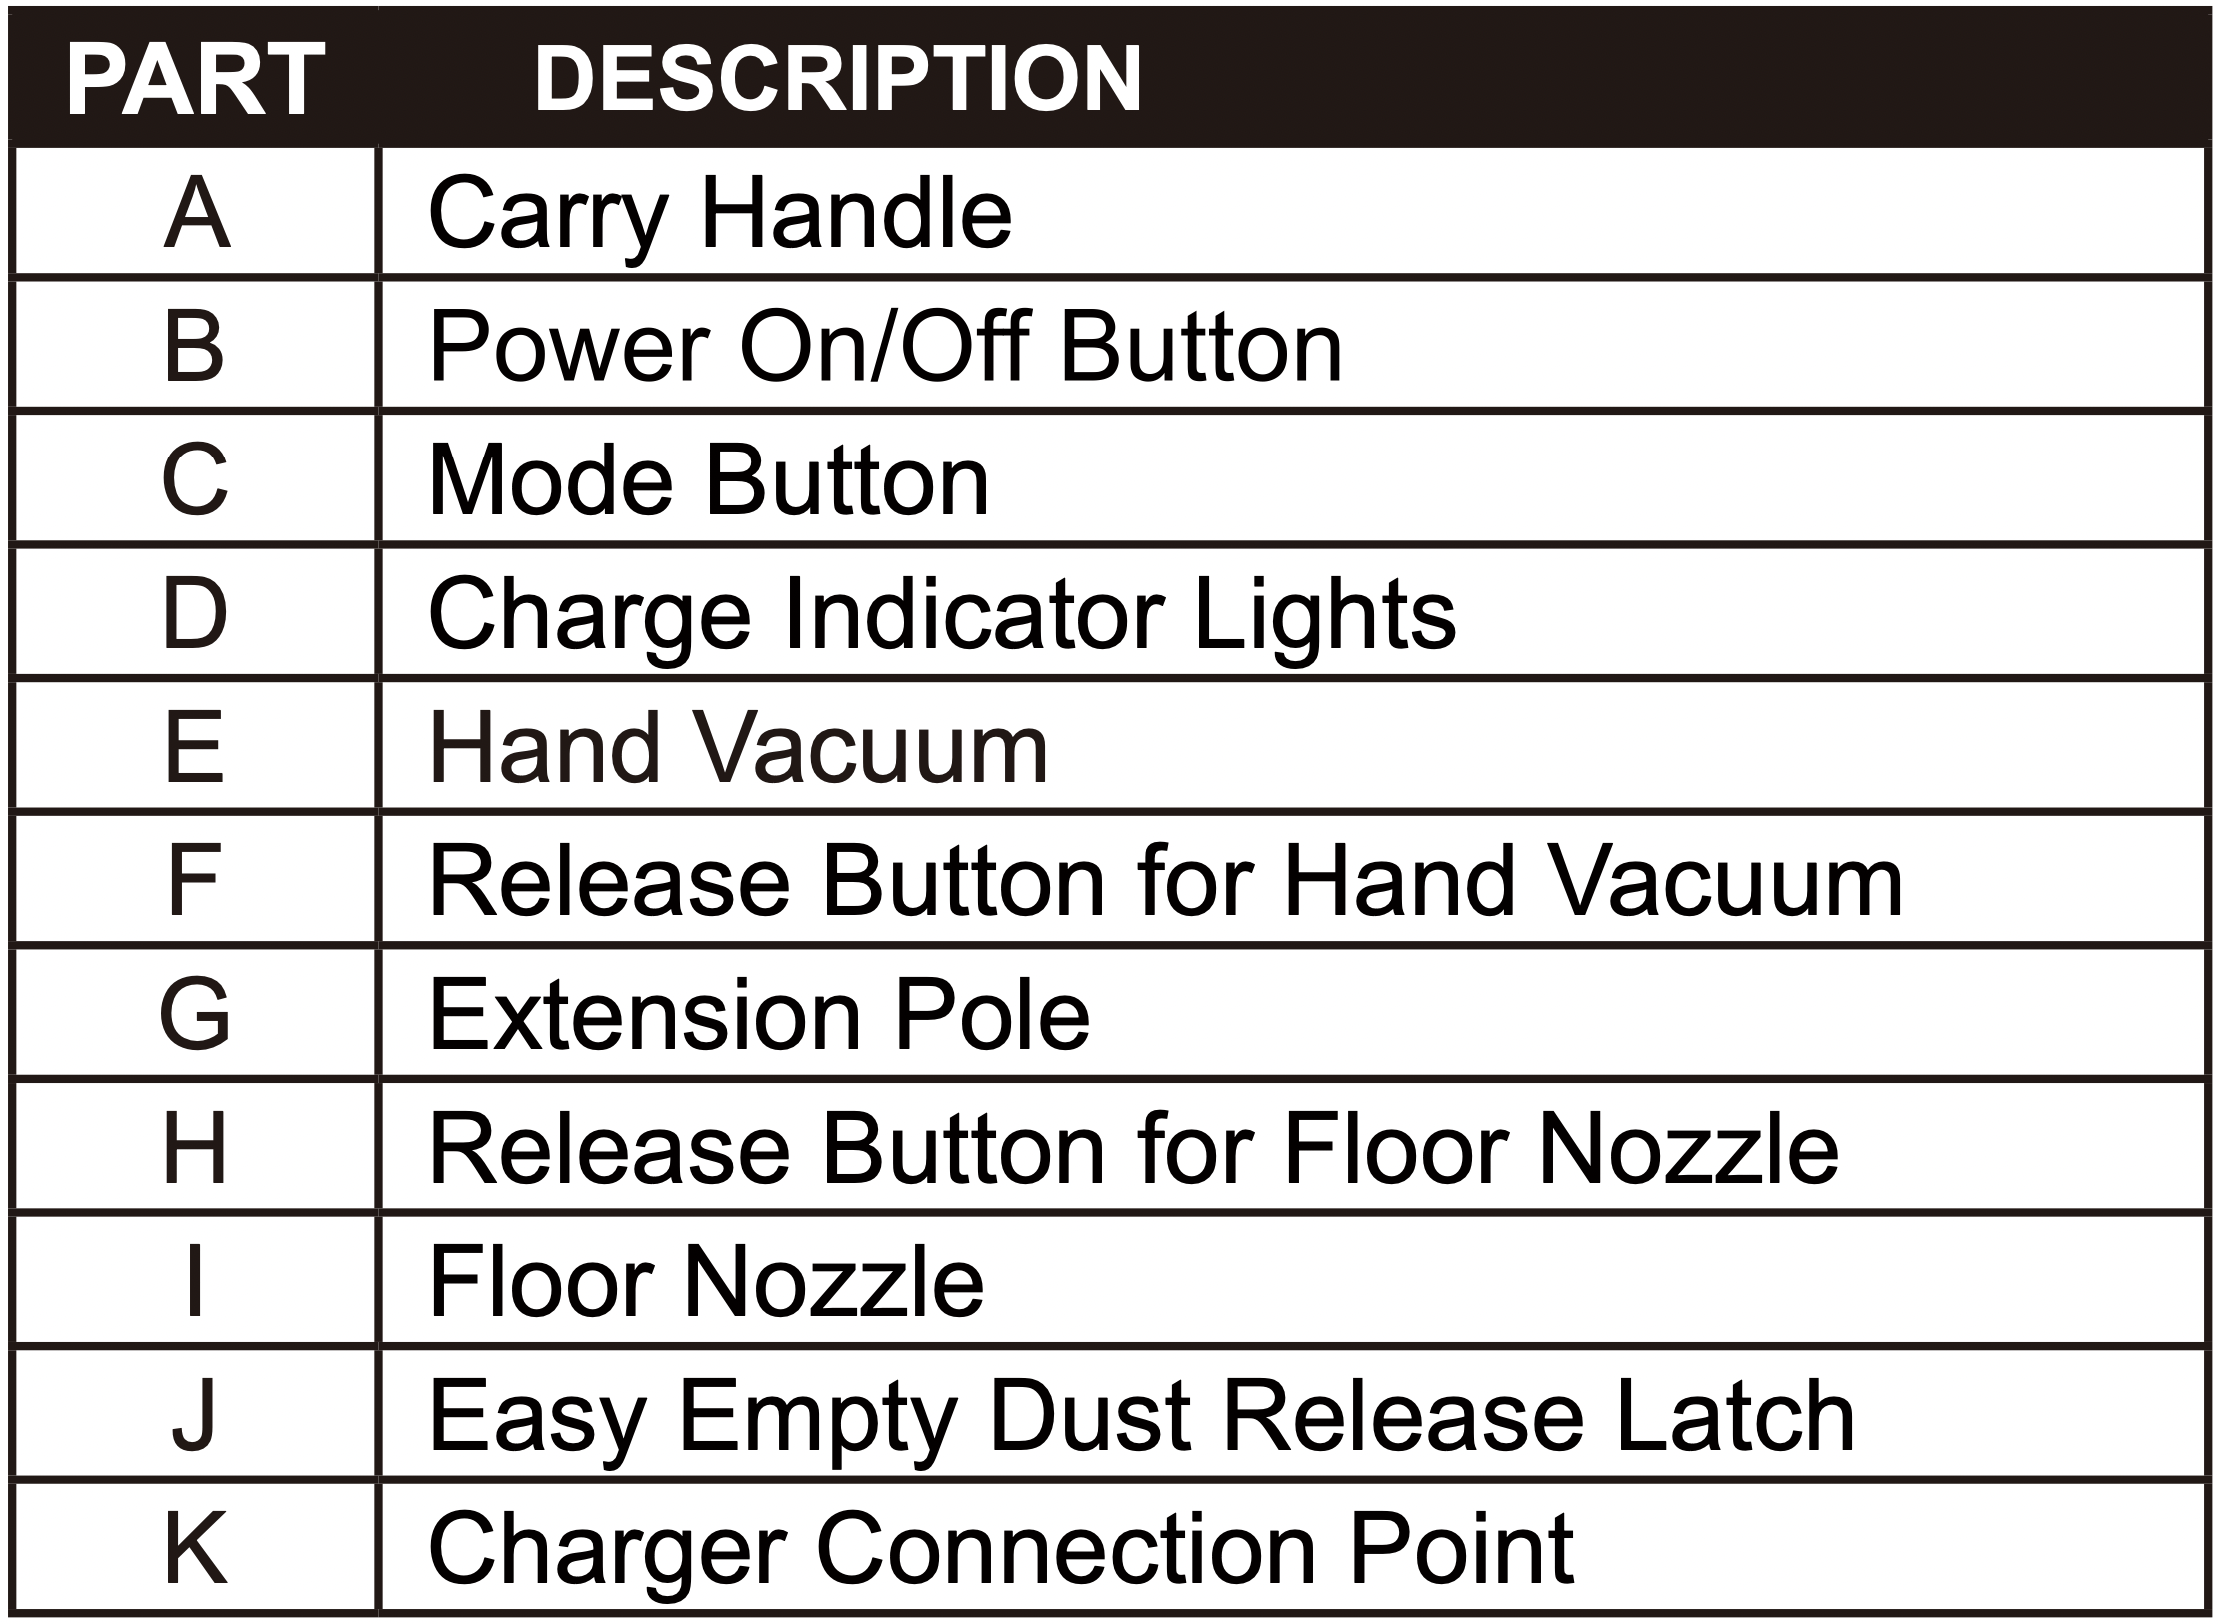
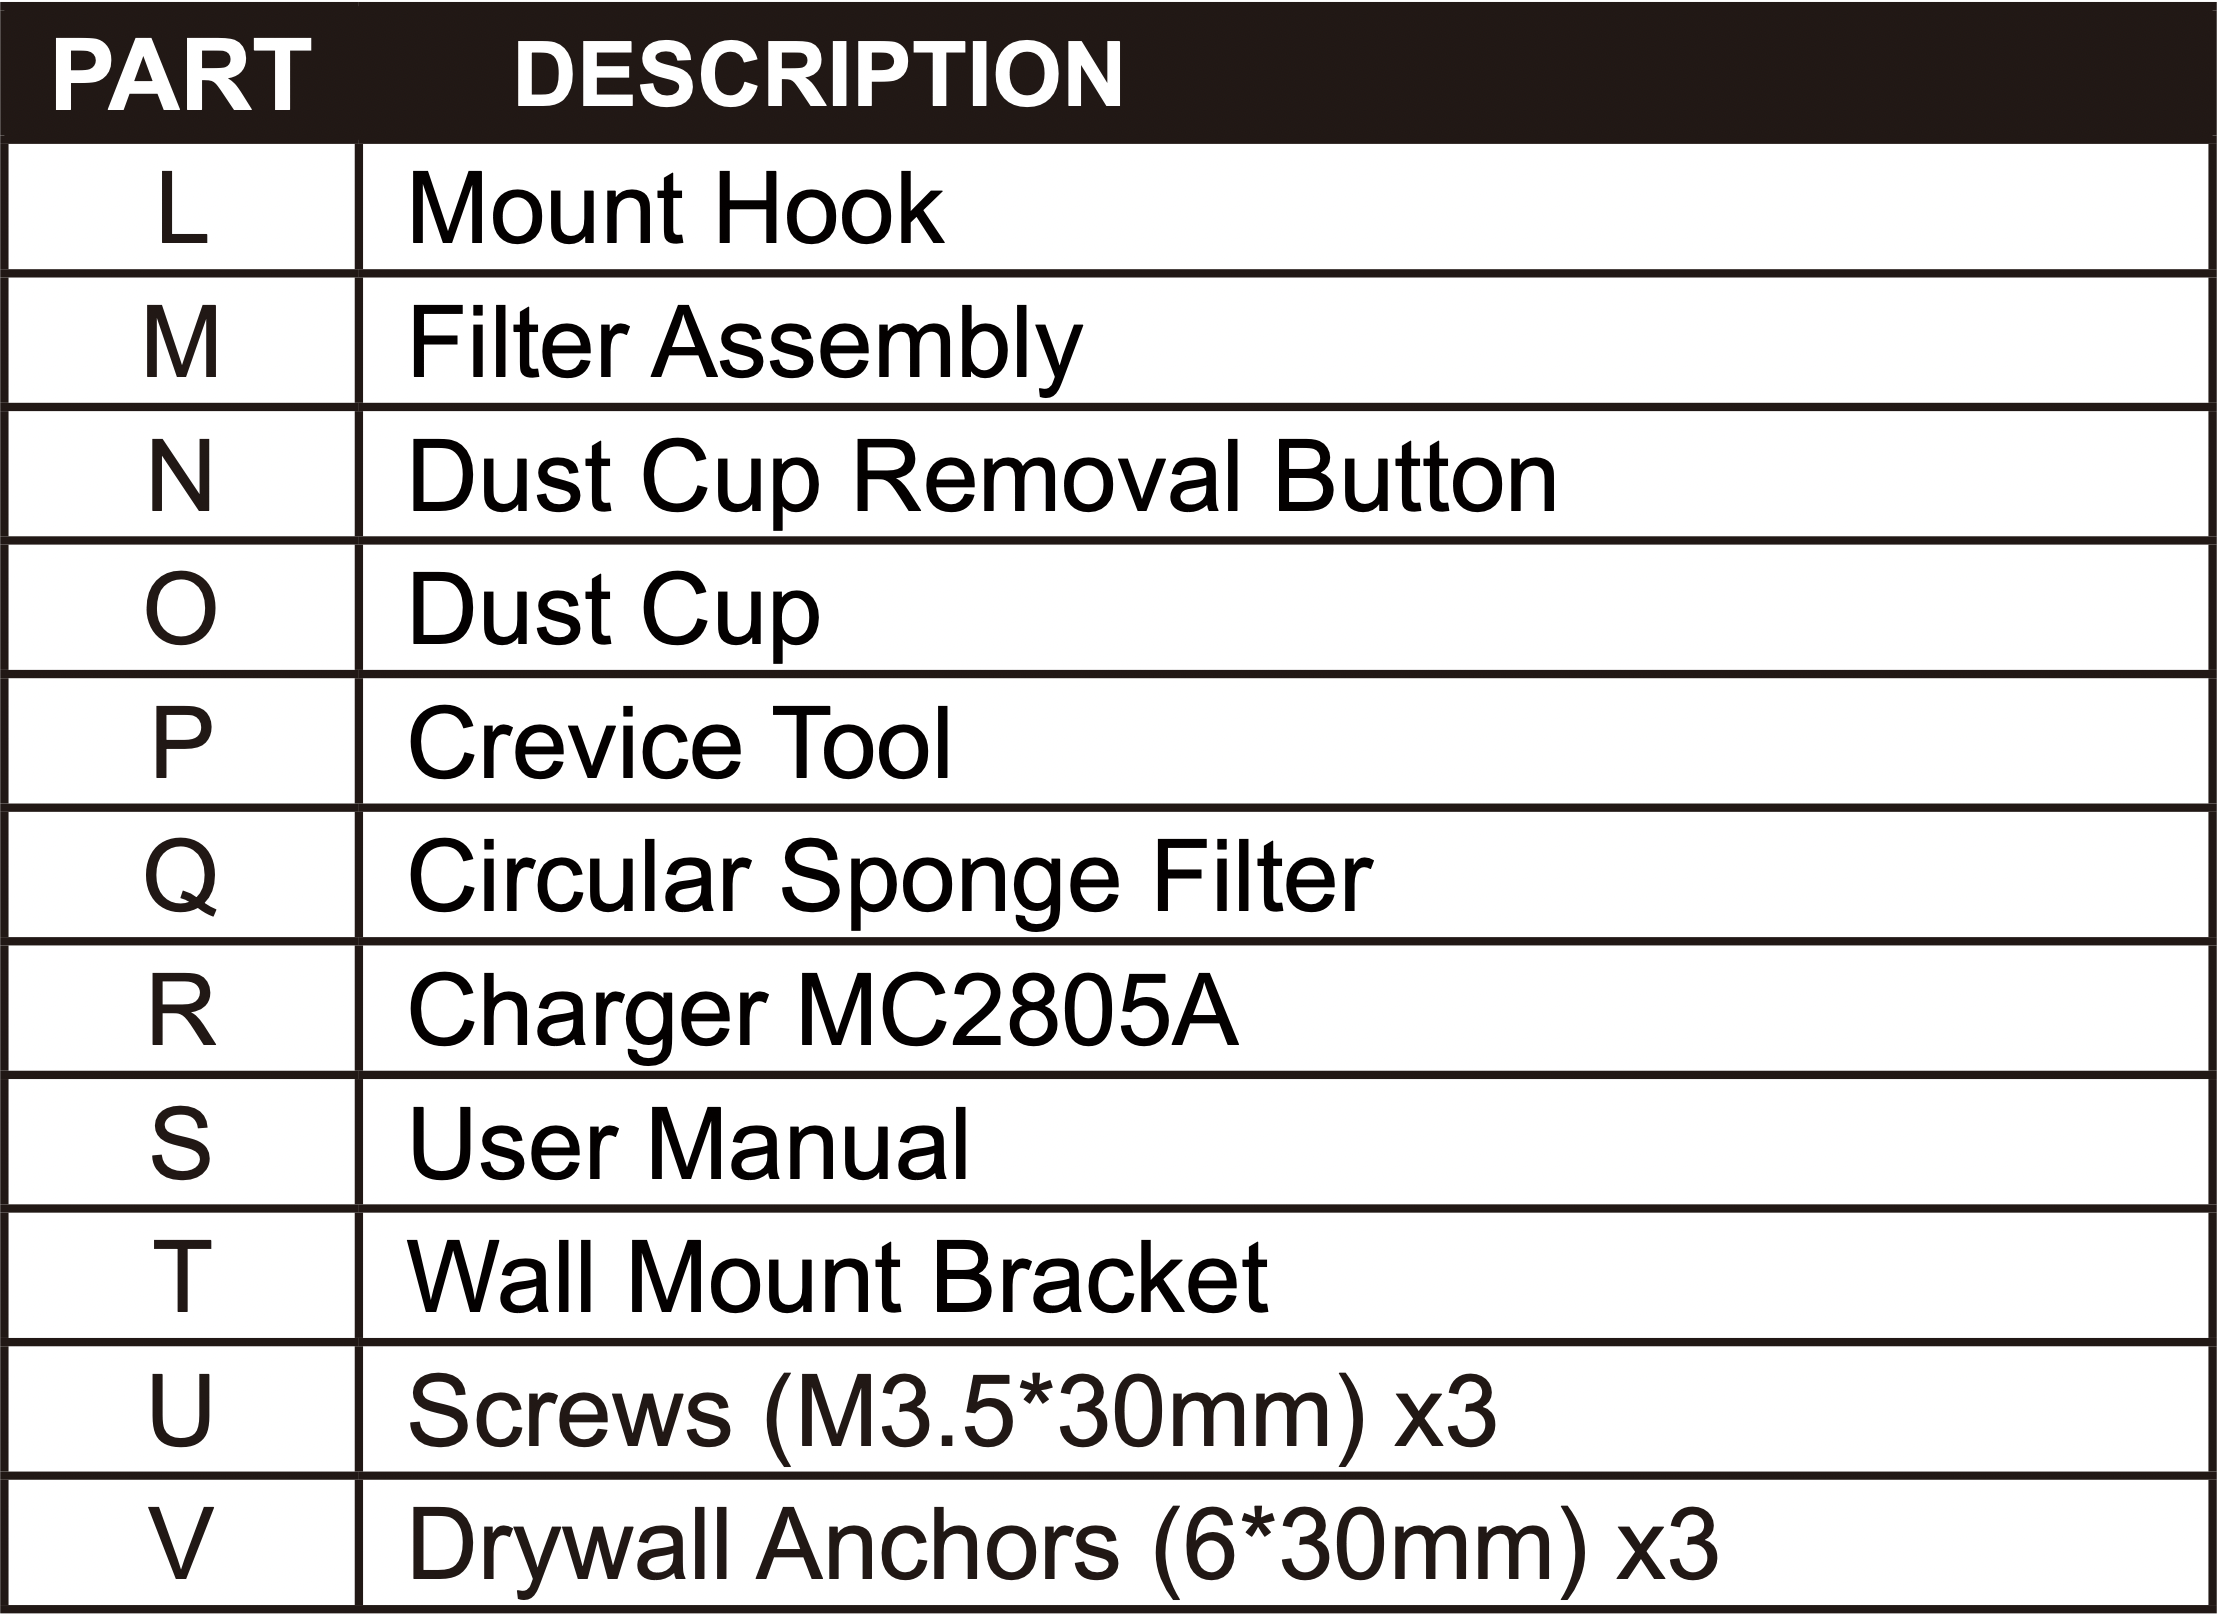
What comes in the carton

Charging the stick vacuum cleaner
Charge battery fully before using for the first time. This may take up to six hours.
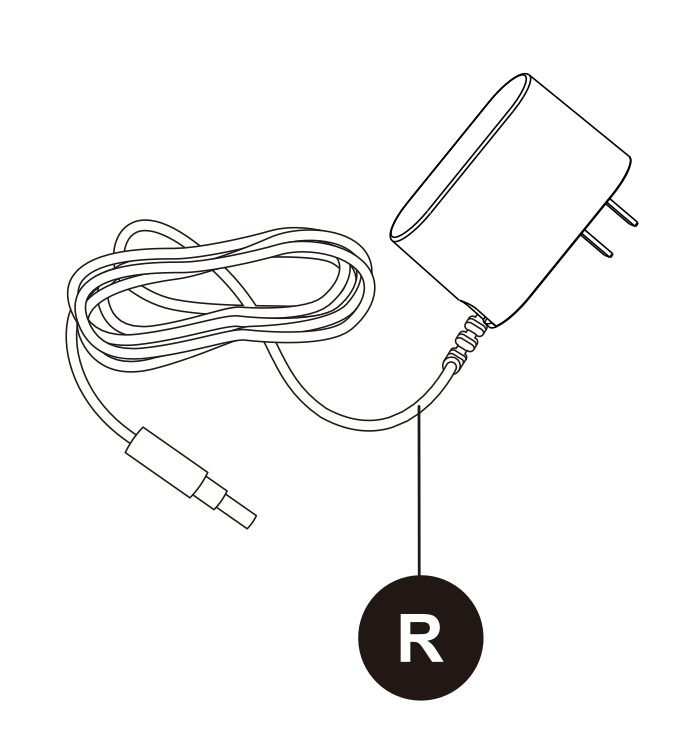
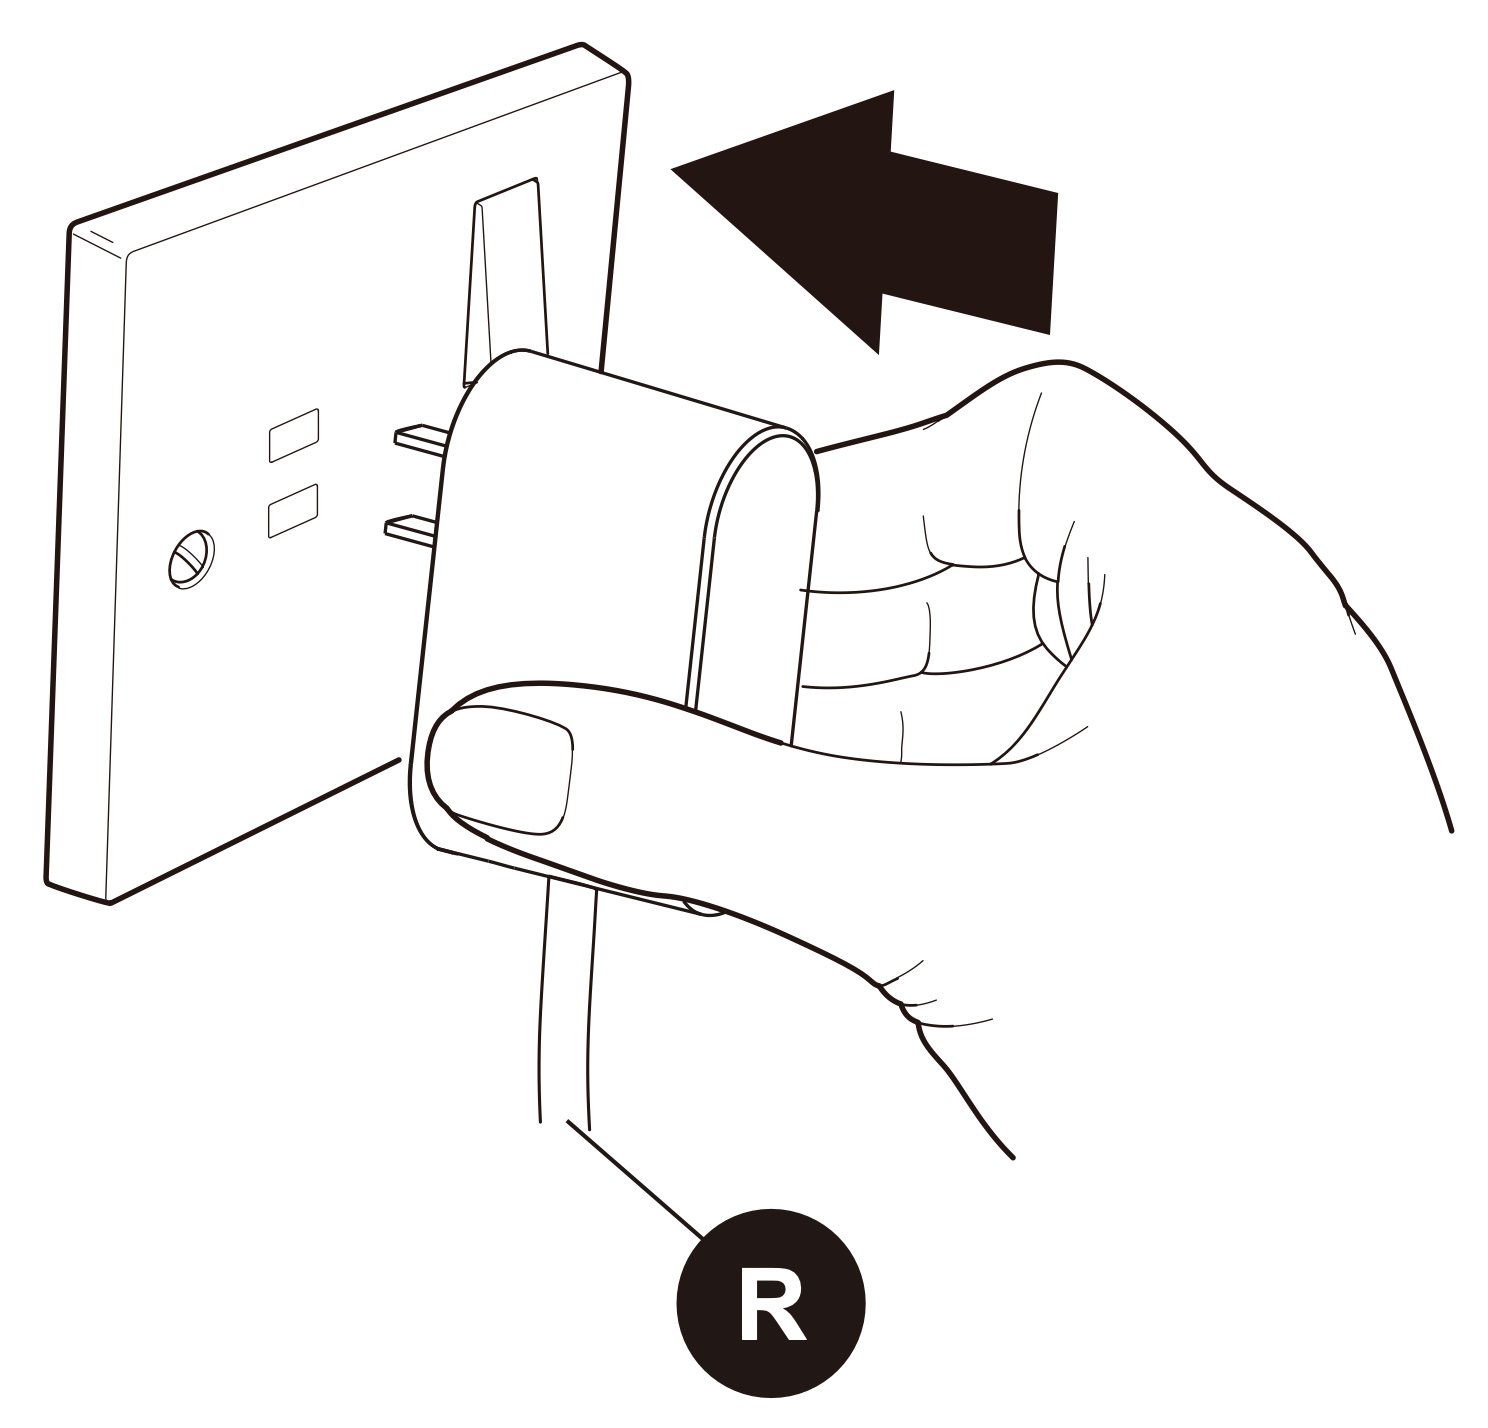
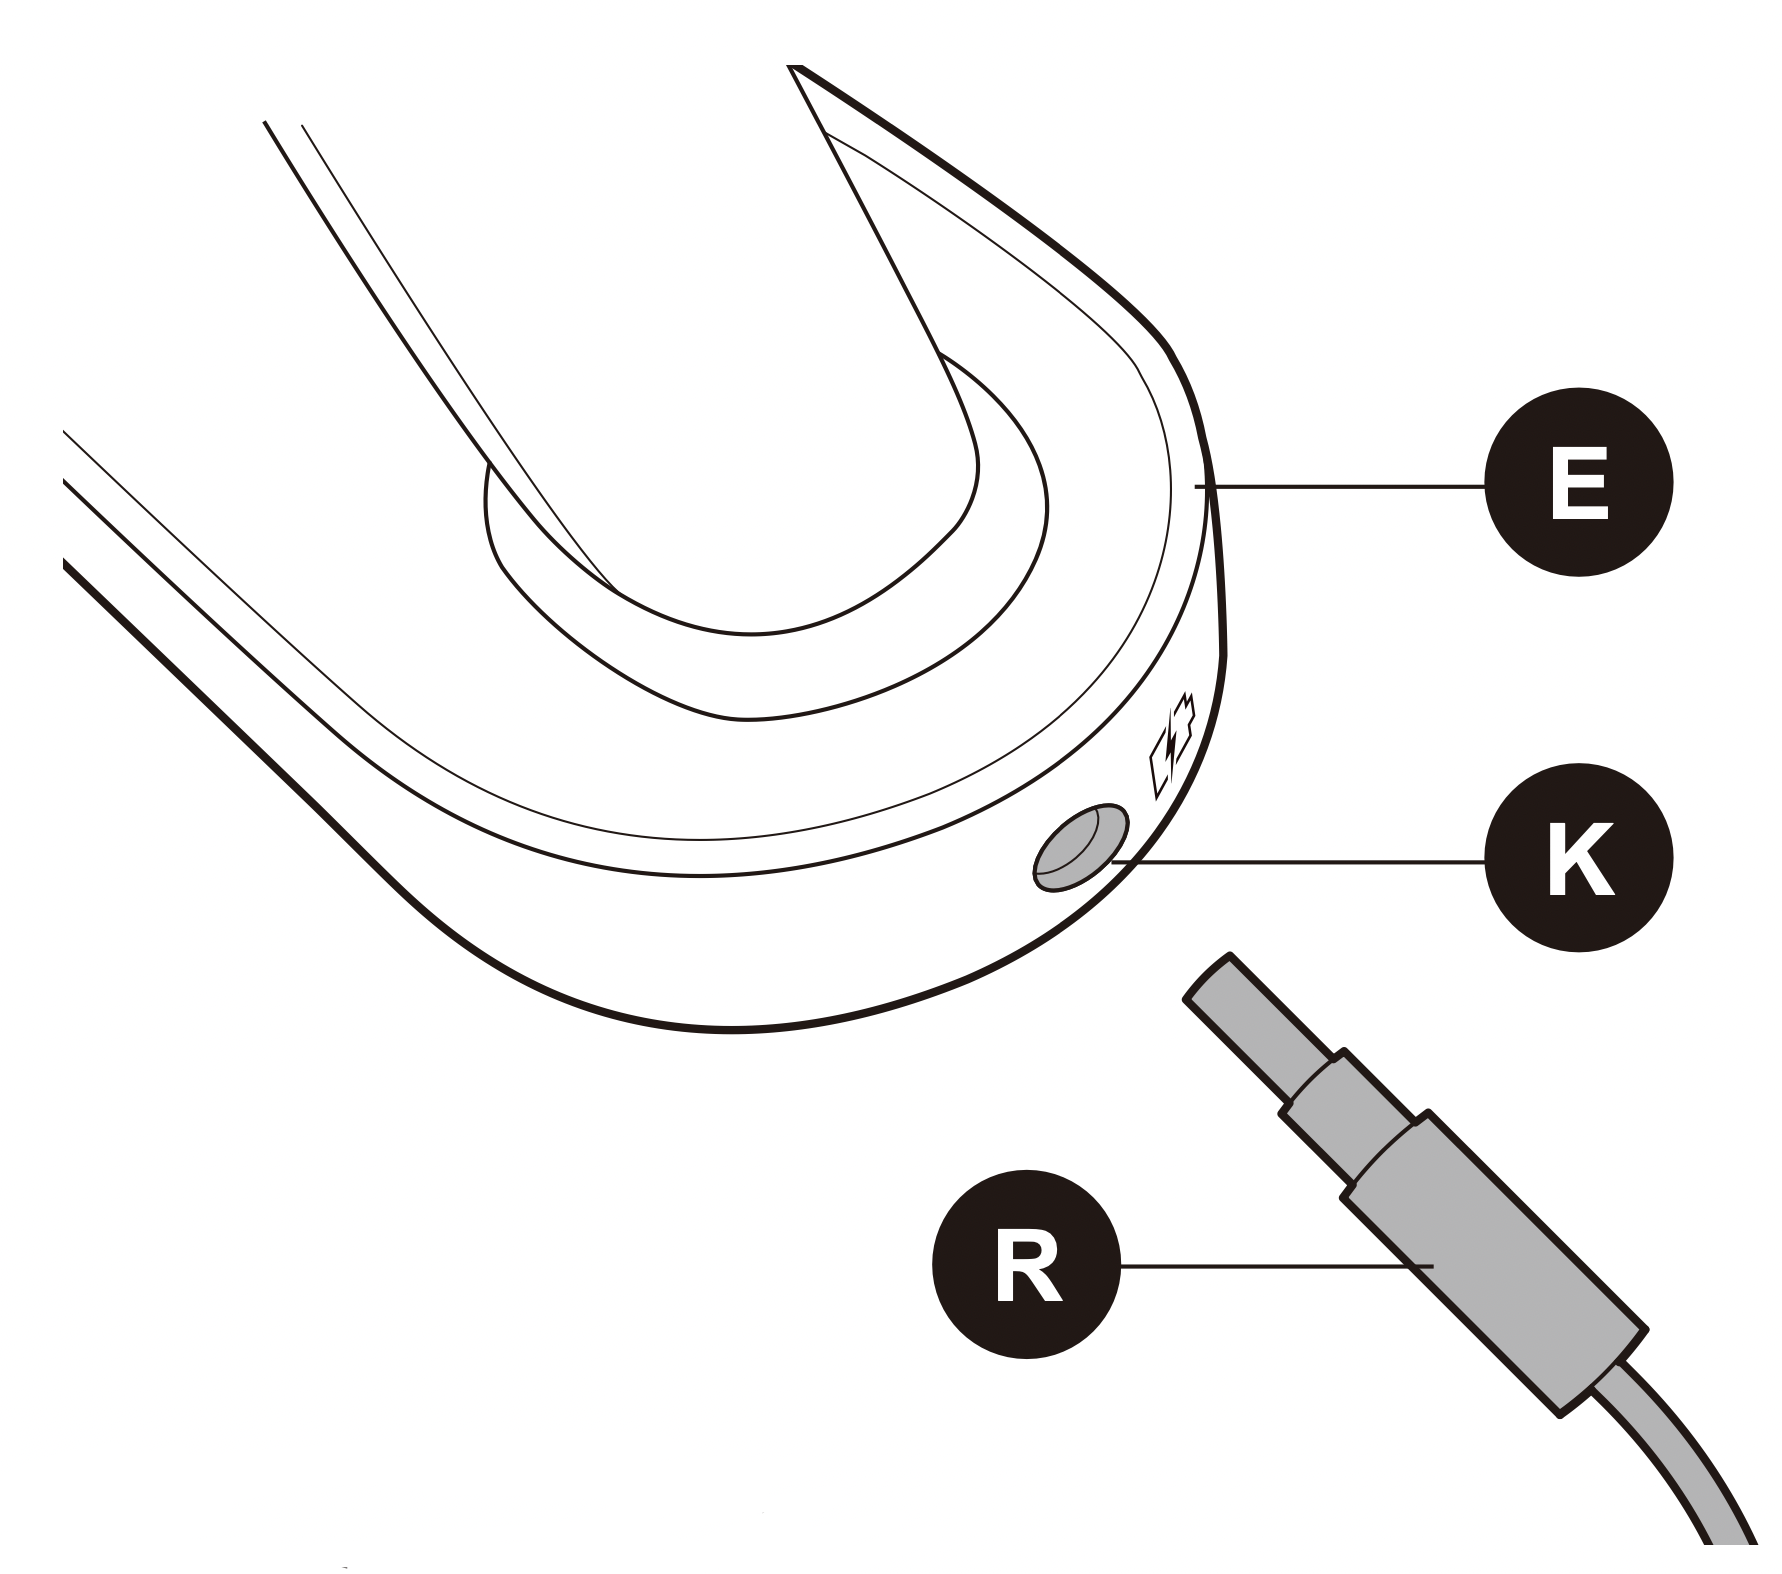
- Plug charger (R) into power outlet on the wall.
- Plug the charger connection (R) into the charger port (K) on top of vacuum handle (E).
- Both top light and lower light of charge indicator lights (D) is charging.
- Once fully charged, both charge indicator lights (D) then they will turn off.
- Once the vacuum has been fully charged, unplug from the power outlet.
Note: Do not leave the stick vacuum unattended while charging. The appliance will not work while it is charging.
Easy assembly
Before assembling, disassembling or attaching accessories ensure that the vacuum is turned off and not connected to a power source.
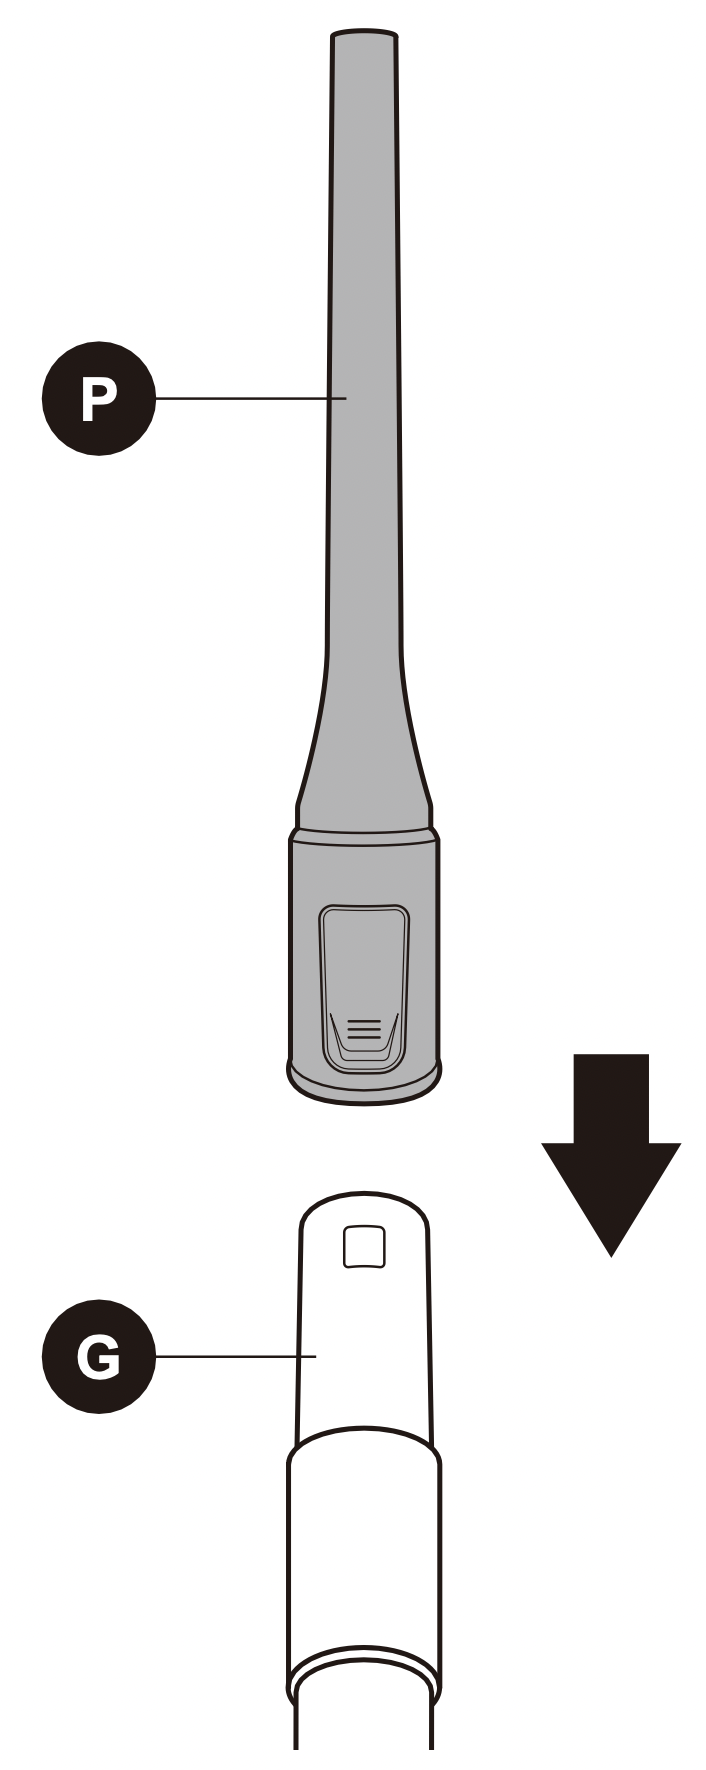
1. Align the extension pole (G) with the top of the floor nozzle (I) and push down until it clicks into place.
2. Align the hand vacuum (E) with the top of the extension pole (G) and push down until it clicks into place. The stick vac is now fully assembled and ready to use.
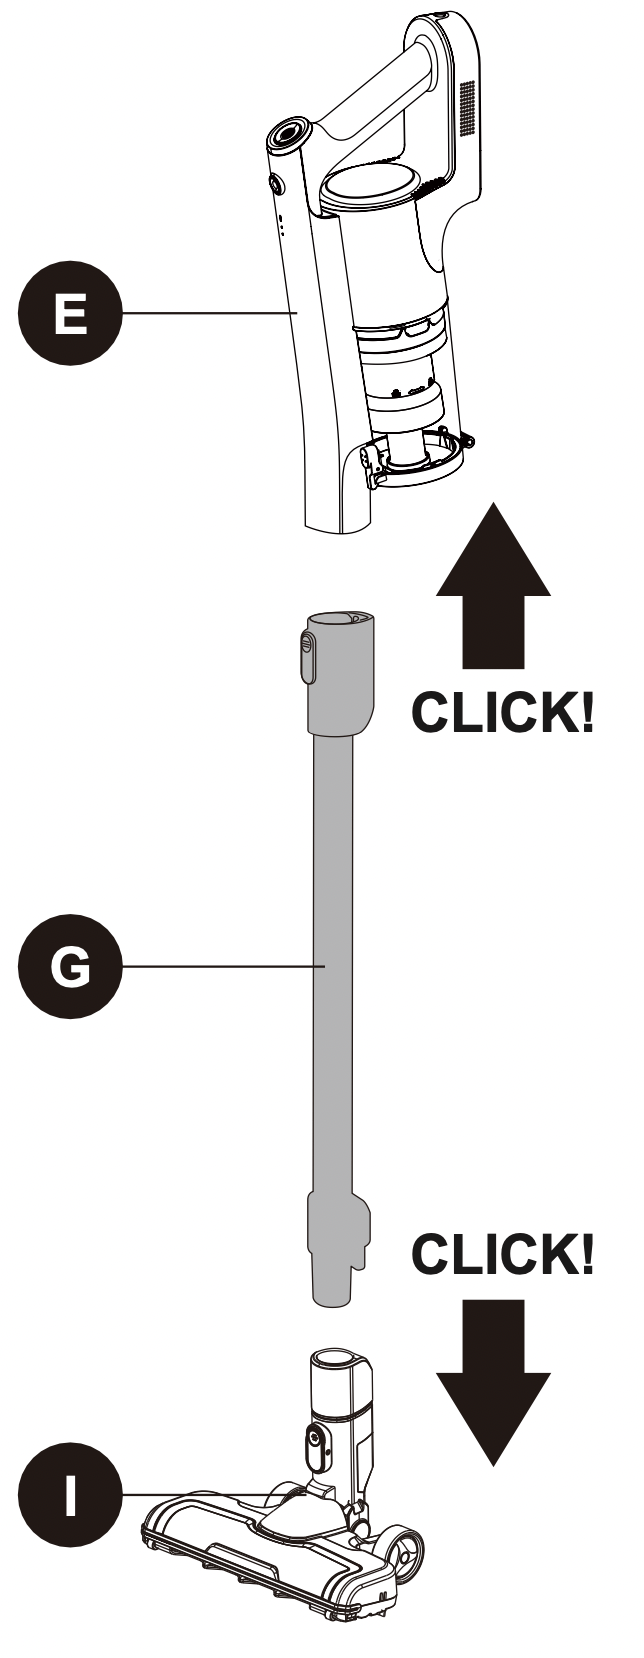
3. To disassemble the hand vacuum (E) from the extension pole (G), simply push the release button for hand vacuum (F) on the extension pole (G) and pull away.

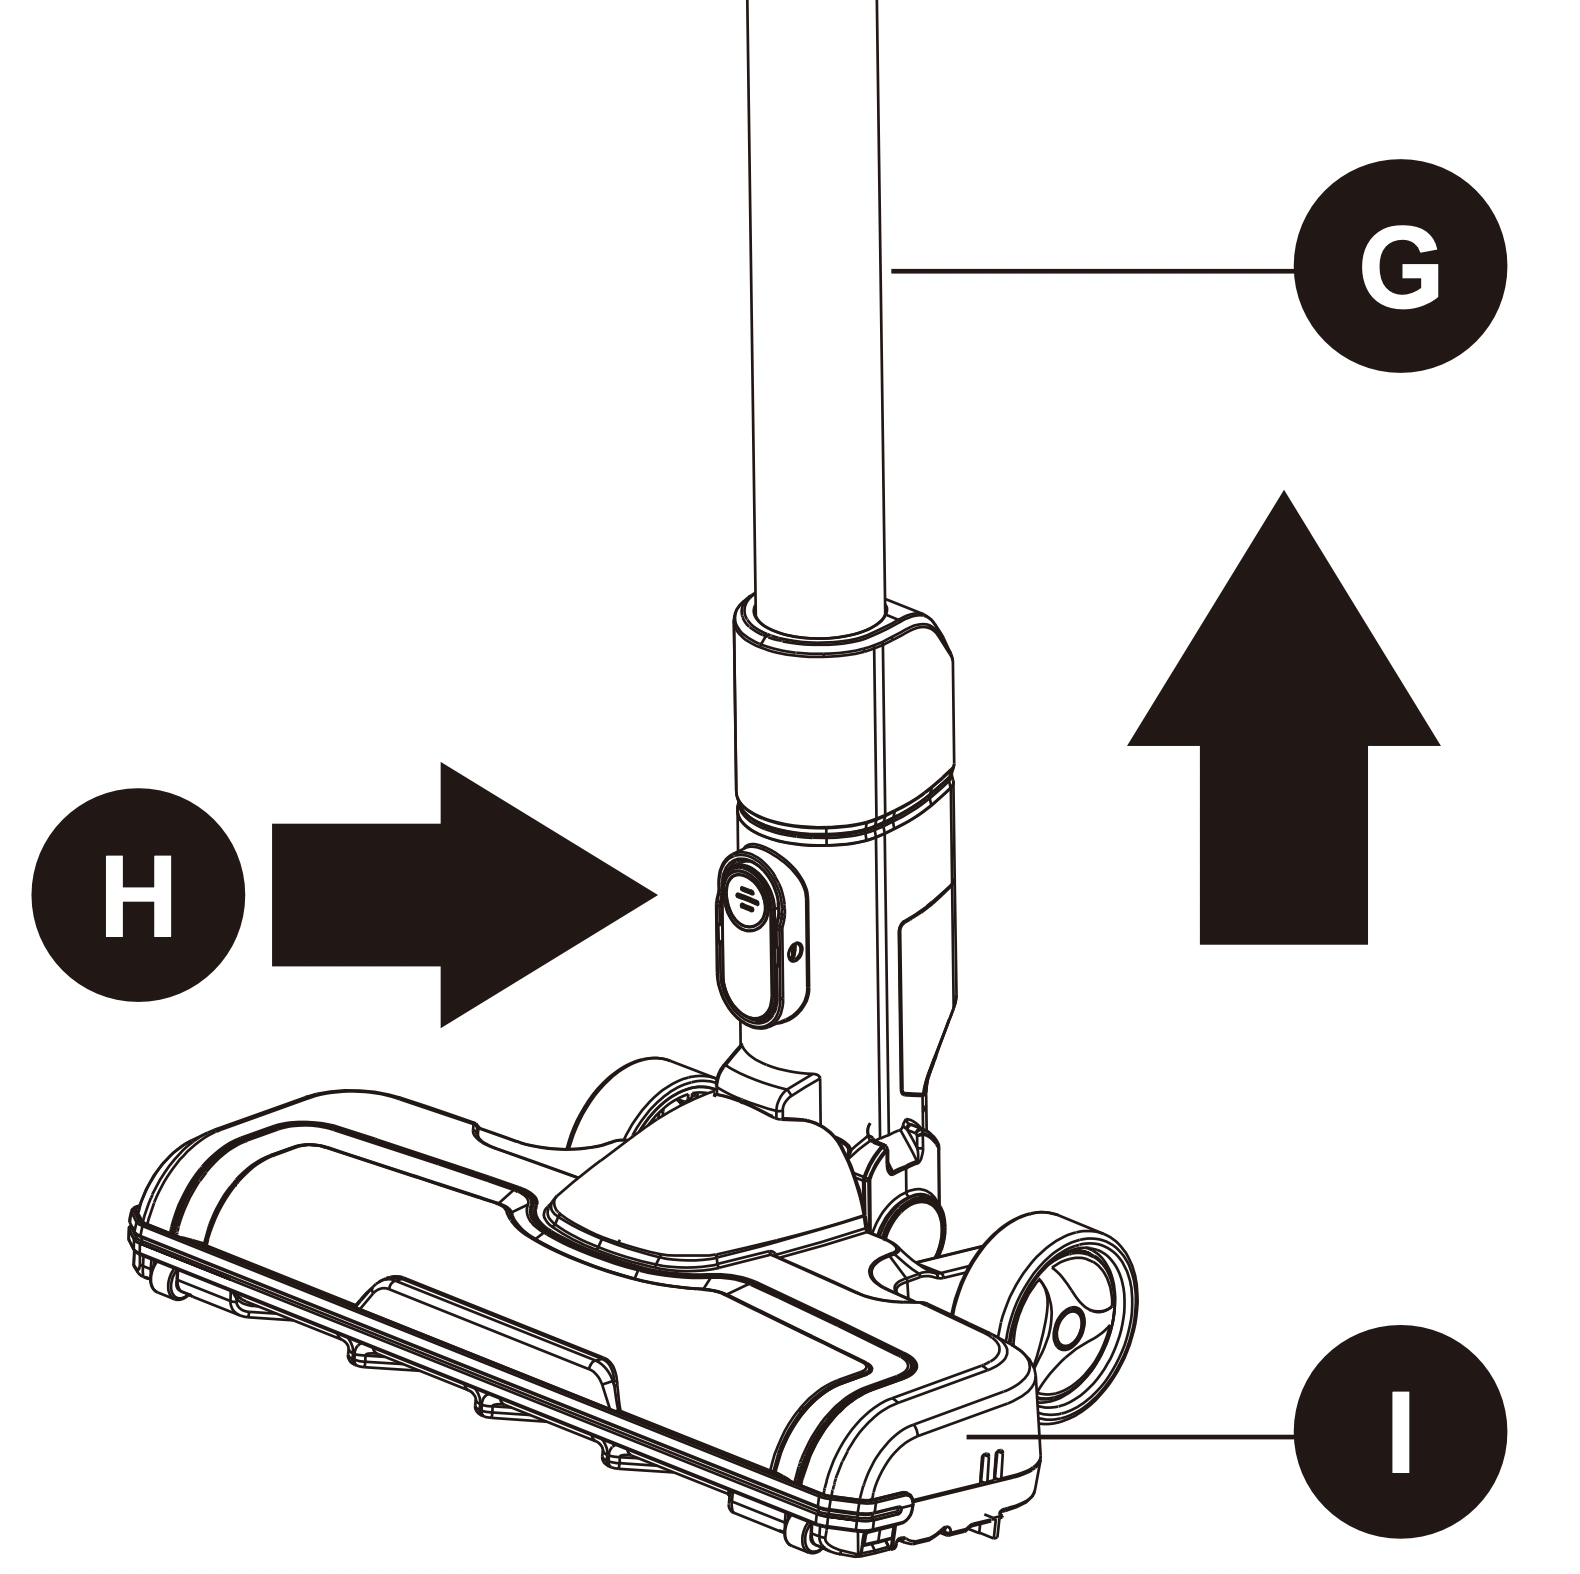
4. To remove the floor nozzle (I) from the extension pole (G), push the release button for floor nozzle (H) down and pull the extension pole (G) up and out.

How to use the stick vacuum cleaner
Ensure the stick vac is fully charged and assembled before using. Always take care when vacuuming stairs.
1. There are two power settings on the stick vac: Max mode (this has a higher suction power but a shorter running time, approx 15 mins) and Eco mode (lower suction power with a longer running time, approx 30 mins).
The stick vac will always start in Max mode. The run time may vary depending on the surface being cleaned.
2. For the ‘Max’ mode simply press the power button (B), while for ‘Eco’ mode press the power button (B) followed by the mode button (C). The Max mode light will illuminate when in ‘Max’ mode and go out when switched to 'Eco' mode. When required. press the power button (B) again to turn off the stick vac.

3. Move the floor nozzle back and forth over the surface. Use even strokes. Don't press hard; allow the stick vac to suck away the debris.
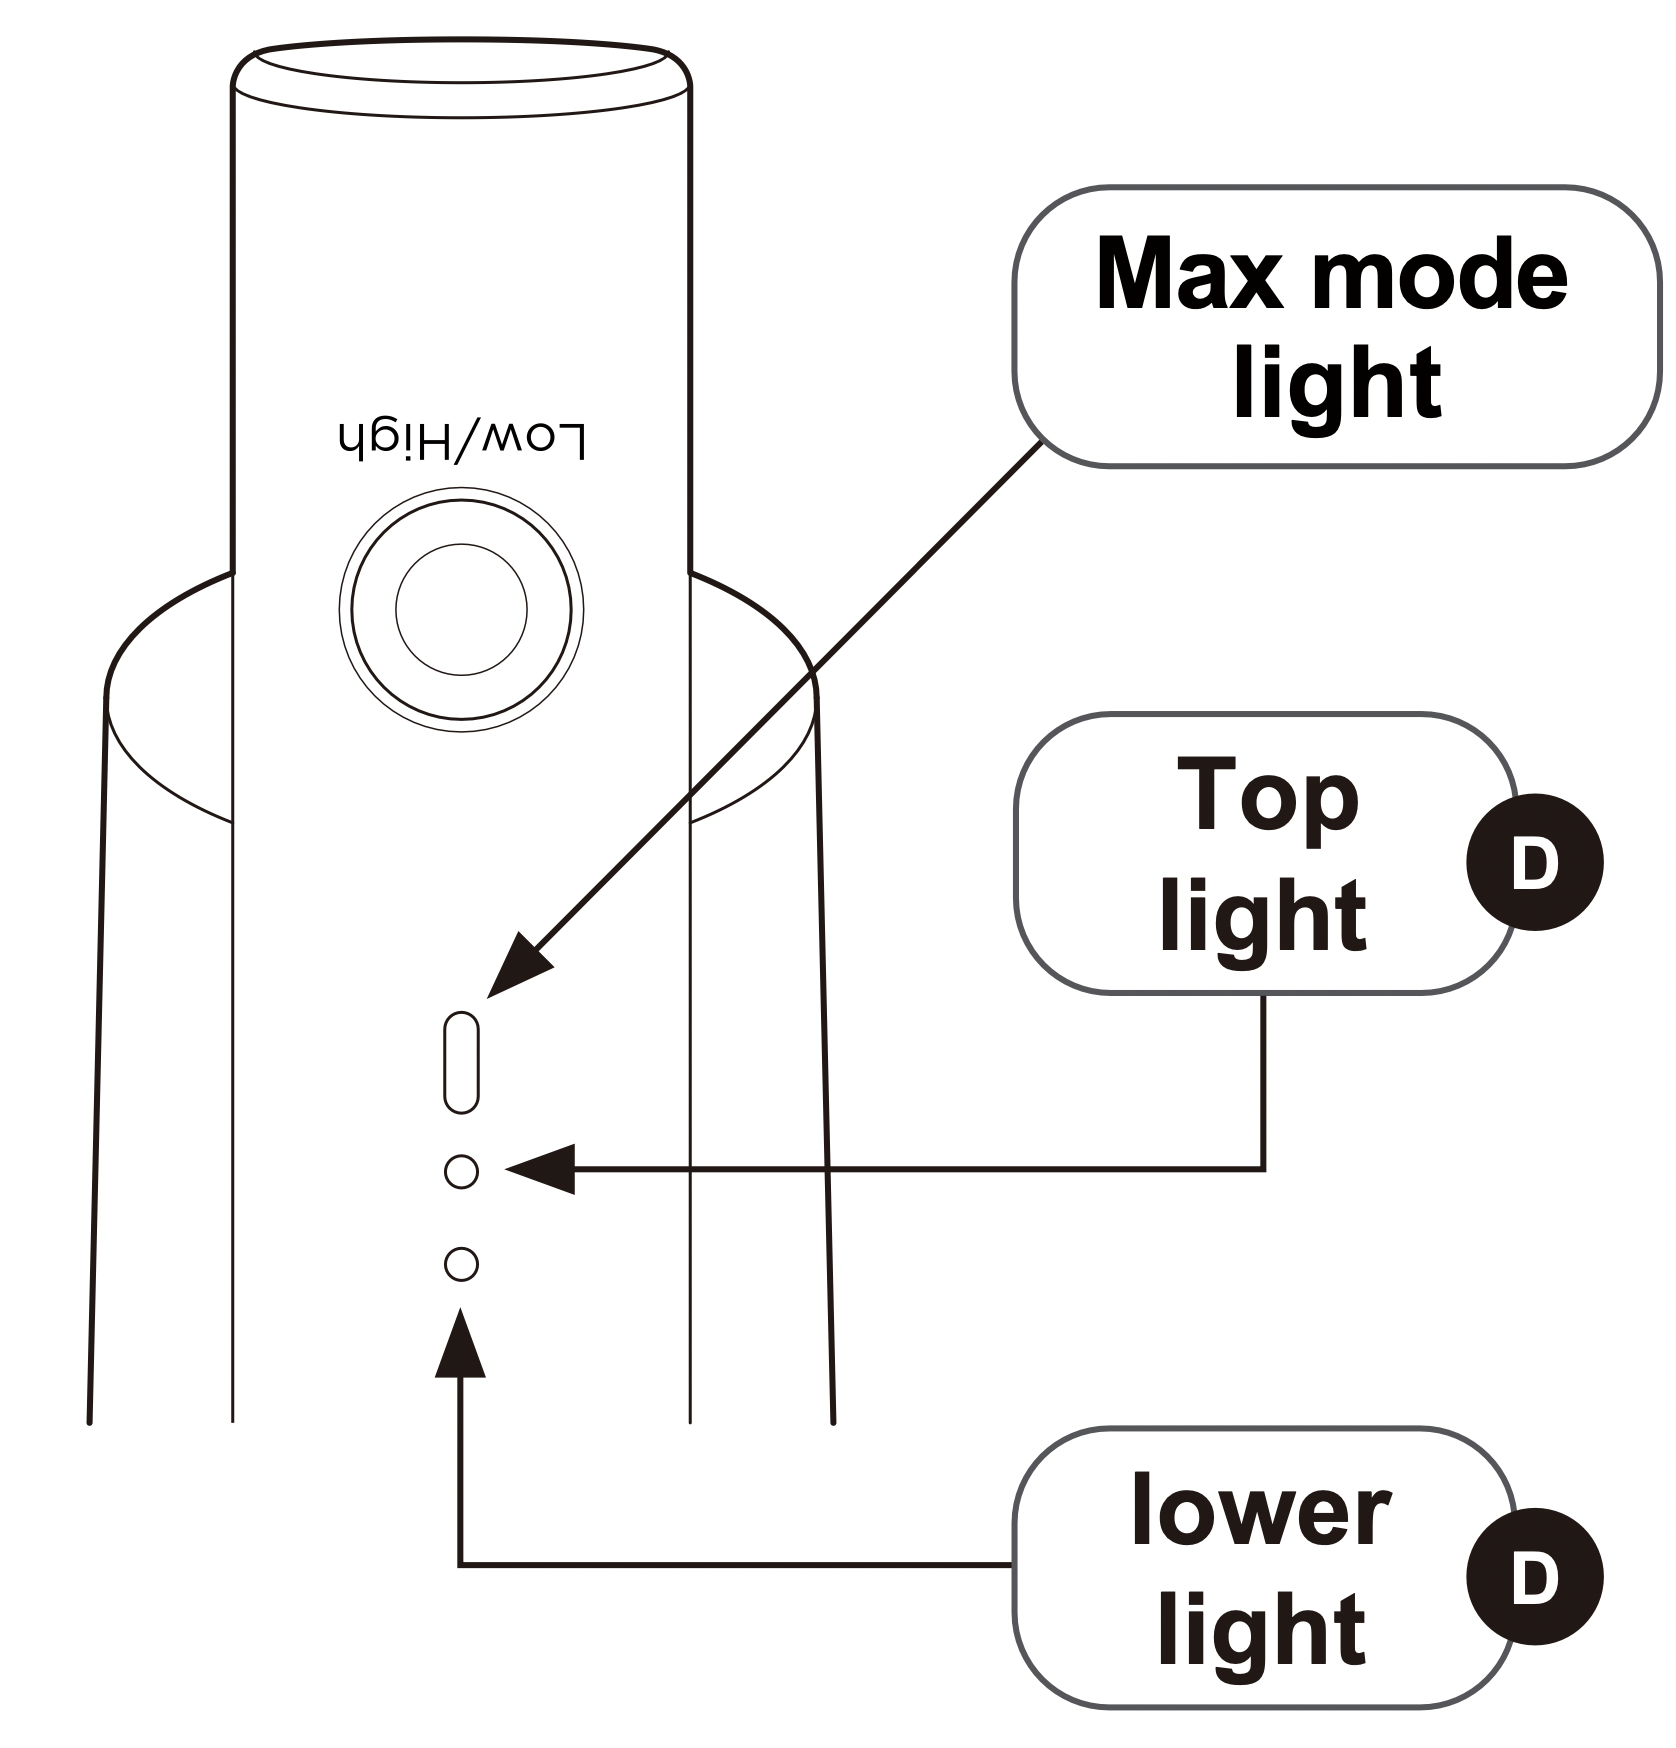
4. The stick vac has charge indicator lights (D), these are the two small lights on the handle.
While charging – the lower light will flash and the top light is off.
Half charged – the lower light is on and the top light will flash.
Fully charged – Both lights are on for around 10 minutes, then they will turn off. When in use and the battery is almost gone, the bottom light will be off and the top light will flash. After approximately 10 seconds the stick vac will automatically switch off.
5. It is advisable to empty the dust cup after each use. For best performance, check the filters are clean (see the ‘Removing and cleaning the dust cup and filters' section of this manual).
When changing the attachment ensure the stick vac is switched off.
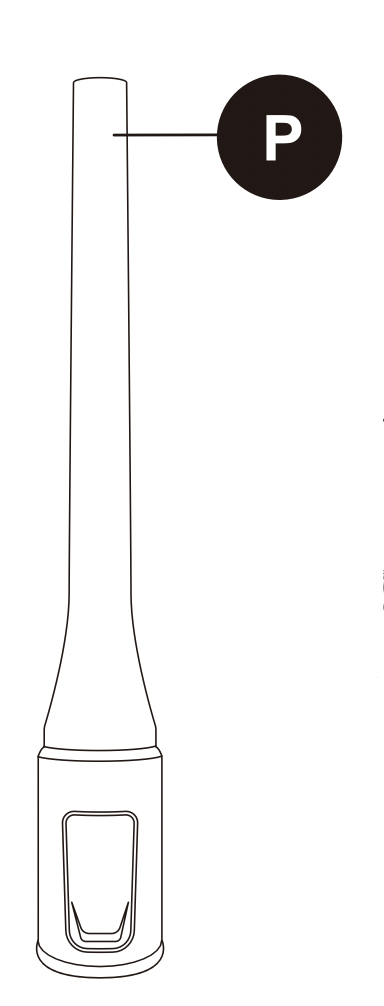
The crevice tool (P) can fit directly onto the hand vacuum (E) for close up vacuuming and low level dusting and cleaning.
For high level cleaning the tools can fit on the end of the extension pole (G).
1. Remove the floor nozzle (I) from the extension pole (G) by pushing down on the release button for floor nozzle (H) and pulling the extension pole (G) away from the floor nozzle (I).
2. Slide the crevice tool (P) onto the end of the extension pole (G) until it clicks into place. The attachment is now ready to use.
How to maintain your vacuum cleaner
Dust cup- Empty after each use
Ensure the stick vac is switched off and any attachments are removed before emptying the dust cup.
1. Hold the dust cup (O) assembly over a household bin and push the dust release latch (J) on the side of the dust cup. The debris will fall out into the bin.
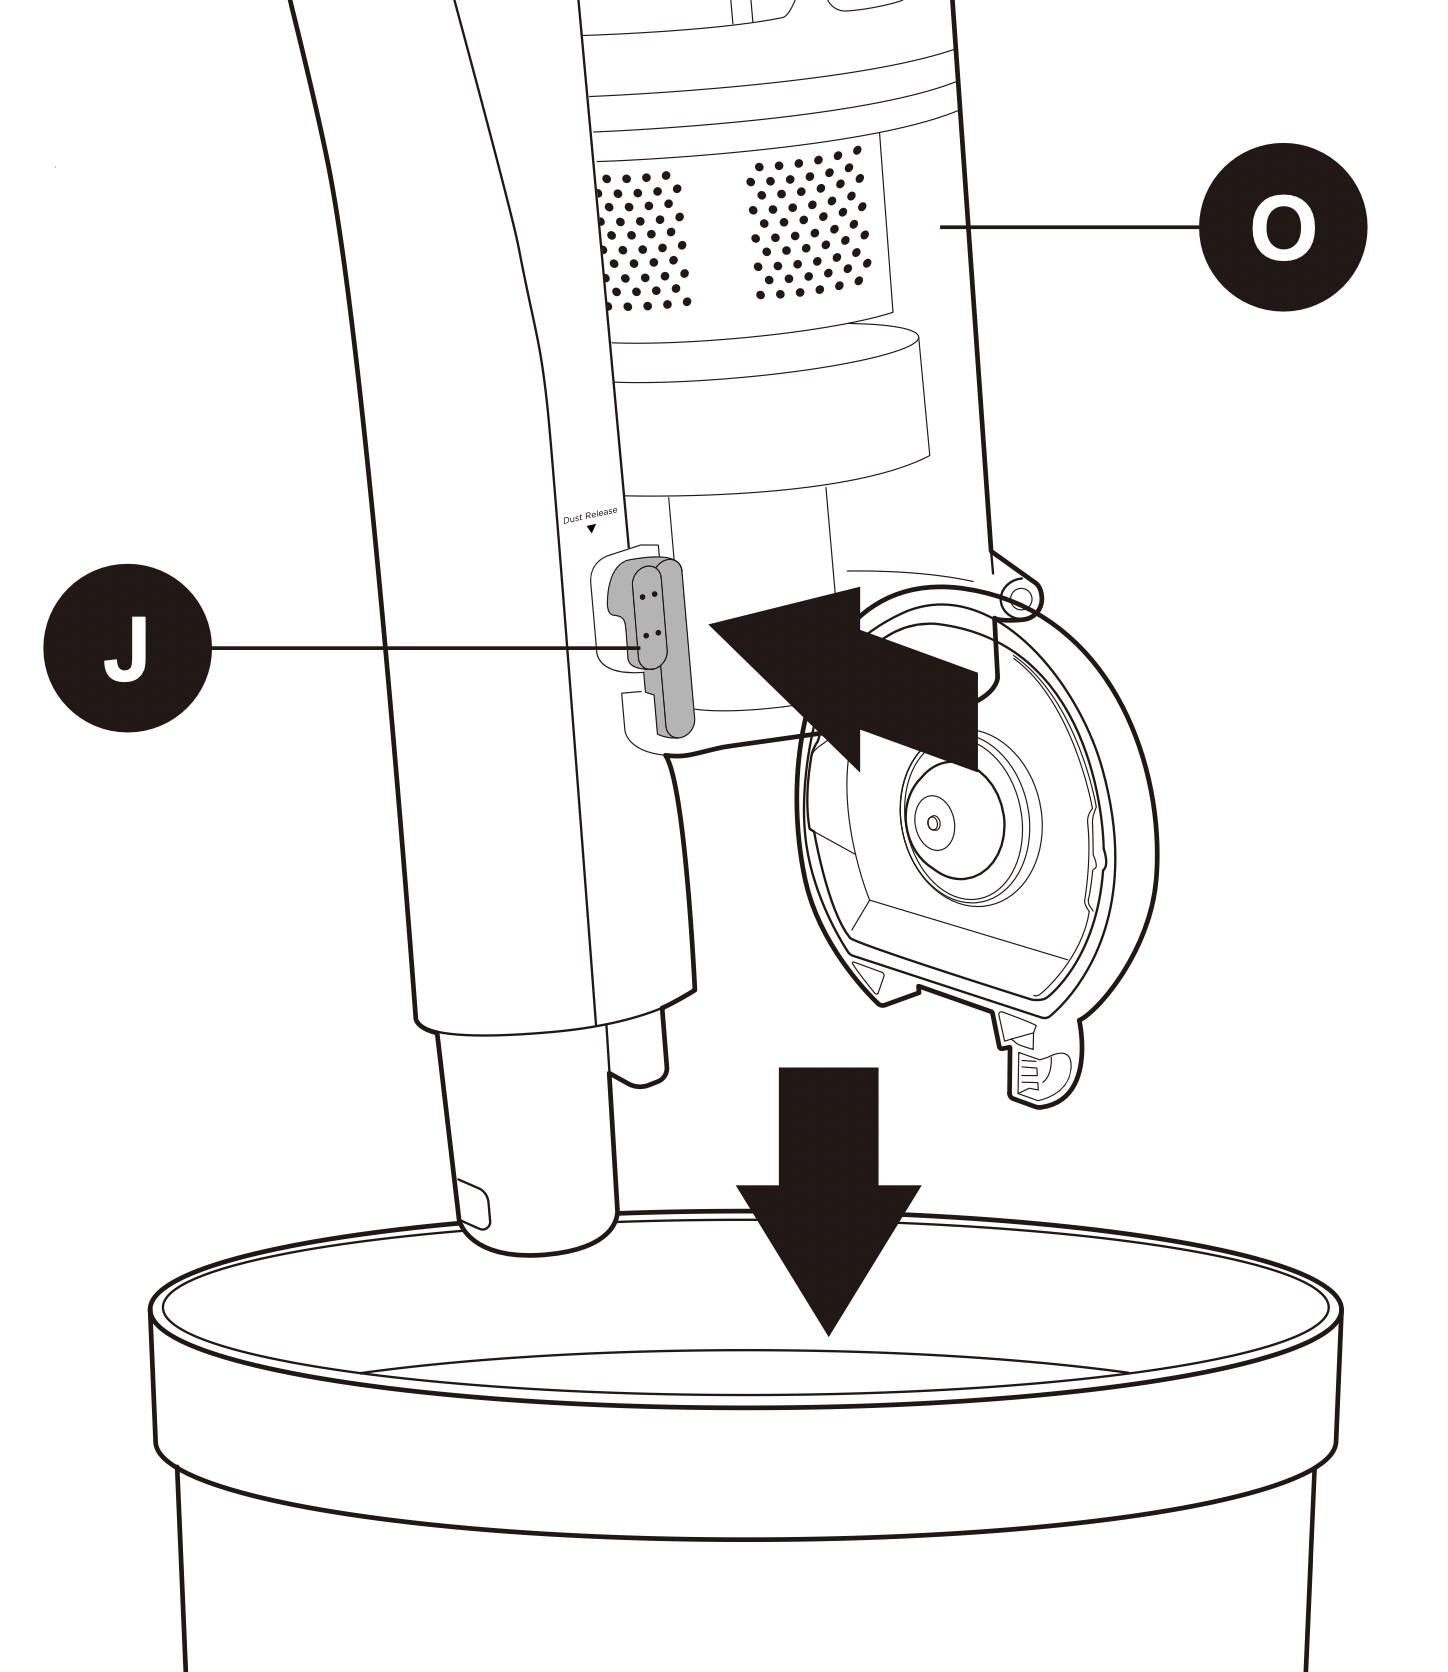
Please note: Do not allow thw dust cup to overfill. Don’t exceed the MAX level marker. Empty regularly.
Every time you empty the dust cup, check the filter assembly and tap gently over the household bin to remove any excess dust.
2. Once empty, close the lid until it clicks shut.
REMOVING AND CLEANING THE DUST CUP AND FILTERS
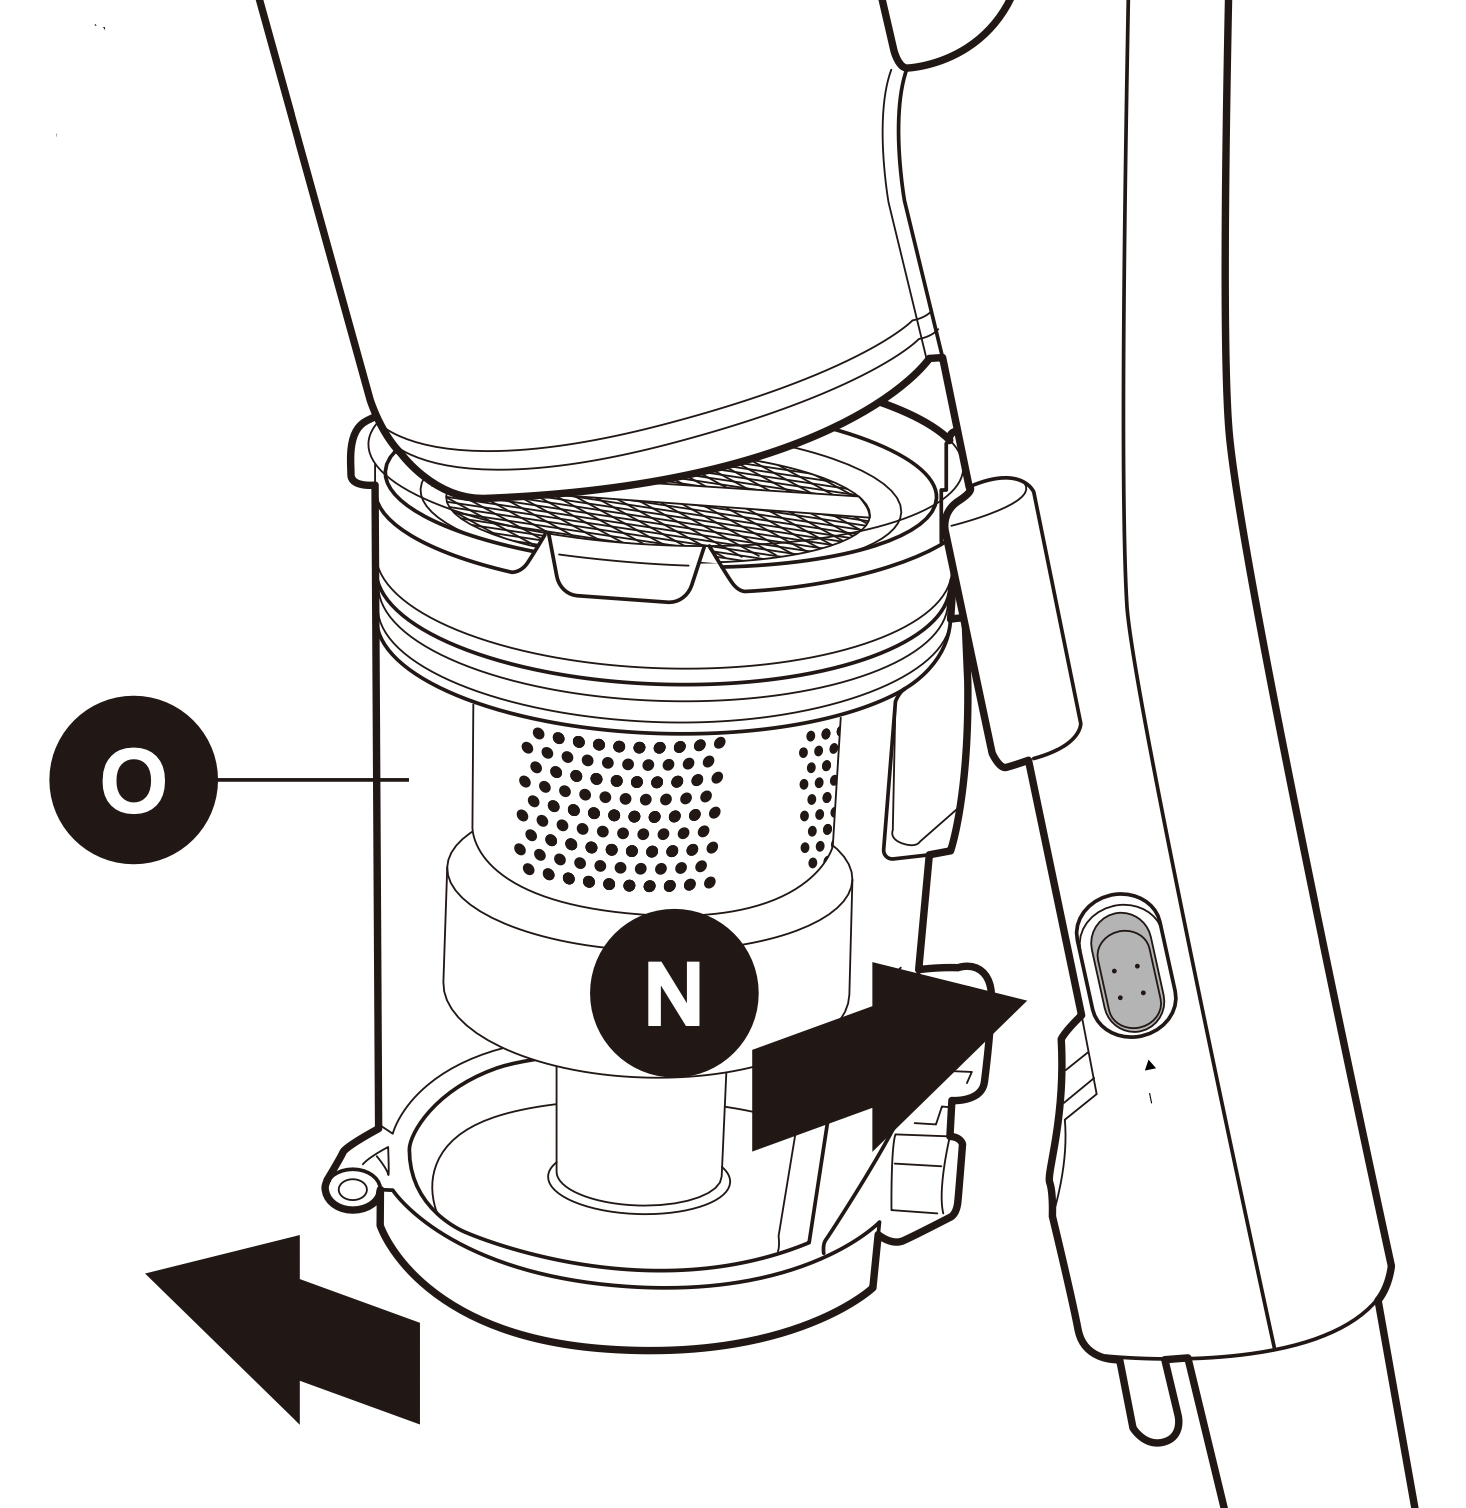
Before starting any cleaning, ensure the stick vac is not charging and is switched off. It is easier to remove the dust cup without any attachments on the stick vac.
1. Empty the dust cup as shown in the ‘Emptying the dust cup’ section of this manual.
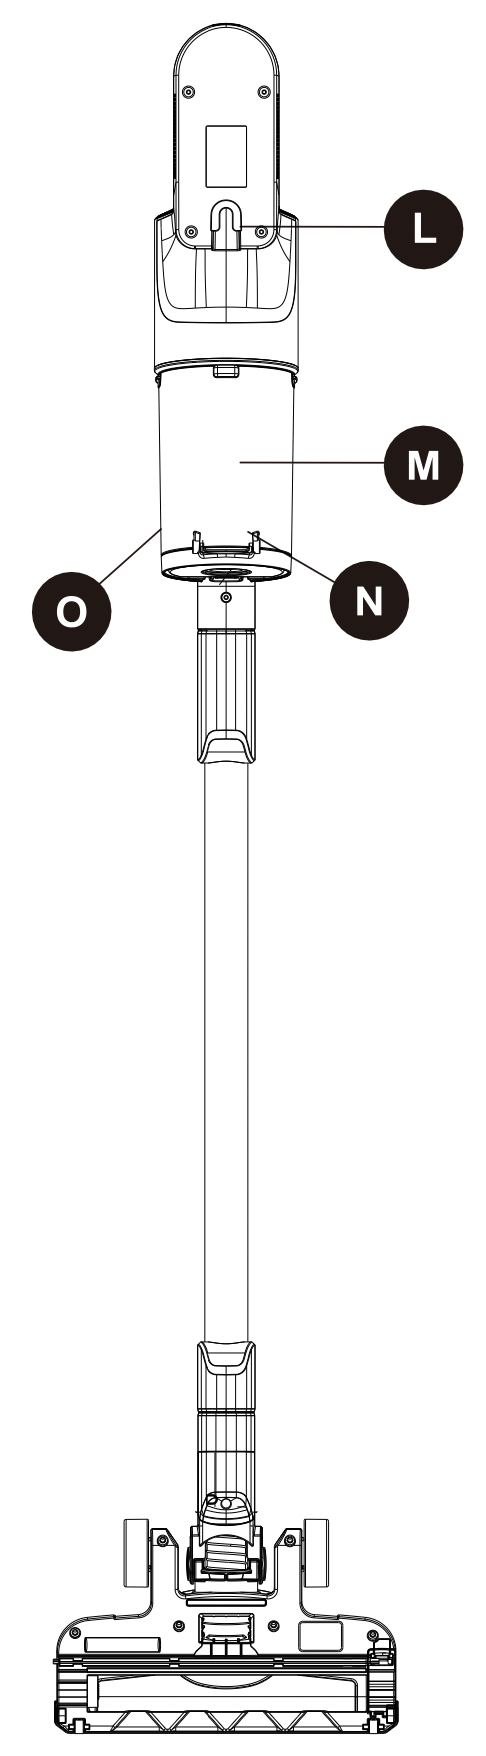
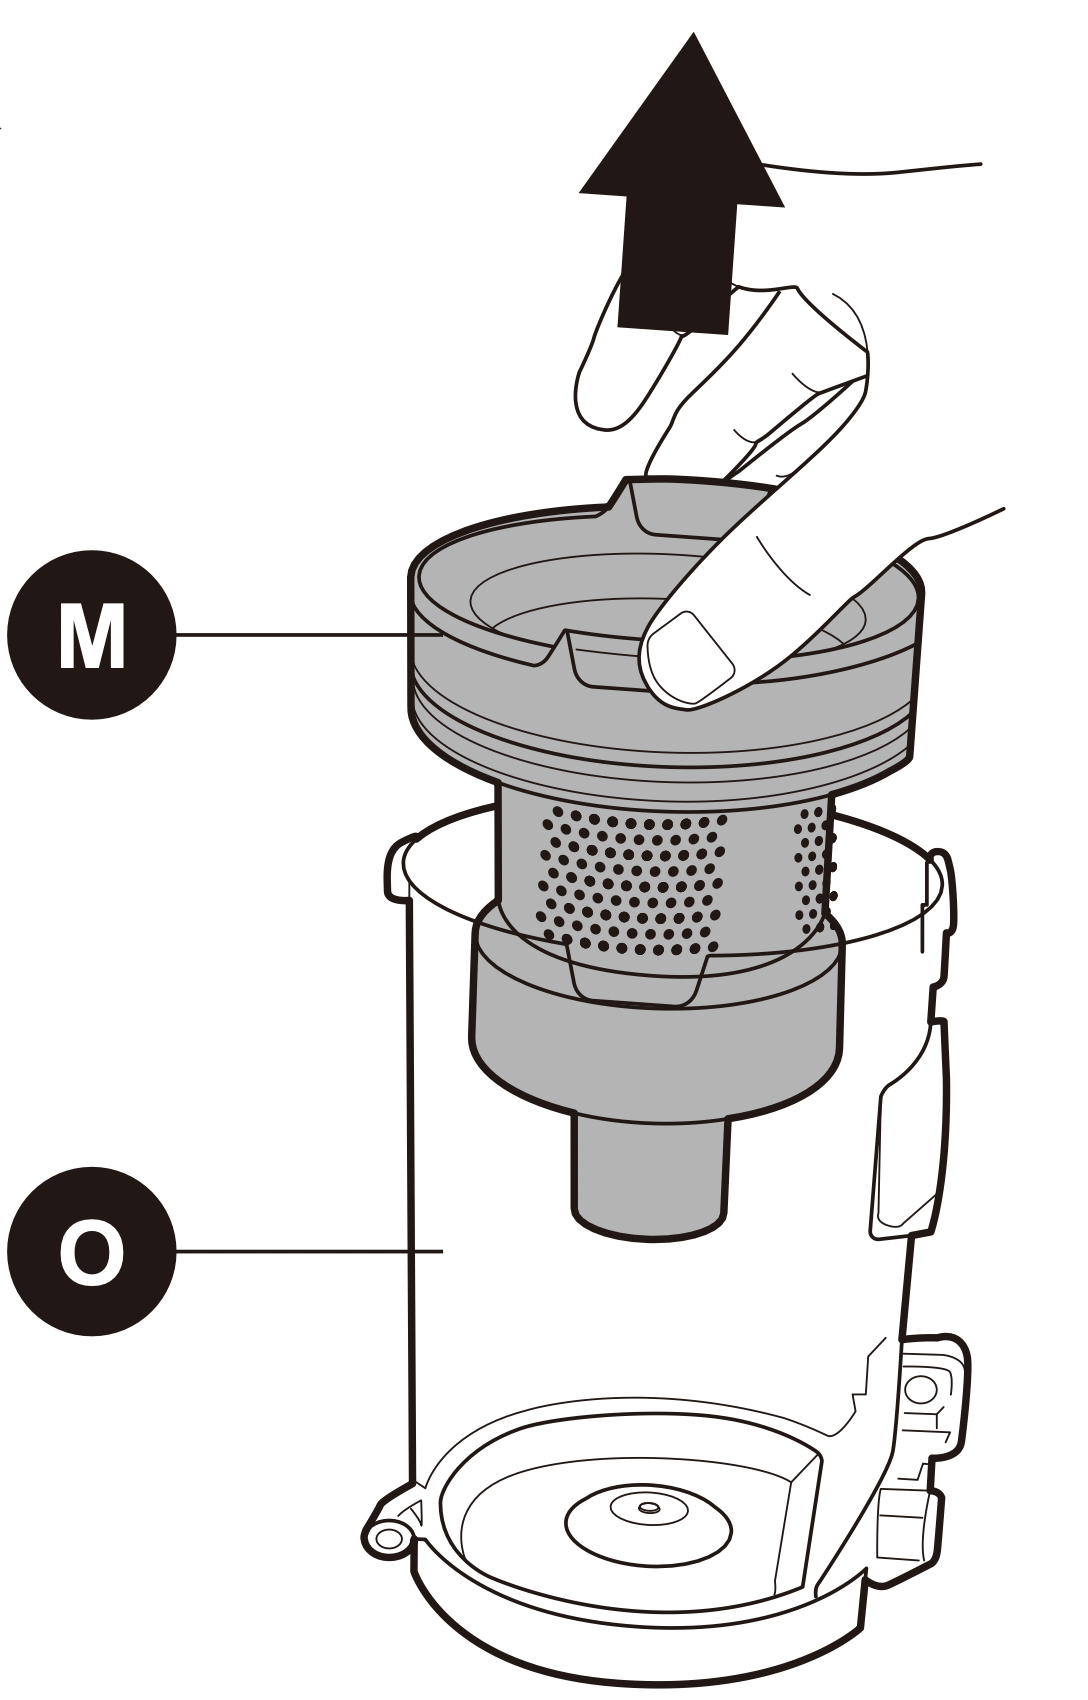
2. Press the dust cup removal button (N) located on the side of the main body near the bottom of the dust cup (O). Then pull the dust cup away from the main body, keeping the cup fairly upright.
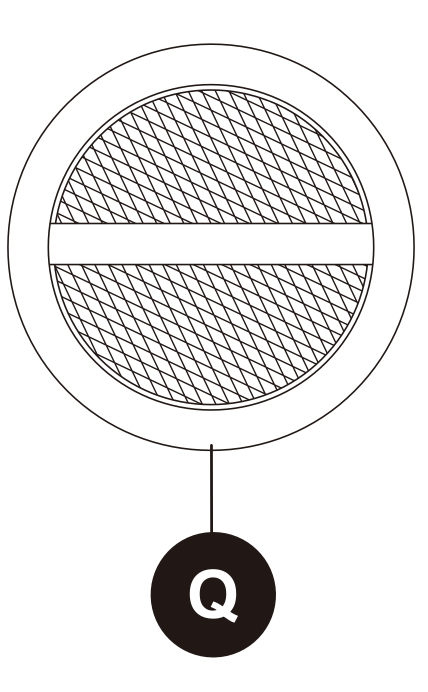
3. The filter cup houses the circular sponge filter (Q) and filter assembly (M). Firstly remove the circular sponge filter (Q) by pinching the ribbon material at the top of the filter and pulling upwards, then set aside.
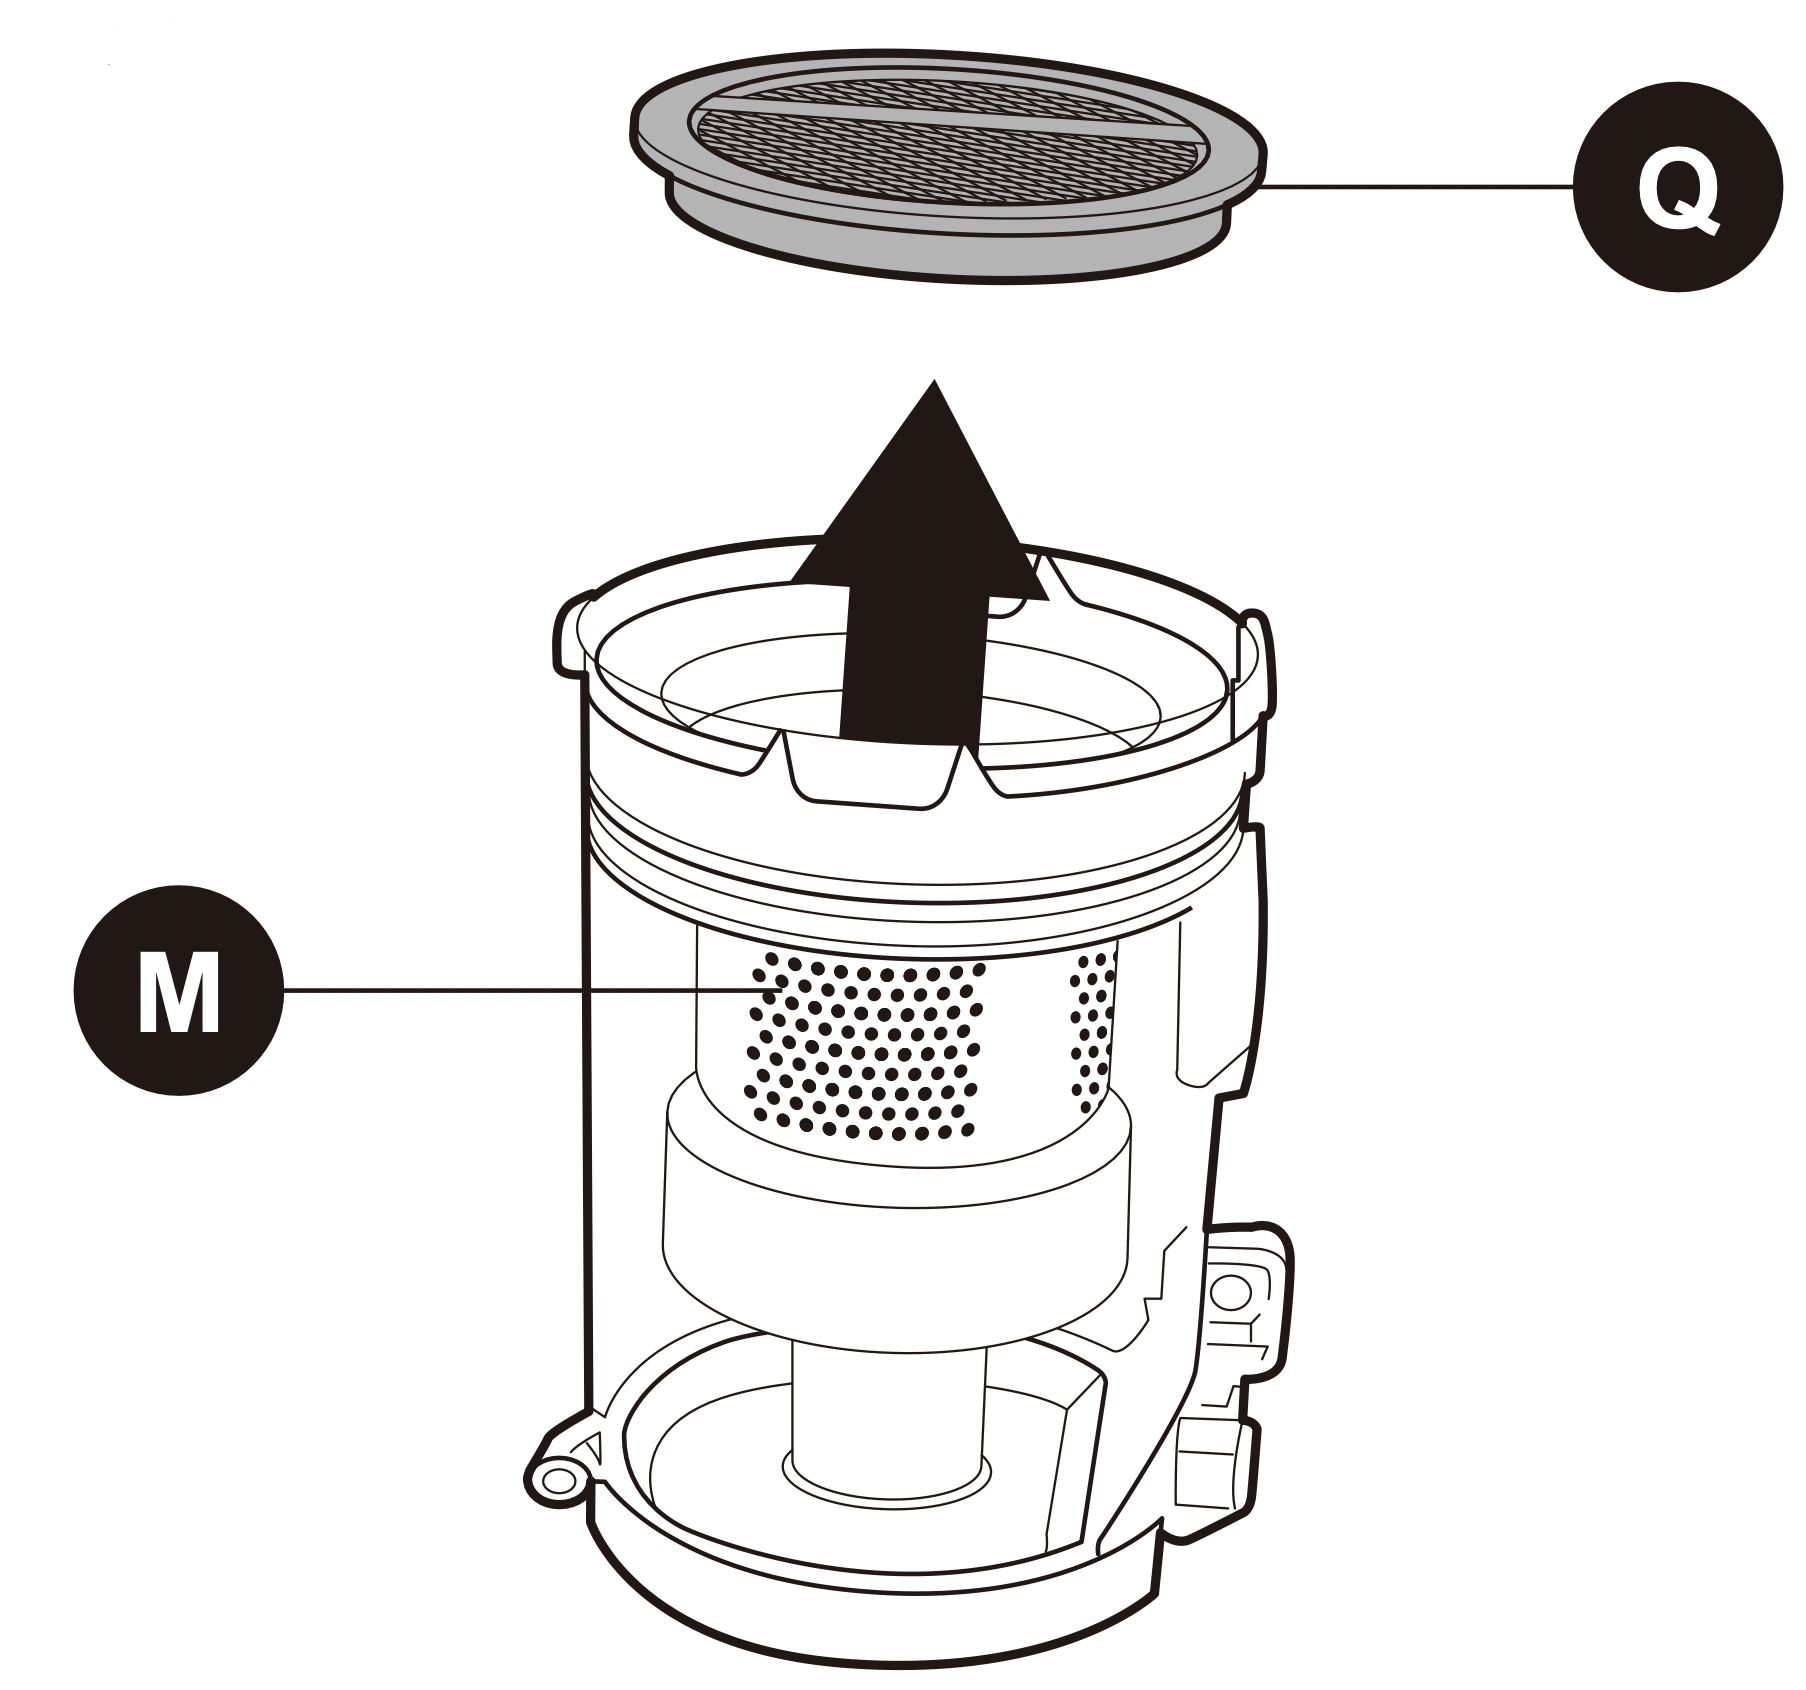
4. Pinch either side of the filter assembly (M) and pull upwards away from the dust cup (O). Tap the filter assembly (M) gently over the household bin to remove any large amounts of dust.
Note: Do not allow the dust cup to overfill. Don't exceed the MAX level marker. Empty regularly.
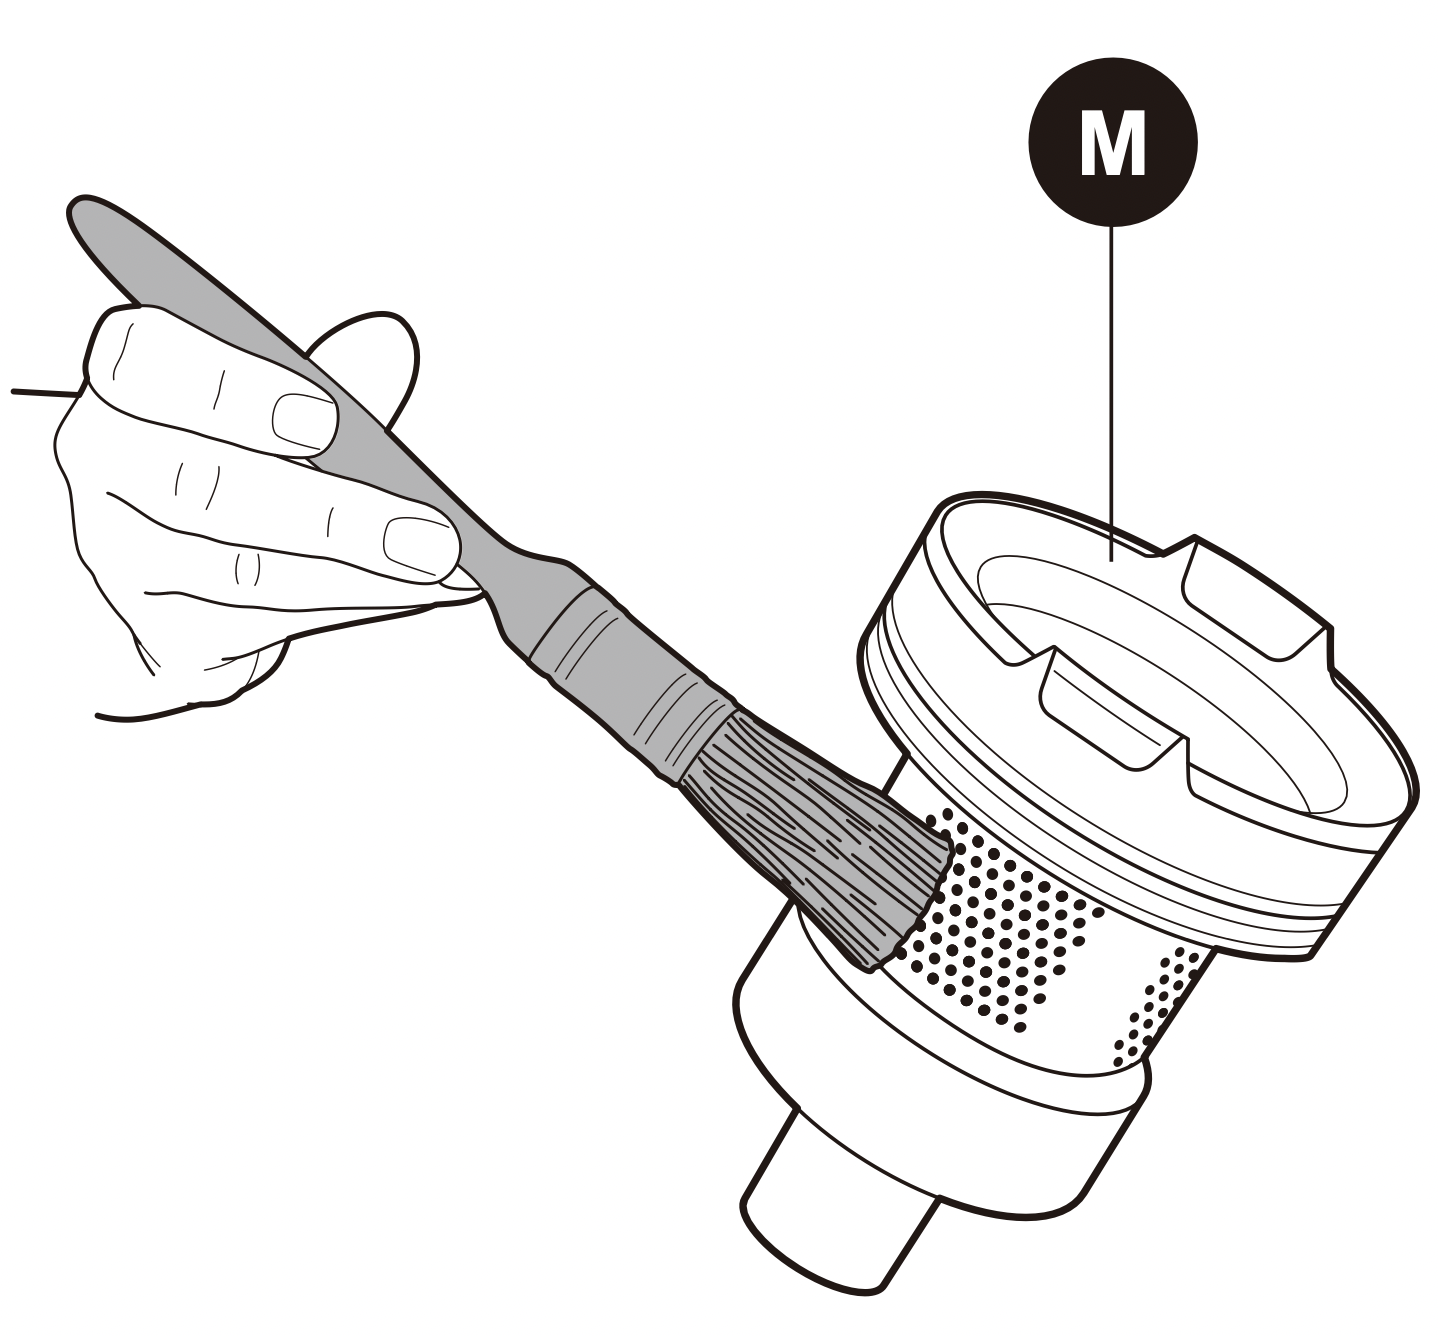
5. Remove anymore excess dust from the filter assembly (M) using a soft brush or a clean paint brush. The filter can be broken down into three parts. Hold the top section and twist the lower section in the direction of the arrow and the unlock padlock icon.
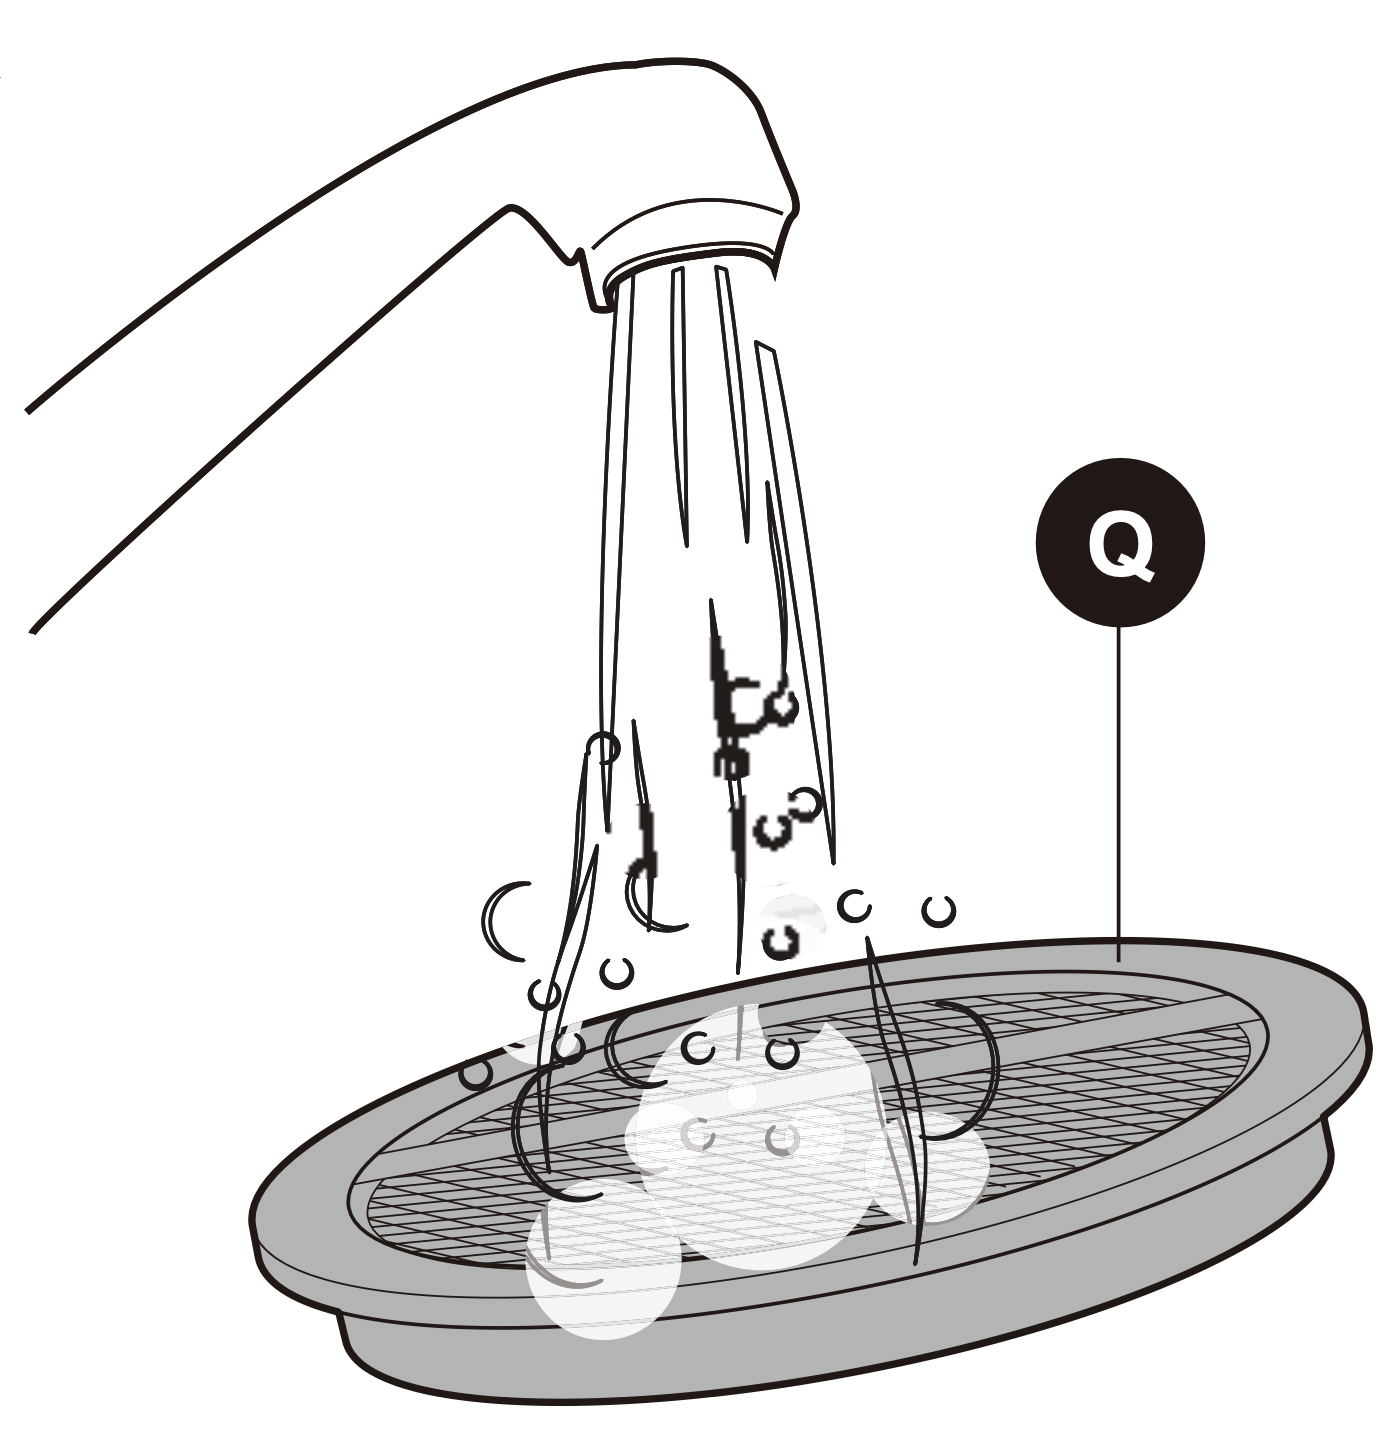
6. Rinse the dust cup, filter assembly parts and circular sponge filter (Q) under warm until the water runs clear and leave to dry for 24 hours.
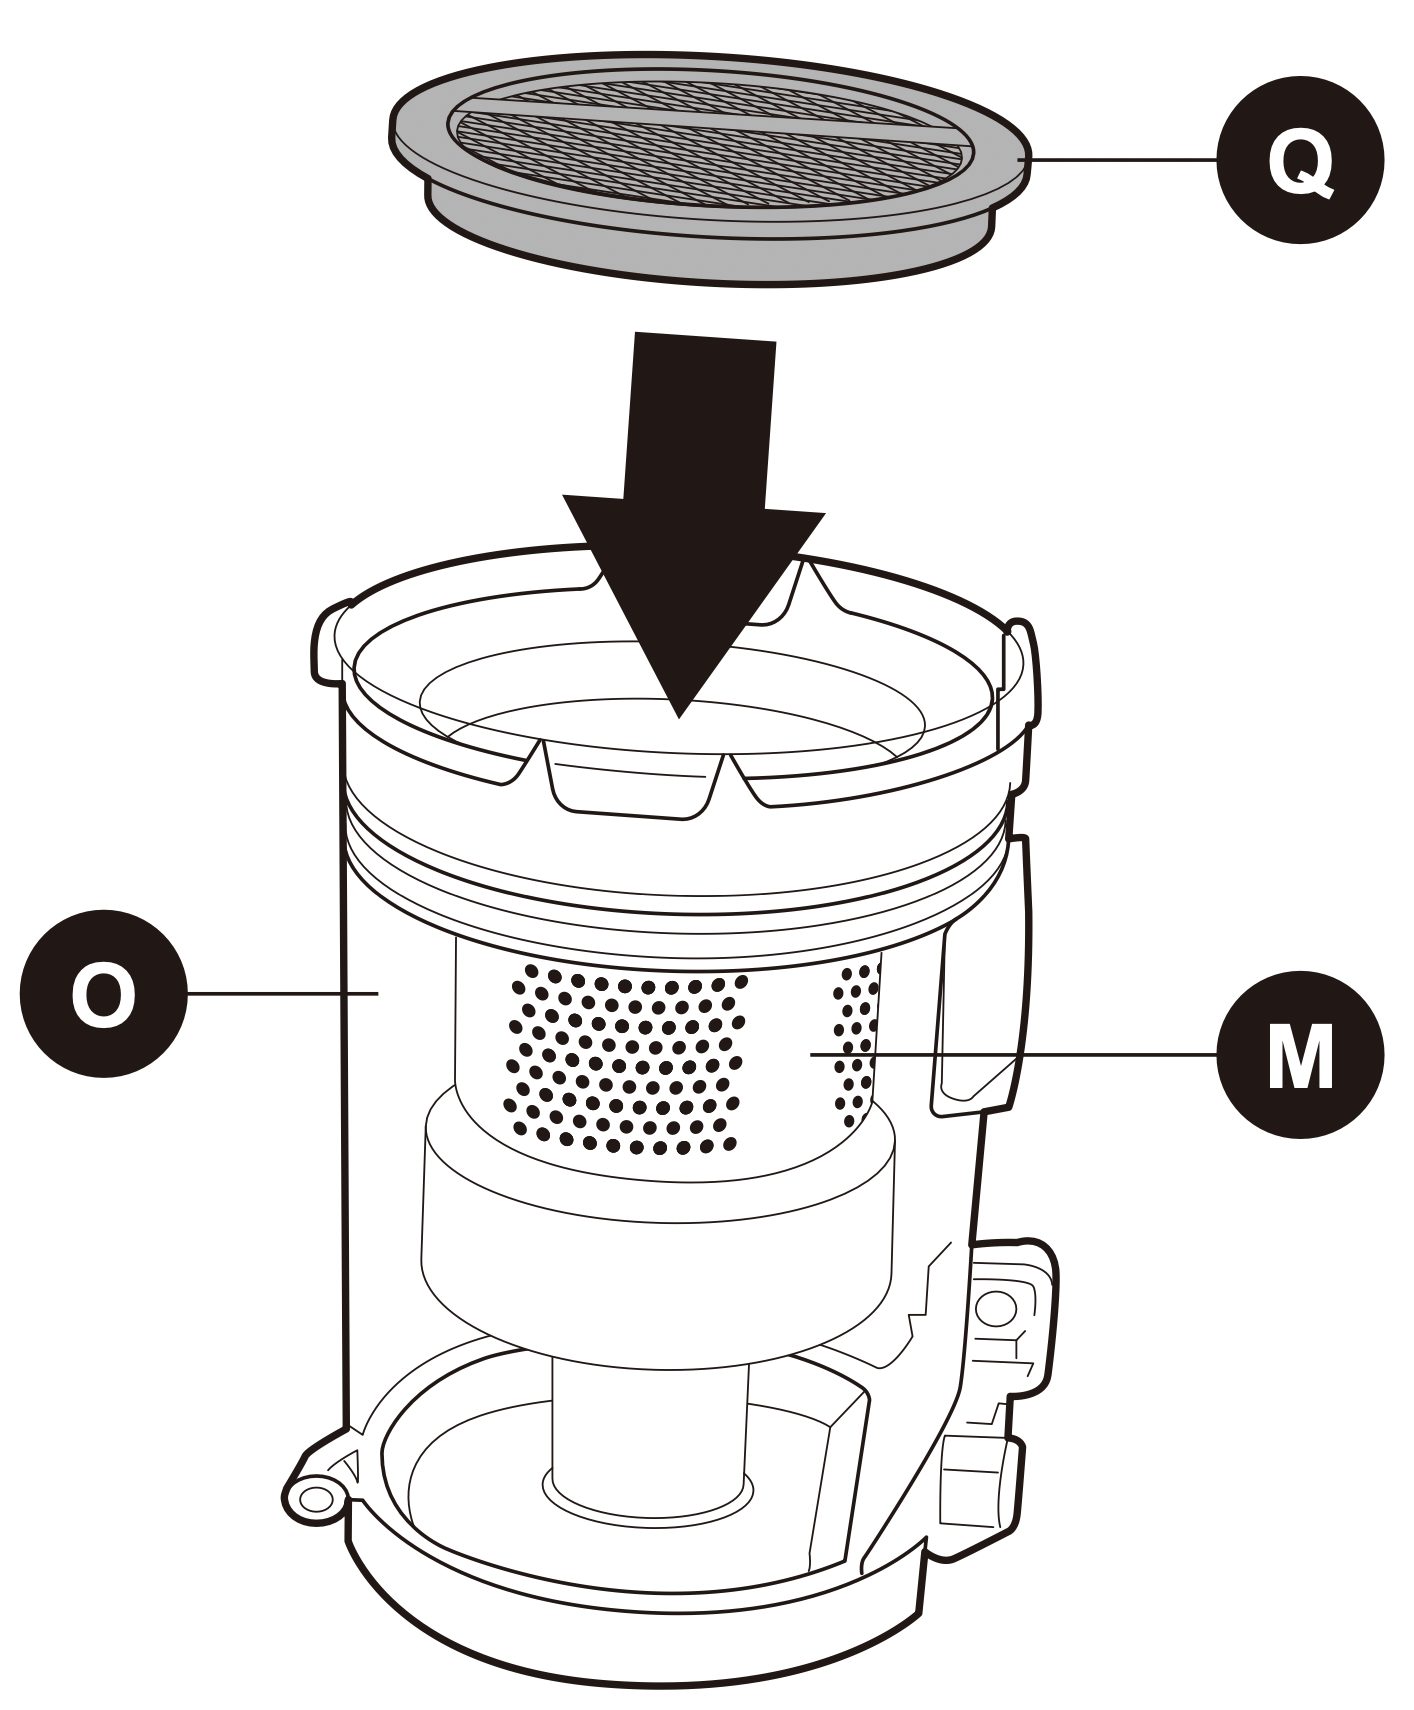
7. Once all the parts are thoroughly dry, reassemble the filter assembly (M) parts following the arrow and the icon for the locked padlock and place it back into the dust cup (O). Don’t forget to put the circular sponge filter (Q) back in the top of the filter assembly.
8. Replace the dust cup (O) to the main body by hooking the channel on the top of the dust cup (O) with the clasp on the main body (1). Push the dust cup b back towards the main body until you hear it click into place (2). Please note: Do not allow the dust cup to overfill. Don't exceed the MAX level marker. Empty regularly.
Note: It is important to regularly maintain and clean the filters. A clogged filter reduces suction power and can shorten the life of your stick vac.

Below is a recommended guide for how often you should clean the filters:
| FILTER TYPE |
RECOMMENDED CLEANING TIMES |
| Filter assembly (M) |
- Shake out debris when you empty the dust cup. Use the soft dusting brush to gently remove any dust build-up.
- Rinse under warm water once a month or more often if required.
|
| Circular sponge filter (Q) |
- Occasionally remove any dust/debris as necessary. The filter can also be rinsed under warm water once a month.
|
REMOVING AND CLEANING THE FLOOR NOZZLE AND ROLLER BRUSH
Before starting any cleaning, ensure the stick vac is not charging and is switched off and remove the floor nozzle from the rest of the stick vac.
If the roller brush becomes tangled during use, the automatic thermal cut out will shut off the stick vac. If that happens, please follow below steps.
1.Step on floor nozzle to lower handle. Turn vacuum face down on floor. Use scissors to clip heavy threads or strings.
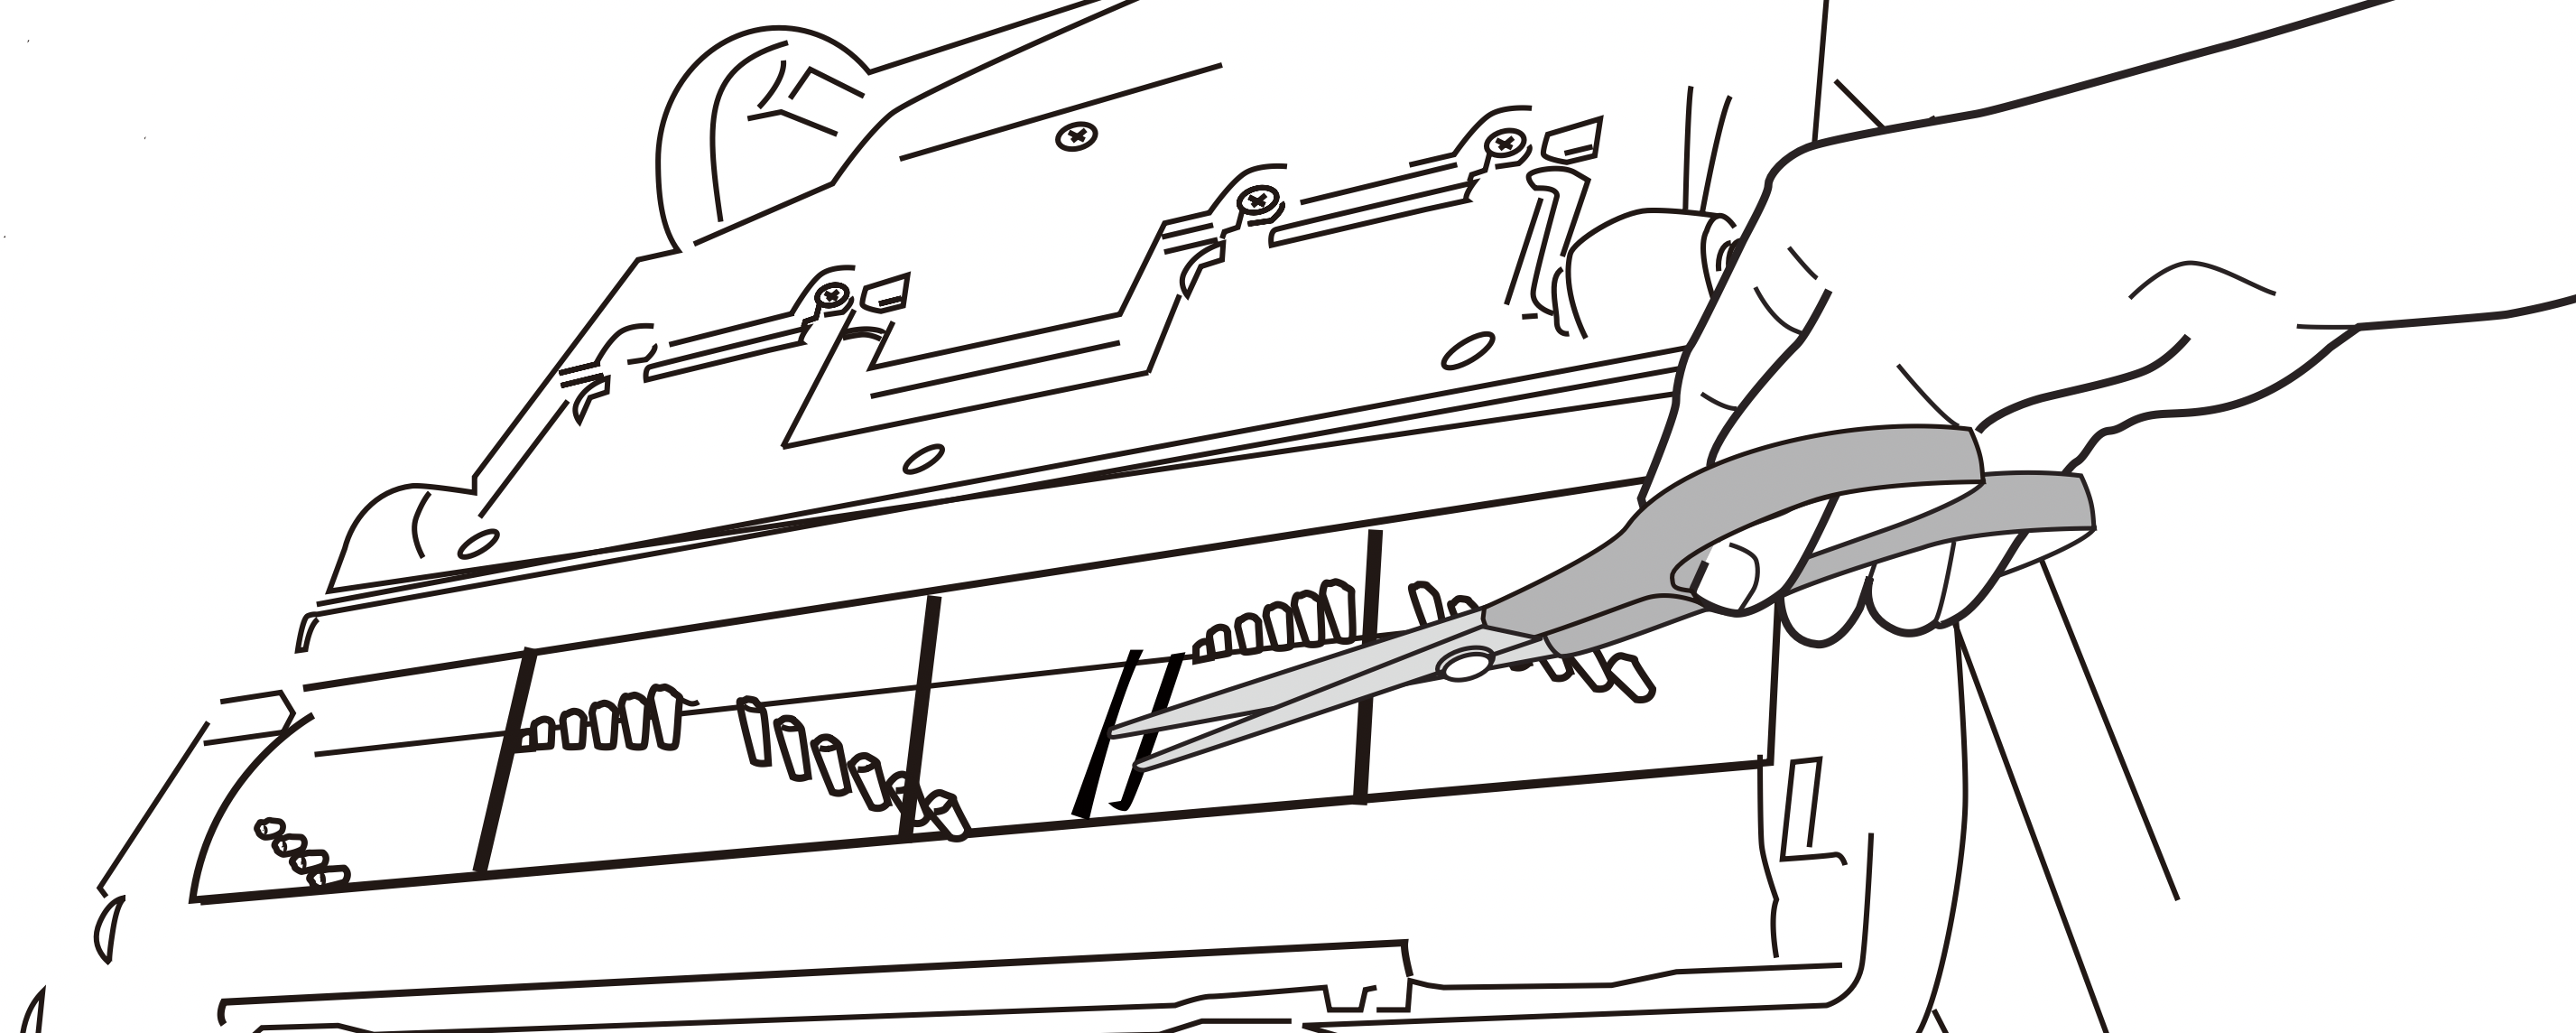
2.If debris cannot be removed easily, locate the brushroll release tab on the right side and open the brushroll cover. Remove the brushroll and clear any tangled hair and remaining debris.
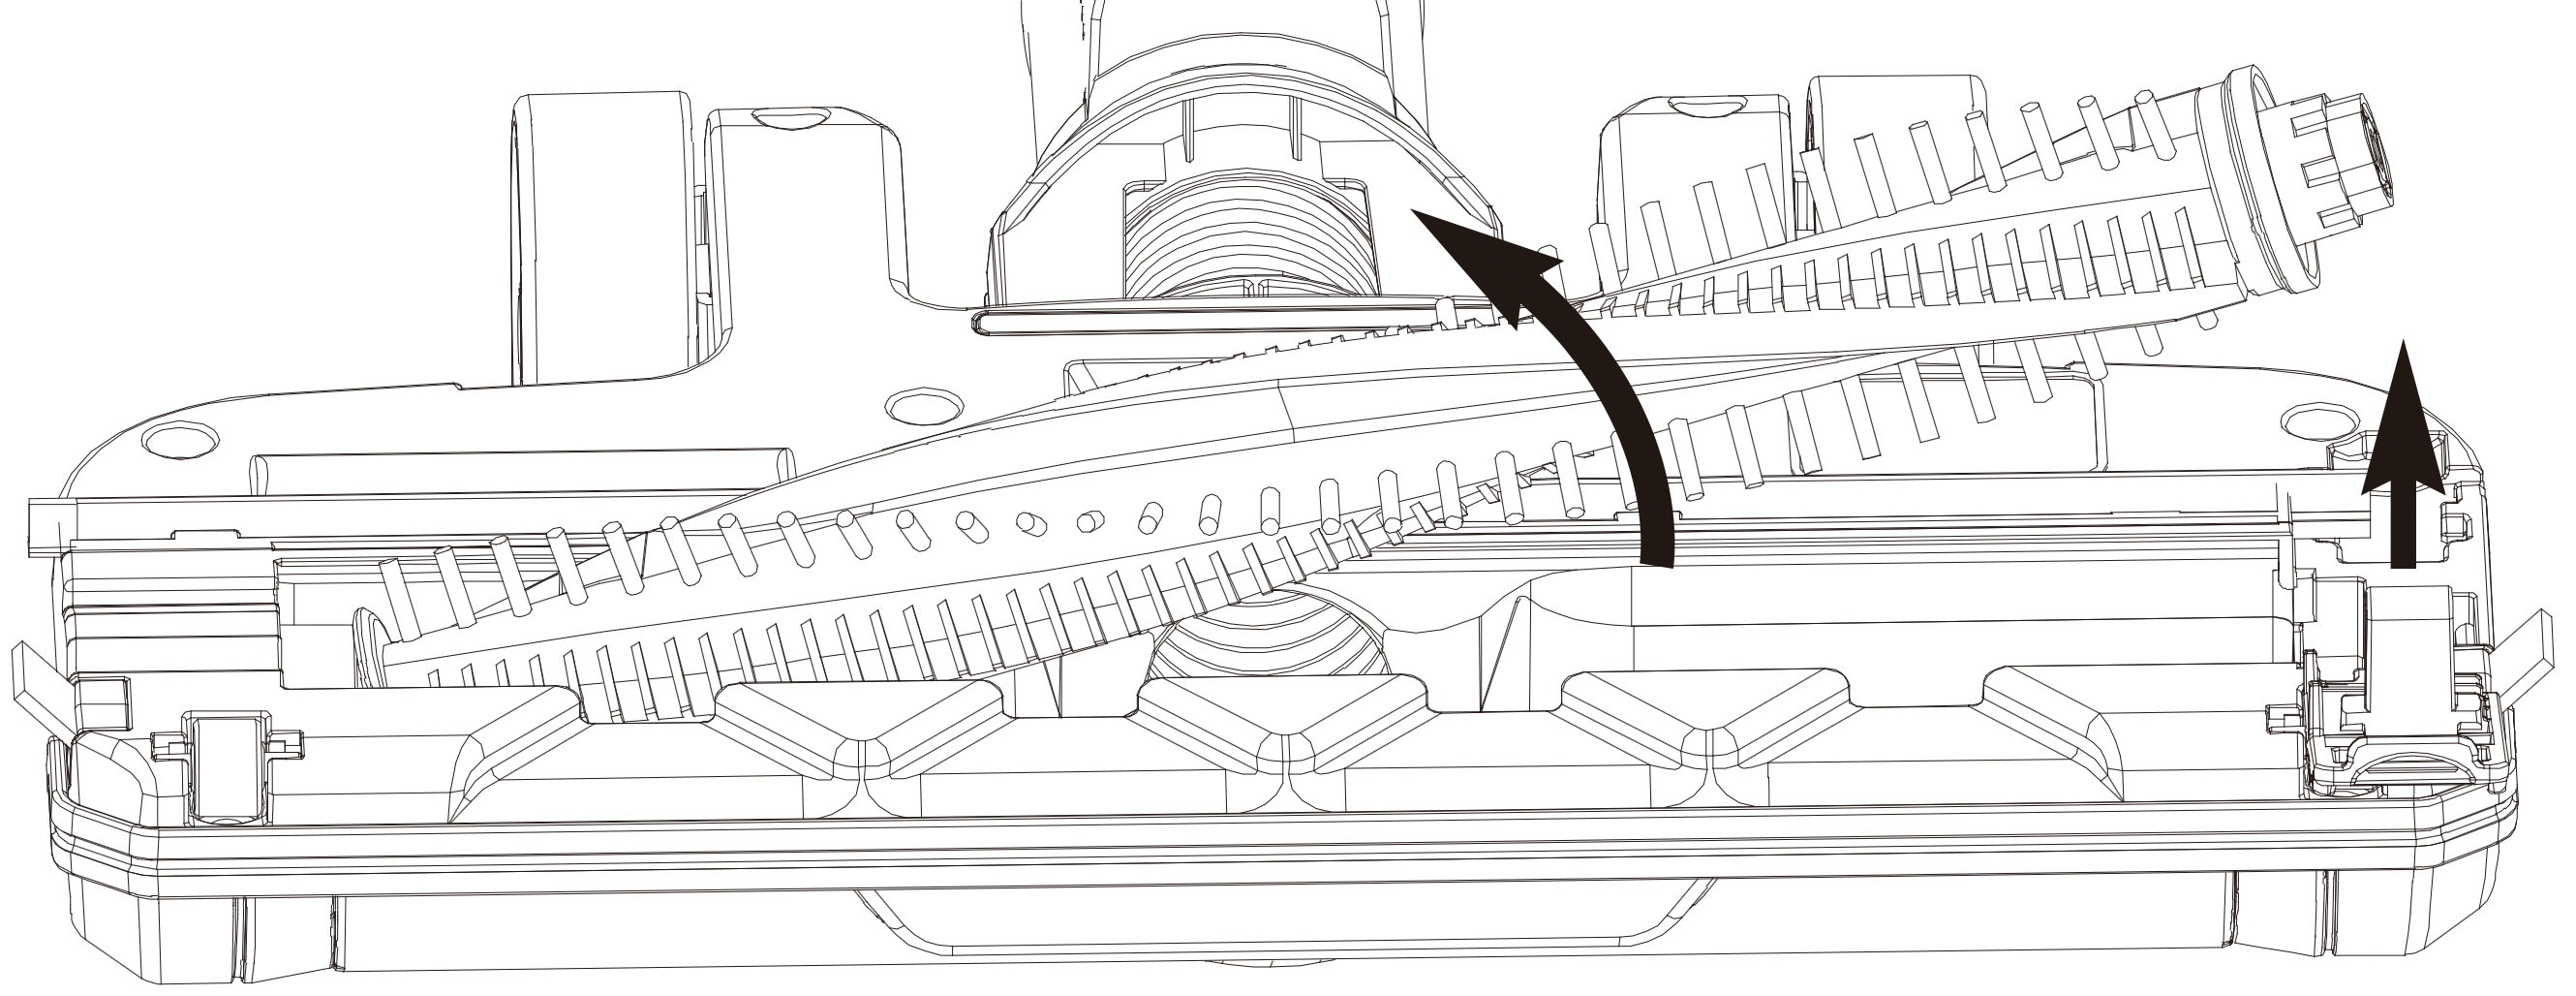
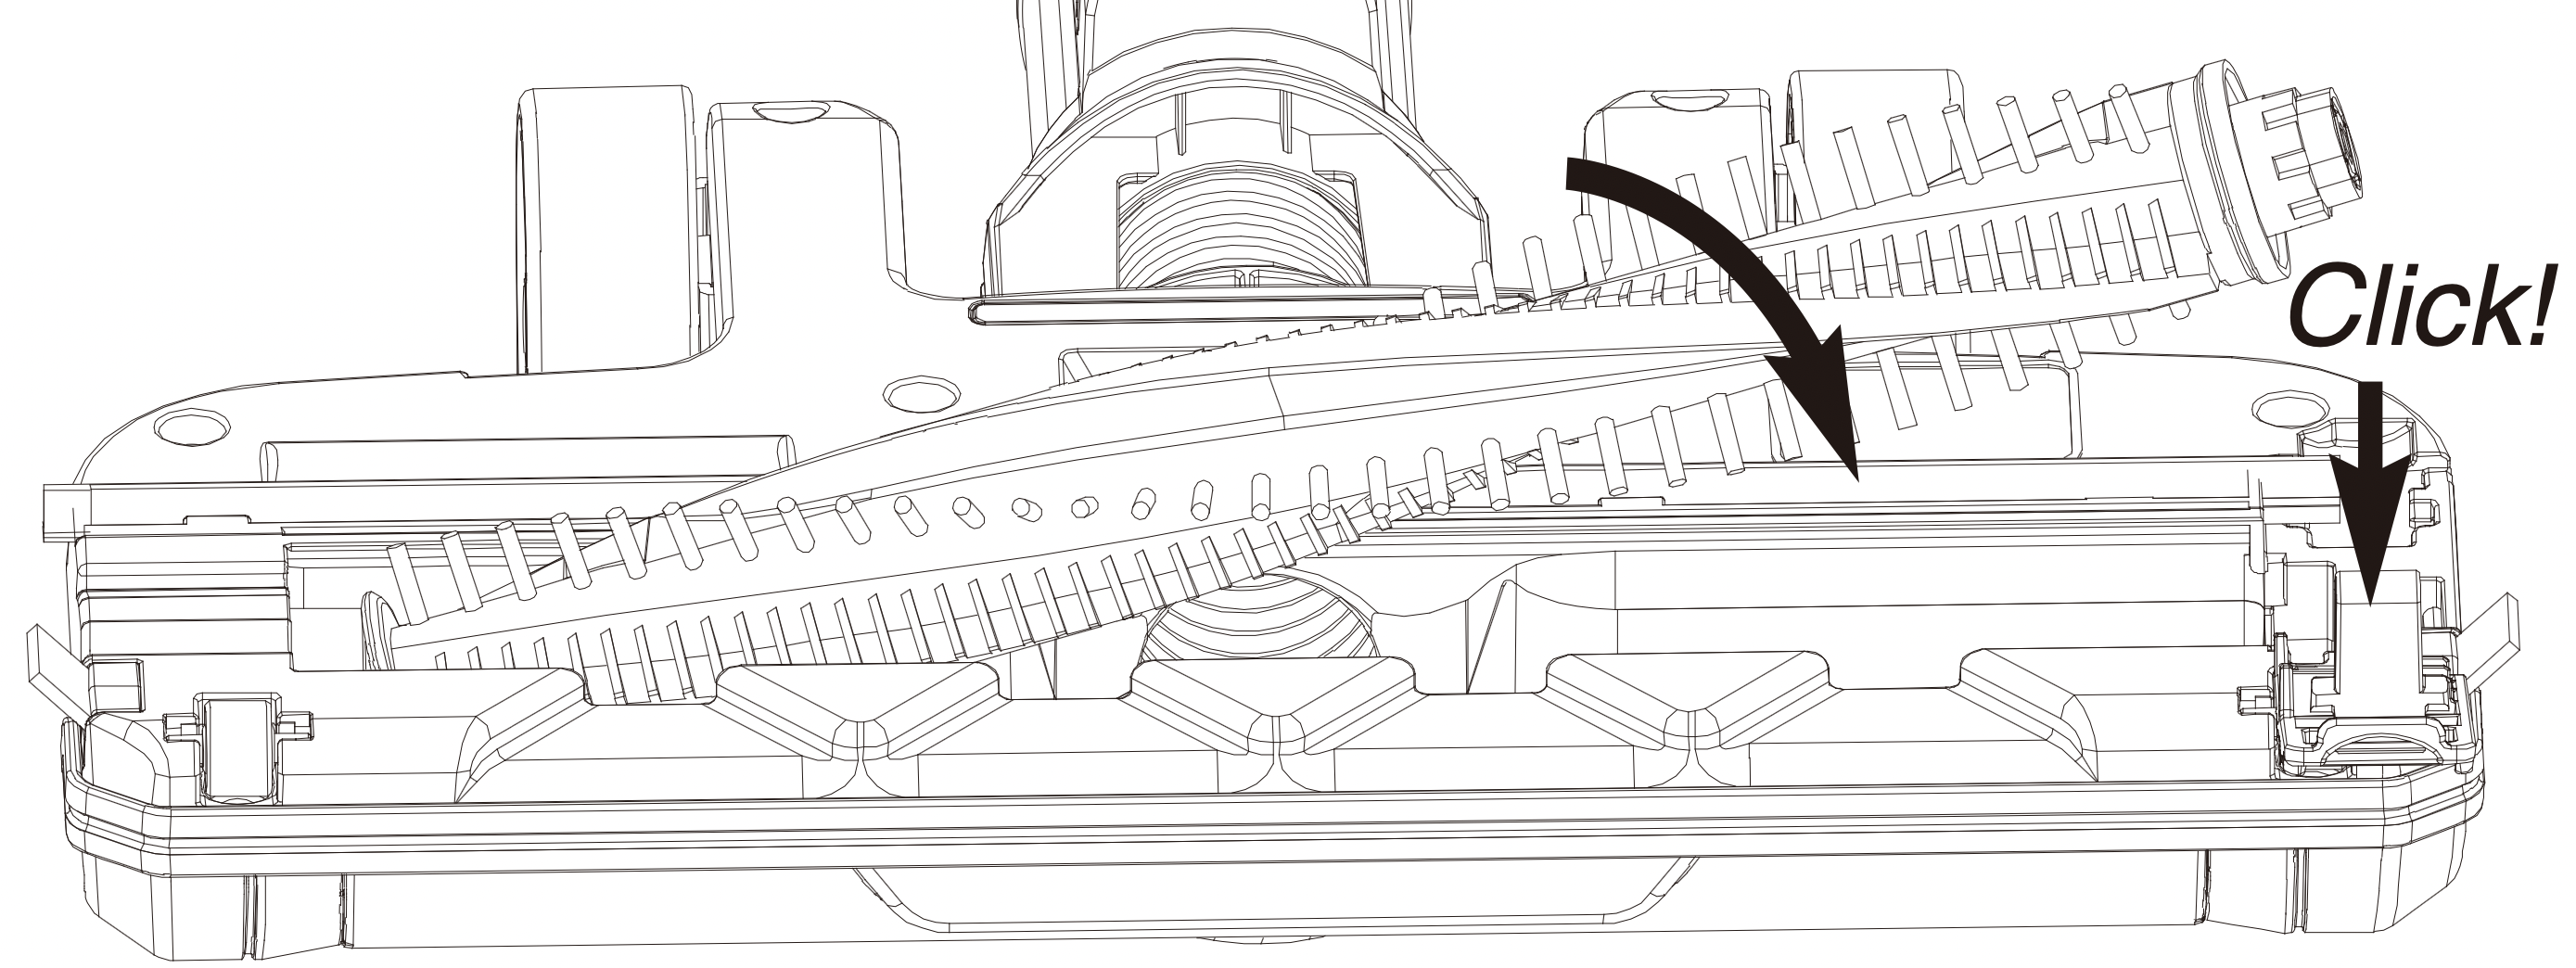
To reassemble:
- Align one end of brushroll with floor nozzle gear.
- Press other end into slot.
- Replace brushroll release tab into slot and press downto click it into place.
CLEARING A BLOCKAGE
Ensure the stick vac is not plugged into the main power supply and is switched off before dismantling the vac.
The stick vac would only become blocked of the dust cup has exceeded the 'Max' level, the filters are clogged up or a large object has been sucked up.
- Check the dust cup (O) and empty if necessary.
- Check 2 filters (M) and (Q) in the unit, remove any debris/dust and wash if necessary.
- If the floor nozzle (I) or crevice tool (P) were in use, detach them from the hand vacuum (E) or extension pole (G).
- Detach the extension pole (G) and look down it to see if there are any blockages. If there are, use the handle of a broom to clear the obstruction. Take care not to damage the pole in the process.
- Check the roller brush for any hair or thread which may have become wrapped around the roller. Cut away with a pair of scissors. To do this safely, remove as shown in the ‘Removing and cleaning the floor nozzle roller brush' section of this manual. Every time you empty the dust cup, check the filter assembly and tap gently over the household bin to remove any excess dust.
- Once empty close the lid until it clicks shut.
STORING THE CORDLESS STICK VAC
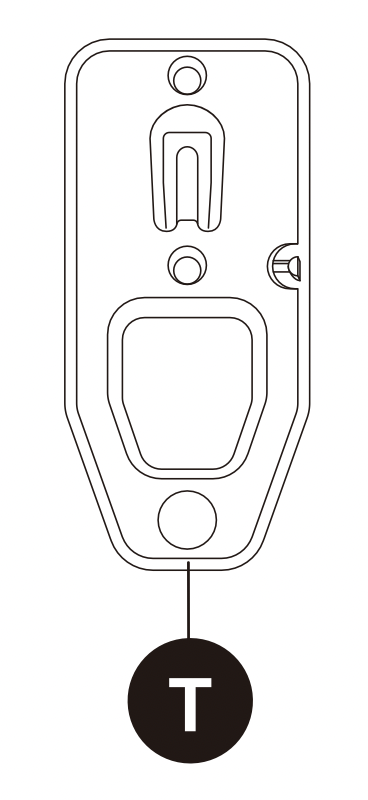
Your stick vac can be stored safely and securely by hanging from the wall mount (T) supplied with your product or by removing all the attachments and stowing together in a cupboard.
Either way will help avoid the product falling over and causing damage.
Always turn off and unplug from the mains supply before storing.
- Remove any attachments if the stick vac was last used with them on.
- Store the stick vac and accessories away safely in a dry place.
TROUBLESHOOTING
| PROBLEM |
WHAT TO DO |
| The stick vac is not cleaning well |
- Empty the dust cup (O)
- Remove excess dust from the filters.
- Wash the (M) and (Q)
- Check for blockages
|
| The stick vac has stopped or won’t work. |
- Charge the vac (check the mains socket works and the switch is turned on)
- It might be blocked – check items 1 to 4 above
- The thermal cut out activated. Switch off the vac and leave the motor to cool for an hour then try using again.
|