Owner'sManual
ManualDelPropietario
VacuumCleaner
Aspiradora
Model, Modelo
116.35912
116.35913
CAUTION:
Read and followall
safetyand operating
instructionsbeforefirst
use ofthis product.
CUIDADO:
Lea y sigue todas las
instrucciones de operaci6n
y seguridad antes del uso de
este producto.
Sears, Roebuck and Co., Hoffman Estates,IL 60179 U.S.A.
www.ee_n.com
Printed in Mexico
Part No. C{31ZCHEOeUCle-KCCI1ZCHEZQUCI Impreso en Mexico

13eforeUsingYourNew
VacuumCleaner ..................... 2
KenmoreVacuumCleanerWarranty .... 2
ImportantSafetyInstructions........... 3
PartsandFeatures................... 4
Assemblytnstructlor_ ............... 5-6
OperatingInstmc'dons................. 6
CordRelease ....................... 6
Releasingthe Handle ................. 7
TouchControl ...................... 7
Gentle Sweep Function ................ 7
PileHeight Selectionand Setting ........ 8
Attachments ..................... 9-10
AttachmentUseTable ............... 11
VacuumingTips .................... 11
Performance/SafetyFeatures .......... 12
VacuumCleanerCare ............... 13
VacuumCleaner Storage ............. 13
Cleaning Exteriorand Attachments ...... 13
Dust BinCleaning .................. 14
Primary FilterRemovaland Cleaning . 15, 16
Motor Safety FilterCleaning ........... 16
ExhaustFitterReplacement............ 17
LightBulbReplacement .............. 18
AgitatorCleaning ................... 19
Clog Removal ..................... 19
Troubleshooting ..................... 20
A_ Or_... backpage
Please read this guide. It will help you assemble and operate your new Kenmore vacuum
cleaner in the safest and most effective way.
For more information about vacuum cleaner care and operation, call your nearest Sears store.
You will need the complete model and serial numbers when requesting information. Your vacu-
um cleaner's model and serial numbers are located on the Model and Serial Number Plate.
Use the space below to record the model number and serial number of your new Kenmore
vacuum cleaner.
Model No.
Serial No.
Date ot Purchase
Keep this book and your sales check (receipt) in a safe place for future reference.
LIMITED ONE YEAR FULL WARRANTY ON KENMORE VACUUM CLEANER
This warranty is for one year from the date of purchase, and includes only private household
vacuum cleaner use. During the warranty year, when this vacuum cleaner is operated and
maintained according to the owner's manual instructions, Sears will repair any defects in
material or workmanship free of charge.
This warranty excludes vacuum cleaner bags, belts, light bulbs, and filters, which are
expendable parts and become worn during normal use.
For warranty service, return this vacuum cleaner to the nearest Sears Service Canter In the
United States.
This warranty applies only while this product is in use in the United States. This warranty gives
you specific legal rights, and you may also have other rights which vary from state to state.
Sears, Roebuck and Co., O/817 WA, Hoffman Estate_, IL 60179
2
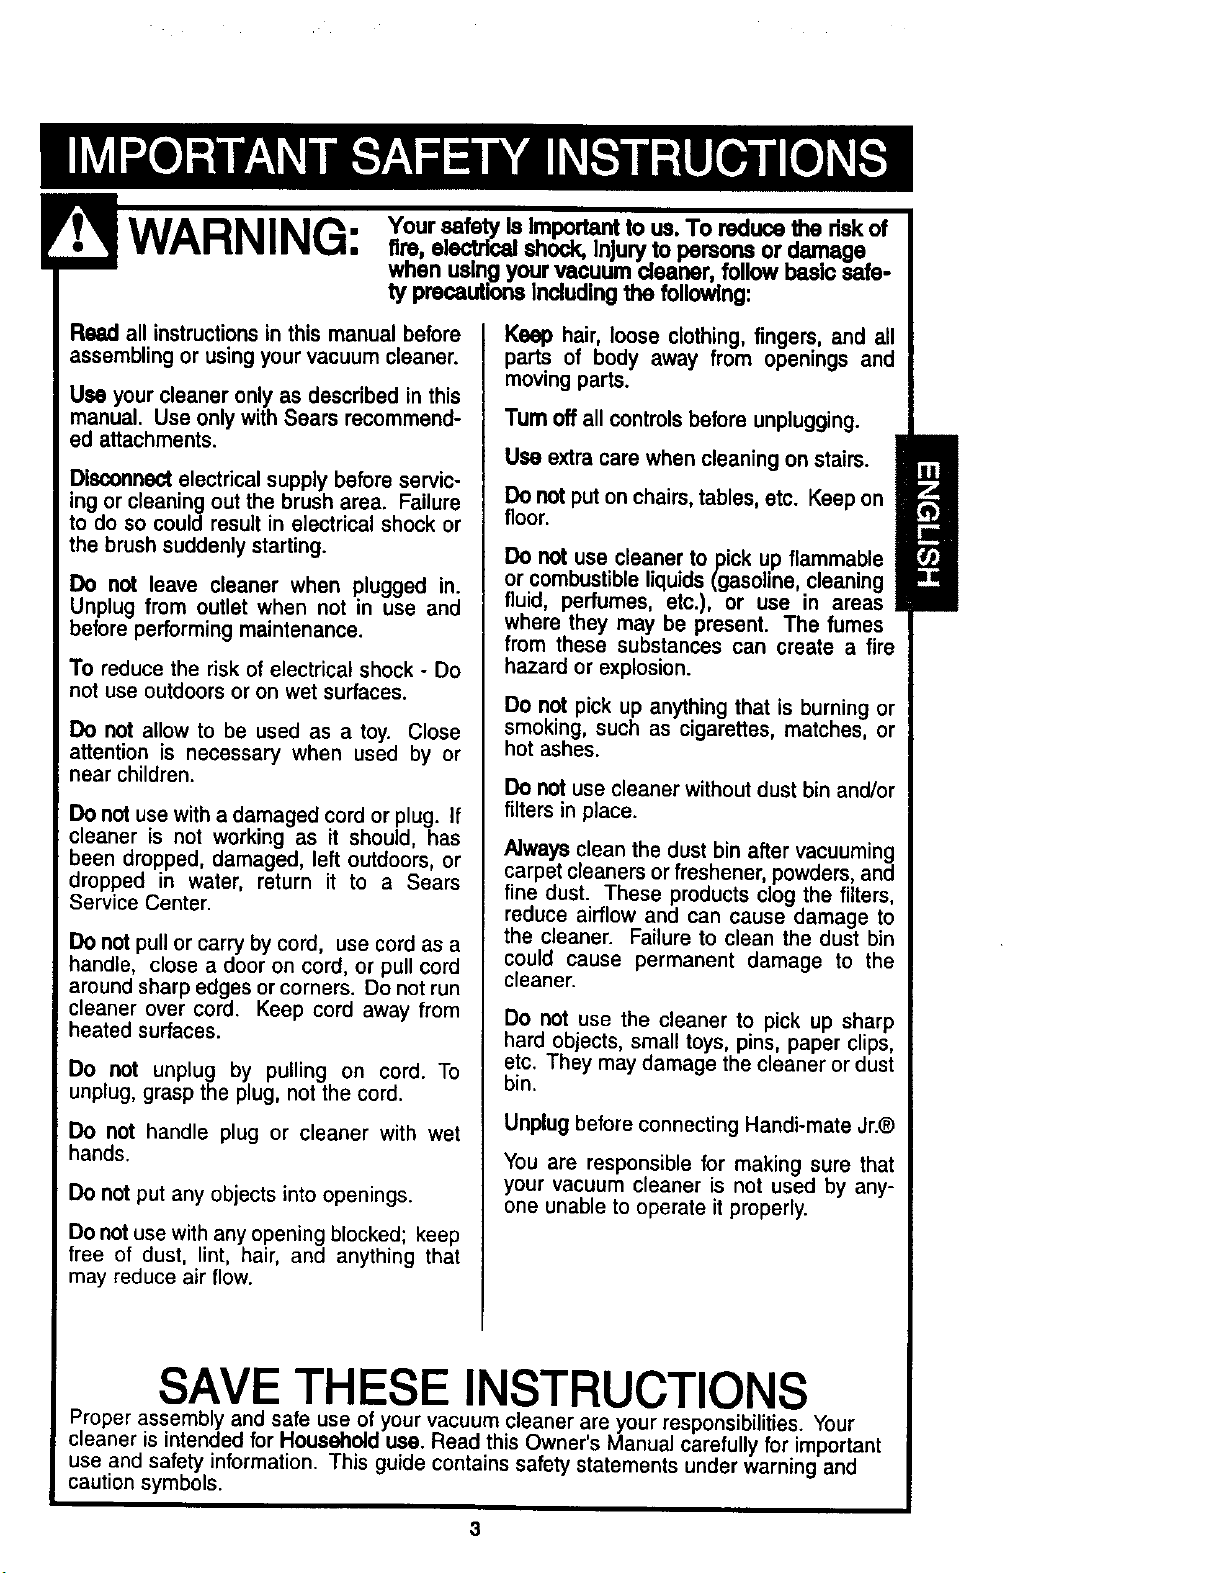
WARNING: Your safety Is Importantto us. To reduce the dsk of
tim, electrical shock, InJuw to persons or damage..
when using your vacuum cleaner, follow basic sam
ty precautions Including the following:
Read allinstructionsinthis manual before
assemblingorusingyourvacuum cleaner.
Use your cleaner only as described in this
manual. Use only with Sears recommend-
ed attachments.
Disconnect electrical supply before servic-
ing or cleaning out the brush area. Failure
to do so could result in electrical shock or
the brush suddenly starting.
Do not leave cleaner when plugged in.
Unplug from outlet when not in use and
beforeperformingmaintenance.
To reduce the risk of electrical shock - Do
not use outdoors or on wet surfaces.
Do not allow to be used as a toy. Close
attention is necessary when used by or
near children.
Do not use with a damaged cord or plug. If
:cleaner is not working as it should, has
been dropped, damaged, left outdoors, or
dropped in water, return it to a Sears
Service Center.
Do not pull or carry by cord, use cord as a
handle, close a door on cord, or pull cord
around sharp edges or corners. Do not run
cleaner over cord. Keep cord away from
heated surfaces.
Do not unptug by putting on cord. To
unplug, grasp the plug, not the cord.
Do not handle plug or cleaner with wet
hands.
Do not put any objects into openings.
Do not use with any opening blocked; keep
free of dust, lint, hair, and anything that
may reduce air flow.
Keep hair, loose clothing, fingers, and a_l
parts of body away from openings and
moving parts.
Turn off all controls before unplugging.
i
Use extra care when cleaning on stairs.
!!
Do not put on chairs, tables, etc. Keep on
floor.
DO not use cleaner to pick up flammable
or combustible liquids (gasoline, cleaning
fluid, perfumes, etc.), or use in areas
where they may be present. The fumes
from these substances can create a fire
hazard or explosion.
Do not pick up anything that is burning or
smoking, such as cigarettes, matches, or
hot ashes.
DO not use cleaner without dust bin and/or
filters in place.
Always clean the dust bin after vacuuming
carpet cleaners or freshener, powders, and
fine dust. These products clog the filters,
reduce airflow and can cause damage to
the cleaner. Failure to clean the dust bin
could cause permanent damage to the
cleaner.
Do not use the cleaner to pick up sharp
hard objects, small toys, pins, paper clips,
etc. They may damage the cleaner or dust
bin.
Unplug before connecting Handi-mate Jr.®
You are responsible for making sure that
your vacuum cleaner is not used by any-
one unable to operate it properly.
SAVE THESE INSTRUCTIONS
Proper assembly and safe use of your vacuum cleaner are your responsibilities. Your
cleaner is intended for Household use. Read this Owner's Manual carefully for important
use and safety information. This guide contains safety statements under warning and
caution symbols.
3

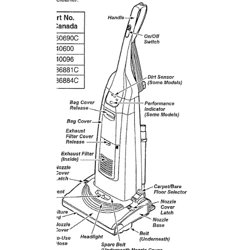
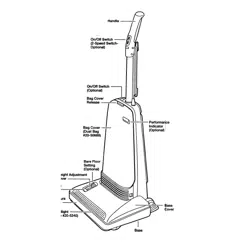
It'is important to know your vacuum cleaner's parts and features to assure its proper and safe
use. Review these before using your vacuum cleaner.
Item Part No. Part No.
In U.S. In Canada
Headlight Bulb 20-5248 20-5248
Exhaust Filter 20-86889 20-86889C
Primary Filter 20-82912
Touch
Control
HandFMa_
Handle.
Upper CordHook
Duet Bin
Release
Handle
Combination
Brush
Carrying
UpperHose
Hook
Extension
Filter Cover
(Filter Inside)
Release
Extension
Release Lever
MotorProtector
(Behind Hose)
Wand Holder
Furniture
Guard
Nozzle
4
_ Please pay special attention to these hazard alert boxes and follow any instructionsI
given. WARNING statements alert you to such dangers as fire electdc shock burnsI
and personal injury. CAUTION statements alert you to such dangerous personal
injury ano/or property damage.
ElectdcaiShockHazard
DonotplugIntotheaiectdcaisupply
t=_l theassemblyiscomplete.Failure
todosocouldresultInaisotdcaishock
orInjury.
Before assembling the vacuum cleaner,
check the PACKING UST on the cover of
the separate REPAIR PARTS LIST. Use
this listto verify that you have received all
the components of your new Kenmore
vacuum cleaner.
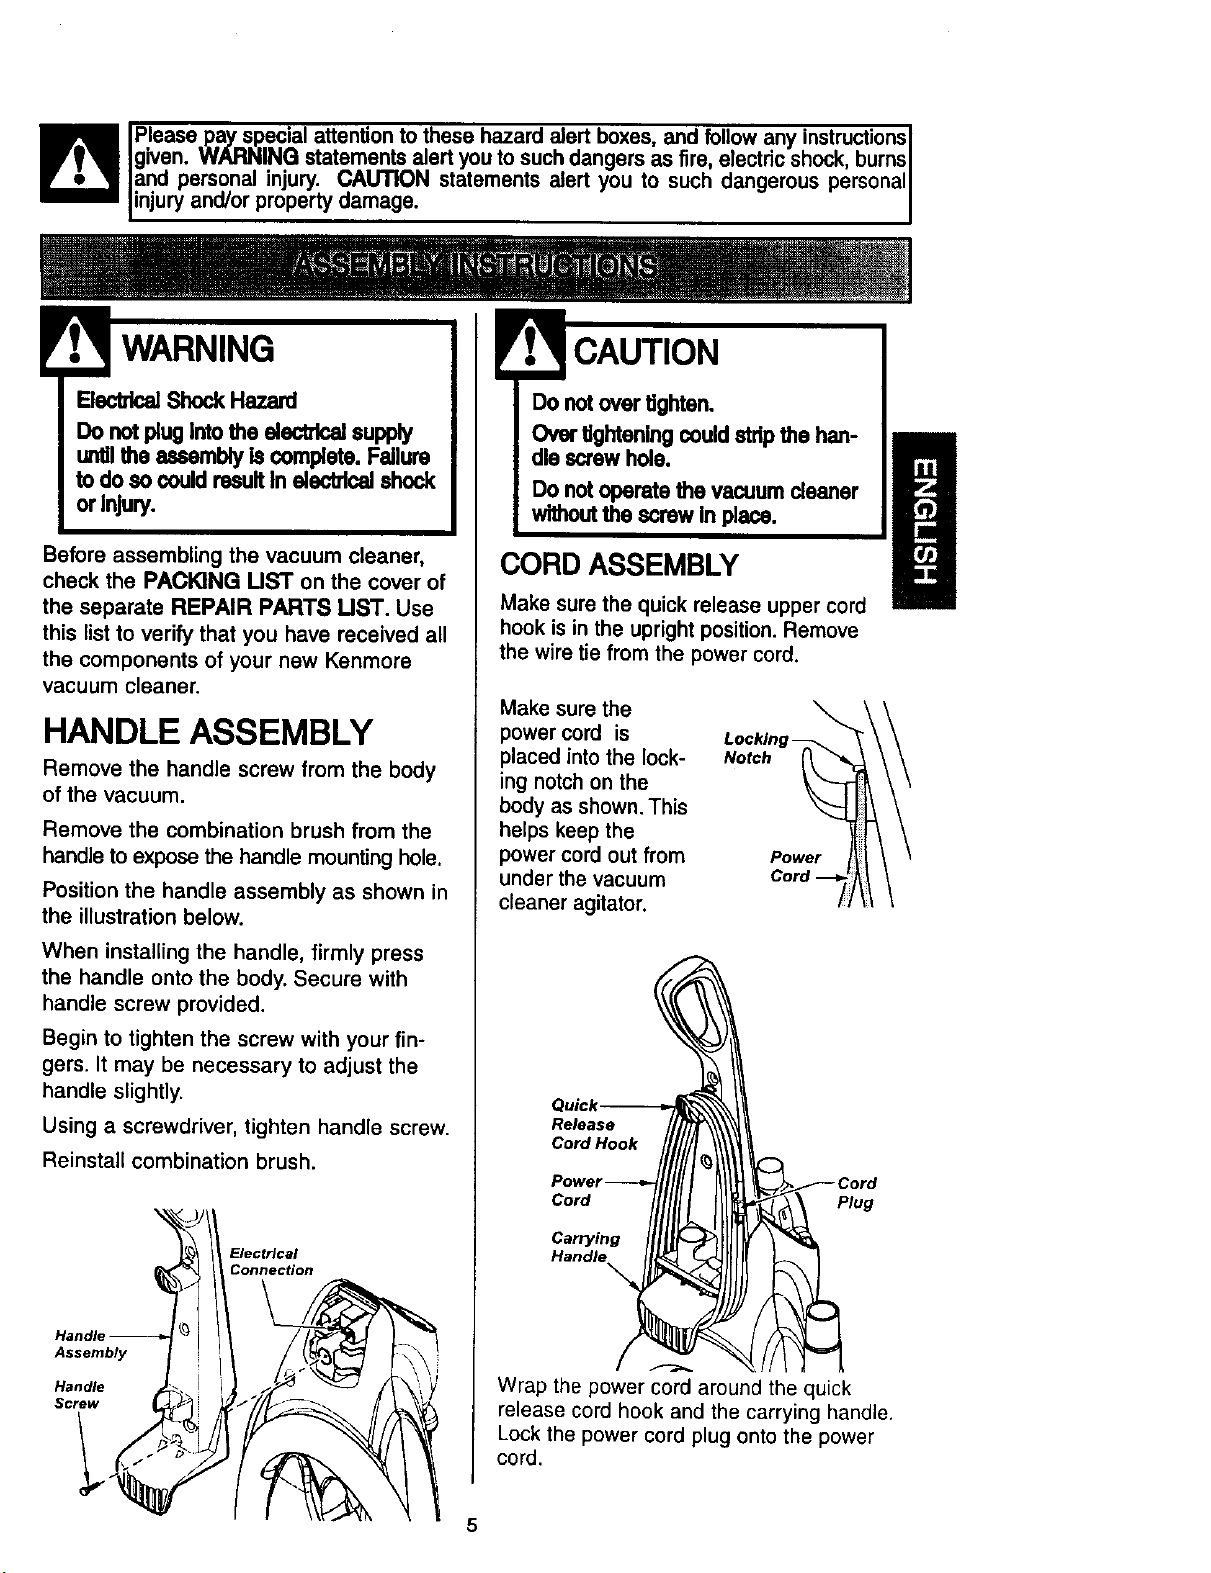
HANDLE ASSEMBLY
Remove the handle screw from the body
of the vacuum.
Remove the combination brush from the
handle to expose the handle mounting hole.
Position the handle assembly as shown in
the illustration below.
When installing the handle, firmly press
the handle onto the body. Secure with
handle screw provided.
Begin to tighten the screw with your fin-
gers. It may be necessary to adjust the
handle slightly.
Using a screwdriver, tighten handle screw.
Reinstall combination brush.
Electrical
Connection
Assembly
Handle
Screw
Do not over tighten.
Over tightening could stdp the han-
dle screw hole.
Do not operate the vacuum cleaner
without the screw in place.
CORD ASSEMBLY
Make sure the quick release upper cord
hook is in the upright position. Remove
the wire tie from the power cord.
Make sure the
power cord is
placed into the lock-
ing notch on the
body as shown. This
helps keep the
power cord out from
under the vacuum
cleaner agitator.
Power t_ l
C°rd--_/ll
!ii
\
\
Release
Cord Hook
Cord
Carrying
Plug
Wrap the power cord around the quick
release cord hook and the carrying handle.
Lock the power cord plug onto the power
cord.
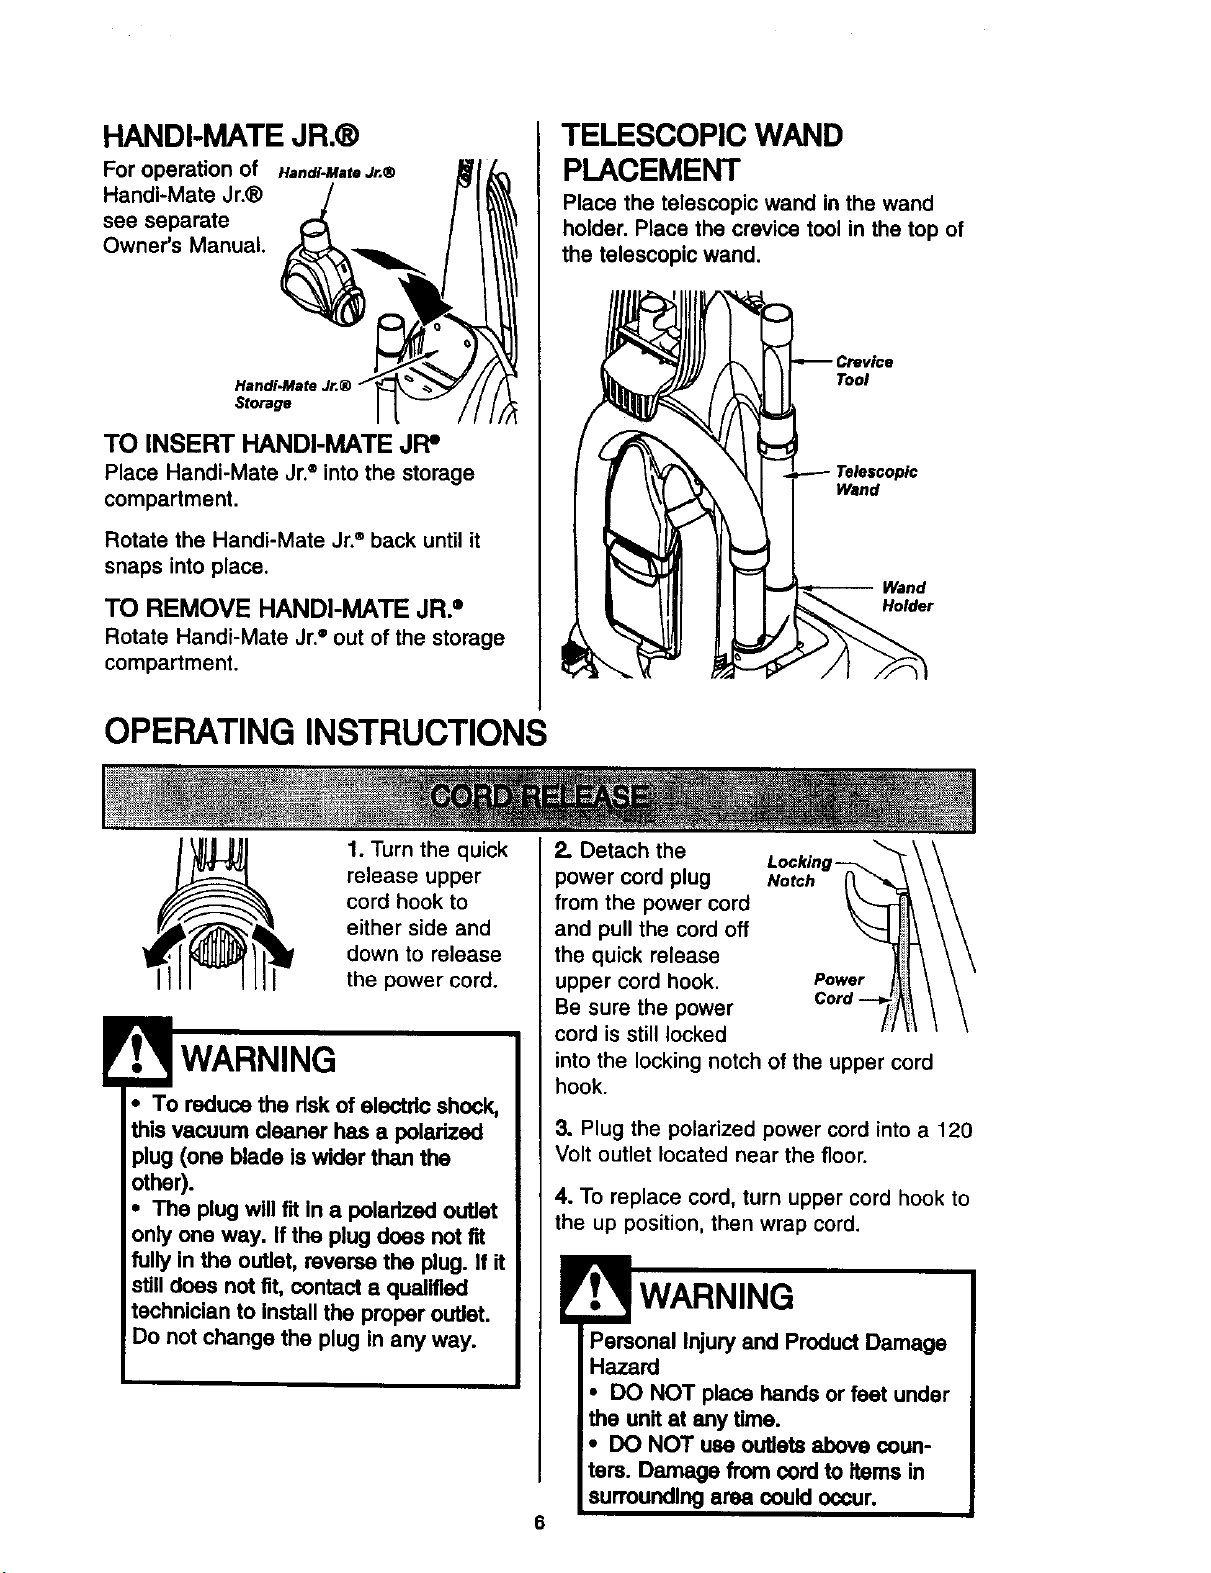
HANDI-MATE JR.®
For operation of
Handi-Mate Jr.®
see separate
Owner's Manual.
Hendl-Mate Jr.®
Heodi.Mate Jr.®
Storage
TO INSERT HANDI-MATE JFP
Place Handi-Mate Jr.®into the storage
compartment.
Rotate the Handi-Mate Jr.®back until it
snaps into place.
TO REMOVE HANDI-MATE JR."
Rotate Handi-Mate Jr.= out of the storage
compartment.
TELESCOPIC WAND
PLACEMENT
Place the telescopic wand in the wand
holder. Place the crevice tool in the top of
the telescopic wand.
Tool
Telescopic
Wand
-- Wand
Holder
OPERATING INSTRUCTIONS
E
1. Turn the quick
release upper
cord hook to
either side and
down to release
the power cord.
WARNING
• To reduce the dsk of electric shock,
this vacuum cleaner has a polarized
plug (one blade is wider than the
other).
• The plug will fit In a polarized outlet
only one way. If the plug does not fit
fully in the outlet, reverse the plug. If it
still does not fit, contact a qualified
technician to install the proper outlet.
Do not change the plug in any way.
2. Detach the "_
Locking -
power cord plug Notch
from the power cord
and pull the cord off
the quick release
upper cord hook. Power
Be sure the power
cord is still locked
into the locking notch of the upper cord
hook.
3. Plug the polarized power cord into a 120
Volt outlet located near the floor.
4. To replace cord, turn upper cord hook to
the up position, then wrap cord.
6
WARNING
Personal Injury and Product Damage
Hazard
place hands or feet under
any time,
• DO NOT use outiets above coun-
ters. Damage from cordto items in
surroundingarea could occur.

Release the handle by pressing down on
the handle release pedal with your foot and
pulling back and down on the handle with
your hand.
Note: The agitator does not rotate when the
vacuum cleaner is in the upright position.
OFF - Turns OFF the vacuum cleaner
(suction) motor.
CARPET - Turns ON the vacuum cleaner
motor to HIGH suction level and the agita-
tor motor to HIGH speed level for cleaning
of most carpets and rugs.
GENTLE - Turns ON the vacuum cleaner
motor to HIGH suction level and the agita-
tor motor to LOW speed level for gentle
cleaning of most delicate carpets.
FLOOR - Turns ON the vacuum cleaner
motor to HIGH suction level and turns OFF
the agitator motor for cleaning of bare
floors.
Touch
Control
Button
OFF
CARPET
GENTLE
FLOOR
MOTOR FUNCTION
Vacuum Cleaner
(Suction) Motor
OFF
HIGH
HIGH
HIGH
Agitator
Motor
OFF
HIGH
LOW
OFF
Your Kenmore Vacuum features a two (2)
speed, direct drive agitator for cleaning a
variety of floor surfaces. Please review the
table below before using your vacuum.
,
Do not use the CARPET setting (high
speed) for cleaning berber style carpet.
The high agitator speed could damage
the carpet or cause excessive carpet
wear.
,
o
Use the GENTLE setting (low speed)
ONLYfor berber or delicate pile carpet-
ing. The agitator may slow down or stop
on thick carpeting, area rugs or throw
rugs. If agitator stops and does not
restart, See page 12, AGITATOR
MOTOR OVERLOAD PROTECTOR of
the owners manual.
The FLOOR setting may be used for all
indoor bare floors including wood, tile,
linoleum, slate etc.
Touch Control
Setting
Carpet (1)
Gentle(2}
Roor (3)
Agitator
Speed
High
Low
Off
Bare
Floor
i/
Commercial
or Low Pile
=/
Berber
or Delicate Area
Carpet Plush Shag Rug
V' i/ l/
v'
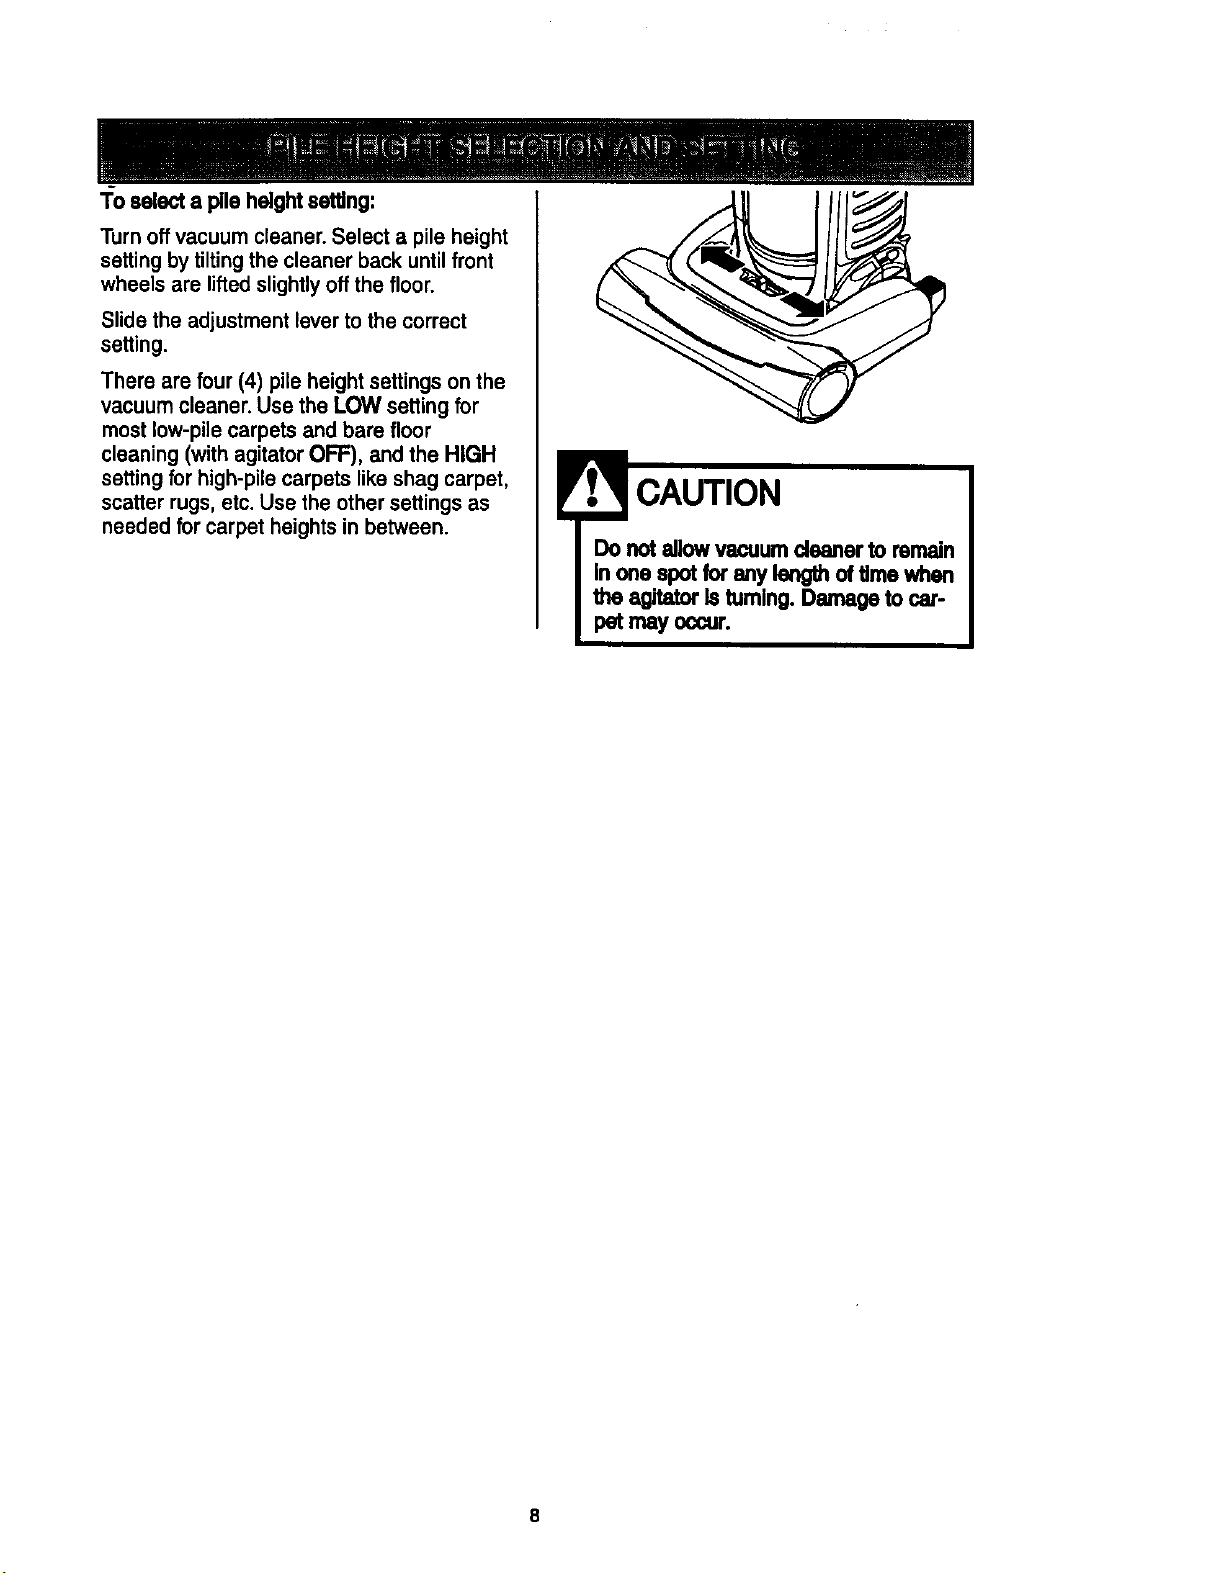
"1:oselecta pileheightsetting:
Turn off vacuum cleaner. Select a pile height
setting by tilting the cleaner back until front
wheels are lifted slightly off the floor.
Slide the adjustment lever to the correct
setting.
There are four (4) pile height settings on the
vacuum cleaner. Use the LOW setting for
most low-pile carpets and bare floor
cleaning (with agitator OFF), and the HIGH
setting for high-pile carpets like shag carpet,
scatter rugs, etc. Use the other settings as
needed for carpet heights in between.
CAUTION
Do not allowvacuum deaner to remain
in one spot forany length ofUmewhen
the agitatorIs tuming.Damage to car-
pet may occur.
C_naUon_
Brush
Carrying
Tool
Extension
Wand
Extension Hose
Release Lever
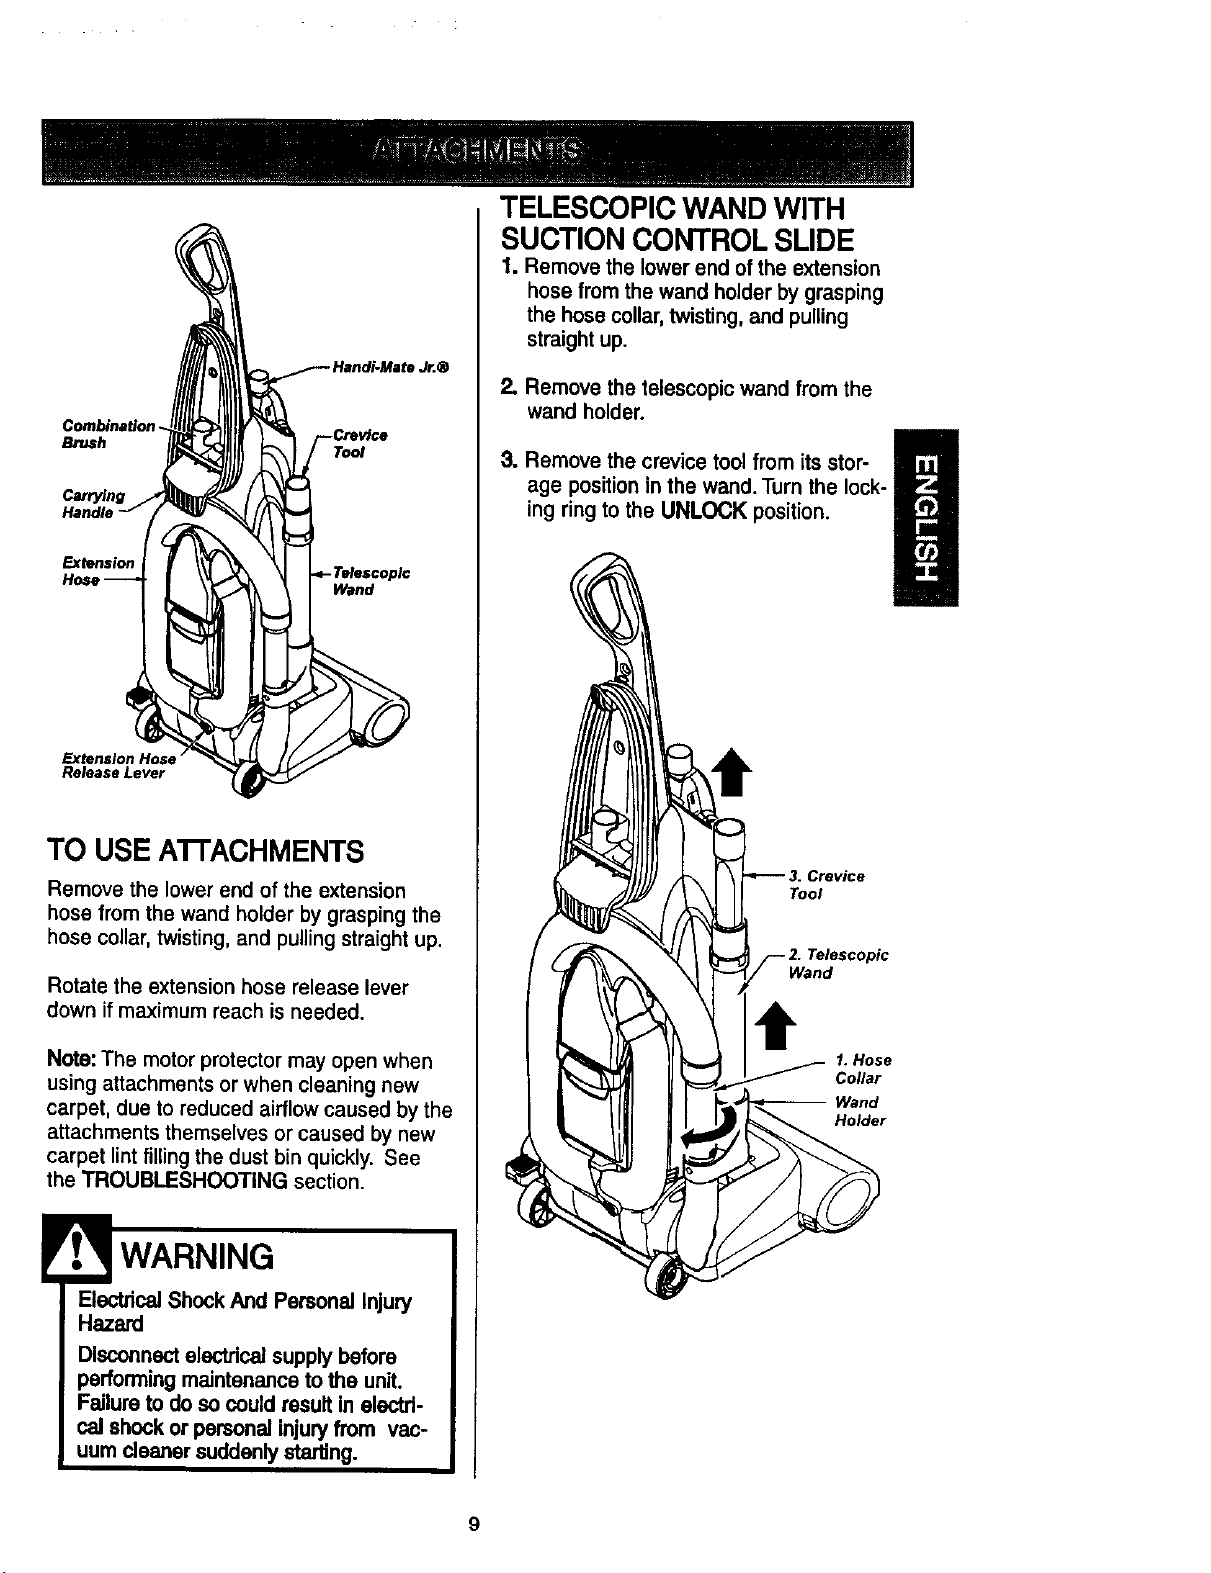
TO USE A'I-FACHMENTS
Remove the lower end of the extension
hose from the wand holder by grasping the
hose collar, twisting, and pulling straight up.
Rotate the extension hose release lever
down if maximum reach is needed.
Note: The motor protector may open when
using attachments or when cleaning new
carpet, due to reduced airflow caused by the
attachments themselves or caused by new
carpet lint filling the dust bin quickly. See
the TROUBLESHOOTING section.
WARNING
Electrical Shock And Personal Injury
Hazard
Disconnectelectricalsupplybefore
performingmaintenancetothe unit.
Failureto do socouldresultIn elactrl-
cal shockor personalinjuryfrom vac-
uumcleanersuddenlystarUng.
TELESCOPIC WAND WITH
SUCTION CONTROL SLIDE
1. Remove the lower end of the extension
hose from the wand holder by grasping
the hose collar, twisting, and pulling
straight up.
2. Remove the telescopic wand from the
wand holder.
m
3. Remove the crevice tool from its stor-
age position in the wand. Turn the Iock-
il
ing ring to the UNLOCK position.
Crevice
Tool
Telescopic
Wand
1. Hose
Coflar
Wand
Holder
9
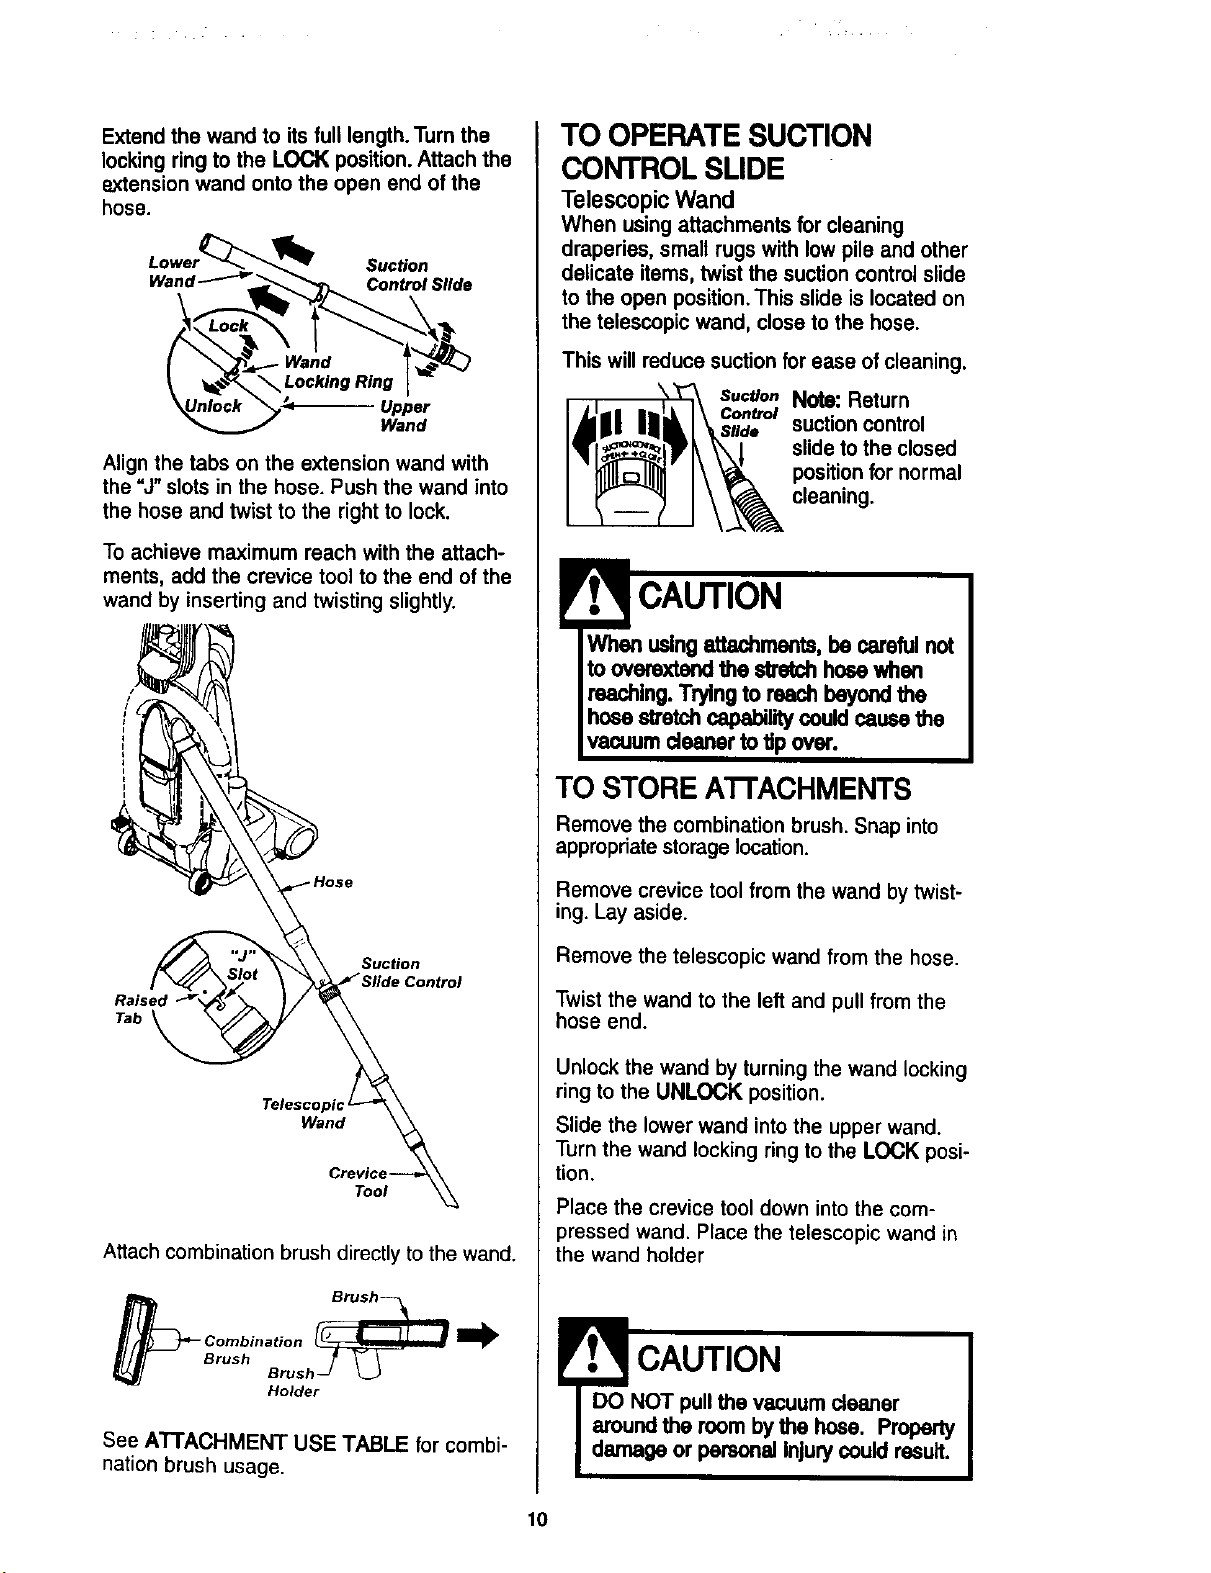
Extend the wand to its full length. Turn the
locking ring to the LOCK position. Attach the
extension wand onto the open end of the
hose.
Lower_ Suction
Wand"_--_tr_ Control Slide
/ oo,,n,.in.t"
Align the tabs on the extension wand with
the "J" slots in the hose. Push the wand into
the hose and twist to the right to lock.
To achieve maximum reach with the attach-
ments, add the crevice tool to the end of the
wand by inserting and twisting slightly.
t_ ,
I '
i
H_°Se suction
I v_._ 7" \ _ SlideControl
Raised _r _ _/
Telescopic
Crevice
Attach combination brush directly to the wand.
Combination I1_
Brush Brush
Holder
See ATTACHMENT USE TABLE for combi-
nation brush usage.
TO OPERATESUCTION
CONTROL SLIDE
TelescopicWand
When using attachments for cleaning
draperies, small rugs with low pile and other
delicate items, twist the suction control slide
to the open position. This slide is located on
the telescopic wand, close to the hose.
This will reducesuctionfor ease of cleaning.
Suction Note: Return
Control
Slide suction control
slide to the closed
position for normal
cleaning.
CAUTION
When usingattachments,be carefulnot
to overextendthe stretchhosewhen
reaching.Tryingto reachbeyondthe
hosestretchcapabilitycould cause the
vacuum deener to tipover.
TO STORE ATrACHMENTS
Remove the combination brush. Snap into
appropriate storage location.
Remove crevice tool from the wand by twist-
ing. Lay aside.
Remove the telescopic wand from the hose.
Twist the wand to the left and pull from the
hose end.
Unlock the wand by turning the wand locking
ring to the UNLOCK position.
Slide the lower wand into the upper wand.
Turn the wand locking ring to the LOCK posi-
tion.
Place the crevice tool down into the com-
pressed wand. Place the telescopic wand in
the wand holder
E CAUTION
DO NOT pull the vacuum deanor
around the room by the hose. Property
damage or personal Injury could result.
10
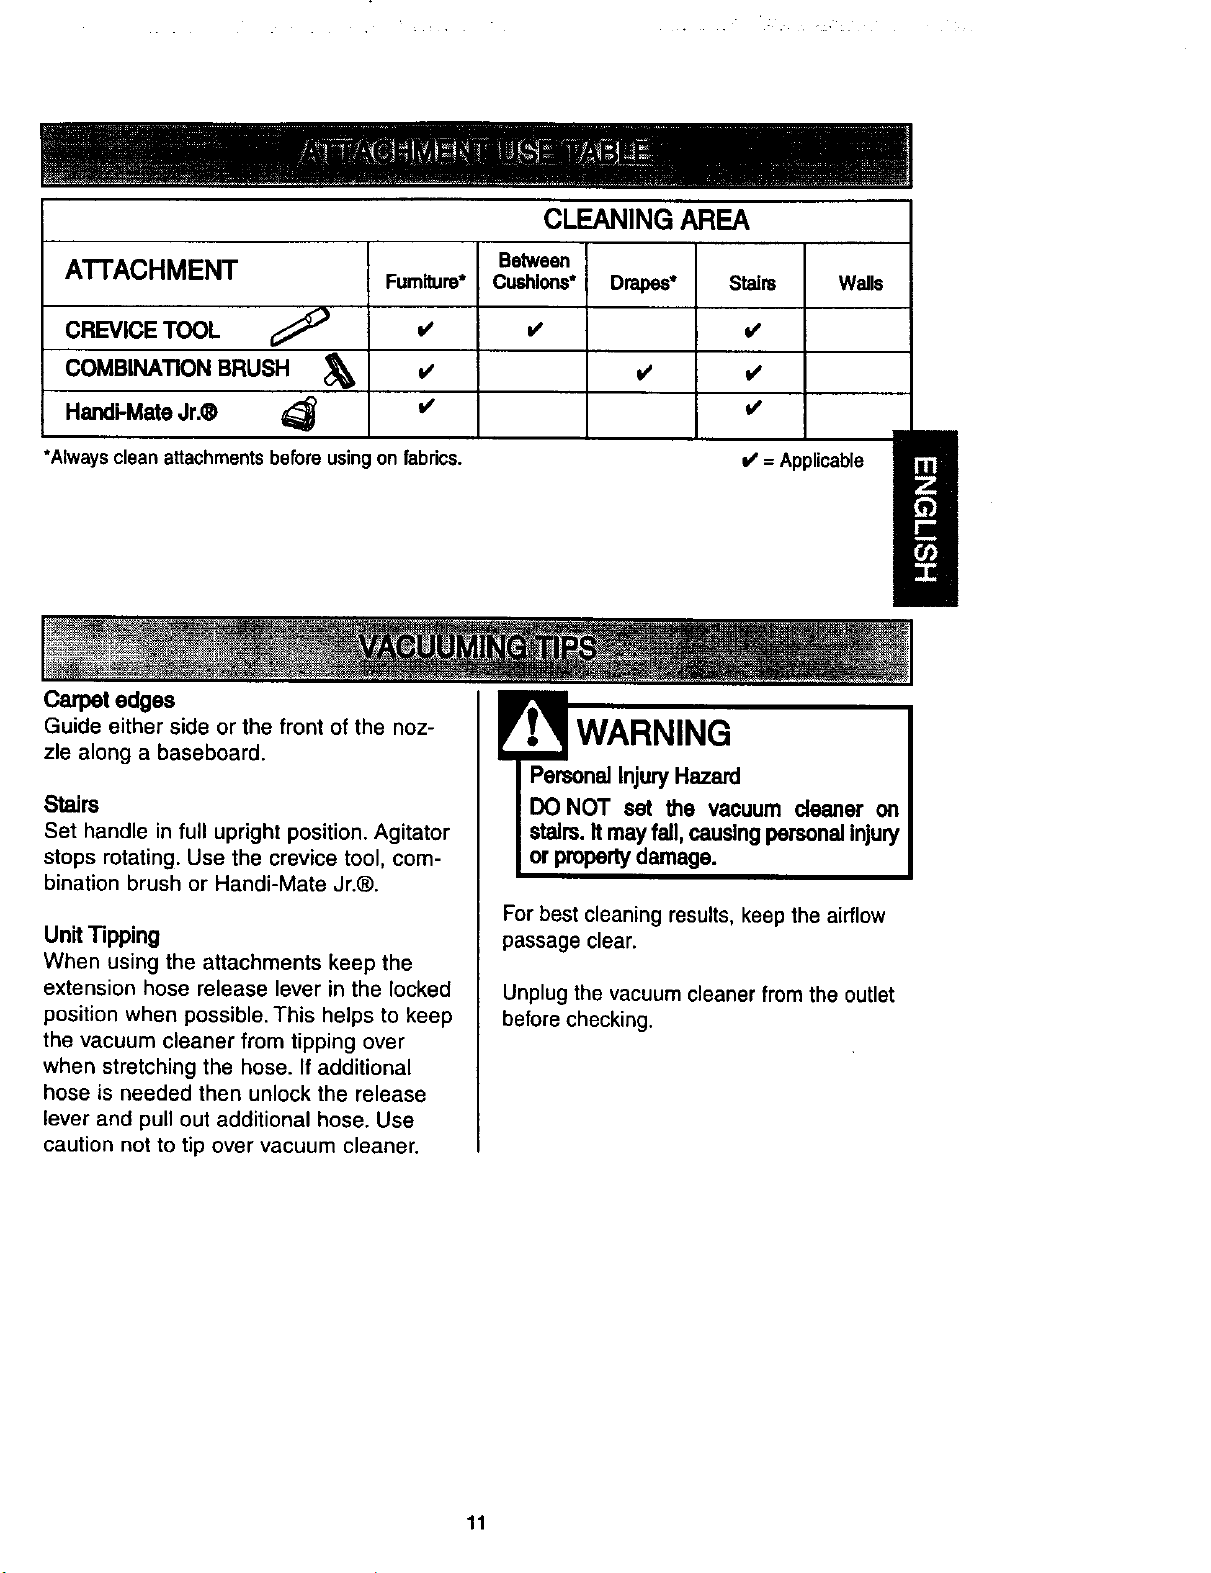
ATTACHMENT
CREVICE TOOL
COMBINATION BRUSH
Handi-MateJr.®
Fumiture*
i/
i/
I/
CLEANINGAREA
Between
Cushions*
Drapes*
l/
v'
*Alwaysclean attachmentsbeforeusingon fabrics.
Stairs
i/
Carpet edges
Walls
i,/
i/
i/= Applicable
Guide either side or the front of the noz-
zle along a baseboard.
Stairs
Set handle in full upright position. Agitator
stops rotating. Use the crevice tool, com-
bination brush or Handi-Mate Jr.®.
Unit Tipping
When using the attachments keep the
extension hose release lever in the locked
position when possible. This helps to keep
the vacuum cleaner from tipping over
when stretching the hose. If additional
hose is needed then unlock the release
lever and pull out additional hose. Use
caution not to tip over vacuum cleaner.
WARNING
For best cleaning results, keep the airflow
passage clear.
Unplug the vacuum cleaner from the outlet
before checking.
11
IVIOTORPROTECTION SYSTEM
Motor Protector
This vacuum cleaner has a motor protector
by-pass valve which automatically opens to
provide cooling air to the vacuum cleaner
motor when a clog prevents the normal
flow of air to the motor. If the by-pass valve
opens to prevent motor overheating and
possible damage to the vacuum cleaner,
you will notice a change of sound as air
rushes through the valve opening.
To correct problem: See the TROUBLE-
SHOOTING section.
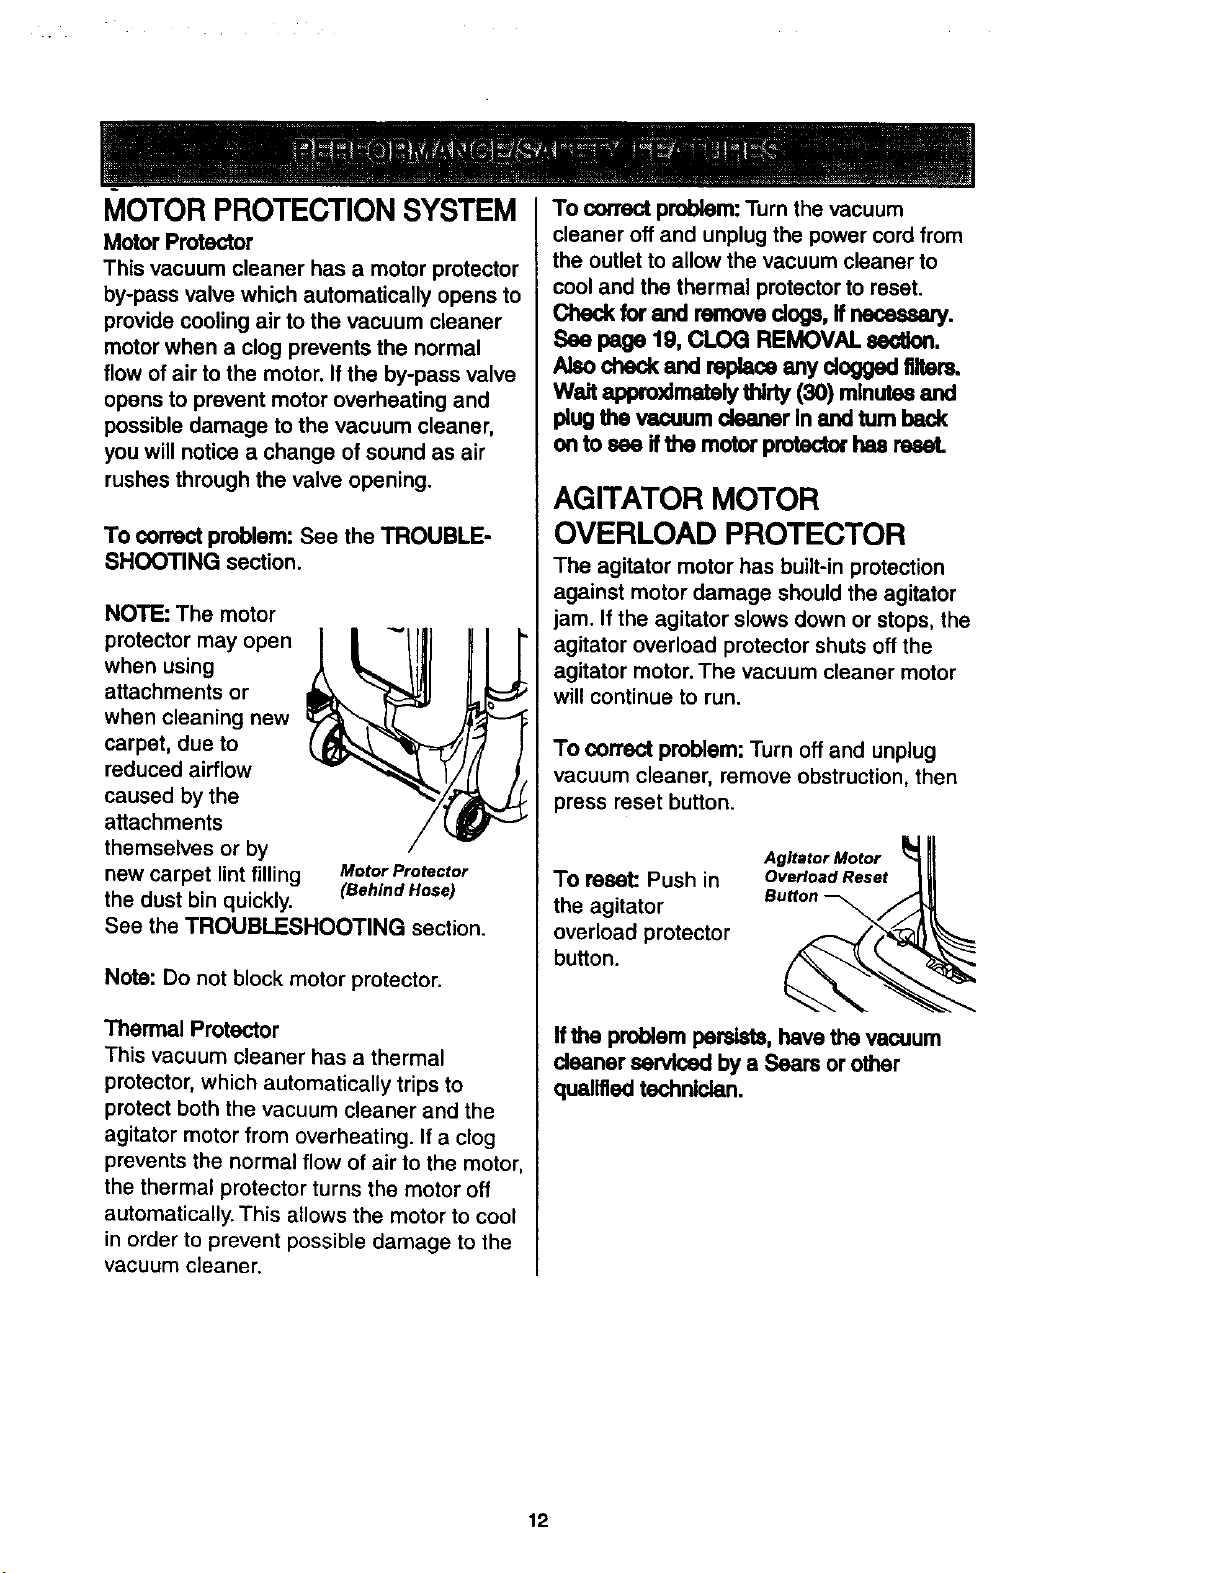
NOTE: The motor
protector may open
when using
attachments or
when cleaning new
carpet, due to
reduced airflow
caused by the
attachments
themselves or by
new carpet lint filling Motor Protector
the dust bin quickly. (BehindHose)
See the TROUBLESHOOTING section.
Note: Do not block motor protector.
Thermal Protector
This vacuum cleaner has a thermal
protector, which automatically trips to
protect both the vacuum cleaner and the
agitator motor from overheating. If a clog
prevents the normal flow of air to the motor,
the thermal protector turns the motor off
automatically. This allows the motor to cool
in order to prevent possible damage to the
vacuum cleaner.
To correctproblem: Turn the vacuum
cleaner off and unplugthe power cord from
the outlet to allow the vacuum cleaner to
cool and the thermal protectorto reset.
Check for and remove dogs, ff nesessary.
page 19, CLOQ REMOVAL section.
Also check and replace any cloggedfilters.
Wait appro_mately thirty (30) minutes and
plugthe vacuum cleaner Inand turn back
on to see ifthe motor protectorhas reset.
AGITATOR MOTOR
OVERLOAD PROTECTOR
The agitator motor has built-in protection
against motor damage should the agitator
jam. If the agitator slows down or stops, the
agitator overload protector shuts off the
agitator motor. The vacuum cleaner motor
will continue to run.
To correct problem: Turn off and unplug
vacuum cleaner, remove obstruction, then
press reset button.
To reset: Push in
the agitator
overload protector
button.
Agitator Motor
OveHoad Reset
Ifthe problem pemists, have the vacuum
cleaner serviced by a Sears or other
qualifiedtechnician.
12
VACUUM CLEANER CARE
Always follow all safety precautions when
performing maintenance to the vacuum
cleaner.
Bactdcal Shock And PersonalInjury
Hazard
Disconnectelectricalsupply before
performingmaintenanceto the unit.
Failureto do so couldresultIn elactd.
cal shock or personal Injuryfromvacu-
um deener e,____enlystarting.
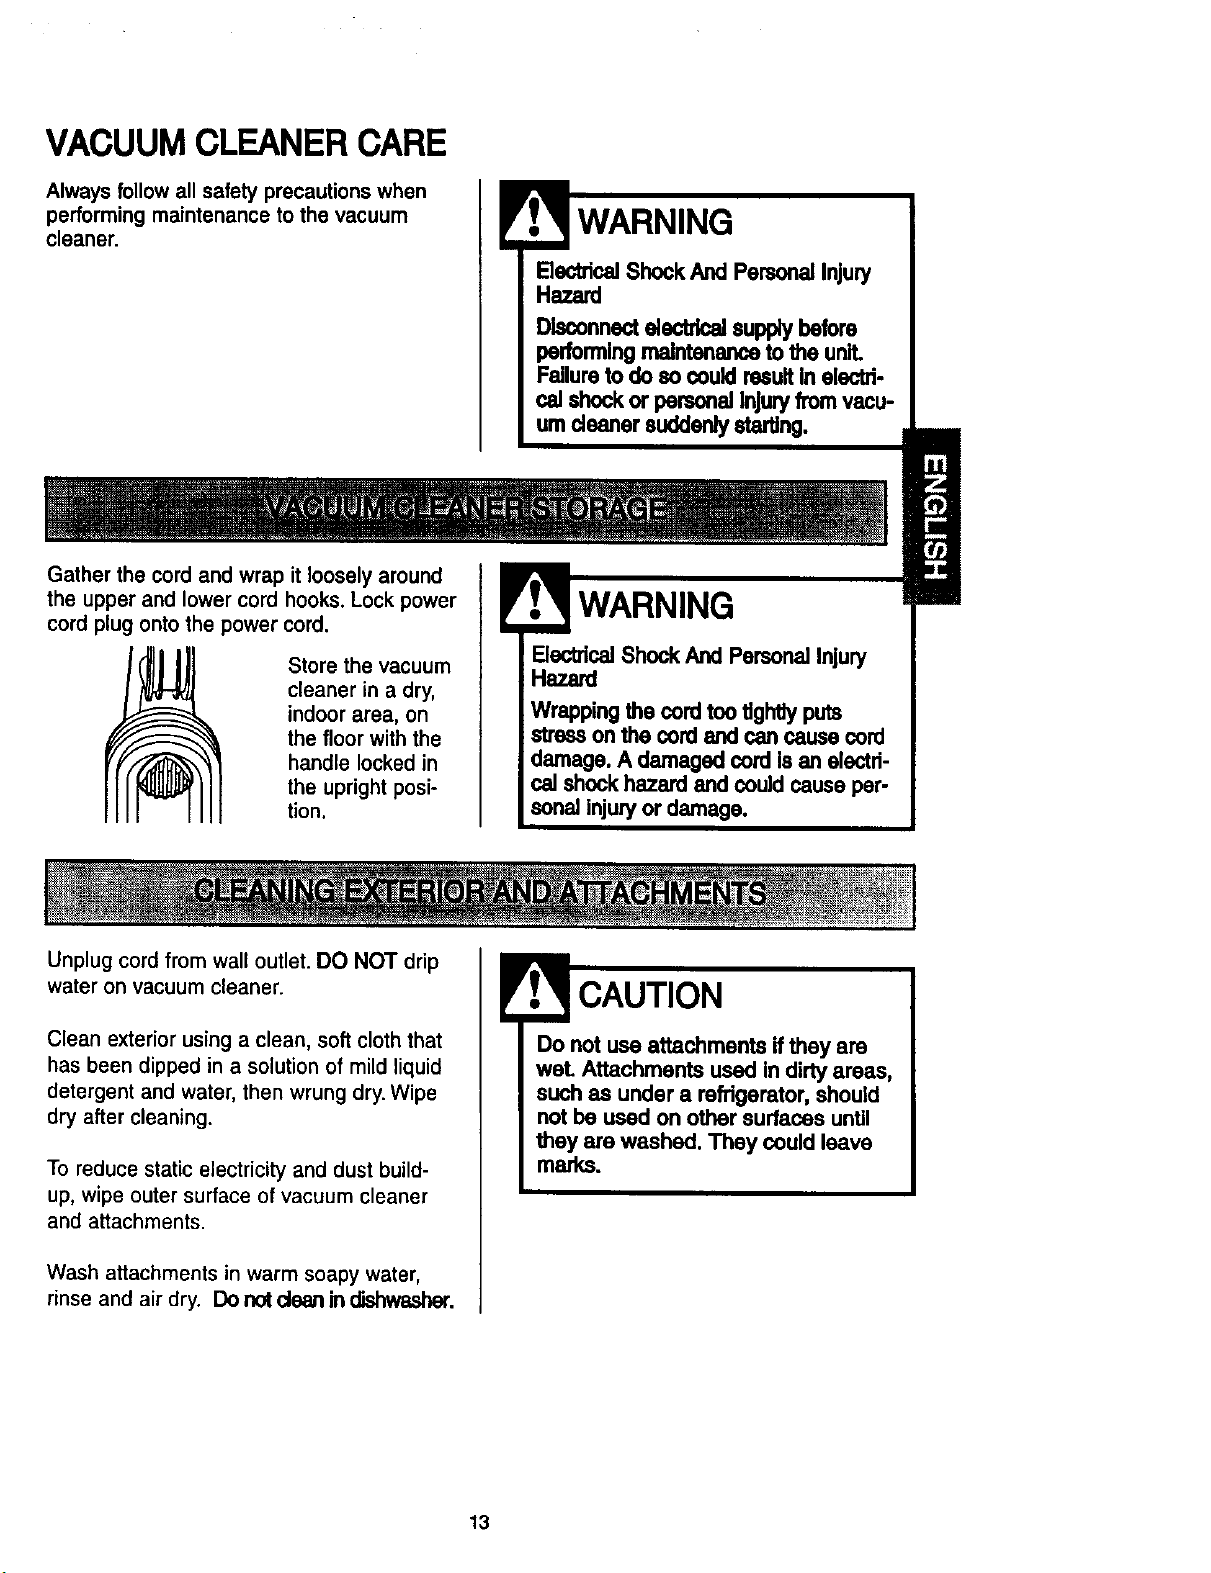
Gather the cord and wrap it loosely around
the upper and lower cord hooks. Lock power
cord plug onto the power cord.
Store the vacuum
cleaner in a dry,
indoor area, on
the floor with the
handle locked in
the upright posi-
tion.
Unplug cord from wall outlet. DO NOT drip
WARNING
ElectricalShock And PersonalInjury
Hazard
Wrappingthe cordtootlghttyputs
stresson the cord and can cause cord
damage. A damaged cordisan elactri-
caJshockhazard end could cause per-
sonalinjuryor damage.
water on vacuum cleaner.
Clean exterior using a clean, soft cloth that
has been dipped in a solution of mild liquid
detergent and water, then wrung dry. Wipe
dry after cleaning.
To reduce static electricity and dust build-
up, wipe outer surface of vacuum cleaner
and attachments.
Wash attachments in warm soapy water,
rinse and air dry. Do not dean in dishwasher.
CAUTION
Do not use attachments ifthey are
weL Attachments used in dirty areas,
suchas under a refrigerator, should
not be used on other surfaces until
they are washed. They could leave
marks.
13
! WARNING
Alwaysunplugpowercordfrom electri-
caloutlet before porformlng any ser-
vice on vacuum.
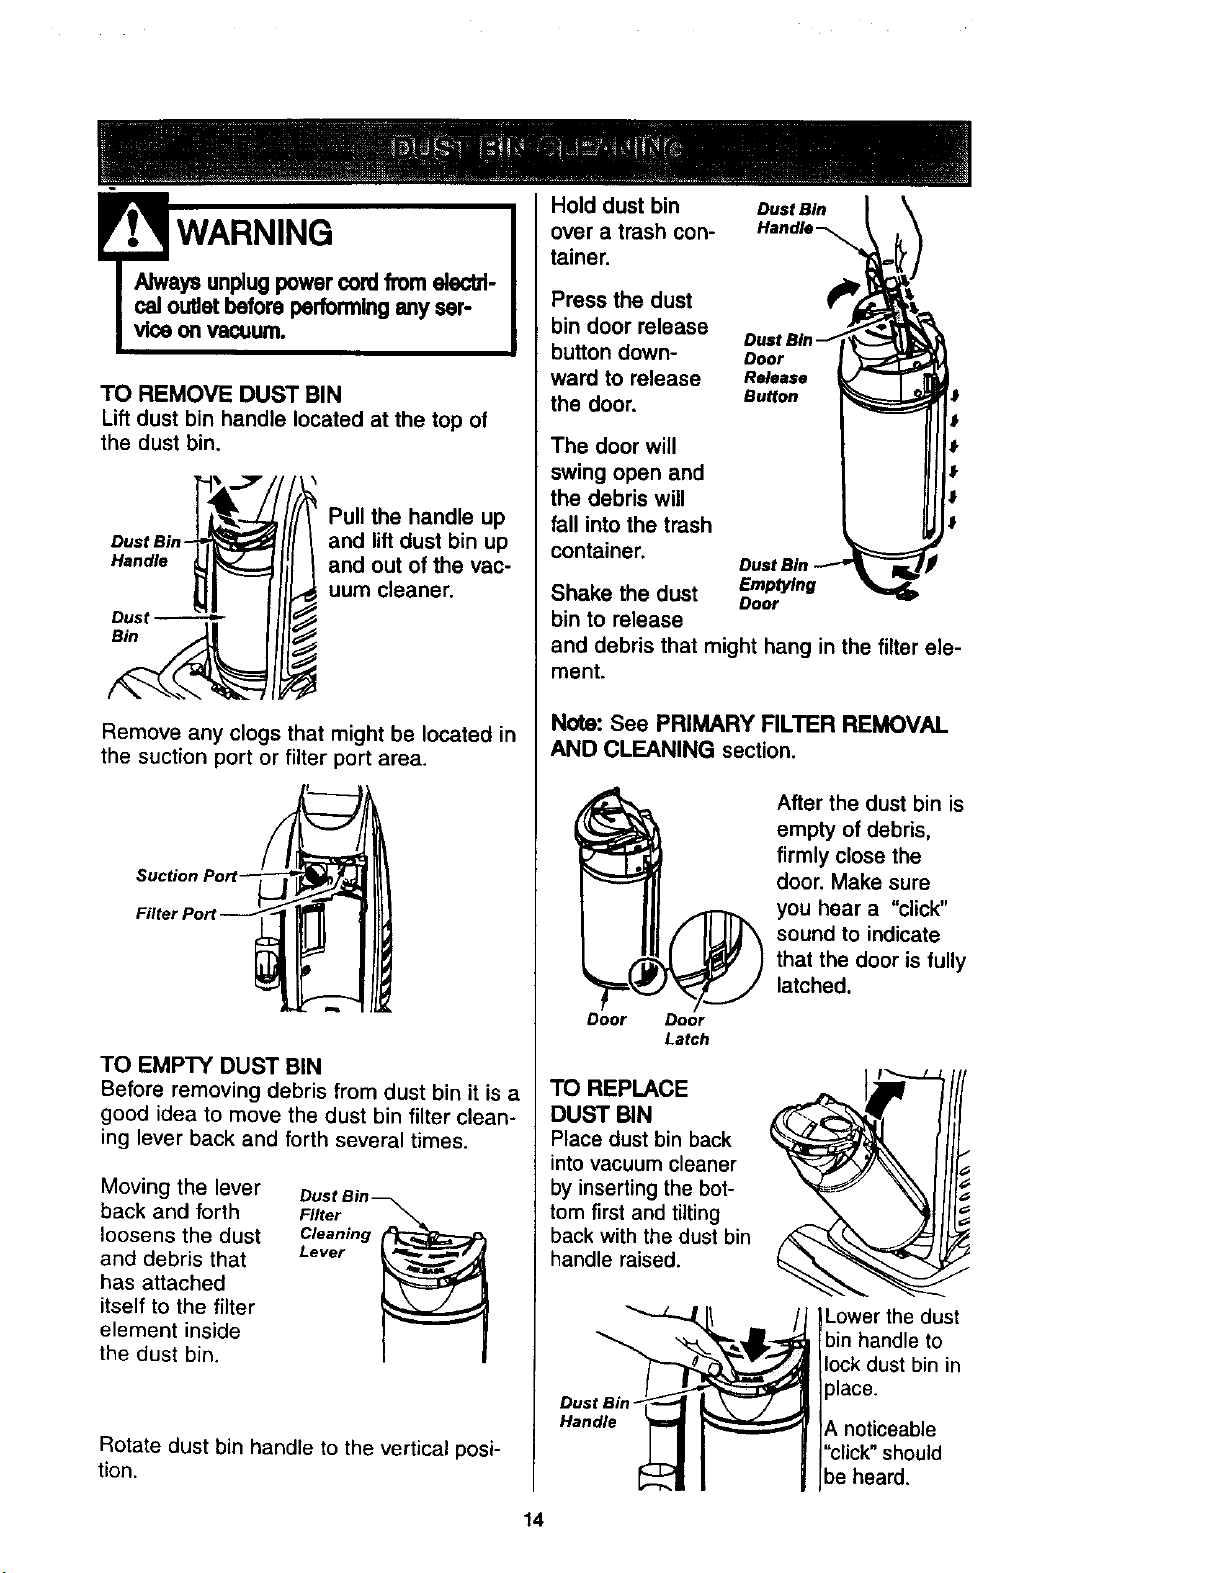
TO REMOVE DUST BIN
Lift dust bin handle located at the top of
the dust bin.
Dust Bin-
Handle
I i
Dust _
Bin
Pull the handle up
and lift dust bin up
and out of the vac-
uum cleaner.
Remove any clogs that might be located in
the suction port or filter port area.
TO EMPTY DUST BIN
Before removing debris from dust bin it is a
good idea to move the dust bin filter clean-
ing lever back and forth several times.
Moving the lever
back and forth Filter
loosens the dust Cleaning
and debris that Lever
has attached
itself to the filter
element inside
the dust bin.
Rotate dust bin handle to the vertical posi-
tion.
Hold dust bin DustBin
over a trash con-
tainer.
Press the dust
bin door release
button down- Door
ward to release Release
the door. Button
The door will
swing open and
the debris will
fall into the trash
container.
Emptying
Shake the dust Door
bin to release
and debris that might hang in the filter ele-
ment.
Note: See PRIMARY FILTER REMOVAL
AND CLEANING section.
Door Door
Latch
After the dust bin is
empty of debris,
firmly close the
door. Make sure
you hear a "click"
sound to indicate
that the door is fully
latched.
TO REPLACE
DUST BIN
Place dust bin back
into vacuum cleaner
by inserting the bot-
tom first and tilting
back with the dust bin
handle raised.
_._jl/} Lower the dust
[bin handle to
_'11_.._-_.,,_1 ]lock dust bin in
]place.
HDUnS_/fJ_ _:_ /A noticeable
I I J/"c,ck"should
II I I /be heard.
14

EJocldcal ShockAnd PersonalInjury
Hazard
Unplugpowercord fromelectricalout-
let. Do notoperate the vacuumcleaner
withoutthe pdmmyor e_aust filters.
Be sure the filters are properlyInstalled
to preventmotorfailure and or alecffi-
cal shock.
PRIMARY FILTER
Check primary filter frequently and clean
when dirty.
TO REMOVE PRIMARY FILTER
Remove the dust bin assembly as outlined
in the DUST BIN CLEANING section.
Make sure dust bin is free of debris before
removing lid and filter. Rotate dust bin lid
assembly counterclockwise as indicated on
the lid and lift off.
Turn This Direction
To Open For Emptying
Closed
(For Use)
Open
(For Emptying)
While holding dust bin lid over a trash con-
tainer grasp primary filter, rotate counter-
clockwise and lift off.
Clean primary filter by gently tapping over a
trash container. Tap on several sides to
ensure best cleaning.
Remove primary
filter by turning
it counterclock-
wise and pulling
out (See arrows
on bottom of fil-
ter). Pip.so with
wateronlyas
needed, do not
use any deter-
gent or soap.
DustBin
Lid
Cam
Allow the filter to dry for 24 hours
before putting it back into the vacuum.
When cleaning the filter no longer
restores vacuum suction to full power you
need to replace the filter.
g
Note: See PARTS AND FEATURES
for the filter number.
TO REPLACE PRIMARY FILTER
To replace filter, insert it over cleaning
cams as far as it will go. Make sure rubber
seal at top of filter is flush against filter sup-
porter, turn filter clockwise to secure into
place.
Note: Under normal use and care, your fil-
ter can be expected to last up to 5 years.
Rubber
Cams
Filter -
Dust Bin
Lid
Re-assemble dust bin lid to dust bin. Insert
into cleaner and secure with dust bin han-
dle.
15
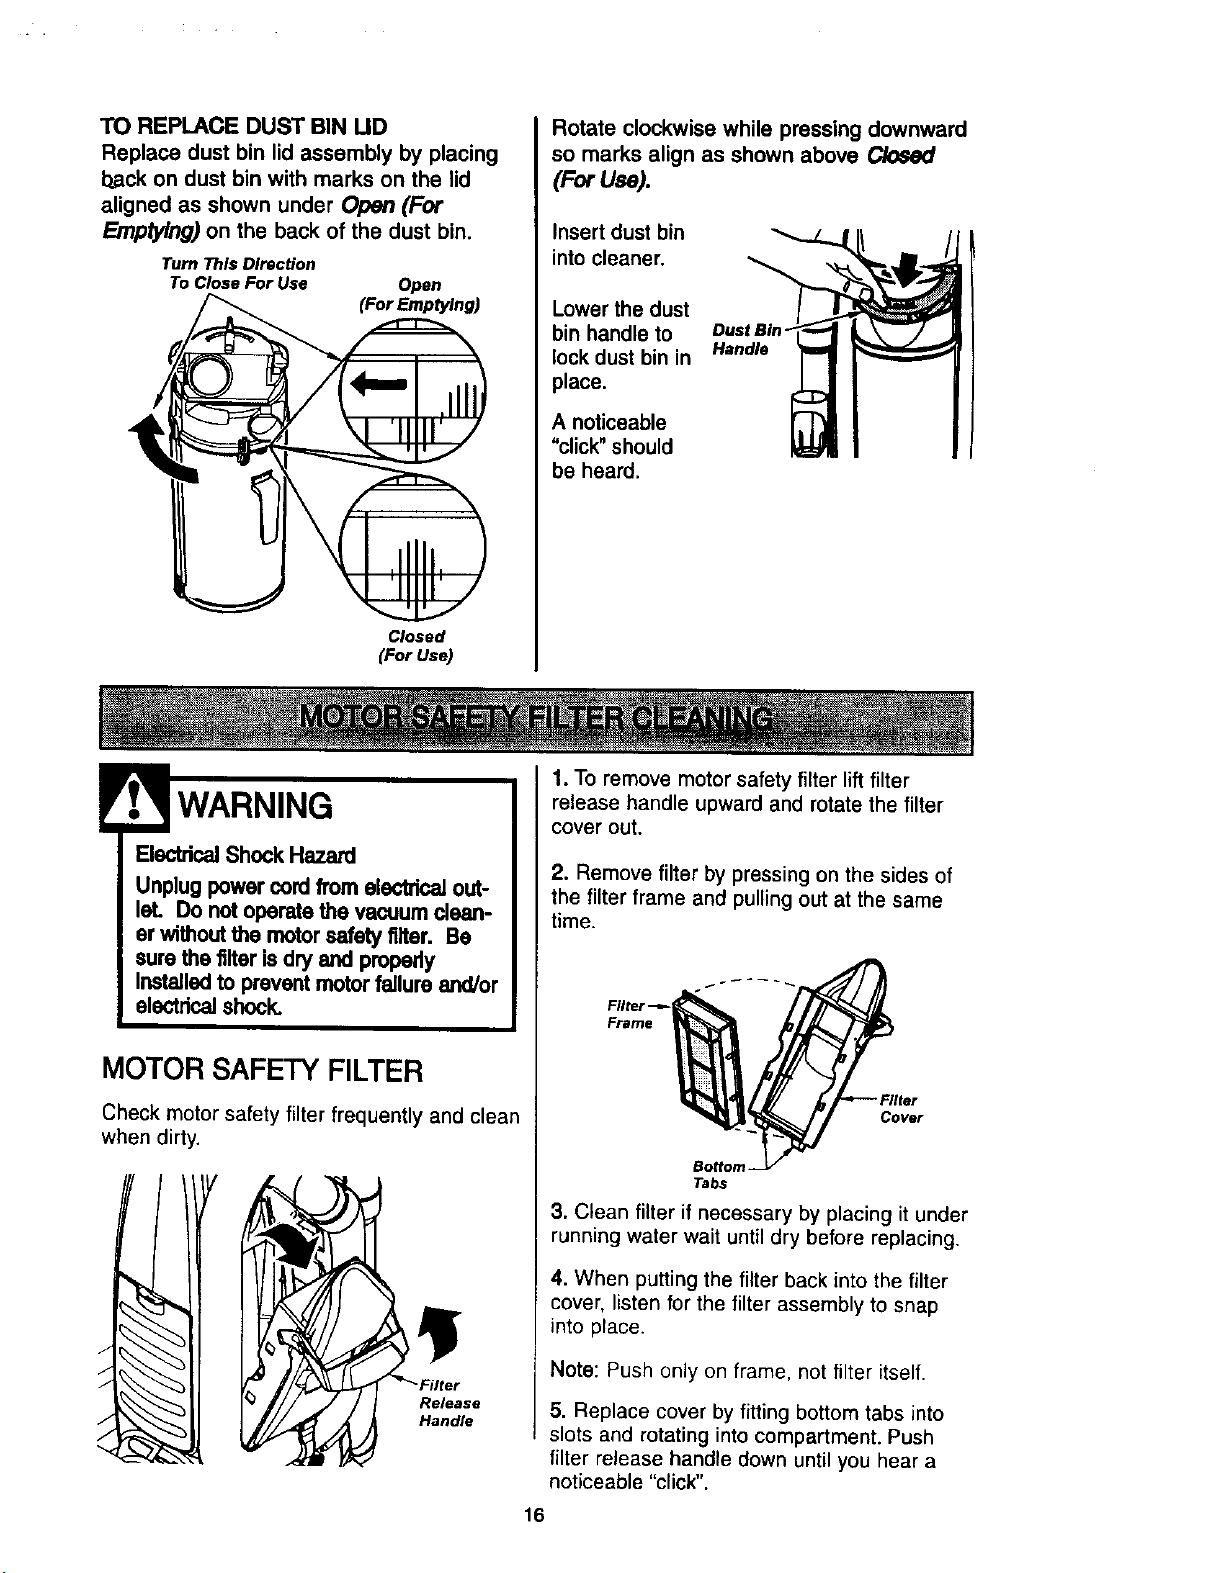
TO REPLACE DUST BIN UD
Replace dust bin lid assembly by placing
b_ck on dust bin with marks on the lid
aligned as shown under Open (For
Emptying) on the back of the dust bin.
Turn This Direction
To Close For Use
Open
(For Emptying)
Closed
(For Use)
Rotate clockwise while pressing downward
so marks align as shown above C/osed
(For Use).
Insertdust bin
intocleaner.
Lowerthe dust
bin handle to oustale-
lock dust bin in Handle
place.
A noticeable
"click"should
be heard.
ElectricalShockHazard
Unplugpowercordfrom electricalout-
let. Do notoperate the vacuum dean-
er withoutthe motorsafety filter. Be
surethe filter isdryand properly
Installed to preventmotorfailure and/or
electrical shock.
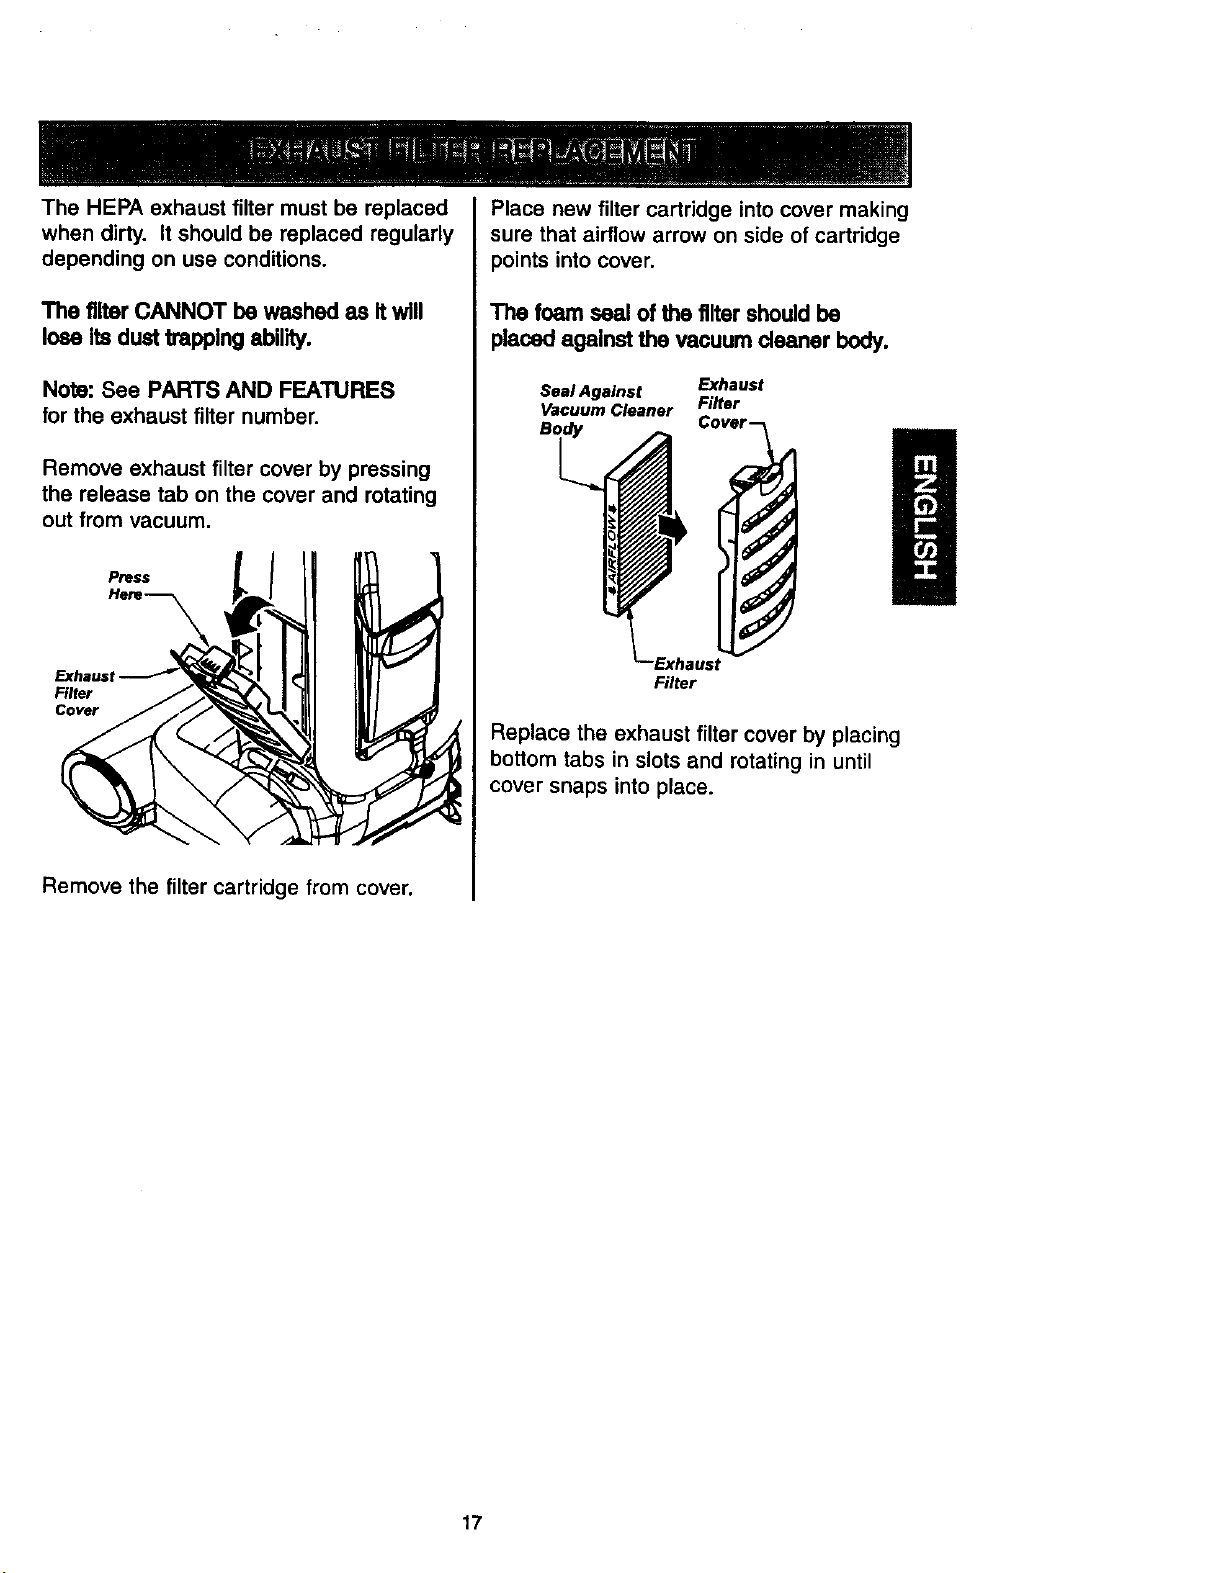
MOTOR SAFETY FILTER
Check motor safety filter frequently and clean
when dirty.
J
J
J
,,,,<
i
Y
_Filter
Release
Handle
1. To remove motor safety filter lift filter
release handle upward and rotate the filter
cover out.
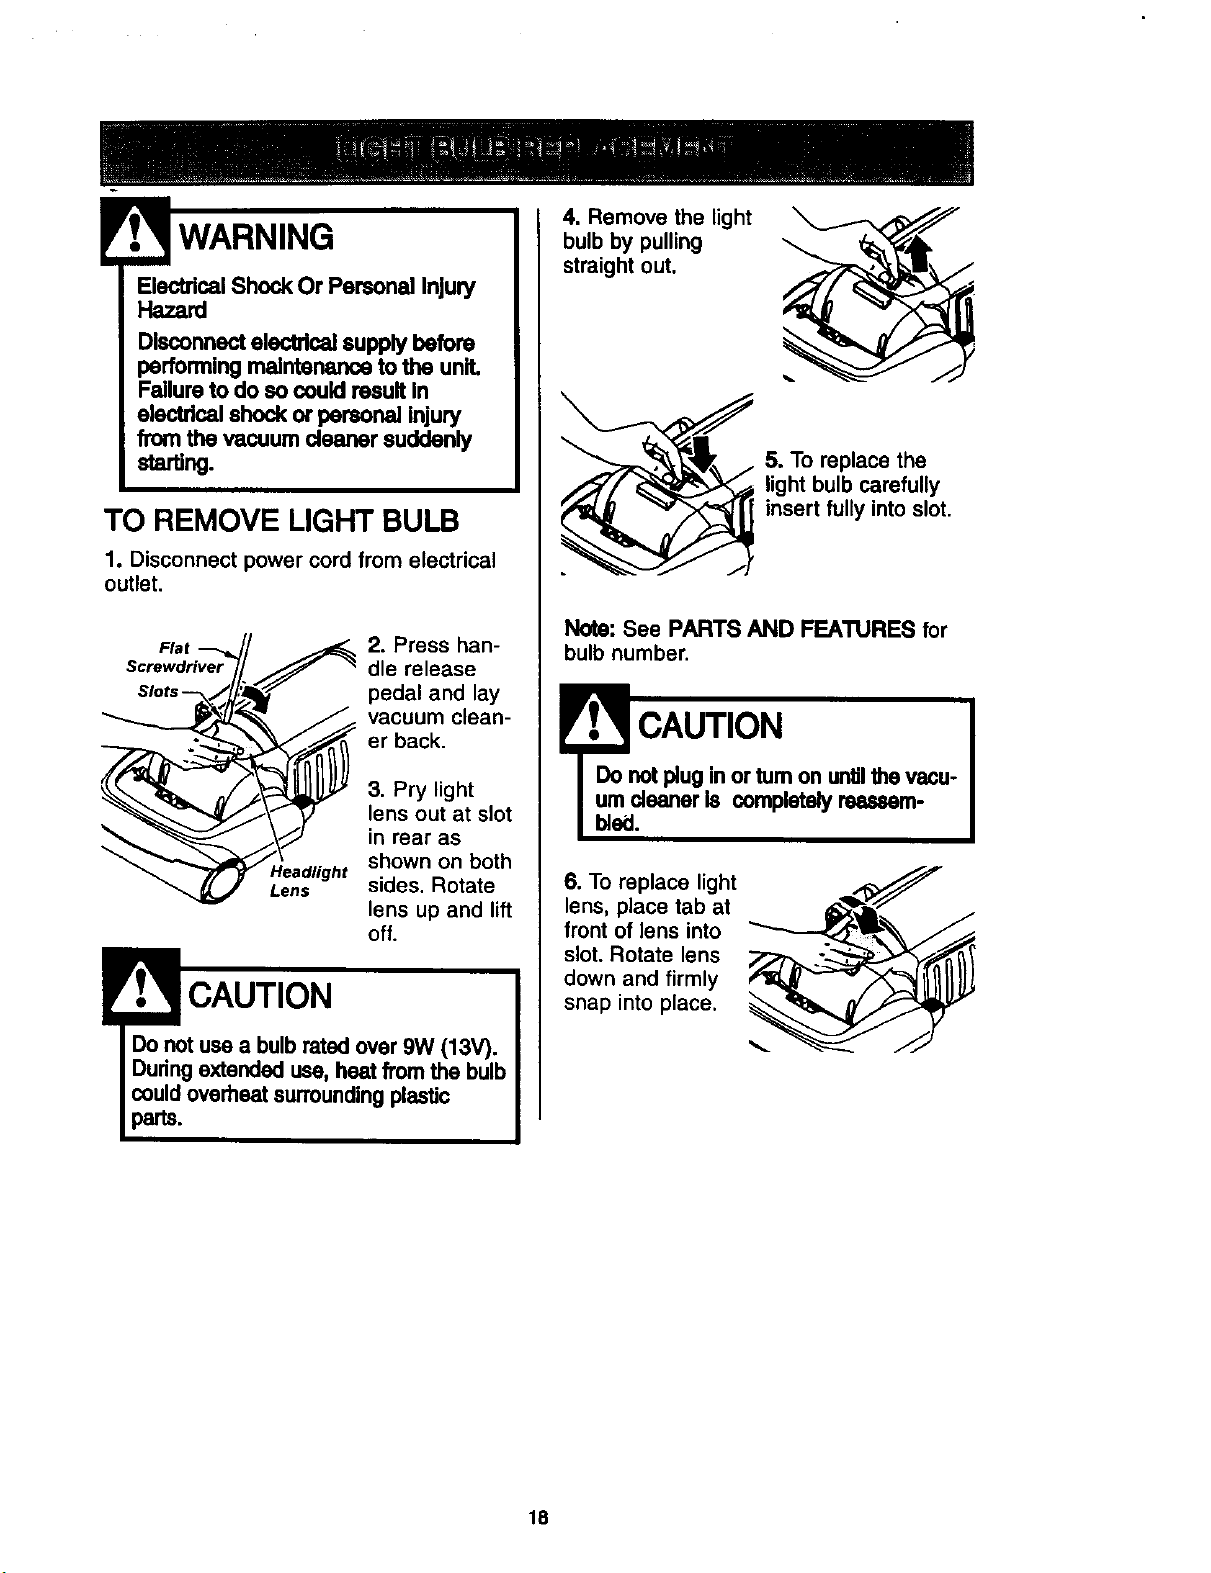
2. Remove filter by pressing on the sides of
the filter frame and pulling out at the same
time.
Filter -"! __
Frame
-- Filter
Cover
Bottom
Tabs
3. Clean filter if necessary by placing it under
running water wait until dry before replacing.
4. When putting the filter back into the filter
cover, listen for the filter assembly to snap
into place.
Note: Push only on frame, not filter itself.
5. Replace cover by fitting bottom tabs into
slots and rotating into compartment. Push
filter release handle down until you hear a
noticeable "click".
16
The HEPA exhaust filter must be replaced
when dirty. It should be replaced regularly
depending on use conditions.
The filter CANNOT be washed as it will
lose its dust trapping ability.
Note: See PARTS AND FEATURES
for the exhaust filter number.
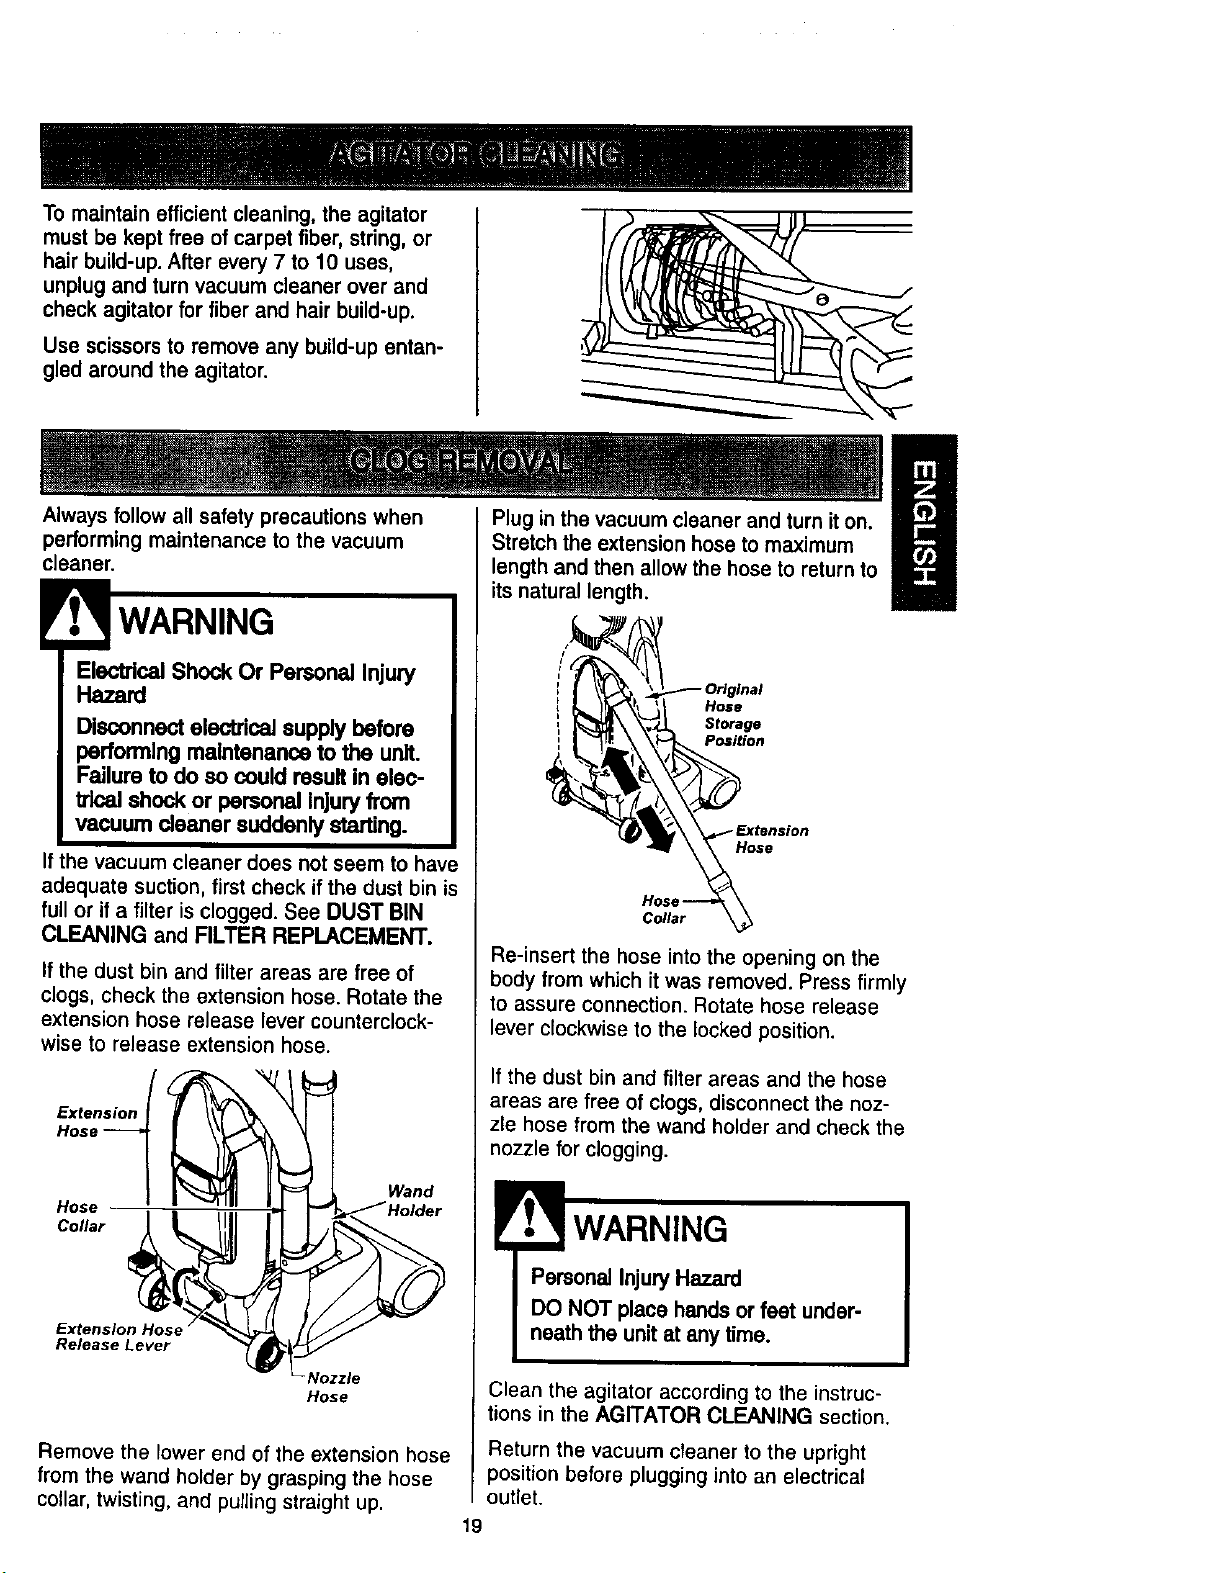
Remove exhaust filter cover by pressing
the release tab on the cover and rotating
out from vacuum.
Press
Here
Rlter
Cover
Remove the filter cartridge from cover.
Place new filter cartridge into cover making
sure that airflow arrow on side of cartridge
points into cover.
The foamsealofthe filtershouldbe
phced against thevacuumcleanerbody.
Seal Against Exhaust
Vacuum CJeaner Filter
Filter
Replace the exhaust filter cover by placing
bottom tabs in slots and rotating in until
cover snaps into place.
17
WARNING
Elecffical Shock Or Personal Injury
Hazard
Dl_onnsot elecltlcal supply before
performing mai_ to the unit.
Failure to do so could result In
electrical shock or personal injury
from the vacuum clear_' suddenly
starting.
TO REMOVE LIGHT BULB
1. Disconnect power cord from electrical
outlet.
Flat
Screwdriver
Slots--
Lens
2. Press han-
dle release
pedal and lay
vacuum clean-
er back.
3. Pry light
lens out at slot
in rear as
shown on both
sides. Rotate
lens up and lift
off.
CAUTION
Do not use a bulb rated over 9W (13V).
Dudng extended use, heat from the bulb
could overheat surrounding plastic
parts.
4. Remove the light
bulb by pulling
straight out.
5. To replace the
light bulb carefully
insert fully into slot.
Note: See PARTS AND FEATURES for
bulb number.
E CAUTION
Do not plug in or turn on until the vacu-
um cleaneris completelyreessern-
bled.
6. TO replace light
lens, place tab at
front of lens into
slot. Rotate lens
down and firmly
snap into place.
18
To maintain efficient cleaning, the agitator
must be kept free of carpet fiber, string, or
hair build-up. After every 7 to 10 uses,
unplug and turn vacuum cleaner over and
check agitator for fiber and hair build-up.
Use scissorsto removeany build-up entan-
gledaround the agitator.
__ -........ • ....
Always follow all safety precautions when
performing maintenance to the vacuum
cleaner.
Plug in the vacuum cleaner and turn it on.
Stretch the extension hose to maximum
length and then allow the hose to return to
its natural length.
ElectricalShock Or PersonalInjury
Hazard
Disconnect electrical supply before
performing maintenance to the unit.
Failure to do so could resuRin elee-
b'lcaJshock or personal Injury from
vacuum cleaner suddenly starting.
If the vacuum cleaner does not seem to have
adequate suction, first check if the dust bin is
full or if a filter is clogged. See DUST BIN
CLEANING and FILTER REPLACEMENT.
('_iO_ar_ t_sl°n
If the dust bin and filter areas are free of
clogs, check the extension hose. Rotate the
extension hose release lever counterclock-
wise to release extension hose.
H°_e r " i _ii;i ;=1 r_ HOlder
Extension Hose" _ :_ _ (Jj
Hose
Remove the lower end of the extension hose
from the wand holder by grasping the hose
collar, twisting, and pulling straight up.
Re-insert the hose into the opening on the
body from which it was removed. Press firmly
to assure connection. Rotate hose release
lever clockwise to the locked position.
If the {:lustbin and filter areas and the hose
areas are free of clogs, disconnect the noz-
zle hose from the wand holder and check the
nozzle for clogging.
WARNING
Personal Injury Hazard
DO NOT place hands or feet under-
neath the unit at any time.
Clean the agitator according to the instruc-
tions in the AGITATOR CLEANING section.
Return the vacuum cleaner to the upright
position before plugging into an electrical
outlet.
19
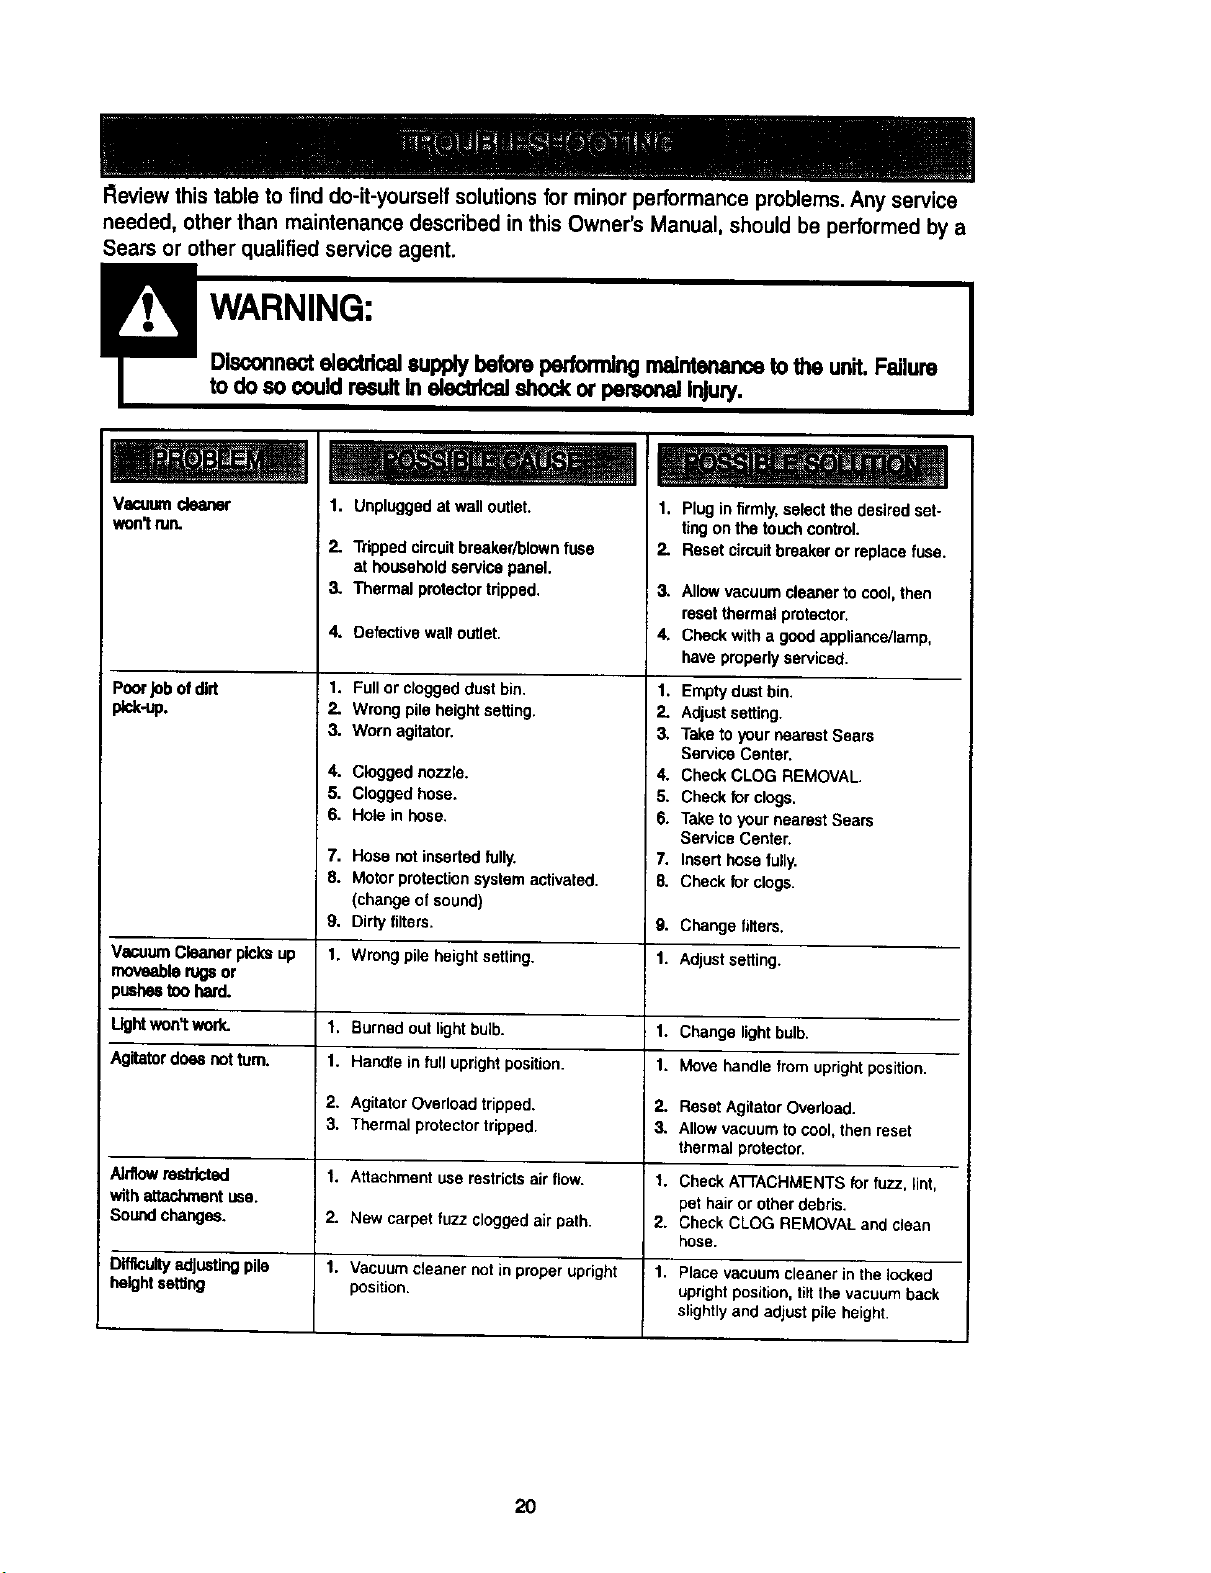
Review this table to find do-it-yourself solutions for minor performance problems. Any service
needed, other than maintenance described in this Owner's Manual, should be performed by a
Sears or other qualified service Bgent.
Vacuumcleaner
won'trun.
PoorJobofdirt
pick-up.
1. Unpluggedat wall outlet.
2.
3.
4.
Trippedcimuitbreaker/blownfuse 2.
at householdservicepanel.
Thermalprotectortripped. 3.
Defective wall outlet.
1. Fullor cloggeddustbin.
2. Wrong pileheightsetting.
3. Worn agitator,
4. Cloggednozzle.
5. Cloggedhose.
6. Hotein hose.
7,
8.
1. Plugin firmly,selectthedesiredsat-
ringonthe touchcontrol.
Resetcimuitbreakeror replacefuse.
4.
Hosenot insertedfully, 7.
Motorprotectionsystemactivated. 8.
(changeof sound)
Dirty tilters.
Allowvacuumcleanerto cool,then
resetthermalprotector.
Chockwitha goodappliance/lamp,
have properlyserviced.
1. Emptydustbin.
2. Adjustsetting.
3, Taketo yournearestSears
ServiceCenter,
4. CheckCLOG REMOVAL.
5. Checkforclogs.
6. Taketoyour nearestSears
ServiceCenter.
Inserthosetully.
Checkforclogs.
9, 9. Changelitters,
VacuumCleanerpicksup 1. Wrongpileheightsetting. 1. Adjustsetting.
moveablerugsor
pushsetoo hard.
Lightwon'twork. 1. Burnedout lightbulb. 1. Changelightbulb.
Agitatordoesnot turn. 1. Handleinfulluprightposition. 1, Move handlefromuprightposition.
2. AgitatorOverloadtripped. 2. ResetAgitatorOverload.
3. Thermalprotectortripped. 3. Allowvacuumtocool,then reset
thermalprotector.
AJn3owrestricted 1. Attachmentuserestrictsairflow. 1, Check ATTACHMENTSfor fuzz, lint,
withattachmentuse. pet hairor otherdebris.
Soundchanges. 2. New carpet fuzzcloggedairpath. 2. CheckCLOG REMOVALand clean
hose.
Difficultyadjustingpile 1. Vacuumcleaner notin properupright 1. Placevacuumcleanerin thelocked
heightseffiog position, uprightposition,tiltthevacuumback
slightlyand adjustpileheight.
20
Arlte,sdo usar suasp]radola nueva ....... I
Garantlade la asplradorade Kenmore..... I
Instmcclones Imporlantesde
segurklad............................. 2
......
Insbucdonesde ensarnblarnlento....... 4-5
Instmcdonesdooperad6n............... 5
Uberaci6n del cord6n el_ctrico .......... 5
Despmndimientodelmango.............. 6
PulsadordeControl.................... 6
GentleSweepFunction.................. 6
Ajustey selecci6ndenivelde pelodela
alfombra ............................ 7
Accesorios......................... 8-9
Cuadmdeusode losaccesorios ......... 10
Sugerenciasparaaspirar............... 10
Camctedisticasde
rendimiento/seguridad............... 11-12
CLIidsdodo 18,ast3_,,'8,dora............... 12
Almacenamientode laaspiradora ........ 12
Limpiezadelexteriory de losaccesorlos... 12
Limpiandoel cubode la basura .......... 13
Primaryfilterremovalandcleaning ....... 14
Motorsafetyfiltercleaning............... 15
Filtrodeescape ...................... 16
Cambiodelabombina................. 17
Limpiezadel agitador .................. 18
C6moeliminarlosresiduosdebasura
en losconductos..................... 18
Reconocimlento de problemas ........... 19
Informacl6n de asslstanda
o serylck) ...................... back page
Porfavorlea estaguiaqueleayudaraa assemblary operarsuaspiradoranuevade Kenmoreen unamanera
m_s seguray efectiva.
Paramas informaci6nacercadelcuidadoy operaci6ndeestaaspirador,Ilamea sutiendaSearsmascercana.
Cuandoprequnteporinformaci6nustednecisitarael n0merocompletode seriey modelode taaspiradoraque
estanen la placade los n_merosdemodeloy serie.
Useelespaciodeabajopararegistrarel n_merode modeloy seriedesu nuevaaspiradorade Kenmora.
N_mero de Modelo
N0merode Serie
Fechade Compra
Matengaeste libro y su reciboen unlugar seguropara referenciasfuturas.
GARANTI'ALIMITADADEUNA_O DE LAASPIRADORAKENMORE
Estagarantiaespor unaSodesdela fecha de compra,e incluyesolamenteel usodela aspiradoraen
hogaresprivados.Duranteel @,ode garantia,cuandola aspiradoraasoperadey mantenidade acueTcloal
manualde instruccionesdeldueRo,Searsreparar&cualquierdefectoen materialeso fabricaci6nlibre de cargo.
Estagarantiaexcluyelasbolsasde colecci6n,correas,lamparillas,y filtros, lascuales son partes gastablesque
sedeteriorancon el usonormal.
Para el serviciodegarantfa,relomeestaaspiradoraal Centrode ServicioSearsmmds cercanoen losEstados
Unidos.
Estagarantia seaplica solamentemiontraseste productoest,, en usoenlos EstadesUnidos.Esta9arantia le
da a usted derechos legaleseepecfficos,y usted puede tenertambienotros derechos loscuales variande
estadoa estado.
Sears,Roebuckand Co.,D/817WA, HoffmanEstates,IL60179
I
r .--i i i e odei erdo, c lJeel a',co,le ncocor odermal
ulVarsuea#mcb ec ecleecu, oconl euc ee
cesdeseQu l,
todas Pasinstrucc'_neseneste manualantes
dearmaro usarsuaspiradora.
Usesuaspiradorasolamentecomosedescribe
enestemanual.Usesolamanteconlos
ancesoriosSearsrecomendados.
De.soonectelatuentede eLectricidadantes de
hacerel servicioo limpiareldrea delcepillo.La
fallade hacerestopuederesultaren choque
al6ctricoo enels0bitoarranquedalcepillo.
Nodejela aspiradoracuandoast&enchufada.
Desenchufedel tomacorrientecuandonoast&
enusoy antesdehacerelserviclo.
Parareducirelriesgode choqueeldctrico- No la
useafueraosobresuperficiesmojadas.
Nopermitaque se lause comounjuguete.Gran
atenci6nesnecesariacuandoes usadaporo
cemadenifios.
Nola useconuncord6nofichadafiados.Si la
aspiradoranoestd trabajandocomodebe,se la
hadejadocaer,daf=ade,dejadaafuera,o
volteadaenelagua,ret6rnelaa un Centrode
ServicioSears.
No latireo arrastredelcord6n,useelcord6n
comounamanija,cierreunapuertasobreel
cord6n,o tiredelcord6nalrededordehordes
affiadosoesquinas.No paselaaspiradorasobre
elcord6n.Mantengael cord6nlejosde
superficiescalientes.
Nodesenchufetirandodel cord6n. Para
desenchufar,tome la ficha, no el cord6n.
Notomela fichao laaspiradoraconlas manos
mojadas.
NoponganingOnobjetoenI_s aberturas.
No la useconninguna abertura bloqueada;
mantbngalalibre de polvo, hilachas,pelo,y
cualquiercosa que pueda reducirla circulacibn
del aire.
Mantengaloscaballos,ropas sueltas, dedos, y
todas laspartes del cuerpolejosde aberturasy
partes movibles.
Apaguetodes loscontmlesantes de desenchu_r.
Useculdadoextracuandolimpieescaleras.No
la pongasobre sitias,mesas,etc. Mant_Jala
sobreel piso.
Nouse la aspiradorapara i_vantar_qu'idos
inflamableso combustibles(gasolina,fluido de
limpiar,perfumes,etc.),o lauseendmas donde
puedanestar presentes.Los vapomsde estas
substanciaspuedencrearun peligrode
incendioo explosion.
No levantenada que este ardiendooechando
humo,tal come cigarrillos,fbsforos,o cenizas
calientes.
No usela aspiradorasinel canasto del polvo
y/o filtrosen su lugar.
Slempre limpieel canastodel polvodespues
de limpiarla alfombra,limpiadoreso
refrescantes,potvos,y potvofino.Estos
productosobstruyenlos filtms,reducenla
circulaci6ndel aire ¥ puedencausardafio a la
aspiradora.La fallaen limpiarel canastode la
basurapuede causardafio permanentea la
aspiradora.
No usela aspiradorapara levantarobjetos
duros afilados,pequefiosjuguetes,alfileres,
sujetapapeles,etc.EIIospuedendaSarla
aspiradorao el canastodela basura.
Desenchufeantesde conectarelHandi-mate
Jr._
Ustedes responsablede estar segumdeque su
aspiradoranoes usadapotalguienincapaz de
operarlacorrectamente.
GUARDE ESTAS INSTRUCCIONES
El armadoy usesegurode su aspiradorason su responsabilidad.Estaaspiradoraha sidodiseSada
exclusivamentepara uso domestico.La aspiradoradebera almacenarseenun lugar secoy en al interior.
LeaesteManualdelpropietariodetenidamente,pusscontieneinformaci6nimportantesobreseguridady
uso.Estaguiacontieneinformaci_nsobre seguridaddebajode simbolosde advertienciaocuidado.
2
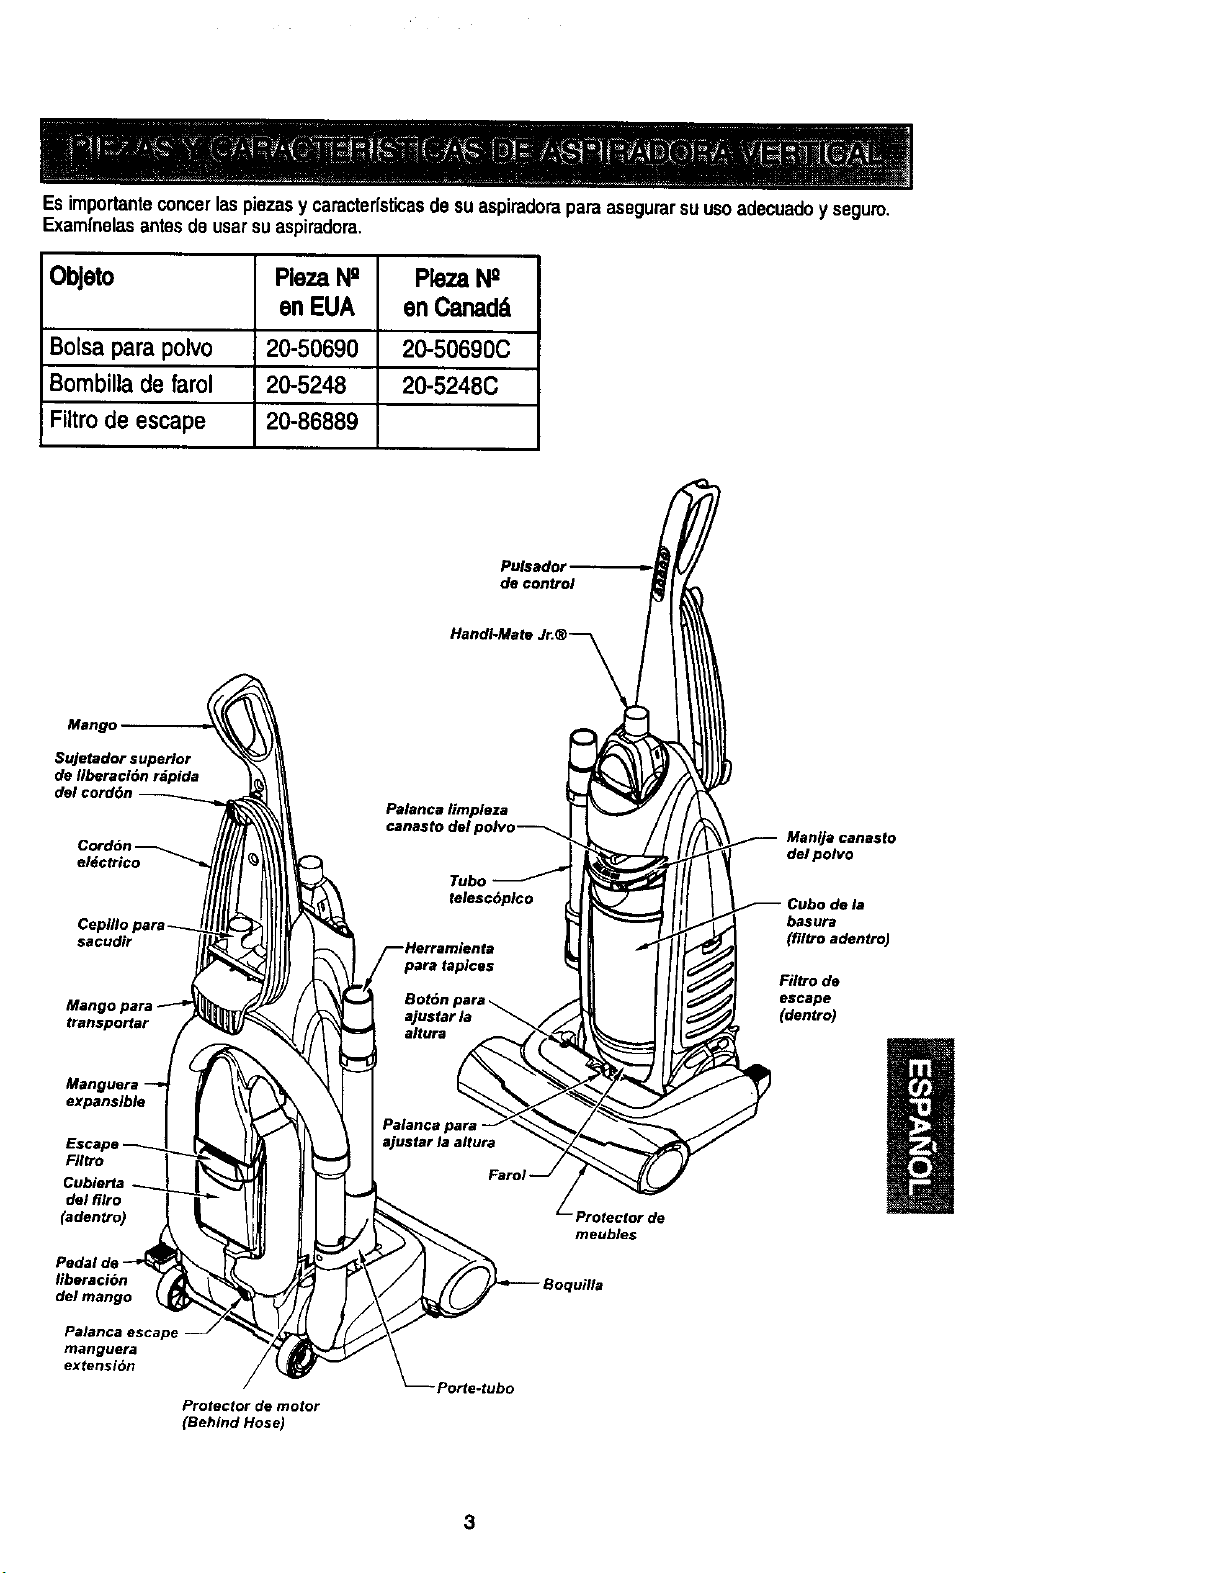
Esimportanteconcerlaspiezasycaracterfsticasdesuaspiradoraparaasegurarsuusoadecuadoyseguro.
Examfnelasantesdeusarsuaspiradora,
ObJeto Pleza N2 Pleza N2
en EUA en Canad_
Bolsa para polvo 20-50690 20-50690C
Bombilla de farol 20-5248 20-5248C
Filtro de escape 20-86889
Pulsador
de control
Mango
Sujetador superior
de liberacl6n rdpida
del cord6n
eldctrico
Cepglo
sacudir
Man
transportar
Manguera
expansible
Fil_o
delfi_o
_dentr_
Pedal d
liberaci6n
del mango
Palanca escape
manguera
extension
Protector de motor
(Behind Hose)
-Porte-tubo
l/Protector de
meubles
Man_acanasto
delpolvo
de la
basura
(filtro adentro)
Filtro de
escape
(dentro)
3
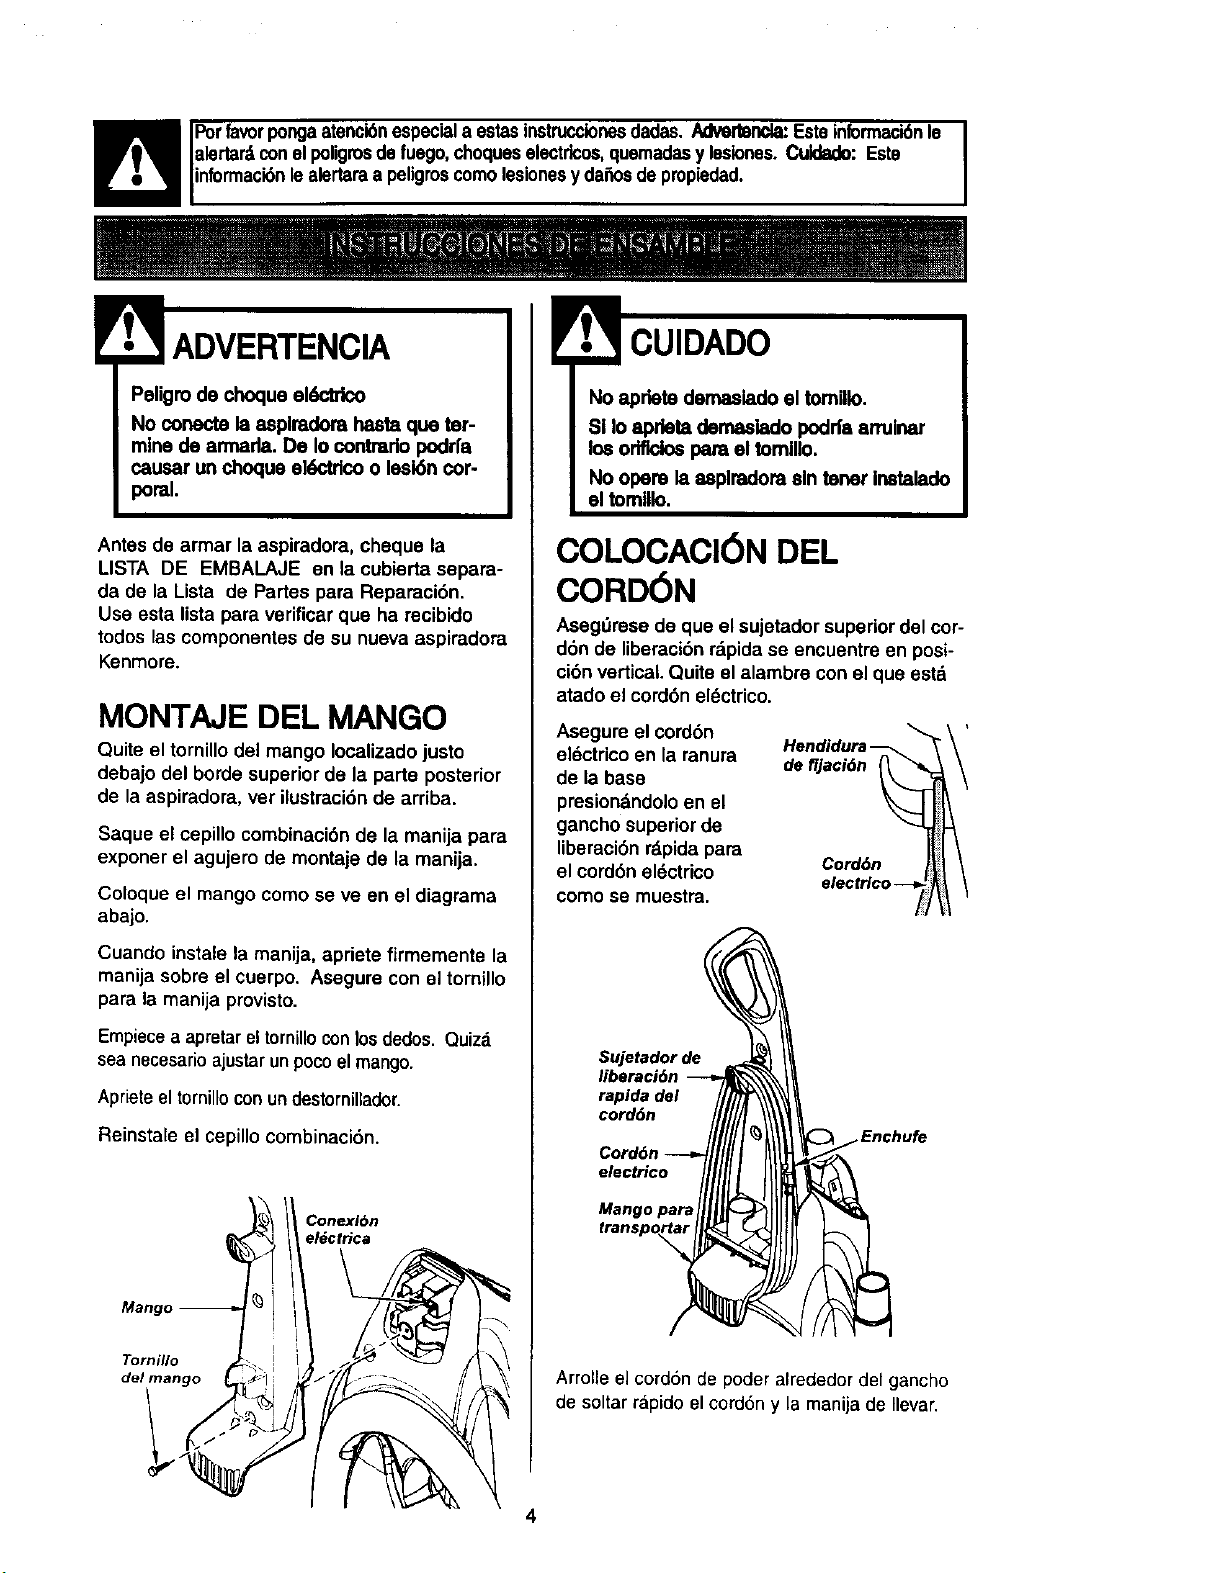
Porfavorpongaatenci6nespeciala estasinstruccionesdadas.Mvertencia:Esteinformaci6nle
lalertar_conelpoligmsde fuego,chequeselectdcos,quemadasy lesionss.Culdado: Este
Jinformack_nlealertaraa peligroscomolesionesydafiosdepropiedad.
Peligro de choque eldctrico
No conecte la asplmdora hasta que ter-
mine de armada. De Io contrado podrfa
causar un choque ek_trlco o lesl6n cor-
poral
Antes de armar la aspiradora, cheque la
LISTA DE EMBALAJE en la cubierta separa-
da de la Lista de Partes para Reparaci6n.
Use esta lista para verificar que ha recibido
todos las componentes de su nueva aspiradora
Kenmore.
MONTAJE DEL MANGO
Quite el tornillo del mango Iocalizadojusto
debajo del borde superior de la parte posterior
de la aspiradora, ver ilustraci6n de arriba.
Saque el cepillocombinaci6n de la manija para
exponer el agujero de montaje de la manija.
Coloque el mango como se ve en el diagrama
abajo.
Cuando instalela manija, apriete firmemente la
manija sobre el cuerpo. Asegure con el tornillo
para la manija provisto.
Empiecea apretar eltornillocon losdedos. Quizd
sea necesario ajustar unpocoel mango.
Apdete el tornillo conun destorninader.
Reinstale el cepillo combinaci6n.
Mango
Tornillo
de/mango
Conexl6n
el6ctrica
No apriete demasiado el tomillo.
SI Is apdeta dentaslado podda anulnar
los odfldos para el tomlllo.
No opere la uplradora sin tener Instalado
el tomlllo.
COLOCACION DEL
CORDON
Aseg0mse de que el sujetador superiordel cor-
d6n de liberaci6n rdpidase encuentre en posi-
ci6n vertical. Quite el alambre con el que esta
atado el cord6n eldctrico.
Asegure el cord6n
el6ctrico en la ranura
de la base
presiondndoloen el
ganch0 superior de
liberaci6n rdpida para
el cordbnel6ctrico
como se muestra.
Hendidura_ _'_ \ '
defljacidn _\
Cord6n t_1
Sujetador de
liberaci6n
rapida del
cord6n
electHco
Mango para
Arrolle el cordonde poder alrededordel gancho
de soltar r&pido el cord6n y la manija de Ilevar.

HANDI-MATE JR.®
Para operar el Handi.Mate Jr.®
Handi-Mate Jr.®
ver manual del
duefio separado.
PAPA INSERTAR EL
HANDI-MATE ®
Ponga el Handi-Mate Jr.® adentro del compar-
timiento de dep6sito.
Rote el Handi-Mate Jr.® hacia atrds hasta que
calce en su lugar.
PAPA SACAR EL HANDI-MATE®
Rote el Handi-Mate Jr.® afuera del compar-
timiento de depesito.
COLOCACIeN DELTUBO
TELESCePICO
Ponga el tubo telescepico en el soporte del
tubo. Ponga la herramienta de hendidurasen el
dpice del tubo telescepico.
para tapices
tlescepico
Porte-tubo
INSTRUCCIONES DE OPERACI6N
I
1. Gire el sujetador
del corden de lado
a lado y hacia abajo
para liberar el cot-
den el_ctrico.
ADVERTENCIA
Peligrodelesienpersonalyda_oalproducto
• Parareducirel desgodechoqueelectrico,
esta aspiraderacuentaconunaclaviJapelariza-
da (uno de loscontactoses m_ anchoque el
otto).
• Laclavijas61opuedeinboducirsedeuna
maneraen el enchufe.Si laclavijanocabebien
en el enchufe,invierta]a.Sia_n nocabe,Ilame
a un electricistaparaque insta]eunenohufe
correcto.No alterela clavijade ningunaman-
era.
2. Desprenda el
enchufe del cordbn
eldctricoy quite el
corden del sujetador
superior. Estdseguro
de que el cable de
poder estd todavfa
fijado en la muesca
de traba del gancho
de arriba del corden.
3. Verifique que la aspiradora tenga instalada
una bolsa. Consulte CAMBIO DE LA BOLSA
PAPA POLVO.
4. Conecte el cord6n electrico polarizado en
un enchufe de 120 voltios que se encuentre
cerca del piso.
Hendidura _ "_ \\
de fijacien _7
Corden t_[ \ \
I
I ADVERTENCIA
Peligrode lesi6npersonaly da_oal pmducto
• NOPONGAmanosni piesdebajode la unidad
enningt_nmemento.
• NO uselos enchufesIocalizadossobralos
muebles.Losobjetoscercanospoddenresultar
da_ados.
5
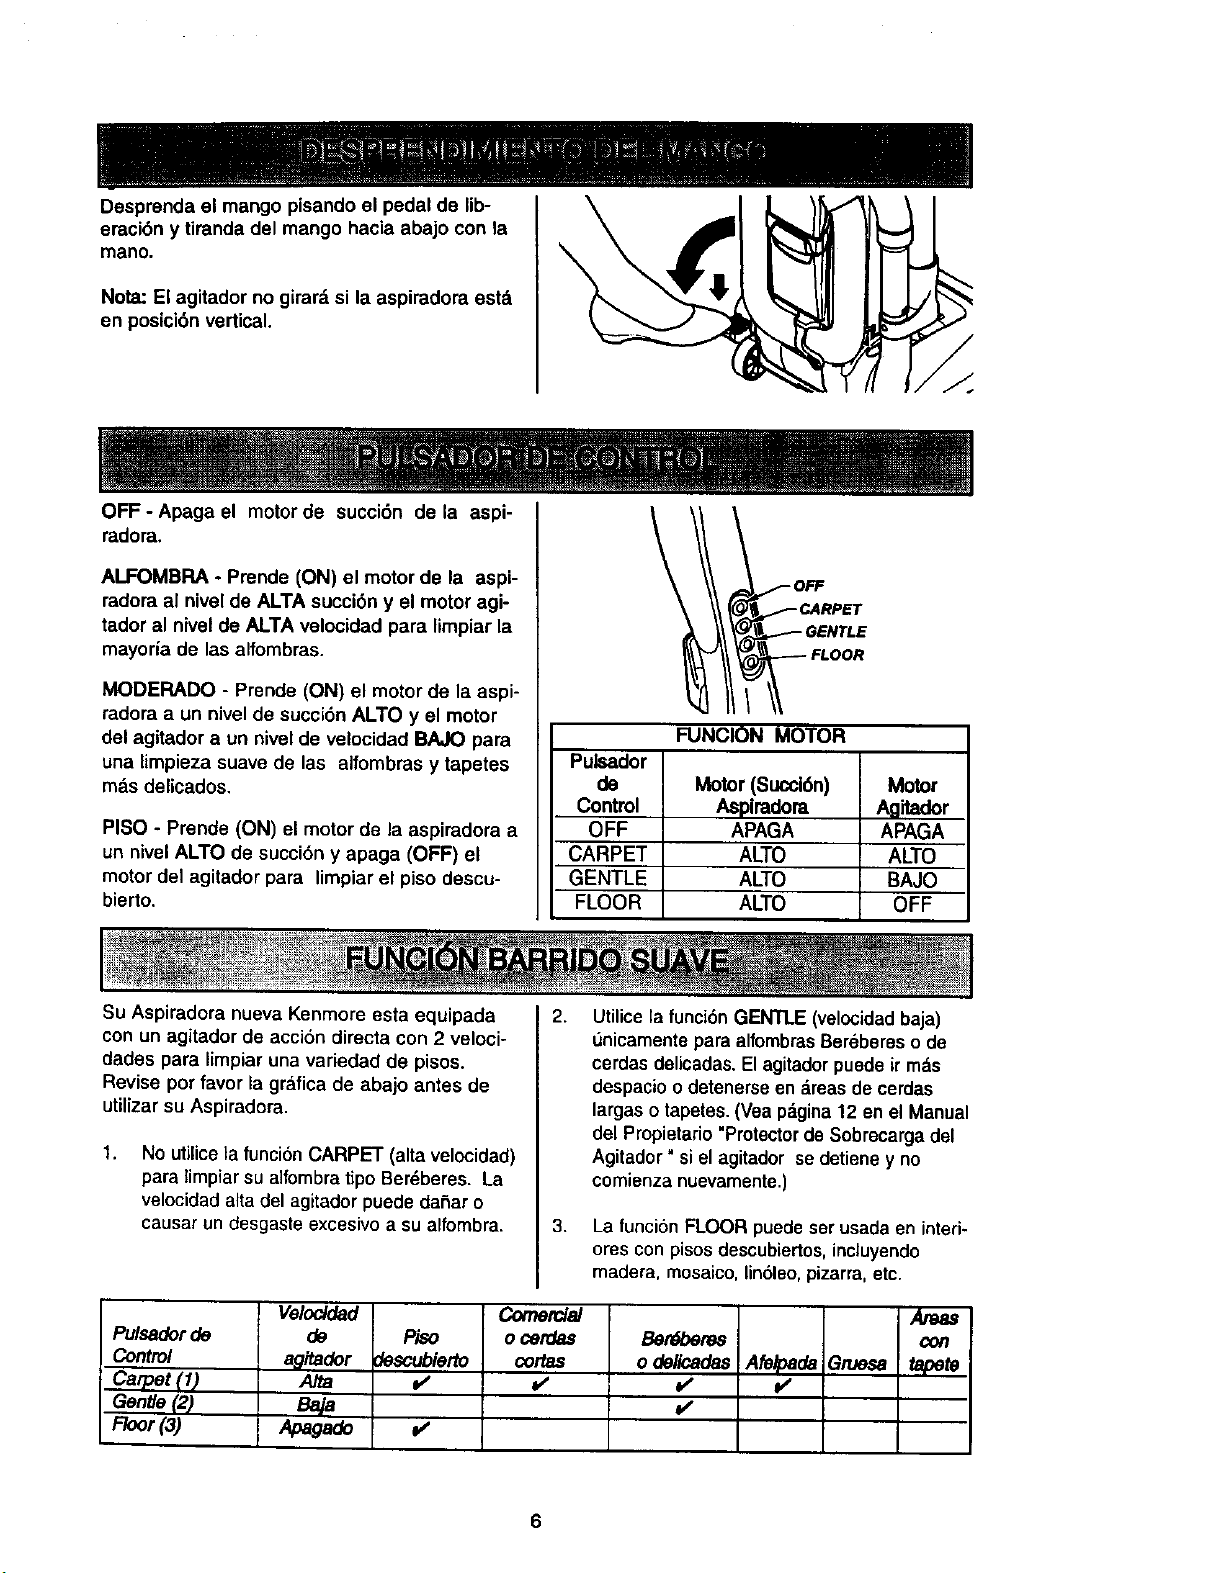
Desprendaelmangopisando el pedal de lib-
eraci6n y tiranda del mango hacia abajo con _a
mano.
Nora: Et agitador no girard,si la aspiradora est8
en posici6nvertical.
\
OFF-Apaga el motor de succi6n de la aspi-
radora.
ALFOMBRA - Prende (ON) el motor de la aspi-
radora al nivel de ALTA succi6n y el motor agi-
tador al nivel de ALTA velocidad para limpiar la
mayoria de lasalfombras.
MODERADO - Prende (ON) el motorde la aspi-
radora a un nivelde succi6nALTO y el motor
del agitador a un nivetde velocidad BAJO pare,
una limpieza suave de las alfombras y tapetes
m_.sdelicados.
PISO - Prende (ON) el motor de la aspiradora a
un nivel ALTO de succibn y apaga (OFF) el
motor del agitador para limpiar el piso descu-
bierto.
l i_ GENTLE
FLOOR
FUNCION MOTOR
Pulsador
de
Control
OFF
CARPET
GENTLE
FLOOR
Motor (Succl6n)
Aspiradora
APAGA
ALTO
ALTO
ALTO
Motor
Agitador
APAGA
ALTO
BAJO
OFF
Su Aspiradora nueva Kenmore esta equipada
con un agitador de acci6n directa con 2 veloci-
dades para limpiar una variedad de pisos,
Revise por favor la grafica de abajo antes de
utilizar su Aspiradora.
1.
No utilicela funci6n CARPET (alta velocidad)
para limpiar su a]fombratipoBerdberes. La
velocidadalta del agitadorpuede dafiar o
causar undesgaste excesivo a sualfombra.
2.
Utilice la funci6n GENTLE (velocidad baja)
unicamente para alfombrasRerebereso de
cerdas delicadas. El agitador puede ir mds
despacio o detenerse en &reasde cerdas
largaso tapetes.(Yea pd.gina12 en eLManual
del Propietario "Protector de Sobrecargadel
Agitador" si el agitador se detiene y no
comienza nuevamente.}
3. La funciSn FLOOR puede ser usadaen inted-
ores con pisos descubiertos, incluyendo
madera, mosaico, linoleo, pizarra, etc.
Pu/sadorde
Control
Carpet (I,)
Genge (2)
Floor(3)
Veloctdad
de
agitador
Alta
Baja
Apagado
Piso
Jescublerto
v"
o/
Comercial
o cerdas
cortas
v"
Ber6beres
o delicadas
=/
Afe_da
j/
Grues8
Areas
con
t oote
6
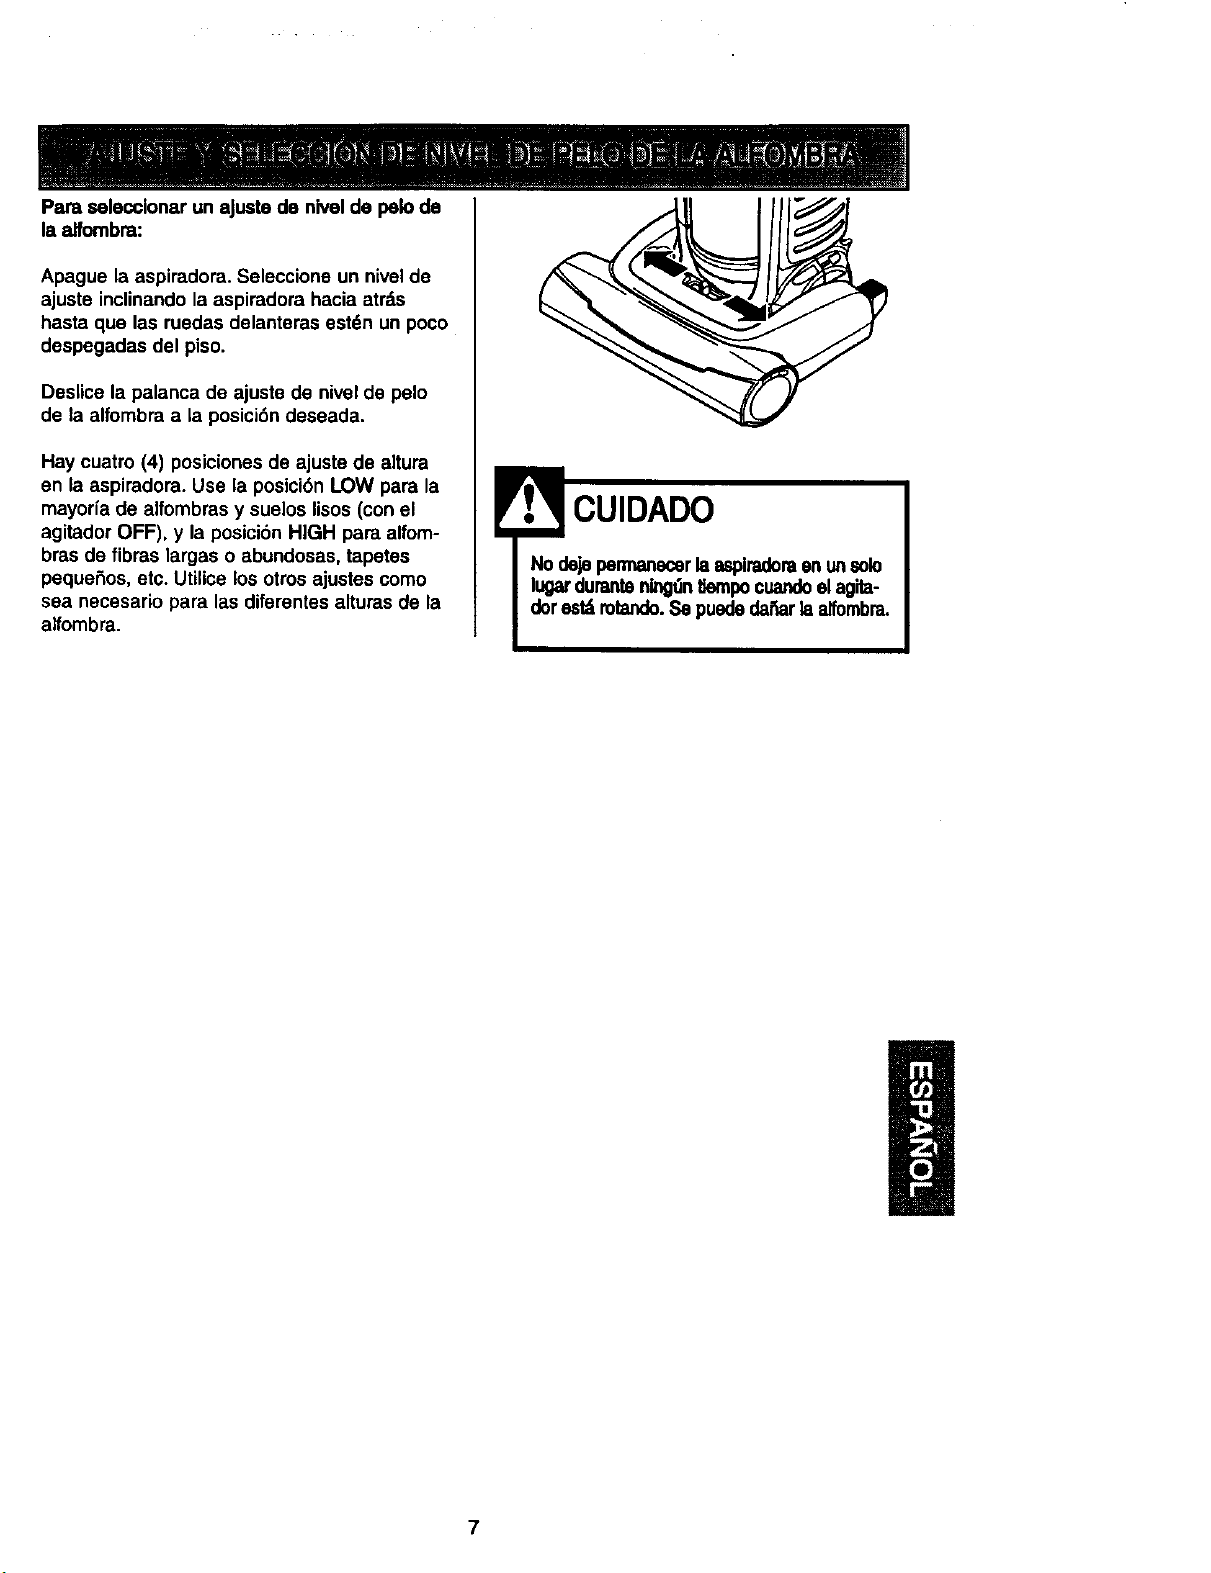
ParaseleccionarunaJustedeniveldepelode
laalfombm:
Apague la aspiradora. Seleccione un nivelde
ajuste inclinando la aspiradora hacia atr_.s
hasta que las ruedas delanteras estdn un poco
despegadas del piso.
Deslice la palanca de ajuste de nivelde pelo
de la alfombra a la posici6ndeseada.
Hay cuatro (4) posiciones de ajuste de aRura
en la aspiradora. Use la posici6n LOW para la
mayorfa de alfombras y suelos lisos(con el
agitador OFF), y la posici6n HIGH para alfom-
bras de fibras largas o abundosas, tapetes
pequeSos, etc. Utilice los otros ajustes como
sea necesario para las diferentes aRurasde la
aRombra.
CUIDADO
7
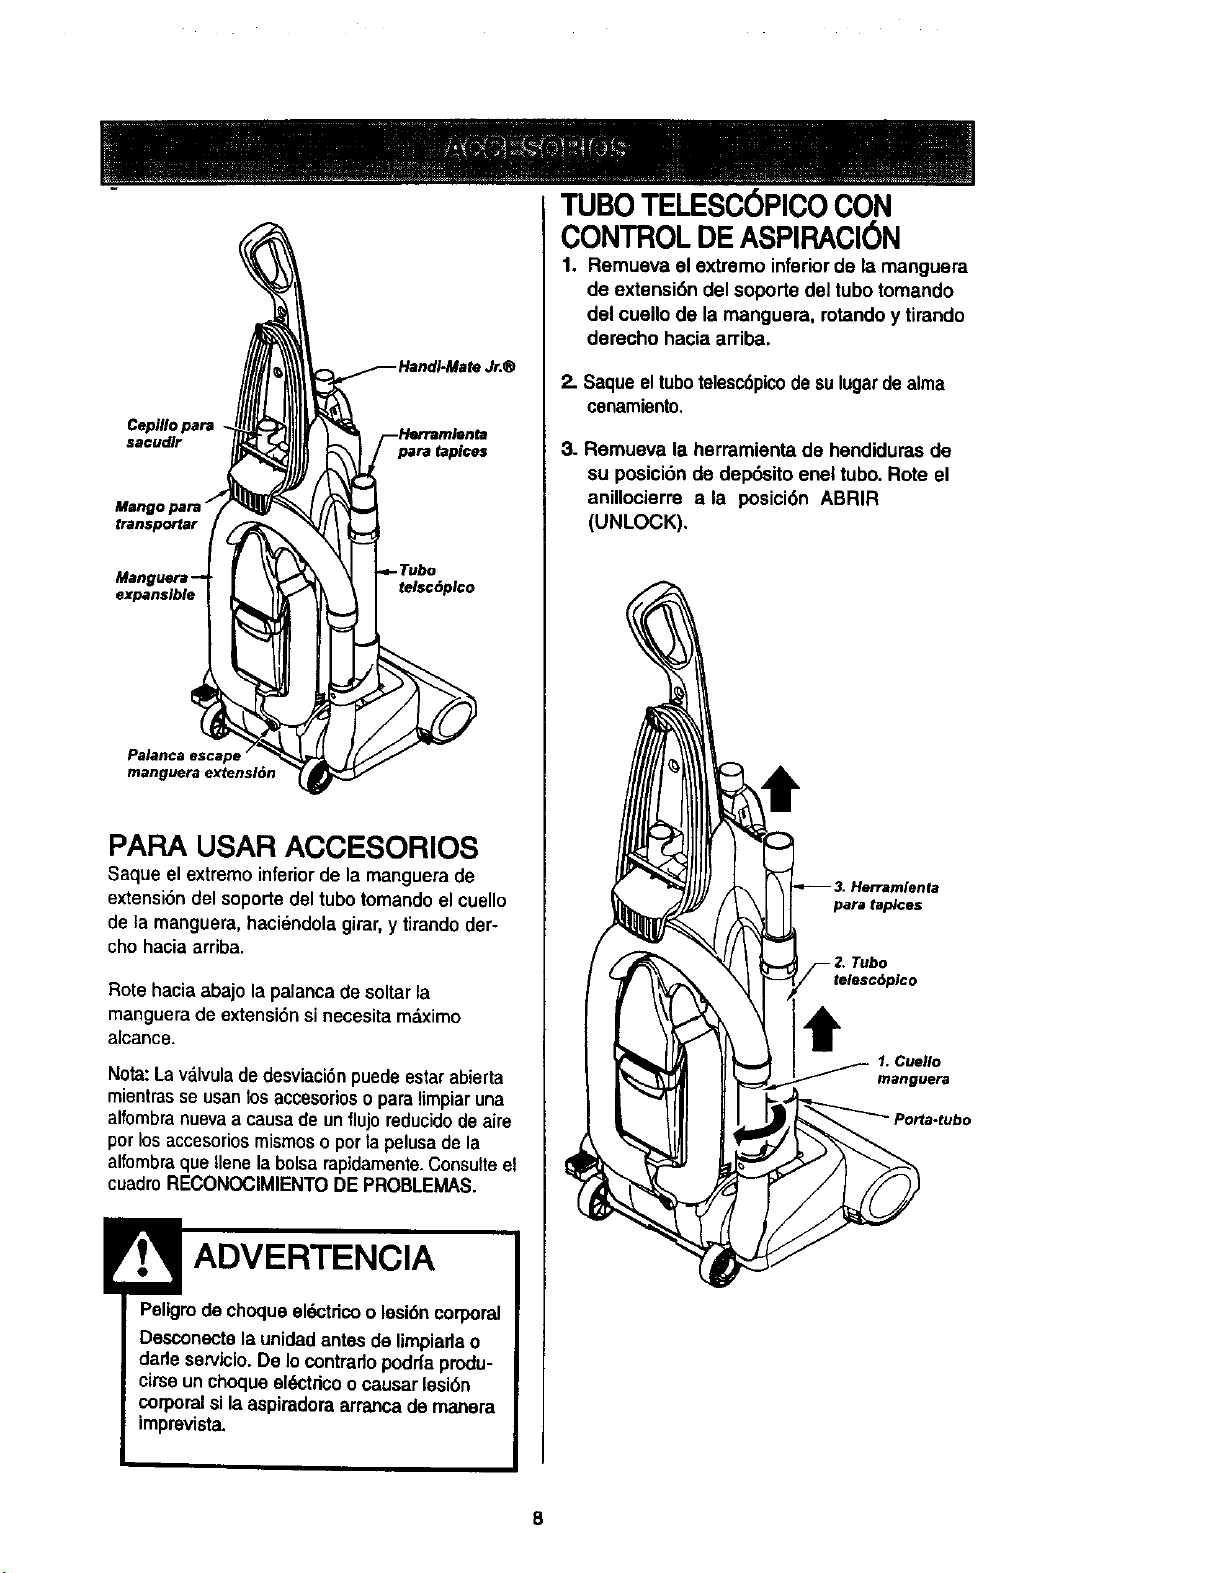
Cepillo para
sacudlr
para tapices
Mango para _"
transportar
expansible
telsc6plco
Palanca escape
manguera extension
PARA USAR ACCESORIOS
Saque el extremoinferior de la manguera de
extensi6ndel soportedel tubotomandoelcuello
dela manguera,haci6ndola girar,y tirandoder-
chohacia arriba.
Rote hacia abajo la palanca de soltarla
manguera de extensi6n si necesita m._ximo
alcance.
Nora:Lav_,lvulade desviaci6npuedeestarabierta
mientrasse usan losaccesorios o para limpiaruna
alfombranuevaa causa de unflujo reducidode aire
por los accesoriosmismoso pot la pelusade la
alfombraque Ilenela bolsa rapidamente.Consulteel
cuadroRECONOCIMIENTODEPROBLEMAS.
! ADVERTENCIA
Peligrode choqueel6ctricoo lesi6ncorporal
Desconectela unidadantes de limpiadao
darleservicio.De Io contradopodrfaprodu-
cirseun choqueeh_ctdcoocausar lesi6n
corporalsi laespiradora arrancade manera
imprevista.
TUBO TELESC )PICO CON
CONTROL DE ASPIRACI6N
1. Remueva el extremo inferiorde la manguera
de extensi6n del soporte del tubotomando
del cuello de la manguera, rotandoy tirando
derecho hacia arriba.
2. Saque eltubotelesc6pico desulugar dealma
cenamiento.
3. Remueva la herramienta de hendidurasde
su posici6nde dep6sito enel tubo. Rote el
anillocierre a la posici6n ABRIR
(UNLOCK).
para teplces
telesc6pico
t
1. Cuello
manguera
8
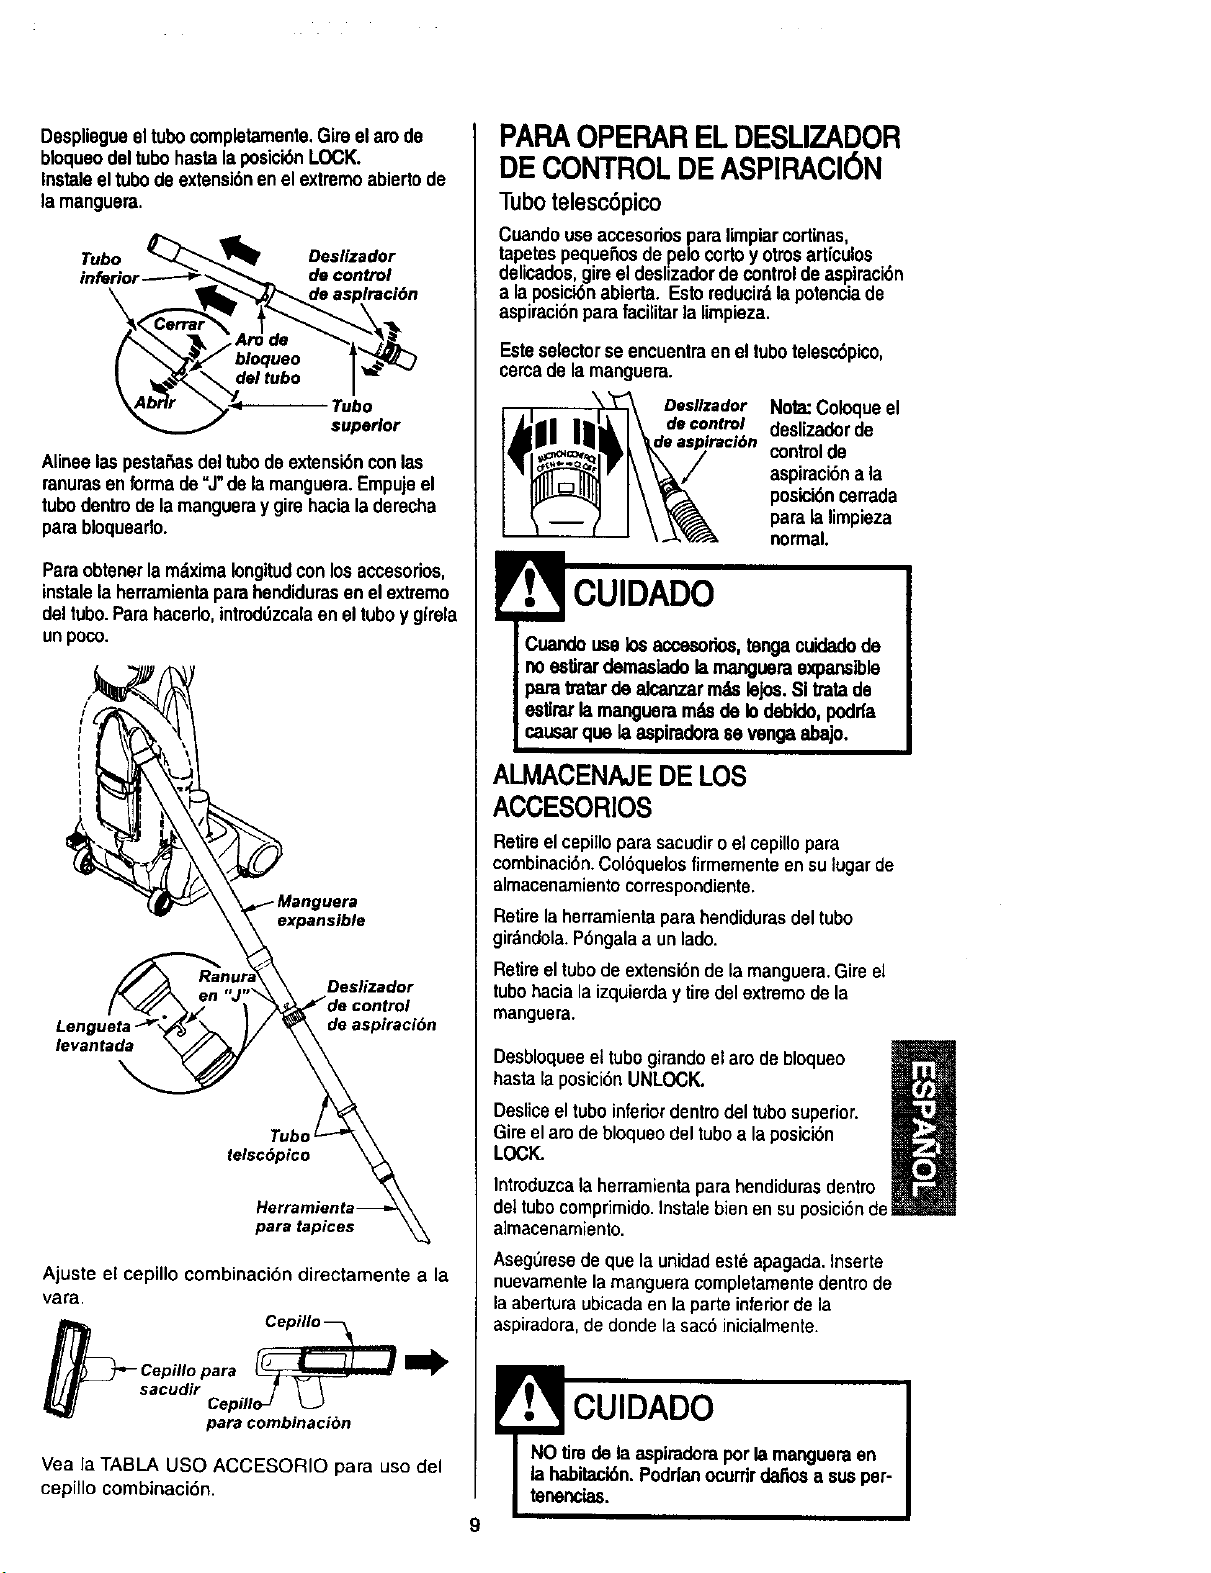
Despliegueeltubocompletamente,Gireelamde
bloqueodeltubohastalaposici6nLOCK.
Instaleeltubodeextensi6nenelextremoabierto de
lamanguera.
Tubo Deslizador
inferior de control
Tubo
superior
Alineelaspestafiasdeltubodeextensi6nconlas
ranurasenforrnade"J"delamanguera.Empujeel
tubodentrodelamangueray girehacialaderecha
parabloquearlo.
ParaobtenerlamdximaIongitudconlosaccesorios,
instalela herramientaparahendidurasenel extremo
deltubo.Parehecedo,introddzcalaen eltuboy gfrela
unpoco.
expansible
Len
levantada
Desl_ador
de aspiraci6n
Tube
telsc6pico
pare tapices
Ajuste el cepillo combinacibndirectamente a la
vara
para combinacion
Vea la TABLA USO ACCESORIO para uso del
cepillo combinacibn.
PAPAOPEPARELDESLIZADOR
DECONTROLDEASPIPACI6N
Tubotelesc6pico
Cuandouseaccesoriosparelimpiarcortinas,
tapetespequeSosde pelo cortoy etrosartfcules
delicados,gire el deshzadorde controlde aspiraci6n
ala posici6nabierta. Esto reduci_ la potenciade
aspiraci6npare facilitarla limpieza.
Esteselectorseencuentraen eltubetelesc6pico,
cercade la manguera.
Dasllzador Note:Coloqueel
decontrol deslizadorde
contmlde
aspiraci6nala
posici6ncerrada
para la limpieza
normal.
CUIDADO
Cuandouselosacoesorios,tengacuidadode
noestirardemas]adolama_guemexpansible
patatmtardealcanzarm=ru=lejos.SI tratade
estimrlamanguemm_18de b debido,podda
causarqua laaspiradomse vengaabajo.
ALMACENAJEDE LOS
ACCESORIOS
Retireel cepilloparasacudir oel cepillopara
combinaci6n.Col6quelosfirmemente ensulugar de
almacenamientocorrespondiente.
Retirela herramientaparahendidurasdel tubo
gir._ndola.P6ngalaa unlado.
Retireeltubode extensi6nde lamanguera.Gireel
tubohacia la izquierday tire del extremode la
manguera.
Desbloqueeet tubogirandoel aro de bloqueo
hasta laposici6nUNLOCK.
Desliceel tubo inferiordentrodel tubosuperior.
Gire el am de bloqueodel tubo ala posicibn
LOCK.
Introduzcala herramientapara hendidurasdentro
del tubocomprimido.Instalebien en suposici6n de
aimacenamiento.
Aseg_resede que la unidadest_apagada.Inserte
nuevamentela mangueracompletamentedentro de
la aberturaubicadaen la parte inferiorde la
aspiradora,de donde la sac6 inicialmente.
9
l CUIDADO
NOtirede la aspimdomporla mangueraen
lahabitack_n.Poddanocurrirda_osa susper-
tenenclas.
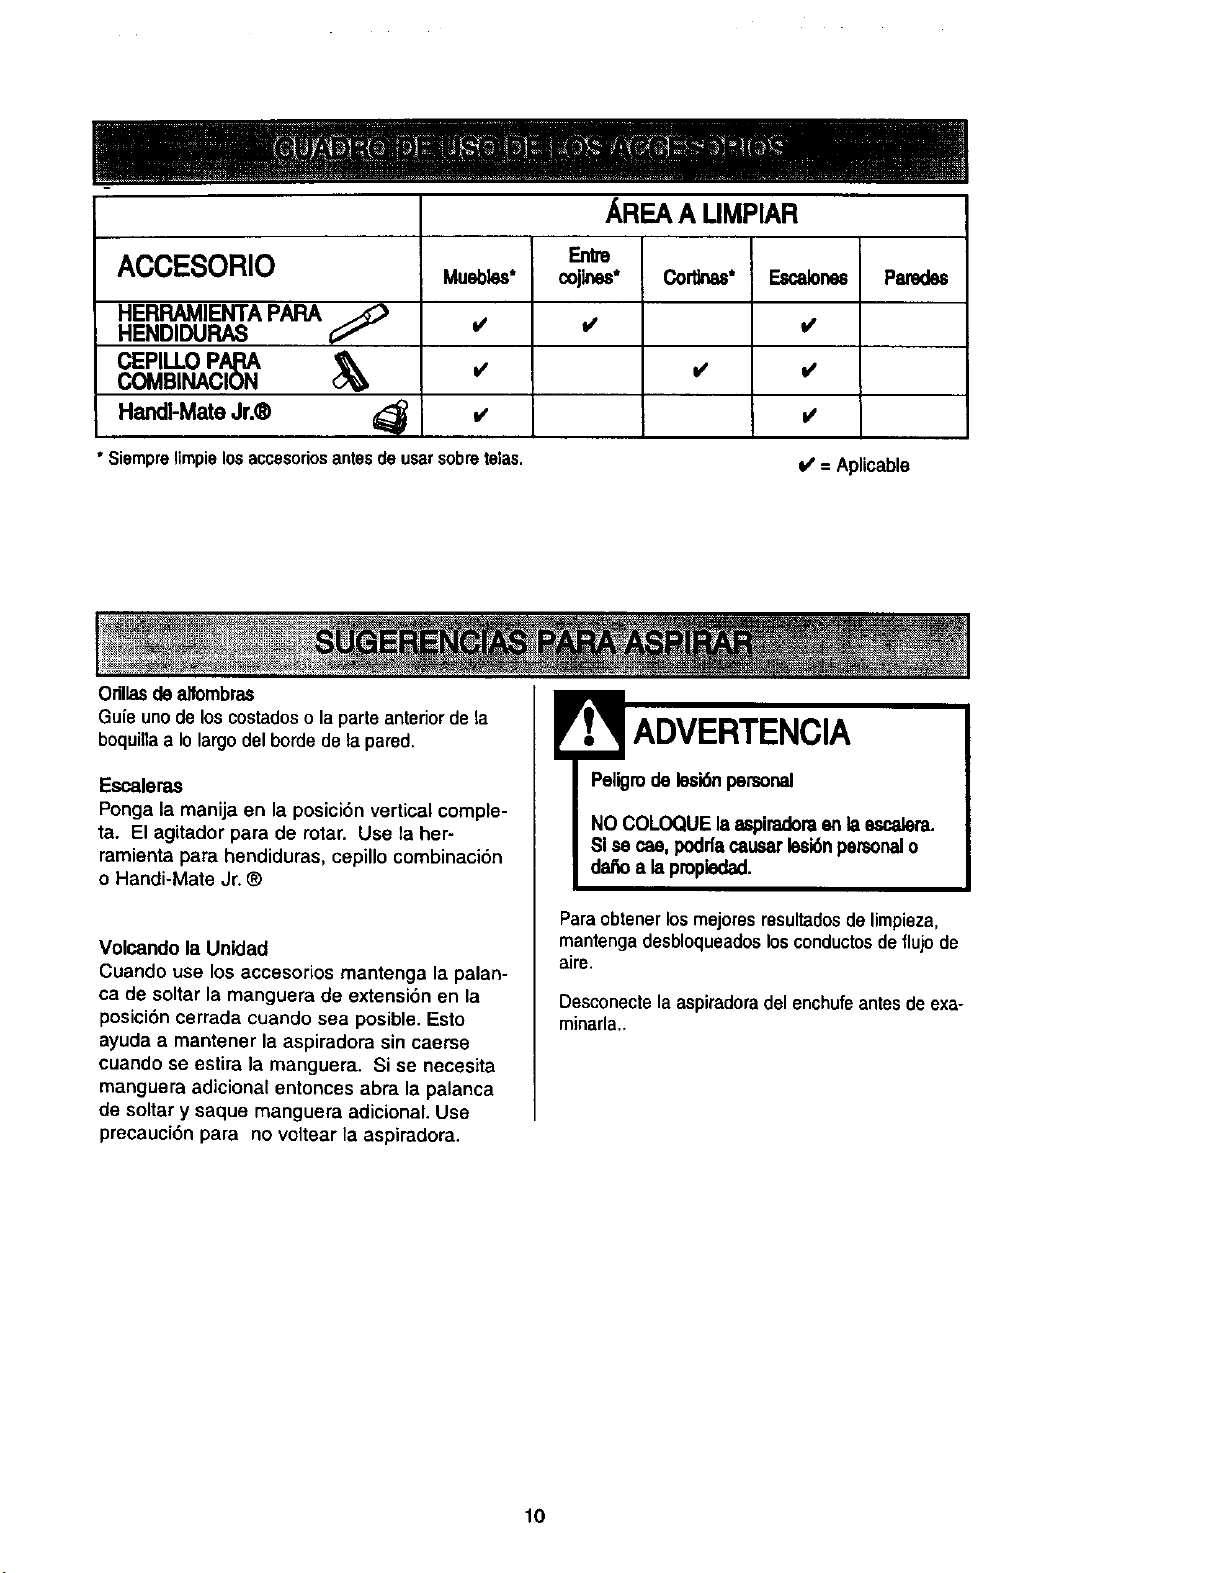
ACCESORIO
HERRAMIENTAPARA
HENDIDURAS
AREA A LIMPIAR
Muebles*
is
l/
i/
Enlm
cojlnes*
Cort_nas*
v'
CEPILLOPApA _,
COMBINAClON
HandI-Mate Jr.®
* Siemprelimpielosaccesoriosantesdeusarsobretelas.
_ne8
Odllasdeaffombras
i/= Aplicable
Paredes
Guie unode loscostadoso la parte anteriorde la
boquillaa Io largodel borde de la pared.
Escaleras
Ponga la manija en la posici6n verticalcomple-
ta. El agitador para de rotar. Use la her-
ramienta para hendiduras, cepillo combinaci6n
o Handi-Mate Jr. ®
Volcando la Unidad
Cuando use los accesorios mantenga la palan-
ca de soltar la manguera de extensi6n en la
posici6n cerrada cuando sea posible. Esto
ayuda a mantener la aspiradora sin caerse
ouando se estira la manguera. Si ee necesita
manguera adicional entonces abra la palanca
de soltary saque manguera adicional.Use
precauci6n para no voltear la aspiradora.
ADVERTENCIA
Peligrode lesi6npersonal
NO COLOQUEla aspiradomen laescaJera.
SIse cae,poddacausarlesionpersonalo
dafioa lapropledad.
Paraobtenerlosmejoresresultadosde limpieza,
mantengadesbloqueadoslosconductosdeflujode
aire.
Desconectela aspiradoradel enchufeantesde exa-
minarla_
10
SISTEMA DE PROTECTI6N
DE MOTOR
Protector de motor
Esta aspiradora tiene una vdlvula de desviaci6n
que sirve como protectorde motory se abre
automaticamente para proveer un flujo de aim al
motor cuando un bloqueo impida que circule el
aim al motor.Si se abre la vdlvula bypass para
impedirque se recaliente el motory que so daSe
a la aspiradora, se notara un cambio de sonido
mientrasel aim pasa por la abertura de la
v_.lvula.
Para correoirel problema:Consulte el cuadro
RECONOCIMIENTO DE PROBLEMAS.
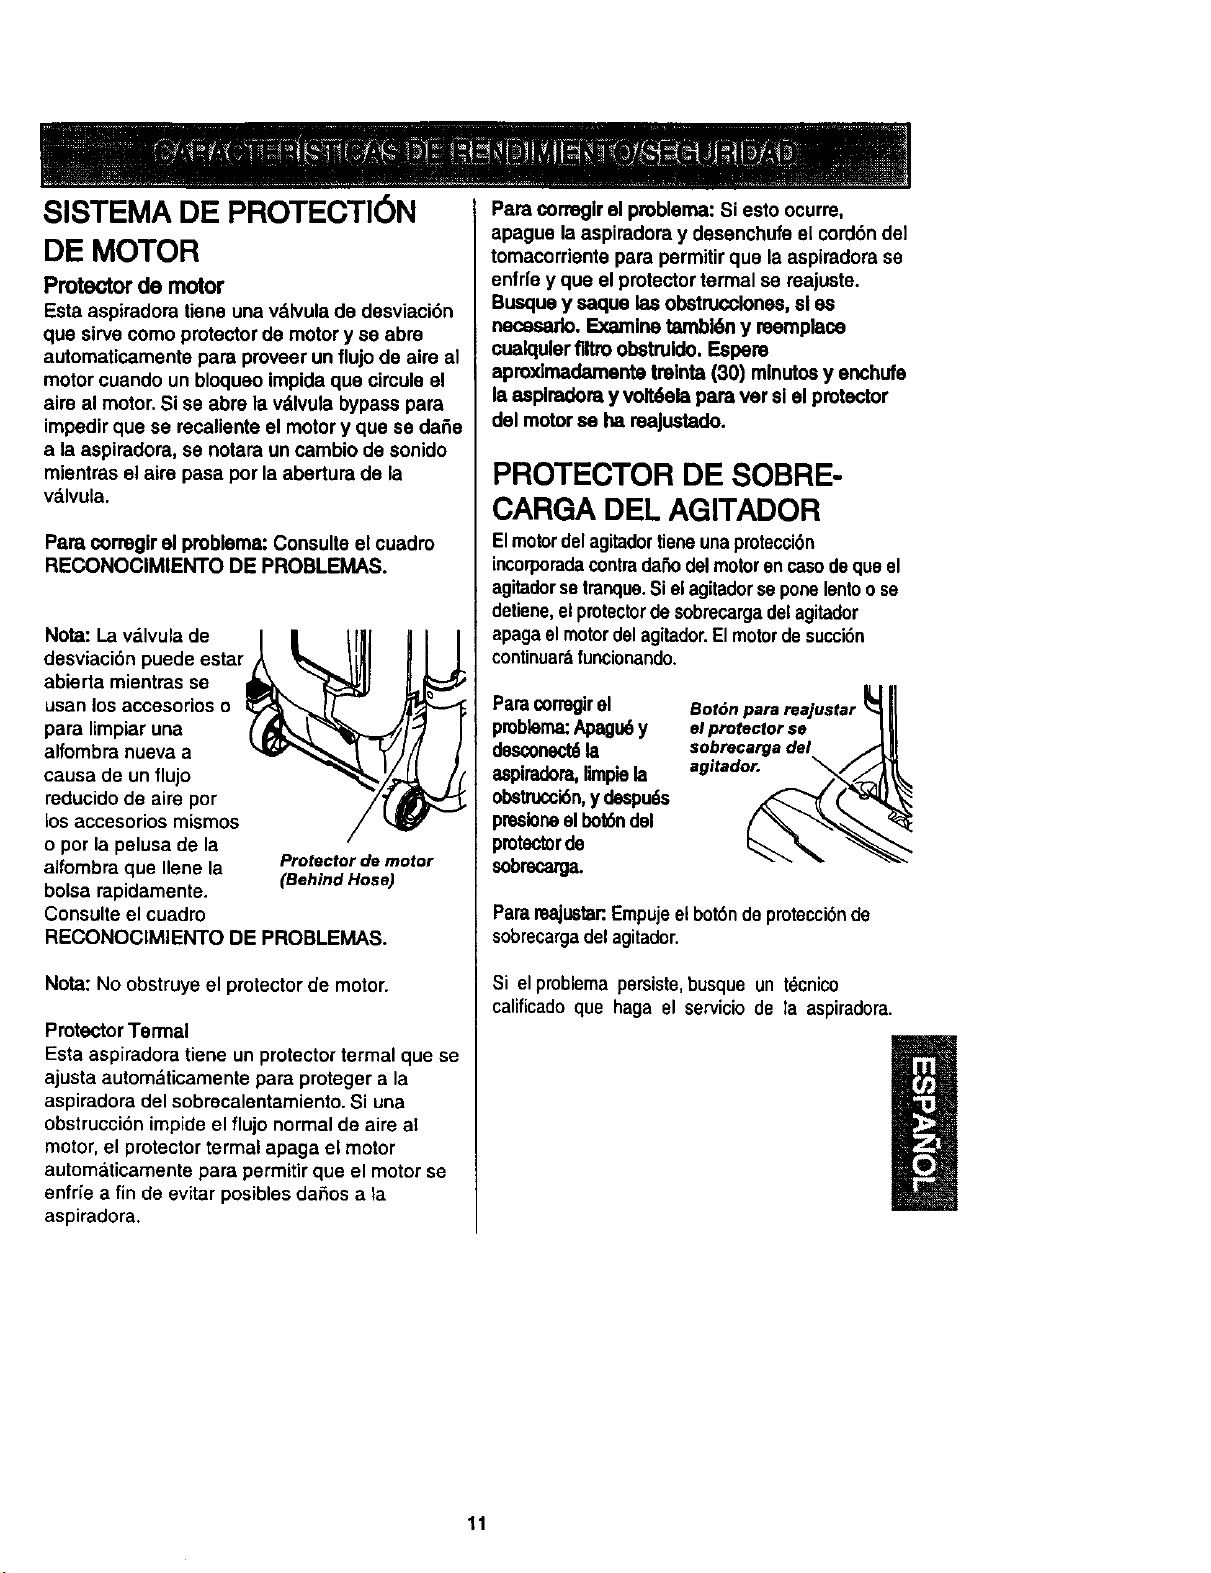
Nota: La vdlvula de
desviaci6n puede estar
abierta mientrasse
usan losaccesorios o
para Iimpiaruna
alfombra nueva a
causa de un flujo
mducido de aim pot
los accesorios mismos
o por la pelusa de la
alfombra que Ilene la
bolsa rapidamente.
Consulte el cuadro
RECONOCIMIENTO DE PROBLEMAS.
Protector de motor
(Behind Hose)
Nota: No obstruyeel protector de motor.
ProtectorTormal
Esta aspiradora tiene un protector termal que se
ajusta automdticamente para proteger a la
aspiradora del sobrecalentamiento. Si una
obstrucci6n impide el flujo normal de aire al
motor, el protector termal apaga el motor
autom&ticamente para permitir que el motor se
enfrie a fin de evitar posibles daSos a la
aspiradora.
Para correglrel problema: Si esto ocurre,
apague la aspiradora y desenchufe el cord6n del
tomacorriente para permitirquo la aspiradora se
enfr{ey que el protectortermal se reajuste.
Busque y saque las obstrucclones,sl es
necesado. Examine tambl6n y reemplace
cualqulerflltro obstruldo.Espere
aproxlmadamente treinta (30) mlnutosy enchufe
laasplradora y vo_ela para ver sl el protector
del motorse ha reajustado.
PROTECTOR DE SOBRE-
CARGA DEL AGITADOR
Elmotordelagitadortieneunaprotecci6n
incorporadacontradaSodelmotor en casodequeel
agitadorse tranque.Si elagitadorseponelentoose
detiene,elprotectordesobrecargadelagitador
apagaelmotordelagitador.Elmotordesuccidn
continuardfuncionando.
Paracorregirel Bot6npara
problema:Apagu6y elprotectorse
desconectdla sobrecargadel
aspiradora,limpiela agitador.
obstrucci6n,y despu_
presloneel bot6ndel
protectorde
sobrecarga.
Parareajustar:Empujeel bot6nde protecci6nde
sobrecargadel agitador.
Si el problema persiste,busque un t_cnico
calificadoque haga el servicio de la aspiradora.
11
CUIDADO DE LA ASPIRADORA
Sigasiempretodaslasinstruccionesdeseguridad
antesde efectuarelmantenimientoa suaspiradora.
Pellgrodechoqueel6ctdcooleei6ncorporal
Desconante_ unk_danm deefantuarel
rnantan_n_ntoa suuptrader_ Dek)conU_-
dopoddaprodudrsoundnoqueeld_tsoo
causorlesk_ncoq_orald laa_plmdomarranso
dornanomimpmvb_
Recojael cord6ny enrr611eloen lossujetadoressu-
periore inferior,sinque quede muyapretado.
Asegurela fichade poderdel cord6n sobreel
cord6nde poder.
Guardela aspiradora
bajotechoen un lu-
garseco,conel
mangoenposici6n
vertical.
Desconecteel cord6nel_ctricodelaclavijade la
ADVERTENCIA
Pedro dechoqueeldcfficoolesidncoq_oral
SI enrollaelcord6nmuyapretadepuedetan-
sadomuchoy causadedales. De da_u,so,el
cord6npoddacausordescargaseldctrlcasy le-
sioneso de_ospersonales.
pared.NOrocieaguasobrelaasplradora.
Limpieel exteriorconuntraposuavey Iiropio,que
hasidoexprimidodespu_sde remojaren unasolu-
cibnde aguay detergenteliquidoligero.Sequeel
exteriorconuntraposecodespudsde liropiar.
Liropielasuperficieexteriordel receptdculoy de los
accesoriosparareducirla electricidadest_,ticay la
acumulaci6ndepotvo.
Lavelos accesodosenaguatibiajabonosa,
enjuaguey deje secar al aire.No loslaveenlava-
dora de platos.
CUIDADO
NouselosaccesorlosslestanmoJados.
Losaccesoriosqueso_lison onAreas
sucias,debajodel mfrigerador,nodeben
usarsoonotrassuperficiessinantessor
lavados.Podrfandejarmamas.
12
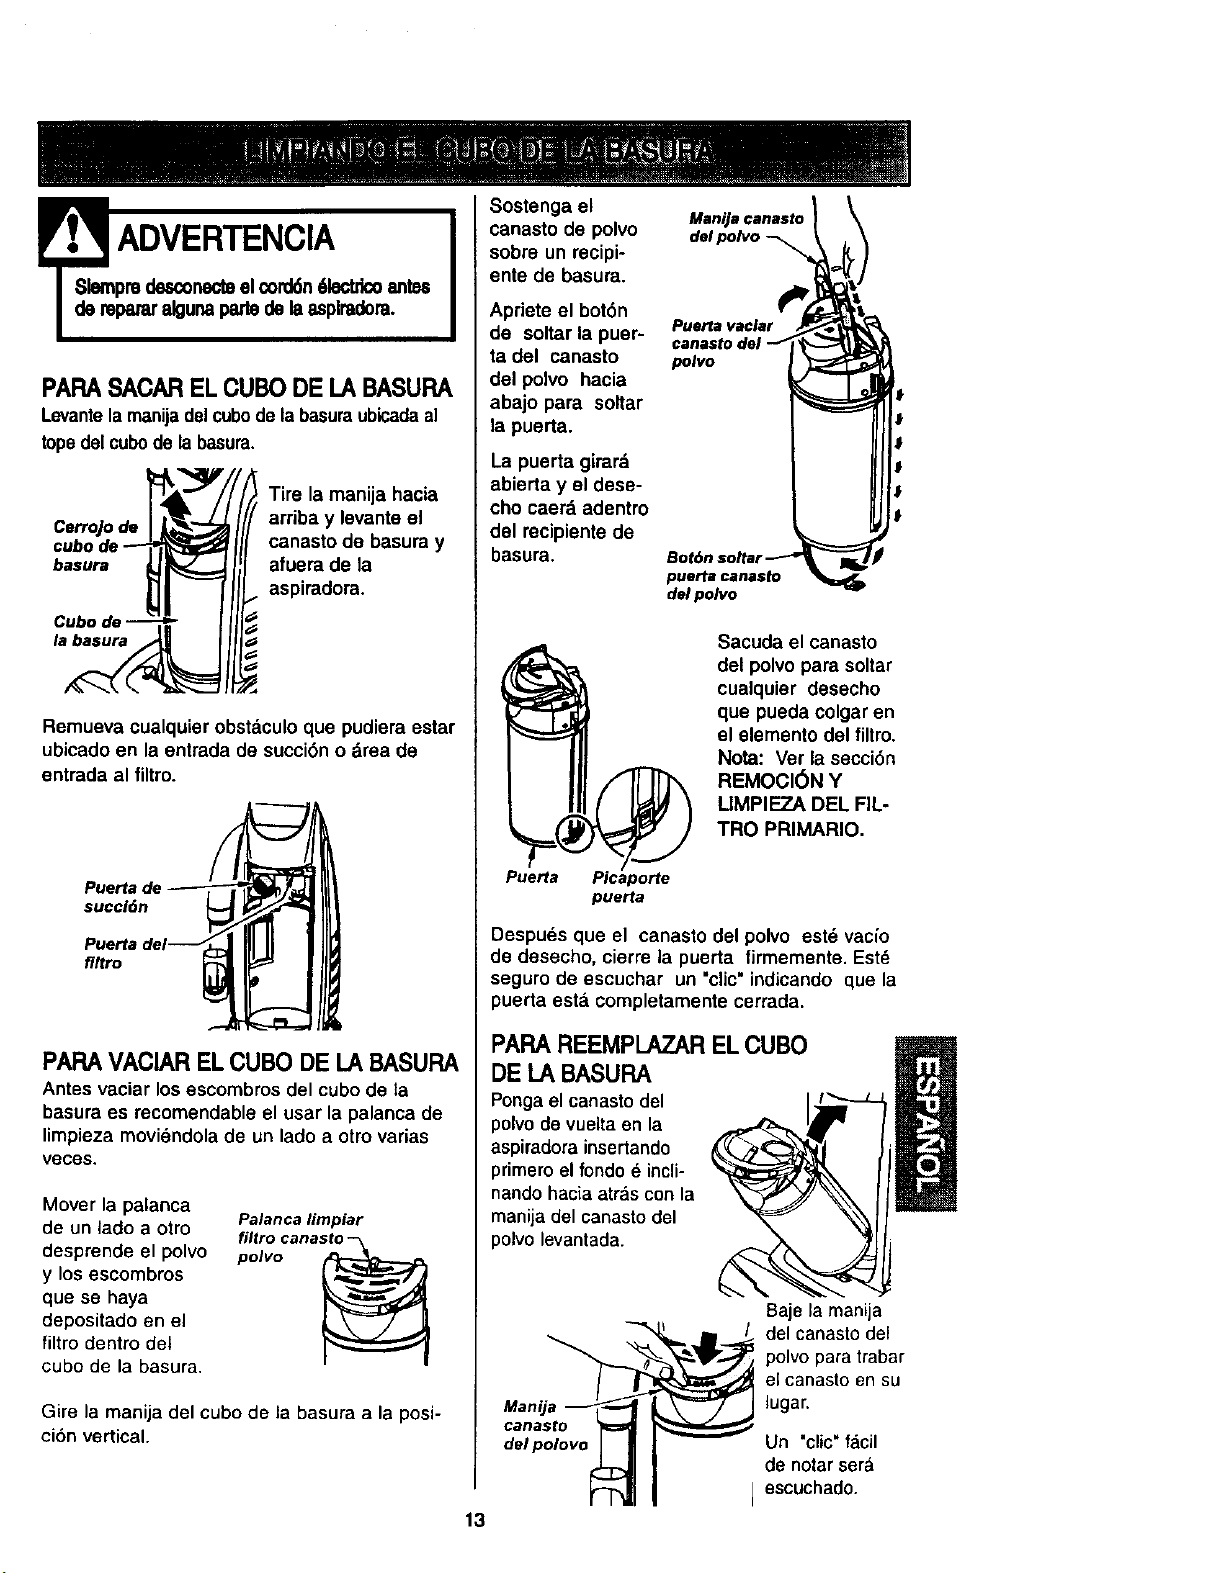
ADVERTENGIA
pmdesconecteel cord6n61ectdcoantes
pm_redgunapaztedelaaspimdom.
PAPASACAR ELCUBO DE LABASURA
Levante lamanijadelcubode labasuraubicadaal
topedelcubode labasura.
" l III1
Tire la manija hacia
arriba y levante el
canasto de basura y
afuera de la
aspiradora.
Remuewacualquier obst._culoque pudieraestar
ubicadoen la entrada de succi6n o drea de
entrada al filtro.
Puerta de
succl6n
flRro
PAPA VACIARELCUBO DE LABASURA
Antes vaciar losescombros del cubode la
basura es recomendable el usar la palanca de
limpieza movi6ndolade un ladoa otto varias
VOCOS,
Mover la palanca
de un iado a otro
desprende el polvo
y los escombros
que se haya
depositado en el
filtro dentro del
cubo de la basura,
Palanca limpiar
filtro canasto -_
polvo
Gire la manija del cubo de la basura a la posi-
ci6n vertical.
13
Sostenga el
canasto de polvo
sobre un recipi-
ente de basura.
Apriete el bot6n
de soltar la puer-
ta del canasto
del polvo hacia
abajo para soltar
la puorta.
La puerta girard
abierta y el dese-
cho caerd adentro
del recipiente de
basura.
i
Manila ¢anasto
puerta canaMo
del polvo
Puerta Picaporte
puerta
Sacuda el canasto
del polvo para soltar
cualquier dosecho
que pueda colgar en
el elemento del filtro.
Nora: Ver la secci6n
REMOCI6N Y
LIMPIF_.ZADEL FIL-
TRO PRIMARIO.
Despues que el canasto del polvo est_ vacfo
de desecho, cierre la puerta firmemente. Estd
seguro de escuchar un "clic"indicando que la
puerta esta completamente cerrada.
PAPA REEMPLAZARELCUBO
DE LA BASUPA
Pongael canastodel
polvodovuelta en la
aspiradorainsertando
primeroel fondo _ incli-
nandohacia arras con la
manijadel canastodel
polvolevantada.
Baje la manija
_m del canastodel
polvo para trabar
el canasto en su
lugar.
Un "clic" facil
de notar sera
I escuchado.
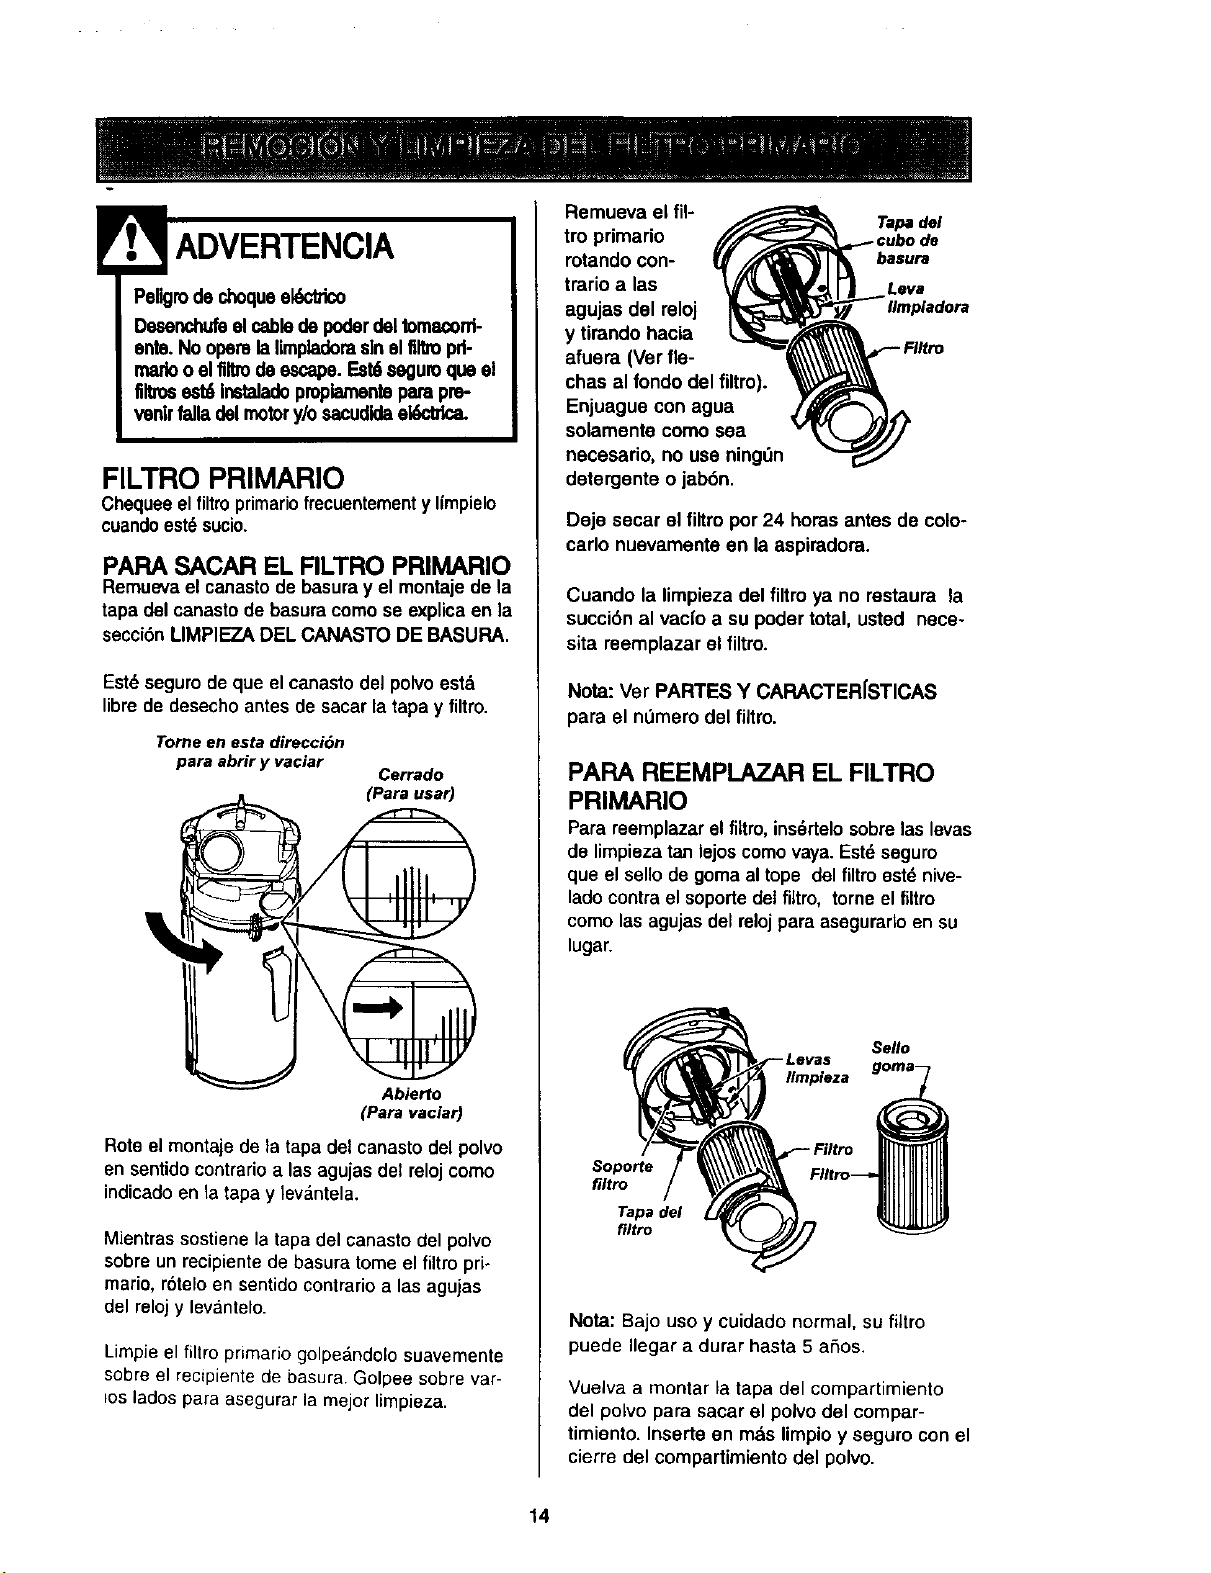
Pellgrode choqueek_.'b'Jco
Desenchufeel cabledepoderdelIomaoord-
ente.Nooperelallmpiadorasin el flltxopal-
mark)o elfiitrode escape.Est6seguroque el
firmsest6 instaladopropiamentepara pro-
venirfalladel motory/osacudidaeidctdca.
FILTRO PRIMARIO
Chequeeel filtro primariofrecuentementy limpielo
cuandoest_sucio,
PAPA SACAR EL FILTRO PRIMARIO
Remuevael canastode basuray el montajede la
tapa del canasto de basura como se explicaen la
secci6aLIMPIEZA DEL CANASTO DE BASURA.
Est_ segurode que el canastodel polvo estd
librede desechoantes de sacar la tapa y filtro.
Tome en esta direccidn
para abrir y vaciar
Co.ado
(Para usad
Rote el montajede la tapa del canasto del polvo
en sentidocontrario alas agujasdel roloj como
indicado en la tapa y lev&ntela.
Mientras sostiene la tapa del canasto del polvo
sobre un recipiente de basura tome el filtro pri°
mario, r6telo en sentido contrario alas agujas
del reloj y levantelo.
Limpie el filtro primario golpe&ndolo suavemente
sobre el recipiente de basura. Golpee sobre var-
los lados para asegurar la mejor limpieza.
Remueva el ill-
tro primario
rotando con-
trario alas
agujas del reloj
y tirando hacia
afuera (Ver fie-
chas al rondo del filtro).
Enjuaguo con agua
solamente como sea
necesario, no usa ningdn
detorgento o jab6n.
Tapadel
basura
Leva
Dejo secar el filtropor 24 horasantes de colo-
carlo nuevamente en la aspiradora.
Cuando la limpieza del filtro ya no restaura la
succi6n al vacl'oa su poder total, ustad nece-
sita reemplazar el filtro.
Nota: Ver PARTES Y CARACTERISTICAS
para el ntTmero del filtro.
PARA REEMPLAZAR EL FILTRO
PRIMARIO
Para reemplazarel filtro,ins_rtelosobrelasIovas
de limpiezatan lejoscomovaya.Eatdseguro
que el sellode gomaal tope dolfiltro estdnive-
ladocontrael soportedetfiltro, tome el filtro
como las agujasdel relojpara asogurafloen su
lugar.
Sello
Ilmpieza
Soporte
filtro
Tapa del
filtro
Nola: Bajo uso y cuidado normal, su filtro
puede Ilegar a durar hasta 5 afios.
Vueiva a montar la tapa del compartimiento
del polvo para sacar el polvo del compar-
timiento. Inserte en rods limpio y seguro con el
cierre del compartimiento del polvo.
14
REMPLAZO DEL BOTE DE POLVO
Coloquelatapadel canastode basurasobreel
canastodebasura.Alineelasmarcascomosemues-
trabajoAb/erto(ParaVaclar).
Tome en esta
direccl6n para cerrar y usar Abierto
(Para vaclar)
Cerrado
(Para usar)
Rotelatapaen sentidode lasagujasdel relojpresio-
nandohaciaabajohastaalinearlasmarcascomose
muestraarribade Cerrado(ParaUsar).
Inserteel canasto
del polvo en la _.
aspiradora.
Baje la manija Manlja
del canastodel canasto
polvoparatrabar delpolovo
el canastodel
polvoen su
lugar.
Un "clic"perceptibleserd escuchado.
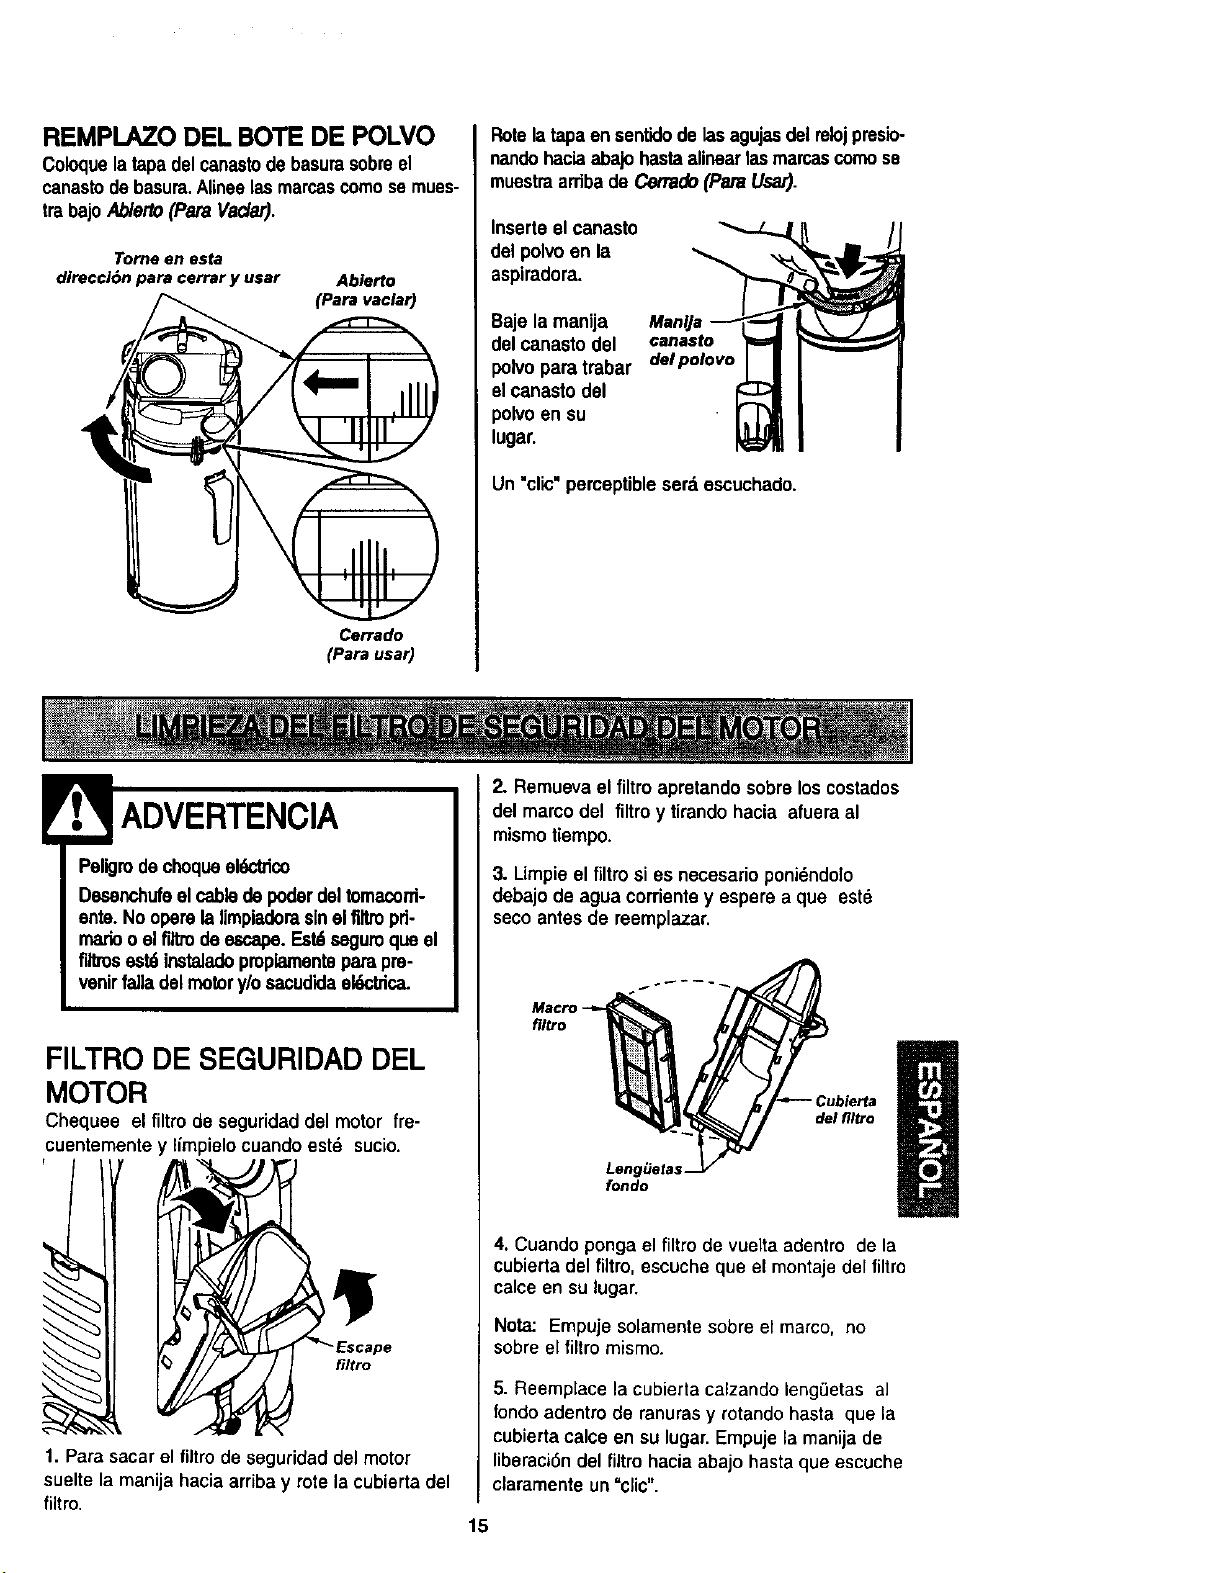
! ADVERTENCIA
Peligmdechoqueel6ctrico
Desenchufeelcabledepoderdeltomacord-
ente.No operelalimpiadorasinel flltropd-
madoo elfilttode escape.Est6seguroqueel
fillzosest6 instaJadopmplementeparapre-
venirfalla delmotory/osacudidael6cbica.
FILTRODE SEGURIDAD DEL
MOTOR
Chequeo el filtro de seguridaddel motor fre-
cuentementey limpielocuandoeste sucio.
i"
filrro
1. Para sacarel filtrode seguridaddel motor
suelte la manija hacia ardba y rote la cubierta del
filtro.
2. Remueva el filtroapretandosobrelos costados
del marco del filtro y tirando hacia afuera al
mismo tiempo.
3. Limpieel filtrosi es necesarioponidndolo
debajo de agua corrientey espere a que estd
seco antes de reemplazar.
filtro
Lengi_etas,
fondo
del flltro
4. Cuando pongael filtro de vuelta adentro de la
cubierta del filtro, escuche que el montaje del filtro
calce en su lugar.
Nota: Empuje solamente sobre el marco, no
sobre el filtro mismo.
5. Reemplace la cubierta calzando lengLietas al
rondo adentro de ranuras y rotando hasta que la
cubierta calce en su lugar. Empuje la manija de
liberaci6n del filtro hacia abajo hasta que escuche
claramenteun =clic".
15
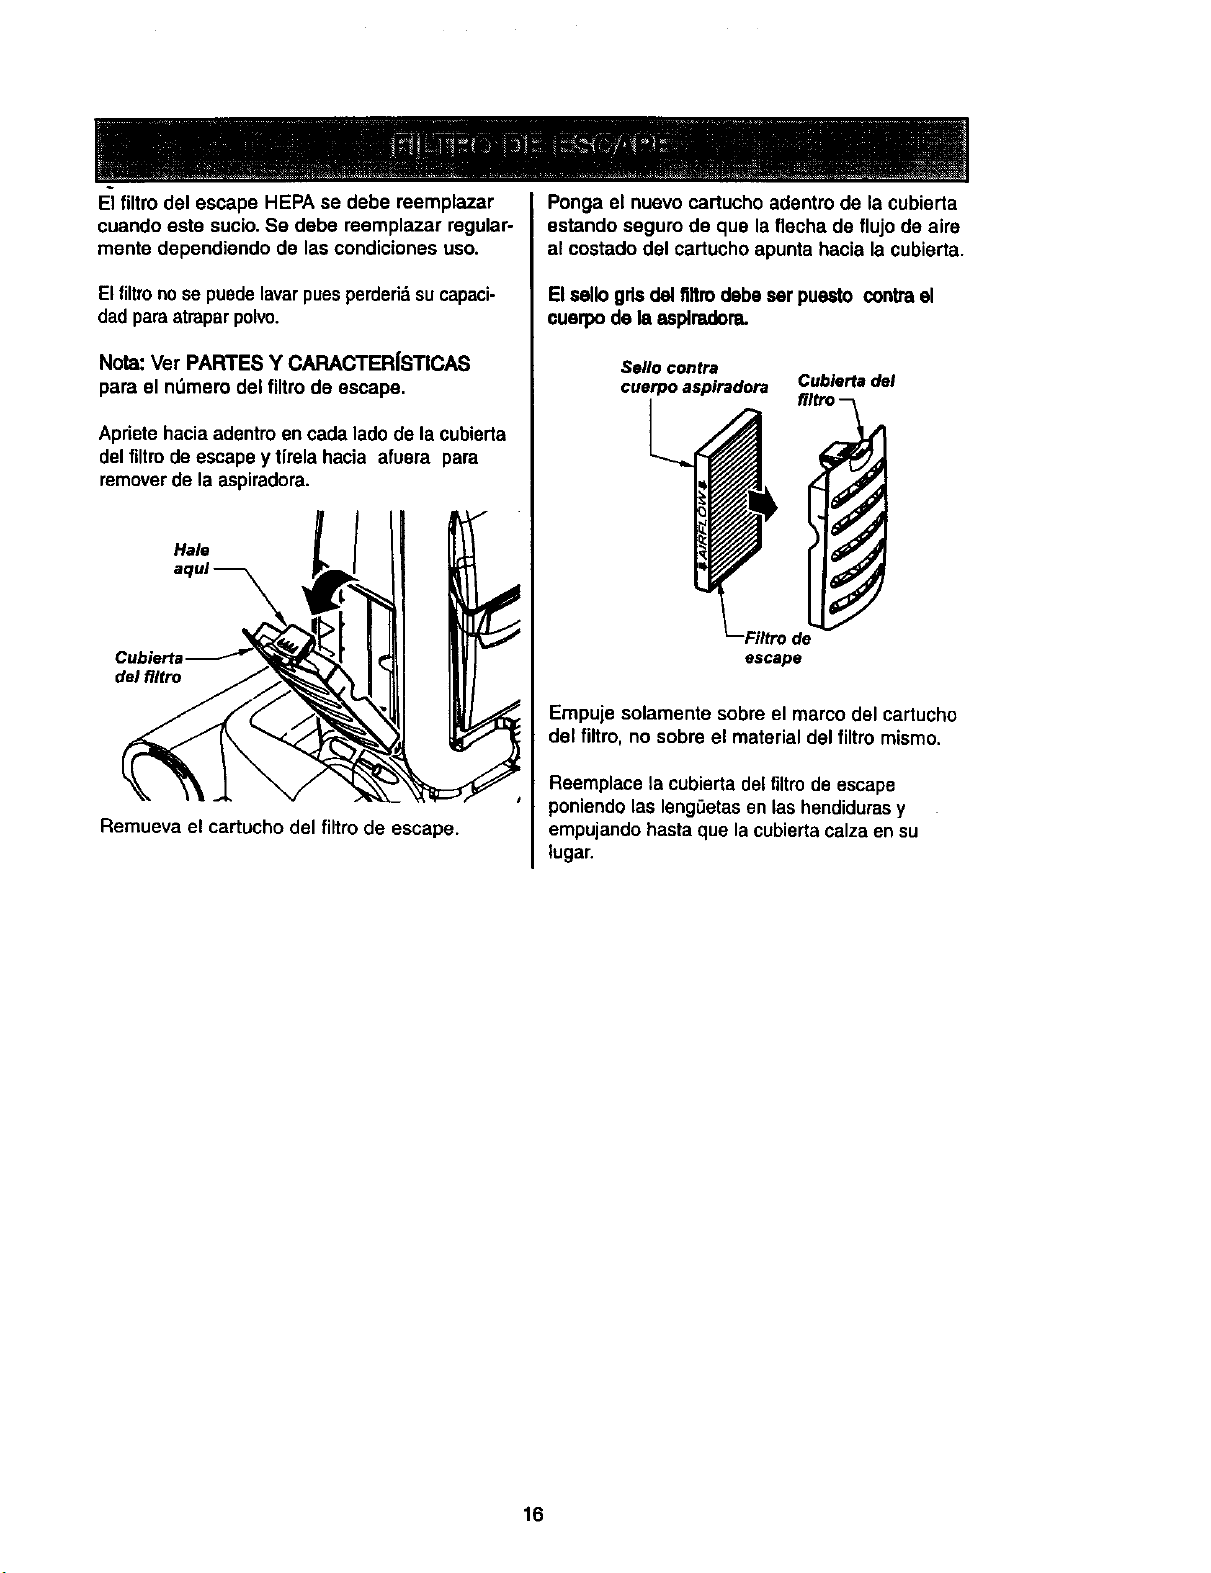
E/filtro del escape HEPA se debe reemplazar
cuando este sucio.Se debe reemplazar regular-
mente dependiendo de las condicionesuso.
Elfiltro no se puedelavarpuesperderidsucapaci-
dad paraatrapar polvo.
Nora: Ver PARTES Y CARACTERfSTICAS
para el n0mero del filtro de escape.
Aprietehacia adentro en cada ladode la cubierta
del filtrode escape y tfrela hacia afuera para
removerde la aspiradora.
Hale
Cubierta
del filtro
Remueva el cartucho del filtro de escape.
Ponga el nuevo cartucho adentro de la cubierta
estando seguro de que la flecha de flujo de aire
al costado del cartucho apunta hacia lacubierta.
Elsello grlsdel flltrodebe serpuesto contrael
cuarpo de la asplredora.
Sello col_tra
cuerpoaspiradora Cubier wdel
filtro--
l
Filtrode
escape
Empuje solamente sabre el marco del cartucho
del filtro, no sabre el material del filtro mismo.
Reemplace la cubiertadel filtmde escape
poniendolas leng_etas en las hendiduras y
empujandohastaque lacubiertacalza en su
tugar.
16
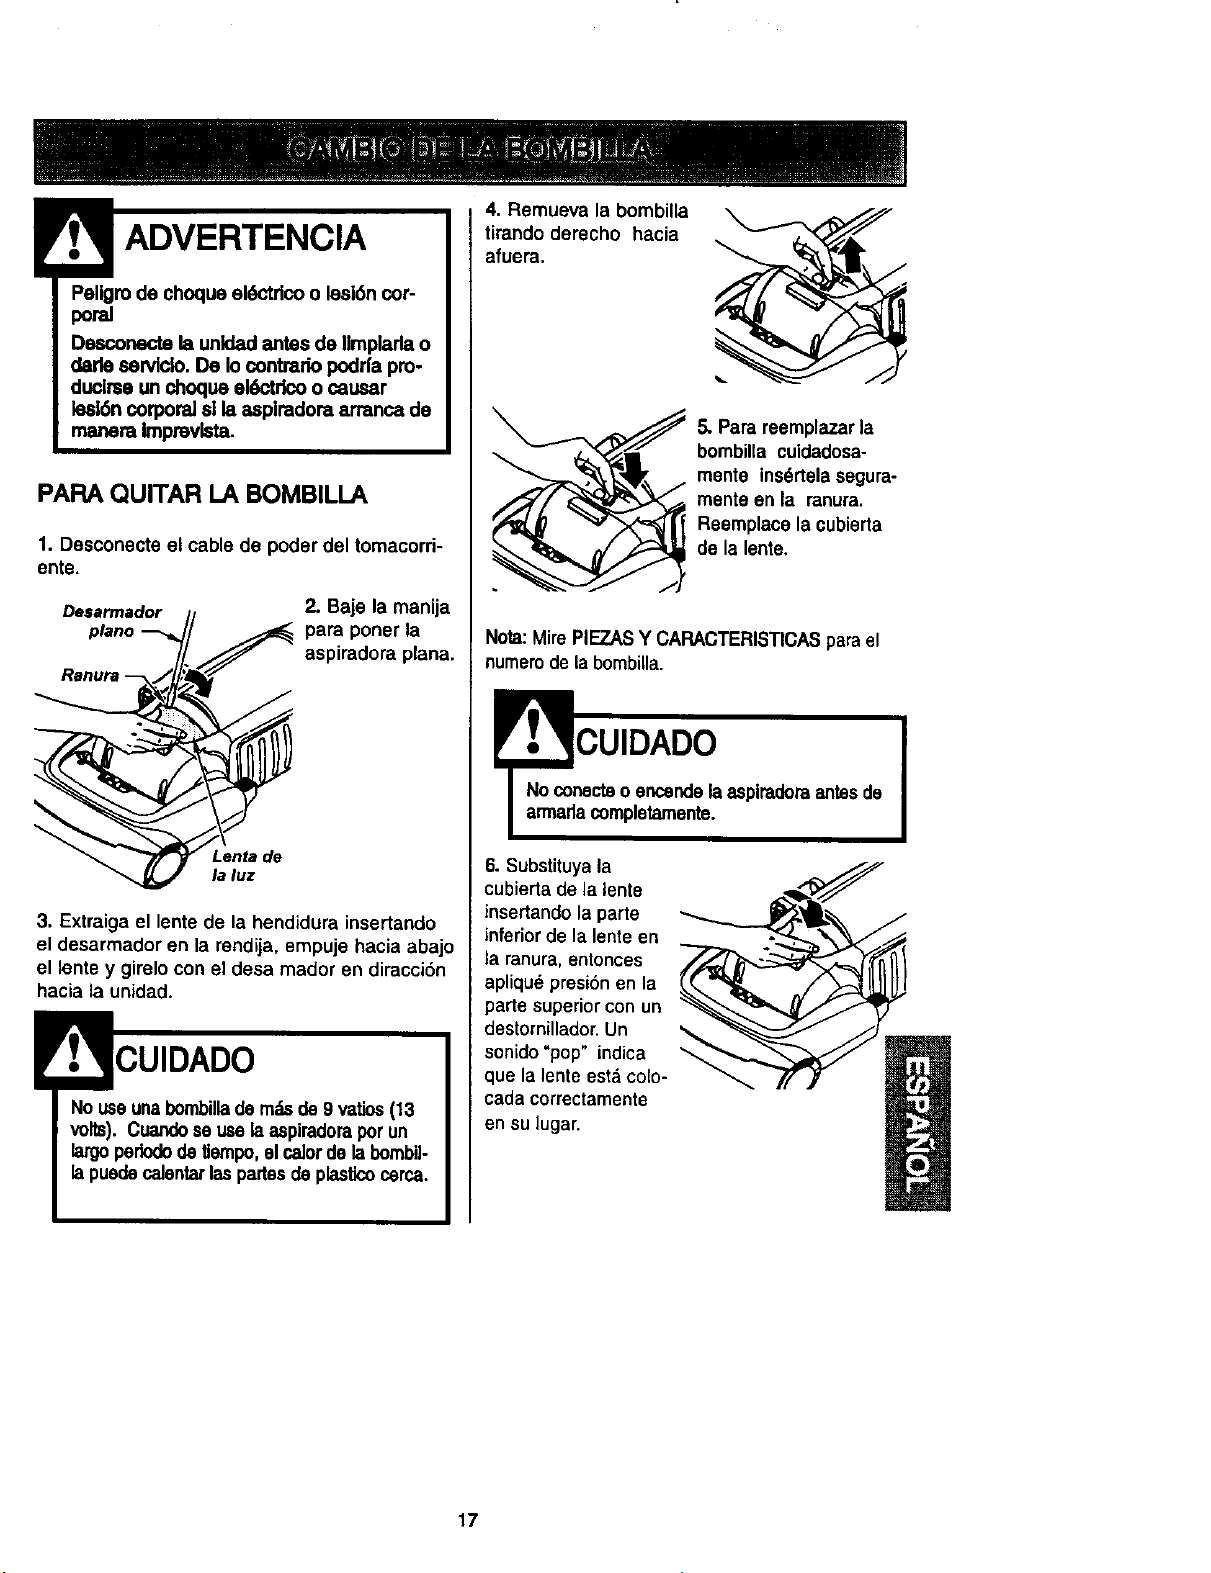
Pellgmdechoqueel_-tricoo lesl6ncor-
poral
DesconectelaunldadantesdeIlmplartao
darlesantlclo.DeIocontradopodrfapro-
ducimeunchoqueek_-tdcoocausar
lesl6ncorpora] sl la asplmdora arranca de
manera Imprevista.
PAPA QUITAR LA BOMBILLA
1. Desconecte el cable de poder del tomacorri-
ente.
Desarmador
2. Baje la manija
para poner la
aspiradera plana.
la luz
3. Extraiga el lente de la hendidura insertando
el desarmador en la rendija, empuje hacia abajo
el lente y girelo con el desa mador en diracci6n
hacia la unidad.
CUIDADO
No useunabombilladerodsde9 vatios(13
volts). Cuandose usela aspiradoraporun
largopedododeUempo,elca]ordela bomb,-
lapuedecalentarlaspartesde plasticocerca.
4. Remueva la bombilla
tirando derecho hacia
afuera.
5. Para reemplazarla
bombilla cuidadosa-
mente insdrtelasegura-
menteen la ranura.
Reemplace lacubierta
de la lente.
Nota:Mire PIEZASY CARACTERISTICASparael
numerode la bombiUa.
i
. CUIDADO
Noconecteo encendelaasplmdomantesde
armadacompletamente.
6. Substituya la
cubiertade la lente
insertandola parte
inferior de la lente en
la ranura, entonces
apliqu_ presibn en la
parte superior con un
destornillador. Un
sonido "pop" indica
que la lente estd colo-
cada correctamente
en su ]ugar.
17
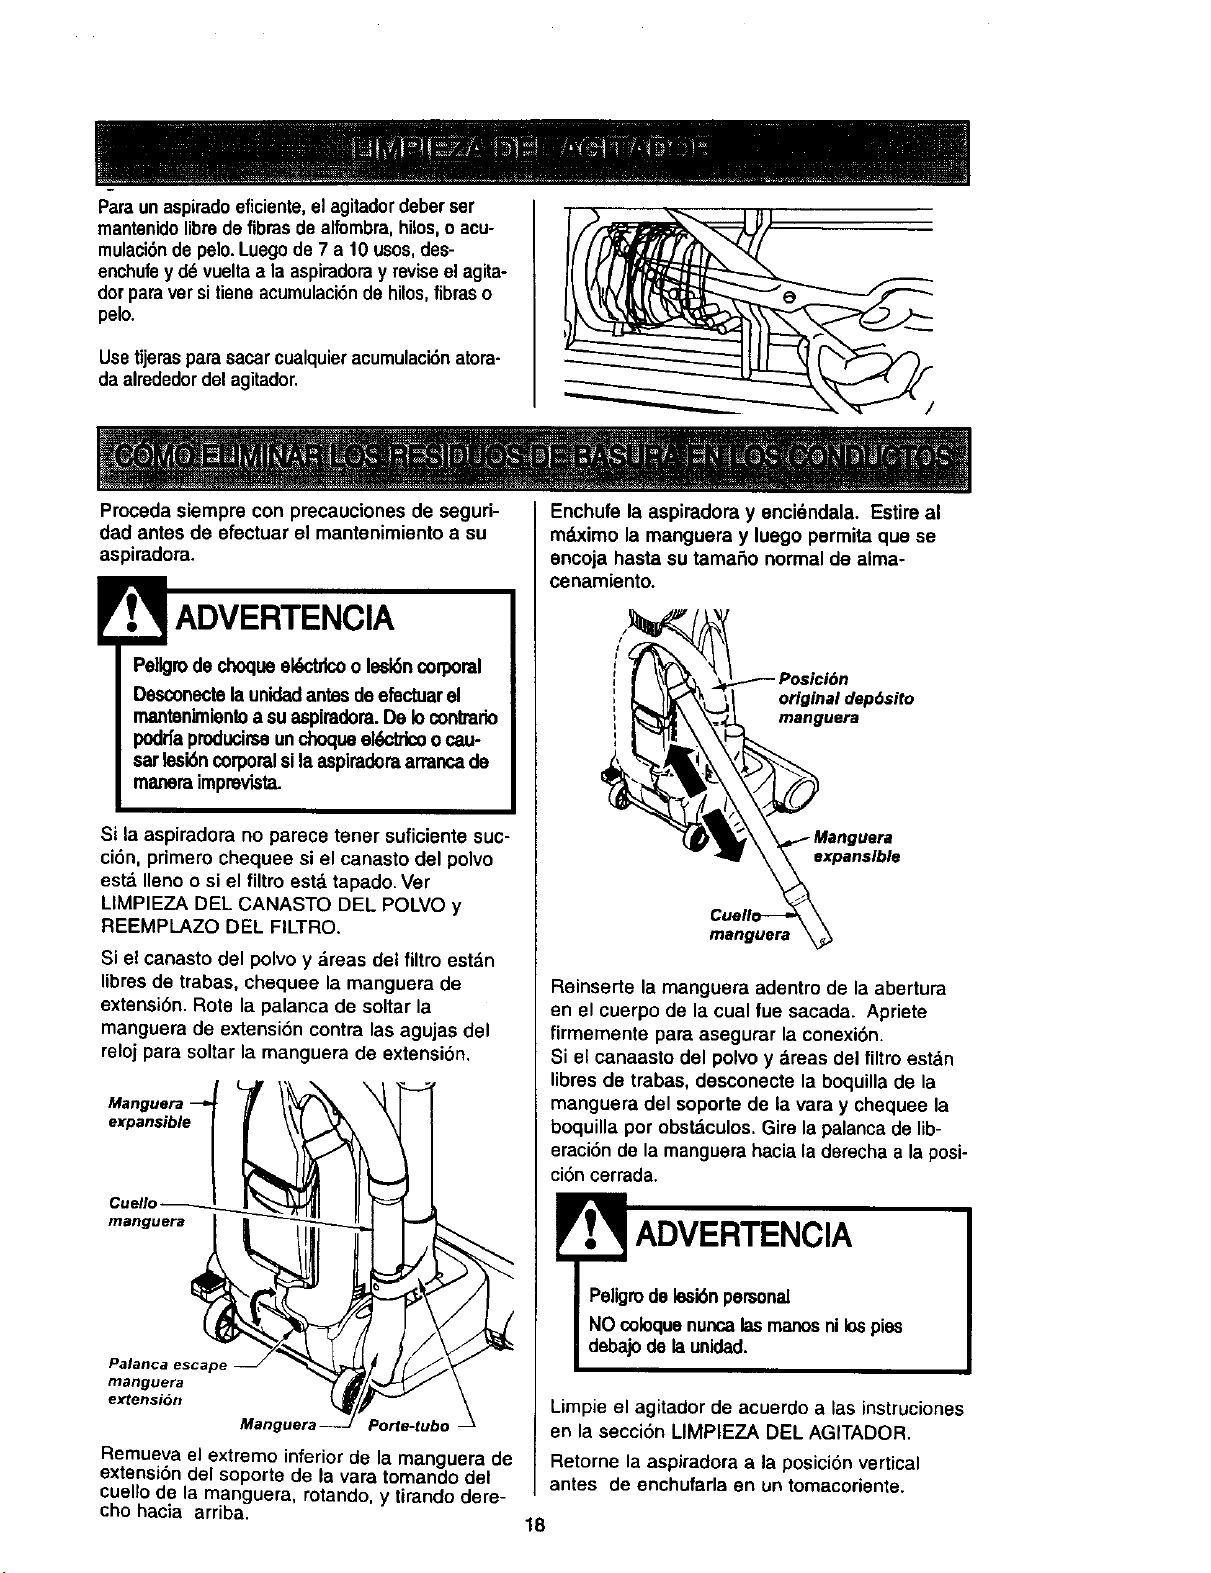
Paraunaspiradoeficiente,el agitadordeberser
mantenidolibredefibras de alfombra,hilos,o acu-
mulaci6ndepelo.Luego de 7 a 10 usos,des-
enchufeyd_ vueltaa la aspiradoray reviseel agita-
dorparaversitieneacumulaci6nde hilos,fibraso
pelo.
Usetijeraspara sacarcualquieracumulaci6natora-
daalrededordel agitador.
Proceda siempre con precauciones de seguri-
dad antes de efectuar el mantenimiento a su
aspiradora.
Pellgrodechoqueel_-trlcoo lesl6ncorporal
Desconectelaunidadantes deefectuarel
mantenimientea suaspiradora.De Iocontrario
podrfaprodudrseunchoqueek_rico ocau-
earlesi6ncorporalsilaaspiradoraarrancade
manem imprevista.
Si la aspiradora no parece tener suficiente suc-
ci6n, primero chequee si el canasto del polvo
est& Ileno o si el filtro esta tapado. Ver
LIMPIEZA DEL CANASTO DEL POLVO y
REEMPLAZO DEL FILTRO.
Si el canasto del polvo y &reas det filtro estdn
libres de trabas, chequee la manguera de
extensi6n. Rote la palanca de soltar la
manguera de extensi6n contra lasagujas del
reloj para soltar la manguera de extensi6n.
expansible
Cuelll
manguera
Palanca escape
manguera
extension
Porte-tubo
Remueva el extremo inferior de la manguera de
extensi6n del soporte de la vara tomando del
cuello de la manguera, rotando, y tirando dere-
cho hacia arriba.
Enchute la aspiradora y encidndala. EsUreal
mdximo la manguera y luego permita que se
encoja hasta su tamaSo normal de alma-
cenamiento.
: _" /_anguera
_\ _lManguera
• _expanslble
Cue,o--. \
manguera
Reinserte la manguera adentro de la abertura
en el cuerpo de la cual rue sacada. Apriete
firmemente para aeegurar la conexi6n.
Si el canaasto del polvo y areas del filtro estdn
libres de trabas, desconecte la boquilla de la
manguera del soporte de la vara y chequee la
boquilla por obst&culos. Gire la palanca de lib-
eraci6n de la manguera hacia la derecha a la posi-
ci6n cerrada.
ADVERTENCIA
Limpie el agitador de acuerdo alas instruciones
en la secci6n LIMPIEZA DEL AGITADOR.
Retorne la aspiradora a la posici6n vertical
antes de enchufarla en un tomacoriente.
18
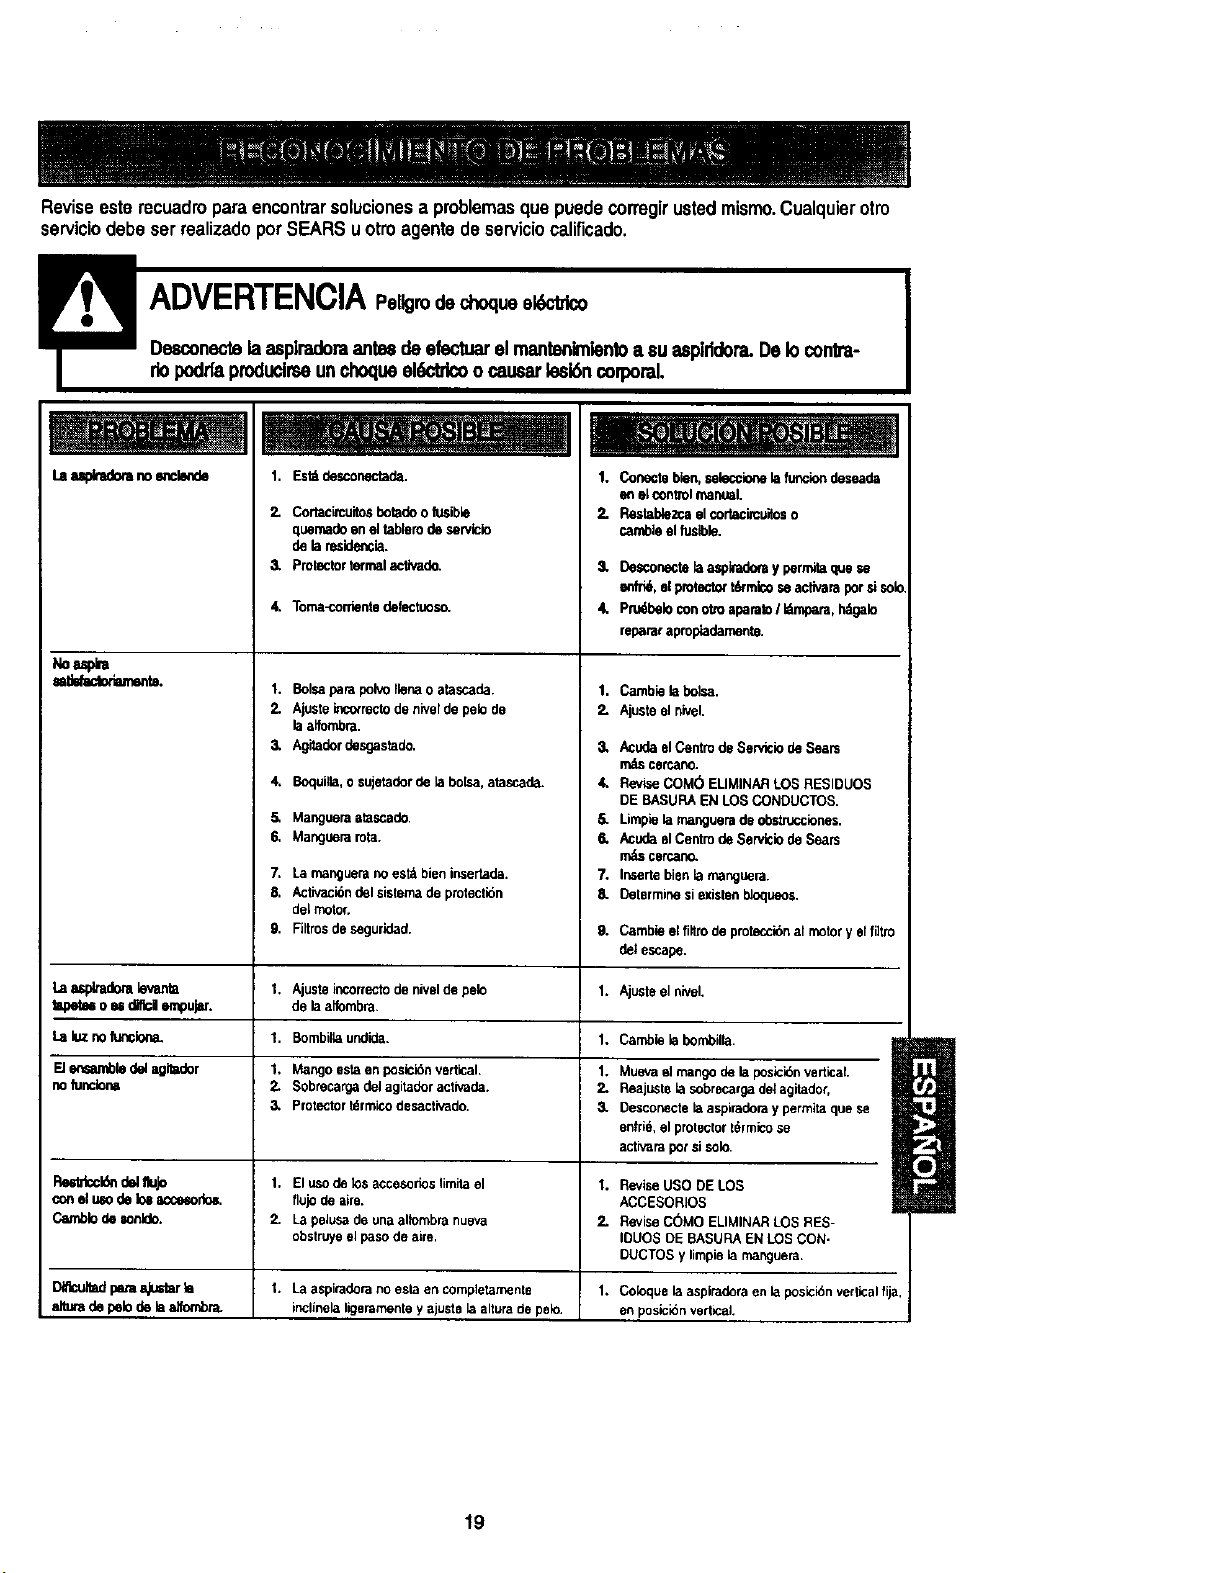
Reviseeste recuadroparaencontrarsolucionesa problemasque puedecorregirustedmismo.Cualquierotro
serviciodebe serrealizadoperSEARSuotroagentedeserviciocalificado.
Noasp_
m_dac_.
Laluz nolunobn_
Eler,sambledelagllador
nofuncbna
1. Est_ desconectade. 1. Conecle blen, seleccione lafuncion deseade
en el control manual.
2. Cortac_cuitosboladoo lusible
quernadoeneltab_emdeserv_cio
delaresklencia.
3. Protectortermelactivado.
To_rden_ deW.so.
1. Bolsaparapol_ Flenao atascada.
2. Ajusteinc_rectode niverde pelode
laalfombm.
3. Agitadordesgastodo.
4. Boquilla, o sujetador de _aboLsa,atascade.
5, Mangueraatascado
6. Manguerarata.
7. La manguera no estzt bien insertade.
8. Activaci6ndel sistoma de protection
deLmotor.
9. Filtrosde sogurldad.
I. Ajuste incorrectode nivel de pelo
de Paalfombm.
I. BombiUaundida.
1. Mango esta en posici6n vertical
2. Sobrecargo del agitador activada,
3. Protector tdrmico desactivado.
2.
3.
4.
Restablezca el cortac_cultoso
camble el fusible.
Desconecte_aaspkadoray permitaq_Je=e
enfr_, elprotectort_micoseactivaraporsisok
Prudbebconottoapamto/ Idmpara,I_galo
repararapmpiademente.
1. Cambielabolsa.
2. Ajusteelnivel.
3, Acude el Cemro de Sen,k;io de Sears
m_s corcano.
4. Revise COM(_ EUMINAR LOS RESIDUOS
DE BASURA EN LOS CONDUCTOS.
6, Limpie la rnanguera de obstnJcciones.
6, Acude el Centre de Servicio de Sears
rnds cercano.
7, Inserte bien la manguera.
6, Determine siexiston b!oqueos.
9. Cambie el fitlrode protecci6nal motor y elfi]tro
det escape.
1. Ajusteelnlvel.
1. Cambie la bombilta.
1. Muevael mangodePaposici6nvertical
2. Reajustolasobrecargodetagitador,
3. Desconectelaaspiradoraypermitaquese
enfrie,elprotectortermicose
activarapotsisolo.
Restdcc_ndelffuJo 1, Elusodek_saccesofiosfimitael 1. Revise USO DE LOS
con el uso de Its accwodos, flujo de aim. ACCESORIOS
Cambb de _nldo, 2- La pelusa de una allombra nueva 2. Revise C(_MO ELIMINAR LOS RES-
obstruye el paso de aire. IDUOS DE BASURA EN LOS CON-
DUCTOS y limpie la rnanguera.
D_ pata aJustar_ 1. La aspicadorano esta en completamente 1, Coloque la aspiradora en la posici6nvertical fija
eltura de peb de is a]fon_ inclinela ligemmente y ajuste la altura de peso. en posicidn vertical
19
For repair - in your home - ofall major brand appliances,
lawn and garden equipment, or heating and cooling systems,
no matter who made it, no matter who sold it!
For the replacement parts, accessories and
owner's manuals that you need to do-it-yourself.
For Sears professional installation of home appliances
and items like garage door openers and water heaters.
1-800-4-MY-HOME ® Anytime,day or night
(1-800-469-4663) (U.S.A.andCanada)
www,sears.corn www.sears.ca
Our Home
Forrepair of carry-in products like vacuums, lawn equipment,
and electronics,call or go on-linefor the nearest
Sears Parts and Repair Center.
1-800-488-1222 Anytirne,dayornight(U.S.A.only)
www.sears.corn
Para oedir servicio de reoarac_6n
a domicilio, y para oroenar o_ezas:
1-888-SU-HOGAR sM
(1-888-784-6427)
SEARS
To pumnase a protection agreement (U.S.A.)
or maintenance agreement (Canada) on a product serviced by Sears:
1-800-827-6655 {U.S.A.) 1-800-361-6665 (Canada)
Au Canada pour service en franr..ais:
1-800-LE-FOYER _c
(1-800-5.33-6937)
WWW.Sea r's,ca
© Sears,RoebuckandCo.
SM k n
® Registered Trademark / Trademark / Service Mark of Sears, Roebuc a d Co.
® Marca Registrada / TMMarca de Fdbrica / sMMarca de Servicio de Sears, Roebuck and Co.
MCMarque de commerce / Mo Marque depos_e de Sears, Roebuck and CO.