Use & Care Guide
Manual de Uso y Cuidado
English / Espa_ol
0 S!Y;
;S £_ Y>f?_:
8.;_ y
Model/Modelo: 796.4158#
ore Elite.
d" g
G
MFL68639705
Sears Brand Management Corporation
Hoffman Estates, IL 60179 U.S.A.
www.kenmore.com
www, sears.¢om
iMPORTANT SAFETY iNSTRUCTIONS ............................. 3-5
GROUNDING REQUIREMENTS.............................................5
FEATURES AND BENEFITS
Key Parts and Components ................................................. 6
Included Accessories ........................................................... 6
Optional Accessories ........................................................... 6
iNSTALLATiON REQUIREMENTS
Key Dimensions and Specifications ................................... 7
Choose the Proper Location ............................................... 7
Flooring .................................................................................. 7
Clearances ............................................................................ 7
iNSTALLATION iNSTRUCTIONS
Unpacking and Removing Shipping Bolts ......................... 8
Connecting the Water Lines ................................................ 9
Connecting the Drain Hose ............................................... 10
Connect to the Power Supply ............................................. 10
Leveling the Washer ........................................................... 11
Installation of Non-Skid Pads (optional) ........................... 11
HOW TO USE
Control Panel Features ........................................................ 12
Operating the Washer ......................................................... 13
Cycle Guide .................................................................... 14-15
Sorting Wash Loads ............................................................ 16
About the Dispenser Drawer .............................................. 17
Detergent and Dispenser Use ............................................. 18
Time and Status Display .................................................... 19
Cycle Modifier Buttons ....................................................... 20
Steam Cycles and Options ................................................. 21
Special Functions ................................................................ 22
CARE AND CLEANING
Regular Cleaning .......................................................... 23-24
Maintenance .................................................................. 25-26
Cleaning the Water Inlet Filters .................................... 25
Cleaning the Drain Pump Filter ..................................... 26
KENMORE CONNECT TM System ......................................... 27
TROUBLESHOOTING GUIDE
Normal Sounds You May Hear ......................................... 28
Before Calling for Service .......................................... 28-30
WARRANTY ............................................................................ 31
In the space below, record the date of purchase, model,
and serial number of your product. You will find the model and
serial number printed on an identification plate located inside
the washer door. Have these items of information available
whenever you contact Sears concerning your
product.
Model No.
Date of Purchase
Serial No.
Save these instructions and your sales receipt for future
reference.
Master Protection Agreements
Congratulations on making a smart purchase. Your new
Kenmore Elite ® product is designed and manufactured
for years of dependable operation. But like all products,
it may require preventive maintenance or repair from
time to time. That's when having a Master Protection
Agreement can save you money and aggravation.
The Master Protection Agreement atso helps extend the
life of your new product. Here's what the
Agreement s includes:
*Parts and labor needed to help keep products
operating properly under normal use, not just defects.
Our coverage goes well beyond the product warranty.
No deductible, no functional failure excluded from
coverage - real protection.
*Expert service by a force of more than 10,000
authorized Sears service technicians, which means
someone you can trust will be working on your product.
*Unllmited service calls and nationwide service, as
often as you want us, whenever you want us.
*"No-lemon" guarantee - replacement of your
covered product if four or more product failures occur
within twelve months.
*Product replacement if your covered product can not
be fixed.
*Annual Preventive Maintenance Check at your request
- no extra charge.
*Fast help by phone - we call it Rapid Resolution.
Phone support from a Sears representative on all
products. Think of us as a "talking owner's manuaU _
*Power surge protection against electric damage due to
power fluctuations.
*$250 food loss protection annually for any food
spoilage that is the result of mechanical failure of any
covered refrigerator or freezer.
*Rental reimbursement if repair of your covered
product takes longer than promised.
*25% discount off the regular price of any non-covered
repair service and related installed parts.
Once you purchase the Agreement, a simple phone
call is all that it takes for you to schedute service. You
can call at any time day or night or schedule a service
appointment online.
The Master Protection Agreement is a risk-free purchase.
If you cancel for any reason during the product
warranty period, we will provide a full refund, or a
prorated refund any time after the product warranty
period expires. Purchase your Master Protection
Agreement today!
Some limitations and exclusions apply.
For prices and addltlonal information in the U.S.A.
call 1=800=827=6655.
_Caverage in Canada varies an some items.
Far full detalls call Sears Canada at 1=800=361=6665.
Sears Installation Service
For Sears professional installation of home appliances,
garage door openers, water heaters, and other major
home items, in the U.S.A. or Canada call:
1-800-4-MY-HOME ®.
Thereare manyimportantsafety messages in this manual and on your appliance. Always read and obey
all safety messages.
This is the safety alert symbol. This symbol alerts you to potential hazards that can result in property
damage and/or serious bodily harm or death.
All safety messages will follow the safety alert symbol and either the word DANGER or WARNING.
These words mean.
!ndicates a hazardous situation which, if not avoided, will result in death or serious
_njury.
!ndicates a hazardous situation which, if not avoided, could result in death or serious
injury.
All safety messages will tell you what the potential hazard is, tell you how to
reduce the chance of injury, and tell you what can happen if the instructions are
not followed.
To reduce the risk of fire, elecfrlc shock, or injury to
persons when using this appliance, follow basic
precautions, includlng the following.
*Before use, the washer must be properly installed as
described in this manual.
*Do not wash articles that have been previously cleaned
in, washed in, soaked in, or spotted with gasoline, dry
cleaning solvents, or other flammable or explosive
substances, as they give off vapors that could
ignite or explode.
*Do not add gasoline, dry cleaning solvents, or other
flammable or explosive substances to the wash water.
These substances give off vapors that could ignite
or explode.
*Under certain conditions, hydrogen gas may be
produced in a hot water system that has not been
used for two weeks or more. HYDROGEN GAS IS
EXPLOSIVE. If the hot water system has not been used
for such a period, before using the washer, turn ON
all hot water faucets and let the water flow from each
for several minutes. This will release any accumulated
hydrogen gas. As the gas is flammable, do not smoke
or use an open flame during this time.
*Do not allow children to play on or in the washer. Close
supervision of children is necessary when the washer is
used near children.
*Before the washer is removed from service or
discarded, remove the door to prevent children from
climbing inside.
*Do not install or store the washer where it will be
exposed to the weather or freezing temperatures.
*Do not tamper with controls.
*Do not repair or replace any part of the washer or
attempt any servicing other than as described in this
manual. We strongly recommend that any service be
performed by a qualified technician.
*See Installation Instructions for grounding requirements.
*ALWAYS follow the fabric care instructions supplied by
the garment manufacturer.
*Do not place items exposed to cooking oil in your
washer. Items contaminated with cooking oils may
contribute to a chemical reaction that could cause a
load to catch fire.
*Use fabric softeners or products to eliminate static only
as recommended by the manufacturer.
*This washer is not designed for maritime use or for
mobile installations such as in RVs, aircraft, etc.
*Turn OFF the water faucets and unplug the washer if
the machine is to be left for an extended period of
time, such as during vacations.
*Packaging material can be dangerous for children.
There is a risk of suffocation. Keep all packaging
from children.
*Always check the inside of the washer for foreign
objects before loading laundry. Keep the door closed
when not in use.
*WARNING: This product contains chemicals known
to the State of California to cause cancer and birth
defects or other reproductive harm. Wash hands after
handling.
To reduce the risk of fire, electric shock, or injury to
persons when using this appllance, follow basic
precautions, including the following.
*Unplug the washer before cleaning to avoid the risk of
electric shock.
*Never use harsh chemicals, abrasive cleaners, or
solvents to clean the washer. They will damage
the finish.
*Do not put oily or greasy rags or clothing on top of
the washer. These substances give off vapors that
could ignite the materials.
*Do not wash items that are soiled with vegetable or
cooking oil. These items may contain some oil after
laundering and may catch fire.
*Disconnect this appliance from the power supply
before attempting any user maintenance. Turning the
controls to the OFF position does not disconnect this
appliance from the power supply. Failure to follow this
warning can cause serious injury, fire, electric shock,
or death.
*Do not combine detergents, fabric softeners, and/or
other laundry products from different manufacturers
for use in a load, unless specified on the fabric label.
*Do not mix chlorine bleach with ammonia or acids
such as vinegar. Follow package directions when
using laundry products. Incorrect usage can produce
poisonous gas, resulting in serious injury or death.
*Do not reach into the washer while parts are moving.
Before loading, unloading, or adding items, push in the
cycle selector knob and allow the drum to coast to a
complete stop before reaching inside. Failure to follow
this warning can cause serious injury, fire, electric shock
or death.
*Refer to INSTALLATION INSTRUCTIONS for detailed
grounding procedures. Installation instructions are
packed in the washer for the installer's reference. If the
washer is moved to a new location, have it checked
and reinstalled by a qualified service technician. Failure
to follow this warning can cause serious injury, fire,
electric shock, or death.
*Do not, under any circumstances, cut or remove the
third (ground) prong from the power cord. Failure to
follow this warning can cause serious injury, fire, electric
shock, or death.
*For personal safety, this appliance must be properly
grounded. Failure to follow this warning can cause
serious injury, fire, electric shock, or death.
*The power cord of this appliance is equipped with a
3-prong (grounding) plug which mates with a standard
3-prong (grounding) wan outlet to minimize the possibility
of electric shock hazard from this appliance.
*This washer must be plugged into a 120VAC, 60Hz
grounded outlet. Failure to follow this warning can
cause serious injury, fire, electric shock, or death.
*Nave the wall outlet and circuit checked by a
quafffied electrlcian to make sure the outlet is property
grounded. Failure to follow this warning can cause
serious injury, fire, electric shock, or death.
*Where a standard 2-prong waft ouffet is encountered,
it is your personal responslbiffty and obffgatlon to
have it replaced with a property grounded 3-prong
waft ouHet. Failure to follow this warning can cause
serious injury, fire, electric shock, or death.
*Do not instaff on carpet. Instaff the washer on a soffd
floor. Failure to follow this warning can cause serious
leak damage.
*Do not remove grounding prong. Do not use an
adapter or extension cord. Plug into a grounded
3-prong outlet. Failure to follow these warnings can
cause serious injury, fire, electric shock, or death.
4
*The washer should always be plugged into its own
indivldual electrlcal outlet which has a voltage rating
that matches the rating plate. This provides the best
performance and also prevents overloading house
wiring circuits which could cause a fire hazard from
overheated wires.
*Never unplug your washer by pulling on the power
cord. Always grip ptug firmly and putl straight out
from the outlet. Failure to follow this warning can
cause serious injury, fire, electric shock, or death.
*immediately repair or replace all power cords that
have become frayed or otherwise damaged. Do not
use a cord that shows cracks or abrasion damage
along its length or at either end. Consult with a
qualified service technician. Failure to follow this
warning can cause serious injury, fire, electric shock,
or death.
*When installlng or moving the washer, be careful not
to pinch, crush, or damage the power cord. Failure
to follow this warning can cause serious injury, fire,
electric shock, or death.
*The washer must be installed and electrically
grounded by a quallfied service technician in
accordance with local codes to prevent shock hazard
and assure stability during operation.
*The washer is heavy. Two or more people may be
needed to install and move the appliance. Failure
to do so can result in damage to property or serious
bodily injury.
*Store and install the washer where it will not be
exposed to temperatures below freezing or exposed
to outdoor weather conditions. Failure to fotlow this
warning can cause serious leak damage.
*To reduce the risk of electric shock, do not install
the washer in humid spaces. Failure to follow this
warning can cause serious injury, fire, electric shock, or
death.
•Donot allow childrento play on or in the washer.Close
supervision of children is necessary when the washer is
used near children. As children grow, teach them the
proper, safe use of all appliances. Failure to comply with
these warnings could result in serious personal injury.
• Destroy the carton, plastic bag, and other packing
materials after the washer is unpacked. Children
might use them for play. Cartons covered with rugs,
bedspreads, or plastic sheets can become airtight
chambers. Failure to comply with these warnings could
result in serious personal injury.
• Keep laundry products out of children's reach. To
prevent personal injury, observe all warnings on
product labels. Failure to comply with these warnings
could result in serious personal injury.
• Before your washer is removed from service or
discarded, remove the door to the washing compartment
to avoid the danger of children or small animals
getting trapped inside. Failure to do so can result in
serious personal injury or death.
IMPORTANT: Please read carefully.
TO CONNECT ELECTRICITY
Improper connection of the equipment-grounding
conductor can result in risk of electric shock. Check
with a qualified electrician or service technician
if you are in doubt as to whether the appliance
is properly grounded. Do not modify the plug
provided with the appliance. If it does not fit the
outlet, have a proper outlet installed by a qualified
electrician. Failure to follow these warnings can
cause serious injury, fire, electric shock, or death.
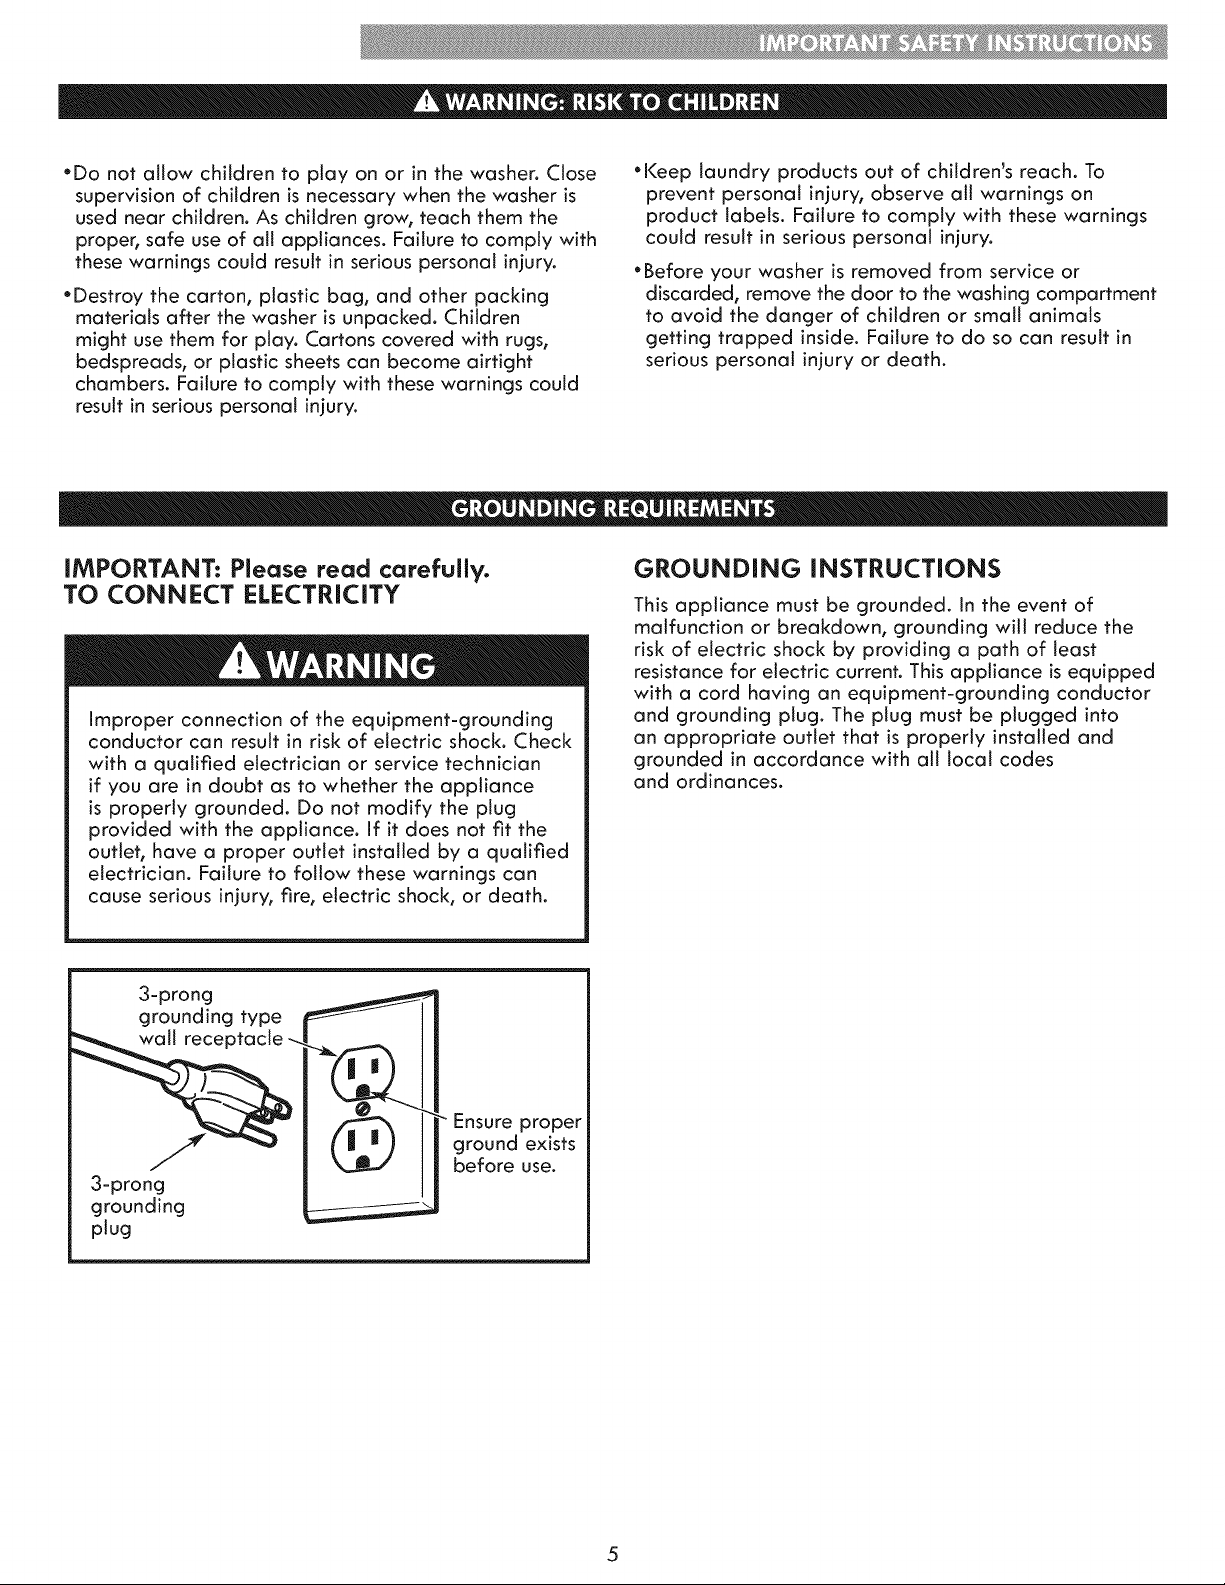
GROUNDING INSTRUCTIONS
This appliance must be grounded. In the event of
malfunction or breakdown, grounding will reduce the
risk of electric shock by providing a path of least
resistance for electric current. This appliance is equipped
with a cord having an equipment-grounding conductor
and grounding plug. The plug must be plugged into
an appropriate outlet that is properly installed and
grounded in accordance with all local codes
and ordinances.
3-prong
grounding type
3-prong
grounding
plug
Ensure proper
ground exists
before use.
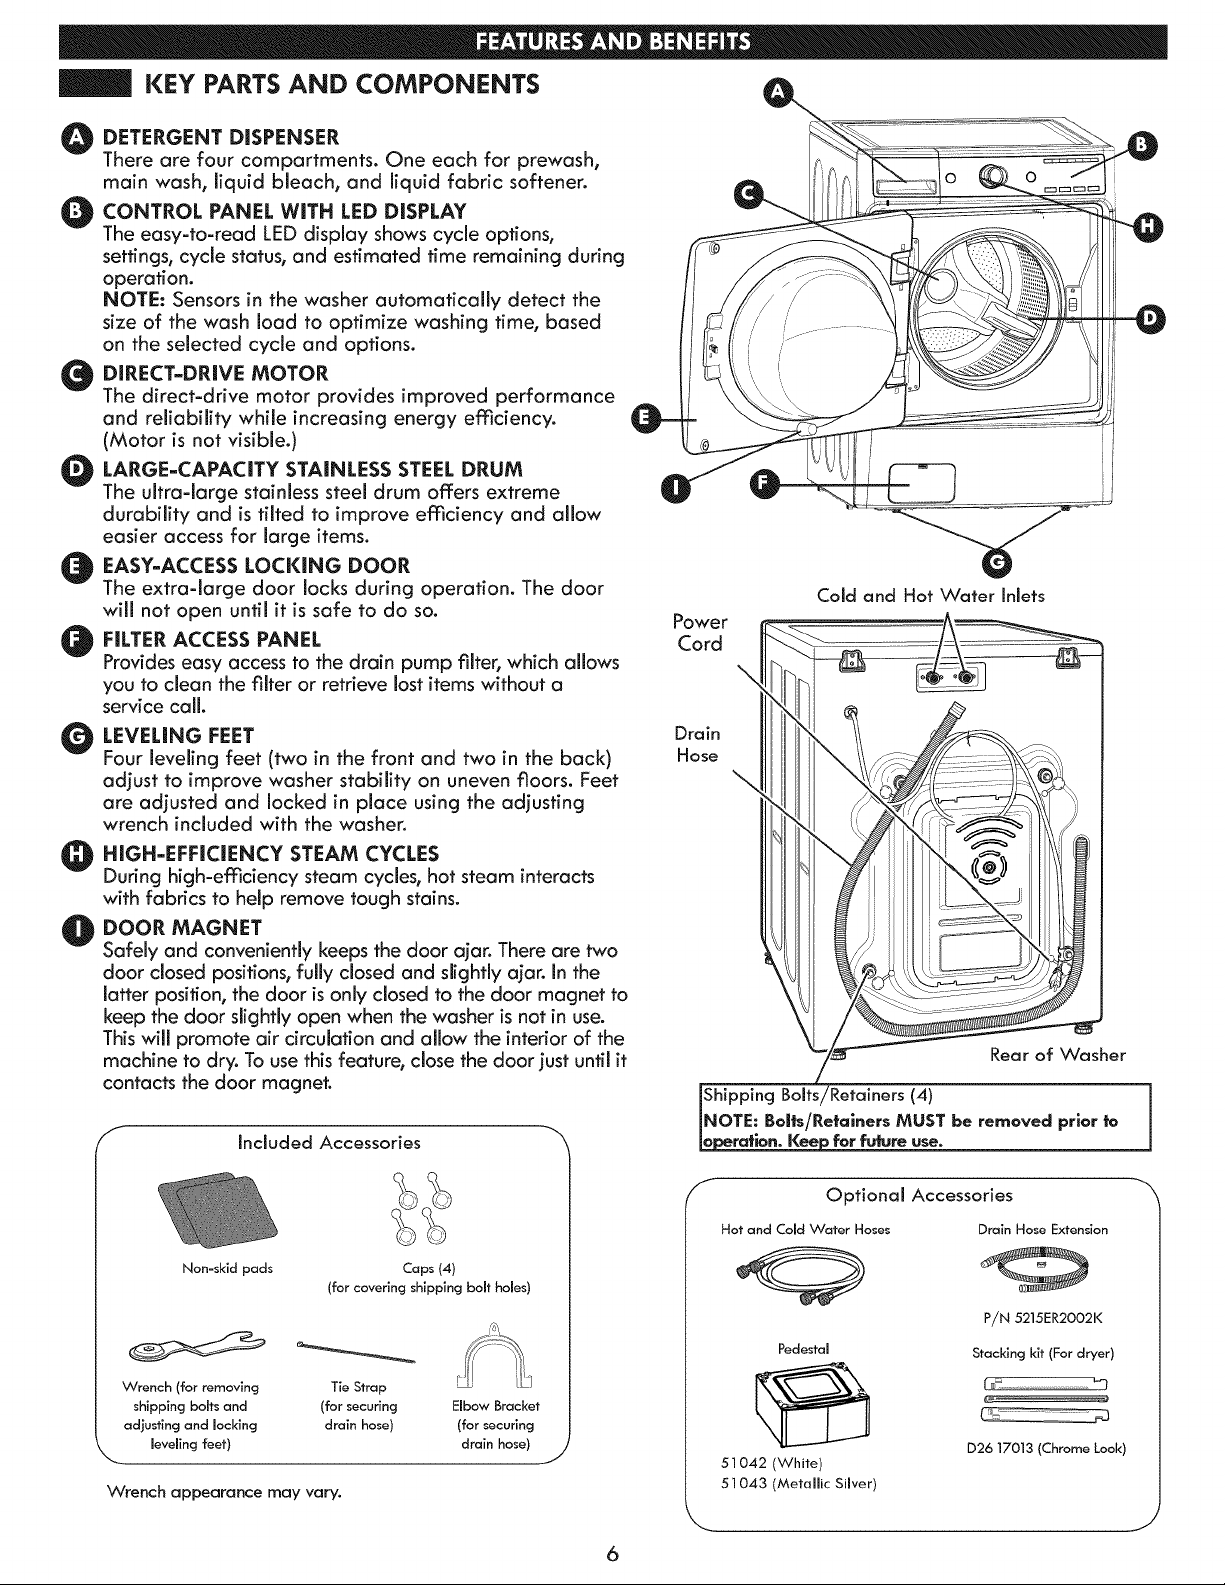
KEY PARTS AND COMPONENTS
O ETERGENT DISPENSER
There are four compartments. One each for prewash,
main wash, liquid bleach, and liquid fabric softener.
O ONTROL PANEL WITH LED DISPLAY
The easy-to-read LED display shows cycle options,
settings, cycle status, and estimated time remaining during
operation.
NOTE: Sensors in the washer automatically detect the
size of the wash load to optimize washing time, based
on the selected cycle and options.
l IRECT-DRIVE MOTOR
The direct=drive motor provides improved performance
and reliability while increasing energy eflficiency.
(Motor is not visible.)
O ARGE=CAPACITY STAINLESS STEEL DRUM
The ultra-large stainless steel drum offers extreme
durability and is tilted to improve eMciency and allow
easier access for large items.
_ ASY-ACCESS LOCKING DOOR
The extra-large door locks during operation. The door
will not open until it is safe to do so.
O ILTER ACCESS PANEL
Provides easy access to the drain pump filter, which allows
you to clean the filter or retrieve lost items without a
service call.
O EVELING FEET
Four leveling feet (two in the front and two in the back)
adjust to improve washer stability on uneven floors. Feet
are adjusted and locked in place using the adjusting
wrench included with the washer.
O IGH-EFFICIENCY STEAM CYCLES
During high-emciency steam cycles, hot steam interacts
with fabrics to help remove tough stains.
O OOR MAGNET
Safely and conveniently keeps the door ajar. There are two
door closed positions, fully closed and slightly ajar. In the
latter position, the door is only closed to the door magnet to
keep the door slightly open when the washer is not in use.
This will promote air circulation and allow the interior of the
machine to dry. To use this feature, close the door just until it
contacts the door magnet.
Included Accessories
Non-skid pads Caps (4)
(for covering shipping bolt holes)
Wrench (for removing
shipping bolts and
adjusting and locking
leveling feet)
Tie Strap
(for securing
drain hose)
Elbow Bracket
(for securing
drain hose)
Wrench appearance may vary.
Power
Cord
Drain
Hose
J
Cold and Hot Water Inlets
\
Rear of Washer
Shipping Bolts/_ (4)
NOTE: Bolts/Retainers MUST be removed prior to
ration. Keep for fu|ure use.
f
Optional Accessories
Hot and Cold Water Hoses Drain Hose Extension
P/N 5215ER2002K
Pedestal Stacking kit (For dryer)
D26 17013 (Chrome Look)
51 042 (White)
51 043 (Metallic Silver)
6
KEY DiMENSiONS AND SPECIFiCATiONS
Description Front-Loading Washer
Electrical Requirements 120 VAC, 60 Hz
Max. Water Pressure 14.5 - 142 PSi (100 - 980 kpa)
Dimensions 27" (W) x 293/4" (D) x 3811/16" (H). 51" (D with door open)
68.6 cm (W) X 75.6 cm (D) X 98.3 cm (H), 129.5 cm (D with door open)
Net Weight 205 lbs (93 kg)
Max. Spin Speed 1,300 RPM
CHOOSE THE PROPER LOCATION
WARNING
*This washer is heavy. Two or more people are
required when moving and unpacking the washer.
Failure to do so may result in damage to property or
serious bodily harm.
"Store and install the washer where it will not be
exposed to temperatures below freezing or exposed
to outdoor weather conditions. Failure to follow this
warning can cause serious injury, fire, electric shock,
or death.
*Properly ground washer to conform with all electric
governing codes and ordinances. Failure to follow this
warning can cause serious injury, fire, electric shock, or
death.
*To reduce the risk of electric shock, do not install the
washer in humid spaces. Failure to follow this warning
can cause serious injury, fire, electric shock, or death.
*To ensure proper air flow, do not block the large
opening on the bottom of the washer with carpeting
or other materials.
*Do not remove ground prong. Do not use an adapter
or extension cord. Plug into a grounded 3-prong
outlet. Failure to follow this warning can cause serious
injury, fire, electric shock, or death.
Power Outlet
*The power outlet must be within 60 in. (1.5 m) of either
side of the washer.
*The appliance and outlet must be positioned so that
the plug is easily accessible.
* Do not overload the outlet with more than
one appliance.
*The outlet must be grounded in accordance with
current wiring electric codes and regulations.
* Time=delay fuse or circuit breaker is recommended.
NOTE: It is the personal responsibility and obligation of
the product owner to have a proper outlet installed by a
qualified service technician.
FLOORING
*To minimize noise and vibration, the washer MUST be
installed on a solidly constructed floor. See the NOTE
to your right.
*Allowable slope under the entire washer is a maximum
1in. difference from side to side or from front to back.
*Installing on carpeting and soft tile surfaces is
not recommended.
*Never install the washer on a platform or weakly
supported structure.
7
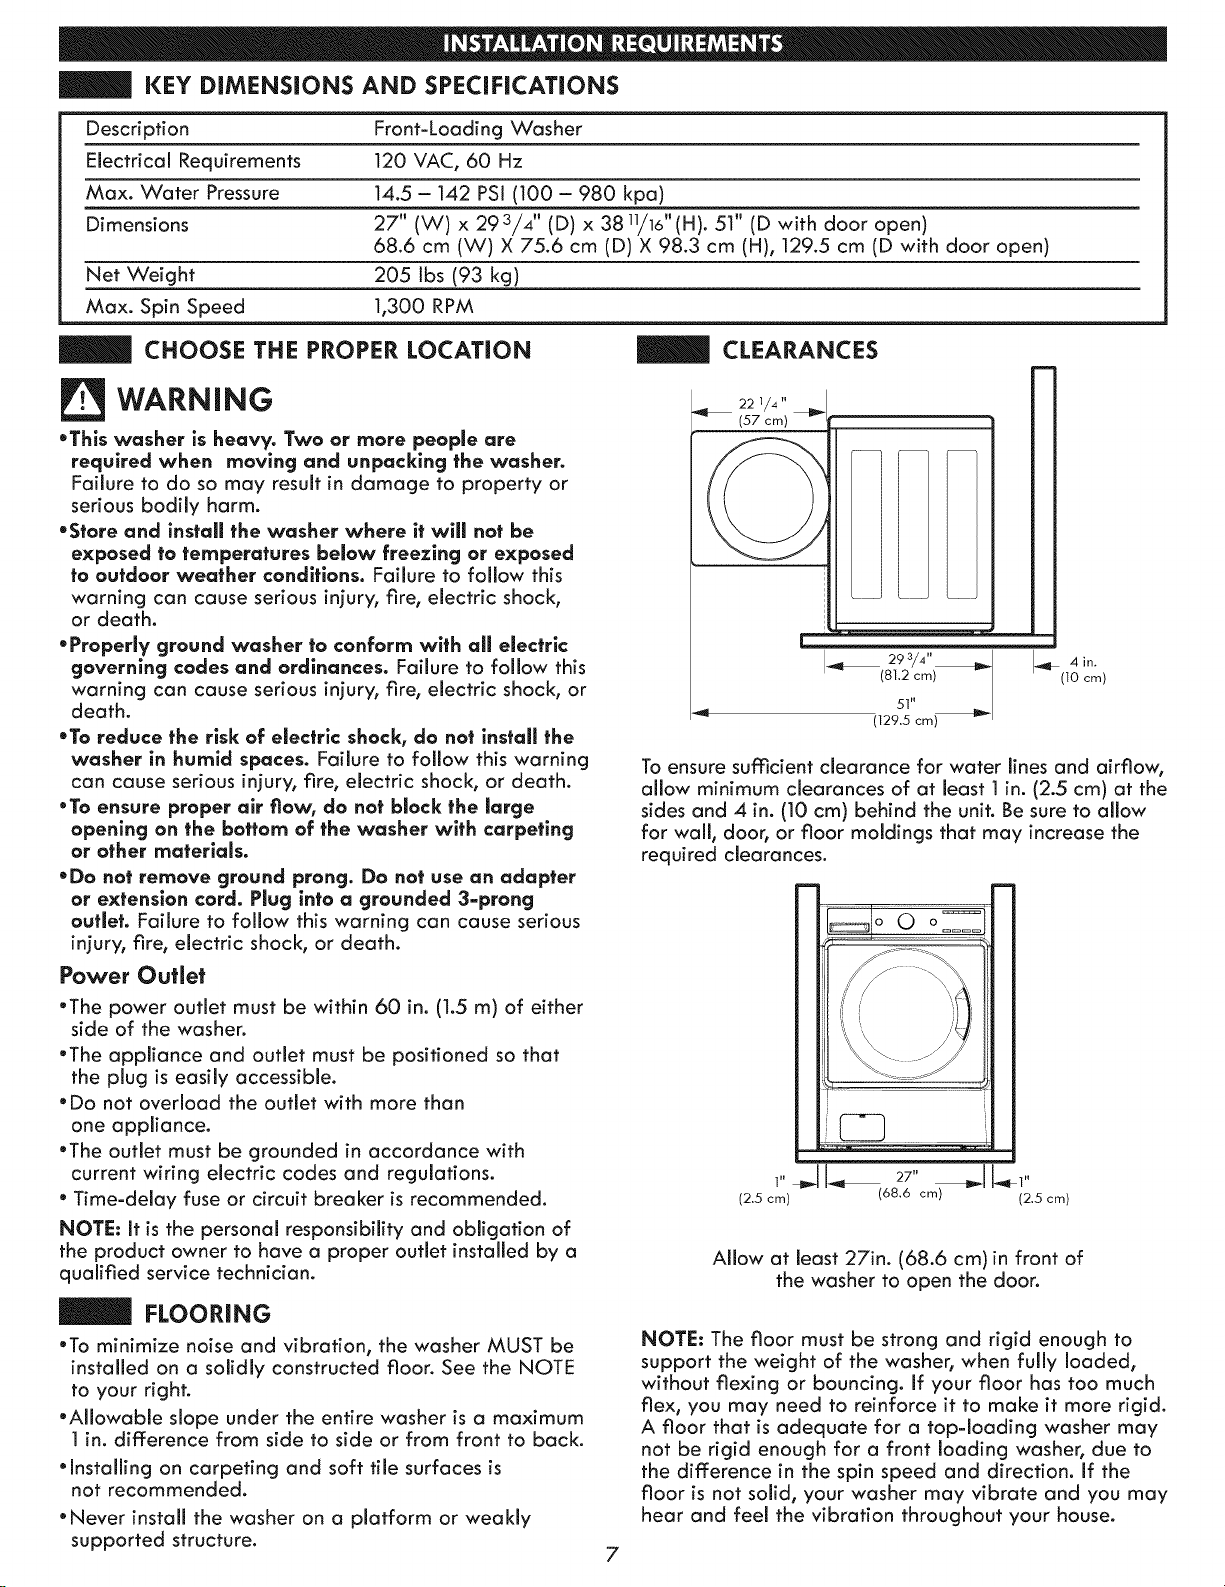
22 1/4 "
(57 cm)
CLEARANCES
(81.2 cm) _ 4 in.
I_'_- 293/4" I_IF(IO cm)
51"
(129.5 cm)
To ensure sumcient clearance for water lines and airflow,
allow minimum clearances of at least 1 in. (2.5 cm) at the
sides and 4 in. (10 cm) behind the unit. Be sure to allow
for wall, door, or floor moldings that may increase the
required clearances.
Allow at least 27in. (68.6 cm)in front of
the washer to open the door.
NOTE: The floor must be strong and rigid enough to
support the weight of the washer, when fully loaded,
without flexing or bouncing. If your floor has too much
flex, you may need to reinforce it to make it more rigid.
A floor that is adequate for a top-loading washer may
not be rigid enough for a front loading washer, due to
the difference in the spin speed and direction, if the
floor is not solid, your washer may vibrate and you may
hear and feel the vibration throughout your house.
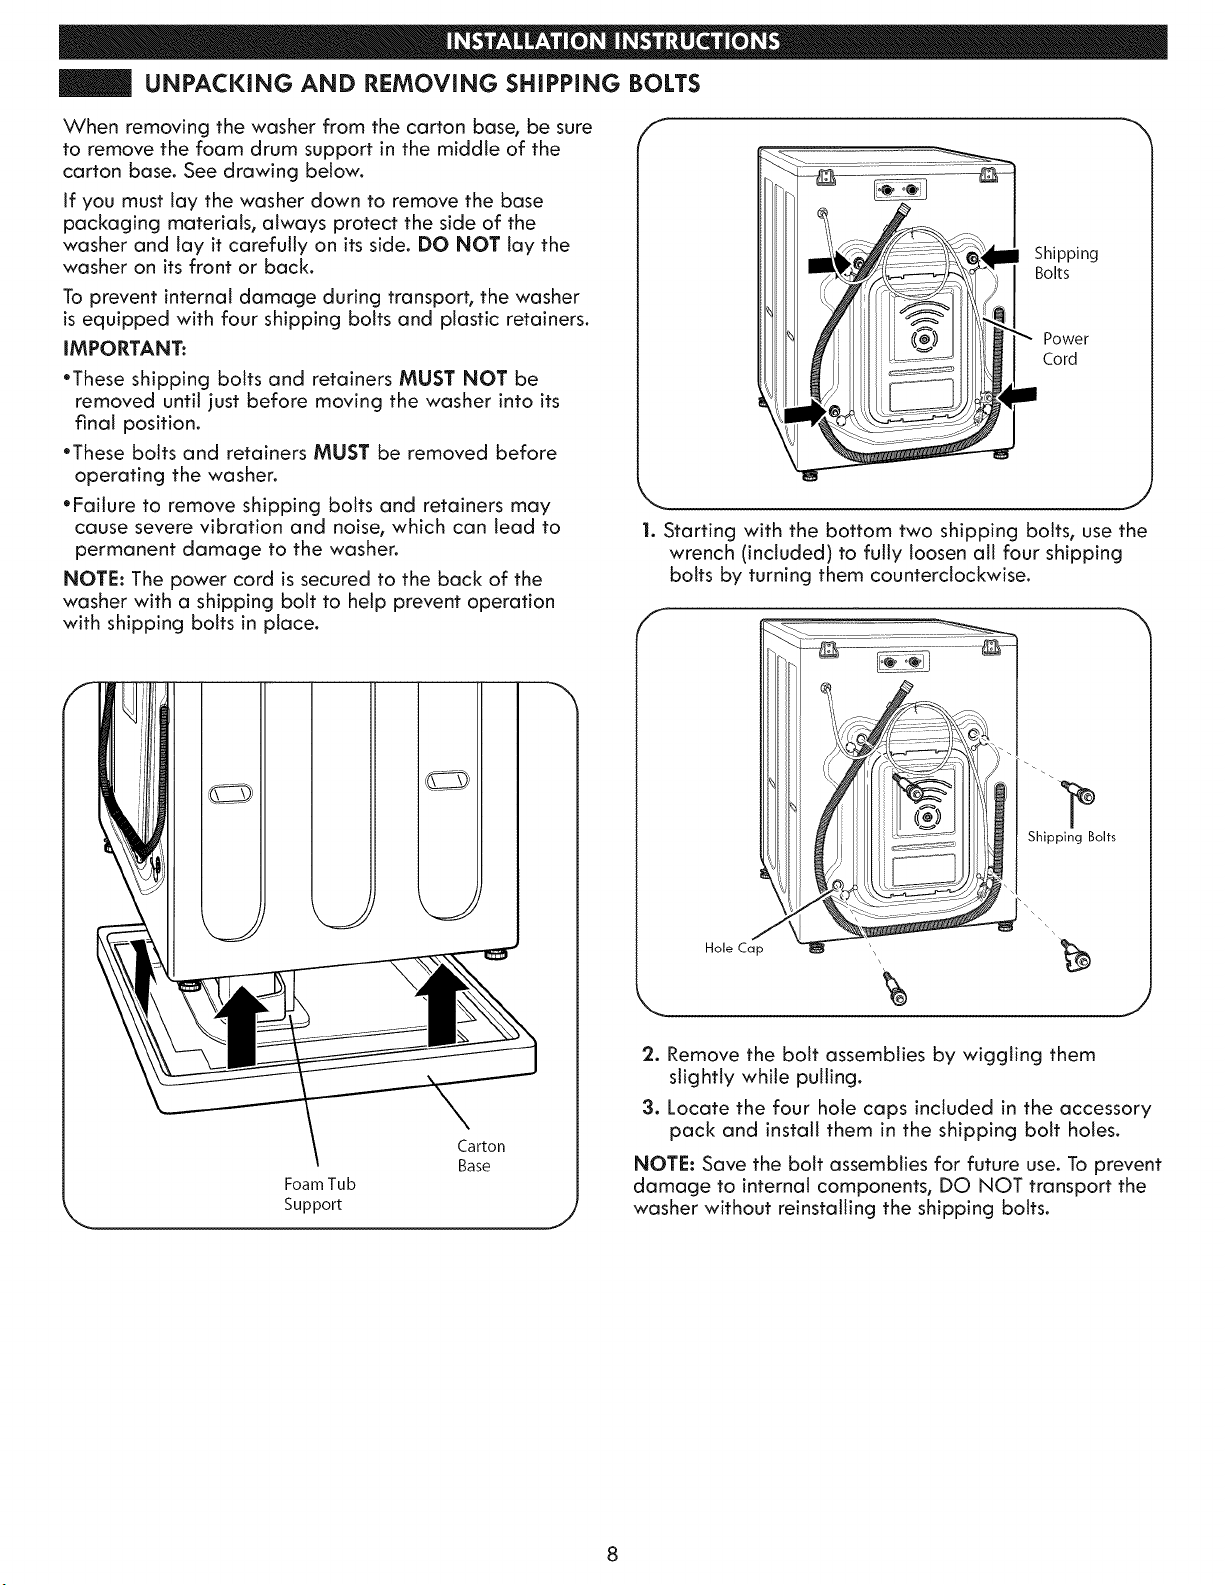
UNPACKING AND REMOVING SHiPPiNG BOLTS
When removing the washer from the carton base, be sure
to remove the foam drum support in the middle of the
carton base. See drawing below.
If you must lay the washer down to remove the base
packaging materials, always protect the side of the
washer and lay it carefully on its side. DO NOT lay the
washer on its front or back.
To prevent internal damage during transport, the washer
is equipped with four shipping bolts and plastic retainers.
IMPORTANT:
*These shipping bolts and retainers MUST NOT be
removed until just before moving the washer into its
final position.
*These bolts and retainers MUST be removed before
operating the washer.
*Failure to remove shipping bolts and retainers may
cause severe vibration and noise, which can lead to
permanent damage to the washer.
NOTE: The power cord is secured to the back of the
washer with a shipping bolt to help prevent operation
with shipping bolts in place.
FoamTub
Support
Carton
Base
E
Shipping
Bolts
Power
Cord
i
1. Starting with the bottom two shipping bolts, use the
wrench (included) to futty loosen ail four shipping
bolts by turning them counterclockwise.
Shipping Bolts
2. Remove the bolt assemblies by wiggling them
slightly while pulling.
3. Locate the four hole caps included in the accessory
pack and install them in the shipping bolt holes.
NOTE: Save the bolt assemblies for future use. To prevent
damage to internal components, DO NOT transport the
washer without reinstalling the shipping bolts.
CONNECTING THE WATER LINES
• iMPORTANT: Use new hoses when installing the
washer. Do NOT reuse old hoses.
•Water supply pressure must be between 14.5 psi and
142 psi (100 - 980 kPa). if the water supply pressure is more
than 142 psi, a pressure reducing valve must be installed.
• Periodically check the hose for cracks, leaks, and wear,
and replace the hose if necessary.
•Make sure that the water lines are not stretched,
pinched, crushed, or kinked.
*The washer should never be installed or stored in a
location subject to freezing temperatures. Damage to the
water lines and internal mechanisms of the washer can
result. If the washer was exposed to freezing temperatures
prior to installation, allow it to stand at room temperature
for several hours before use and check for leaks prior
to operation.
* For optimal wash performance, the hot water temperature
should be set at 120°-135°F (48-57°C) and the cold water
at 60°F (15°C).
1.
RubberSeal
Water Hose
(to water inlet
on washer)
RubberSeal
Water Hose/"
(to tap)
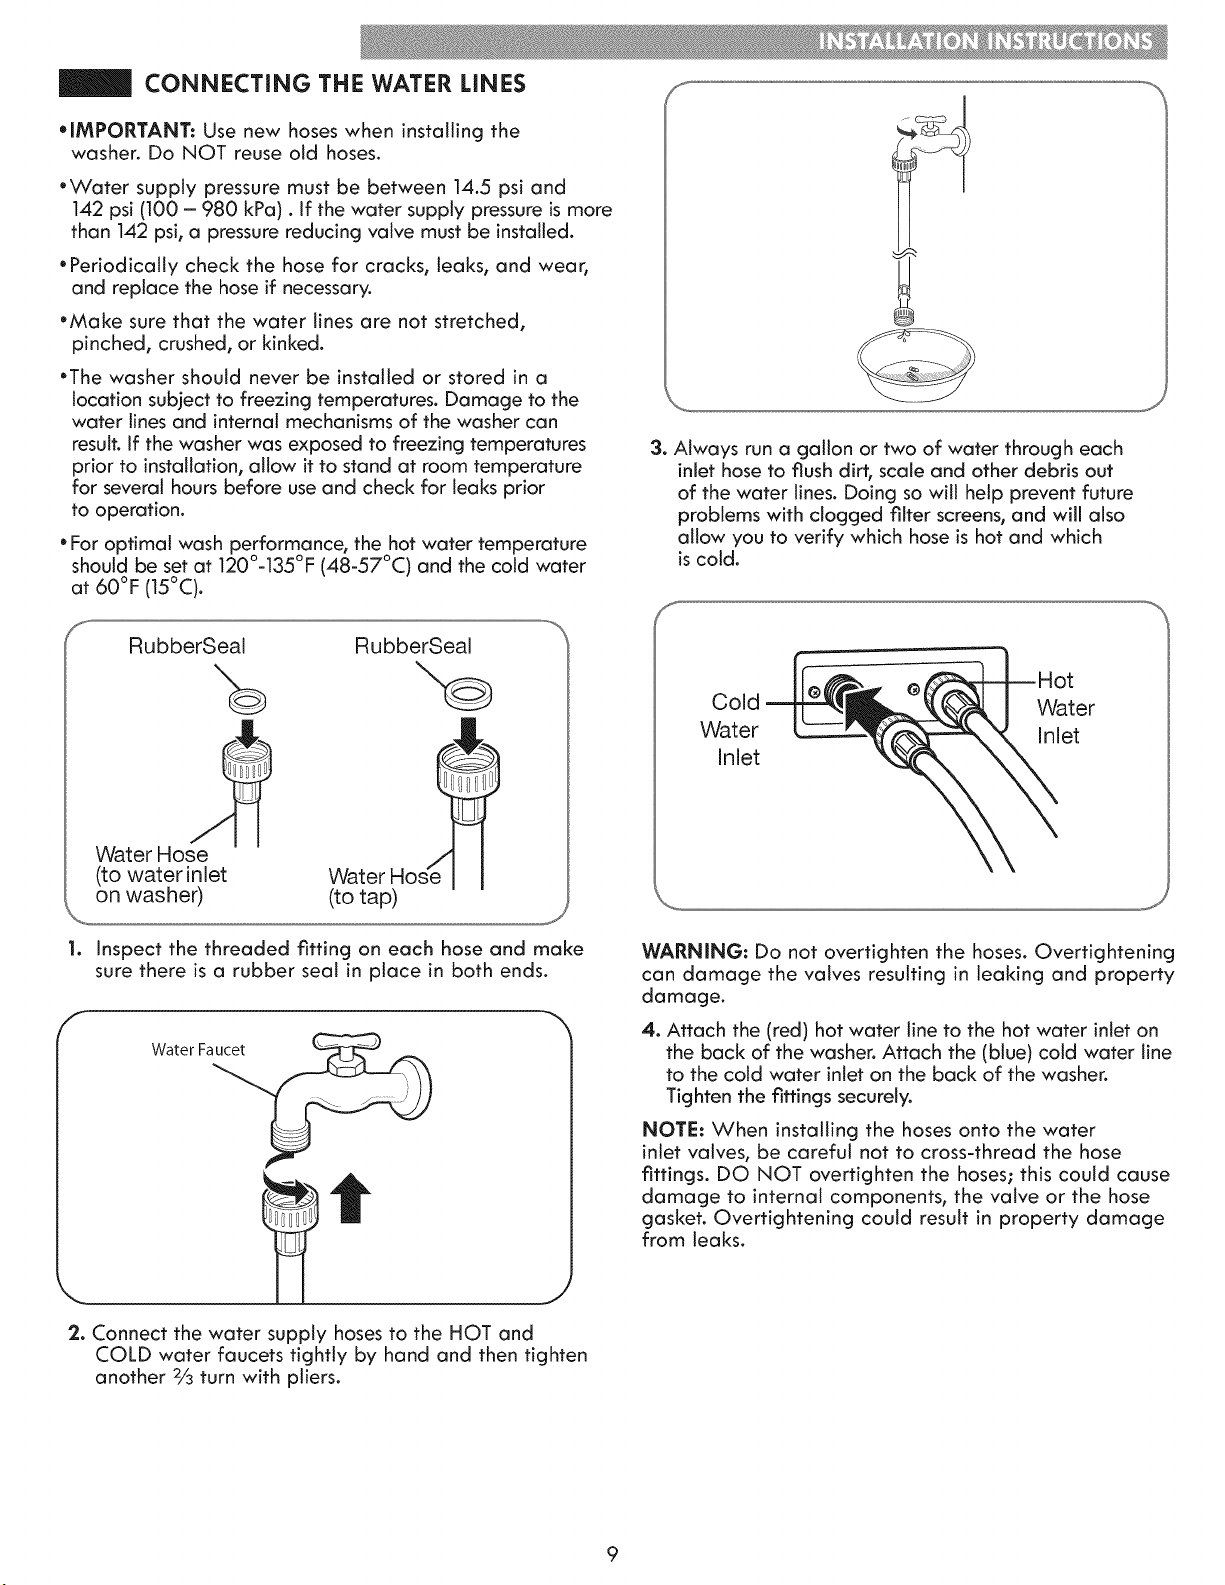
Inspect the threaded fitting on each hose and make
sure there is a rubber seal in place in both ends.
f
\
2. Connect the water supply hoses to the HOT and
COLD water faucets tightly by hand and then tighten
another 2/3 turn with pliers.
f ........................................................................................................................................................................................................................................................................................................................
3, Always run a gallon or two of water through each
inlet hose to flush dirt, scale and other debris out
of the water lines. Doing so will help prevent future
problems with clogged filter screens, and will also
allow you to verify which hose is hot and which
is cold.
Cold Water
Water Inlet
Inlet
WARNING: Do not overtighten the hoses. Overtightening
can damage the valves resulting in leaking and property
damage.
4. Attach the (red) hot water line to the hot water inlet on
the back of the washer. Attach the (blue) cold water line
to the cold water inlet on the back of the washer.
Tighten the fittings securely.
NOTE: When installing the hoses onto the water
inlet valves, be careful not to cross-thread the hose
fittings. DO NOT overtighten the hoses; this could cause
damage to internal components, the valve or the hose
gasket. Overtightening could result in property damage
from leaks.
CONNECTING THE DRAIN HOSE
*The drain hose should always be properly secured.
Failure to properly secure the drain hose can result in
flooding and property damage.
• Do not install the end of the drain hose higher than 96
in. (243.8 cm) above the bottom of the washer.
• The drain must be installed in accordance with any
applicable local codes and regulations.
• Make sure that the drain hose is not stretched, pinched,
crushed, or kinked.
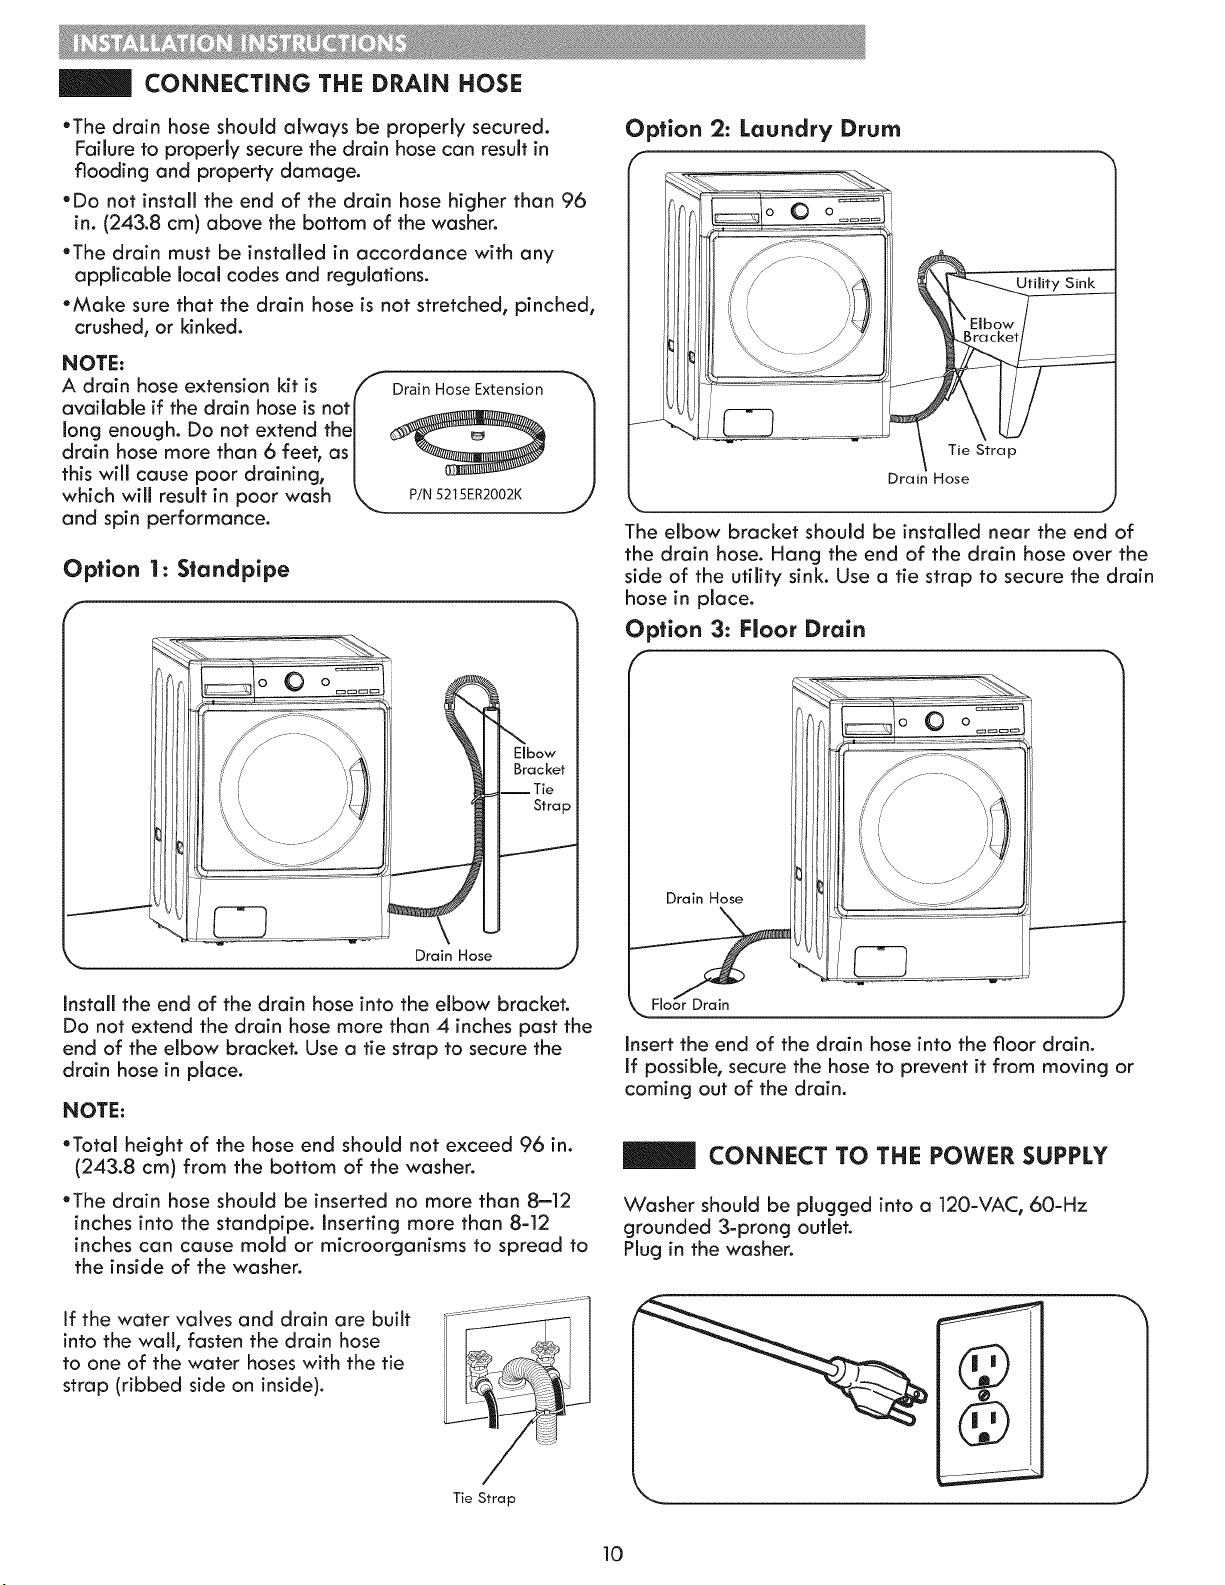
NOTE:
A drain hose extension kit is f DrainHoseExtension
available if the drain hose is not| __
J
long enough. Do not extend the|
drain hose more than 6 feet, as |
this will cause poor draining, |
which will result in poor wash k_ P/N5215ER2002K
and spin performance.
Option I: Standpipe
C
Drain Hose
\
Elbow
Bracket
m Tie
Strap
J
Install the end of the drain hose into the elbow bracket.
Do not extend the drain hose more than 4 inches past the
end of the elbow bracket. Use a tie strap to secure the
drain hose in place.
NOTE:
• Total height of the hose end should not exceed 96 in.
(243.8 cm) from the bottom of the washer.
• The drain hose should be inserted no more than 8-12
inches into the standpipe. Inserting more than 8-12
inches can cause mold or microorganisms to spread to
the inside of the washer.
If the water valves and drain are built
into the wall, fasten the drain hose
to one of the water hoses with the tie
strap (ribbed side on inside).
Tie Strap
Option 2: Laundry Drum
Sink
The elbow bracket should be installed near the end of
the drain hose. Hang the end of the drain hose over the
side of the utility sink. Use a tie strap to secure the drain
hose in place.
Option 3: Floor Drain
Insert the end of the drain hose into the floor drain.
If possible, secure the hose to prevent it from moving or
coming out of the drain.
CONNECT TO THE POWER SUPPLY
Washer should be plugged into a 120-VAC, 60-Hz
grounded 3-prong outlet.
Plug in the washer.
10

LEVELING THE WASHER
The drum of your new washer spins at very high speeds.
To minimize vibration, noise, and unwonted movement,
the floor must be a level, solid surface.
NOTE= Adjust the leveling feet only as far as necessary to
level the washer. Extending the leveling feet more than
necessary can cause the washer to vibrate.
NOTE: Before installing the washer, make
sure that the floor is clean, dry and free of
dust, dirt, water and oils so the washer feet
cannot slide easily. Leveling feet that
move or slide on the floor can contribute
to excess vibration and noise due to
poor contact with the floor. See
INSTALLATION OF NON-SKID PADS
for more information.
NOTE= If a drip pan must be used, make sure to follow the
instructions provided with the drip pan and make sure the
leveling feet are adjusted for firm and even contact with
the pan. Use of drip pans and failure to properly level the
machine may result in increased vibration and noise
during operation.
All four leveling feet must rest solidly on the floor. Rock
the washer from corner to corner to make sure that all
four leveling feet are in firm and even contact with the floor.
Level
i
J
Leveling Feet Leveling Feet
1. Position the washer in its final location, taking special
care not to pinch, strain, or crush the water and drain
lines. Place a level across the top of the washer.
Raise Lower
'2. Loosen the Iocknuts on all four leveling feet with
the wrench until you can adjust the feet (wrench
appearance may vary). Use the wrench to turn the feet
clockwise to raise the washer, and counterclockwise
to lower the washer. Using a level, adjust the feet until
the washer is level from side to side and front to back.
Make sure that all four feet are in firm contact with the
floor.
NOTE: If you are installing the washer on the optional
pedestal, the washer leveling feet should be fully retracted.
Use the leveling feet on the pedestal to level the washer.
11
Tighten all 4 lock nuts
securely using the
wrench.
3. Once the washer is level from side to side and front to
back, use the adjusting wrench to tighten all four lock
nuts securely to prevent the legs from getting out of
adjustment during operation. Make sure that all four
leveling feet are in flrm contact with the floor.
NOTE =To make sure that the washer is properly level, run
the washer with a test load= place a medium-sized load
of laundry in the machine. Then, press POWER, select
RINSE & SPIN, and press the START/PAUSE button.
See the following sections for additional information on
cycle selection and operation. Verify that the washer does
not rock or vibrate excessively during the spin cycle. If the
washer vibrates or shakes, adjust the leveling feet, while
the washer is spinning, until the vibrations are reduced.
iNSTALLATiON OF NON-SKID PADS
(optional)
Some floor surfaces are too slippery to prevent the
washer from moving on the floor during heavily
unbalanced loads. While it is normal for an occasional
load to be out of balance, excess noise and vibration can
result from the washer moving out of position. If these
conditions are encountered, follow the instructions below
for installation of the non-skid pads. These pads will help
prevent the washer from moving during heavy, out of
balance conditions, thereby reducing noise and vibration.
NOTE: The non-skid pads are included in the installation
packet
Non-skid pads
his side up
Stick adhesive side to floor
move backing
Place the pads under both front feet.
WARNING: Toreducetheriskofnre,elec+rlcshack,ori.jurVtopersa.s,reada.dfonawthis
entire Use & Care Guide, indudlng the Important Safety Instructions, before operating this washer.
CONTROL PANEL FEATURES
POWER
Normal lCasua[ •
Heavy Duty •
Whitest Whites •
Bulky •
Comforter •
Kids Wear o
Rugged •
t
• Sanitize
• Workout Wear
Ddicates
Small Load
® ExpressWash
• Cold Clean
• Rinse& Spin
START PAUSE
D
L_Accela-_e,h _Stecsm_'_reat PreW"_sh ExtraR+_,se DelayStan StayFr'_sh MyC'/c+e
• Extra Hot • Extra High e Heavy _ Connect
• Hot • High •
• Warm • Medium • Normal • Loud
• Cold o Low • e Soft
• Tap Cold • No Spin • Light • Off
Wash Temp Spin Speed i Soil Level j
............. ; k ....... J \ .......... ;
m co_DRINSES
l
+
Chime
O
O
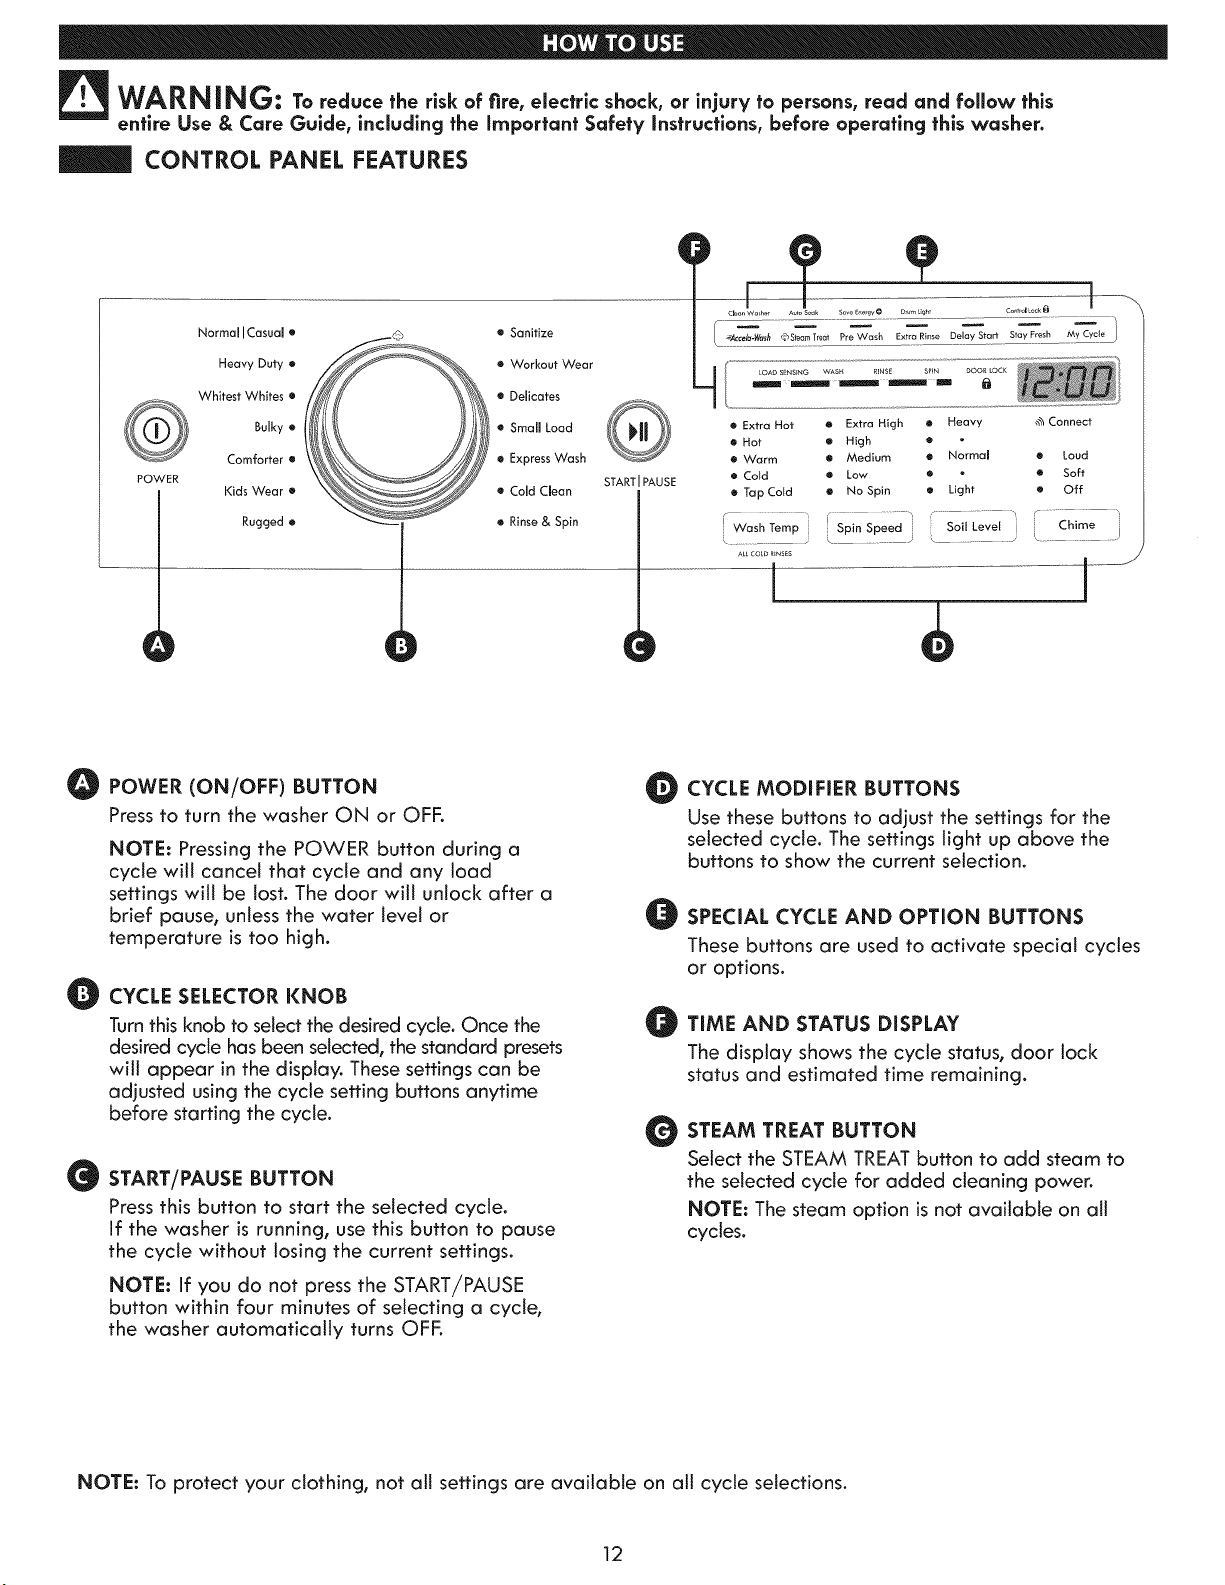
POWER (ON/OFF) BUTTON
Press to turn the washer ON or OFF.
NOTE: Pressing the POWER button during a
cycle will cancel that cycle and any toad
settings will be lost. The door will unlock after a
brief pause, unless the water level or
temperature is too high.
CYCLE SELECTOR KNOB
Turn this knob to select the desired cycle. Once the
desired cycle has been selected, the standard presets
will appear in the display. These settings can be
adjusted using the cycle setting buttons anytime
before starting the cycle.
G START/PAUSE BUTTON
Press this button to start the selected cycle.
If the washer is running, use this button to pause
the cycle without losing the current settings.
NOTE: If you do not press the START/PAUSE
button within four minutes of selecting a cycle,
the washer automatically turns OFF.
e
o
o
@
CYCLE MODIFIER BUTTONS
Use these buttons to adjust the settings for the
selected cycle. The settings light up above the
buttons to show the current selection.
SPECIAL CYCLE AND OPTION BUTTONS
These buttons are used to activate special cycles
or options.
TIME AND STATUS DISPLAY
The display shows the cycle status, door lock
status and estimated time remaining.
STEAM TREAT BUTTON
Select the STEAM TREAT button to add steam to
the selected cycle for added cleaning power.
NOTE: The steam option is not available on all
cycles.
NOTE: To protect your clothing, not all settings are available on all cycle selections.
12
OPERATING THE WASHER
POWER
NormallCasua[ ® • Sanitize
Heavy Duty ® • Workout Wear
Whitest Whites ® o DeJicates
Bulky ® ® Small Load
Comforter o • Express Wash
Kids Wear e • Cold Clean
Rugged ® ® Rinse & Spin
0
@
@
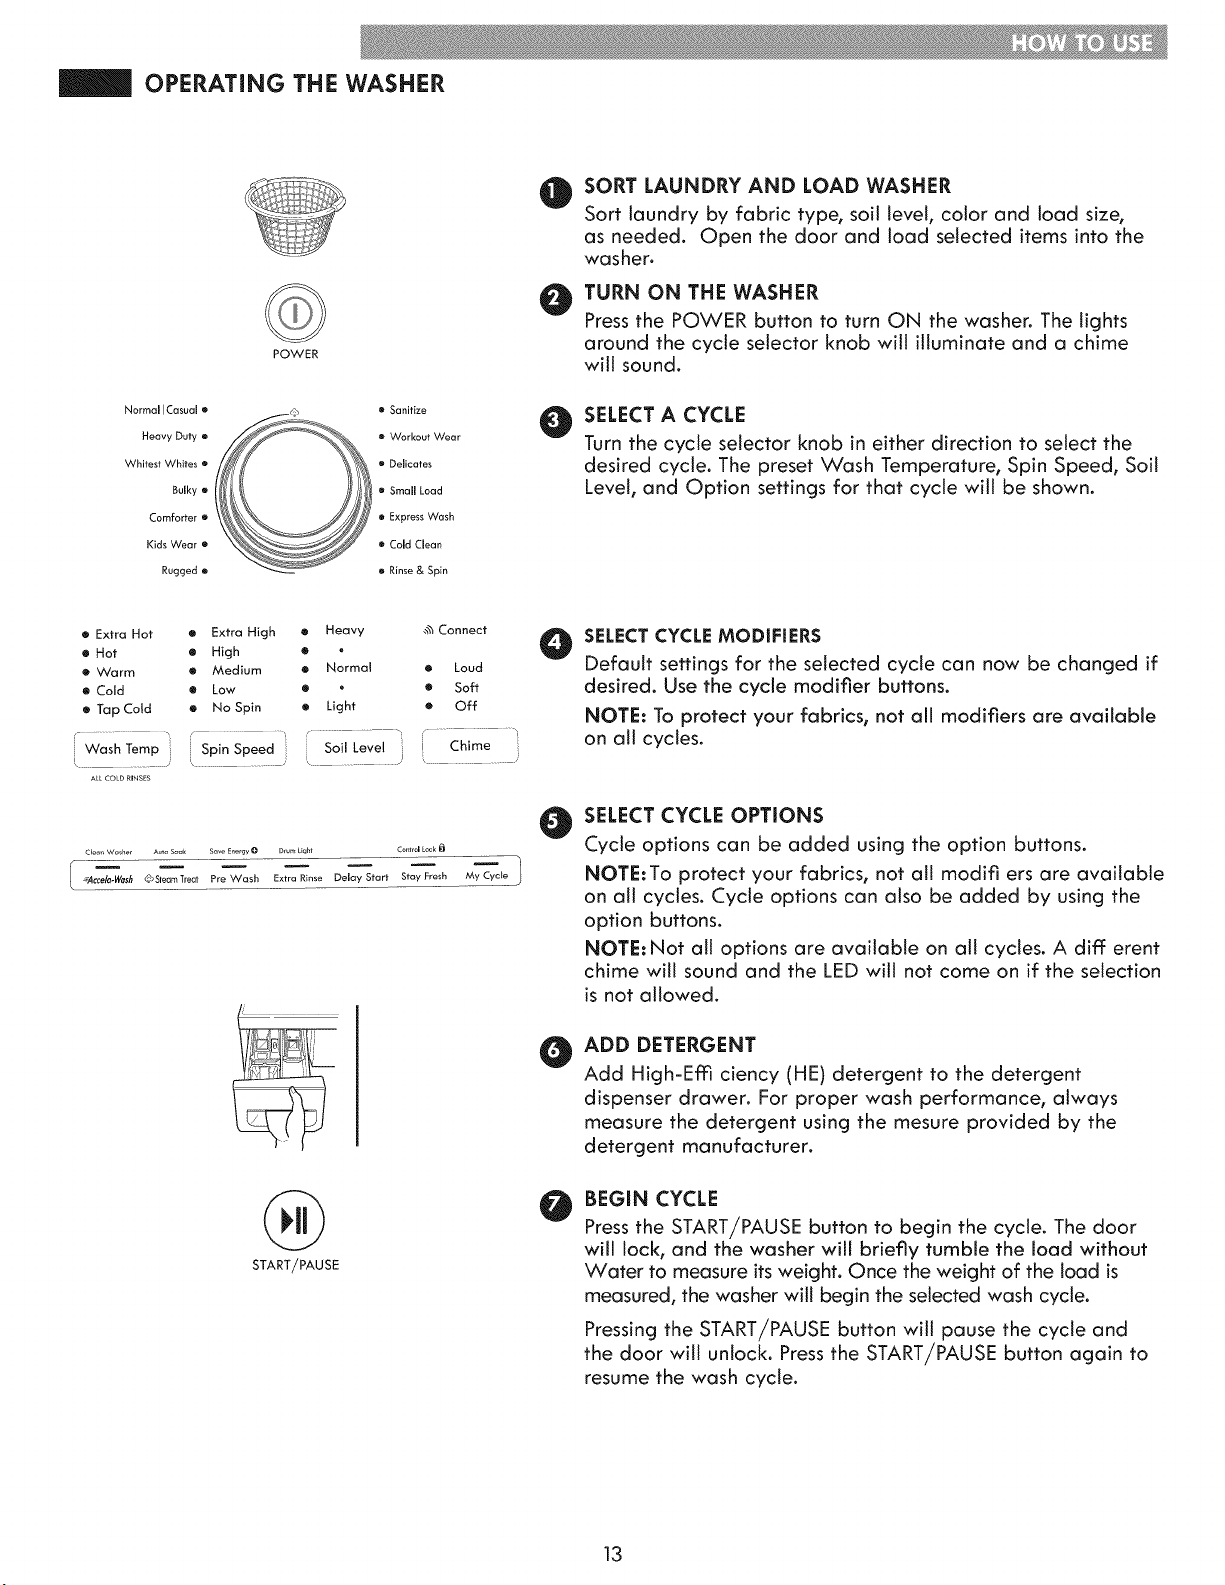
SORT LAUNDRY AND LOAD WASHER
Sort laundry by fabric type, soil [eve[, color and load size,
as needed. Open the door and load selected items into the
washer.
TURN ON THE WASHER
Press the POWER button to turn ON the washer. The lights
around the cycle selector knob win illuminate and a chime
win sound.
SELECT A CYCLE
Turn the cycle selector knob in either direction to seIect the
desired cycle. The preset Wash Temperature, Spin Speed, Soil
Level, and Option settings for that cycle win be shown.
• Extra Hot ® Extra High o Heavy _% Connect
• Hot e High o .
e Warm e Medium • Normal • Loud
• Cold • Low o • • Soft
e Tap Celd e No Spin • Light e Off
........... , .......... _ r ............. _ U .................
Wash Temp [ Spin Speed [ Soil Level Chime
\ ........... ., L.................. k ............... _ _ .............
ALLCOLDmNSES
Clean Washer Auto Soak SaveEnergy@ DrumLight Co_trolL°ck _
: -=Accela-WasD _Steam Trec_t Pre Wash Extra Rinse Delay Start Stay Fresh My Cycie
®
START/PAUSE
O
O
O
O
SELECT CYCLE MODIFIERS
Default settings for the selected cycle can now be changed if
desired. Use the cycle modifier buttons.
NOTE: To protect your fabrics, not all modifiers are available
on all cycles.
SELECT CYCLE OPTIONS
Cycle options can be added using the option buttons.
NOTE: To protect your fabrics, not all modifi ers are available
on aN cycles. Cycle options can also be added by using the
option buttons.
NOTE: Not aIt options are available on aN cycIes. A diff erent
chime will sound and the LED will not come on if the selection
is not allowed.
ADD DETERGENT
Add High-Effl ciency (HE) detergent to the detergent
dispenser drawer. For proper wash performance, always
measure the detergent using the mesure provided by the
detergent manufacturer.
BEGIN CYCLE
Press the START/PAUSE button to begin the cycle. The door
will lock, and the washer will briefly tumble the load without
Water to measure its weight. Once the weight of the load is
measured, the washer will begin the selected wash cycle.
Pressing the START/PAUSE button will pause the cycle and
the door win unlock. Pressthe START/PAUSE button again to
resume the wash cycle.
13
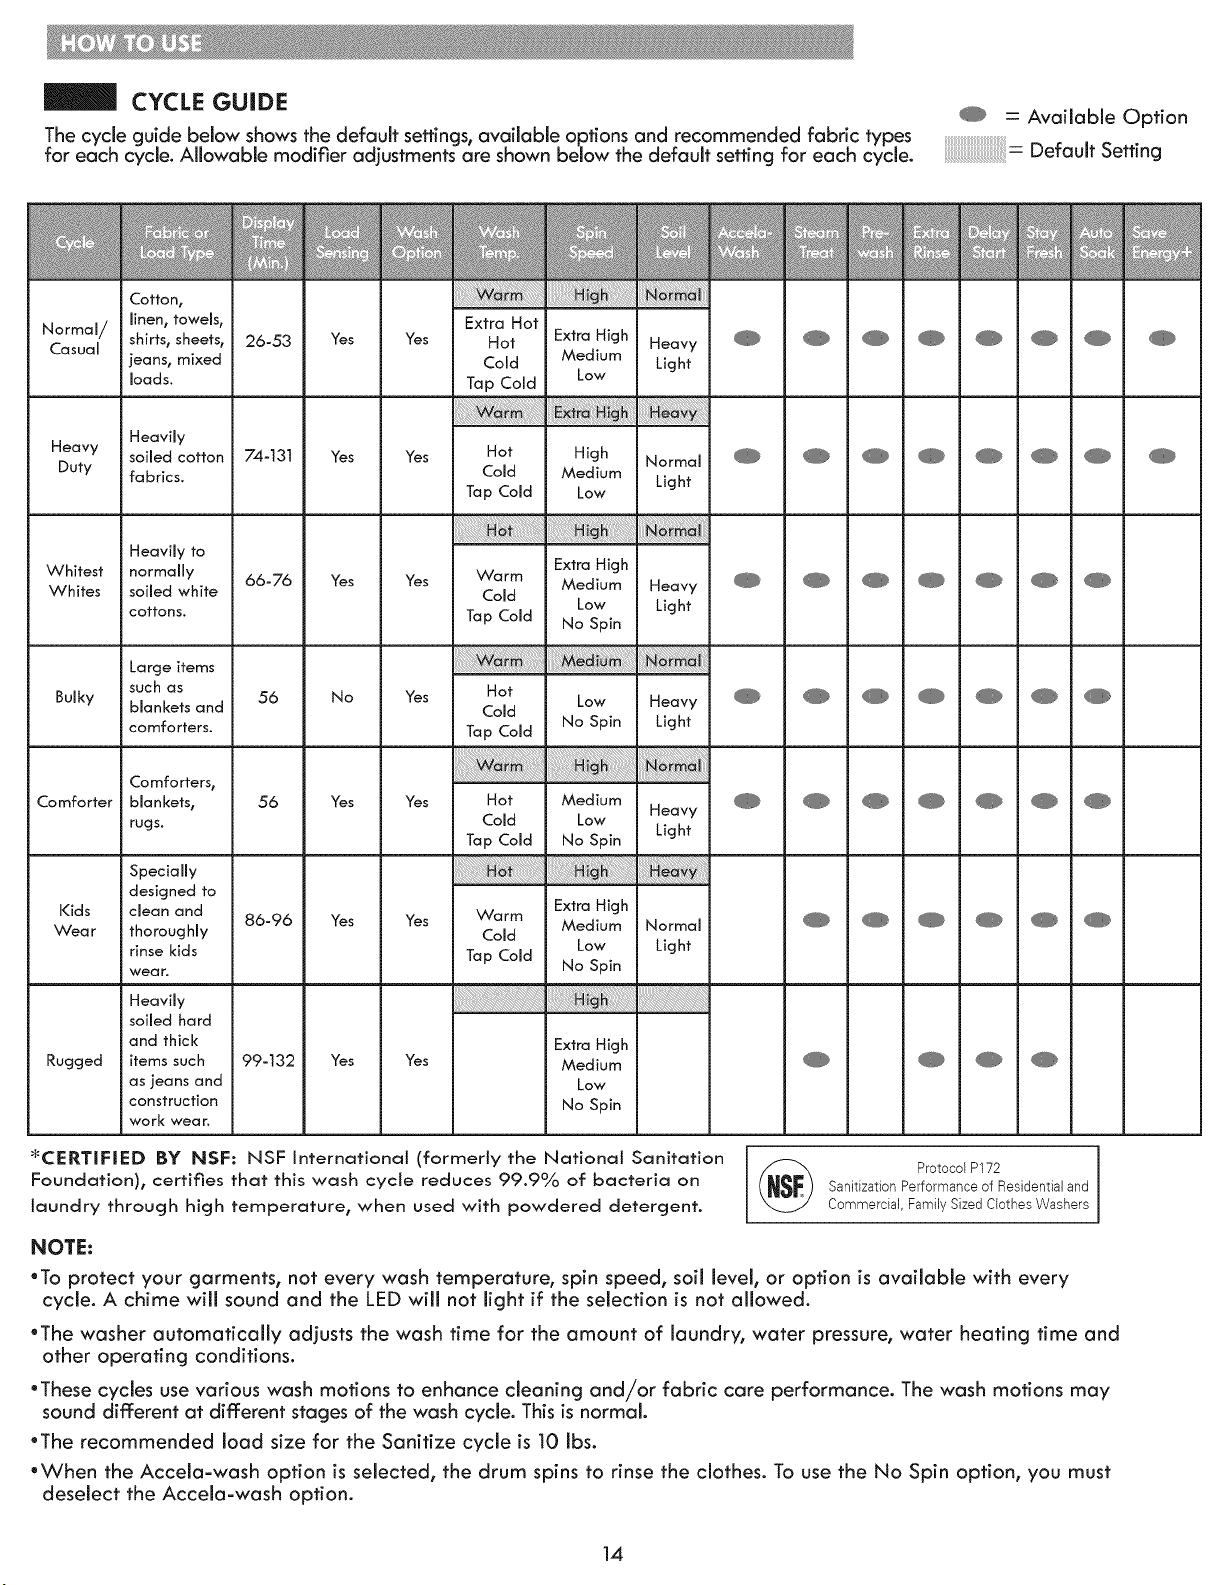
CYCLE GUIDE
The cycle guide below shows the default settings, available options and recommended fabric types
for each cycle. Allowable modifier adjustments are shown below the default setting for each cycle.
@ = Available Option
: DefaultSetting
w
@
Normal/
Casual
Heavy
Duty
Whitest
Whites
Bulky
Comforter
Kids
Wear
Rugged
Cotton,
linen, towels,
shirts_ sheets_
jeans, mixed
loads.
Heavily
soiled cotton
fabrics.
Heavily to
normally
soiled white
cottons.
Large items
such as
blankets and
comforters.
Comforters t
blankets,
rugs.
Specially
designed to
clean and
thoroughly
rinse kids
wea r.
Heavily
soiled hard
and thick
items such
as jeans and
construction
work wear.
:6-53 Yes Yes
:4-131 Yes Yes
,6-76 Yes Yes
56 No Yes
56 Yes Yes
6-96 Yes Yes
9-13"_ Yes Yes
Low
Extra High
Medium
Low
No Spin
eaw
Light
ormc
Light
eav_
Light
orm(
Light
_CERTIFIED BY NSF: NSF International (formerly the National Sanitation
Foundation), certifies that this wash cycle reduces 99.9% of bacteria on
laundry through high temperature, when used with powdered detergent.
M m
Protocol P172
Sanitizatfon Performance of Residential and
Commercial, Family Sized Clothes Washers
m m
@@
@
@ @
@
NOTE:
• To protect your garments, not every wash temperature, spin speed, soil level, or option is available with every
cycle. A chime will sound and the LED will not light if the selection is not allowed.
• The washer automatically adjusts the wash time for the amount of laundry, water pressure, water heating time and
other operating conditions.
• These cycles use various wash motions to enhance cleaning and/or fabric care performance. The wash motions may
sound different at different stages of the wash cycle. This is normal.
• The recommended load size for the Sanitize cycle is 10 Ibs.
• When the Accela-wash option is selected, the drum spins to rinse the clothes. To use the No Spin option, you must
deselect the Accela-wash option.
14
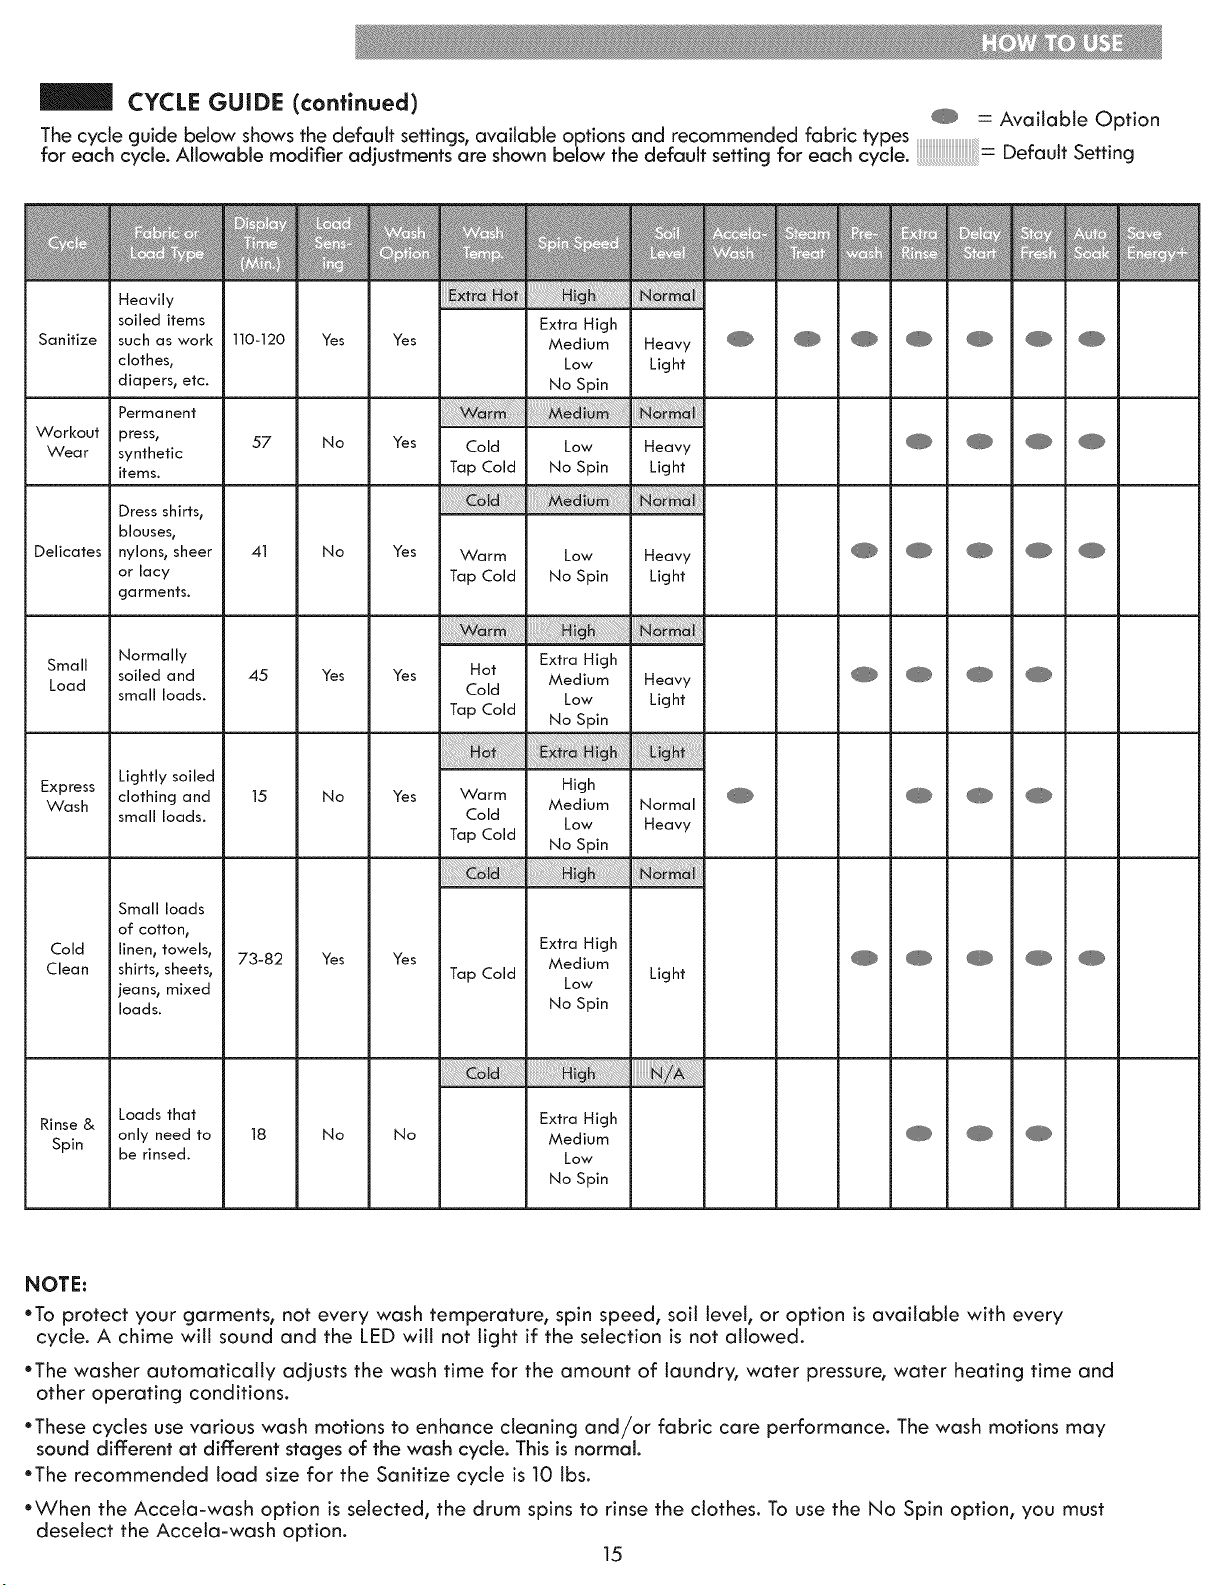
CYCLE GUIDE (continued) _ = Available Option
The cycle guide below shows the default settings, available options and recommended fabric types
for each cycle. Allowable modifier adjustments are shown below the default setting for each cycle. Default Setting
m
Heavily
soiled items
Sanitize such as work
clothes,
diapers, etc.
Permanent
Workout press,
Wear synthetic
items.
Dress shirts,
blouses,
Delicates nylons, sheer
or lacy
garments.
Small Normally
soiled and
Load
small loads.
Lightly soiled
Express clothing and
Wash
small loads.
Small loads
of cotton,
Cold linen, towels,
Clean shirts, sheets,
jeans, mixed
loads.
Loads that
Rinse &
Spin only need to
be rinsed.
m
0-12,
57
41
45
15
'3-8:
18
m
Ye
N(
N(
Ye
N(
Ye
N(
m
Yes
Yes
Yes
Yes
Yes
Yes
No
m
Extra High
Medium
Low
No Spin
Cold Low
Tap Cold No Spin
Warm Low
Tap Cold No Spin
Extra High
Hot
Medium
Cold
Low
Tap Cold
No Spin
Warm High
Medium
Cold
Low
Tap Cold
No Spin
Extra High
Medium
Tap Cold
Low
No Spin
Extra High
Medium
Low
No Spin
ie(
.ig
m
ie(
.ig
ie(
.ig
ie(
.ig
or
ie(
.ig
m m m m
4@
@ @
@
@
@
@
@
m m
@
m m
NOTE:
*To protect your garments, not every wash temperature, spin speed, soil level, or option is available with every
cycle. A chime will sound and the LED will not light if the selection is not allowed.
• The washer automatically adjusts the wash time for the amount of laundry, water pressure, water heating time and
other operating conditions.
• These cycles use various wash motions to enhance cleaning and/or fabric care performance. The wash motions may
sound different at different stages of the wash cycle. This is normal.
• The recommended load size for the Sanitize cycle is 10 lbs.
*When the Accela-wash option is selected, the drum spins to rinse the clothes. To use the No Spin option, you must
deselect the Accela-wash option.
15
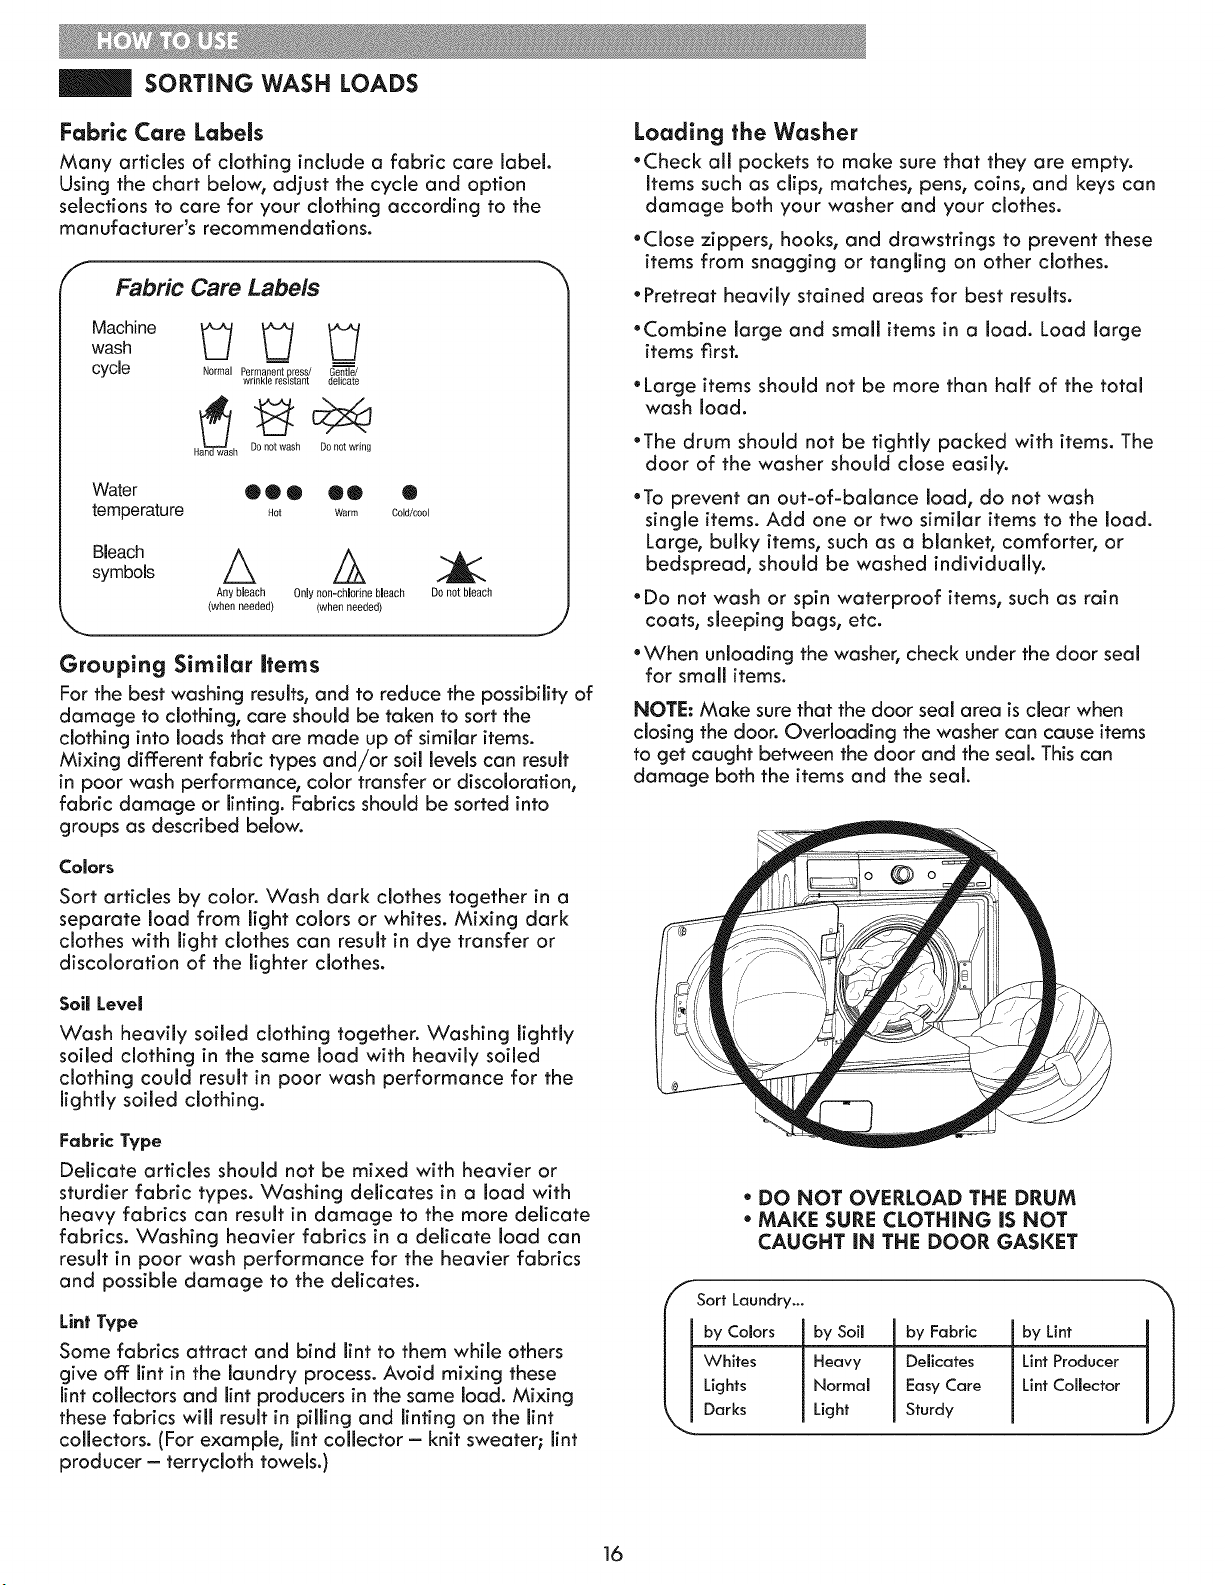
SORTING WASH LOADS
Fabric Care Labels
Many articles of clothing include a fabric care label.
Using the chart below, adjust the cycle and option
selections to care for your clothing according to the
manufacturer's recommendations.
Fabric Care Labels
Machine
wash
cycle
Normal Permanent press/ Gentle/
wrinkle resistant delicate
H h Do not wash Do not wring
Water • • • 00 •
temperature ,at Warm Co,d/ooo,
Bleach
symbo,s _ _
Any bleach Only non-chlorine bleach Do not bleach
(when needed) (when needed)
J
Grouping Similar items
For the best washing results, and to reduce the possibility of
damage to clothing, care should be taken to sort the
clothing into loads that are made up of similar items.
Mixing different fabric types and/or soil levels can result
in poor wash performance, color transfer or discoloration,
fabric damage or linting. Fabrics should be sorted into
groups as described below.
Colors
Sort articles by color. Wash dark clothes together in a
separate load from light colors or whites. Mixing dark
clothes with light clothes can result in dye transfer or
discoloration of the lighter clothes.
Soil Level
Wash heavily soiled clothing together. Washing lightly
soiled clothing in the same load with heavily soiled
clothing could result in poor wash performance for the
lightly soiled clothing.
Fabric Type
Delicate articles should not be mixed with heavier or
sturdier fabric types. Washing delicates in a load with
heavy fabrics can result in damage to the more delicate
fabrics. Washing heavier fabrics in a delicate load can
result in poor wash performance for the heavier fabrics
and possible damage to the delicates.
Lint Type
Some fabrics attract and bind lint to them while others
give off lint in the laundry process. Avoid mixing these
lint collectors and lint producers in the same load. Mixing
these fabrics will result in pilling and linting on the lint
collectors. (For example, lint collector - knit sweater; lint
producer - terrycloth towels.)
Loading the Washer
• Check all pockets to make sure that they are empty.
Items such as clips, matches, pens, coins, and keys can
damage both your washer and your clothes.
• Close zippers, hooks, and drawstrings to prevent these
items from snagging or tangling on other clothes.
* Pretreat heavily stained areas for best results.
• Combine large and small items in a load. Load large
items first.
*Large items should not be more than half of the total
wash load.
• The drum should not be tightly packed with items. The
door of the washer should close easily.
• To prevent an out-of-balance load, do not wash
single items. Add one or two similar items to the load.
Large, bulky items, such as a blanket, comforter, or
bedspread, should be washed individually.
• Do not wash or spin waterproof items, such as rain
coats, sleeping bags, etc.
• When unloading the washer, check under the door seal
for small items.
NOTE: Make sure that the door seal area is clear when
closing the door. Overloading the washer can cause items
to get caught between the door and the seal. This can
damage both the items and the seal.
* DO NOT OVERLOAD THE DRUM
* MAKE SURE CLOTHING IS NOT
CAUGHT IN THE DOOR GASKET
I Sort Laundry...
bySoil byFabric byLint _ 1
Heavy Delicates Lint Producer I I
Normal Easy Care Lint Collector I !
Light Sturdy
]6
ABOUT THE DISPENSER DRAWER
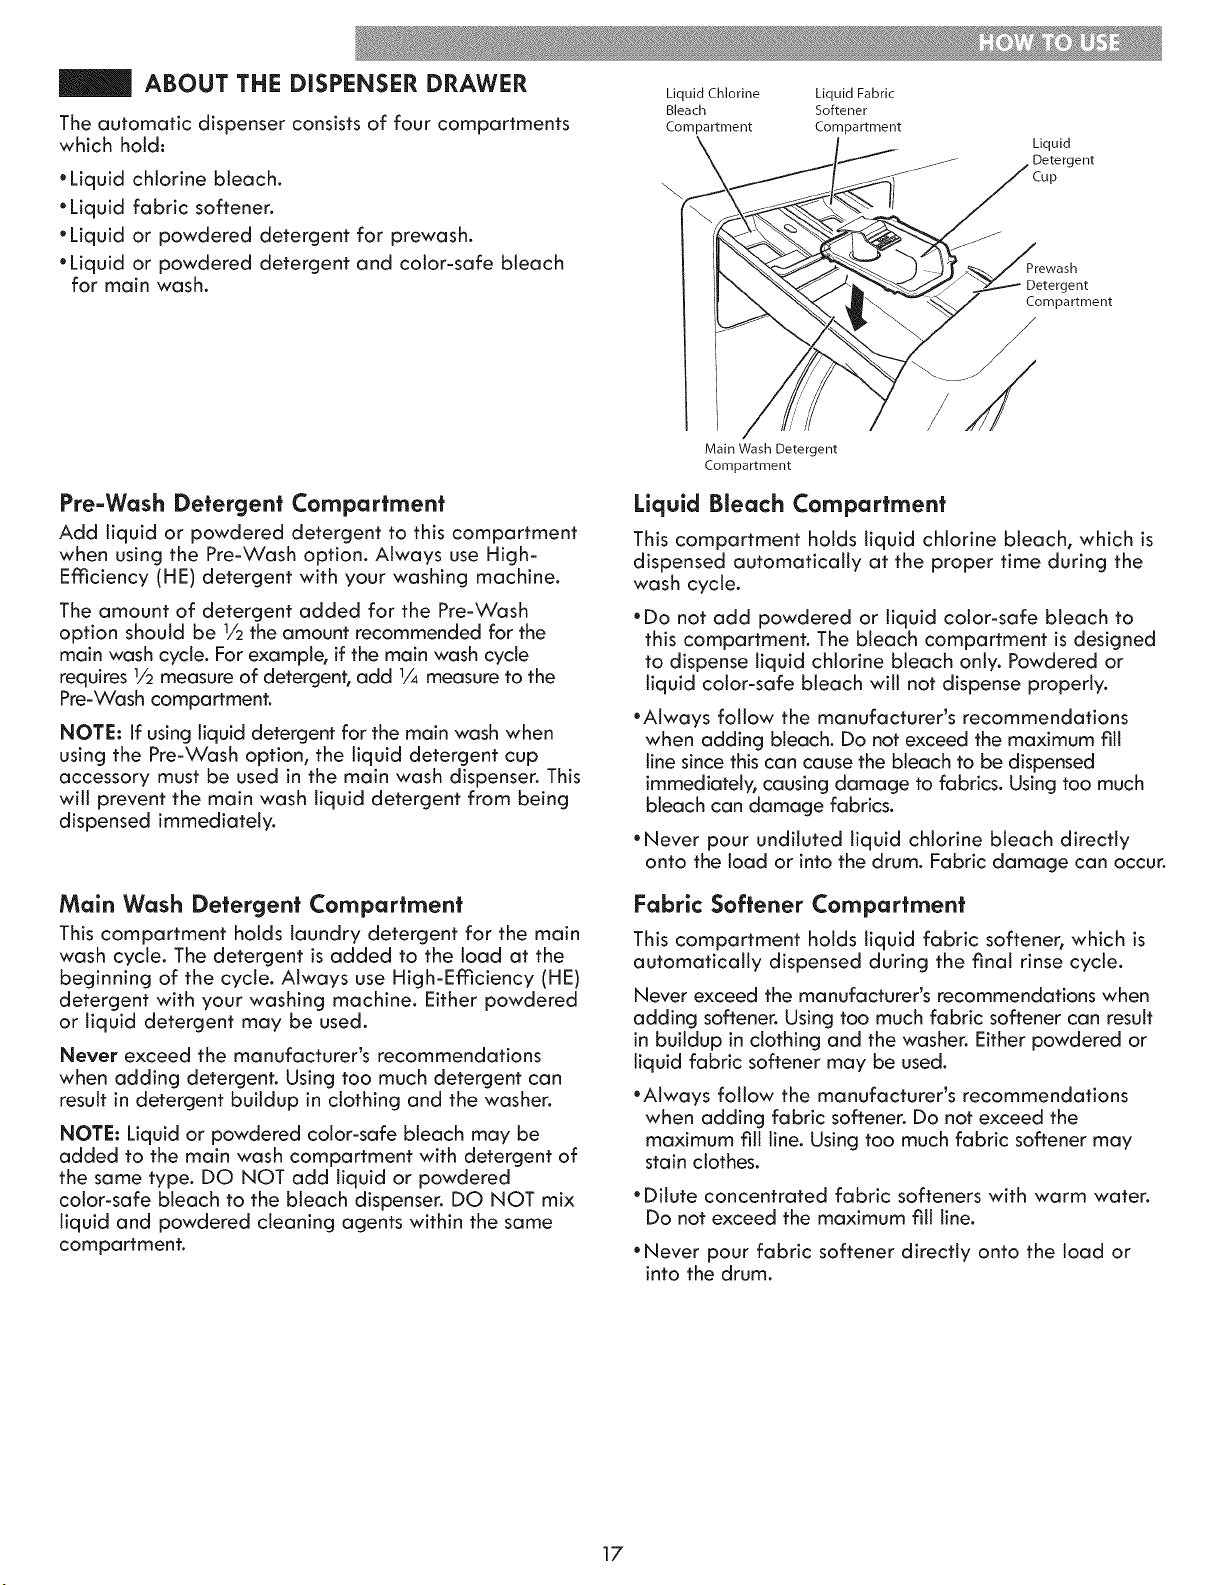
The automatic dispenser consistsof four compartments
which hold.
* Liquid chlorine bleach.
* Liquid fabric softener.
* Liquid or powdered detergent for prewash.
"Liquid or powdered detergent and color-safe bleach
for main wash.
Liquid Chlorine
Bleach
Compartment
Liquid Fabric
Softener
Compartment
Liquid
jent
Cup
Detergent
Compartment
Y
Pre-Wash Detergenf Compartment
Add liquid or powdered detergent to this compartment
when using the Pre=VCashoption. Always use High=
Ef_qciency(HE) detergent with your washing machine.
The amount of detergent added for the Pre-Wash
option should be 1/2the amount recommended for the
main wash cycle. For example, if the main wash cycle
requires 1/2measure of detergent, add 1/4 measure to the
Pre-Wash compartment.
NOTE: If using liquid detergent for the main wash when
using the Pre-Wash option, the liquid detergent cup
accessory must be used in the main wash dispenser. This
wilt prevent the main wash liquid detergent from being
dispensed immediately.
Main Wash Detergent Compartment
This compartment holds laundry detergent for the main
wash cycle. The detergent is added to the load at the
beginning of the cycle. Always use High-Emciency (HE)
detergent with your washing machine. Either powdered
or liquid detergent may be used.
Never exceed the manufacturer's recommendations
when adding detergent. Using too much detergent can
result in detergent buildup in clothing and the washer.
NOTE: Liquid or powdered color-safe bleach may be
added to the main wash compartment with detergent of
the same type. DO NOT add liquid or powdered
color-safe bleach to the bleach dispenser. DO NOT mix
liquid and powdered cleaning agents within the same
compartment.
Main Wash Detergent
Compartment
Liquid Bleach Compartment
This compartment holds liquid chlorine bleach, which is
dispensed automatically at the proper time during the
wash cycle.
* Do not add powdered or liquid color-safe bleach to
this compartment. The bleach compartment is designed
to dispense liquid chlorine bleach only. Powdered or
liquid color-safe bleach will not dispense properly.
*Always follow the manufacturer's recommendations
when adding bleach. Do not exceed the maximum fill
line since this can cause the bleach to be dispensed
immediately, causing damage to fabrics. Using too much
bleach can damage fabrics.
*Never pour undiluted liquid chlorine bleach directly
onto the load or into the drum. Fabric damage can occur.
Fabric Softener Compartmenf
This compartment holds liquid fabric softener, which is
automatically dispensed during the final rinse cycle.
Never exceed the manufacturer's recommendations when
adding softener. Using too much fabric softener can result
in buildup in clothing and the washer. Either powdered or
liquid fabric softener may be used.
*Always follow the manufacturer's recommendations
when adding fabric softener. Do not exceed the
maximum fill line. Using too much fabric softener may
stain clothes.
* Dilute concentrated fabric softeners with warm water.
Do not exceed the maximum fill line.
*Never pour fabric softener directly onto the load or
into the drum.
17
DETERGENT AND DISPENSER USE
A Word About Detergents
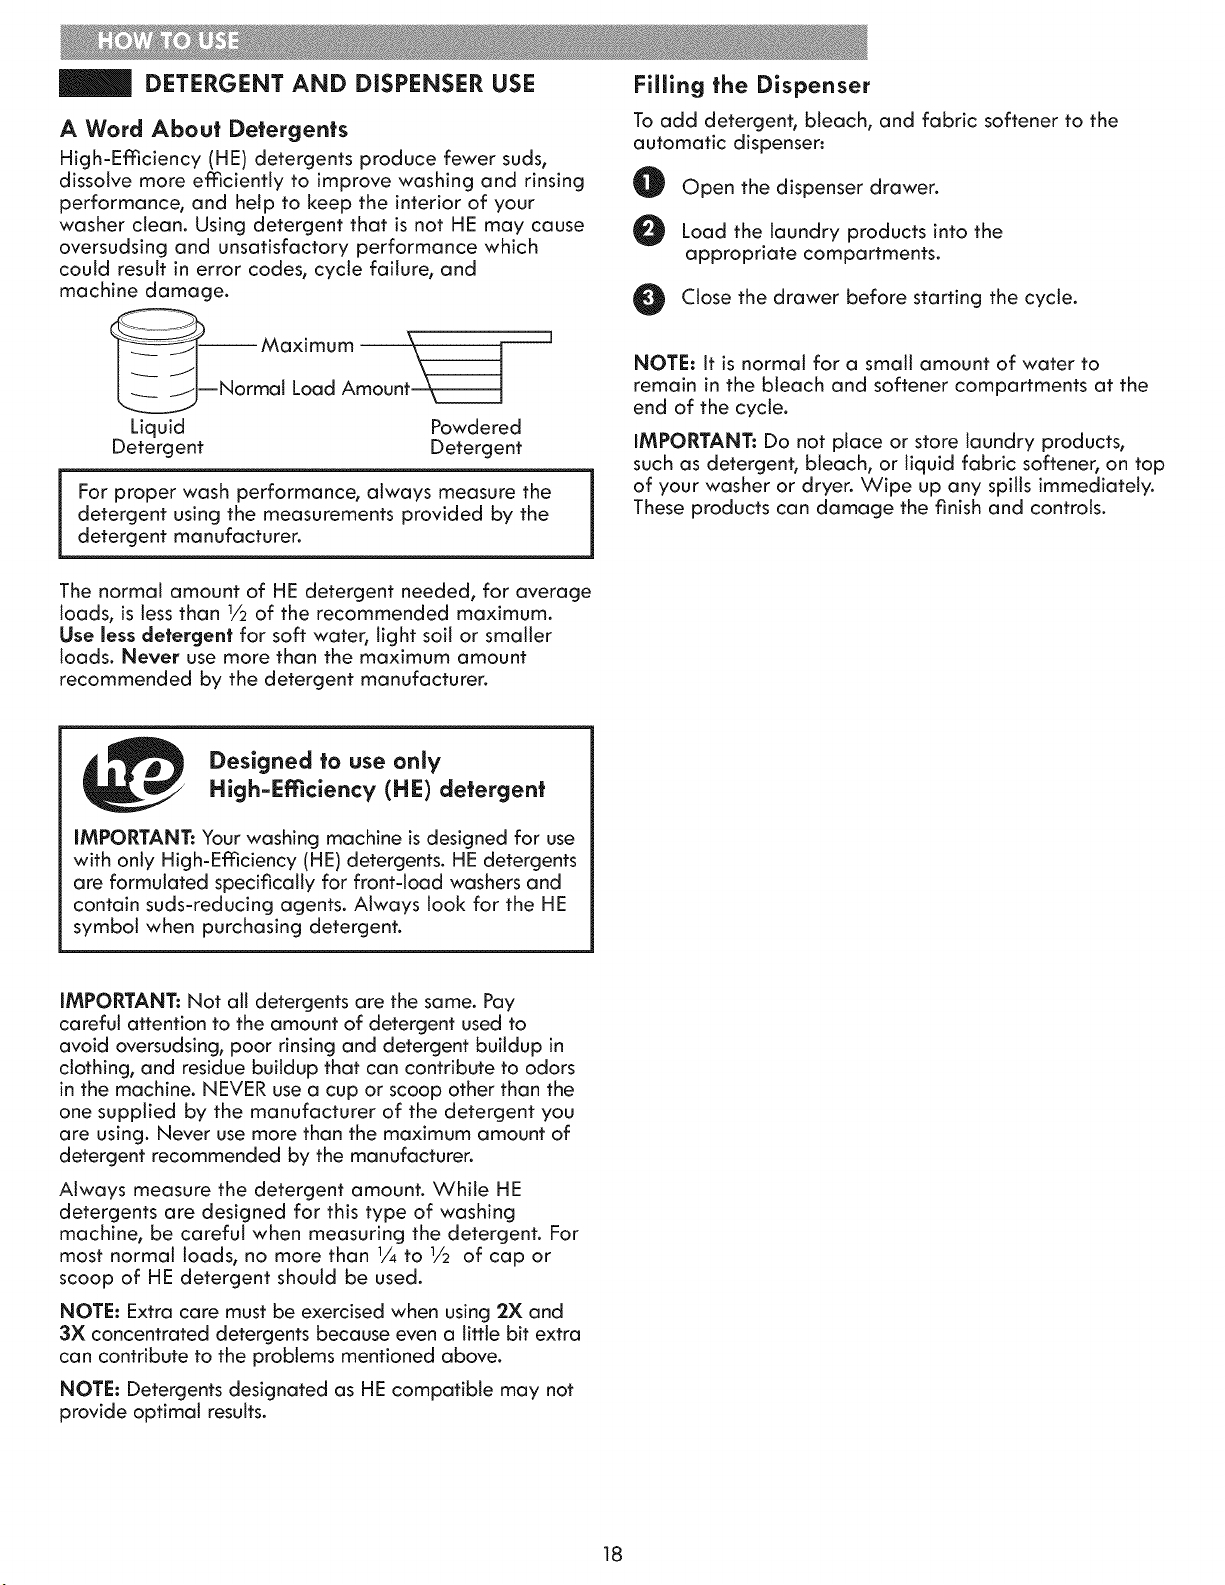
High-Efficiency (HE) detergents produce fewer suds,
dissolve more efficiently to improve washing and rinsing
performance, and help to keep the interior of your
washer clean. Using detergent that is not HE may cause
oversudsing and unsatisfactory performance which
could result in error codes, cycle failure, and
machine damage.
Maximum ____N
ormal Load Amount_:::J
Liquid Powdered
Detergent Detergent
For proper wash performance, always measure the
detergent using the measurements provided by the
detergent manufacturer.
Filling the Dispenser
To add detergent, bleach, and fabric softener to the
automatic dispenser:
O Open the dispenser drawer.
O Load the laundry products into the
appropriate compartments.
O Close the drawer before starting the cycle.
NOTE: It is normal for a small amount of water to
remain in the bleach and softener compartments at the
end of the cycle.
IMPORTANT: Do not place or store laundry products,
such as detergent, bleach, or liquid fabric softener, on top
of your washer or dryer. Wipe up any spills immediately.
These products can damage the finish and controls.
The normal amount of HE detergent needed, for average
loads, is tess than 1/2of the recommended maximum.
Use less detergent for soft water, light soil or smaller
loads. Never use more than the maximum amount
recommended by the detergent manufacturer.
Designed to use onl V
High-Efficiency (HE) detergent
IMPORTANT: Your washing machine is designed for use
with only High-Efficiency (HE) detergents. HE detergents
are formulated specifically for front-load washers and
contain suds-reducing agents. Always look for the HE
symbol when purchasing detergent.
IMPORTANT: Not all detergents are the same. Pay
careful attention to the amount of detergent used to
avoid oversudsing, poor rinsing and detergent buildup in
clothing, and residue buildup that can contribute to odors
in the machine. NEVER use a cup or scoop other than the
one supplied by the manufacturer of the detergent you
are using. Never use more than the maximum amount of
detergent recommended by the manufacturer.
Always measure the detergent amount. While HE
detergents are designed for this type of washing
machine, be careful when measuring the detergent. For
most normal loads, no more than 1/4 to 1/2 of cap or
scoop of HE detergent should be used.
NOTE: Extra care must be exercised when using 2X and
3X concentrated detergents because even a little bit extra
can contribute to the problems mentioned above.
NOTE: Detergents designated as HE compatible may not
provide optimal results.
18
TIME AND STATUS DISPLAY
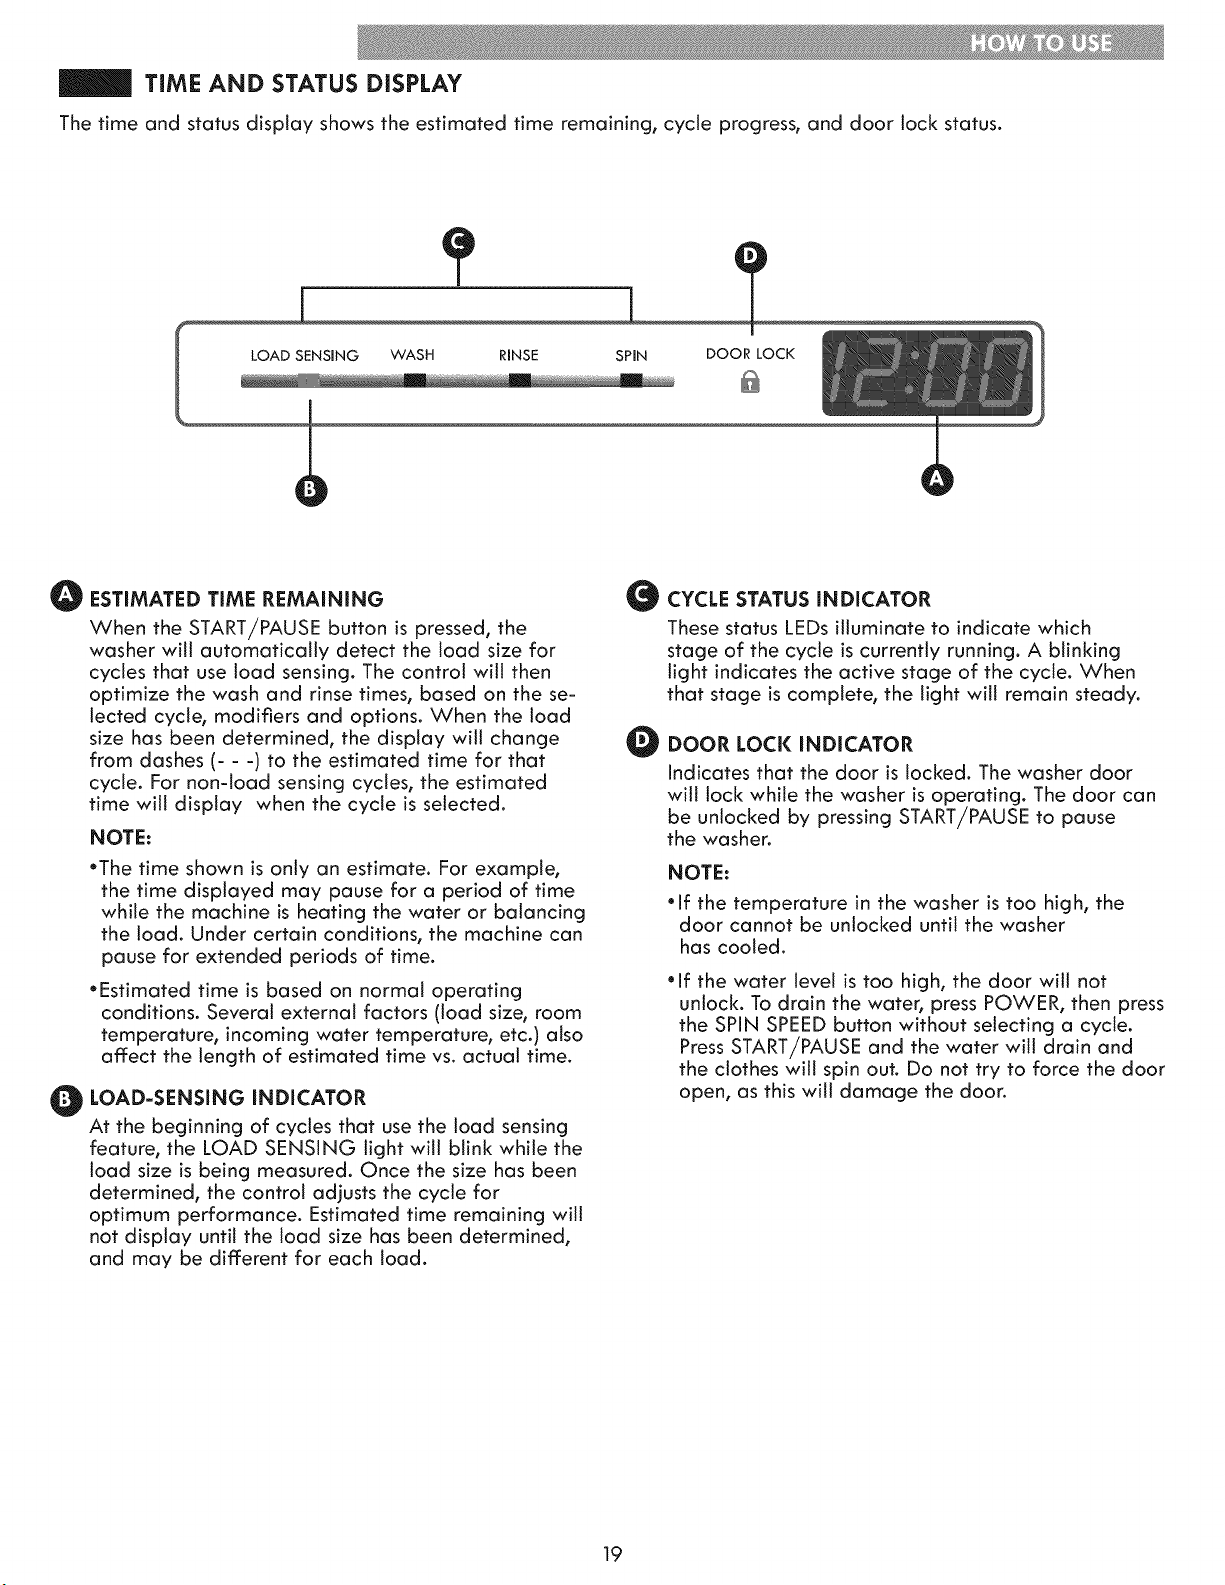
The time and status display shows the estimated time remaining, cycle progress, and door lock status.
[
DOOR LOCK
i
LOAD SENSING WASH RINSE SPiN
O ESTIMATED TIME REMAINING
When the START/PAUSE button is pressed, the
washer will automatically detect the load size for
cycles that use load sensing. The control will then
optimize the wash and rinse times, based on the se-
lected cycle, modifiers and options. When the load
size has been determined, the display will change
from dashes (- - -) to the estimated time for that
cycle. For non-load sensing cycles, the estimated
time witl display when the cycle is selected.
NOTE:
•The time shown is only an estimate. For example,
the time displayed may pause for a period of time
while the machine is heating the water or balancing
the load. Under certain conditions, the machine can
pause for extended periods of time.
• Estimated time is based on normal operating
conditions. Several external factors (load size, room
temperature, incoming water temperature, etc.) also
affect the length of estimated time vs. actual time.
O OAD-SENSING INDICATOR
At the beginning of cycles that use the load sensing
feature, the LOAD SENSING light will blink while the
load size is being measured. Once the size has been
determined, the control adjusts the cycle for
optimum performance. Estimated time remaining will
not display until the toad size has been determined,
and may be different for each load.
CYCLE STATUS iNDiCATOR
These status LEDs illuminate to indicate which
stage of the cycle is currently running. A blinking
light indicates the active stage of the cycle. When
that stage is complete, the light will remain steady.
DOOR LOCi< iNDiCATOR
Indicates that the door is locked. The washer door
wilt lock while the washer is operating. The door can
be unlocked by pressing START/PAUSE to pause
the washer.
NOTE:
• if the temperature in the washer is too high, the
door cannot be unlocked until the washer
has cooled.
• if the water level is too high, the door will not
unlock. To drain the water, press POWER, then press
the SPIN SPEED button without selecting a cycle.
Press START/PAUSE and the water will drain and
the clothes will spin out. Do not try to force the door
open, as this will damage the door.
19
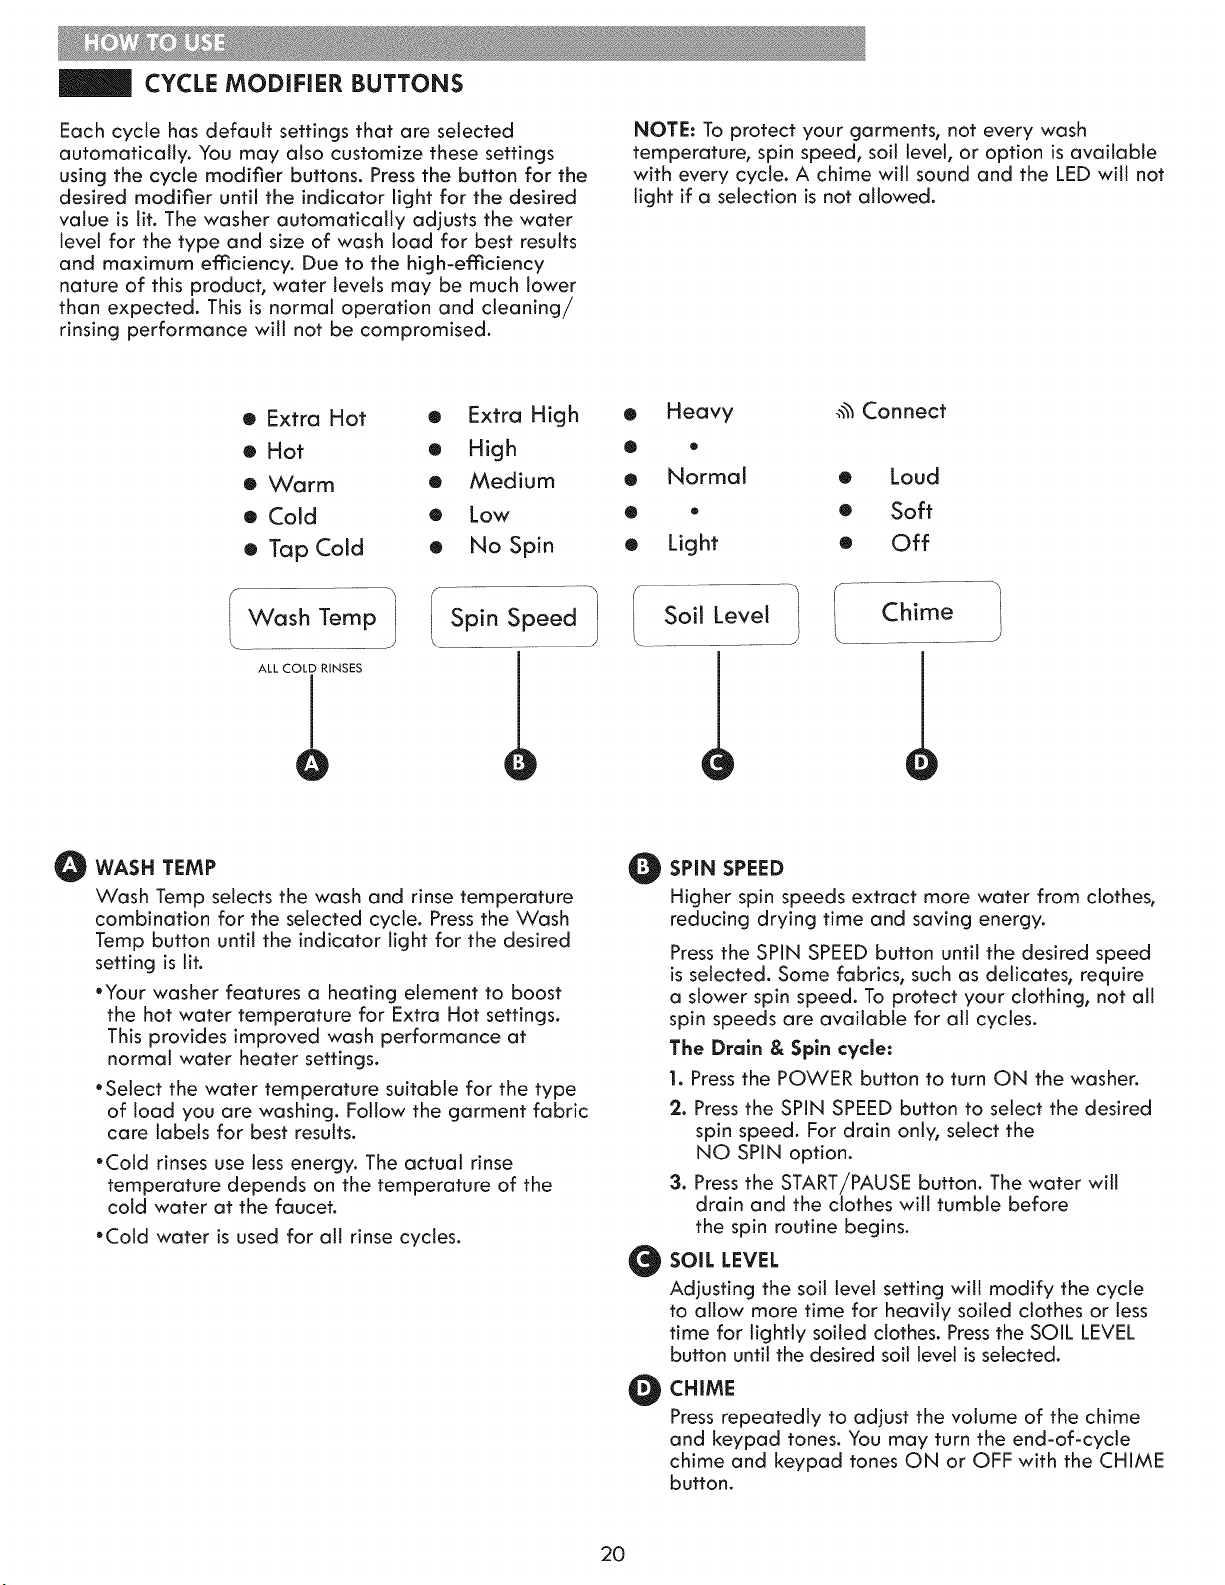
CYCLE MODiFiER BUTTONS
Each cycle has default settings that are selected
automatically. You may also customize these settings
using the cycle modifier buttons. Press the button for the
desired modifier until the indicator light for the desired
value is lit. The washer automatically adjusts the water
level for the type and size of wash load for best results
and maximum efficiency. Due to the high-efficiency
nature of this product, water levels may be much lower
than expected. This is normal operation and cleaning/
rinsing performance will not be compromised.
NOTE: To protect your garments, not every wash
temperature, spin speed, soil level, or option is available
with every cycle. A chime will sound and the LED will not
light if a selection is not allowed.
• Extra Hot
• Hot
• Warm
• Cold
• Tap Cold
Wash Temp
ALL COLD RINSES
I
O
• Extra High
• High
• Medium
• Low
• No Spin
!Spi_Sp_ed_
• Heavy
® •
• Normal
® o
• Light
f__ .........................................
Soil Level
\
0
Connect
• Loud
• Soft
• Off
.........!
0
O WASH TEMP
Wash Temp selects the wash and rinse temperature
combination for the setected cycle. Press the Wash
Temp button until the indicator light for the desired
setting is lit.
•Your washer features a heating element to boost
the hot water temperature for Extra Hot settings.
This provides improved wash performance at
normal water heater settings.
•Setect the water temperature suitable for the type
of load you are washing. Follow the garment fabric
care labels for best results.
•Cold rinses use less energy. The actual rinse
temperature depends on the temperature of the
cold water at the faucet.
*Cold water is used for all rinse cycles.
O SPIN SPEED
@
0
Higher spin speeds extract more water from clothes,
reducing drying time and saving energy.
Press the SPIN SPEED button until the desired speed
is selected. Some fabrics, such as delicates, require
a slower spin speed. To protect your clothing, not all
spin speeds are available for all cycles.
The Drain & Spin cycle:
1. Press the POWER button to turn ON the washer.
2. Press the SPIN SPEED button to select the desired
spin speed. For drain only, select the
NO SPIN option.
3. Press the START/PAUSE button. The water will
drain and the clothes will tumble before
the spin routine begins.
SOIL LEVEL
Adjusting the soil level setting will modify the cycle
to allow more time for heavily soiled clothes or tess
time for lightly soiled clothes. Pressthe SOIL LEVEL
button until the desired soil level is selected.
CHIME
Press repeatedly to adjust the volume of the chime
and keypad tones. You may turn the end-of-cycle
chime and keypad tones ON or OFF with the CHIME
button.
2O
STEAM CYCLES AND OPTIONS
Your washing machine features several additional cycle
options that customizecycles to meet your individual needs.
Q
0
0
Turn ON the washer and turn the cycle selector knob to
select the desired cycle.
Use the cycle modifier buttons to adjust the settings for
that cycle.
Pressthe cycle option button(s) for the option(s) you
would like to add. The button will light when that option
is selected. For secondary functions, press and hold
the button for three seconds. The LEDwill blink when
the secondary option is selected. Both options cannot be
selected together.
O f the selected option is not allowed for the selected
cycle, the chime will sound twice to alert you and
the LED will not illuminate.
O ressthe START/PAUSE button to start the cycle. After a
brief delay, the door will lock and the cycle will begin.
NOTE: To protect your garments, not every option is
available with every cycle.
NOTE: If the START/PAUSEbutton is not pressed within four
minutes, the control will shut off and the settings will be lost.
STEAM TREAT
AotoSoak Select the STEAM TREATbutton to add steam to
the selected cycle for added cleanincj power.
Adding steam to cycles helps provide improved
...._ ....................cleaning performance. By creating steam, fab-
rics get the benefit of a deep clean. The steam
option is not available on all cycles.
To add steam to a cycle:
Turn ON the washer and turn the cycle selector knob to
select a cycle that allows the steam option. Refer to the
Cycle Guide to see which cycles allow steam.
O Pressthe STEAM TREAT button. The washer will
automatically adjust the cycle settings.
O Set any other desired options.
O Pressthe START/PAUSE button to start the cycle.
NOTE:
The door may be very warm during steam cycles. This
is normal
Do not attempt to override the door lock mechanism or
reach into the washer during a steam cycle. Steam can
cause severe burns.
iMPORTANT NOTES ABOUT STEAM CYCLES:
*Steam may not be visible during the steam cycles. This
is normal.
"Do not use steam with delicate fabrics such as wool,
silk, or easily discolored fabrics.
DELAY START
......... Once you have selected the cycle and other
settings, press this button to delay the start of the
wash cycle. Each press of the button increases
the delay time by one hour, for up to 19 hours. Once the
desired delay time is set, press the START/PAUSE button to
start the delay time.
EXTRA RINSE
DrumLight This option will add an extra rinse to the
selected cycle. Use this option to help ensure
_E_ia the removal of detergent or bleach residue
from fabrics.
ACCELA-WASH
Clean Washer
The Accela-Wash option uses a twin spray
water and detergent injection which
reduces cycle time while maintaining wash
performance in a normal cycle.
DRUM LIGHT
Drum Light
!
The drum is equipped with a blue LED light
that illuminates when the washer is turned on.
This light automatically turns off when the
door is closed and the cycle starts.
To turn on the light during a cycle, press and hold the EX-
TRA RINSE button for three seconds. The drum light will illu-
minate and then turn off automatically after four minutes.
NOTE: Clothes may appear to be yellow in the washer
while the drum light is on. This effect is caused by the
reflection of the light.
STAY FRESH
Coo,_o_Lock_ Thisfeature helps keep wrinkles from seffing in
clothes and helps keep them fresh if they are not
removed from the washer as soon as the cycle is
complete. Pressthe STAYFRESHbutton to tumble
the clothes intermittently and circulate fresh air through the
drum for up to eight hours. Pressthe POWER button or the
START/PAUSE button to remove clothes at any time.
PRE WASH
SovoE°orgyo Select thisoptionto add a 15-minute prewash,
rinse and spin cycle to the chosen cycle. This isespecially useful for heavily soiled items.
21
SPECIAL FUNCTIONS
CONTROL LOCK
CootrdLook_ Use this option to disable the controls. The
washer can only be locked during a cycle. Thisfeature can prevent children from changing
cycles or operating the machine. Once set, the
controls remain locked and must be turned OFF before the
controls can be used again. Once the washer has shut off,
the power button wifl allow the machine to be turned ON,
but the controls will stiff be locked. When the controls are
locked, "CL" wifl display alternately with the estimated time
remaining.
Pressand hold the STAY FRESHbutton for three seconds to
activate or deactivate the controls.
CLEAN WASHER CYCLE
CleanWasherDetergent residue can build up in the wash
drum over time and can lead to a mildewy or
musty smell. The CLEAN WASHER cycle is
specially designed to remove this buildup
using bleach or another cleaner designed specifically for
cleaning front load washers. Run the CLEAN WASHER cycle
once a month, or more often under heavy use conditions or if
odor is present. See complete instructions in the CARE AND
CLEANING section.
@
@
Turn ON the washer and press and hold the ACCELA-
WASH button for five seconds. Selecting any other cycle
after CLEAN WASHER has been selected will cause the
CLEAN WASHER cycle to be cancelled.
Fill the bleach dispenser to the MAX line with liquid
chlorine bleach. Do not overfill the bleach dispenser.
Overfilling will cause the bleach to dispense immedi-
ately.
NOTE: For other drum cleaning products, follow
the cleaner manufacturer's instructions and
recommendations. For powdered cleaning products,
add the cleaner to the main wash compartment of
the dispenser drawer. Place tablet cleaners directly
into the drum.
Press the START/PAUSE button to start the cycle.
After the cycle has ended, secure the door slightly ajar
with the door magnet. This will promote air circulation
and allow the interior of the machine to dry. To use this
feature, close the door just until it contacts the door
magnet.
NOTE: Do NOT use this cycle with clothes, and do
NOT add detergent or fabric softener.
MY CYCLE
MY CYCLE allows you to store a customized wash
cycle for future use. It allows you to save favorite
temperature, spin speed, soil level, and other
options for a cycle, and then recall them at the touch of a
button.
NOTE: You can only save a setting for one cycle at a
time. Pressing and holding the MY CYCLE button will over-
write any previously saved cycle.
To save a MY CYCLE:
Pressthe POWER button to turn on the washer.
Turn the cycle selector knob to select the desired cycle.
Pressthe CYCLE MODIFIER button to adjust the cycle as desired.
Press the CYCLE OPTION button to add the desired options.
Press and hold the MY CYCLE button for three seconds.
To
@
@
recaff a MY CYCLE:
Press the POWER button to turn on the washer.
Pressthe MY CYCLEbutton. The stored settings will be
displayed.
Press the START/PAUSE button to start the cycle.
NOTE: MY CYCLE can be adjusted the same as any
other cycle. However, once any other button is pressed,
the LED will turn off indicating that the settings are no
longer those of your saved cycle. Press and hold the MY
CYCLE button for five seconds to overwrite the previous
MY CYCLE settings and replace them with the current
settings.
AUTO SOAK
AutoSoak Use the AUTO SOAK option to presoak
garments to help remove difficult spots or
stains on fabric. This option provides a 30
minute presoak prior to the start of the
selected cycle. At the end of the presoak time, the select-
ed cycle will use the same water.
To use the AUTO SOAK feature, press and hold the
STEAM TREAT button for five seconds.
SAVE ENERGY
SaveEnergyOThis option saves energy by using cooler water
while increasing the wash and rinse times to
maintain wash performance. This feature is only
_ ...................: available with the NORMAL/CASUAL and
HEAVY DUTY cycles as listed below.
To use the Save Energy option, press and hold the Pre Wash
button for three seconds.
• NORMAL- Hot becomes Warm
• NORMAL - Warm becomes Cold
• HEAVY DUTY - Hot becomes Warm
22
WARNING: Toreducetheriskofnre,electricshock,oriniurytopersons,readandfallowthis
entire Use & Care Guide, including the Important Safety Insfrucflons, before aperaflng this washer.
* Unplug the washer before cleanlng to avoid the risk of elecfrlc shock. Failure to follow this warning can
cause serious injury, fire, electric shock, or death.
* Never use harsh chemicals, abrasive cleaners, or solvents to clean the washer. They will damage the finish.
REGULAR CLEANING
Cleaning the Exterior
Proper care of your washer can extend its life. The outside of
the machine can be cleaned with warm water and a mild,
nonabrasive household detergent.
immediately wipe off any spills with a soft, damp cloth.
IMPORTANT: Do not use solvents, cleaning alcohols, or simi-
lar products. Never use steel wool or abrasive cleaners
because they can damage the surface.
Care and Cleaning of the interior
Use a towel or soft cloth to wipe around the washer door
opening, door seal, and door glass. These areas should be
kept clean to ensure a watertight seal. Be sure to wipe
under the inside rubber seat to remove any moisture or soil.
Always remove items from the washer as soon as the cycle
is complete. Leaving damp items in the washer can cause
wrinkling, color transfer, and odor. Run the CLEAN WASHER
cycle once a month, or more often if needed, to remove
detergent buildup and other residue.
Clean Washer
0
0
0
Remove any clothing in the drum.
Open the dispenser drawer.
Add liquid chlorine bleach or another drum cleaner
designed specifically for cleaning front load
washers.
- If using liquid chlorine bleach
Add liquid chlorine bleach to the bleach
compartment of the drawer. (NOTE : Do not
exceed the maximum fill line and do not pour
undiluted liquid bleach directly into the wash
drum.)
- If using powder cleaner
Remove the liquid detergent cup and add powder
cleaner to the main wash compartment of the
dispenser drawer.
- If using tablet cleaner
Add tablet cleaner directly to the wash drum.
NOTE:
• Do not add tablet cleaner to the dispenser drawer.
• Do not add any laundry detergent or fabric softener to
the drawer when using CLEAN WASHER.
O
Turn ON the washer and press and hotd the
ACCELA-WASH button for three seconds, and the LED
will blink. Selecting any other cycle after CLEAN
WASHER has been selected will cause the CLEAN
WASHER cycle to be cancelled.
O After the cycle ends, open the door and allow the
drum interior to dry completely.
NOTE: Run the CLEAN WASHER cycle once a month. If a
mildewy or musty smell is present, run the CLEAN
WASHER cycle once a week for three consecutive weeks.
Door Seal and Glass Cleaning
Due to the location and nature of the door seal, some
detergent and soil residue may build up on the door glass
and seal. Periodic cleaning with a bleach solution can help
remove buildup and stains, and can help sanitize the seal to
prevent odors.
NOTE: Wear rubber gloves and eye protection while
performing the following procedure:
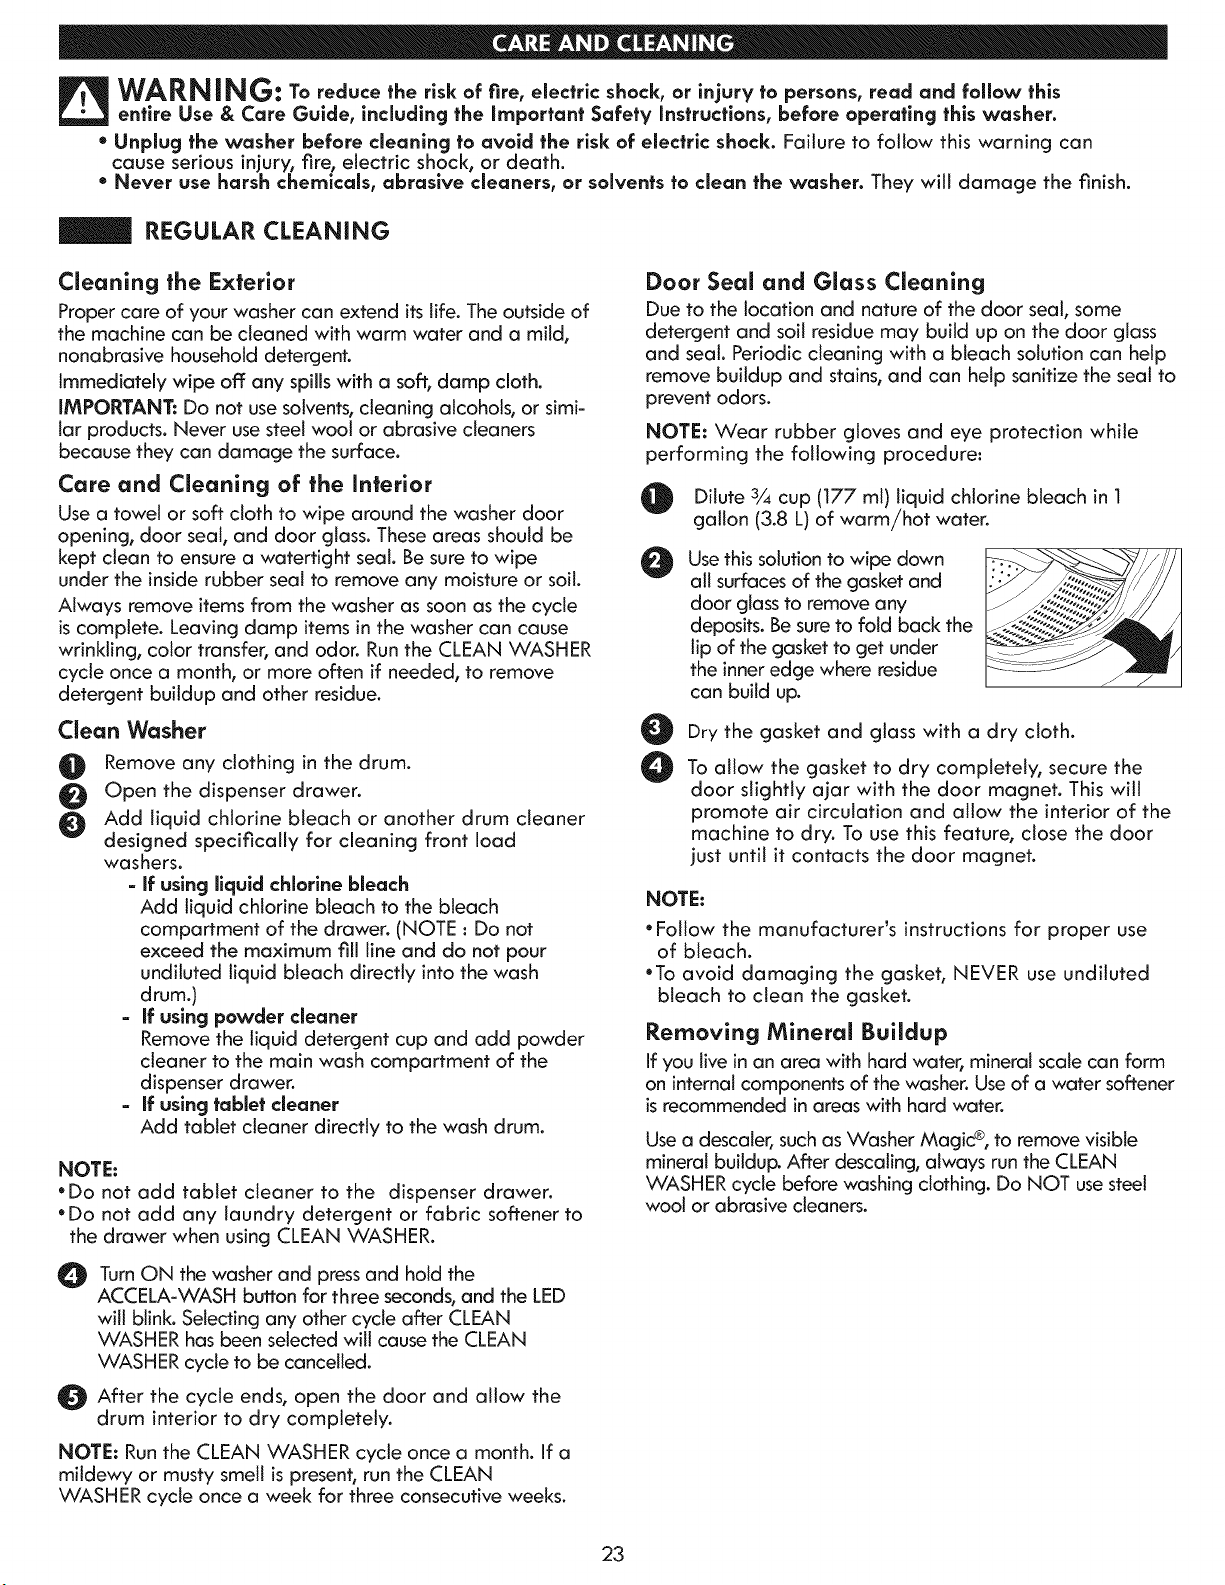
Dilute 3¼ cup (177 ml) liquid chlorine bleach in 1
gallon (3.8 L) of warm/hot water.
Usethis solution to wipe down
all surfaces of the gasket and
door glass to remove any
deposits. Be sure to fold back the
lip of the gasket to get under
the inner edge where residue
can build up.
Dry the gasket and glass with a dry cloth.
To allow the gasket to dry completely, secure the
door slightly ajar with the door magnet. This will
promote air circulation and allow the interior of the
machine to dry. To use this feature, close the door
just until it contacts the door magnet.
NOTE:
*Follow the manufacturer's instructions for proper use
of bleach.
"To avoid damaging the gasket, NEVER use undiluted
bleach to clean the gasket.
Removing Mineral Buildup
If you live in an area with hard water, mineral scale can form
on internal components of the washer. Use of a water softener
is recommended in areas with hard water.
Use a descater, such as Washer Magic ®,to remove visible
mineral buildup. After descaling, always run the CLEAN
WASHER cycle before washing clothing. Do NOT use steel
wool or abrasive cleaners.
23
REGULAR CLEANING (continued)
Storing the Washer
If the washer will not be used for an extended period of time
and is in an area that could be exposed to freezing
temperatures, perform the following steps to protect the
washer from damage.
Turn OFF the water supply.
O isconnect hoses from water supply and drain water
from hoses.
O Plug the power cord into a properly grounded
electrical outlet.
O Add 1gallon of nontoxic recreational vehicle (RV)
antifreeze to the empty wash drum and close the door.
0
Pressthe POWER button, then press the SPIN SPEED
button without selecting a cycle. Pressthe START/PAUSE
button to activate the drain pump. Thiswill expel some
of the antifreeze, leaving enough to protect the washer
from damage.
Unplug the power cord, dry the drum interior with a soft
cloth, and close the door.
0
Refer to the instructions below to clean and dry the
dispenser drawer.
Store the washer in an upright position.
To remove the antifreeze from the washer after
storage, run the EXPRESS WASH cycle. Do not add
laundry to this cycle.
Cleaning the Dispenser
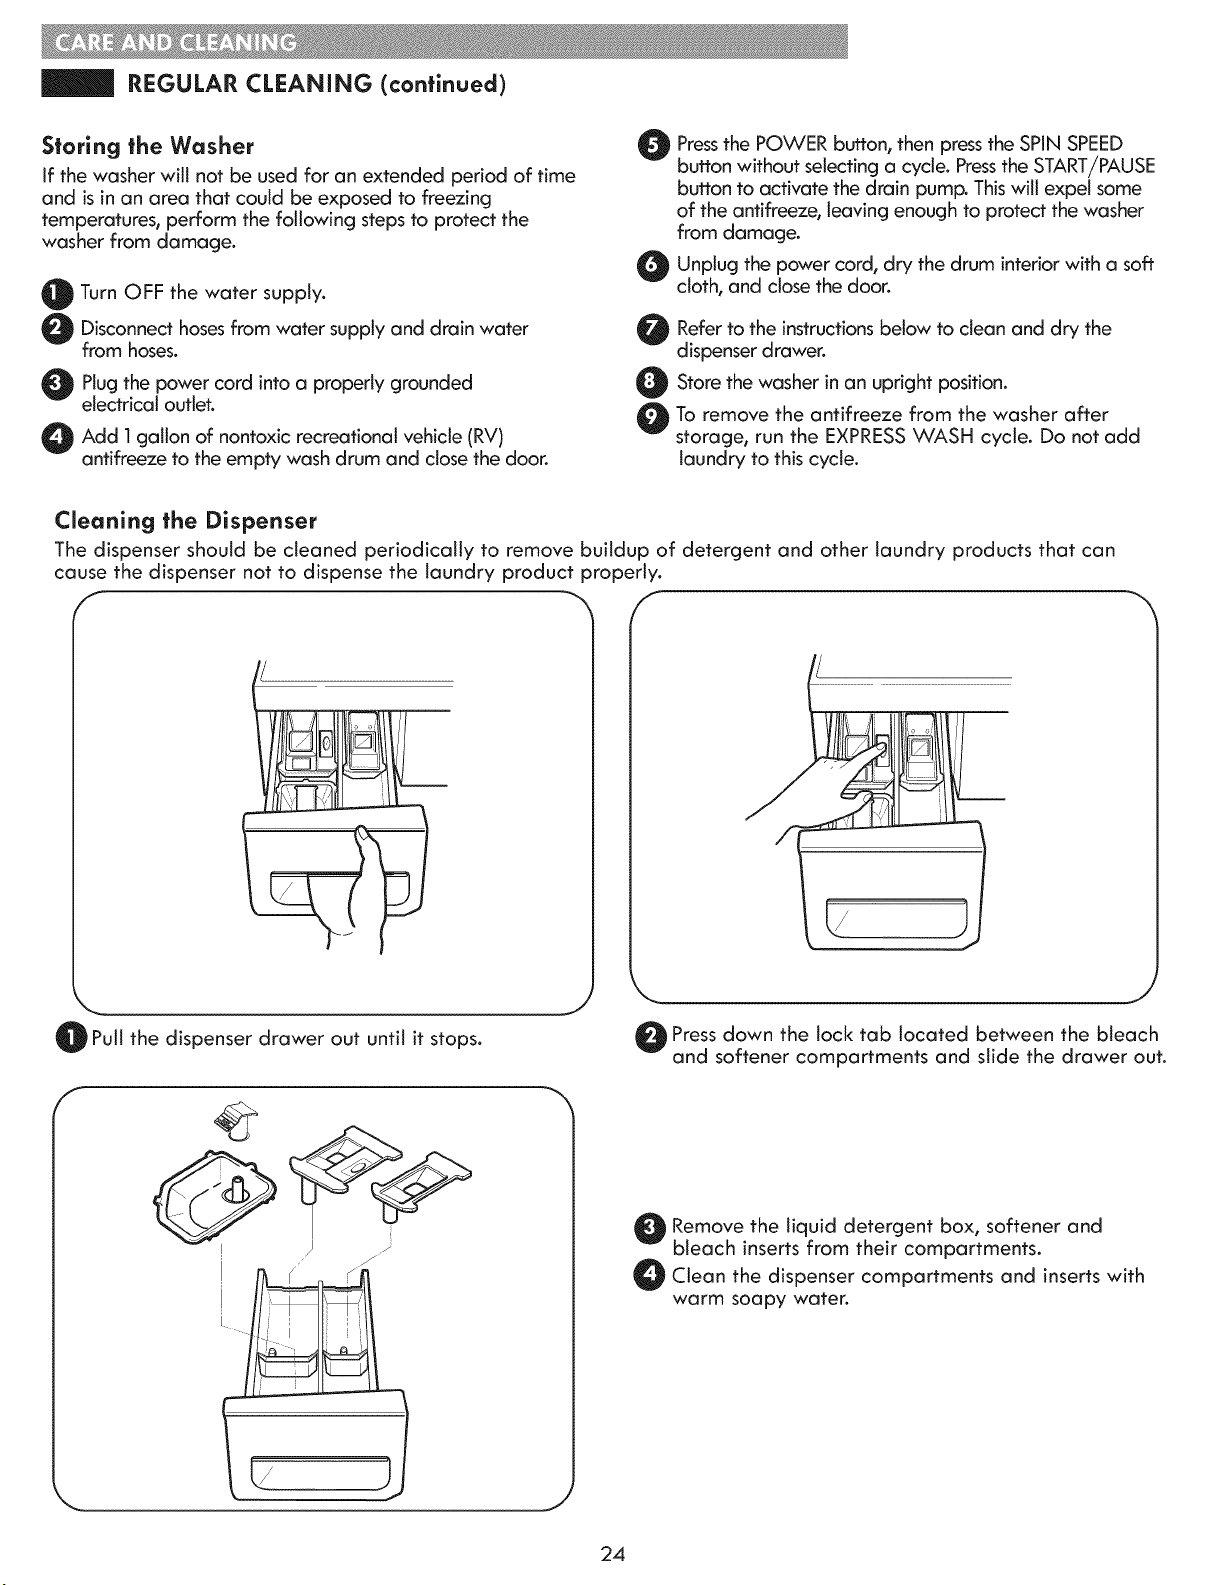
The dispenser should be cleaned periodically to remove buildup of detergent and other laundry products that can
cause the dispenser not to dispense the laundry product properly.
f _ f
O Putt the dispenser drawer out until it stops.
F
i
O Press down the lock tab located between the bleach
and softener compartments and slide the drawer out.
Remove the liquid detergent box, softener and
bleach inserts from their compartments.
O Clean the dispenser compartments and inserts with
warm soapy water.
24
MAINTENANCE
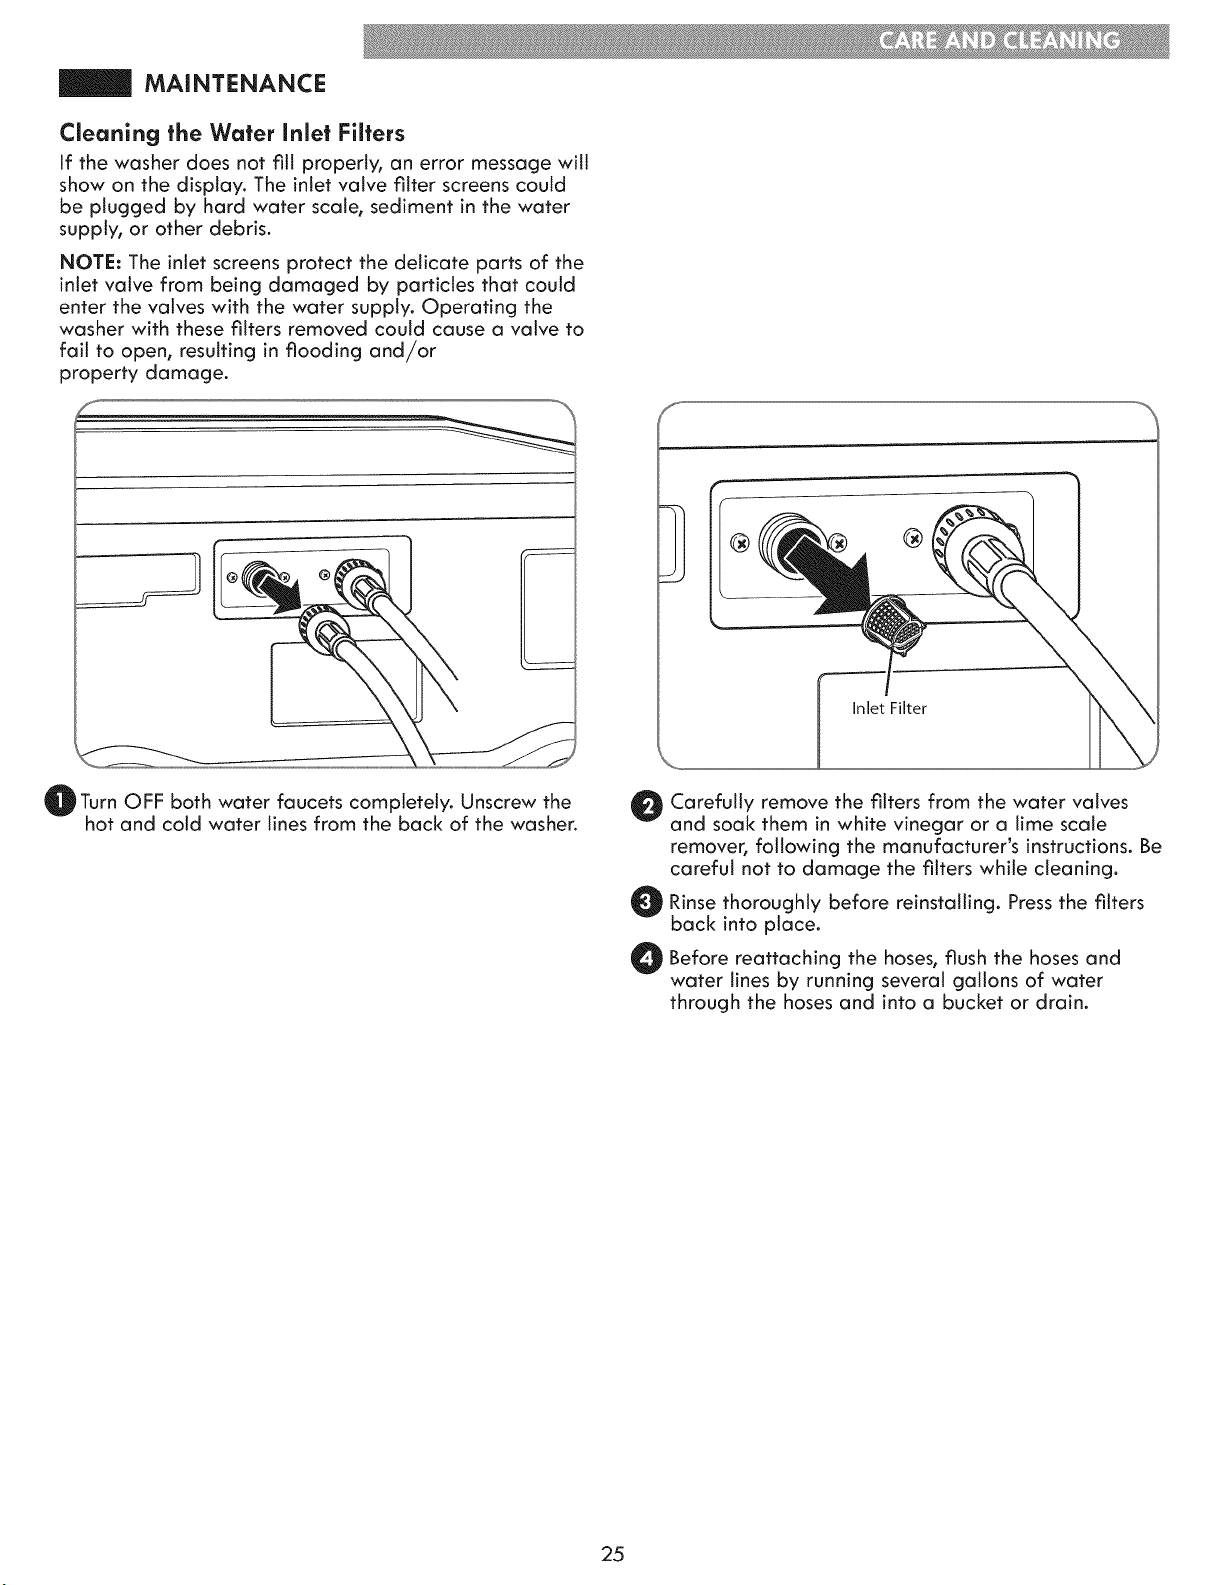
Cleaning the Water inlet Filters
If the washer does not fill properly, an error message will
show on the display. The inlet valve filter screens coutd
be plugged by hard water scale, sediment in the water
supply, or other debris.
NOTE: The inlet screens protect the delicate parts of the
inlet valve from being damaged by particles that could
enter the valves with the water supply. Operating the
washer with these filters removed could cause a valve to
fail to open, resulting in flooding and/or
property damage.
Turn OFF both water faucets completely. Unscrew the
hot and cold water lines from the back of the washer.
0
@ @
Inlet Filter
Carefully remove the filters from the water valves
and soak them in white vinegar or a time scale
remover, following the manufacturer's instructions. Be
careful not to damage the filters while cleaning.
Rinse thoroughly before reinstalling. Press the filters
back into place.
Before reattaching the hoses, flush the hoses and
water lines by running several gallons of water
through the hoses and into a bucket or drain.
25
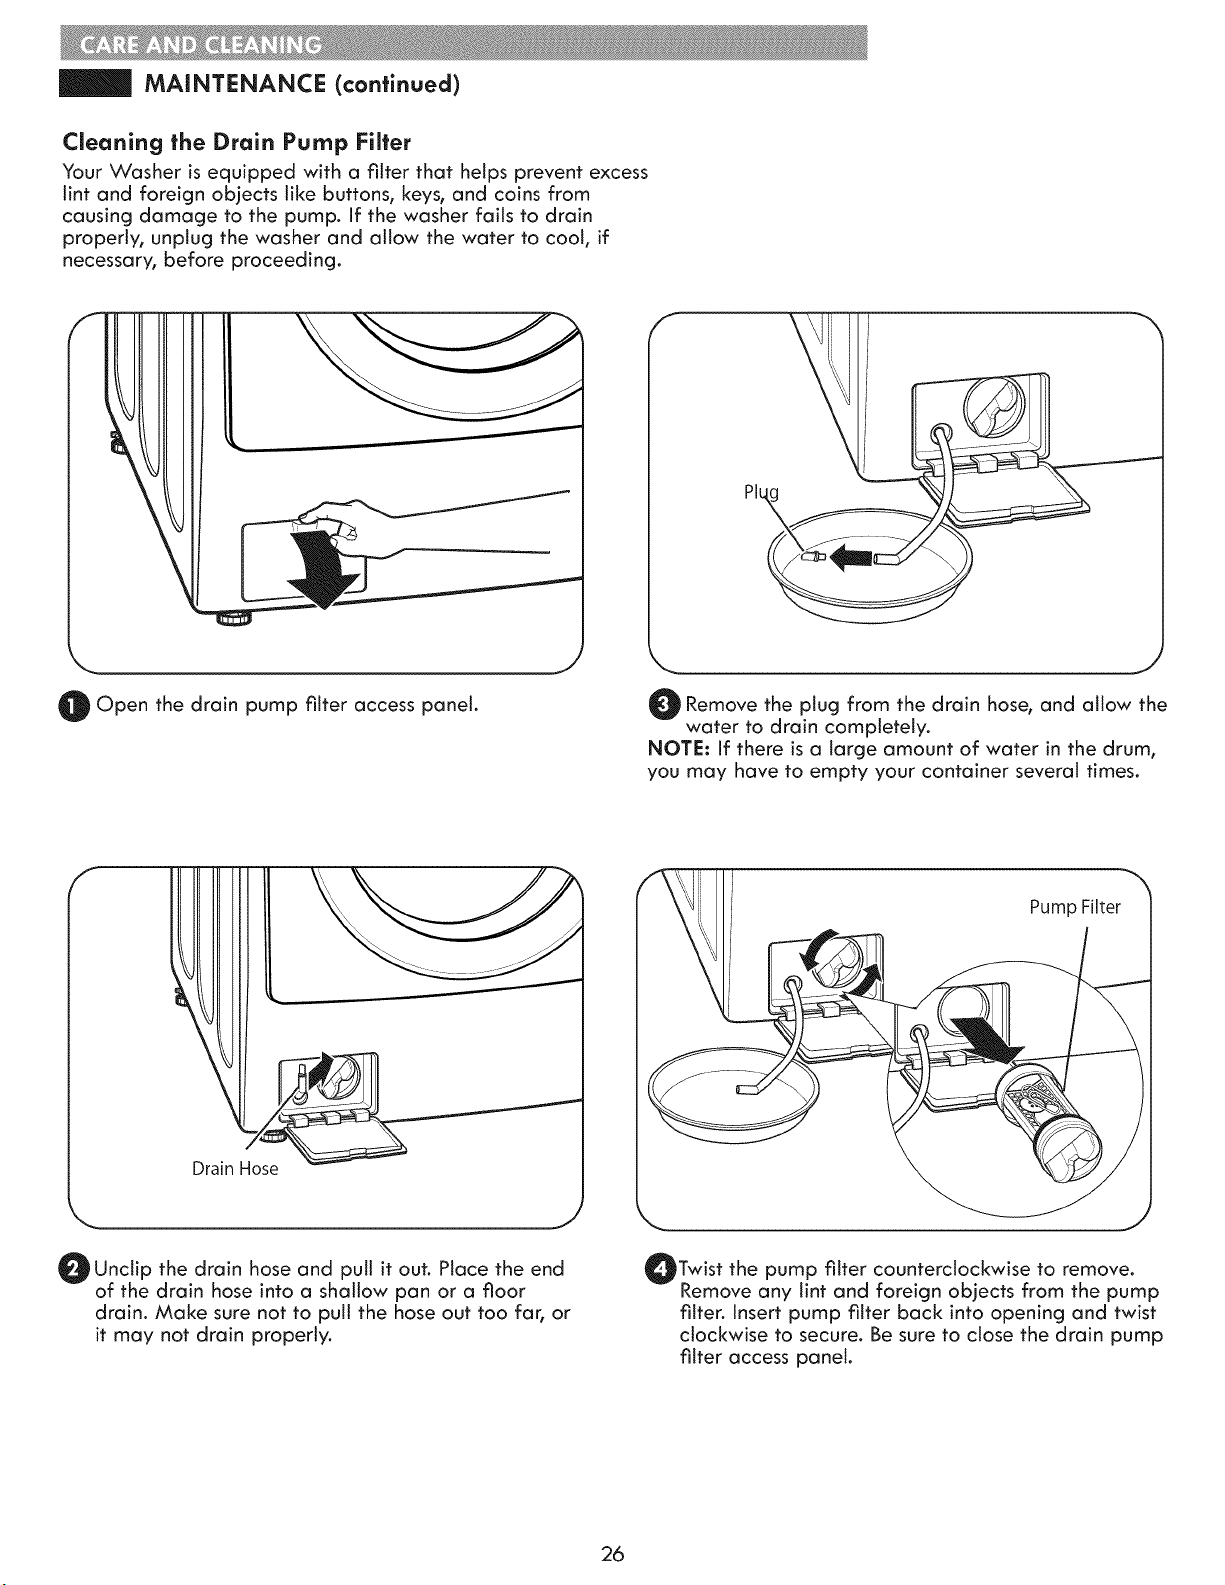
MAINTENANCE (continued)
Cleaning the Drain Pump Filler
Your Washer is equipped with a filter that helps prevent excess
lint and foreign objects like buttons, keys, and coins from
causing damage to the pump. If the washer fails to drain
properly, unplug the washer and allow the water to cool, if
necessary, before proceeding.
O Open the drain pump filter access panel.
J
Remove the from the drain and allow the
plug hose,
water to drain completely.
NOTE: If there is a large amount of water in the drum,
you may have to empty your container several times.
Drain Hose
J
O UncNp the drain hose and putt it out. Place the end
of the drain hose into a shallow pan or a floor
drain. Make sure not to putt the hose out too far, or
it may not drain properly.
OTwist pump to remove.
the filter counterclockwise
Remove any lint and foreign objects from the pump
filter. Insert pump filter back into opening and twist
clockwise to secure. Be sure to close the drain pump
filter access panel.
26

Should you experience any problems with your
washing machine, it has the capability of transmitting
data via your telephone to the Kenmore Connect
Team. This gives you the capability of speaking
directly to our specially trained technicians. The
technician records the data transmitted from your
machine and uses it to analyze the issue, providing a
fast and effective diagnosis.
Using the Kenrnore Connect TM System
Follow the technician's instructions and perform
the following steps when requested.
if you experience problems with your washer, call
1-800-4-MY-HOME ®. Only use the Kenmore Connect
System feature when instructed to do so by the
Kenmore Connect Team. The transmission sounds that
you will hear are normal and sound similar to a fax
machine.
Kenmore Connect cannot be activated unless your
washing machine is turned on by pressing the POWER
button. If your washing machine is unable to turn
on, then troubleshooting must be done without using
Kenmore Connect.
HOLD the mouthpiece of your phone over the POWER button, when instructed to do so by
the call center, no more than one inch from (but not touching) the machine.
NOTE: Do not press any other buttons or turn the cycle selector knob.
PUSH and hold the WASH TEMP button while continuing to hold your phone to the
POWER button.
LISTEN for three beeps. After you hear the three beeps, release the WASH TEMP button. A
tone transmission will begin. Keep the phone in place until the tone transmission has finished.
This takes about 6 seconds, and the display will count down the time. Once the countdown is
over and the tones have stopped, resume your conversation with the technician, who will then
be able to assist you in using the information transmitted for analysis.
NOTE:
* For best results, do not move the phone while the tones are being transmitted.
"If the call center agent is not able to get an accurate recording of the data, you may be
asked to try again.
"Pressing the POWER button during the transmission will shut off Kenmore Connect.
27
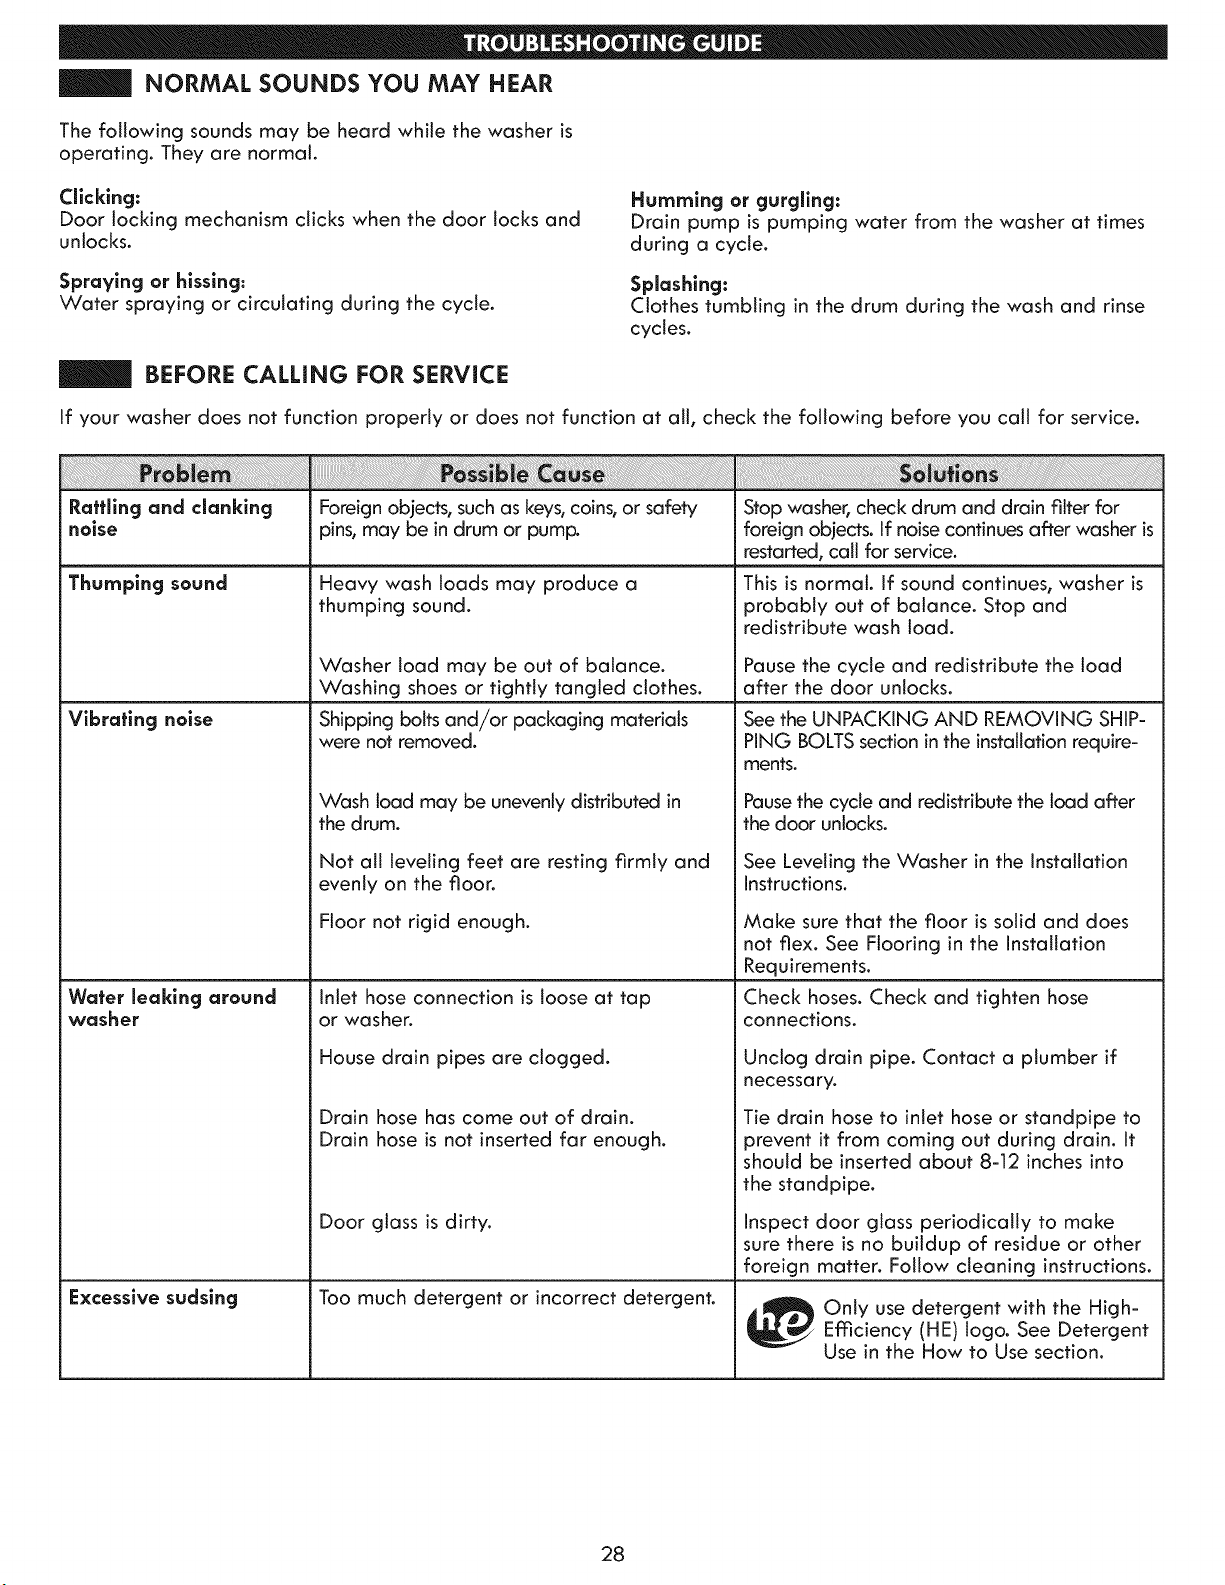
NORMAL SOUNDS YOU MAY HEAR
The following sounds may be heard while the washer is
operating. They are normal.
Clicklng:
Door locking mechanism clicks when the door locks and
unlocks.
Spraying or hissing:
Water spraying or circulating during the cycle.
Humming or gurgllng:
Drain pump is pumping water from the washer at times
during a cycle.
Splashing:
Clothes tumbling in the drum during the wash and rinse
cycles.
BEFORE CALLING FOR SERVICE
If your washer does not function properly or does not function at all, check the following before you call for service.
Rattling and clanklng Foreign objects, such as keys, coins, or safety Stop washer, check drum and drain filter for
noise pins, may be in drum or pump. foreign objects. If noise continues after washer is
restarted, call for service.
Thumping sound
Vibrating noise
Heavy wash loads may produce a
thumping sound.
Water leaklng around
washer
Excessive sudsing
Washer load may be out of balance.
Washing shoes or tightly tangled clothes.
Shipping bolts and/or packaging materials
were not removed.
Wash load may be unevenly distributed in
the drum.
Not att leveling feet are resting firmly and
evenly on the floor.
Floor not rigid enough.
Inlet hose connection is loose at tap
or washer.
House drain pipes are clogged.
Drain hose has come out of drain.
Drain hose is not inserted far enough.
Door glass is dirty.
Too much detergent or incorrect detergent.
This is normal. If sound continues, washer is
probably out of balance. Stop and
redistribute wash load.
Pause the cycle and redistribute the load
after the door unlocks.
See the UNPACKING AND REMOVING SHIP-
PING BOLTSsection in the installation require-
ments.
Pausethe cycle and redistribute the load after
the door unlocks.
See Leveling the Washer in the Installation
Instructions.
Make sure that the floor is solid and does
not flex. See Flooring in the Installation
Requirements.
Check hoses. Check and tighten hose
connections.
Unclog drain pipe. Contact a plumber if
necessary.
Tie drain hose to inlet hose or standpipe to
prevent it from coming out during drain. It
should be inserted about 8-12 inches into
the standpipe.
Inspect door glass periodically to make
sure there is no buildup of residue or other
foreign matter. Follow cleaning instructions.
_!_ nly use detergent with the High-Efficiency (HE)logo, See Detergent
Use in the How to Use section.
28
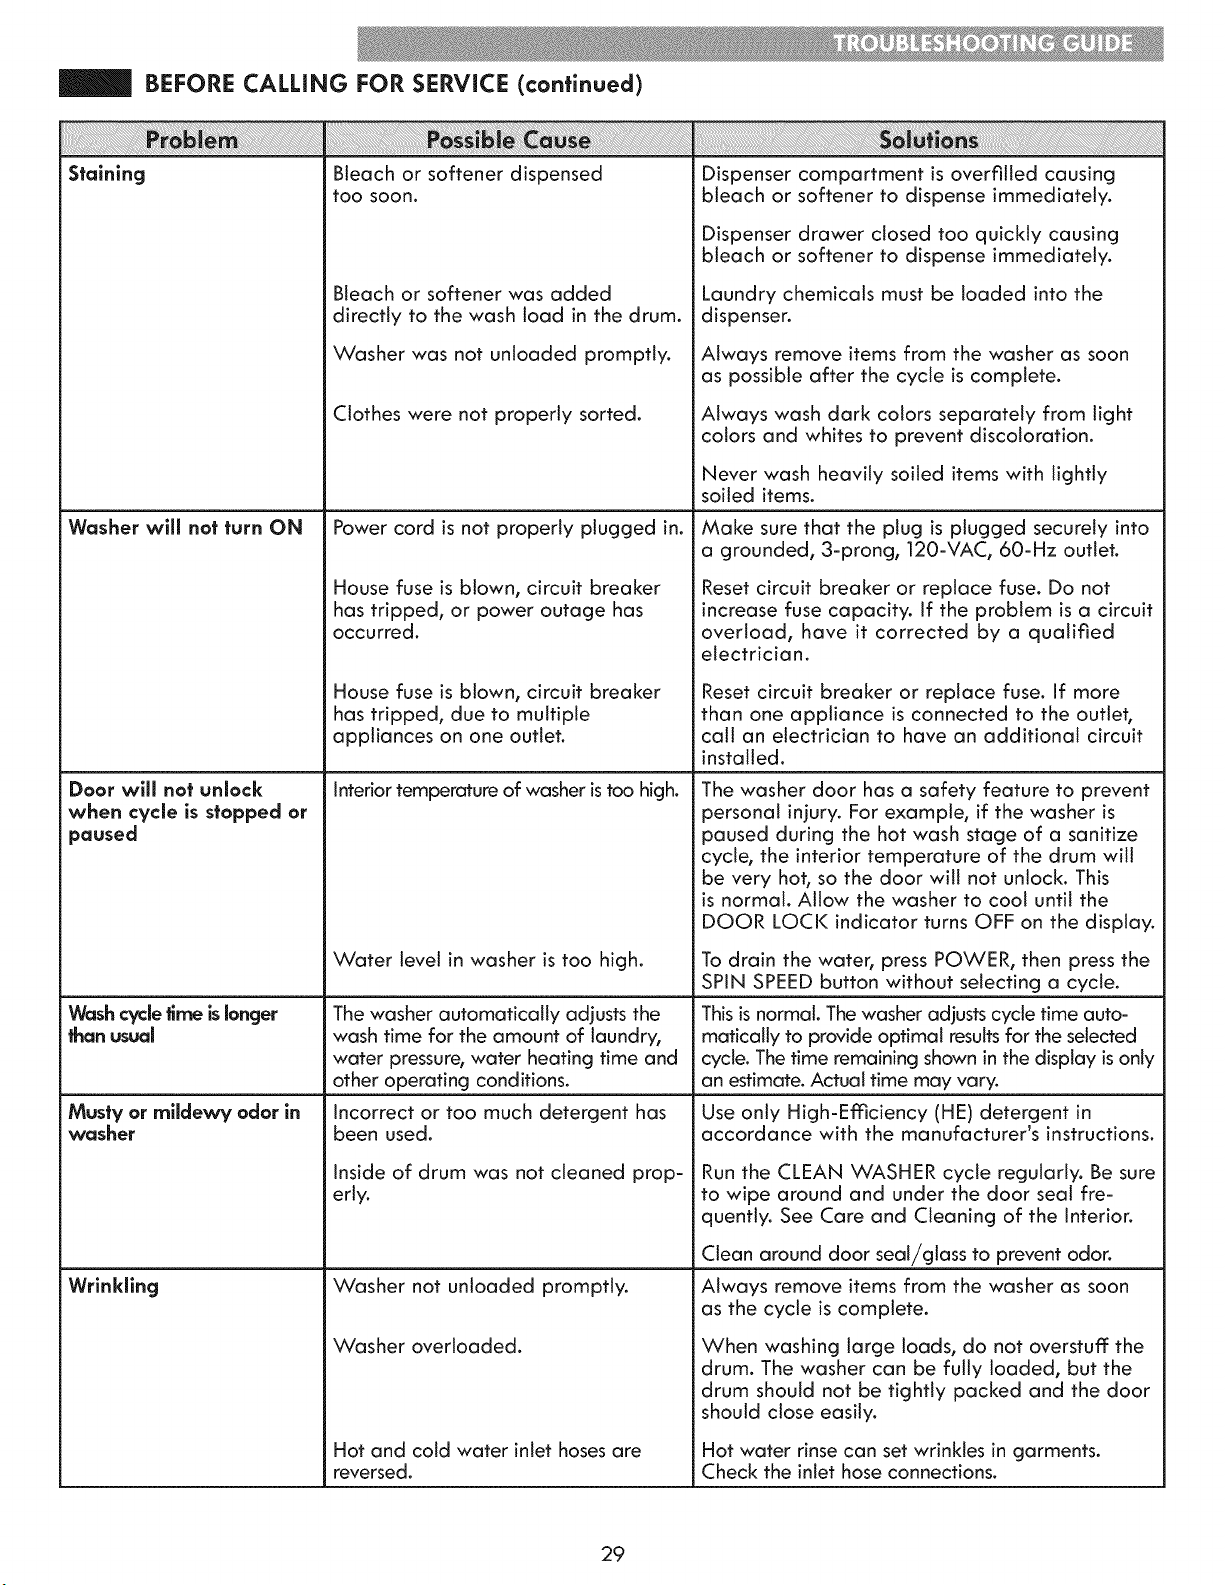
BEFORE CALLING FOR SERVICE (continued)
Staining
Washer will nat turn ON
Bleach or softener dispensed
too soon.
Bleach or softener was added
directly to the wash load in the drum.
Washer was not unloaded promptly.
Clothes were not properly sorted.
Door will not unlock
when cycle is stopped or
paused
Washcycle time is longer
than usual
Musty or rnlldev_ odor in
washer
Wrlnkllncj
Power cord is not properly plugged in.
House fuse is blown, circuit breaker
has tripped, or power outage has
occurred.
House fuse is blown, circuit breaker
has tripped, due to multiple
appliances on one outlet.
interior temperature of washer is too high.
Water level in washer is too high.
The washer automatically adjusts the
wash time for the amount of laundry,
water pressure, water heating time and
other operating conditions.
Incorrect or too much detergent has
been used.
iJi i! ! ! ! ! !i ! ! ! ! ! ! ! ! !! !!i i ii !i !i i i i ii!!i!!i!!i!!i!!i!!i!!i!!i!!i!!i!!i!!i!!i!!i!!i! i ii ii ii iiiiiiiiiiiiiiiiiiiiii!ii ! ii!i!iiiiiiiiiiiiiiiiiiiiiiiiiiiiiiiiiiiiiiiiiiiiiiiiiiiiiiiiiiiiiiiiiiiiii i i! ! i ! ! i ! !!i!i!!!i!i!iiiiiiiiiiiiiiiiiiiii!i!!!!!i!iiiiii i i i ! ! i!i!i ii iiiiiiiiiii i ! !i! ! !i!i i! i iii i i I!!i I i!i ! !i!! ! i11i! i! i! i! i! i! i! i! i! i! i! i! i! i! i! i!! !! !!!!!!!!!!!! !! !! !! !! !! !! ! !! !!! !i !i iiiiiiiiiiiiiiiiiiiiiiiiiiiiiiiiiiiiiiiiiiiiiiiiiiiiiiiiiiiiiiiiiiiiiiiiiiiiiiiiiii iiiiiiiiiii i i i i i i i!i!i!i!i!i!i!i!iiiiiiiiiiiiiiiiiiiiiiiiiiiiiiiiiiiiiiiiiiii i ii!ii! iiiiiiiiiiiiiiiiiiiiiiiiiiiiiiiiiiiiiiiiiiiiiiiiiiiiiiiiiiiiiiiiiiiiiiiiiiiiiiiiiiiiiiiiiii i i ! i !
Dispenser compartment is overfitted causing
bleach or softener to dispense immediately.
Dispenser drawer closed too quickly causing
bleach or softener to dispense immediately.
Laundry chemicals must be loaded into the
dispenser.
Always remove items from the washer as soon
as possible after the cycle is complete.
Always wash dark colors separately from light
colors and whites to prevent discoloration.
Never wash heavily soiled items with lightly
soiled items.
Make sure that the plug is plugged securely into
a grounded, 3-prong, 120-VAC, 60-Hz outlet.
Reset circuit breaker or replace fuse. Do not
increase fuse capacity. If the problem is a circuit
overload, have it corrected by a qualified
electrician.
Reset circuit breaker or replace fuse. If more
than one appliance is connected to the outlet,
call an electrician to have an additional circuit
installed.
The washer door has a safety feature to prevent
personal injury. For example, if the washer is
paused during the hot wash stage of a sanitize
cycle, the interior temperature of the drum will
be very hot, so the door will not unlock. This
is normal. Allow the washer to coot until the
DOOR LOCI( indicator turns OFF on the display.
To drain the water, press POWER, then press the
SPIN SPEED button without selecting a cycle.
This is normal. The washer adjusts cycle time auto-
matically to provide optimal resuttsfor the selected
cycle. The time remaining shown in the display is only
an estimate. Actual time may vary.
Use only High-Efficiency (HE) detergent in
accordance with the manufacturer's instructions.
Inside of drum was not cleaned prop- Run the CLEAN WASHER cycle regularly. Be sure
erty. to wipe around and under the door seat fre-
quently. See Care and Cleaning of the Interior.
Washer not unloaded promptly.
Washer overloaded.
Hot and cold water inlet hoses are
reversed.
Ctean around door seal/glass to prevent odor.
Always remove items from the washer as soon
as the cycle is complete.
When washing large loads, do not overstuff the
drum. The washer can be fully loaded, but the
drum should not be tightly packed and the door
should close easily.
Hot water rinse can set wrinkles in garments.
Check the inlet hose connections.
29

BEFORE CALLING FOR SERVICE (continued)
Your washing machine is equipped with an automatic error-monitoring system to detect and diagnose problems at an
early stage.
Water in the washer
drains slowly or not at
all, or the display shows:
| ,_,c|
Washer tills with water
slowly or not at all, or
the display shows:
Drain hose is kinked, pinched, or clogged.
The drain pump filter is clogged.
Drain discharge is more than 96 inches
above bottom of washer.
Water supply faucets are not open fully.
Water line hoses are kinked, pinched, or
crushed.
Water inlet filters are clogged.
Water supply pressure to faucet or house is
too low.
! i ! !! !!! !i ! !! !! !! !! !i ii i!! i! ! !!!!!!i!i!iiiiiiiiiiiiiii!i! ! !!!!i!i!i!ii!ii!ii!iiiii!i!!!!i!i!i!iiiiiiiiiiiiiiiiiiiiiiiiiiiii iiiiiiiiiiiiiiiiiiiiiiiiiiiiiiiiiiiiiiiiiiiiiiiiiiiiiiiiiiiiiiiiiiiiiiiiiiiiiiii!!! iiiiiiiiiiiiiiiiiiiiiiiii!i! !!!i!iii!i!iii! ! i ! ! i ! ! i!ii!ii!ii!ii!ii!ii!i ! i!i i!i i ii ii ii i i i i i i! ! ! ! !i!i ! ! i!i ii i ii i !i! ! ii ii!i! ii i i i!iiiiiii i iii ii ii ii ii ii ii ii ii ii iiiiii iiiiiiiiiiiiiiiiiiiiiiiiiiiiiiiiiiiiiiiiiiiiiiiiiiiiiiiiiiiiiiiiiiiiii i! !!!i! !!!i! i i i i!i!i!i!i!i!iii!iiiiiiiiiiiiiiiiiiiiiiiiiiiiiiiiiiiiiiiiiiiiiiiiiiiii!i!!i!!i!!i!!i!!i!!i!!i!!i!!i!!ii!i!!!!!!!!!!!!!i!ii!ii!ii!iiiii!iiiiiiiiiiiii iiiiiiiiiiiiiiiiiiiiii i i i i
Make sure the drain hose is free of clogs, kinks,
etc., and is not pinched behind or under the
washer.
Clean the drain pump filter. See Maintenance in
the Care and Cleaning section.
Adjust or repair drain. Maximum drain height is
96 inches.
Make sure that the water faucets are fully open.
Make sure the hoses are not kinked or pinched.
Be careful when moving the washer during
cleaning and maintenance
Clean the inlet filters. See Maintenance in the
Care and Cleaning section.
Check another faucet in the house to make sure
that household water pressure is adequate and
flow is not restricted.
Water supply connected with leak-limiting Hoses designed to limit leaks can trip falsely
hoses, and prevent the washer from filling. The use of
leak limiting hoses is not recommended.
Cycle won't start, or the The door is not closed properly. Make sure that the door is closed properly and
display shows: press the START/PAUSE button. After starting
I ! a cycle, it may take a few moments before thed
n=n _ drum begins to turn or spin. The washer will not
or operate unless the door is locked.
I I- -_! If the door is closed and locked and the open
f_l I_1_ m door error message is displayed, call
for service.
The display shows: Load is too small. Add 1 or 2 similar items to help balance the load.
I _ II- i Load is out of balance. The washer has an imbalance detection and
UL- _ correction system. If individual heavy articles are
loaded (bath mat, bath robe, etc.) and the imbal-
ance is too great, the washer will make several
attempts to restart the spin cycle. If an imbalance
is still detected, the washer will stop and the error
code will display.
The display shows: Control error. Unplug the washer and wait 60 seconds. Reconnect
j j- _ power and try again. If the error reappears, call for
L- L- _ service.
The display shows: Water level is too high due to a faulty Close the water faucets, unplug the washer, and
I l-l_-'-'-I water valve, call for service.
The display shows: The water level sensor is not working Close the water faucets, unplug the washer, and
m OFr-el
he displa_
n_c|
The display
shows:
shows:
correctly.
A motor error has occurred.
A power failure has occurred.
call for service.
Allow the washer to stand for 30 minutes and
then restart the cycle. If the LE error code per-
sists, call for service.
If the power to the washer has been interrupted
during a cycle, the PF error code will display
the next time the washer is turned ON. This will
alert you to the fact that the previous cycle may
not have been completed. Select any cycle to
clear the error code and use the washer.
3O
Kenmore One Year Limited Warranty
When installed, operated and maintained according to all supplied instructions, if this appliance fails due
to a defect in material and workmanship within one year from the date of purchase, call 1-800-4-MY-
HOME® to arrange for free repair.
If this appliance is ever used for other than private family purposes, this warranty applies for only 90 days
from the date of purchase.
This warranty covers ONLY defects in materlal and workmanship, and wlll NOT pay far:
1. Expendable items that can wear out from normal use, including but not limited to filters,
belts, incandescent light bulbs and bags.
2. A service technician to instruct the user in correct product installation, operation
or maintenance.
3. A service technician to clean or maintain this product.
4. Damage to or failure of this product if it is not installed, operated or maintained according to
all instructions supplied with the product.
5. Damage to or failure of this product resulting from accident, abuse, misuse or use for other than its
intended purpose.
6. Damage to or failure of this product caused by the use of detergents, cleaners, chemicals or utensils
other than those recommended in all instructions supplied with the product.
Z Damage to or failure of parts or systems resulting from unauthorized modifications made
to this product.
Disclaimer of implled warranties; limitation of remedies
Customer's sole and exclusive remedy under this limited warranty shall be product repair as provided herein.
Implied warranties, including warranties of merchantability or fitness for a particular purpose, are limited
to one year or the shortest period allowed by law. Sears shall not be liable for incidental or consequential
damages. Some states and provinces do not allow the exclusion or limitation of incidental or consequential
damages, or limitation on the duration of implied warranties of merchantability or fitness, so these
exclusions or limitations may not apply to you.
This warranty applies only while this appliance is used in the United States or Canada%
This warranty gives you specific legal rights, and you may also have other rights which vary from state to
state.
In-home repair service is not available in all Canadian geographical areas, nor will this warranty cover
user or servicer travel and transportation expenses if this product is located in a remote area (as defined by
Sears Canada Inc.) where an authorized servicer is not available.
Sears Brands Management Corporation, Hoffman Estates, IL 60179
Sears Canada Inc., Toronto, Ontario, Canada M5B 2C3
31

32
INSTRUCCIONES IMPORTANTES SOBRE SEGURIDAD ..... 34=36
REQUISITOS DE CONEXION A TIERRA ...................................... 36
FUNCIONES Y VENTAJAS
Piezas y componentes cloves ..................................................... 37
Accesorios incluidos .................................................................... 37
Accesorios opcionales ................................................................. 37
REQUISITOS DE INSTALACI6N
Dimensiones y especiflcaciones clave ...................................... 38
C6mo elegir la ubicaci6n m6s adecuada ................................ 38
Tipo de piso .................................................................................. 38
Espacios de instalaci6n ............................................................... 38
INSTRUCCIONE$ PARA LA INSTALACION
Desempaquetado y desembalaje de pernos de transporte.. 39
Conexi6n de Jas tuber[as de agua ............................................. 40
ConexJ6n de la manguera de drenaje ...................................... 41
Conexi6n del suministro el_ctrico ............................................... 41
Nivelaci6n de la lavadora ......................................................... 42
Instalaci6n de almohadillas antirresbalantes (opcional) ....... 42
INSTRUCCIONES DE USO
Funciones del panel de controi ................................................... 43
Manejo de la lavadora ................................................................. 44
Guia de ciclos ......................................................................... 45=46
Clasificaci6n de las cargos de lavado ..................................... 47
Acerca della gaveta del dispensador ...................................... 48
Uso del detergente y dispensador ............................................. 49
Pantalla de tJempo y estado ...................................................... 50
Botones modificadores de ciclo .................................................. 51
Ciclos de vapor y botones de opci6n ....................................... 52
Funciones especiaies .................................................................... 53
CUIDADO Y LIMPIEZA
Limpieza regular ..................................................................... 54-55
Mantenimiento ........................................................................ 56=57
Limpieza de los filtros de entrada de agua ......................... 56
Limpieza del flltro de bomba de drenaje ............................ 57
GUiA DE SOLUCION DE PROBLEMAS
Sistima KENMORE CONNECT TM .............................................. 58
Sonidos normales que se pueden escuchar ............................. 59
Antes de solicitar asistencia t6cnica .................................... 59=61
GARANTiA ........................................................................................ 62
En el espacio de abajo, registre la fecha de la compra_ el modelo y
nOmero de serie del producto. Usted encontrar6 el nOmero de modelo
y de serie impreso en una placa de identificaci6n ubicada dentro de la
puerto de la lavadora. Tango esta informaci6n a mano siempre que se
ponga en contacto con Sears en relaci6n con su producto.
N. ° de modelo
Fecha de compra
N. ° de serie
Guarde estas instrucciones y su recibo de venta para
referencia futura.
Acuerdos maestros de protecci6n
Felicidades por haber realizado una compra inteligente. Su nuevo
producto Kenmore ® est6 dise_ado y fabricado para brindar a_os
de funcionamiento fiable. No obstante, al igual qua cualquier otro
producto, es posibie qua requiera un mantenimiento preventivo
o alguna reparaci6n coda cierto tiempo. Ahi es cuando contar
con un Acuerdo maestro de protecci6n puede ayudarle a ahorrar
tiempo y dinero.
El acuerdo maestro de protecci6n tambi6n Io ayuda a extender la
vida Otil de su nuevo producto. El Acuerdo* incluye los siguientes
puntos:
*Piezas y mano de obra necesarias para mantener los productos
en buen funcionamiento bajo un uso normal, no Onicamente los
defectos de fabricaci6n. Nuestra cobertura va mucho mas all6 de la
garantia del productoo No hay ninguna falla funcional deducible que
se excluya de la cobertura: se trata de una protecci6n real.
*Servicio experto mediante un grupo de m6s de 10.000 t@cnicos
autorizados de Sears, Io que significa que alguien en quien puede
confiar va a trabajar en su producto.
"Visitas a su domicilio ilimitadas y servicio en todo el pais todas
las veces quenos necesite, cuando nos necesite.
*Gorontio por defe¢tos de fobrlcoci6n: reempiazo de su producto
si se producen cuatro o m6s fallas dentro de los doce meses.
* Reemplazo del producto: si 8ste no puede repararse.
* Control de mantenimiento preventivo anual a pedido, sin cargos
extra.
*Ayuda r6pida pot tel_fono: Io Ilamamos resoluci6n r6pida.
Soporte telef6nico de un representante de Sears sobre todos los
productos. Piense en nosotros como un "manual de usuario que
habla".
* Protecci6n de picos de tensi6n contra dodos el6ctricos debidos a
fluctuaciones de la energfa.
* Protecci6n anual de $250 por p_rdida de comida que se
haya producido como resultado una falla mec6nica cualquier
refrigerador o congelador cubierto.
Reintegro por alquiler sila reparaci6n de su producto tarda mc_s
de io prometido.
* 25°/0 de descuento del precio normal de cualquJer servJcJo de
reparaci6n no cubierto y de piezas relacionadas instaladas.
Una vez que adquiera el Acuerdo, s61o tiene qua hacer un Ilamado
telef6nico para programar el servicio. Puede Ilamar en cualquier
momento de dia o de noche, o coordinar un servicio tScnico online.
El Acuerdo maestro de protecci6n es una compra sin riesgos.
Si usted Io cancela por cualquier raz6n durante el periodo de
garantia del producto, le devolveremos la totalidad del dinero, o
una devoiuci6n prorrateada en cualquier momento despu6s de que
expire el periodo de garantia. Adquiera hoy mismo su Acuerdo
maestro de protecci6n.
Se aplican algunas limitaciones y exclusiones.
Para consultar precios y e informaci6n adicional en los EE. UU.
llame al 1=800=827=6655.
* La cobertura en Canad_ varia en algunos aspectos.
Para m6s detalles, Ilame a Sears Canad6 a 1=800=361=6665.
Servicio de instalaci6n de Sears
Para solicitar la instalaci6n profesional de Sears de
electrodom6sticos, dispositivos para apertura de puertas de garaje,
calentadores de agua y otros electrodom6sticos, Ilame en los EE.
UU. o Canad6 a: 1-800-4-MY-HOME ®.
33
En este manual y en su electrodom6sti¢o figuran muchos mensajes importantes de seguridad. Lea y ¢umpla siempre
con todos los mensajes de seguridad.
#ste es el sfmbolo de alerta de seguridad. Este sfmbolo Io alerta sobre posibles riesgos que pueden resultar en da_os
sobre la propiedad y/o lesiones fisicas graves o la muerte.
Todos los mensaies de seguridad incluir6 el sfmbolo de alerta y la palabra PELIGRO o ADVERTENCIA.
Estas palabras significan:
Si no se siguen estas instrucciones sobre seguridad, se pueden producir da_os materiales y/o
lesiones personales graves o la muerte.
Si no se siguen estas instrucciones sobre seguridad, se pueden producir da_os materiales y/o
lesiones personales graves o la muerte.
Todos los mensajes de seguridad le indicar6n cu61 es el peligro potencial, le indicar6n c6mo
reducir el riesgo de lesiones y Io que puede suceder si no se siguen las instrucciones.
Para reducir el riesgo de incendio, descarga el_ctrica o
lesiones personales al utilizar este electrodorn_stico, siga estas
precauciones b6sicas, entre las que se inctuyen las siguientes:
"Antes de utilizar la lavadora, es necesario instalarla
correctamente, seg6n se describe en este manual,
" No lave arficulos que previamente hayan sido limpiados, lavados,
sumergidos o salpicados con gasolina, disolventes de limpieza en
seco o cualquier otra sustancia inflamable o explosiva, ya que
pueden desprender vapores que podrfan incendiarse o explotar.
* No agregue gasolina, disolventes de limpieza en seco u otras
sustancias explosivas al agua de lavado° Estas sustancias emanan
vapores que podrfan encenderse o explotan
* Bajo ciertas condiciones, se puede producir gas hidr6geno en un
sistema de agua caliente que no se haya usado por un plazo de
2 semanas o m6s. EL GAS HIDR6GENO ES EXPLOSIVO. Si no se
ha usado el sistema de agua caliente durante tal perfodo, antes
de utilizar la lavadora, abra todas las Ilaves de agua caliente y
deje que el agua fluya durante algunos minutos. Esto liberar6
cualquier gas hidr6geno acumulado. Ya que el gas es inflamable,
no fume ni use ninguna llama abierta durante este perfodo.
"No deie que los ni_os jueguen en la lavadora o dentro de
ella. Cuando se usa la lavadora cerca de los ni_os se necesita
supervisi6n minuciosa.
"Antes de poner la lavadora fuera de servicio o tirarla, retire la
puerta para que los ni_os no puedan trepar al interior.
* No instale ni guarde la lavadora cuando est_ expuesta a la
intemperie o temperaturas de congelamiento.
" No toquetee los ¢ontroles,
* No repare ni cambie ninguna pieza de la lavadora ni intente
dar un mantenimiento diferente al descrito en este manual.
Recomendamos enf_ticamente que el mantenimiento Io brinde
una persona calificada.
* Vea las Instrucciones para la instalaci6n para referirse a los
requisitos de ¢onexi6n a tierra.
* Siga SIEMPRE las instrucciones de ¢uidado de la prenda provistas
por el fabricante de las prendas.
" No coloque prendas expuestas a aceite comestible en su
lavadora. Las prendas contaminadas con aceites comestibles
podrfan contribuir a la formaci6n de una reacci6n qu[mica que
cause que una carga de lavado se incendie.
* Use suavizantes o productos para eliminar est_tica Onicamente
del modo recomendado por el fabricante.
* Esta lavadora no esta dise_ada para uso marino o instalaciones
m6viles tales como vehfculos recreativos, aeronaves, etc.
* Cierre las Ilaves de agua y desenchufe la lavadora si va a deiar
la lavadora sin funcionar por un perfodo prolongado de tiempo,
¢omo durante las vacaciones.
* El material de embalaje podrfa resultar peligroso para los ni_os.
E×iste riesgo de asfl×iao Mantenga todos los elementos de
embaiaje fuera del alcance de los ni_os.
* Antes de cargar la lavadora, siempre revise que no haya ob]etos
extra_os en su interior. Mantenga la puerta ¢errada ¢uando no se
use,
* ADVERTENCIA: Este producto contiene qu[micos conocidos por
el Estado de California como causantes de ¢_ncer y defectos
de nacimiento u otros da_os reproductivos. L_vese las manos
despu_s de usarlo.
34
Pore reducir el riesgo de incendio, descargo el_ctrica o
lesiones personales ol utilizer este electrodom_stico, siga estas
precauciones b6sicas, entre los que se incluyen los siguientes:
* Desenchufe Io Iovodaro antes de proceder a su limpiezo para
evitar posibles descargas el6ctricas.
"No utilice nunca productos quimicos fuertes, limpiadores
abrasivos o disolventes pare limpiar la lavadora. Da_ar6n el
acabado.
* No coloque patios grasosos o oceitosos sabre Io lavadoro. Estas
sustancias despiden vapores que podr[an prender fuego a los
materiales.
* No lave prendas que est_n sucias con oceite vegetal o de
cocina. Las mismas pueden quedar con algo de aceite luego del
lavado y prenderse fuego.
* Desconecte este electrodom_stico de Io tomo de corriente
antes de realizer cualquier funci6n de montenimiento. Colocar
los controles en la posici6n OFF (apagado) no desconecto el
electrodom_stico de Io tomo de corriente. Si no se cumple con
esta advertencia se podrc]n producir lesiones graves, incendios,
descargas el6ctricas o muerte.
• No combine detergentes, suavizantes y arras productos de
lavanderio de diferentes fabricantes en una misma cargo, a
menos que asi se especifique en la etiqueta.
• No mezcle blanqueador con clara con omoniaco o 6cidos, coma
vinagre. Sigo los direcciones del poquete oi usor productos de
lavanderio. Un uso indebido puede producir gases venenosos, Io
que puede resultar en heridas graves o la muerte.
* No coloque los manos dentro de Io Iavadoro cuando sus partes
est_n en movimiento. Antes de cargar, descargar o ogregar
prendas, presione Io perilla selectora de ciclos y espere basra
que Io tino se detengo totalmente antes de meter los monos en su
interior. Si no se cumple con esta advertencia se podr6n producir
lesiones graves, incendios, descargas el_ctricas o muerte.
* Consulte las INSTRUCC!ONES DE INSTALACI6N pare obtener
informaci6n detollado de los procedimientos de conexi6n o tierro. Junto
con la lavadora se encuentran las instruccionesde instalaci6n como
referenda. Si cambiara de lugar la lavadora, contrate a una persona del
servicio califJcada pare que la controle y reinstale. Si no se cumple con
esta advertencia se podrc]n producir lesiones graves, incendios, descargas
el_ctricas o muerte.
* Bojo ninguna circunstancio, carte o quite Io tercero davija (de conexi6n o
tierro) del cable el&.--trico. Si no se cumple con esta advertencia se podr6n
producir lesiones graves, incendios, descargas el_ctricas o muerte.
* Par motivos de seguridad personal, este electrodom_stico debe estor
conedodo o tierro adecuadamente. Si no se cumple con esta advertencia
se podr6n producir lesiones graves, incendios, descargas el_ricas o
muerte.
* El cable de olimentoci6n de este eledrodom_stico est6 equipado con un
enchufe de tres clcrvijas (de conexi6n o tierro) qua coincide con una tome
de corriente paro tres clavijas (de cortexi6n a tierro) pare asi minimizar la
posibilidad de descarga el_ctrica de este electrodom_stico.
* Esto Iavodoro debe estor enchufado o una tome de corriente de 120 V de
CA, 60 Hz y con conexi6n a tierro. Si no se cumple con esta advertencia
se podr6n producir lesiones graves, incendios, descargas el_ricas o
muerte.
* Solicite o un electricisto colificado que controle la tomo de corriente y
el circuito el_'trico paro osegurorse de que Io tome de corriente est6
corredamente conectoda o tierro. Si no se cumple con esta advertencia se
podr6n producir lesiones graves, incendios,descargas el_ctricas o muerte.
* Si _nicomente se dispone de una tomo de corriente de 2 clavijas, ser6
responsobilidad y obligaci6n suyo sustituirlo par otto de 3 clavijas, de
conexi6n o tierro, y odecuada paro este uso. Si no se cumple con esta
adverfencia se podr6n producir lesiones graves, incendios,descargas
el_ctricas o muerte.
* No instolar sabre olfombro. Instole Io lavodoro sabre piso firme. Si no se
cumple con esta advertencia, se podr6n producir da_os per filtraciones.
* No elimine el cable de conexi6n a tierro. No use un adaptodor o
prolongador. Enchufe en una tomo de corriente con conexi6n a tierro
de 3 clavijas. Si no se cumple con estas advertencias se podr6n producir
lesiones graves, incendios, descargas el_ctricas o muerte.
• Lo lavadoro deberio estar siempre conectado o un enchufe
individual con un indice de voltaje equivalente oi que figure en
su etiqueta de caracteristicas t_cnicas. Esto garantiza el mejor
funcionamiento y adem6s previene ia sobrecarga de los circuitos
del hogar, Io cual podria ocasionar riesgos de incendio debido al
recaientamiento de cables.
• Nunco desenchufe su Iavadoro jalondo del cable de corriente.
Siempre tome su enchufe firmemente y jale del mismo hacia fuera
para retirarlo. Si no se cumple con esta advertencia se podr6n
producir lesiones graves, incendios, descargas elSctricas o muerte.
• Repare o reemplace de inmediato todos los cables de corriente
pelados o con cualquier tipo de da_o. No use un cable con
cortaduras o obrasi6n sabre su extensi6n o extremos. Consulte a
una persona calificada dei servicio t_cnico. Si no se cumple con
esta advertencia se podr6n producir iesiones graves, incendios,
descargas el6ctricas o la muerte.
• AI instalar o cambiar de lugar Io Iavadora, evite todo tipo de
cortes u arras do_os en el cable de corriente. Si no se cumple
con esta advertencia, se podr6n producir lesiones graves,
incendios, descargas el_ctricas o muerte.
• Lo Iavadoro debeser instalada y conectada o tierro par uno
persona especializado del servicio t_cnico cumpliendo con los
c6digos locales para prevenir riesgos de descargas y asegurar la
estabilidad durante el funcionamiento.
* Lo Iavadoro es pesado. Se necesitan dos o m6s personas paro
instalar y traslodar el electrodom_stico. Si no se cumple esta
advertencia, se podr6n producir da_os en la propiedad y graves
lesiones personales.
. No olmacene ni instale la Iavadoro en lugares expuestos o
temperatures de congelaci6n ni o inclemencias meteorol6gicas.
Si no se cumple con esta advertencia, se podr6n producir da_os
par filtraciones.
"Con el fin de reducir el riesgo de descargas el_ctricas no
instale Io Iavadoro en espacios hgmedos. Si no se cumple con
esta advertencia, se podr6n producir lesiones graves, incendios,
descargas el6ctricas o muerte.
35
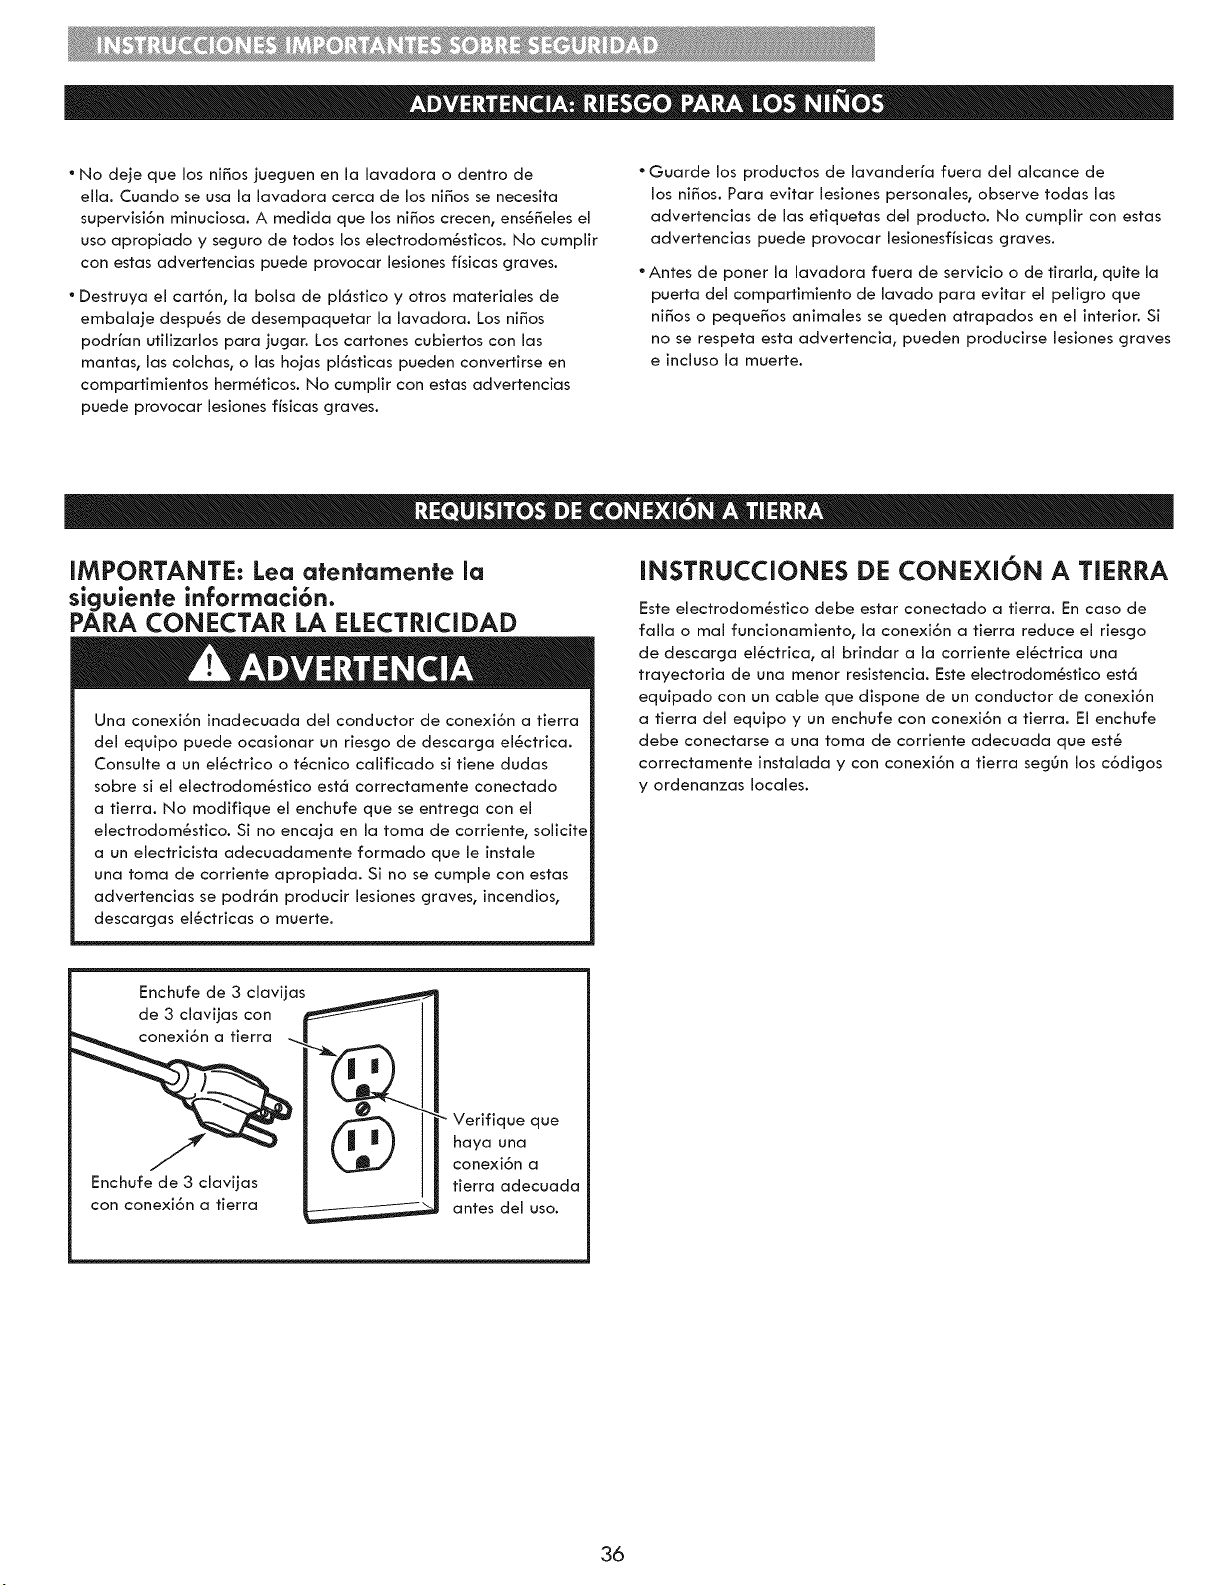
o No deje que los ni_os jueguen en la lavadora o dentro de
ella. Cuando se usa la lavadora cerca de los ni_os se necesita
supervisi6n minuciosa. A medida que los ni_os crecen, ens6_eles el
uso apropiado y seguro de todos los electrodomSsticos. No cumplir
con estas advertencias puede provocar lesiones fisicas graves.
Destruya el cart6n, la bolsa de pl6stico y otros materiales de
embalaje despu6s de desempaquetar la lavadora. Los ni_os
podrfan utilizarlos para jugar. Los cartones cubiertos con las
mantas, las colchas, o las hojas pl6sticas pueden convertirse en
compartimientos hermSticos. No cumplir con estas advertencias
puede provocar lesiones fisicas graves.
Guarde los productos de lavanderfa fuera del alcance de
los ni_os. Para evitar lesiones personales, observe todas las
advertencias de las etiquetas del producto. No cumplir con estas
advertencias puede provocar lesionesfisicas graves.
Antes de poner la lavadora fuera de servicio o de firarla, quite la
puerta del compartimiento de lavado para evitar el peligro que
ni_os o peque_os animales se queden atrapados en el interior. Si
no se respeta esta advertencia, pueden producirse lesiones graves
e incluso la muerte.
IMPORTANTE: Lea atentamente la
siguiente inforrnaci6n,
PARA CONECTAR LA ELECTRECIDAD
Una conexi6n inadecuada del conductor de conexi6n a tierra
del equipo puede ocasionar un riesgo de descarga el6ctrica.
Consulte a un el_ctrico o tScnico calificado si tiene dudas
sobre si el electrodomSstico est6 correctamente conectado
a tierra. No modifique el enchufe que se entrega con el
electrodomSstico. Si no encaja en la toma de corriente, solicite
a un electricista adecuadamente formado que le instale
una toma de corriente apropiada. Si no se cumple con estas
advertencias se podr6n producir lesiones graves, incendios,
descargas el6ctricas o muerte.
INSTRUCCIONES DE CONEXI6N A TIERRA
Este electrodomSstico debe estar conectado a tierra. En caso de
falla o real funcionamiento, la conexi6n a tierra reduce el riesgo
de descarga el_ctrica, al brindar a la corriente el6ctrica una
trayectoria de una menor resistencia. Este electrodomSstico est6
equipado con un cable que dispone de un conductor de conexi6n
a tierra del equipo y un enchufe con conexi6n a tierra. El enchufe
debe conectarse a una toma de corriente adecuada que est8
correctamente instalada y con conexi6n a tierra segOn los c6digos
y ordenanzas locales.
Enchufe de 3 clavijas
de 3 clavijas con
Enchufe de 3 claviias
con conexidn a fierra
Verifique que
haya una
conexi6n a
tierra adecuada
antes del uso.
36
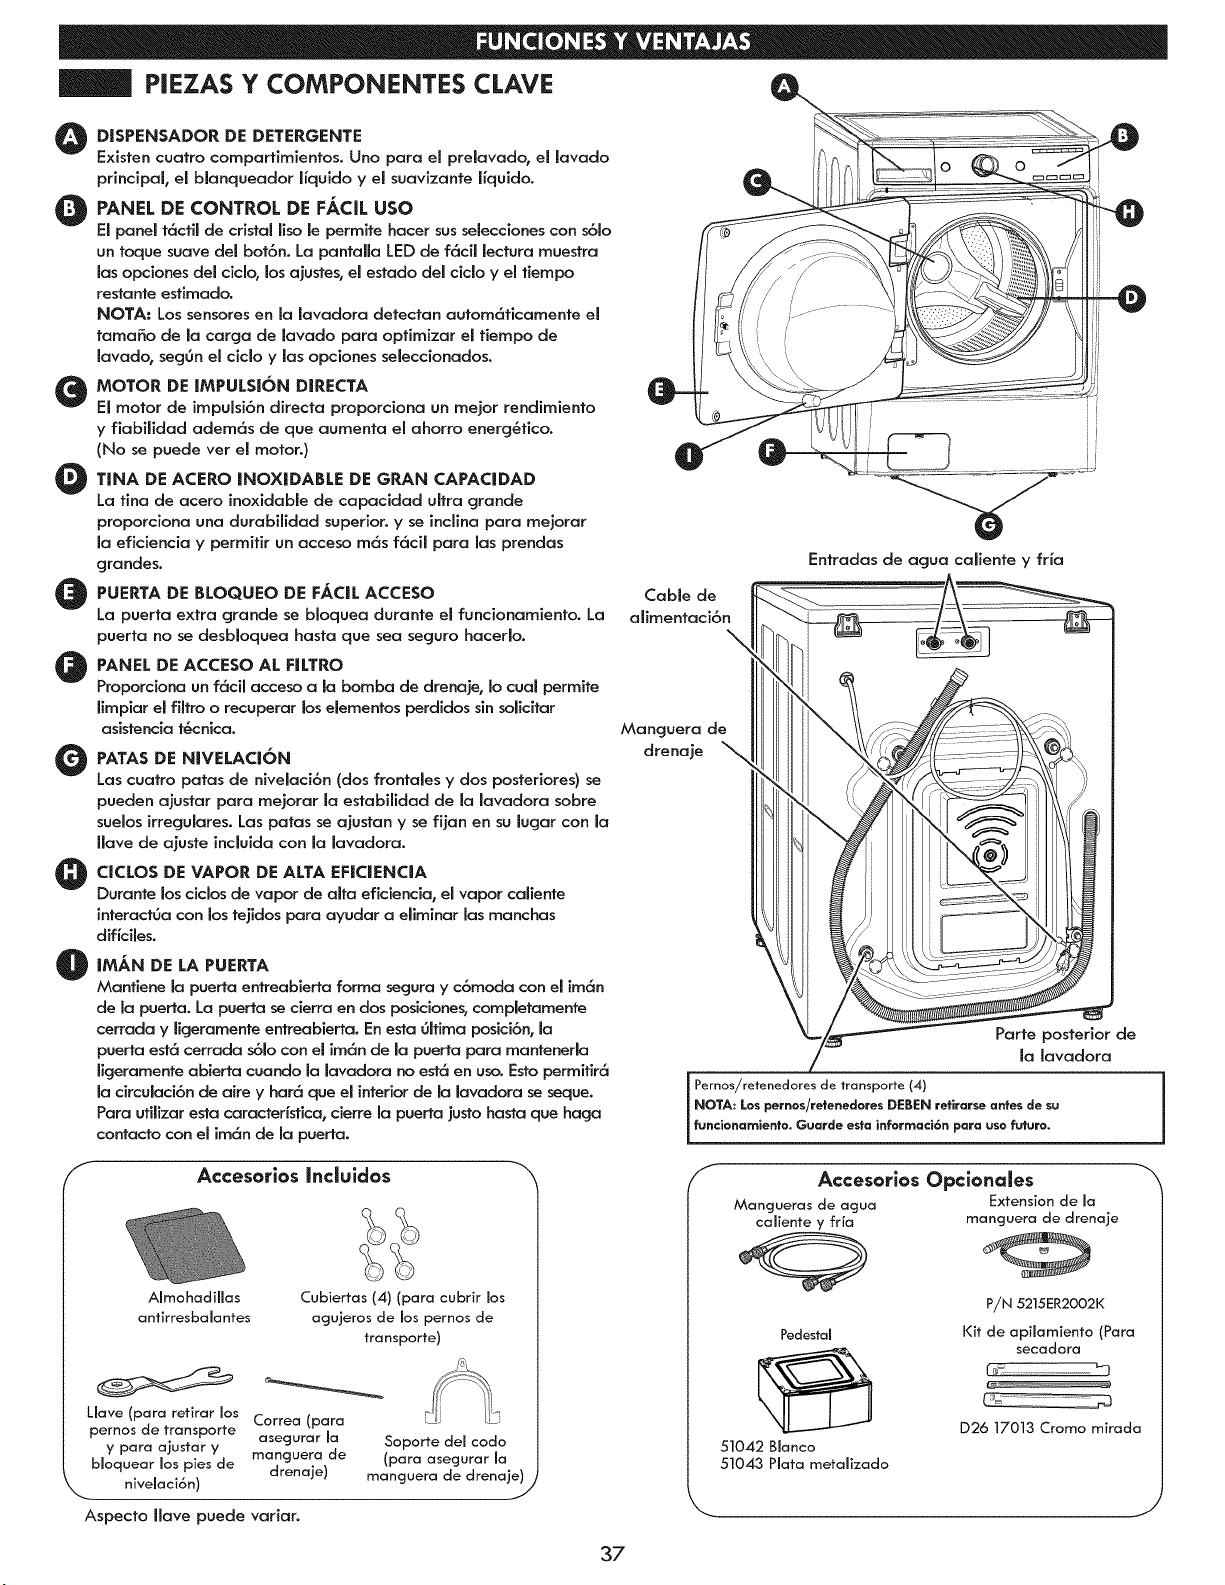
P[EZAS Y COMPONENTE$ CLAVE
O |SPENSADOR DE DETERGENTE
Existen cuatro comparfimientos. Uno para e| pre[avado, e| [avado
principal, e| b[anqueador [[quido y e| suavizante [iquido.
O PANEL DE CONTROL DE FAC[L USO
E| pane[ t6cti[ de crista[ ||so [e permite hacer sus se[ecciones con s6[o
un toque suave de[ bot6n. La panta[[a LED de f6ci[ [ectura muestra
[as opciones de[ cic[o, |us ajustes, e| estado de[ cic[o y e| fiempo
restante esfimado.
NOTA: Los sensores en la lavadora detectan autom6ticamente el
tamaSo de [a carga de [avado para opfimizar el fiempo de
lavado, seg6n e| cic[o y las opciones se[eccionados.
_ MOTOR DE |MPULSJ6N DiRECTA
E| motor de [mpu[sJ6n directa proporciona un me|or rendimiento
y fiabi[idad adem6s de que aumenta e| ahorro energ_fico.
(No se puede ver e| motor.)
O |NA DE ACERO |NOXJDABLE DE GRAN CAPAC|DAD
La t[na de acero inoxidab[e de capacidad ultra grande
proporciona una durabi[idad superior, y se inciina para mejorar
[a eficlencia y permifir un acceso m6s f6ci[ para [as prendas
grandes.
PUERTA DE BLOQUEO DE FACIL ACCESO
La puerta extra grande se b[oquea durante e| funcionamlento. La
puerta no se desb[oquea hasta que sea seguro hacer[o.
PANEL DE ACCESO AL F|LTRO
Proporclona un f6ci[ acceso a [a bomba de drenaje, [o cua[ permite
limpiar e| fi[tro o recuperar |us e[ementos perdidos sin so[icitar
asistencia t_cnica.
O ATAS DE NJVELACION
Las cuatro paras de nive[aci6n (dos fronta[es y dos posteriores) se
pueden ajustar para mejorar [a estabi[idad de [a [avadora sobre
sue|as irregu[ares. Las patas se ajustan y se fijan en su [ugar con [a
[[ave de ajuste inc[u[da con [a [avadora.
Q |CLOS DE VAPOR DE ALTA EFJCIENC|A
Durante |us cic[os de vapor de a[ta eficiencia, e| vapor ca[iente
[nteradOa con |us tejidos para ayudar a e[iminar [as manchas
dif[ci[es.
|MAN DE LA PUERTA
Mantiene [a puerta entreabierta forma segura y c6moda con e| im6n
de [a puerta. La puerta se c[erra en dos posiciones_ ¢omp[etamente
cerrada y [[geramente entreabierta. En esta 6[tima posici6n_ [a
puerta est6 cerrada s6[o con e| im6n de [a puerta para mantener[a
[[geramente abierta cuando [a [avadora no est6 en uso. Esto permitir6
[a circu[aci6n de aire y har6 que e| interior de [a [avadora se seque.
Para uti[izar esta caracter{stica_ cierre [a puerta justo hasta que haga
contacto con e[ im6n de [a puerla.
Cable de
a[imentaci6n
Entradas de agua ca[iente y fr[a
Manguera de
drenaje
Parte posterior de
[a [avadora
i
Pernos/retenedores de transporte (4)
[ NOTA: Lospernos/retenedores DEBENrefirarseantes de su
funcionamienfo. Guarde estainformaci6n para usofuturo.
F Accesorios Incluldos "_
A[mohadil[as
antirresba[antes
Cubiertas (4) (para cubrir |us
agujeros de |us pernos de
transporte)
Llave (para retirar los Correa (para
pernos de transporte
y para ajustar y asegurar [a Soporte de[ codo
manguera de (para asegurar [a
b[oquear |us pies de drenaje)
nive[aci6n) manguera de drenaje)
/
Aspecto [[ave puede variar.
/ Accesorios Opc[ona[es _'
Mangueras de agua Extension de [a
ca[iente y fria manguera de drenaje
P/N 5215ER2002K
Pedestal Kit de api[amiento (Para
secadora
D26 17013 Cromo mirada
51042 B[anco
51043 Plata meta[izado
J
37
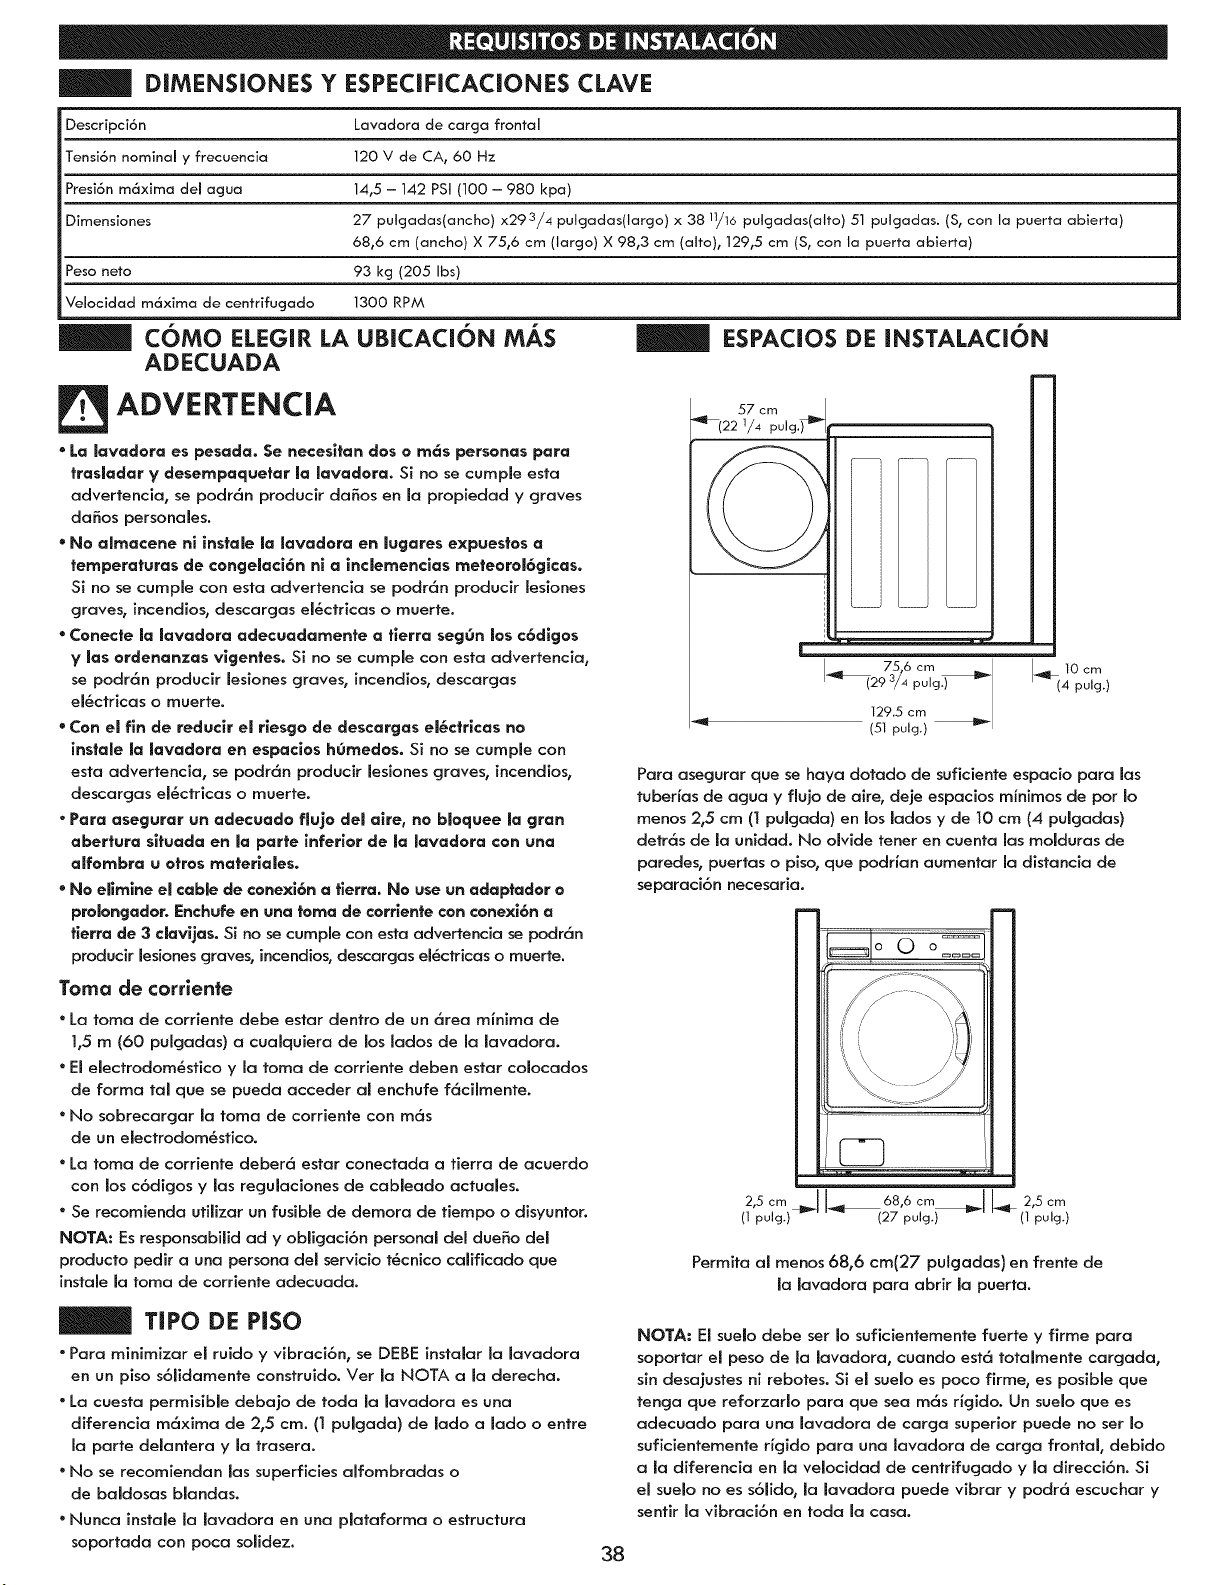
DIMENSIONES Y ESPECIFICACIONES CLAVE
Descripci6n
Tensi6n nominal y frecuencia
Presi6n m6xima del acjua
Dimensiones
Peso nero
Velocidad m6xima de centdfucjado
coma ELEGIR LA UBICACI6N MAS
ADECUADA
Lavadoro de carcja frontal
120 V de CA, 60 Hz
14,5 - 142 PSi (100 - 980 kpa)
27 putcjadas(ancho ) x293/4 putcjadas(larcjo ) x 3811/16 putcjadas(atto) 51 pulcjadas. (S, con la puerto abierta)
68,6 cm (ancho) X 75,6 cm (largo) X 98,3 cm (alto), 129,5 cm (S, con la puerto abierta)
93 kcj (205 Ibs)
1300 RPM
ESPACIOS DE INSTALACION
ADVERTENCIA
* La lavadora es pesada. Se necesifan dos o m6s personas pare
frasladar y desempaquefar la lavadora. Si no se cumple esta
advertencia, se podr6n producir da_os en la propiedad y graves
doses personales.
* No almacene ni insfale la lavadora en lugares expuesfos a
temperatures de congelaci6n ni a inclemencias meteorol6gicas.
Si no se cumple con esta advertencia se podr6n producir lesiones
graves, incendios, descargas el&ctricas o muerte.
* Conecte la lavadora adecuadamenfe a fierra segOn los c6diges
y los ordenanzas vigentes. Si no se cumple con esta advertencia,
se podr6n producir lesiones graves, incendios, descargas
el_ctdcas o muerte.
"Con el fin de reducir el riesgo de descargas el_ctricas no
instale la lavadora en espaclos h_medos. Si no se cumple con
esta advertencia, se podr6n producir lesiones graves, incendios,
descargas el_ctricas o muerte.
- Pora asegurar un adecuado fluja del aire, no bloquee la gran
abertura situada en la perle inferior de la lavadora con una
alfombra u afros maferiales.
* No eEmine el cable de conexi6n a tierra. No use un adaptador a
prolongador. Enchufe en una toma de corriente con conexi6n a
fferra de 3 davijas. Si no se cumple con esta advertencia se podr6n
produclr lesiones graves, incendios, descargas el_ctricas o muerte.
Toma de corrienfe
" La lama de corriente debe estar dentro de un 6rea minima de
1,5 m (60 pulgadas) a cualquiera de los lades de la lavadora.
"El electrodom_sfico y la lama de corriente deben estar colocados
de farina tal que se pueda acceder al enchufe f6cimente.
- No sobrecargar la lama de corriente con m6s
de un electrodom&sfico.
"La lama de corriente deber6 estar conectada a tierra de acuerdo
con los c6digos y las regulaciones de cableado actuales.
- Se recomienda utilizar un fusible de demora de tiempo o disyuntor.
NOTA: Es responsabilid ad y obligaci6n personal del dueSo del
producto pedir a una persona del servicio tScnico calificado qua
instale la toma de corriente adecuada.
TIPO DE PISO
"Para minimizar el ruido y vibraci6n, se DEBE instalar la lavadora
en un piso s6iidamente construido. Ver la NOTA a la derecha.
"La cuesta permisible deba]o de toda la lavadora es una
diferencia m6xima de 2,5 cm. (1 pulgada) de lade a lade o entre
la porte delantera y la trasera.
* No se recomiendan los superficies alfombradas o
de baldosas blandas.
" Nunca instaae la lavadora en una plataforma o estructura
soportada con poca solidez.
38
57 cm
_(22 ]/4
75 6 cm _ _ 10 cm
I (29 3/4 pulg.) (4 pug.
129.5 cm
(51 pulg.)
Para asegurar que se haya dorado de suficiente espacio para los
tuberJas de agua y fiujo de aire, deje espacios minimos de per Io
menos 2,5 cm (1 pulgada) en los lades y de 10 cm (4 puigadas)
detr6s de la unidad. No olvide tener en cuenta las molduras de
paredes, puertas o piso, que podrlan aumentar la distancia de
separaci6n necesaria.
2,5 cm q_J L"_r 68,6 cm _,_J _ 2,5 cm
(lpulg.) _ " (27pulg.) (lpulg.)
Permita al menos 68,6 cm(27 putgadas) en frente de
Ja Javadora para abrir Ja puerto.
NOTA: EI suelo debeser Io suficientemente fuerte y firme para
soportar el peso de la lavadora, cuando est6 totalmente cargada,
sin desajustes ni rebates. Si el suelo es pace firme, es posible qua
tonga qua reforzarlo para qua sea m6s rigido. Un suelo qua es
adecuado para una lavadora de cargo superior puede no set Io
suficientemente rigido para una lavadora de cargo frontal debido
a la diferencia en la vebcidad de centrifugado y la direcci6n. Si
el suelo no es s6ffdo, la lavadora puede vibrar y podr6 escuchar y
sentir la vibraci6n en toda la casa.
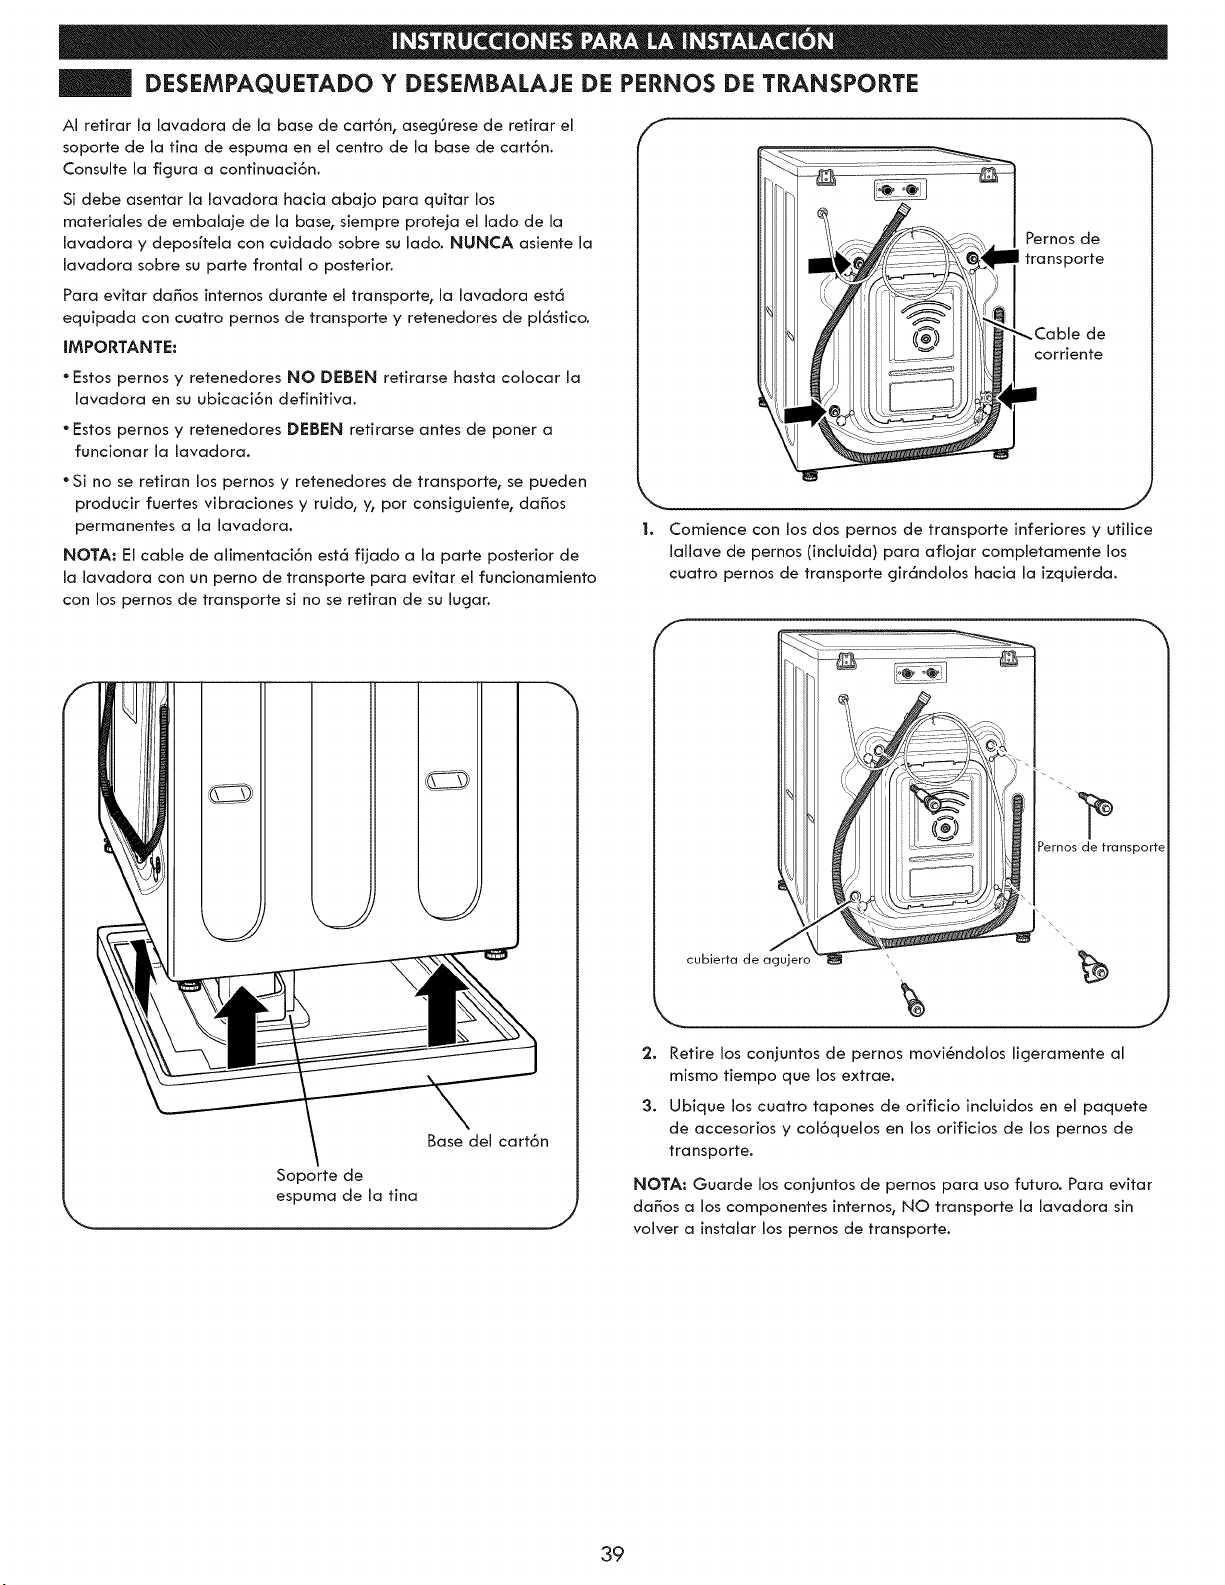
DESEMPAQUETADO Y DESEMBALAJE DE PERNOS DE TRANSPORTE
AI retirar la lavadora de la base de cart6n, asegOrese de retirar el
soporte de Ja tina de espuma en el centro de la base de cart6n.
ConsuJte la figura a continuaci6n.
Si debe asentar la lavadora hacia abaio para quitar los
materiales de embalaie de la base, siempre proteja el Jado de Ja
lavadora y deposffela con cuidado sobre su lado. NUNCA asiente la
lavadora sobre su parte frontal o posterior.
Para evitar da_os internos durante el transporte, Ja Javadora est_
equipada con cuatro pernos de transporte y retenedores de pl_stico.
IMPORTANTE:
"Estos pernos y retenedores NO DEBEN retirarse hasta colocar la
lavadora en su ubicaci6n definitiva.
"Estos pernos y retenedores DEBEN retirarse antes de poner a
funcionar la lavadora.
"Si no se retiran los pernos y retenedores de transporte, se pueden
producir fuertes vibraciones y ruido, y, por consiguiente, da_os
permanentes a la lavadora.
NOTA: El cable de alimentaci6n est_ fijado a Ja parte posterior de
la lavadora con un perno de transporte para evitar el funcionamiento
con los pernos de transporte si no se retiran de su lugar.
E
Pernos de
transporte
_Cable de
corriente
II
1. Comience con los dos pernos de transporte inferiores y utilice
lallave de pernos (incluida) para afloiar completamente los
cuatro pernos de transporte gir_ndolos hacia la izquierda.
Soporte de
espuma de la tina
Base del cart6n
Pernos de transport{
\\
cubierta de agujero _ _)
_t'
2. Retire los conjuntos de pernos movi_ndolos ligeramente al
mismo tiempo que los extrae.
3. UbJque los cuatro tapones de orificJo Jncluidos en el paquete
de accesorios y coJ6quelos en los orificios de los pernos de
transporte.
NOTA: Guarde los conjuntos de pernos para uso futuro. Para evitar
da_os a los componentes internos, NO transporte la lavadora sin
volver a instalar los pernos de transporte.
39
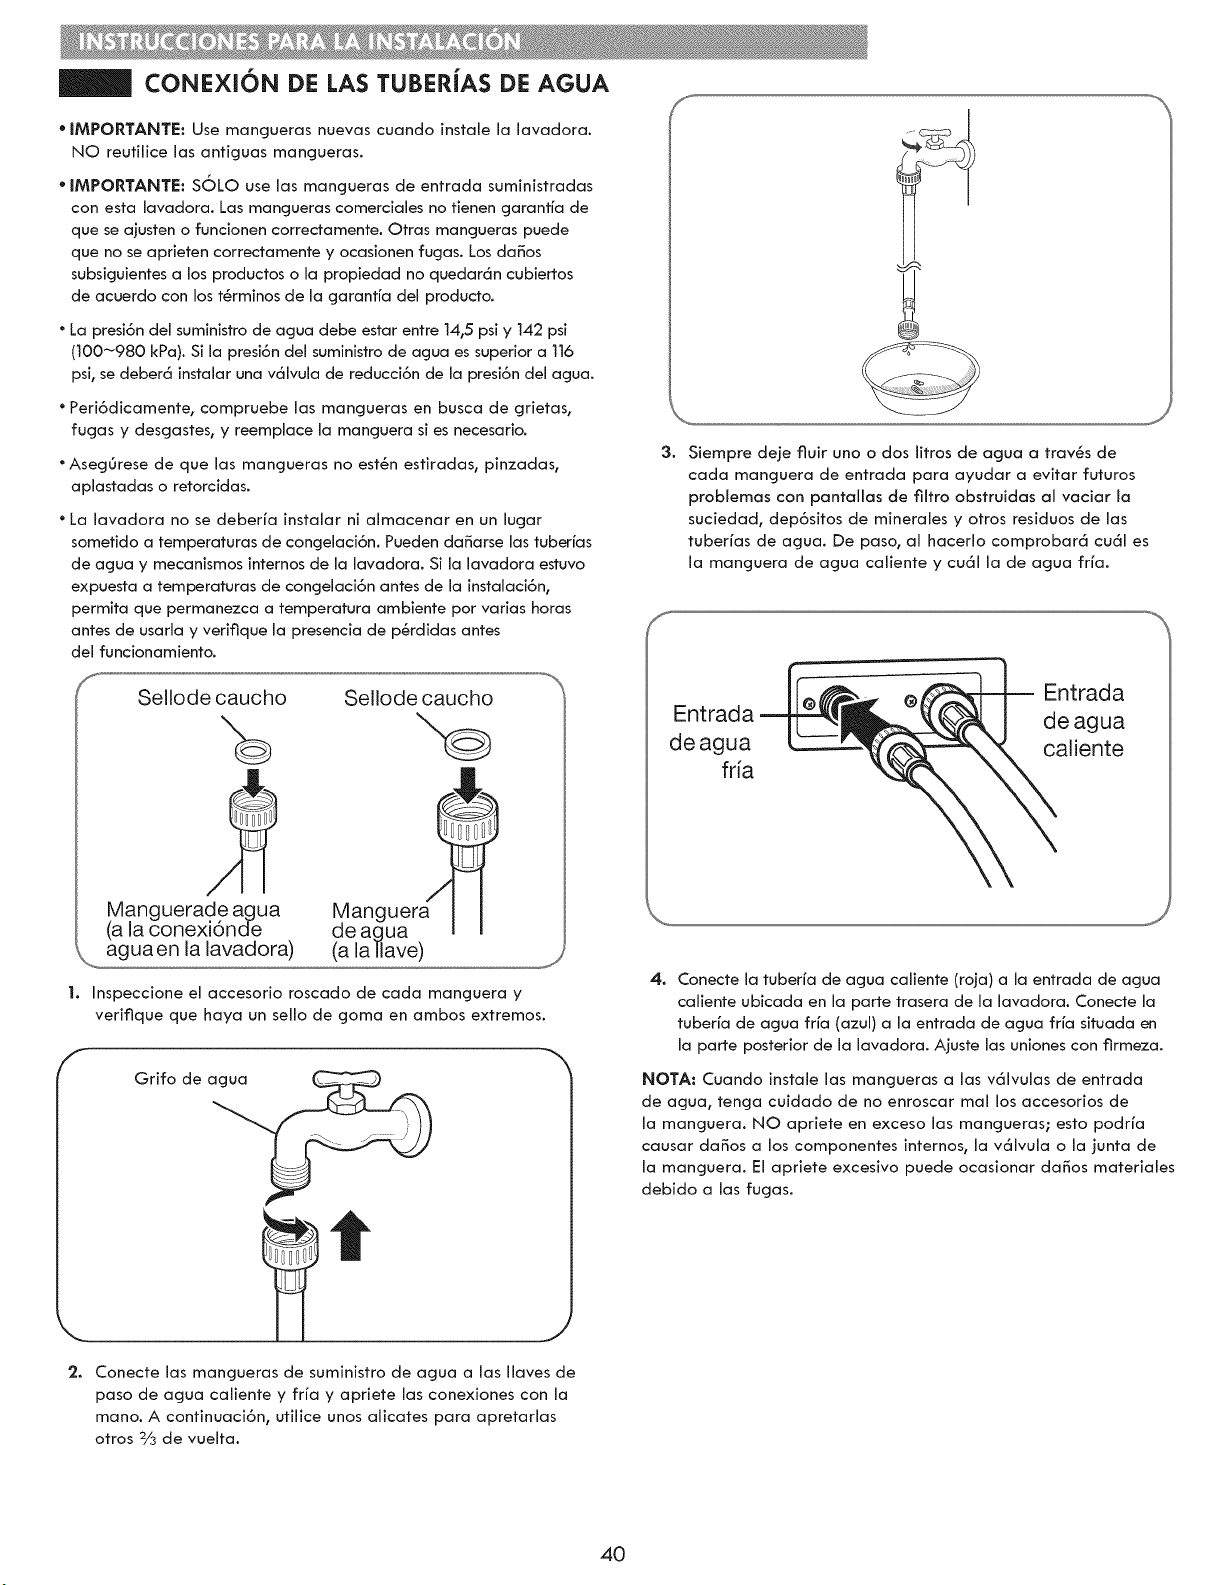
CONEXION DE LAS TUBERiAS DE AGUA
* IMPORTANTE: Use rnangueras nuevas ¢uando instale la lavadora.
NO reutiiice las antiguas mangueras.
* IMPORTANTE: SOLO use las rnangueras de entrada sumJnJstradas
con esta lavadora. Las mangueras ¢omer¢ia[es no tJenen garanffa de
que se ajusten o funcJonen ¢orrectarnente. Otras rnangueras puede
que no se aprJeten ¢orrectamente y ocasJonen fugas. Los da_os
subsiguientes a los productos o la propJedad no quedar_n ¢ubiertos
de acuerdo con los t6rminos de la garant[a del producto.
* La presi6n del suministro de agua debe estar entre 14,5 psi y 142 psi
(100-980 kPa). Si la presi6n del suministro de agua es superior a 116
psi, se deberd instalar una v61vula de reducci6n de la presi6n del agua.
* Peri6dicamente, compruebe las mangueras en busca de grietas,
fugas y desgastes, y reemplace la manguera si es necesario.
* AsegOrese de que las mangueras no est6n estiradas, pinzadas,
aplastadas o retorcidas.
* La lavadora no se deberM instalar ni almacenar en un lugar
sometido a temperaturas de congelaci6n. Pueden da_arse las tuberMs
de agua y mecanismos internos de la lavadora. Si la lavadora estuvo
expuesta a temperaturas de congelaci6n antes de la instalaci6n,
permita que permanezca a temperatura ambiente por varias horas
antes de usarla y veriflque la presencia de p6rdidas antes
del funcionamiento.
1,
Manguerade agua
(a la conexi6nde
aguaen la lavadora)
/
Manguera
de agua
(a la Ilave)
Inspeccione el accesorio roscado de cada manguera y
verifique que haya un sello de goma en ambos extremos.
Grifo de a_
2. Conecte las mangueras de suministro de agua a las Ilaves de
paso de agua caliente y fr[a y apriete las conexiones con la
mano. A continuaci6n, utilice unos alicates para apretarlas
otros 2/3 de vuelta.
3,
Siempre deje fluir uno o dos iitros de agua a trav6s de
cada manguera de entrada para ayudar a evitar futuros
problemas con pantallas de filtro obstruidas al vaciar la
suciedad, dep6sitos de minerales y otros residuos de las
tuberMs de agua. De paso, al hacerlo comprobard cu61 es
la manguera de agua caliente y cu61 la de agua frM.
f
Entrada
Entrada de agua
de agua caliente
fria
J
4. Conecte la tuberM de agua caliente (roja) a la entrada de agua
caliente ubicada en la parte trasera de la lavadora. Conecte la
tuberM de agua frM (azul) a la entrada de agua frfa situada en
la parte posterior de la lavadora. Ajuste las uniones con firmeza.
NOTA: Cuando instale las mangueras alas vdlvulas de entrada
de agua, tenga cuidado de no enroscar real los accesorios de
la manguera. NO apriete en exceso las mangueras; esto podrM
causar da_os a los componentes internos, la v61vula o la junta de
la manguera. El apriete excesivo puede ocasionar da_os materiales
debido alas fugas.
4O
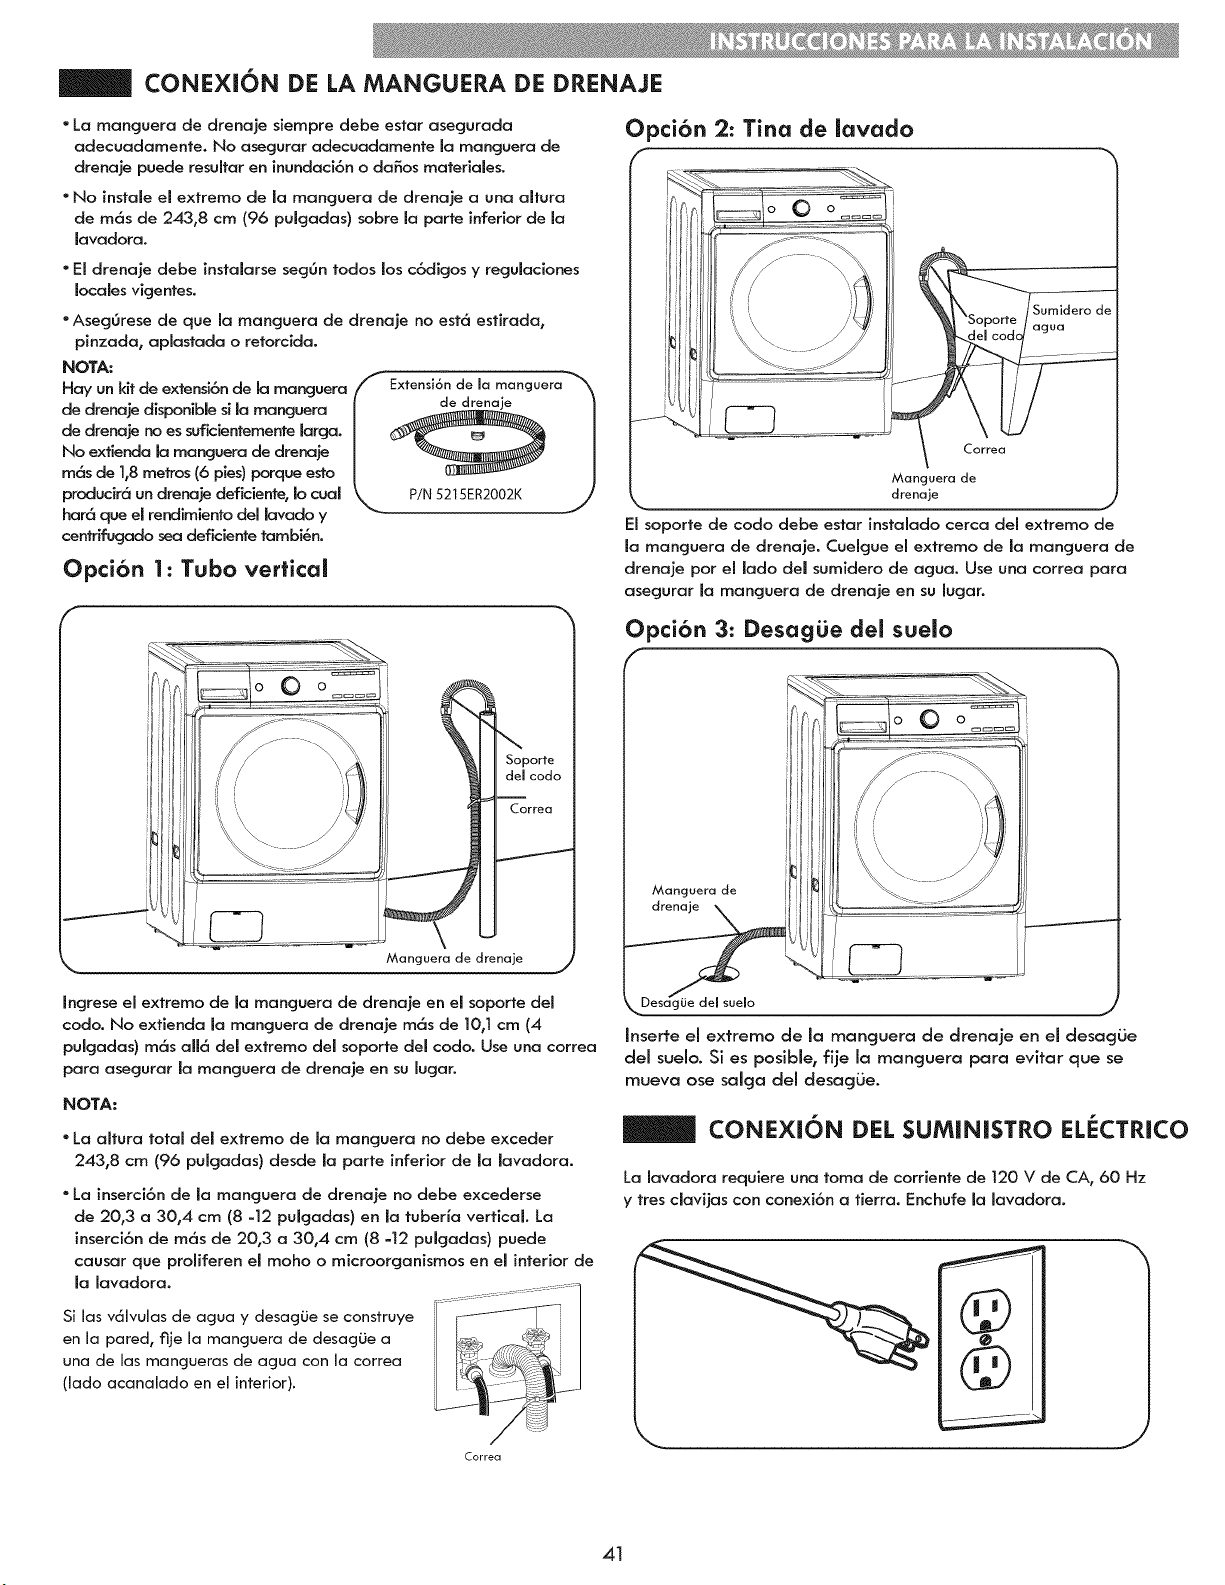
CONEXION DE LA MANGUERA DE DRENAJE
* La manguera de drenaje sJempre debe esfar asegurada
adecuadamente. No asegurar adecuadamente la manguera de
drenaje puede resultar en inundad6n o daSos materiales.
"No instale el extremo de Ja mancjuera de drenaje a una altura
de m6s de 243,8 cm (96 pulgadas) sobre la parte inferior de la
lavadora.
"El drenaje debe instalarse seg6n todos los c6dicjos y regulaciones
locales vigentes.
• Aseggrese de que la manguera de drenaje no est6 esfirada,
pinzada, aplastada o retorcidao
NOTA:
Hay un kit de extensi6n de la manguera//Extensi6n de la mancjuera
de drenaje disponible si la mancjuera | _ |
de drenaje no es suficientemente Jarga. | _ |
Noextier alamang°eradedre ie / /
m6s de 1,8 metros (6 pies)porque esto | J
produck6 un drena_ deficiente, Jo cuaJ _k. P/N 5215ER2002K .,,/
hat6 que el rendimiento deJ Javado y
centrJfugadosea defJcientetambJ_n.
Opci6n 1: Tubo vertical
Opci6n 2: Tina de lavado
drenc_je
EI soporte de codo debe estar instalado cerca del extremo de
Ja manguera de drenaje. CueJgue eJ extremo de Ja manguera de
drenaje por eJ Jado deJ sumldero de agua. Use una correa para
asegurar Ja mancjuera de drenaje en su Jugar.
de drenaje
Jngrese eJ extremo de la manguera de drenaje en el soporte deJ
codo. No extienda la manguera de drenaje m6s de 10,1 cm (4
pulgadas) m6s aft6 de{ extremo del soporte del codo. Use una correa
para asegurar Ja manguera de drenaje en su Jugar.
NOTA:
• La aJtura totaJ deJ extremo de Ja manguera no debe exceder
243,8 cm (96 pulgadas) desde la parte inferior de la lavadora.
" La inserci6n de Ja manguera de drenaje no debe excederse
de 20,3 a 30,4 cm (8 -12 pulgadas) en la tuberia vertical La
inserci6n de m6s de 20,3 a 30,4 cm (8 =12 pulgadas) puede
causar que proliferen el moho o microorganismos en el interior de
la lavadora.
Si las v6lvuJas de agua y desagOe se construye
en Ja pared, fije la manguera de desagOe a
una de las mangueras de agua con la correa
(lado acanalado en el interior).
Opci6n 3: DesagLie del suelo
Manguera de
drenaje
deJ sueJo
Inserte eJ extremo de la manguera de drenaje en el desagL)e
deJ sueJo. Si es posibJe_ fije Ja manguera para evitar que se
mueva ose saJga del desagiJe.
CONEXION DEL SUMINISTRO ELECTRICO
La lavadora requiere una toma de corriente de 120 V de CA, 60 Hz
y tres davijas con conexi6n a tierra. Enchufe la lavadora.
Correa
J
41
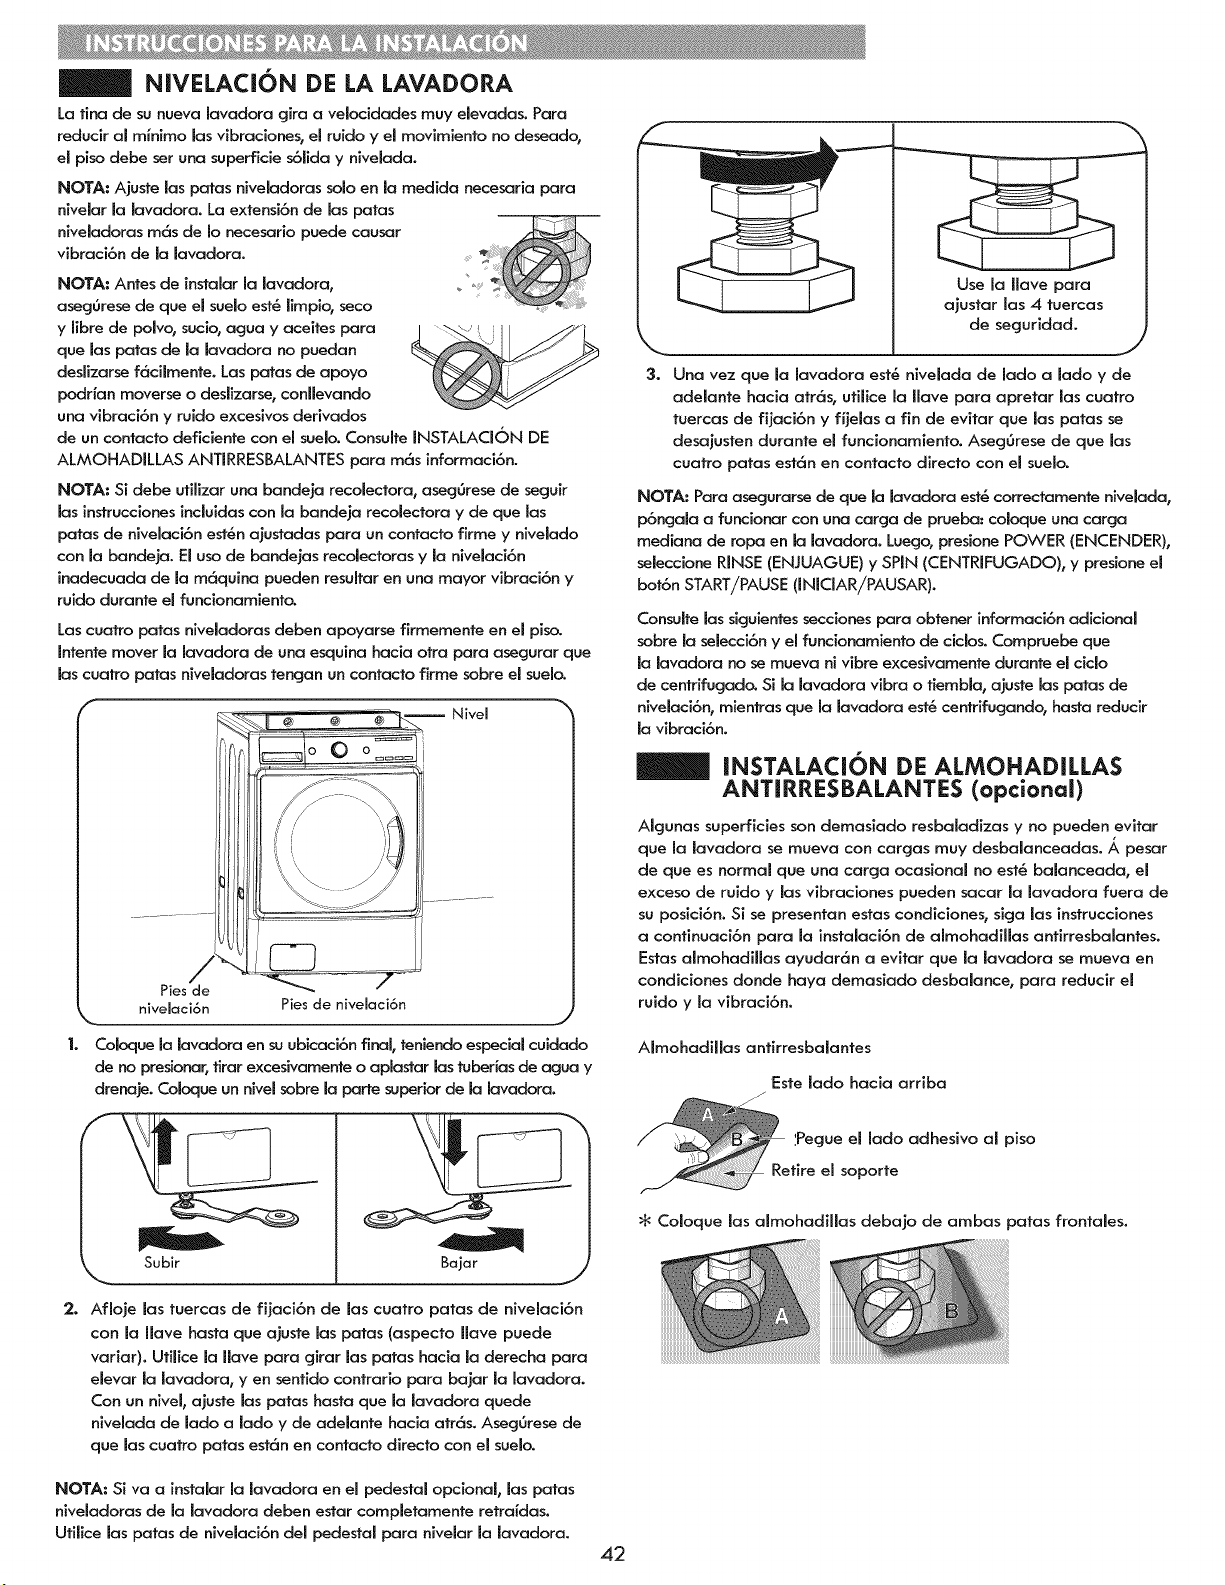
NIVELACION DE LA LAVADORA
La tina de su nueva lavadora gira a velocidades muy elevadas. Para
reducir al mlnimo las vlbraciones0 el ruido y el movlmiento no deseado,
el piso debe ser una superficie s61ida y nivelada.
NOTA: Ajuste las paras niveladoras solo en la medida necesaria para
nivelar la lavadora. La extensi6n de las paras
nlveladoras m6s de Io necesario puede causar
vibraci6n de la lavadora.
NOTA: Antes de instalar la lavadora,
aseggrese de que el suelo est_ Iimpio, seco
y libre de polvo, sucio, agua y aceites para
que las paras de la lavadora no puedan
deslizarse f6cilmente. Las paras de apoyo
podrian moverse o deslizarse, conllevando
una vibraci6n y ruido excesivos derivados
de un contacto deficiente con el suelo. Consulte INSTALACION DE
ALMOHADILLAS ANTIRRESBALANTES para m6s informaci6n.
NOTA: Si debe ufilizar una bandeja recolectora, aseg6rese de seguir
las instrucciones incluidas con la bandeja recolectora y de que las
paras de nivelaci6n est6n ajustadas para un contacto firme y nivelado
con la bandeja. El uso de bandejas recolectoras y la nivelaci6n
inadecuada de la m6quina pueden resultar en una mayor vibraci6n y
ruido durante el funcionamiento.
Lascuatro paras niveladorasdeben apoyarse firmemente en el piso.
Intentemover la lavadora de una esquina hacia otra para asecjurar que
lascuatro paras niveladoras tengan un contacto firme sobre el suelo.
/
Pies de
nivelaci6n
Nivel
//
/
Pies de nivelaci6n
Coloque la lavadora en su ubicaci6n final, teniendo especial cuidado
de no presionar, tirar excesivamente o aplastar las tuberJas de agua y
drenaje. Coloque un nivel sobre la pane superior de la lavadora.
Bajar
J
2. Afloje las tuercas de fijaci6n de las cuatro paras de nivelaci6n
con la Ilave basra que ajuste las paras (aspecto Ilave puede
variar). Utilice la Ilave para girar las paras hacia la derecha para
elevar la lavadora, y en sentido contrario para bajar la lavadora.
Con un nivel, ajuste las paras basra que la lavadora quede
nlvelada de lado a lado y de adelante hacia atr6s. Aseg6rese de
que las cuatro paras est6n en contacto directo con el suelo.
Use la llave para
ajustar las 4 tuercas
de seguridad.
3_
Una vez que la lavadora est_ nivelada de lado a lado y de
adelante hacia atr6s, utilice la Ilave para apretar las cuatro
tuercas de fijaci6n y fiielas a fin de evitar que las paras se
desajusten durante el funcionamiento. Aseg6rese de que las
cuatro paras est6n en contacto directo con el suelo.
NOTA: Para asegurarse de que la lavadora est_ correctamente nivelada,
p6ngala a funcionar con una carga de prueba: coloque una carga
mediana de ropa en la lavadora. Luego, presione POWER (ENCENDER),
seleccione RINSE (ENJUAGUE) y SPIN (CENTRIFUGADO), y presione el
bot6n START/PAUSE (INICIAR/PAUSAR).
Consulte las siguientesseccionespara obtener informaci6nadicional
sobre la selecci6n y el funcionamiento de ciclos. Compruebe que
la lavadora no semueva nivibre excesivamente durante el ciclo
de centrifugado. Si la lavadora vibra o tiembla, ajuste las paras de
nivelaci6n, mientras que la lavadora est6centrifugando, hasta reducir
la vlbraci6n.
INSTALACION DE ALMOHADILLAS
ANTIRRESBALANTES (opcional)
Algunas superficies son demasiado resbaladizas y no pueden evitar
que la lavadora se mueva con cargas muy desbalanceadas. A pesar
de que es normal que una carga ocasional no est6 balanceada, el
exceso de ruido y las vibraciones pueden sacar la lavadora fuera de
su posici6n. Si se presentan estas condiciones, siga las instrucciones
a continuaci6n para la instalaci6n de almohadillas antirresbalantes.
Estas almohadillas ayudar6n a evitar que la lavadora se mueva en
condiciones donde haya demasiado desbalance, para reducir el
ruido y la vibraci6n.
AImohadillas antirresbalantes
Este lado hacia arriba
'.Pegue el lado adhesivo al piso
tire el soporte
:_ Coloque las almohadillas debajo de ambas paras frontales.
NOTA: Siva a instalar la lavadora en el pedestal opcional, las paras
niveladoras de la lavadora deben estar completamente retrafdas.
Utilice las paras de nivelaci6n del pedestal para nivelar la lavadora.
42
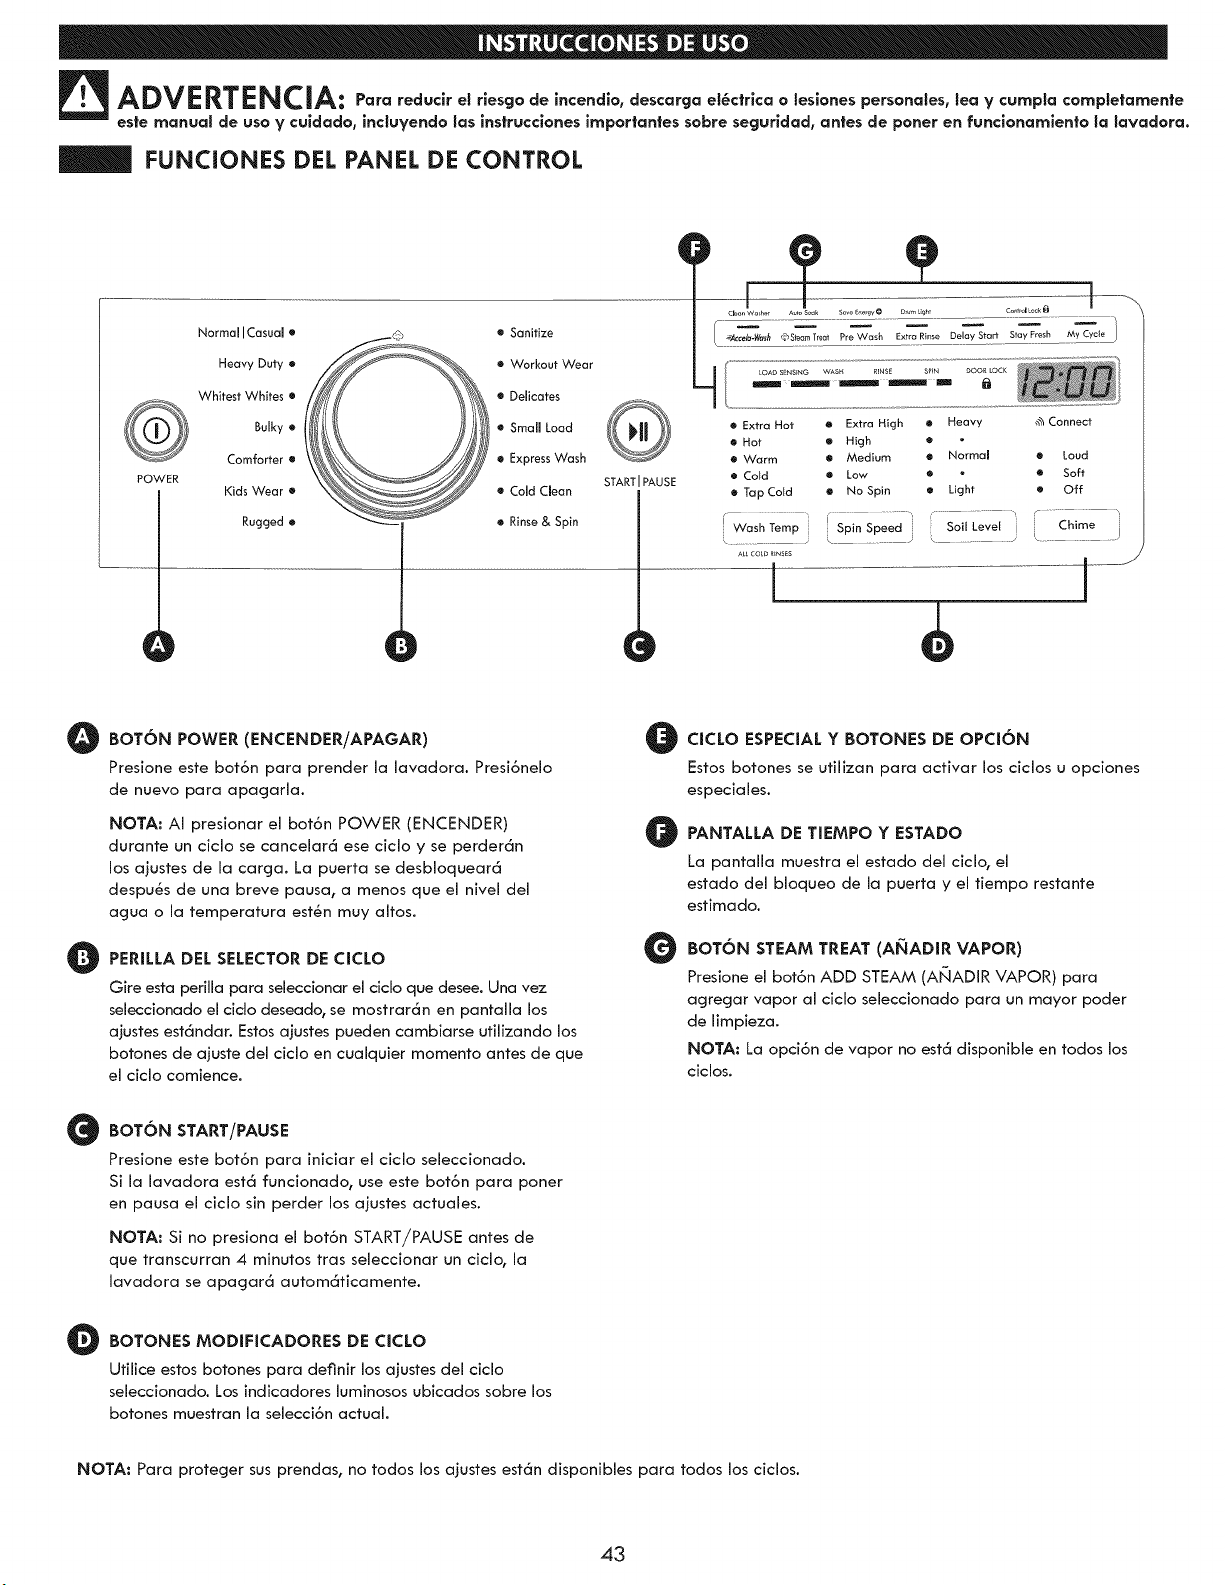
ADVERTENCIA: Para reducir el riesgo de incendia, descarga el_ctrica a lesiones personales, lea y cumpla campletamente
este manual de usa y cuidado, incluyendo las instrucciones importantes sabre seguridad, antes de porter en funcionamiento la lavadora.
FUNCIONES DEL PANEL DE CONTROL
POWER
NormallCasual •
Heavy Duty •
Whitest Whites •
Bulky •
Comforter •
Kids Wear e
Rugged •
t
• Sanitize
• Workout Wear
• Ddicates
Small Load
® ExpressWash
• Cold Clean
Rinse& Spin
START PAUSE
D
L_Accela-_e,l_ _Steam'_rea, PreW'_sh ExtraR_,se DelayStart StayFr'_sh MyCyc_e
• Extra Hot • Extra High e Heavy _h Connect
m Hot m High •
• Warm • Medium • Normal • Loud
• Cold m Low • e Soft
• Tap Cold • No Spin • Light • Off
Wash Temp Spin Speed i Soil Level j
............. ; k ....... J \ .......... ;
m co_DRINSES
l
Chime
O
O
BATON POWER (ENCENDER/APAGAR)
Presione este bot6n para prender [a [avadora. Presi6nelo
de nuevo para apagarla.
NOTA: AI presionar el bot6n POWER (ENCENDER)
durante un ciclo se cancelar6 ese ciclo y se perder6n
los ajustes de la carga. La puerta se desbloquear6
despuSs de una breve pausa, a menos que el nivel del
agua o la temperatura estSn muy altos.
PERILLA DEL SELECTOR DE CICLO
Gire esta perilla para seiecdonar el ciclo que desee. Una vez
seleccionado el ciclo deseado, se mostrar6n en pantalla los
ajustes est6ndar. Estos ajustes pueden cambiarse ufilizando los
botones de ajuste del ciclo en cualquier momenta antes de que
el ciclo comience.
@
BATON START/PAUSE
PresJone este bot6n para iniciar ei cicio seieccionado.
SJ la lavadora est_ funcJonado, use este bot6n para poner
en pausa el ciclo sin perder los aiustes actuaies.
NOTA: Si no presiona el bot6n START/PAUSE antes de
que transcurran 4 minutos tras seieccionar un ciclo, la
lavadora se apagar6 autom6ticamente.
O OTONES MODIFICADORES DE CICLO
Utilice estos botones para definir [as ajustes de[ cic[o
seieccionado. Los indicadores Juminosos ubicados sabre los
botones muestran la selecci6n actual.
O
@
@
CICLO ESPECIAL Y BOTONES DE OPCION
Estos botones se utiiizan para activar [as ciclos u opciones
especiales.
PANTALLA DE TIEMPO Y ESTADO
La pantalla muestra el estado del ciclo, el
estado del bloqueo de la puerta y el tiempo restante
estimado.
BOT6N STEAM TREAT (Ai_IADIR VAPOR)
Presione el bot6n ADD STEAM (A_IADIR VAPOR) para
agregar vapor aJ ciclo seJeccJonado para un mayor poder
de iimpieza.
NOTA: La opci6n de vapor no est6 disponible en todos los
ciclos.
NOTA: Para proteger sus prendas, no todos los ajustes est6n disponibles para todos los ciclos.
43
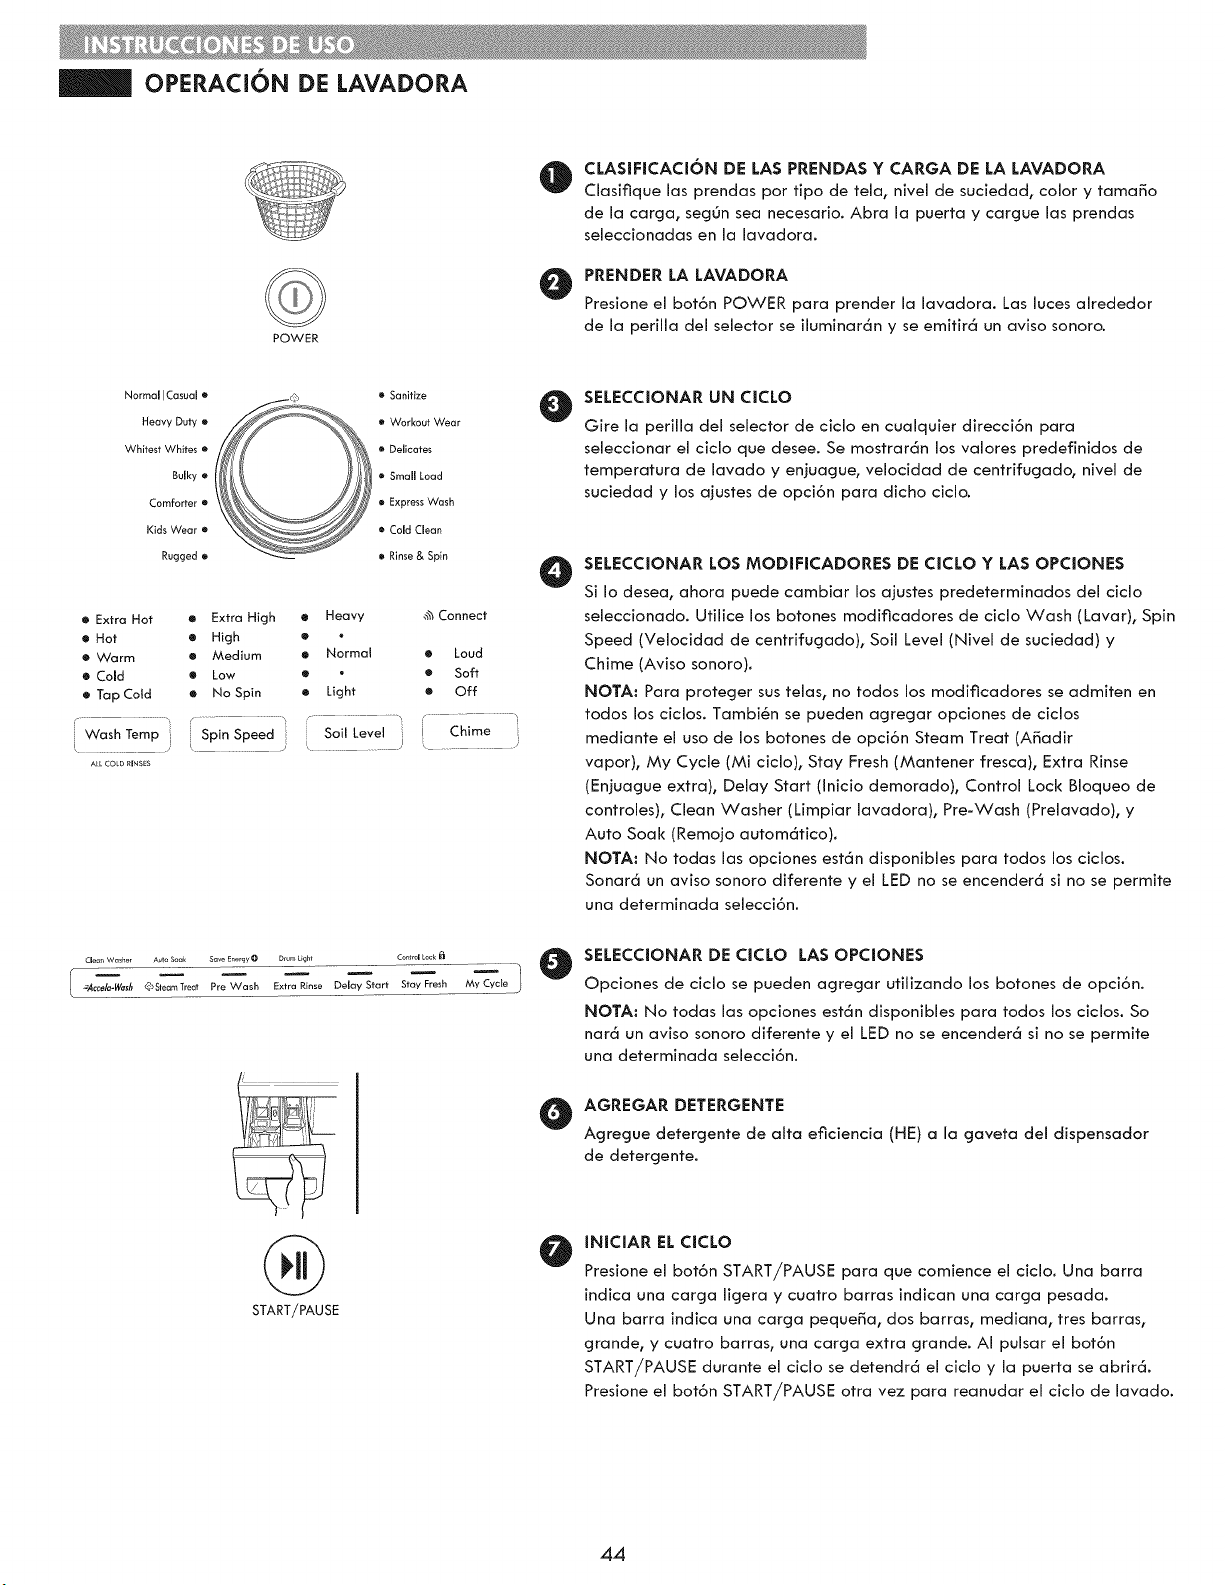
OPERACK)N DE LAVADORA
POWER
@
@
CLASIFICACI6N DE LAS PRENDAS Y CARGA DE LA LAVADORA
Clasifique las prendas por fipo de tela, nivel de suciedad, color y tama_o
de la carga, segOn sea necesario. Abra la puerto y ¢argue los prendas
seleccionadas en la lavadora.
PRENDER LA LAVADORA
Presione el bot6n POWER para prender la lavadora. Las luces alrededor
de la perilla del selector se iluminar6n y se emitir6 un aviso sonoro.
Normal I Casual ® o Sanitize
Heavy Duty e ® Workout Wear
Whitest Whites ® ® Delicates
Bulky ® • Small Load
Comforter ® • Express Wash
Kids Wear ® o Cold Clean
Rugged • • Rinse & Spin
e Extra Hot o Extra High e Heavy _h Connect
• Hot • High ® •
• Warm • Medium • Normal m Loud
o Cold e Low e m Soft
• Tap Cold • No Spin ® Light • Off
Wash Temp ] i Spin Speed Soil Level 1 [ Chime
ALLCOD_INSES
@
O
Clean Washer Aulo S_k Save EnergyO Drum Ught Control Lock _ @
e/a-[4/a_h _Sleam Treat Rre Wash Extra Rinse Dek_y Start Slay Fresh My Cycle
@
SELECCIONAR aN CICLO
Gire la perilla del selector de ci¢lo en cualquier direcci6n para
seleccionar ei ciclo que desee. Se mostrar(_n los valores predefinidos de
temperatura de lavado y enjuague, velocidad de centrifugado, nivel de
suciedad y los ajustes de opci6n para dicho ciclo.
SELECCIONAR LOS MODIFICADORES DE CICLO Y LAS OPCIONES
Si Io desea, ahora puede cambiar los ajustes predeterminados del ciclo
seleccionado. Ufilice los botones modificadores de ciclo Wash (Lavar), Spin
Speed (Velocidad de centrifugado), Soil Level (Nivel de suciedad) y
Chime (Aviso sonoro).
NOTA: Para proteger sus telas, no todos los modificadores se admiten en
todos los ci¢los. Tambi4n se pueden agregar opciones de ciclos
mediante el uso de los botones de opci6n Steam Treat (A_adir
vapor), My Cycle (Mi ciclo), Stay Fresh (Mantener fresca), Extra Rinse
(Enjuague extra), Delay Start (Inicio demorado), Control Loci< Bloqueo de
controles), Clean Washer (Limpiar lavadora), Pre-Wash (Prelavado), y
Auto Soak (Remojo autom6fico).
NOTA: No todas las opciones est6n disponibles para todos los ciclos.
Sonar6 un aviso sonoro diferente y el LED no se encender6 si no se permite
una determinada selecci6n.
SELECCIONAR DE CICLO LAS OPCIONES
Opciones de ciclo se pueden agregar utilizando los botones de opci6n.
NOTA: No todas las opciones est6n disponJbles para todos los ciclos. So
nar6 un avJso sonoro diferente y el LED no se encender6 si no se permite
una determinada selecci6n.
AGREGAR DETERGENTE
Agregue detergente de alto eficiencia (HE) a la gaveta del dispensador
de detergente.
START/PAUSE
INICIAR EL CICLO
Presione el bot6n START/PAUSE para que comience el ciclo. Una barra
indica una carga lJgera y cuatro barras JndJcan una carga pesada.
Una barra indica una carga peque_a, dos barras, medJana, tres barras,
grande, y cuatro barras, una carga extra grande. AI pulsar el bot6n
START/PAUSE durante el cJclo se detendr6 ei cicio y ia puerta se abrJr6.
Presione el bot6n START/PAUSE otra vez para reanudar el ciclo de lavado.
44
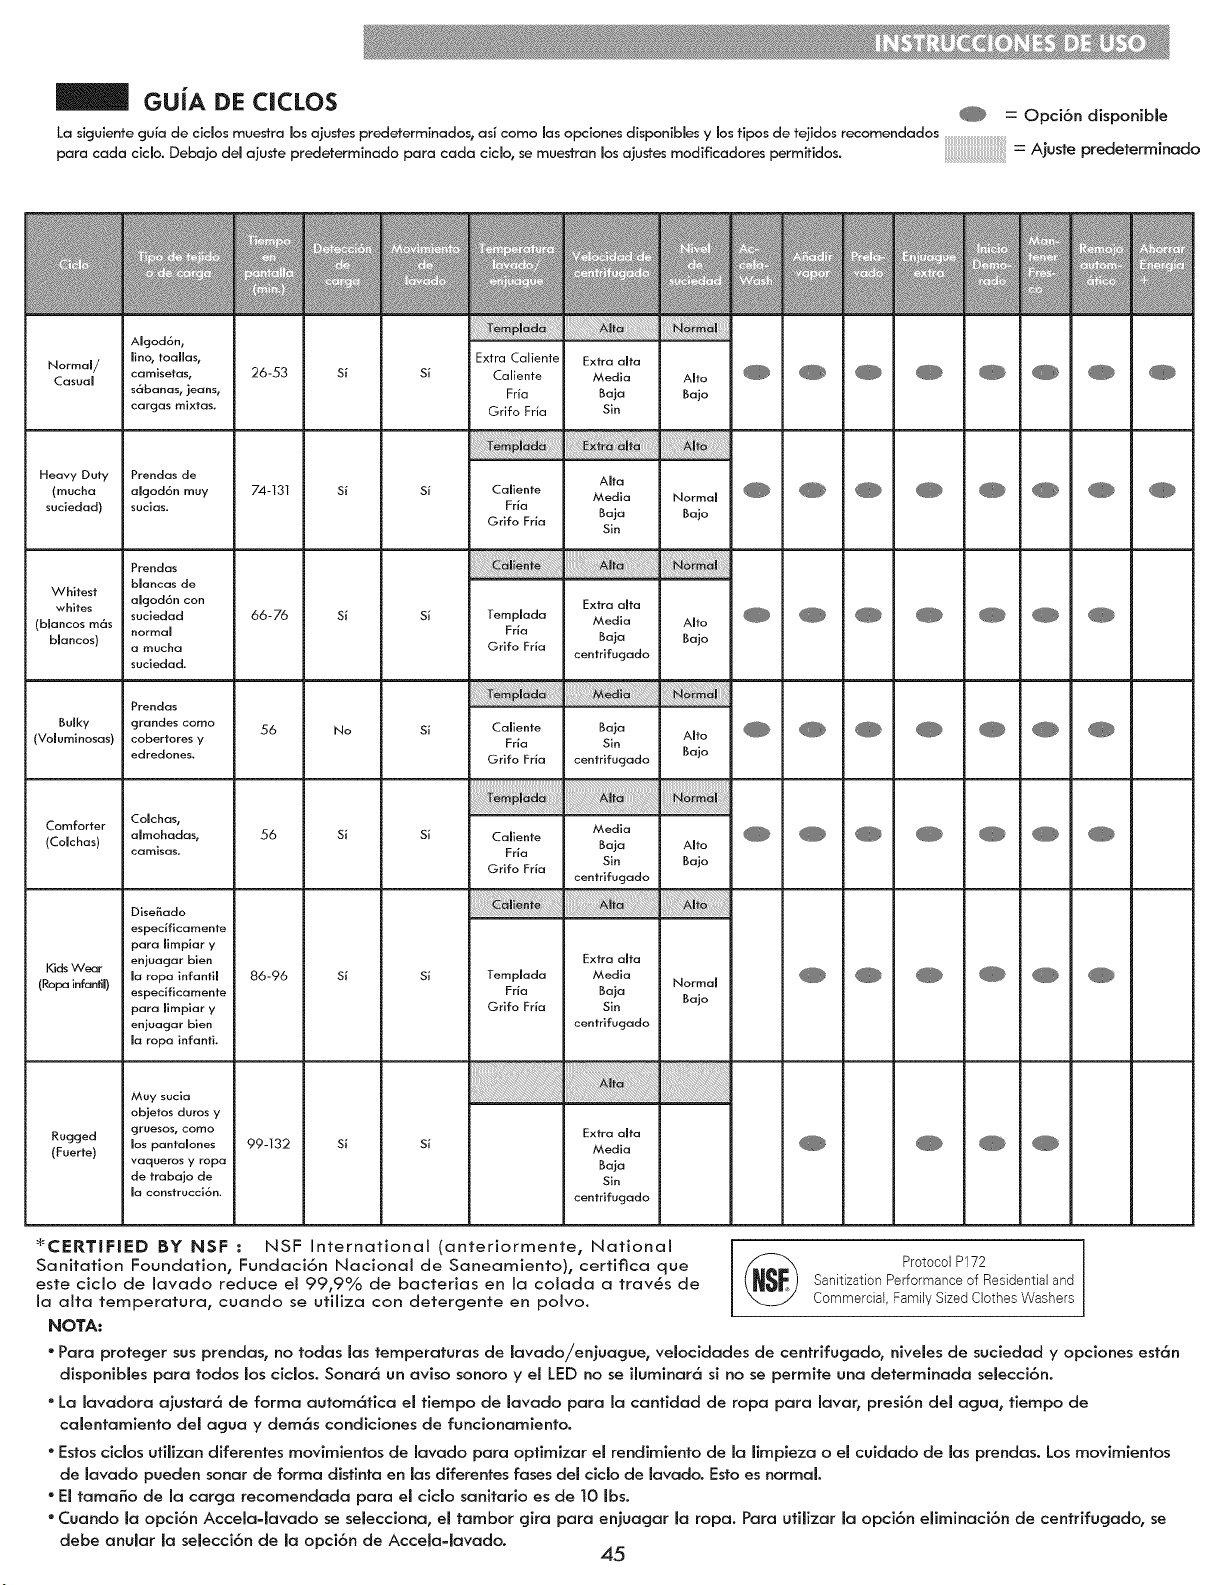
GUfA
DE CICLOS
@ = Opci6n disponible
La siguiente gula de ciclos muesfra los ajustes predeterminados, as{ como las opcJones disponibles y losfipos de tejidos recomendados
para cada ciclo. Debajo del ajuste predeterminado pare cada ciclo, se muestran los ajustes modificadores permitidos. = @uste predeterminado
Normal/
Casual
Heavy Duty
(mucha
suciedad)
Whitest
whites
(blancos m6s
blancos)
Bulky
(Voluminosas)
Comforter
(Comchas)
Kids Wear
(Rope infantil)
Rucjcjed
(Fuerte)
AIcjod6n,
lino, toaflas,
camisetas,
s(_banas, jeans,
cargas mixtas.
Prendas de
alcjod6n muy
suc]as.
Prendas
blancas de
alcjod6n con
sucledad
normal
a mucha
suciedad.
Prendas
cjrandes como
cobertores y
edredones.
Cokhas,
almohadas,
cam_sas.
Dise_ado
especificamente
pare limpiar y
enjuagar bien
la rope infantil
especificamente
pare [impiar y
enjuacjar bien
la rope infanti.
Muy sucia
objetos duros y
cjruesos, como
los pantalones
vaqueros y rope
de trabajo de
la construcci6n.
_CERTIF|ED BY NSF :
m
Si
Si
s_
No
si
s_
si
Extra Caliente
Caliente
Frfa
Grifo Fria
Caliente
Fria
Grifo Fda
Templada
Fda
Grifo Frla
Caliente
Fria
Grifo Frla
Caliente
Fda
Grifo Frla
Templada
Fria
Grifo Fria
Extra alta
Media
Baja
Sin
Extra alta
Media
Baja
centrifugado
Baja
Sin
centrlfugado
Media
Baja
Sin
centrifucjado
Extra alia
Media
Baia
Sin
centrifucjado
Extra alta
Media
Baja
Sin
centrifugado
NSF International (anteriormente, National
@
m
Ito
:_JO
rmc
::IJO
Ito
_jo
Ito
:_jo
m
iiiiiiiiiil]]i!ii!iiiiiiiiiil]]i!ii!
Ito
_jo
rmc
:_JO
@
N _
N _
N _
N _
N _
N _
N
ProtocolP172 ]
SanJtizati0nPerformanceof Residentialand
C0mmercial,FamilySizedClothes Washers
@
@
Sanitation Foundation, Fundaci6n Nacional de Saneamiento), certifica que
este ciclo de lavado reduce el 99,9% de bacterias en la colada a trav6s de
la aita temperature, cuando se utilize con detergente en poivo.
NOTA:
"Pare proteger sus prendas_ no todas _as temperaturas de _avado/enjuague, velocidades de centrifugado_ niveles de su¢iedad y opciones est6n
disponibJes pare todos _os cidos. Sonar6 un aviso sonoro y e{ LED no se i{uminar6 si no se permite una determinada se_ecci6n.
• La _avadora ajustar6 de forma autom6tica e_ fiempo de Javado pare _a canfidad de rope pare _avar, presi6n deJ ague, tiempo de
calentamiento de_ agua y dem6s condiciones de funcionamiento.
- Estos cic_os utffizan diferentes movimientos de lavado pare optimizer el rendimiento de la _impieza o el cuidado de las prendas. Los movimientos
de Javado pueden sonar de forma distinta en Jas diferentes rases de_ clc_o de _avado. Esto es normal
"EJ tama_o de _a carga recomendada pare el clclo sanffario es de t0 _bs.
• Cuando la opci6n Accelaqavado se selecciona, el tambor gira pare enjuagar la rope. Pare utilizer la opci6n effminaci6n de centrifugado, se
debe anular _a selecci6n de _a opci6n de Accelaqavado.
45
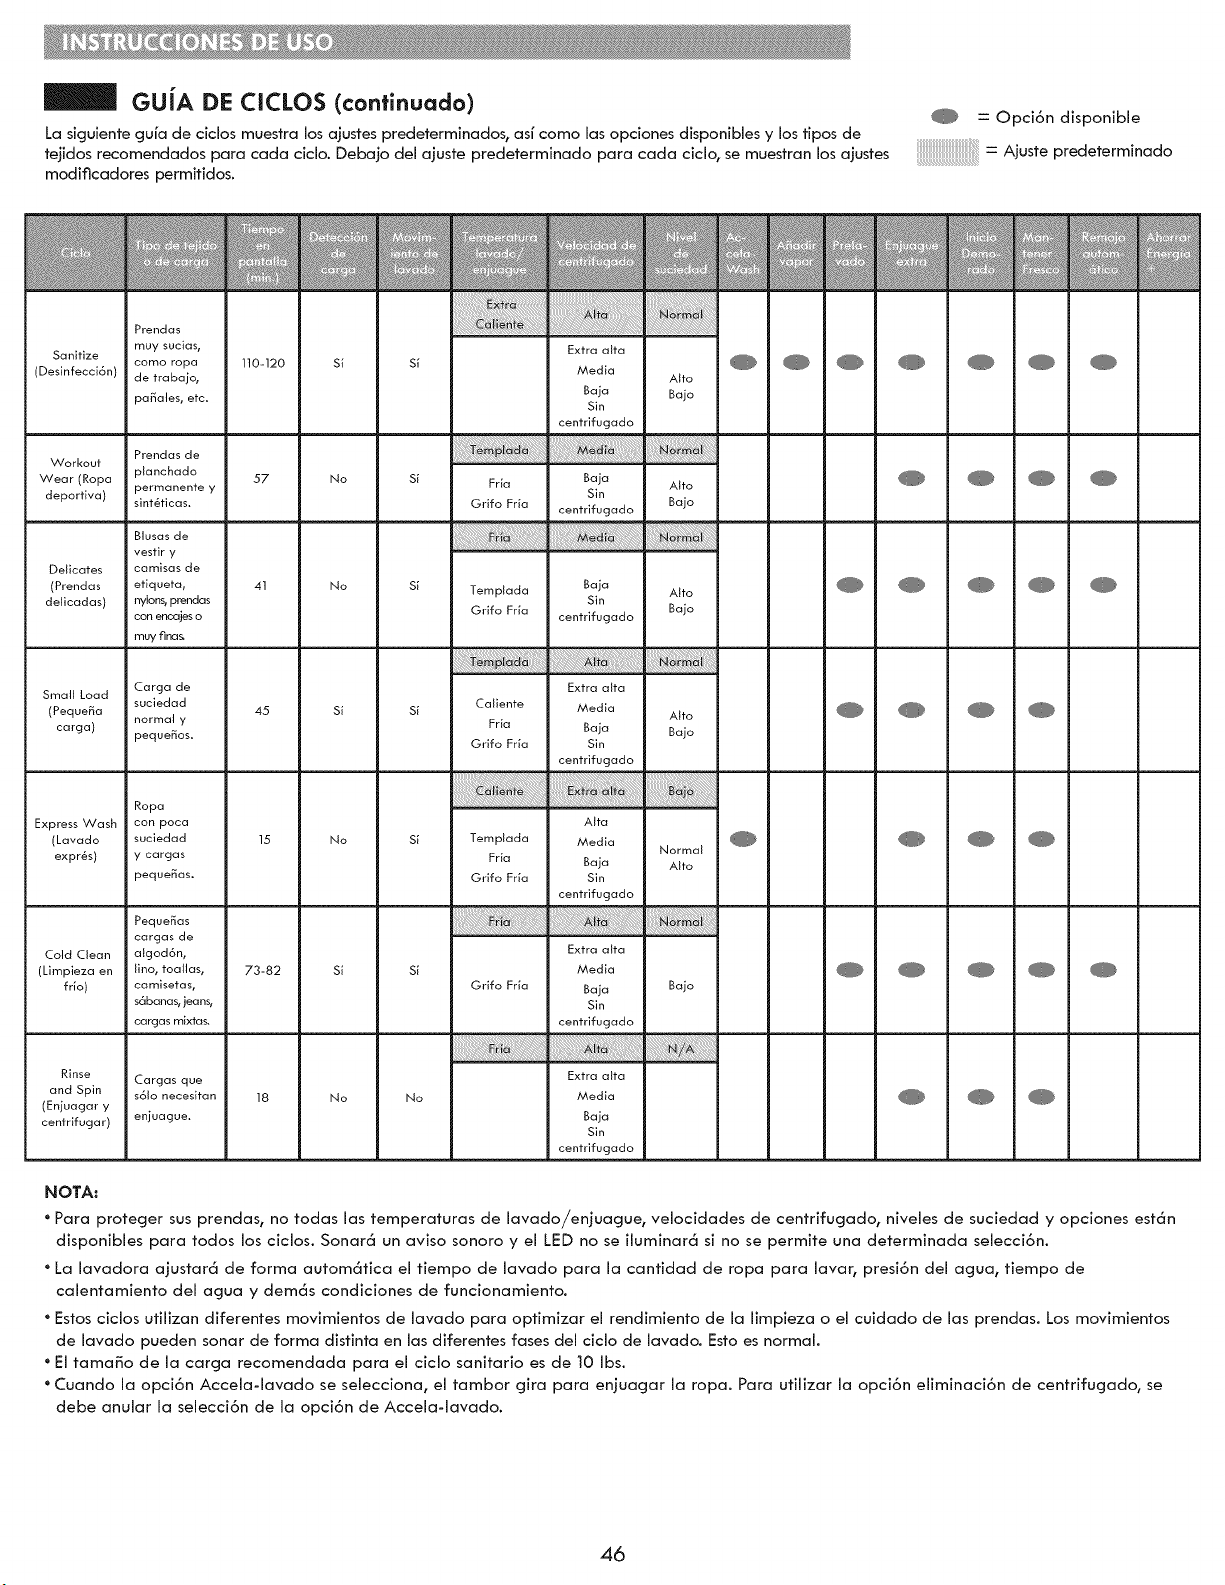
GUiA DE CICLOS (conEnuado)
La siguiente gu[a de cJclos muestra los ajustes predeterminados, asf coma las opciones disponibles y los tipos de
tejidos recomendados para cada ciclo. Debajo del ajuste predeterminado para cada ciclo, se muestran los ajustes
modificadores permitidos.
= Op¢i6n disponible
iiiiiiiiiiiiiiiiiiiiiiiiiiiiiiiiiiiiiiiiiiiiiiiiiiiiiiiiiiiiiiiiiiiiiiii__ : Ajuste predeterminado
m
Prendas
muy sucias,
Sanitize
como ropa
(Desinfecci6n) de trabajo,
)a_ales, etc.
Prendas de
Workout
)lanchado
Wear (Ropa )ermanente y
deporfiva) sint_ticas.
Blusas de
vestir y
Delicates camisas de
(Prendas etiqueta,
delicadas) nylons, prendas
con encajes o
muy fina&
Small Load Carga de
suciedad
(PequeF_a normal y
carga) peque_os.
Ropa
Express Wash con poca
(Lavado suciedad
expr&s) y cargas
peque_as.
PequeF_as
cargas de
Cold Clean algod6n,
(Lirnpieza en lino, toallas,
trio) camisetas,
s_banas, jeans,
cargas mixtas.
Rinse Cargas que
and Spin s6lo necesitan
(Enjuagar y
centrifugar) enjuague.
m
0-1
57
41
45
15
'3-_
18
m
Si
No
No
S_
No
S_
No
m
Si
m
S_
S_
S_
S_
S_
N(
Extra alia
Media
Baja
Sin
centrifugado
m
@
m
\ira
_ajo
\ira
_ajo
\ira
_ajo
m
\ira
_ajo
)rm(
\lto
N
_ajo
m
@
@
@
@
m m
NOTA:
* Para proteger sus prendas, no todas las temperaturas de lavado/enjuague, velocidades de centrifugado, niveles de suciedad y opciones est_n
disponibles para todos los ciclos. Sonar_ un aviso sonora y el LED no se iluminar_ si no se permite una determinada selecci6n.
" La lavadora ajustar_ de forma autom_tica el tiempo de lavado para la cantidad de ropa para lavar, presi6n del agua, tiempo de
calentamiento del agua y demos condiciones de funcionamiento.
" Estos ciclos utilizan diferentes movimientos de lavado para opfimizar el rendimiento de la limpieza o el cuidado de las prendas. Los movimientos
de lavado pueden sonar de forma distinta en las diferentes fases del ciclo de lavado. Esto es normal.
" El ramada de la carga recomendada para el ciclo sanitaria es de 10 Ibs.
"Cuando la opci6n Accela-lavado se selecciona, el tambor gira para enjuagar la ropa. Para ufilizar la opci6n eliminaci6n de centrifugado, se
debe anular la selecci6n de la opci6n de Accela-lavado.
46

CLASIFICACI6N DE CAP, GAS DE LAVADO
Efiquetas de cuidado de las prendas
Muchas prendas de vestir induyen una etiqueta de cuidado
de la prenda. Utilice el siguiente diagrama para ajustar el
cido y las opciones para cuidar la prenda de acuerdo con las
recomendaciones del fabricante.
Fabric Care Labels
Machine
wash
cycle
Normal Permanent press/ Gentle/
wrinkle resistant delicate
H h Do not wash Do not wring
Water • • • 00 •
temperature ,0t Warm C01d/0001
Bleach
symbo,s _ _
Any bleach Only non-chlorine bleach Do not bleach
(when needed) (when needed)
Agrupaci6n de prendas similares
Pard obtener los mejores resultados al lavar y reducir las posibilidades
de daSar las prendas, es necesario tener cuidado a la hora de
dasificar la ropa en coladas formadas por prendas slmilares. Si
se mezdan diferentes tipos de tejidos o niveles de suciedad, el
rendimiento del lavado se vet6 degradado, y podrian producirse
transferencias de color o decoloraciones, daSos en los tejidos o
formaci6n de pelusas en las prendas. Los tejidos se deben dasificar en
grupos tal como se describe a continuaci6n.
Co, ores
Clasifique las prendas por color. Las prendas oscuras juntas en
una carga separada de las prendas Mancas o de colores claros.
Mezclar prendas oscuras con prendas claras puede dar como
resuhado el finte ola decobraci6n de las prendas m6s tiaras.
Nivel de sucledad
Lave la ropa muy sucia junta. Si se lava ropa que no est6 muy
sucia en la misma colada que la ropa muy sucia, es muy posible
que la ropa con poca suciedad no se lave bien.
Tipo de fejido
Las prendas dellcadas no se deben mezdar con prendas m6s
pesadas y resistentes. Lavar prendas delicadas junto con tejidos
pesados puede causar daSos en las prendas m6s delicadas. Si se
lavan prendas pesadas en una carga de ropa delicada, puede
resultar que la ropa pesada no se lave correctamente y que se
produzcan da5os en las prendas delicadas.
Tipo de pelusas
AIgunos tejidos atraen las pelusas mientras que otros sueffan pelusas
en el proceso de lavado. Evite mezdar prendas recolectoras de
pelusas con prendas generadoras de pelusas en la misma carga. Si
mezcla estos dos tipos de tejidos, se formar6n bolas y pelusas en las
prendas recolectoras de pelusas. (Por ejemplo, recolector de pelusas:
buzo de tejido o punto; productor de pelusas: toaffa de felpa).
Carga de la lavadora
"Compruebe que todos los bolsiHos est6n vacios. Objetos como
dips, ceriHas, boffgrafos, monedas y Haves pueden daSar tanto _a
lavadora como _as prendas.
* Cierre cremaHeras, broches y cordones pard evitar enganches o
enredos en otras prendas°
"Aplique un tratamiento previo alas 6reds muy sucias para
mejorar el resultado.
"Mezc_e prendas grandes y pequeSas en _a misma carga. Cargue
primero _as prendas grandee.
* Las prendas grandee no deben ocupar m6s de Ja mitad de Ja
carga total de la colada.
"La tina no debe estar abarrotada con prendas. La puerta de la
lavadora se deberla cerrar con facffidad.
*Para evitar una colada desequiffbrada, no lave prendas 0nicas.
Agregue unao dos prendas simi_ares a _a colada. Las prendas
grandee y voluminosas, como _os cobertores, edredones o colchas,
deberian lavarse individualmente.
* No lave ni centrifugue prendas impermeables, como gabardinas,
bolsas de dormir, etc.
* A_ retlrar la carga de _a lavadora, compruebe bajo la junta de la
puerta que no haya prendas pequeSas.
NOTA: AsegOrese de que el 6tea de _ajunta de la puerta est6
despejada cuando cierre la puerta. La carga excesiva de la lavadora
puede hacer que se queden prendas atrapadas entre la puerta y la
junta. Esto puede daSar tanto las prendas como la junta.
• NO SOBRECARGUE LA T|NA
• ASEGORESE DE QUE NO EXiSTAN PRENDAS
ATRAPADAS EN LA JUNTA DE LA PUERTA
S Ck_eificaci6n de las prendae... "_
Par colores Per nivel
Whites
(b_ancaa)
Lights (Clarae)
Darke
(Oacuras)
de suciedad
A_to
Normal
Bajo
Por tejido
Delicatee
(Prendas
delicadas)
Easy care
(No delicadas
by Lint (Per
pelusas)
Generador de
pelusaa
Colector de
pelusas
L Sturdy (Fuerte)
J
47
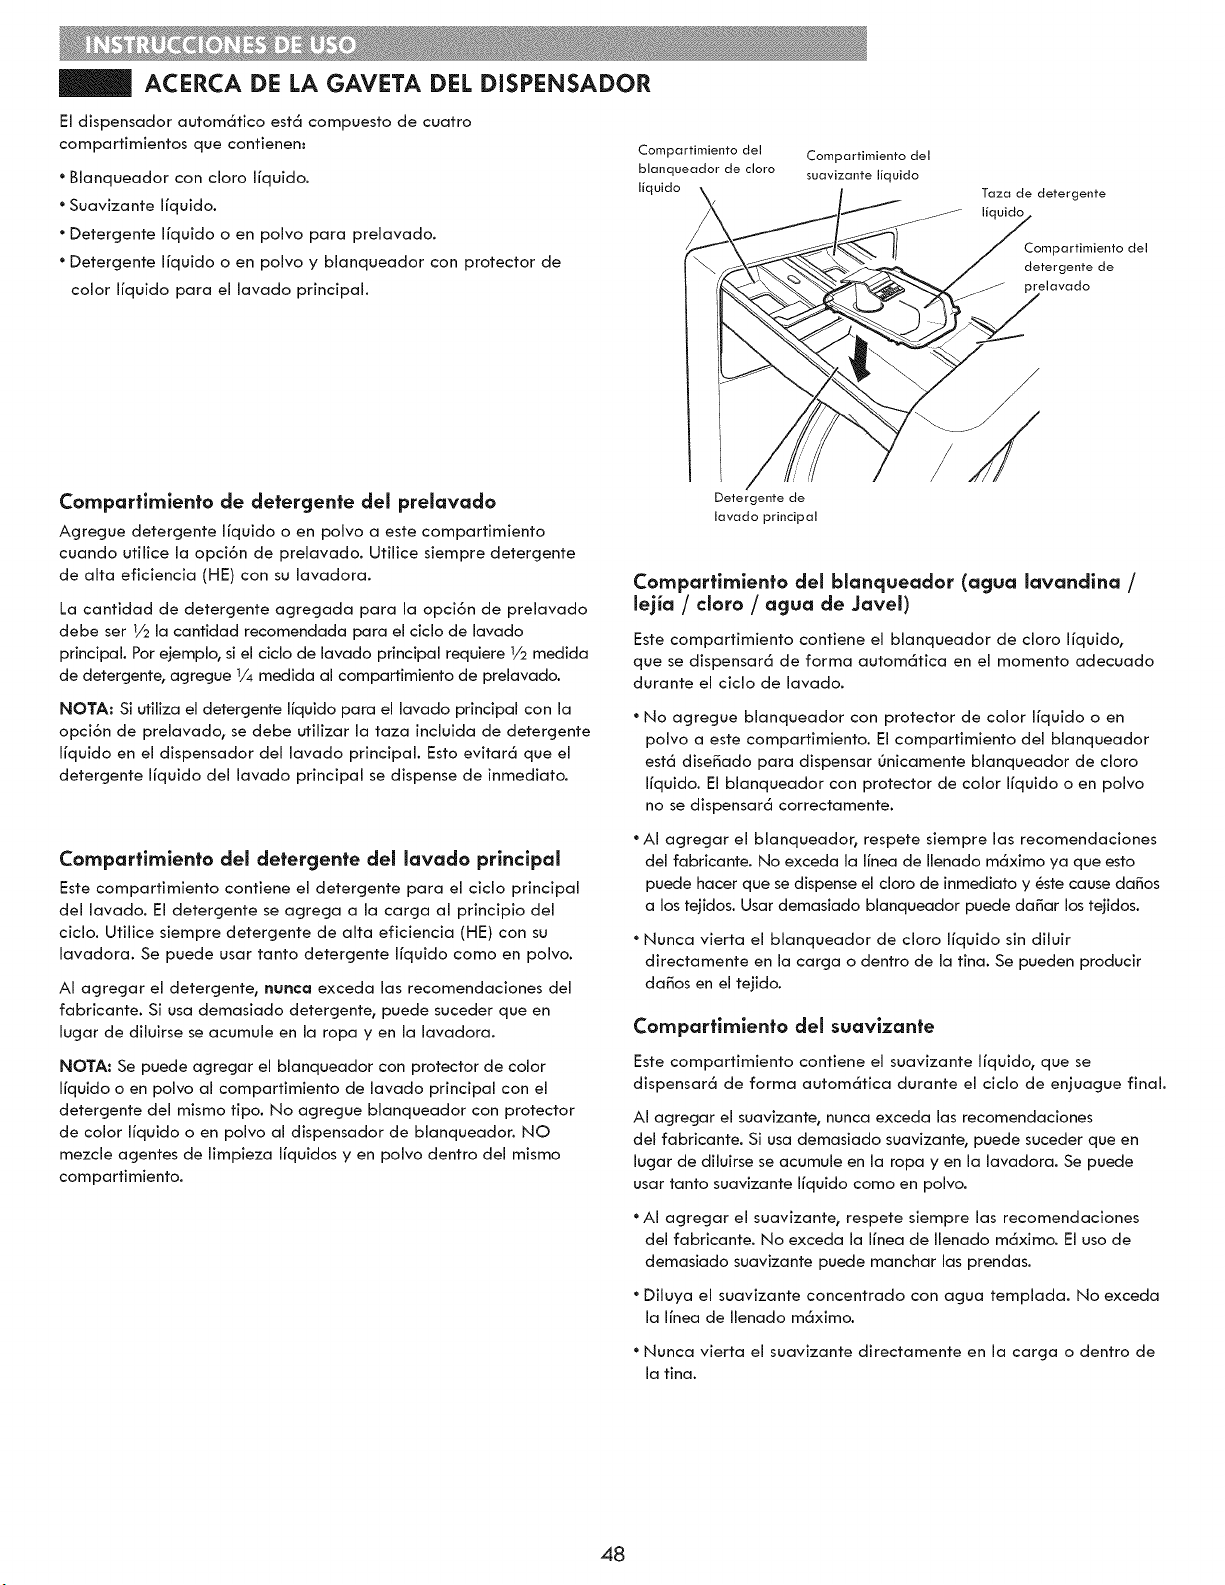
ACERCA DE LA GAVETA DEL DiSPENSADOR
El dispensador autom_tico est_ compuesto de cuatro
compartimientos que contienem
* Blanqueador con clara Ifquido.
* Suavizante Ifquido.
* Detergente [fquido o en polvo para prelavado.
* Detergente [fquido o en polvo y bianqueador con protector de
color Ifquido para el lavado principal.
Comparfimiento del
blanqueador de clara
liquido
Comparfimiento del
suavizante liquido
Taza de detergente
Compartimiento del
detergente de
orelavado
Camparflrnienfo de defergenfe del prelavado
Agregue detergente Ifquido o en polvo a este compartimiento
cuando utilice la opci6n de pre[avado. Utilice siempre detergente
de alta eficiencia (HE) con su lavadora.
La cantidad de detergente agregada para [a opci6n de prelavado
debe ser 1/2 la cantidad recomendada para el ciclo de lavado
principal. Par ejemplo, si el cic[o de lavado principal requiere 1/2 medida
de detergente, agregue t/4 medida al compartimiento de prelavado.
NOTA: Si utiliza el detergente [fquido para el lavado principal con [a
opcJ6n de pre[avado, se debe utilizar la taza inciuida de detergente
ifquido en el dispensador de[ [avado principal. Esto ev[tar(_ que el
detergente ifquido de[ [avado principal se dispense de inmediato.
Compartlmienfa del defergenfe del lavada principal
Este compartimiento contiene el detergente para el ciclo principal
de[ [avado. El detergente se agrega a [a carga a[ principio del
ciclo. Utilice siempre detergente de alta eficiencia (HE) con su
lavadora. Se puede usar tanto detergente Ifquido coma en polvo.
A[ agregar e[ detergente, nunca exceda las recomendaciones del
fabricante. Si usa demasiado detergente, puede suceder que en
lugar de diluirse se acumule en la ropa y en la lavadora.
NOTA: Se puede agregar el blanqueador con protector de color
Ifquido o en poivo al compartimiento de [avado principal con el
detergente de[ mismo tipo. No agregue bianqueador con protector
de color [fquido o en polvo a[ dispensador de bianqueador. NO
mezcie agentes de [impieza [fquidos yen polvo dentro del mismo
compartimiento.
Detergente de
lavado principal
Compartimienfa del blanqueadar (agua lavandlna /
lejia / clara / agua de Javel)
Este compartimiento contiene el blanqueador de clara [fquido,
que se dispensar_ de farina autom6tica en el momenta adecuado
durante el ciclo de [avado.
* No agregue bianqueador con protector de color Ifquido o en
polvo a este compartimiento. El compartimiento de[ blanqueador
est_ dise_ado para dispensar Onicamente blanqueador de clara
[fquido. El blanqueador con protector de color [fquido o en polvo
no se dispensar_ correctamente.
* A[ agregar el blanqueadob respete siempre las recomendaciones
de[ fabricante. No exceda [a [fnea de [lenado m_ximo ya que esto
puede hater que se dispense el clara de inmediato y 6ste cause daffos
a los teiidos. Usar demasiado blanqueador puede daffar [as teiidos.
* Nunca vierta el bianqueador de clara [fquido sin diiuir
directamente en [a carga o dentro de [a tina. Se pueden producir
da_os en el tejido.
Comparflmlenfo del suavizanfe
Este compartimiento contiene el suavizante Ifquido, que se
dispensar_ de forma autom_tica durante el ciclo de enjuague final.
AI agregar el suavizante, nunca exceda las recomendaciones
del fabricante. Si usa demasiado suavizante, puede suceder que en
[ugar de diiuirse se acumule en [a ropa yen la [avadora. Se puede
usar tanto suavizante [fquido coma en polvo.
* A[ agregar el suavizante r respete siempre las recomendaciones
de[ fabricante. No exceda [a [fnea de Ilenado m_ximo. El usa de
demasiado suavizante puede manchar las prendas.
* Diiuya el suavizante concentrado con agua templada. No exceda
[a [fnea de [lenado m_ximo.
* Nunca vierta el suavizante directamente en [a carga o dentro de
[a tina.
48
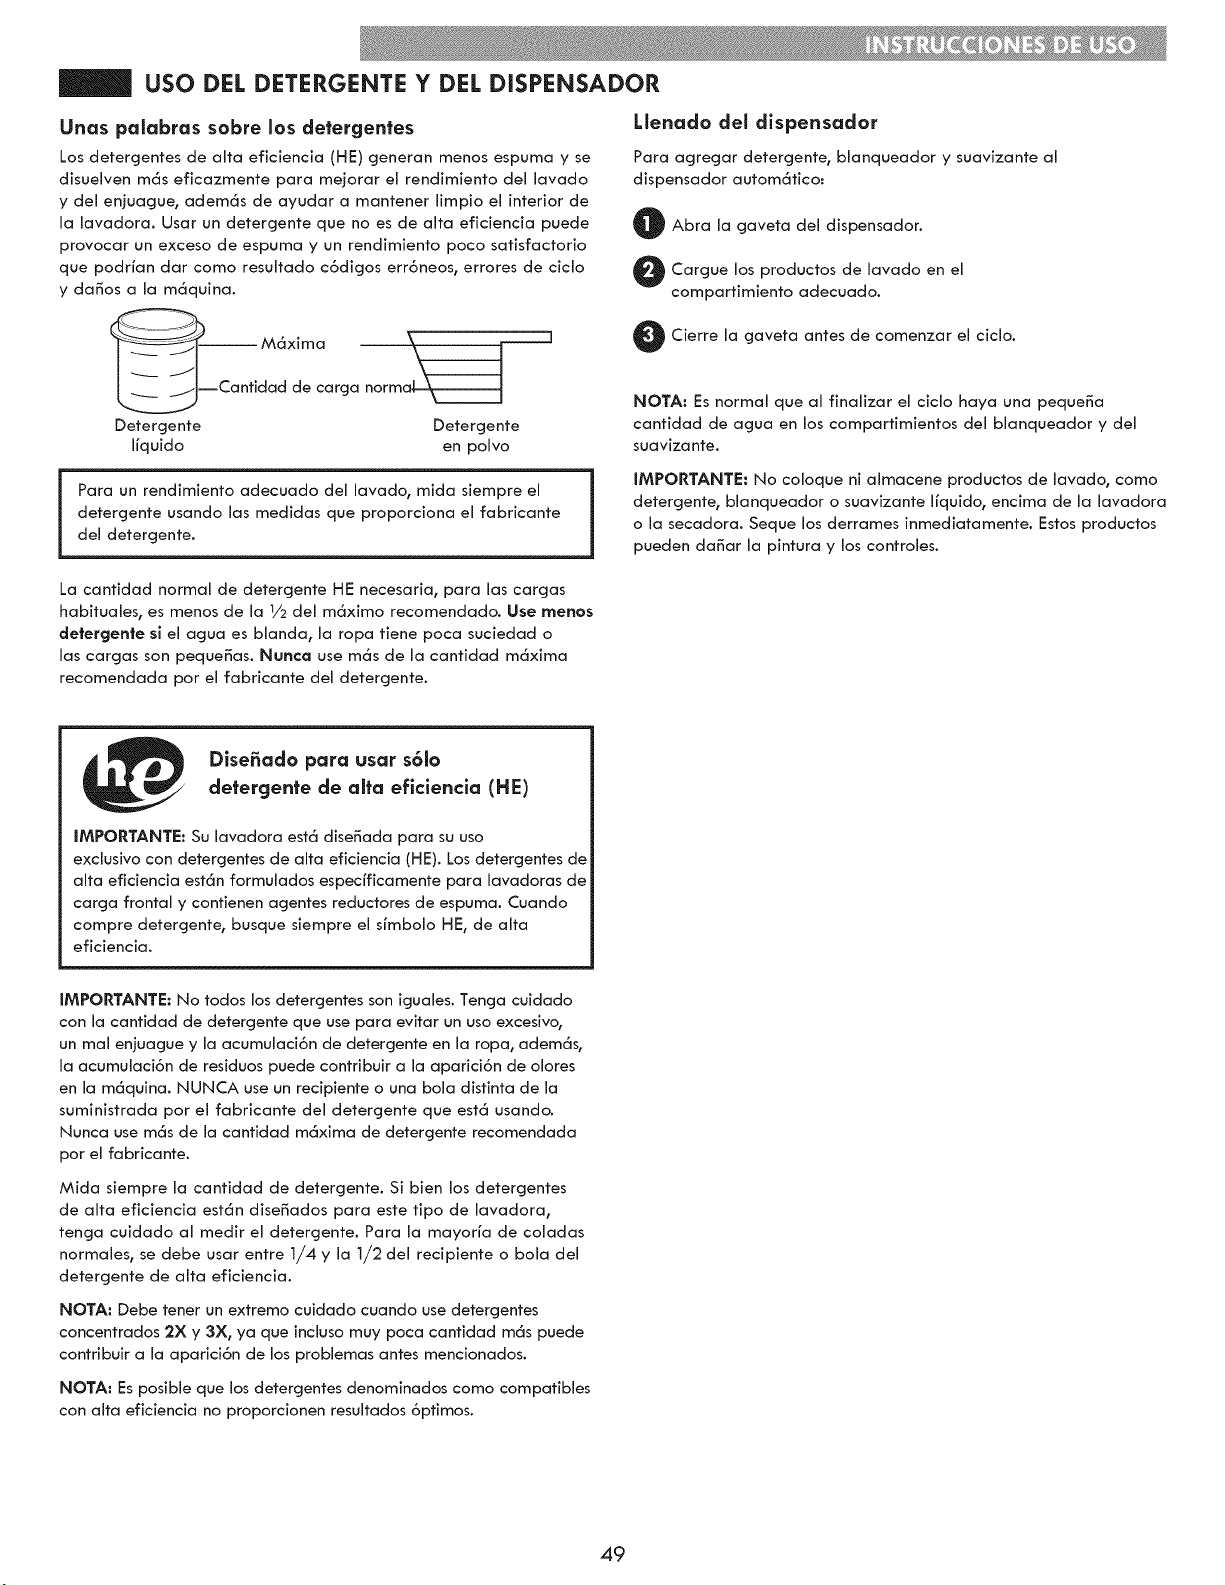
USO DEL DETERGENTE Y DEL DiSPENSADOR
Unas palabras sobre los detergentes
Los detergentes de alta eficiencia (HE) generan menos espuma y se
disuelven mas eficazmente para mejorar el rendimiento del lavado
y del eniuague, ademas de ayudar a mantener limpio el interior de
la lavadora. Usar un detergente que no es de alta eficiencia puede
provocar un exceso de espuma y un rendimiento poco satisfactorio
que podHan dar como resultado c6digos err6neos, errores de ciclo
y da_os a la maquina.
Maxima _i
Cantidad de carga norma_
Detergente Detergente
Ifquido en polvo
Llenado del dispensador
Para agregar detergente, blanqueador y suavizante al
dispensador automatico..
O Abra la gaveta del dispensador.
O argue los productos de lavado en el
compartimiento adecuado.
O Cierre la antes de el ciclo.
gaveta
comenzar
NOTA: Es normal que al finalizar el ciclo haya una peque_a
cantidad de agua en los compartimientos del blanqueador y del
suavizante.
Para un rendimiento adecuado del lavado, mida siempre el
detergente usando las medidas que proporciona el fabricante
del detergente.
IMPORTANTE: No coloque ni almacene productos de lavado, como
detergente, blanqueador o suavizante Ifquido, encima de la lavadora
o la secadora. Seque los derrames inmediatamente. Estos productos
pueden da_ar la pintura y los controles.
La cantidad normal de detergente HE necesaria, para las cargas
habituales, es menos de la 1/2 del maximo recomendado. Use menos
detergente si el agua es blanda, la ropa tiene poca suciedad o
las cargas son peque_as. Nunca use mas de la cantidad maxima
recomendada por el fabricante del detergente.
Dise6ado para usar s61o
detergente de alta eficlencla (HE)
IMPORTANTE: Su lavadora esta dise_ada para su uso
exclusivo con detergentes de alta eficiencia (HE). Los detergentes de
alta eficiencia estan formulados especfficamente para lavadoras de
carga frontal y contienen agentes reductores de espuma. Cuando
compre detergente, busque siempre el sfmbolo HE, de alta
eficiencia.
IMPORTANTE: No todos los detergentes son iguales. Tenga cuidado
con la cantidad de detergente que use para evitar un uso excesivo,
un real enjuague y la acumulaci6n de detergente en la ropa, ademas,
la acumulaci6n de residuos puede contribuir a la aparici6n de olores
en la maquina. NUNCA use un recipiente o una bola distinta de la
suministrada por el fabricante del detergente que esta usando.
Nunca use mas de la cantidad maxima de detergente recomendada
por el fabricante.
Mida siempre la cantidad de detergente0 Si bien los detergentes
de alta eficiencia estan dise_ados para este fipo de lavadora,
tenga cuidado al medir el detergente. Para la mayorfa de coladas
normales, se debe usar entre 1/4 y la 1/2 del recipiente o bola del
detergente de alta eficiencia.
NOTA: Debe tener un extremo cuidado cuando use detergentes
concentrados 2X y 3X, ya que incluso muy poca cantidad mas puede
contribuir a la aparici6n de los problemas antes mencionados.
NOTA: Es posible que los detergentes denominados como compatibles
con alta eficiencia no proporcionen resultados 6ptimos.
49
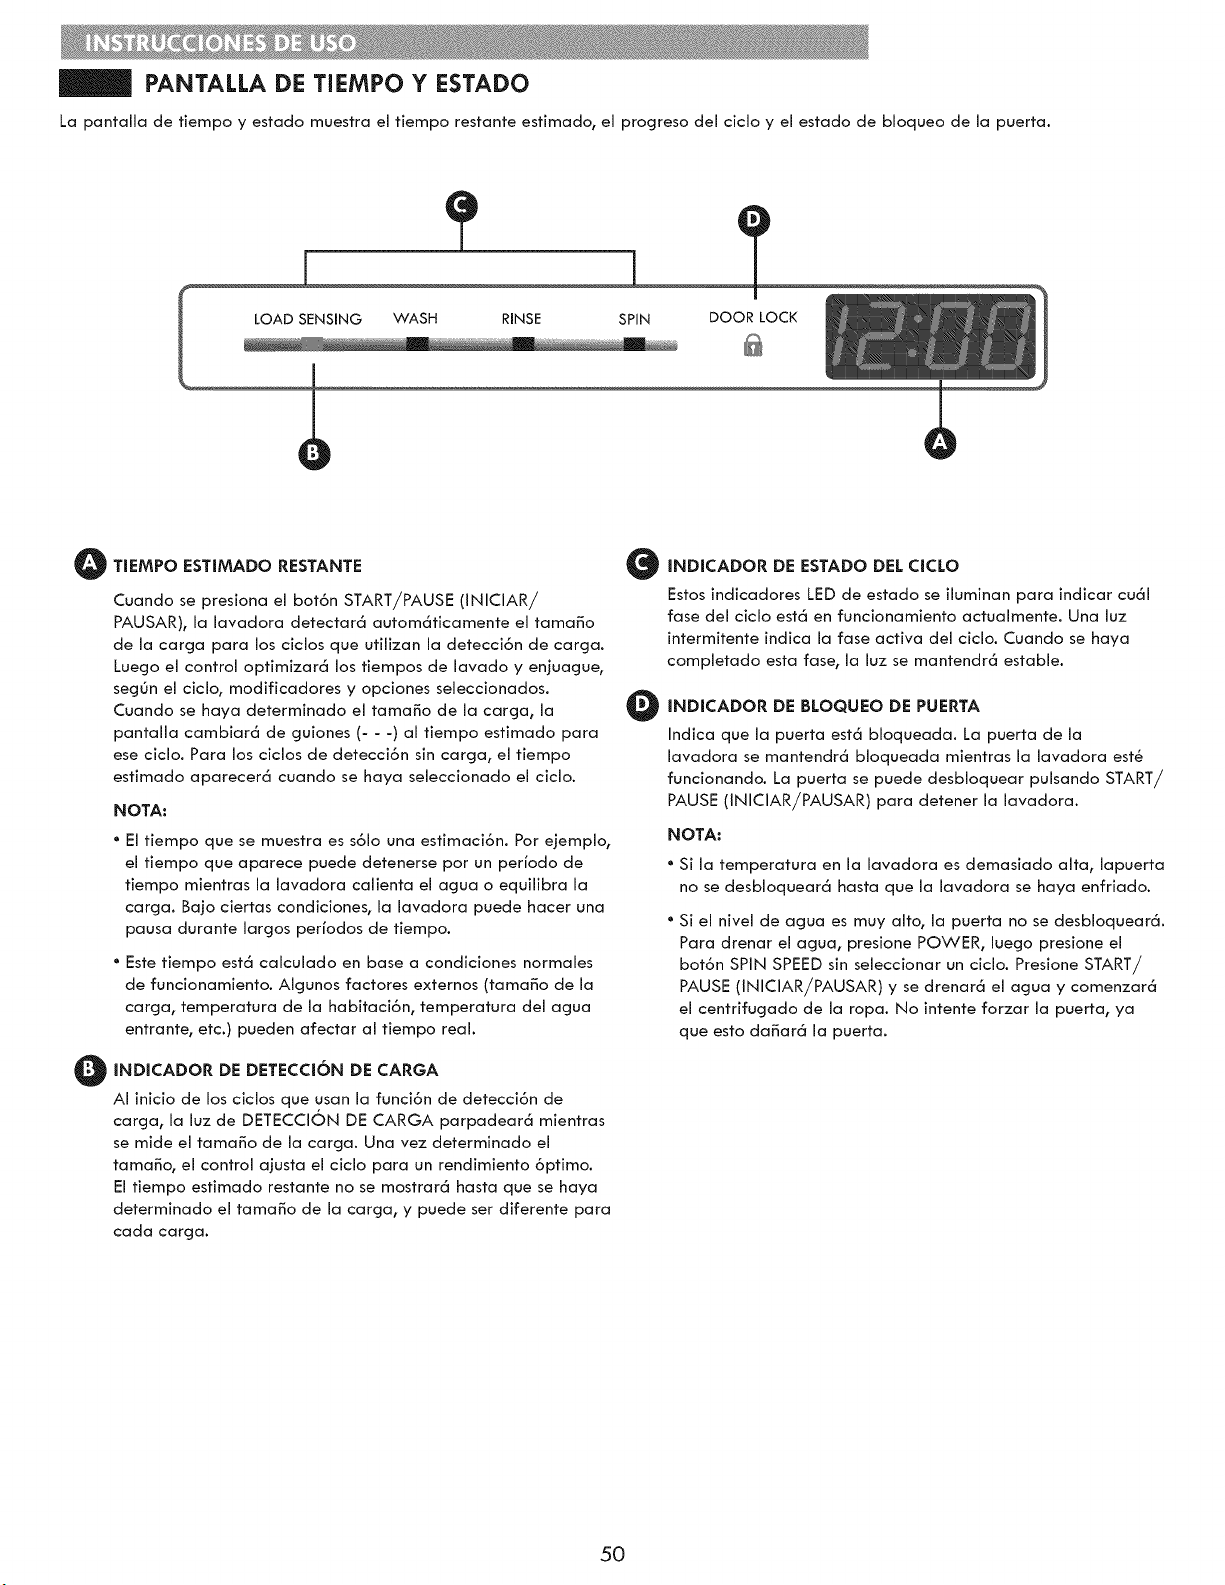
PANTALLA DE TIEMPO Y ESTADO
La pantalla de tiempo y estado muestra el tiempo restante estimado, el progreso del ciclo y el estado de bloqueo de la puerta.
i
|
LOAD SENSING WASH RINSE SPIN
I
DOOR LOCK
O
TIEMPO ESTIMADO RESTANTE
Cuando se presiona el bot6n START/PAUSE (INICIAR/
PAUSAR), la lavadora detectar6 autom6ficamente el tama_o
de la carga para los ciclos que ufilizan la detecci6n de carga.
Luego el control opfimizar6 los tiempos de lavado y enjuague,
segOn el ciclo, modificadores y opciones seleccionados.
Cuando se haya determinado el tama_o de la carga, la
pantalla cambiar6 de guiones (- - -) al tiempo estimado para
ese ciclo. Para los ciclos de detecci6n sin carga, el tiempo
estimado aparecer6 cuando se haya seleccionado el ciclo.
NOTA:
" El tiempo que se muestra es s61o una esfimaci6n. Por ejemplo,
el tJempo que aparece puede detenerse pot un perfodo de
tiempo mientras la lavadora calienta el agua o equilibra la
carga. Bajo ciertas condiciones, la lavadora puede hater una
pausa durante largos perfodos de tiempo.
" Este tiempo est_ calculado en base a condiciones normales
de funcionamiento. Algunos factores externos (tama_o de la
carga, temperatura de la habitaci6n, temperatura del agua
entrante, etc.) pueden afectar al tiempo real.
O INDICADOR DE DETECCI6N DE CARGA
AI inicio de los ciclos que usan la funci6n de detecci6n de
carga, la luz de DETECCION DE CARGA parpadear6 mientras
se mide el tama_o de la carga. Una vez determinado el
tama_o, el control ajusta el ciclo para un rendimiento 6ptimo.
El fiempo estimado restante no se mostrar6 hasta que se haya
determinado el tama_o de la carga, y puede ser diferente para
cada carga.
O
O
INDICADOR DE ESTADO DEL ClCLO
Estos indicadores LED de estado se iluminan para indicar cu_l
fase del ciclo estc] en funcJonamiento actualmente. Una luz
intermitente Jndica la fase activa del ciclo. Cuando se haya
completado esta fase, la luz se mantendr_ estable.
INDICADOR DE BLOQUEO DE PUERTA
Indica que la puerta estc] bloqueada. La puerta de la
iavadora se mantendr_ bloqueada mJentras la iavadora est6
funcionando. La puerta se puede desbioquear puisando START/
PAUSE (INICIAR/PAUSAR) para detener ia iavadora.
NOTA:
" Si la temperatura en la lavadora es demasiado alta, lapuerta
no se desbloquear6 hasta que la lavadora se haya enfriado.
" Si el nivel de agua es muy alto, la puerta no se desbloquear_.
Para drenar el agua, presione POWER, luego presione el
bot6n SPIN SPEED sin seleccionar un ciclo. Presione START/
PAUSE (INICIAR/PAUSAR) y se drenar_ el agua y comenzar_
el centrifugado de la ropa. No intente forzar la puerta, ya
que esto da_ar_ la puerta.
5O
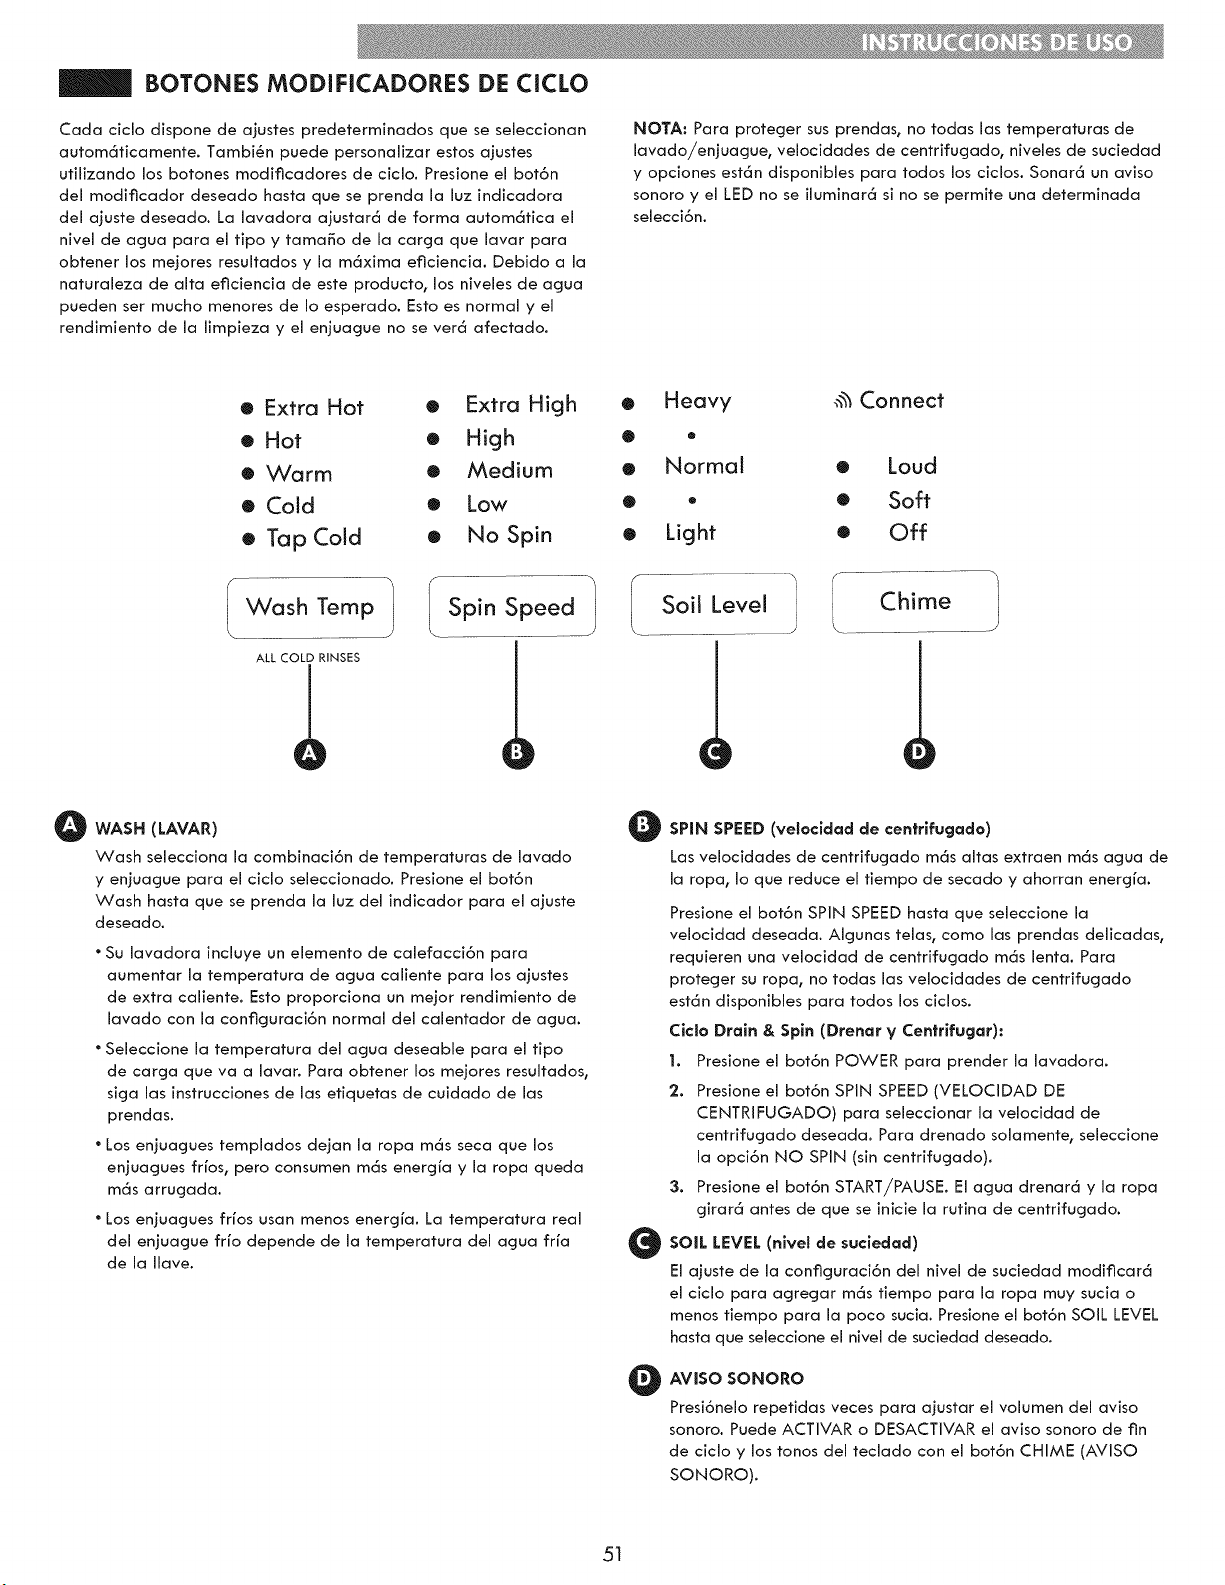
BOTONES MODIFICADORES DE CICLO
Cada ciclo dispone de ajustes predeterminados que se seieccionan
autom_ticamente. TambiSn puede personalizar estos ajustes
utilizando los botones modificadores de ciclo. Presione el bot6n
del modificador deseado hasta que se prenda la luz indicadora
del ajuste deseado. La lavadora ajustar_ de forma autom_tica el
nivel de agua para el fipo y tamaffo de [a carga que [avar para
obtener los me]ores resuitados y [a maxima eficiencia. Debido a la
naturaleza de alta eficiencia de este producto, los niveles de agua
pueden ser mucho menores de Io esperado. Esto es normal y el
rendimiento de la limpieza y el enjuague no se ver_ afectado.
NOTA: Para proteger sus prendas, no todas las temperaturas de
lavado/enjuague, velocidades de centrifugado, niveies de suciedad
y opciones est_n disponibies para todos los ciclos. Sonarc_ un aviso
sonora y el LED no se iluminar_ si no se permite una determinada
selecci6n.
• Extra Hot • Extra High o
• Hot e High •
e Warm • Medium o
• Cold • Low •
• Tap Cold • No Spin •
......Washmemo!
ALL COLD RINSES
O
Heavy _%Connect
o
Normal • Loud
,, • Soft
Light • Off
Soil Level
O WASH (LAVAR)
Wash selecciona [a combinaci6n de temperaturas de lavado
y enjuague para el ciclo seleccionado. Presione el bot6n
Wash hasta que se prenda la luz del indicador para el ajuste
deseado.
" Su lavadora incluye un elemento de calefacci6n para
aumentar [a temperatura de agua caliente para los ajustes
de extra caliente. Esto proporciona un me]or rendimiento de
lavado con la configuraci6n normal del calentador de agua.
* Seleccione la temperatura del agua deseabie para el tipo
de carga que va a [avar. Para obtener los mejores resuitados
siga [as instrucciones de las etiquetas de cuidado de las
prendas.
* Los eniuagues templados de]an [a ropa m_s seca que los
enjuagues frios, pero consumen m6s energfa y la ropa queda
m_s arrugada.
* Los enjuagues frios usan menos energia. La temperatura real
de[ eniuague frio depende de la temperatura del agua fria
de la Ilave.
O
O
SPIN SPEED (velocidad de centrifugada)
Las velocidades de centrifugado m_s altas extraen m_s agua de
la ropa, Io que reduce el tiempo de secado y ahorran energfa.
Presione el bot6n SPIN SPEED hasta que seleccione la
velocidad deseada. Aigunas telas, coma [as prendas delicadas,
requieren una velocJdad de centrifugado m_s [enta. Para
proteger su ropa, no todas las velocidades de centrifugado
est_n disponibles para todos los ciclos.
Ciclo Drain & Spin (Drenar y Centrifugar):
1. Presione el bot6n POWER para prender la lavadora.
2. Presione el bot6n SPIN SPEED (VELOCIDAD DE
CENTRIFUGADO) para seleccionar la velocidad de
centrifugado deseada. Para drenado solamente, seleccione
la opci6n NO SPIN (sin centrifugado).
3. Presione el bot6n START/PAUSE. El agua drenar5 y la ropa
girard antes de que se inicie la rutina de centrifugado.
SOIL LEVEL (nivel de suciedad)
El ajuste de [a configuraci6n de[ nivel de suciedad modificar_
el ciclo para agregar m_s tiempo para [a ropa muy sucia o
menos tiempo para [a poco sucia. Presione el bot6n SOIL LEVEL
hasta que seleccione el nivel de suciedad deseado.
AVlSO SONORO
Presi6ne[o repetidas veces para ajustar el volumen de[ aviso
sonora. Puede ACTIVAR o DESACTIVAR el aviso sonora de fin
de ciclo y los tonos del teclado con el bot6n CHIME (AVISO
SONORa).
51
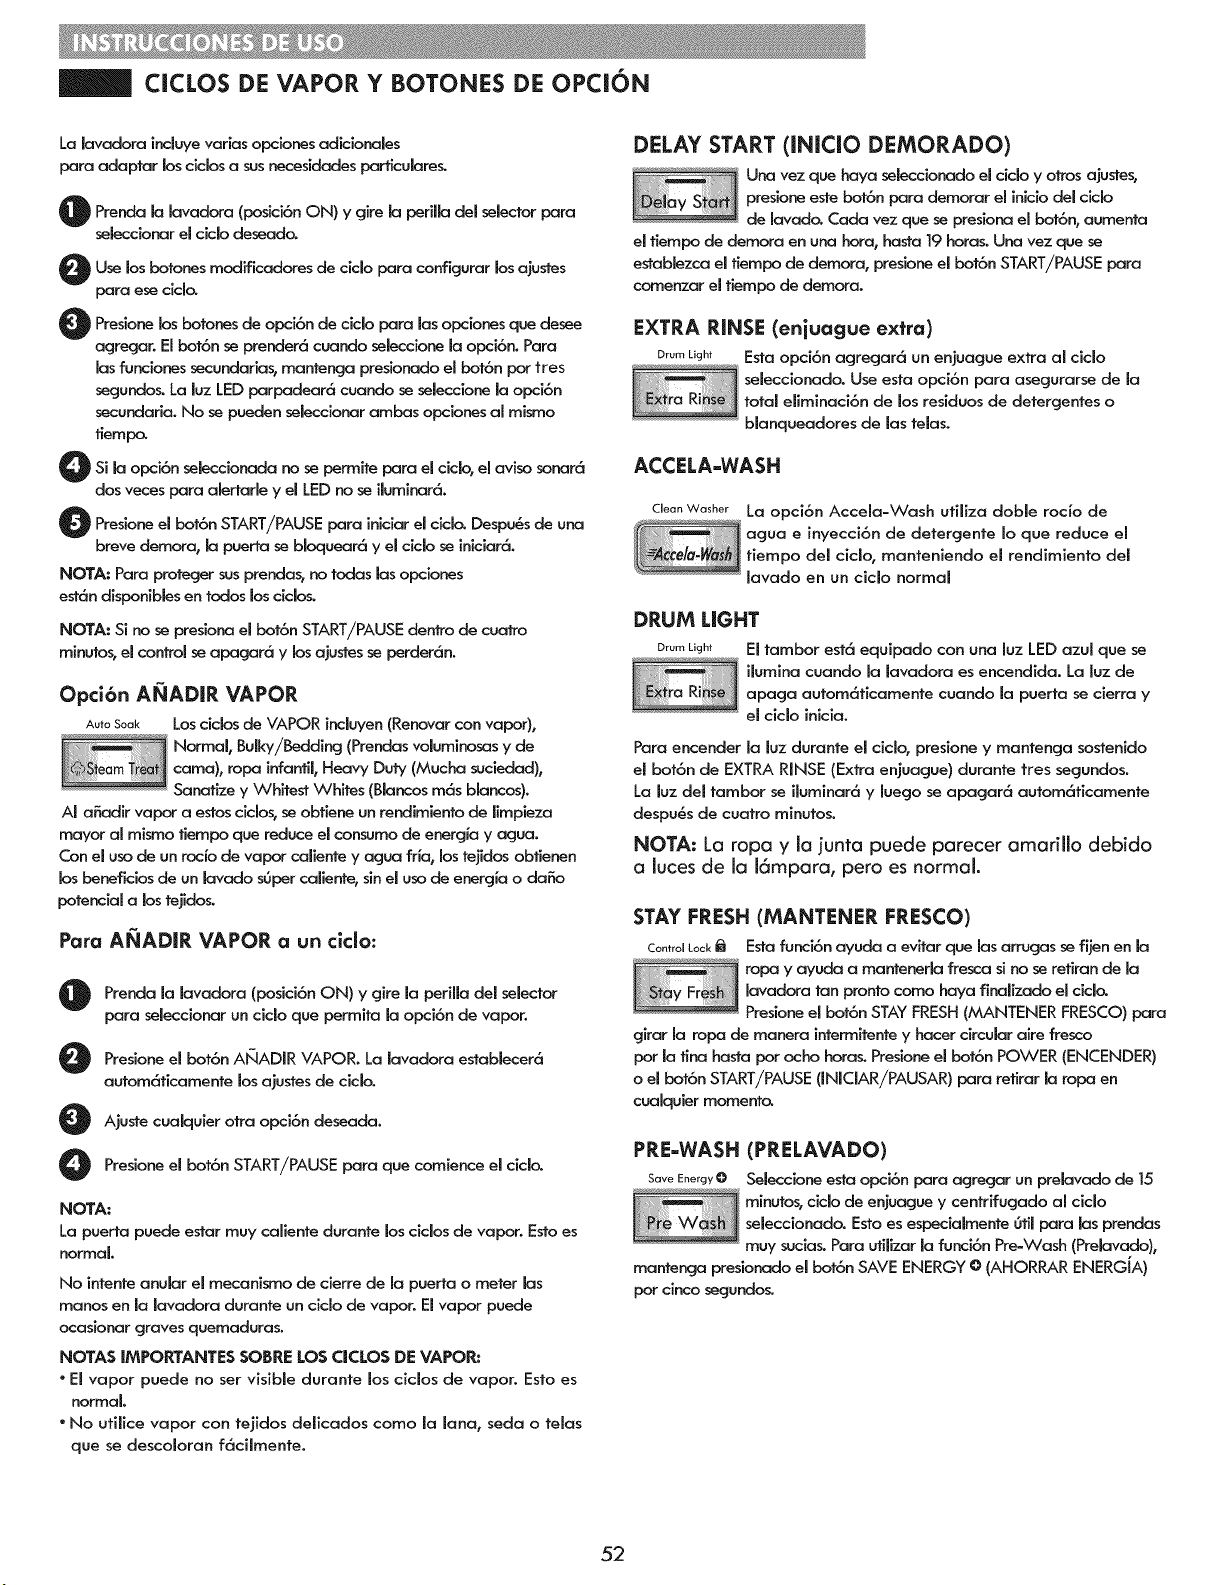
CICLOS DE VAPOR Y BOTONES DE OPCION
La lavadora induye vadas opciones adicionales
para adaptar los cidos a sus necesidades parficulare_
_ Prenda (posici6n ON) y gire perilla para
la lavadora la del selector
sebccionar el ciclo deseada
O Use los botones modificadores de cldo configurar los ajustes
para
para ese clda`
O Presione los botones de de ciclo las desee
opcion opcionespara que
agregar. El bot6n se prender6 cuando seleccione la opci6n. Para
las funciones secundarias, mantenga presionado el bot6n por tres
segundos. La luz LED parpadeard_ cuando se seleccione la opci6n
secundaria. No se pueden selecclonar ambas opciones al mismo
tiempa`
O Si la ol0ci6n seleccionada no se permite para el ciclo, el aviso sonar6
dos veces para abrtarb y el LED no se ibminar6.
O resione el bot6n START/PAUSE para iniciar el cida` Despu_s de una
breve demor% la puerta se bloquear6 y el cicb se iniciar6.
NOTA: Para proteger sus prendas, no tadas las opciones
est6n disponibbs en tados bs ciclos.
NOTA: Si no se presiona el bot6n START/PAUSEdentro de cuatro
mlnutos,el control seapagar6 y bs ajustesse perder6n.
Opci6n ANADIR VAPOR
AutoSoak Los cidos de VAPOR induyen (Renovar con vapor),
Normal, Bulky/Bedding (Prendas voluminosas y de
I_ earn _ _ cama), ropa infanfil, Heavy Duty (Mucha suciedad),
Sanafize y Whitest Whites (Blancos m6s blancos).
AI afiadir vapor a estos cicbs, se obfiene un rendimiento de Iimpieza
mayor al misrno fiempo que reduce el consumo de energfa y agua.
Con el uso de un rocfo de vapor caliente y agua frfa, los tejldos obtienen
bs beneficios de un lavado sOper caliente, sin el uso de energia o dafio
potencial a los tejidos.
Para AI_ADIR VAPOR a un cldo:
Prenda la lavadora (posici6n ON) y gire la periHa del selector
para seleccionar un cido que permita la opci6n de vapor.
O resione el bot6n ANADIR VAPOR. La lavadora estabbcer6
autom6ficamente bs ajustes de cido.
O Ajuste cualquier otra opci6n deseada.
O Presioneel bot6n START/PAUSEpara que comience el cicb.
NOTA:
La puerta puede estar muy caliente durante los cidos de vapor. Esto es
normal
No intente anular el mecanismo de cierre de la puerta o meter las
manos en la lavadora durante un ciclo de vapor. El vapor puede
ocasionar graves quemaduras.
NOTAS |MPORTANTES SOBRE LOS CICLOS DE VAPOR:
• El vapor puede no ser visible durante los cidos de vapor. Esto es
normal
" No utilice vapor con tejidos delicados como la lana_ seda o telas
que se descoloran f6cilmente.
DELAY START (INIClO DEMORADO)
Una vez que haya seleccionado el ciclo y otros ajustes,
presione este bot6n para demorar el iniclo del cido
de lavada` Cada vez que se presiona el bot6n_ aumenta
el tiempo de demora en una hora, hasta 19 horas. Una vez que se
establezca el tiempo de demora, presione el bot6n START/PAUSE para
comenzar el tiempo de demora.
EXTRA RINSE (eniuague extra)
DrumLight Esta opci6n agregar6 un enjuague extra al cido
seleccionado. Use esta opci6n para asegurarse de la
total ellmlnaci6n de los reslduos de detergentes o
blanqueadores de las telas.
ACCELA-WASH
Clean Washer
La opci6n Accela-Wash utiliza doble rocfo de
agua e inyecci6n de detergente Io que reduce el
fiempo del ciclo, manteniendo el rendimlento del
lavado en un ciclo normal
DRUM LIGHT
Drum Light
El tambor est6 equipado con una luz LED azul que se
ilumina cuando la lavadora es encendida. La luz de
apaga autom6ficamente cuando la puerta se cierra y
el ciclo inicia.
Para encender la luz durante el ciclo, presione y mantenga sostenido
el bot6n de EXTRA RINSE (Extra enjuague) durante fres segundos.
La luz del tambor se iluminar6 y luego se apagar6 autom6ficamente
despu_s de cuatro minutos.
NOTA: La ropa y la junta puede parecer amarillo debido
a luces de la 16mpara, pero es normal.
STAY FRESH (MANTENER FRESCO)
ControlLock_ Esta funci6n ayuda a evitar que las arrugas se fijen en la
' ropa y ayuda a mantenerla fresca si no se retiran de la
lavadora tan pronto como haya finalizado el cida`
Presione el bot6n STAY FRESH (MANTENER FRESCO) para
girar la ropa de manera intermitente y hacer circular aire fresco
por la tina basra pot ocho horas. Presione el bot6n POWER (ENCENDER)
o el bot6n START/PAUSE 0NICIAR/PAUSAR) para refirar la ropa en
cualquier momenta,
PRE-WASH (PRELAVADO)
SaveEnergyO Seleccione esta opci6n para agregar un prelavado de ]5
minutos, cido de enjuague y centrffugado al cido
seleccionado. Esto es especialmente 6til pard las prenclas
muy sucias. Para utilizar la funci6n Pre-Wash (Prelavado),
mantencja presionado el bot6n SAVE ENERGY €) (AHORRAR ENERGiA)
Igor cinco segundos.
52
FUNCIONES ESPECIALES
CONTROL LOCK (bloqueo de los controles)
ControlLock_ Utilice esta opci6n para deshabilitar los controles. La
lavadora s61o se puede bloquear durante un ciclo. Esta
funci6n impide que los nifios cambien los ciclos o
rnanejen la m6quina. Una vez activado, los controles
permanecen bloqueados yes necesar_o DESACTIVAR el
bloqueo de los controles antes de poder utilizar los controles
nuevamente. Una vez apagada la lavadora, el bot6n de alimentaci6n
permitir6 prender la m6quina, pero los controles continuar6n
bloqueados. Si los controles est6n bloqueados, se iluminar6 el LED de
CONTROL LOCK yen la pantalla se alternar6n las letras "CL" con el
tlempo del ciclo estimado. Mantencja preslonado el bot6n CONTROL
LOCK per tres segundos para activar o desactivar los controles.
CLEAN WASHER (limpiar lavadora)
cleonWo_her LOSresiduos de detergente pueden acum01arse en la
tina de lavado con el tiempo y pueden producir un
olor a rnoho o a humedad. El ciclo CLEAN WASHER
est6 especialmente disefiado para eliminar esta
acumulaci6n usando blanqueador u otro Iimpiador
disefiado especfficamente para la limpieza de lavadoras de carcja frontal.
Utilice el ciclo CLEAN WASHER una vez al mes, o m6s a menudo en
condicbnes de uso intensivo, o si advlerte la presencia de olores.
Encienda la lavadora y presione el bot6n ACCELA-WASH. La
selecci6n de cualquier otto ciclo despu_s de haber seleccionado
CLEAN WASHER har6 que se cancele el ciclo CLEAN WASHER.
@
Rellene el dispensador de blanqueador hasta la Iinea
MAX con blanqueador con cloro liquido. No sobrellene el
dispensador de blanqueador. El sobrellenado puede causar que
el blanqueador se dispense inmediatamente.
NOTA: Para otros productos de limpieza de tinas, sicja las
instrucciones y recomendaciones del fabricante del lirnpiador.
Agrecjue los productos de limpieza en polvo al compartimiento
de lavado principal de la gaveta del dispensador. Coloque los
limpiadores en tabletas directamente en la tina.
Presione el bot6n START/PAUSE para que comience el ciclo.
Cuando finalice el ciclo, abra la puerta y deje que el interior
de la tina se seque completamente.
NOTA: NO use este ciclo con ropa y NO agregue detergente
nl suavizante.
MY CYCLE (ml ciclo)
El bot6n MY CYCLE le permite guardar un ciclo de lavado
personalizado para utilizarlo en otto momento. De esta
manera, podr6 guardar sus ajustes favoritos de
temperatura, velocidad de centrifugado, nivel de suciedad y dem6s
opclones para un ciclo y, m6s adelante, recuperarlos con s61o presionar
un bot6n.
NOTA: $61o puede guardar los ajustes personalizados para un
ciclo a la vez. AI mantener presionado el bot6n MY CYCLE, se
sobrescriblr6 cualquier ciclo prevlamente guardado.
Para guardar UN C|CLO personalizaclo:
O Presione el para prender la lavadora.
bot6n POWER
O ire la perilla del selector de ciclo para seleccionar el ciclo que
desee.
O Presioneel MODIFICADOR CICLO para el
bot6n de DE cambiar
ajuste deseado.
O Presione el bot6n de DE CICLO para agregar las
OPCION
opciones deseadas.
O Mantenga presionado el bot6n MY CYCLE.
Para recuperar UN CICLO personalizado:
O Presione el bot6n POWER para prender la lavadora.
O Presione el bot6n MY CYCLE. Se mostrar6n los ajustes almacenados.
O Presione el bot6n START/PAUSE para que comience el ciclo.
NOTA: El ciclo personalizado se puede ajustar de la misma
manera que cualquier otto ciclo. No obstante, una vez que se
presiona cualquier otro bot6n, el LED se apagar6 para indicar
que los ajustes ya no coinciden exactamente con los del ciclo
personalizado.
AUTO SOAK (REMOJO AUTOMATICO)
AutoSoak Use la opci6n AUTO SOAK para remojar
f_ previamente las prendas con el fin de eliminar las
manchas dificiles de las prendas. Esta opci6n
.....................................proporciona un remojado previo de 30 minutos
antes de que comience el ciclo seleccionado. AI
final del tiempo de remojo previo, el ciclo seleccionado utilizar6 la
misma agua.
Para utilizar la funci6n AUTO SOAK (REMOJO AUTOMA, TICO),
mantenga presionado el bot6n DELAY START (INICIO DEMORADO)
durante cinco segundos.
SAVE ENERGY (ahorrar energia)
SaveEnergyO Esta opci6n ahorra energla usando agua m6s fr_a a la
vez que aumenta los tiempos de lavado y enjuague para
mantener el rendimiento de lavado. Esta funci6n s61o est6
disponible con los ciclos
NORMAL/CASUAL y HEAVY DUTY tal como se indica a continuaci6n.
"NORMAL = Caliente se Templada
"NORMAL - Tmeplada se Fria
- HEAVY DUTY (mucha suciedad) = Caliente se Templada
53
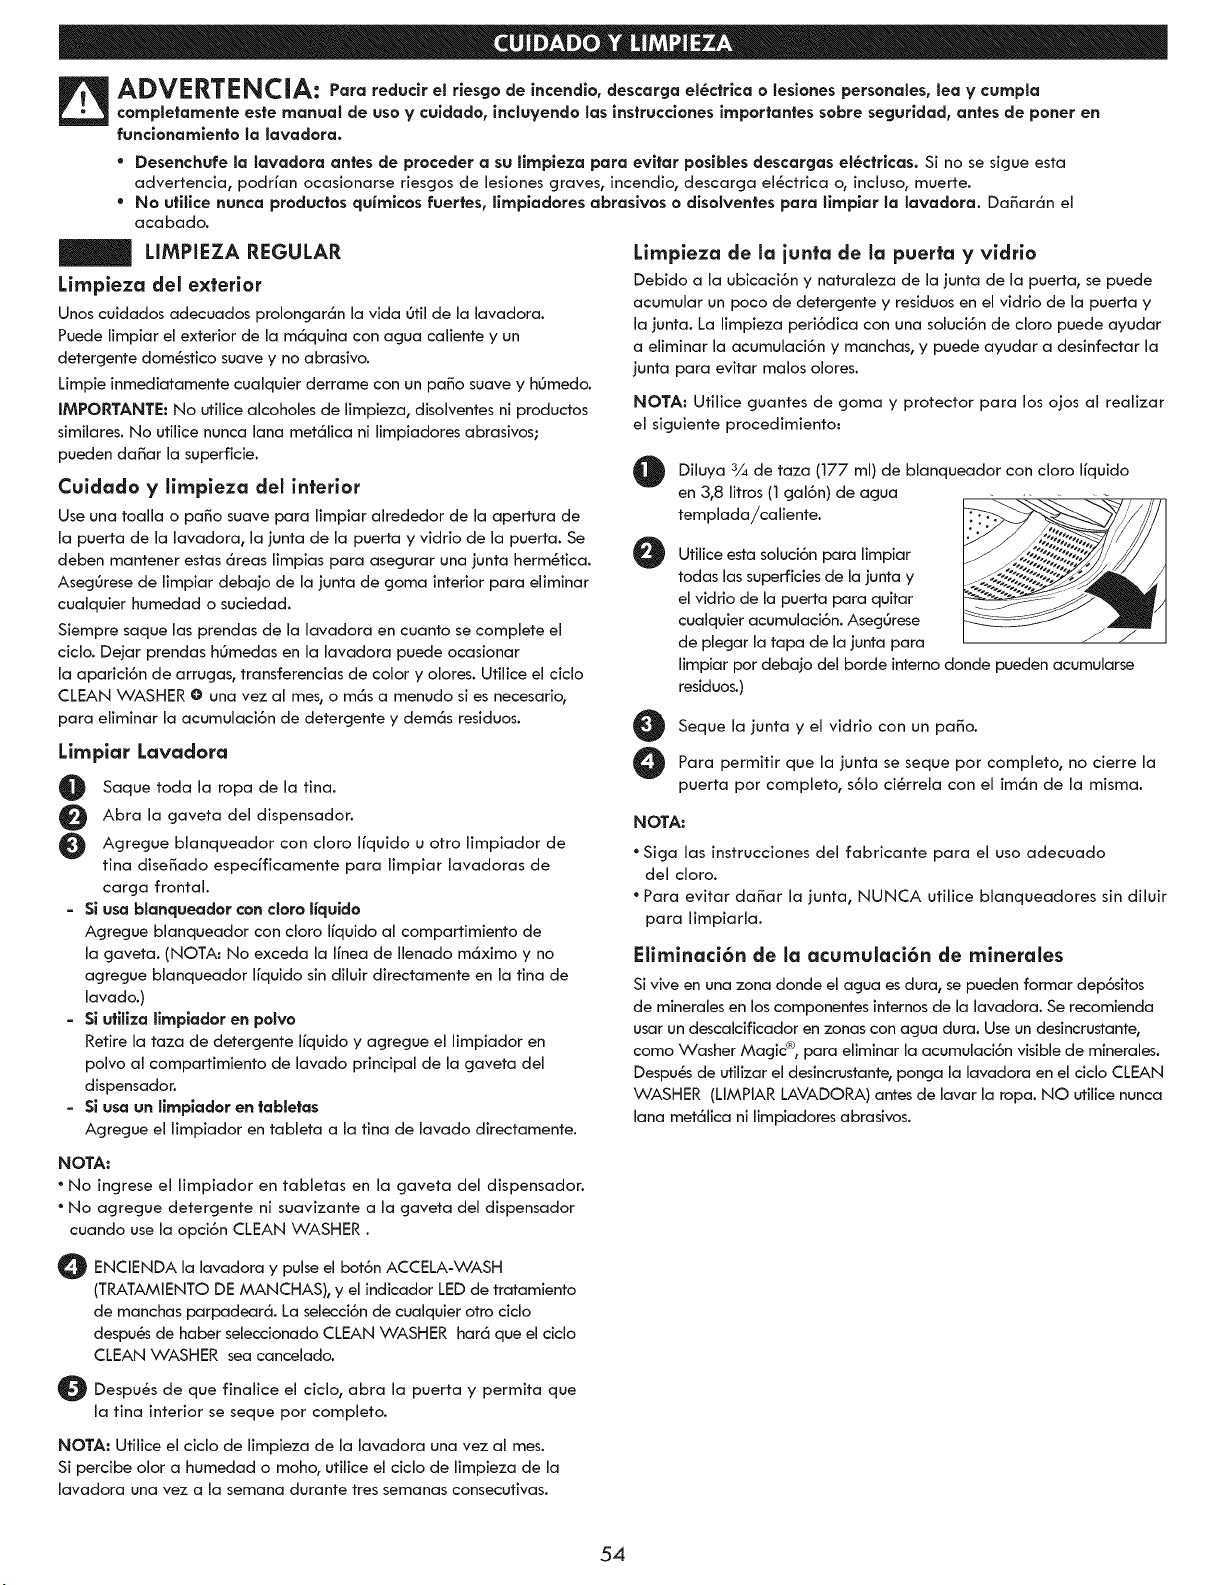
ADVERTENCIA: P=a edu irel iesgodei=endio,desk=go olesionespe sonales,leaV umpla
completamente este manual de uso y cuidaclo, incluyencto los instrucciones importantes sobre seguridacl, antes de porter en
funcionamiento la lavaclora.
* Desenchufe la lavaclora antes de proceder a su limpieza para evitar posibles clescargas el_ctricaso Si no se sigue esta
advertencia, podrfan ocasionarse riesgos de lesiones graves, incendio, descarga ei6ctrica o, incluso, muerte.
* No ufilice nunca procluctos quimicos fuertes, limpiaclores abrasivos o clisolventes para limpiar la lavaclora. Danar_n el
acabado.
LIMPIEZA REGULAR
Limpieza del exterior
Unos cuidados adecuados prolongar6n la vida Otil de la lavadora.
Puede limpiar el exterior de la m6quina con agua caliente y un
detergente domSstico suave y no abrasivo.
Limpie inmediatamente cualquier derrame con un pa_o suave y hOmedo.
IMPORTANTE: No utiiice aicohoies de limpieza, disoiventes ni productos
simHares. No utilice nunca iana met6iica ni limpiadores abrasivos;
pueden da_ar ia superficie.
Cuidado y limpieza del interior
Use una toalla o pa_o suave para iimpiar alrededor de ia apertura de
ia puerta de ia iavadora, ia junta de ia puerto y vidrio de ia puerto. Se
deben mantener estas d_reas HmpJas para asegurar una junta herm_tJca.
AsegOrese de HmpJar deba]o de la junta de goma interior para eliminar
cuaiquJer humedad o sucJedad.
Siempre saque las prendas de la iavadora en cuanfo se compiete ei
ciclo. Dejar prendas hOmedas en ia iavadora puede ocasJonar
la aparJcJ6n de arrugas, transferencias de color y oiores. Utiiice ei ciclo
CLEAN WASHER O una vez al mes_ o md_sa menudo sJ es necesario,
para eiiminar ia acumuiaci6n de detergente y dem6s residuos.
Limpiar Lavadora
0
0
0
Saque toda la ropa de la tina.
Abra la gaveta del dispensador.
Agregue blanqueador con clara Ifquido u otro limpiador de
tina dise_ado especfficamente para limpiar lavadoras de
cargo frontal.
Si usa btanqueador con cloro ffquiclo
Agregue blanqueador con clara Ifquido al comparfimiento de
la gaveta. (NOTA: No exceda la Ifnea de Ilenado m6ximo y no
agregue blanqueador Ifquido sin diluir directamente en la tina de
lavado.)
Si utiiiza limpiador en polvo
Retire la taza de detergente Ifquido y agregue el limpiador en
polvo al compartimiento de lavado principal de la gaveta del
dispensador.
Si usa un limpiaclor en tabletas
Agregue el limpiador en tableta a la tina de lavado directamente.
Limpieza de la iunta de la puerto y vidrio
Debido a la ubicaci6n y naturaleza de la junta de la puerto, se puede
acumular un poco de detergente y residuos en el vidrio de la puerto y
la junta. La limpieza peri6dica con una soluci6n de clara puede ayudar
a eliminar la acumulaci6n y manchas, y puede ayudar a desinfectar la
junta para evitar malos olores.
NOTA: Utilice guantes de goma y protector para los ojos al realizar
el siguiente procedimiento:
Diluya 3¼ de taza (177 ml) de blanqueador clara iiquido
con
en 3,8 IJtros (] gai6n) de agua
templada/caliente.
O
Utilice esta soluci6n para limpiar
todas las superficies de la junta y
el vidrio de la puerto para quitar
cualquier acumulaci6n. AsegOrese
de plegar la tapa de la iunta para
limpiar per debajo del borde interno donde pueden acumularse
residuos.)
Sequela junta y el vidrio con un pa_o.
Para permitir que la junta se seque par completo, no cierre la
puerta par completo, s61o ci_rrela con el im6n de la misma.
NOTA:
* Siga los instrucciones del fabricante para el usa adecuado
del clara.
" Para evitar daSar la junta, NUNCA utilice blanqueadores sin diluir
para limpiarla.
Eliminaci6n de la acumulaci6n de minerales
Si vive en una zona donde el agua es dura, se pueden formar dep6sitos
de minerales en los componentes internos de la lavadora. Se recomienda
usar un descalcificador en zonas con agua dura. Use un desincrustante,
coma Washer Magid _, para eliminar la acumulaci6n visible de minerales.
DespuSs de utilizar el desincrustante, ponga la lavadora en el ciclo CLEAN
WASHER (LIMPIAR LAVADORA) antes de lavar la ropa. NO utilice nunca
lana met61ica ni limpiadores abrasivos.
NOTA:
* No ingrese el limpiador en tabletas en la gaveta del dispensador.
" No agregue detergente ni suavizante a la gaveta del dispensador
cuando use la opci6n CLEAN WASHER.
O ENCIENDA la lavadora y pulse el bot6n ACCELA-WASH
(TRATAMIENTO DE MANCHAS), y el indicador LED de tratamiento
de manchas parpadear6. La selecci6n de cualquier otro ciclo
despuSs de haber seleccionado CLEAN WASHER har6 que el ciclo
CLEAN WASHER sea cancelado.
O Despu6s de que finalice el ciclo, abra la puerta y permita que
la tina interior se seque par completo.
NOTA: Utilice el ciclo de limpieza de la lavadora una vez al mes.
Si percibe olor a humedad o moho, utilice el ciclo de limpieza de la
lavadora una vez a la semana durante tres semanas consecutivas.
54
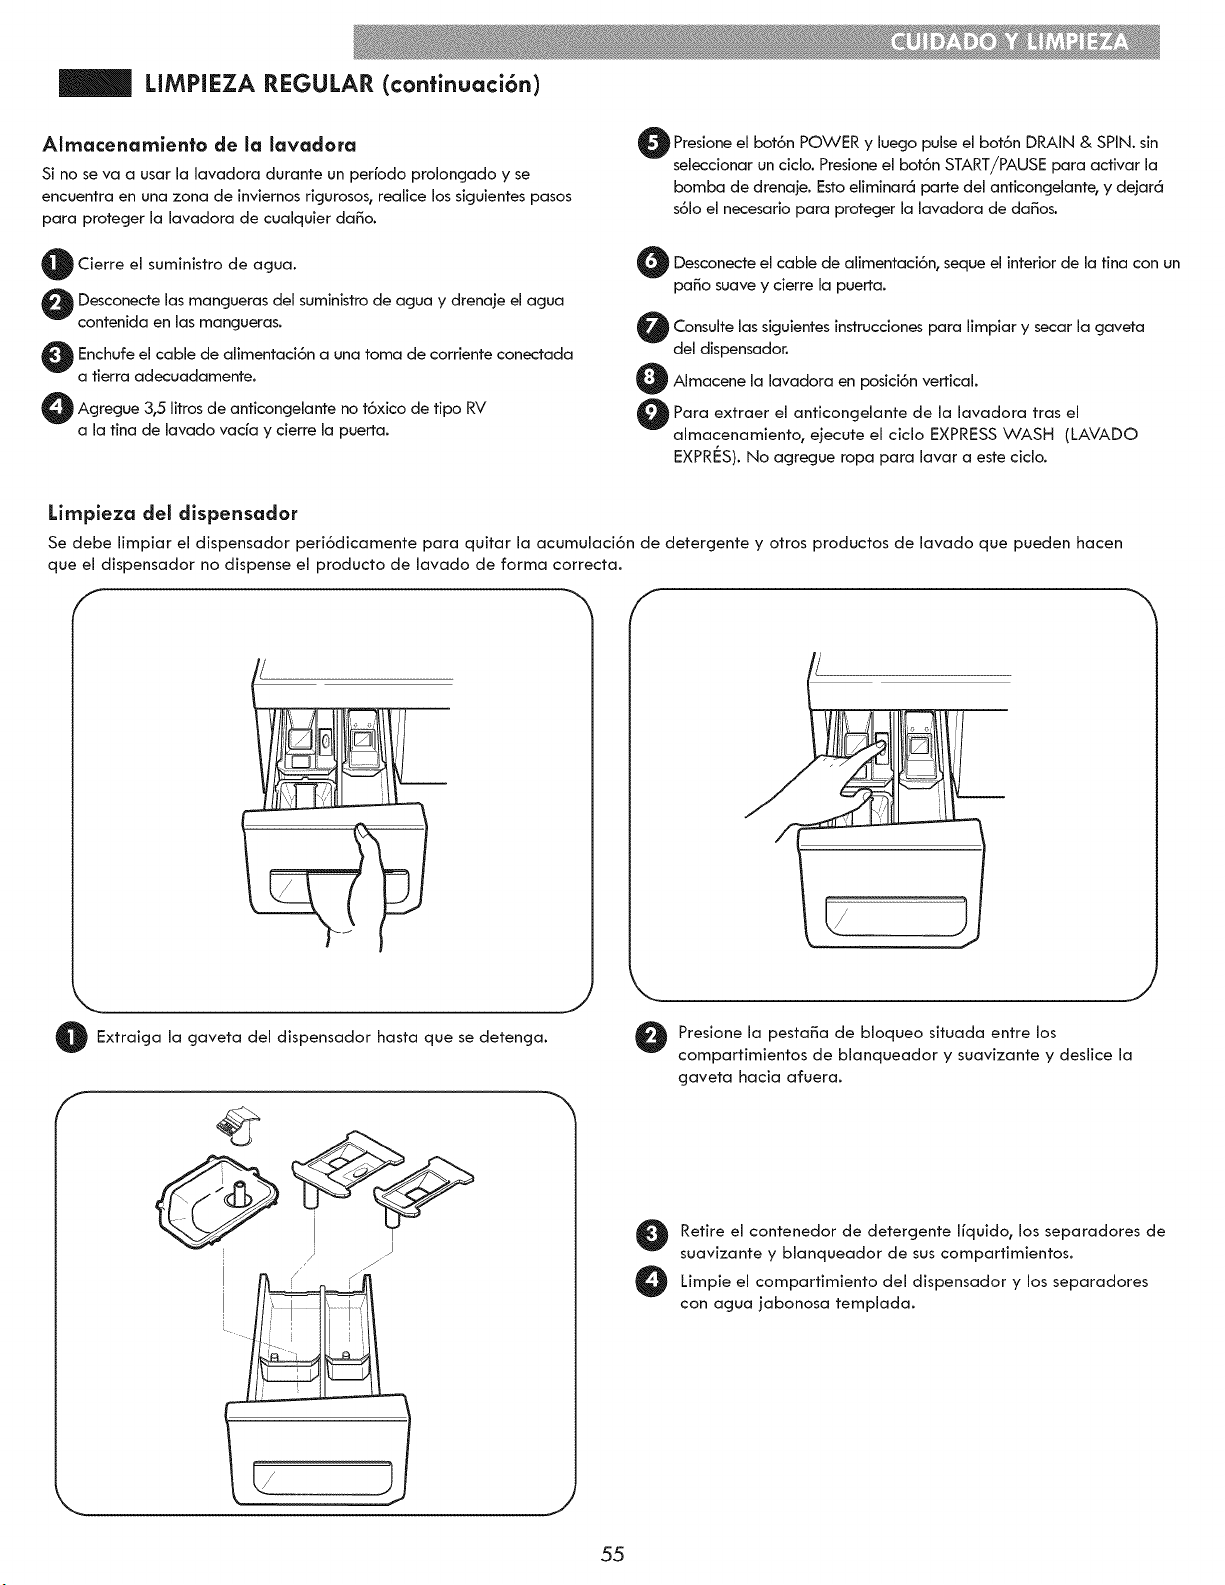
LIMPIEZA AEGULAA (confinuaci6n)
Almacenamiento de la lavadora
Si no se va a usar la lavadora durante un perfodo prolongado y se
encuentra en una zona de inviernos rigurosos, realice los siguientes pasos
para proteger la lavadora de cualquier da_o.
i_ Cierre el suministro de agua.
O esconecte las mangueras del suministro de agua y drenaie el agua
contenida en las mangueras.
O nchufe el cable de alimentaci6n a una toma de ¢orriente ¢onectada
a tierra adecuadamente.
O Agregue 3,5 Iitros de anticongelante no t6xi¢o de tipo RV
a la tina de lavado vada y cierre la puerta.
O Presione el bot6n POWER el bot6n DRAIN & SPIN. sin
luego pulse
Y
seleccionar un ciclo. Presione el bot6n START/PAUSE para activar la
bomba de drenaje. Esto eiiminar_ parte del anticongelante, y dejar_
s61oel necesario para proteger la lavadora de da_os.
O Desconecte el cable de el interior de la tina
alimentaci6n,
seque
con an
paso suave y cierre la puerta.
O Consulte siguientes para limpiar y secar gaveta
las instrucciones la
del dispensador.
O Almacene la lavadora en posici6n vertical.
Para extraer el de la lavadora tras el
anticongelante
aJmacenamiento, ejecute el ciclo EXPRESS WASH (LAVADO
EXPRt_S). No agregue ropa para lavar a este ¢iclo.
Limpieza del dispensador
Se debe limpiar el dispensador peri6dicamente para quitar la acumulaci6n de detergente y otros productos de lavado que pueden hacen
que el dispensador no dispense el producto de lavado de forma correcta.
r _ f
O Extraiga gaveta dispensador que se detenga.
la del hasta
f
,/ j"
.J
J
O resione la pesta_a de bioqueo situada entre los
compartimientos de blanqueador y suavizante y deslice la
gaveta hacia afuera.
O etire el contenedor de detergente Ifquido, los separadores de
suavizante y blanqueador de sus compartimientos.
O Limpie compartimiento dispensador y separadores
el del los
con agua jabonosa templada.
55
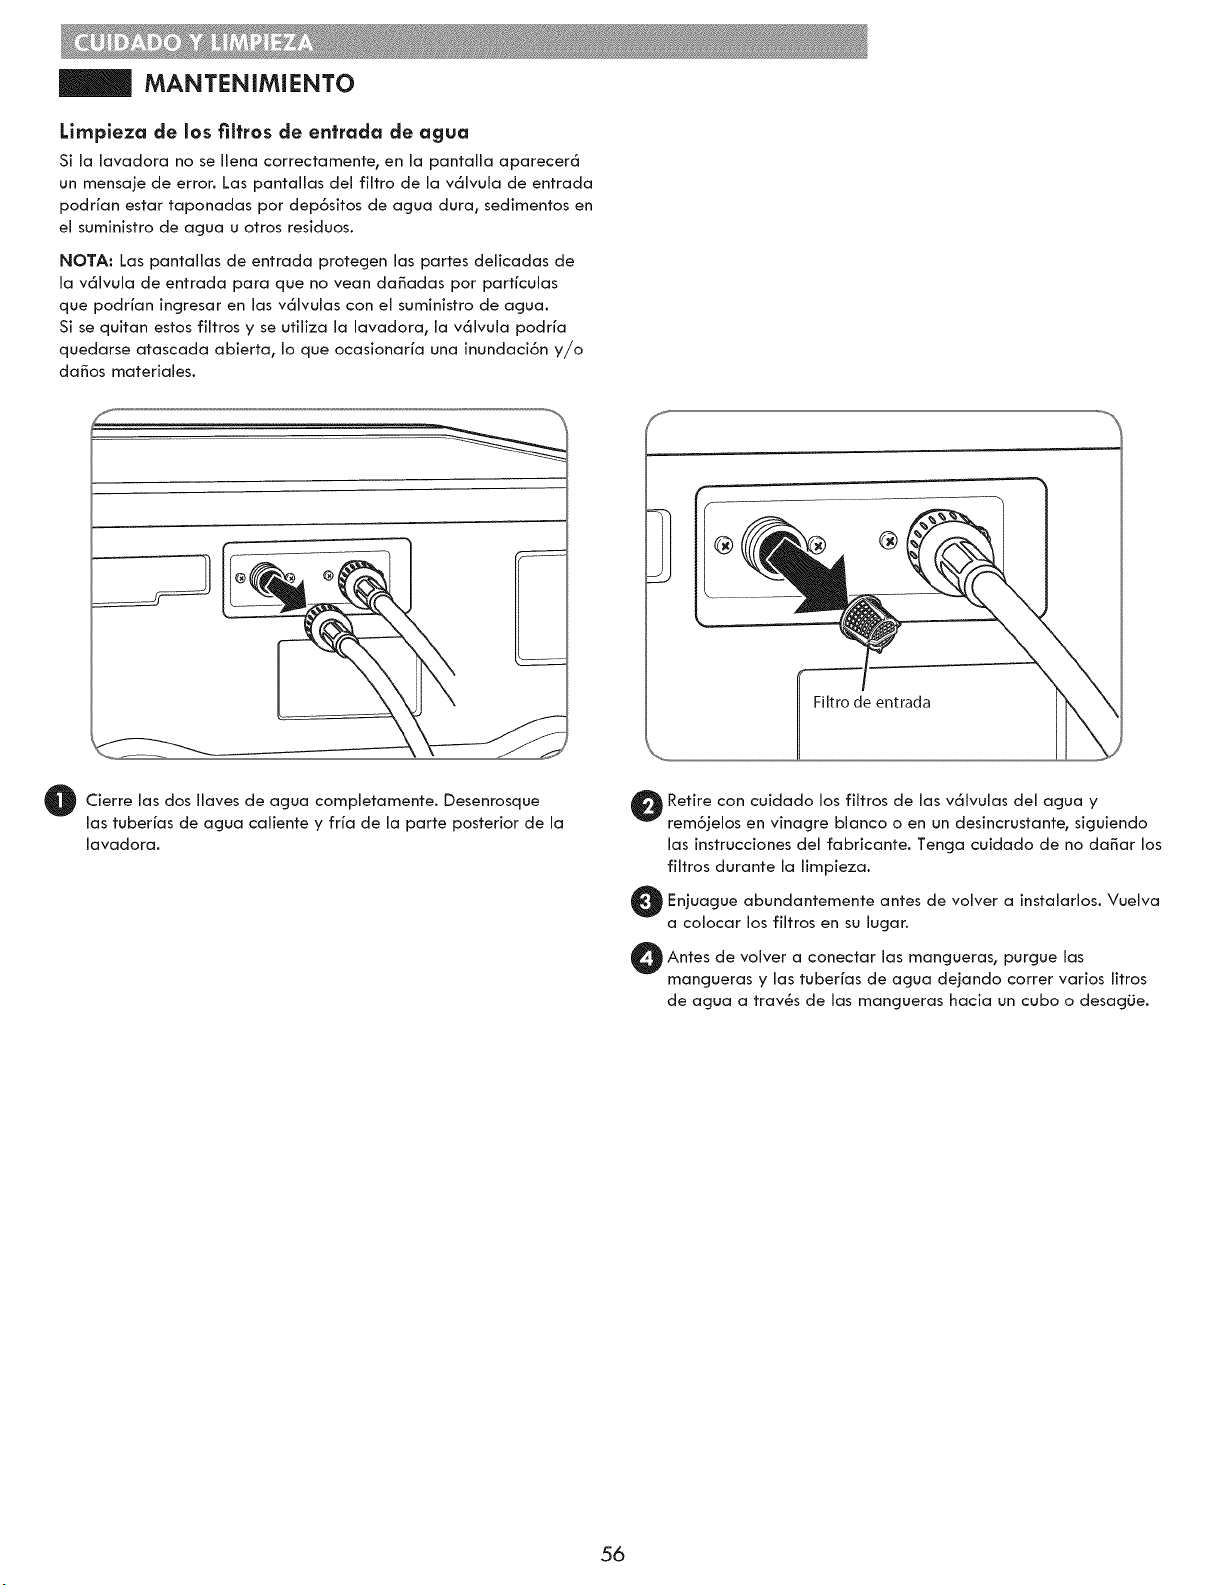
MAN'rENIMIENTO
Limpieza de los filtros de entrada de agua
Si la lavadora no se Ilena correctamente, en la pantalla aparecer6
un mensaie de error. Las pantallas del filtro de la v61vula de entrada
podrfan estar taponadas por dep6sitos de agua dura, sedimentos en
el suministro de agua u otros residuos.
NOTA: Las pantallas de entrada protegen las partes delicadas de
la v_lvula de entrada para que no vean dafiadas por parffculas
que podrfan ingresar en las v_lvulas con el suministro de agua.
Si se quitan estos filtros y se ufiliza la lavadora, la v_lvula podrfa
quedarse atascada abierta, Io que ocasionarfa una inundaci6n y/o
dafios materiales.
O Cierre las dos Ilaves de
completamente. Desenrosqueagua
las tuberfas de agua caliente y frfa de la parte posterior de la
lavadora.
@
Filtro de entrada
O Retire con cuidado los filtros de las v_lvulas del
agua Y
rem6jelos en vinagre blanco o en un desincrustante, siguiendo
las instrucciones del fabricante. Tenga cuidado de no da_ar los
filtros durante la limpieza.
O Enjuague abundantemente antes de volver instalarlos. Vuelva
a
a colocar los filtros en su lugar.
O Antes de volver conectar las las
a
mangueras, purgue
mangueras y las tuberfas de agua dejando correr varios litros
de agua a trav6s de las mangueras ha¢ia un cubo o desag0e.
56
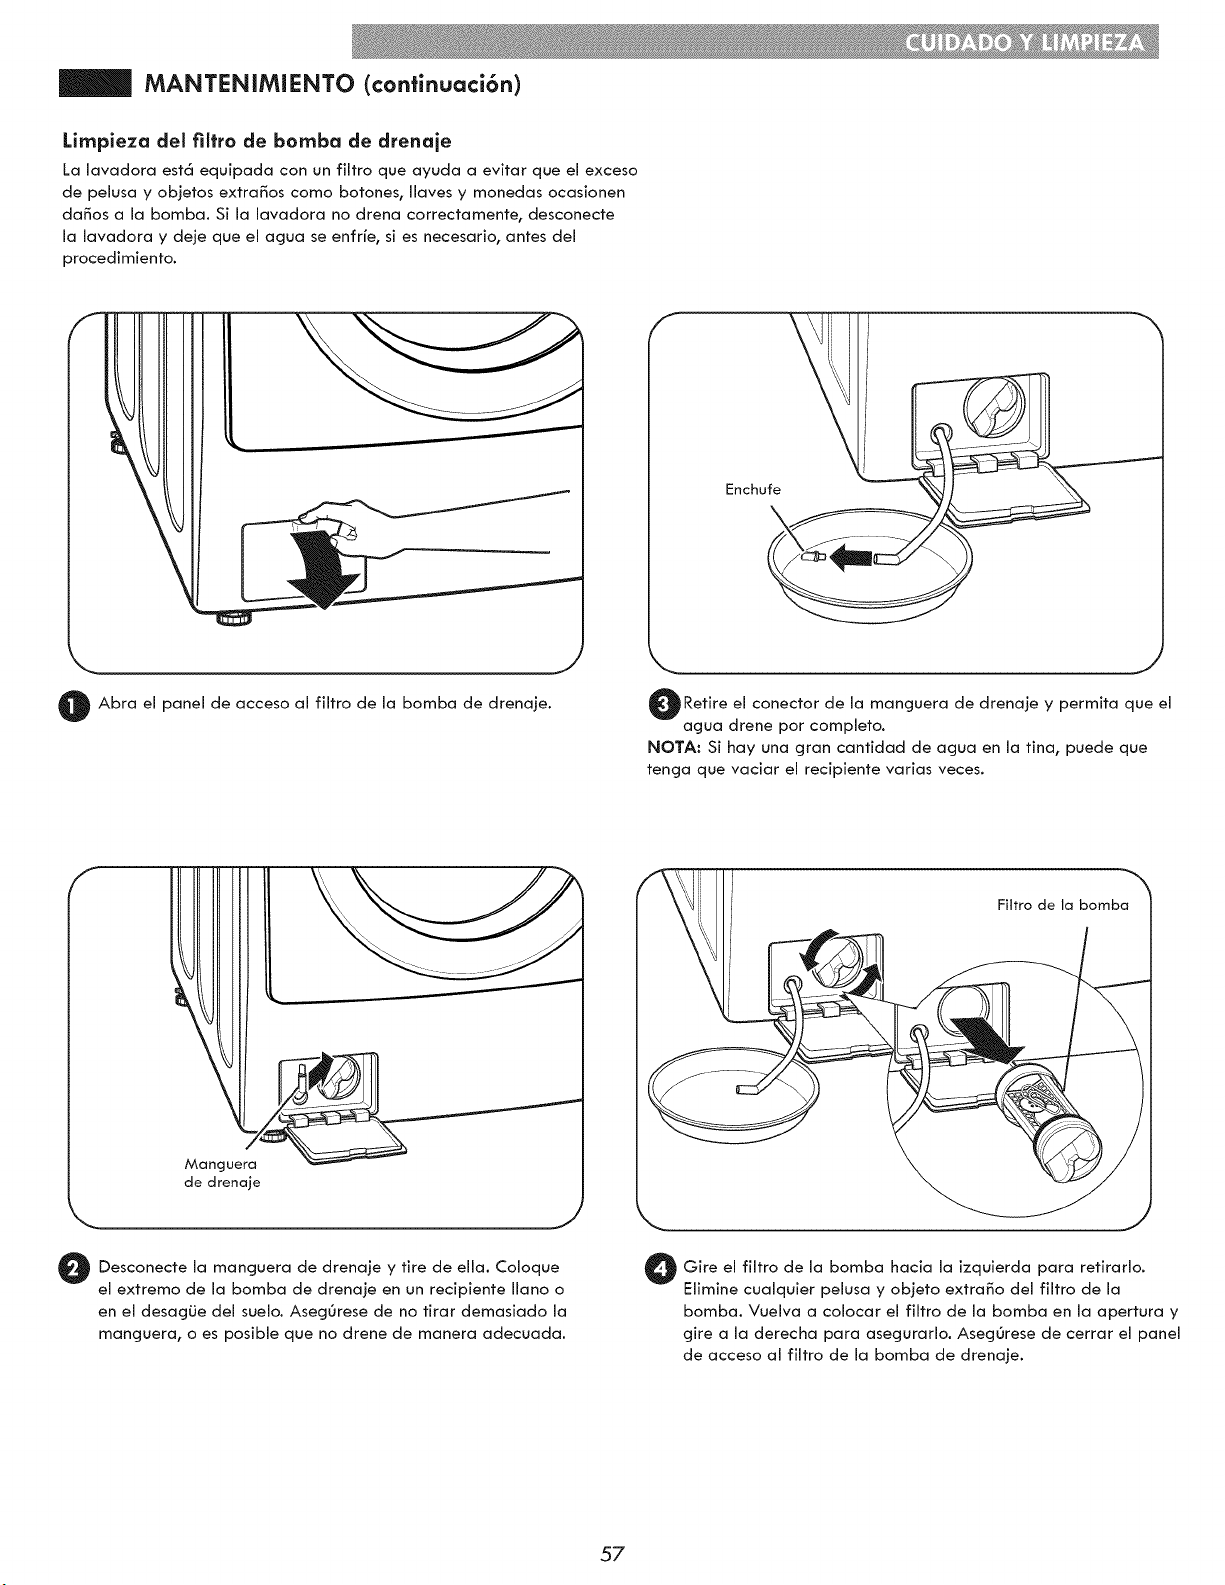
MANTENIMIENTO (confinuaci6n)
Limpieza del ffitro de bomba de drenaie
La lavadora est_ equipada con un filtro que ayuda a evitar que el exceso
de pelusa y ob]etos extra_os como botones, Ilaves y monedas ocasionen
da_os a la bomba. Si la lavadora no drena correctamente, desconecte
la lavadora y deje que el agua se enfrfe, si es necesario, antes del
procedimiento.
O Abra el panel de acceso al filtro de la bomba de drenaje.
J
ORetire el conector de la de el
drenaje permita
manguera Y que
agua drene por completo.
NOTA: Si hay una gran cantidad de agua en la tina, puede que
tenga que vaciar el recipiente varias veces.
Manguera
de drenaje
J
Desconecte la de tire de ella,
drenaje Coloquemanguera Y
el extremo de la bomba de drenaie en un recipiente llano o
en el desag0e del suelo. AsegOrese de no tirar demasiado la
manguera, o es posible que no drene de manera adecuada.
O Gire el filtro de la bomba hacia la izquierda retirarlo.
para
Elimine cualquier pelusa y objeto extra_o del filtro de la
bomba. Vuelva a colocar el filtro de la bomba en la apertura y
gire a la derecha para asegurarlo. AsegOrese de cerrar el panel
de acceso al filtro de la bomba de drenaje.
57
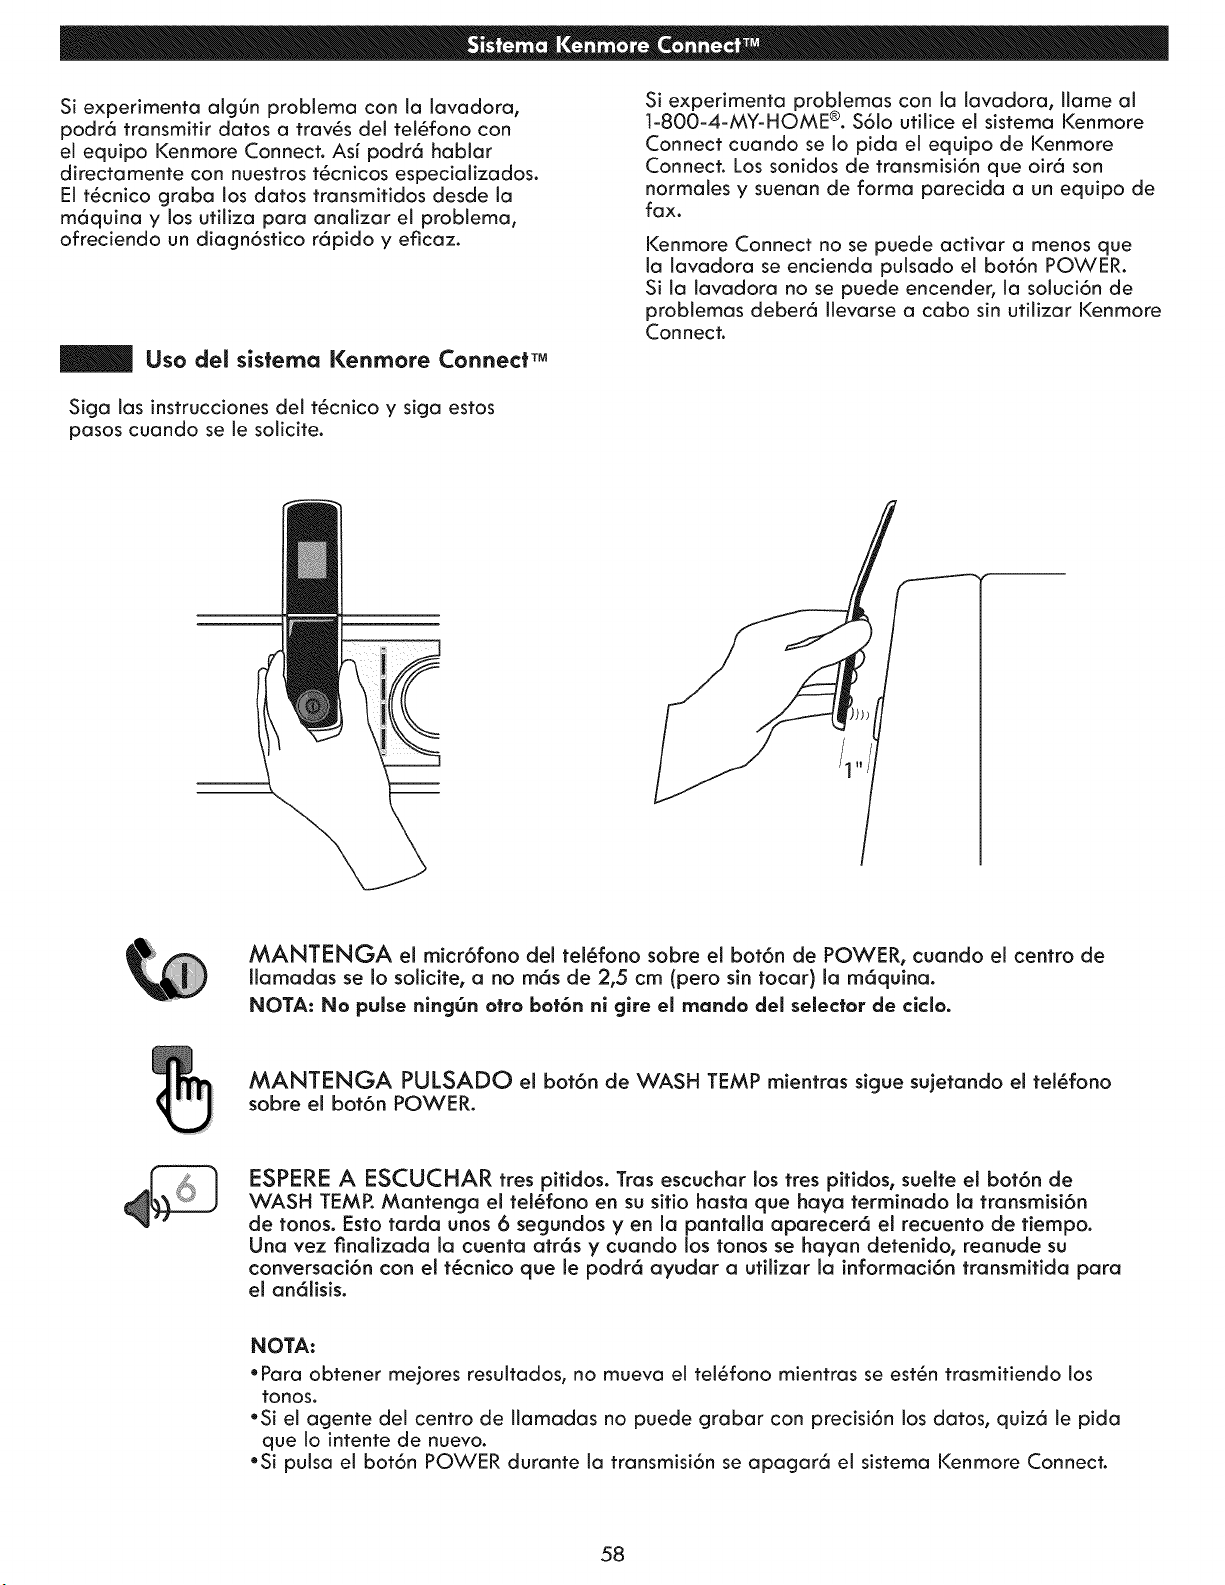
Si experimenta alg0n probiema con la lavadora,
podr6 transmitir datos a trav6s dei tel6fono con
el equipo Kenmore Connect. Asi podr6 habiar
directamente con nuestros t6cnicos especializados.
El t6cnico graba los datos transmifidos desde la
m6quina y Jos utiiiza para anaiizar el problema,
ofreciendo un diagn6stico r6pido y eficaz.
Uso del sistema Kenmore Connect TM
Siga las instrucciones dei t6cnico y siga estos
pasos cuando se le solicite.
Si experimenta problemas con la lavadora, Ilame ai
1-800-4-MY-HOME ®. S6io ufilice el sistema Kenmore
Connect cuando se io pida el equipo de Kenmore
Connect. Los sonidos de transmisi6n que oir6 son
normales y suenan de forma parecida a un equipo de
fax.
Kenmore Connect no se puede activar o menos que
Io lavodora se encienda pulsado el bot6n POWER.
Si la lavadora no se puede encender, la soluci6n de
problemas deber6 llevarse a cabo sin utilizar Kenmore
Connect.
MANTENGA el micr6fono dei tel6fono sobre el bot6n de POWER, cuando el centro de
Ilamadas se Io solicite, a no m6s de 2,5 cm (pero sin tocar) la m6quina.
NOTA: No pulse nlng_n otto bot6n nl glre el mando del selector de clclo.
MANTENGA PULSADO el bot6n de WASH TEMP mientras sigue sujetando el tel6fono
sobre el bot6n POWER.
ESPERE A ESCUCHAR tres pitidos. Tras escuchar los tres pitidos, suelte el bot6n de
WASH TEMP. Mantenga el tei6fono en su sitio hasta que haya terminado la transmisi6n
de tonos. Esto tarda unos 6 segundos yen la pantaiia aparecer6 el recuento de tiempo.
Una vez finaiizada la cuenta atr6s y cuando los tonos se hayan detenido, reanude su
conversaci6n con el t6cnico que le podr6 ayudar a utilizar la informaci6n transmitida para
el an61isis.
NOTA:
Para obtener me]ores resultados, no mueva el tei6fono mientras se est6n trasmitiendo los
tonos.
*Si el agente del centro de Ilamadas no puede grabar con precisi6n los datos, quiz6 le pida
que Io intente de nuevo.
*Si pulsa el bot6n POWER durante la transmisi6n se apagar6 el sistema Kenmore Connect.
58
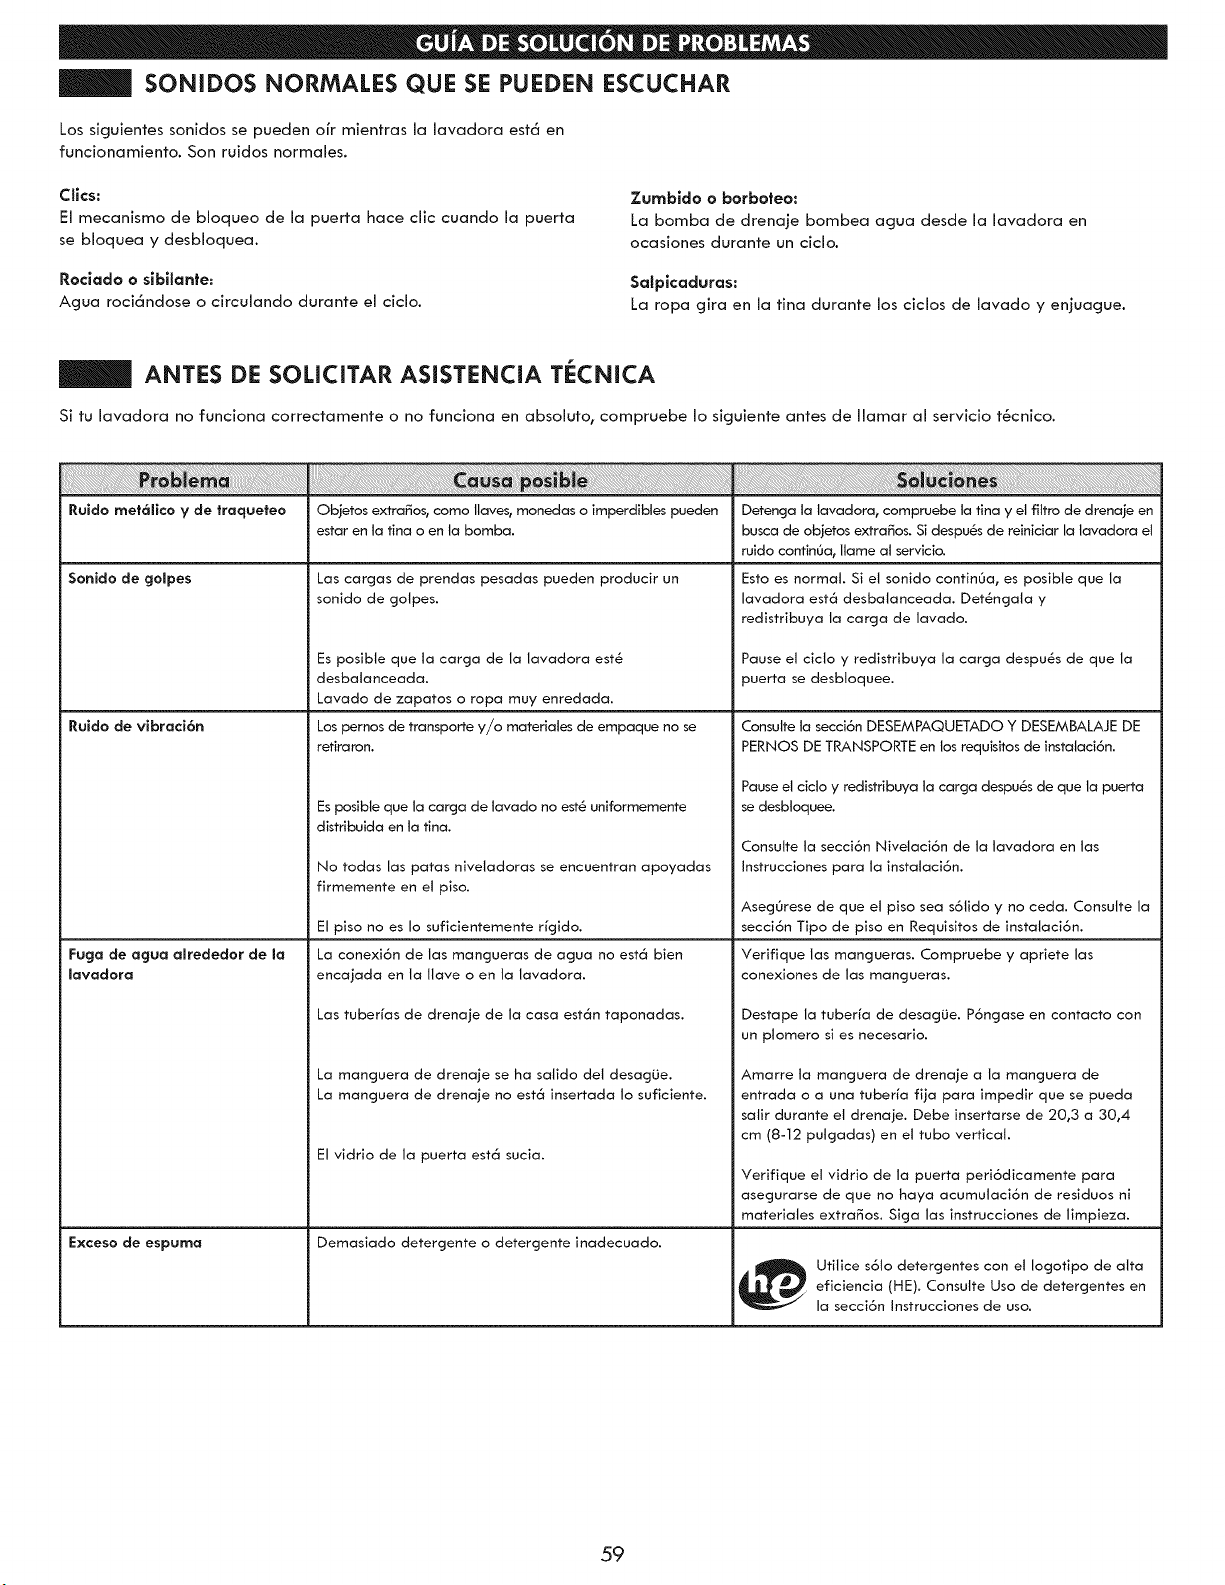
SONIDOS NORMALES QUE SE PUEDEN ESCUCHAR
Los siguientes sonidos se pueden ofr mientras la lavadora est_ en
funcionamiento. Son ruidos normales.
Clics:
El mecanismo de bioqueo de la puerta hace clic cuando la puerta
se bloquea y desbioquea.
Rociaclo o sibilante:
Agua roci6ndose o circulando durante el ciclo.
Zumbido o borboteo:
La bomba de drenaje bombea agua desde la lavadora en
ocasiones durante un ciclo.
Salpicacluras:
La ropa gira en la tina durante los ciclos de lavado y enjuague.
ANTES DE SOLICITAR ASISTENCIA TECNiCA
Si tu lavadora no funciona ¢orrectamente o no funciona en absoluto r ¢ompruebe io siguiente antes de ilamar al servicio t_¢ni¢o.
Ruido met_lico y de traqueteo Objetos extra_os, como Ilaves, monedas o imperdibtes pueden
estar en ta tina o en ta bomba.
Sonido de golpes
Ruido de vibraci6n
Fuga de agua alrededor de la
lavadora
Las cargas de prendas pesadas pueden producir un
sonido de gotpes.
Es posible que la carga de la lavadora est6
desbatanceada.
Lavado de zapatos o ropa muy enredada.
Los pernos de transporte y/o materiales de empaque no se
retiraron.
Exceso de espuma
Es posibte que la carga de tavado no est_ uniformemente
distribuida en la tina.
No todas las paras niveladoras se encuentran apoyadas
firmemente en el piso.
El piso no es Io suficientemente rfgido.
La conexi6n de las mangueras de agua no est_ bien
encajada en ta llave o en ta lavadora.
Las tuberfas de drenaje de la casa est_n taponadas.
La manguera de drenaje se ha salido del desagUe.
La manguera de drenaje no est_ insertada 1o suficiente.
El vidrio de la puerta est_ sucia.
Demasiado detergente o detergente inadecuado.
Detenga ta tavadora_ compruebe la tina y el fittro de drenaje en
busca de objetos extraSos. Si despu_s de reiniciar la tavadora el
ruido contin0a, ltame al servicio.
Esto es normal. Si el sonido continOa, es posible que la
lavadora est6 desbatanceada. Det6ngala y
redistribuya la carga de lavado.
Pause el cicto y redistribuya la carga despu_s de que la
puerta se desbtoquee.
Consulte la secci6n DESEMPAQUETADO Y DESEMBALAJE DE
PERNOS DE TRANSPORTE en los requisitos de instalaci6n.
Pause el cicto y redistribuya ta carga despu_s de que ta puerta
se desbloquee.
Consutte ta secci6n Nivetaci6n de la tavadora en las
Instrucciones para la instalaci6n.
Aseg0rese de que el piso sea s61ido y no ceda. Consulte la
secci6n Tipo de piso en Requisitos de instalaci6n.
Verifique las mangueras. Compruebe y apriete las
conexiones de las mangueras.
Destape la tuberfa de desagUe. P6ngase en contacto con
un plomero si es necesario.
Amarre ta manguera de drenaje a la manguera de
entrada o a una tuberfa flja para impedir que se pueda
salir durante el drenaje. Debe insertarse de 20t3 a 30t4
cm (8-12 pulgadas) en el tubo vertical.
Verifique el vidrio de la puerta peri6dicamente para
asegurarse de que no haya acumulaci6n de residuos ni
materiates extra_os. Siga las instrucciones de limpieza.
Utilice s6to detergentes con el Iogotipo de alta
eficiencia (HE). Consutte Uso de detergentes en
la secci6n Instrucciones de uso.
59
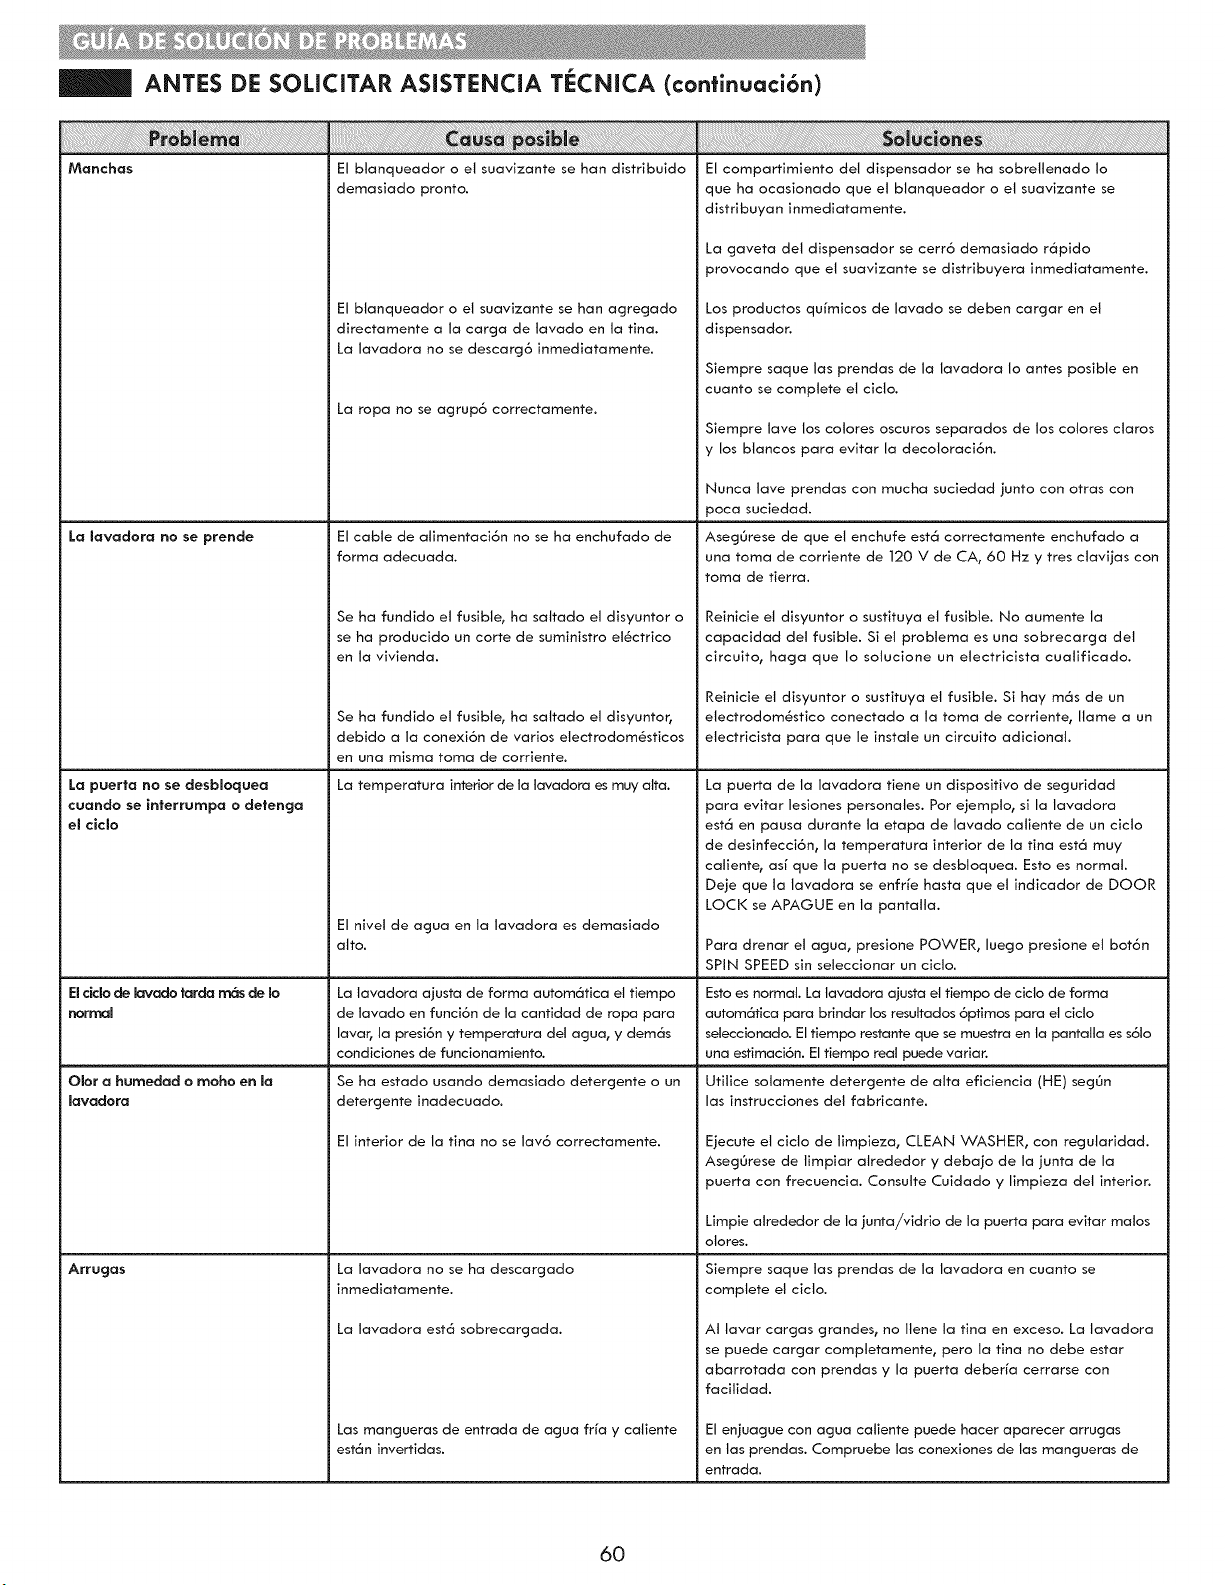
ANTES DE SOLICITAR ASiSTENCIA TECNICA (continuaci6n)
Manchas
La lavadora no se prende
La puerta no se desbloquea
cuancio se interrumpa o detenga
el ciclo
Elc'lclode lavado tarda rn_ de Io
normal
OIor a humedad o moho en la
lavadora
Arrugas
El btanqueador o el suavizante se han distribuido
demasiado pronto.
El blanqueador o el suavizante se han agregado
directamente a la carga de lavado en ta tina.
La lavadora no se descarg6 inmediatamente.
La ropa no se agrup6 correctamente.
El cable de atimentaci6n no se ha enchufado de
forma adecuada.
Se ha fundido et fusible, ha sattado el disyuntor o
se ha producido un corte de suministro el_ctrico
en la vivienda.
Se ha fundido el fusible, ha sattado el disyuntor,
debido a la conexi6n de varios electrodom6sticos
en una misma toma de corriente.
La temperatura interior de ta lavadora es muy alta.
El nivel de agua en ta lavadora es demasiado
alto.
La tavadora ajusta de forma autom6tica el tiempo
de tavado en funci6n de la cantidad de ropa para
lavar, la presi6n y temperatura del agua, y dem6s
condiciones de funcionamiento.
Se ha estado usando demasiado detergente o un
detergente inadecuado.
El interior de la tina no se lav6 correctamente.
La lavadora no se ha descargado
inmediatamente.
La lavadora est6 sobrecargada.
Las mancjueras de entrada de acjua frfa y caliente
est6n invertidas.
El compartimiento del dispensador se ha sobrellenado 1o
que ha ocasionado que el blanqueador o et suavizante se
distribuyan inmediatamente.
La gaveta del dispensador se cerr6 demasiado r6pido
provocando que et suavizante se distribuyera inmediatamente.
Los productos qufmicos de lavado se deben cargar en el
dispensador.
Siempre saque las prendas de la lavadora 1o antes posible en
cuanto se complete el cicto.
Siempre lave los colores oscuros separados de los cotores claros
y los btancos para evitar la decoloraci6n.
Nunca lave prendas con mucha suciedad junto con otras con
poca suciedad.
AsegOrese de que el enchufe est6 correctamente enchufado a
una toma de corriente de 120 V de CA, 60 Hz y tres clavijas con
toma de tierra.
Reinicie el disyuntor o sustituya et fusible. No aumente la
capacidad del fusible. Si el problema es una sobrecarga det
circuito, haga que 1o sotucione un etectricista cuatificado.
Reinicie el disyuntor o sustituya el fusible. Si hay m6s de un
etectrodom6stico conectado a la toma de corriente, Ilame a un
etectricista para que le instale un circuito adicional.
La puerta de la lavadora tiene un dispositivo de seguridad
para evitar lesiones personates. Por ejemplo, si la lavadora
est6 en pausa durante ta etapa de lavado catiente de un ciclo
de desinfecci6n, la temperatura interior de la tina est6 muy
catiente, asf que la puerta no se desbtoquea. Esto es normal.
Deje que la tavadora se enfrfe hasta que et indicador de DOOR
LOCi< se APAGUE en ta pantatla.
Para drenar el agua, presione POWER, luego presione et bot6n
SPIN SPEEDsin seleccionar un cicto.
Esto es normal. La lavadora ajusta el tiempo de cicto de forma
autom6tica para brindar los resuttados 6ptimos para el cicto
seleccionado. El tiempo restante que se muestra en ta pantalla es s61o
una estimaci6n. El tiempo real puede variar.
Utilice solamente detergente de alta eficiencia (HE) seg6n
las instrucciones del fabricante.
Ejecute el cicto de timpieza0 CLEAN WASHER, con regutaridad.
AsegOrese de timpiar alrededor y debajo de la junta de la
puerta con frecuencia. Consulte Cuidado y limpieza det interior.
Limpie alrededor de la junta/vidrio de la puerta para evitar malos
oJores.
Siempre saque tas prendas de la lavadora en cuanto se
complete el ciclo.
At lavar cargas grandes, no llene la tina en exceso. La lavadora
se puede cargar comptetamente, pero la tina no debe estar
abarrotada con prendas y la puerta deberfa cerrarse con
facilidad.
El enjuague con agua catiente puede hacer aparecer arrugas
en tas prendas. Compruebe las conexiones de las mangueras de
entrada.
6O
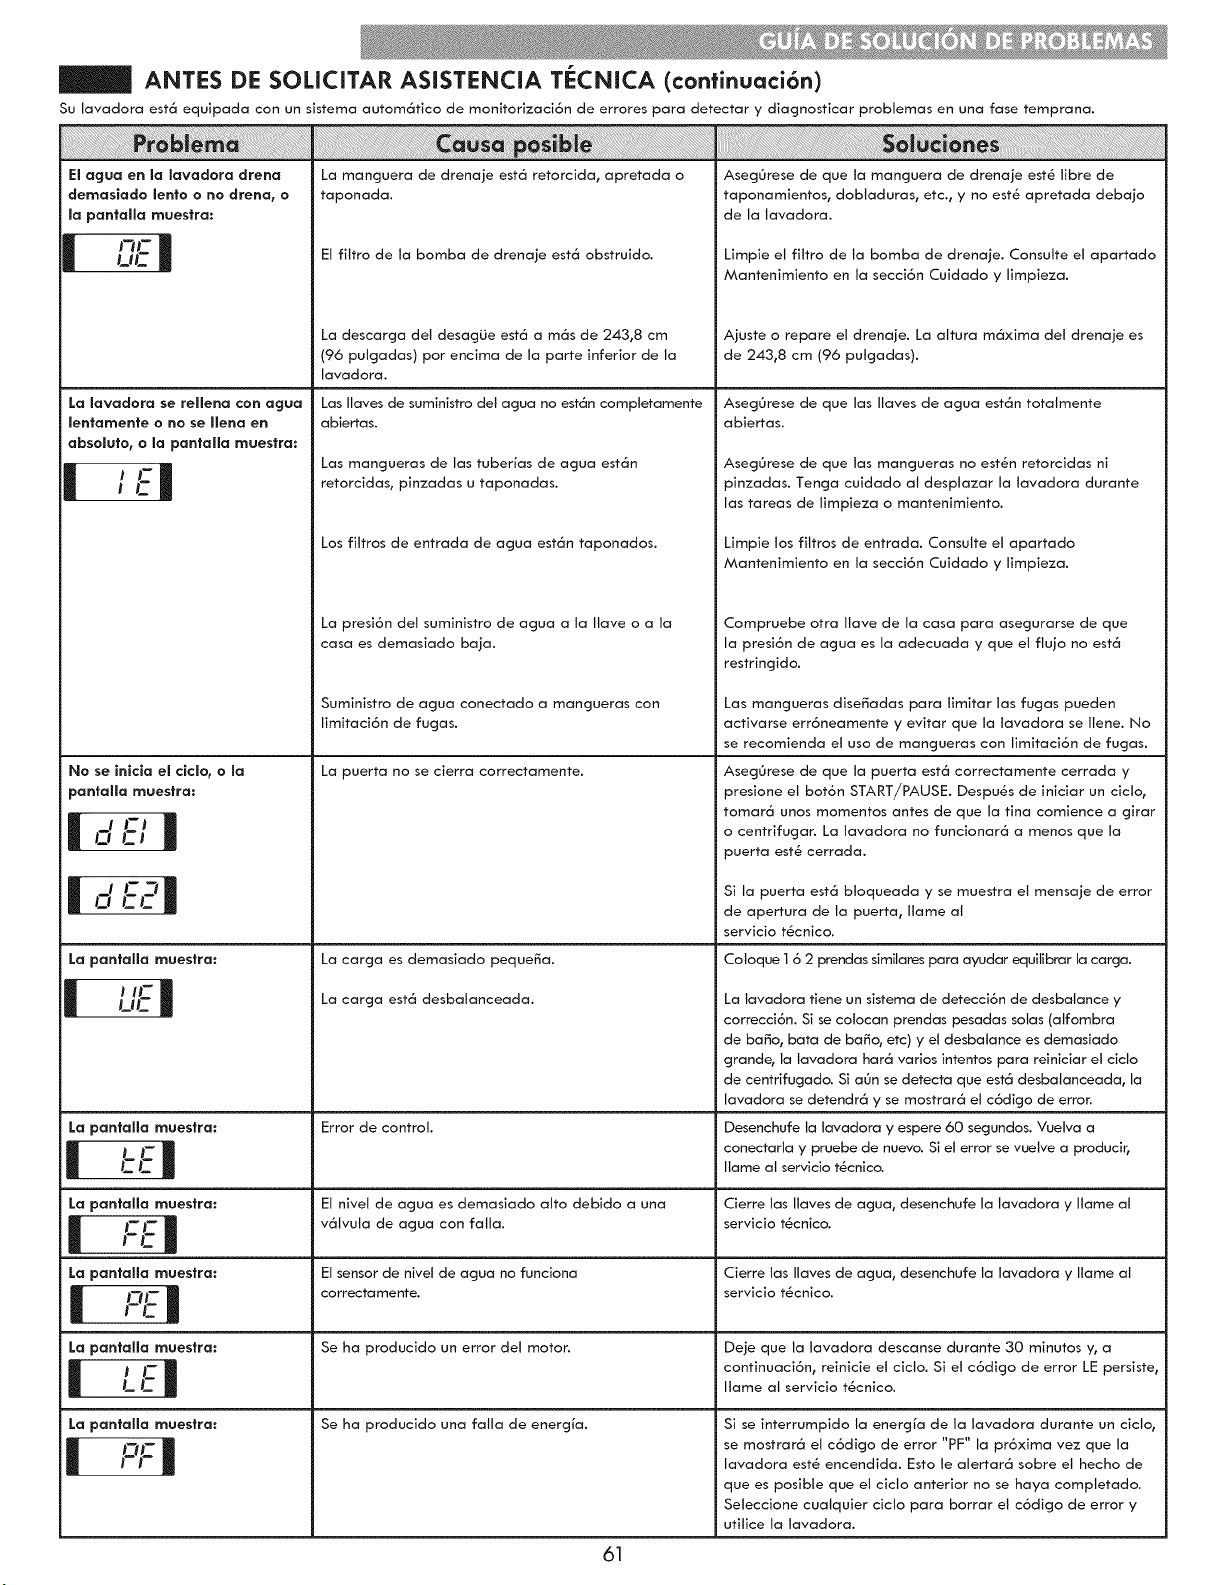
ANTES DE SOLiCITAR ASISTENCIA TECNICA (confinuaci6n)
Su lavadora est6 equipada con un sistema autom6tico de monitorizaci6n de errores para detectar y diagnosticar probtemas en una fase temprana.
iiiiiiiiiii!iiiiiiiiii!!i!!!!i
El agua en la lavadora clrena
demasiado lento o no drena, o
la pantalla muestra:
La lavadora se rellena con agua
lentamente o no se Ilena en
absolute, o la pantalla muestra:
| ;El
No se inicla el clclo, o la
pantalla muestra:
ii!ii!i!!i!!!!!i!!!i!ii!ii!ii!ii!ii!ii!ii!ii!i!!!!!i!i!i!i! i ! !i! ! !i!iii i iii i iii ill! i i i i ii ii iiiiiiiiiiiiiiiiiiiiiiiiiiiiiiiiiiiiiiiiiiiiiiiiiiiiiiiiiiiiiiiiiiiiiiiiiiiii!i!iiiiiiiiiiiiiiiiiiiii!i!!i!iiiiiiiiiiiiiiiiiiiiii!i! ! ! ! !! ! iii!!!i i i ! i! i ! ! ! ! [i6! !ii i i i i i ii ! ! i ii!ii i ii i !i! i !i! i i i i i i i i i ii ii ii i ii i i iiiiiiiiiiiiiiiiiiiiiiiiiiiiiiiii iiiiii!ii!ii!ii!ii!iiiiiiiiiiiiiiiiiiiiiiiiiiiiii i!i!i!i!i!i!i!iiiiiiiiiiiiiiiiiiiiiiiiiiiiiiiiiiiiiiiiiiiiiii i i i
La manguera de drenaje est6 retorcida_ apretada o
taponada.
El fittro de la bomba de drenaje est6 obstruido.
La descarga del desag0e est6 a m6s de 24318 cm
(96 putgadas) pot encima de la parte inferior de la
lavadora.
Las Ilaves de suministro del agua no est6n comptetamente
abiertas.
Las mangueras de tas tuberfas de agua est6n
retorcidas_ pinzadas u taponadas.
Los fittros de entrada de agua est6n taponados.
La presi6n del suministro de agua a la llave o a la
casa es demasiado baja.
Suministro de agua conectado a mangueras con
limitaci6n de fugas.
La puerta no se cierra correctamente.
iiiiiii_i_i_i_i_!ii_iIIii_i!i_II_II_II_II_i_i_i_iiiiiii_iiiii!!_iii_iiiiiiiiiiiiiiiiiiiiiiiiiiiii_iiiiiiiiiiiiiiiiiii_iiiiiii!!_iiiiiiiii_iiiiiiiiiiiiiiii!!_iiiii_ii_ii!_ii!_iii_iiiiii_iii_i_i!_!_!_i_i!ii_iiiiiiiiiiiiiiiiiiiiiiiiiiiiiii_iii_i_F_i_i!!_ii_iiii!iii_ii_iiii?_ili_ili_iiiii!iiiiiiiii!i!i_iiiii!_ii_!_ii_ii_ii_i_ii_!iiiiiiiii_!ii_ii_iii_!i_!i_i!i_iiiiiiiiiiiiiiii_ii_iii_iiiiiiiiiiiiiiiiiiiiiii_iiiiiiiiiiiiiiiiiiiiiii_i_i_i_i_i!i!i!i_i_ii_ii_i_iii_i!i_i!i_i!i_ii_ii_ii_ii_ii_ii_ii_ii_ii_ii_ii_ii_ii_ii_ii_ii_ii_ii_i_!_i!_!!i!i_ii_ii_ii_ii_ii_ii_ii_ii_ii_ii_ii_ii_ii_ii_ii_i!i_i_ii_ii_ii_ii_iiiii_!i_!i!i_ii_iiiiiiiiiiiiiiiiiiiiiiiiiiiiiiiiiii!!_iiiiiiiiiiiiiiiii_iii_iiiiii_!_J_!i
!iiiL!!!_i¸i!i_i_iiiiiiiii_iiiiiii_iiiiiiii:i_!!i_!_!iiiiii_i_i_!_!!iii_iiiii_!_i_i_ii_i_i_i_i_!i_ii!i_i_i_i_!i¸!i!!i!_i!iiiiii_!_!!iii!!_!_isO!iiii_i_iiiiOne!!_i!_i¸iiiiiii_i_ii_i_!:_!¸_JJi_JJi_i_iiii!iiiiii_i_i_i¸ii!_ili__i_!_!ii_ii_ii_iiiiii_i_!_!_i_i_i_ii_ii_ii!ii_ii_ii!i_i_!!_!_i_!!_!ii!!i_!_i_!_!_!_i!i!_:iiii_i_i_iiiiiiiiiiii_i_iii_iiiiiiii_i_iiiiii_i::
Aseg0rese de que ta manguera de drenaje est6 tibre de
taponamientos_ dobtaduras_ etc._ y no est6 apretada debajo
de la lavadora.
Limpie et fittro de la bomba de drenaje. Consutte el apartado
Mantenimiento en la secci6n Cuidado y limpieza.
Ajuste o repare el drenaje. La altura m6xima del drenaje es
de 24318 cm (96 pulgadas).
Aseg0rese de que las Ilaves de agua est6n totatmente
abiertas.
Aseg0rese de que las mangueras no est6n retorcidas ni
pinzadas. Tenga cuidado at desptazar la lavadora durante
las tareas de limpieza o mantenimiento.
Limpie los fittros de entrada. Consulte el apartado
Mantenimiento en la secci6n Cuidado y limpieza.
Compruebe otra Ilave de la casa para asegurarse de que
la presi6n de agua es la adecuada y que el ftujo no est6
restringido.
Las mangueras dise_adas para timitar las fugas pueden
activarse err6neamente y evitar que la lavadora se llene. No
se recomienda el uso de mangueras con limitaci6n de fugas.
Aseg0rese de que la puerta est6 correctamente cerrada y
presione el bot6n START/PAUSE. Despu6s de iniciar un ciclo,
I o'Er|
I ,:l L-L-I
La pantalla muestra:
I J H-
La pantalla muestra:
| '-'-
La pantalla muestra:
La pantalla muestra:
| "-
La pantalla muestra:
I P;:I
La carga es demasiado peque_a.
La carga est6 desbalanceada.
Error de control.
El nivel de agua es demasiado alto debido a una
v61vula de agua con fatla.
61
El sensor de nivel de agua no funciona
correctamente.
Se ha producido un error del motor.
Se ha producido una falla de energfa.
tomar6 unos momentos antes de que la tina comience a girar
o centrifugar. La lavadora no funcionar6 a menos que la
puerta est6 cerrada.
Si la puerta est_ btoqueada y se muestra el mensaje de error
de apertura de la puerta, Ilame al
servicio t6cnico.
Coloque 1 6 2 prendas simitares para ayudar equitibrar la carga.
La lavadora tiene un sistema de detecci6n de desbalance y
correcci6n. Si se cotocan prendas pesadas solas (atfombra
de ba_o_ bata de ba_o_ etc) y el desbatance es demasiado
grande, la lavadora hat6 varios intentos para reiniciar el cicto
de centrifugado. Si aOn se detecta que est6 desbalanceada_ la
lavadora se detendr6 y se mostrar6 el c6digo de error.
Desenchufe la lavadora y espere 60 segundos. Vuelva a
conectarla y pruebe de nuevo. Si el error se vuelve a producir,
Ilame al servicio t6cnico.
Cierre tas Ilaves de agua, desenchufe la tavadora y Ilame al
servicio t6cnico.
Cierre tas Ilaves de agua, desenchufe la lavadora y Itame al
servicio t6cnico.
Deje que la tavadora descanse durante 30 minutos y, a
continuaci6n, reinicie el cicto. Si el c6digo de error LE persiste,
Ilame al servicio t6cnico.
Si se interrumpido ta energ_a de ta lavadora durante un ciclo,
se mostrar6 el c6digo de error "PF" la pr6xima vez que la
lavadora est6 encendida. Esto le atertar6 sobre el hecho de
que es posibte que el cicto anterior no se haya completado.
Seleccione cuatquier ciclo para borrar el c6digo de error y
utilice la lavadora.
f
Garanfia limitada por un a_o de Kenmore
Si, tras ser instalado, operado y mantenido seg0n todas las instrucciones del producto, este
electrodom_stico sufriera averias debidas a defectos de material y mano de obra, dentro del periodo de
un a_o a partir de la fecha de compra, liame al 1-800-4-MY-HOME® para soiicitar su reparaci6n gratuita.
Si este electrodom6stico fuera a ser utilizado con fines distintos a los dom6sticos, esta garantia s6io
tendr6 validez durante 90 dias a partir de la fecha de compra.
Esta garanfia cubre _nlcamente los defectos de materlal y mano de obra, y NO pagar6:
1. Eiementos consumibies que puedan desgastarse debido ai uso normal0 inciuyendo entre otros, los
fiitros, correas, bombillas incandescentes y bolsas.
2. Un tScnico de servicio para ense_ar ai usuario ia instalaci6n0 funcionamiento o mantenimiento
correctos dei producto.
3. Un tScnico de servicio para reaiizar iabores de iimpieza o mantenimiento dei producto.
4. Da_os o averias como consecuencia de no seguir todas ias instrucciones de instalaci6n0 funcionamiento
o mantenimiento inciuidas con ei producto.
5. Da_os o averias en caso de accidente0 abuso0 uso inadecuado o uso con prop6sitos distintos a los fines
para los que ei producto rue dise_ado.
6. Da_os o averias en caso de utiiizar detergenteso iimpiadores0 sustancias quimicas o utensilios distintos a
los recomendados en ias instrucciones inciuidas con ei producto.
7. Da_os o faiias de los componentes o sistemas como resuitado de modificaciones hechas sin
autorizaci6n a este producto.
Descargo de responsabilldad de garanfias irnpffcltas; llmltaci6n de acclones legales
El Onico y exclusivo recurso del cliente bajo esta garantia limitada ser6 la reparaci6n del producto como
se indica en la presente. Las garanfias impiicitas, inciuyendo garantias de comerciabilidad y aptitud para
un objetivo particular0 se encuentran iimitadas a un a_o o ai periodo m6s corto permitido por ia iey. Sears
no ser6 responsabie de los da_os incidentales o derivados. Aigunos estados y provincias no permiten ia
exciusi6n o iimitaci6n de da_os o iimitaciones incidentaies o resultantes, o iimitaciones sobre ia duraci6n de
garanfias impiicitas o de comerciabilidad o aptitud, por io tanto ias iimitaciones o exciusiones anteriores
pueden no apiicarse en su caso.
Esta cjaranfia podr6 apiicarse s6io si este electrodom(_stico se utiiiza en los Estados Unidos o Canad6 _.
Esta garanfia ie otorga derechos iegaies especificos, y usted tambiSn puede contar con otros derechos, que
pueden variar de estado a estado.
_Ei servicio de reparaci6n a domicilio no est6 disponibie en todas ias 6reas cjeocjr6ficas de Canad6.
Tampoco esta cjaranfia cubrir6 los gastos de trasiado o transporte dei usuario o del tScnico de reparaci6n
si el producto est6 ubicado en un 6rea remota (tai como ia define Sears Canada Inc.) donde no haya
ningOn t_cnico de reparaci6n disponibie.
Sears Brands Management Corporation, Hoffman Estates, IL 60179
Sears Canada Inc., Toronto, Ontario, Canad6 M5B 2C3
J
62

63

64

65

Your Home
For troubleshooting, product manuals and expert advice:
www.managemylife.com
For repair - in your home - of all major brand appliances,
lawn and garden equipment, or heating and cooling systems,
no matter who made it, no matter who sold it!
For the replacement parts, accessories and
owner's manuals that you need to do-it-yourself.
For Sears professional installation of home appliances
and items like garage door openers and water heaters.
1-800-4-MY-HOME ® (1-800-469-4663)
Call anytime, day or night (U.S.A. and Canada)
www.sears.com www.sears.ca
Our Home .......................................................................................................................................................................................................................................................................................................................................................................................................................................................
For repair of carry-in items like vacuums, lawn equipment,
and electronics, call anytime for the location of your nearest
Sears Parts & Repair Service Center
1-800-488-1222 (U.S.A.) 1-800-469-4663 (Canada)
www.sears.com www.sears_ca ...............................................................................................................................................................................................................................................
To purchase a protection agreement on a product serviced by Sears
1-800-827-6655 (U.S.A.) 1-800-361-6665 (Canada)
Para pedir servicio de reparacion Au Canada pour service en frangais:
a domicilio, y para ordenar piezas: 1-800-LE-FOYER Mc
1-8 88-S U -H O GAR ® (1-800-533-6937)
(1-888-784-6427) www. sea rs. ca
TM
® Registered Trademark / Trademark of KCD tP, LLC in the United States, or Sears Brands, LLC in other countries
® Marca Registrada / TM Marca de Fabrica de KCD tP, LLC en Estados Unidos, o Sears Brands, LLC in otros paises
MCMarque de commerce / MDMarque d6posee de Sears Brands, LLC