Important Safety Instructions .................................................... 2
How and Why .......................................................................... 2
Energy Saving Ideas ..................................................................... 3
Installation ...........................................................................................3-4
Using the Air Conditioner ......................................................... 5
Air Conditioner Features ..................................................... 5-6
Care and Cleaning .................................................................. 6-7
Routine Maintenance .......................................................................8
Before You Call For Service ..........................................................9
Sears Service ........................................................................... 10
Warranty ....................._....................... /¥,_ _.......................... 10
Read and Save These instructions
This Useand Care Manual provides specific operating instructions for your model Usethe air conditioner only as instructed
in thismanual, Theseinstructions are not meant to coverevery possible condition and situation that may occur Cornmon sense
and caution must be practiced when installing, operating, and maintaining any appliance
Record Your Model and Serial Numbers
Record in the space provided below the model and serial numbers The serial plate is located behind the left front louvers
Reading the numbers may be easier by using a flashlight or by removing the cabinet front as instructed under "Care and
Cleaning" On compact models, it is located on the outside of the cabinet.
Model Number:
Serial Number:
Purchase Date:
P/N 955R-D02(9411)
Important Safety
Instructions
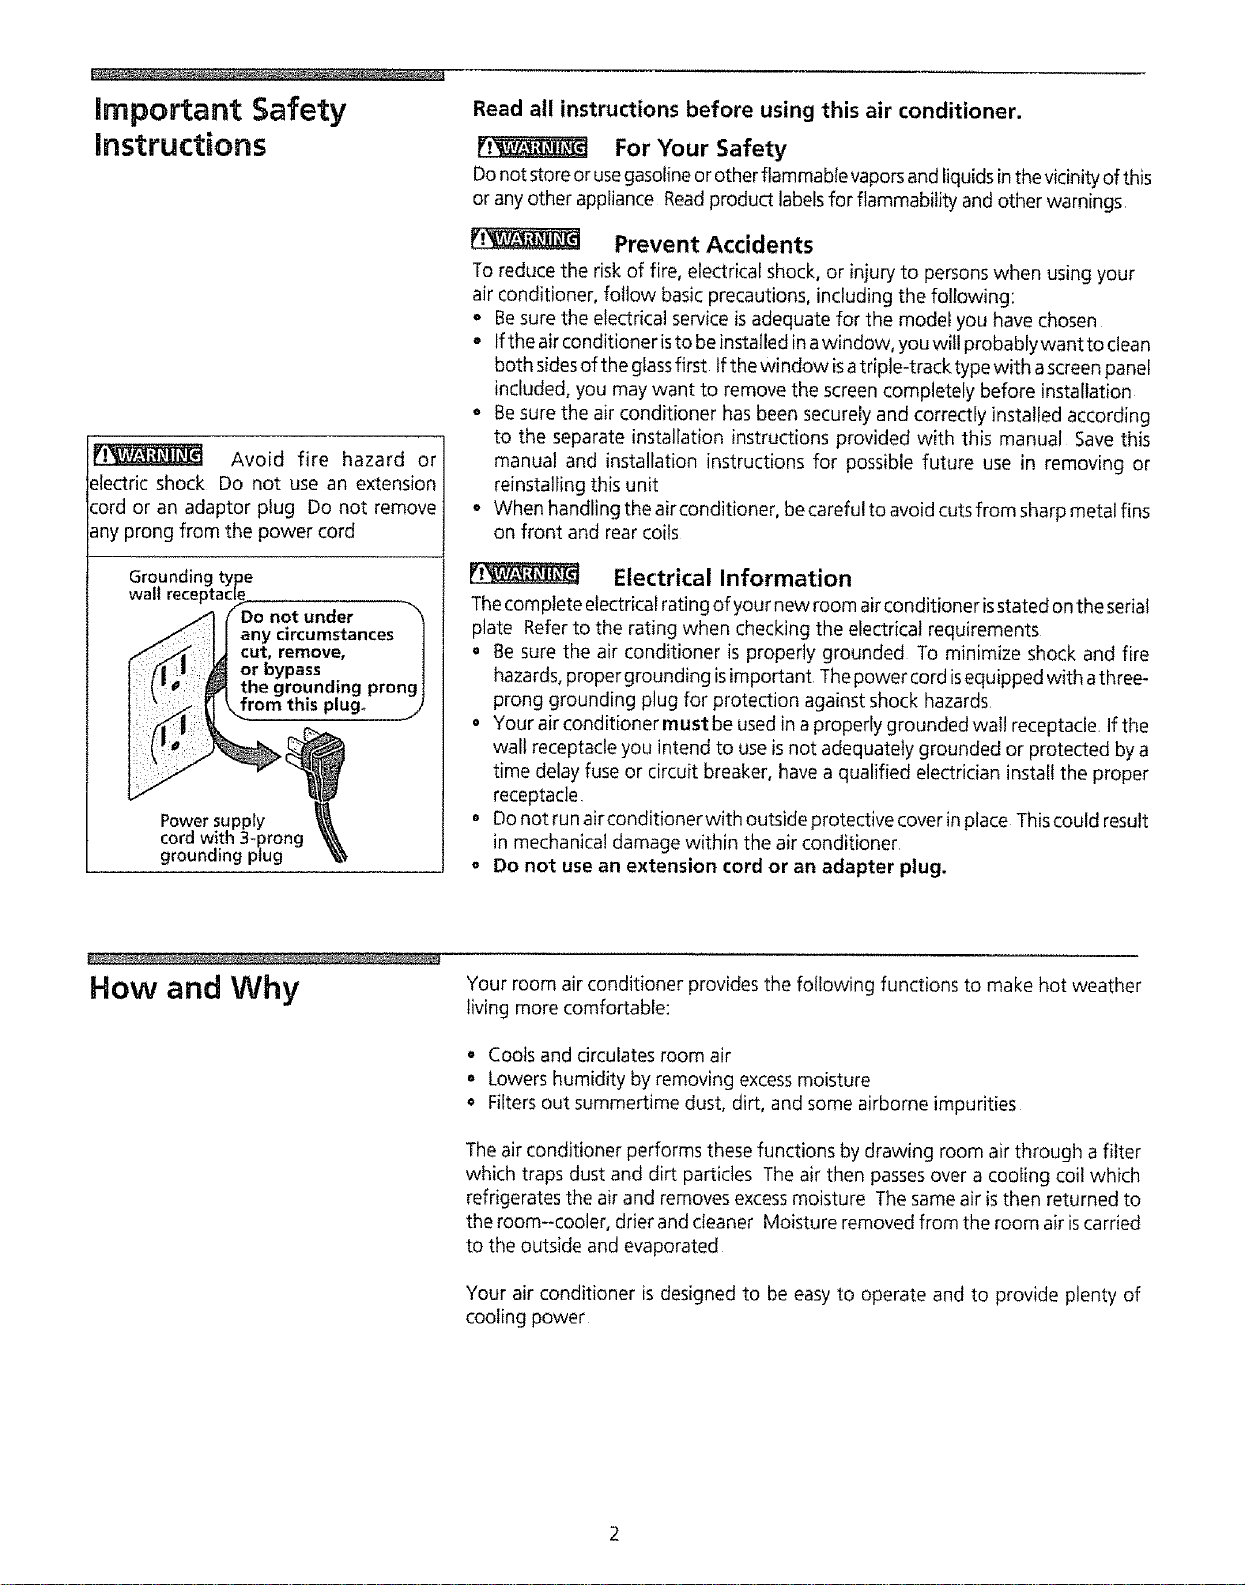
Avoid fire hazard or
electric shock Do not use an extension
cord or an adaptor plug Do not remove
any prong from the power cord
Groundin(
wall
|e
not under _'_
any circumstances|
cut, remove, 1
or bypass |
the grounding prong 1
romthi plug .j
Power supply
cord with 3-prong
grounding plug
Read all instructions before using this air conditioner.
For Your Safety
Donot store or usegasoline or other flammable vaporsand liquidsinthevicinity of this
or anyother appliance Readproduct labelsfor flammability and other warnings
Prevent Accidents
To reduce the risk of fire, electrical shock, or injury to persons when using your
air conditioner, follow basic precautions, including the following:
° Besure the electrical service isadequate for the model you have chosen
° Ifthe air conditioner isto be installed in awindow, you will probablywant to clean
both sidesof the glassfirst tf the window isatriple-track type with ascreen panel
included, you may want to remove the screen completely before installation
o Besure the air conditioner has been securely and correctiy installed according
to the separate installation instructions provided with this manual Savethis
manual and installation instructions for possible future use in removing or
reinstalling this unit
o When handling the airconditioner, be careful to avoid cutsfrom sharp metal fins
on front and rear coils
Fi_ Electrical Information
Thecornplete electrical rating of your new room air conditioner isstated on the serial
plate Referto the rating when checking the electrical requirements
• Be sure the air conditioner is properly grounded To minimize shock and fire
hazards, proper grounding isimportant Thepower cord isequipped with athree-
prong grounding plug for protection against shock hazards
• Your air conditioner must be used in a properly grounded wall receptacle If the
wall receptacle you intend to useis not adequately grounded or protected by a
time delay fuse or circuit breaker, have a qualified electricianinstall the proper
receptacle
o Do not run airconditionerwith outside protective cover in place Thiscould result
in mechanical damage within the air conditioner
o Do not use an extension cord or an adapter plug.
How and Why
Your room air conditioner provides the following functions to make hot weather
living more comfortable:
° Cools and circulates room air
° Lowers humidity by removing excessmoisture
Filtersout summertime dust, dirt, and some airborne impurities
The air conditioner performs these functions by drawing room air through a filter
which traps dust and dirt particles The air then passesover a coofing coil which
refrigerates the air and removes excessmoisture The same air is then returned to
the room--cooler, drier and cleaner Moisture removed from the room air iscarried
to the outside and evaporated
Your air conditioner is designed to be easy to operate and to provide plenty of
cooling power
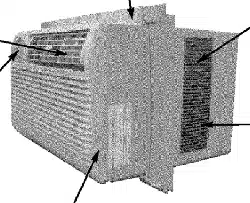
Energy Saving Ideas
• Thecapacity of the room air conditioner must fit the room sizefor efficient and
satisfactory operation
• Install the room air conditioner onthe shady side of your home A window that
faces north is best because it is shaded most of the day,
• Do not block air flow inside with blinds, curtains or furniture; or outside with
shrubs, enclosures, or other buildings,
• Closethe fireplace damper, floor and wall registers so coot air does not escape
up the chimney and into the duct work
• Keepblindsanddrapesinother windows closedduring the sunniestpartof the day.
• Clean the air filter as recommended in the section "Care and Cleaning"
o Proper insulation and weatherstripping inyour homewill help keepwarm air out
and cool air in
• External house shading with trees, plants or awnings will help reduce the air
conditioner's work load
° Operate heat producing appliances such as ranges, washers, dryers and
dishwashers during the coolest part of the day
Unstallation
_L
7%____t;€ ,, -"i :•
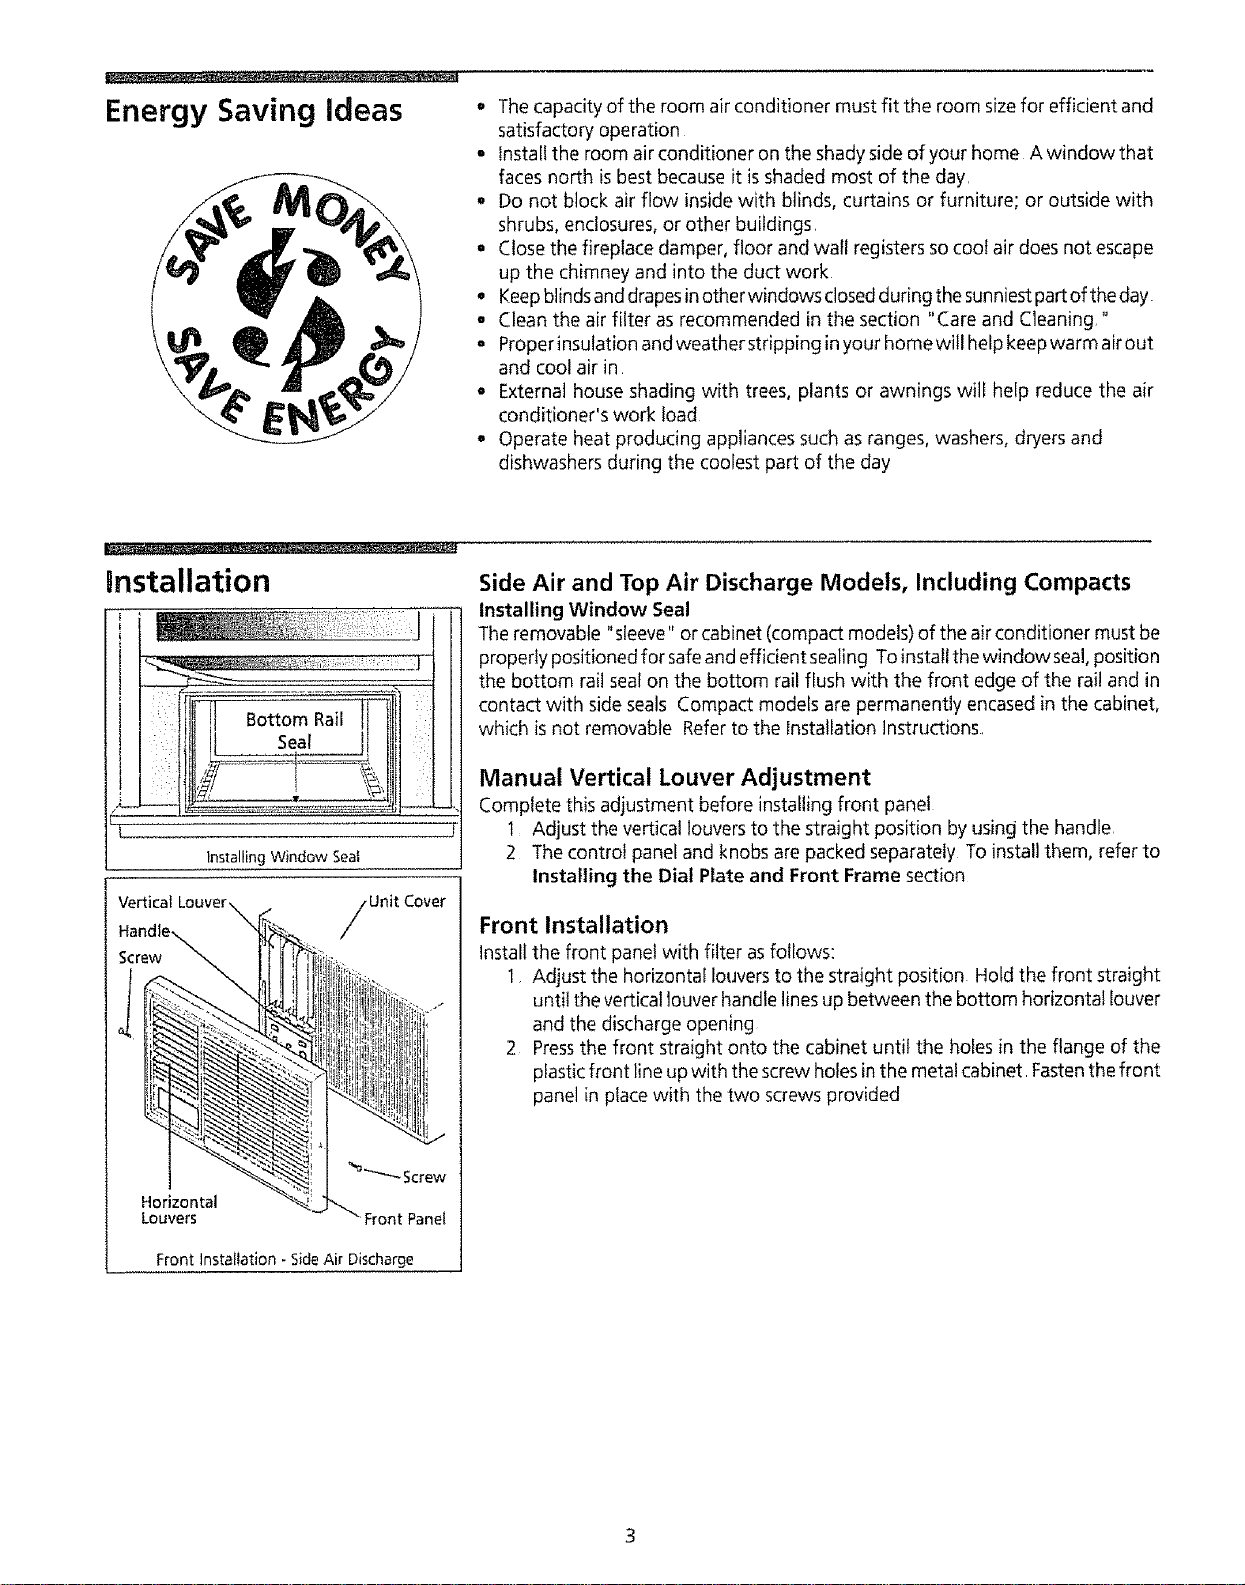
Installing Window Seal
Vertical Louver_
Horizontal
Louvers
Unit Cover
',1ti t t_ :ii'"
11,
; It t_;,i
,!/_ t
4,I, I,
%_-_-_ Screw
_" Front Panel
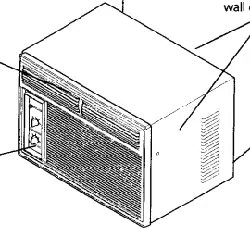
Front Installation - Side Air Discharge
Side Air and Top Air Discharge Models, Including Compacts
Installing Window Seal
Theremovable "sleeve" or cabinet (compact models) of the air conditioner must be
properly positioned for safeand efficient sealing To instatlthe window seal,position
the bottom rail seal on the bottom rail flush with the front edge of the rail and in
contact with side seals Compact models are permanently encased in the cabinet,
which isnot removable Referto the Installation Instructions,
Manual Vertical Louver Adjustment
Complete this adjustment before installing front panel
1 Adjust the vertical louversto the straight position by using the handle,
2 The control panel and knobs are packed separately To install them, refer to
Installing the Dial Plate and Front Frame section
Front Installation
Install the front panel with filter asfollows:
1 Adjust the horizontal louvers to the straight position Hold the front straight
until the vertical louver handle linesup between the bottom horizontal louver
and the discharge opening
2 Pressthe front straight onto the cabinet until the holes in the flange of the
plastic front line up with the screw holes inthe metal cabinet Fastenthe front
panel in place with the two screws provided
nnstaDlation (continued)
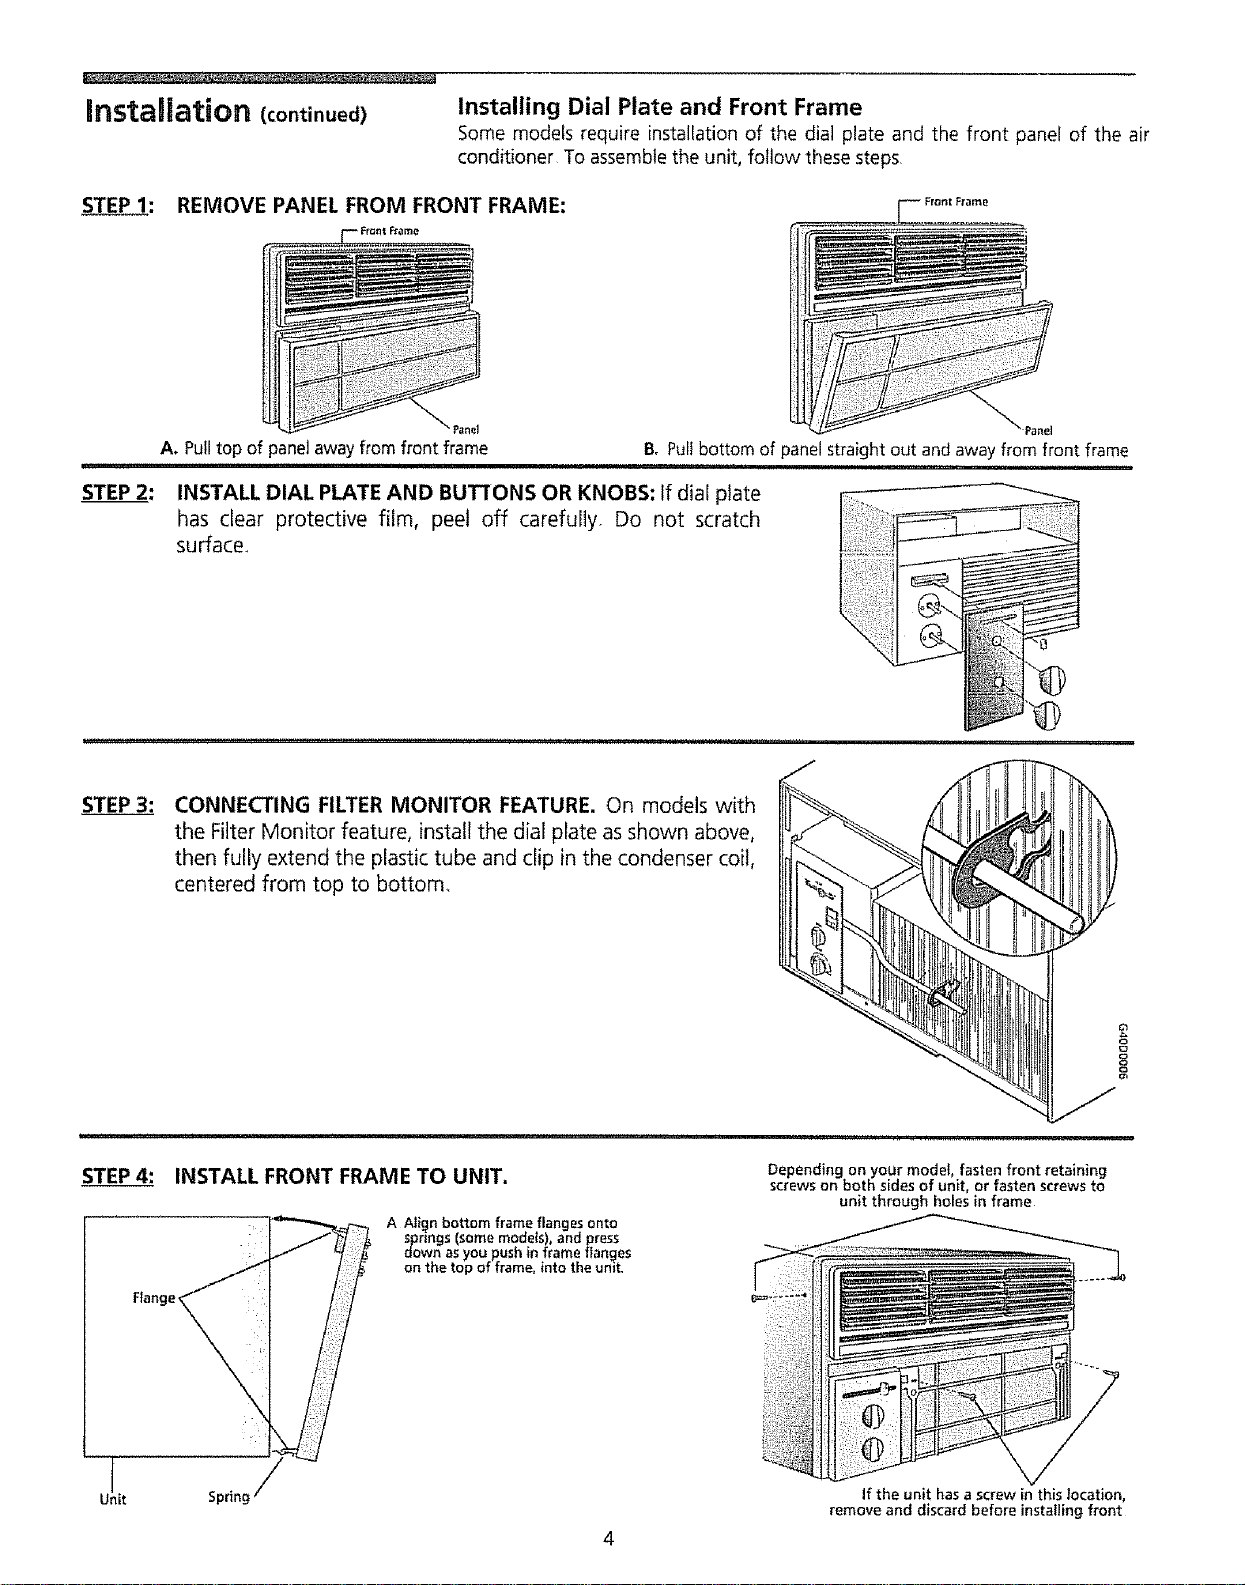
Installing Dial Plate and Front Frame
Some models require installation of the dial plate and the front panel of the air
conditioner To assemblethe unit, follow these steps
STEP 1: REMOVE PANEL FROM FRONT FRAME:
A, Pull top of panel away from front frame
B. Pull bottom of panel straight out and away from front frame
STEP 2: INSTALL DIAL PLATE AND BUTTONS OR KNOBS: If dial plate
has clear protective film, peel off carefully Do not scratch
sufface_
STEP 3:
CONNECTING FILTER MONITOR FEATURE. On models with
the Filter Monitor feature, install the dial plate as shown above,
then fully extend the plastic tube and clip in the condenser coil,
centered from top to bottom_
ii , ,
INSTALL FRONT FRAME TO UNIT.
A A_ign bottom frame flanges onto
springs {some mode{s), and press
down as you push in frame flanges
on the top of frame, into the unit,
Depending on your model, fasten front retaining
screws on both sides of unit, or fasten screws to
unit through holes in frame
q
Unit
Spring
4
If the unit has a screw in this location,
remove and discard before installing front
Using the Air Conditioner
NOTE: tf the air conditioner isturned off,
wait 3 minutes before restarting This
allows pressure inside the compressor to
equalize Failure to follow these
instructions may cause inefficient
operation
To reduce the risk of fire, electric shock, or injury to persons, read the
IMPORTANTSAFETYINSTRUCTIONSbefore operating this appliance
To begin operating the air conditioner, follow these steps:
I Pluginthe air conditioner (Toprevent electrical hazards,do not useanextension
cord or an adapter plug )
2 Setthe exhaust vent to the CLOSEDposition
3 Setthe TEMPControl to the coolest setting,
4 Set the fan control at the highest level
5 Adjust the louvers for comfortable air flow,
6 Once the room hascooled, set the fan to the POWERSAVERFANsetting and/
or adjust the TEMP Control to the setting you find most comfortable
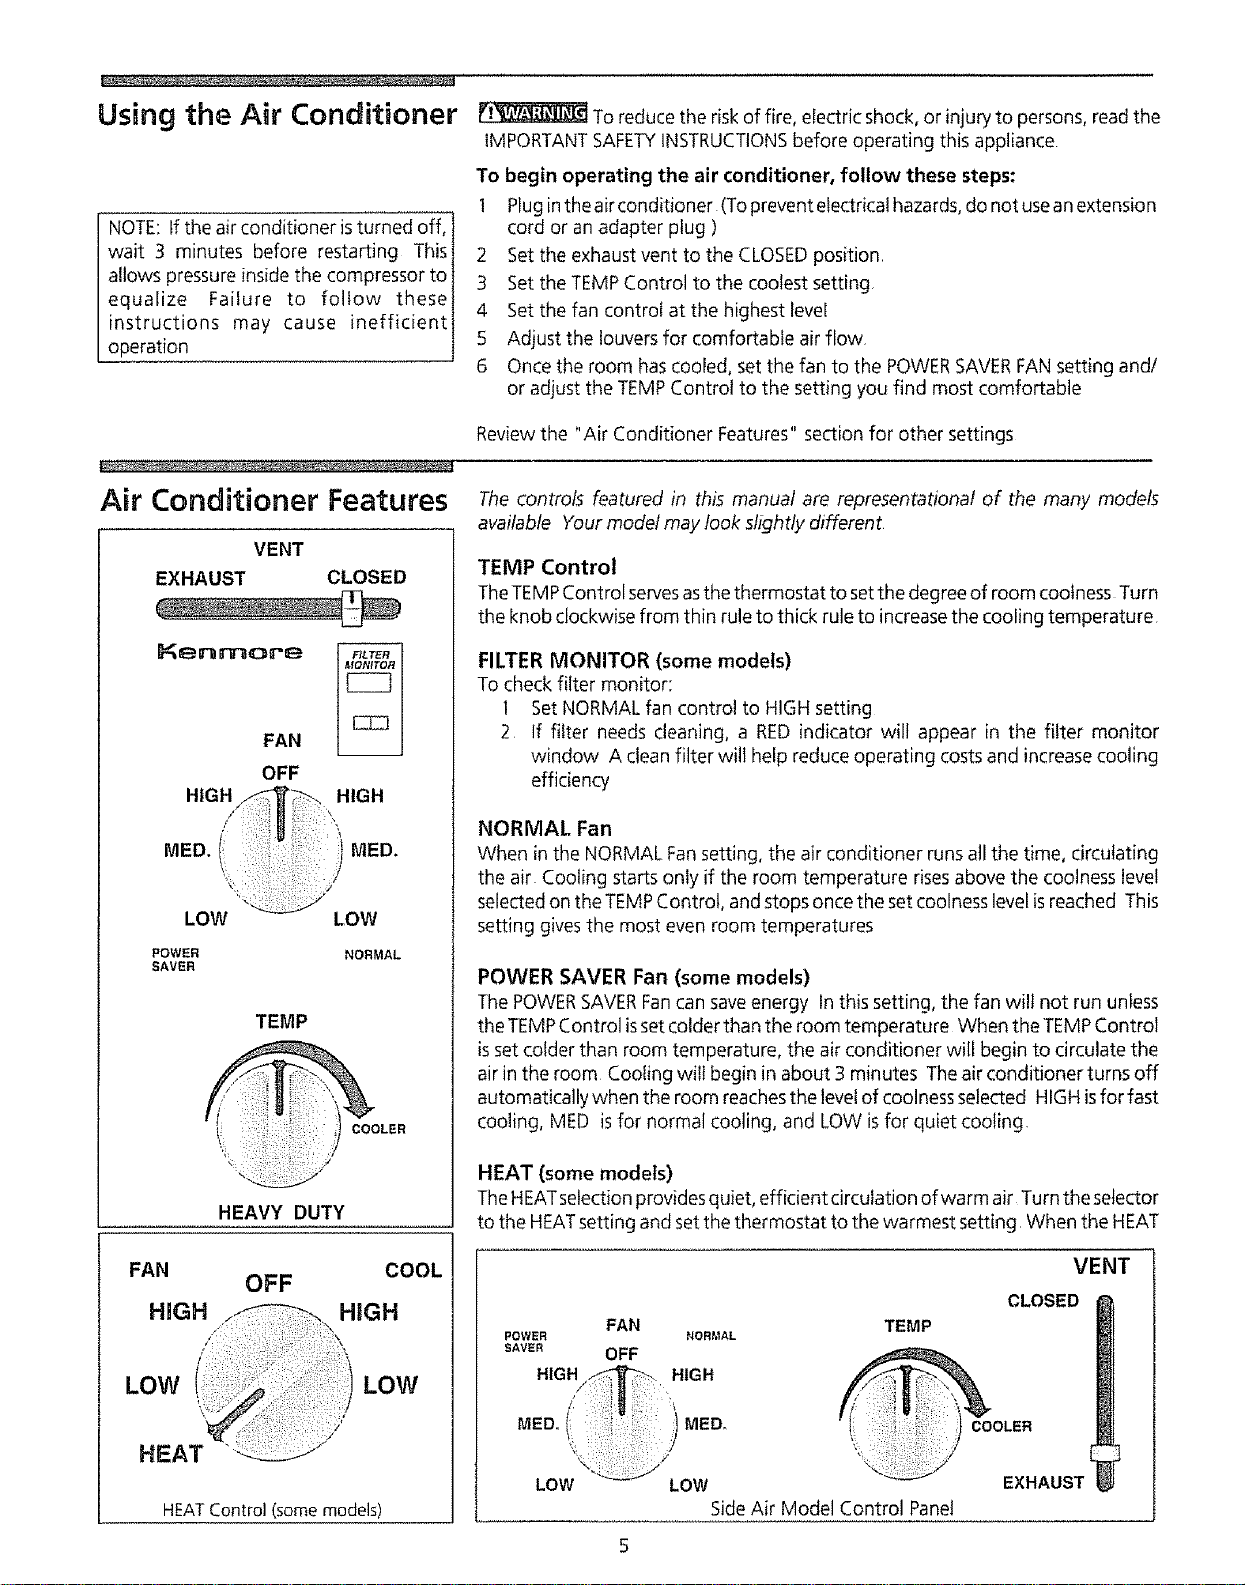
Air Conditioner Features
VENT
EXHAUST CLOSED
OFF
HIGH HIGH
/
: Y
LOW LOW
POWER NORMAL
SAVER
TEMP
COOLER
HEAVY DUTY
Reviewthe "Air Conditioner Features" section for other settings
FAN COOL
OFF
HiGH HiGH
LOW
HEAT "
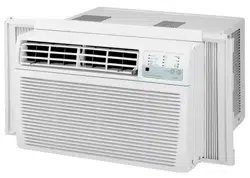
The controls featured in this manual are representational of the many models
available Your model may look slightly different
LOW
HEATControl (some models)
TEMP Control
TheTEMPControl servesasthe thermostat to setthe degree of room coolness Turn
the knob clockwise from thin rule to thick rule to increase the cooling temperature
FILTER MONITOR (some models)
To check filter monitor;
1 Set NORMAL fan control to HIGH setting
2 If filter needs cleaning, a RED indicator will appear in the filter monitor
window A clean filter will help reduce operating costs and increasecooling
efficiency
NORMAL Fan
When in the NORMAL Fansetting, the air conditioner runs all the time, circulating
the air Cooling starts only if the room temperature rises above the coolness level
selectedon the TEMPControl, andstops oncethe set coolness level isreached This
setting gives the most even room temperatures
POWER SAVER Fan (some models)
The POWERSAVERFancan save energy In this setting, the fan wilt not run unless
the TEMPControl isset colderthan the room temperature When the TEMPControl
isset colder than room temperature, the air conditioner wilebegin to circulate the
air in the room Coo{ing wilt begin in about 3 minutes The air conditioner turns off
automatically when the room reachesthe levelof coolnessselected HIGH isfor fast
cooling, MED isfor normal cooling, and LOW isfor quiet coo{ing,
HEAT (some models)
TheHEATselection provides quiet, efficient circulation of warm air Turn the selector
to the HEATsetting and set the thermostat to the warmest setting When the HEAT
FAN
POWER NORMAL
SAVER OFF
HIGH HIGH
/
MED. I MED_
/
LOW LOW
VENT
CLOSED
TEMP
OLER
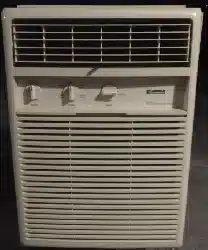
SideAir Model Control Panel
Air Conditioner Features
(continued)
VentControl - CompactModels
setting is selected, the thermostat maintains the temperature by automatically
turning the heater on and off in response to room temperature. Once the room is
warm, adjust the thermostat to a cooler setting The fan runs continuously to
circulate air in the room
A slight heat odor may come from the unit when first switching to HEATafter the
cooling season isover This odor, caused by fine dust particles on the heater, will
disappear quickly
Vent Control
TheVent Control allows the airconditioner to either recircufate insideair (CLOSED)
or exhaust air to the outside (OPEN)
• TheCLOSEDposition isusedwhen maximum cooling isdesired,It mayalsobeused
for air recirculation without cooling when the air conditioner isset in the FAN
position
= The OPENposition removesstaleair from the room and exhausts itto the outside
Freshair isdrawn intothe room through normal air passagesfound in homes
• TheOPENor CLOSEDposition can be usedwith any fan selection,,
o Forcompact modeJs,push the slide into CLOSE,pull out to OPEN,
The air directional louvers control the air flow direction Adjust louvers up, down,
left or right The outside tabs adjust the air up or down The center leversdirect the
air left or right,
Care and Cleaning
Remove /
Knobs
I_-'_.._ Locking
Remove _ " : it/f /_ :
Press firmly on each side of R
case to release locking tabs--
Figure I
Removing Decorative Front - Some Compact Models
Clips
Clean your air conditioner occasionally to keep itlooking new, Be sureto unplug
the unitbeforecleaningto preventshockor firehazards.
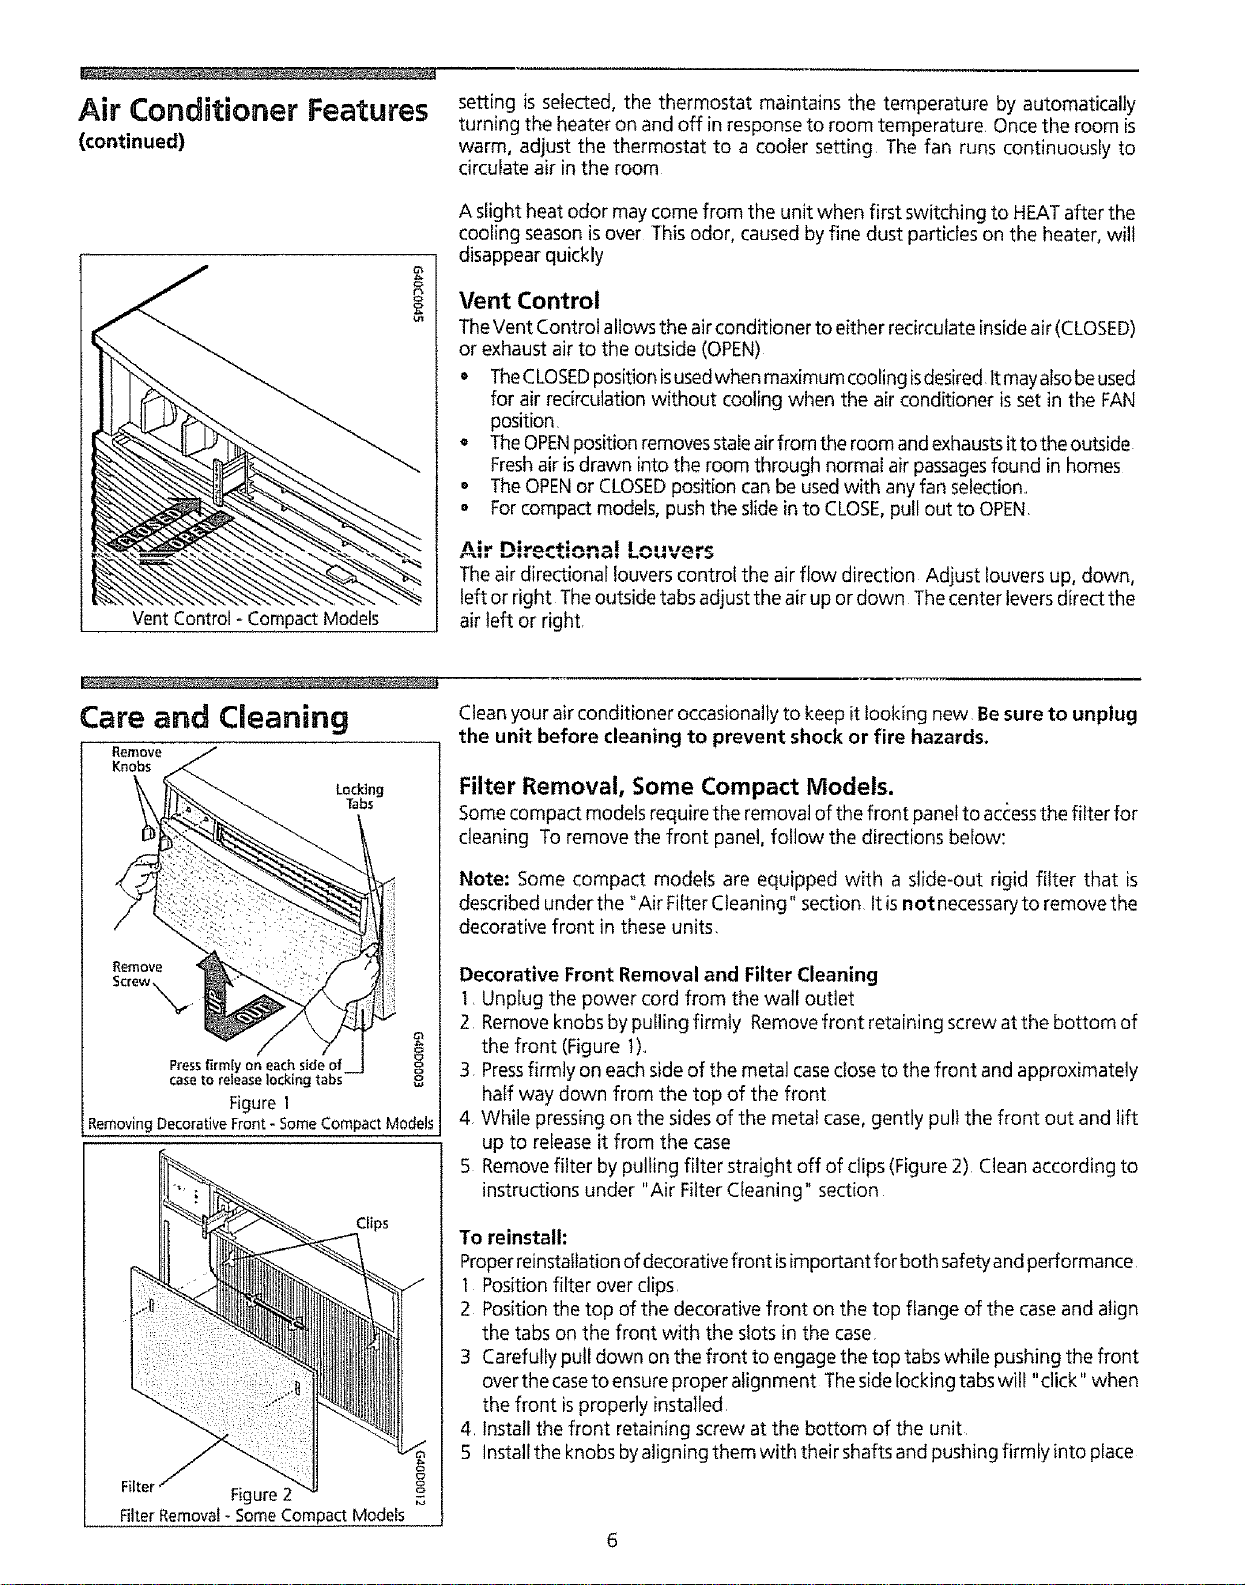
Filter Removal, Some Compact Models.
Somecompact models require the removal of the front panel to accessthe filter for
cleaning To remove the front panel, follow the directions below:
Note: Some compact models are equipped with a slide-out rigid filter that is
described under the "Air Filter Cleaning" section It is not necessaryto remove the
decorative front in these units,
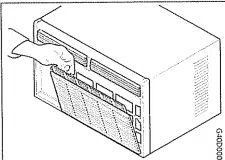
Decorative Front Removal and Filter Cleaning
1, Unplug the power cord from the wall outlet
2 Removeknobs by pulling firmly Removefront retaining screw at the bottom of
the front (Figure t).,
3 Pressfirmly on each side of the metal caseclose to the front and approximately
half way down from the top of the front
4, While pressing on the sides of the metal case, gently puli the front out and lift
up to release it from the case
5 Removefilter by pulling filter straight off of clips (Figure 2) Clean according to
instructions under "Air Filter Cleaning" section
To reinstall:
Properreinstallation of decorative front isimportant for both safety and performance
I Position filter over clips
2 Position the top of the decorative front on the top flange of the case and align
the tabs on the front with the slots in the case
3 Carefully pull down on the front to engage the top tabs while pushing the front
overthe caseto ensure proper align ment The sidelocking tabs will "click" when
the front isproperly installed,
4, Install the front retaining screw at the bottom of the unit
5 Installthe knobs byaligning them with their shafts and pushing firmfy into place
Figure2
Filter Removal - Some Compact Models
6
Care and Cleaning
continued)
8
Figure3
s
Figure4
8
8
Figure5 ."
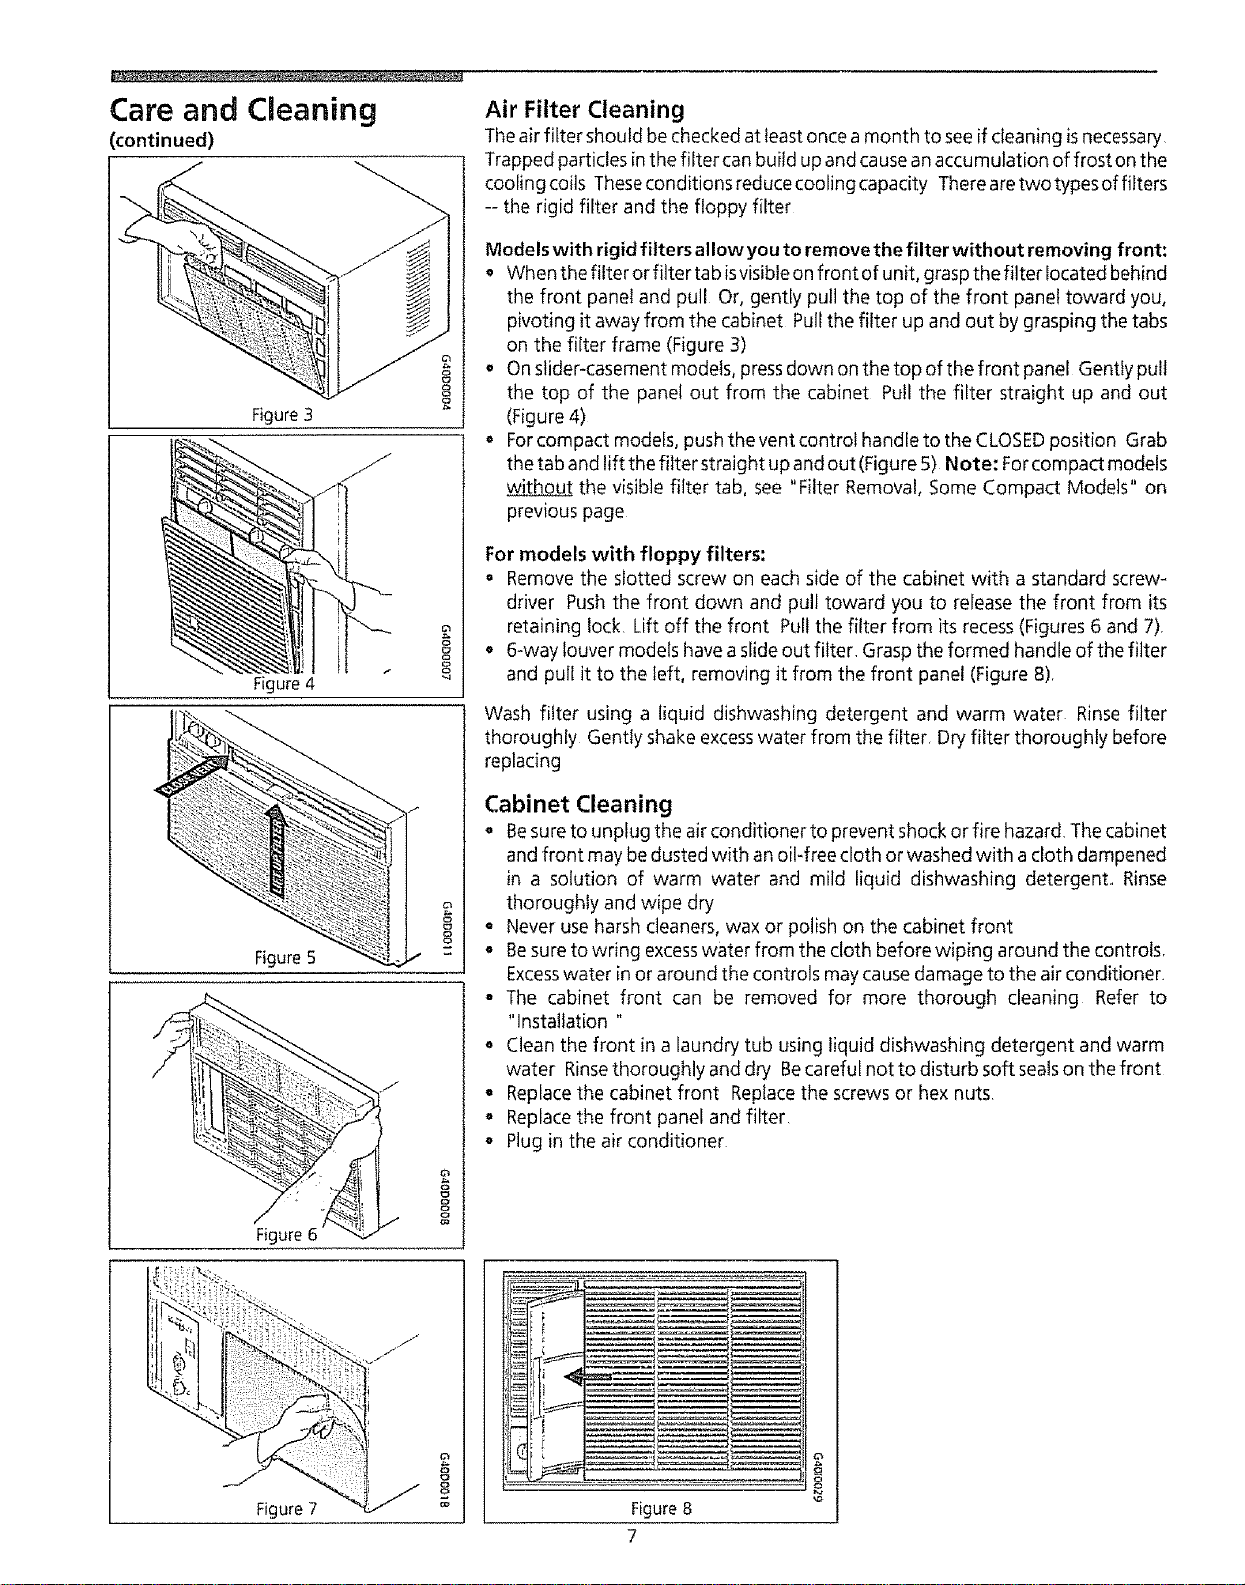
Air Filter Cleaning
Theair filter should be checked at least once amonth to seeif cleaning isnecessary
Trapped particles inthe filter can build up and cause an accumulation of frost on the
coolingcoils Theseconditionsreducecoolingcapac[ty Therearetwotypesoffilters
-- the rigid filter and the floppy filter
Models with rigidfilters allow you to remove the filter without removing front:
o When the fitter or filter tab isvisible on front of unit, grasp the filter Iocated behind
the front panel and pull Or, gently pull the top of the front panel toward you,
pivoting it away from the cabinet Pull the filter up and out by grasping the tabs
on the filter frame (Figure 3)
• Onslider-casement models, pressdown on the top of the front panel Gently pult
the top of the panel out from the cabinet Pull the filter straight up and out
(Figure 4)
a Forcompact models, push the vent control handle to the CLOSEDposition Grab
thetabandliftthefilterstraight upandout(Figure5) Note: Forcompact models
without the visible filter tab, see "Filter Removal, Some Compact Models" on
previous page
For models with floppy filters:
= Remove the slotted screw on each side of the cabinet with a standard screw-
driver Pushthe front down and pull toward you to release the front from its
retaining lock. Lift off the front Pull the filter from its recess(Figures 6 and 7)r
O 6-way louver models have a slideout filter. Graspthe formed handle of the filter
and pull it to the left, removing it from the front panel (Figure 8),
Wash filter using a liquid dishwashing detergent and warm water Rinse filter
thoroughly Gently shake excesswater from the filter, Dry filter thoroughly before
replacing
Cabinet Cleaning
° Besureto unplug the air conditioner to prevent shock or fire hazard, The cabinet
and front may be dusted with an oil-free cloth or washed with a cloth dampened
in a solution of warm water and mild liquid dishwashing detergent, Rinse
thoroughly and wipe dry
o Never use harsh cleaners, wax or polish on the cabinet front
• Besure to wring excesswater from the cloth before wiping around the controls.
Excesswater in or around the controls may cause damage to the air conditioner.
- The cabinet front can be removed for more thorough cleaning Refer to
"Installation "
• Clean the front in a laundry tub using liquid dishwashing detergent and warm
water Rinsethoroughly and dry Becareful not to disturb soft sealson the front
• Replacethe cabinet front Replace the screws or hex nuts
. Replace the front panel and filter
o Plug in the air conditioner
Figure
_JJ
8
8
Figure8
7
Routine Maintenance
Winter Storage
if you plan to store the air conditioner during the winter, remove it carefully from
the window according to the installation instructions Cover it with plastic or return
it to the original carton NOTE'.To prevent rust or electrical connections from
being damaged, store air conditioner in an upright position and a dry placer
A winter cover can be purchased from your dealer The cover will protect the air
conditioner when it is left in placethrough the winter
Before performing any service, unplug the power cord from
the electrical outlet,
Cleaning the Cabinet Front
Removethe front panel Wash with warm, sudsy water Rinseand dry with a soft
cloth Never usesolvents, cleaning fluids, abrasive cleaners or strong detergents. If
the packaging leavesa gum residue, remove with acloth dipped in rubbing alcohol
Repairing Paint Damage
Inspect weather-exposed parts (cabinet shell, mounting hardware, if used, etc)
once or twice a year, especially in areasnear oceans or where rust is a problem If
needed, touch up with a good grade of exterior painL
Cleaning Inside the Air Conditioner
_'!_ No Liquid should get into the motor, electrical control box, or
compressor electrical terminals
1 Remove front panel
2 With help and using the proper lifting methods to avoid personal injury,
remove the chassis from cabinet shell.* When removing the air conditioner
from cabinet shellor window, the remay be water inside the basethat may spill
on the floor Be careful to avoid cuts from sharp metal fins on the front and
rear coils
3 Liquids should not get into electrical parts. Wrap the fan motor, electrical
control box, and electrical terminals in plastic This will keep water or other
liquid from getting inside where it could damage the insulation and cause
serious trouble.
4. Clean and hose out base, coils, and water pans Clean at least once a year or
more often if the coils and pans collect dirt, sand, leaves, algae, or insects
5. After cleaning, remove plastic protection. Wait 24 hours before starting the
unit again This ailows time for all areas to dry out
Note: Water from rainfall or from normal usedoesnot harm these components
since the water isnot asforcefully driven into parts asa stream of water from
a garden hose
6. While the cabinet isremoved, this is a good time to oil the fan motor (See
instructions below )
*HANDLE NOTE: If the air conditioner has a chassis handle, it is NOT intended for lifting
the unit It is for sliding the chassis WITHIN the cabinet shell only (to aid in cleaning,
maintenance, etc)
Oiling the Fan Motor
To oil fan motor:
1. Removefront panel
2. Slidechassispart-way out of the cabinet shell to expose fan motor oil plugs
(Be careful not to slide chassis out too far.) If the air conditioner is not
equipped with a slide-out chassis,remove the cabinet
3. Oil the fan motor per instructions on the motor. To add oil, pull out the oil
plug at each end of the motor A one-ounce capsule of oil (part number
10943) isavailable through your nearest SearsService Center Repiace oil
hole plugs after oiling
After servicing, reverse the above procedures to reinstall the air conditioner
8
Before You Call for
Service...
Before calling for service, review this list It may saveyou time and expense This list
includes common occurrences that are not the result of defective workmanship or
materials in this appliance
OCCURRENCE
Air conditioner witl not operate.
SOLUTION
Wall plug disconnected Push plug firmly into wall outlet
Housefuse blown or circuit breaker tripped Replacefuse with time delay type or resetdrcuit breaker
FAN selector in OFF position Turn FAN selector to the desired FAN setting
Unit turned off by moving TEMPControl to a warmer setting and then immediately turning back
to a colder setting Wait approximately 3 minutes Listen for compressor to start
Unit turned off and then on too quickly Turn unit off and wait 3 minutes before restarting
TEMPControlsetwarmerthanroomtemperatureTurnTEMPControlclockwiseto acoldersetting
(thickrule)
Air from unit does hot feel cold
enough.
Turn selector to a higher FAN position
TEMP Control set too warm (thin rule) Turn TEMPControl clockwise to acolder setting (thick rule)
Roomtemperature below 70°F(2 t°C) Cooling may not occur until room temperature risesabove
70T (2I°C)
Temperature sensingtube touching cold coil, located behind air filter Straighten tube awayfrom coil
Air conditioner cooling, but room is
too warm - - ice forming on cooling
coil behind decorative front°
Outdoor temperature below 70°F(21°C) To defrost the coil, set selector to FAN position Then,
turn TEMP Control clockwise to a warmer setting (thin rule)
Air filter may be dirty Clean filter Refer to Care and Cleaning section To defrost, set selector
to FAN
TEMP CONTROL set too cold for night-time cooling To defrost the coil, set selector to a FAN
position Then, set TEMP CONTROL to a warmer position,
Air conditioner cooling, but room is
too warm -- N__Qice forming on
cooling coil behind decorative front.
Dirty air filter--air restricted Clean air filter Refer to Care and CIeaning section
TEMPControl set too warm Turn TEMP Control clockwise to a colder setting (thick rule)
Vent set at OPENposition Set vent at CLOSEDposition for maximum coofing
Air directional touvres positioned improperly Position louvres for better air distribution
Frontofunitisblockedbydrapes, blinds, furniture, etc -restrictsakdistribution Clear blockage
in front of unit
Doors, windows, registers, etc open --cold air escapes Close doors, windows, registers, etc
Unit recently turned on in hot room Allow additional time to remove "stored heat" from walls,
ceiling, floor and furniture
Dirty air filter-- air restricted Clean air filter
Air conditioner turns on and off Outside temperature extremely hot Set FAN on high speed to bring air past cooling coils more
rapidly frequently
Noise when unit is cooling° Air movement sound This is normat tf too loud, turn selector to lower FAN setting
Sound of fan hitting water-moisture removal system This isnormal when humidity ishigh Close
doors, windows and registers
Window vibration--poor installation Refer to installation instructions or check with installer
Water dripping INSIDE when unit is Improper installation Tilt air conditioner slightly to the outside to allow water drainage Refer
cooling_ to installation instructions--check with installer
Water dripping OUTSIDE when unit Unit removing large quantity of moisture from humid room This is normal during excessively
iscooling, humid days
Sears Service
"We ServiceWhat We Sell" isour assurance you can depend on Searsfor service
and Searsserviceis nationwide, Your air conditioner has added value when you
consider that Sears has service units nationwide, staffed with professional
technicians specifically trained on Sears appliances and having parts, tools and
equipment to insure that we meet our pledge to you "We ServiceWhat We Sell/'
Sears Maintenance Agreement
Maintain the value of your Kenmore® air conditioner with a SearsMaintenance
Agreement Searsair conditioners are designed, manufactured, and tested for years
of dependable operation, Yet, anymodern appliance may require servicefrom time
to time,
The SearsMaintenance Agreement
o lsyour way to buy tomorrow's service at today's price
• Eliminates repair bills resulting from normal use°
• Allows for asmany service calls asrequired
o Providesfor service by professional Sears4rained technicians
o Offers an annual preventive maintenance check-up at your request
This maintenance _g__,,=n_ dv_ not cov_ o lulnol IN>toiled Jn, r=tn_ol]_du, _,or
damage resulting from external causessuch asacts of God, abuse, theft, fire, flood,
wind, lightning, freezing, power failure, power reduction, etc, Please ask a
salesperson to seethe agreement for all of the terms and conditions
Warranty
Full One-Year Warranty on Air Conditioner
For one year from date of purchase, when this air conditioner is operated and
maintained for normal room cooling according to instructionsin this owner's
manual, Searswill repair this air conditioner, free of charge, if defective in material
or workmanship
Full Five-Year Warranty on Sealed Refrigeration System
For five yearsfrom the date of purchase, when this air conditioner is operated and
maintained for normal room cooling according to instructions in this owner's
manual, Searswill repair the sealed refrigeration system (consisting of refrigerant,
connecting tubing, and compressor), free of charge, if defective in material or
workmanship
This warranty gives you specific legal rights, and you may have other
rights which vary from state to state.
Warranty service is available by contacting the NEARESTSEARSSERVICECENTER/
DEPARTMENT in the United States or call 1-800-4-REPAIR
For parts, call 1-800-FON-PART
SEARS, ROEBUCK and CO.
3333 Beverly Road
Hoffman Estates, IL 60719
10
PRINTEDIN U S A
Instrucdones Importantes de Seguridad ....................................2
Funciones del Acondicionador de Aire ...........................................2
Caractefistlcas del Acondicionador de Aire .........................5-6
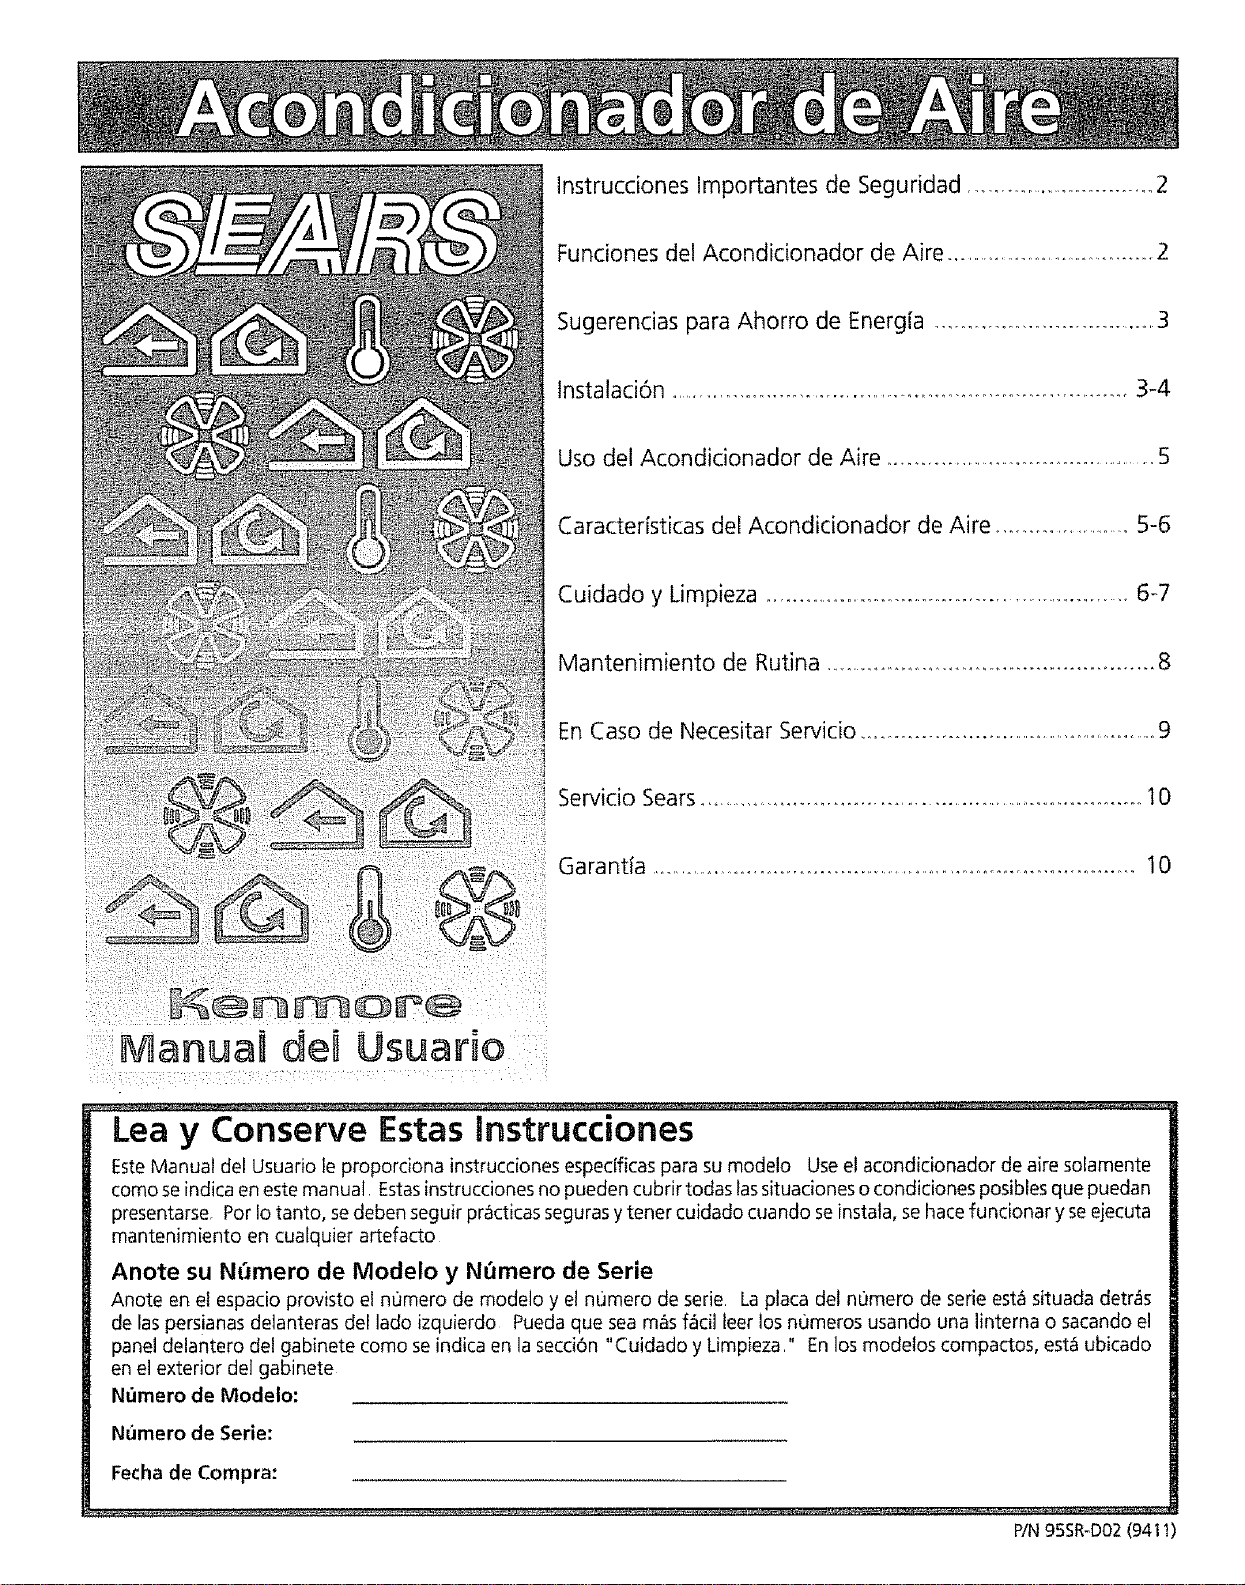
Manuai de8 Usuario
Lea y Conserve Estas Instrucciones
EsteManual del Usuario le proporciona instrucciones espedficas para su modelo Use el acondicionador de aire solamente
como se indica en este manual Estasinstrucciones no pueden cubrir todas lassituaciones o condiciones posibles que puedan
presentarse Por Iotanto, sedeben seguir pr_Icticasseguras y tener cuidado cuando seinstala, se hace funcionar y seejecuta
mantenimiento en cualquier artefacto
Anote su N_mero de Modelo y N_mero de Serie
Anote en el espacio provisto el nOmero de modelo y el nomero de serie. La placa del numero de serie estcisituada detr_s
de laspersianas delanteras del lado izquierdo Pueda que sea m_s f_ci] leer los numeros usando una lintema o sacando el
panel delantero dei gabinete como se indica en la secciOn"Cuidado y Limpieza," En los modelos compactos, est_ ubicado
en el exterior del gabinete
Nt_mero de Modelo:
Numero de Serie:
Fecha de Compra:
PIN95SR-DO2(941I)
[nstrucdones
[mportantes de
Seguridad
Lea todas las instrucciones antes de usar este acondicionador de aire_
Para Mayor Seguridad
No almacene o use gasolina u otros l[quidos o vapores inflamables en la proximidad
de este o cualquier otto artefacto Lea las etiquetas de los productos para
informarse sobre la inflamabitidad y otras advertendas
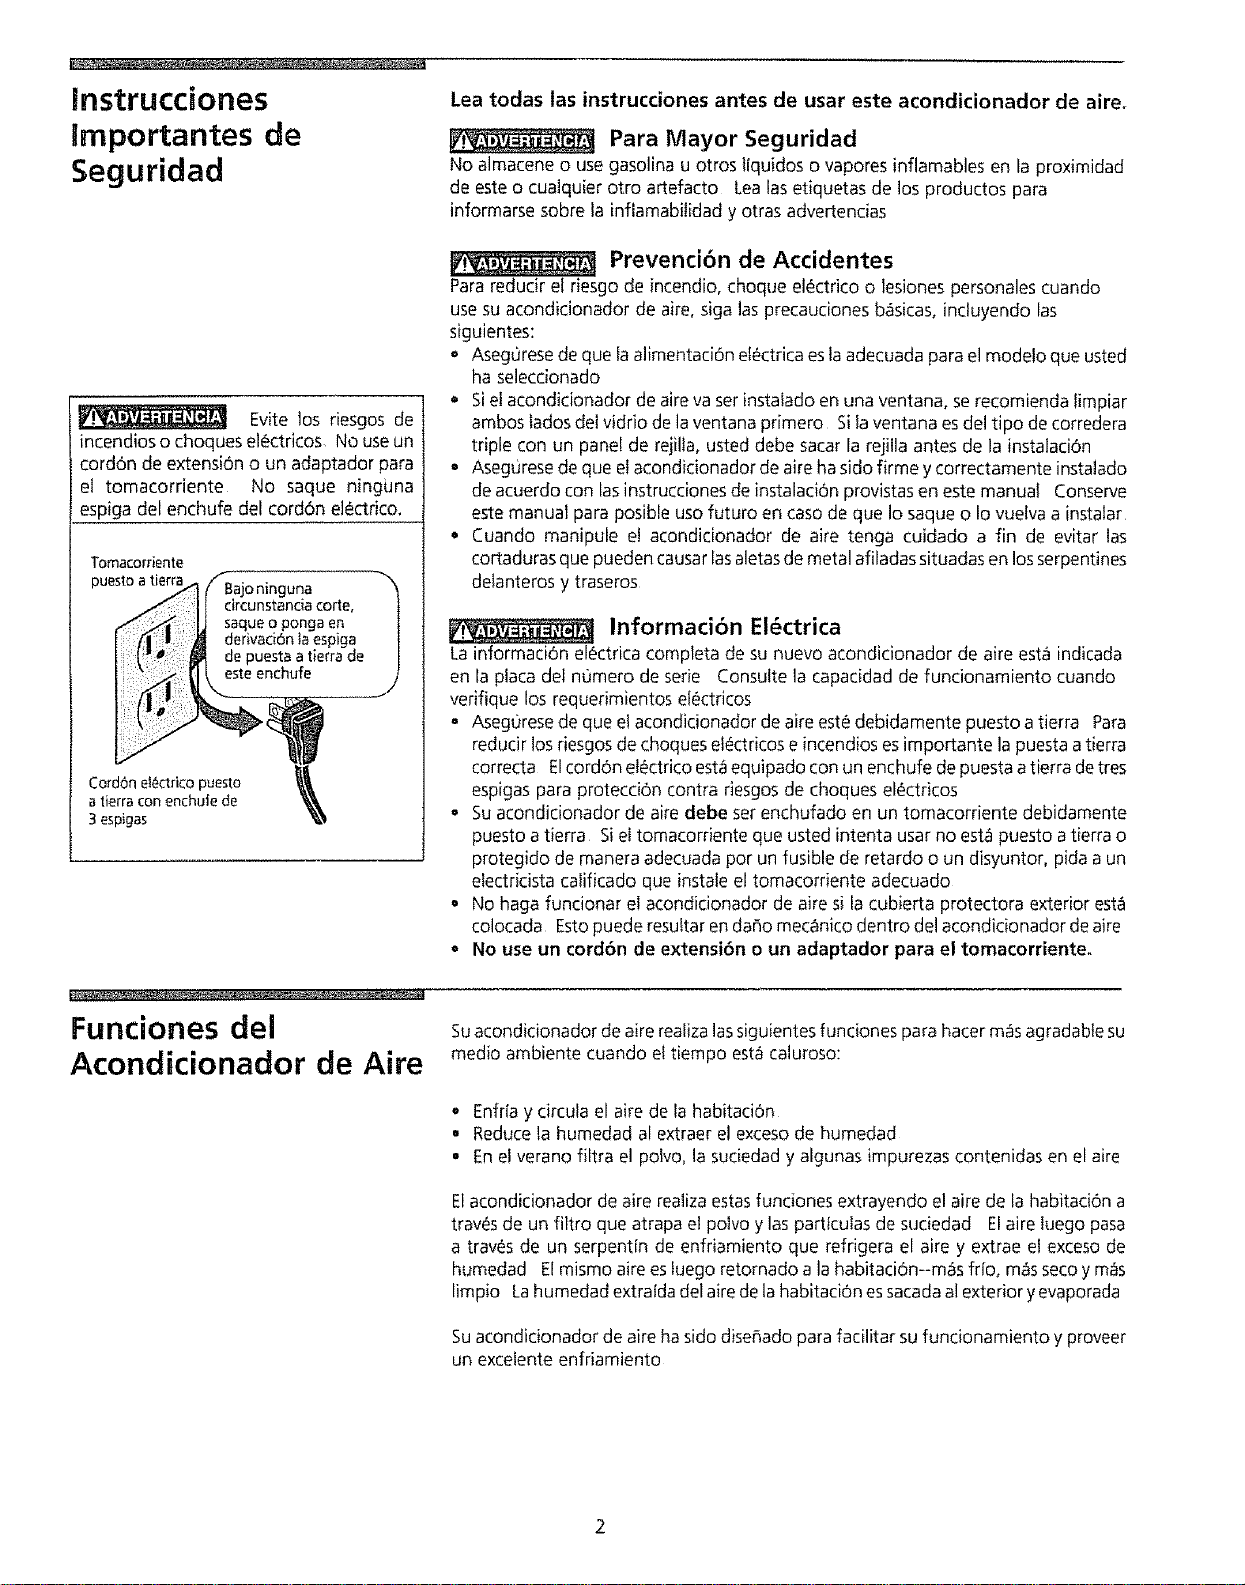
Evite los riesgos de
incendios o choques el_ctricos No use un
cord6n de extensi6n o un adaptador para
e[ tomacorriente No saque ninguna
espiga del enchufe del cord6n el_ctrico.
Tomacorriente
puesto atierra
Cord6n e!_ctrico puesto
a tierracon enchufe de
3 espigas
Prevenci6n de Accidentes
Para reducir el desgo de incendio, choque el_ctrico o lesiones personales cuando
use su acondicionador de aire. siga las precauciones b_sicas, incluyendo las
siguientes:
o Aseg0rese de que [aalimentaci6n et_ctrica es taadecuada para el modelo que usted
ha selecdonado
• Siel acondicionador de aire va ser insta[ado en una ventana, se recomienda limpiar
ambas tados del vidrio de la ventana primero Si la ventana es del tipo de corredera
triple con un panel de rejilta, usted debe sacar [a rejilla antes de la instalaci6n
• Aseg0rese de que el acandicionador de aire ha sido firme y correctamente instalado
de acuerdo con las instrucciones de instalaci6n provistas en este manual Conserve
este manual para posible uso futuro en caso de que Io saque o Io vuelva a instalar
Cuando manipule e! acondicionador de aire tenga cuidado a fin de evitar las
cortaduras que pueden causar las aletas de metal afiladas situadas en los serpentines
delanteros y traseros
Informaci6n El_ctrica
La informaci6n el6ctrica completa de su nuevo acondicionador de aire esta indicada
en la placa del n0mero de serie Consulte la capacidad de fundonamiento cuando
verifique los requerimientos eI6ctricos
o Aseg0rese de que e! acondicianador de aire est_ debidamente puesto a tierra Para
redudr los riesgos de choques el_ctricos e incendios es importante la puesta a tierra
correcta Elcord6n et_ctrico est_ equipado con un enchufe de puesta atierra de tres
espigas para protecci6n contra riesgos de choques el_ctricas
o Su acondicionador de aire debe set enchufado en un tomacorriente debidamente
puesto a tierra Si el tomacorriente que usted intenta usar no est_ puesto a tierra o
protegido de manera adecuada pot un fusible de retardo o un disyuntor, pida aun
electridsta calificado que insta[e el tomacorriente adecuado
o No haga fundonar el acondicionador de aire si la cubierta protectora exterior est,1
colocada Esto puede resu[tar en da_o mecanico dentro del acondicionador de aire
o No use un cord6n de extensi6n o un adaptador para el tomacorriente.
Fundones del Suacondicionador de aire realizalassiguientesfunciones para hater m_sagradabtesu
Acondicionador de Aire medio ambiente cuando el tiempo est_ caluroso:
• Enfria y circula el aire de Ia habitaci6n
° Reduce la humedad al extraer el exceso de humedad
° En el verano filtra el polvo, la suciedad y algunas impurezas contenidas en el aire
Elacondidonador de aire realiza estas funciones extrayendo el aire de la habitaci6n a
traves de un filtro que atrapa el polvo y las partfculas de sudedad El aire luego pasa
a trav¢s de un serpentin de enfriamiento que refrigera el aire y extrae el exceso de
humedad El mismo aire es [uego retornado a la habitaci6n--m_s fifo, m_isseco y m&s
limpio Lahumedad extrafda del aire de la habitaciOn es sacada al exterior y evaporada
Suacondidonador de aire ha sido diseffado para fadlitar su funcionamiento y proveer
un excelente enfriamiento
Sugerencias Para
Ahorro de Energia
• La capacidad del acondicionador de aire debe corresponder al tamaflo de la
habitaciOn para un funcionamiento eficazy satisfactorio
° Instaleel acondicionador deaire enel lado sombreado de sucasa Unaventanaque
est6 dirigida al notre esIo mejor puesesta a la sombra la mayor parte del dla
° No bloquee el flujo de aire con persianas,cortinas o muebles; o en el exterior con
arbustos, cercasu otros edificios
° Cierreel registro de lachimenea,losregistrosdel pisoymuralesde modo que elaire
frio no escapea travesde la chimenea ni haciael interior de los ductos
Mantenga lascortinasypersianasen otras ventanascerradasdurante lahora de m_s
sol del dfa
• Limpieel filtro del aire como se recomienda en la secci6n "Cuidado y Limpieza"
o Elaislamiento apropiado de su hogar le ayudara a mantener el aire caliente afuera
y a conservarel aire seco en el interior
, Lasombra provistaen el exterior de la casapar arboles, plantas o alerosayudar_a
reducir la cargade trabajo del acondicionador de aire
° Utilice losartefactos que producen calortales como estufas,lavadoras,secadorasy
lavadorasde platos durante la parte m&sfrescadel dfa
InstalaciOn
_'_.. ............. , .
I RielInferior
'L
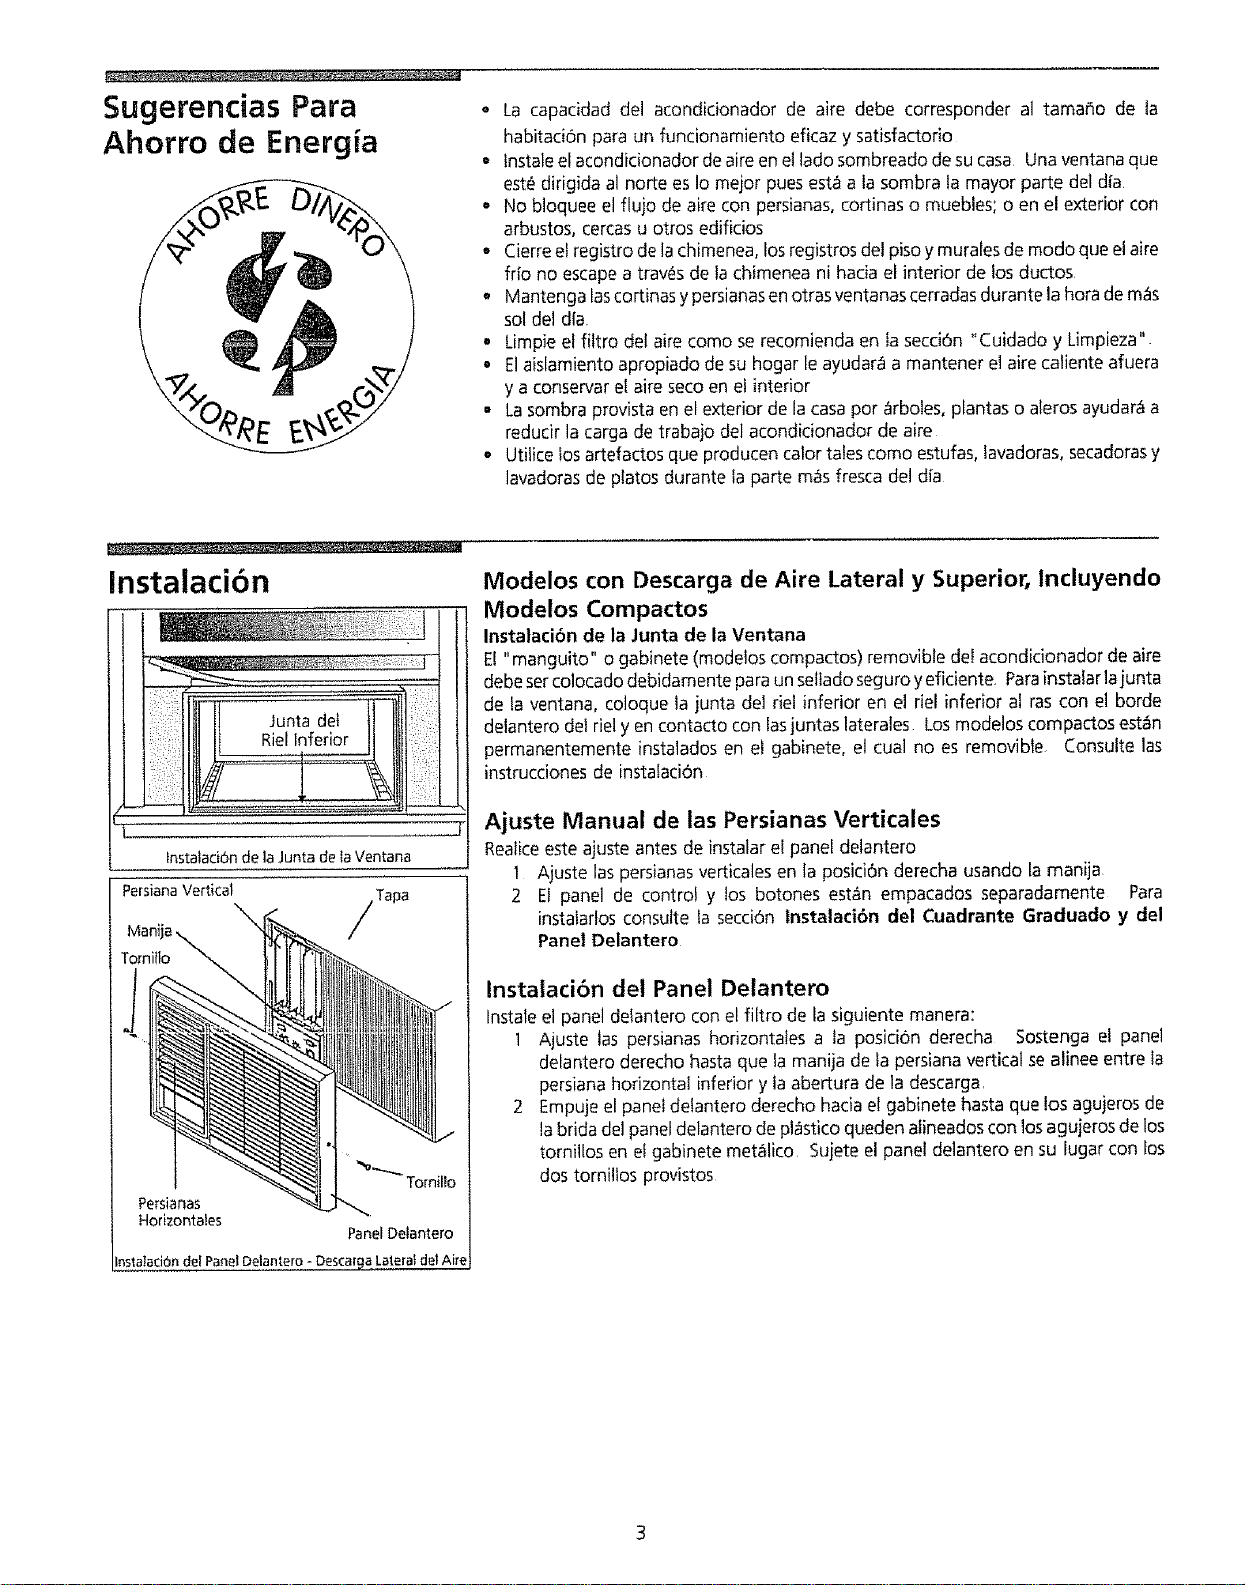
fnstataci6n de la Junta de la Ventana
Persiana Vertical
Tomillo
Persianas
Horizontales
Tomilto
Panel Detantero
Instalad6n del Panel Delan_.ero - Descar_a Lalera} del Ake
IVlodelos con Descarga de Aire Lateral y Superior, lncluyendo
Modelos Compactos
InstalaciOn de la Junta de la Ventana
E!"manguito" o gabinete (modelos compactos)removible deFacondicionador de aire
debesercolocado debidamenteparaun selladoseguroyeficiente. Parainstalarlajunta
de la ventana, coloque la junta del del inferior en el riel inferior at ras con el borde
delantero del riel yen contacto con lasjuntas laterales Losmodelos compactos est_n
permanentemente instaladosen el gabinete, el cual no es removible Consulte las
instruccionesde instafaciOn
Ajuste Manual de las Persianas Verticales
Realiceeste ajuste antes de instalar el panel delantero
1 Ajuste laspersianasverticalesen la posiciOnderecha usando la manija
2 El panel de control y los botones est_n empacados separadamente Para
instalarlosconsutte la secci6n tnstalaci6n del Cuadrante Graduado y del
Panel Delantero
Instalaci6n del Panel Delantero
Instaleel panel delantero con el filtro de la siguiente manera:
I Ajuste las persianas horizontales a la posicion derecha Sostenga el panel
delantero derecho hasta que la manija de la persianavertical sealinee entre la
persianahorizontal inferior y la abertura de la descarga
2 Empujeel paneldelantero derecho haciael gabinete hasta que los agujeros de
labrida del paneldelantero de pl_sticoqueden alineadoscon losagujerosde los
tornillos en el gabinete metalico Sujeteel panel delantero en su lugar con los
dos tornillos provistos
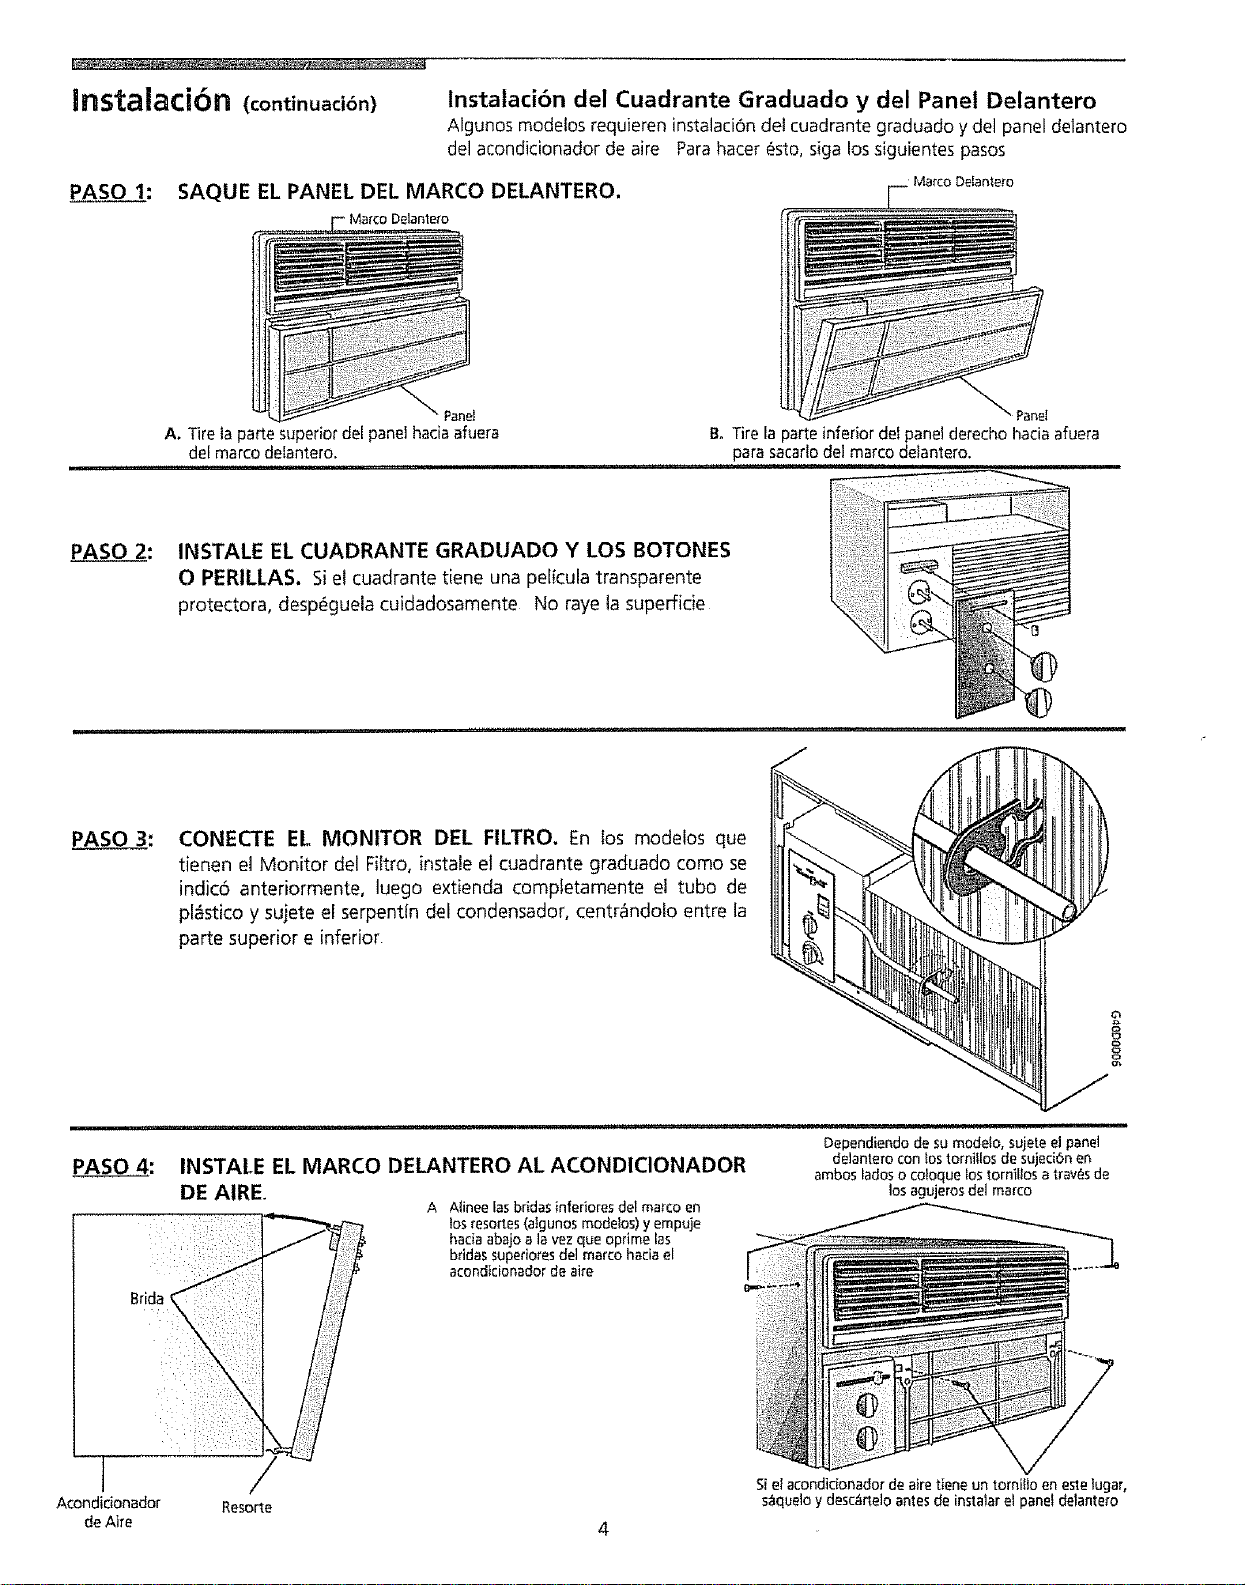
Instalaci6n (continuaci6n)
PASO 1:
Instalaci6n del Cuadrante Graduado y del Panel Delantero
Algunos modefos requieren instalaci6n del cuadrante graduado y del panel delantero
del acondicionador de aire
SAQUE EL PANEL DEL MARCO DELANTERO,
Delantero
Panel
A, Tire ta parte superior del panel hacia afuera
del marco deiantero.
Parahacer 6sto, siga lossiguientes pasos
Marco Deian_e_o
' Panel
Bo Tire la parte inferior del panet derecho hacia afuera
para sacarlo del marco delantero.
PASO 2: INSTALE EL CUADRANTE GRADUADO Y LOS BOTONES
O PERILLAS. Si el cuadrante tiene una peiicula transparente
protectora, desp6gueia cuidadosamente No raye ia superficie
PASO _3:
CONECTE EL MONITOR DEL FILTRO, En tos modeios que
tienen el Monitor del Fiitro, instale el cuadrante graduado como se
indic6 anteriormente, luego extienda completamente el tubo de
pl_stico y sujete el serpentin del condensador, centr_ndoto entre la
parte superior e inferior
PASO 4:
INSTALE EL MARCO DELANTERO AL ACONDICIONADOR
DE AIRE.
A AIinee lasbridas inferiores del marco en
los resortes(algunos modelos) y empuje
hacia abajo a la vez que oprime las
bridas superioresdel marco haciael
acondidonador de ake
Brida '
Acondidonador Resorte
de Aire
Dependiendo de su modelo, sujete el panel
delantero con _ostornitlos de sujeci6nen
ambos ladoso co!oque _ostornillos a trav6sde
los agujerosdel marco
Si el acondicionador de airetiene un tornitlo en este tugar,
s_quelo y desc_rtelo antes de instalar el panel delantero
Uso dea Acondidonador
de Aire
Para redudr el riesgo de incendio, choque el6ctrico o tesiones
personales, lea estas INSTRUCCtONES DE SEGURIDAD IMPORTANTES antes de poner
en funcionamiento este artefacto
NOTA: Si apaga ei acondicionador de aire,
espere 3 minutos antes de ponerlo en
marcha nuevamente Esto permite
estabitizar la presi6n dentro del compresor
El incumplimiento de estas instrucciones
puede causar fundonamiento ineficaz
Para poner en funcionamiento el acondicionador de aire, siga estos pasos:
1 Enchufe elacondicionador de aire (Para evitar riesgos el_ctdcos, no use un cord6n
de extensi6n ni un adaptador )
2 Coloque el registro de evacuaci6n en ta posici6n CERRADA
3 Coloque el control de la TEMPERATURA en et ajuste m_s fflo
4 Cotoque el control de! ventilador en el nivel m_s alto
5 Ajuste Ins persianas para un flujo de aire agradable
6 Una vez que la habitaci6n se haya enfriado, coloque el ventilador en ta posici6n
POWER SAVER FAN y/o regule el termostato al ajuste que encuentre m_flsc6modo
Consulte la secci6n "CaracteHsticas del Acondicionador de Aire" para otros ajustes
Caracteristicas del
Acondidonador de Aire
VENT
EXHAUST CLOSED
Kenmore
FAN
OFF
LOW LOW
POWER NORMAL
SAVER
TEMP
COOLER
GRAN CAPACIDAD
FAN COOL
OFF
HEAT (Calefaccion) (atgunos modelos)
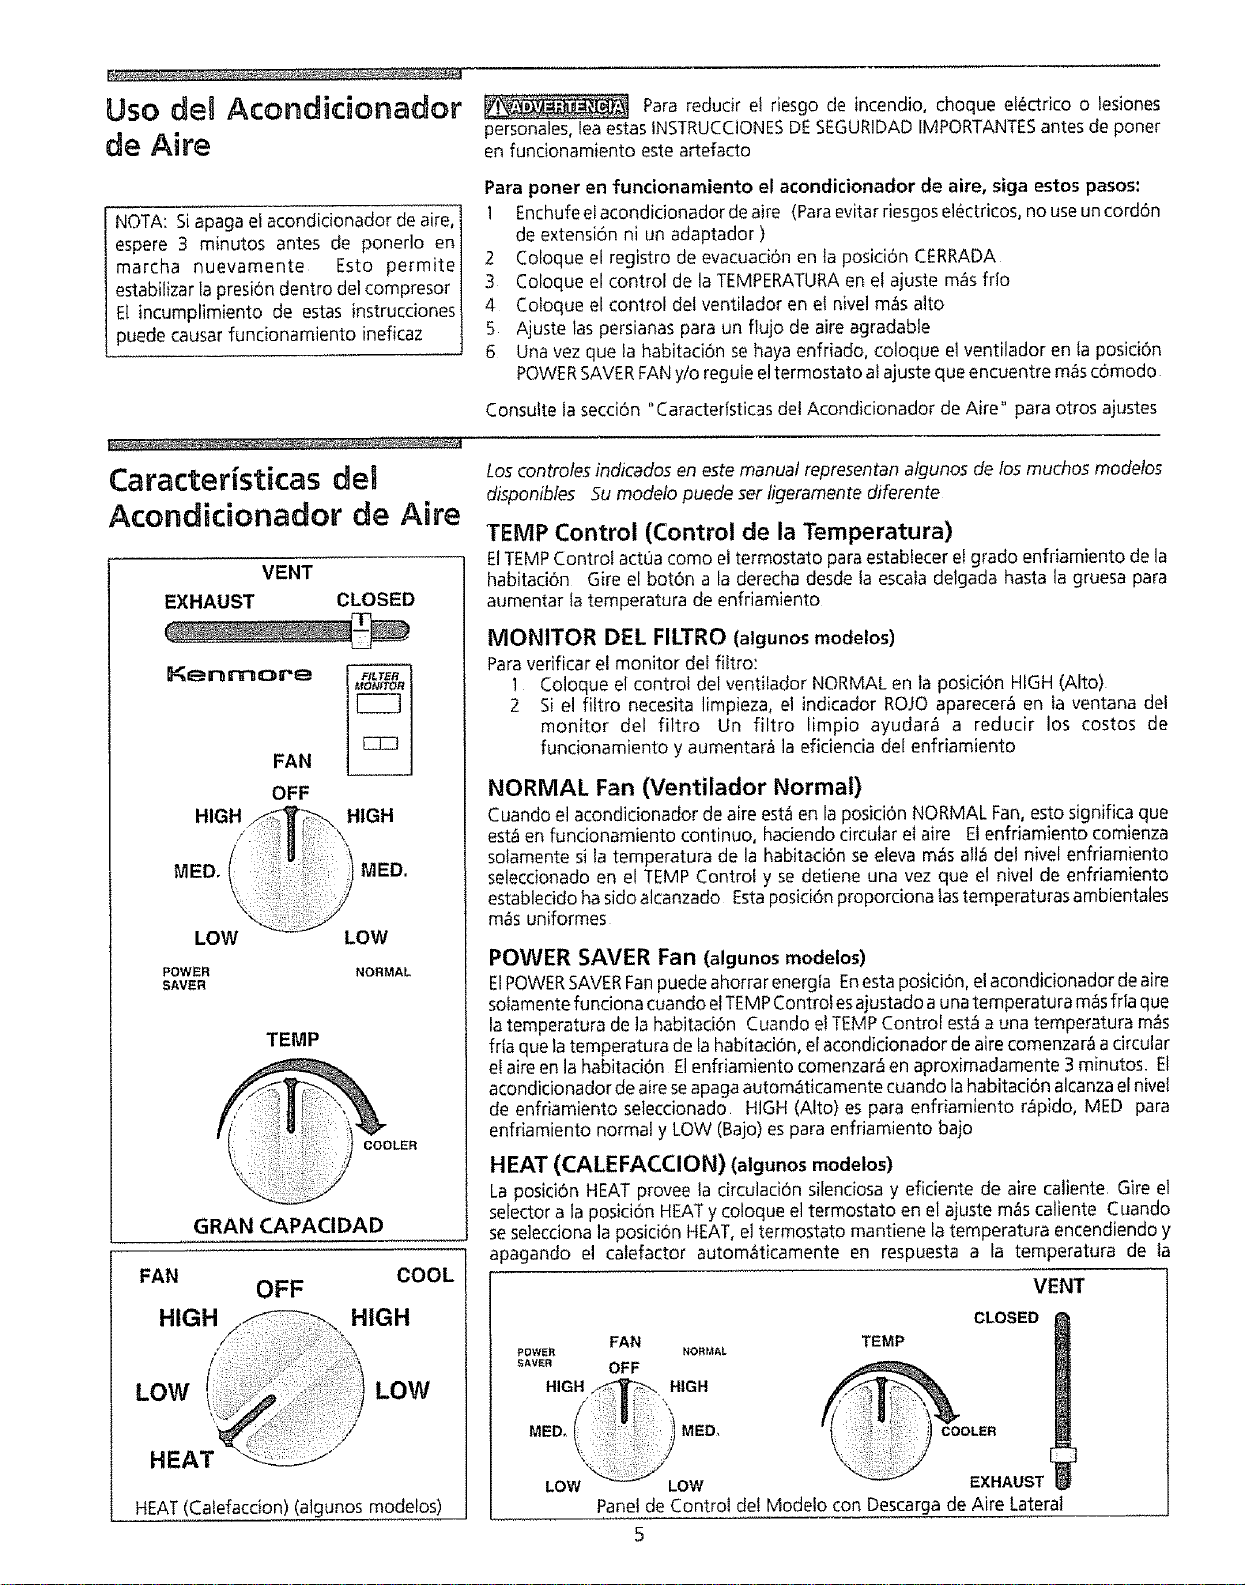
Los controtes indicados en este manual representan algunos de los muchos modelos
disponibles Su modelo puede ser ligeramente diferente
TEMP Control (Control de la Temperatura)
ElTEMP Contro! act0a como el termostato para establecer et grado enfriamiento de la
habitaci6n Gire el bot6n ala derecha desde ia escaia delgada haste la gruesa para
aumentar ta temperatura de enfriamiento
MONITOR DEL FILTRO (algunosmodelos)
Para vefificar el monitor del filtro:
1 Coloque el control del ventilador NORMAL en la posici6n HIGH (Alto)
2 Si el fiitro necesita limpieza, el indicador ROJO aparecer_ en ia ventana del
monitor del filtro Un filtro limpio ayudar_ a reducir los costos de
funcionamiento y aumentar& la eficiencia del enfriamiento
NORMAL Fan (Ventilador Normal)
Cuando el acondicionador de aire est_ en la posici6n NORMAL Fan, esto significa que
est_ en funcionamiento continuo, haciendo circular el aire E1enfriamiento comienza
solamente si la temperatura de la habitaci6n se eleva m_s all_ del nivel enfriamiento
selecdonado en el TEMP Control y se detiene una vez que el nivel de enfriamiento
establecido ha sido alcanzado Esta posici6n proporcionatas temperaturas ambientales
m_s uniformes
POWER SAVER Fan (algunos modelos)
ElPOWER SAVERFan puede ahorrar energia Enesta posici6n, el acondidonador de aim
solamente funciona cuando el TEMP Controf esajustado a una temperatura m_s ffla que
la temperatura de ta habitaci6n Cuando e! TEMP Control est._a una temperature m_s
fria que ta temperature de ta habitaci6n, el acondicionador de aire comenzar_ a circular
el aire en la habitaci6n Elenfriamiento comenzar_ en aproximadamente 3 minutos, El
acondicionador de aire seapaga autom_ticamente cuando la habitacidn alcanza el niveI
de enfriamiento seleccionado HIGH (Alto) es para enfriamiento r_pido, MED pare
enfriamiento normal y LOW (Bajo) es para enfriamiento bajo
HEAT (CALEFACCION) (algunos modelos)
La posici6n HEAT provee la circulaci6n silenciosa y eficiente de aire caliente Gire el
selector ala posici6n NEAT y coloque el termostato en el ajuste m_s caliente Cuando
se selecciona la posid6n HEAT, el termostato mantiene la temperatura encendiendo y
apagando el calefactor autom_ticamente en respuesta ala temperatura de la
VENT
POWER
_AVER
LOW
CLOSED
TEMP
FAN NORM_
OFF
LOW AUST
Panel de Control del Modelo con Descarga de Aire Lateral
5
Caracteristicas dei
Acondicionador de Aire
(continuacibn)
habitaci6n Unavez que la habitacibn est_calefaccionada, ajusteeftermostato a una
posici6n m_tsfria Etventitador funciona continuamente para hacer circular el aire de
la habitaci6n
Zontrol de Evacuac]6n - Modelos Compactos
Puedeque salgaun olor cuando el acondicionador escolocado par primera vezen la
posid6n HEAT despues que ha pasado la temporada de enfriamiento Este olor,
causadoper lasparticulasfinas de potvo en el catefactor, desaparecer_ir_ipidamente
Cuidado y Limpieza
Sacare_
Tom!lie
Lengt_etas
de Suied6n
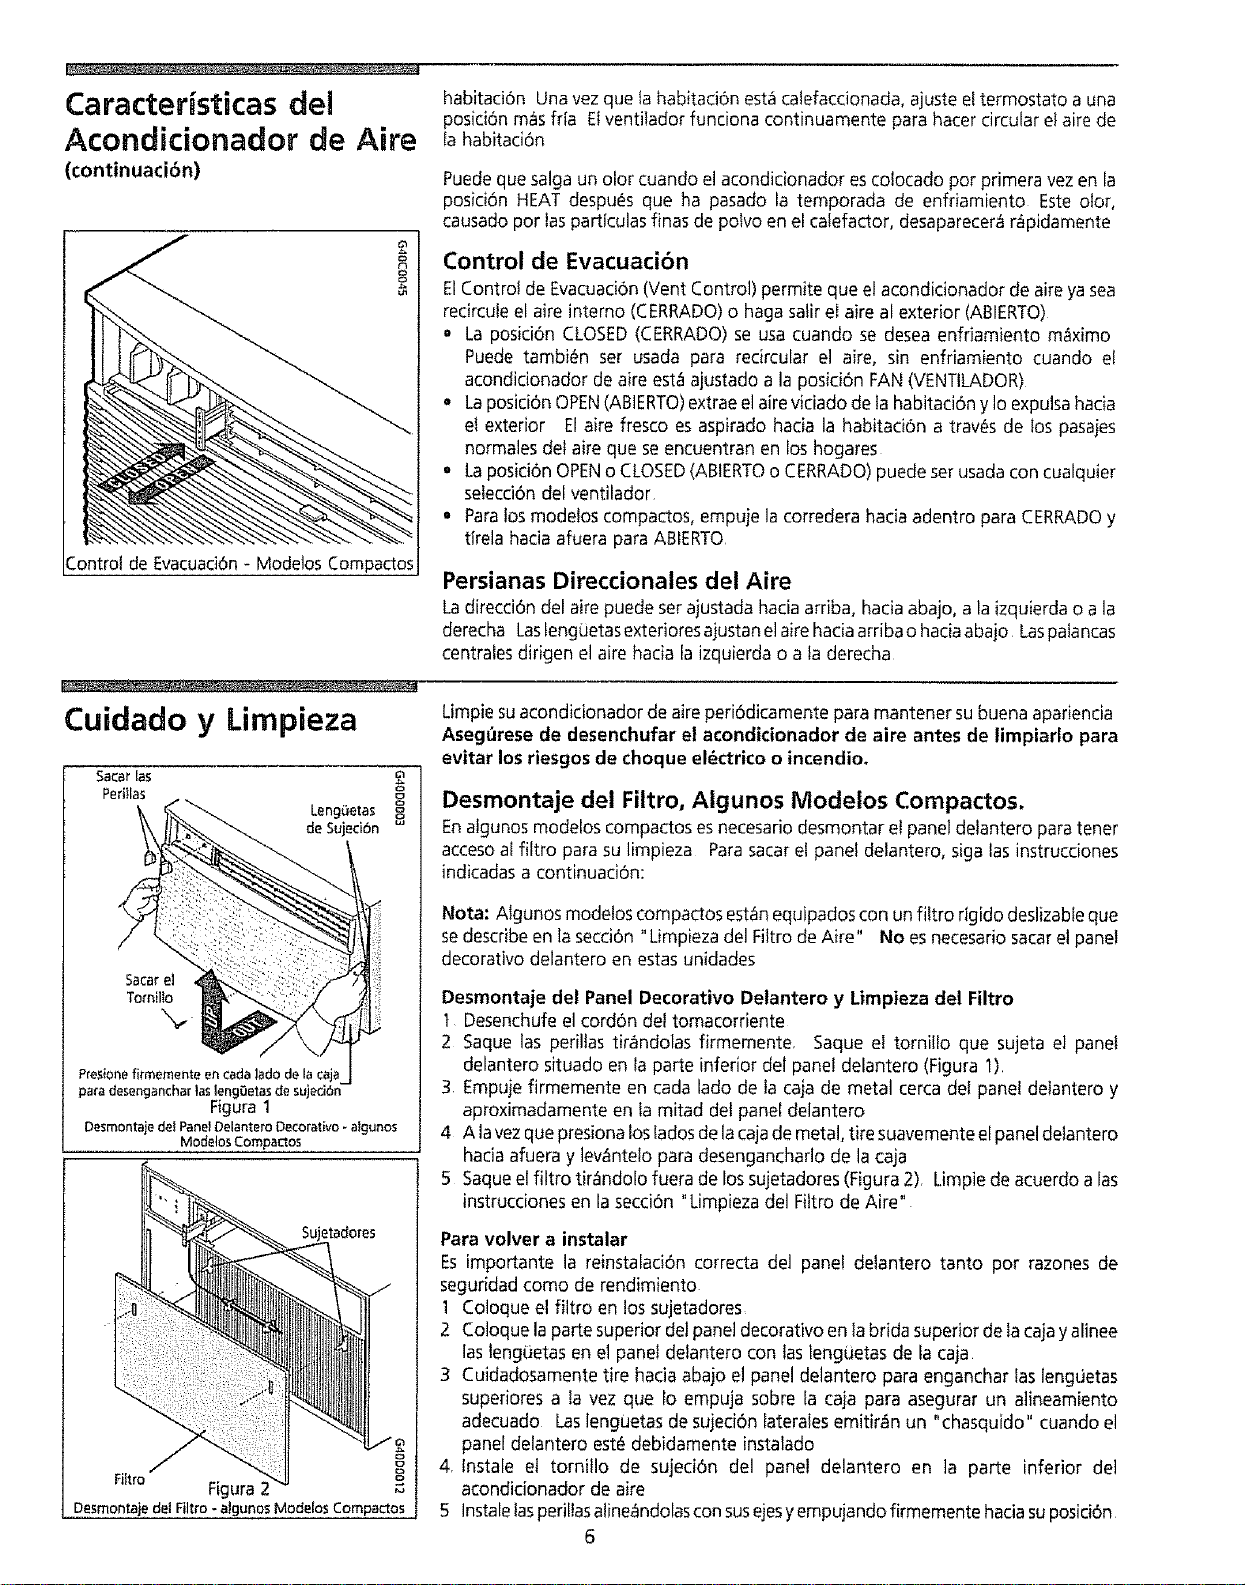
Presione fii'memente en cada lade de la caja
pafadesengancharlaslengOetasdesujeci6n
Figura 1
Desmontajedel PanelDelanteroDecorative- algunos
ModelosCompaL'tos
e
8
=13
Filtro
Figura 2
,,,DesmontaJedel Filtro - algunos Modelos Compactos
Control de Evacuaci6n
ElControl de Evacuacibn(Vent Control) permite que el acondicionador de aire yasea
recircuieel aire interne (CERRADO)o hagasalir el aire al exterior (ABIERTO)
• La posici6n CLOSED(CERRADO)se usacuando se deseaenfriamiento m_ximo
Puede tambi_n set usada para recircular el aire. sin enfriamiento cuando el
acondidonador de aire est.1ajustado a la posicibn FAN(VENTILADOR)
• Laposici6nOPEN(ABIERTO)extraee]airevie!adode tahabitaci6n y Ioexpulsahacia
el exterior Elaire fresco es asp!ratio hacia la habitad6n a travEsde Ios pasajes
normales dei aire que seencuentran en loshogares
o Laposicion OPENo CLOSED(ABIERTOo CERRADO)puede serusadacon cualquier
selecci6ndel ventilador
• Paralos modeJoscompactos, empuje la corredera hada adentro paraCERRADOy
tirela hacia afuera para ABIERTO
Persianas Direccionales del Aire
Ladirecci6n del airepuede serajustada haciaarriba, haciaabajo, a la izquierdao a la
derecha Lastenguetasexterioresajustanetairehada arribao haciaabajo Laspatancas
centraiesdirigen el aire hacia la izquierda o a ta derecha
Limpie suacondicionador de aire peri6dicamente para mantener su buena apariencia
Aseg6rese de desenchufar el acondicionador de aire antes de limpiarlo para
evitar los riesgos de cheque el_ctrico o incendio.
Desmontaje dei Fiitro, Aigunos Modeios Compactos.
Enalgunosmodelos compactos esnecesariodesmontar el panel deiantero paratener
accesoal filtro para su limpieza Parasacarel panel delantero, siga lasinstrucciones
]ndicadasa continuaci6n:
Nota: AIgunos modelos compactosest_nequipadoscon unfiltro rig!do deslizableque
sedescribeen la secci6n "Limpieza del Filtro de Aire" No esnecesariosacarel panel
decorative delantero en estasunidades
Desmontaje del Panel Decorativo Delantero y Limpieza del Filtro
t Desenchufeel cord6n deitomacorriente
2 Saque las perillas tirandolas firmemente. Saque el torn!lie que sujeta el panel
delantero situado en la parte inferior del panel delantero (Figura 1).
3. Empujefirmemente en cada lade de la caja de metal cerca del panel delantero y
aproximadamente en la mitad del panel delantero
4 A lavezquepresionalosladesdelacajade metal,tire suavementeel paneldetantero
haciaafuera y lev_ntelo para desengancharlo de la caja
5 Saqueel filtro tir_tndolofuera de lossujetadores(Figura2). Limpiede acuerdoalas
instrucdones en la secci6n "Limpieza del FiItrode Aire"
Para velvet a instalar
Es importante la reinstalad6n correcta deI panel detantero tanto per razones de
seguridadcome de rendimiento
1 Coloque el filtro en los sujetadores
2 Co]oque la parte superiordel panel decorativeen la brida superior de tacajayalinee
laslengLietasen el panetdelantero con tasleng_Jetasde tacaja
3 Cuidadosamente tire haciaabajo el panel delantero para enganchar laslenguetas
super!ores a ta vez que fo empuja sobre Ia caja para asegurar un atineamiento
adecuado LaslengUetasde sujeci6n tateralesemitir_n un "chasquido"cuando el
panel delantero est_ debidamente instalado
4 lnstale et tornillo de sujeci6n del panel delantero en ta parte inferior del
acondicionador de aire
5 Instaletasperillasaline_tndolasconsusejesyempujandofirmemente haciasuposici6n
6
Cuidado y Limpieza
_continuaci6n)
Figura 3
8
Figura 4
Figura 5
8
Figura 6
Limpieza del Filtro del Aire
El fittro dei aire debe ser revisado pot fo menos una vez al rues para vet si es necesario
limpiarlo Laspart[culas atrapadas en el fittro pueden acumularse y causar acumulackSn
de escarcha en los serpentines de enfriamiento Estas condiciones reducen la
capacidad de enfriamiento Hay dos tipos de filtro--el fiftro rig!do y el filtro flexible
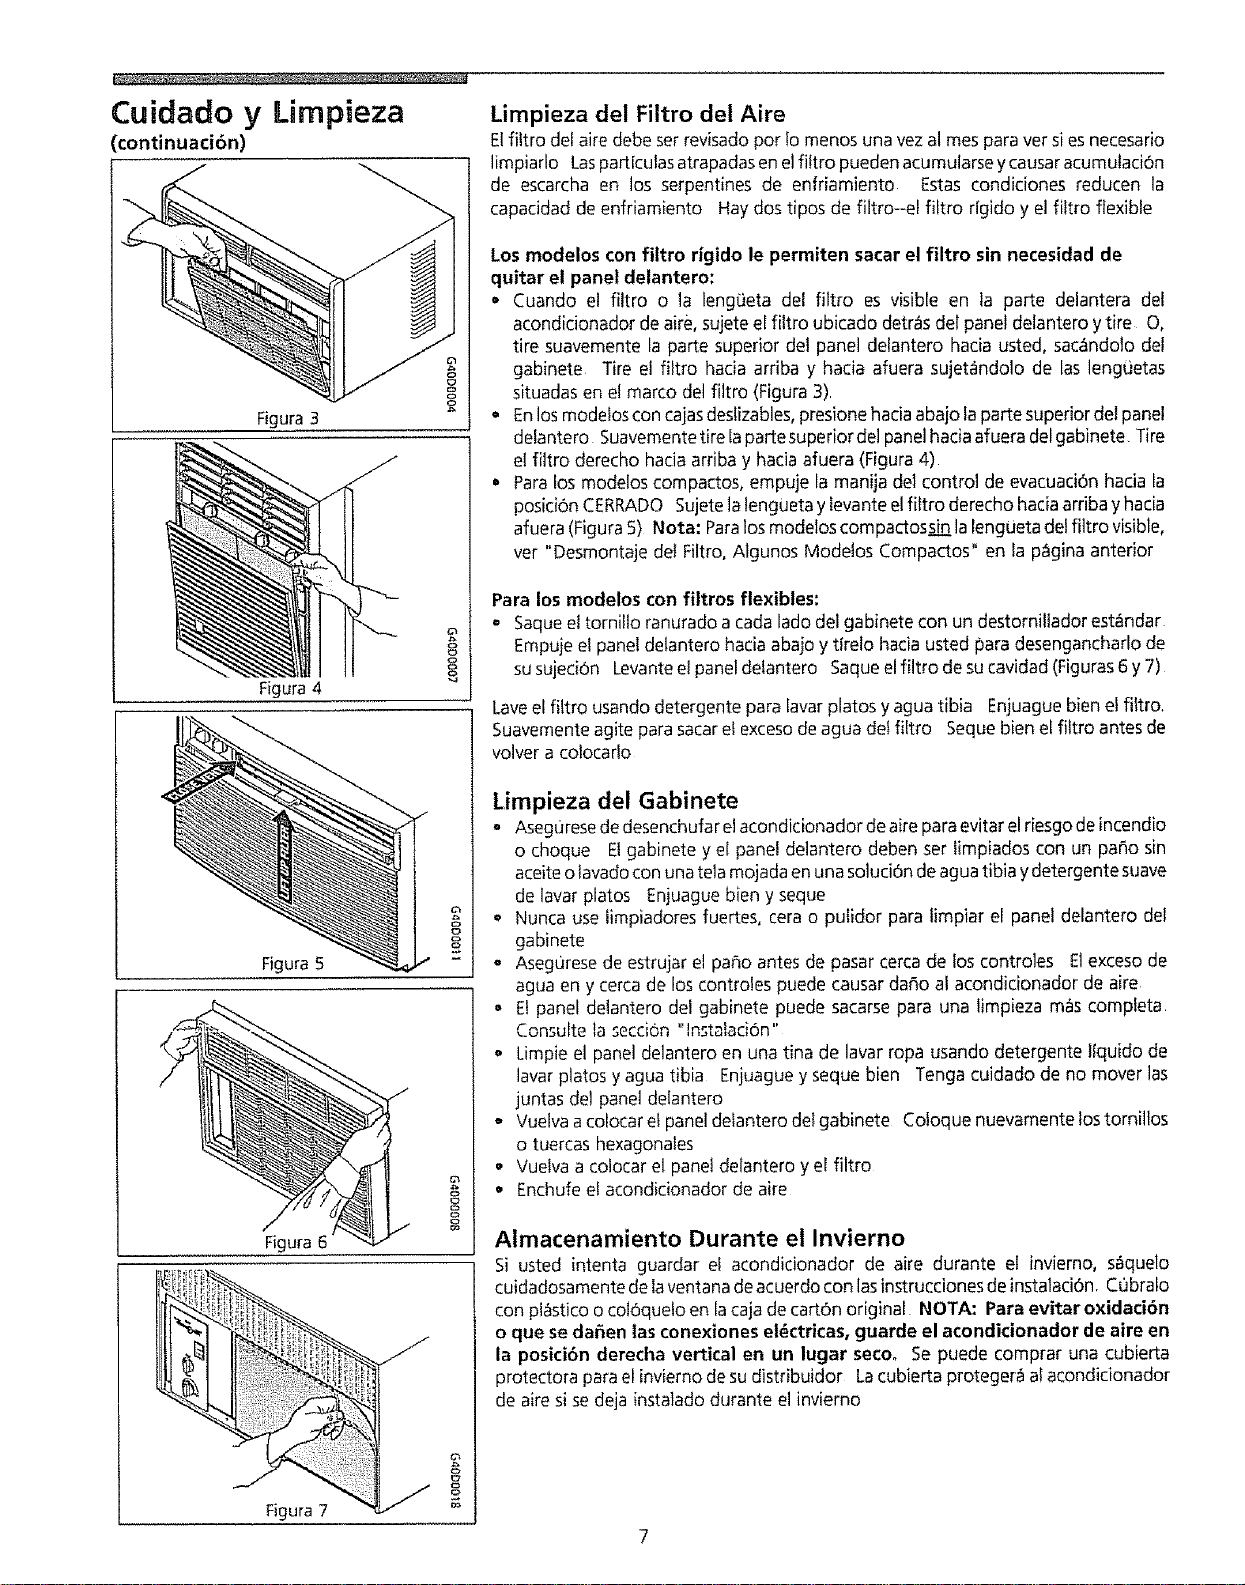
Los modelos con filtro rigido le permiten sacar el filtro sin necesidad de
quitar el panel delantero:
• Cuando el filtro o la leng_eta del filtro es visible en la pa_e delantera del
acondidonador de aire, sujete el filtro ubicado detr_s del panel delantero ytire O,
tire suavemente la parte superior det panel deiantero hacia usted, sac&ndolo del
gabinete Tire el fikro hacia arriba y hacia afuera sujet_ndolo de las lenguetas
situadas en et marco del filtro (Figura 3)
• En los modelos con cajas deslizables, presione hacia abajo ta parte superior del panel
delantero Suavementetirelapartesuperiordelpanelhaciaafueradelgabinete Tire
el filtro derecho hacia arriba y hacia afuera (Figura 4)
. Para los modelos compactos, empuje la manija del control de evacuaci6n hacia la
posid6n CERRADO Sujete la tengUeta y levante el fiftro derecho hacia arriba y hacia
afuera (Figura 5) Nota: Paralos modelos compactossi£ la lengueta det fiitro visible,
ver "Desmontaje del Filtro, Algunos Modelos Compactos" en la p_gina anterior
Para los modelos con filtros flexibles:
, Saqueel tornilto ranurado a cadalado del gabinete con un destomillador est_ndar
Empujeel panel delantero haciaaba]oy tfrelo haciausted para desengancharlode
susujecion Levanteel paneldelantero Saqueelfiltro desucavidad(Figuras6 y 7)
Laveel filtro usando detergente para lavar platos y agua tibia Enjuague bien el filtro.
Suavemente agite para sacar el exceso de agua det filtro Seque bien el fittro antes de
volver a colocarlo
Limpieza del Gabinete
o Aseg0rese de desenchufar etacondicionador de aire para evitar el riesgo de incendio
o choque El gabinete y el panel delantero deben ser limpiados con un paso sin
aceite otavado con una tela mojada en una soluci6n de agua tibia y detergente suave
de lavar platos Enjuague bien y seque
Nunca use limp!adores fuertes, cera o putidor para timpiar el panel delantero del
gabinete
= Aseg0rese de estrujar el paso antes de pasar cerca de los controles E1exceso de
agua en y cerca de los controles puede causar daSo al acondicionador de aire
• E! panel delantero del gabinete puede sacarse para una limpieza m_s compteta
Consulte ta section "Instafaci6n"
o Limpie el panel delantero en una tina de lavar ropa usando detergente Ifquido de
lavar platos y agua tibia Enjuague y seque bien Tenga cuidado de no mover las
juntas del panel delantero
o Vuelva acolocar et panel defantero det gabinete Cotoque nuevamente los tomillos
o tuercas hexagonales
• Vuetva a colocar el panel delantero y el filtro
• Enchufe ef acondicionador de aire
Almacenamiento Durante el Invierno
Si usted intenta guardar el acondicionador de aire durante el invierno, saquelo
cuidadosamente de laventana de acuerdo con las instrucciones de instalaci6n Cubrato
con pl_stico o coI6quelo en la caja de cart6n original NOTA: Para evitar oxidaci6n
o que se da_en las conexiones el_ctricas, guarde el acondicionador de aire en
la posici6n derecha vertical en un lugar seco. Se puede comprar una cubierta
protectora para el invierno de su distribuidor La cubierta proteger_ al acondicionador
de aire si se deja instalado durante el inviemo

Mantenimiento de
Rutina
Antes de efectuar cualquier mantenirniento desenchufe el
cord6n el_ctrico del tomacorriente.
Limpieza del Panel Delantero del Gabinete
Saqueelpaneldelantero Laveconaguajabonosatibia Enjuagueysequeconunpa_o
suave Nunca use solventes, liquidos de limpieza, limpiadores abrasivos o detergentes
fuertes Siios materiales de empaque dejaron residuos de goma, s&quelos con un paso
humedecido con alcohol para fricciones
Reparaci6n de la Pintura DaSada
lnspeccione las piezas que est_n expuestas afas inclemencias del tiempo (el
gabinete, la ferreterfa de montaje, si se ha usado, etc ) una o dos veces al argo,
especiafmente en lugares cerca del mar o donde la oxidaci6n es un problema Si es
necesario, proteja con una pintura para exterior de buena clase
Limpieza del Interior dei Acondicionador de Aire
NOdebe entrar liquido al motor, a la caja de control el_ctrica o a los
bornes electricos del compresor
1 Saque el panel delantero
2 Con ayuda y usando los m_todos adecuados para levantar objetos pesados a fin de
evitar lesi6n personal, saque el chasis del gabinete * Cuando se saca el
acondicionador de aire del gabinete o de ta ventana puede que haya agua dentro
de la base la cual se puede derramar en el suelo Tenga cuidado para evitar
cortaduras en las aletas de metal afiladas en la parte delantera yen los serpentines
detanteros y traseros
3 Los liquidos no deben penetrar alas piezas el_ctricas Cubra el ventilador, la caja
de control e!_ctdca y los bornes el_ctricos con p!_stico Esto evitar_ que el agua y
otros liquidos penetren al interior donde podrian da_ar el aislamiento y causar
problemas serios
4 Limpie y lave la base con agua, Io serpentines y los colectores de agua Limpie pot
Io menos una vezal afio o m_s a menudo si los serpentines y loscolectores acumulan
sudedad, arena, hojas, algas o insectos
5 Despu_s de la limpieza, saque el protector de pl_stico Espere 24 horas antes de
volver a poner en marcha el acondidonador de aire nuevamente. Esto le da tiempo
a que se seque Nota: El agua de fa tluvia o def uso normal no da_a estos
componentes pues no penetra forzadamente alas piezas como el chorro de agua
de una manguera de jard[n
6 Cuando se ha sacado el gabinete, es una buena oportunidad para ace!tar el motor
del ventilador (Vea las instruct!ones a continuaci6n )
*NOTA SOBRE LA MANIJA: EIacondicionador de aire tiene una manija, la cual
NO est_ destinada para levantar el artefacto Espara deslizar el chasis hacia
DENTRO del gabinete solamente (para ayudar a la limpieza, mantenimiento, etc )
Lubricaci6n del Motor del Ventilador
Para lubricar el motor del ventilador:
1 Saque el panel delantero
2 Deslice el chasis hasta la mitad fuera det gabinete para dejar al descubierto los
tapones de lubricaci6n del motor del ventilador (Tenga cuidado de no deslizar el
chasis hasta muy afuera ) Si el acondicionador de aire no est_ equipado con un
chasis deslizable, saque el gabinete
3, Lubrique el motor del ventifador seg0n las instrucciones def motor Para agregar
aceite, saque el tap6n del aceite en cada extremo del motor, Puede adquirir una
c_psula de una onza de aceite (pieza numero 10943) en su Centro de Servicio Sears
m_s cercano Vuetva a cotocar los tapones del agujero de! aceite despu_s de la
lubricad6n
Despuesdel mantenimiento, invierta losprocedimientos anteriores para voiverinstalar
el acondicionador de aire
En case de necesitar
m
servuao,..
PROBLEMA
Elacondidonador de alre no fundona_
Antes de Ilamar aun tecnico pare servido, reviseesta lista Puedeahorrar tiempo y
dinero Esta tista incluye los problemas m_s comunes que no son el resuttado de
materialeso mane de obra defectuosa de este artefacto
SOLUCION
Est6desenchufado Enchufelo bien en el tomacorriente
Fusibledel hogar quemsdo o disyuntor disparado Reemplaceel fusible con fusibles de acci6n reta_dada o vuelva a
reposicionar et disyuntor
Elselector FANesta en la posici6n OFF Coloque el selector FANen etajuste FAN deseado
Etacondicionador de aire seapaga sise mueve el Control TEMPa un aiuste mas catieatey si se vuelve inmediatamente
aun ajuste m_s frio Espere aproximadamente 3 minulos Escuchepare vet si el compresor se pone en marcha
EIaire acondidonado fu_ apagado y puesto en marcha muy r&pidamente Apague el a¢ondidonador de aire y espere
3 minutes anles de ponedo en marcha nuevamente
EIcontrol TEMPest& ajustado a una temperature superior ata temperature de ta habitaci6n Gire etControl TEMPa
la derecha aun ajuste mas frIo (la escala m&sgruesa)
Eleire proveniente del acondicionador de
aire no parece Io suficientemente if|o.
Gire el selector ala posici6n FAN m_s alia
EIcontrol TEMP esta ajustado a demasiado catiente (escaia delgada) Gire el Control TEMPa Is derecha a on aiuste
mas frto (escala gruesa)
La temperature de la habitad6n es inferior a 21_C (70_F) El enffiamiento no se producir_t hasta que la temperature
de la habitaci6n sobrepase 21°C (70°F)
El tube detector de la temperature esta tocando etserpeniJnfrto. situado detr_s del fittro de! aire Aleje el tube detector
del serpent_rn
Elacondicionador de aire enfrla, pero la
habitaci6n eat& demasiado caliente - se
forma hielo en el serpentin de
enfriamiento detrbs de! panel decorative
delantero.
Elacondicionador de aire enfrla pero la
habitadbn est_ demasiado caltente - NO
hay formaei6n de hielo en el serpentin de
enfriamiento detr_s del panel decorative
delantero,
Latemperature extedor es inferior a 21°C (70_F) Paradeshielar el serpentln, coloque el selector en ta posici6n FAN
Luego gire el Controt TEMP hsds la derecha aun aiuste m_s ca}iente (escala delgada)
Elfiltrodelakepuedeestarsucio Limpieelfiltrodelailecoosultelasecd6n"CuidadoyLimpieza" Paradeshielar,
eoloque et selector en ts posid6n FAN
TEMP CONTROLest,_ajustado demasiado fdo pare enffiamiento nocturne Para deshielar e! serpentfn, coloque el
selector en la posici6nFAN Luego, cofoque el CONTROLTEMP en una posici6nm_s caliente
El filtro del aire esta sucio--restricciOn del aire limpie el fillro del a#e Consulte la secci6n Cuidado y limpieza
El Control TEMP est_ ajustado a demasiadocaliente Gke et Control TEMPa ta derecha a uo ajuste m_s file (eseata
gruesa)
ElControl de Evacuaci6nest_en la position OPEN(ABIERTO) Coloque e!Control deEvacuacibnen laposiciOnCLOSED
(CERRADO)pare enfriamiento maximo
Las persianasdirecdoneles del aire est_n mal dirigidas Coloque Ins persianas de manera de lograr una mejor
dislribuci6n del aire
Elacondicionador de aire seapaga y se
endende r&pldamente_
Se produce ruido cuando el
acondicionador de aire esta enfriando..
Goteo INTERIOR delagua cuando el
acondicionador de ai_ est& enfrfando.
Goteo de ague HACIA AFUERA cuando el
acondtcionador de aire est_ enfriando,
Laparte delantera del acondicionador de aire est_ bloqoeada per cortinas, persianas, muebles, etc - se restringela
distribuci6n del aire Despeje Ins obstrucdones situadas delante del acondidonador de aire
Puerta£ ventanas, registros,etc abiertos -- et affe frlo se eseapa Cierre tas puertas, ventanas, registros, etc
Etaeondicionador deaire ha side reci_n encendido en una habltaci_n que est_ ca]iente Deje que transcun'aun poco
de tiempo para que salga e! taler que est_ acumulado en tas paredes, en el techo, plsoy muebles
Filtrode aire sucio -- restricci6n det aire Limpie et filtro del aire
Latemperature exterior esta demasiado caliente Coloque el FAN (VENTILADOR)en la posid6n m_s atta para que el
aire pase sobre los serpentines de enfriamiento m_s frecuentemente
Ruidoproducidoper el movimiento del aire Estoes normal Sies demasiadofuerte, gire el seleL'loral ajusteFANmasbaio
Ruido produddo por e! ventilador al golpear elslstema de extracci6n de agualhumedad Esto es normal cuando la
humedad es demasiado alia Cierre las puertas, ventanas y registros
VibraciOn de Ia ventsna--instalaci6n deficiente CensuReInsinstrucdonesde instalacibno con un _nstaladorprofesionat
Instalad_n incorrecta Incline el acondicionador de aire ligeramente hada el exterior pare desaguarlo Consulte Ins
instruedones de instalaciOn-consulle con un instalador profesional
El acondicionador esta extrayendo una gran cantidad de humedad de Is habitad6n Esto es norma! durante dlas
excesivamente h_medos

Servicio Sears
"Nosotros Reparamosto que Vendemos" es nuestra garantla de que usted puede
depender de Searspara servicio y elserviciode Sears1opuede conseguir a tray,s de
todo el pals Suacondicionador de aire tiene mayor valor cuando seconsidera que
Searstiene centros de servicioa trav_s de todo el pals, con t_cnicos entrenados por
Sears t_.cnicosespedficamente entrenados en losartefactos Searsyque cuentan con
las piezas, herramientas y equipo para asegurarle que cumplimos con nuestra
promesa "Nosotros reparamos 1oque vendemos '_
Convenio de Mantenirniento de Sears
Conserveelvalor desuacondicionador deaire Kenmore®adquiriendo el convenio de
Mantenimiento Sears Losacondicionadoresde aire Searsest_n disefados, fabricados
y probados para funcionamiento confiable durante muchos afros Sin embargo,
cualquierartefacto moderno puede, de vez en cuando,necesitarservicio
ElConvenio de Mantenimiento Sears
Essumanera de comprar la reparaci6n del maSanaal precio de boy
• EliminaJascuentas de reparacionesresultantes det uso normal
o Permitetantas Ilamadasde serviciocomo sean necesarias
o Proporcionaserviciopor t_cnicos profesionalesentrenados por Sears
Ofrece mantenimiento preventivo anual si Io solicita
Esteconvenio de mantenimiento no cubre la instalaci6n original, la reinstalaci6n o
daffo resultantede causasextemastalescomo casosfortuitos, abuso,robo, incendio,
inundaciones,viento, rayos,congelaci6n,falla de energla, reducci6n de potenda, etc
Solidte a un vendedor que leexplique todos lost_rminos y condicionesdet convenio
Garant[a Garantia Completa de un Afio para el Acondicionador de Aire
Dentro de un afo a partir de lafecha de compra, cuando esteacondicionador de aire
esoperado y mantenido para enfriamiento normal de habitaciones de acuerdo alas
instruccionesen estemanual del usuario, Searsreparar_ este acondicionador de aire,
gratis, siexistedefecto de material o mano de obra
Garantia Completa de Cinco Afros en el Sistema de
Refrigeracibn Sellado
Durante cinco afrosa partir de la fecha decompracuando esteacondicionador de aire
esoperado y mantenido para enfriamiento normal de habitaciones de acuerdo alas
instruccionesde este manual del usuario, Searsreparar_ el sistema de refrigeraci6n
sellado(queconsisteenel refrigerante, tubo de conexi6nycompresor)gratuitamente,
siexistedefecto de material o mano de obra
Esta garantia le otorga derechos legales especificos y usted
tambi6n puede tenet otros derechos que varian de un
estado a otto.
El servicio bajo la garant[a est6 disponible poniendose en contacto con el CENTRO/
DEPARTAMENTO DE SERVlC!O SEARS MAS CERCANO en los Estados Unidos 6
Ilamando a1800-4REPAIR Para REPUESTOSY REPARACION tlame a1800-FON PART
SEARS, ROEBUCK and CO.
3333 Beverly Road
Hoffrnan Estates, IL 60719
IMPRESO EN EE UU
10