User Manual Philips 65OLED807/12 4k Uhd Android Tv
Channel Installation
About Installing Satellites
Up to 4 Satellites
You can install up to 4 satellites (4 LNBs) on this TV. Select the exact number of satellites you wish to install at the start of the installation. This will speed up the installation.
Unicable
You can use a Unicable system* to connect the antenna dish to the TV. You can select Unicable for up to 4 satellites at the start of the installation.
* Note: supports Unicable 1 (EN50494) and Unicable 2 (EN50607/JESS).
HD+ OpApp
HD+ OpApp* is an app provided by HD+ for Germany users that can run a virtual set-top box on TV. The app has the applications and features that you previously needed a physical set-top box to access
You need internet connection and accept the Philips Terms of Use, the Privacy Policy and Smart TV Terms of Use to install the HD+ OpApp. You can install the App either using the Apps Screen or the Search for satellites option in the Settings Menu.
If the HD+ OpApp cannot be downloaded or installed, you may try to download again later. If problem persists, please contact HD+.
Once the HD+ OpApp has been installed successfully, you can start the free period. Please switch the source to Watch Satellite after the installation. If you have been using a CAM Module for HD+ before, you can remove it now. If a CICAM is inserted in the TV, it will not be used to descramble the signal when you are watching a satellite channel.
After HD+ OpApp is installed, there are some features will be affected.
- Recording and reminder functionalities are not allowed for satellite channels
- Favourite list is only available in Antenna/Cable.
- The channel selection, TV Guide, channel information are replaced by the OpApp user interface
- Satellite channels renaming and cloning will be disabled.
- Note: HD+ OpApp is only available for HD+ subscriber and the country setting is Germany.
Start the Installation
Make sure your satellite dish is connected correctly and is perfectly aligned before you start the installation.
To start the satellite installation…
- Select Settings > Channels > Satellite Installation and press OK. Enter your PIN code if necessary.
- Select Search for Satellite and press OK
- Select Search and press OK. TV will search for satellites.
- Select Install and press OK. The TV shows the current satellite installation setup.
If you want to change this setup, select Settings
If you don't want to change the setup, select Search. Go to step 5.
5. In Installation System, select the number of satellites you want to install or select one of the Unicable systems. When you select Unicable, you can choose the User Band Numbers and enter the User Band Frequencies for each tuner. In some countries, you can adjust some expert settings for each LNB in More Settings.
6. The TV will search for the satellites available on the alignment of your antenna dish. This may take a few minutes. If a satellite is found, its name and reception strength are shown on screen.
7. When the TV found the satellites you need, select Install.
8. If a satellite offers Channel Packages, the TV will show the available packages for that satellite. Select the package you need. Some packages offer a Quick or Full install for their available channels, select one or the other. The TV will install the satellite channels and radio stations.
9. To store the satellite setup and installed channels and radio stations, select Finish.
Satellite Installation Settings
The satellite installation settings are preset according your country. These settings determine how the TV searches and installs satellites and its channels. You can always change these settings.
To change the satellite installation settings
- Start the satellite installation.
- On the screen where you can start searching for satellites, select Settings and press OK.
- Select the number of satellites you want to install or select one of the Unicable systems. When you select Unicable, you can choose the User Band Numbers and enter the User Band Frequencies for each tuner.
- When you're done, select Next and press OK.
- On the Settings menu, press the colour key Done to return to the screen to start searching for satellites.
Homing Transponder and LNB
In some countries, you can adjust the expert settings for homing transponder and each LNB. Only use or change these settings when a normal installation fails. If you have non-standard satellite equipment, you can use these settings to overrule the standard settings. Some providers might give you some transponder or LNB valeus which you can enter here.
Satellite CAMs
If you use a CAM – a Conditional Access Module with a smart card – to watch satellite channels, we recommend to do the satellite installation with the CAM inserted in the TV.
Most CAMs are used to descramble channels.
Newest generation CAMs can install all the satellite channels by themselves on your TV. The CAM will invite you to install its satellite(s) and channels. These CAMs not only install and descramble the channels but also handle regular channel updates.
Channel Packages
Satellite operators can offer channel packages that bundle free channels (free-to-air) and offer a sorting that suits a country. Some satellites offer subscription packages - a collection of channels you pay for.
If you choose a subscription package, the TV might ask you to select a Quick or Full installation. Select Quick to install the channels of the package only or select Full to install the package and all other available channels too. We recommend a Quick installation for subscription packages. If you have additional satellites that are not part of your subscription package, we recommend a Full installation. All installed channels are put in the channels list All
Unicable Setup
The Unicable System
You can use a Single Cable system or Unicable system* to connect the antenna dish to the TV. A Single Cable system uses one cable to connect the satellite dish to all satellite tuners in its system. A Single Cable system is typically used in apartment buildings. If you use a Unicable system, the TV will ask you to assign a user band number and corresponding frequency during the installation. You can install up to 4 satellites with Unicable on this TV
If you notice some missing channels after a Unicable installation, another installation might have been done at the same moment on the Unicable system. Do the installation again to install the missing channels.
* Note: supports Unicable 1 (EN50494) and Unicable 2 (EN50607/JESS)
User Band Number
In a Unicable system, each connected satellite tuner must be numbered (e.g. 0, 1, 2 or 3, etc.).
You can find the available user bands and their number on the Unicable switchbox. User band is sometimes shortened as UB. There are Unicable switchboxes that offer 4 or 8 user bands. If you select Unicable in the settings, the TV will ask you to assign the unique user band number for each built-in satellite tuners. A satellite tuner cannot have the same user band number as another satellite tuner in the Unicable system
User Band Frequency
Next to the unique user band number, the built-in satellite receiver needs the frequency of the selected user band number. These frequencies are mostly shown next to the user band number on a Unicable switchbox.
Manual Channel Update
You can always start an channel update yourself.
To start a channel update manually…
- Select Settings > Channels > Satellite Installation and press OK.
- Select Search for Channels and press OK
- Select Update Channels and press OK. The TV will start updating. The update may take a few minutes.
- Follow the instructions on screen. The update may take a few minutes.
- Select Finish and press OK.
Manual Installation
Manual Installation is intended for expert users
You can use Manual Installation to quickly add new channels from a satellite transponder. You need to know the frequency and polarization of the transponder. The TV will install all channels of that transponder. If the transponder was installed before, You can use Manual Installation to quickly add new channels from a satellite transponder. You need to know the frequency and polarization of the transponder. The TV will install all channels of that transponder. If the transponder was installed before,
To install a transponder…
- Select Settings > Channels > Satellite Installation and press OK
- Select Manual Installation and press (right) to enter the menu
- If you have more than 1 satellite installed, select LNB for which you want to add channels.
- Set the Polarisation you need. If you set the Symbol Rate Mode to Manual, you can enter the symbol rate in Symbol Rate manually.
- Press the arrows (up) or (down) to adjust the frequency, and select Done.
- Select Search and press OK. The signal strenght is shown on screen.
- If you want to store the channels of a new transponder, select Store and press OK.
- Press (left) repeatedly if necessary, to close the menu.
Homing Transponder and LNB
In some countries, you can adjust the expert settings for homing transponder and each LNB. Only use or change these settings when a normal installation fails. If you have non-standard satellite equipment, you can use these settings to overrule the standard settings. Some providers might give you some transponder or LNB values which you can enter here.
LNB Power
By default, LNB Power is set to Automatic
22 kHz Tone
By default, the Tone is set to Automatic.
Low LO Frequency / High LO Frequency
The local oscillator frequencies are set to standard values. Adjust the values only in case of exceptional equipment that needs different values.
Help and Support
Register your TV
Register your TV and enjoy a range of benefits including full support (including downloads), privileged access to information about new products, exclusive offers and discounts, the chance to win prizes and even participate in special surveys about new releases.
Using Help
Open Help
Press the key (blue) to open Help immediately. Help will open on the chapter that is most relevant to what you are doing or what is selected on TV. To look up topics alphabetically, press the colour key Keywords .
To read the Help as a book, select Book.
You can also open Help in the Quick menu.
Before you execute the Help instructions, close Help. To close Help, press the colour key Close .
For some activities, like Text (Teletext), the colour keys have specific functions and cannot open Help
TV Help on your tablet, smartphone or computer
To carry out extended sequences of instructions more easily, you can download the TV Help in PDF format to read on your smartphone, tablet or computer. Alternatively, you can print the relevant Help page from your computer.
To download the Help (user manual) go to www.philips.com/TVsupport
Quick Menu > Help
You can use more Help functions to diagnose and get more information about your TV.
- TV information - View the Model name, Serial number and Software version of your TV.
- How to - You can see instructions on how to install channels, sort channels, update TV software, connect external devices and use Smart functions on your TV.
- TV diagnose - Run the TV diagnose to check the condition of your TV.
- Self-diagnose - You can check if the picture, sound, network and other settings are working fine
- Update software - Check available software updates
- User manual - Read the user manual for TV information.
- Troubleshooting - Find a solution for frequent ask questions.
- Factory settings - Reset all settings to factory settings.
- Reinstall TV - Reinstall and redo the complete TV installation.
- Contact info - Show the telephone number or web address for your country or region.
TV Diagnose and Selfdiagnose
TV diagnose
You can run the TV diagnose test to check the condition of your TV. At the end of the diagnose, TV will clear the cache memory and close any unused apps to continue the smooth functioning of your TV.
To run the TV diagnose test…
- Select Quick Menu >Help > TV diagnose and press OK.
- Select Start to run a series of diagnostic tests.
- When the test completed, you can view the status of following items.
- Remote control
- Power
- Picture
- Sound
- External devices
- Network
- Tuner
- Storage
- Clear cache memory
- Apps
4. Select Close to close the result page and go back to TV diagnose wizard
5. Select Done to exit from TV diagnose, select Selfdiagnose to do other diagnostic check, select View results to view the result page again.
Self-diagnose
Self-diagnose can help you to do troubleshooting of your TV by checking the configurations of the TV.
To run the Self-diagnose…
- Select Quick Menu > Help > Selfdiagnose and press OK.
- Select following items to check the configurations.
- Check the TV - You can check if the picture, sound and other settings are working fine..
- Check the network - Check the network connection.
- Check the remote control - Perform the test to verify the TV bundled remote control functionality.
- View weak signal history - Display the list of channel numbers that were automatically saved when signal strength was weak.
- Optimize internal storage - Free up space in TV’s internal storage for optimal performance.
Troubleshooting
Switch On and Remote Control
The TV does not switch on
- Disconnect the power cable from the power outlet. Wait for one minute then reconnect it.
- Make sure that the power cable is securely connected.
Creaking sound at startup or switch off
When you are switching the TV on, off or to standby, you hear a creaking sound from the TV chassis. The creaking sound is due to the normal expansion and contraction of the TV as it cools and warms up. This does not affect performance.
TV does not respond to the remote control
The TV requires some time to start up. During this time, the TV does not respond to the remote control or TV controls. This is normal behaviour.
If the TV continues to be unresponsive to the remote control, you can check if the remote control is working by means of a mobile phone camera. Put the phone in camera mode and point the remote control to the camera lens. If you press any key on the remote control and you notice the infrared LED flicker through the camera, the remote control is working. The TV needs to be checked.
If you do not notice the flickering, the remote control might be broken or its batteries are low. This method of checking the remote control is not possible with remote controls which are wirelessly paired with the TV.
The TV goes back to standby after showing the Philips startup screen
When the TV is in standby, a Philips startup screen is displayed, then the TV returns to standby mode. This is normal behaviour. When the TV is disconnected and reconnected to the power supply, the startup screen is displayed at the next startup. To switch on the TV from standby, press on the remote control or on the TV
The standby light keeps on blinking
Disconnect the power cable from the power outlet. Wait 5 minutes before you reconnect the power cable. If the blinking reoccurs, contact Philips TV Consumer Care.
Channels
No digital channels found during the installation
See the technical specifications to make sure that your TV supports DVB-T or DVB-C in your country. Make sure that all cables are properly connected and that the correct network is selected. Previously installed channels are not in the channel list Make sure that the correct channel list is selected.
Picture
No picture / distorted picture
- Make sure that the antenna is properly connected to the TV.
- Make sure that the correct device is selected as the display source
- Make sure that the external device or source is properly connected.
Sound but no picture
- Change to other video sources and then change back to current source, then do picture style restore in Picture settings or do Factory reset in General settings option
Poor antenna reception
- Make sure that the antenna is properly connected to the TV.
- Loud speakers, unearthed audio devices, neon lights, high buildings and other large objects can influence reception quality. If possible, try to improve the reception quality by changing the antenna direction or moving devices away from the TV
- If reception on only one channel is poor, fine-tune this channel with Manual Installation.
Poor picture from a device
- Make sure that the device is connected properly. Make sure the device's output video setting is the highest possible resolution if applicable.
- Restore picture style or change to other picture styles.
Picture settings change after a while
Make sure that Location is set to Home . You can change and save settings in this mode.
A commercial banner appears
Make sure that Location is set to Home.
Picture does not fit the screen
- Change to a different picture format.
- Change Picture format to Original
Picture position is incorrect
- Picture signals from some devices may not fit the screen correctly. Check the signal output of the connected device.
- Change Picture format to Original
Computer picture is not stable
Make sure that your PC uses the supported resolution and refresh rate
Sound
No sound or poor sound quality
If no audio signal is detected, the TV automatically switches the audio output off — this does not indicate malfunction
- Make sure that the sound settings are correctly set.
- Make sure that all cables are properly connected.
- Make sure that the volume is not muted or set to zero
- Make sure that the TV audio output is connected to the audio input on the Home Theatre System. Sound should be heard from the HTS speakers
- Some devices may require you to manually enable HDMI audio output. If HDMI audio is already enabled, but you still do not hear audio, try changing the digital audio format of the device to PCM (Pulse Code Modulation). Refer to the documentation accompanying your device for instructions.
HDMI and USB
Unable to pair
- Make sure the device is in pairing mode. Read the user manual of the device.
- Keep the wireless speaker as close to the TV as possible
- Trying to pair several devices with the TV at the same time, may not work.
Bluetooth lost connection
- Always position the wireless speaker within a range of 5 meters from the TV.
Bluetooth Audio and Video syncronisation
- Before you purchase a wireless Bluetooth speaker, inform yourself about its quality of Audio to Video syncronisation, commonly called 'lip sync'. Not all Bluetooth devices perform correctly. Ask your dealer for advice.
Wrong menu language
Change the language back to your language 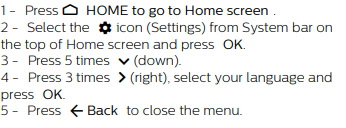
Online Help
To solve any Philips TV related problem, you can consult our online support. You can select your language and enter your product model number
On the support site you can find your country's telephone number to contact us as well as answers to frequently asked questions (FAQs). In some countries, you can chat with one of our collaborators and ask your question directly or send a question by email. You can download new TV software or the manual to read on your computer.
Support and Repair
For support and repair, call the Consumer Care hotline in your country. Our service engineers will take care of a repair, if necessary
Find the telephone number in the printed documentation that came with the TV.
Or consult our website www.philips.com/TVsupport and select your country if needed.
TV model number and serial number
You might be asked to provide the TV product model number and serial number. Find these numbers on the packaging label or on the type label on the back or bottom of the TV.