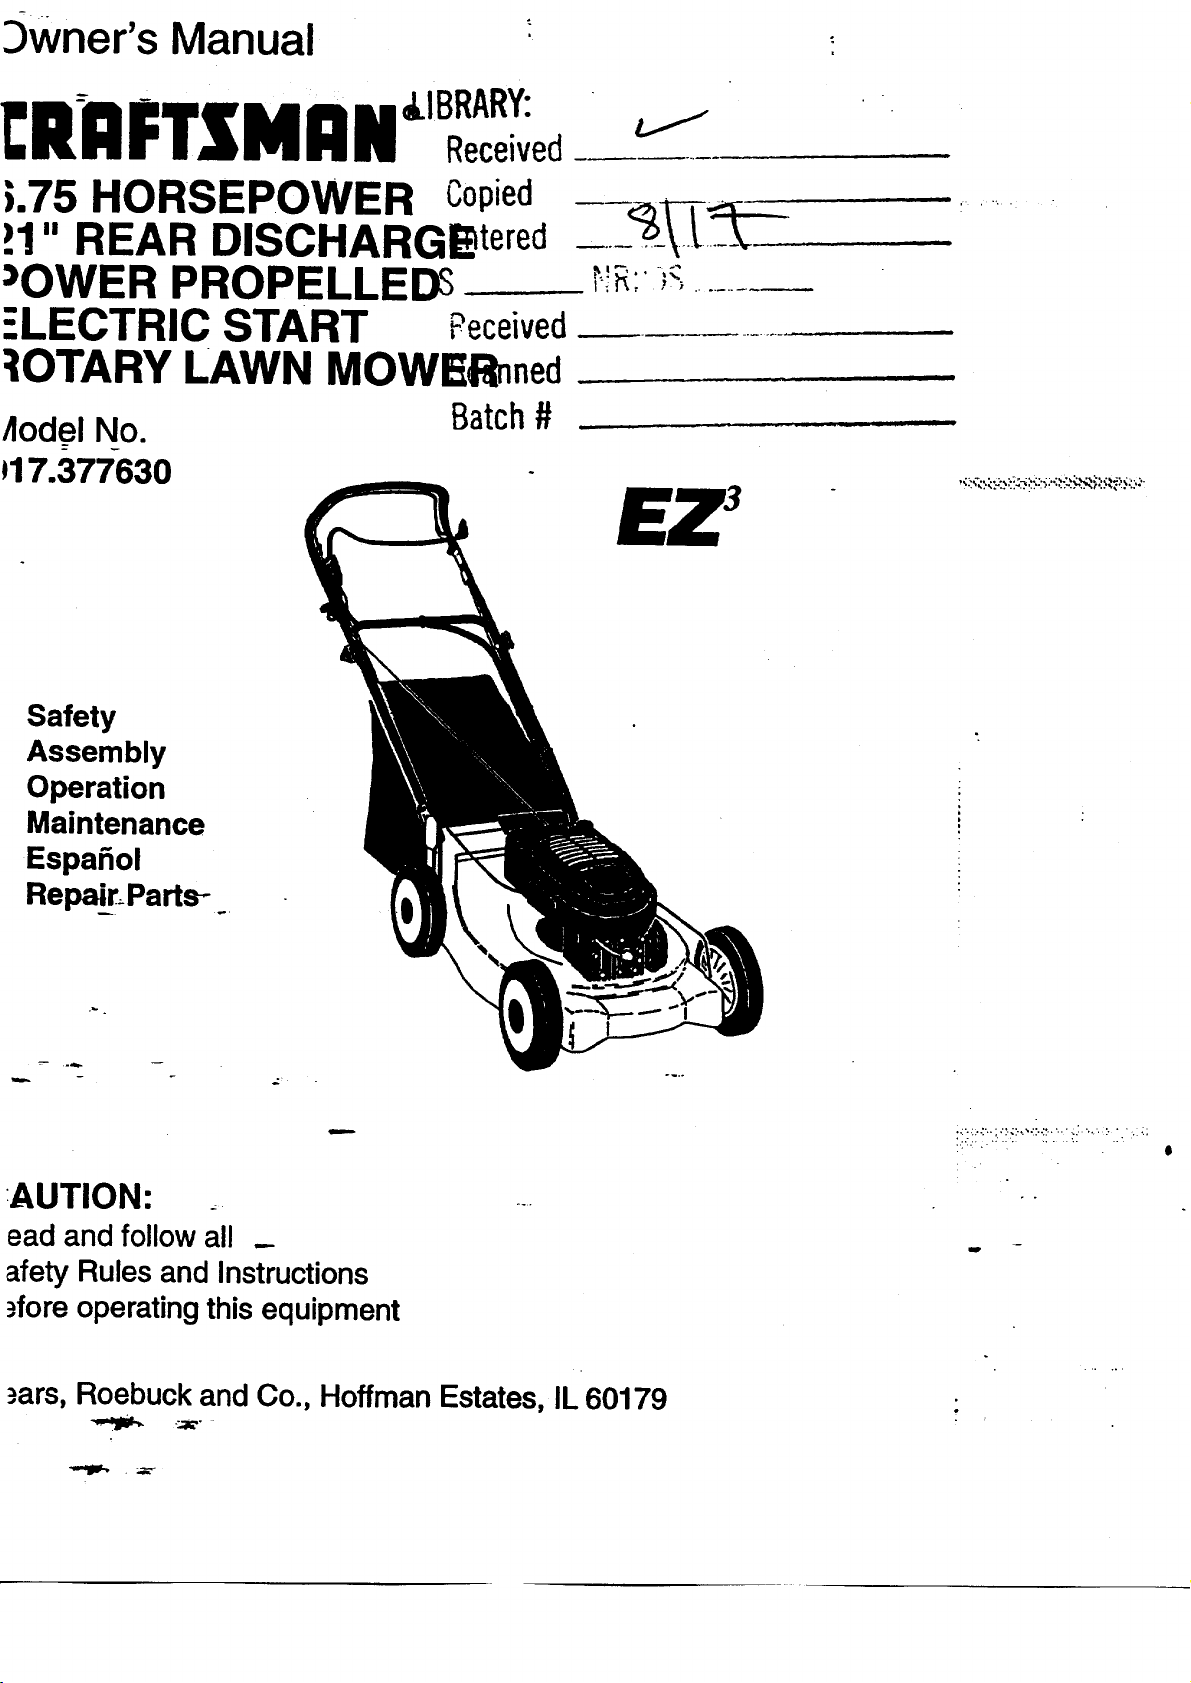
9Wner's Manual
CRnFTSMnN
&IBRARY:
Received
i.75 HORSEPOWER Copied
!1" REAR DISCHARG_tered
_OWER PROPELLEDS
LAWN MOWE4_lnned
/Iodel No. Batch#
117.377-630
Safety
Assembly
Operation
Maintenance
Espafiol
Repair._Parts-_.
,_!"-, .. '_:_
AUTION:
ead and follow all _
afety Rules and Instructions
._fomoperatingthisequipment
i_:ii!_i::"_"i!_!''__!!I;_I::_
4
m
.=ars,Roebuck and Co., Hoffman Estates, IL60179
Warranty 2 Product Specifications 11
Safety Rules 2 Service and Adjustments 13
Assembly 4 Storage 14
Operation 6 Troubleshooting 15
Maintenance Schedule 10 Repair Parts 35
Maintenance 10 Parts Ordering Back Cover
LIMITED TWO YEAR WARRANTY ON CRAFTSMAN POWER MOWER
For two years from date of purchase, when this Craftsman Lawn Mower is maintained,
lubricated, and tuned up according to the operating and maintenance instructionsin the
owner's manual, Sears will repair free of charge any defect in material or workmanship.
If this Craftsman Lawn Mower is used for commercial or rental purposes, this warranty
applies for only 90 days from the date of purchase.
This Warranty does not cover:
• Expendable items which become wom during normal use, such as rotary mower
blades, blade adapters, belts, air cleaners and spark plug.
• Repairs necessary because of operator abuse or negligence, includingbent crank-
shafts and the failure to maintain the equipment according to the instructionscon-
tained in the owner's manual.
Warranty service is available by retuming the Craftsman power mower to the nearest
Sears Service Center/Department in the United States. This warranty applies only while
this product is in use in the United States.
This Warranty gives you specificlegal rights, and you may also have other rightswhich
vary from state to state."
SEARS, ROEBUCKAND CO., DI817 WA, HOFFMAN ESTATES, ILLINOIS 60179
TRAINING:
• Read this operator's manualcarefully.
_Becomefamiliar withthe controlsand
knowhow to operate your mower
properly.,Learn how to quicklystop
mower.
Do notallowchildren to use your mower.
Never allow adults to us_"-mowerwithout
properinstructions.
Keep the area of operation clear of all
persons,esl_eciallysmall children and
pets.
• Use mower only as the manufacturer
intendedand as descnl:Dedin this manual.
• Do not operate mower ifithas been
droppedor damaged in any manner.
Always have damage repaired before
usingyour mower.
• _ot u_ accessory attachments that
are not recommended by the manufac-
turer. Use of suchattachmentsmay be
hazardous.
The blade turnswhen the engine is
running.
PREPARATION:
• Alwaysthoroughlycheck the area to be
mowed and clear itof allstones, sticks,
wires, bones, and otherforeign objects.
These objectswillbe thrownby the blade
- and can cause severe injury.
• Alwayswear safety glasses or eye
shieldswhen starting and while using
your mower.
• Dress properly.Do notoperate mower
when barefootor wearing open sandals.
Wear only solidshoes withgood traction
when mowing.
• Check fuel tank before startingengine.
Do notfillgas tank indoors,when the
engine is runningor when the engine is
2
aid
hot. Allow the engine to coolfor several
minutes before fillingthe gas tank. Clean
off _ spilledgasoline before startingthe
engine.
• Always make wheel height adjustments
before sta_ng you_:mower.Never
attempt to dothis while the engine is
running.
• Mow onlyin daylightor good artificial
light.
OPERATION:
• Keep your eyes and mind on your mower
and the area being cut. Do not let other
interests distract you.
• Do not mow wet or slippery grass. Never
run while operating your mower. Always
be:sure of your footing m keep a firm
hold on the handles and walk.
• Do not put hands or feet near or under
rotating parts. Keep clear of the discharge
opening at all times.
• " Always stop the engine whenever you
leave or are not using your mower, or
before crossing driveways, walks, roads,
and any gravel--covered areas.
• Never direct discharge of material toward
bystanders nor allow anyone near the
mower while you are operating it.
• Before cleaning, inspecting, or repairing
your mower, stop the engine and make
absolutely sure the blade and all moving
parts have stopped. Then disconnect the
spark plug wire and keep it away from the
spark plug to prevent accidental starting.
• De-nQt,,_,ontinue to-run your mower if you
hit a foreign object. Follow the procedure
outlined above, then repair any damage
before restarting and operating you
mower.
• Do no[change the govemor settings or
overspeed the engine. Engine damage or
...l_ersonal inj_ry_may result,
• Do n(_toperate your mower if it vibrates
abnormally. Excessivevibrationi,_san
indicationof damage; stopthe engine,
safely check for the cause ofvibration
and repair as required.
• Do not run the engine indoors.Exhaust
fumes are dangerous. --
• Never cut grass by pullingthe mower
towardsyou. Mow across the face of
slopes, never upand down or you might
loseyour footing.Do not mow exces-
sivelysteep slopes. Use caution when
operatingthe mower on uneven terrain
or when changing directions-- maintain
goodfooting.
• Never operate your mower without
properguards, plates, grass catcher or
other safety devices in place.
MAINTENANCE AND STORAGE:
• Check the blade and the engine mount-
ing boltsoftento be sure they are
tightened properly.
• Check all bolts, nutsand screwsat
frequent intervalsfor proper tightnessto
be sum mower isin safe working
condition.
• Keep allsafety devices in place and
working.
• To reduce fire hazard, keep the engine
free of grass, leaves orexcessive grease
and oil.
• Check grass catcher often for deteriora-
tionand wear and replace worn bags.
Use only replacementbags that are
recommended by and comply with
specificationsofthe manufacturer ofyour
mower.
• Always keep a sharp blade on your
mower.
• Allowengine to cool before storing in any
enclosure.
• Never store mower with fuel inthe tank
inside a buildingwhere fumes may reach
an open flame or an ignitionsource such
as a hot water heater, space heater,
clothes dryer, etc.
CAUTION: Always disconnect spark plug
wire and place wire where it cannot
contact spark plug in order to prevent
accidental startingwhen setting up,
transporting, adjusting or making repairs.
WARNING
The engine exhaust from this product
containschemicals known to the State of
Californiato cause cancer, birth defects,
or other reproductive harm.
!
3
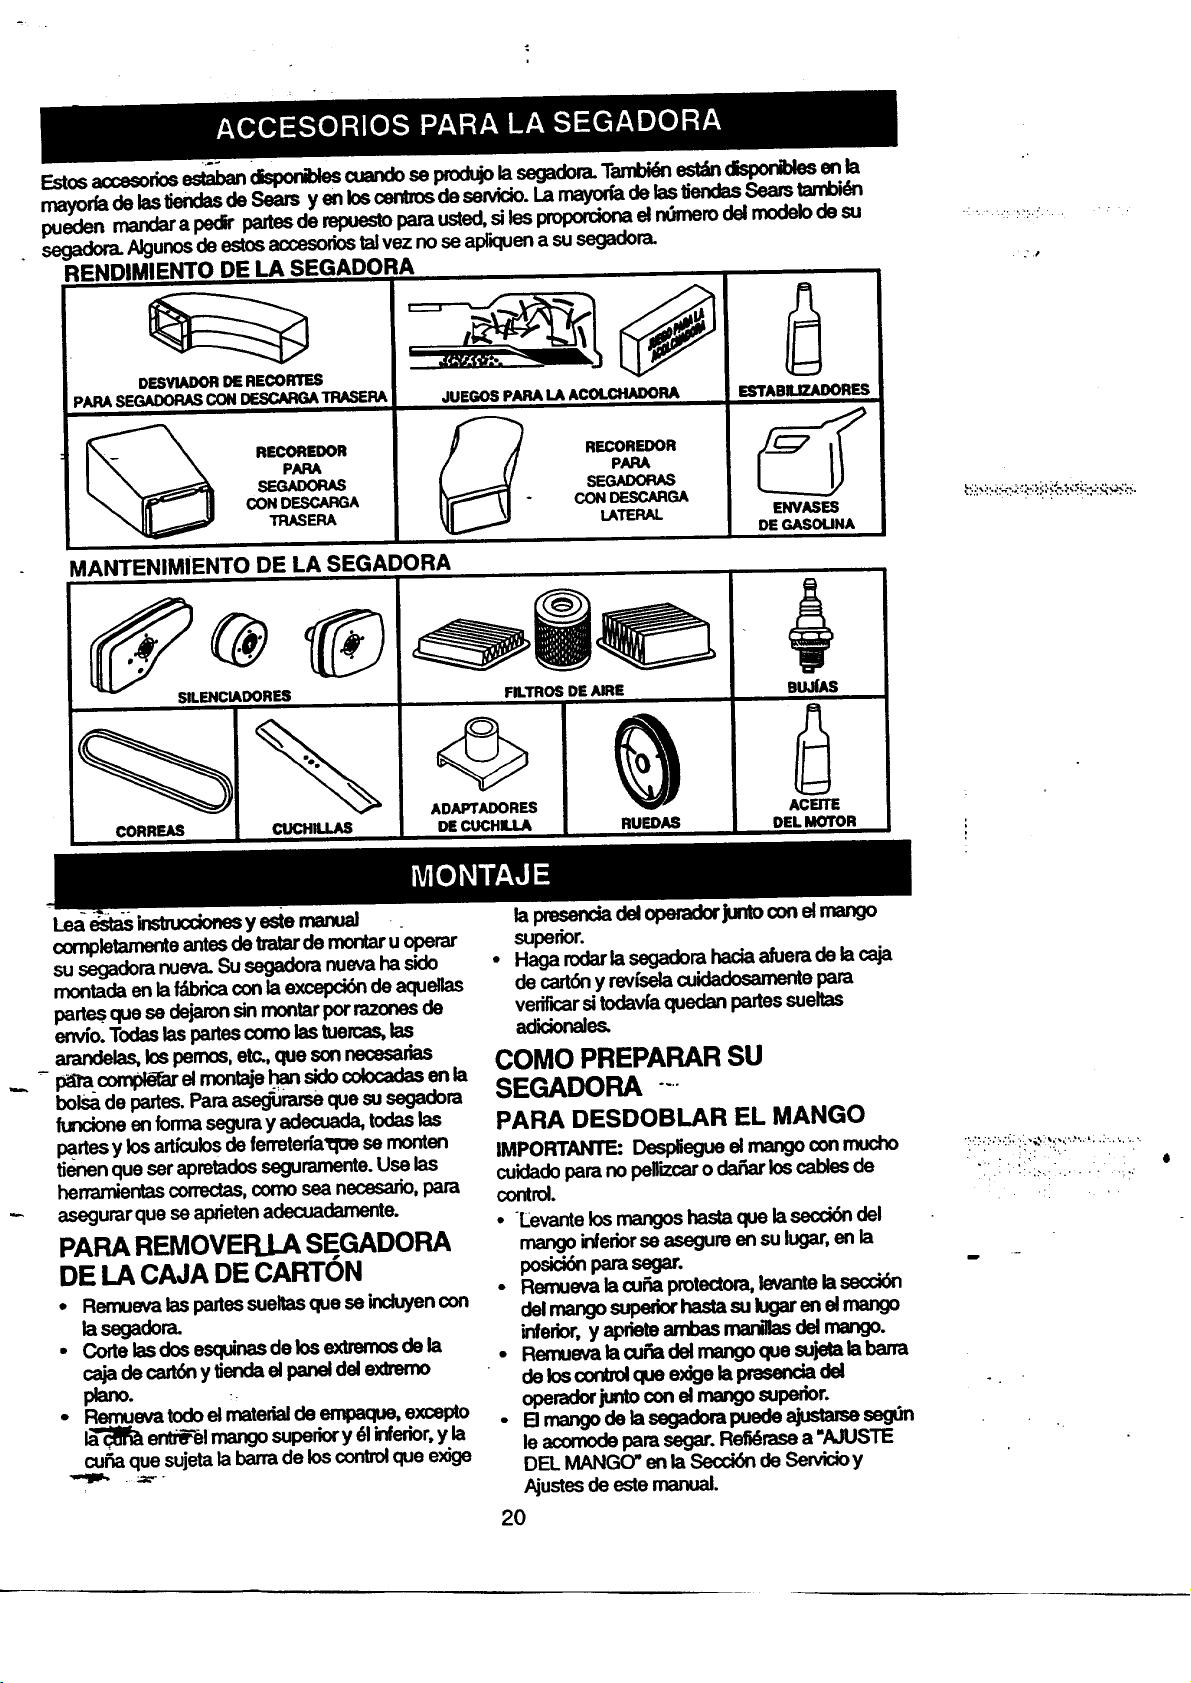
mower was
availableat mostSears retailoutletsand servicecenters. MostSearsstorescanalsoorder
repairpadsforyou,whenyou providethe modelnumberofyourlawnmower. Someofthese
accessorP.s maynotapplytoyourlawnmower.
LAWN MOWER PERFORMANCE
CUPPING DEFLECTOR
FOR REAR DISCHARGE LAWN MOWERS
GRASS CATCHERS
FOR
REAR DISCHARGE
LAWN MOWERS
MULCHER KITS
f?
GRASSCATCHERS
FOR
SIDEDISCHARGE
LAWNMOWERS
LAWN MOWER MAINTENANCE
MUFFLERS
BELTS BLADES BLADE ADAPTERS
AIR RLTERS
I_tF.L_LS
STABILIZER
GAS CANS
SPARK PLUGS
ENGINE OIL
_.. . .._.:.'
%,,,..,_,,,,.,_,,,..
-" Ri_lbdthes_T_structions and this manual in
its entirety before you attempt to assemble
or operate your new lawn mower. Your
new lawn mower has been assembled at
the factory with the exception of those
parts left unassembled for shipping
_ _purposes. To ensure safe and proper
operation-of your lawn mower, all parts
and hardware you assemble must be
tightened securely. Use tba.correct tools
as necessary to ensure proper tightness.
All parts such as nuts, washers, bolts, etc.,
necessary to complete the assembly have
been placed in the parts bag.
TO REMOVE LAWN MOWER FROM
CARTON
• Remove loose parts included with
mower.
• Cut down two end comers of carton and
lay end panel down fiat.
• .,I;Ijmov_ll packing materials except
padding between upper and lower
"-',_andle and padding holdingoperator
presence control bar to upper handle.
Roll lawn mower out of carton and check
carton thoroughlyfor additional loose
pads.
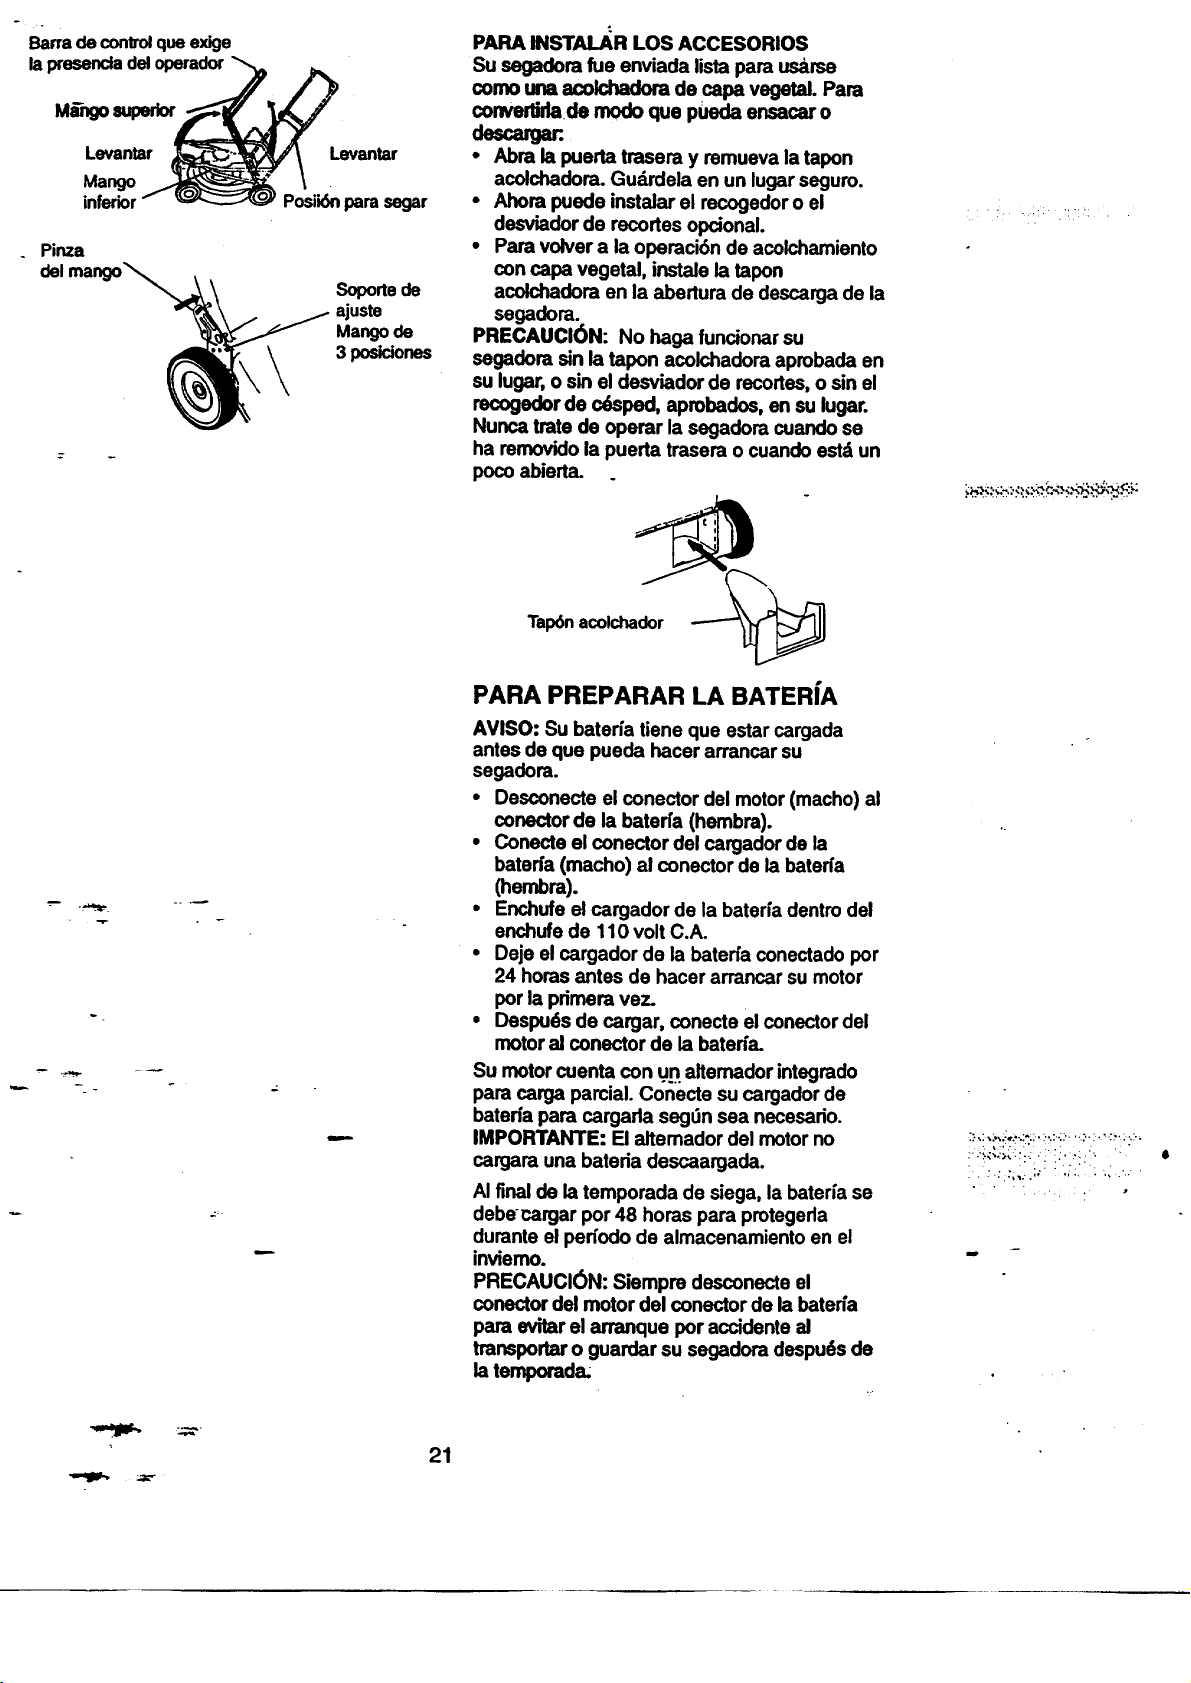
HOW TO SET UP YOUR LAWN
MOWER
TO UNFOLD HANDLE
IMPORTANT: Unfold handle carefully so
as not to pinch or damage control cables.
• Raise handles untillower handle section
locks intoplace in mowing position.
-- Remove protective padding, raise upper
handle section intoplace on lower
handle and tighten both handle knobs.
• Remove handle padding holding
operator presence controlbar to upper
handle.
• Your lawn mower handle can be
adjusted foryour mowing comfort.
Refer to "Adjust Handle" in the Service
and Adjustments sectionof this manual.
4
ii,
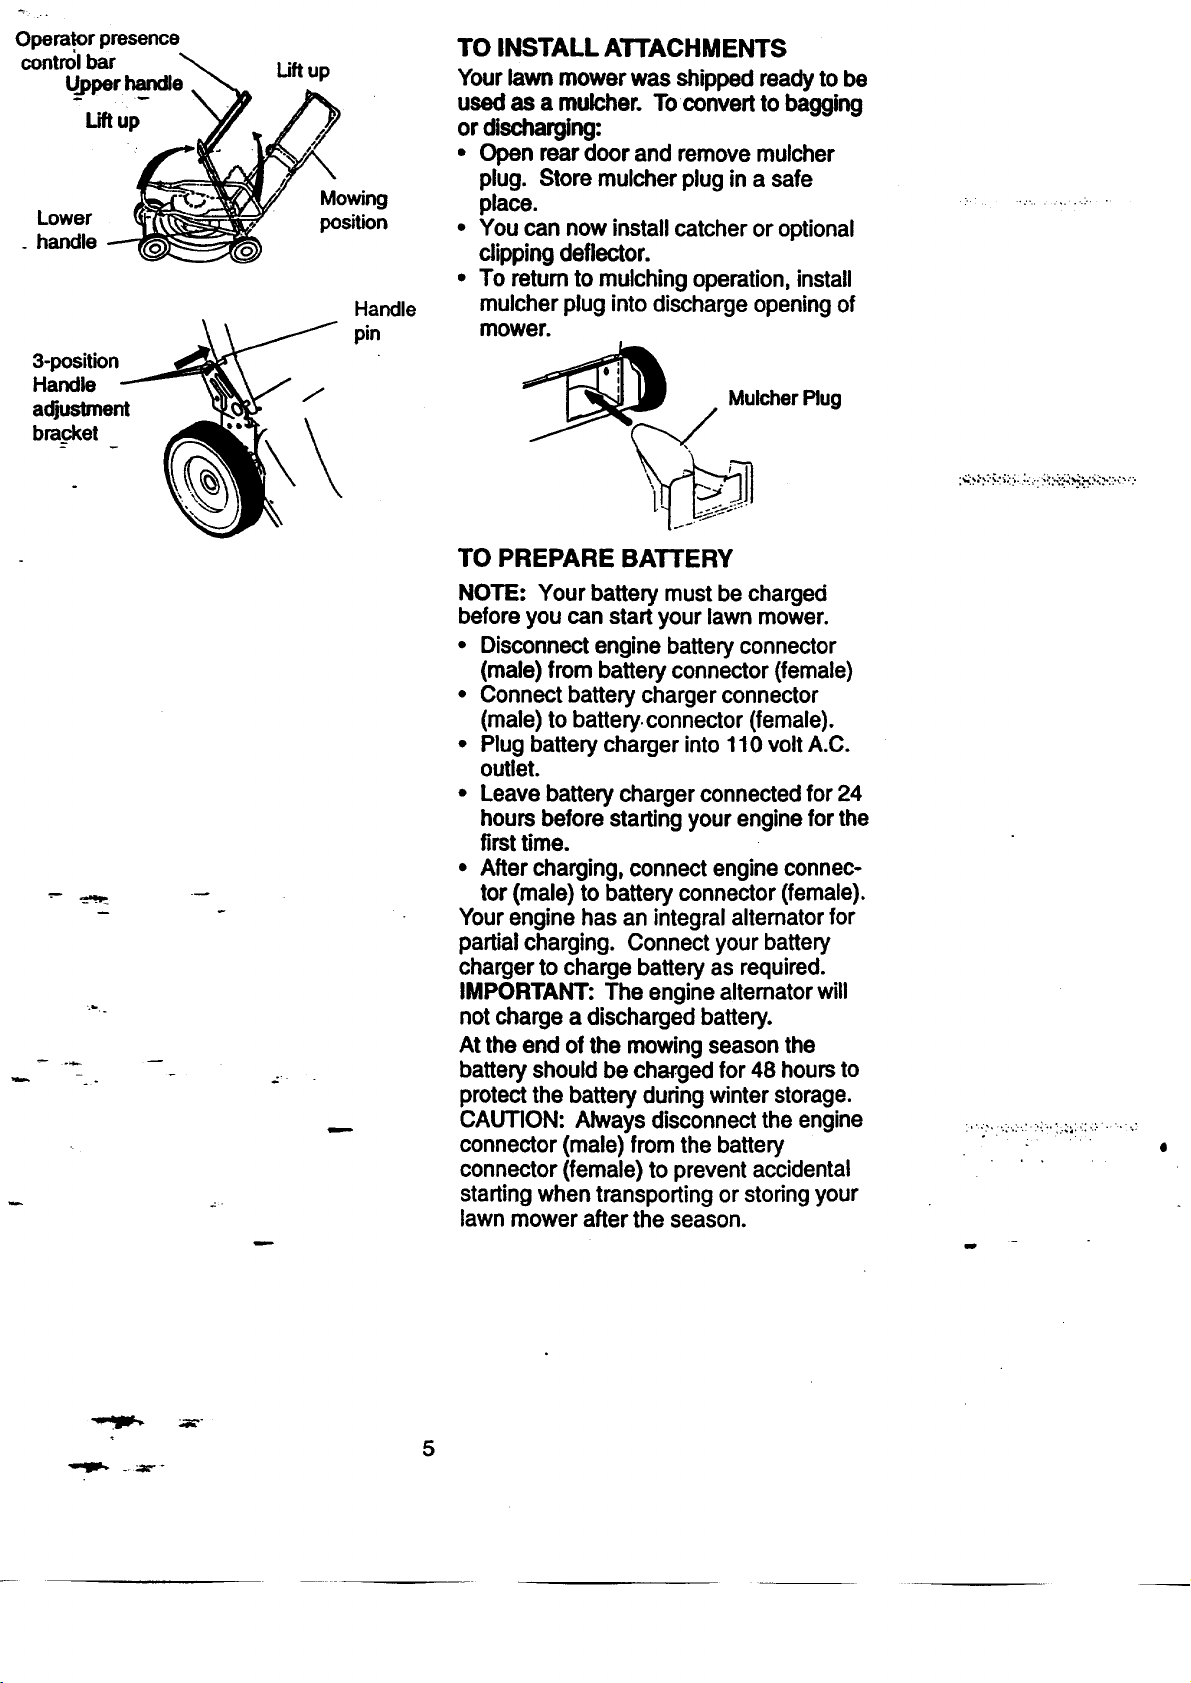
Operatorpresence
control bar
Upper handle
Liftup
Lower
_ handle
3-position
Handle
adjustment
bracket
m
=b,.
Liftup
..:,.
Mowing
position
Handle
pin
J
TO INSTALL ATTACHMENTS
Your lawn mower was shipped ready to be
used as a mulcher. Toconvert to bagging
or discharging:
• Open rear door and remove mulcher
plug. Store mulcher plugin a safe
place.
• You can now install catcher or optional
clippingdeflector.
• To return to mulching operation, install
mulcher plug into discharge opening of
mower.
Mulcher Plug
TO PREPARE BATTERY
NOTE: Your battery must be charged
before you can start your lawn mower.
• Disconnect engine battery connector
(male) from battery connector (female)
• Connect battery charger connector
(male) to battery, connector (female).
• Plug battery charger into 110 volt A.C.
outlet.
• Leave battery charger connected for 24
hours before starting your engine for the
first time.
• After charging, connect engine connec-
tor (male) to battery connector (female).
Your engine has an integral alternator for
partial charging. Connect your battery
charger to charge battery as required.
IMPORTANT: The engine altemator will
not charge a discharged battery.
At the end of the mowing season the
battery should be charged for 48 hours to
protect the battery during winter storage.
CAUTION: Always disconnect the engine
connector (male) from the battery
connector (female) to prevent accidental
starting when transporting or storing your
lawn mower after the season.
:'":'.":":":i:i_:''?'!!I:!/......:
w

KNOW YOUR LAWN MOWER
READ THIS OWNER'S MANUALAND SAFETY RULES BEFORE OPERATING YOUR LAWN
MOWER. Comparetheillustrationswithyourlawnmowertofamiliarizeyourselfwiththe
locationofvariouscontrolsand adjustments.Savethismanualforfuture reference.
These symbols mayappear onyourlawnmoweror inliteraturesuppliedwiththe product.
Learn andunderstandtheir meaning.
CAUTION ENGINE ENGINE FAST SLOW CHOKE FUEL OIL DANGER. KEEP _S
OR WARNING ON OFF AND FEET AWAY
= D/'ivecontrol
Electdc start
Operator presence control
7..........................
Starter handle
Cable clip
Grass catcher
Wheel adjuster
lever
Gasoline cap
Pdmer
-. Engine oilcap w/dipstick ...-.
MEETS CPSC SAFETY RL:_UIREMENTS
Sears rotary walk-behind power lawn mowers conform to the safety standards of the
American National Standards Institute and the U.S. Consumer Product Safety Commis-
sion. The bladetums when the engine is runn[hg.
Operator presence_ontrol - must be
held down to the handle to start the
engine. Release to stopthe engine.
Primer - pumps additional fuel fromthe
carburetor to the cylinder for use when
starting a cold engine.
Starter handle - used for starting the
en .g_. "9"_
i
Drive control bar - used to engage
power-propelled foward motion of lawn
mower.
Mulcher plug - Located at the rear
discharge opening must be removed when
converting to bagging operation.
Electric start key - used for starting the
engine.
!
The operationofanylawnmowercan resultin
foreignobjectsthrownintothe eyes, whichcan
resultinsevereeyedamage.Alweysweer
safetyglassesoreye shieldswhile operating
yourlawn mowerorperforminganyadjust-
merits or repairs.We recommenda wide
visionsafetymaskoverthe speclaclesor
standardsafetyglasses.
HOW TO USE YOUR LAWN MOWER
ENGINE SPEED
The engine speedwas setat the factoryfor
optimumperformance Speed is not adjust-
able.
ENGINE ZONE CONTROL
CAUTION: Federalregulationsrequirean
eng'_,3ecor_,oltobe installedonthis lawn
mower inorderto minimizethe riskofblade
contactinjury.Do notunderany circur_ances
attempttodefeatthe function ofthe operator
control. The bladeturnswhen the engineis
running.
• Your lawnmower isequippedwithan
operatorpresencecontrolbarwhich
requiresthe operatortobe positioned
behind the lawn mowerhandleto startand
operatethe lawnmower.
TO ADJUST CUTTING HEIGHT
• Allfour wheelsare adjustedbya single
lever.
• Pulladjusterlevertowardwheel.To raise
mower, move leverforward to desired
position.To lowermower,movethe lever
toward the rear.
LowerWheelsforhighcut
-- \
Wh_
Acluster
Lever
/
Raise Wheels for low cut
TO OPERATEDRIVE SY.S'[T=M
• To st:artforwardmotion,liftdrive controlbar
upto handle.
• Tostopforwardmotion,releasedrive
control bar.
.IMPORTANT: Alwa_ keepdrivecontrol bar
fullyengaged againsthandlewhenin use.
_. Drive
Operator presence controlbar
To Drive control
drive "_ desengaged
7
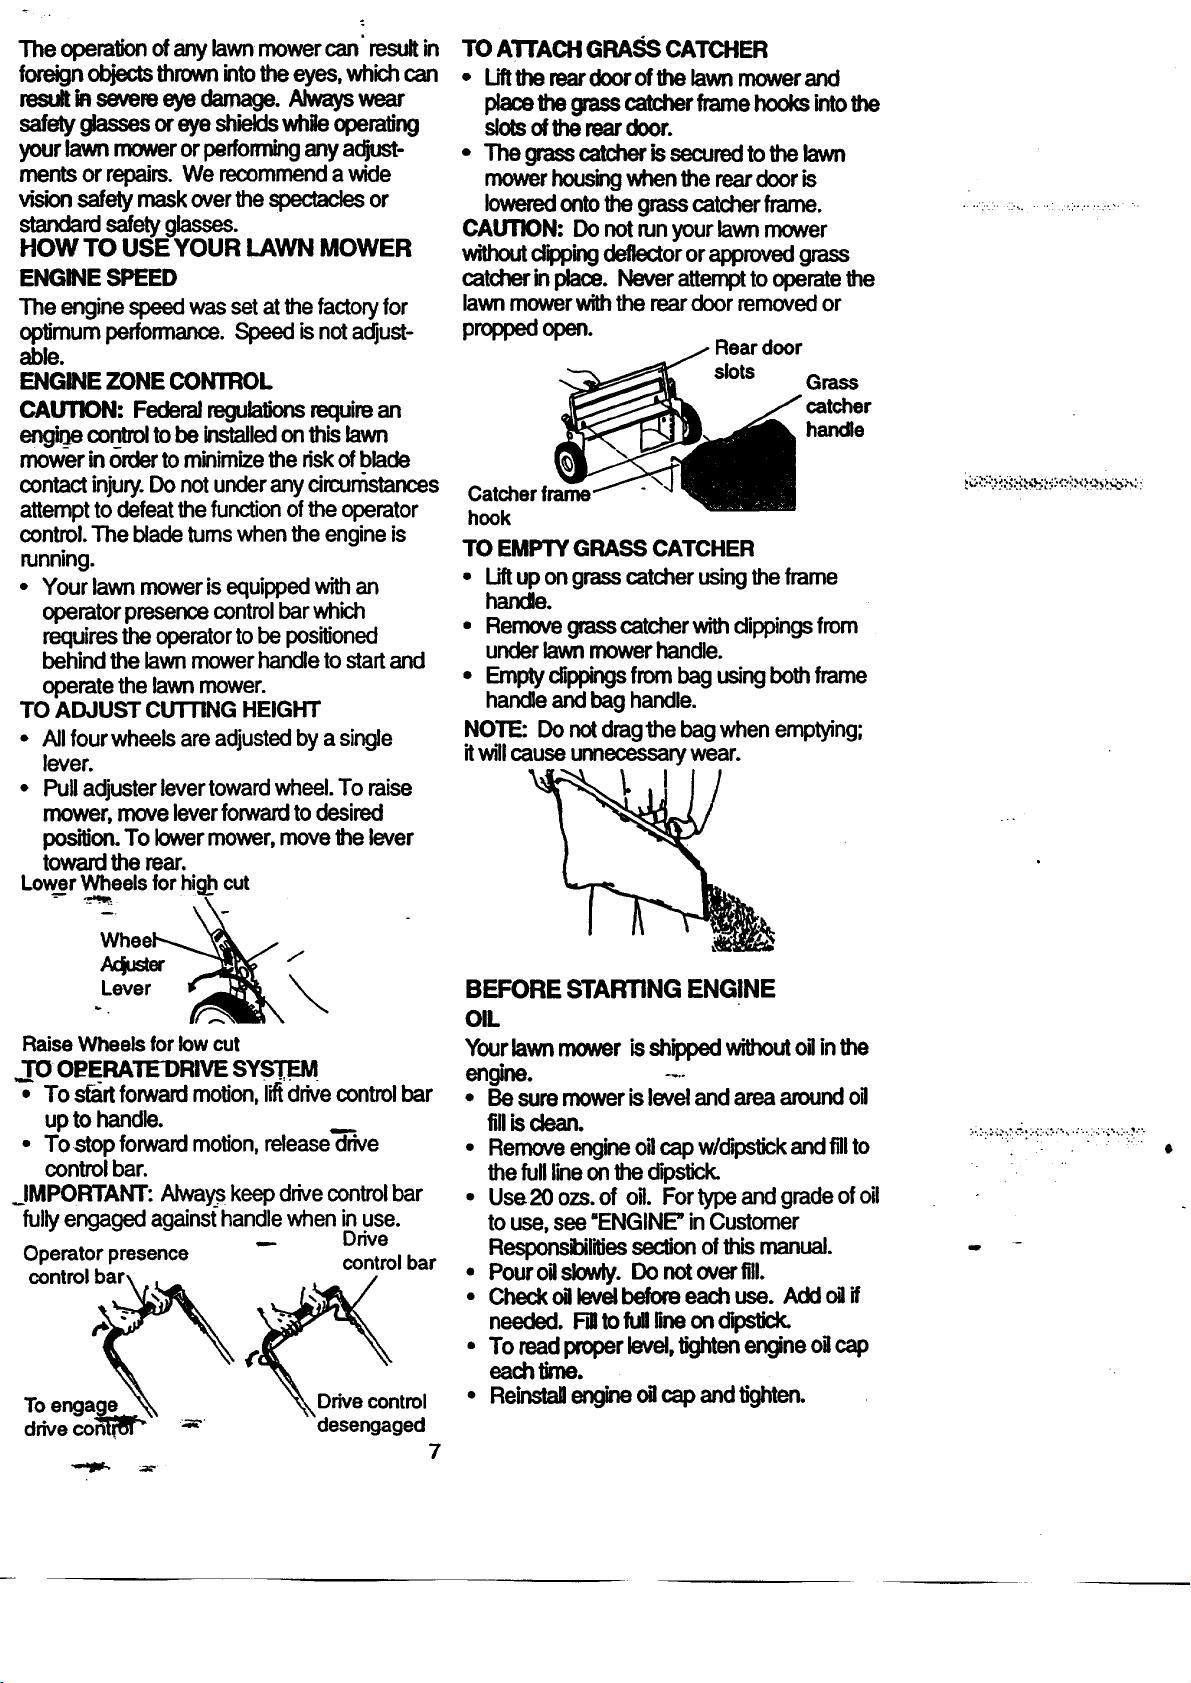
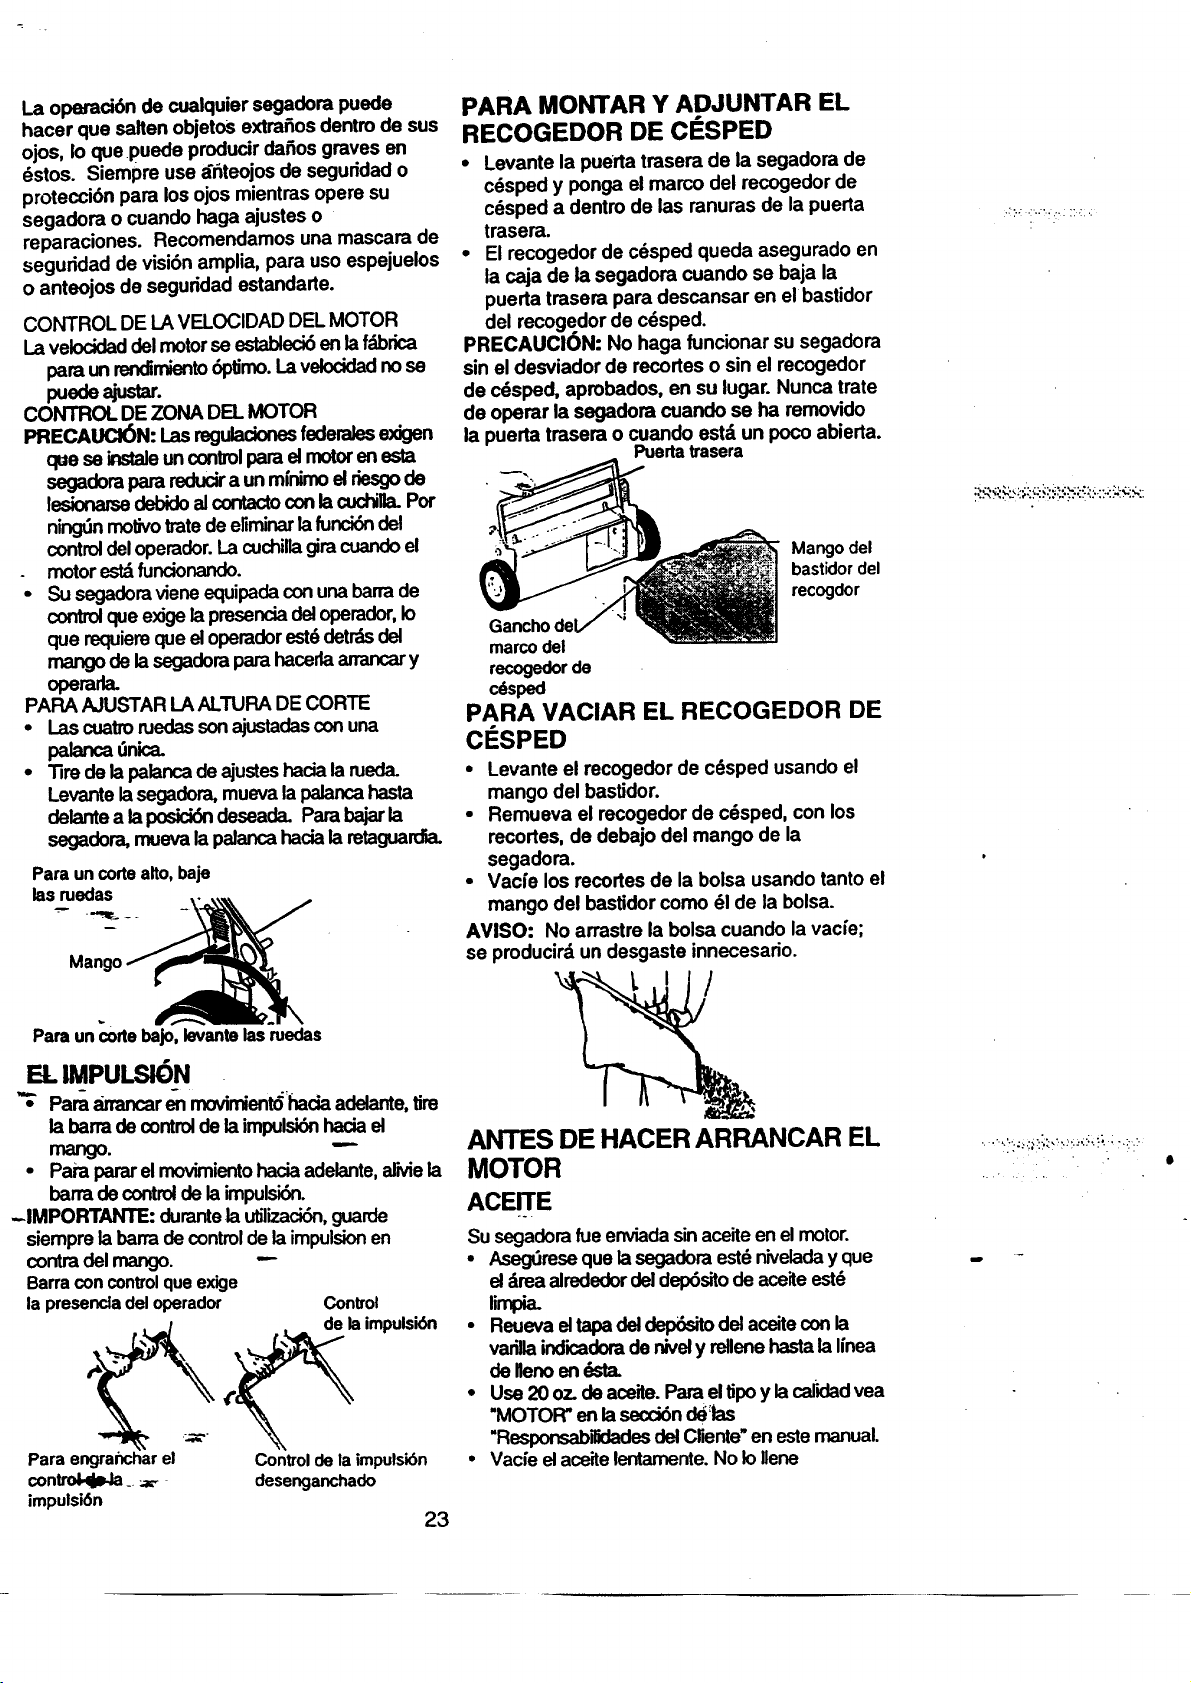
TO ATTACH GRA,SSCATCHER
• Liltthereardeor ofthe lawn mowerand
placethe grasscatcherframehooksintothe
slotsofthereardeor.
• The grasscatcherissecuredtothe lawn
mowerhousingwhen the reardooris
loweredontothegrasscatcherframe.
CAUTION: Do notrunyourlawn mower
withoutdipping deflectororapprovedgrass
catcherin place. Never attemptto operatethe
lawnmowerwiththe reardoorremovedor
proppedopeno
_ / Reardoor
_ slots Grass
_--/__ __J catcher
h "e
Catcherframer " "
hook
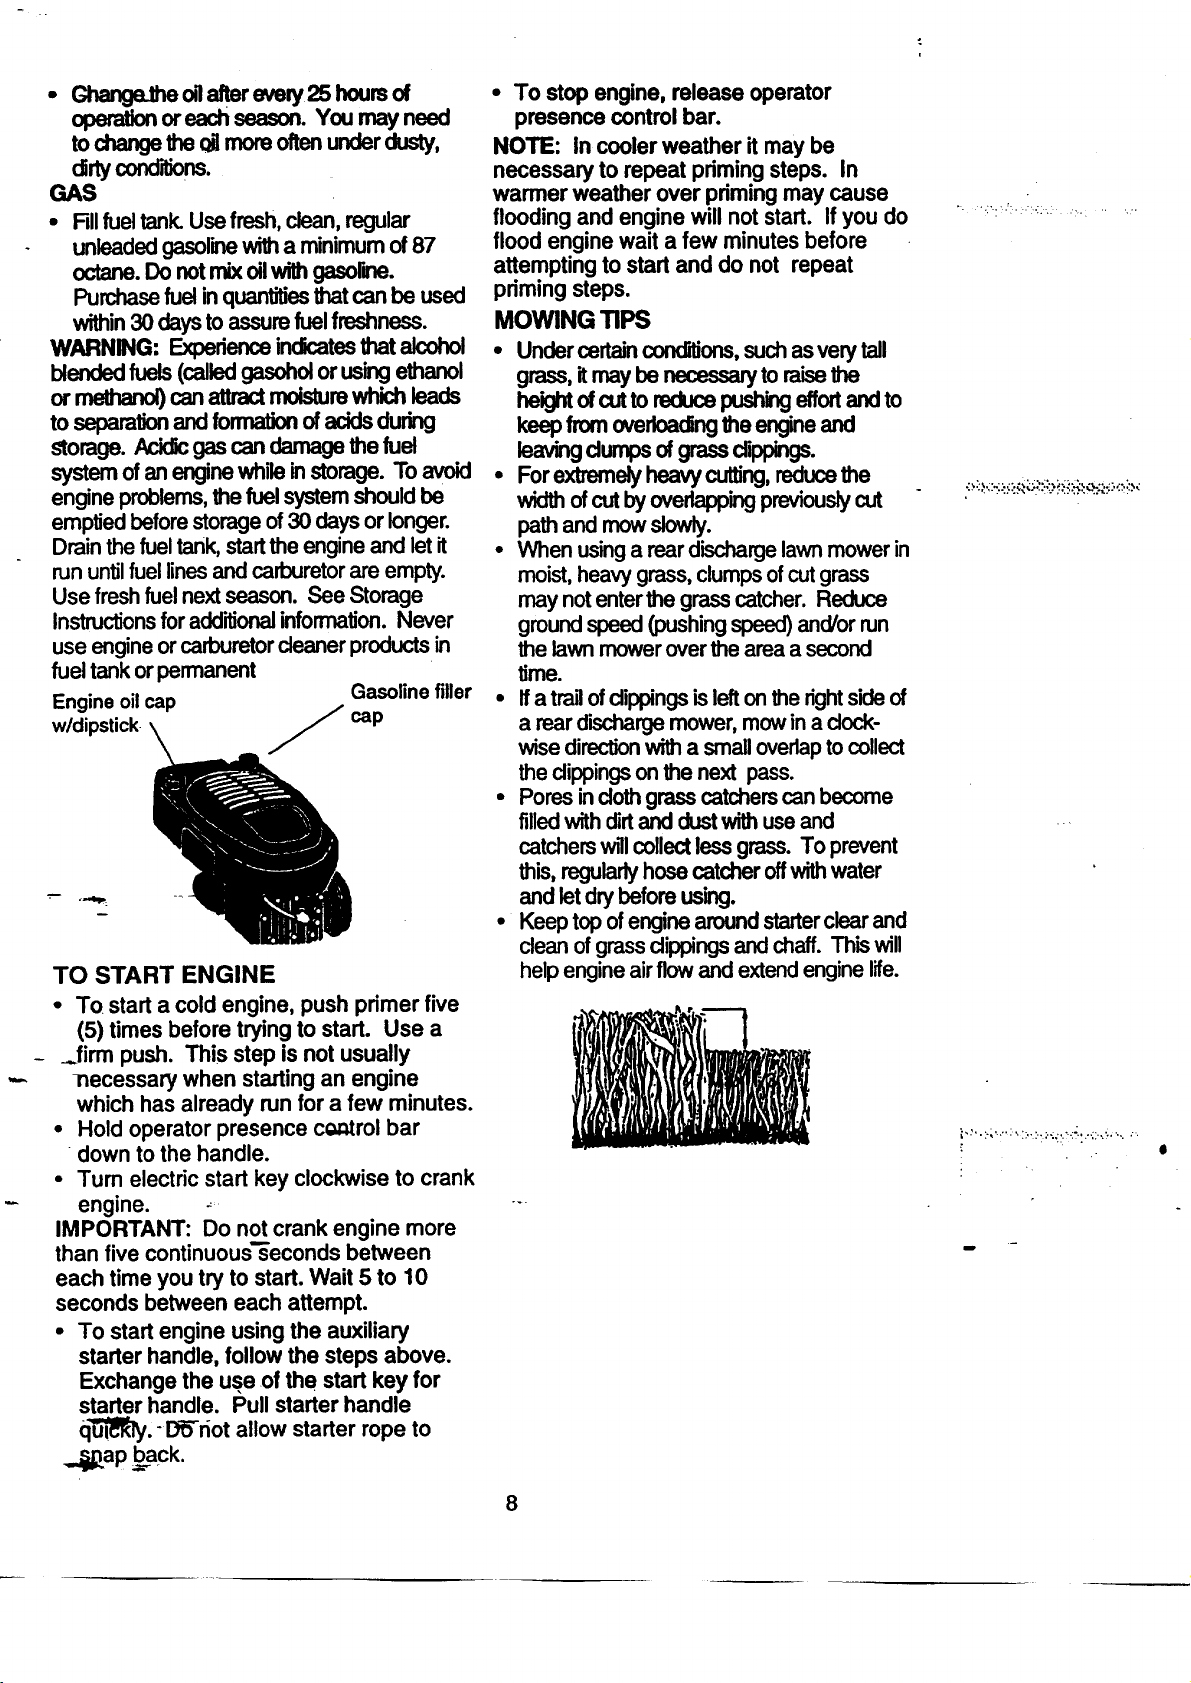
TO EMPTY GRASS CATCHER
• Liftupon grasscatcher usingtheframe
handle.
• Removegrasscatcher withclippingsfrom
underlawnmowerhandle.
• Emptyclippingsfrom bag usingbothframe
handleandbag handle.
NOTE: Do notdragthe bagwhen emptying;
itwillcause unnecessarywear.
BEFORE STARTING ENGINE
OIL
Yourlawn mower is shipped withoutoilinthe
engine. _oo
• Be sure moweris leveland area aroundoil
fillisdean.
• Removeengineoilcapw/dipslJckandfillto
the fulllineonthe dip_
• Use20 ozs.of oil. Fortypeand grade ofoil
to use,see =ENGINE"inCustomer
Respons_lnJessectionofthis manual.
• Pouroilsiowly.Do notoverlill.
• Check oillevelbefom each use. Addoilif
needed. RI to fuUlineon d'pstick.
• To readproperlevel,tightenengineoilcap
each time.
• Reinstallengineoilcapand tighten.
:; ......._. %-.., .... :.._ .:......_. •. _....
t
• Ghange__ oUalterevenj25 hoursof
operal_ or each season. You mayneed
to changethe di morn oftenunderdusty,
dirtyconditions.
GAS
• Fillfueltank.Usefresh,clean,regular
unleadedgasolinewitha minimumof87
octane.Do notmixoilwithgasoline.
Purchasefuel inquant_esthat canbe used
within30 daysto assurefuelfreshness.
WARNING: Experienceindicatesthatalcohol
blendedfuels(calledgasohoior using ethanol
or methanol)canattractmoisturewhichleads
toseparationand fon_tion ofadds during
storage. Acidicgascandamage the fuel
systemofan enginewhile instorage. Toavoid
engineproblems,thefuelsystemshouldbe
emptiedbeforestorageof30 days orlonger.
Drainthe fuel tank,starttheengineand letit
rununtilfuel linesand carburetorare empty.
Use fresh fuel nextseason. See Storage
Instructionsfor additionalinformation.Never
use engineor carburetor deaner productsin
fuel tankorpermanent
Engine oilcap Gasoline filler
w/dipstick / caP
TO START ENGINE
• To start a cold engine, push primer five
(5) times before trying to start. Use a
jirm push. This step is not usually
T_ecessarywhen starting an engine
which has already runfor a few minutes.
• Hold operator presence c_:=trolbar
down to the handle.
• Turn electric start key clockwise to crank
engine. _
IMPORTANT: Do not crank engine more
than five continuous_econds between
each time you try to start. Wait 5 to 10
seconds between each attempt.
• To start engine using the auxiliary
starter handle, follow the steps above.
Exchange the use of the start key for
starter handle. Pull starter handle
q'_ll_,- D_r_ot allow starter rope to
.4_ap _back"
• To stop engine, release operator
presence control bar.
NOTE: In cooler weather it may be
necessary to repeat priming steps. In
warmer weather over priming may cause
flooding and engine will not start. If you do
flood engine wait a few minutes before
attempting to start and do not repeat
priming steps.
MOWING TIPS
• Undercertaincond_ons,suchasverytall
grass,itmay be necessarytoraisethe
heightofcutto reducepushingelfortandto
keepfromoverloadingtheengineand
leavingdumpsofgrassclippings.
• For_e_ heavycutUng,reducethe
widthofcutbyoverlappingpreviouslycut
pathand mowslowly.
• When usinga reardischargelawnmowerin
moist,heavygrass,clumpsofcutgrass
may notenterthe grasscatcher. Reduce
groundspeed (pushingspeed)and/or run
the lawnmoweroverthe areaa second
time.
• ffa tra=lofdippingsisleftonthe rightsideof
a reardischargemower,mowina dock-
wise directionwitha smalloverlaptocollect
the dippingsonthe next pass.
• Pores indothgrasscatchers canbecome
filledwithdirtand dustwithuseand
catchers wglcollectlessgrass.To prevent
this, regularlyhosecatcher offwithwater
and letdrybefore using.
• Keep topofengine aroundstarterclearand
cleanofgrassclippingsand chaff. Thiswill
helpengineairflow and extendenginelife.
8
m
MULCHING MOWING TIPS
IMPORTANT: For bestperformance,keep
mow_housimfreeofbuilt-upgrassand
trash.See _ in CUSTOMER
RESPONSIBILITIESo_,ectionofthismanual.
• The spedal mulchingbladewillrecurthe
grassdT_pingsmany timesand rec_..e
them insizesothat astheyfall ontothe
- lawntt_y willcfmperseintothe grassand
notbe nolk:ed.Also,the mulchedgrasswill
biodegradequicklyto providenutrientsfor
the lawn. Alwaysmulchwithyourhighest
engine(blade)speed as this willprovidethe
bestrecurringadionoftheblades.
• Avoidcuttingyour lawn when itiswet Wet
grasstendstoformdumps and interferes
withthemulchingaction.The besttimeto
mowyourlawnisthe earlyaftemoon_At
this timethe grasshasdried and the newly
cut areawill not be exposed to the direct
sun.
• Forbest results,adjustthe lawn mower
cuttingheightso that the lawn mowercuts
olfonlybhetopone-thirdofthegrassblades.
Ifthe lawnisovergrownitwil be necessary
to raisethe heightofcuttoreduce pushing
effortand tokeep fromoverloadingthe
engineand leavingdumps of mulched
grass.For extremelyheavymulching,
reduceyourwidthofcutby overlapping
cutpathandmowskeW.
• Certaintypes ofgrassand grassconditions
may requirethatan area be mulcheda
secondtimeto completelyhidethe
clippings.When doinga secondcut,mow
acrossorperpend'_ulartothe flintcutpath.
• Change yourcuttingpattemfromweekto
week. Mow northtosouthoneweek then
changetoeast towestthe nextweek. This
will helpprevent mattingand grainingofthe
lawn.
,..,., ..
•," ".-. ; ,,-."." '_;'.-';'L_"',,";"
•;.,_:_ _._, .,_..._, ,;._'_, .,_, .._.-
,..,. ..... . , •
.a_"¸
9
DATES
CheckforLooseFasteners Ii/ t/
// II
Clean/Inspect Grass Catcher
MClean LawnMower
;CleanUnderDriveCover
: Pow -Propo,ed.ow=s V"
WEi (.ve
,(Power-Propelled Mowers) k4
R CI1eck/Sharpen/ReplaceBlade tf4=p
LubdcatJonChart I_
Clean Battery/Recharge
,IElectric Start MowersI t/ k44
E 'Check En(jine OilLevel tp4
Change EngineOil _#'1,2
G JClean Air Filter v'
I InspectMuffler V'
Clean or Replace Spark Plug v'
N Replace Air FilterPaper Cartridge Vr2
1- Char_ rnoreoftenwhenoperal_ undwa heavyloadorIn highantlenl teml_aU_
2- ServicemoreoftenwhenoperatYngIndirtyorduslycomJllons.
3- Replacebladesmore ollenwhenmowinginsandysoil
4 - Charge48_ al endofseason.
GENERAL RECOMMENDATIONS
The warrantyonthislawnmowerdoesnot
coveritemsthathave beensubjectedto
.-op_ator abuse_ornegrKjence.Toreceivefull
valuefromthe warranty,operatormust
maintainmoweras instructedinthis manual.
Some adjustmentswillneedtobe made
periodicallytoproperlymaintainyourunit.
Alladjustmentsinthe ServiceandAdjust-
mentssectionofthisrnanualshouldbe
- checkedat-leastonceeach season.
• -Once a y_ar, replace_thesparkplug,
replaceairfilterelementand checkbladefor
wear. Anew sparkplugard-dearVnewair
- filterelementassuresproperair-fuel mixture
and helpsyourenginerunbetter and last
longer.
• Followthe mainter_lce scheduleinthis
manual.
BEFORE EACH USE
• Checkengineoillevel
• Checkforloosefasteners.
LUBRICATION
Keep unitwell lubricated (See "LUBRICATION
c_ _
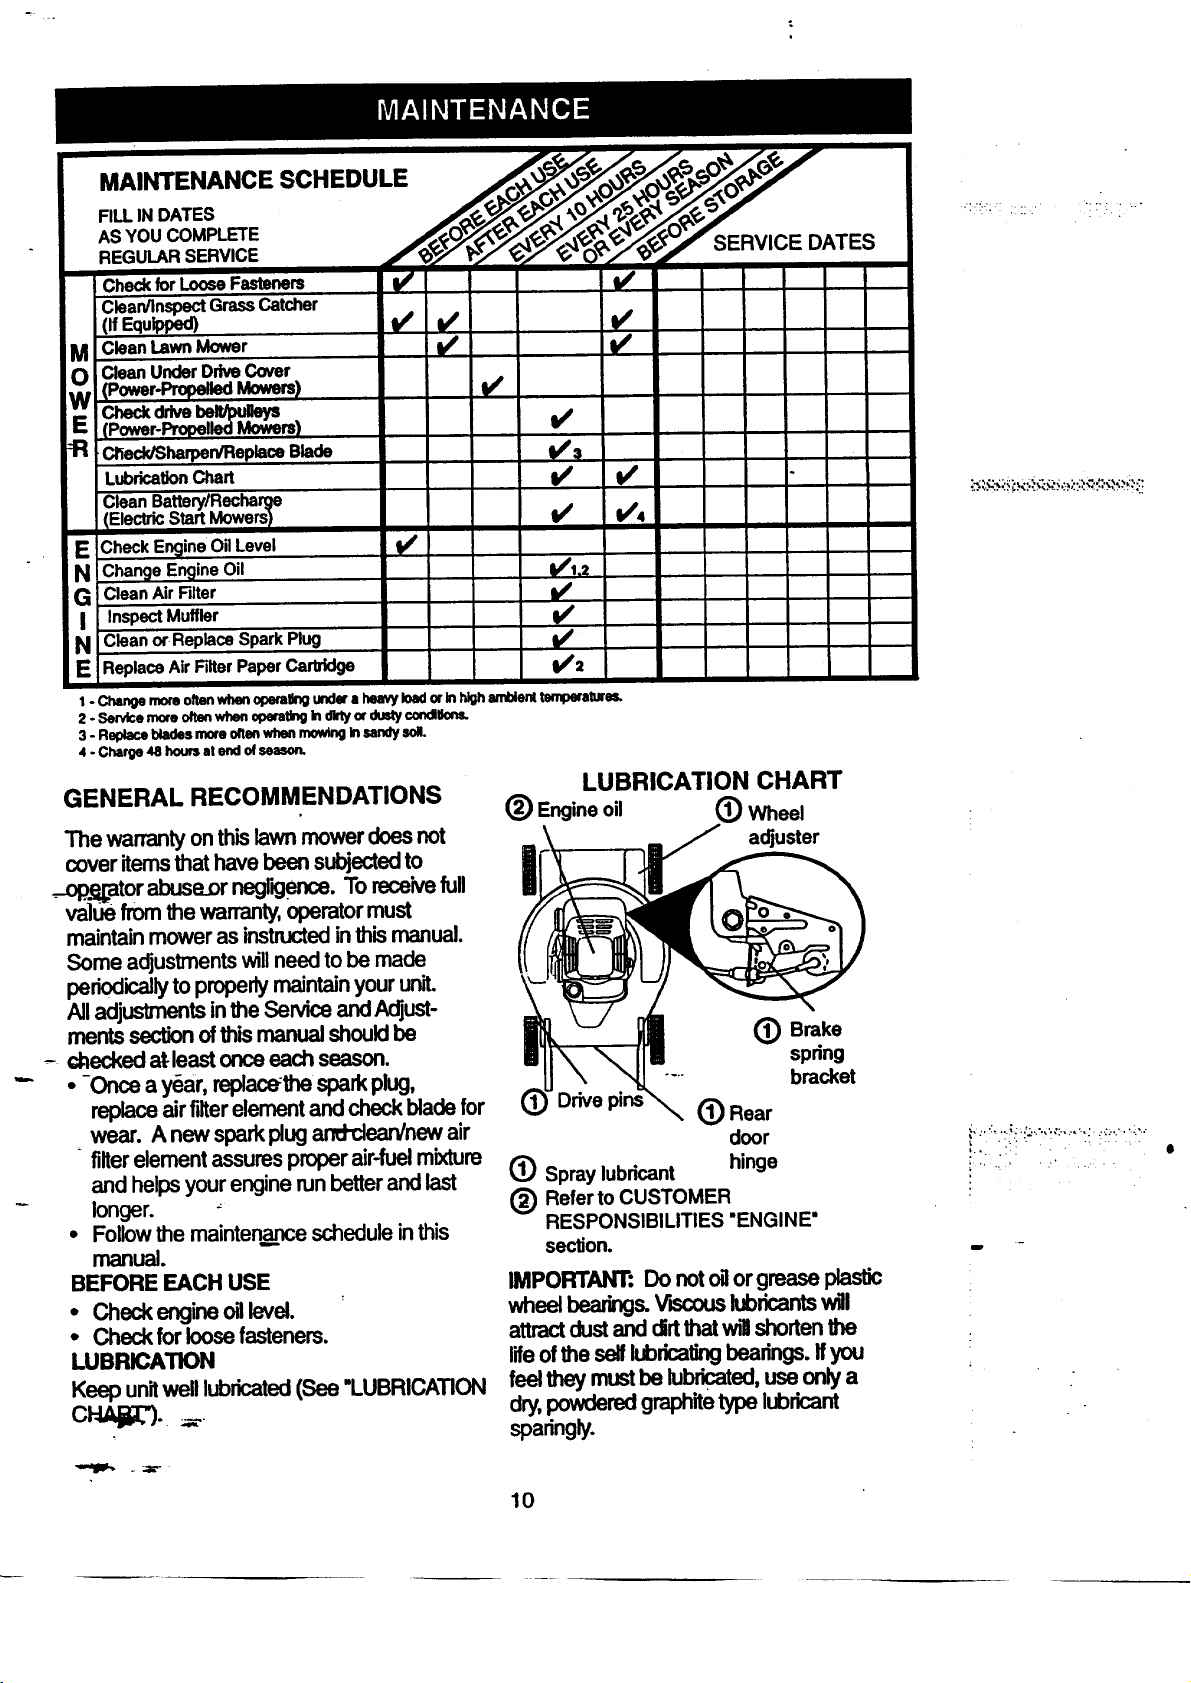
LUBRICATION CHART
(_) Engine oil (_ Wheel
adjuster
(_) Brake
spring
bracket
Drive (_) Rear
door
(_) Spray lubricant hinge
I_ Refer to CUSTOMER
RESPONSIBILITIES "ENGINE"
section.
IMPORTANT: Do not oilorgreaseplastic
wheelbearings.Viscouslubricantswill
attractdustand dirtthat willshortenthe
life ofthe selflubricatingbearings.Ifyou
feel theymust be lubricated,useonlya
dry,powderedgraphitetypelubricant
sparingly.
10
":::!:: ': ':::: "i:': : "'"
_, ,, . ; -..,...... ,,. , • .. .... ...
_... .:,:
ale
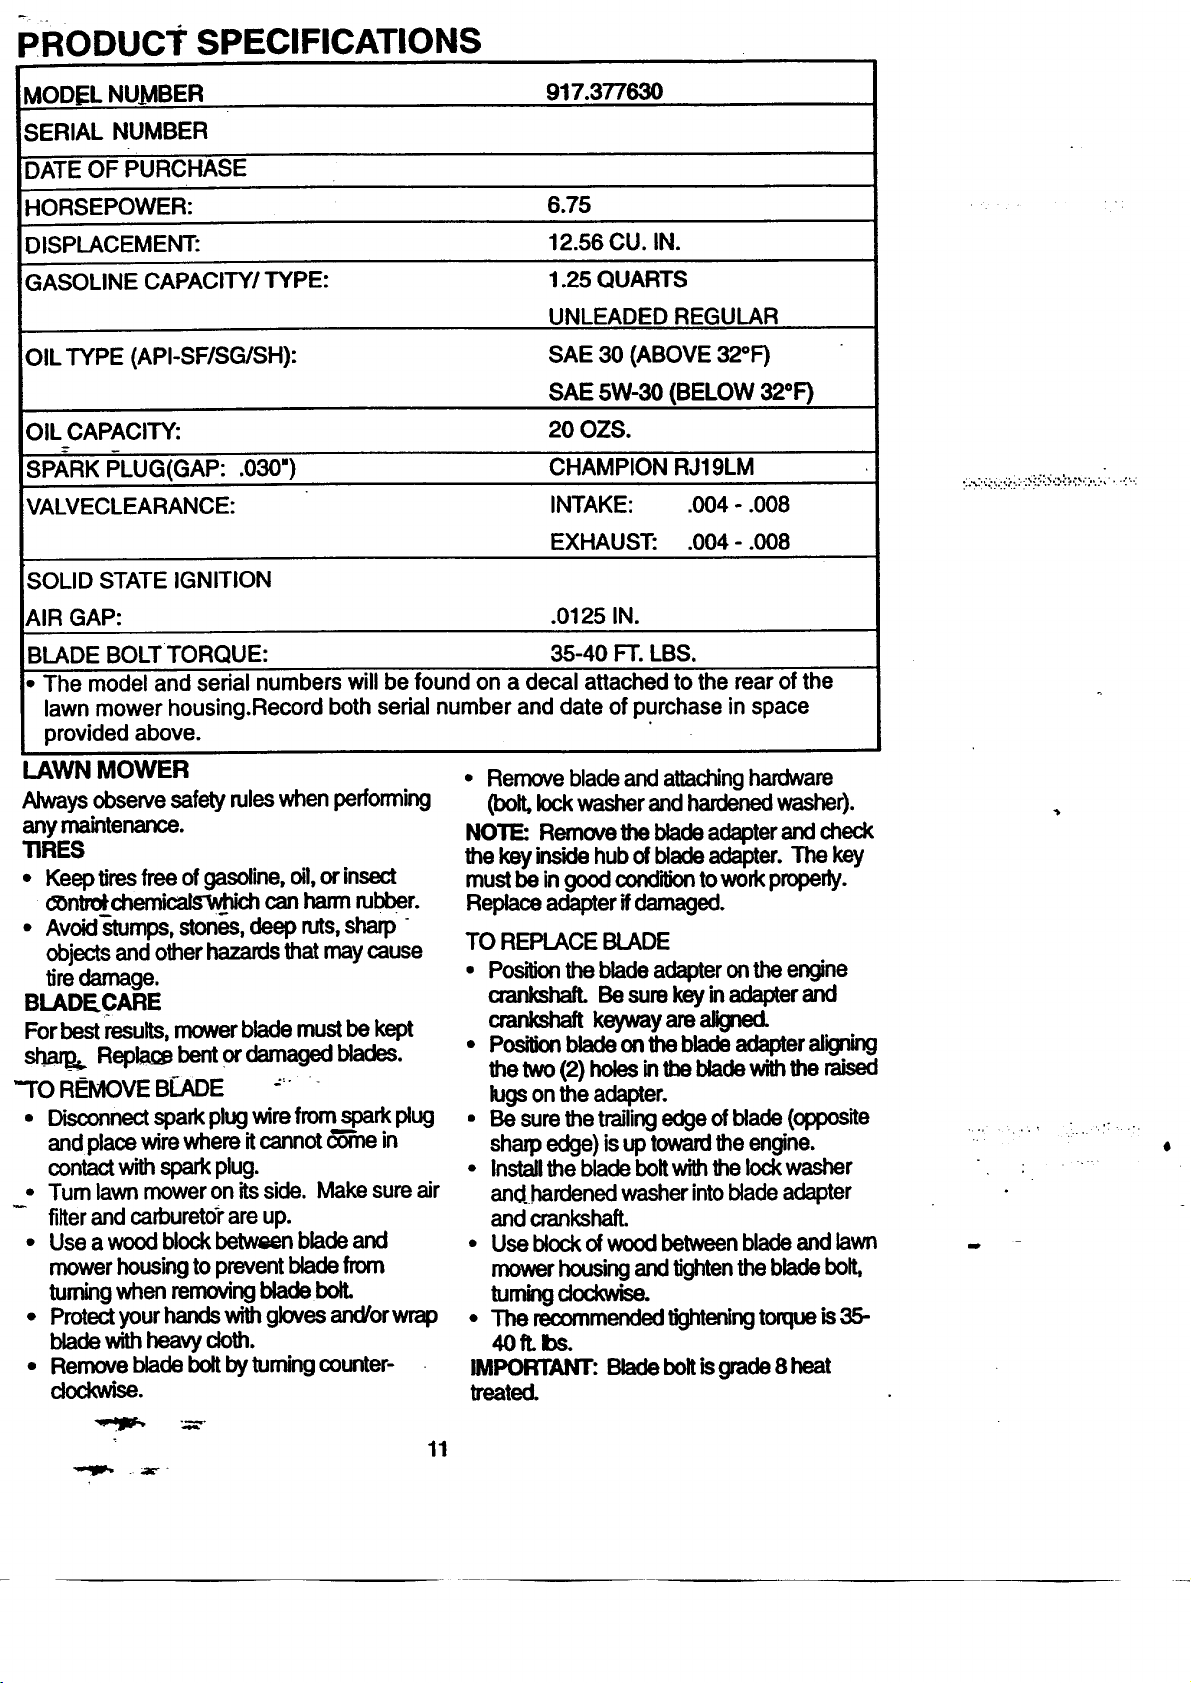
PRODUCT SPECIFICATIONS
MOD[EL NUMBER 917.377630
SERIAL NUMBER
DATE OF PURCHASE
-IORSEPOWER: 6.75
_)ISPLACEMENT: 12.56 CU. IN.
GASOLINE CAPACITY/TYPE: 1.25 QUARTS
UNLEADED REGULAR
OIL TYPE (API-SF/SG/SH): SAE 30 (ABOVE 32°F)
SAE 5W-30 (BELOW 32°F)
OIL CAPACITY: 20 OZS.
SPARK F;LUG(GAP: .030") CHAMPION RJ19LM
VALVECLEARANCE: INTAKE: .004 - .008
EXHAUST: .004 - .008
SOLID STATE IGNITION
AIR GAP: .0125 IN.
BLADE BOLTTORQUE: 35-40 FT. LBS.
The model and serial numbers will be found on a decal attached to the rear of the
lawn mower housing.Record both serial number and date of purchase in space
provided above.
LAWN MOWER
Alwaysobservesafetyruleswhenperforming
anymaintenance.
TIRES
• Keep tiresfreeof gasoline,oil,orinsect
_ntro#_chemical_" canharm rubber.
• Avoidstumps,stones,deep ruts,sharp "
objects and otherhazardsthat maycause
tire damage.
BLADECARE
.~
Forbestresults,mowerblade mustbe kept
Replacebent ordamaged blades.
-TO REMOVE BI_a_iE -'
• Disconnectsparkplug wire fromsparkplug
andplacewire where itcannot_rrle in
contactwithsparkplug.
• Turn lawn moweron itsside. Make sure air
filterand carburetdr are up.
• Use a wood blockbetwltenblade and
mowerhousingtopreventbladefrom
turningwhen removingbladeboll
• Protectyourhandswithglovesand/orwrap
withheavycloth.
• Removeblade boltbyturning counter-
clockwise.
11
• Remove blade andattachinghardware
(bolt,lockwasherandhardenedwasher).
NOTE: Remove the bladeadapterandcheck
the keyinsidehubof bladeadapter. The key
mustbe in goodconditionto workproperly.
Replaceadapterifdamaged.
TO REPLACE BLADE
• Posillonthebladeadapteronthe engine
crankshaft.Besure keyin adapterand
keywayare aligned.
• Positionblade onthe bladeadapteraligning
the two(2) holesinthe bladewiththe raised
lugsonthe adapter.
• Be surethe trailingedgeofblade(opposite
sharpedge)isuptowardthe engine.
• Installthe bladeboltwiththe lockwasher
and.hardenedwasherintoblade adapter
and crankshafL
• Use block of woodbetween blade andlawn
mower housingandtightenthe bladebolt,
turningS.
• The recommendedtighteningtorque is35-
40ft.lbs.
IMPORTANT: Bladeboltisgrade8 heat
treated.
• • • . ,:
:::._::.:;::;::::::i.:.::._i::::;_.::.::....:.,.::.::.,-...:...:
m
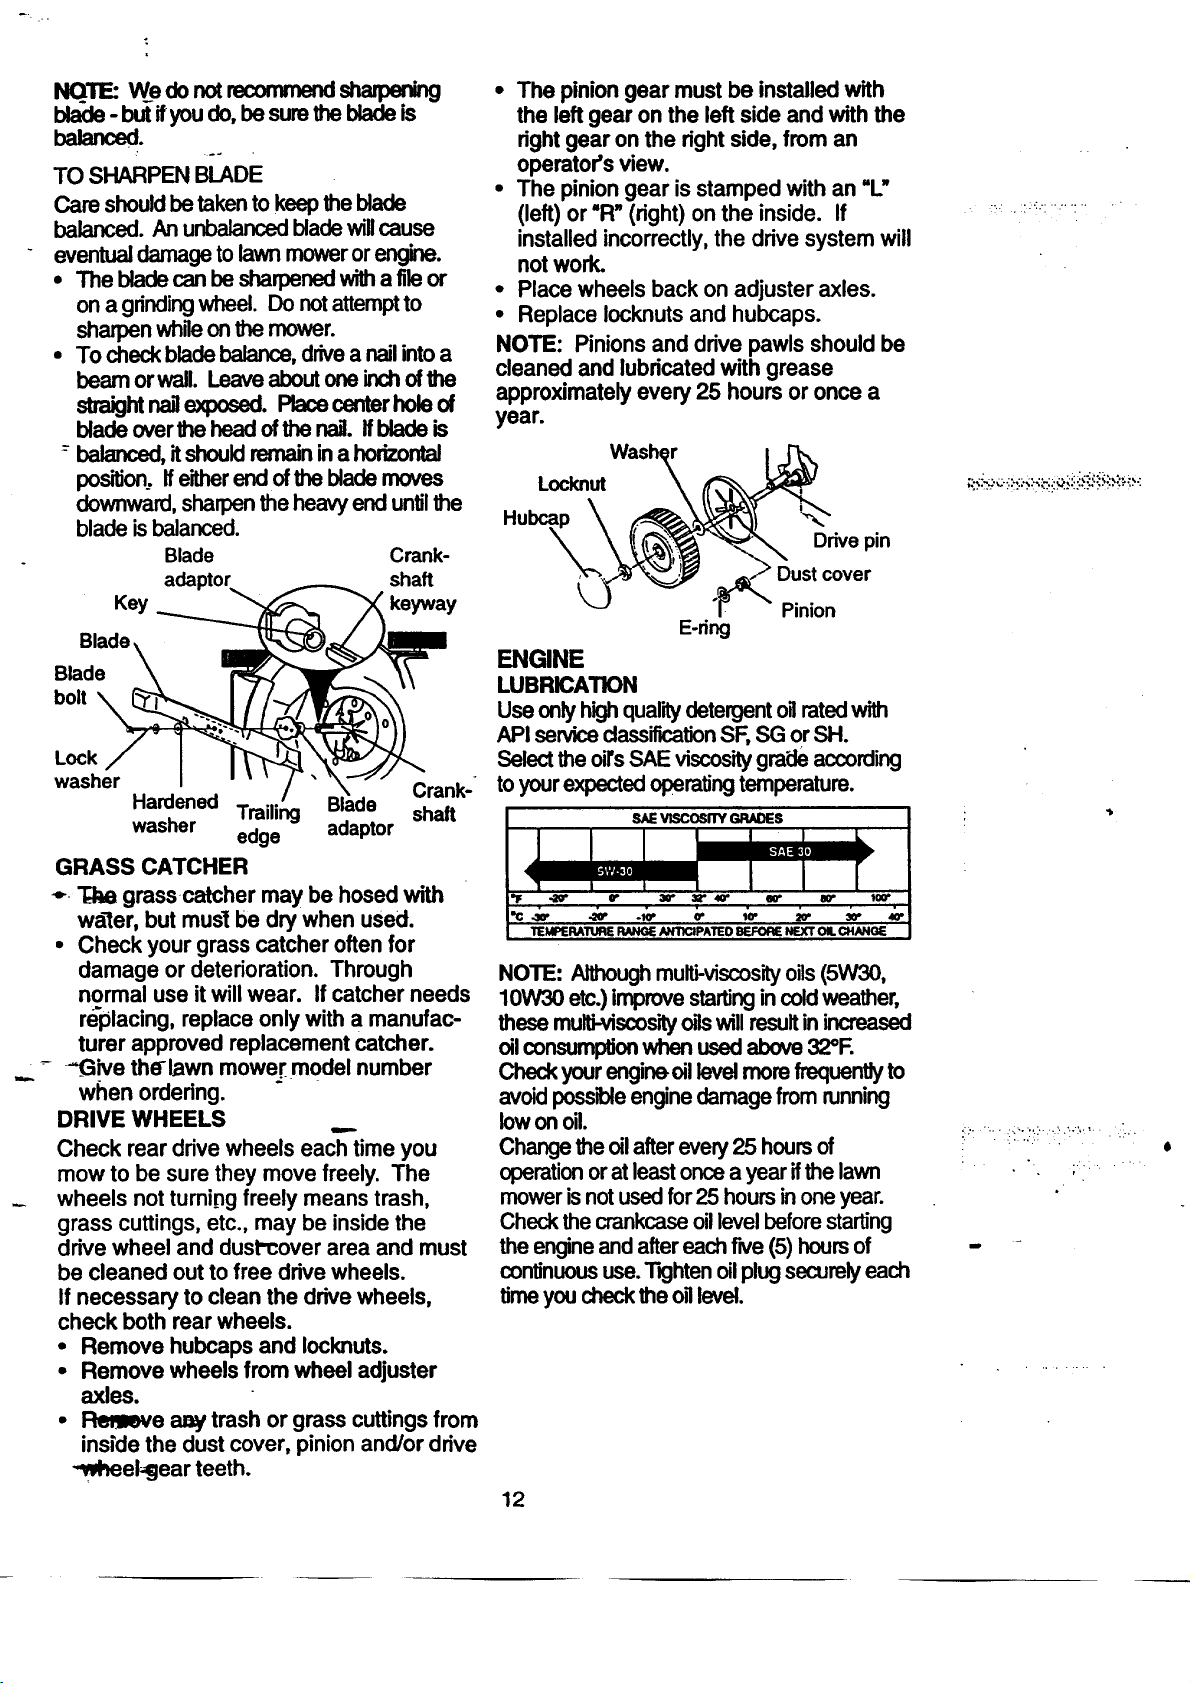
NOTE: Wedo notrecommendsharpening
blacle- butif youdo, be sumthe blade is
balanced.
TO SHARPEN BLADE
Care shouldbe takento keepthe blade
balanced. An unbalancedblade wglcause
eventualdamage tolawnmowerorengine.
• The blade can be sharpenedwitha fileor
ona grindingwheel. Donotattemptto
sharpenwhileonthe mower.
• To checkbladebalance,drivea nailintoa
beam orwall. Leaveaboutoneinchofthe
straightnanexposed. Race centerhole of
blade overthe headof the nail. Ifblade is
--balanced,itshouldremainina ho__ontal
position.,if eitherend ofthe blade moves
downward,sharpenthe heavyenduntilthe
bladeisbalanced.
Blade Crank-
adaptor shaft
Key _ keyway
Blade
Blade
bolt
Lock
washer Crank-
Hardened Trailing Blade shaft
washer edge adaptor
GRASS CATCHER
t,- "L:kegrasscatcher may be hosed with
water, but musl be dry when used.
• Check your grass catcher oftenfor
damage or deterioration. Through
normal use itwillwear. If catcher needs
re'placing, replace only with a manufac-
turer approved replacement catcher.
_ive the-lawn mower model number
when ordering.
DRIVE WHEELS
Check rear drive wheels eac'h'timeyou
mow to be sure they move freely. The
wheels not turning freely means trash,
grass cuttings, etc., may be inside the
drive wheel and dust'cover area and must
be cleaned out to free drive wheels.
If necessary to clean the drive wheels,
check both rear wheels.
• Remove hubcaps and Iocknuts.
• Remove wheels from wheel adjuster
axles.
• _e aw trash or grass cuttingsfrom
inside the dustcover, pinion and/or drive
Wd,mel_jear teeth.
• The pinion gear must be installedwith
the left gear on the left side and with the
rightgear on the rightside, from an
operator's view.
• The pinion gear is stamped with an "L"
(left) or "R" (right) on the inside. If
installed incorrectly,the drive system will
not work.
• Place wheels back on adjuster axles.
• Replace Iocknuts and hubcaps.
NOTE: Pinionsand drive pawls should be
cleaned and lubricated with grease
approximately every 25 hours oronce a
year.
LocknutWash_
Drive pin
Dust cover
Pinion
E-ring
ENGINE
LUBRICATION
Use onlyhighqualitydetergent oilratedwith
API service dassificationSF,SG orSH.
Selectthe oirsSAE viscositygra_deaccording
toyourexpectedoperatingtemperature.
SAEvlscc_rrY GRADES
NOTE: Althoughmulti-viscosityoils(5W30,
10W30 etc.)improvestartingin coldweather,
these multi-viscosityoilswillresultinincreased
oilconsumplJonwhen usedabove32"R
Checkyourengineoil levelmore frequentlyto
avoidpossibleenginedamagefromrunning
lowon oil.
Changethe oilafteravery 25 hoursof
operationorat leastoncea year ifthe lawn
mowerisnotusedfor25 hoursinoneyear.
Checkthe crankcaseoillevelbeforestarting
the engineendaftereachfive(5)hoursof
continuous use.Tightenoilplugsecurelyeach
timeyoucheckthe oglevel.
12
;:?" "' " ,i'_'" ;_'_' "' "'7 ;'' " •-i!'.
i.
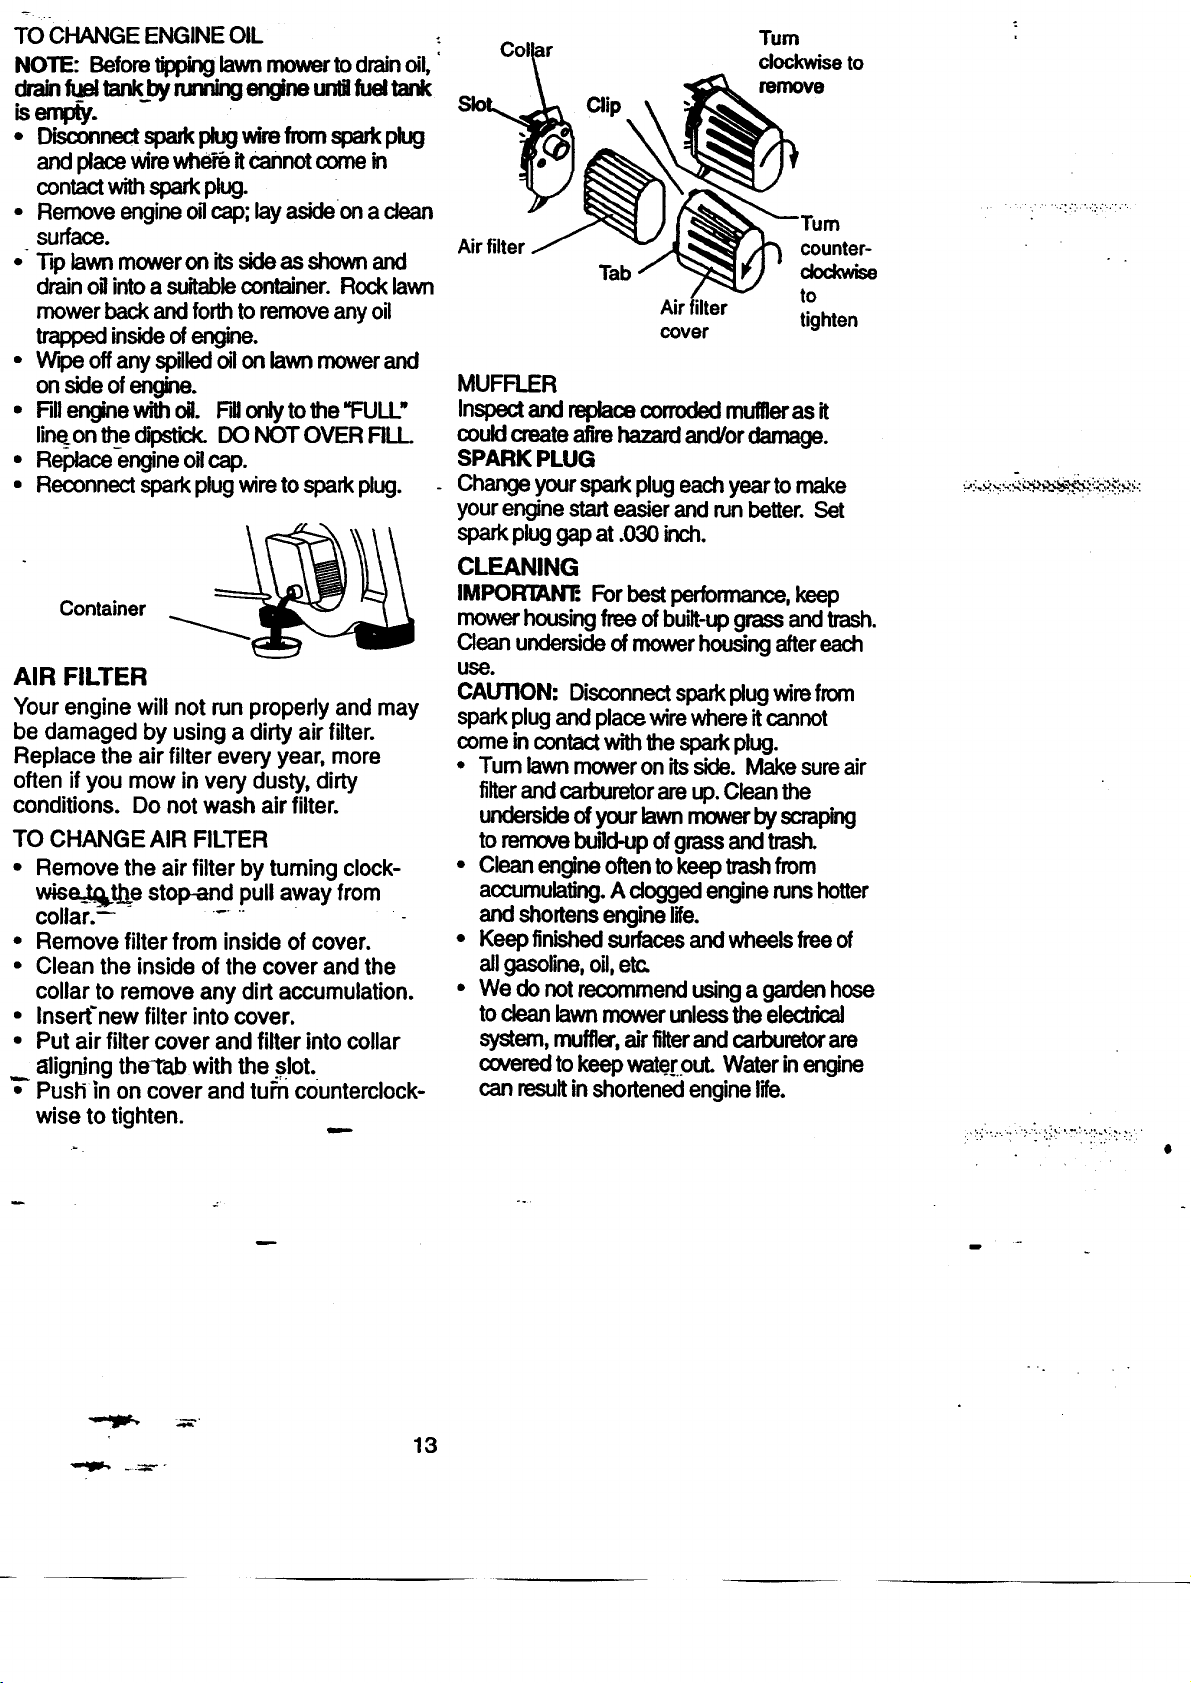
TO CHANGE ENGINE OIL -.
NOTE: Beforetippinglawnmowertodrainoil,'
dra tankbyrunn en neuna tank
iserupt.
• DL onnectspa wirefromspark
and placewirewheib itCannotcomein
contactwithsparkplug.
• Remove engineoilcap;lay asideon a dean
surface.
• "Tip lawn moweron itsside as shown and
drain oilinto a suitable container. Rock lawn
mower back and forthto remove any oil
trapped inside of engine.
• Wipe off any spilled oilon lawn mower and
onsideofengine.
• I=illenginewithoil. Rgonlyto the'FULL•
line_onthe dipstick. DO NOT OVER FILL
• Re_ce-engine oHcap.
• Reconnectsparkplugwire tosparkplug.
Container
AIR FILTER
Your engine will not runproperly and may
be damaged by using a dirty air filter.
Replace the air filter every year, more
often ifyou mow in very dusty, dirty
conditions. Do not wash air filter.
TO CHANGE AIR FILTER
• Remove the air filter by tuming clock-
wiseJ_e stop-and pull away from
collar.-- ......
• Remove filter from inside of cover.
• Clean the inside of the cover and the
collar to remove any dirt accumulation.
• Insert'new filter into cover.
• Put air filter cover and filter intocollar
aligning thel"ab withthe slot.
";" Push in on cover and tu_ counterclock-
wise to tighten.
Clip
Tum
clockwiseto
remove
Air filter
Tab
counter-
dockwba
to
Airfilter
tighten
cover
MUFFLER
Inspectand replacecorrodedmuffleras it
could createafirehazardand/ordamage.
SPARK PLUG
Change yoursparkplugeach yeartomake
yourenginestarteasierand runbetter. Set
sparkpluggap at .030 inch.
CLEANING
IMPOMAN'E Forbestperformance,keep
mower housingfree ofbuiit-upgrassandtrash.
Cleanundersideofmowerhousingaltereach
use.
CAUTION: Disconnectsparkplugwire from
sparkplug and place wire whereit cannot
come incontactwith the sparkplug.
• Tum lawnmoweron itsside. Make sureair
filterandcarburetorare up.Cleanthe
undersideof yourlawnmowerbyscraping
toremovebugd-upofgrassandtrash.
• Clean engineoftentokeeptrashfrom
accumulating.Adogged enginerunshotter
and shortensenginelife.
• Keepfinishedsurfacesandwheels freeof
allgasoline,oil,etc.
• We donotrecommendusinga gardenhose
tocleanlawn mowerunlessthe electrical
system,muffler,airfilterand carburetorare
coveredtokeep wate.rouLWater inengine
canresultinshortened enginelife.
::':::::'_-"-"::::'"! ::_:::":":::'?::i:.'.'":.::
D
13
CAUTION: BEFORE PERFORMING ANY
SERVICE ORADJUSTMENTS:
• Releasecontrolbar.
• Make surethe blade andallmoving
partshavecompletelystopped.
• Disconnectsparkplugwirefrom
sparkplugand placewhere itcannot
comeincontactwithplug.
LAWN MOWER
TO ADJUST CUTTING HEIGHT
See "TOADJUST CUTTING HEIGHT" inthe
(_era-tionsectionofthis manual.
REAR DEFLECTOR
The reardeflector,attached betweenthe rear
wheelsofyourlawnmower,isprovidedto
minimizethe possibilitythat objectswillbe
thrownoutthe rearofthe lawnmower intothe
operator'smowing position. Ifthe rear
deflector becomesdamaged, itshouldbe
replaced.
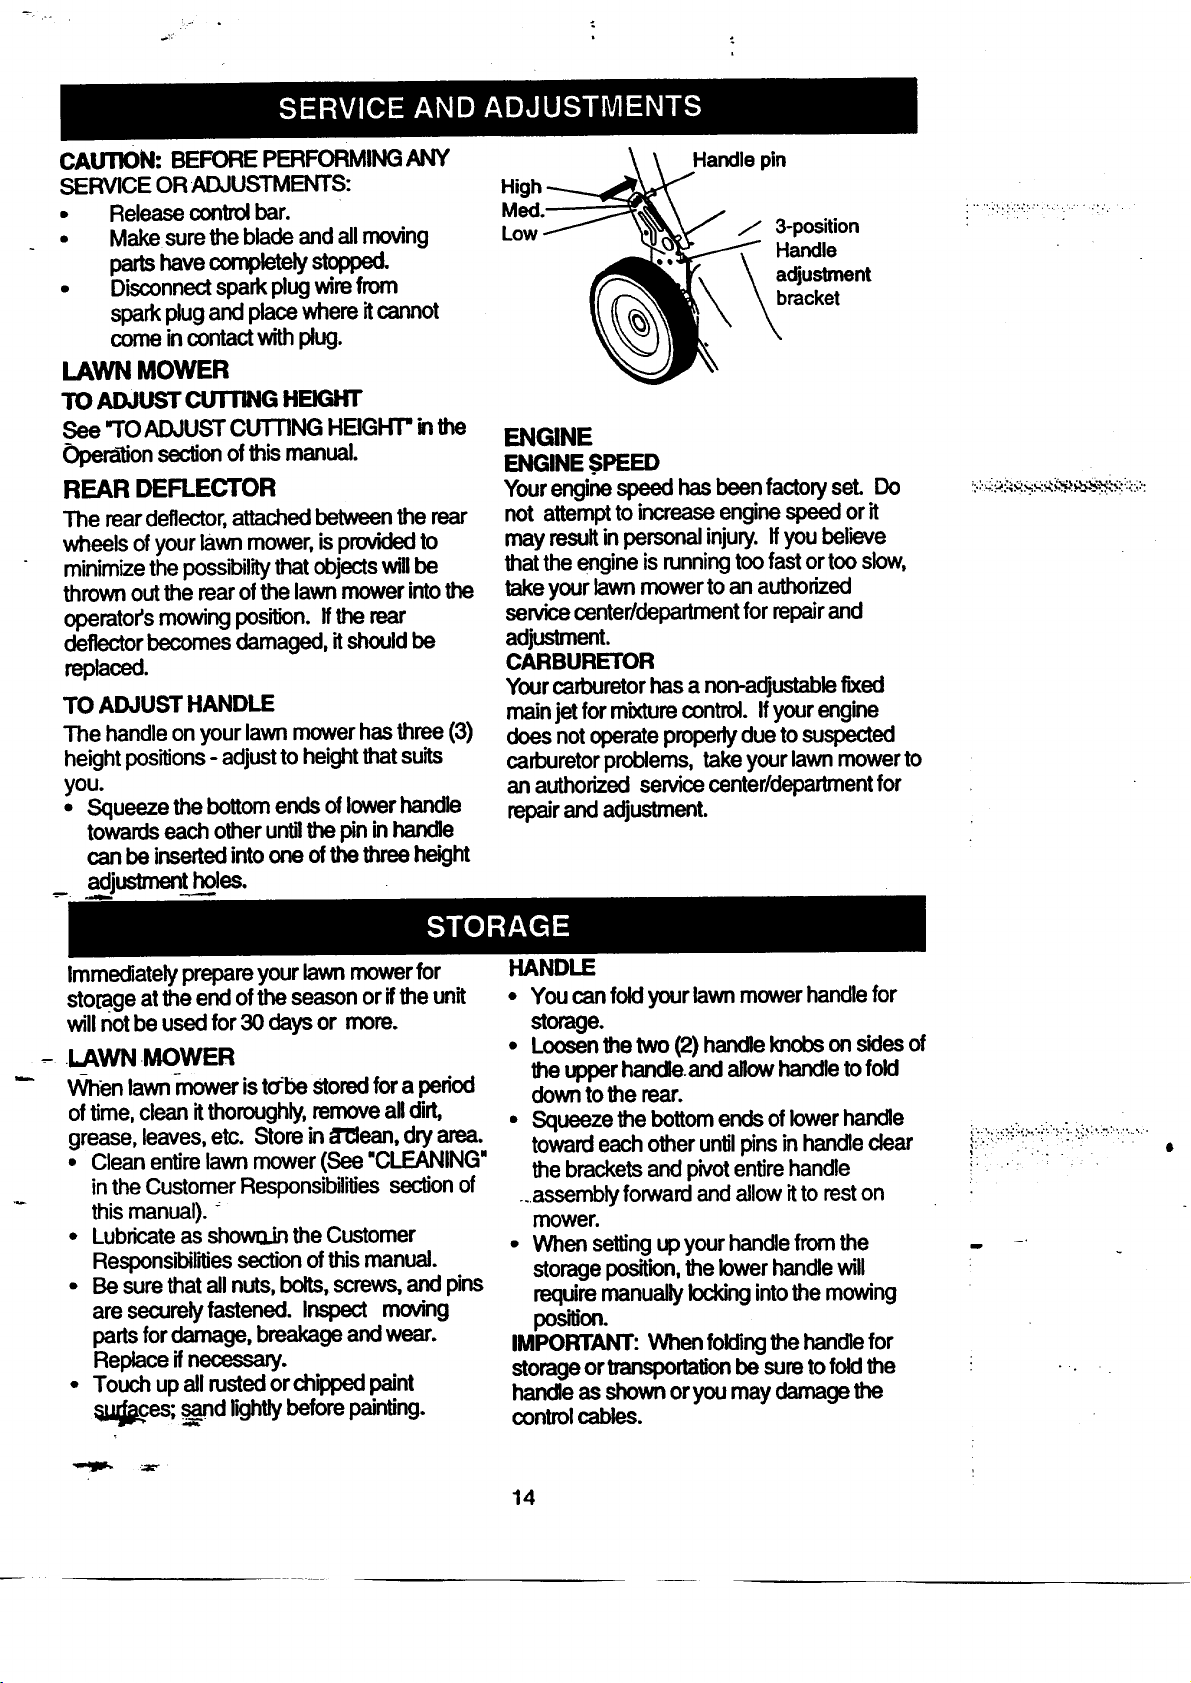
TO ADJUST HANDLE
The handleonyourlawnmowerhasthree(3)
heightpositions - adjusttoheightthatsuits
you.
• Squeeze thebottomendsoflowerhandle
towardseach otheruntilthe pininhandle
can be insertedintoone ofthe threeheight
High
Med.
Low
Handle pin
/ 3-position
Handle
adjustment
bracket
ENGINE
ENGINE .SPEED
YourenginespeedhasbeenfactoryseL Do
not attempttoincreaseenginespeedor it
may resultinpersonalinjury.Ifyoubelieve
that the engineisrunningtoofastortooslow,
lake yourlawnmower toan authorized
service centeddepartment forrepairand
adjustment.
CARBURETOR
Yourcarburetorhasa non-adjustablefixed
mainjetfor mixturecontrol. Ifyourengine
doesnotoperateproperlydue tosuspected
carburetorproblems, takeyourlawn mowerto
an authorizedservicecenter/departmentfor
repairand adjustment.
!:.:::_:_i:_,_:$.'.;:__._._._':..';i::::.:;:':
Immediately prepareyourlawn mowerfor
sto[ageat the end ofthe seasonorIfthe unit
willnotbe usedfor 30 daysor more.
.LAWN MOWER
When lawn iTtower isto:be Storedfor a period
of time, clean it thoroughly, remove all dirt,
grease, leaves, etc. Store in _l'€lean, dry area.
• Clean entire lawn mower (See "CLEANING"
in the Customer Responsibilities section of
this manual).
• Lubricate as show_jn the Customer
Responsibilities section ofthis manual.
• Be sure that all nuts, bolts, screws, and pins
are securely fastened. Inspect moving
parts for damage, breakage and wear.
Replace if necessary.
• Touch up all rusted or chipped paint
,_..ces; s_nd r_htly before painting.
HANDLE
• Youcanfoldyourlawn mowerhandlefor
storage.
• Looeenthe two(2)handleknobson sidesof
the upperhandle.andallowhandletofold
downtothe rear.
• Squeeze the bottomendsoflowerhandle
towardeachotheruntilpinsin handleclear
the bracketsand pivotentirehandle
..assemblyforwardand allow it torest on
mower.
• When setting upyourhandlefromthe
storage position,the lowerhandlewill
requiremanuallylockingintothe mowing
posib'on.
IMPORTANT: When foldingthe handlefor
Storageortransportationbe sure tofoldthe
handleas shownor youmay damagethe
controlcables.
:::::::::::i:!:'::._:-ii::':'!.::;::'.:-.:":.:'._.'
::.: ::i.:: : "
am
_';K_
14
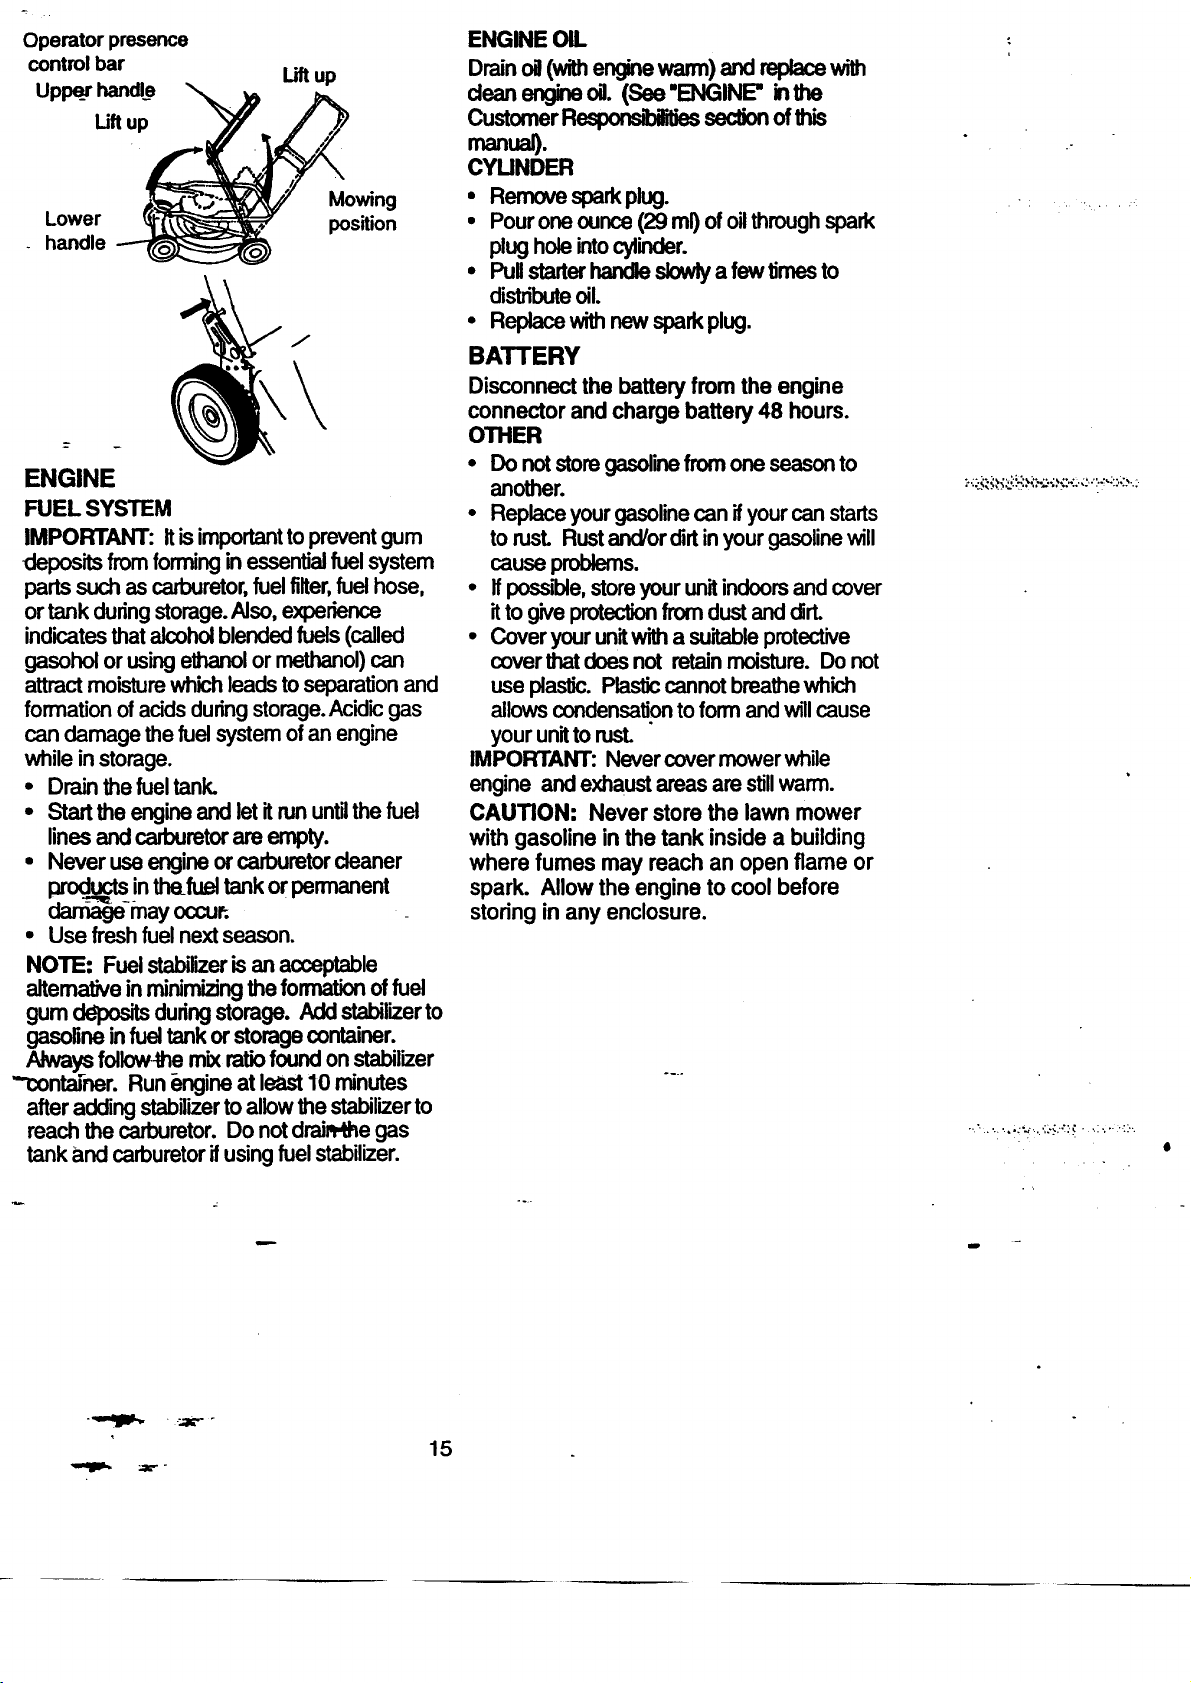
Operatorpresence
controlbar
UPl_r_handle
Liftup
Liftup
Lower
handle
Mowing
position
J
ENGINE
FUEL SYSTEM
IMPORTANT: Itisimportanttopreventgum
depositsfrom forming in essentialfuelsystem
partssuchas carburetor,fuelfilter,fuelhose,
ortank duringstorage.Also,experience
indicatesthatalcoholblendedfuels(called
gasoholor usingethanolor methanol)can
attractmoisturewhichleadstoseparationand
formation ofacidsduringstorage.Acidicgas
can damage the fuel system ofan engine
while instorage.
• Drain the fueltank.
• Startthe engineand letItrununtilthefuel
linesandcarburetorare empty.
• Never useengineor carburetorcleaner
productsinthefuel tankor permanent
darnage mayoccuP.
• Use freshfuel nextseason.
NOTE: Fuelstabilizeris an acceptable
alternativeinminimizingthe formationoffuel
gumdepositsduringstorage. Addstabilizerto
gasolineinfuel tankor storage container.
Alwaysfollowthe mixratiofoundonstabilizer
""con_ner. Run_ngine at least10 minutes
afteraddingstabilizerto allowthe stabilizerto
reach the carburetor.Do notdrain-thegas
tank and carburetorifusingfuel stabilizer.
ENGINE OIL
Drainoil(withenginewarm) andreplacewith
dean engineoil. (See "ENGINE" inthe
CustomerResponsbli_essectionofthis
manual).
CYUNDER
• Removesparkplug.
• Pouroneounce (29 ml) ofoilthroughspark
plugholeintocylinder.
• Pullstarterhandleslowlya fewtimes to
distributeoil.
• Replacewithnewsparkplug.
BATTERY
Disconnect the battery from the engine
connector and charge battery 48 hours.
OTHER
• Do notstoregasolinefromone seasonto
another.
• Replaceyourgasolinecan ifyourcan starts
torust. Rustand/ordirtinyourgasolinewill
cause problems.
• Ifpossible,storeyour unitindoorsand cover
Ittogiveprotectionfrom dustand dirt.
• Coveryourunitwitha suitableprotective
coverthatdoesnot retainmoisture. Donot
use plastic.Plasticcannotbreathewhich
allowscondensationtoform and will cause
yourunittorust.
IMPORTANT: Nevercovermowerwhile
engine andexhaustareasare stillwarm.
CAUTION: Never store the lawn mower
with gasoline in the tank inside a building
where fumes may reach an open flame or
spark. Allow the engine to cool before
storing in any enclosure.
:,.:.-.,;_..:__:..::._:.__.: :.::.,::.;:,..',_;,,::.,';..:
• . . • . .. •
!
15
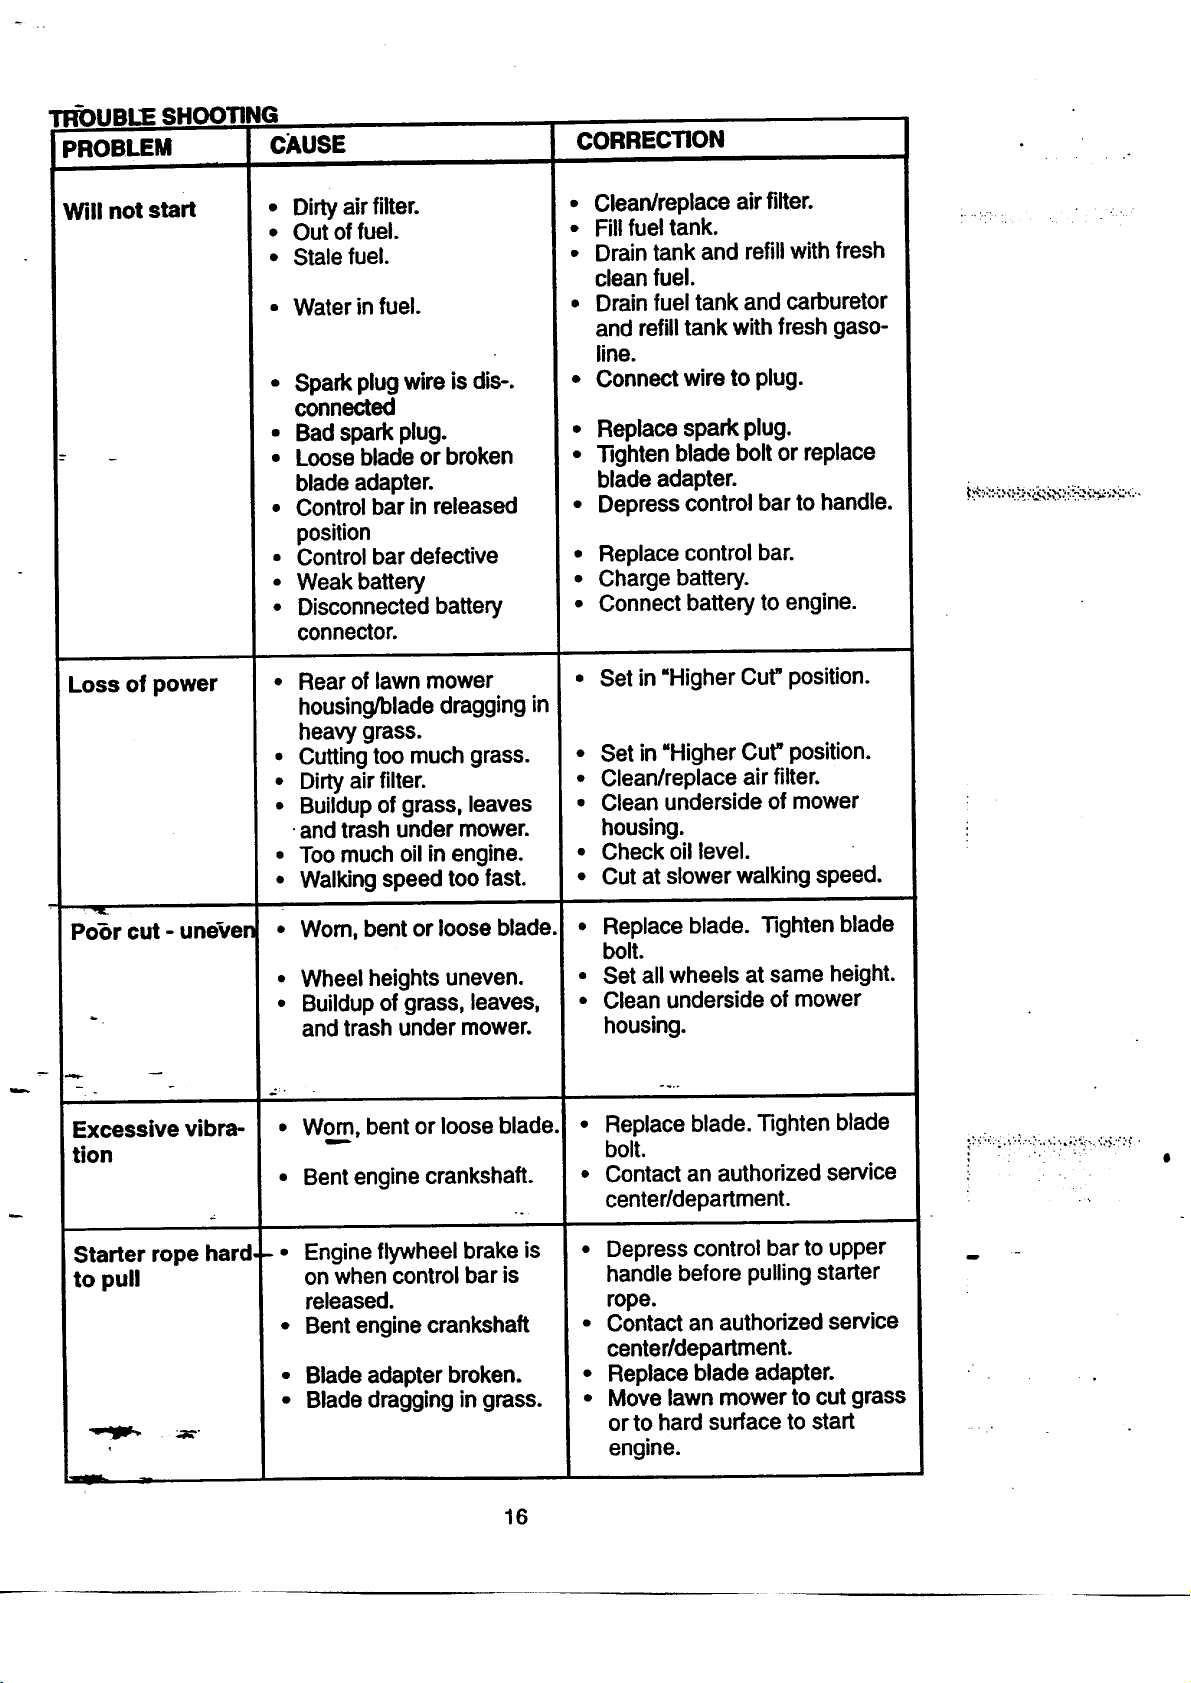
TR_UBUE SHOOTING
PROBLEM CAUSE CORRECTION
ii ii
Will not start
Loss of power
Poor cut - uneven
Excessive vibra-
tion
Starter rope hard,
to pull
=__
• Dirty air filter.
• Out of fuel.
• Stale fuel.
• Water in fuel.
• Spark plug wire is dis-.
connected
• Bad spark plug.
• Loose blade or broken
blade adapter.
• Control bar in released
position
• Control bar defective
• Weak battery
• Disconnected battery
connector.
• Rear of lawn mower
housing/blade dragging in
heavy grass.
• Cuttingtoo much grass.
• Dirtyair filter.
• Buildupof grass, leaves
•and trash under mower.
• Too much oil in engine.
• Walking speed too fast.
• Wom, bent or loose blade.
• Wheel heights uneven.
• Buildupof grass, leaves,
and trash under mower.
Wo.m, bent or looseblade.
• Bent engine crankshaft.
..
Engine flywheel brake is
on when control bar is
released.
• Bent engine crankshaft
• Blade adapter broken.
• Blade dragging in grass.
• Clean/replace airfilter.
• Fillfuel tank.
• Drain tank and refillwith fresh
clean fuel.
• Drain fuel tank and carburetor
and refill tank with fresh gaso-
line.
• Connect wire to plug.
• Replace spark plug.
• Tighten blade bolt or replace
blade adapter.
• Depress control bar to handle.
• Replace control bar.
• Charge battery.
• Connect battery to engine.
• Set in "Higher Cut"position.
• Set in "Higher Cut" position.
• Clean/replace air filter.
• Clean underside of mower
housing.
• Check oil level.
• Cut at slower walking speed.
• Replace blade. Tighten blade
bolt.
• Set all wheels at same height.
• Clean underside of mower
housing.
• Replace blade. Tighten blade
bolt.
• Contact an authorized service
center/department.
• Depress control bar to upper
handle before pulling starter
rope.
• Contact an authorized service
center/department.
• Replace blade adapter.
• Move lawn mower to cut grass
or to hard surface to start
engine.
16
• ,:.,....,. _':_ "_,,'..;:...-.. _.=_.,. _.,...,
=lw

TROUBLE SHOOTING
PROBLEM CAUSE CORRECTION
-- w
Loss of drive
(Serf-Propelled
Mowing)
Grass catcher
not filling (If so
equipped)
Hard to push
• Drive wheels not turning
-" with drive control engaged.
• Belt not driving.
• Cutting height too low.
• Lift on blade wom off.
• Catcher not venting air.
• Grass is too high orwheel
height istoo low.
• Rear of lawn mower
housing/blade dragging
in grass.
• Grass catcher too full.
• Handle height positionnot
rightfor you.
• Adjust or replace drive control
cable, if broken.
• Put belt on pulleys or replace
belts if broken.
• Raise cutting height.
• Replace blade.
• Clean grass catcher•
Raise cutting height.
• Raise rear of lawn mower
housing one (1)
setting higher.
I. Empty grass c_tcher.
• • Adjust handle height to suit.
m
17
CRAFTSMAN
Model No. 917.377630
Garantfa 18 Especificacionesdel Producto 27
Reglas de Seguridad 18 Servicioy Adjustes 30
Montaje 20 Almacenamiento 31
Opemci6n 22 Idenlificaci6n de problemas 32
Mantenimiento " 26 Partes de repuesto Vea el manual
Programa de Mantenimiento 26 ingl6s del dueF)o
Orden de Partes Contratapa
GARANT[A LIMITADADE DOS _ PAPA LASEGADORAA MOTOR CRAFTSMAN
Por dos (2) afios,a padirde lafechadecompra,cuandoestaSegadoraCrattsman se mantenga,lubdque
y afine segdnlas_ paralaoperaci6ny elmantenimientoenetmanualdelduefio,Sears
reparardgratistododefectoenel materialy lamano deobra.
Sila SegadoraCraftsmanse usaparafines comerdak_ ode arfiendo,estagarantfas61ose aplicapor
noventa(90) dias a partirdelafechadecompra.
EstaGarantfano cubre:
• Artfculosque se desgastanduranteel usonomnaitalescomolascuchillassegadorasmtatorias,los
adaptadoresde lacuchilla,lascorreas,losfilbosdeairey lasbujfas.
• Reparacionesnecesariasdebidoal abusoo a la negigenciadeloperador,indw,_dose a los
cig0efialesdobladosy a lafalta demantenimientodelequiposecjdnlasinstmcx:ionesque se incluyen
en elmanualdel duefio.
ELSERVIClO DE GARANI"[AESTADISPONIBLE aidevolverla segadpraa motorCmttsman al centro/
depadmentode servicioSearsmas cercanoenlos EstadosUnkJos.Estagaranffase aplicasolamente
mientrasel productoeste enuso enlosEstadosUnidos.
EstaGarantfale otorgaderechoslegalesespecificos,y puedequetambidntenga otmsderechos_
vadan de estadoa estado.
Sea_, R6ebuck_:l.Co., D/B17WA,HoffmanEstates,IL 60179 USA
_._>..,.. ;;,-..:._ .. _ .,, .: ;,.;_..:,;:,;:.....::._..
Los:.e_'tandraresdesegufidadexpertla pmsenda
del operatoren loscontrolespara mdudra un
minimoeldesgode lesioname.8u unidadviene
.._ equipadaconclchoscontroles,Pornhgun motivo
tratedel eliminarlafunci_e loscontro/esque
e_3en lapresenda deioperador.
ENTRENAMIENTO: ---
• Lea estemanualdel operador
cuidadosamente.Famirmdceseconlos
controlesy aprendaa operarsusegadoraen
lorma adectmda. _ a pararsusegadora
_nte.
• No pen'nitaque losn',_)s usensusegadora.
Nunca_ que losaduitosoperenla
segadorasincon_ conlasbsUUcciones
adecuadas.
• _ el_,rea_ ope,-ac_uespe_
de genre,espedaknentede nirx)spequerm6
• Uselasegadorasdamente paralosfines
propuestosporelfabricantey segdnlas
e_ descdtasen estemanual.
• Nooperelasegadorasise hacafdoo _ en
ctmlquierafonna._empre reparelosdafios
antesdeusada.
• No useaccesoriosqueno hayansido
recomendadosporelfabficante.Elusode dchos
accesoriospuedeserpeligroso.
• ..La cuchillagiracuandoel motor est_
funcionando.
PREPARACION:
• Siernprerevisecukb,dosa.,'ne_eel_bea quese
va a segary _ detodaslaspiedras,
palos,alambms,huesosy otmsobjetos
Estosobjetosserdnlanzadosconla
cuchilay puedenpmdudrledonesgraves.
• s_mm use=teohs desegu_ opromctoms
deojoscuandoananquey duranteeltiempo
que uselasegadora.
18
i':" _'!;:i;:!:!__":;;:'' :":;"!
;;.,<,.,. - ..:::. :.......
• V_ase entom_ _ Nooperela
segade__ _ ocons_d_
mLentruclueelmotorest_bndonande.
• Si_gueskTmpreduranteeldfao conbuena
I.z =tir._.
OPERACION: ....
• Mantenga susojosy su mente en la
segadom yen el drea que se est_ cortando.
No permitaque otrosintereses Iodistraigan.
• No corte c6sped mojado o msbaloso.Nunca
corm mientrasest6 operando susegadora.
Siempre asegdrese de mantener elequilibrio
- mantenga el mango agarmdo firrnementey
camine.
• No ponga las manos o los pies cerca odebajo
de las partes rotatodas.Mantdngase
alejade de la abertura de descarga en todo
momento.
• _;iemp_e pare el motorcuando se vaya
ocuando no est6 usando su segadora, o
antes de atravesar las entmdas para autos,
los senderos, caminosy dreas cubiertasde
ripio.
- • Nunca dirijaladescarga del materialhacia
los espectadoms ni permita a nadie cercade
la segadora mientras la est6 operando.
• Antes de limpiar,inspeccionaro de reparar I
a segadora, pare el motory est6
completamente seguro de que lacuchillay
que todas las partes que se mueven se
hayan detenido. Luego, desconecte el
alambre de la bujfay mantdngalo alejado de
6sta para evitar el arranque por accidente.
• No contindehaciendo funcionarsu segadora
sile pega a un objeto extrar_. Siga el
procedimientodescdtoanteriormente, luego
repare cualquierdafio antes de volvera
arrancar y de operar su segadora.
• --No_eambieIosaJostesdel reguladoro
hagd-_ueel motor_mde a una velocidad
excesiva. Se pueden producir_ en el
motory Iesiones personales.
• No opere susegadora si vibra fuera de Io
normal. Lavibmci6n excesiva es una
indicaci6nde daSo; pare el motor, revise en
f_nlnasegum la causa de la vibraci6ny haga
lasmparaciones seg0n sea necesario.
• No haga fundonar el motor en
recintoscerrados.Los gases de,_._ape son
peligmsos.
• Nunca code el c6sped tirando la segadora
hacia usted. Siegue a travds de la cara de
las pendientes, n0nca hacia ardbao hacia
abajo pues puede peter el equilibrio.No
siegue pendientesdemasiado empinadas.
Tenga cuidadocuandoopere la segadora en
termno d'sparejoo cuando cambie de
direcci_ - mantenga un buen equiTlbdo.
• Nunca opere lasegadom sin las
protecdones adecuadas, las plarK:h_ el
recogedorde c6sped y otrosdispositivosde
segumlad en su lugar.
MANTENIMIENTO Y
ALMACENAMIEN-TO:
• Revise lacuchiUay los pemos de montaje
del motor a menudo, para asegurarse que
estdn apretados en la formaadecuada.
• Revise todoslospemos, tuercas y tornillosa
intervalosfrecuentes, para verificarsiestdn
apretados en forma adecuada, y
asegurarseque la segadora se encuentra en
condidones de funcionamientoseguro.
• Mantenga todoslos dispositivosde seguddad
en sulugar y listospara funcionar.
• Para reducirel peligrode incendio,
mantenga el motorsin cdsped, hojasy grasa
o aceite en exceso.
• RevLseel recogedorde c#.speda menudo
para verificarsi haydeteriom y desgaste y
cambie las bolsasdesgastadas. Use
solamentelas bolsasde repuesto
recomendadas porel fabricantede su
segadora o que cumplencon las
especificacionesde 6ste.
• Siempre mantenga una cuchillaafilada en su
segadora.
• Siempre permitaque el motorse enfrie
antes de guardarla en cualquierrecinto
cerrado.
• Nunca guarde la segadora con combustible
en el estanquedentro de un edirK:iOendonde
losgases pueden alcanzar una llama
expuesta o una fuente de ignici6n,tal como el
calentadorde agua, la estufade
calefacci6n, lasecadora de ropa, etc.
PRECAUCI6N: Siempre desconecte el
alambre de la bujia y p6ngalodonde no pueda
entrar en contactocon la buji'a,para evitar el
ananque poraccidente, durante lapreparaci6n,
el transporte,el ajuste 0.cuandose hacen
reparaciones.
PRECAUCI(SN: Es conocidoporel Estadode
Californiaque los gasesde escapedel motorde
este productorcontienenquimicoslos cuales a
ciertosniveles, pueden ocasionar,cdncer,
defectosde nacimiento,y otrosdaRosal sistema
reproductivo.
..--.:..::.::.:.... :: ..... :.:....
• .- /
.::.. :.,_, ,, ,.:'._'.. _. ,....., ....;,..-
,me
19
Estos acxx_ori_ _ _ cum'_o,_ produjolasegadora.Tambi_ e_m _ enb
rnayodadelaslJendasdeSears yen loscentrosdeserv_io.La mayodadelasliendasSeam tambi6n
pueden mandarape(ir pmtesde mpuesloparausted,siles pmporcio_d n_nemdd rnodelodesu
segado_ Algunosdeeslosaccesor_talveznoseapliquenasusegadera.
RENDIMIENTO DE LA SEGADORA
DESVlAI)ORDE RECORTES
PAPA SEGAOOP.ASCONDESCARGATRASERA
RECOREDOR
PARA
SEGADORAS
CON DESCARGA
TRASERA
JUEGOS PARA LA ACOLCHADORA
F" ! RECOREDOR
PAPA
LATERAL
ESTABlUZAOORES
i
DE GASOMNA
MANTENIMIENTO DE LA SEGADORA
SILENCL_DORES
CORREAS CUCHILLAS
FILTROS DE AIRE
ADAPTADORES
DE CUCHILLA RUEDAS
BUJfAS
ACEITE
DEL MOTOR
;: ...... -. :,..., ...,,, _,...,,..',-'h.,,,.._ _.', _ :,.
Lea e_a_S_ y e_e manual .
complelamenteantesdetralarde _ u operar
su segaderanueva.Susegadoranuevahaside
montadaenlaf'a:_caconia excepci_ndeaquellas
partesque se dejaronsinmontarporrazonesde
envfo.Todaslaspartescomolastuercas,las
arandelas,lospernos,etc.,que son necesarias
__comp_ar e_montajeh_ _ cokx:ad=en_a
balsade partes.Paraaseg_raJ_ que susegadera
funcioneenformaseguray adecuada,todaslas
_rtes y losarticulosdeferreterfa'qaese monten
tienenqueserapreladosseguramente.Uselas
hen-amientasconect_, comosea necesario,para
asecjurarque se aprietenadecuadamente.
PAPA REMOVE_ SEGADORA
DE LA CAJA DE CARTON
• Remueva laspartessuellasquese inciwen con
la segade_
• Cortelasdos esquinasdelosextremosclela
cajade cart6ny 5endaelpaneldel edmn_
piano.
• Remueva todoelmatedalde empaque,excel)tO
en0_bl mangosupe_" y 61_edor, y la
curiacluesujetala bana de loscontrolque exige
_ presendacUoperadorjuntocon_mango
superior.
Haga rodarlasegaderahacia afuemde lacaja
decart6ny revL_dacuidadosamentepara
verif_arsitodavh quedan partessueltas
adidonales.
COMO PREPARAR SU
SEGADORA ....
PARA DESDOBLAR EL MANGO
IMPORTANTE: Despliegueelmangoconmucho
cuidadoparano peHizcaroda6ar loscablesde
control.
• Levante losmangoshastaclueh secci6ndel
mangoinferiorse asegureensu lugar,en h
posk_n parasegar.
• Remueva h cuba protectora,levantelasecci_n
del mangosupebr basrasulugarenelmango
_e_r, y apdeteant_ rnanllaSdel mmx_.
• Remuevah cu_ del mangoque suje_ labarra
de loscontrolque exJgeb prasencbdel
operaderjuntoconel mangosupedor.
• B mangode_ segadorapuedeajumrseseg_n
le acornodepara segar.Re_rase a "AJUSTE
DEL MANGO" enla Secck_ de ServUo y
Ajustesdeeste manual.
20
.... ,,,,.
.,, , ,
m
Barrade conlrolque exkje
la presencta del operador
Levantar
Mango
inferior
Pinza
delmar__
Levantar
Posii6n para segar
Soporte de
_ juste
Mangode
3 posiciones
PARA INSTALAR LOS ACCESORIOS
Su segadora fue enviada lista para usarse
como una acolchadora de capa vegetal. Para
convertidade mode que pueda ensacar o
Uescar u:
• Abra la puerta trasera y remueva la tapon
acolchadora. Gudrdela en un lugar segum.
• Ahora puecleinstelar el recogedor o el
clesviadorde recortes Ol_onal.
• Para volver a la operaci6n de acolchamiento
con capa vegetal, instale la tapon
acolchadora en la abertura de descarga de la
segadora.
PRECAUGI6N: No haga funcionar su
segadora sin la tapon acolchadora aprobada en
su lugar,o sin el desviador de recortes, o sin el
recogedor de c6sped, apmbados, en su lugar.
Nunca trate de operar la segadora cuando se
ha removidola puerta trasera o cuande estd un
pocoabierta. .
Tap6n acolchador
21
PARA PREPARAR LA BATERIA
AVISO: Su bater/a tiene que estarcargada
antes de que pueda hacer arrancar su
segadora.
• Desconecte el conector del motor(macho) al
conector de la bater|a (hembra).
• Conecte el conector del cargadorde la
baterfa (macho) al conector de la baterfa
(hembra).
• Enchufe el cargador de la bateria dentro del
enchufede 110 volt C.A.
• Deje el cargador de la baterfa conectado por
24 horas antes de hacer arrancar su motor
porla pdmera vez.
• Despuds de cargar, conecte el conectordel
motoral conector de la bateda.
Su motor cuenta con un altemador integrado
para carga parcial. Conecte su cargadorde
bateda para cargarla segdn sea necesario.
IMPORTANTE: El altemador del motorno
cargara una bateda descaargada.
AI final de la temporada de siega, la bater/a se
debecargar por 48 horas para protegeda
dumnte el perfodode almacenamiento en el
invierno.
PRECAUCI(SN: Siempm desconecte el
conector del motor del conector de la baterfa
para evitar el arranque por accidenteal
transportaro guarder su segadora despu6s de
la temporada.
•, _,., . ... :
FAMILiARICESE CON SU SEGADORA
LEA ESTE MANUALDEL DU_ Y LAS REGLAS DE SEGURIDAD ANTES DE OPERAR SU
SEGADORA, Comparelasibstmdonesconsusegadorapara familiadzarse conlaubicaci6ndelos
diversoscontrolesy ajustes.Guardeeste manualpara referendaen elfuturo.
i
Estos srmbolospueden apareser sobre su segadom o en la literature proporclonada con el
producto. Aprenda y comprerKla sus slgnificados.
ATTENCIONO MOTOR MOTOR _ LENTO ESTRAN¢_ _ ACEITIE PEUGRO. P.._JARDEI/kS
ADVERTENQA ENCENDIOO APAO_DO LAOGN BUSTIBI.E MAHOSYI.OSPIF.SI.EJO$
I
Barradecontroldela
impulsi6n .
lue e._dgela presenda
lnterruptorde arranque
de Ilave
=.-:_.:,,.'_.<_:_.':_:_:._.-:._::;__,_..:.,._._
Cord6n arrancador
Manilla
Recogedordec6sped
Ajustadordelarueda
Tapa del
deposito de
gasolina
Cebador
Caja
Tapadeldeposito
deaceitedel
motorconvadlla
indicadorade
nivel
CUMPLE CON LOS REQUISITOS DE SEGURIDAD DE LACPSC
Lassegadorasa motor,que se conducendesde lapartedeatr-'as,mtatodas,Sears,cumplenconlos
estdndaresdese(_uddaddelAmericanNationalStandardsInstitutey dela U.S. ConsumerProductSafety
Commission.Lacuchill_giracuandoelmotorest,_funcionando.
Barra de control que exige lapresencla del
operador- _ quesujetarseabajo,juntoconel
mango,parahacerarrancarel motor.Su_tela para
pararel motor.
Cebador - bombeacombu_lde addonal desde el
carburadoralaTrdroparausocuandosenecesita
rnoto,' o.
Cordor arrancador- se usa parahacerarrancarel
_jL Oro _K.,- =
Barra de control de la impulsion--' se usapara
engancharla segadompare movimientohada
adelanteimpulsadaa motor.
Tapon de la acolchadora- situadaenlaabertura
dela descan_lbasera y debe serquitadacuando
se convieeelaopracck_ de ensacadoa desca_a.
Interruptor de arranque de llave - se usa pare
hacer arrancar el motor.
22
era,
La operack_nde cualquier segadora puede
hacer que salten objetos extrafios dentro de sus
ojos, Io que puede producirdafiosgraves en
6stos. Siempre use dr_teojosde seguridad o
protecci6n para losojos mientras opere su
segadora o cuando haga ajustes o
reparaciones. Recomendamos una mascara de
seguridad de visi6namplia, para uso espejuelos
o anteojos de seguridad estandarte.
CONTROL DE LA VELOClDAD DEL MOTOR
La veloddaddel motor se estableci6en la f_lbrica
para un rendimiento6ptimo. La veloddadnose
puedeajustar.
CONTROL DE ZONA DEL MOTOR
PRECAUCl6N: Lasregulacionesfederak_ exigen
cluese in,staleuncontrolparael motorenesta
segadoraparareducira un minimoel desgode
lesionarse debidoalcontactoconla cuchilla.Por
ningdnrnolivobatede efirninarlafunci6ndd
controldeloperaclor.La cuchillagira cuandoel
motor estdfuncionanclo.
• Susegacloraviene equipadaconuna bana de
controlclueexigelapresenciadeloperador,Io
que requiemqueel opemdorest6detrdsdel
rnangode lasegadompara hacedaanancar y
operada.
PARA AJUSTAR LAALTURA DECORTE
• Lascuatromedassonajustadascon una
palancaOnica.
• "firedela palancadeajusteshacialarueda.
Levantelasegadora,muevalapalancahasta
delantea laposicidndeseada. Para bajarla
segadora,muevala palancahacialaretaguardia.
Parauncortealto,baje
lasruedas
Paraun(:ortebajo,levantelasruedas
EL IMPULSl6N
";" Para anancaren movimient6'hadaadelante,tire
la barrade controlde laimpulsi6nhaciael
mai_. "-
• Para pararelmovimientohaciaadelante,alMe la
barradecontroldela impulsi6n.
-IMPORTANTE: durantela utilizaci6n,guarde
siemprelabarrade controlde laimpulsionen
contradel mango.
Barraconcontrolqueexige
la presendadel operador Control
__ delaimpulsi6n
Paraengrancharel Controldelaimpulsk_n
control,lil_ ___ - desenganchado
impulsi6n
23
PARA MONTAR Y ADJUNTAR EL
RECOGEDOR DE CESPED
• Levante la puerta trasera de la segadora de
c6sped y ponga el marco del recogedor de
c6sped a dentro de las ranuras de la puerta
trasera.
• El recogedor de c6sped queda asegurado en
la caja de la segadora cuando se baja la
puerta trasera para descansar en el bastidor
del recogedor de cdsped.
PRECAUClON: No haga funcionar su segadora
sin el desviador de recortes o sin el recogedor
de c6sped, aprobados, en su lugar. Nunca trate
de opemr la segadom cuando se ha removido
la puerta trasera o cuando estd un poco abieda.
Puertatrasera
Mango del
bastidordel
recogdor
marcodel
recogedorde
c6sped
PARA VACIAR EL RECOGEDOR DE
ClaSPED
• Levante el recogedor de cdsped usando el
mango del bastidor.
• Remueva el recogedor de cdsped, con los
recortes, de debajo del mango de la
segadora.
• Vacfe los recortesde la bolsa usando tanto el
mango del bastidor como dl de la bolsa.
AVISO: No arrastre la bolsa cuando la vacfe;
se producirdun desgaste innecesario.
/
ANTES DE HACER ARRANCAR EL
MOTOR
ACEITE
o..
Su segadorarueenviadasinaceiteend motor.
• Asegdreseque lasegadoraestdniveladay que
d drea alrededordeldep6sitodeaceiteest_
mpia.
• Reueva eltapadel depi_sitodeiaceitecon la
varillaindicadoradenively rellenehastala finea
de flenoendsta.
• Use20 oz.de aceite.Paraeltipoy laca[dadvea
"MOTOR"enlasecd6n c161as
"ResponsabilidadesdelCfiente"en estemanual.
• Vacfe elaceitelentamente.No Io Ilene
,:.,.-.,,,,,.,, .. ,.: ,
....;,;,,,_..!....,_.;.,,::..._<..:.:.;..._.:_._.,:.,
•....,'...::?:;_::!.'_,::.:::..,::::!',.::.::::
me
demasiado.
• Reviseel niveldelacelteantesde cadauso.
_-Agregueace_ des necesado. LLenebasrala
Ifneade Iienoen lavan'llaindicadoradoniveL
• Vuelvaa instalarlatapadeldep6sitode aceite
delmotory aprf_tela.
• Cambieel aceitedespu6sde 25 horasde
ope_ o porlo menos una vez ala_osila
segadorase utilizamenos25 horasalar3o.
Puede necesitar_ elaceiterndsa
menudooJandolascorx:licionessonp61vorosas
o sucias.
GASOLINA
• Lleneelestanquedecombu_l_le. Usegasolina
regular,sinplomo,nuevay Utopiaconelminimo
de 87 octanos.No mezde el aceiteconla
gasol_a. Paraasegurarque lagasolinattaTBada
: sea frescacompreestanquesloscualespuedan
set ublizadesdurantelosprimoros30 dfa,s.
ADVERTENCIA: Laexperienciahaindicadoque
loscombustiblesmezcladosconalcohol(conoddes
comogasohol,o elusodeetanolo metanol)
puedenatraer lahumedad,laqueconducea la
separacidny formaci6nde_cidos duranteel
almacenamiento.Lagasolinaac_dicapuededa_ar
elsistemadelcombustibledeun motor duranteel
aJmacenamiento.Paraevitarlosproblemascon el
motor,se debevaciarelsistemadelcombustible
antesde guardadoporunpedodode 30 dfaso
rods. Vacfe elestanquedelcombustible,haga
arrancarel motor y hdgalofuncionarhastaquelas
Ifneasdel combustibley el cmbumdorqueden
vacfos.La pr6xJmatemporadausecombustible
nuevo.Vea las InstruccionesParaE!
Almacenamientoparatndsinformaci6n.Nuncause
productosde r_npiezaparaelmotor opara el
carburadoren elestanquedelcombustible puesse
_ _e_n producir_ permanentes.
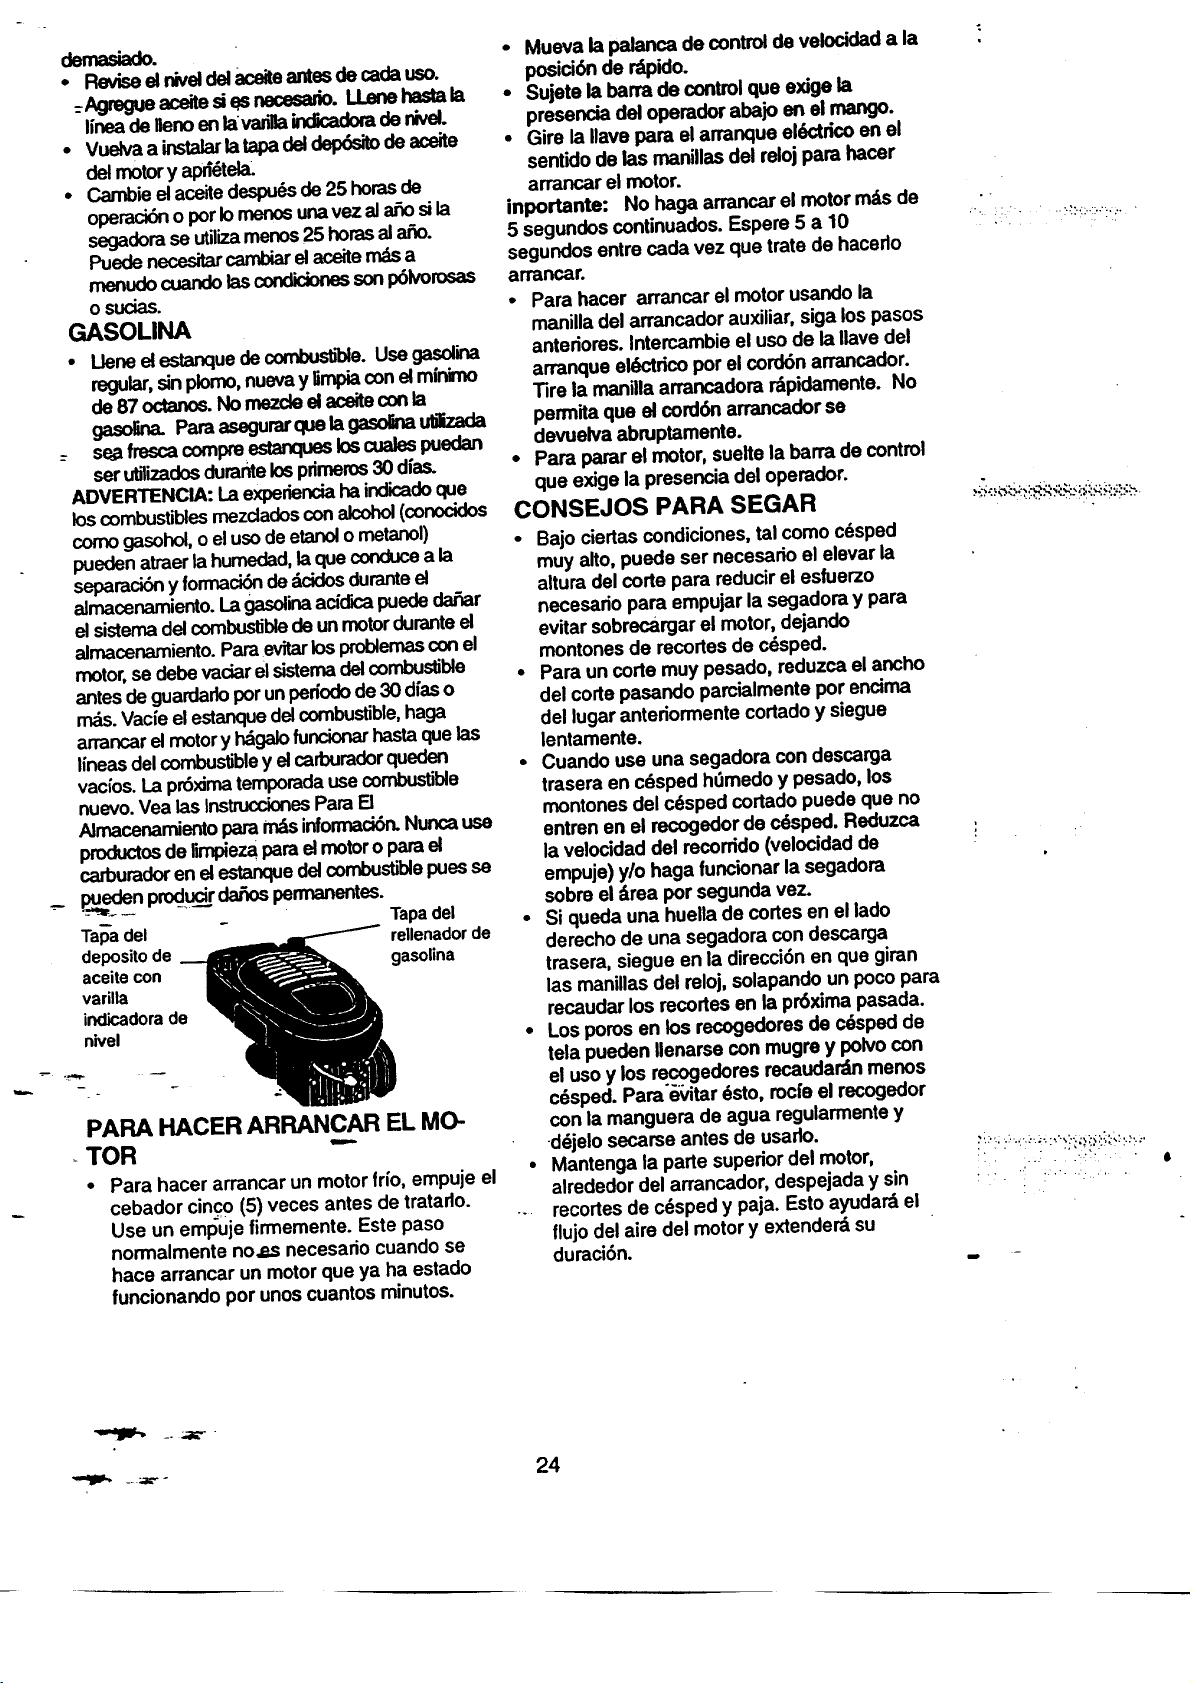
-- _ Tapadel
Tapadel _ reilenadorde
depositode _ gasolina
aceitecon
varilla
indicadorade
nivel
PARA HACER ARRANCAR EL MO-
TOR -"
Para hacer arrancar un motorfrfo, empuje el
cebador cinco (5) veces antes de tratarlo.
Use un empuje firmemente. Este paso
normalmente no,e,.snecesario cuando se
hace arrancar un motorque ya ha estado
funcionando por unoscuantos minutos.
• Mueva la palanca de controlde velocidad a la
posici6n de rdpido.
• Sujete la barra de controlque exige la
presencia del operador abajo en el mango.
• Gire la Ilave para el arranque eldctricoen el
sentido de las manillas del relojpara hacer
arrancar el motor.
inportante: No haga arrancar el motor mds de
5 segundos continuados. Espere 5 a 10
segundos entre cada vez que trate de hacedo
arrar_3ar.
• Para hacer arrancar el motor usando la
manilla del arrancador auxiliar, siga los pasos
anteriores. Intercambie el uso de la Ilave del
arranque eldctricopor el cord6n arrancador.
Tire la manilla arrancadora rdpidamente. No
permita que el cord6n arrancador se
devuelva abruptamente.
• Para parar el motor, suelte la barra de control
que exige la presencia del operador.
CONSEJOS PARA SEGAR
• Bajo ciertas condiciones,tal como c6sped
muy alto, puede ser necesario el elevar la
altura del corte para reducirel esfuerzo
necesario para empujar la segadora y para
evitar sobrecargar el motor, dejando
montones de recortes de c6sped.
• Para un cortomuy pesado, reduzca el ancho
del corte pasando parcialmente pot encima
del lugar anteriormente cortadoy siegue
lentamente.
• Cuando use una segadora con descarga
trasera en cdsped hdmedo y pesado, los
montones del cdsped cortado puede que no
entren en el recogedor de c6sped. Reduzca
la velocidad del recorddo (velocidadde
empuje) y/o haga funclonarla segadora
sobre el drea por segunda vez.
• Si queda una huella de cortes en el lade
derecho de una segadora con descarga
trasera, siegue en la direcci6nen que giran
las manillas del reloj, solapando un pocopara
recaudar los recortes en la pr6xima pasada.
• Los pores en los recogedores de c6sped de
tela pueden Ilenarse con mugre y polvocon
el uso y los recogedores recaudardn menos
c6sped. Para'_vitar 6sto, rocfe el recogedor
con la manguera de agua regularmentey
d6jelo secarse antes de usaflo.
• Mantenga la parte superiordel motor,
alrededor del arrancador, despejada y sin
recortesde cdspedy paja. Estoayudard el
flujodel aire del motory extenderd su
duraci6n.
- . ,. .
: ":; " 6
: : . "iI :.... ,
24
i,
CONSEJOS PARASEGAR Y
ACOLCHAR
IMPORTANTE: Pare ob'tenerel mejor
rendimiento mantenga la caja de la segadora
sin acumulac6n de cdspedy basura. Vea
"LIMPIEZA" en la secci6n de
RESPONSABILIDADES DEL CLIENTE de este
manual.
• La cuchillaacolchadora especial va a volver
a cortar los recortesde c6sped muchas
veces, y los reduce en tamarx), de modo que
si se caen en el c6sped se van a dispesar
entre dste y no se van a notar. Tambi6n, el
c6sped acolchado se va a deshacer
rdpidamente entregando substancias
nut_itivas-pamel cdsped. Siempre acolche
con la velocidad del motor (cuchilla) rndsalta,
pues asf se obtendrd la mejor acci6n de
recorte de las cuchillas.
• Evite cortar el c6sped cuando estd mojado.
" El c_sped mojado tiende a format montones
e interfiere con la acci6n de acolchado. La
mejor hora para segar el c6sped es temprano
en la tarde. A esa hora dste se ha secado y
el drea reci6n cortada no quedard expuesta
al sol directo.
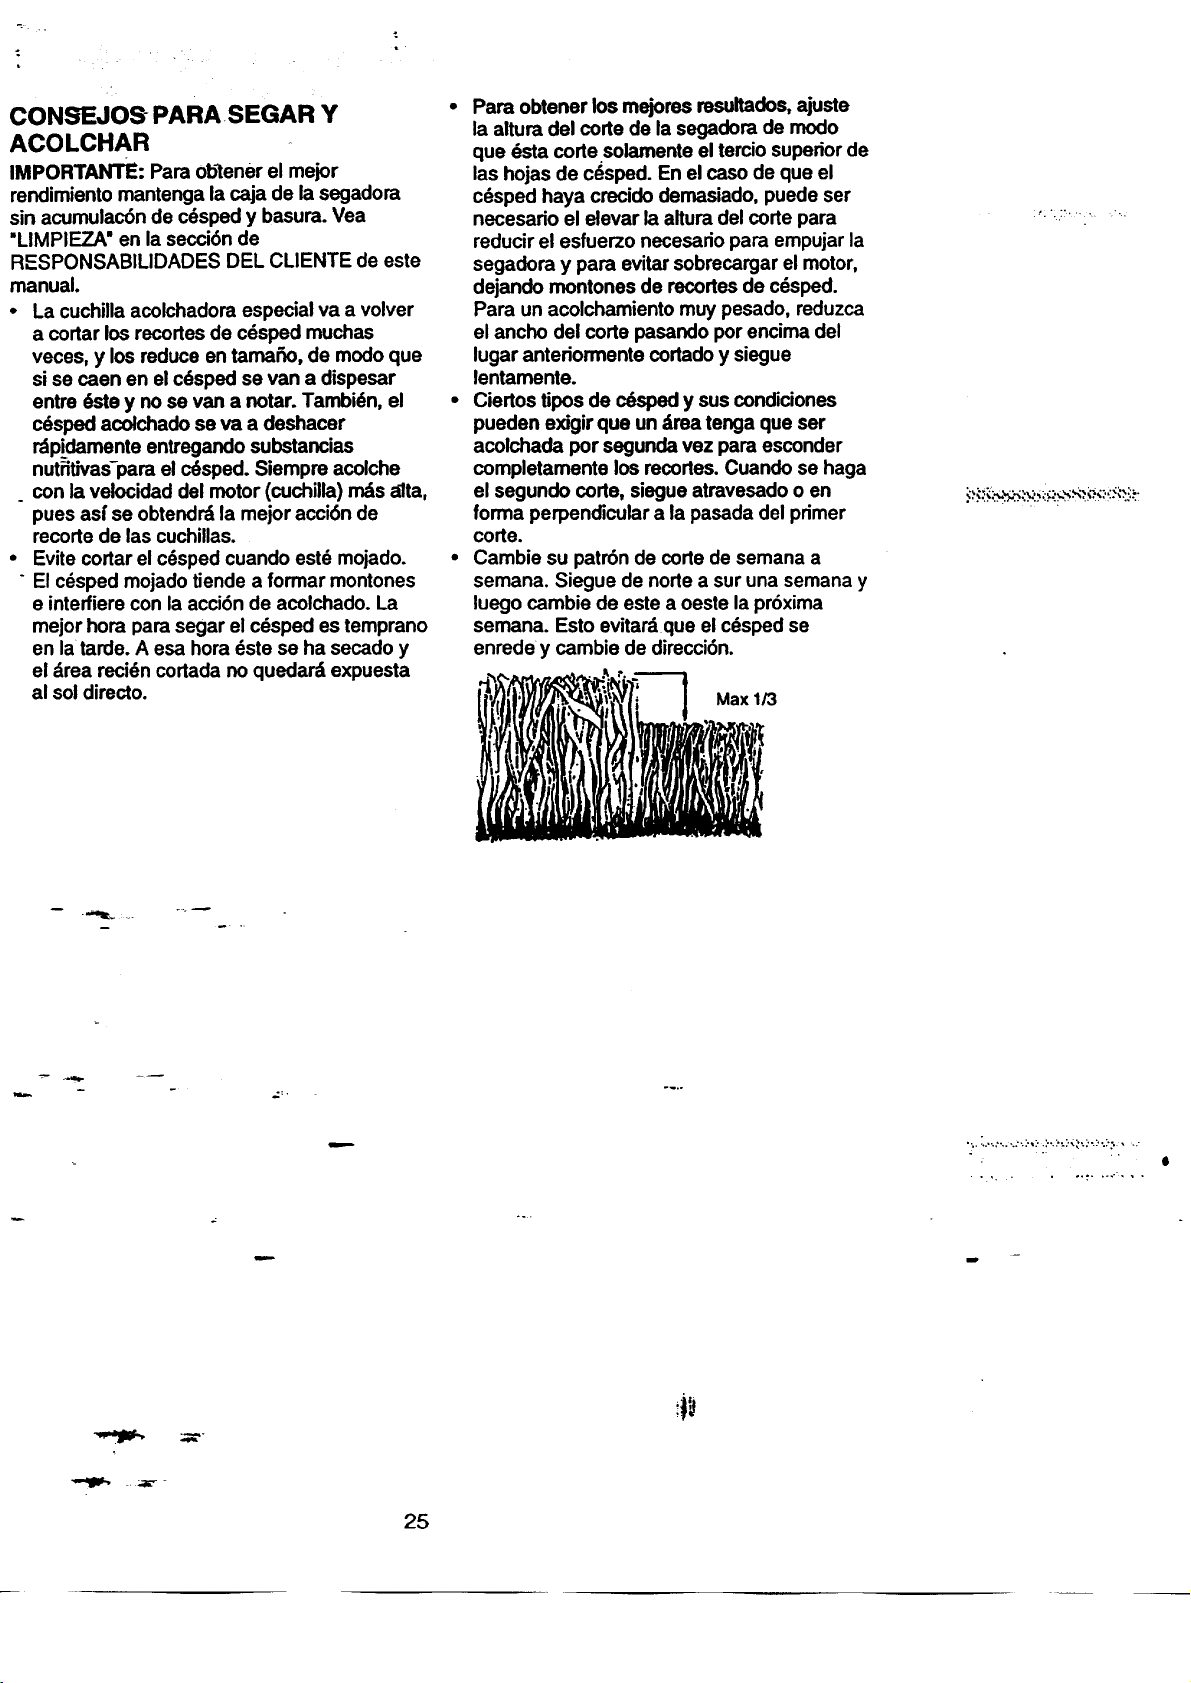
• Para obtener los mejores resultados, ajuste
la altura del corte de la segadora de modo
que 6sta code solamente el terciosuperior de
las hojas de c_sped. En el caso de que el
cdsped haya crecido demasiado, puede set
necesario el elevar la altura del corte para
reducir el esfuerzo necesario para empujar la
segadora y para evitar sobrecargar el motor,
dejando montones de recortes de cdsped.
Para un acolchamiento muy pesado, reduzca
el ancho del corte pasando por encima del
lugar anteriormente cortado y siegue
lentamente.
• Ciertos tipos de c6sped y suscondiciones
puedan exigir que un drea tenga que ser
acolchada por segunda vez para esconder
completamente los recortes. Cuando se haga
el segundo code, siegue atravesado o en
forma perpendicular a la pasada del primer
code.
• Cambie su patr6n de corte de semana a
semana. Siegue de nortea sur una semana y
luego cambie de este a oeste la pr6xima
semana. Esto evitard•queel cdsped se
enrede y cambie de direcci6n.
,4,'q.
m
25
• _ , , ,, -
L.E.E,.,,s O,,
o,.,EcoMP, Es,.,
o,:s.v,c,o
. , ,f,- Ov,/-
Revisarsi hay su)etadores sueltos _ li_
Umplar/_nspecclonarel recogedor de
c_sped (si viene equipado) I/ _ _'
Limpiarla segadora
Umpiar debajode la cublerta do latrans-
misi6n (segadoras con poder propulsor)
Revlsar las correas y lasix)leas Impul-
sadas(segao'omsconpoderprolaCs_)
Revisar o/afilar/camblar la cuchUl*
Tabla de lubricad()n_
I.impiar labateda/mcargar
(segadoras con arranque e_ctdco)
!
M
Limpiar elliltrode aim
RO Inspeccionarel silenciador
Limpiaro/cambiar !a bujfa
Cambiar el cartucho de papet del flltro
de aim
v'
v'=
v' v'
V' ,V'_
Revisar el niveldel aceite ,
Cambiar el aceitedel motor .... I/'IR !
VP2
I - Cambiar m_Lsa men_lo cuando le opom bajo carga peuda o on ambientes con alias teml=eraturas.
2 - Oar servicio mAs a menudo cuando se opero on €ondidonel sudas o polvorosas.
3 - Cambie las cuchillas m;_Lsa monuclocuando sieguo en torreno arenoso.
4 - Catgar pot 48 horas a|fin de hi temporada.
RECOMENDACiONES
GENERALES
La garantiadeestas_adora nocubm losarlfculos
que hartestadosujetosalabusooa lanegrK3enda
del opemdor.Pararecibirtodoelvalordela
garantia,el operadortieneque mantenerla
S-_gadorasegu"nlas instmccionesdescritasen este
manual.
Hayalgunosajustesque se tienenque haceren
formaperi6dicapara podermantenersuunidad
adecuadamente.
Todoslosajustesenla secckSnde Sen_cioy
_._Ajust_ de estemanualtienenqueset revisados
- porlo meRosunvez po!;cadatempomda.
• Unavez ala_o, carnie labuj_ limpieocambie
elelementodelfirm deaimy revisesilacuchiUa
estddesgastada.Una bujfa"rt0evay un elernento
del filtrode aimlimpio/nuevoaseguranla mezda
de aire-combu_'bleadecuaday ayudana que
su motorfurK:ionemejory quedurerods.
• Sigaelprogramade mantenimientoen este
manual.
ANTES DE CADA USO
• Reviseelniveldel aceitedel motor.
• Revise sihaysujetadoressueltos.
LUBRICACION
Mantengala unk_. bienlubdcada(yeala"TABLA
BR,c=Ac,o
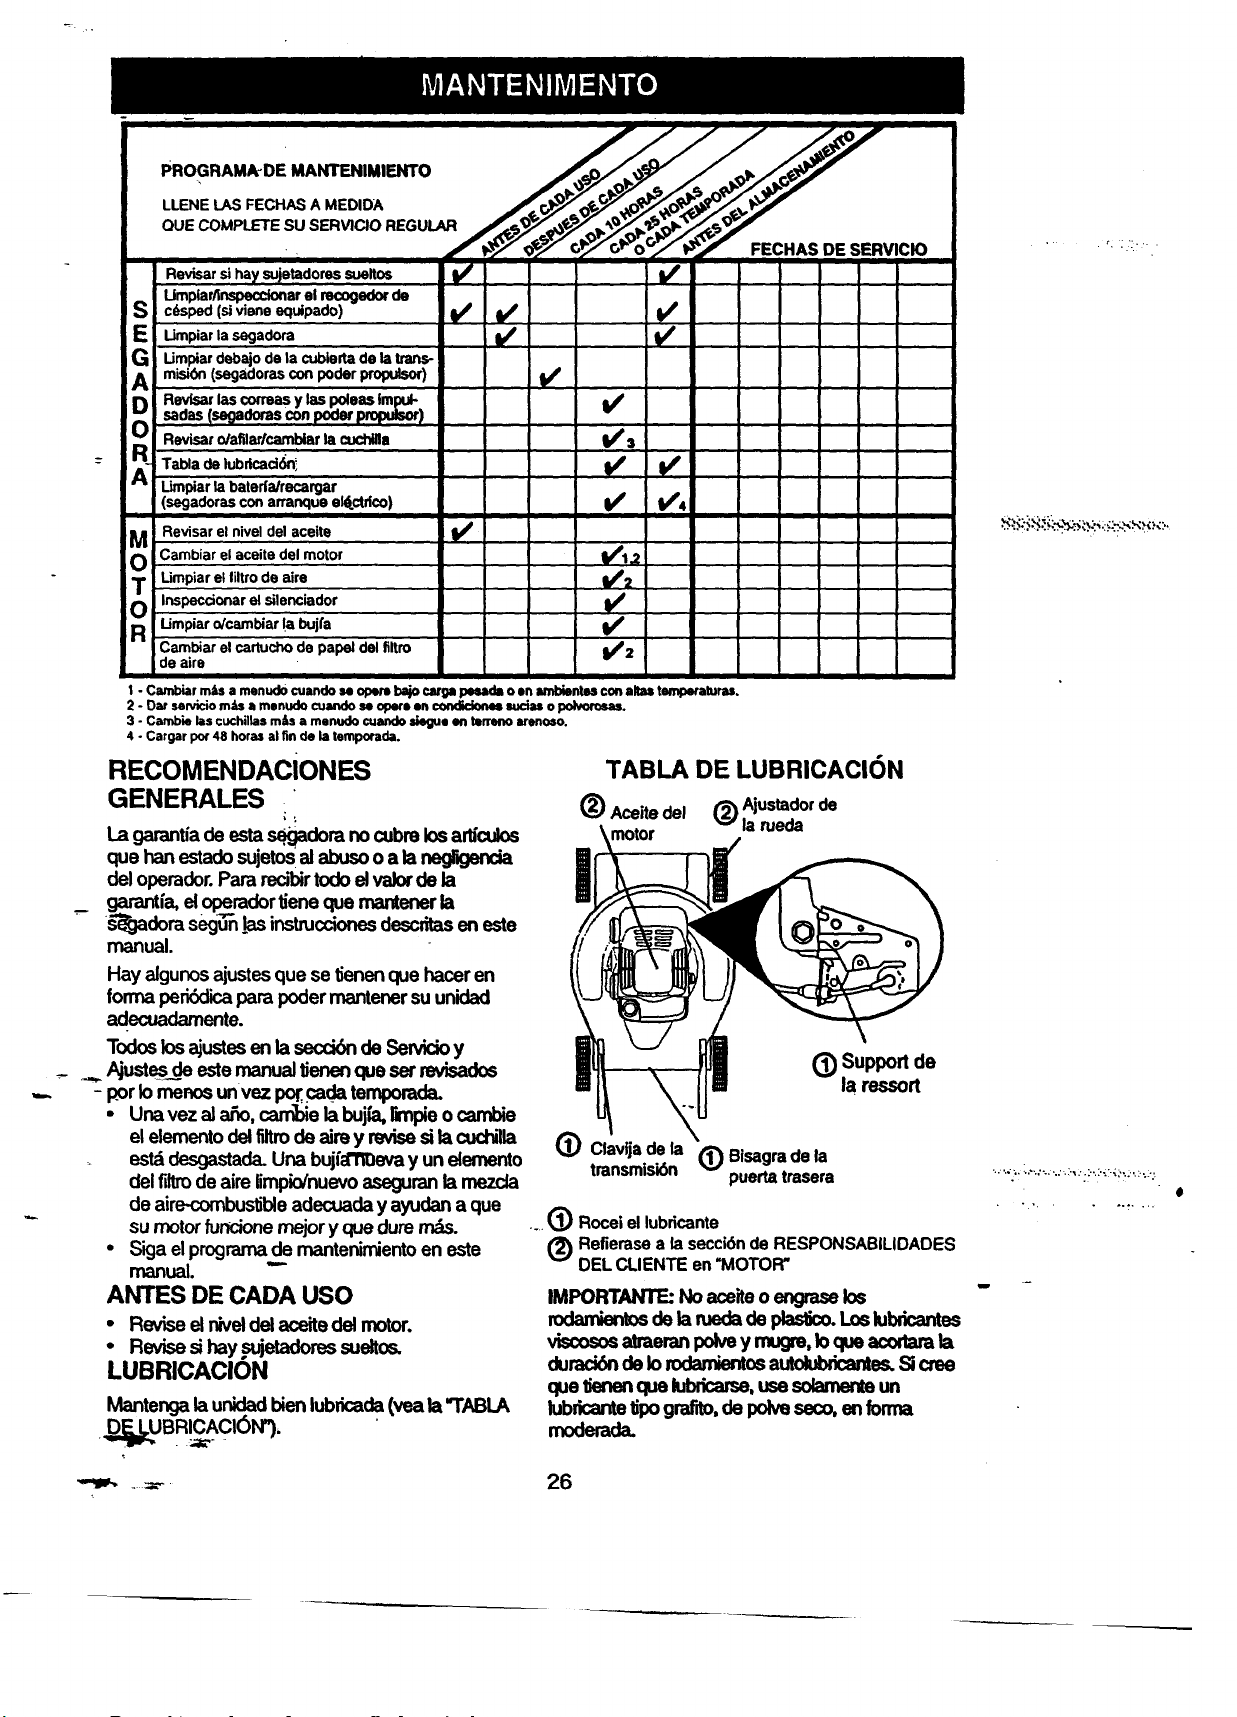
TABLA DE LUBRICACION
(_) Aceite del _ Ajustadorde
la rueda
(_) Supportde
la ressort
(D Clavlja de la (_) Bisagra de la
transmisi_ puerta trasera
....(_) Rocei el lubricante
(_ Refiemse a la secck_nde RESPONSABILIDADES
DEL CLIENTE en =MOTOR"
IMPOFITANTE:No aceiteo engraselos
rodamientosdela medadeplastico.Loslubricantes
viscososatraeranpolvey rnugm,Ioque acortarala
du_ deIomdamientosautolulxicanles.Sicree
quelichenque Iubdcar_. usesolamer_ un
lubdcantelipo graflto,depolveseco,enforma
moderada.
•_'.;;;,;.',._;;:............ • ..,..
. =,- 26
.
-SPECIFICACIONES DEL PRODUCTO
_i0MERO DE MODELO 917.377630
I_IOMERO DE SERIE
=ECHA DE COMPRA
3ABALLOS DE FUERZA: 6.75
3ESPLAZAMIENTO: 12.56 CU. IN.
CAPACIDAD Y TIPO 1.25 Cuartos
DE GASOLINA: REGULAR SIN PLOMO
TIPO DE ACEITE: SAE 30 (sobre 32°F)
(API-__SF/SG/SH) SAE 5W-30 (debajo 32°F)
CAPACIDAD DE ACEITE: 20 oz. de capacidad
BUJfA (ABERTURA: .030") CHAMPION RJ19LM
T.OLERANCIA DE VALVULA: ADMISION: .004 - .008
DESCARGA: .004 - .008
SENCENDIDO DE ESTADO
SOLIDO ABERTURA DE AIRE: .0125 IN.
TORSI6N DEL PERNO
DE LA CUCHILLA: 35-40 FT. LBS.
• El numdro del nodelo y el de serie se encuentran en la calcomania adjunta a la parte
trasera de la caja de la segadora. Debe registrartanto el numdro de serie come la
fecha de compra y mantengalos en un lugar seguro para refencia en el futuro.
SEGADORA • Remuevael pemode lacuch_lagi_'ldolo en el
Siempreol0@ewelasregtasdeseguddedcuando
haga elmantenimiento. -
LLANTAS
• MantengalasIlantassingasorma,aceiteo
substanciasquimicasparacort_ de insectos
que puddendafiarlagoma.
• Evitelostocones,laspiedras,lasgrietas
pmfuodas,losobjetosaf!ladosy otrospeligros
-"que _ dafiara lasIiant_
CUIDADO DE LA CUCHILLA
Para obtenerlosmejoresresultados,la_chilla de
la segadoratieneque mantenerseafilada.Cambie
lacuchilladobladaoda_ada.
PARAREMOVER LACUCHILLA
Desconecte elalambrede la-buj[ay p<_3a]oen
donde no puedaentraren contactocon
Hagadescansarlasegadoraensulado.
Asegdreseque eltiltmde airey que el
carburadorquedenmirandohada am'ba.
Use unbloquede madera entrelacuchillay la
cajade la segademparaevitarque lacuchilla
9ire cuandese le quiteelpemo.
• Proteja'_m_ar_s==on guantesy/o envuelvala
cuchillaconuna telagmesa.
sentidocontrarioen que9iranlasmanillasdel
re_.
• Remueva lacuchillay losarffculosdeferreteffa
adjuntadores(elpemo,la arandeladeseguridad
y laarandelaendurecida).
AVISO: Re_Jeva eladaptadorde lacuchillay
reviseelcubointeriorde la ranuradeladaptadorde
lac_hill_La rejoinIienoque est_en buenas
oond'_ione_pe.mqtmItmcioneenforrr__Jecuada.
C_bie eladepladorsies_'d_do.
PAPACAMBIAR LACUCHILLA
• Pongael adaptadorde lacuchillaenelciguefial
dei motor.Asegdreseque laranuradet
adaptadory queel chaveterodelcigue_l est_n
aline.
• Pongalacuchillaenel adaptadorde dsta
alineandolosdos(2) agujerosen lacuchillacon
lassalienteselevadaseneladaptador.
• Asegdresede queelbordede sarKlade la
cuchiga(opuestoalhordeafilado)est6hada
am'bahaciael motor.
• Instaleel pemode lacuchillaconlaarandelade
seguridady laarandelaend,recidaenel
adaptadordela cuchigay _1ciguefiaL
27
...... , . ., .
Use un bloquedemadera entrelacuchilay la
cajade lasegadoray apdete elpemode la
--'cuch_lla-girdndoloen elsenlkloenquegiranlas
maniUasdelreloj.
• Latorsi6nparaapmtar recomendadaes de35-
4opieslibras.
IMPORTANTE: ELPERNO DE I_ACUCHILLA ES
CLASE 8 TRATADOACALOR.
AVISO: No recomendamoselafilarlacuchilla-
perosiIo hace,asegdresedeque quede
balanceada.
PARAAFILAR LA CUCHILLA
Se tiene quetenercuidadode manteneda
balanceada.Una cuchillaclueno est_balanceada
va a producireventualmentedaRoen la segadorao
en el motor.
-'- La-cuchillapuedeafilameconuna limao enuna
rueda_:No tratede af_ar_rn_ntras
se encuentraen lasegadora.
• Parerevisarel balancede lacuchill_claveun
clavoen unavigao en la pared.Deje alrededor
de una pulgadade undavo rectoexpuesto.
Pongaelagujerocentralde lacuchillasobrela
cabeza del davo. Si lacuchillaestdbalanceada
debe permaneceren laposick_ horizontal.Si
cualquieradelos extremosde lacuchillase
muevehaciaabajo,afileelextmlT_ pesado
hastaque dstaquede balanoeada.
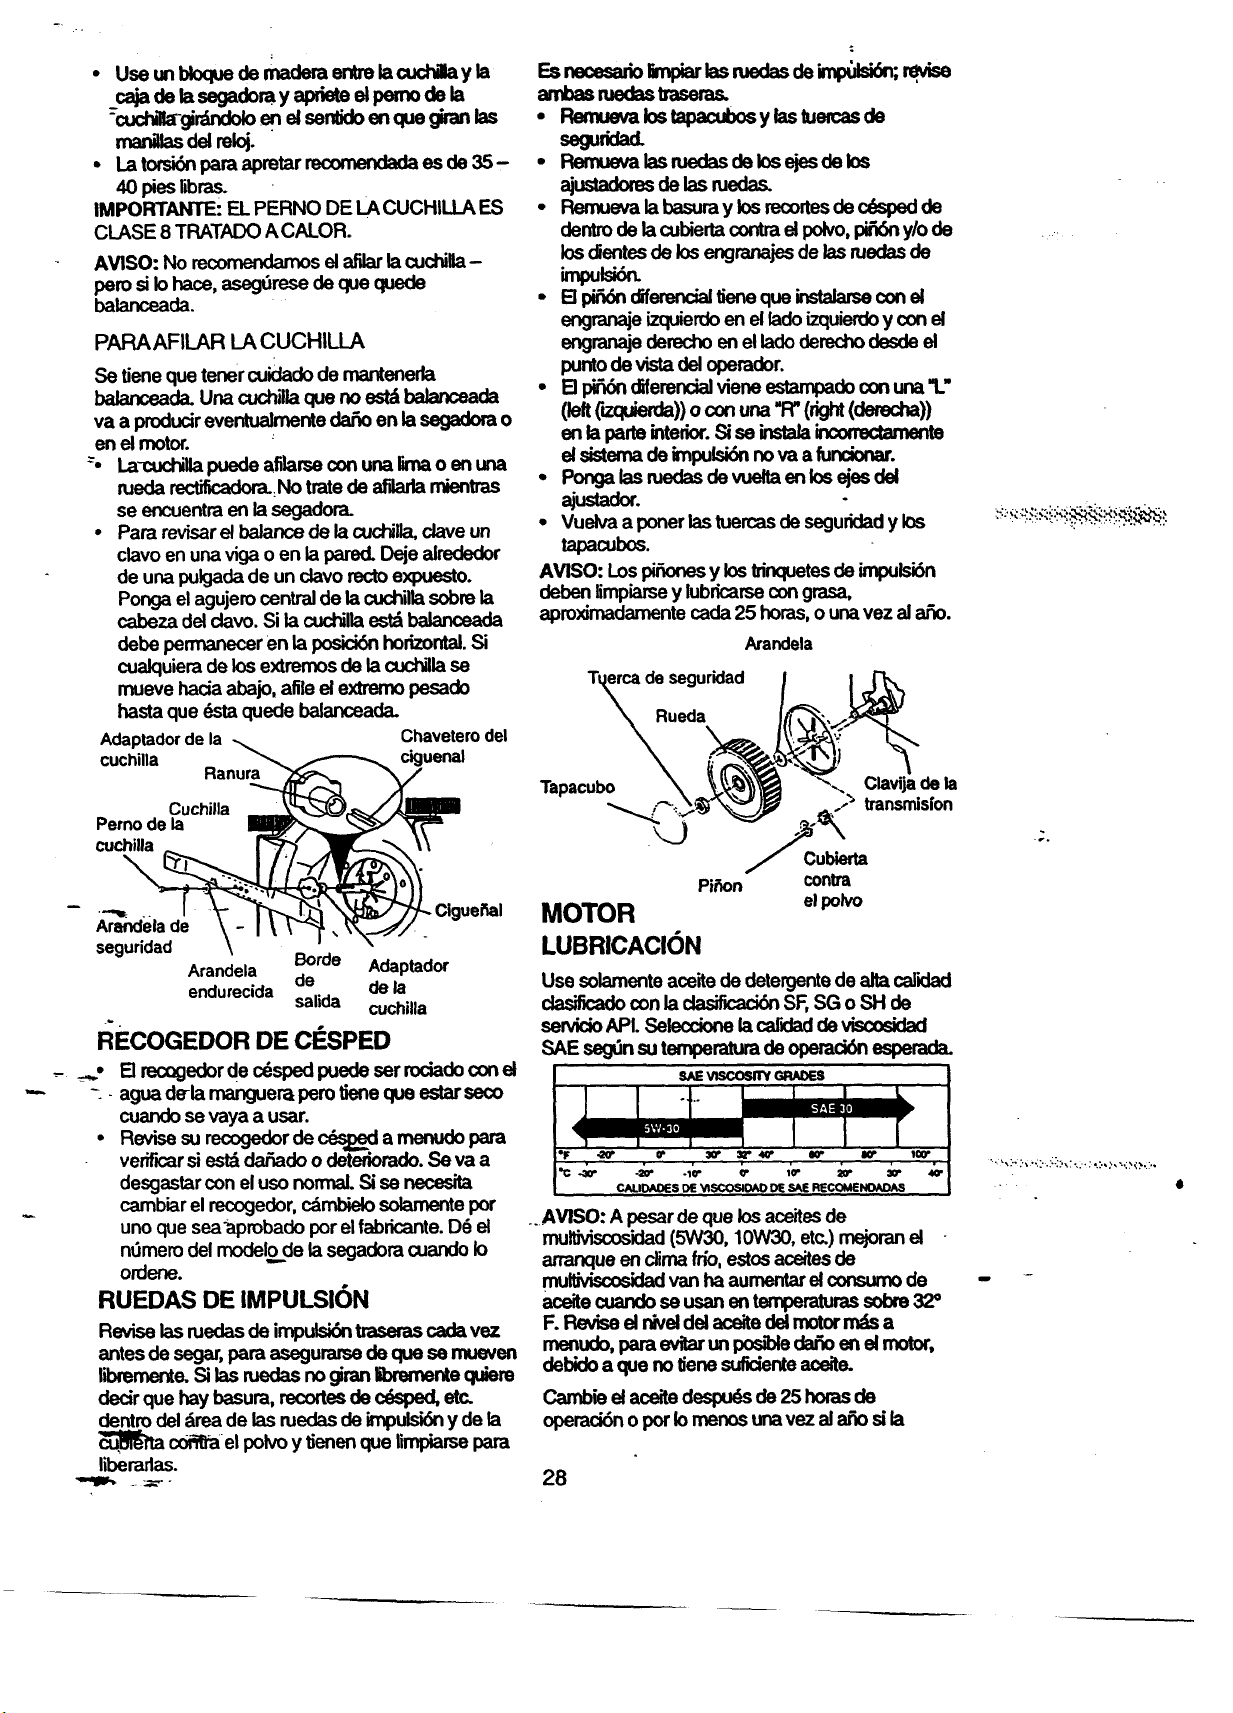
Adaptadordela Chaveterodel
cuchilla ciguenal
Esnecesa_r,_par= medasde=_n; .p_so
ambasmedastmsem_
• _ lostapacubosylastuercasde
seguddad.
• Remuevalas.Jedasdebs e_sdebs
_us=deresde_ nJede_
• Remueva b basuray k)srecortesdec6spedde
dentrode_ cu_e_ contraelpdvo,p_'_)ny/ode
losdientesde losengrar_jesde lasmedasde
• E]pi_dndiferencialtieneque _ conel
engrar_e izquierdoen elladoizquierdoy conel
engranajederechoenel ladederechodesde el
puntode vistadel operador.
• B pir36ndiferendalvieneestampadoconuna"L"
(k,ft('=quierda))oconuna"Fr'(right(demcha))
en laparteintedor.Sise instalaineorrec_an_r_
el sistema de impulsi_ no va a funcionar.
• Pongalasmedas devueltaenlos ejesdel
ajustador.
• Vuelvaa ponerlastuercasde seguridady los
tapacubos.
AVISO: Lospi_onesy loslfinquetesde impulsk_
debeniimpiarsey lubdcarsecongrasa,
aproxirnadamentecada25 horas,o unavez alalso.
Arandela
erca de seguridad
Rueda
Ranura
Tapacubo Clavijadela
Cuchilla -,,_. transmision
Pernodela
cuchilla Cubierta
contra
elpolvo
Arandelade
seguridad Borde
Arandela Adaptador
endurecida de dela
salida cuchilla
I_ECOGEDOR DE ClaSPED
FI recQgedorde cdspedpuedeser rociadocon et
agua derlarnangueraperotJeneclueestarseco
cuandose vaya a usar.
Revise surecogedordec_,_ a menudopara
verifk:arsiestddar3adoodeteriorado. Se va a
desgastarconel usonormal.Sise necesita
cambiarelrecogedor,cdmbielosolamentepor
unoque sea'aprobadoporel fabdcante.D_ el
ndmemdel modelode lasegadoracuandoIo
ordene.
RUEDAS DE IMPULSION
Reviselasruedasde irnpulsi_ traserascade,vez
antesde segar,para asegurarsede cluese mueven
libremente.Si lasruedasnogiranlibrementequiere
decircluehaybasura,recortesde cdsped,etc.
dentrodel=_readelas ruedasdeirnpulsi_ y de la
c0r3_ elpolvoy tJenenque limpiarsepara
libemdas.
Pii_on
MOTOR
LUBRICACION
Use solamenteaceitede detergentedealla calidad
_ conla _ SF,SG oSH de
servicioAPI. Seleccionela cardaddeviscosided
SAE seg_nsutemperdturadeoperaci6nesperada.
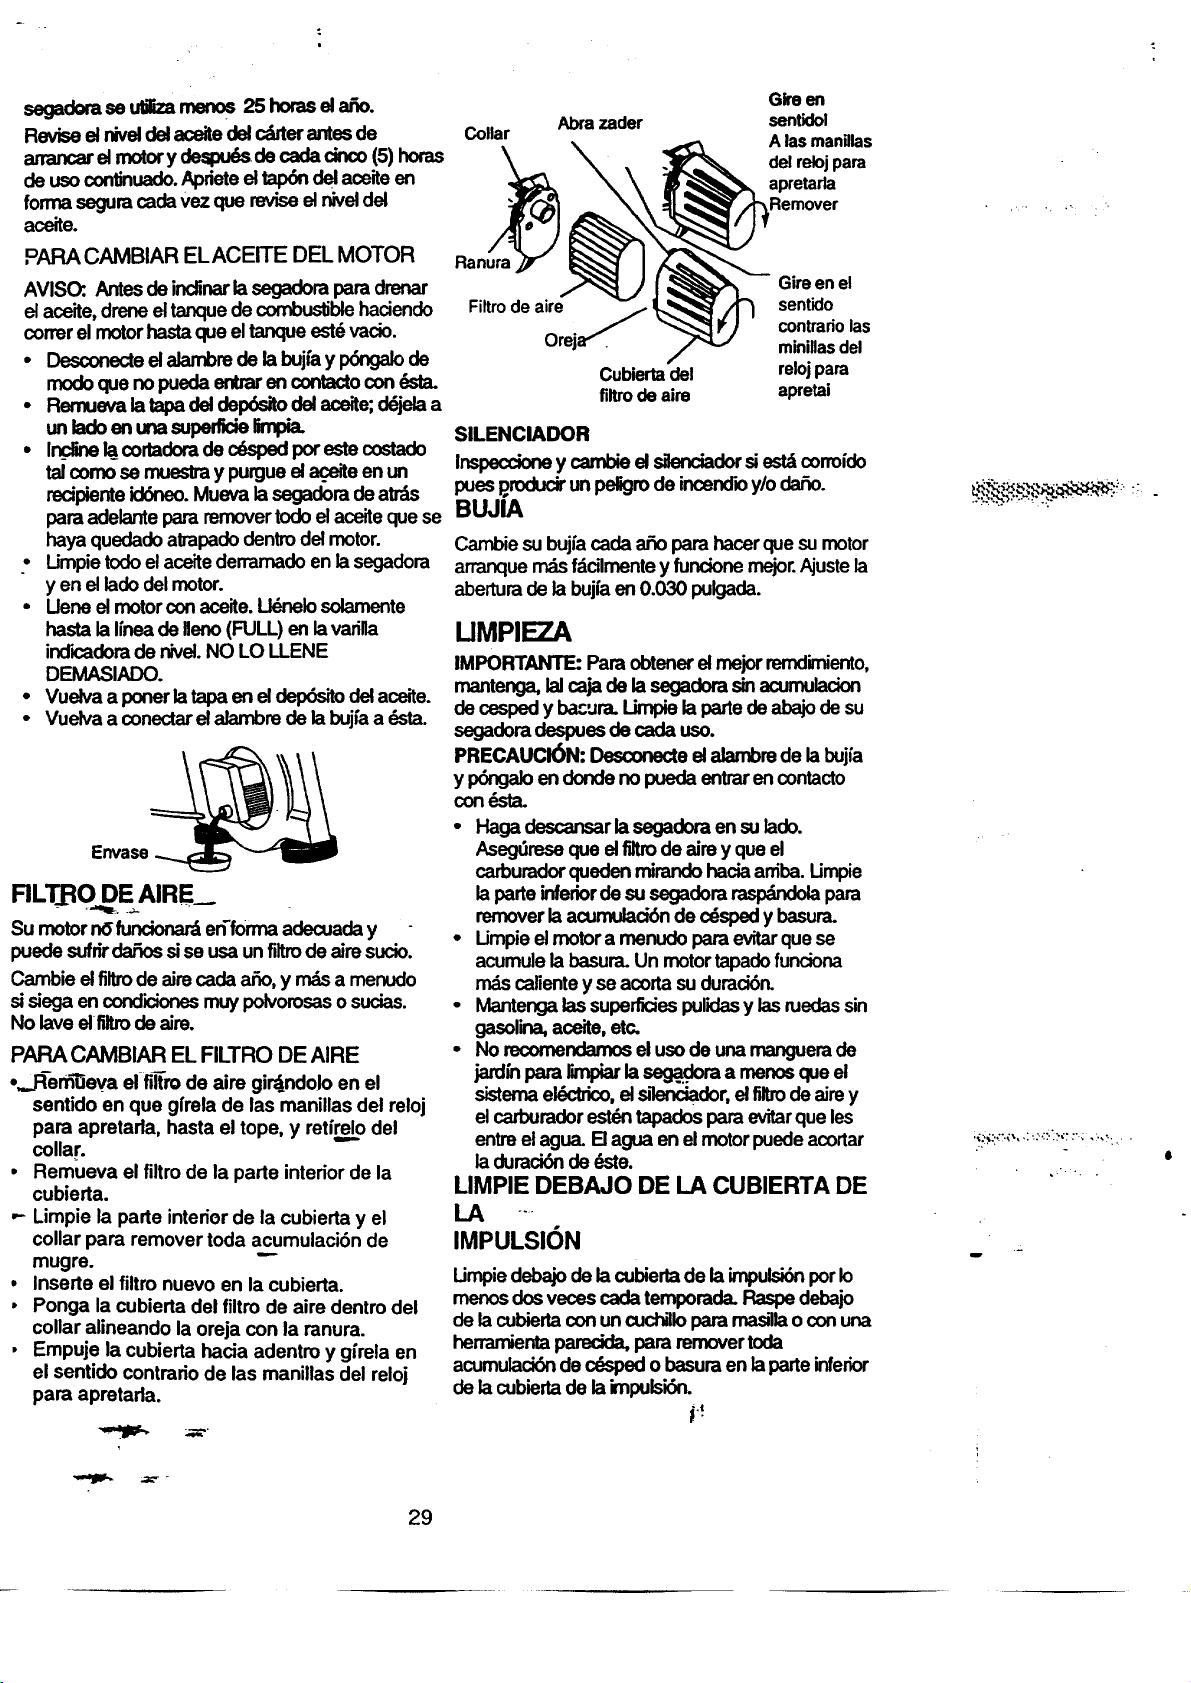
SAEVISCOSIW GRADES
IF -2O" 0" 30" _ 40" IlO" _ 100"
c_,o_s o__asco_o_oo__ _CO_NOAO_
..AVISO: A pesardeque los aceitesde
multiviscosidad(5W30, 10W30, etc.)mejoranel
arranqueen climafrio, estosaceitesde
multMscosktadvanhaaumentarel consumode
aceite cuando se usan en temperaturas sobre 32_
F. Reviseelniveldel aceltedelmotorrndsa
menude,paraevitarun posse daEoenel motor,
debido a que notienesuficienteaceite.
Cambieelaceitedespudsde 25 hornsde
operaci6noporIomenosunavez ala_5osila
28
• , ..... :_,.... •
..............._.....:._._. ':.
lip
segadorase utilizarnenos 25 horasel afio.
Reviseel niveldelaceitedelcdrterantesde
anancarel rnotory despu6sde cada dnco(5) horas
deuso continuado.Aprieteeltap6n delacelteen
formaseguracadaVezque reviseelniveldel
aceite.
PARA CAMBIAR ELACEITE DEL MOTOR
AVISO: Antesdeindinarlasegadorapara drenar
elaceite,dreneel tanquede combustiblehaciendo
correrel motorhastaque eltanqueest6vacio
• Desconecteelalambrede labujh y I_ngalo de
modoque no puedaentraren contactocondsta.
• Remueva latapadeldelX_SitOdel aceite;d_jelaa
unladoenmasupe ie limpia.
• In_ne lacortadorade c&spedpoteste costado
talcomose muestray purgueel.aceiteen un
recipienteick_-_o.Mueva la segadorade atrds
paraadelantepara removertodeel aceitequese
hayaquedadoatrapadodentrodelmotor.
? Umpietodoelaceitederramade enla segadora
yen el ladedel motor.
• Uene el motor conaceite.I_l_mlo solamente
hasta la Ifneade Ileno(FULL) enlavarilla
ind'_adorade nivel.NO LO LLENE
DEMASIADO.
• Vuelva a ponerla tapaen el dep6sitodelaceite.
• Vuelva a conectarel alambmde labujfaa dsta.
Envase
RLTJ:IODE AIRE--
Su motor nOfundonard en'formaadecuaday
puedesufrircla_s sise usaunflltrode aimsucio
Cambie elfiltrodeaim cada ar3o,y rndsa menudo
sisiegaen condicionesmuypolvorosasosucias.
No lave el Btrode aire.
PAPA CAMBIAR EL FILTRO DE AIRE
•. J_em'0evael fi_rode aim gir_ndolo en el
sentido en que gfrelade las manillas del reloj
para apretada, hasta el tope, y retfrel,o del
collar
• Remueva el filtrode la parte interiorde la
cubierta
• Limpie la parte interiorde la cubierta y el
collar para remover toda acumulaci6n de
mugre
• Inserte el filtro nuevo en la cubierta.
• Ponga la cubierta del filtrode aire dentro del
collar alineando la oreja con la ranura.
• Empuje la cubierta hacia adentm y gfrela en
el sentido contrario de las manillas dei reloj
para apretada.
29
Collar
Abra zader
Gire en
sentidol
A las manillas
del relojpara
apretarla
Remover
Ranura
Gireenel
Filtrodeaire i sentido
contradolas
Oreja_ minillasdel
Cubiertadel relojpara
filtrodeaim apretai
SILENCIADOR
Inspeccioney carrd:_el_dor siestdcorrofdo
puesproducirun petgm de incendioy/o clar3o
BUJIA
Cambiesubujfacadaax_opara hacerquesumotor
ananquerndsfdcilmente y funcione mejorAjustela
aberturade la bujfaen0.030 pulgada
UMPIEZA
IMPORTANT_ Para obtenerel mojor remdimiento,
rnantenga,laicajade la segadorasinacumulacion
de cosped y ba.,'.-'ura.Limpiela partede abajode su
segadomdespuesde cada uso.
PRECAUCI_N: Desconecteelahmbm dela bujfa
y 1:_'_3aloen dondeno puedaentrarencontacto
con_,sta.
• Haga descansar la segadera en su lade.
Asegdresequeel filtrodeaim y queel
carburadorquedenmirandohaciaarriba.Umpie
la parteinferiorde susegadom_ para
removerlaacumulad6nde cdspedy basura.
• Umpie elmotor a menudopara evitarquese
acumulela basura,Un motortapadofunciona
rndscalientey se acortasuduraci6n.
• Mantengalassuperficiespulidasy lasmedassin
gasolina,aceite,etc.
• No recomendemoselusode unamanguerade
jardfnpara limpiarla_.._ a menosqueel
sistemaeldctfico,elsflenciador,elfiltrode aimy
elcarburadorest_ tapadosparaevitarque les
entreelagua. [] agua en elmotorpuedeacortar
la duraci6nde _te.
LIMPIE DEBAJO DE LA CUBIERTA DE
A ....
IMPULSION
Umpie debajode la cubierlade la impulsi6n por Io
rnenosdos vecoscarla temporada.Raspedebajo
de lacubiertacon un¢uchillopara mas=llaocon una
herramienla parecida, para rernovertode
acumulaci6n de ¢_ o basura en la parte inferior
de la cubiertade la impuls'_n.
i.!
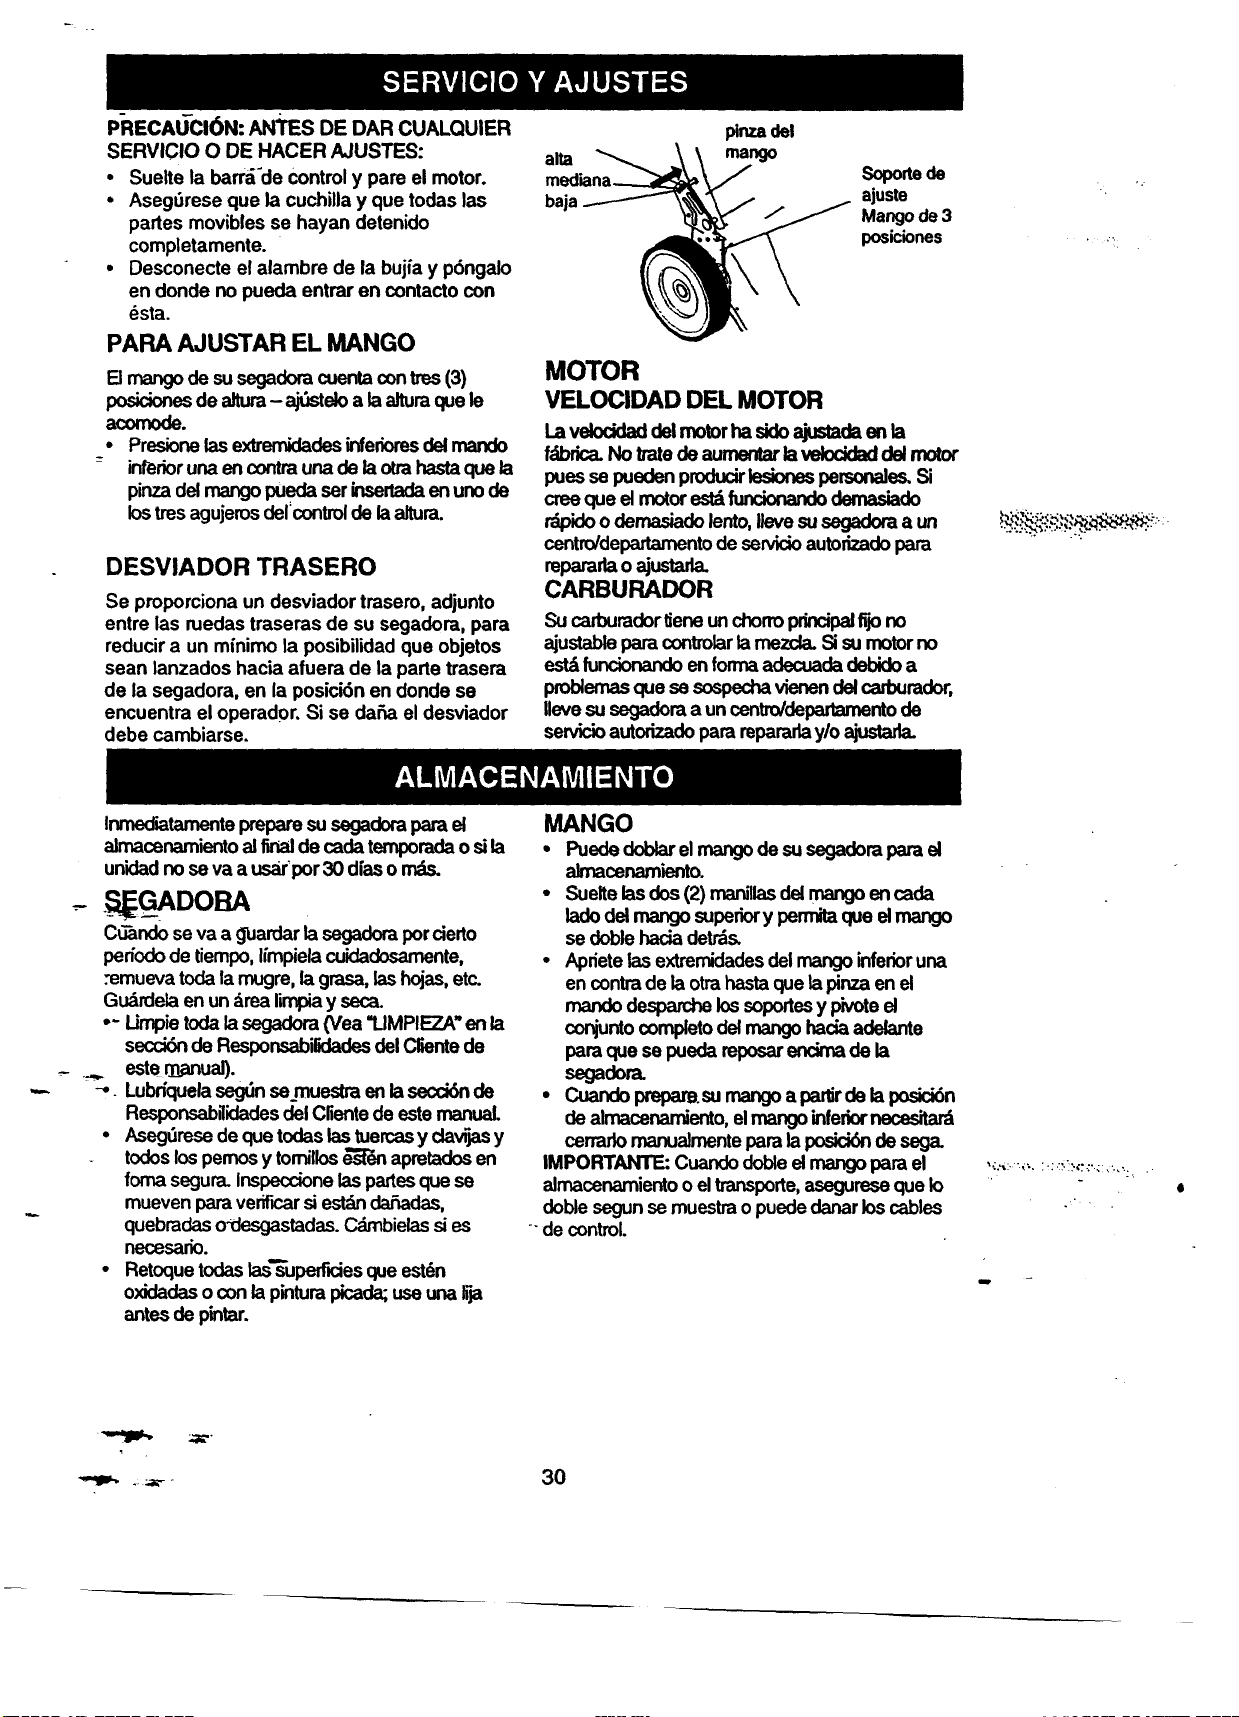
P-RECAtJCl6N: AWrEs DE DAR CUALQUIER
SERVICIO O DE HACER AJUSTES:
• Suelte la barrY'de controly pare el motor.
• AsegGreseque la cuchillay que todas las
partes movibles se hayan detenido
completamente.
• Desconecte el alambre de la bujfay p6ngalo
en donde no pueda entrar en contactocon
_sta.
PARA AJUSTAR EL MANGO
Elmangode susegadoracuentacontres(3)
posicionesde altura- aj_elo a laalturaquele
acomode.
• Presione lasextremidadesinfedoresdelmando
-- inrerloruna encontrauna de laotrahastaquela
pinzadel mangopuedaserinsertadaenunode
lostresagujerosdel'controlde laaltura.
DESVIADOR TRASERO
Se proporciona un desviador trasero, adjunto
entre las ruedas traseras de su segadora, para
reducira un mfnimola posibilidadque objetos
sean lanzados hacia afuera de la parte trasera
de la segadora, en la posicidn en donde se
encuentra el operador. Si se daffa el desviador
debe cambiarse.
aria
baja
plnza del
mango
Soportede
ajuste
Mangode3
posiciones
MOTOR
VELOCIDADDELMOTOR
Lavebddad del motorha sidoajustadaen la
f,'_:_L No tratede aurnerC_laveloddeddel motor
puesse puedenproducirlesiones pemonales.Si
creeque elmotorestdfunciork_b demasiade
r_pidoo demasiadolento,Ilevesusegadoma un
centro/departamentodesen/icioautorizadopara
reparadao ajustarla.
CARBURADOR
Su carburadorliene unchorroprincipalfijono
ajustablepara contmlarlamezcla.Sisumotorno
est&lunclonandoen formaadecuadadebidoa
problemascluese sospechavlenendelcaxbumdor,
gevesu segadoma un centro/departamentode
servicioautodzadopara reparaday/o ajustada.
• ...:
1
Inmed'_tamente preparesusegadorapara el
aimacenamientoalfinalde cadatemporadaosila
un'dadno se va a usarpor 30 d[asomds.
. GADOBA
C_ndo se va a giJardarla segadoraporcierto
periodode tiempo,I_mpielacuidadosamente,
:emuevatoda la mugre,lagrasa,lashojas,etc.
Gu_rdelaen un&rea limpiay seca.
•- Umpie toda la segaclom(Vea "UMPIEZA" en la
seccidnde ResponsabilidadesdelClientede
estemanual).
Lubdquelaseg_nse muestraenlaseccidnde
ResponsabHidadesdel Clientede estemanual.
• Asegt_resede quetodaslastuercasy cla_jasy
todoslospemosy tornillos_en apretadosen
fomasegura.Inspeccionelaspartesque se
muevenparaverificarsi est,_ daRadas,
quebradaso-desgastadas.C_,-nbielassies
rlecesario.
• Retoque todaslas"_uperflciesclueest_n
oxidadasoconlapintumpicada;useunahia
antesde pintar.
MANGO
• Puededoblarelrnangode susegadomparael
aJmacenamlento.
• Suelte lasdos (2) marQlasdelmangoen cada
lack)del mangosuperiory permitaque elmango
se doblehaciadetrds.
• Apdete[asextrernidadesdelmangoinferioruna
en contrade laotrahast'_que lapinzaen el
mandodesparchelossoportesy pivoteel
conjuntocompletodelmangohada adelante
pare que se puedareposarencimade la
segadora.
• Cuandopreparesurnangoa partirde laposici6n
de almacenarniento,elmango infe_r necesita_
cerrarlomanualmente para laposici6nde sega.
IMPORTANTE_Cuandodobleelmango para el
almacenamientooelttansporte,aseguresequeIo
doblesegunse muestrao puededanarloscables
" decontrol.
m
30
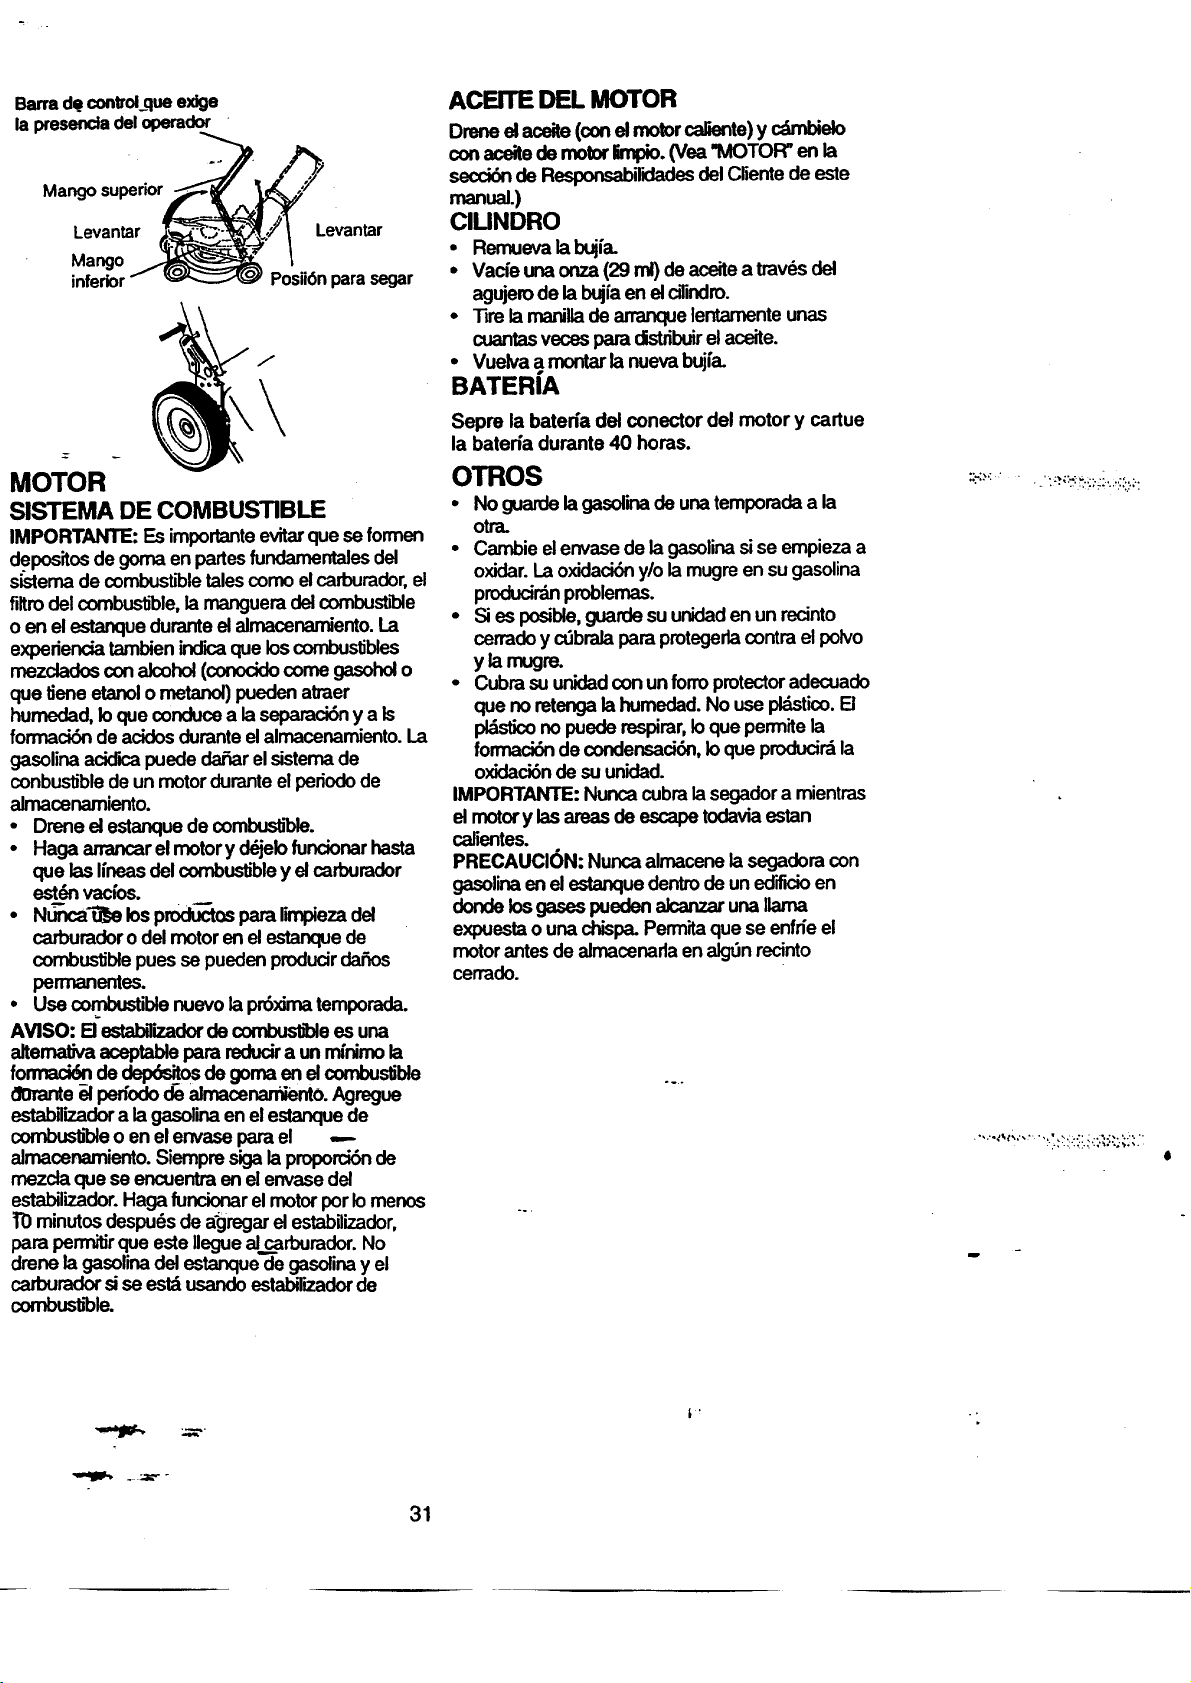
Barra dQcontrolque exige
la presenda del operador
Mango superior
Levantar
Mango
inferior
Levantar
Posii6npara segar
J
MOTOR
SISTEMA DE COMBUSTIBLE
IMPORTANTE: Es imporlanteevitarque se formen
depositosde goma enpartesfundamentalesdel
sistemade combustibletalescomoelcarburador,el
filtrodelcombusbble,lamangueradelcombustible
o en el estanqueduranteelalmacenamiento.La
experiendatambienincr_aqueloscombustibles
mezdadosconalcohol(conoddecomegesoholo
que lJeneetanolometanol)puedenatraer
humedad,Ioque conduce a laseparaci6ny a Is
formaci6n deacidosduranteelalmacenamiento.La
gasolinaacidicapuededa_ar elsistemade
conbu_ble deun motorduranteelperiodode
almacenamiento.
• Drene elestanquede combusb'ble.
• Haga arrancarelmotory d_jelofuncionarhasta
que iaslineasdel combustibley elcarburader
estdnvac{os.
• NL_'lca_e bs produ_tospara rmr_piezadel
carburadorodel motorenelestanquede
combustiblepues se puedenproducirdafios
permanentes.
• Use combustiblenuevolapr6ximatemporada.
AVISO: B estabirBadorde combustiblees una
altematJvaaceptablepara reducira un mfnimola
fonnack___dedelx_os degoma enel combustible
Oaranteelperfododealmacenamiento.Agmgue
establlizadora lagasolinaenelestanquede
cornbus_leoenelenvaseparael ,--
almacerk_miento.Siempresigalaproporcid_de
mezdaquese encuentraenel envasedel
estabilizador.Haga funcionarel motor porIomenos
TOminutosdespudsde a_gregarelestabilizador,
para perrnitirque este Ilegue_,.__rburador. No
drenela gasolinadelestanque de gasolinay el
carburadorsise estd usandoestab_Tlzadorde
combusb"ole.
ACEmE DEL MOTOR
Drened aceite(cond motorcaliente)y cdmbielo
conaceitedemotorlimpfo.(Vea"MOTOR"enla
secci_ de Responsabirdadesdel Cliente de este
manual.)
CIUNDRO
• Remueva labujfa.
• Vade unaonza(29ml)deaceitea trovesdel
agujemde labujia enelalindro.
• Tirelamanillade arranquelentamenteunas
cuantasvecespara distribuirelaceite.
• Vuelvaa montarlanuevabujia.
BATERIA
Sepre la bateda del conector del motory cartue
la bateda durante 40 horas.
OTROS
* Noguardelagasormade unatemporadaa la
otra.
• Cambie el envasede lagasolinasise empiezaa
oxidar.Laoxidaci6ny/o la mugreensugasolina
producirdnproblemas.
• Sies posible,guardesuunidaden un recinto
cerradoy cdbralaparaprotegerlacontraelpolvo
y lamugm.
• Cubrasuunidadcon unform protectoradecuado
que no retengalahumedad.No use pldstico.[]
pl_sticono puederespirar,Ioque permitela
fownaci6ndecondensad6n,Ioque producirdla
oxidaci6nde suunidad.
IMPORTANTE: Nuncacubralasegadora mientras
elmotory lasareasde escapetodaviaestan
calientes.
PRECAUClON: Nuncaalmacenelasegadoracon
gesolinaenel estanquedentrode un ed'_cioen
dondelosgasespuedenalcanzarunallama
expuestao unachispa.Permitaque se enfde el
motor antesdealmacenadaenalg_nrecinto
cerrado.
::"::':" ' -':::_:_'!::'i':"'::::.:':
I
31
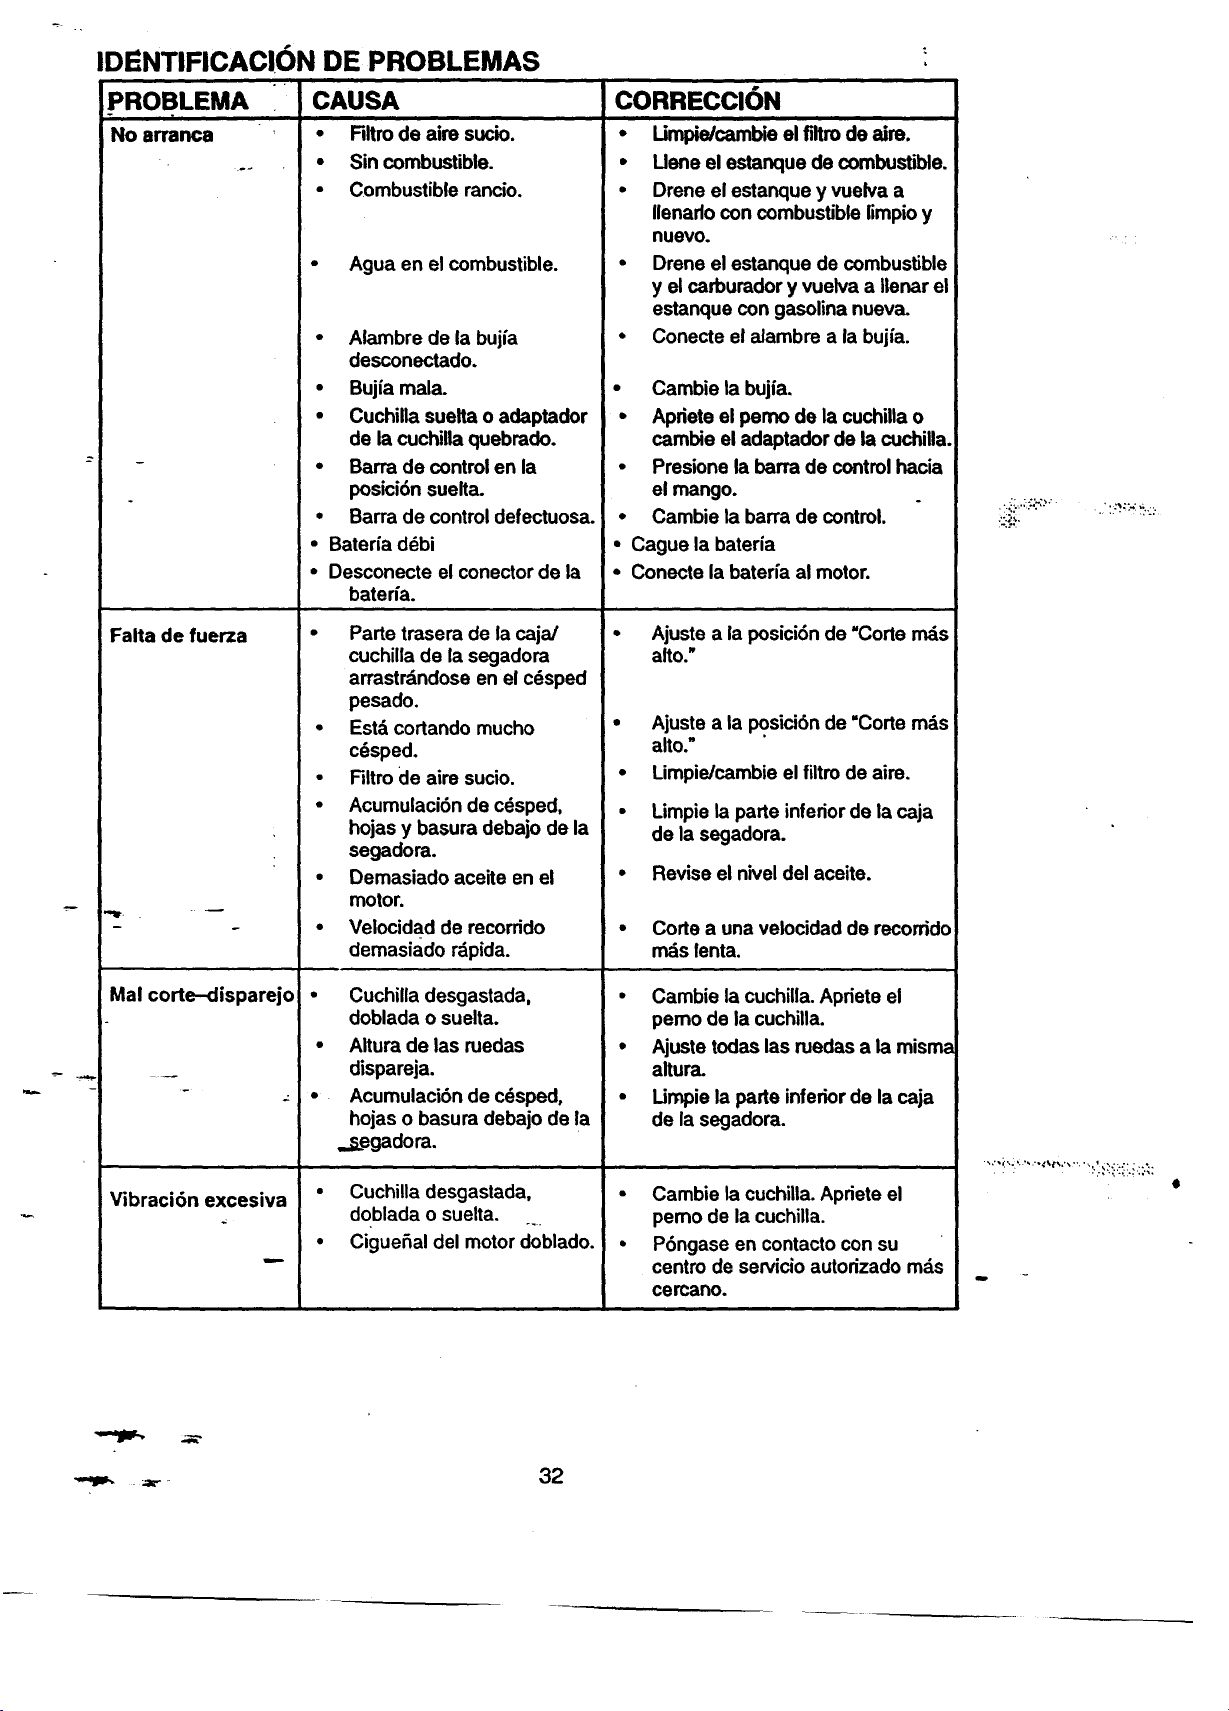
IDENTIFICAC!ON DE PROBLEMAS
PROBLEMA CAUSA CORRECCI6N
1
No an'a_a • Rltro de aim sucre.
Sin combustible.
Combustible rancio.
Agua en el combustible.
Alambre de la bujfa
desconectado,
Bujia mala.
Cuchilla suelta o adaptador
de la cuchilla quebrado.
Barra de controlen la
posicidn suelta.
Barra de controldefectuosa.
• Umpie/cambie el filtrode aim.
• Uene el estanque de combustible.
• Drene el estanque y vuelva a
Ilenarlo con combustible limpioy
nuevo.
• Drene el estanque de combustible
y el carburador y vuelva a Ilenar el
estanque con gasolina nueva.
• Conecte el alambre a la bujfa.
Cambie la bujfa,
• Apriete el pemo de la cuchillao
cambie el adaptador de la cuchilla.
• Presione la barra de controlhacia
el mango.
• Cambie la barra de control.
Falta de fuerza
mlP-
m
Mal corte-disparejo
Vibraci6n excesiva
• Bateda ddbi
• Desconecte el conector de la
baterfa.
Parte trasera de la cajaJ
cuchilla de la segadora
arrastrdndose en el cdsped
pesado.
Estd cortando mucho
c_sped.
Filtrode aim sucio.
Acumulaci6n de cdsped,
hojas y basura debajo de la
segadora.
Demasiado aceite en el
motor.
Velocidad de recorrido
demasiado rdpida.
Cuchilla desgastada,
doblada o suelta.
Altura de las ruedas
dispareja.
Acumulaci6n de c6sped,
hojas o basura debajo de !a
,zegadora.
• Cuchilla desgastada,
doblada o suelta,
• CigueSal del motor doblado.
• Cague la bateria
• Conecte la bateda al motor.
• Ajuste a la posici6nde "Corte rnds
alto."
Ajuste a la i_sici6n de "Code mzis
alto."
Limpie/cambie el filtrode aim.
Limpie la parle inferior de la caja
de la segadora.
Revise el nivel del aceite.
• Code a una velocidad de recorrido
rods lenta.
• Cambie la cuchilla.Apriete el
pemo de la cuchilla.
• Ajustetodas las ruedas a la misma
altura.
Umpie la parte inferior de la caja
de la segadora.
• Cambie la cuchilla. Apriete el
pemo de la cuchilla.
• P6ngase en contactocon su
centro de servicio autorizado rods
cercano.
" i
• ": .; ._;.._?.'. .. :,,:..,. _. -
. :..: • •.......%..
.-,,,.
• . : .,_.,,._.._.;._.;:
el.
32
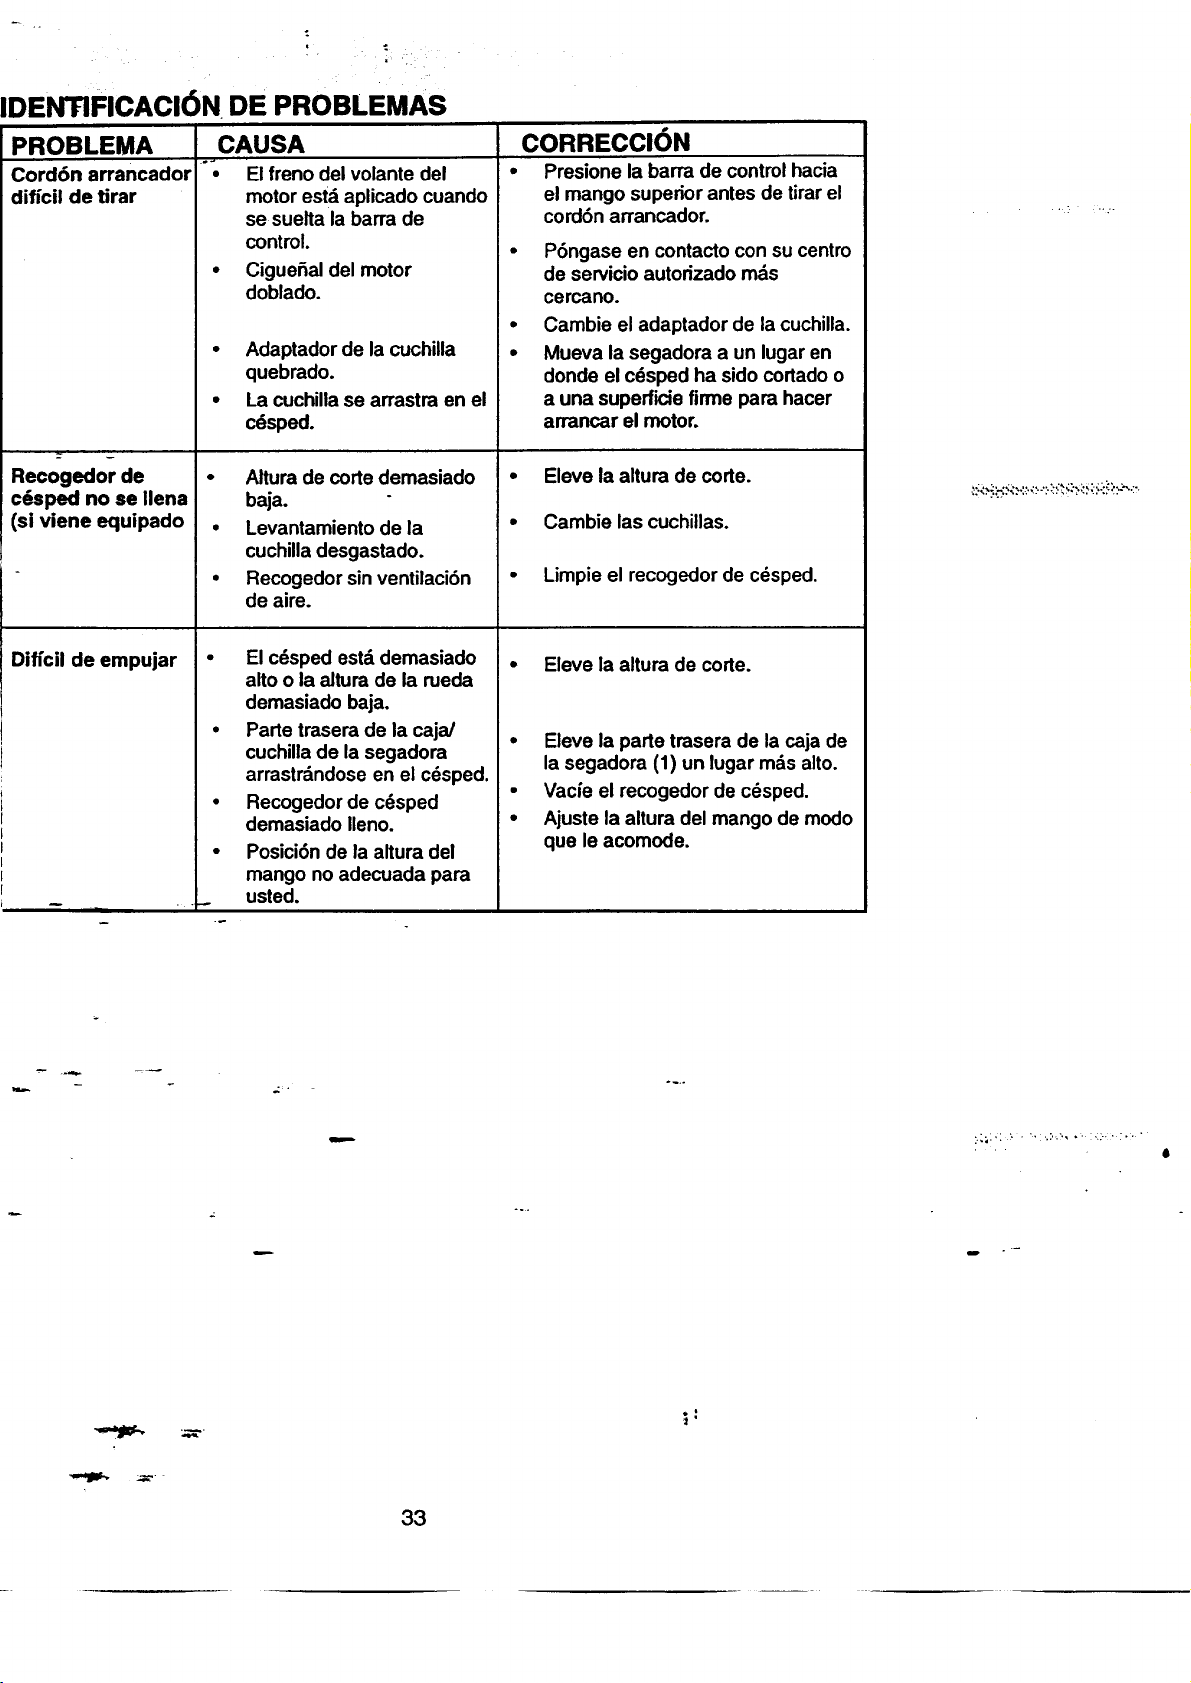
IDENTIFICACI6N DE PROBLEMAS
PROBLEMA
Cord6n arrancador
dificil de tirar
Recogedor de
c6sped no se Ilena
(si viene equipado
Diffcil de empujar
CAUSA
El freno del volante del
motorestd aplicado cuando
se suelta la barra de
control.
• Cigue_al del motor
doblado.
• Adaptador de la cuchilla
quebrado.
• La cuchillase arrastra en el
c6sped.
Altura de corte demasiado
baja.
Levantamiento de la
cuchilla desgastado.
Recogedor sin ventilaci6n
de aire.
El c6sped estd demasiado
alto o la altura de la rueda
demasiado baja.
Parte trasem de la caja/
cuchilla de la segadora
arrastrdndose en el cdsped.
Recogedor de cdsped
demasiado Ileno.
Posici6n de la altura del
mango no adecuada para
usted.
CORRECClON
• Presione la barra de controlhacia
el mango superior antes de tirar el
cord6n arrancador.
P6ngase en contacto con su centro
de servicio autorizado mds
cercano.
Cambie el adaptador de la cuchilla.
Mueva la segadora a un lugar en
donde el c6sped ha sido cortado o
a una superficie firme para hacer
arrancar el motor.
• Eleve la altura de code.
• Cambie las cuchillas.
• Limpie el recogedor de cdsped.
• Eleve la altura de code.
• Eleve la parte tmsera de la caja de
la segadora (1) un lugar mds alto.
• Vacfe el recogedor de cdsped.
• Ajuste la altura del mango de modo
qua le acomode.
• " 0
33
3:
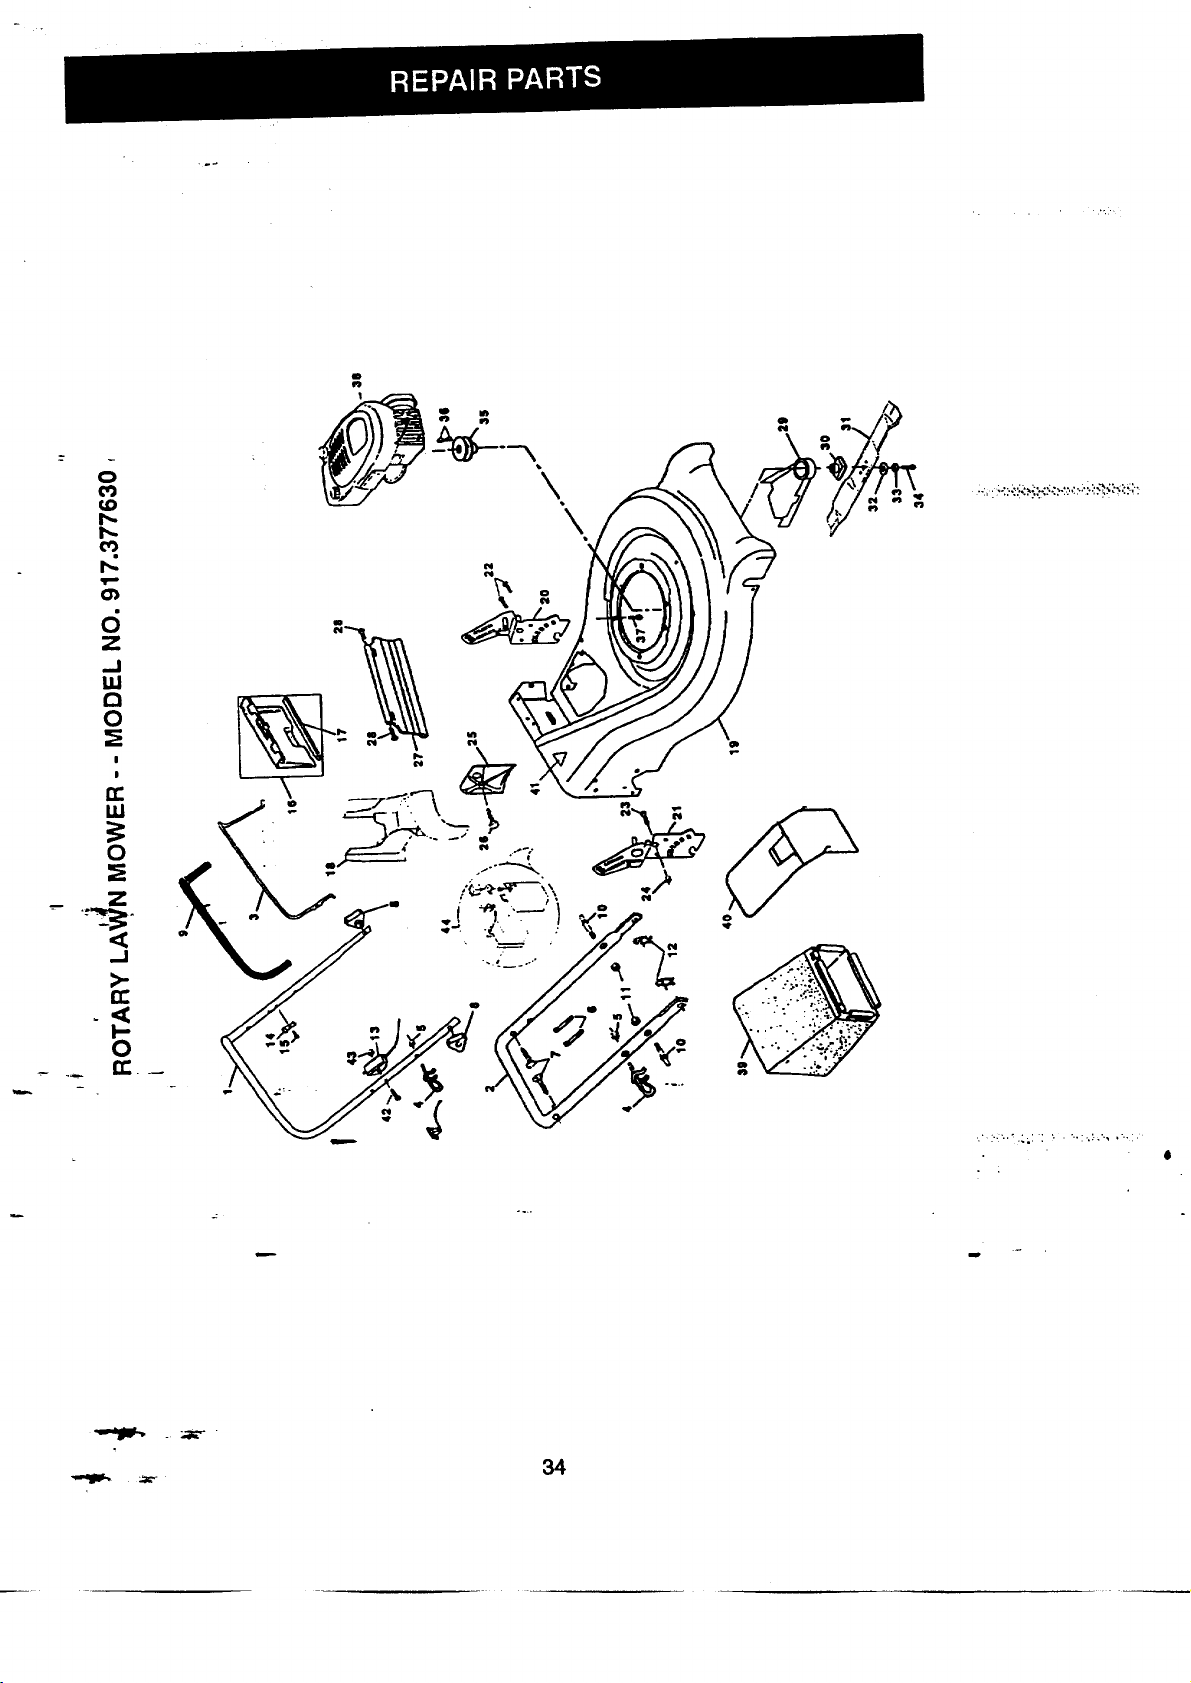
•-._ ,o.,,,_,_,_.,,,...,_?.,,.,,.,,.,,,,._%_,,..,:
i
m
84
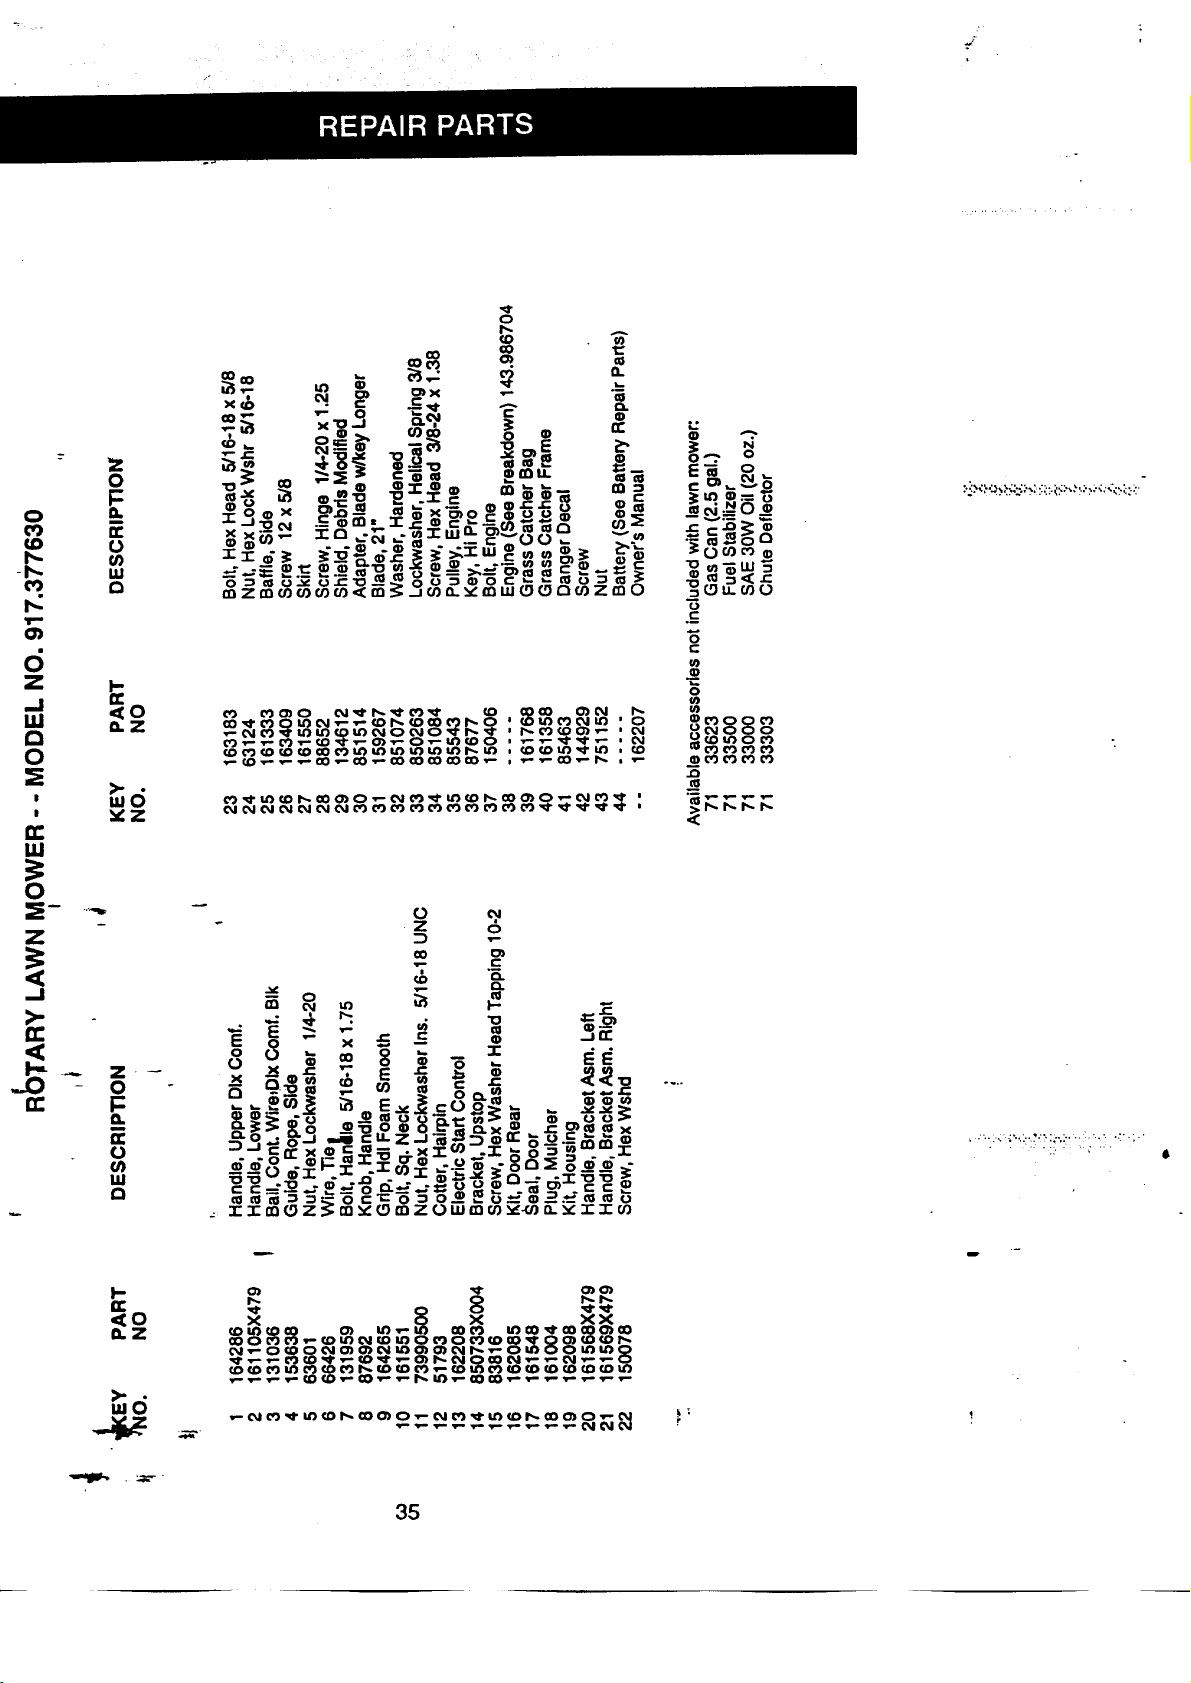
.-s"
l-
Iz
,_0
_Z
_omo0_
35
:
l
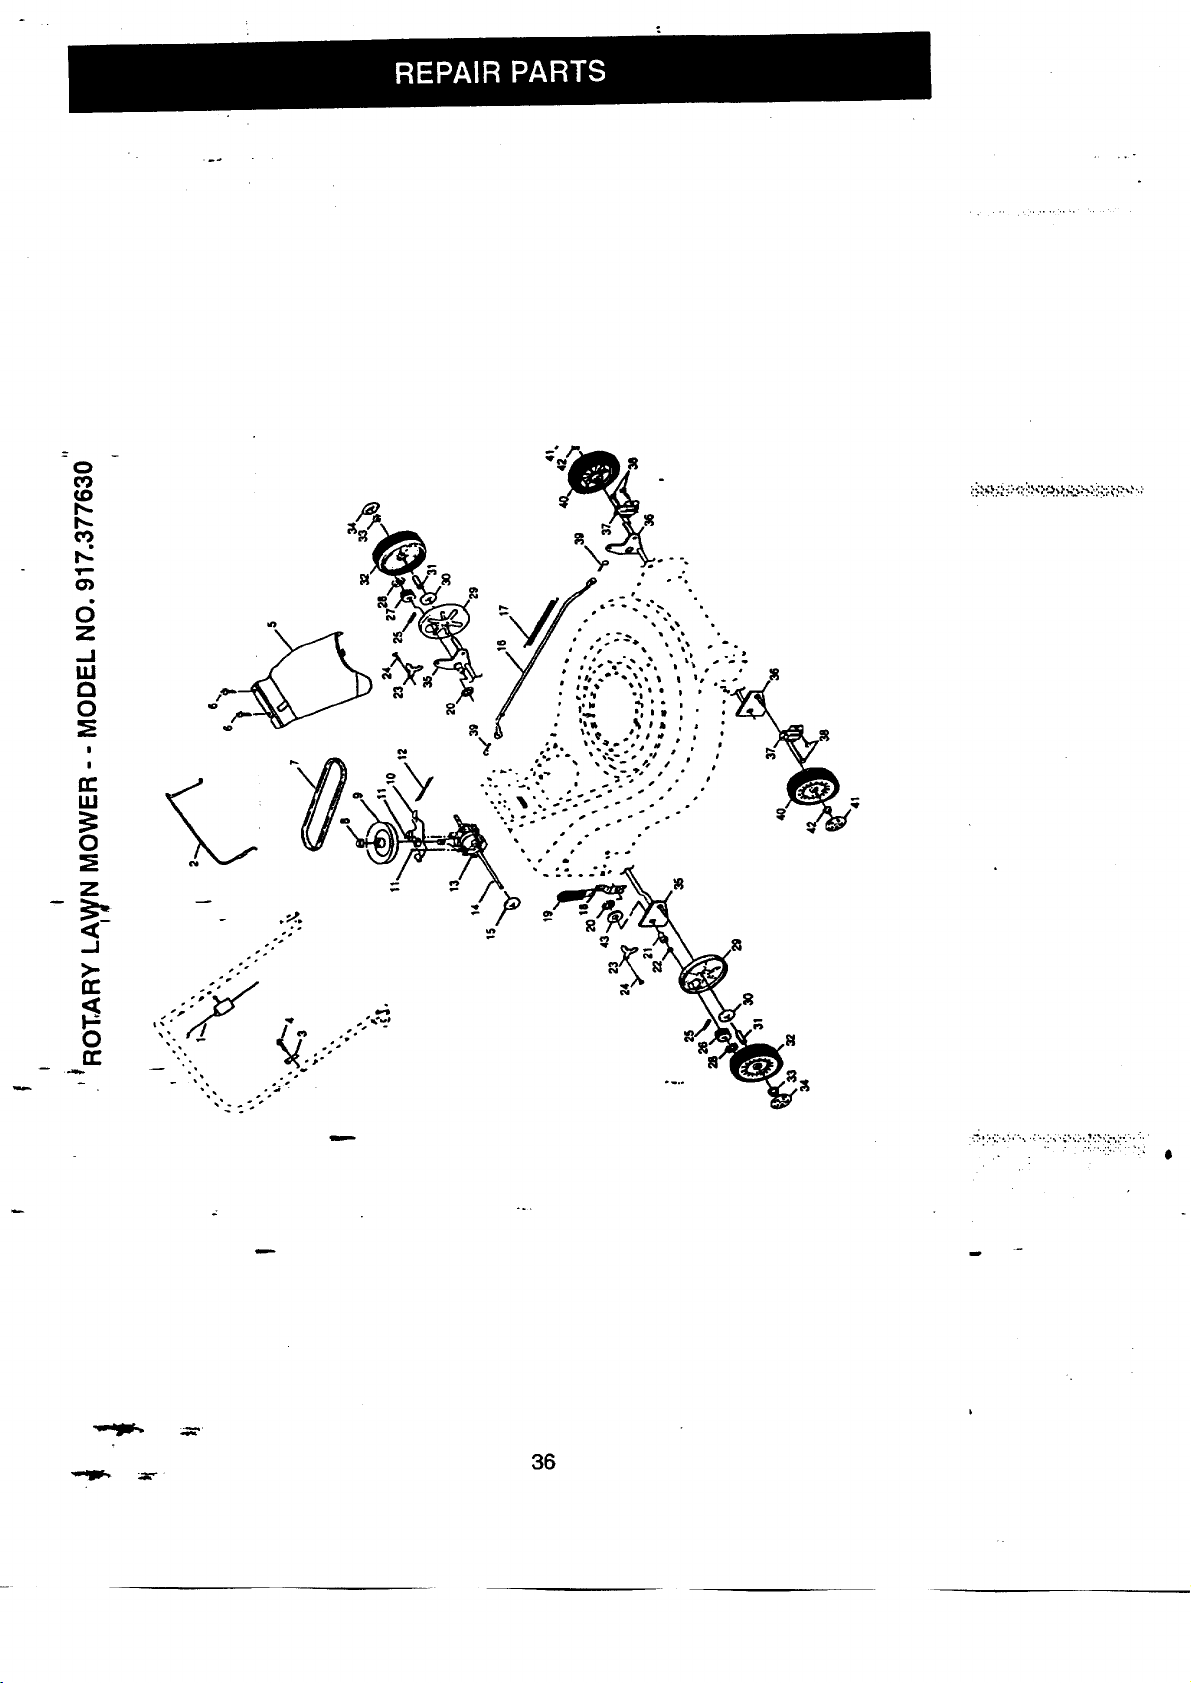
_J
n-
\
-G"
u
36
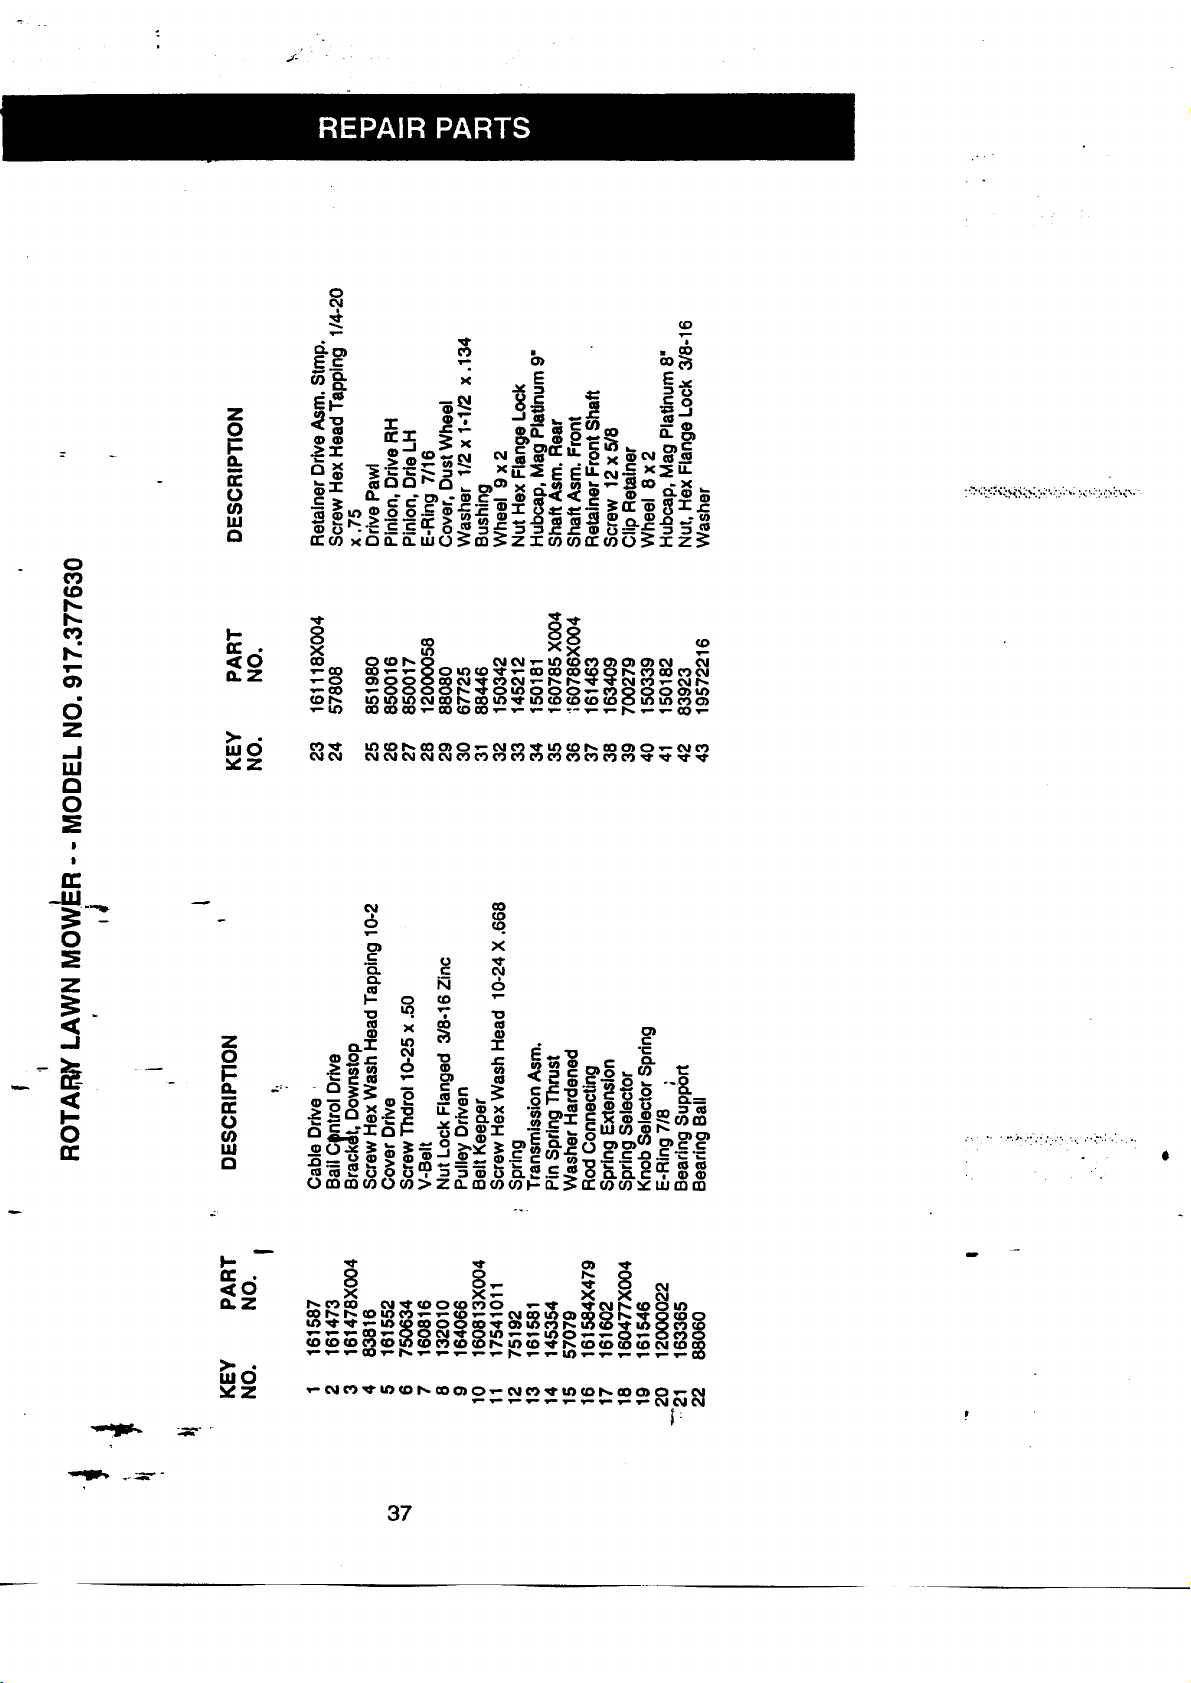
--_ ::) _-. =Jc.)
"CG _r- ,._ CO
C_ a x . ._x --
.1._; E E,, €_ x_; u.
- ar_l"O b_o)o) x ._-q) m _.-,,..-.,._€0 -x,_
o -<C<C ,- .... a)
r_ rr m x 0 _. _. LU0 _ m _, Z :i::m U) rr U) 0 _ .r Z _
P.
,,-I ,,
_ __0___0_
I-
_,.z
_d
"_z
_ _00_ _0
37
.._:..:2...";_;-..,_.2_._:.....? .,._ ,.,:,.?,.,..,:-.,.2,....
am
ROTARY LAWN MOWER -- MODEL NO. 917.377630
BATTERY
3
\
I
/ I
I
I
._._ : ..;_ -.',; ..;..- .... ...., ..
:._,_._:._. :,... ,.... _;_,_.:_..... ..... ,..
KEY PART
NO."- NO.
1 161334
2 7509O9
3 17411312
4 86353
5 111549X
DESCRIPTION
BatteryBox
Battery
Hex Washer Head Screw
13x.750
Connector Mounting Clip
BattenJCharger
--"":...........:'.:"i'_':i":'::"......"
38

...... . ,-,
• -,,, ,,...].,:,,,::,,.,.._;;,,,,-.,:,...,,.,;,,,,;,.,,,,
,+,..
..,wjI.
_' ; "." • .... ,-,.,,.,...,,,,_.,._._?. •
_ .. ...
w
+_.
t-
39

CRAFTSMAN 4-CYI_L_E I_I_IQII_E , "-
MOI_EL NUMBER 143.986704
157
1537
120
'277
224 2O7
223\ 184 380
223A,,, '_
238
25O
119
42
101
3OO
"305
3O6
73
45 46
• , , -
• ."':'+"+""" ':._" """ ""_.;;2 ""i+;"'-" "',.",_.
:+.; ...:....... ,_. ; ; ,.+._
: : . .'..: . .,,..:.:....,:.
4O
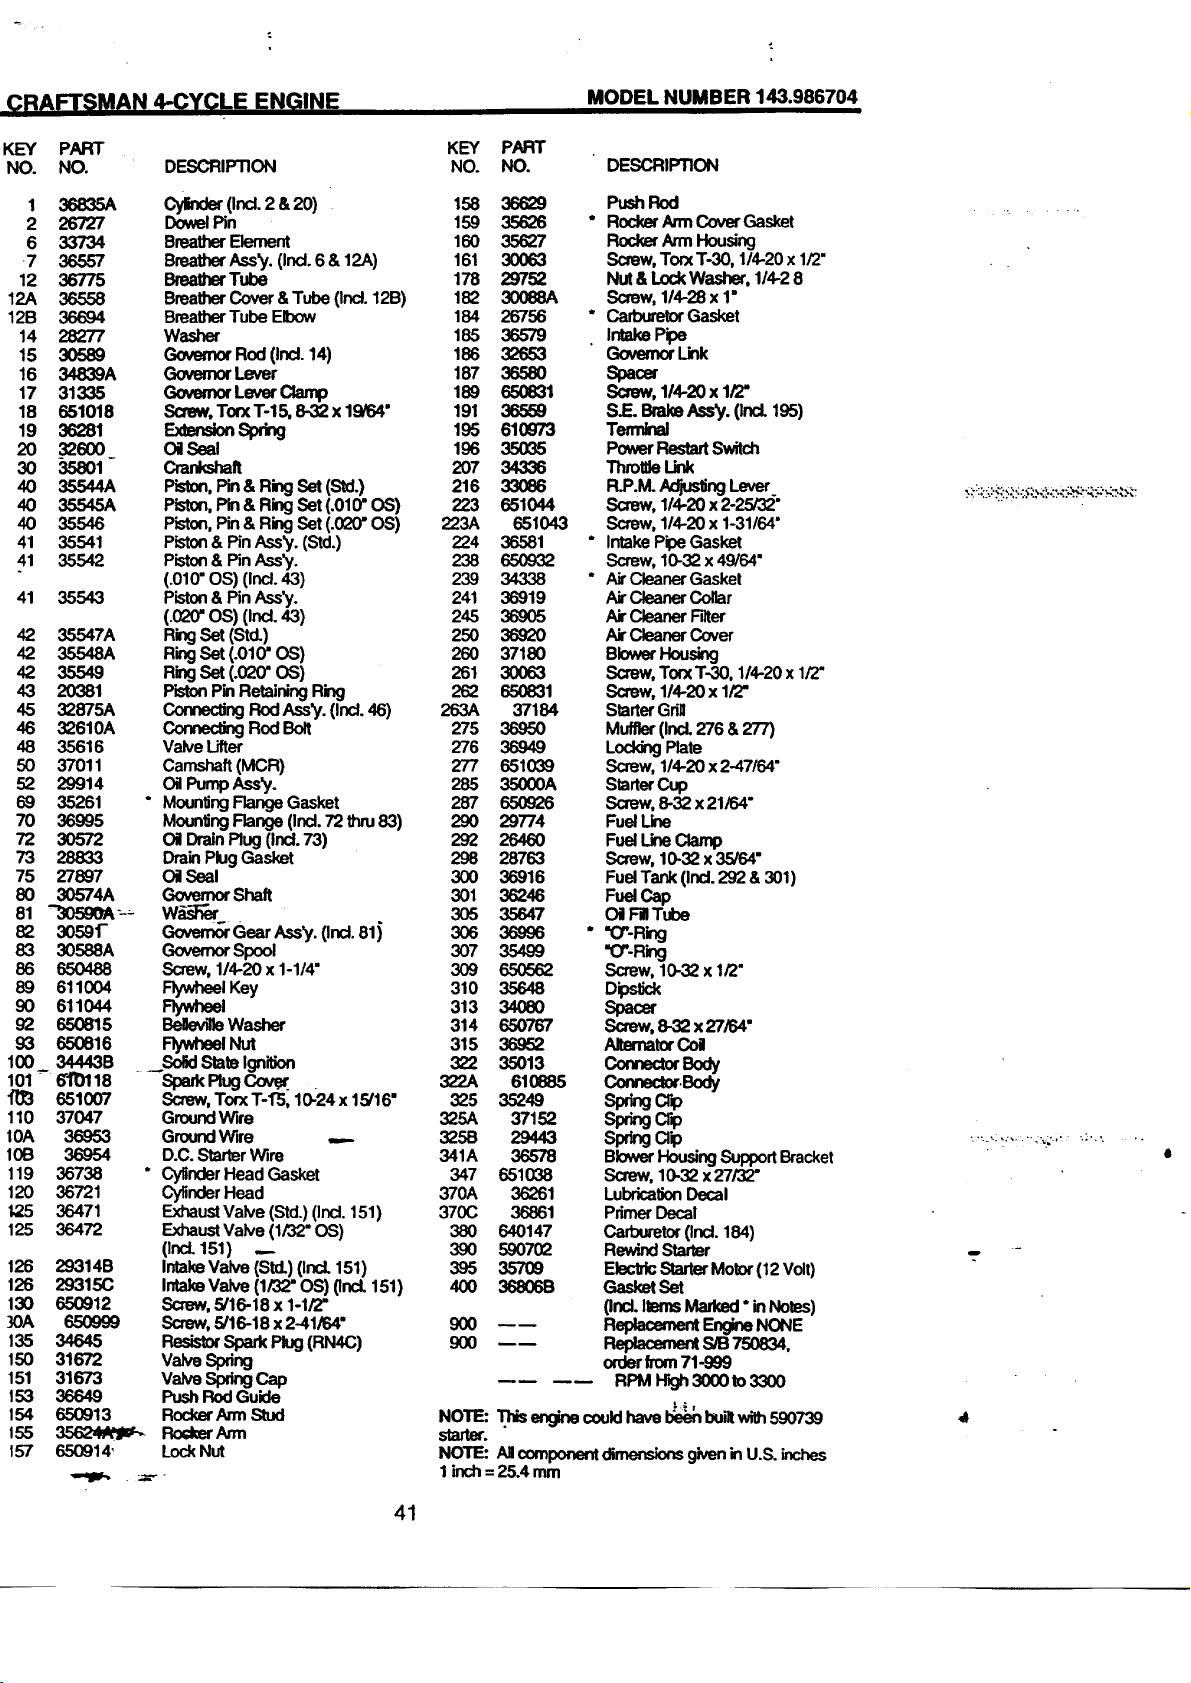
(;:RAFTSMAN4.-CYCLEENGINE
KEY PART .
NO. NO. DESCRIPTION
1 36835A
2 26727
6 33734
-7 36557
12 36775
12A 36558
12B 36694
14 28277
15 3O589
16 34839A
17 31335
18 651018
19 36281
2o 325oo
3O 358O1
4O 35544A
4O 35545A
4O 35546
41 35541
41 35542
35543
42 35547A
42 35548A
42 35549
43 20381
45 32875A
46 32610A
45 35616
50 37011
52 29914
69 35261 *
7O 36995
72 3O572
73 28833
75 27897
80 305"74A
81 "305gOA"-=
82 3059f
83 30588A
86 650488
89 611004
90 611044
92 65O815
93 65O816
100 34443B
101 - 6"r0118
651oo7
110 37047
t0A 36953
10B 36954
119 36738
120 36721
1,25 36471
125 36472
126 29314B
126 29315C
130 650912
]0A 650999
t35 34645
150 31672
151 31673
153 36649
154 650913
155
t57 650914'
Cyrmder(ind. 2 &20)
DowelPin
BreatherElement
BreatherAss_'.(Ind. 6 & 12A)
BreatherTube
BrealherCover&Tube (Ind. 12B)
BreatherTube Elbow
Washer
GovernorRod (Ind. 14)
GovemorLever
GovemorLeverClamp
Screw,TorxT-15, 8-32 x 19/64"
_spr_
OJSeal
_ft
Piston,Pin& RingSet(Std.)
Piston,Pin& RingSet(.010"OS)
Piston,Pin& RingSet (.020"OS)
P_on&PinAss_/.(Std.)
Piston& Pin Ass'y.
(.010"OS) (ind. 43)
Piston& Pin _.
(.020"OS) (Ind. 43)
RingSet (Std.)
R_j Set (.010"OS)
R_ Set ¢020" OS)
PistonPinRetainingRk_j
Cor,necengRod Ass'y.0nd. 45)
RodBoJt
ValveLifter
Camshaft(MCR)
o_PumpAss'y.
MounlingFlangeGasket
MountingRange(ind.72thru83)
Oi DrainPlug(Ind. 73)
DrainPlugGasket
OI1Seal
GovemorShaft
w_s-Ra"
Goven_" Gear Ass'y.(Ind. 81i
GovernorSpool
Screw,1/4-20x 1-1/4"
FlywheelKey
F_,_sel
BelevtlteWasher
_lNut
_SeM Statelg_n
Sp=kP_j Cove.
Screw,TorxT-1"5,10:24x 15/16"
GroundWire
GroundWire ,,..-
D.C.StarterWire
* Cy_nderHead Gasket
CylinderHead
F_xhaustValve (Std.)(Ind. 151)
ExhaustValve (1/32"OS)
(Ind.151) --
intakeValve(StcL)(ind.151)
intakeValve(1/32" OS)pnd. 151)
Screw,5/16-18 x 1-1/2"
Screw,5/16-18 x 2-41/154"
ResistorSpark Plug(RN4C)
V_ve Sp_ng
VaJveSpr_ Cap
Push RodGuide
RockerArm Stud
P,oCkerArm
LockNut
41
MODEL NUMBER 143.986704
KEY PART
NO. NO. DESCRIPTION
158 36629 PushRod
159 35626 * RockerArm CoverGasket
160 35627 RockerArm Housing
161 30063 Scmw,TorxT-30,1/4-20xl/2"
178 29752 Nut& LockWasher, 114-28
132 30088A Screw,I14.-28xi"
184 26756 ° CarburetorGasket
185 36579 IntakePipe
186 32653 GovernorLink
187 36580 Spacer
189 650831 Screw,114-20x 1/2"
191 36559 S.E. BrakeAss'y.(Ind. 195)
195 610973 Temthal
196 35(X35 PowerRestartSwitch
207 34336 ThrottleLink
216 33086 R.P.M.AdjustingLever
223 651044 Screw, 114-20x 2-25/32"
223A 651043 Screw, 1/4-20x 1-31/64"
224 36581 " IntakePipeGasket
238 _ Screw, 10-32x 49/64"
239 34338 * Air Cleaner Gasket
241 36919 AirCleanerCollar
245 36905 Air_ Filter
250 36920 AirCleanerCover
260 37180 BlowerHousing
261 30063 Screw,TorxT-30, 1/4-20x 1/2"
262 650831 Screw, 114-20x 1/2"
263A 37184 StarterGdll
275 36950 Muffler(Incl.276& 277)
276 36949 LoddngPlate
277 651039 Screw, 1/4-20x2-47/64"
285 35000A StarterCup
287 650926 Screw,8-32 x21/64"
290 29774 FuelLine
292 26460 FuelLineClamp
298 28763 Screw,10-32 x35/64"
300 36916 FuelTank (Ind. 292 & 301)
301 36245 FuelCap
305 35647 OI1FillTube
306 36996 • "O'-Ring
307 35499 "O'-Ring
309 650562 Screw,10-32 x 1/2"
310 35648 Dipstick
313 34080 Spacer
314 650767 Screw,8-32 x27/64"
315 36952 /Uterr_torCoB
322 35013 ComectorBody
322A 610885 Connector.Body
325 35249 Springcrp
325A 37152 Springcrp
32_ 29443 _ a_
341A 36578 BlowerHousingSupportBracket
347 651038 Screw, 10-32 x27/32"
37OA 36261 LubricationDecal
370C 36861 PrimerDecal
380 640147 Carburetor(Ind. 184)
390 590702 RewindStarter
395 35709 E_ StarletMotor(12 Volt)
4O0 36806B GasketSet
(Ind.ItemsMad_ed*inNotes)
900 ---- ReplacementEngineNONE
900 ---- _ s,_750e34.
orderfrom71-999
RPM High3000 to 3300
NOTE: .'l_is€_ginecouldhave _ built,#_h590739
starter.
NOTE: Allcomponentdimensionsgivenin U.S.inches
1inch=25A mm
: ....,.: .::,., .. ;._:;..;. ..;.. ,. ..
d.
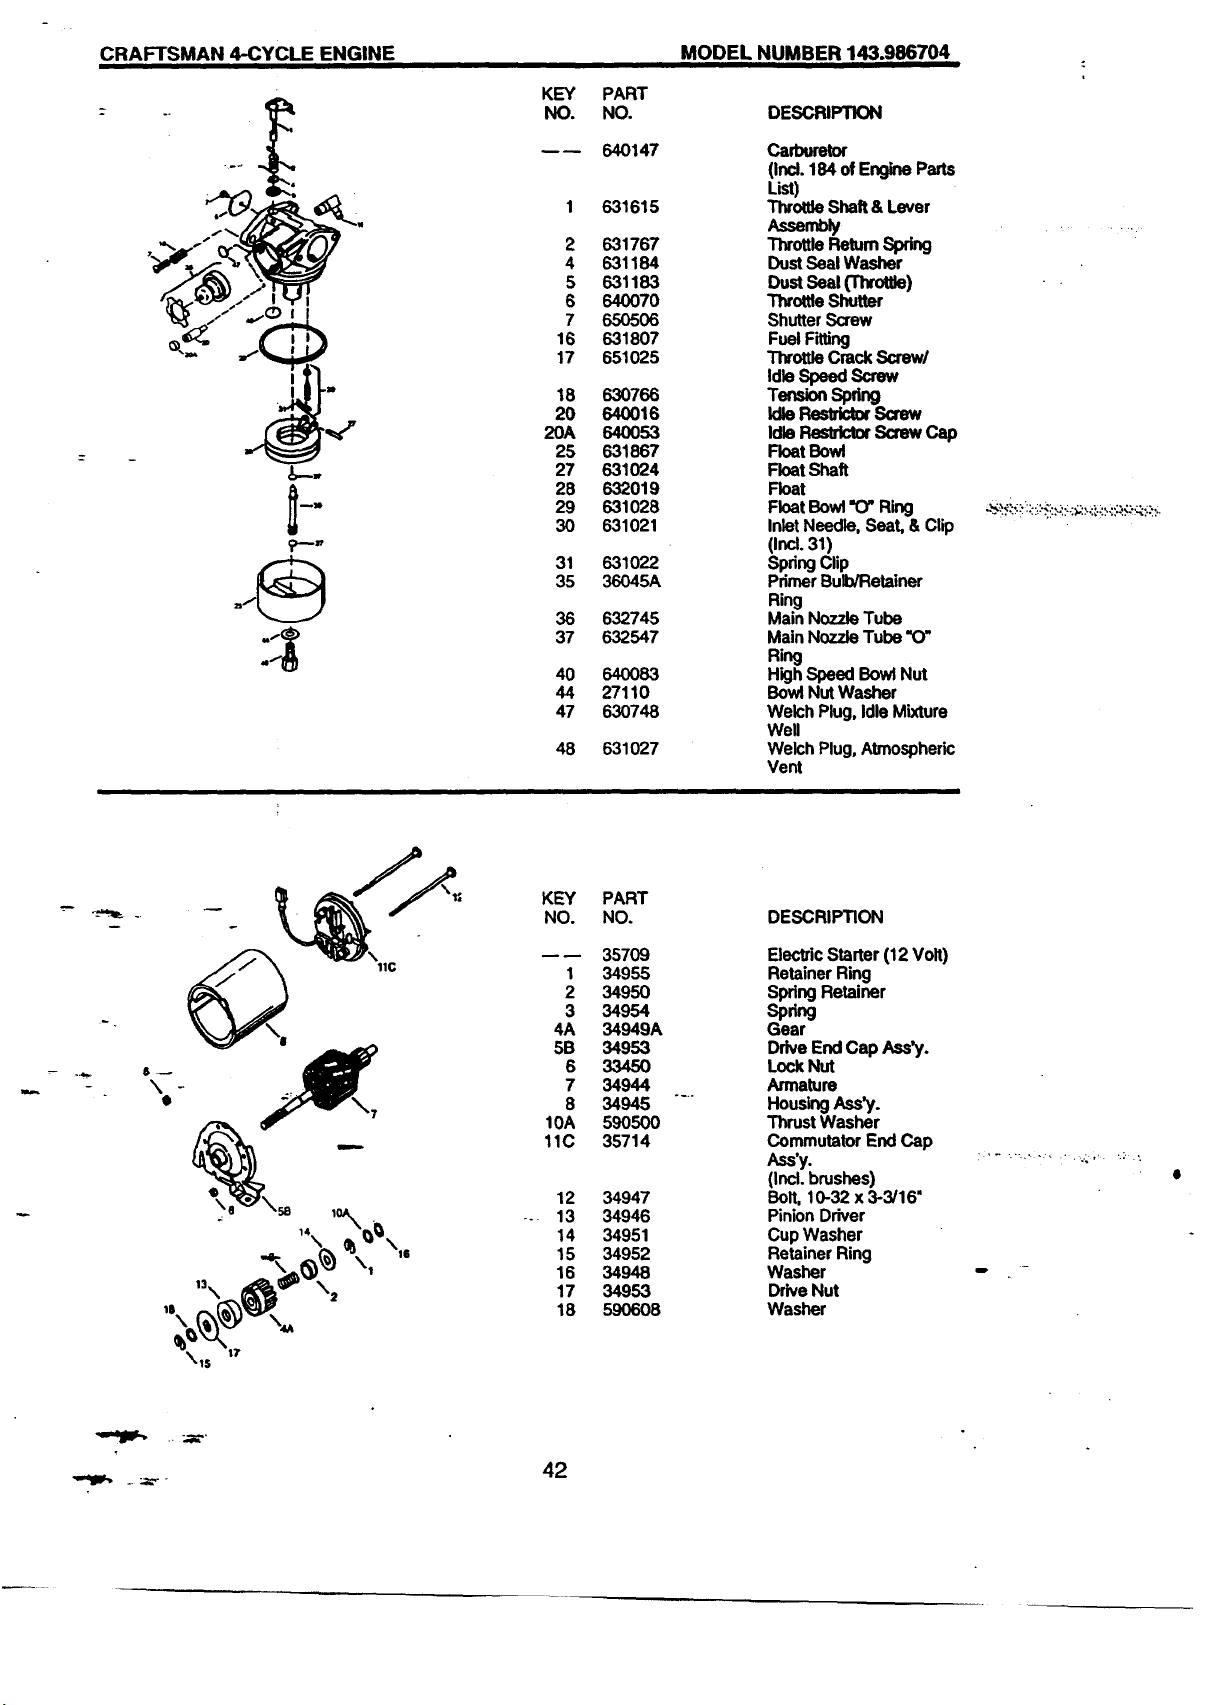
CRAFTSMAN 4-CYCLE ENGINE MODE L NUMBER 143.986704
KEY
NO.
2
4
5
6
7
16
17
18
20
20A
25
27
28
29
3O
31
35
36
37
4O
44
47
48
PART
NO.
64O147
631615
631767
631184
631183
640O70
65O5O6
631807
651025
630766
640016
64OO53
631867
631024
632019
631O28
631021
631022
36045A
632745
632547
64OO83
27110
630748
631027
DESCRIPTION
Carburetor
(Incl.184 ofEngineParts
List)
ThrotBeShaft& Lever
AssemUy
ThrottleReturnSpring
DustSeal Washer
DustSeal_)
ThrottleShutter
ShutterScrew
FuelFitting
ThrottleCrack Screw/
Idle Speed Screw
Teflon Spr_
Idle _ Screw
Idle_ SorewCap
FloatBowl
Float Shaft
Float
FloatBOWl"C)"Ring
InletNeedle, Seat, & Clip
(Ind. 31)
SpringClip
PrimerBulb/Retainer
Ring
Main Nozzle Tube
Main Nozzle Tube "(7'
Ring
HighSpeed Bowl Nut
BowlNut Washer
Welch Plug, Idle Mixture
Well
Welch Plug, Atmospheric
Vent
KEY
NO.
w_
1
2
3
4A
5B
6
7
8
10A
11C
12
-- 13
14
15
16
17
18
PART
NO.
35709
34955
34950
34954
34949A
34953
33450
34944
34945
59O5O0
35714
34947
34946
34951
34952
34948
34953
59O608
DESCRIPTION
ElectricStarter (12 Volt)
Retainer Ring
Spring Retainer
Spring
Gear
Drive End Cap Ass'y.
LockNut
Armature
HousingAss'y.
ThrustWasher
CommutatorEnd Cap
Ass'y.
(Ind. brushes)
Bolt, 10-32 x 3-3/16"
PinionDriver
Cup Washer
Retainer Ring
Washer
DriveNut
Washer
!
42
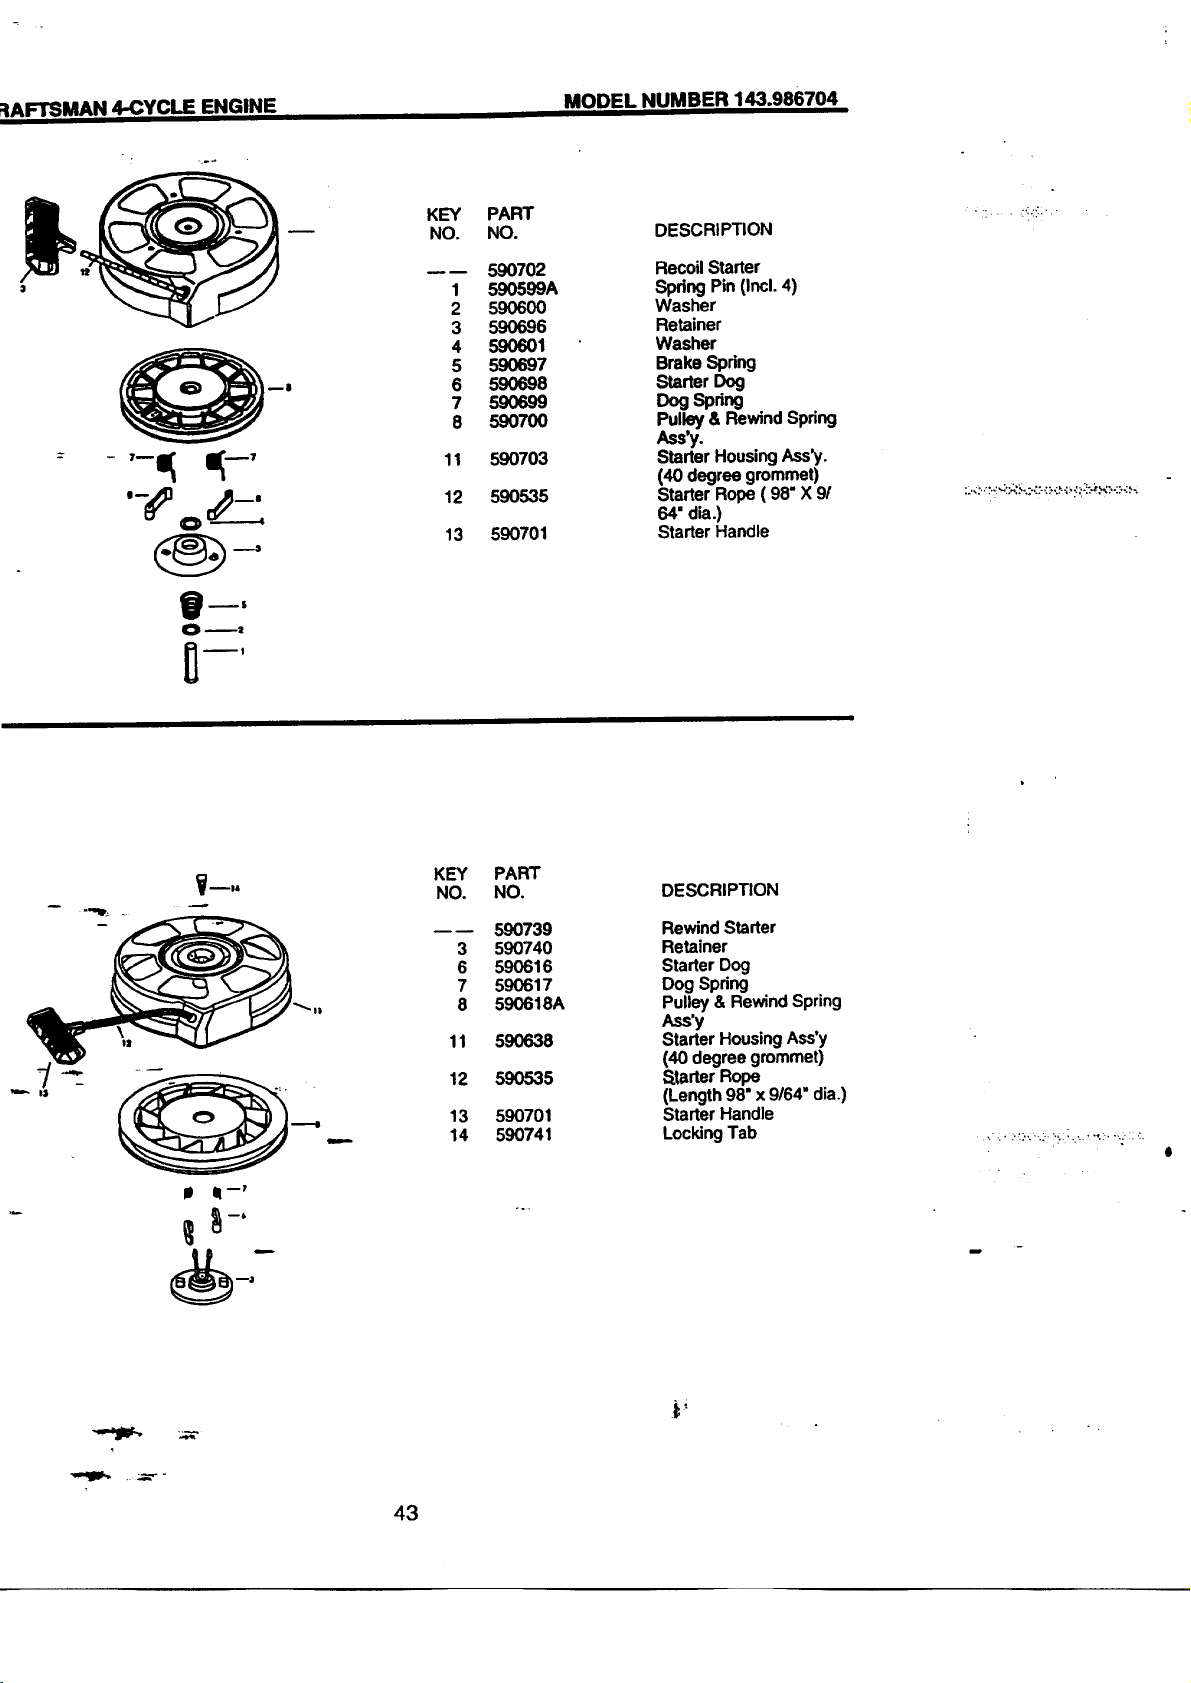
_IAFTSMAN 4-CYCLE ENGINE
MODEL NUMBER 143.986704
KEY
NO.
1
2
3
4
5
6
7
8
11
12
13
PART
NO.
590702
590599A
59O6O0
590696
590601
590697
59O698
59O699
59O70O
590703
590535
590701
DESCRIPTION
Recoil Starter
Spring Pin (Incl. 4)
Washer
Retainer
Washer
Brake Spdng
StarterDog
DogSp_ng
Pulley & Rewind Spdng
Ass'y.
Starter HousingAss_j.
(40 degree grommet)
Starter Rope ( 98" X 9/
64" dia.)
Starter Handle
V_I4
KEY
NO.
3
6
7
8
11
12
13
14
PART
NO.
590739
590740
590616
590617
590618A
59O638
59O535
590701
590741
DESCRIPTION
Rewind Starter
Retainer
Starter Dog
Dog Spring
Pulley & RewindSpring
Ass'y
Starter HousingAss'y
(40 degree grommet)
Starter Rope
(Length 98" x9/64" dia.)
Starter Handle
LockingTab
i=.
43
For the repair or replacement parts you need
delivered directly to your home
Call 7 am. 7 pm, 7 days a week
1-800-366-PART
(1-800-366-7278)
Para ordenar piezas con entrega a
domicilio - 1-800-659-7084
For in-house major brand repair service
Call 24 hours a day, 7 days a week
1-800-4-REPAIR
(1o800-473-7274)
- Para pedir servicio de reparaci6n a
domicilio - 1-800-676-5811
For the location of a Sears Parts and
Repair Center in your area
Call 24 hours a day, 7 days a week
1-800-488-1222
II Illll II ]
...._":
For information on purchasing a Sears
- Maintenance Agreement or to inquire
about an existing Agreement
Call 9 am - 5 pm, Monday-Saturday
-. 1-800-827-6655
,,::.
When requesting service or ordering
parts, alway_provide the following
information:
= Product Type • Part Number
• Model Number • Part Description
SEARS
Arner_.a "sRepair Specia/_sts
162207 02.05.98 VB
Printed in U.S.A.