-1.,:r:.:ll.:]]ìt.ir'
rì,:ì
ffi
.:..:i.l--!t:.i:t
,.ìlrg{.nÉìi
l
^.'
,-
.n:
--*5r '
:""
"
l:ui;¡.,.
1-ì;'¡r'')r
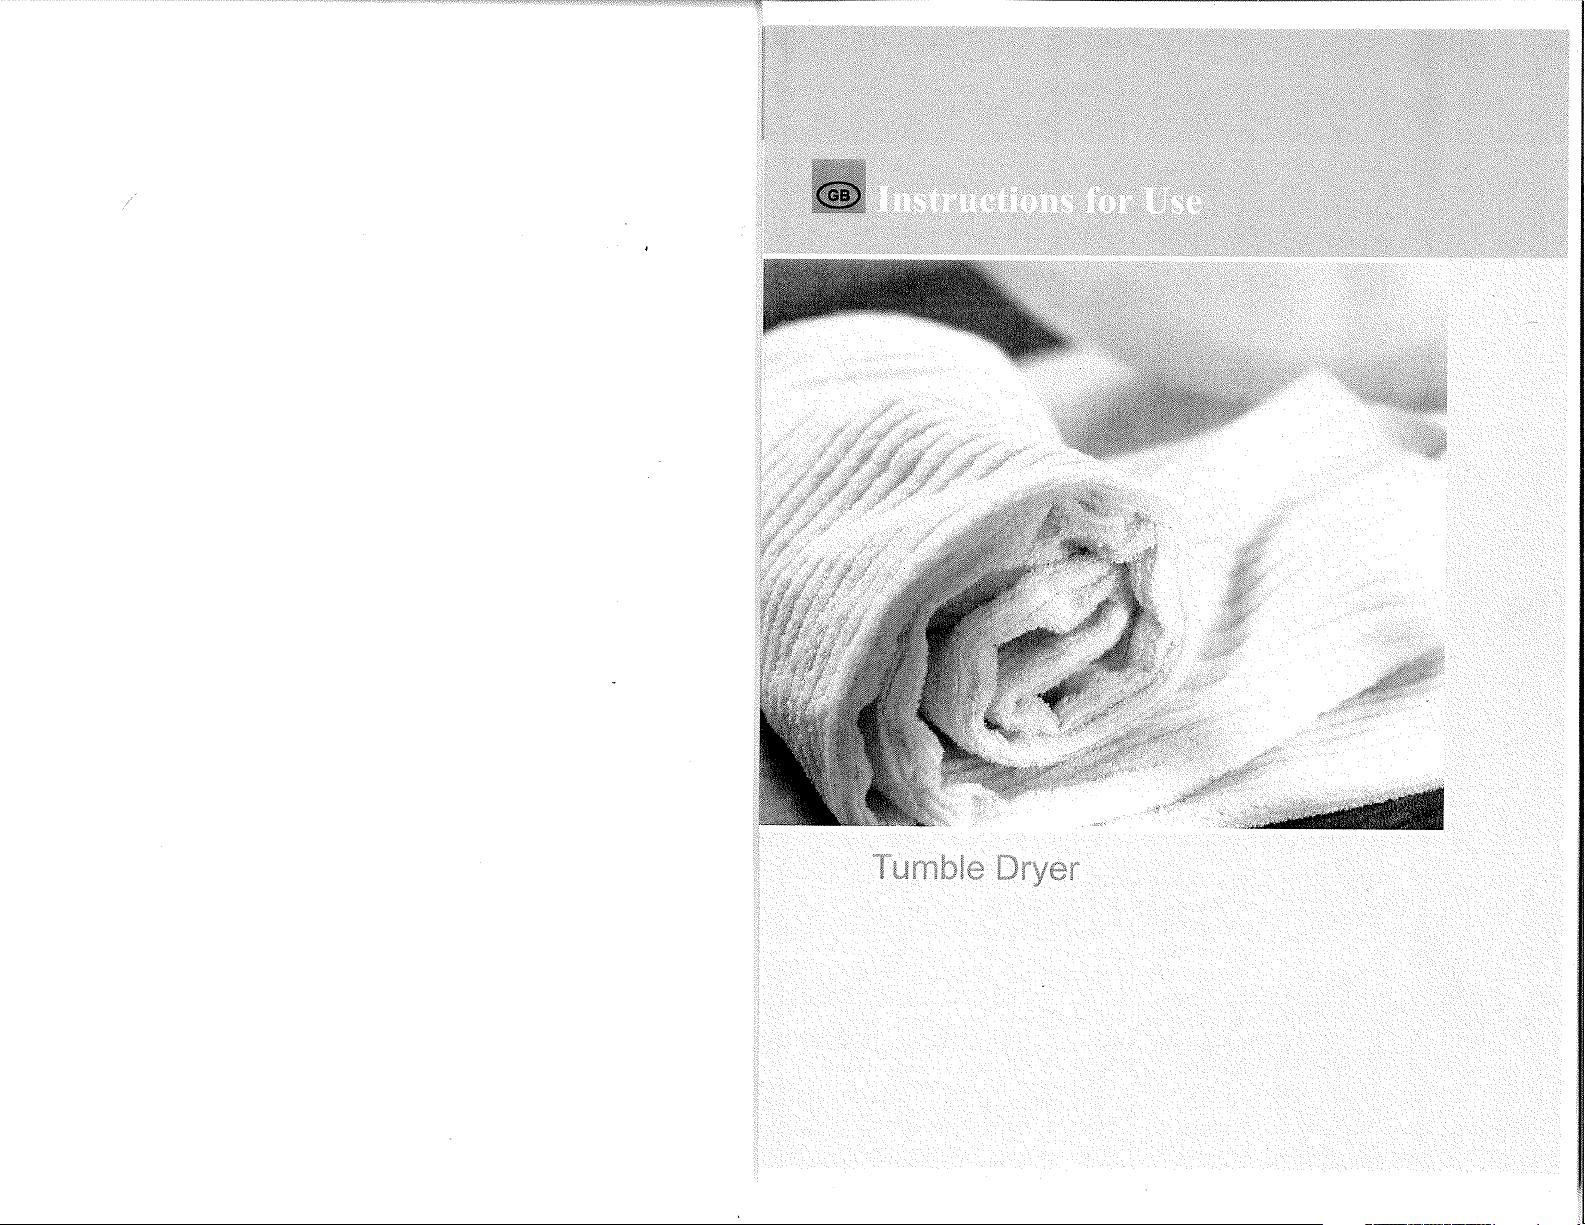
Thank
you
for
your
trust
and
for buying
our
tumble
dryer.
We
congratulate
you
on
your
wise
decision'
This
appliance
rs designed
for
drying
clothes
for
'
home
use
only.
The
dryer
enables
quick
drying
of
your
laundry,
teaving
it soft
and
tender
without
affecting
lfs
shape'
Our
apptiances
are
environmentally
friendly:
some
of the
materiats
are
recyclable
while
others
are
disposed
of and
destroyed.
To
protect
the
environment
dispose
of
your
appliance
by
detivering
it to
the
authorized
location.
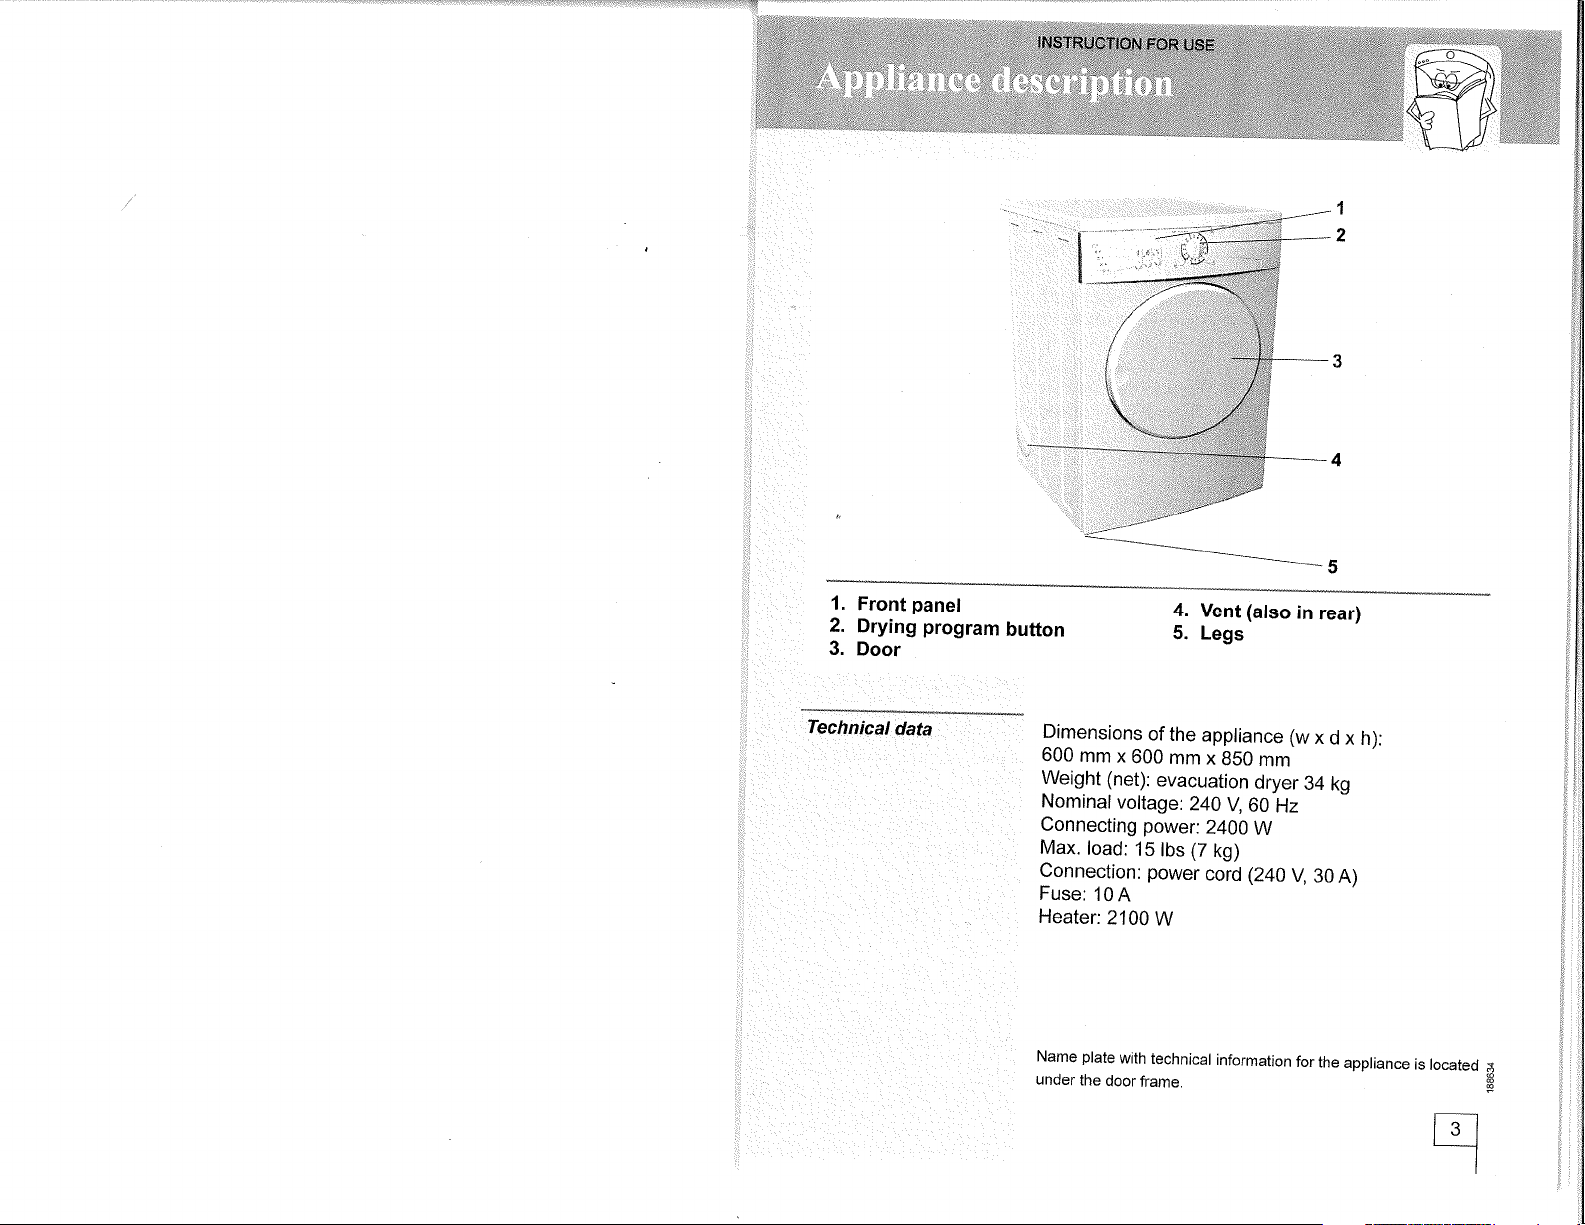
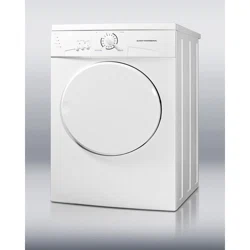
Front
panel
Drying program
button
Door
Technical
data
4.
5.
1.
2.
3.
Vent
(also
in
rear)
Legs
Dimensions
of
the
appliance
(w
x
d x
h):
600
mm
x
600
mm
x
8S0
mm
Weight
(net):
evacuation
dryer
34
kg
Nominal
voltage:
240V,60
Hz
Connecting
power:
24OO
W
Max.
load:
15
tbs (7
kg)
Connection:
power
cord(240
V
30A)
Fuse:104
Heater:
2100
W
Name plate
with
technical
information
for
the
appliance
is
located
under
the
door
frame.
t
-t
o
Use the
dryer
to dry only
laundry
washed
with
water.
Do not attempt
to dry
laundry
which
has been
washed
or cleaned
with
flammable
detergents
or solutions
(gasoline,
trichloroethylene
etc,), as
it may cause
explosion.
r
Do not
let children
play
with the
appliance,
Prevent
your
children
or
pets
from entering
the
dryer
drum.
o
When discarding
the old
appliance
remove
the
power
cord
and break
the lock,
so that the
door can
not be
locked
(safety
precautions
for
children).
o
Clean
lint
filter after each
drying.
lf
you
pulled
the
filter out,
always
reinsert
it before the
next drying
operation.
¡
After
use always
turn the appliance
off
(the
program
selection
knob should
be in
position
"0")
and
unplug
the
power
cord.
o
Leave
all repairs
to a
qualified
technician,
Tampering
with the appliance
or
repairs by
an
unqualified
person
may
cause accidents
or
failures.
Call the authorized
service department
(see
list of
authorized
service departménts).
o
Rating
plate
with technical
information
about the
appliance
is located
under
the door frame.
¡
The room
must be
well ventilated,
surrounding
air
must
not
contain
dusty
particles.
r
Room
where the appliance
is
located must be
well
ventilated to
prevent
back
flow of
gases,
released
by open
fire
gas
appliances
(fireplace).
1.\
jr¡::::.rìr:i::ì:ij*r:tjr.Tjffi
To
reduce
the
risk
of
fire,
always consider the
following:
.
Never
dry soiled clothes in the tumble dryer.
.
Laundry
soiled with substances like cooking oil,
acetone,
alcohol,
petrol,
petroleum,
stain remover,
turpentine, wax
and waxes must be washed in hot
water and detergent
prior
drying
in tumble
dryer.
.
Do not
dry objects made of foam
(latex),
water
resistant fabrics, rubber
lined fabrics,
and clothes
filled
with rubber foam in the dryer.
¡
For
wash cycles
use
laundry softeners
as
instructed
by their manufacturers,
.
Last
stage
of drying is carried out without heating,
to
allow laundry
to cool down before extracting it
from
the
drum. lf
you
take the laundry out before
it
cools down,
spread it to allow cooling.
A B"for" connecting
the appliance read
these
instruct¡ons carefully.
Repairing
any failure
arising from
inappropriate
connections
or
misuse of the appliance is
not covered
by the
guarantee;
A Neue,
stop a tumble
dryer
before
the
end
of
the
drying cycle unless
all
items
are
quickly
removed
and
spread
out
so
that
the
heat is dissipated.
Dlsposing
of
packaging
Disposing
of old
dryers
A
n¡st
of suffocation
There
is a risk
of suffocation
from
the cardboard
box
and
plastic
film.
Do not allow
children
to
play
with the
packaging.
All our
packaging
materials
are environmentally
friendly
and
recyclable.
Please
dispose
of the
packaging
in an
environmentally-responsible
manner.
Any
retailer
or
your
local
authority
will be
able
to advise
you
on the
disposal
methods
currently
available.
A oáng"r
of
death
Danger
of death
from
electrocution
or
suffocation.
Your old
dryer:
o
Disconnect
it
from the
main
power
supply.
o
Cut through
the
main cable
and
discard
along
with
the
plug.
o
Break
the door
lock.
This
prevents
children
from
locking
themselves
in the drYer.
Environmentally-friendly
disposal
conserves
valuable
raw materials.
Any
retailer
or
your
local
authority
will be able
to advise
you
on the
disposal
methods
currently
available.
1.
2.
A
fo
reduce
the risk
of fire,
electric
shock,
or
injury to
persons
when
using
your
appliance
follow
basic
precautions,
including
the
following:
Read
all instructions
before
using
the appliance.
Do
not wash
articles
that have
been
previously
cleaned in,
washed
in,
soaked
in
or spotted
with
gasoline,
dry-cleaning
solvents,
and
other
flammable
or explosive
substances
as
they
give
off
vapors
that
could ignite
or
explode.
Do
not
add
gasoline,
dry-cleaning
solvents,
or
other
flammable
or
explosive
substances
to the
wash
water.
These
substances
give
off
vapors
that
could
ignite
or
explode,
Under
certain
conditions,
hydrogen
gas
may
be
produced
in a
hot water
system
that has
not
been
used
for
2 weeks
or more.
HYDROGEN
GAS lS
EXPLOSIVE,
if
the hot
water
system
has not
been
used
for
such a
period,
before
using
a washing
machine,
turn
on
all hot
water faucets
and
let
the water
flow
from
each
for
several
minutes.
This
will
release
any
accumulated
hydrogen
gas.
As the
gas
is
flammable
do not
smoke
or
use
an open
flame
during
this
time.
Do not
allow
children
to
play
on
or in
the
appliance.
Close
supervision
of
children
is
necessary
when
the
appliance
is used
near
children.
Before
the appliance
is removed
from
service
or
discarded,
remove
the
door.
Do
not
reach
into
the
appliance
if
the
tub or
agitator
is
moving.
Do
not
install
or store
this
appliance
where
it
will
be exposed
to
the weather.
Do
not tamper
with
controls.
Do not
repair
or replace
any
part
of
the
appliance
or
attempt
any
servicing
unless
å
specifically
recommended
in
the
user- Ë
3.
4,
5.
6.
7.
B,
9.
10
Save tlrese
ìnstru
ctÍons
maintenance
instructions,
or
in
published user-
repair
instructions
that
you
understand
and
have
the
skills
to
carry
out.
11.
To reduce
the
risk
of electric
shock,
disconnect
the
appliance
from
the
power
supply
before
attempting
any
user
maintenance.
Turning
the
controls
to the
>OFF<
position
does
not
disconnect
the
appliance
from
the
power
supply'
Grounding
instructions
This
appliánce
must
be
grounded' ln
the
event
of
malfunction
or breakdown,
grounding will
reduce
the
risk
of
electric
shock
by
providing
a
path
of
least
resistance
for
electric
current,
This
appliance
is
equipped
with
a cord
having
an
equipment-
grounding conductor
and
a
grounding
plug.
The
þtug
musi
be
plugged
into
an
appropriate
outlet
that
is
pioperly installed
and
grounded in accordance
with all
local
codes
and
ordinances.
A
lmprop"r
connection
of
the
equipment-
grounding
conductor
can
result
in
a risk
óf
electric
shock.
Gheck
with
a
qualified
electrician
or
serviceman
if
you
are
in
doubt
as
to
whether
the
appliance
is
.
properly
grounded.
Do
not
modify
the
plug
provided with
the
appliance-
if it
will
not
fit the
outlet;
have
a
proper
outlet
installed
by a
qualified
electrician.
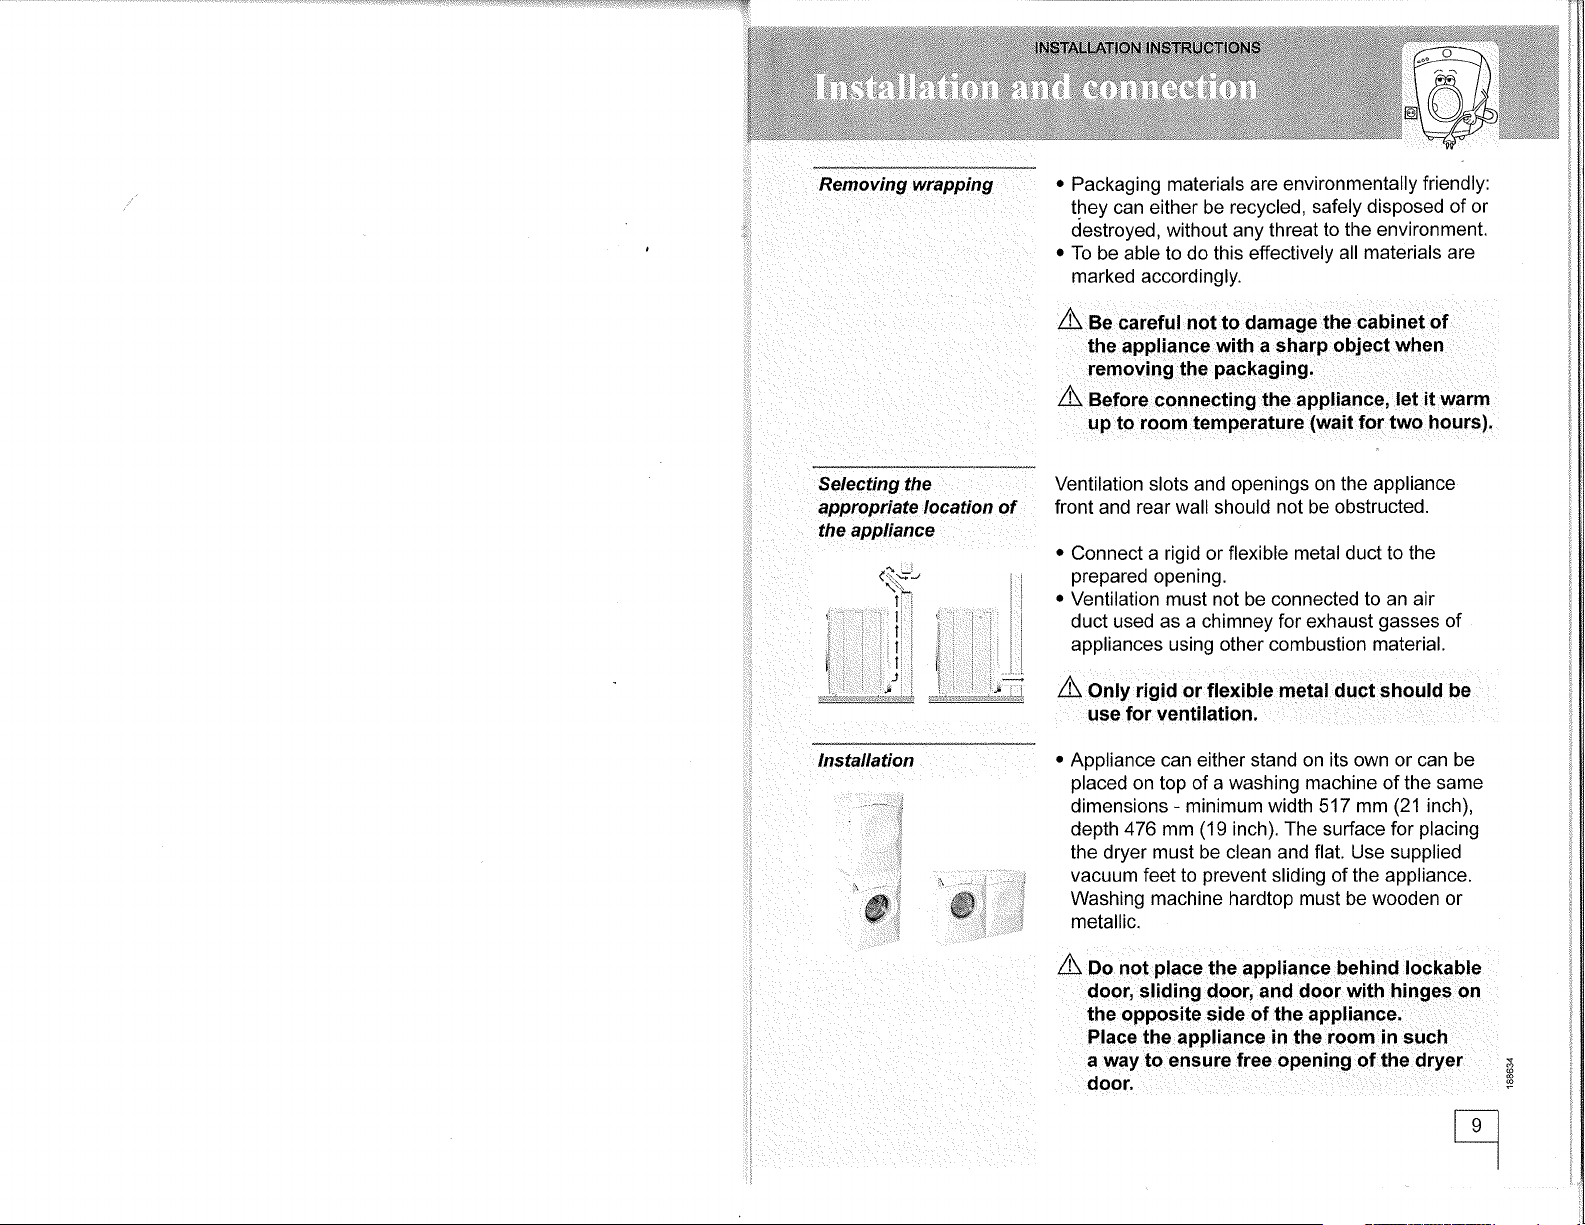
Removing wrapping
Selecting the
appropriate
location
of
the appliance
.
Packaging materials
are environmentally
friendly:
they can either be
recycled, safely
disposed of or
destroyed,
without any
threat
to the environment.
¡
To
be
able
to do
this effectively
all materials are
marked
accordingly.
A
g"
careful not to damage
the cabinet
of
the appliance with
a sharp object
when
removing the
packaging
A
Betore
connecting
the
appliance,
let
it
warm
up
to
room
temperature
(wait
for
two
hours).
Ventilation slots and openings
on the
appliance
front
and rear wall should
not be obstructed.
¡
Connect a rigid or flexible
metal duct to the
prepared
opening.
o
Ventilation
must
not
be connected
to an air
duct used
as
a chimney for
exhaust
gasses
of
appliances using other combustion material.
A Onry
rigid
or flexible metat duct should be
use for ventilation.
ti
t*.
)L
Ît
i
I
I
I
I
(i
i
::
ì
i:
I
:i
i..ì.
i
l'
..,11
ì'ìlì
l1lì
ìriil
ìll.l
:,,.
r
ì
rr
1.,...,
....J r
ì
\rj!ìå¡:.:sÌlJ]i:l1i:i;W
i'ì I ì,.:=
ì.
....'
rJ
I ì
lnstallation Appliance can either stand on its own or can
be
placed
on top of a washing
machine
of the
same
dimensions
-
minimum width 517 mm
(21
inch),
depth 476 mm
(19
inch). The surface for
placing
the dryer must be clean and flat. Use supplied
vacuum feet
to
prevent
sliding of the appliance.
Washing machine hardtop must be wooden or
metallic.
A Oo not
place
the
appliance behind
lockable
doo¡
sliding
door, and door with hinges on
the opposite side of the appliance.
Place
the appliance
in
the room
in
such
a way to ensure free opening of the dryer
door.
#
Edr .
1
--.1
Wtt
.
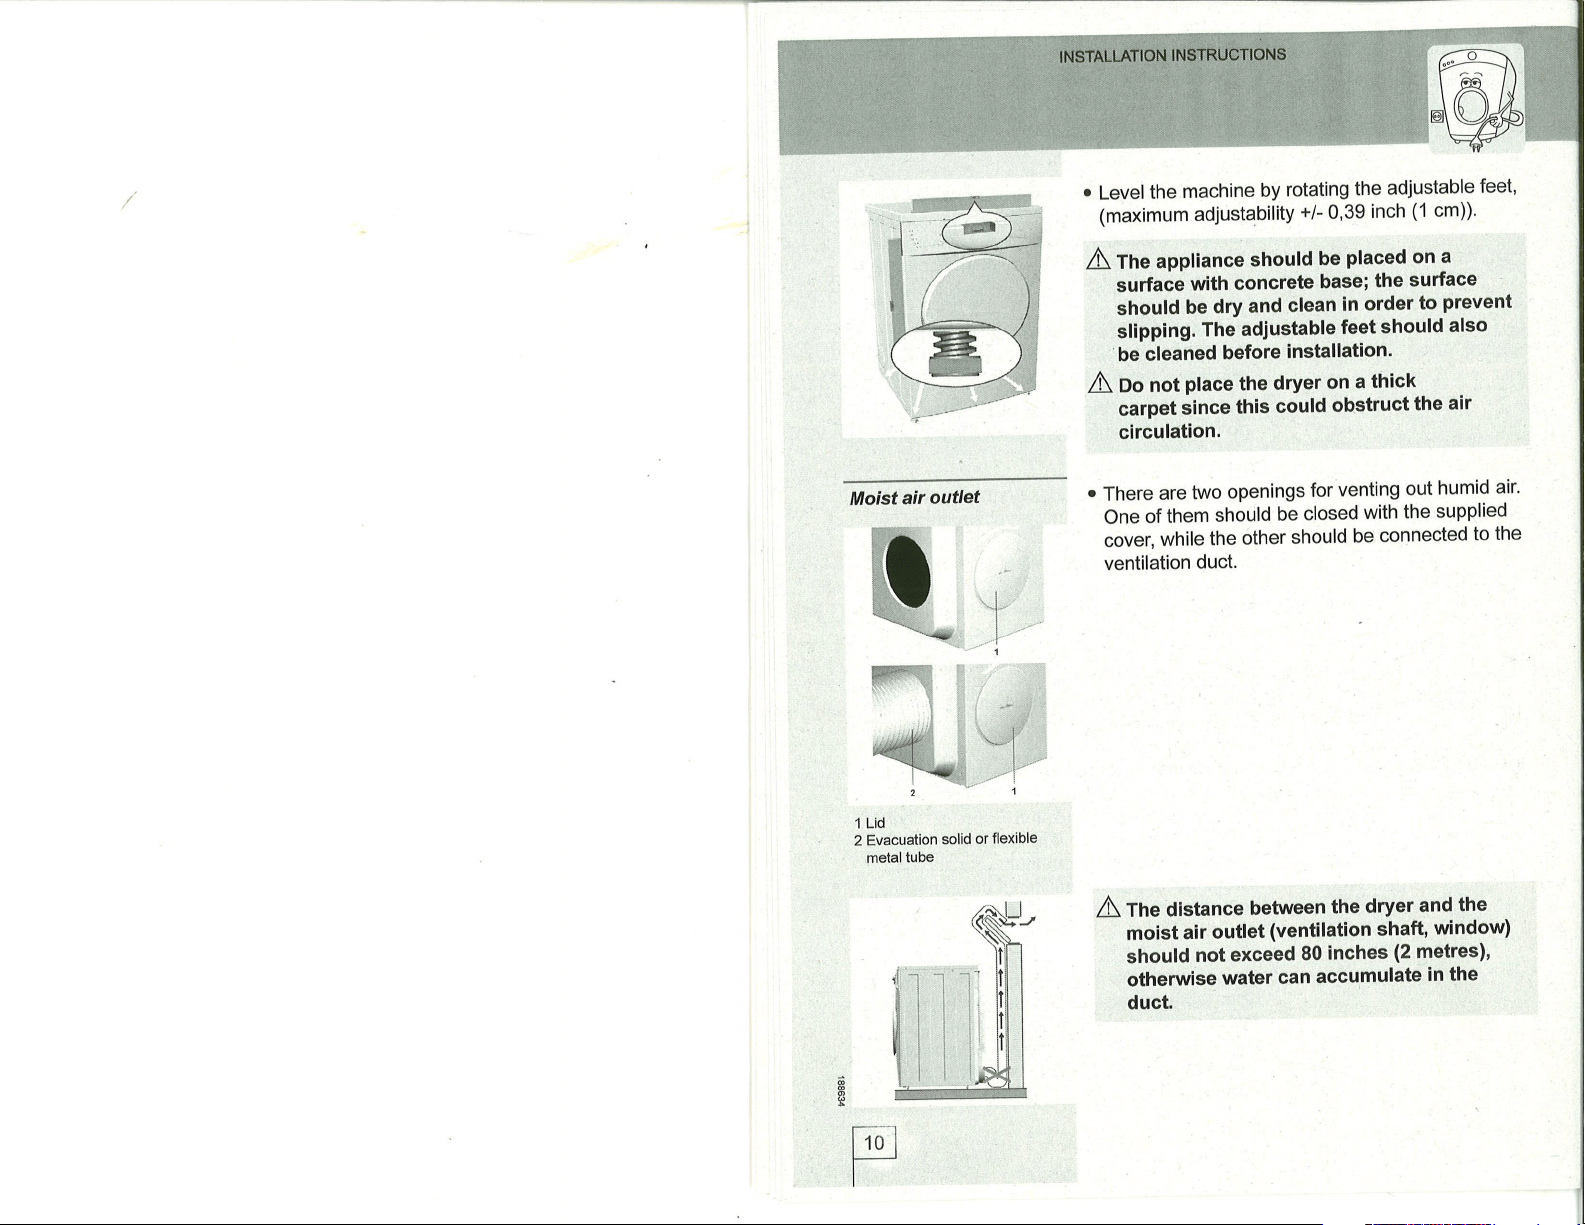
Level
the
machine
by
rotating
the
adjustable
feet,
(maximum
adjustability
+/-
0,39
inch
(1
cm))'
A
fne
appliance
should
be
placed on
a
surface
with
concrete
base;
the
surface
should
be
dry
and
clean
in
order
to
prevent
slipping.
The
adjustable
feet
should
also
be
cleaned
before
installation.
A
Oo
not
place
the
dryer
on
a
thick
carpet
since
this
could
obstruct
the
air
circulation.
o
There
are
two
openings
for
venting
out
humid
air'
One of
them
should
be
closed
with
the
supplied
cover,
while
the
other
should
be connected
to the
ventilation
duct.
Moist aÍr
outlet
1 Lid
2
Evacuation
solid
or
flexible
metal
tube
A
rne distance
between
the
dryer
and
the
moist
air
outlet
(ventilation
shaft,
window)
should
not exceed
80
inches
(2
metres)'
othenruise
water
can
accumulate
in the
duct.

:.-r-..:....::.ì11r'::ìiÌ¡::ra.:|9:1er:rrj:.:"/::irr111}r1¡rt::,lryaìì:i:1r.!11i.¡¡arril¡jrrc
Power connection
¡
Use
the
power
cord
to connect the dryer to the
power
supply via wall
socket.
.
Rated voltage
and other characteristics
are
indicated
on
the
rating
plate,
located
below the
door of the appliance.
A fne
wall
socket should always be within
reach. lt has to be
grounded
according
to
local regulations.
A
lf
tn"
power
cord
is
damaged
it
should
only
be
replaced
by
a
qualified
technician.
A Electr¡c
connection and
grounding
should
be
carried out in
accordance
with
current
standards and regulations.
A
Connect
to
individual branch circuit.
IMPORTANT
NOTE:
This dryer does
not come
complete
with
an electrical
power
cord. Electrical
power
cord kits
must be
purchased
by the
consumer
and are available
at most local
hardware
stores. Before
purchasing
a
power
cord kit
for
your
dryer,
you
must first
establish which
type of
power
cord
plug
is required
(compatible)
to fit the electrical
receptacle
in
your
laundary
room.
i.e. 3 wire
-
4
wire.
(See
Fig. 1)
When
purchasing
a 3-wire or 4-wire
power
cord
kit with
strain relief,
make
sure the cord meets
the
following
requirements:
o
UL listed dryer
cord kit
.240V
minimum
rated
¡
30 A rated
.
IYPE SRD
or SRDT
¡
minimim
five feet
long
¡
closed-loop
terminals or open-end
spade
lugs
with
upturned
ends
This
dryer has
a
pre-installed
(rear
mount) external
junction
box to facilitate
easy connection
of
the
Connecting
to
power
supply
(
I]_[ )
\Lr,/
Fig. 1
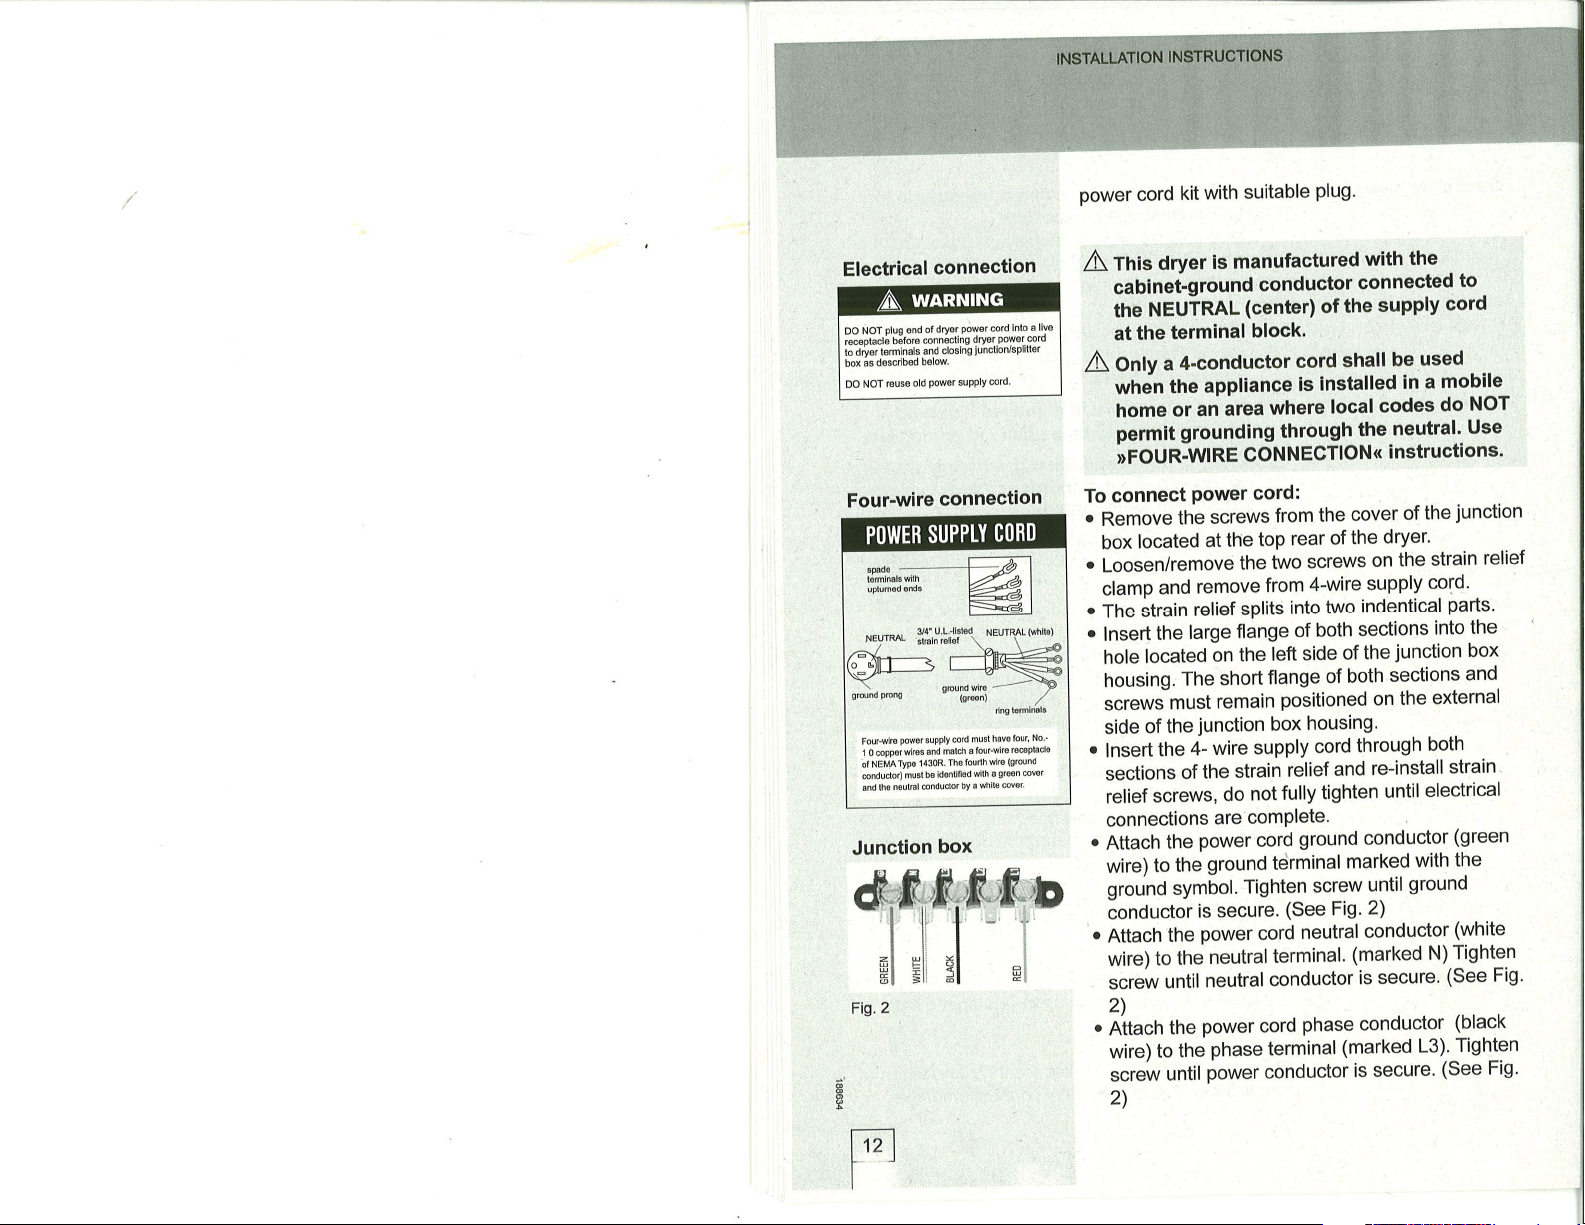
Electrical
connection
DO
NOT
ptug
ond
of dryer
powsr
ærd
Inlo a
llvo
i.ã.oudå ¡ãtore
"onnãctng
dry6r
powor
cord
to ddort€minâls
and
closlng
Juncllon/splltler
box ás dgscdbod
b€low
Do NOT rguss
old
Power
suPPlY
cord.
power
cord
kit
with
suitable
Plug.
A
fn¡s
dryer
is
manufactured
with
the
""6¡ns1-ground
conductor
connected
to
the
NEUÍFiAL
(center)
of
the
supply
cord
at
the
terminal
block.
A
Onty
a
4-conductor
cord
shall
be
used
when
the
appliance
is
installed
in
a
mobile
home
or
an
afea
where
local
codes
do
NOT
permit
grounding
through
the
neutral'
Use
ufOUn-W¡nE
CONNECTION<
instructions'
To connect
Power
cord:
o
Remove
the
screws
from
the
cover
of
the
junction
box
located
at
the
top
rear
of
the
dryer'
o
Loosen/remove
the
two
screws
on
the
strain
relief
clamp
and
remove
from
4-wire
supply
cord'
¡
The
strain
relief
splitS
into
two
indentical
parts'
o
lnsert
the
large
flange
of
both
sections
into
the
hole
located
on
the
left side
of
the
junction
box
housing.
The
short
flange
of
both
sections
and
screwJmust
remain
positioned
on
the
external
side
of
the
junction
box
housing'
¡
lnsert
the
4-
wire
supply
cord
through
both
sections
of
the
strain
relief
and
re-install
strain
'
relief
screws,
do
not
fully
tighten
until
electrical
connections
are
comPlete
¡
Attach
the
power
cord
ground
conductor
(green
wire)
to
the
ground tdrminal
marked
with
the
ground symbol.
Tighten
screw
untilground
conductor
is secure.
(See Fig.
2)
o
Attach
the
power
cord
neutral
conductor
(white
wire)
to
the
neutral
terminal.
(marked
N)
Tighten
screw
until
neutralconductor
is
secure'
(See Fig'
2)
.
Àttach
the
power
cord
phase conductor
(black
wire)
to
the
phase
terminal
(marked
L3)'-Ïghten
screw
until
power
conductor
is
secure'
(See Fig'
2)
Four-wire
connection
¡lng
Mlml!
Fdtswlro
Fwêr
supply
@rd
must
hav6
loui
No
_
I
0 æpFr$r€s
and
matd
ã loutsdro
r۾phds
õf
NEmTypo
1430R.
Th6foudhdß
(grdnd
øndudor)
mustbe
ld€ntfiodúlh
¿
oræn
øvôr
ånd
he neut€l
@nduclor
by a
ú¡19
øv6i
Fig.2
li
i'
l1
r
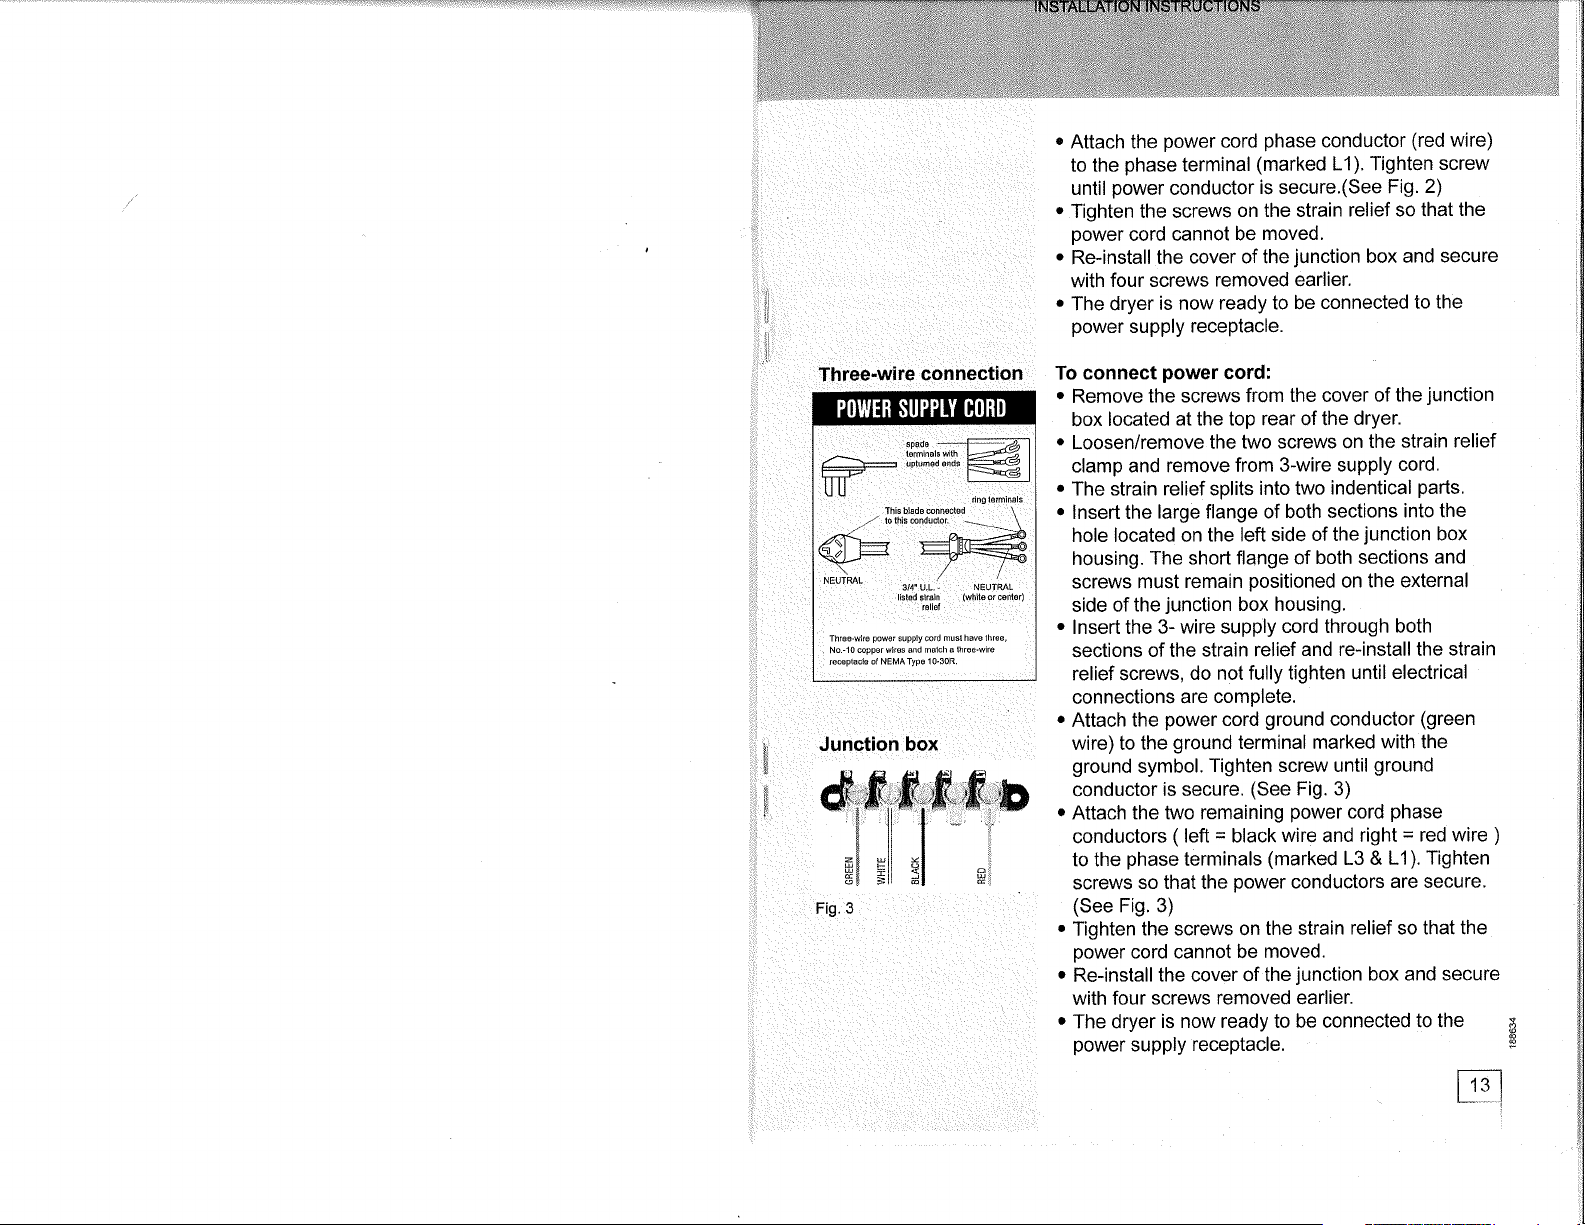
Attach the
power
cord
phase
conductor
(red
wire)
to the
phase
terminal
(marked
L1), Tighten
screw
until
power
conductor
is secure.(See
Fig.
2)
.
Tighten the screws
on the strain
relief so
that the
power
cord
cannot be
moved.
.
Re-install
the
cover of the
junction
box
and secure
with
four screws
removed
earlier.
¡
The
dryer
is
now ready to
be connected
to
the
power
supply
receptacle.
To connect
power
cord:
.
Remove
the screws
from the cover
of the
junction
box located
at the top
rear
of
the dryer.
.
Loosen/remove
the two screws
on the
strain relief
clamp and
remove from
3-wire supply
cord.
r
The strain relief splits
into two
indentical
parts.
.
lnsert the
large flange of
both sections
into the
hole located
on the left side
of the
junction
box
housing.
The short flange
of both sections
and
screws
must
remain
positioned
on the external
side
of the
junction
box housing.
.
lnsert the
3- wire supply
cord through
both
sections of the
strain
relief and re-install the
strain
relief screws,
do
not fully tighten
until electrical
connections
are complete.
.
Attach
the
power
cord
ground
conductor
(green
wire) to
the
ground
terminal
marked with the
ground
symbol.
Tighten screw until
ground
conductor
is secure.
(See
Fig. 3)
o
Attach
the two remaining
power
cord
phase
conductors
(
left
=
black
wire and
right
=
red wire
)
to the
phase
terminals
(marked
L3 &
L'1). Tighten
screws
so that the
power
conductors
are secure.
(See
Fig. 3)
.
Tighten the screws
on the strain
relief so that
the
power
cord cannot
be moved.
.
Re-install
the cover
of
the
junction
box and secure
with
four screws removed
earlier.
o
The dryer
is now ready to
be connected
to the
power
supply
receptacle.
Junction box
Fig.
3
'b
druil*r'ßffi"
Él Ëli
=l
F,
I
Three-wire
connection
Threo-wke
pow€r
supplyco¡d
musl havo lhr€e
No.l0
æpperw[os 6¡d mûlch
a lhree-wlo
rcceplacl€ of NEMATypo 10.30R.
E¡I
Note:
The receptacle should be located
so that
the
plug
and
receptacle
will
be accessible
with the
dryer in
its installed
position.
Additional Grounding
Procedure
Some
local codes may
require
a separate
ground.
ln such cases, the
required
accessory
ground
wire,
clamp and screw
must be
purchased
separately.
Never
ground
the dryer
to
plastic plumbing
lines,
gas
lines or hot
water
pipes.
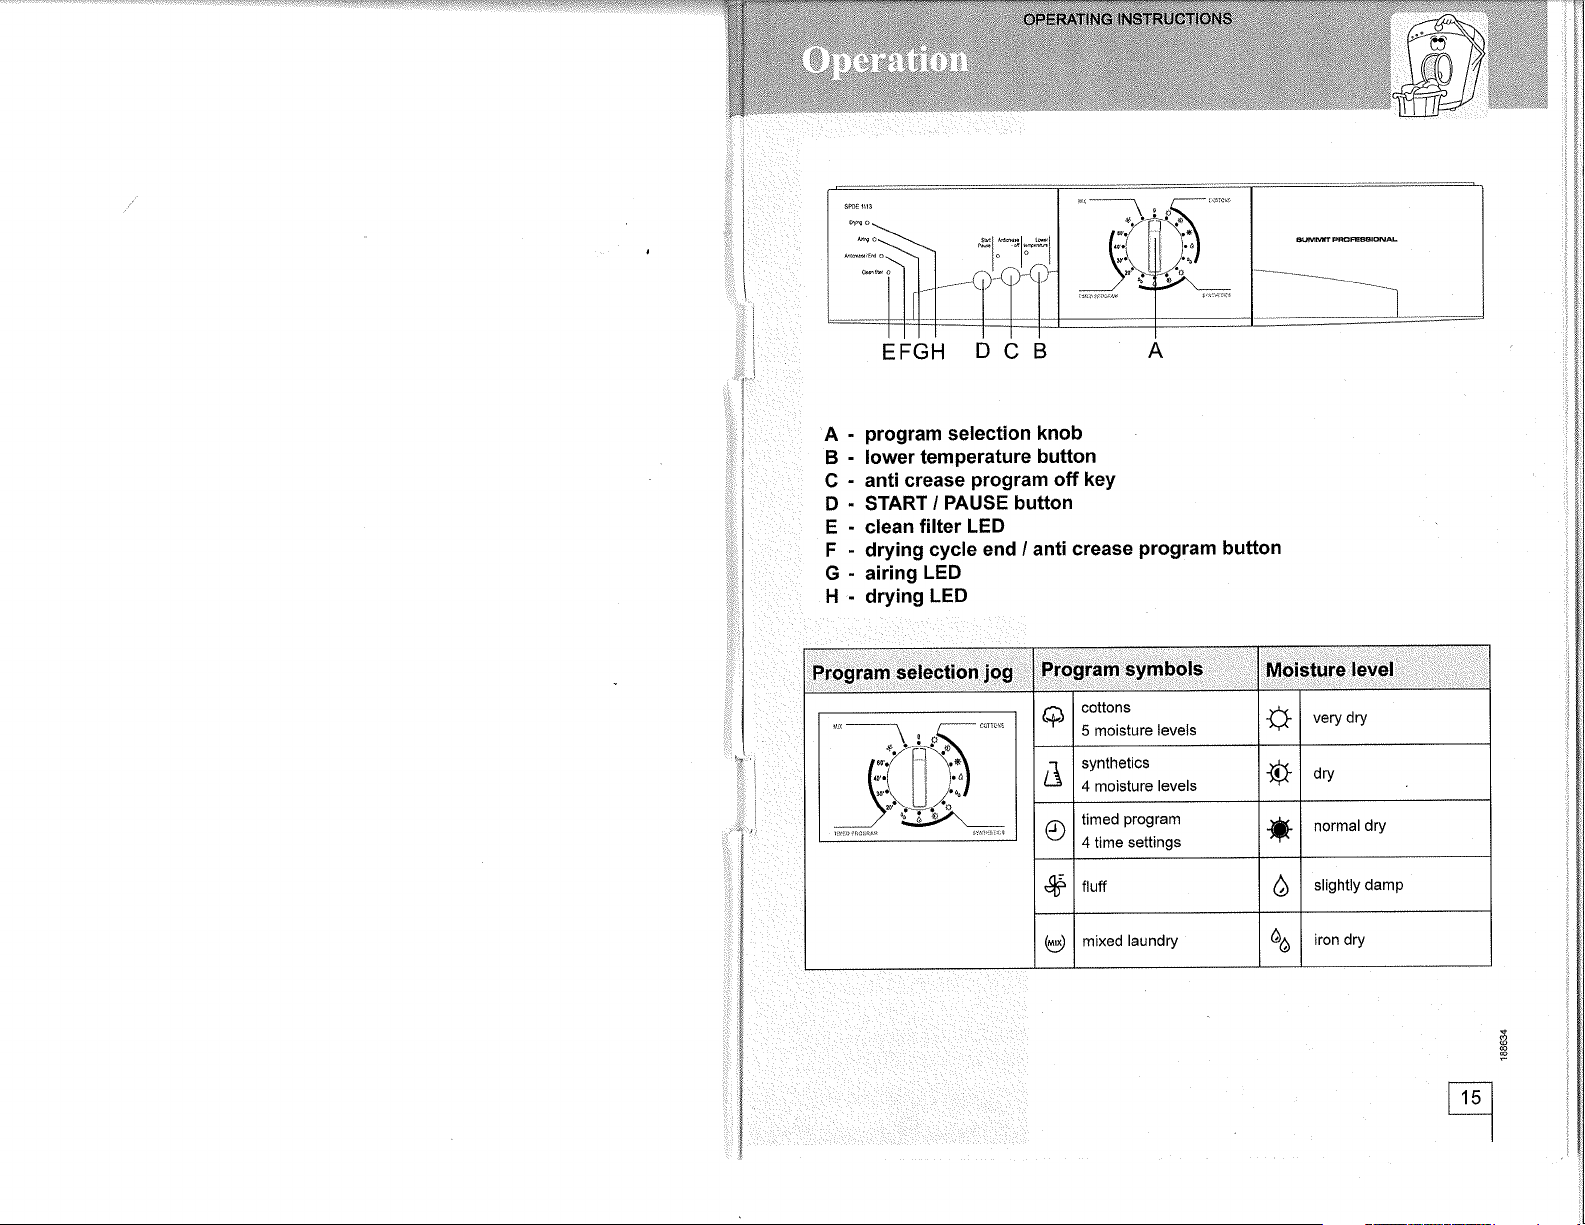
E FGH
A
- program
selection
knob
B
-
lower temperature
button
G
-
anti crease
program
off key
D
-
START
/
PAUSE button
E
-
clean
filter LED
F
-
drying
cycle end /
anti crease
program
button
G
-
airing
LED
H
-
drying
LED
Prôg
ram
selectión
jo-g,¡
PÍogiam,Symbols Moisture level
a
cottons
5 moisture
levels
#
very
dry
¿1
synthet¡cs
4 moisture
levels
#
dry
o
timed
program
4 time
settings
#
normal
dry
s
fluff
ô
slightly damp
a,
mixed
laundry
ô^
iron dry
Drying
procedure
/*\
I
i{
Operating
the
dryer
ft
r, l
\I
-
Open
the
dryer
door
by
pushing
the
left-hand
side
of the
door
towards
the
appliance.
-
Sort
the
laundry
according
to the type
of
fabric.
A Fasten
buttons
and
zippers,
tie
any strings
and
pull
out
the
Pockets.
A Very
delicate
laundry
should be
put
in a
special
protective sack.
A n
¡" recommended
to
load the drum
with
items
of
different
sizes.
A
oo not
load
drip'wet
laundry
into the
dryer
(min.800
rPm).
A
pay
attention
to
the
labels
on
the
clothes,
indicating
the
recommended
drying
mode
(see
table
of
textile
treatment
symbols
on
the
last
Page)'
-
Load
the
laundry
into
the
drum.
-
GIose
the dryer
door.
-
Drying
proqram
selection
By
turning
selector
knob
(A)
select
the
preferred
diying
program
according
to
the
type
of
laundry
and
required
final
moisture.
The
selector
knob
may
be
turned
in
both
directions.
-
Selection
of
additional
functions
Additional
functions
are
selected
prior
to
pressing
the
START
button
(D).
Decreasing
the
temPeratu
re
This
function
is selected
if
you
wish
to
dry
laundry
at
a temperature
lower
than
determined
by the
program
(see
drying
programs
chart
on
page
20)'
This
function
makes
the
drying
cycle
last
longer'
A,
¡ftet
drying
is
completed,
this
function
returns
to
the
initial
higher
temperature'
EFGH
DCB
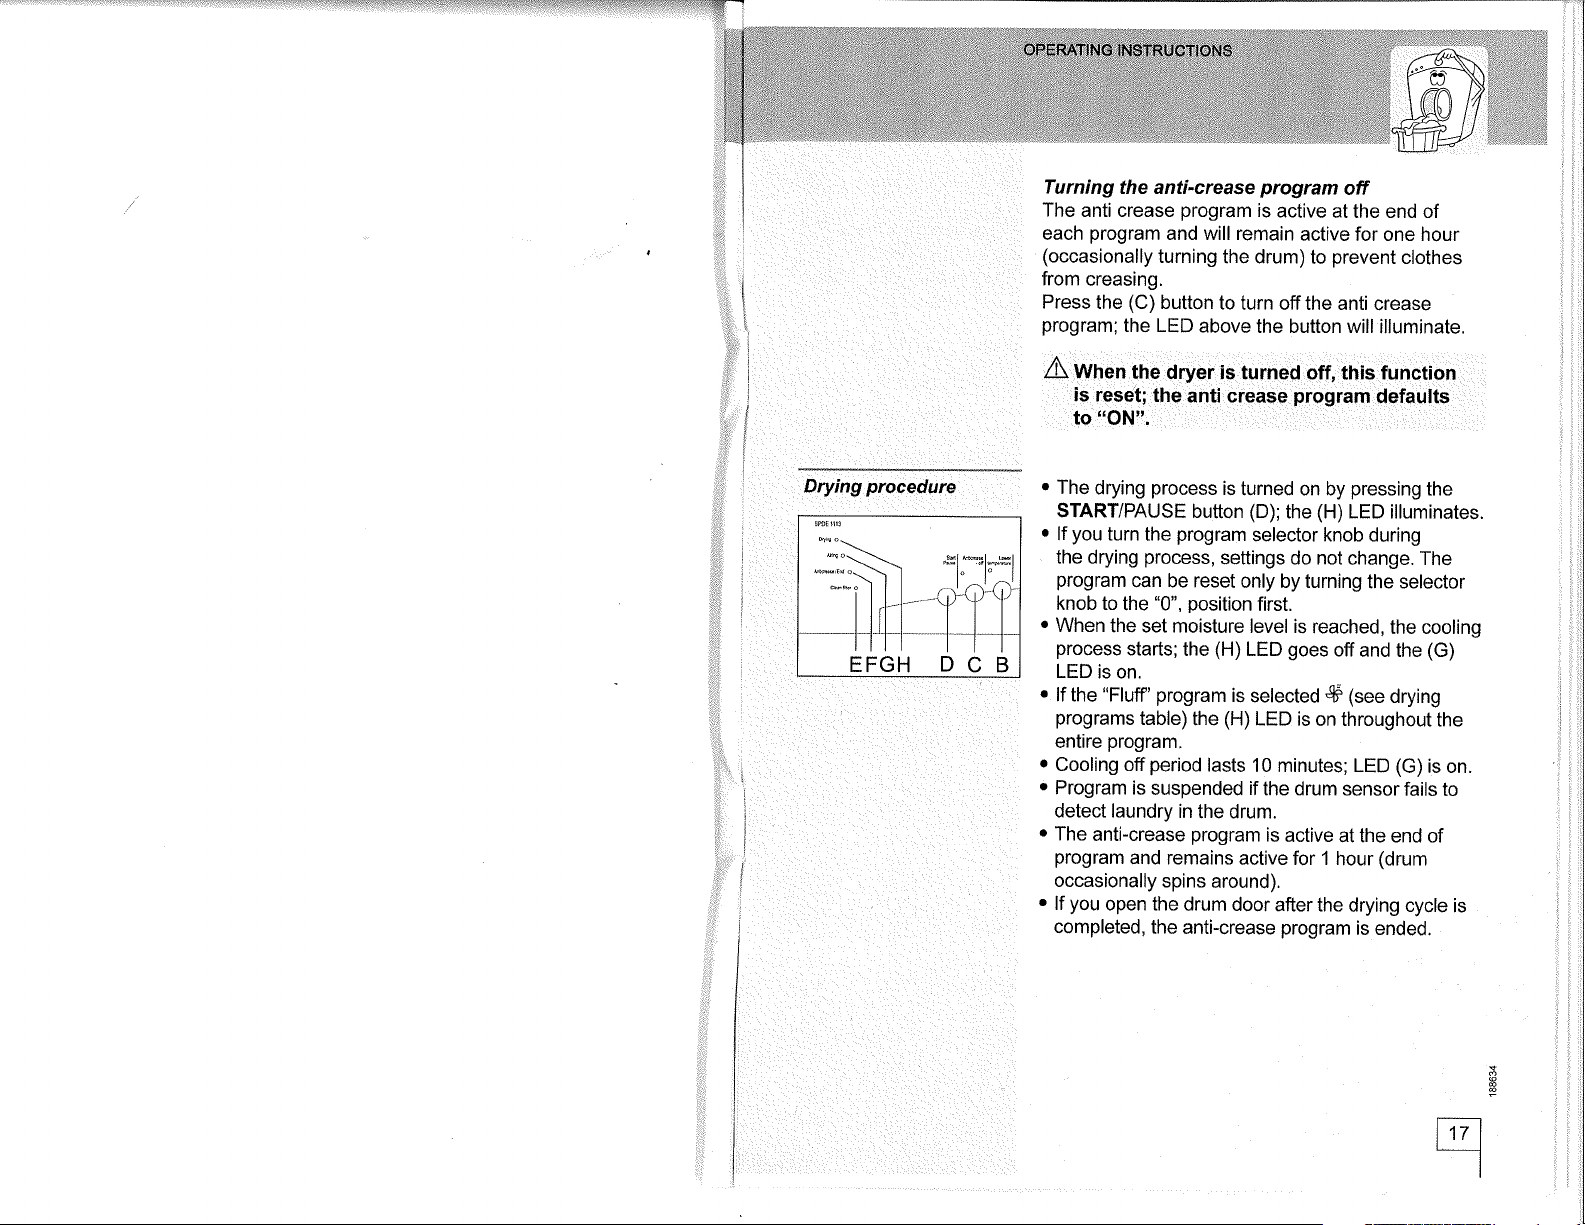
i-ïir|¡_r.â1t1Ë9l31:Ì,:,-r',¡:..
Drying
procedure
Turning
the anti-crease
program
off
The
anti crease
program
is
active at
the end of
each
program
and will remain
active
for
one hour
(occasionally
turning
the drum) to
prevent
clothes
from creasing.
Press
the
(C)
button
to turn
off the anti crease
program;
the LED
above
the button will illuminate.
A, Wn"n
the dryer
is turned off,
this
function
is
reset;
the
anti crease
program
defaults
to
"ON".
.
The
drying
process
is turned
on by
pressing
the
START/PAUSE
button
(D);
the
(H)
LED illuminates.
.
lf
you
turn the
program
selector knob during
the drying
process,
settings do not change.
The
program
can
be reset only
by turning
the selector
knob to the
"0",
position
first.
¡
When
the set moisture
level is reached,
the cooling
process
starts;
the
(H)
LED
goes
off and
the
(G)
LED
is on.
r
lf
the
"Fluffl'
program
is
selected #
(see
drying
programs
table) the
(H)
LED is
on throughout
the
entire
program.
o
Cooling off
period
lasts
10 minutes; LED (G)
is
on.
.
Program
is
suspended if
the drum
sensor fails
to
detect laundry
in the
drum.
¡
The
anti-crease
program
is
active at
the end of
program
and
remains active
for t hour
(drum
occasionally
spins around).
¡
lf
you
open the drum
door
after the drying
cycle is
completed,
the
anti-crease
program
is ended.
ll
-
End
of
drying
procedure
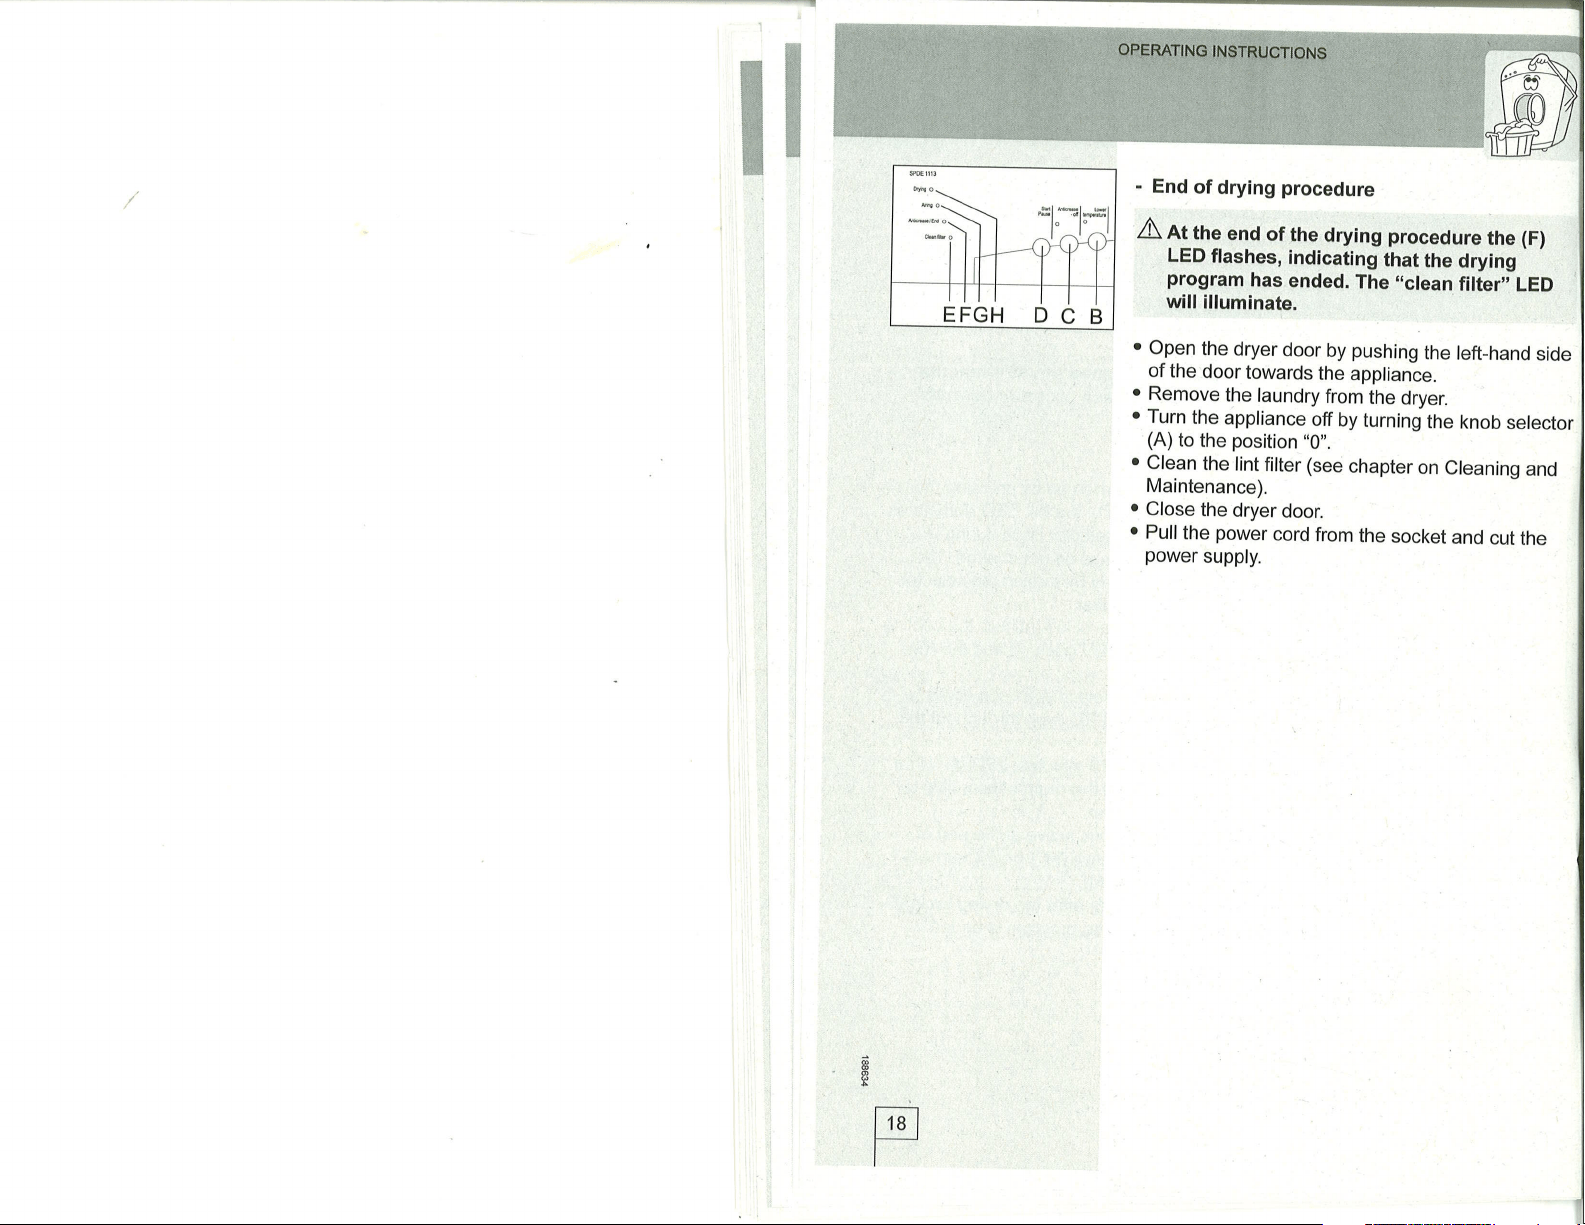
A lt
the
end
of
the drying procedure
the
(F)
LED
flashes,
indicating
that
the
drying
program
has
ended.
The.,clean
filter"
LED
willilluminate.
.
Open
the
dryer
door
by
pushing
the
left-hand
side
of the
door
towards
the
appliance.
o
Remove
the
laundry
from
the
dryer.
o
Turn
the
appliance
off
by
turning
the
knob
selector
(A)
to the
position
"0".
o
p_le.an
the lint
filter
(see
chapter
on
Cteaning
and
Maintenance).
o
Close
the
dryer
door.
r
Pull
the
power
cord
from
the
socket
and
cut
the
power
supply.
E
I
EFGH
DCB
"lÏl
{ù-!)
ll
DC
r*"1
{r)
I
B
E FGH
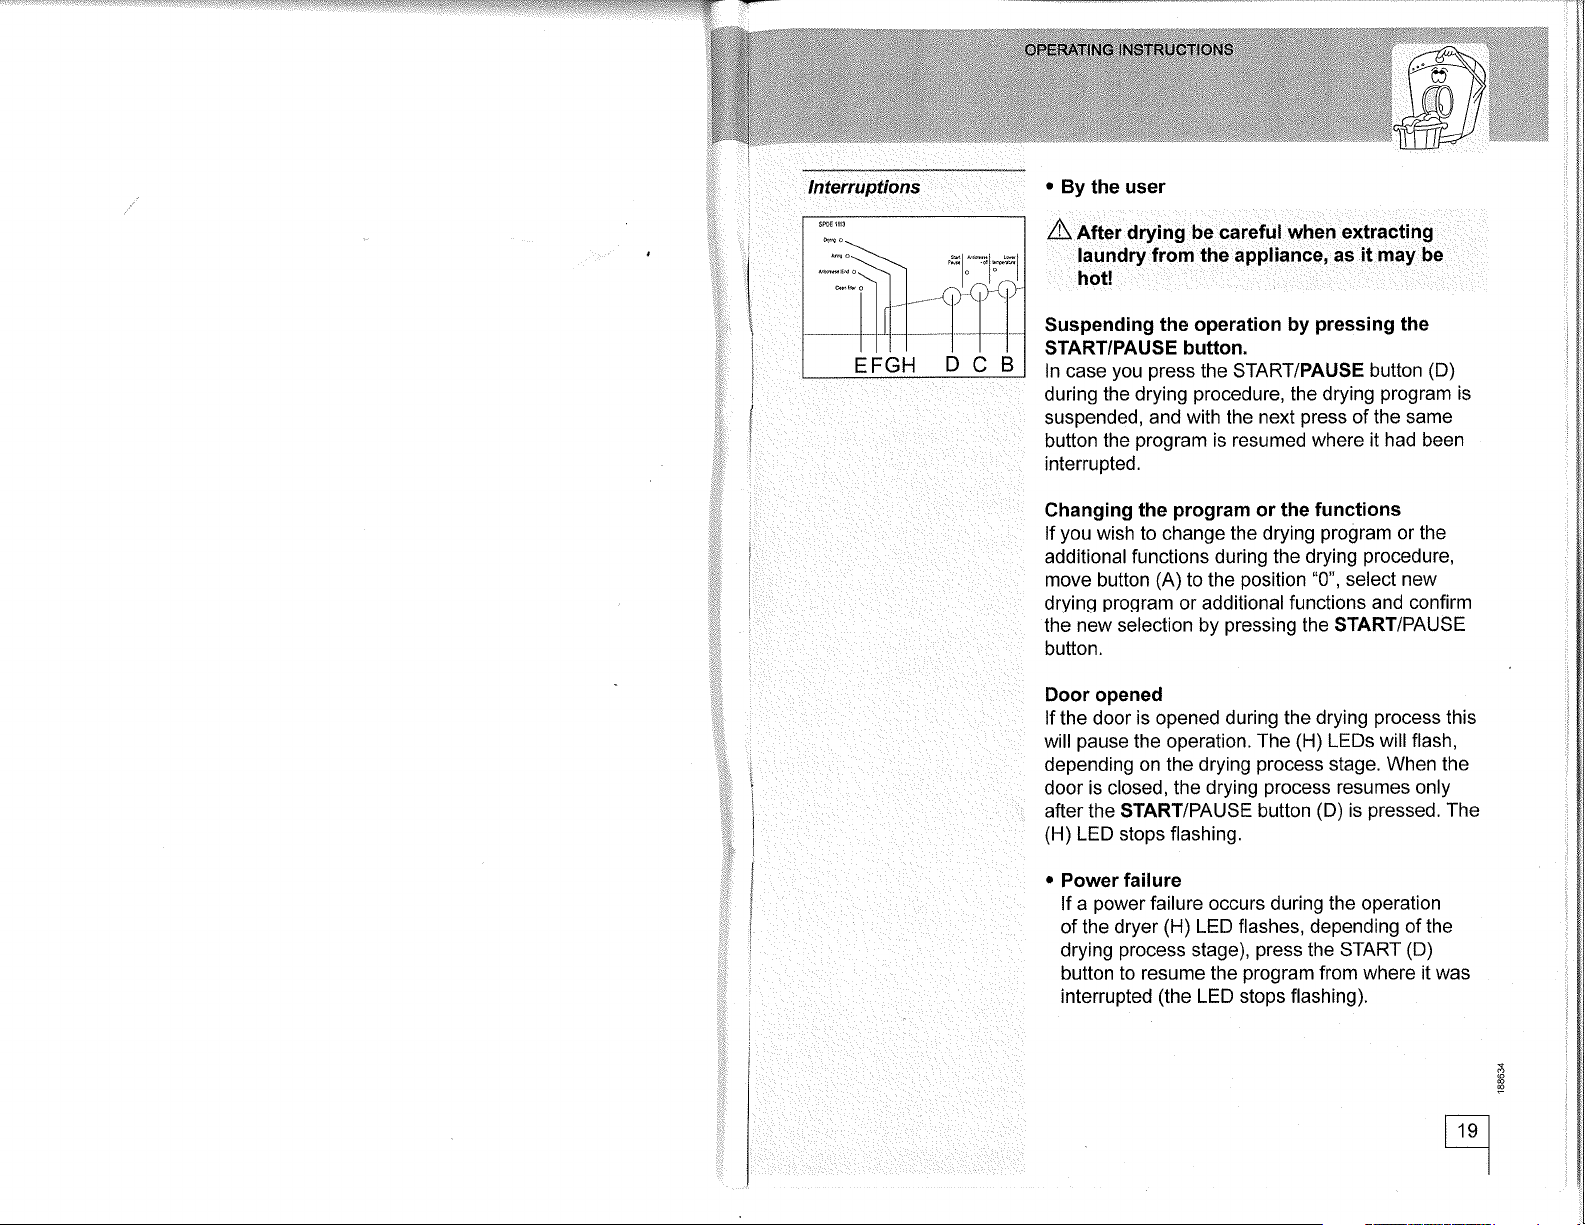
lnterruptions
r
By the user
A.
Rt"r drying
be careful
when
extracting
laundry
from the appliance,
as it may be
hot!
Suspending
the operation by
pressing
the
START/PAUSE
button.
ln case
you press
the START/PAUSE
button
(D)
during
the drying
procedure,
the drying
program
is
suspended, and
with
the
next
press
of the same
button
the
program
is resumed where it had been
interrupted.
Changing the
program
or the
functions
lf
you
wish
to change
the drying
program
or the
additional functions during the
drying
procedure,
move button
(A)
to the
position
"0",
select new
drying
program
or additional functions
and confirm
the new selection by
pressing
the START/PAUSE
button.
Door opened
lf the
door is opened during the
drying
process
this
will
pause
the operation.
The
(H)
LEDs willflash,
depending on the drying
process
stage.
When
the
door is closed, the
drying
process
resumes only
after the START/PAUSE button
(D)
is
pressed.
The
(H)
LED stops flashing.
o
Power failure
lf a
power
failure occurs during the operation
of the dryer
(H)
LED flashes, depending of the
drying
process
stage),
press
the
START
(D)
button to resume the
program
from where it was
interrupted
(the
LED stops flashing).
.
Drying is
economically most
effective
if
you
dry
the
recommended
quantity
of laundry
per
load
(see
Program Chart on
page
20),
¡
Do not
dry
laundry made
of especially
sensitive
fibers
(wool,
silk), which
may
shrink
or lose
shape.
r
lt is not necessary
to
use
a fabric
conditioner
when
washing
the laundry,
since
drying
makes it
soft and tender.
r
Drying time is much shorter
and consequently
the
energy consumption lower if laundry is well spun
prior
to drying.
r
By selecting
the
most suitable drying
program,
you
will
avoid over-d
ryi ng and
difficult.i.roni
ng.
¡
By
cleaning the
filter
on
regular
basis
drying time
is shorter and consumes
less
energy.
il
i
l
l
i
P
't
.
'iì
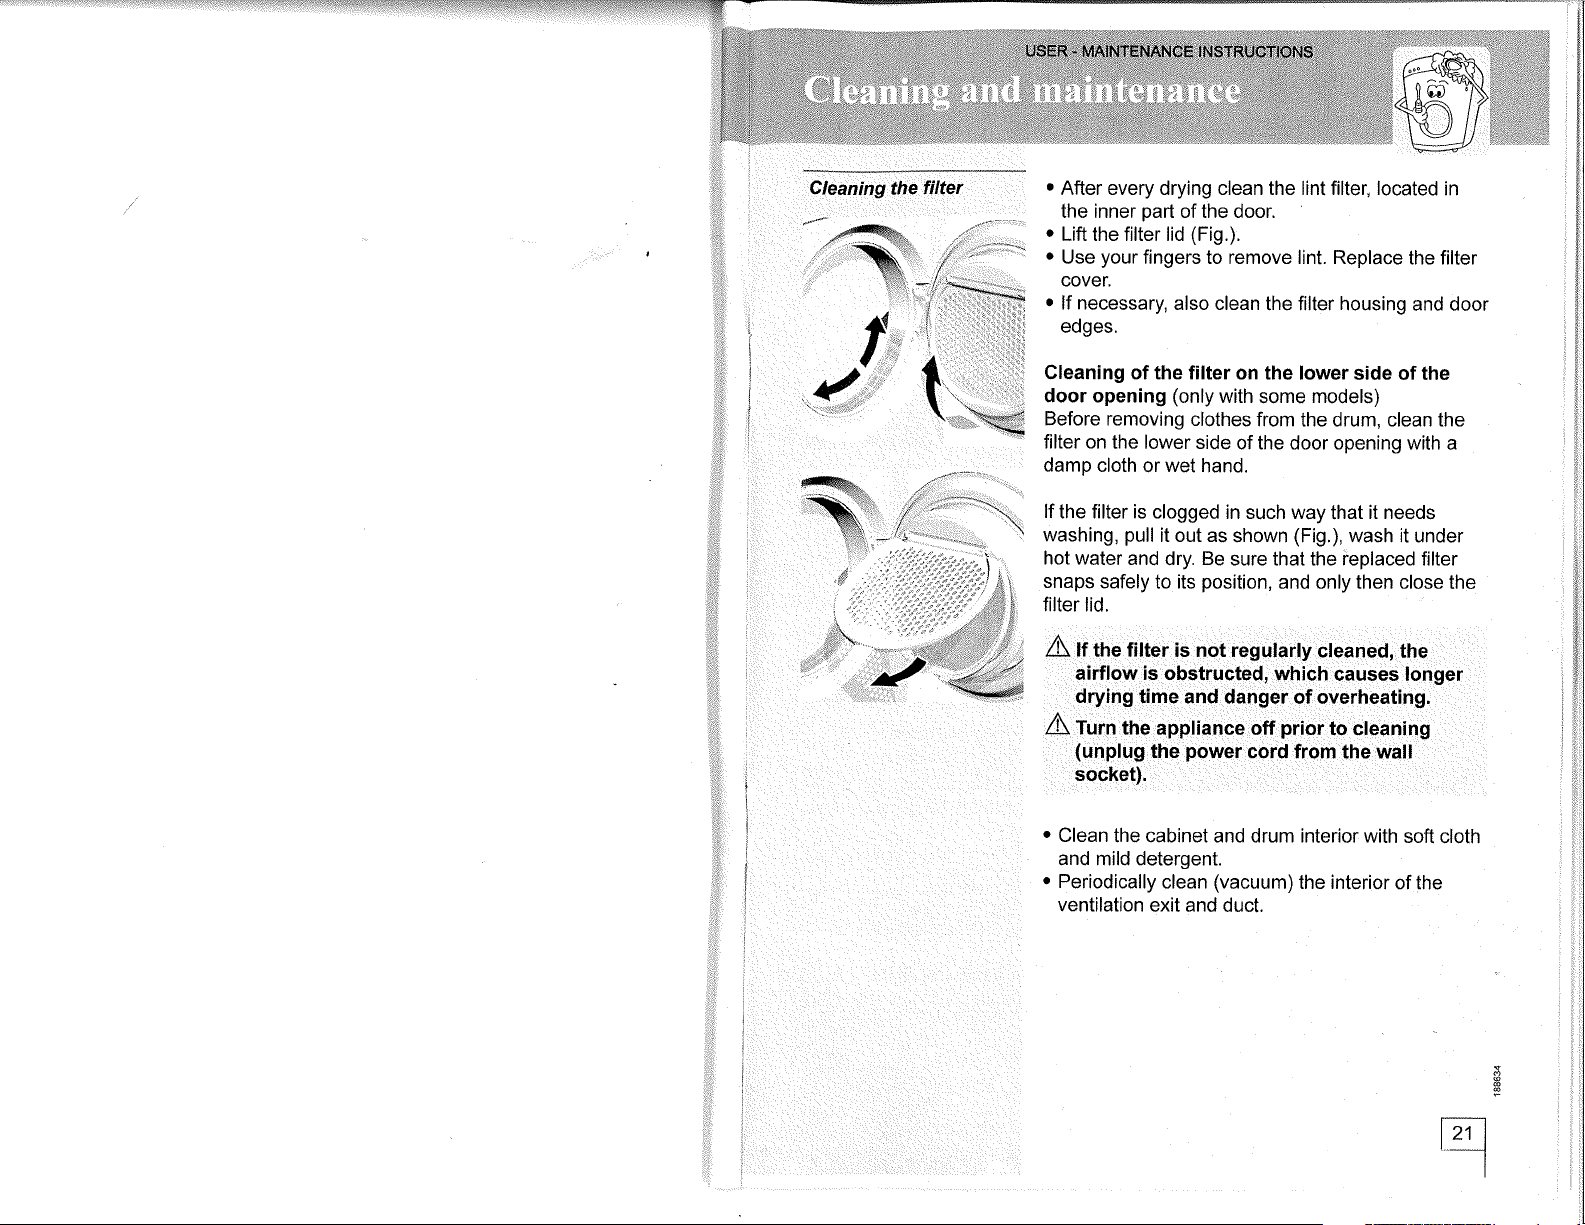
Cleaning
the
filter
¡
After
every drying clean the lint filter, located
in
the inner
part
of the door.
o
Lift the filter lid
(Fig.).
.
Use
your
fingers
to remove lint. Replace
the filter
cover.
¡
lf necessary,
also clean the filter housing
and door
edges.
Cleaning
of the filter
on the lower side of the
door opening
(only
with some models)
Before removing
clothes from
the drum, clean the
filter on the lower
side
of the door opening with a
damp
cloth or wet
hand.
lf
the filter is clogged
in such way that it needs
washing,
pull
it out as shown
(Fig.),
wash
it
under
hot water
and dry. Be
sure that the
ieplaced
filter
snaps
safely
to
its
position,
and only then close
the
filter lid.
A
f
tn"
filter
is not regularly
cleaned,
the
airflow is obstructed, which
causes longer
drying time
and danger
of overheating.
A
turn
the
appliance
off
prior
to cleaning
(unplug
the
power
cord from the
wall
socket).
.
Clean the
cabinet and drum interior with
soft cloth
and
mild detergent.
¡
Periodically
clean
(vacuum)
the interior
of the
ventilation
exit and
duct.
/--iøryþ
"\.
'r
Triå.
r:.
:
ti
î
¿
Appliance
does
not work:
Environmental
interference
(for
example electrical
wiring)
could induce signalization
of different faults.
ln such
cases:
switch the appliance
off, and wait for
a
few
seconds;
switch the
appliance back
on and repeat the
drying
program.
lf the fault repeats,
call
authorized
service
shop.
Trouble
Check
lf there is
current in the socket
and if the fuse is
functioning.
lf
the
plug
is correctly inserted
into the socket.
There is
current
in
the socket,
þut
the drum is not
rolling:
lf
the door is closed
tightly
(press
it
towards the
appliance).
lf the
program
runs
according
to
instructions.
lf appropriate
drying time is
selected.
lf
the
filter
is clean.
lf
the room is adequately
ventilated.
lf the amount of laundry
to be dried is
not too big.
lf the ventilation
duct is too long
(only
with evacuation
dryer
-
max 2
m
(80
inch)).
lf
the
laundry
loaded in
the drum has not
been spun
enough or if appropriate
drying time has
been
set.
lf
the amount of laundry
to be dried is
not too big.
lf there are only large
pieces
of laundry
(large
and small
pieces
should
be dried together).
lf different fabrics
are dried
together
(group
the
laundry
according
to the type of fabrics).
The
machine
signals errors or failures
in operation
by flashing signal LED's.
Record number
of flashes representing
the failure,
shut the machine
off and
call nearest
authorized
service.
lf a failure occurs
due to incorrect
installation or inappropriate
use
of the
Laundry is
not
dry:
Unevenly
dried
laundry:
appliance,
the
guarantee
is void,
and the repair
bill shall be settled
by the user.
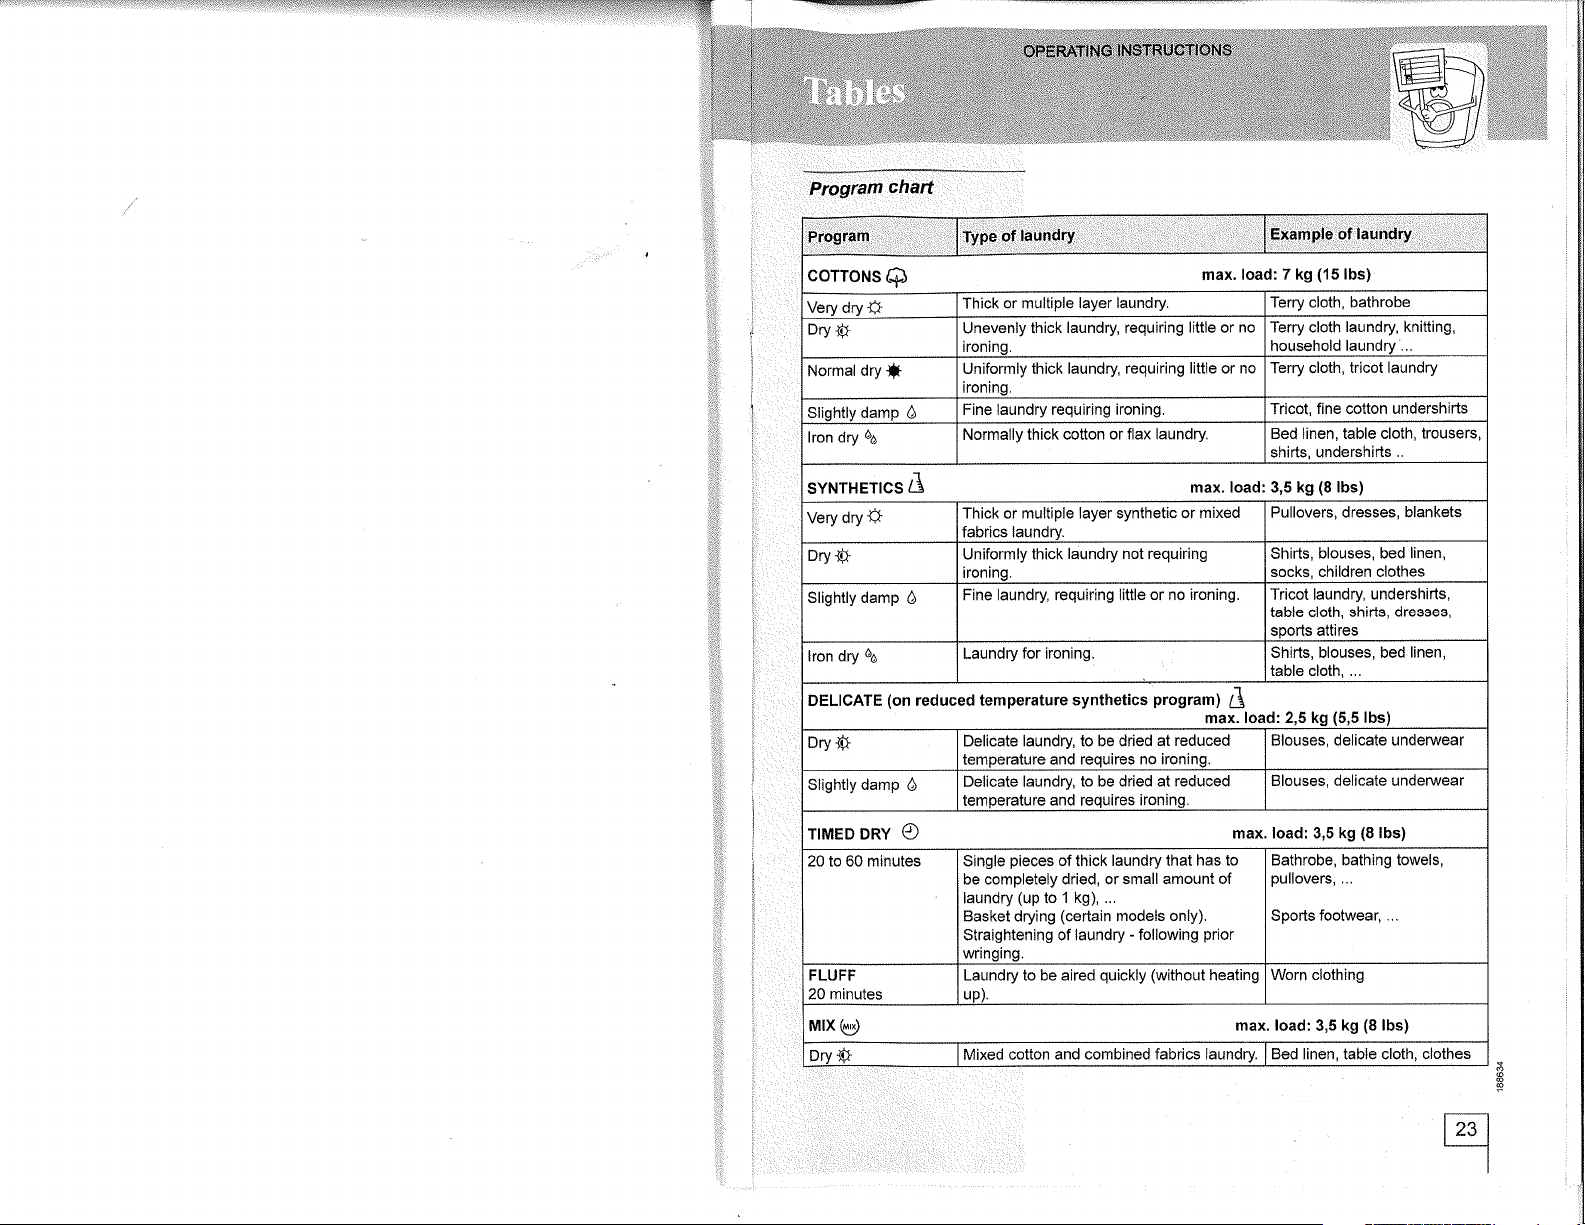
Program
chart
P,rogråm
Type
of
laundry
Exgmple:of
laundry
COTTONS
Q
max'
load: 7
kg
(15
lbs)
Very dry
#
Thick
or multiple layer
laundry
Terry cloth, bathrobe
Dry
r*
Unevenìy
thick laundry, requiring
little or no
ironinq.
Terry cloth
laundry, knitting,
household laundry'...
Normal
dry
{
Uniformly thick laundry,
requiring little or no
ironing.
Terry cloth, tricot laundry
Slìshtly damp
ô
Fine laundry requiring
ironing.
Tricot, fine cotton undersh¡rts
lron dry
ôo
Normally thick
cotton or flax laundry.
Bed linen, table cloth,
trousers,
shirts, undershirts
..
SYNTHETICS
Ll
max. load: 3,5 kg
(8
lbs)
Very
dry #
Thick or multiple layer synthetic
or
mixed
fabrics laundry.
Pullovers, dresses, blankets
Dry
#
Uniformly thick
laundry not requiring
ironino.
Shirts,
blouses, bed
linen,
socks, children clothes
Slightly damp
ô
Fine laundry,
requiring
little
or
no
ironing, Tricot
laundry, undershirts,
table cloth, shirts,
dresses,
sports attires
lron dry
ôo
Laundry
for ironing.
Shirts, blouses, bed
linen,
table cloth, ...
DELICATE
(on
reduced
temperature synthetics
program¡
¿f
max.
load: 2,5 kg
(5,5
lbs)
Drv
#
Delicate laundry, to be dried
at reduced
temperature and requires no ironing.
Blouses, delicate underwear
Slìghtly damp
ô
Delicate
laundry, to be dried at reduced
temperature
and requires ironing.
Blouses, delicate undenvear
TIMED DRY O
max. load: 3,5
kg
(8
lbs)
20 to 60 minutes Single
pieces
of thick laundry that
has to
be completely dried, or
small amount of
laundry
(up
to 1 kg), ..,
Basket drying
(certain
models only).
Straightening of laundry
-
following
prior
wringing,
Bathrobe, bathing towels,
pullovers,,..
Sports footwear, .,.
FLUFF
20 minutes
Laundry to be aired
qu¡ckly
(w¡thout
heating
up).
Worn clothing
MIX
@)
max. load:
3,5
kg
(8
lbs)
Drv
#
Mixed
cotton and combined fabrics laundry. Bed linen, table cloth,
clothes
ry
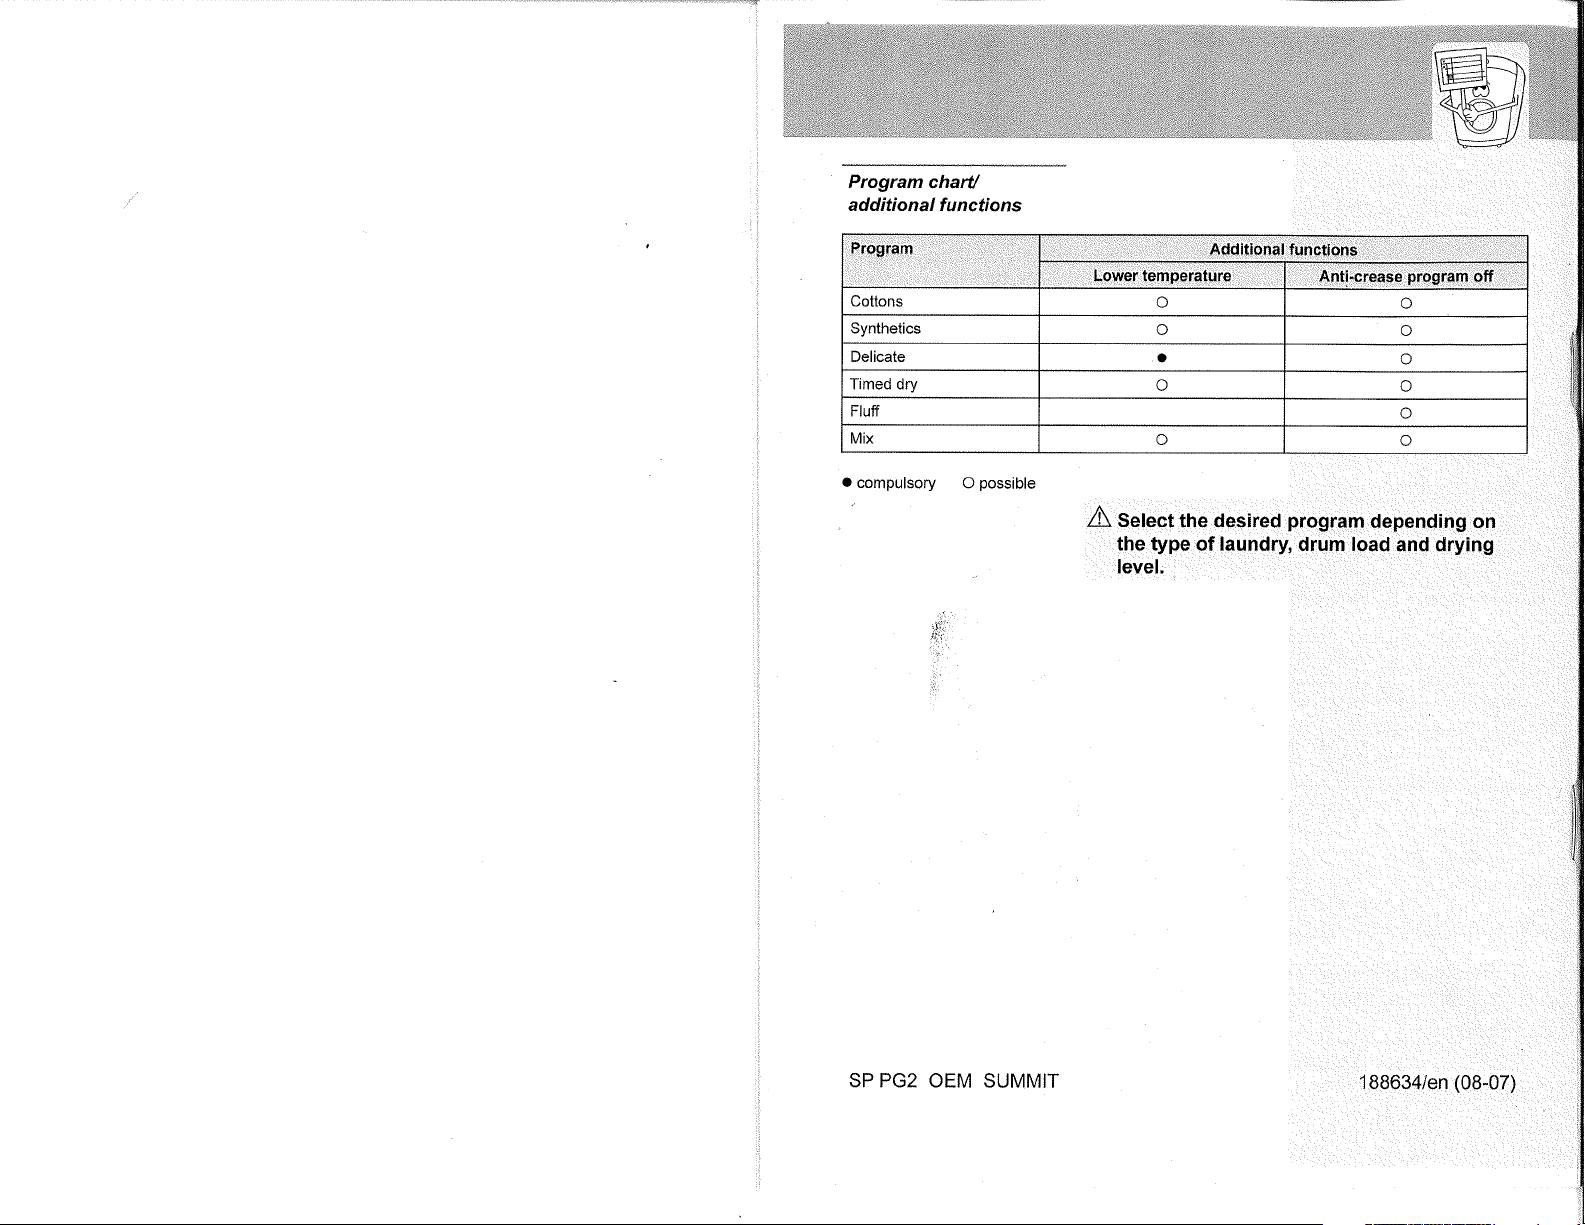
Program charU
additional functions
a
compulsory
O
possible
A Select the desired
program
depending on
the type of
laundry drum
load and dry¡ng
level,
Prograryl
Additional
functiòns
Lower
temperature
Anti.crease
pregiam
off
Cottons
o
o
Synthetics
o
o
Delicate
o
o
Timed dry
o
o
Fluff
o
Mix
o o
SP PG2 OEM SUMMIT
188634/en
(08-07)