1
NA
English,1
NA
ARWDF 129
Instructions for use
WASHER-DRYER
! This symbol reminds you to read this instruction manual.
Contents
Important safety instructions, 2-3
Important safety instructions
Grounding instructions
Safety
Installation instructions, 4-5-6
Unpacking and levelling
Minimum Unstallation Spacing
Connecting Water Inlet
Drainage
Connecting the drain hose
Electrical
Under Sink Method
Technical data
Description of the washer-dryer and
starting a wash cycle, 7-8
Control panel
Indicator lights
Starting a wash cycle
Wash cycles, 9
Table of wash cycles
Special wash cycles
Personalisation, 10-11-12
Setting the temperature
Setting the drying cycle
Functions
Dryer Efficiency
Detergents and laundry, 13
Detergent dispenser drawer
Bleach cycle
Preparing the laundry
Garments requiring special care
Load balancing system
Helpful Hints
Care and maintenance instructions, 14
Cutting off the water or electricity supply
Cleaning the washer-dryer
Cleaning the detergent dispenser drawer
Caring for the door and drum of your appliance
Cleaning the pump
Checking the water inlet hose
Troubleshooting, 15
Service, 16
Warranty, 17-18

2
NA
IMPORTANT SAFETY INSTRUCTIONS
WARNING - To reduce the risk of fire, electrical shock, or
injury to persons when using your appliance, follow basic
precautions, including the following:
•Readallinstructionsbeforeusingtheappliance.
•Donotwashordryarticlesthathavebeenpreviously
cleaned in, washed in, soaked in, or spotted with gaso-
line, dry cleaning solvents, other flammable, or exlosive
substances as they give off vapors that could ignite or
explode.
•Donotallowchildrentoplayonorintheappliance.Clo-
se supervision of children is necessary when the applian-
ce is used near children.
•Beforetheapplianceisremovedfromserviceordiscar-
ded, remove the door to the washing/drying compart-
ment.
•Donotaddgasoline,drycleaningsolvents,orotherflam-
mable or explosive substances to the wash water. These
substances give off vapors that could ignite or explode.
•Donotinstallorstorethisappliancewhereitwillbe
exposed to the weather.
•Donottamperwithcontrols.
•UndercertainconditionsHydrogengasmaybeprodu-
ced in a hot water system that has not been used for 2
weeksormore.HYDROGENGASISEXPLOSIVE.Ifthe
hot water system has not been used for such a period,
before using the appliance, turn on all hot water faucets
and let the water flow from each for several minutes.
Thiswillreleaseanyaccumulatedhydrogengas.Asthe
gas is flammable do not smoke or use an open flame
during this time.
•Turnoffwaterfaucetstorelievepressureonhosesand
valves and to minimize leakage if a break or rupture
occurs.
•Donotreachintotheapplianceifthetubordrumis
moving.
•Donotrepairorreplaceanypartoftheapplianceor
attempt any servicing unless specifically recommended
in the user-maintenance instructions or in published
user-repair instructions that you understand and have
the skills to carry out.
•Donotusefabricsoftenersorproducttoeliminatestatic
unless recommended by the manufacturer of the fabric
softener or product.
•Donotuseheattodryarticlescontainingfoamrubberor
similarly textured rubber-like materials.
•Good,safepracticesandcautionMUSTbeapplied
when installing, operating, and maintaining any applian-
ce. Follow basic precaution.
•Disconnectpowertothewasheratthecircuitbreaker
or fuse box, or unplug the machine in an emergency or
when servicing required. Have the installer show you and
label the proper switch or fuse at the electrical discon-
nect box.
•Theinterioroftheapplianceshouldbecleanedperiodi-
cally by qualified service personnel.
•Donotplaceitemsexposedtocookingoilsinyourdryer.
Items contaminated with cooking oils may contribute to
a chemical reaction that could cause a load to catch fire.
•Beforeloadingthewasher,makesurethedrumisempty.
SAVE THESE INSTRUCTIONS
GROUNDING INSTRUCTIONS
This appliance must be grounded. In the event of mal-
function or breakdown, grounding will reduce the risk of
electric shock by providing a path of least resistence for
electric current. This appliance is equipped with a cord ha-
ving an equipment-grounding conductor and a grounding
plug. The plug must be plugged into an appropriate outlet
that is properly installed and grounded in accordance with
all local codes and ordinances.
WARNING-Improperconnectionoftheequipment-groun-
ding conductor can result in a electric shock.
Check with a qualified electrician or service representative
or personnel if you are in doubt as to whether the applian-
ce is properly gounded.
Do not modify the plug provided with the appliance: if it will
not fit outlet, have a proper outlet installed by a qualified
electrician.
Important safety instructions
3
NA
Safety
CAUTION:
To reduce the risk of electric shock, DO NOT remove cover (or back)/no user servicable parts inside.
Refer for servicing to qualified services personnel.
The model number of this product may be found on the back of the unit; the serial number of the label affixed to the back of
the unit.
Youshouldnotethemodelandserialnumbersofthisunitinthespaceprovided.Retainthisbookletasapermanentrecord
of your purchase to aid in identification in the event of theft.
MODELN.
SERIALN.
WARNING:
TO PREVENT FIRE OR SHOCK HAZARD DO NOT EXPOSE THIS PRODUCT TO RAIN OR MOISTURE.
The linghtning flash with arrowhead symbol, within an equilateral triagle, is intended to alert the user to the presen-
ce of uninsulated “dangerous voltage” within the product’s enclosure that may be of sufficient magnitude to constitu-
te a risk of electric shock to persons.
The exclamation point within an equilateral triangle is intended to alert the user to the presence of important opera-
ting and maintenance (servicing) instructions in the booklet.
IndesitCompanyofferstohiscustomersproductswiththeENERGYSTARLabel.
This appliance was tested by UL and conforms with both Canadian and U.S. UL safety requirements
and displays their Mark.
CAUTION RISK
OF ELECTRIC
SHOCK DO
NOT OPEN
!
!
C
U
L
US LISTED
®
!
4
NA
! This instruction manual should be kept in a safe place for
future reference. If the washer-dryer is sold, transferred or
moved, make sure that the instruction manual remains with
the machine so that the new owner is able to familiarise
himself/herself with its operation and features.
!Readtheseinstructionscarefully:theycontainvitalinfor-
mation relating to the safe installation and operation of the
appliance.
Unpacking and levelling
Unpacking
1.Removethewasher-dryerfromitspackaging.
2. Make sure that the washer-dryer has not been damaged
during the transportation process. If it has been damaged,
contact the retailer and do not proceed any further with the
installation process.
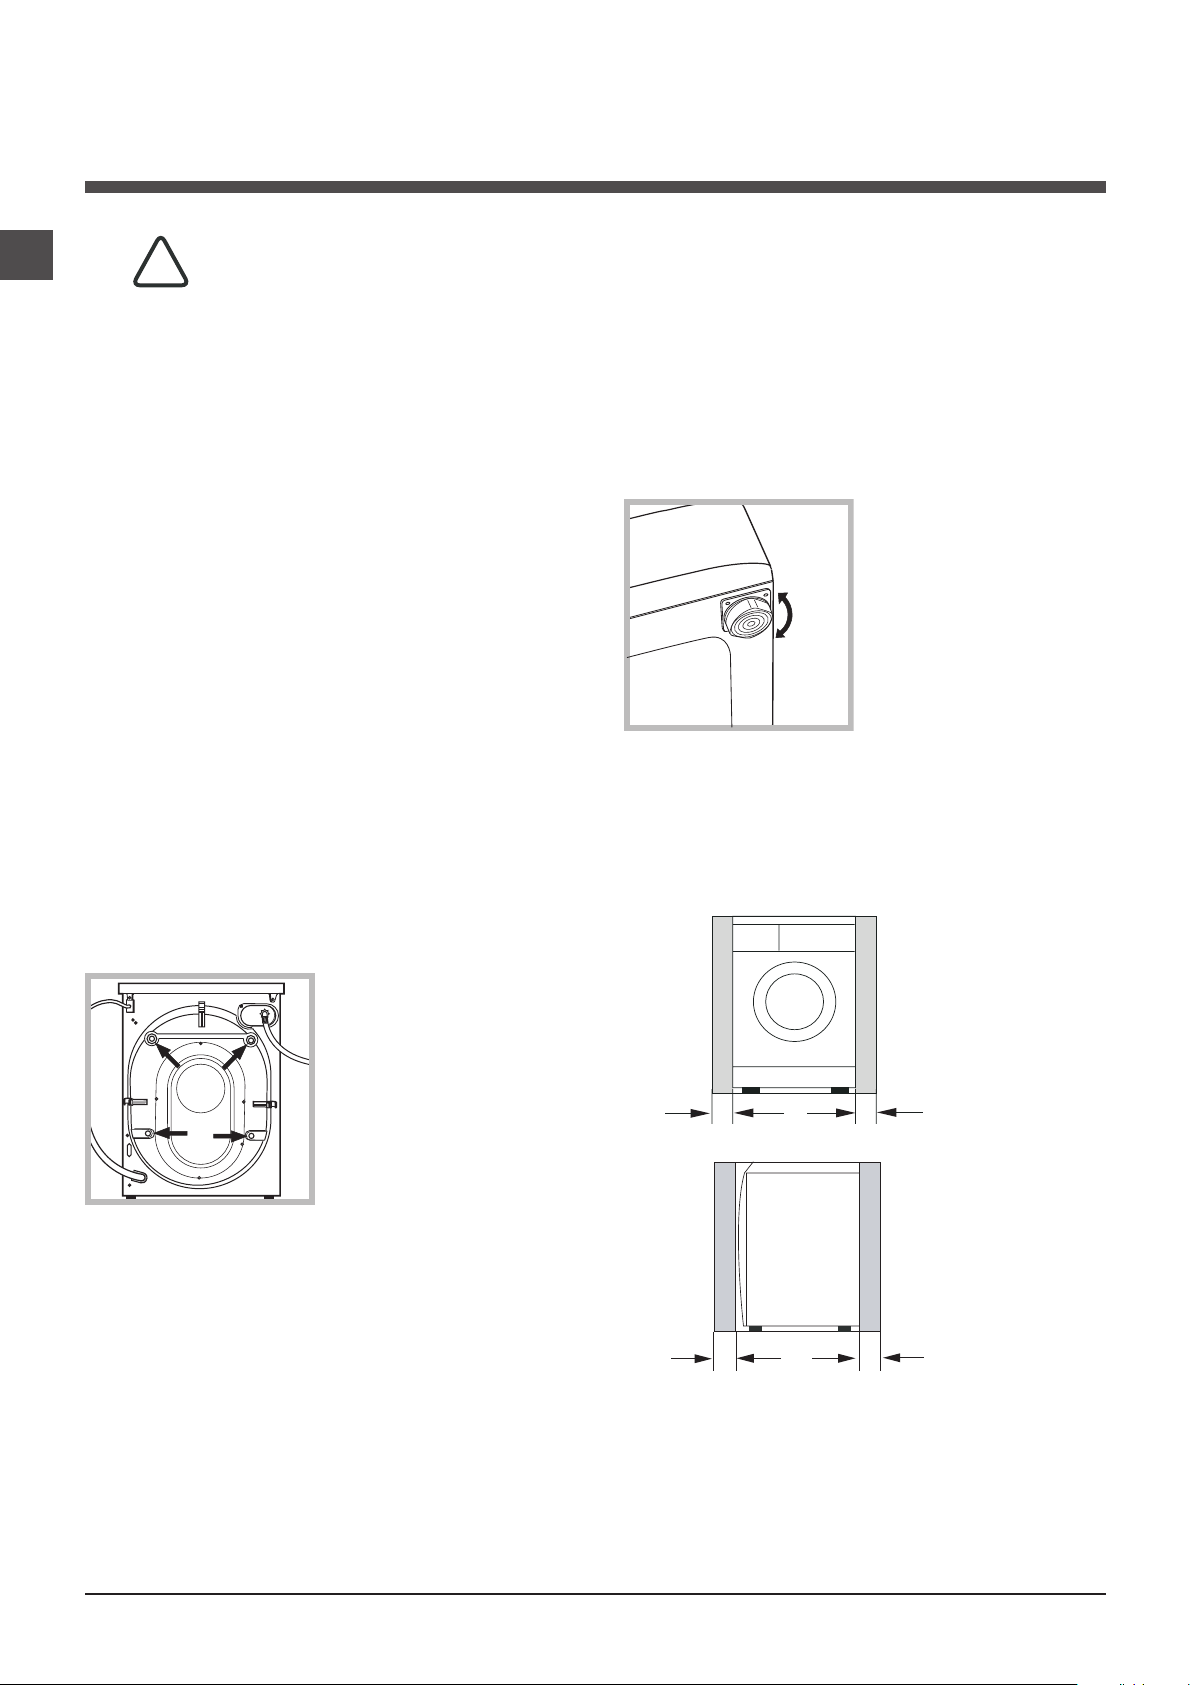
3.Removethe4 protective
screws (used during tran-
sportation) and the rubber
washer with the correspon-
ding spacer, located on the
rear part of the appliance
(see figure).
4. Close off the holes using the plastic plugs provided.
5. Keep all the parts in a safe place: you will need them
again if the washer-dryer needs to be moved to another
location.
! Packaging materials should not be used as toys for
children.
Levelling
1. Install the washer-dryer on a flat sturdy floor, without re-
sting it up against walls, furniture cabinets or anything else.
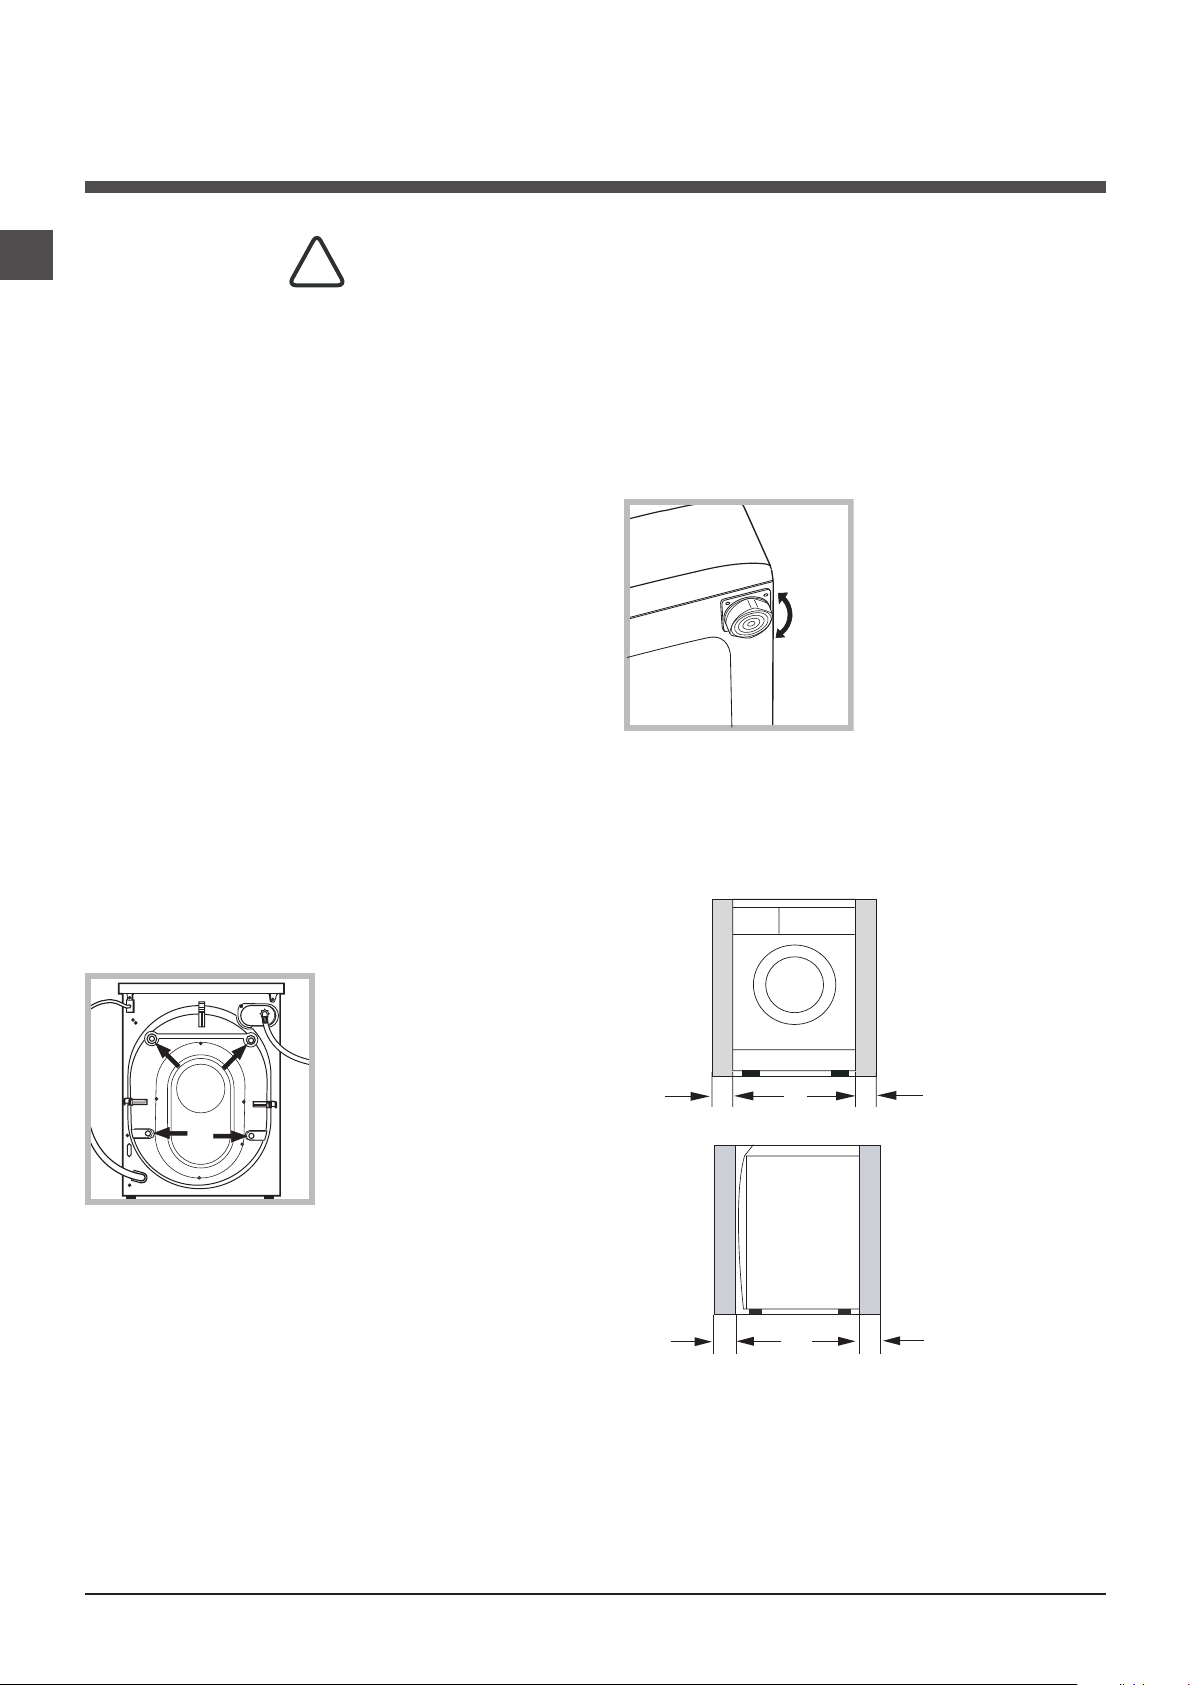
2. If the floor is not perfectly
level, compensate for any
unevenness by tightening
or loosening the adjustable
front feet (see figure); the an-
gle of inclination, measured
in relation to the worktop,
must not exceed 2°.
Levelling the machine correctly will provide it with stability,
help to avoid vibrations and excessive noise and prevent it
from shifting while it is operating.
Minimum Installation Spacing
This appliance may be installed in a recessed area, closet
or alcove. The installation spacing is in inches and is the
minimum acceptable.
*Additionalspacingshouldbeconsideredforeasyinstal-
lation, servicing and compliance with local codes and
ordinances. Installations must conform with the minimum
dimensions indicated.
0" *
0" *
Recessed Front View
1" *
1"
Side View
WARNING- RISK OF FIRE
Clothes dryer installation must be performed by a qualified installer.
Install the clothes dryer according to the manufacturer’s instructions and local codes.
To reduce the risk of severe injury or death, follow all installation instructions.
SAVE THESE INSTRUCTIONS
!
Installation instructions
5
NA
H
C
Connecting Water Inlet
If the water pipes you will be connecting to are new or
unused, run the water until clear to remove any debris that
could clog the water valve screens or valves before con-
nectingthemachine.NOTE:Supplyshut-offvalvesshould
be easily accessible.
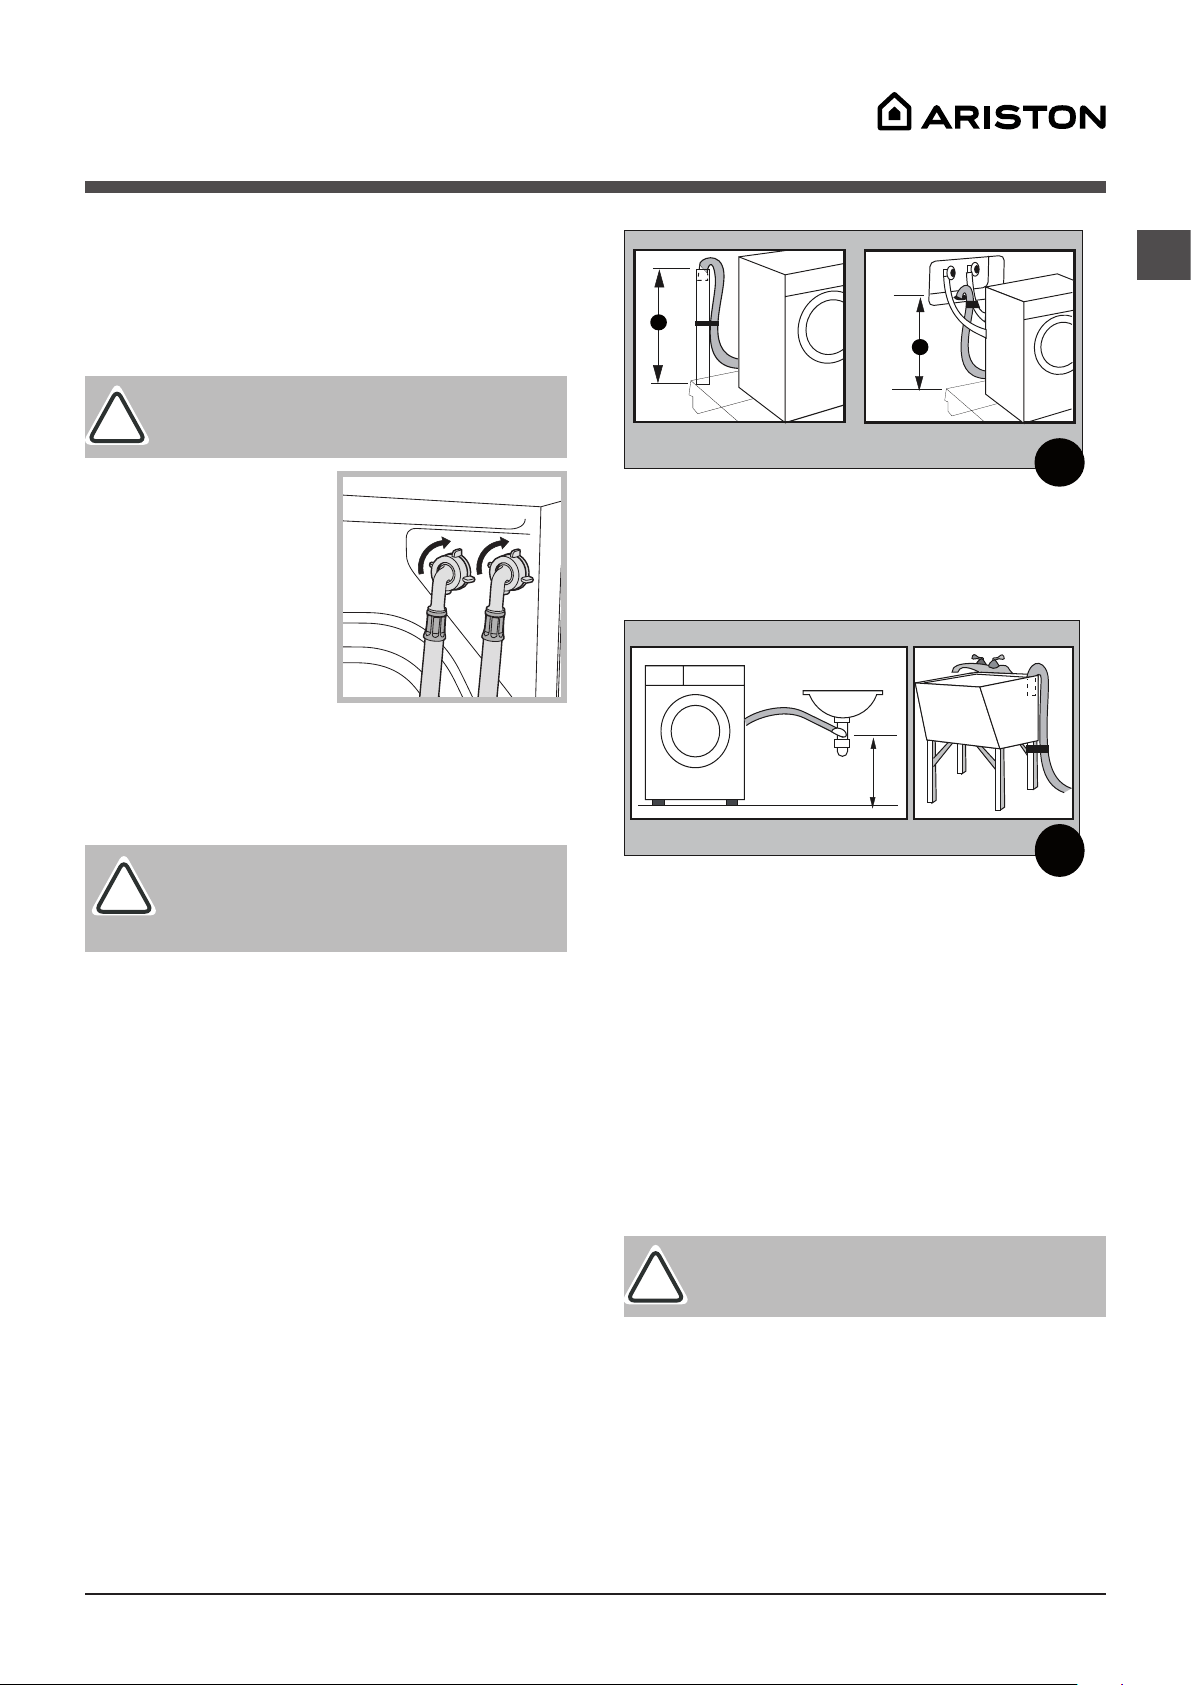
1. Screw the cold water fill
hose (C blue connector) onto
the cold water supply until
tight.
2. turn on the cold water
supply and check for leaks,
tighten if necessary.
3. Screw the hot water fill
hose (H red connector) onto
the hot water supply until tight.
4. Turn on the hot water supply and check for leaks,
tighten if necessary.
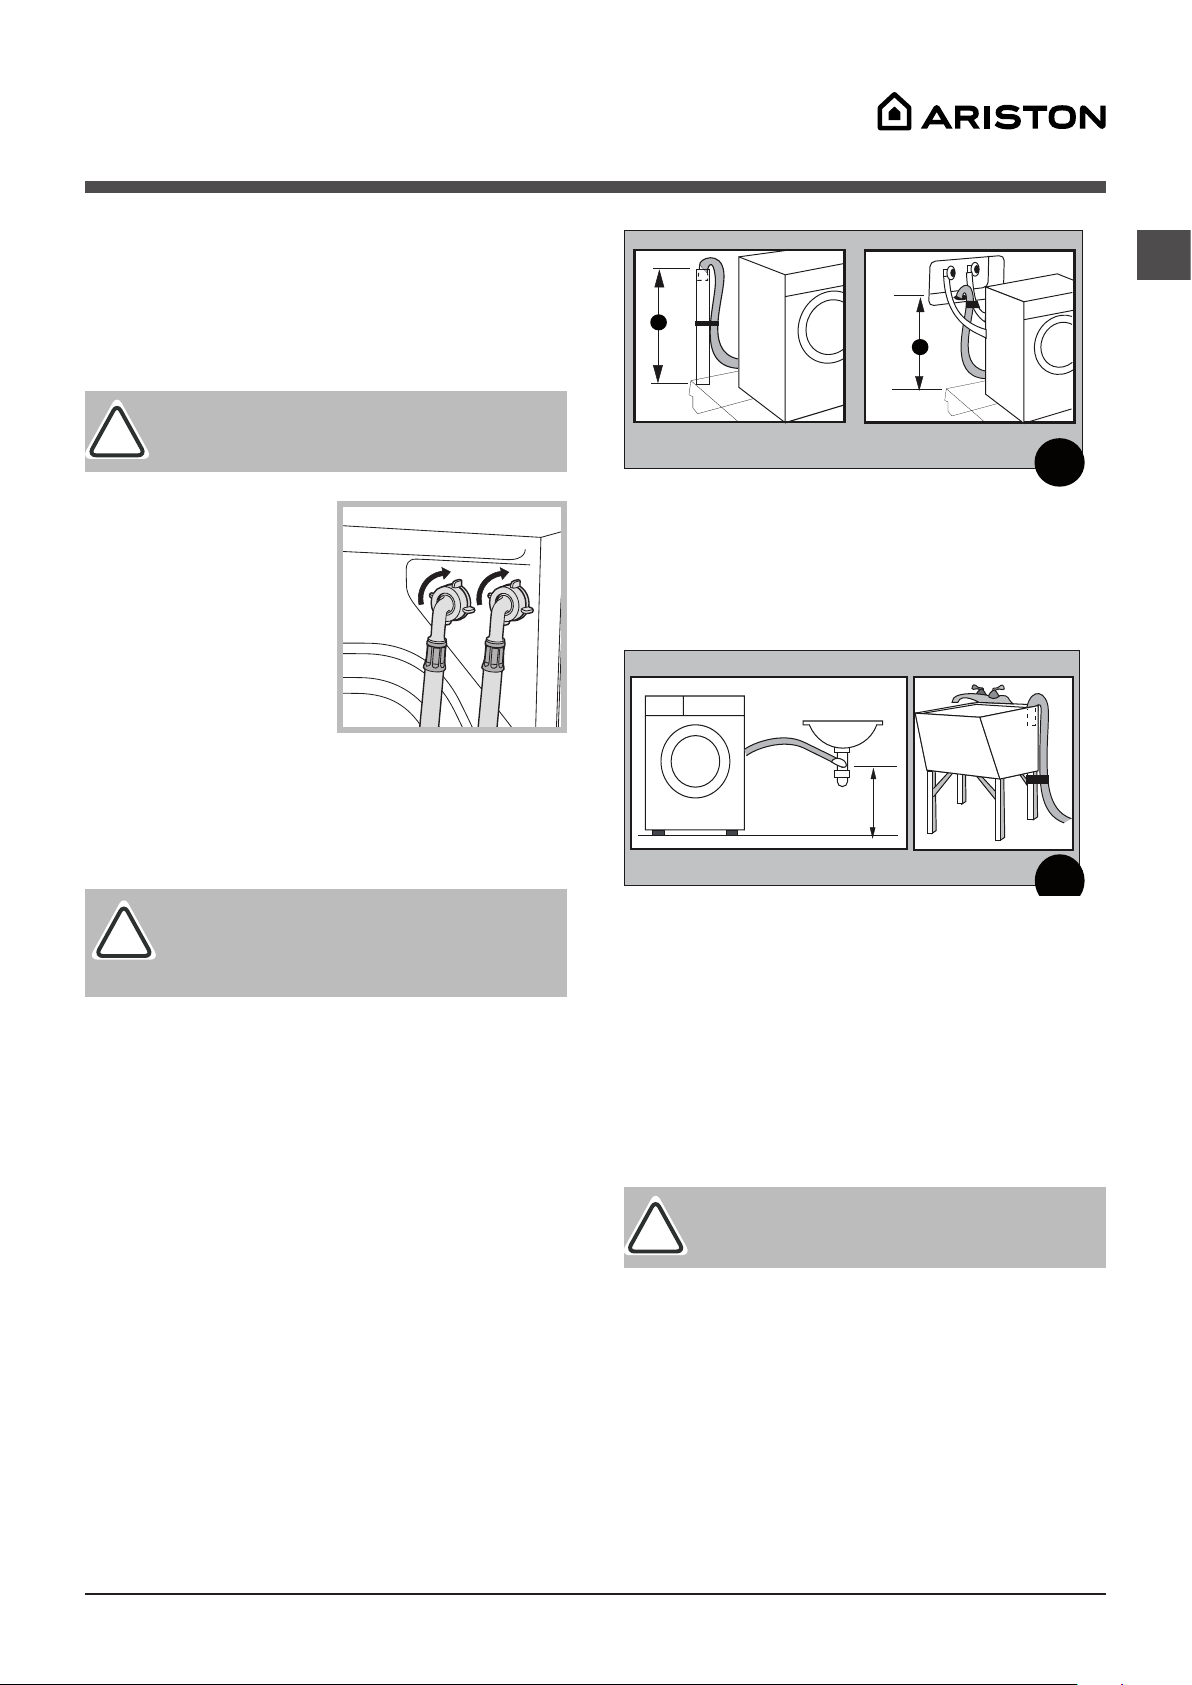
Drainage
•Standpipe Diameter/Capacity -Needsa1¼”
minimum diameter standpipe with a minimum carry-away
capacity of 7 gallons per minute.
•Top of Standpipe - Must be between 25” - 34” high
from the bottom of the machine.
•Outlet End of Drain Hose (provided with the unit)
- Must be at least 20” above the bottom of the washer-
dryer.Anairbreakmustbeavailableatthestandpipeto
avoidsiphoning.Nomorethan6”ofthedrainhoseshould
be inserted into the drain pipe to prevent siphoning.
Connecting the drain hose
It is possible for the water to be discharged into a sink,
standpipe or drainpipe, but an air break must be available
at a min. 20” height to prevent the machine from siphoning
(Fig.6).
Important: Water pressure MUST range wi-
thin the values indicated on the “Technical Data”
chart.
!
!
Important: Do not use excessive force. Da-
mage to the couplings can result. The couplings
should be tightened by hand; a tool should only
be used if a leak occurs.
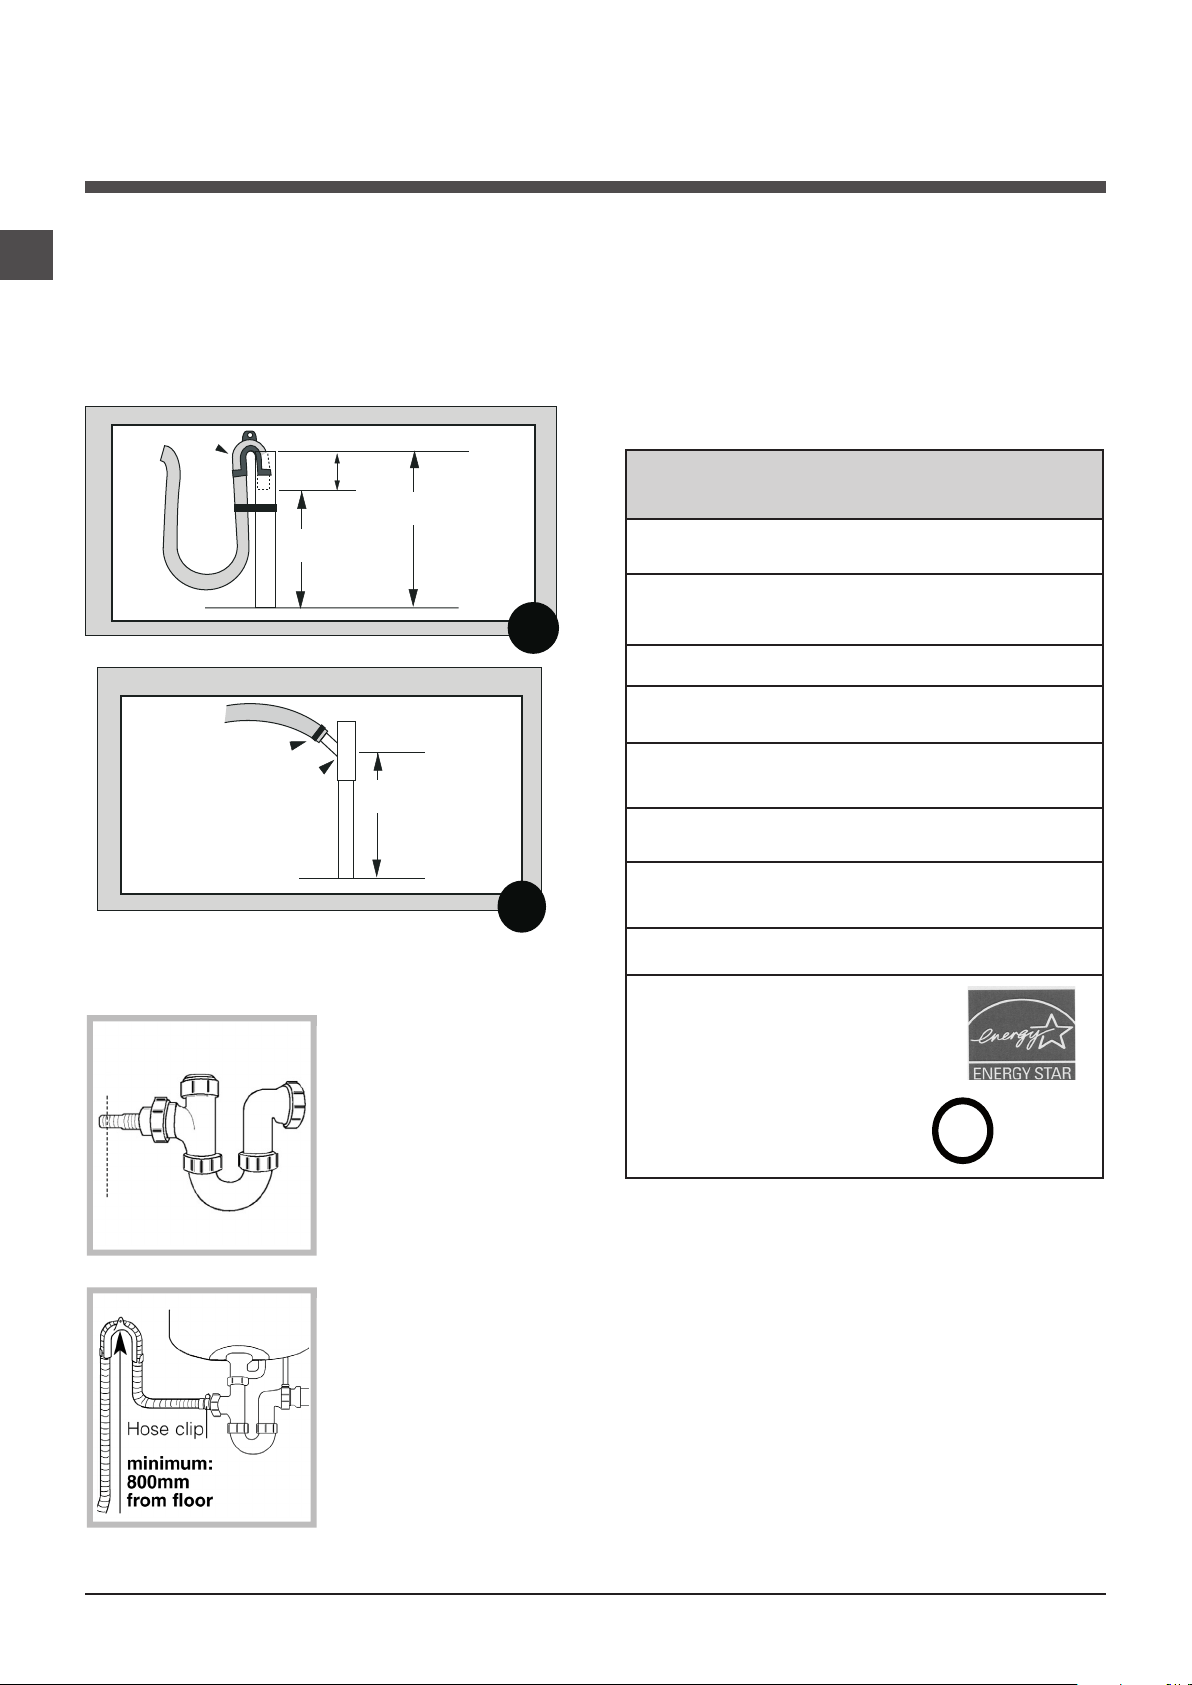
A & B = 25" (62 cm) min. / 34" (86 cm) max.
Floor Standpipe Wall Standpipe
A
B
Fig. 4
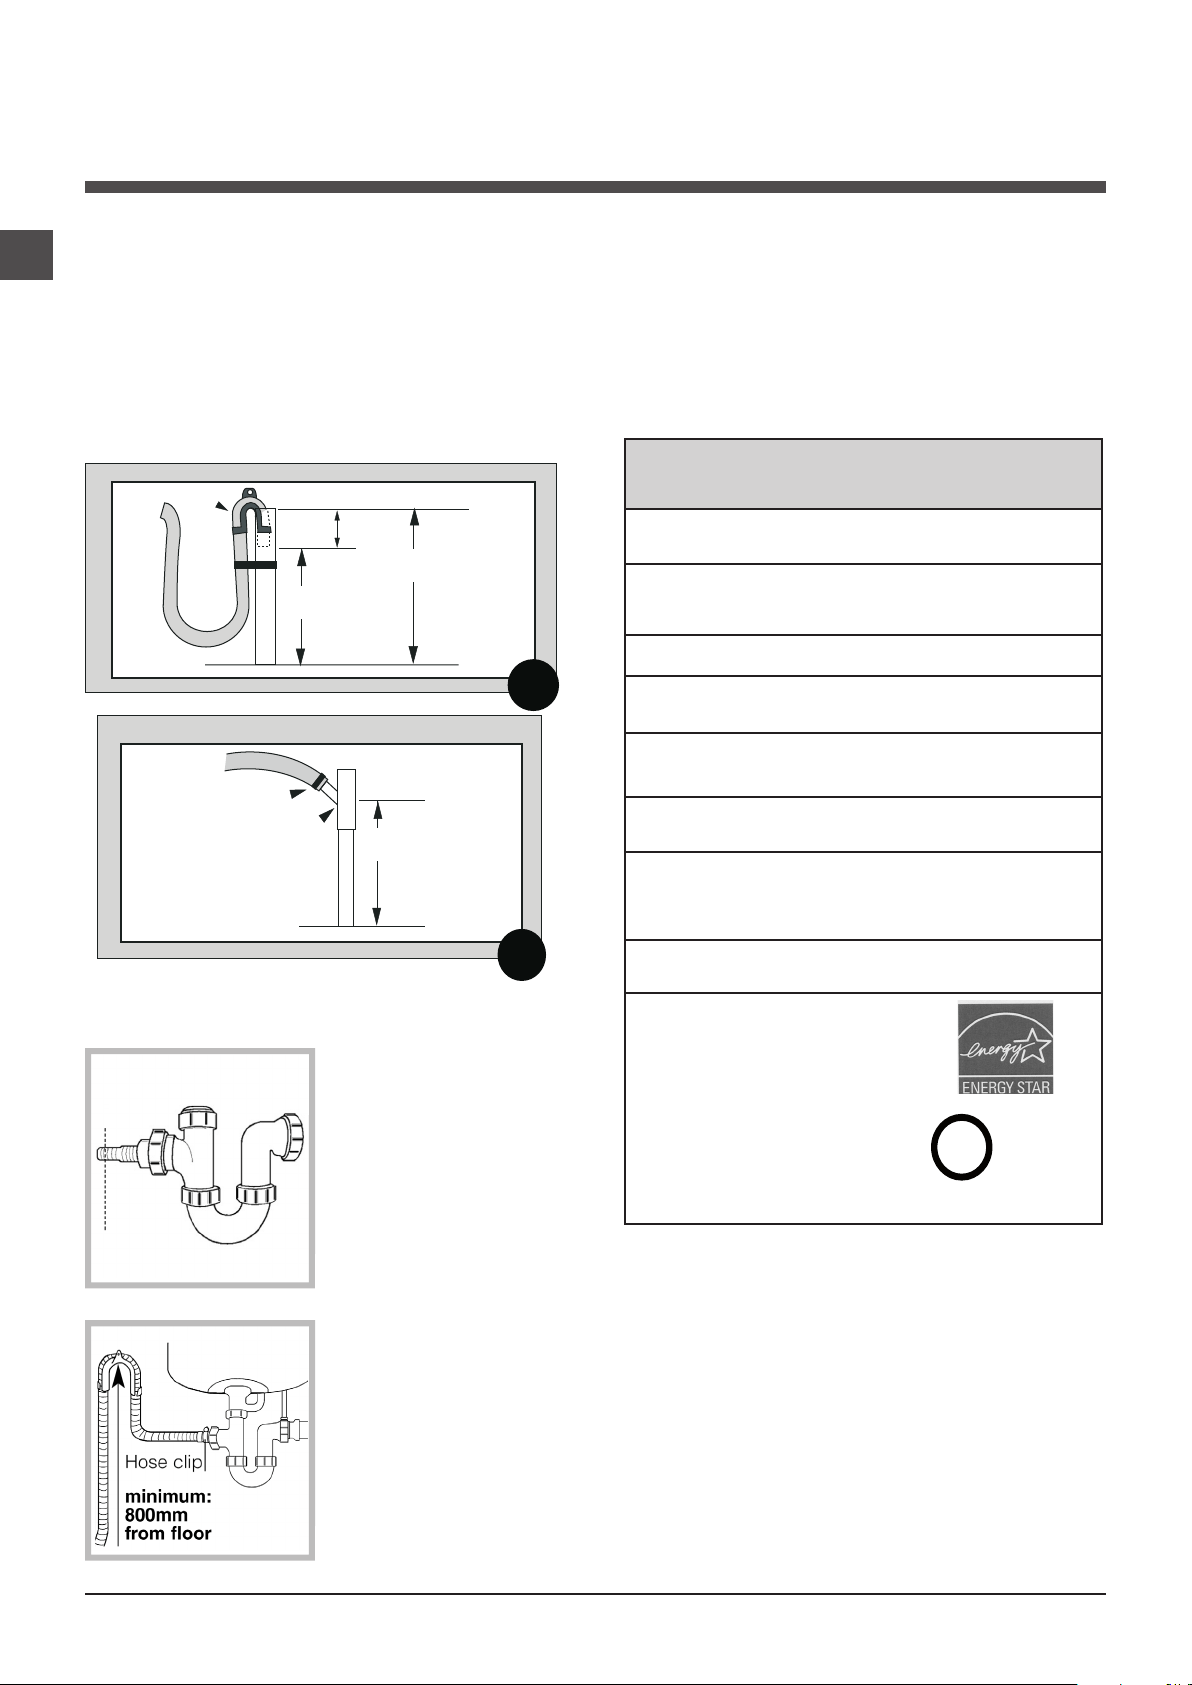
Standpipe Drain System - Installations require a minimum
1¼”(3.2cm)diameterstandpipewithaminimumcarry
awaycapacityof7gallons(26liters)perminute.
Wall or Floor Standpipe Drain System - The top of the
standpipemustbebetween25”(62cm)-34”(86cm)
from the bottom of the washer (Fig. 4).
Sink Drainpipe System - Entry into the sink drain
system must be above the trap (Fig. 5). When routing the
drain hose through cabinets or walls, use a protective ma-
terial such as electrical or duct tape to cover sharp edges
that could damage the drain hose. Use a suitable clamp
to secure the drain hose to the “Y” branch or the disposer.
With a sink drainpipe system, you may connect directly:
1) to a disposer by following the manufacturers attachment
method.
2) directly to a “Y” branch tail piece (available at most
hardware stores).
3) Through the floor to a separate trap. The trap must be
vented to prevent siphoning. To provide proper venting,
installanAirGapKit(availableatmosthardwarestores).
4)TothetothefaucetusingaFaucetAdapterKit(available
separately).
•UseaU-Clamp(providedinyouraccessoriespacket)
or suitable item to secure the outlet end of the drain hose
(pre-installed on the back of your machine).
25" (62 cm) min.
with an air break
Laundry Sink Drain
Fig. 5
Sink Drain W/ "Y" Branch Tailpiece
Important: Make sure that the drain hose is
not kinked and that water flow is not restricted.
!
6
NA
•Inserttheoutletendofthedrainhoseintothestandpipe,
wallorfloordrain(Fig.6).NOTE:Theoutletendofthe
drain hose MUST be at least 20” (50 cm) above the base
ofthemachine.Nomorethan6”ofthedrainhoseshould
be inserted into the drain pipe to prevent siphoning.
•Useastrap,cabletie,orsimilaritemtoholdthehoseor
the U-Clamp in place.
Under Sink Method
1. Cut the blocked end of
the under sink drainage
unit.
2. Fix the hooked end sup-
portaminimumof620mm
from the floor.
3. Use a hose clip clamp to
securely attach the grey drai-
nage hose end to the under
sink drainage unit using a
hose. clamp
20" (62 cm) min.
34" (86 cm) max.
Standpipe
"Y" Tail Piece
This connection MUST be
before drain trap and at
least 20" (50.8 cm) above
the floor where washer will
be installed.
Cable tie
Floor Standpipe w/ "Y" Branch Tail Piece
Fig. 7
20" (50 cm) min.
with an air break
25" (62 cm) min.
34" (86 cm) max.
6" max.
Standpipe
Floor Standpipe
Fig. 6
U-Clamp
Electrical
•MachineVoltage/Amperage-120V,60Hz,11Amp.
•Connection-3-prongplugwith6’cordisprovidedwith
the machine.
•Circuit/Protector-3-wiresinglephase,120V,60Hz,AC,
onaseparate15Ampcircuit.
Technical Information
Technical data
Model
ARWDF129
Dimensions
width:23.4””(59.5cm)
height:33.24””-33.75””(84.5-85.7cm)
depth:22””(55.9)cm
Weight
148lbs
Minimum Installa-
tion Clearances
Sides: 0””
Front / Back: 1””
Capacity
Washing: 2 to 15 lbs. (1 to 7 kg)
Drying: 2 to 11 lbs. (1 to 5 kg)
Electrical
connections
Voltage:120Volts,11Amp,60Hz
Water
connections
Max.Pressure:0.69Mpa(6.9bar),100psi
Min. Pressure: 0.05 Mpa (0.5 bar), 7.2 psi
Max. Spin speed
upto1200RPM
Indesit Company offers to his customers
productswiththeENERGYSTARLabel.
This appliance was tested by UL and
conforms with both Canadian and U.S.
UL safety requirements and displays
their Mark.
C
U
L
US LISTED
®

7
NA
WARNING: To reduce the risk of fire, electric shock, or
injury to persons, read the IMPORTANT SAFETY IN-
STRUCTIONS before operating this appliance.
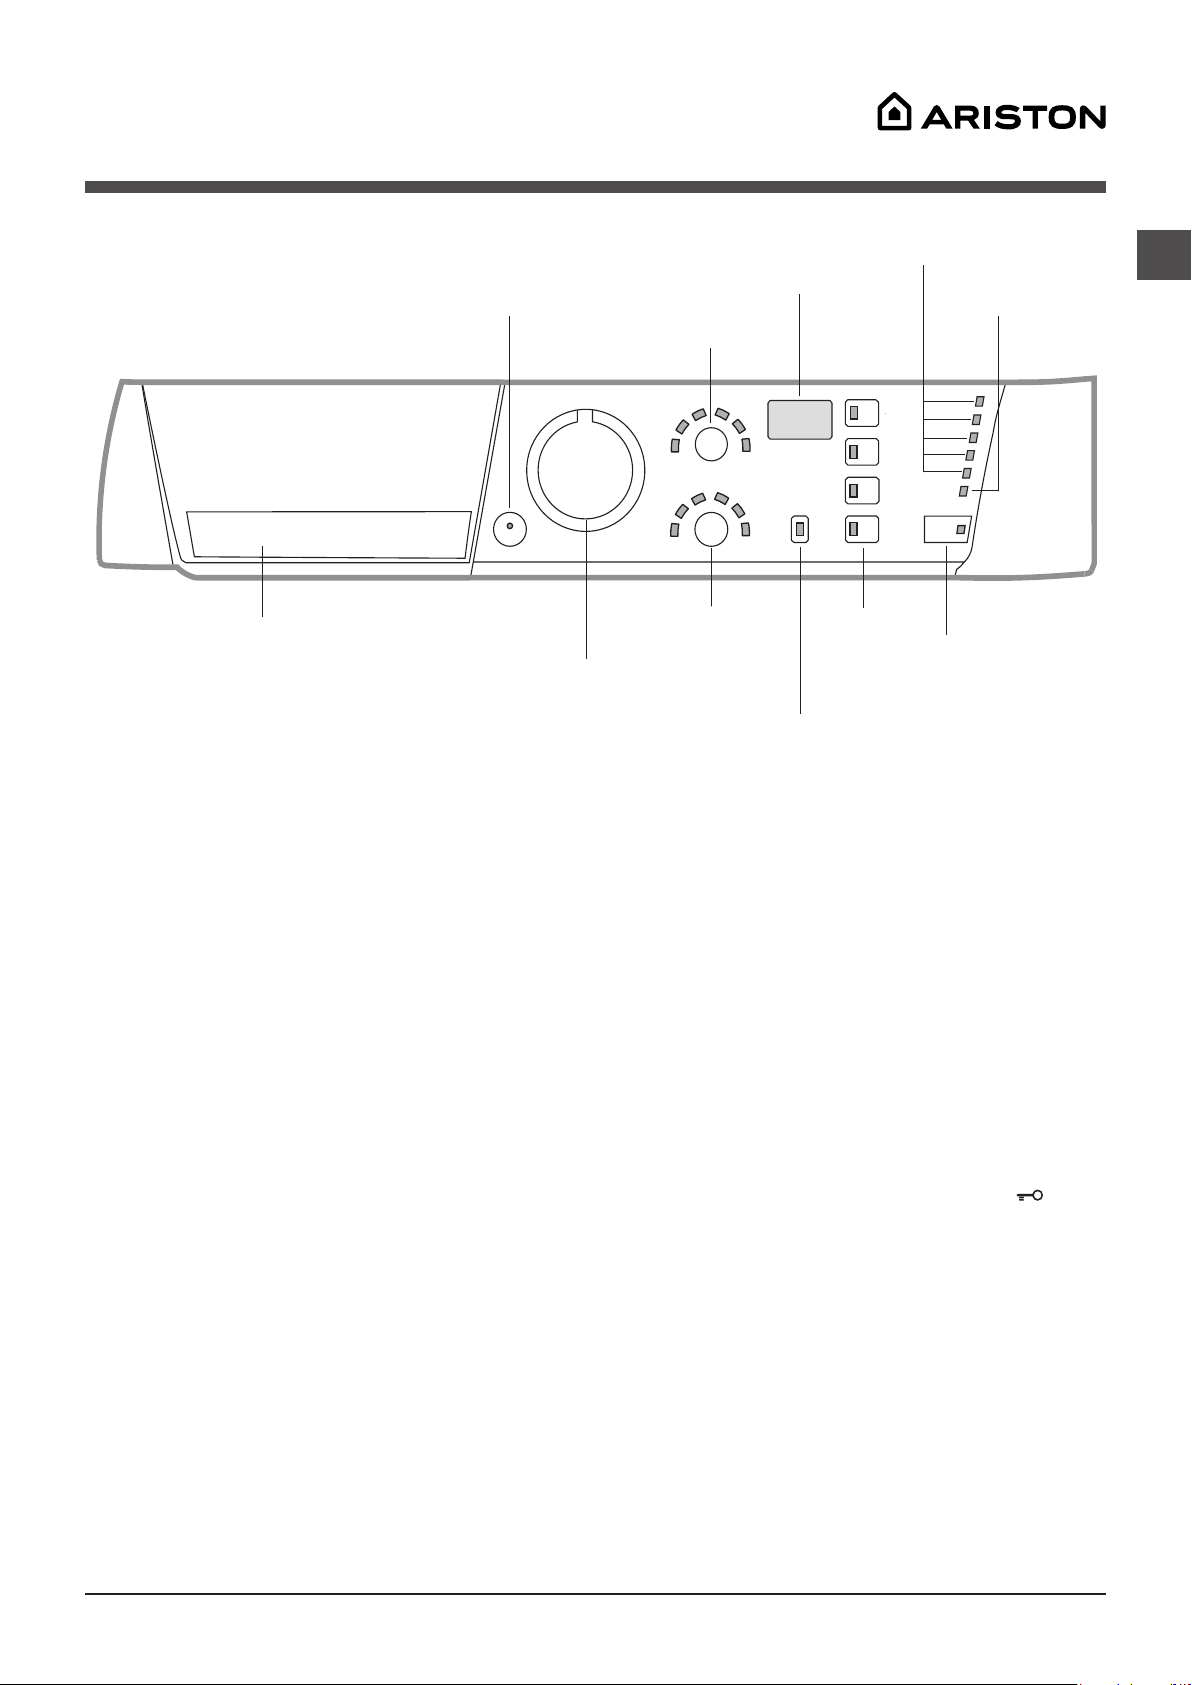
Detergent dispenser drawer: used to dispense
detergents and washing additives (see “Detergents and
laundry”).
ON/OFF button with indicator light: switches the machine
on and off.
If the indicator light is illuminated, this indicates that the
machine is switched on.
WASH CYCLE knob: programmes the wash cycles. During
the wash cycle, the knob does not move.
DRYING button: used to set the desired drying program-
me (see “Personalisation”).
TEMPERATURE button: sets the temperature or the cold
wash cycle (see “Personalisation”).
The wash temperatures selections are uniformly distribuited.
DISPLAY: indicates the time remaining for the selected
washing/drying cycle and, if a delayed start has been
programmed, the time remaining until the start of the wash
cycle.
CHILD LOCK button with indicator light: activates or
deactivates the control panel lock.
FUNCTION buttons with indicator light: used to select the
available functions. The indicator light corresponding to the
selected function will remain lit.
WASH CYCLE PROGRESS
indicator light
s: used to
monitor the progress of the wash cycle.
The illuminated indicator light shows which phase is in
progress.
DOOR LOCKED indicator light: indicates whether the
door may be opened or not (see next page).
START/PAUSE button with indicator light: starts or tem-
porarily interrupts the wash cycles.
N.B. To pause the wash cycle in progress, press this
button; the corresponding indicator light will flash orange,
while the indicator light for the current wash cycle phase
willremainlitinafixedmanner.IftheDOORLOCKED
indicator light is switched off, the door may be opened.
To start the wash cycle from the point at which it was inter-
rupted, press this button again.
Description of the washer-dryer
and starting a wash cycle
DOOR
LOCKED
indicator light
START/PAUSE
button with indicator
light
Control panel
WASH CYCLE PROGRESS
indicator lights
FUNCTION
buttons with
indicator lights
Detergent dispenser drawer
WASH CYCLE
knob
DISPLAY
ON/OFF
button with indicator
light
TEMPERATURE
button
DRYING
button
CHILD LOCK
button with indicator light

8
NA
Indicator lights
The indicator lights provide important information.
This is what they can tell you:
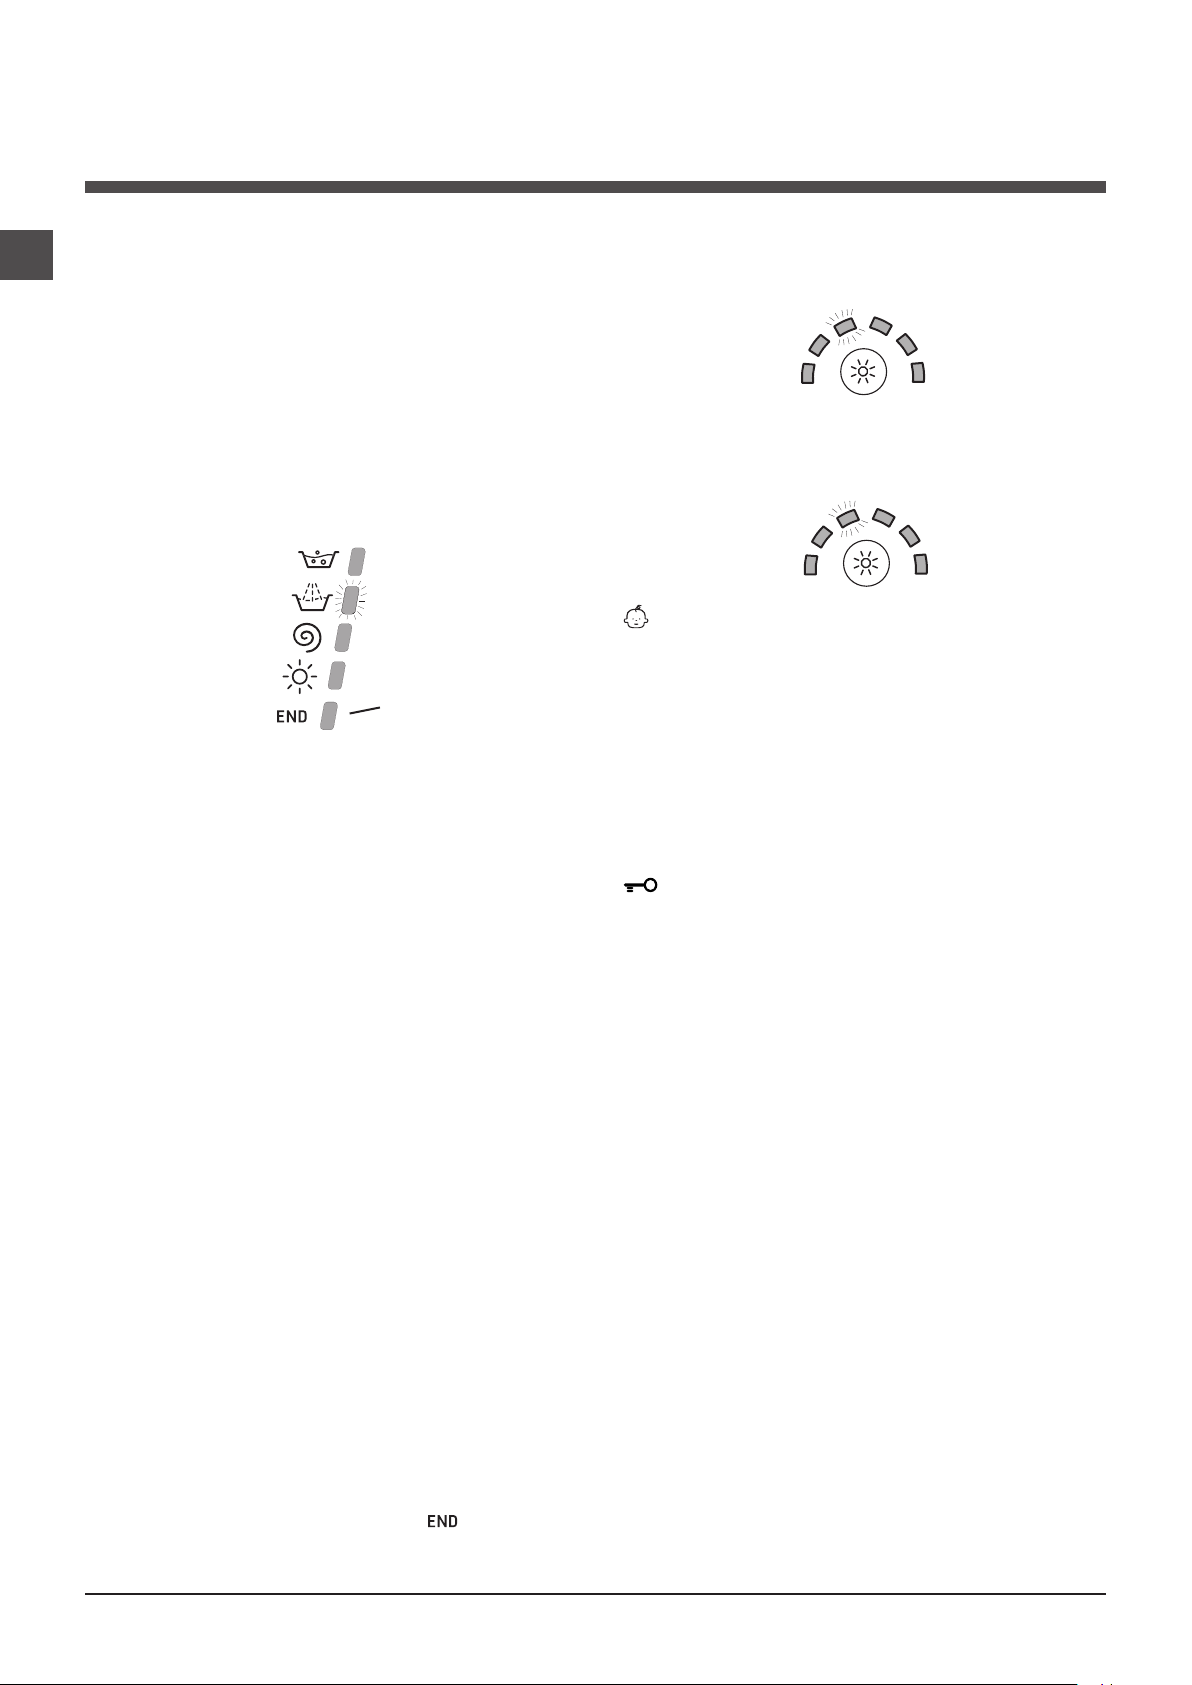
Wash cycle phase indicator lights
AstheWASHCYCLEknobisrotated,theindicatorlights
illuminate, indicating the stages which will be performed by
the machine in accordance with the selected wash cycle.
Oncethedesiredwashcyclehasbeenselectedandhas
begun, the indicator lights switch on one by one to indicate
which phase of the cycle is currently in progress.
Note:
during the “Drain” phase, the indicator light corresponding
to the “Spin” cycle phase will illuminate.
Function buttons and corresponding indicator lights
When a function is selected, the corresponding indicator
light will illuminate.
If the selected function is not compatible with the pro-
grammed wash cycle, the corresponding indicator light will
flash, a sound signal will be emitted and the function will
not be activated.
If a function which is incompatible with another function
selected previously, only the most recent selection will
remain active.
Temperature indicator light
When a temperature value is selected, the corresponding
indicator light will illuminate.
Drying indicator light
When a drying value is selected, the corresponding indica-
tor light will illuminate.
Child lock indicator light
To activate the control panel lock, press and hold the
button for approximately 2 seconds. When the indicator
light is illuminated, the control panel is locked. This means
it is possible to prevent wash cycles from being modified
accidentally, especially where there are children in the
home.
To deactivate the control panel lock, press and hold the
button for approximately 2 seconds.
Door locked indicator light
If this indicator light is on, the appliance door is locked to
prevent it from being opened accidentally; to avoid any
damage, wait for the indicator light to switch off before you
open the appliance door.
N.B. IftheDELAYTIMERfunctionisactivated,thedoor
cannot be opened; pause the machine by pressing the
START/PAUSEbuttonifyouwishtoopenit.
!IftheSTART/PAUSEindicatorlight(orange)flashes
rapidly at the same time as the function indicator light, this
indicates a problem has occurred (see “Troubleshooting”).
Starting a wash cycle
1. Switchthewasher-dryeronbypressingtheON/OFFbutton.Allindicatorlightswillswitchonforafewseconds,thenthey
willswitchoffandtheSTART/PAUSEindicatorlightwillpulse.
2. Load the laundry and close the door.
3.SettheWASHCYCLEknobtothedesiredprogramme.
4. Set the washing temperature (see “Personalisation”).
5. Set the drying cycle if necessary (see “Personalisation”).
6. Measure out the detergent and washing additives (see “Detergents and laundry”).
7. Select the desired functions.
8.StartthewashcyclebypressingtheSTART/PAUSEbuttonandthecorrespondingindicatorlightwillremainlitinafixed
manner, in green.
Tocancelthesetwashcycle,pausethemachinebypressingtheSTART/PAUSEbuttonandselectanewcycle.
9.Attheendofthewashcyclethe indicatorlightwillswitchon.TheDOORLOCKEDindicatorlightwillswitchoff,indi-
cating that the door may be opened. Take out your laundry and leave the appliance door ajar to make sure the drum dries
completely.Switchthewasher-dryeroffbypressingtheON/OFFbutton.
Wash
Rinse
Spin
Dry
End of wash cycle
Note: Assoonasadrying
level or time period has
been set, this indicator light
illuminates to indicate that the
selected wash cycle will be
followed by a drying phase.
9
NA
Special wash cycles
Permanent (wash cycle 3) Press this cycle has less mechanical agitation and spinning speed designed to reduce
wrinkles.
Mixed Load (wash cycle 4) this wash cycle was designed to wash lightly soiled garments quickly: it lasts just 30 minu-
tesandthereforesavesbothenergyandtime.Byselectingthiswashcycle(4atWARMtemperature),itispossibleto
washdifferentfabricstogether(exceptforwoolandsilkitems),withamaximumloadof6.6lb-(3kg).
Quick Wash & Dry (wash cycle 5) was designed to wash and dry lightly soiled garments quickly. This cycle may be
usedtowashanddryalaundryloadofupto2.20lb-(1kg)injust60minutes.
To achieve optimum results, use liquid detergent and pre-treat cuffs, collars and stains.
Bright White (washcycle6)Usethiscyclewhenbleachingwithhypocloritebasedproducts.
Pour the bleach, the detergent and the additives into the relevant compartments (see paragraph entitled “Detergent
dispenser drawer”).
Active wear (wash cycle 7) is for washing lightly soiled sports clothing fabrics (tracksuits, shorts, etc.); for best results,
we recommend not exceeding the maximum load indicated in the “Table of wash cycles”. We recommend using a
liquid detergent and dosage suitable for a half-load.
Lightly Soiled 15 min. (washcycle8)thiswashcyclewasdesignedtowashlightlysoiledgarmentsquickly:itlasts
just15minutesandthereforesavesbothenergyandtime.Byselectingthiswashcycle(8atWARMtemperature),itis
possible to wash different fabrics together (except for wool and silk items), with a maximum load of 3.30 lb - (1.5 kg).
For this cycle we recommend pretreating stains, shirt necks and wrists with specific antistain products.
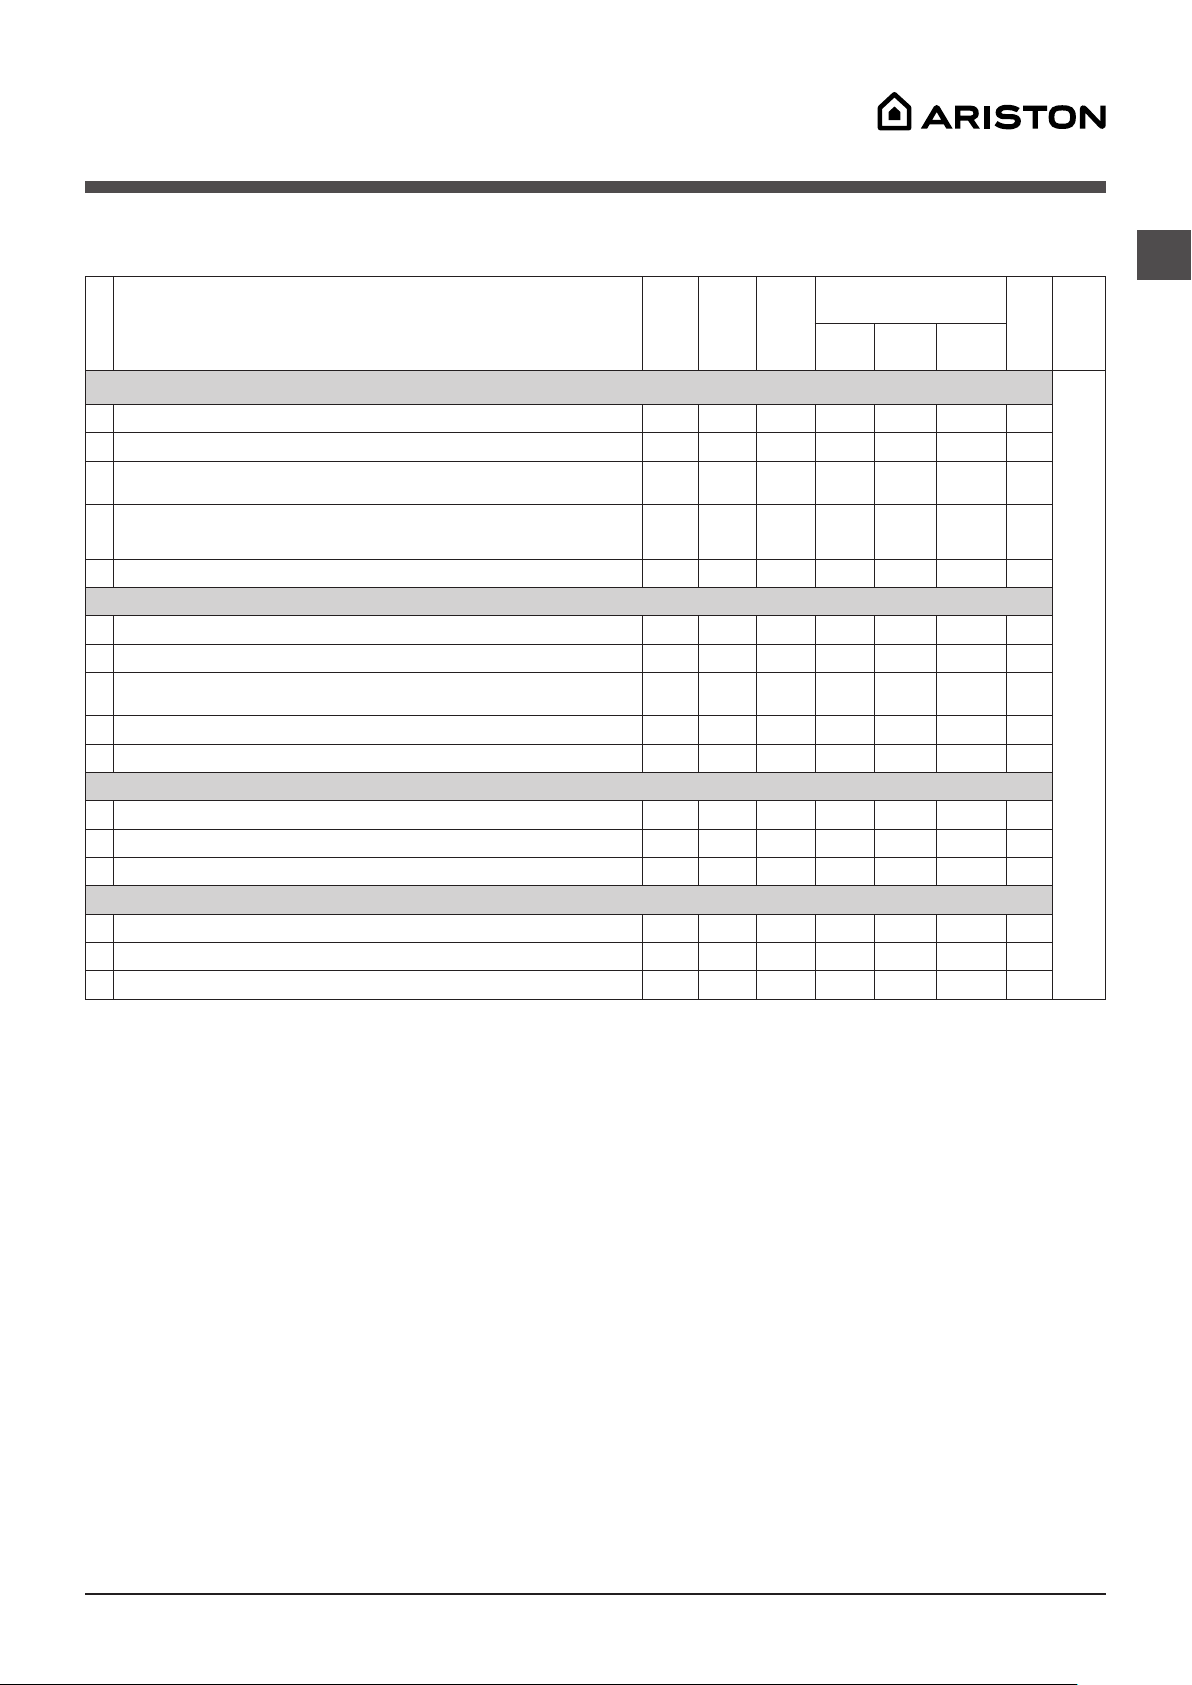
Wash cycles
Table of wash cycles
Wash
cycles
Description of the wash cycle
Max.
temp.
(°C)
Max.
speed
(rpm)
Drying
Detergents
Max
load
(lb)
Cycle
dura-
tion
Bleach Wash
Fabric
softener
Essentials cycles
The duration of the wash cycles can be checked on the display.
1
Cottons Regular: Heavily soiled whites and resistant colours. Hot Max
-
Max
2
Cottons Colored: Lightly soiled whites and delicate colours. Warm Max
-
Max
3
Permanent Press: Normallysoiledsyntheticsorpermanentpresslabelled
garments.
Warm 800
-
6.6
4
Mixed Load: To refresh lightly soiled garments quickly (not suitable for wool,
silk and clothes which require washing by hand).
Warm 800
-
6.6
5
Quick Wash&Dry
Warm Max
-
2.20
Special wash cycles
6
Bright White: Heavily soiled whites and resistant colours. Hot Max
Max
7
Active Wear
Warm 600 - -
6.6
8
Lightly Soiled 15 min.: To refresh lightly soiled garments quickly
(not suitable for wool, silk and clothes which require washing by hand)
Warm 800
-
3.30
9
Delicate: Lightly soiled delicates colours. Warm 800
-
6.6
10
Wool: for wool, cashmere, etc. Warm 800
-
3.30
Drying
11
Cottons
- -
- - - 11
12
Permanent Press
- -
- - - 6.6
13
Wool
- -
- - - 2.20
Partials wash cycles
A
Rinse
- Max
- -
Max
B
Spin
- Max
- - - Max
C
Drain no spin
- - - - - - Max
10
NA
Personalisation
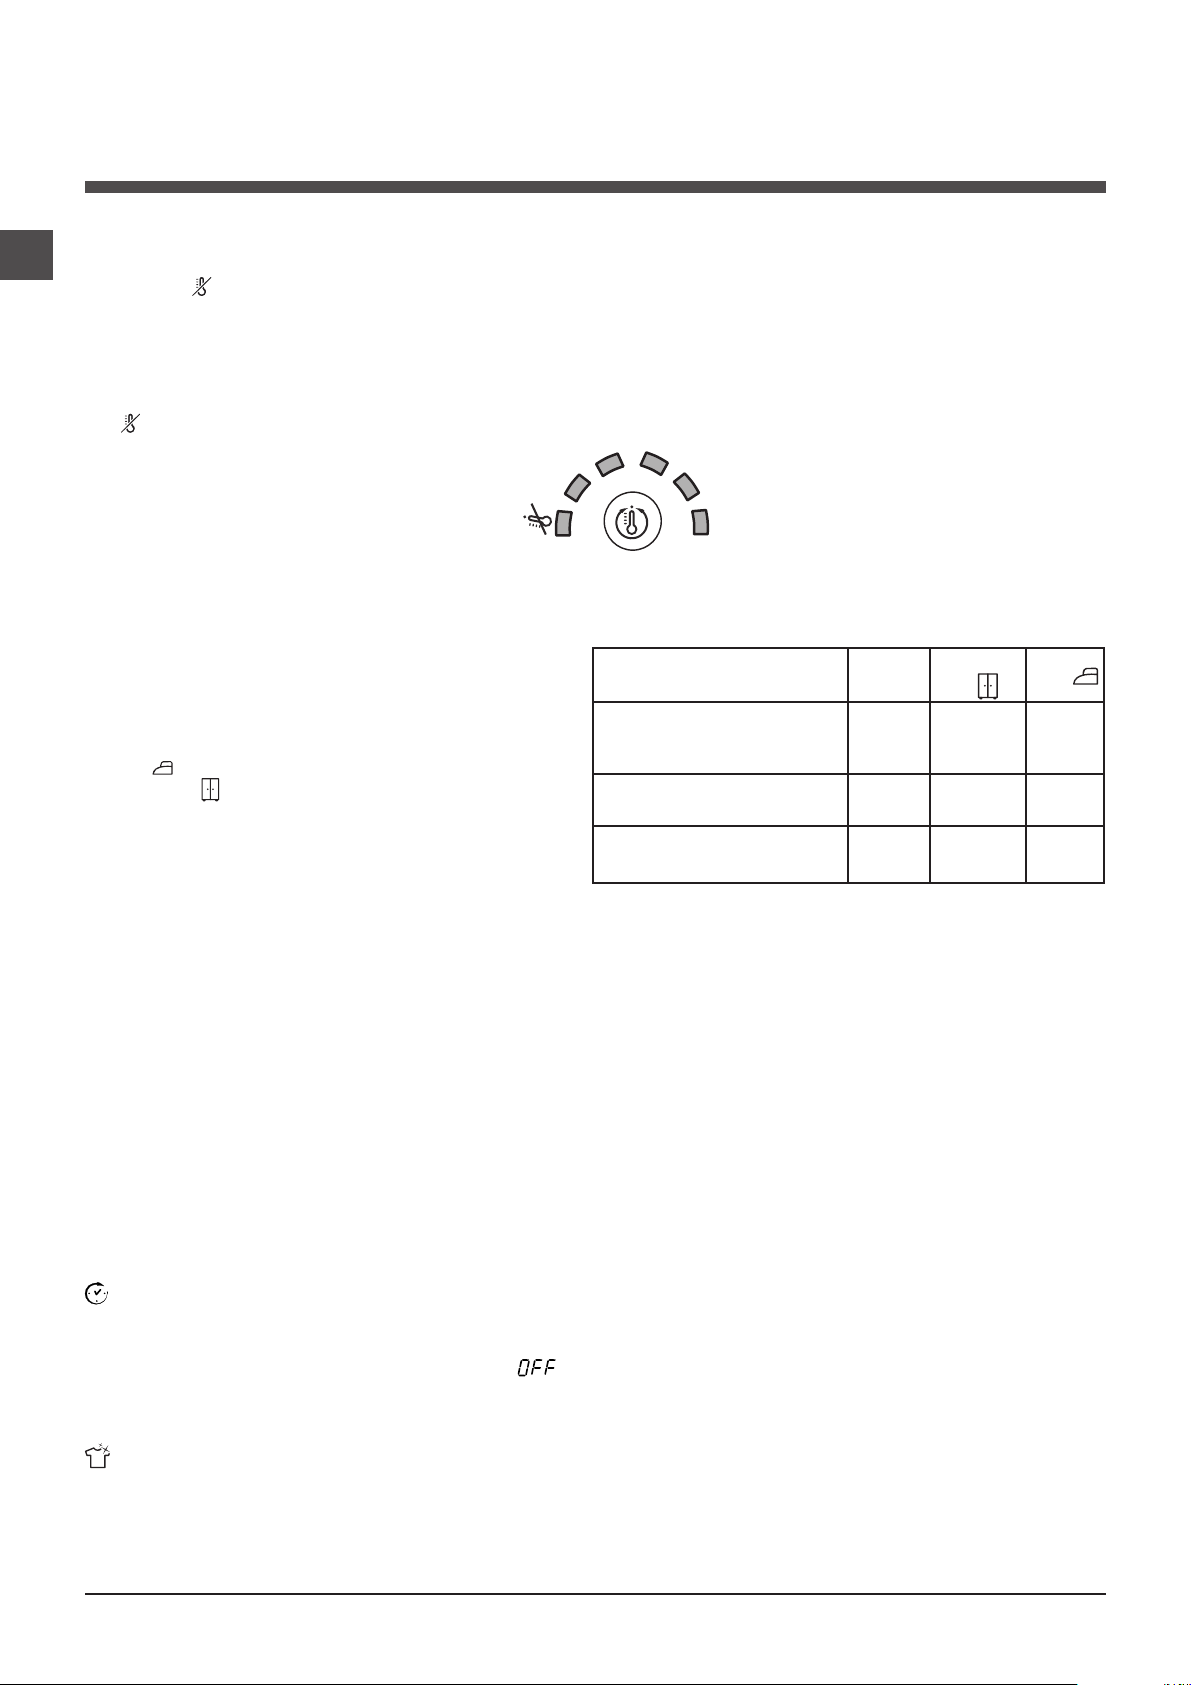
Setting the temperature
By pressing the TEMPERATURE button to set the wash temperature. (See Table of wash cycles) Wash temperature can be
set selecting , “Cold”, “Warm”, “Hot” or 2 in-between positions which correspond to intermediate levels of water tempe-
rature (example: the position between “cold” and “warm” is lukewarm). See below for the indication in °C and °F for each
temperature position.
The available selections are:
Setting the drying cycle
The desired drying cycle type may be set by pressing the
DRYINGbuttononceorseveraltimes.Twooptionsare
available:
A - Based on time: from 40 to 180 minutes.
B - Based on the how damp the clothes are once they have
been dried:
Iron dry : slightly damp clothes, easy to iron.
Cupboard dry : very dry clothes, recommended for towelling
and bathrobes.
If your laundry load to be washed and dried is much greater
than the maximum stated load (see adjacent table), perform
the wash cycle, and when the cycle is complete, divide the
garments into groups and put some of them back in the
drum.Atthispoint,followtheinstructionsprovidedfora“Drying only”cycle.Repeatthisprocedurefortheremainderofthe
load.
N.B.:whenthedryingiscompletethereisacoolingperiod,eventhoughtheDRYINGbuttonisinthe0 position.
Drying only
TurntheWASHCYCLEknobtooneofthedryingsettings(11-12-13) according to the type of fabric, then select the desired
dryingdurationusingtheDRYINGbutton.
Functions
The various wash functions available with this washer-dryer will help to achieve the desired results, each time.
To activate the functions:
1. Press the button corresponding to the desired function;
2. the function is enabled when the corresponding indicator light is illuminated.
Note:Iftheindicatorlightflashesrapidly,thissignalsthatthisparticularfunctionmaynotbeselectedinconjunctionwiththe
selected wash cycle.
Delay timer
To set a delayed start for the selected wash cycle, press the button repeatedly until the desired delay time is displayed (this
may be between 1 hour and 24 hours).
To disable the function press the button until the text is displayed.
N.B.OnceyouhavepressedtheSTART/PAUSE button, the delay time may only be decreased if you wish to modify it.
! This option is enabled with all programmes.
Super Wash
Because a greater quantity of water is used in the initial phase of the cycle, and because of the increased cycle duration, this
function offers a high-performance wash.
! Thisfunctionmaynotbeusedinconjunctionwithwashcycles4,5,8,10,11,12,13,A,B,C.
Table of Drying times (guideline values)
Fabric
type
Load type
Max.
load (lb)
Cupboard
dry
Iron
dry
Cotton
Clothing of different
sizes, Terry towels
11.02 180 160
Synthe-
tics
Sheets, Shirts, Pyjamas,
socks, etc.
6.6 180 160
Wool Knitwear, Pullovers, etc. 3.30 150 130
• Tap water
• Cold 15°C/59°F
• 20°C/68°F
• Warm 30°C/86°F
• 40 °C/ 104 °F
• Hot 57 °C / 134 °F
COLD
WARM
HOT

11
NA
Extra rinse
By selecting this function, the efficiency of the rinse is increased and optimal detergent removal is guaranteed. It is particularly
useful for sensitive skin.
!Thisfunctionmaynotbeusedinconjunctionwithwashcycles4,5,8,11,12,13,B,C.
Spin speed
By selecting this function it is possible to reduce the spin speed.
! This function may not be used in conjunction with wash cycles 1, 2, 5, 11, 12, 13, C.
Note: For the first two Programmes (Cottons Regular and Cottons Colored) the garments will be spun at maximum speed.
This allows to get the most from the spinning phase and reduce time and energy needed for the drying.

12
NA
Dryer Efficiency
Your washer dryer operates on 120 volts and has a 1,200 watt dryer. It will take a longer time to dry clothes than a traditional
dryer (which operates on 220 volts, 5,000 watts).
However, with the following tips, you can increase the efficiency of the dryer.
1. DOOR REMAINS LOCKED DURING DRYING: The door is electronically kept locked drying cycle, with
the Mode+Door Lock light on. This prevents any starting abd shutting the heater, which in turn conserves energy by trapping
the heat.
2. FABRIC SOFTNER: When the Wash and Dry cycles are set to run consecutively, the preheat function comes on
automatically.Inthis,theheateristurnedonduringthelastspincycleofthewashprogram.IntheRegularWashprogram,
the clothes will be getting sun at 1,200 rpm, while hot air from the dryer will be entering the drum at the same time. While
centrifugal force causes clothes to stick to the sides of the drum, the hot air will “bake) them to sides. It may take 30 minutes
or more for the clothes to unstick and fall into the drum. USING LIQUID FABRIC SOFTNER WILL CAUSE
THE CLOTHEST UNSTICK IMMEDIATELY. THIS HELPS DRY CLOTHES FASTER AND
CAUSES LESS WRINKLES.
3. OVERLOADING: The drum has a capacity of 12 lbs. While this is the largest drum available on any combination
washer-dryer.Thedrumshouldnotbeoverloaded.Withtoomanyclothes,airflowisreduced,increasingdryingtime.Amaxi-
mum of 2/3 of the drum full of clothes is raccomanded for ideal drying.
4. OVER DRYING: This machine uses a condensing dryer. In this cold water is used to condense the moisture from
the hot air. Since there is no external exhaust system, the moisture remains in the machine. Frequently, when it seems the
clothes are damp, it is actually the remaining moisture (like dew). Take clothes out and within a few minutes they will be dry.
Do not overdry the clothes.
5. USE LOW SUDSING DETERGENT: By using low sudsing detergent, you are preventing suds from ente-
ring the condensing chamber. When suds enter the condensing chamber, lint particles can clog up the chamber and the fan
blower.Overtime,thisreducesdryingefficiencyandmayrequirethefanblower(impeller)tobecleaned.
Your new appliance is carefully engineered product. Many times what appears to be a reason to call for service, requires
nothing more than a simple adjustment you can easily make in your own home.
You will be charged for a service call while the appliance is in warranty if the problem is not caused by
defective product workmanship or materials covered by this warranty.
To avoid a charge for an unnecessary service call, and before calling a serviceman, please refer to the troubleshooting sec-
tionforsituationsthatyoucanremedy.Thissectionisincludedonpages16-17ofthisUseandCareBook.
YourWasher-Dryerisfrontloading,withanextralargedooropeningforeasieraccess.Ithas9washcyclesinadditionto
extra rinse and pre wash cycles.
You will obviously want to obtain the best possible wash. By reading and following the instructions in this booklet you will
achieve excellent results.
Please, ensure that the instructions are followed. If you should need any further advice or assistance, please, contact the
dealer where your machine was purchased.
This appliance is an automatic washer with a capacity of up to:
15 lbs (6,8 kg)

13
NA
Detergents and laundry
Detergent dispenser drawer
Good washing results also depend on the correct dose of
detergent: adding too much detergent will not necessa-
rily result in a more efficient wash, and may in fact cause
build up on the inside of your appliance and contribute to
environmental pollution.
! Do not use hand washing detergents because these
create too much foam.
Openthedetergentdi-
spenser drawer and pour
in the detergent or washing
additive, as follows.
compartment 1: Deter-
gent for the wash cycle
(powder or liquid)
Liquid detergent should only
be poured in immediately prior
to the start of wash cycle.
compartment 2: Additives (fabric softeners, etc.)
The fabric softener should not overflow the grid.
extra compartment 3: Bleach
Bleach cycle
Bleaching may only be performed in conjunction with wash
cycles 6. Pour the bleach into extra compartment 3; pour
the detergent and softener into the corresponding com-
partments, then select one of the abovementioned wash
cycles.
This option is recommended only for very soiled cotton
garments.
Preparing the laundry
•Dividethelaundryaccordingto:
- the type of fabric/the symbol on the label.
- the colours: separate coloured garments from whites
•Emptyallgarmentpocketsandcheckthebuttons.
•Donotexceedthelistedvalues,whichrefertotheweight
of the laundry when dry:
Durable fabrics: max. 15 lb - (7 kg)
Syntheticfabrics:max.6.6lb-(3kg)
Delicate fabrics: max. 4.4 lb - (2 kg)
Wool: max. 3.30 lb - (1,5 kg)
How much does your laundry weigh?
1 sheet 14-17 oz - (400-500 g)
1 pillow case 5-7 oz - (150-200 g)
1 tablecloth 14-17 oz - (400-500 g)
1bathrobe31-42oz-(900-1200g)
1towel5-8oz-(150-250g)
MAX
1
3
2
Garments requiring special care
Wool:Aristonistheonlywasher-dryermanufacturertohave
been awarded the prestigious Woolmark Platinum Care en-
dorsement(M.0508)bytheWoolmarkCompany,whichme-
ans that all woollen garments may be washed in the washer-
dryer, even those which state “hand wash only” on the
label. Wash cycle 10 therefore offers complete peace of mind
when washing woollen garments in the washer-dryer (max.
load 3.30 lb - 1,5 kg) and guarantees optimal performance.
Load balancing system
Before every spin cycle, to avoid excessive vibrations and
to distribute the load in a uniform manner, the drum rotates
continuously at a speed which is slightly greater than the
washing rotation speed. If, after several attempts, the load is
not balanced correctly, the machine spins at a reduced spin
speed. If the load is excessively unbalanced, the washer-
dryer performs the distribution process instead of spinning.
To encourage improved load distribution and balance, we
recommend small and large garments are mixed in the load.
Helpful Hints
Your washer Dryer features three different speeds during the
wash cycle. During the Cotton cycle the drum spins at 1,200
or800rpm.DuringPermanentPressthedrumspinsat850
rpm. During delicates, the drum spins at 500 rpm. When Drying
heavy cotton articles, such as bath towels or jeans, be sure the
“Regular”washersettingisselected.Thefasterspinningwill
extract more water from these highly absorment fabrics and
reduce the degree of dampness as the machine goes into the
drying mode. This will cut down on your drying time.
Use Liquid Fabric Softener. Fill the softener compartment
up to the level marked. Using fabric softner fluffs out clothes
immediately after tha wash cycle. This helps speed drying
time and reduce wrinkles.
This washer Dryer isa120Voltmachine,sotheheating
element requires more time to achieve full heat than a larger
220Voltunitrequires.Theheatingelementwilltakeabout10
minutes to reach full heat.
To dry your laundry, the Washer Dryer blows heated air
intotherotatingdrum.Asthedrumtumblesyourlaundry,the
warm air dries it. If the drum is overfilled with laundry, the air is
not allowed to circulate and clothes will not dry properly.
Use Low sudsing Detergent. This is recommended for
all front loading washers. It ensures there is no over sudsing,
whichmayreducetheperformanceofyourmachine.Also,
this prevents damage to your machine which may be caused
by excess suds entering the condensing chamber and clog-
ging the fan blower mechanism with lint.
When sorting laundry always take into consideration
the quantity and type of fabric contained in the load. Highly
absorbent fabrics such as those used in towels or jeans will
abosorb more water and become very heavy when saturated.
If you notice that your clothes are taking longer than usual to
dry may be overloading the machine, or washing too many
highly absorbent articles for a single load.
14
NA
Care and maintenance
instructions
Cutting off the water and electricity
supplies
•Turnoffthewatertapaftereverywashcycle.Thiswillli-
mit wear on the hydraulic system inside the washer-dryer
and help to prevent leaks.
•Unplugthewasher-dryerwhencleaningitandduringall
maintenance work.
Cleaning the washer-dryer
The outer parts and rubber components of the appliance
can be cleaned using a soft cloth soaked in lukewarm
soapy water. Do not use solvents or abrasives.
Cleaning the detergent dispenser dra-
wer
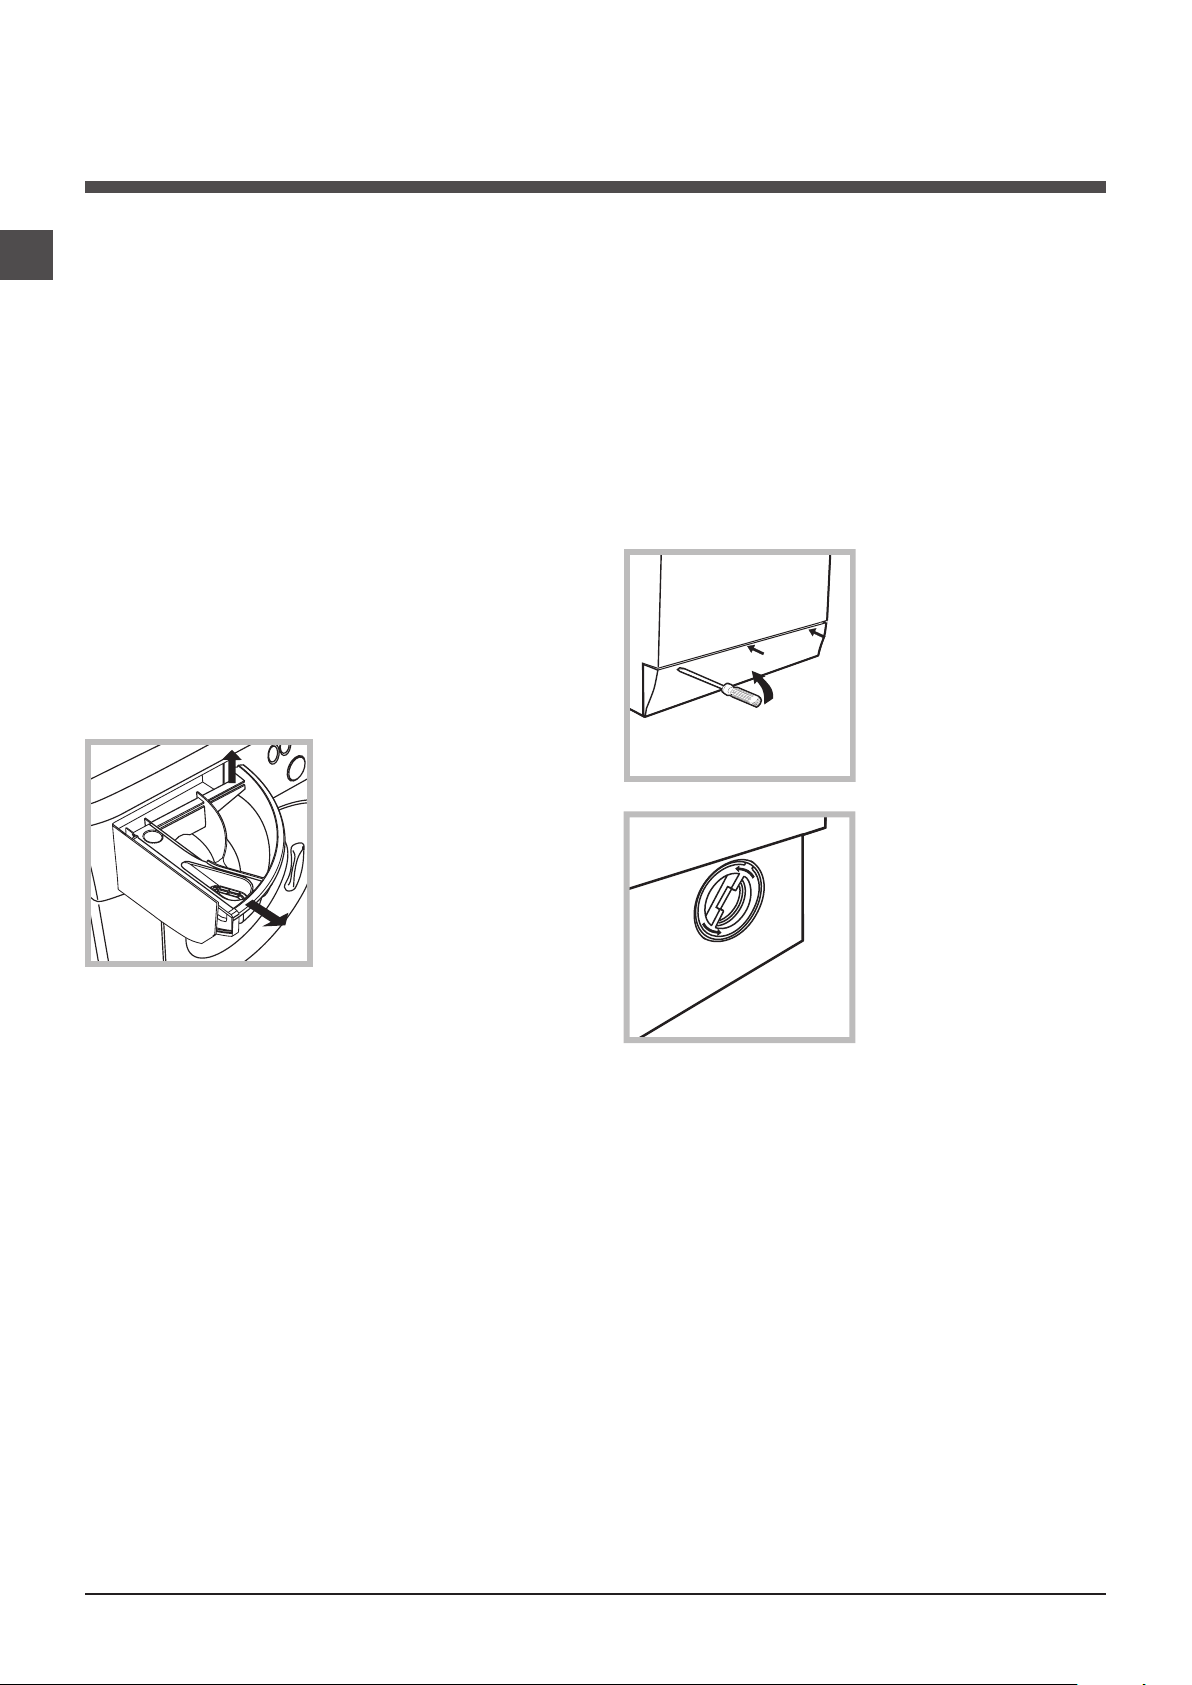
Removethedispenserby
raising it and pulling it out
(see figure).
Wash it under running wa-
ter; this operation should be
repeated frequently.
Caring for the door and drum of your
appliance
•Alwaysleavetheportholedoorajarinordertoprevent
unpleasant odours from forming.
Cleaning the pump
The washer-dryer is fitted with a self-cleaning pump which
does not require any maintenance. Sometimes, small items
(such as coins or buttons) may fall into the pre-chamber
which protects the pump, situated in its bottom part.
! Make sure the wash cycle has finished and unplug the
appliance.
To access the pre-chamber:
1. using a screwdriver,
remove the cover panel on
the lower front part of the
washer-dryer (see figure);
2. unscrew the lid by rota-
ting it anti-clockwise (see
figure): a little water may
trickle out. This is perfectly
normal;
3. clean the inside thoroughly;
4. screw the lid back on;
5. reposition the panel, making sure the hooks are securely
in place before you push it onto the appliance.
Checking the water inlet hose
Check the inlet hose at least once a year. If there are any
cracks, it should be replaced immediately: during the wash
cycles, water pressure is very strong and a cracked hose
could easily split open.
!Neverusesecond-handhoses.
1
2

15
NA
Troubleshooting
Yourwasher-dryercouldfailtowork.BeforecontactingtheTechnicalAssistanceCentre(see “Assistance”), make sure that
the problem cannot be not solved easily using the following list.
Problem:
The washer-dryer does not switch
on.
The wash cycle does not start.
The washer-dryer does not take
in water (the indicator light for
the first wash cycle stage flashes
rapidly).
The washer-dryer continuously
takes in and drains water.
The washer-dryer does not drain or
spin.
The washer-dryer vibrates a lot
during the spin cycle.
The washer-dryer leaks.
The START/PAUSE indicator light
(orange) and the function indicator
lights flash rapidly.
There is too much foam.
The washer-dryer does not dry.
Possible causes / Solutions:
•Theapplianceisnotpluggedintothesocketfully,orisnotmakingcontact.
•Thereisnopowerinthehouse.
•Thewasher-dryerdoorisnotclosedproperly.
•TheON/OFFbuttonhasnotbeenpressed.
•TheSTART/PAUSEbuttonhasnotbeenpressed.
•Thewatertaphasnotbeenopened.
•Adelayedstarthasbeenset(usingtheDelayTimer,see “Personalisation”).
•Thewaterinlethoseisnotconnectedtothetap.
•Thehoseisbent.
•Thewatertaphasnotbeenopened.
•Thereisnowatersupplyinthehouse.
•Thepressureistoolow.
•TheSTART/PAUSEbuttonhasnotbeenpressed.
•Thedrainhoseisnotfittedataheightbetween65and100cmfromthefloor
(see “Installation”).
•Thefreeendofthehoseisunderwater(see “Installation”).
•Thewalldrainagesystemisnotfittedwithabreatherpipe.
If the problem persists even after these checks, turn off the water tap, switch
theapplianceoffandcontacttheAssistanceService.Ifthedwellingisononeof
the upper floors of a building, there may be problems relating to water drainage,
causing the washer-dryer to fill with water and drain continuously. Special anti-
draining valves are available in shops and help to avoid this inconvenience.
•Thewashcycledoesnotincludedraining:somewashcyclesrequirethedrain
phase to be started manually.
•Thedrainhoseisbent(see “Installation”).
•Thedrainageductisclogged.
•Thedrumwasnotunlockedcorrectlyduringinstallation(see “Installation”).
•Thewasher-dryerisnotlevel(see “Installation”).
•Thewasher-dryeristrappedbetweencabinetsandwalls(see “Installation”).
•Thewaterinlethoseisnotscrewedonproperly(see “Installation”).
•Thedetergentdispenserdrawerisblocked(forcleaninginstructions,see
“Care and maintenance”).
•Thedrainhoseisnotfixedproperly(see “Installation”).
•Switchoffthemachineandunplugit,waitforapproximately1minuteand
then switch it back on again.
Iftheproblempersists,contacttheTechnicalAssistanceService.
•Thedetergentisnotsuitableformachinewashing(itshoulddisplaythetext
“for washer-dryers” or “hand and machine wash”, or the like).
•Toomuchdetergentwasused.
• Theapplianceisnotpluggedintothesocket,ornotenoughtomakecontact.
• Therehasbeenapowerfailure.
• The appliance door is not shut properly.
• Adelayedstarthasbeenset(usingtheDelayTimer,see “Personalisation”).
• ButtonDRYINGisinthe0 position.

16
NA
Service
Before calling for Assistance:
•Check whether you can solve the problem alone (see “Troubleshooting”);
•Restarttheprogrammetocheckwhethertheproblemhasbeensolved;
•Ifthisisnotthecase,contactanauthorisedTechnicalAssistanceCentreusingthetelephonenumberprovidedonthe
guarantee certificate.
! Alwaysrequesttheassistanceofauthorisedtechnicians.
Have the following information to hand:
• thetypeofproblem;
• theappliancemodel(Mod.);
• theserialnumber(S/N).
This information can be found on the data plate applied to the rear of the washer-dryer, and can also be found on the front of
the appliance by opening the door.

17
NA
ARISTON ONE-YEAR LIMITED WARRANTY
(USA & CANADA ONLY)
WHO IS COVERED BY THIS WARRANTY
This limited one-year warranty (“Warranty”) is given only
to the original end-use/retail purchaser (the “First Using
Purchaser”) of the accompanying Ariston product(s) (the
“AristonProduct”).
IfyoupurchasedthisAristonProductfromsomeoneother
thananauthorizedAristonreseller/dealerintheUnitedStates
orCanada,oriftheAristonProductwasused(includingbut
not limited to floor models or refurbished products) prior to
your purchase, then you are not the First Using Purchaser
andtheAristonProductthatyoupurchasedisnotcovered
by this Warranty. This Warranty is not transferable.
WHAT IS COVERED BY THIS WARRANTY
AristonwillrepairorreplaceanypartoftheAristonProduct
which fails due to a defect in materials or workmanship when
usedundernormalhome-useconditions.Aristonwillalso
provide, free of charge, all labor and related services to repair
or replace the defective part.
ThisWarrantyappliesonlytoAristonProductspurchased
and used in the United States or Canada. Subject to the
exclusionsbelow, forAriston Products purchased in, but
used outside, the United States or Canada, this Warranty
covers only warranty service within the United States or
Canada (and does not include shipping outside the United
States or Canada).
LENGTH OF THE WARRANTY
This Warranty runs for a period of one (1) year from the date
of the original purchase by the First Using Purchaser. Please
note that a copy of your original purchase receipt showing
the purchase date and the vendor’s name and address are
required to obtain service under this Warranty. For the pur-
poses of determining the applicable warranty period, please
note that any and all replaced or repaired parts shall assume
the identity of the original.
WHAT IS NOT COVERED BY THE WARRANTY
(EXCLUSIONS)
This Warranty does not cover:
1. Improper installation, delivery, maintenance and/or im-
properoperationoftheAristonProduct.
2.DamagecausediftheAristonProducthasnotbeenused
in compliance with the electricity or gas supply specifications
printed on the rating plate.
3.FailureofordamagetotheAristonProductifitisaltered,
abused, misused, or used for other than the intended pur-
pose, or if it is used commercially.
4. Service trips to your home to provide instructions on the
useofyourAristonProduct.
5.Replacementofhousefusesorcorrectionoftheplumbing
or electric wiring in your home.
6.Damagecausedbyneglect,accident,fire,floodsoracts
of God.
7. Physical Damage to the appearance of your Ariston
Product including, without limitation, scratches, rust, dents,
warping, peeling and the like.
8.Damagecausedbytransportation.
9.Replacementofanyconsumableordegradableitemor
accessory including, but not limited to: plugs, cables, bat-
teries, light bulbs, fluorescent tubes and starters, covers
and filters, or replacement of any removable parts made of
glass or plastic.
10. Damage caused after delivery.
11. Water damage of any kind.
12.AnAristonProductnotaccessibletoproviderequired
service.
13. Problems arising from other than defects in materials or
workmanship.
14. Travel time when installed in a recreational vehicle or
marine application.
This Warranty is voidiftheAristonProductisaltered,ser-
viced, maintained, dismantled, or otherwise interfered with
byanypersonwhoisnotauthorizedbyAriston.
15.Non-standardlaborwheninstalledinamarineapplica-
tion.
16.Waterleaksofanykind.
TOTHEEXTENTPERMITTEDBYLAW,THISWARRANTY
ISINLIEUOFALLOTHERWARRANTIES,WRITTEN
ORORAL,WHETHEREXPRESSEDBYAFFIRMATION,
PROMISE,DESCRIPTION,DRAWING,MODELOR
SAMPLE.ANYANDALLWARRANTIESOTHERTHAN
THISONE,WHETHEREXPRESSORIMPLIED,INCLUD-
INGIMPLIEDWARRANTIESOFMERCHANTABILITYAND
FITNESSFORAPARTICULARPURPOSE,AREHEREBY
DISCLAIMED.IMPLIEDWARRANTIESINCLUDING,
BUTNOTLIMITEDTO,THEIMPLIEDWARRANTIESOF
MERCHANTABILITYANDFITNESSTHATCANNOTBE
EXCLUDEDBYLAW,SHALLBELIMITEDTOTHESAME
DURATIONASTHISWARRANTY.EXCEPTFORTHAT
REPAIRORREPLACEMENTASDESCRIBEDABOVE,
ARISTONSHALLNOTBELIABLEFORANYDIRECT,IN-
DIRECT,INCIDENTALORCONSEQUENTIALDAMAGES
ORSPECIFICRELIEF.
Some States and Provinces do not allow the exclusion or
limitation of incidental or consequential damages and/or
implied warranties, so the above limitations or exclusions
may not apply to you. This Warranty gives you specific legal
rights and you may also have other legal rights which vary
from State to State or Province to Province.
Warranty

18
NA
WHAT YOU SHOULD DO TO OBTAIN WARRANTY
SERVICE
AllrepairsorwarrantyservicemustbyprovidedbyAriston
oranAuthorizedAristonServiceCenter.
Toschedulewarrantyservicepleasecall1-877-356-0766,
email service@aristonamerica.com. Please remember to
provideuswithyourAristonProduct’smodelnumberand
serial number.
Please note that a copy of your original purchase receipt
showing the purchase date and the vendor’s name and ad-
dress are required to obtain service under this Warranty. If
theAristonProductislocatedinanareawhereservicebyan
AuthorizedAristonServiceCenterisnotavailable,youmay
be responsible for a trip charge or you may be required to
bringtheAristonProducttoanAuthorizedAristonService
Center for service.
The foregoing are your sole (i.e., only) and exclusive rem-
edies under this Warranty. This Warranty is the only war-
rantythatAristonisgivingforthisAristonProduct.This
Warranty replaces all other agreements and understand-
ingsthatyoumayhavewithAristonoritsrepresentatives.

19
FR
Français, 1
FR
ARWDF 129
Manuel d’utilisation
LAVE-LINGE/SÈCHE-LINGE
! Ce symbole vous rappelle de lire ce mode d’emploi.
Table des matières
Consignes de sécurité importantes, 20-21
Consignes de sécurité importantes
Consignes de mise à la terre
Sécurité
Instructions pour l’installation, 22-23-24
Déballage et mise de niveau
Encombrement minimum
Raccordement de l’arrivée d’eau
Évacuation
Raccordement de la décharge
Raccordements électriques
Pose sous évier
Caractéristiques techniques
Description du lave-linge/sèche-linge et
démarrage d’un cycle de lavage, 25-26
Tableau de commande
Témoins
Démarrage d’un cycle de lavage
Cycles de lavage, 27
Tableau des cycles de lavage
Cycles de lavage spéciaux
Personnalisation, 28-29-30
Réglage de la température
Réglage du cycle de séchage
Fonctions
Efficacité du sèche-linge
Produits lessiviels et linge, 31
Distributeur de produits lessiviels
Cycle Javel
Préparation du linge
Vêtements nécessitant des soins particuliers
Système d’équilibrage des charges
Conseils utiles
Consignes pour l’entretien et le
nettoyage, 32
Coupure de l’arrivée d’eau et de l’électricité
Nettoyage du lave-linge/sèche-linge
Nettoyage du distributeur de produits lessiviels
Entretien du hublot et du tambour de votre machine
Nettoyage de la pompe
Contrôle du tuyau d’arrivée d’eau
Dépannage, 33
Entretien, 34
Garantie, 35-36

20
FR
CONSIGNES DE SÉCURITÉ IMPORTANTES
AVERTISSEMENT : - pour limiter le risque d’incendie,
d’électrocution ou de blessure lors de l’utilisation de la
machine, suivez les consignes de base suivantes :
•Lisezlemanueldanssonintégralitéavantd’utiliserla
machine.
•Nelaveznineséchezlesvêtementspréalablement
lavés avec de l’essence, imbibés ou tachés d’essence,
de solvants pour le nettoyage à sec, d’autres produits
inflammables ou de substances explosives car ils sont
susceptibles de produire des vapeurs inflammables.
•Interdisezauxenfantsdejouersuroudanslamachine.
Gardez les enfants sous étroite surveillance lorsqu’ils se
trouvent à proximité de la machine.
•Avantl’enlèvementdelamachinepourl’entretienou
pour sa mise au rebut, retirez la porte permettant l’accès
au compartiment de lavage/séchage.
•N’ajoutezpasd’essence,desolvantsutiliséspourle
nettoyage à sec ou d’autres substances inflammables
ou explosives dans l’eau de lavage. Ces substances
libèrent des vapeurs inflammables.
•N’installezninestockezlamachinedansunendroit
exposé aux intempéries.
•Veillezànepasendommagerlescommandes.
•Danscertainscas,del’hydrogènepeutêtreproduit
dans le circuit d’eau chaude s’il n’a pas été utilisé
pendant2semainesouplus.L’HYDROGÈNEESTUN
GAZEXPLOSIF.Silecircuitd’eauchauden’apasété
utilisé pendant cette période, avant d’utiliser la machine,
ouvrez tous les robinets d’eau chaude et laissez l’eau
s’écouler pendant plusieurs minutes. Cela permettra de
libérerl’hydrogèneaccumulé.Legazétantinflammable,
évitez de fumer ou d’approcher une flamme vive pendant
cette période.
•Coupezlesrobinetsd’eauchaudepourlibérerla
pression sur les tuyaux et les vannes. Vous pourrez ainsi
contenir les fuites en cas de rupture éventuelle.
•Éviteztoutemanipulationàl’intérieurdelamachine
lorsque la cuve ou le tambour est en mouvement.
•Netentezpasderéparerouderemplacerun
quelconque élément de la machine ni d’effectuer
une quelconque réparation sauf si la marche à suivre
est clairement expliquée dans le manuel d’entretien
de l’utilisateur ou dans le manuel de réparation de
l’utilisateur.Assurez-vousaupréalablededisposerdes
compétences nécessaires pour prendre en charge ces
opérations.
•N’utilisezpasd’assouplissantnideproduitspour
éliminer l’électricité statique sauf si l’usage de ces
produits est conseillé par le fabricant de l’assouplissant
ou du produit en question.
•Évitezd’utiliserlachaleurpoursécherlesarticles
contenant du caoutchouc mousse ou des matériaux
d’une texture analogue au caoutchouc.
•Veillezàfairepreuvedelaprudencenécessairelorsde
l’installation, l’utilisation et la maintenance de la machine.
Respectez les précautions de base.
•Coupezl’alimentationdulave-lingeauniveaudu
disjoncteuroudelaboîteàfusiblesoudébranchezla
machine en cas d’urgence ou lors d’une réparation.
Faites en sorte que l’installateur vous montre et signale
le commutateur ou le fusible correspondant au niveau du
tableau.
•L’intérieurdelamachinedoitfairel’objetd’unnettoyage
périodique par un technicien qualifié.
•Neplacezpasd’articlesexposésàdeshuilesde
cuissondanslesèche-linge.Lesarticlescontaminéspar
des huiles de cuisson peuvent provoquer une réaction
chimique susceptible d’enflammer le linge.
•Avantdechargerlelave-linge,vérifiezsiletambourest
bien vide.
CONSERVEZ CE MANUEL
CONSIGNES POUR LA MISE À LA TERRE
Cet appareil doit être mis à la terre. En cas de
dysfonctionnement ou de panne, la mise à la terre permet
de limiter le risque d’électrocution offrant une résistance
inférieureaucourantélectrique.L’appareilestéquipéd’un
câble doté d’un conducteur de terre et d’une prise de
miseàlaterre.Lafichedoitêtrebranchéedanslaprise
adéquate, laquelle devra être correctement installée et
mise à la terre conformément aux règlements locaux en
vigueur.
AVERTISSEMENT-Toutraccordementinadéquatdu
conducteur de terre peut provoquer une électrocution.
Vérifiez auprès d’un électricien, d’un technicien ou du
personnel qualifié en cas de doute quant à la mise à la
terre de l’appareil.
Ne modifiez pas la fiche fournie avec l’appareil : si elle ne
rentre pas dans la prise, demandez à un électricien qualifié
d’en installer une nouvelle.
Consignes de sécurité importantes

21
FR
Sécurité
AVERTISSEMENT :
Pour réduire le risque d’électrocution, N’enlevez PAS le capot (ou le dos) de l’appareil. Aucune pièce
protégée par ces éléments ne peut être remplacée par l’utilisateur. Faites appel à un technicien qualifié le
cas échéant.
Laréférencedumodèleetlenumérodesériesetrouventàl’arrièredel’appareil.
Notezlemodèleetlenumérodesériedansl’espaceindiqué.Conservezcemanuelcommepreuved’achat.Ilpermettra
l’identification de la machine en cas de vol.
N°DEMODÈLE
N°DESÉRIE
AVERTISSEMENT :
POUR ÉVITER TOUT RISQUE D’INCENDIE OU D’ÉLECTROCUTION, PROTÉGEZ L’APPAREIL CONTRE
LES INTEMPÉRIES ET L’HUMIDITÉ.
Le symbole représentant une flèche en forme d’éclair encadré d’un triangle équilatéral signale la présence d’une
tension non isolée à l’intérieur du bâti d’une intensité suffisante pour causer une électrocution.
Le point d’exclamation encadré d’un triangle équilatéral signale à l’utilisateur la présence de consignes d’utilisation
et d’entretien importantes dans le manuel.
LaSociétéIndesitproposeàsesclientsdesproduitsmarquésparlelabelENERGYSTAR.
CetappareilaététestéparUL.IlaétédéclaréconforméauxnormesdesécuritéULpourleCanada
etlesÉtats-Unis,commel’indiquelesymbole.
ATTENTION : RISQUE
D’ELECTROCUTION.
NE PAS OUVRIR
!
!
C
U
L
US LISTED
®
!
22
FR
! Conservez ce manuel en vue d’une consultation
ultérieure. En cas de vente du lave-linge/sèche-linge,
si celui-ci est déplacé ou déménagé, veillez à ce que le
manuel accompagne la machine de sorte que le nouveau
propriétaire puisse se familiariser avec son fonctionnement
et ses caractéristiques.
!Lisezattentivementcesinstructions:ellescontiennent
des informations essentielles quant à l’installation et à
l’utilisation en toute sécurité de la machine.
Déballage et mise de niveau
Déballage
1. Déballez le lave-linge/sèche-linge.
2. Vérifiez si le lave-linge/sèche-linge n’a pas été
endommagé pendant le transport. S’il a été endommagé,
contactez le vendeur et attendez avant de continuer
l’installation.
3. Retirez les 4 vis de
protection (utilisées pendant
le transport), la rondelle en
caoutchouc et l’entretoise
sur la face arrière de la
machine (voir figure).
4. Bouchez les trous à l’aide des pastilles en plastique
fournies.
5. Conservez toutes les pièces en lieu sûr : vous en aurez
besoin si le lave-linge/sèche-linge doit à nouveau être
déplacé.
!Lesemballagesnesontpasdesjouets.Ilsdoiventêtre
conservés hors de portée des enfants.
Mise de niveau
1.Installezlelave-linge/sèche-lingesurunesurface
résistante sans toutefois l’appuyer contre les parois, le
mobilier ou tout autre élément à proximité.
2. Si le sol n’est pas
parfaitement de niveau,
compensez les écarts en
serrant ou desserrant les
pieds avant réglables (voir
figure).L’angled’inclinaison,
mesuré au niveau du plan
de travail, ne peut pas
dépasser 2°.
Mettezcorrectementlamachinedeniveaupourassurer
sa stabilité, éviter les vibrations et les bruits excessifs. Cela
permet également d’éviter le déplacement de la machine
pendant son fonctionnement.
Encombrement minimum
Lamachinepeutêtreinstalléedansunespaceconfiné,
dansunplacardouunealcôve.Lesespacessontexprimés
en pouces et représentent le minimum acceptable.
*Prévoyez un espace supplémentaire pour une installation
et un entretien facile. Veillez également à respecter les
règlementslocauxenvigueur.L’installationdoitrespecter
les dimensions minimum indiquées.
0" *
0" *
Recessed Front View
1" *
1"
Side View
AVERTISSEMENT- RISQUE D’INCENDIE
L’installationdusèche-lingedoitêtreeffectuéeparuninstallateurqualifié.
Installezlesèche-lingeconformémentauxconsignesdufabricantetauxrèglementslocaux.
Pour limiter le risque de blessure voire la mort, suivez toutes les consignes d’installation.
CONSERVEZ CE MANUEL
!
Consignes d’installation
23
FR
H
C
Raccordement de l’arrivée d’eau
Si les canalisations prévues pour le raccordement sont
neuvesoun’ontjamaisétéutilisées,faitescoulerl’eaupour
évacuer les débris susceptibles de boucher les filtres ou les
vannesavantderaccorderlamachine.REMARQUE:les
vannes d’arrêt fournies doivent être facilement accessibles.
1. Raccordez le robinet
d’eau froide (raccord bleu
C ) à l’arrivée d’eau froide.
Serrez bien.
2.Ouvrezl’arrivéed’eau
froide et vérifiez l’absence de
fuites. Serrez davantage si
nécessaire.
3. Raccordez le robinet d’eau chaude (raccord rouge H ) à
l’arrivée d’eau chaude. Serrez bien.
4.Ouvrezl’arrivéed’eauchaudeetvérifiezl’absencede
fuites. Serrez davantage si nécessaire.
Évacuation
•Diamètre/capacité de la conduite verticale : une
conduite verticale d’au moins 1 ¼” et dotée d’une capacité
de 26,50 litres/minutes est nécessaire.
•Sommet de la conduite verticale : doit se trouver
à une distance comprise entre 64 et 86 cm du bas de la
machine.
•Extrémité du tuyau de décharge (fourni avec la
machine) : doit se trouver à au moins 50 cm au-dessus
dufonddulave-linge/sèche-linge.Uneprised’airdoit
être prévue au niveau du tuyau de décharge afin d’éviter
le siphonnage. Veillez à introduire le tuyau d’évacuation
sur 15 cm maximum dans la décharge pour éviter le
siphonnage.
Raccordement de la décharge
L’eaupeutêtreévacuéeversunlavabo,uneconduite
verticaleouuntuyaud’écoulement.Uneprised’airdoit
être prévue à au moins 50 cm pour éviter le siphonnage
(Fig. 6).
Important : la pression de l’eau doit être
comprise entre les valeurs figurant dans les
Caractéristiques techniques.
!
!
Important : ne serrez pas trop fort car vous
pourriezendommagerlesraccords.Lesraccords
doivent être serrés à la main. N’utilisez un outil
qu’en cas de fuite.
A & B = 25" (62 cm) min. / 34" (86 cm) max.
Floor Standpipe Wall Standpipe
A
B
Fig. 4
Conduite verticale : l’installation nécessite une colonne
montante de 1 ¼” (3,2 cm) d’une capacité de 26 litres par
minute. Canalisation encastrée dans le sol ou dans le mur :
le haut de la canalisation doit être compris entre 25” (62 cm)
et 34” (86 cm) par rapport au fond du lave-linge (Fig. 4).
Décharge sous évier : le raccordement au système
d’évacuation du bac doit se trouver au-dessus du siphon
(Fig.5).Lorsqueladéchargeestencastréedansdes
parois ou des murs, utilisez un matériau de protection
(ruban isolant ou adhésif en toile) pour couvrir les bords
tranchants susceptibles d’endommager la conduite.
Utilisezunsystèmedefixationadaptépourraccorder
la décharge à la bifurcation ou au broyeur. En présence
d’une décharge sous évier, vous pouvez effectuer le
raccordement directement aux éléments suivants :
1) à un broyeur en respectant les techniques de fixation
prévues par le fabricant.
2) directement à un about de bifurcation (disponible dans
la plupart des quincailleries).
3)parleplancherversunsiphondistinct.Lesiphondoit
être doté d’une prise d’air pour éviter le siphonnage.
Pour garantir l’aération du système, installez un reniflard
(disponible dans la plupart des quincailleries).
4)Aurobinetàl’aided’unadaptateur(disponible
séparément).
•Utilisezunebrideouverte(fournieaveclesaccessoires)
ou un système adapté pour fixer l’extrémité au tuyau
d’évacuation (prévu à l’arrière de la machine).
25" (62 cm) min.
with an air break
Laundry Sink Drain
Fig. 5
Sink Drain W/ "Y" Branch Tailpiece
Important : veillez à ce que la décharge ne
soit pas pincée et que l’eau s’écoule librement.
!
24
FR
•Introduisezl’extrémitédeladéchargedanslaconduite
verticale ou la décharge encastrée dans le mur ou le sol
(Fig.6).REMARQUE:l’extrémitédeladéchargeDOITse
trouver à au moins 20” (50 cm) au-dessus de la base de la
machine. Veillez à introduire le tuyau d’évacuation sur 6” (15
cm) maximum dans la décharge pour éviter le siphonnage.
•Utilisezdurubanadhésif,unserre-câblesoutoutautre
élément analogue pour maintenir le tuyau ou la bride
ouverte en place.
Pose sous évier
1. Coupez l’extrémité
fermée de la décharge sous
l’évier.
2. Fixez le support pour le
raccord à au moins 620 mm
du sol.
3.Utilisezuncollierde
serrage pour raccorder
l’extrémité de la conduite
d’évacuation grise à la
décharge sous l’évier.
20" (62 cm) min.
34" (86 cm) max.
Standpipe
"Y" Tail Piece
This connection MUST be
before drain trap and at
least 20" (50.8 cm) above
the floor where washer will
be installed.
Cable tie
Floor Standpipe w/ "Y" Branch Tail Piece
Fig. 7
20" (50 cm) min.
with an air break
25" (62 cm) min.
34" (86 cm) max.
6" max.
Standpipe
Floor Standpipe
Fig. 6
U-Clamp
Raccordements électriques
•Tension/intensitédelamachine:120V,60Hz,11Amp.
•Raccordement:priseàtroisbrochesetcordonde1m80
fournis
•Circuit/parafoudre:monophaséàtroisfils,120V,60Hz,
CA,surcircuitde15Ampséparé.
Données techniques
Caractéristiques techniques
Modèle
ARWDF129
Dimensions
largeur:23.4”(59,5cm)
hauteur : 33.24” - 33.75” (84,5 - 85,7 cm)
profondeur:22”(55,9)cm
Poids
148lbs(68kg)
Encombrement
minimum
Côtés : 0”
Avant/arrière:1”(3cm)
Capacité
Lavage:2à15lbs.(1à7kg)
Séchage:2à11lbs.(1à5kg)
Raccords
électriques
Tension:120Volts,11Amp,60Hz
Raccordements
en eau
Pressionmaximale:0,69Mpa(6,9bar),
100 psi
Pressionminimale:0,05Mpa(0,5bar),
7,2 psi
Vitesse
d’essorage max.
jusqu’à1200tr/min
LaSociétéIndesitproposeàsesclients
des produits marqués par le label
ENERGYSTAR.
CetappareilaététestéparUL.
Ilaétédéclaréconforméauxnormes
desécuritéULpourleCanada
etlesÉtats-Unis,commel’indique
le symbole.
C
U
L
US LISTED
®
25
FR
AVERTISSEMENT : pour limiter les risques d’incendie,
d’électrocution ou de blessures, lisez les CONSIGNES
DE SÉCURITÉ IMPORTANTES avant d’utiliser
l’appareil.
Distributeur de produits lessiviels : utilisé pour la
distribution des produits lessiviels et des compléments de
lavage (voir « Produits lessiviels et linge »).
ON/OFF avec témoin : permet de mettre la machine sous/
hors tension. Si le témoin est allumé, cela indique que la
machine est sous tension.
Bouton CYLE DE LAVAGE permet de programmer les
cycles de lavage. Pendant le cycle de lavage, le bouton
reste immobile.
Bouton SECHAGE : permet de sélectionner le
programme de séchage souhaité (voir “Personnalisation”).
Bouton TEMPERATURE : permet de régler la
température ou le cycle de lavage à froid (voir
“Personnalisation”).
ECRAN : indique le temps restant pour le cycle de lavage/
séchage sélectionné. En cas de départ différé, le temps
restant avant le démarrage du cycle s’affiche.
VERROU ENFANT avec témoin : active ou désactive le
verrou du panneau de commande.
Boutons de FONCTION avec témoin : permettent
lasélectiondesfonctionsdisponibles.Letémoin
correspondant à la fonction sélectionnée restera allumé.
Témoins de PROGRESSION DU CYCLE DE LAVAGE :
permettent de contrôler la progression du cycle de lavage.
Témoin PORTE VERROUILLEE : indique si le hublot
peut être ouvert ou non (voir page suivante).
Bouton START/PAUSE avec témoin lumineux : démarre
ou interrompt momentanément les cycles de lavage.
Remarque : pour interrompre un cycle de lavage, appuyez
surcebouton.Letémoincorrespondantclignoteraen
orange alors que le témoin indiquant la phase de lavage
resterafixe.SiletémoinPORTEVERROUILLEE est
éteint, la porte peut être ouverte. Pour redémarrer le cycle
de lavage à l’endroit où il a été interrompu, appuyez à
nouveau sur ce bouton.
Description du lave-linge/sèche-linge
et démarrage d’un cycle de lavage
Témoin
PORTE
VERROUILLEE
Bouton
START/
PAUSE
avec
témoin lumineux
Tableau de commande
Témoins de PROGRESSION DU
CYCLE DE LAVAGE
Boutons de
FONCTION
avec témoin
Distributeur de produits lessiviels
Bouton CYLE DE
LAVAGE
ECRAN
Bouton ON/OFF
avec témoin
Bouton
TEMPERATURE
Bouton
SECHAGE
Bouton
VERROU ENFANT
avec témoin
26
FR
Témoins
Letémoinfournitdesinformationsimportantes.
Asavoir:
Témoins d’indication de phase de lavage
LorsquevoustournezleboutonCYCLEDELAVAGE,
les témoins s’illuminent et indiquent les étapes qui seront
effectuées par la machine selon le cycle de lavage sélectionné.
Unefoisquelecycledelavagesélectionnéacommencé,
les témoins s’allument au fur et à mesure pour indiquer la
phase en cours.
Note:
pendant la phase “Vidange”, le témoin correspondant au
cycle “Essorage” s’allume.
Boutons de fonction et témoins correspondants
Lorsqu’unefonctionestsélectionnée,letémoin
correspondant s’allume.
Si la fonction désirée n’est pas compatible avec le cycle de
lavage programmé, le témoin correspondant clignotera, un
signal sonore sera émis et la fonction ne sera pas activée.
Si une fonction est incompatible avec une autre fonction
active, seule la dernière sélection restera active.
Témoin de température
Lorsqu’unetempératureestsélectionnée,letémoin
correspondant s’allume.
Témoin de séchage
Lorsqu’unefonctiondeséchageestsélectionnée,le
témoin correspondant s’allume.
Témoin de verrouillage enfants
Pour activer le verrouillage du tableau de commande,
appuyez sur ce bouton et maintenez-le enfoncé pendant
2secondesenviron.Lorsqueletémoinestallumé,le
tableaudecommandeestbloqué.Lescyclesdelavagene
peuvent donc pas être modifiés par accident, surtout en
présence d’enfants dans la maison.
Pour désactiver le verrouillage du tableau de commande,
appuyez sur ce bouton et maintenez-le enfoncé pendant 2
secondes environ.
Témoin Porte verrouillée
Si ce témoin est allumé, la porte de la machine est
verrouillée afin d’éviter toute ouverture accidentelle. Pour
éviter tout dommage à l’appareil, attendez que le témoin
s’éteigne avant d’ouvrir la porte.
Remarque : silafonctionDÉPARTDIFFÉRÉestactive,
laportenepeutpasêtreouverte.Mettezlamachineen
pauseenappuyantsurleboutonSTART/PAUSEsivous
souhaitez l’ouvrir.
!SiletémoinSTART/PAUSE(orange)clignoterapidement
en même temps que le témoin indiquant la fonction, c’est
qu’un problème s’est produit (voir “Dépannage”).
Démarrage d’un cycle de lavage
1. Activezlelave-linge/sèche-lingeenappuyantsurleboutonON/OFF.Touslestémoinss’allumerontpendantquelques
secondes.Ilss’éteindrontensuiteetletémoinSTART/PAUSEclignotera.
2. Chargez le linge et fermez le hublot.
3.Programmezlecycledelavageàl’aideduboutonCYCLEDELAVAGE.
4. Réglez la température (voir Personnalisation”).
5. Réglez le cycle de séchage si nécessaire (voir “Personnalisation”).
6.Ajoutezladosedeproduitlessivieletlescomplémentsdelavage(voir “Produits lessiviels et linge”).
7. Sélectionnez les fonctions désirées.
8.LancezlecycledelavageenappuyantsurleboutonSTART/PAUSE.Letémoincorrespondantresterafixe(vert).Pour
annulerlecycleprogrammé,mettezlamachineenpauseenappuyantsurleboutonSTART/PAUSEetensélectionnantun
nouveau cycle.
9.Autermeducycledelavage,letémoin s’allumera.LetémoinPORTEVERROUILLEs’allumerapoursignaler
que l’ouverture du hublot est possible. Retirez le linge et laissez le hublot ouvert pour que le tambour puisse sécher
complètement.Éteignezlelave-linge/sèche-lingeenappuyantsurleboutonON/OFF.
Lavage
Rinçage
Essorage
Séchage
Fin du cycle de lavage
Remarque : Dès que le
niveau ou la durée de
séchage aura été paramétré,
ce témoin s’allumera pour
indiquer que le cycle de
lavage sélectionné sera suivi
d’une phase de séchage.

27
FR
Special wash cycles
Permanent (wash cycle 3) Press this cycle has less mechanical agitation and spinning speed designed to reduce
wrinkles.
Mixed Load (washcycle4)thiswashcyclewasdesignedtowashlightlysoiledgarmentsquickly:itlastsjust30minu-
tesandthereforesavesbothenergyandtime.Byselectingthiswashcycle(4atWARMtemperature),itispossibleto
washdifferentfabricstogether(exceptforwoolandsilkitems),withamaximumloadof6.6lb-(3kg).
Quick Wash & Dry(washcycle5)wasdesignedtowashanddrylightlysoiledgarmentsquickly.Thiscyclemaybe
usedtowashanddryalaundryloadofupto2.20lb-(1kg)injust60minutes.
To achieve optimum results, use liquid detergent and pre-treat cuffs, collars and stains.
Bright White (washcycle6)Usethiscyclewhenbleachingwithhypocloritebasedproducts.
Pour the bleach, the detergent and the additives into the relevant compartments (see paragraph entitled “Detergent
dispenser drawer”).
Active wear(washcycle7)isforwashinglightlysoiledsportsclothingfabrics(tracksuits,shorts,etc.);forbestresults,
werecommendnotexceedingthemaximumloadindicatedinthe“Tableofwashcycles”.Werecommendusinga
liquid detergent and dosage suitable for a half-load.
Lightly Soiled 15 min. (washcycle8)thiswashcyclewasdesignedtowashlightlysoiledgarmentsquickly:itlasts
just15minutesandthereforesavesbothenergyandtime.Byselectingthiswashcycle(8atWARMtemperature),itis
possibletowashdifferentfabricstogether(exceptforwoolandsilkitems),withamaximumloadof3.30lb-(1.5kg).
Forthiscyclewerecommendpretreatingstains,shirtnecksandwristswithspecificantistainproducts.
Cycles de lavage
Tableau des cycles de lavage
Cycles de
lavage
Description du cycle de lavage
Tem-
pérature
maxi-
male
(°C)
Vitesse
maxi-
male (tr/
min)
Séchage
Produits lessiviels
Vo-
lume
ma-
ximal
(lb)
Durée
du
cycle
Javel Lessive
Adoucis-
sant
Cycles de base
Laduréedescyclesdelavages’afficheàl’écran.
1
Coton standard : vêtements blancs et colorés résistants très sales.
Très
chaud
Max
-
Max
2
Coton couleur : vêtements blancs et colorés délicats peu sales. Chaud Max
-
Max
3
Sans repassage : vêtements synthétiques ou sans repassage normaux. Chaud 800
-
6.6
4
Volume mixte : pourrafraîchirrapidementlesvêtementspeusales(ne
convient pas pour la laine, la soie et les vêtements nécessitant un lavage à
la main).
Chaud 800
-
6.6
5
Lavage/séchage rapide
Chaud Max
-
2.20
Cycles de lavage spéciaux
6
Blanc éclatant : vêtements blancs et colorés résistants très sales.
Très
chaud
Max
Max
7
Vêtements de sport
Chaud 600 - -
6.6
8
Peu de taches - 15 min : pourrafraîchirrapidementlesvêtementspeu
sales (ne convient pas pour la laine, la soie et les vêtements nécessitant un
lavage à la main).
Chaud 800
-
3.30
9
Délicat : couleurs délicates peu sales. Chaud 800
-
6.6
10
Laine : laine, cashmere, etc. Chaud 800
-
3.30
Séchage
11
Coton
- -
- - - 11
12
Sans repassage
- -
- - - 6.6
13
Laine
- -
- - - 2.20
Cycles de lavage partiels
A
Rinçage
- Max
- -
Max
B
Essorage
- Max
- - - Max
C
Vidange sans essorage
- - - - - - Max

28
FR
Personnalisation
Réglage de la température
AppuyezsurleboutonTEMPERATURE pour régler la température de lavage. (Voir Tableau des cycles de lavage)La
température de lavage peut être définie à l’aide du réglage , “Froid”, “Chaud”, “Très chaud” ou les deux positions
intermédiaires (par exemple : la position comprise entre “froid” et “chaud” équivaut donc à tiède). Voir ci-dessous pour les
valeurs en °C et °F correspondant à chaque température.
Leschoixdisponiblessontlessuivants:
Réglage du cycle de séchage
LecycledeséchagesouhaitépeutêtredéfiniparunesimplepressionsurleboutonSÉCHAGEàuneouplusieursreprises.
Deux options sont disponibles :
A - En fonction de la durée : de 40 à 180 minutes.
B - En fonction de l’humidité des vêtements lorsqu’ils
ont été séchés :
Prêt à repasser : vêtements légèrement humides,
prêts à repasser.
Prêt à ranger : vêtements très secs, conseillé pour le
linge de maison.
Si le linge à laver et sécher présente un volume de loin
supérieur au volume maximal (voir tableau ci-contre),
effectuez le cycle de lavage et au terme du cycle,
séparez le linge en plusieurs groupes. Replacez ensuite
une partie dans le tambour. Suivez les instructions
fournies dans le chapitre réservé au programme
“Séchage uniquement” Répétez cette procédure pour
le reste du linge.
Remarque : le séchage est suivi d’une période de
refroidissement,mêmesileboutonSECHAGEestenposition0.
Séchage uniquement
TournezleboutonCYCLEDELAVAGEsurl’undesréglagessuivants(11-12-13) en fonction du type de linge et choisissez la
duréedeséchagesouhaitéeàl’aideduboutonSECHAGE.
Fonctions
Lesdifférentesoptionsdeséchageoffertesparlelave-linge/sèche-lingepermettrontd’obteniràchaquefoislerésultatsouhaité.
Pour activer les fonctions :
1.Appuyezsurleboutoncorrespondantàlafonctionsouhaitée:
2. la fonction s’active lorsque le témoin correspondant s’allume.
Remarque: Si l’indicateur clignote rapidement, c’est que la fonction en question n’est pas compatible avec le cycle de lavage
souhaité.
Retardateur
Pourdifférerledépartd’uncycledelavagedonné,appuyezplusieursfoissurleboutonjusqu’àcequeledélaisouhaité
s’affiche (il peut être compris entre 1 et 24 heures).
Pourdésactiverlafonction,appuyezsurleboutonjusqu’àceque s’affiche.
Remarque :lorsquevousappuyezsurleboutonSTART/PAUSE,laduréenepeutêtrequediminuée.
! Cette option est valable pour tous les programmes.
Super Wash
Puisqu’une plus grande quantité d’eau est utilisée au cours de la phase initiale de ce cycle et en raison de la durée du cycle,
cette fonction permet un lavage performant.
! Cettefonctionnepeutpasêtreutiliséeaveclescyclesdelavage4,5,8,10,11,12,13,A,B,C.
Tableau des temps de séchage (indications)
Type de
tissu
Type de lessive
Volume
maximal
(lb)
Prêt à
ranger
Prêt à
repasser
Coton
Vêtements
de différentes
tailles, serviettes
éponges
11.02 180 160
Synthétique
Draps, chemises,
pyjamas,
chaussettes, etc.
6.6 180 160
Laine Tricot, pulls, etc. 3.30 150 130
• L’eaudurobinet
• Froid (cold) 15°C/59°F
• 20 °C/ 68 °F
• Chaud (warm) 30 °C/ 86 °F
• 40 °C/ 104 °F
• Très chaud (hot) 57 °C / 134 °F
COLD
WARM
HOT

29
FR
Rinçage extra
Si vous sélectionnez cette fonction, le rinçage sera d’autant plus efficace et les produits lessiviels seront complètement
éliminés.
! Cette fonction ne peut pas être utilisée avec les cycles de lavage 4, 5, 8, 11, 12, 13, B, C.
Changer la centrifugeuse
Cette fonction permet de réduire la vitesse d’essorage.
! Cette fonction ne peut pas être utilisée avec les cycles de lavage 1, 2, 5, 11, 12, 13, C.
Remarque : pour les deux premiers programmes (Cotons blancs et colorés) les vêtements seront essorés à la vitesse maxi-
mum. Ceci permet d’obtenir un essorage optimal et de réduire ainsi le temps et l’énergie nécessaires au séchage.

30
FR
Efficacité du sèche-linge
Votrelave-linge/sèche-lingefonctionnesous120Vetrenfermeunséchoirde1200W.Illuifaudradoncplusdetempspour
sécherlesvêtementsqu’unsèche-lingetraditionnel(lequelfonctionnesous220Và5000W).
Toutefois, si vous suivez les conseils suivants, vous pourrez augmenter l’efficacité du sèche-linge.
1. LE HUBLOT DOIT RESTER FERME PENDANT LE SÉCHAGE :Laporteestverrouillée
électroniquementpendantlecycledeséchage.LestémoinsModeetPorteverrouilléesontallumés.Celapermetd’éviterle
démarrage et l’arrêt du système de chauffage tout en garantissant la conservation d’énergie en piégeant la chaleur.
2. ADOUCISSANT : lorsque la machine est programmée pour effectuer un cycle de lavage suivi d’un cycle de
séchage,lafonctiondepréchauffageestautomatiquementactivée.Ainsi,lesystèmedechauffageestactivélorsdu
dernier cycle du programme de lavage. Dans le programme de lavage standard, les vêtements seront essorés à 1200 tr/
min et de l’air chaud sera introduit dans le tambour. Bien que la force centrifuge colle les vêtements aux côtés du tambour,
l’airchaudpermettradeleséchauffer.Aumoins30minutespeuvents’avérernécessairespourlesdécollerdelaparoi
et les faire tomber dans le tambour. UTILISEZ UN ADOUCISSANT LIQUIDE POUR DÉCOLLER
IMMEDIATEMENTLESVETEMENTS.CELAPERMETTRAAUXVÊTEMENTSDE
SÉCHER PLUS RAPIDEMENT ET DE MOINS SE FROISSER.
3. SURCHARGE : Letambouraunecapacitéde12lbs(5,4kg).Ils’agitduplusgrandtambourdisponibledansun
combinélave-linge/sèche-linge.Letambournedoitcependantpasêtresurchargé.Enprésenced’unvolumedevêtements
tropimportant,lefluxd’airestréduitetletempsdeséchagepluslong.Ilestconseillédechargeraumaximumà2/3pourun
séchage efficace.
4. SÉCHAGE EXCESSIF : cette machine utilise un séchoir à condensation. De l’eau froide est donc utilisée pour
condenser l’humidité contenue dans l’air chaud. Puisqu’il n’y a pas de système d’évacuation externe, l’humidité reste dans la
machine. Souvent, lorsque les vêtements semblent mouillés, il ne s’agit en fait que d’une humidité résiduelle (rosée). Sortez
les vêtements et ils sécheront en quelques minutes. Ne séchez pas les vêtements à outrance.
5. UTILISEZ DES PRODUITS LESSIVIELS PEU MOUSSANTS : en utilisant ce type de produits,
vousévitezquedel’eaudelessiveaccèdeàlachambredecondensation.Lorsquedel’eaudelessiveentredanslachambre
decondensation,despeluchespeuventobturerlachambreetleventilateur.Aufildutemps,celaréduitl’efficacitédela
machine.Lenettoyagedelaturbinepeutdoncs’avérernécessaire.
Votreappareilafaitl’objetd’uneétudeapprofondie.Laplupartdutemps,lesdemandesd’interventionn’exigentqu’un
simple réglage de votre part.
Vous devrez supporter des frais si pendant la période de garantie, le problème signalé n’est pas dû à un
défaut de fabrication couvert par la présente garantie.
Pour éviter les frais inutiles et avant d’appeler un technicien, consultez le chapitre Dépannage pour résoudre le problème par
vous-même.Cechapitrefigureauxpages16-17duprésentManueld’utilisationetd’entretien.
Lelave-linge/sèche-lingedisposed’unhublotlargeàl’avantoffrantunaccèsfacile.Ilcontient9programmesdelavage
auxquelss’ajoutentdescyclesderinçageetdeprélavage.
Vouscherchezbiensûràobtenirunelessiveoptimale.Lisezetrespectezlesconsignesdecemanuelpourobtenirles
résultats escomptés.
Veillez à respecter les consignes. Si vous avez besoin d’aide ou de conseils, contactez votre revendeur.
L’appareilestunlave-lingeautomatiqued’unecapacitémaximalede:
15 lbs (6,8 kg)
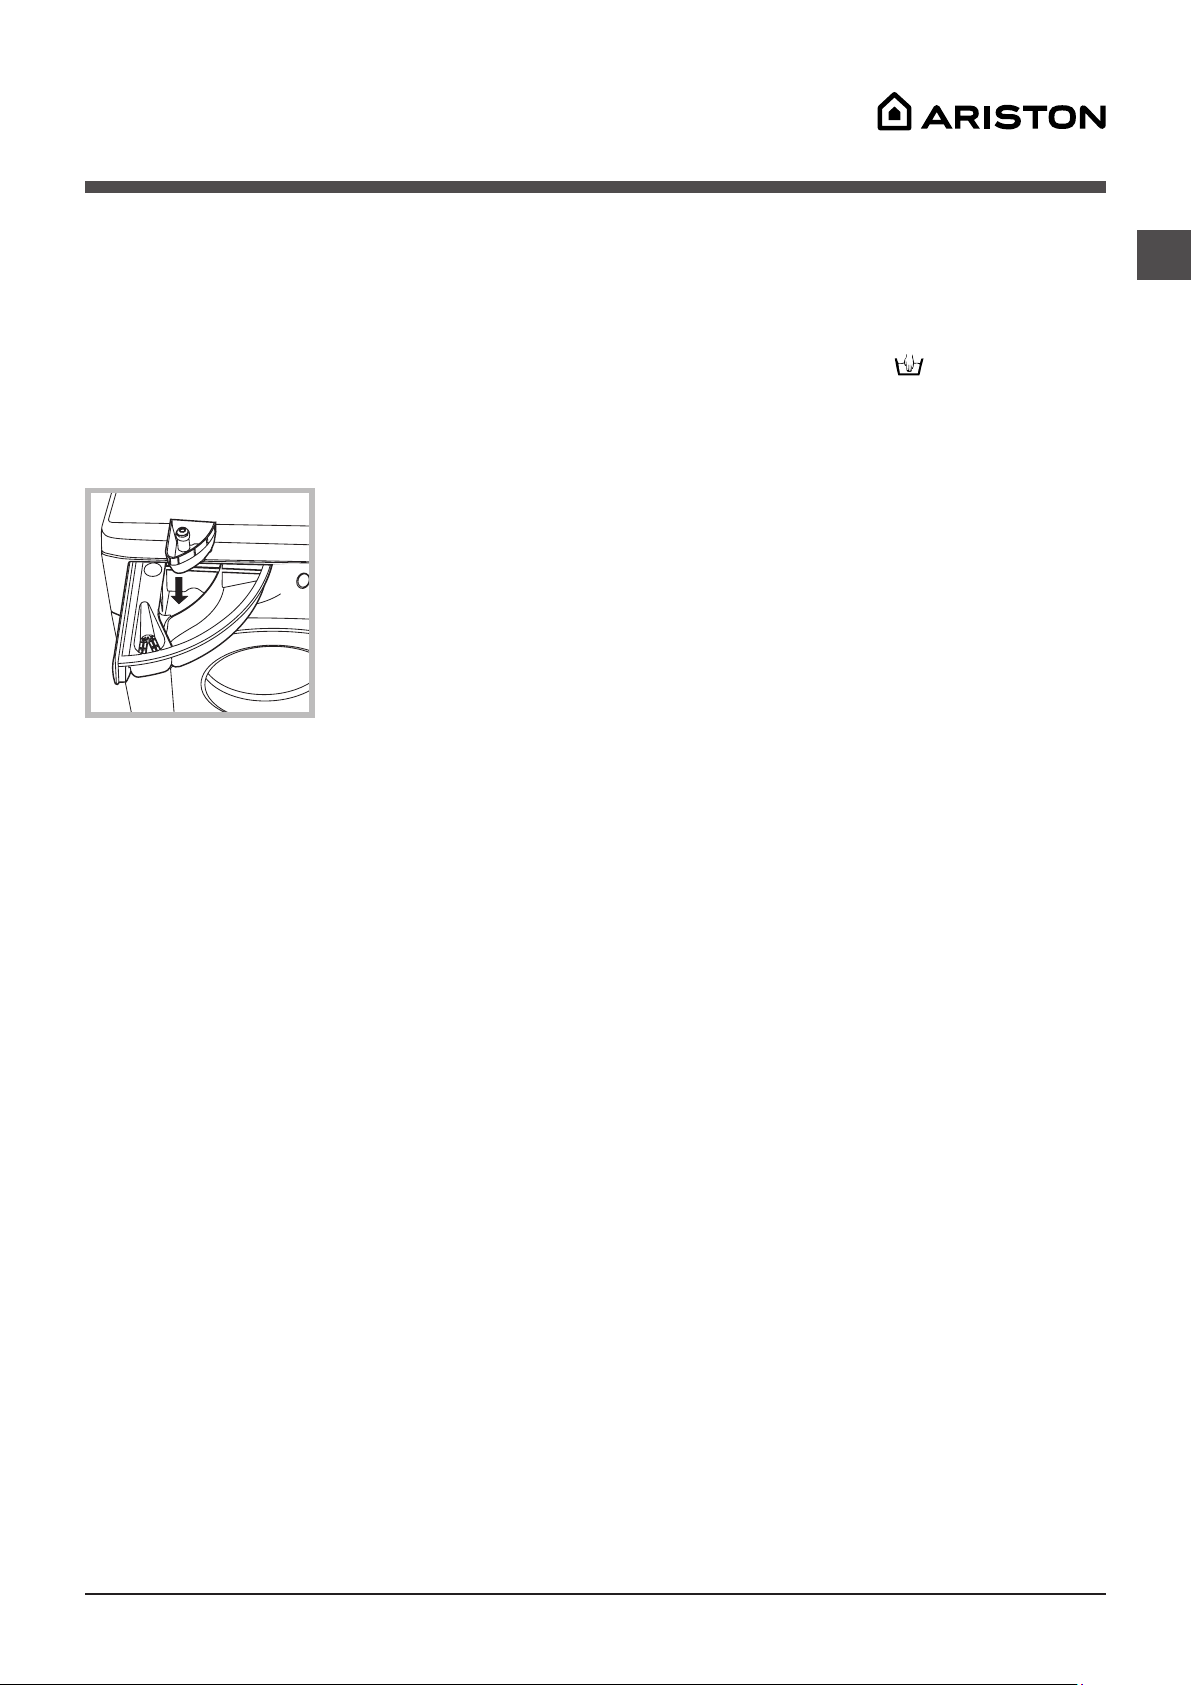
31
FR
Produits lessiviels et linge
Distributeur de produits lessiviels
Laqualitédulavagedépendaussidel’utilisationd’une
dosedeproduitlessivieladaptée:l’ajoutd’unetrop
grande quantité de produit lessiviel ne donnera pas
forcémentunelessivepluspropre.Leproduitpourrait
même s’accumuler dans la machine et contribuer à la
pollution de l’environnement.
! N’utilisez pas de produits pour le lavage à la main car ils
génèrent trop de mousse.
Ouvrezledistributeur
de produits lessiviels
et versez-y le savon ou
l’additif selon les consignes
suivantes.
compartiment 1 : lessive
pour le cycle de lavage
(poudre ou liquide)
Leproduitliquidedoitêtre
versé immédiatement avant le
début du cycle de lavage.
compartiment 2 : additifs (adoucissants, etc.)
L’adoucissantnedoitpasdépasserlagrille.
compartiment supplémentaire 3 : Javel
Cycle à l’eau de Javel
Bleachingmayonlybeperformedinconjunctionwithwash
cycles 6.Lelavageàl’eaudeJavelnepeutavoirlieu
qu’en association à d’autres cycles de lavage 6. Versez la
Javel dans le compartiment supplémentaire 3. Versez le
produit lessiviel et l’adoucissant dans les compartiments
correspondants et choisissez le cycle de lavage souhaité.
Cette option n’est conseillée que pour les vêtements en
coton très sales.
Préparation du linge
•Séparezlelingeenfonctiondescritèressuivants:
- type de tissu/symbole sur l’étiquette.
- couleurs : séparez les couleurs des blancs
•Videzlespochesetvérifiezlesboutons.
•Nedépassezpasleslimitesindiquées.Ellesfont
référence au poids du linge à sec :
Vêtementsdurables:max.15lb-(7kg)
Vêtementssynthétiques:max.6.6lb-(3kg)
Vêtementsdélicats:max.4.4lb-(2kg)
Laine:max.3.30lb-(1,5kg)
Combien pèse votre linge ?
1 chemise : 14-17 oz - (400-500 g)
1 taie d’oreiller : 5-7 oz - (150-200 g)
1 nappe : 14-17 oz - (400-500 g)
1peignoirdebain:31-42oz-(900-1200g)
1 serviette : 5-8 oz - (150-250 g)
MAX
1
3
2
Vêtements nécessitant des soins particuliers
Laine :Aristonestleseulfabricantdelave-linge/
sèche-lingeayantobtenulecélèbrelabelWoolmark
PlatinumCare(M.0508)deWoolmarkCompany,ce
qui signifie que tous les vêtements en laine peuvent
être lavés en machine, même ceux portant la mention
“lavage à la main uniquement” sur l’étiquette.
Lecycledelavage10 vous permet de laver vos
vêtements en laine en toute tranquillité dans le lave-
linge/sèche-linge(chargemax.:3,30lb-1,5kg)et
vous garantit d’excellents résultats.
Système d’équilibrage des charges
Avantchaqueessorage,pouréviterlesvibrations
excessives et pour répartir la charge de manière
uniforme, le tambour tourne en permanence à une
vitesse légèrement supérieure à celle du lavage. Si, après
plusieurs tentatives, la charge n’est pas correctement
équilibrée, la machine essorera à une vitesse réduite. Si la
charge n’est pas du tout équilibrée, le lave-linge/sèche-
linge exécutera le programme de répartition au lieu de
l’essorage. Pour assurer la répartition et l’équilibrage des
charges, il est conseillé de mélanger les vêtements grands
aux petits.
Conseils utiles
Votre lave-linge/sèche-linge tourne à trois vitesses
différentes pendant le cycle de lavage. Pendant le cycle
Coton, le tambour tourne à 1200 ou 800 tr/min. Pendant
le cycle Sans repassage, le tambour tourne à 850 tr/
min. Pendant le cycle réservé au linge délicat, le tambour
tourneà500tr/min.Lorsduséchagedesarticlesplus
lourds en coton, comme les serviettes de bain ou les
jeans,veillezàsélectionnerleréglageStandard.Plus
l’essorage se fera rapidement, plus le volume d’eau extrait
des tissus à forte absorption sera important. Vous réduirez
ainsi l’humidité lors du passage de la machine en mode
Séchage. Vous pourrez ainsi réduire le temps de séchage.
Utilisez un adoucissant liquide. Remplissez le
compartimentpourl’adoucissantjusqu’auniveau
indiqué.L’utilisationd’unadoucissantpermetde
secouer les vêtements directement à la fin du lavage.
Vous réduisez ainsi le temps de séchage et le
froissement des vêtements.
Ce lave-linge/sèche-linge fonctionne sous 120
V.Lesystèmedechauffagenécessitedoncplusde
temps pour atteindre sa température maximale qu’une
machinede220V.Ledispositifdechauffageatteint
sa température maximale en 10 minutes environ.
Pour faire sécher votre linge, le lave-linge/sèche-
linge envoie de l’air chaud dans le tambour. Tandis
que le tambour tourne, l’air chaud sèche le linge. Si le
tambour est trop chargé, l’air ne circule pas librement
et les vêtements ne peuvent pas sécher correctement.
Utilisez des produits lessiviels peu moussants.
Ce conseil vaut pour tous les lave-linge à chargement
par l’avant. Cela permet d’éviter une mousse excessive,
laquelle pourrait limiter les performances de votre
machine. Vous éviterez ainsi d’endommager votre
machine suite à la présence de mousse dans la chambre
de condensation et de peluches dans la soufflerie.
Lorsque vous triez le linge, teneztoujourscompte
de la quantité et du type de tissu composant la lessive.
Lestissusàforteabsorptioncommeceuxutilisésdans
lesserviettesoulesjeansabsorberontplusd’eau.Ils
seront donc beaucoup plus lourd une fois saturés en
eau. Si vous constatez que vos vêtements mettent plus
de temps à sécher, c’est peut-être parce que vous
chargez trop votre machine ou que vous lavez trop de
vêtements à forte absorption en même temps.
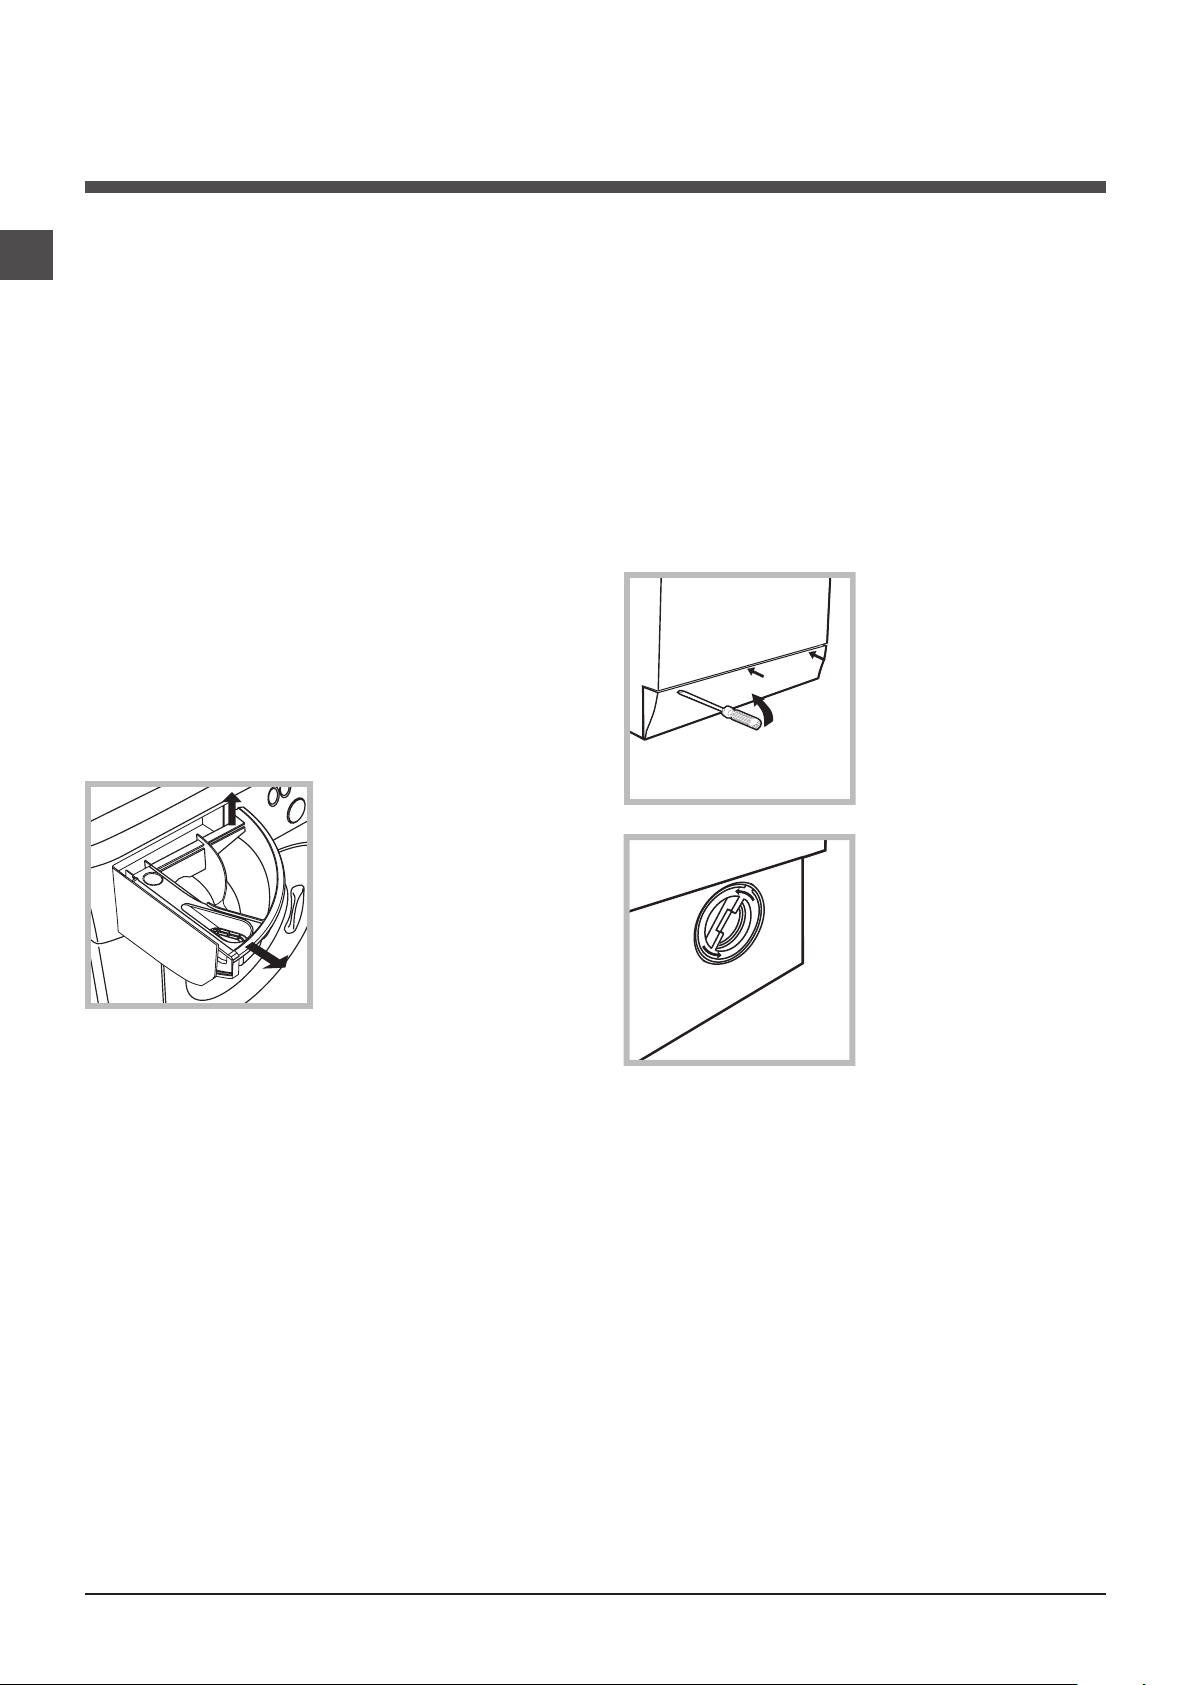
32
FR
Consignes pour l’entretien et le
nettoyage
Coupure de l’arrivée d’eau et de
l’électricité
•Coupezlerobinetd’arrivéed’eauautermedechaque
cycle de lavage. Vous limiterez ainsi l’usure du circuit
hydraulique à l’intérieur du lave-linge/sèche-linge et
éviterez les fuites.
•Débranchezlelave-linge/sèche-lingelorsdunettoyage
et pendant les entretiens.
Nettoyage du lave-linge/sèche-linge
Lesélémentsextérieursetlescomposantsencaoutchouc
peuvent être nettoyés à l’aide d’un chiffon humide imbibé
d’eau tiède et de savon. N’utilisez pas de solvants ou de
produits abrasifs.
Nettoyage du distributeur de produits
lessiviels
Retirez le distributeur en le
soulevant et en le tirant vers
vous (voir illustration).
Rincez-le à l’eau claire.
Répétez cette opération le
plus souvent possible.
Entretien du hublot et du tambour de
votre machine
•Laisseztoujourslehublotouvertpouréviterlaformation
de mauvaises odeurs.
Nettoyage de la pompe
Lelave-linge/sèche-lingeestdotéd’unepompede
nettoyage automatique ne nécessitant aucun entretien.
Parfois, de petits éléments (pièces ou boutons) peuvent
tomber dans la chambre intermédiaire protégeant la
pompe, laquelle se trouve dans la partie inférieure.
! Vérifiez la fin du cycle de lavage et débranchez la
machine.
Pour accéder à la chambre intermédiaire :
1. à l’aide d’un tournevis,
retirez le capot de la
partie inférieure du lave-
linge/sèche-linge (voir
illustration);
2. dévissez le couvercle
en tournant dans le sens
contraire des aiguilles d’une
montre (voir illustration) : de
l’eau peut s’écouler. C’est
toutàfaitnormal;
3.nettoyezsoigneusementl’intérieur;
4.revissezlecouvercle;
5. replacez le panneau en veillant à ce que les crochets
soient bien en place avant de l’enfoncer.
Contrôle du tuyau d’arrivée d’eau
Vérifiez le tuyau d’arrivée d’eau au moins une fois
par an. Si vous constatez des fissures, remplacez-le
immédiatement : pendant les cycles de lavage, la pression
d’eauesttrèsforte.Untuyaucraquelépourraittrèsbiense
fendre.
!N’utilisezjamaisdetuyauxdedeuxièmemain.
1
2

33
FR
Dépannage
Votrelave-linge/sèche-lingepeutparfoisrefuserdefonctionner.AvantdeprendrecontactavecleServicetechnique(voir
“Assistance”), vérifiez si le problème ne peut pas être résolu à l’aide de la liste suivante.
Problème:
Le lave-linge/sèche-linge ne
s’allume pas.
Le cycle de lavage ne démarre pas.
Le lave-linge/sèche-linge
n’achemine pas l’eau (le témoin du
premier cycle de lavage clignote
rapidement).
Le lave-linge/sèche-linge pompe et
évacue l’eau en permanence.
Le lave-linge/sèche-linge ne se
vide pas ou n’essore pas.
Le lave-linge/sèche-linge vibre
beaucoup pendant l’essorage.
Le lave-linge/sèche-linge fuit.
Le témoin START/PAUSE (orange)
et le témoin de fonction clignotent
rapidement.
Trop de mousse.
Le lave-linge/sèche-linge ne sèche
pas.
Causes possibles/Solutions :
•L’appareiln’estpasbranchédanslaprisedecourantouiln’estpas
suffisamment branché pour effectuer un contact.
•Lamaisonn’estpasalimentée.
•Lehublotdulave-linge/sèche-lingen’estpasbienfermé.
•LeboutonMARCHE/ARRÊTn’apasétéenfoncé.
•LeboutonMARCHE/ARRÊTn’apasétéenfoncé.
•Lerobinetd’eaun’apasétéouvert.
•Undépartdifféréaétéprogrammé(àl’aidedel’optionDépartdifféré,voir
“Personnalisation”).
•Letuyaud’arrivéed’eaun’estpasreliéaurobinet.
•Letuyauestplié.
•Lerobinetd’eaun’apasétéouvert.
•Lamaisonn’estpasalimentéeeneau.
•Lapressionesttropfaible.
•LeboutonMARCHE/ARRÊTn’apasétéenfoncé.
•Letuyaud’évacuationn’estpasinstalléàunehauteurcompriseentre65et
100 cm par rapport au sol (voir “Installation”).
•L’extrémitélibredutuyausetrouvesousl’eau(voir “Installation”).
•Ladéchargemuralen’estpasdotéed’unreniflard.
Si le problème persiste au terme de ces vérifications, coupez l’arrivée
d’eau, mettez l’appareil hors tension et contactez le Service technique. Si
votre habitation se trouve au niveau des étages supérieurs d’un bâtiment,
le problème peut être dû à l’évacuation, ce qui causerait l’alimentation en
eau et la vidange permanentes du lave-linge/sèche-linge. Des vannes anti-
décharge sont disponibles dans le commerce. Elles vous aideront à résoudre
le problème.
•Lecycledelavagenecomprendpasl’évacuation:certainscyclesnécessitent
un démarrage manuel de la phase d’évacuation.
•Letuyaudedéchargeestplié(voir “Installation”).
•Letuyaud’évacuationestbouché.
•Letambourn’apasétédébloquépendantl’installation(voir “Installation”).
•Lelave-linge/sèche-lingen’estpasdeniveau(voir “Installation”).
• Lelave-linge/sèche-lingeestencastréentredeuxparoisoudumobilier(voir “Installation”).
•L’arrivéed’eaun’estpasbienvissée(voir “Installation”).
•Ledistributeurdeproduitslessivielsestbloqué(pourlesconsignesde
nettoyage, voir “Consignes pour l’entretien et le nettoyage”).
•Letuyaudedéchargeestmalfixé(voir “Installation”).
•Mettezlamachinehorstensionetdébranchez-la.Attendezuneminuteenviron
et remettez-la sous tension.
Si le problème persiste, contactez le Service technique.
•Leproduitlessivieln’estpasadaptéaulavageenmachine(vousdeveztrouver
la mention “Pour lave-linge/sèche-linge”, “lavage en machine et à la main” ou
toute mention analogue sur l’emballage).
•Vousavezutilisétropdeproduitslessiviels.
•L’appareiln’estpasbranchédanslaprisedecourantouiln’estpas
suffisamment enfoncé pour effectuer un contact.
• Ilyaeuunepannedecourant.
• Lehublotn’estpasbienfermé.
•Undépartdifféréaétéprogrammé(àl’aidedel’optionDépartdifféré,voir
“Personnalisation”).
• LeboutonSÉCHAGEestenposition0.

34
FR
Réparation
Avant d’appeler le technicien :
• Vérifiezsivouspouvezrésoudreleproblèmeparvous-même(voir“Dépannage”);
•Redémarrezleprogrammepourvérifiersileproblèmeaétérésolu;
•Siteln’estpaslecas,contactezleServicetechniqueaunumérodetéléphonefigurantsurlecertificatdegarantie.
! Demandeztoujoursl’aidedetechniciensagréés.
Ayez les informations suivantes à portée de main :
• typedeproblème;
• modèle(Mod.);
• numérodesérie(S/N).
Ces informations se trouvent sur la plaque signalétique à l’arrière du lave-linge/sèche-linge. Elles sont également reprises à
l’avant de l’appareil (hublot).

35
FR
GARANTIE LIMITÉE ARISTON (UN AN)
(ETATS-UNIS et CANADA UNIQUEMENT)
QUI EST COUVERT PAR CETTE GARANTIE
Cette garantie limitée d’un an (“Garantie”) est attribuée
uniquement à l’acheteur originel (“Acheteur originel”) des
produitsAristonl’accompagnant(“ProduitAriston”).
SivousavezachetéceProduitAristond’unepersonneautre
quelerevendeuragrééAristonauxÉtats-UnisouauCanada,
sileProduitAristonaétéutilisé(encecompris,lesmodèles
d’exposition et les produits reconditionnés) avant votre
achat,vousn’êtespasl’Acheteuroriginel.Parconséquent,le
ProduitAristonquevousavezachetén’estpas couvert pas
cettegarantie.LaprésenteGarantieestinaliénable.
QUE COUVRE CETTE GARANTIE?
Aristonprendraenchargelaréparationouleremplacement
de tout ProduitAriston en panne suite àdes défauts de
fabrication ou des avaries apparues dans le cadre d’une
utilisationnormale.Ariston prendraégalement en charge
les frais de main-d’œuvre et les frais connexes associés à la
réparation ou au remplacement des pièces défectueuses.
LaprésenteGarantienes’appliquequ’auxProduitsAriston
achetés et utilisés aux États-Unis ou au Canada. Sans
préjudice des restrictions ci-dessous, pour les Produits
AristonachetésauxÉtats-UnisouauCanadamaisutilisés
en dehors des frontières de ces pays, la Garantie ne couvrira
quelesinterventionseffectuéesauxÉtats-UnisouauCanada
(ellenecomprenddoncpaslesenvoishorsdesÉtats-Unis
ou du Canada).
DURÉE DE LA GARANTIE
Sachez qu’une copie du reçu affichant la date d’achat ainsi
que le nom et l’adresse du vendeur sont nécessaires pour
profiter des services inclus dans la présente garantie. Pour
définir la période de garantie applicable, toutes les pièces
remplacées ou réparées seront assimilées aux éléments
d’origine.
CE QUI N’EST PAS COUVERT PAR LA GARANTIE
(EXCLUSIONS)
Laprésentegarantienecouvrepaslesélémentssuivants:
1. Installation, livraison, entretienou utilisationinadéquats
duProduitAriston.
2.DommagescauséssileProduitAristonn’apasétéutilisé
conformément aux critères d’alimentation en gaz ou en
électricité figurant sur la plaque signalétique.
3.PanneoudommagecauséauProduitAristonsuiteàune
altération, une utilisation impropre ou inadaptée ou en cas
d’utilisation professionnelle.
4. Déplacements à votre domicile pour vous fournir des
consignesquantàl’utilisationdevotreProduitAriston.
5. Remplacement des fusibles ou modification de la plomberie
ou des raccordements électriques à votre domicile.
6. Dommages causés suite à une négligence, un accident,
un incendie, une inondation ou une catastrophe naturelle.
7. Dommages physiques causés à l’aspect de votre Produit
Ariston,encecompris,sansrestriction,lesrayures,larouille,
les coups, le gauchissement, l’écaillage et assimilés.
8. Dommages causés par le transport.
9. Remplacement des éléments consommables ou
dégradables ainsi que des accessoires, notamment : prises,
câbles, batteries, ampoules, tubes lumineux et démarreurs,
capots et filtres ou remplacement des pièces amovibles à
base de verre ou de plastique.
10. Dommages causés après la livraison.
11. Dommages causés par l’eau de quelque nature que ce soit.
12.ProduitAristoninaccessiblepourleserviceàfournir.
13. Problèmes causés par d’autres défauts matériels ou de
fabrication.
14. Déplacement en cas d’installation dans un mobil-home
ou sur un bateau.
Cette garantie est nullesileProduitAristonaétémodifié
oudémonté,s’ilafaitl’objetd’unentretienoud’une
réparation ou s’il a été manipulé par toute autre personne
quelepersonnelagrééparAriston.
15.Lestravauxparticulierseffectuésdanslecadred’une
installation sur un bateau.
16. Fuites d’eau de quelque nature que ce soit.
DANSLESLIMITESPRÉVUESPARLALOI,LA
PRÉSENTEGARANTIEANNULETOUTESLESAUTRES,
ÉCRITESOUVERBALES,EXPRIMÉESSOUSFORME
D’AFFIRMATION,DEPROMESSE,DEDESCRIPTION,
DESCHÉMA,DEMODÈLEOUD’ÉCHANTILLON.
TOUTESLESAUTRESGARANTIESAUTRESQUELA
PRÉSENTE,EXPLICITEOUIMPLICITE,ENCECOMPRIS
LESGARANTIESIMPLICITESDEVALEURMARCHANDE
OUD’ADÉQUATIONÀUNUSAGEPARTICULIERSONT
ANNULÉESPARLAPRÉSENTE.LESGARANTIES
IMPLICITES,NOTAMMENTLESGARANTIESIMPLICITES
DEVALEURMARCHANDEOUD’ADÉQUATIONÀ
UNUSAGEPARTICULIERNEPOUVANTPASÊTRE
EXCLUESPARLALOI,SERONTLIMITÉESÀLAMÊME
DURÉEQUELAPRÉSENTEGARANTIE.SAUFPOUR
LESRÉPARATIONSOULESREMPLACEMENTSDE
PIÈCESCI-DESSUS,ARISTONDÉCLINETOUTE
RESPONSABILITÉENCASDEDOMMAGESDIRECTS,
INDIRECTS,ACCIDENTELSOUCONSÉCUTIFS.
Certains états et provinces n’autorisent pas l’exclusion ou
la limitation des dommages accidentels ou consécutifs et/
oulesgarantiesimplicites.Lesrestrictionsouexclusionsci-
dessuspeuventdoncnepasvousconcerner.Laprésente
garantie vous confère des droits particuliers. Vous pouvez
disposer d’autres droits susceptibles de varier selon l’Etat
ou la Province où vous vous trouvez.
Garantie

36
FR
QUE DEVEZ-VOUS FAIRE POUR PROFITER DE CE
SERVICE DE GARANTIE
Toutes les réparations ou les services de garantie doivent
êtreeffectuésparAristonouparunServicetechniqueagréé
parAriston.
Pour prendre un RDV pour une intervention sous garantie,
appelez le 1-877-356-0766 ou envoyez un e-mail à l’adresse
[email protected]. Veillez à signaler le modèle de
votreProduitAristonainsiquelenumérodesérie.
Sachez qu’une copie du reçu affichant la date d’achat ainsi
que le nom et l’adresse du vendeur sont nécessaires pour
profiter des services inclus dans la présente garantie. Si le
ProduitAristonsetrouvedansunezonenondesserviepar
leServicetechniqueAristonagréé,lesfraisdedéplacement
pourront vous être facturés. Il peutégalementvous être
demandéd’apporterleProduitAristonauServicetechnique
Aristonagréé.
Lesélémentsci-dessussontlesconditionsexclusives
quantàlaprésenteGarantie.LaprésenteGarantieest
laseulequ’AristonfournitpourceProduitAriston.La
présente Garantie remplace tous les autres contrats et
accordssusceptiblesdevouslieravecAristonouses
représentants.

37
ES
Español,1
ES
ARWDF 129
Instrucciones de uso
LAVASECARROPAS
! Este símbolo te recuerda que debes leer este
manual de instrucciones.
Tabla de contenidos
Instrucciones de seguridad
importantes, 38-39
Instrucciones de seguridad importantes
Instrucciones de conexión a tierra
Seguridad
Instrucciones de instalación, 40-41-42
Desembalaje y nivelación
Espacio mínimo para la instalación
Conexión de la entrada de agua
Descarga
Conexión de la manguera de descarga
Características eléctricas
Método debajo del fregadero
Datos técnicos
Descripción del lavasecarropas y
comienzo de un ciclo de lavado, 43-44
Panel de control
Luces indicadoras
Comienzo de un ciclo de lavado
Ciclos de lavado, 45
Tabla de ciclos de lavado
Ciclos de lavado especiales
Personalización, 46-47-48
Ajuste de temperatura
Ajuste del ciclo de secado
Funciones
Eficiencia de la secadora
Detergentes y ropa, 49
Cajón de detergente
Ciclo de blanqueo
Preparación de la ropa
Prendas que requieren un cuidado especial
Sistema de equilibrado de carga
Consejos útiles
Instrucciones de cuidado y
mantenimiento, 50
Corte del suministro de agua o electricidad
Limpieza del lavasecarropas
Limpieza del cajón de detergente
Cuidado de la puerta y el tambor del artefacto
Limpieza de la bomba
Control de la manguera de entrada de agua
Resolución de problemas, 51
Servicio, 52
Garantía, 53-54

38
ES
INSTRUCCIONES DE SEGURIDAD IMPORTANTES
ADVERTENCIA: - A fin de reducir el riesgo de
incendio, choque eléctrico, o lesiones durante el uso
del artefacto, tome las precauciones básicas, incluidas
las siguientes:
•Leatodaslasinstruccionesantesdeusarelartefacto.
•Nolavenisequeartículosquehayanentradoen
contacto(porlavado,limpieza,inmersiónomanchas)
con gasolina, solventes para limpieza en seco, u otras
sustancias inflamables o explosivas, ya que producen
vapores que pueden encenderse o explotar.
•Nopermitaquelosniñosjueguensobreelartefacto
nidentrodeél.Sielartefactoseusaconniñoscerca,
debe supervisarlos con cuidado.
•Antesdesacarelartefactodeservicioodescartarlo,
quítele la puerta del compartimiento de lavado/secado.
•Noagreguegasolina,solventesparalimpiezaenseco
ni otras sustancias inflamables o explosivas al agua de
lavado. Estas sustancias producen vapores que pueden
encenderse o explotar.
•Noinstalenialmaceneesteartefactoalaintemperie.
•Noaltereloscontroles.
•Bajodeterminadascondiciones,sepuedeproducirgas
hidrógenoenunsistemadeaguacalientequenose
hausadoen2semanasomás.ELGASHIDRÓGENO
ESEXPLOSIVO.Siusaráelartefactodespuésde2
semanasomássinuso,primeroabratodoslosgrifos
de agua caliente y deje correr el agua durante unos
minutos.Deestamaneraseliberaráelgashidrógeno
acumulado. Debido a que el gas es inflamable, no fume ni
use una llama abierta durante esta operación.
•Cierrelosgrifosparaaliviarlapresiónenlasmangueras
yválvulas,yparaminimizarlaspérdidasencasode
rotura.
•Nointroduzcalasmanosenelartefactoconlacubaoel
tambor en movimiento.
•Noreparenireemplaceningunapiezadelartefactoni
intente realizar ningún servicio, salvo recomendación
específica en las instrucciones de mantenimiento o de
reparación por el usuario que usted comprenda y esté
capacitado para llevar a cabo.
•Nousesuavizantesdetelasuotrosproductospara
eliminarlaestática,salvorecomendacióndelfabricante
del suavizante o producto.
•Nosequeartículoscongomaespumanimaterialestipo
goma de textura similar.
•DEBEaplicarprácticassegurasyprecauciónalinstalar,
operar y mantener cualquier artefacto. Tome medidas
básicasdeprecaución.
•Encasodeemergenciaodenecesitarservicio,
desconecte la alimentación al artefacto en el disyuntor o
lacajadefusibles,odesenchúfelo.Solicitealinstalador
que le muestre y etiquete el interruptor o fusible correcto
en la caja de desconexión eléctrica.
•Elinteriordelartefactodebeserlimpiadoperiódicamente
por personal de servicio calificado.
•Nocoloqueartículosexpuestosaaceitesdecocinaenel
secarropas. Los artículos contaminados con aceites de
cocina pueden ayudar a provocar una reacción química
que puede incendiar la carga.
•Antesdecargarellavarropas,verifiquequeeltambor
esté vacío.
GUARDE ESTAS INSTRUCCIONES
INSTRUCCIONES DE CONEXIÓN A
TIERRA
El artefacto se debe conectar a tierra. En caso de mal
funcionamiento o avería, la conexión a tierra reduce el
riesgodechoqueeléctricoalofreceruntrayectodemenor
resistenciaparalacorrienteeléctrica.Elartefactoestá
equipadoconuncableconunconductoryunenchufe
deconexiónatierra.Elenchufesedebecolocarenun
tomacorriente adecuado, correctamente instalado y
conectado a tierra de conformidad con todos los códigos
y ordenanzas locales.
ADVERTENCIA:Laconexiónincorrectadelconductorde
conexiónatierrapuedellevaralchoqueeléctrico.
Consulte a un electricista calificado o a un representante o
empleadodeserviciosinoestásegurosielartefactoestá
bien conectado a tierra.
Nomodifiqueelenchufesuministradoconelartefacto:si
no encaja en el tomacorriente, encargue la instalación de
un tomacorriente adecuado a un electricista calificado.
Instrucciones de seguridad
importantes
39
ES
Seguridad
PRECAUCIÓN:
A fin de reducir el riesgo de choque eléctrico, NO quite la tapa (ni la parte posterior).
No existen piezas que pueda reparar el usuario en el interior.
Encargue las tareas de servicio a personal de servicio calificado.
El número de modelo de este producto se encuentra en la parte posterior de la unidad, y el número de serie en la etiqueta
fijada en la parte posterior de la unidad.
Anoteelnúmerodemodeloyelnúmerodeseriedelaunidadenelespacioprovisto.Guardeestecuadernillocomoregistro
permanente de su compra, para facilitar la identificación en caso de robo.
N.DEMODELO
N.DESERIE
ADVERTENCIA:
PARA PREVENIR INCENDIOS O CHOQUES, NO EXPONGA ESTE PRODUCTO A LA LLUVIA O A LA HUMEDAD.
El relámpago conflechadentrodeuntriánguloequiláteroleindicaalusuariolapresenciade“voltajepeligroso”
sinaislamientodentrodelgabinetedelproductoquepuedesersuficientepararepresentarunriesgodechoque
eléctrico para las personas.
El signo de exclamacióndentrodeuntriánguloequiláteroleindicaalusuariolapresenciadeinstrucciones
importantesdeoperaciónymantenimiento(servicio)enelcuadernillo.
IndesitCompanyofreceasusclientesproductosconlaetiquetadeENERGYSTAR.
EsteartefactohasidoprobadoporULycumpleconlosrequisitosdeseguridaddeULdelos
EstadosUnidosyCanadá,porlocualpresentasuMarca.
PRECAUCIÓN
RIESGO DE CHOQUE
ELÉCTRICO NO
ABRIR
!
!
!
C
U
L
US LISTED
®

40
ES
! Es importante conservar este manual de instrucciones
en un lugar seguro para referencia futura. En caso de
vender, transferir o trasladar el lavasecarropas, asegúrese
detrasladartambiénelmanual,paraqueelnuevodueño
pueda conocer sus características y saber cómo usarlo.
! Leaatentamentelasinstrucciones:contieneninformación
importante sobre la instalación y operación segura del
artefacto.
Desembalaje y nivelación
Desembalaje
1. Desembale el lavarropas.
2.Verifiquequeellavarropasnohayasufridodaños
duranteeltransporte.Siestuvieradañado,comuníquese
con el vendedor y no prosiga con la instalación.
3. Quite los 4 tornillos de
protección (que se usan
paraeltransporte)yla
arandela de goma con su
correspondiente separador,
ubicados en la parte
posterior del artefacto (ver
la figura).
4.Cierrelosorificiosconlostaponesdeplástico
suministrados.
5.Conservetodaslaspiezasenunlugarseguro:
lasnecesitaránuevamentesidecidetrasladarel
lavasecarropas.
! Los materiales de embalaje no se deben entregar a los
niñoscomojuguetes.
Nivelación
1. Instale el lavarropas sobre un piso plano y rígido, sin
apoyarlo en paredes, muebles ni elemento alguno.
2.Sielpisonoes
completamentehorizontal,
compense las irregularidades
ajustando o aflojando las
patas delanteras ajustables
(ver la figura).Elángulode
inclinación, medido con
respecto a la superficie de
trabajo, no debe superar los
2°.
Lanivelaciónadecuadabrindaestabilidadalamáquina
y ayuda a evitar vibraciones, ruidos excesivos y
desplazamientos durante el funcionamiento.
Espacio mínimo para la instalación
Este artefacto se puede instalar empotrado, en un
armariooenunnicho.Elespacioparalainstalaciónestá
expresado en pulgadas y es el mínimo aceptable.
*Consideredejarmásespacioparafacilitarlainstalación
y el servicio y cumplir con códigos y ordenanzas locales.
Las instalaciones deben cumplir con las dimensiones
mínimas indicadas.
ADVERTENCIA- RIESGO DE INCENDIO
La instalación del secarropas debe estar a cargo de un instalador calificado.
Instale el secarropas de acuerdo con las instrucciones del fabricante y los códigos locales.
A fin de reducir el riesgo de lesiones graves o la muerte, siga todas las instrucciones de instalación.
GUARDE ESTAS INSTRUCCIONES
!
Instrucciones de instalación
0" *
0" *
Recessed Front View
1" *
1"
Side View
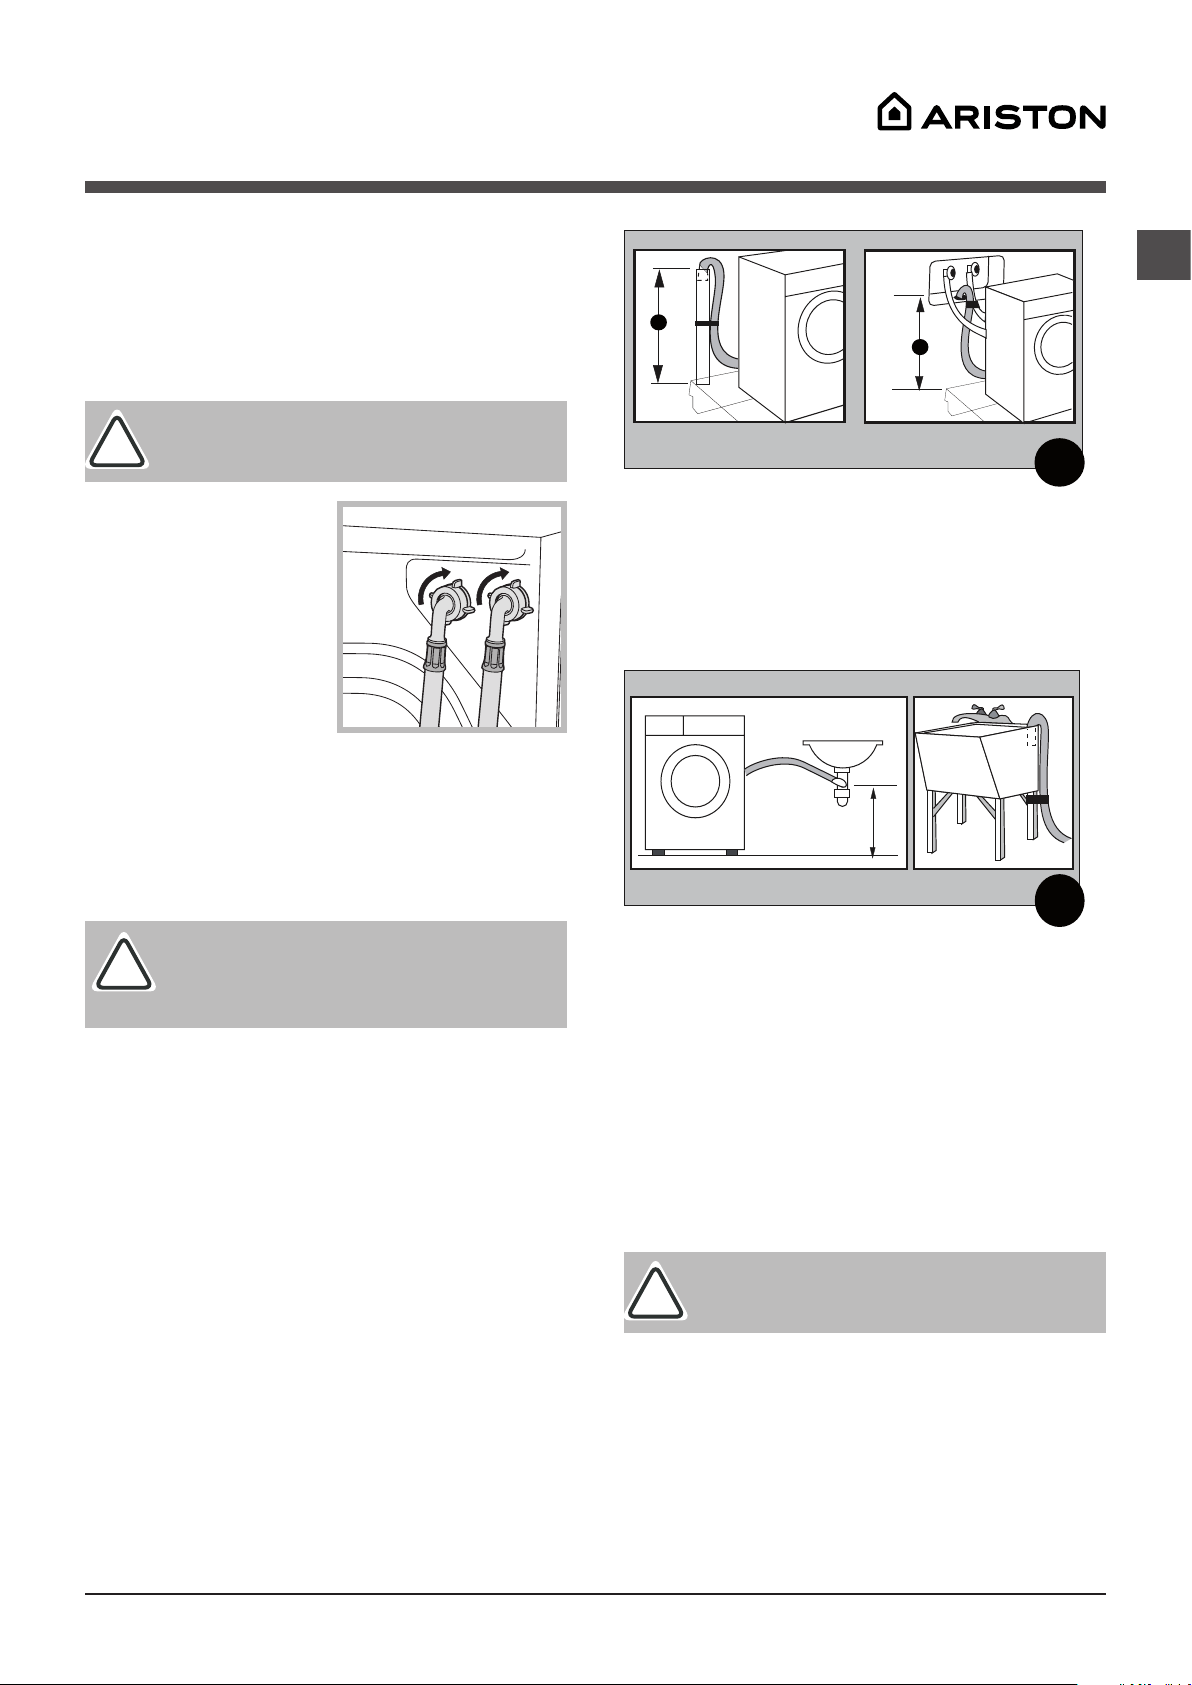
41
ES
Conexión de la entrada de agua
Silastuberíasdeaguaalasqueconectaráelartefacto
sonnuevasonotienenuso,dejecorrerelaguahasta
que salga limpia, a fin de eliminar todo residuo que pueda
obstruirlosfiltrosdelasválvulasdeaguaolasválvulas
antesdeconectarlamáquina.NOTA:Lasválvulasde
cierredealimentacióndebenserdefácilacceso.
1. Enrosque la manguera
de llenado de agua fría
(el conector azul C)en
la entrada de agua fría y
ajústela bien.
2. Abra el suministro de agua
fría y verifique que no existan
pérdidas. Ajuste la manguera
si es necesario.
3. Enrosque la manguera de llenado de agua caliente (el
conector rojo H)enlaentradadeaguacalienteyajústela
bien.
4. Abra el suministro de agua caliente y verifique que no
existan pérdidas. Ajuste la manguera si es necesario.
Descarga
•Diámetro/capacidad del tubo vertical: Necesitaun
tuboverticalconundiámetromínimode1¼”(3,2cm)y
unacapacidaddedescargamínimade7galones(26litros)
por minuto.
•Parte superior del tubo vertical: Se debe encontrar
aunaalturade25”(62cm)-34”(86cm)desdelabasede
lamáquina.
•Extremo de salida de la manguera de descarga
(suministrada con la unidad): Se debe encontrar a
unaalturamínimade20”(50cm)desdelabasedela
máquina.Eltuboverticaldebecontarconinterrupción
de aire para evitar el sifonaje. Para evitar el sifonaje, no
sedebeinsertarmásde6”(15cm)delamanguerade
descarga en el tubo de desagüe.
Conexión de la manguera de descarga
Es posible descargar el agua en un fregadero, un tubo
vertical o un tubo de desagüe, pero debe existir una
interrupcióndeaireaunaalturamínimade20”(50cm)
paraevitarelsifonajeenlamáquina(Fig.6).
Importante: LapresióndeaguaDEBEestar
comprendida dentro de los valores indicados en
latabla“Datostécnicos”.
!
!
Importante: Do not use excessive force.
Damagetothecouplingscanresult.Lasuniones
sedebenajustaramano.Useunaherramienta
únicamente en caso de pérdida.
Sistema de descarga con tubo vertical: La instalación
requiereuntuboverticalconundiámetromínimode1
¼”(3,2cm)yunacapacidaddedescargamínimade7
galones(26litros)porminuto.Sistemadedescargacon
tuboverticaldeparedodepiso:Lapartesuperiordeltubo
verticalsedebeencontraraunaalturade25”(62cm)-
34”(86cm)desdelabasedelamáquina(Fig.4).
Sistema de descarga en fregadero: La entrada al
sistema de descarga en fregadero debe estar por sobre
elcolector(Fig.5).Sipasalamangueradedescargapor
muebles o paredes, use un material protector, como cinta
aislante,paracubrirlosbordesfilososquepuedandañar
lamanguera.Useunaabrazaderaadecuadaparafijarla
manguera de descarga a la bifurcación o el triturador. Con
un sistema de descarga en fregadero, puede conectar
directamente:
1)Auntriturador,siguiendolasinstruccionesdel
fabricante.
2)Aunacoladebifurcación(disponibleenlamayoríade
lasferreterías).
3)Auncolectordistintoatravésdelpiso.Elcolectordebe
estar ventilado para evitar el sifonaje. Para ofrecer una
ventilación adecuada, instale un kit de intervalo de aire
(disponibleenlamayoríadelasferreterías).
4)Algrifo,conunkitdeadaptaciónparagrifo(disponible
porseparado).
•UseunaabrazaderatipoU(incluidaenelpaquetede
accesorios)uotroelementoadecuadoparafijarelextremo
de salida de la manguera de descarga (preinstalada en la
parteposteriordelamáquina).
Importante: Asegúrese de que la manguera
no esté doblada y de que no esté restringido el
flujo de agua.
!
H
C
A & B = 25" (62 cm) min. / 34" (86 cm) max.
Floor Standpipe Wall Standpipe
A
B
Fig. 4
25" (62 cm) min.
with an air break
Laundry Sink Drain
Fig. 5
Sink Drain W/ "Y" Branch Tailpiece
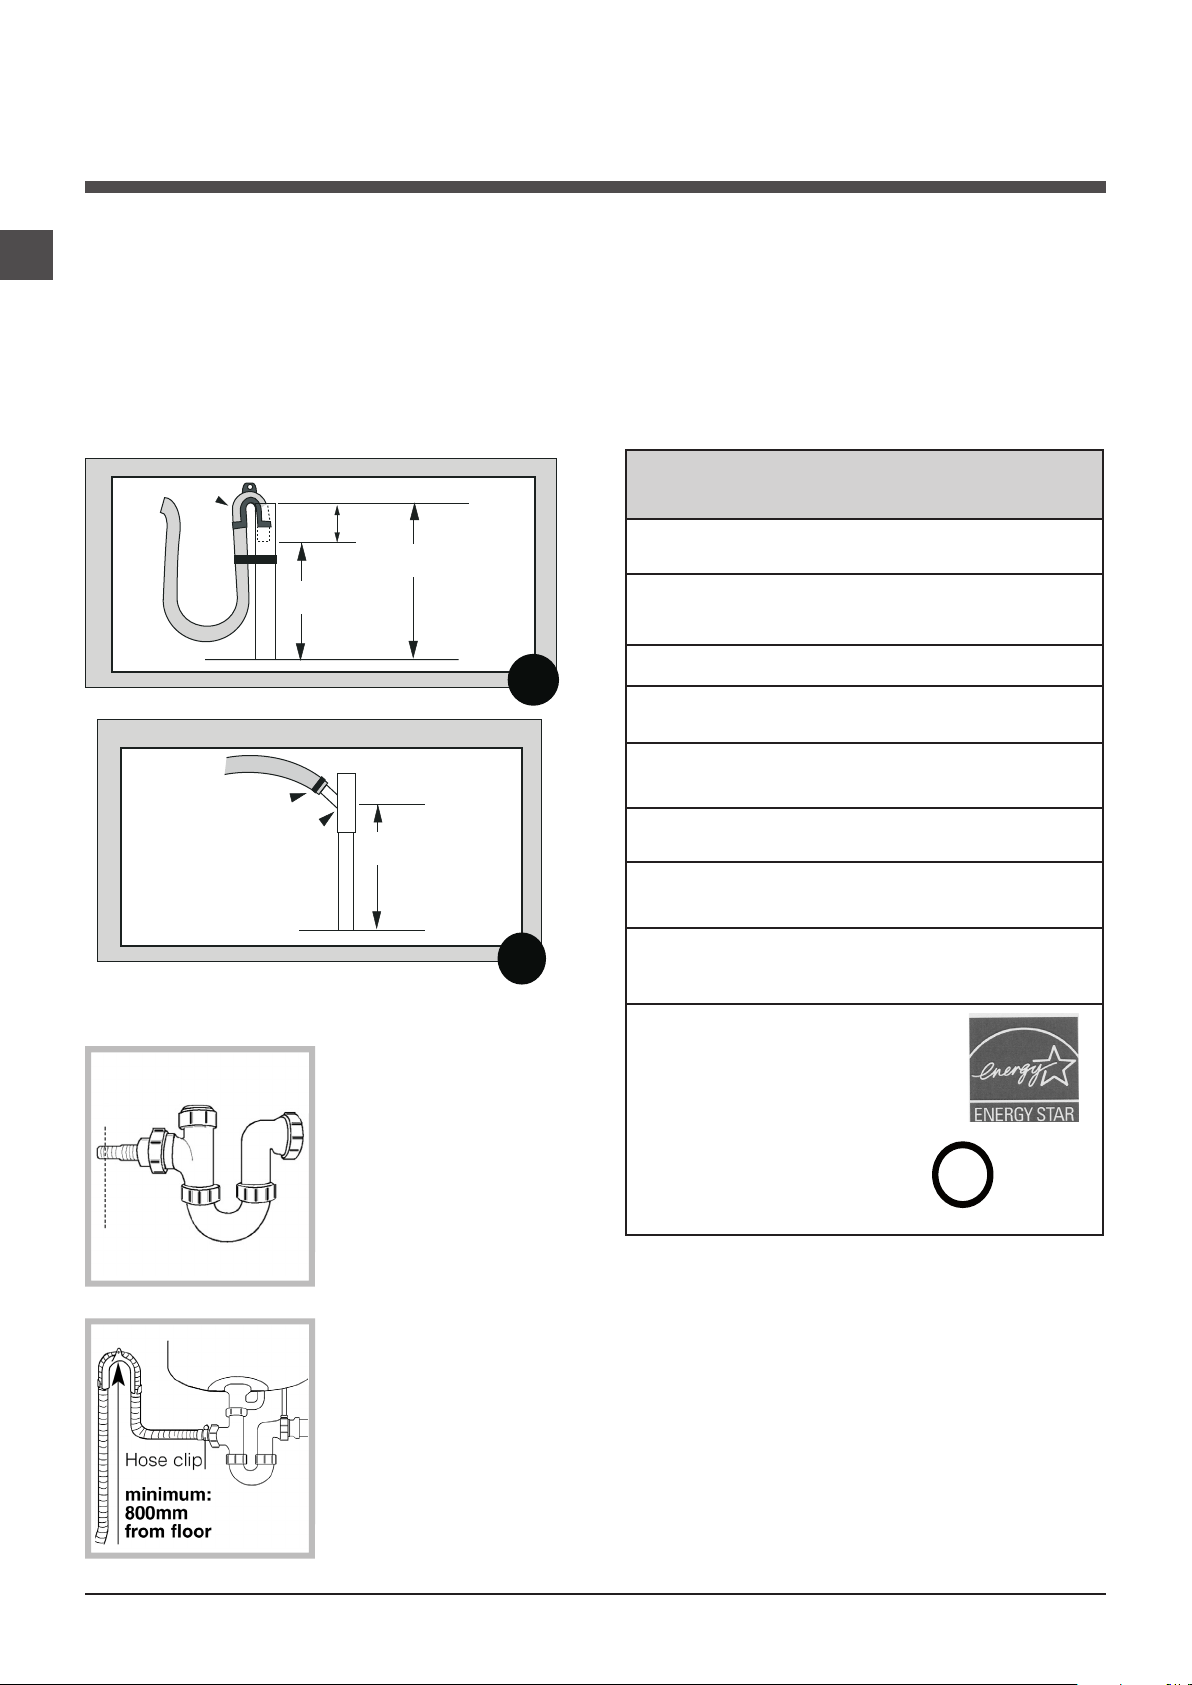
42
ES
•Inserteelextremodesalidadelamangueradedescarga
dentro del tubo vertical o el drenaje de pared o de piso
(Fig.6).NOTA:Elextremodesalidadelamanguerade
descargaseDEBEencontraraunaalturamínimade
20”(50cm)desdelabasedelamáquina.Paraevitar
elsifonaje,nosedebeinsertarmásde6”(15cm)dela
manguera de descarga en el tubo de desagüe.
•Useunaabrazadera,unsujetacableounelementosimilar
parasujetarlamangueraoabrazaderatipoUensulugar.
Método debajo del fregadero
1. Corte el extremo
bloqueado de la unidad
de descarga debajo del
fregadero.
2. Fije el soporte de extremo
deganchoaunadistancia
mínimade620mmdelpiso.
3. Useunagrapade
manguera para ajustar
firmemente la manguera de
descarga gris a la unidad
de descarga de fregadero
con una abrazadera de
manguera.
Características eléctricas
•Voltaje/amperajedelamáquina:120V,60Hz,11Amp.
•Conexión:Sesuministraunenchufede3patascon
cablede6’(180cm)conlamáquina.
•Circuito/protector:3alambres,monofásico,120V,60
Hz,CA,enuncircuitoseparadode15Amp.
Datos técnicos
20" (62 cm) min.
34" (86 cm) max.
Standpipe
"Y" Tail Piece
This connection MUST be
before drain trap and at
least 20" (50.8 cm) above
the floor where washer will
be installed.
Cable tie
Floor Standpipe w/ "Y" Branch Tail Piece
Fig. 7
20" (50 cm) min.
with an air break
25" (62 cm) min.
34" (86 cm) max.
6" max.
Standpipe
Floor Standpipe
Fig. 6
U-Clamp
Datos técnicos
Modelo
ARWDF129
Dimensiones
Ancho:23,4”(59,5cm)
Altura:33,24”–33,75”(84,5–85,7cm)
Profundidad:22”(55,9cm)
Peso
148lb(67kg)
Espacio mínimo
para la instalación
Laterales:0”
Adelante/atrás:1”
Capacidad
Lavado:2a15lb(1a7kg)
Secado:2a11lb(1a5kg)
Conexiones
eléctricas
Voltaje:120V,11Amp,60Hz
Conexiones
hidráulicas
Presiónmáx.:0,69mpa(6,9bar),100psi
Presiónmín.:0,05mpa(0,5bar),7,2psi
Velocidad de
centrifugado
máxima
Hasta1.200RPM
Indesit Company ofrece a sus clientes
productos con la etiqueta de
ENERGYSTAR.
Esteartefactohasidoprobado
porULycumpleconlosrequisitos
deseguridaddeULdelos
EstadosUnidosyCanadá,
por lo cual presenta su Marca.
C
U
L
US LISTED
®

43
ES
ADVERTENCIA: A fin de reducir el riesgo de incendio,
choqueeléctricoolesiones,lealas INSTRUCCIONES
DE SEGURIDAD IMPORTANTES antes de usar este
artefacto.
Cajón de detergente: Se usa para agregar los
detergentes y aditivos de lavado (ver “Detergentes y
ropa”).
BotóndeENCENDIDO/APAGADO conluzindicadora:
Enciendeyapagalamáquina.
Silaluzindicadoraestáencendida,entonceslamáquina
estáencendida.
Perilla de CICLOS DE LAVADO: Programa los ciclos de
lavado. Durante el ciclo de lavado, la perilla no se mueve.
BotóndeSECADO: Se usa para elegir el programa de
secado deseado (ver “Personalización”).
BotóndeTEMPERATURA: Se usa para elegir
la temperatura o el ciclo de lavado en frío (ver
“Personalización”).
Lasopcionesdetemperaturadelavadoestándistribuidas
de manera uniforme.
PANTALLA: Indica el tiempo restante del ciclo de lavado/
secado seleccionado y, si se programó el comienzo
retrasado,eltiemporestantehastaelcomienzodelciclo
de lavado.
BotóndeBLOQUEO PARA NIÑOS conluzindicadora:
Activa o desactiva el bloqueo del panel de control.
BotonesdeFUNCIÓN conlucesindicadoras:Se
usan para seleccionar las funciones disponibles. La luz
indicadora correspondiente a la función seleccionada
permaneceráencendida.
Luces indicadoras de
PROGRESO DEL CICLO DE
LAVADO: Se usan para controlar el progreso del ciclo de
lavado.
Laluzindicadoraencendidaindicacuálfasedelavado
estáencurso.
Luz indicadora de PUERTA BLOQUEADA: Indica si la
puerta se puede abrir o no (ver la página siguiente).
BotóndeARRANQUE/PAUSA conluzindicadora:
Arrancaointerrumpemomentáneamenteelciclode
lavado.
Nota:Parapausarelciclodelavadoencurso,presione
estebotón.Laluzindicadoracorrespondienteparpadeará
en naranja, mientras que la luz indicadora de la fase del
ciclodelavadoencursopermaneceráencendida.Silaluz
indicadoradePUERTABLOQUEADA estáapagada,
se puede abrir la puerta.
Para retomar el ciclo de lavado desde el punto de la
interrupción, presione el botón nuevamente.
Descripción del lavasecarropas y
comienzo de un ciclo de lavado
Luz indicadora
de
PUERTA
BLOQUEADA
Botónde
ARRANQUE/
PAUSA
con luz indicadora
Panel de control
Luces indicadoras de PROGRESO
DEL CICLO DE LAVADO
Botonesde
FUNCIÓN
con
luces indicadoras
Cajón de detergente
Perilla de CICLOS
DE LAVADO
PANTALLA
Botónde
ENCENDIDO/APAGADO
conluzindicadora:
Botónde
TEMPERATURA:
Botónde
SECADO
:
Botónde
BLOQUEO PARA NIÑOS
con
luzindicadora:

44
ES
Luces indicadoras
Las luces indicadoras ofrecen información importante.
Estoesloquelepuedendecir:
Luces indicadoras de fase del ciclo de lavado
AlgirarlaperilladeCICLOSDELAVADO,lasluces
indicadoras se encienden para indicar las etapas que
llevaráacabolamáquinasegúnelciclodelavado
seleccionado.
Unavezqueseseleccionaycomienzaelciclodelavado
deseado, las luces indicadoras se encienden de a una
paraindicarcuálfasedelcicloestáencurso.
Nota:
Durante la fase de "Descarga", se enciende la luz indicadora
correspondiente a la fase de "Centrifugado".
Botones de función con las luces indicadoras
correspondientes
Cuando se selecciona una función, se enciende la luz
indicadora correspondiente.
Si la función seleccionada no es compatible con el ciclo
de lavado programado, la luz indicadora correspondiente
parpadea,seemiteunaseñalsonora,ylafunciónnose
activa.
Si la función seleccionada no es compatible con otra
función seleccionada anteriormente, permanece activa
únicamentelaselecciónmásreciente.
Luz indicadora de temperatura
Cuando se selecciona una temperatura, se enciende la luz
indicadora correspondiente.
Luz indicadora de secado
Cuando se selecciona un valor de secado, se enciende la
luz indicadora correspondiente.
Luz indicadora de bloqueo para niños
Para activar el bloqueo del panel de control, presione el
botón y manténgalo presionado durante aproximadamente
2segundos.Cuandolaluzindicadoraestáencendida,
elpaneldecontrolestábloqueado.Estosignificaquees
posible evitar la modificación accidental de los ciclos de
lavado,especialmentesihayniñosenlacasa.
Para activar el bloqueo del panel de control, presione el
botón y manténgalo presionado durante aproximadamente
2segundos.
Luz indicadora de puerta bloqueada
Siestaluzindicadoraestáencendida,lapuertadel
artefactoestábloqueadaparaevitarqueseabra
accidentalmente.Paraevitardaños,esperequelaluz
indicadora se apague antes de abrir la puerta.
Nota: SiestáactivadalafuncióndeTEMPORIZADORDE
RETRASO,lapuertanosepuedeabrir.Sideseaabrirla,
pongalamáquinaenpausapresionandoelbotónde
ARRANQUE/PAUSA.
! SilaluzindicadoradeARRANQUE/PAUSA(naranja)
parpadearápidamentealmismotiempoquelaluz
indicadora de función, esto significa que se produjo un
problema (ver “Resolución de problemas”).
Comienzo de un ciclo de lavado
1. EnciendaellavasecarropaspresionandoelbotóndeENCENDIDO/APAGADO.Todaslaslucesindicadorasseencenderán
duranteunossegundos,luegoseapagarán,ylaluzindicadoradeARRANQUE/PAUSAcomenzaráaparpadear.
2. Cargue la ropa y cierre la puerta.
3. ElijaelprogramadeseadoconlaperilladeCICLOSDELAVADO.
4. Ajuste la temperatura de lavado (ver “Personalización”).
5. Elija el ciclo de secado si es necesario (ver “Personalización”).
6. Mida la cantidad de detergente y aditivos de lavado (ver “Detergentes y ropa”).
7. Seleccione las funciones deseadas.
8. PongaenmarchaelciclodelavadopresionandoelbotóndeARRANQUE/PAUSA.Laluzindicadoracorrespondiente
permaneceráencendida,encolorverde.
Paracancelarelciclodelavadoseleccionado,pongalamáquinaenpausapresionandoelbotóndeARRANQUE/PAUSAy
seleccione un nuevo ciclo.
9. Alfinalizarelciclodelavado,seencenderálaluzindicadorade .LaluzindicadoradePUERTABLOQUEADAse
apagará,indicandoquesepuedeabrirlapuerta.Saquelaropaydejelapuertadelartefactoentreabiertaparaqueeltambor
sesequecompletamente.ApagueellavasecarropaspresionandoelbotóndeENCENDIDO/APAGADO.
Lavado
Enjuague
Centrifugado
Secado
Fin del ciclo de lavado
Nota: Unavezquese
configura un nivel de secado
o un período de tiempo, esta
luz indicadora se enciende
para indicar que al ciclo
de lavado seleccionado le
seguiráunafasedesecado.
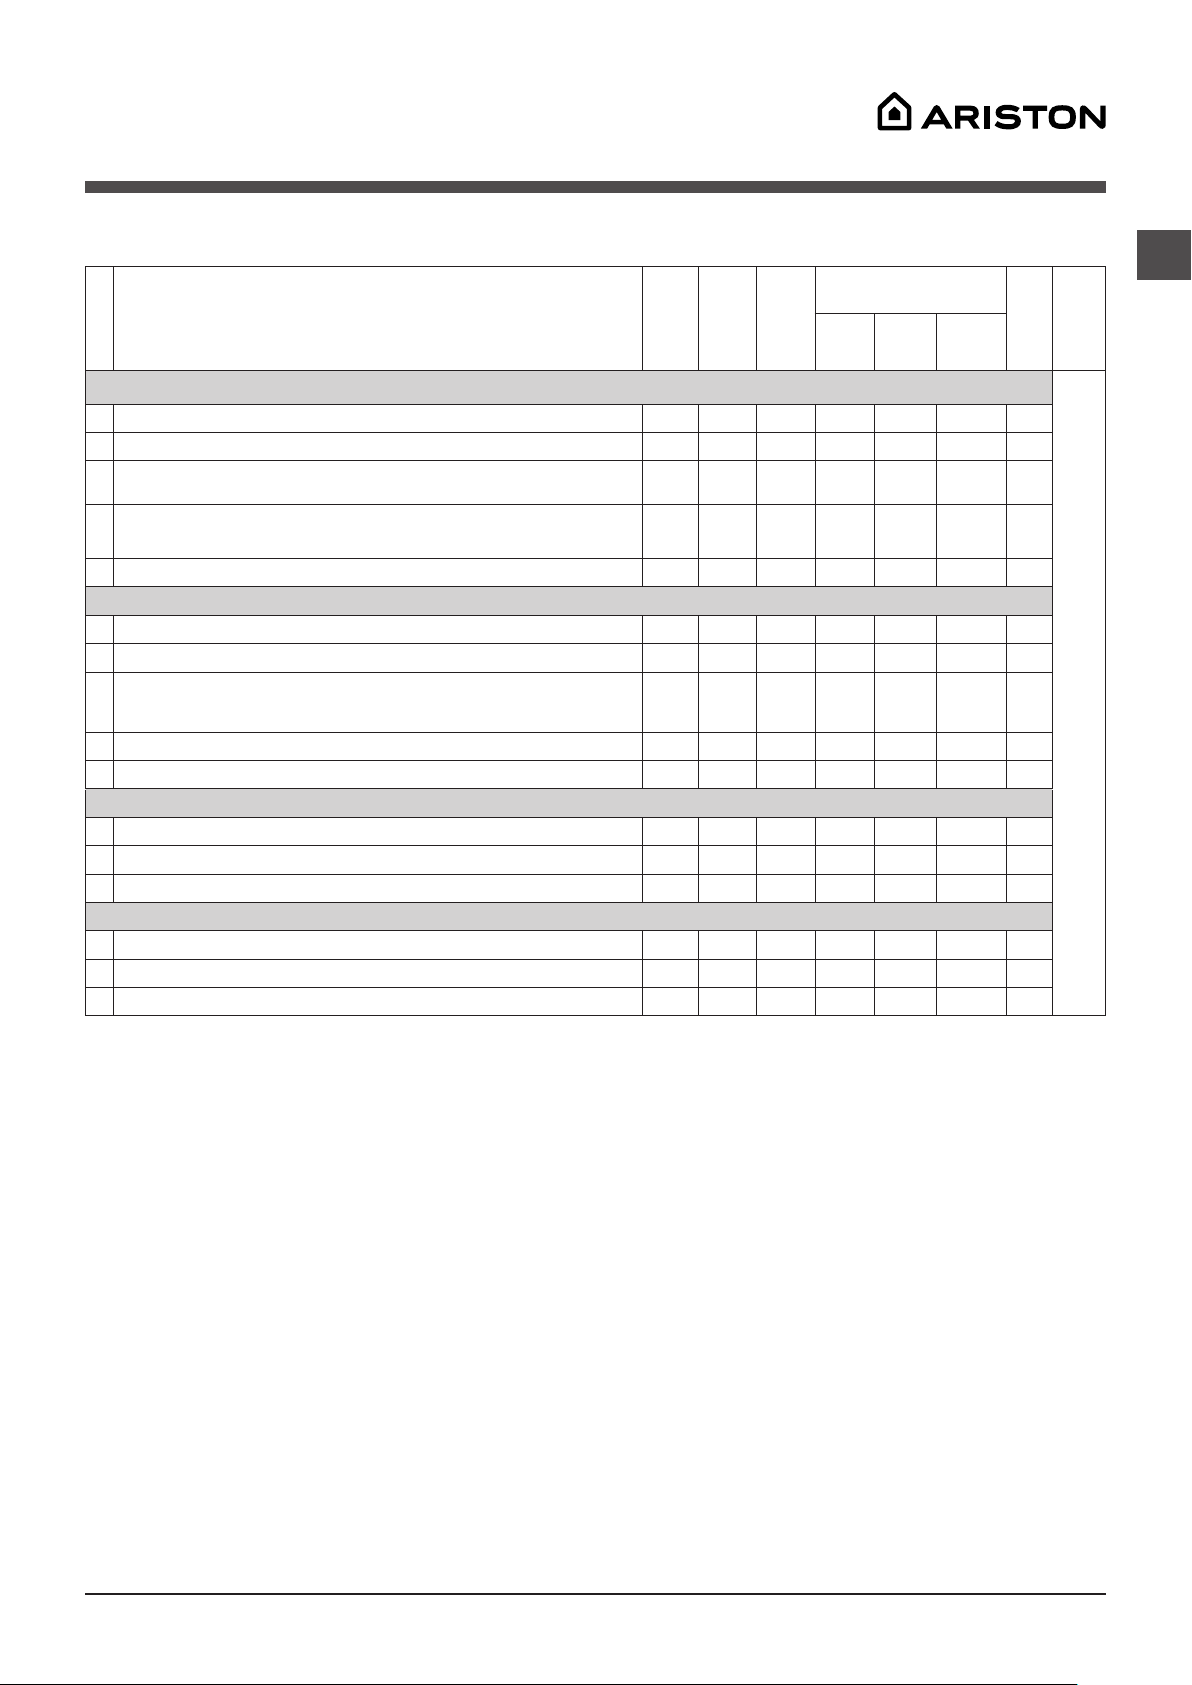
45
ES
Ciclos de lavado especiales
Planchado Permanente (ciclodelavado3).Esteciclotienemenoragitaciónmecánicayvelocidaddecentrifugado
para reducir las arrugas.
Carga Mixta (ciclodelavado4).Esteciclodelavadofuediseñadoparalavarprendaspocosuciasrápidamente:dura
apenas30minutos,porloqueahorraenergíaytiempo.Esteciclo(4atemperaturaTIBIA)permitelavardistintastelas
almismotiempo(exceptoprendasdelanaydeseda),conunacargamáximade6,6lb(3kg).
Lavado y Secado Rápido(ciclodelavado5).Esteciclodelavadofuediseñadoparalavarysecarprendaspoco
suciasrápidamente.Esteciclosepuedeusarparalavarysecarunacargaderopadehasta2,2lb(1kg)enapenas60
minutos.
Paralograrresultadosóptimos,useundetergentelíquidoypretratelospuños,loscuellosylasmanchas.
Blanco Brillante (ciclodelavado6).Useestecicloparablanquearconproductosabasedehipoclorito.
Introduzca el blanqueador, el detergente y los aditivos en los compartimientos correspondientes (ver "Cajón de
detergente").
Prendas Deportivas(ciclodelavado7).Estecicloesparalavarprendasdeportivaspocosucias(equipos,shorts,
etc.).Paralograrlosmejoresresultados,recomendamosnosuperarlacargamáximaindicadaenla“Tabladeciclosde
lavado”.Recomendamosusarundetergentelíquidoyunacantidadadecuadaparamediacarga.
Poca Suciedad 15 min. (ciclodelavado8).Esteciclodelavadofuediseñadoparalavarprendaspocosucias
rápidamente:duraapenas15minutos,porloqueahorraenergíaytiempo.Esteciclo(4atemperaturaTIBIA)permite
lavardistintastelasalmismotiempo(exceptoprendasdelanaydeseda),conunacargamáximade1,50kg(1,5kg).
Paraesteciclo,recomendamospretratarlospuños,loscuellosylasmanchasconproductosantimanchasespecíficos.
Ciclos de lavado
Tabla de ciclos de lavado
Ciclos de
lavado
Descripción del ciclo de lavado
Temp.
máx.
(°C)
Vel.
máx.
(rpm)
Secado
Detergentes
Car-
ga
máx.
(lb)
Dura-
ción
del
ciclo
Blan-
quea-
dor
Lavado
Suavi-
zantae
de telas
Ciclos esenciales
La duración de los ciclos de lavado se puede consultar en la pantalla.
1
Algodón Común: Colores resistentes y blancos muy sucios.
Caliente
Máx.
-
Máx.
2
Algodón Color: Colores delicados y blancos poco sucios. Tibia Máx.
-
Máx.
3
Planchado Permanente: Telas sintéticas con suciedad normal o pren-
das con etiqueta de planchado permanente.
Tibia 800
-
6.6
4
Carga Mixta: Para refrescar prendas poco sucias rápidamente (no ade-
cuado para lana, seda y ropa que se debe lavar a mano).
Tibia 800
-
6.6
5
Lavado y Secado Rápido
Tibia Máx.
-
2.20
Ciclos de lavado especiales
6
Blanco Brillante: Colores resistentes y blancos muy sucios.
Caliente
Máx.
Máx.
7
Prendas Deportivas
Tibia 600 - -
6.6
8
Poca Suciedad 15 min.: Para refrescar prendas poco sucias rápidamen-
te (no adecuado para lana, seda y ropa que se debe lavar a mano).
Tibia 800
-
3.30
9
Delicados: Colores delicados poco sucios. Tibia 800
-
6.6
10
Lana: Para lana, cachemir, etc. Tibia 800
-
3.30
Secado
11
Algodón
- -
- - - 11
12
Planchado Permanente
- -
- - - 6.6
13
Lana
- -
- - - 2.20
Ciclos de lavado parciales
A
Enjuague
- Máx.
- -
Máx.
B
Centrifugado
- Máx.
- - - Máx.
C
Drenaje sin centrifugado
- - - - - - Máx.
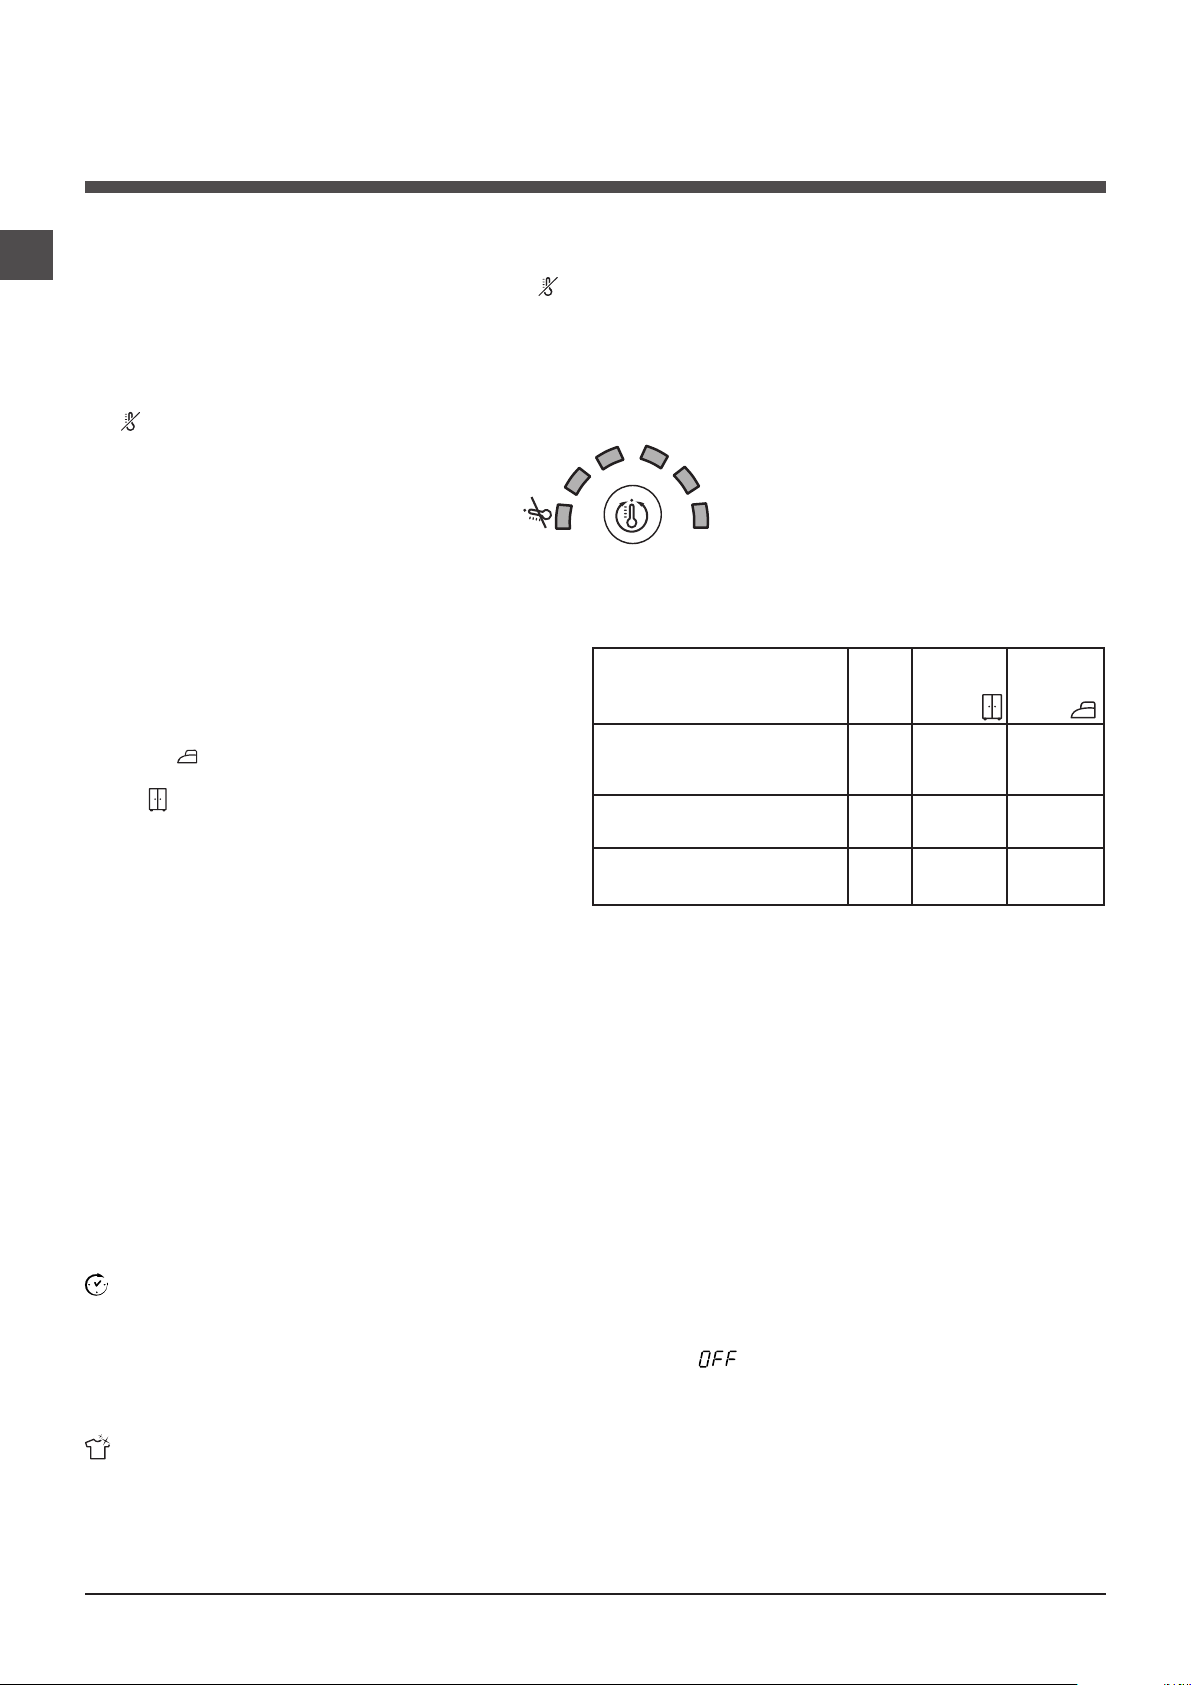
46
ES
Personalización
Ajuste de temperatura
Seleccione la temperatura de lavado presionando el botón de TEMPERATURA (ver la Tabla de ciclos de lavado).La
temperatura de lavado se puede ajustar seleccionando , “Fría”, “Tibia”, “Caliente” o2posicionesintermediasque
correspondenanivelesintermediosdetemperaturadelagua(porejemplo:laposiciónentre “fría” y “tibia” esapenastibia).
Abajoseindicalatemperaturaen°Cy°Fdecadaposición.
Lasopcionesdisponiblesson:
Ajuste del ciclo de secado
El tipo de ciclo de secado deseado se puede elegir
presionandoelbotóndeSECADOunaovariasveces.Hay
dosopcionesdisponibles:
A -Enbasealtiempo:De 40 a 180 minutos.
B -Enbasealahumedaddelasprendasluegodelsecado:
Planchado :prendasligeramentehúmedas,fácilesde
planchar.
Ropero :prendasmuysecas;recomendadoparatoallasy
batasdebaño.
Silacantidadderopaquedesealavarysecaresmucho
mayoralmáximoprevisto(ver la tabla), realice el lavado
y, una vez finalizado el ciclo, divida la carga y vuelva a
colocar una parte en el tambor. Luego siga las instrucciones
correspondientesalciclode“Sólo Secado”. Repitaelprocedimientoparaelrestodelacarga.
Nota: Alfinalizarelsecadohayunperíododeenfriamiento,aunqueelbotóndeSECADOseencuentraenlaposición 0.
Sólo Secado
GirelaperilladeCICLOSDELAVADOhastaunadelasposicionesdesecado(11-12-13)segúneltipodetela,yluego
seleccioneeltiempodesecadodeseadoconelbotóndeSECADO.
Funciones
Las distintas funciones de lavado que ofrece este lavasecarropas lo ayudan a obtener los resultados deseados.
Paraactivarlasfunciones:
1. Presione el botón correspondiente a la función deseada.
2.Cuandoseenciendelaluzindicadoracorrespondiente,lafunciónestáactiva.
Nota:Silaluzindicadoraparpadearápidamente,estosignificaquelafunciónelegidanosepuedeseleccionaren
combinación con el ciclo de lavado seleccionado.
Temporizador de retraso
Pararetrasarelcomienzodelciclodelavadoseleccionado,presioneelbotónvariasveceshastaquesemuestreeltiempo
deretrasodeseado(puedeserentre1y24horas).
Paradesactivarlafunción,presioneelbotónhastaquesemuestreeltexto .
Nota:UnavezpresionadoelbotóndeARRANQUE/PAUSA, el tiempo de retraso se puede disminuir, pero no aumentar.
!Estaopciónestádisponibleparatodoslosprogramas.
Super Wash
Yaqueseusaunamayorcantidaddeaguaenlafaseinicialdelciclo,ygraciasalamayorduracióndelciclo,estafunción
ofrece un lavado óptimo.
! Estafunciónnosepuedeusarencombinaciónconlosciclosdelavado4,5,8,10,11,12,13,A,ByC.
Tabla de tiempos de secado (valores indicativos)
Tipo
de
tela
Tipo de carga
Carga
máx.
(lb)
Ropero
Planchado
Algodón
Ropadedistintos
tamaños,toallas
11.02 180 160
Sintética
Sábanas,camisas,
pijamas, medias, etc.
6.6 180 160
Lana Tejidos, pulóveres, etc. 3.30 150 130
• El agua del grifo
• Fría (cold) 15°C/59°F
• 20°C/68°F ℃
• Tibia (warm) 30°C/86°F℃
• 40°C/104°F
• Caliente (hot) 57°C/134°F
COLD
WARM
HOT

47
ES
Enjuague extra
Al seleccionar esta función, se mejora la eficiencia del enjuague y se garantiza la eliminación óptima del detergente.
Es especialmente útil para piel sensible.
!Estafunciónnosepuedeusarencombinaciónconlosciclosdelavado4,5,8,11,12,13,ByC.
Cambio de centrífuga
Al seleccionar esta función, es posible reducir la velocidad de centrifugado.
! Estafunciónnosepuedeusarencombinaciónconlosciclosdelavado1,2,5,11,12,13yC.
Nota: Para los dos primeros Programas (Algodón normal y Algodón de color) las prendas deberán centrifugarse a la máxima
velocidad. Esto permite obtener el mejor resultado en la fase de aceleración y reducir el tiempo y la energía necesarios para
el secado.

48
ES
Eficiencia de la secadora
Sulavasecarropasoperacon120voltseincluyeunasecadorade1.200watts.Lasecadoratardamásensecarlaropaque
unasecadoratradicional(queoperacon220voltsy5.000watts).
Noobstante,puedeaplicarlossiguientesconsejosparaaumentarlaeficienciadelasecadora.
1. LA PUERTA PERMANECE BLOQUEADA DURANTE EL SECADO: La puerta se mantiene
bloqueada electrónicamente durante el ciclo de secado, con la luz de Modo + Puerta bloqueada encendida. Así se evita que
el calentador se encienda y se apague, y a la vez se conserva energía al atrapar el calor.
2. FABRIC SOFTNER: Cuando se programan ciclos de lavado y secado consecutivos, la función de
precalentamientoseenciendeautomáticamente.Conestafunción,elcalentadorseenciendeduranteelúltimociclode
centrifugadodelprogramadelavado.Enelprogramadelavadocomún,laropasecentrifugaa1.200rpm,mientrasque
almismotiempoingresaairecalientedelasecadoraeneltambor.Mientrasquelafuerzacentrífugahacequelaropase
peguealosladosdeltambor,elairecalientehacequese"endurezca"contraloslados.Laropapuedetardar30minutos
omásendespegarseycaereneltambor.SI USA UN SUAVIZANTE DE TELAS LÍQUIDO, LA ROPA
SEDESPEGARÁDEINMEDIATO.ASÍLAROPASESECARÁMÁSRÁPIDOYTENDRÁ
MENOS ARRUGAS.
3. SOBRECARGA: Eltambortieneunacapacidadde12libras(5,5kg),lamásgrandedisponibleencualquier
lavasecarropas. El tambor no se debe sobrecargar. Cuando se carga demasiada ropa, se reduce el flujo de aire y el secado
tardamás.Serecomiendacargar2/3deltamborparalograrelsecadoideal.
4. SOBRESECADO: Estamáquinausaunasecadoradecondensación,enlaqueseusaaguafríaparacondensarla
humedaddelairecaliente.Dadoquenoexisteunsistemadeescapeexterno,lahumedadpermaneceenlamáquina.Con
frecuencia,cuandoparecequelaropaestáhúmeda,enrealidadsetratadelahumedadquequeda(comounrocío).Saque
laropa,yestarásecaencuestióndeminutos.Nosequelaropaenexceso.
5. USE DETERGENTE DE BAJA ESPUMA: Al usar un detergente de baja espuma, evita que ingrese
espumaenlacámaradecondensación.Cuandoingresaespumaenlacámaradecondensación,lapelusapuedeobstruir
lacámarayelventilador.Coneltiempo,estoreducelaeficienciadesecadoypuedehacernecesariolimpiarelventilador
(soplador).
Suartefactonuevoesunproductodecuidadodiseño.Muchasveces,algoqueparecesermotivodeunpedidodeservicio
técnicorequiereapenasunsimpleajustequepuedehacerustedmismoensucasa.
Si el problema no se debe a un defecto de materiales o de mano de obra cubierto por la garantía, el
pedido de servicio se le cobrará, aun durante el período de garantía.
Para evitar que se le cobre un pedido de servicio innecesario, antes de llamar a un técnico consulte en la sección de
resolucióndeproblemaslassituacionesquepuedesolucionarustedmismo(páginas16-17deestemanual).
Sulavasecarropasesdecargafrontal,conunapuertaextragrandeparamejoracceso.Ofrece9ciclosdelavadoademás
de ciclos adicionales de enjuague y prelavado.
Ustedsindudadesealograrelmejorlavadoposible.Sileeysiguelasinstruccionesofrecidasenestecuadernillo,logrará
resultados excepcionales.
Asegúrese de seguir las instrucciones. Si necesita mayor información o asistencia, comuníquese con el distribuidor donde
comprólamáquina.
Esteartefactoesunalavadoraautomáticaconunacapacidaddehasta:
15 libras (7 kg)
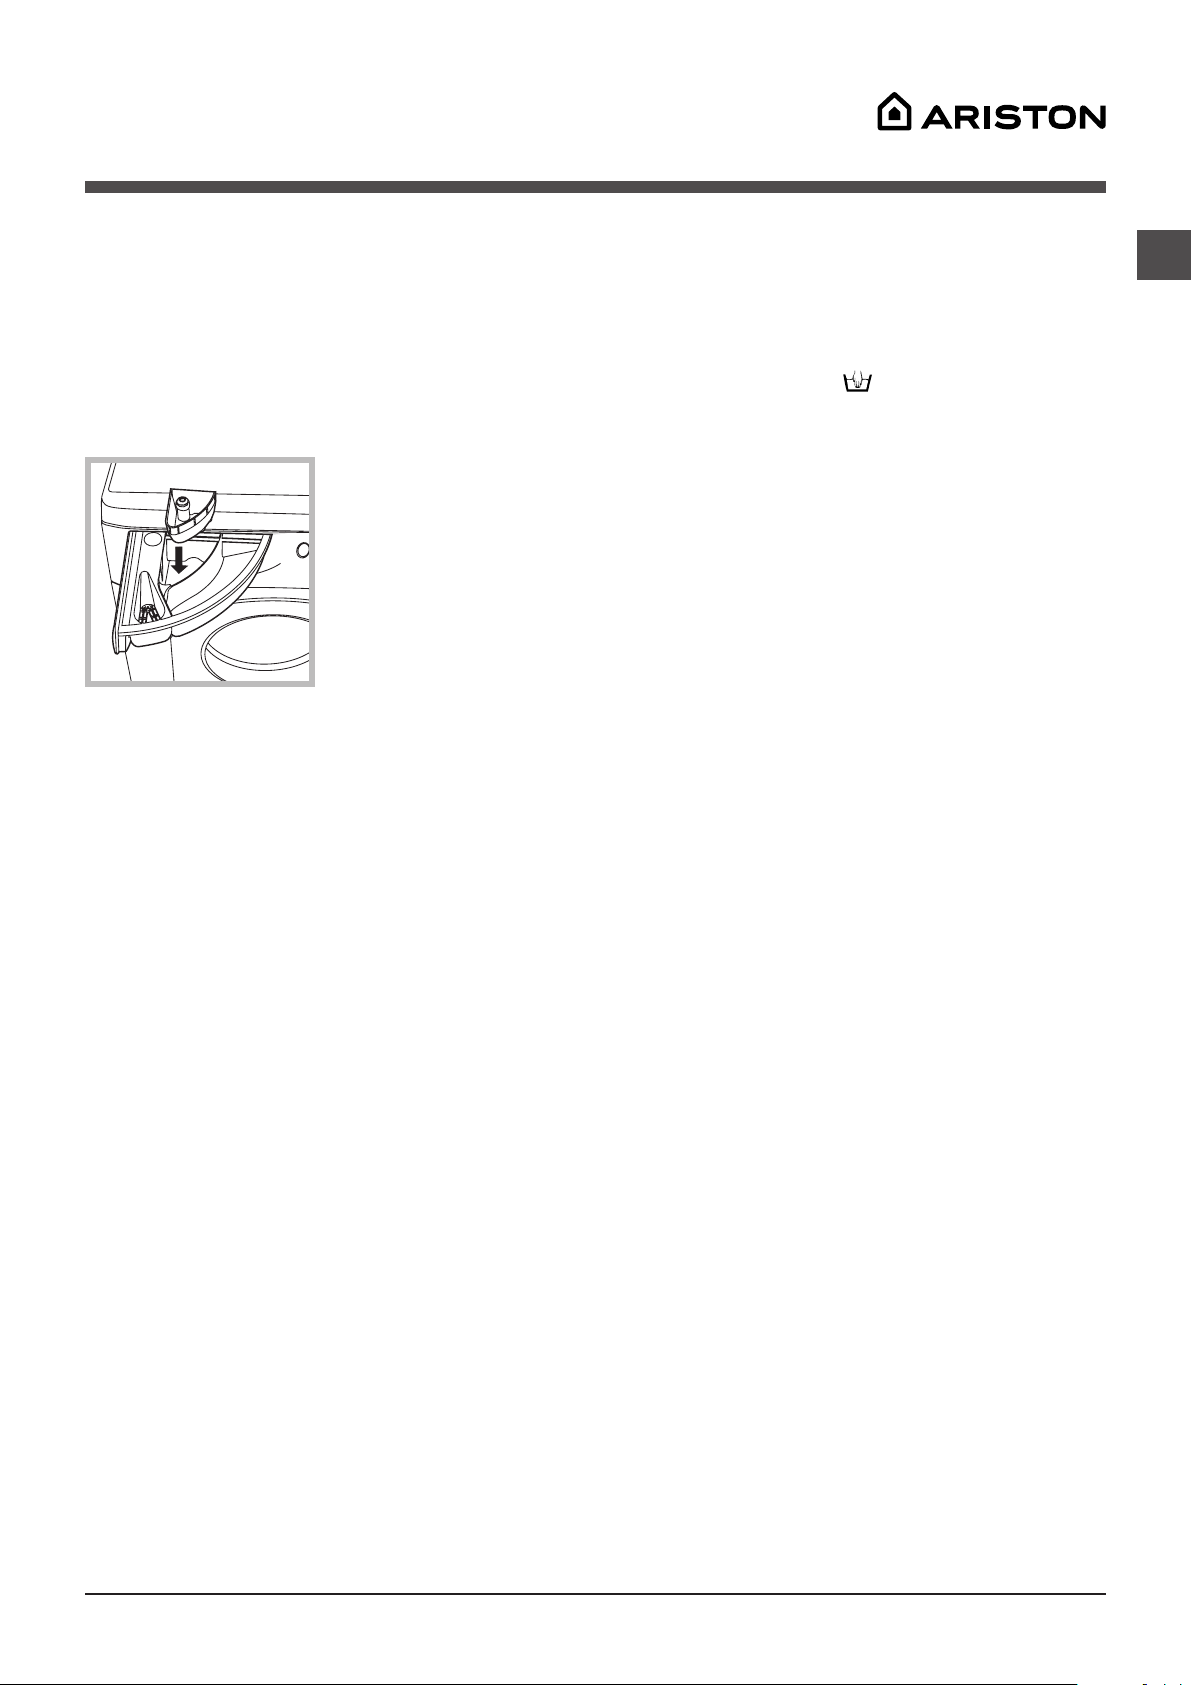
49
ES
Detergentes y ropa
Cajón de detergente
El buen resultado del lavado también depende de la dosis
correctadedetergente:siagregademasiadodetergente,
nonecesariamentelograráunlavadomáseficiente.Por
el contrario, puede provocar la acumulación de residuos
dentro del artefacto y contribuir a la contaminación
ambiental.
! Nousedetergentesparalavaramano,yaqueproducen
demasiada espuma.
Abra el cajón para
detergentes e introduzca el
detergente o aditivo, de la
siguientemanera:
Compartimiento 1:
Detergente para el ciclo
de lavado (en polvo o
líquido)
El detergente líquido se debe
verter inmediatamente antes de comenzar el ciclo de lavado.
Compartimiento 2: Aditivos (suavizantes de telas, etc.)
El suavizante no debe rebalsar la rejilla.
Compartimiento extra 3: Blanqueador
Ciclo de blanqueo
El blanqueo se puede realizar únicamente en combinación
con el ciclo de lavado 6. Introduzca el blanqueador en
el compartimiento extra 3, introduzca el detergente y el
suavizante en los compartimientos correspondientes, y
luego seleccione el ciclo de lavado.
Esta opción se recomienda únicamente para prendas de
algodón muy sucias.
Preparación de la ropa
•Dividalaropasegún:
-eltipodetela/elsímbolodelaetiqueta.
-loscolores:separelasprendasdecolordelasblancas.
•Vacíetodoslosbolsillosycontrolelosbotones.
•Nosuperelosvaloresindicados,quecorrespondenal
pesodelaropacuandoestáseca:
Telasresistentes:6,80kg(7kg)máx.
Telassintéticas:2,99kg(3kg)máx.
Telasdelicadas:2,00kg(2kg)máx.
Lana:1,50kg(1,5kg)máx.
¿Cuánto pesa su ropa?
1sábana14-17oz(400-500g)
1fundadealmohada5-7oz(150-200g)
1mantel14-17oz(400-500g)
1batadebaño31-42oz(900-1.200g)
1toalla5-8oz(150-250g)
MAX
1
3
2
Prendas que requieren un cuidado especial
Lana: Ariston es el único fabricante de lavasecarropas que
obtuvoelprestigiosoreconocimientoWoolmarkPlatinum
Care(M.0508)otorgadoporWoolmarkCompany,que
significa que todas las prendas de lana se pueden lavar
en el lavasecarropas, incluso aquellas cuya etiqueta indica
“lavaramanoúnicamente” . Por lo tanto, el programa
delavado10ofreceabsolutatranquilidadallavarprendas
delanaenellavasecarropas(cargamáxima3,3lb-1,5kg)
y garantiza resultados óptimos.
Sistema de equilibrado de carga
Antes de cada ciclo de centrifugado, a fin de evitar
vibraciones excesivas y distribuir la carga de manera
uniforme, el tambor gira continuamente a una velocidad
levemente mayor a la velocidad de rotación de lavado. Si
luegodevariosintentoslacarganoestábienequilibrada,la
máquinacentrifugaaunavelocidaddecentrifugadoreducida.
Silacargaestámuymalequilibrada,lamáquinarealizaun
proceso de distribución, en lugar de centrifugar. Para lograr
un mejor equilibrio y distribución de la carga, recomendamos
mezclarprendasgrandesypequeñasenlacarga.
Consejos útiles
Su lavasecarropas presenta tres velocidades distintas durante
el ciclo de lavado. Durante el ciclo de Algodón, el tambor
centrifugaa1.200u800rpm.DuranteelciclodePlanchado
Permanente,centrifugaa850rpm.DuranteelciclodeDelicados,
centrifugaa500rpm.Alsecarartículosdealgodónpesados,
comotoallasdebañoopantalonesdejean,asegúresede
seleccionarellavado"común".Elcentrifugadomásrápidoextrae
másaguadeestostejidosabsorbentesyreducelahumedadal
pasar al modo de secado. Así se reduce el tiempo de secado.
Use un suavizante de telas líquido. Llene el
compartimientoparasuavizantehastaelnivelmarcado.El
suavizante esponja la ropa inmediatamente después del ciclo
de lavado. Así se reduce el tiempo de secado y las arrugas.
Este lavasecarropas esunamáquinade120volts,porloque
elcalentadornecesitamástiempoparaalcanzarelniveldecalor
máximoquelasunidadesmásgrandesde220volts.Elcalentador
tardaunos10minutosenalcanzarelniveldecalormáximo.
Para secar la ropa, el lavasecarropas sopla aire caliente
haciaelinteriordeltamborgiratorio.Eltamboragitalaropa,y
alairecalientelaseca.Sieltamborestásobrecargado,elaire
no puede circular y la ropa no se seca bien.
Use detergente de baja espuma. Esta recomendación
esválidaparatodosloslavarropasdecargafrontal.Alusar
este tipo de detergente, se evita el exceso de espuma, que
puedeafectarelrendimientodelamáquina.Tambiénse
evitaelposibledañoocasionadoporelingresodelexceso
deespumaenlacámaradecondensaciónylaposterior
obstrucción del mecanismo del ventilador con pelusa.
Al preparar la ropa para lavar tenga en cuenta la cantidad
de prendas y los tipos de tela. Los tejidos muy absorbentes,
como los de las toallas y los pantalones de jean, absorben
másaguaysevuelvenmuypesadoscuandosesaturan.Si
notaquesuropatardamástiempoqueelhabitualensecarse,
esposiblequehayasobrecargadolamáquinaoquehaya
incluido demasiados artículos muy absorbentes en la carga.
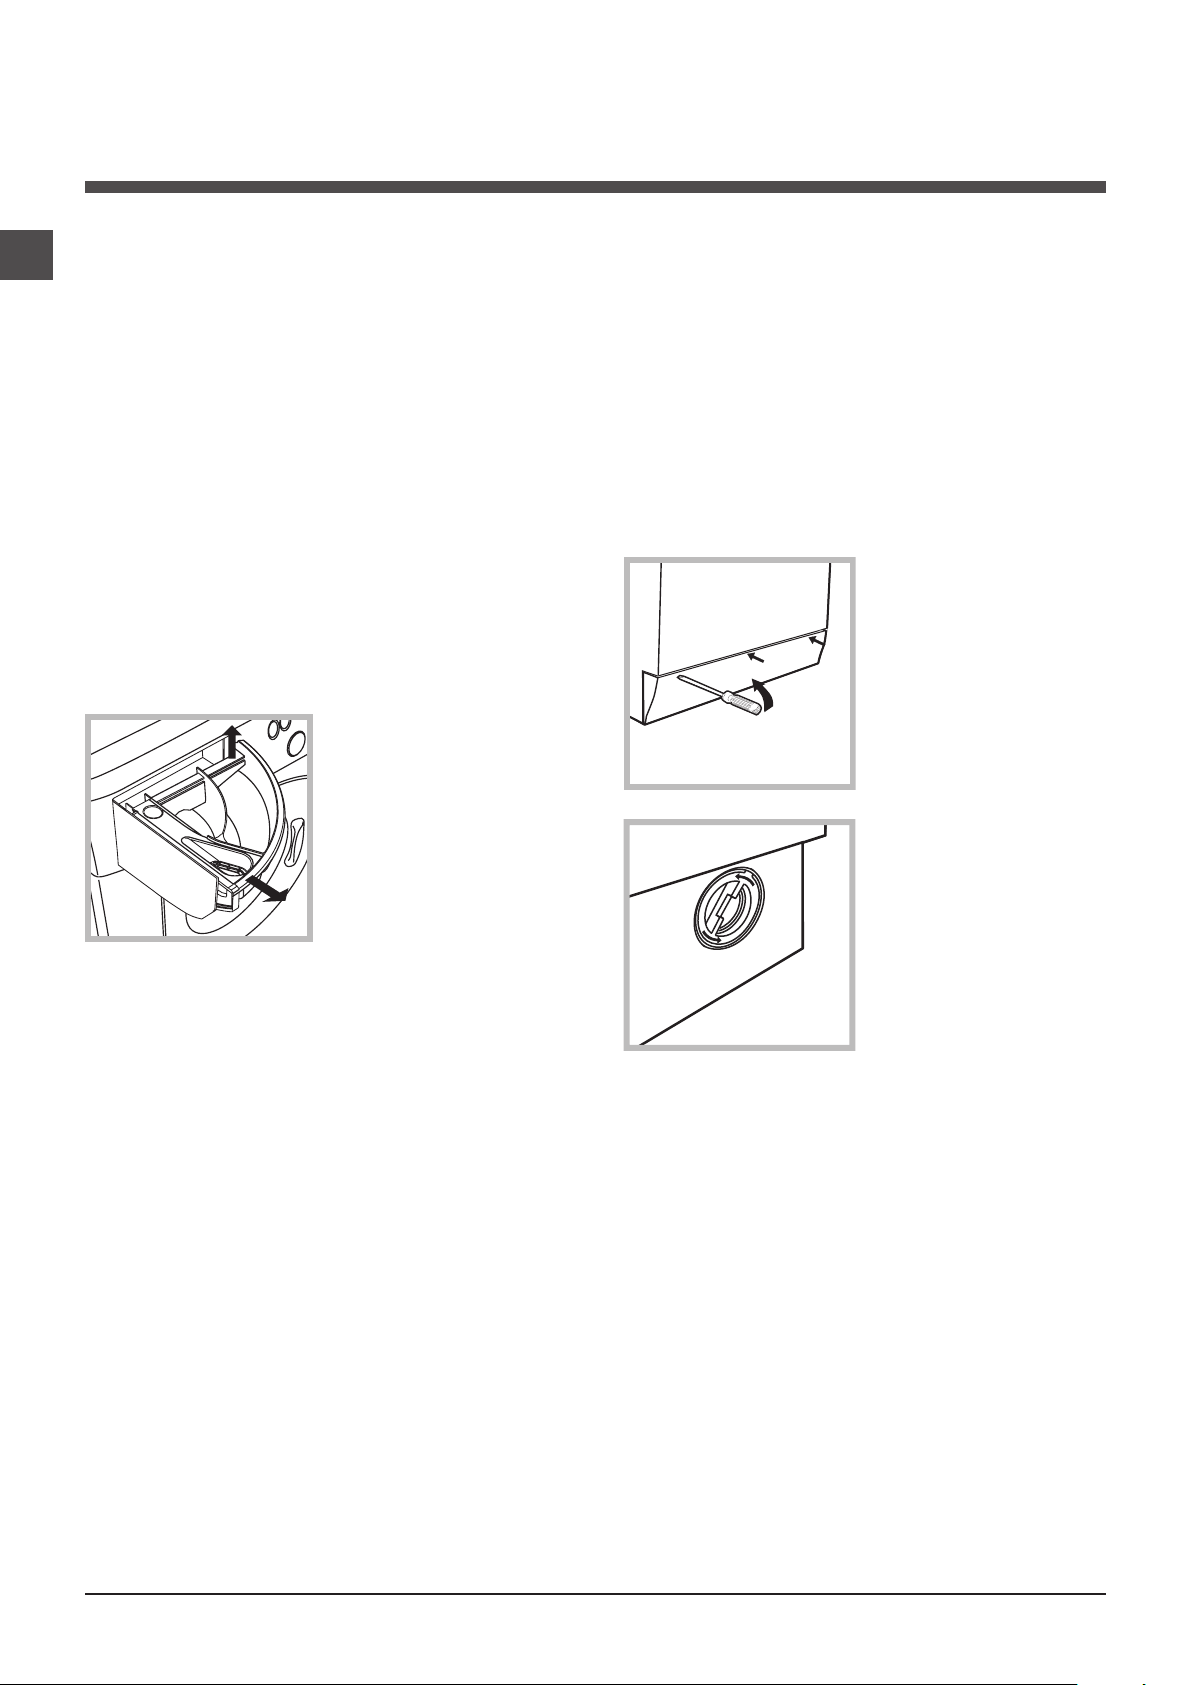
50
ES
Instrucciones de cuidado y
mantenimiento
Corte del suministro de agua y electricidad
•Cierreelgrifodeaguadespuésdecadaciclodelavado.
Asíselimitaeldesgastedelsistemahidráulicodel
lavasecarropas y se ayuda a prevenir pérdidas.
•Desenchufeellavasecarropasparalimpiarloypara
todas las tareas de mantenimiento.
Limpieza del lavasecarropas
Las partes externas y los componentes de goma del
artefactosepuedenlimpiarconunpañosuaveembebido
enaguatibiaconjabón.Nousesolventesnisustancias
abrasivas.
Limpieza del cajón de detergente
Quiteelcajónlevantándolo
ytirandohaciaafuera(ver la
figura).
Láveloconaguacorriente.
Repitaestaoperacióncon
frecuencia.
Cuidado de la puerta y el tambor del
artefacto
•Siempredejelapuertaentreabiertaparaevitarla
acumulación de olores desagradables.
Limpieza de la bomba
El lavasecarropas cuenta con una bomba autolimpiante
que no requiere mantenimiento. A veces pueden caer
elementospequeños(comomonedasobotones)enla
precámaraqueprotegelabomba,ubicadaenlaparte
inferior.
! Asegúresedequehayaterminadoelciclodelavadoy
desenchufeelartefacto.
Paraaccederalaprecámara:
1. Con un destornillador,
quite el panel de la parte
delantera inferior del
lavarropas (ver la figura);
2.Quitelatapagirándola
en el sentido contrario a
las agujas del reloj (ver la
figura). Puede salir algo de
agua. Esto es normal.
3. Limpie el interior completamente.
4.Vuelvaacolocarlatapa.
5.Vuelvaacolocarelpanel,asegurándosedequelos
ganchosesténensulugarantesdepresionarlosobreel
artefacto.
Control de la manguera de entrada de agua
Controlelamangueradeentradaalmenosunavezalaño.
Encasodegrietas,sedebesustituirdeinmediato:durante
los ciclos de lavado, la presión de agua es muy fuerte y si
lamangueraestáagrietadasepuederomperfácilmente.
! Nuncausemanguerasyausadas.
1
2

51
ES
Resolución de problemas
Su lavasecarropas puede fallar. Antes de comunicarse con el Centro de Asistencia Técnica (ver “Asistencia”),primerofíjesesi
setratadeunproblemadefácilsoluciónconlassiguientesrecomendaciones:
Problema:
El lavasecarropas no se enciende.
El ciclo de lavado no comienza.
El lavasecarropas no carga agua
(la luz indicadora de la primera
etapa del ciclo de lavado parpadea
rápidamente).
El lavasecarropas carga y descarga
agua continuamente.
El lavasecarropas no descarga o no
centrifuga.
El lavasecarropas vibra mucho
durante el centrifugado.
El lavasecarropas pierde.
La luz indicadora de ARRANQUE/
PAUSA (naranja) y las luces
indicadoras de función parpadean
rápidamente.
Hay demasiada espuma.
El lavasecarropas no seca.
Posibles causas/soluciones:
•Elartefactonoestábienenchufadoeneltomacorriente,onohacecontacto.
•Nohaycorrienteeléctricaenlacasa.
•Lapuertadellavasecarropasnoestábiencerrada.
•NopresionóelbotóndeENCENDIDO/APAGADO.
•NopresionóelbotóndeARRANQUE/PAUSA.
•Noabrióelgrifodeagua.
•Seleccionóelcomienzoretrasado(coneltemporizadorderetraso,ver
“Personalización”).
•Lamangueradeentradadeaguanoestáconectadaalgrifo.
•Lamangueraestáretorcida.
•Noabrióelgrifodeagua.
•Nohaysuministrodeaguaenlacasa.
•Lapresiónesdemasiadobaja.
•NopresionóelbotóndeARRANQUE/PAUSA.
•Lamangueradedescarganoestáinstaladaaunaalturaentrelos65y100
cm del suelo (ver “Instalación”).
•Elextremolibredelamangueraseencuentrasumergido(ver “Instalación”).
•Elsistemadedescargadeparednotieneunrespiradero.
Si el problema persiste después de estas verificaciones, cierre el grifo de agua,
apague el artefacto y comuníquese con el Servicio de Asistencia. Si su casa se
encuentraenunodelospisosmásaltosdeunedificio,esposiblequeexista
un problema de drenaje, por el cual el lavasecarropas carga y descarga agua
continuamente.Puedecomprarválvulasespecialesantidrenajeparasolucionar
este problema.
•Elciclodelavadonoincluyedescarga:enalgunosciclosdelavado,la
descarga se debe activar manualmente.
•Lamangueradedescargaestáretorcida(ver “Instalación”).
•Elconductodedescargaestáobstruido.
•Eltambornofuedesbloqueadocorrectamentedurantelainstalación(ver
“Instalación”).
•Ellavarropasnoestánivelado(ver “Instalación”).
•Ellavarropasestáatrapadoentremueblesyparedes(ver “Instalación”).
•Lamangueradeentradadeaguanoestáenroscadacorrectamente(ver
“Instalación”).
•Elcajóndedetergenteestábloqueado(consultelasinstruccionesdelimpieza
en “Cuidado y mantenimiento”).
•Lamangueradedescarganoestábienajustada(ver “Instalación”).
•Apagueydesenchufelamáquina.Espereaproximadamente1minutoyvuelva
aenchufarlayencenderla.
Si el problema persiste, comuníquese con el Servicio de Asistencia Técnica.
•Eldetergentenoesadecuadoparalavarenmáquina(debetenerunaleyenda
como“paralavasecarropas”o“paralavadoamanooenmáquina”,osimilar).
•Usódemasiadodetergente.
• Elartefactonoestáenchufadoeneltomacorriente,onolosuficienteparahacercontacto.
• Secortólacorrienteeléctricaenlacasa.
• Lapuertadelartefactonoestábiencerrada.
• Seleccionóelcomienzoretrasado(coneltemporizadorderetraso,ver
“Personalización”).
• ElbotóndeSECADOestáenlaposición0 .

52
ES
Servicio
Antes de llamar para solicitar asistencia técnica:
•Verifiquesipuederesolverelproblemasolo(ver “Resolución de problemas”).
•Reinicieelprogramaparaverificarsielproblemaestáresuelto.
•Sielproblemapersiste,comuníqueseconunCentrodeAsistenciaTécnicaautorizadoalnúmerodeteléfonoindicadoen
el certificado de garantía.
! Siempre recurra a técnicos autorizados.
Tenga los siguientes datos a mano:
• eltipodeproblema
• elmodelodelartefacto(Mod.)
• elnúmerodeserie(S/N)
Estos datos se encuentran en la placa fijada en la parte posterior del lavasecarropas, y también en la parte delantera,
abriendo la puerta.

53
ES
GARANTÍA LIMITADA DURANTE UN AÑO DE ARISTON
(EE.UU.YCANADÁÚNICAMENTE)
QUIÉNESTÁCUBIERTOPORESTAGARANTÍA
Esta garantía limitada durante un año (la “Garantía”) se
otorga únicamente al comprador minorista/final original (el
“CompradordePrimerUso”)delproductoAristonadjunto
(el“ProductoAriston”).
Si usted no compró el Producto Ariston de un revendedor/
distribuidor autorizado de Ariston en los Estados Unidos
o Canadá, osi compró el ProductoAriston usado antes
de su compra (por ejemplo, modelos de exhibición o
reacondicionados),entoncesustedno es el Comprador de
PrimerUso,yelProductoAristonadquiridonoseencuentra
cubiertoporestaGarantía.EstaGarantíano es transferible.
QUÉ CUBRE ESTA GARANTÍA
Ariston se compromete o reparar o sustituir cualquier pieza
del Producto Ariston que falle por un defecto de materiales
odemanodeobra,cuandohayasidousadoensituaciones
normales de uso doméstico. Ariston también brindará,
sin cargo alguno, toda la mano de obra y los servicios
relacionados necesarios para reparar o sustituir la pieza
defectuosa.
Esta Garantía es válida únicamente para los Productos
AristonadquiridosenlosEstadosUnidosoCanadá.Sujetoa
lasexclusionesindicadasmásabajo,enelcasodeProductos
AristonadquiridosenlosEstadosUnidosoCanadá,pero
usados en otropaís, esta Garantía cubre únicamente el
serviciobajogarantíarealizadodentrodelosEstadosUnidos
oCanadá(ynoincluyeelenvíofueradelosEstadosUnidos
oCanadá).
DURACIÓN DE LA GARANTÍA
Esta Garantía se extiende durante un (1) año desde la
fechadelacompraoriginaldelCompradordePrimerUso.
Tenga en cuenta que es necesario presentar una copia de
surecibodecompraoriginalconlafechadecomprayel
nombre y la dirección del comercio a fin de obtener servicio
bajoestaGarantía.Alosfinesdedeterminarelperíodode
garantía aplicable, tenga en cuenta que toda pieza sustituida
oreparadaasumirálaidentidaddelaoriginal.
QUÉ NO CUBRE ESTA GARANTÍA (EXCLUSIONES)
EstaGarantíanocubre:
1. Instalación, entrega, mantenimiento y/u operación indebida
del Producto Ariston.
2. Daños ocasionados por no usar el Producto Ariston
en cumplimiento de las especificaciones de suministro de
electricidad o gas indicadas en la placa de datos.
3.DañosocasionadosalProductoAristonofallasdeéste
por alteración, abuso, mal uso, uso distinto del previsto, o
uso comercial.
4.Visitasdeservicioasucasaparabrindarinstrucciones
sobre el uso de su Producto Ariston.
5.Reemplazodefusiblesensucasaocorreccióndelas
tuberías o los circuitos eléctricos de su casa.
6.Dañosocasionadospornegligencia,accidente,incendio,
inundación o actos fortuitos.
7.DañosfísicosalaspectodesuProductoAriston,como
rayones, óxido, abolladuras, deformaciones, descamación
y otros.
8.Dañosocasionadosporeltransporte.
9. Reemplazo de accesorios o elementos consumibles
o degradables, por ejemplo: enchufes, cables, baterías,
bombillas,tubosfluorescentes,arrancadores,tapasyfiltros;
yreemplazodepiezasextraíblesdevidrioodeplástico.
10.Dañosocasionadosluegodelaentrega.
11.Dañosporaguadecualquiertipo.
12.ProductosAristonquenoesténaccesiblespararealizar
el servicio necesario.
13. Problemas no ocasionados por defectos de materiales
o de mano de obra.
14. Tiempo de viaje cuando el producto esté instalado en un
vehículorecreativoounaaplicaciónmarítima.
EstaGarantíaquedarásin efecto si una persona no
autorizada por Ariston altera, desmantela, mantiene, o
realiza servicio al Producto Ariston o interfiere con él de
cualquier otra manera.
15.Manodeobranoestándarcuandoelproductoesté
instalado en una aplicación marítima.
16.Dañosporaguadecualquiertipo.
HASTAELGRADOMÁXIMOQUEPERMITALALEY,
ESTAGARANTÍAREEMPLAZATODAOTRAGARANTÍA,
ESCRITAUORAL,YASEAEXPRESADAMEDIANTE
DECLARACIÓN,PROMESA,DESCRIPCIÓN,DIBUJO,
MODELOOMUESTRA.QUEDADENEGADATODA
OTRAGARANTÍA,EXPLÍCITAOIMPLÍCITA,INCLUIDAS
LASGARANTÍASIMPLÍCITASDECOMERCIABILIDAD
YAPTITUDPARAUNFINDETERMINADO.AQUELLAS
GARANTÍASIMPLÍCITAS,INCLUIDASENTREOTRAS
LASGARANTÍASIMPLÍCITASDECOMERCIABILIDAD
YAPTITUDPARAUNFINDETERMINADO,QUENO
PUEDANSEREXCLUIDASPORLEY,QUEDARÁN
LIMITADASALAMISMADURACIÓNQUELAPRESENTE
GARANTÍA.EXCEPTUANDOLASREPARACIONESO
LOSREEMPLAZOSANTEDICHOS,ARISTONNOSERÁ
RESPONSABLEPORDAÑOSDIRECTOS,INDIRECTOS,
INCIDENTALESOEMERGENTES,NIPORDESAGRAVIOS
ESPECÍFICOS.
Algunos estados o provincias no permiten la exclusión o
limitacióndedañosincidentalesoemergentesy/ogarantías
implícitas, por lo tanto las exclusiones o limitaciones
antedichaspuedennocorresponderleausted.EstaGarantía
leconfiere derechos legalesespecíficos yes posibleque
tambiéngocedeotrosderechoslegalessegúnsuestado
o provincia.
Garantía

54
ES
QUÉ DEBE HACER PARA OBTENER SERVICIO
BAJO GARANTÍA
Todas las reparaciones y los servicios bajo garantía deben ser
provistos por Ariston o por un Centro de Servicios Autorizado
de Ariston.
Para solicitar servicio bajo garantía, llame al
1-877-356-0766oenvíeunmensajedecorreoelectrónicoa
[email protected].Recuerdeinformarelnúmero
de modelo y el número de serie de su Producto Ariston.
Tenga en cuenta que es necesario presentar una copia de
surecibodecompraoriginalconlafechadecomprayel
nombre y la dirección del comercio a fin de obtener servicio
bajoestaGarantía.SielProductoAristonseencuentraen
unazonadondenoestádisponibleelserviciodeunCentro
de Servicios Autorizado de Ariston, es posible que se le
cobre el traslado del personal o que se le solicite que lleve
el Producto Ariston a un Centro de Servicios Autorizado de
Ariston para recibir el servicio.
Losantedichossonsusrecursosúnicosyexclusivosbajo
estaGarantía.EstaGarantíaeslaúnicagarantíaotorgada
porAristonparaesteProductoAriston.EstaGarantía
reemplaza todo otro acuerdo o entendimiento que usted
pueda tener con Ariston o sus representantes.

55
ES

56
ES
195077382.00
07/2009 - Xerox Fabriano