
1
EN
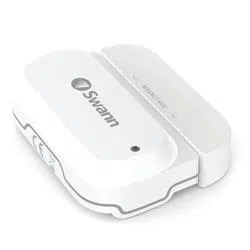
Window/Door Alert Sensor
Sensor de alerta de ventana/puerta
Capteur d’alerte de fenêtre/porte
Sensore di allarme nestra/porta
Fenster/Tür-Warnsensor
EN
Quick Start Guide
ES
Guía de inicio rápido
FR
Guide de démarrage rapide
IT
Guida rapida
DE
Schnellstartanleitung

2
EN
OVERVIEW
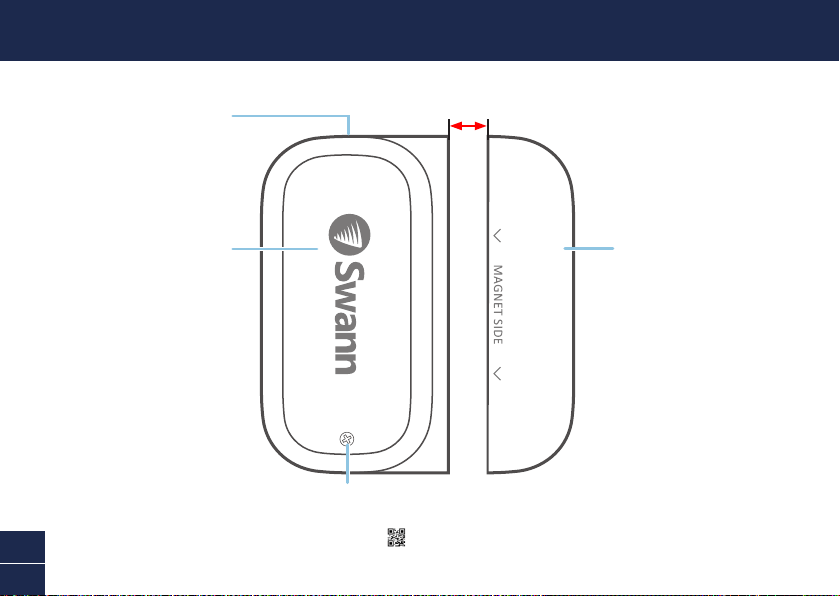
Magnet
Sensor
Status light
< 10mm(3/8”)
Cover screw
Remove to access battery compartment
and QR code
(located under cover)
3
EN
BATTERY INSTALLATION
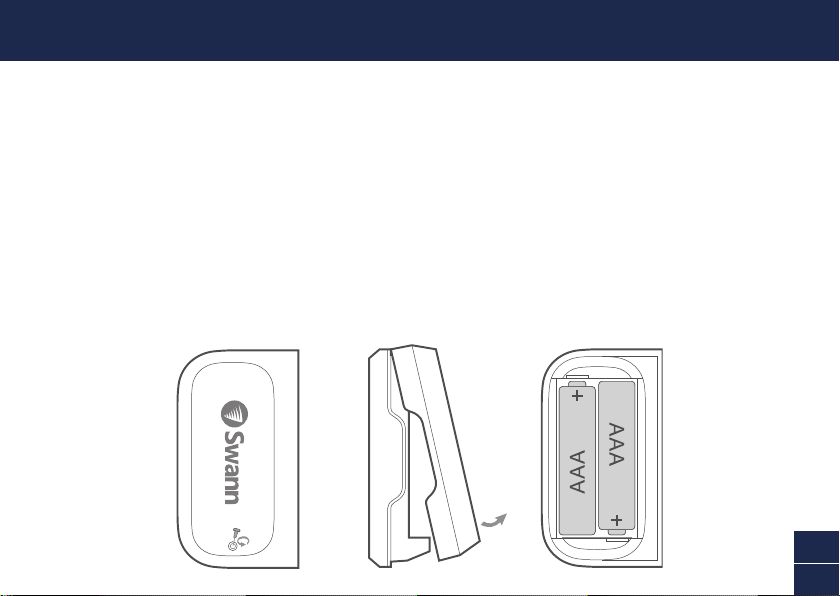
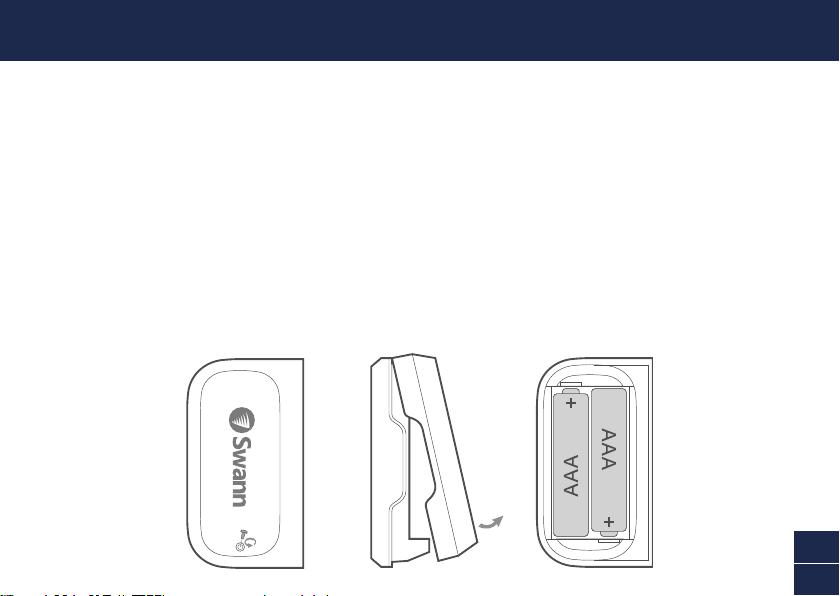
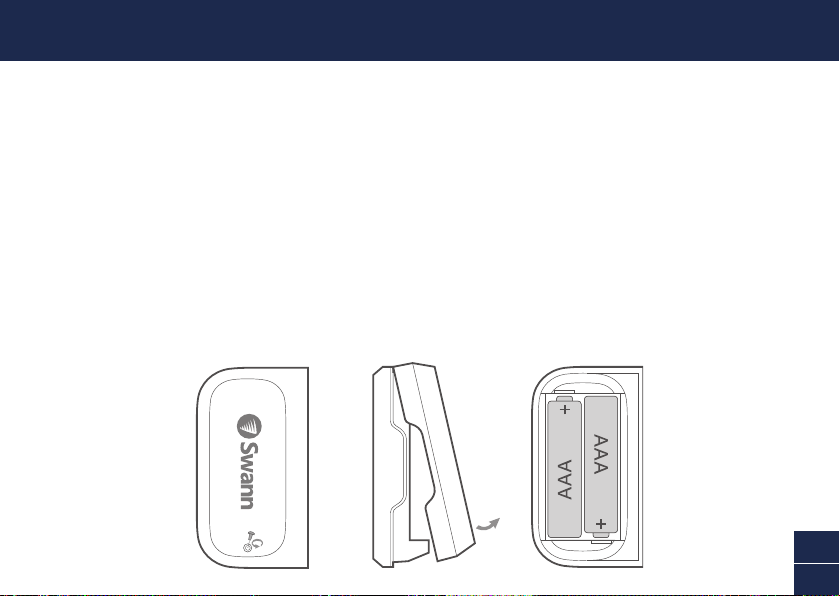
1 Unscrew the sensor cover with the supplied screwdriver and lift it off.
2 Insert the supplied two AAA batteries into the battery compartment according to the polarity
markings (+ and -) shown. Pairing mode will automatically activate on the sensor for 3 minutes
when batteries are inserted. The sensor status light will blink blue slowly during pairing mode.
If you have downloaded the Swann Security app on your mobile device (see page 4), you can
proceed to the pairing process (see page 5).
Note: Pairing mode on the sensor can be activated at any time by re-inserting the batteries.
3 Afteryouhavepairedthesensor,replacethecoverandscrewitrmlyinplace.
4 Should you need to replace the batteries in the future, there is no need to re-pair the sensor.
Simply wait for pairing mode to timeout (3 minutes), after which the sensor will automatically
reconnecttothepreviouslyconguredWi-Finetwork.

4
EN
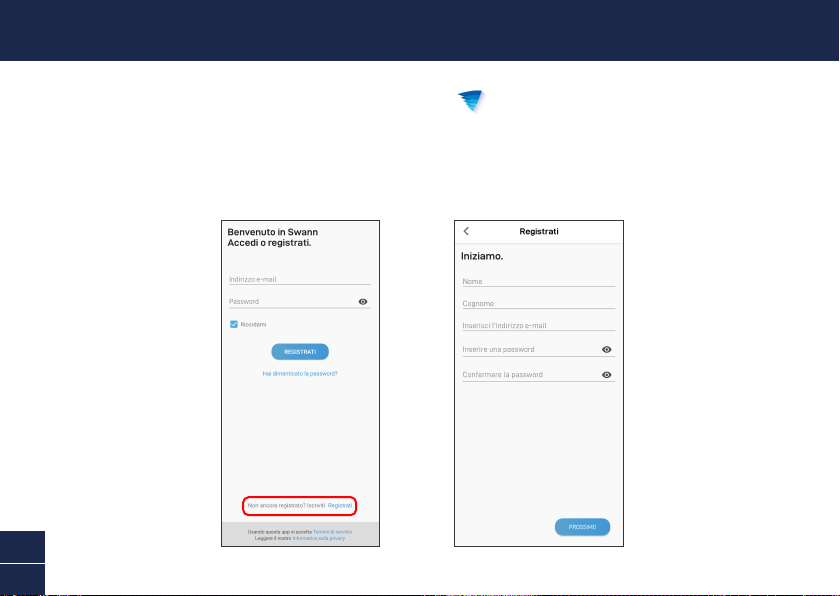
DOWNLOAD THE SWANN SECURITY APP
1 Download the latest version of the Swann Security app from the Apple App Store® or Google
Play™ Store on your iOS or Android device. Simply search for "Swann Security".
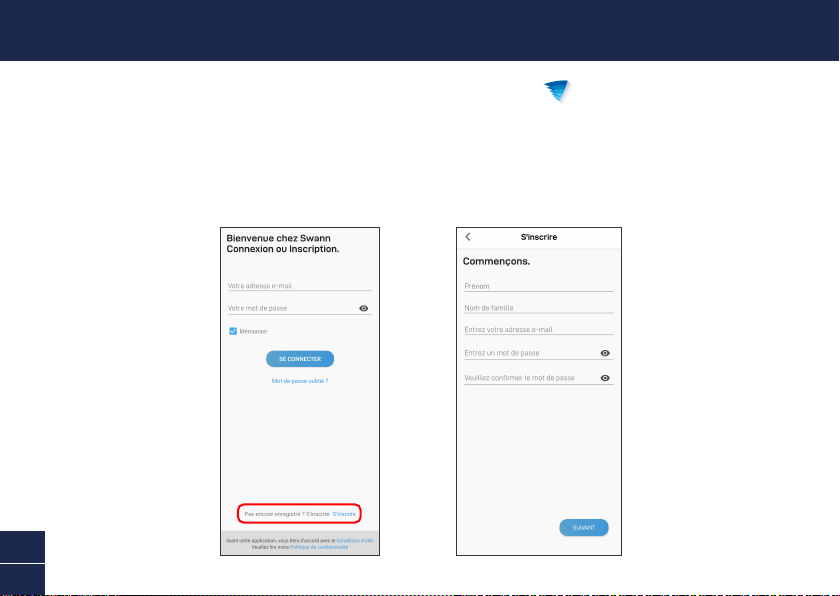
2 Open the app and create your Swann Security account by tapping “Not yet registered? Sign
Up” atthebottomofthescreen.Then,activateyourSwannSecurityaccountbyconrmingthe
vericationemailthatissenttotheregisteredemailaddress.
5
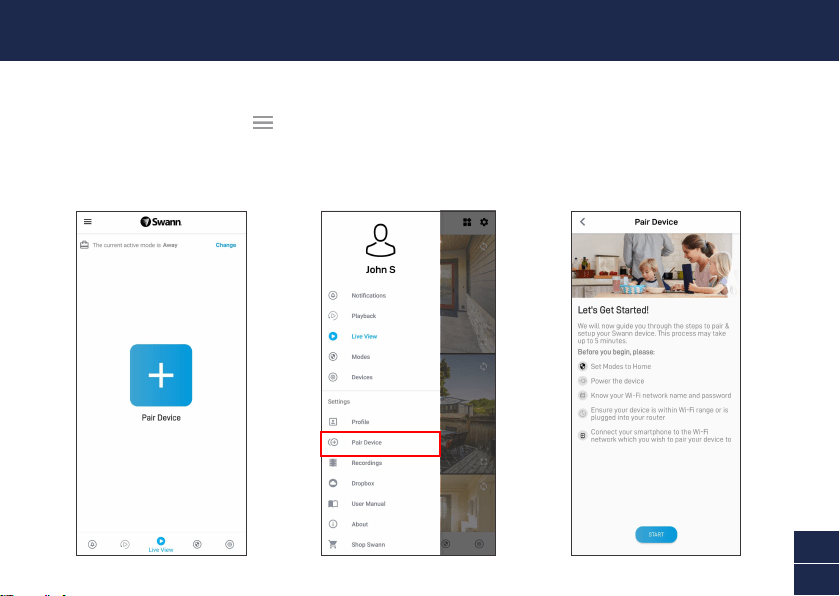
EN
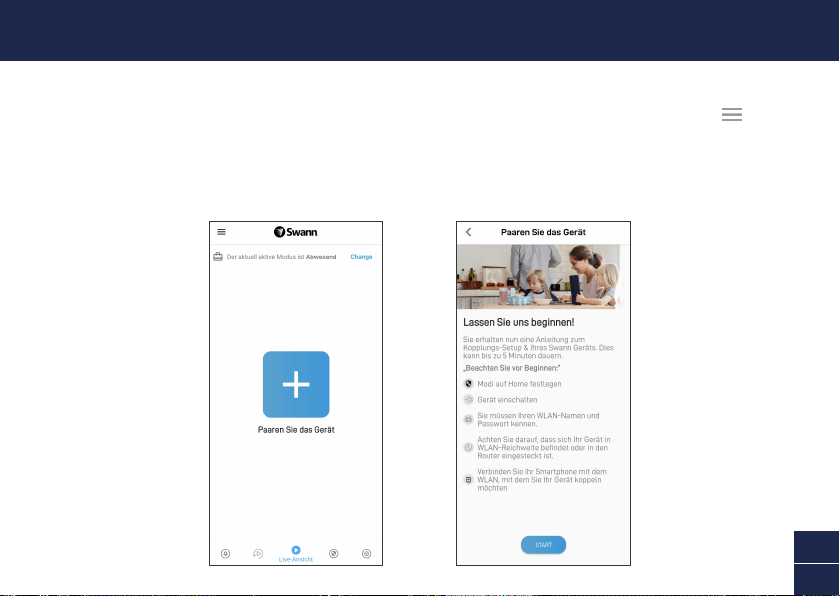
Open the Swann Security app and tap the Pair Device button on the screen. If you have already paired
a device, tap the menu icon in the top left and select “Pair Device”. The app will now guide you
through the pairing process and set up your sensor.
Before you begin, have the sensor with you and be close to your router. Please note that the sensor
canconnecttoa2.4GHzWi-Finetworkonly.
SET UP THE SENSOR

6
EN
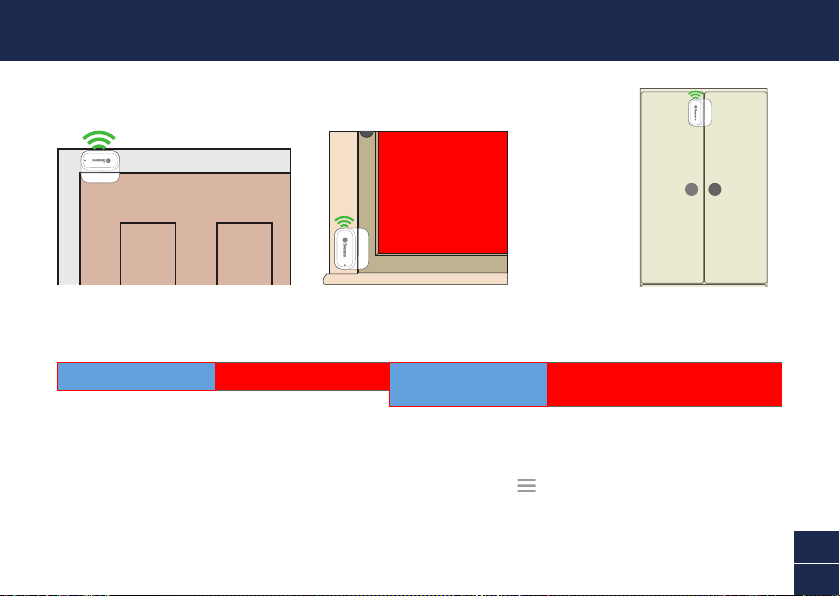
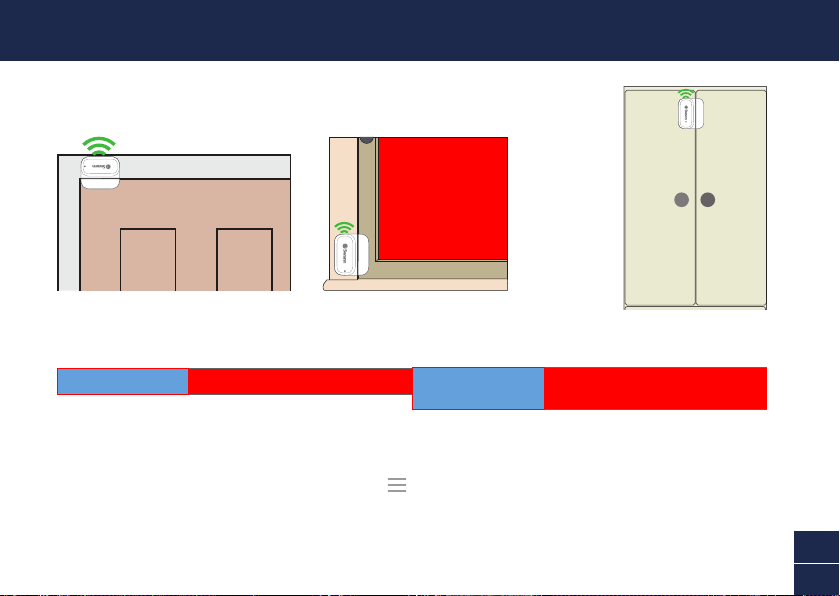
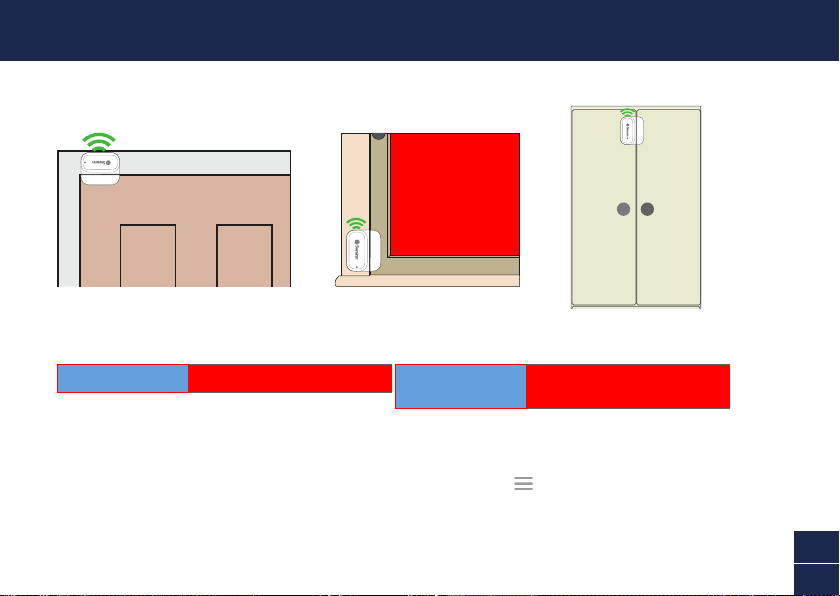
Take the time to choose a location and properly check the orientation of the sensor and the magnet.
The sensor and magnet should ideally be positioned in a way that when the window or door is closed,
they are aligned side by side, less than 10mm (3/8”) apart. See Mounting Examples on the next page.
Also,makesurethesensorlocationhasstrong,reliableWi-Fireceptionavailablesoyoucanget
timelyalerts.Asageneralrule,theneareryoursensoristoyourWi-Firouter,thebetterthewireless
connectionquality.YoucanexpandtheWi-FicoverageofyourcurrentnetworkbyinstallingaWi-Fi
range extender.
1 For reliable bonding, clean the surface where the sensor and magnet will be mounted with an
alcohol/cleaning wipe, and let dry.
2 Fit the sensor and the magnet with appropriate double-sided tapes.
3 Select a location on the window/door. Attach the sensor to the window/door frame and the magnet
tothewindow/door.Makesurethesensorcoverwillbeaccessibleinthenalposition(incaseof
battery replacement/re-pairing).
4 Pressrmlyontosurfacefor60secondseachtosecure.
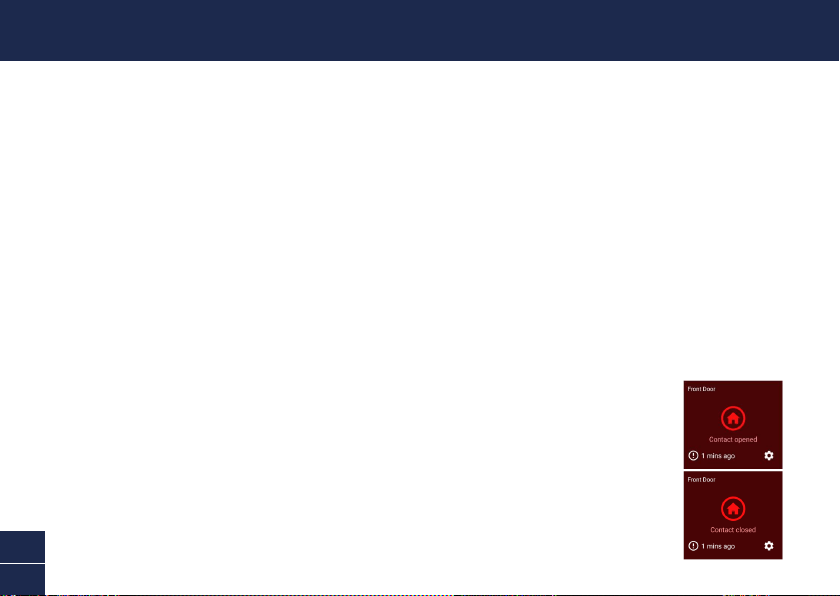
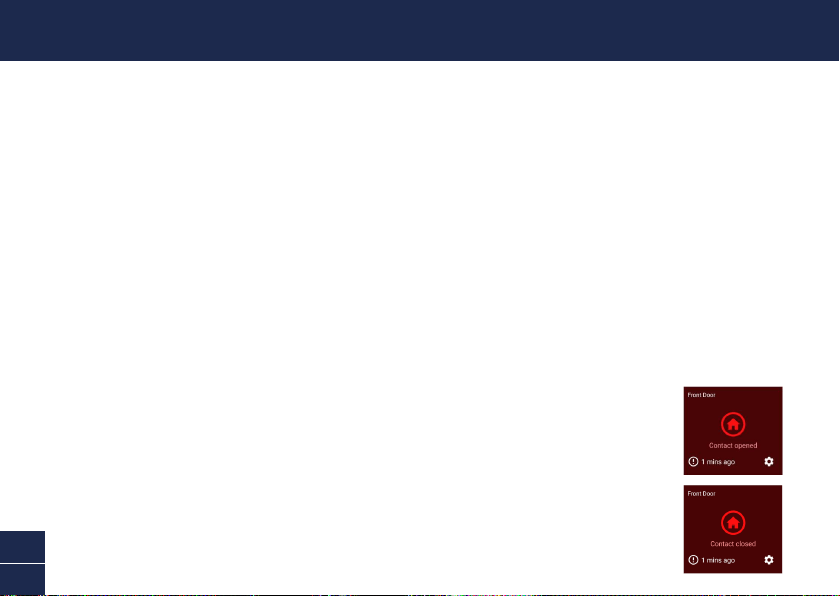
5 To test the sensor, simply open the window/door. The app will send you a push
notication,forexample,“Contact sensor has been opened on Front Door”.
Closethewindow/door.Theappwillsendyouanothernotication,forexample,
“Contact sensor has been closed on Front Door”. The sensor tile will also
automatically update its status in the app, as shown on the right.
Note: You can use the Modes feature in the app to congure whether or not to
receive “Opened” and “Closed” push notications when the sensor is in Home,
Away or Night mode.
MOUNTING THE SENSOR

7
EN
HELP AND RESOURCES
Status Light Guide
Thestatuslightonthesensortellsyouwhatishappeningwiththedeviceconnection.Whenthe
sensor is functioning normally, the status light will be off (unless it is out of battery/unpaired).
Mounting Examples
Door installation
Cabinet
installation
Windowinstallation
Swann Security App Manual
Access the Swann Security app manual (Menu
> User Manual) at any time to learn more about
navigating through the various screens and functions in the app.
Slow Blinking Blue Pairing mode
Sensor Battery Level
You can check the battery level of the sensor in the app: Devices tab > Sensor > Battery %
Solid Blue (5 seconds) Change in Open/Closed state. Connecting to Wi-Fi.

8
ES
GENERALIDADES
Imán
Sensor
Luz de estado
< 10mm(3/8”)
Tornillo de la cubierta
Da acceso al compartimiento de baterías y el
código QR
(ubicado debajo de la cubierta)
9
ES
INSTALACIÓN DE LA BATERÍA
1 Desatornille la cubierta del sensor con el destornillador provisto y levántela.
2 Coloque las dos baterías AAA incluidas en el compartimiento de baterías según las marcas de
polaridad (+ y -) que se muestran. El modo de vinculación activará automáticamente el sensor
durante 3 minutos cuando se coloquen las baterías. La luz de estado del sensor parpadeará de
azul lentamente durante el modo de vinculación. Si ha descargado la aplicación Swann Security en
su dispositivo móvil (vea la página 10), puede pasar al proceso de vinculación (vea la página 11).
Aviso: El modo de vinculación en el sensor se puede activar en cualquier momento reinsertando
las baterías.
3 Luegodehabervinculadoelsensor,coloquelacubiertayatorníllelahastaquequederme.
4 Si debe reemplazar las baterías en el futuro, no es necesario revincular el sensor. Simplemente
espereaquenaliceeltiempodevinculación(3minutos),luegodelcualelsensorserevinculará
automáticamentealaredWi-Fipreviamentecongurada.
10
ES
DESCARGUE LA APLICACIÓN SWANN SECURITY
1 Descargue la última versión de la aplicación Swann Security de las tiendas App Store® de
Apple o Google Play™ en su dispositivo iOS o Android. Simplemente busque "Swann Security".
2 Abra la aplicación y cree una cuenta de Swann Security; para ello, haga clic en el botón “¿Aún no
se ha registrado? Regístrese” en la parte inferior de la pantalla. A continuación, active su cuenta
deSwannSecurityalconrmarelcorreoelectrónicodevericaciónqueseenvíaaladirección
de correo electrónico registrada.
11
ES
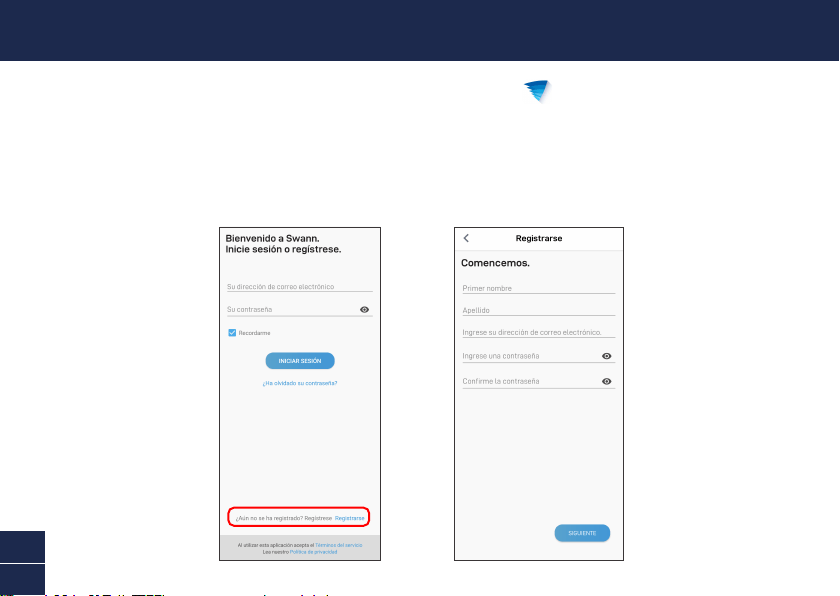
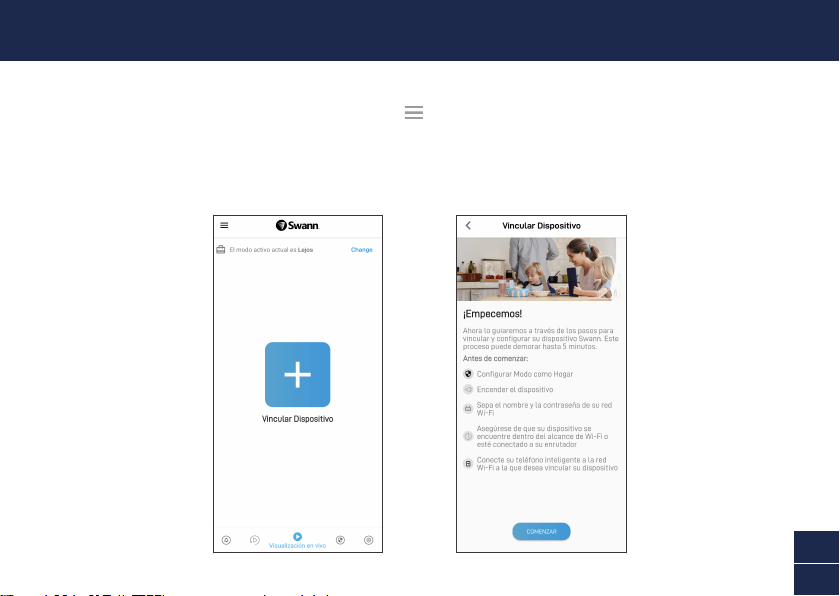
Abra la aplicación Swann Security y toque el botón Vincular dispositivo en la pantalla Si ya ha
vinculado un dispositivo, toque el ícono de menú en la parte superior izquierda y seleccione
“Vincular dispositivo”.Laaplicaciónahoraloguiaráenelprocesodevinculaciónycongurarásu
sensor.
Antes de comenzar, tenga el sensor con usted y esté cerca de su enrutador. Tenga en cuenta que el
sensorsolopuedeconectarseaunaredWi-Fi2.4GHz.
CONFIGURACIÓN DEL SENSOR

12
ES
Tómese el tiempo para elegir una ubicación y controle de manera adecuada la orientación del sensor y
el imán. El sensor y el imán deben estar posicionados idealmente de manera que cuando la ventana o
puertaesténcerradas,esténalineadasladoalado,amenosde10mm(3/8”)dedistancia.Veaejemplos
de montaje en la siguiente página.
Además,asegúresedequelaubicacióndelsensortengaunarecepciónfuerteyabledeWi-Fidisponible
para que pueda recibir alertas oportunas. Como regla general, cuanto más cerca esté el sensor del
enrutadordeWi-Fi,mejorserálacalidaddelaconexióninalámbrica.Puedeaumentarlacoberturade
Wi-FidesuredexistentemediantelainstalacióndeunextensorderangodeWi-Fi.
1 Paraunavinculaciónconable,limpielasupercieendondesemontaránelsensoryelimáncon
un paño de limpieza/alcohol y espere que se seque.
2 Ajuste el sensor y el imán con cintas de doble faz adecuadas.
3 Elija una ubicación en la ventana / puerta. Adhiera el sensor al marco de la ventana / puerta y
el imán a la ventana / puerta. Asegúrese de que se pueda acceder a la cubierta del sensor en la
posiciónnal(encasodereemplazarovincularlabatería).
4 Presione rmemente en la supercie durante 60 segundos cada uno para que
quedenjos.
5 Para probar el sensor, simplemente abra la ventana / puerta. La aplicación
enviará una noticación push, por ejemplo, “El sensor de contacto se ha
abierto en la puerta delantera”. Cierre la ventana / puerta. La aplicación
enviará una noticación push, por ejemplo, “El sensor de contacto se ha
cerrado en la puerta delantera”. El mosaico del sensor también actualizará
automáticamente su estado en la aplicación, como se muestra a la derecha.
Aviso: Puede usar la función de Modos en la aplicación para congurar recibir
o no noticaciones push “Abierto” y “Cerrado” cuando el sensor esté en modo
Hogar, Lejos o Noche.
MONTAJE DEL SENSOR

13
ES
AYUDA Y RECURSOS
Guía de luz de estado
La luz del estado en el sensor le indica lo que está sucediendo con la conexión del dispositivo. Cuando el sensor esté
funcionando normalmente, la luz del estado estará apagada (a menos que no tenga batería o no esté vinculado).
Ejemplos de montaje
Instalación de la puerta
Instalación del
gabinete
Instalación de la ventana
Manual de la aplicación Swann Security
Acceda al manual de la aplicación Swann Security (Menu
> Manual del usuario) en cualquier momento para
aprender más sobre navegar por las diversas pantallas y funciones de la aplicación.
Azul con intermitencia lenta Modo de vinculación Azul permanente (5 segundos) Cambiar a estado (abierto/cerrado).
Conectando al Wi-Fi.
Nivel de batería del sensor
Puede controlar el nivel de batería del sensor en la aplicación: Pestaña del dispositivo > Sensor > % de batería
¿Tiene preguntas?
¡Estamosparaayudarlo!VisitenuestroCentrodeAtenciónensupport.swann.com. Además, puede enviarnos un
correo electrónico en cualquier momento a: [email protected]

14
FR
APERÇU
Aimant
Capteur
Voyant d’état
< 10mm(3/8”)
Vis de protection
Permet d’accéder au compartiment des piles et
au code à barres
(situé sous le couvercle)

15
FR
INSTALLATION DES PILES
1 Dévissez le couvercle du capteur avec le tournevis fourni et soulevez-le.
2 Insérez les deux piles AAA fournies dans le compartiment des piles en respectant les marques
de polarité (+ et -) indiquées. Le mode de jumelage s'activera automatiquement sur le capteur
pendant 3 minutes lorsque les piles sont insérées. Le voyant d'état du capteur clignote lentement
en bleu pendant le mode de jumelage. Si vous avez téléchargé l'application Swann Security sur votre
appareilmobile(voirpage16),vouspouvezprocéderauprocessusdejumelage(voirpage17).
Remarque: le mode de jumelage sur le capteur peut être activé à tout moment en réinsérant les
piles.
3 Après avoir jumelé le capteur, replacez le couvercle et vissez-le fermement en place.
4 Si vous devez remplacer les piles à l'avenir, il n'est pas nécessaire de jumeler à nouveau le capteur.
Attendez simplement que le mode de jumelage expire (3 minutes), après quoi le capteur se recon-
necteraautomatiquementauréseauWi-Ficonfiguréprécédemment.
16
FR
TÉLÉCHARGEZ L'APPLICATION SWANN SECURITY
1 Téléchargez la dernière version de l'application Swann Security depuis l’Apple App Store
MD
ou Google Play
MC
sur votre appareil iOS ou Android. Effectuez simplement une recherche pour
«Swann Security».
2 Ouvrez l'application et créez votre compte Swann Security en appuyant sur «Pas encore
enregistré? S’inscrire» au bas de l’écran. Ensuite, activez votre compte Swann Security en
confirmant le courriel de vérification qui est envoyé à l'adresse courriel enregistrée.

17
FR
Ouvrez l'application Swann Security et appuyez sur le bouton Apparier l’appareil sur l'écran. Si vous
avez déjà jumelé un appareil, appuyez sur l'icône de menu en haut à gauche et sélectionnez
«Apparier l’appareil».L'applicationvamaintenantvousguidertoutaulongduprocessusdejumelage
et configurer votre capteur.
Avantdecommencer,ayezlecapteuravecvousetsoyezàproximitédevotrerouteur.Veuilleznoter
quelecapteurnepeutseconnecterqu'àunréseauWi-Fide2,4GHz.
CONFIGURATION DU CAPTEUR
18
FR
Prenez le temps de choisir un emplacement et de bien vérifier l'orientation du capteur et de l'aimant.
Le capteur et l'aimant doivent idéalement être positionnés de manière à ce que lorsque la fenêtre ou
laporteestfermée,ilssoientalignéscôteàcôte,àmoinsde10mm(3/8po)l'undel'autre.Voirles
exemples de montage à la page suivante.
Assurez-vous également que l'emplacement du capteur dispose d'une réception Wi-Fi puissante et
fiable afin que vous puissiez recevoir des alertes en temps opportun. En règle générale, plus votre
capteurestprochedevotrerouteurWi-Fi,meilleureestlaqualitédelaconnexionsansfil.Vouspouvez
augmenterlacouvertureWi-FidevotreréseauexistanteninstallantunprolongateurdeportéeWi-Fi.
1 Pour une liaison fiable, nettoyez la surface sur laquelle le capteur et l'aimant seront montés avec
une lingette alcoolisée/nettoyante et laissez sécher.
2 Fixez le capteur et l'aimant avec du ruban adhésif double face approprié.
3 Choisissez un emplacement sur la fenêtre/porte. Fixez le capteur au cadre de la fenêtre/ porte
et l'aimant à la fenêtre/porte. Assurez-vous que le couvercle du capteur sera accessible dans la
position finale (en cas de remplacement/rejumelage de la pile).
4 Appuyezfermementsurlasurfacependant60secondeschacunafindelessécuriser.
5 Pour tester le capteur, ouvrez simplement la fenêtre/porte. L'application vous
enverra une notification poussée, par exemple, « Le capteur de contact a
été ouvert sur la porte d'entrée ». Fermez la fenêtre/la porte. L’application
vous enverra une autre notification, par exemple, « Le capteur de contact a
été fermé sur la porte d’entrée ». La vignette du capteur mettra également
automatiquement à jour son statut dans l'application, comme indiqué à droite.
Remarque:VouspouvezutiliserlafonctionModesdel'applicationpourconfigurer
laréceptionounondesnotificationspoussée«Ouvert»et«Fermé»lorsquele
capteurestenmode«Àlamaison»,«Absent»ou«Nuit».
MONTAGE DU CAPTEUR
19
FR
AIDE ET RESSOURCES
Guide du voyant d’état
Le voyant d'état sur le capteur vous indique ce qui se passe avec la connexion de l'appareil. Lorsque le capteur
fonctionne normalement, le voyant d'état est éteint (à moins que la pile ne soit épuisée/non jumelé).
Exemples de montage
Installation sur une porte
Installation sur
une armoire
Installation sur une fenêtre
Manuel de l'application Swann Security
Accédez à tout moment au manuel de l'application Swann Security (Menu
> Manuel de l'utilisateur) pour en
savoir plus sur la navigation dans les différents écrans et fonctions de l'application.
Bleu clignotant lentement Mode de jumelage Bleu fixe (5 secondes) Changement d'état ouvert/fermé.
Connexion au Wi-Fi.
Niveau de la pile du capteur
Vouspouvezvérifierleniveaudelapileducapteurdansl’application:Onglet Appareils > Capteur > % de la pile
Questions?
Noussommeslàpourvousaider!VisiteznotreCentredesoutienausupport.swann.com.Vouspouvezégalement
nousenvoyeruncourrielàtoutmomentvia:[email protected]
20
IT
PANORAMICA
Magnete
Sensore
Luce di stato
< 10mm(3/8”)
Vite del coperchio
Fornisce l’accesso al vano batteria e al
codice QR
(situato sotto il coperchio)

21
IT
INSTALLAZIONE DELLA BATTERIA
1 Svitare il coperchio del sensore con il cacciavite in dotazione e sollevarlo.
2 Inserire le due batterie AAA in dotazione nel vano batterie secondo i segni di polarità (+ e -)
indicati. La modalità di abbinamento si attiva automaticamente sul sensore per 3 minuti quando
le batterie sono inserite. La luce di stato del sensore lampeggerà lentamente in blu durante la
modalità di abbinamento. Dopo aver scaricato l’app Swann Security sul dispositivo mobile (vedi
pagina 22), procedere al processo di abbinamento (vedi pagina 23).
Nota: La modalità di abbinamento del sensore può essere attivata in qualsiasi momento
reinserendo le batterie.
3 Dopo aver abbinato il sensore, rimettere il coperchio e avvitarlo saldamente in posizione.
4 Se in futuro dovesse essere necessario sostituire le batterie, non c’è bisogno di riparare il senso-
re. Basta attendere il timeout della modalità di abbinamento (3 minuti), dopo di che il sensore si
riconnetteràautomaticamenteallareteWi-Fiprecedentementecongurata.
22
IT
DOWNLOAD DELL’APPLICAZIONE SWANN SECURITY
1 Scaricare l’ultima versione dell’app Swann Security dall’Apple App Store® o Google Play™
Store sul dispositivo iOS o Android. Basta cercare "Swann Security".
2 Aprire l’app e creare l’account Swann Security toccando “Non ancora registrato? Iscriviti” nella
parte inferiore dello schermo. Quindi, attivare l’account Swann Security confermando l’email di
vericainviataall’indirizzoemailregistrato.

23
IT
Aprire l’app Swann Security e toccare il tasto Accoppiamento dispositivo sullo schermo. Se è stato
già abbinato un dispositivo, toccare l’icona del menu in alto a sinistra e seleziona “Accoppiamento
dispositivo”. L’app guiderà ora attraverso il processo di abbinamento e imposterà il sensore.
Prima di iniziare, abbianare il sensore e avvicinarsi al router. Si prega di notare che il sensore può
connettersisoloadunareteWi-Fia2,4GHz.
IMPOSTARE IL SENSORE

24
IT
Scegliere una giusta collocazione e controllare l’orientamento del sensore e del magnete.
Ilsensoreeilmagnetedovrebberoidealmenteessereposizionatiinmodochequandolanestraola
portaèchiusa,sianoallineatiunoaccantoall’altro,amenodi10mm(3/8")didistanza.VedereEsempi
di montaggio alla pagina seguente.
Inoltre,assicurarsichelaposizionedelsensoreabbiaunaricezioneWi-Fiforteeafdabile,inmodo
dapoterricevereavvisitempestivi.Dinorma,quantopiùvicinoilsensorealWi-Firouter,tantomigliore
sarà la qualità di connessione.
1 Perunabbinamentoafdabile,pulirelasuperciedoveilsensoreeilmagnetesarannomontati
con una salviettina di alcool/pulitura e lasciare asciugare.
2 Montare il sensore e il magnete con i nastri biadesivi appropriati.
3 Selezionareunaposizionesullanestra/porta.Fissareilsensorealtelaiodellanestra/porta
eilmagneteallanestra/porta.Assicurarsicheilcoperchiodelsensoresiaaccessibilenella
posizionenale(incasodisostituzione/riparazionedellabatteria).
4 Premeresaldamentesullasupercieper60secondiciascunoperssare.
5 Pertestareilsensore,bastaaprirelanestra/porta.L’appinvieràunanotica
push, ad esempio, “Il sensore di contatto è stato aperto sulla porta d’ingresso”.
Chiuderelanestra/porta.L’applicazioneinvieràun’altranotica,adesempio,“Il
sensore di contatto è stato chiuso sulla porta d’ingresso”. La scheda del sensore
aggiornerà anche automaticamente il suo stato nell’app, come mostrato sulla
destra. Nota: È possibile usare la funzione Modalità nell’app per congurare
se ricevere o meno le notiche push “Aperto” e “Chiuso” quando il sensore è in
modalità Home, Away o Night.
MONTARE IL SENSORE
25
IT
AIUTO E RISORSE
Guida alle luci di stato
La luce di stato sul sensore dice cosa sta succedendo con la connessione del dispositivo. Quando il sensore
funziona normalmente, la luce di stato sarà spenta (a meno che non sia senza batteria o non sia guasto).
Esempi di montaggio
Installazione a porta
Installazione
nell’armadio
InstallazionediWindows
Manuale dell’app Swann Security
Accedere al manuale dell’app Swann Security (Menu
> Manuale dell’utente) in qualsiasi momento per saperne di
più sulla navigazione nelle varie schermate e funzioni dell’app.
Blu lampeggiante lento Modalità di accoppiamento
Blu fisso (5 secondi) Cambio di stato aperto/chiuso. Connesso
con Wi-Fi.
Livello della batteria del sensore
Controllare il livello della batteria del sensore nell’app: Scheda Dispositivi > Sensore > % Batteria
Domande?
Siamoadisposizioneperaiutarvi!VisitateilnostroCentrodisupportosusupport.swann.com. Potete anche inviare
un'e-mail in qualsiasi momento a: [email protected]

26
DE
ÜBERBLICK
Magnet
Sensor
Statusanzeige
< 10mm
Abdeckungsschraube
Ermöglicht den Zugang zum Batteriefach und zum
QR-Code
(bendetsichunterderAbdeckung)
27
DE
INSTALLATION DER BATTERIE
1 Schrauben Sie den Deckel des Sensors mit dem mitgelieferten Schraubendreher ab und heben
Sie ihn ab.
2 Legen Sie die zwei mitgelieferten AAA-Batterien entsprechend der dargestellten
Polaritätsmarkierungen (+ und -) in das Batteriefach ein. Der Kopplungsmodus wird automatisch
für 3 Minuten am Sensor aktiviert, wenn die Batterien eingelegt werden. Die Sensorstatus-Anzeige
blinktwährenddesKopplungsmoduslangsamblau.WennSiedieSwannSecurity-AppaufIhr
Mobilgerät heruntergeladen haben (siehe Seite 28), können Sie mit dem Kopplungsprozess
fortfahren (siehe Seite 29). Hinweis: Der Kopplungsmodus am Sensor kann jederzeit durch
erneutes Einlegen der Batterien aktiviert werden.
3 Nachdem Sie den Sensor gekoppelt haben, setzen Sie die Abdeckung wieder auf und schrauben
sie fest.
4 Sollten Sie in Zukunft die Batterien austauschen müssen, ist es nicht notwendig, den Sensor neu
zukoppeln.WartenSieeinfach,bisderKopplungsmodusabgelaufenist(3Minuten).Danach
verbindetsichderSensorautomatischwiedermitdemzuvorkonguriertenWLAN.

28
DE
HERUNTERLADEN DER SWANN SECURITY-APP
1 LadenSiedieaktuelleVersionder Swann Security-App aus dem Apple App Store® oder im
Google Play™ Store auf Ihr iOD oder Android-Gerät herunter. Suchen Sie einfach nach „Swann
Security“.
2 Öffnen Sie die App und erstellen Ihr Swann Security-Konto, indem Sie unten im Bildschirm auf
„Noch nicht registriert? Hier anmelden” tippen. Dann aktivieren Sie Ihr Swann Security Konto,
indem Sie die Bestätigungs-E-Mail bestätigen, die an die registrierte E-Mail-Adresse gesendet
wurde.
29
DE
ÖffnenSiedieSwannSecurity-AppundtippenSieimBildschirmaufdieSchaltäche Paaren Sie das
Gerät.WennSiebereitseinGerätgekoppelthaben,tippenSieobenlinksaufdasMenüsymbol und
wählen Sie „Paaren Sie das Gerät“. Die App wird Sie nun durch den Kopplungsprozess führen und
Ihren Sensor einrichten. Bevor Sie beginnen, sollten Sie den Sensor bereit haben und sich in der Nähe
IhresRoutersbenden.BittebeachtenSie,dassdieSensornurmiteinem2,4GHzWLANverbunden
werden kann.
SENSOR EINRICHTEN
30
DE
Nehmen Sie sich die Zeit, einen Standort zu wählen und die Ausrichtung des Sensors und des Magneten
ordnungsgemäß zu überprüfen. Sensor und Magnet sollten idealerweise so positioniert werden, dass
sie bei geschlossenem Fenster oder geschlossener Tür nebeneinander ausgerichtet sind und weniger
als 10 mm voneinander entfernt sind. Siehe Montagebeispiele auf der nächsten Seite.
StellenSieaußerdemsicher,dassamStandortdesSensorseinstarker,zuverlässigerWLAN-Empfang
verfügbarist,damitSierechtzeitigWarnmeldungenerhalten.Allgemeingilt,jenähersichderSensor
amWLAN-Routerbendet, destobesser istdie QualitätderFunkverbindung.Siekönnen dieWLAN-
AbdeckungdesbestehendenNetzwerksverstärken,indemSieeinenWLAN-Extenderinstallieren.
1 FüreinezuverlässigeVerbindungreinigenSiedieOberäche,aufderderSensorundderMagnet
montiert werden, mit einem Alkohol-/Reinigungstuch und lassen Sie sie trocknen.
2 Befestigen Sie den Sensor und den Magneten mit einem dafür geeigneten doppelseitigen
Klebeband.
3 WählenSieeineStelleaufdemFenster/derTür.BefestigenSiedenSensoramFenster-/Türrahmen
und den Magneten am Fenster/an der Tür. Stellen Sie sicher, dass die Sensorabdeckung in der
endgültigen Position zugänglich ist (für den Fall eines Batteriewechsels/einer erneuten Kopplung).
4 Jeweils60SekundenlangfestaufdieOberächedrücken,umihnzubefestigen.
5 Um den Sensor zu testen, öffnen Sie einfach das Fenster/die Tür. Die App
sendet Ihnen eine Push-Benachrichtigung, z. B. „Kontaktsensor an der
Haustür wurde geöffnet”. Schließen Sie das Fenster/die Tür. Die App sendet
Ihnen eine weitere Benachrichtigung, zum Beispiel: „Der Kontaktsensor
an der Haustür wurde geschlossen”. Die Sensorkachel wird auch
automatisch ihren Status in der App aktualisieren, wie rechts dargestellt.
Hinweis: Mit der Funktion „Modi“ in der App können Sie kongurieren, ob Sie
Push-Benachrichtigungen „Geöffnet“ und „Geschlossen“ erhalten möchten, wenn
sich der Sensor im Modus Home, Away oder Night bendet.
MONTAGE DES SENSORS
31
DE
HILFE UND RESSOURCEN
Bedeutung der Statusanzeigen
DieStatusanzeigeamSensorzeigtIhnendenStatusderGeräteverbindungan.WennderSensornormalfunktioniert,
ist die Statusanzeige aus (es sei denn, die Batterie ist leer bzw. der Sensors ist nicht gekoppelt.
Befestigungsbeispiele
Türinstallation
Schrankinstallation
Fensterinstallation
Swann Security-App-Handbuch
Greifen Sie jederzeit auf das Handbuch der Swann Security-App zu (Menü
> Benutzerhandbuch), um mehr über
die Navigation durch die verschiedenen Bildschirme und Funktionen in der App zu erfahren.
Blinkt langsam blau Kopplungsmodus Durchgehend blau
(5 Sekunden)
Änderung des Zustands Offen/
Geschlossen. WLAN verbunden.
Batteriestand des Sensors
Sie können den Batteriestand des Sensors in der App überprüfen: Registerkarte Geräte > Sensor > Batterie %
Noch Fragen?
WirhelfenIhnengerne.Besuchen Sie unser Support-Center auf support.swann.com. Sie können uns auch jederzeit
per E-Mail erreichen unter: [email protected]

32
EN
QSGSWIFIWDOORVER15L
HAVE QUESTIONS?
We’reheretohelp!VisitourSupportCenteratsupport.swann.com
You can also email us at any time via: [email protected]
FCC STATEMENT
This equipment has been tested and found to comply with the limits for Class
B digital device, pursuant to part 15 of the FCC Rules. These limits are designed
to provide reasonable protection against harmful interference in a residential
installation. This equipment generates, uses and can radiate radio frequency
energy and, if not installed and used in accordance with the instructions, may
cause harmful interference to radio communications. However, there is no
guarantee that interference will not occur in a particular installation. If this
equipment does cause harmful interference to radio or television reception, which
can be determined by turning the equipment off and on, the user is encouraged
to try to correct the interference by one or more of the following measures: •
Reorient or relocate the receiving antenna • Increase the separation between the
equipment and the receiver • Connect the equipment into an outlet on a circuit
different from that to which the receiver is connected • Consult the dealer or an
experiencedradio/TVtechnicianforhelp.
This device complies with Part 15 of the FCC Rules. Operation is subject to the
following two conditions: (1) this device may not cause harmful interference, and
(2) this device must accept any interference received, including interference that
may cause undesired operation.
FCC RF Radiation Exposure Statement Caution: To maintain compliance with
the FCC’s RF exposure guidelines, place the product at least 20cm from nearby
persons.
WARNING:Modicationsnotapprovedby thepartyresponsibleforcompliance
could void user’s authority to operate the equipment.
CE DECLARATION OF CONFORMITY
Hereby, Swann Communications, declares that this product is in compliance with
the essential requirements and other relevant provisions of Directive 2014/53/
EU. The full test of the EU declaration of conformity is available at the following
internet address: www.swann.com/uk/compliance
RECYCLING
ThisproductbearstheselectivesortingsymbolforWasteelectricalandelectronic
equipment(WEEE).This meansthat this productmust be handledpursuant to
European directive 2012/19/EU in order to be recycled or dismantled to minimize
its impact on the environment. User has the choice to give his product to a
competent recycling organization or to the retailer when he buys a new electrical
or electronic equipment.
BATTERY SAFETY INFORMATION Replace batteries at the same time. Do not
mix new and old batteries or battery types (for example, alkaline and lithium
batteries). Keep batteries out of reach of children. Dispose of used batteries
promptly in accordance with local regulations. | INFORMACIÓN DE SEGURIDAD
DE LA BATERÍA Sustituya las baterías al mismo tiempo. No mezcle baterías
nuevas y usadas ni tipos de baterías (por ejemplo, baterías alcalinas y de
litio). Mantenga las baterías fuera del alcance de los niños. Deseche las
baterías usadas correctamente de acuerdo con las reglamentaciones locales. |
INFORMATIONS SUR LA SÉCURITÉ DE LA PILE Remplacez les piles en même
temps. Ne mélangez pas des piles ou types de piles neuves et anciennes (par
exemple, des piles alcalines et au lithium). Gardez les piles hors de portée des
enfants. Débarrassez-vous rapidement des piles usagées conformément aux
réglementations locales. | INFORMAZIONI DI SICUREZZA DELLA BATTERIA
Sostituire contemporaneamente le batterie. Non usare insieme batterie nuove e
vecchie o batteri di diverso tipo (ad esempio, batterie alcaline e al litio). Tenere le
batterie fuori dalla portata dei bambini. Smaltire correttamente le batterie usate
nel rispetto delle norme locali. | SICHERHEITSHINWEISE ZU BATTERIEN
Ersetzen Sie die Batterien gleichzeitig. Mischen Sie niemals neue und alte
Batterien oder Batterietypen (z.B. Alkali- und Lithiumbatterien). Batterien von
Kindern fernhalten. Entsorgen Sie verbrauchte Batterien sofort gemäß den
örtlichen Bestimmungen.
Model:SWIFI-WDOOR
© Swann Communications 2021