DO NOT RETURN YOUR GRILL TO THE STORE
Before visiting your local retailer, call our customer
service department at 1-866-994-6390 from 9:00 am
to 5:00 pm Eastern Time, Monday through Friday.
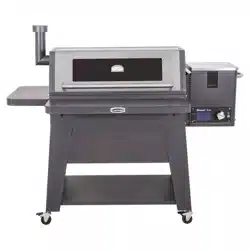
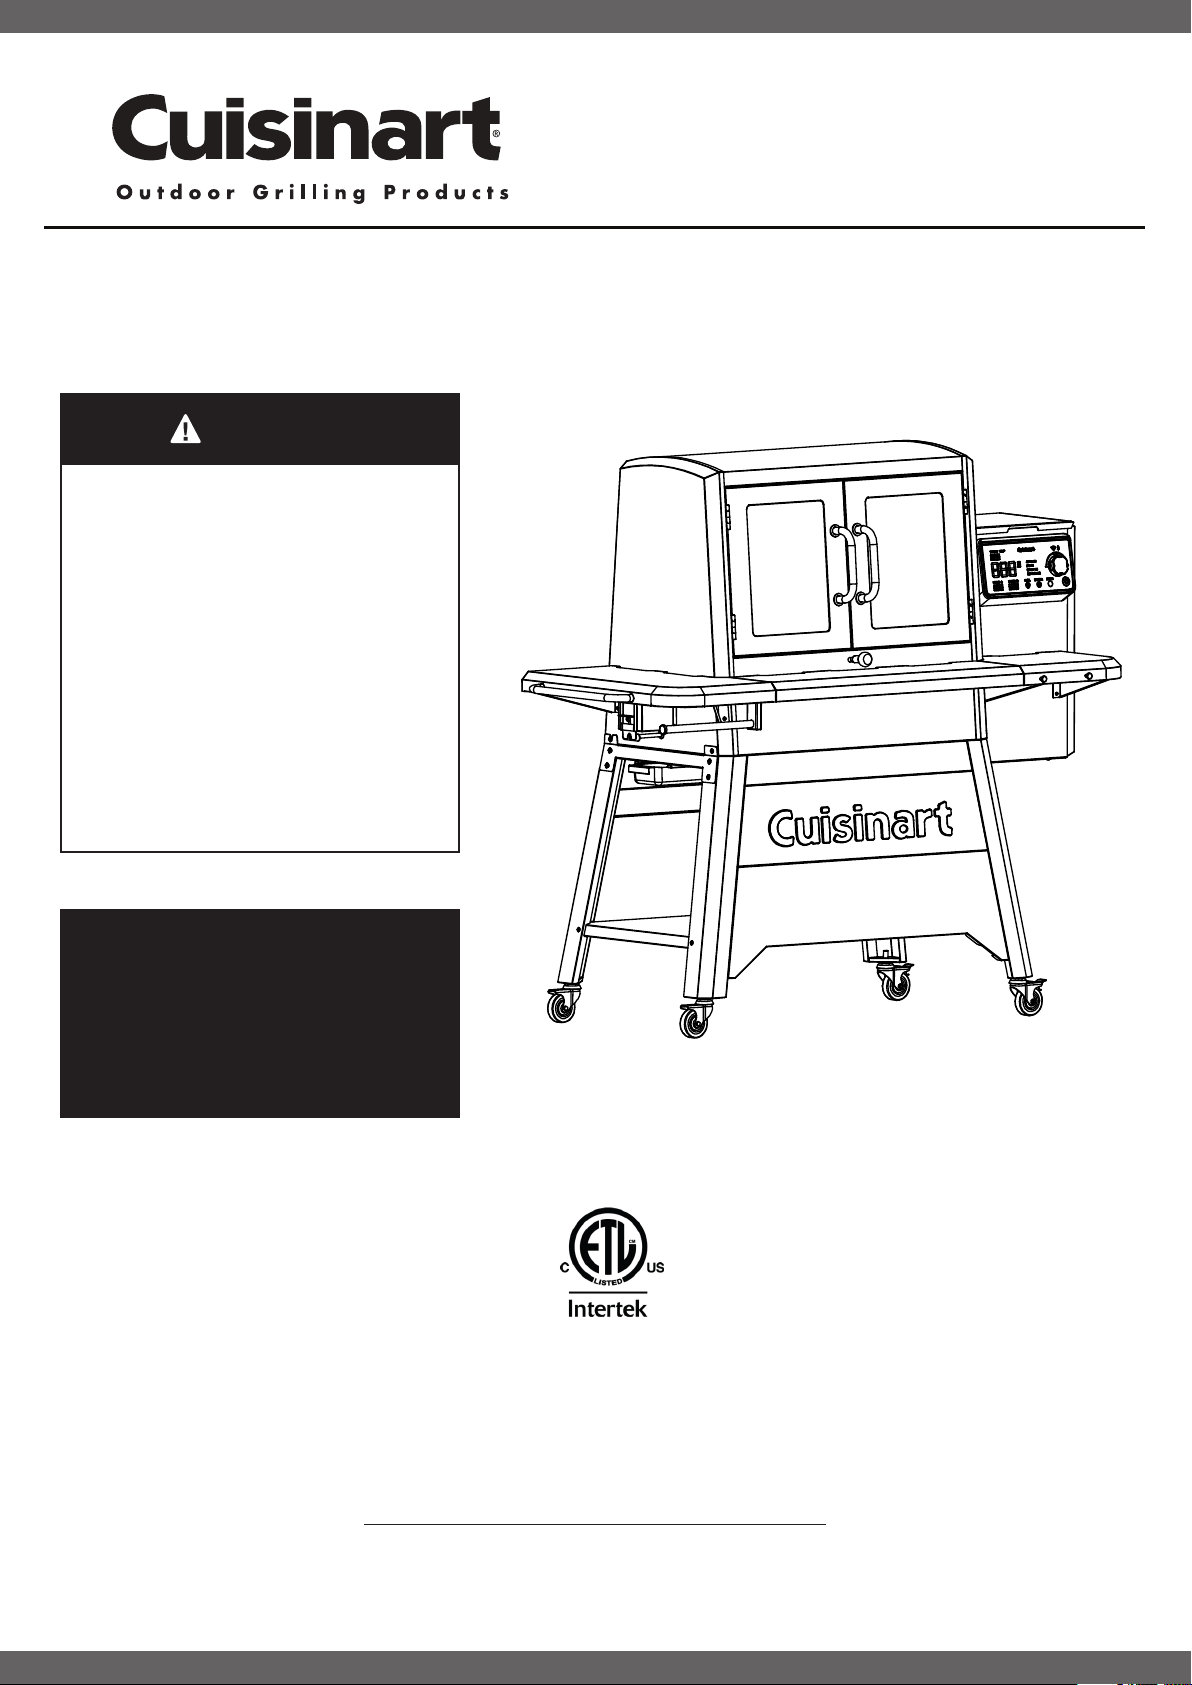
Model NO: CGWM-080
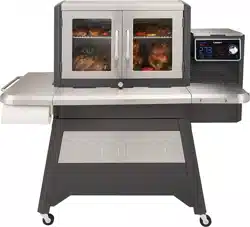
CLERMONT
PELLET GRILL & SMOKER
Customer Service Hotline
1-866-994-6390
OWNER’S MANUAL
ASSEMBLY AND
OPERATING INSTRUCTIONS
WARNING
PLEASE READ THIS ENTIRE MANUAL
BEFORE INSTALLATION AND USE
OF THIS PELLET FUEL-BURNING
APPLIANCE.
FAILURE TO FOLLOW THESE
INSTRUCTIONS COULD RESULT IN
PROPERTY DAMAGE, BODILY INJURY
OR EVEN DEATH.
CONTACT LOCAL BUILDING OR FIRE
OFFICIALS ABOUT RESTRICTIONS
AND INSTALLATION INSPECTION
REQUIREMENTS IN YOUR AREA.
NOTICE TO INSTALLER: LEAVE
THESE INSTRUCTIONS WITH
THE GRILL OWNER FOR FUTURE
REFERENCE.
SAVE THIS MANUAL FOR FUTURE
REFERENCE.
IMPORTANT: ALL INSTRUCTIONS AND SAFEGUARDS ON THIS SECTION MUST BE
FOLLOWED TO PREVENT DAMAGE AND/OR INJURY.
IMPORTANT SAFETY INFORMATION
WARNING: For outdoor use only. Do not use near or inside a building, garage or any other
enclosed area.
WARNING: A major cause of fires is failure to maintain required clearances (Air space to
combustible materials). Keep all combustible materials at least 60 inches (152.4 cm) away
from the grill at all times. This includes combustible overhangs, and combustible flooring like a
wooden deck.
WARNING: This product is an electrical device utilizing hazardous voltage levels and must
be operated away from water. If water contacts the power cord or sensitive electronics serious
damage to the product or electrocution risk may occur. Do not operate this product in rain or
wet conditions. Do not allow this product to come in contact with water. Set this product up
more than 10’ from any large body of water (swimming pool, lake, pond, etc).
WARNING: Carbon monoxide is a colorless, odorless gas produced by burning common
cooking fuels like wood, charcoal, and propane. Follow these guidelines to prevent this
colorless, odorless gas from poisoning you, your family, or others:
Know the symptoms of carbon monoxide poisoning; headache, dizziness, weakness, •
nausea, vomiting, sleepiness and confusion. Carbon monoxide reduces the blood’s ability
to carry oxygen. Low blood oxygen levels can result in loss of consciousness and death.
See a doctor if you or others develop cold or flu-like symptoms while cooking or in the •
vicinity of this appliance. Carbon monoxide poisoning, which can easily be mistaken for a
cold or flu, is often detected too late.
Alcohol consumption and drug use increase the effects of carbon monoxide poisoning.•
Carbon monoxide is especially toxic to mother and child during pregnancy, infants, the •
elderly, grills and people with blood or circulatory system problems, such as anemia or
heart disease.
DANGER: NOT for use in or on boats or recreational vehicles.
DANGER: Do not store or use flammable liquids near the grill.
DANGER: Only use this product with a GFI protected 3 prong outlet.
CALIFORNIA PROPOSITION 65 WARNING
WARNING: This product can expose you to chemicals, including carbon •
monoxide, which are known to the State of California to cause cancer and birth
defects or other reproductive harm. For more information go to:
www.P65Warnings.ca.gov
Warnings and Usage
SAFETY INFORMATION
2

Cover …………….…………......………………………….………...….………….………….….…………………..……..1
Table of Contents……...........…….……………………..….………...….………….………………..……….…….…..3
Safety Information……….….............……………………...………...….………….….………….……………..……..4
Exploded View…….................………….…………………….…………………….......................……….………....5
Parts List….………........................……..…..….……...…..............……………....………………...........................6
Assembly Preparation and Instructions…......................…………………...……………………….….….….....…..8
Operating the Grill…..............................................................................….....……..…………………….…........21
Cooking.......…………….…………………..........………………….…......…...….….……………………...…...25
Care and Maintenance...............….........................……….………………......…………….……...….….…...…..28
Trouble Shooting.....……................…….……………………………………..........….…………………..…....…...31
Warranty and Replacement Parts…..........……….....……….…………………….....…………..………….……...33
TABLE OF CONTENTS
3

GENERAL WARNINGS
-----------------------------------------------------------------------------------
DO NOT •use on wood decks. Set up this grill on a hard, non-combustible smooth level surface.
In case of fire, turn the control “OFF”. Unplug the grill from the power source and allow the fire to burn •
out on its own. Do not use water to try to extinguish a fire.
Keep a fire extinguisher on hand acceptable for use with electric products. Refer to your local authority •
to determine proper size and type.
Creosote – Formation and need for removal. When wood pellets are burned slowly, they produce tar •
and other organic vapors that combine with expelled moisture to form creosote. The creosote vapors
condense on relatively cooler surfaces like the exhaust vents and the glass. As a result, creosote
residue accumulates on these surfaces. When ignited, this creosote makes an extremely hot fire. To
prevent this do a deep clean on the internal components of the grill at least twice a year. See Care and
Maintenance Section on Page 28.
Keep appliance clean. When grease or creosote has accumulated, it should be cleaned to reduce risk •
of fire. See Care and Maintenance section.
The surfaces of the grill will get very hot during regular use and can be a burn hazard. Do not leave •
unattended when children are present and keep away from combustible materials.
To avoid accidental burns wear heat resistant mitts, use long handled tools, handles, and knobs when •
operating the grill.
To protect against electric shock, do not immerse cord, plugs, or heating element in water or any other •
liquids.
Do not place power cord where it may come in contact with hot surfaces or pose a tripping hazard.•
Unplug this grill from the power source when not in use and before cleaning. Allow appliance to cool •
down before attempting to clean or service.
Do not operate any appliance with a damaged power cord or plug, or after the appliance has •
malfunctioned or been damaged in any manner.
NEVER• add cooking pellets to a hot fire pot by hand. You could be seriously burned. If the hopper
runs out of pellets or your fire goes out while cooking, let the grill completely cool and follow the Initial
Lighting Instructions.
Use only cooking grade wood pellets. •NEVER use heating grade wood pellets as they are not safe for
cooking.
NEVER• use gasoline, gasoline-type lantern fuel, kerosene, charcoal lighter fluid, or similar liquids to
start or “freshen up” a fire in this appliance. Keep all such liquids well away from the appliance when in
use.
Outdoor extension cords must be used with outdoor use products and are marked with suffix “W” and •
with the statement “Suitable for Use with Outdoor Appliances.”
Use only with a properly grounded GFI (Ground Fault Interrupter) household circuit.•
Do not attempt to move this appliance while it is in use.•
After a period of storage, inspect the grill for abrasion, wear, cuts, or damage to the temperature •
controller and power cord.
Before covering your grill make sure that the grill has cooled completely.•
Do not operate this grill while under the influence of drugs, alcohol, or while fatigued.•
Do not use this grill unless it is completely assembled, and all parts are securely fastened and •
tightened.
SAFETY INFORMATION
4

EXPLODED VIEW
5
4
3
5
6
7
8
9
10
11
12
15
14
16
17
13
19
18
24
28
26
27
25
21
22
23
32
31
30
29
20
57
58
60
59
63
62
61
64
65
1
2
50
51
-----------------------------------------------------------------------------------
*Full parts list with service components is located at the end of the manual.
PARTPART DESCRIPTIONDESCRIPTION
QTY
QTY
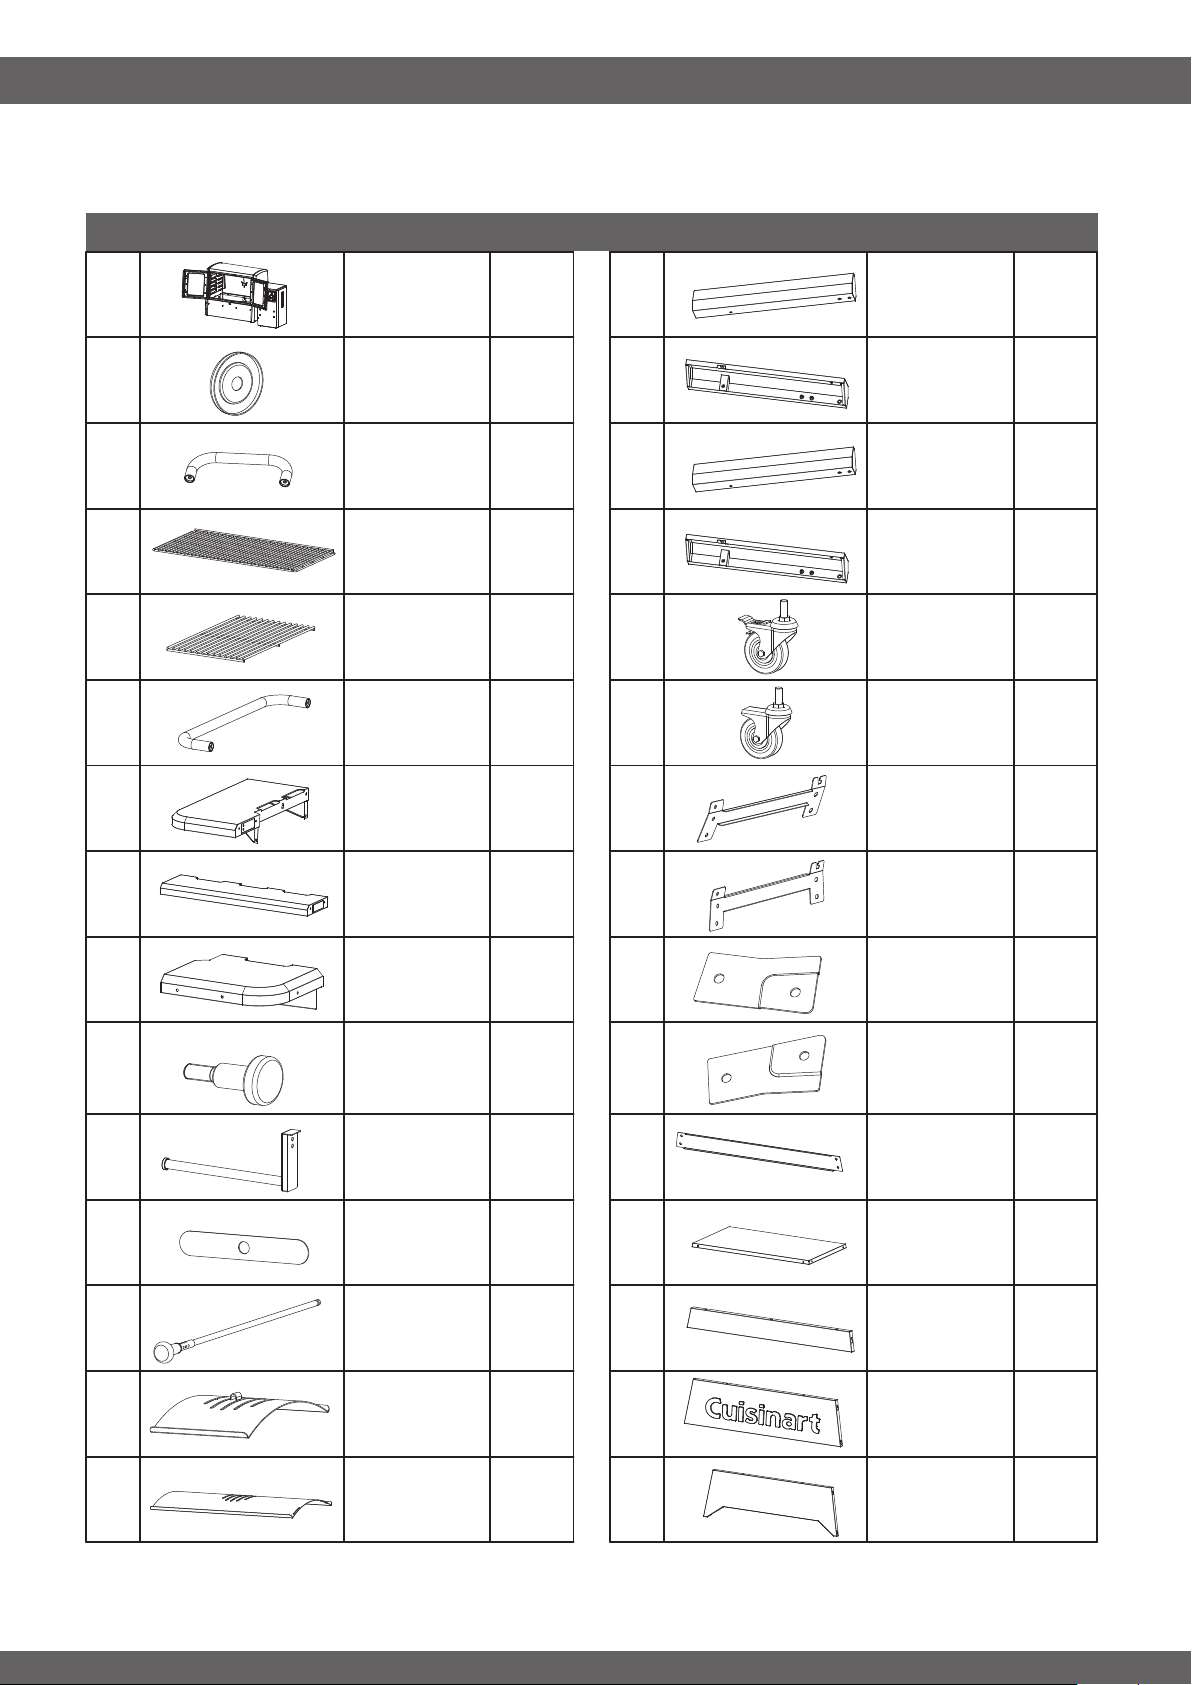
COMPONENTS
6
(x4)
(x1)
(x3)
(x2)
(x2)
(x1)
(x1)
(x1)
(x1)
(x1)
(x3)
(x1)
(x1)
(x1)
(x1)
13
12
11
14
15
16
17
(x1)
(x1)
(x1)
(x1)
29
28
27
30
31
23
24
25
26
(x1)
(x1)
(x1)
(x1)
(x2)
(x2)
(x1)
(x1)
(x1)
(x1)
1-2
3
4
5
6
18
19
20
21
22
8
9
10
(x1)
32
-----------------------------------------------------------------------------------
Main Body
Drip Shield
Bottom Cart
Panel
Door Bezel
Left
Front Leg
Main Handle
Caster
Left Table
Left Cart
Bracket
Front Table
Right Cart
Bracket
Right Table
Left Support
Brace
Tool Hook
Right Support
Brace
Paper Towel
Holder
Rear Cart
Bracket
Sear Rod
Cover
Cart Shelf
Searing Rod
Top
Cart Panel
Sear Shutter
Middle Cart
Panel
Door Handle
Left
Rear Leg
Smoking
Rack
Right
Front Leg
Cooking
Grates
Right
Rear Leg
Locking
Caster
PARTPART DESCRIPTIONDESCRIPTION
QTY
QTY
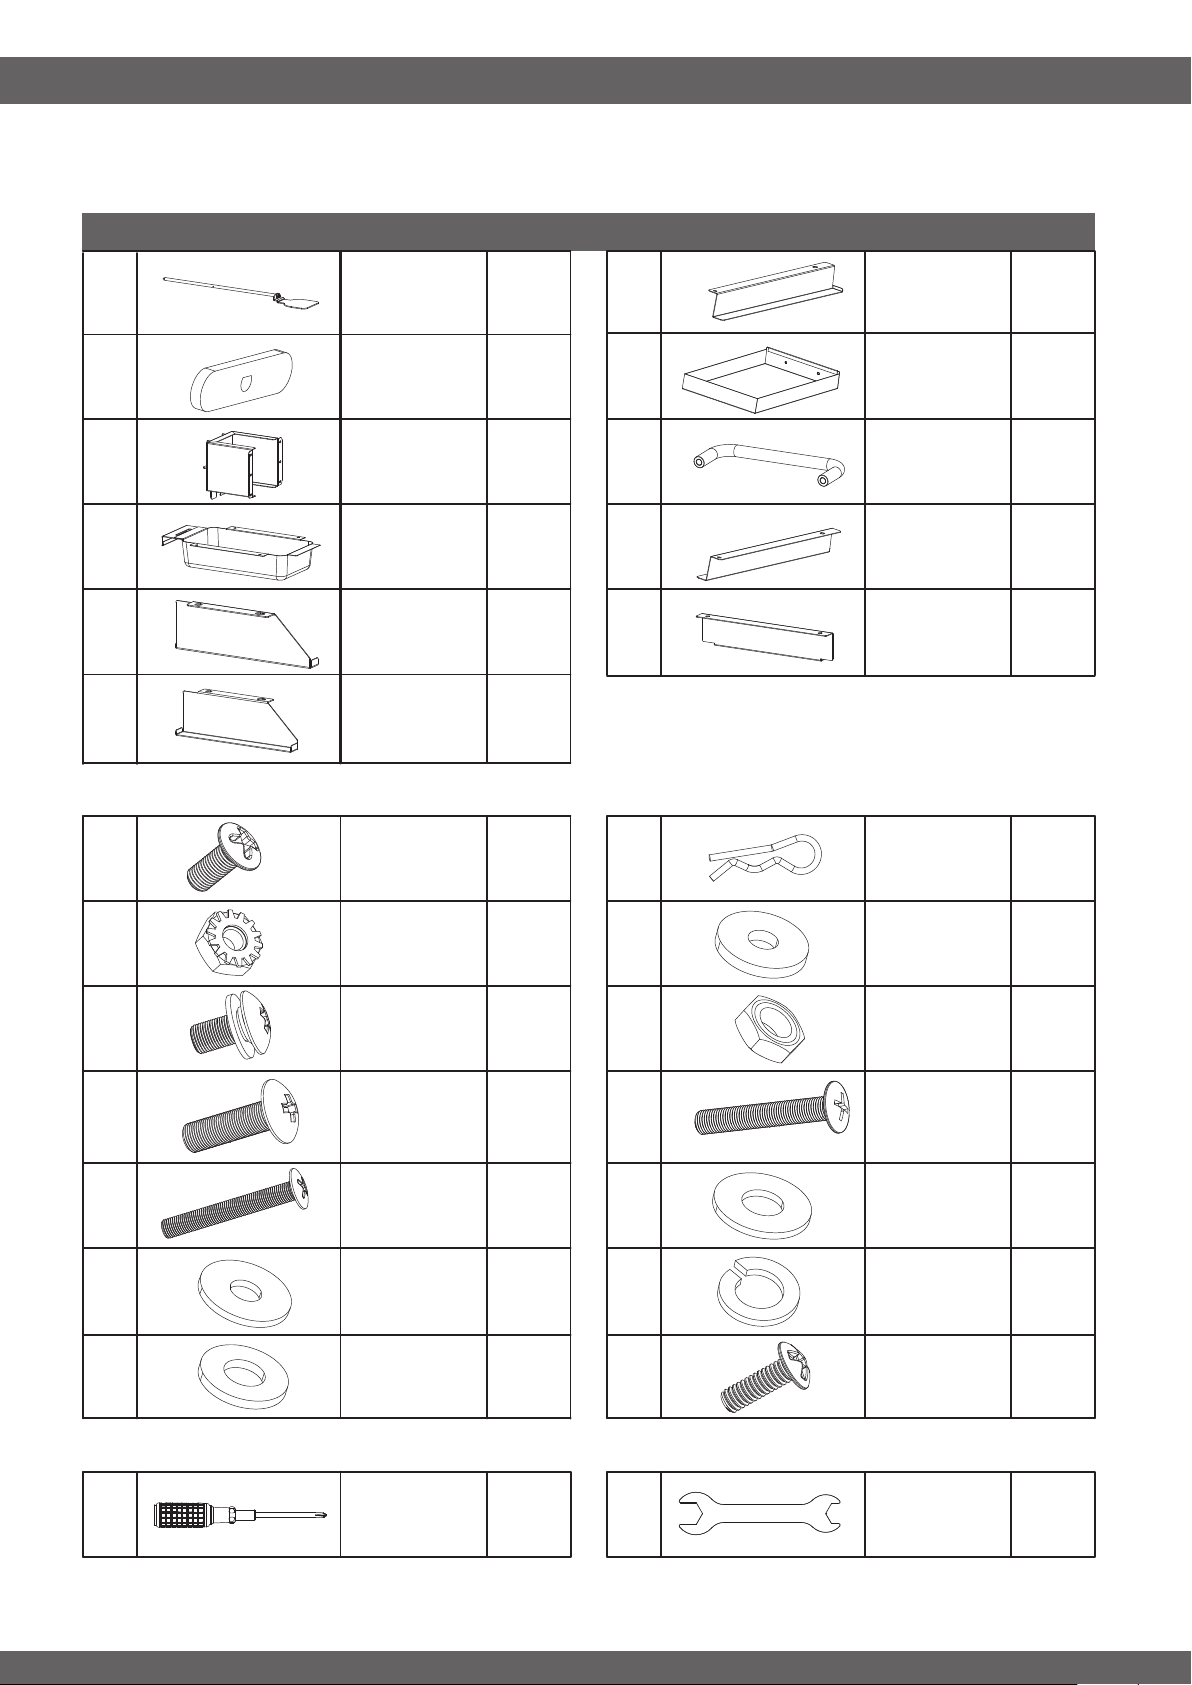
COMPONENTS
7
(x1)
(x1)
(x1)
(x1)
(x39)
(x4)
(x22)
(x4)
(x1)
(x4)
(x1)
F
(x1)
G
E
O
N
(x1)
P
(x4)
(x1)
(x4)
M
L
H
I
J
K
(x1)
(x1)
(x1)
(x1)
(x1)
(x1)
(x2)
(x6)
(x2)
57
51
58
59
62
61
(x1)
60
63
64
65
A
B
C
D
(x1)
50
HARDWARE
-----------------------------------------------------------------------------------
TOOLS
Left
Grease Drawer
Bracket
Ash Cleaning
Rod
Right
Ash Drawer
Bracket
Phillips Head
Screw
#8-32 × 3/8
Cotter Pin
Lock Nut
#8-32
Insulative
Washer 2
Phillips Head
Lock Screw
1/4-20 x 1/2
Nut, 1/4-20
Phillips Head
Screw
1/4-20 x 3/4
Phillips Head
Screw
1/4-20 x 1-1/4
Phillips Head
Screw
1/4-20 x 1-3/4
Washer 1/4”
Washer M4
Spring Washer
1/4”
Phillips Head
Screw
8#-32 x 1/2
Insulative
Washer 1
Caster
Wrench
Phillips
Screwdriver
Ash Cleaning
Rod Handle
Ash Drawer
Ash Clean
Lock Housing
Ash Drawer
Handle
Grease Tray
Left
Ash Drawer
Bracket
Right
Grease Drawer
Bracket
Rear
Ash Drawer
Bracket

Assembly Tip: To avoid scratching grill and to protect floor/patio surfaces, reuse cardboard packaging and lay
parts on top of while assembling.
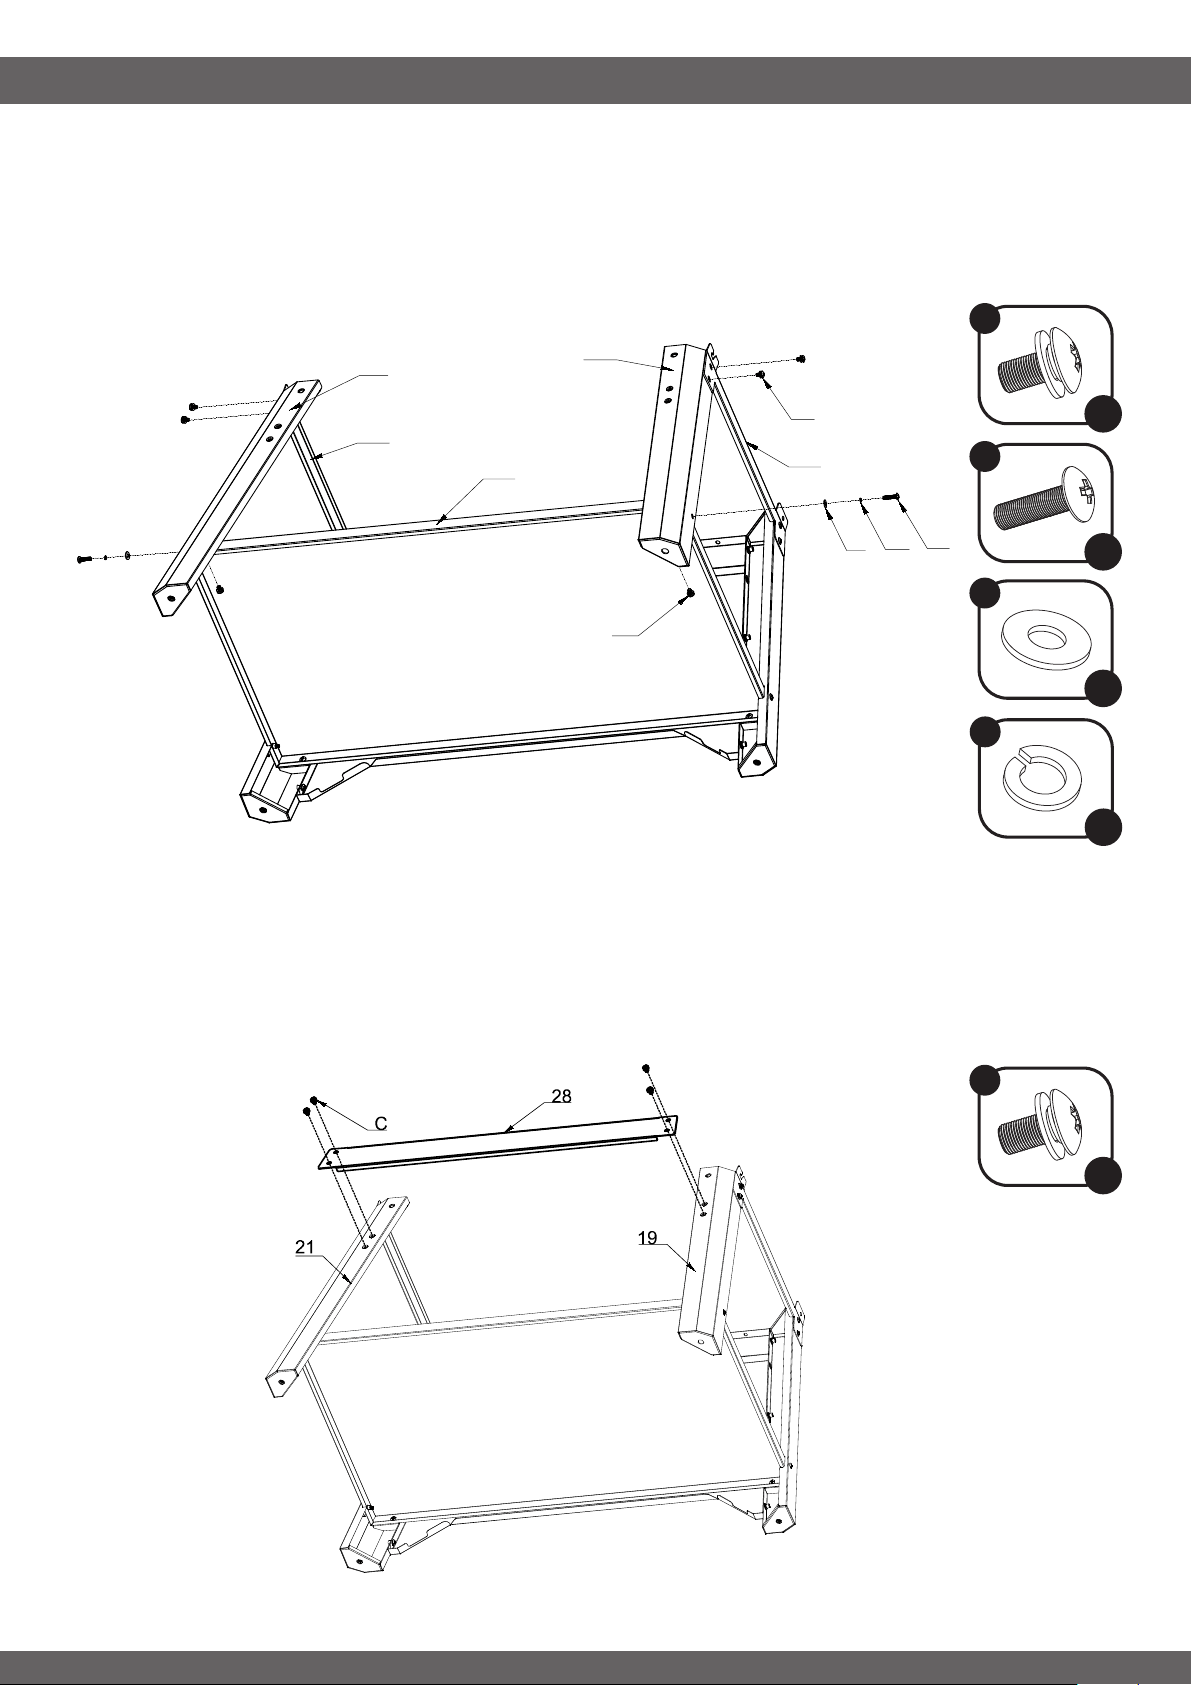
STEP 1
-----------------------------------------------------------------------------------
Following the illustration, arrange Top Cart Panel (30), Middle Cart Panel (31), and Bottom Cart Panel (32) •
face down on the floor. Use 4x Screw (A) and 4x Nut (B) to attach the three panels together creating the
Cart Panel Assembly.
Loosen but do not remove 5x Lock Screw (C) on the side of the Left Front Leg (18). •
Slot the protruding screws into the keyholes on the Cart Panel Assembly and tighten the screws to secure •
the components together.
Repeat for the Right Front Leg (20). •
ASSEMBLY INSTRUCTIONS
Some parts may contain sharp edges. Wear protective gloves during assembly and set up. Read and follow
all safety statements, warnings, assembly instructions and use and care instructions before attempting to
assemble and use.
Before you Begin: Unpack all the components and verify that everything is present before beginning assembly.
Several components are packed inside the cooking chamber, it is important to remove these as well. If any part
is missing or damaged, DO NOT attempt to assemble the product.
Estimated assembly time: 1 hour.
NOTE: During assembly two people will be required to lift the Main Body (1) onto the cart. The Main Body (1)
weighs over 100 lbs.
Tools required for assembly: (included) Wrench, Phillips Head Screwdriver and (not included) Gloves
ASSEMBLY PREPARATION
8
Included
Not Included
B
A
C
20
30
31
32
B
A
18
C
A
B
x 4
x 4

C
D
L
M
C
x 2
x 2
x 2
x 2
STEP 3
-----------------------------------------------------------------------------------
Attach the Cart Shelf (29) to the existing assembly using 2x Lock Screw (C) on the bottom inside edge of the •
shelf. Create 2x lock screw sets using one each of Screw (D), Spring Washer (M), and Flat Washer (L). Going
through the holes on the bottom left and right sides of the legs, tighten these screw sets into the bottom
shelf.
ASSEMBLY INSTRUCTIONS
STEP 2
-----------------------------------------------------------------------------------
Assemble the Left Cart Bracket (24) and the Right Cart Bracket (25) to the two front legs using 4x Lock •
Screw (C). Note the tabs at the top of the bracket should flare outward and the tab with the round hole
should be towards the front.
9
18
24
25
C
20
C
D
29
18
20
L
M
x 4
C
D
L
M
ASSEMBLY INSTRUCTIONS
STEP 4
-----------------------------------------------------------------------------------
Attach the Left Rear Leg (19) and the Right Rear Leg (21) to the Cart Shelf using the same procedure as •
Step 3. Then attach the upper section of both legs to the respective cart brackets using 4x Lock
Screw (C).
STEP 5
-----------------------------------------------------------------------------------
Assemble the Rear Cart Bracket (28) to the existing assembly using 4x Lock Screw (C).•
10
C
D
C
21
19
24
25
29
L
M
D
L
M
C
C
x 2
x 2
x 2
x 6
x 4
D
ASSEMBLY INSTRUCTIONS
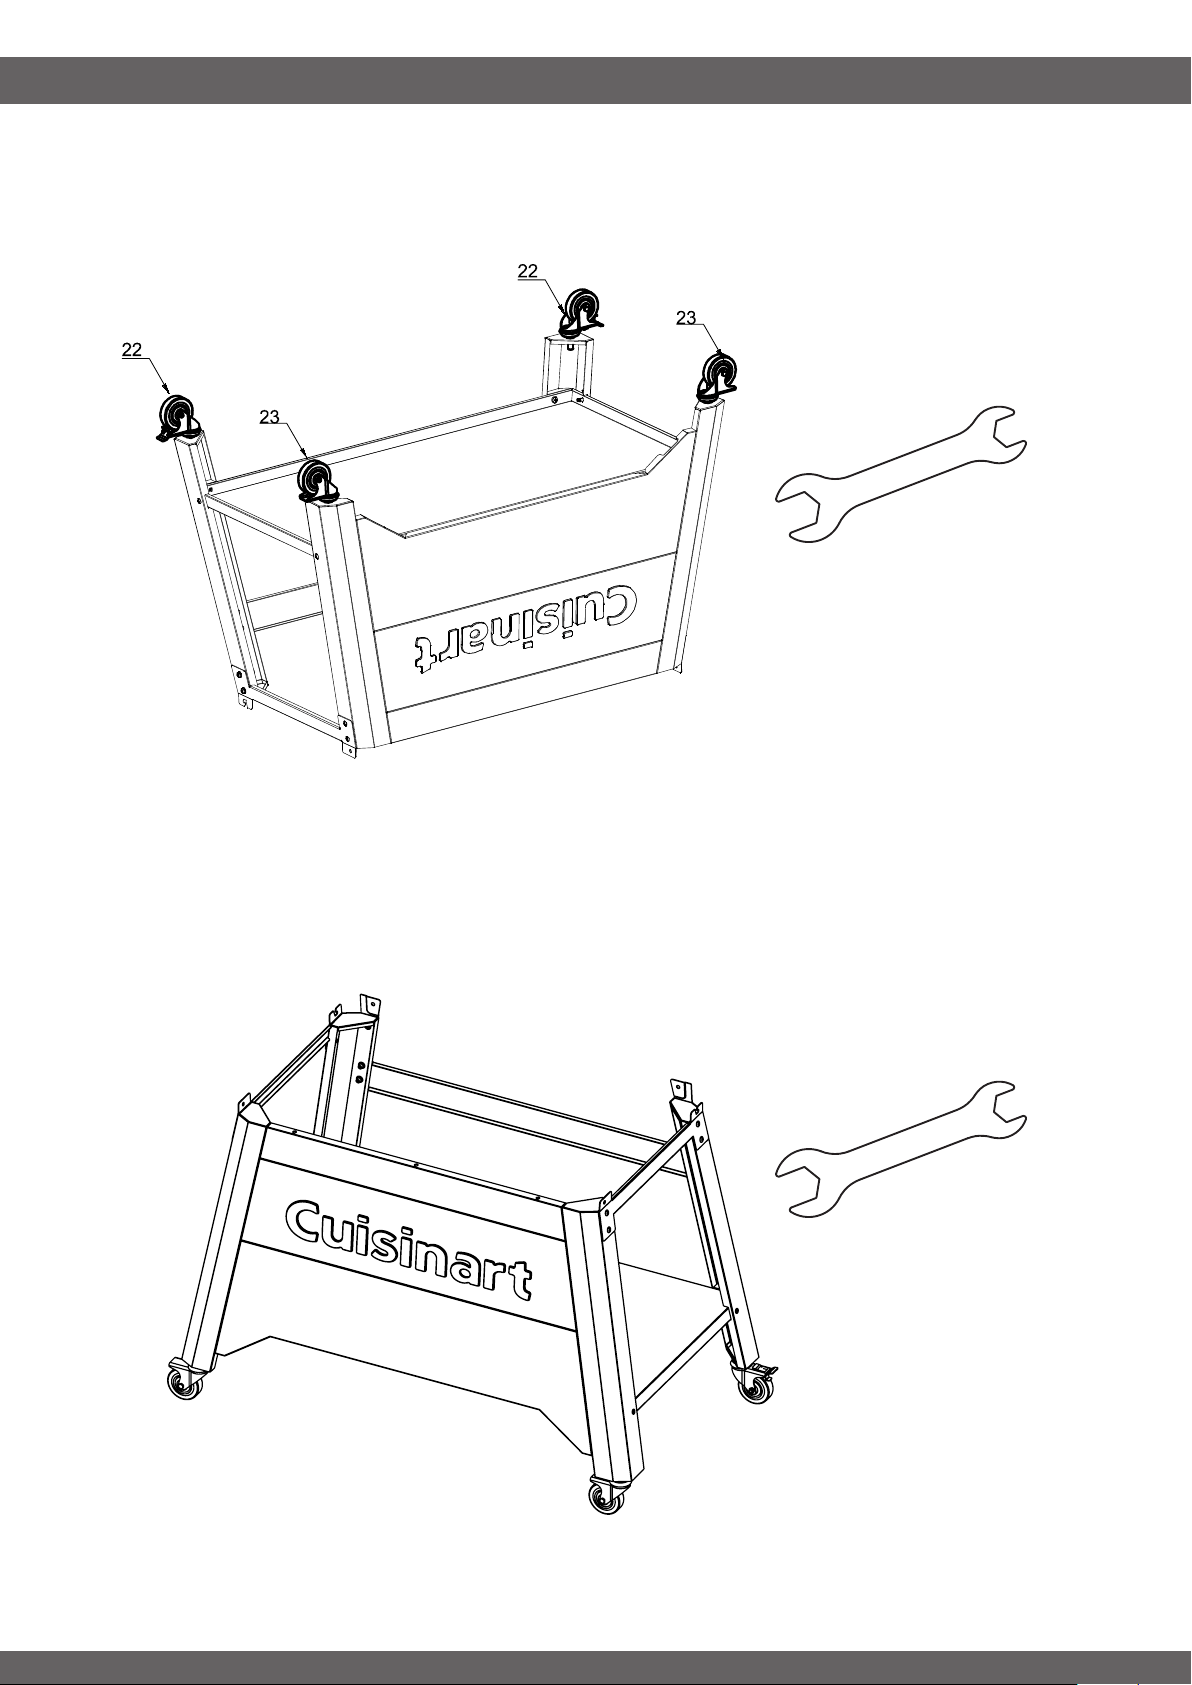
STEP 6
-----------------------------------------------------------------------------------
Using the supplied Caster Wrench (P), attach 2x Locking Casters (22) to the rear legs and 2x Casters (23) •
to the front legs.
STEP 7
-----------------------------------------------------------------------------------
Turn the completed cart assembly right side up on a level surface and ensure all four casters are •
contacting the floor. Adjust as needed. Engage the locks on the two Locking Casters (22).
11
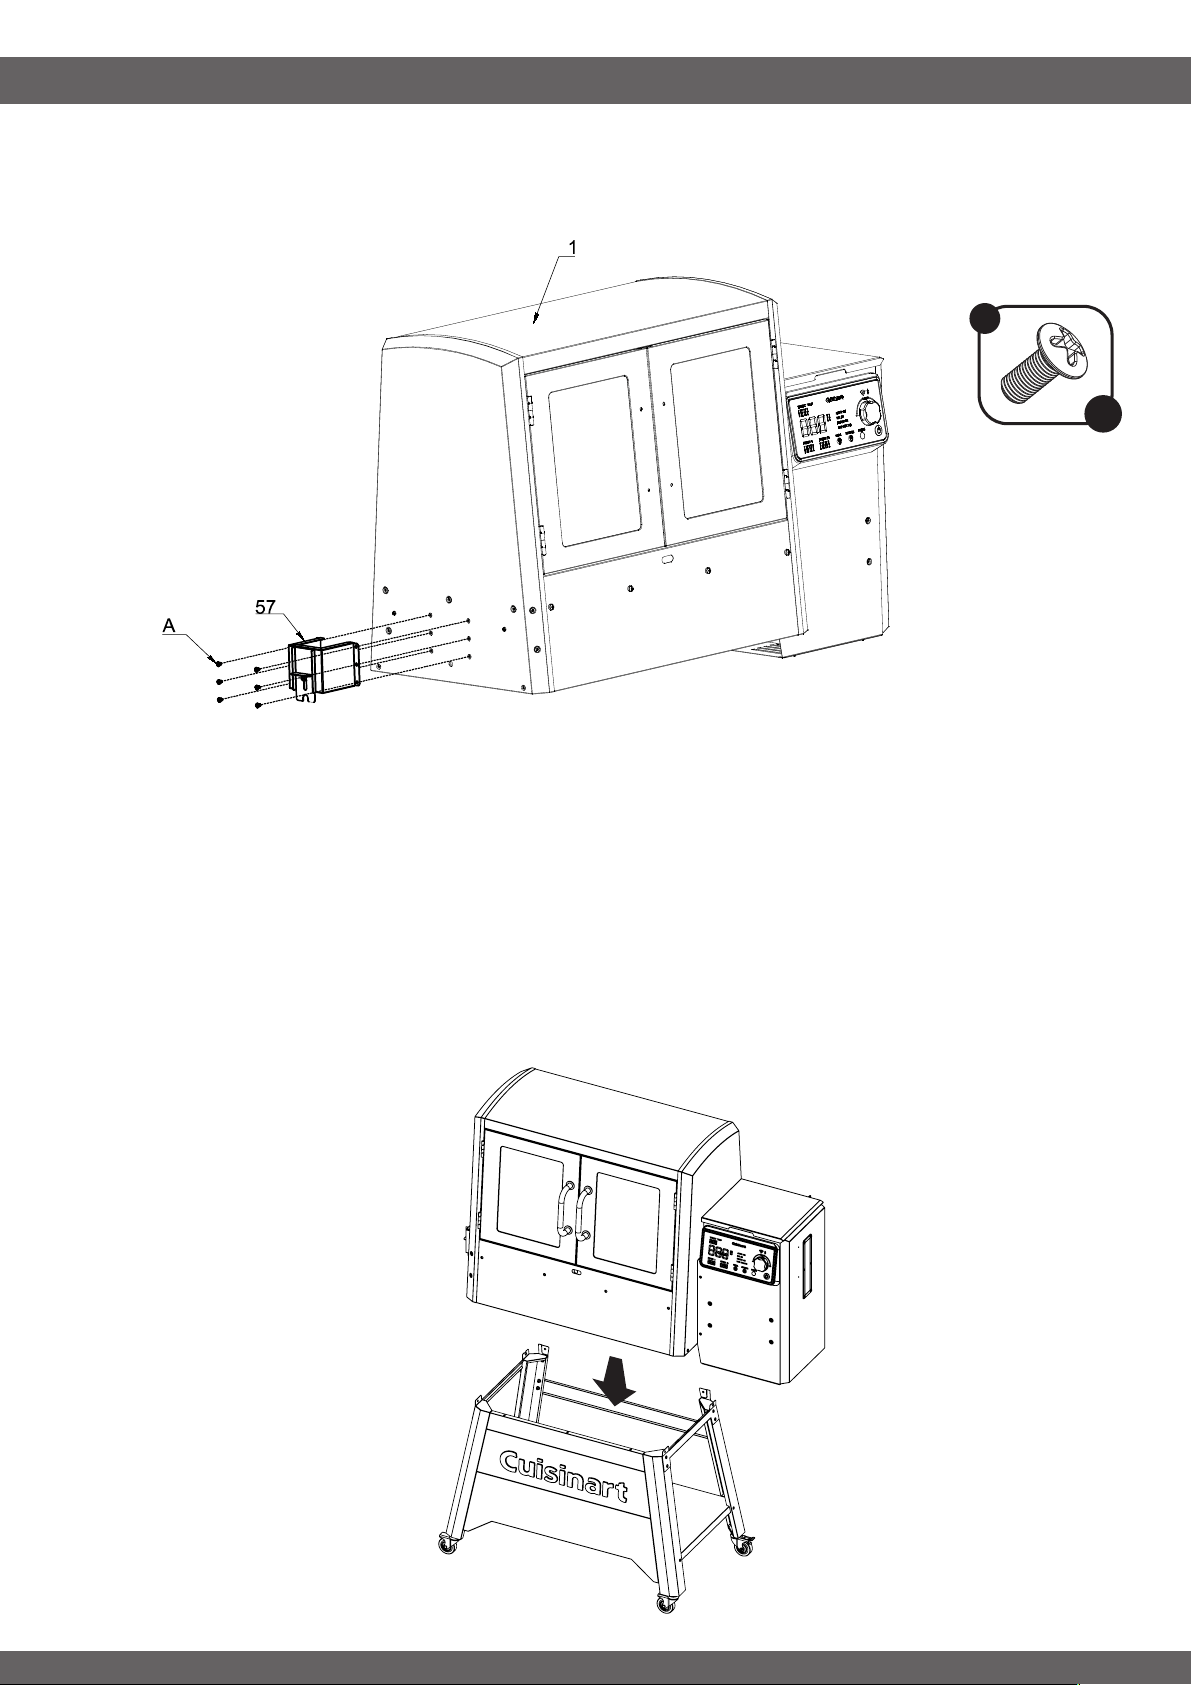
STEP 9
-----------------------------------------------------------------------------------
Important! •This step requires two people who can safely lift the Main Body (1). Ensure that the doors are
closed and secured before lifting.
Lift the Main Body (1) and place it on to the Cart Assembly. Ensure the screw holes align between the •
Main Body and the vertical tabs on the Left Cart Bracket (24) and Right Cart Bracket (25).
Note: Verify that all loose components have been removed from inside the cooking chamber. •
Tip: One person can lift the Main Body using the assembled Ash Clean Lock Housing from •
Step 8 and the other person can lift from the bottom of the hopper to avoid pinching fingers.
12
ASSEMBLY INSTRUCTIONS
STEP 8
-----------------------------------------------------------------------------------
Attach the Ash Clean Lock Housing (57) to the Main Body (1) using 6x Screw (A). Ensure all 6 screws are •
tight.
A
x 6
ASSEMBLY INSTRUCTIONS
13
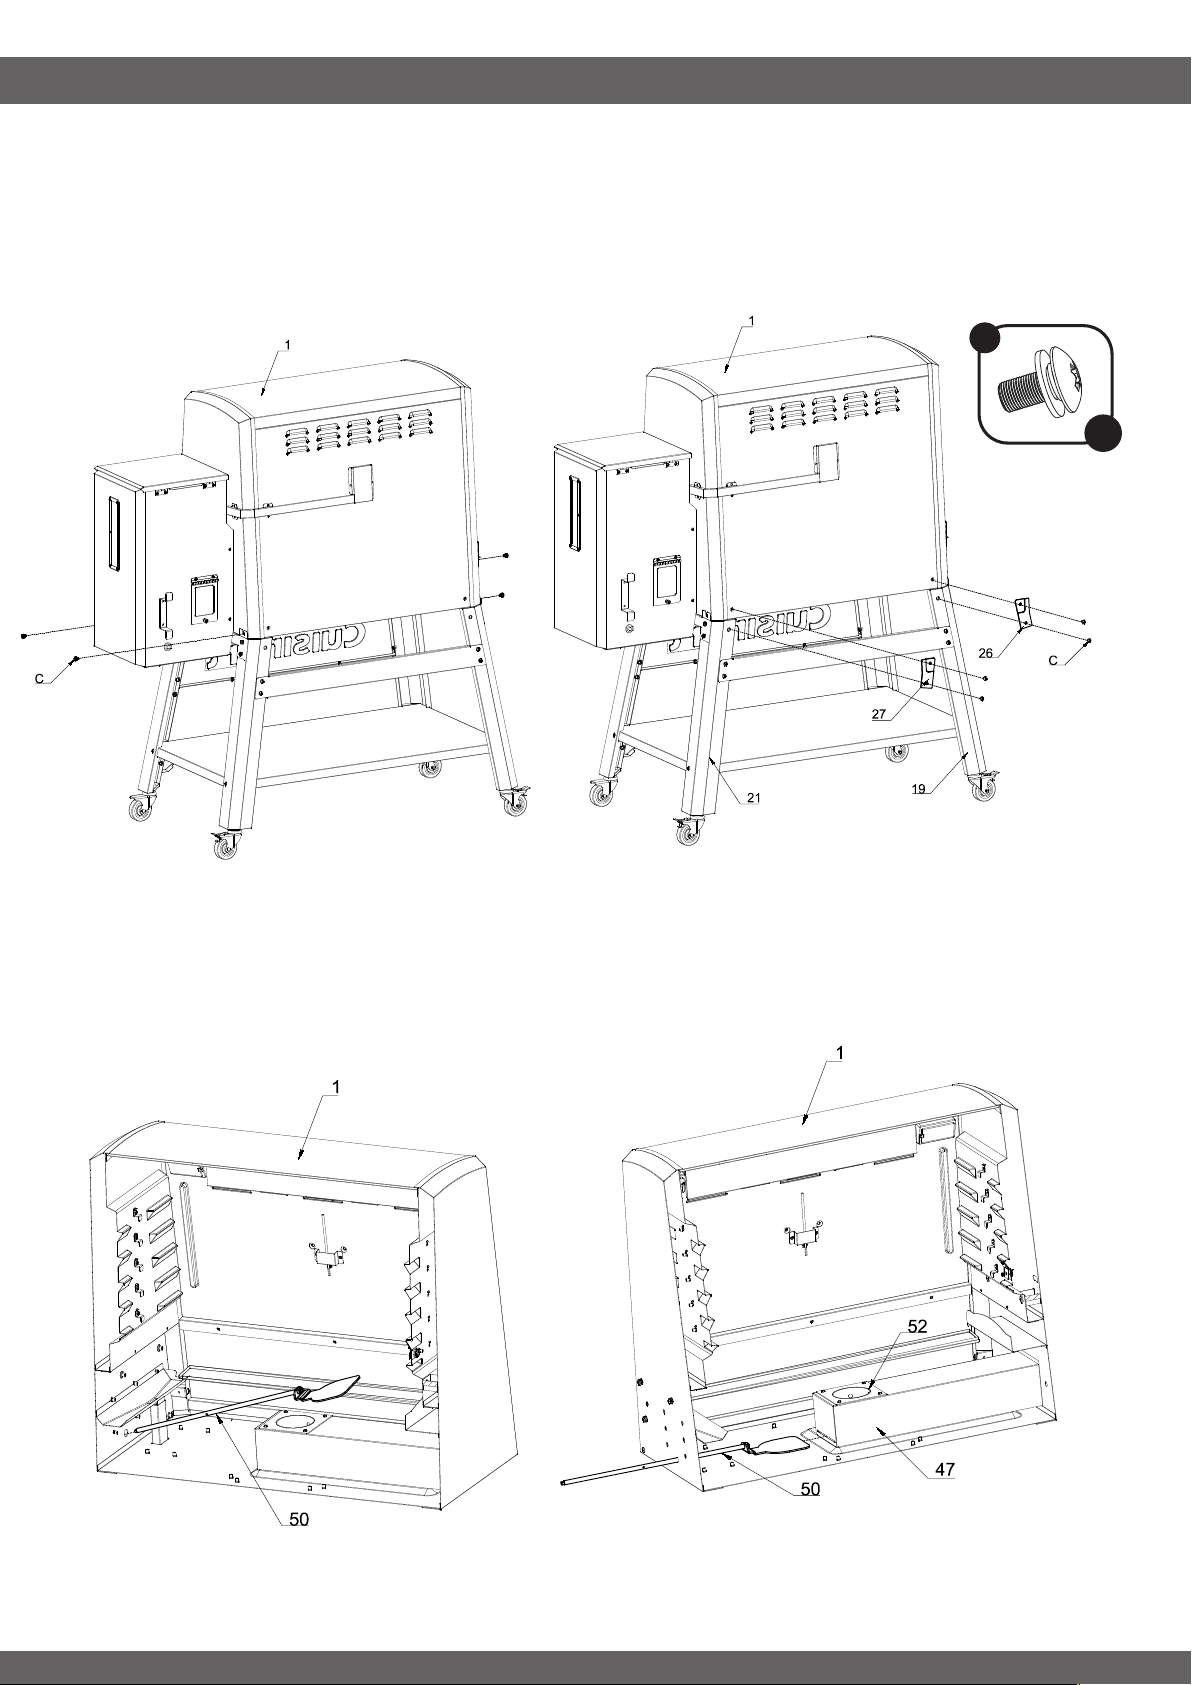
STEP 10
-----------------------------------------------------------------------------------
Secure the Main Housing to the Cart Assembly using 4x Lock Screw (C) on the four vertical tabs from the •
Cart Brackets.
Secure the Left Support Brace (26) and Right Support Brace (27) to the Cart Assembly and Main body using •
4x Lock Screw (C).
STEP 11
-----------------------------------------------------------------------------------
From the inside of the Main Body (1) insert the Ash Cleaning Rod (50) through the hole to the outside of the •
main body. Noting the orientation of the flat plate, insert the Ash Cleaning Rod (50) into the Auger Assembly
(47) below the Fire Pot Assembly (52).
Note components 47 and 52 are pre-assembled in the Main Body (1)•
C
x 8
ASSEMBLY INSTRUCTIONS
14
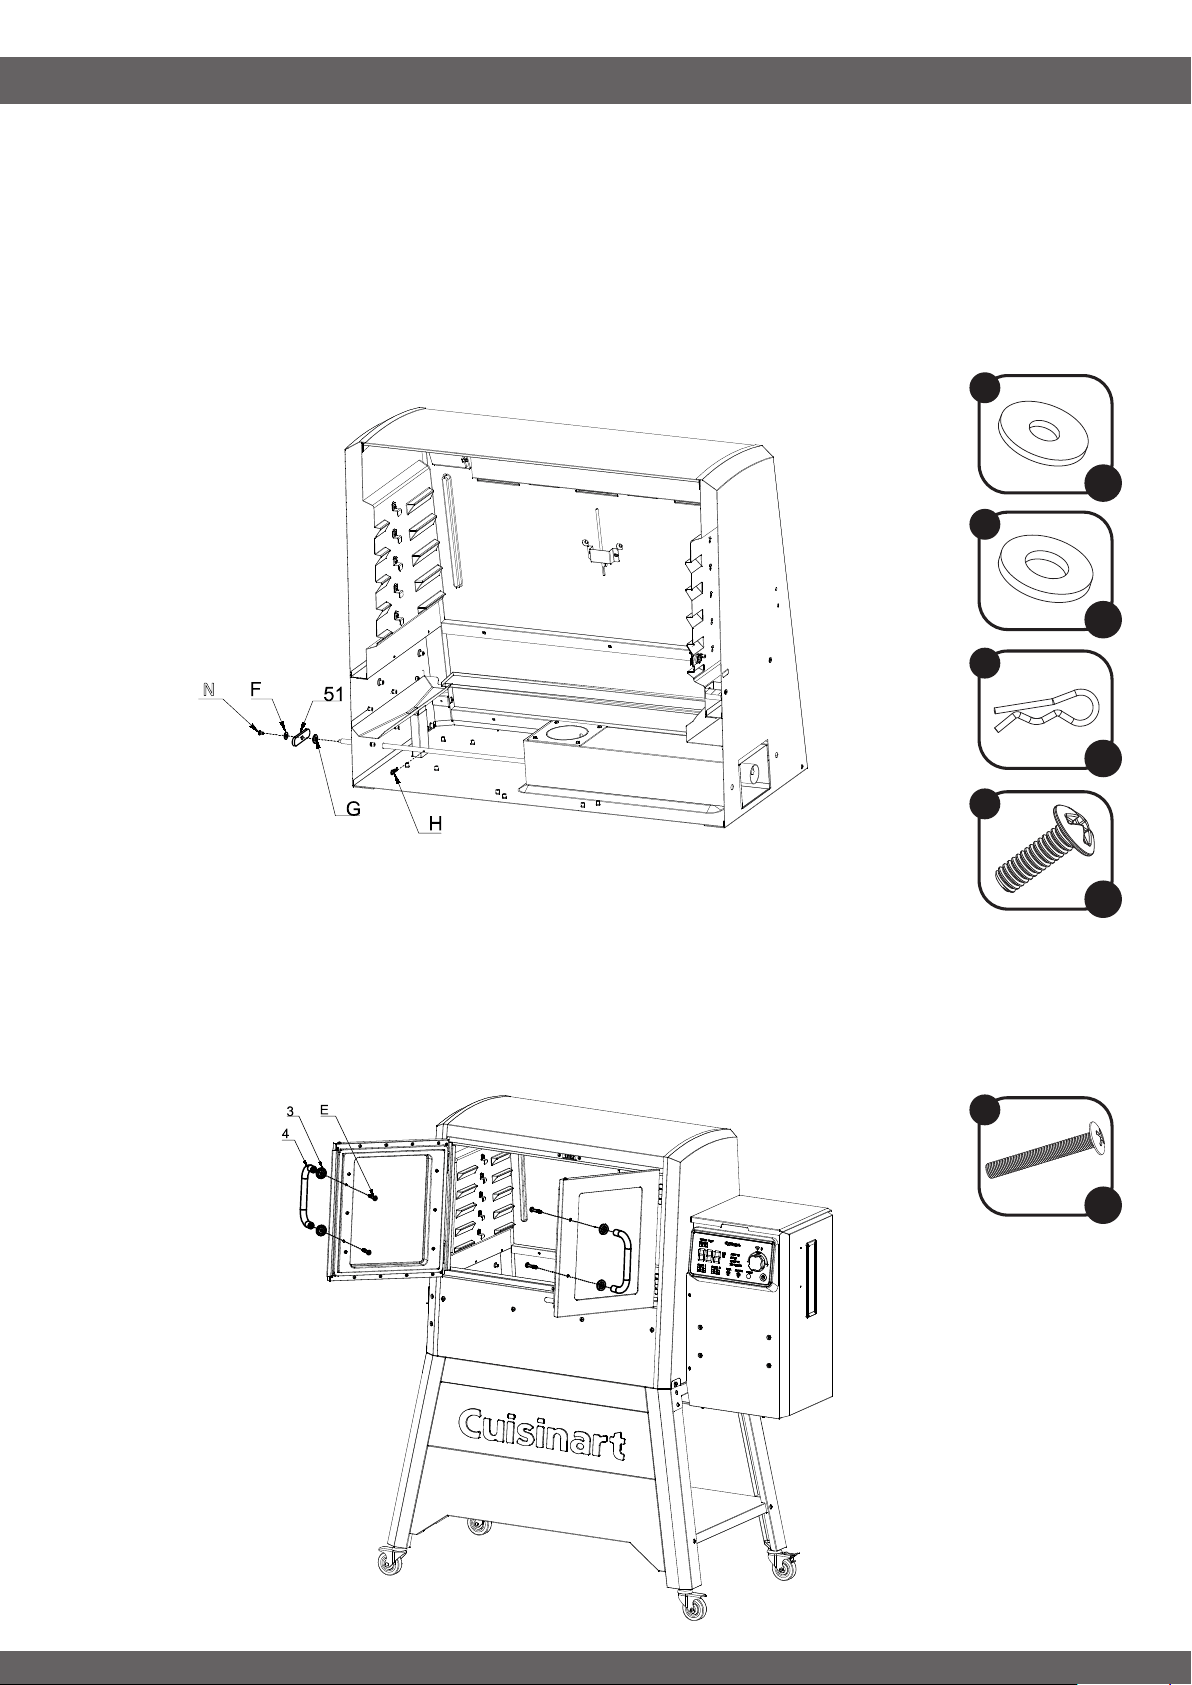
STEP 12
-----------------------------------------------------------------------------------
From inside the Main Body (1) assemble the Cotter Pin (H) into the hole on the Ash Cleaning Rod (50). •
On the outside assemble to the rod in order: Insulative Washer (G), Ash Cleaning Rod Handle (51), Flat
Washer (F), and tighten with Screw (N). When Assembly is complete, lift the lock plate from the Ash Clean
Lock Housing (57) and firmly press the Ash Cleaning Rod Assembly all the way in.
Tip: Verify correct assembly by looking into the Fire Pot. The flat plate from the Ash •
Cleaning Rod should be fully inserted and act as the floor in the fire pot.
STEP 13
-----------------------------------------------------------------------------------
Press 4x Screw (E), two per door, into the through holes from the inside of the door. The screws should •
protrude out the front of the door. For each door pair 2x Door Bezel (3) with 1x Door Handle (4) and attach
them to the doors using the protruding screws.
N
F
G
H
N
E
x 1
x 1
x 1
x 1
x 4
x 1
ASSEMBLY INSTRUCTIONS
15
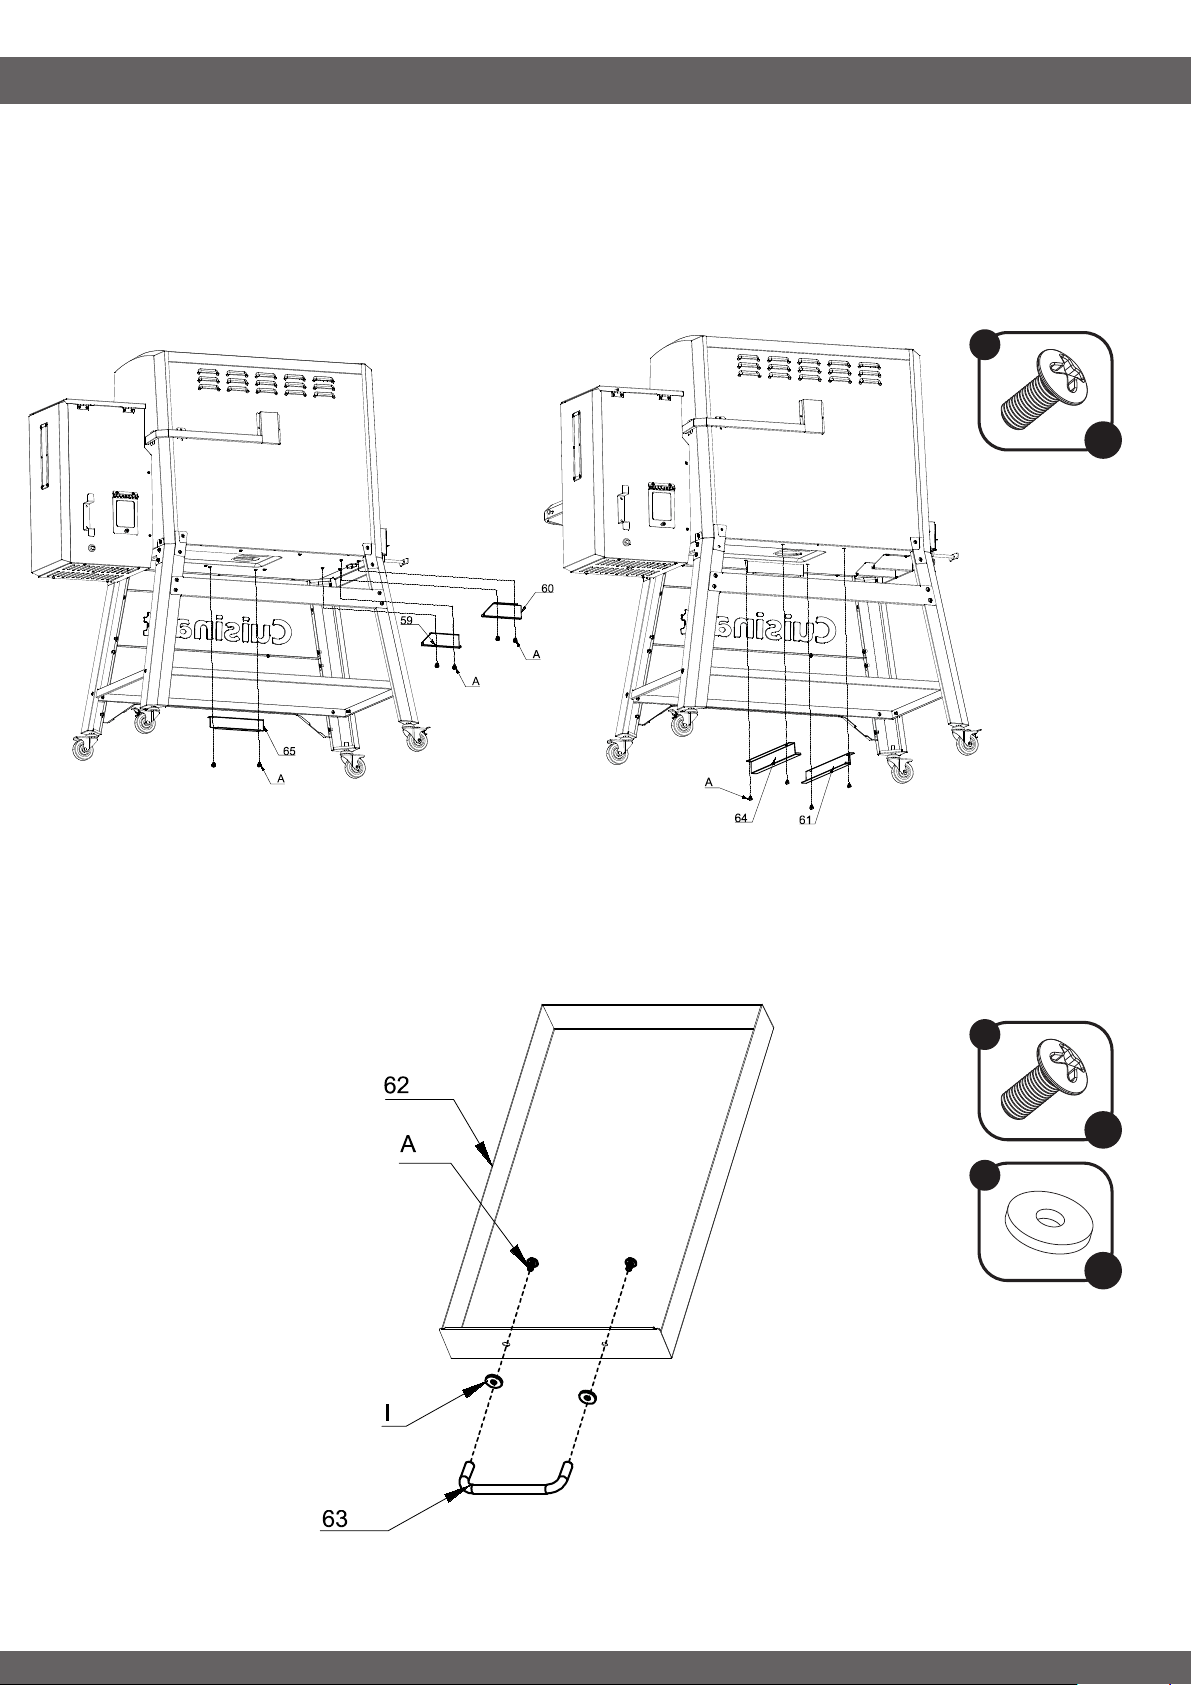
STEP 14
-----------------------------------------------------------------------------------
Attach the Right Grease Drawer Bracket (59), Left Grease Drawer Bracket (60), and Rear Ash Drawer •
Bracket (65) to the bottom of the Main Body (1) using 6x Screw (A).
Attach the Left Ash Drawer Bracket (64), and Right Ash Drawer Bracket (61) to the bottom of the Main Body •
(1) using 4x Screw (A).
STEP 15
-----------------------------------------------------------------------------------
Attach the Ash Drawer Handle (63) to the Ash Drawer (62) using 2x Screw (A) and 2x Insulative Washer (I).•
A
A
I
x 10
x 2
x 2
ASSEMBLY INSTRUCTIONS
16
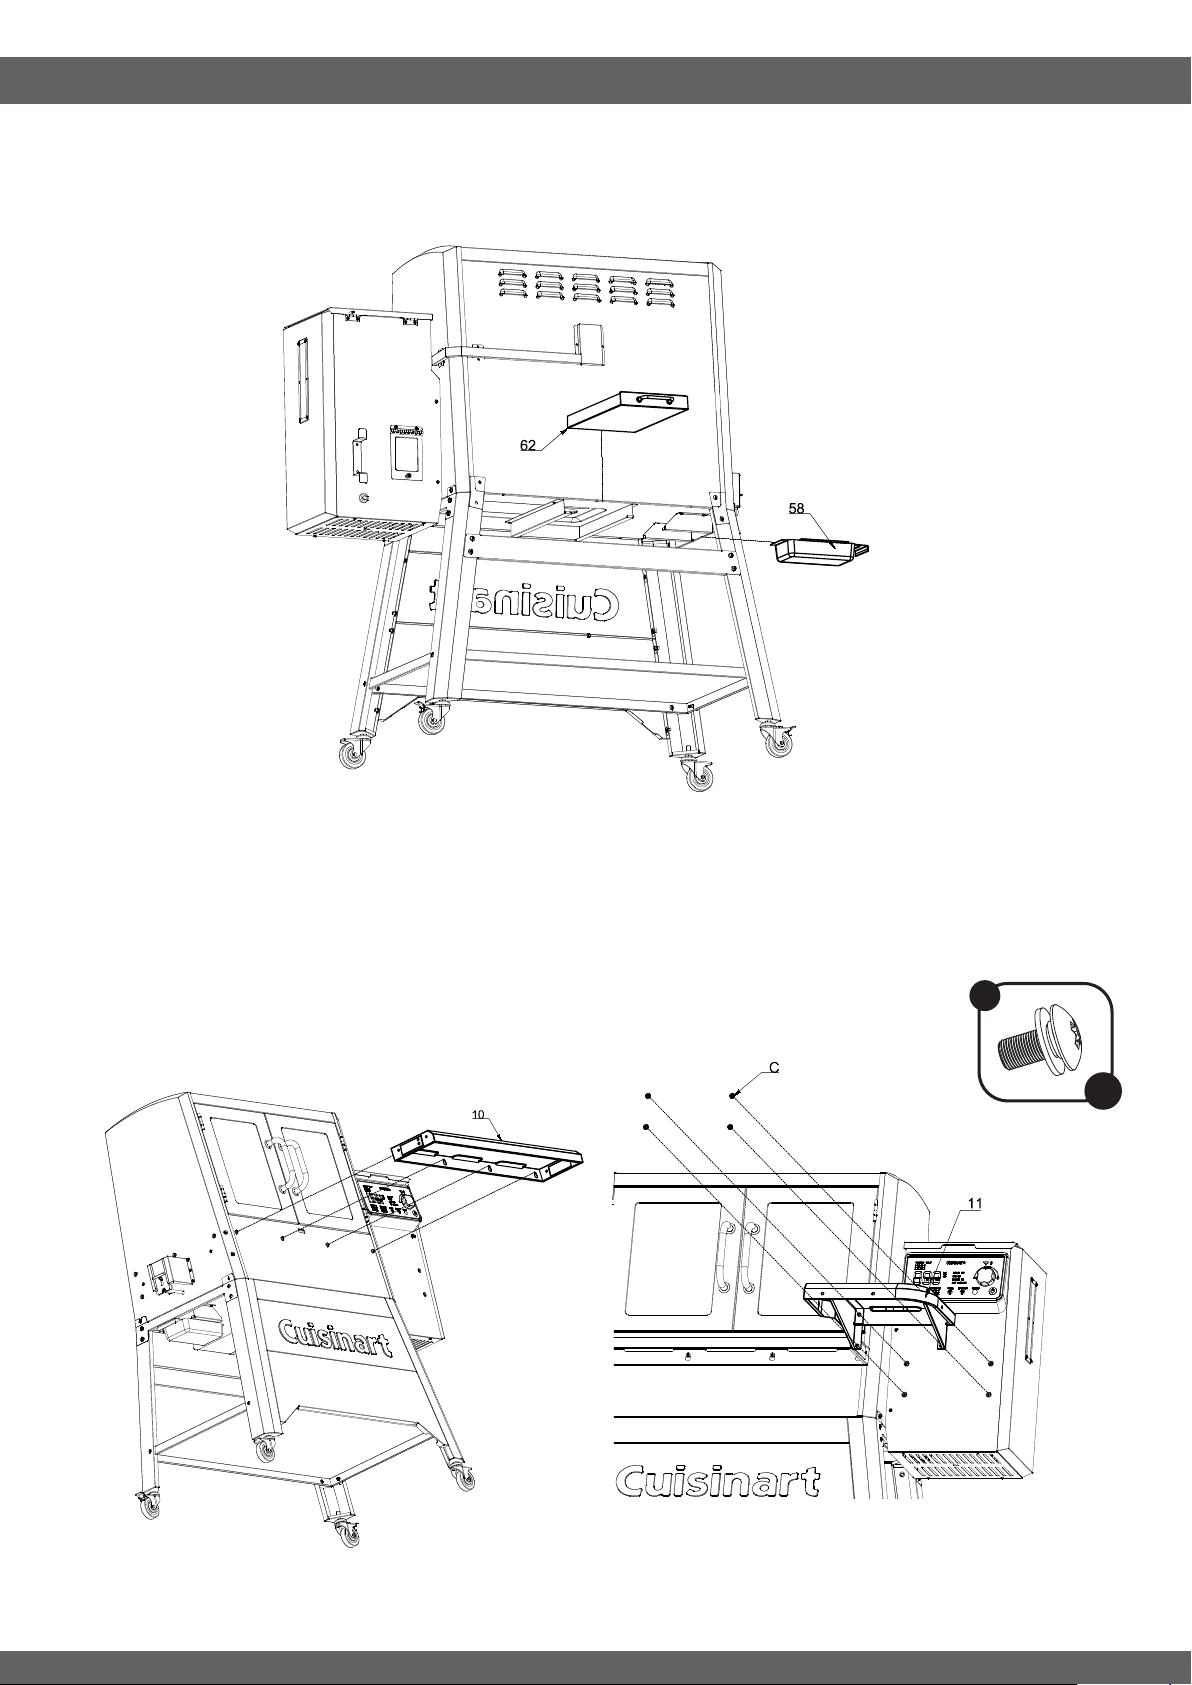
STEP 16
-----------------------------------------------------------------------------------
Insert the Ash Drawer (62) and the Grease Tray (58) into their respective locations. •
STEP 17
-----------------------------------------------------------------------------------
Loosen but do not remove 4x Lock Screw (C) on the front of the Main Body (1). Hang the Front Table (10) •
to the Main Housing using the keyhole slots.
Loosely attach the Right Table (11) to hopper using 4x Lock Screw (C). Do not tighten any screws yet. •
C
x 4
ASSEMBLY INSTRUCTIONS
17
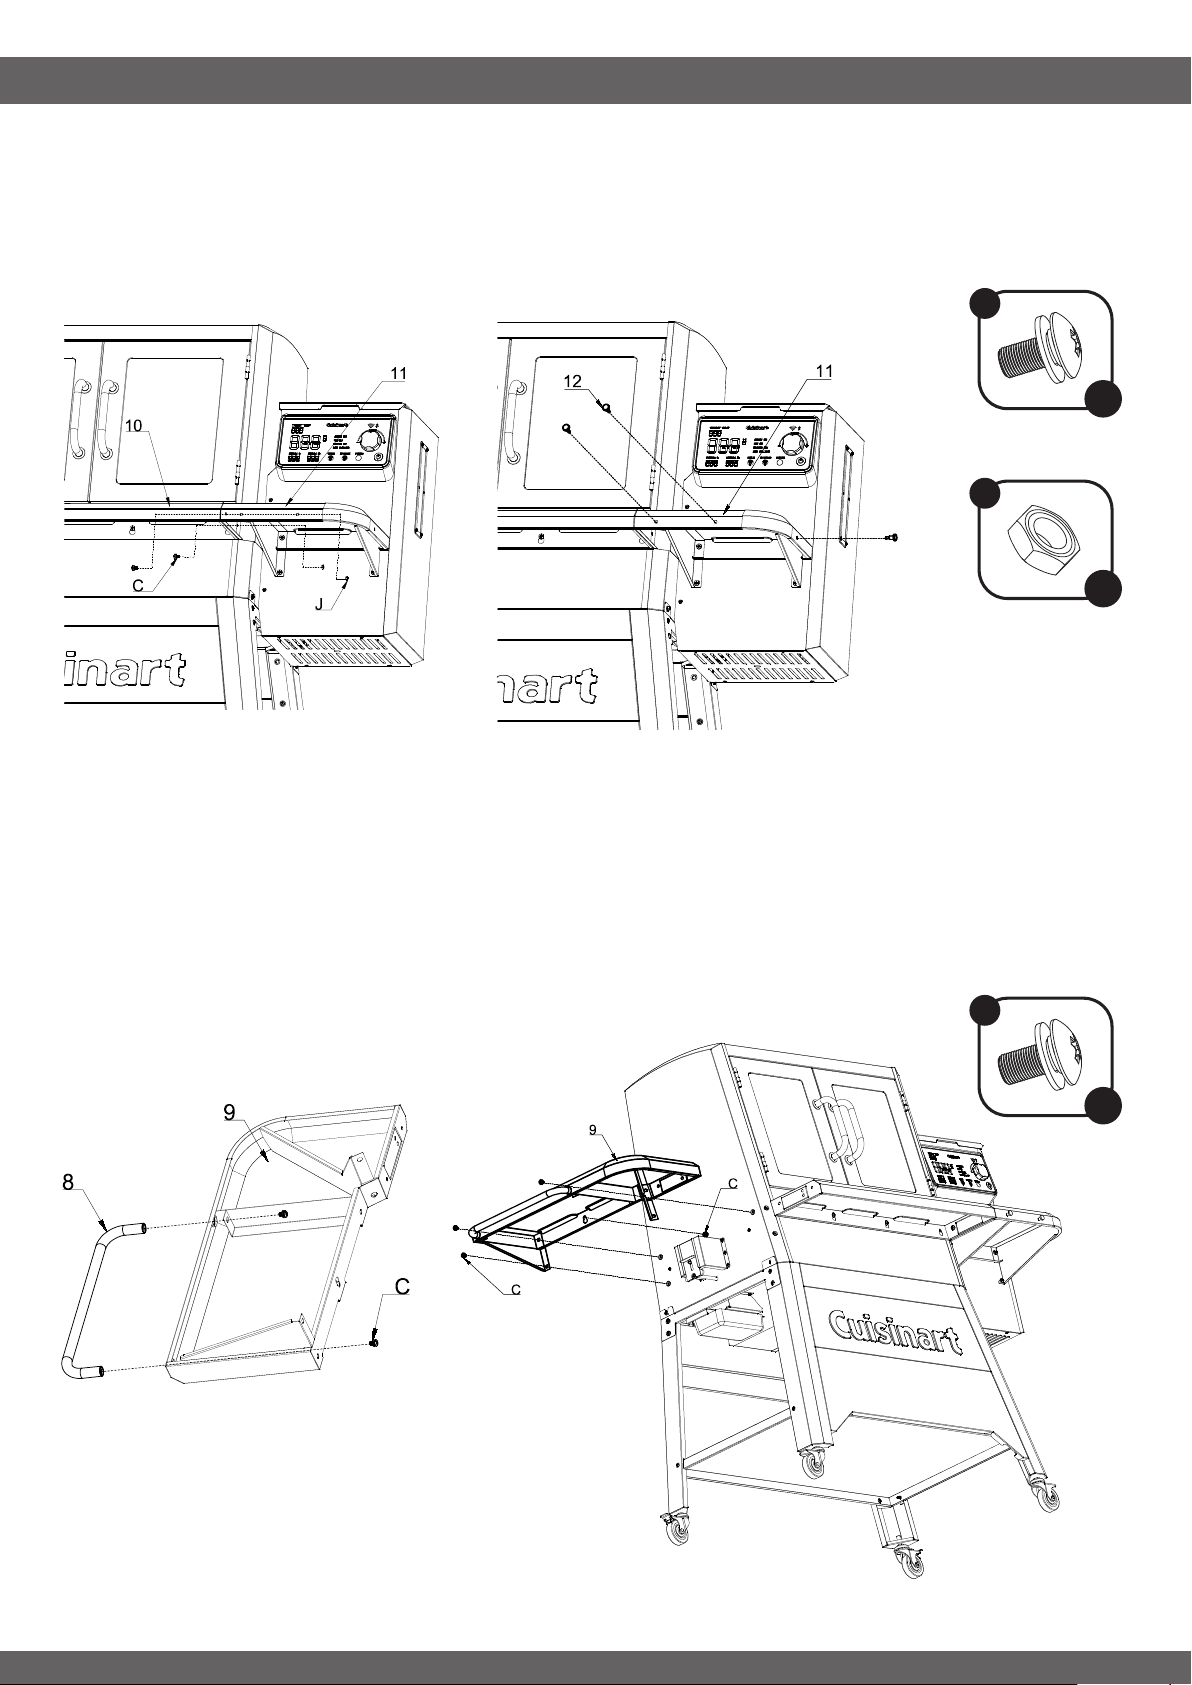
STEP 18
-----------------------------------------------------------------------------------
Connect the Front Table (10) to the Right Table (11) using 2x Lock Screw (C) and 2x Nut (J). Ensure table •
surfaces line up before tightening fasteners. Attach 3x Tool Hooks (12) to the Left Table (11).
STEP 19
-----------------------------------------------------------------------------------
Fasten Main Handle (8) to Left Table (9) with 2x Lock Screw (C).•
Loosen but do not remove 1x Lock Screw (C) on the left side of the Main housing. Hang the Left Table (9) •
to the Main Housing (1) using the keyhole slot. Secure the table to the main housing with 3x Lock Screw
(C) but do not tighten.
C
J
x 2
x 2
C
x 5

ASSEMBLY INSTRUCTIONS
18
STEP 20
-----------------------------------------------------------------------------------
Connect the Front Table (10) to the Left Table (9) using 2x Lock Screw (C) and 2x Nut (J). Ensure table •
surfaces line up before tightening fasteners. Using 2x Lock Screw (C) to secure the left table corner
support to the Main Body (1).
Now that the three tables are level and fixed to each other, tighten all 14 loose screws that attach the •
tables to the Main Body (1).
STEP 21
-----------------------------------------------------------------------------------
Attach the Paper Towel Holder (13) to the Left Table (9) using 2x Screw (K) and 2x Nut (J). •
C
J
J
K
x 4
x 2
x 2
x 2

ASSEMBLY INSTRUCTIONS
19
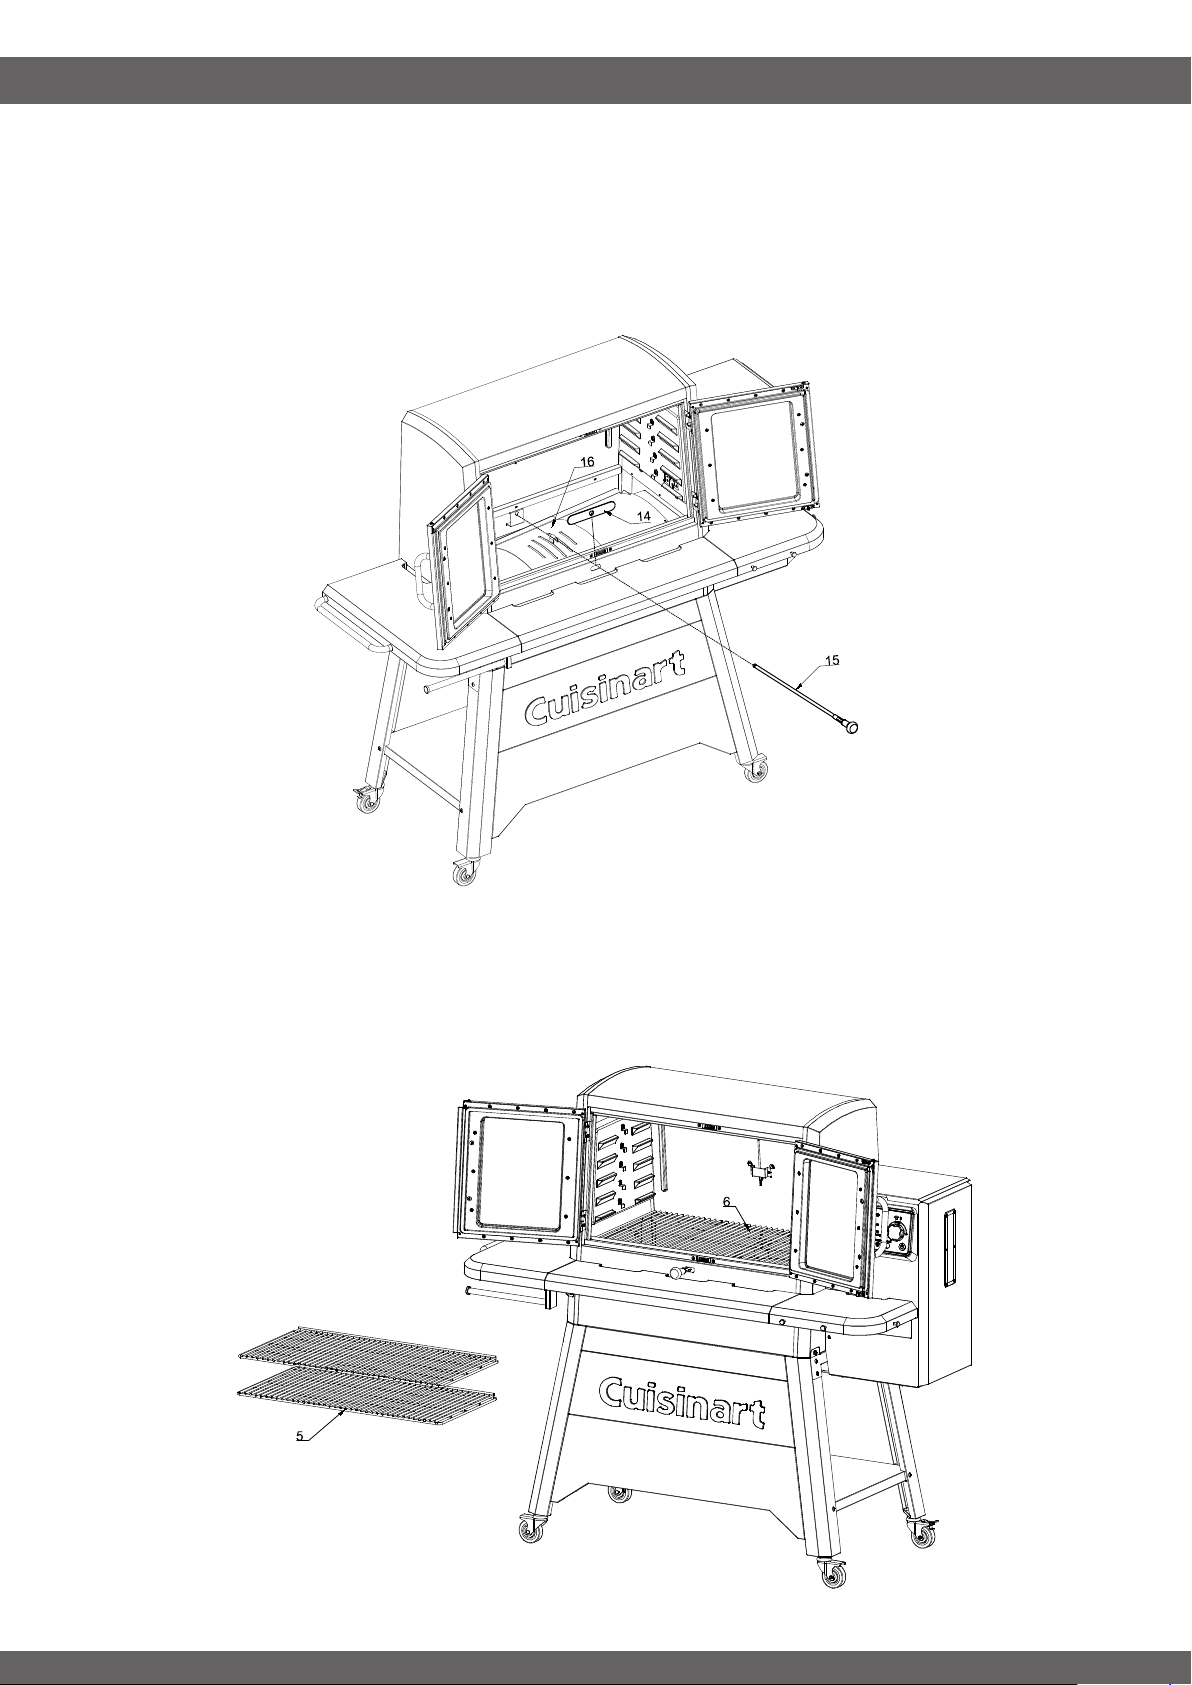
STEP 22
-----------------------------------------------------------------------------------
Insert the Drip Shield (17) into the cooking chamber. There are tabs on the right side of the cooking chamber •
that fit into slots on the Drip Shield (17). The opposite side of the Drip Shield (17) sits on top of the Grease
Collector (7).
Note: Grease Collector (7) Is pre-assembled in the Main Body (1)•
STEP 23
-----------------------------------------------------------------------------------
Place the Sear Shutter (16) on top of the installed Drip Shield (17). Note the orientation.•
ASSEMBLY INSTRUCTIONS
20
STEP 24
-----------------------------------------------------------------------------------
Insert the Sear Rod Cover (14) on the inside edge of the cooking chamber so that the hole lines up with •
the oval shaped hole in the Main Body (1). Insert the Searing Rod (15) through the oval shaped hole, Sear
Rod Cover (14) hole, Sear Shutter (16) hole, and finally secure it in the key shaped slot towards the back
of the cooking chamber. Verify proper assembly by actuating the searing rod by the knob and seeing if the
Sear Shutter (16) opens and closes a direct path to the fire pot below.
STEP 25
-----------------------------------------------------------------------------------
Insert the 3x Cooking Grates (6) into the bottom of the cooking chamber. When those are in, slot the 2x •
Smoking Racks (5) into any of the slots in the cooking chamber. Note that you will need to tilt the rack up
slightly when inserting to get it past the pull out stops.
Peel off protective film from control panel. Peel off all POP labels that are in or attached to the cooking •
chamber.

OPERATING THE GRILL
21
-----------------------------------
WARNING
----------------------------------
Read and follow all warnings and instructions contained in the preceding sections of this manual.
-----------------------------------------------------------------------------------
Control Panel
-----------------------------------------------------------------------------------
Target
temperature
Temperature
adjustment knob
Chamber
temperature
Probe 1
temperature
Grill light
on/off
Probe 2
temperature
Hopper light
on/off
Prime
button
Power
on/off
Connection via
Bluetooth
®
Connection via
WiFi
Target temperature:• Target temperature your grill will heat to and maintain. This temperature can be
changed at any time.
Chamber temperature:• Current internal temperature of the cooking chamber.
Probe 1 temperature:• Temperature reading from the built-in food probe 1.
Probe 2 temperature: •Temperature reading from the built-in food probe 2.
Grill light:• On/off button that actuates the built-in lights inside your cooking chamber.
Hopper light: •On/off button that actuates the built-in light inside the pellet hopper.
Prime button: •Holding down the Prime button will actuate the pellet auger at an accelerated rate for as
long as you hold it. There will be an audible cue as the prime button is depressed. While not needed for
regular operation, this can reduce the time it takes to start your grill.
Power on/off:• Turns the grill on or off. When the grill is turned on it will automatically heat to the default
set temp of 350° F. To turn the grill off hold the Power button for several seconds until control panel shuts
down. When the grill is turned off the internal fan will stay on for 10 minutes to ensure any remaining
embers are extinguished.
WARNING: After operation ALWAYS use the power off function and DO NOT unplug your grill
before the fan shuts off on its own. Failure to follow these instructions can result in a fire inside
your pellet hopper.
Temperature adjustment knob: •
To adjust the set temperature of the grill press the dial once and the Target Temperature number will •
start flashing. Turn the knob clockwise for hotter and counterclockwise for cooler. After you have
arrived at the desired temperature, wait a few seconds without touching the dial to allow the number to
stop flashing, it is now set.
To adjust the set temperature of the food probes press the dial twice for Probe 1 and press the dial •
three times for Probe 2. Follow the same procedure as adjusting the set temperature of the grill. When
the probe temperature reaches the target it will beep 3 times and the probe temperature display will
flash.
Connection via Bluetooth•
®
: This icon will illuminate when a Bluetooth
®
connection is established
between the Clermont Pellet Grill and a mobile device.
Connection via WiFi:• This icon will illuminate when a WiFi or Cloud connection is established between
the Clermont Pellet Grill and a mobile device.
Auger on:• Illuminates when the auger is running. The auger will turn on or off in regular operation to
regulate the chamber temperature.

Fan on:• Illuminates when the internal fan is running which provides the firepot with air.
Igniter on:• Illuminates when the hot rod is on which ignites the pellets in the fire pot at the beginning of
every cook. This turns off after initial start-up.
Low pellets: •Illuminates when the low pellet sensor is triggered. An audible alarm will sound as well. Refill
pellets in the hopper to solve.
-----------------------------------
WARNING
----------------------------------
DO NOT leave your grill unattended while in use.•
DO NOT move grill when in use. Lock wheels in place to stabilize grill.•
DO NOT use water to extinguish flare-ups.•
Ensure grill is on a stable, level surface and all four casters are in firm contact with the ground.•
TURNING ON THE GRILL:
-----------------------------------------------------------------------------------
Note: It is recommended to wash the grill grates and smoking racks with warm soapy water before initial
lighting of the grill.
INITIAL LIGHTING INSTRUCTIONS:
-----------------------------------------------------------------------------------
To be used on initial firing or anytime the grill runs out of pellets.•
Always allow the auger tube to fully load with pellets to ensure proper lighting of the grill.•
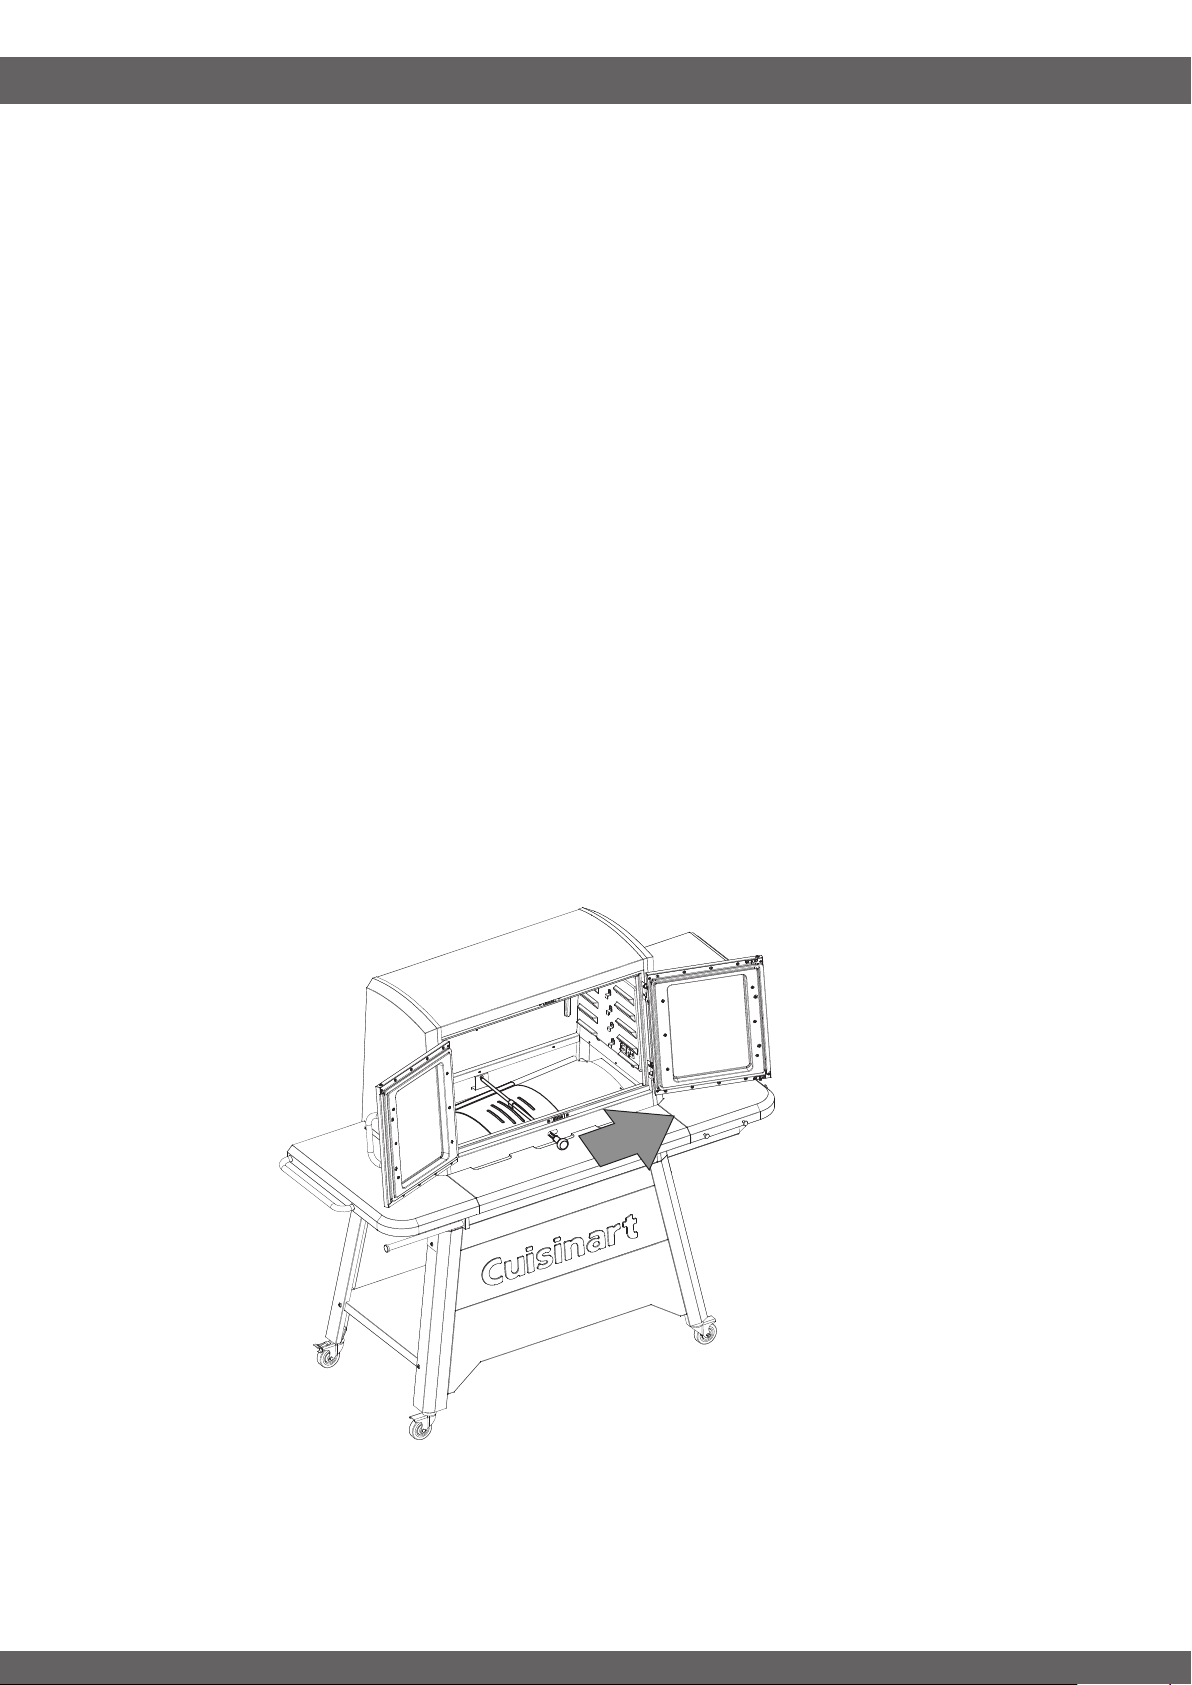
Step 1: Open both doors and remove cooking grates, sear shutter, and drip shield from inside the grill. Leave
doors open.
Step 2: Plug power cord into a GFI (grounded) outdoor electrical outlet. Use only a Ground Fault Interrupter
(GFI) protected circuit with this outdoor cooking appliance. Never remove the grounding plug or use with an
adapter with 2 prongs. Only use extension cords with a 3 prong grounding plug, rated for the power of the
equipment, and approved for outdoor use with a W-A marking.
Step 3: Open the pellet hopper lid. Make sure the auger is free from debris and other objects. Press the power
button, turn the temperature control knob to 200° F.
Look inside the pellet hopper to verify the auger is slowly turning.•
Place your hand about 3” above the fire pot and make sure you can feel air blowing out from the fire pot.•
Look inside the fire pot and make sure the ignitor is getting hot. It will take a couple of minutes for the •
ignitor to glow red. DO NOT TOUCH THE IGNITOR!
Verify the digital display is not displaying any error codes. Note: Please see the troubleshooting section for •
error code details.
If all the above checks pass, press the power button to turn off the grill. The internal fan will stay on for 10 •
minutes after the grill is turned off. This is normal.
If any of the above checks fail, consult our Troubleshooting section.•
Step 4: Fill the pellet hopper with cooking pellets.
WARNING: Never use heating fuel pellets as they are not safe for cooking.
Step 5: Turn the grill back on.
NOTE: During the initial loading of the auger tube, it will take approximately 9 minutes for the
pellets to move from the pellet hopper to the fire pot. You can speed this process up by holding the
Prime button.
Step 6: When the pellets start falling into the fire pot, turn off the grill.
Step 7: Replace the drip shield, sear shutter, and cooking grates in the cooking chamber.
Step 8: Keep the cooking chamber doors open. Turn the grill back on again, then dial temperature control
knob to 300° F. After a few minutes you should smell and see smoke coming out of the cooking chamber as
the pellets ignite in about 4 minutes.
NOTE: The ignitor will cycle 5 minutes on and 1 minute off 4 times during startup.
Step 9: After the fire has started in the fire pot close the cooking chamber doors and set the temperature
control knob to the desired setting. Refer to the next section “BREAKING IN YOUR GRILL” for initial curing
instructions.
OPERATING THE GRILL
22

OPERATING THE GRILL
23
BREAKING IN YOUR GRILL:
-----------------------------------------------------------------------------------
Many surfaces of your Clermont Pellet Grill have been coated in a thin layer of oil to protect it during shipping.
After you have started a fire in the fire pot and before cooking food for the first time allow the grill to run at
500° F for 30 minutes with the doors closed to ensure it is properly seasoned. Then allow the grill to go
through its natural shut down cycle. After these break-in procedures are complete the grill is ready to use.
SUBSEQUENT LIGHTING INSTRUCTIONS:
-----------------------------------------------------------------------------------
Step 1: Empty the fire pot contents by actuating the ash clearing mechanism. Instructions for that is located
on page 28 in this manual.
Step 2: Open pellet hopper lid and check the pellet level. Add more pellets if necessary.
WARNING: NEVER add cooking pellets to a hot fire pot by hand. You could be seriously burned.
If the hopper runs out of pellets or your fire goes out while cooking, let the grill completely cool and
follow the Initial Lighting Instructions.
Step 3: Open cooking chamber doors and plug the grill into a GFI outlet. The control panel should have a
flashing blue power button, press it to turn the grill on. After 2-4 minutes you should smell and see smoke
coming out of the cooking chamber as the pellets ignite.
Step 4: After the fire is started in the fire pot close the cooking chamber doors and set the temperature control
knob to the desired setting. For best results, preheat the grill for 15 to 20 minutes with the doors closed before
placing food in the grill.
GRILL DOES NOT LIGHT OR FIRE IN POT EXTINGUISHES WHILE COOKING:
-----------------------------------------------------------------------------------
Step 1: Turn off the grill and unplug. Open cooking chamber doors and remove all food, cooking grates,
searing rod, sear shutter, and drip shield.
WARNING: Always use oven mitts/gloves to protect your hands. Metal parts become hot during
use. Use extreme caution when handling cooking grates, grease tray and baffle.
Step 2: Open Ash Clean-out to remove all pellets and ash from the fire pot. Close ash clean-out.
Step 3: Restart the grill and check the fan, ignitor, and auger to ensure they are operational. You should feel
wind just above the fire pot, the ignitor should begin to glow after about 2 minutes and pellets should be falling
into the fire pot from the auger tube. If any of these things do not happen please refer to our troubleshooting
section.
Step 4: Wearing oven mitts/gloves, replace all the components removed in Step 1.
Step 5: Preheat the grill for 10 to 15 minutes with doors closed before placing food back in the grill.
If this procedure is not successful, see Troubleshooting section in your owner’s manual.
MANUAL START-UP PROCEDURE: (To be used if ignitor is not working properly):
-----------------------------------------------------------------------------------
Step 1: Ensure the grill is off. Plug the power cord into a grounded power source.
Step 2: Check fire pot to ensure there is no obstruction for proper ignition. Fill pellet hopper with cooking
grade pellets.
Step 3: Open cooking chamber doors. Remove the cooking grates, searing rod, sear shutter, and drip shield
to expose the fire pot. Place a small handful of pellets into the fire pot. Squirt a gelled fire starter, or other
appropriate pellet starter, over the top of the pellets. A small amount of solid fuel fire starter, such as those
composed of sawdust and wax, or wood shavings, is also recommended. Add another small handful of pellets
in the fire pot.
NOTE: Do not use gasoline, lighter fluid, kerosene, or petrol for lighting a fire in your grill.

24
OPERATING THE GRILL
Step 4: Light the contents of the fire pot using a long match or a long lighter. Allow the starter to burn 3 to 5
minutes. Do not attempt to add more starter into the fire pot as this can cause injury.
Step 5: Quickly and carefully replace all components removed in Step 3. Continue on from Step 2 of the
“Subsequent Lighting Instructions”.
TURNING OFF THE GRILL:
-----------------------------------------------------------------------------------
Step 1: Press and hold the power button until the control panel shuts off. An auto cool down feature will keep
the fan running for 10 minutes. If you don’t allow the grill to run the cool down feature a fire may travel up the
auger tube and ignite your pellet hopper.
Step 2: After the auto cool down is complete the fan should power off automatically, you may now unplug the
power cord from the GFI outlet.
WARNING: Do not unplug the grill while the fan is still working on the shut down cycle, the grill
will automatically shut off when the cycle is done. Interruption of the shut down cycle could result
in a fire in the hopper chamber.
OPERATING TIPS:
-----------------------------------------------------------------------------------
• NEVER move your Pellet Grill while it is hot. If you are transporting your grill in a vehicle
after cooking on it, make sure the fire is completely out and the grill is cold before placing it in
any vehicle.
NEVER put water into the fire pot. It will jam the auger and can damage the ignitor.•
The Pellet Grill is designed to operate with the doors closed.•
The temperature readout is an approximate and can be affected by the following factors: outside ambient •
temperature, the amount and direction of wind, the quality of pellet fuel being used, the lid being opened,
and the quantity of food.
When selecting a temperature setting, the auger will feed pellets for several minutes. This will momentarily •
raise the temperature, but the temperature will decrease and stabilize after 10-15 minutes.
The auger will not run 100% of the time, it cycles on and off depending on the temperature setting.•
This grill is equipped with a pellet hopper sensor. “LOW PELLET” will illuminate on the controller and •
it will start beeping once the pellets are below the sensor. After you add pellets the alarm will shut off
automatically.
Pellets can hang up in the pellet hopper after cooking for a long period of time. It’s important to monitor the •
pellet level and mix the pellets by hand to ensure they flow into the auger.
25
COOKING
PREHEATING THE GRILL:
-----------------------------------------------------------------------------------
Prior to use, it is recommended that you preheat your grill. This ensures that the cooking grates are at the
desired temperatures to sear the food sugars when cooking. Preheat the grill for 15 to 20 minutes or until it
reaches the desired temperature before adding food. Close the doors during the preheat period.
SMOKING:
-----------------------------------------------------------------------------------
To smoke food on your Clermont Pellet Grill:
Step 1: Set the grill to a low temperature like 225° F. Higher temperatures will produce less smoke so try to
keep it below 300° F.
Step 2: Allow the grill to preheat and ensure the sear rod is shut, in the left position.
Step 3: When the grill temperature has stabilized, about 20 minutes, place the food to be smoked on one of
the two smoking racks.
Step 4: Use a food probe to monitor the internal temperatures of your food to ensure doneness.
Tip: Cold food absorbs smoke more easily than room temperature.•
SEARING:
-----------------------------------------------------------------------------------
The Clermont Pellet Grill is equipped with a direct sear mechanism which allows you open an air path between
your food and the fire pot.
To operate:
Step 1: Set the grill temperature to 500° F or above and slide the direct sear rod to the right. If the fire has
already been started, you should be able to see it through the slots of the sear shutter.
Step 2: Allow the cooking grates to preheat before placing food on them to maximize grill marks.
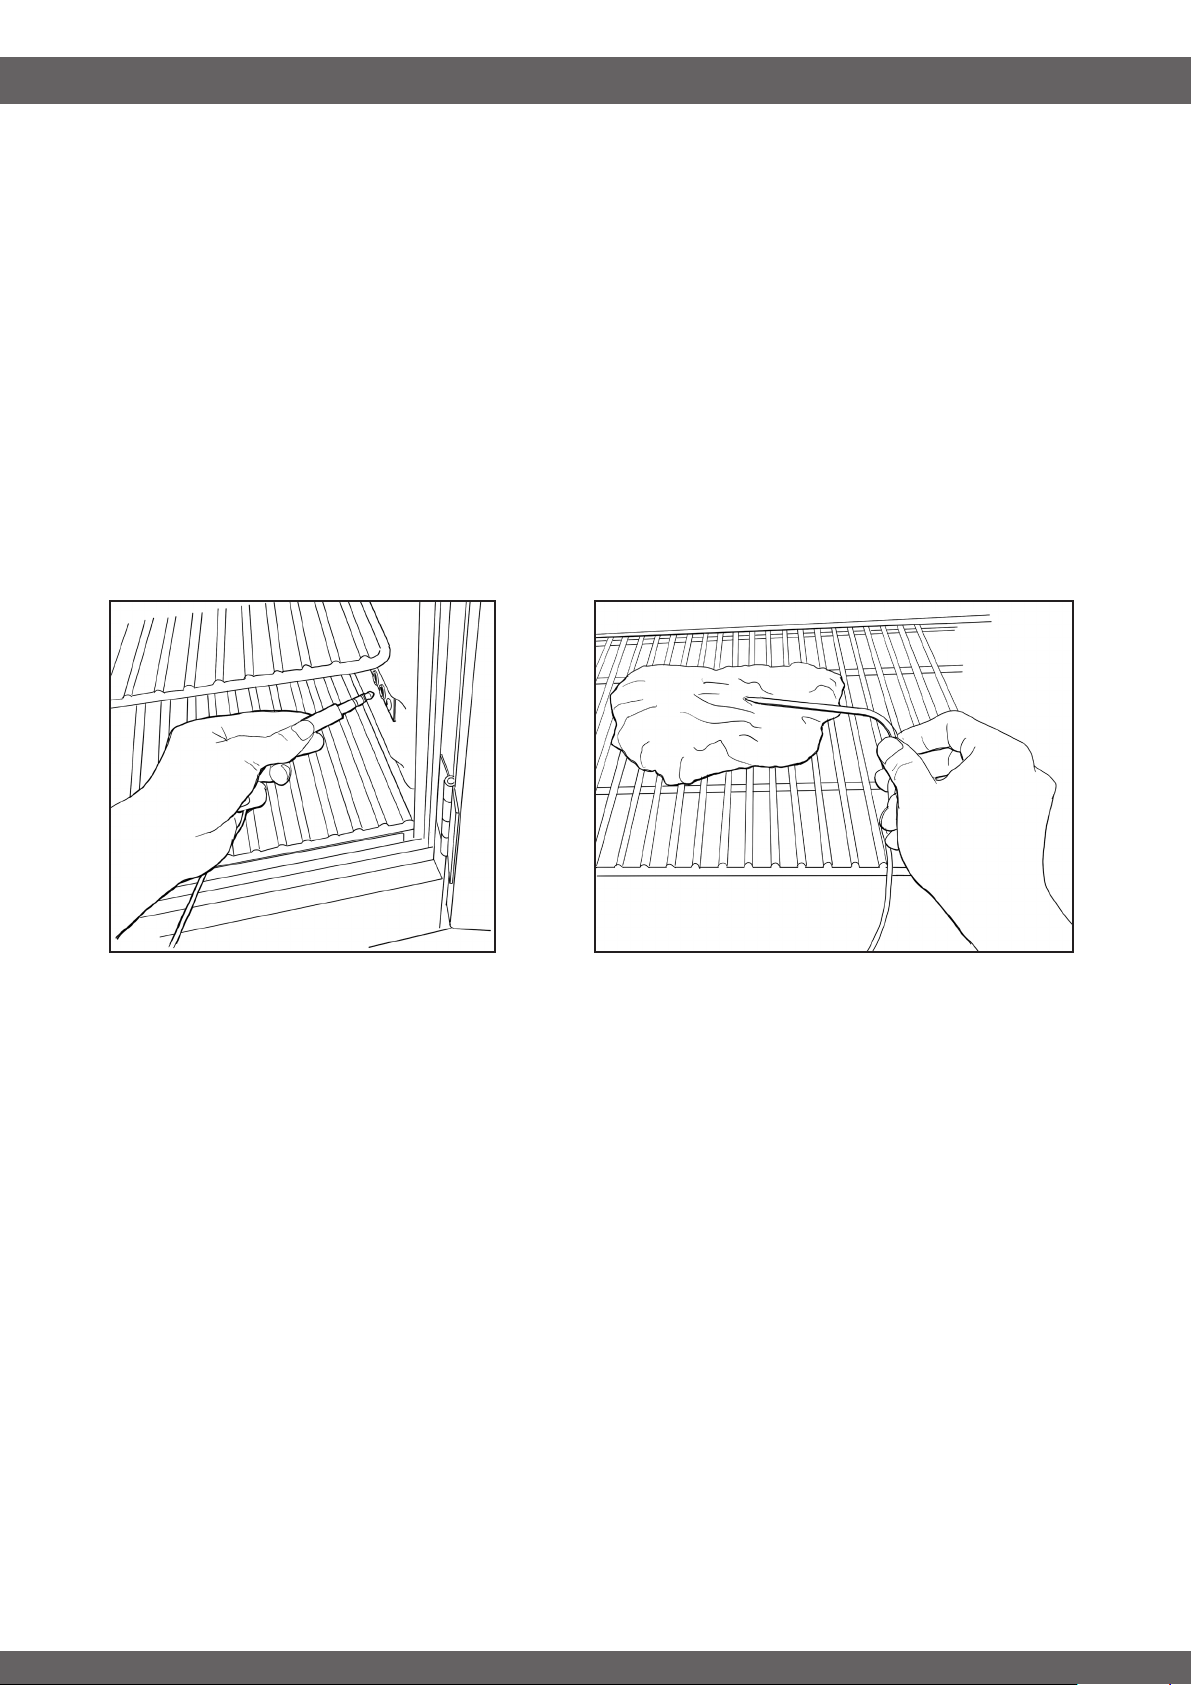
FOOD PROBES:
-----------------------------------------------------------------------------------
There are two food thermometers supplied with your Clermont Pellet Grill. These thermometers are stored
under the hopper lid and are meant to be inserted into your food.
To use,
Step 1: Unwind the cable and remove the thermometer from the hopper lid.
Step 2: Inside the cooking chamber at the bottom right corner there are two thermometer jacks which are
protected by flip-up covers when not in use. Flip one of these covers up and insert the thermometer probe into
its jack. If the grill is already hot, it is recommended to use oven mitts/gloves to avoid burning yourself.
Step 3: The long sharp thermometer probe should be fully inserted into the thickest part of your food, ensure
the tip of the thermometer does not come out the other side. Be careful to avoid bones when inserting the
probe because if left near a bone, the temperature readings may become inaccurate.
Step 4: To adjust the set temperature of the food probes press the dial twice for Probe 1 and press the dial
three times for Probe 2. Follow the same procedure as adjusting the set temperature of the grill. When the
probe temperature reaches the target it will beep 3 times and the probe temperature display will flash.
GRILLING TO PROPER TEMPERATURE:
-----------------------------------------------------------------------------------
Use a meat thermometer to be sure food has reached a safe internal temperature.•
The US Department of Agriculture recommends the minimum temperature be reached for the following •
food items:
Ground Meat . . . . . . . . . . . . . . . 160° F (71° C)
Pork . . . . . . . . . . . . . . . . . . . . . . 145° F (62.8° C)
Poultry . . . . . . . . . . . . . . . . . . . . 165° F (73.9° C)
Roasts . . . . . . . . . . . . . . . . . . . . 145° F (62.8° C)
Seafood . . . . . . . . . . . . . . . . . . . 145° F (62.8° C)
Vegetables . . . . . . . . . . . . . . . . . 145° F (62.8° C)
Use caution when removing food from Pellet Grill. All surfaces are HOT and may cause burns. Use •
protective gloves or long, sturdy cooking tools to remove food.
This grill is HOT while in use and will remain HOT for a period of time afterwards. Use caution.•
Pellet grills do not produce highly visible smoke 100% of the time. Even though you don’t see smoke you •
are still getting smoke flavor.
26
COOKING

27
COOKING
COOKING TIPS:
-----------------------------------------------------------------------------------
CLEANLINESS:
Always wash hands thoroughly with soap and hot water prior to handling food and after handling raw •
meat, uncooked poultry or seafood.
When using a platter to carry raw meat, uncooked poultry or seafood to the grill, make sure to wash the •
platter thoroughly with soap and hot water before placing cooked foods back on the platter or use different
platters for raw and cooked foods.
Never use the same utensils when handling raw meat, uncooked poultry or seafood unless you wash the •
utensils thoroughly with soap and hot water.
Never re-use marinade from raw meat or uncooked poultry on foods that have been cooked and are ready •
to be served.
HELPFUL HINTS:
If you pre-cook meat or poultry, do so immediately before grilling.•
Never defrost meat at room temperature or on a counter top. When defrosting meat at room temperature •
or on a countertop be aware of the “Danger Zone” which is the temperature range between 40° F and
140° F. Bacteria is most active at these temperatures and can double in population in as little as 20
minutes.
Refrigerate leftovers within 2 hours of taking food off the grill.•
For additional information, please phone the USDA’s toll free Meat & Poultry Hotline at 800-535-4555.•
28
CARE AND MAINTENANCE
ASH CLEAN-OUT:
-----------------------------------------------------------------------------------
Before each use, open ash clean-out to get rid of ash and burnt pellets.
NOTE: Make sure Ash Drawer is in place before emptying ash.•
WARNING: Ensure fire is completely out before emptying the ash.
Step 1: Lift Ash Clean-Out Handle Lock.
Step 2: Pull Ash Clean-Out Handle.
Step 3: Remove Ash Drawer and empty then replace.
Step 4: Return Ash Clean-Out Handle and Ash Clean-Out Handle Lock to previous positions.
Step 1:
Step 2:
Step 3:
29
CARE AND MAINTENANCE
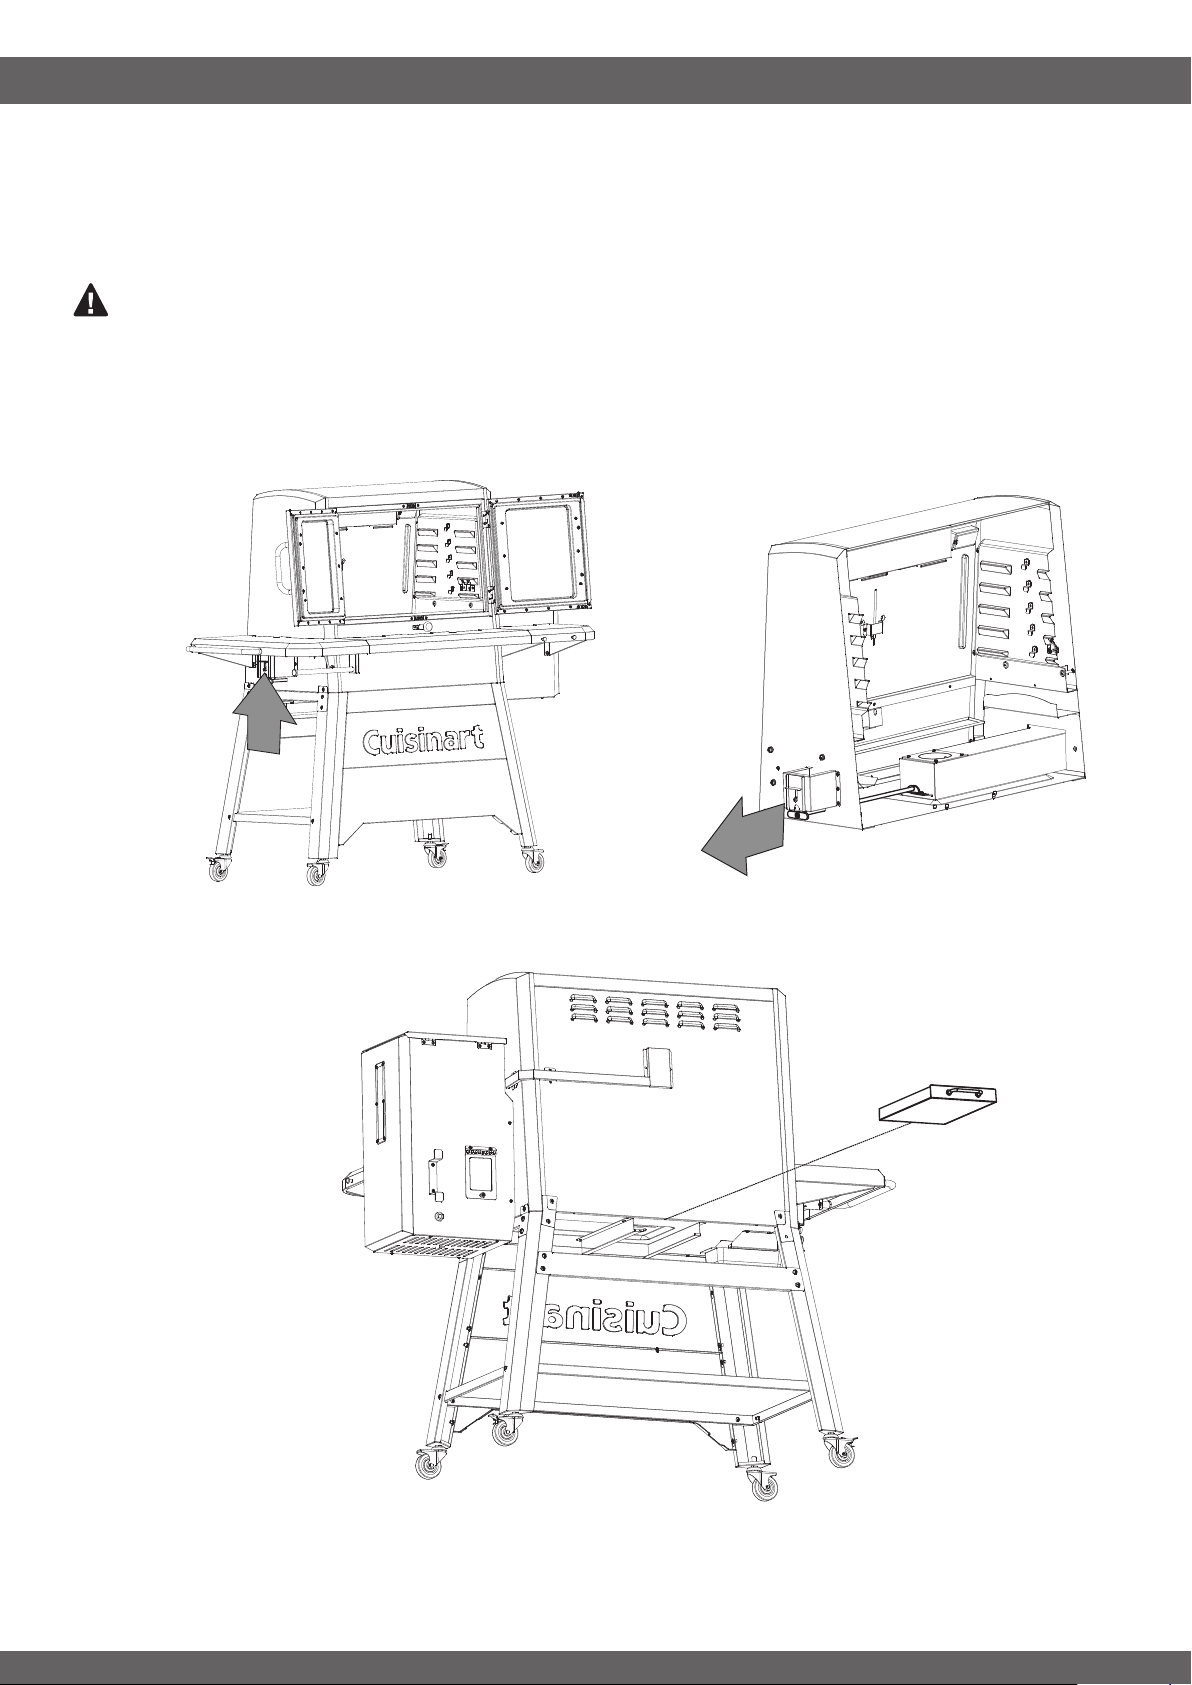
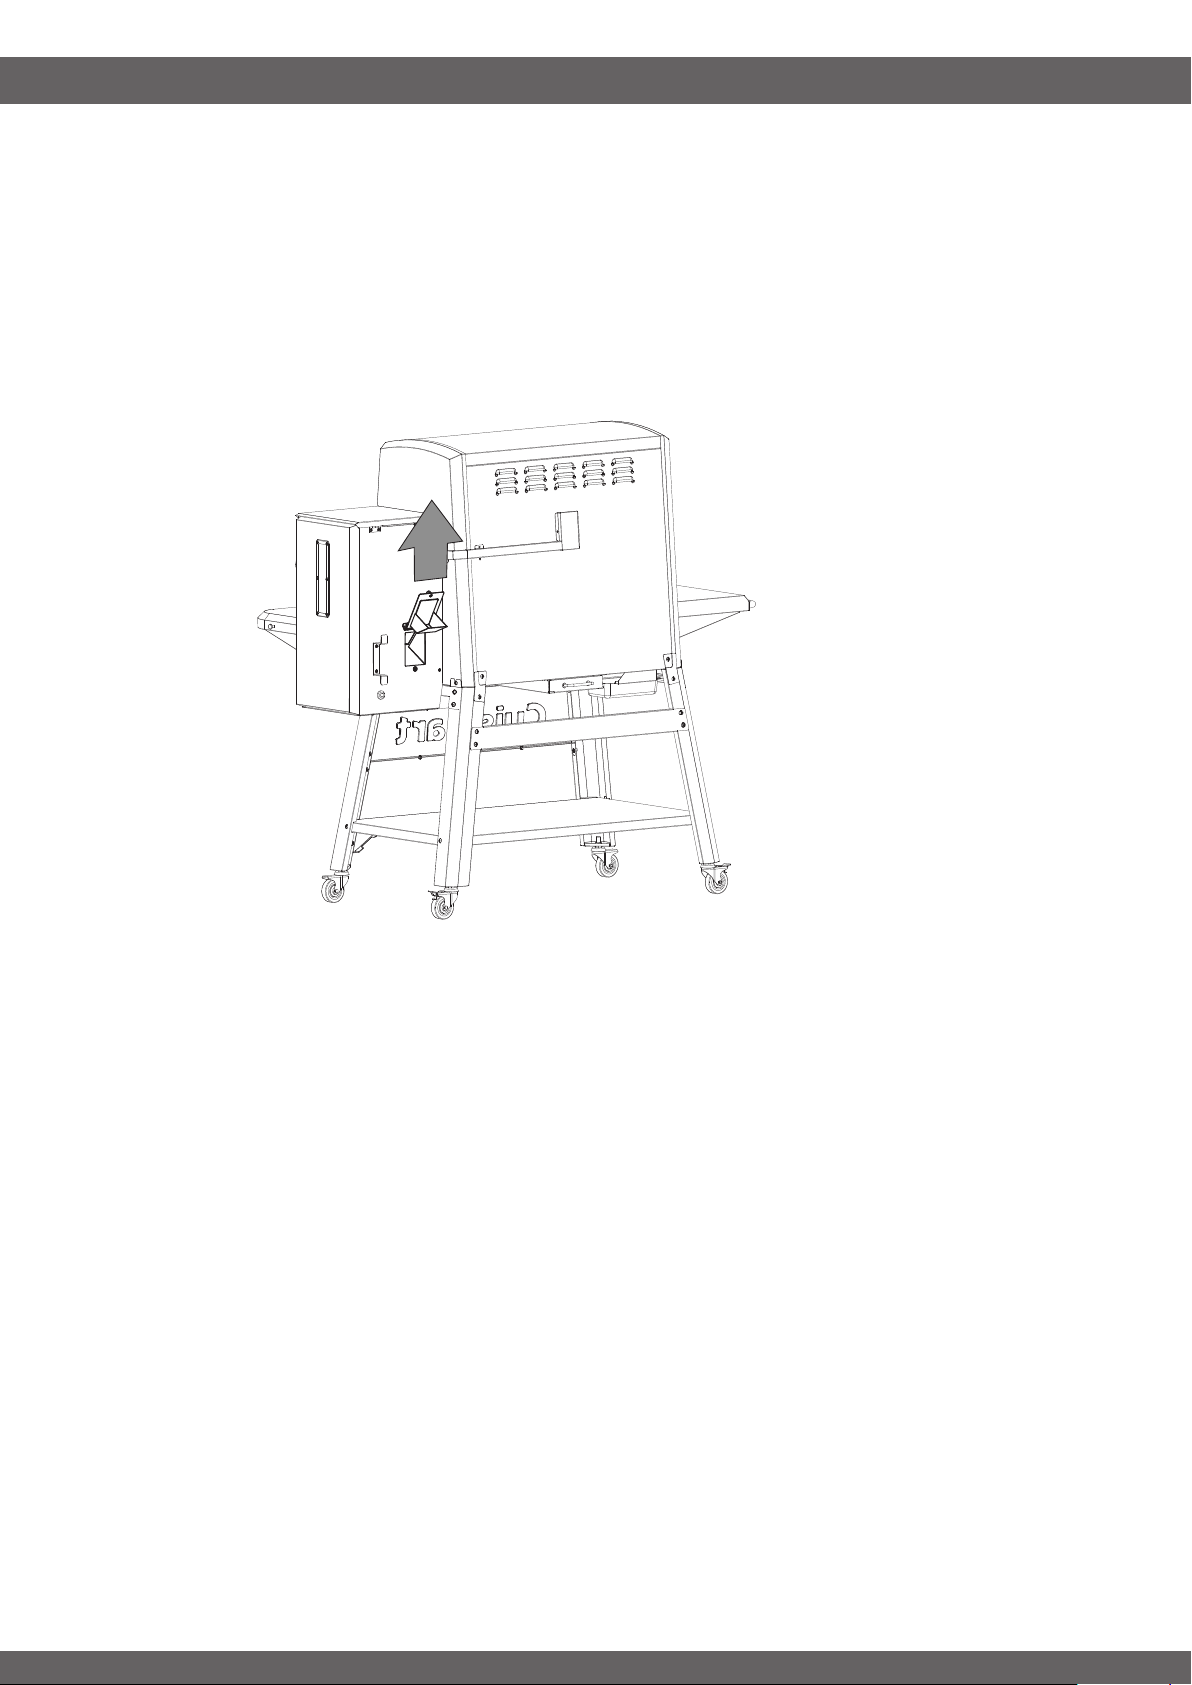
PELLET HOPPER CLEAN-OUT:
-----------------------------------------------------------------------------------
If grill will be left un-attended for a long period of time, we recommend you remove unused pellets. Always
store wood pellets away from heat and in a dry location.
Step 1: Have an empty bucket ready to catch pellets falling out.
Step 2: While pressing the pellet clearing door shut, unscrew its lock.
Step 3: With the bucket directly below the pellet clearing door pull it out to open.
Step 4: Close the pellet clearing door and screw the lock back into place.
REMOTE CONNECTIVITY:
-----------------------------------------------------------------------------------
Refer to the technology quick start guide for instructions and capabilities.
PROPER CARE & MAINTENANCE:
-----------------------------------------------------------------------------------
Remove wood pellets from hopper if grill will not be used for a long period of time. Wood pellets can •
become soggy due to moisture/humidity and can cause the auger to bind up or not push pellets to burn
chamber.
Disposal of ashes – Ashes should be placed in a metal container with a tight-fitting lid. The closed •
container of ashes should be placed on a non-combustible floor or on the ground, well away from all
combustible materials, pending final disposal. When the ashes are disposed by burial in soil or otherwise
locally dispersed, they should be retained in the closed container until all cinders have thoroughly cooled.
It’s important to keep your grill always covered when not in use to avoid rain getting inside the grill and •
damaging the grill and/or cause excessive corrosion. The grill and pellets must be kept dry in order to
function properly.
Wash cooking grates and drip shield with hot, soapy water, rinse well and dry. Lightly coat grill grates, sear •
shutter, and drip shield with a high smoke point food grade oil like vegetable oil or canola oil. Never use a
commercial oven cleaner because it may damage the painted finish.

Clean inside and outside of grill by wiping off with a damp cloth. Apply a light coat of vegetable oil or •
vegetable oil spray to the interior surface to prevent rusting.
Never apply paint to the interior surface. Rust spots on the interior surface can be buffed, cleaned, then •
lightly coated with vegetable oil or vegetable oil spray to minimize further rusting.
Depending on use, periodically remove the cooking grates, grease tray and heat distribution plate to clean •
the ash from in and around the fire pot. Make sure the grill is cold before starting this procedure.
Grease can build up in the exhaust assembly which may result in some dripping from the exhaust vents. •
Wipe any visible grease coming out of the exhaust on the back of the grill after each use. It is also
recommended to occasionally disassemble the exhaust assembly from the inside of the cooking chamber
to give all the components a deep clean.
Keep the appliance free and clear of combustible materials, gasoline and other flammable vapors and •
liquids.
For safe grilling and peak performance of your grill, perform these checks at least twice per year or after •
extended periods of storage.
Be sure to tighten up all hardware (nuts, bolts, screws, etc.) at least twice per year.•
CAUTION: Some parts may contain sharp edges. Wear protective gloves if necessary.
TRANSPORTING AND STORAGE:
-----------------------------------------------------------------------------------
Warning
Never move a grill when it is hot or when objects are on the cooking surfaces.•
Never store flammable liquids or spray canisters under or near the grill.•
DO NOT extinguish grease fires using water.•
BEFORE STORING YOUR GRILL:
-----------------------------------------------------------------------------------
Clean all surfaces.•
If storing the grill outdoors, close the wood pellet lid and cover the grill with a cover for protection from the •
weather.
If the grill is stored outside during the rainy season, care should be taken to ensure that water does not get •
into the pellet hopper. Wood pellets, when wet, expand greatly and will jam your auger.
Never move a grill when it is hot or when objects are on the cooking surfaces. •
Never store flammable liquids or spray canisters under or near the grill.•
DO NOT extinguish grease fires using water.
30
CARE AND MAINTENANCE
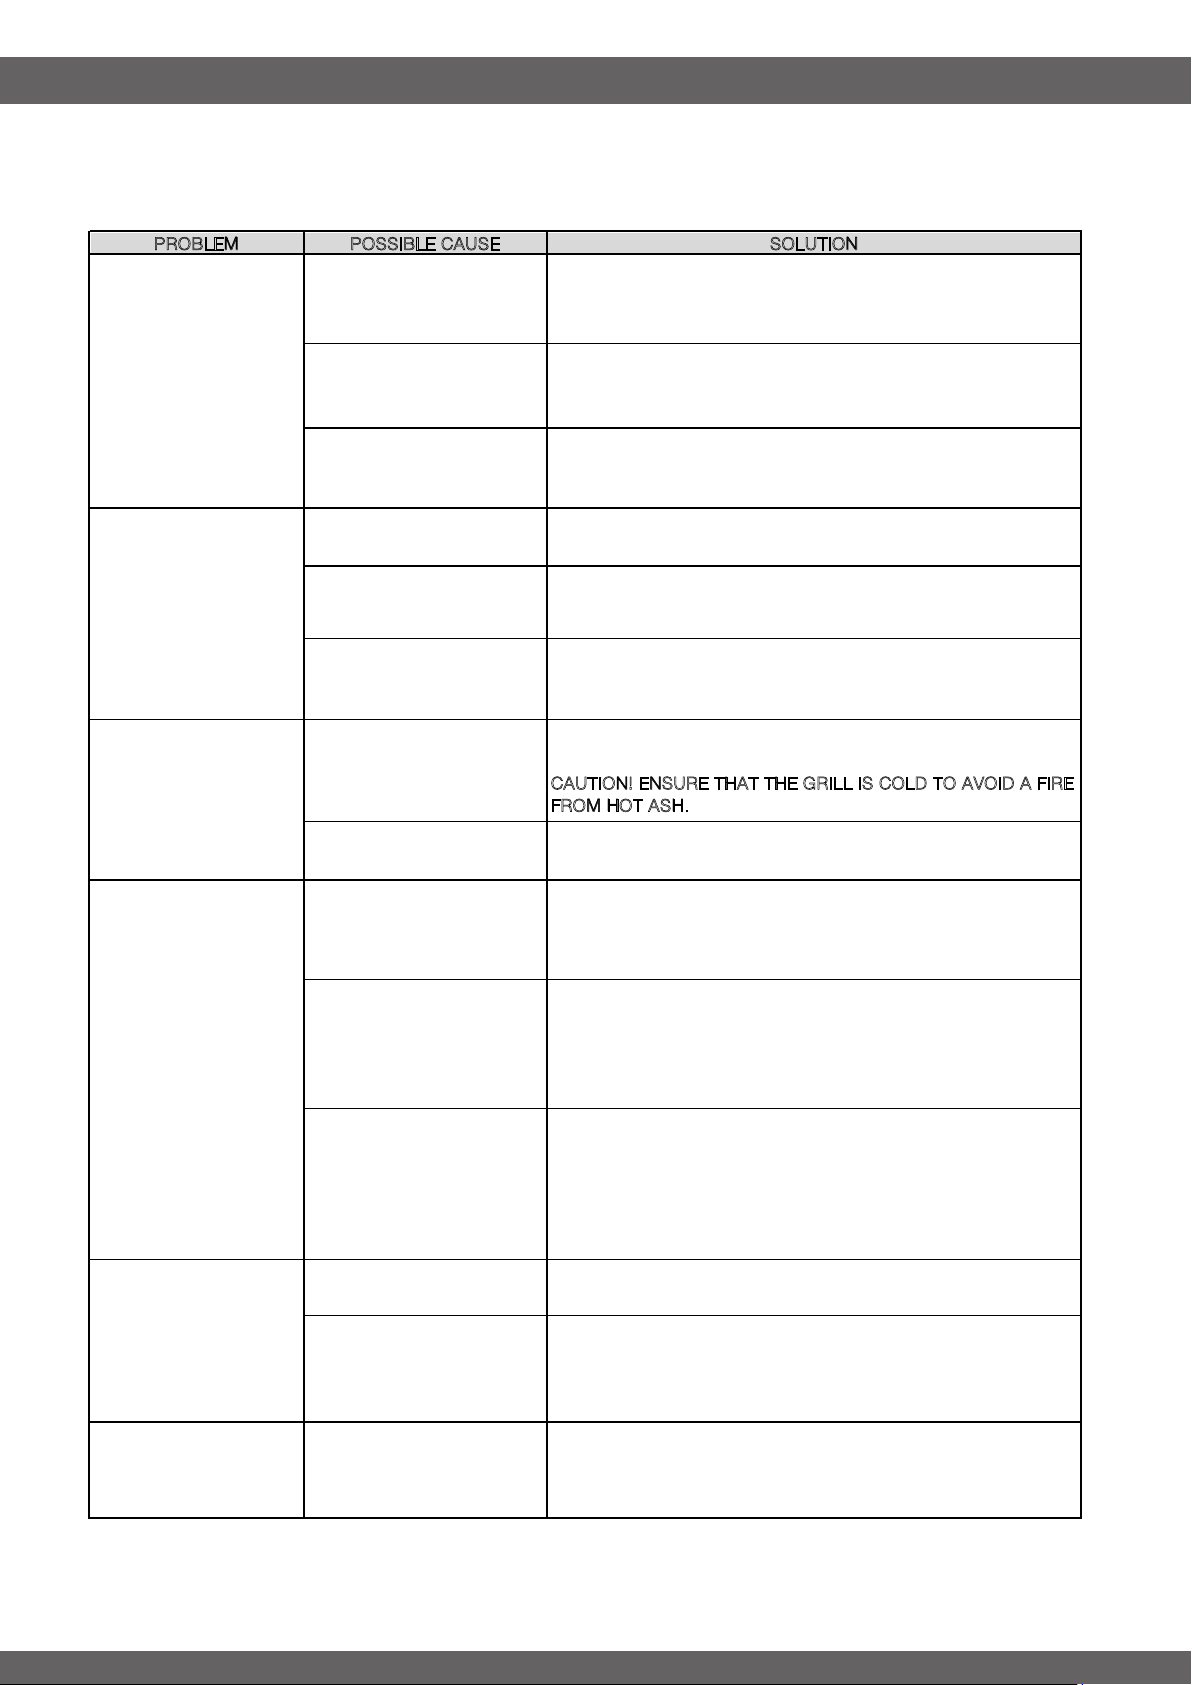
ISSUE RESOLUTION:
-----------------------------------------------------------------------------------
31
TROUBLE SHOOTING
PROBLEM POSSIBLE CAUSE SOLUTION
There is no power
Make sure the grill is plugged into a functional GFI certified outlet.
Ensure the GFI outlet has not tripped. Test the outlet with another
appliance that is known to work
The fuse is blown.
Check the fuse by unscrewing the fuse cap on the back of the control
panel inside the hopper. If the fuse is indeed blown then replace it
with a 5A fuse.
Connections to the
control panel are loose
With the grill unplugged access the back of the control panel and
ensure all connectors are securely attached and in the proper
locations. Refer to the wiring diagram.
Temperature adjustment
too low
Turn up heat on the control knob.
Opening the doors too often
Opening the door allows heat to escape and causes the temperature
to vary drastically from the set temperature.
Out of pellets
Add pellets and allow sufficient time for the pellets to travel from the
pellet hopper to the fire pot (can take up to 10 minutes).
Excessive ash buildup
Excess ash. Remove all unburned pellets and ash from the fire pot
using the ash clean-out procedure on page 28.
C
AUTION! ENSURE THAT THE GRILL IS COLD TO AVOID A FIRE
FROM HOT ASH.
Poor pellet quality
Inspect pellets to ensure they are whole and are not damp. If they
are, replace pellets and restart the grill.
Auger is not primed
Before the unit is used for the first time or anytime the hopper is
emptied, allow the auger tube to fully load with pellets to ensure
proper lighting of the grill (about 9 minutes). Follow Initial Lighting
Instructions.
Auger is jammed
Remove all components inside the firebox and inspect the fire pot,
are there fresh pellets inside? If not, inspect the auger to see if it is
turning at all. If the auger is not turning and you are sure there are
fresh pellets in the hopper, please contact our customer support
team.
Ignitor has failed
Remove all components from inside the fire box and inspect the fire
pot. If there are fresh pellets but they are not lighting the ignitor is
malfunctioning. Contact our customer service team for a resolution. If
a replacement part is required, follow Manual Start-Up Procedure to
continue using the grill as you wait for it to arrive.
Adjust temperature control
Reduce heat by reducing the selected
temperature setting.
Pellet overflow in fire pot
Press the power button on the grill to initiate its power down cycle.
Allow the fan to run until the fire is completely out. After everything
has cooled sufficiently, actuate the ash clean out mechanism to clear
the fire pot and restart the grill.
Temperature
fluctuations
External Factors
Temperature fluctuations are normal for pellet grills. Any significant
fluctuations can be caused by wind, air temperature, improper use, or
lack of grill maintenance.
LCD screen will not
light up
Grill is not getting hot
enough
Fire goes out unexpectedly
Pellets will not light after
several minutes
Grill is getting too
hot
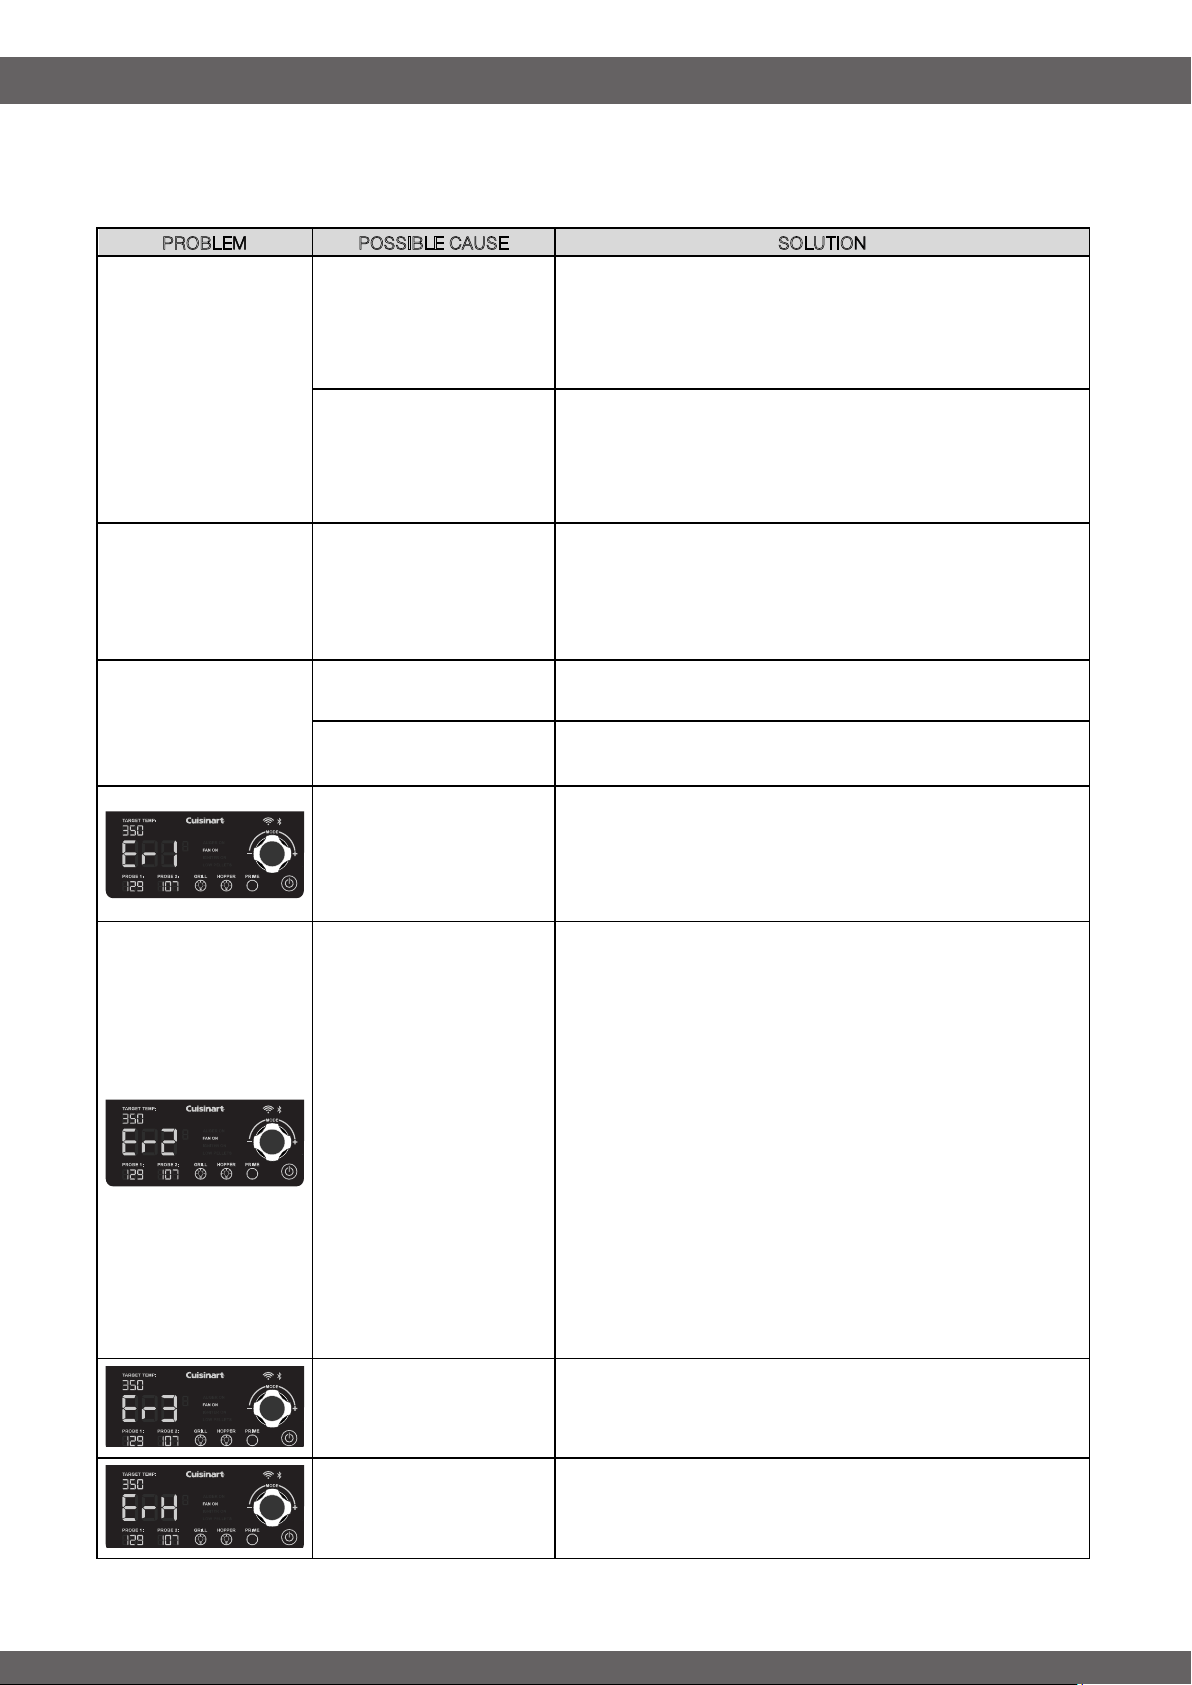
ISSUE RESOLUTION:
-----------------------------------------------------------------------------------
32
TROUBLE SHOOTING
PROBLEM POSSIBLE CAUSE SOLUTION
This is normal due to the air
pressure inside the grill. The
amount of smoke can vary
depending on cooking
conditions.
This condition will not affect cooking. But can be minimized by
ensuring the inside of the grill is clean and there is not excessive ash.
Unplugged grill too soon.
Once the grill is turned off the fan will continue to run for 10 minutes. If
you do not allow the grill to go through the cool down process it can
cause fire to transfer to the auger tube. Plug the grill back in and turn
it on to activate the fan, then go through the proper shut down
procedure.
Flare ups or grease fires
Excessive grease build up
or temperature setting too high
while cooking greasy food
If a grease fire occurs, keep the doors closed and hold the power
button to go through standard shut down procedures. To avoid this
condition ensure the interior of the grill is cleaned of grease regularly
to prevent buildup and cook below 350° F for very greasy foods.
poor pellet quality
Pellets may be damp or have broken down into dust. Replace pellets
with fresh ones.
Ash build up in fire pot
Operating the ash clean out mechanism before every cook will
prevent this from ever happening.
ER1-Internal thermometer
of the grill is malfunctioning
Check to see if the temperature probe is attached to the control
panel. If it is loose, firmly connect the probe to the control panel and
restart the grill. If there is no problem with the connection then you
may need to replace the temperature probe, please call our customer
service team for assistance.
ER2-An error occurred during
the startup cycle
1. With the grill unplugged, ensure all components are firmly attached
to the control panel, refer to the wiring diagram. You can access the
control panel by unscrewing the four screws on the inside of the
hopper directly behind the LCD screen. After all checks are made,
reassemble everything, plug the grill in, and go through the startup
procedure.
2. If there is no fire proceed to remove everything from the internal
chamber of the grill and observe the fire pot for the following:
-Ignitor: is it getting hot? Either watch to see if it glows red hot or
hover your hand over the fire pot an inch or two to feel for heat.
-Fan: hover your hand over the fire pot to feel if there is any air
movement. You should also be able to very clearly hear the fan if it is
operational.
-Auger motor: visually inspect the auger for a minute to see if it is
spinning. Note that it spins very slowly.
If any of the components are not operating properly please call our
customer service team for a resolution.
ER3-There is a flame out
and the grill cannot
re-ignite the pellets
Follow the same procedure as ER2.
ERH-High temperture alert
The internal temperature has reached over 650° F, which is above the
normal operating temperature of this grill.
Prolonged excessive or
discolored smoke
Smoke comes out
of pellet hopper
33
WARRANTY AND REPLACEMENT PARTS
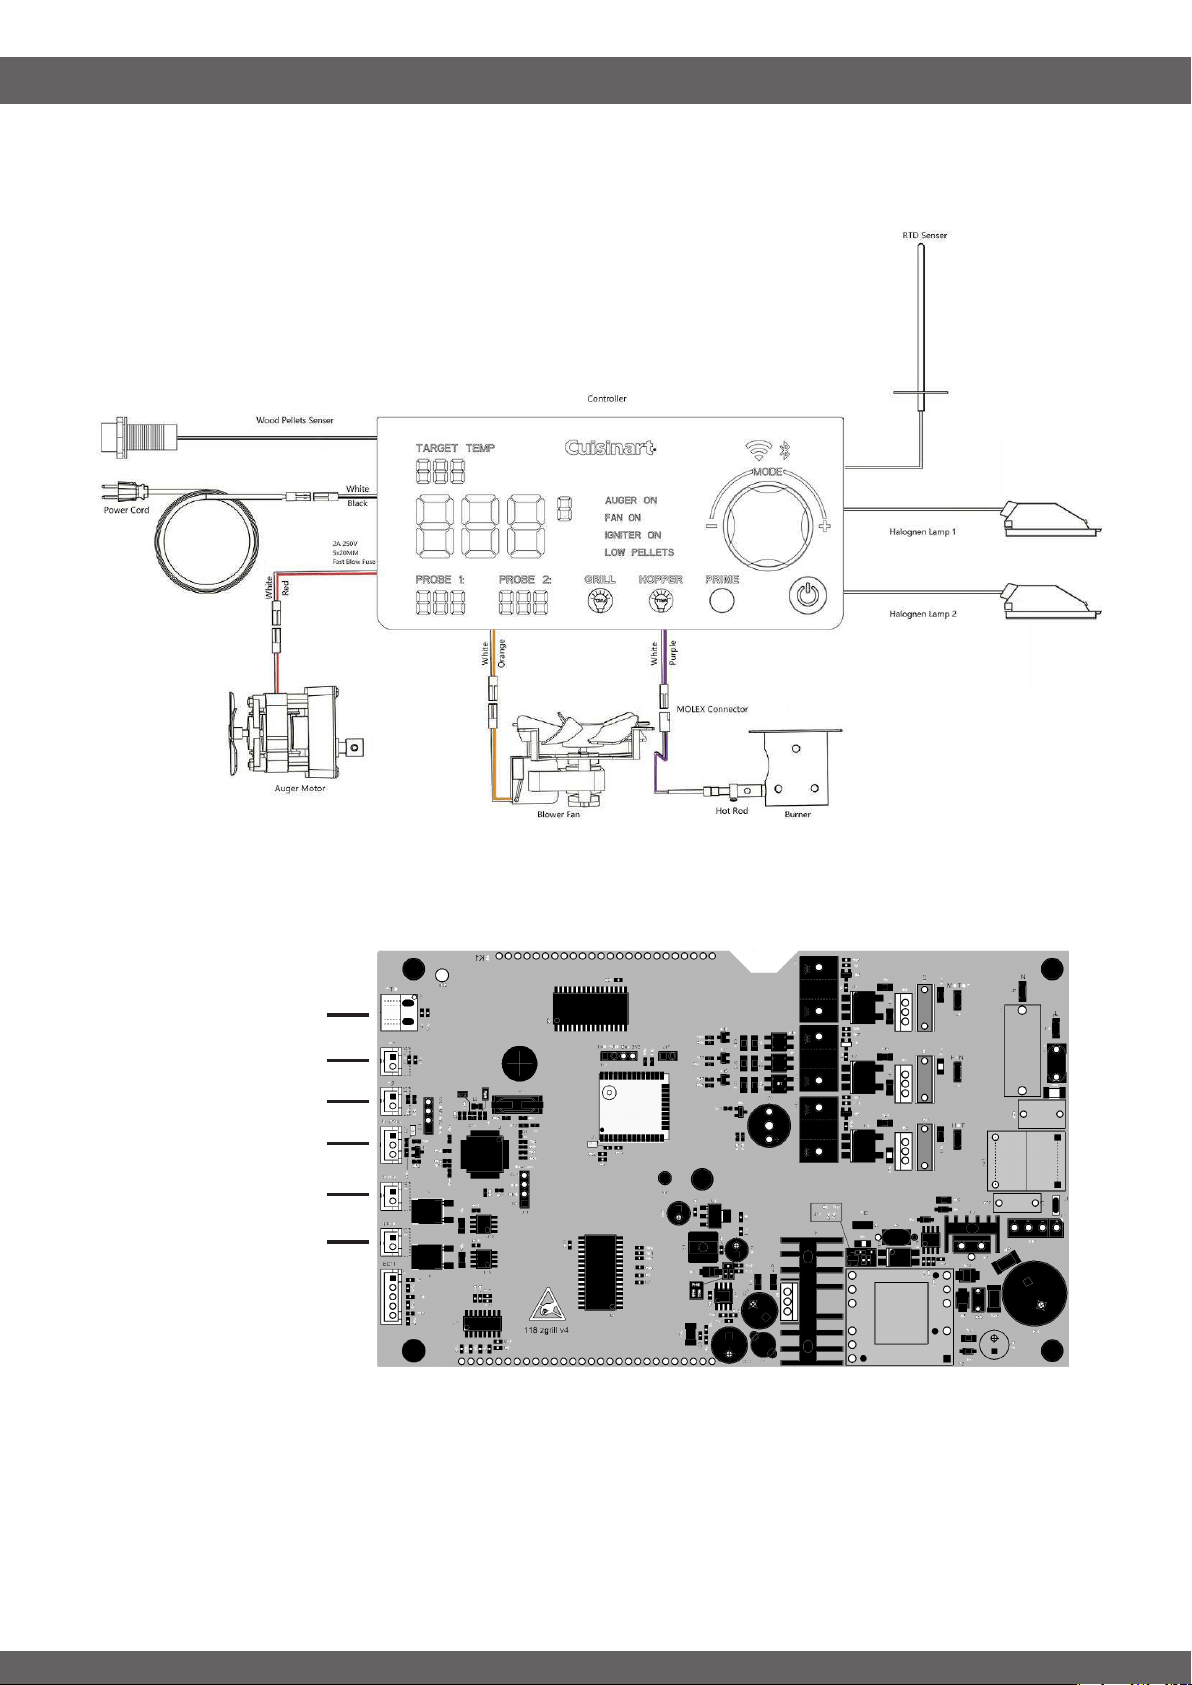
WIRING DIAGRAM:
-----------------------------------------------------------------------------------
t(SJMM5FNQFSBUVSF4FOTPS
t1SPCF
t1SPCF
t-PX1FMMFU4FOTPS
t(SJMM-JHIU
t)PQQFS-JHIU

WARRANTY AND REPLACEMENT PARTS
34
EXPLODED VIEWS
-----------------------------------------------------------------------------------
1
2
4
3
5
6
7
8
9
10
11
12
15
14
16
17
13
19
18
24
28
26
27
25
21
22
23
32
31
30
29
20
57
58
60
59
63
62
61
64
65
-----------------------------------------------------------------------------------
33
34
35
36
37
38
39
40
41
42
43
44
45
46
47
48
49
50
51
52
53
54
55
56
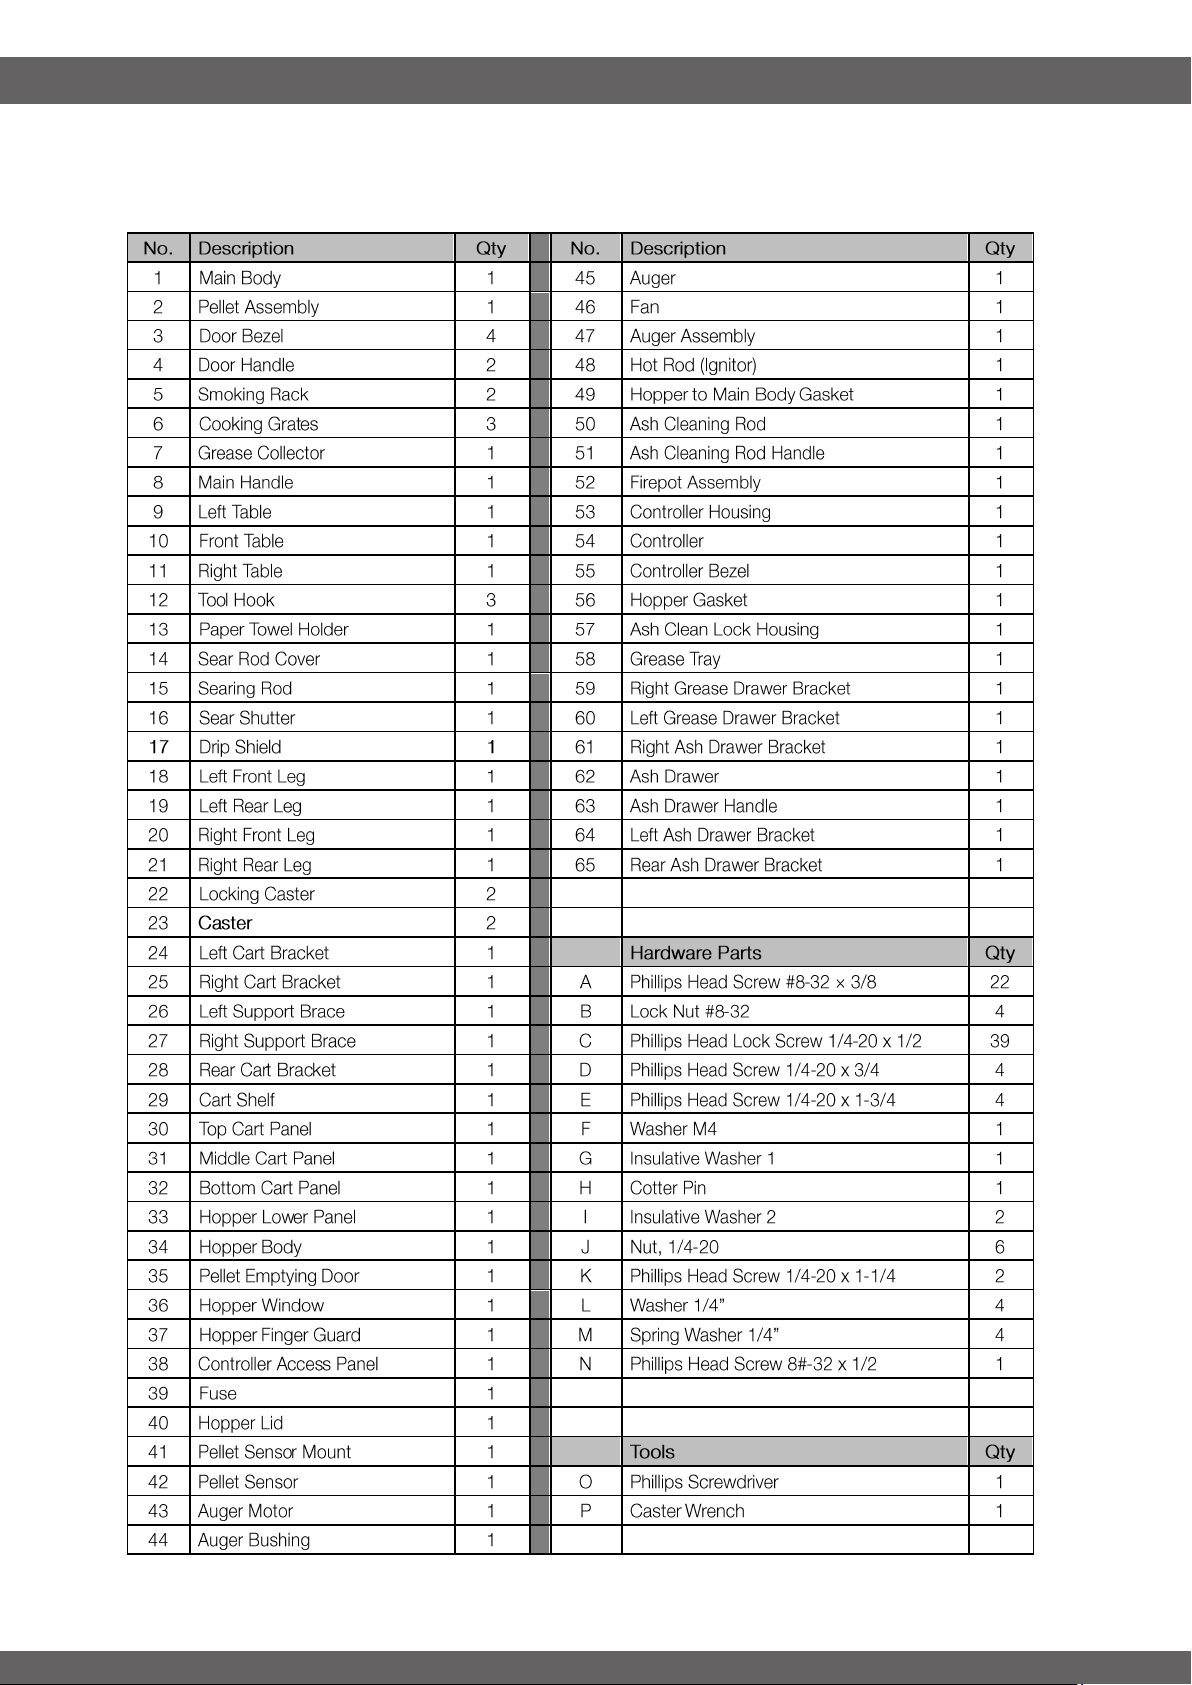
PARTS LIST:
-----------------------------------------------------------------------------------
35
WARRANTY AND REPLACEMENT PARTS

36
WARRANTY AND REPLACEMENT PARTS
IC:
FCC ID:
Operation is subject to the following two conditions:
(1) This device may not cause harmful interference, and
(2) This device must accept any interference received, including interference that may cause any undesired
operation.
FCC Warning
Warning: Changes or modifications to this smoker not expressly approved by the party responsible for
compliance could void the user’s authority to operate the equipment.
FCC Statement
This equipment has been tested and found to comply with the limits for a Class B digital device, pursuant
to Part 15 of the FCC Rules. These limits are designed to provide reasonable protection against harmful
interference in a residential installation. This equipment generates, uses and can radiate radio frequency energy
and, if not installed and used in accordance with the instructions, may cause harmful interference to radio
communications.
However, there is no guarantee that interference will not occur in a particular installation. If this equipment does
cause harmful interference to radio or television reception, which can be determined by turning the equipment
off and on, the user is encouraged to try to correct the interference by one of the following measures:
Reorient or relocate the receiving antenna.1.
Increase the separation between the equipment and receiver.2.
Connect the equipment into an outlet on a circuit different from that to which the receiver is connected.3.
Consult the dealer or an experienced radio/TV technician for help.4.
The Bluetooth
®
word mark and logos are registered trademarks owned by Bluetooth SIG, Inc. and any use
of such marks by the Jordan Kahn Co., Inc. is under license. Other trademarks and trade names are those of
their respective owners.
®

WARRANTY AND REPLACEMENT PARTS
37
WARRANTY
-----------------------------------------------------------------------------------
PROOF OF PURCHASE is required to access this warranty program, which is in effect from the date of •
purchase.
Customers will be subject to parts, shipping, and handling fees if unable to provide proof of the purchase •
or after the warranty has expired.
If you have any questions or problems, you can call our customer service department at •1-866-994-6390
from 9:00am to 5:00pm Eastern time, Monday through Friday for assistance.
This limited warranty applies to the functionality of the product ONLY and does not cover cosmetic issues •
such as scratches, dents, corrosion or discoloring by heat, abrasive and chemical cleaners or any tools
used in the assembly or installation of the appliance, surface rust, or the discoloration of stainless steel
surfaces. Paint is not warranted and will require touch up. RUST is not considered a manufacturing or
materials defect.
This limited warranty will not reimburse you for the cost of any inconvenience, food, personal injury or •
property damage.
LIMITED WARRANTY
-----------------------------------------------------------------------------------
All parts warrantied 3-years from date of purchase.•
WARRANTY PROVISIONS
-----------------------------------------------------------------------------------
This warranty is non-transferable and does not cover failures due to misuse of improper installation or •
maintenance.
This warranty is for replacement of defective parts only. We are not responsible for incidental or •
consequential damages or labor costs.
This warranty does not cover corrosion or discoloration after the grill is used, or lack of maintenance, •
hostile environments, accidents, alterations, abuse or neglect.
This warranty does not cover damage caused by heat, abrasive and chemical cleaners, or any damage to •
other components used in the installation or operation of the gas grill.
Paint is not warranted and may require touch-up. Items considered to be consumable such as batteries •
are not covered under this warranty.
DISCLAIMER OF IMPLIED WARRANTIES; LIMITATION OF REMEDIES
-----------------------------------------------------------------------------------
Repair or replacement of defective parts is your exclusive remedy under the terms of this limited warranty.•
Manufacturer will not be responsible for any consequential or incidental damages caused by weather. This •
limited warranty or any applicable implied warranty does not cover damage resulting from acts of God,
improper care and maintenance, grease fire, accident, alteration, replacement of parts by anyone other
than manufacturer, misuse, transportation, commercial use, hostile environments (inclement weather, act of
nature, animal tampering), improper installation not in accordance with local codes or printed manufacturer
instructions.
For replacement parts, call our customer service department at 1-866-994-6390 from 9:00am to 5:00pm •
Eastern time, Monday through Friday
To register your Cuisinart product, please visit https://cuisinart.registria.com. •
For FAQ’s and replacement parts, please contact us at [email protected]. For our •
consumer care department, please contact us at grilling@thefulhamgroup.com or
call 1-866-994-6390.
Model # CGWM-080•
North American Distributor: The Fulham Group Newton, MA 02466 •