100 %
Recycled Paper
100 %
the possibilities _'_"
ThanK you br purcnastng this Samsung product.
To recewe more complete service, olease register
your Product at
www.samsung.comiregister
1-800-SAMSUNG 726-78641
res of your new
range
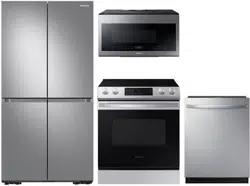
Enhanced convenience, Better cooking Easy maintenance, Vour new gas
range has been designed to bring you these benefits and more,
Bigger is better
With a capacity of 5.8 cubic feet, your new range has more space than
many other leading brands in the United States and Canadian markets.
This means greater convenience for you when cooking for the holidays or
when entertaining.
,, A cooktop with 5 burners
Power burners, simmer burners, aswell as a center oval burner provide
flexible cooktop heat for a variety of cookware.
The center oval burner provides even heating over largeareas, so it is
perfect for griddle cooking.
2 features of your new range
rnportant 3afet7
n trLAct
READ ALL INSTRUCTIONS BEFORE USING THIS APPLIANCE
All electrical and gas equipment with moving parts can be dangerous. Please read the
important safety instructions for this appliance in this manual. The instructions must be
followed to minimize the risk of injury, death, or property damage.
Save this manual. Please Do Not Discard.
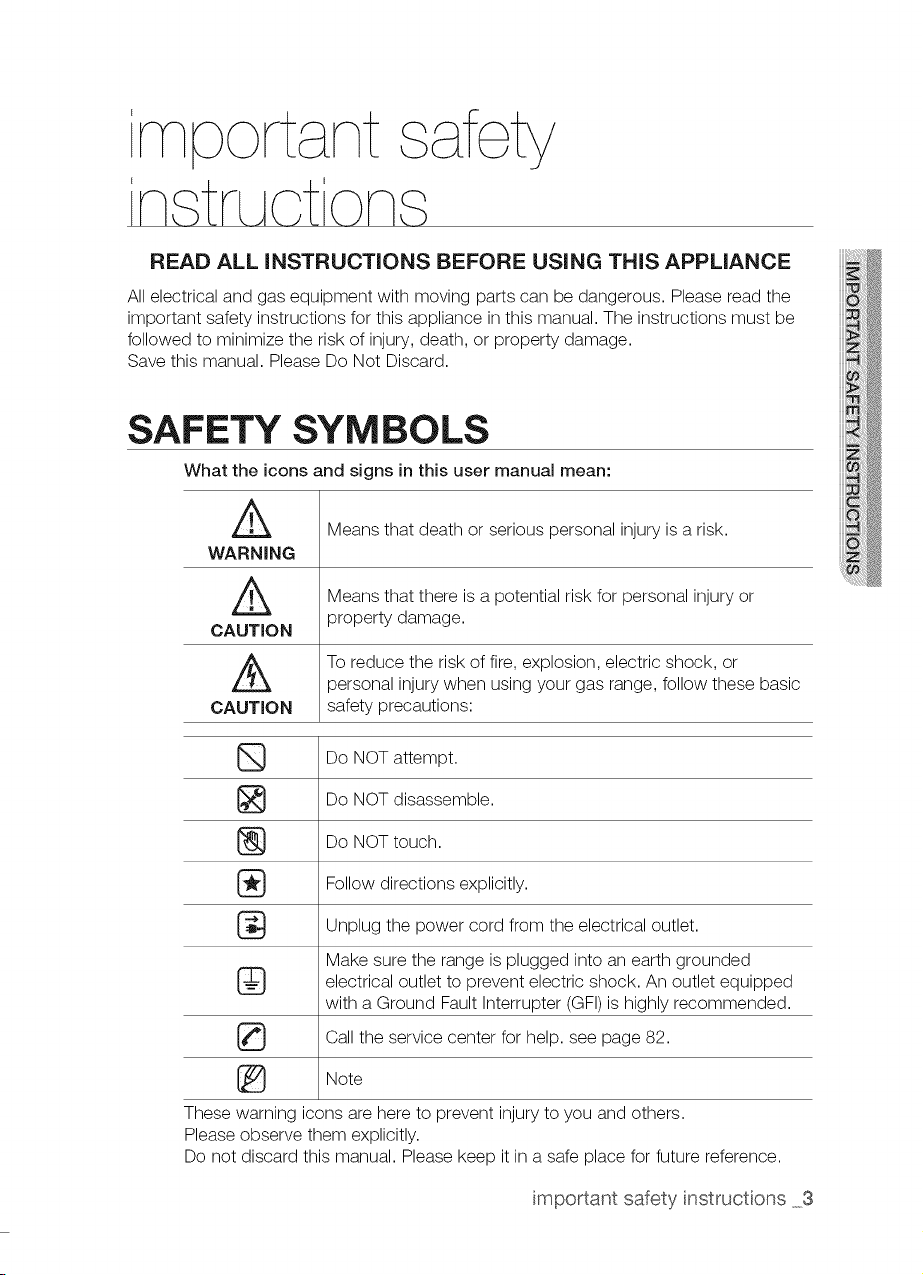
SAFETY SYMBOLS
What the icons and signs in this user manual mean:
A Means that death or serious personal injury isa risk.
WARNING
A Means that there is risk for
a
potential personal injury
or
property damage.
CAUTION
To reduce the risk of fire, explosion, electric shock, or
sersonal injury when using your gas range, follow these basic
CAUTION safety precautions:
Do NOTattempt.
Do NOT disassemble.
Do NOTtouch.
Follow directions explicitly.
the cord from the electrical outlet.
Unplug power
Make sure the range isplugged into an earth grounded
electrical outlet to prevent electric shock. An outlet equipped
with a Ground Fault Interrupter (GFI)is highly recommended.
Callthe service center for help. see page 82.
Note
®
These warning icons are here to prevent injury to you and others.
Please observe them explicitly.
Do not discard this manual. Please keep it in a safe place for future reference.
important safety instructions 3
WARNING: If the information in this manual is not followed
exactly, a fire or explosion may result causing property
damage, personal injury or death,
- DO NOT store or use gasoline or other flammable vapors
and liquids in the vicinity of this or any other appliance,
WHAT TO DO IF YOU SMELL GAS:
• DO NOT try to light any appliance,
• DO NOT touch any electrical switch,
• DO NOT use any phone in your building,
• Immediately call your gas supplier from a neighbor's
phone, Follow the gas supplier's instructions,
• If you cannot reach your gas supplier, call the fire
department,
Installation and service must be performed by a qualified
installer, service agency, or the gas supplier,
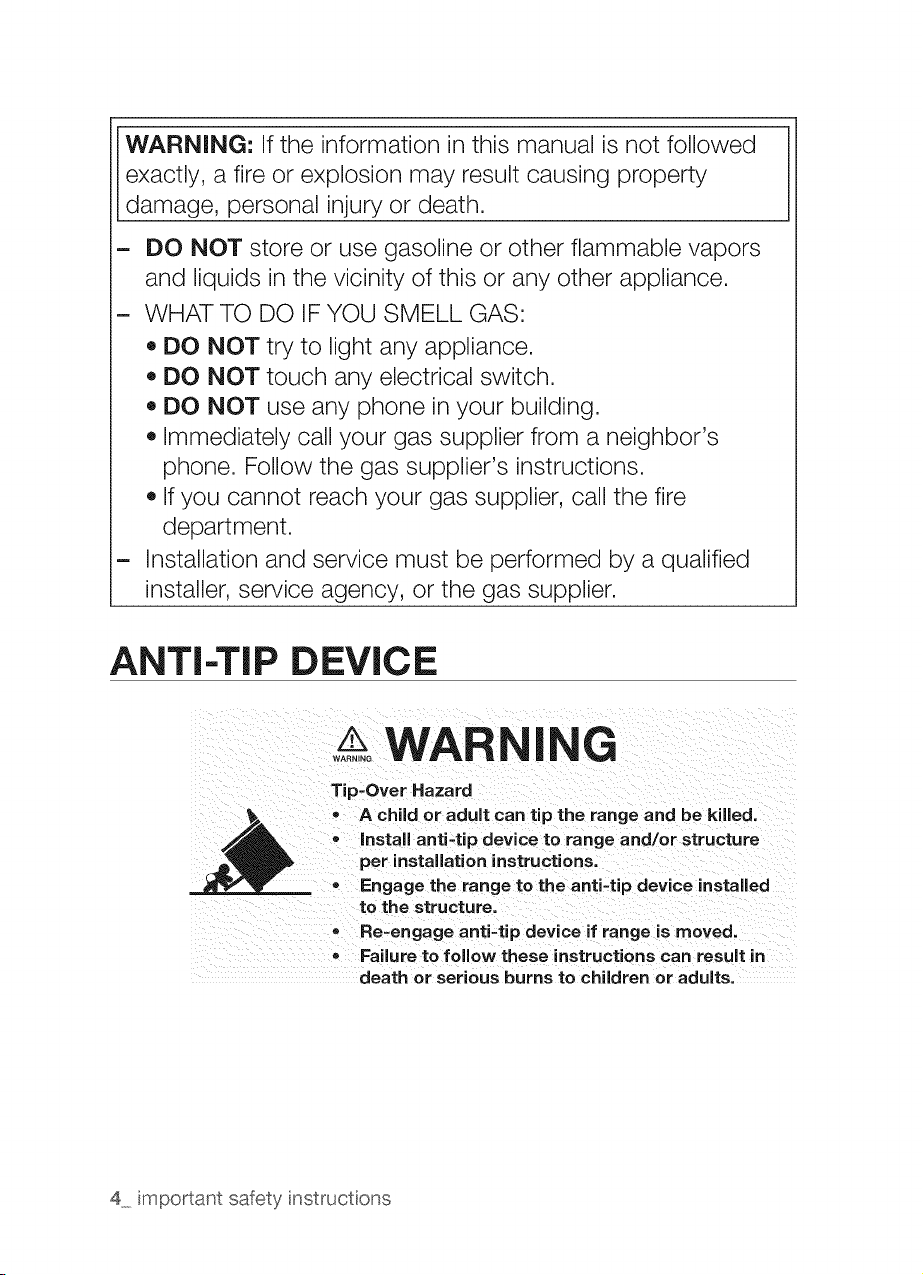
ANTI=TIP DEVICE
WARNING
Tip=Over Hazard
• A child or adult can tip the range and be killed.
,, Install anti-tip device to range and/or structure
r installation instructions.
= Engage the range to the anti-tip device installed
to the structure.
= Re-engage anti-tip device if range is moved.
- Failure to follow these instructions can result in
death or serious burns to children or adults.
4 important safety instructions
To prevent accidental tipping ofthe range, attach an approved anti-tip device
to the floor. (See Installing the Anti-Tip Device in the Installation Instructions.)
Check for proper installation by carefully tipping the range forward. The anti-tip
device should engage and prevent the range from tipping over.
If the range is pulled out away from the wall for any reason, make sure the anti-
tip device isreengaged after the range has been pushed back into place.
Follow the installation instructions found in the Installation Manual. Failure to
follow these instructions can result in death, serious personal injury, and / or
property damage.
DO NOT step / sit / lean on the door or drawer to prevent accidental tipping of
the range.
IMPORTANT SAFETY
PRECAUTIONS
A
WARNING
Follow basic precautions when installing and using this range to reduce the risk
of fire, electrical shock, injury, or death to persons, including:
installation and Service
This range must be properly located and installed in accordance with the
installation instructions before it isused.
Professional installation is strongly recommended.
Due to the size and weight of the range, it ishighly recommended that two or
more people move or install this appliance.
All ranges can tip over and cause severe injuries. Install the anti-tip device
packed with this range following the instructions found in the Installation
Instructions.
Never try to repair or replace this appliance on your own unless itis specifically
recommended in this manual. This appliance should be serviced only by a
qualified service technician.
Know the location of the gas shut-off valve and how to shut it off if necessary.
Properly remove or destroy the packaging materials after the appliance is
unpacked.
@
@
Electrical/Mechanical
Unplug or disconnect power before servicing.
Do not tamper with the controls.
Grates and griddles (ifequipped) are heavy. They can be dangerous ifdropped.
The inner portion of the split oven rack (if equipped) could drop down
accidentally ifnot assembled properly. Place the inner rack in the proper
position within the outer rack.
Always position the oven racks atthe same level on each cavity side. Uneven
racks could cause food to slide to the lower side, posing a risk of burns.
important safety instructions 5
@
®
@
®
Danger to Children
Do not store any object of interest to children on the cooktop or backguard
of the range. Children climbing on the range to reach items could be killed or
seriously injured.
The inner rack of the Split Rack can be dropped ifit is not assembled properly.
Place the Inner rack in the proper place on the Outer rack. Always insert the
rack or split rack assembly (if equipped) on the same level ofthe oven cavity
side.
Keep children away from the door when opening or closing it asthey may
bump themselves on the door or catch their fingers in the door.
Keep all packaging materials out of reach of children. Children may play with
them. Failure to dispose of plastic bags could result in suffocation.
Do not leave children alone or unattended in an area where a range isin use.
They should never be allowed to sit or stand on any part of a range.
Do not let little children touch the range.
The cooktop grates and griddle (if equipped) are heavy and presents arisk of
injury if dropped on a foot. Teach children not to touch or play with grates or
griddle.
Teach children not to touch or play with the controls or any part of the range.
We recommend you utilize the control / door lockout feature to reduce the risk
of mis-use by children.
Before disposing of the range, cut off the power cord to prevent it from being
connected to a power source. Remove the door to prevent children and
animals from getting trapped.
Fire
Do not touch oven burners, drawer burners, or interior surfaces of the oven
during or immediately after cooking. Cooking surfaces, grates, cooktop burners
and caps, as well as oven walls may be hot even though they are dark in color.
Interior oven surfaces can become hot enough to cause burns. During and
after use, do not touch or let clothing or other flammable materials contact
oven burners, drawer burners, or interior surfaces of the oven until they have
had sufficient time to cool.
Do not let a pot holder touch a hot heating element. Do not use a towel or
other bulky cloth as a pot holder.
Do not use your range to heat unopened food containers or to dry wet items or
clothing.
Keep oven vent ducts unobstructed. Clean vents frequently to avoid grease
buildup. See page 59. There can be slight popping sound during oven cooking.
This sound may occur during the normal oven burner cycling, when the oven
burner flame isextinguished.
6 imoortant safetv instructions
Never use your range for any purposes but cooking. Doing so could result in
carbon monoxide poisoning and/or overheating of the oven.
Do not wear loose-fitting or hanging garments while using this appliance.
DO NOT STORE OR USE combustible materials, gasoline, or other flammable
vapors or liquids in the vicinity of this appliance. See "WHAT TO DO IF YOU
SMELL GAS" under the Gas Warnings.
Do not pour water into the cooktop well while cleaning the cooktop. This could
leak down into the range gas and electrical systems creating arisk of electrical
shock or high levels of Carbon Monoxide, due to corrosion ofthe gas valves or
ports.
Do not use water on a grease fire. Water might cause a grease fire to explode,
spreading the fire and creating alarger fire and health hazard. To put out a
grease fire, turn off the heat source and smother the fire with tight-fitting lid or
use a multipurpose dry chemical or foam-type fire extinguisher.
Never leave surface units unattended at high heat settings. Boilovers cause
smoke, and greasy spillovers could ignite.
Do not use a flame to check for gas leaks. Instead, use a brush to spread a
soapy water mixture around the area you are checking. If there is a gas leak,
you will see small bubbles in the soapy water mixture at the point of the leak.
Do not place portable appliances, or any other object other than cookware on
the cooktop. Damage or fire could occur if the cooktop is hot.
Do not attempt to operate this appliance ifit is damaged, malfunctioning, or
has missing or broken parts.
Never place plastic, paper, or other items that could melt or burn near the oven
vents or any of the surface burners.
If the self-clean mode malfunctions, turn the oven off and disconnect the power
supply. Refer to pages 82 to contact a qualified service technician.
There can be slight popping sound during oven cooking.
Steam and Vapors
Use care when opening the oven door. Let hot air or steam escape before
removing or placing food in a hot oven.
Use only dry pot holders. Putting moist or damp pot holders on hot surfaces
may result in burns from steam.
important safety instructions 7

Surface Burner Warnings
- The burner spreader can be blocked by food or dust. Clean the spreader
ifit appears blocked. If you clean the spreader with water, assemble itonly
after it iscompletely dry. If the spreader iswet, itmight prevent the burners
from igniting.
- Do not pour water on the cooktop for cleaning. It can get inside the range
and cause the parts inside to rust.
- Only ignite the cooktop burners with the burner caps in place. If the
burner caps are not in place, you can damage the controls or cause an
unintended large or dangerous flame.
- Heating of beverages can result in delayed eruptive boiling. To prevent
delayed eruptive boiling, ALWAYS allow heated beverages to stand at least
20 seconds after you have turned the burner off so that the temperature
in the liquid can stabilize. In the event ofscalding, follow these FIRST AID
instructions:
,, Immerse the scalded area in cold water for at least 10 minutes
Cover with clean, dry dressing
,, Do not apply any creams, oils or lotions
- After turning on a surface burner, check to make sure that the burner has
ignited. Adjust the level of the flame by turning the burner knob.
- When you set a burner to simmer, do not turn the burner knob quickly.
Watch the flame to make sure it stays on.
8 important safety instructions
GAS WARNINGS
WARNING
@
If the instructionsinthis manual are not followed exactly, a fire or explosion
may result, causing death, personal injury, or property damage.
If you smell gas:
1. Close the valve and do not use the range.
2. DO NOT light a match, candle, or cigarette.
3. DO NOT turn on any gas or electric appliances.
4. DO NOT touch any electrical switches or plug a power cord into an outlet.
5. DO NOT use any phone in your building.
6. Clear the room, building, or area of all occupants.
7. Immediately call your gas supplier from a neighbor's phone. Follow the gas
supplier's instructions.
8. If you cannot reach your gas supplier, call the fire department.
Read instructions completely and carefully,
Installation of this range must conform with local codes or, in the absence of
local codes, with the National Fuel Gas Code, ANSI Z223.1/NFPA.54, latest
edition. In Canada, installation must conform with the current Natural Gas
Installation Code, CAN/CGA-B149.1, or the current Propane Installation Code,
CAN/CGA-B149.2, and with local codes where applicable. This range has
been design-certified by ETLaccording to ANSI Z21.1, latest edition, and
Canadian Gas Association according to CAN/CGA-1.1, latest edition.
Do not install this range in a place which isexposed to a strong draft.
Installation and service must be performed by a qualified installer, service
agency, or gas supplier.
Have the installer show you the location ofthe gas shut-off valve and how to
shut it off.
Always use NEW flexible connectors when installing a gas appliance. Never
reuse old flexible connectors. The use of old flexible connectors can cause gas
leaks and personal injury.
Never use this appliance as a space heater to heat or warm the room. Doing
so may result in carbon monoxide poisoning and overheating of the oven.
Never block the oven vents (air openings). They provide the air inlet and
exhaust that are necessary for the oven to operate properly with correct
combustion.
important safety instructions 9
STATE OF CALiFORNiA
PROPOSiTiON 65 WARNINGS
®
WARNING
The California Safe Drinking Water and Toxic Enforcement Act requires the
Governor of California to publish a list of substances known to the state to
cause birth defects or other reproductive harm and requires businesses to
warn customers of potential exposure tosuch substances.
Gasappliances can cause minor exposure to three of these substances,
namely, carbon monoxide, formaldehyde, and soot, caused primarily by the
incomplete combustion of natural gas or LP fuels. Properly adjusted burners,
indicated by a bluish rather than yellow flame, will minimize incomplete
combustion. Exposure to these substances can be minimized by venting with
an open window or by using a ventilation fan or hood.
IN THE COMMONWEALTH OF
MASSACHUSETTS
This product must be installed by a licensed plumber or gas fitter qualified or
licensed by the State of Massachusetts.
When using ball-type gas shut-off valves, you must use the T-handle type.
Multiple flexible gas lines must not be connected inseries.
10 important safety instructions
ELECTRICAL WARNINGS
®
G
Comply with the following electrical instructions and requirements to avoid
death, personal injury from electric shock, and/or property damage from fire:
1, Plug into a grounded 3-prong outlet.
2, DO NOT remove the ground prong.
3, DO NOTuse an adapter.
4, NEVER use an extension cord.
Use a dedicated 120-volt, 60-Hz, 20-amp, AC, fused electrical circuit for this
appliance. A time-delay fuse or circuit breaker isrecommended. DO NOT plug
more than one appliance into this circuit.
The range issupplied with a 3-pronged grounded plug. This cord MUST be
plugged into a mating, grounded 3-prong outlet that meets all local codes and
ordinances. If you are unsure your electrical outlet is properly grounded, have it
checked by a licensed electrician.
If codes permit the use of a separate ground wire, we recommend that a
qualified electrician determine the proper path for this ground wire.
Electrical service to the range must conform to local codes. Barring local
codes, it should meet the latest ANSI/NFPA No. 70 - Latest Revision (for the
U.S.) or the Canadian Electrical Code CSA C22.1 - Latest Revisions.
It isthe personal responsibility of the appliance owner to provide the correct
electrical service for this appliance.
NEVERconnect the ground wire to plastic plumbing lines, gas lines, or hot
water pipes.
DO NOT modify the plug provided with the appliance.
DO NOT put a fuse in a neutral or ground circuit.
important safety instructions 11
GROUNDING iNSTRUCTiONS
@
WARNING
Q
Grounding a range with a cord connection:
This appliance must be Earth grounded. In the event ofa malfunction or
breakdown, grounding will reduce the risk ofelectrical shock by providing a
path for the electric current. This appliance is equipped with a cord having a
grounding plug. The plug must be firmly plugged into an outlet that isproperly
installed and grounded in accordance with the local codes and ordinances.
Improper connection of the grounding plug can result in arisk of electric shock.
Check with a qualified electrician ifyou are not sure whether the appliance is
properly grounded.
NEVER modify the plug provided with the appliance. If it does not fit the
existing outlet, have a qualified electrician install a proper outlet.
INSTALLATION WARNINGS
®
WARNING
G
@
Have your range installed and properly grounded by a qualified installer, in
accordance with the installation instructions. Any adjustment and service
should be performed only by qualified gas range installers or service
technicians.
Be sure your range iscorrectly installed and adjusted by a qualified service
technician or installer for the type ofgas (natural or LP) you will use. Foryour
range to utilize LP gas, the installer must replace the 5 surface burner orifices
and 2 oven orifices with the provided LPorifice set, and reverse the GPR
adapter.
These adjustments must be made by a qualified service technician in
accordance with the manufacturer's instructions and all codes and
requirements of the authority having jurisdiction. Failure to follow these
instructions could result in serious injury or property damage. The qualified
agency performing this work assumes the gas conversion responsibility.
Do not attempt to repair or replace any part of your range unless it is
specifically recommended in this manual. All other service should be referred to
a qualified technician.
This appliance must be properly grounded. Plug your range into a 120-
volt grounded outlet that isonly used for this appliance. Do not remove the
grounding (third) prong from the plug. Firmly plug the power cord into the wall
outlet. If you are not sure your electrical outlet isgrounded, it isyour personal
responsibility and obligation to have a properly grounded, three-prong outlet
installed in accordance with local and national codes. Do not use a damaged
power plug or loose wall outlet. Do not use an extension cord with this
appliance. Inaddition, do not use an adapter or otherwise defeat the grounding
plug. If you do not have a proper outlet or have any doubts about the outlet,
consult a licensed electrician.
12 important safety instructions
Locate the range out of kitchen traffic paths and drafty locations to prevent
poor aircirculation.
This appliance should be positioned so that the power plug is easily accessible.
Do not install in an area exposed to dripping water or outside weather
conditions.
Remove allpackaging materials from the range before operating it. These
materials can ignite, causing smoke and/or fire damage.
Install this appliance on a level and hard floor that can support its weight.
Synthetic flooring, like linoleum, must withstand 180 °F (82 °C) temperatures
without shrinking, warping, or discoloring. Never install the range directly over
interior kitchen carpeting unless a sheet of0.25-inch plywood or a similar
insulator is placed between the range and carpeting.
G ever block the vents (air openings) of the range. They provide the air inlet and
exhaust necessary for the range to operate properly with correct combustion.
Air openings are located behind the range, under the oven control panel, at
the top and bottom of the oven door, and under the lower warming or storage
drawer.
Large scratches on or sharp blows to the door glass can cause the glass
to break or shatter.
Makesure the wall coverings around the range can withstand heat, up to 200 °F
(93 °C),generated by the range.
Avoid placing cabinets above the range. This reduces the hazard caused by
reaching over the open flames of operating burners.
Do not put any combustible material or items around the range.
If cabinets are placed above the range, allow a minimum clearance of 40
in (102 cm) between the cooking surface and the bottom of unprotected
cabinets.
Install a ventilation hood or an externally vented Over The Range Microwave
Oven over the range cooktop that isas wide as the range, centered over
the range, and projects forward beyond the front of the cabinets. See the
Installation instructions
Remove alltape and packaging. Make sure the burners are properly seated
and level.
Remove any accessories from the oven and/or lower drawer.
Check to make sure no range parts have come loose during shipping.
important safety instructions 13
SURFACE BURNER WARNINGS
WARNING
®
G
®
Follow basic precautions when installingand using this range to reduce the risk
of fire, electrical shock, injury, or death to persons, including:
Use proper pan sizes. Avoid pans that are unstable or warped. Select
cookware having flat bottoms largeenough to cover the burner grates. To
avoid spillovers, make sure cookware islarge enough to contain your food.
This will save cleaning time and prevent hazardous accumulations of food,
since heavy spattering or spillovers left on the range can ignite. Use pans with
handles that can be easily grasped and remain cool.
Do not use pots or pans larger than the grate on a grate. Using pots or pans
larger than a grate may cause the pots or pans to discolor or deform. It can
also cause units or the wall around the grate to ignite and may generate excess
carbon monoxide.
Always use the LITEposition when igniting the top burners. Make sure the
burners have ignited.
If ignition fails, turn the knob to Offand wait until the gas already emitted has
dissipated. If you keep the knob in the LITE position without proper ignition, the
emitted gas might cause an explosion.
Never leave the surface burners unattended at HIGH flame settings. Boilovers
cause smoking, and greasy spillovers can ignite.
Stand away from the range when frying.
Adjust the top burner flame size so it does not extend beyond the edge ofthe
cookware. Flames that extend past cookware edges can be hazardous.
To decrease spattering when cooking foods with lots of liquid, such as meat
sauce or stew, adjust the the flame to low and stir frequently.
Only use dry pot holders. Pot holders with moisture in them can release steam
and cause burns ifthey come in contact with hot surfaces.
Keep pot holders away from open flames when lifting cookware. Never use a
towel or bulky cloth in place ofa pot holder.
Keep all plastic away from the surface burners or any open flame.
When using glass cookware, make sure itis designed for top-of-range cooking.
Always make sure cookware handles are turned to the side or rear of the
cooktop, but not over other surface burners. This will minimize the chance of
burns, spillovers, and the ignition of flammable materials that can be caused if
pots or pans are bumped accidently.
Do not wear loose or hanging garments when using the range. They could
ignite and burn you if they touch a surface burner.
Take care that your hands do not touch the burners when they are on. Turn off
the burners when you change a pan or pot.
14 important safety instructions
_ lways heat frying oils slowly, and watch as they heat. If you arefrying foods
at high heat, carefully watch during the cooking process. If a combination of
fats or oils are to be used during frying, they need to be stirred together before
heating.
Use a deep fryer thermometer whenever possible. This prevents overheating
the fryer beyond the smoking point.
Use as little oil as possible for shallow or deep-fat frying. Using too much oil
can cause spillovers when food is added.
Items should always be removed from the cooktop when they are done
cooking.
Never leave plastic items on the cooktop. Hot airfrom the vent can melt or
ignite plastic items or cause a building up of dangerous pressure in closed
plastic containers.
This cooktop is not designed to flame foods or cook with a wok or wok ring
attachment. If foods are flamed, they should only be flamed under a ventilation
hood that is on.
Always make sure foods being fried are thawed and dried. Moisture of any kind
can cause hot fat to bubble up and over the sides of the pan.
Never move a pan or deep-fat fryer full of hot fat. Always let it cool before
moving.
_ lways make sure the controls are OFF and the grates are cool before you
remove them to prevent any possibility of burning.
If the range is located near awindow, NEVER hang long curtains or paper
blinds on that window. They could blow over the surface burners and ignite,
causing a fire hazard.
Grease isflammable and should be handled very carefully. Never try to
extinguish a grease fire with water.
If you smell gas, turn off the gas to the range and call a qualified service
technician. NEVERuse an open flame to locate a leak.
Always turn off the surface burner controls before removing cookware. All
surface burner controls should be turned OFF when you are not cooking.
Always turn the burners off before you go to sleep or go out.
important safety instructions 15
OVEN WARNINGS
WARNING
NEVERcover any holes or passages in the bottom oven cover. NEVER cover
an entire oven rack with aluminum foil or like material. Covering the bottom
cover and/or racks blocks airflow through the oven and could cause carbon
monoxide poisoning.
Do not use aluminum foil or foil liners anywhere in the oven, except as
described in this manual. Misuse traps heat and could cause a fire hazard or
damage the range.
[_ lways follow the manufacturer's directions when using cooking or roasting
bags in the oven.
DO NOT clean the door gasket. The door gasket isessential for a good seal.
Care should be taken not to damage or move the gasket.
Do not strike the oven glass. Do not spray water onto the oven glass when the
oven ison or just after you have turned the oven off.
Stand away from the range when opening the door of a hot oven. The
escaping hot air and steam can cause burns.
Do not use the oven for storage. Stored items can be damaged or ignite.
Keep the oven free from grease buildup.
Reposition oven racks only when the oven iscool to prevent burning or
personal injury.
Do not heat unopened containers. Pressure in the container could build up,
resulting in an explosion and/or personal injury.
Only use glass cookware that is recommended for use in gas ovens.
This prevents fire flare-ups from stored grease buildup.
Do not broil meat too close to the burner flame. Trim excess fat from meat
before cooking. Meat fat can ignite, causing afire hazard.
If a grease fire should occur in the oven, turn off the oven by pressing the
Clear/Off pad. Keep the oven door closed to put out the fire.
Always bake and/or broil with the oven door closed. Broiling with the door
partially or fully open can damage the surface burner control knobs and even
the kitchen counter.
G
Keep the appliance area clear and free from combustible materials, gasoline,
and other flammable vapors and liquids.
Do not use the oven to dry paper, clothes, etc. Such items might catch fire if
overheated.
16 important safety instructions
ELECTRIC WARMING DRAWER
OR LOWER STORAGE DRAWER
WARNINGS
The warming drawer is designed to keep hot cooked foods at serving
temperature. Always start with hot food. Cold or room-temperature foods
cannot be heated, warmed, or cooked in the warming drawer.
[_ Do not touch the interior drawer surface or heating element. These surfaces
may be hot and could burn you.
Use care when opening the drawer. Escaping hot air and/or steam can cause
burns or personal injury.
Do not use aluminum foil to line the lower drawer. Aluminum foil will trap heat
and alter the warming performance of the drawer. It could also damage the
interior finish.
Never use the lower/warming drawer in the upper oven. Never put the lower/
warming drawer in the upper oven during a self-cleaning cycle.
Never leave jars or cans of fat drippings in or near the lower drawer.
Do not leave or store paper products, plastics, canned food, or combustible
materials in the drawer. Do not use the drawer to dry newspapers. They could
ignite. Plastic items could melt.
important safety instructions 17
SELF=CLEANING OVEN WARNINGS
WARNING
@
@
Follow basic precautions when installing and using this range to reduce the risk
of fire, electrical shock, injury, or death to persons, including:
Do not leave children unattended near the range during a self-cleaning cycle.
The outside surfaces of the range get hot enough to burn if touched.
Stand away from the range when opening the oven door after a self-cleaning
cycle. The oven will be VERY HOT and the escaping hot air and steam can
cause burns.
Remove all racks and other utensils from the oven before starting a self clean
cycle. The oven racks may become damaged, and foreign objects could ignite
ifleft within the oven cavity.
Wipe off any excess spillage before using the self-cleaning operation.
Remove all cookware, oven probes, and any aluminum foil before using the
self-cleaning operation.
Never self-clean with the lower drawer or drawer pan placed in the oven.
If the self-cleaning operation malfunctions, turn off the oven, disconnect the
power supply, and contact a qualified service technician.
Do not use oven cleaners. Commercial oven cleaners or oven liners should
NEVERbe used in or around any part of the oven. Residue from oven cleaners
will damage the inside of the oven during a self-cleaning operation.
Nickel oven shelves should be removed from the oven during a self-cleaning
cycle. Porcelain-coated oven shelves may be cleaned in the oven during a self-
cleaning cycle.
PROPER COOKING
POULTRY
OF MEAT AND
Make sure all meat and poultry iscooked thoroughly. Meat should always be
cooked to an internal temperature of 160 °F (71 °C). Poultry should always be
cooked to an internal temperature of 180 °F (82 °C). Cooking these foods to
these minimally safe temperatures can help protect you and your family from
food bourne illnesses.
SAVE THESE INSTRUCTIONS
18 important safety instructions
INTRODUCING YOUR NEW
RANGE
,_,,_,' _,i_ _i_
SURFACE COOKING
i
OPERATING THE OVEN
USING THE WARMING DRAWER
MAiNTAiNiNG YOUR APPLIANCE
TROUBLESHOOTING
WARRANTY
/9
20 Overview
21 Lighting agassurfaceburner
21 Manually lighting a gassurfaceburner
21 Flamesize selection
22 Gas surface burners and controlknobs
23 Cookware usage
23 Centerburner grate
24 Wok grate
25 Using the griddle
27 Oven controlpanels and displays
30 Setting the clock
31 Setting the timer on/off
32 Positioningthe oven racks
33 Using the gliding rack
34 Ovenvent
34 Oven light
35 Baking
37 Convectionbaking and roasting
40 Timed cooking
42 Delaytimed cooking
44 Broiling
46 Keepwarm
47 Using the easy cookfeature
50 Favoritecooking
52 Sabbathfunction
54 Extrafeatures
56 About the warming drawer
57 Turning the warming drawer on or off
58
62
66
67
69
70
75
8O
Careand cleaningd the oven
Careand cleaningofthe cooktop
Changing the ovenlight
Removing and replacingthe ovendoor
Removing and replacingthe warming drawer
Self-cleaningoven
Troubleshooting
Troubleshootingandinformation codes
81 Warranty
contents 19
ntFoduoncj
UF NOW
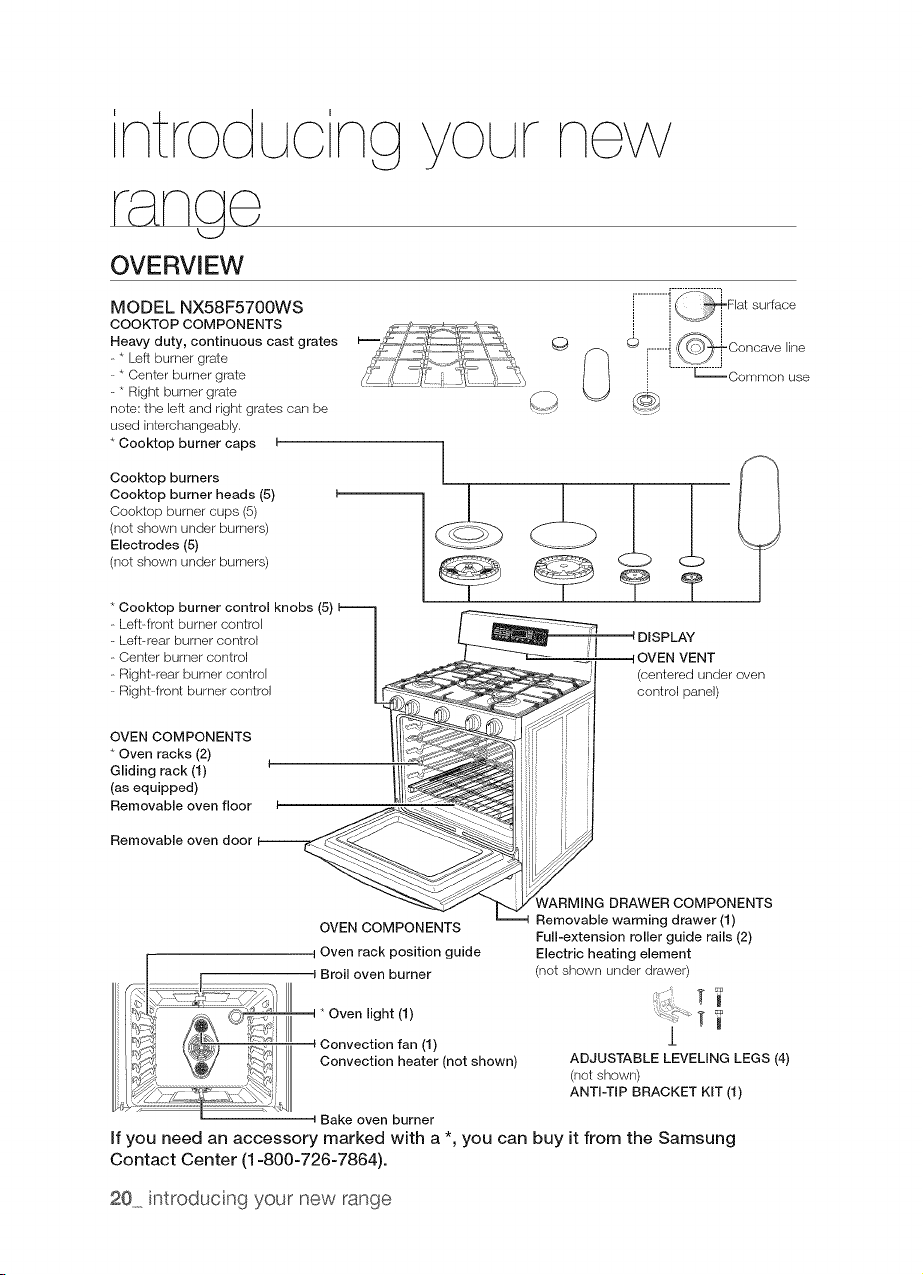
MODEL NX58F5700WS
COOKTOP COMPONENTS
Heavy duty, continuous cast grates
- * Left burner grate
- * Center burner grate
- * Right burner grate
note: the left and right grates carl be
used interchangeably,
•Cooktop burner caps I
Cooktop burners
Cooktop burner heads (5)
Cooktep burner cups (5)
(net shown under burners)
Electrodes (5)
(net shown under burners)
*Cooktop burner control knobs (5)
- Left-front burner control
- Left--rear burner control
- Center burner control
- Right--rear burner controJ
- Right--front burner control
©
.............1i_,-_(t JFlat surface
,-----d,_Concave ne
.......... _Cemmon use
____ _,DISPLAY
I _ I IOVEN VENT
(centered under oven
control panel)
OVEN COMPONENTS
*Oven racks (2)
Gliding rack (1) "
(as equipped)
Removable oven floor
Removable oven door
OVEN COMPONENTS
I Oven rack position guide
I Broil oven burner
VARMING DRAWER COMPONENTS
Removable warming drawer (1)
Full-extension roller guide rails (2)
Electric heating element
(not shown under drawer)
1
ADJUSTABLE LEVELING LEGS (4)
(not shown)
ANTI-TIP BRACKET KIT (1)
I Bake oven burner
If you need an accessory marked with a *, you can buy it from the Samsung
Contact Center (1-800-726-7864).
20 introducng your' new range

w_oBEFORE USING THE SURFACE BURNERS, make sureto follow all the safety
warnings and precautions listed on page 8. Failure to do so could result in product
damage, personal injury, and/or death.
LIGHTING A GAS SURFACE BURNER
Make sure all surface burners are positioned and
assembled properly.
1. Push in and turn the control knob to the LITE
position. You will hear a "clicking" sound
indicating the electronic ignition system is
working properly.
2. After the surface burner lights, turn the control
knob to adjust the power setting of the surface
burner and turn off the electronic ignition system.
3. The dual valve located in the farthest to the right controls the inner/outer flame of the
dual burner[RF].
When the inner / outer flame ison the HI position, the flame size
gets smaller from the outside when turning the knob from HIto LO.
To control the inner flame, push and turn the knob once again at
the position where it starts to control inner flame.
We highly recommend using the right front side burner for
simmering tomato sauce and right rear side burner for melting
chocolate
MANUALLY LIGHTING A GAS SURFACE BURNER
if a power failure occurs, the surface burners can still be lit manually.
_Use extreme caution when manually lighting a surface burner.
1. Hold a long gas grill lighter to the surface burner you want to light.
2. Push in and turn the control knob for that burner to the LITEposition.
3. After the burner has lit, set the control knob and the burner to the desired setting.
FLAME SIZE SELECTION
/_ Flames larger than the bottom of the cookware will not result in faster heating, but
wA%'_,,,could result in a fire hazard and/or personal injury.
The flames on the burners should always stay under the cookware. The flames should
never extend beyond the bottom surface and/or up the sides of the cookware.
Always watch the flames when adjusting the heat setting with the control knob(s). The
flames should always match the size of the cookware being used.
surface cooking 21
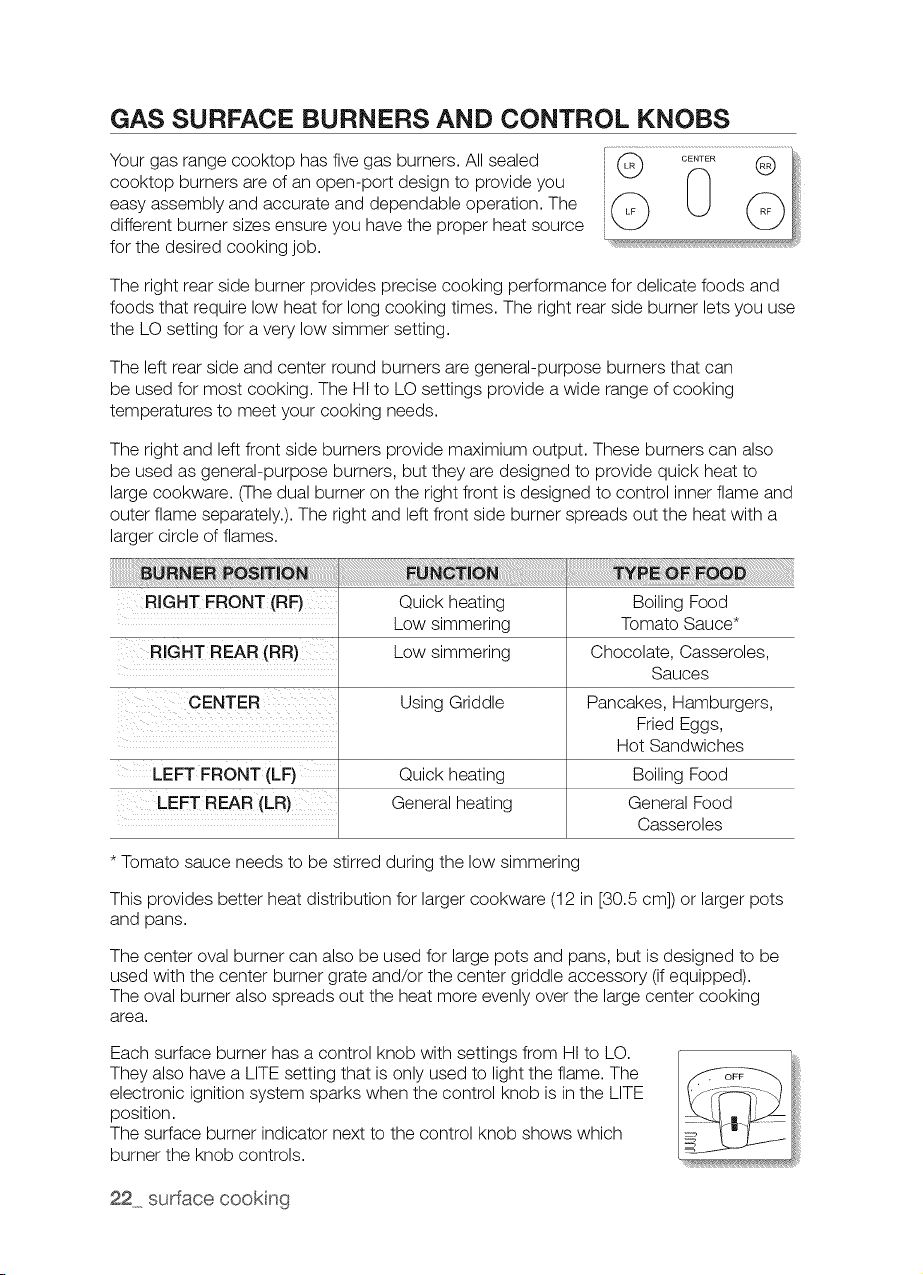
GAS SURFACE BURNERS AND CONTROL KNOBS
Your gas range cooktop has five gas burners. All sealed
cooktop burners are of an open-port design to provide you
easy assembly and accurate and dependable operation. The
different burner sizes ensure you have the proper heat source
for the desired cooking job.
The right rear side burner provides precise cooking performance for delicate foods and
foods that require low heat for long cooking times. The right rear side burner lets you use
the LO setting for a very low simmer setting.
The left rear side and center round burners are general-purpose burners that can
be used for most cooking. The HI to LOsettings provide a wide range of cooking
temperatures to meet your cooking needs.
The right and leftfront side burners provide maximium output. These burners can also
be used as general-purpose burners, but they are designed to provide quick heat to
large cookware. (The dual burner on the right front isdesigned to control inner flame and
outer flame separately.). The right and leftfront side burner spreads out the heat with a
larger circle offlames.
RIGHT FRONT (RF)
RIGHT REAR (RR)
CENTER
LEFT FRONT (LF)
LEFT REAR (LR)
Quick heating Boiling Food
Low simmering Tomato Sauce*
Low simmering Chocolate, Casseroles,
Sauces
Using Griddle
Quick heating
General heating
Pancakes, Hamburgers,
Fried Eggs,
Hot Sandwiches
Boiling Food
General Food
Casseroles
* Tomato sauce needs to be stirred during the low simmering
This provides better heat distribution for larger cookware (12 in [30.5 cm]) or larger pots
and pans.
The center oval burner can also be used for large pots and pans, but isdesigned to be
used with the center burner grate and/or the center griddle accessory (if equipped).
The oval burner also spreads out the heat more evenly over the large center cooking
area.
Each surface burner has a control knob with settings from HI to LO.
They also have a LITE setting that isonly used to light the flame. The
electronic ignition system sparks when the control knob is in the LITE
position.
The surface burner indicator next to the control knob shows which
burner the knob controls.
22 surface cooking
COOKWARE USAGE
Using the correct cookware can prevent many problems, such as uneven cooking or
extended cooking times. Using the proper pans will reduce cooking times and cook food
more evenly. Look for the following pan characteristics:
• Flat bottom and straight sides.
Tight-fitting lid.
Weight of handle does not tilt pan.
Pan iswell-balanced.
Pan size matches the amount offood being prepared and the size ofthe surface
burner.
Made of material that conducts heat well.
The pot/pan diameter matches the surface burner flame diameter.
What your cookware is made of determines how evenly and quickly heat istransferred
from the surface burner to the pan bottom.
ALUMINUM: Excellent heat conductor. Some types of food will cause the aluminum to
darken. (Anodized aluminum cookware resists staining and pitting.)
COPPER: Excellent heat conductor, but discolors easily.
STAINLESS STEEL: Slow heat conductor with uneven cooking results. Is durable, easy
to clean, and resists staining.
CAST-IRON: A poor conductor, but retains heat very well. Cooks evenly once cooking
temperature isreached.
ENAMELWARE: Heating characteristics willvary depending on base material.
GLASS: Slow heat conductor. Glass cookware isdesigned for two usages--top-of-
range cooking or oven use. Only use cookware where it isdesignated to be used.
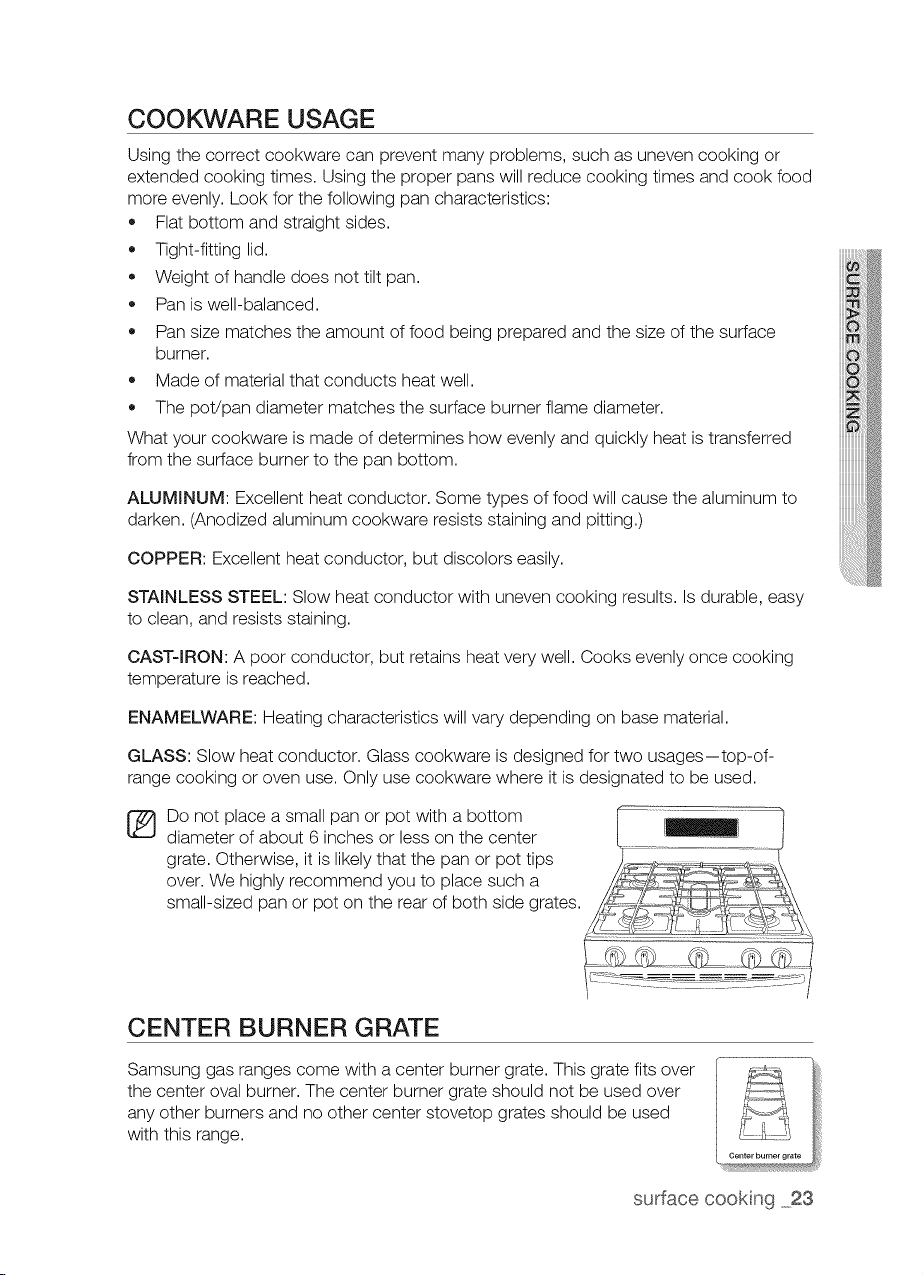
Do not place a small pan or pot with a bottom
diameter of about 6 inches or less on the center
grate. Otherwise, it islikely that the pan or pot tips
over. We highly recommend you to place such a
small-sized pan or pot on the rear of both side grates.
CENTER BURNER GRATE
Samsung gas ranges come with a center burner grate. This grate fits over
the center oval burner. The center burner grate should not be used over
any other burners and no other center stovetop grates should be used
with this range.
.................................
Center burner grat_
surface cooking 23
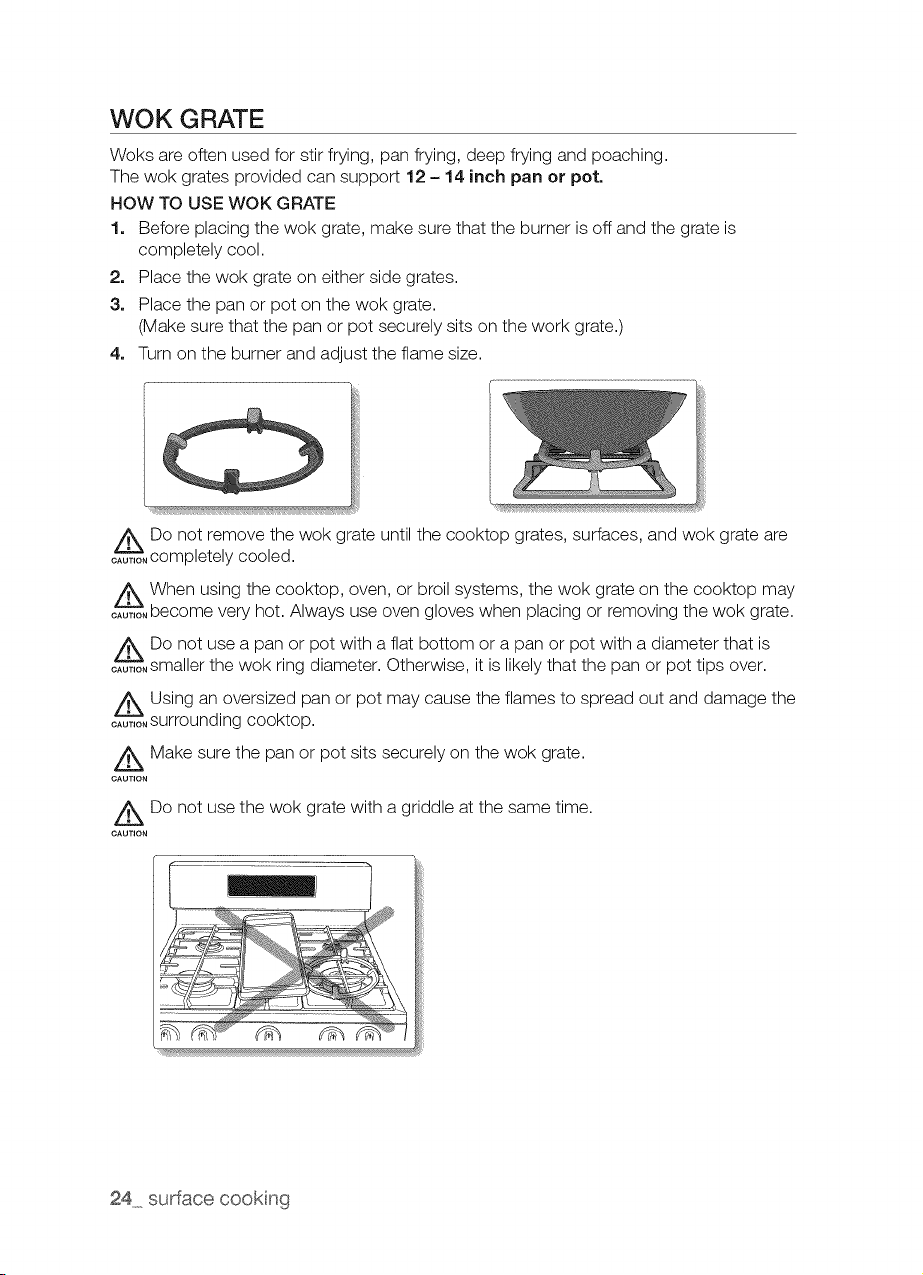
WOK GRATE
Woks are often used for stir frying, pan frying, deep frying and poaching.
The wok grates provided can support 12 - 14 inch pan or pot.
HOW TO USE WOK GRATE
1. Before placing the wok grate, make sure that the burner isoff and the grate is
completely cool.
2. Place the wok grate on either side grates.
3. Place the pan or pot on the wok grate.
(Make sure that the pan or pot securely sits on the work grate.)
4. Turn on the burner and adjust the flame size.
o,Z_,oNDo not remove the wok grate until the cooktop grates, surfaces, and wok grate are
completely cooled.
o,_o When using the cooktop, oven, or broil systems, the wok grate on the cooktop may
become very hot. Always use oven gloves when placing or removing the wok grate.
/_ Do not use a pan or pot with a flat bottom or a pan or pot with a diameter that is
OA%--'_T,osmaller the wok ring diameter. Otherwise, it islikely that the pan or pot tips over.
o,_o Using an oversized pan or pot may cause the flames to spread out and damage the
surrounding cooktop.
Z_ Make sure the pan or pot sits securely on the wok grate.
CAUTION
z_Do not use the wok grate with a griddle at the same time.
CAUTION
24 surface cooking
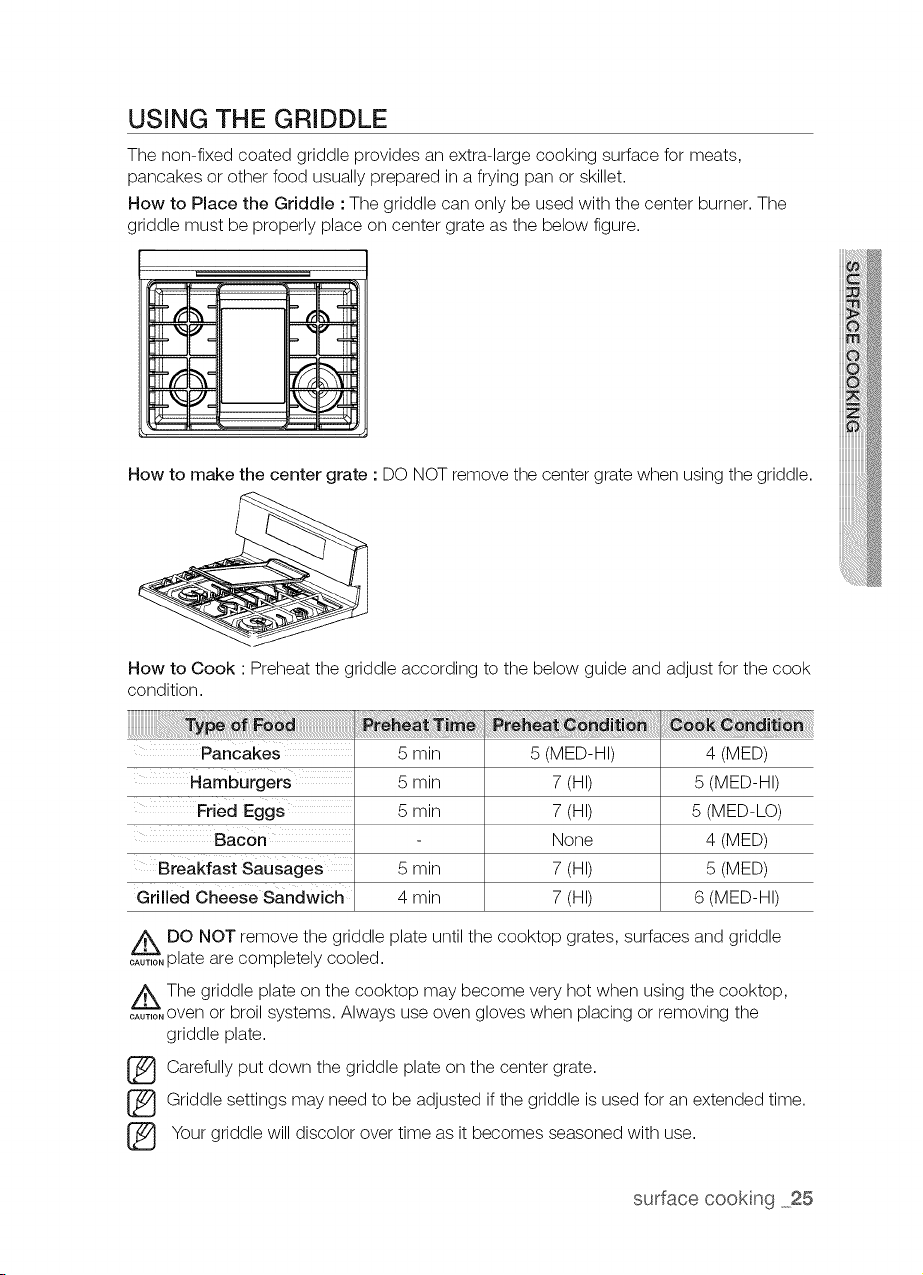
USING THE GRIDDLE
The non-fixed coated griddle provides an extra-large cooking surface for meats,
pancakes or other food usually prepared in a frying pan or skillet.
How to Place the Griddle :The griddle can only be used with the center burner. The
griddle must be properly place on center grate as the below figure.
How to make the center grate : DO NOT remove the center grate when using the griddle.
How to Cook ' Preheat the griddle according to the below guide and adjust for the cook
condition.
Pancakes
Hamburgers
Fried Eggs
BacOn
Breakfast sausages
Grilled cheese sandwich
5 min
5 min
5 min
5 min
4 min
5 (MED-HI)
7 (HI)
7 (HI)
None
7 (HI)
7 (HI)
4 (MED)
5 (MED-HI)
5 (MED-LO)
4 (MED)
5 (MED)
6 (MED-HI)
/_ DO NOT remove the griddle plate until the cooktop grates, surfaces and griddle
o%-%T,oplate are completely cooled.
/_The griddle plate on the cooktop may become very hot when using the cooktop,
....... oven or broil systems. Always use oven gloves when placing or removing the
griddle plate.
_ Carefully put down the griddle plate on the center grate.
_ Griddle settings may need to be adjusted ifthe griddle is used for an extended time.
[_ Your griddle will discolor over time as it becomes seasoned with use.
surface cookng 25
®
Move the griddle plate to the keeping place after using and getting cooled.
Important Note :
DO NOT overheat the griddle. This can damage the non fixed coating.
DO NOT use metal utensils that can damage the griddle surface. Do not use
the griddle as a cutting board.
DO NOT place or store items on the griddle plate.
DO NOT use the griddle after turning it over on the grate.
DO NOT use the griddle plate for another purpose.
Avoid cooking extremely greasy foods, grease spill over can occur.
The griddle can become hot when surrounding burners are in use
26 surface cookng
I
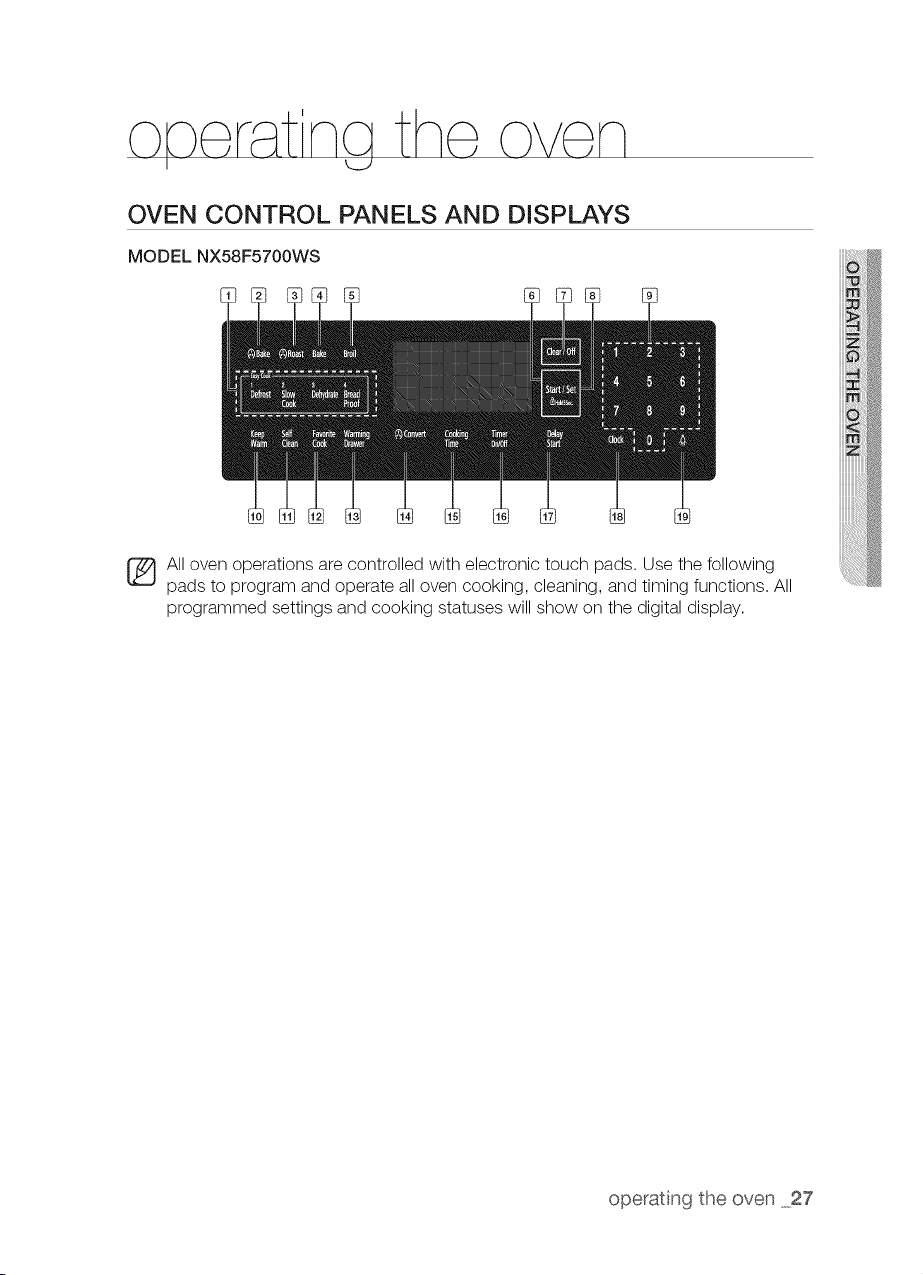
OVEN CONTROL PANELS AND DISPLAYS
MODEL NX58F5700WS
All oven operations are controlled with electronic touch pads. Use the following
pads to program and operate all oven cooking, cleaning, and timing functions. All
programmed settings and cooking statuses will show on the digital display.
operating the oven 27
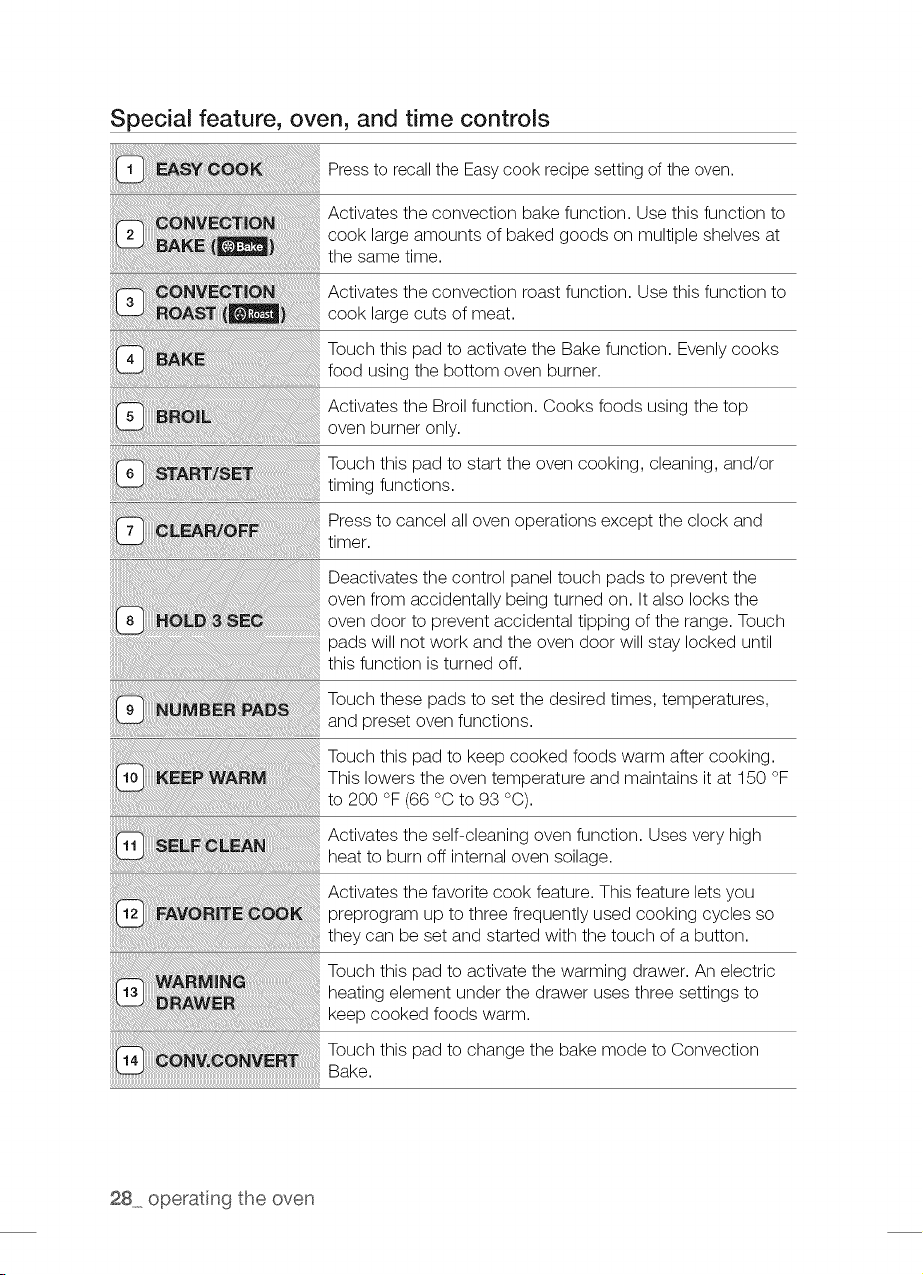
Special feature, oven, and time controls
Press to recallthe Easy cook recipe setting of the oven.
Activates the convection bake function. Use this function to
cook large amounts of baked goods on multiple shelves at
the same time.
Activates the convection roast function. Use this function to
cook large cuts of meat.
Touch this pad to activate the Bake function. Evenly cooks
food using the bottom oven burner.
Activates the Broil function. Cooks foods using the top
oven burner only.
Touch this pad to start the oven cooking, cleaning, and/or
timing functions.
Press to cancel all oven operations except the clock and
timer.
Deactivates the control panel touch pads to prevent the
oven from accidentally being turned on. It also locks the
oven door to prevent accidental tipping of the range. Touch
pads will not work and the oven door will stay locked until
this function is turned off.
Touch these pads to set the desired times, temperatures,
and preset oven functions.
Touch this pad to keep cooked foods warm after cooking.
This lowers the oven temperature and maintains it at 150 °F
to 200 °F(66 °C to 93 °C).
Activates the self-cleaning oven function. Uses very high
heat to burn off internal oven soilage.
Activates the favorite cook feature. This feature lets you
preprogram up to three frequently used cooking cycles so
they can be set and started with the touch of a button.
Touch this pad to activate the warming drawer. An electric
heating element under the drawer uses three settings to
keep cooked foods warm.
Touch this pad to change the bake mode to Convection
Bake.
28 operat ng the oven
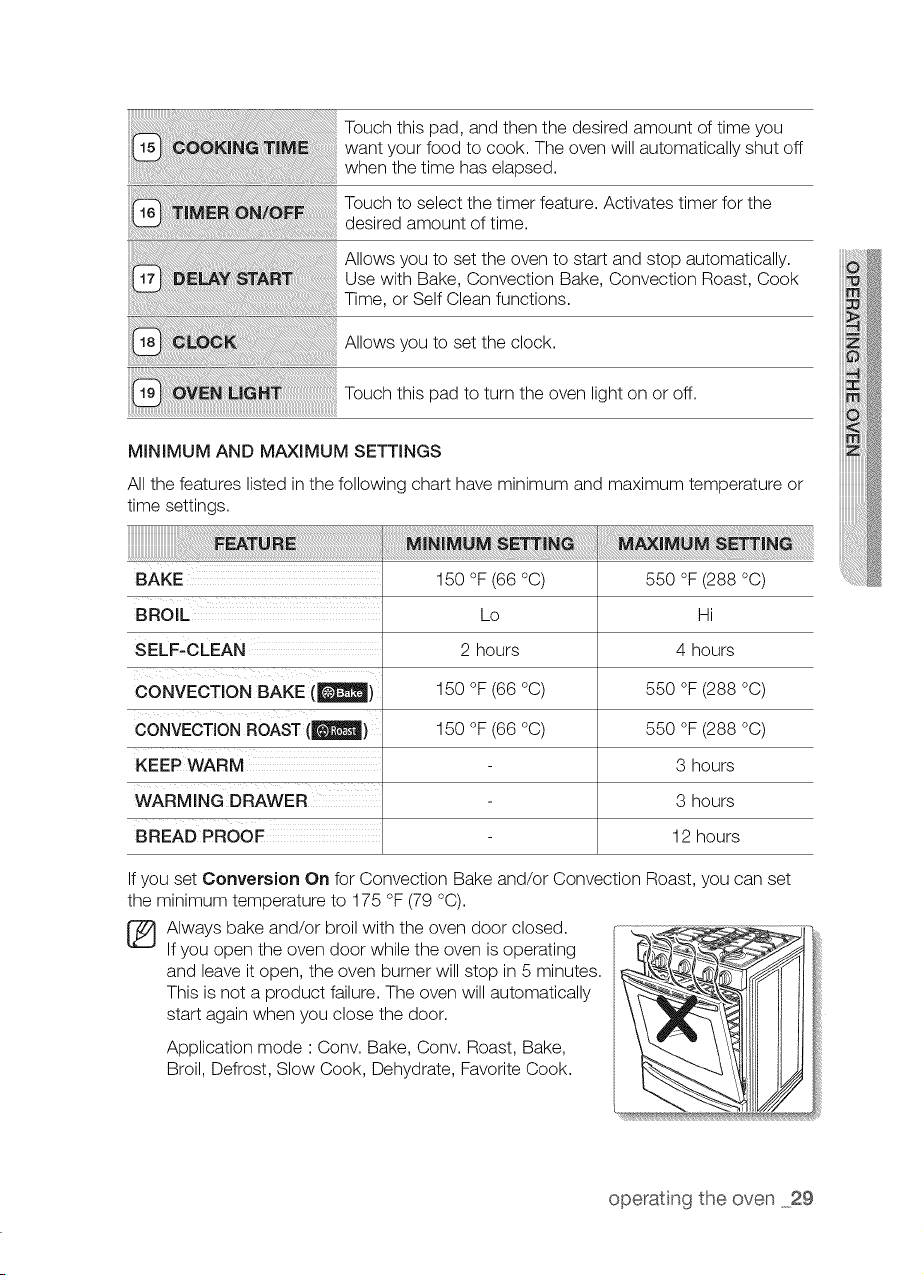
Touch this pad, and then the desired amount of time you
want your food to cook. The oven will automatically shut off
when the time has elapsed.
Touch to select the timer feature. Activates timer for the
desired amount of time.
Allows you to set the oven to start and stop automatically.
Use with Bake, Convection Bake, Convection Roast, Cook
Time, or Self Clean functions.
MINIMUM AND MAXIMUM SETTINGS
All the features listed in the following chart have minimum and maximum temperature or
time settings.
BAKE
BROIL
SELF-CLEAN
CONVECTION BAKE (_!)
CONVECTION ROAST[It, ll)
KEEP WARM
WARMING DRAWER
BREAD PROOF
150 °F (66°C)
Lo
2 hours
150 °F (66°C)
150 °F (66°C)
550 °F (288 °C)
Hi
4 hours
550 °F (288 °C)
550 °F (288 °C)
3 hours
3 hours
12 hours
If you set Conversion On for Convection Bake and/or Convection Roast, you can set
the minimum temperature to 175 °F (79 °C).
[_ lways bake and/or broil with the oven door closed.
If you open the oven door while the oven isoperating
and leave itopen, the oven burner will stop in 5minutes.
This isnot a product failure. The oven will automatically
start again when you close the door.
Application mode ' Conv. Bake, Conv. Roast, Bake,
Broil, Defrost, Slow Cook, Dehydrate, Favorite Cook.
operating the oven _29
SETTING THE CLOCK
The clock must be set to the correct time of day for the automatic oven timing functions
to work properly. The clock can be adjusted to show a 12-hour or 24-hour display. The
12-hour display isthe default setting.
The time of day cannot be changed during a timed cooking, delayed start, self-cleaning,
or Sabbath function operation.
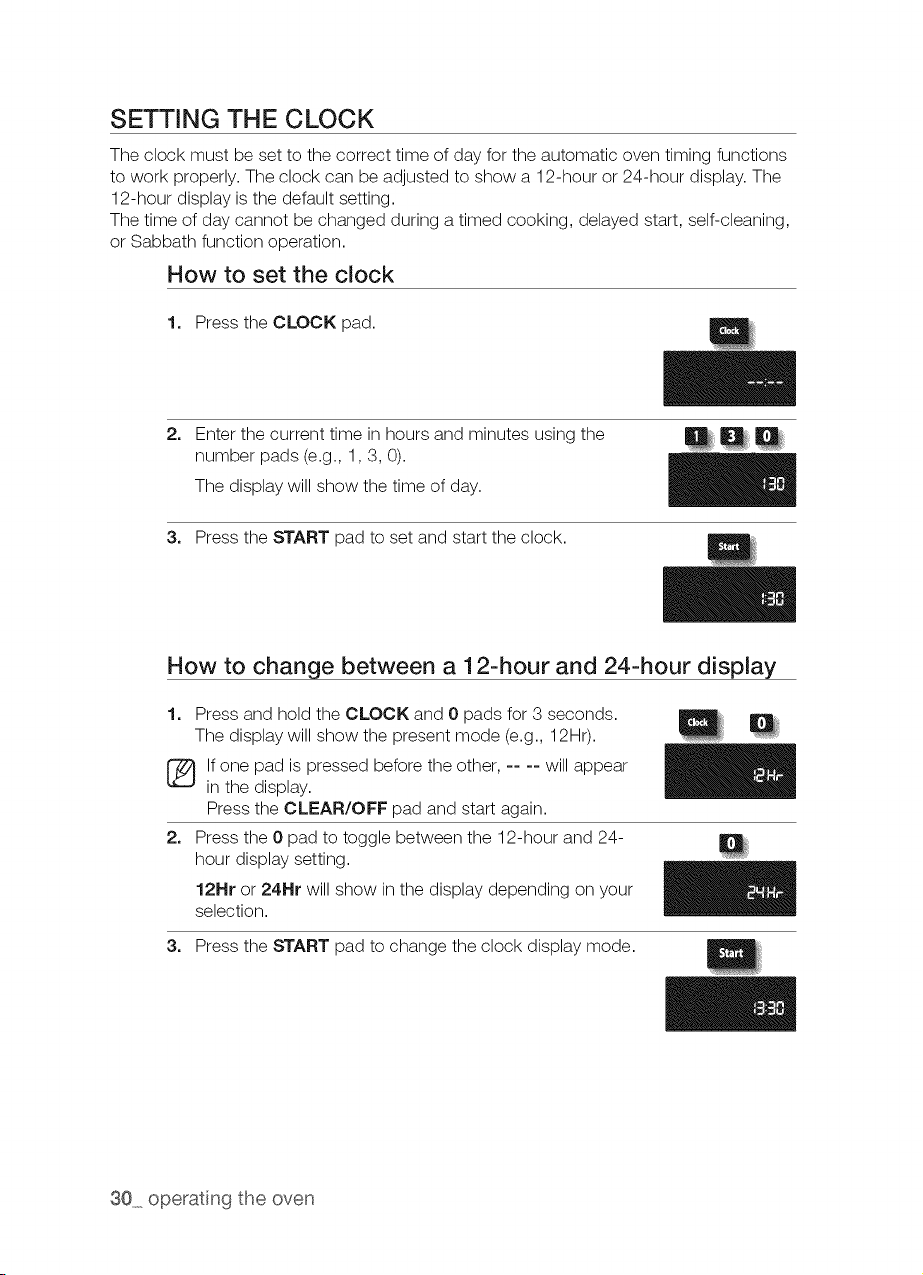
How to set the clock
1. Press the CLOCK pad.
2. Enter the current time in hours and minutes using the _
number pads (e.g., 1,3, 0).
The display will show the time of day.
3. Press the START pad toset and start the clock.
How to change between a 12-hour and 24-hour display
1. Press and hold the CLOCK and 0 pads for 3 seconds.
The display will show the present mode (e.g., 12Hr).
If one pad is pressed before the other, -- -- will appear
in the display.
Press the CLEAR/OFF pad and start again.
2. Press the 0 pad to toggle between the 12-hour and 24-
hour display setting.
12Hr or 24Hr will show in the display depending on your
selection.
3. Press the START pad tochange the clock display mode.
30 operat ng the oven
SETTING THE TIMER ON/OFF
The timer serves as an extra timer that beeps when the set time has elapsed. Itdoes not
start or stop cooking functions. The feature can be used at the same time as any other
oven functions. The timer can be set for any amount oftime from 1 second to 9 hours
and 99minutes.
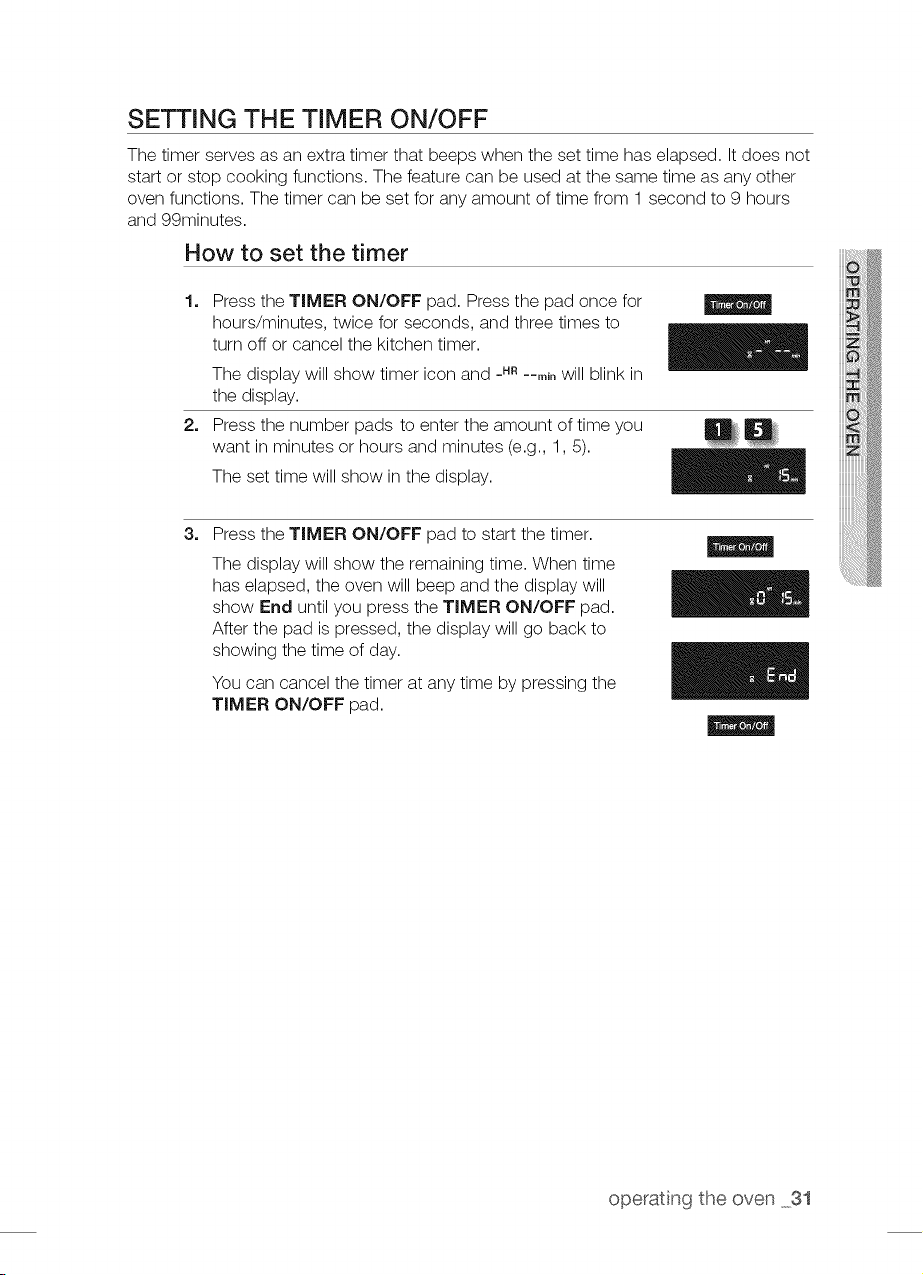
How to set the timer
1=
2=
Press the TIMER ON/OFF pad. Press the pad once for
hours/minutes, twice for seconds, and three times to
turn off or cancel the kitchen timer.
The display will show timer icon and _HR--m_,will blink in
the display.
Press the number pads to enter the amount of time you
want in minutes or hours and minutes (e.g., 1,5).
The set time will show in the display.
3=
Press the TIMER ON/OFF pad to start the timer.
The display will show the remaining time. When time
has elapsed, the oven will beep and the display will
show End untilyou press the TIMER ON/OFF pad.
After the pad ispressed, the display will go back to
showing the time of day.
You can cancel the timer at any time by pressing the
TIMER ON/OFF pad.
operating the oven 31
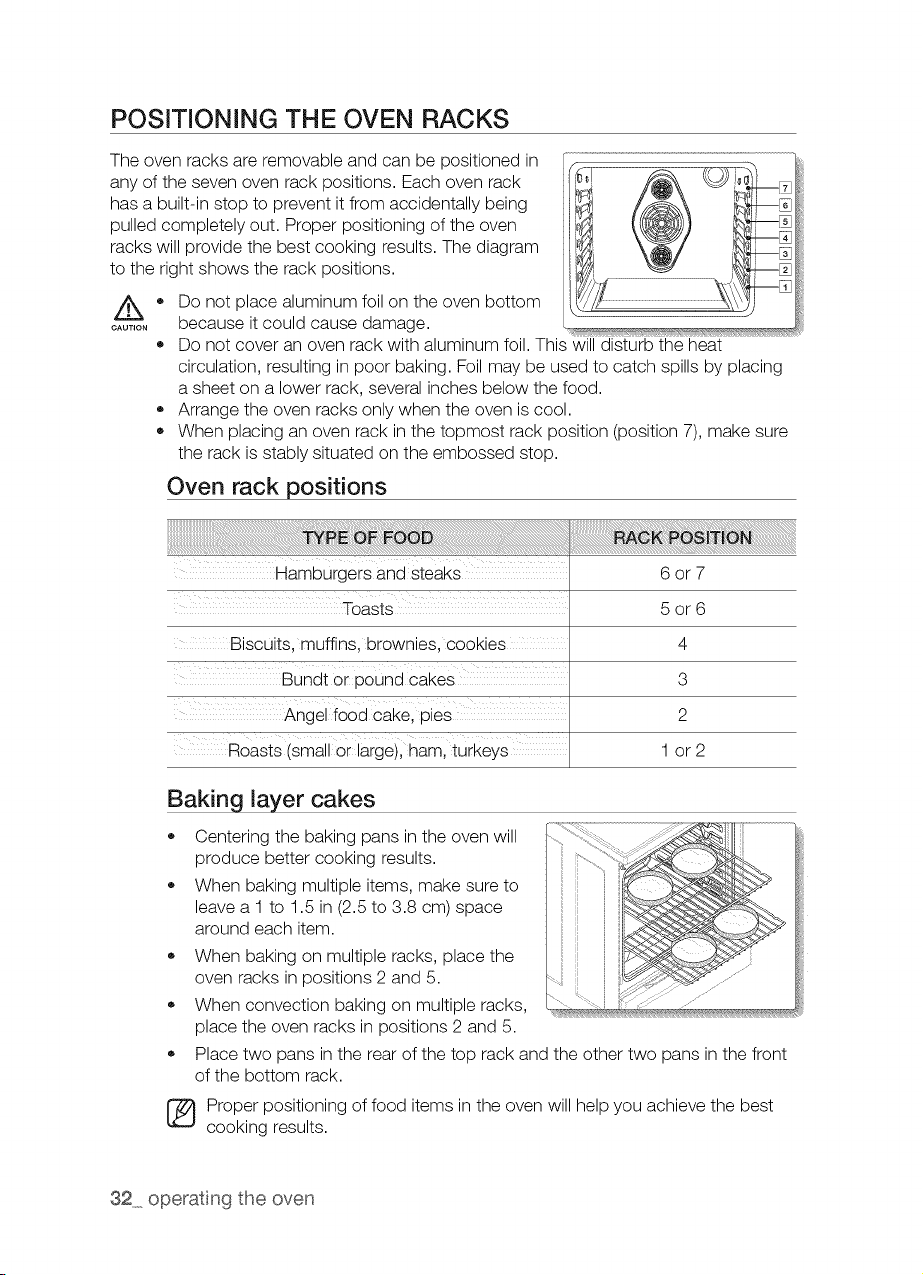
POSiTiONiNG THE OVEN RACKS
The oven racks are removable and can be positioned in
any of the seven oven rack positions. Each oven rack
has a built-in stop to prevent itfrom accidentally being
pulled completely out. Proper positioning ofthe oven
racks will provide the best cooking results. The diagram
to the right shows the rack positions.
OAUTION
®
Do not place aluminum foil on the oven bottom
because it could cause damage.
Do not cover an oven rack with aluminum foil.This will disturb the heat
circulation, resulting in poor baking. Foil may be used to catch spills by placing
a sheet on a lower rack, several inches below the food.
Arrange the oven racks only when the oven is cool.
When placing an oven rack in the topmost rack position (position 7), make sure
the rack isstably situated on the embossed stop.
Oven rack positions
Hamburgers and steaks 6 or 7
Toasts 5 or 6
Biscuits. muffins, brownies. COOKIES 4
Bundt or oouna caKes 3
Angel food cake. oles 2
Roasts Ismall or large), nam. turkeys 1 or 2
Baking layer cakes
• Centering the baking pans in the oven will
produce better cooking results.
When baking multiple items, make sureto
leave a 1 to 1.5 in (2.5to 3.8 cm) space
around each item.
When baking on multiple racks, place the
oven racks in positions 2 and 5.
When convection baking on multiple racks,
place the oven racks in positions 2 and 5.
Place two pans in the rear ofthe top rack and the other two pans in the front
of the bottom rack.
[_ roper positioning offood items in the oven will help you achieve the best
cooking results.
32 operat ng the oven
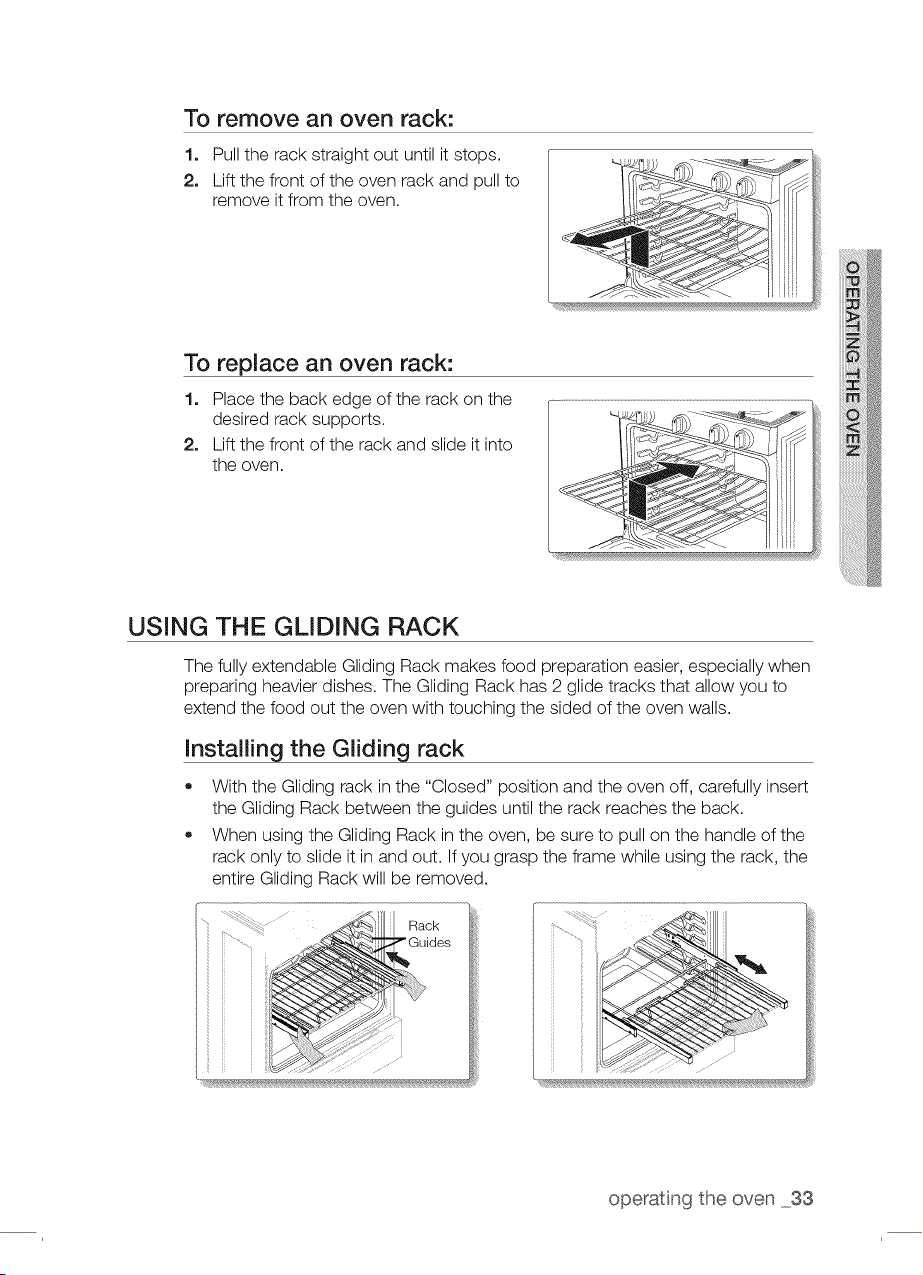
To remove an oven rack:
1. Pull the rack straight out until it stops.
2. Lift the front ofthe oven rack and pull to
remove it from the oven.
To replace an oven rack:
1. Place the back edge of the rack on the
desired rack supports.
2. Lift the front ofthe rack and slide it into
the oven.
USING THE GLIDING RACK
The fully extendable Gliding Rack makes food preparation easier, especially when
preparing heavier dishes. The Gliding Rack has 2 glide tracks that allow you to
extend the food out the oven with touching the sided of the oven walls.
Installing the Gliding rack
• With the Gliding rack in the "Closed" position and the oven off, carefully insert
the Gliding Rack between the guides until the rack reaches the back.
When using the Gliding Rack in the oven, be sure to pull on the handle of the
rack only to slide it in and out. If you grasp the frame while using the rack, the
entire Gliding Rack will be removed.
Rack
operating the oven 33
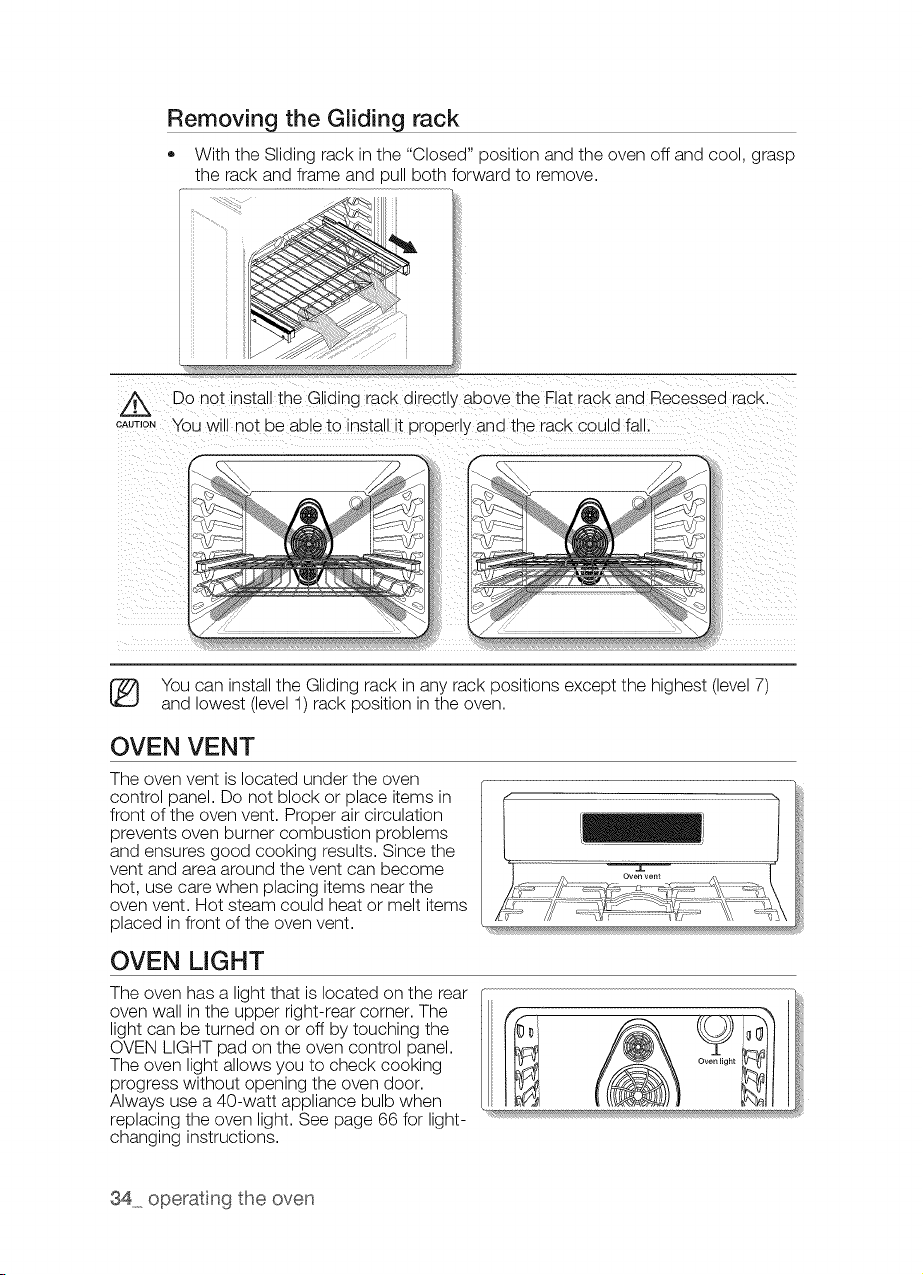
Removing the Gliding rack
• With the Sliding rack in the "Closed" position and the oven off and cool, grasp
the rack and frame and pull both forward to remove.
//_ Do not insta the Gliding rack direct y above the Flat rack ana Recessea racK.
CAUT,ONYOUWill not De able to insta it properly and the rack could fall.
You can install the Gliding rack in any rack positions except the highest (level 7)
and lowest (level 1) rack position in the oven.
OVEN VENT
The oven vent islocated under the oven
control panel. Do not block or place items in
front ofthe oven vent. Proper air circulation
prevents oven burner combustion problems
and ensures good cooking results. Since the
vent and area around the vent can become
hot, use care when placing items near the
oven vent. Hot steam could heat or melt items
placed in front of the oven vent.
OVEN LIGHT
The oven has a light that is located on the rear
oven wall in the upper right-rear corner. The
light can be turned on or off by touching the
OVEN LIGHT pad on the oven control panel.
The oven light allows you to check cooking
progress without opening the oven door.
Always use a 40-watt appliance bulb when
replacing the oven light. See page 66 for light-
changing instructions.
34 operat ng the oven

BAKING
The Bake function lets you program the oven to bake atany temperature between 150 °F
(66°C) and 550 °F (288 °C).
How to set the oven temperature
1.
2.
3.
Position the oven rack in the desired location.
Press the BAKE pad. The oven will beep every time a
pad ispressed.
The default temperature, 350 °, will blink on the display.
If the default temperature is the desired cooking
temperature, skip to step 4.
Press the number pads for the desired cooking
temperature (for example, 3, 7, 5).
4.
Press the START pad.
The oven will automatically light and start preheating.
The display will show a blinking _,along with 150°,
Bake, and the bake element icon, until the oven
reaches 150 °. Then, the display will just show the
actual oven temperature.
When the oven reaches the desired baking
temperature, itwill beep 6 times.
5.
6.
Place the food in the oven and close the oven door.
Preheating isvery important for good baking results.
When baking is complete, remove the item(s) from the
oven, close the oven door, and press the CLEAR/OFF
pad.
The oven will shut off, and the display will show the
time of day.
To change a programmed baking temperature, press the BAKE pad, enter the
new baking temperature, and then press the START pad. If the oven temperature
ishigher than the new setting, the oven will beep 6 times, then show the new
setting. The oven will complete cooking at the new temperature.
operating the oven 35

If your baking results are not what you are used to, the
preset oven cooking temperature can be adjusted __.30°F
(__.17°C) as follows:
1. Press and hold the BAKE and 0 pads for 3 seconds.
The display will show AdJ and 0.
2. Press the BAKE pad to toggle between + or -
temperature adjustments.
3. Press the number pads for the desired temperature
adjustment for example, (1,0).
The display will show AdJ and 10.
4_
Press the START pad.
The oven will beep twice, and the display will show the
time of day. The next time you bake, the oven will use
the new temperature setting.
[_ This adjustment will not affect the broiling or the self-cleaning temperatures.
The adjustment will be retained in memory after a power failure.
36 operat ng the oven
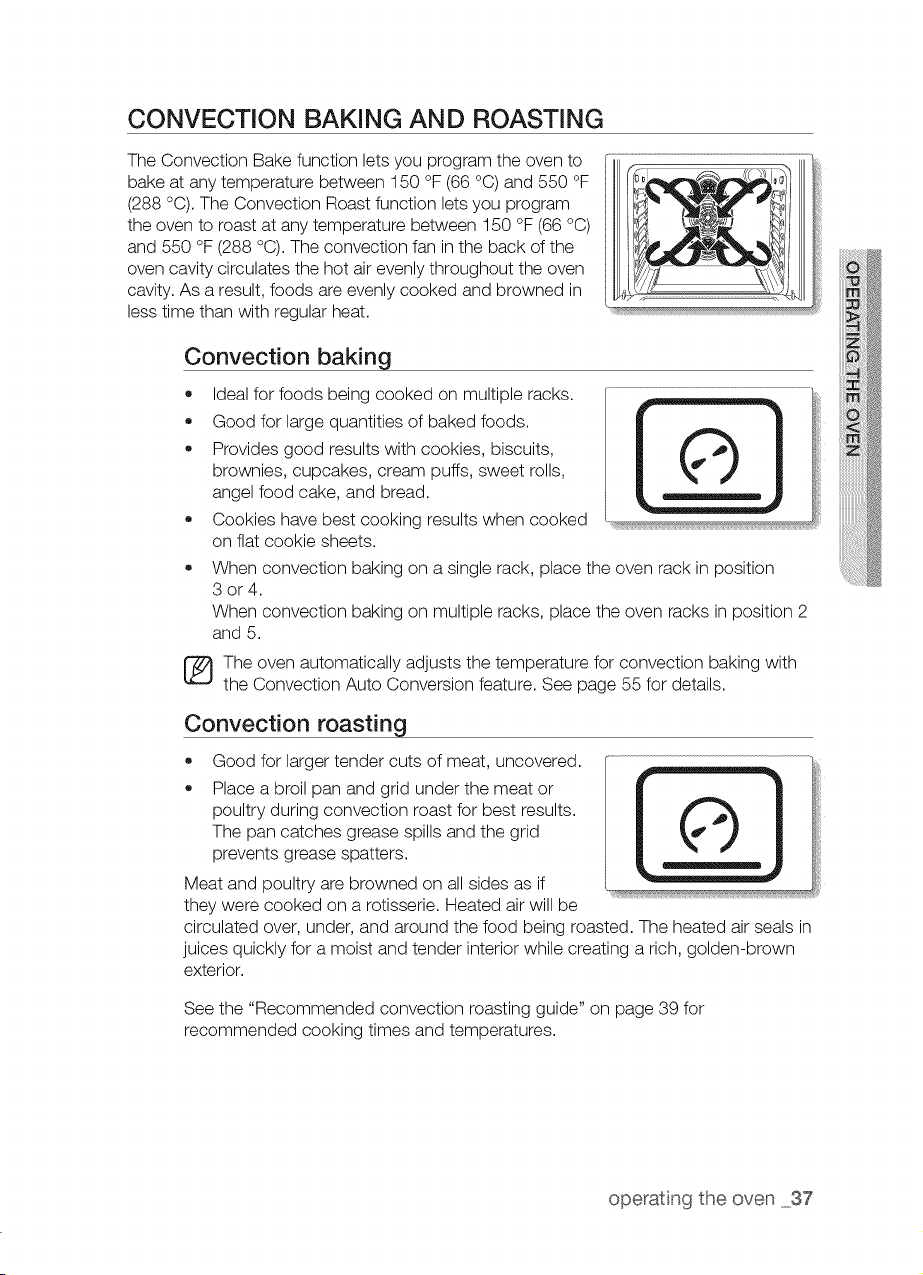
CONVECTION BAKING AND ROASTING
The Convection Bake function lets you program the oven to
bake at any temperature between 150 °F (66 °C) and 550 °F
(288 °C).The Convection Roast function lets you program
the oven to roast at any temperature between 150 °F (66 °C)
and 550 °F (288 °C). The convection fan in the back ofthe
oven cavity circulates the hot air evenly throughout the oven
cavity. As a result, foods are evenly cooked and browned in
less time than with regular heat.
Convection baking
• Ideal for foods being cooked on multiple racks.
Good for large quantities of baked foods.
Provides good results with cookies, biscuits,
brownies, cupcakes, cream puffs, sweet rolls,
angel food cake, and bread.
Cookies have best cooking results when cooked
on flat cookie sheets.
When convection baking on a single rack, place the oven rack in position
3or4.
When convection baking on multiple racks, place the oven racks in position 2
and 5.
The oven automatically adjusts the temperature for convection baking with
the Convection Auto Conversion feature. See page 55 for details.
Convection roasting
Good for larger tender cuts of meat, uncovered.
Place a broil pan and grid under the meat or
poultry during convection roast for best results.
The pan catches grease spills and the grid
prevents grease spatters.
Meat and poultry arebrowned on all sides as if
they were cooked on a rotisserie. Heated airwill be
circulated over, under, and around the food being roasted. The heated air seals in
juices quickly for a moist and tender interior while creating a rich, golden-brown
exterior.
See the "Recommended convection roasting guide" on page 39 for
recommended cooking times and temperatures.
operating the oven 37
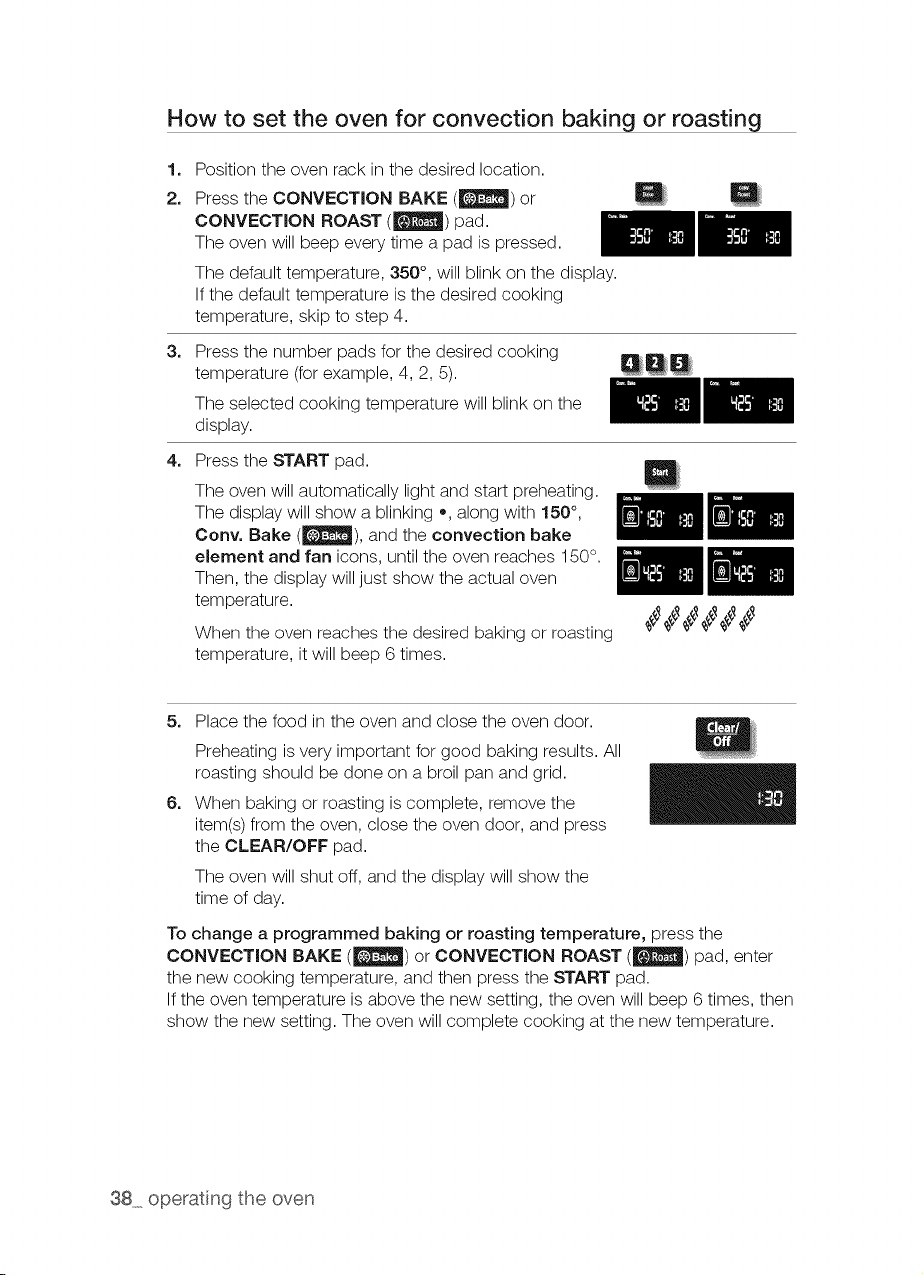
How to set the oven for convection baking or roasting
1.
2.
3.
4.
Position the oven rack in the desired location.
Press the CONVECTION BAKE (_) or
CONVECTION ROAST (_) pad.
The oven will beep every time a pad ispressed.
The default temperature, 350 °, will blink on the display.
If the default temperature isthe desired cooking
temperature, skip to step 4.
Press the number pads for the desired cooking
temperature (forexample, 4, 2, 5).
The selected cooking temperature will blink on the
display.
Press the START pad.
The oven will automatically light and start preheating.
The display will show a blinking +,along with 1,50°,
Cony. Bake (F_J_), and the convection bake
element and fan icons, until the oven reaches 150 °.
Then, the display will just show the actual oven
temperature.
When the oven reaches the desired baking or roasting
temperature, it will beep 6 times.
5. Place the food in the oven and close the oven door.
6.
Preheating isvery important for good baking results. All
roasting should be done on a broil pan and grid.
When baking or roasting iscomplete, remove the
item(s) from the oven, close the oven door, and press
the CLEAR/OFF pad.
The oven will shut off, and the display will show the
time of day.
To change a programmed baking or roasting temperature, press the
CONVECTION BAKE (_) or CONVECTION ROAST (|) pad, enter
the new cooking temperature, and then press the START pad.
If the oven temperature is above the new setting, the oven will beep 6 times, then
show the new setting. The oven will complete cooking at the new temperature.
38 operat ng the oven
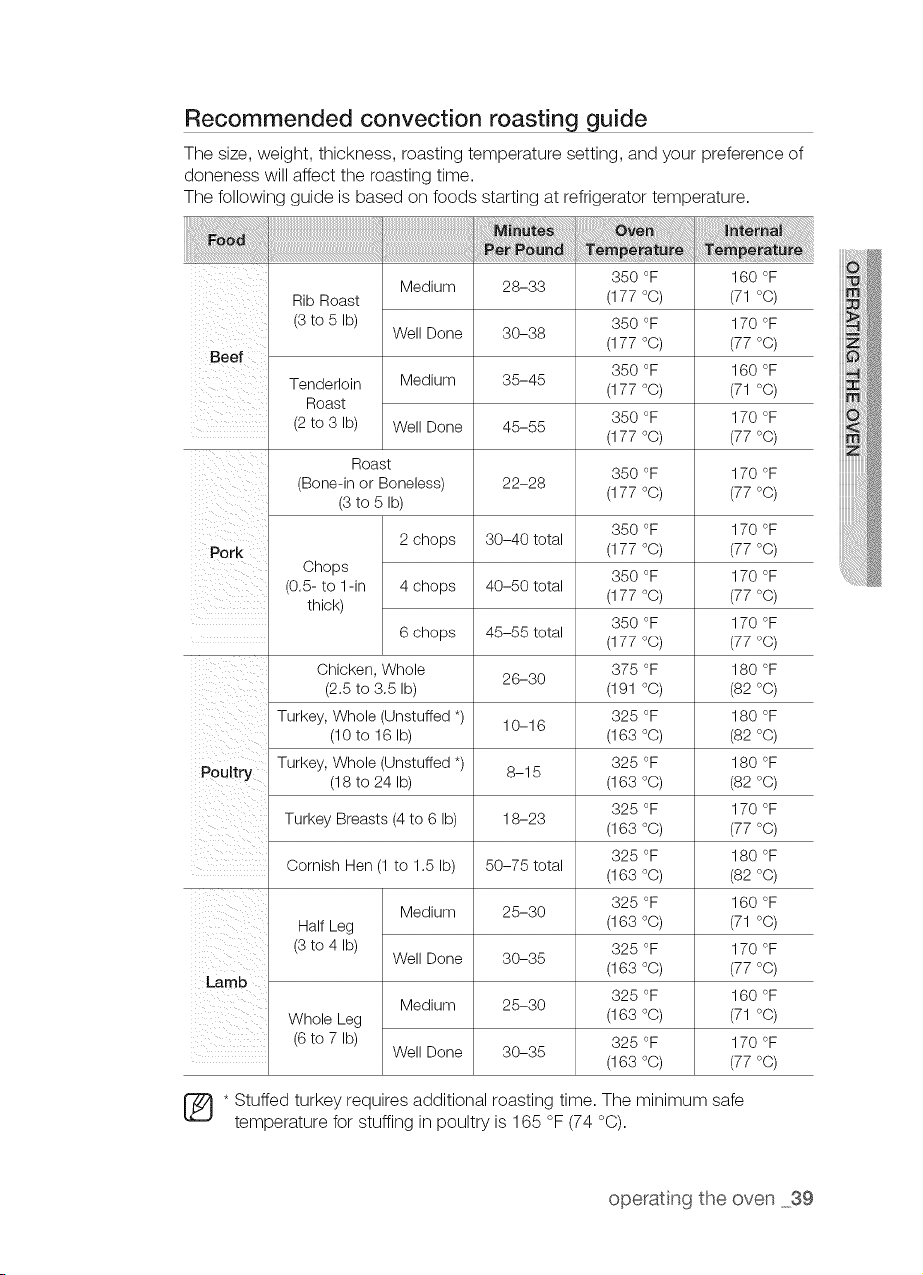
Recommended convection roasting guide
The size, weight, thickness, roasting temperature setting, and your preference of
doneness will affect the roasting time.
The following guide is based on foods starting at refrigerator temperature.
_i I _ _ i
Beef
350 °F
(177 °C)
350 °F
(177 °C)
350 °F
(177 °C)
350 °F
(177 °C)
160 °F
(71 °C)
170 °F
(77 °C)
160 °F
(71 °C)
170 °F
(77 °C)
350 °F 170 °F
(177 °C) (77 °C)
Pork
Poultry
Medium
Rib Roast
(3to 5 Ib)
Well Done
Tenderloin Medium
Roast
(2to 3 Ib) Well Done
Roast
(Bone-in or Boneless)
(3to 5 Ib)
2 chops
Chops
(0.5- to 1-in 4 chops
thick)
6 chops
Chicken, Whole
(2.5 to 3.5 Ib)
Turkey, Whole (Unstuffed *)
(10to 16 Ib)
Turkey, Whole (Unstuffed *)
(18to 24 Ib)
Turkey Breasts (4to 6 Ib)
Cornish Hen (1 to 1.5 Ib)
Medium
Half Leg
(3to 4 Ib)
Well Done
Medium
Whole Leg
(6to 7 Ib)
Well Done
28-33
30-38
35-45
45-55
22-28
30-40 total
40-50 total
45-55 total
26-30
10-16
8-15
18-23
50-75 total
25-30
30-35
25-30
30-35
Lamb
350 °F
(177 °C)
350 °F
(177 °C)
350 °F
(177 °C)
375 °F
(191 °C)
325 °F
(163 °C)
325 °F
(163 °C)
325 °F
(163 °C)
325 °F
(163 °C)
325 °F
(163 °C)
325 °F
(163 °C)
325 °F
(163 °C)
325 °F
(163 °C)
170 °F
(77 °C)
170 °F
(77 °C)
170 °F
(77 °C)
180 °F
(82 °C)
180 °F
(82 °C)
180 °F
(82 °C)
170 °F
(77 °C)
180 °F
(82 °C)
160 °F
(71 °C)
170 °F
(77 °C)
160 °F
(71 °C)
170 °F
(77 °C)
* tuffed turkey requires additional roasting time. The minimum safe
temperature for stuffing in poultry is 165 °F (74 °C).
operating the oven 39
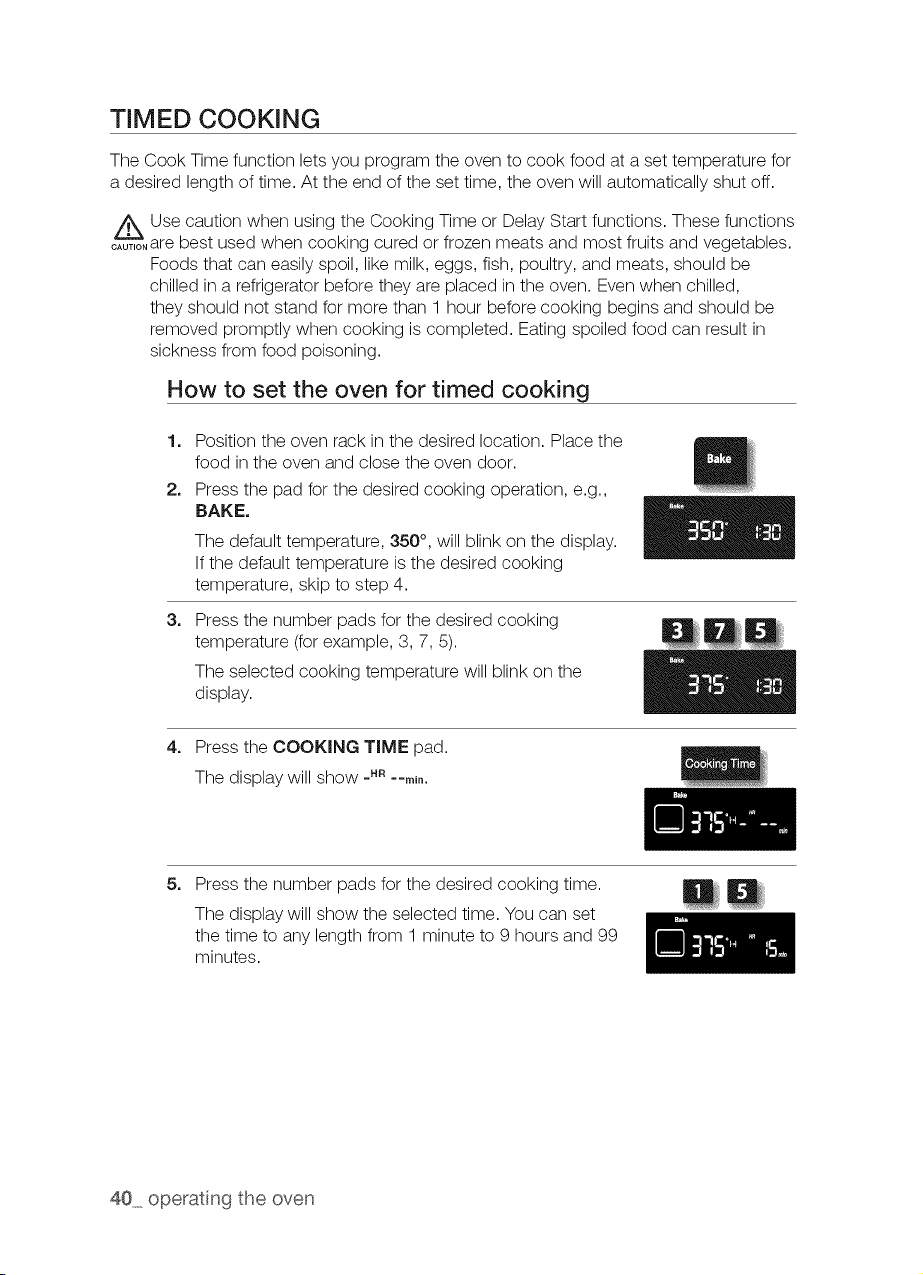
TIMED COOKING
The Cook Time function lets you program the oven to cook food at a set temperature for
a desired length of time. At the end of the set time, the oven will automatically shut off.
A Use caution when using the Cooking Time or Delay Start functions. These functions
o%'-',T,oare best used when cooking cured or frozen meats and most fruits and vegetables.
Foods that can easily spoil, like milk, eggs, fish, poultry, and meats, should be
chilled ina refrigerator before they are placed in the oven. Even when chilled,
they should not stand for more than 1 hour before cooking begins and should be
removed promptly when cooking is completed. Eating spoiled food can result in
sickness from food poisoning.
How to set the oven for timed cooking
1. Position the oven rack in the desired location. Place the
food in the oven and close the oven door.
2. Press the pad for the desired cooking operation, e.g.,
BAKE.
3.
The default temperature, 350 °, will blink on the display.
If the default temperature isthe desired cooking
temperature, skip to step 4.
Press the number pads for the desired cooking
temperature (forexample, 3, 7, 5).
The selected cooking temperature will blink on the
display.
4. Press the COOKING TIME pad.
The display will show _,R --m_,.
5.
Press the number pads for the desired cooking time.
The display will show the selected time. You can set
the time to any length from 1 minute to 9 hours and 99
minutes.
40 operat ng the oven
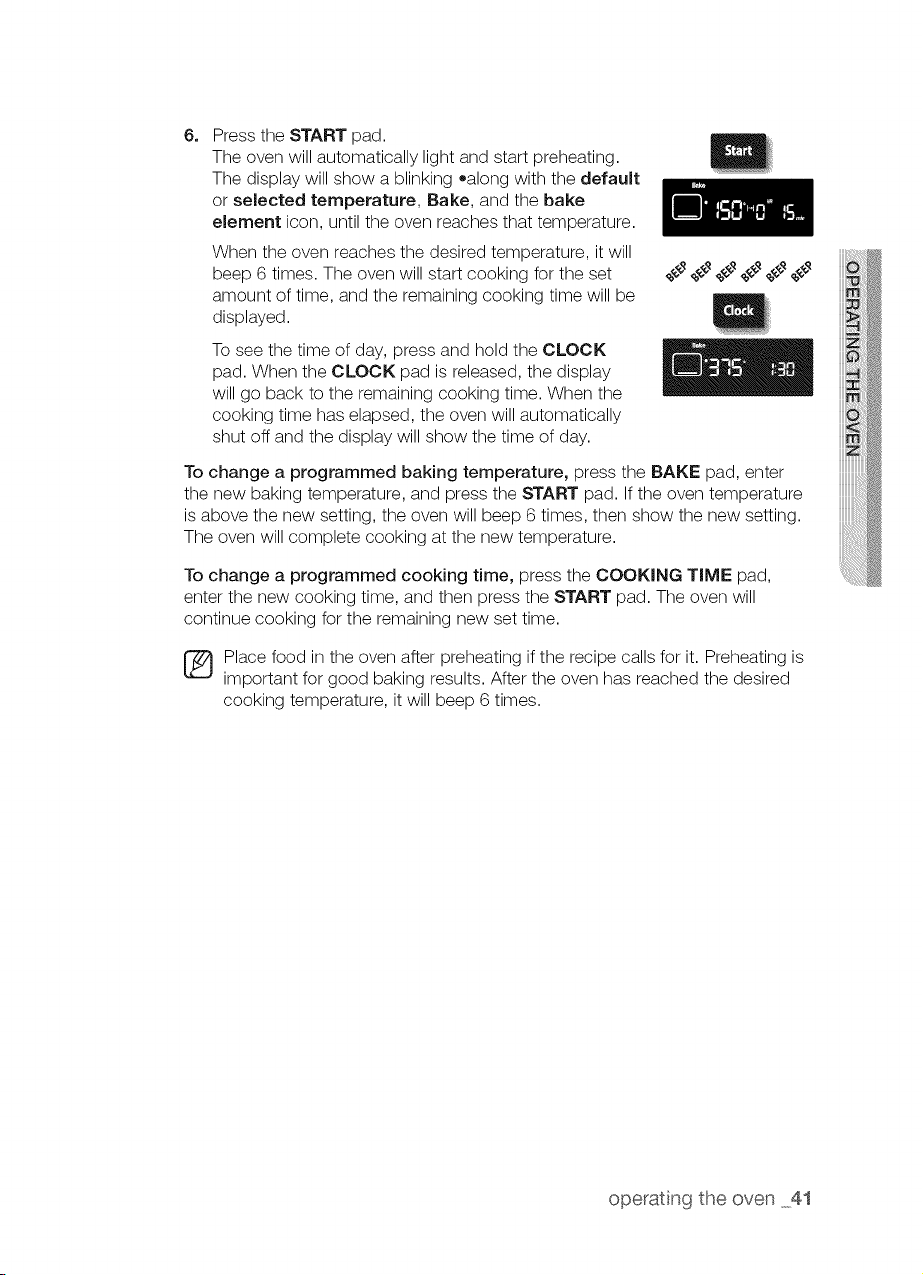
6_
Press the START pad.
The oven will automatically light and start preheating.
The display will show a blinking oalong with the default
or selected temperature, Bake, and the bake
element icon, until the oven reaches that temperature.
When the oven reaches the desired temperature, it will
beep 6 times. The oven will start cooking for the set
amount of time, and the remaining cooking time will be
displayed.
To see the time of day, press and hold the CLOCK
pad. When the CLOCK pad is released, the display
will go back to the remaining cooking time. When the
cooking time has elapsed, the oven will automatically
shut off and the display will show the time of day.
To change a programmed baking temperature, press the BAKE pad, enter
the new baking temperature, and press the START pad. If the oven temperature
isabove the new setting, the oven will beep 6 times, then show the new setting.
The oven will complete cooking atthe new temperature.
To change a programmed cooking time, press the COOKING TIME pad,
enter the new cooking time, and then press the START pad. The oven will
continue cooking for the remaining new set time.
[_ lace food inthe oven after preheating if the recipe calls for it. Preheating is
important for good baking results. After the oven has reached the desired
cooking temperature, itwill beep 6 times.
operating the oven 41
DELAY TIMED COOKING
The Delay Start function lets you use the kitchen timer to automatically start and stop
another cooking program (Bake, Convection Bake, or Convection Roast). Delay Start
can be set before other cooking operations for up to 12 hours. The clock must be set to
the correct time of day for Delay Start to work properly.
A Use caution when using the Cooking Time or Delay Start functions. These functions
o%-"_,T,oare best used when cooking cured or frozen meats and most fruits and vegetables.
Foods that can easily spoil, like milk, eggs, fish, poultry, and meats, should be
chilled ina refrigerator before they are placed in the oven. Even when chilled,
they should not stand for more than 1 hour before cooking begins and should be
removed promptly when cooking is completed. Eating spoiled food can result in
sickness from food poisoning.
How to set the oven for delay timed cooking
1. Position the oven rack in the desired location. Place the
food in the oven and close the oven door.
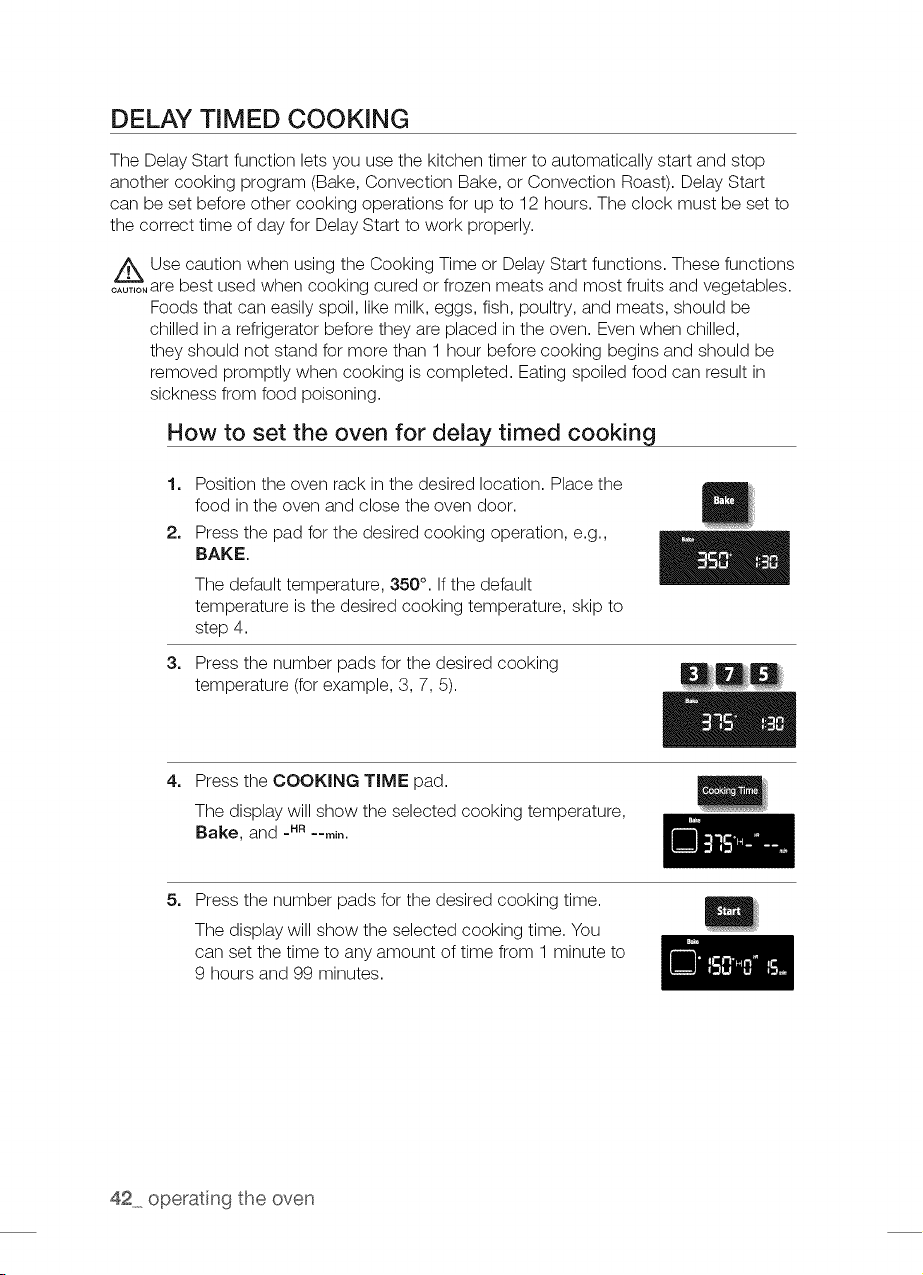
2. Press the pad for the desired cooking operation, e.g.,
BAKE.
3_
The default temperature, 350 °. If the default
temperature isthe desired cooking temperature, skip to
step 4.
Press the number pads for the desired cooking
temperature (forexample, 3, 7, 5).
4. Press the COOKING TIME pad.
The display will show the selected cooking temperature,
Bake, and _HR--rain.
5_
Press the number pads for the desired cooking time.
The display will show the selected cooking time. You
can set the time to any amount of time from 1minute to
9 hours and 99 minutes.
42 operat ng the oven
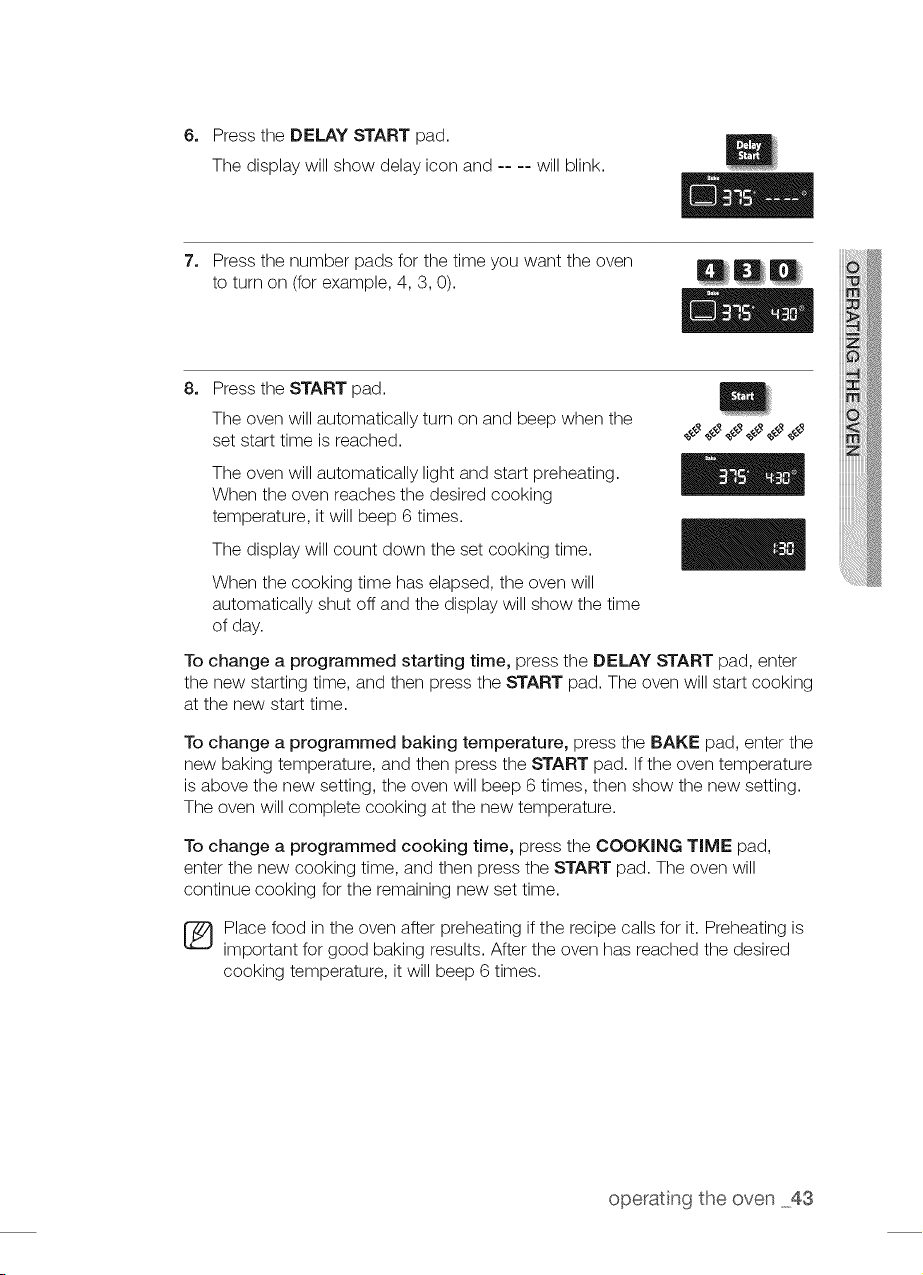
6. Press the DELAY START pad.
The display will show delay icon and .... will blink.
7.
Press the number pads for the time you want the oven
to turn on (for example, 4, 3, 0).
8. Press the START pad.
The oven will automatically turn on and beep when the
set start time is reached.
The oven will automatically light and start preheating.
When the oven reaches the desired cooking
temperature, itwill beep 6 times.
The display will count down the set cooking time.
When the cooking time has elapsed, the oven will
automatically shut off and the display will show the time
of day.
To change a programmed starting time, press the DELAY START pad, enter
the new starting time, and then press the START pad. The oven will start cooking
at the new start time.
To change a programmed baking temperature, press the BAKE pad, enter the
new baking temperature, and then press the START pad. If the oven temperature
isabove the new setting, the oven will beep 6 times, then show the new setting.
The oven will complete cooking atthe new temperature.
To change a programmed cooking time, press the COOKING TIME pad,
enter the new cooking time, and then press the START pad. The oven will
continue cooking for the remaining new set time.
Place food in the oven after preheating if the recipe calls for it. Preheating is
important for good baking results. After the oven has reached the desired
cooking temperature, itwill beep 6 times.
operating the oven 43
BROILING
The Broil function allows you to cook and brown foods using only a top heat source. The
oven door must remain closed during broiling. The meat or fish should always be placed
on a broiling grid in abroiling pan.
A ifa fireoccurs during broiling, leave the oven door closed and turn off the
....... oven. If the fire continues, throw baking soda on the fire or use a foam-type fire
extinguisher. Do not put water or flour on the fire. Flour may explode and water
can cause a grease fire to spread. Both can cause personal injury and/or property
damage.
How to set the oven for broiling
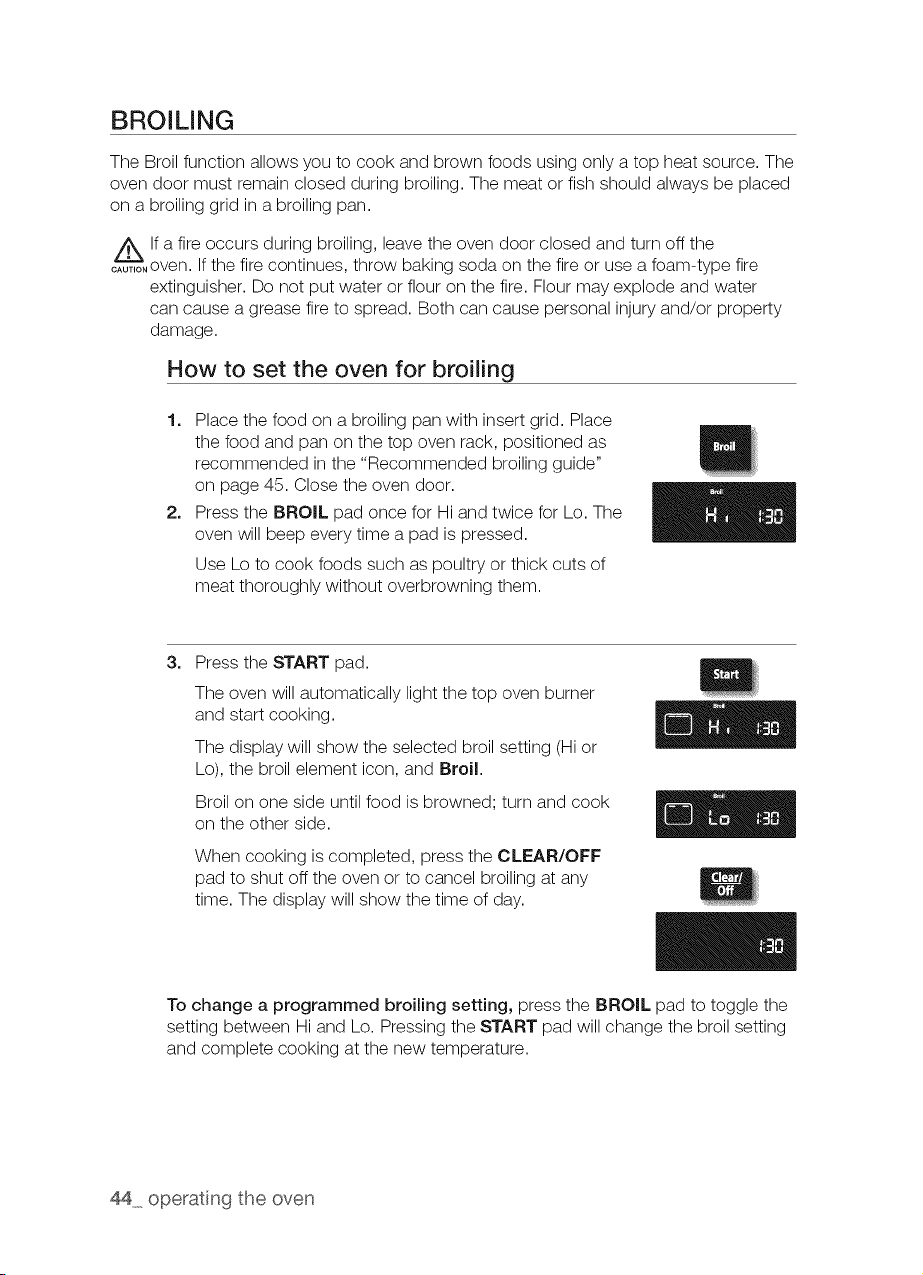
1. Place the food on a broiling pan with insert grid. Place
the food and pan on the top oven rack, positioned as
recommended in the "Recommended broiling guide"
on page 45. Close the oven door.
2. Press the BROIL pad once for Hi and twice for Lo. The
oven will beep every time a pad ispressed.
Use Lo to cook foods such as poultry or thick cuts of
meat thoroughly without overbrowning them.
3_
Press the START pad.
The oven will automatically light the top oven burner
and start cooking.
The display will show the selected broil setting (Hi or
Lo),the broil element icon, and Broil.
Broil on one side until food isbrowned; turn and cook
on the other side.
When cooking iscompleted, press the CLEAR/OFF
pad to shut off the oven or to cancel broiling at any
time. The display will show the time of day.
To change a programmed broiling setting, press the BROIL pad to toggle the
setting between Hiand Lo. Pressing the START pad will change the broil setting
and complete cooking at the new temperature.
44 operat ng the oven
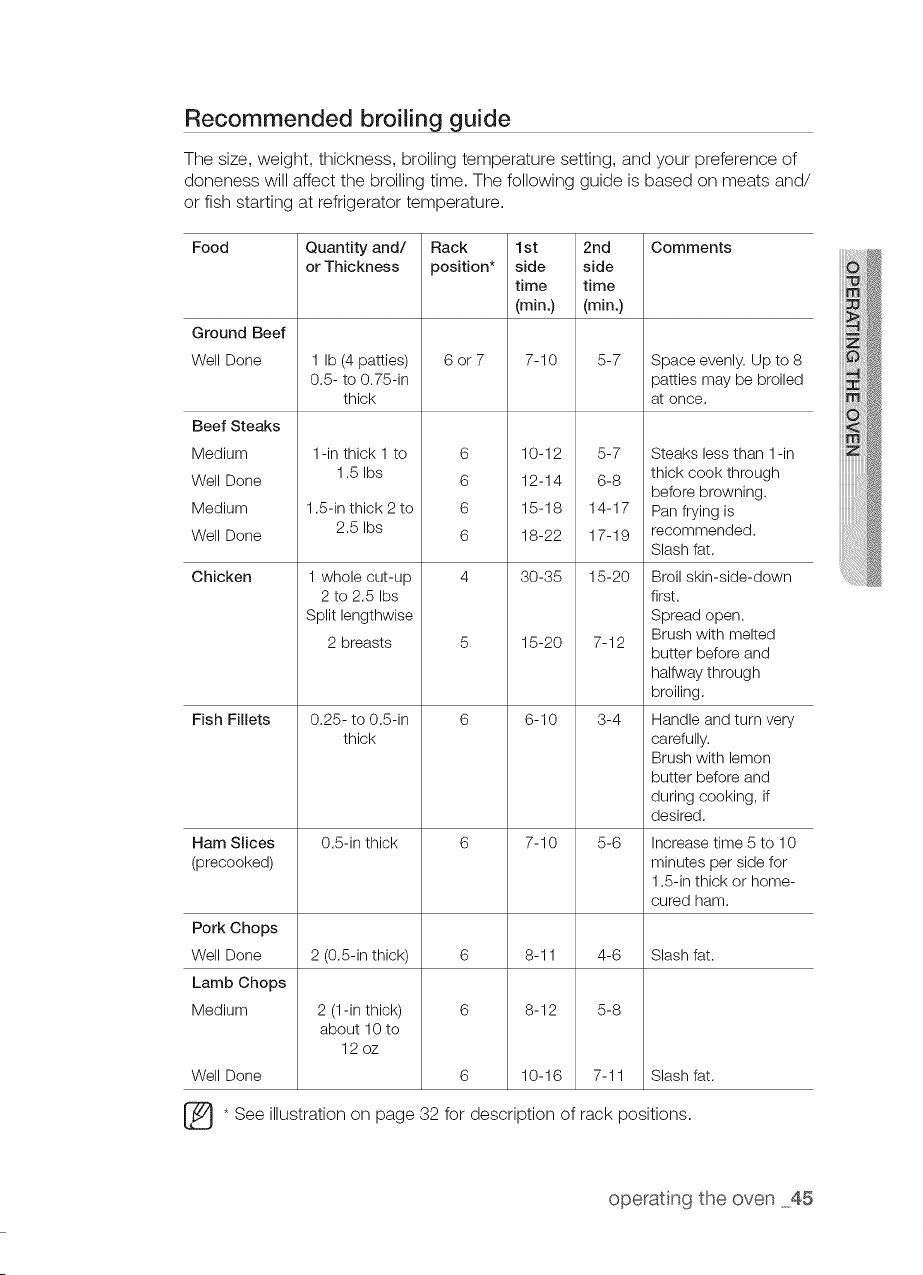
Recommended broiling guide
The size, weight, thickness, broiling temperature setting, and your preference of
doneness will affect the broiling time. The following guide isbased on meats and/
or fish starting at refrigerator temperature.
Food
Ground Beef
Well Done
Beef Steaks
Medium
Well Done
Medium
Well Done
Chicken
Fish Fillets
Ham Slices
(precooked)
Pork Chops
Well Done
Lamb Chops
Medium
Well Done
Quantity and/
or Thickness
1Ib (4 patties)
0.5- to 0.75-in
thick
1 -in thick 1 to
1.5 Ibs
1.5-in thick 2to
2.5 Ibs
1whole cut-up
2 to 2.5 Ibs
Split lengthwise
2 breasts
0.25- to 0.5-in
thick
0.5-in thick
2 (0.5-in thick)
2 (1-in thick)
about 10 to
12 oz
Rack 1st 2rid Comments
position* side side
time time
(rain.) (rain.)
6or7 7-10 5-7
6
6
6
6
Space evenly. Up to 8
patties may be broiled
at once.
10-12 5-7 Steaks less than 1 -in
thick cook through
12-14 6-8
before browning.
15-18 14-17 Pan frying is
18-22 17-19 recommended.
Slash fat.
30-35 15-20 Broil skin-side-down
first.
Spread open.
Brush with melted
15-20 7-12
butter before and
halfway through
broiling.
6-10 3-4 Handle and turn very
carefully.
Brush with lemon
butter before and
during cooking, if
desired.
7-10 5-6 Increase time 5 to 10
minutes per side for
1.5-in thick or home-
cured ham.
8-11 4-6 Slash fat.
8-12 5-8
10-16 7-11 Slash fat.
* See illustration on page 32 for description of rack positions.
operating the oven 45

KEEP WARM
The Keep Warm function allows you to keep cooked foods warm at a low baking
temperature. The Keep Warm feature keeps cooked food warm for serving up to 3 hours
after cooking has finished. After 3 hours, the feature automatically shuts off the oven.
How to use the warm feature
1. Position the oven rack in the desired location. Place the
food in the oven and close the oven door.
2. Press the KEEP WARM pad.
3_
Press the START pad.
The oven will automatically light and start preheating to
the Keep Warm temperature (approx. 170 °F [77 °C]).
The display will show the oven element icon, Warm,
and the time of day.
When warming is completed, press the CLEAR/OFF
pad to shut off the oven or to cancel Keep Warm at any
time. The display will show the time of day.
To program Keep Warm after a timed cooking function, press the KEEP
WARM pad after you program the timed cooking function. When Time Cook
is complete, the oven will beep 6 times and lower the oven temperature to the
Keep Warm setting. The oven will maintain that temperature until Keep Warm is
canceled.
46 operat ng the oven
USING THE EASY COOK FEATURE
Defrost
This function isdesigned to make the warm environment so that the frozen meat
can be defrosted.
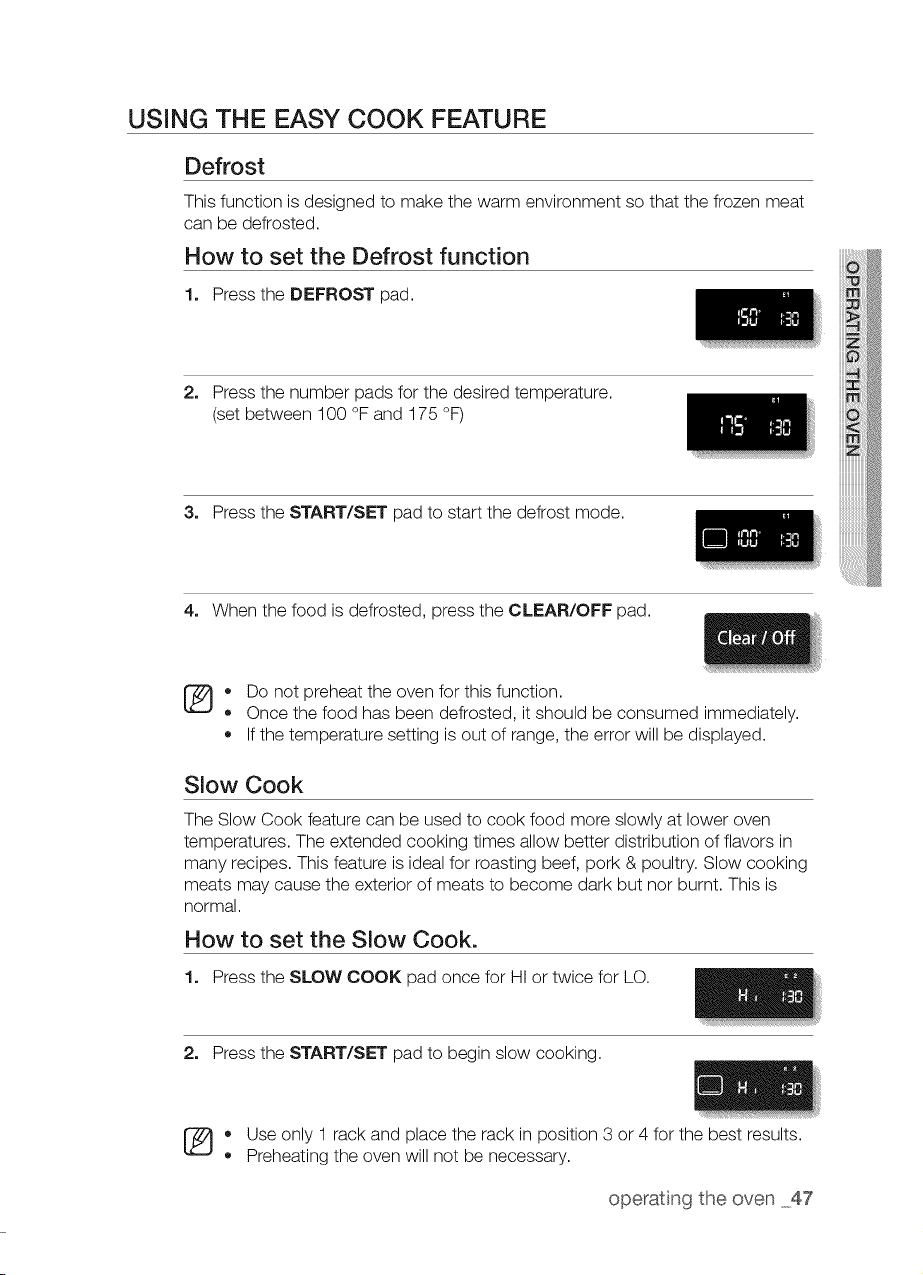
How to set the Defrost function
1. Press the DEFROST pad.
2. Press the number pads for the desired temperature.
(set between 100 °Fand 175 °F)
3. Press the START/SET pad to start the defrost mode.
4. When the food isdefrosted, press the CLEAR/OFF pad.
[_ • Do not preheat the oven for this function.
Once the food has been defrosted, itshould be consumed immediately.
If the temperature setting isout of range, the error will be displayed.
Slow Cook
The Slow Cook feature can be used to cook food more slowly at lower oven
temperatures. The extended cooking times allow better distribution offlavors in
many recipes. This feature isideal for roasting beef, pork & poultry. Slow cooking
meats may cause the exterior of meats to become dark but nor burnt. This is
normal.
How to set the Slow Cook.
1. Press the SLOW COOK pad once for HI or twice for LO.
2. Press the START/SET pad to begin slow cooking.
®
Use only 1 rack and place the rack in position 3 or 4 for the best results.
Preheating the oven will not be necessary.
operating the oven 47
Dehydrate
This function isdesigned to dry food or remove the moisture from food using
heat circulation.
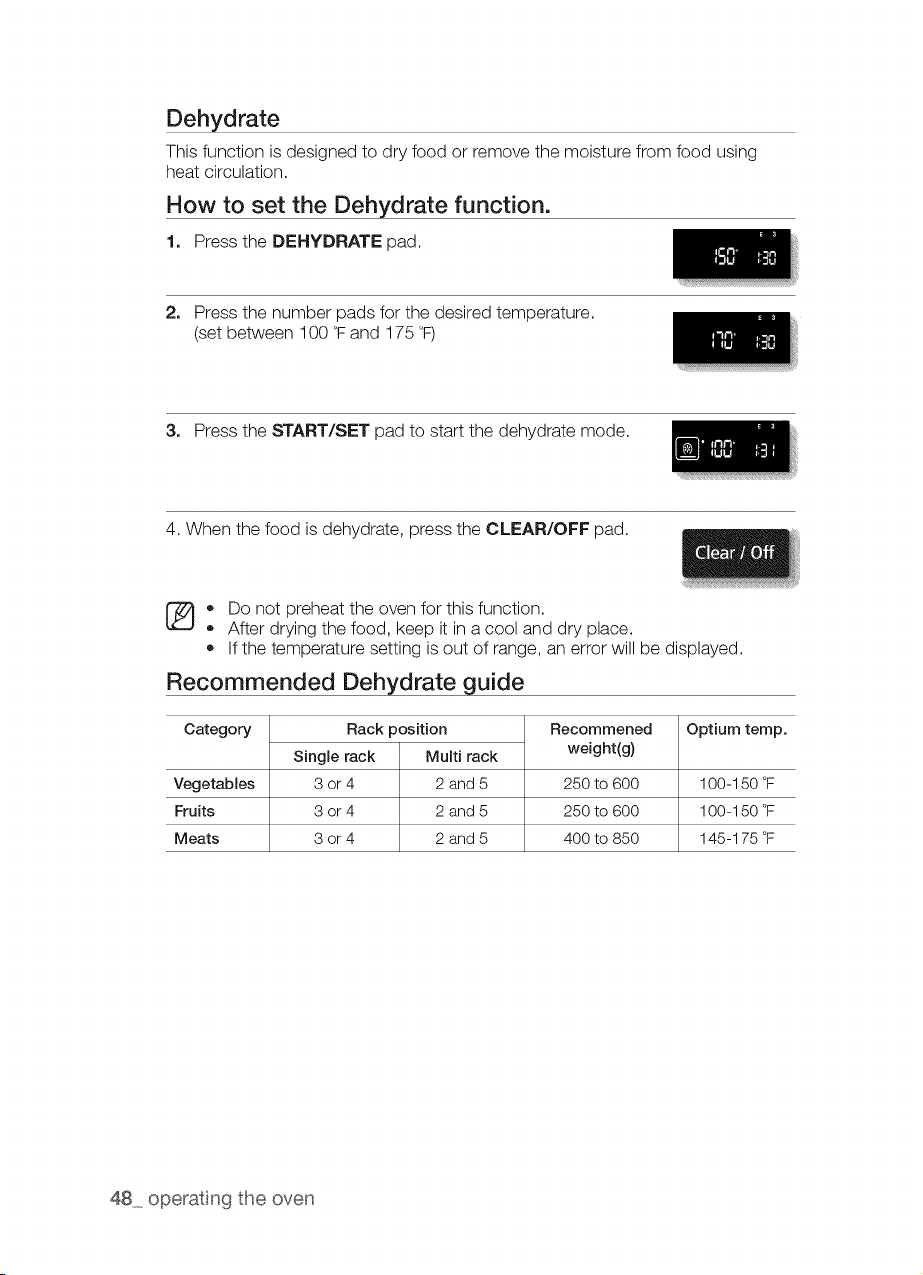
How to set the Dehydrate function.
1. Press the DEHYDRATE pad.
2. Press the number pads for the desired temperature.
(set between 100 °Fand 175 °F)
3. Press the START/SET pad to start the dehydrate mode.
4.When the food isdehydrate, press the CLEAR/OFF pad.
[_} • Do not preheat the oven for this function.
After drying the food, keep itin a cool and dry place.
If the temperature setting isout of range, an error will be displayed.
Recommended Dehydrate guide
Category
Vegetables
Fruits
Meats
Rack position
Single rack Multi rack
3or 4 2 and 5
3or 4 2 and 5
3or 4 2 and 5
Recommened
weight(g)
250 to 600
250 to 600
400 to 850
Optium temp.
100-150 °F
100-150 °F
145-175 °F
48 operat ng the oven

Bread Proof
The proofing feature maintains a warm environment useful for rising yeast-
leavened products.
How to set the oven for proofing.
1. Enter the proofing mode.
Press the BREAD PROOF pad.
2. Start the proofing function. Press the pad. The proofing
feature automatically provides the optimum temperature
for the proof process, and therefore does not have a
temperature adjustment.
3. Press the CLEAR/OFF pad at any time to turn offthe proofing feature.
[_ • If you press the BREAD PROOF pad when the oven temperature is
above 100°F, Hot will appear in the display. Because these functions
produce the best results when started while the oven is cool, we
recommend that you wait until the oven has cooled down and Hot
disappears from the display.
To avoid lowering the oven temperature and lengthening proofing time,
do not open the oven door unnecessarily.
Check bread products early to avoid over-proofing.
Do not use the proofing mode for warming food or keeping food hot.
The proofing oven temperature isnot hot enough to hold foods at safe
temperatures. Use the warm feature.
For best results, place the dough in adish in the oven on rack 3 or 4 and
cover the dough with a cloth or with plastic wrap. (The plastic may need
to be anchored underneath the container so the oven fan will not blow it
off.)
operating the oven 49
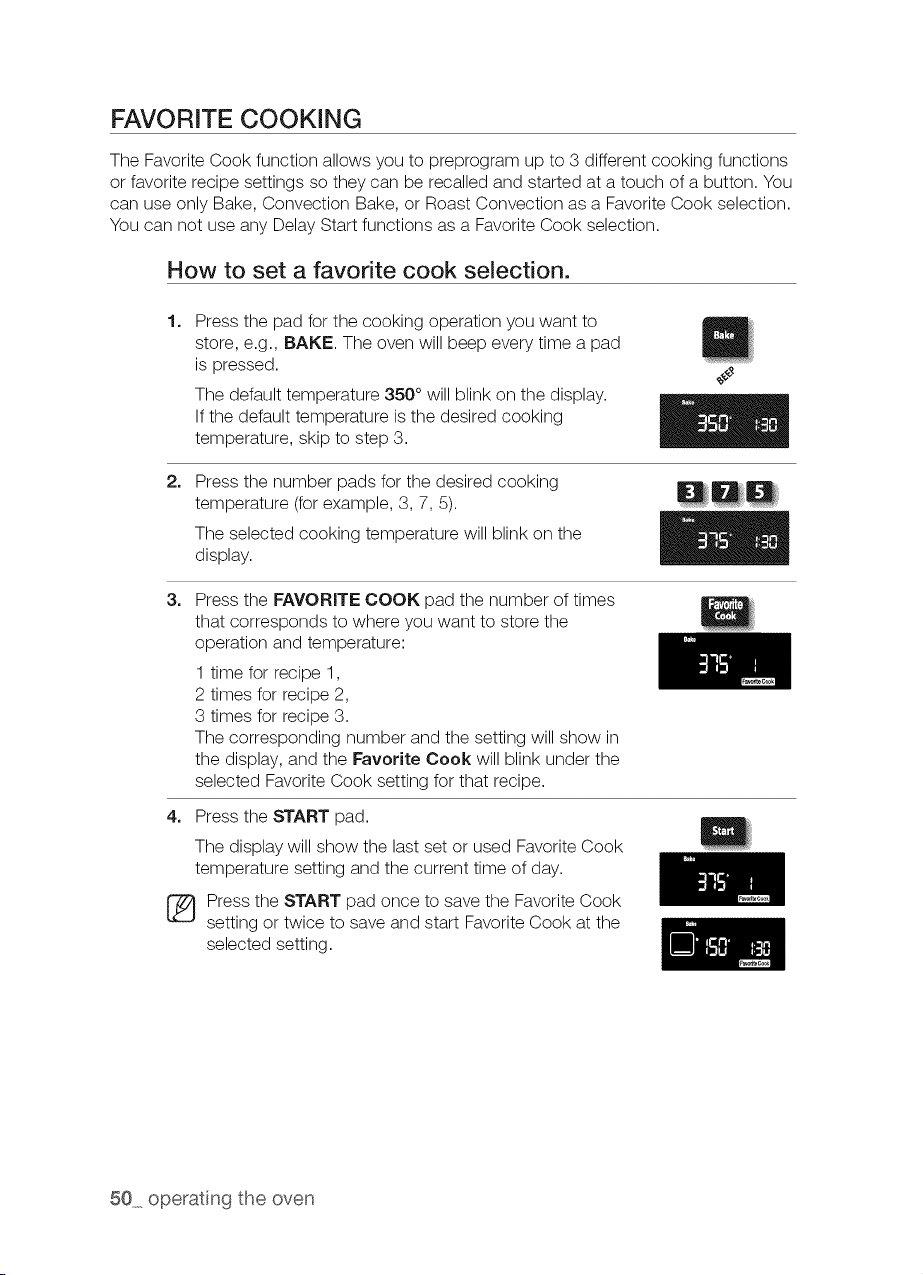
FAVORITE COOKING
The Favorite Cook function allows you to preprogram up to 3 different cooking functions
or favorite recipe settings so they can be recalled and started at a touch of a button. You
can use only Bake, Convection Bake, or Roast Convection as a Favorite Cook selection.
You can not use any Delay Start functions as a Favorite Cook selection.
How to set a favorite cook selection.
Press the pad for the cooking operation you want to
store, e.g., BAKE. The oven will beep every time a pad
is pressed.
The default temperature 350 ° will blink on the display.
If the default temperature isthe desired cooking
temperature, skip to step 3.
I
2_
Press the number pads for the desired cooking
temperature (forexample, 3, 7, 5).
The selected cooking temperature will blink on the
display.
3_
Press the FAVORITE COOK pad the number of times
that corresponds to where you want to store the
operation and temperature:
1 time for recipe 1,
2 times for recipe 2,
3 times for recipe 3.
The corresponding number and the setting will show in
the display, and the Favorite Cook will blink under the
selected Favorite Cook setting for that recipe.
4. Press the START pad.
The display will show the last set or used Favorite Cook
temperature setting and the current time of day.
_ ress the START pad once to save the Favorite Cook
setting or twice to save and start Favorite Cook at the
selected setting.
50 operat ng the oven

How to use or recall a favorite cook selection
2.
3_
Position the oven rack in the desired location.
Press the FAVORITE COOK pad the number of times
that corresponds to where the recipe setting isstored:
1 time for recipe 1,
2 times for recipe 2,
3 times for recipe 3.
The Favorite Cook will blink under the selected
Favorite Cook setting for that recipe on the display.
Press the START pad.
A • will blink to the left of the default or actual
temperature until the selected temperature is reached.
The oven will beep 6 times. The default or actual
temperature, the cooking function, the cooking
function icon, and the time of day will be displayed.
When the oven reaches the desired cooking
temperature, itwill beep 6 times.
4_
5_
Place the food in the oven and close the oven door.
Preheating isvery important for good baking or roasting
results.
When cooking is complete, remove the item(s) from the
oven, close the oven door, and press the CLEAR/OFF
pad.
The oven will shut off and the display will show the time
of day.
operating the oven 51
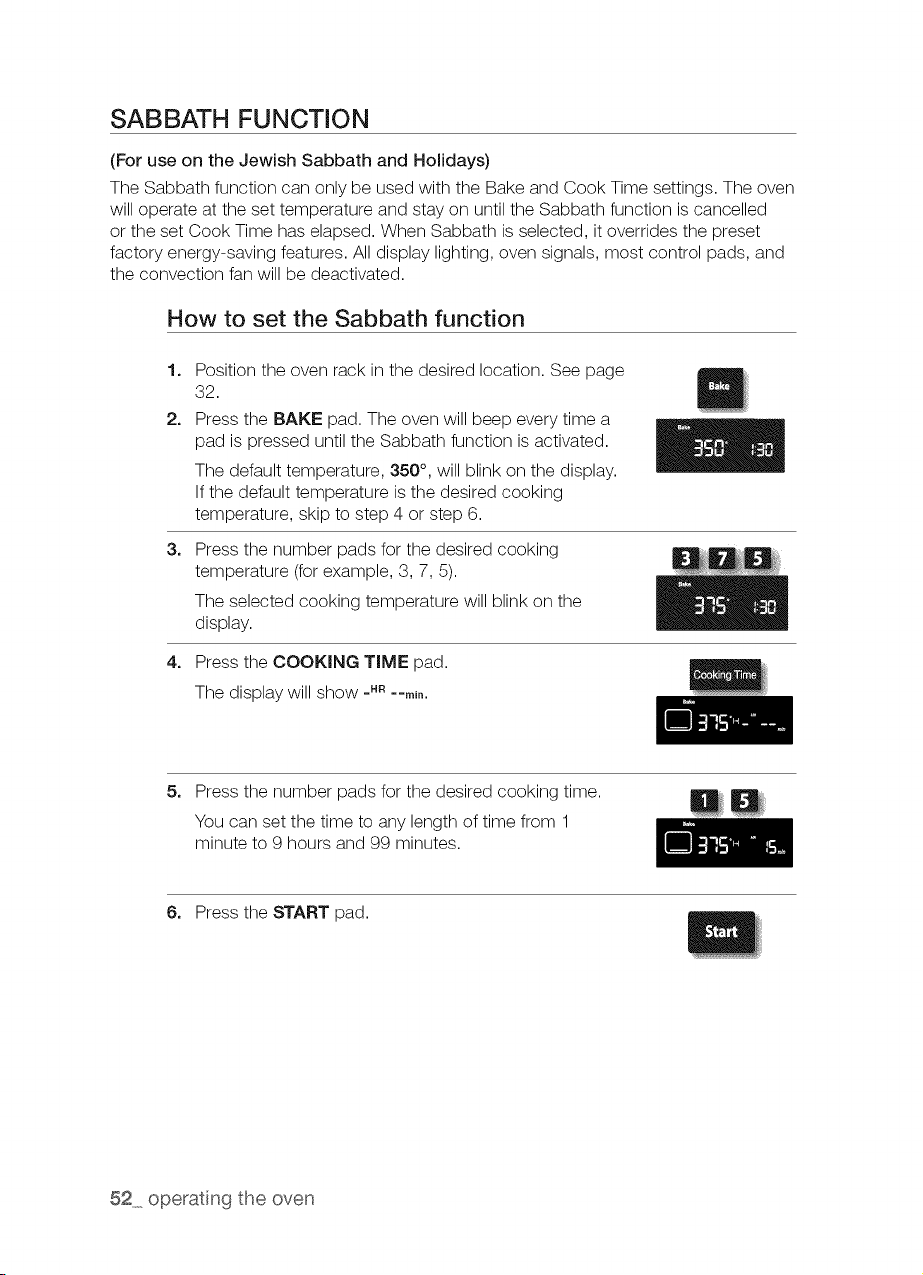
SABBATH FUNCTION
(For use on the Jewish Sabbath and Holidays)
The Sabbath function can only be used with the Bake and Cook Time settings. The oven
will operate at the set temperature and stay on until the Sabbath function is cancelled
or the set Cook Time has elapsed. When Sabbath isselected, itoverrides the preset
factory energy-saving features. All display lighting, oven signals, most control pads, and
the convection fan will be deactivated.
How to set the Sabbath function
1,
2.
3,
4,
Position the oven rack in the desired location. See page
32.
Press the BAKE pad. The oven will beep every time a
pad is pressed until the Sabbath function isactivated.
The default temperature, 350 °, will blink on the display.
If the default temperature isthe desired cooking
temperature, skip to step 4 or step 6.
Press the number pads for the desired cooking
temperature (forexample, 3, 7, 5).
The selected cooking temperature will blink on the
display.
Press the COOKING TIME pad.
The display will show _,R --m_,.
5. Press the number pads for the desired cooking time.
You can set the time to any length of time from 1
minute to 9 hours and 99 minutes.
6. Press the START pad.
52 operat ng the oven

7=
Press and hold the CLOCK and TIMER ON/OFF pad
at the same time for 3 seconds.
The display will show SAb. The oven signals, display
LEDs, and alloven controls except the number, BAKE,
COOKING TIME, START, and CLEAR/OFF pads will
be deactivated.
Inapproximately 20 seconds, the control panel will
"click" and the oven will start the lighting and preheating
process. After the oven reaches the selected cooking
temperature, the oven will continue to cook at that
temperature until the Cook Time has elapsed or the
Sabbath function iscancelled.
The display will not count down the set cook time, but
the oven will shut off at the end of the set time.
How to change the temperature and cancel the Sabbath
function
To change a programmed baking temperature, press
the BAKE pad, enter the new baking temperature, and
press the START pad. Inapproximately 20 seconds, the
control panel will "click" and the oven will complete cooking
at the new temperature.
To only turn off the oven, press the CLEAR/OFF pad.
The display will still show SAb, and the oven signal and
LEDs will still be deactivated.
To cancel the Sabbath function, press and hold the
CLOCK and TIMER ON/OFF pad at the same time for 3
seconds. The display will show the time of day.
operating the oven 53
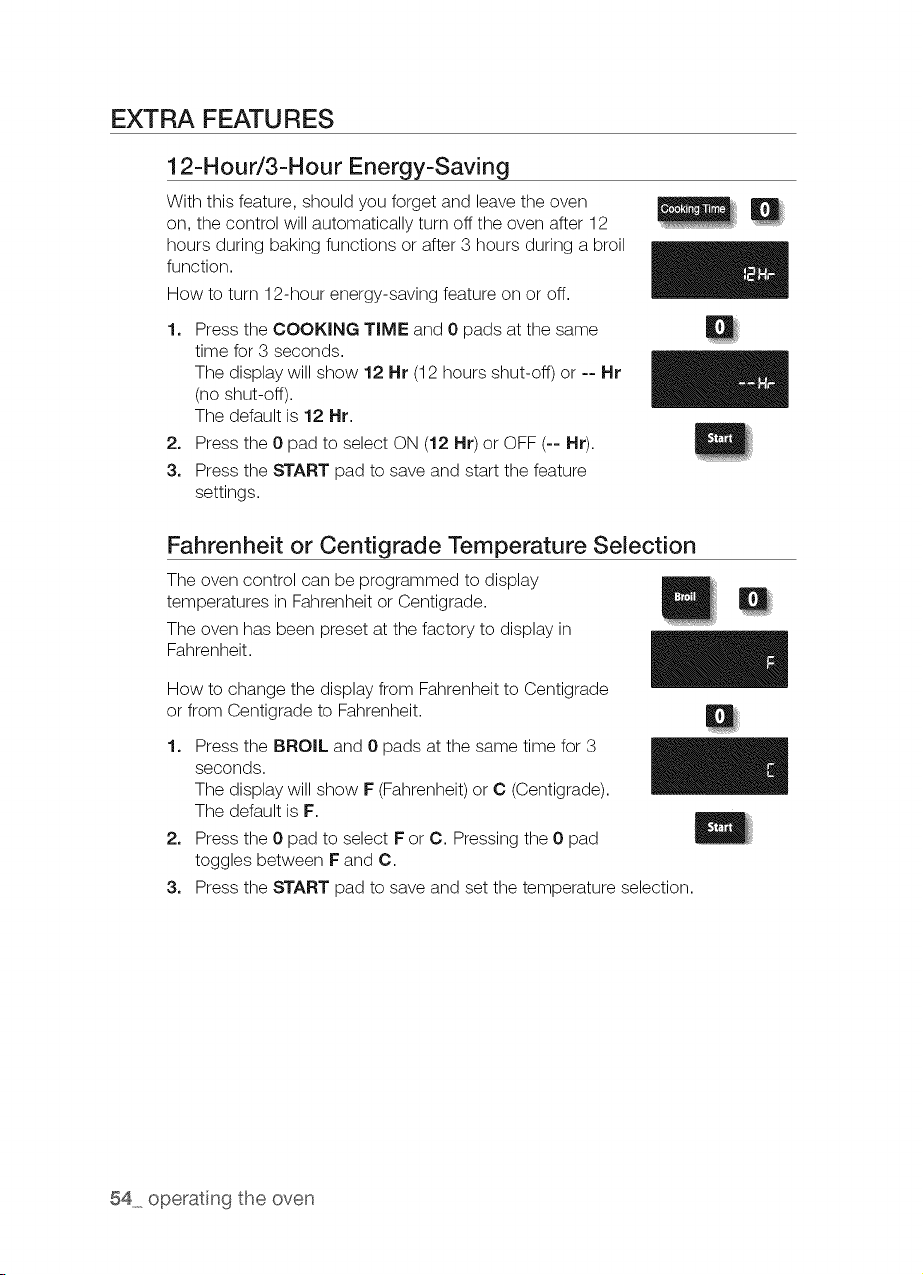
EXTRA FEATU RES
12-Hour/3-Hour Energy-Saving
With this feature, should you forget and leave the oven
on, the control will automatically turn off the oven after 12
hours during baking functions or after 3 hours during a broil
function.
How to turn 12-hour energy-saving feature on or off.
1. Press the COOKING TIME and 0 pads at the same
time for 3 seconds.
The display will show 12 Hr (12hours shut-off) or -- Hr
(no shut-off).
The default is 12 Hr.
2. Press the 0 pad to select ON (12 Hr) or OFF (-- Hr).
3. Press the START pad tosave and start the feature
settings.
m
m
Fahrenheit or Centigrade Temperature Selection
The oven control can be programmed to display
temperatures in Fahrenheit or Centigrade.
The oven has been preset at the factory to display in
Fahrenheit.
How to change the display from Fahrenheit to Centigrade
or from Centigrade to Fahrenheit.
1. Press the BROIL and 0 pads at the same time for 3
seconds.
The display will show F(Fahrenheit) or C (Centigrade).
The default is F.
2. Press the 0 pad to select F or C. Pressing the 0 pad
toggles between F and C.
m
3. Press the START pad tosave and set the temperature selection.
54 operat ng the oven
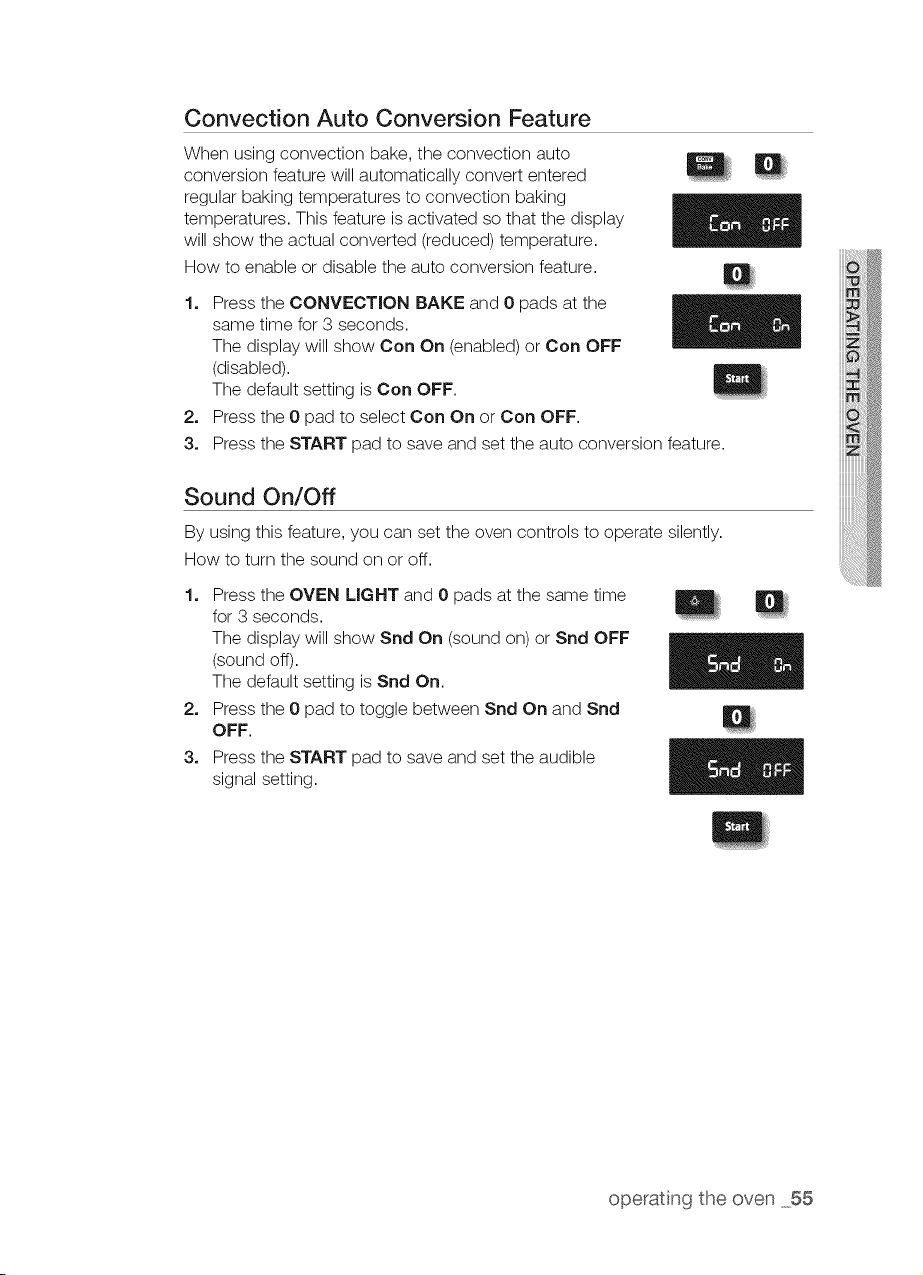
Convection Auto Conversion Feature
When using convection bake, the convection auto
conversion feature will automatically convert entered
regular baking temperatures to convection baking
temperatures. This feature is activated so that the display
will show the actual converted (reduced) temperature.
How to enable or disable the auto conversion feature.
1.
2_
3.
Press the CONVECTION BAKE and 0 pads at the
same time for 3 seconds.
The display will show Con On (enabled) or Con OFF
(disabled).
The default setting isCon OFF.
Press the 0 pad to select Con On or Con OFF.
Press the START pad to save and set the auto conversion feature.
Sound On/Off
By using this feature, you can set the oven controls to operate silently.
How to turn the sound on or off.
1. Press the OVEN LIGHT and 0 pads at the same time
for 3 seconds.
The display will show Snd On (sound on) or Snd OFF
(sound off).
The default setting isSnd On.
2. Press the 0 pad to toggle between Snd On and Snd
OFF.
3. Press the START pad to save and set the audible
signal setting.
m
operating the oven 55
ABOUT THE WARMING DRAWER
The Warming Drawer lets you keep hot, cooked foods warm. Always start with hot food.
Do not use the warming drawer to heat or reheat cold food.
Allow approximately 25 minutes for the warming drawer to preheat.
o_Z_,oDo not use plastic containers or plastic wrap in the warming drawer. The plastic will
melt upon direct contact with the drawer. Melted plastic may not be removable and
isnot covered under the warranty.
,, Do not line the warming drawer with aluminum foil. Foilisan excellent heat insulator
and will trap heat beneath it. This will upset the performance ofthe drawer and could
damage the interior finish.
Do not put liquid or water in the warming drawer.
Allfoods placed in the warming drawer should be covered with a lid or aluminum foil.
When warming pastries or breads, vent the cover to allow moisture to escape.
,, Remove serving spoons, etc., before placing containers in the warming drawer.
,, Food should be kept hot in its cooking container or transferred to a heat-safe serving
dish.
,, The warming drawer cannot be used during a self-cleaning cycle.
The warming drawer will shut off automatically after 3 hours.
56 usng the warm ng drawer
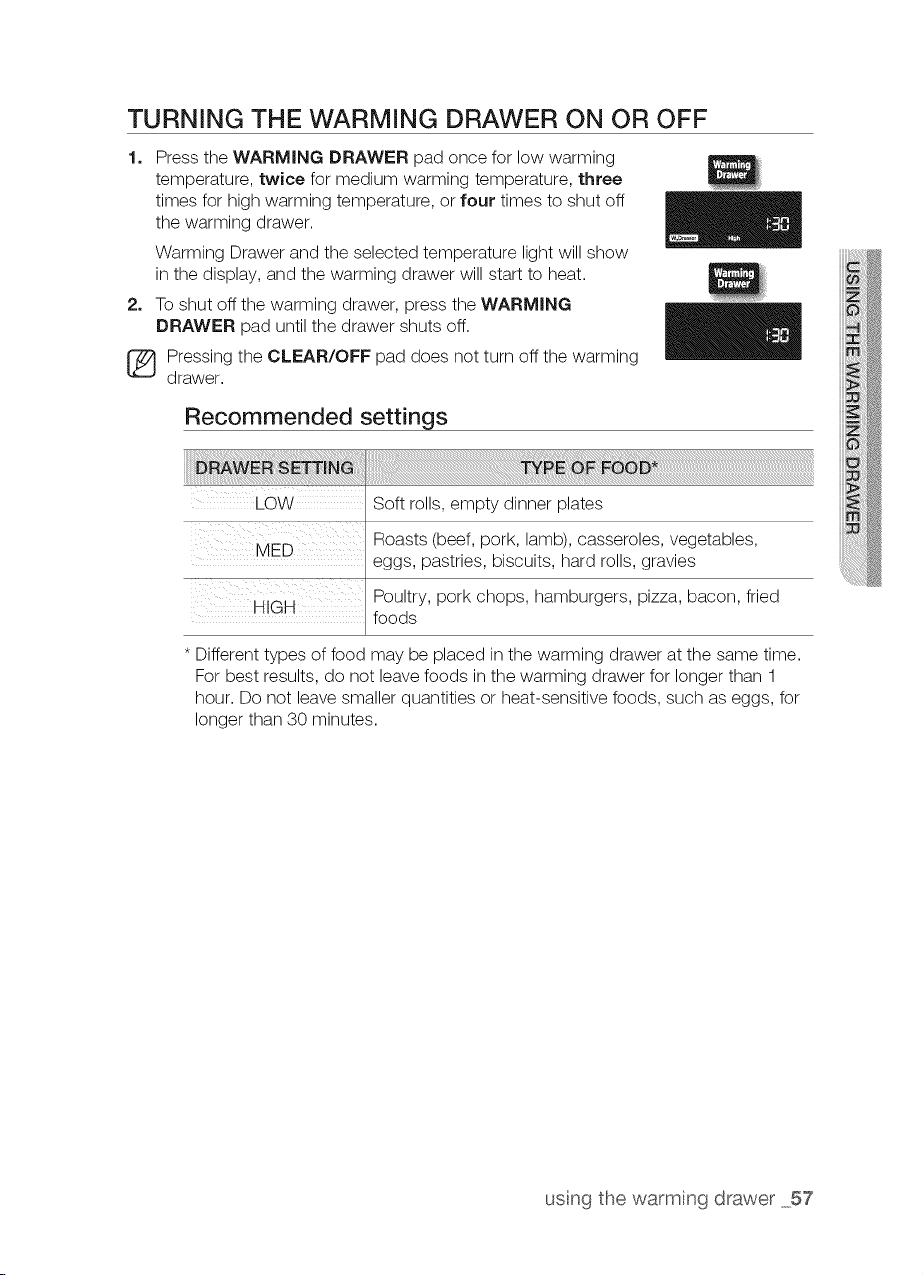
TURNING THE WARMING DRAWER ON OR OFF
1. Press the WARMING DRAWER pad once for low warming
temperature, twice for medium warming temperature, three
times for high warming temperature, or four times to shut off
the warming drawer.
Warming Drawer and the selected temperature light will show
in the display, and the warming drawer will start to heat.
2. To shut off the warming drawer, press the WARMING
DRAWER pad until the drawer shuts off.
[_ ressing the CLEAR/OFF pad does not turn off the warming
drawer.
Recommended settings
Soft rolls, empty dinner plates
Roasts (beef, pork, lamb), casseroles, vegetables,
eggs, pastries, biscuits, hard rolls, gravies
Poultry, pork chops, hamburgers, pizza, bacon, fried
HIGH foods
* Different types of food may be placed in the warming drawer at the same time.
For best results, do not leave foods in the warming drawer for longer than 1
hour. Do not leave smaller quantities or heat-sensitive foods, such as eggs, for
longer than 30 minutes.
usng the warming drawer 57
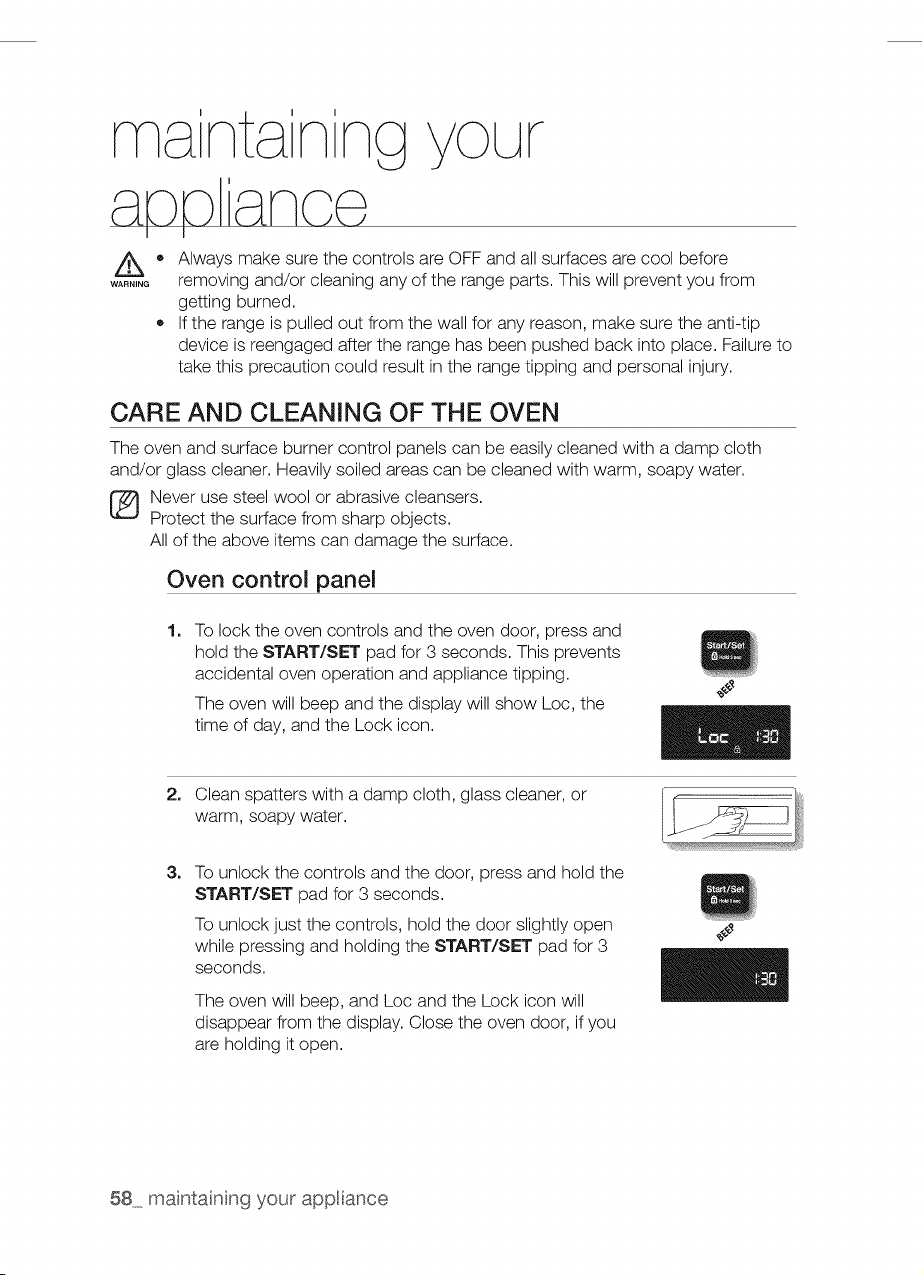
n ng
I I
WARNING
f
Always make sure the controls are OFF and all surfaces are cool before
removing and/or cleaning any of the range parts. This will prevent you from
getting burned.
If the range ispulled out from the wall for any reason, make sure the anti-tip
device isreengaged after the range has been pushed back into place. Failure to
take this precaution could result in the range tipping and personal injury.
CARE AND CLEANING OF THE OVEN
The oven and surface burner control panels can be easily cleaned with a damp cloth
and/or glass cleaner. Heavily soiled areas can be cleaned with warm, soapy water.
Never use steel wool or abrasive cleansers.
Protect the surface from sharp objects.
All of the above items can damage the surface.
Oven control panel
1=
To lock the oven controls and the oven door, press and
hold the START/SET pad for 3 seconds. This prevents
accidental oven operation and appliance tipping.
The oven will beep and the display will show Loc, the
time of day, and the Lock icon.
2. Clean spatters with a damp cloth, glass cleaner, or
warm, soapy water.
3=
To unlock the controls and the door, press and hold the
START/SET pad for 3 seconds.
To unlock just the controls, hold the door slightly open
while pressing and holding the START/SET pad for 3
seconds.
The oven will beep, and Loc and the Lock icon will
disappear from the display. Close the oven door, ifyou
are holding itopen.
58 maintaining your appiance
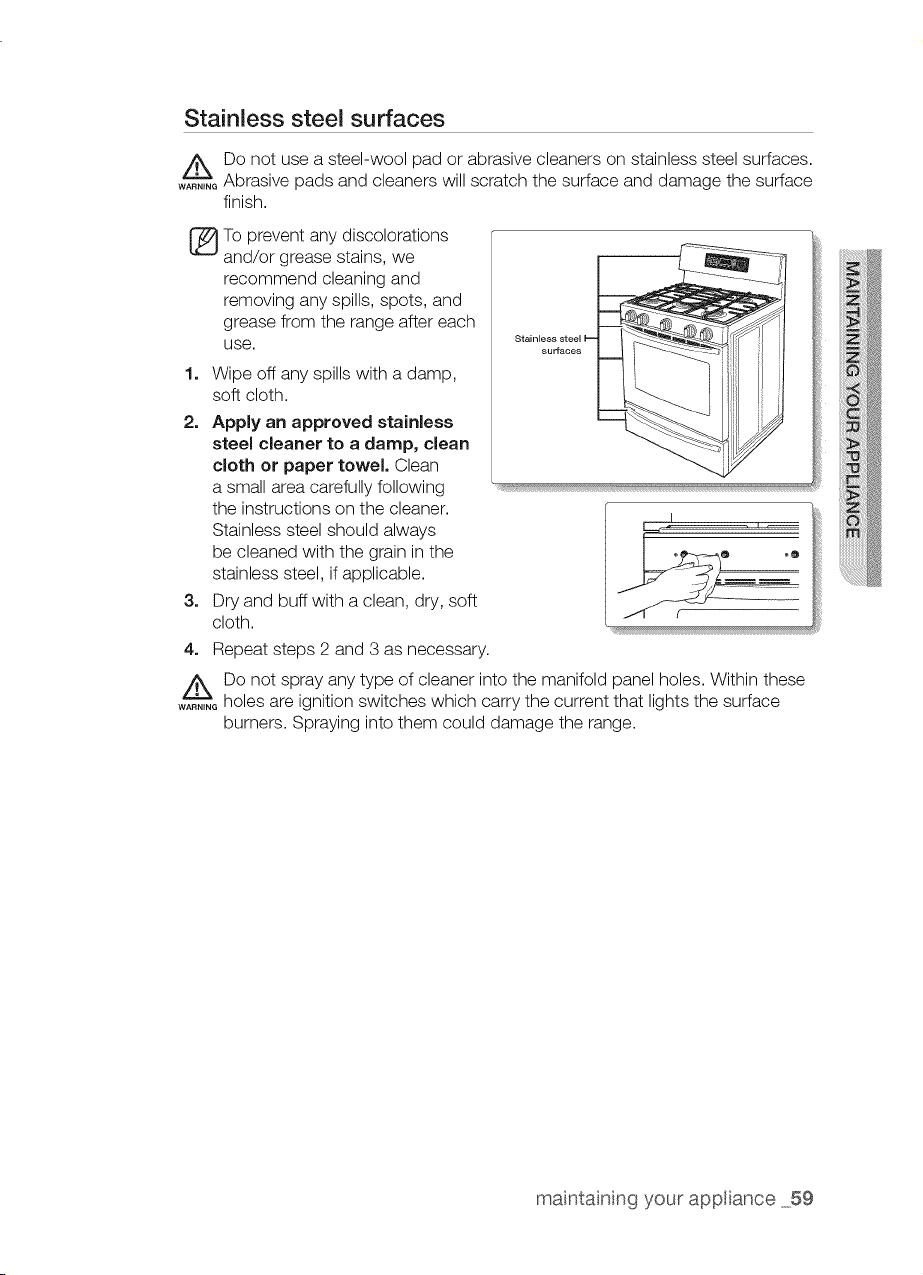
Stainless steel surfaces
_Do not use a steel-wool pad or abrasive cleaners on stainless steel surfaces.
....... Abrasive pads and cleaners will scratch the surface and damage the surface
finish.
To prevent any discolorations
and/or grease stains, we
recommend cleaning and
removing any spills, spots, and
grease from the range after each
use.
1. Wipe off any spills with a damp,
soft cloth.
2. Apply an approved stainless
steel cleaner to a damp, clean
cloth or paper towel. Clean
a small area carefully following
the instructions on the cleaner.
Stainless steel should always
be cleaned with the grain in the
stainless steel, ifapplicable.
3. Dry and buff with a clean, dry, soft
cloth.
Stainless steel_ -=
su#aces
4. Repeat steps 2 and 3 as necessary.
z_Do not spray any type of cleaner into the manifold panel holes. Within these
....... holes are ignition switches which carry the current that lights the surface
burners. Spraying into them could damage the range.
maintaining your appiance 59
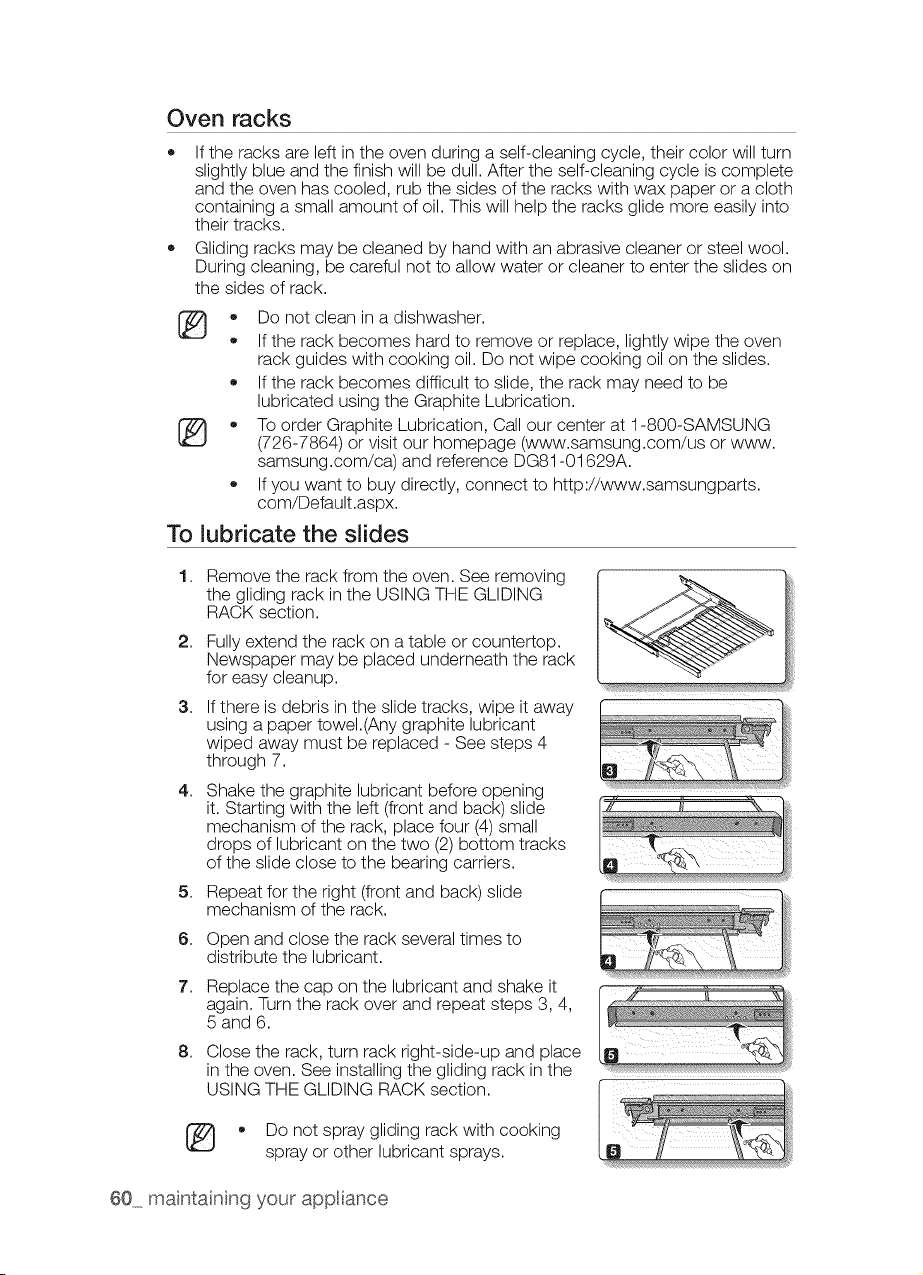
Oven racks
• If the racks are left in the oven during a self-cleaning cycle, their color will turn
slightly blue and the finish will be dull. After the self-cleaning cycle iscomplete
and the oven has cooled, rub the sides ofthe racks with wax paper or acloth
containing a small amount of oil. This will help the racks glide more easily into
their tracks.
Gliding racks may be cleaned by hand with an abrasive cleaner or steel wool.
During cleaning, be careful not to allow water or cleaner to enter the slides on
the sides of rack.
• Do not clean in a dishwasher.
If the rack becomes hard to remove or replace, lightly wipe the oven
rack guides with cooking oil. Do not wipe cooking oil on the slides.
If the rack becomes difficult to slide, the rack may need to be
lubricated using the Graphite Lubrication.
• To order Graphite Lubrication, Call our center at 1-800-SAMSUNG
(726-7864) or visit our homepage (www.samsung.com/us or www.
samsung.com/ca) and reference DG81-01629A.
If you want to buy directly, connect to http://www.samsungparts.
com/Default.aspx.
To lubricate the slides
1,
2,
3,
4,
5,
6.
7.
8,
Remove the rack from the oven. See removing
the gliding rack in the USING THE GLIDING
RACK section.
Fullyextend the rack on a table or countertop.
Newspaper may be placed underneath the rack
for easy cleanup.
If there is debris inthe slide tracks, wipe itaway
using a paper towel.(Any graphite lubricant
wiped away must be replaced -See steps 4
through 7.
Shake the graphite lubricant before opening
it. Starting with the left (front and back) slide
mechanism of the rack, place four (4)small
drops of lubricant on the two (2)bottom tracks
of the slide close to the bearing carriers.
Repeat for the right (front and back) slide
mechanism of the rack.
Open and close the rack several times to
distribute the lubricant.
Replace the cap on the lubricant and shake it
again. Turn the rack over and repeat steps 3, 4,
5 and 6.
Close the rack, turn rack right-side-up and place
in the oven. See installing the gliding rack in the
USING THE GLIDING RACK section.
• Do not spray gliding rack with cooking
spray or other lubricant sprays.
60 maintaining your appiance
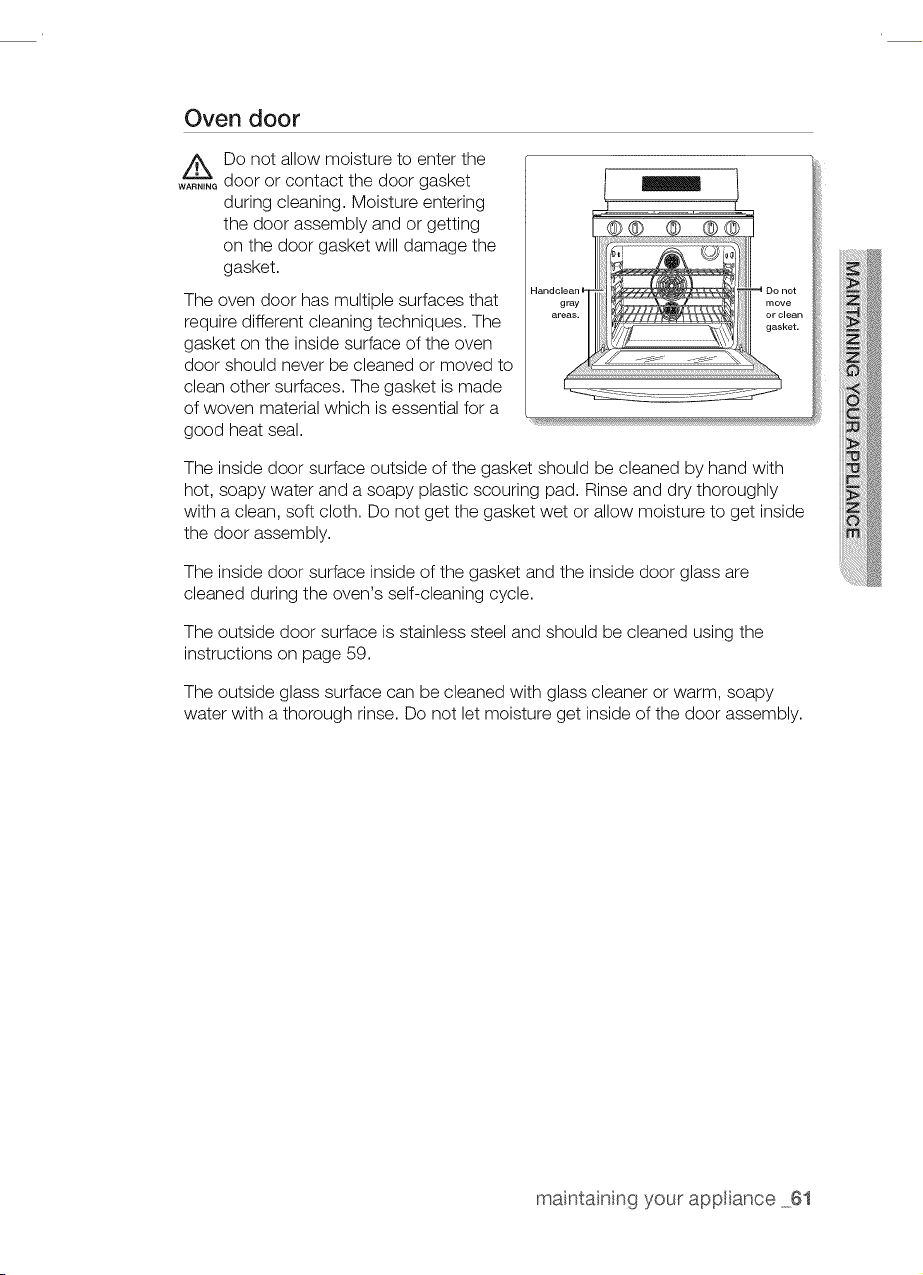
Oven door
z_Do not allow moisture to enter the
....... door or contact the door gasket
during cleaning. Moisture entering
the door assembly and or getting
on the door gasket will damage the
gasket.
The oven door has multiple surfaces that
require different cleaning techniques. The
gasket on the inside surface ofthe oven
door should never be cleaned or moved to
clean other surfaces. The gasket is made
of woven material which is essential for a
good heat seal.
Handclean
arge_
L
The inside door surface outside ofthe gasket should be cleaned by hand with
hot, soapy water and a soapy plastic scouring pad. Rinse and dry thoroughly
with a clean, soft cloth. Do not get the gasket wet or allow moisture to get inside
the door assembly.
The inside door surface inside ofthe gasket and the inside door glass are
cleaned during the oven's self-cleaning cycle.
The outside door surface isstainless steel and should be cleaned using the
instructions on page 59.
The outside glass surface can be cleaned with glass cleaner or warm, soapy
water with a thorough rinse. Do not let moisture get inside ofthe door assembly.
maintaining your appiance 61
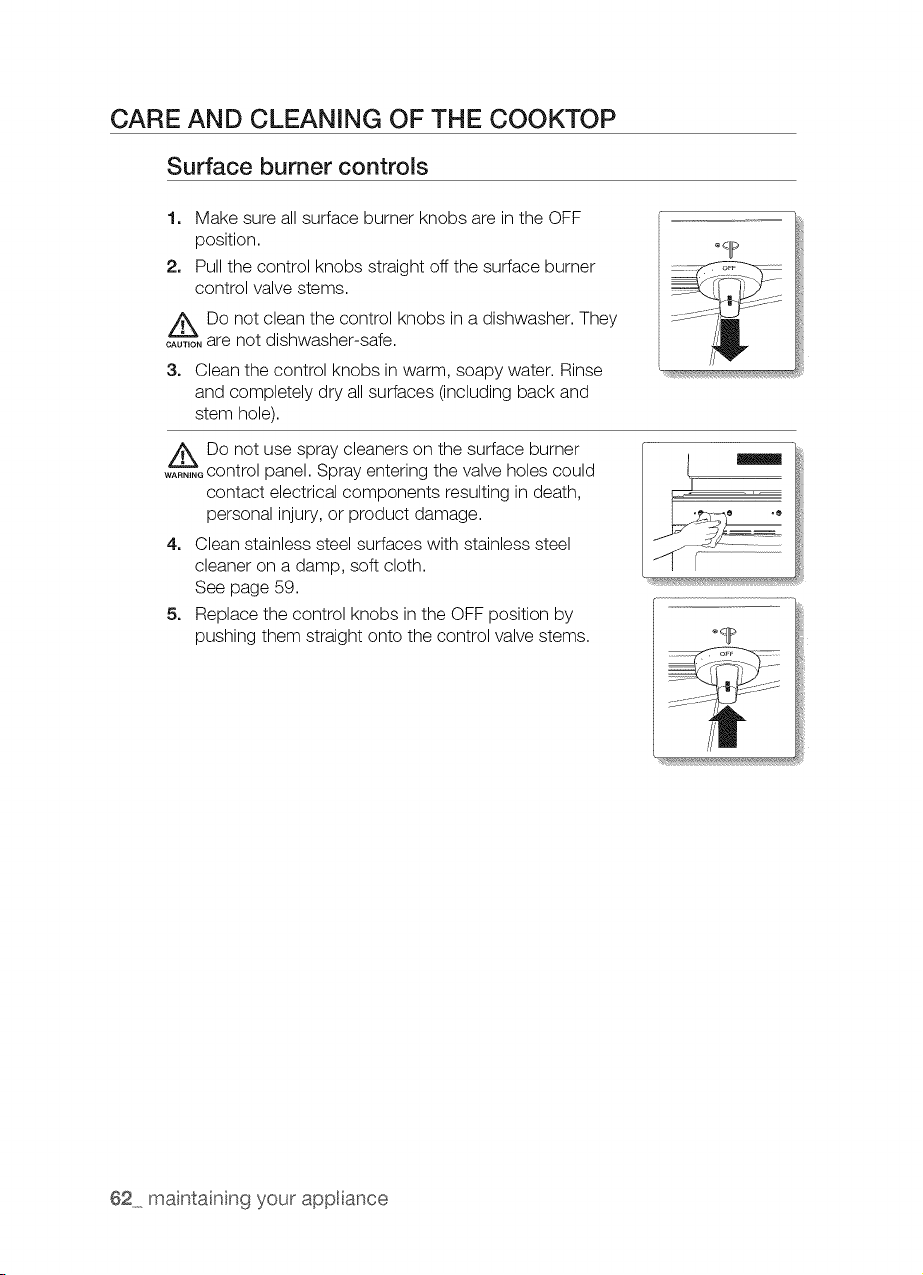
CARE AND CLEANING OF THE COOKTOP
Surface burner controls
1. Make sure all surface burner knobs are in the OFF
position.
2. Pull the control knobs straight offthe surface burner
control valve stems.
ADo not clean the control knobs in a dishwasher. They
....... are not dishwasher-safe.
3. Clean the control knobs in warm, soapy water. Rinse
and completely dry all surfaces (including back and
stem hole).
//_ Do not use spray cleaners on the surface burner
_%m%,,,control panel. Spray entering the valve holes could
contact electrical components resulting in death,
personal injury, or product damage.
4. Clean stainless steel surfaces with stainless steel
cleaner on a damp, soft cloth.
See page 59.
5. Replace the control knobs inthe OFF position by
pushing them straight onto the control valve stems.
62 maintaining your appiance
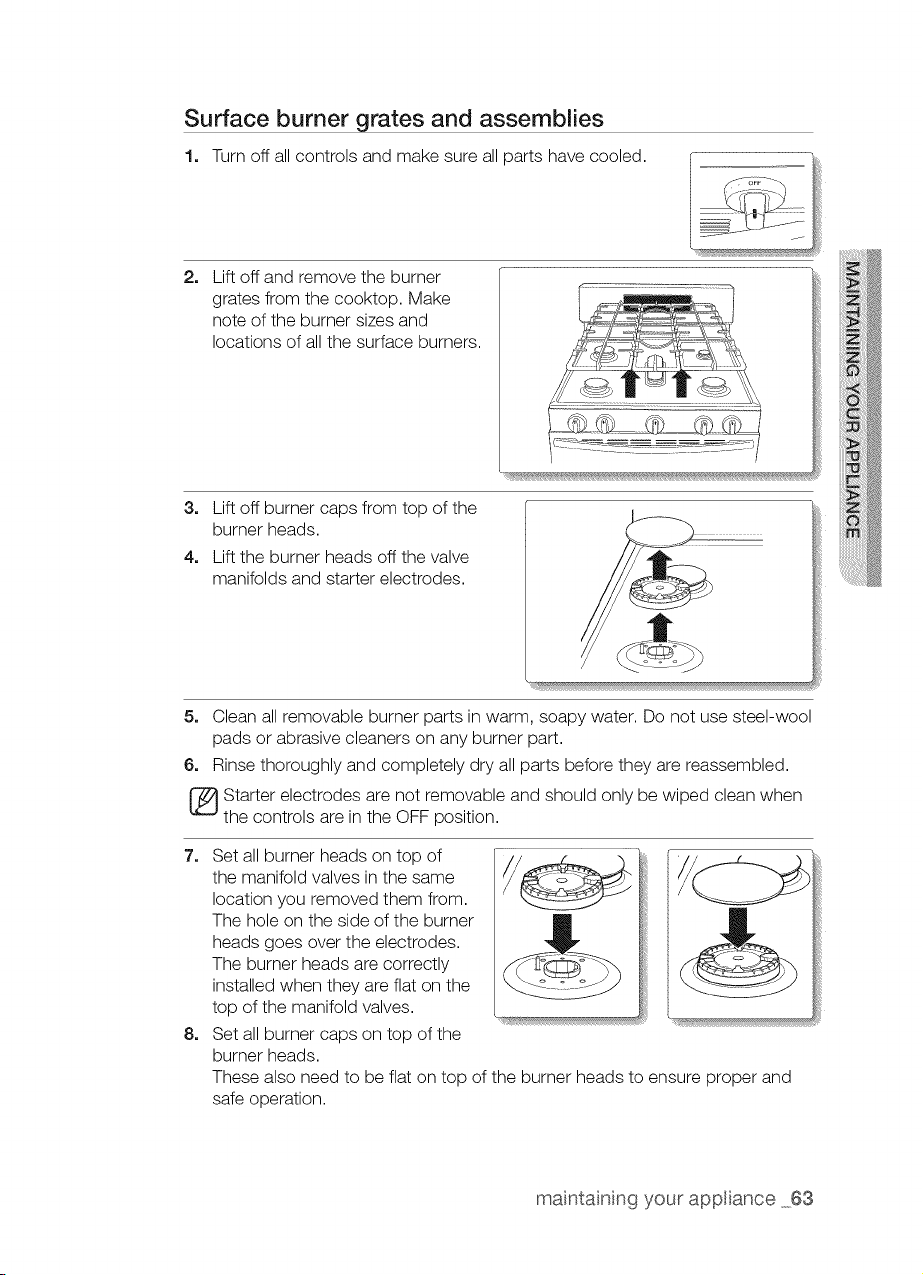
Surface burner grates and assemblies
1. Turn off allcontrols and make sure all parts have cooled.
2. Lift off and remove the burner
grates from the cooktop. Make
note of the burner sizes and
locations of allthe surface burners.
3. Lift off burner caps from top of the
burner heads.
4. Lift the burner heads off the valve
manifolds and starter electrodes.
5. Clean allremovable burner parts in warm, soapy water. Do not use steel-wool
pads or abrasive cleaners on any burner part.
6. Rinse thoroughly and completely dry all parts before they are reassembled.
[_ tarter electrodes are not removable and should only be wiped clean when
the controls are in the OFF position.
7. Set all burner heads on top of
the manifold valves in the same
location you removed them from.
The hole on the side of the burner
heads goes over the electrodes.
The burner heads are correctly
installed when they are flat on the
top of the manifold valves.
8. Set all burner caps on top of the
burner heads.
These also need to be flat on top ofthe burner heads to ensure proper and
safe operation.
maintaining your app[ance 63
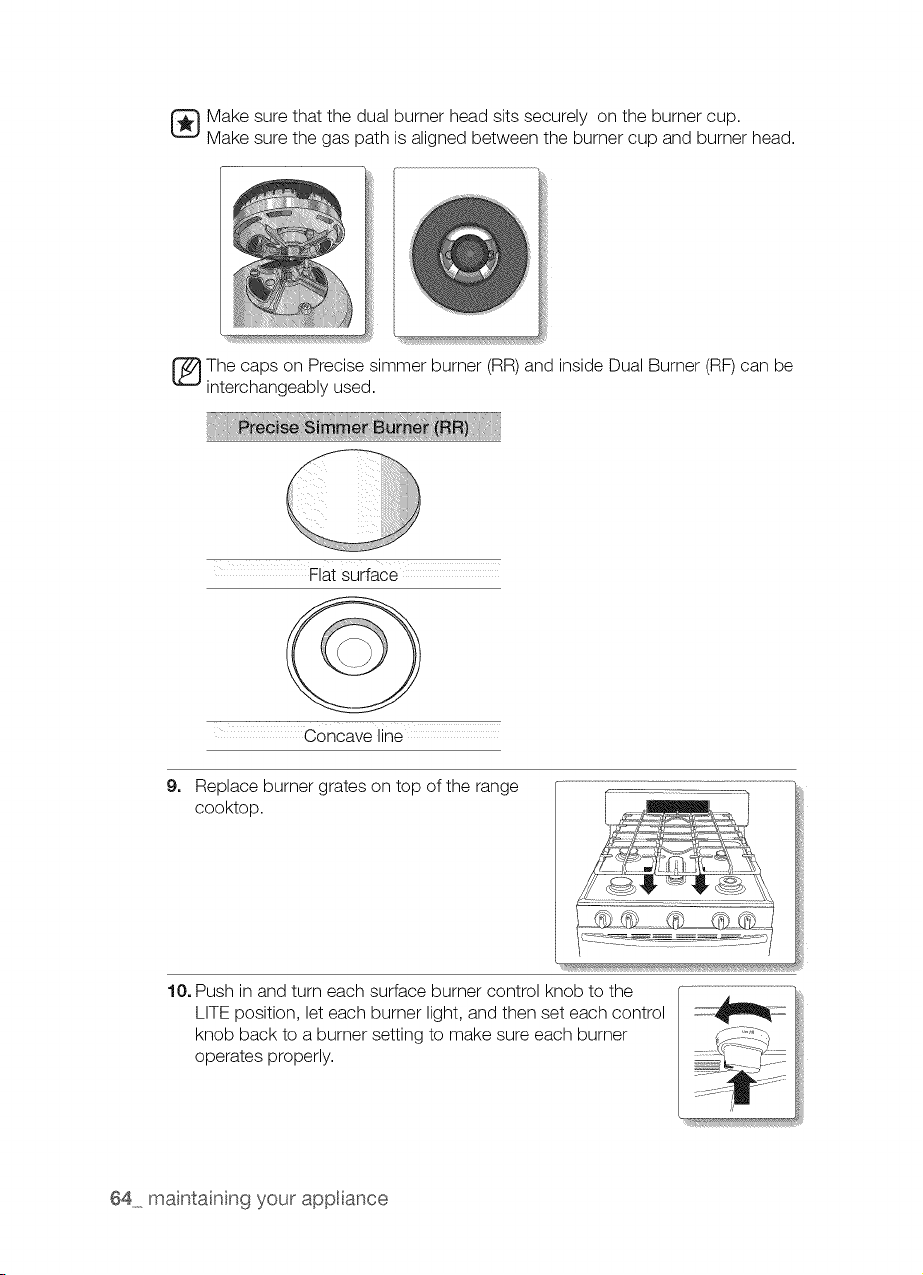
Make sure that the dual burner head sits securely on the burner cup.
Make sure the gas path isaligned between the burner cup and burner head.
iii
[_The caps on Precise simmer burner (RR)and inside Dual Burner (RF) can be
interchangeably used.
9,
Flat surface
Concave line
Replace burner grates on top ofthe range
cooktop.
10, Push in and turn each surface burner control knob to the
LITE position, let each burner light, and then set each control
knob back to a burner setting to make sure each burner
operates properly.
64 maintaining your appiance
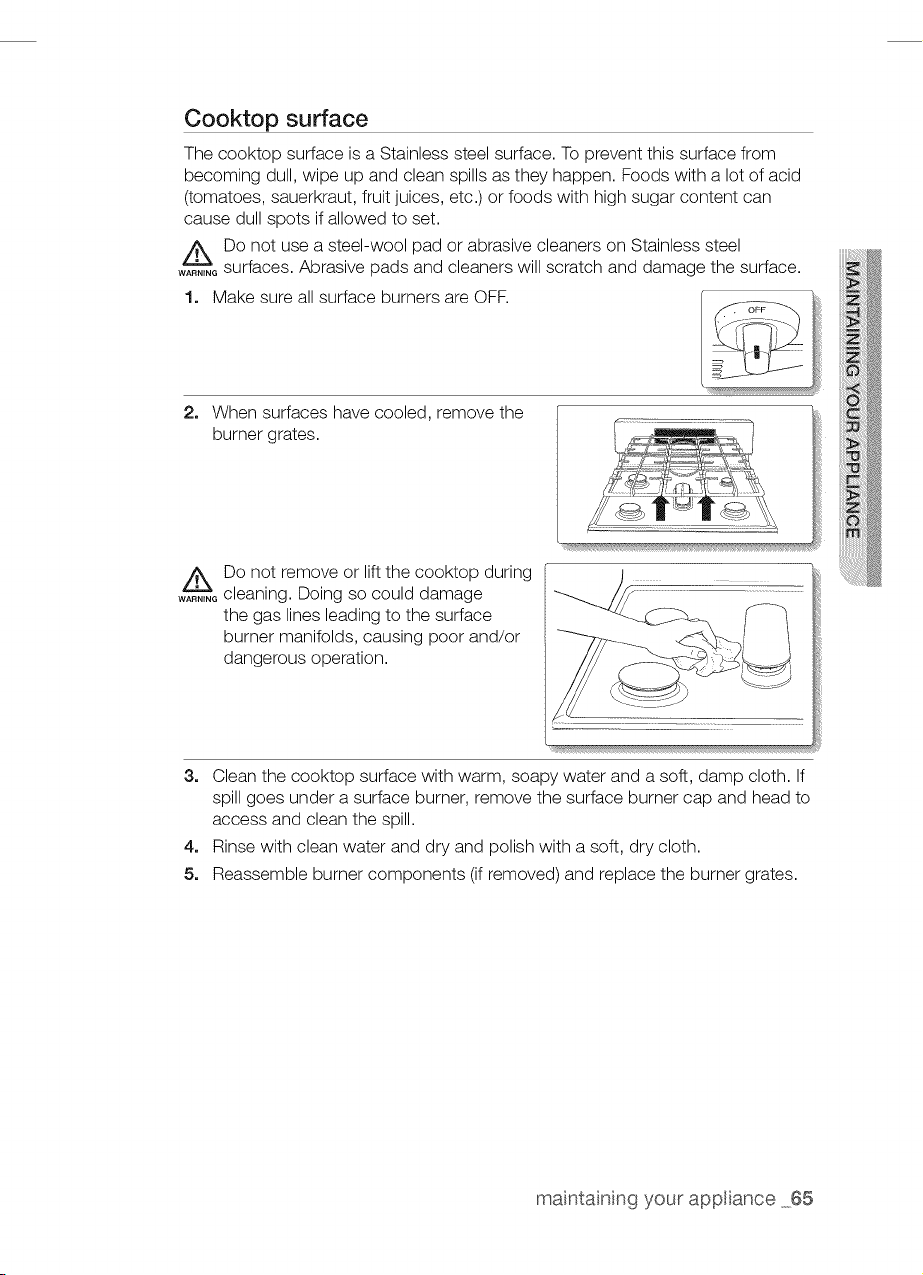
Cooktop surface
The cooktop surface isa Stainless steel surface. To prevent this surface from
becoming dull, wipe up and clean spills as they happen. Foods with a lot of acid
(tomatoes, sauerkraut, fruit juices, etc.) or foods with high sugar content can
cause dull spots if allowed to set.
z_Do not use a steel-wool pad or abrasive cleaners on Stainless steel
....... surfaces. Abrasive pads and cleaners will scratch and damage the surface.
1. Make sure all surface burners are OFR
2. When surfaces have cooled, remove the
burner grates.
ADo not remove or liftthe cooktop during
....... cleaning. Doing so could damage
the gas lines leading to the surface
burner manifolds, causing poor and/or
dangerous operation.
l
3. Clean the cooktop surface with warm, soapy water and a soft, damp cloth. If
spill goes under a surface burner, remove the surface burner cap and head to
access and clean the spill.
4. Rinse with clean water and dry and polish with a soft, dry cloth.
5. Reassemble burner components (ifremoved) and replace the burner grates.
maintaining your appiance 65
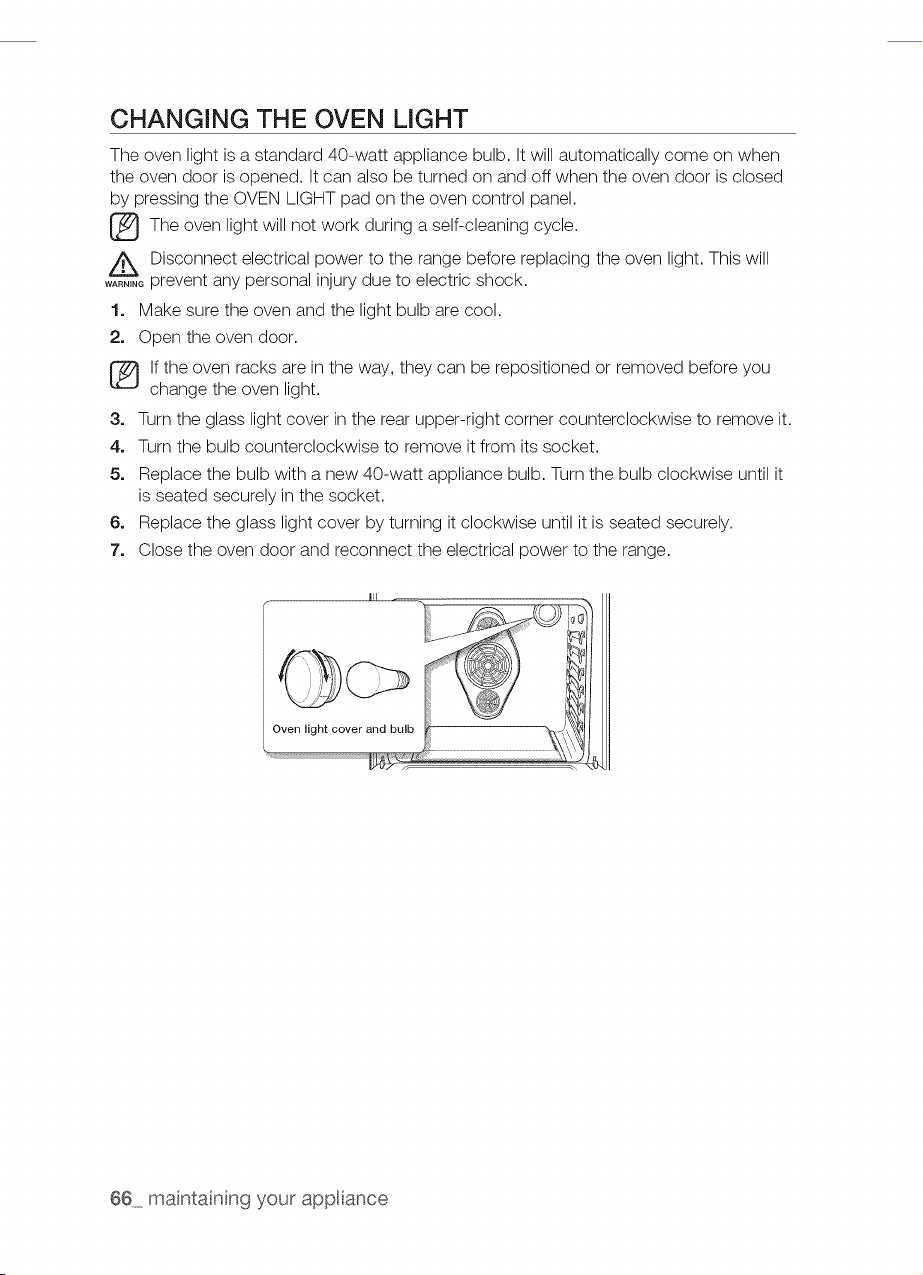
CHANGING THE OVEN LIGHT
The oven light isa standard 40-watt appliance bulb. It will automatically come on when
the oven door is opened. It can also be turned on and off when the oven door isclosed
by pressing the OVEN LIGHT pad on the oven control panel.
_The oven light will not work during a self-cleaning cycle.
Z_ Disconnect electrical power to the range before replacing the oven light. This will
....... prevent any personal injury due to electric shock.
1. Make sure the oven and the light bulb are cool.
2. Open the oven door.
If the oven racks are in the way, they can be repositioned or removed before you
change the oven light.
3. Turn the glass light cover in the rear upper-right corner counterclockwise to remove it.
4. Turn the bulb counterclockwise to remove it from its socket.
5. Replace the bulb with a new 40-watt appliance bulb. Turn the bulb clockwise until it
is seated securely in the socket.
6. Replace the glass light cover by turning itclockwise until it isseated securely.
7. Close the oven door and reconnect the electrical power to the range.
Oven light cover and bulb
66 maintainng your appliance
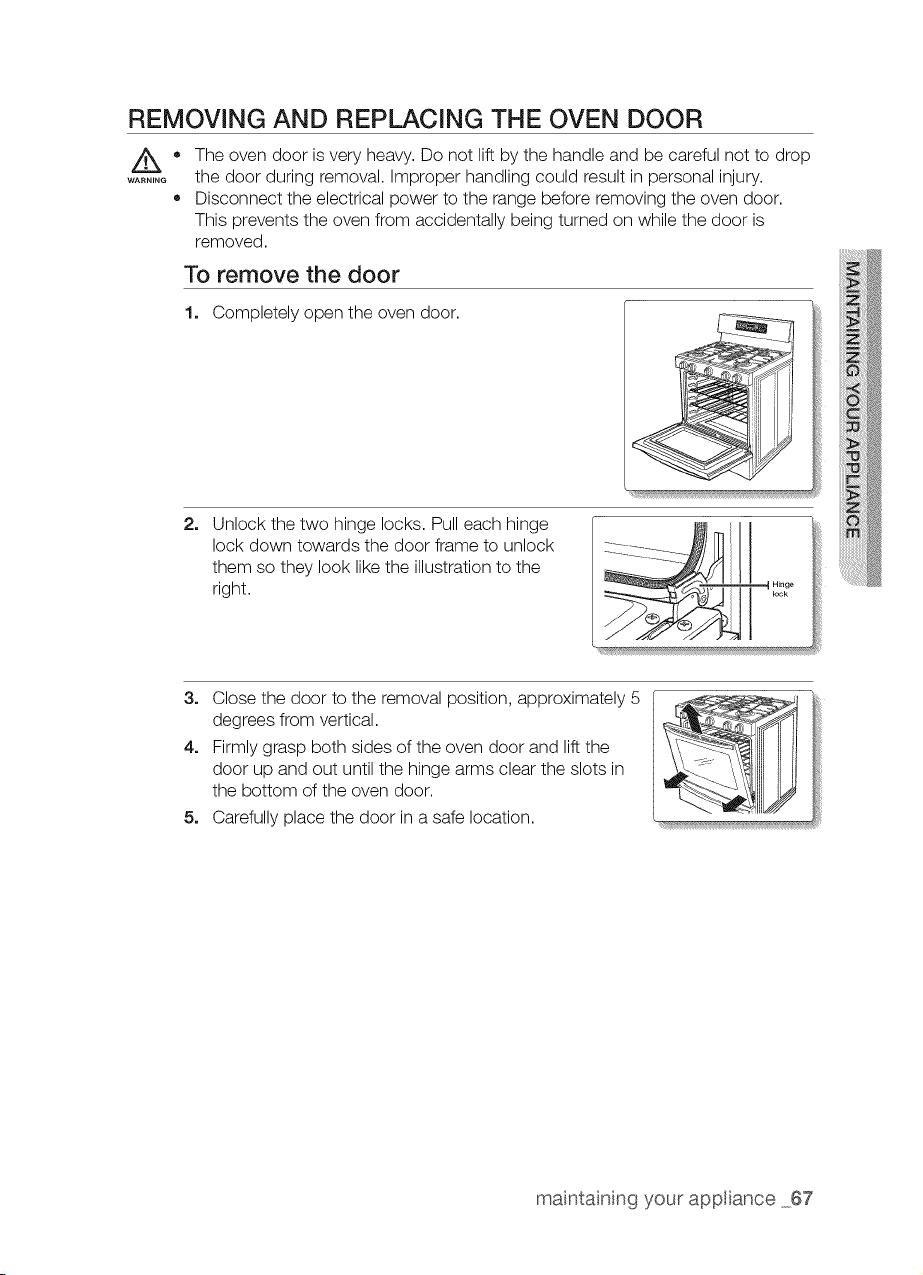
REMOVING AND REPLACING THE OVEN DOOR
/k
WARNING
®
®
The oven door isvery heavy. Do not lift by the handle and be careful not to drop
the door during removal. Improper handling could result in personal injury.
Disconnect the electrical power to the range before removing the oven door.
This prevents the oven from accidentally being turned on while the door is
removed.
To remove the door
1. Completely open the oven door.
2.
Unlock the two hinge locks. Pulleach hinge
lock down towards the door frame to unlock
them so they look likethe illustration to the
right.
3. Close the door to the removal position, approximately 5
degrees from vertical.
4. Firmly grasp both sides of the oven door and liftthe
door up and out until the hinge arms clear the slots in
the bottom of the oven door.
5. Carefully place the door in a safe location.
maintaining your appiance 67
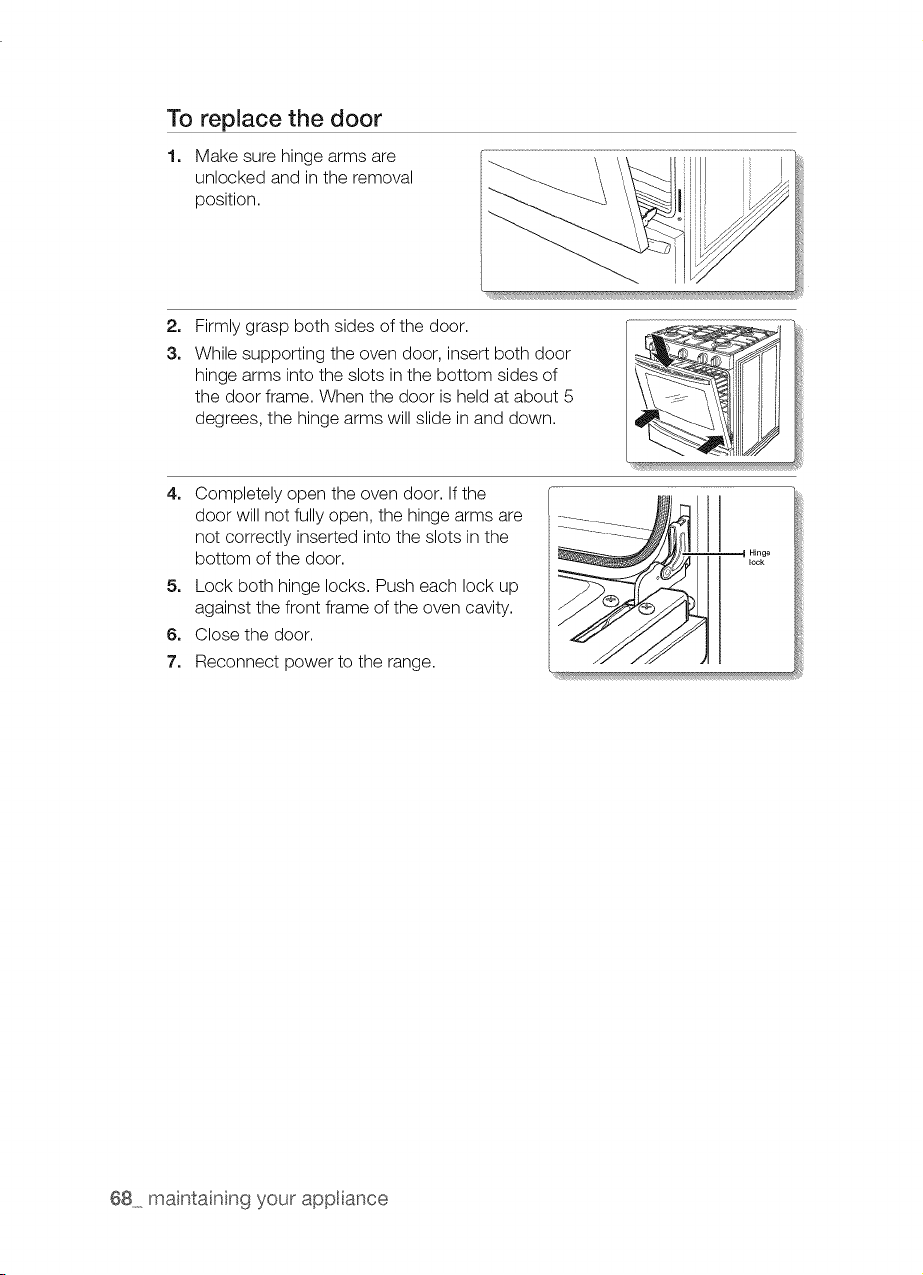
To replace the door
1. Make sure hinge arms are
unlocked and in the removal
position.
2.
3.
Firmly grasp both sides ofthe door.
While supporting the oven door, insert both door
hinge arms into the slots in the bottom sides of
the door frame. When the door isheld at about 5
degrees, the hinge arms will slide in and down.
4. Completely open the oven door. If the
door will not fully open, the hinge arms are
not correctly inserted into the slots in the
bottom ofthe door.
5. Lock both hinge locks. Push each lock up
against the front frame ofthe oven cavity.
6. Close the door.
7. Reconnect power to the range.
Hinge
lock
68 maintaining your appiance
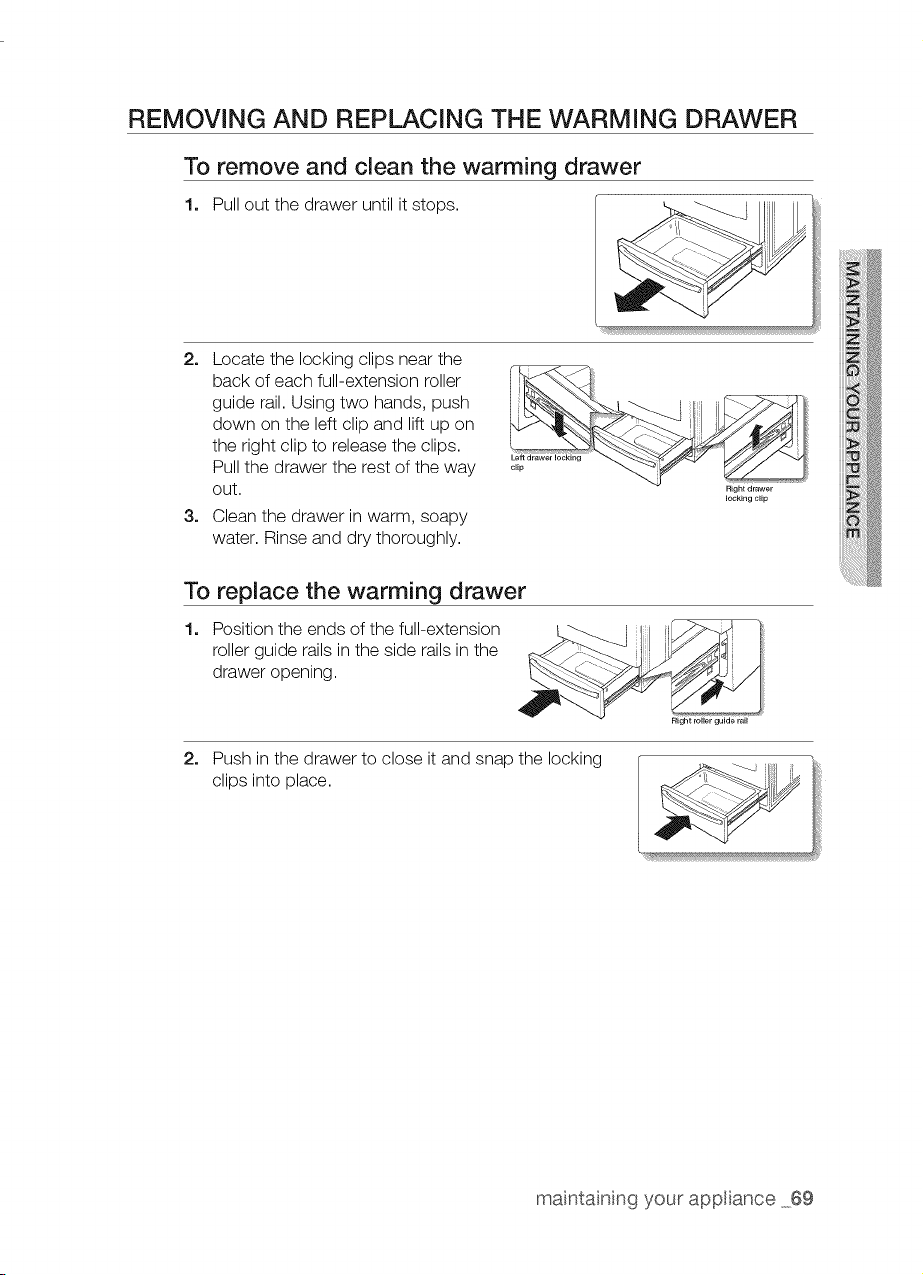
REMOVING AND REPLACING THE WARMING DRAWER
To remove and clean the warming drawer
1. Pull out the drawer until it stops.
2. Locate the locking clips near the
back of each full-extension roller
guide rail.Using two hands, push
down on the left clip and lift up on
the right clip to release the clips.
Pull the drawer the rest of the way
out.
3. Clean the drawer in warm, soapy
water. Rinse and dry thoroughly.
locking clip
To replace the warming drawer
1. Position the ends ofthe full-extension
roller guide rails in the side rails in the
drawer opening.
2. Push in the drawer to close itand snap the locking
clips into place.
maintaining your appiance 69
SELF-CLEANING OVEN
The self-cleaning oven uses high temperatures (well above cooking temperatures) to
burn off left over grease and residue completely or reduce them to a finely powdered ash
that can be wiped away with a damp cloth.
Z_ Failure to follow these precautions could result in damage to the oven, fire, and/or
....... personal injury.
,, Do not leave small children unattended near the range during a self-cleaning
cycle. The outside surfaces of the range can get extremely hot.
,, Some birds are extremely sensitive to fumes from a self-cleaning oven. Relocate
birds to a well-ventilated room away from the range.
,, Do not line the oven, oven racks, or oven bottom with aluminum foil. Doing so
will result in poor heat distribution, produce poor baking results, and cause
permanent damage to the oven interior. The aluminum foil will melt onto and
adhere to the interior oven surfaces.
,, Do not force the oven door open during the self cleaning cycle. Itwill damage
the automatic door-locking system. The door automatically locks when the self-
cleaning cycle isstarted and stays locked until the cycle iscancelled and the
oven temperature is below 350 °F.
,, Be careful opening the oven door after a self-cleaning cycle. The oven will still
be VERY HOT and hot air and steam might escape when the door isopened.
70 maintainng your appliance
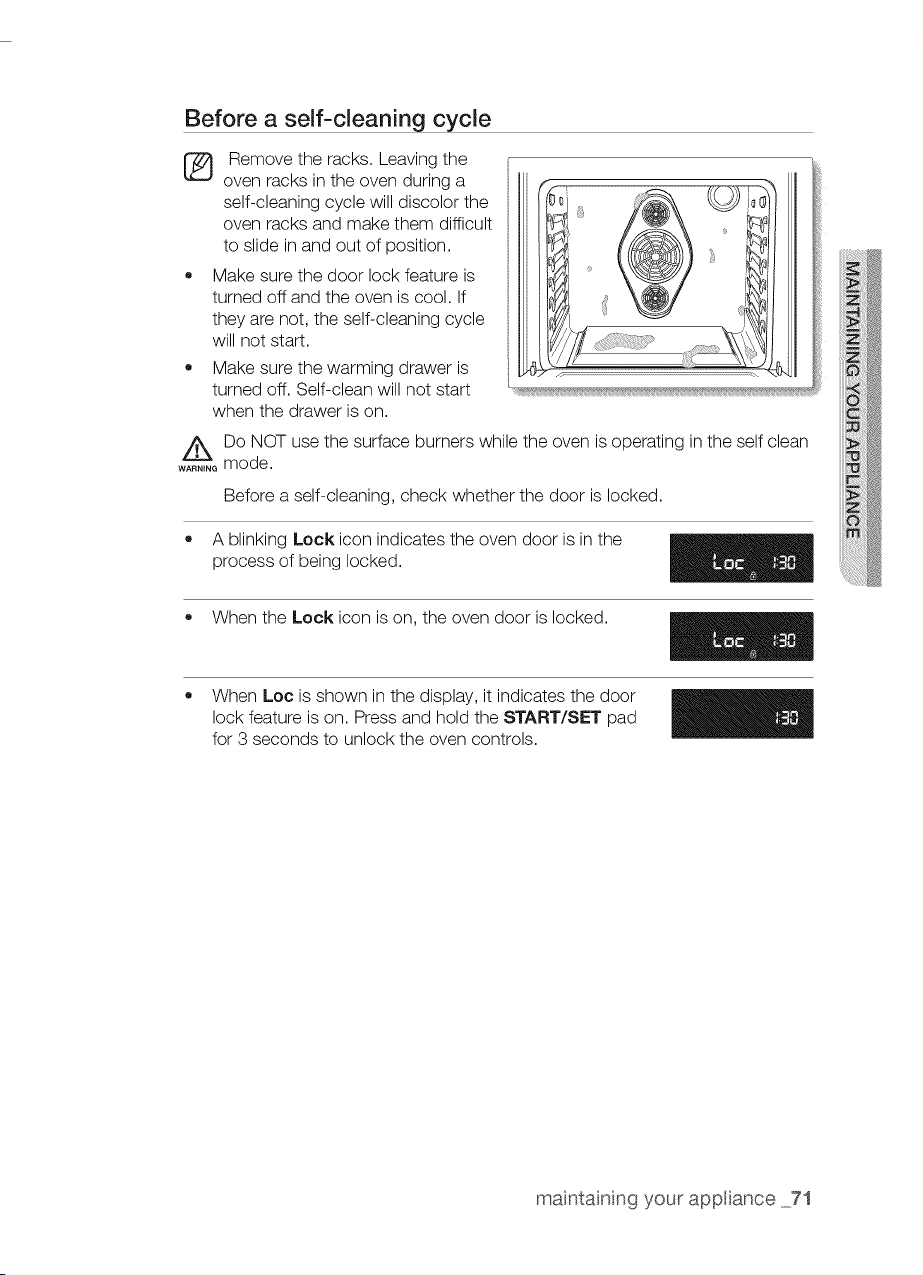
Before a self=cleaning cycle
[_ Remove the racks. Leaving the
oven racks in the oven during a
self-cleaning cycle will discolor the
oven racks and make them difficult
to slide in and out of position.
• Make sure the door lock feature is
turned off and the oven is cool. If
they are not, the self-cleaning cycle
will not start.
Make sure the warming drawer is
turned off. Self-clean will not start
when the drawer is on.
_Do NOT use the surface burners while the oven is operating inthe self clean
wAR.,NGmode.
Before a self-cleaning, check whether the door islocked.
A blinking Lock icon indicates the oven door is inthe
process of being locked.
When the Lock icon ison, the oven door islocked.
When Loo is shown in the display, it indicates the door
lock feature is on. Press and hold the START/SET pad
for 3 seconds to unlock the oven controls.
maintaining your appiance 71
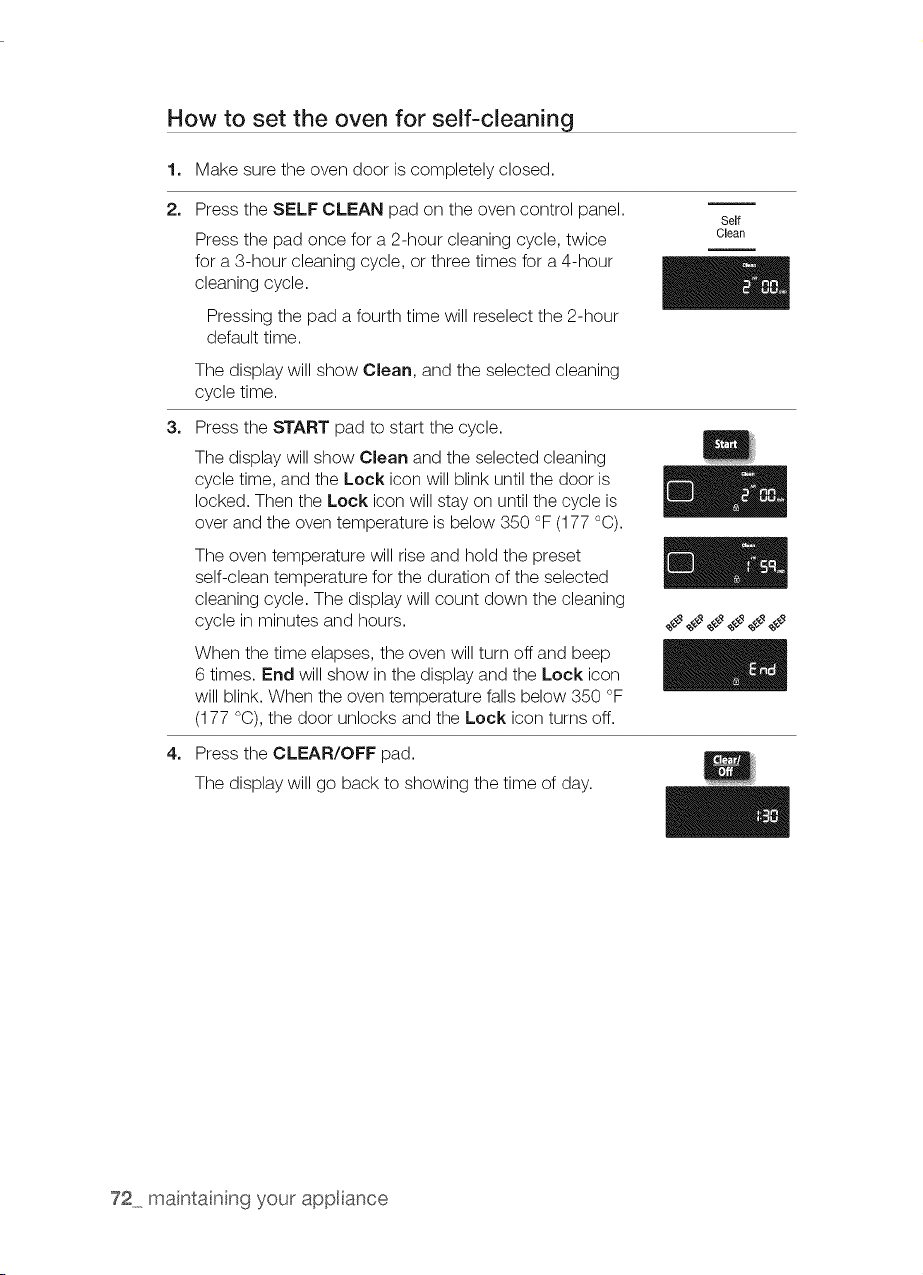
How to set the oven for self-cleaning
1. Make sure the oven door iscompletely closed.
2.
3_
4_
Press the SELF CLEAN pad on the oven control panel.
Press the pad once for a 2-hour cleaning cycle, twice
for a 3-hour cleaning cycle, or three times for a 4-hour
cleaning cycle.
Pressing the pad a fourth time will reselect the 2-hour
default time.
The display will show Clean, and the selected cleaning
cycle time.
Press the START pad tostart the cycle.
The display willshow Clean and the selected cleaning
cycle time, and the Lock icon will blink untilthe door is
locked. Then the Lock icon will stay on untilthe cycle is
over and the oven temperature is below 350 °F (177 °C).
The oven temperature will rise and hold the preset
self-clean temperature for the duration of the selected
cleaning cycle. The display will count down the cleaning
cycle in minutes and hours.
When the time elapses, the oven will turn offand beep
6 times. End will show in the display and the Lock icon
will blink. When the oven temperature falls below 350 °F
(177 °C), the door unlocks and the Lock icon turns off.
Self
Clean
Press the CLEAR/OFF pad.
The display will go back to showing the time of day.
72 maintainng your appliance
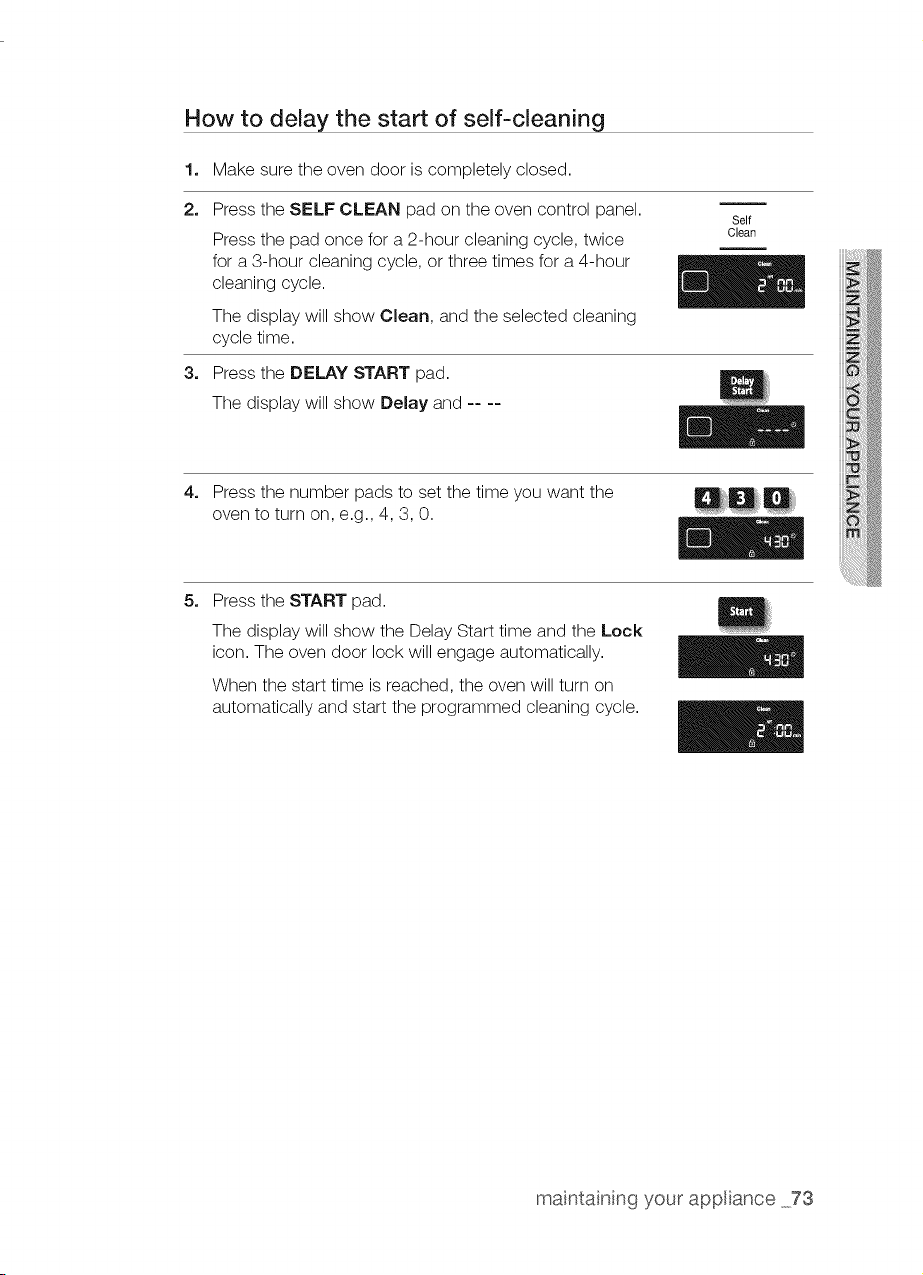
How to delay the start of self-cleaning
1. Make sure the oven door is completely closed.
2.
3_
Press the SELF CLEAN pad on the oven control panel.
Press the pad once for a 2-hour cleaning cycle, twice
for a 3-hour cleaning cycle, or three times for a 4-hour
cleaning cycle.
The display will show Clean, and the selected cleaning
cycle time.
Self
Clean
Press the DELAY START pad.
The display will show Delay and ....
4. Press the number pads to set the time you want the
oven to turn on, e.g., 4, 3, 0.
5_
Press the START pad.
The display will show the Delay Start time and the Lock
icon. The oven door lock will engage automatically.
When the start time is reached, the oven will turn on
automatically and start the programmed cleaning cycle.
maintainng your appliance 73
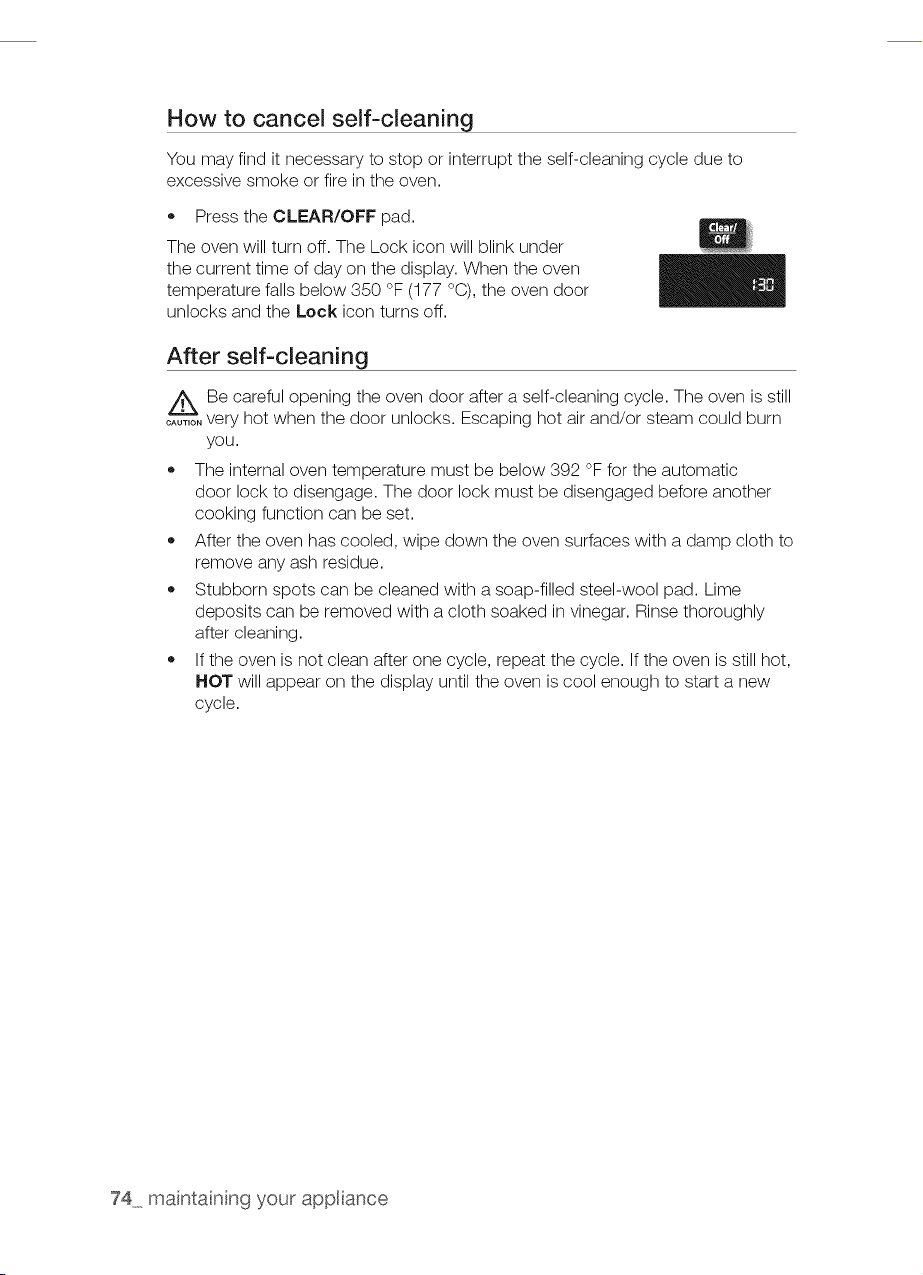
How to cancel self-cleaning
You may find it necessary to stop or interrupt the self-cleaning cycle due to
excessive smoke or fire in the oven.
• Press the CLEAR/OFF pad.
The oven will turn off. The Lock icon will blink under
the current time of day on the display. When the oven
temperature falls below 350 °F (177 °C),the oven door
unlocks and the Lock icon turns off.
After self-cleaning
A Be careful opening the oven door after a self-cleaning cycle. The oven isstill
oAo_T,overy hot when the door unlocks. Escaping hot air and/or steam could burn
you.
• The internal oven temperature must be below 392 °Ffor the automatic
door lock to disengage. The door lock must be disengaged before another
cooking function can be set.
• After the oven has cooled, wipe down the oven surfaces with a damp cloth to
remove any ash residue.
• Stubborn spots can be cleaned with a soap-filled steel-wool pad. Lime
deposits can be removed with a cloth soaked in vinegar. Rinse thoroughly
after cleaning.
• If the oven is not clean after one cycle, repeat the cycle. If the oven is still hot,
HOT will appear on the display until the oven iscool enough to start a new
cycle.
74 maintainng your appliance

TROUBLESHOOTING
Samsung works hard to ensure that you don't have problems with your new gas range.
If you experience a problem, look first for a solution in the table below. If,after trying the
suggested solution, you're stillhaving trouble, call Samsung at 1-800-SAMSUNG (1-
800-726-7864).
You smell gas.
The range is not level.
The oven control beeps
and displays an error
cocle.
There isagas leak.
The surface burner knob is not in
the 'off' position, yet the burner
itself is not ignited.
The appliance has been installed
improperly.
The leveling leg(s)is (are)
damaged or uneven.
The kitchen cabinets are not
properly aligned and make the
range appear to be not level.
You have afunction error code.
See the "Troubleshooting and
information codes" chart on
page 80.
Clear the room, building, or area
of alloccupants.
Immediately call your gas
supplier from a neighbor's
shone. Do not call from your
shone. Itis electrical and
could cause a spark that could
ignite the gas. Follow the gas
supplier's instructions.
If you cannot reach your gas
supplier, call the fire department.
Make sure the floor is level,
strong, and stable. Ifthe floor
sags or slopes, contact a
carpenter.
Check and level the range. (See
the Installation Instructions.)
Ensure that cabinets are square
and provide sufficient room for
installation.
All burners do not light.
Press the CLEAR/OFF pad and
restart the oven. Ifthe problem
9ersists, disconnect all power to
the range for at least 30 seconds
and then reconnect the power. If
this does not solve the problem,
call for service.
The power cord isnot plugged Make sure the electrical plug
into the electrical outlet, isplugged into a live, properly
grounded outlet.
A fuse inyour home may be Replace the fuse or reset the
blown or the circuit breaker circuit breaker.
tripped.
The gas supply is not properly See the Installation Instructions
connected or turned on. that came with your range.
troub eshooting 75
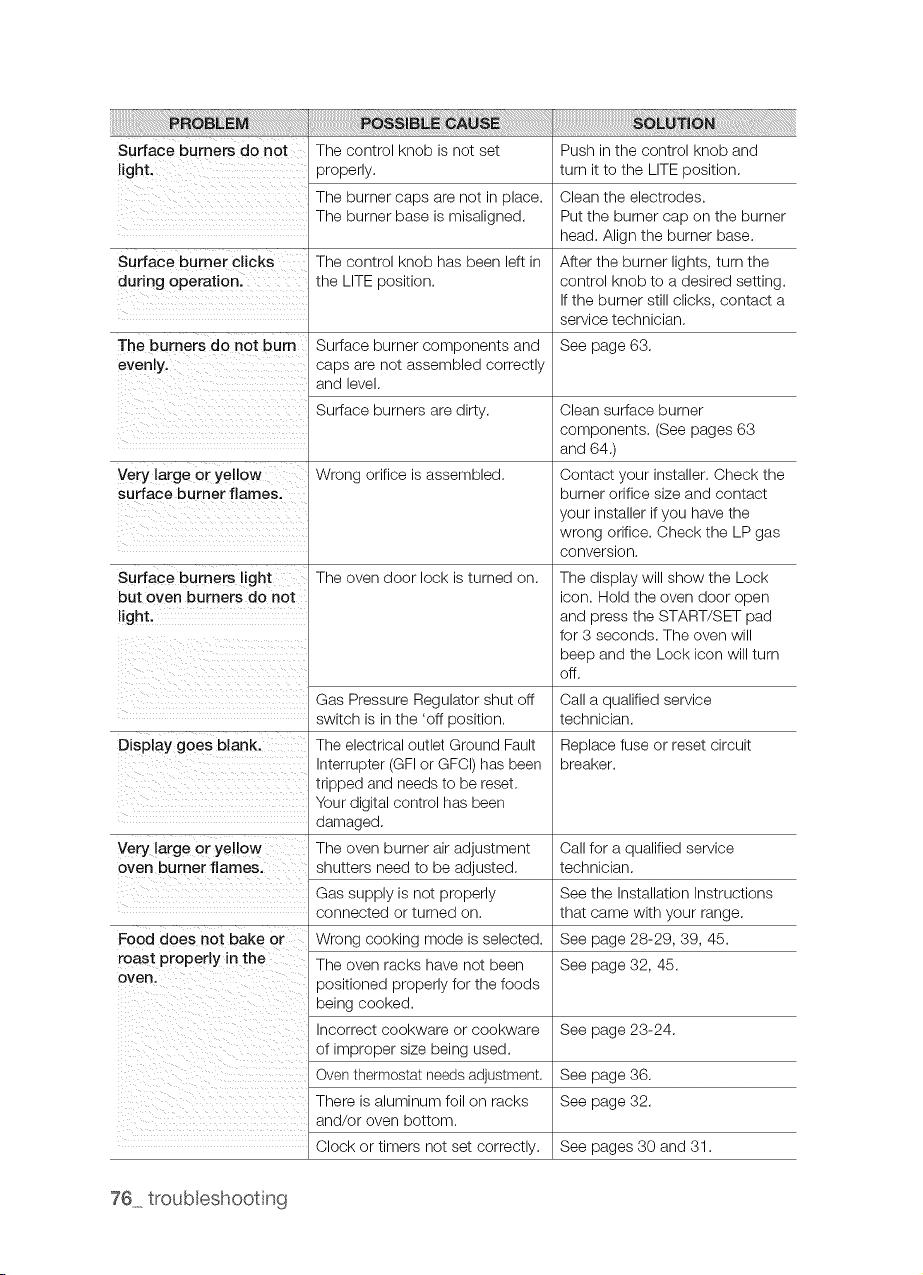
Surface burners do not
light.
Surface burner clicks
during operation.
The burners do not burn
evenly.
Very large or yellow
surface burner flames.
Surface burners light
but oven burners do not
light.
Display goes blank.
Very large or yellow
oven burner flames.
Food does not bake or
roast properly in the
oven.
The control knob isnot set
properly.
The burner caps are not in place.
The burner base ismisaligned.
The control knob has been left in
the LITE position.
Surface burner components and
caps are not assembled correctly
and level.
Surface burners are dirty.
Wrong orifice is assembled.
The oven door lock is turned on.
Gas Pressure Regulator shut off
switch is in the 'off position.
The electrical outlet Ground Fault
Interrupter (GFIor GFCI)has been
tripped and needs to be reset.
Your digital control has been
damaged.
The oven burner air adjustment
shutters need to be adjusted.
Gas supply isnot properly
connected orturned on.
Wrong cooking mode isselected.
The oven racks have not been
positioned properly for the foods
being cooked.
Incorrect cookware or cookware
of improper size being used.
Oven thermostat needsadjustment,
There isaluminum foil on racks
and/or oven bottom.
Clock or timers not set correctly.
Push in the control knob and
turn it to the LITE position.
Clean the electrodes.
Put the burner cap on the burner
head. Align the burner base.
After the burner lights, turn the
control knob to a desired setting.
If the burner still clicks, contact a
service technician.
See page 63.
Clean surface burner
components. (Seepages 63
and 64.)
Contact your installer. Check the
burner orifice size and contact
your installer if you have the
wrong orifice. Check the LP gas
conversion.
The display will show the Lock
icon. Hold the oven door open
and press the START/SET pad
for 3 seconds. The oven will
beep and the Lock icon will turn
off.
Calla qualified service
technician.
Replace fuse or reset circuit
breaker.
Callfor aqualified service
technician.
See the Installation Instructions
that came with your range.
See page 28-29, 39, 45.
See page 32, 45.
See page 23-24.
See page 36.
See page 32.
See pages 30 and 31.
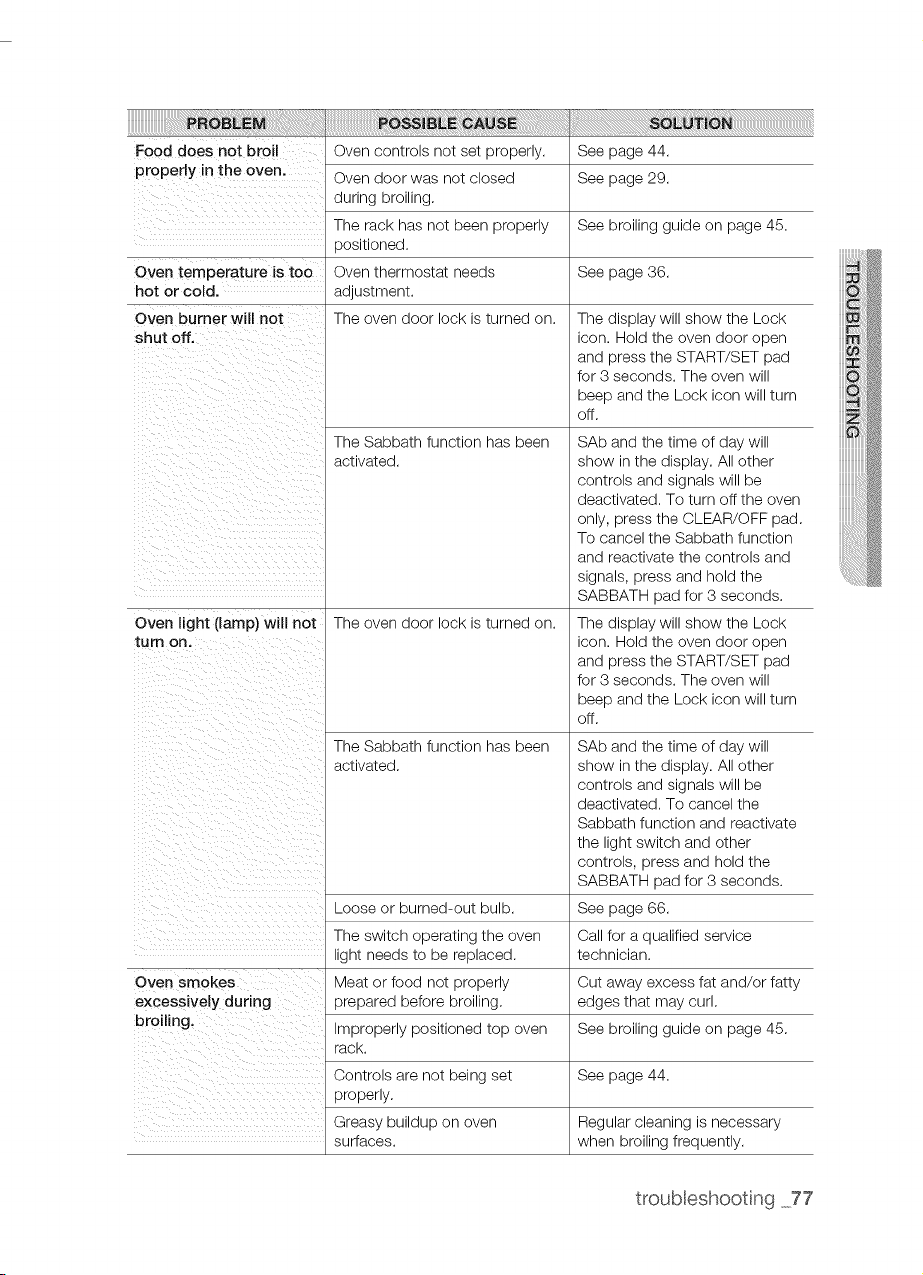
Fooddoesnotbroil Ovencontrolsnotsetproperly.Seepage44.
properlyintheoven, Ovendoorwasnotclosed Seepage29.
duringbroiling.
TherackhasnotbeenproperlySeebroilingguideonpage45.
positioned.
Oventemperatureistoo Oventhermostatneeds Seepage36.
hotorcold. adjustment.
Theovendoorlockisturnedon.Ovenburnerwillnot
shutoff.
Ovenlight(lamp)willnot
turnon.
Ovensmokes
excessively during
broiling.
The Sabbath function has been
activated.
The oven door lock isturned on.
The Sabbath function has been
activated.
The display will show the Lock
icon. Hold the oven door open
and press the START/SET pad
for 3seconds. The oven will
beep and the Lock icon will turn
off.
SAb and the time of day will
show in the display. All other
controls and signals will be
deactivated. To turn offthe oven
only, press the CLEAR/OFF pad.
To cancel the Sabbath function
and reactivate the controls and
signals, press and hold the
SABBATH pad for 3 seconds.
The display will show the Lock
icon. Hold the oven door open
and press the START/SET pad
for 3seconds. The oven will
beep and the Lock icon will turn
off.
SAb and the time of day will
show in the display. All other
controls and signals will be
deactivated. To cancel the
Sabbath function and reactivate
the light switch and other
controls, press and hold the
SABBATH pad for 3 seconds.
See page 66.
Call for a qualified service
technician.
Loose or burned-out bulb.
The switch operating the oven
light needs to be replaced.
Meat or food not properly Cut away excess fat and/or fatty
prepared before broiling, edges that may curl.
Improperly positioned top oven See broiling guide on page 45.
rack.
See page 44.Controls are not being set
properly.
Greasy buildup on oven
surfaces.
Regular cleaning isnecessary
when broiling frequently.
troubleshooting 77
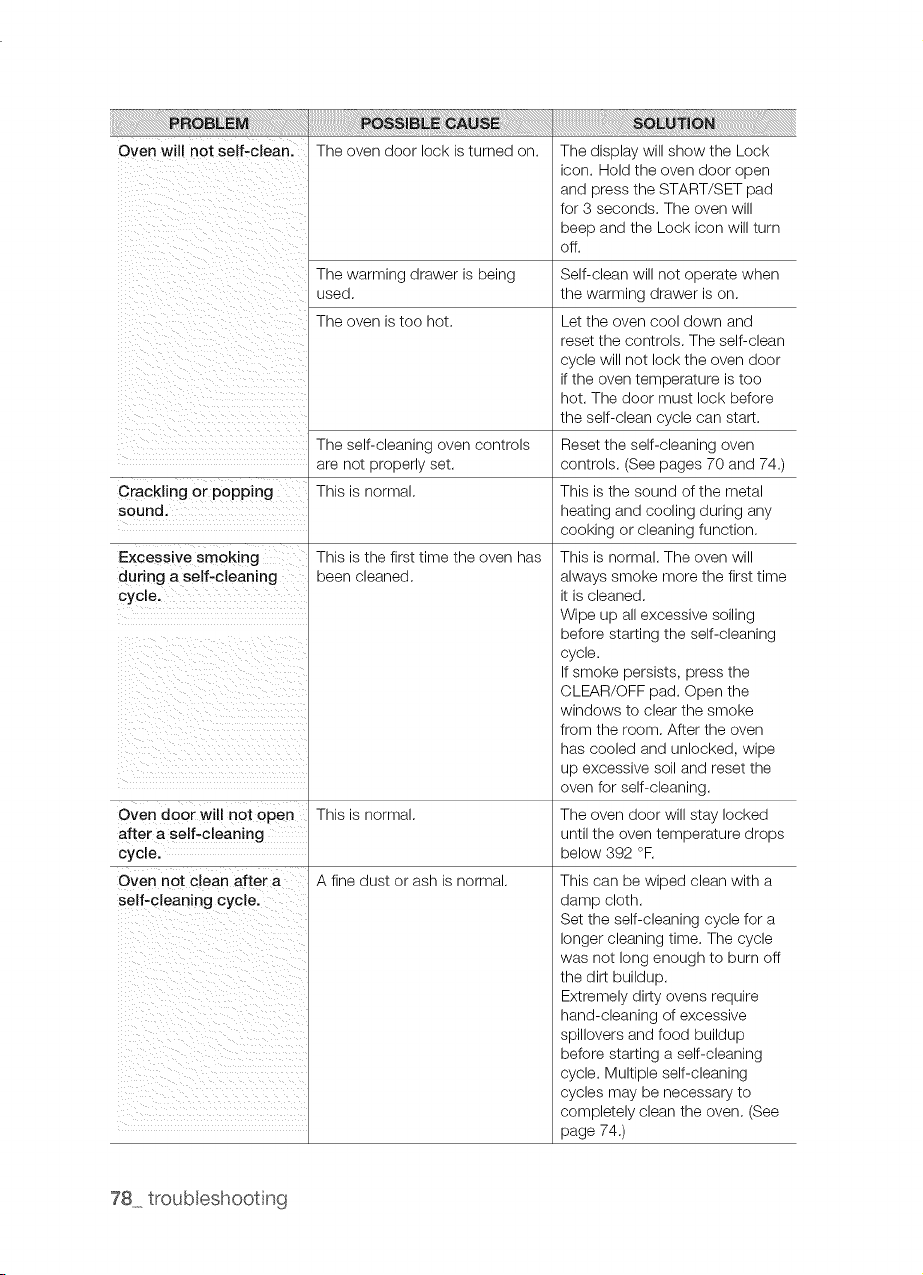
The oven door lock isturned on.Oven will not self-clean.
Crackling or popping
sound.
Excessive smoking
during a self-cleaning
cycle.
Oven door will not open
after aself-cleaning
cycle.
Oven not clean after a
self-cleaning cycle.
The warming drawer is being
used.
The oven istoo hot.
The self-cleaning oven controls
are not properly set.
This is normal.
This is the first time the oven has
been cleaned.
This is normal.
A fine dust or ash isnormal.
The display will show the Lock
icon. Hold the oven door open
and press the START/SET pad
for 3 seconds. The oven will
beep and the Lock icon will turn
off.
Self-clean will not operate when
the warming drawer ison.
Let the oven cool down and
reset the controls. The self-clean
cycle will not lock the oven door
if the oven temperature istoo
hot. The door must lock before
the self-clean cycle can start.
Reset the self-cleaning oven
controls. (See pages 70 and 74.)
This is the sound of the metal
heating and cooling during any
cooking or cleaning function.
This is normal. The oven will
always smoke more the first time
it is cleaned.
Wipe up allexcessive soiling
before starting the self-cleaning
cycle.
Ifsmoke persists, press the
CLEAR/OFF pad. Open the
windows to clear the smoke
from the room. After the oven
has cooled and unlocked, wipe
up excessive soil and reset the
oven for self-cleaning.
The oven door will stay locked
until the oven temperature drops
below 392 °R
This can be wiped clean with a
damp cloth.
Set the self-cleaning cycle for a
longer cleaning time. The cycle
was not long enough to burn off
the dirt buildup.
Extremely dirty ovens require
hand-cleaning of excessive
spillovers and food buildup
before starting a self-cleaning
cycle. Multiple self-cleaning
cycles may be necessary to
completely clean the oven. (See
page 74.)
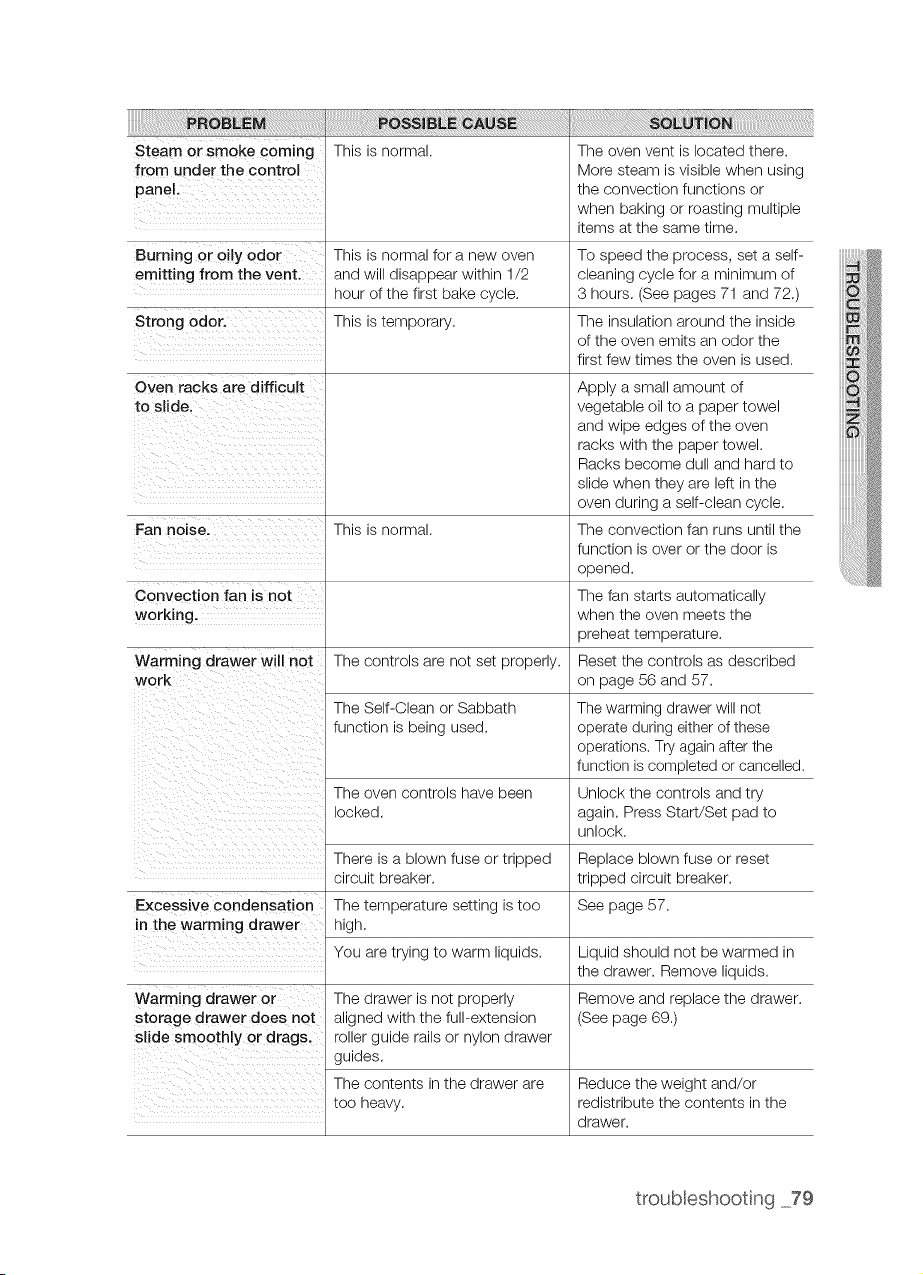
Steamorsmokecoming
fromunderthecontroJ
BurningoroilyOdor
Thisisnormal.
Thisisnormalforanewoven
emittingfromthevent. andwilldisappearwithin1/2
Theovenventislocatedthere.
Moresteamisvisiblewhenusing
theconvectionfunctionsor
whenbakingorroastingmultiple
itemsatthesametime.
Tospeedtheprocess,setaself-
cleaningcycleforaminimumof
hour of the first bake cycle. 3 hours. (See pages 71 and 72.)
This istemporary. The insulation around the inside
of the oven emits an odor the
first few times the oven is used.
oven racks are difficult
to slide.
Fan noise. This is normal.
Convection fan is not
working.
Warming drawer will not
work
Excessive condensation
in the warming drawer
Warming drawer or
storage drawer does not
slide smoothly or drags.
The controls are not set properly.
The Self-Clean or Sabbath
function is being used.
Apply a small amount of
vegetable oil to a paper towel
and wipe edges of the oven
racks with the paper towel.
Racks become dull and hard to
slide when they are left in the
oven during a self-clean cycle.
The convection fan runs until the
function is over or the door is
opened.
The fan starts automatically
when the oven meets the
_reheat temperature.
Reset the controls as described
on page 56 and 57.
Thewarming drawer will not
operate during either of these
operations. Tryagain after the
function iscompleted or cancelled.
The oven controls have been Unlock the controls and try
locked, again. Press Start/Set pad to
unlock.
There isa blown fuse or tripped Replace blown fuse or reset
circuit breaker, tripped circuit breaker.
The temperature setting istoo See page 57.
high.
You are trying to warm liquids. Liquid should not be warmed in
the drawer. Remove liquids.
Remove and replace the drawer.
(See page 69.)
The drawer is not properly
aligned with the full-extension
roller guide railsor nylon drawer
guides.
The contents in the drawer are
too heavy.
Reduce the weight and/or
redistribute the contents in the
drawer.
troubleshooting 79
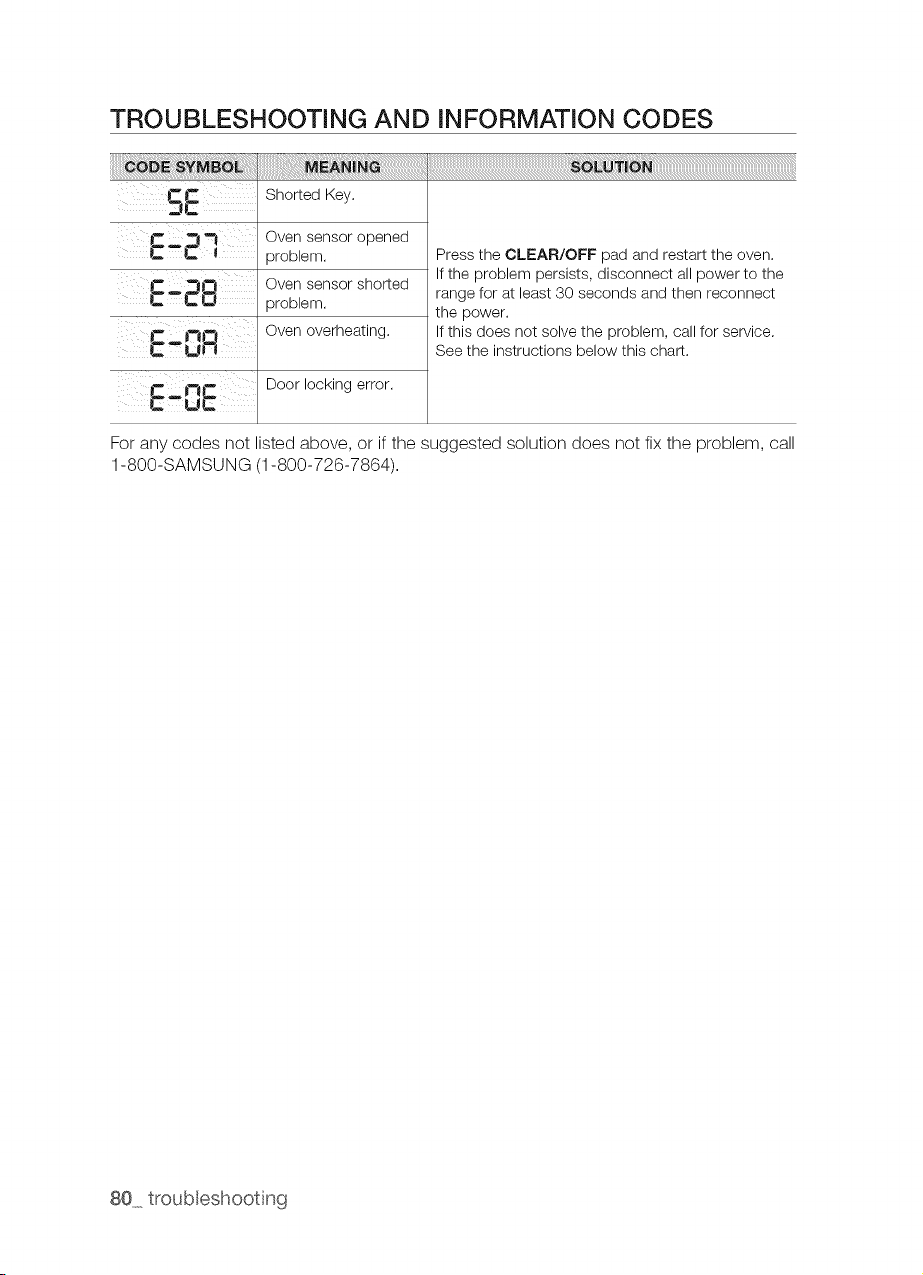
TROUBLESHOOTING AND INFORMATION CODES
Shorted Key.
Oven sensor opened
C_ ! 3roblem.
_tJ_l Oven sensor shorted
C_CO _roblem.
jw |wliO Oven overheating.
!iTh_ Door locking error.
PC°L_C
Press the CLEAR/OFF pad and restart the oven.
If the problem persists, disconnect all power to the
range for at least 30 seconds and then reconnect
the power.
If this does not solve the problem, call for service.
See the instructions below this chart.
For any codes not listed above, or ifthe suggested solution does not fix the problem, call
1-800-SAMSUNG (1-800-726-7864).
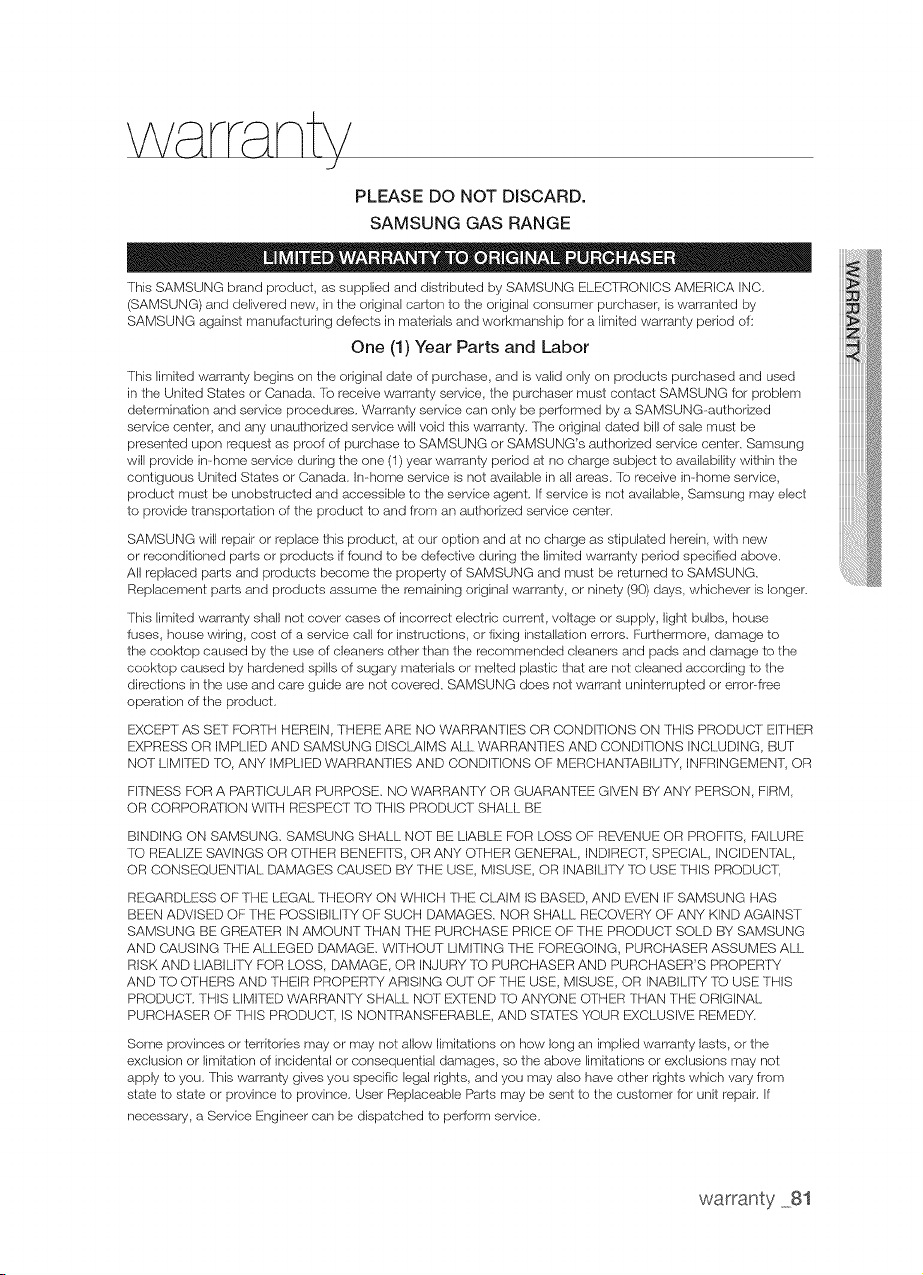
PLEASEDONOTDISCARD.
SAMSUNGGASRANGE
[his SAMSUNG brand product, as supplied and distributed by SAMSUNG ELECTRONICS AMERICA INC,
(SAMSUNG) and delivered new, in the original carton to the original consumer purchaser, iswarranted by
SAMSUNG against manufacturing defects in materials and workmanship for a limited warranty period of:
One (1)Year Parts and Labor
This limited warranty begins on the original date of purchase, and isvalid only on products purchased and used
in the United Stales or Canada, 'to receive warranty service, the purchaser must contact SAMSUNG for problem
determination and service procedures, Warranty service can only be performed by aSAMSUNG-authodzed
service center, and any unauthorized service will void this warranty, The original dated billof sale must be
presented upon request as proof of purchase to SAMSUNG or SAMSUNG's authorized service center, Samsung
will provide in-home service during the one (1)year warranty period at no charge subject to availability within the
contiguous United States or Canada, ks-home service isnot available in a, areas, To receive in-home service,
product must be unobstructed and accessible to the service agent, Ifservice isnot available, Samsung may elect
to provide transportation of the product to and from an authorized service center.
SAMSUNG will repair or replace this product, at our option and at no charge as stipulated herein, with new
or reconditioned parts or products if found to be defective during the limited warranty period specified above,
All replaced parts and products become the property of SAMSUNG and must be returned to SAMSUNG,
Replacement parts and products assume the remaining original warranty, or ninety (90) days, whichever is longer,
This limited warranty shall not cover cases of incorrect electric current, voltage orsupply, light bulbs, house
fuses, house wiring, cost of aservice call for instructions, or fixing installation errors, Furthermore, damage to
the cooktop caused bythe use of cleaners other than the recommended cleaners and pads and damage to the
cooktop caused by hardened spills of sugary materials or melted plastic that are not cleaned according to the
directions inthe use and care guide are not covered, SAMSUNG does not warrant uninterrupted or error-free
operation of the product,
EXCEPT AS SET FORTH HEREIN, THERE ARE NO WARRANTIES OR CONDmONS ON THIS PRODUCI EITHER
EXPRESS OR IMPLIED AND SAMSUNG DISClAIMS ALL WARRANTIES AND CONDMONS INCLUDING, BUT
NO-f LIMITED TO, ANY IMPLIED WARRANTIES AND CONDITIONS OF MERCHANTABILITY, INFRINGEMENT, OR
FITNESS FOR A F_&RTICU[..ARPURPOSE, NO WARRANTY OR GUARANTEE GIVEN BY ANY PERSON, FIRM,
OR CORPORATION WITH RESPECT TO THIS PRODUCT SHALL BE
BINDING ON SAMSUNG, SAMSUNG SHALL NOT BE LIABLE FOR LOSS OF RE_/ENUE OR PROFITS, FRILURE
TO REALIZE SAVINGS OR OTHER BENEFITS, OR ANY OTHER GENERAL, INDIRECT, SPECIAL, INCIDEN I}&L,
OR CONSEQUENTIAL DAMAGES CAUSED BY THE USE, MISUSE, OR INABILITY lO USE THIS PRODUC%
REGARDLESS OFTHE LEGAL THEORY ON WHICH THE CLAIM IS BASED, AND EX/EN IFSAMSUNG HAS
BEEN ADVISED OF THE POSSIBILITY OF SUCH DAMAGES, NOR SHALL RECOVERY OF ANY KIND AGAINST
SAMSUNG BE GREA] ER IN AMOUNT THAN THE PURCHASE PRICE OF THE PRODUCT SOLD BY SAMSUNG
AND CAUSING THE ALLEGED DAMAGE, WITHOUT LIMITING THE FOREGOING, PURCHASER ASSUMES ALL
RISK AND LIABILITY FOR LOSS, DAMAGE, OR INJURY lO PURCHASER AND PURCHASER'S PROPERTY
AND TO OTHERS AND THEIR PROPERTY ARISING OUT OF THE USE, MISUSE, OR INABILFIY TO USE THIS
PRODUCT. THIS LIMITED WARRAN TY SHALL NOT EXIEND TOANYONE OTHER THAN THE ORIGINAL
PURCHASER OFTHIS PRODUCT, IS NONTRANSFERABLE, AND STATES YOUR EXCLUSIVE REMEDY.
Some provinces or territories may or may not allow limitations on how long an implied warranty lasts, or the
exclusion or limitation of incidental orconsequential damages, so the above limitations or exclusions may not
apply to you, This warranty gives you specific legal rights, and you may also have other rights which vary from
state to state or province to province, User Replaceable Parts may be sent to the customer for unit repair. If
necessary, aService Engineer carl be dispatched to perform service,
warranty 81
To obtain warranty service, please contact SAMSUNG at:
REGISTRATION
Please register your product online at www.samsung.com/register.
QUESTIONS
For questions about features, operation/performance, parts, accessories, or service, call
1-800-726-7864, or visit our Web site at www.samsung.com, www.samsung.com/ca.
Model # Serial #
Please attach your receipt (or a copy) to this manual. You may need it, along with
your model and serial number, when calling for assistance.


Scan this with your smartphone
Scan the QRcode * or visit
www.samsung.com/spsn
to view our helpful
How-to Videos and Live Shows
_Requires reader to be installed on your smarLphone
Please be advised that the Samsung warranty does NOT cover service calls to explain
product operation, correct improper installation, or perform normal cleaning or maintenance.
QUESTIONS OR COMMENTS
www.samsung.com/ca (English)
CANADA www.samsung.com/cafr (French)
MEXICO
U.S.A
Consumer Electronics
U.S.A
Mobile Phones
1-800-SAMSUNG(726-7864)
01-800-SAMSUNG(726-7864)
1-800-SAMSUNG(726-7864)
1-800-SAMSUNG(726-7864)
www.samsung.com
Code No.: DG68-00517A
trab
,. . FRAN_AIS CANAD EN
._de possibilates
Nous vousremerc_onsd'avoirchoisi ce DrOdUlt
Samsung.Afindebeneficierdu meilleurdu service aores-
en_e. enreglsl:rez VOl:re alalaarell sur le site SUlvarlt :
www.samsung.com/register
1-800-SAMSUNG t726-7864,
O F otOFct¢1U0¢dO
i \
Plus de commodite, Cuisson de meilleure qualite, Entretien facile, Votre
nouvelle ouisini6re a gaz a 6te congue pour vous offrir bus ces avantages
et plus encore,
Plus d'espace
Dot_e d'une capacit_ de 5.8 pieds cubes, votre nouvelle cuisini_re dispose
d'un espace bien plus important que toutes les marques concurrentes
pr_sentes sur les march_s am@icain et canadien. IIvous est d_sormais
plus facile de cuisiner pendant les f6tes ou pour le plaisir.
Table de cuisson & 5 brQieurs
Des brOleurs haute puissance, des brOleurs de mijotage ainsi qu'un brOleur
ovale central fournissent une chaleur de cuisson r_glable pour une grande
vari_t_ d'ustensiles.
Le brOleurovale central fournit une chaleur uniforme sur une grande
surface ; il est donc ideal pour lacuisson au gril.
2 caract@stiques de votre nouvette cuisin @e
oon gn "
rn ort _nb
I
LISEZ TOUTES LES CONSIGNES DE Si_CURITI_AVANT D'UTILISER L'APPAREIL
Tousles appareilselectriqueseta gaz comportantdespiecesmobilespresententun danger.Veuillezlire
les consignesde securite importantespourcet appareildansce manuel.Cesinstructionsdoivent_tre
respecteesafindeminimiserlesrisquesde blessuresgraves,voiremortellesou ded6g_ts materiels,
Conservezce manuel/ Veuillezne pas lejeter
SYMBOLES DE Si CUi:IITi
Signification des icSnes et des symboles utilis_s dans ce manuel :
Signifiequ'ilya unrisquede blessuresgraves,voiremortelles,
AVERTISSEMENT
Signifiequ'ilya unrisquepotentiel ou d6g_.ts
de blessures de
materiels.
ATTENTION
Afin de reduirelesrisquesd'incendie,d'explosion,d'electrocutionou
deblessuresIorsdeI'utilisationde votre cuisinierea gaz, vous devez
ATTENTION respecterces reglesde securitedebase'
Interdit.
NEPASdemonter,
NEPAStoucher,
scrupuleusement consignes.
Suivez les
Debranchezle cordond'alimentationdela prisemurale.
Assurez-vousquela cuisiniereest brancheesurune prisemuralereliee
a laterreafin d'@itertout risqued'electrocution.L'utilisationd'une
_risedotee d'uninterrupteurdifferentielestfortementrecommandee,
Contactezleserviced'assistancetechnique,Reportez-vousa la page
82,
Remarque
Lessymbolesd'avertissementsontlapour @iterquevous oud'autrespersonnesnese
blessent,Veilleza bien en respecterlesconsignes.Veuillezne pas jeterce manuel,Oonservez
ce manueldansun endroitsOrafindepouvoirleconsulterulterieurement,
consignes de securit6 mportantes 3
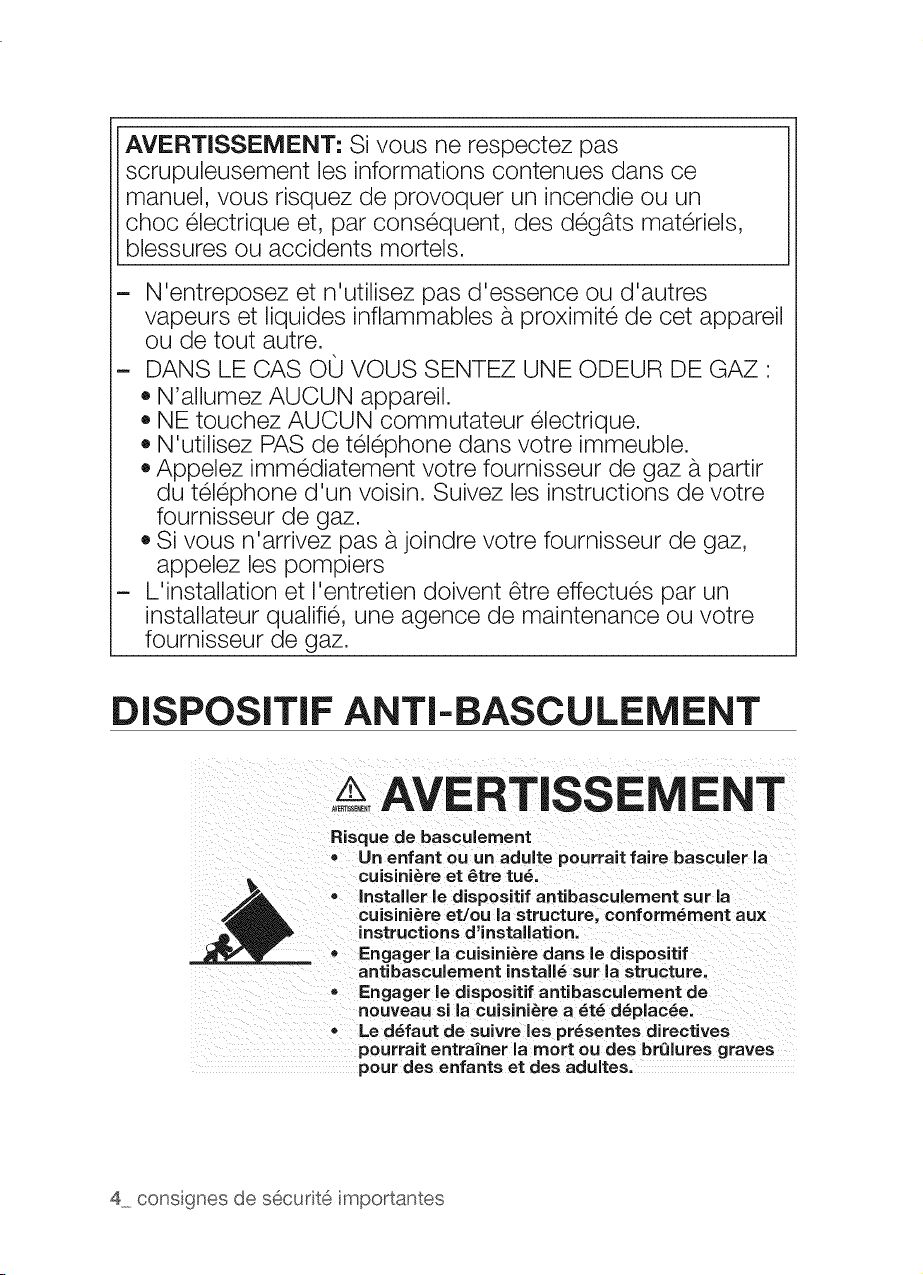
AVERTISSEMENT: Sivous ne respectez pas
scrupuleusement les informations contenues dans ce
manuel, vous risquez de provoquer un incendie ou un
choc electrique et, par consequent, des d6g_ts materiels,
blessures ou accidents morteIs.
- N'entreposez et n'utilisez pas d'essence ou d'autres
vapeurs et liquides inflammables a proximite de cet appareil
ou de tout autre.
- DANS LE CAS O0 VOUS SENTEZ UNE ODEUR DE GAZ :
• N'allumez AUCUN appareil.
• NEtouchez AUCUN commutateur electrique.
• N'utilisez PAS de tel6phone dans votre immeuble.
Appelez immediatement votre fournisseur de gaz a partir
du tel6phone d'un voisin. Suivez les instructions de votre
fournisseur de gaz.
Sivous n'arrivez pas ajoindre votre fournisseur de gaz,
appelez les pompiers
- L'installation et I'entretien doivent _tre effectues par un
installateurqualifie, une agence de maintenance ou votre
fournisseur de gaz.
DISPOSITIF ANTI=BASCULEMENT
AVERT
Risque de basculement
,D Un enfant ou un adulte pourrait faire basculer la
cuisiniere et _tre tun.
o Installer le dispositif antibasculement sur la
cuisini_re et/ou la structure, conform_ment aux
instructions d'installation.
e Engager la cuisini_re darts le dispositif
antibasculement install_ sur la structure.
= Engager le dispositif antibasculement de
nouveau si lacuisini_re a _t_ d_ptac_e.
= Le d_faut de suivre les pr_sentes directives
pourrait entrafner la mort ou des br01ures graves
pour des enfants et des adu Ites.
4 consgnes de s6cur[t6 mportantes
®
Afin d'_viter le basculement de la cuisini_re, fixez-la correctement au sol b.
I'aide d'un support anti-basculement adaptS. (Reportez-vous au chapitre
Installation du dispositif anti-basculement dans les consignes d'installation.)
Wrifiez la bonne installation en basculant la cuisini_re avec precaution
en avant. Veillez b.ce que le dispositif anti-basculement soit en place afin
d'emp_cher la cuisini_re de basculer.
Si la cuisini_re est, pour une quelconque raison, retiree du mur, assurez-vous
que le dispositif anti-basculement est convenablement remont_ une fois que la
cuisini_re est remise en place.
Respectez les consignes d'installations d_crites dans le manuel d'installation.
Lenon-respect de ces consignes peut entraTner des accidents mortels,
blessures et/ou d_g_.ts materiels.
NE marchez pas, ne vous asseyez pas, nevous appuyez pas sur la porte ou le
tiroir pour _viter le basculement accidentel de la cuisini_re.
PRI CAUTIONS IMPORTANTES
RELATIVES A LA Si CURITE
AVERT_SEMENT
@
Suivez toutes les consignes de bases Iorsque vous installez et utilisez votre
cuisini_re afin d'_viter tout risque d'incendie, d'_lectrocution, de blessures
graves ou mortelles, incluant :
Installation et entretien
Cette cuisini_re doit _tre correctement plac_e et install_e conform_ment aux
consignes d'installation avant de pouvoir _tre utilis_e.
Une installation par un professionnel est fortement recommand_e.
En raison de sa taille et de son poids, la cuisini_re doit _tre transport_e et
install_e par au moins deux personnes.
Toutes les cuisini_res sont susceptibles de basculer et de provoquer des
blessures graves. Installez le dispositif anti-basculement fourni avec cette
cuisini_re en suivant les instructions d_crites dans lesconsignes d'installation.
Ne r_parez nine remplacez jamais cet appareil vous-m_me, sauf si le present
manuel vous y autorise. L'entretien de cet appareil doit imp_rativement _tre
assur_ par untechnicien qualifi_.
Vous devez connaTtreI'emplacement de lavanne de fermeture de gaz et savoir
comment celle-ci seferme, le cas _ch_ant.
Enlevez ou d_truisez correctement I'emballage une fois I'appareil d_ball_.
€:lectrique/M_canique
D_branchez la cuisini_re ou mettez-la hors tension avant de proc_der b.la
r_paration.
consgnes de securit6 mportantes 5
Ne modifiez pas les boutons de commande. Les grilles et plaques (si fournies)
sont Iourdes. Elles pr_sentent un danger sielles tombent.
G
@
®
La pattie int_rieure de la grille en deux pi_ces (si fournie) du four pourrait
tomber accidentellement si elle n'a pas _t_ assembl_e correctement.
Positionnez la grille int_rieure correctement sur la grille ext_rieure.
Positionnez toujours les grilles du four b.la m6me hauteur de chaque c6t_ du
four. Lenon-respect de cette consigne peut entraTner une chute des aliments
et par consequent un risque de brOlures.
Danger pour les enfants
N'entreprosez pas d'objets susceptibles d'_veiller I'int_r6t des enfants sur la
table de cuisson ou sur le dosseret de la cuisiniere. Les enfants risquent, en
grimpant sur la cuisini_re, de se blesser gravement, voire mortellement.
Lagrille int_rieure de la grille en deux pieces peut tomber si elle n'a pas _t_
assembl_e correctement. Positionnez la grille int_rieure correctement sur la
grille ext_rieure. Ins_rez toujours la grille ou I'ensemble de la grille en deux
pi_ces (si fournie) sur la m6me hauteur de chaque c6t_ du four.
Gardez tousles _l_ments d'emballage hors de la pottle des enfants. Ceux-ci
risqueraient de les utiliser pour jouer. Si les sacs en plastique ne sont pas jet_s,
cela peut entraTner une asphyxie.
Ne laissez jamais un enfant sans surveillance dans la piece ou est install_e la
cuisiniere. Ne les autorisez jamais b.monter sur une quelconque partie de la
cuisini_re.
Ne laissez pas de petits enfants toucher la cuisini_re.
Les grilles et la plaque (si fournie) de la table de cuisson sont Iourdes et
pr_sentent un risque de blessures sielles tombent sur le pied. Apprenez aux
enfants b. ne pas jouer avec lesgrilles ou la plaque.
Apprenez aux enfants b. ne pas toucher aux commandes ou aux autres
_l_ments de la cuisini_re et b. ne pas jouer avec.
Nous vous conseillons d'utiliser la fonction deverrouillage des commandes /
de la porte afin de r_duire tout risque d'utilisation incorrecte par des enfants.
Avant de mettre votre cuisiniere au rebut, d_branchez le cordon d'alimentation.
Retirez la porte afin d'_viter que des enfants ou des animaux nese fassent
pi_ger b.I'int_rieur de I'appareil.
Incendie
Ne touchez pas les bl'Oleurs du four, les bl'Oleurs du tiroir ou les surfaces
internes du four. Les surfaces de cuisson, les plaques, les brOleurset les
chapeaux de la table de cuisson ainsi que les patois du four peuvent 6tre
chauds m6me s'ils n'apparaissent pas rouges. Les surfaces internes du four
deviennent suffisamment chaudes pour provoquer des brOlures. Pendant et
apres le fonctionnement, ne touchez pas les brOleursdu four, les brOleursdu
tiroir et les surfaces internes du four et ne laissez aucun v6tement ou produit
inflammable entrer en contact avec ces derniers tant qu'ils n'ont pas refroidis.
6 consgnes de s6curit6 mportantes
Les maniques ne doivent pas entrer en contact avec les _l_ments chauffants.
N'utilisez pas de serviette ou tout autre torchon volumineux comme manique.
N'utilisez pas votre cuisini_re pour chauffer des aliments contenus dans des
r_cipients ferm_s ou pour s_cher des objets humides.
N'obstruez pas les conduits deventilation du four. Nettoyez fr_quemment les
orifices de ventilation pour _viter qu'ils ne s'encrassent. Voir page 59. Pendant
la cuisson au four, il se peut que vous entendiez un I_ger bruit de cr_pitement.
Ce bruit peut apparaTtre pendant le cycle normal de cuisson au four Iorsque la
flamme du brOleurdu four s'_teint.
Q Cette cuisini_re ne doit jamais _tre utilisee b.d'autres fins que lacuisson. Le
non-respect de cette consigne peut entraTner une intoxication au monoxyde de
carbone et/ou une surchauffe du four.
Evitez de porter des v_tements amples et des accessoires pendants Iorsque
vous utilisez I'appareil.
N'ENTREPOSEZ ET N'UTILISEZ PASde mat_riaux combustibles, d'essence
ou d'autres vapeurs et liquides inflammables b. proximit_ de cet appareil. Voir
_ DANS LECAS OU VOUS SENTEZ UNE ODEUR DE GAZ ,, dans le chapitre
des avertissements concernant le gaz '
Lots du nettoyage de la table de cuisson, ne versez pas d'eau sur celle-ci.
L'eau pourrait couler dans les systemes d'alimentation en gaz et dans les
circuits _lectriques de la cuisini_re entraTnant un risque d'_lectrocution ou
un niveau _lev_ de monoxyde de carbone dO b. la corrosion des orifices des
combustibles.
N'utilisez pas d'eau pour _teindre les flammes de friture. L'eau peut entraTner
une explosion d'une flamme de friture, ce qui pourrait entraTner et propager
un incendie puis entraTner des dommages corporels. Eteignez lasource de
chaleur et_touffez les flammes b.I'aide d'un couvercle herm_tique ou en
utilisant un extincteur multifonction b. poudre ou b. mousse.
Ne laissez jamais la table de cuisson sans surveillance Iorsqu'un brOleur
fonctionne b.puissance _lev_e. Encas de d_bordement, les particules
graisseuses provenant des aliments risquent de s'enflammer.
N'utilisez pas de flamme pour v_rifier s'il y a des Mites de gaz. Utilisez de I'eau
savonneuse autour de I'endroit b.v_rifier.
Ne placez aucun appareil portable ou tout objet different d'un ustensile de
cuisine sur la surface de cuisson. Si la surface de cuisson est chaude, cela
peut provoquer un incendie ou des d_g_.ts materiels.
N'essayez pas d'utiliser cette cuisini_re si elle est endommag_e, en
dysfonctionnement ou s'il y ades pi_ces manquantes ou d_fectueuses.
Ne placez jamais d'objets en plastique, en papier ou dans une autre matiere
susceptible de fondre ou de brOler b.proximit_ des orifices de ventilation ou des
brOleurs de surface.
consgnes de s6curite mportantes 7
@
Si lemode d'auto-nettoyage ne fonctionne pas, _teignez le four et d_branchez-
le de la prise d'alimentation. Reportez-vous aux pages 83 pour contacter un
technicien de maintenance qualifi_.
Pendant la cuisson au four, il se peut que vous entendiez un I_ger bruit de
cr_pitement.
Vapeurs
Soyez prudent Iorsque vous ouvrez la porte du four. Laissez I'air chaud ou
la vapeur s'_chapper avant de retirer les aliments du four chaud ou de les
remettre.
Utilisez uniquement des maniques seches. L'utilisation de maniques humides
ou mouill_es sur des surfaces chaudes peut entraTner des brOlures par la
vapeur.
Avertlssements concemant les br_leurs de surface
- Le diffuseur de flammes du brOleurpeut _tre obstru_ par des aliments ou
de la poussiere. Nettoyez le diffuseur s'il semble obstru_. Si vous nettoyez
le diffuseur b,I'eau, assemblez-le uniquement une fois sec. Si le diffuseur
est humide, cela peut emp_cher les brOleurs de s'allumer.
- Pour nettoyer la table de cuisson, ne versez pas d'eau sur celle-ci. L'eau
peut s'introduire dans la cuisini_re et les pi_ces internes risquent de rouiller.
- Allumez les brOleursde latable de cuisson uniquement Iorsque leurs
chapeaux sont correctement install_s. Si les chapeaux des brOleurs nesont
pas correctement install_s, les commandes peuvent _tre endommag_es et
la flamme risque d'etre anormalement grande ou dangereuse.
- Si vous faites r_chauffer des liquides, I'_bullition peut survenir b,
retardement. Pour _viter une _bullition b, retardement des liquides, laissez-
les TOUJOURS reposer au moins une vingtaine de secondes une fois le
brOleur_teint, ceci afin de permettre b,la temp@ature de se stabiliser. En
cas d'accident, effectuez les gestes de PREMIERS SECOURS suivants :
,, immergez la zone brOl_edans de I'eau froide pendant au moins
10 minutes ;
,, couvrez avec un pansement sec et propre
,, n'appliquez aucune creme, huile ou lotion
- Apres avoir allum_ un brOleurde surface, v@ifiez qu'il s'enflamme. Ajustez
le niveau de la flamme en tournant le bouton du brOleur.
- Lorsque vous r_glez un brOleur sur mijotage, ne tournez pas le bouton
rapidement. Observez la flamme pour v@ifier qu'elle reste allum_e.
8 consgnes de s6cur[t6 mportantes
AVERTISSEMENTSCONCERNANTLEGAZ
AVSRT_EMENT
®
@
Si vous ne respectez pas scrupuleusement les informationscontenues dans
ce manuel, vous risquez de provoquer un incendie ou une explosion et, par
consequent, des accidents mortels, blessures ou d_g_.ts mat@iels.
1. Fermez la vanne et n'utilisez pas la cuisini_re.
2. N'allumez PAS d'allumette, de bougie ou de cigarette.
3. N'allumez AUCUN appareil au gaz ou _lectrique.
4. NE touchez AUCUN commutateur _lectrique et ne branchez PAS lecordon
d'alimentation sur la prise.
5. N'utilisez PAS de t_l_phone dans votre immeuble.
6. Evacuez la piece, I'immeuble ou le quartier de tousles occupants.
7. Appelez imm_diatement votre fournisseur de gaz b. partir du t_l_phone d'un
voisin. Suivez les instructions devotre fournisseur de gaz.
8. Si vous n'arrivez pas b.joindre votre fournisseur de gaz, appelez les
pompiers.
Lisez enti_rement et attentivement les instructions,
L'installation de cette cuisini@e doit _tre conforme aux codes Iocaux ou, en
absence de codes Iocaux, au National FuelGas Code (Code national de gaz
combustible), ANSI Z223.1/NFPA.54, derni_re _dition. Au Canada, I'installation
doit _tre conforme au Natural Gas Installation Code (Code d'installation du
gaz naturel), CAN/CGA-B149.1, en vigueur, ou au Propane Installation Code
(Code d'installation du propane), CAN/CGA-B149.2, en vigueur, ainsi qu'aux
codes Iocaux qui s'appliquent. Cette cuisiniere a _t_ certifi_e par ETLselon
ANSI Z21.1, derniere _dition, et par la Canadian Gas Association (l'Association
canadienne du gaz) selon CAN/CGA-1.1, derni@e _dition.
N'installez pas cet appareil b.un endroit ou il sera expos_ b.de forts courants
d'air.
L'installation et I'entretien doivent _tre effectu_s par un installateur qualifi_, une
agence de maintenance ou votre fournisseur de gaz.
Demandez b. I'installateur de vous montrer I'emplacement de la vanne de
coupure du gaz et comment celle-ci se ferme.
Utilisez toujours des connecteurs flexibles NEUFS Iorsque vous installez un
appareil b.gaz. N'utilisez jamais de connecteurs flexibles anciens. L'utilisation
des connecteurs flexibles anciens peut entraTner des fuites de gaz et provoquer
des blessures.
N'utilisez jamais cet appareil en tant que chauffage int@ieur pour chauffer une
piece. Le non-respect de cette consigne peut entraTnerune intoxication au
monoxyde de carbone et une surchauffe du four.
Veillezb.nejamais obstruer les orifices de ventilation du four (ouvertures d'air).
IIs permettent b.I'air d'entrer et de sortir ce qui est n_cessaire pour que le four
fonctionne correctement avec un combustible appropri_.
consgnes de s6curite mportantes 9
LOI CALIFORNIENNE RELATIVE
AUX PRODUITS TOXIQUES ET _,
L'EAU POTABLE
®
/k
AVERTIS_ME_
Conform_ment b.la California Safe Drinking Water and Toxic Enforcement
Act (Loi californienne relative aux produits toxiques et b. I'eau potable), le
gouverneur de la Californie est tenu de publier une liste des substances
reconnues par I'Etat comme pouvant causer des malformations cong_nitales
ou pr_sentant d'autres dangers pour la reproduction et pour lesquelles les
entreprises doivent avertir leurs clients d'une _ventuelle exposition b. de telles
substances.
Des appareils b.gaz peuvent causer une exposition mineure b.quatre de ces
substances, notamment le monoxyde de carbone, la formaldehyde et la suie,
qui sont principalement d_gag_s par une combustion incomplete du gaz
naturel ou du GPL. Des brOleurs bien ajust_s, dot_s d'une flamme bleue plut6t
que jaune, permettront de minimiser une combustion incomplete. L'a_ration de
la piece peut minimiser I'exposition b. ces substances, soit en ouvrant la fen6tre
soit en utilisant un ventilateur ou une hotte.
DANS LE COMMONWEALTH
MASSACHUSETTS
DU
®
Cet appareil doit 6tre install_ par un plombier certifi_ ou un monteur
d'installations au gaz qualifi_ ou certifi_ par I'Etat du Massachusetts.
Lorsque des vannes b. bille sont utilis_es pour la fermeture du gaz, elles doivent
6tre munies d'une poign_e en T.
II ne faut pas connecter plusieurs canalisations de gaz flexibles en s_rie.
10 consgnes de secudt6 mportantes

MISES EN GARDE RELATIVES
AUX RISQUES ELECTRIQUES
®
G
Veillezb.vous conformer aux consignes et recommandations suivantes
concernant I'_lectricit_ afin d'_viter tout risque d'accident mortel et de blessure
due b. une _lectrocution et/ou de d_g_.ts materiels dus b.un incendie.
1. Branchez I'appareil sur une prise murale tripolaire reli_e b.la
terre.
2. N'enlevez PASla prise murale.
3. N'utilisez PAS d'adaptateur.
4. N'utilisez JAMAIS de rallonge.
Utilisez un circuit _lectrique d_di_ de 120 V,60 Hz, 20 A (CA) avec fusible
pour cet appareil. II est recommande d'utiliser un fusible b. retardement ou un
disjoncteur b.retardement. NE branchez PASplus d'un seul appareil sur ce
circuit.
Cette cuisini_re est fournie avec une prise tripolaire reli_eb. la terre. Ce cordon
DOlT6tre branch_ dans une prise murale tripolaire mise b.la terre et 6tre
conforme aux normes _lectriques en vigueur. Sivous n'6tes pas s@rque la
prise est correctement mise b.la terre, consultez un _lectricien qualifi_ afin qu'il
v6rifie.
Si les normes permettent I'utilisation d'un cb.ble de mise b.la terre s_par_, nous
vous recommandons de faire appel b.un _lectricien qualifi_ afin qu'il d_termine
le chemin appropri_ pour ce cb.ble.
L'installation _lectrique de la cuisini_re doit 6tre conforme aux codes Iocaux.
Endehors des codes Iocaux, I'installation _lectrique doit 6tre conforme b.la
derniere norme ANSI/NFPA N°70 - derni_re edition (pour les @tats-Unis) ou au
code _lectrique canadien CSA C22.1 - derni_re _dition.
II releve de la responsabilit_ du propri_taire de I'appareil de fournir une
installation _lectrique conforme.
Ne branchez JAMAIS le cb.ble de mise b. la terre sur des canalisations en
plastique ou des conduites de gaz ou d'eau chaude.
NE modifiez PAS la prise fournie avec cet appareil.
NE mettez PASde fusible dans un circuit neutre ou de terre.
consgnes de secudt6 mp@'tantes 11
CONSIGNES DE MISE A LA TERRE
AWRTI_M_t_
Misea la terrede la cuisinierea I'aided'unbranchementduc_bled'alimentation'
Cetappareildoit_tre reliea laterre, La misea la terrereduitle risqued'electrocution,car
ellefournit aucourantun cheminde sortie en cas de dysfonctionnementou depanne.Cette
cuisiniereest equipeed'un cordon disposantd'une prisedemisea laterre, La fichedoit
_tre brancheesuruneprisesecteurposee et misealaterreconformementa la legislationen
vigueur,
Tout raccordementnonconformedelaprisedemisea laterre peutentraTnerun risque
d'electrocution,Si vous n'_tespas stir que I'appareilestcorrectementmisa laterre,v@ifiez-
leavec un electricienqualifie,
NEmodifiezJAMAISlaprisefournieavec cet appareil.Si lafiche fournienes'adapte pas sur
votre prisemuraleexistante,renseignez-vousaupresd'unelectricienqualifiepour remplacer
cettederniere,
AVERTISSEMENTS RELATIFS
L'INSTALLATION
®
AWRTI_M_t_
@
@
Assurez-vousque votrecuisiniereest correctementinstalleeetmisea laterre par un
installateurqualifieconformementaux instructionsd'installation.L'installationet I'entretien
doivent6treeffectuespar desmonteursd'installationsau gaz oudes techniciensde
maintenancequalifies.
Assurez-vousque votrecuisiniereest correctementinstalleeetregl6epourle type de gaz
utiliser(naturelou GPL)par un installateurqualifieou un technicienqualifie,Pourutiliserdu
GPL,les5 orificesdesbrClleursde surfaceet les2orificesdesbrOleursdu four doivent_tre
remplacespar le kit d'orificesGPLfourni et I'adaptateurdupotentieldemisea laterre(GPR)
doit _tre inverse,
Cesreglagesdoivent_tre effectuesparun techniciendemaintenancequalifieconformement
aux consignesdu fabricantainsiqu'atousles codes et exigencesrequisespar I'autorite
competente.Lenon-respectde cesconsignespeut entraTnerdesblessuresgraveset/ou des
d6g_tsmateriels,L'agencequalifieeeffectuantcestravauxassumelaresponsabilitedela
conversionde gaz.
Ner@areznine remplacezjamaislespiecesdelacuisinierevous-m_me,saufsi le present
manuelvous yautorise.Touteautrer@arationdevra_tre effectueepar un technicienqualifie,
Cetappareildoit_trecorrectementreliea laterre. Branchezla cuisinieresur uneprisemurale
de 115 V relieea laterre qui doit uniquement_tre utiliseepour cette cuisiniere.Necoupezni
ne retirezla (troisieme)brochemise a laterredelaprise,Branchezle cordond'alimentation
fermementa la prisemurale.Sivous n'_tespas stir quela priseest reliee_.la terre,il releve
de votre responsabilitedefournirune prisetripolairecorrectementinstalleeet relieea laterre
conformementaux normeslocaleset nationales.N'utilisezjamaisun cordond'alimentation
endommageouuneprisemuralemalfixee. N'utilisezpas derallonge.Enoutre, n'utilisezpas
d'adaptateuret nedemontezpaslaprisede terre,Si vous ne disposezpas deprisecorrecte
ou si vous avezle moindredoute,consultezun electricienqualifie,
12 consgnes de secudte mportantes
_ lacezla cuisinierehorsdescheminsdepassagedelacuisineet en dehorsdescourants
d'airafind'@iterune mauvaisecirculationdeFair.
Cettecuisinieredoit _tre positionneede tellefagon quelapriserestefacilementaccessible,
N'installezpasvotre cuisinieredansun endroitouelleest exposeea des egouttementsd'eau
oua des conditionsclimatiquesexterieures.
Retireztout el6mentd'emballagedevotrecuisiniereavantde I'utiliser.Ces el6mentspeuvent
s'enflammer,provoquantundegagementde fumeeet/ouun incendie.
Installezvotre appareilsurunrev_tementplat etdur, capablede supporterson poids, Des
rev_tementssynthetiques,tels quedulinoleum,doiventsupporterdes temperaturesde
180°F(82°C)sans retr6cir,se voilerouse decolorer.N'installezjamaisvotre cuisiniere
directementsurunemoquettede cuisine,saufsi vous placezunecouche de contreplaque
de0,25 poucesouun isolantsimilaireentrela cuisiniereetlamoquette.
Veilleza ne jamaisobstruerlesorificesde ventilation(ouverturesd'air)de la cuisiniere,IIs
permettenta I'air d'entrer et de sortir ce qui est necessairepour quela cuisinierefonctionne
correctementavec un combustibleapproprie.Desouverturesd'air se trouventa I'arrierede
la cuisiniere,sous le tableaude commandedu four, enhautet enbas de la portedu four
ainsiquesousletiroirdechauffe-platet derangementinferieur.
De largesrayuresoudessoufflements intensessurleverredelaporte risquentde
fragiliserleverreou delecasser.
_ ssurez-vousque lesrev_tementsmurauxsitues a proximitedeI'appareilpeuventresister
la chaleurgen6r6epar celui-ci, pouvantallerjusqu'a200 °F (93 °C),
Evitezdeplacerdes placardsderangementau-dessusdelacuisiniere,Celareduitledanger
provoqueIorsqu'onmetses brasau-dessusdes flammesnuesdes brClleurspouratteindre
le placard,
Ne placezaucunobjet combustibleautourdelacuisiniere,
Si un placardde rangementest installeau-dessusdelacuisiniere,respectezunedistance
minimumde40pouces(102 cm)entrelasurfacede cuissonetle basdesplacardsnon
proteg6s,
Installezune hotte de ventilationou unfour micro-ondesa hotteintegreeventiledeI'exterieur
au-dessusde la tablede cuisson.Cetteventilationdoit _tre aussilargequela cuisiniere,_tre
centreesurla cuisiniereet se propagerau-delades placards,Reportez-vousaux consignes
d'installation.
Retireztouteslesbandeset I'emballage,Assurez-vousquelesbrClleurssontcorrectement
positionneset mis a niveau.
Retireztousles accessoiresdufour et/ou dutiroirinferieur,
Assurez-vousqu'aucunepiecede la cuisinierene s'est detach6eIorsdu transport,
consgnes de secudt6 mportantes 13
AVERTISSEMENTS CONCERNANT
LES BROLEURS DE SURFACE
/k
AWRTI_M_t_
Suiveztoutes les consignes de bases Iorsque vous installez et utilisez votre
cuisiniereafind'eviter tout risqued'incendie, d'electrocution, de blessures gravesou
mortelles comme indiqueci-dessous.
Utilisez des plats detaille appropriee. Evitez des recipients instablesou ddormes.
Selectionnezdes ustensilesb.fond plat, suffisamment largespour recouvrir toute la
surface desgrillesdu brOleur.Poureviterundebordement, assurez-vous que les
ustensilessont suffisamment largespour contenirles aliments. Vous economisez
ainsi du temps de nettoyage et emp_chez une accumulation dangereuse des
aliments,car des projections ou deseclaboussures importantes sur la cuisiniere
peuvent s'enflammer. Utilisezdes recipients avecdes manches ayantune bonne
prise enmain et restant froides.
Ne placezpas decasseroles ou des platsqui sont plus grands que la grille. Cela
pourrait causer une decoloration, une ddormation ouune inflammation des unites
oudu mur b.proximite de la cuisiniere.Cela pourrait egalement genererbeaucoup
demonoxyde decarbone.
Utilisez toujours la position LITE (ALLUMER)Iorsque vousallumez les brOleurs.
Assurez-vous que les brOleursse sont allumes.
Si I'allumage a echoue, laissez le bouton sur Off (Desactiver) etattendezjusqu'b, ce
que le gaz echappe ait disparu. Si vous utilisez la cuisinierealors que le brOleur ne
s'est pascorrectement allume,le gaz echappe peut provoquer une explosion.
Ne laissezjamais les brOleurs de surface sans surveillance Iorsqu'un brOleur
fonctionne b.puissance elevee (HIGH). En cas de debordement, les particules
graisseusesprovenant des aliments risquent de s'enflammer.
Eloignez-vous dela cuisiniereIorsque vous faites friredes aliments.
_ justez lataillede laflamme du brOleurafinqu'elle ned@asse pas le bord de
la table de cuisson. Desflammes d@assant les bords de la table de cuisson
presentent undanger.
Afin de reduireles eclaboussures lots de la cuisson des alimentscontenant
beaucoup de liquides, par exemple des sauces de viande ou desragoOts,mettez la
flamme auminimum etremuezfrequemment.
Utilisezuniquement desmaniques seches. L'utilisation de maniques humides ou
mouilleespeutentraTnerdes brOlures enraisonde lavapeur qui se degage Iorsque
les maniques entrenten contact avecdes surfaces chaudes.
Eloignez-lesdesflammes nues Iorsque vous soulevez les ustensiles de cuisson.
N'utilisezjamais deserviette ou tout autre torchon volumineux comme manique.
Eloignez tout objet en plastique desbrOleurs desurface ou des flammes nues.
Lorsquevous utilisez des ustensiles enverre, assurez-vous qu'ils sont congus pour
une utilisation sur une table decuisson.
14 consgnes de secudt6 mportantes
_ erifiez toujours que lesmanchesd'ustensiles sont dirigees vers les c6tes ou
I'arrierede la table decuisson, et non au-dessus des brOleursde surface. Ceci
minimiserale risquede brOlure,d'eclaboussures et d'inflammation de matieres
inflammables sile recipient est renverse.
Ne portez jamaisde v_tements amples etdes accessoires pendants Iorsque vous
utilisez cette cuisiniere.S'ils entrenten contact avec unbrOleur de surface, ils
pourront s'enflammer et vous brOler.
Veillez b.nepastoucher avecvos mains les brOleurs Iorsqu'ils sont allumes. Eteignez
les brOleursIorsquevous changez une po_le ou casserole.
Chauffeztoujours lentement les huilesdefritureet observez-les Iorsqu'elles
chauffent. Sivous faites friredes alimentsb.temperature elevee,observez
attentivement leprocessus decuisson. Si vous devez utiliserun melangede
graissesou d'huiles pour frire, melangez-les avant de les chauffer.
Utilisezunthermometre b.friture sipossible. Cela eviteque I'huile ou lagraissesoit
chauffeeau-delb, du point de fumee.
Pour toute friture, utilisez lemoinsd'huile possible. L'utilisation excessive d'huile
peut provoquer des eclaboussures lots de I'ajout desaliments.
Retireztoujours tout objet de la table decuisson Iorsque vous cuisinez.
Ne posez jamaisd'objets en plastiquesur la table de cuisson. L'air chaud provenant
de I'orifice de ventilation risquedefairefondre le plastique ou d'augmenter la
pression de fagon dangereuse dans des recipients enplastique fermes.
Cette table de cuisson n'est pas congue pour faire flamberdes alimentsou pour
cuisineravec unwok ou unanneauwok. Sivous faites flamberdes aliments, faites-
le sous une hotte deventilation allumee.
Assurez-vous toujours que lesalimentsb.friresont decongeles etsecs. Toute
humidite peutprovoquer unbouillonnement de la graissechaude qui pourrait ainsi
deborder de lapo_le.
Ne d@lacez jamais une po_leou une friteuse remplie de graissechaude. Attendez
toujours que la graisseait refroidi.
_ vant de retirerles grilles,verifiez toujours que les commandes sont desactivees et
que les grilles ont refroidi afind'eviter tout risquede brOlure.
Si lacuisiniereestplaceeb.proximite d'une fen_tre, n'accrochez JAMAISde rideaux
longs ou destores enpapier sur cette fen_tre. IIs peuvent voler au-dessus des
brOleurs desurface et s'enflammer provoquant unrisqued'incendie.
La graisseest inflammable etdoit _tremanipulee avecprecaution. N'essayez jamais
d'eteindre unincendie lieb.la graisseavecde I'eau.
Si vous sentez une odeur de gaz, eteignez legaz de la cuisiniereetappelez un
technicien de maintenance qualifie.N'utilisezJAMAIS deflamme nue pour Iocaliser
une fuite de gaz.
Eteigneztoujours les commandes des brOleursde surface avant de retirerla
casserole. Toutes les commandes de brOleursde surface doivent _tredesactivees si
vous necuisinezpas.
Eteigneztoujours les brOleurs avant devous coucher ou dequitter la maison.
consgnes de secudt6 mportantes 15
AVERTISSEMENTSCONCERNANTLE FOUR
AVE_FSSEMENT
@
®
@
®
Ne couvrezJAMAISles orifices ou passages sur le couvercleau fond dufour. Ne
couvrez JAMAIS entierement une grille du fouravecdu papier aluminium ou tout autre
mat@iausimilaire.Sivous couvrez lecouvercle aufond et/ou lesgrilles, la circulation
de I'air b.travers le fourserabloquee pouvantcauserune intoxicationau monoxyde de
carbone.
Ne placezjamais de papier aluminium ou decaissettesenaluminium dans le four
autrement que tel que decrit dans ce manuel.
Une mauvaise utilisation risque de c@er despoches dechaleur et de provoquer un
incendie ou d'endommager la cuisiniere.
Suiveztoujoursles recommandations dufabricantIorsque vousutilisez dessacsde
cuisson oub. rOtirdans le four.
NE nettoyezPAS lejoint de la porte.Le joint dela porte est indispensablepour
assurerune bonne etanch6it6.Veillezb.nepasendommager ni d@lacer lejoint.
@viteztout chocsur le verre dufour. Nevaporisez pasd'eau sur le verre dufour
Iorsque le fourestallume ou juste apresavoir eteint le four.
Lorsquevousouvrez la porte dufour chaud, maintenez une certaine distanceentre
vous etla cuisiniere.L'airchaudet lavapeur sortant dufour peuvent provoquerdes
brOlures.
N'entreposez pasd'objets b.I'interieur du four.LeseBments ranges dans lefour
peuvent Ctre endommages ous'enflammer.
_ vitez I'accumulationde graisses dans le four.
Replacez les grilles dufour uniquementIorsquelefourestfroidafin d'eviter des
brOluresou desblessures.
Ne faitespas chaufferdesrecipients fermes. L'accumulation de pressiondansle
recipient pourrait lefaireexploser et/ou provoquer des blessures.
_ tilisezuniquementdes ustensilesenverre recommandes pour une utilisation sOre
dans desfours b.gaz.
Ceci eviteI'embrasementdesgraisses accumuBes.
@vitezde griller dela viandetrop pres de la flammedu brOleur.RetirezI'exces de
grassur laviande avant dela faire cuire. Lagraisse deviande peut s'enflammer
provoquant unrisque d'incendie.
Si unincendielie b.la graisse se declare b.I'int@ieurdufour, eteignez le four en
appuyant sur latouche Clear/Off (Effacer/arrCt).Laissez la porte du fourfermee afin
d'etouffer le feu.
Cuisinezet/ougrillezles aliments toujours avec la portedu four fermee. Sivousutilisez
lefour avecla porte entierement ou partiellement ouverte,les boutons decommandes
des brOleursdesurface et mCmele comptoir de cuisinepeuvent Ctreendommages.
Gardez la cuisiniere etses alentours propres etn'entreposez pasde mat@iaux
combustibles, d'essence oud'autres vapeurs etliquidesinflammables b.proximite.
16 consgnes de secudt6 mportantes
N'utilisez pas lefour poursecher du papier outout autre objet. De tels objets
pourraientprendrefeu encas desurchauffe.
AVERTISSEMENTS CONCERNANT
LE TIROIR CHAUFFE=PLAT
ELECTRIQUE OU LE TIROIR DE
RANGEMENT INFERIEUR
Le tiroir chauffe-plat sert b.conserver les aliments cuits b.temp@ature de
consommation. Les aliments doivent 6tre d_jb. chauds. Les aliments frois ou b.
temp@ature ambiante ne peuvent pas 6tre cuits, r_chauff_s ou cuisines dans le
tiroir chauffe-plat.
Ne touchez pas les surfaces internes du tiroir ou les _l_ments chauffants. Ces
surfaces peuvent 6tre chaudes au point de provoquer des brOlures.
_ oyez prudent b.I'ouverture du tiroir. L'air chaud et/ou la vapeur sortant du
tiroir peuvent provoquer des brOlures et des blessures.
N'utilisez pas de papier aluminium pour tapisser le tiroir inf@ieur. Lepapier
aluminium enfermerait la chaleur et modifierait la qualit_ de chauffe du tiroir. II
peut aussi endommager la finition int@ieure.
N'utilisez jamais et ne nettoyez jamais vous-m6me la I_chefrite du tiroir du four
dans le compartiment sup@ieur de celui-ci.
Ne laissez jamais de pot ou de boTtecontenant de la graisse dans le tiroir ou b.
proximitY.
Ne placez et n'entreposez pas de papier, plastique, conserves ou mat@iaux
combustibles dans le tiroir. N'utilisez pas le tiroir pour s_cher des journaux. IIs
risquent de s'enflammer. Les objets en plastique risquent de fondre.
consgnes de secudt6 mportantes 17
AVERTISSEMENTS CONCERNANT
LE FOUR AUTO-NETTOYANT
z_
AVERTISSEMS_T
@
@
@
@
Suivez toutesles consignesde bases Iorsque vousinstallezetutilisezvotrecuisiniere
afind'@iter tout risque d'incendie,d'electrocution,de blessuresgraves oumortelles,
incluant '
Ne laissezpasd'enfants sanssurveillanceb.proximite dela cuisinieredurantuncycle
d'auto-nettoyage. Les surfaces exterieuresdela cuisinieredeviennentsuffisamment
chaudes pourprovoquer desbr@uresencontactavec la peau.
Lorsque vousouvrezlaporte dufour apres uncycle d'auto-nettoyage, maintenezune
certaine distanceentre vousetlacuisiniere.Lefoursera TRES CHAUDetI'air chaudet
lavapeur sortant dufourpourraient provoquer desbr@ures.
Enleveztouteslesgrilleset autres ustensiles dufouravant dedemarrer le cycle d'auto-
nettoyage. Les grilles dufourpeuvent _treendommagees etdesobjets etrangers,
laissesb.I'interieur dufour,peuvent s'enflammer.
Avant dedemarrer I'auto-nettoyage, retirez lesgrossesprojections despatois de
I'appareil.
Retireztousles ustensilesdecuisson, la sondedufouretle papier d'aluminium avant
dedemarrerlecycle d'auto-nettoyage.
Ne lancezjamais I'auto-nettoyage siune lechefritedutiroir oudutiroir superieur se
trouve dans lefour.
En cas dedysfonctionnement du moded'auto-nettoyage,eteignezle four, debranchez
I'alimentationetcontactez untechnicien demaintenance qualifie.
N'utilisez pasdenettoyantpour four.N'utilisez JAMAIS denettoyantni derev_tement
de protection pourfourdisponibles dans le commerce pour nettoyer les surfaces
interieuresetexterieuresdufour.Des residus provenant desnettoyantsdufour vont
endommager I'interieurdufourdurantlecycle d'auto-nettoyage.
Retirezlesgrilles ennickel avant dedemarrer le cycle d'auto-nettoyage dufour.
Nettoyez lesgrilles recouvertes deporcelaine dans lefour pendant le cycle d'auto-
nettoyage.
CUISSON APPROPRll_E DE LA
VIANDE ET DE LA VOLAILLE
_ ssurez-vous que laviande etlavolaillesont totalement cuites. La viande doitto@ours
_trecuiteb.une temperaturede 160 °F (71°C).La volailledevrait to@ours_trecuite
b.une temperatureinternede 180 °F (82 °C).La cuissonde cesaliments b.ces
temperatures minimales desecurite aide b.vousproteger, vousetvotrefamille,contre
lesmaladies d'origine alimentaire.
CONSERVEZPR¢:CIEUSEMENTCESCONSIGNES
18 consgnes de secudt6 mportantes
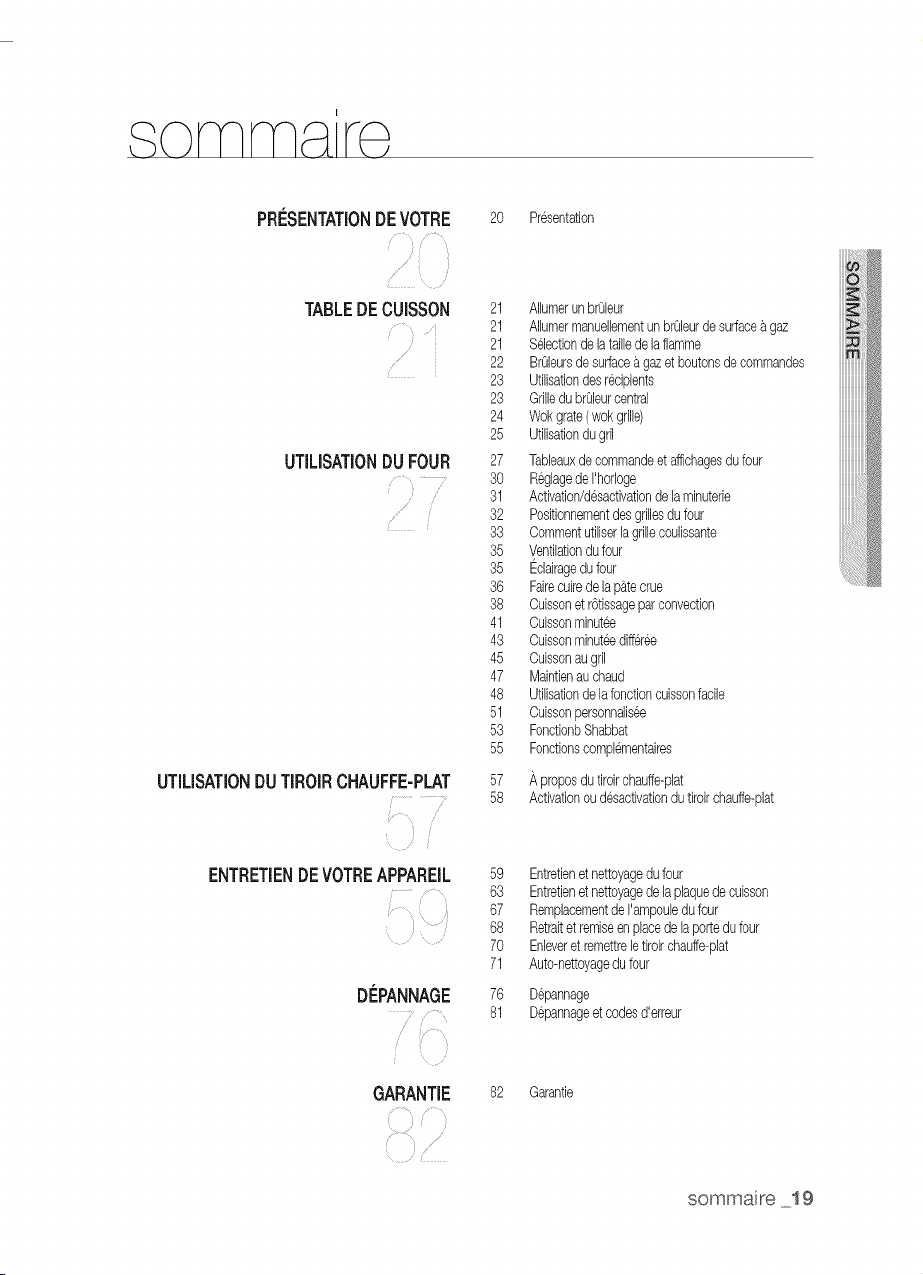
PRI'-'SENTATiONDEVOTRE
TABLEDECUISSON
UTiLISATiONDUFOUR
UTiLISATiONDUTiROiRCHAUFFE-PLAT
.....
i
ENTRETiENDEVOTREAPPAREiL
DEPANNAGE
GARANTIE
20 Presentation
21 Allumerunbr01eur
21 Alhmermanuellementunbr@urdesurfaceagaz
21 %ection delatailledelaflamme
22 Br01eursdesurfacea gazet boutonsde commandes
23 Utilisationdesr@ipients
23 Grilledubr01eurcentral
24 Wokgrate(wokgrille)
25 Utilisationdugril
27 Tableauxdecommandeet affichagesdu four
30 Reglagede I'horloge
31 Activation/d@activationde laminuterie
32 Positionnementdesgrillesdu four
33 Commentutiliserlagrillecoulissante
35 Ventilationdufour
35 Eclairagedu four
36 Fairecuirede lap_tecrue
38 Cuissonet r6tissageparconvection
41 Cuissonminutee
43 Cuissonminuteedifferee
45 Cuissonaugril
47 Maintienauchaud
48 Utilisationdelafonctioncuissonfacile
51 Cuissonpersonnalisee
53 FonctionbShabbat
55 Fonctionscomplementaires
57 Aproposdutiroirchauffe-plat
58 Activationou d@activationdutiroirchauffe-plat
59 Entretienetnettoyagedufour
63 Entretienetnetteyagedelaplaquedecuisson
67 Remplacementde I'ampouledufour
68 Retraitetremiseenplacedelaportedufour
70 Enleveret remettreletiroirchauffe-plat
71 Auto-nettoyagedufour
76 D@annage
81 D@annageetcodesd'erreur
82 Garantie
sommaire 19
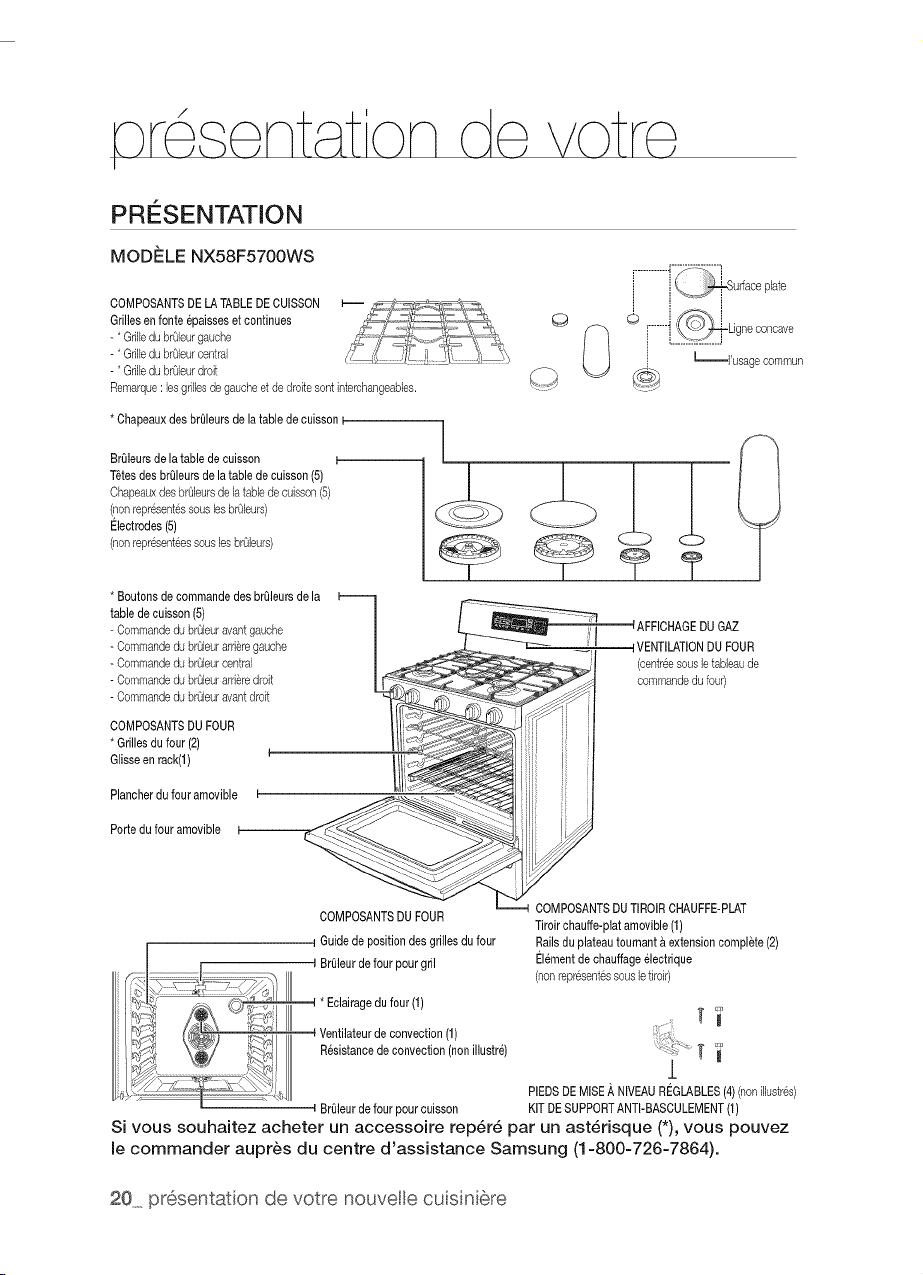
pr ent _t on de votre
PRI SENTATiON
MODELE NX58F5700WS
COMPOSANTSDELATABLEDECUlSSON
Grillesenfonte@aisseset continues
-*Grilledubr_leurgauche
-*Grilledubr_leurcentral
-*Grilledubr_leurdroit
Remarque:lesgrillesde gaucheetdedreitesentinterchangeables.
©
............._[_ii_udace plate
S-_ i
0 ........_Ugne concave
L-_l'usage cemmun
*ChapeauxdesbrOleursde latable decuissonI-
BrOleursdelatablede cuisson
T6tesdesbreleursdelatablede ouisson(5)
ChapeauxdesbrOleursdelatabledecuisson(5)
(nonrepresent6ssouslesbrOleurs)
Electrodes(5)
(nonrepr6senteessouslesbrOleurs)
*Boutonsde commandedesbreleursdela
tablede cuisson(5)
- Cemmandedu brOleuravantgauche
- Commandedu brOleurar@regauche
- Cemmandedu brOleurcentral
- Commandedu brOleurar@redrdt
- Cemmandedu brOleuravantdreit
) I 4AFFICHAGEDUGAZ
VENTILATIONDUFOUR
(centreesousletableaude
commandedufour)
COMPOSANTSDUFOUR
*Grillesdu four(2)
Glisseenrack(l) "
Plancherdufouramovible I
Portedu fouramovible
COMPOSANTSDUFOUR
I Guidede positiondesgrillesdufour
; BrOleurdefourpourgril
' Eclaragedufour(1)
. '
(',_it _,,d I III venmateuraeoonveo[ionUJ
_, R6sstancede oonvecton(non
/III illustre)
/Ill
_i =_'''_z 0411 I BrOleurdefourpourcuisson
COMPOSANTSDUTIROIRCBAUFFE-PLAT
Tiroirchauffe-platamevible(1)
Railsduplateautoumant&extensioncomplete(2)
Elementdechauffageelectrique
(nonrepresent6ssousletiroir)
/
PIEDSDEMISE,&,NIVEAUREGLABLES(4)(nonillustr@)
KITDESUPPORTANTI-BASOULEMENT(1)
Si vous souhaitez acheter un accessoire rep#r# par un ast_risque (*),vous pouvez
le commander aupr_s du centre d'assistance Samsung (1:800-726-7864).
20_ presentat on de votre nouvette cuisini@e
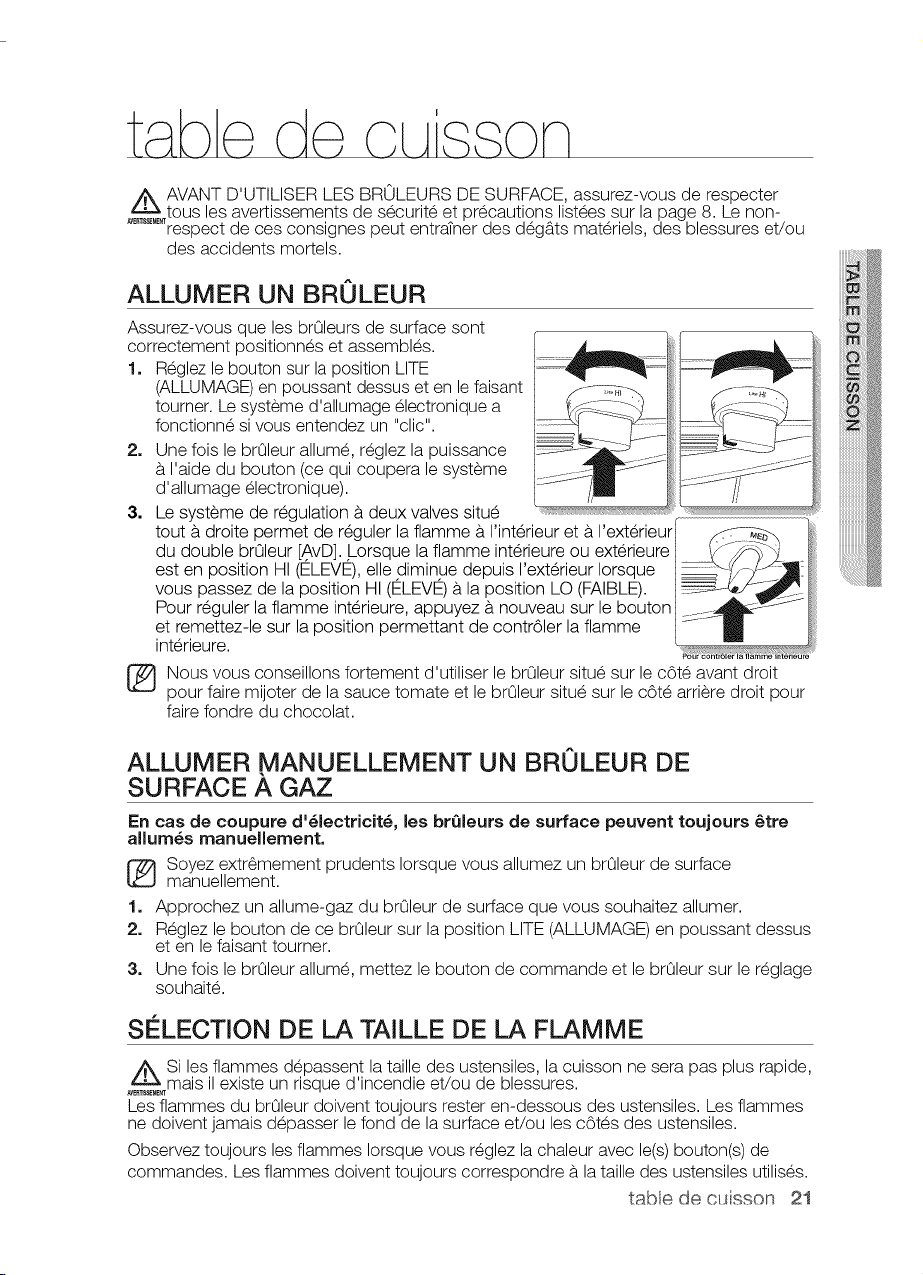
OLA
Z_ AVANT D'UTILISER LES BROLEURS DE SURFACE, assurez-vous de respecter
tousles avertissements de securite et precautions listees sur la page 8. Lenon-
........respect de ces consignes peut entratner des degg.ts materiels, des blessures et/ou
des accidents mortels.
ALLUMER UN BROLEUR
Assurez-vous que les brOleurs de surface sont
correctement positionnes et assembles.
1. Reglezle bouton sur la position LITE
(ALLUMAGE)en poussant dessus eten le faisant
tourner. Lesysteme d'allumage electronique a
fonctionne sivous entendez un "clic".
2,
3.
Unefois le brOleur allume, reglez la puissance
b.I'aide du bouton (ce qui coupera le systeme
d'allumage electronique).
Lesysteme de regulation a.deux valves situe
tout a.droite permet de reguler la flamme a. I'interieur eta. I'exterieur
du double braleur [.AvD]..Lorsque laflamme interieure ou exterieure
est en position HI (ELEVE), elle diminue depuis I'exterieur Iorsque
vous passez de la position HI (FtLEVFt) a.la position LO (FAIBLE).
Pour reguler la flamme interieure, appuyez a.nouveau sur le bouton
et remettez-le sur la position permettant de contr61er la flamme
interieure.
[_ ous vous conseillons fortement d'utiliser le braleur situe sur le cOte avant droit
pour faire mijoter de la sauce tomate et le braleur situe sur le cOtearriere droit pour
faire fondre du chocolat.
ALLUMER .MANUELLEMENT UN BROLEUR DE
SURFACE A GAZ
En cas de coupure d'_lectricit_, les brQleurs de surface peuvent toujours _tre
allum_s manuellement,
[_ oyez extr6mement prudents Iorsque vous allumez un braleur de surface
manuellement.
1. Approchez un allume-gaz du braleur de surface que vous souhaitez allumer.
2. Reglez le bouton de ce braleur sur la position LITE(ALLUMAGE) en poussant dessus
eten le faisant tourner.
3. Unefois lebraleur allume, mettez le bouton de commande et le braleur sur le reglage
souhaite.
SELECTION DE LA TAILLE DE LA FLAMME
_Si les flammes depassent la taille des ustensiles, la cuisson ne sera pas plus rapide,
....... mais il existe un risque d'incendie et/ou de blessures.
Lesflammes du braleur doivent toujours rester en-dessous des ustensiles. Les flammes
ne doivent jamais depasser lefond de la surface et/ou les cOtes des ustensiles.
Observez toujours lesflammes Iorsque vous reglez lachaleur avec le(s) bouton(s) de
commandes. Les flammes doivent toujours correspondre b. lataille des ustensiles utilises.
tabedecusson 21
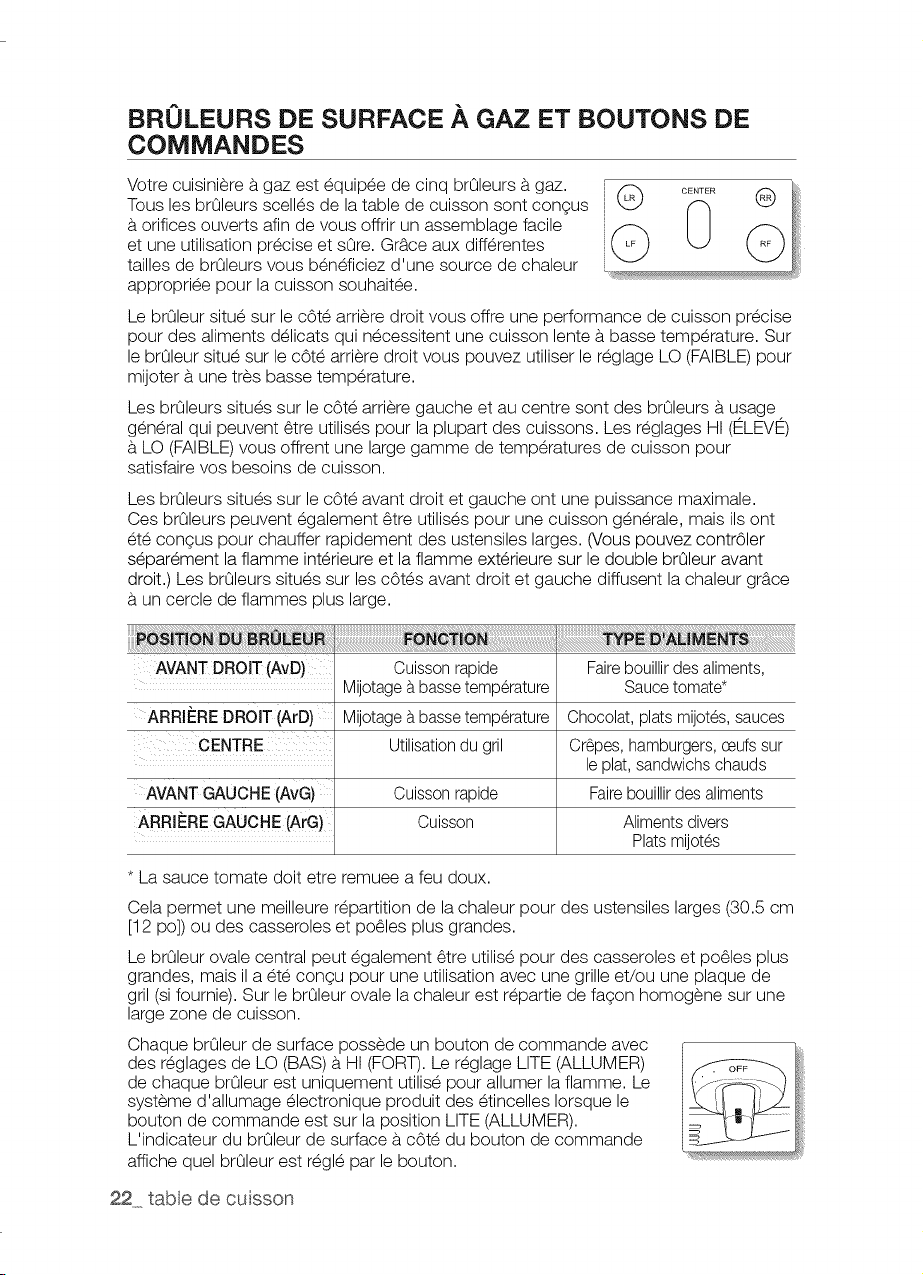
BROLEURS DE SURFACE A GAZ ET BOUTONS DE
COMMANDES
Votre cuisiniere a.gaz est equipee de cinq brOleursb.gaz.
Tousles brOleurs scelles de la table de cuisson sont congus
orifices ouverts afin de vous offrir un assemblage facile
et une utilisation precise et sore. Grace aux differentes
tailles de brOleursvous beneficiez d'une source de chaleur
appropriee pour la cuisson souhaitee.
LebrOleursitue sur le cOtearriere droit vous offre une performance de cuisson precise
pour des aliments delicats qui necessitent une cuisson lente a basse temperature. Sur
le brOleur situe sur le cOte arriere droit vous pouvez utiliser le reglage LO (FAIBLE)pour
mijoter a une tres basse temperature.
Les brOleurssitues sur le cOtearriere gauche etau centre sont des brOleursa usage
general qui peuvent 6tre utilises pour la plupart des cuissons. Les reglages HI (t2LEVE)
a LO(FAIBLE)vous offrent une large gamme de temperatures de cuisson pour
satisfaire vos besoins de cuisson.
Les brOleurssitues sur le cOteavant droit et gauche ont une puissance maximale.
Ces brOleurs peuvent egalement 6tre utilises pour une cuisson generale, mais ils ont
ete congus pour chauffer rapidement des ustensiles larges. (Vous pouvez contr61er
separement la flamme interieure et la flamme exterieure sur le double brOleur avant
droit.) Les brOleurs situes sur les cOtes avant droit et gauche diffusent la chaleur grace
a un cercle de flammes plus large.
AVANTDROIT(AvD) Cuisson rapide
Mijotage a basse temperature
ARRII_RE DROIT(ArD) Mijotage a basse temperature
CENTRE Utilisation dugril
AVANT GAUCHE(AvG)Cuisson rapide
ARRIERE GAUCHE (ArG) Cuisson
Fairebouillirdesaliments,
Sauce tomate*
Chocolat,platsmijot_s, sauces
Cr_pes,hamburgers,eeufssur
le plat,sandwichs chauds
Fairebouillirdesaliments
Aliments divers
Plats mijot_s
* La sauce tomate doit etre remuee a feu doux.
Cela permet une meilleure repartition de la chaleur pour des ustensiles larges (30.5 cm
[12 pc]) ou des casseroles et po61es plus grandes.
LebrOleurovale central peut egalement 6tre utilise pour des casseroles et po61es plus
grandes, mais ila ete congu pour une utilisation avec une grille et/ou une plaque de
gril (si fournie). Sur le brOleurovale lachaleur est repartie de fagon homogene sur une
largezone de cuisson.
Chaque brOleur de surface possede un bouton de commande avec
des reglages de LO (BAS) a HI (FORT). Lereglage LITE (ALLUMER)
de chaque brOleurest uniquement utilise pour allumer la flamme. Le
systeme d'allumage electronique produit des etincelles Iorsque le
bouton de commande est sur la position LITE (ALLUMER).
L'indicateur du brOleur de surface a cOtedu bouton de commande
affiche quel brOleur est regle par le bouton.
22 table de cusson
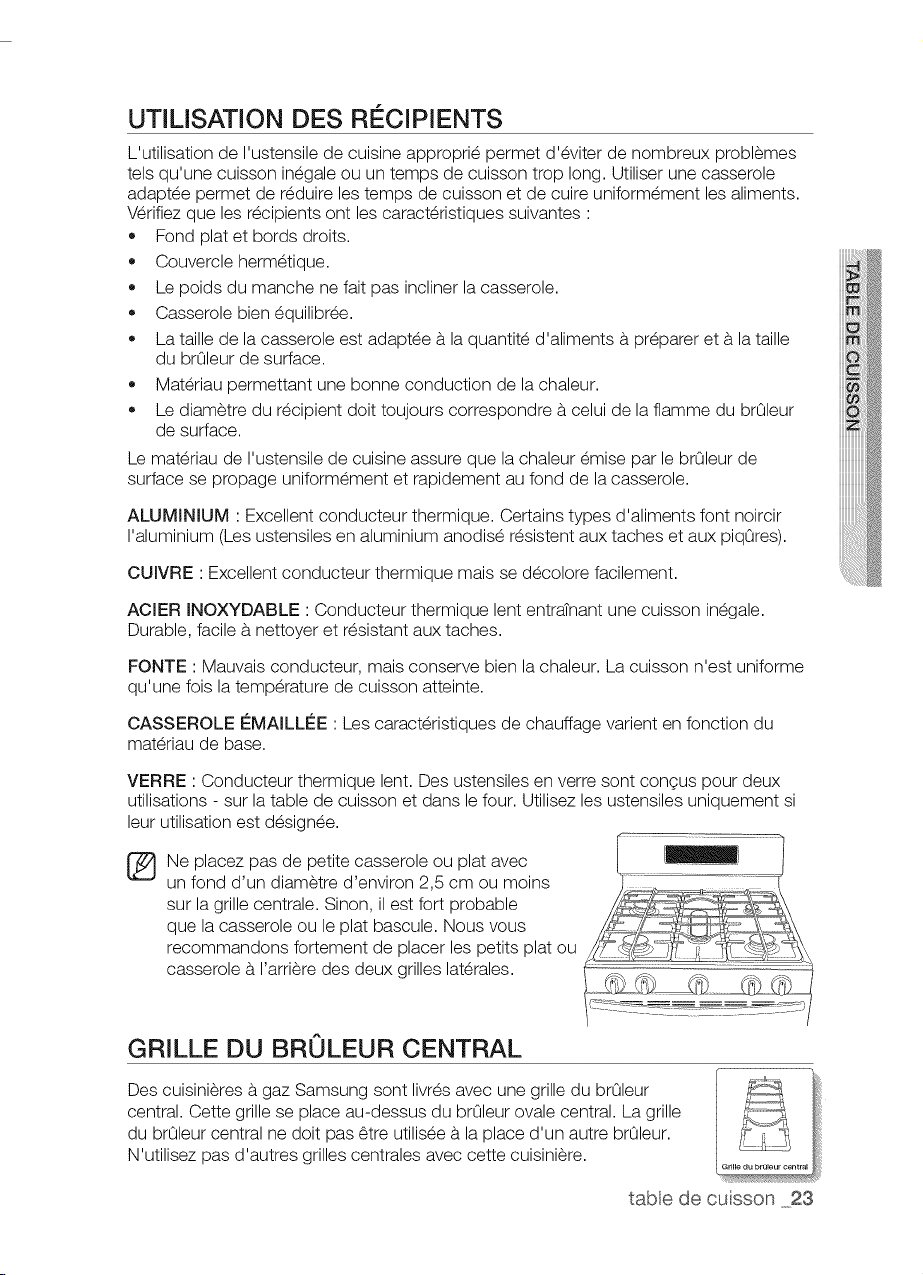
UTILISATION DES RECIPIENTS
L'utilisation de I'ustensile de cuisine approprie permet d'eviter de nombreux problemes
tels qu'une cuisson inegale ou untemps de cuisson trop long. Utiliser une casserole
adaptee permet de reduire les temps de cuisson et de cuire uniformement les aliments.
Wrifiez que les recipients ont les caracteristiques suivantes :
• Fond plat et bords droits.
Couvercle hermetique.
Le poids du manche nefait pas incliner la casserole.
Casserole bien equilibree.
Lataille de la casserole est adaptee ala quantite d'aliments a preparer eta la taille
du brOleur de surface.
Materiau permettant une bonne conduction de la chaleur.
Le diametre du recipient doit toujours correspondre a celui de la flamme du brOleur
de surface.
Lemateriau de I'ustensile de cuisine assure que la chaleur emise par le brOleur de
surface se propage uniformement et rapidement au fond de lacasserole.
ALUMINIUM :Excellent conducteur thermique. Certains types d'aliments font noircir
I'aluminium (Les ustensiles en aluminium anodise resistent aux taches et aux piqOres).
CUIVRE : Excellent conducteur thermique mais se decolore facilement.
ACIER INOXYDABLE : Conducteur thermique lent entratnant une cuisson inegale.
Durable, facile a nettoyer et resistant aux taches.
FONTE : Mauvais conducteur, mais conserve bien la chaleur. Lacuisson n'est uniforme
qu'une fois la temperature de cuisson atteinte.
CASSEROLE EMAILLEE 'Les caracteristiques de chauffage varient en fonction du
materiau de base.
VERRE : Conducteur thermique lent. Des ustensiles enverre sont congus pour deux
utilisations - sur la table de cuisson et dans le four. Utilisez les ustensiles uniquement si
leur utilisation est designee.
Ne placez pas de petite casserole ou plat avec
un fond d'un diametre d'environ 2,5 cm ou moins
sur la grillecentrale. Sinon, il est fort probable
que la casserole ou le plat bascule. Nous vous
recommandons fortement de placer les petits plat ou
casserole a I'arriere des deux grilles laterales.
GRILLE DU BROLEUR CENTRAL
Des cuisinieres b,gaz Samsung sont livres avec une grille du br01eur
central. Cette grille se place au-dessus du brOleur ovale central. La grille
du brOleurcentral ne doit pas 6tre utilisee a la place d'un autre brOleur.
N'utilisez pas d'autres grilles centrales avec cette cuisiniere.
table de cuisson 23
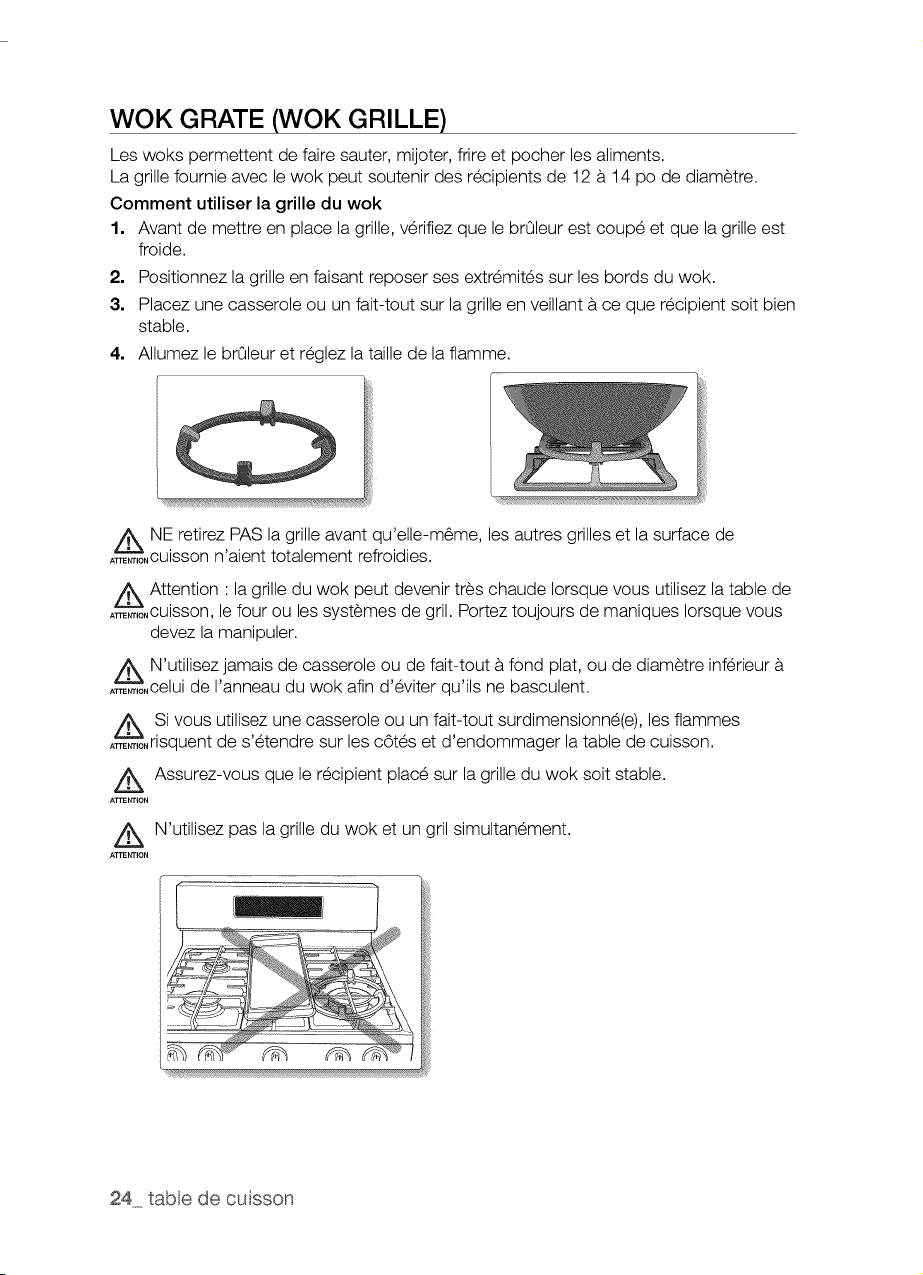
WOK GRATE (WOK GRILLE)
Les woks permettent de faire sauter, mijoter, frire et pocher les aliments.
La grille fournie avec le wok peut soutenir des recipients de 12 a 14 pc de diam_tre.
Comment utiliser la grille du wok
1. Avant de mettre en place la grille, verifiez que le brOleur est coupe et que la grille est
froide.
2. Positionnez la grille en faisant reposer ses extremites sur les bords du wok.
3. Placez une casserole ou unfait-tout sur la grille en veillant a ce que recipient soit bien
stable.
4. Allumez le brOleur et reglez la taille de la flamme.
/_ NE retirez PAS la grille avant qu'elle-m6me, les autres grilles et la surface de
AT%'--_._,.cuisson n'aient totalement refroidies.
/_ Attention : la grille du wok peut devenir tres chaude Iorsque vous utilisez la table de
AT,%--_.,,.cuisson, le four ou les systemes de gril. Portez toujours de maniques Iorsque vous
devez la manipuler.
/_ N'utilisez jamais de casserole ou de fait-tout a fond plat, ou de diametre inferieur
A_%--_.T,.celui de I'anneau du wok afin d'eviter qu'ils ne basculent.
A_o Si vous utilisez une casserole ou un fait-tout surdimensionne(e), les flammes
.risquent de s'etendre sur les c6tes et d'endommager la table de cuisson.
Z_ Assurez-vous que le recipient place sur la grille du wok soit stable.
ATTENTION
_ N'utilisez pas la grille du wok et un gril simultanement.
ATTENTION
4
24 table de cusson
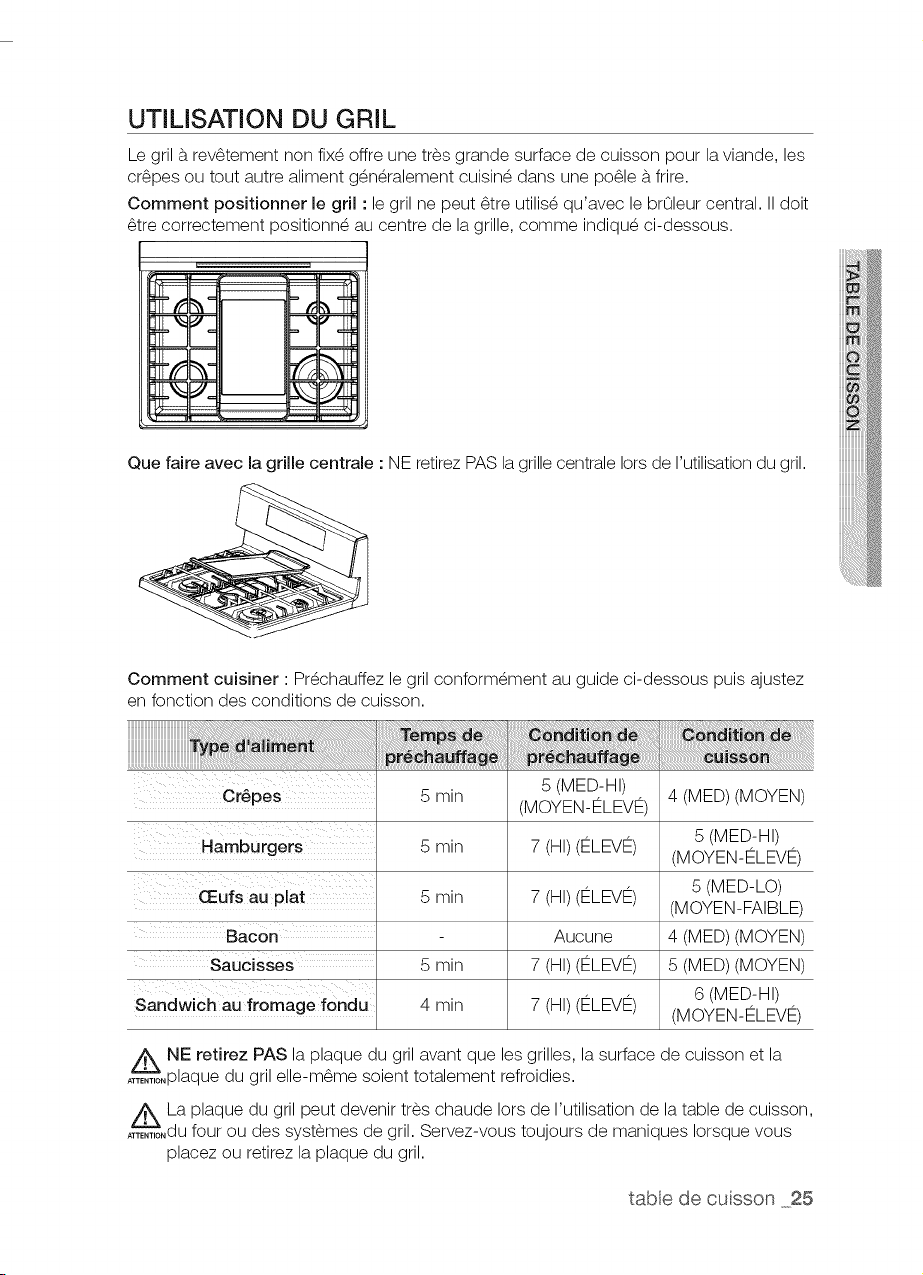
UTILISATION DU GRIL
Legril b,rev6tement non fix_ offre une tres grande surface de cuisson pour la viande, les
cr_pes ou tout autre aliment g_n_ralement cuisin_ dans une po61e b,frire.
Comment positionner le gril : legril ne peut 6tre utilis_ qu'avec le brOleurcentral. II doit
6tre correctement positionn_ au centre de la grille, comme indiqu_ ci-dessous.
Que faire avec la grille centrale : NE retirez PASla grillecentrale lots de I'utilisation du gril.
Comment cuisiner ' Pr_chauffez le gril conform_ment au guide ci-dessous puis ajustez
en fonction des conditions de cuisson.
Cr_pes
Hamburgers
CEufs au plat
Bacon
Saucisses
Sandwich au fromage fondu
5 min
5 min
5 min
5 min
4 min
5 (MED-HI)
(MOYEN-FtLEVFt)
7 (HI)(FtLEVFt)
7 (HI)(FtLEVFt)
Aucune
7 (HI)(FtLEVFt)
7 (HI)(FtLEVFt)
4 (MED)(MOYEN)
5 (MED-HI)
(MOYEN-FtLEVFt)
5 (MED-LO)
(MOYEN-FAIBLE)
4 (MED)(MOYEN)
5 (MED)(MOYEN)
¢ (MED-HI)
(MOYEN-¢LEVFt)
/_k NE retirez PAS la plaque du gril avant que les grilles, la surface de cuisson et la
A%"_I,T,,plaque du gril elle-m6me soient totalement refroidies.
i_k La plaque du gril peut devenir tres chaude Iors de I'utilisation de la table de cuisson,
A%"I,_,,du four ou des systemes de gril. Servez-vous toujours de maniques Iorsque vous
placez ou retirez la plaque du gril.
tabedecuisson 25
_ D_posez la plaque du gril sur la grille centrale avec precaution.
II peut _tre n_cessaire de r_gler les param_tres du grilsi celui-ci est utilis_ pendant
une p_riode prolong_e.
_Du fait qu'il va s_cher avec I'usage, votre gril se d_colorera avec le temps.
[_ pres utilisation et refroidissement de la plaque du gril, placez-la b.I'endroit pr_vu b.
cet effet.
Remarque importante :
NE FAITES PASsurchauffer le gril. Ceci pourrait endommager le rev_tement
non fix_.
N'utilisez PAS d'ustensiles en m_tal pouvant endommager la surface du gril.
Ne vous servez PASdu gril comme d'une planche b.d_couper.
Ne placez et ne rangez PAS d'articles sur la plaque du gril.
N'utilisez PAS le gril apres I'avoir retoum_ sur la grille.
N'utilisez PAS la plaque du gril pour toute autre fonction.
Evitezde cuisiner des aliments tres gras car il pourrait y avoir des
_claboussures de graisse.
Legril peut devenir chaud Iorsque les br01eursautour sont en marche.
26 tabedecusson
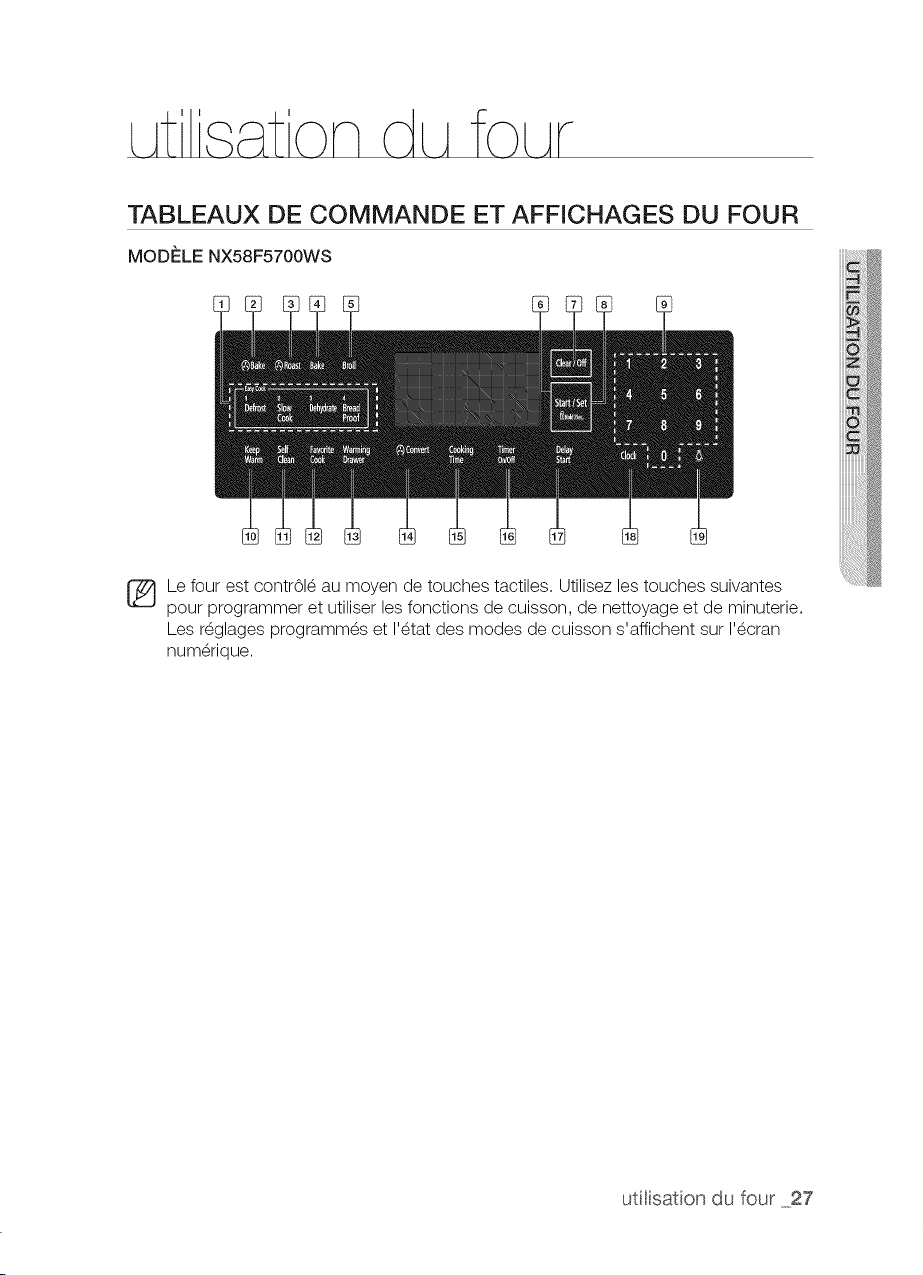
TABLEAUX DE COMMANDE ET AFFICHAGES DU FOUR
MODI_LE NX58F5700WS
Lefour est contr8l_ au moyen de touches tactiles. Utilisez les touches suivantes
pour programmer et utiliser les fonctions de cuisson, de nettoyage et de minuterie.
Les r_glages programm_s et I'_tat des modes de cuisson s'affichent sur I'_cran
num_rique.
utilisaton du four 27
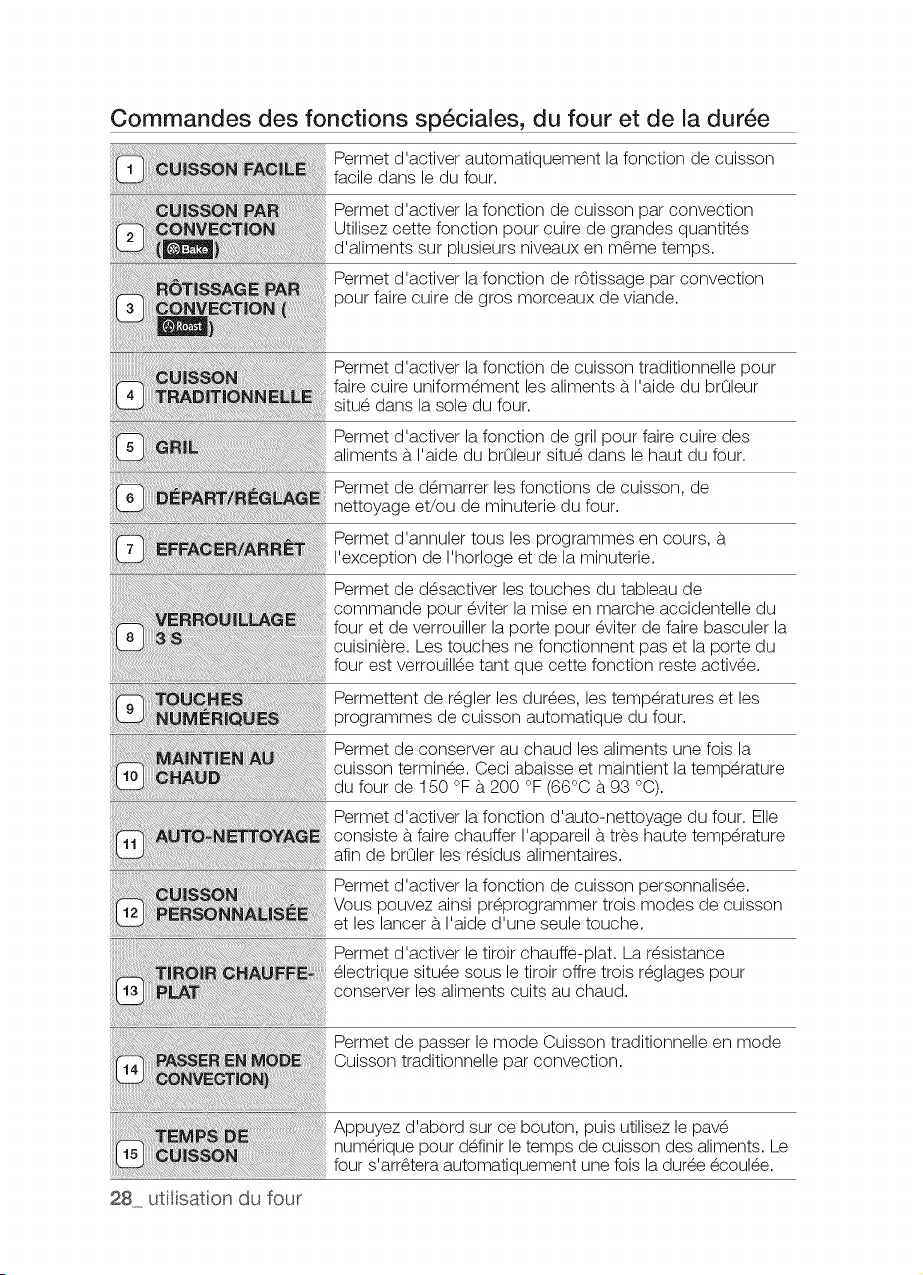
Commandes des fonctions sp6ciales, du four et de la dur6e
Permet d'activer automatiquement la fonction de cuisson
facile dans le du four.
Permet d'activer la fonction de cuisson par convection
Utilisez cette fonction pour cuire de grandes quantit_s
d'aliments sur plusieurs niveaux en m_me temps.
Permet d'activer la fonction de r6tissage par convection
pour faire cuire de gros morceaux deviande.
Permet d'activer la fonction de cuisson traditionnelle pour
faire cuire uniform_ment les aliments b.I'aide du brOleur
situ_ dans la sole du four.
Permet d'activer la fonction de gril pour faire cuire des
aliments b.I'aide du brOleursitu_ dans le haut du four.
Permet de d_marrer les fonctions de cuisson, de
nettoyage et/ou de minuterie du four.
Permet d'annuler tous les programmes en cours, b.
I'exception de I'horloge et de la minuterie.
Permet de d_sactiver les touches du tableau de
commande pour _viter lamise en marche accidentelle du
four et de verrouiller laporte pour _viter de faire basculer la
cuisini_re. Lestouches ne fonctionnent pas et la porte du
four est verrouill_e tant que cette fonction reste activ_e.
Permettent de r_gler les duties, les temp@atures et les
programmes de cuisson automatique du four.
Permet de conserver au chaud les aliments une fois la
cuisson termin_e. Ceci abaisse et maintient la temp@ature
du four de 150 °F b. 200 °F (66°C b.93 °C).
Permet d'activer la fonction d'auto-nettoyage du four. Elle
consiste b.faire chauffer I'appareil b. tres haute temp@ature
afin de brOler les r_sidus alimentaires.
Permet d'activer la fonction de cuisson personnalis_e.
Vous pouvez ainsi pr_programmer trois modes de cuisson
et les lancer b. I'aide d'une seule touche.
Permet d'activer le tiroir chauffe-plat. La r_sistance
electrique situ_e sous le tiroir offre trois r_glages pour
conserver les aliments cuits au chaud.
Permet de passer le mode Cuisson traditionnelle en mode
Cuisson traditionnelle par convection.
Appuyez d'abord sur ce bouton, puis utilisez le pav_
num@ique pour d_finir le temps de cuisson des aliments. Le
four s'arr_tera automatiquement une fois la dur_e _coul_e.
28 utilisaton du four
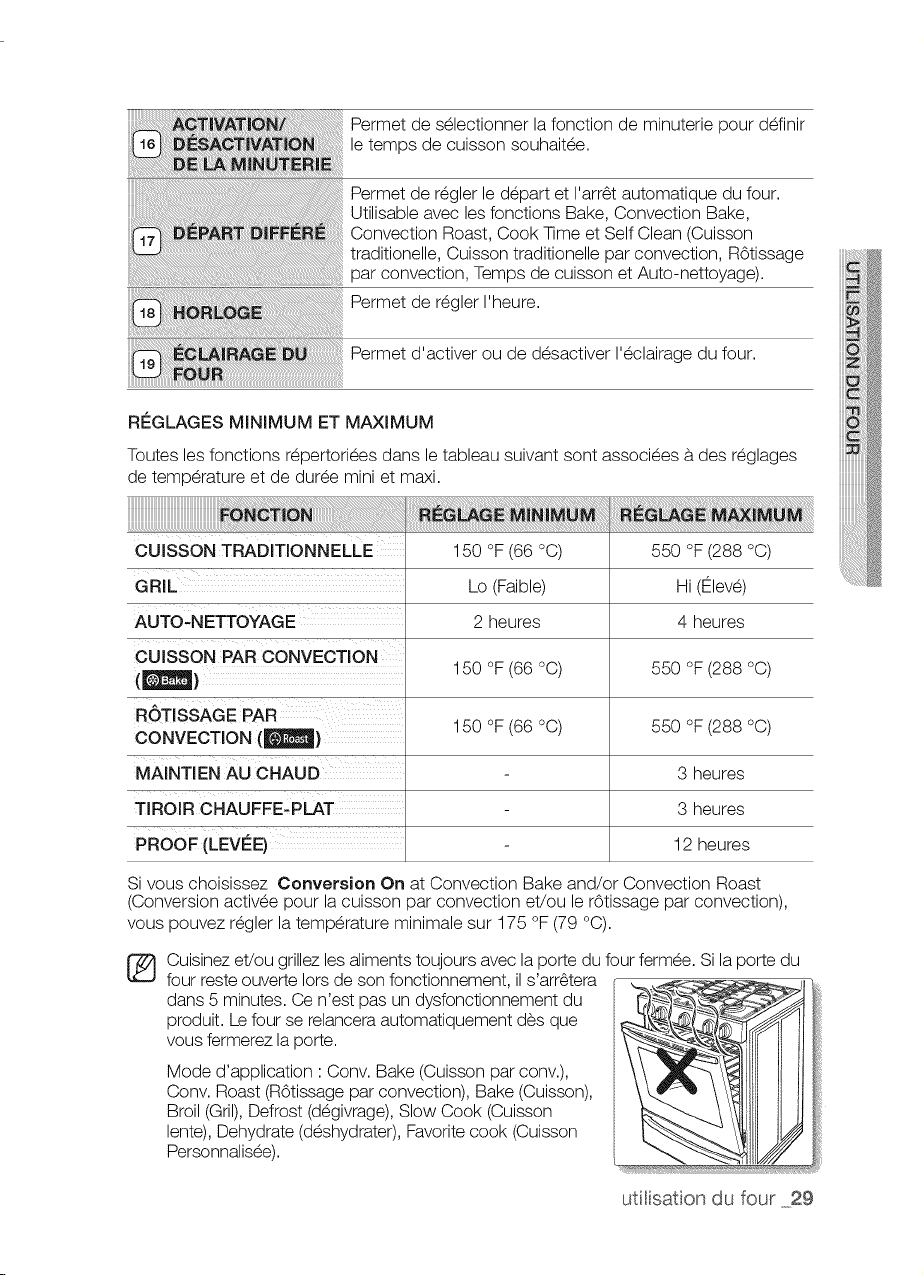
Permetdeselectionnerlafonctiondeminuteriepourdefinir
letempsdecuissonsouhaitee.
PermetdereglerledepartetI'arr6tautomatiquedufour.
UtilisableaveclesfonctionsBake,ConvectionBake,
ConvectionRoast,CookTimeetSelfClean(Cuisson
traditionelle,Cuissontraditionelleparconvection,ROtissage
parconvection,TempsdecuissonetAuto-nettoyage).
PermetdereglerI'heure.
Permetd'activeroudedesactiverI'eclairagedufour.
R#:GLAGESMiNiMUMETMAXIMUM
Touteslesfonctionsrepertorieesdansletableausuivantsontassocieesb.des reglages
detemperature et de duree mini et maxi.
CUISSON TRADITiONNELLE
GRiL
AUTO-N ETTOYAGE
CUiSSON PAR CONVECTION
ROTISSAGE PAR
CONVECTION (_)
MAINTiEN AU CHAUD
TiROiR CHAUFFE-PLAT
PROOF (LEVE_E)
150 °F (66 °C) 550 °F (288 °C)
Lo (Faible) Hi(t21eve)
2 heures 4 heures
150 °F (66 °C)
150 °F (66 °C)
550 °F (288 °C)
550 °F (288 °C)
3 heures
3 heures
12 heures
Si vous choisissez Conversion On at Convection Bake and/or Convection Roast
(Conversion activee pour la cuisson par convection et/ou le rOtissage par convection),
vous pouvez regler la temperature minimale sur 175 °F(79 °C).
Cuisinez et/ou grillezles aliments toujours avec la porte dufour fermee. Si la porte du
four resteouverte Iors deson fonctionnement, il s'arr6tera
dans 5 minutes. Ce n'est pas undysfonctionnement du
produit. Lefour se relancera automatiquement des que
vous fermerez la porte.
Mode d'application :Conv. Bake (Cuisson parconv.),
Conv. Roast (ROtissagepar convection), Bake (Cuisson),
Broil (Gril), Defrost (degivrage),Slow Cook (Cuisson
lente), Dehydrate (deshydrater), Favoritecook (Cuisson
Personnalisee).
utilisaton du four 29
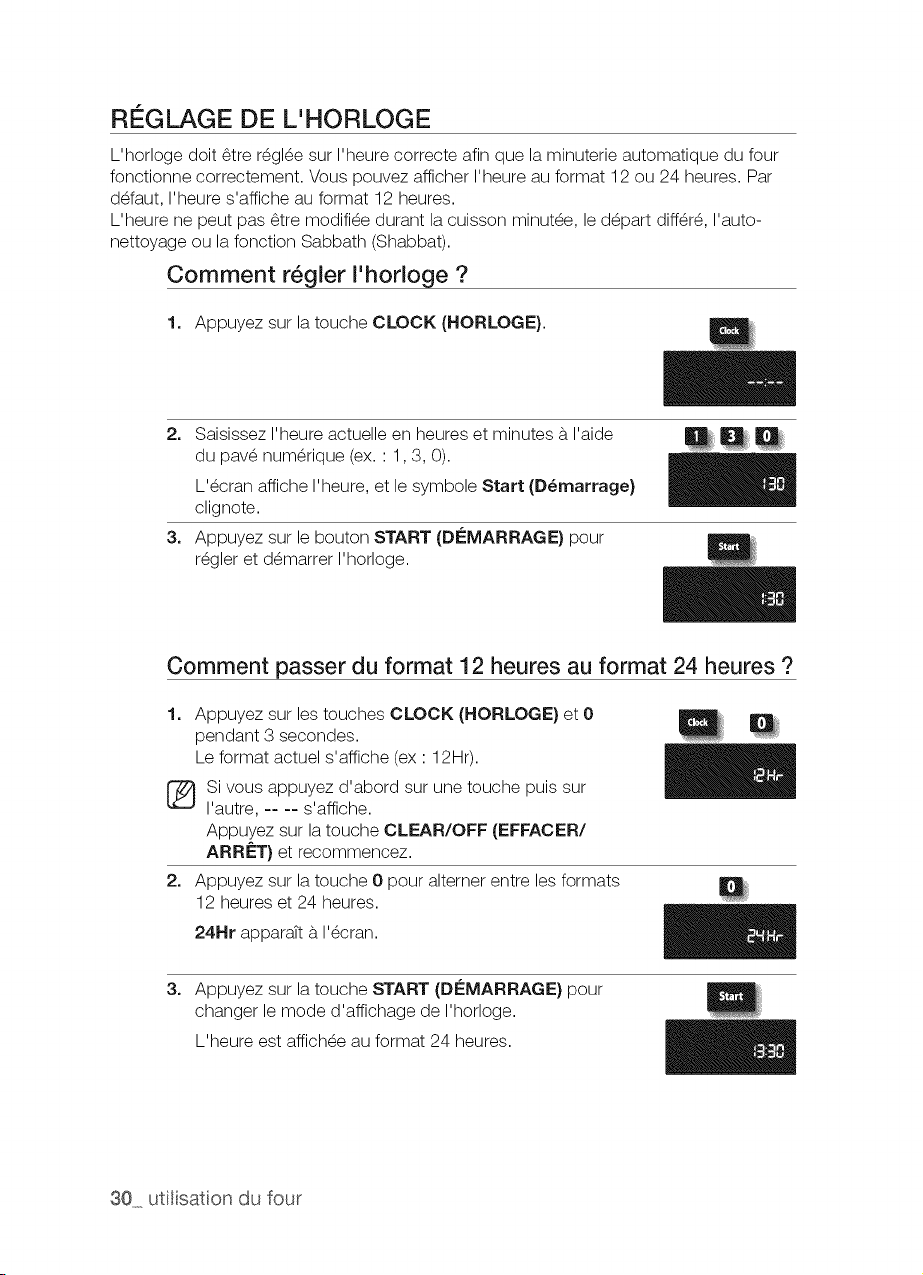
REGLAGE DE L'HORLOGE
L'horloge doit _tre r_gl_e sur I'heure correcte afin que la minuterie automatique du four
fonctionne correctement. Vous pouvez afficher I'heure au format 12 ou 24 heures. Par
d_faut, I'heure s'affiche au format 12 heures.
L'heure ne peut pas _tre modifi_e durant la cuisson minut_e, le d_part diff@_, I'auto-
nettoyage ou la fonction Sabbath (Shabbat).
Comment r6gler I'horloge ?
1. Appuyez sur la touche CLOCK (HORLOGE}.
2. Saisissez I'heure actuelle en heures et minutes b.I'aide
du pav_ num@ique (ex. : 1,3, 0).
L'_cran affiche I'heure, et le symbole Start (D6marrage}
clignote.
3. Appuyez sur le bouton START (Di£MARRAGE} pour
r_gler et d_marrer I'horloge.
I
Comment passer du format 12 heures au format 24 heures ?
1. Appuyez sur les touches CLOCK (HORLOGE} et 0
pendant 3 secondes.
Leformat actuel s'affiche (ex ' 12Hr).
®
2_
Si vous appuyez d'abord sur une touche puis sur
I'autre, -- -- s'affiche.
Appuyez sur la touche CLEAR/OFF (EFFACER/
ARRf=T} et recommencez.
Appuyez sur la touche 0 pour alterner entre les formats
12 heures et 24 heures.
24Hr apparaTtb.I'_cran.
3_ Appuyez sur la touche START (Di£MARRAGE} pour
changer lemode d'affichage de I'horloge.
L'heure est affich_e au format 24 heures.
30 utiIisaton du four
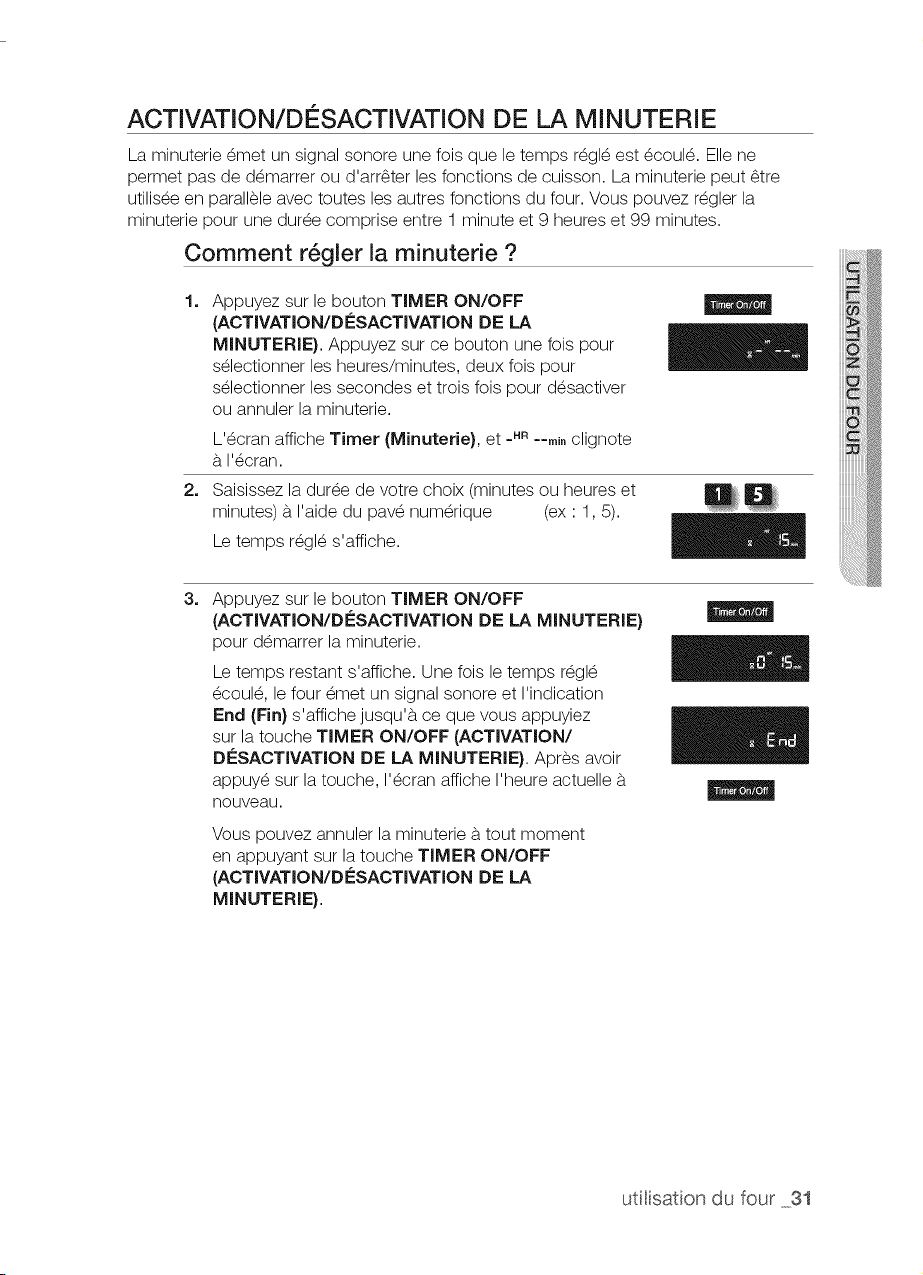
ACTIVATION/DI SACTIVATION DE LA MINUTERIE
La minuterie _met un signal sonore une fois que le temps r_gleest _coul_. Elle ne
permet pas de d_marrer ou d'arr_ter les fonctions de cuisson. La minuterie peut _tre
utilis_e en parall_le avec toutes les autres fonctions du four. Vous pouvez r_gler la
minuterie pour une dur_e comprise entre 1 minute et 9 heures et 99 minutes.
Comment r6gler la minuterie ?
1=
2=
Appuyez sur le bouton TIMER ON/OFF
(ACTIVATION/Di_SACTIVATION DE LA
MINUTERIE}. Appuyez sur ce bouton une his pour
s_lectionner les heures/minutes, deux fois pour
s_lectionner les secondes et trois fois pour d_sactiver
ou annulet la minuterie.
L'_cran affiche Timer (Minuterie}, et =HR==rnJnclignote
b.I'_cran.
Saisissez la dur_e de votre choix (minutes ou heures et
minutes) b.I'aide du pav_ num@ique (ex ' 1,5).
Le temps r_gl_ s'affiche.
3=
Appuyez sur le bouton TIMER ON/OFF
(ACTIVATION/Di_SACTIVATION DE LA MINUTERIE}
pour demarrer la minuterie.
Le temps restant s'affiche. Unefois le temps r_gl_
_coul_, lefour _met un signal sonore et I'indication
End (Fin) s'affiche jusqu'b, ce que vous appuyiez
sur la touche TIMER ON/OFF (ACTIVATION/
Di_SACTIVATION DE LA MINUTERIE}. Apres avoir
appuy_ sur latouche, I'_cran affiche I'heure actuelle b.
nouveau.
Vous pouvez annuler la minuterie b.tout moment
en appuyant sur la touche TIMER ON/OFF
(ACTIVATION/DESACTIVATION DE LA
MINUTERIE}.
utilisation du four 31
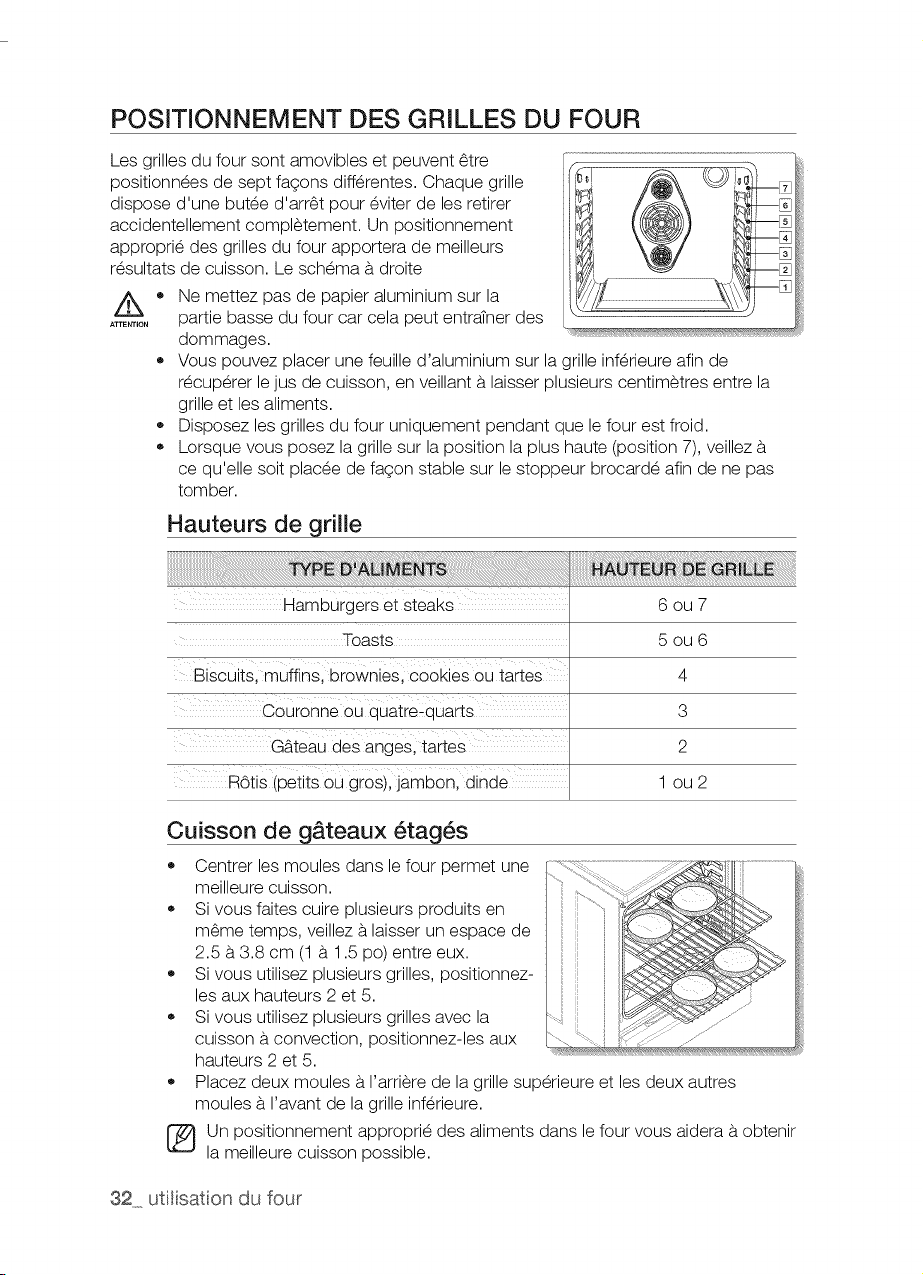
POSITIONNEMENT DES GRILLES DU FOUR
Les grilles du four sont amovibles et peuvent 6tre
positionnees de sept fagons differentes. Chaque grille
dispose d'une butee d'arr6t pour eviter de les retirer
accidentellement completement. Un positionnement
approprie des grilles du four apportera de meilleurs
resultats de cuisson. Le schema b.droite
• Ne mettez pas de papier aluminium sur la
......... partie basse du four car cela peut entratner des
dommages.
Vous pouvez placer une feuille d'aluminium sur la grille inferieure afin de
recup@er le jus de cuisson, enveillant b.laisser plusieurs centimetres entre la
grille et les aliments.
Disposez les grilles du four uniquement pendant que le four est froid.
Lorsque vous posez la grille sur la position la plus haute (position 7), veillez b.
ce qu'elle soit placee de fagon stable sur le stoppeur brocarde afin de ne pas
tomber.
Hauteurs de grille
Hamburgers etsteaks
Toasts
Biscuits. muffins, brownies, cookies ou tartes
Couronne ou auatre-auarts
G_.teau des anges, tartes
ROtis(petlts ou gros), jamDon, alnae
6ou7
5ou6
4
3
2
1 ou2
Cuisson de g&teaux _tag_s
®
®
®
®
®
®
Centrer les moules dans le four permet une
meilleure cuisson.
Si vous faites cuire plusieurs produits en
m6me temps, veillez b.laisser unespace de
2.5 b. 3.8 cm (1b. 1.5 po) entre eux.
Si vous utilisez plusieurs grilles, positionnez-
les aux hauteurs 2 et 5.
Si vous utilisez plusieurs grilles avec la
cuisson b. convection, positionnez-les aux
hauteurs 2 et 5.
Placez deux moules b. I'arriere de la grille superieure et les deux autres
moules b.I'avant de la grille inferieure.
Un positionnement approprie des aliments dans le four vous aidera b.obtenir
la meilleure cuisson possible.
32 utiiisaton du four
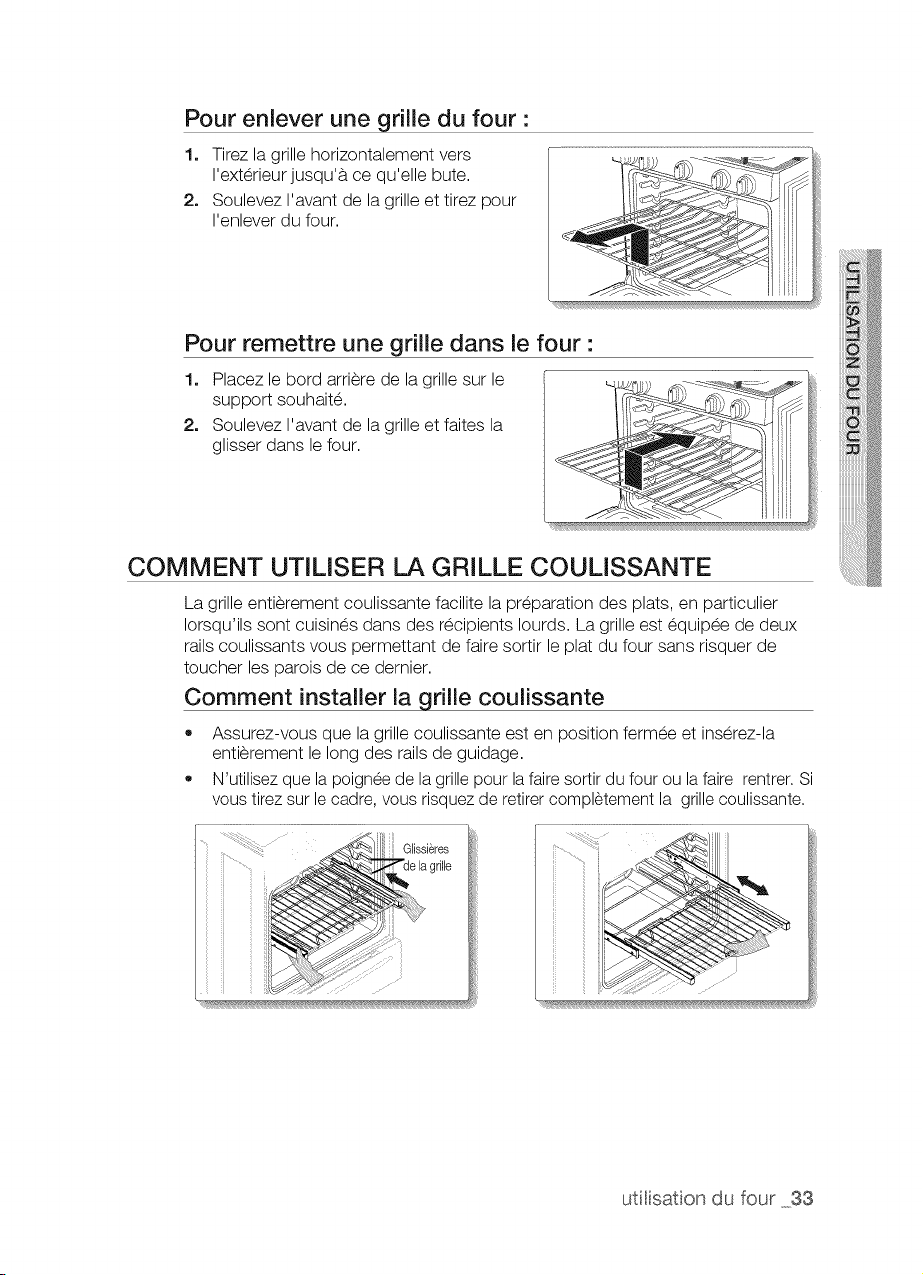
Pour enlever une grille du four"
1. Tirezla grille horizontalement vers
I'exterieur jusqu'a ce qu'elle bute.
2. Soulevez I'avant de la grille et tirez pour
I'enlever du four.
Pour remettre une grille darts le four •
1. Placez le bord arriere de la grille sur le
support souhaite.
2. Soulevez I'avant de la grille et faites la
glisser dans le four.
COMMENT UTILISER LA GRILLE COULISSANTE
La grille entierement coulissante facilite la preparation des plats, en particulier
Iorsqu'ils sont cuisines dans des recipients Iourds. La grilleest equipee de deux
railscoulissants vous permettant defaire sortir le plat du four sans risquer de
toucher les parois de ce demier.
Comment installer la grille coulissante
• Assurez-vous que la grille coulissante est en position fermee et inserez-la
entierement le long des railsde guidage.
N'utilisez que la poignee de la grille pour la fairesortirdu four ou la faire rentrer.Si
voustirez sur le cadre, vous risquezde retirercompletement la grillecoulissante.
utilisaton du four 33
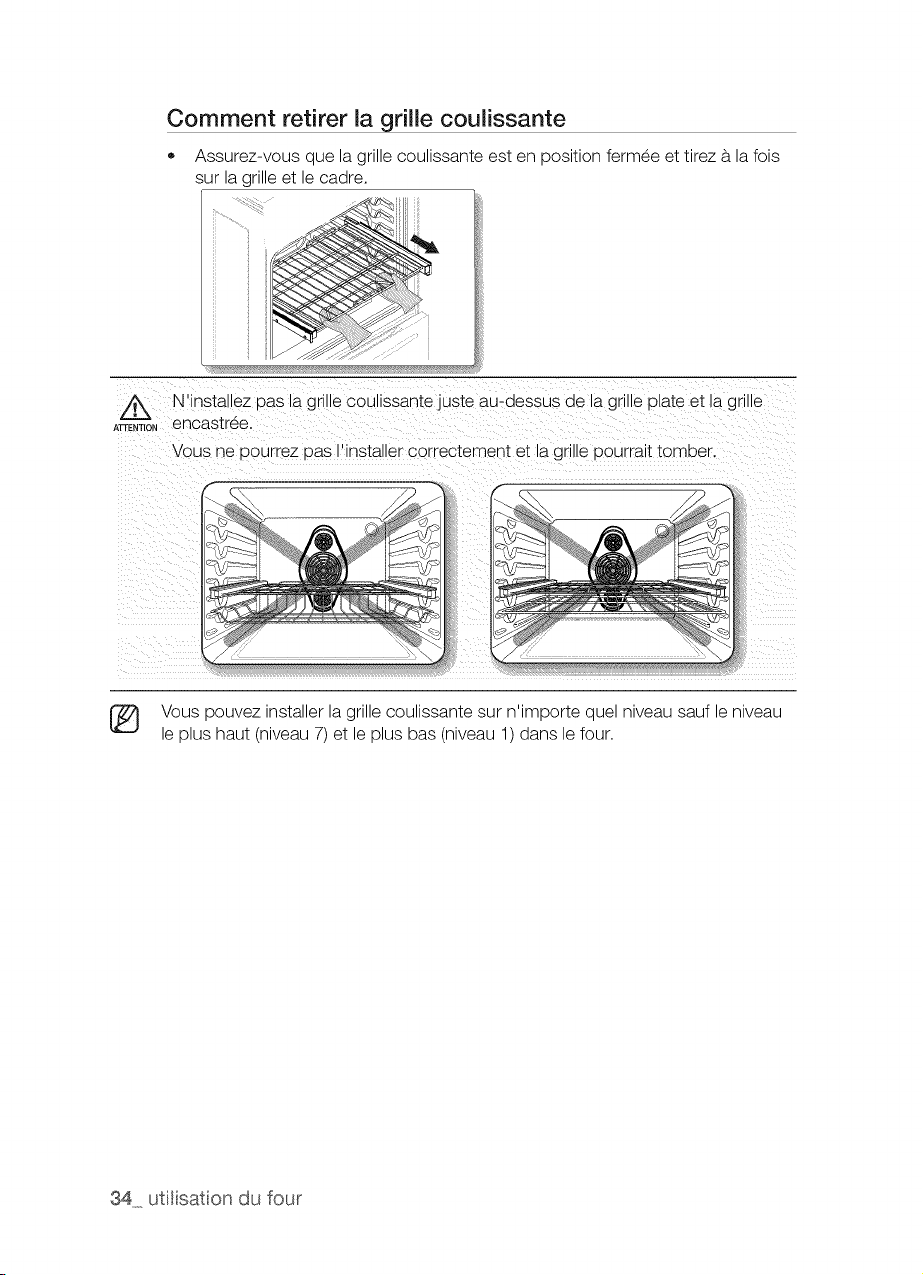
Comment retirer la grille coulissante
• Assurez-vous que la grille coulissante est en position fermee et tirez a la fois
sur la grille et le cadre.
mEN_T_° N'installez oas a gnHe couHssante.uste au-dessus de la gnHeolate et _agnHe
. encastree.
Vous ne uourrez DasI'installer correctement et la gnlle oourrait tomber,
Vous pouvez installer la grille coulissante sur n'importe quel niveau sauf le niveau
le plus haut (niveau 7) et le plus bas (niveau 1) dans le four.
34 utilisaton du four
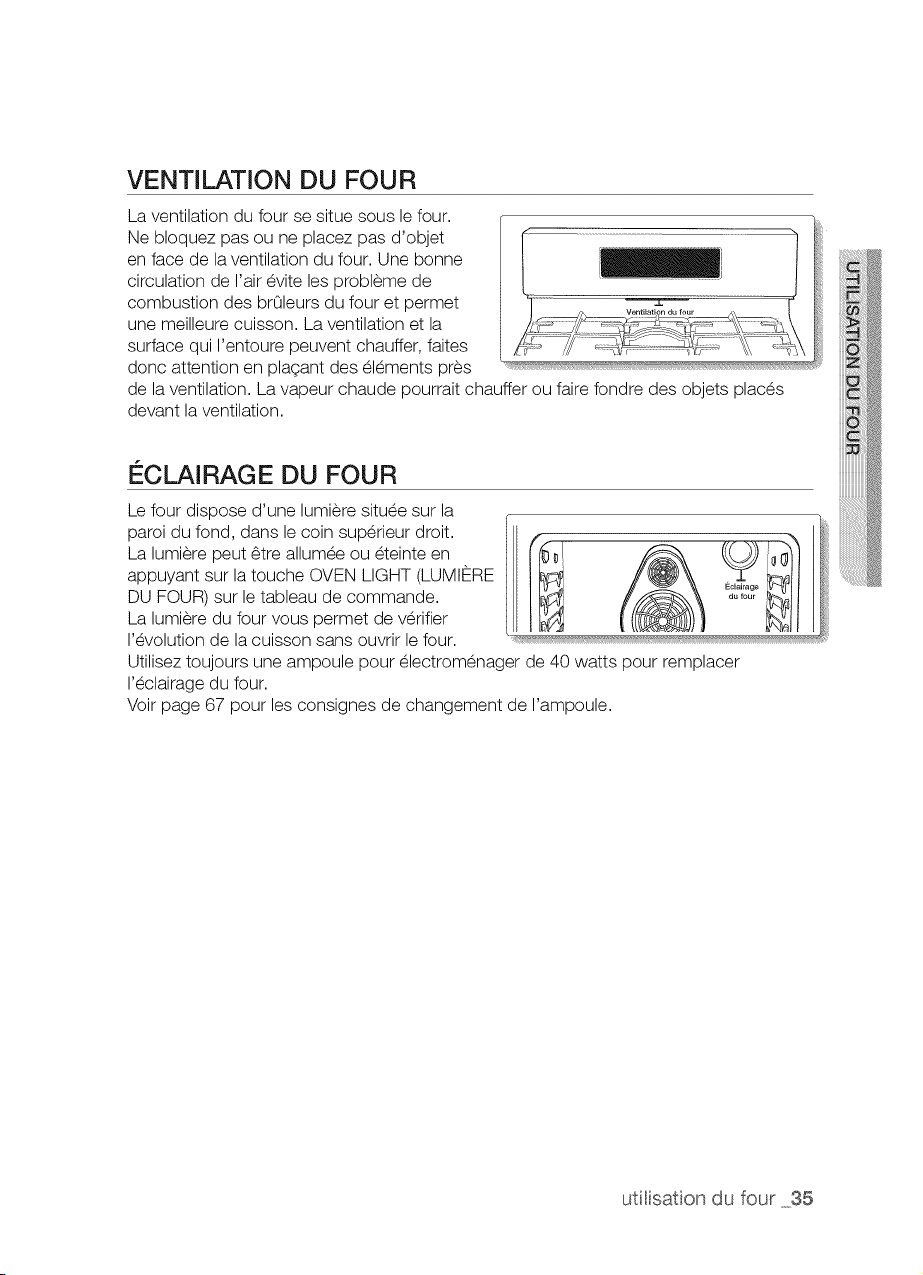
VENTILATION DU FOUR
Laventilation du four se situe sous lefour.
Ne bloquez pas ou ne placez pas d'objet
en face de la ventilation du four. Une bonne
circulation de I'air #vite les probl#me de
combustion des br01eurs du four et permet
une meilleure cuisson. Laventilation et la
surface qui I'entoure peuvent chauffer, faites
donc attention en plagant des #l#ments pr#s
de la ventilation. La vapeur chaude pourrait chauffer ou fairefondre des objets plac#s
devant la ventilation.
ECLAIRAGE DU FOUR
Lefour dispose d'une lumi#re situ#e sur la
paroi du fond, dans le coin sup#rieur droit.
La lumi#re peut 6tre allum#e ou #teinte en
appuyant sur la touche OVEN LIGHT (LUMIt_RE
DUFOUR) sur le tableau de commande.
La lumi#re du four vous permet dev#rifier
I'#volution de la cuisson sans ouvrir le four.
Utiliseztoujours une ampoule pour #lectrom#nager de 40 watts pour remplacer
I'#clairage du four.
Voir page 67 pour les consignes de changement de I'ampoule.
utiiisaton du four 35

FAIRE CUIRE DE LA PATE CRUE
La fonction Bake (Cuisson traditionnelle), vous permet de programmer la cuisson du four
b.une temperature comprise entre 66°C (150 °F)et 288 °C (550 °F).
Comment r6gler la temp6rature du four ?
1=
2.
3=
Positionnez la grille sur I'emplacement de votre choix.
Appuyez sur le bouton BAKE (OUISSON
TRADITIONNELLE). Un signal sonore retentit b.
chaque fois que vous appuyez sur une touche.
Latemperature par d_faut (350 o)clignotent b.I'_cran.
Si la temperature par d_faut est celle que vous d_sirez,
passez b.I'_tape 4.
Appuyez sur les chiffres de la temperature de cuisson
souhait_e (3, 7,5).
4=
Appuyez sur la touche START (DleMARRAGE}.
Lefour s'allume automatiquement et le pr_chauffage
d_marre. L'_cran affiche un • clignotant, ainsi que
150 o, Bake (Cuisson traditionnelle), et lesymbole
du mode de cuisson, jusqu'b, ce que le four atteigne
cette temperature. Ensuite, I'_cran n'affiche que la
temperature actuelle du four.
Lorsque le four atteint la temperature de cuisson
souhait_e, un signal sonore retentit 6 fois.
5=
6=
Placez lesaliments dans le four et fermez la porte.
Lepr_chauffage est tres important pour une bonne
cuisson.
Unefois la cuisson termin_e, sortez les aliments du
four, fermez la porte, etappuyez sur latouche CLEAR/ __
OFF (EFFACER/ARR_'=T).
Lefour s'_teint et I'_cran affiche I'heure du jour.
Pour changer une temperature de cuisson programm_e, appuyez sur la
touche BAKE (CUISSON TRADITIONNELLE}, entrez la nouvelle temperature,
puis appuyez sur la touche START (DI£MARRAGE}. Si la temperature du four
est superieure au nouveau r_glage, un signal sonore retentit 6 fois, puis affiche
les donn_es entr_es. Le four termine la cuisson avec la nouvelle temperature.
36 utilisaton du four
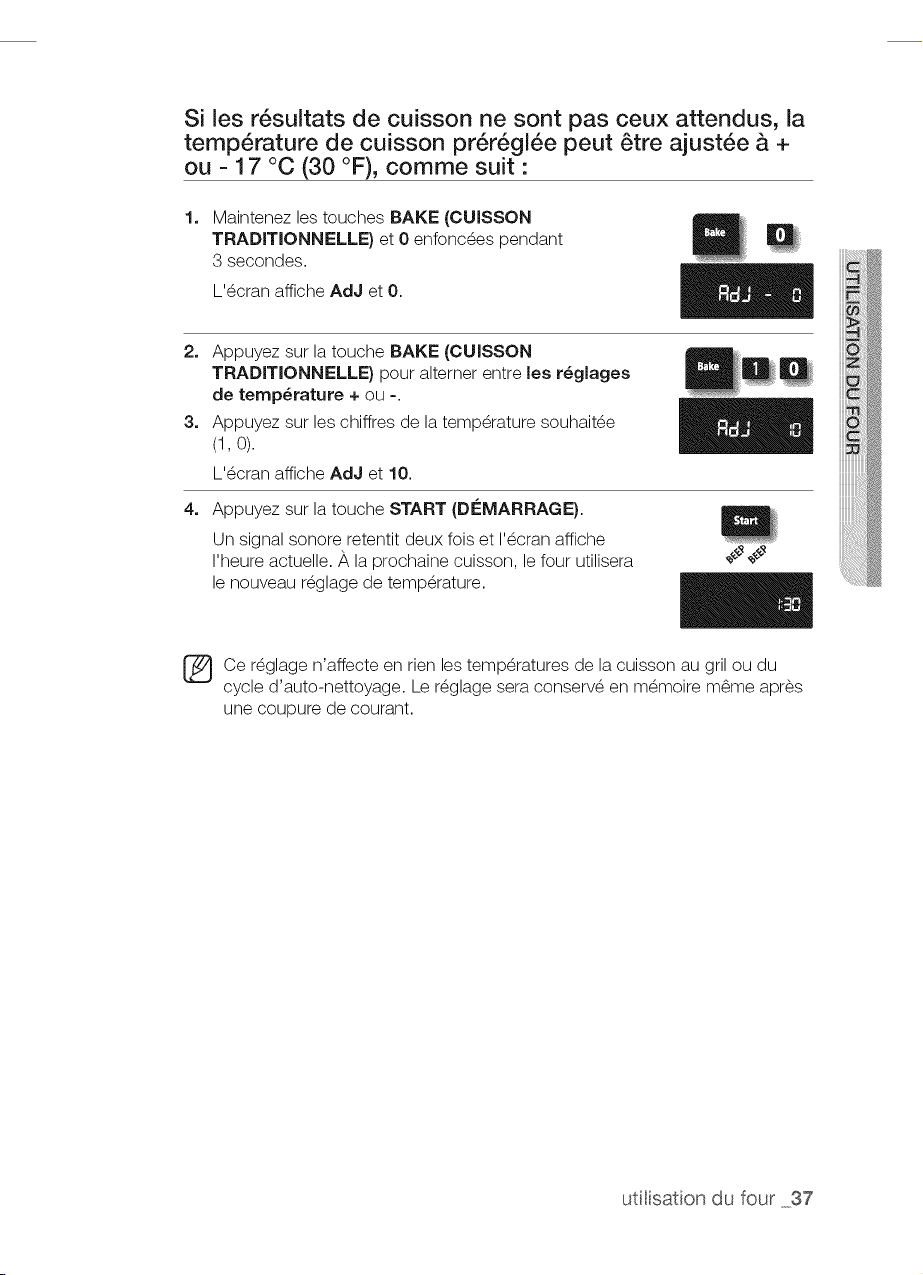
Si les r6sultats de cuisson ne sont pas ceux attendus, la
temp6rature de cuisson pr6r6gl6e peut 6tre ajust6e & +
ou - 17 °C (30 °F), comme suit"
Maintenez les touches BAKE (CUISSON
TRADITIONNELLE} et 0 enfonc_es pendant
3 secondes.
L'_cran affiche AdJ et 0.
2. Appuyez sur la touche BAKE (CUISSON
TRADITIONNELLE} pour alterner entre les r6giages
de temp6rature + ou -.
3. Appuyez sur les chiffres de la temp@ature souhait_e
(1,0).
L'_cran affiche AdJ et 10.
4_ Appuyez sur la touche START (Di_MARRAGE}.
Un signal sonore retentit deux fois et I'_cran affiche
I'heure actuelle. A la prochaine cuisson, le four utilisera
le nouveau r_glage de temp@ature.
[_ e r_glage n'affecte en rien les temp@atures de la cuisson au gril ou du
cycle d'auto-nettoyage. Ler_glage sera conserv_ en m_moire m_me apres
une coupure de courant.
utilisaton du four 37
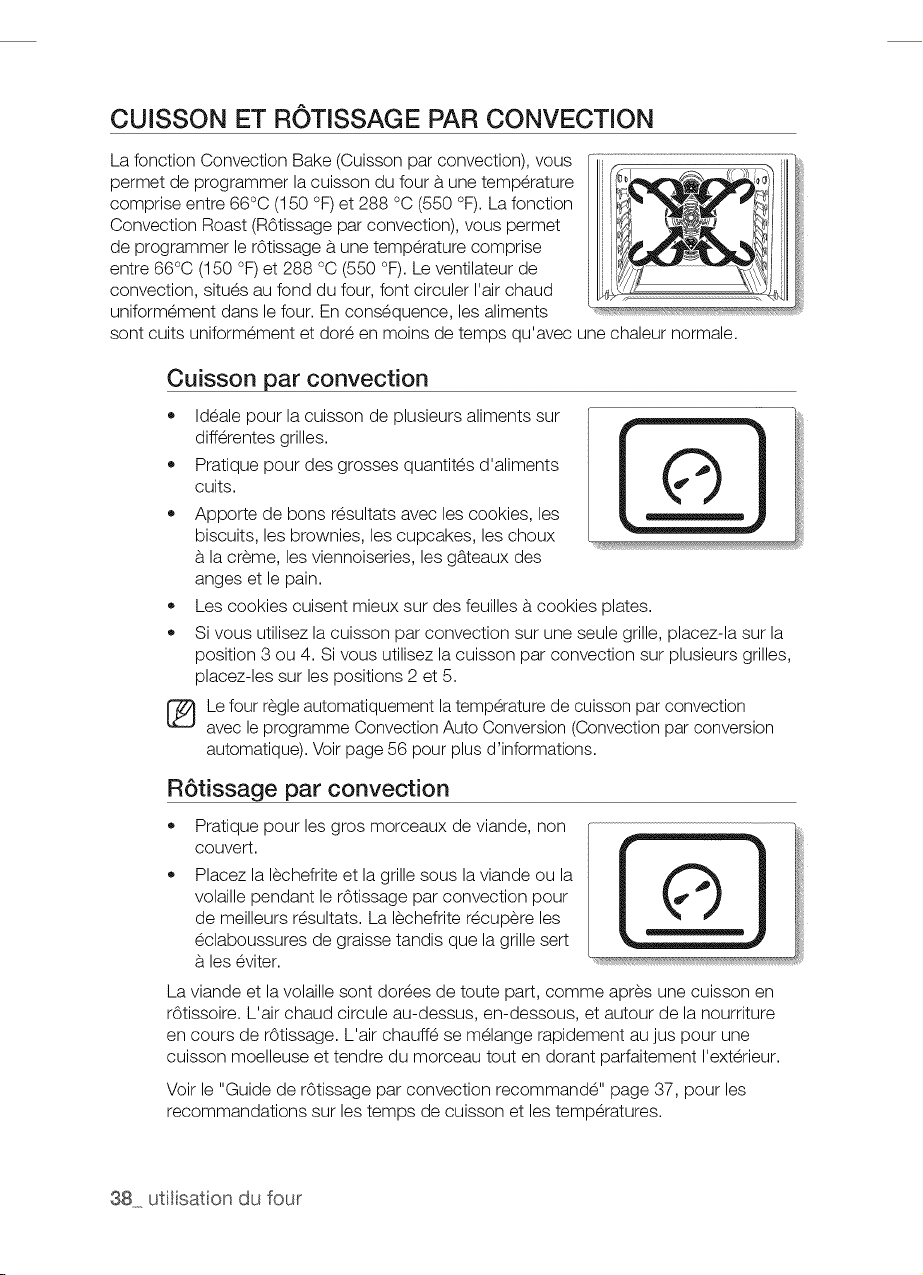
CUISSON ET ROTISSAGE PAR CONVECTION
Lafonction Convection Bake (Cuisson par convection), vous
permet de programmer la cuisson du four a une temperature
comprise entre 66°C (150 °F)et 288 °C (550 °F). Lafonction
Convection Roast (ROtissagepar convection), vous permet
de programmer le rOtissage a une temperature comprise
entre 66°C (150 °F) et 288 °C (550 °F). Leventilateur de
convection, situes au fond du four, font circuler I'air chaud
uniformement dans lefour. Enconsequence, les aliments
sont cuits uniformement et dote en moins de temps qu'avec une chaleur normale.
Cuisson par convection
• Ideale pour la cuisson de plusieurs aliments sur
differentes grilles.
Pratique pour des grosses quantites d'aliments
cuits.
Apporte de bons resultats avec les cookies, les
biscuits, les brownies, les cupcakes, les choux
la creme, les viennoiseries, les g&teaux des
anges et le pain.
Les cookies cuisent mieux sur des feuilles a cookies plates.
Si vous utilisez la cuisson par convection sur une seule grille, placez-la sur la
position 3 ou 4. Si vous utilisez la cuisson par convection sur plusieurs grilles,
placez-les sur les positions 2et 5.
Lefour regleautomatiquement la temperature de cuisson par convection
avec le programme Convection Auto Conversion (Convection par conversion
automatique). Voir page56 pour plus d'informations.
R6tissage par convection
Pratique pour les gros morceaux de viande, non
couvert.
Placez la lechefrite et la grille sous la viande ou la
volaille pendant le rOtissage par convection pour
de meilleurs resultats. La lechefrite recupere les
eclaboussures de graisse tandis que la grille sert
les eviter.
La viande et la volaille sont dorees de toute part, comme apres une cuisson en
rOtissoire. L'air chaud circule au-dessus, en-dessous, et autour de lanourriture
en cours de rOtissage. L'air chauffe se melange rapidement aujus pour une
cuisson moelleuse ettendre du morceau tout en dorant parfaitement I'exterieur.
Voir le "Guide de rOtissage par convection recommande" page 37, pour les
recommandations sur les temps de cuisson et les temperatures.
38 utilisaton du four
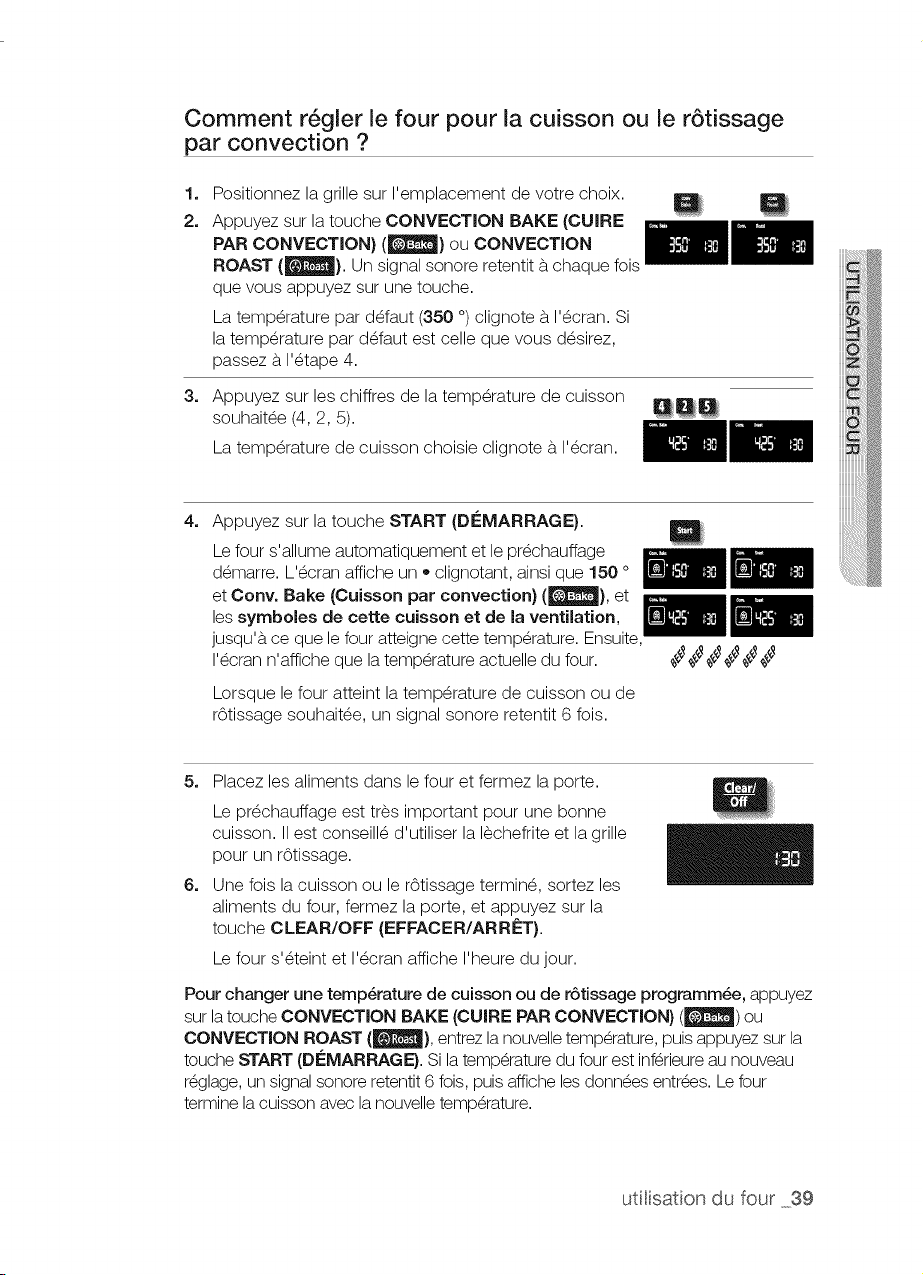
Comment r6gler le four pour la cuisson ou le rStissage
par convection ?
3=
Positionnez lagrille sur I'emplacement de votre choix.
Appuyez sur latouche CONVECTION BAKE (CUIRE
PAR CONVECTION) (_) ou CONVECTION
ROAST (t_J_ml). Un signal sonore retentit a chaque fois
que vous appuyez sur une touche.
La temperature par d_faut (350 o)clignote b.I'_cran. Si
la temperature par d_faut est celle que vous d_sirez,
passez b.I'_tape 4.
Appuyez sur les chiffres de la temperature de cuisson
souhait_e (4, 2, 5).
La temperature de cuisson choisie clignote b. I'_cran.
4= Appuyez sur latouche START (Di_MARRAGE).
Lefour s'allume automatiquement et le pr_chauffage
d_marre. L'ecran affiche un • clignotant, ainsi que 150 o
etCony. Bake (Cuisson par convection) (It'_J_), et
les symboles de cette cuisson et de laventilation,
jusqu'a ce que le four atteigne cette temperature. Ensuite,
I'_cran n'affiche que la temperature actuelle du four.
Lorsque le four atteint latemperature de cuisson ou de
rOtissage souhait_e, un signal sonore retentit 6 fois.
5. Placez les aliments dans le four et fermez la porte.
Le pr_chauffage est tres important pour une bonne
cuisson. II est conseill_ d'utiliser la I_chefrite et la grille
pour un rOtissage.
6. Une fois la cuisson ou le r6tissage termin_, sortez les
aliments du four, fermez la porte, et appuyez sur la
touche CLEAR/OFF (EFFACER/ARR_'=T).
Le four s'_teint et I'_eran affiche I'heure dujour.
######
Pour changer une temperature de cuisson ou de rStissage programm6e, appuyez
sur latouche CONVECTION BAKE (CUIRE PARCONVECTION) (_) ou
CONVECTION ROAST (|), entrez la nouvelle temperature, puisappuyez sur la
touche START (DI-MARRAGE). Sila temperature dufour estinf_rieure aunouveau
r_glage,unsignal sonore retentit 6 fois, puis affiehe les donn_es entr_es. Lefour
terminela cuisson avecla nouvelletemperature.
utilisaton du four 39

Guide de rStissage par convection recommand6
Les temps de r6tissage d_pendent de la taille, du poids, de I'_paisseur, du
r_glage de la temperature de r6tissage ainsi que de vos preferences de cuisson.
Le guide suivant est bas_ sur des aliments sortant du r_frig_rateur.
C6te de porc
(1,4a 2,2 kg)(3
a.5 Ib)
Medium
(Moyen)
Bien cult
Medium
(Moyen)
Bien cult
R6ti
(avecou sans os)
(1.4a2.2 kg) (3a.5Ib)
2c6telettes
177°O
(350OF)
177°O
(350OF)
177°O
(350OF)
177°O
(350OF)
28-33
30-38
35-45
45-55
22-28
30 a 40 rain
au total
40 a 50 rain
au total
45 a 55 rain
au total
26-30
10-16
8-15
18-23
50 a 75 rain
au total
25-30
30-35
25-30
30-35
71 °0
(160°F)
77°0
(160OF)
71 °0
(160OF)
77°0
(160OF)
Beeuf
Filet
.... (1a. 1.4 kg)(2
a.3 Ib)
177°C 77°C
.... (350OF) (160OF)
177°O 77°0
Porc C6tebttes (350°F) (160°F)
(1.3a2,5 cm 177°O 77°0
4c6tebttes
d'@abseur) (350°F) (160°F)
(0.5a 1 pouce) 177°0 77°C
6c6telettes
(350°b) (160°b)
Poulet entier 191 °C 82 °C
.... (11a 15 kg) (2.5 a3.5 Ib) (375oF) (180oF)
Dindeentiere (non fourree*)(8 163 °0 82 °0
11 kg) (10a.16 Ib) (325°F) (180°F)
Dindeentiere (non fourr6e*)(8 163°O 82°0
Volaille
11 kg)(18 a.24Ib) (325°F) (180°F)
Blancs dedinde(1,8a 2.7 kg) 163°O 77°C
(4a.6Ib) (325°F) (160°F)
Poulet de Cornouailbs (400 a 163 °C 82 °C
700 g)(1 a 1.5 Ib) (325°F) (180°F)
Medium 163 °C 71 °C
DemPgigot (Moyen) (325°F) (160°F)
(1,4a 1.8 kg)(3
163 °C 77°C
a.4 Ib) Bien cult
(325OF) (160OF)
Ag neau
Medium 163°O 71°O
Gigot entbr (Moyen) (325°F) (160°F)
(2.7a 32 kg)(6
163 °C 77°C
a.7 Ib) Bien cult
(325OF) (160OF)
* ne dinde farcie n_cessite un temps de cuisson suppl_mentaire. La
temperature minimale n_cessaire pour cuire la farce dans la volaille est de
74 °C (165 °F).
40 utilisaton du four

CUISSON MINUTI E
Lafonction Cook Time (Temps de cuisson) vous permet de programmer une
temp@ature de cuisson pour une dur_e d_termin_e. A la fin du temps programme, le
four s'_teint automatiquement.
,/_ Soyez prudent Iorsque vous utilisez les fonctions Cooking Time (Temps de cuisson)
AT%"_,T,,OU Delay start (D_part diff@_). Ces fonctions sont tres utiles pour la cuisson des
viandes salves ou surgel_es ainsi que de la plupart des fruits et I_gumes. Les
aliments qui se p@iment facilement, comme le lait, les oeufs et les viandes, doivent
_tre conserves au r_frig@ateur avant d'etre places dans le four. M_me refrig@_s,
ces aliments ne doivent pas rester b. I'air ambiant pendant plus d'une heure avant
le d_marrage de lacuisson. De plus, ils doivent _tre retires rapidement du four une
fois la cuisson termin_e. Laconsommation d'aliments g_.t_speut entraTner des
maladies li_es b. un empoisonnement alimentaire.
Comment r6gler le four pour la cuisson minut6e ?
1=
2.
3=
Positionnez lagrille sur I'emplacement de votre choix.
Placez les aliments dans le four et fermez la porte.
Appuyez sur la touche du mode de cuisson souhait_
(ex :BAKE (CUISSON TRADMONNELLE}.
La temp@ature par d_faut (350 o) clignote b.I'_cran. Si
la temp@ature par d_faut est celle que vous d_sirez,
passez b.I'_tape 4.
Appuyez sur les chiffres de la temp@ature de cuisson
souhait_e (3, 7, 5).
La temp@ature de cuisson choisie clignote b. I'_cran.
4. Appuyez sur la touche COOKING TIME (TEMPS DE
CUISSON}.
L'_cran affiche _NR__,,_,.
5=
Appuyez sur les chiffres du temps de cuisson souhait_.
L'_cran affiche le temps choisi, et le symbole Start
(D_marrage) clignote. Vous pouvez r_gler le temps
sur n'importe quelle dur_e comprise entre 1 minute et
9 heures et 99 minutes.
utilisaton du four 41

6=
Appuyez sur la touche START (Di'-=MARRAGE}.
Lefour s'_claire automatiquement et commence le
pr_chauffage. L'6cran affiche un • clignotant, ainsi
que la temperature par d_faut, ou la temperature
choisie, Bake (Cuieson traditionnelle} et le symbole
du mode de cuisson, jusqu'a ce que le four atteigne
cette temperature.
Lorsque le four atteint la temperature d_sir_e, le signal
sonore retentit 6 fois. Lefour commence la cuisson
pour la dur_e d_finie et letemps restant s'affiche.
Pour voir I'heure, maintenez la touche CLOCK
(HORLOGE) enfonc_e. Lorsque vous rel_chez la
touche CLOCK (HORLOGE), I'affichage se r_initialise
et le temps de cuisson restant s'affiche a nouveau.
Lorsque le temps de cuisson est _coul_, le four s'_teint
automatiquement et I'_cran affiche I'heure actuelle.
Pour changer une temp6rature de cuisson programm_e, appuyez sur la
touche BAKE (CUISSON TRADITIONNELLE}, entrez la nouvelle temperature,
puis appuyez sur la touche START (Di£MARRAGE}. Si la temperature du four
est inf_rieure au nouveau r_glage, un signal sonore retentit 6 fois, puis affiche les
donn_es entr_es. Le four termine la cuisson avec la nouvelle temperature.
Pour changer un temps de cuisson programme, appuyez sur la touche
COOKING TIME (TEMPS DE CUISSON), entrez lenouveau temps de cuisson,
puis appuyez sur la touche START (Di£MARRAGE}. Le four continue la cuisson
pour le temps restant du nouveau r_glage.
Si la recette I'indique, enfournez la nourriture une fois le four pr_chauff_. Le
pr_chauffage est important pour une bonne cuisson. Lorsque le four atteint
la temperature souhait_e, un signal sonore retentit 6 fois.
42 ut((isaton du four

CUISSON MINUTI E DIFFI RI E
Labnction Delay Start (D_part differS) vous permet d'utiliser la minuterie pour
commencer et arr_ter automatiquement un autre programme de cuisson (Bake
(Cuisson traditionnelle), Convection Bake (Cuisson par convection), ou Convection
Roast (R6tissage par convection)). Led_part diff_r_ peut _tre r_gl_jusqu'b. 12 heures
avant d'autres cuissons. L'horloge doit _tre r_gl_e b.la bonne heure pour un bon
fonctionnement du d_part differS.
,/_ Soyez prudent Iorsque vous utilisez les fonctions Cooking Time (Temps de cuisson)
ATTE"_,T,,OU Delay start (D_part differS). Ces fonctions sont tres utiles pour la cuisson des
viandes salves ou surgel_es ainsi que de la plupart des fruits et I_gumes. Les
aliments qui se p_riment facilement, comme le lait, les oeufs et les viandes, doivent
_tre conserves au r_frig_rateur avant d'etre places dans lefour. M_me refrig_r_s,
ces aliments ne doivent pas rester b. I'air ambiant pendant plus d'une heure avant
le d_marrage de lacuisson. De plus, ils doivent _tre retires rapidement du four une
fois la cuisson termin_e. Laconsommation d'aliments g_tt_speut entraTner des
maladies li_es b. un empoisonnement alimentaire.
Comment r6gler le four pour la cuisson minut_e diff_r6e ?
1=
2.
3=
Positionnez lagrille sur I'emplacement de votre choix.
Placez les aliments dans le four et fermez la porte.
Appuyez sur la touche du mode de cuisson souhait_
(ex : BAKE (CUISSON TRADITIONNELLE}.
La temperature par d_faut (350 o)Si la temperature par
d_faut est celle que vous d_sirez, passez b.I'_tape 4.
Appuyez sur les chiffres de la temperature de cuisson
souhait_e (3, 7, 5).
4=
Appuyez sur la touche COOKING TIME (TEMPS DE
CUISSON}.
L'6cran affiche la temperature de cuisson s_lectionn_e,
Bake (Cuisson traditionnelle} et _.R --m_..
5=
Appuyez sur les chiffres du temps de cuisson souhait_.
L'_cran affiche le temps de cuisson s_lectionn_. Vous
pouvez r_gler le temps de cuisson pour une dur_e
comprise entre 1 minute et 9 heures 99 minutes.
utilisaton du four 43
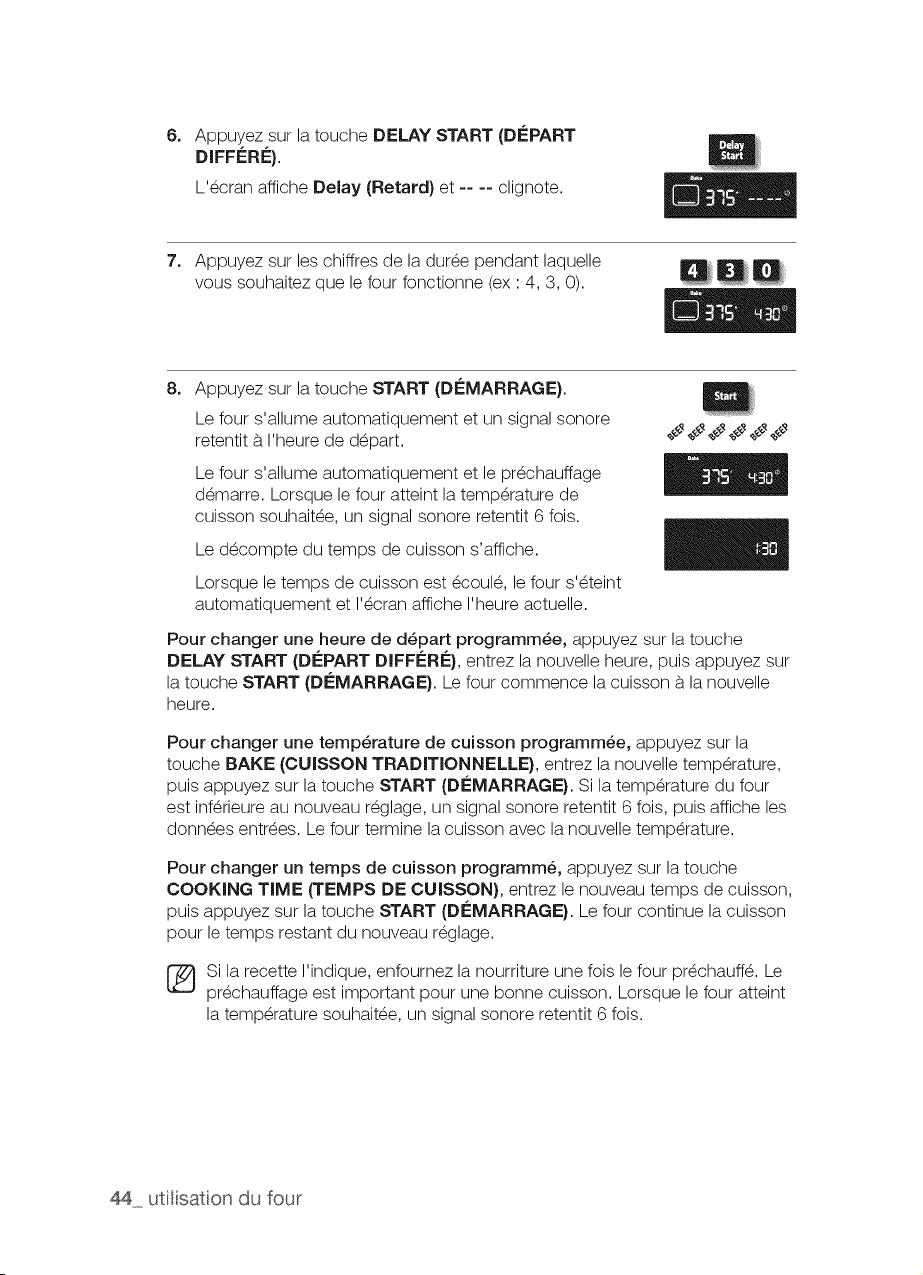
6. Appuyez sur la touche DELAY START (Di£PART
DIFF_:RF:}.
L'_cran affiche Delay (Retard} et .... clignote.
7=
Appuyez sur les chiffres de la dur_e pendant laquelle
vous souhaitez que le four fonctionne (ex ' 4, 3, 0).
8=
Appuyez sur la touche START (Di£MARRAGE}.
Lefour s'allume automatiquement et un signal sonore
retentit b. I'heure de d_part.
Lefour s'allume automatiquement et le pr_chauffage
d_marre. Lorsque lefour atteint la temperature de
cuisson souhait_e, un signal sonore retentit 6 fois.
Led_compte du temps de cuisson s'affiche.
Lorsque le temps de cuisson est _coul_, le four s'_teint
automatiquement et I'_cran affiche I'heure actuelle.
Pour changer une heure de d_part programm_e, appuyez sur latouche
DELAY START (De:PART DIFFC:R¢:}, entrez la nouvelle heure, puis appuyez sur
la touche START (Di£MARRAGE}. Le four commence la cuisson b. la nouvelle
heure.
Pour changer une temp6rature de cuisson programm_e, appuyez sur la
touche BAKE (CUISSON TRADITIONNELLE}, entrez la nouvelle temperature,
puis appuyez sur la touche START (Di£MARRAGE}. Si la temperature du four
est inf_rieure au nouveau r_glage, un signal sonore retentit 6 fois, puis affiche les
donn_es entr_es. Le four termine la cuisson avec la nouvelle temperature.
Pour changer un temps de cuisson programme, appuyez sur la touche
COOKING TIME (TEMPS DE CUISSON}, entrez lenouveau temps de cuisson,
puis appuyez sur la touche START (Di£MARRAGE}. Le four continue la cuisson
pour le temps restant du nouveau r_glage.
Si la recette I'indique, enfournez la nourriture une fois le four pr_chauff_. Le
pr_chauffage est important pour une bonne cuisson. Lorsque le four atteint
la temperature souhait_e, un signal sonore retentit 6 fois.
44 utilisaton du four
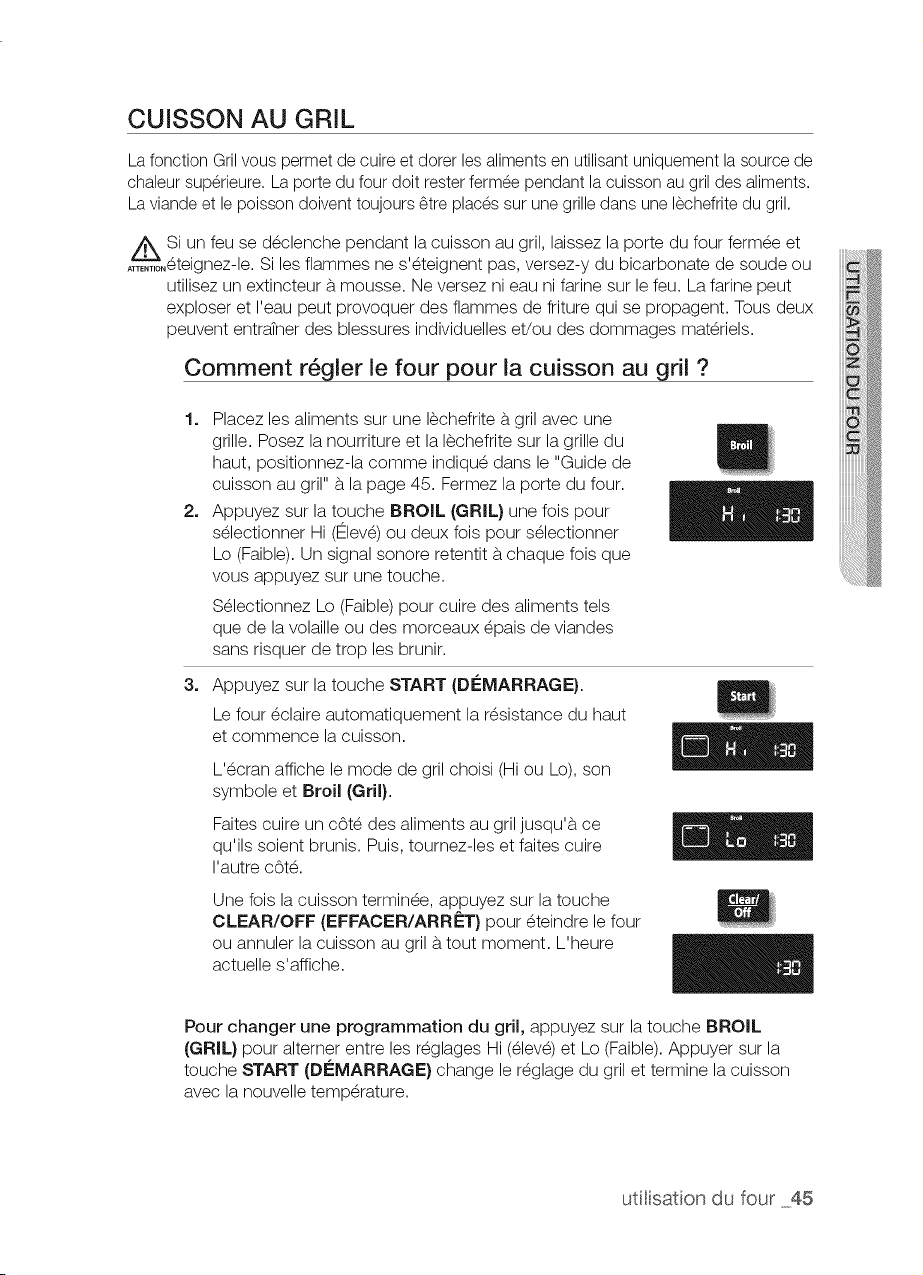
CUISSON AU GRIL
La fonction Gril vous permet de cuire et dorer les alimentsen utilisantuniquement lasource de
chaleur superieure. Laporte dufour doit rester fermee pendant la cuisson augrildes aliments.
La viande etle poisson doivent toujours 6tre places surune grilledans une lechefrite du gril.
A Si un feu se declenche pendant la cuisson au gril, laissez la porte du four fermee et
AT%'_,T,,eteignez-le. Siles flammes ne s'eteignent pas, versez-y du bicarbonate de soude ou
utilisez un extincteur b.mousse. Ne versez ni eau ni farine sur le feu. La farine peut
exploser et I'eau peut provoquer des flammes de friture qui se propagent. Tous deux
peuvent entraTner des blessures individuelles et/ou des dommages materiels.
Comment r6gler le four pour la cuisson au gril ?
2_
3_
Placez les aliments sur une Dchefrite b.gril avec une
grille. Posez la nourriture et la lechefrite sur la grille du
haut, positionnez-la comme indiqu_ dans le "Guide de
cuisson au gril" b.la page 45. Fermez la porte du four.
Appuyez sur la touche BROIL (GRIL} une fois pour
s_lectionner Hi (Ftlev_)ou deux fois pour selectionner
Lo (Faible). Un signal sonore retentit b.chaque fois que
vous appuyez sur une touche.
S_lectionnez Lo (Faible) pour cuire des aliments tels
que de lavolaille ou des morceaux _pais de viandes
sans risquer de trop les brunir.
Appuyez sur la touche START (DleMARRAGE}.
Le four _olaire automatiquement la r_sistance du haut
et commence la cuisson.
L'_cran affiche le mode de grilchoisi (Hi ou Lo),son
symbole et Broil (Gril}.
Faites cuire un c6t_ des aliments au gril jusqu'b, ce
qu'ils soient brunis. Puis, tournez-les et faites cuire
I'autre c6t_.
Une fois la cuisson terminee, appuyez sur la touche
CLEAR/OFF (EFFACER/ARRET) pour _teindre le four
ou annulet la cuisson au gril b.tout moment. L'heure
actuelle s'affiche.
Pour changer une programmation du gril, appuyez sur la touche BROIL
(GRIL} pour alterner entre les r_glages Hi (_lev_) et Lo (Faible). Appuyer sur la
touche START (Di£MARRAGE} change le r_glage du gril et termine la cuisson
avec la nouvelle temperature.
utilisaton du four 45
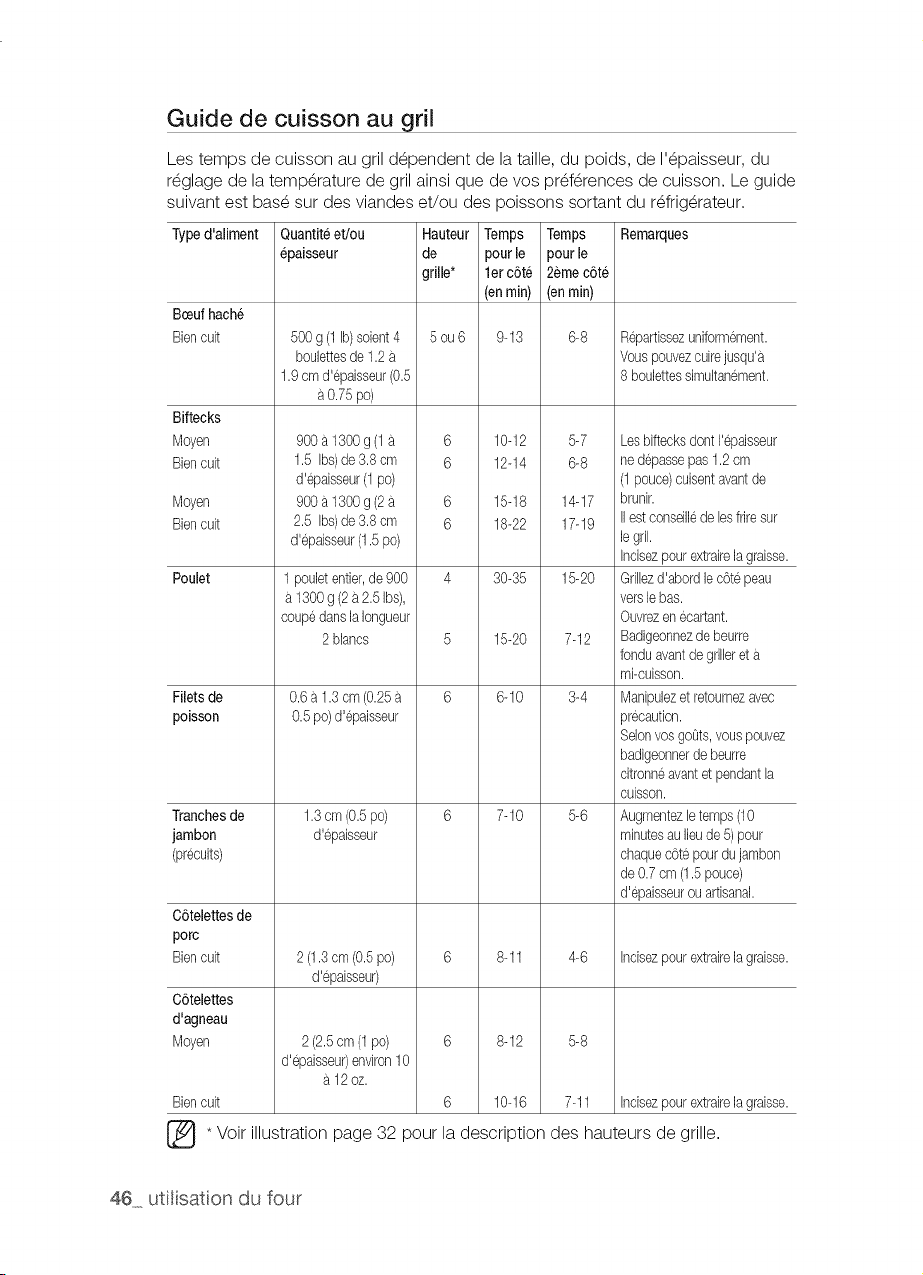
Guide de cuisson au gril
Lestemps de cuisson augril dependent de la taille, du poids, de I'epaisseur, du
reglage de latemp@ature degril ainsi que de vos pref@ences de cuisson. Le guide
suivant est base sur desviandes et/ou des poissons sortant du refrig@ateur.
Typed'aliment
Bceufhache
Biencult
Biftecks
Moyen
Biencult
Moyen
Biencult
Poulet
Filets de
poisson
]'ranchesde
jambon
(precuits)
C6telettesde
porc
Ben cult
C6telettes
d'agneau
Moyen
Bbn cult
Quantiteet/ou Hauteur Temps Temps Remarques
@aisseur de pourle pourle
grille* let c6te 2emec6te
(enrain) (enrain)
500g(1Ib)sobnt4
boulettesde 1.2
1.9cm d'@aisseur(0.5
0.75 po)
900a1300g (1
1.5 Ibs)de 3.8 cm
d'@aisseur(1po)
900a1300g (2
2.5 Ibs)de 3.8 cm
d'@aisseur(1.5po)
5ou6 9-13 6-8
6
6
6
6
1 pouletentler,de 900 4
1300g (2a2.5Ibs),
coupedansla Iongueur
2 blancs 5
R@artissezuniformement.
Vouspouvezcuimjusqu'a
8 boulettessimultanement.
0.6 a 1.3cm(0.25
0.5po)d'@aisseur
1.3cm (0.5po)
d'@aisseur
10-12 5-7 Lesbiftecksdont I'@aisseur
12-14 6-8 ned@assepas1.2cm
(1pouce)cuisentavantde
15-18 14-17 brunir.
18-22 17-19 IIestconseillede lesfriresur
legril.
Incisezpour extrairela graisse.
30-35 15-20 Grillezd'abordlec6te peau
verslebas.
Ouvrezenecartant.
15-20 7-12 Badigeonnezdebeurre
fonduavantde grilbret
mi-cuisson.
6-10 3-4 Manipubzet retournezavec
precaution.
Selonvos goOts,vouspouvez
badigeonnerde beurre
citronneavantetpendantla
CUiSSOn.
7-10 5-6 Augmentezletemps(10
minutesau lieude5)pour
chaquecOtepourdu jambon
de 0.7cm (1.5pouce)
d'@aisseurou artisanal.
2 (1.3cm (0.5po) 6 8-11 4-6 Incisezpour extrairelagmisse.
d'@aisseur)
2 (2.5cm (1po)
d'@aisseur)environ10
a12oz.
6 8-12 5-8
6 10-16 7-11 Incisezpour extrairelagmisse.
* Voir illustration page 32 pour la description des hauteurs de grille.
46 utilisaton du four
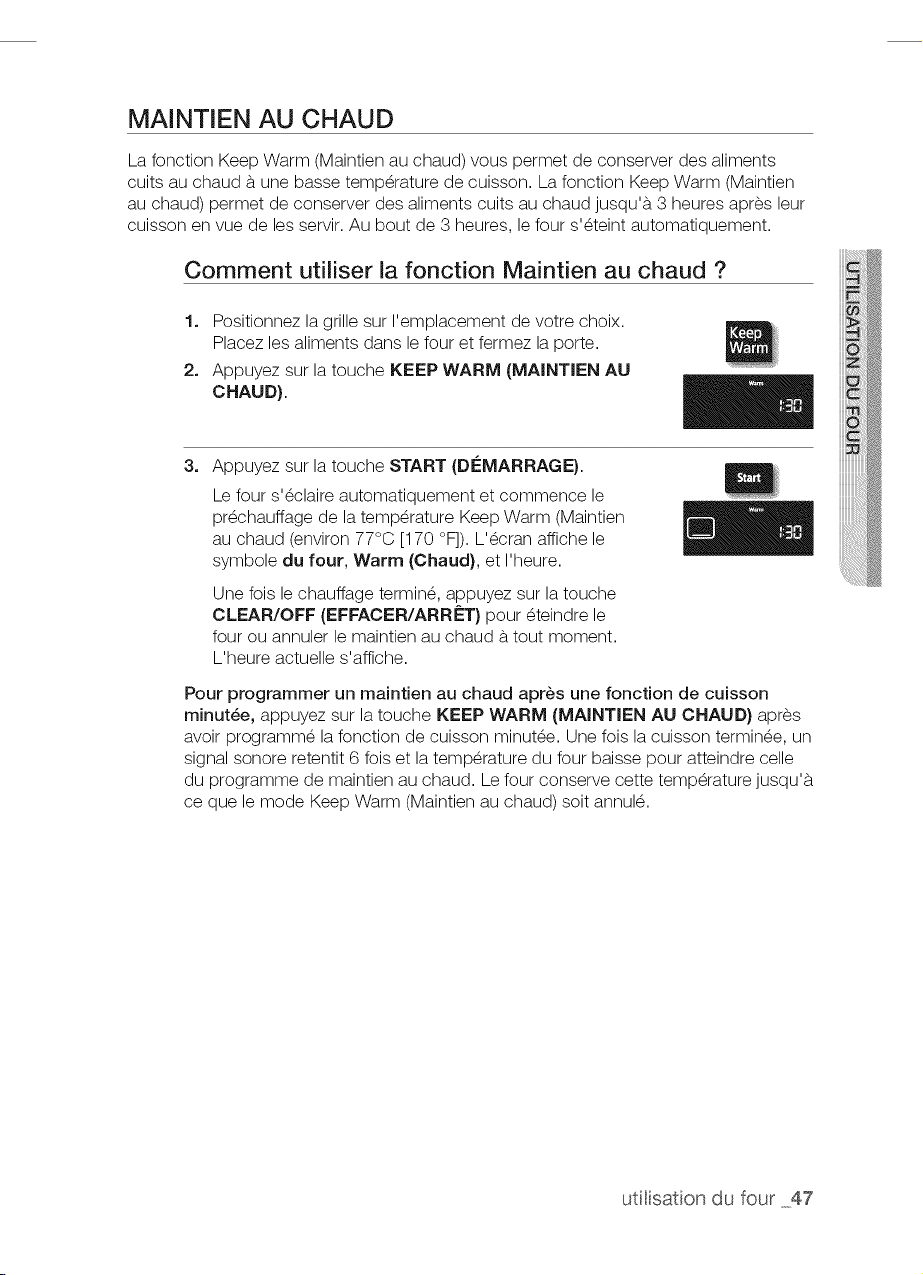
MAINTIEN AU CHAUD
Labnction Keep Warm (Maintien au chaud) vous permet de conserver des aliments
cuits au chaud b.une basse temperature de cuisson. La fonction KeepWarm (Maintien
au chaud) permet de conserver des aliments cuits au chaud jusqu'b. 3 heures apres leur
cuisson envue de les servir. Au bout de 3 heures, le four s'_teint automatiquement.
Comment utiliser la fonction Maintien au chaud ?
1. Positionnez la grille sur I'emplacement de votre choix.
Placez les aliments dans le four et fermez la porte.
2. Appuyez sur la touche KEEP WARM (MAINTIEN AU
CHAUD).
3,
Appuyez sur la touche START (D#MARRAGE).
Le four s'_claire automatiquement etcommence le
pr_chauffage de la temperature Keep Warm (Maintien
au chaud (environ 77°0 [170 °F]). L'_cran affiche le
symbole du four, Warm (Chaud}, et I'heure.
Une lois le chauffage termin_, appuyez sur la touche
CLEAR/OFF (EFFACER/ARRf=T} pour _teindre le
four ou annulet le maintien au chaud b.tout moment.
L'heure actuelle s'affiche.
Pour programmer un maintien au chaud apres une fonction de cuisson
minut_e, appuyez sur la touche KEEP WARM (MAINTIEN AU CHAUD) apres
avoir programm_ la fonction de cuisson minut_e. Unefois lacuisson termin_e, un
signal sonore retentit 6 fois et la temperature du four baisse pour atteindre celle
du programme de maintien au chaud. Le four conserve cette temperature jusqu'b.
ce que le mode Keep Warm (Maintien au chaud) soit annulS.
u%satondu four 47
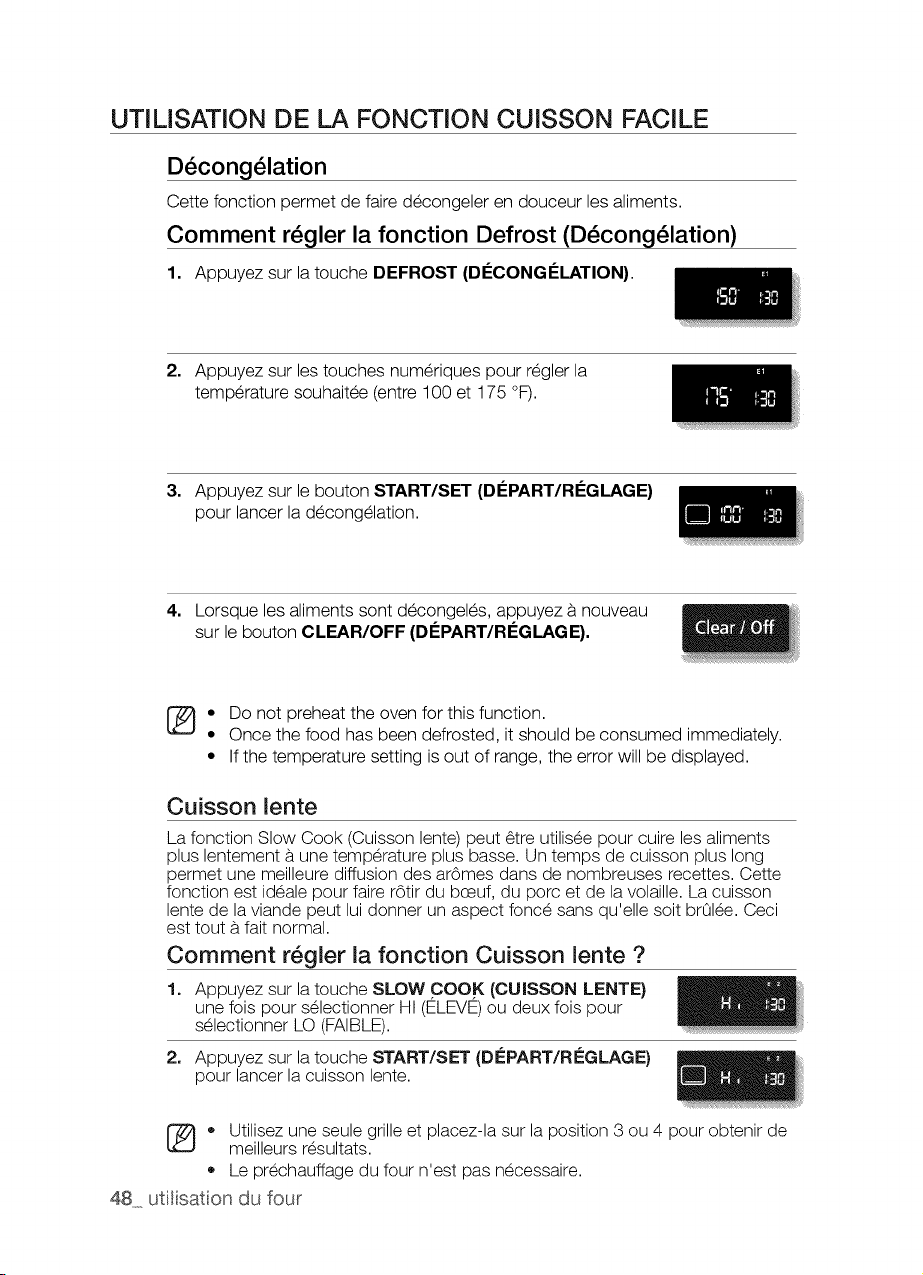
UTIUSATION DE LA FONCTION CUISSON FACILE
D_cong_lation
Cette fonction permet de faire decongeler en douceur les aliments.
Comment r_gler la fonction Defrost (D_cong_lation)
1. Appuyez sur la touche DEFROST (DI_CONGI_LATION}.
2. Appuyez sur les touches numeriques pour regler la
temperature souhaitee (entre 100 et 175 °F).
3. Appuyez sur le bouton START/SET (DI_PART/RI_GLAGE)
pour lancer la decongelation.
4. Lorsque les aliments sont decongeles, appuyez a nouveau
sur le bouton CLEAR/OFF (DI_PART/RI_GLAGE).
[_ • Do not preheat the oven for this function.
Once the food has been defrosted, it should be consumed immediately.
• If the temperature setting isout of range, the error will be displayed.
Cuisson lente
La fonction Slow Cook (Cuisson lente) peut 6tre utilisee pour cuire les aliments
plus lentement a une temperature plus basse. Un temps de cuisson plus long
permet une meilleure diffusion des arOmes dans de nombreuses recettes. Cette
fonction est ideale pour faire rOtir du bceuf, du porc et de lavolaille. La cuisson
lente de laviande peut lui donner un aspect fonce sans qu'elle soit br01ee. Ceci
est tout a fait normal.
Comment r6gler la fonction Cuisson lente ?
1. Appuyez sur la touche SLOW .COOK (CUISSON LENTE)
une fois pour selectionner HI (ELEVE)ou deux fois pour
selectionner LO(FAIBLE).
2. Appuyez sur la touche START/SET (Dr:PART/Ri_GLAGE)
pour lancer la cuisson lente.
[_ • Utilisez une seule grille et placez-la sur la position 3 ou 4 pour obtenir de
meilleurs resultats.
• Le prechauffage du four n'est pas necessaire.
48 utilisaton du four
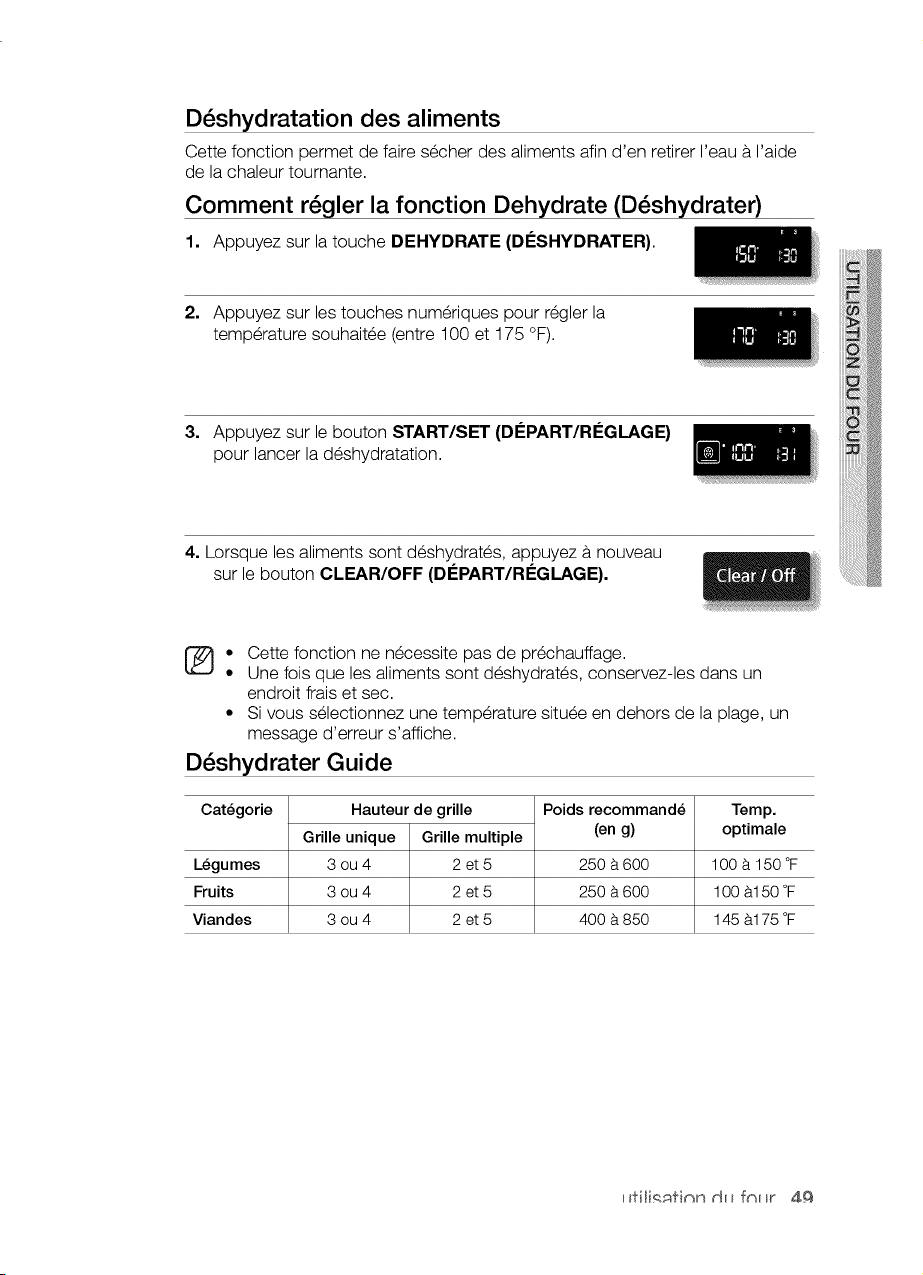
D_shydratation des aliments
Cette fonction permet de faire secher des aliments afin d'en retirer I'eau a I'aide
de la chaleur tournante.
Comment r_gler la fonction Dehydrate (D_shydrater)
1. Appuyez sur la touche DEHYDRATE (DI-SI-IYDRATER}.
2. Appuyez sur les touches numeriques pour regler la
temperature souhaitee (entre 100 et 175 °F).
3. Appuyez sur le bouton START/SET (DI_PART/RI_GLAGE)
pour lancer la deshydratation.
4. Lorsque les aliments sont deshydrates, appuyez bnouveau
sur le bouton CLEAR/OFF (DI-PART/RI-GLAGE).
[_ • Cette fonction ne necessite pas de prechauffage.
Unefois que les aliments sont deshydrates, conservez-les dans un
endroit frais etsec.
• Si vous selectionnez une temperature situee en dehors de la plage, un
message d'erreur s'affiche.
D_shydrater Guide
Categorie
Legumes
Fruits
Viandes
Hauteur de grille
Grille unique Grille multiple
3 ou 4 2 et 5
3 ou 4 2 et 5
3 ou 4 2 et 5
Poids recommande
(en g)
250 8 600
250 8 600
400 8 850
Temp.
optimale
100 8 150 °F
100 8150 °F
145 8175 °F
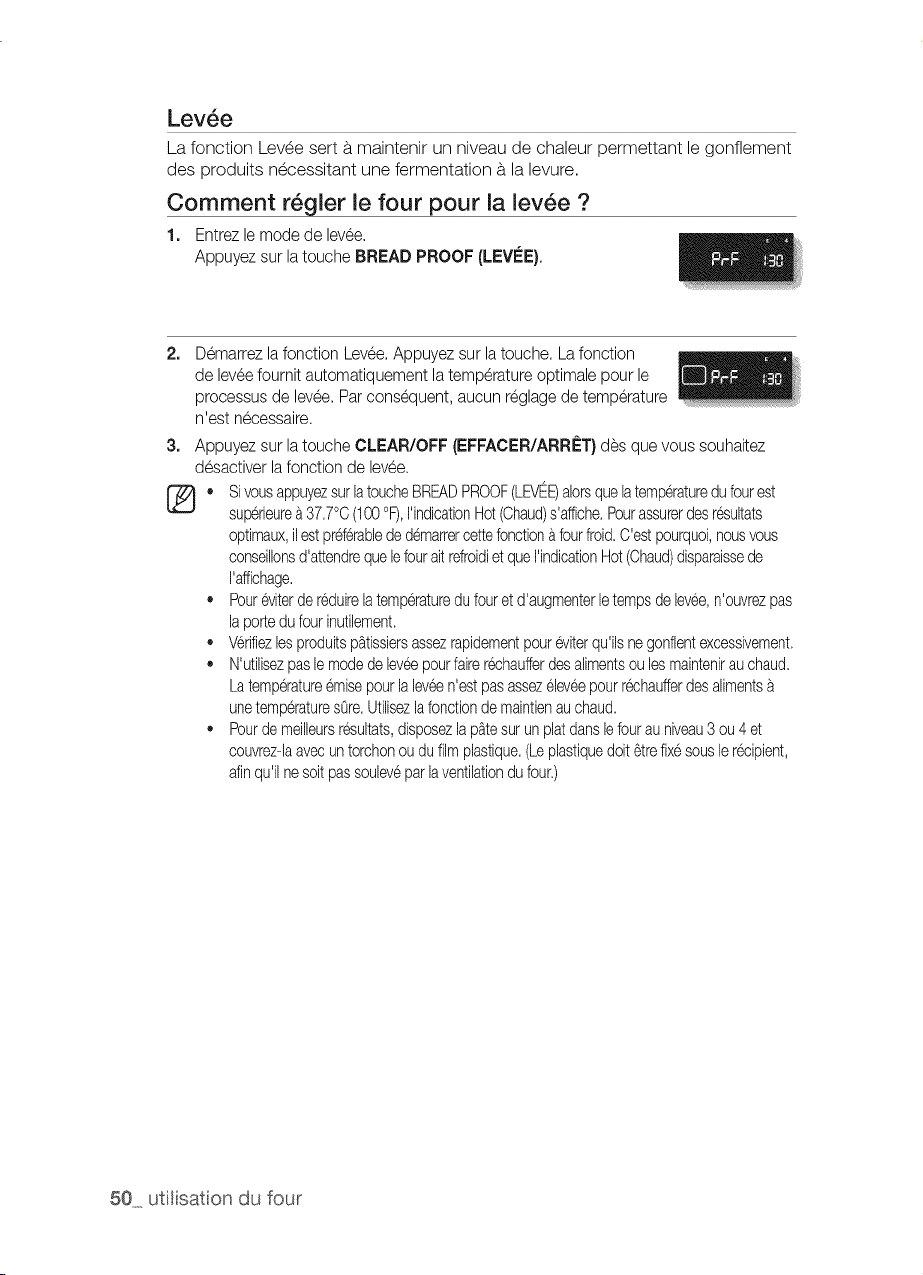
Levee
La fonction Levee sert b,maintenir un niveau de chaleur permettant le gonflement
des produits necessitant une fermentation b,la levure.
Comment r_gler le four pour la levee ?
1. Entrezle mode delevee.
Appuyez surla toucheBREAD PROOF (LEVEE},
2.
Demarrezla fonction Levee.Appuyez surla touche. Lafonction
de leveefournit automatiquementla temp6ratureoptimale pour le
processus delevee.Par consequent, aucunr6glage detemperature
n'est n@essaire.
Appuyez surla toucheCLEAR/OFF (EFFACER/ARRI_T}desque voussouhaitez
desactiver lafonction de levee.
Sivousappuyezsur latoucheBREADPROOF(LEVEE)alorsquelatemperaturedu fourest
superieurea 37,7°C(100°F),I'indicationHot(Chaud)s'affiche,Pourassurerdesresultats
optimaux,ilestpreferablededemarrercettefonctionafourfroid.C'estpourquoi,nousvous
conseillonsd'attendrequelefouraitrefroidietqueI'indicationHot(Chaud)disparaissede
I'affichage,
o Pour@iterde reduirelatemperaturedufouret d'augmenterletempsde levee,n'ouvrezpas
laportedufourinutilement.
VerifiezlesproduitspAtissiersassezrapidementpoureviterqu'ilsnegonflentexcessivement.
N'utilisezpaslemodede leveepourfairer@haufferdesalimentsou les maintenirauchaud.
Latemperatureemisepourlaleveen'estpasassezelev@pour r@haufferdesaliments
unetemperaturesGre,Utilisezlafonctionde maintienauchaud.
Pourdemeilleursresultats,disposezlapatesur unplatdanslefourau niveau3 ou 4 et
couvrez-laavecun torchonou dufilmplastique,(Leplastiquedolt 6trefixesousler@ipient,
afinqu'il nesoitpassouleveparlaventilationdu four.)
50 ut[l[saton du four

CUISSON PERSONNALISI E
Lafonction Favorite Cook (Cuisson personnalis_e) vous permet de pr_-programmer 3
diff_rentes fonctions de cuisson ou les reglages de votre recette pr_f_r_e qui peuvent
donc _tre r_utilis_s et lances en actionnant un bouton. Vous pouvez seulement utiliser
les fonctions Bake (Cuisson traditionnelle), Bake convection (Cuisson par convection) ou
Roast convection (ROtissage par convection) pour les choix de Favorite Cook (Cuisson
personnalis_e). Vous ne pouvez pas utiliser les fonctions de Delay Start (D_part differS)
pour votre s_lection Favorite Cook (Cuisson personnalis_e).
Comment r6gler une s61ection de cuisson personnalis6e ?
2_
Appuyez sur la touche du mode de cuisson que
vous souhaitez enregistrer (ex : BAKE (CUISSON
TRADITIONNELLE}). Un signal sonore retentit b.
chaque fois que vous appuyez sur une touche.
La temperature par d_faut (350 o)clignote b.I'_cran. Si
la temperature par d_faut est celle que vous d_sirez,
passez b.I'_tape 3.
Appuyez sur les chiffres de la temperature de cuisson
souhait_e (3, 7, 5).
La temperature de cuisson choisie clignote b. I'_cran.
3_
Appuyez sur la touche FAVORITE COOK (CUISSON
PERSONNALISI'-=E) autant de fois que n_cessaire pour
obtenir I'emplacement de stockage de la fonction et de
la temperature :
1 fois pour la recette 1,
2 fois pour la recette 2,
3 fois pour la recette 3.
Le chiffre correspondant et le r_glage apparaissent b.
I'_cran, et les indicateurs Favorite Cook (Cuisson
personnalis_e} clignotent sous le r_glage Favorite
Cook (Cuisson personnalis_e) s_lectionn_ pour cette
recette.
4_
Appuyez sur la touche START (Di'-=MARRAGE}.
L'_cran affiche la derni_re temperature Favorite Cook
(Cuisson personnalis_e) r_gl_e ou utilis_e ainsi que
I'heure actuelle.
[_ Appuyez sur la touche START (Di'-=MARRAGE}
une fois pour enregistrer le r_glage Favorite Cook
(Cuisson personnalis_e) ou deux fois pour enregistrer
et commencer la cuisson personnalis_e sur le r_glage
s_lectionn_.
utilisat on du four _51
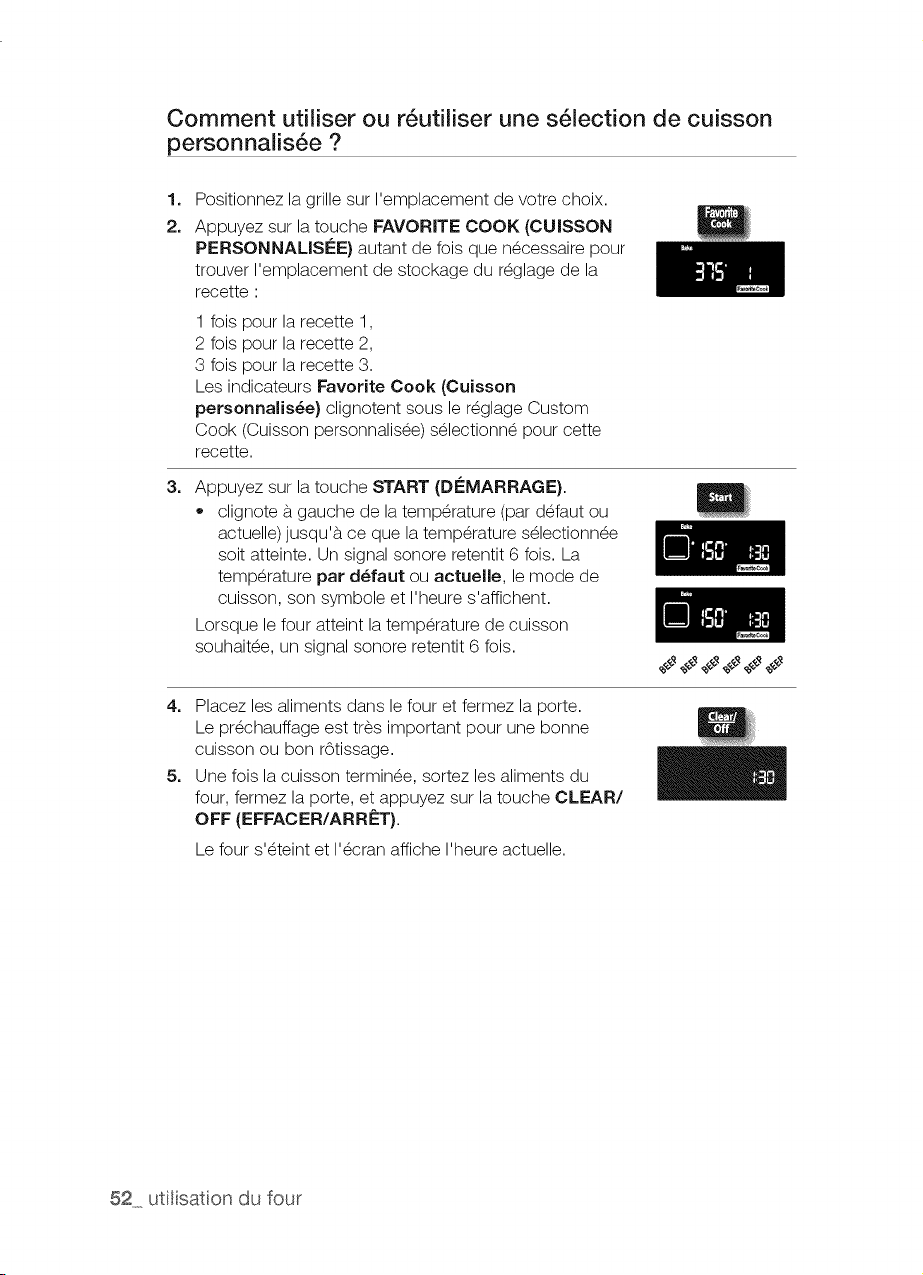
Comment utiliser ou r6utiliser une s61ection de cuisson
personnalis6e ?
1=
2.
3=
Positionnez la grille sur I'emplacement de votre choix.
Appuyez sur la touche FAVORITE COOK (OUISSON
PERSONNALISi'=E} autant de fois que n_eessaire pour
trouver I'emplacement de stockage du r_glage de la
reeette :
1 his pour la recette 1,
2 his pour la recette 2,
3 his pour la recette 3.
Les indicateurs Favorite Cook (Cuisson
personnalis_e) clignotent sous le r_glage Custom
Cook (Cuisson personnalis_e) s_lectionn_ pour cette
recette.
Appuyez sur la touche START (Di£MARRAGE}.
,, clignote b.gauche de la temperature (par d_faut ou
actuelle) jusqu'b, ce que la temperature s_lectionn_e
soit atteinte. Un signal sonore retentit 6 fois. La
temperature par d_faut ou actuelle, le mode de
cuisson, son symbole et I'heure s'affichent.
Lorsque le four atteint la temperature de cuisson
souhait_e, un signal sonore retentit 6 fois.
4. Placez les aliments dans le four et fermez la porte.
Lepr_chauffage est tres important pour une bonne
cuisson ou bon rOtissage.
5. Unefois lacuisson termin_e, sortez les aliments du
four, fermez la porte, etappuyez sur latouche CLEAR/
OFF (EFFACER/ARR_'=T).
Lefour s'_teint et I'_eran affiehe I'heure actuelle.
52 utilisaton du four

FONCTIONB SHABBAT
(utilis_e pour les f_tes et le Shabbat juifs)
Lafonction Sabbath (Shabbat) ne peut _tre utilis_e qu'avec les r_glages Bake (Cuisson
traditionnelle) et Cook Time (Temps de cuisson). Le four fonctionne sur la temperature
d_finie et ne change pas jusqu'b, ce que la fonction Sabbath (Shabbat) soit annul_e ou
que letemps de cuisson soit _coul_. Si la fonction Sabbath (Shabbat) est s_lectionn_e,
elle _crase les fonctions d'_conomie d'_nergie enregistr_es par d_faut. Tout I'_clairage
de I'ecran, les signaux du four, la plupart des touches de commande et leventilateur b.
convection seront d_sactiv_s.
Comment r6gler la fonction Sabbath ?
1.
2.
3.
Positionnez lagrille sur I'emplacement de votre choix.
Voir page 32.
Appuyez sur le bouton BAKE (CUISSON
TRADITIONNELLE). Un signal sonore retentit b.
chaque fois que vous appuyez sur une touche jusqu'b.
ce que la fonction Sabbath (Shabbat) soit activ_e.
La temperature par d_faut (350 o)clignote b.I'_cran. Si
la temperature par d_faut est celle que vous d_sirez,
passez b.I'_tape 4 ou b.I'_tape 6.
Appuyez sur les chiffres de la temperature de cuisson
souhait_e (3, 7, 5).
La temperature de cuisson choisie clignote b. I'_cran.
4. Appuyez sur la touche COOKING TIME _EMPS DE
CUISSON}.
L'_cran affiche _HR--m_,.
5. Appuyez sur les chiffres du temps de cuisson souhait_.
Vous pouvez r_gler le temps de cuisson pour une dur_e
comprise entre 1 minute et 9 heures et 99 minutes.
6. Appuyez sur la touche START (Di£MARRAGE}.
utilisaton du four 53
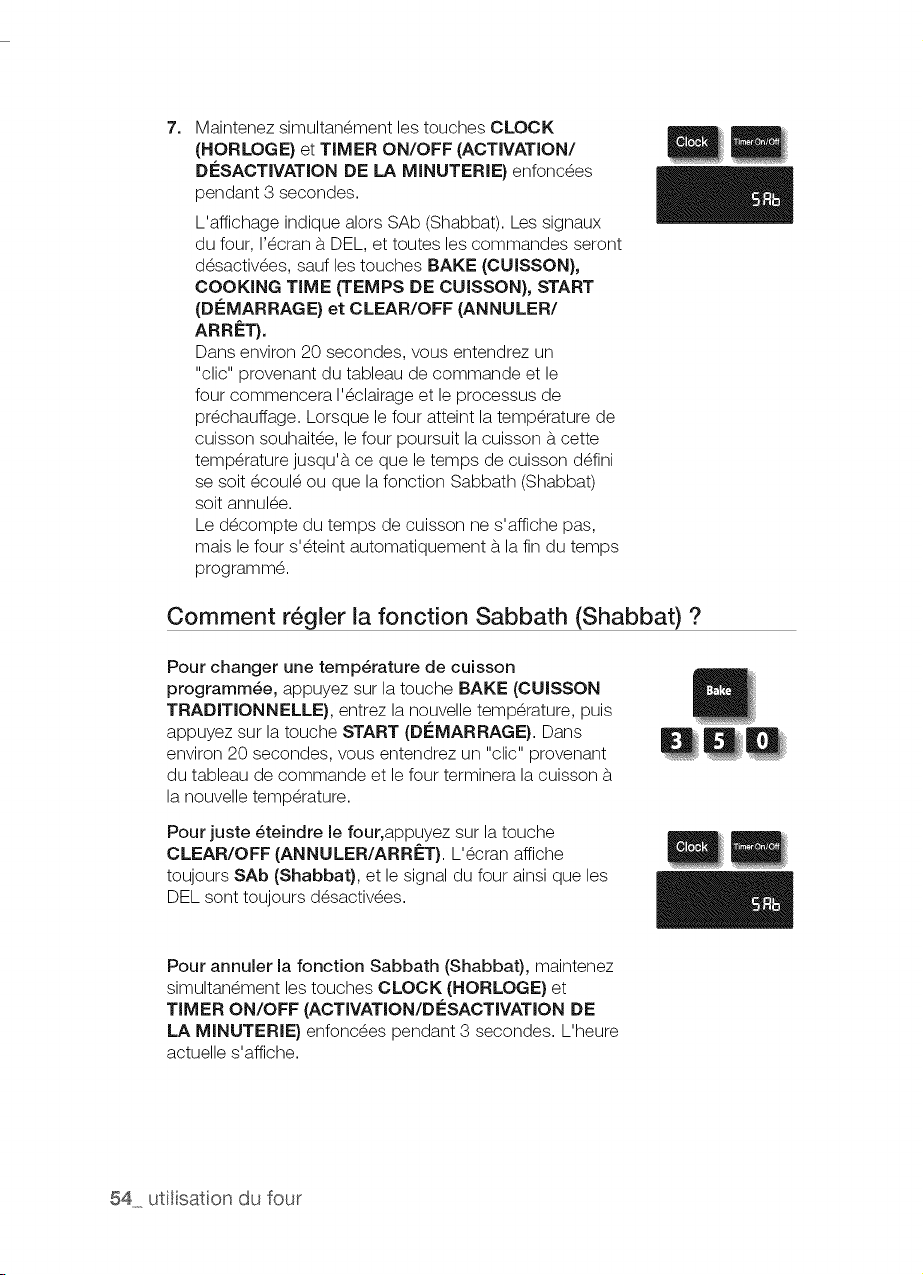
7= Maintenez simultan_ment les touches CLOCK
(HORLOGE} et TIMER ON/OFF (ACTIVATION/
DleSACTIVATION DE LA MINUTERIE} enfonc_es
pendant 3 secondes.
L'affichage indique alors SAb (Shabbat). Les signaux
du four, I'_cran b. DEL, et toutes les commandes seront
d_sactiv_es, sauf les touches BAKE (CUISSON),
COOKING TIME (TEMPS DE CUISSON), START
(DEMARRAGE) et CLEAR/OFF (ANNULER/
ARRf=T).
Dans environ 20 secondes, vous entendrez un
"clic" provenant du tableau de commande et le
four commencera I'_clairage et le processus de
pr_chauffage. Lorsque le four atteint la temp@ature de
cuisson souhait_e, le four poursuit la cuisson b.cette
temp@ature jusqu'b, ce que le temps de cuisson d_fini
se soit ecoul_ ou que lafonction Sabbath (Shabbat)
soit annul_e.
Led_compte du temps de cuisson ne s'affiche pas,
mais le four s'_teint automatiquement b.la fin du temps
programme.
Comment rGgler la fonction Sabbath (Shabbat) ?
Pour changer une temperature de cuisson
programm6e, appuyez sur la touche BAKE (CUISSON
TRADMONNELLE), entrez la nouvelle temp@ature, puis
appuyez sur la touche START (DI£MARRAGE). Dans
environ 20 seeondes, vous entendrez un "clic" provenant
du tableau de eommande et le four terminera la cuisson b.
la nouvelle temp@ature.
Pour juste 6teindre le four, appuyez sur la touche
CLEAR/OFF (ANNULER/ARRf=T}. L'_cran affiche
toujours SAb (Shabbat), et le signal du four ainsi que les
DELsont toujours d_sactiv_es.
Pour annuler la fonction Sabbath (Shabbat), maintenez
simultan_ment les touches CLOCK (HORLOGE) et
TIMER ON/OFF (ACTIVATION/DleSACTIVATION DE
LA MINUTERIE} enfonc_es pendant 3 secondes. L'heure
actuelle s'affiche.
54 utilisaton du four
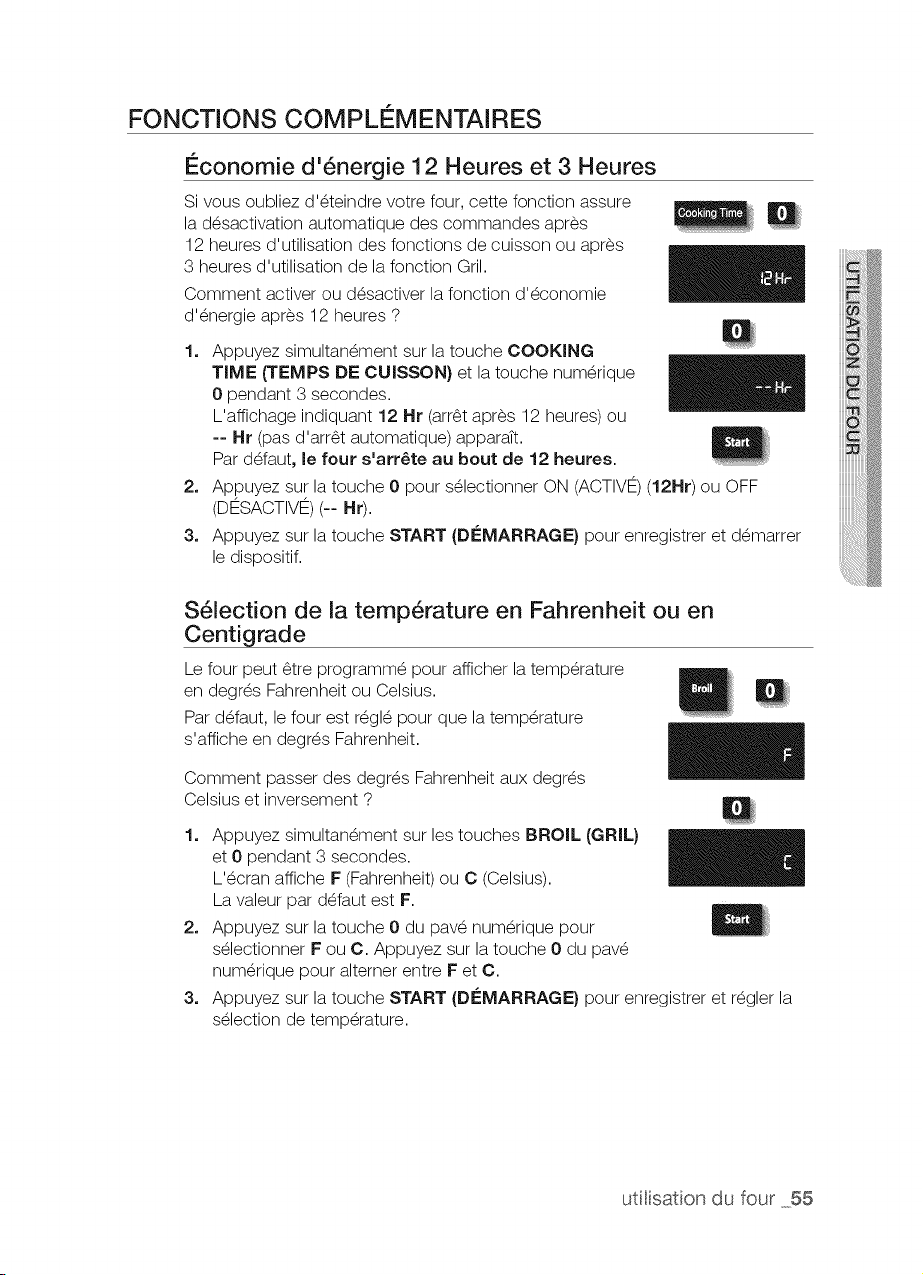
FONCTIONS COMPLi_MENTAIRES
l_conomie d'6nergie 12 Heures et 3 Heures
Si vous oubliez d'_teindre votre four, cette fonction assure
la d_sactivation automatique des commandes apres
12 heures d'utilisation des fonctions de cuisson ou apres
3 heures d'utilisation de la fonction Gril.
Comment activer ou d_sactiver la fonction d'_conomie
d'_nergie apres 12 heures ?
Appuyez simultan_ment sur la touche COOKING
TIME (TEMPS DE CUISSON} et la touche num_rique
0 pendant 3 secondes.
L'affichage indiquant 12 Hr (arr_t apres 12 heures) ou
-- Hr (pas d'arr_t automatique) apparaTt.
Par d_faut, le four s'arr_te au bout de 12 heures.
2. Appuyez sur la touche 0 pour s_lectionner ON (ACTIVe) (12Hr) ou OFF
(DFtSACTIVFt) (-- HI').
3. Appuyez sur la touche START (Di£MARRAGE} pour enregistrer et d_marrer
le dispositif.
S61ection de la temp6rature en Fahrenheit ou en
Centigrade
Lefour peut _tre programm_ pour afficher la temperature
en degr_s Fahrenheit ou Celsius.
Par d_faut, le four est r_gl_ pour que la temperature
s'affiche en degr_s Fahrenheit.
Comment passer des degr_s Fahrenheit aux degr_s
Celsius et inversement ?
1. Appuyez simultan_ment sur les touches BROIL (GRIL}
et 0 pendant 3 secondes.
L'_cran affiche F (Fahrenheit) ou C (Celsius).
La valeur par d_faut est F.
2. Appuyez sur la touche 0 du pav_ num_rique pour
s_lectionner F ou C. Appuyez sur la touche 0 du pav_
num_rique pour alterner entre F et C.
3_
Appuyez sur la touche START (DleMARRAGE} pour enregistrer et r_gler la
s_lection de temperature.
uti(isaton du four 55
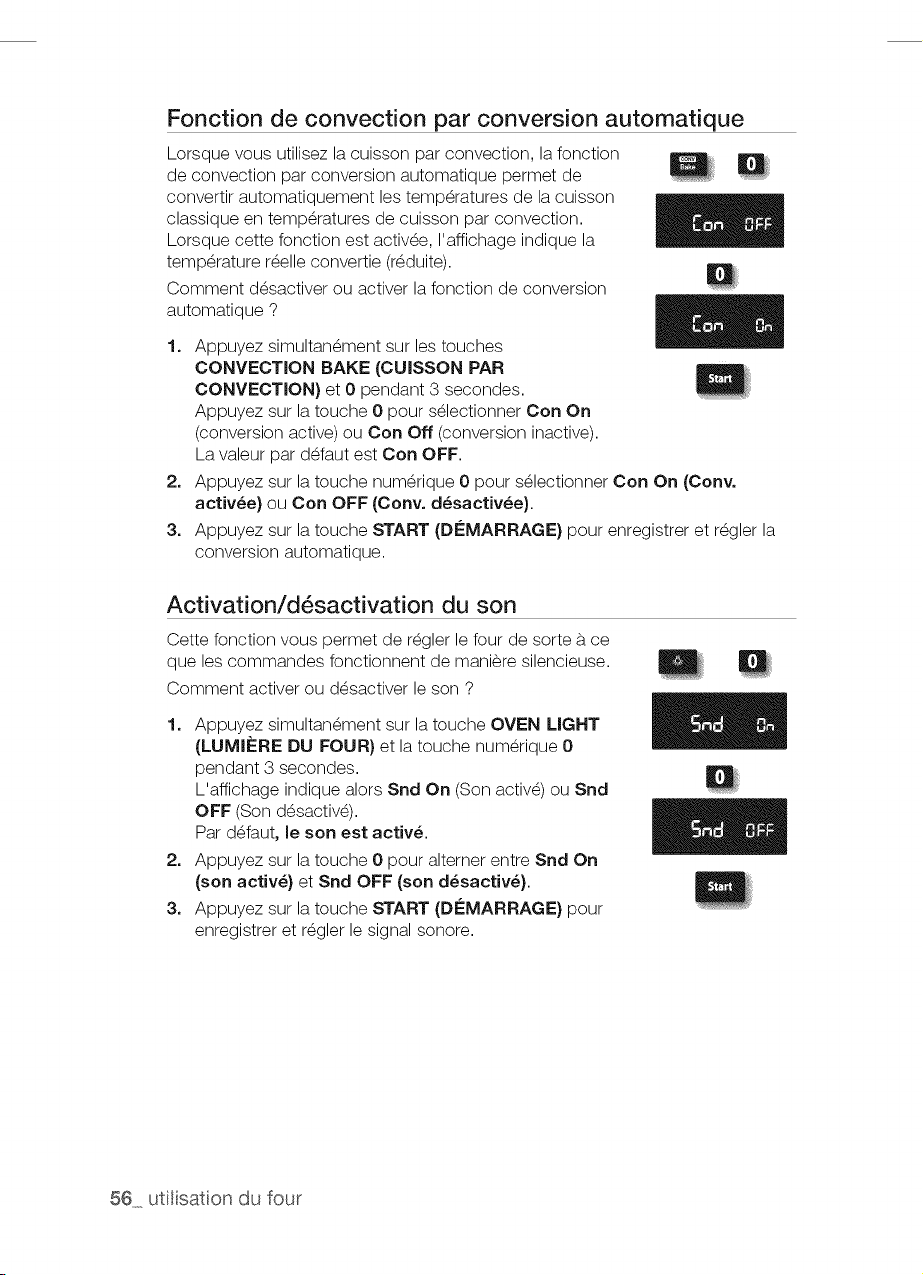
Fonction de convection par conversion automatique
Lorsque vous utilisez la cuisson par convection, la fonction
de convection par conversion automatique permet de
convertir automatiquement les temperatures de la cuisson
classique en temperatures de cuisson par convection.
Lorsque cette fonction est activ_e, I'affichage indique la
temperature r_elle convertie (r_duite).
Comment d_sactiver ou activer la fonction de conversion
automatique ?
1=
Appuyez simultanement sur les touches
CONVECTION BAKE (CUISSON PAR
CONVECTION) et 0 pendant 3 secondes.
Appuyez sur la touche 0 pour s_lectionner Con On
(conversion active) ou Con Off (conversion inactive).
Lavaleur par d_faut est Con OFF.
2. Appuyez sur la touche num_rique 0 pour selectionner Con On (Cony.
activ_e) ou Con OFF (Cony. d_sactiv_e).
3. Appuyez sur la touche START (Di£MARRAGE) pour enregistrer et r_gler la
conversion automatique.
Activation/d6sactivation du son
Cette fonction vous permet de r_gler le four de sorte _tce
que les commandes fonctionnent de mani_re silencieuse.
Comment activer ou d_sactiver le son ?
1. Appuyez simultan_ment sur la touche OVEN LIGHT
(LUMI_=RE DU FOUR) et la touche num_rique 0
pendant 3 secondes.
L'affichage indique alors Snd On (Sonactive) ou Snd
OFF (Son d_sactiv_).
Par d_faut, le son est activ&
2. Appuyez sur la touche 0 pour alterner entre Snd On
(son active) et Snd OFF (son d_sactiv_).
3. Appuyez sur la touche START (DI-MARRAGE) pour
enregistrer et r_gler lesignal sonore.
56 utilisaton du four
PROPOS DU TIROIR CHAUFFE-PLAT
Letiroir chauffe-plat vous permet de conserver les aliments cuits chauds. Les aliments
doivent _tre d_jb. chauds. N'utilisez pas le tiroir chauffe-plat pour chauffer ou r_chauffer
des aliments froids.
Environ 25 minutes sont n_cessaires pour pr_chauffer letiroir chauffe-plat.
A_,_,oN'utilisez pas de r_cipients en plastique, ni de film plastique dans le tiroir chauffe-
,plat. Leplastique fond s'il entre en contact direct avec le tiroir chauffe-plat. II est
possible que le plastique fondu ne s'enl_ve plus. Ces d_g_.ts nesont pas couverts
par la garantie.
• Ne tapissez pas letiroir chauffe-plat de papier d'aluminium. Le papier d'aluminium
est un excellent isolant thermique etaurait pour consequence d'emprisonner la
chaleur. Son utilisation est susceptible de perturber le fonctionnement du tiroir et
d'endommager la finition int_rieure.
,, Ne placez pas de liquide ou d'eau dans le tiroir chauffe-plat.
Tousles aliments places dans le tiroir chauffe-plat doivent _tre recouverts d'un
couvercle ou de papier d'aluminium. Lorsque vous faites chauffer des pb.tisseries ou
du pain, am_nagez une ouverture dans le couvercle afin de permettre b.I'humidit_ de
s'_chapper.
,, Retirez les couverts de service, etc., avant de placer le r_cipient dans le tiroir chauffe-
plat.
,, Conservez les aliments dans le r_cipient de cuisson ou transf_rez-les dans un plat de
service r_sistant b. la chaleur.
,, Letiroir chauffe-plat ne peut pas _tre utilis_ durant le cycle d'auto-nettoyage.
Letiroir chauffe-plat s'_teint automatiquement apres 3 heures.
utilisat on du tiror chauffe-oplat 57
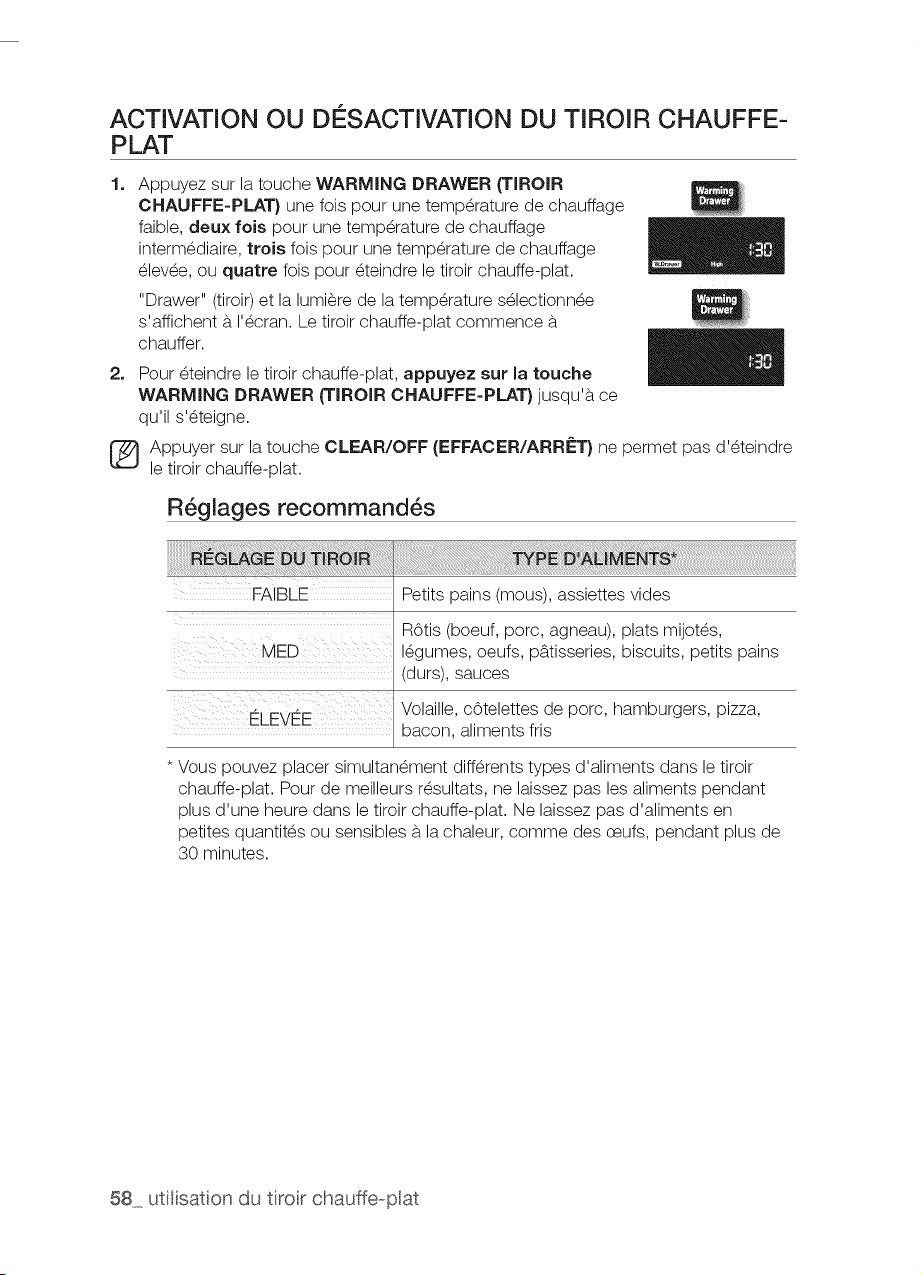
ACTIVATION OU DI SACTIVATION DU TIROIR CHAUFFE-
PLAT
1=
2=
Appuyez sur la touche WARMING DRAWER (TIROIR
CHAUFFE-PLAT) une fois pour une temperature de chauffage
faible, deux fois pour une temperature de chauffage
interm_diaire, trois fois pour une temperature de chauffage
_lev_e, ou quatre fois pour _teindre le tiroir chauffe-plat.
"Drawer" (tiroir)et la lumi_re de latemperature s_lectionn_e
s'affichent b.I'_cran. Le tiroir chauffe-plat commence b.
chauffer.
Pour _teindre le tiroir chauffe-plat, appuyez sur la touche
WARMING DRAWER ('rIROIR CHAUFFE-PLAT} jusqu'b, ce
qu'il s'_teigne.
[_ ppuyer sur la touche CLEAR/OFF (EFFACER/ARRf=T} ne permet pas d'_teindre
le tiroir chauffe-plat.
R6glages recommand6s
FAIBLE Petits pains (mous), assiettes vides
R6tis (boeuf, porc, agneau), plats mijot_s,
MED I_gumes, oeufs, pb.tisseries, biscuits, petits pains
(durs), sauces
ELEVEE Volaille, c5telettes de porc, hamburgers, pizza,
bacon, aliments fris
* Vous pouvez placer simultan_ment diff_rents types d'aliments dans le tiroir
chauffe-plat. Pour de meilleurs r_sultats, ne laissez pas les aliments pendant
plus d'une heure dans le tiroir chauffe-plat. Ne laissez pas d'aliments en
petites quantit_s ou sensibles b. la chaleur, comme des ceufs, pendant plus de
30 minutes.
58 utiIisat on du tiror chauffe-oplat
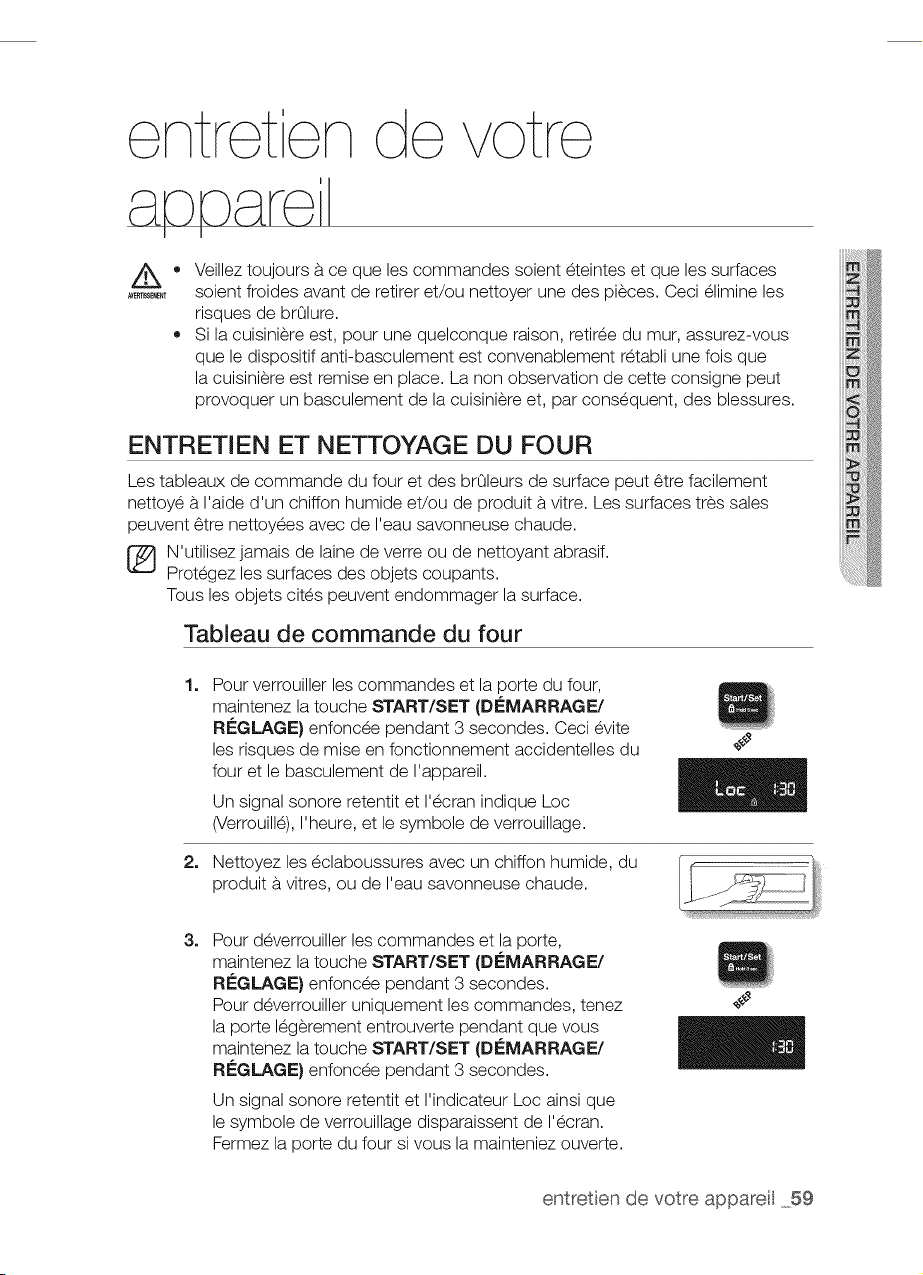
entreten do votre
AVEFm_$E_NT
Veilleztoujours b.ce que les commandes soient eteintes et que les surfaces
soient froides avant de retirer et/ou nettoyer une des pieces. Ceci elimine les
risques de bralure.
Si la cuisiniere est, pour une quelconque raison, retiree du tour, assurez-vous
que le dispositif anti-basculement est convenablement retabli une fois que
la cuisiniere est remise en place. La non observation de cette consigne peut
provoquer un basculement de la cuisiniere et, par consequent, des blessures.
ENTRETIEN ET NETTOYAGE DU FOUR
Lestableaux de commande du four et des braleurs de surface peut 6tre facilement
nettoye b. I'aide d'un chiffon humide et/ou de produit b.vitre. Les surfaces tres sales
peuvent 6tre nettoyees avec de I'eau savonneuse chaude.
N'utilisez jamais de laine de verre ou de nettoyant abrasif.
Protegez les surfaces des objets coupants.
Tousles objets cites peuvent endommager la surface.
Tableau de commande du four
1.
2_
Pour verrouiller les commandes et la porte du four,
maintenez la touche START/SET (DI"MARRAGE/
REGLAGE) enfoncee pendant 3 secondes. Ceci evite
les risques de raise en fonctionnement accidentelles du
four et le basculement de I'appareil.
Un signal sonore retentit et I'ecran indique Loc
(Verrouille), I'heure, et le symbole deverrouillage.
Nettoyez les eclaboussures avec un chiffon humide, du
produit b.vitres, ou de I'eau savonneuse chaude.
3.
Pour deverrouiller les commandes et la porte,
maintenez la touche START/SET (Di"=MARRAGE/
RC'GLAGE) enfoncee pendant 3 secondes.
Pour d@errouiller uniquement les commandes, tenez
la porte legerement entrouverte pendant que vous
maintenez la touche START/SET (DI"MARRAGE/
RC_GLAGE) enfoncee pendant 3 secondes.
Un signal sonore retentit et I'indicateur Loc ainsi que
le symbole de verrouillage disparaissent de I'ecran.
Fermez la porte du four sivous la mainteniez ouverte.
entretien de votre apparel 59
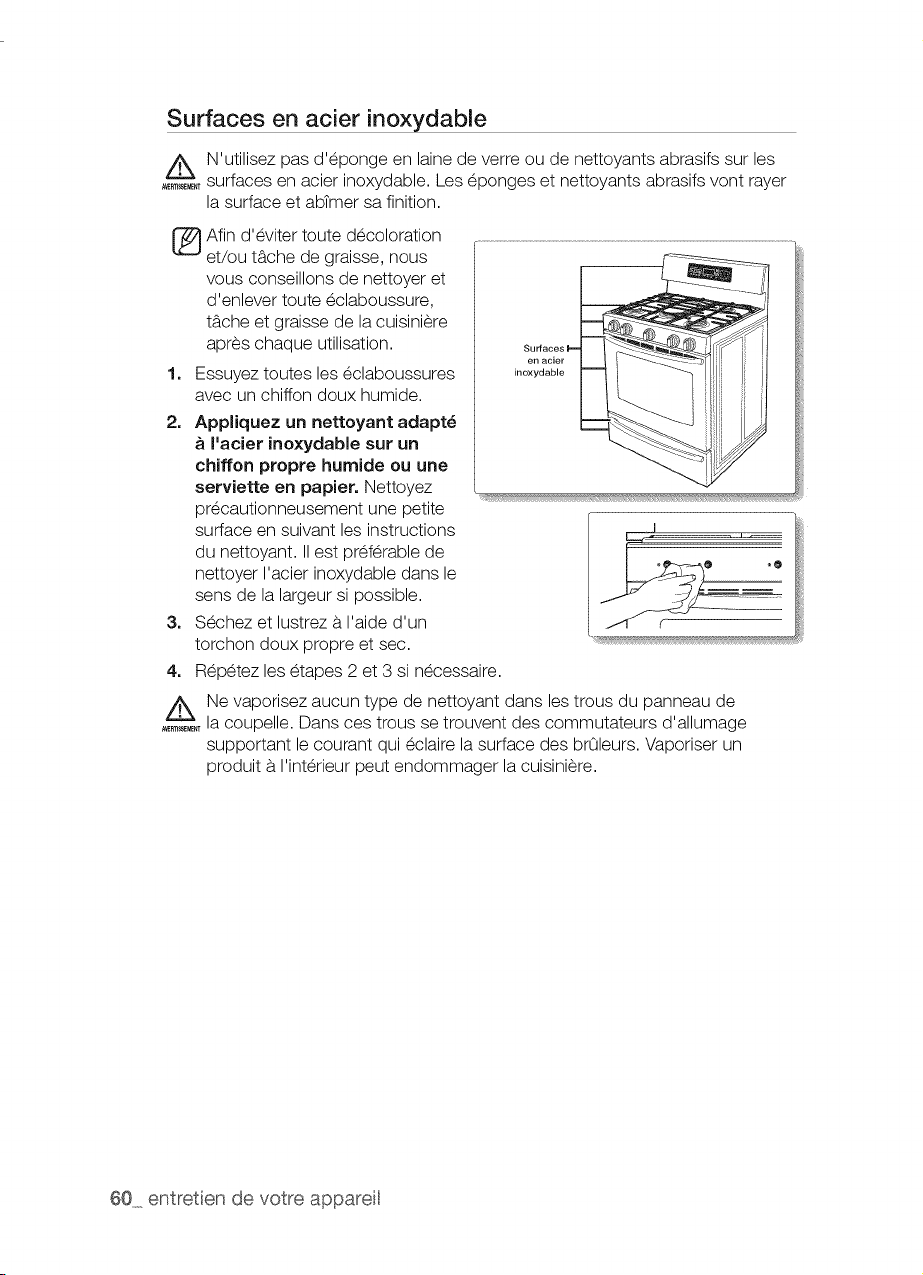
Surfaces en acier inoxydable
A_, N'utilisez pas d'eponge en laine de verre ou de nettoyants abrasifs sur les
surfaces en acier inoxydable. Les eponges et nettoyants abrasifs vont rayer
la surface et abtmer sa finition.
Afin d'eviter toute decoloration
et/ou tb.che de graisse, nous
vous conseillons de nettoyer et
d'enlever toute eclaboussure,
tb.cheet graisse de la cuisiniere
apres chaque utilisation.
1, Essuyez toutes les eclaboussures
avec un chiffon doux humide.
2. Appliquez un nettoyant adapt_
I'acier inoxydable sur un
chiffon propre humide ou une
serviette en papier. Nettoyez
precautionneusement une petite
surface en suivant les instructions
du nettoyant. II est preferable de
nettoyer I'acier inoxydable dans le
sens de la largeur si possible.
3. Sechez et lustrez b.I'aide d'un
torchon doux propre et sec.
4. Repetez les etapes 2 et 3 si necessaire.
/_Ne vaporisez aucun type de nettoyant dans les trous du panneau de
....... la coupelle. Dans ces trous se trouvent des commutateurs d'allumage
supportant le courant qui eclaire la surface des brOleurs. Vaporiser un
produit b.I'interieur peut endommager la cuisiniere.
60 entretien de votre appar@

Grilles de cuisson
• Si vous laissez les grilles dans le four durant un cycle d'auto-nettoyage, leur
couleur deviendra legerement bleutee et I'aspect de leur surface se temira.
Une fois le cycle d'auto-nettoyage termine et le four refroidi, essuyez les parties
laterales des grilles b. I'aide d'un papier sulfurise ou d'un chiffon legerement
huile. Cela permettra une meilleure insertion des grilles dans leurs glissieres.
Les grilles coulissantes peuvent 6tre nettoyees b.la main avec un nettoyant
abrasif ou de la laine de verre. Lors du nettoyage, veillez b. ne pas laisser de
I'eau ou un nettoyant penetrer dans les glissieres sur les cOtes de la grille.
* Ne les nettoyez pas au lave-vaisselle.
S'il devient difficile de retirer ou remplacer la grille, essuyez legerement
les glissieres de la grille du four avec de I'huile de cuisson. N'essuyez
pas I'huile de cuisson sur les glissieres.
Si la grille devient difficile b.faire coulisser, ilpeut s'averer necessaire
de la lubrifier b. I'aide de la Lubrification au graphite.
* Pour passer commande d'une Lubrification au graphite, appelez notre
centre au 1-800-SAMSUNG (726-7864) ou rendez-vous sur notre
page d'accueil (www.samsung.com/us ou www.samsung.com/ca)
munie de la reference DG81-01629A.
Si vous souhaitez acheter directement, connectez-vous b. I'adresse
http://www.samsungparts.com/Default.aspx.
Pour lubrifier les glissi_res
1,
2,
3,
4,
5,
6.
Retirez la grille du four. Reportez-vous au retrait de la
grille coulissante dans la section COMMENT UTILISER
LA GRILLE COULISSANTE ?
Ouvrez completement la grille sur une table ou un plan
de travail. Vous pouvez placer unjournal sous la grille
pour vous faciliter le nettoyage.
Si vous constatez lapresence de debrissur les glissieres,
essuyez-les b.I'aided'une serviette en papier.(Le lubrifiant
augraphite retire lots de I'essuyage doit6tre remplace -
Reportez-vous auxetapes 4 b.7.)
Secouez le lubrifiant augraphite avantde I'ouvrir.En
commengant par le mecanisme de glissiere cOte gauche
(avant etarriere) de la grille, posez quatre (4)petites gouttes
de lubrifiant sur les deux (2)pistes inferieures de la glissiere
b.proximitedes supports.
Repetez I'operation sur le mecanisme de glissiere cOte
droit (avant et arriere) de la grille.
Ouvrez etfermez la grille plusieurs fois pour repartir le
lubrifiant.
entretien de votre apparel 61
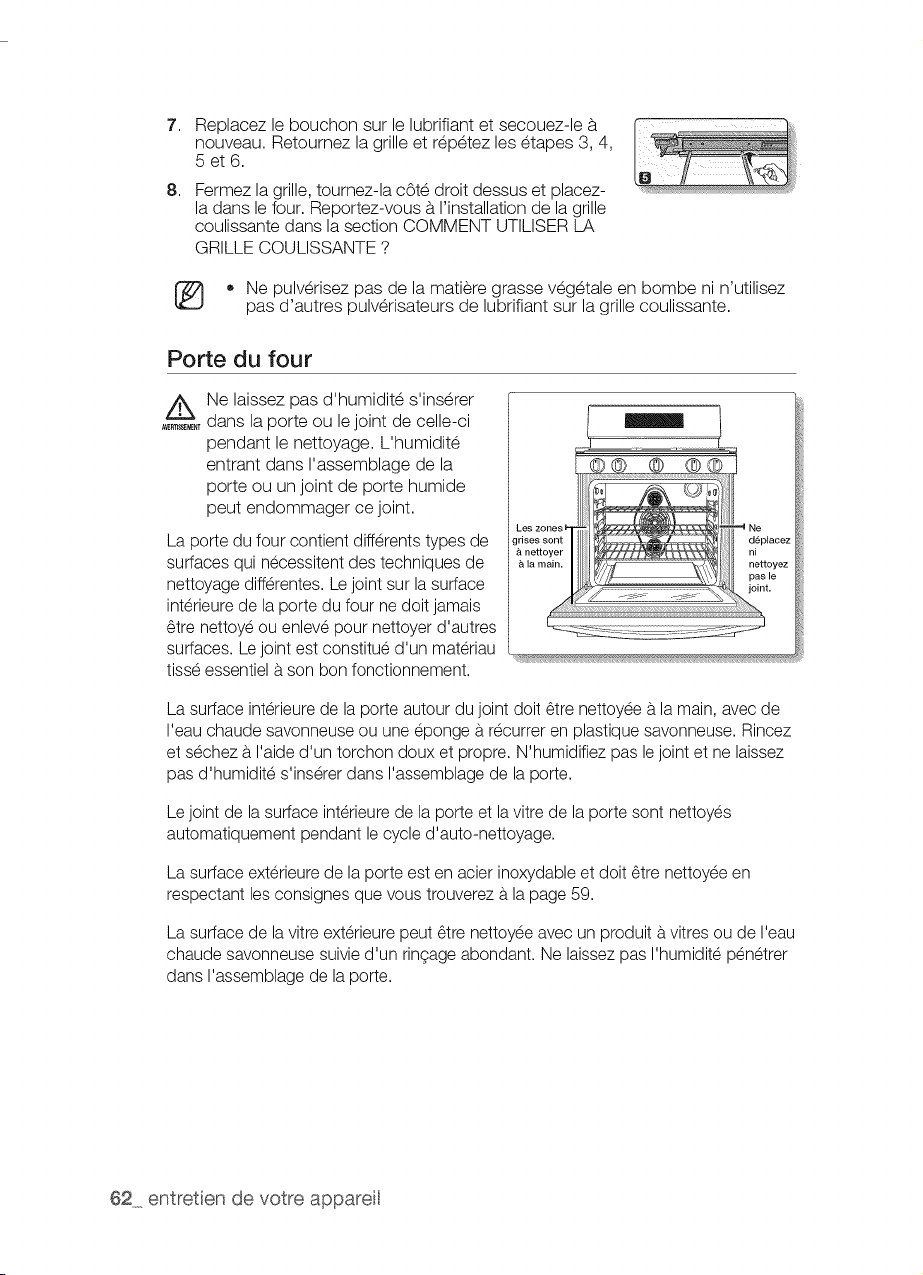
7,
8,
Replacez lebouchon sur le lubrifiant et secouez-le
nouveau. Retoumez la grille et repetez les etapes 3, 4,
5 et 6.
Fermez la grille, toumez-la c6te droit dessus et placez-
la dans le four. Reportez-vous a I'installation de la grille
coulissante dans la section COMMENT UTILISER LA
GRILLE COULISSANTE ?
• Ne pulverisez pas de la matiere grasse vegetale en bombe ni n'utilisez
pas d'autres pulverisateurs de lubrifiant sur la grillecoulissante.
Porte du four
z_Ne laissez pas d'humidite s'inserer
....... dans laporte ou lejoint de celle-ci
pendant le nettoyage. L'humidite
entrant dans I'assemblage de la
porte ou un joint de porte humide
peut endommager ce joint.
La porte du four contient differents types de
surfaces quin@essitent des techniques de
nettoyage differentes. Le joint sur lasurface
interieure de la porte dufour nedoit jamais
6tre nettoye ou enleve pour nettoyer d'autres
surfaces. Lejoint est constitue d'un materiau
tisse essentiel a son bon fonctionnement.
La surface interieure de la porte autour du joint doit 6trenettoyee a la main, avecde
I'eau chaude savonneuse ou une @onge a r@urrer enplastique savonneuse. Rincez
etsechez a I'aided'un torchon doux et propre. N'humidifiez pas le joint etne laissez
pas d'humidite s'inserer dans I'assemblage de la porte.
Lejoint de la surface interieure de laporte etlavitre de la porte sont nettoyes
automatiquement pendant le cycle d'auto-nettoyage.
La surface exterieure de laporte estenacier inoxydable etdoit 6tre nettoyee en
respectant les consignes que vous trouverez a la page 59.
La surface de la vitre exterieurepeut 6tre nettoyee avecun produit a vitresou de I'eau
chaude savonneuse suivie d'un ringageabondant. Ne laissezpasI'humidite penetrer
dans I'assemblage de laporte.
62 entretien de votre appareil
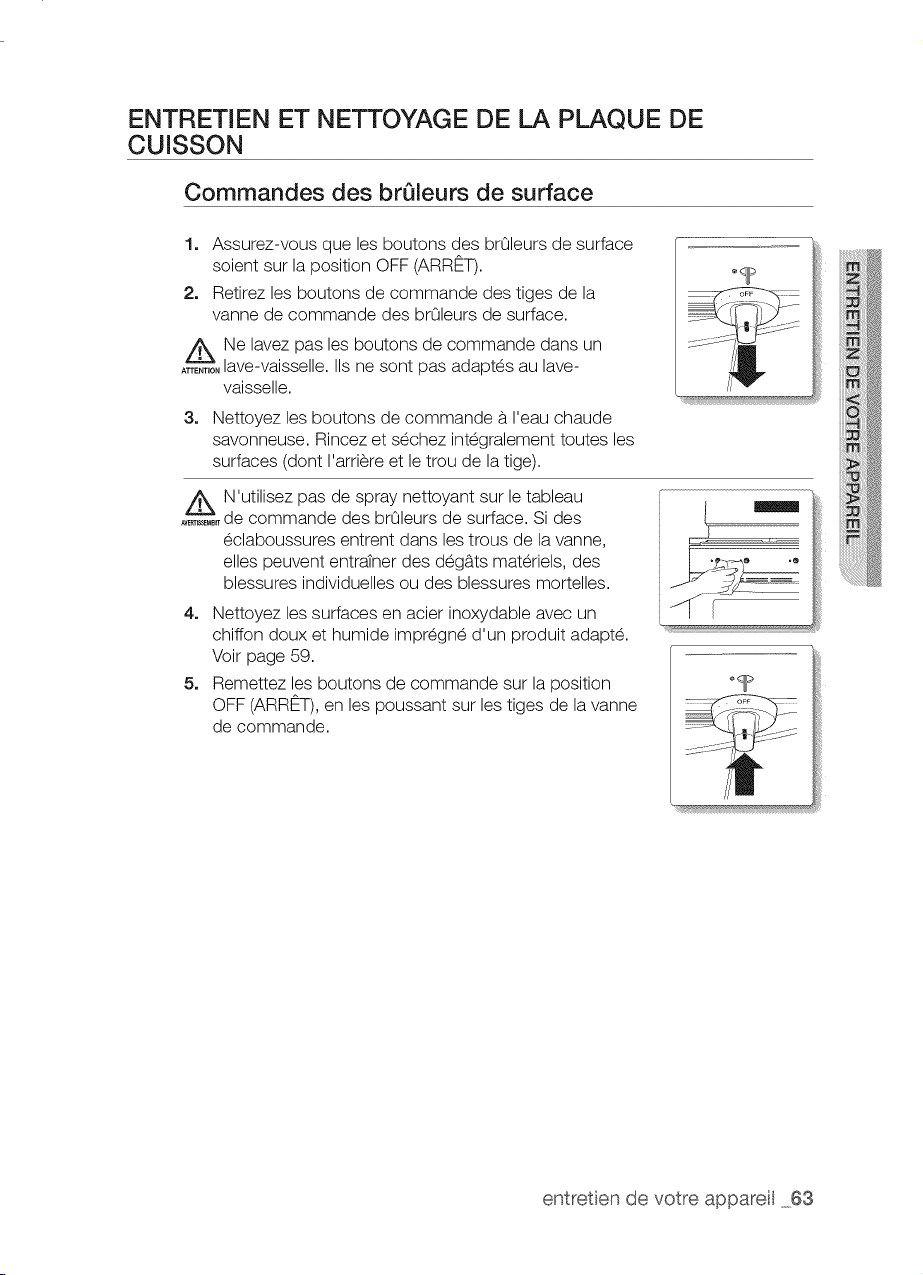
ENTRETIEN ET NETTOYAGE DE LA PLAQUE DE
CUISSON
Commandes des brQleurs de surface
1.
2.
Assurez-vous que les boutons des brOleurs de surface
soient sur la position OFF (ARRt2T).
Retirez les boutons de commande des tiges de la
vanne de commande des brOleurs de surface.
A&Ne lavez pas les boutons de commande dans un
. lave-vaisselle. IIs nesont pas adaptes au lave-
vaisselle.
3. Nettoyez les boutons de commande aI'eau chaude
savonneuse. Rincez etsechez integralement toutes les
surfaces (dont I'arriere et le trou de la tige).
/_ N'utilisez pas de spray nettoyant sur le tableau
....."-_-_,M,de commande des brOleurs de surface. Si des
eclaboussures entrent dans les trous de la vanne,
elles peuvent entratner des deg&ts materiels, des
blessures individuelles ou des blessures mortelles.
4. Nettoyez les surfaces en acier inoxydable avec un
chiffon doux et humide impregn6 d'un produit adapt&
Voir page 59.
5. Remettez les boutons de commande sur la position
OFF (ARRt2T),en les poussant sur les tiges de la vanne
de commande.
v............... .....
__ _- _%_ _2_-_
//V
entretien de votre apparel 63
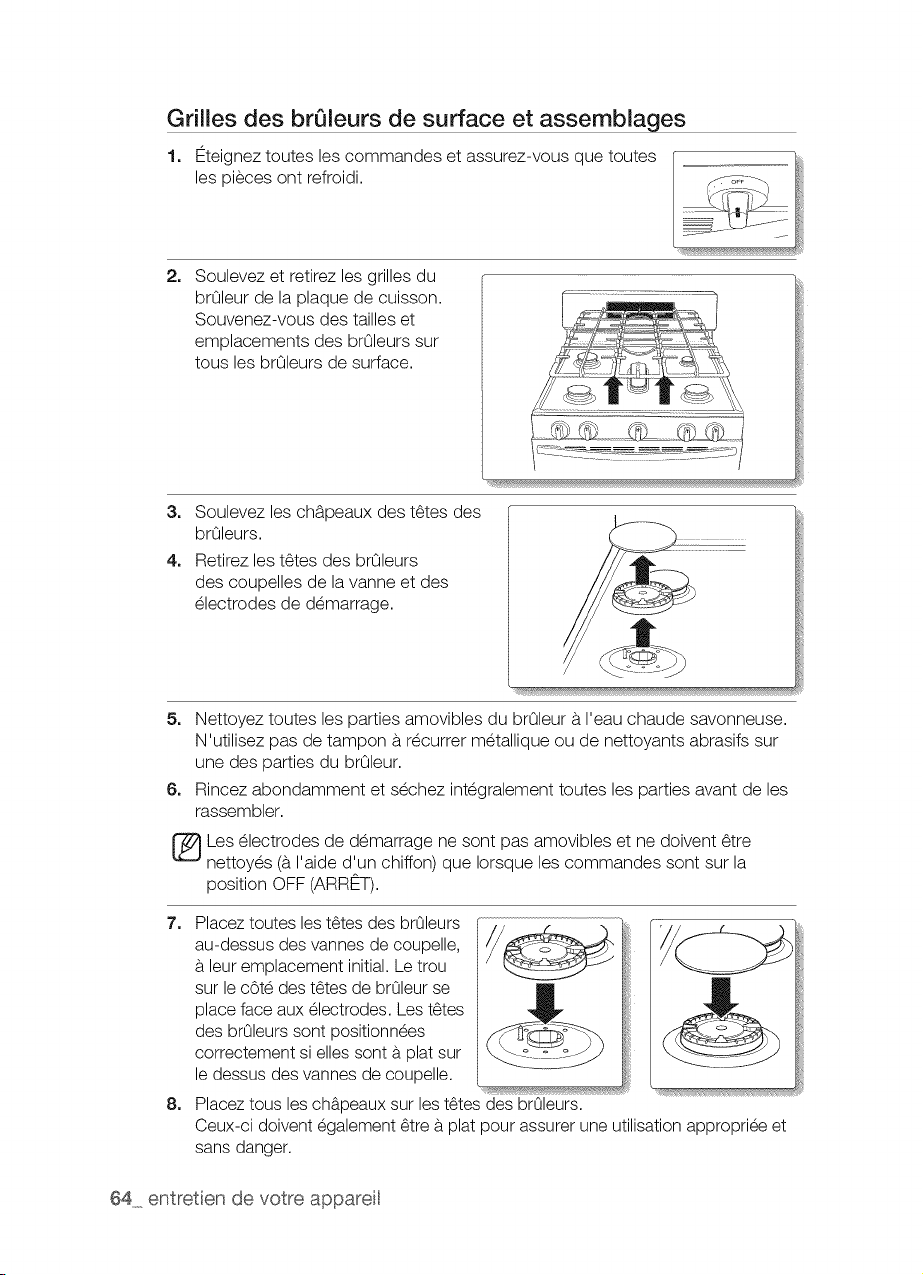
Grilles des brQleurs de surface et assemblages
1, Eteignez toutes les commandes et assurez-vous que toutes
les pieces ont refroidi.
2.
Soulevez et retirez les grilles du
brOleur de la plaque de cuisson.
Souvenez-vous des tailles et
emplacements des brOleurssur
tousles brOleurs de surface.
3. Soulevez les chb,peaux des t6tes des
brOleurs.
4. Retirez les t6tes des brOleurs
des coupelles de lavanne et des
electrodes de demarrage.
5. Nettoyez toutes les parties amovibles du brOleura I'eau chaude savonneuse.
N'utilisez pas de tampon a recurrer metallique ou de nettoyants abrasifs sur
une des parties du brOleur.
6, Rincez abondamment et sechez integralement toutes les parties avant de les
rassembler.
Les electrodes de demarrage ne sont pas amovibles et ne doivent 6tre
nettoyes (a I'aide d'un chiffon) que Iorsque les commandes sont sur la
position OFF (ARRt2T).
7.
8.
Placez toutes les t6tes des brOleurs
au-dessus des vannes decoupelle,
leur emplacement initial. Letrou
sur le cOtedes t6tes de brOleur se
place face aux electrodes. Lest6tes
des brOleurs sont positionnees
correctement sielles sont a plat sur
le dessus des vannes decoupelle.
Placez tousles chapeaux sur les t6tes des brOleurs.
Ceux-ci doivent egalement 6tre a plat pour assurer une utilisation appropriee et
sans danger.
64 entretien de votre appareil

[_ ssurez-vous que la t6te du brOleurdouble soit stable sur la coupelle du
brOleur.
Assurez-vous que le passage du gaz soit aligne entre la coupelle du brOleur
et la t6te du brOleur.
Le chapeau du brOleur de mijotage precis (ArD) et I'interieur du double
brOleur(AvD)peuvent 6tre utilises de fagon interchangeable.
9.
surface plate
Ligne concave
Replacez les grilles des brOleurs sur la
plaque de cuisson de lacuisiniere.
10, Enfoncez et tournez chaque bouton de commande des
brOleurs de surface sur la position LITE (ALLUMER), puis
remettez-les sur le reglage du brOleurpour s'assurer qu'ils
fonctionnent correctement.
entretien de votre apparel 65
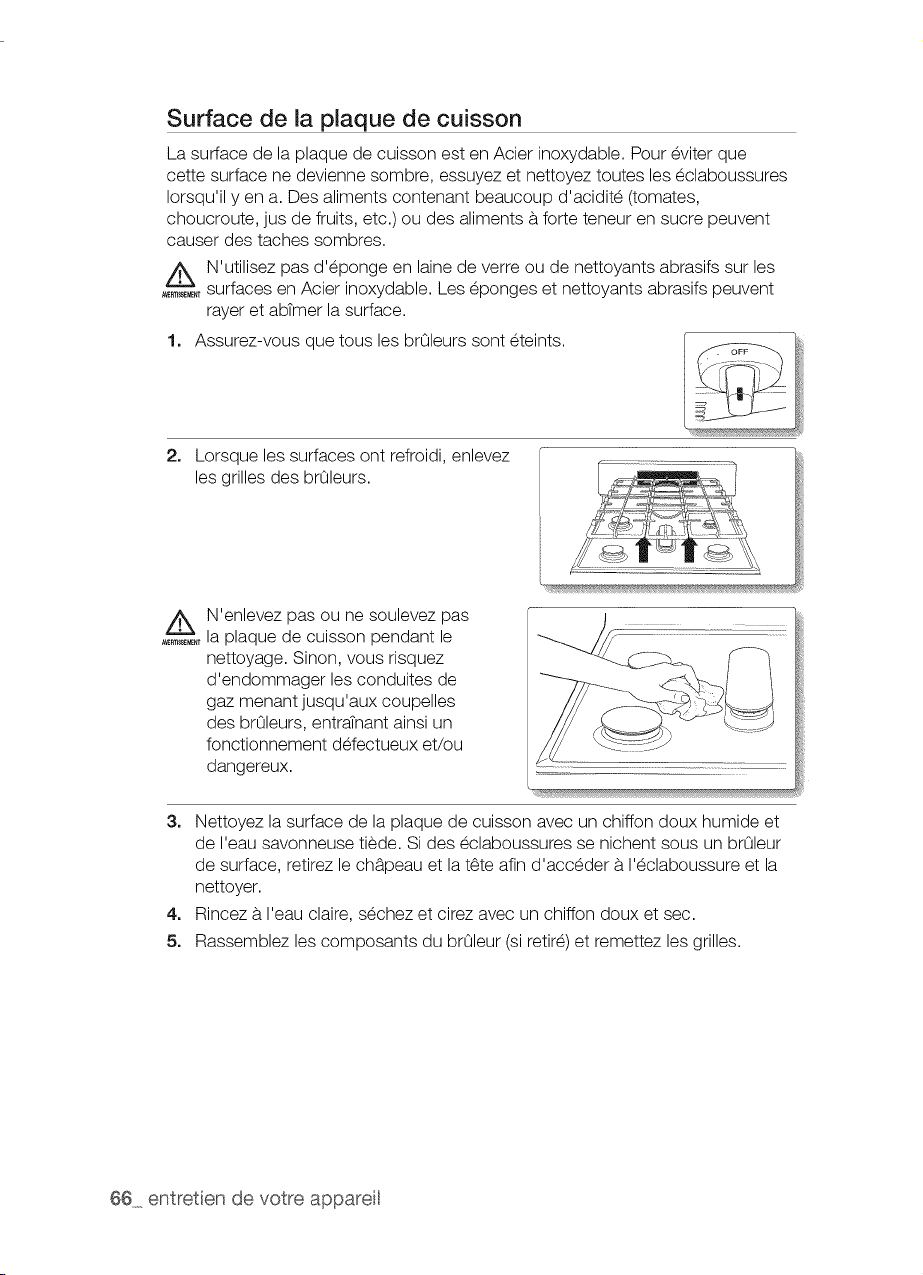
Surface de la plaque de cuisson
La surface de la plaque de cuisson est en Acier inoxydable. Pour eviter que
cette surface ne devienne sombre, essuyez et nettoyez toutes les eclaboussures
Iorsqu'il yen a. Des aliments contenant beaucoup d'acidite (tomates,
choucroute, jus de fruits, etc.) ou des aliments b.forte teneur en sucre peuvent
causer des taches sombres.
A_, N'utilisez pas d'eponge en laine de verre ou de nettoyants abrasifs sur les
surfaces en Acier inoxydable. Leseponges et nettoyants abrasifs peuvent
rayer et abtmer la surface.
1, Assurez-vous que tousles brOleurs sont eteints.
2. Lorsque les surfaces ont refroidi, enlevez
les grilles des brOleurs.
/_ N'enlevez pas ou ne soulevez pas
A_,,_'"la plaque de cuisson pendant le
nettoyage. Sinon, vous risquez
d'endommager les conduites de
gaz menant jusqu'aux coupelles
des brOleurs, entratnant ainsi un
fonctionnement defectueux et/ou
dangereux.
3, Nettoyez la surface de la plaque de cuisson avec un chiffon doux humide et
de I'eau savonneuse tiede. Si des eclaboussures se nichent sous un brOleur
de surface, retirez le chb.peau et la t6te afin d'acceder b.I'eclaboussure et la
nettoyer.
4, Rincez b.I'eau claire, sechez etcirez avec un chiffon doux et sec.
5, Rassemblez les composants du brOleur (si retire)et remettez les grilles.
66 entretien de votre appar@
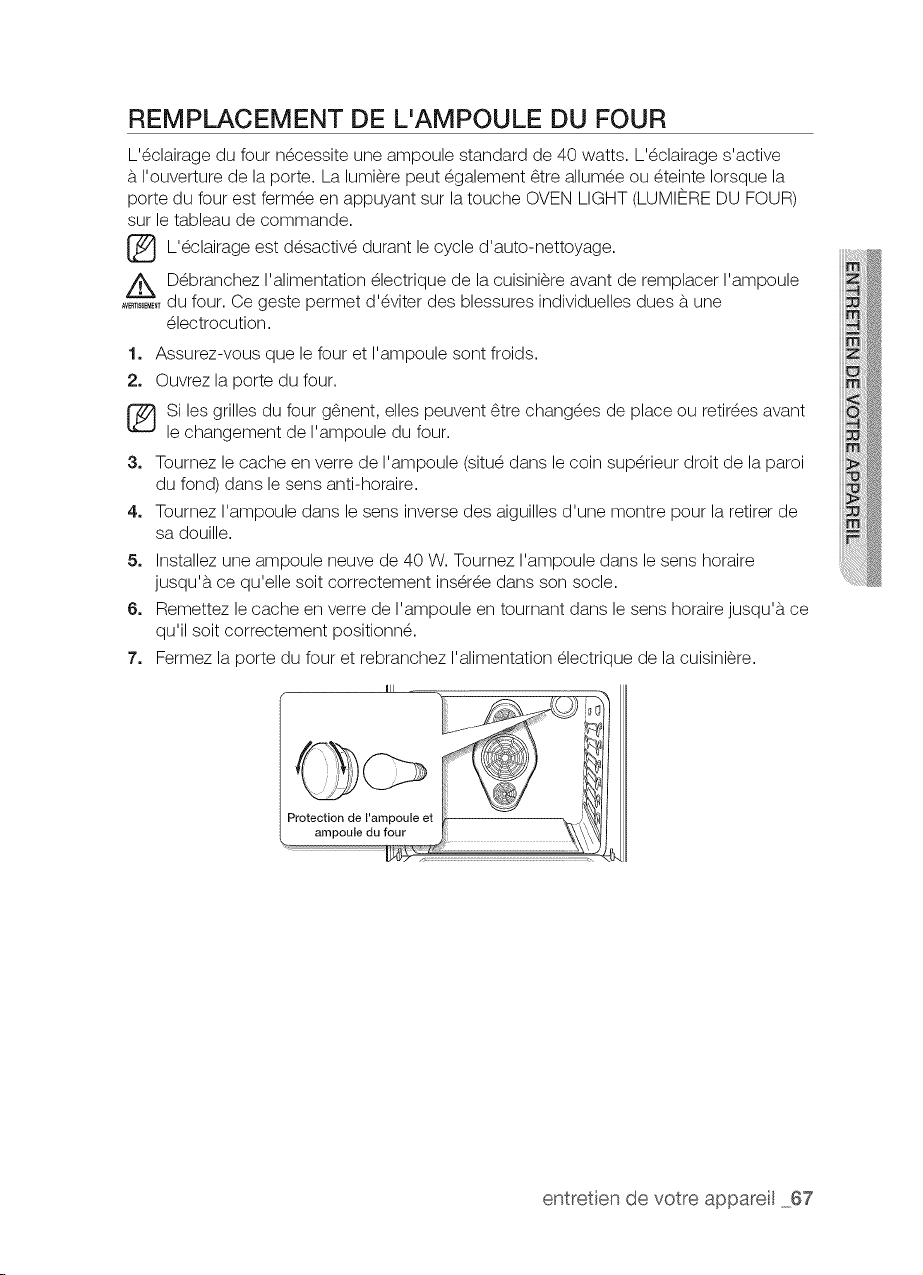
REMPLACEMENT DE L'AMPOULE DU FOUR
L'_clairage du four n_cessite une ampoule standard de 40 watts. L'_clairage s'active
b. I'ouverture de la porte. Lalumi_re peut _galement _tre allum_e ou _teinte Iorsque la
porte du four est ferm_e en appuyant sur la touche OVEN LIGHT (LUMIERE DU FOUR)
sur le tableau de commande.
[_ L'_clairage est d_sactiv_ durant le cycle d'auto-nettoyage.
Z_ D_branchez I'alimentation _lectrique de la cuisini_re avant de remplacer I'ampoule
..........du four. Ce geste permet d'_viter des blessures individuelles dues b. une
_lectrocution.
1. Assurez-vous que lefour et I'ampoule sont froids.
2. Ouvrez la porte du four.
Si les grilles du four g_nent, elles peuvent _tre chang_es de place ou retirees avant
le changement de I'ampoule du four.
3. Tournez le cache en verre de I'ampoule (situ_ dans le coin sup_rieur droit de la paroi
du fond) dans le sens anti-horaire.
4. Tournez I'ampoule dans le sens inverse des aiguilles d'une montre pour la retirer de
sa douille.
5. Installez une ampoule neuve de 40 W.Tournez I'ampoule dans le sens horaire
jusqu'b, ce qu'elle soit correctement ins_r_e dans son socle.
6. Remettez le cache enverre de I'ampoule en tournant dans le sens horaire jusqu'b, ce
qu'il soit correctement positionn_.
7. Fermez la porte du four et rebranchez I'alimentation electrique de la cuisini_re.
entretien de votre appare 67
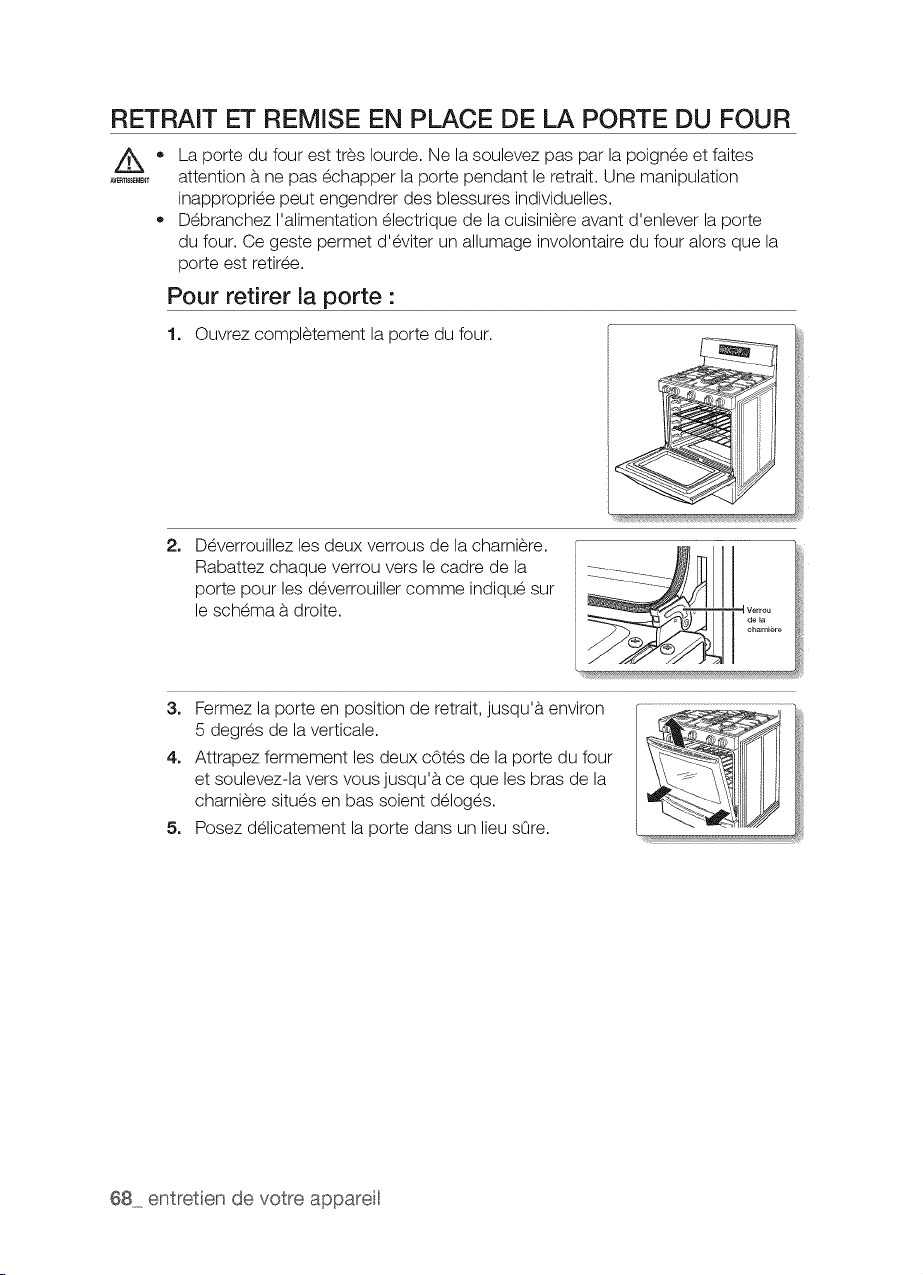
RETRAIT ET REMISE EN PLACE DE LA PORTE DU FOUR
La porte du four est tres Iourde. Ne la soulevez pas par la poignee et faites
attention b.ne pas echapper la porte pendant le retrait. Une manipulation
inappropriee peut engendrer des blessures individuelles.
Debranchez I'alimentation electrique de la cuisiniere avant d'enlever la porte
du four. Ce geste permet d'eviter un allumage involontaire du four alors que la
porte est retiree.
Pour retirer la porte •
1. Ouvrez completement la porte du four.
2, Deverrouillez les deux verrous de la charniere.
Rabattez chaque verrou vers le cadre de la
porte pour les deverrouiller comme indique sur
le schema b. droite.
3. Fermez la porte en position de retrait, jusqu'b, environ
5 degres de la verticale.
4. Attrapez fermement les deux cOtes de la porte du four
et soulevez-la vers vous jusqu'b, ce que les bras de la
charniere situes en bas soient deloges.
5. Posez delicatement la porte dans un lieu sore.
68 entretien de votre appar@
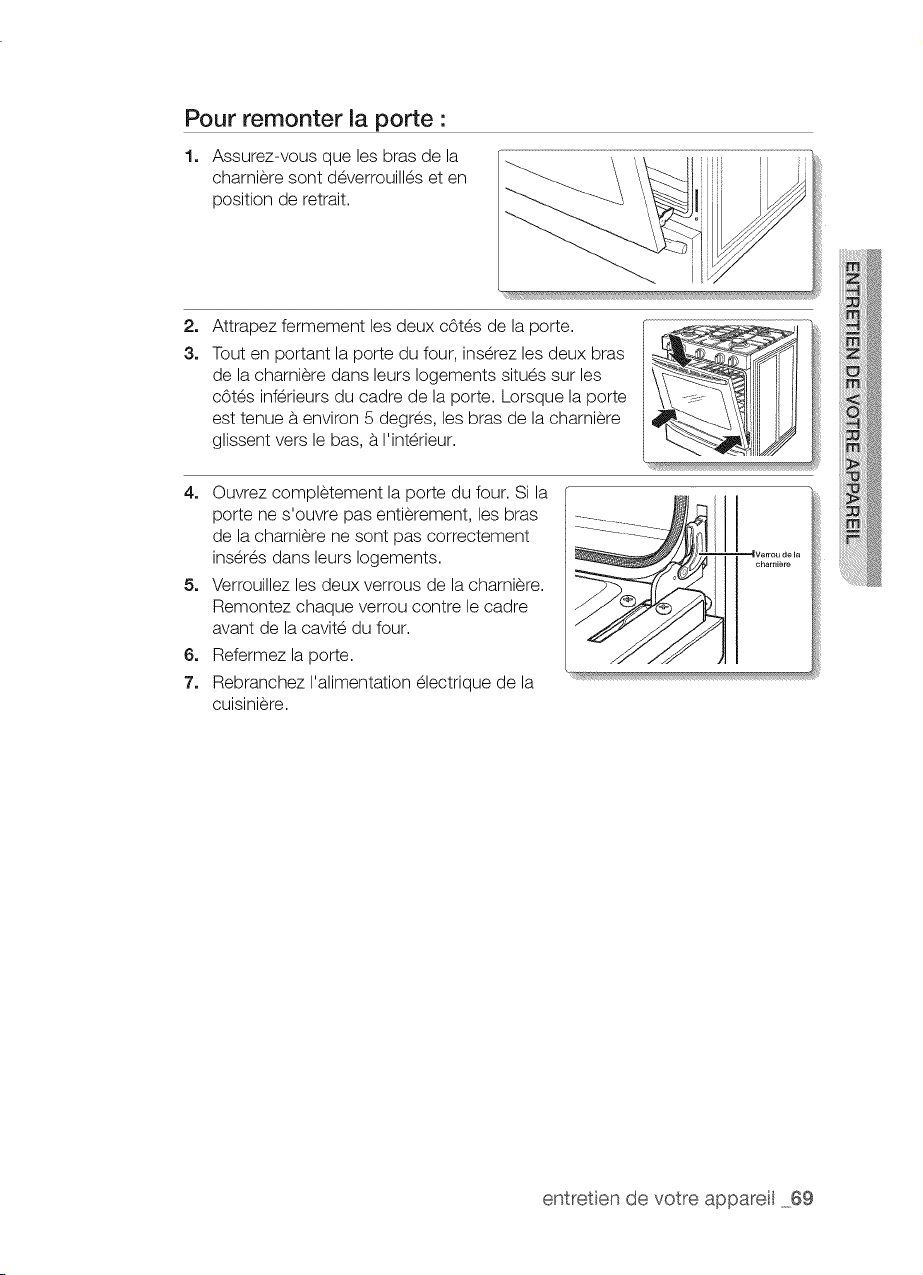
Pour remonter la porte •
1. Assurez-vous que les bras de la
charniere sont deverrouilles et en
position de retrait.
2.
3.
Attrapez fermement les deux cOtes de la porte.
Tout en portant la porte du four, inserez les deux bras
de la charniere dans leurs Iogements situes sur les
cOtes inferieurs du cadre de la porte. Lorsque la porte
est tenue b.environ 5 degres, les bras de la charniere
glissent vers le bas, b.I'interieur.
4. Ouvrez completement la porte du four. Si la
porte ne s'ouvre pas entierement, les bras
de la charniere ne sont pas correctement
inseres dans leurs Iogements.
5. Verrouillez les deux verrous de la charniere.
Remontez chaque verrou contre le cadre
avant de la cavite du four.
6. Refermez la porte.
7. Rebranchez I'alimentation electrique de la
cuisiniere.
entretien de votre apparel 69
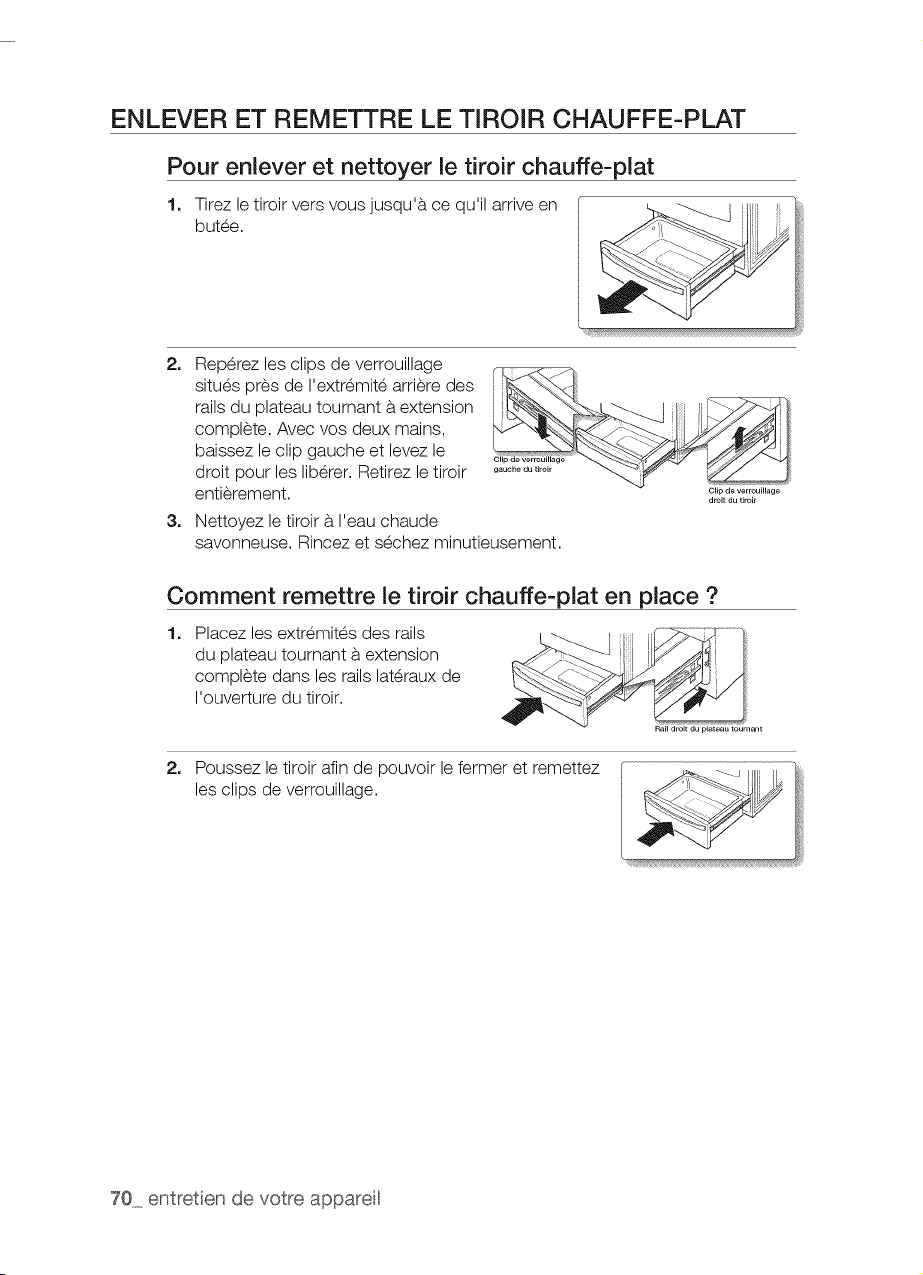
ENLEVER ET REMETTRE LE TIROIR CHAUFFE-PLAT
Pour enlever et nettoyer le tiroir chauffe-plat
1. Tirez le tiroir vers vous jusqu'a ce qu'il arrive en
butee.
2. Reperez les clips de verrouillage
situes pres de I'extremite arriere des
rails du plateau tournant a extension
complete. Avec vos deux mains,
baissez le clip gauche et levez le
droit pour les liberer. Retirez le tiroir
entierement.
3. Nettoyez le tiroir a I'eau chaude
savonneuse. Rincez et sechez minutieusement.
Comment remettre le tiroir chauffe-plat en place ?
1. Placez les extremites des rails
du plateau tournant a extension
complete dans les railslateraux de
I'ouverture du tiroir.
2. Poussez le tiroir afin de pouvoir le fermer et remettez
les clips de verrouillage.
70 entretien de votre appar@
AUTO-NETTOYAGE DU FOUR
Lecycle d'auto-nettoyage produit une temperature tres _lev_e (bien sup_rieure aux
temperatures de cuisson) afin de brOler compl_tement les r_sidus de graisse ou les
r_duire en poudre ; il vous suffit ensuite de les retirer b. I'aide d'un torchon humide.
//_ Lenon-respect des ces consignes peut entraTner des dommages sur le four, un
..........incendie, et/ou des blessures individuelles.
,, Ne laissez jamais de jeunes enfants sans surveillance b. proximit_ de la cuisini_re
durant le cycle d'auto-nettoyage. Lessurfaces ext_rieures de la cuisini_re
peuvent devenir tres chaudes.
,, Certains oiseaux sont tres sensibles aux fumees emises par le cycle d'auto-
nettoyage du four. D_placez les oiseaux dans une piece bien a_r_e, loin de la
cuisini_re.
Ne recouvrez pas le four, les grilles ou le dessous du four avec du papier
aluminium. Lachaleur serait ainsi mal distribute, les r_sultats de cuisson altar,s
et I'int_rieur du four endommag_ de fagon irreversible. Lepapier aluminium peut
fondre b.I'int_rieur du four.
Ne forcez jamais I'ouverture de la porte du four. Vous risqueriez d'endommager
le systeme de verrouillage automatique de la porte. La porte se verrouille
automatiquement Iorsque le cycle d'auto-nettoyage commence et reste
verrouillee jusqu'b, ce que le cycle soit annul_ et que la temperature du four
descende en dessous de 177°C (350 °F).
Soyez prudent en ouvrant la porte du four apres un cycle d'auto-nettoyage.
Lefour reste TRI£SCHAUD et de I'air chaud ainsi que de la vapeur peuvent
s'_chapper a I'ouverture de la porte.
entretien de votre appare 71
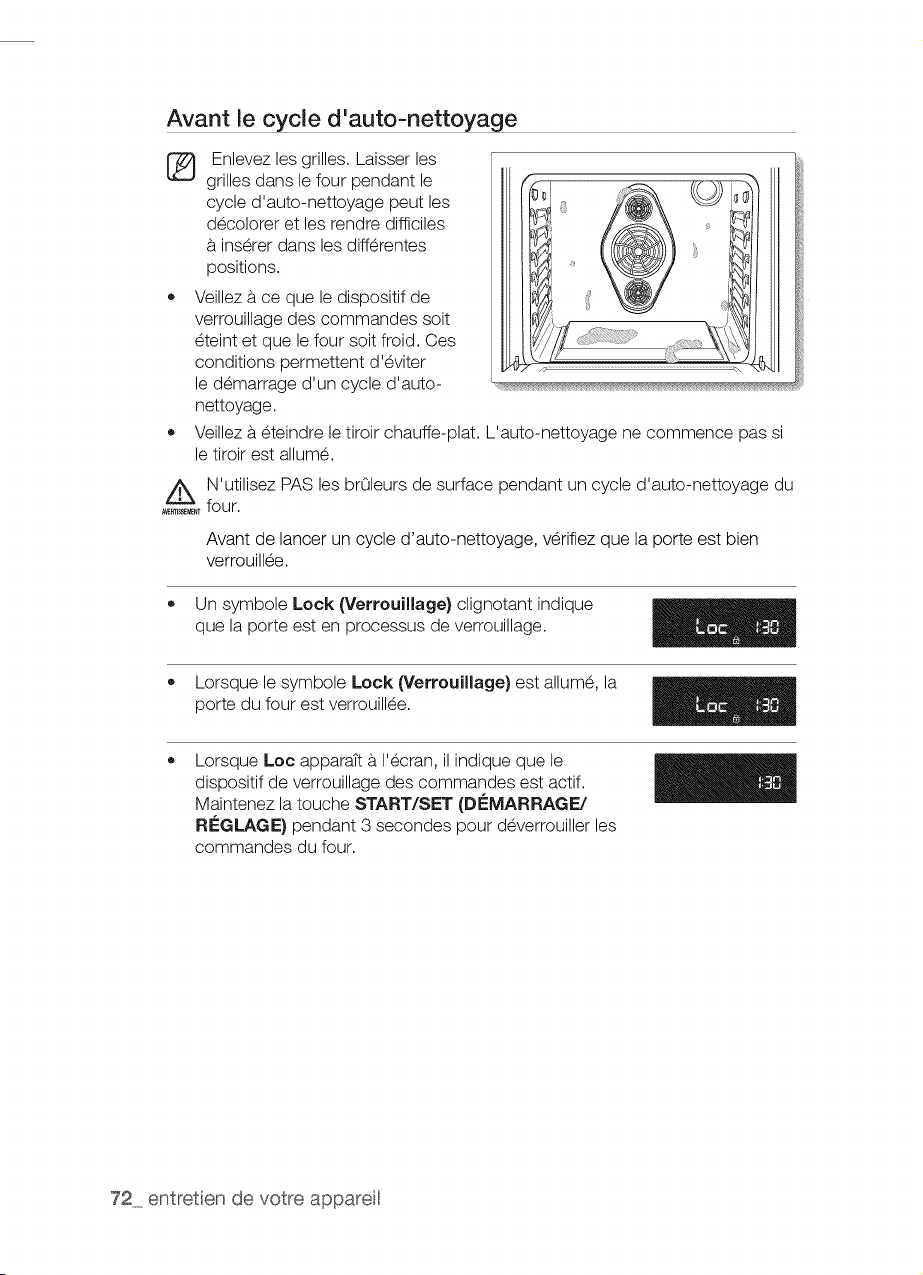
Avant le cycle d'auto-nettoyage
®
Enlevez les grilles. Laisser les
grilles dans le four pendant le
cycle d'auto-nettoyage peut les
decolorer et les rendre difficiles
b.inserer dans les differentes
positions.
Veillezb.ce que le dispositif de
verrouillage des commandes soit
eteint et que le four soit froid. Ces
conditions permettent d'eviter
le demarrage d'un cycle d'auto-
nettoyage.
Veillezb.eteindre letiroir chauffe-plat. L'auto-nettoyage ne commence pas si
le tiroir est allume.
A_, N'utilisez PAS les br01eursde surface pendant uncycle d'auto-nettoyage du
four.
Avant de lancer un cycle d'auto-nettoyage, verifiez que la porte est bien
verrouillee.
• Un symbole Lock (Verrouillage) clignotant indique
que la porte est en processus de verrouillage.
• Lorsque lesymbole Lock _'errouillage) est allume, la
porte du four est verrouillee.
Lorsque Loc apparatt b. I'ecran, il indique que le
dispositif de verrouillage des commandes est actif.
Maintenez la touche START/SET (DEMARRAGE/
REGLAGE) pendant 3 secondes pour deverrouiller les
commandes du four.
72 entretien de votre appareil
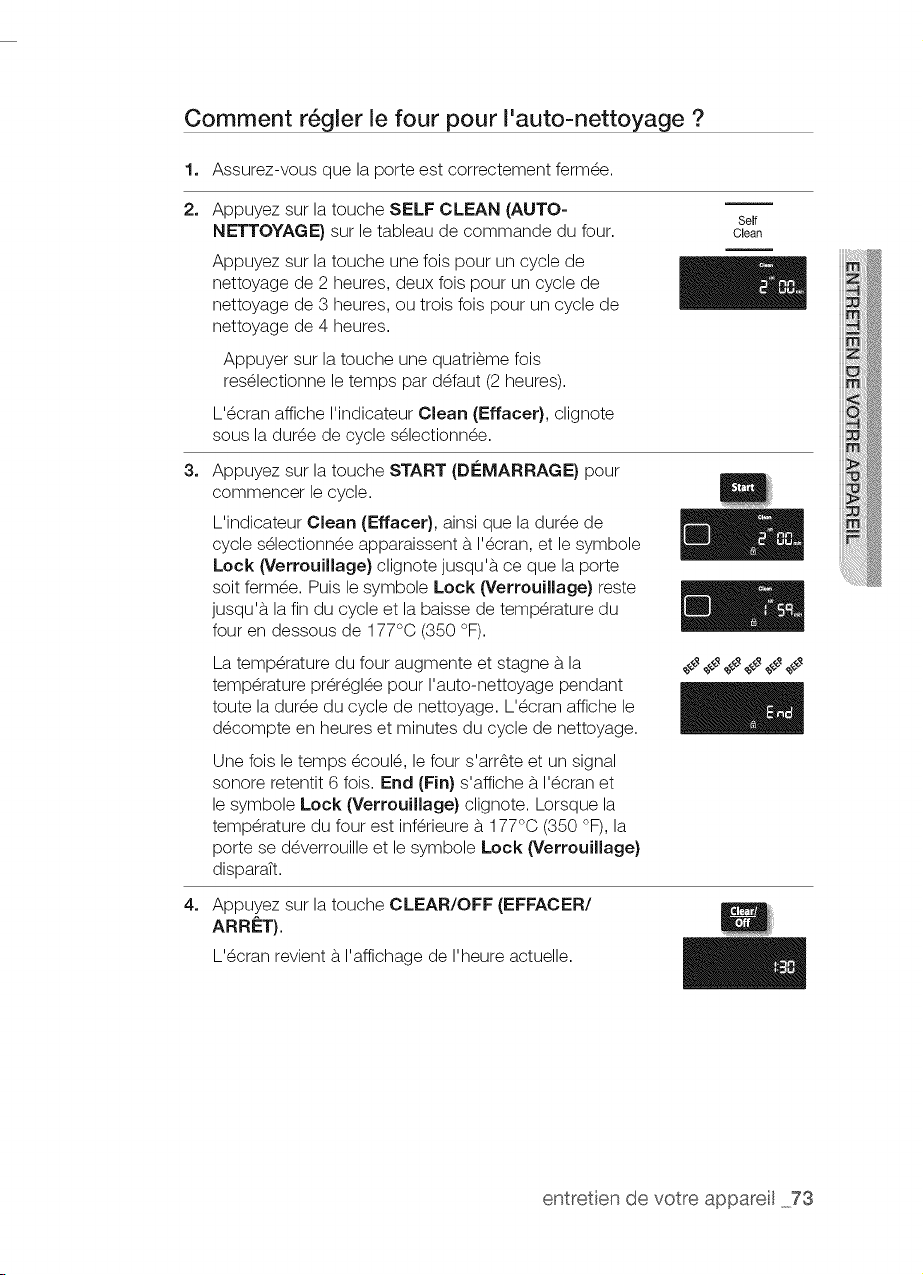
Comment r6gler le four pour I'auto-nettoyage ?
1. Assurez-vous que la porte est correctement ferm_e.
2.
3=
4=
Appuyez sur la touche SELF CLEAN (AUTO-
NETTOYAGE) sur le tableau de commande du four.
Appuyez sur la touche une fois pour un cycle de
nettoyage de 2 heures, deux fois pour un cycle de
nettoyage de 3 heures, ou trois fois pour un cycle de
nettoyage de 4 heures.
Appuyer sur la touche une quatri_me fois
res_lectionne le temps par d_faut (2 heures).
L'_cran affiche I'indicateur Clean (Effacer}, clignote
sous la dur_e de cycle s_lectionn_e.
Appuyez sur la touche START (Di£MARRAGE} pour
commencer le cycle.
L'indicateur Clean (Effacer}, ainsi que la dur_e de
cycle s_lectionn_e apparaissent b.I'_cran, et le symbole
Lock (Verrouillage} clignote jusqu'b, ce que la porte
soit ferm_e. Puis le symbole Lock (Verrouillage} reste
jusqu'b, la fin du cycle et la baisse de temp@ature du
four en dessous de 177°C (350 °F).
La temp@ature du four augmente et stagne b.la
temp@ature pr@_gl_e pour I'auto-nettoyage pendant
toute la dur_e du cycle de nettoyage. L'_cran affiche le
d_compte en heures et minutes du cycle de nettoyage.
Une fois le temps _coul_, le four s'arr_te et un signal
sonore retentit 6 fois. End (Fin} s'affiche b.I'_cran et
le symbole Lock (Verrouillage} clignote. Lorsque la
temp@ature du four est inf@ieure b. 177°C (350 °F), la
porte se d_verrouille et le symbole Lock (Verrouillage}
disparaTt.
Appuyez sur la touche CLEAR/OFF (EFFACER/
ARRET).
L'_cran revient b.I'affichage de I'heure actuelle.
Self
Clean
entretien de votre appare 73

Comment diff6rer le cycle d'auto-nettoyage ?
1. Assurez-vous que la porte est correctement ferm_e.
2. Appuyez sur la touche SELF CLEAN (AUTO-
NETTOYAGE} sur le tableau de commande du four.
Appuyez sur la touche une fois pour un cycle de
nettoyage de 2 heures, deux fois pour un cycle de
nettoyage de 3 heures, ou trois fois pour un cycle de
nettoyage de 4 heures.
3=
Self
Clean
i
L'_cran affiche I'indicateur Clean (Effacer}, clignote
sous la dur_e de cycle s_lectionn_e.
Appuyez sur la touche DELAY START (DISPART
DIFFERLe}.
L'_cran affiche Delay (Retard} et ....
4=
5=
Appuyez sur les chiffres de la dur_e pendant laquelle
vous souhaitez que le four fonctionne (ex ' 4, 3, 0).
Appuyez sur la touche START (Di£MARRAGE}.
L'_cran affiche I'heure du Delay Start (D_part DifferS) et
le symbole Lock (Verrouillage}. Le verrouillage de la
porte du four s'enclenche automatiquement.
I'heure de d_part programm_e, lefour s'allume
automatiquement et commence le cycle de nettoyage
programme.
74 entretien de votre appareit
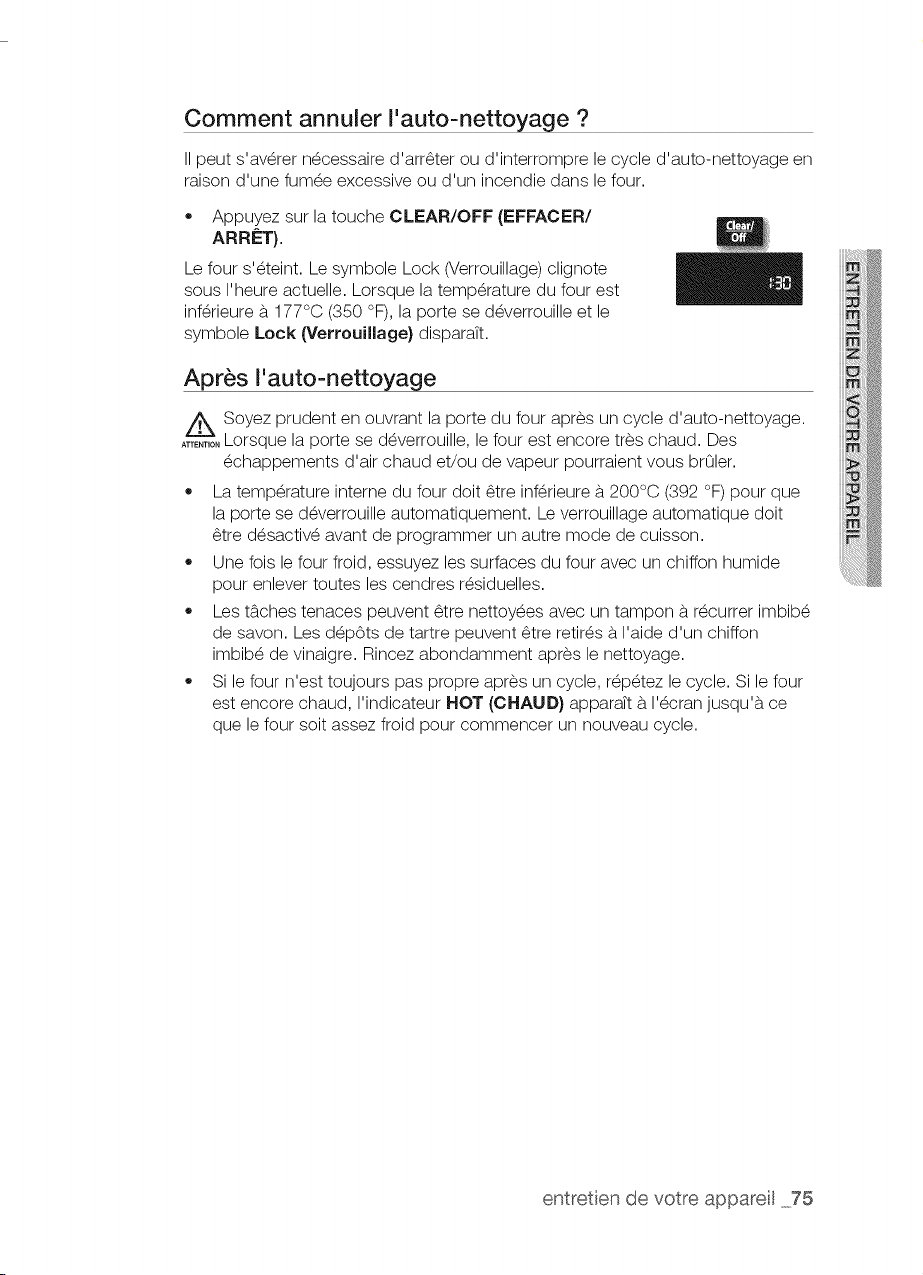
Comment annuler I'auto-nettoyage ?
II peut s'av_rer n_cessaire d'arr_ter ou d'interrompre le cycle d'auto-nettoyage en
raison d'une fum_e excessive ou d'un incendie dans le four.
Appuyez sur la touche CLEAR/OFF (EFFACER/
ARRg:T}.
Lefour s'_teint. Le symbole Lock<Verrouillage) clignote
sous I'heureactuelle. Lorsque la temperature du four est
inf_rieure b. 177°C (350 °F),la porte se d_verrouille et le
symbole Lock (Verrouillage} disparaTt.
Apr6s I'auto-nettoyage
A_,i/_,oSoyez prudent en ouvrant la porte du four apres uncycle d'auto-nettoyage.
, Lorsque la porte se d_verrouille, le four est encore tres chaud. Des
_chappements d'air chaud et/ou de vapeur pourraient vous br01er.
La temperature interne du four doit _tre inf_rieure b. 200°C (392 °F)pour que
la porte se d_verrouille automatiquement. Leverrouillage automatique doit
_tre d_sactiv_ avant de programmer un autre mode de cuisson.
Une fois le four froid, essuyez les surfaces du four avec un chiffon humide
pour enlever toutes les cendres r_siduelles.
,, Les tS.ches tenaces peuvent _tre nettoy_es avec un tampon b. r_currer imbib_
de savon. Lesd_p6ts de tartre peuvent _tre retires b.I'aide d'un chiffon
imbib_ de vinaigre. Rincez abondamment apres le nettoyage.
Si le four n'est toujours pas propre apres un cycle, r_p_tez le cycle. Si le four
est encore chaud, I'indicateur HOT (CHAUD) apparaTt b. I'_cran jusqu'b, ce
que le four soit assez froid pour commencer un nouveau cycle.
entretien de votre appare 75
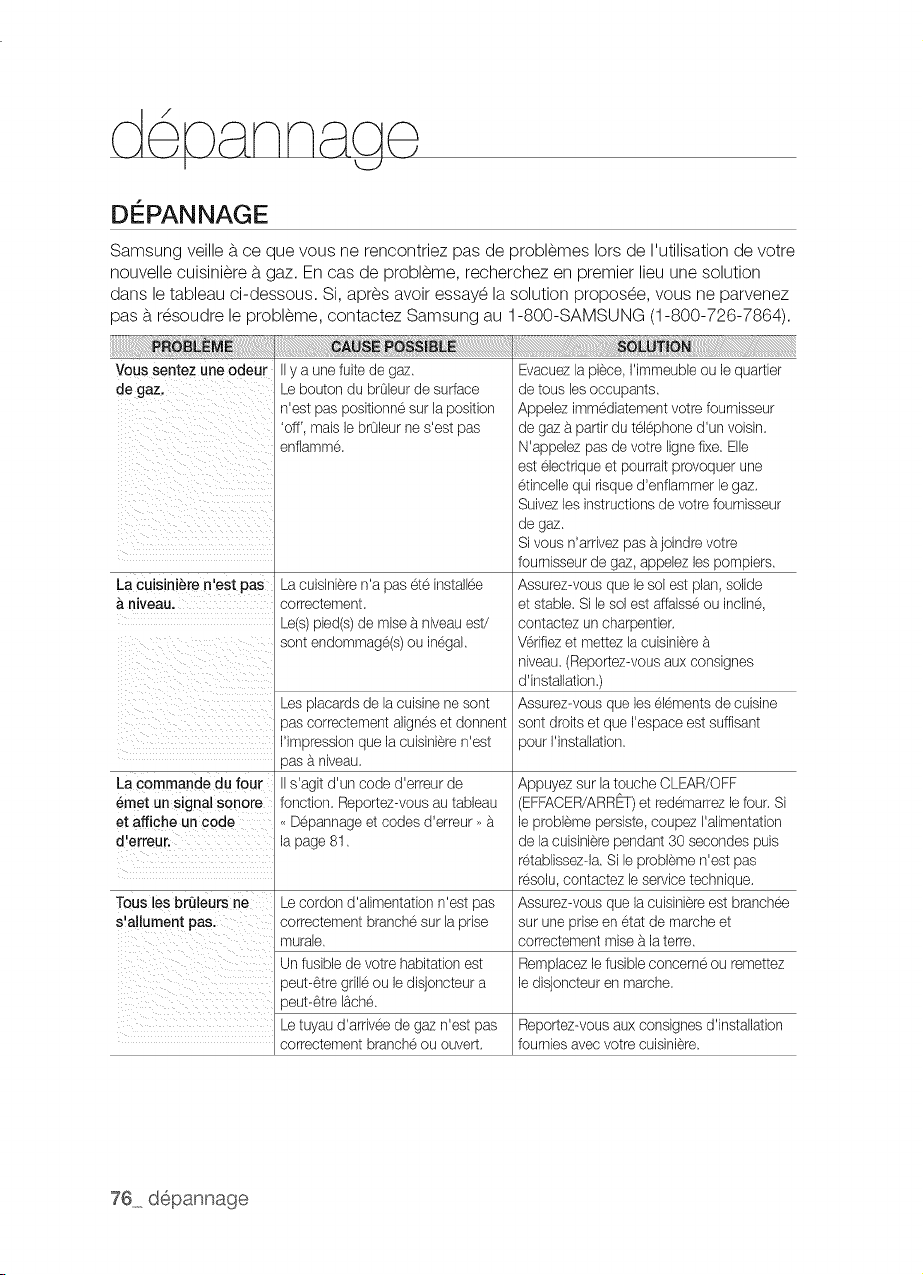
d e _nn _ae
I
DE PANNAGE
Samsung veille b. ce que vous ne rencontriez pas de problemes lots de I'utilisation de votre
nouvelle cuisini_re b. gaz. En cas de probleme, recherchez en premier lieu une solution
dans le tableau ci-dessous. Si, apres avoir essaye la solution proposee, vous ne parvenez
pas b. resoudre le probleme, contactez Samsung au 1-800-SAMSUNG (1-800-726-7864).
PROBLEME c_usE POSSIBLE , SOLUTION
Vous sentez une odeur
de gaz.
La culsiniere n'est pas
& niveau.
La commande du four
emet un signal sonore
etaffiche un code
d'erreu_
IIy aune fuitedeg_.
Le boutondubrOleurde surface
n'est pas positionne sur la position
'off', maislebrOleurne s'est pas
enflamm&
La cuisiniere n'a pas6re installee
correctement.
Le(s)pied(s) de raise aniveau edd
sontendommage(s)ou inegal.
Lesplacards delacuisinene sont
)as correctement alignesetdonnent
I'impressionque lacuisiniere n'est
)as a.niveau
II s'agitd'un code d'erreurde
fonction. Reportez-vous au tableau
,, D@annage et codes d'erreur>>a.
la page 81.
Evacuez la piece, I'immeuble oulequartier
de tousles occupants
Appelez immediatement votre fournisseur
de gaza.partirdu tel6phone d'un voisin.
N'appelezpas de votre ligne fixe. Elle
est electrique etpourrait provoquer une
etincelle qui risqued'enflammer le g_.
Suivez lesinstructions devotre fournisseur
de gaz.
Sivous n'arrivezpasajoindrevotre
fournisseur de g_, appelez les pompiers.
Assurez-vous que lesolest plan,solide
etstable. Sile solestaffaisseou incline,
contactezun charpentier.
Verifiezetmettezlacuisiniere _.
niveau. (Reportez-vous auxconsignes
d'installation.)
Assurez-vous que les el6mentsdecuisine
sontdroits et que I'espace estsuffisant
)our I'installation.
Tousles br_leurs ne Le cordon d'alimentation n'est pas
s'allument pas. correctementbranchesur laprise
murale.
Un fusibledevotre habitationest
peut-6tregrille ou le disjoncteura
)eut-6tre I_ch6.
Le tuyaud'arrivee de g_ n'est pas Reportez-vous auxconsignes d'installation
correctementbrancheououvert, fournies avec votre cuisiniere.
Appuyez sur latouche CLEAR/OFF
EFFACER/ARRF)et redemarrez le four. Si
le problemepersiste, coupez I'alimentation
de la cuisinierependant 30 secondes puis
retablissez-la.Sile problemen'est pas
resolu, contactez le servicetechnique.
Assurez-vous que lacuisiniereest branchee
sur une priseen etat de marcheet
correctementmise a la terre.
Remplacez le fusibleconcerneou remettez
le disjoncteur en marche
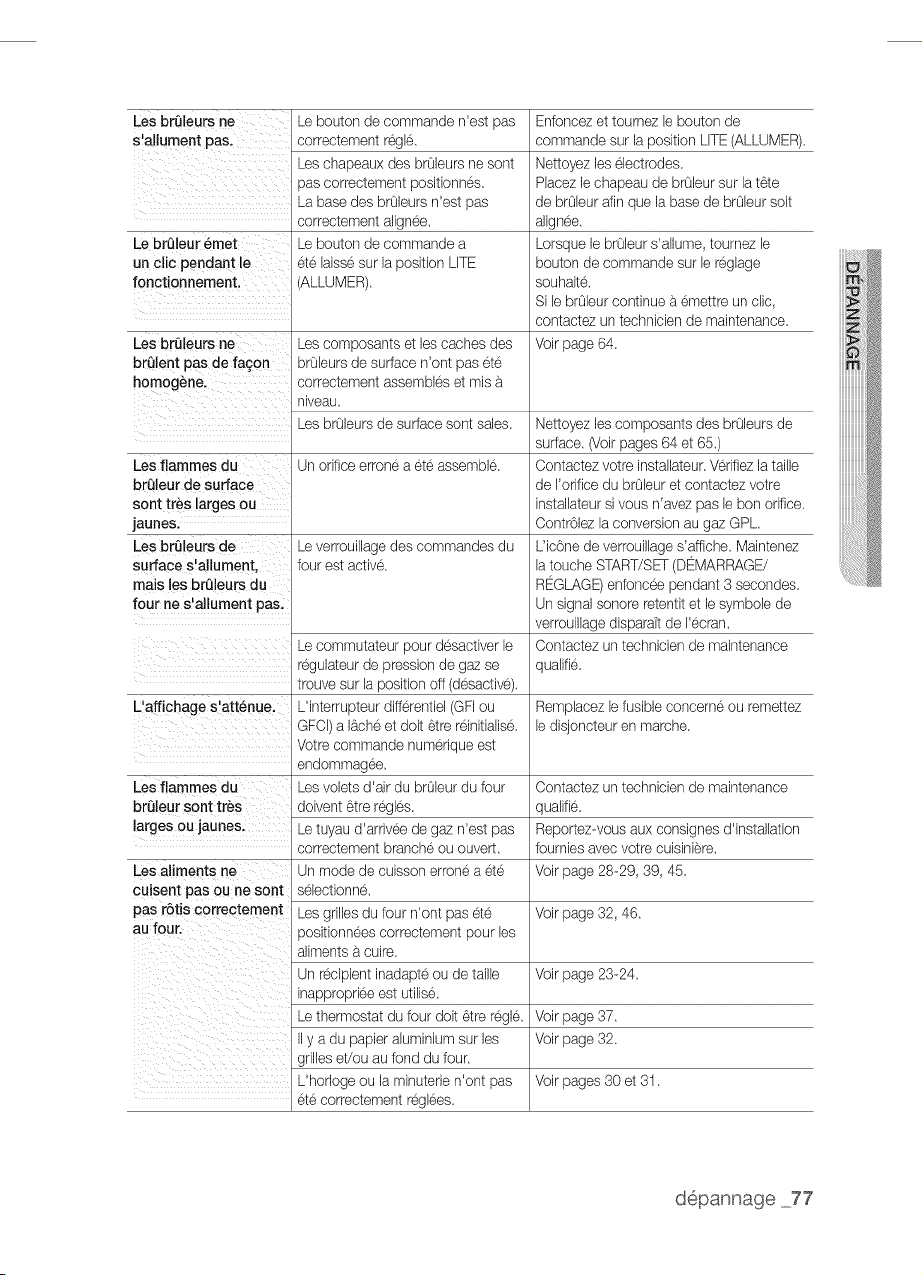
LesbrOleursne
s'allumenlpas.
LebrOleuremet
unclicpendantle
fonctionnement,
Leboutondecommanden'estpas
correctementr6gle.
Leschapeauxdesbr01eursnesont
Dascorrectementpositionnes.
Labasedesbr01eursn'estpas
correctementalignee.
Leboutondecommandea
et6laissesurlapositionLITE
(ALLUMER).
Enfoncezettournezleboutonde
commandesurlapositionLITE(ALLUMER)
Nettoyezleselectrodes.
PlacezlechapeaudebrQleursurlat6te
debrOleurafinquelabasedebrOleursoit
alignee.
LorsquelebrQleurs'allume,toumezle
boutondecommandesurlereglage
souhaite.
SilebrOleurcontinuea.emettreunclic,
contactezuntechniciendemaintenance.
Voirpage64.Lesbr_leursne Lescomposantsetlescachesdes
br_lentpasdefa_;onbrQleursdesurfacen'ontpaset6
homog_ne, correctementassemblesetmisa.
niveau,
LesbrOleursdesurfacesontsales,Nettoyezlescomposantsdesbr01eursde
surface.(Voirpages64et65.)
Lesllammesdu Unorificeerroneaet6assembl&Contactezvotreinstallateur,Verifiezlataille
br_leurdesurface deI'orificedubrOleuretcontactezvotre
sonttreslargesou installateursivousn'avezpaslebonorifice,
jaunes. Oontr61ezlaconversionaug_GPL
Lesbr_leursde Leverrouillagedescommandesdu L'ic6nedeverrouillages'affiche.Maintenez
surfaces'allument,fourestactiv& latoucheSTART/SET(DEMARRAGE/
rnaislesbr01eursdu REGLAGE)enfonceependant3secondes.
fournes'allumentpas, Unsignalsonoreretentitetlesymbolede
verrouillagedisparaTtdeI'ecran.
Lecommutateurpourdesactiverle Contactezuntechniciendemaintenance
r6gulateurdepressiondegazse qualifie.
trouvesurlapositionoff(d6sactiv6).
L'affichages'attenue,L'interrupteurdifferentiel(GFIou Remplacezlefusibleconcerneouremettez
GFCI)aI_.ch6etdolt6trer6initialise,ledisjoncteurenmarche.
Votrecommandenumeriqueest
endommagee,
Lesflammesdu Lesvoletsd'airdubrOleurdufour Contactezuntechniciendemaintenance
br_leursonttres doivent6trer6gles, qualifie.
largesoujaunes. Letuyaud'arriveedegazn'estpas Reportez-vousauxconsignesd'installation
correctementbrancheououvert, fourniesavecvotrecuisiniere.
Lesalimentsne Unmodedecuissonerronea6re Voirpage28-29,39,45,
cuisentpasounesontselectionn&
pasr6tiscorrectementLesgrillesdufourn'ontpaset6 Voirpage32,46.
aufour, Dositionn6escorrectementpourles
alimentsacuire.
Unrecipientinadapteoudetaille Voirpage23-24,
inappropri6eestutilise,
Lethermostatdufourdolt6treregl6,Voirpage37.
IIyadupapieraluminiumsurles Voirpage32.
grilleset/ouaufonddufour.
L'horlogeoulaminuterien'ontpas Voirpages30et31.
6recorrectementr6glees,
depannage 77
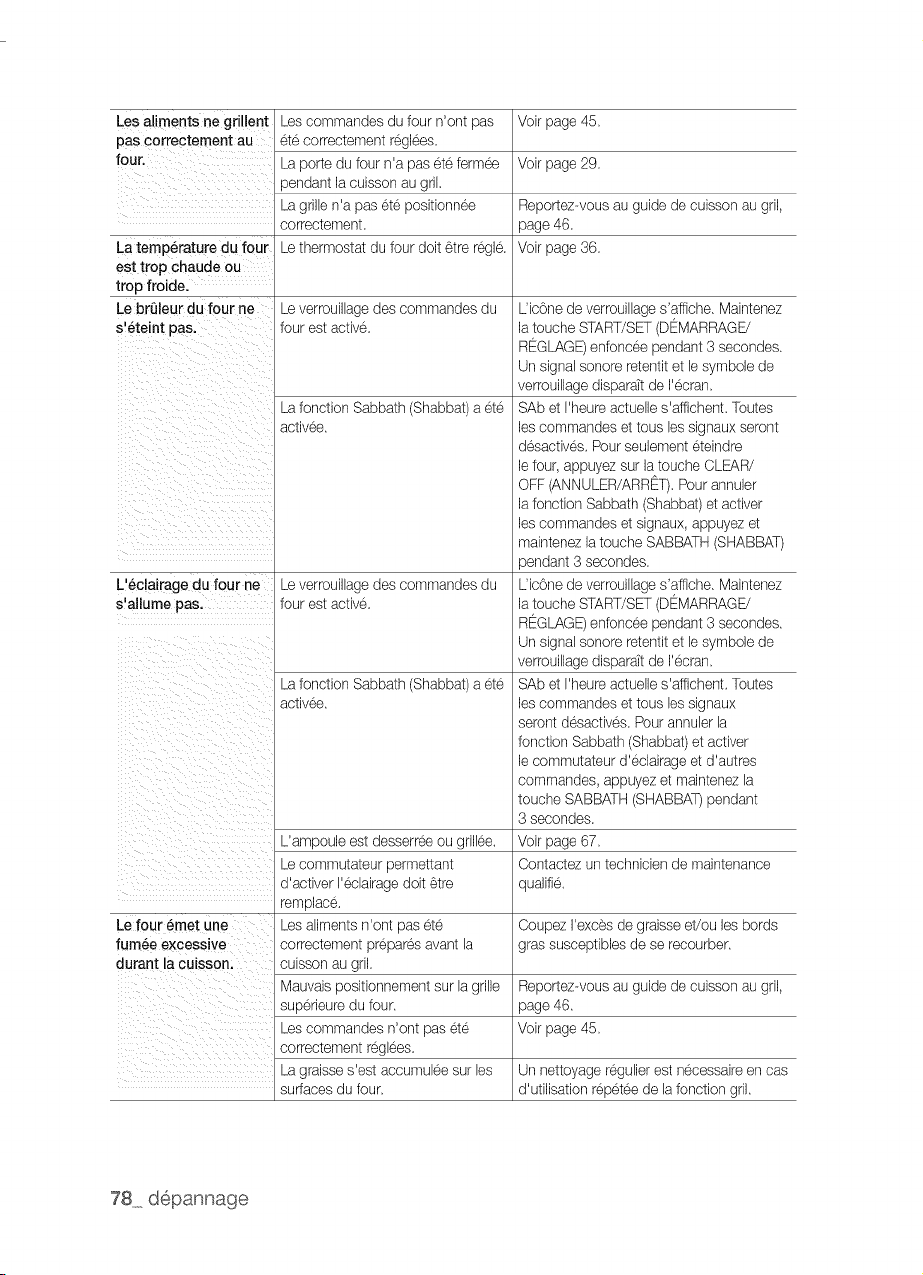
Lesaliments ne gdllent
pas correctement au
four,
La temperature du four
est trop chaude ou
trop froide.
Le brQleurdufour ne
s'eteint pas,
L'eclairage du four ne
s'allume pas.
Le four emet une
fumee excessive
durant la cuisson.
Lescommandes du four n'ontpas
et6 correctement r6glees
La portedu four n'a paset6 fermee
)endant lacuisson au gril,
La grille n'apas et6 positionnee
correcternent.
Le thermostat dufourdoit6trer6gle.
Le verrouillage des commandes du
fourest active
La fonction Sabbath(Shabbat) a et6
activee
Le verrouillage des commandes du
fourest active
La fonction Sabbath(Shabbat) a et6
activee
L'ampouleest desserreeou grillee.
Le commutateur permettant
d'activerI'eclairage doit _tre
remplace.
Lesalimentsn'ont pas et6
correctementprepar6s avantla
cuisson au gril.
Mauvaispositionnement sur lagrille
superieuredu four.
Lescommandes n'ontpas 0re
correctementr6glees.
La graisse s'est accumuleesur les
surfaces du four.
Voir page 45
Voir page 29
Reportez-vous au guidedecuisson au gril,
page 46.
Voir page 36.
Uic6ne de verrouillages'affiche, Maintenez
la touche START/SET(DEMARRAGE/
REGLAGE)enfonceependant3secondes.
Unsignalsonore retentit etlesymbolede
verrouillagedispara_tde I'ecran.
SAbetI'heureactuelles'affichent, Toutes
les commandes et tousles signauxseront
d6sactives,Pour seulementeteindre
le four, appuyez sur latouche CLEAR/
OFF (ANNULER/ARRET).Pour annuler
la fonction Sabbath(Shabbat) et activer
les commandes et signaux,appuyez et
maintenezlatouche SABBATH (SHABBAT)
)endant 3 secondes.
Uic6ne de verrouillages'affiche, Maintenez
la touche START/SET(DEMARRAGE/
REGLAGE)enfonceependant3secondes.
Unsignalsonore retentit etlesymbolede
verrouillagedispara_tde I'ecran.
SAbetI'heureactuelles'affichent, Toutes
les commandes et tous les signaux
seront desactiv6s.Pour annulerla
fonction Sabbath(Shabbat) et activer
le commutateur d'eclairage et d'autres
commandes,appuyez et maintenezla
touche SABBATH (SHABBAT)pendant
3secondes.
Voir page 67.
Contactez un technicien de maintenance
qualifie.
CoupezI'exces de graisse et/ou lesbords
gras susceptibles de se recourber
Reportez-vous au guidedecuisson au gril,
page 46.
Voir page 45
Unnettoyage regulier est necessaire en cas
d'utilisation r6p6tee de la fonction gril.
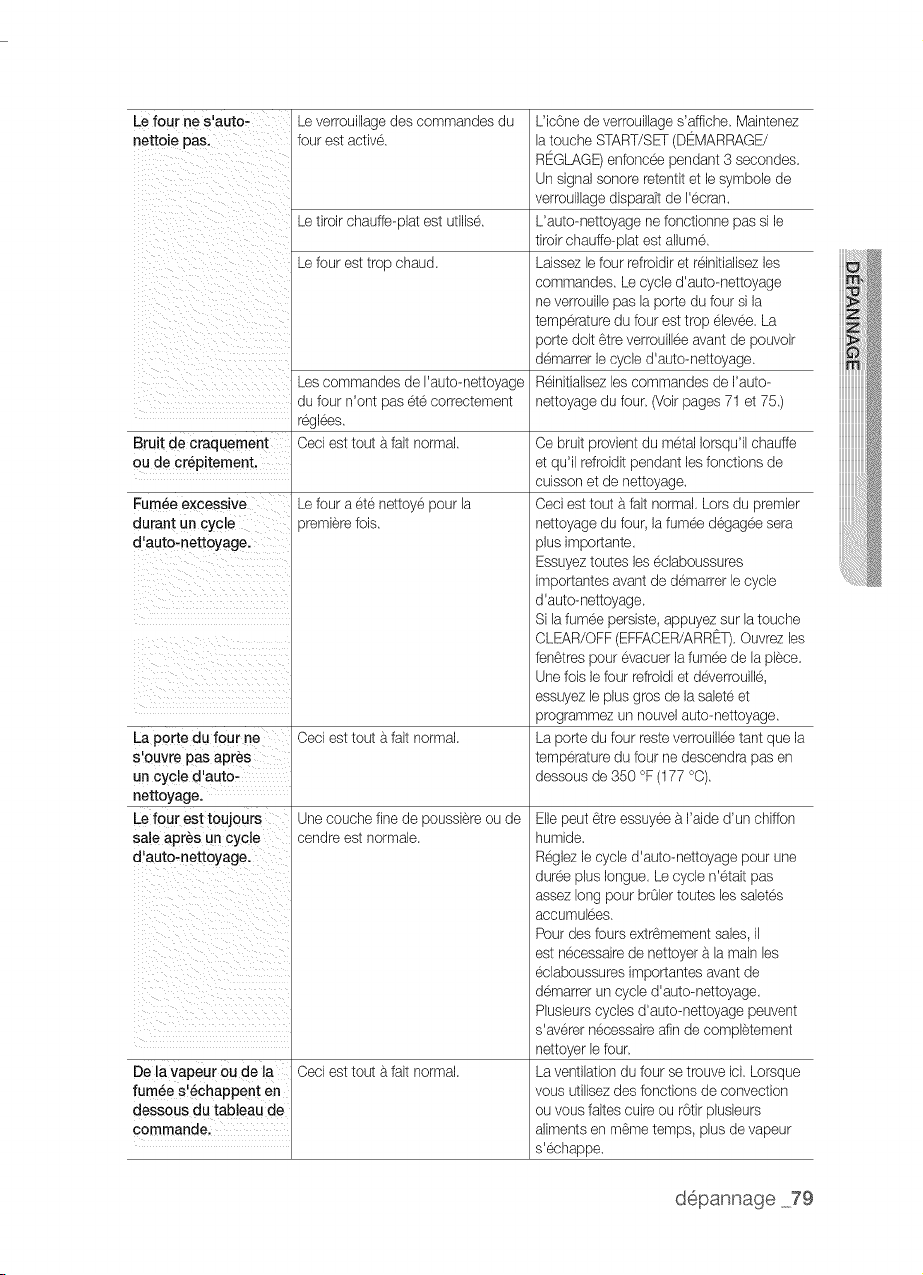
Le four Fies'auto-
nettoie pas.
Leverrouillagedescommandes du
fourest active.
Letiroir chauffe-plat est utilise.
Le fouresttrop chaud.
Bruit decraquement
ou de crepitement
Fumee excessive
durant un cycle
d'auto-nettoyage.
La porte du four ne
s'ouvre pas apres
un cycle d'auto-
nettoyage.
Le four est toujours
sale apres un cycle
d'auto-nettoyage.
Dela vapeur ou de la
fumee s'echappent en
dessous du tableau de
commande.
Lescommandes de I'auto-nettoyage
du four n'ontpas 6re correctement
r6glees.
Ceciesttout a.fait normal.
Lefour a ete nettoyepourla
premierefois.
Ceciesttout a.fait normal
Une couche finedepoussiereou de
cendre est normale.
Ceciesttout a.fait normal
L'ic0ne deverrouillage s'affiche Maintenez
latouche START/SET(DEMARRAGE/
REGLAGE)enfoncee pendant3secondes.
Un signalsonore retentit etlesymbolede
verrouillagedisparaTtde I'ecran.
L'auto-nettoyagene fonctionne passile
tiroir chauffe-plat estallume.
Laissez lefourrefroidir etreinitialisezles
commandes. Le cycled'auto-nettoyage
ne verrouillepas la portedu four sila
temperature du fouresttrop6levee. La
portedolt6treverrouilleeavantde pouvoir
demarrer le cycle d'auto-nettoyage.
Reinitialisezles commandes de I'auto-
nettoyage du four.(Voirpages71et 75.)
Cebruit provient du metalIorsqu'il chauffe
etqu'il refroidit pendantlesfonctionsde
cuisson et de nettoyage.
Ceciesttout a.fait normal.Lots du premier
nettoyage du four,lafumee d6gageesera
plus importante.
Essuyeztoutes les eclaboussures
importantes avantde demarrerle cycle
d'auto-nettoyage.
Si lafumee persiste,appuyez sur latouche
CLEAR/OFF(EFFACER/ARRET).Ouvrez les
fen6trespourevacuerlafumee de la piece
Une fois lefour refroidietd6verrouille,
essuyez le plus gros de lasalete et
programmezun nouvel auto-nettoyage.
La porte du fourreste verrouilleetant que la
temperature du fourne descendra pasen
dessous de 350 °F (177°O).
Ellepeut 6treessuyee aI'aided'un chiffon
humide.
Reglezlecycled'auto-nettoyage pour une
dureeplus Iongue.Le cyclen'etait pas
assezlong pour brOlertoutes lessaletes
accumulees.
Pour desfours extr6mementsales,il
est necessaire de nettoyeralamain les
eclaboussuresimportantes avantde
demarrer un cycled'auto-nettoyage.
Plusieurscycles d'auto-nettoyage peuvent
s'averer necessaire afinde completement
nettoyerlefour.
La ventilation dufoursetrouve ici. Lorsque
vous utilisezdes fonctionsde convection
ou vous faites cuireou r6tirplusieurs
ailmentsen m6me temps, plus de vapeur
s'echappe.
depannage79
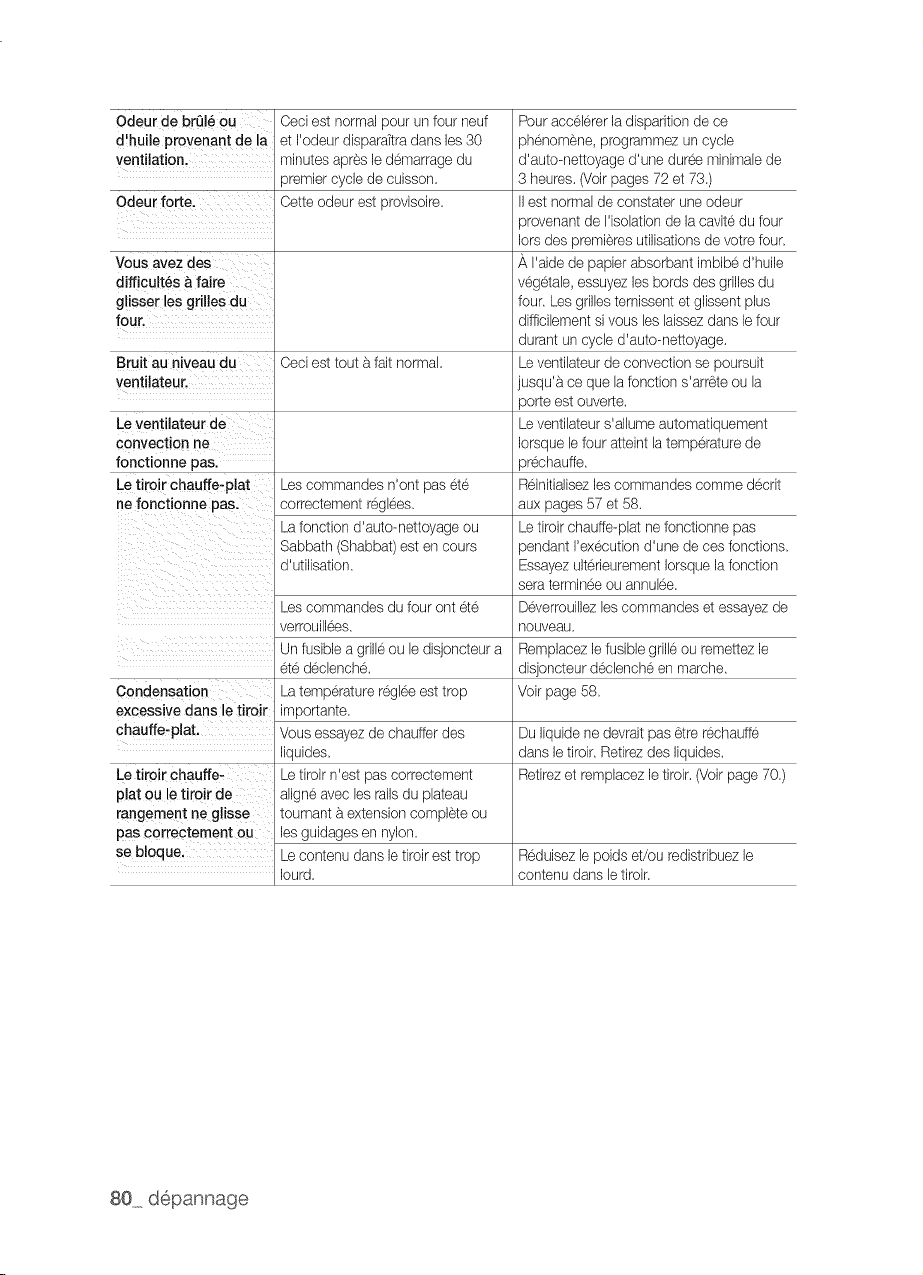
Odeur de brOleou
d'huile provenant de la
ventilation.
Odeur forte.
Vous avezdes
difficultes & faire
glisser lesgrilles du
four.
Ceciestnormal pour un fourneuf
etI'odeurdisparaTtradansles30
minutes apres ledemarrage du
premier cycle de cuisson.
Cette odeur estprovisoire.
Bruit au niveau du Ceciesttout a faitnormal.
ventilateur.
Le ventilateur de
convection ne
fonctionne pas.
Le tiroir chauffe-plat Lescommandes n'ontpas 6re
ne fonctionne pas. correctementregBes,
La fonction d'auto-nettoyage ou
Sabbath(Shabbat) estencours
d'utilisation,
Condensation
excessive darts letiroir
chauffe-plat.
Le tiroir chauffe-
plat ou letiroir de
rangement ne glisse
pas correctement ou
se bloque.
Lescommandes du fouront 6re
verrouilBes.
Un fusibleagrille ou le dLsjoncteura
et6 declench&
La temperature regl6e est trop
importante.
Vousessayez de chaufferdes
liquides.
Le tiroir n'est pas correctement
aligne avec les rails du plateau
tournant a extensioncomplete ou
les guidages en nylon.
Le contenu dans letiroir esttrop
Iourd.
Pour acceBrer ladisparition de ce
phenom6ne,programmezuncycle
d'auto-nettoyage d'une duree minimalede
3heures.(Voirpages72 et 73.)
II estnormal de constater une odeur
)rovenant de I'isolation de la cavitedufour
lotsdespremieresutilisations de votre four.
I'aide de papier absorbantimbibe d'huile
veg6tale, essuyez les bords desgrilles du
four.Lesgrillesternissentetglissent plus
difficilement sivous les laissezdans lefour
durantun cycled'auto-nettoyage.
Le ventilateurdeconvectionse poursuit
jusqu'a ce que lafonction s'arr6te ou la
)orte est ouverte.
Le ventilateurs'allume automatiquement
Iorsque le fouratteintlatemperature de
)rechauffe.
Reinitialisezlescommandes commedecrit
auxpages57et58.
Le tiroir chauffe-plat nefonctionnepas
)endant I'executiond'unede cesfonctions.
Essayezulterieurement Iorsquela fonction
sera termineeou annuBe.
Deverrouillezles commandes etessayez de
nouveau.
Remplacez le fusiblegrilBou remettezle
disjoncteurd6clenche en marche.
Voir page 58.
DuIiquide ne devraitpas6trer6chauffe
dansle tirol Retirezdes Iiquides.
Retirezet remplacezle tiroir. (Voirpage 70.)
Reduisezle poids et/ou redistribuez le
contenudansle tiroir.
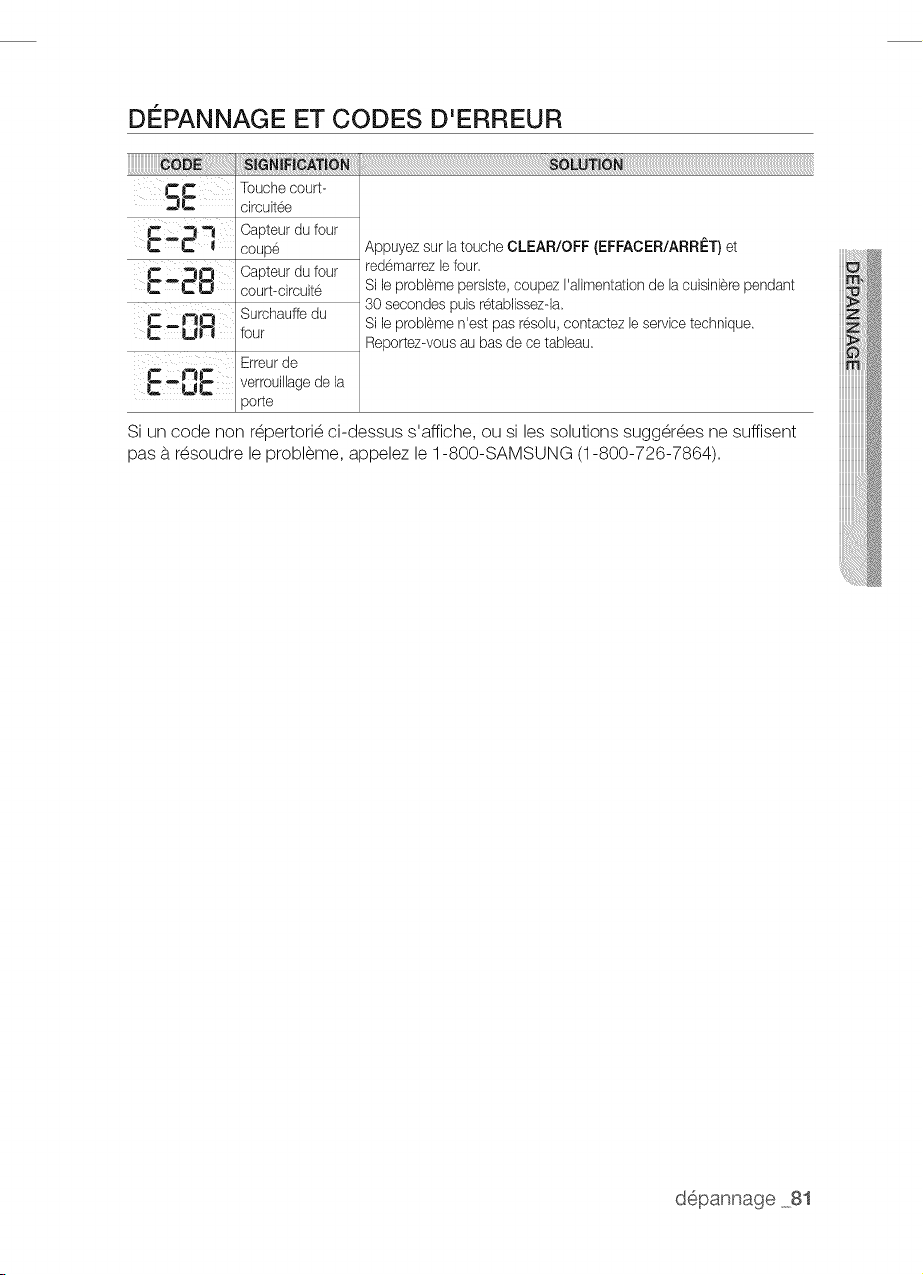
DI PANNAGE ET CODES D'ERREUR
11_J_ Touchecourt-
circuit6e
_lwt Capteur du four
!_ ! coupe
--trt Capteur du four
C °CO court-circuit6
it.- ii_!twt Surchauffe du
C_Un four
tw 17tm Erreur de
C _ UC verrouillagede la
porte
AppuyezsurlatoucheCLEAR/OFF (EFFACER/ARRET) et
redemarrez lefour,
Sile problemepersiste, coupez I'alimentation de la cuisiniere pendant
80 secondes puis retablissez-la
Sile problemen'est pasresolu,contactezle service technique.
Reportezwous au basdecetableau.
Si un code non r_pertori_ ci-dessus s'affiche, ou si les solutions sugg_r_es ne suffisent
pas b.r_soudre le probl_me, appelez le 1-800-SAMSUNG (1-800-726-7864).
depannage 81
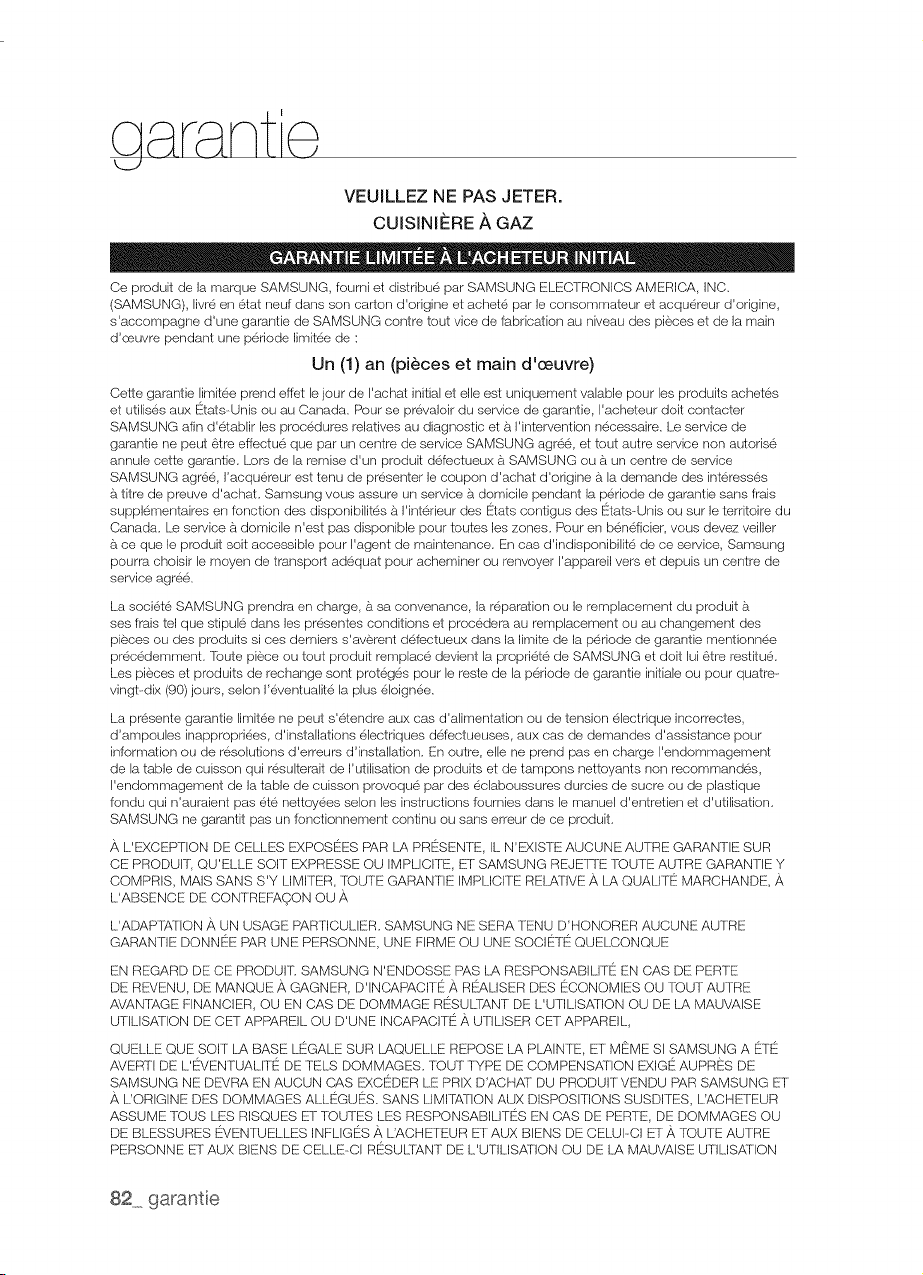
cj s _nte
VEUILLEZ NE PAS JETER.
CUISINII_RE ,_GAZ
Ce produit de la marque SAMSUNG, fourni et distribue par SAMSUNG ELECTRONICS AMERICA, INC,
(SAMSUNG), livre en etat neuf dans son carton d'origine et achete par leconsornmateur etacquereur d'origine,
s'accompagne d'une garantie de SAMSUNG contre tout vice de fabrication au niveau des pi'eces et de la main
d'ceuvre pendant une periode limit6e de :
Un (1)an (pkYces et main d'oeuvre)
Cette garantie limitee prend eflet le jour de I'achat initial et elleest uniquement valable pour lee produits achetes
et utilises aux E!!tats-Unis ou au Canada, Pour se prevaloir du service de garantie, I'acheteur doit contacter
SAMSUNG afin d'etablir les procedures relatives au diagnostic et $_rirltervention necessaire, Le service de
garantie ne peut 6tre effectue que par un centre de service SAMSUNG agr6e, et tout autre service non autorise
annule cette garantie, Lors de la remise d'un produit d6fectueux a SAMSUNG ou aun centre de service
SAMSUNG agre6, racquereur est tenu de presenter le coupon d'achat d'origine a la demande des int6resses
titre de preuve d'achat, Samsung vous assure un service a domicile pendant la periode de garantie sans frais
suppl6mentaires en fonction des disponibilit6s a rinterieur des E{tatscontigus des F
DEL'APPAREILOUDEL'INCAPACITE".]/_L'UTILISER,CETqEGARANTIELIMITF_EN'ES-rVALABLEPOUR
PERSONNED'AUTREQUEL'ACHETEURINITIALDUPRODUFr]N'ESTPASTRANSFE{RABLEETE!!NONCE
VOTRERECOURSEXCLUSIF,
Certainesprovincesouterritoirespeuventautoriserounondeslimitationsquant&ladureedesgarantiesimplicites
niI'exclusionoulalimitationdedommagesaccessoiresouindirects;ilsepeutparcensequentqueleslimitations
etexclusions6nonceesci-dessusnes'appliquentpas&votrecas,Cettegarantievousconfgredesdroitslegaux
specifiques,Veuspouvezegalementavoird'autresdroitsquivarientd'unEtataI'autreetd'uneprovincearautre,
LespiecesremplaceesparI'utilisateurpeuvent6treenvoyeesauclientpourreparation,Sinecessaire,uningenieur
duserviced'assistancepourra6treenvoyepoureffectuerdesreparations,
Pourben6ficierd'unserviced'assistancecouvertparvotregarantie,contactezSAMSUNGaI'adressesuivante:
ENREGISTREMENT
Veuillez enregistrer votre produit sur www.samsung.com/register.
QUESTIONS
Pour les questions sur les fonctions, le fonctionnement/la performance, les pi_ces, les
accessoires, ou le service, appelez le 1-800-726-7864, ou consultez le site internet
www.samsung.com, www.samsung.com/ca
Mod#le # S_rie #
Veuillez joindre votre facture (ou une copie) & ce manuel. Vous pouvez en avoir
besoin, ainsi que du mod#le et num_ro de s_rie, si vous devez appeler I'assistance.
garant e 83

Veuillez noter que la garantie Samsung n'inclut pas les d_placements du service apres-vente
pour expliquer le fonctionnement de I'appareil, corriger une installation non correcte ou
ex_cuter des travaux de nettoyage ou d'entretien r_guliers.
DESQUESTIONS OU DESCOMMENTAIRES?
www.samsung.comlca (English)
CANADA www.samsung.com/ca fr (French)
MEXICO
U.S.A
Consumer Electronics
U.S.A
Mobile Phones
1-800-SAMSU NG(726-7864)
01-800-SAMSU NG(726-7864)
1-800-SAMSU NG(726-7864)
1-800-SAMSU NG(726-7864)
www.samsung.com
Code N ° : DG68-00517A