Home
Bookmarks
Home
Samsung
Samsung UN46F5500AFXZA User Manual
Page 41
Samsung UN46F5500AFXZA led television
User Manual - Page 41
For UN46F5500AFXZA.
PDF File Manual
,
85 pages
,
Read Online
|
Download pdf file
E Manual Guide
Viewing The E Manual
Scrolling A Page
Using The Top Icons
Returning To The Home Page
Searching The Index
Searching Pages
Closing The E Manual
Jumping To A Menu Item
Updating The EManual
Getting Started
Antenna Connection
Video Device Connections
HDMI Connection
Component Connection
AV Connection
Audio Device Connections
Digital Audio (Optical) Connection
Audio Output Connection
ARC (Audio Return Channel)
Computer Connection
HDMI Connection
HDMI To DVI Connection
Switching Between Video Sources
Programming
Auto Program
Remove Scrambled Channels
Channel Management
Remove Channels
Restore Removed Channels
Program Rating Lock
Blocking Programs Usng The TV Rating
Blocking Based On Movie Rating (MPAA)
Blocking Based On Canadian English Rating
Blocking Based On Canadian French Rating
Blocking Based On Downloadab E U,S, Rating
Watching Bocked / Restricted Programs
Rename Analog Channels
Favorite Channels
Add Favorite Channels
Remove Favorite Channels
Rearrange The Favorite Channels List
Rename A Favorite Channel List
Copy A Favorite Channels List
Network Configuration
Wired Network
Wireless Network
PDP 5500, LED 5500 Series And Above
LED 4300 Series Modes
Wire Ess Network Precautions
Network Security Protocols
Wired Network Setup
Automatic Wired Network Setup
Manual Wired Network Setup
Failed Wired Connection
Wireless Network Setup
Automatic Wireless Network Setup
Manual Wireless Network Setup
Using The WPS Button
Failed Wireless Connection
Dynamic Versus Static IP Addresses
Checking The Network Status
Mobile Device Connection
WiFi Direct
AIIShare Settings
Rename The TV
Controlling The TV
Smart Touch Control
Inserting The Batteries (AAA X 2)
Connecting To The TV
Reconnecting The Smart Teuch Contro
Battery Low Alarm
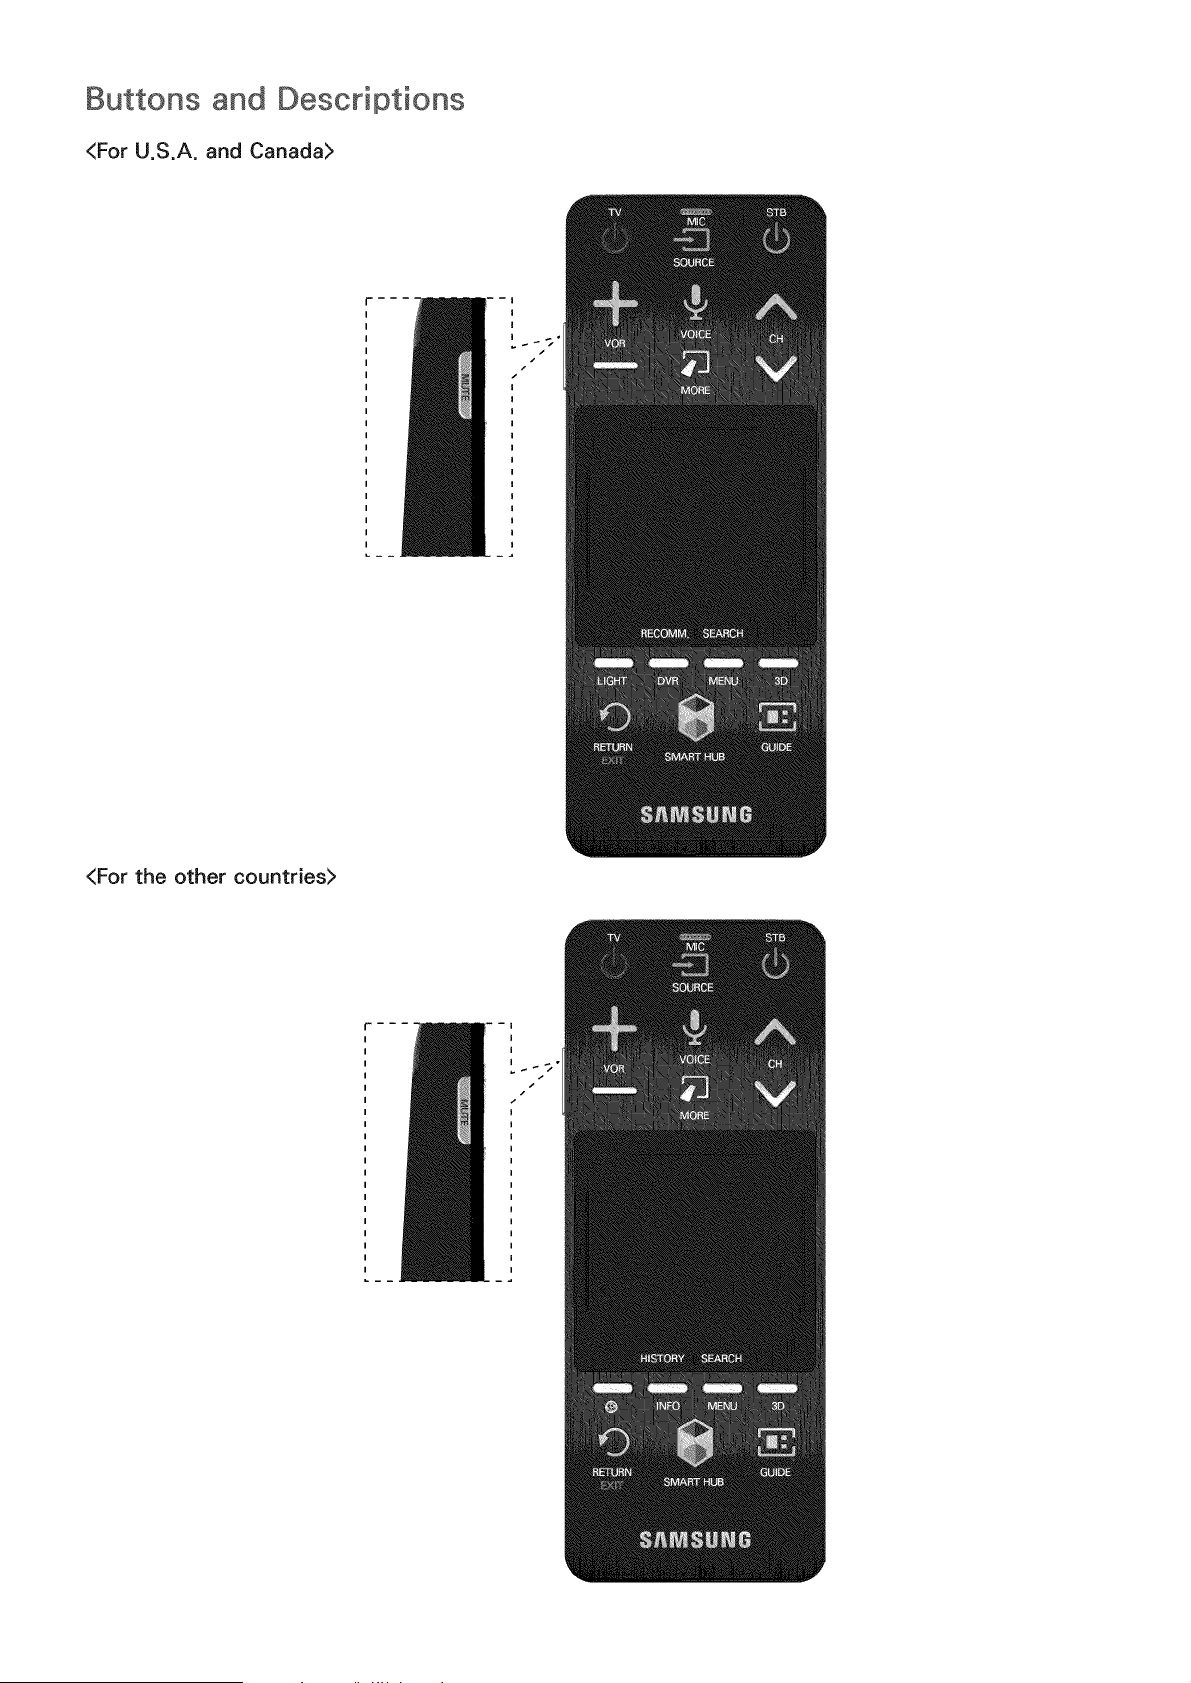
Buttons And Descriptions
Special Functions
Using The Touch Pad
Dragging
Pressing
Flicking
Pressing And Holding
Pressing And Dragging
Scrolling Up/Down
Scrolling Left/Right
Changing Channels By Entering Numbers
Numerca NputGuide
Adjusting The Touch Pad
Show Status And Notification Banner
Recommended
History
Deleting History Data
Searching
Virtual Remote Control
Changing The Virtual Remote Control Panel
Change A Position Of The Virtual Remote Panel
Using The Number Panel
Using The Playback Control Panel
Using The Quick Access Panel
Adjusting The Virtual Remote Control
Universal Remote Setup
Connecting The IR Extender
Add The External Device
Using The Universal Remote Control
Registered External Device Management
Entering Text Using The Onscreen Keypad
Entering Text Using The QWERTY Keypad
Addit Ona Features
SMART Interaction
Precautions
Face Recognition
TV Camera Use
Motion Control
Voice Recoonit On
Voice Recognition
Operating Environment
Enabling Voice Recognition
Voice Recognition Tutorial
Basic Voice Recognition Use
Voice Recognition Settings
Interactive Voice Recognition Commands
Deactivating Voice Recognition
Motion Control
Operating Environment
Motion Control Environment Test
Motion Control Tutorial
Motion Control Activation
Using The Basic Motion Controls
Motion Control Options
Motion Control Screen
The Screen Compos Tion While ViewingTV
The Smart Hub Screen Composition
Face Recognition
Operating Environment
Face Registration
Face Registration From The Smart Hub Accouter Informat On Screen
Face Registration For The Smart Hub Account Using Face Recognition
Face Recognition Login
Using Peripheral Devices
Keyboard Connection
Keyboard Use
Mouse Connection
Mouse Use
TV Viewing
TV Viewing
Program Info
Change The Broadcast Signal
Guide
Change Channels
Change Category
Quick Navigatior
Schedule Viewing
Checking The Program Info
Channel List
Change Channels
Genre
Change The Broadcast Signal
Change The Channe Lst
Schedule Viewing
Digital Channel Schedule Viewing
Gide
Program Info
Analog Channel Schedule Viewing
Cancel A Schedule Viewing
Edit Schedule List
3 D TV
Precautions
Restrictions
Tips
Activating 3D Mode
Setting 3D Effects
PiP
Analog Screen Calibration
Broadcast Audio Options
Digital Broadcast Audio Options
Analog Broadcast Audio Options
Sports Mode
Subtitles
Show Subtitles
Subtitle Options
Subtitle Display Options
TV Settings
Basic Picture Settings
Changing The Picture Mode
Picture Quality
Applying The Current Picture Quality Setting To Another Input
Picture Size
Page 41/85
Page 1
Page 2
Page 3
Page 4
Page 5
Page 6
Page 7
Page 8
Page 9
Page 10
Page 11
Page 12
Page 13
Page 14
Page 15
Page 16
Page 17
Page 18
Page 19
Page 20
Page 21
Page 22
Page 23
Page 24
Page 25
Page 26
Page 27
Page 28
Page 29
Page 30
Page 31
Page 32
Page 33
Page 34
Page 35
Page 36
Page 37
Page 38
Page 39
Page 40
Page 41
Page 42
Page 43
Page 44
Page 45
Page 46
Page 47
Page 48
Page 49
Page 50
Page 51
Page 52
Page 53
Page 54
Page 55
Page 56
Page 57
Page 58
Page 59
Page 60
Page 61
Page 62
Page 63
Page 64
Page 65
Page 66
Page 67
Page 68
Page 69
Page 70
Page 71
Page 72
Page 73
Page 74
Page 75
Page 76
Page 77
Page 78
Page 79
Page 80
Page 81
Page 82
Page 83
Page 84
Page 85
Contents
Table of Contents
Search
Previous
Next
Bookmarks
Loading ...
Loading ...
Loading ...
Buttons
and
Descriptions
<For
U.S.A.
and
Canada>
<For
the
other
countries>
f--
Loading ...
Loading ...
Loading ...
File type: PDF
File name: 62409690_un46f5500afxza.pdf
File size: 15.57 MB
File Language: English
Pages: 85
Author: Samsung
File created: 2022-08-01
Published: 2022-08-24
Updated: 2023-08-21
Download File
Table of Contents
×
E Manual Guide
8
Viewing The E Manual
8
Scrolling A Page
8
Using The Top Icons
8
Returning To The Home Page
8
Searching The Index
9
Searching Pages
9
Closing The E Manual
9
Jumping To A Menu Item
9
Updating The EManual
9
Getting Started
11
Antenna Connection
11
Video Device Connections
11
HDMI Connection
11
Component Connection
12
AV Connection
12
Audio Device Connections
13
Digital Audio (Optical) Connection
13
Audio Output Connection
14
ARC (Audio Return Channel)
14
Computer Connection
15
HDMI Connection
15
HDMI To DVI Connection
16
Switching Between Video Sources
17
Programming
18
Auto Program
18
Remove Scrambled Channels
18
Channel Management
19
Remove Channels
19
Restore Removed Channels
20
Program Rating Lock
20
Blocking Programs Usng The TV Rating
20
Blocking Based On Movie Rating (MPAA)
21
Blocking Based On Canadian English Rating
21
Blocking Based On Canadian French Rating
22
Blocking Based On Downloadab E U,S, Rating
22
Watching Bocked / Restricted Programs
22
Rename Analog Channels
22
Favorite Channels
24
Add Favorite Channels
24
Remove Favorite Channels
24
Rearrange The Favorite Channels List
25
Rename A Favorite Channel List
25
Copy A Favorite Channels List
25
Network Configuration
26
Wired Network
26
Wireless Network
27
PDP 5500, LED 5500 Series And Above
27
LED 4300 Series Modes
27
Wire Ess Network Precautions
28
Network Security Protocols
28
Wired Network Setup
29
Automatic Wired Network Setup
29
Manual Wired Network Setup
29
Failed Wired Connection
31
Wireless Network Setup
32
Automatic Wireless Network Setup
32
Manual Wireless Network Setup
33
Using The WPS Button
35
Failed Wireless Connection
35
Dynamic Versus Static IP Addresses
36
Checking The Network Status
38
Mobile Device Connection
38
WiFi Direct
38
AIIShare Settings
38
Rename The TV
38
Controlling The TV
39
Smart Touch Control
39
Inserting The Batteries (AAA X 2)
39
Connecting To The TV
39
Reconnecting The Smart Teuch Contro
40
Battery Low Alarm
40
Buttons And Descriptions
41
Special Functions
43
Using The Touch Pad
44
Dragging
44
Pressing
44
Flicking
45
Pressing And Holding
45
Pressing And Dragging
45
Scrolling Up/Down
46
Scrolling Left/Right
46
Changing Channels By Entering Numbers
47
Numerca NputGuide
47
Adjusting The Touch Pad
47
Show Status And Notification Banner
48
Recommended
48
History
48
Deleting History Data
48
Searching
48
Virtual Remote Control
49
Changing The Virtual Remote Control Panel
49
Change A Position Of The Virtual Remote Panel
49
Using The Number Panel
49
Using The Playback Control Panel
49
Using The Quick Access Panel
49
Adjusting The Virtual Remote Control
49
Universal Remote Setup
50
Connecting The IR Extender
50
Add The External Device
51
Using The Universal Remote Control
51
Registered External Device Management
51
Entering Text Using The Onscreen Keypad
52
Entering Text Using The QWERTY Keypad
52
Addit Ona Features
52
SMART Interaction
53
Precautions
53
Face Recognition
53
TV Camera Use
53
Motion Control
54
Voice Recoonit On
54
Voice Recognition
55
Operating Environment
55
Enabling Voice Recognition
56
Voice Recognition Tutorial
56
Basic Voice Recognition Use
56
Voice Recognition Settings
56
Interactive Voice Recognition Commands
57
Deactivating Voice Recognition
57
Motion Control
58
Operating Environment
58
Motion Control Environment Test
59
Motion Control Tutorial
59
Motion Control Activation
59
Using The Basic Motion Controls
60
Motion Control Options
60
Motion Control Screen
61
The Screen Compos Tion While ViewingTV
61
The Smart Hub Screen Composition
62
Face Recognition
64
Operating Environment
64
Face Registration
65
Face Registration From The Smart Hub Accouter Informat On Screen
65
Face Registration For The Smart Hub Account Using Face Recognition
66
Face Recognition Login
66
Using Peripheral Devices
67
Keyboard Connection
67
Keyboard Use
67
Mouse Connection
68
Mouse Use
68
TV Viewing
69
TV Viewing
69
Program Info
69
Change The Broadcast Signal
69
Guide
69
Change Channels
70
Change Category
70
Quick Navigatior
70
Schedule Viewing
71
Checking The Program Info
71
Channel List
72
Change Channels
72
Genre
72
Change The Broadcast Signal
73
Change The Channe Lst
73
Schedule Viewing
74
Digital Channel Schedule Viewing
74
Gide
75
Program Info
75
Analog Channel Schedule Viewing
75
Cancel A Schedule Viewing
75
Edit Schedule List
75
3 D TV
76
Precautions
76
Restrictions
77
Tips
77
Activating 3D Mode
78
Setting 3D Effects
78
PiP
79
Analog Screen Calibration
80
Broadcast Audio Options
81
Digital Broadcast Audio Options
81
Analog Broadcast Audio Options
81
Sports Mode
81
Subtitles
82
Show Subtitles
82
Subtitle Options
82
Subtitle Display Options
82
TV Settings
83
Basic Picture Settings
83
Changing The Picture Mode
83
Picture Quality
84
Applying The Current Picture Quality Setting To Another Input
84
Picture Size
85
Search:
×
Search