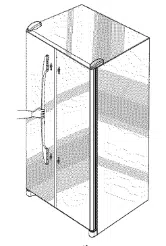
by Side
r
Table of Contents
Important Safety Instructions ...... 1-2
Installation ...................................... 3-6
0
0
0
0
Temperature Controls ......................... 7
Fresh Food Features ........................... 8
Freezer Features .................................. 9
.............i.......................................
Ice and Water .............................. 10-12
Water Filter .................................. 13-15
Food Storage Tips ...................... 16-18
Care and Cleaning ..................... 19-22
Troubleshooting .......................... 24-27
Warranty & Service ............................ 31
Guide d'utilisation
et d'entretien ............................... 32
Operating Sounds ............................. 23
Guia de uso y cuidado ..................... 64
Form No. PJo]/06 Part No. 12842125 Litho U.S.A.
ImportnntSnfetyInstructions
Installer: Please leave this guide with this appliance.
Consumer: Please read and keep this Use and
Care Guide for future reference; it provides the
proper use and maintenance information.
Keep sales receipt and/or canceled check as proof
of purchase.
Have complete model and serial number
identification of your refrigerator. This is located on a
data plate inside the fresh food compartment, on the
upper right side. Record these numbers below for
easy access.
Model Number
Serial Number
Date of Purchase
Call: 1-800-688-9900 USA
1-800-688-2002 Canada
In our continuing effort to improve the quality and
performance of our appliances, it may be necessary
to make changes to the appliance without revising
this guide.
What You Need to Know About
Safety Instructions
Warning and Important Safety Instructions appearing in
this guide are not meant to cover all possible
conditions and situations that may occur. Common
sense, caution and care must be exercised when
installing, maintaining or operating appliance.
Always contact the manufacturer about problems or
conditions you do not understand.
Recognize Safety Symbols, Words,
Labels
DANGER - Immediate hazards which WILL result
in severe personal injury or death.
kVlVl_,1-'1#II#
WARNING - Hazards or unsafe practices which
COULD result in severe personal injury or death.
To reduce risk of injury or death, follow basic
precautions, including the following:
Important: Child entrapment and suffocation are
not problems of the past. Junked or abandoned
refrigerators are still dangerous - even if they sit out
for "just a few days" If you are getting rid of your old
refrigerator, please follow the instructions below to
help prevent accidents.
Before you throw away your old
refrigerator or freezer:
• Take off the doors.
• Leave the shelves in place so
children may not easily climb
inside.
• Cut off power cord plug.
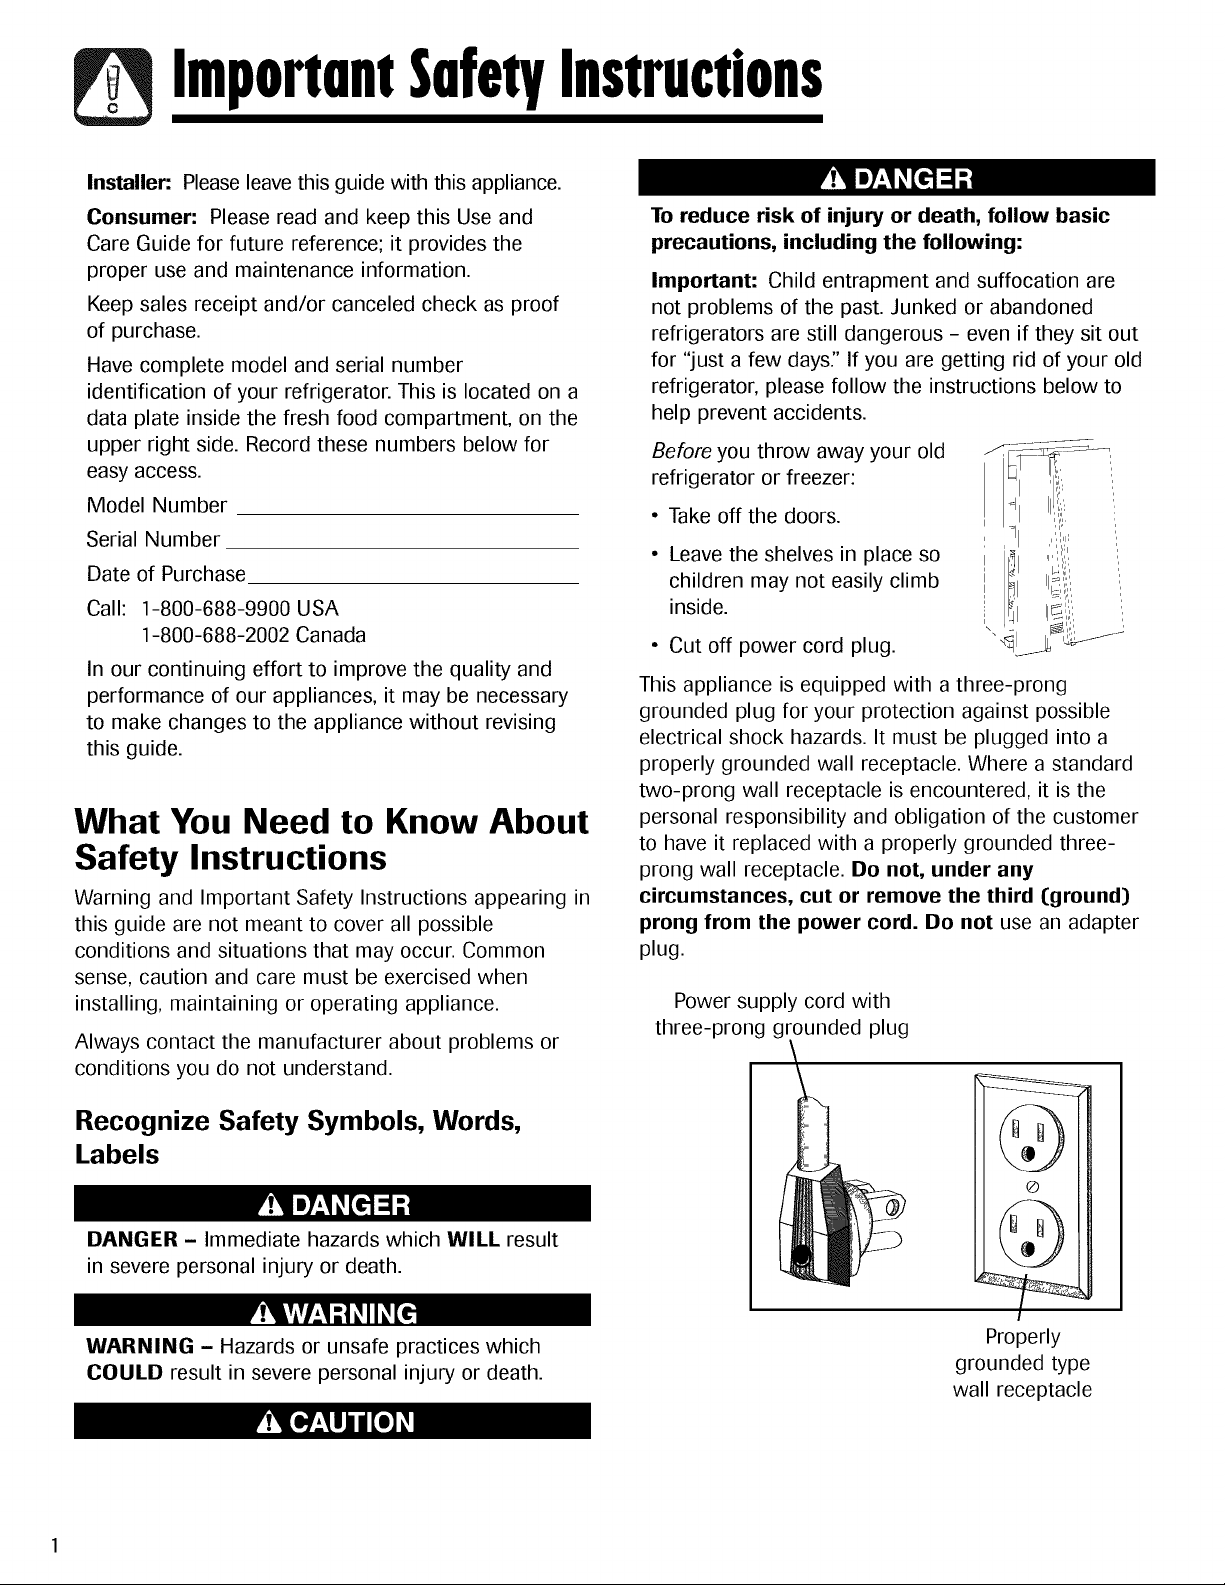
This appliance is equipped with a three-prong
grounded plug for your protection against possible
electrical shock hazards. It must be plugged into a
properly grounded wall receptacle. Where a standard
two-prong wall receptacle is encountered, it is the
personal responsibility and obligation of the customer
to have it replaced with a properly grounded three-
prong wall receptacle. Do not, under any
circumstances, cut or remove the third (ground)
prong from the power cord. Do not use an adapter
plug.
Power supply cord with
three-prong grounded plug
Properly
grounded type
wall receptacle
Importnn!SnfetyInstructions
To reduce risk of fire, electric shock, serious
injury or death when using your refrigerator,
follow basic precautions, including the following:
1. Read all instructions before using the refrigerator.
2. Observe all local codes and ordinances.
.
4.
.
6.
7.
.
.
10.
11.
12.
Be sure to follow grounding instructions.
Check with a qualified electrician if you are not
sure this appliance is properly grounded.
Do not ground to a gas line.
Do not ground to a cold-water pipe.
Refrigerator is designed to operate on a separate
115 volt, 15 amp., 60 cycle line.
Do not modify plug on power cord. If plug does
not fit wall receptacle, have proper receptacle
installed by a qualified electrician.
Do not use a two-prong adapter, extension cord
or power strip.
Do not remove warning tag from power cord.
Do not tamper with refrigerator controls.
Do not service or replace any part of refrigerator
unless specifically recommended in Use and Care
Guide or published user-repair instructions.
Do not attempt service if instructions are not
understood or if they are beyond personal skill
level.
13.
1/4.
15.
16.
17.
18.
Always disconnect refrigerator from electrical
supply before attempting any service. Disconnect
power cord by grasping the plug, not the cord.
Install refrigerator according to Installation
Instructions. All connections for water, electrical
power and grounding must comply with local
codes and be made by licensed personnel when
required.
Keep your refrigerator in good condition. Bumping
or dropping refrigerator can damage refrigerator
or cause refrigerator to malfunction or leak. If
damage occurs, have refrigerator checked by
qualified service technician.
Have worn power cords and/or loose plugs
replaced by a qualified service technician.
Always read and follow manufacturer's storage
and ideal environment instructions for items being
stored in refrigerator.
Your refrigerator should not be operated in the
presence of explosive fumes.
19. Children should not climb, hang or stand on any
part of the refrigerator.
20. Clean up spills or water leakage associated with
water installation.
SAVE THESE INSTRUCTIONS
Installadon
Location
• Do not install refrigerator near oven, radiator or
other heat source. If not possible, shield refrigerator
with cabinet material.
• Do not install where temperature falls below 55 ° F
(13° C) or rises above 110° F (/43° C). Malfunction
may occur at this temperature.
• Refrigerator is designed for indoor household
application only.
Measuring the Opening
When installing your refrigerator, allow '.;' space at top
and '.;' space behind machine compartment cover
(located in the rear) for proper air circulation. If the
refrigerator is placed with the door hinge side against
a wall, you may want to allow additional space so the
door can be opened wider.
Subflooring or floor coverings (i.e. carpet, tile, wood
floors, rugs) may make your opening smaller than
anticipated.
Some clearance may be gained by using the leveling
procedure under Levehng.
Important: If refrigerator is to be installed into a
recess where the top of the refrigerator is completely
covered, use dimensions from floor to top of hinge cap
to verify proper clearance.
Transporting Your Refrigerator
• NEVER transport refrigerator on its side. If an
upright position is not possible, lay refrigerator on its
back. Allow refrigerator to sit upright for
approximately 30 minutes before plugging it in to
assure oil returns to the compressor. Plugging
refrigerator in immediately may cause damage to
internal parts.
• Use an appliance dolly when moving refrigerator.
ALWAYS truck refrigerator from its side or
back-NEVER from its front.
• Protect outside finish of refrigerator during transport
by wrapping cabinet in blankets or inserting padding
between the refrigerator and dolly.
• Secure refrigerator to dolly firmly with straps or
bungee cords. Thread straps through handles when
possible. Do not over-tighten. Over-tightening
restraints may dent or damage outside finish.
Door and Hinge Removal
Some installations require door removal to get
refrigerator to final location.
To avoid severe personal injury or death,
observe the following:
• Disconnect power to refrigerator before removing
doors. Connect power only after replacing doors.
• Green ground wire must be attached to top hinge
while performing door removal and replacement.
• Tape decorative panels (select models) securely
into place before removing door handles.
To avoid property damage, observe the following:
• Protect vinyl or other flooring with cardboard, rugs
or other protective material prior to moving
refrigerator.
• Do not adjust refrigerator to be any shorter than
68'/2" tall (minus hinge and cap). Doing so may
damage underside components.
1. Unplug power cord from power source.
2. Remove toe grille (see page/4).
• Open both doors 180 °, or as wide as possible.
Materials Needed:
• Phillips Screwdriver
• 3/8" hex head driver
• 5/15' hex head driver
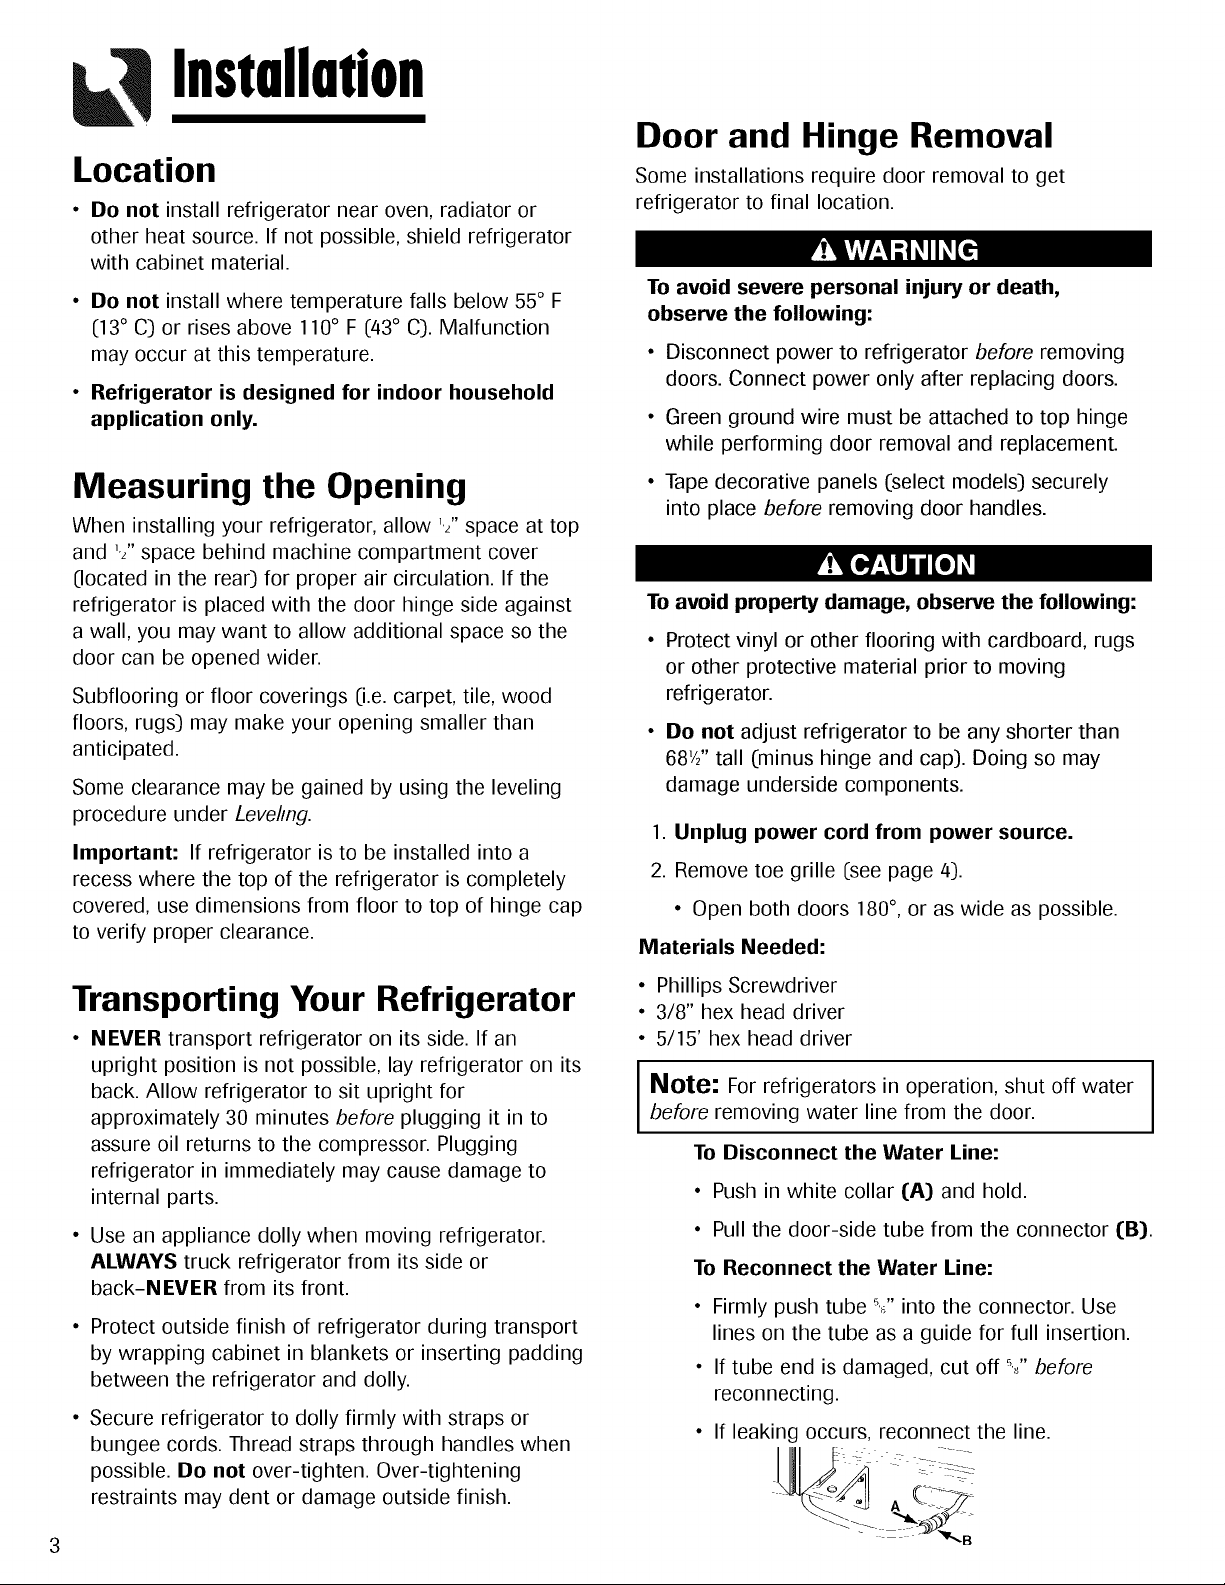
I Note: For refrigerators in operation, shut off water
before removing water line from the door.
To Disconnect the Water Line:
I
• Push in white collar (A) and hold.
• Pull the door-side tube from the connector (B).
To Reconnect the Water Line:
• Firmly push tube _._"into the connector. Use
lines on the tube as a guide for full insertion.
• If tube end is damaged, cut off _._"before
reconnecting.
• If leaking occurs, reconnect the line.
Installation
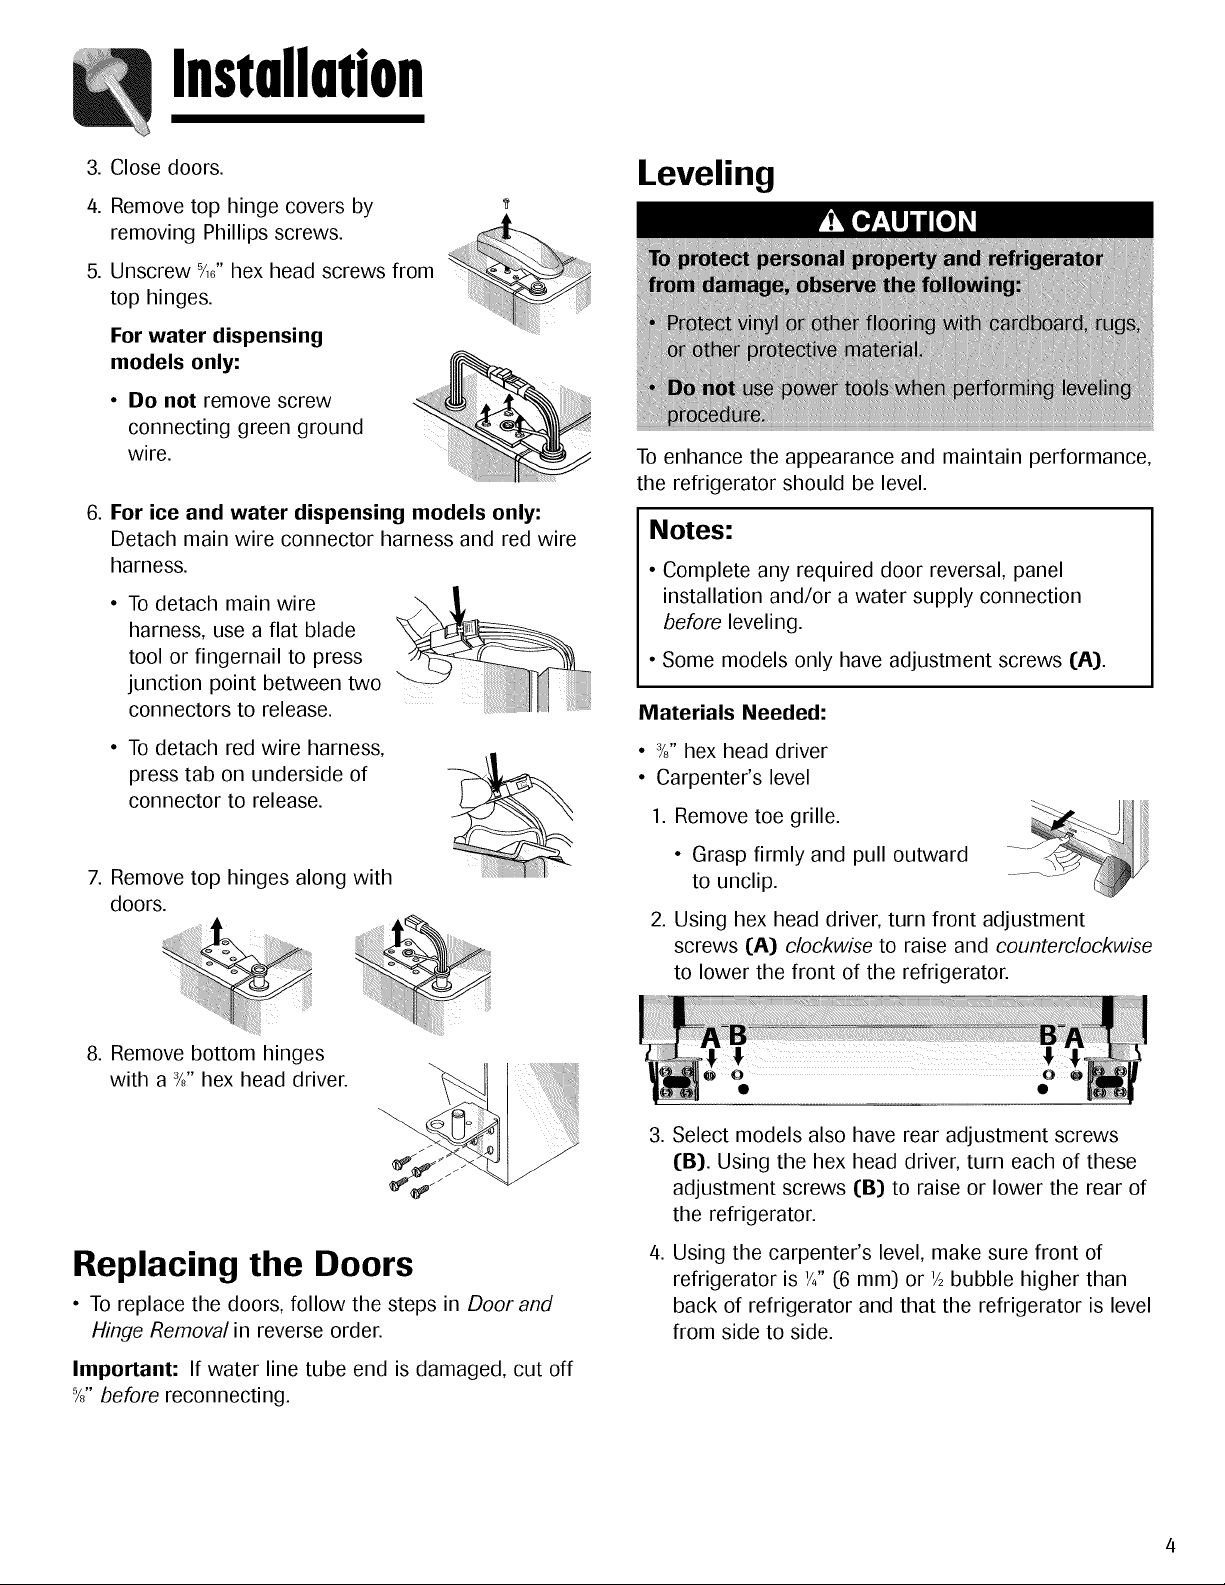
3. Close doors.
4. Remove top hinge covers by
removing Phillips screws.
5. Unscrew 5/,6"hex head screws from
top hinges.
For water dispensing
models only:
• Do not remove screw
connecting green ground
wire.
6. For ice and water dispensing models only:
Detach main wire connector harness and red wire
harness.
To detach main wire
harness, use a flat blade
tool or fingernail to press
junction point between two
connectors to release.
• To detach red wire harness,
press tab on underside of
connector to release.
7. Remove top hinges along with
doors.
8. Remove bottom hinges
with a 3/;, hex head driver.
Replacing the Doors
• To replace the doors, follow the steps in Door and
Hinge Removal in reverse order.
Important: If water line tube end is damaged, cut off
%" before reconnecting.
Leveling
To enhance the appearance and maintain performance,
the refrigerator should be level.
Notes:
• Complete any required door reversal, panel
installation and/or a water supply connection
before leveling.
• Some models only have adjustment screws (A).
Materials Needed:
• %" hex head driver
• Carpenter's level
1. Remove toe grille.
• Grasp firmly and pull outward
to unclip.
2. Using hex head driver, turn front adjustment
screws (A) clockwise to raise and counterclockwise
to lower the front of the refrigerator.
.
.
Select models also have rear adjustment screws
(B). Using the hex head driver, turn each of these
adjustment screws (B) to raise or lower the rear of
the refrigerator.
Using the carpenter's level, make sure front of
refrigerator is '/4" (6 mm) or '/2bubble higher than
back of refrigerator and that the refrigerator is level
from side to side.
iiL" Installadon
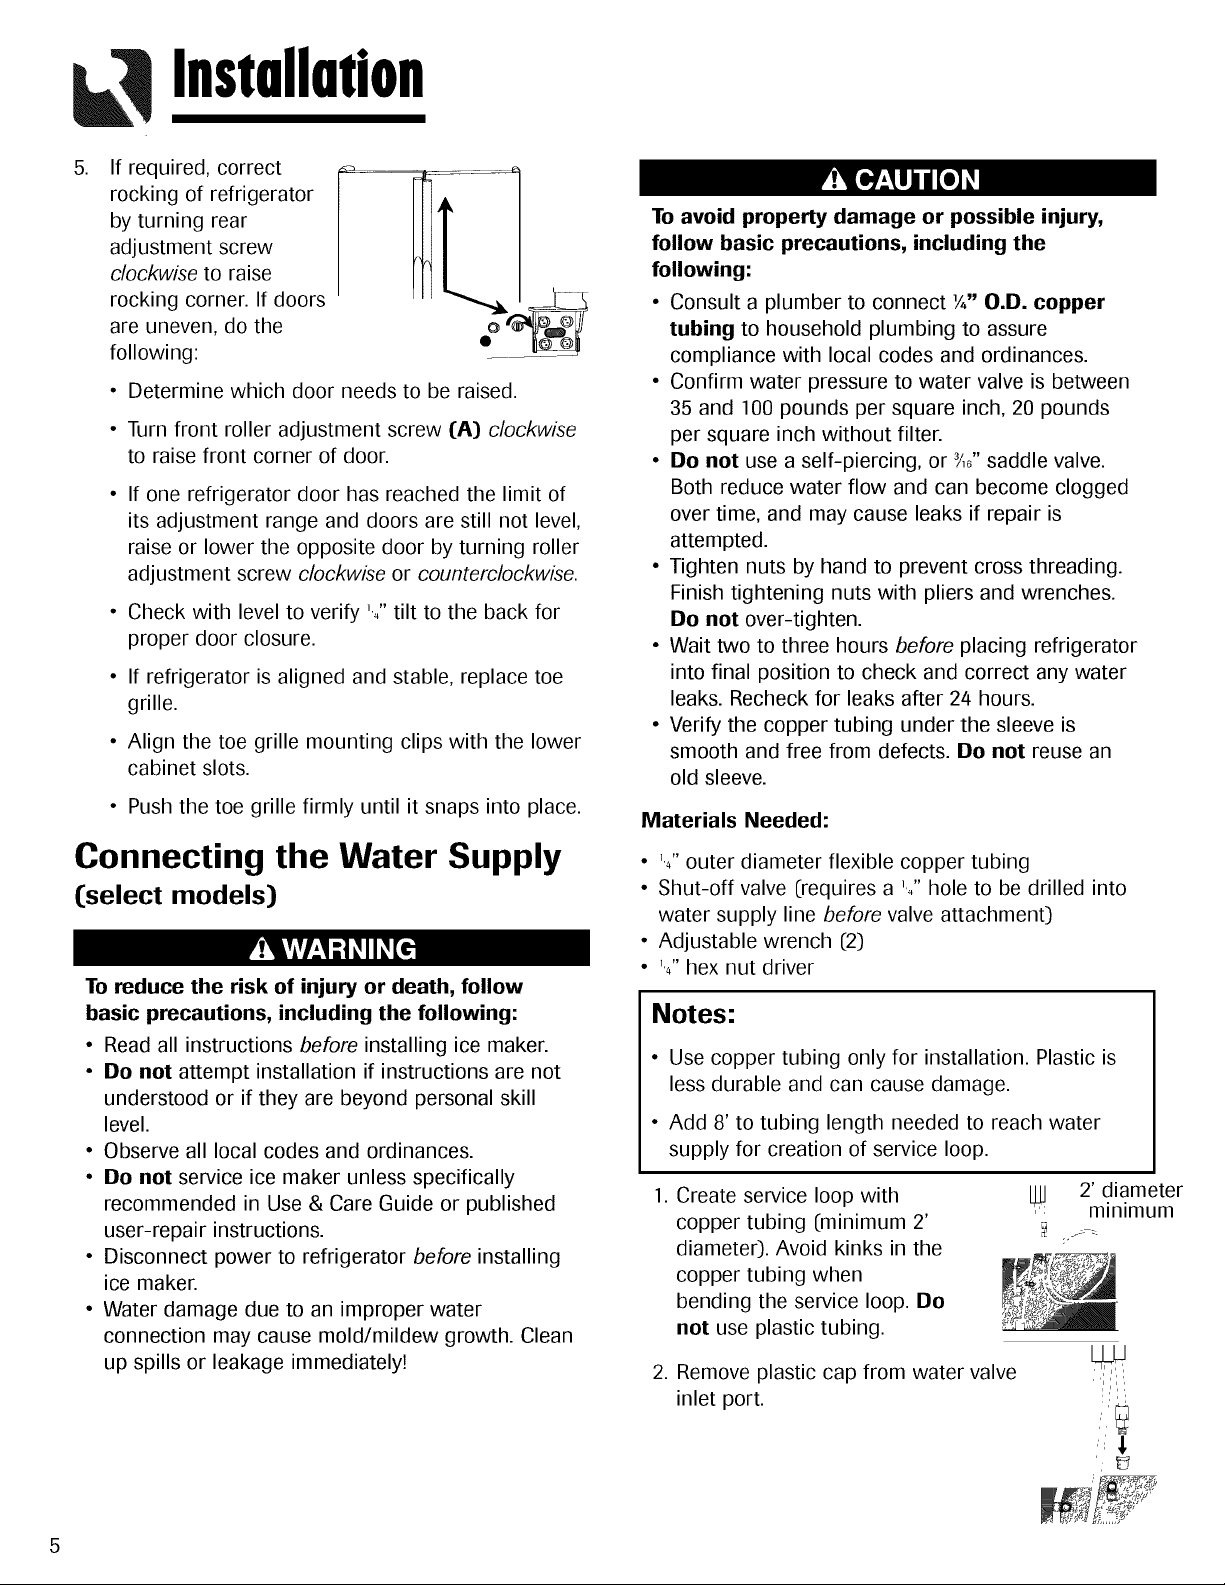
.
If required, correct
rocking of refrigerator
by turning rear
adjustment screw
clockwise to raise
rocking corner. If doors
are uneven, do the
following:
• Determine which door needs to be raised.
• Turn front roller adjustment screw (A) clockwise
to raise front corner of door.
If one refrigerator door has reached the limit of
its adjustment range and doors are still not level,
raise or lower the opposite door by turning roller
adjustment screw clockwise or counterclockwise.
Check with level to verify '._"tilt to the back for
proper door closure.
• If refrigerator is aligned and stable, replace toe
grille.
• Align the toe grille mounting clips with the lower
cabinet slots.
• Push the toe grille firmly until it snaps into place.
Connecting the Water Supply
([select models)
To reduce the risk of injury or death, follow
basic precautions, including the following:
• Read all instructions before installing ice maker.
• Do not attempt installation if instructions are not
understood or if they are beyond personal skill
level.
• Observe all local codes and ordinances.
• Do not service ice maker unless specifically
recommended in Use & Care Guide or published
user-repair instructions.
• Disconnect power to refrigerator before installing
ice maker.
• Water damage due to an improper water
connection may cause mold/mildew growth. Clean
up spills or leakage immediately!
To avoid property damage or possible injury,
follow basic precautions, including the
following:
• Consult a plumber to connect Y4" O.D. copper
tubing to household plumbing to assure
compliance with local codes and ordinances.
• Confirm water pressure to water valve is between
35 and 100 pounds per square inch, 20 pounds
per square inch without filter.
• Do not use a self-piercing, or _/,6"saddle valve.
Both reduce water flow and can become clogged
over time, and may cause leaks if repair is
attempted.
• Tighten nuts by hand to prevent cross threading.
Finish tightening nuts with pliers and wrenches.
Do not over-tighten.
• Wait two to three hours before placing refrigerator
into final position to check and correct any water
leaks. Recheck for leaks after 2/4 hours.
• Verify the copper tubing under the sleeve is
smooth and free from defects. Do not reuse an
old sleeve.
Materials Needed:
• '.4"outer diameter flexible copper tubing
• Shut-off valve (requires a '._" hole to be drilled into
water supply line before valve attachment)
• Adjustable wrench (2)
• '.4" hex nut driver
Notes:
• Use copper tubing only for installation. Plastic is
less durable and can cause damage.
• Add 8' to tubing length needed to reach water
supply for creation of service loop.
1. Create service loop with
copper tubing (minimum 2'
diameter). Avoid kinks in the
copper tubing when
bending the service loop. Do
not use plastic tubing.
LIJJ 2' diameter
,. minimum
i_ ,, sj _:
2. Remove plastic cap from water valve
inlet port.
",' _,
Installation
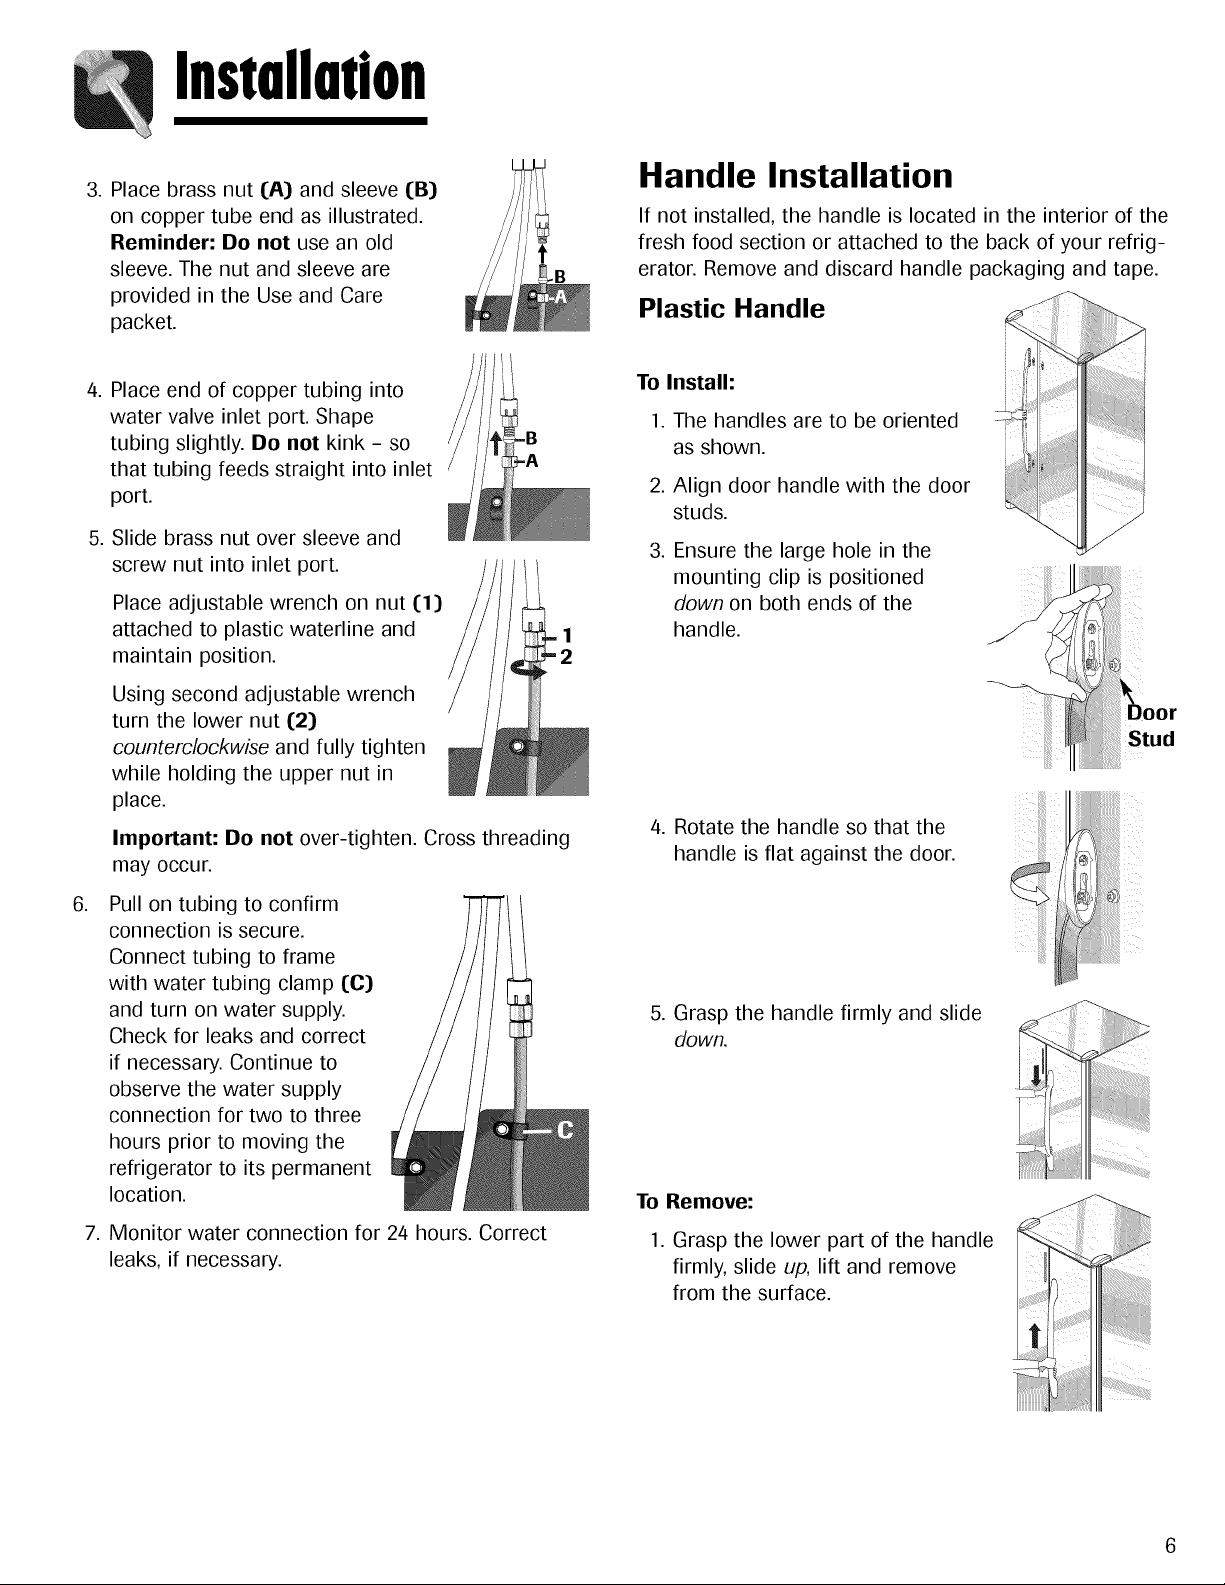
3. Place brass nut I[A) and sleeve lIB)
on copper tube end as illustrated.
Reminder: Do not use an old
sleeve. The nut and sleeve are
provided in the Use and Care
packet.
t
4. Place end of copper tubing into
water valve inlet port. Shape
tubing slightly. Do not kink - so
that tubing feeds straight into inlet
port.
5. Slide brass nut over sleeve and
screw nut into inlet port.
Place adjustable wrench on nut (1)
attached to plastic waterline and
maintain position.
Using second adjustable wrench
turn the lower nut (2)
counterclockwise and fully tighten
while holding the upper nut in
place.
Important: Do not over-tighten. Cross threading
may occur.
.
Pull on tubing to confirm
connection is secure.
Connect tubing to frame
with water tubing clamp (C)
and turn on water supply.
Check for leaks and correct
if necessary. Continue to
observe the water supply
connection for two to three
hours prior to moving the
refrigerator to its permanent
location.
7. Monitor water connection for 24 hours. Correct
leaks, if necessary.
Handle Installation
If not installed, the handle is located in the interior of the
fresh food section or attached to the back of your refrig-
erator. Remove and discard handle packaging and tape.
Plastic Handle
To Install:
1. The handles are to be oriented
as shown.
2. Align door handle with the door
studs.
3. Ensure the large hole in the
mounting clip is positioned
down on both ends of the
handle.
oor
Stud
4. Rotate the handle so that the
handle is flat against the door.
5. Grasp the handle firmly and slide
down.
ii
,jiiiii_ii_ii_ii_i!_ii_iii_!i_ii!i_ii___
II IIII
To Remove:
1. Grasp the lower part of the handle
firmly, slide up, lift and remove
from the surface.
TemperutureControls
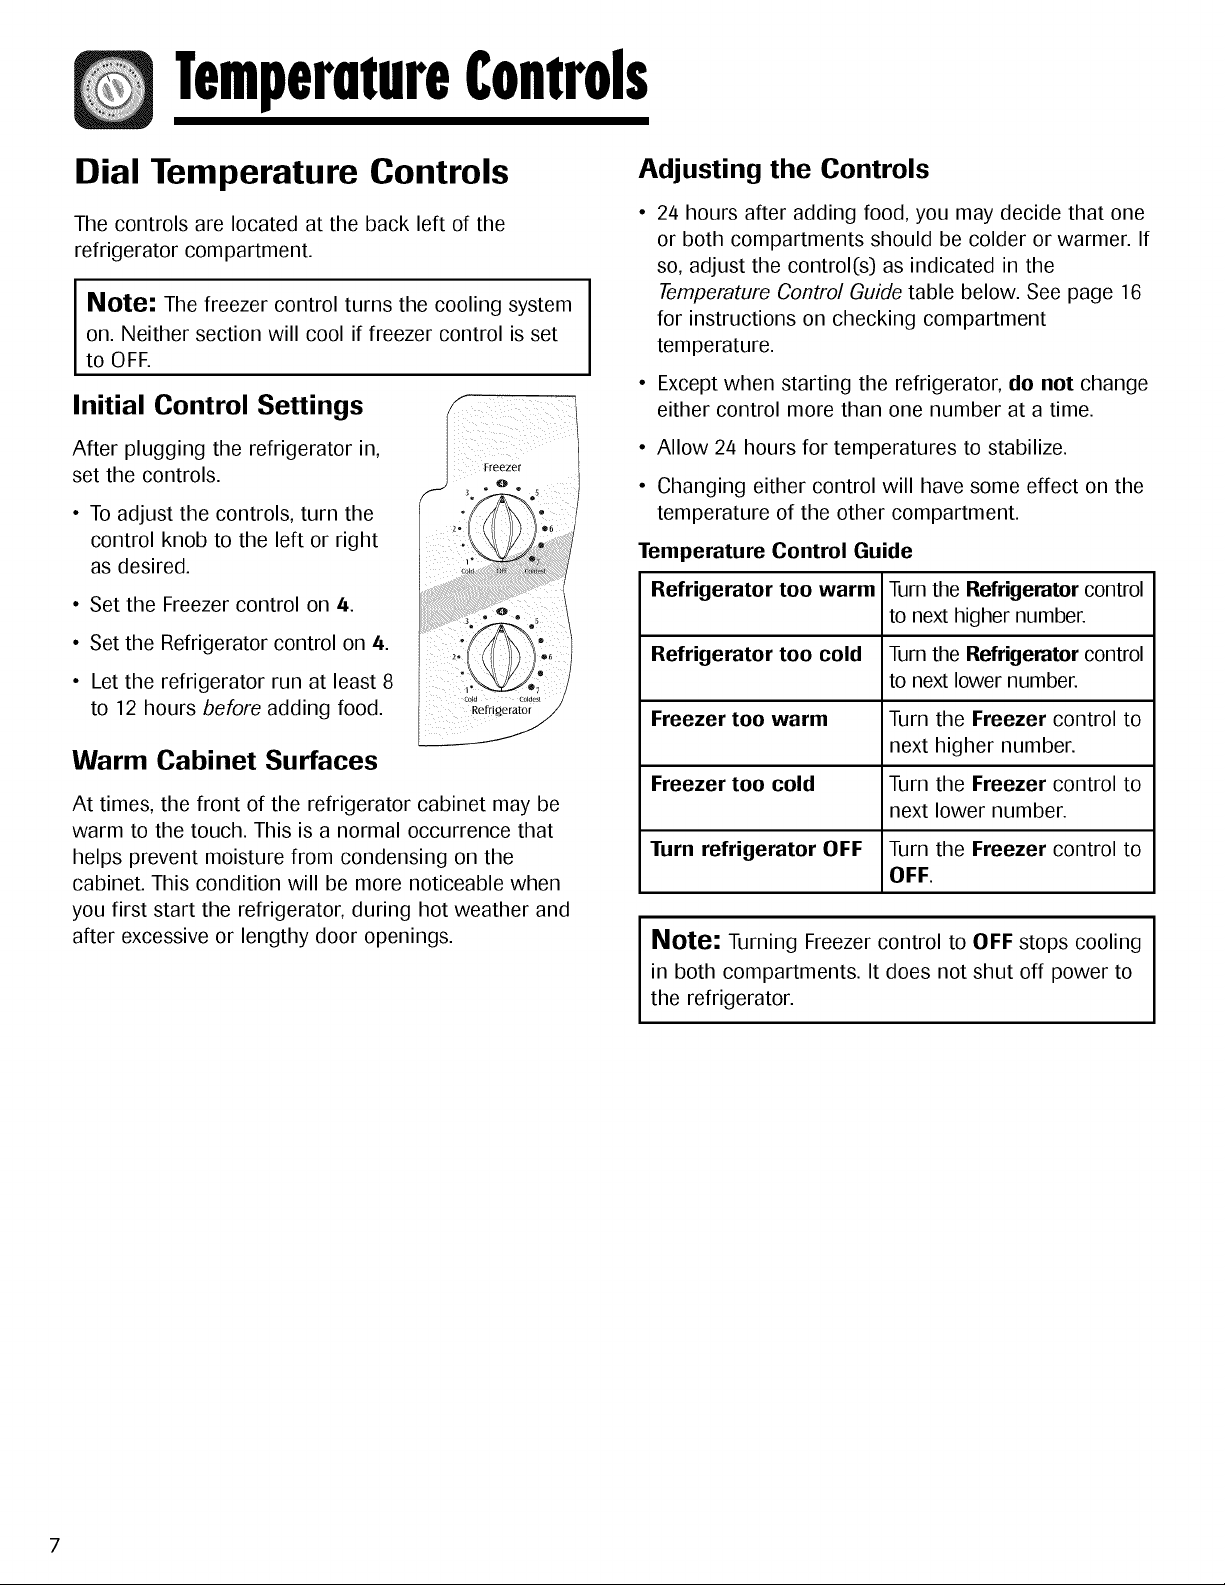
Dial Temperature Controls
The controls are located at the back left of the
refrigerator compartment.
Note: The freezer control turns the cooling system
on. Neither section will cool if freezer control is set
to OFF.
Initial Control Settings
After plugging the refrigerator in,
set the controls.
• To adjust the controls, turn the
control knob to the left or right
as desired.
• Set the Freezer control on 4.
• Set the Refrigerator control on 4.
• Let the refrigerator run at least 8
to 12 hours before adding food.
Warm Cabinet Surfaces
Freezer
O
3, _ e eS
®6
3 " * ®5
06
, •
(_old Coldesl
At times, the front of the refrigerator cabinet may be
warm to the touch. This is a normal occurrence that
helps prevent moisture from condensing on the
cabinet. This condition will be more noticeable when
you first start the refrigerator, during hot weather and
after excessive or lengthy door openings.
Adjusting the Controls
• 24 hours after adding food, you may decide that one
or both compartments should be colder or warmer. If
so, adjust the control(s) as indicated in the
Temperature Control Guide table below. See page 16
for instructions on checking compartment
temperature.
• Except when starting the refrigerator, do not change
either control more than one number at a time.
• Allow 24 hours for temperatures to stabilize.
• Changing either control will have some effect on the
temperature of the other compartment.
Temperature Control Guide
Refrigerator too warm Turn the Refrigerator control
to next higher number.
Refrigerator too cold Turn the Refrigerator control
to next lower number.
Freezer too warm Turn the Freezer control to
next higher number.
Freezer too cold Turn the Freezer control to
next lower number.
Turn refrigerator OFF Turn the Freezer control to
OFF.
Note: Turning Freezer control to OFF stops cooling
in both compartments. It does not shut off power to
the refrigerator.
FreshFoodFeatures
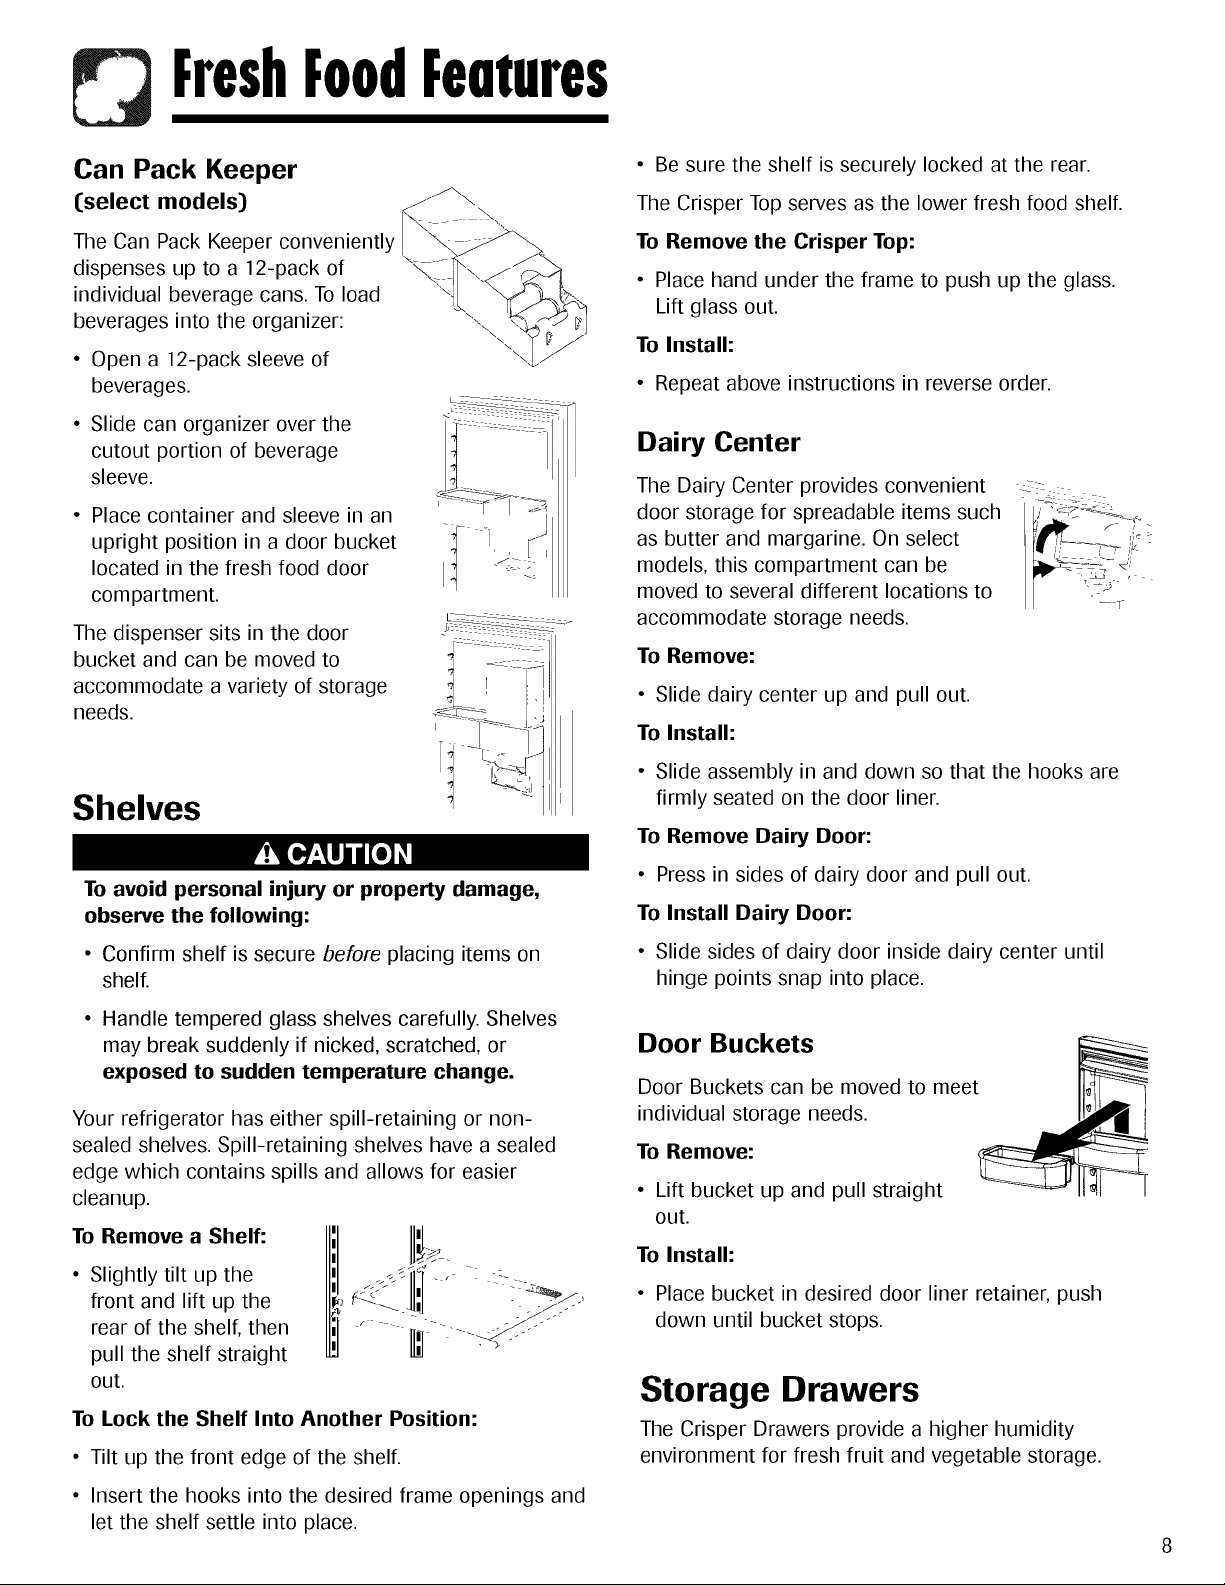
Can Pack Keeper
[select models) ._ _
The Can Pack Keeper conveniently,
dispenses up to a 12-pack of
individual beverage cans. To load
beverages into the organizer:
• Open a 12-pack sleeve of
beverages.
• Slide can organizer over the
cutout portion of beverage
sleeve.
Place container and sleeve in an
upright position in a door bucket
located in the fresh food door
compartment.
The dispenser sits in the door
bucket and can be moved to
accommodate a variety of storage
needs.
Shelves
I
./
To avoid personal injury or property damage,
observe the following:
• Confirm shelf is secure before placing items on
shelf.
• Handle tempered glass shelves carefully. Shelves
may break suddenly if nicked, scratched, or
exposed to sudden temperature change.
Your refrigerator has either spill-retaining or non-
sealed shelves. Spill-retaining shelves have a sealed
edge which contains spills and allows for easier
cleanup.
To Remove a Shelf:
• Slightly tilt up the
front and lift up the
rear of the shelf, then
pull the shelf straight
out.
To Lock the Shelf Into Another Position:
• Tilt up the front edge of the shelf.
• Insert the hooks into the desired frame openings and
let the shelf settle into place.
• Be sure the shelf is securely locked at the rear.
The Crisper Top serves as the lower fresh food shelf.
To Remove the Crisper Top:
• Place hand under the frame to push up the glass.
Lift glass out.
To Install:
• Repeat above instructions in reverse order.
Dairy Center
The Dairy Center provides convenient
door storage for spreadable items such
as butter and margarine. On select
models, this compartment can be
moved to several different locations to
accommodate storage needs.
To Remove:
• Slide dairy center up and pull out.
To Install:
• Slide assembly in and down so that the hooks are
firmly seated on the door liner.
To Remove Dairy Door:
• Press in sides of dairy door and pull out.
To Install Dairy Door:
• Slide sides of dairy door inside dairy center until
hinge points snap into place.
Door Buckets
Door Buckets can be moved to meet
individual storage needs.
To Remove:
• Lift bucket up and pull straight
out.
To Install:
• Place bucket in desired door liner retainer, push
down until bucket stops.
Storage Drawers
The Crisper Drawers provide a higher humidity
environment for fresh fruit and vegetable storage.
FreezerFeatures
Shelves and Baskets
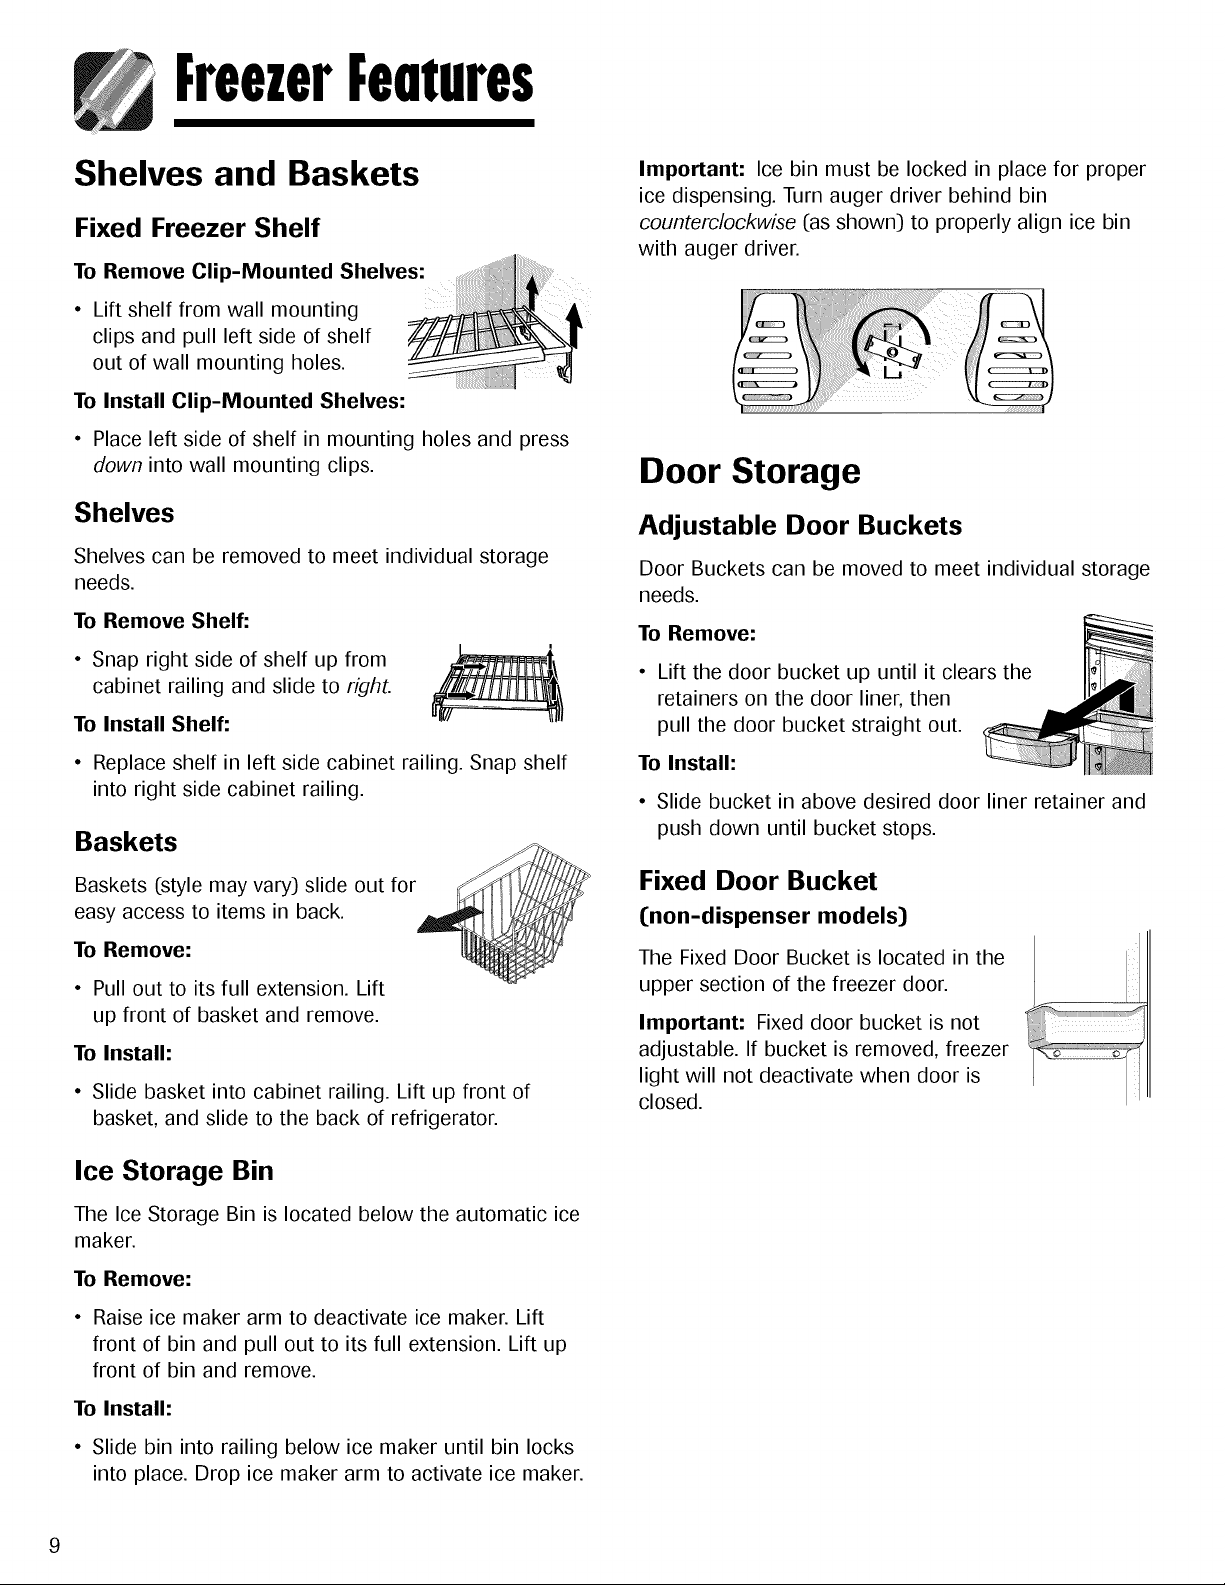
Fixed Freezer Shelf
To Remove Clip-Mounted Shelves:
• Lift shelf from wall mounting
clips and pull left side of shelf
out of wall mounting holes.
To Install Clip-Mounted Shelves:
• Place left side of shelf in mounting holes and press
down into wall mounting clips.
Shelves
Shelves can be removed to meet individual storage
needs.
To Remove Shelf:
• Snap right side of shelf up from
cabinet railing and slide to right.
To Install Shelf:
• Replace shelf in left side cabinet railing. Snap shelf
into right side cabinet railing.
Baskets
Baskets (style may vary) slide out for
easy access to items in back.
To Remove:
• Pull out to its full extension. Lift
up front of basket and remove.
To Install:
• Slide basket into cabinet railing. Lift up front of
basket, and slide to the back of refrigerator.
Ice Storage Bin
The Ice Storage Bin is located below the automatic ice
maker.
To Remove:
• Raise ice maker arm to deactivate ice maker. Lift
front of bin and pull out to its full extension. Lift up
front of bin and remove.
To Install:
• Slide bin into railing below ice maker until bin locks
into place. Drop ice maker arm to activate ice maker.
Important: Ice bin must be locked in place for proper
ice dispensing. Turn auger driver behind bin
counterclockwise (as shown) to properly align ice bin
with auger driver.
Door Storage
Adjustable Door Buckets
Door Buckets can be moved to meet individual storage
needs.
To Remove:
• Lift the door bucket up until it clears the
retainers on the door liner, then
pull the door bucket straight out.
To Install:
• Slide bucket in above desired door liner retainer and
push down until bucket stops.
Fixed Door Bucket
(non-dispenser models)
The Fixed Door Bucket is located in the
upper section of the freezer door.
Important: Fixed door bucket is not
adjustable. If bucket is removed, freezer
light will not deactivate when door is
closed.
9
IceundWuter
Automatic Ice Maker
Note: Energy rating guides that are posted on the
refrigerator at the time of purchase do not include
optional ice maker energy usage.
Some models are automatic ice maker ready. The
number of the appropriate ice maker kit is IC10S. The
kit contains installation instructions and water
connection instructions.
Other models have a factory installed ice maker.
Connect the ice maker to the water supply as
instructed on pages 5-6. Proper water flow and a
level refrigerator are essential for optimal ice
maker performance.
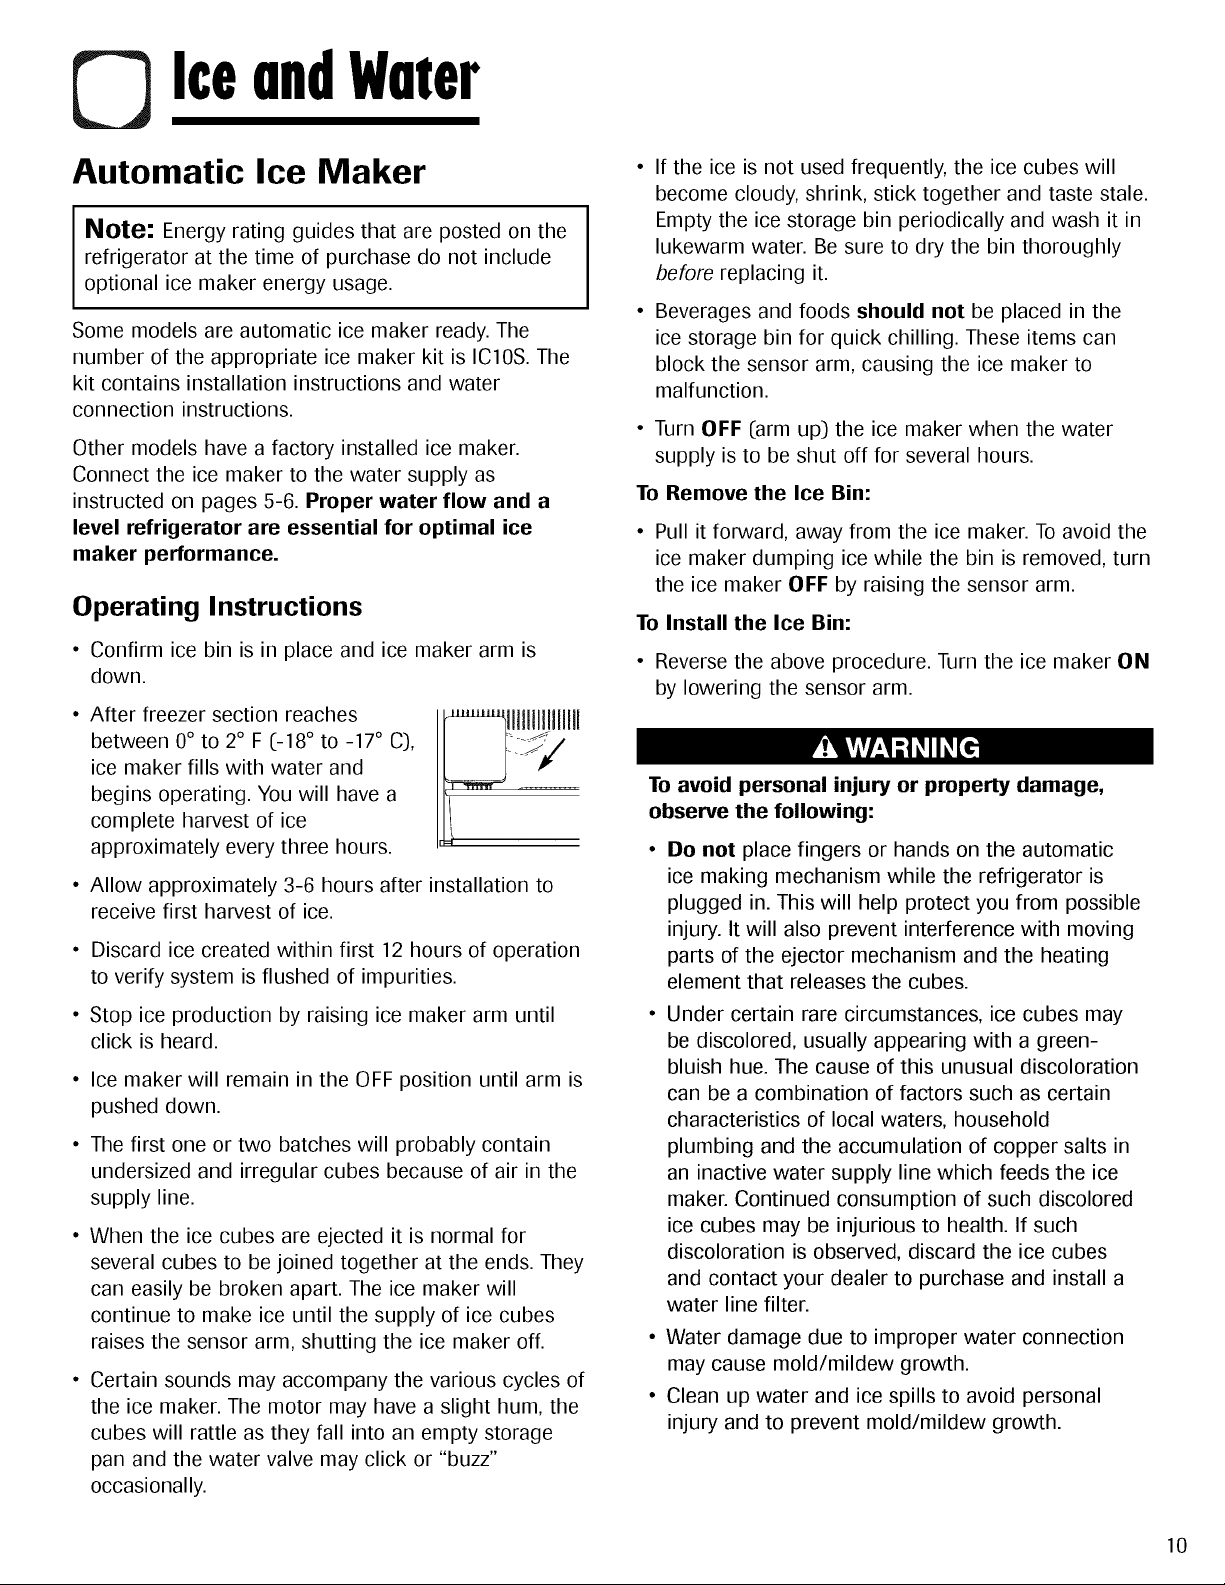
Operating Instructions
• Confirm ice bin is in place and ice maker arm is
down.
• After freezer section reaches
between 0° to 2° F (-18 ° to -17° C),
ice maker fills with water and
begins operating. You will have a
complete harvest of ice
approximately every three hours.
• Allow approximately 3-6 hours after installation to
receive first harvest of ice.
• Discard ice created within first 12 hours of operation
to verify system is flushed of impurities.
• Stop ice production by raising ice maker arm until
click is heard.
• Ice maker will remain in the OFF position until arm is
pushed down.
• The first one or two batches will probably contain
undersized and irregular cubes because of air in the
supply line.
• When the ice cubes are ejected it is normal for
several cubes to be joined together at the ends. They
can easily be broken apart. The ice maker will
continue to make ice until the supply of ice cubes
raises the sensor arm, shutting the ice maker off.
• Certain sounds may accompany the various cycles of
the ice maker. The motor may have a slight hum, the
cubes will rattle as they fall into an empty storage
pan and the water valve may click or "buzz"
occasionally.
If the ice is not used frequently, the ice cubes will
become cloudy, shrink, stick together and taste stale.
Empty the ice storage bin periodically and wash it in
lukewarm water. Be sure to dry the bin thoroughly
before replacing it.
Beverages and foods should not be placed in the
ice storage bin for quick chilling. These items can
block the sensor arm, causing the ice maker to
malfunction.
Turn OFF (arm up) the ice maker when the water
supply is to be shut off for several hours.
To Remove the Ice Bin:
• Pull it forward, away from the ice maker. To avoid the
ice maker dumping ice while the bin is removed, turn
the ice maker OFF by raising the sensor arm.
To Install the Ice Bin:
• Reverse the above procedure. Turn the ice maker ON
by lowering the sensor arm.
To avoid personal injury or property damage,
observe the following:
• Do not place fingers or hands on the automatic
ice making mechanism while the refrigerator is
plugged in. This will help protect you from possible
injury. It will also prevent interference with moving
parts of the ejector mechanism and the heating
element that releases the cubes.
• Under certain rare circumstances, ice cubes may
be discolored, usually appearing with a green-
bluish hue. The cause of this unusual discoloration
can be a combination of factors such as certain
characteristics of local waters, household
plumbing and the accumulation of copper salts in
an inactive water supply line which feeds the ice
maker. Continued consumption of such discolored
ice cubes may be injurious to health. If such
discoloration is observed, discard the ice cubes
and contact your dealer to purchase and install a
water line filter.
• Water damage due to improper water connection
may cause mold/mildew growth.
• Clean up water and ice spills to avoid personal
injury and to prevent mold/mildew growth.
10
IceandWater
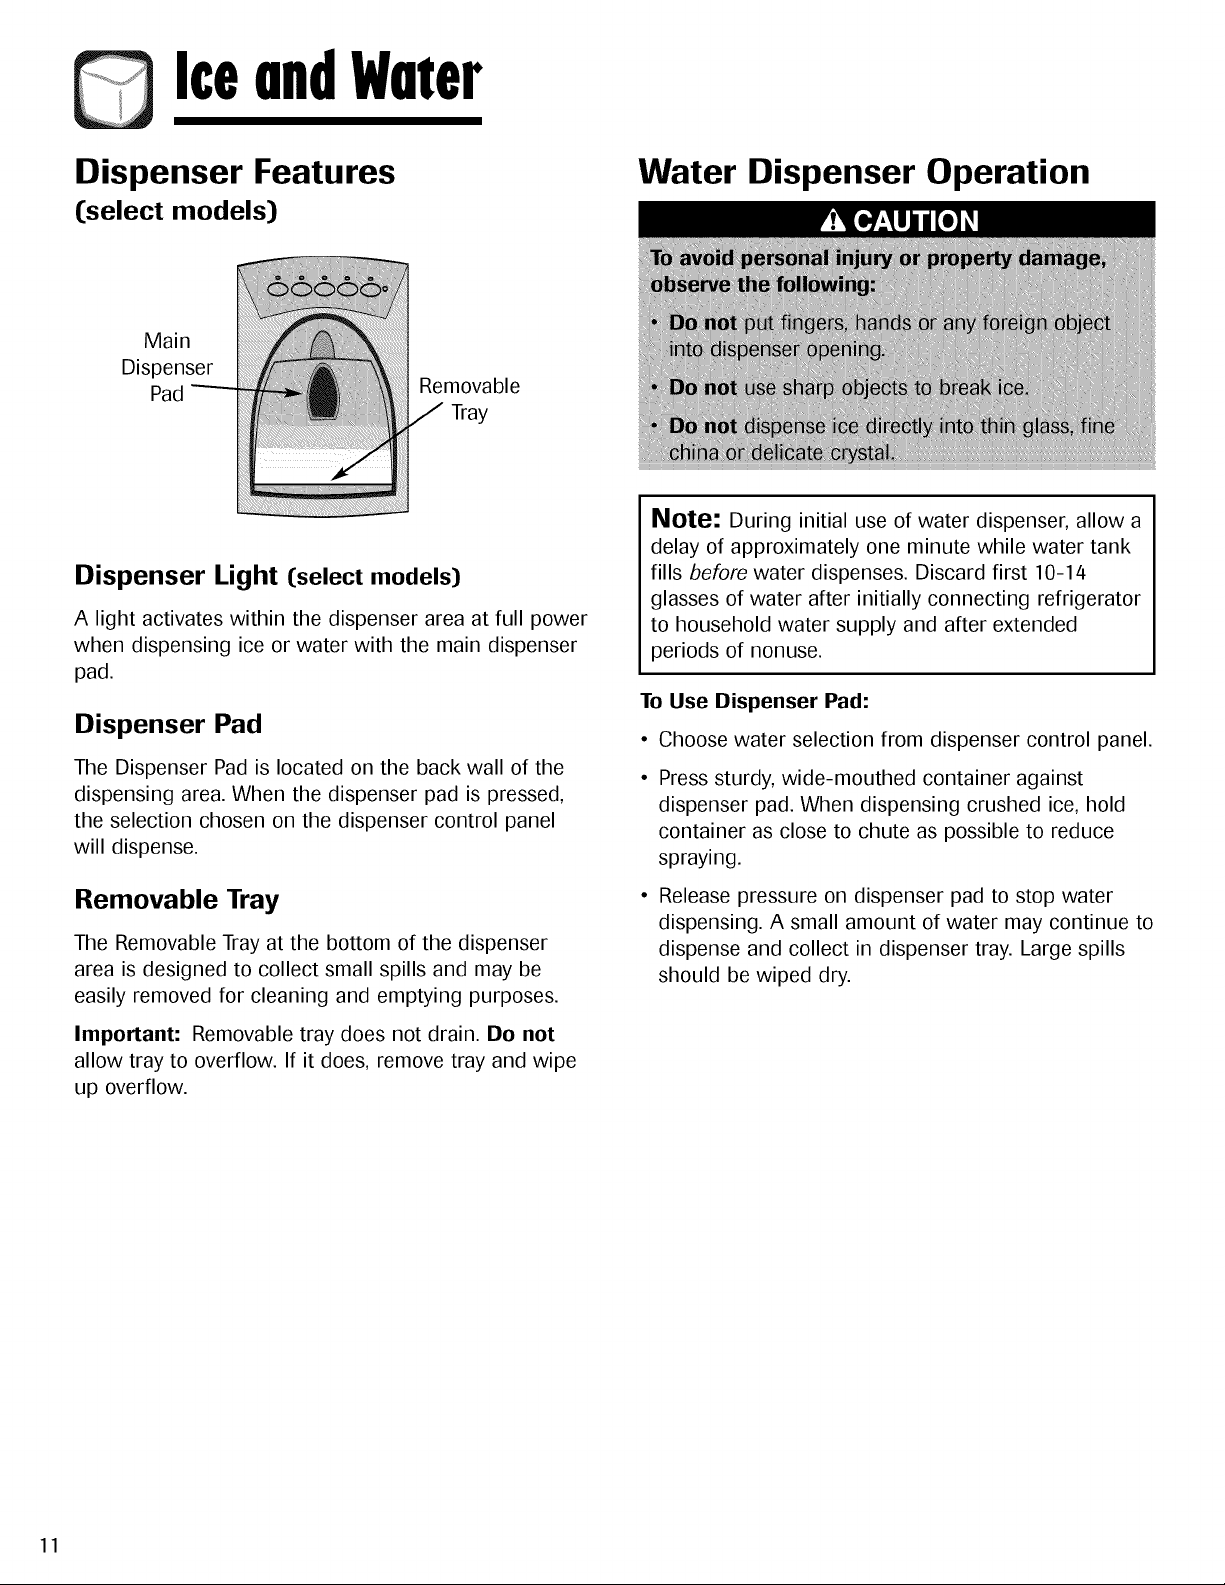
Dispenser Features
Cselect models)
Water Dispenser Operation
Main
Dispenser
Pad
Removable
Tray
Dispenser Light (select models)
A light activates within the dispenser area at full power
when dispensing ice or water with the main dispenser
pad.
Dispenser Pad
The Dispenser Pad is located on the back wall of the
dispensing area. When the dispenser pad is pressed,
the selection chosen on the dispenser control panel
will dispense.
Removable Tray
The Removable Tray at the bottom of the dispenser
area is designed to collect small spills and may be
easily removed for cleaning and emptying purposes.
Important: Removable tray does not drain. Do not
allow tray to overflow. If it does, remove tray and wipe
up overflow.
Note: During initial use of water dispenser, allow a
delay of approximately one minute while water tank
fills before water dispenses. Discard first 10-14
glasses of water after initially connecting refrigerator
to household water supply and after extended
periods of nonuse.
To Use Dispenser Pad:
• Choose water selection from dispenser control panel.
• Press sturdy, wide-mouthed container against
dispenser pad. When dispensing crushed ice, hold
container as close to chute as possible to reduce
spraying.
• Release pressure on dispenser pad to stop water
dispensing. A small amount of water may continue to
dispense and collect in dispenser tray. Large spills
should be wiped dry.
11
Iceu,d Wuter
Dispenser Control (selectmodels)
(control features vary by model)
c> (T>
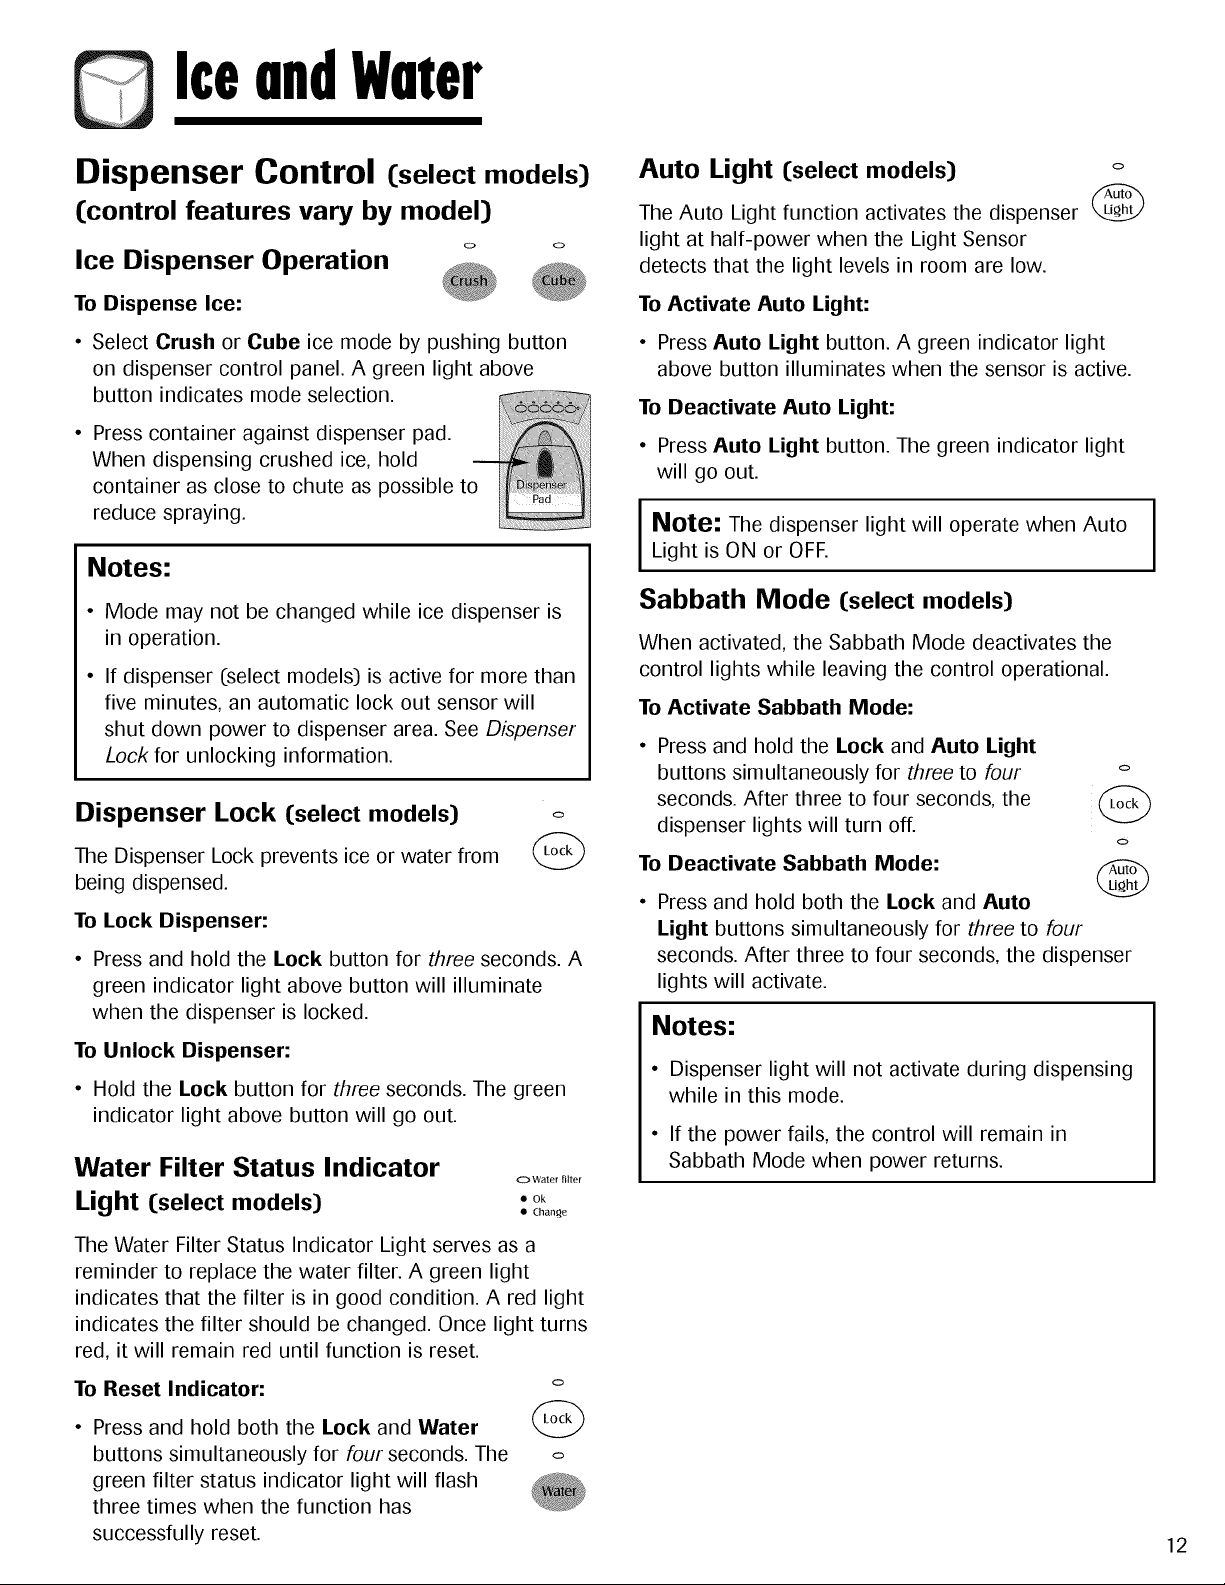
Ice Dispenser Operation
To Dispense Ice:
Select Crush or Cube ice mode by pushing button
on dispenser control panel. A green light above
button indicates mode selection.
Press container against dispenser pad.
When dispensing crushed ice, hold
container as close to chute as possible t
reduce spraying.
Notes:
• Mode may not be changed while ice dispenser is
in operation.
• If dispenser (select models) is active for more than
five minutes, an automatic lock out sensor will
shut down power to dispenser area. See Dispenser
Lock for unlocking information.
Dispenser Lock (select models) o
The Dispenser Lock prevents ice or water from _._
being dispensed.
To Lock Dispenser:
• Press and hold the Lock button for three seconds. A
green indicator light above button will illuminate
when the dispenser is locked.
To Unlock Dispenser:
• Hold the Lock button for three seconds. The green
indicator light above button will go out.
Water Filter Status Indicator
O Water filter
Light (select models) .. ok
Chan_e
The Water Filter Status Indicator Light serves as a
reminder to replace the water filter. A green light
indicates that the filter is in good condition. A red light
indicates the filter should be changed. Once light turns
red, it will remain red until function is reset.
To Reset Indicator:
Press and hold both the Lock and Water
buttons simultaneously for four seconds. The
green filter status indicator light will flash
three times when the function has
successfully reset.
o
o
Auto Light (select models)
The Auto Light function activates the dispenser
light at half-power when the Light Sensor
detects that the light levels in room are low.
o
@
To Activate Auto Light:
• Press Auto Light button. A green indicator light
above button illuminates when the sensor is active.
To Deactivate Auto Light:
• Press Auto Light button. The green indicator light
will go out.
Note: The dispenser light will operate when Auto
Light is ON or OFF.
Sabbath Mode (select models)
When activated, the Sabbath Mode deactivates the
control lights while leaving the control operational.
To Activate Sabbath Mode:
Press and hold the Lock and Auto Light
buttons simultaneously for three to four
seconds. After three to four seconds, the
dispenser lights will turn off.
To Deactivate Sabbath Mode:
• Press and hold both the Lock and Auto
Light buttons simultaneously for three to four
seconds. After three to four seconds, the dispenser
lights will activate.
Notes:
• Dispenser light will not activate during dispensing
while in this mode.
• If the power fails, the control will remain in
Sabbath Mode when power returns.
12
WaterFilter
Water Filter Removal and
Installation Cselect models)
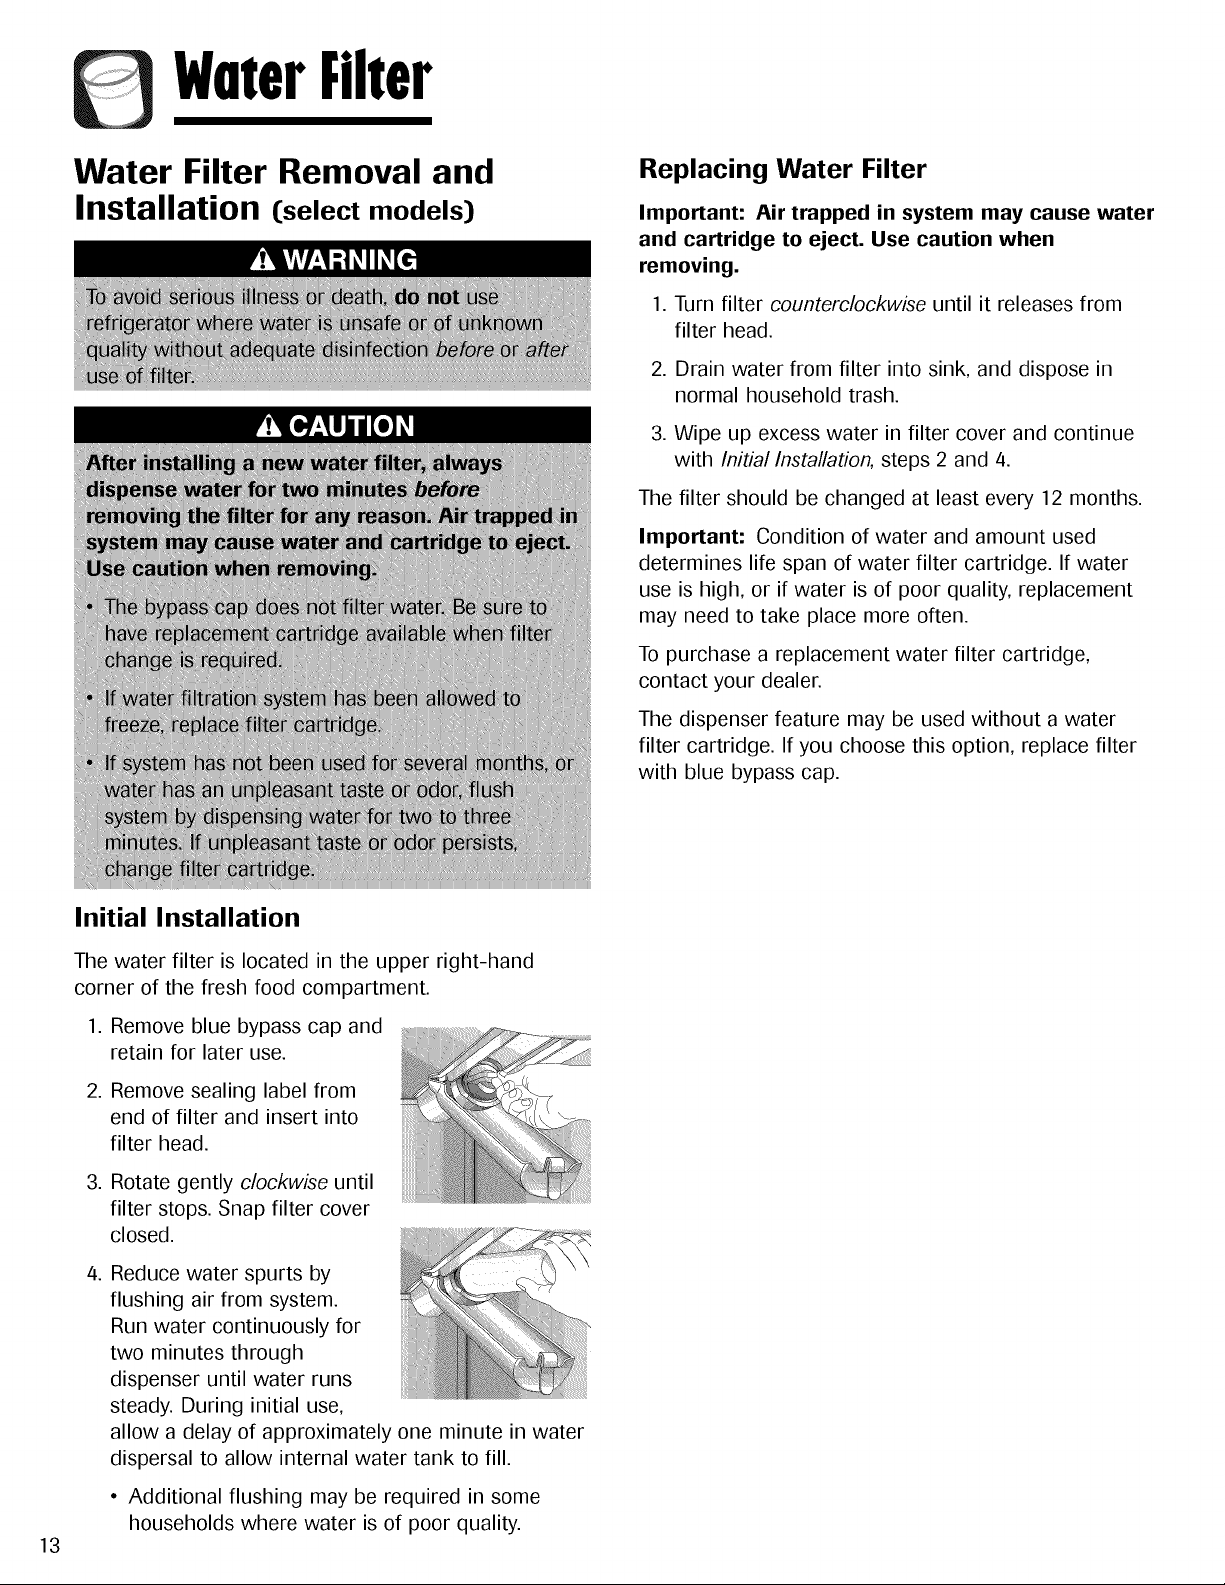
Initial Installation
Replacing Water Filter
Important: Air trapped in system may cause water
and cartridge to eject. Use caution when
removing.
1. Turn filter counterclockwise until it releases from
filter head.
2. Drain water from filter into sink, and dispose in
normal household trash.
3. Wipe up excess water in filter cover and continue
with Initial Installation, steps 2 and 4.
The filter should be changed at least every 12 months.
Important: Condition of water and amount used
determines life span of water filter cartridge. If water
use is high, or if water is of poor quality, replacement
may need to take place more often.
To purchase a replacement water filter cartridge,
contact your dealer.
The dispenser feature may be used without a water
filter cartridge. If you choose this option, replace filter
with blue bypass cap.
13
The water filter is located in the upper right-hand
corner of the fresh food compartment.
1. Remove blue bypass cap and
retain for later use.
.
.
Remove sealing label from
end of filter and insert into
filter head.
Rotate gently clockwise until
filter stops. Snap filter cover
closed.
.
Reduce water spurts by
flushing air from system.
Run water continuously for
two minutes through
dispenser until water runs
steady. During initial use,
allow a delay of approximately one minute in water
dispersal to allow internal water tank to fill.
• Additional flushing may be required in some
households where water is of poor quality.
WaterFilter
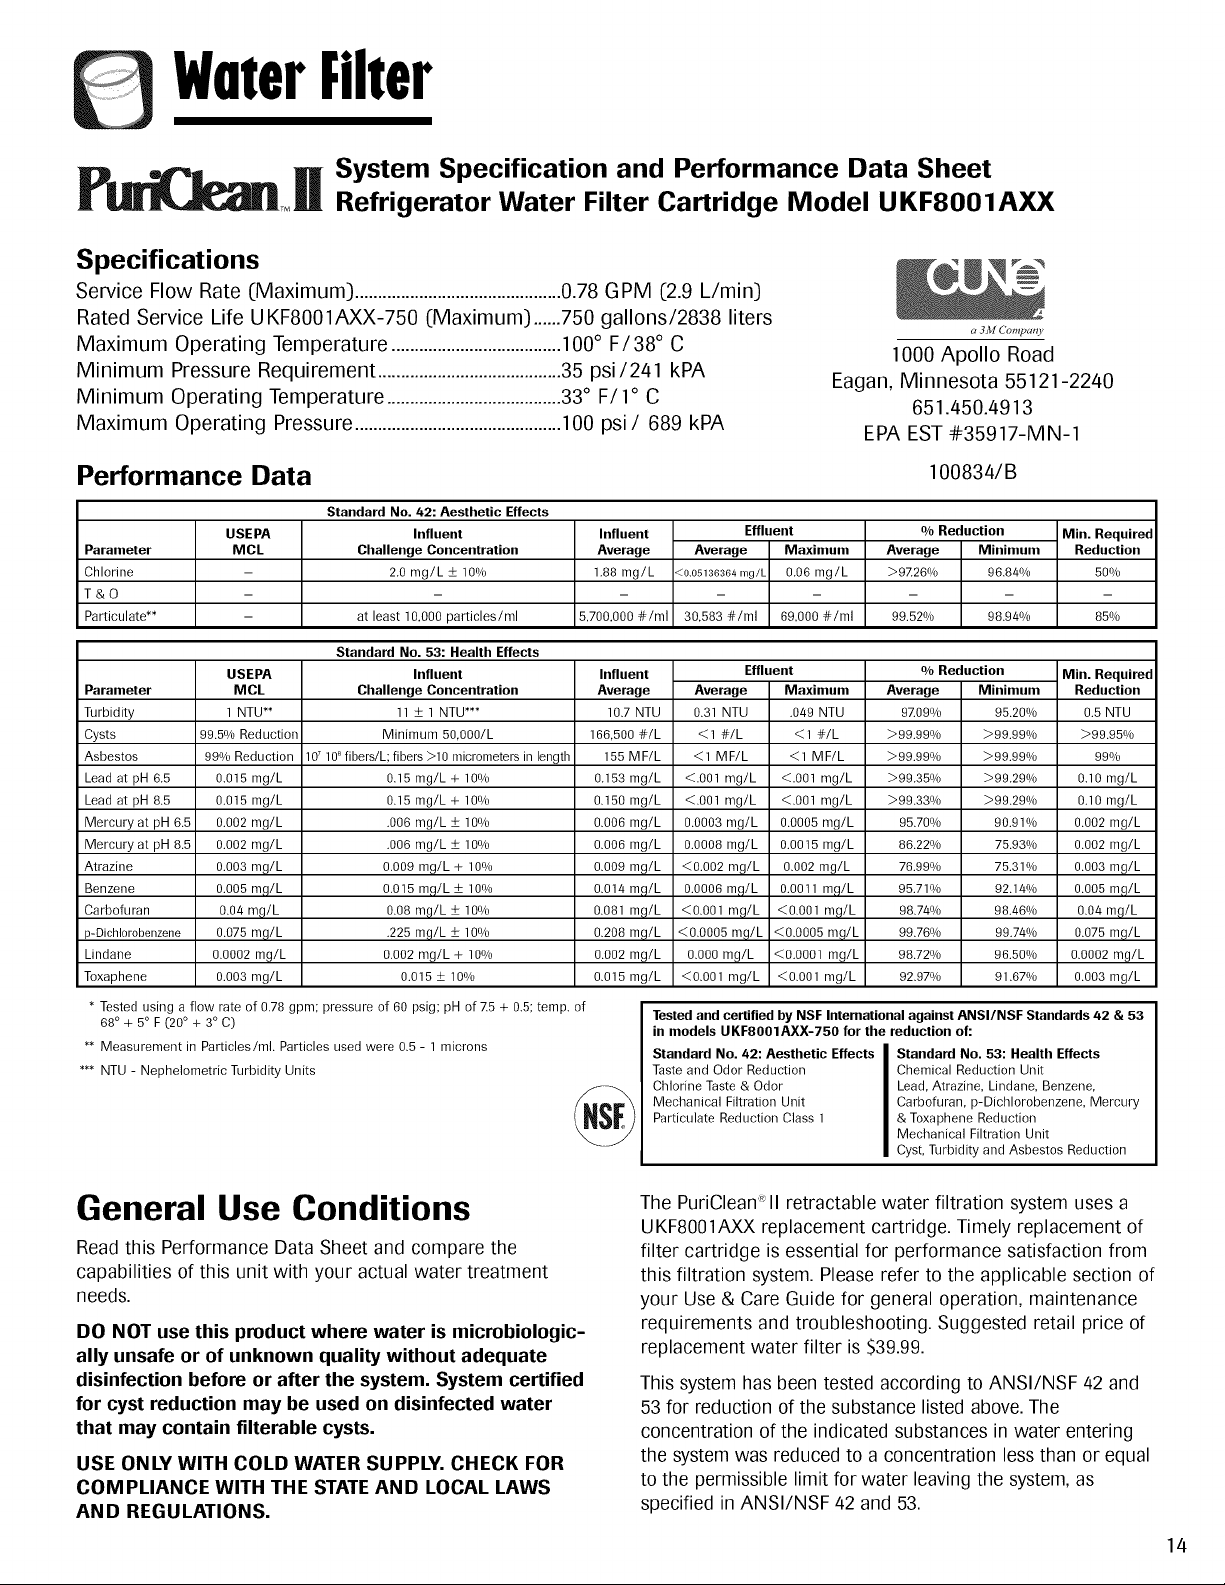
System Specification and Performance Data Sheet
Refrigerator Water Filter Cartridge Model UKF8OOIAXX
Specifications
Service Flow Rate (Maximum) .............................................0.78 GPM (2.9 L/min)
Rated Service Life U KF8001AXX-750 (Maximum) ......750 gallons/2838 liters
Maximum Operating Temperature .....................................100° F/38 ° C
Minimum Pressure Requirement ........................................35 psi/241 kPA
Minimum Operating Temperature ......................................33° F/1 ° C
Maximum Operating Pressure .............................................100 psi/ 689 kPA
a 3M Company
1000 Apollo Road
Eagan, Minnesota 55121-2240
651.450.4913
EPA EST #35917-MN-1
Performance Data
100834/B
Parameter
Chlorine
T&O
Particulate**
USEPA
MCL
Standard No. 42: Aesthetic Effects
Influent
Challenge Concentration
2.0 mg/L -4- 10%
at least 10,000 particles/ml
Influent
Average
1.88 mg/L
5,700,000 #/ml
Effluent
Average Maximum
<o.o5136364 mg/L 0.06 mg/L
30,583 #/ml 69,000 #/ml
% Reduction
Average Minimum
>9Z26% 96.84%
99.52o/o 98.94%
Min. Required
Reduction
5O%
85%
Parameter
Turbidity
Cysts
Asbestos
Lead at pH 6.5
Lead at pH 8.5
Mercury at pH 6.5
Mercury at pH 8.5
Atrazine
Benzene
Carbofuran
p-Dichlorobenzene
Lindane
Toxaphene
USEPA
MCL
1 NTU**
99.5% Reduction
99% Reduction
0.015 mg/L
0.015 mg/L
0.002 mg/L
0.002 mg/L
0.003 mg/L
0.005 mg/L
0.04 mg/L
0.075 mg/L
0.0002 mg/L
0.003 mg/L
Standard No. 53: Health Effects
Influent Influent
Effluent
Average
9709%
>99.990/0
>99.990/0
>99.350/0
>99.330/0
95.70%
86.22%
76.99%
95.71%
98.74%
99.76%
98.72%
92.97%
Challenge Concentration
11 _+ 1 NTU***
Minimum 5O,0OO/L
107108fibers/L; fibers >10 micrometers in length
0.15 mg/L + 10%
0.15 mg/L + 10%
.006 mg/L _+10o/o
.006 mg/L _+10o/o
0.009 mg/L + 10%
0.015 mg/L _+10%
0.08 mg/L _+10%
.225 mg/L -4-10%
0.002 mg/L + 10%
0.015 _+10%
Average
10.7 NTU
166.500 #/L
155 MF/L
0.153 mg/L
0.150 mg/L
0.006 mg/L
0.006 mg/L
0.009 mg/L
0.014 mg/L
0.081 mg/L
0.208 mg/L
O.0O2mg/L
0.015 mg/L
Average Maximum
0.31 NTU .049 NTU
<1 #/L <1 #/L
<1 MF/L <1 MF/L
<.001 mg/L <.001 mg/L
<.001 mg/L <.001 mg/L
0.0003 mg/L 0.0005 mg/L
0.0008 mg/L 0.0015 mg/L
<0.002 mg/L 0.002 mg/L
0.0006 mg/L 0.0011 mg/L
<0.001 mg/L <0.001 mg/L
<0.0005 mg/L <0.0005 mg/L
O.O0Omg/L <0.0001 mg/L
<0.001 mg/L <0.001 mg/L
% Reduction
Minimum
95.200/0
>99.990/0
>99.990/0
>99.290/0
>99.29%
90.91%
75.93%
75.31%
92.14%
98.46%
99.74%
96.50o/o
91.67%
* Tested using a flow rate of 0.78 gpm; pressure of 60 psig; pH of 7.5+ 0.5; temp. of
Min. Required
Reduction
0.5 NTU
>99.950/0
99%
0.10 mg/L
O.1Omg/L
0.002 mg/L
0.002 mg/L
0.003 mg/L
0.005 mg/L
0.04 mg/L
0.075 mg/L
0.0002 mg/L
0.003 mg/L
68°+5 °F(20 °+3 °C)
** Measurement in Particles/rob Particles used were 0.5 - 1 microns
*** NTU - Nephelometric Turbidity Units
Tested and certified by NSF International against ANSI/NSF Standards 42 & 53
in models UKF8001AXX-750 for the reduction of:
Standard No. 42: Aesthetic Effects Standard No. 53: Health Effects
Taste and Odor Reduction Chemical Reduction Unit
Chlorine Taste & Odor Lead, Atrazine, Lindane, Benzene,
Mechanical Filtration Unit Carbofuran, p-Dichlorobenzene, Mercury
Particulate Reduction Class 1 & Toxaphene Reduction
Mechanical Filtration Unit
Cyst, Turbidity and Asbestos Reduction
General Use Conditions
Read this Performance Data Sheet and compare the
capabilities of this unit with your actual water treatment
needs.
DO NOT use this product where water is microbiologic-
ally unsafe or of unknown quality without adequate
disinfection before or after the system. System certified
for cyst reduction may be used on disinfected water
that may contain filterable cysts.
USE ONLY WITH COLD WATER SUPPLY. CHECK FOR
COMPLIANCE WITH THE STATE AND LOCAL LAWS
AND REGULATIONS.
The PuriClean:_II retractable water filtration system uses a
UKF8001AXX replacement cartridge. Timely replacement of
filter cartridge is essential for performance satisfaction from
this filtration system. Please refer to the applicable section of
your Use & Care Guide for general operation, maintenance
requirements and troubleshooting. Suggested retail price of
replacement water filter is $39.99.
This system has been tested according to ANSI/NSF 42 and
53 for reduction of the substance listed above. The
concentration of the indicated substances in water entering
the system was reduced to a concentration less than or equal
to the permissible limit for water leaving the system, as
specified in ANSI/NSF 42 and 53.
14
WaterFilter
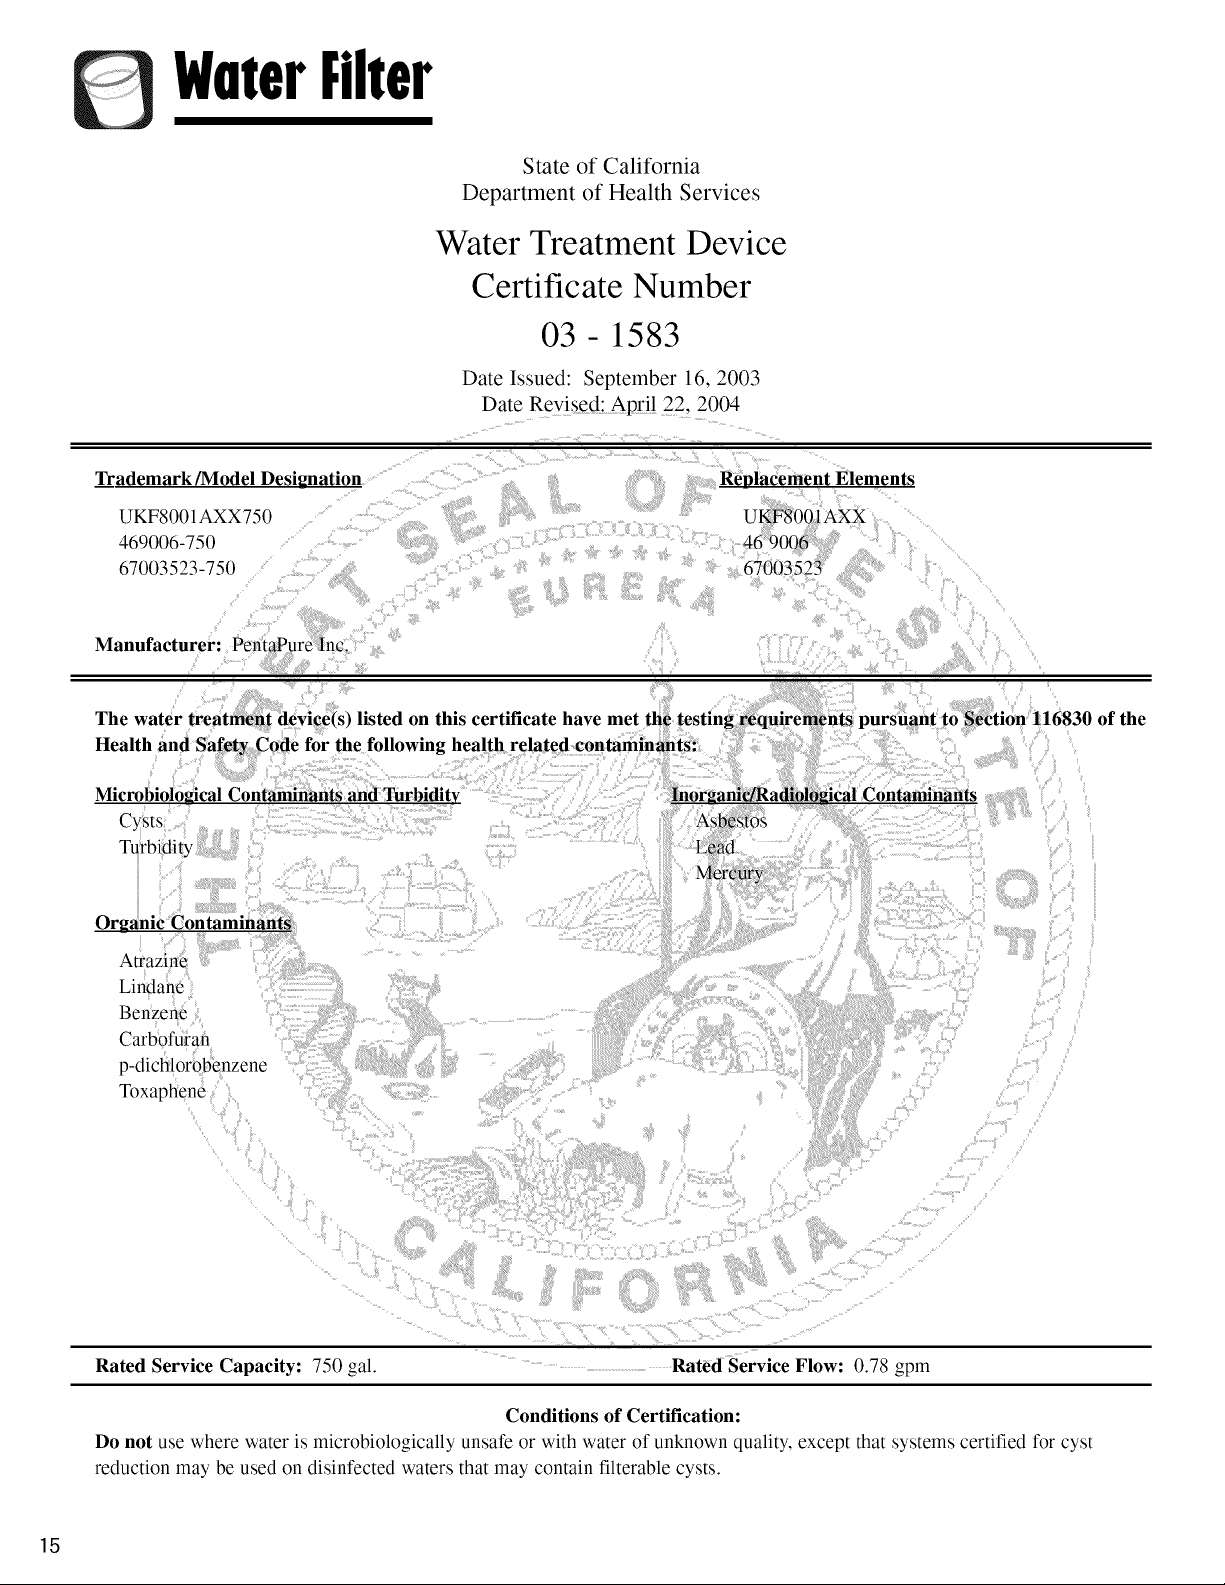
State of California
Department of Health Services
Water Treatment Device
Certificate Number
03 - 1583
UKF8001AXX750
469006-750 .................
67003523-750
Manufacturer: Pen_aPur_lnc:_:
Date Issued: September 16, 2003
Date Revised: April 22, 2004
Replacement Elements
Health
listed on this certificate have met
Cysts:
ents pursuant to Section 116830 of the
_icaI Contaminants
Atlazin_
Lindane
Benzen:6
Carbofu_a_
p-dichlor0benzene
_S
Toxaphen6 ....
Rated Service Capacity: 750 gal. Rated Service Flow: 0.78 gpm
Conditions of Certification:
Do not use where water is microbiologically unsafe or with water of unknown quality, except that systems certified for cyst
reduction may be used on disinfected waters that may contain filterable cysts.
15
FoodStorogeTips
Fresh Food Storage
• The fresh food compartment of a refrigerator should
be kept between 340-40 ° F (1°-4 ° C) with an
optimum temperature of 37° F (3° C). To check the
temperature, place an appliance thermometer in a
glass of water and place in the center of the
refrigerator. Check after 24 hours. If the temperature
is above 40° F (4° C) adjust the controls as explained
on page 7.
• Avoid overcrowding the refrigerator shelves. This
reduces the circulation of air around the food and
results in uneven cooling.
Fruits and Vegetables
Storage in the crisper drawers traps humidity to help
preserve the fruit and vegetable quality for longer
time periods.
Sort fruits and vegetables before storage and use
bruised or soft items first. Discard those showing
signs of decay.
• Always wrap odorous foods such as onions and
cabbage so the odor does not transfer to other foods.
While vegetables need a certain amount of humidity
to remain fresh, too much humidity can shorten
storage times (especially leafy vegetables). Drain
vegetables well before storing.
• Wait to wash fresh produce until right before use.
Meat and Cheese
Raw meat and poultry should be wrapped securely
so leakage and contamination of other foods or
surfaces does not occur.
Occasionally mold will develop on the surface of
hard cheeses (Swiss, Cheddar, Parmesan). Cut off at
least an inch around and below the moldy area. Keep
your knife or instrument out of the mold itself. Do
not try to save individual cheese slices, soft cheese,
cottage cheese, cream, sour cream or yogurt when
mold appears.
Dairy Food
Most dairy foods such as milk, yogurt, sour cream
and cottage cheese have freshness dates on their
cartons for appropriate length of storage. Store these
foods in the original carton and refrigerate
immediately after purchasing and after each use.
Frozen Food Storage
• The freezer compartment of a refrigerator should be
kept at approximately 0° F (-17 ° C). To check the
temperature, place an appliance thermometer
between the frozen packages and check after 24
hours. If the temperature is above 0° F (-17 ° C),
adjust the control as described on page 7.
• A freezer operates more efficiently when it is at least
two-thirds full.
Packaging Foods for Freezing
To minimize dehydration and quality deterioration use
aluminum foil, freezer wrap, freezer bags or airtight
containers. Force as much air out of the packages as
possible and be sure they are tightly sealed. Trapped
air can cause the food to dry out, change color and
develop an off-flavor (freezer burn).
Overwrap fresh meats and poultry with suitable
freezer wrap before freezing.
• Do not refreeze meat that has completely thawed.
Loading the Freezer
Avoid adding too much warm food to the freezer at
one time. This overloads the freezer, slows the rate of
freezing and can raise the temperature of frozen
foods.
• Leave space between the packages so cold air can
circulate freely, allowing food to freeze as quickly as
possible.
Avoid storing hard-to-freeze foods such as ice cream
and orange juice on the freezer door shelves. These
foods are best stored in the freezer interior where the
temperature varies less with door openings.
Refer to the Food Storage Chart for approximate
storage times, pages 17-18.
16
FoodStorogeTips
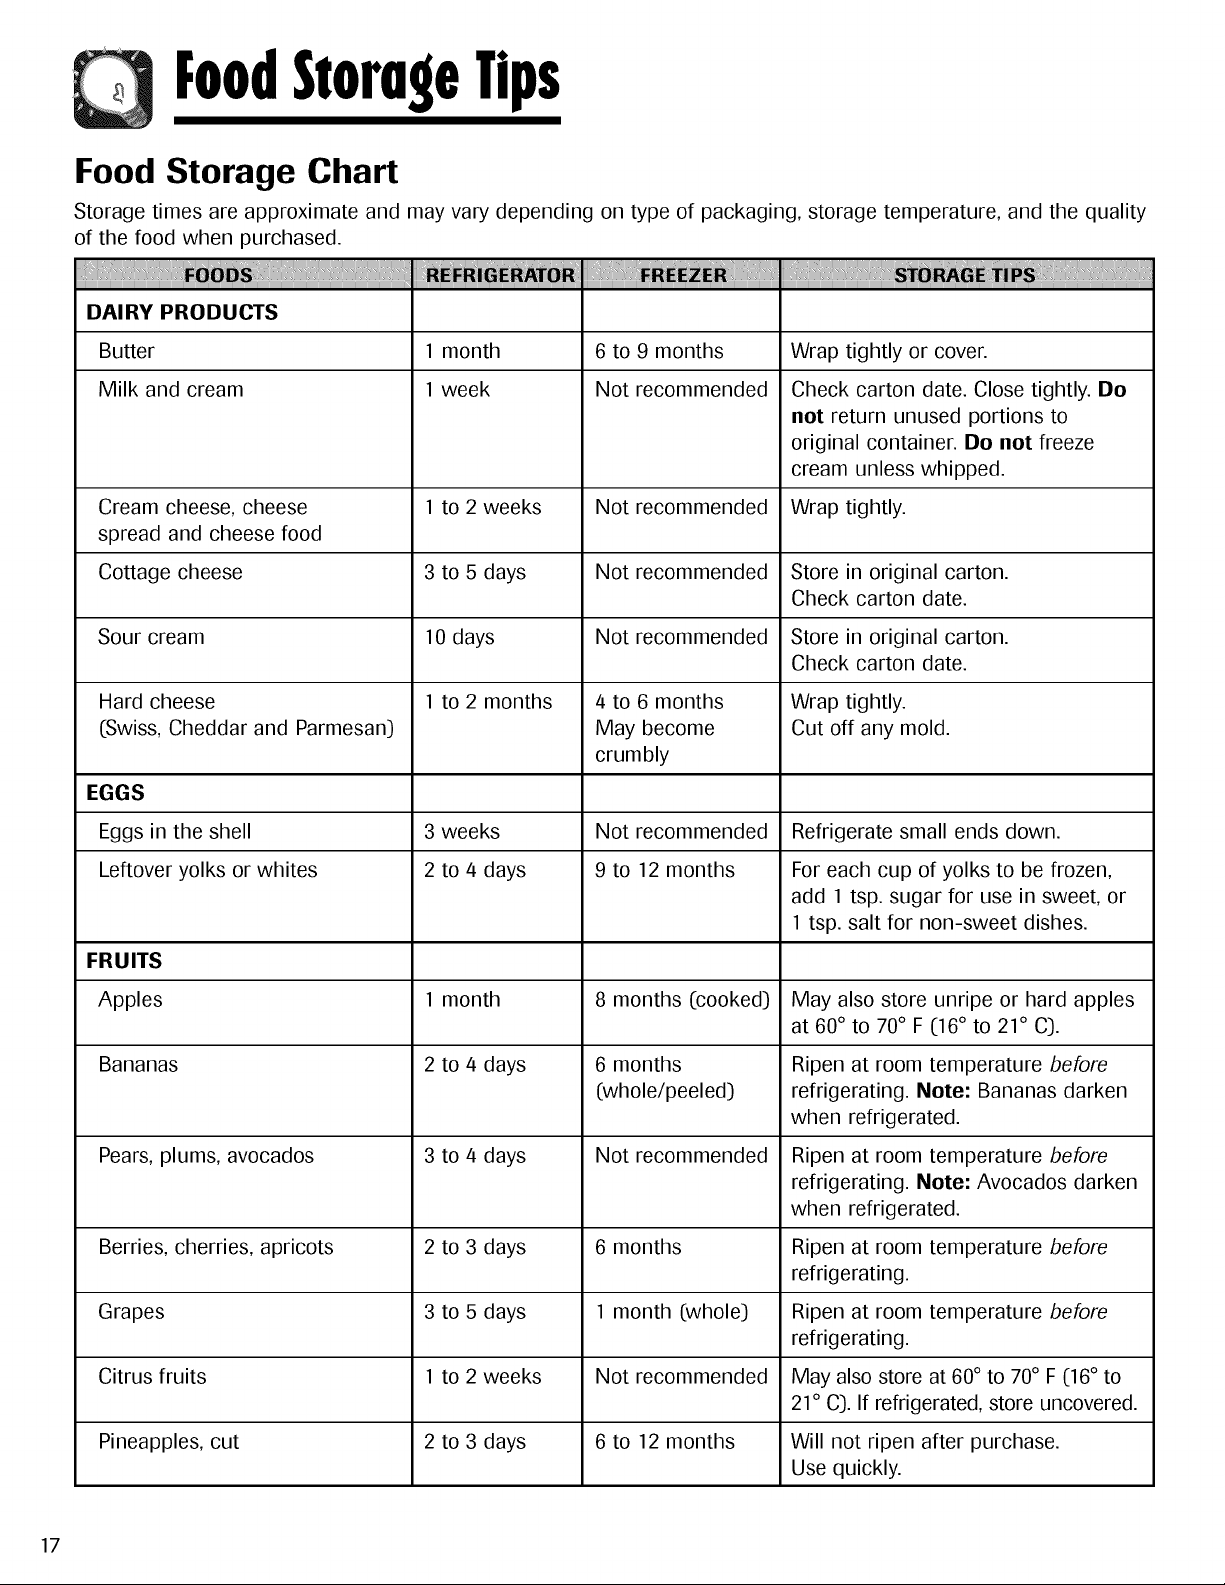
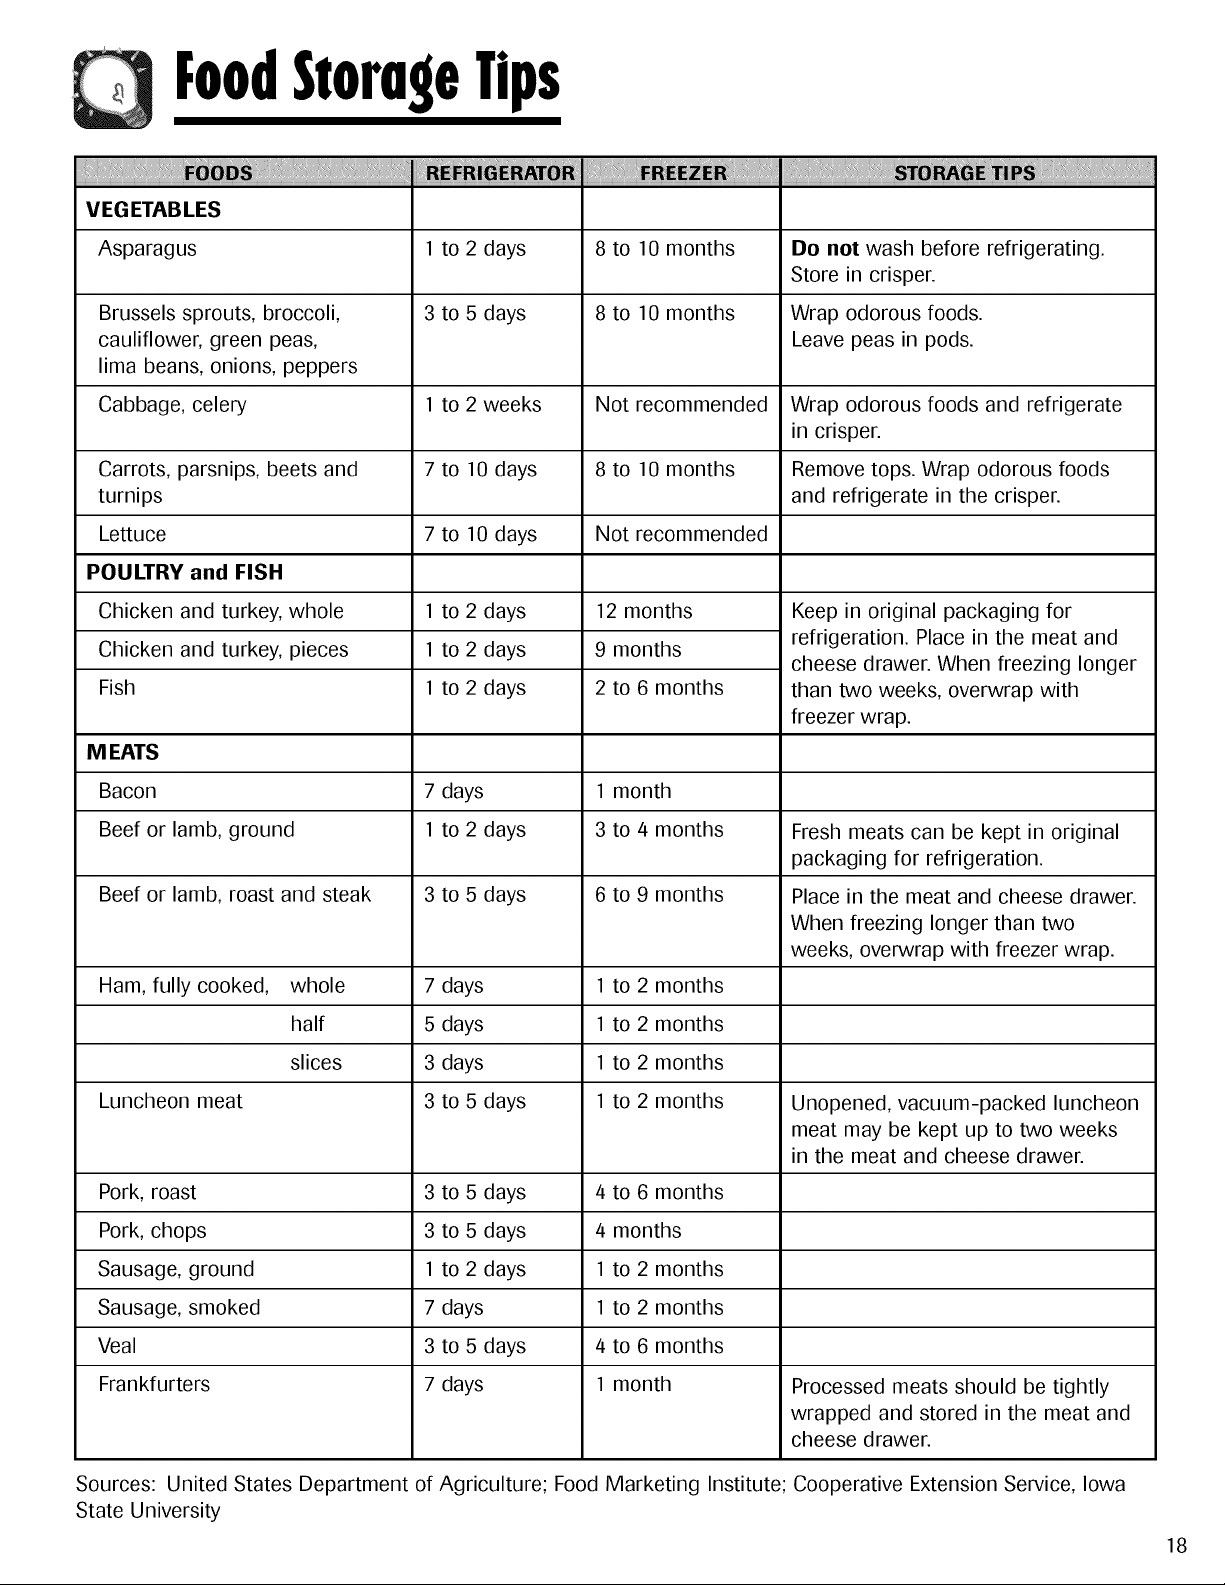
Food Storage Chart
Storage times are approximate and may vary depending on type of packaging, storage temperature, and the quality
of the food when purchased.
DAI RY PRODUCTS
Butter 1 month 6 to 9 months
Milk and cream 1 week Not recommended
Cream cheese, cheese 1 to 2 weeks Not recommended
spread and cheese food
Cottage cheese 3 to 5 days Not recommended
Sour cream 10 days Not recommended
Hard cheese 1 to 2 months 4 to 6 months
(Swiss, Cheddar and Parmesan) May become
crumbly
EGGS
Eggs in the shell 3 weeks Not recommended
Leftover yolks or whites 2 to/4 days 9 to 12 months
FRUITS
Apples 1 month 8 months (cooked)
Bananas 2 to/4 days 6 months
(whole/peeled)
Pears, plums, avocados 3 to/4 days Not recommended
Berries, cherries, apricots 2 to 3 days 6 months
Grapes 3 to 5 days 1 month (whole)
Citrus fruits 1 to 2 weeks Not recommended
Pineapples, cut 2 to 3 days 6 to 12 months
Wrap tightly or cover.
Check carton date. Close tightly. De
not return unused portions to
original container. Do not freeze
cream unless whipped.
Wrap tightly.
Store in original carton.
Check carton date.
Store in original carton.
Check carton date.
Wrap tightly.
Cut off any mold.
Refrigerate small ends down.
For each cup of yolks to be frozen,
add 1 tsp. sugar for use in sweet, or
1 tsp. salt for non-sweet dishes.
May also store unripe or hard apples
at 60° to 70° F (16° to 21 ° C).
Ripen at room temperature before
refrigerating. Note: Bananas darken
when refrigerated.
Ripen at room temperature before
refrigerating. Nete: Avocados darken
when refrigerated.
Ripen at room temperature before
refrigerating.
Ripen at room temperature before
refrigerating.
May also store at 60° to 70° F (16° to
21° C). If refrigerated, store uncovered.
Will not ripen after purchase.
Use quickly.
17
FoodStorogeTips
!!!!!!!!!!!!!!'J!! . ! !!!!!!!:
VEGETABLES
Asparagus I to 2 days 8 to 10 months Do not wash before refrigerating.
Store in crisper.
Brussels sprouts, broccoli, 3 to 5 days 8 to 10 months Wrap odorous foods.
cauliflower, green peas, Leave peas in pods.
lima beans, onions, peppers
Cabbage, celery I to 2 weeks Not recommended Wrap odorous foods and refrigerate
in crisper.
7 to 10 days 8 to 10 months Remove tops. Wrap odorous foods
and refrigerate in the crisper.
7 to 10 days Not recommended
Carrots, parsnips, beets and
turnips
Lettuce
POULTRY and FISH
Chicken and turkey, whole
Chicken and turkey, pieces
Fish
1 to 2 days
1 to 2 days
1 to 2 days
12 months
9 months
2 to 6 months
Keep in original packaging for
refrigeration. Place in the meat and
cheese drawer. When freezing longer
than two weeks, overwrap with
freezer wrap.
M EATS
Bacon 7 days 1 month
Beef or lamb, ground 1 to 2 days 3 to 4 months Fresh meats can be kept in original
packaging for refrigeration.
Beef or lamb, roast and steak 3 to 5 days 6 to 9 months Place in the meat and cheese drawer.
When freezing longer than two
weeks, overwrap with freezer wrap.
Ham, fully cooked, whole 7 days 1 to 2 months
half 5 days 1 to 2 months
slices 3 days 1 to 2 months
Luncheon meat 3 to 5 days 1 to 2 months Unopened, vacuum-packed luncheon
meat may be kept up to two weeks
in the meat and cheese drawer.
Pork, roast 3 to 5 days 4 to 6 months
Pork, chops 3 to 5 days 4 months
Sausage, ground 1 to 2 days 1 to 2 months
Sausage, smoked 7 days 1 to 2 months
Veal 3 to 5 days 4 to 6 months
Frankfurters 7 days 1 month Processed meats should be tightly
wrapped and stored in the meat and
cheese drawer.
Sources: United States Department of Agriculture; Food Marketing Institute; Cooperative Extension Service, Iowa
State University
18
CareandCleaning
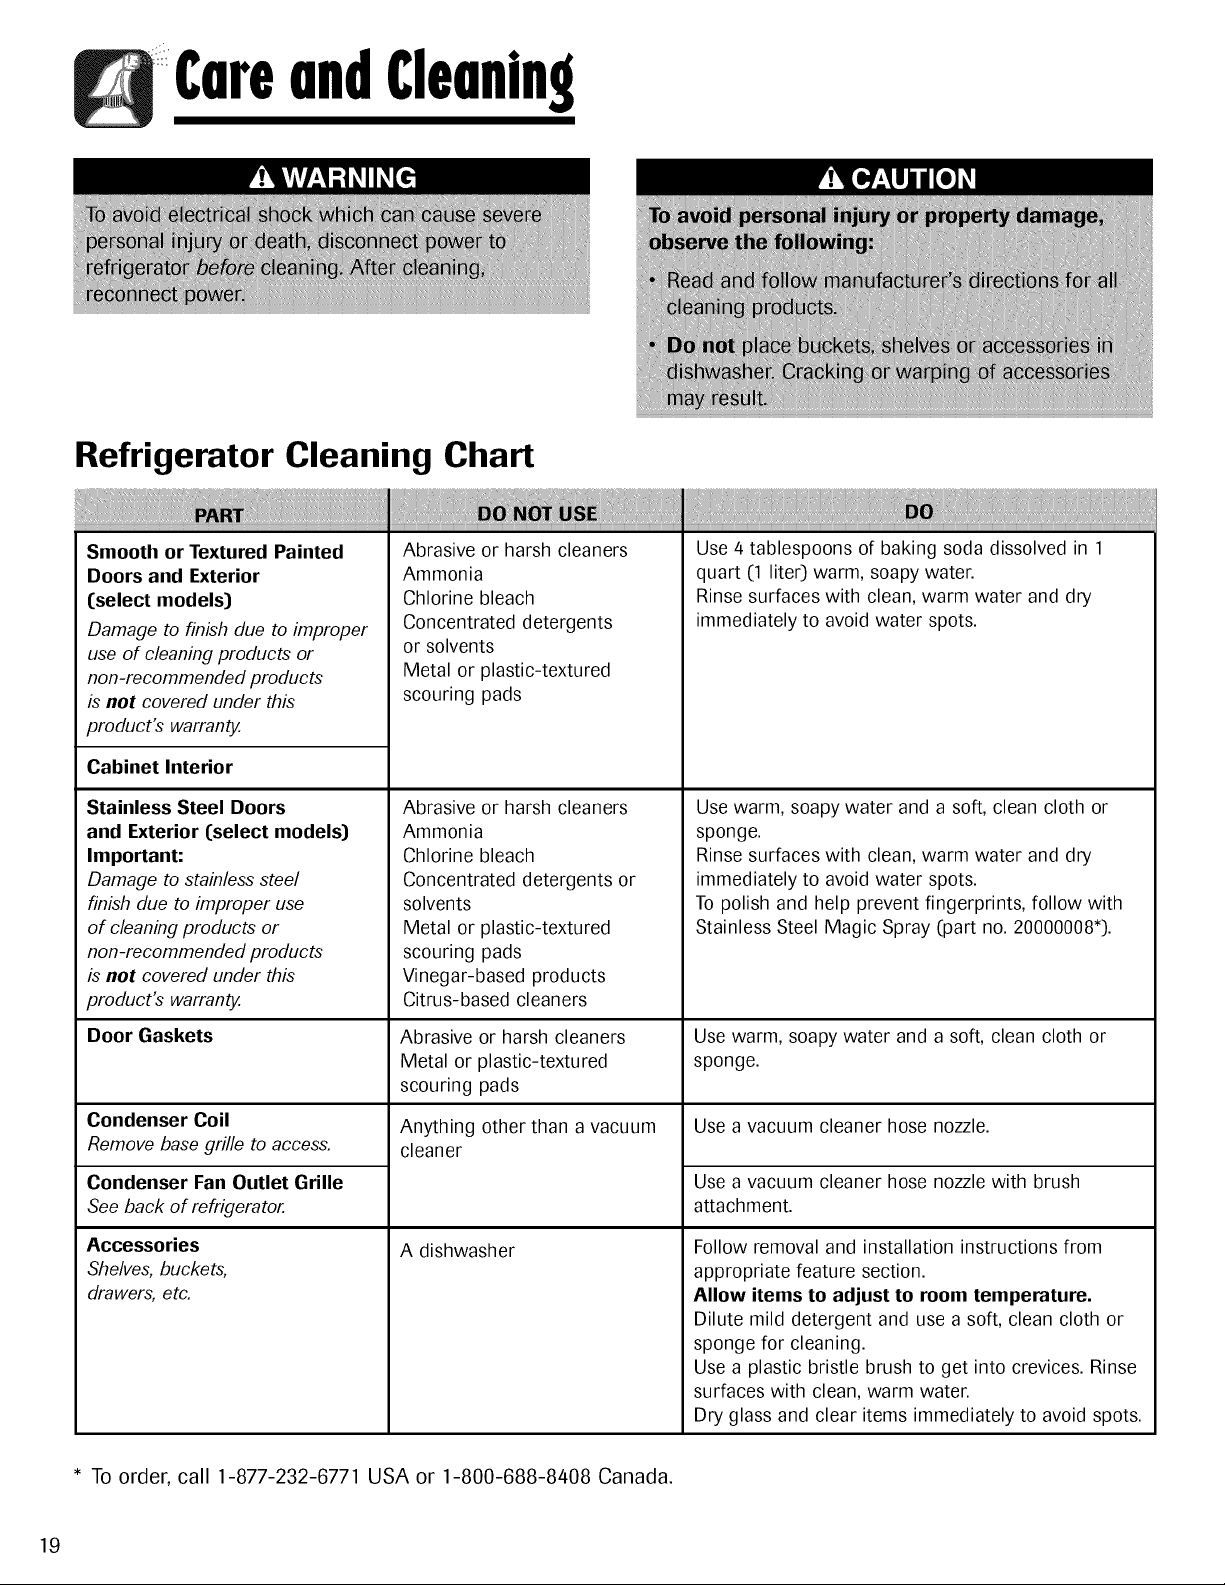
Refrigerator Cleaning Chart
Smooth or Textured Painted
Doors and Exterior
(select models)
Damage to finish due to improper
use of cleaning products or
non-recommended products
is not covered under this
product's warranty.
Cabinet Interior
Stainless Steel Doors
and Exterior (select models)
Important:
Damage to stainless steel
finish due to improper use
of cleaning products or
non-recommended products
is not covered under this
product's warranty.
Door Gaskets
Condenser Coil
Remove base grille to access.
Condenser Fan Outlet Grille
See back of refrigerator.
Accessories
Shelves, buckets,
drawers, etc.
Abrasive or harsh cleaners
Ammonia
Chlorine bleach
Concentrated detergents
or solvents
Metal or plastic-textured
scouring pads
Abrasive or harsh cleaners
Ammonia
Chlorine bleach
Concentrated detergents or
solvents
Metal or plastic-textured
scouring pads
Vinegar-based products
Citrus-based cleaners
Abrasive or harsh cleaners
Metal or plastic-textured
scouring pads
Anything other than a vacuum
cleaner
A dishwasher
Use 4 tablespoons of baking soda dissolved in 1
quart (1 liter) warm, soapy water.
Rinse surfaces with clean, warm water and dry
immediately to avoid water spots.
Use warm, soapy water and a soft, clean cloth or
sponge.
Rinse surfaces with clean, warm water and dry
immediately to avoid water spots.
To polish and help prevent fingerprints, follow with
Stainless Steel Magic Spray (part no. 20000008*).
Use warm, soapy water and a soft, clean cloth or
sponge.
Use a vacuum cleaner hose nozzle.
Use a vacuum cleaner hose nozzle with brush
attachment.
Follow removal and installation instructions from
appropriate feature section.
Allow items to adjust to room temperature.
Dilute mild detergent and use a soft, clean cloth or
sponge for cleaning.
Use a plastic bristle brush to get into crevices. Rinse
surfaces with clean, warm water.
Dry glass and clear items immediately to avoid spots.
* To order, call 1-877-232-6771 USA or 1-800-688-8408 Canada.
19
CareandCleaning
Removing Odors From
Refrigerator
1. Remove all food and turn the refrigerator OFF.
2. Disconnect power to the refrigerator.
3. Clean the walls, floor, ceiling of cabinet interior,
drawers, shelves and gaskets according to the
instructions on page 19.
4. Dilute mild detergent and brush solution into
crevices using a plastic bristle brush. Let stand for
five minutes. Rinse surfaces with warm water. Dry
surfaces with a soft, clean cloth.
5. Wash and dry all bottles, containers and jars.
Discard spoiled or expired items.
6. Wrap or store odor-causing foods in tightly sealed
containers to prevent reoccurring odors.
7. Reconnect power to refrigerator and return food to
refrigerator.
8. Allow the refrigerator to cool.
9. After 24 hours, check if odor has been eliminated.
If odor is still present:
1. Remove drawers and place on top shelf of
refrigerator.
2. Pack refrigerator and freezer sections - including
doors - with crumpled sheets of black and white
newspaper.
3. Place charcoal briquettes randomly on crumpled
newspaper in both freezer and refrigerator
compartments.
4. Close doors and let stand 24 to 48 hours.
Energy Saving Tips
• Avoid overcrowding refrigerator shelves. This reduces
air circulation around food and causes refrigerator to
run longer.
• Avoid adding too much warm food to refrigerator at
one time. This overloads compartments and slows
rate of cooling.
• Do not use aluminum foil, wax paper, or paper
toweling as shelf liners. This decreases air flow and
causes refrigerator to run less efficiently.
• A freezer that is two-thirds full runs most efficiently.
Locate refrigerator in coolest part of room. Avoid
areas of direct sunlight, or near heating ducts,
registers or other heat producing appliances. If this is
not possible, isolate exterior by using a section of
cabinet or an added layer of insulation.
Clean door gaskets every three months according to
cleaning instructions. This will assure that door seals
properly and refrigerator runs efficiently.
• Take time to organize items in refrigerator to reduce
time that door is open.
• Be sure your doors are closing securely by leveling
refrigerator as instructed in your installation
instructions.
• Clean condenser coils as indicated in the cleaning
instructions every three months. This will increase
energy efficiency and cooling performance.
20
CareandCleaning
Replacing Light Bulbs
Upper Fresh Food Section
The upper fresh food light bulbs are located behind the
front panel. Reach behind the panel to remove the
bulbs.
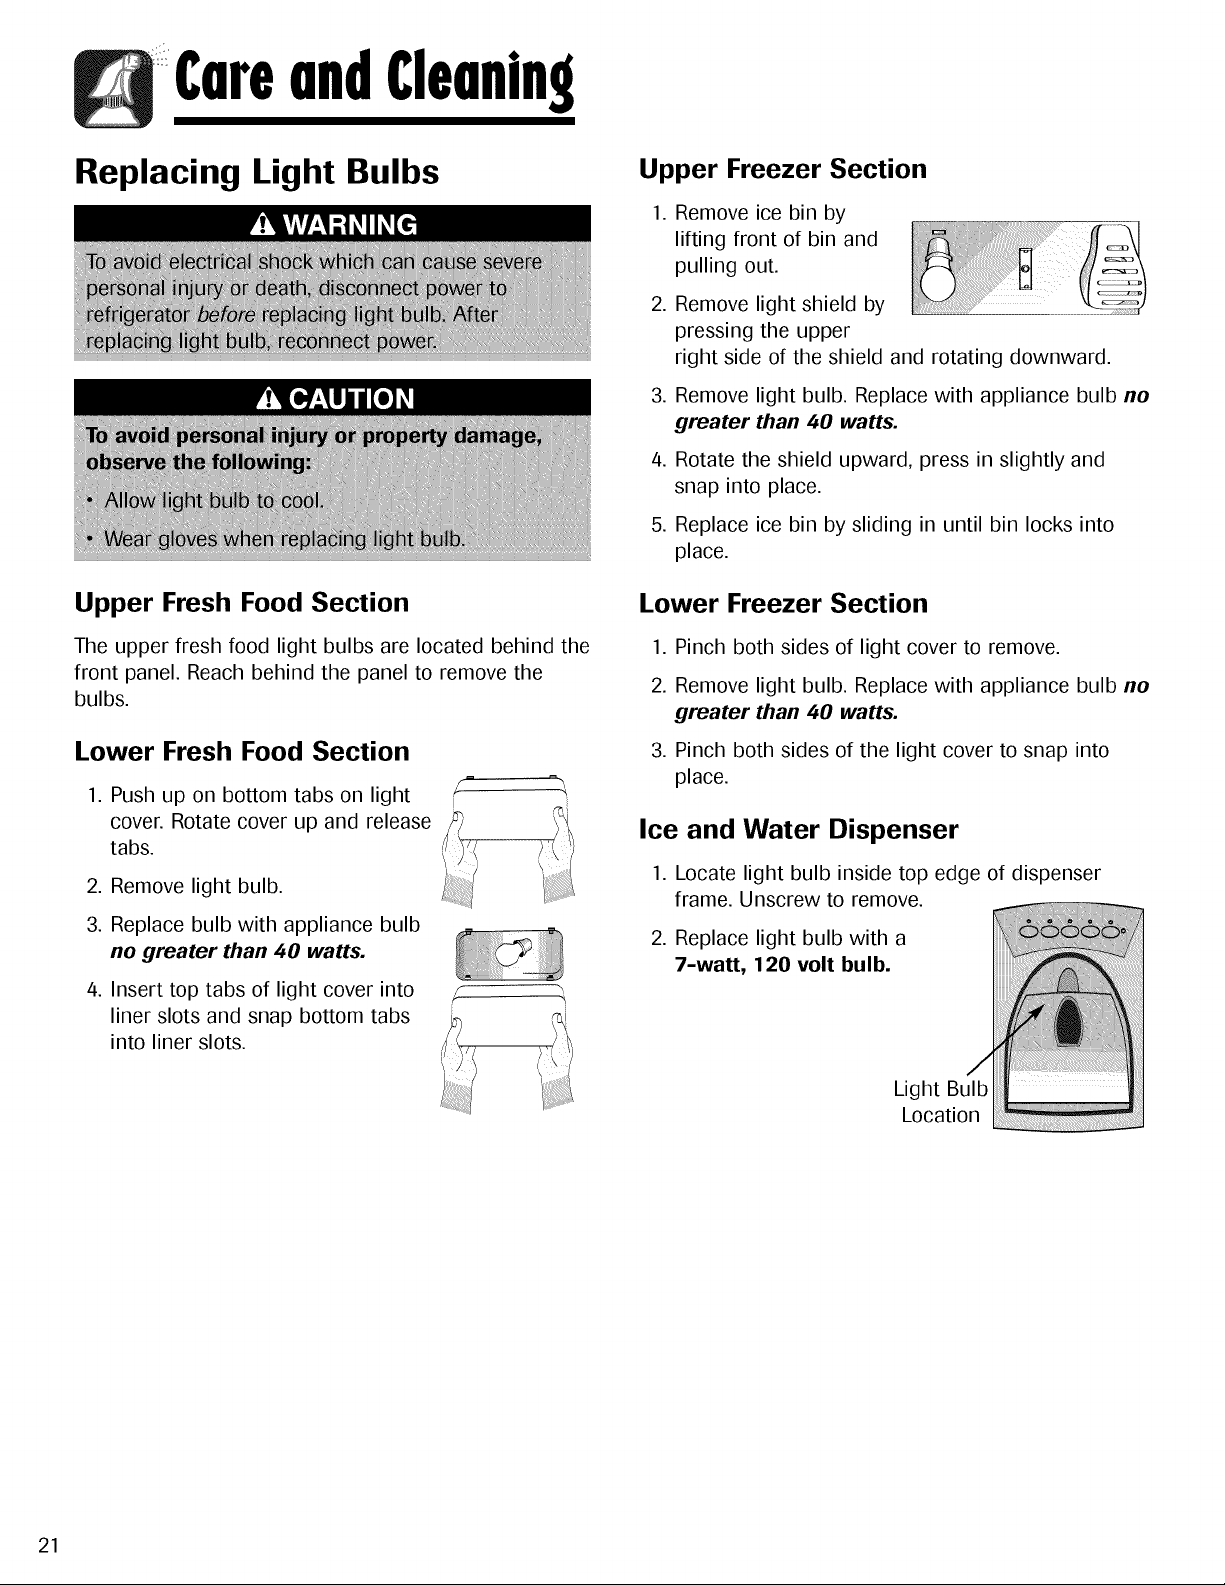
Lower Fresh Food Section
1. Push up on bottom tabs on light
cover. Rotate cover up and release
tabs.
2. Remove light bulb.
3. Replace bulb with appliance bulb
no greater than 40 watts.
4. Insert top tabs of light cover into
liner slots and snap bottom tabs
into liner slots.
!
Upper Freezer Section
1. Remove ice bin by
lifting front of bin and
pulling out.
2. Remove light shield by
pressing the upper
right side of the shield and rotating downward.
.
.
Remove light bulb. Replace with appliance bulb no
greater than 40 watts.
Rotate the shield upward, press in slightly and
snap into place.
5. Replace ice bin by sliding tn until bin locks into
place.
Lower Freezer Section
1. Pinch both sides of light cover to remove.
2. Remove light bulb. Replace with appliance bulb no
greater than 40 watts.
3. Pinch both sides of the light cover to snap into
place.
Ice and Water Dispenser
1. Locate light bulb inside top edge of dispenser
frame. Unscrew to remove.
2. Replace light bulb with a
7-watt, 120 volt bulb.
Light Bulb
Location
21
CareandCleaning
Preparing for Vacation
For short vacations or absences (three months
or less):
1. Remove all perishables.
2. If no one will be checking in on the refrigerator
during your absence, remove all frozen items also.
3. If your refrigerator has an automatic ice maker:
• Shut off the water supply to the ice maker at
least one day ahead of time.
• After the last load of ice drops, raise the wire
shut off arm to the OFF position.
• Empty the ice bin.
/4. If the room temperature will drop below 55° F
(12° C), follow the instructions for longer absences.
For long vacations, absences (more than three
months) OR if the room temperature will drop below
55 ° F (12 ° C):
1. Remove food.
2. If your refrigerator has an automatic ice maker:
• Shut off the water supply to the ice maker at
least one day ahead of time.
• After the last load of ice drops, raise the wire
shut off arm to the OFF position.
• Empty the ice bin.
3. If your refrigerator has a dispenser system with
water filter, remove the water filter cartridge and
install the filter bypass. Dispose of the used
cartridge.
4. Turn the freezer control to OFF.
5. Unplug the refrigerator.
6. Thoroughly clean the interior of both compartments
with a baking soda solution and a clean, soft cloth
(four tablespoons of baking soda in one quart of
warm water.).
7. Dry thoroughly.
8. Leave the doors open to prevent the formation of
mold and mildew.
Upon Your Return:
After a Short Vacation or Absence:
For models with automatic ice makers or dispensers:
• Reconnect the water supply and turn on supply valve
(see pages 5-6).
• Monitor water connection for 24 hours and correct
leaks if necessary.
• Run 10-15 glasses of water from the dispenser to
flush out the system.
• Restart the ice maker.
• Discard at least the first three ice harvests.
After a Long Vacation or Absence:
• If your refrigerator has an automatic ice maker,
reconnect the water supply and turn on supply valve
(see pages 5-6).
• Plug the refrigerator back in and reset controls (see
page 7).
• Monitor water connection for 24 hours and correct
leaks, if necessary.
For dispenser models, run water through the dispenser
for at least three minutes with the filter bypass in
place, then install water filter (page 13).
After installing the water filter, run water through the
dispenser continuously for at least two minutes, or
until water runs steady. Initially you may notice a
one to two minute delay in water dispersal as the
internal tanks fills.
• Restart the ice maker.
• Discard ice produced within the first 12 hours (at
least the first three harvests).
Preparing to Move
• Follow the above instructions for long
vacations/absences, through step 7.
• Secure all loose items such as shelves and drawers
by taping them securely in place to prevent damage.
• Tape the doors shut.
• Use an appliance dolly when moving the refrigerator.
ALWAYS truck the refrigerator from its side or back-
NEVER from its front.
• Be sure the refrigerator stays in an upright position
during moving.
22
OperotingSounds
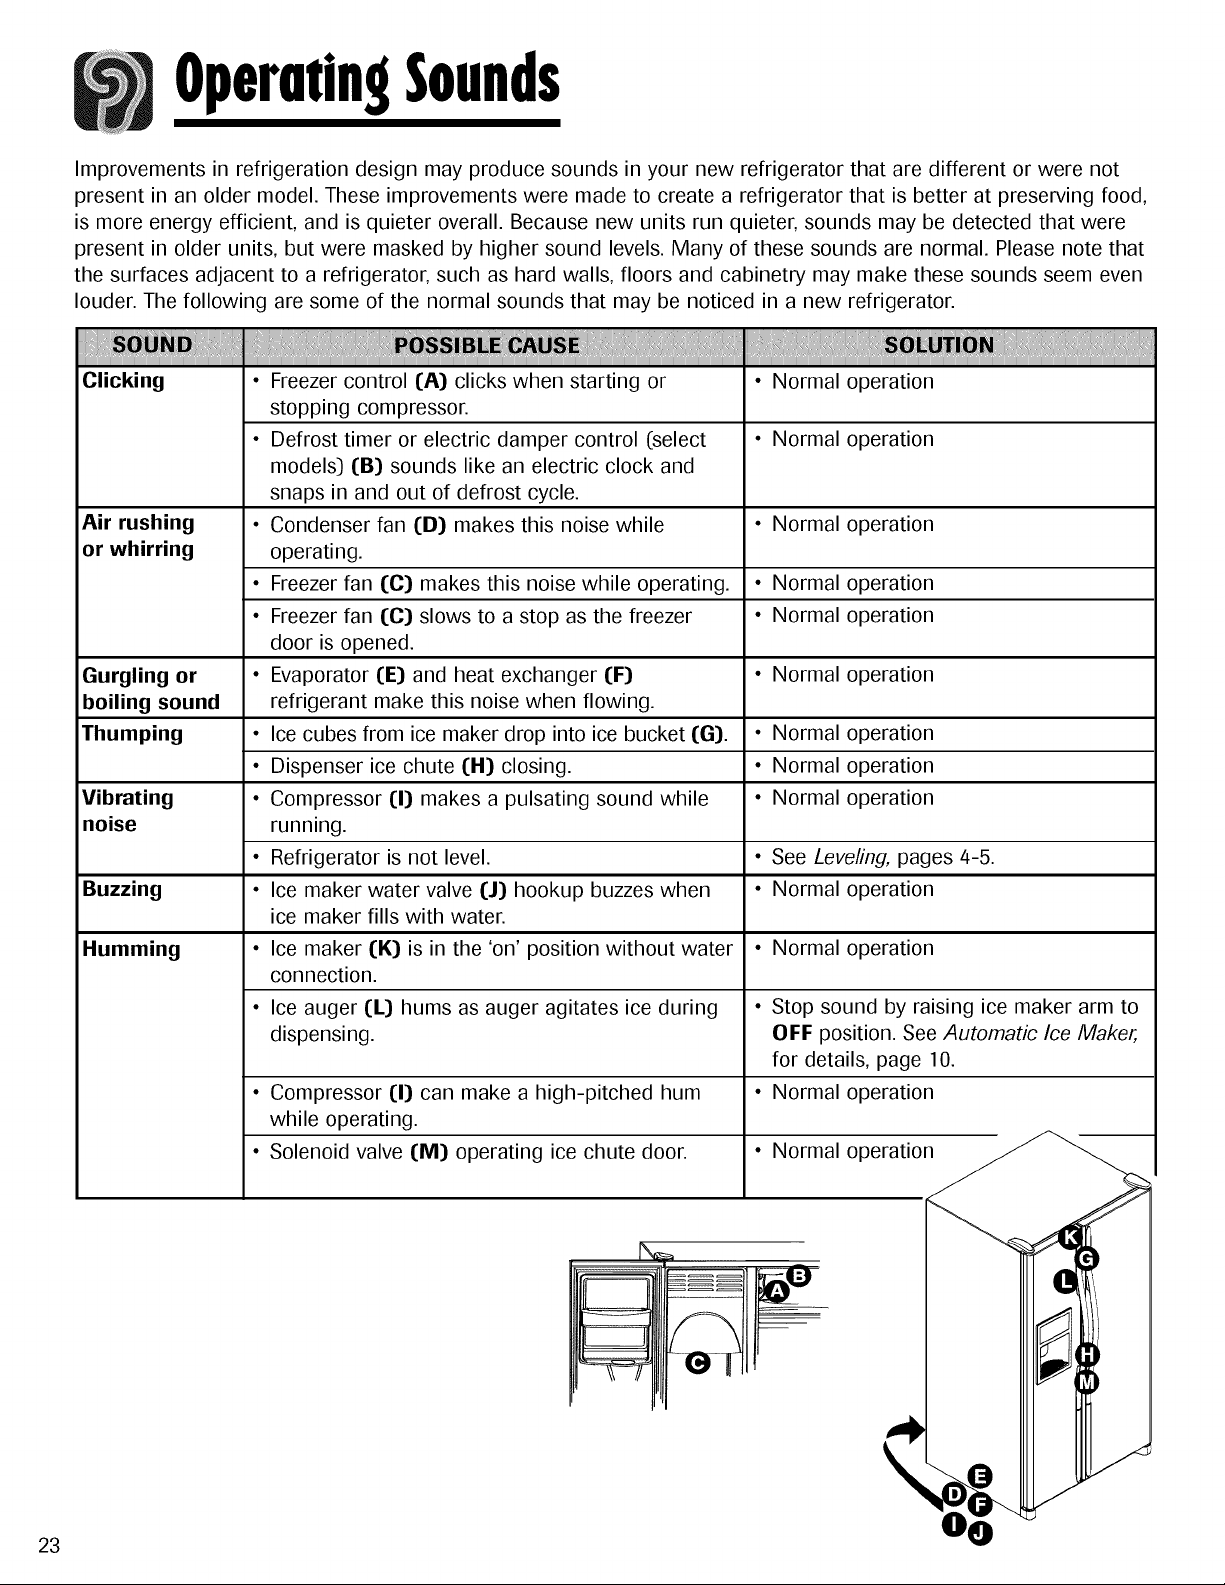
Improvements in refrigeration design may produce sounds in your new refrigerator that are different or were not
present in an older model. These improvements were made to create a refrigerator that is better at preserving food,
is more energy efficient, and is quieter overall. Because new units run quieter, sounds may be detected that were
present in older units, but were masked by higher sound levels. Many of these sounds are normal. Please note that
the surfaces adjacent to a refrigerator, such as hard walls, floors and cabinetry may make these sounds seem even
louder. The following are some of the normal sounds that may be noticed in a new refrigerator.
ii` !!
Clicking • Freezer control (A) clicks when starting or
stopping compressor.
• Defrost timer or electric damper control (select
models) (B) sounds like an electric clock and
snaps in and out of defrost cycle.
Air rushing • Condenser fan (D) makes this noise while
or whirring operating.
• Freezer fan (C) makes this noise while operating.
• Freezer fan (C) slows to a stop as the freezer
door is opened.
Gurgling or • Evaporator (E) and heat exchanger (F)
boiling sound refrigerant make this noise when flowing.
Thumping • Ice cubes from ice maker drop into ice bucket (G).
• Dispenser ice chute (H) closing.
Vibrating • Compressor [I) makes a pulsating sound while
noise running.
• Refrigerator is not level.
Buzzing • Ice maker water valve (J) hookup buzzes when
ice maker fills with water.
Humming • Ice maker (K) is in the 'on' position without water
connection.
• Ice auger (L) hums as auger agitates ice during
dispensing.
• Compressor [I) can make a high-pitched hum
while operating.
• Solenoid valve (M) operating ice chute door.
• Normal operation
• Normal operation
• Normal operation
• Normal operation
• Normal operation
• Normal operation
• Normal operation
• Normal operation
• Normal operation
• See Leveling, pages 4-5.
• Normal operation
• Normal operation
• Stop sound by raising ice maker arm to
OFF position. See Automatic Ice Maker,
for details, page 10.
• Normal operation
• Normal operatio_
23
Troubleshooting
!!! ! ! ii !i !i!iiiiiiiii! ii iiii!i!!i!iLiil!liii iii
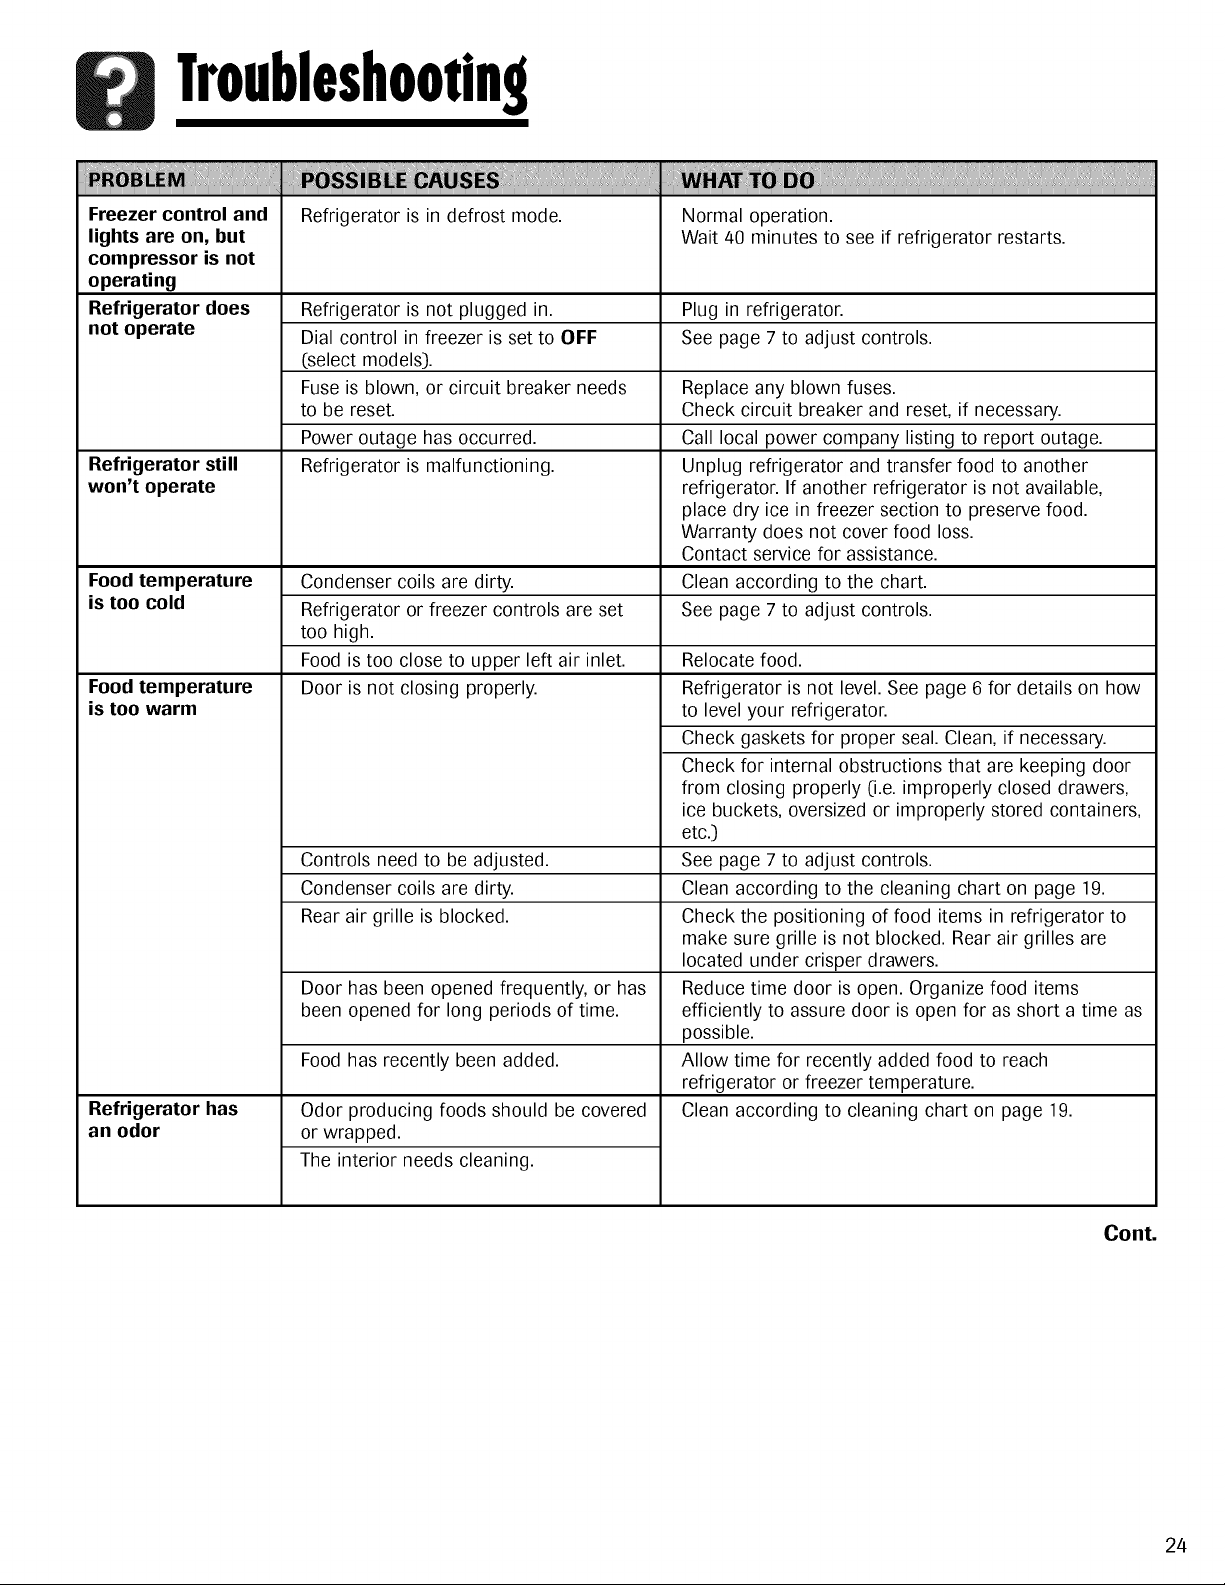
Freezer control and Refrigerator is in defrost mode. Normal operation.
lights are on, but Wait 40 minutes to see if refrigerator restarts.
compressor is not
operating
Refrigerator does Refrigerator is not plugged in. Plug in refrigerator.
not operate Dial control in freezer is set to OFF See page 7 to adjust controls.
(select models).
Fuse is blown, or circuit breaker needs
to be reset.
Power outage has occurred.
Refrigerator is malfunctioning.Refrigerator still
won't operate
Food temperature Condenser coils are dirty.
is too cold Refrigerator or freezer controls are set
too high.
Food is too close to upper left air inlet.
Door is not closing properly.Food temperature
is too warm
Refrigerator has
an odor
Controls need to be adjusted.
Condenser coils are dirty.
Rear air grille is blocked.
Door has been opened frequently, or has
been opened for long periods of time.
Food has recently been added.
Odor producing foods should be covered
or wrapped.
The interior needs cleaning.
Replace any blown fuses.
Check circuit breaker and reset, if necessary.
Call local power company listing to report outage.
Unplug refrigerator and transfer food to another
refrigerator. If another refrigerator is not available,
place dry ice in freezer section to preserve food.
Warranty does not cover food loss.
Contact service for assistance.
Clean according to the chart.
See page 7 to adjust controls.
Relocate food.
Refrigerator is not level. See page 6 for details on how
to level your refrigerator.
Check gaskets for proper seal. Clean, if necessary.
Check for internal obstructions that are keeping door
from closing properly (i.e. improperly closed drawers,
ice buckets, oversized or improperly stored containers,
etc.)
See page 7 to adjust controls.
Clean according to the cleaning chart on page 19.
Check the positioning of food items in refrigerator to
make sure grille is not blocked. Rear air grilles are
located under crisper drawers.
Reduce time door is open. Organize food items
efficiently to assure door is open for as short a time as
possible.
Allow time for recently added food to reach
refrigerator or freezer temperature.
Clean according to cleaning chart on page 19.
Cont.
24
Troubleshooting
iliiliiiii ii liil,
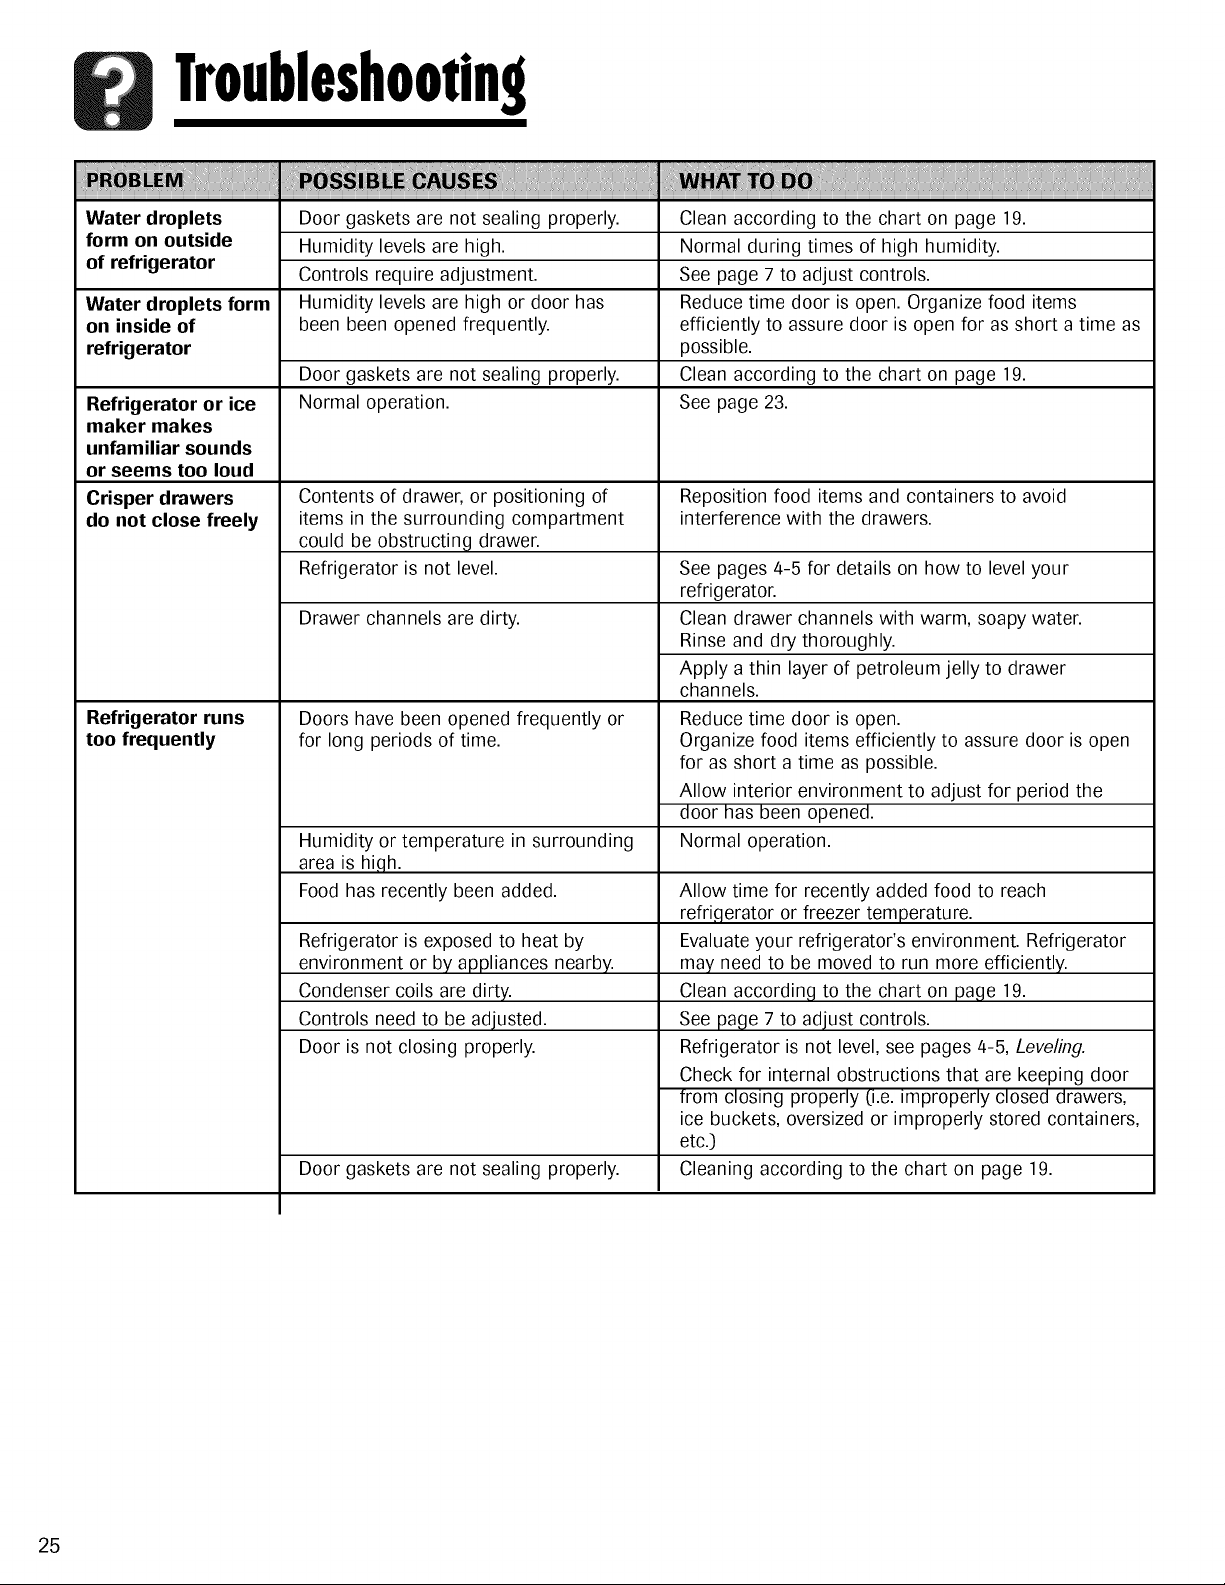
Water droplets Door gaskets are not sealing properly. Clean according to the chart on page 19.
form on outside Humidity levels are high. Normal during times of high humidity.
of refrigerator Controls require adjustment. See page 7 to adjust controls.
Water droplets form Humidity levels are high or door has Reduce time door is open. Organize food items
on inside of been been opened frequently, efficiently to assure door is open for as short a time as
refrigerator possible.
Door gaskets are not sealing properly. Clean according to the chart on page 19.
Refrigerator or ice Normal operation. See page 23.
maker makes
unfamiliar sounds
or seems too loud
Crisper drawers Contents of drawer, or positioning of Reposition food items and containers to avoid
do not close freely items in the surrounding compartment interference with the drawers.
could be obstructing drawer.
Refrigerator is not level.
Drawer channels are dirty.
Refrigerator runs
too frequently
Doors have been opened frequently or
for long periods of time.
Humidity or temperature in surrounding
area is high.
Food has recently been added.
Refrigerator is exposed to heat by
environment or by appliances nearby.
Condenser coils are dirty.
Controls need to be adjusted.
Door is not closing properly.
Door gaskets are not sealing properly.
See pages 4-5 for details on how to level your
refrigerator.
Clean drawer channels with warm, soapy water.
Rinse and dry thoroughly.
Apply a thin layer of petroleum jelly to drawer
channels.
Reduce time door is open.
Organize food items efficiently to assure door is open
for as short a time as possible.
Allow interior environment to adjust for period the
door has been opened.
Normal operation.
Allow time for recently added food to reach
refrigerator or freezer temperature.
Evaluate your refrigerator's environment. Refrigerator
may need to be moved to run more efficiently.
Clean according to the chart on page 19.
See page 7 to adjust controls.
Refrigerator is not level, see pages 4-5, Leveling.
Check for internal obstructions that are keeping door
from closing properly _i.e.improperly closed drawers,
ice buckets, oversized or improperly stored containers,
etc.)
Cleaning according to the chart on page 19.
25
Iroubleshooting
Ice and Water
iii i
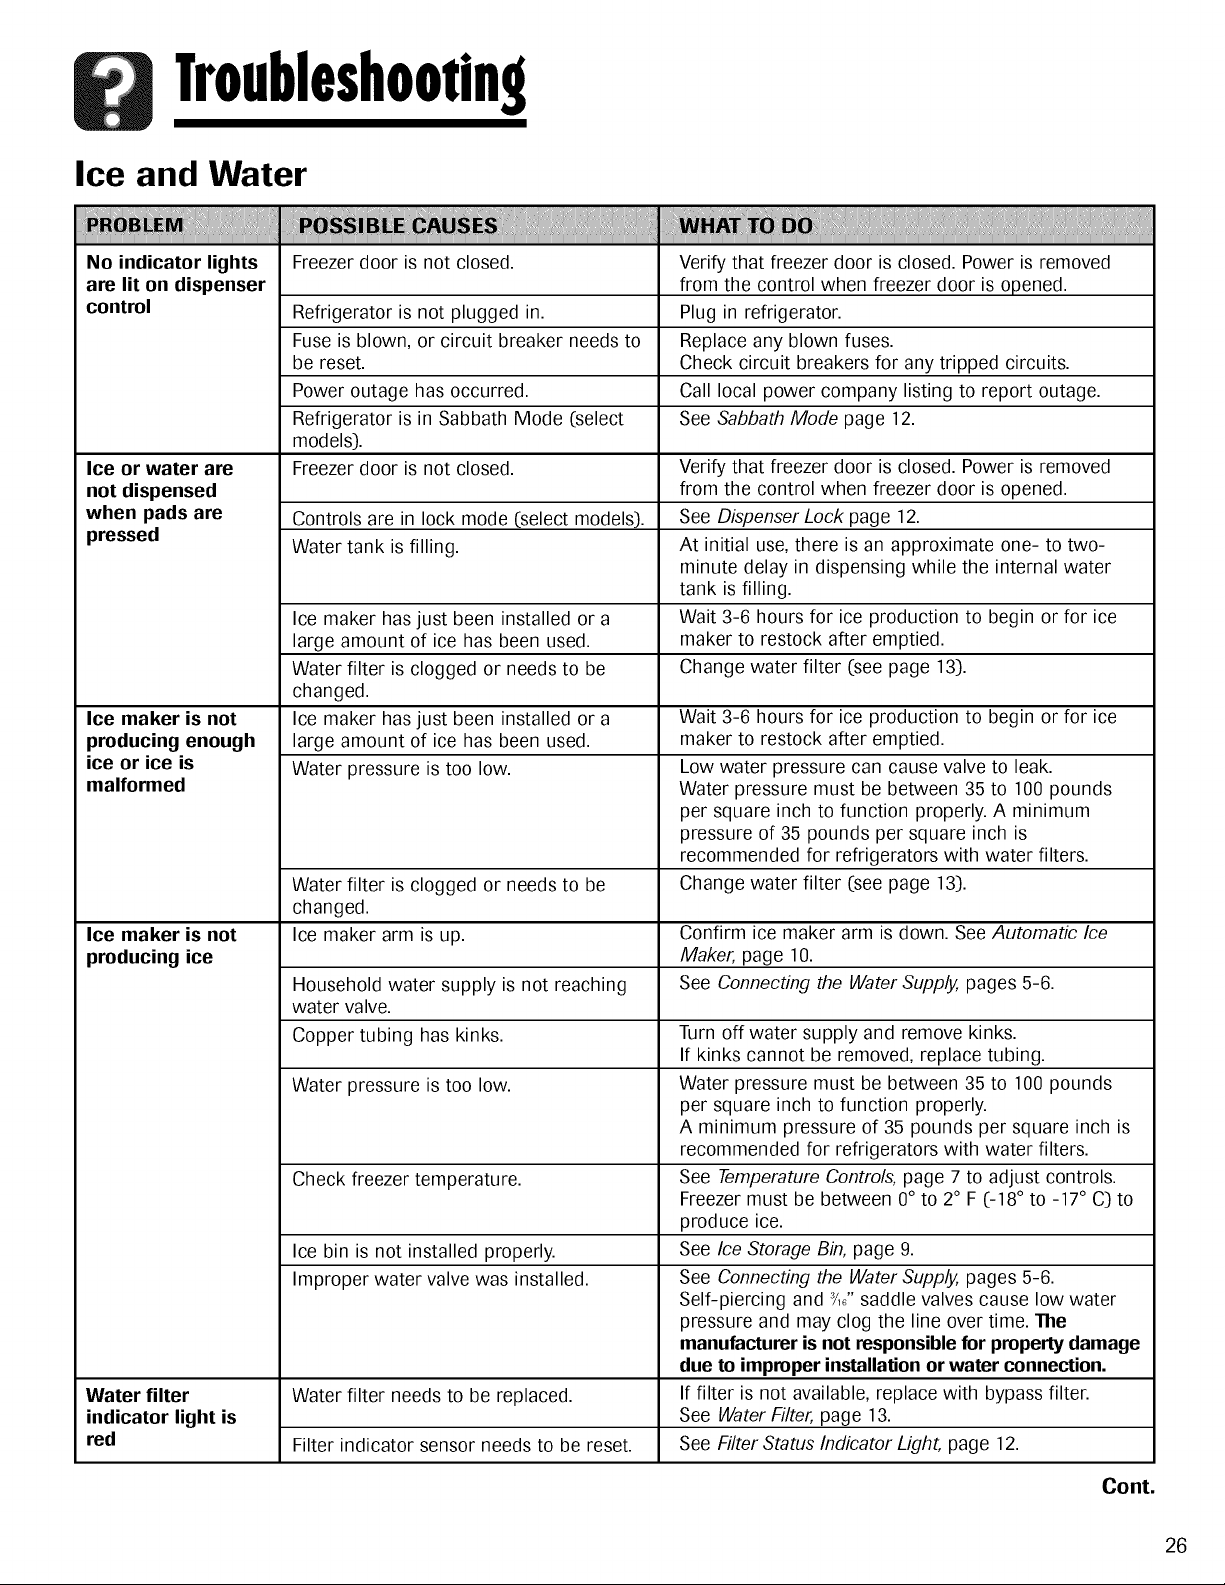
No indicator lights Freezer door is not closed. Verify that freezer door is closed. Power is removed
are lit on dispenser from the control when freezer door is opened.
control Refrigerator is not plugged in. Plug in refrigerator.
Fuse is blown, or circuit breaker needs to Replace any blown fuses.
be reset. Check circuit breakers for any tripped circuits.
Power outage has occurred. Call local power company listing to report outage.
Refrigerator is in Sabbath Mode (select See Sabbath Mode page 12.
models).
Ice or water are Freezer door is not closed. Verify that freezer door is closed. Power is removed
not dispensed from the control when freezer door is opened.
when pads are Controls are in lock mode (select models). See Dispenser Lock page 12.
pressed Water tank is filling. At initial use, there is an approximate one- to two-
minute delay in dispensing while the internal water
tank is filling.
Ice maker has just been installed or a Wait 3-6 hours for ice production to begin or for ice
large amount of ice has been used. maker to restock after emptied.
Water filter is clogged or needs to be Change water filter (see page 13).
changed.
Ice maker has just been installed or a
large amount of ice has been used.
Water pressure is too low.
Ice maker is not
producing enough
ice or ice is
malformed
Water filter is clogged or needs to be
changed.
Ice maker is not Ice maker arm is up. Confirm ice maker arm is down. See Automatic Ice
producing ice Maker, page 10.
Household water supply is not reaching See Connecting the WaterSupp/y,pages 5-6.
water valve.
Copper tubing has kinks.
Water pressure is too low.
Check freezer temperature.
Ice bin is not installed properly.
Improper water valve was installed.
Water filter Water filter needs to be replaced.
indicator light is
red Filter indicator sensor needs to be reset.
Wait 3-6 hours for ice production to begin or for ice
maker to restock after emptied.
Low water pressure can cause valve to leak.
Water pressure must be between 35 to 100 pounds
per square inch to function properly. A minimum
pressure of 35 pounds per square inch is
recommended for refrigerators with water filters.
Change water filter (see page 13).
Turn off water supply and remove kinks.
If kinks cannot be removed, replace tubing.
Water pressure must be between 35 to 100 pounds
per square inch to function properly.
A minimum pressure of 35 pounds per square inch is
recommended for refrigerators with water filters.
See Temperature Controls, page 7 to adjust controls.
Freezer must be between 0° to 2° F (-18 ° to -17° C) to
produce ice.
See Ice Storage Bin, page 9.
See Connecting the Water Supply, pages 5-6.
Self-piercing and 3/,/,saddle valves cause low water
pressure and may clog the line over time. The
manufacturer is not responsible for property damage
due to improper installation or water connection.
If filter is not available, replace with bypass filter.
See Water Filter, page 13.
See Filter Status Indicator Light, page 12.
Cont.
26
Troubleshooting
! iiiiI liilL ! liilLii!!!iiii i
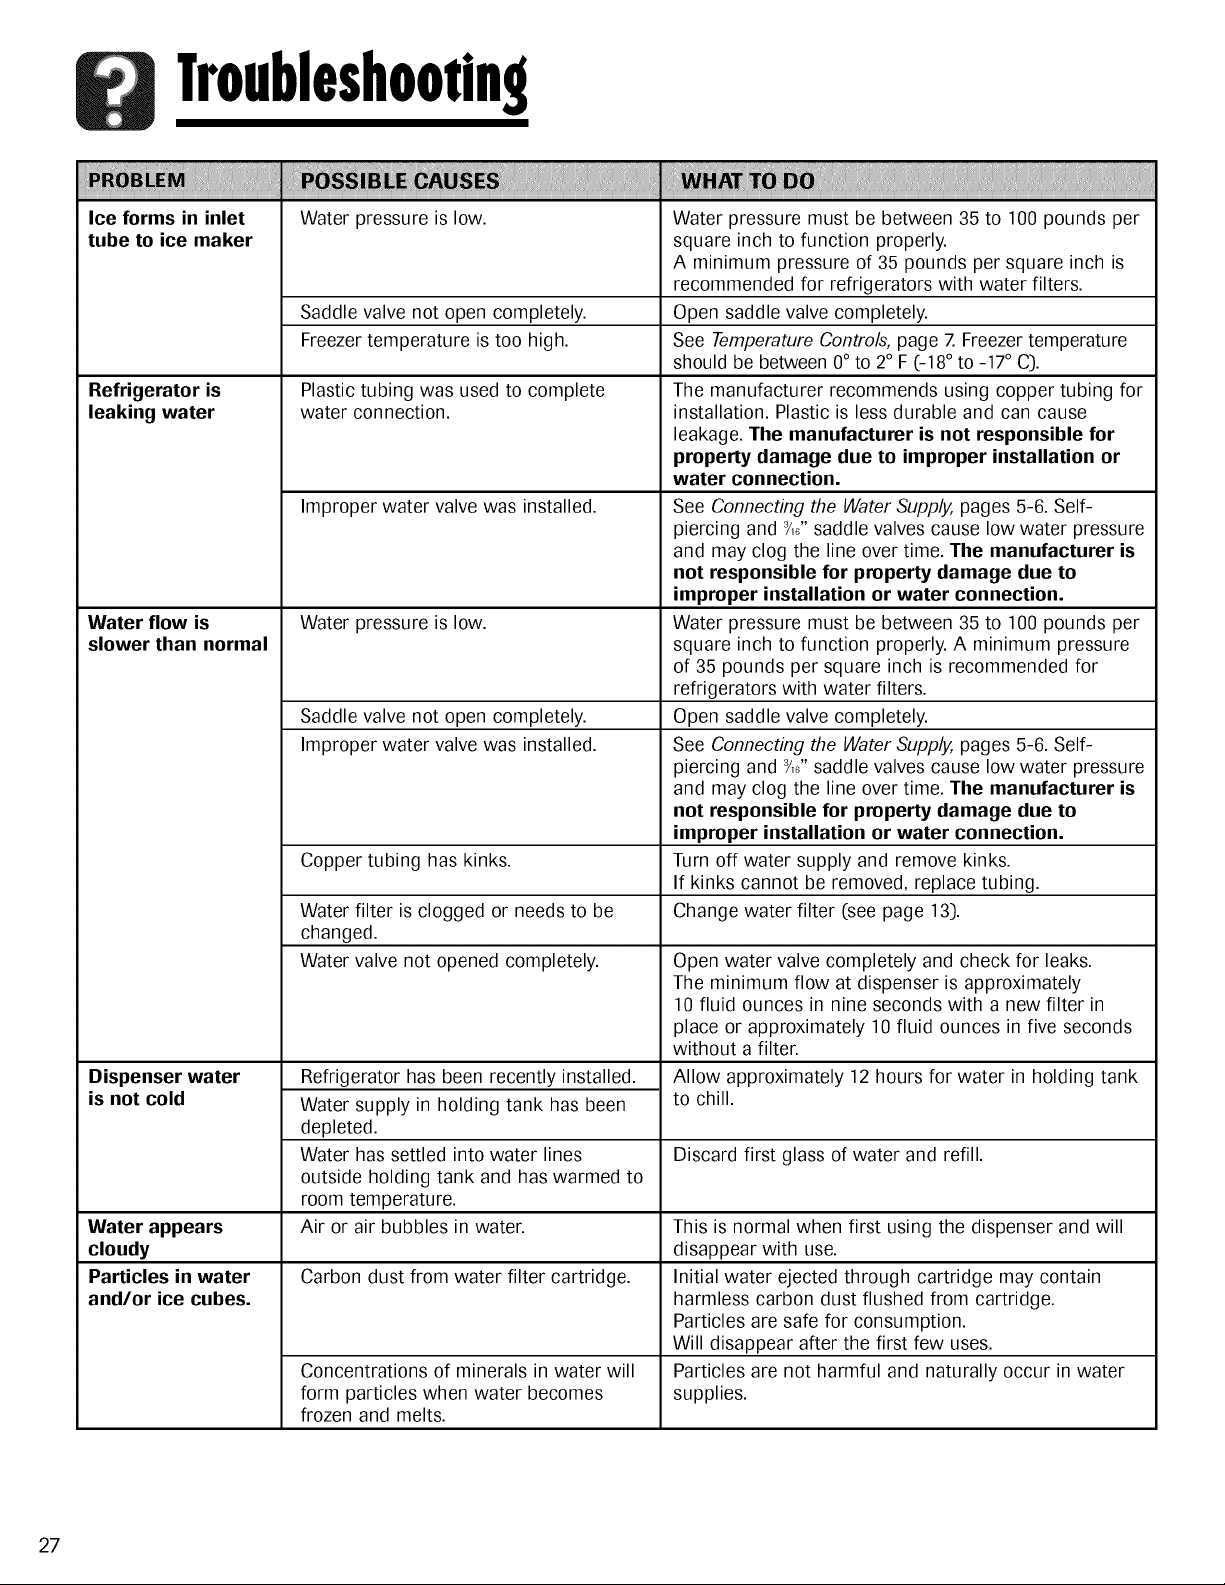
Ice forms in inlet Water pressure is low.
tube to ice maker
Saddle valve not open completely.
Freezer temperature is too high.
Refrigerator is
leaking water
Plastic tubing was used to complete
water connection.
Improper water valve was installed.
Water flow is Water pressure is low.
slower than normal
Saddle valve not open completely.
Improper water valve was installed.
Dispenser water
is not cold
Water appears
cloudy
Particles in water
and/or ice cubes.
Copper tubing has kinks.
Water filter is clogged or needs to be
changed.
Water valve not opened completely.
Refrigerator has been recently installed.
Water supply in holding tank has been
depleted.
Water has settled into water lines
outside holding tank and has warmed to
room temperature.
Air or air bubbles in water.
Carbon dust from water filter cartridge.
Concentrations of minerals in water will
form particles when water becomes
frozen and melts.
Water pressure must be between 35 to 100 pounds per
square inch to function properly.
A minimum pressure of 35 pounds per square inch is
recommended for refrigerators with water filters.
Open saddle valve completely.
See Temperature Controls, page Z Freezer temperature
should be between 0° to 2° F (-18° to -17° C).
The manufacturer recommends using copper tubing for
installation. Plastic is less durable and can cause
leakage. The manufacturer is not responsible for
property damage due to improper installation or
water connection.
See Connecting the Water Supply, pages 5-6. Self-
piercing and Y,G"saddle valves cause low water pressure
and may clog the line over time. The manufacturer is
not responsible for property damage due to
improper installation or water connection.
Water pressure must be between 35 to 100 pounds per
square inch to function properly. A minimum pressure
of 35 pounds per square inch is recommended for
refrigerators with water filters.
Open saddle valve completely.
See Connecting the Water Supply, pages 5-6. Self-
piercing and Y,_;"saddle valves cause low water pressure
and may clog the line over time. The manufacturer is
not responsible for property damage due to
improper installation or water connection.
Turn off water supply and remove kinks.
If kinks cannot be removed, replace tubing.
Change water filter (see page 13).
Open water valve completely and check for leaks.
The minimum flow at dispenser is approximately
10 fluid ounces in nine seconds with a new filter in
place or approximately 10 fluid ounces in five seconds
without a filter.
Allow approximately 12 hours for water in holding tank
to chill.
Discard first glass of water and refill.
This is normal when first using the dispenser and will
disappear with use.
Initial water ejected through cartridge may contain
harmless carbon dust flushed from cartridge.
Particles are safe for consumption.
Will disappear after the first few uses.
Particles are not harmful and naturally occur in water
supplies.
27

#ores
28

#ores
29

#ores
30
Wurruntv& Service
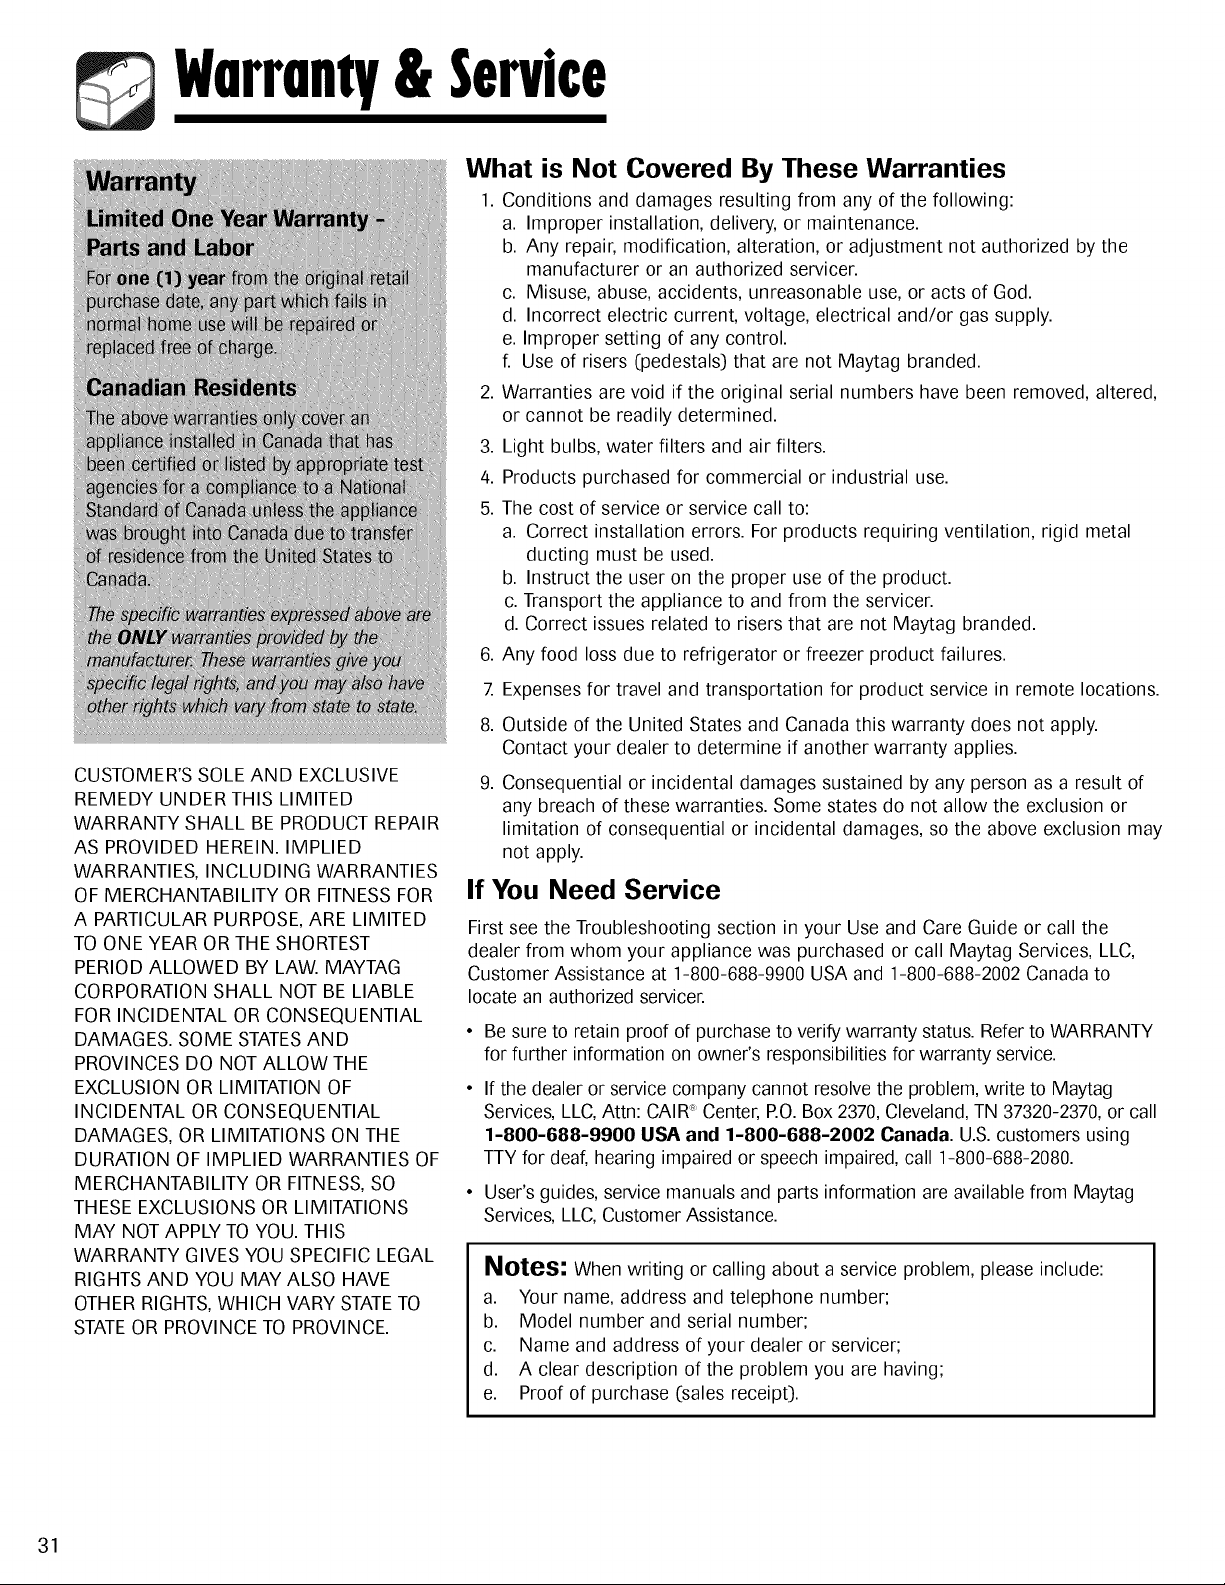
What is Not Covered By These Warranties
1. Conditions and damages resulting from any of the following:
a. Improper installation, delivery, or maintenance.
b. Any repair, modification, alteration, or adjustment not authorized by the
manufacturer or an authorized servicer.
c. Misuse, abuse, accidents, unreasonable use, or acts of God.
d. Incorrect electric current, voltage, electrical and/or gas supply.
e. Improper setting of any control.
f. Use of risers (pedestals) that are not Maytag branded.
2. Warranties are void if the original serial numbers have been removed, altered,
or cannot be readily determined.
3. Light bulbs, water filters and air filters.
4. Products purchased for commercial or industrial use.
5. The cost of service or service call to:
a. Correct installation errors. For products requiring ventilation, rigid metal
ducting must be used.
b. Instruct the user on the proper use of the product.
c. Transport the appliance to and from the servicer.
d. Correct issues related to risers that are not Maytag branded.
Any food loss due to refrigerator or freezer product failures.
,
7.
8.
CUSTOMER'S SOLE AND EXCLUSIVE 9.
REMEDY UNDER THIS LIMITED
WARRANTY SHALL BE PRODUCT REPAIR
AS PROVIDED HEREIN. IMPLIED
WARRANTIES, INCLUDING WARRANTIES
OF MERCHANTABILITY OR FITNESS FOR
A PARTICULAR PURPOSE,ARE LIMITED
TO ONE YEAR OR THE SHORTEST
PERIOD ALLOWED BY LAW. MAYTAG
CORPORATION SHALL NOT BE LIABLE
FOR INCIDENTAL OR CONSEQUENTIAL
DAMAGES. SOME STATESAND "
PROVINCES DO NOT ALLOW THE
EXCLUSION OR LIMITATION OF •
INCIDENTAL OR CONSEQUENTIAL
DAMAGES, OR LIMITATIONS ON THE
DURATION OF IMPLIED WARRANTIES OF
MERCHANTABILITY OR FITNESS,SO .
THESE EXCLUSIONS OR LIMITATIONS
MAY NOT APPLY TO YOU. THIS
WARRANTY GIVES YOU SPECIFIC LEGAL
RIGHTS AND YOU MAY ALSO HAVE
OTHER RIGHTS,WHICH VARY STATETO
STATEOR PROVINCE TO PROVINCE.
Expenses for travel and transportation for product service in remote locations.
Outside of the United States and Canada this warranty does not apply.
Contact your dealer to determine if another warranty applies.
Consequential or incidental damages sustained by any person as a result of
any breach of these warranties. Some states do not allow the exclusion or
limitation of consequential or incidental damages, so the above exclusion may
not apply.
If You Need Service
First see the Troubleshooting section in your Use and Care Guide or call the
dealer from whom your appliance was purchased or call Maytag Services, LLC,
Customer Assistance at 1-800-688-9900 USA and 1-800-688-2002 Canada to
locate an authorized servicer.
Be sure to retain proof of purchase to verify warranty status. Refer to WARRANTY
for further information on owner's responsibilities for warranty service.
If the dealer or service company cannot resolve the problem, write to Maytag
Services, LLC,Attn: CAIR_ Center, RO. Box 2370, Cleveland, TN 37320-2370, or call
1-800-688-9900 USA and 1-800-688-2002 Canada. U.S. customers using
TTY for deaf, hearing impaired or speech impaired, call 1-800-688-2080.
User's guides, service manuals and parts information are available from Maytag
Services, LLC, Customer Assistance.
Notes: When writing or calling about a service problem, please include:
a. Your name, address and telephone number;
b. Model number and serial number;
c. Name and address of your dealer or servicer;
d. A clear description of the problem you are having;
e. Proof of purchase (sales receipt).
31
Compartiments juxtapos6s
RefrigGrateur
Table des mati_res
Instructions de s_curit_
,,,,,i.....
importantes ............ 33-34,
Installation ............... 35-38 ....................
o
0
0
0
Commandos de temperature ... 39
Caract_ristiques - compartiment
r_frig_rateur .............. 40
Caract_ristiques - compartiment
cong_lateur ............... 41
Eau et glagons ............ 42-44
Filtre _ eau ............... 45-47
Conseils pour la conservation
des aliments ........... 48-50
Entretien et nettoyage ...... 51-54
Recherche des pannes ..... 56-60
Garantie et service
apri_s-vente ............... 63
Guia de uso y cuidado ........ 64
Bruits de fonctionnement ...... 55
32
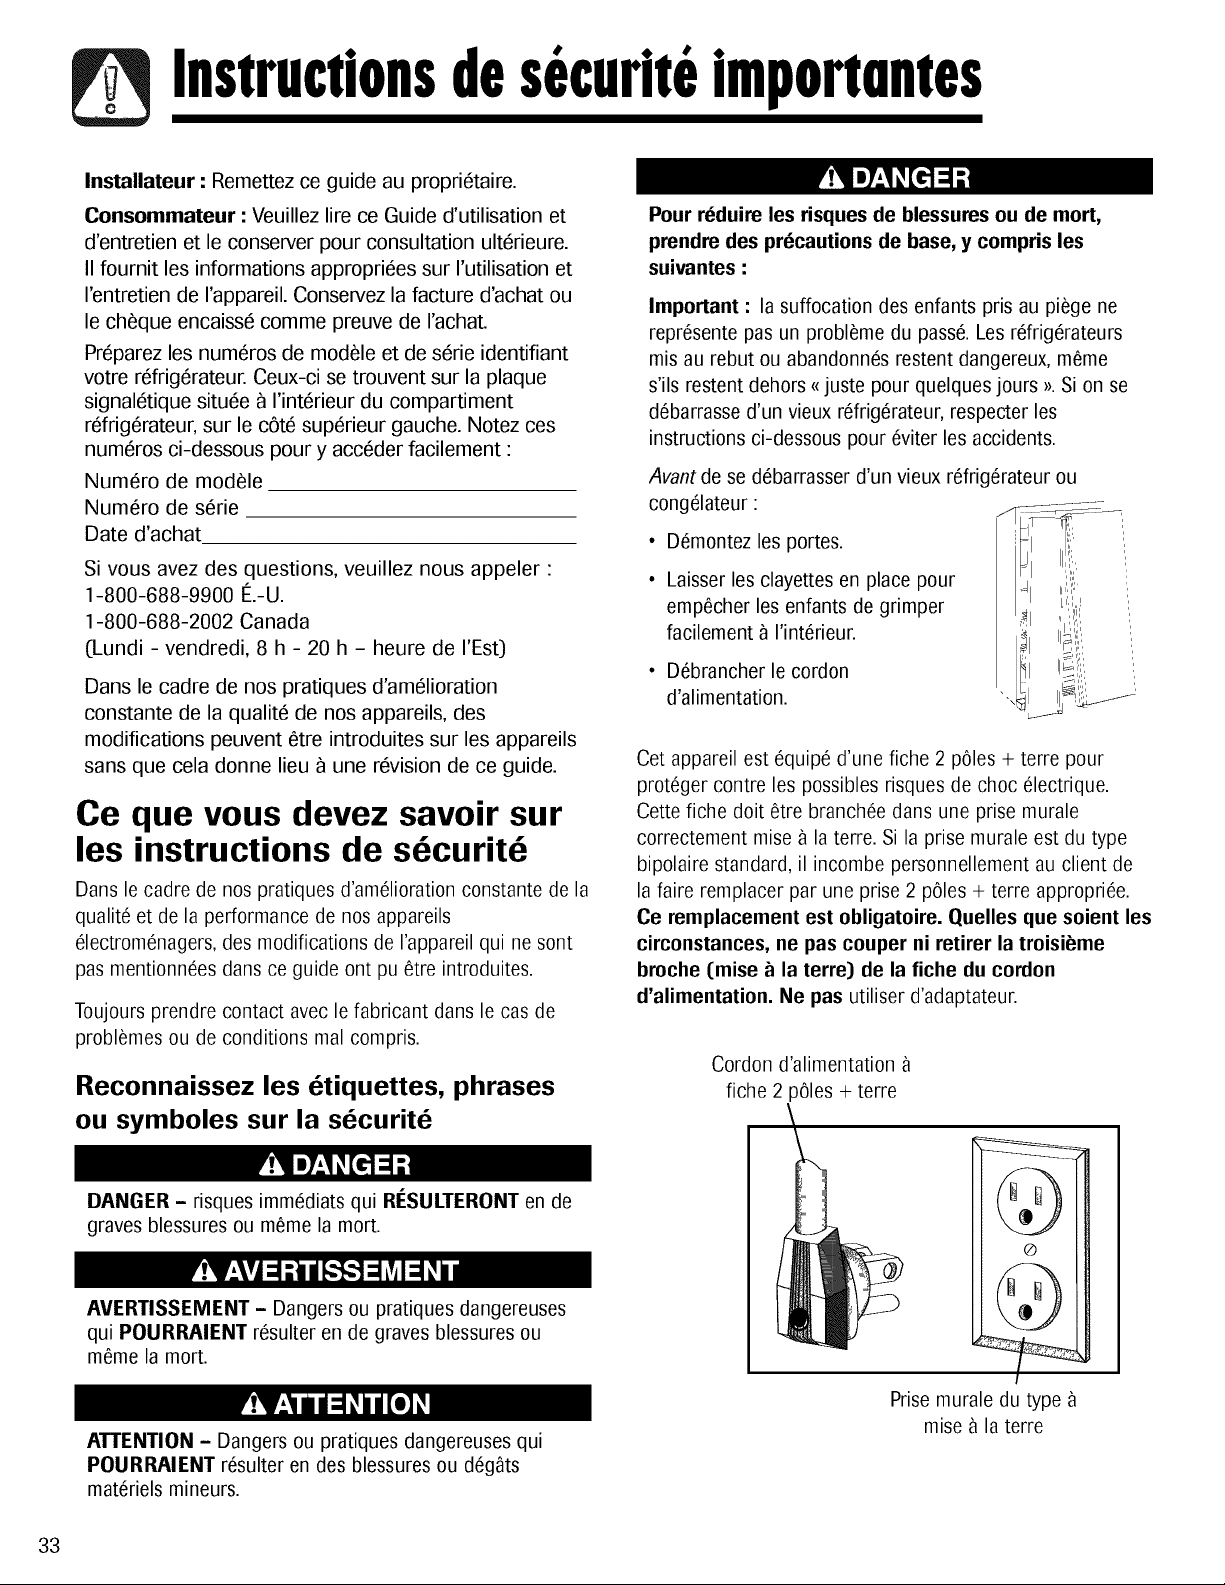
Instructionsdesecurit6importnntes
Installateur : Remettez ce guide au propri6taire.
Oonsommateur : Veuillez lire ce Guide d'utilisation et
d'entretien et le conserver pour consultation ulterieure.
II fournit les informations approprides sur I'utilisation et
I'entretien de I'appareil. Conservez la facture d'achat ou
le cheque encaisse comme preuve de I'achat
Preparez les numeros de modele et de serie identifiant
votre refrigerateur. Ceux-ci se trouvent sur la plaque
signaletique situee 9 I'interieur du compartiment
refrigerateur, sur le cete superieur gauche. Notez ces
numeros ci-dessous pour y acceder facilement :
Numero de modele
Numero de serie
Date d'achat
Si vous avez des questions, veuillez nous appeler :
1-800-688-9900 I_.-U.
1-800-688-2002 Canada
(Lundi - vendredi, 8 h - 20 h - heure de I'Est)
Dans le cadre de nos pratiques d'amelioration
constante de la qualite de nos appareils, des
modifications peuvent etre introduites sur les appareils
sans que cela donne lieu 9 une revision de ce guide.
Ce que vous devez savoir sur
les instructions de s6curit6
Dans le cadre de nos pratiques d'am61ioration constante de la
qualit6 et de la performance de nos appareils
61ectrom6nagers, des modifications de I'appareil qui ne sont
pas mentionn6es dans ce guide ont pu etre introduites.
Toujours prendre contact avec le fabricant dans le cas de
problemes ou de conditions real compris.
Reconnaissez les 6tiquettes, phrases
ou symboles sur la s6curit6
DANGER - risques imm6diats qui RI_SULTERONT en de
graves blessures ou meme la mort.
Pour r6duim les risques de blessures ou de mort,
prendre des pr6cautions de base, y compris les
suivantes :
Important : la suffocation des enfants pris au piege ne
repr6sente pas un probl_me du pass& Les r6frig6rateurs
mis au rebut ou abandonn6s restent dangereux, meme
s'ils restent dehors {{juste pour quelques jours >>.Si on se
d6barrasse d'un vieux r6frig6rateur, respecter les
instructions ci-dessous pour 6viter les accidents.
Avant de se debarrasser d'un vieux r6frig_rateur ou
cong61ateur : /
• D6montez les portes.
• Laisser les clayettes en place pour
empecher les enfants de grimper
facilement _ I'int6rieur.
• D6brancher le cordon
d'alimentation.
Ii,lIII'
Cet appareil est 6quip6 d'une fiche 2 poles + terre pour
prot6ger contre les possibles risques de choc 61ectrique.
Cette fiche doit etre branch6e dans une prise murale
correctement raise _ la terre. Si la prise murale est du type
bipolaire standard, il incombe personnellement au client de
la faire remplacer par une prise 2 poles + terre appropri6e.
Ce remplacement est obligatoire. 0uelles que soient les
circonstances, ne pas couper ni retirer la troisi6me
broche (mise _ la term) de la fiche du cordon
d'alimentation. Ne pas utiliser d'adaptateur.
Cordon d'alimentation
fiche 2 poles + terre
AVERTISSEMENT - Dangers ou pratiques dangereuses
qui POURRAIENT r6sulter en de graves blessures ou
m_me la mort.
ATTENTION - Dangers ou pratiques dangereuses qui
POURRAIENT r6sulter en des blessures ou d6g_ts
materiels mineurs.
Prise murale du type
raise ) la terre
33
Instructionsdesecurit6importnntes
Pour reduire les risques d'incendie, de choc
_lectrique, de blessures graves ou m_me de mort Iors
de rutilisation du refrigerateur, prendre des
precautions de base, y compris les suivantes :
1. Lire toutes les instructions avant de se servir du
refrigerateur.
2. Observer tousles codes et reglements Iocaux.
3. Veiller _ suivre les instructions de mise _ la terre.
4. Consulter un electricien qualifie en cas de doute sur la
mise _ la terre correcte de cet appareil.
5. Ne pas mettre I'appareil _ la terre sur une canalisation
de gaz.
6. Ne pas le mettre ) la terre sur une tuyauterie d'eau
froide.
,
,
10.
Le refrigerateur est congu pour fonctionner sur une
ligne 115 V, 15 A, 60 Hz distincte.
Ne pas modifier la fiche du cordon d'alimentation. Si la
fiche ne s'adapte pas _ la prise murale, faire poser une
prise correcte par un electricien qualifi&
Ne pas utiliser un adaptateur bipolaire, un cordon
prolongateur ni un bloc multiprise.
Ne pas enlever I'etiquette d'avertissement du cordon
d'alimentation.
11.
12.
Ne pas circonvenir les commandes du refrigerateur.
Ne pas r@arer ni remplacer une piece quelconque du
refrigerateur, sauf si le guide d'utilisation et d'entretien
ou les instructions de reparation par I'utilisateur le
recommandent expressement.
13.
14.
15.
16.
17.
18.
Ne pas proceder a une reparation si on ne comprend
pas les instructions ou si on n'a pas une competence
suffisante.
Toujours debrancher le refrigerateur de la prise de
courant avant de proceder _ toute reparation.
Debrancher le cordon d'alimentation en saisissant sa
fiche, pas le cordon lui-meme.
Installer le refrigerateur conformement aux instructions
d'installation. Tousles branchements d'eau,
d'alimentation electrique et de mise _ la terre doivent
etre conformes aux codes Iocaux et effectues par un
technicien professionnel Iorsque ceux-ci I'exigent.
Maintenir le refrigerateur en bon etat. II peut 6tre
endommage, mal fonctionner ou fuir si on le heurte ou
le fait tomber. S'il est endommage, faire verifier le
refrigerateur par un r@arateur qualifi&
Faire remplacer les cordons d'alimentation et/ou leur
fiche si elle a du jeu par un r@arateur qualifi&
Toujours lire et respecter les instructions de
conservation et d'environnement ideal donnees par le
fabricant pour les denrees conservees dans le
refrigerateur.
Ne pas faire fonctionner le refrigerateur en presence
de vapeurs explosives.
19. Ne pas laisser les enfants grimper sur le refrigerateur,
s'y suspendre ni se tenir sur une partie quelconque de
rappareil.
20. I_ponger I'eau qui s'est renversee ou a fuit Iors du
raccordement de la canalisation d'eau.
CONSERVEZ CES INSTRUCTIONS
34
Instnllndon
35
Emplacement d'installation
• N'installez pas le refrigerateur pres d'un four,
radiateur ou d'une autre source de chaleur. Si cela
n'est pas possible, protegez-le avec du materiau de
I'armoire.
• Ne I'installez pas dans un endroit oQ la temperature
descend en dessous de 12° C (55° F), ou monte au-
dessus de 43° C (110 ° F). A ces temperatures, il
pourrait mal fonctionner.
• Le r_frigerateur est prevu seulement pour une
application domestique, a I'interieur.
Mesure de I'ouverture
Lors de I'installation de votre appareil, prevoyez un
espace de 1,2 cm ('._po) en haut, et de 1,2 cm ('.2po)
derriere le couvercle du compartiment machine (situe
I'arriere) pour assurer une bonne circulation de I'air. Si
le refrigerateur est place avec le c6te charniere contre
un mur, vous pouvez prevoir un espace supplementaire,
de faqon _ ouvrir la porte plus largement.
Les revetements de sol (tapis, carreaux, bois) peuvent
diminuer les dimensions de I'ouverture.
Un degagement supplementaire peut etre obtenu en
ayant recours _ la methode presentee dans la section
Mise 4 mveau, page 36.
Important : Si le refrigerateur doit etre installe dans
une enceinte oQ sa partie superieure se trouverait
completement recouverte, mesurez la distance entre le
plancher et le haut du cache pour verifier le bon
degagement.
Transport du refrigerateur
• NE transportez ,IAMAIS le refrigerateur sur le c6te.
S'il n'est pas possible de le mettre _ la verticale,
posez-le sur I'arriere. Laissez le refrigerateur _ la
verticale pendant environ 30 minutes avant de le
brancher pour etre sQr que I'huile revienne au
compresseur. Le branchement immediat du
refrigerateur pourrait endommager les pieces internes.
• Servez-vous d'un chariot ou diable pour d@lacer le
refrigerateur. Transportez TOUJOURS le refrigerateur
par un c6te ou par I'arriere et JAMAIS par I'avant.
• Protegez le fini exterieur du refrigerateur Iors du transport
en enveloppant la caisse de couvertures ou en ajoutant
du rembourrage entre le refrigerateur et le diable.
• Assujettissez fermement le refrigerateur au diable
I'aide de sangles ou de cordons elastiques. Faites
passer les sangles par les poignees, si possible. Ne
serrez pas trop. Un serrage excessif pourrait
endommager I'exterieur du fini.
Depose des portes et des
charnieres
Dans certaines installations, il est necessaire d'enlever
les portes pour transporter le refrigerateur _ son
emplacement definitif.
Pour eviter de graves blessures ou meme la
mort, observez les points suivants :
• Debranchez le refrigerateur avant de retirer les
portes. Ne rebranchez le refrigerateur qu'apres
avoir remis en place les portes.
• Le fil de terre vert doit 6tre raccorde a la charniere
superieure Iors de la depose et de la remise en
place des portes.
• Fixez en place, par ruban adhesif, les panneaux
decoratifs (certains modeles], avant de retirer les
poignees de porte.
Pour eviter des deg_ts materiels, observez les
points suivants :
• Protegez le sol en vinyle ou autre rev_tement de
sol, a I'aide de cartons, tapis ou autre materiau de
protection, avant de deplacer le refrigerateur.
• Ne reglez pas le refrigerateur 9 une hauteur
inferieure 9 174 cm (681/2po] (moins charniere et
cache), au risque sinon, d'endommager les
composants en dessous.
Materiel necessaire :
• Tournevis Phillips
• Douille-tournevis hexagonalede :._po
• Douille-tournevis hexagonalede %,po
1. Debranchez le cordon d'alimentation.
2. Retirez la grille inferieure et les caches inferieurs
(page 36).
• Ouvrez les deux portes _ 180°, ou aussi
largement que possible.
Remarque - Pour les refrig_rateurs en cours de
fonctionnement, coupez I'eau avant de retirer la
canalisation d'eau de la porte.
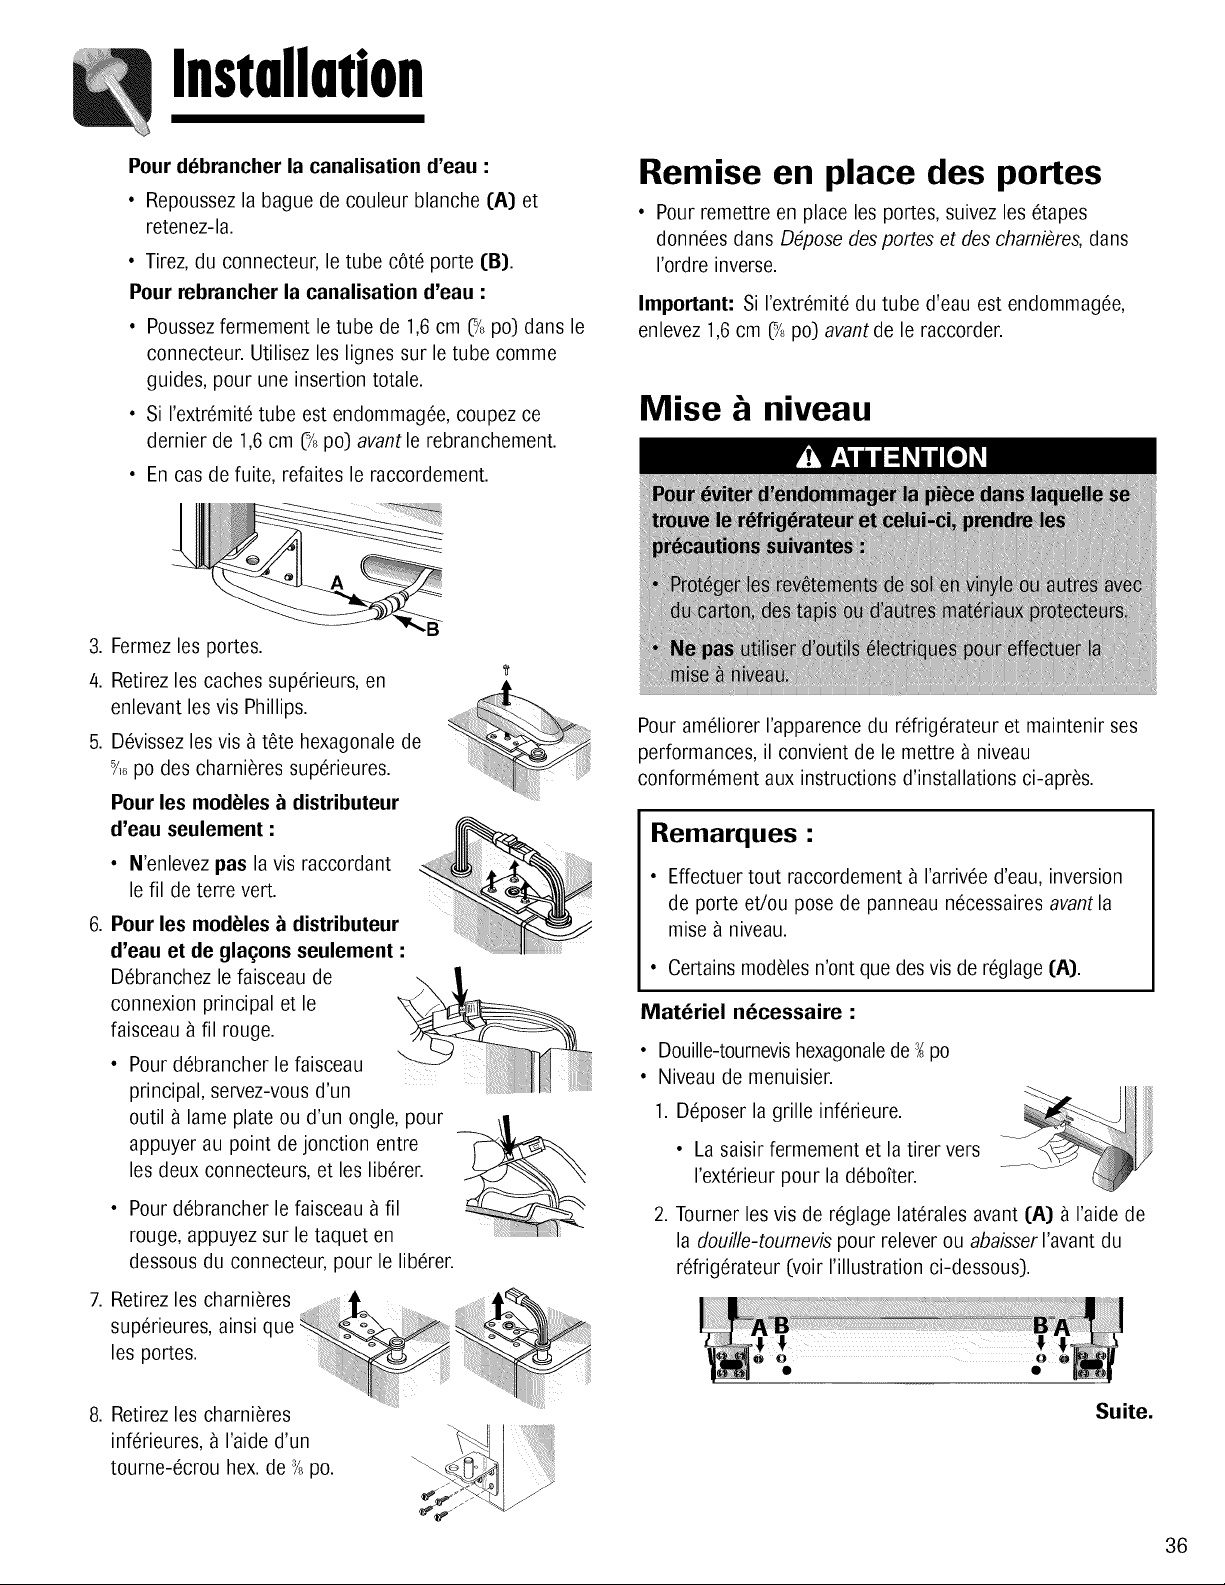
Installation
Pour d6bmncher la canalisation d'eau :
• Repoussez la bague de couleur blanche (A) et
retenez-la.
• Tirez, du connecteur, le tube cote porte (B).
Pour mbmncher la canalisation d'eau :
• Poussez fermement le tube de 1,6 cm (_/8po) dans le
connecteur. Utilisez les lignes sur le tube comme
guides, pour une insertion totale.
• Si I'extremite tube est endommagee, coupez ce
dernier de 1,6 cm (_/8po) avant le rebranchement.
• En cas de fuite, refaites le raccordement.
Remise en place des portes
• Pour remettre en place les portes, suivez les _tapes
donn_es dans D_pose des portes et des chami_res, dans
I'ordre inverse.
Important: Si I'extremite du tube d'eau est endommagee,
enlevez 1,6 cm (_/8po) avant de le raccorder.
Mise & niveau
B
3. Fermez les portes.
4. Retirez les caches superieurs, en
enlevant les vis Phillips.
5. Devissez les vis _ t6te hexagonale de
Y,6po des charnieres superieures.
Pour les modules _ distributeur
d'eau seulement :
• N'enlevez pas la vis raccordant
le fil de terre vert.
6 Pour les modeles _ distributeur
d'eau et de gla£ons seulement :
D_branchez le faisceau de
connexion principal et le
faisceau _ fil rouge.
• Pour debrancher le faisceau
principal, servez-vous d'un
outil _ lame plate ou d'un ongle, pour
appuyer au point de jonction entre
les deux connecteurs, et les liberer.
• Pour debrancher le faisceau _ fil
rouge, appuyez sur le taquet en
dessous du connecteur, pour le lib_rer.
7. Retirez les charni_res
superieures, ainsi que
les portes.
8. Retirez les charni_res
inf_rieures, _ I'aide d'un
tourne-ecrou hex. de 3/8po.
Pour am_liorer I'apparence du rdrigerateur et maintenir ses
performances, il convient de le mettre _ niveau
conformement aux instructions d'installations ci-apres.
Remarques •
• Effectuer tout raccordement _ I'arriv_e d'eau, inversion
de porte et/ou pose de panneau necessaires avant la
mise _ niveau.
• Certains modeles n'ont que des vis de reglage IA).
Materiel necessaire :
• Douille-tournevis hexagonalede _ po
• Niveau de menuisier.
1. D@oser la grille inf_rieure.
• La saisir fermement et la tirer vers
I'exterieur pour la deboker.
2. Tourner les vis de reglage laterales avant (A) b raide de
la douille-toumevis pour relever ou abaisser I'avant du
rdrig_rateur (voir rillustration ci-dessous).
Suite.
36
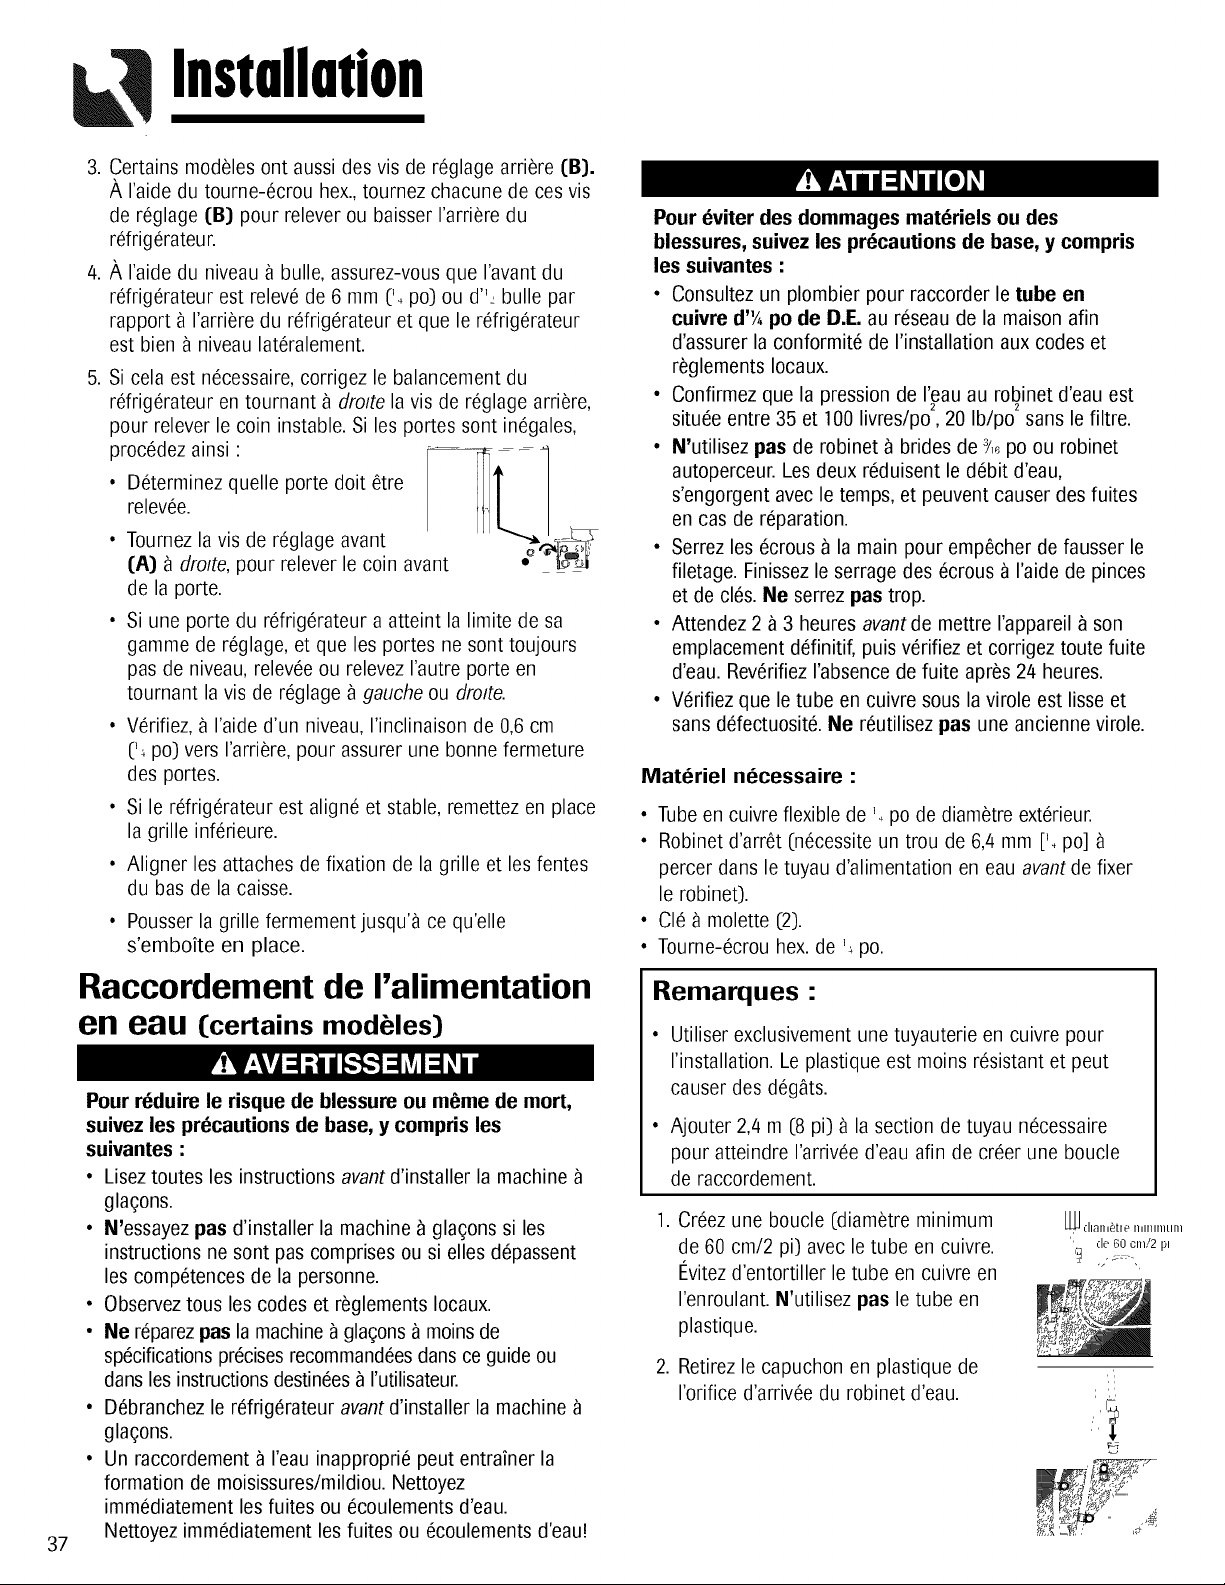
iiL Instnllntion
37
3. Certains modeles ont aussi des vis de reglage arriere [B].
A I'aide du tourne-ecrou hex., tournez chacune de ces vis
de reglage [B) pour relever ou baisser I'arriere du
rdrigerateur.
4. A I'aide du niveau _]bulle, assurez-vous que I'avant du
rdrigerateur est releve de 6 mm ['_ po) ou d": bulle par
rapport _]I'arriere du refrigerateur et que le rdrigerateur
est bien _]niveau lateralement.
Si cela est necessaire, corrigez le balancement du
rdrigerateur en tournant _ dro/te la vis de reglage arriere,
pour relever le coin instable. Si les portes sont inegales,
procedez ainsi • :_[_-
• Determinez quelle porte dolt _tre
relevee.
• Tournez la vis de reglage avant , o- _.
I:A) _] droite, pour relever le coin avant _'_
de la porte.
• Si une porte du refrigerateur a atteint la limite de sa
gamme de reglage, et que les portes ne sont toujours
pas de niveau, relevee ou relevez I'autre porte en
tournant la vis de reglage _]gauche ou droite.
• Verifiez, _]I'aide d'un niveau, I'inclinaison de 0,6 cm
('_ po) vers I'arriere, pour assurer une bonne fermeture
des portes.
• Si le refrigerateur est aligne et stable, remettez en place
la grille inferieure.
• Aligner les attaches de fixation de la grille et les fentes
du bas de la caisse.
• Pousser la grille fermement jusqu'_] ce qu'elle
s'emboite en place.
Raccordement de I'alimentation
en eau [certainsmodeles)
Pour reduire le risque de blessure ou meme de mort,
suivez les precautions de base, y compris les
suivantes :
• Lisez toutes les instructions avant d'installer la machine
gla£:ons.
• N'essayez pas d'installer la machine b glagons si les
instructions ne sont pas comprises ou si elles depassent
les competences de la personne.
• Observez tous les codes et reglements Iocaux.
• Ne reparez pas la machine _]gla_ons _]moins de
specifications precises recommandees dans ce guide ou
dans les instructions destinees _ rutilisateur.
• Debranchez le refrigerateur avant d'installer la machine
glagons.
• Un raccordement ) I'eau inapproprie peut entrainer la
formation de moisissures/mildiou. Nettoyez
immediatement les fuites ou ecoulements d'eau.
Nettoyez immediatement les fuites ou ecoulements d'eau!
Pour eviter des dommages materiels ou des
blessures, suivez les precautions de base, y compris
les suivantes :
• Consultez un plombier pour raccorder le tube en
cuivre d']4 po de D.E. au reseau de la maison afin
d'assurer la conformite de I'installation aux codes et
reglements Iocaux.
• Confirmez que la pression de I'eau au robinet d'eau est
• 2
situee entre 35 et 100 hvres/po, 20 Ib/po_sans le filtre.
• N'utilisez pas de robinet ) brides de f,_ po ou robinet
autoperceur. Les deux reduisent le debit d'eau,
s'engorgent avec le temps, et peuvent causer des fuites
en cas de reparation.
• Serrez les ecrous _ la main pour empecher de fausser le
filetage. Finissez le serrage des ecrous ) I'aide de pinces
et de cles. Ne serrez pas trop.
• Attendez 2 _ 3 heures avant de mettre I'appareil _]son
emplacement ddinitif, puis verifiez et corrigez route fuite
d'eau. Reverifiez I'absence de fuite apres 24 heures.
• Verifiez que le tube en cuivre sous la virole est lisse et
sans defectuosit& Ne reutilisez pas une ancienne virole.
Materiel necessaire "
• Tube en cuivre flexible de '_ po de diametre exterieur.
• Robinet d'arret (necessite un trou de 6,4 mm['. po]
percer dans le tuyau d'alimentation en eau avant de fixer
le robinet).
• Cle _ molette (2).
• Tourne-ecrou hex. de '_ po.
Remarques -
Utiliser exclusivement une tuyauterie en cuivre pour
I'installation. Le plastique est moins resistant et peut
causer des deg_ts.
Ajouter 2,4 m (8 pi) _ la section de tuyau necessaire
pour atteindre I'arrivee d'eau afin de creer une boucle
de raccordement.
,
Creez une boucle (diametre minimum
de 60 cm/2 pi) avec le tube en cuivre.
I_vitezd'entortiller le tube en cuivre en
I'enroulant. N'utilisez pas le tube en
plastique.
Retirez le capuchon en plastique de
I'orifice d'arrivee du robinet d'eau.
Lk_ (llallle[le IhlllllllLl[ll
(le 60 cnl/2 pl
,, ,,',
r_2d,.1_i'-_ _,_
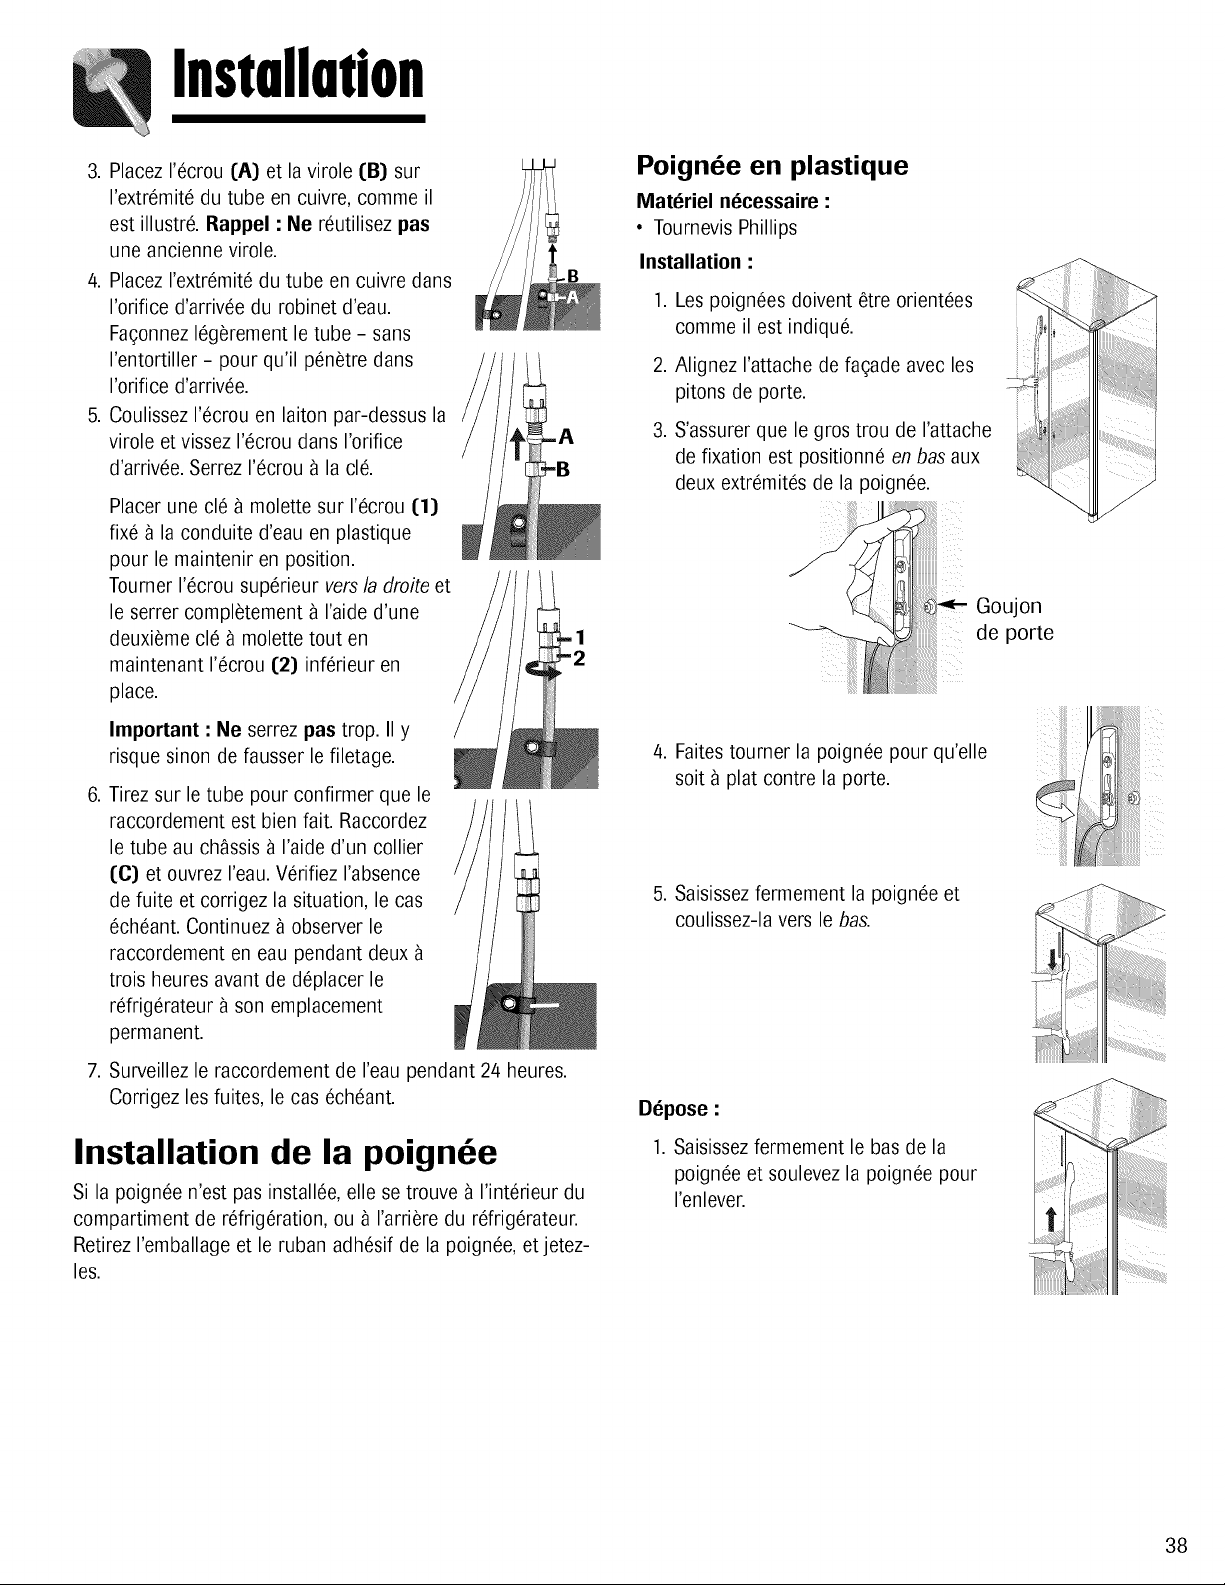
Installation
3. Placez 1'6crou (:A) et la virole (:B) sur
I'extr(_mit6du tube en cuivre, comme il
est illustr& Rappel : Ne r6utilisez pas
une ancienne virole.
4. Placez I'extr6mit6 du tube en cuivre dans
I'orifice d'arriv6e du robinet d'eau.
Fa?onnez 16gerement le tube - sans
I'entortiller - pour qu'il p6netre dans
I'orifice d'arriv6e.
5. Coulissez 1'6crouen laiton par-dessus la
virole et vissez 1'6crou dans I'orifice
d'arriv6e. Serrez 1'6crou_ la cl&
Placer une cl6 _ molette sur 1'6crou(:1)
fix6 _ la conduite d'eau en plastique
pour le maintenir en position.
Tourner 1'6crou sup6rieur vers la droite et
le serrer completement _ raide d'une
deuxieme cl6 _ molette tout en
maintenant 1'6crou(:2) inf6rieur en
place.
Important : Ne serrez pas trop. II y
risque sinon de fausser le filetage.
6. Tirez sur le tube pour confirmer que le
raccordement est bien fait. Raccordez
le tube au chassis _ I'aide d'un collier
(:C) et ouvrez I'eau. V6rifiez rabsence
de fuite et corrigez la situation, le cas
6ch6ant. Continuez _ observer le
raccordement en eau pendant deux
trois heures avant de d@lacer le
rdrig6rateur _ son emplacement
permanent.
7. Surveillez le raccordement de reau pendant 24 heures.
Corrigez les fuites, le cas 6ch6ant.
Installation de la poign e
Si la poign6e n'est pas install6e, elle se trouve _ I'int6rieur du
compartiment de refrigeration, ou _ I'arriere du r6frig6rateur.
Retirez I'emballage et le ruban adh6sif de la poign6e, et jetez-
les.
Poign6e en plastique
Materiel necessaire :
• Tournevis Phillips
Installation :
,
,
,
Les poign6es doivent etre orient6es
comme il est indiqu&
Alignez I'attache de fa(;ade avec les
pitons de porte.
S'assurer que le gros trou de rattache
de fixation est positionn6 en bas aux
deux extr6mit6s de la poign6e.
Goujon
de porte
4. Faites tourner la poign6e pour qu'elle
soit ) plat contre la porte.
5. Saisissez fermement la poign6e et
coulissez-la vers le bas.
Depose :
1. Saisissez fermement le bas de la
poign6e et soulevez la poign6e pour
I'enlever.
38
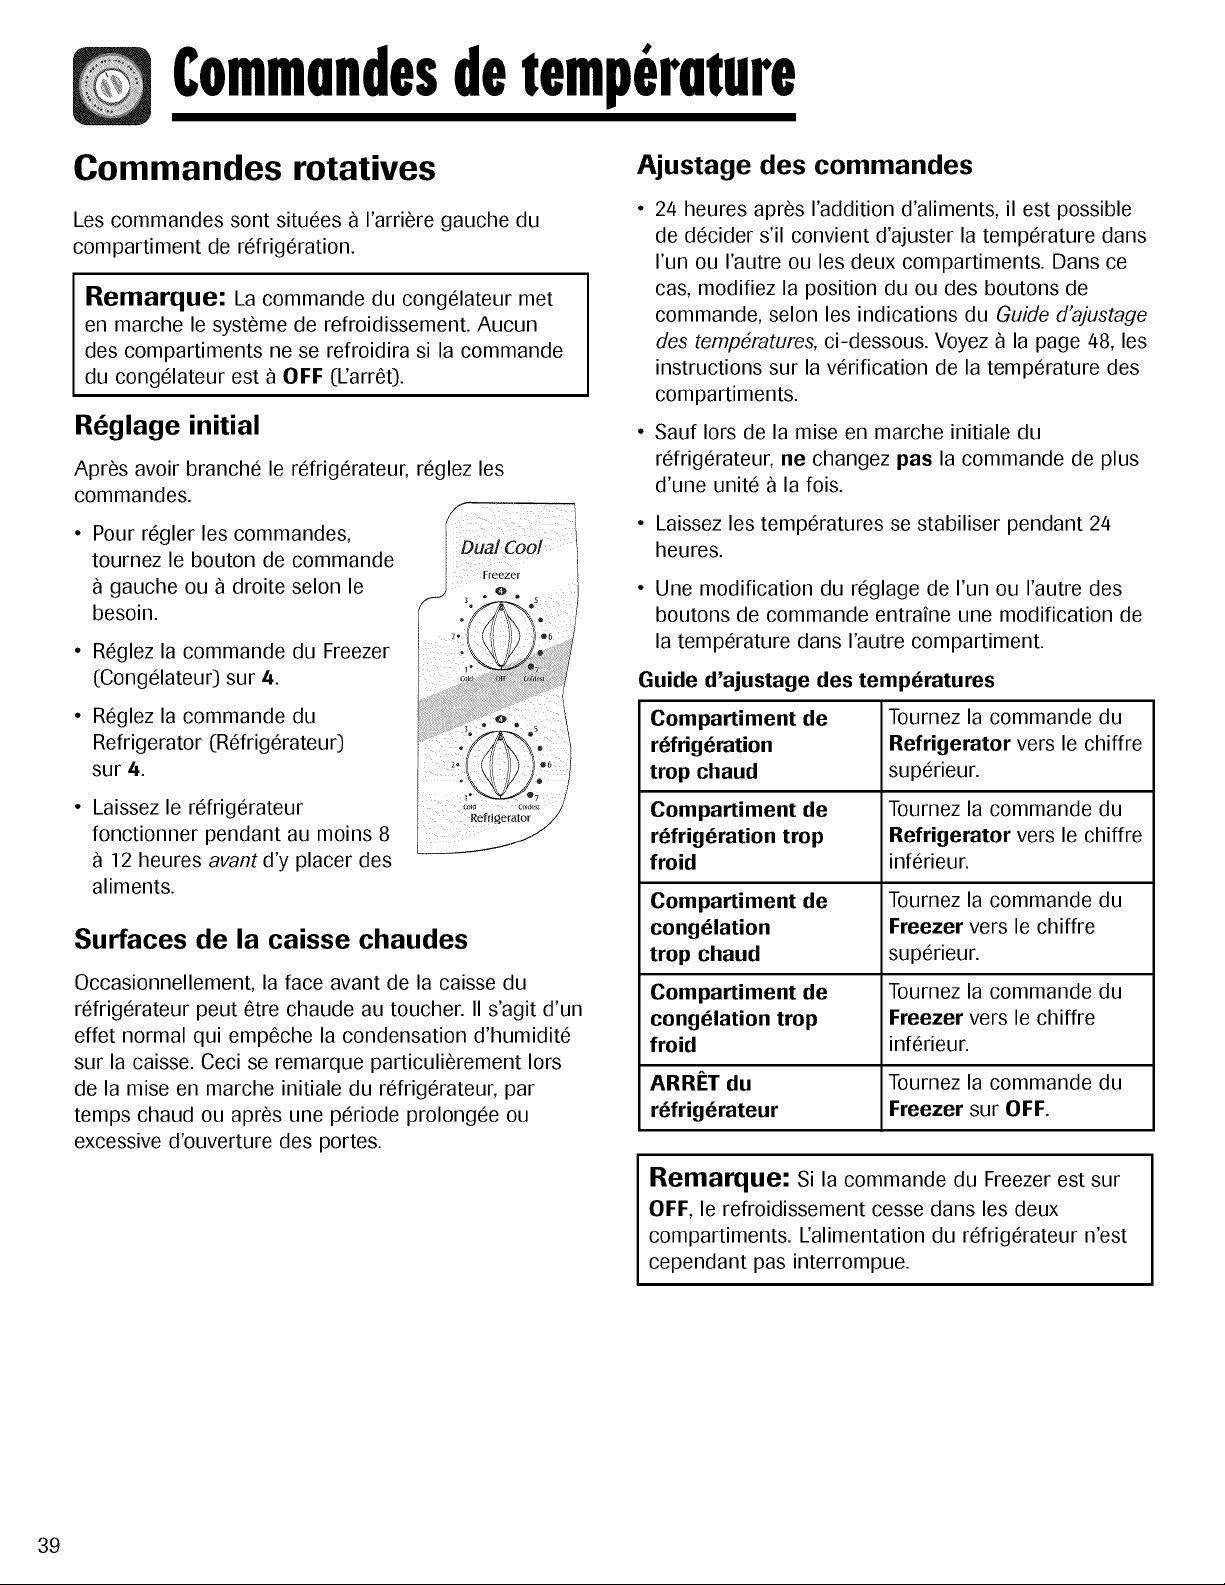
Commundesdetempermure
Commandes rotatives
Les commandes sont situees a I'arriere gauche du
compartiment de refrigeration.
Remarque: La commande du congOateur met
en marche le systeme de refroidissement. Aucun
des compartiments ne se refroidira si la commande
du congOateur est a OFF (_arre0.
R6glage initial
Apres avoir branche le refrigerateur, reglez les
commandes.
Pour regler les commandes,
tournez le bouton de commande
gauche ou a droite selon le
besoin.
Reglez la commande du Freezer
(CongOateur) sur 4.
Reglez la commande du
Refrigerator (Refrigerateur)
sur 4.
Laissez le refrigerateur
fonctionner pendant au moins 8
12 heures avant d'y placer des
aliments.
Refr!gerator
Surfaces de la caisse chaudes
Occasionnellement, la face avant de la caisse du
refrigerateur peut etre chaude au toucher. II s'agit d'un
effet normal qui empeche la condensation d'humidite
sur la caisse. Ceci se remarque particulierement Iors
de la mise en marche initiale du refrigerateur, par
temps chaud ou apres une periode prolongee ou
excessive d'ouverture des portes.
Ajustage des commandes
24 heures apres I'addition d'aliments, il est possible
de decider s'il convient d'ajuster la temperature dans
I'un ou I'autre ou les deux compartiments. Dans ce
cas, modifiez la position du ou des boutons de
commande, selon les indications du Guide d'ajustage
des temperatures, ci-dessous. Voyez a la page 48, les
instructions sur la verification de la temperature des
compartiments.
Saul Iors de la mise en marche initiale du
refrigerateur, ne changez pas la commande de plus
d'une unite a la lois.
• Laissez les temperatures se stabiliser pendant 24
heures.
• Une modification du reglage de I'un ou I'autre des
boutons de commande entraine une modification de
la temperature dans I'autre compartiment.
Guide d'ajustage des temperatures
Compartiment de
refrigeration
trop chaud
Compartiment de
refrigeration trop
froid
Tournez la commande du
Refrigerator vers le chiffre
superieur.
Tournez la commande du
Refrigerator vers le chiffre
inferieur.
Compartiment de Tournez la commande du
cong_lation Freezer vers le chiffre
trop chaud superieur.
Compartiment de Tournez la commande du
cong_lation trop Freezer vers le chiffre
froid inferieur.
ARRf:T du Tournez la commande du
refrigerateur Freezer sur OFF.
Remarque: Si la commande du Freezer est sur
OFF, le refroidissement cesse dans les deux
compartiments. _alimentation du refrigerateur n'est
cependant pas interrompue.
39
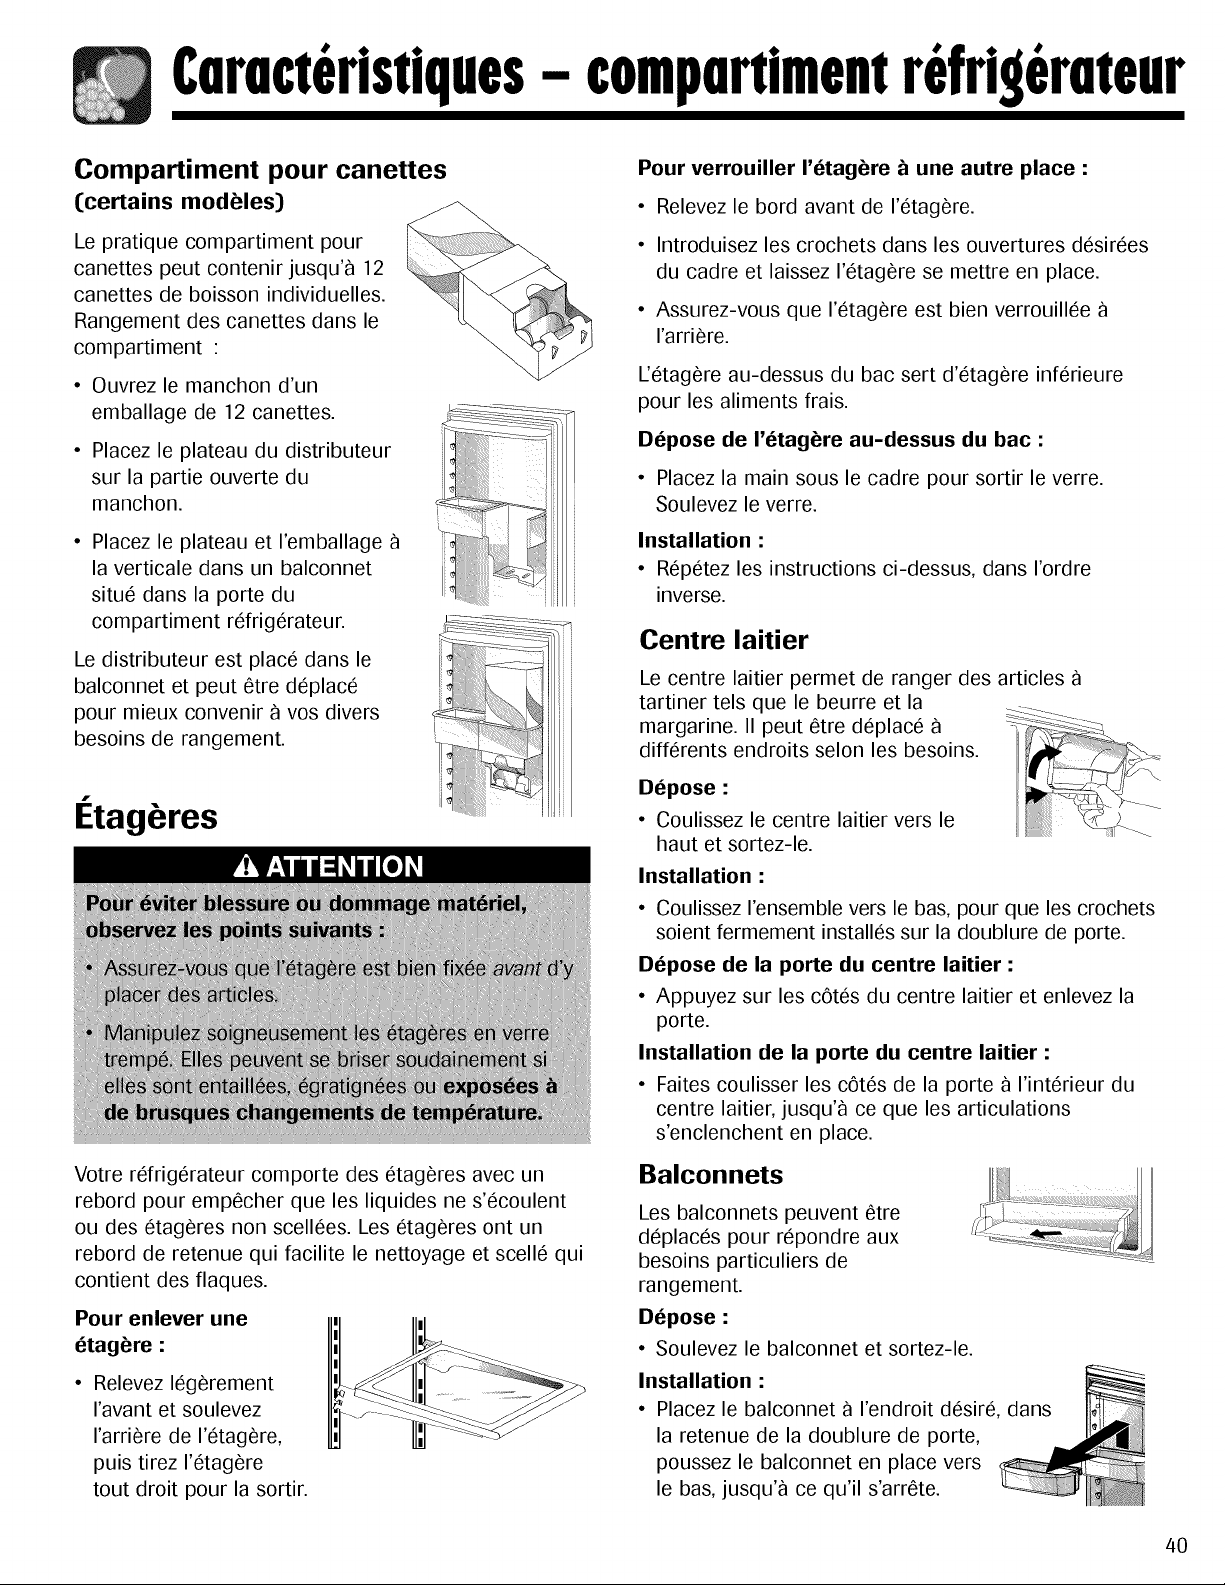
Cnrncteristiques- compnrtimen!refrigeruteur
Compartiment pour canettes
(certains modbles)
Le pratique compartiment pour
canettes peut contenir jusqu'a 12
canettes de boisson individuelles.
Rangement des canettes dans le
compartiment :
• Ouvrez le manchon d'un
emballage de 12 canettes.
• Placez le plateau du distributeur
sur la partie ouverte du
manchon.
Placez le plateau et I'emballage
la verticale dans un balconnet
situe dans la porte du
compartiment refrigerateur.
Le distributeur est place dans le
balconnet et peut 6tre deplace
pour mieux convenir a vos divers
besoins de rangement.
I tagbres
Votre refrigerateur comporte des etageres avec un
rebord pour empecher que les liquides ne s'ecoulent
ou des etageres non scellees. Les etageres ont un
rebord de retenue qui facilite le nettoyage et scelle qui
contient des flaques.
Pour enlever une
etagbre :
Relevez legerement
ravant et soulevez
I'arriere de I'etagere,
puis tirez I'etagere
tout droit pour la sortir.
Pour verrouiller I'etagbre b une autre place :
• Relevez le bord avant de I'etagere.
• Introduisez les crochets dans les ouvertures desirees
du cadre et laissez I'etagere se mettre en place.
• Assurez-vous que I'etagere est bien verrouillee
I'arriere.
IJetagere au-dessus du bac sert d'etagere inferieure
pour les aliments frais.
Depose de I'etagbre au-dessus du bac :
• Placez la main sous le cadre pour sortir le verre.
Soulevez le verre.
Installation :
• Repetez les instructions ci-dessus, dans I'ordre
inverse.
Centre laitier
Le centre laitier permet de ranger des articles
tartiner tels que le beurre et la
margarine. II peut 6tre deplace
differents endroits selon les besoins.
Depose :
• Coulissez le centre laitier vers le
haut et sortez-le.
Installation :
• Coulissez I'ensemble vers le bas, pour que les crochets
soient fermement installes sur la doublure de porte.
Depose de la porte du centre laitier :
• Appuyez sur les c(_)tesdu centre laitier et enlevez la
porte.
Installation de la porte du centre laitier :
• Faites coulisser les cetes de la porte a I'interieur du
centre laitier, jusqu'a ce que les articulations
s'enclenchent en place.
Balconnets
Les balconnets peuvent etre
deplaces pour r@ondre aux
besoins particuliers de
rangement.
Depose :
• Soulevez le balconnet et sortez-le.
Installation :
• Placez le balconnet a I'endroit desire, dans
la retenue de la doublure de porte,
poussez le balconnet en place vers
le bas, jusqu'a ce qu'il s'arrete.
40

Cnrncteristiques- compnrtimen!cong61nteur
Tiroirs et bacs de rangement
Les bacs a legumes procurent un environnement
humidite plus elevee pour les legumes et les fruits frais.
Bac & gla£ons
Le bac a gla(_ons est situe sous la machine a gla(_ons
automatique.
Clayettes et paniers
Clayette fixe du congelateur
Depose :
Relevez le bras de la machine a gla(_ons pour
desactiver la machine a gla(_ons. Relevez I'avant du
bac et sortez-le au maximum. Soulevez I'avant du
bac et retirez-le.
Installation :
de montage dans la paroi.
Installation des clayettes montees sur attaches :
• Placez le c6te gauche de la clayette dans les trous de
montage et abaissez-la dans les attaches de montage
de la paroi.
Clayettes
Les clayettes peuvent etre enlevees, pour r@ondre aux
besoins particuliers de rangement.
Depose :
• Saisissez la clayette par le c6te droit
pour la sortir des glissieres de la
caisse, et coulissez-la a droite.
Installation :
• Remettez la clayette dans les glissieres de la caisse,
du c6te gauche. Enclenchez la clayette dans les
glissieres de la caisse, du c6te droit.
Paniers
Les paniers (le style peut varier)
coulissent vers I'exterieur, pour
faciliter I'acces aux articles ranges
I'arriere.
Depose :
• Tirez le panier au maximum. Soulevez I'avant et
retirez-le.
Installation :
• Inserez le panier dans les glissieres de la caisse.
Soulevez I'avant du panier, et coulissez-le a I'arriere
du refrigerateur.
• Coulissez le bac dans les glissieres sous la machine
gla(_ons, jusqu'a ce que le bac se verrouille en
place. Baissez le bras de
la machine a gla(_ons
pour mettre cette
derniere en marche.
Important : Le bac a gla(_ons doit 6tre verrouille en
place, pour permettre une bonne liberation des
gla(_ons. Tournez a gauche (tel qu'il est indique), le
dispositif d'entrainement de la vis sans fin derriere le
bac, pour aligner correctement le bac a gla(_ons avec
le dispositif de la vis sans fin.
Rangement dans la porte
Balconnets reglables
Les balconnets peuvent 0tre
enleves pour r@ondre aux besoins
individuels de rangement.
Depose :
• Soulevez le balconnet, jusqu'a ce
qu'il se degage des retenues de la
contre-porte, puis tirez le balconnet tout droit.
Installation :
• Coulissez le balconnet dans la retenue de contre-
porte souhaitee ci-dessus et poussez-le vers le bas,
jusqu'a ce qu'il s'arrete.
Balconnet fixe (modbles sans distributeur)
Le balconnet fixe est situe dans la partie
superieure de la porte du congelateur.
Important : Le balconnet fixe n'est pas
reglable. Si vous enlevez le balconnet, la
lampe du congelateur ne va pas
s'eteindre a la fermeture de la porte.
41
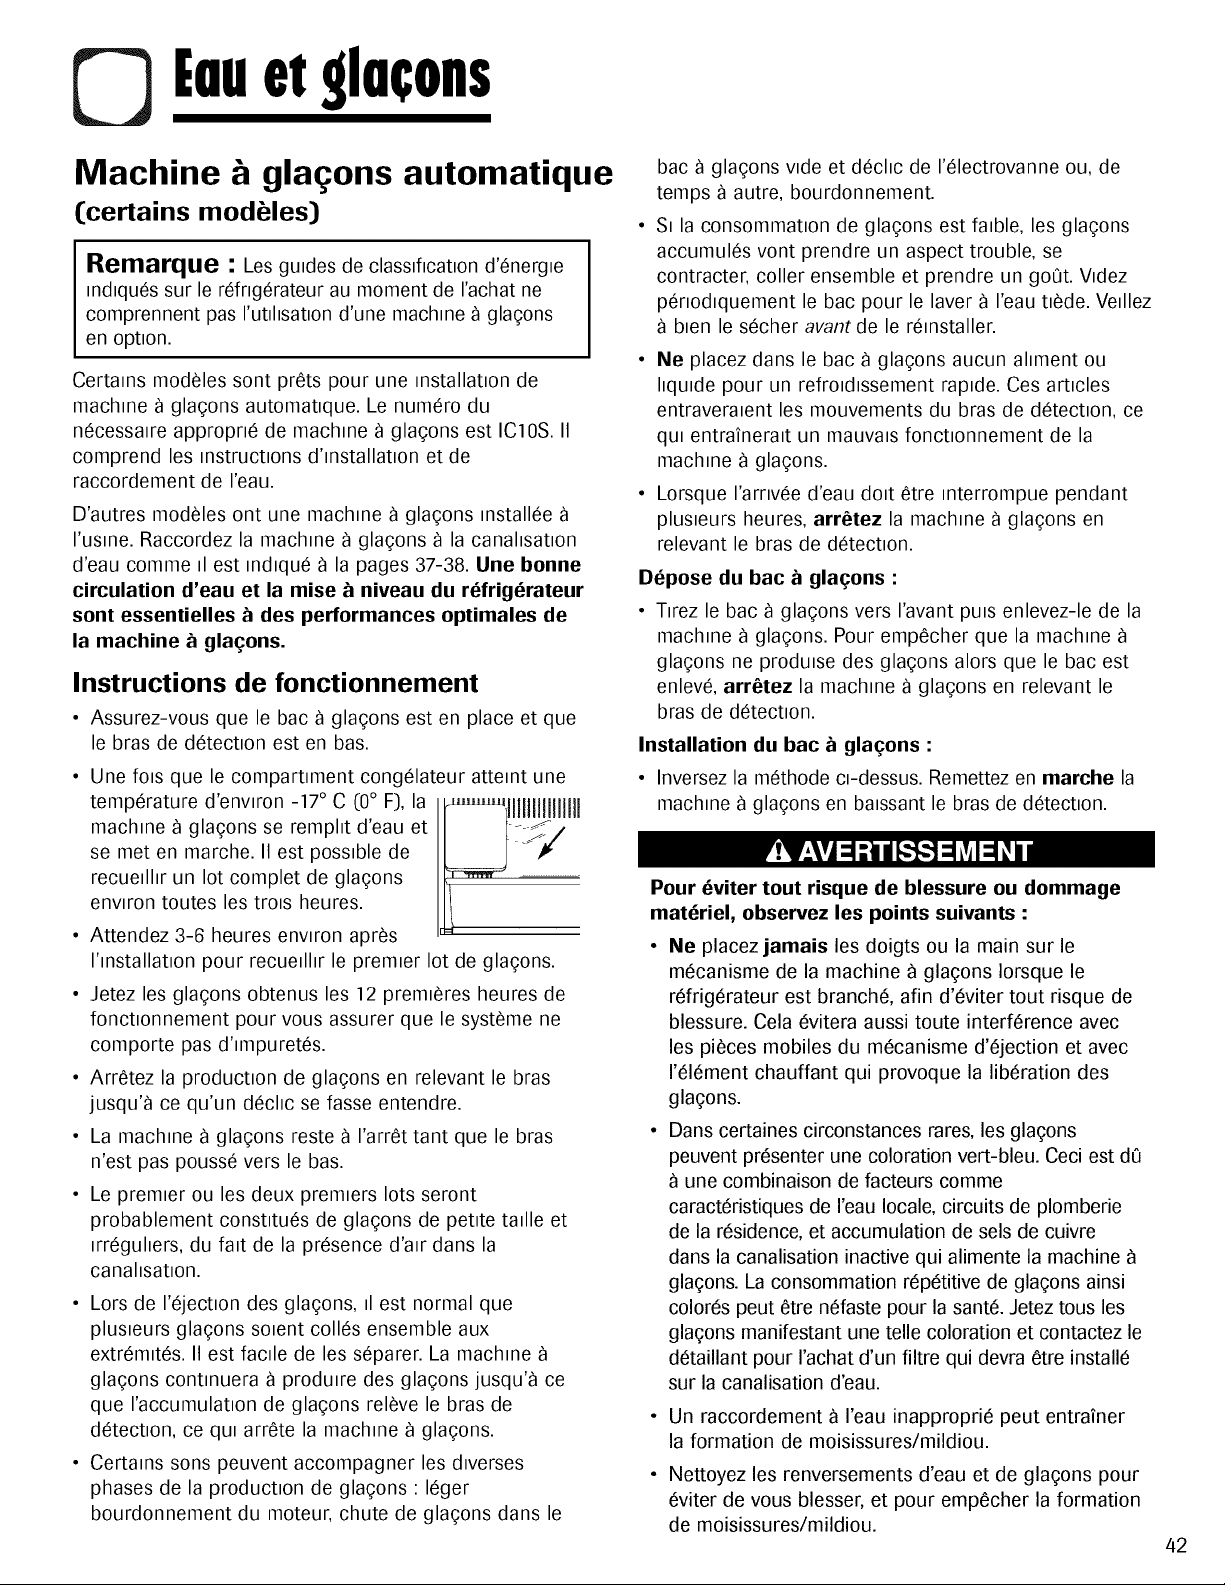
[uuetglu¢ons
Machine gla ons automatique
(certains modbles)
Remarque - Los gu=des de clasmficat=on d'energ=e
md=ques sur le refngerateur au moment de I'achat ne
comprennent pas I'utflBat=on d'une machine _ gla?ons
en option.
Certams modeles sont prets pour une mstallat=on de
machine _ gla?ons automat=que. Le numero du
necessawe appropne de machine _ gla?ons est IC10S. II
comprend los mstruct=ons d'mstallat=on et de
raccordement de I'eau.
D'autres modeles ont une machine _ gla?ons mstallee
I'usme. Raccordez la machine _ gla?ons _ la canahsat_on
d'eau comme _1est md_que _ la pages 37-38. Une bonne
circulation d'eau et la mise _ niveau du r_frigerateur
sent essentielles b des performances optimales de
la machine b gla(;ons.
Instructions de fonctionnement
• Assurez-vous que le bac _ gla?ons est en place et que
le bras de detect=on est en bas.
• Une fob que le compartm]ent congelateur attemt une
temperature d'enwron -17 ° C (0 ° F), la
machine _ gla?ons se rempht d'eau et
se met en marche. II est possible de
recue_lhr un lot complet de gla?ons
enwron toutes les troB heures.
• Attendez 3-6 heures enwron apres
I'mstallat_on pour recueflhr le premier lot de gla?ons.
• Jetez les gla?ons obtenus les 12 premieres heures de
fonct_onnement pour vous assurer que le systeme ne
con]porte pas d'm]puretes.
• Arretez la production de gla?ons en relevant le bras
jusqu'_ ce qu'un dechc se fasse entendre.
• La machine _ gla?ons reste _ I'arret tant que le bras
n'est pas pousse vers le bas.
• Le premier ou les deux premiers lots seront
probablement const_tues de gla?ons de petite tmlle et
_rreguhers, du fret de la presence d'mr dans la
canahsatlon.
11111111111111
• Lors de I'eject_on des gla?ons, _1est normal que
plus_eurs gla?ons so_ent colles ensemble aux
extrem_tes. II est facile de les separer. La machine
gla?ons continuera _ produire des gla?ons jusqu'_ ce
que I'accumulat_on de gla?ons releve le bras de
detection, ce qu_arrete la machine _ gla?ons.
• Certams sons peuvent accompagner les dwerses
phases de la production de gla?ons : leger
bourdonnement du moteur, chute de gla?ons dans le
bac _ gla?ons wde et dechc de I'electrovanne ou, de
temps _ autre, bourdonnement.
S_la consommat_on de gla?ons est fmble, les gla?ons
accumules vont prendre un aspect trouble, se
contracter, coller ensemble et prendre un go0t. Wdez
penod_quement le bac pour le laver _ I'eau t_ede. Vefllez
b_en le secher avant de le remstaller.
• Ne placez dans le bac _ gla?ons aucun ahment ou
hqulde pour un refroldBsement raplde. Ces articles
entraveraient les mouvements du bras de detection, ce
qu_ entrafnermt un mauvaB fonct_onnement de la
machine _ gla?ons.
• Lorsque I'amvee d'eau dolt etre mterrompue pendant
plus_eurs heures, arretez la machine _ gla?ons en
relevant le bras de detection.
Depose du bac _ gla!_ons :
• T=rez le bac _ gla?ons vers I'avant pub enlevez-le de la
machine _ gla?ons. Pour empecher que la machine
gla?ons ne produBe des gla?ons alors que le bac est
enleve, arretez la machine _ gla?ons en relevant le
bras de detect=on.
Installation du bac b gla(;ons :
• Inversez la methode a-dessus. Remettez en marche la
machine _ gla?ons en baBsant le bras de detect=on.
Pour eviter tout risque de blessure ou dommage
materiel, observez los points suivants :
• Ne placez jamais los doigts ou la main sur le
mecanisme de la machine 9 gla?ons Iorsque le
refrigerateur est branch& afin d'eviter tout risque de
blessure. Cola evitera aussi toute interference avec
los pieces mobiles du mecanisme d'ejection et avec
1'616ment chauffant qui provoque la liberation des
gla?ons.
•Dans certaines circonstances rares, los gla?ons
peuvent presenter une coloration vert-bleu. Ceci est d_
une combinaison de facteurs comme
caractdristiques de reau locale, circuits de plomberie
de la residence, et accumulation de sels de cuivre
dans la canalisation inactive qui alimente la machine
gla?ons. La consommation repetitive de gla?ons ainsi
colores peut _tre nefaste pour la sante. Jetez tousles
gla?ons manifestant une telle coloration et contactez le
detaillant pour rachat d'un filtre qui devra ¢tre install6
sur la canalisation d'eau.
• Un raccordement 9 I'eau inappropri6 peut entrafner
la formation de moisissures/mildiou.
• Nettoyez les renversements d'eau et de glagons pour
6viter de vous blesser, et pour empecher la formation
de moisissures/mildiou.
42
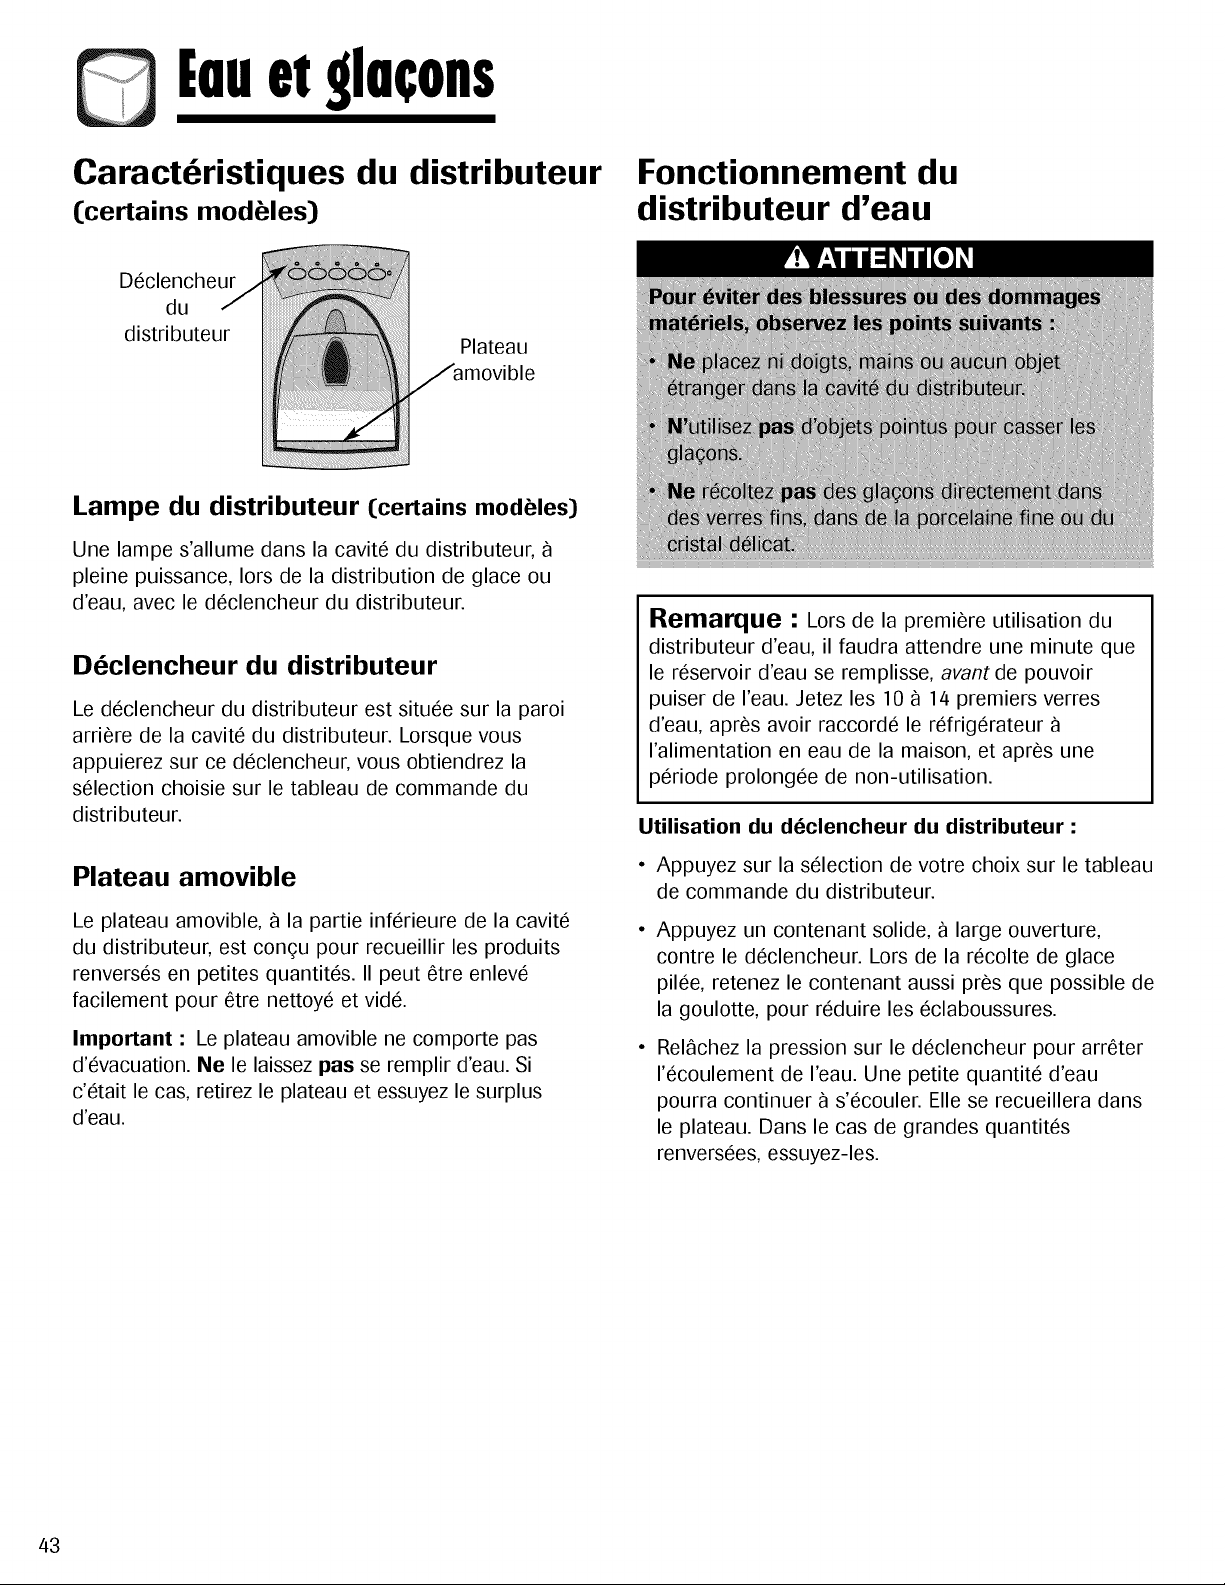
[ouetglo¢ons
Caract6ristiques du distributeur
(certains modbles)
Fonctionnement du
distributeur d'eau
Declencheur
du
distributeur
Plateau
Lampe du distributeur (certains modides)
Une lampe s'allume dans la cavite du distributeur,
pleine puissance, Iors de la distribution de glace ou
d'eau, avec le declencheur du distributeur.
D6clencheur du distributeur
Le declencheur du distributeur est situee sur la paroi
arriere de la cavite du distributeur. Lorsque vous
appuierez sur ce declencheur, vous obtiendrez la
selection choisie sur le tableau de commande du
distributeur.
Plateau amovible
Le plateau amovible, a la partie inferieure de la cavite
du distributeur, est congu pour recueillir les produits
renverses en petites quantites. II peut etre enleve
facilement pour etre nettoye et vide.
Important : Le plateau amovible ne comporte pas
d'evacuation. Ne le laissez passe remplir d'eau. Si
c'etait le cas, retirez le plateau et essuyez le surplus
d'eau.
Remarque • Lors de la premiere utilisation du
distributeur d'eau, il faudra attendre une minute que
le reservoir d'eau se remplisse, avant de pouvoir
puiser de I'eau. Jetez les 10 a 14 premiers verres
d'eau, apres avoir raccorde le rdrigerateur
I'alimentation en eau de la maison, et apres une
periode prolongee de non-utilisation.
Utilisation du d_clencheur du distributeur :
• Appuyez sur la selection de votre choix sur le tableau
de commande du distributeur.
Appuyez un contenant solide, a large ouverture,
contre le declencheur. Lors de la recolte de glace
pilee, retenez le contenant aussi pres que possible de
la goulotte, pour reduire les eclaboussures.
Rel_chez la pression sur le declencheur pour arreter
I'ecoulement de I'eau. Une petite quantite d'eau
pourra continuer a s'ecouler. Erie se recueillera dans
le plateau. Dans le cas de grandes quantites
renversees, essuyez-les.
43
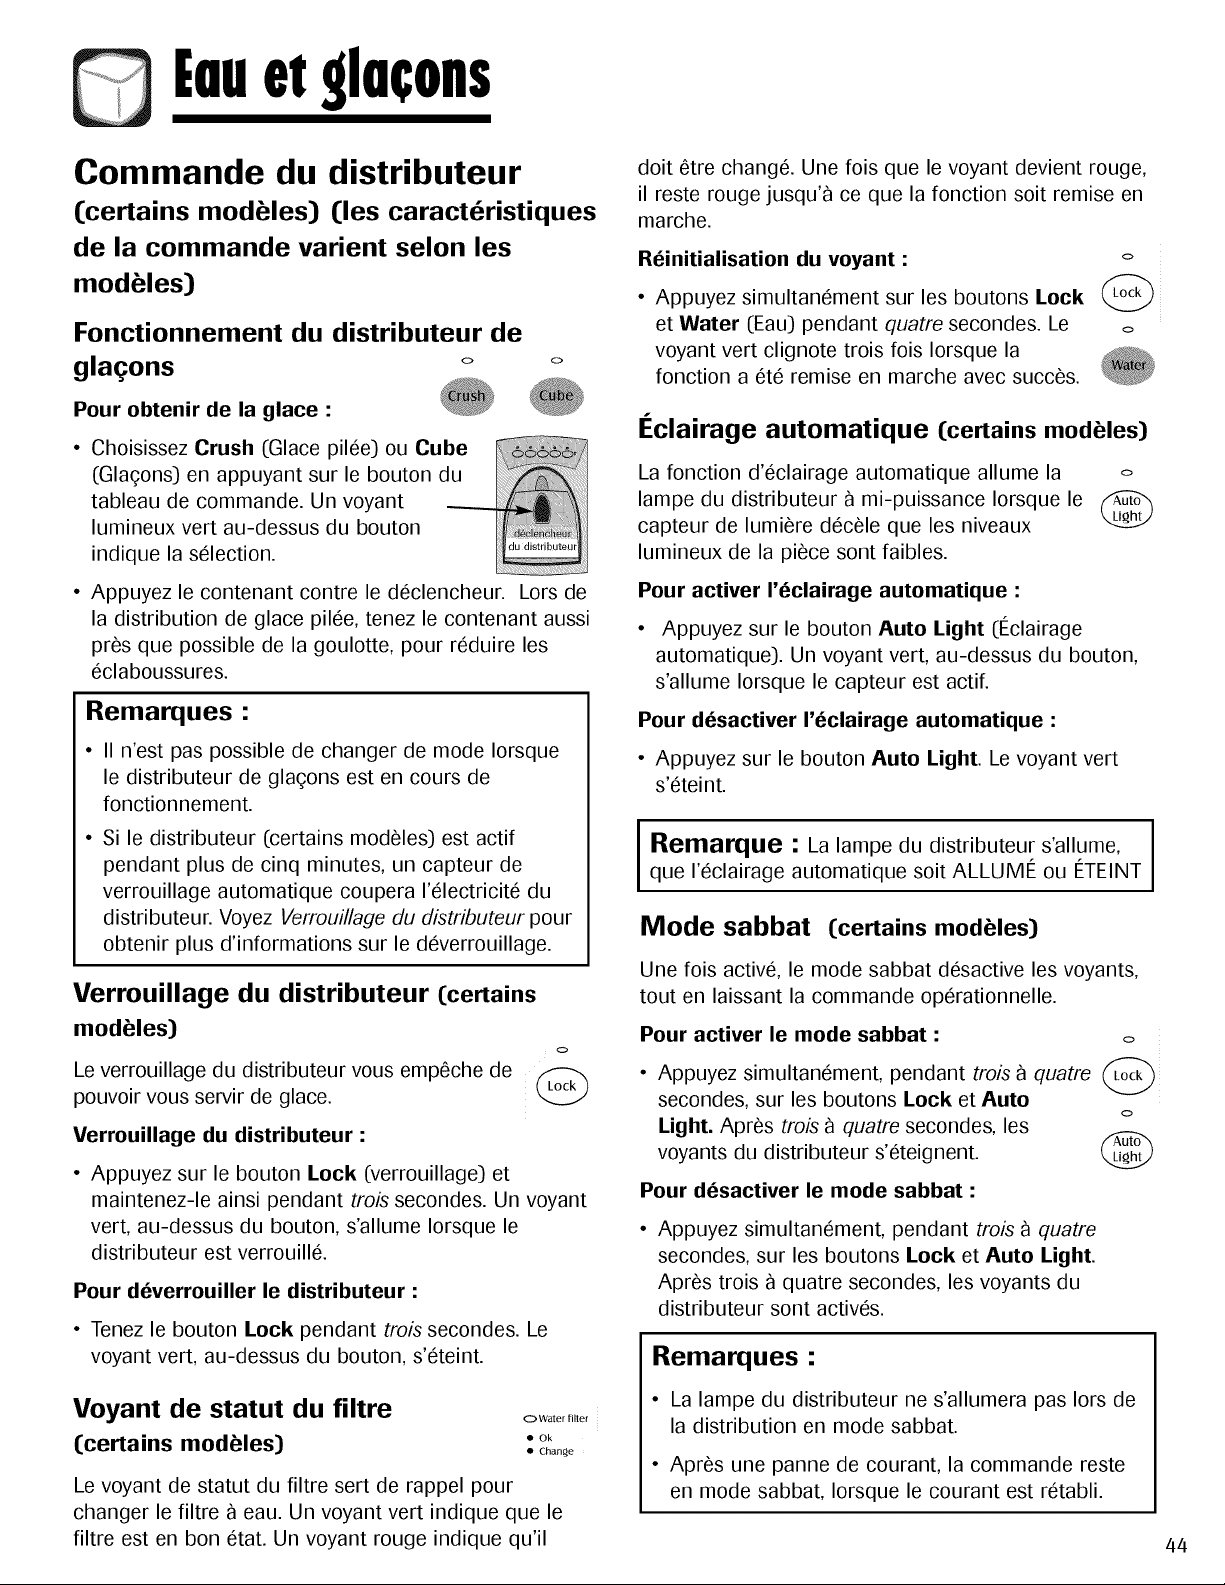
[ouet91o¢ons
Commande du distributeur
[certains modbles) lies caract6ristiques
de la commande varient selon les
modbles)
Fonctionnement du distributeur de
gla_ons o o
Pour obtenir de la glace :
• Choisissez Crush (Glace pilee) ou Cube
(Gla?ons) en appuyant sur le bouton du
tableau de commande. Un voyant
lumineux vert au-dessus du bouton
indique la selection.
• Appuyez le contenant contre le declencheur. Lors de
la distribution de glace pilee, tenez le contenant aussi
pres que possible de la goulotte, pour reduire les
eclaboussures.
Remarques •
• II n'est pas possible de changer de mode Iorsque
le distributeur de gla?ons est en cours de
fonctionnement.
• Si le distributeur (certains modeles) est actif
pendant plus de cinq minutes, un capteur de
verrouillage automatique coupera I'electricite du
distributeur. Voyez Verrouillage du distributeur pour
obtenir plus d'informations sur le deverrouillage.
Verrouillage du distributeur [certains
modbles]
Le verrouillage du distributeur vous empeche de
pouvoir vous servir de glace.
Verrouillage du distributeur :
• Appuyez sur le bouton Lock (verrouillage) et
maintenez-le ainsi pendant trois secondes. Un voyant
vert, au-dessus du bouton, s'allume Iorsque le
distributeur est verrouille.
Pour deverrouiller le distributeur :
• Tenez le bouton Lock pendant trois secondes. Le
voyant vert, au-dessus du bouton, s'eteint.
Voyant de statut du filtre
[certains modbles]
O Water filter
• Ok
• Chan_e
Le voyant de statut du filtre sert de rappel pour
changer le filtre a eau. Un voyant vert indique que le
filtre est en bon etat. Un voyant rouge indique qu'il
doit etre change. Une lois que le voyant devient rouge,
il reste rouge jusqu'a ce que la fonction soit remise en
marche.
Reinitialisation du voyant :
• Appuyez simultanement sur les boutons Lock
et Water (Eau) pendant quatre secondes. Le
voyant vert clignote trois lois Iorsque la
fonction a ete remise en marche avec succes.
I_clairage automatique [certains modbles)
La fonction d'eclairage automatique allume la o
lampe du distributeur a mi-puissance Iorsque le
capteur de lumiere decele que les niveaux
lumineux de la piece sont faibles.
Pour activer I'eclairage automatique :
• Appuyez sur le bouton Auto Light (l_clairage
automatique). Un voyant vert, au-dessus du bouton,
s'allume Iorsque le capteur est actif.
Pour desactiver I'eclairage automatique :
• Appuyez sur le bouton Auto Light. Le voyant vert
s'eteint.
I Remarque • La lampe du distributeur s'allume, I
I
que I'eclairage automatique soit ALLUMI_ ou I_TEINT
I
Mode sabbat [certains modbles)
Une lois active, le mode sabbat desactive les voyants,
tout en laissant la commande operationnelle.
Pour activer le mode sabbat :
• Appuyez simultanement, pendant trois a quatre
secondes, sur les boutons Lock et Auto
Light. Apres trois a quatre secondes, les
voyants du distributeur s'eteignent.
Pour desactiver le mode sabbat :
Appuyez simultanement, pendant trois a quatre
secondes, sur les boutons Lock et Auto Light.
Apres trois a quatre secondes, les voyants du
distributeur sont actives.
Remarques •
• La lampe du distributeur ne s'allumera pas Iors de
la distribution en mode sabbat.
• Apres une panne de courant, la commande reste
en mode sabbat, Iorsque le courant est retabli.
44
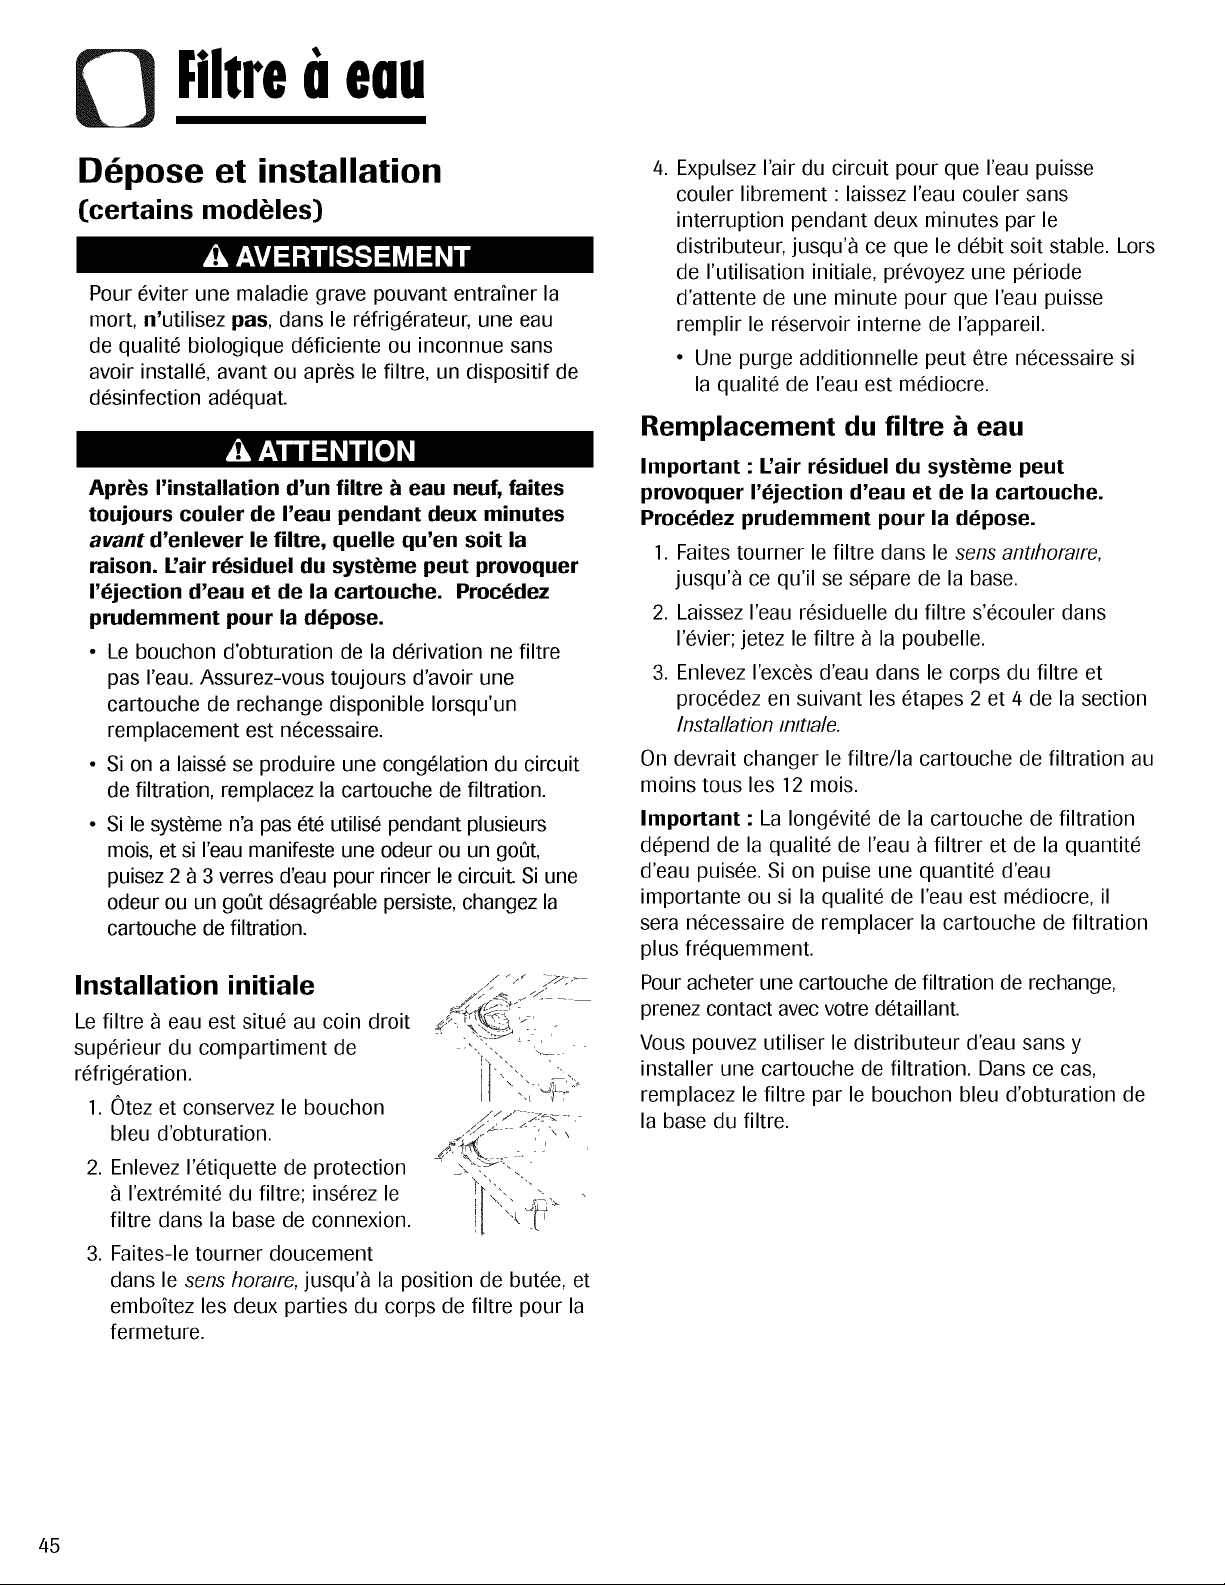
Filtred eau
D pose et installation
(certains modbles)
Pour eviter une maladie grave pouvant entrainer la
mort, n'utilisez pas, dans le refrigerateur, une eau
de qualit6 biologique deficiente ou inconnue sans
avoir install6, avant ou apres le filtre, un dispositif de
desinfection adequat.
Aprbs rinstallation d'un filtre b eau neuf, faites
toujours couler de I'eau pendant deux minutes
avant d'enlever le filtre, quelle qu'en soit la
raison. L'air r6siduel du systbme peut provoquer
1'6jection d'eau et de la cartouche. Proc6dez
prudemment pour la d6pose.
• Le bouchon d'obturation de la derivation ne filtre
pas reau. Assurez-vous toujours d'avoir une
cartouche de rechange disponible Iorsqu'un
remplacement est necessaire.
• Si on a laiss6 se produire une congelation du circuit
de filtration, remplacez la cartouche de filtration.
• Si le systeme n'a pas 6te utilis6 pendant plusieurs
mois, et si I'eau manifeste une odeur ou un goQt,
puisez 2 a 3 verres d'eau pour rincer le circuiL Si une
odeur ou un go0t desagreable persiste, changez la
cartouche de filtration.
Installation initiale
Le filtre _ eau est situe au coin droit
superieur du compartiment de
refrigeration.
1. Otez et conservez le bouchon
bleu d'obturation.
2. Enlevez 1'etiquette de protection
I'extremit6 du filtre; inserez le
filtre dans la base de connexion.
, Faites-le tourner doucement
dans le sens horaire, jusqu'_ la position de butee, et
emboitez les deux parties du corps de filtre pour la
fermeture.
,
Expulsez I'air du circuit pour que I'eau puisse
couler librement : laissez I'eau couler sans
interruption pendant deux minutes par le
distributeur, jusqu'_ ce que le debit soit stable. Lors
de I'utilisation initiale, prevoyez une periode
d'attente de une minute pour que I'eau puisse
remplir le reservoir interne de I'appareil.
• Une purge additionnelle peut etre necessaire si
la qualit6 de I'eau est mediocre.
Remplacement du filtre eau
Important : L'air rbsiduel du systbme peut
provoquer I'bjection d'eau et de la cartouche.
Procbdez prudemment pour la dbpose.
1. Faites tourner le filtre dans le sens antihoraire,
jusqu'_ ce qu'il se separe de la base.
2. Laissez I'eau residuelle du filtre s'ecouler dans
1'6vier; jetez le filtre _ la poubelle.
3. Enlevez I'exces d'eau dans le corps du filtre et
procedez en suivant les 6tapes 2 et 4 de la section
Installation inltiale.
On devrait changer le filtre/la cartouche de filtration au
moins tousles 12 mois.
Important : La Iongevit6 de la cartouche de filtration
depend de la qualit6 de I'eau _ filtrer et de la quantit6
d'eau puisee. Si on pulse une quantit6 d'eau
importante ou si la qualit6 de I'eau est mediocre, il
sera necessaire de remplacer la cartouche de filtration
plus frequemment.
Pour acheter une cartouche de filtration de rechange,
prenez contact avec votre detaillant.
Vous pouvez utiliser le distributeur d'eau sans y
installer une cartouche de filtration. Dans ce cas,
remplacez le filtre par le bouchon bleu d'obturation de
la base du filtre.
45
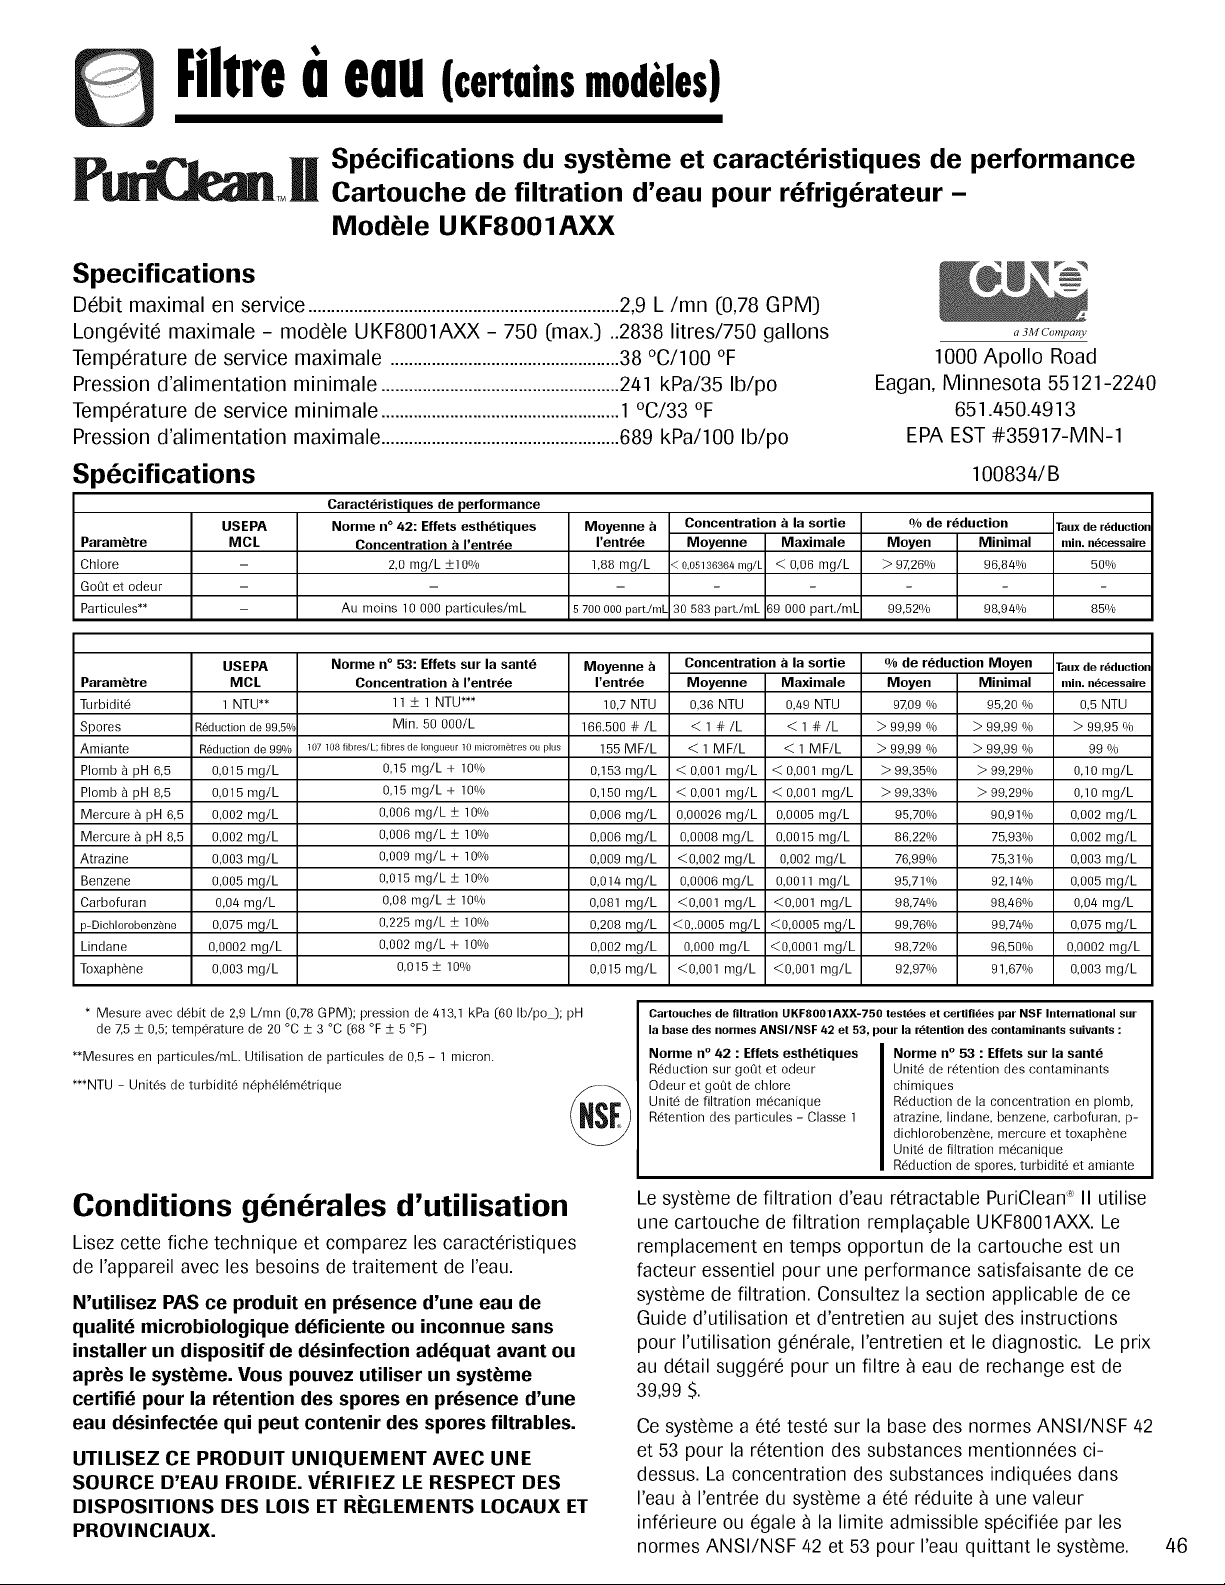
Filtrea euu(certuinsmodeles)
ToH
Sp6cifications du systbme et caract6ristiques de performance
Cartouche de filtration d'eau pour r6frig6rateur -
Modble UKFB001AXX
Specifications
Debit maximal en service ....................................................................2,9 L/mn (0,78 GPM]
Longevite maximale - modele U KFB001AXX - 750 (max.) ..2838 litres/750 gallons
Temperature de service maximale ..................................................38 °C/100 °F
Pression d'alimentation minimale ....................................................241 kPa/35 Ib/po
Temperature de service minimale ....................................................1 °C/33 °F
Pression d'alimentation maximale ....................................................689 kPa/100 Ib/po
a 3M Company
1000 Apollo Road
Eagan, Minnesota 55121-2240
651.450.4913
EPA EST #35917-MN-1
Sp6cifications
USEPA
Parametre M C L
Chlore
Go0t et odeur
Particules**
Caractbristiques de performance
Norme n° 42: Effets esth_tiques Moyenne a Concentration _ la sortie
Concentration a I'entrbe I'entrbe Moyenne Maximale
2,0 mg/L _+10% 1,88 mg/L <0,05136364mg/L < 0,06 mg/L
Au moins 10 000 particules/mL 5700 000 part./m[ 30 583 part./mL 39 000 part/mL
100834/B
% de redaction
Moyen Minimal
> 9Z26% 96,84%
99,52% 98,94%
raux de r6duction
rain. n6cessaire
5O%
85%
Parambtre
Turbidite
Spores
Amiante
Plomb _ pH 6,5
Plomb _ pH 8,5
Mercure _ pH 6,5
Mercure _ pH 8,5
Atrazine
Benzene
Carbofuran
p-Dichlorobenzene
Lindane
Toxaphene
USEPA
MCL
1 NTU**
Reductionde 99,5o/o
Reductionde 99o/o
0,015 mg/L
0,015 mg/L
0,002 mg/L
0,002 mg/L
0,003 mg/L
0,005 mg/L
0,04 mg/L
0,075 mg/L
0,0002 mg/L
0,003 mg/L
Norme n° 53: Effets sur la santb
Concentration a I'entrbe
II ± 1 NTU***
Min. 50 000/L
107108fibles/L;fiblesdeIongueur 10microm_tresou plus
0,15 mg/L + 10%
0,15 mg/L + 10%
0,006 mg/L ± 10%
0,006 mg/L ± 10%
0,009 mg/L + 10%
0,015 mg/L ± 10%
0,08 mg/L ± 10%
0,225 mg/L ± 10%
0,002 mg/L + 10%
0,015 ± 10%
Moyenne
I'entr_e
10,7 NTU
166.500 #/L
155 MF/L
0,153 mg/L
0,150 mg/L
0,806 mg/L
0,806 mg/L
0,809 mg/L
0,814 mg/L
0,081 mg/L
0,208 mg/L
0,002 mg/L
0,815 mg/L
Concentration a la sortie
Moyenne Maximale
0,36 NTU 0,49 NTU
<I#/L <I#/L
< 1 MF/L < 1 MF/L
< 0,001 mg/L < 0,001 mg/L
< 0,001 mg/L < 0,001 mg/L
0,00026 mg/L 0,0005 mg/L
0,0008 mg/L 0,0015 mg/L
<0,002 mg/L 0,002 mg/L
0,0006 mg/L 0,0011 mg/L
<0,801 mg/L <0,801 mg/L
<0,.0005 mg/L <0,0005 mg/L
0,O00 mg/L <0,0001 mg/L
<0,801 mg/L <0,801 mg/L
% de reduction Moyen
Moyen Minimal
9Z09 % 95,20 %
> 99,99 % > 99,99 %
> 99,99 % > 99,99 %
> 99,35% > 99,29%
99,33% > 99,29%
95,70% 90,91%
86,22% 75,93%
76,99% 75,31%
95,71% 92,14%
98,74% 98,46%
99,76% 99,74%
98,72% 96,50%
92,97% 91,67%
]'auxde r6duction
rain. n6cessaire
O,5 NTU
> 99,95 %
99 %
0,10 mg/L
0,10 mg/L
0,002 mg/L
0,002 mg/L
0,003 mg/L
0,005 mg/L
0,04 mg/L
0,075 mg/L
0,0002 mg/L
0,003 mg/L
* Mesure avec debit de 2,9 L/ran (0,78 GPM); pression de 413,1 kPa (60 Ib/po_; pH
de Z5 ± 0,5; temperature de 20 °C ± 3 °C (68 °F ± 5 °F)
**Mesures en particules/mh Utilisation de particules de 0,5 - 1 micron.
***NTU - Unites de turbidite nephelemetrique .f----_
Cartouches de filtration UKF8001AXX-750 test6es et certifi6es par NSF International sur
la base des normes ANSI/NSF 42 et 53, pour la r6tention des contaminants suivants :
Norme n ° 42 : Effets esthbtiqaes
Reduction sur goQt et odeur
Odeur et goOt de chlore
Unite de filtration mecanique
Retention des particules - Classe 1
Norme n° 53 : Effets sur la sante
Unite de retention des contaminants
chimiques
Reduction de la concentration en plomb,
atrazine, lindane, benzene, carbofuran, p-
dichlorobenzene, mercure et toxaphene
Unite de filtration mecanique
Reduction de spores, turbidite et amiante
Conditions generales d'utilisation
Lisez cette fiche technique et comparez les caracteristiques
de I'appareil avec les besoins de traitement de I'eau.
N'utilisez PAS ce produit en presence d'une eau de
qualite microbiologique deficiente ou inconnue sans
installer un dispositif de desinfection adequat avant ou
aprbs le systbme. Vous pouvez utiliser un systbme
certifi6 pour la retention des spores en presence d'une
eau d6sinfectee qui peut contenir des spores filtrables.
UTILISEZ CE PRODUIT UNIQUEMENT AVEC UNE
SOURCE D'EAU FROIDE. VI_RIFIEZ LE RESPECT DES
DISPOSITIONS DES LOIS ET Ri:GLEMENTS LOCAUX ET
PROVINCIAUX.
Le systeme de filtration d'eau retractable PuriClean_ II utilise
une cartouche de filtration rempla?able UKF8001AXX. Le
remplacement en temps opportun de la cartouche est un
facteur essentiel pour une performance satisfaisante de ce
systeme de filtration. Consultez la section applicable de ce
Guide d'utilisation et d'entretien au sujet des instructions
pour I'utilisation generale, I'entretien et le diagnostic. Le prix
au detail suggere pour un filtre _ eau de rechange est de
39,99 $.
Ce systeme a 6t6 teste sur la base des normes ANSI/NSF 42
et 53 pour la retention des substances mentionnees ci-
dessus. La concentration des substances indiquees dans
I'eau _ I'entree du systeme a ete reduite 9 une valeur
inferieure ou egale _ la limite admissible specifiee par les
normes ANSI/NSF 42 et 53 pour I'eau quittant le systeme.
46
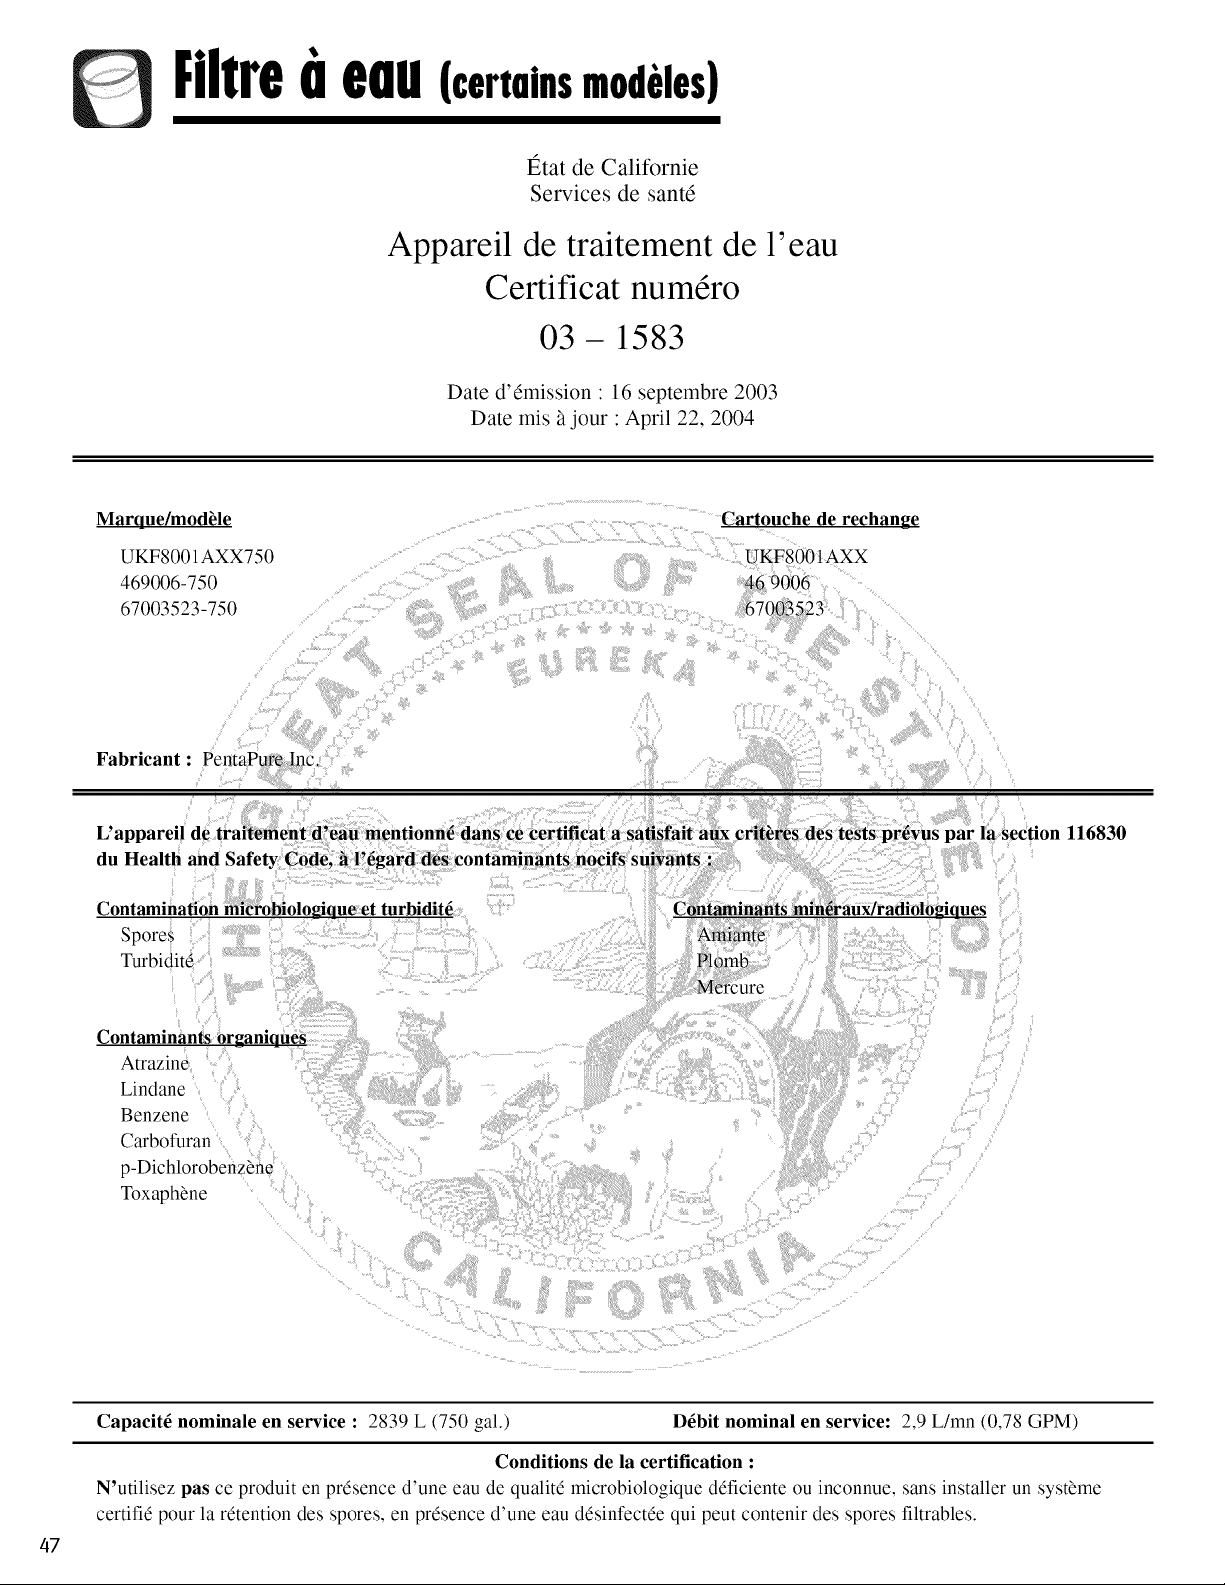
FiltreLneuu(certuinsmodeles)
I_tat de Calitbrnie
Services de sant6
Appareil de traitement de 1'eau
Certificat num6ro
03- 1583
Date d'dmission • 16 septembre 2003
Date mis 5 jour • April 22, 2004
Marque/modUle
UKF8001AXX750
469006-750
67003523-750
Cartouche de rechange
UKF8001AXX
Fabricant : PentaPure Inc.
L'appareil de traitement d'eau mentionn6 dans ce certificat a satiSfait a_ cri_s des tests pr6vus par la section 116830
dn Health and Safety Code, hF6gard des contaminants nocffs snivants :i _ .
Contamination obiologique et turbidit6 Contaminants min_aux/radiolozioues
Spores
Turbidit6
Contaminants organiques
Atrazine
Lindane
Benzene
Carbofuran
p-Dichlorobenz_ne
Toxaph_ne
47
Capacit_ nominale en service : 2839 L (750 gal.) D_bit nominal en service: 2,9 L/mn (0,78 GPM)
Conditions de la certification :
N'utilisez pasce produit en pr6sence d'une eau de qualit6 microbiologique d6ficiente ou inconnue, sans installer un syst_me
certifi6 pour la r6tention des spores, en pr6sence d'une eau d6sinfect6e qui peut contenir des spores filtrables.
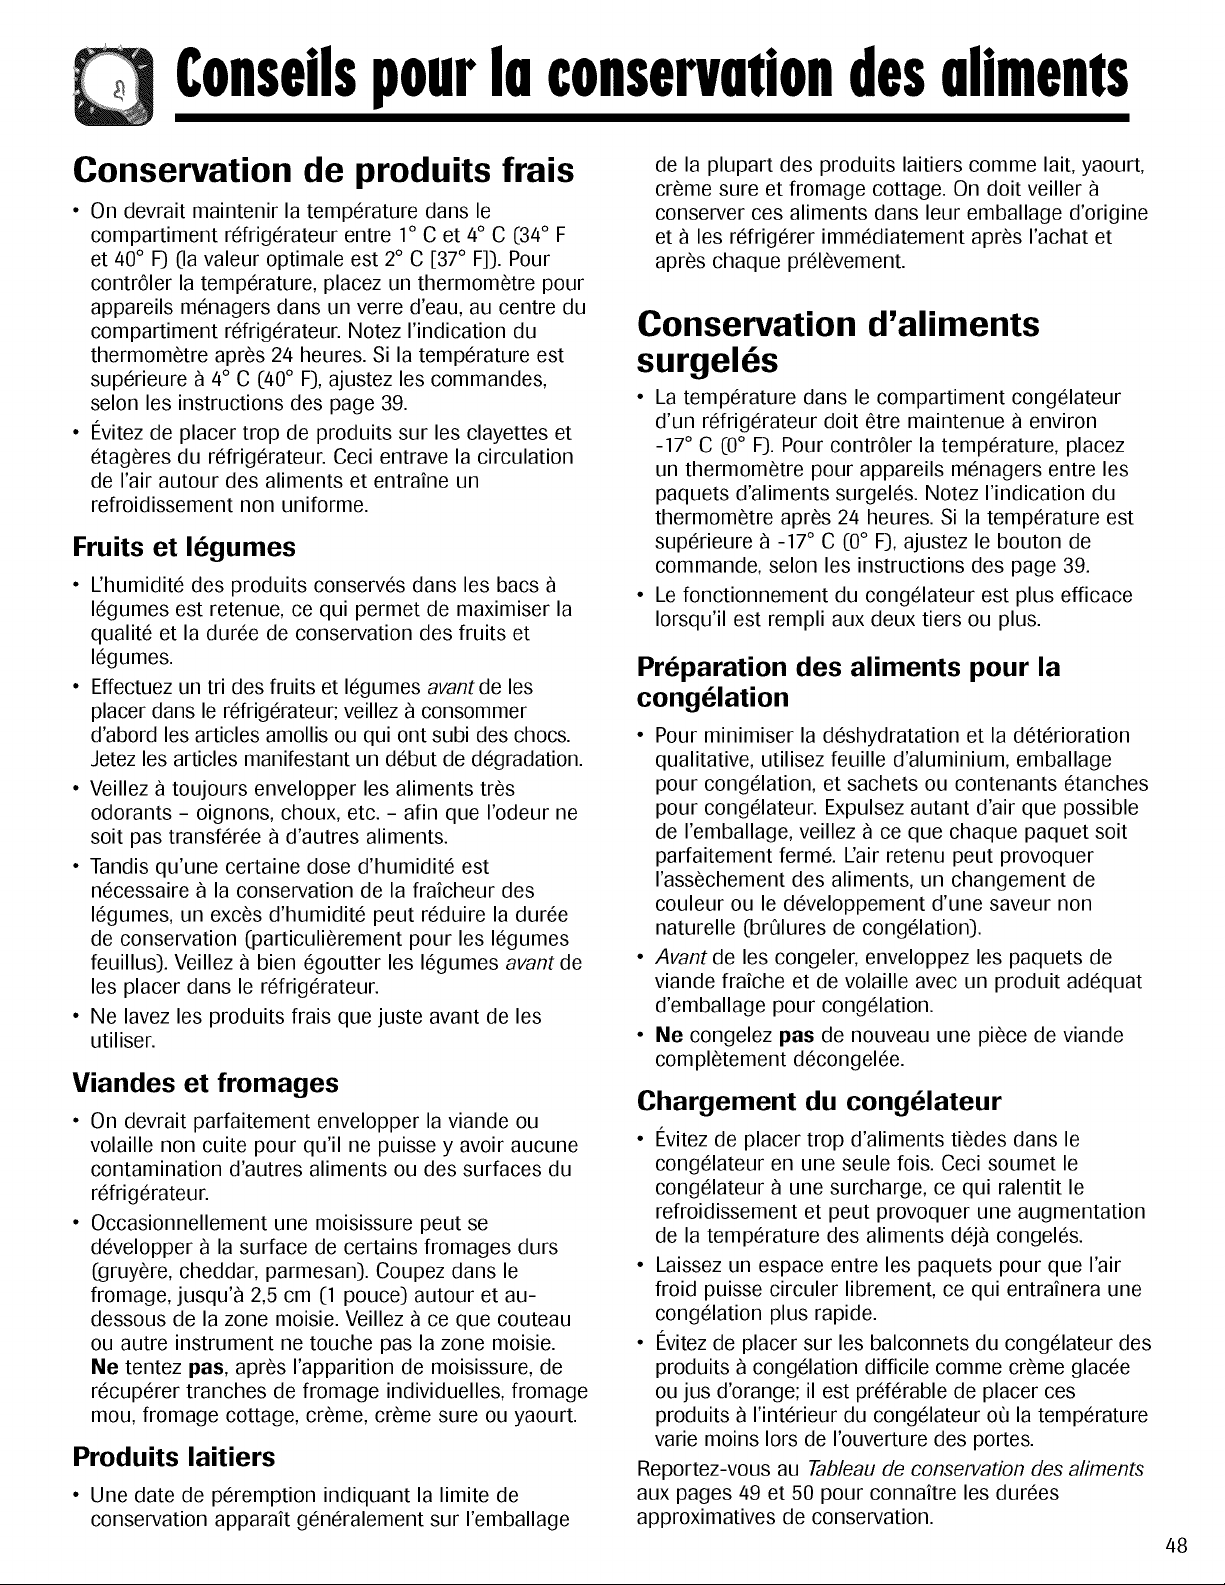
Conseilspourluconservutiondesuliments
Conservation de produits frais
• On devrait maintenir la temperature dans le
compartiment refrigerateur entre 1° C et 4° C (34° F
et 40° F) (la valeur optimale est 2° C [37° F]). Pour
contr61er la temperature, placez un thermometre pour
appareils menagers dans un verre d'eau, au centre du
compartiment refrigerateur. Notez rindication du
thermometre apres 24 heures. Si la temperature est
superieure a 4° C (40° F), ajustez les commandes,
selon les instructions des page 39.
• #__vitezde placer trop de produits sur les clayettes et
etageres du refrigerateur. Ceci entrave la circulation
de rair autour des aliments et entraine un
refroidissement non uniforme.
Fruits et 16gumes
• L'humidite des produits conserves dans les bacs
legumes est retenue, ce qui permet de maximiser la
qualite et la duree de conservation des fruits et
legumes.
• Effectuez un tri des fruits et legumes avant de les
placer dans le refrigerateur; veillez a consommer
d'abord les articles amollis ou qui ont subi des chocs.
Jetez les articles manifestant un debut de degradation.
• Veillez a toujours envelopper les aliments tres
odorants - oignons, choux, etc. - afin que I'odeur ne
soit pas transferee a d'autres aliments.
• Tandis qu'une certaine dose d'humidite est
necessaire a la conservation de la fraicheur des
legumes, un exces d'humidite peut reduire la duree
de conservation (particulierement pour les legumes
feuillus). Veillez a bien egoutter les legumes avant de
les placer dans le refrigerateur.
• Ne lavez les produits frais que juste avant de les
utiliser.
Viandes et fromages
• On devrait parfaitement envelopper la viande ou
volaille non cuite pour qu'il ne puisse y avoir aucune
contamination d'autres aliments ou des surfaces du
refrigerateur.
• Occasionnellement une moisissure peut se
developper a la surface de certains fromages durs
(gruyere, cheddar, parmesan). Coupez dans le
fromage, jusqu'a 2,5 cm (1 pouce) autour et au-
dessous de la zone moisie. Veillez ace que couteau
ou autre instrument ne touche pas la zone moisie.
He tentez pas, apres I'apparition de moisissure, de
recuperer tranches de fromage individuelles, fromage
mou, fromage cottage, creme, creme sure ou yaourt.
Produits laitiers
• Une date de peremption indiquant la limite de
conservation apparait generalement sur I'emballage
de la plupart des produits laitiers comme lait, yaourt,
creme sure et fromage cottage. On doit veiller
conserver ces aliments dans leur emballage d'origine
eta les refrigerer immediatement apres rachat et
apres chaque prelevement.
Conservation d'aliments
surgeles
• La temperature dans le compartiment congelateur
d'un refrigerateur doit etre maintenue a environ
-17 ° C (0° F). Pour contr61er la temperature, placez
un thermometre pour appareils menagers entre les
paquets d'aliments surgeles. Notez I'indication du
thermometre apres 24 heures. Si la temperature est
superieure a -17 ° C (0° F), ajustez le bouton de
commande, selon les instructions des page 39.
• Le fonctionnement du congelateur est plus efficace
Iorsqu'il est rempli aux deux tiers ou plus.
Preparation des aliments pour la
cong61ation
• Pour minimiser la deshydratation et la deterioration
qualitative, utilisez feuille d'aluminium, emballage
pour congelation, et sachets ou contenants etanches
pour congelateur. Expulsez autant d'air que possible
de I'emballage, veillez ace que chaque paquet soit
parfaitement ferme. I_:airretenu peut provoquer
I'assechement des aliments, un changement de
couleur ou le developpement d'une saveur non
naturelle (brQlures de congelation).
• Avant de les congeler, enveloppez les paquets de
viande fraiche et de volaille avec un produit adequat
d'emballage pour congelation.
• He congelez pas de nouveau une piece de viande
completement decongelee.
Chargement du cong61ateur
• #__vitezde placer trop d'aliments tiedes dans le
congelateur en une seule lois. Ceci soumet le
congelateur a une surcharge, ce qui ralentit le
refroidissement et peut provoquer une augmentation
de la temperature des aliments deja congeles.
• Laissez un espace entre les paquets pour que I'air
froid puisse circuler librement, ce qui entrainera une
congelation plus rapide.
• #__vitezde placer sur les balconnets du congelateur des
produits a congelation difficile comme creme glacee
ou jus d'orange; il est preferable de placer ces
produits a I'interieur du congelateur ou la temperature
varie moins Iors de rouverture des portes.
Reportez-vous au Tableau de conservation des aliments
aux pages 49 et 50 pour connaitre les durees
approximatives de conservation.
48

Conseilspourluconservutiondesuliments
Tableau de conservation des aliments
La dur_e de conservation est approximative et peut varier selon le type d'emballage, la temperature de conservation
et la qualite du produit Iors de son achat.
PRODUITS LAITI ERS
Beurre 1 mois 6 _ 9 mois Empaquetez bien ou couvrez.
Lait et creme 1 semaine Non recommande
Verifiez la date sur I'emballage. Fermez
bien. Ne remettez pas la pattie non
utilisee dans le contenant d'origine. Ne
congelez pas la creme _ moins qu'elle
ne soit fouettee.
Fromage 9 la creme, tartinade de 1 _ 2 semaines Non recommande Enveloppez bien.
fromage et produits au fromage
Fromage cottage 3 _ 5 jours Non recommande Conservez dans le contenant d'origine.
Verifiez la date sur le cartonnage.
Creme sure 10 jours Non recommande Conservez dans le contenant d'origine.
Verifiez la date sur le cartonnage.
Fromage dur 1 _ 2 mois 4 _ 6 mois Enveloppez bien.
(gruyere, cheddar et parmesan) Peut s'emietter Decoupez route pattie moisie.
CEUFS
Oeufs en coquille 3 semaines Non recommande Refrigerez, pointe vers le bas.
Jaunes ou blancs 2 _ 4 jours 9 _ 12 mois Pour chaque tasse de jaunes d'oeuf,
ajoutez 1 c. 9 the de sucre pour les
p_tisseries ou 1 c. _ the de sel pour les
mets non sucres.
FRU ITS
Pommes 1 mois 8 mois (cuites) I_galement,conservationde pommes _ chair
ferme ou non mores_ 15-21° C (60-70° F).
Bananes 2 _ 4 jours 6 mois Faites m0rir 9 la temperature ambiante
(entieres/pelees) avant de mettre au refrigerateur.
Remarque : Les bananes noircissent
Iorsqu'elles sont mises au refrigerateur.
Poires, prunes, avocats 3 _ 4 jours Non recommande Faites m0rir 9 la temperature ambiante
avant de mettre au refrigerateur.
Remarque : Les avocats noircissent
Iorsqu'ils sont mis au refrigerateur.
Baies, cerises, abricots 2 _ 3 jours 6 mois Faites m0rir _ la temperature ambiante
avant de mettre au refrigerateur.
Raisin 3 _ 5 jours 1 mois (entier) Faites m0rir _ la temperature ambiante
avant de mettre au refrigerateur.
Agrumes 1 _ 2 semaines Non recommande Se conservent aussi _ 15-21° C (60-
70° F).Au refrigerateur, conservez sans
les recouvrir.
Ananas, decoupe 2 _ 3 jours 6 _ 12 mois Ne m0rit pas apres I'achat. Utilisez
rapidement.
49
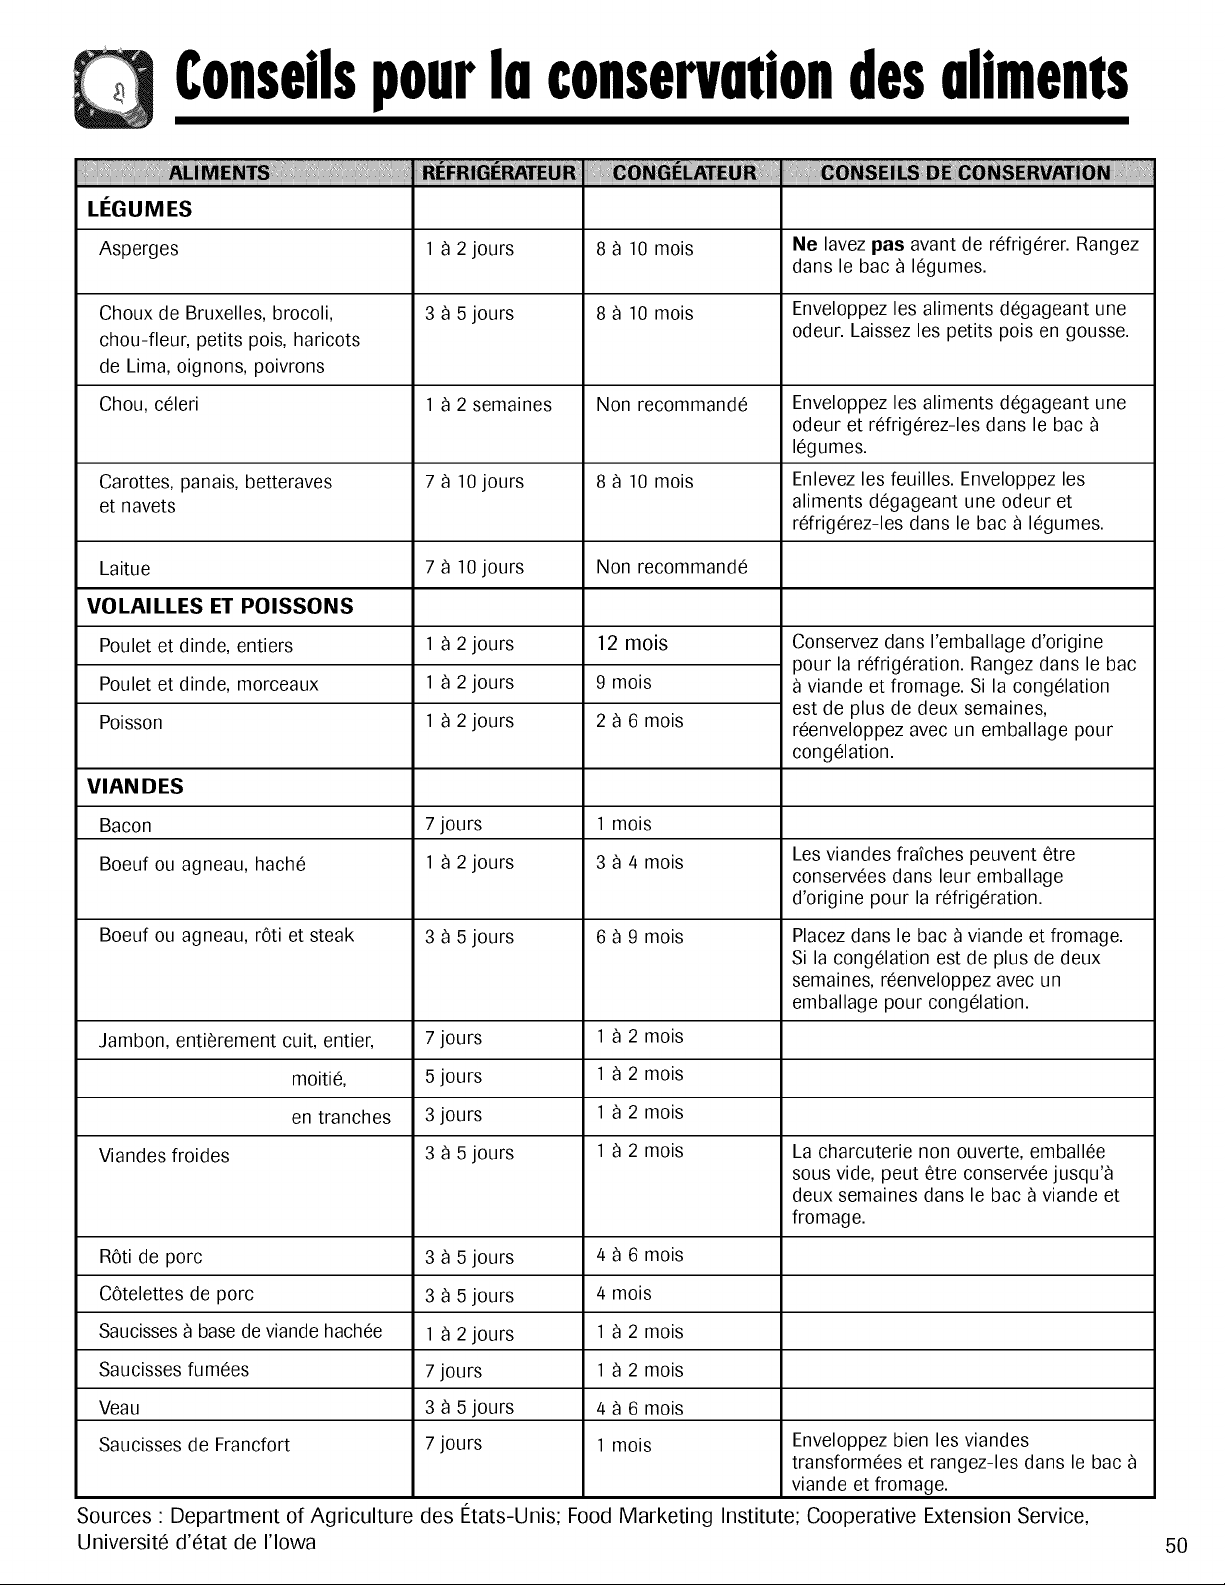
¢onseilspourIoconservmiondesuliments
LI_GUMES
Asperges I _ 2 jours 8 _ 10 mois Ne lavez pas avant de r_frigerer. Rangez
dans le bac _ legumes.
Choux de Bruxelles, brocoli, 3 _ 5 jours 8 _ 10 mois Enveloppez les aliments degageant une
chou-fleur, petits pois, haricots odeur. Laissez les petits pois en gousse.
de Lima, oignons, poivrons
Chou, celeri 1 _ 2 semaines Non recommande Enveloppez les aliments degageant une
odeur et refrigerez-les dans le bac
legumes.
Carottes, panais, betteraves 7 _ 10 jours 8 _ 10 mois Enlevez les feuilles. Enveloppez les
et navets aliments degageant une odeur et
refrigerez-les dans le bac _ legumes.
Laitue 7 _ 10 jours Non recommande
VOLAILLES ET POISSONS
Poulet et dinde, entiers I _ 2 jours 12 mois Conservez dans I'emballage d'origine
pour la refrigeration. Rangez dans le bac
Poulet et dinde, morceaux 1 _ 2 jours 9 mois _ viande et fromage. Si la congelation
est de plus de deux semaines,
Poisson 1 _ 2 jours 2 _ 6 mois reenveloppez avec un emballage pour
congelation.
VIANDES
Bacon 7 jours 1 mois
Boeuf ou agneau, hache 1 _ 2 jours 3 _ 4 mois Les viandes frafches peuvent etre
conservees dans leur emballage
d'origine pour la refrigeration.
Boeuf ou agneau, rOti et steak 3 _ 5 jours 6 _ 9 mois Placez dans le bac 9 viande et fromage.
Si la congelation est de plus de deux
semaines, reenveloppez avec un
emballage pour congelation.
Jambon, entierement cuit, entier, 7 jours 1 _ 2 mois
moitie, 5 jours 1 _ 2 mois
en tranches 3 jours 1 _ 2 mois
Viandes froides 3 _ 5 jours 1 _ 2 mois La charcuterie non ouverte, emballee
sous vide, peut etre conservee jusqu'9
deux semaines dans le bac _ viande et
fromage.
ROtide porc 3 _ 5 jours 4 _ 6 mois
COtelettes de porc 3 _ 5 jours 4 mois
Saucisses_ base de viande hachee 1 _ 2 jours 1 _ 2 mois
Saucisses fumees 7 jours 1 _ 2 mois
Veau 3 _ 5 jours 4 _ 6 mois
Saucisses de Francfort 7 jours 1 mois Enveloppez bien les viandes
transformees et rangez-les dans le bac
viande et fromage.
Sources • Department of Agriculture des letats-Unis; Food Marketing Institute; Cooperative Extension Service,
Universite d'etat de rlowa
50
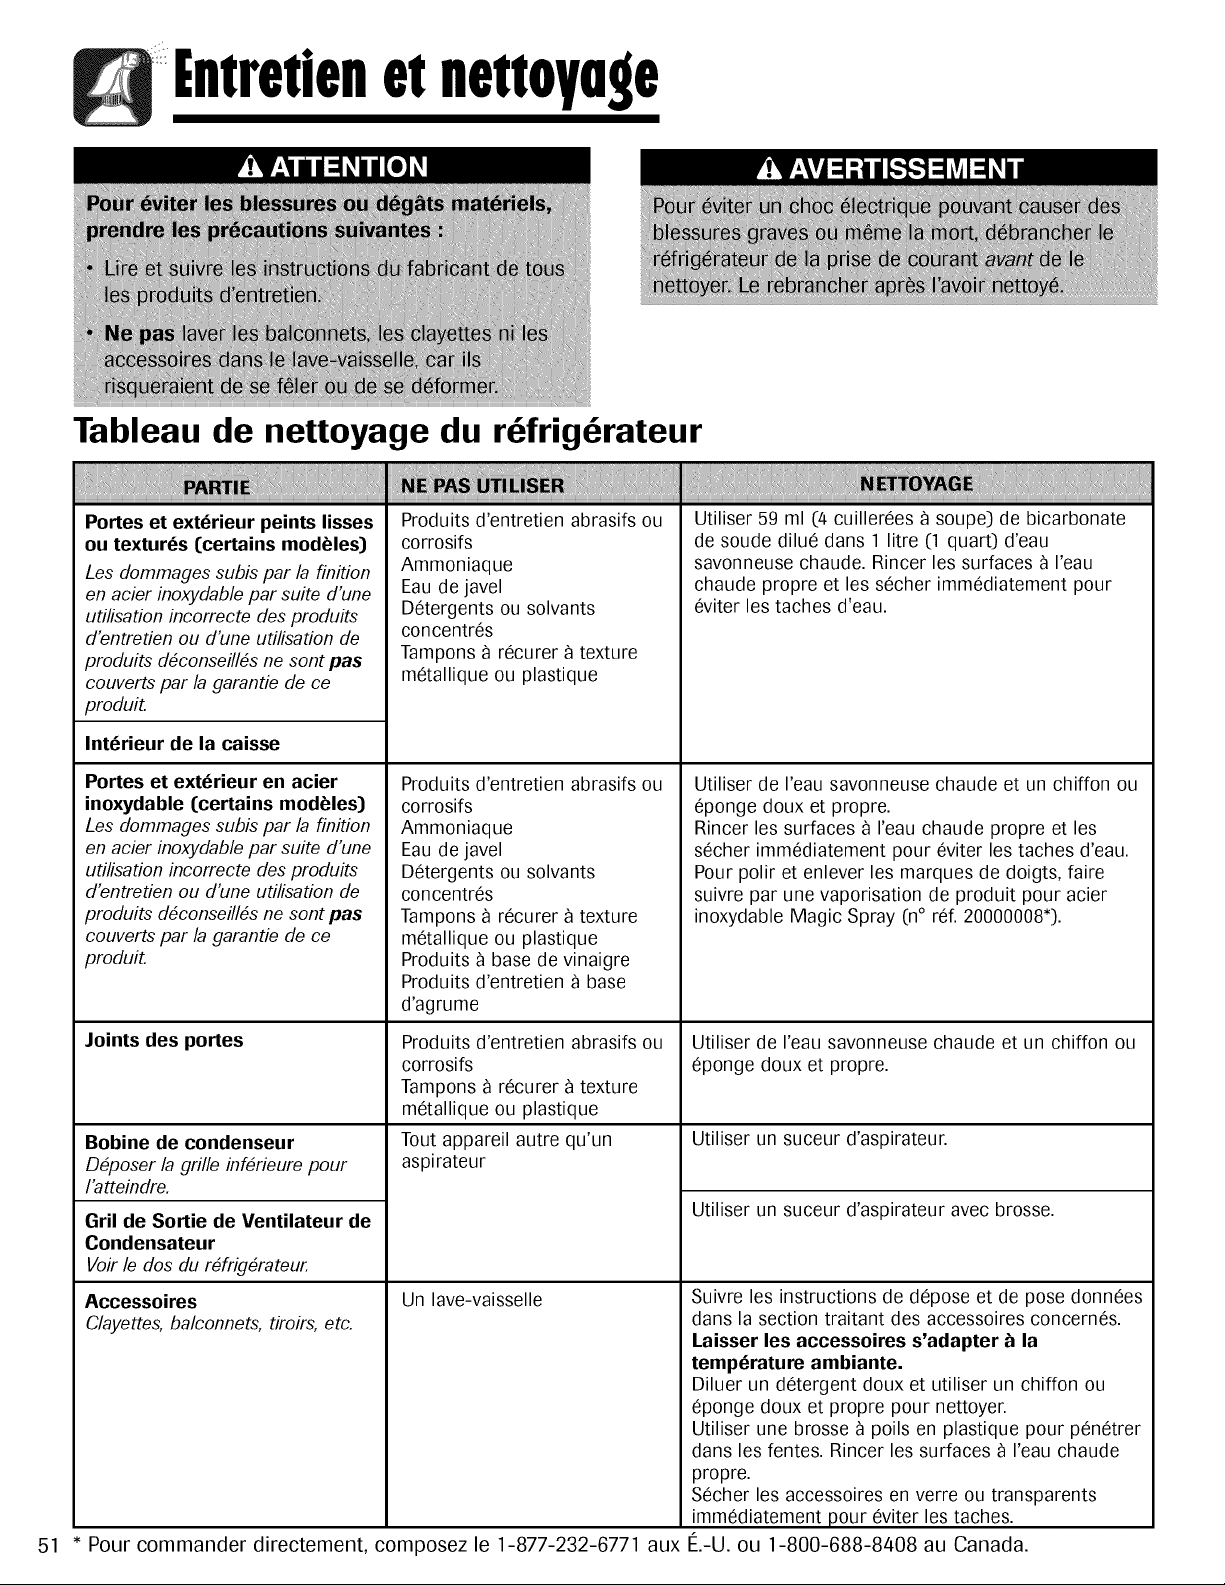
|ntredenetnettoynge
Tableau de nettoyage du r frig rateur
Portes et exterieur peints lisses
ou textures [certains modeles]
Les dommages subis par la finition
en acier inoxydable par suite d'une
utilisation incorrecte des produits
d'entretien ou d'une utilisation de
produits d_conseill_s ne sont pas
couverts par la garantie de ce
produit.
Interieur de la caisse
Portes et exterieur en acier
inoxydable [certains modeles]
Les dommages subis par la finition
en acier inoxydable par suite d'une
utilisation incorrecte des produits
d'entretien ou d'une utilisation de
produits d_conseill_s ne sont pas
couverts par la garantie de ce
produit.
Joints des portes
Bobine de condenseur
D_poser la grille inf_rieure pour
I'atteindre.
Gril de Sortie de Ventilateur de
Condensateur
Voir /e dos du r#frig#rateur.
Accessoires
Clayettes,balconnets, tiroirs, etc.
Produits d'entretien abrasifs ou
corrosifs
Ammoniaque
Eau de javel
Detergents ou solvants
concentres
Tampons 9 recurer 9 texture
metallique ou plastique
Produits d'entretien abrasifs ou
corrosifs
Ammoniaque
Eau de javel
Detergents ou solvants
concentres
Tampons 9 recurer 9 texture
metallique ou plastique
Produits 9 base de vinaigre
Produits d'entretien _ base
d'agrume
Produits d'entretien abrasifs ou
corrosifs
Tampons _ recurer 9 texture
metallique ou plastique
Tout appareil autre qu'un
aspirateur
Un lave-vaisselle
51 Pour commander directement, composez le 1-877-232-6771 aux
Utiliser 59 ml (4 cuillerees 9 soupe) de bicarbonate
de soude dilue dans 1 litre (1 quart) d'eau
savonneuse chaude. Rincer les surfaces _ I'eau
chaude propre et les secher immediatement pour
eviter les taches d'eau.
Utiliser de I'eau savonneuse chaude et un chiffon ou
eponge doux et propre.
Rincer les surfaces 9 I'eau chaude propre et les
secher immediatement pour eviter les taches d'eau.
Pour polir et enlever les marques de doigts, faire
suivre par une vaporisation de produit pour acier
inoxydable Magic Spray (n° ref. 20000008*).
Utiliser de I'eau savonneuse chaude et un chiffon ou
eponge doux et propre.
Utiliser un suceur d'aspirateur.
Utiliser un suceur d'aspirateur avec brosse.
Suivre les instructions de depose et de pose donnees
dans la section traitant des accessoires concernes.
Laisser les accessoires s'adapter _ la
temperature ambiante.
Diluer un detergent doux et utiliser un chiffon ou
eponge doux et propre pour nettoyer.
Utiliser une brosse 9 poils en plastique pour penetrer
dans les fentes. Rincer les surfaces _ I'eau chaude
propre.
Secher les accessoires en verre ou transparents
immediatement pour eviter les taches.
#__.-U.ou 1-800-688-8408 au Canada.
|ntredenetnettoynge
D sodorisation du
r frig rateur
1. Enlevez toute la nourriture et ARRf:TEZ le
refrigerateur.
2. Debranchez le refrigerateur.
3. Nettoyez les parois, la partie inferieure et le
plafond de I'interieur de la caisse, et les bacs,
tiroirs, clayettes, etageres et joints, conformement
aux instructions donnees a la page 51.
4. Diluez du detergent doux et passez la solution
dans les interstices a I'aide d'une brosse
filaments plastiques. Laissez agir pendant 5
minutes. Rincez les surfaces a I'eau tiede. Sechez
les surfaces a I'aide d'un linge propre et doux.
5. Lavez et sechez tousles flacons, recipients et
bocaux. Jetez les articles dont la date de
peremption est expiree ou qui se sont gates.
6. Enveloppez les aliments generateurs d'odeur ou
mettez-les dans des contenants bien fermes pour
eviter que les odeurs ne reapparaissent.
7. Rebranchez le refrigerateur et remettez la
nourriture a I'interieur.
8. Laissez le refrigerateur refroidir.
9. Apres 24 heures, verifiez si les odeurs ont ere
eliminees.
Si les odeurs sont toujours presentes :
1. Retirez les bacs et tiroirs et placez-les sur I'etagere
superieure du refrigerateur.
2. Remplissez les sections refrigerateur et congelateur
y compris les contre-portes, de feuilles froissees de
journaux en noir et blanc.
3. Placez des briquettes de charbon de bois au
hasard sur le journal froisse dans les deux
compartiments.
4. Fermez les portes et laissez agir pendant 24 a 48
heures.
Conseils pour I'economie
d'energie
• I_vitez de surcharger les etageres du refrigerateur.
Ceci reduit la circulation de I'air autour des aliments
et fair fonctionner le refrigerateur plus Iongtemps.
• I_vitez d'ajouter trop de nourriture tiede dans le
refrigerateur en meme temps. Ceci surcharge les
compartiments et diminue la vitesse de
refroidissement.
N'utilisez pas de papier aluminium, papier cire ou
papier essuie-tout pour recouvrir les clayettes et
etageres. Ceci diminue la circulation de I'air et
entrave le fonctionnement efficace du refrigerateur.
Un congelateur qui est aux deux tiers plein
fonctionne plus efficacement.
Installez le refrigerateur a I'endroit le plus frais de la
piece. I_vitez les zones en contact avec la lumiere
directe du soleil ou pres des bouches de chaleur,
conduits de chauffage ou appareils generateurs de
chaleur. Si ceci n'est pas possible, isolez I'exterieur
en utilisant une section de I'armoire ou une couche
supplementaire d'isolant.
Nettoyez les joints de porte tous les trois mois selon
les instructions de nettoyage. Ceci assure une bonne
fermeture des portes et une efficacite de
fonctionnement du refrigerateur.
Prenez le temps d'organiser le rangement des
articles dans le refrigerateur pour reduire le temps
d'ouverture des portes.
Assurez-vous que les portes sont bien fermees en
mettant le refrigerateur d'aplomb, selon les
instructions d'installation.
Nettoyez, tous les trois mois, les serpentins du
condenseur, comme il est indique dans les
instructions de nettoyage. Ceci augmente I'efficacite
energetique et les performances de refroidissement.
52
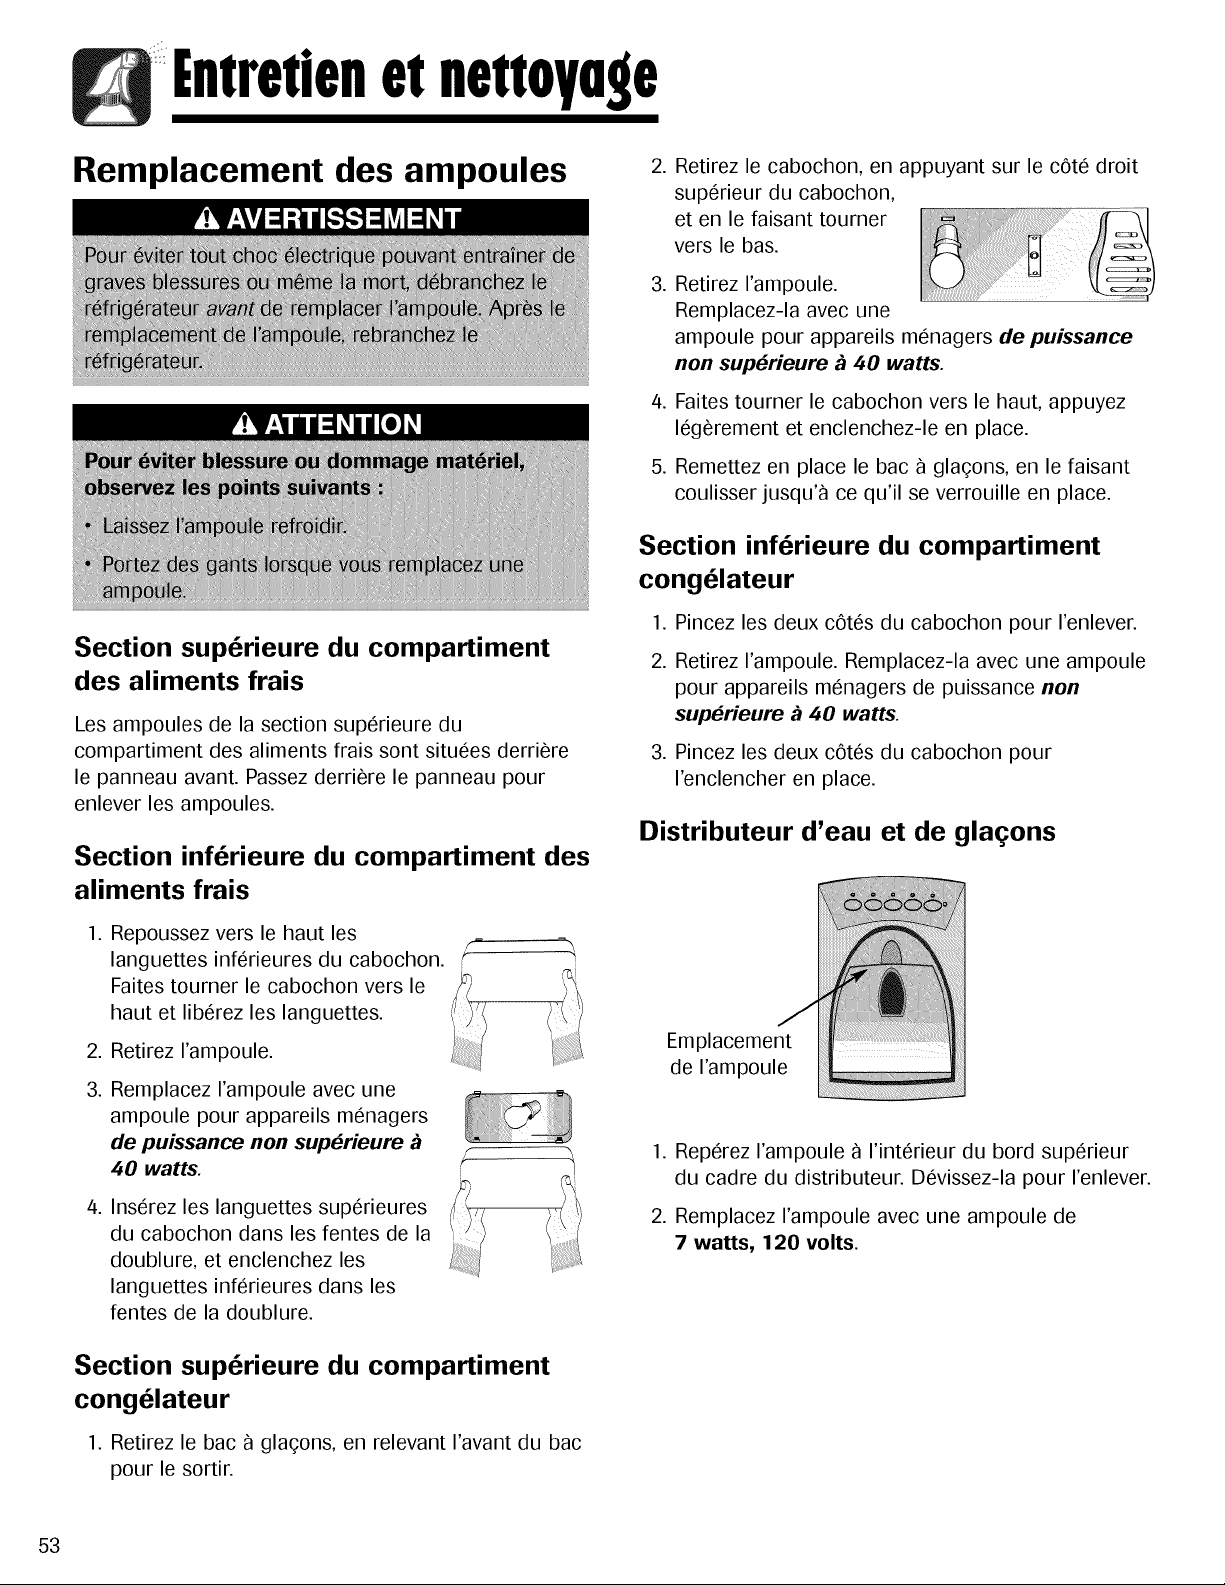
|ntredenetnettoynge
Remplacement des ampoules
.
.
Section sup6rieure du compartiment
des aliments frais
Les ampoules de la section superieure du
compartiment des aliments frais sont situees derriere
le panneau avant. Passez derriere le panneau pour
enlever les ampoules.
Section inferieure du compartiment des
aliments frais
.
.
3.
Repoussez vers le haut les
languettes inferieures du cabochon.
Faites tourner le cabochon vers le
haut et liberez les languettes.
Retirez rampoule.
Remplacez I'ampoule avec une
ampoule pour appareils menagers
de puissance non sup#rieure
40 watts.
.
Inserez les languettes superieures
du cabochon dans les fentes de la
doublure, et enclenchez les
languettes inferieures dans les
fentes de la doublure.
Section sup6rieure du compartiment
cong61ateur
1. Retirez le bac a gla£ons, en relevant I'avant du bac
pour le sortir.
.
.
Retirez le cabochon, en appuyant sur le c6te droit
superieur du cabochon,
et en le faisant tourner
vers le bas.
Retirez rampoule.
Remplacez-la avec une
ampoule pour appareils menagers de puissance
non sup#rieure _ 40 watts.
Faites tourner le cabochon vers le haut, appuyez
legerement et enclenchez-le en place.
Remettez en place le bac a gla£ons, en le faisant
coulisser jusqu'a ce qu'il se verrouille en place.
Section inferieure du compartiment
cong61ateur
1. Pincez les deux c6tes du cabochon pour I'enlever.
2. Retirez I'ampoule. Remplacez-la avec une ampoule
pour appareils menagers de puissance non
sup_rieure _ 40 watts.
3. Pincez les deux c6tes du cabochon pour
I'enclencher en place.
Distributeur d'eau et de gla£ons
Emplacement
de I'ampoule
1. Reperez I'ampoule a I'interieur du bord superieur
du cadre du distributeur. Devissez-la pour I'enlever.
2. Remplacez I'ampoule avec une ampoule de
7 watts, 120 volts.
53
|ntredenetnettoynge
Preparation pour des conges
Pour de courts congbs ou absences [trois mois
ou moins) :
1. Enlevez toutes les denrees perissables.
2. Si personne ne vient verifier le refrigerateur de temps
en temps, pendant votre absence, retirez aussi tous
les aliments congeles.
3. Si votre refrigerateur a une machine _ gla£ons
automatique :
• Coupez I'alimentation en eau de la machine
gla£ons, au moins un jour avant votre depart.
• Apres la derniere recolte de gla£ons, relevez le bras
de detection _ la position ARRf:T.
• Videz le bac _ gla£ons.
4. Si la temperature ambiante descend en dessous de
12° C (55° F), suivez les instructions ci-dessous, pour
de Iongues absences.
Dans le cas d'absences de Iongue dur_e (plus de
trois mois), OU si la tempbrature ambiante risque de
descendre en dessous de 12 ° C C55° F) :
1. Retirez les aliments.
2. Si votre refrigerateur comporte une machine
gla£ons automatique :
• Coupez I'alimentation en eau de la machine
gla£ons, au moins un jour avant votre depart.
• Apres la derniere recolte de gla£ons, relevez le bras
de detection _ la position ARRf:T.
• Videz le bac _ gla£ons.
3. Si votre refrigerateur comporte un systeme de
distribution avec filtre _ eau, retirez la cartouche de
filtration et installez la derivation du filtre. Jetez la
cartouche usagee.
4. Toumez la commande du Freezer (Congelateur) sur
OFF (Arret).
5. Debranchez le refrigerateur.
6. Nettoyez parfaitement I'interieur des deux
compartiments, _ I'aide d'une solution de bicarbonate
de sodium et d'un linge propre et souple (quatre
cuillerees _ soupe de bicarbonate dans 1 litre/1 pinte
d'eau tiede).
7. Sechez bien I'interieur.
8. Laissez les portes ouvertes pour empecher la
formation de moisissure et de mildiou.
A votre retour -
Aprbs de courts congbs ou absences :
Pour les modeles equipes de distributeur ou de machine
gla£ons automatique :
• Rebranchez I'alimentation en eau et ouvrez le robinet
d'eau (pages 37-38).
• Surveillez, pendant 24 heures, le raccordement _ I'eau
et assurez-vous qu'il n'y a pas de fuites. R@arez-les au
besoin.
• Faites couler 10 _ 15 verres d'eau du distributeur, pour
bien rincer le systeme.
• Remettez la machine _ gla£ons en marche.
• Jetez au moins les trois premiers lots de gla£ons.
Apr_s une Iongue absence :
• Si votre congelateur comporte une machine _ gla£ons
automatique, rebranchez I'alimentation en eau et ouvrez
le robinet d'eau (pages 37-38).
• Rebranchez le refrigerateur et reglez _ nouveau les
commandes (page 39).
• Surveillez, pendant 24 heures, le raccordement _ I'eau
et assurez-vous qu'il n'y a pas de fuites. R@arez-les au
besoin.
Pour les modeles avec distributeur, faites couler I'eau par
le distributeur pendant au moins trois minutes, avec la
derivation du filtre en place, puis installez le filtre _ eau
(page 45).
• Apres I'installation du filtre _ eau, faites couler I'eau en
continu par le distributeur pendant au moins deux
minutes, ou jusqu'_ ce que I'eau s'ecoule de fa£on
reguliere. Au debut, vous pourrez remarquer un retard
d'une _ deux minutes darts la distribution de I'eau, alors
que le reservoir se remplit.
• Remettez la machine _ gla£ons en marche.
• Jetez les gla£ons produits les douze premieres heures
(au moins les trois premiers lots).
Preparation pour un
demenagement
• Suivez les instructions ci-dessus, donnees pour de
Iongues absences, jusqu'_ I'etape 7.
• Puis, immobilisez tousles articles mobiles, comme les
clayettes, les etageres et les tiroirs, par du ruban
adhesif fixe en place pour eviter tout dommage.
• Fermez les portes par du ruban adhesif.
• D@lacez le refrigerateur _ I'aide d'un chariot ou diable.
D@lacez le refrigerateur TOUJOURS par son c(_te ou
sa pattie arriere, etJAMAIS par I'avant.
• Assurez-vous que le refrigerateur reste _ la verticale
lots de son d@lacement.
54
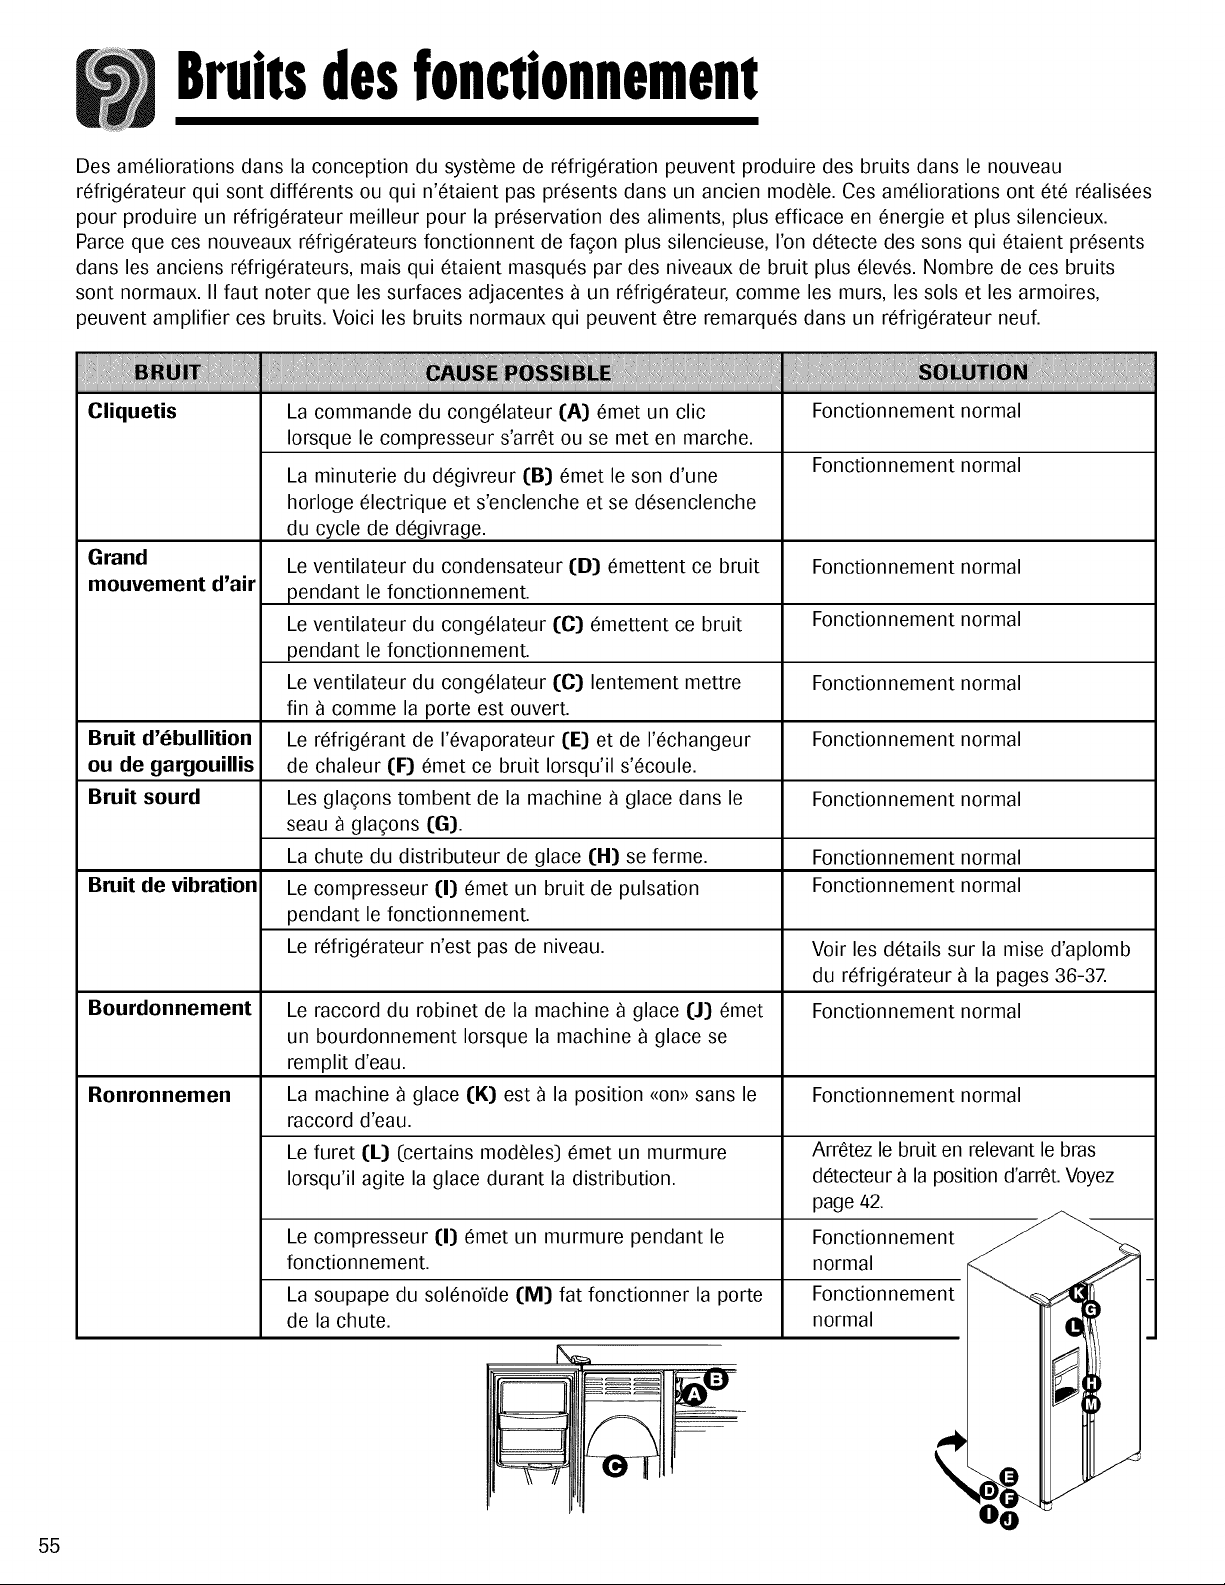
Bruitsdesfonctionnemen!
55
Des ameliorations dans la conception du systeme de refrigeration peuvent produire des bruits dans le nouveau
refrigerateur qui sont differents ou qui n'etaient pas presents darts un ancien modele. Ces ameliorations ont ete realisees
pour produire un refrigerateur meilleur pour la preservation des aliments, plus efficace en energie et plus silencieux.
Parce que ces nouveaux refrigerateurs fonctionnent de fa£on plus silencieuse, I'on detecte des sons qui etaient presents
dans les anciens refrigerateurs, mais qui etaient masques par des niveaux de bruit plus eleves. Nombre de ces bruits
sont normaux. II faut rioter que les surfaces adjacentes _ un refrigerateuc comme les murs, les sols et les armoires,
peuvent amplifier ces bruits. Voici les bruits normaux qui peuvent 6tre remarques dans un refrigerateur neuf.
ilili !i
Cliquetis La commande du congelateur I:A] emet un clic Fonctionnement normal
Iorsque le compresseur s'arr6t ou se met en marche.
La minuterie du degivreur I:B] emet le son d'une Fonctionnement normal
horloge electrique et s'enclenche et se desenclenche
du cycle de degivrage.
Grand Le ventilateur du condensateur I:D] emettent ce bruit Fonctionnement normal
mouvement d'air pendant le fonctionnement.
Le ventilateur du congelateur I:C] emettent ce bruit Fonctionnement normal
pendant le fonctionnement.
Le ventilateur du congelateur I:C] lentement mettre Fonctionnement normal
fin _ comme la porte est ouvert.
Bruit d'_bullition Le refrigerant de I'evaporateur I:E] et de I'echangeur Fonctionnement normal
ou de gargouillis de chaleur I:F] emet ce bruit Iorsqu'il s'ecoule.
Bruit sourd Les gla_ons tombent de la machine _ glace dans le Fonctionnement normal
seau _ gla£ons I:G].
La chute du distributeur de glace I:tt] se ferme. Fonctionnement normal
Bruit de vibration Le compresseur I:1] emet un bruit de pulsation Fonctionnement normal
pendant le fonctionnement.
Le refrigerateur n'est pas de niveau. Voir les details sur la mise d'aplomb
du refrigerateur _ la pages 36-3Z
Bourdonnement Le raccord du robinet de la machine _ glace I:J] emet Fonctionnement normal
un bourdonnement Iorsque la machine _ glace se
remplit d'eau.
Ronronnemen La machine _ glace I:K] est _ la position <_on_>sans le Fonctionnement normal
raccord d'eau.
Le furet I:L] (certains modeles] emet un murmure
Iorsqu'il agite la glace durant la distribution.
Le compresseur I:1] emet un murmure pendant le
fonctionnement.
La soupape du soleno_de I:M] fat fonctionner la porte
de la chute.
Arr6tez le bruit en relevant le bras
detecteur _ la position d'arr6t. Voyez
page 42.
Fonctionnement
normal
Fonctionnement
normal
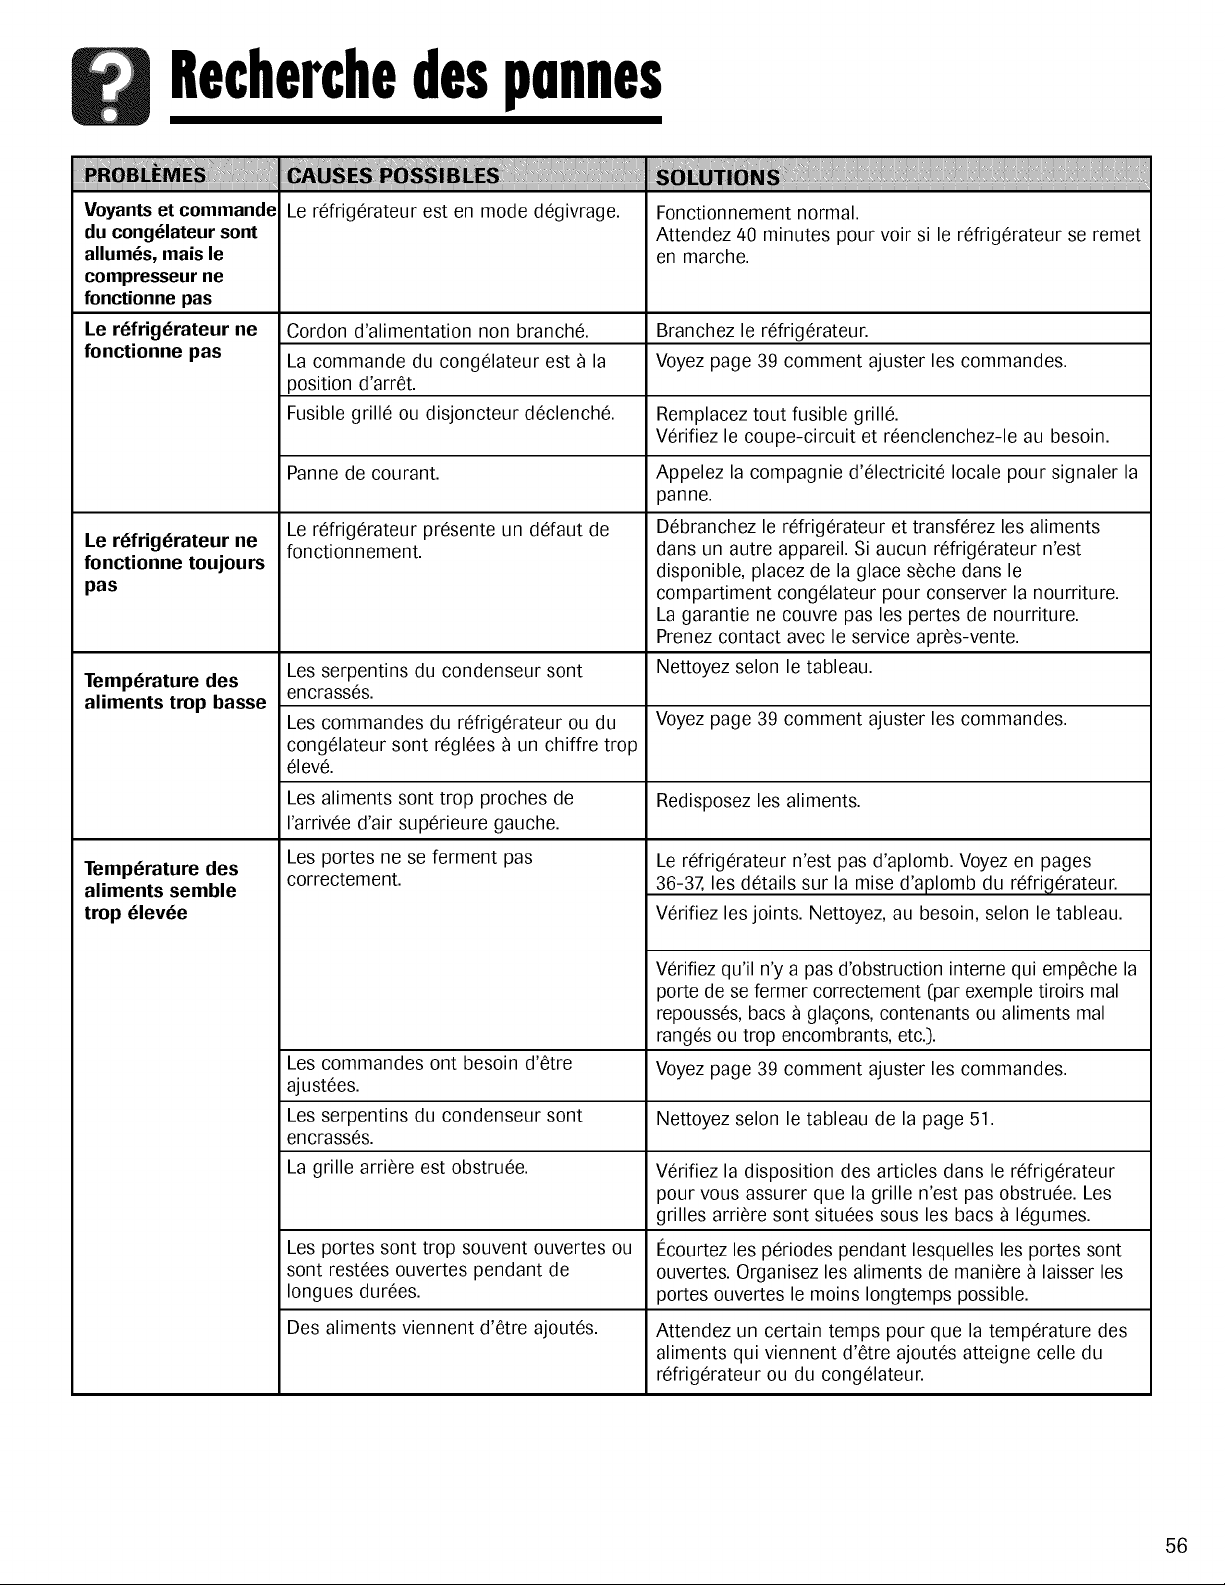
Recherchedespunnes
Le refrigerateur est en mode degivrage. Fonctionnement normal.
Voyantset commande
du cong_lateur sont
allum_s, mais le
compresseur ne
fonctionne pas
Le r6frigbrateur ne
fonctionne pas
Le r6frigbrateur ne
fonctionne toujours
pas
Attendez 80 minutes pour voir si le refrigerateur se remet
en marche.
Cordon d'alimentation non branche. Branchez le refrigerateur.
La commande du congelateur est _ la Voyez page 39 comment ajuster les commandes.
position d'arret.
Fusible grille ou disjoncteur declenche. Remplacez tout fusible grille.
Verifiez le coupe-circuit et reenclenchez-le au besoin.
Panne de courant.
Le refrigerateur presente un defaut de
fonctionnement.
Appelez la compagnie d'electricite locale pour signaler la
panne.
Debranchez le refrigerateur et transferez les aliments
dans un autre appareil. Si aucun refrigerateur n'est
disponible, placez de la glace seche dans le
compartiment congelateur pour conserver la nourriture.
La garantie ne couvre pas les pertes de nourriture.
Prenez contact avec le service apr_s-vente.
Les serpentins du condenseur sont Nettoyez selon le tableau.
Temperature des
encrasses.
aliments trop basse
Les commandes du refrigerateur ou du Voyez page 39 comment ajuster les commandes.
congelateur sont reglees _ un chiffre trop
eleve.
Les aliments sont trop proches de Redisposez les aliments.
I'arrivee d'air superieure gauche.
Les portes ne se ferment pas
correctement.
Tempbrature des
aliments semble
trop blevbe
Le refrigerateur n'est pas d'aplomb. Voyez en pages
36-37, les details sur la mise d'aplomb du refrigerateur.
Verifiez les joints. Nettoyez, au besoin, selon le tableau.
Verifiez qu'il n'y a pas d'obstruction interne qui emp_che la
porte de se fermer correctement (par exemple tiroirs mal
repousses, bacs _ glagons, contenants ou aliments mal
ranges ou trop encombrants, etc.].
Les commandes ont besoin d'etre Voyez page 39 comment ajuster les commandes.
ajustees.
Les serpentins du condenseur sont Nettoyez selon le tableau de la page 51.
encrasses.
La grille arriere est obstruee. Verifiez la disposition des articles dans le refrigerateur
pour vous assurer que la grille n'est pas obstruee. Les
grilles arriere sont situees sous les bacs _ legumes.
Les portes sont trop souvent ouvertes ou I_courtezles periodes pendant lesquelles les portes sont
sont restees ouvertes pendant de ouvertes. Organisez les aliments de maniere _ laisser les
Iongues durees, portes ouvertes le moins Iongtemps possible.
Des aliments viennent d'etre ajoutes. Attendez un certain temps pour que la temperature des
aliments qui viennent d'etre ajoutes atteigne celle du
refrigerateur ou du congelateur.
56
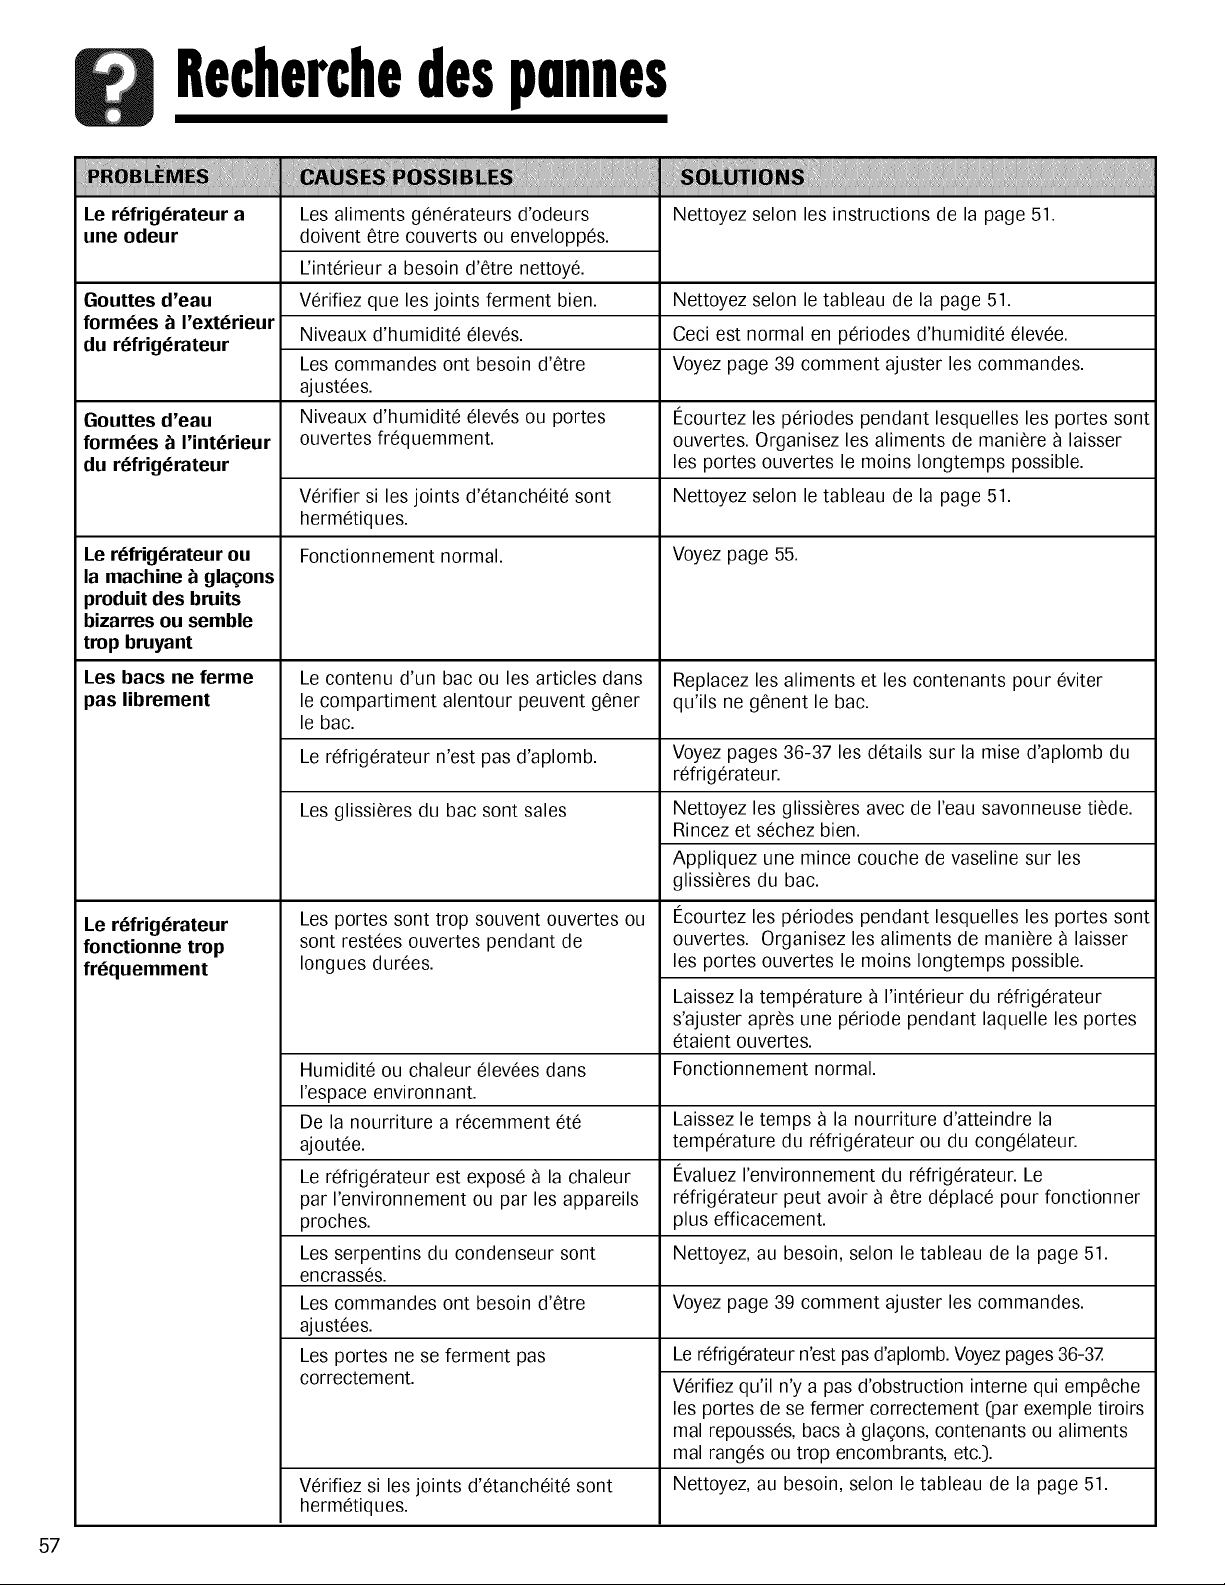
Recherchedespunnes
Le r_frig_rateur a
uge odeur
J!! iilii iliiliilil
Nettoyez selon les instructions de la page 51.
Gouttes d'eau Nettoyez selon le tableau de la page 51.
form6es _ I'exterieur
du refrigerateur Ceci est normal en p0riodes d'humidit0 01ev0e.
Voyez page 39 comment ajuster les commandes.
Gouttes d'eau I_courtez les p0riodes pendant lesquelles les portes sont
form6es _ I'int_rieur ouvertes. Organisez les aliments de mani0re _ laisser
du r_frig_mteur les portes ouvertes le moins Iongtemps possible.
V0rifier si les joints d'0tanch0it0 sont Nettoyez selon le tableau de la page 51.
herm0tiques.
Fonctionnement normal. Voyez page 55.
Le r_frig_rateur ou
la machine _ glagons
produit des bruits
bizarres ou semble
trop bruyant
Les aliments g0n0rateurs d'odeurs
doivent 0tre couverts ou envelopp0s.
L'int0rieur a besoin d'0tre nettoy0.
V0rifiez que les joints ferment bien.
Niveaux d'humidit0 01ev0s.
Les commandes ont besoin d'0tre
ajust0es.
Niveaux d'humidit0 01ev0sou portes
ouvertes fr0quemment.
Les bacs ne ferme Le contenu d'un bac ou les articles dans Replacez les aliments et les contenants pour 0viter
pas librement le compartiment alentour peuvent goner qu'ils ne g0nent le bac.
le bac.
Le r0frig0rateur n'est pas d'aplomb. Voyez pages 36-37 les d0tails sur la mise d'aplomb du
r0frig0rateur.
Les glissi0res du bac sont sales
Les portes sont trop souvent ouvertes ou
sont rest0es ouvertes pendant de
Iongues dur0es.
Le r6frigerateur
fonctionne trop
frequemment
Nettoyez les glissi0res avec de I'eau savonneuse ti0de.
Rincez et s0chez bien.
Appliquez une mince couche de vaseline sur les
glissi0res du bac.
I_courtez les p0riodes pendant lesquelles les portes sont
ouvertes. Organisez les aliments de mani0re 9 laisser
les portes ouvertes le moins Iongtemps possible.
Laissez la temp0rature 9 I'int0rieur du r0frig0rateur
s'ajuster apr0s une p0riode pendant laquelle les portes
0taient ouvertes.
Humidit0 ou chaleur 01ev0esdans Fonctionnement normal.
I'espace environnant.
De la nourriture a r0cemment 0t0 Laissez le temps 9 la nourriture d'atteindre la
ajout0e, temp0rature du r0frig0rateur ou du cong01ateur.
Le r0frig0rateur est expos0 9 la chaleur I_valuez I'environnement du r0frig0rateur. Le
par I'environnement ou par les appareils r0frig0rateur peut avoir _ 0tre d0plac0 pour fonctionner
proches, plus efficacement.
Les serpentins du condenseur sont Nettoyez, au besoin, selon le tableau de la page 51.
encrass0s.
Les commandes ont besoin d'0tre Voyez page 39 comment ajuster les commandes.
ajust0es.
Les portes ne se ferment pas
correctement.
V0rifiez si les joints d'0tanch0it0 sont
herm0tiques.
Le r0frig0rateur n'est pas d'aplomb. Voyez pages 36-37.
V0rifiez qu'il n'y a pas d'obstruction interne qui emp0che
les portes de se fermer correctement (par exemple tiroirs
mal repouss0s, bacs _ glagons, contenants ou aliments
mal rang0s ou trop encombrants, etc.).
Nettoyez, au besoin, selon le tableau de la page 51.
57
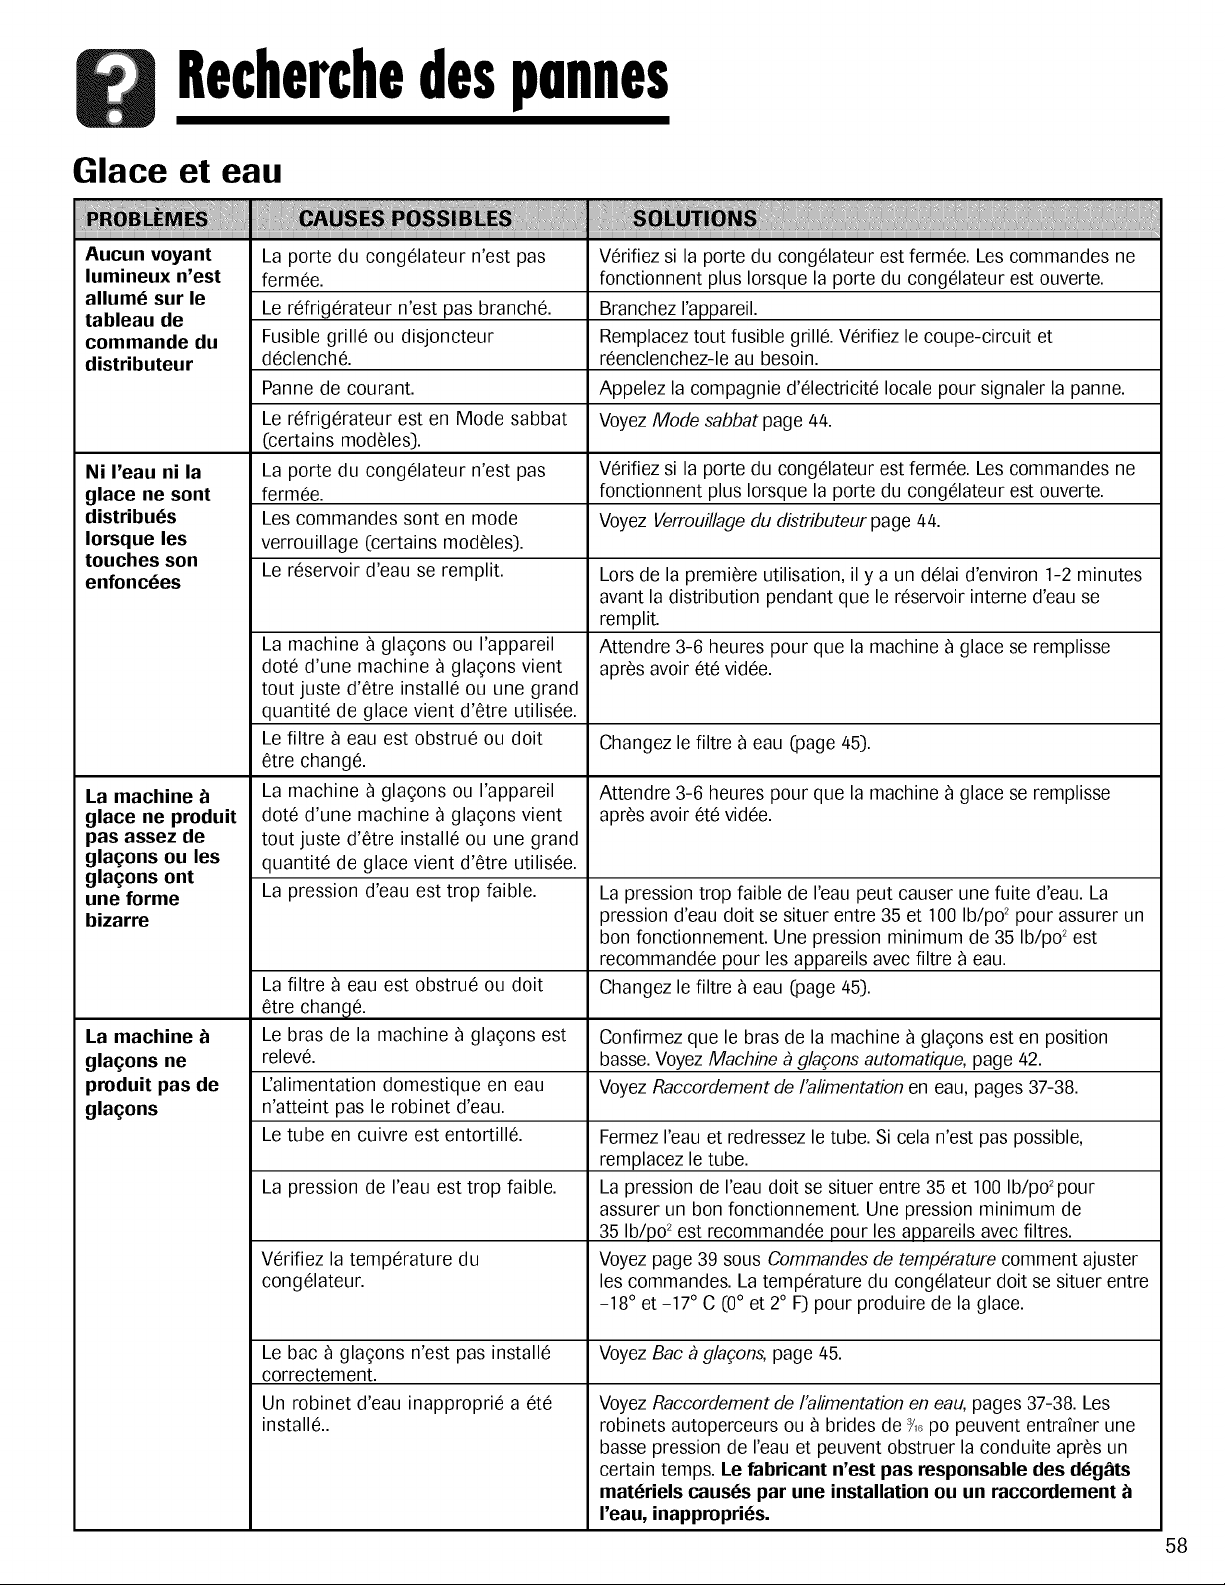
Recherchedesponnes
Glace et eau
Aucun voyant
lumineux n'est
allum_ sur le
tableau de
commande du
distributeur
Ni I'eau ni la
glace ne sent
distribu_s
Iorsque les
touches son
enfonc_es
La machine
glace ne produit
pas assez de
glagons ou les
glagons ont
une forme
bizarre
La porte du congelateur n'est pas
fermee.
Le refrigerateur n'est pas branche.
Fusible grille ou disjoncteur
declenche.
La machine t_
glagons ne
produit pas de
glagons
Panne de courant.
Le refrigerateur est en Mode sabbat
(certains modeles).
La porte du congelateur n'est pas
fermee.
Les commandes sont en mode
verrouillage (certains modeles).
Le reservoir d'eau se remplit.
La machine _ gla£;ons ou I'appareil
dote d'une machine _ gla(_onsvient
tout juste d'etre installe ou une grand
quantite de glace vient d'etre utilisee.
Le filtre 9 eau est obstrue ou doit
0tre change.
La machine 9 gla£;ons ou I'appareil
dote d'une machine _ gla£;onsvient
tout juste d'etre installe ou une grand
quantite de glace vient d'etre utilisee.
La pression d'eau est trop faible.
La filtre 9 eau est obstrue ou doit
etre change.
Le bras de la machine _ gla£;ons est
releve.
L'alimentation domestique en eau
n'atteint pas le robinet d'eau.
Le tube en cuivre est entortille.
La pression de I'eau est trop faible.
Verifiez la temperature du
congelateur.
Le bac _ gla£;ons n'est pas installe
correctement.
Un robinet d'eau inapproprie a ete
installe..
Verifiez si la porte du congelateur est fermee. Les commandes ne
fonctionnent plus Iorsque la porte du congelateur est ouverte.
Branchez I'appareil.
Remplaceztout fusible grille. Verifiez le coupe-circuit et
reenclenchez-le au besoin.
Appelez la compagnie d'electricite locale pour signaler la panne.
VoyezMode sabbat page 44.
Verifiez si la porte du congelateur est fermee. Les commandes ne
fonctionnent plus Iorsque la porte du congelateur est ouverte.
Voyez Verrouillagedu distributeur page 44.
Lorsde la premiere utilisation, il y a un delai d'environ 1-2 minutes
avant la distribution pendant que le reservoir interne d'eau se
remplit.
Attendre 3-6 heures pour que la machine _ glace se remplisse
apres avoir ete videe.
Changez le filtre _ eau (page 45).
Attendre 3-6 heures pour que la machine _ glace se remplisse
apres avoir ete videe.
La pression trop faible de I'eau peut causer une fuite d'eau. La
pression d'eau doit se situer entre 35 et 100 Ib/po2 pour assurer un
bon fonctionnement. Une pression minimum de 35 Ib/po2 est
recommandee pour les appareils avec filtre _ eau.
Changez le filtre _ eau (page 45).
Confirmez que le bras de la machine 9 gla£;onsest en position
basse.Voyez Machine _ gla¢ons automatique, page 42.
Voyez Raccordement de I'alimentation en eau, pages 37-38.
FermezI'eau et redressez le tube. Si cela n'est pas possible,
remplacez le tube.
La pression de I'eau doit se situer entre 35 et 100 Ib/po2pour
assurer un bon fonctionnement. Une pression minimum de
35 Ib/po2est recommandee pour les appareils avec filtres.
Voyez page 39 sous Commandes de temp6rature comment ajuster
les commandes. La temperature du congelateur doit se situer entre
-18 ° et -17 ° C (0° et 2° F) pour produire de la glace.
VoyezBac _ gla¢ons,page 45.
Voyez Raccordement de I'alimentation en eau, pages 37-38. Les
robinets autoperceurs ou _ brides de -7,_po peuvent entrafner une
basse pression de reau et peuvent obstruer la conduite apres un
certain temps. Le fabricant n'est pas responsable des deg_ts
materiels causes par une installation ou un raccordement t_
I'eau, inappropri_s.
58
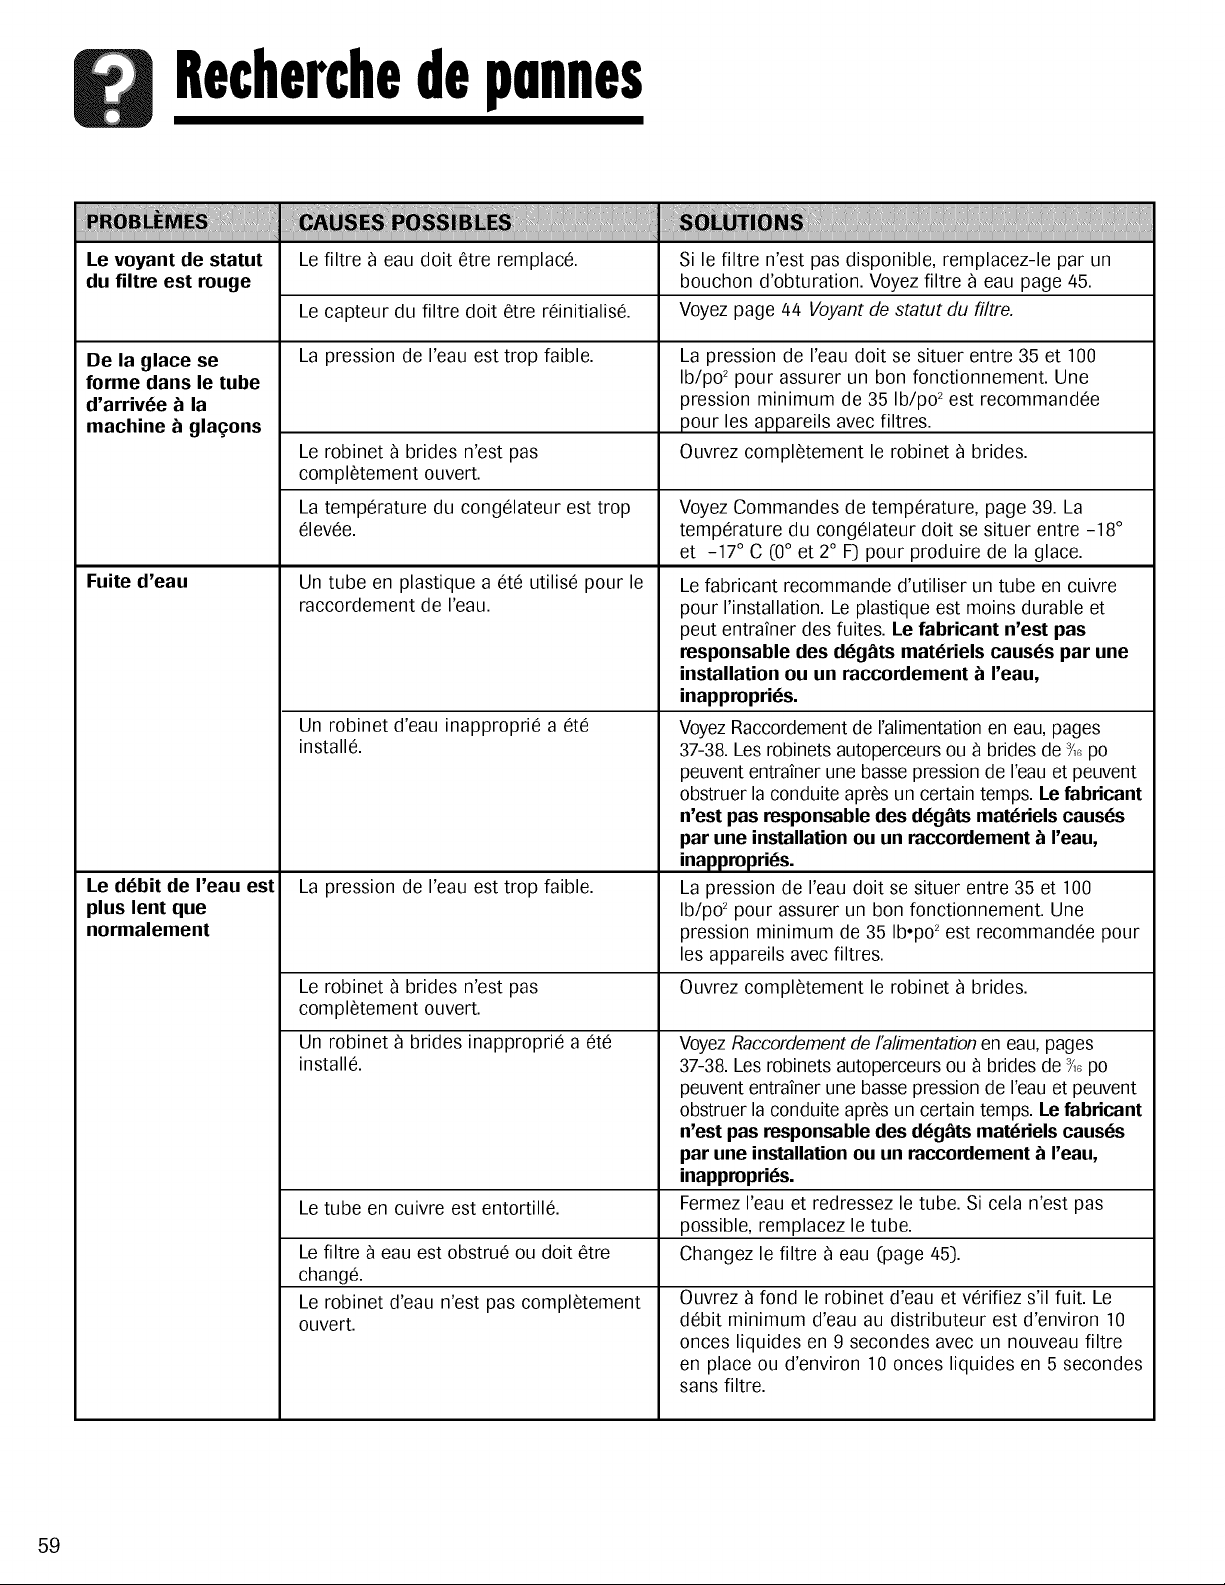
Recherchedeponnes
!!!!!!!!
Le voyant de statut
du filtre est rouge
De la glace se
forme dans le tube
d'arrivee _ la
machine _ glagons
Fuite d'eau
Le filtre _ eau doit etre remplace.
Le capteur du filtre doit eve reinitialise.
La pression de I'eau est trop faible.
Le robinet _ brides n'est pas
completement ouvert.
La temperature du congelateur est trop
elevee.
Un tube en plastique a ete utilise pour le
raccordement de I'eau.
Si le filtre n'est pas disponible, remplacez-le par un
bouchon d'obturation. Voyez filtre _ eau page 45.
Voyez page 44 Voyant de statut du filtre.
La pression de I'eau doit se situer entre 35 et 100
Ib/po2pour assurer un bon fonctionnement. Une
pression minimum de 35 Ib/po2est recommandee
pour les appareils avec filtres.
Ouvrez completement le robinet _ brides.
Voyez Commandes de temperature, page 39. La
temperature du congelateur doit se situer entre -18 °
et -17 ° C (0° et 2° F) pour produire de la glace.
Le fabricant recommande d'utiliser un tube en cuivre
pour I'installation. Le plastique est moins durable et
peut entrafner des fuites. Le fabricant n'est pas
responsable des deg_ts materiels causes par une
installation ou un raccordement _ I'eau,
inappropries.
Un robinet d'eau inapproprie a ete VoyezRaccordement de ralimentation en eau, pages
installe. 37-38. Les robinets autoperceurs ou 9 brides de _,_po
peuvent entrafner une basse pression de I'eauet peuvent
obstruer la conduite apres un certain temps. Le fabdcant
n'est pas responsable des deg_ts materiels causes
par une installation ou un raccordement _ I'eau,
inappropries.
La pression de I'eau est trop faible. La pression de I'eau doit se situer entre 35 et 100
Ib/po2pour assurer un bon fonctionnement. Une
pression minimum de 35 Ib.po_est recommandee pour
les appareils avec filtres.
Le robinet _ brides n'est pas Ouvrez completement le robinet _ brides.
completement ouvert.
Un robinet _ brides inapproprie a ete Voyez Raccordement de I'alimentationen eau, pages
installe. 37-38. Les robinets autoperceurs ou _ brides de _,_po
Le tube en cuivre est entortille.
Le debit de I'eau est
plus lent que
normalement
Lefilt_ _ eau estobstrue ou doitet_
change.
Le robinet d'eau n'est pas completement
ouvert.
peuvent entrafner une basse pression de I'eauet peuvent
obstruer la conduite apres un certain temps. Le fabdcant
n'est pas responsable des deg_ts matedels causes
par une installation ou un raccordement _ I'eau,
inappropries.
Fermez I'eau et redressez le tube. Si cela n'est pas
possible, remplacez le tube.
Changez le filtre _ eau (page 45).
Ouvrez 9 fond le robinet d'eau et verifiez s'il fuit. Le
debit minimum d'eau au distributeur est d'environ 10
onces liquides en 9 secondes avec un nouveau filtre
en place ou d'environ 10 onces liquides en 5 secondes
sans filtre.
59
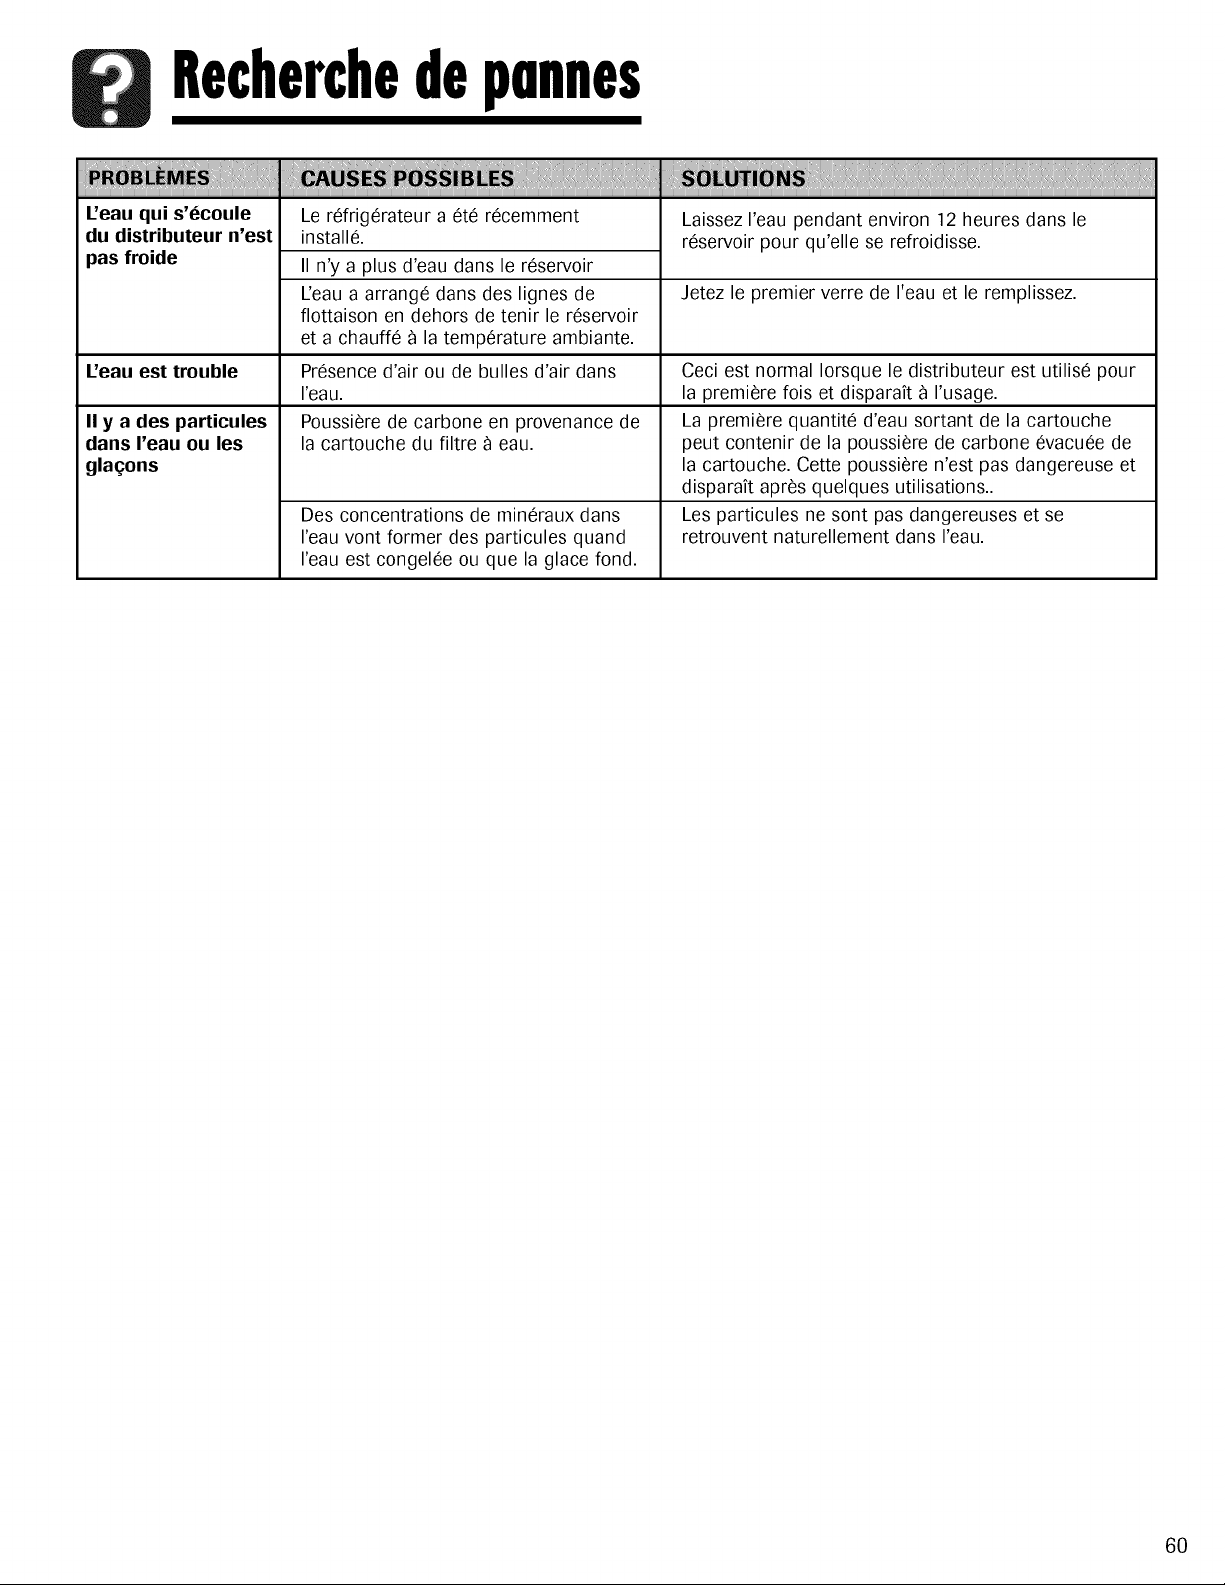
Recherchedeponnes
iiiii!!!iiiii iiliili!J
I_'eauqui s'Ocoule
du distributeur n'est
pas froide
I_'eauest trouble
II y a des particules
dans I'eau ou les
gla_ons
Le refrigerateur a ete recemment
installe.
II n'y a plus d'eau dans le reservoir
L'eau a arrange dans des lignes de
flottaison en dehors de tenir le reservoir
eta chauffe _ la temperature ambiante.
Presence d'air ou de bulles d'air dans
I'eau.
Poussiere de carbone en provenance de
la cartouche du filtre _ eau.
Des concentrations de mineraux dans
I'eau vont former des particules quand
I'eau est congelee ou que la glace fond.
Laissez I'eau pendant environ 12 heures dans le
reservoir pour qu'elle se refroidisse.
Jetez le premier verre de I'eau et le remplissez.
Ceci est normal Iorsque le distributeur est utilise pour
la premiere fois et disparait _ I'usage.
La premiere quantite d'eau sortant de la cartouche
peut contenir de la poussiere de carbone evacuee de
la cartouche. Cette poussiere n'est pas dangereuse et
disparak apres quelques utilisations..
Les particules ne sont pas dangereuses et se
retrouvent naturellement dans I'eau.
6O

Remorques
61

Remorques
62
Guruntieetserviceupres-vente
LESEULETUNIQUERECOURSDU CLIENTEN
VERTUDE CETTEGARANTIELIMITI_EESTLA
RI'-:PARATIONDU PRODUITCOMME DI_CRITE
PRI'-:CI'-:DEMMENT.LESGARANTIES
IMPLICITES,Y COMPRISLESGARANTIESDE
QUALITI'-:MARCHANDEOU D'ADAPTATIONA
UN USAGEPARTICULIER,SONTLIMITI_ESA
UN AN OU A LA PI'-:RIODELA PLUSCOURTE
PERMISEPARLA LOI.MAYTAGCORPORATION
NE SERAPASTENUERESPONSABLEDES
DOMMAGESDIRECTSOU INDIRECT&
CERTAINSI_TATSETCERTAINESPROVINCES
INTERDISENTL'EXCLUSIONETLA LIMITATION
DESDOMMAGESDIRECTSOU INDIRECTS
AINSI QUELESLIMITATIONSSUR LA DURI_E
DESGARANTIESIMPLICITESDEQUALITI'-:
MARCHANDEOU D'ADAPTATIONA UN
USAGEPARTICULIER.IL ESTDONC POSSIBLE
QUECESLIMITATIONSNE S'APPLIQUENTPAS
A VOUS.CETTEGARANTIEVOUSCONFERE
DESDROITSJURIDIQUESSPI'-:CIFIQUESETIL
SEPEUTQUEVOUSAYIEZ D'AUTRESDROITS,
QUIVARIENTD'UN FTATA LRUTREOU D'UNE
PROVINCEA LRUTRE.
Ne sent pas couverts par ces garanties
1. Les problemes et dommages resultant des situations suivantes :
a. Mise en service, livraison ou entretien effectues incorrectement.
b. Toute reparation, modification, alteration et tout reglage non autorises par le
fabricant ou par un prestataire de service apres-vente agree.
c. Mauvais emploi, emploi abusif, accidents, usage non raisonnable, ou
catastrophe naturelle.
d. Courant electrique, tension, alimentation electrique ou en gaz incorrects.
e. Reglage incorrect d'une commande.
f. Utilisation des supports (socles) qui ne sont pas de marque Maytag.
2. Les garanties ne peuvent etre honorees si les numeros de serie d'origine ont
ere enleves, modifies ou ne sont pas facilement lisibles.
3. Ampoules, filtres 9 eau et filtres 9 air.
4. Les produits achetes 9 des fins commerciales ou industrielles.
5. Les frais de depannage ou de visite pour :
a. Correction d'erreurs de mise en service. Pour les produits necessitant une
ventilation, un conduit metallique rigide doit 0tre utilise.
b. Initiation de I'utilisateur 9 I'emploi de I'appareil.
c. Transport de I'appareil chez le reparateur et retour de I'appareil chez
I'utilisateur.
d. Resolutiondes problemes reliesaux supports qui ne sont pas de marque Maytag.
6. Tout aliment perdu en raison de pannes du refrigerateur ou du congelateur.
7. D@enses de deplacement et de transport pour la reparation du produit dans
des endroits eloignes.
8. Cette garantie n'est pas valide 9 I'exterieur des I_tats-Uniset du Canada.
Communiquez avec votre detaillant pour savoir si une autre garantie
s'applique.
9. Dommages indirects ou accessoires subis par route personne 9 la suite d'une
quelconque violation des garanties. Certains I_tats ou provinces ne permettent
pas I'exclusion ou la limitation de responsabilite en ce qui
concerne les dommages directs ou indirects. L'exclusion ci-dessus peut en
consequence ne pas s'appliquer 9 votre cas.
Si vous avez besoin d'aide
Consultez d'abord la section sur le d@annage dans le manuel d'utilisation et
d'entretien, puis appelez le detaillant de qui vous avez achete votre appareil ou le
service _ la clientele de Maytag Services, LLC au 1-800-688-9900 aux I_tats-Unis
et au 1-800-688-2002 au Canada pour savoir oQ trouver un reparateur autorise.
• Veillez 9 conserver la facture d'achat pour justifier de la validite de la
garantie. Pour d'autres renseignements concernant les responsabilites du
proprietaire _ I'egard du service sous garantie, voir le texte de la GARANTIE.
• Si le detaillant ou I'agence de service apres-vente ne peut resoudre le
probleme, ecrivez 9 Maytag Services, LLC 9 I'adresse suivante : CAIR
Center, P.O. Box 2370, Cleveland, TN 37320-2370 I_tats-Unis, ou appelez au
1-800-688-9900 aux I_tats-Unis ou au 1-800-688-2002 au Canada.
•Les guides d'utilisation, les manuels de service et les renseignements sur
les pieces sont disponibles aupres du service _ la clientele de Maytag
Services, LLC.
Remarques : Veillez _ fournir I'information suivante Iorsque vous communiquez
avec nous au sujet d'un probleme :
a. Vos nom, adresse et numCro de tCICphone;
b. NumCro de modele et numCro de sCrie de I'appareil;
c. Nom et adresse du dCtaillant avec la date I'appareil achetC;
d. Description dCtaillCe du probleme observC;
e. Preuve d'achat (facture de vente).
63
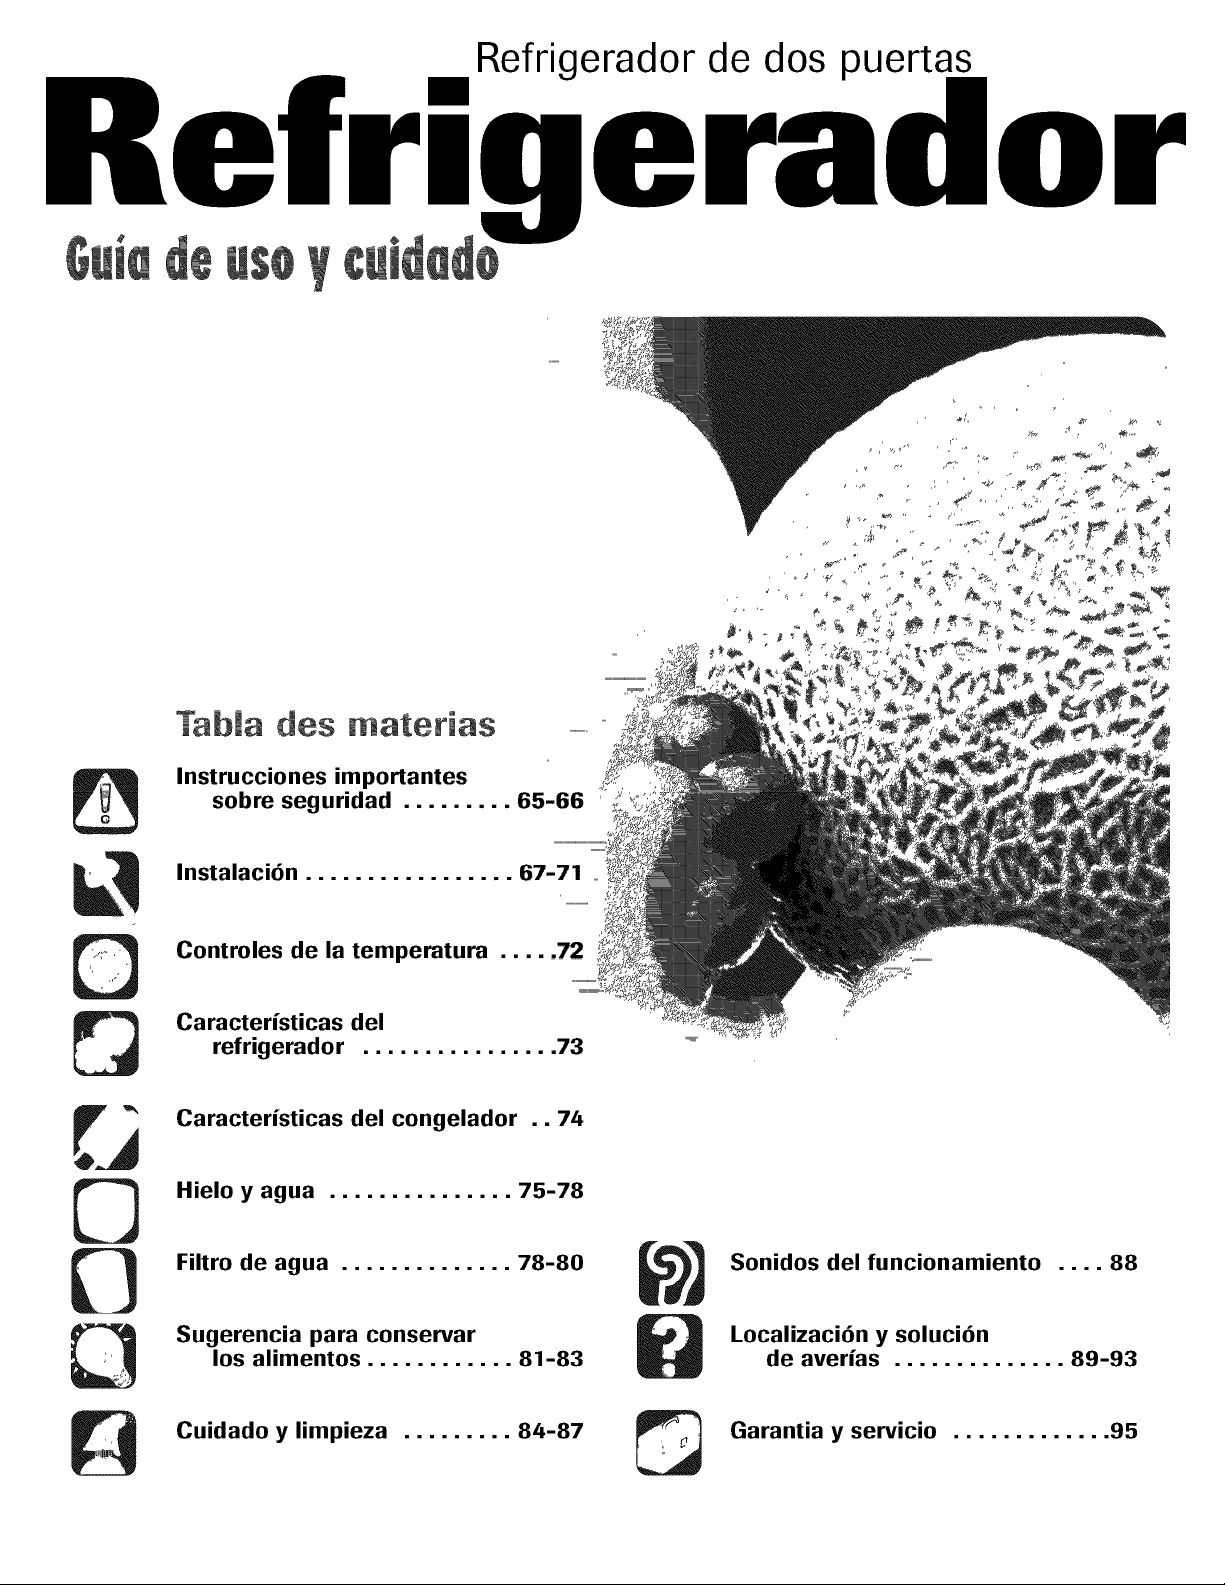
Refrigerador de dos puertas
rigerador
Tabia des materias
Instrucciones importantes
sobre seguridad ......... 65-66
Instalaci6n ................. 67-71 ....
©
[3
Controles de la temperatura ..... 72
Caracteristicas del
refrigerador ................ 73
Caracteristicas del congelador .. 74
Hielo y agua ............... 75-78
Filtro de agua .............. 78-80
Sugerencia para conservar
los alimentos ............ 81-83
Cuidado y limpieza ......... 84-87
Sonidos del funcionamiento .... 88
Localizaci(_n y soluci(_n
de averias .............. 89-93
Garantia y servicio ............. 95
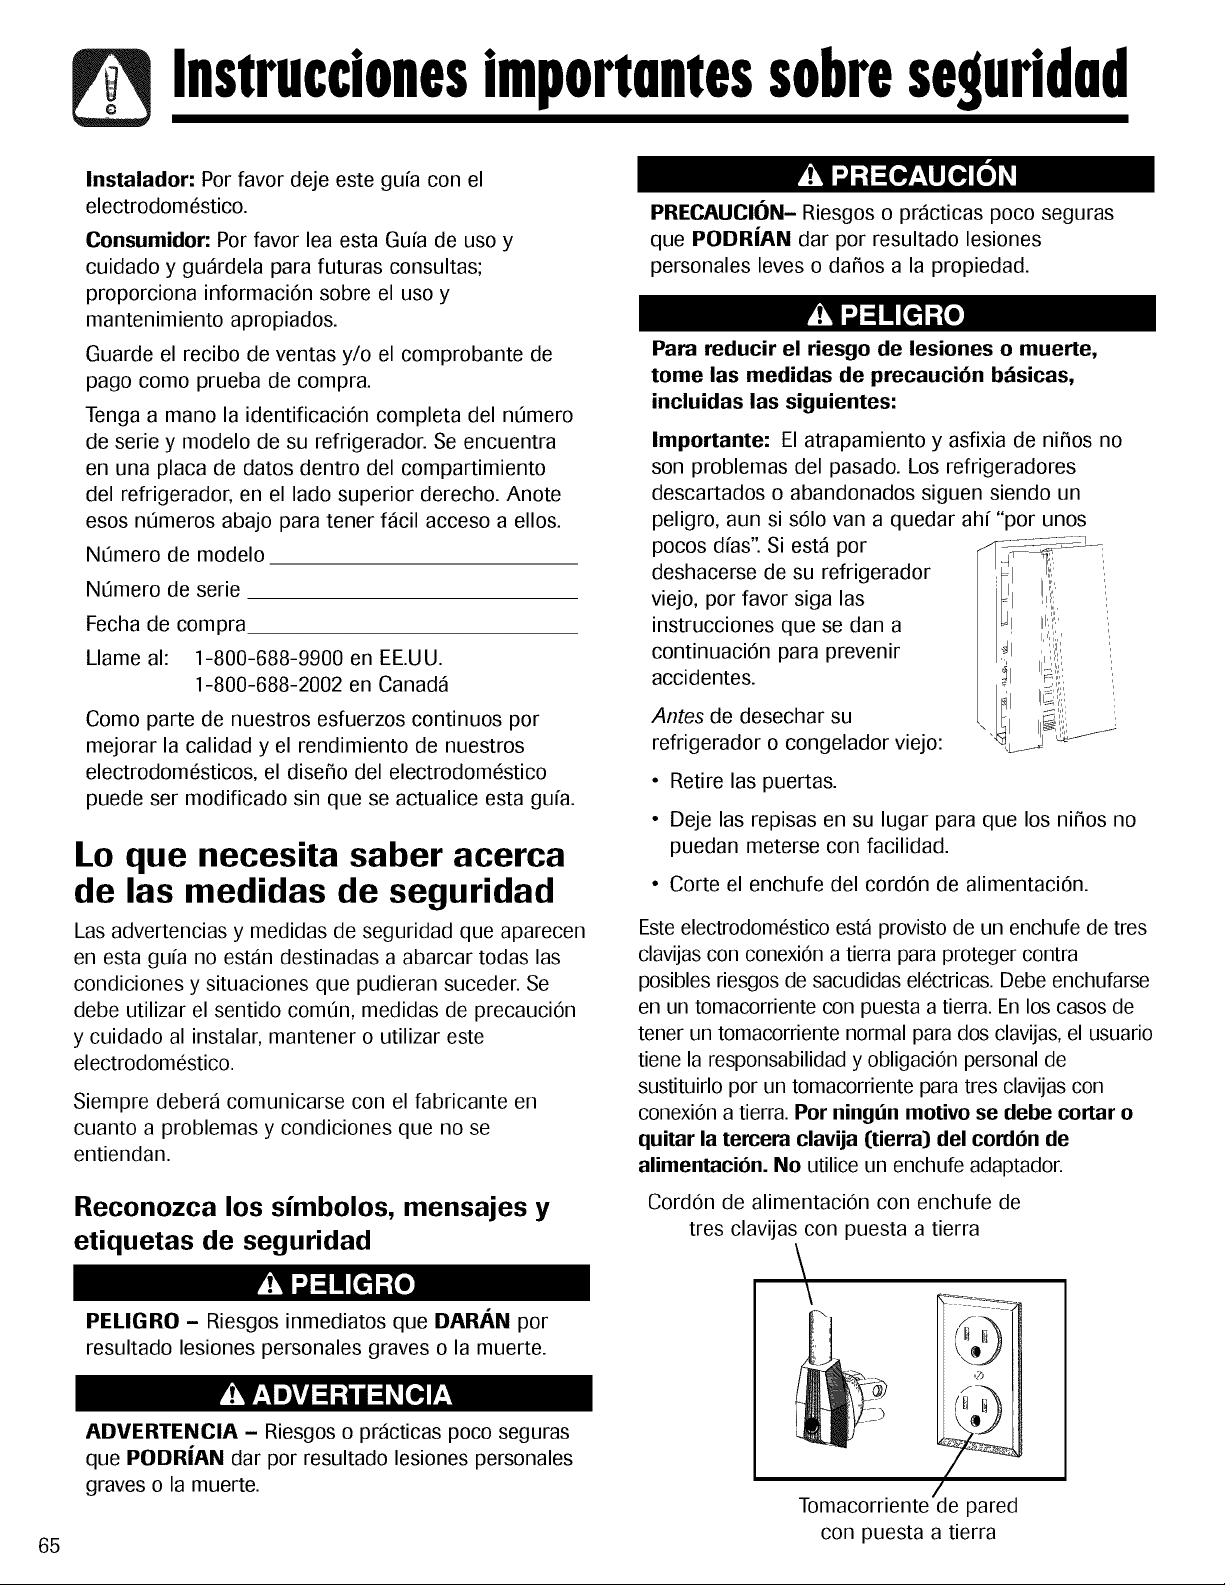
Instruccionesimportuntessobreseguridud
65
Instalador: Por favor deje este gufa con el
electrodom6stico.
Consumidor: Por favor lea esta Gufa de uso y
cuidado y gudrdela para futuras consultas;
proporciona informaciOn sobre el uso y
mantenimiento apropiados.
Guarde el recibo de ventas y/o el comprobante de
pago como prueba de compra.
Tenga a mano la identificaci6n completa del n_mero
de serie y modelo de su refrigerador. Se encuentra
en una placa de datos dentro del compartimiento
del refrigerador, en el lado superior derecho. Anote
esos nLimeros abajo para tener Mcil acceso a ellos.
Nt_mero de modelo
N_mero de serie
Fecha de compra
Llame al: 1-800-688-9900 en EE.UU.
1-800-688-2002 en Canada
Como parte de nuestros esfuerzos continuos por
mejorar la calidad y el rendimiento de nuestros
electrodom6sticos, el dise_o del electrodom6stico
puede ser modificado sin que se actualice esta gufa.
Lo que necesita saber acerca
de las medidas de seguridad
Las advertencias y medidas de seguridad que aparecen
en esta gufa no estan destinadas a abarcar todas las
condiciones y situaciones que pudieran suceder. Se
debe utilizar el sentido comQn, medidas de precauci6n
y cuidado al instalar, mantener o utilizar este
electrodom6stico.
Siempre debera comunicarse con el fabricante en
cuanto a problemas y condiciones que no se
entiendan.
Reconozca los simbolos, mensajes y
etiquetas de seguridad
PELIGRO - Riesgos inmediatos que DP,R/i,N por
resultado lesiones personales graves o la muerte.
ADVERTENCIA - Riesgos o prdcticas poco seguras
que PODR|AN dar por resultado lesiones personales
graves o la muerte.
PRECAUCION- Riesgos o prdcticas poco seguras
que PODR|AN dar por resultado lesiones
personales leves o da_os a la propiedad.
Para reducir el riesgo de lesiones o muerte,
tome las medidas de precauci6n b_sicas,
incluidas las siguientes:
Importante: El atrapamiento y asfixia de ni_os no
son problemas del pasado. Los refrigeradores
descartados o abandonados siguen siendo un
peligro, aun si s61o van a quedar ahf "por unos
pocos dfas". Si estd por
deshacerse de su refrigerador
viejo, por favor siga las
instrucciones que se dan a
continuaci6n para prevenir
accidentes.
Antes de desechar su
refrigerador o congelador viejo:
• Retire las puertas.
• Deje las repisas en su lugar para que los ni_os no
puedan meterse con facilidad.
• Corte el enchufe del cord6n de alimentaci6n.
Este electrodom6stico esta provisto de un enchufe de tres
clavijas con conexi6n a tierra para proteger contra
posibles riesgos de sacudidas el6ctricas. Debe enchufarse
en un tomacorriente con puesta a tierra. En los casos de
tener un tomacorriente normal para dos clavijas, el usuario
tiene la responsabilidad y obligaci6n personal de
sustituirlo por un tomacorriente para tres clavijas con
conexiOn a tierra. Por ningt_n motivo se debe cortar o
quitar la tercem clavija (tierm) del cord6n de
alimentacibn. No utilice un enchufe adaptador.
Cord6n de alimentaci6n con enchufe de
tres clavijas con puesta a tierra
\
(
/
Tomacorriente de pared
con puesta a tierra
Instruccionesimportuntessobreseguridud
Para reducir el riesgo de incendio, sacudidas
el_ctricas, lesiones graves o la muerte cuando
utilice su refrigerador, tome estas medidas de
precauci6n b_sicas, incluidas las siguientes:
1. Lea todas las instrucciones antes de usar el
refrigerador.
2. Respete todos los c6digos y reglamentos locales
vigentes.
3. AsegL_rese de seguir las instrucciones sobre la
conexi6n a tierra.
.
.
.
7.
Ante cualquier duda respecto a la conexi6n a
tierra de este electrodom6stico, consulte con un
electricista competente.
No haga la conexi6n a tierra a una tuberfa de
gas.
No haga la conexi6n a tierra a una tuberfa de
agua frfa.
El refrigerador estd dise_ado para funcionar
conectado a un circuito separado de 115 V, 15 A,
60 Hz.
.
.
10
No modifique el enchufe del cord6n de
alimentaci6n. Si el enchufe no cabe en el
tomacorriente, pida a un electricista competente
que le instale un tomacorriente correcto.
No use un adaptador de dos clavijas, cable de
extensi6n o una regleta de alimentaci6n con
tomacorrientes mOltiples.
No retire la etiqueta de advertencia del cord6n de
alimentaci6n.
11. No altere los controles del refrigerador.
12. No repare ni reemplace ninguna pieza del
refrigerador a menos que est6 especfficamente
13.
14.
15.
16.
17.
18.
19.
20.
recomendado en la Gufa de uso y cuidado o en
las instrucciones publicadas para reparaciones
hechas por el usuario. No intente hacer
reparaciones si no entiende las instrucciones o si
para seguirlas se requieren conocimientos
t6cnicos mayores.
Siempre desconecte el refrigerador del suministro
electrico antes de intentar realizar cualquier
trabajo de mantenimiento. Desenchufe el cord6n
de alimentaci6n agarrdndolo del enchufe, nunca
del cord6n.
Instale el refrigerador de acuerdo a las
instrucciones de instalaci6n. Todas las conexiones
de agua, energfa el6ctrica y puesta a tierra deben
ser de conformidad con los c6digos locales y
cuando sea necesario realizadas por personal
autorizado.
Mantenga su refrigerador en buenas condiciones.
Si se golpea o deja caer el refrigerador puede
da_arse o causar su malfuncionamiento o fugas.
Si se da_a, hdgalo revisar por un t6cnico de
servicio calificado.
Sustituya los cables de alimentaci6n que esten
desgastados y/o los enchufes flojos.
Siempre lea y siga las instrucciones del fabricante
referentes al almacenamiento y ambiente ideal
para los artfculos guardados en el refrigerador.
No permita que su refrigerador funcione en
presencia de vapores explosivos.
No permita que los ni_os se trepen, cuelguen o
paren en ninguna parte del refrigerador.
Limpie los derrames o fugas de agua
relacionados con la instalaci6n del sistema de
agua.
CONSERVE ESTAS INSTRUCCIONES
66
Instalacion
67
Ubicaci6n
• No instale el refrigerador cerca del horno, del radiador o
de otra fuente de calor. Si esto no es posible, proteja el
refrigerador con material de los armarios.
• No instale el refrigerador en un lugar donde la
temperatura pueda bajar a menos de 13° C (55° F) o suba
a m_s de 43° C (110° F). Con tales temperaturas puede
ocurrir real funcionamiento.
• El refrigerador ha sido dise_ado solamente para use
dom6stico en el interior.
Medici6n de la cavidad
Cuando instale su refrigerador, haga todas las mediciones
con cuidado. Se debe dejar un espacio de 1,25 cm (lji,) en la
parte superior y lJ,"detr_s de la cubierta del compartimiento
mec_nico (situado en la parte trasera) para contribuir a la
circulaciOn adecuada del aire. Si el refrigerador es colocado
con el lado de la bisagra de la puerta contra una pared, debe
dejar espacio adicional para que la puerta se pueda abrir
m_s.
Los revestimientos del subsuelo o del piso (es decir,
alfombras, baldosas, pisos de madera, tapetes) pueden
disminuir el tama_o de la cavidad.
Se puede obtener m_s espacio libre usando el procedimiento
de nivelaci6n descrito en la secci6n Nivelado.
Importante: Si el refrigerador va a ser instalado en una
cavidad en que la parte superior del mismo quedar_
completamente cubierta, use las dimensiones desde el piso
hasta la parte superior de la tapa de la bisagra para verificar
el espacio libre apropiado.
Transporte del refrigerador
• NUNCA transporte el refrigerador de costado. Si no es
posible transportarlo en posici6n vertical, h_galo
descansar en la parte trasera. Deje el refrigerador en
posici6n vertical durante aproximadamente 30 minutos
antes de enchufarlo a fin de asegurar de que el aceite
vuelva al compresor. Si el refrigerador se enchufa
inmediatamente, se puede causar da_o alas piezas
internas.
• Siempre use una carretilla de mano cuando mueva el
refrigerador. SIEMPRE coloque la carretilla de mano por
el costado o por la parte trasera del refrigerador - NUNCA
por el frente.
• Proteja el acabado exterior del refrigerador durante el
transporte envolviendo el gabinete en frazadas o
colocando material acolchado entre el refrigerador y la
carretilla.
• Asegure el refrigerador firmemente en la carretilla de
mano con flejes o cuerdas el_sticas. Pase los flejes a traves
de las manijas cuando sea posible. No apriete demasiado
los materiales de sujeci6n pues pueden hendir o da_ar el
acabado exterior.
Desmontaje de las puertas y
de las bisagras
En algunos casos es necesario retirar las puertas del
refrigerador para colocarlo en su lugar definitivo.
Materiales necesarios:
1.
Destornillador Phillip
Llave de tuercas hexagonal de _8"
Llave de tuercas hexagonal de _6"
Desenchufe el cord6n el6ctrico de la fuente de
alimentaci6n.
2. Retire la rejilla inferior (ver p_gina 69).
• Abra ambas puertas 180° o tanto como sea posible.
Nota: Para los refrigeradores que est_n en uso, cierre
el suministro del agua antes de retirar la tuberfa del agua
de la puerta.
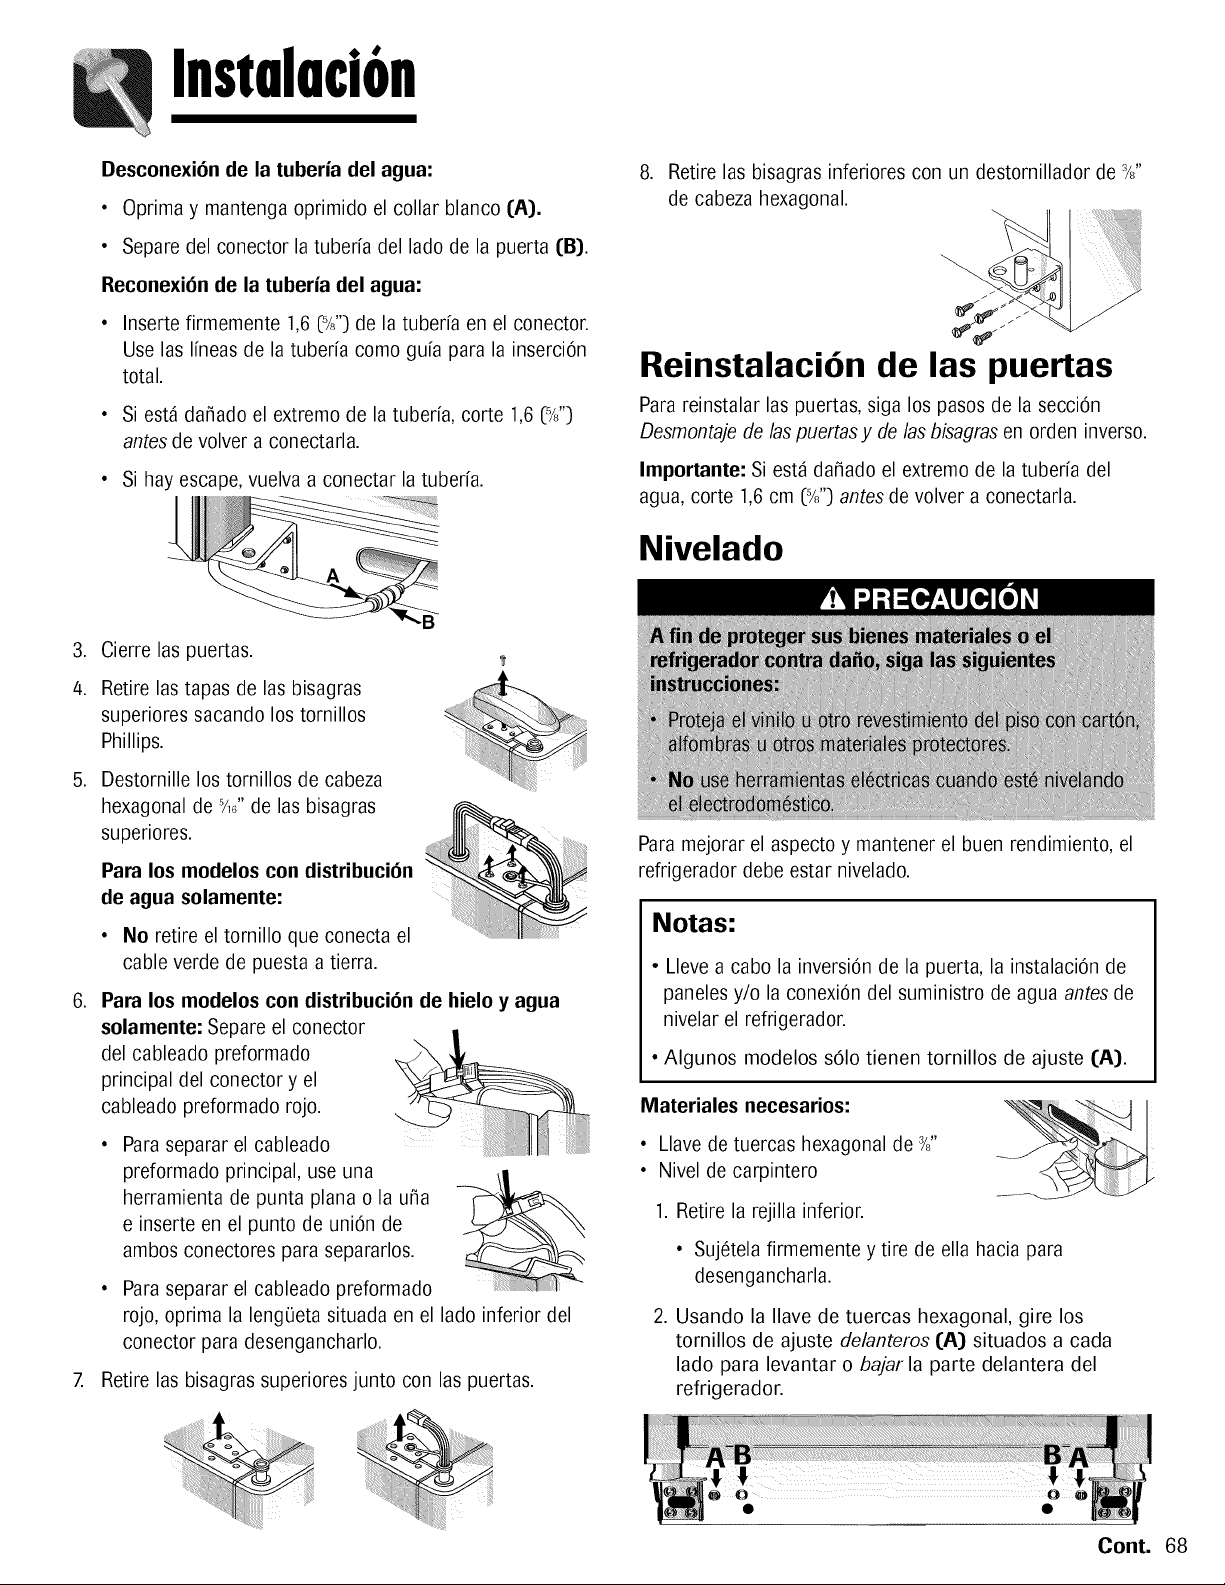
Instalacion
DesconexiOn de la tuberia del agua:
• Oprima y mantenga oprimido el collar blanco (A).
• Separe del conector la tuberia del lado de la puerta (B).
ReconexiOn de la tuberia del agua:
• Inserte firmemente 1,6 (5/;,)de la tuberfa en el conector.
Use las lineas de la tuberia como guia para la inserciOn
total.
• Si est_ da_ado el extremo de la tuberia, corte 1,6 (5/;,)
antes de volver a conectarla.
• Si hay escape, vuelva a conectar la tuberia.
8. Retire las bisagras inferiores con un destornillador de 3/8"
de cabeza hexagonal.
Reinstalaci6n de las puertas
Para reinstalar las puertas, siga los pasos de la secciOn
Desmontaje de las puertas y de las bisagras en orden inverso.
Importante: Si est_ da_ado el extremo de la tuberia del
agua, corte 1,6 cm (5/;,)antes de volver a conectarla.
Nivelado
,
4.
,
,
B
Cierre las puertas.
Retire las tapas de las bisagras
superiores sacando los tornillos
Phillips.
Destornille los tornillos de cabeza
hexagonal de 5/,j, de las bisagras
superiores.
Para los modelos con distribuci6n
de agua solamente:
• No retire el tornillo que conecta el
cable verde de puesta a tierra.
Para los modelos con distribuciOn de hielo y agua
solamente: Separe el conector
del cableado preformado
principal del conector y el
cableado preformado rojo.
Para separar el cableado
preformado principal, use una
herramienta de punta plana o la u_a
e inserte en el punto de union de
ambos conectores para separarlos.
Para separar el cableado preformado
rojo, oprima la leng(Jeta situada en el lado inferior del
conector para desengancharlo.
7. Retire las bisagras superiores junto con las puertas.
Para mejorar el aspecto y mantener el buen rendimiento, el
refrigerador debe estar nivelado.
Notas:
• Lleve a cabo la inversi6n de la puerta, la instalaci6n de
paneles y/o la conexiOn del suministro de agua antes de
nivelar el refrigerador.
• Algunos modelos s01o tienen tornillos de ajuste (A).
Materiales necesarios:
• Llave de tuercas hexagonal de %"
• Nivel de carpintero
1. Retire la rejilla inferior.
• Suj_tela firmemente y tire de ella hacia para
desengancharla.
2. Usando la Ilave de tuercas hexagonal, gire los
tomillos de ajuste delanteros (A) situados a cada
lado para levantar o bajar la parte delantera del
refrigerador.
Cont. 68
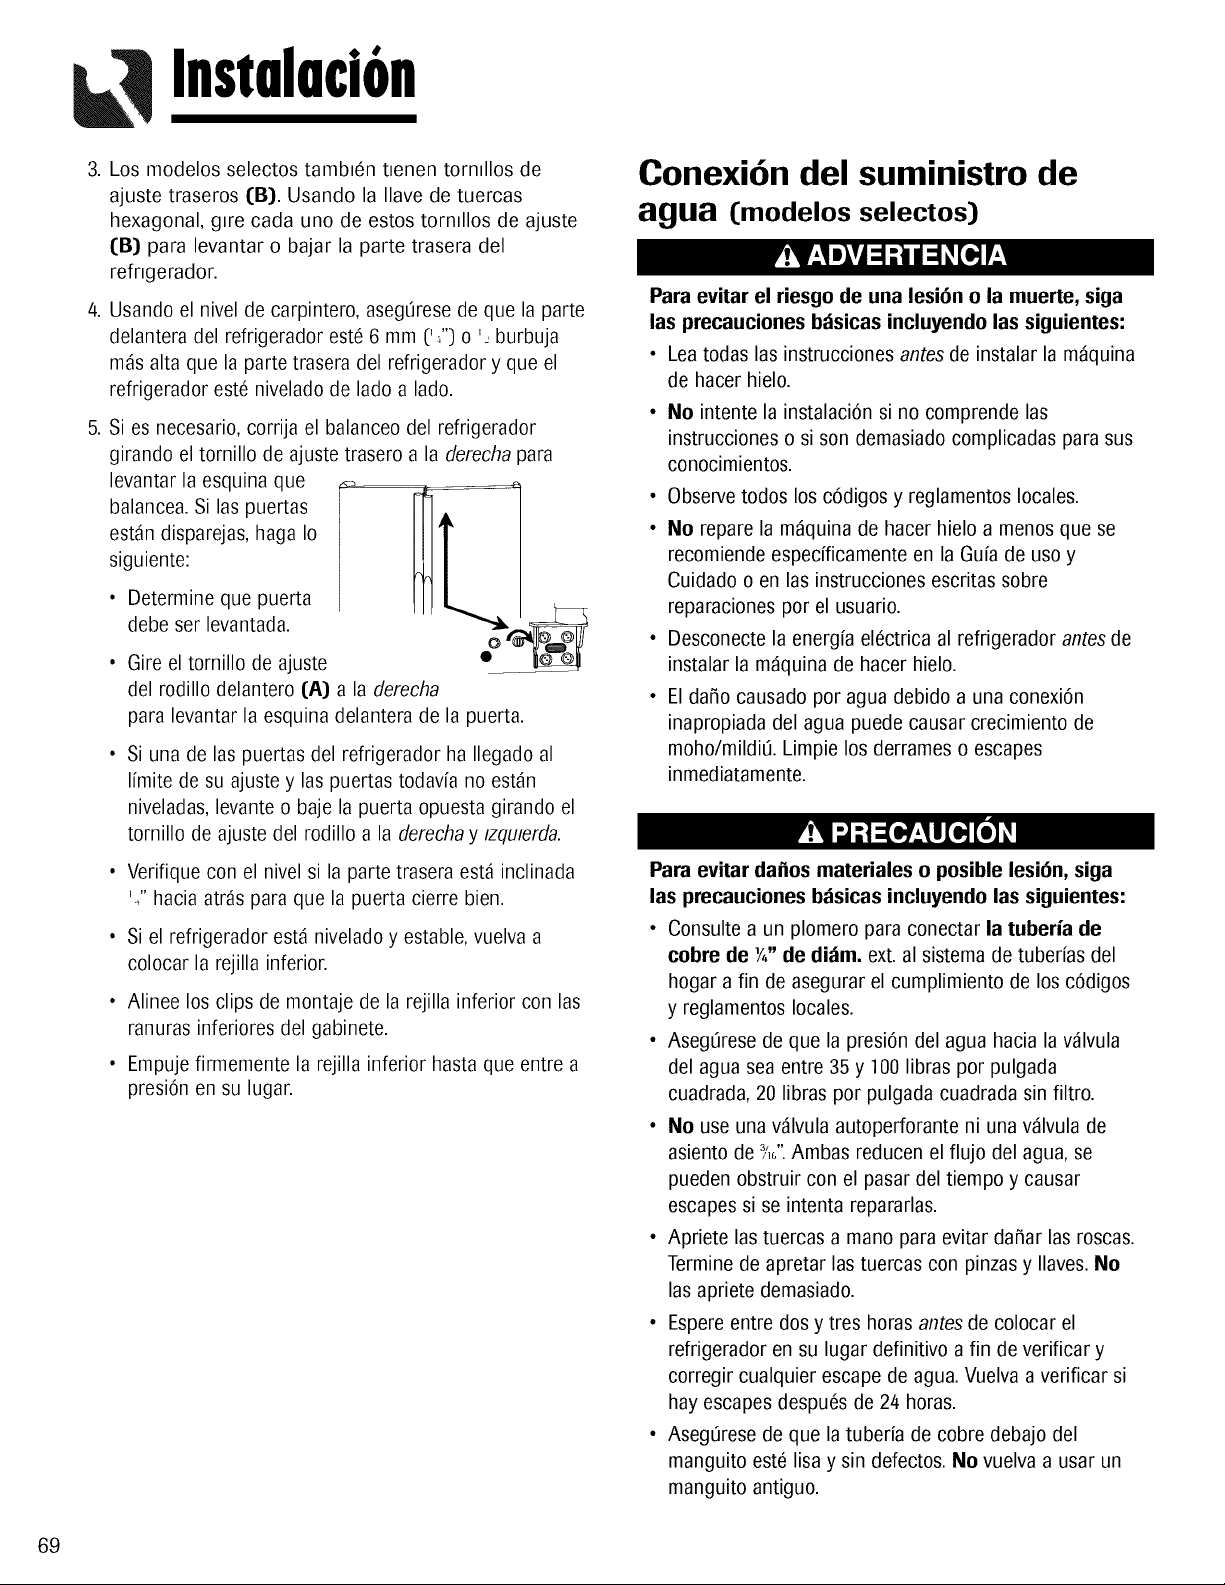
69
iHL' Instalacion
Los modelos selectos tamb_6n t_enen torndlos de
ajuste traseros (B). Usando la Ilave de tuercas
hexagonal, g_re cada uno de estos torndlos de ajuste
I:B) para levantar o bajar la parte trasera del
refngerador.
Usando el nivel de carpintero, asegdrese de que la parte
delantera del refrigerador est6 6 mm ('2) o '_ burbuja
rods alta que la parte trasera del refrigerador y que el
refrigerador est6 nivelado de lado a lado.
Si es necesario, corrija el balanceo del refrigerador
girando el tornillo de ajuste trasero a la derecha para
levantar la esquina que
balancea. Si las puertas
estdn disparejas, haga Io
siguiente:
• Determine que puerta
debe ser levantada.
• Gire el tornillo de ajuste
del rodillo delantero I:A) a la derecha
para levantar la esquina delantera de la puerta.
Si una de las puertas del refrigerador ha Ilegado al
Ifmite de su ajuste y las puertas todavfa no est_n
niveladas, levante o baje la puerta opuesta girando el
tornillo de ajuste del rodillo a la derecha y tzquterda.
Verifique con el nivel si la parte trasera est_ inclinada
'2 hacia arras para que la puerta cierre bien.
Si el refrigerador est_ nivelado y estable, vuelva a
colocar la rejilla inferior.
Alinee los clips de montaje de la rejilla inferior con las
ranuras inferiores del gabinete.
Empuje firmemente la rejilla inferior hasta que entre a
presi6n en su lugar.
Conexi6n del suministro de
agua (modelos selectos)
Para evitar el riesgo de una lesi6n o la muerte, siga
las precauciones bdsicas incluyendo las siguientes:
• Lea todas las instrucciones antes de instalar la m_quina
de hacer hielo.
• No intente la instalaci6n si no comprende las
instrucciones o si son demasiado complicadas para sus
conocimientos.
• Observe todos los c6digos y reglamentos locales.
• No repare la m_quina de hacer hielo a menos que se
recomiende espec[ficamente en la Gufa de uso y
Cuidado o en las instrucciones escritas sobre
reparaciones por el usuario.
• Desconecte la energfa el6ctrica al refrigerador antes de
instalar la m_quina de hacer hielo.
• El da_o causado por agua debido a una conexi6n
inapropiada del agua puede causar crecimiento de
moho/milditJ. Limpie los derrames o escapes
inmediatamente.
Para evitar da_os materiales o posible lesi6n, siga
las precauciones bdsicas incluyendo las siguientes:
• Consulte a un plomero para conectar la tuberia de
cobre de Y4"de di_im, ext. al sistema de tuberias del
hogar a fin de asegurar el cumplimiento de los codigos
y reglamentos locales.
• AsegL_resede que la presi6n del agua hacia la vdlvula
del agua sea entre 35 y 100 libras por pulgada
cuadrada, 20 libras por pulgada cuadrada sin filtro.
• No use una vdlvula autoperforante ni una vdlvula de
asiento de _/,,".Ambas reducen el flujo del agua, se
pueden obstruir con el pasar del tiempo y causar
escapes si se intenta repararlas.
• Apriete las tuercas a mano para evitar da_ar las roscas.
Termine de apretar las tuercas con pinzas y Ilaves. No
las apriete demasiado.
• Espere entre dos y tres horas antes de colocar el
refrigerador en su lugar definitivo a fin de verificar y
corregir cualquier escape de agua. Vuelva a verificar si
hay escapes despu6s de 24 horas.
• AsegL_resede que la tuberia de cobre debajo del
manguito est6 lisa y sin defectos. No vuelva a usar un
manguito antiguo.
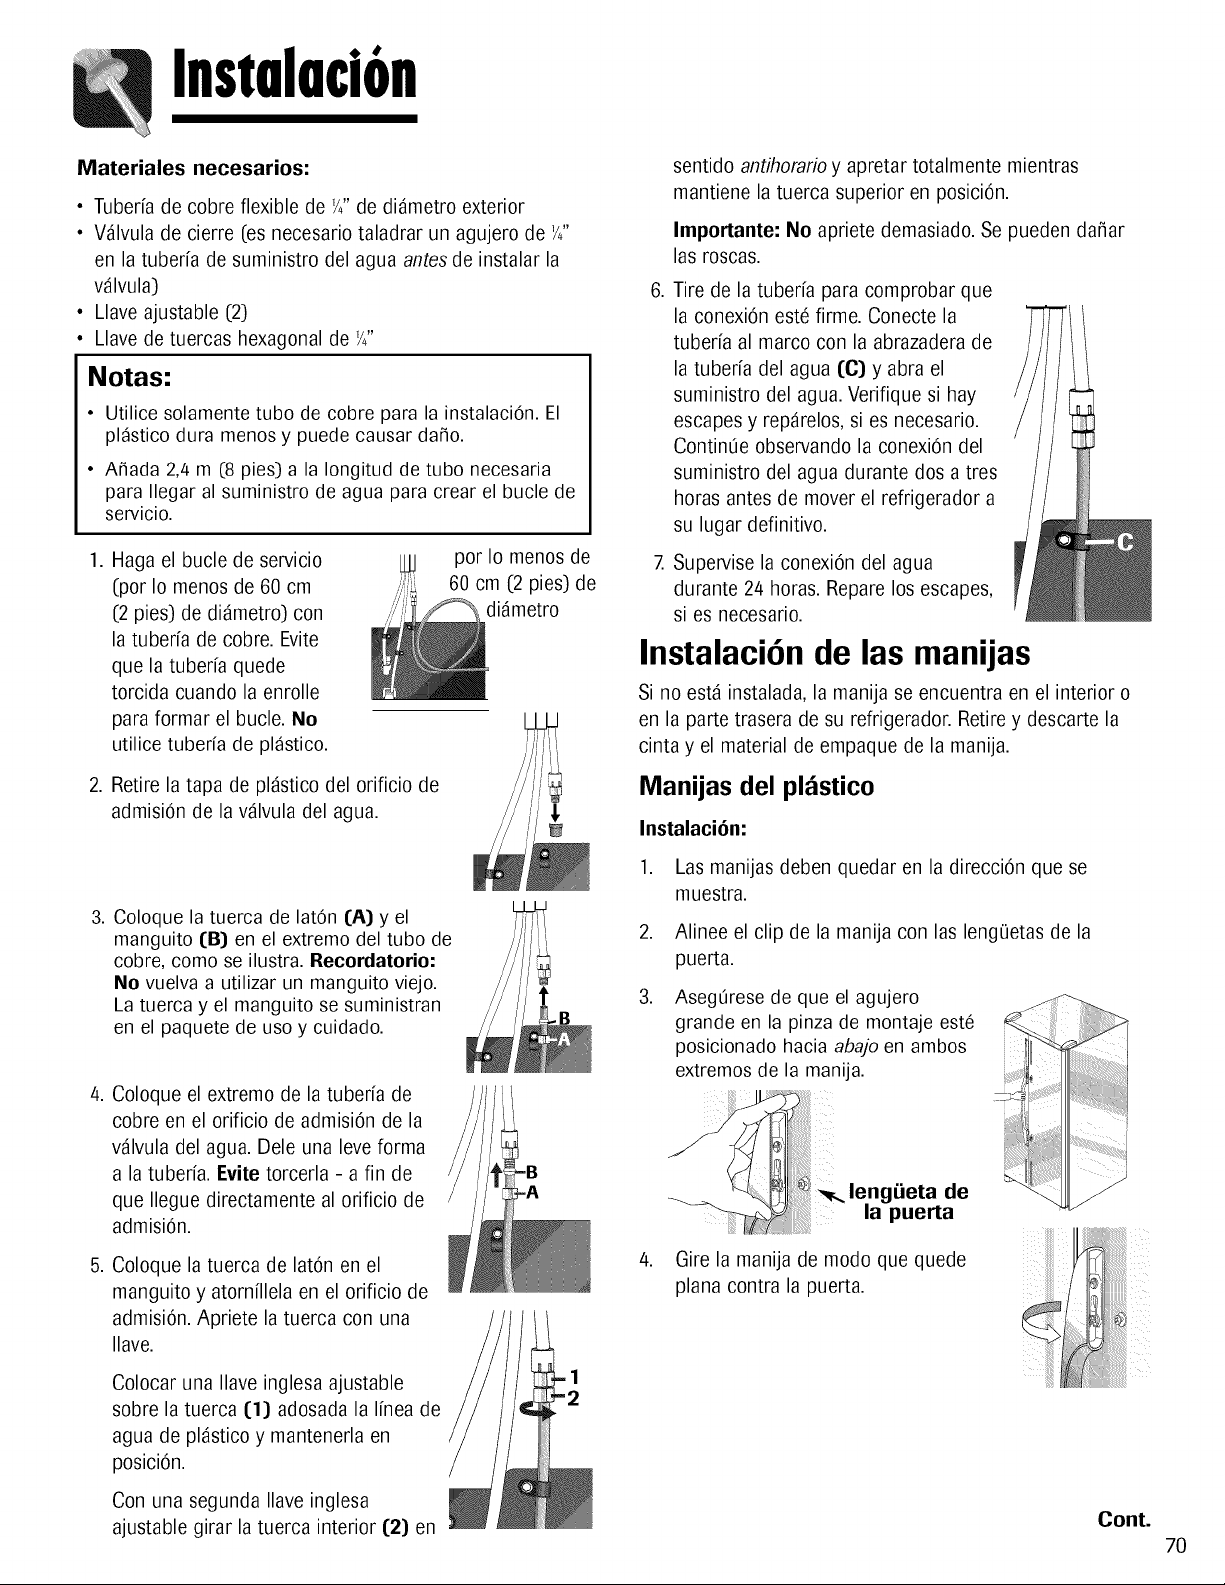
Instalacion
Materiales necesarios:
• Tuber[a de cobre flexible de '/4"de di_metro exterior
• V_lvula de cierre (es necesario taladrar un agujero de '/4"
en la tube@ de suministro del agua antes de instalar la
v_lvula)
• Llave ajustable (2)
Llave de tuercas hexagonal de '/_"
Notas:
• Utilice solamente tubo de cobre para la instalaciOn. El
pl_stico dura menos y puede causar da_o.
• A_ada 2,4 m (8 pies) a la Iongitud de tubo necesaria
para Ilegar al suministro de agua para crear el bucle de
servicio.
1. Haga el bucle de servicio
(por Io menos de 60 cm
(2 pies) de di_metro) con
la tube@ de cobre. Evite
que la tuberfa quede
torcida cuando la enrolle
para formar el bucle. No
utilice tuberfa de pl_stico.
2. Retire la tapa de pl_stico del orificio de
admisiOn de la v_lvula del agua.
por Io menos de
60 cm (2 pies) de
di_metro
3. Coloque la tuerca de latOn 1[A)y el
manguito 1[B) en el extremo del tubo de
cobre, como se ilustra. Recordatorio:
No vuelva a utilizar un manguito viejo.
La tuerca y el manguito se suministran
en el paquete de uso y cuidado.
4. Coloque el extremo de la tube@ de
cobre en el orificio de admisiOn de la
v_lvula del agua. Dele una leve forma
a la tube@. [rite torcerla - a fin de
que Ilegue directamente al orificio de
admisiOn.
5. Coloque la tuerca de latOn en el
manguito y atornfllela en el orificio de
admisiOn. Apriete la tuerca con una
Ilave.
Colocar una Ilave inglesa ajustable
sobre la tuerca I[1) adosada la IMea de
agua de pl_stico y mantenerla en
posiciOn.
Con una segunda Ilave inglesa
ajustable girar la tuerca interior 112)en
=B
,
sentido antihorario y apretar totalmente mientras
mantiene la tuerca superior en posiciOn.
Importante: No apriete demasiado. Se pueden da_ar
las roscas.
Tire de la tuberfa para comprobar que
la conexiOn este firme. Conecte la
tube@ al marco con la abrazadera de
la tube@ del agua 110)y abra el
suministro del agua. Verifique si hay
escapes y rep_relos, si es necesario.
Co@n@ observando la conexiOn del
suministro del agua durante dos a tres
horas antes de mover el refrigerador a
su lugar definitivo.
Supervise la conexiOn del agua
durante 24 horas. Repare los escapes,
si es necesario.
Instalaci6n de las manijas
Si no est_ instalada, la manija se encuentra en el interior o
en la parte trasera de su refrigerador. Retire y descarte la
cinta y el material de empaque de la manija.
Manijas del plfistico
InstalaciOn:
1. Las manijas deben quedar en la direcciOn que se
muestra.
,
,
,
Alinee el clip de la manija con las lengQetas de la
puerta.
Asegt_rese de que el agujero
grande en la pinza de montaje este
posicionado hacia abajo en ambos
extremos de la manija.
lengiieta de
la puerta
planaGirelacontramanijaladepuerta.mOdoque quede
Cont.
7O
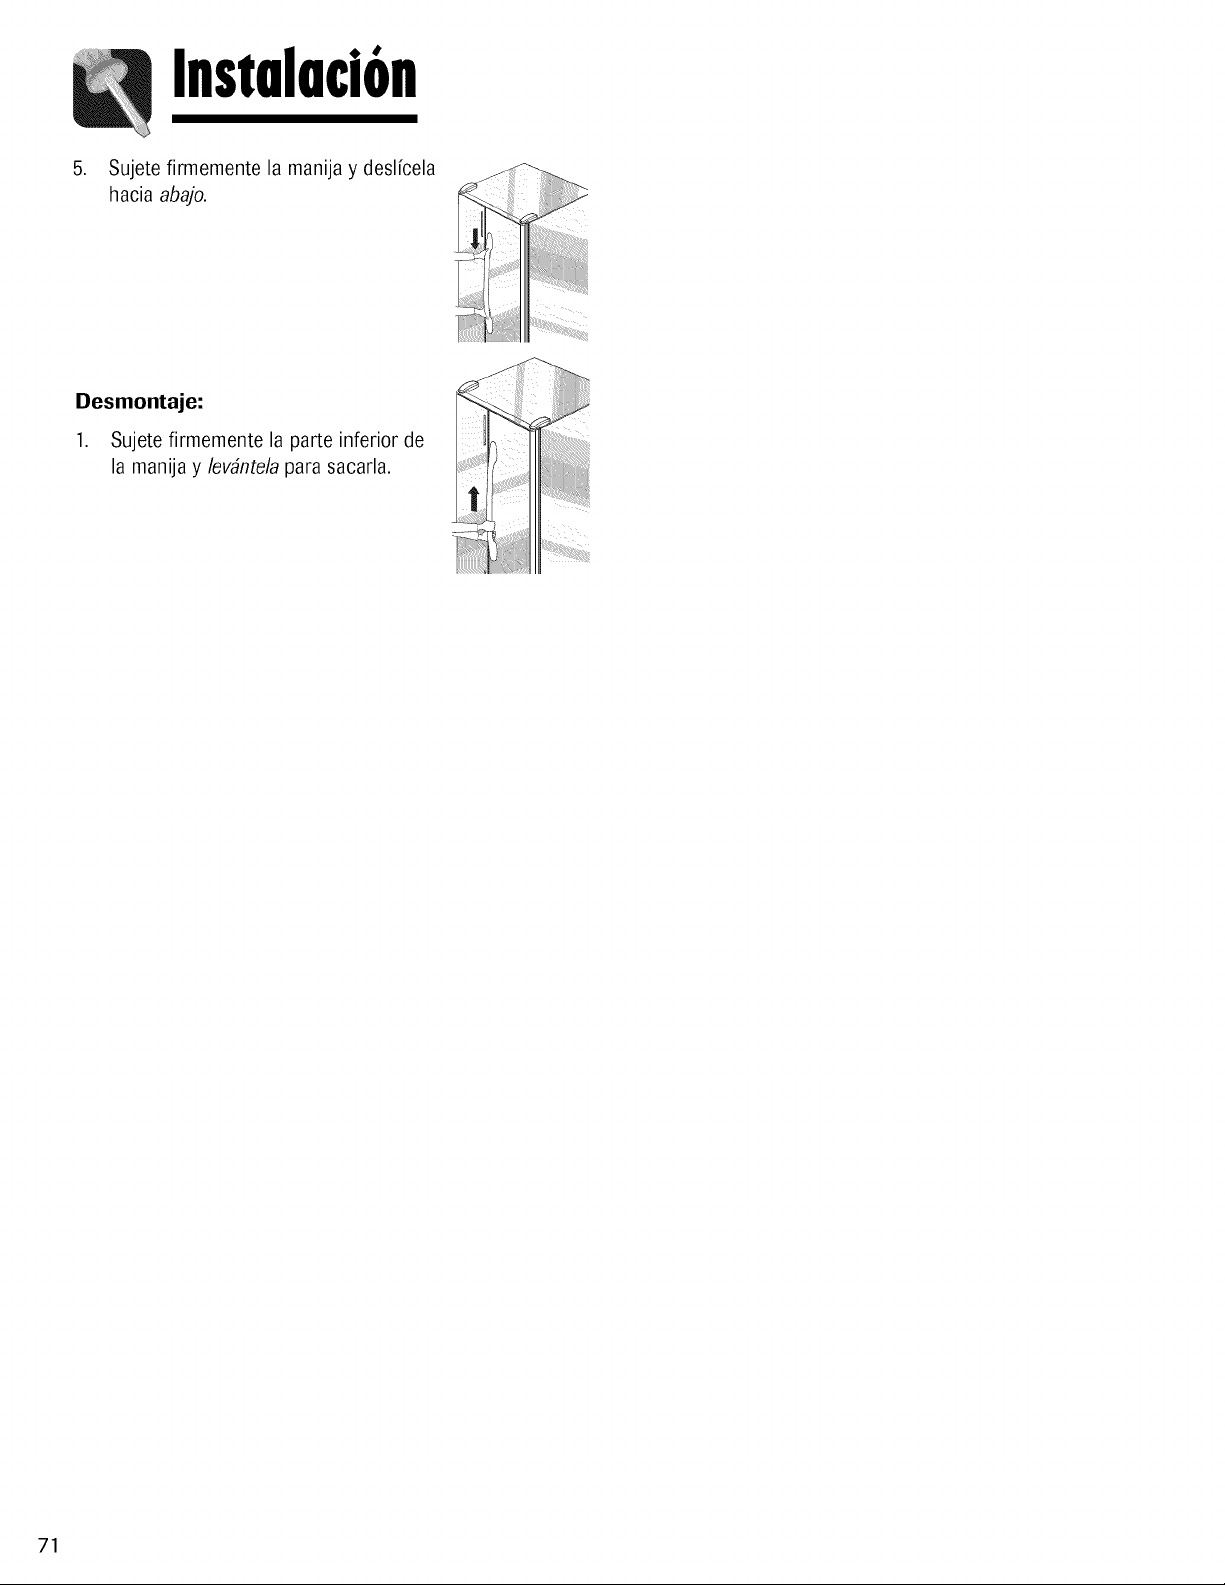
Instalacion
5. Sujete firmemente la manija y deslfcela
hacia abajo.
Desmontaje:
1. Sujete firmemente la parte inferior de
la manija y lev_ntela para sacarla,
71
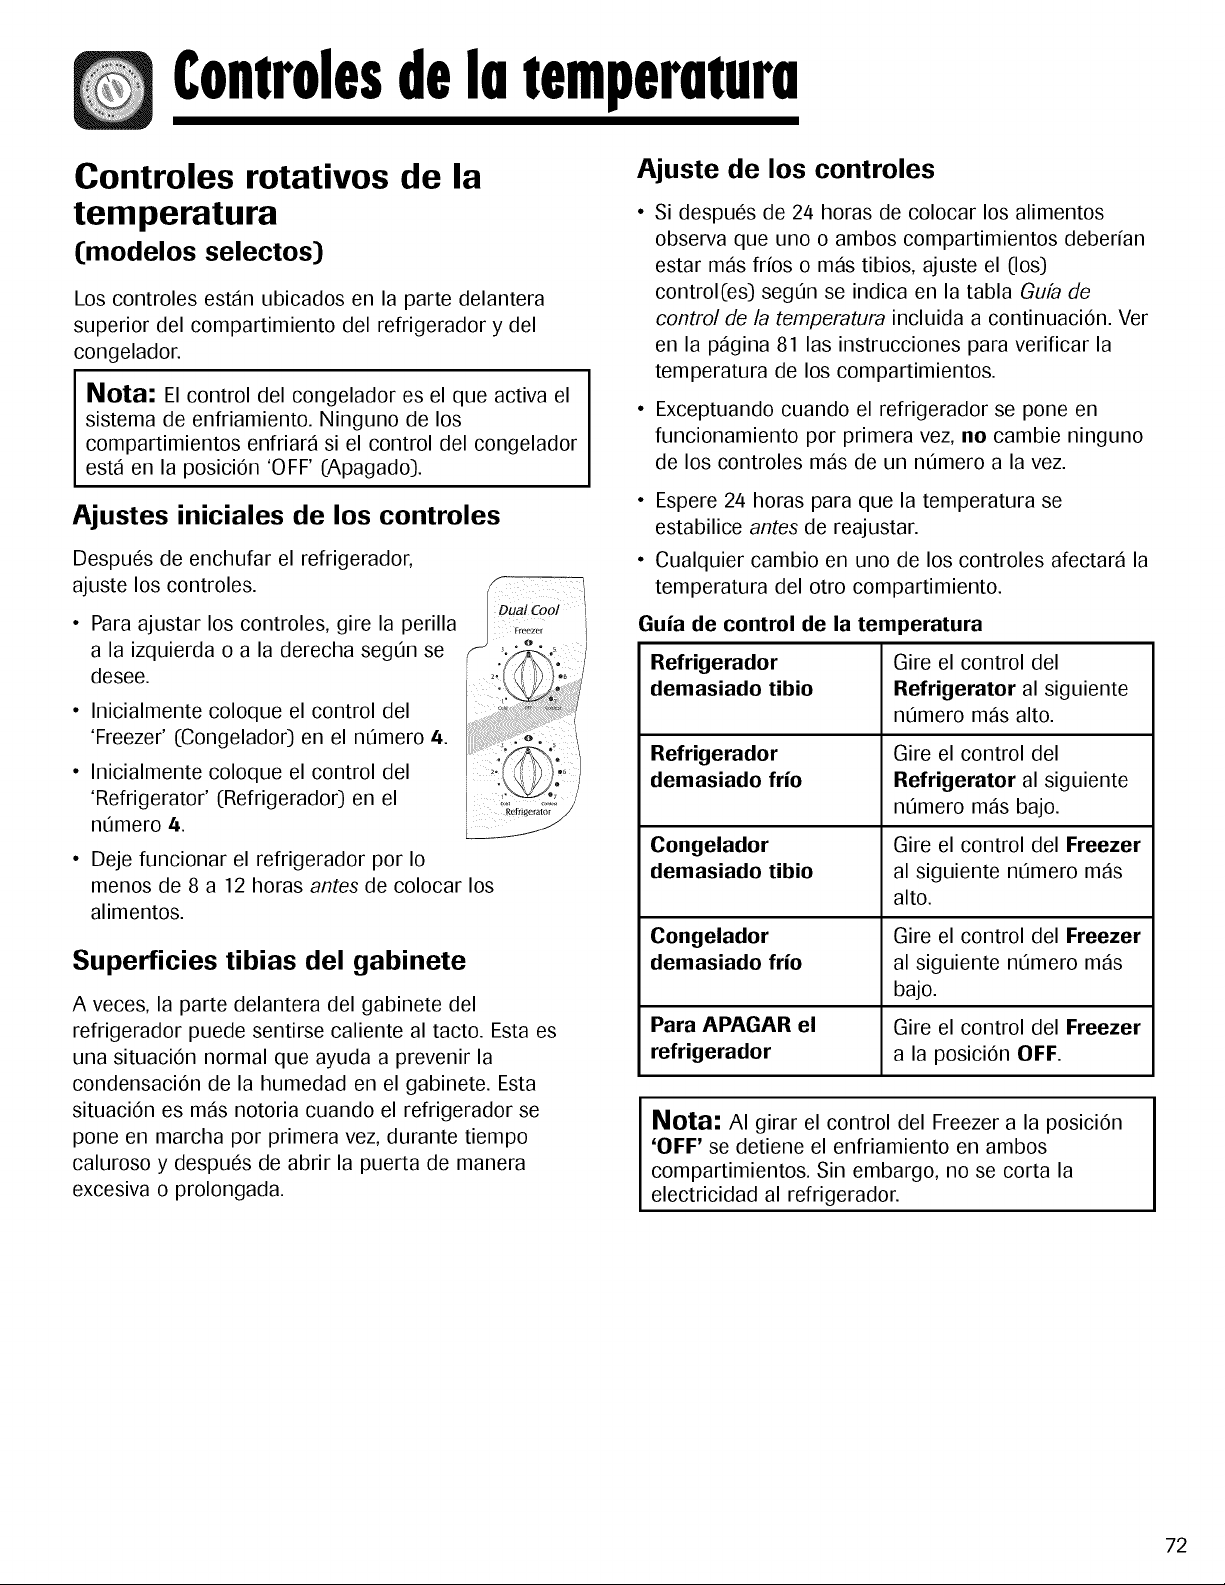
Controlesdelutemperuturu
Controles rotativos de la
temperatura
(modelos selectos)
Los controles estan ubicados en la parte delantera
superior del compartimiento del refrigerador y del
congelador.
Nora- El control del congelador es el que activa el
sistema de enfriamiento. Ninguno de los
compartimientos enfriara si el control del congelador
esta en la posici6n 'OFF' (Apagado).
Ajustes iniciales de los controles
Despu6s de enchufar el refrigerador,
ajuste los controles.
• Para ajustar los controles, gire la perilla
a la izquierda o a la derecha segQn se
desee.
• Inicialmente coloque el control del
'Freezer' (Congelador) en el nQmero 4.
• Inicialmente coloque el control del
'Refrigerator' (Refrigerado0 en el
nQmero 4.
• Deje funcionar el refrigerador por Io
menos de 8 a 12 horas antes de colocar los
alimentos.
Superficies tibias del gabinete
A veces, la parte delantera del gabinete del
refrigerador puede sentirse caliente al tacto. Esta es
una situaci6n normal que ayuda a prevenir la
condensaci6n de la humedad en el gabinete. Esta
situaci6n es mas notoria cuando el refrigerador se
pone en marcha por primera vez, durante tiempo
caluroso y despu6s de abrir la puerta de manera
excesiva o prolongada.
Ajuste de los controles
Si despu6s de 24 horas de colocar los alimentos
observa que uno o ambos compartimientos deberfan
estar mas frfos o mas tibios, ajuste el (los)
control(es) segQn se indica en la tabla Gufa de
control de la temperatura incluida a continuaci6n. Ver
en la pagina 81 las instrucciones para verificar la
temperatura de los compartimientos.
• Exceptuando cuando el refrigerador se pone en
funcionamiento por primera vez, no cambie ninguno
de los controles mas de un nQmero a la vez.
• Espere 24 horas para que la temperatura se
estabilice antes de reajustar.
• Cualquier cambio en uno de los controles afectara la
temperatura del otro compartimiento.
Guia de control de la temperatura
Refrigerador
demasiado tibio
Refrigerador
demasiado frio
Gire el control del
Refrigerator al siguiente
nQmero mas alto.
Gire el control del
Refrigerator al siguiente
nQmero mas bajo.
Gire el control del Freezer
al siguiente nQmero mas
alto.
Congelador
demasiado tibio
Congelador Gire el control del Freezer
demasiado frio al siguiente nQmero mas
bajo.
Para APAGAR el Gire el control del Freezer
refrigerador a la posici6n OFF.
Nota: AI girar el control del Freezer a la posici6n
'OFF' se detiene el enfriamiento en ambos
compartimientos. Sin embargo, no se corta la
electricidad al refrigerador.
72
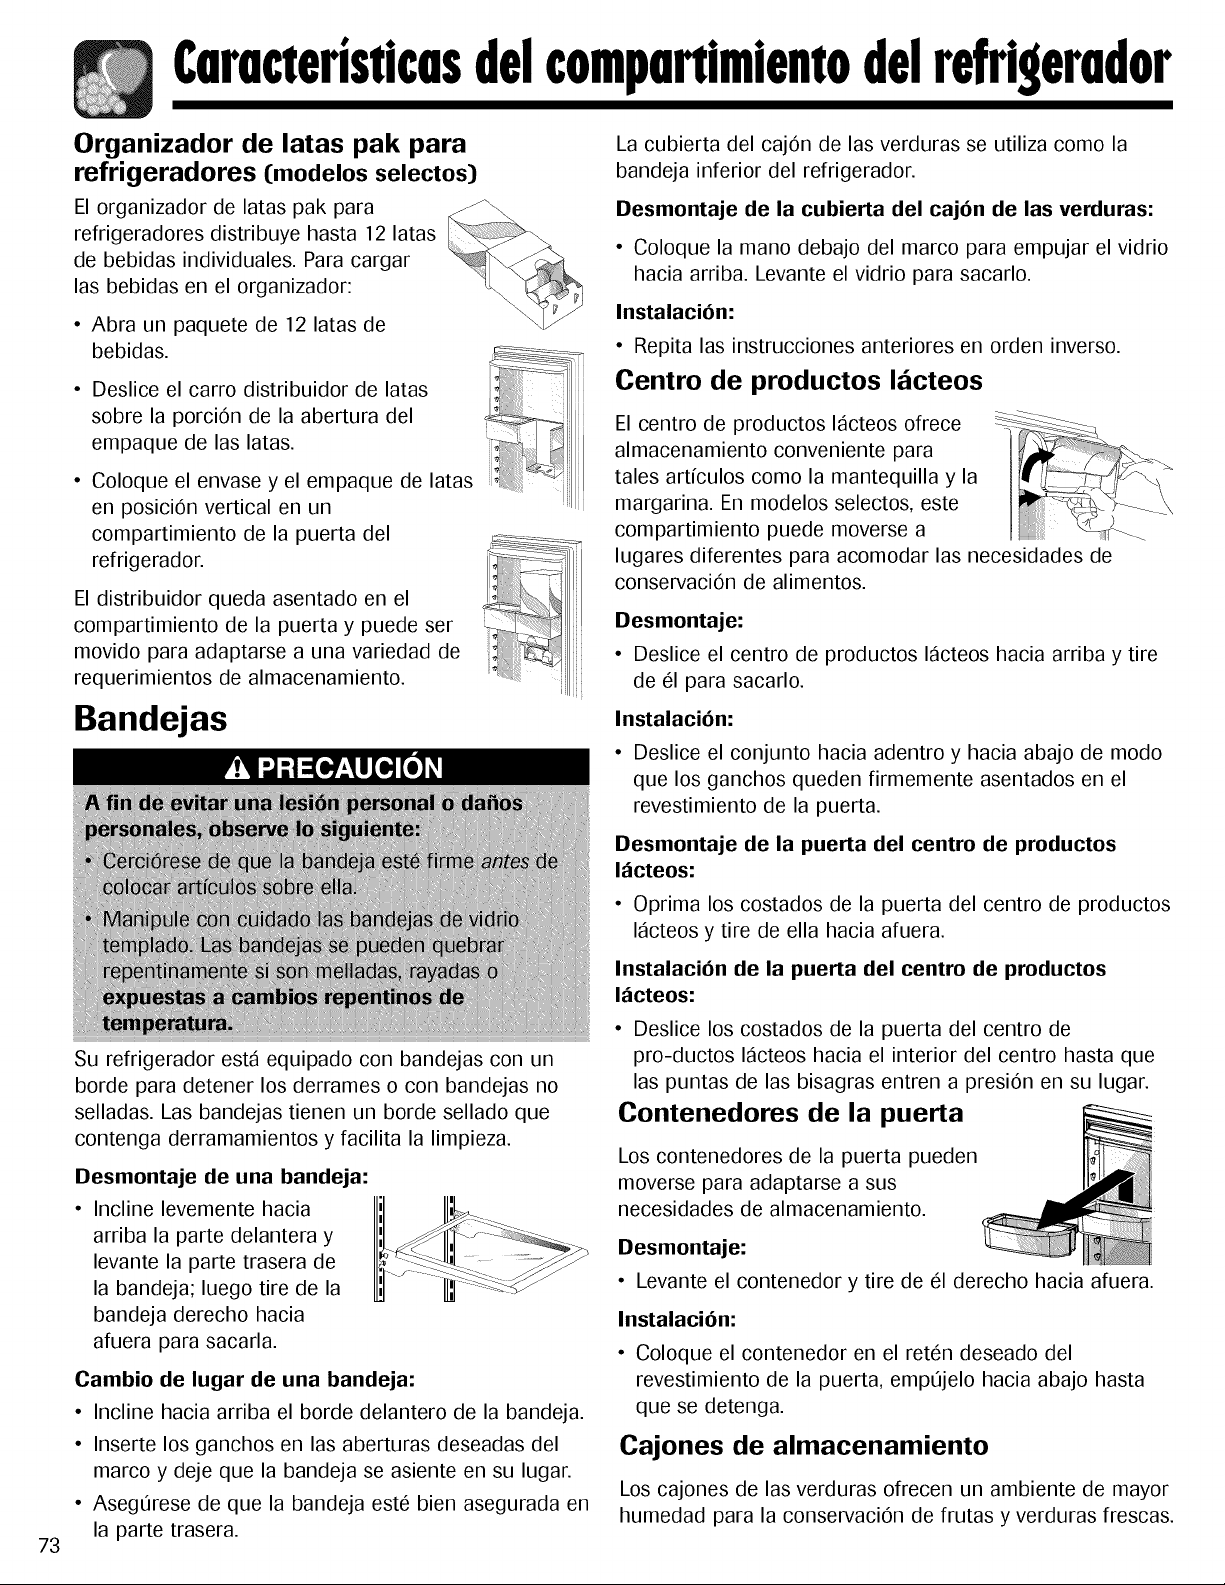
73
Comcteristlcosdelcomponlmlentodelrefrlgerodor
Organizador de latas pak para
refrigeradores (modelos selectos)
La cubierta del caj6n de las verduras se utiliza como la
bandeja inferior del refrigerador.
El organizador de latas pak para
refrigeradores distribuye hasta 12 latas
de bebidas individuales. Para cargar
las bebidas en el organizador:
• Abra un paquete de 12 latas de
bebidas.
Deslice el carro distribuidor de latas
sobre la porci6n de la abertura del
empaque de las latas.
Coloque el envase y el empaque de latas
en posici6n vertical en un
compartimiento de la puerta del
refrigerador.
El distribuidor queda asentado en el
compartimiento de la puerta y puede ser
movido para adaptarse a una variedad de
requerimientos de almacenamiento.
+_4i:ili
+_i!i+iii++
++_+Tiii++7;ii_
i i,_i_! !_' _
i+++
ii'4;;++++
Desmontaje de la cubierta del caj6n de las verduras:
• Coloque la mano debajo del marco para empujar el vidrio
hacia arriba. Levante el vidrio para sacarlo.
Instalaci6n:
• Repita las instrucciones anteriores en orden inverso.
Centro de productos I cteos
El centro de productos lacteos ofrece
almacenamiento conveniente para
tales artfculos como la mantequilla y la
margarina. En modelos selectos, este
compartimiento puede moverse a
lugares diferentes para acomodar las necesidades de
conservaci6n de alimentos.
Desmontaje:
• Deslice el centro de productos lacteos hacia arriba y tire
de 61 para sacarlo.
Bandejas
+m
++
+++++
++l+e++co
+i
Su refrigerador esta equipado con bandejas con un
borde para detener los derrames o con bandejas no
selladas. Las bandejas tienen un borde sellado que
contenga derramamientos y facilita la limpieza.
Desmontaje de una bandeja:
• Incline levemente hacia
arriba la parte delantera y
levante la parte trasera de
la bandeja; luego tire de la
bandeja derecho hacia
afuera para sacarla.
Cambio de lugar de una bandeja:
• Incline hacia arriba el borde delantero de la bandeja.
Instalaci6n:
• Deslice el conjunto hacia adentro y hacia abajo de modo
que los ganchos queden firmemente asentados en el
revestimiento de la puerta.
Desmontaje de la puerta del centro de productos
I_cteos:
• Oprima los costados de la puerta del centro de productos
lacteos y tire de ella hacia afuera.
Instalaci6n de la puerta del centro de productos
I_cteos:
• Deslice los costados de la puerta del centro de
pro-ductos lacteos hacia el interior del centro hasta que
las puntas de las bisagras entren a presi6n en su lugar.
Contenedores de la puerta
Los contenedores de la puerta pueden
moverse para adaptarse a sus
necesidades de almacenamiento.
Desmontaje:
• Levante el contenedor y tire de 61 derecho hacia afuera.
Instalaci6n:
• Coloque el contenedor en el ret6n deseado del
revestimiento de la puerta, empQjelo hacia abajo hasta
que se detenga.
• Inserte los ganchos en las aberturas deseadas del
marco y deje que la bandeja se asiente en su lugar.
• Aseg_rese de que la bandeja est6 bien asegurada en
la parte trasera.
Cajones de almacenamiento
Los cajones de las verduras ofrecen un ambiente de mayor
humedad para la conservaci6n de frutas y verduras frescas.
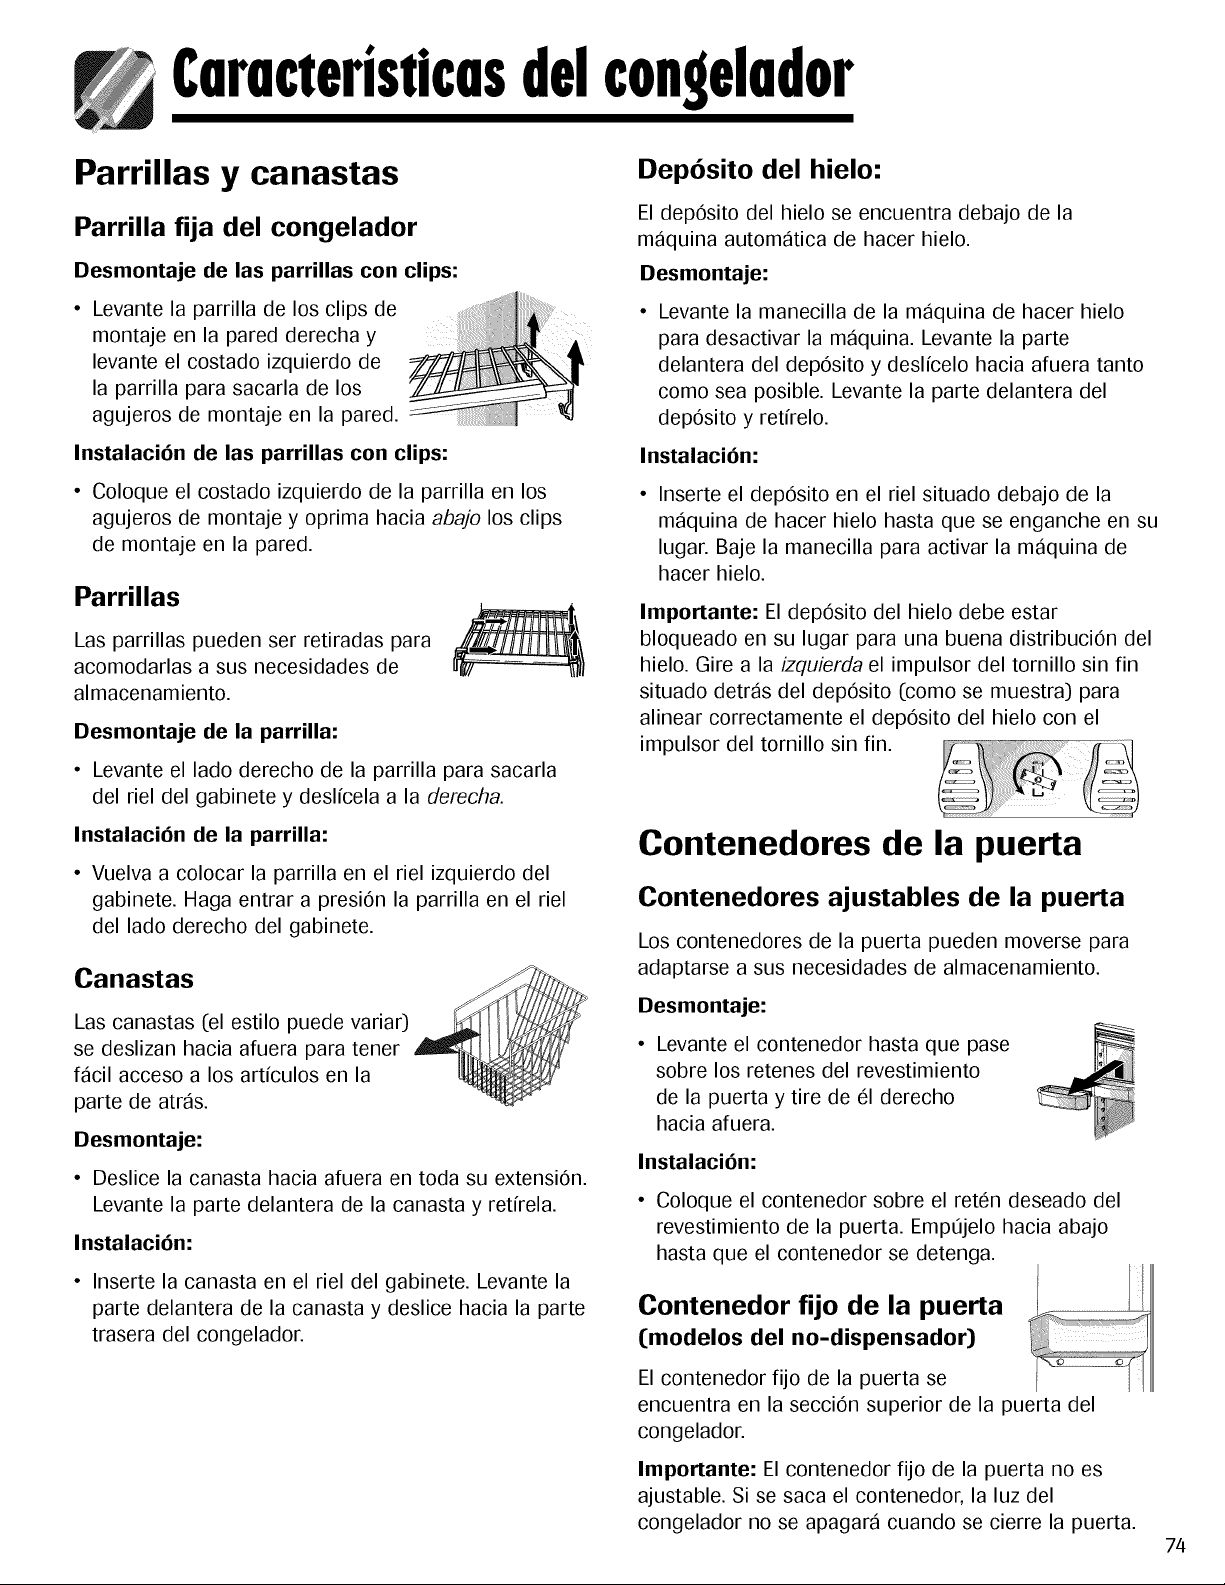
Caracteristicasdelcongelador
Parrillas y canastas
Parrilla fija del congelador
Desmontaje de las parrillas con clips:
• Levante la parrilla de los clips de
montaje en la pared derecha y
levante el costado izquierdo de
la parrilla para sacarla de los
agujeros de montaje en la pared.
Instalaci6n de las parrillas con clips:
• Coloque el costado izquierdo de la parrilla en los
agujeros de montaje y oprima hacia abajo los clips
de montaje en la pared.
Parrillas
Las parrillas pueden ser retiradas para
acomodarlas a sus necesidades de
almacenamiento.
Desmontaje de la parrilla:
• Levante el lado derecho de la parrilla para sacarla
del riel del gabinete y deslfcela a la derecha.
Dep6sito del hielo:
El dep6sito del hielo se encuentra debajo de la
maquina automatica de hacer hielo.
Desmontaje:
• Levante la manecilla de la maquina de hacer hielo
para desactivar la maquina. Levante la parte
delantera del dep6sito y deslfcelo hacia afuera tanto
como sea posible. Levante la parte delantera del
dep6sito y retfrelo.
Instalaci6n:
• Inserte el dep6sito en el riel situado debajo de la
maquina de hacer hielo hasta que se enganche en su
lugar. Baje la manecilla para activar la maquina de
hacer hielo.
Importante: El dep6sito del hielo debe estar
bloqueado en su lugar para una buena distribuci6n del
hielo. Gire a la izquierda el impulsor del tornillo sin fin
situado detras del dep6sito (como se muestra) para
alinear correctamente el dep6sito del hielo con el
impulsor del tornillo sin fin.
Instalaci6n de la parrilla:
• Vuelva a colocar la parrilla en el riel izquierdo del
gabinete. Haga entrar a presi6n la parrilla en el riel
del lado derecho del gabinete.
Canastas
Las canastas (el estilo puede variar)
se deslizan hacia afuera para tener
facil acceso a los artfculos en la
parte de arras.
Desmontaje:
• Deslice la canasta hacia afuera en toda su extensi6n.
Levante la parte delantera de la canasta y retfrela.
Instalaci6n:
• Inserte la canasta en el riel del gabinete. Levante la
parte delantera de la canasta y deslice hacia la parte
trasera del congelador.
Contenedores de la puerta
Contenedores ajustables de la puerta
Los contenedores de la puerta pueden moverse para
adaptarse a sus necesidades de almacenamiento.
Desmontaje:
• Levante el contenedor hasta que pase
sobre los retenes del revestimiento
de la puerta y tire de 61derecho
hacia afuera.
Instalaci6n:
• Coloque el contenedor sobre el ret6n deseado del
revestimiento de la puerta. EmpQjelo hacia abajo
hasta que el contenedor se detenga.
Contenedor fijo de la puerta
(modelos del no-dispensador)
El contenedor fijo de la puerta se
encuentra en la secci6n superior de la puerta del
congelador.
Importante: El contenedor fijo de la puerta no es
ajustable. Si se saca el contenedor, la luz del
congelador no se apagara cuando se cierre la puerta.
74
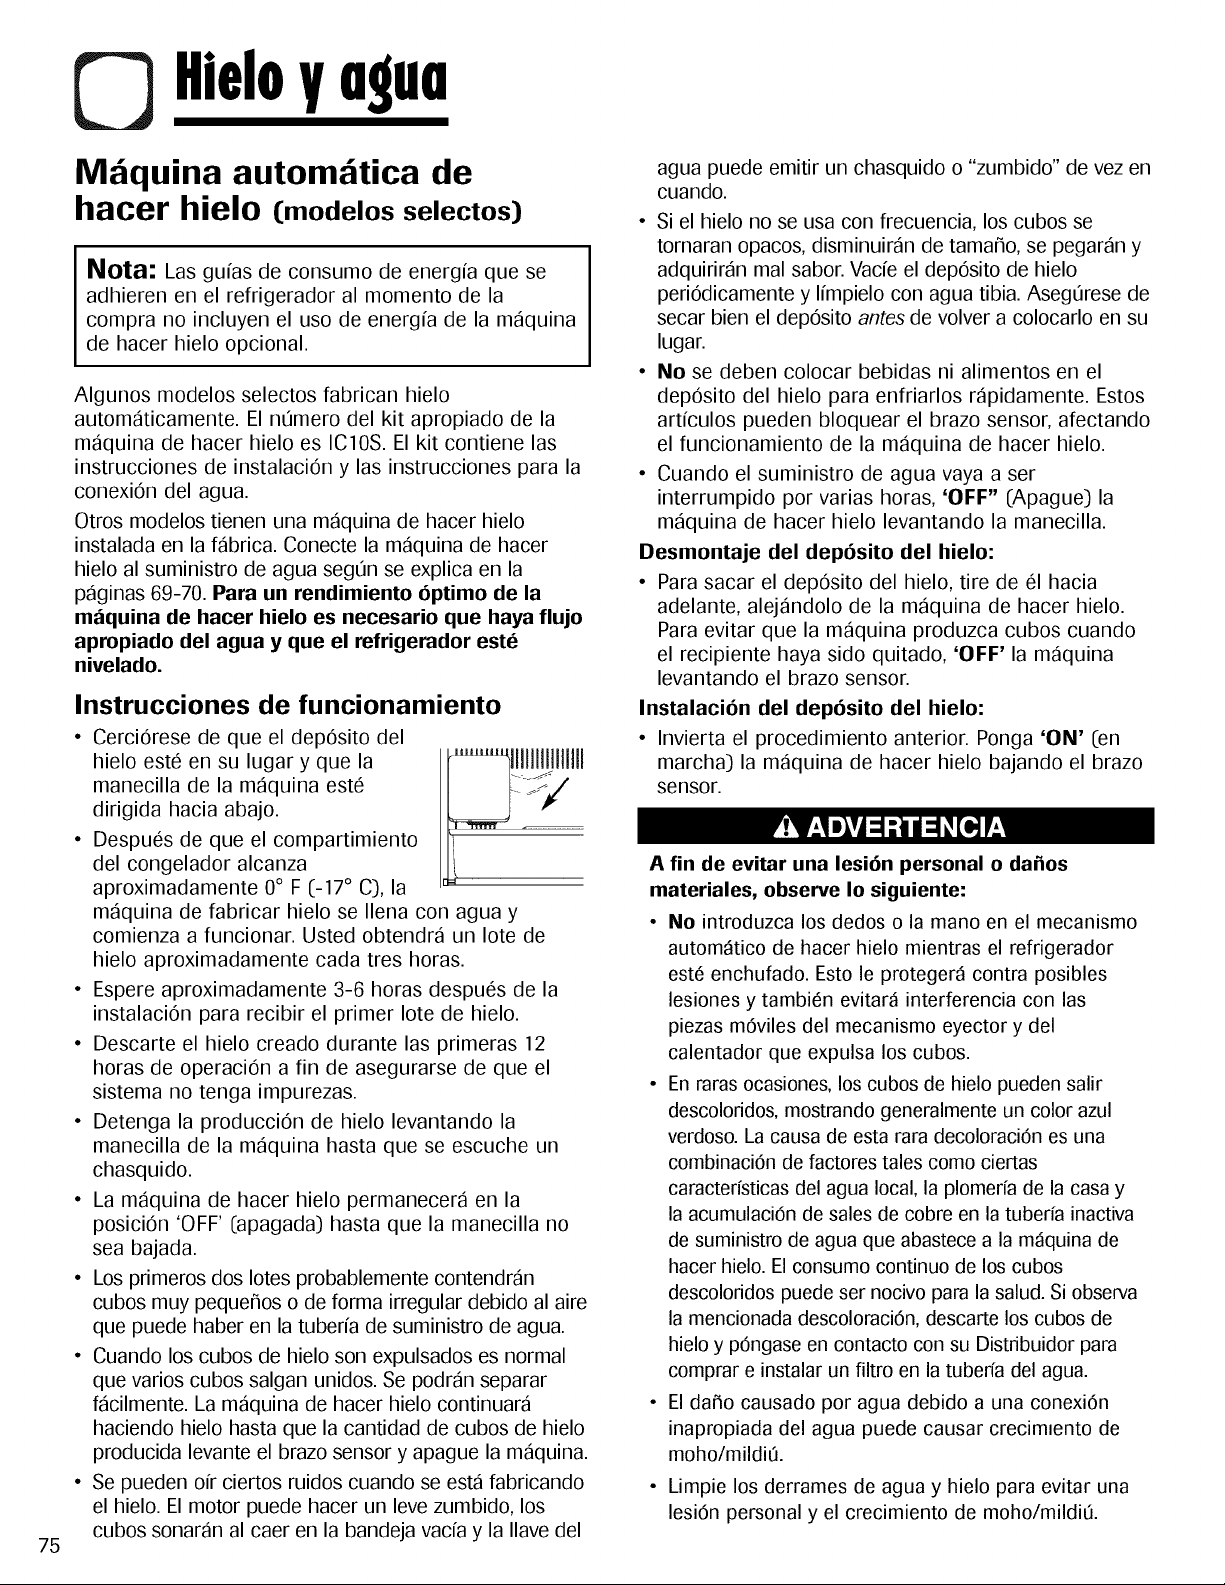
75
HieloYagua
Mfiquina automfitica de
hacer hielo [modelos selectos)
Nota: Las gu/as de consumo de energ/a que se
adhieren en el refrigerador al momento de la
compra no incluyen el uso de energ/a de la maquina
de hacer hielo opcional.
Algunos modelos selectos fabrican hielo
automaticamente. El nQmero del kit apropiado de la
maquina de hacer hielo es IC10S. El kit contiene las
instrucciones de instalaciOn y las instrucciones para la
conexiOn del agua.
Otros modelos tienen una maquina de hacer hielo
instalada en la fabrica. Conecte la maquina de hacer
hielo al suministro de agua segun se explica en la
paginas 69-70. Para un rendimiento 6ptimo de la
mfiquina de hacer hielo es necesario que haya flujo
apropiado del agua y que el refrigerador este
nivelado.
Instrucciones de funcionamiento
• Cerci6rese de que el dep6sito del
hielo est_ en su lugar y que la IIIIIIIIIIIIIII
manecilla de la maquina este
dirigida hacia abajo
• Despues de que el compartimiento
del congelador alcanza
aproximadamente 0 ° F (-17 ° C)la
maquina de fabricar hielo se Ilena con agua y
comienza a funcionar Usted obtendra un Iote de
hielo aproximadamente cada tres horas
• Espere aproximadamente 3-6 horas despues de la
instalaci6n para recibir el primer Iote de hielo
• Descarte el hielo creado durante las primeras 12
horas de operaci6n a fin de asegurarse de que el
sistema no tenga impurezas
• Detenga la producci6n de hielo levantando la
manecilla de la maquina hasta que se escuche un
chasquido
• La maquina de hacer hielo permanecera en la
posici6n 'OFF (apagada) hasta que la manecilla no
sea bajada
• Los primeros dos Iotes probablemente contendran
cubos muy peque_os o de forma irregular debido al aire
que puede haber en la tube@ de suministro de agua
• Cuando los cubos de hielo son expulsados es normal
que varios cubos salgan unidos Se podran separar
facilmente La maquina de hacer hielo continuara
haciendo hielo hasta que la cantidad de cubos de hielo
producida levante el brazo sensor y apague la maquina
• Se pueden off ciertos ruidos cuando se esta fabricando
el hielo El motor puede hacer un leve zumbido los
cubos sonaran al caer en la bandeja vacfa y la Ilave del
agua puede emitir un chasquido o "zumbido" de vez en
cuando.
• Si el hielo no se usa con frecuencia, los cubos se
tornaran opacos, disminuiran de tama_o, se pegaran y
adquiriran mal sabor. Vacfe el depOsito de hielo
periOdicamente y l/mpielo con agua tibia. Asegurese de
secar bien el depOsito antes de volver a colocarlo en su
lugar.
• No se deben colocar bebidas ni alimentos en el
depOsito del hielo para enfriarlos rapidamente. Estos
art/culos pueden bloquear el brazo sensor, afectando
el funcionamiento de la maquina de hacer hielo.
• Cuando el suministro de agua vaya a ser
interrumpido por varias horas, 'OFF" (Apague) la
maquina de hacer hielo levantando la manecilla.
Desmontaje del dep6sito del hielo:
• Para sacar el dep6sito del hielo, tire de _1 hacia
adelante, alejandolo de la maquina de hacer hielo.
Para evitar que la maquina produzca cubos cuando
el recipiente haya sido quitado, 'OFF' la maquina
levantando el brazo sensor.
Instalaci6n del dep6sito del hielo:
• Invierta el procedimiento anterior. Ponga 'ON' (en
marcha) la maquina de hacer hielo bajando el brazo
sensor.
A fin de evitar una lesion personal o dafios
materiales, observe Io siguiente:
• No introduzca los dedos o la mano en el mecanismo
autom_tico de hacer hielo mientras el refrigerador
este enchufado. Esto le proteger_ contra posibles
lesiones y tambien evitar_ interferencia con las
piezas mOviles del mecanismo eyector y del
calentador que expulsa los cubos.
• En raras ocasiones, los cubos de hielo pueden salir
descoloridos, mostrando generalmente un color azul
verdoso. La causa de esta rata decoloraciOn es una
combinaciOn de factores tales como ciertas
caracterfsticas del agua local, la plomerfa de la casa y
la acumulaciOn de sales de cobre en la tuberfa inactiva
de suministro de agua que abastece a la m_quina de
hacer hielo. El consumo continuo de los cubos
descoloridos puede ser nocivo para la salud. Si observa
la mencionada descoloraciOn, descarte los cubos de
hielo y pOngase en contacto con su Distribuidor para
comprar e instalar un filtro en la tuberfa del agua.
• El da_o causado por agua debido a una conexiOn
inapropiada del agua puede causar crecimmnto de
moho/mildi&
• Limpie los derrames de agua y hielo para evitar una
lesion personal y el crecimiento de moho/mildi&
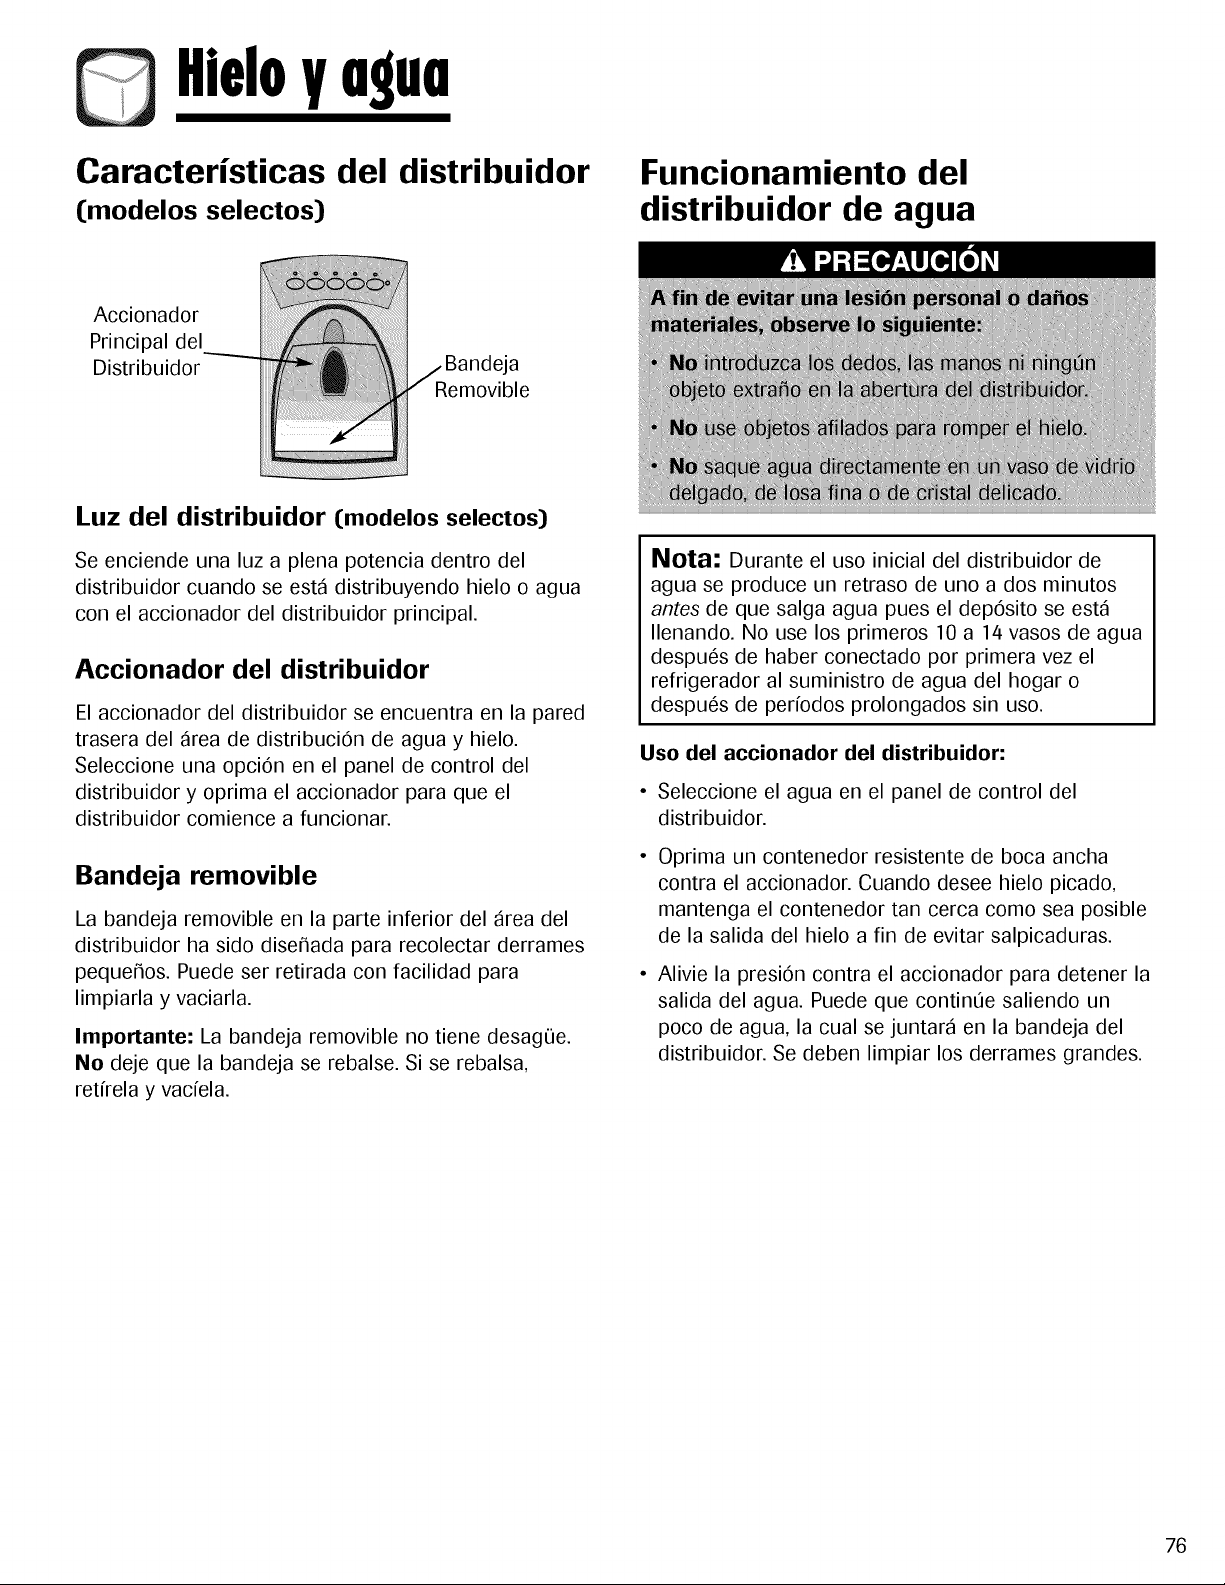
HieloVugua
Caracteristicas del distribuidor
(modelos selectos)
Funcionamiento del
distribuidor de agua
Accionador
Principal del
Distribuidor
Bandeja
Removible
Luz del distribuidor (modelos selectos)
Se enciende una luz a plena potencia dentro del
distribuidor cuando se esta distribuyendo hielo o agua
con el accionador del distribuidor principal.
Accionador del distribuidor
El accionador del distribuidor se encuentra en la pared
trasera del area de distribuci6n de agua y hielo.
Seleccione una opci6n en el panel de control del
distribuidor y oprima el accionador para que el
distribuidor comience a funcionar.
Bandeja removible
La bandeja removible en la parte inferior del area del
distribuidor ha sido dise_ada para recolectar derrames
peque_os. Puede ser retirada con facilidad para
limpiarla y vaciarla.
Importante: La bandeja removible no tiene desag0e.
No deje que la bandeja se rebalse. Si se rebalsa,
retfrela y vacfela.
Nota: Durante el uso inicial del distribuidor de
agua se produce un retraso de uno a dos minutos
antes de que salga agua pues el dep6sito se esta
Ilenando. No use los primeros 10 a 14 vasos de agua
despu6s de haber conectado por primera vez el
refrigerador al suministro de agua del hogar o
despu6s de perfodos prolongados sin uso.
Uso del accionador del distribuidor:
• Seleccione el agua en el panel de control del
distribuidor.
• Oprima un contenedor resistente de boca ancha
contra el accionador. Cuando desee hielo picado,
mantenga el contenedor tan cerca como sea posible
de la salida del hielo a fin de evitar salpicaduras.
• Alivie la presi6n contra el accionador para detener la
salida del agua. Puede que continQe saliendo un
poco de agua, la cual se juntara en la bandeja del
distribuidor. Se deben limpiar los derrames grandes.
76
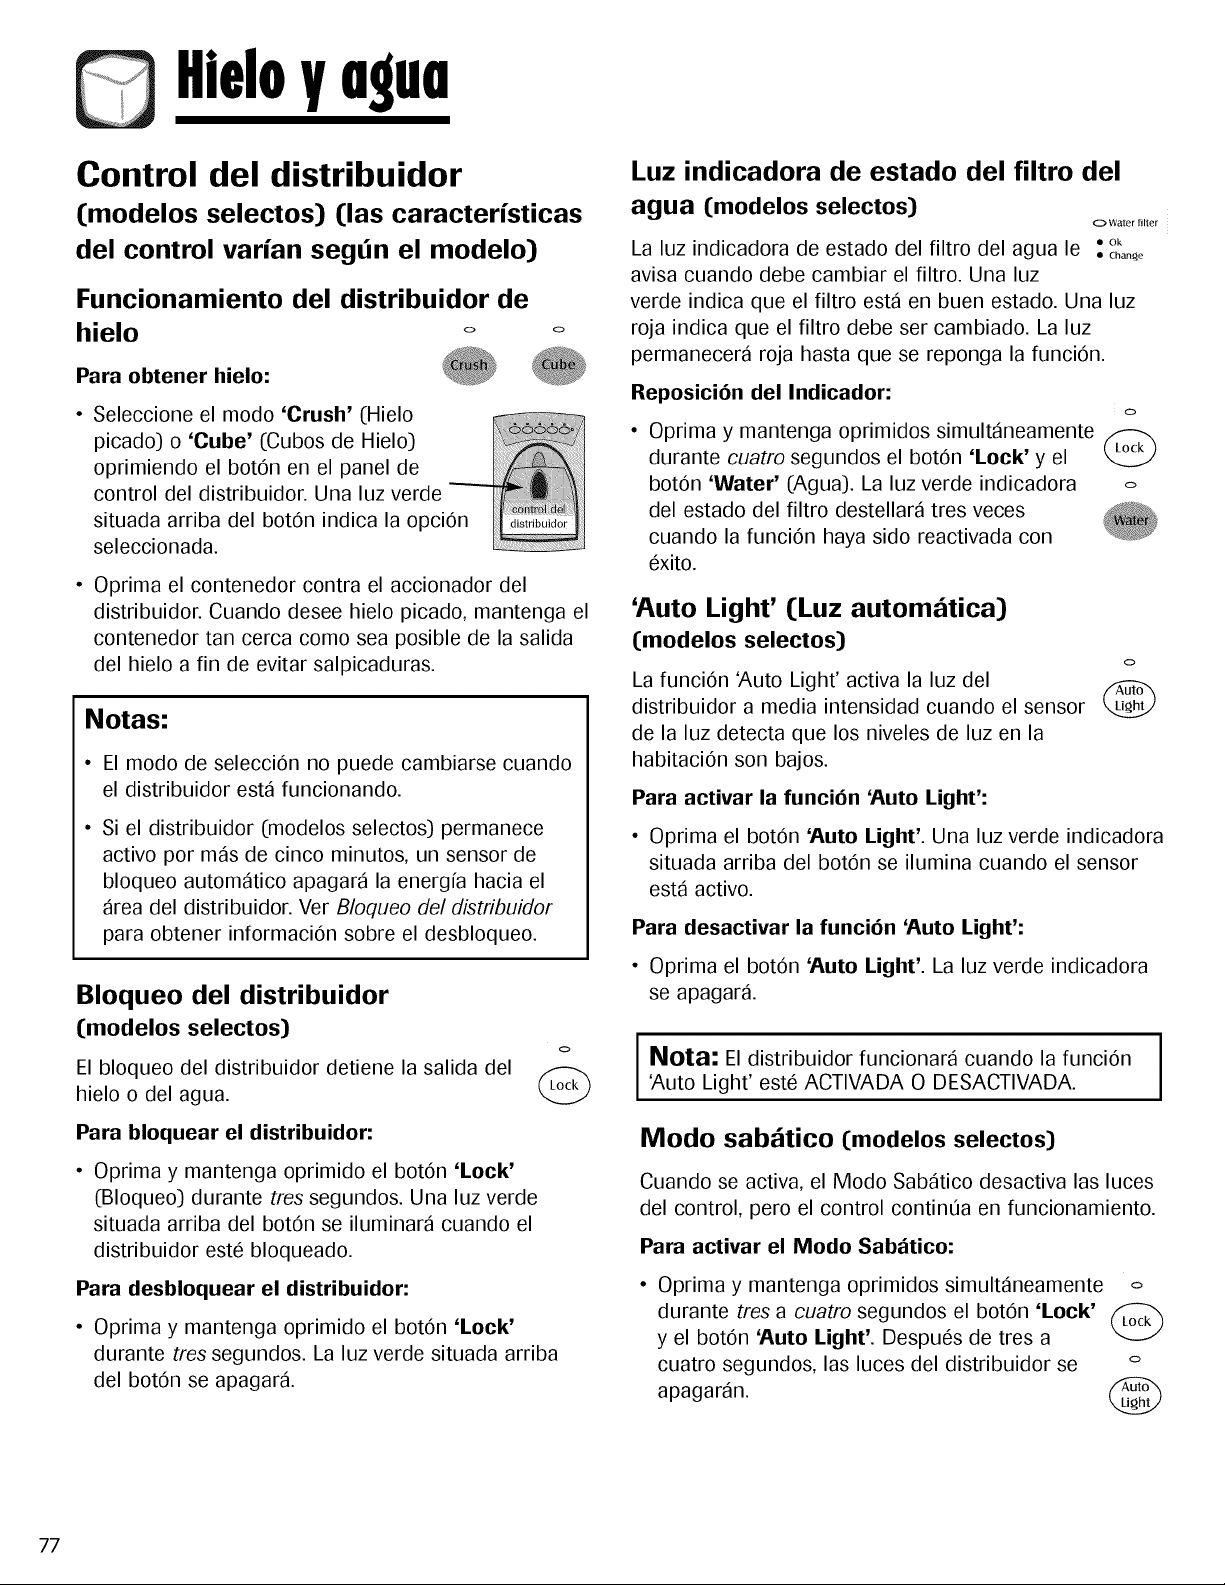
HieloVaguu
Control del distribuidor
(modelos selectos) (las caracterfsticas
del control varian segdn el modelo)
Funcionamiento del distribuidor de
hielo o o
Para obtener hielo:
• Seleccione el modo 'Crush' (Hielo
seleccionada.
• Oprima el contenedor contra el accionador del
distribuidor. Cuando desee hielo picado, mantenga el
contenedor tan cerca como sea posible de la salida
del hielo a fin de evitar salpicaduras.
Notas:
• El modo de selecci6n no puede cambiarse cuando
el distribuidor esta funcionando.
• Si el distribuidor (modelos selectos) permanece
activo por mas de cinco minutos, un sensor de
bloqueo automatico apagara la energfa hacia el
area del distribuidor. Ver Bloqueo del distribuidor
para obtener informaci6n sobre el desbloqueo.
Bloqueo del distribuidor
(modelos selectos)
o
El bloqueo del distribuidor detiene la salida del
hielo o del agua.
Para bloquear el distribuidor:
• Oprima y mantenga oprimido el bot6n 'Lock'
(Bloqueo) durante tres segundos. Una luz verde
situada arriba del bot6n se iluminara cuando el
distribuidor est6 bloqueado.
Para desbloquear el distribuidor:
• Oprima y mantenga oprimido el bot6n 'Lock'
durante tres segundos. La luz verde situada arriba
del bot6n se apagar&
Luz indicadora de estado del filtro del
agua (modelos selectos)
O Water filter
La luz indicadora de estado del filtro del agua le • Ok
• Chan_e
avisa cuando debe cambiar el filtro. Una luz
verde indica que el filtro esta en buen estado. Una luz
roja indica que el filtro debe ser cambiado. La luz
permanecera roja hasta que se reponga la funciOn.
Reposici6n del Indicador:
o
• Oprima y mantenga oprimidos simultaneamente
durante cuatro segundos el bot6n 'Lock' y el
bot6n 'Water' (Agua). La luz verde indicadora o
del estado del filtro destellara tres veces
cuando la funci6n haya sido reactivada con
6xito.
'Auto Light' (Luz autom_tica)
(modelos selectos)
o
La funciOn 'Auto Light' activa la luz del
distribuidor a media intensidad cuando el sensor
de la luz detecta que los niveles de luz en la
habitaci6n son bajos.
Para activar la funci6n 'Auto Light':
• 0prima el bot0n 'Auto Light'. Una luz verde indicadora
situada arriba del bot6n se ilumina cuando el sensor
esta activo.
Para desactivar la funci6n 'Auto Light':
• 0prima el bot0n 'Auto Light'. La luz verde indicadora
se apagar&
I Nota: El distribuidor funcionara cuando la funciOn I
I
'Auto Light' est6 ACTIVADA 0 DESACTIVADA.
I
Modo sab_tico (modelos selectos)
Cuando se activa, el Modo Sabatico desactiva las luces
del control, pero el control continfia en funcionamiento.
Para activar el Modo Sab_ttico:
• Oprimay mantenga oprimidos simultaneamente o
durante tres a cuatro segundos el bot6n 'Lock'
y el bot6n 'Auto Light'. Despu6s de tres a
cuatro segundos, las luces del distribuidor se °
apagaran. @
77

HieloVugua
Para desactivar el Modo Sab_ttico:
Oprima y mantenga oprimidos simultaneamente
durante tres a cuatro segundos el bot6n 'Lock'
(Bloqueo) y el bot6n 'Auto Light' (Luz automatica).
Despu6s de tres a cuatro segundos, las luces del
distribuidor se encenderan.
Notas:
• La luz del distribuidor no se activara cuando se
est6 sacando agua en este modo.
• Si hay una falla de energfa, el control permanecera
en Modo Sabatico hasta que se restablezca la
energfa.
iiltro deogun(modelosselectos)
Instalaci6n y Desmontaje
Instalaci6n inicial
El filtro de agua esta ubicado en la
esquina superior derecha del
compartimiento del refrigerador.
1. Retire la tapa de derivaci6n azul
y cons6rvela para uso posterior.
2. Retire la etiqueta de sellado del
extremo del filtro e ins6rtelo en
la cabeza del filtro.
3. Gire suavemente a la derecha
hasta que el filtro se detenga.
Cierre la cubierta del filtro.
.
Reduzca las salpicaduras de agua purgando el aire
del sistema. Deje correr el agua continuamente
durante dos minutos a trav6s del distribuidor hasta
que el agua salga uniformemente. Durante el uso
inicial, es necesario esperar de uno minuto para
que comience a salir agua pues el dep6sito del
agua interno debe tener tiempo de Ilenarse.
• Se puede requerir limpieza adicional en los
hogares en que el agua es de mala calidad.
Reemplazo de filtro del agua
Importante: El aire que permanece atrapado en el
sistema puede causar eyecci6n de agua y del
cartucho.
1. Gire el filtro a la izquierda hasta que se
desenganche de la cabeza.
2. Desag0e el agua del filtro en el fregadero y
descartelo en la basura normal del hogar.
.
Limpie el exceso de agua acumulada en la
cubierta del filtro y continQe con la Instalaci6n
inicial, pasos 2 y 4.
El filtro de agua debe cambiarse por Io menos cada 12
meses.
Importante: La calidad del agua y la cantidad usada
determinan la duraci6n de la vida Qtil del cartucho
filtrante. Si consume mucha agua o si el agua es de
mala calidad, puede que sea necesario reemplazar el
filtro mas a menudo.
Para comprar un cartucho filtrante de repuesto, p6ngase
en contacto con su distribuidor.
El distribuidor puede ser usado sin el cartucho filtrante
del agua. Si usted decide esta opci6n, reemplace el filtro
con la tapa de derivaci6n azul.
78
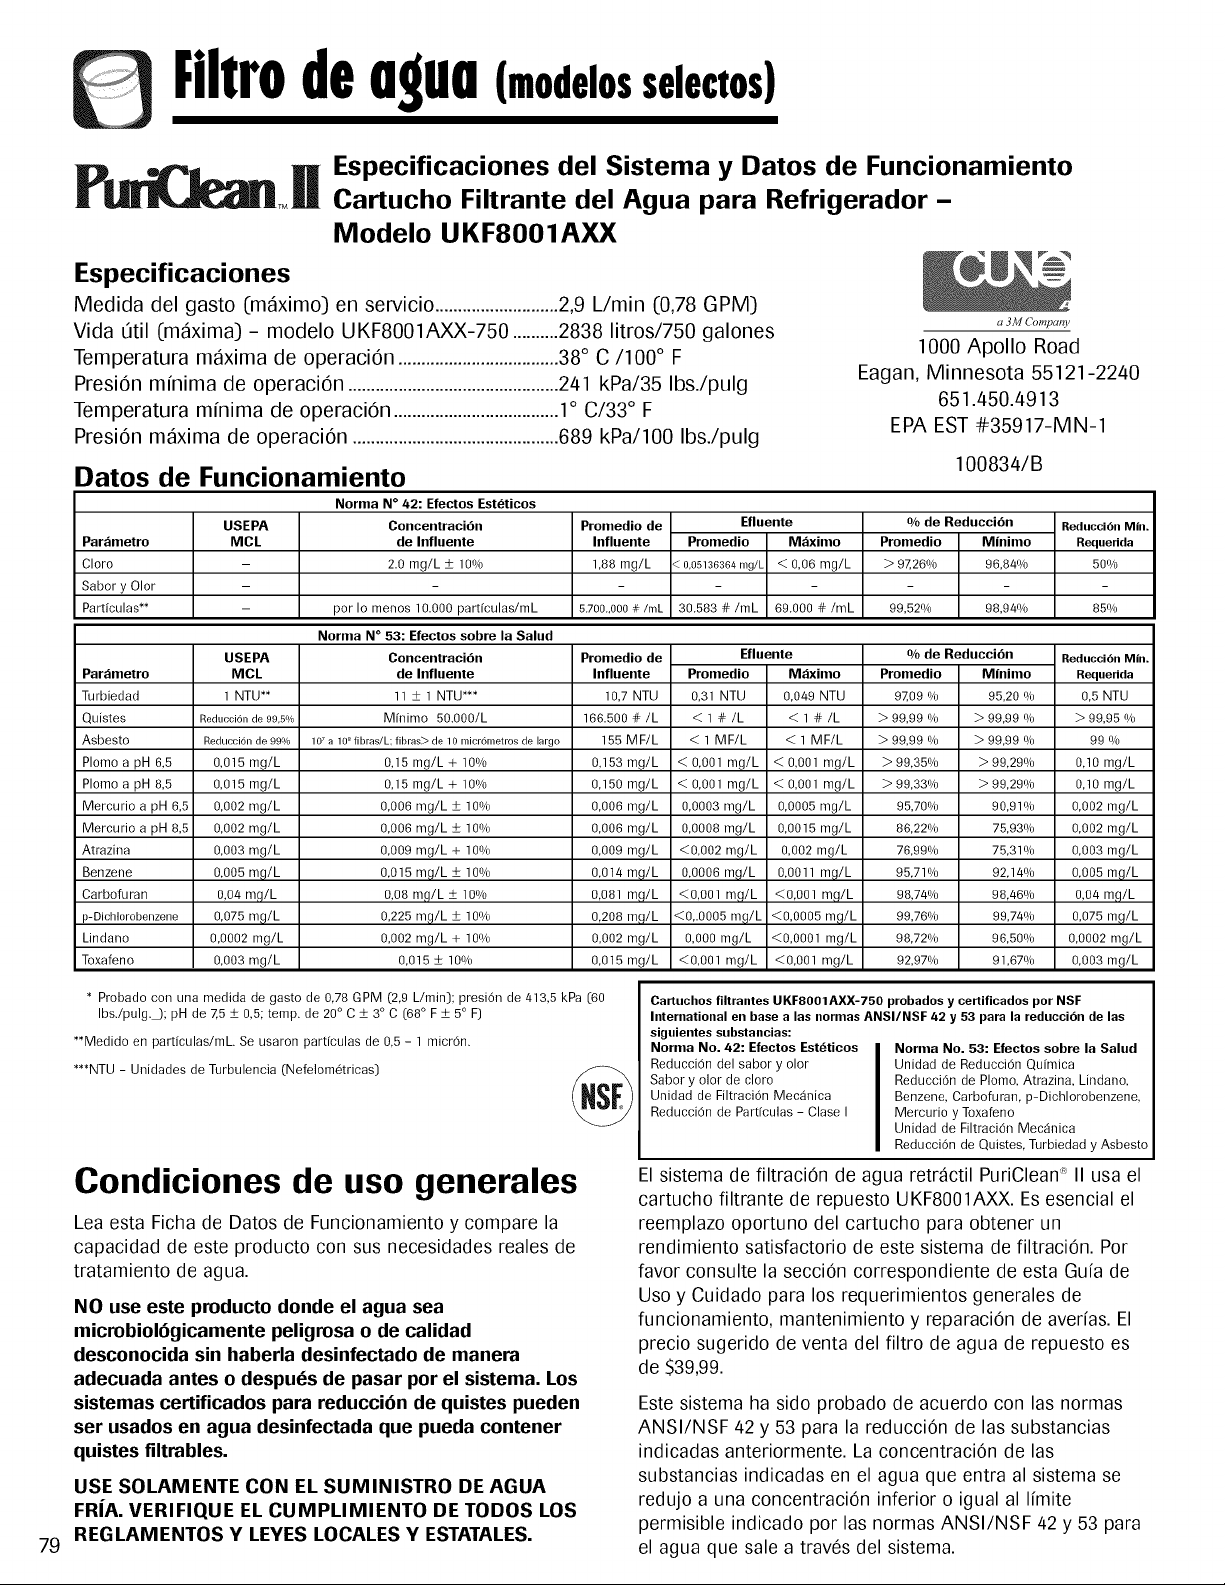
|iliro deogun(modelosselectos)
79
F TMH
Especificaciones
Medida del gasto (m_iximo) en servicio ...........................2,9 L/min (0,78 GPM)
Vida Qtil (m_ixima) - modelo UKF8001AXX-750 ..........2838 litros/750 galones
Temperatura m_ixima de operaci6n ...................................38° C/100 ° F
Presi6n minima de operaci6n ..............................................241 kPa/35 Ibs./pulg
Temperatura minima de operaci6n ....................................1° C/33 ° F
Presi6n m_ixima de operaci6n .............................................689 kPa/100 Ibs./pulg
Especificaciones del Sistema y Datos de Funcionamiento
Cartucho Filtrante del Agua para Refrigerador -
Modelo UKF8001AXX
a 3M CompatTy
1000 Apollo Road
Eagan, Minnesota 55121-2240
651.450.4913
EPAEST #35917-MN-1
Datos de Funcionamiento
Par_metro
Cloro
Sabor y Olor
Partfculas**
Par_metro
Turbiedad
Quistes
Asbesto
Plomo a pH 6,5
Plomo a pH 8,5
Mercurio a pH 6,5
Mercurio a pH 8,5
Atrazina
Benzene
Carbofuran
p-Dichlorobenzene
Lindano
Toxafeno
100834/B
USEPA
MCL
Norma N° 42: Efectos Estbticos
Concentraci6n
de Influente
2.0 mg/L _+10%
USEPA
MCL
1 NTU**
Redtlcoi6n de 99,5o/o
Reducci6n de 99%
0,015 mg/L 0,15
0,015 mg/L 0,15
pot Io menos 10.000 partfculas/mL
Norma N ° 53: Efectos sobre la Salud
Concentraci6n
de Influente
II _+ 1 NTU***
Mfnimo 50.000/L
107 a 10 ° fibras/L; fibres> de 10 mici6metios de largo
mg/L + 10%
mg/L + 10%
0,002 mg/L
0,002 mg/L
0,003 mg/L
0,005 mg/L
0,04 mg/L
0,975 mg/L
0,0002 mg/L
0,003 mg/L
0,006 mg/L _+ 10%
0,006 mg/L _+ 10%
0,009 mg/L + 10%
0,015 mg/L _+ 10%
0,08 mg/L _+ 10%
0,225 mg/L _+ 10%
0,002 mg/L + 10%
0,015 ± 10%
Promedio de
Influente
1,88 mg/L
5.700.+000#/rnL
Promedio de
Influente
10,7 NTU
166.500 #/L
155 MF/L
0,153 mg/L
0,150 mg/L
0,006 mg/L
0,006 mg/L
0,009 mg/L
0,014 mg/L
0,081 mg/L
0,208 mg/L
0,002 mg/L
0,015 mg/L
Efluente
Promedio Mfiximo
< 0,05136364 mg/L < 0,06 mg/L
30.583 #/mL 69.000 #/mL
Efluente
Promedio M_ximo
0,31 NTU 0,049 NTU
<I#/L <I#/L
< 1 MF/L < 1 MF/L
< 0,001 mg/L < 0,001 mg/L
< 0,001 mg/L < 0,001 mg/L
0,0003 mg/L 0,0005 mg/L
0,0008 mg/L 0,0015 mg/L
<0,002 mg/L 0,002 mg/L
0,0006 mg/L 0,0011 mg/L
<0,001mg/L <0,001mg/L
<0,.0005 mg/L <0,0005 mg/L
0,0O0 mg/L <0,0001 mg/L
<0,001 mg/L <0,001 mg/L
% de Reducci6n
Prolnedio M|nimo
> 9Z26% 96,84%
99,52% 98,94%
% de Reducci6n
Prolnedio M|nimo
9709 % 95,20 %
> 99,99 % > 99,99 %
> 99,99 % > 99,99 %
99,35% > 99,29%
99,33% > 99,29%
95,70% 90,91%
86,22% 75,93%
76,99% 75,31%
95,71% 92,14%
98,74% 98,46%
99,76% 99,74%
98,72% 96,50o/o
92,97% 91,67%
Reducci6n Min.
Requerida
5O%
85%
Reducci6nMin.
Requerida
0,5 NTU
> 99,95 %
99 %
0,10 mg/L
0,10 mg/L
0,002 mg/L
0,002 mg/L
0,003 mg/L
0,005 mg/L
0,04 mfl/L
0,075 mg/L
0,0002 mg/L
0,003 mg/L
* Probado con una medida de gasto de 0,78 GPM (2,9 L/rain); presi6n de 413,5 kPa (60
Ibs./pulg._; pH de Z5 -+ 0,5; temp. de 20° C 4- 3° C (68° F _+5° F)
**Medido en partfculas/mL Se usaron partfculas de 0,5 - 1 micr6n.
***NTU - Unidades de Turbulencia (Nefelom_tricas)
Condiciones de uso generales
Lea esta Ficha de Datos de Funcionamiento y compare la
capacidad de este producto con sus necesidades reales de
tratamiento de agua.
NO use este producto donde el agua sea
micmbiol6gicamente peligrosa o de calidad
desconocida sin haberla desinfectado de manera
adecuada antes o despues de pasar pot el sistema. Los
sistemas certificados para reducci6n de quistes pueden
set usados en agua desinfectada que pueda contener
quistes filtrables.
USE SOLAMENTE CON EL SUMINISTRO DE AGUA
FRiA. VERIFIO.UE EL CUMPLIMIENTO DE TODOS LOS
REGLAMENTOS Y LEYES LOCALES Y ESTATALES.
Cartuchos filtrantes UKFS00tAXX-750 probados y certificados por NSF
International en base a las normas ANSI/NSF 42 y 53 para la reducci6n de las
siguientes substancias:
Norma No. 42: Efectos Esteticos Norma No. 53: Efectos sobre la Salud
Reducci6n del saber y olor Unidad de Reducci6n Qufmica
Sabor y olor de cloro Reducci6n de Plomo, Atrazina, Lindano,
Unidad de Filtraci6n Mec_inica Benzene, Carbofuran, p-Dichlorobenzene,
Reducci0n de Partfeulas - Clase I Mercurio y Toxafeno
Unidad de Filtraci0n Mec_inica
Redueci6n de Quistes, Turbiedad y Asbesto
El sistema de filtraciOn de agua retr_ctil PuriClean _ II usa el
cartucho filtrante de repuesto UKF8001AXX. Es esencial el
reemplazo oportuno del cartucho para obtener un
rendimiento satisfactorio de este sistema de filtraciOn. Por
favor consulte la secciOn correspondiente de esta Guia de
Uso y Cuidado para los requerimientos generales de
funcionamiento, mantenimiento y reparaciOn de averias. El
precio sugerido de venta del filtro de agua de repuesto es
de S39,99.
Este sistema ha sido probado de acuerdo con las normas
ANSI/NSF 42 y 53 para la reducciOn de las substancias
indicadas anteriormente. La concentraciOn de las
substancias indicadas en el agua que entra al sistema se
redujo a una concentraciOn inferior o igual al Ifmite
permisible indicado por las normas ANSI/NSF 42 y 53 para
el agua que sale a trav6s del sistema.
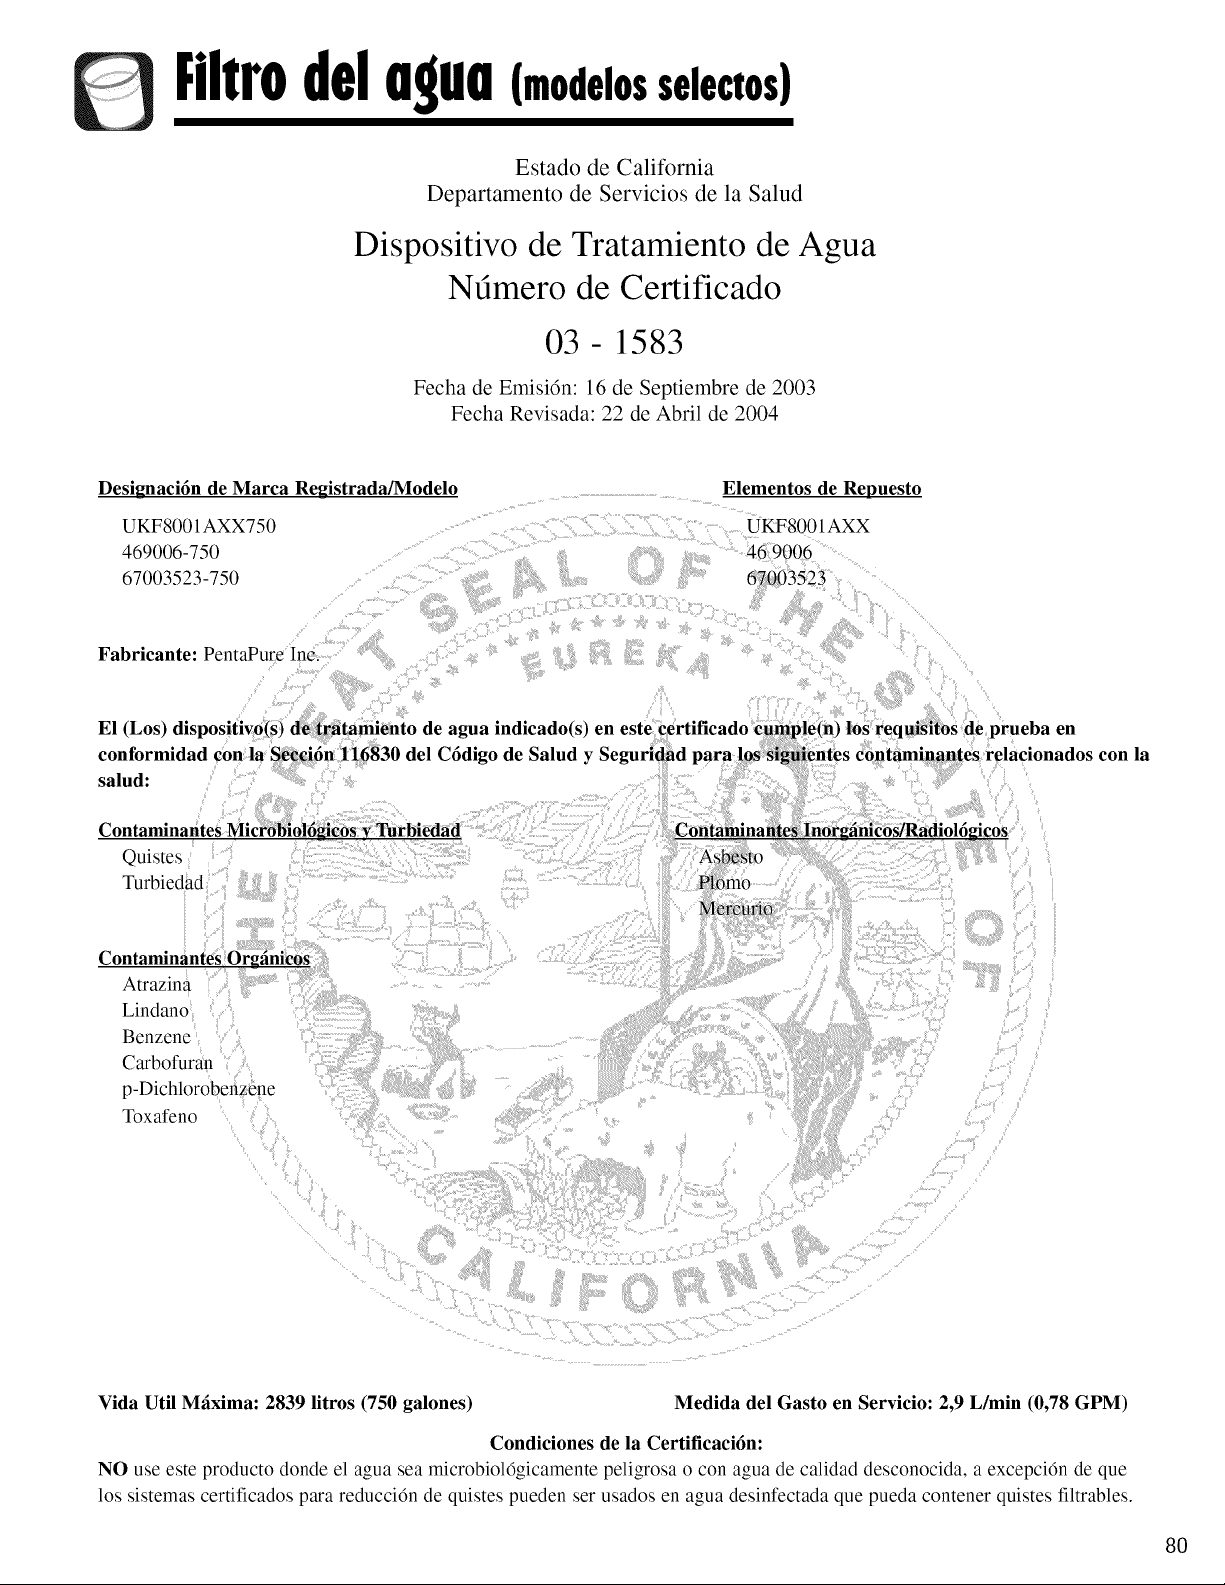
Filtrodelagua(modelosselectos)
Estado de California
Departamento de Servicios de la Salud
Dispositivo de Tratamiento de Agua
Ntimero de Certificado
03- 1583
Fecha de Emisi6n: 16 de Septiembre de 2003
Fecha Revisada: 22 de Abril de 2004
Designaci6n de Marca Registrada/Modelo
UKF8001AXX750
469006-750
67003523-750
Elementos de Repuesto
UKF8001AXX
469006
67003593
Fabricante: PentaPure Inc.
salud:
Contaminantes Microbiol6gicos VTurbiedad
Quistes
Turbiedad
Contaminantes Inor_inicos_adiol6_icos
la
Contaminantes Org_inicos
Atrazina
Lindano
Benzene
Carbofuran
p-Dichlorobenzene
Toxafeno
Vida Util Mfixima: 2839 litros (750 galones) Medida del Gasto en Servicio: 2,9 L/min (0,78 GPM)
Condiciones de la Certificaci6n:
NO use este producto donde el agua sea microbiol6gicamente peligrosa o con agua de calidad desconocida, a excepci6n de que
los sistemas certificados para reducci6n de quistes pueden ser usados en agua desinfectada que pueda contener quistes filtrables.
8O
$ugerenciosporuconservorlosolimentos
81
Conservaci6n de alimentos
frescos
• La temperatura del refrigerador se debe mantener entre
1° C (34° F) y 4° C (400 F). La temperatura ideal es de
3° C (370 F). Para verificar la temperatura, coloque un
term6metro para electrodom6sticos en un vaso de agua
en el centro del refrigerador. Espere 24 horas antes de
verificar la temperatura. Si la temperatura es superior a
4° C (400 F) ajuste los controles seg0n se explica en las
pdgina 72.
• Evite sobrecargar las bandejas del refrigerador pues
esto reduce la circulaci6n de aire alrededor de los
alimentos y ocasiona enfriamiento irregular.
Frutas y verduras
• El cajOn de las verduras retiene la humedad para ayudar
a preservar la frescura de las frutas y verduras por
perfodos m_s prolongados.
• Clasifique las frutas y verduras antes de guardarlas y
consuma primero las que se encuentren maduras o
magulladas. Descarte aquellas que muestren se_ales
de descomposiciOn.
• Siempre envuelva los alimentos que despiden olor tal
como cebollas y repollo de modo que el olor no se
transfiera a otros alimentos.
• Aunque las verduras necesitan cierta cantidad de
humedad para retener la frescura, demasiada humedad
puede acortar el tiempo de conservaci6n (especialmente
las verduras con hojas). Seque bien las verduras antes
de guardarlas.
• No lave las verduras frescas hasta el momento de
usarlas.
Carnes y quesos
La carne cruda de res y de ave debe envolverse muy
bien para que no ocurran derrames ni contaminaciOn
de otros alimentos o superficies.
A veces se puede formar moho en la superficie de los
quesos duros (Suizo, Cheddar y Parmesano). Corte por
Io menos 2,5 cm (1") alrededor y debajo del _rea
afectada. Mantenga el cuchillo o instrumento cortante
alejado del moho. El queso restante retendr_ su sabor y
se puede comer sin preocupaciOn. No trate de
conservar las rodajas individuales de queso, el queso
cremoso, el requesOn, la crema, nata cortada o yogur
cuando tengan se_ales de moho.
Productos Idcteos
La mayorfa de los productos I_cteos como la leche,
yogur, nata cortada y requesOn muestran la fecha de
vencimiento en sus envases para asegurar su correcta
duraciOn. Guarde estos alimentos en los envases
originales y refrig6relos inmediatamente despu6s de
comprarlos y despu6s de cada uso.
Conservaci6n de alimentos
congelados
• El compartimiento del congelador de un refrigerador
debe ser mantenido aproximadamente a -17° C (0° F).
Para verificar la temperatura, coloque un termOmetro
para electrodom6sticos entre los paquetes congelados y
espere 24 horas antes de verificarla. Si la temperatura
es superior a -17° C (0° F), ajuste el control como se
indica en las p_gina 72.
• El congelador funcionar_ m_s eficazmente si se ocupa
por Io menos dos tercios de su capacidad.
Envoltura de los alimentos para su
congelaci6n
• Para reducir la deshidrataciOn y el deterioro de la calidad
de los alimentos, use papel de aluminio, envoltura para
alimentos congelados, bolsas especiales para alimentos
congelados o envases herm6ticamente cerrados. Extraiga
la mayor cantidad posible de aire del paquete y
aseg0rese de que est6 bien sellado. El aire atrapado
puede resecar, cambiar de color o dar mal sabor
(quemadura de congelaciOn) a los alimentos.
• Envuelva bien las carnes frescas y la came de ave con
envoltura especial para alimentos congelados antes de
guardarlas.
• No congele nuevamente la carne que se haya
descongelado completamente.
Colocaci6n de los alimentos en el
congelador
• Evite guardar demasiados alimentos tibios en el
congelador de una sola vez. Esto sobrecarga el
congelador, reduce la velocidad de congelaciOn y
puede elevar la temperatura de los alimentos
congelados.
• Deje un espacio entre los paquetes de manera que el
aire pueda circular libremente para que los alimentos
se congelen Io m_s r_pido posible.
• Evite guardar alimentos diffciles de congelar tal como
helados y jugo de naranja concentrado en los
compartimientos de la puerta del congelador. Es
preferible guardar estos alimentos en el interior del
congelador donde la temperatura fluct0a menos
cuando se abre la puerta.
Consulte la Tabla de consen/acidn de los alimentos en las
p_ginas 82-83 para los tiempos de almacenamiento
aproximados.
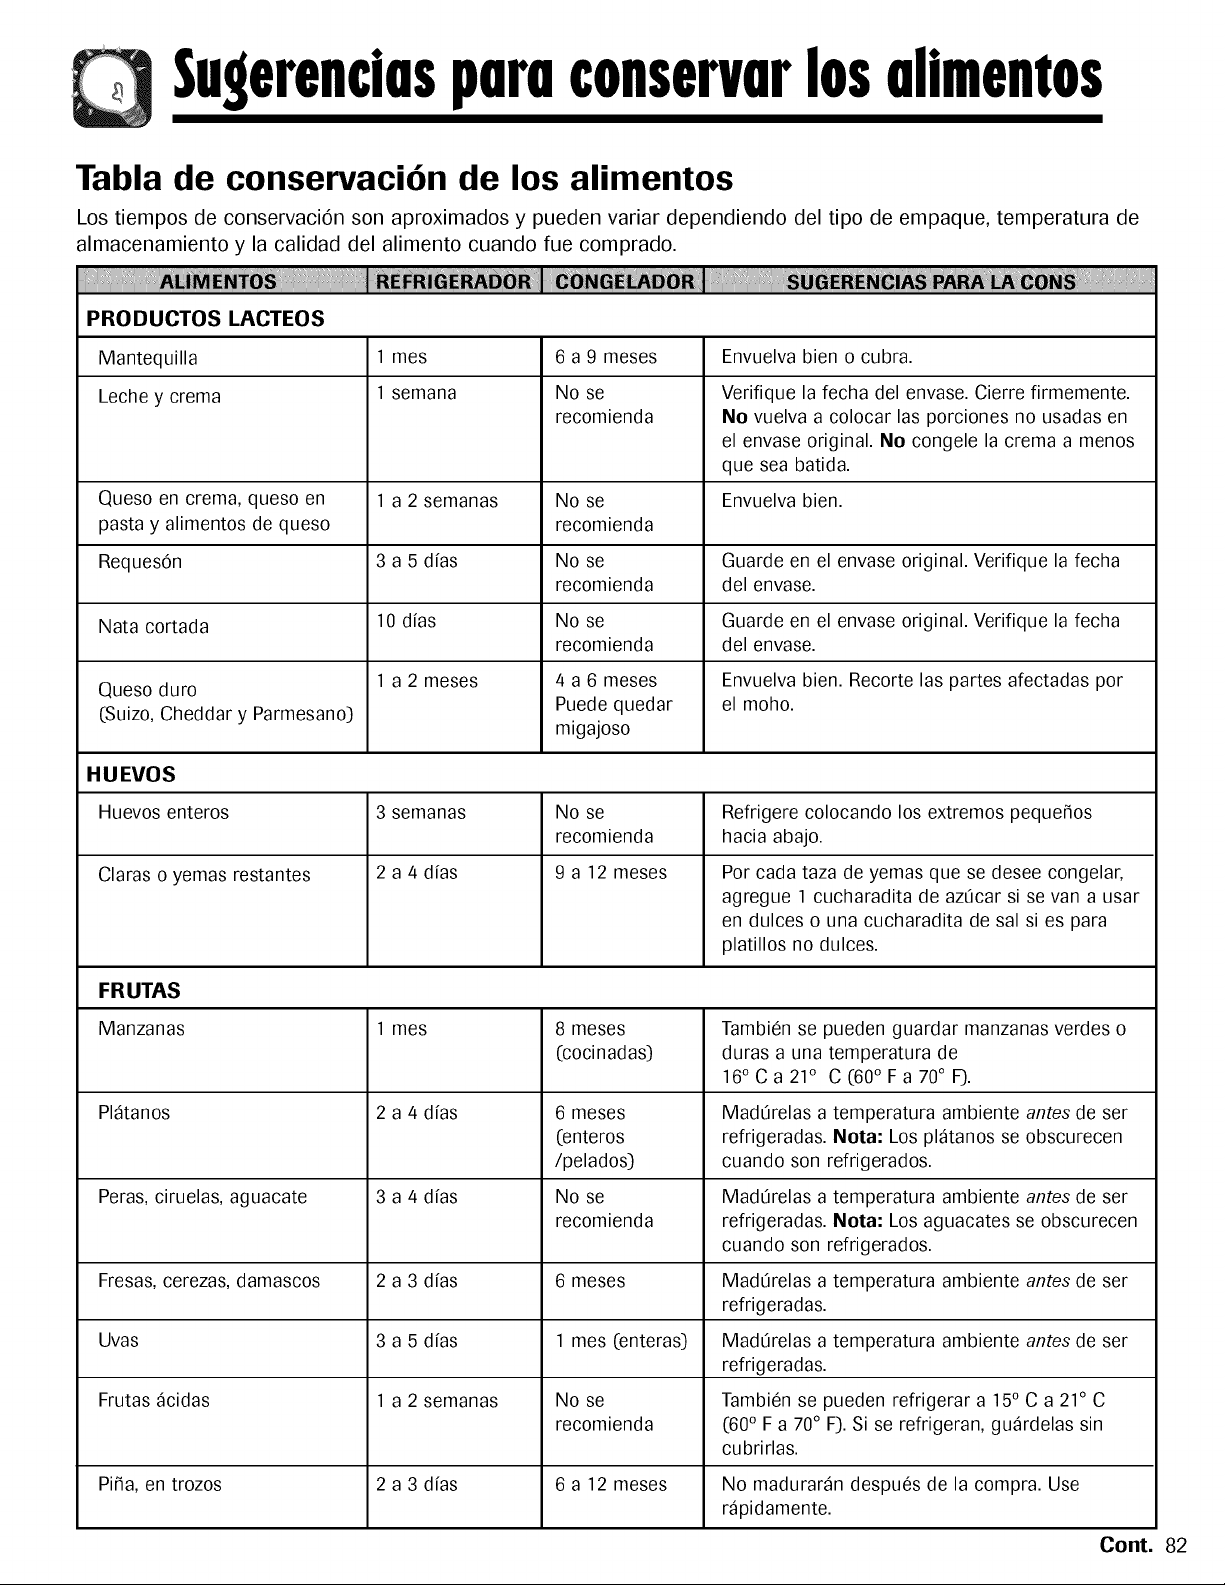
Sugerenciosporuconservorlosolimentos
Tabla de conservaciCn de los alimentos
Los tiempos de conservaci6n son aproximados y pueden variar dependiendo del tipo de empaque, temperatura de
almacenamiento y la calidad del alimento cuando rue comprado.
PRODUCTOS LACTEOS
Mantequilla 1 mes 6 a 9 meses Envuelva bien o cubra.
Leche y crema 1 semana No se Verifique la fecha del envase. Cierre firmemente.
recomienda No vuelva a colocar las porciones no usadas en
el envase original. No congele la crema a menos
que sea batida.
Queso en crema, queso en 1 a 2 semanas No se Envuelva bien.
pasta y alimentos de queso recomienda
RequesOn 3 a 5 dfas No se Guarde en el envase original. Verifique la fecha
recomienda del envase.
Nata cortada 10 dfas No se Guarde en el envase original. Verifique la fecha
recomienda del envase.
Queso duro 1 a 2 meses 4 a 6 meses Envuelva bien. Recorte las partes afectadas pot
Puede quedar el moho.
(Suizo, Cheddar y Parmesano)
migajoso
HUEVOS
Huevos enteros 3 semanas No se Refrigere colocando los extremos peque_os
recomienda hacia abajo.
Claras o yemas restantes 2 a 4 dfas 9 a 12 meses
Por cada taza de yemas que se desee congelar,
agregue I cucharadita de az0car si se van a usar
en dulces o una cucharadita de sal si es para
platillos no dulces.
FRUTAS
Manzanas I mes 8 meses Tambi(_nse pueden guardar manzanas verdes o
(cocinadas) duras a una temperatura de
16°Ca21° C(60 °Fa70 °F).
Pl_tanos 2 a 4 dfas 6 meses Mad0relas a temperatura ambiente antes de set
(enteros refrigeradas. Nota" Los pl_tanos se obscurecen
/pelados) cuando son refrigerados.
Peras, ciruelas, aguacate 3 a 4 dfas No se Mad0relas a temperatura ambiente antes de set
recomienda refrigeradas. Nota" Los aguacates se obscurecen
cuando son refrigerados.
Fresas, cerezas, damascos 2 a 3 dfas 6 meses Mad0relas a temperatura ambiente antes de set
refrigeradas.
Uvas 3 a 5 dfas 1 mes (enteras) Mad0relas a temperatura ambiente antes de set
refrigeradas.
Frutas _cidas 1 a 2 semanas No se Tambi(_nse pueden refrigerar a 15° C a 21° C
recomienda (60° F a 70° F). Si se refrigeran, gu_rdelas sin
cubrirlas.
PiCa,en trozos 2 a 3 dfas 6 a 12 meses No madurar_n despu(_sde la compra. Use
r_pidamente.
Cont. 82
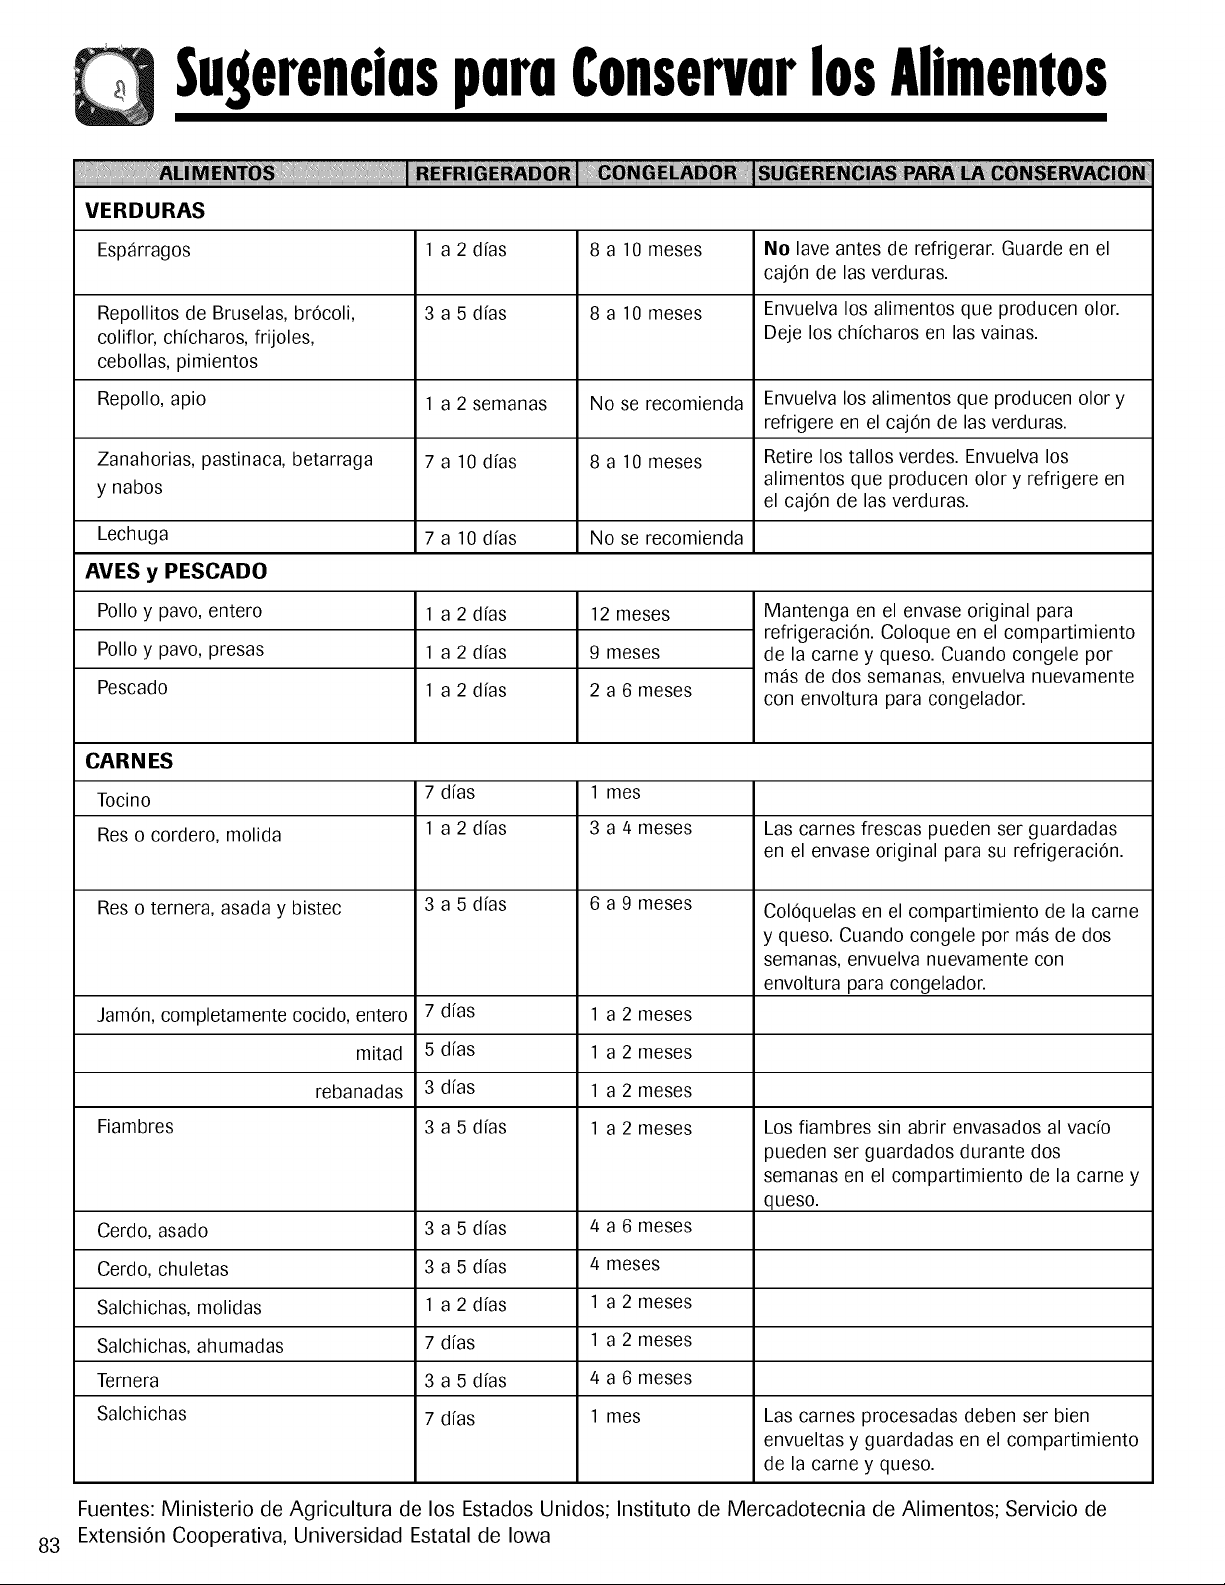
$ugerenciuspuro¢onservorlosAlimentos
83
VERDURAS
Esp_rragos I a 2 dfas 8 a 10 meses No lave antes de refrigerar. Guarde en el
cajOn de las verduras.
Repollitos de Bruselas, br6coli, 3 a 5 dfas 8 a 10 meses Envuelva los alimentos que producen olor.
coliflor, chfcharos, frijoles, Deje los chfcharos en las vainas.
cebollas, pimientos
Repollo, apio 1 a 2 semanas No se recomienda Envuelva los alimentos que producen olor y
refrigere en el cajOn de las verduras.
Zanahorias, pastinaca, betarraga 7 a 10 dfas 8 a 10 meses Retire los tallos verdes. Envuelva los
alimentos que producen olor y refrigere en
y nabos el cajOn de las verduras.
Lechuga 7 a 10 dfas No se recomienda
AVES y PESCADO
Polio y pavo, entero
Polio y pavo, presas
Pescado
1 a 2 dfas
1 a 2 dfas
1 a 2 dfas
] 2 meses
9 meses
2 a 6 meses
Mantenga en el envase original para
refrigeraciOn. Coloque en el compartimiento
de la came y queso. Cuando congele por
m_s de dos semanas, envuelva nuevamente
con envoltura para congelador.
CARN ES
Tocino 7 dfas 1 mes
Res o cordero, molida 1 a 2 dfas 3 a 4 meses Las carnes frescas pueden set guardadas
en el envase original para su refrigeraciOn.
Res o ternera, asada y bistec 3 a 5 dfas 6 a 9 meses ColOquelas en el compartimiento de la came
y queso. Cuando congele por m_s de dos
semanas, envuelva nuevamente con
envoltura para congelador.
Jam6n, completamente cocido, entero 7 dfas 1 a 2 meses
mitad 5 dfas 1 a 2 meses
rebanadas 3 dfas 1 a 2 meses
Fiambres 3 a 5 dfas 1 a 2 meses Los fiambres sin abrir envasados al vacfo
pueden set guardados durante dos
semanas en el compartimiento de la came y
queso.
Cerdo, asado 3 a 5 dfas 4 a 6 meses
Cerdo, chuletas 3 a 5 dfas 4 meses
Salchichas, molidas 1 a 2 dfas 1 a 2 meses
Salchichas, ahumadas 7 dfas 1 a 2 meses
Ternera 3 a 5 dfas 4 a 6 meses
Salchichas 7 dfas 1 mes Las carnes procesadas deben set bien
envueltas y guardadas en el compartimiento
de la came y queso.
Fuentes: Ministerio de Agricultura de los Estados Unidos; Instituto de Mercadotecnia de Alimentos; Servicio de
ExtensiOn Cooperativa, Universidad Estatal de Iowa

CuidadoVlimpieza
Tabla de limpieza del refrigerador
I !i!i!i!i!i!i!i!i!i!i!ili;;i!!,:!i!i!i!i!i!i!i!i!i!i!i!i
Puertas con acabado texturizado
y exterior pintado liso (algunos
modelos)
Eldafio causadoal acabadode acero
inoxidabledebido al usoincorrecto de
productos de limpiezao productos no
recomendadosne estDcubierto bajo
estagarandadel product&,
Interior del gabinete
Exteriory puertasde acem
inoxidable(algunos modelos)
El dafio causado al acabado de acero
inoxidabledebidoalusoincorrectode
productos de limpiezao productosno
recomendadosne estDcubiertobajo
estagaranda del producto.
Burletesde las puertas
Serpentin del condensador
Parateneracceso,retirela rejillade la
base.
Rejilla de salida del ventilador
del condensador
Veala parte traseradel refrigerador.
Accesorios
Repisas, cubetas, gavetas, etc.
Limpiadoresabrasivoso fuertes
Amonfaco
Blanqueadorde cloro
Detergenteso solventesconcentrados
Esponjasde fregar met_licaso de pl_stico
texturizado
Limpiadoresabrasivoso fuertes
Amonfaco
Blanqueadorcon cloro
Detergenteso solventesconcentrados
Esponjasde fregar met_licaso de pl_stico
texturizado
Productosa basede vinagre
Limpiadoresa base de cftricos
Limpiadoresabrasivoso fuertes
Esponjasde fregar met_licaso de pl_stico
texturizado
Cualquiercosasalvo una aspiradora
Un lavavajillas
Use59 ml (4 cucharadas)de bicarbonatode sosa
disueltoen 1 litro (1 qt) de aguajabonosa
tibia.Enjuaguela superficie con aguatibia limpiay
sequeinmediatamenteparaque no queden
manchasde agua.
Useaguajabonosatibia y una esponjao paso
suavey limpio.
Enjuaguela superficie con aguatibia limpiay
sequeinmediatamenteparaque no queden
manchasde agua.
Parapulir las superficiesy evitar dejar huellas
dactilares,aplique despu6suna capa de Stainless
SteelMagic Spray (N° de pieza20000008*).
Useaguajabonosatibia y una esponjao paso
suavey limpio.
Usela boquilla de la manguerade la aspiradora.
Usela boquilla de la manguerade la aspiradora
con un accesoriode cepillo.
Sigalas instruccionesde retiro e instalaci6nen la
secci6ncorrespondiente.
Deje que losarticulos se ajusten a la
temperaturaambiental.
Diluyaun detergentesuavey useuna esponja o
paso limpio y suavepara limpiar.
Useun cepillo con cerdasde pl_stico para limpiar
las hendiduras.Enjuaguelas superficiescon agua
tibia limpia.
Sequelos articulosde vidrio y transparentes
inmediatamenteparaque no queden manchas.
* Para hacer pedidos, Name al 1-877-232-6771 en EE.UU. o al 1-800-688-8408 en Canad&
84
CuidadoVlimpieza
Eliminaci6n de los olores del
refrigerador
.
2.
3.
.
.
.
Retire todo los alimentos y apague el refrigerador.
Desenchufe el refrigerador.
Limpie las paredes, el piso, el techo del interior del
gabinete, los cajones, las bandejas y las juntas de
acuerdo con las instrucciones indicadas en la
pagina 84.
Diluya detergente suave y escobille los intersticios
con la soluci6n usando una escobilla de cerdas de
plastico. Deje reposar durante 5 minutos. Enjuague
las superficies con agua tibia. Seque las superficies
con un paso limpio y suave.
Lave y seque todas las botellas, envases y frascos.
Descarte los alimentos a_ejos o deteriorados.
Envuelva o guarde los alimentos que causan olores
en envases herm6ticos para evitar que los olores
vuelvan a ocurrir.
7.
.
9.
Enchufe el refrigerador y vuelva a colocar los
alimentos en el refrigerador.
Espere a que el refrigerador se enfrfe.
Despu6s de 24 horas, verifique si se han eliminado
los olores.
Si el olor at_n persiste:
1. Retire los cajones y col6quelos en la bandeja
superior del refrigerador.
.
.
.
Llene el compartimiento del refrigerador y del
congelador - incluyendo las puertas - con hojas
de peri6dicos en blanco y negro arrugadas.
Coloque briquetas de carb6n dispersas en los
peri6dicos arrugados en el compartimiento del
refrigerador y del congelador.
Cierre las puertas y deje reposar durante 24-48
horas.
Sugerencias para ahorro de
energia
• Evite colocar demasiados artfculos en las bandejas
del refrigerador. Esto reduce la circulaci6n del aire
alrededor de los alimentos y el refrigerador realizara
ciclos de funcionamiento mas frecuentes.
Evite colocar demasiados alimentos tibios en el
refrigerador de una sola vez. Esto sobrecarga los
compartimientos y disminuye la velocidad de
enfriamiento.
Ne use papel de aluminio, papel encerado o toallas
de papel para forrar las bandejas. Esto disminuye la
circulaci6n del aire y el refrigerador funcionara
menos eficientemente.
Un congelador Ileno hasta dos tercios de su
capacidad funcionara mas eficientemente.
Ubique el refrigerador en la parte mas fresca de la
habitaci6n. Evite las areas que reciben luz directa del
sol o cerca de tuberfas o rejillas de calefacci6n u
otros electrodom6sticos que producen calor. Si esto
no es posible, aisle el exterior usando una secci6n de
los armarios o una capa adicional de aislamiento.
Limpie las juntas de la puerta cada tres meses de
acuerdo con las instrucciones de limpieza. Esto
asegurara que la puerta cierre herm6ticamente y que
el refrigerador funcione con mayor eficiencia.
Organice los artfculos en el refrigerador de modo
que se reduzca el tiempo que la puerta esta abierta.
AsegQrese de que las puertas se cierran
herm6ticamente nivelando el refrigerador como se
indic6 en las instrucciones de instalaci6n.
Limpie las bobinas del condensador cada tres meses
como se indica en las instrucciones de limpieza. Esto
contribuira al ahorro de energfa y a un mejor
enfriamiento.
85
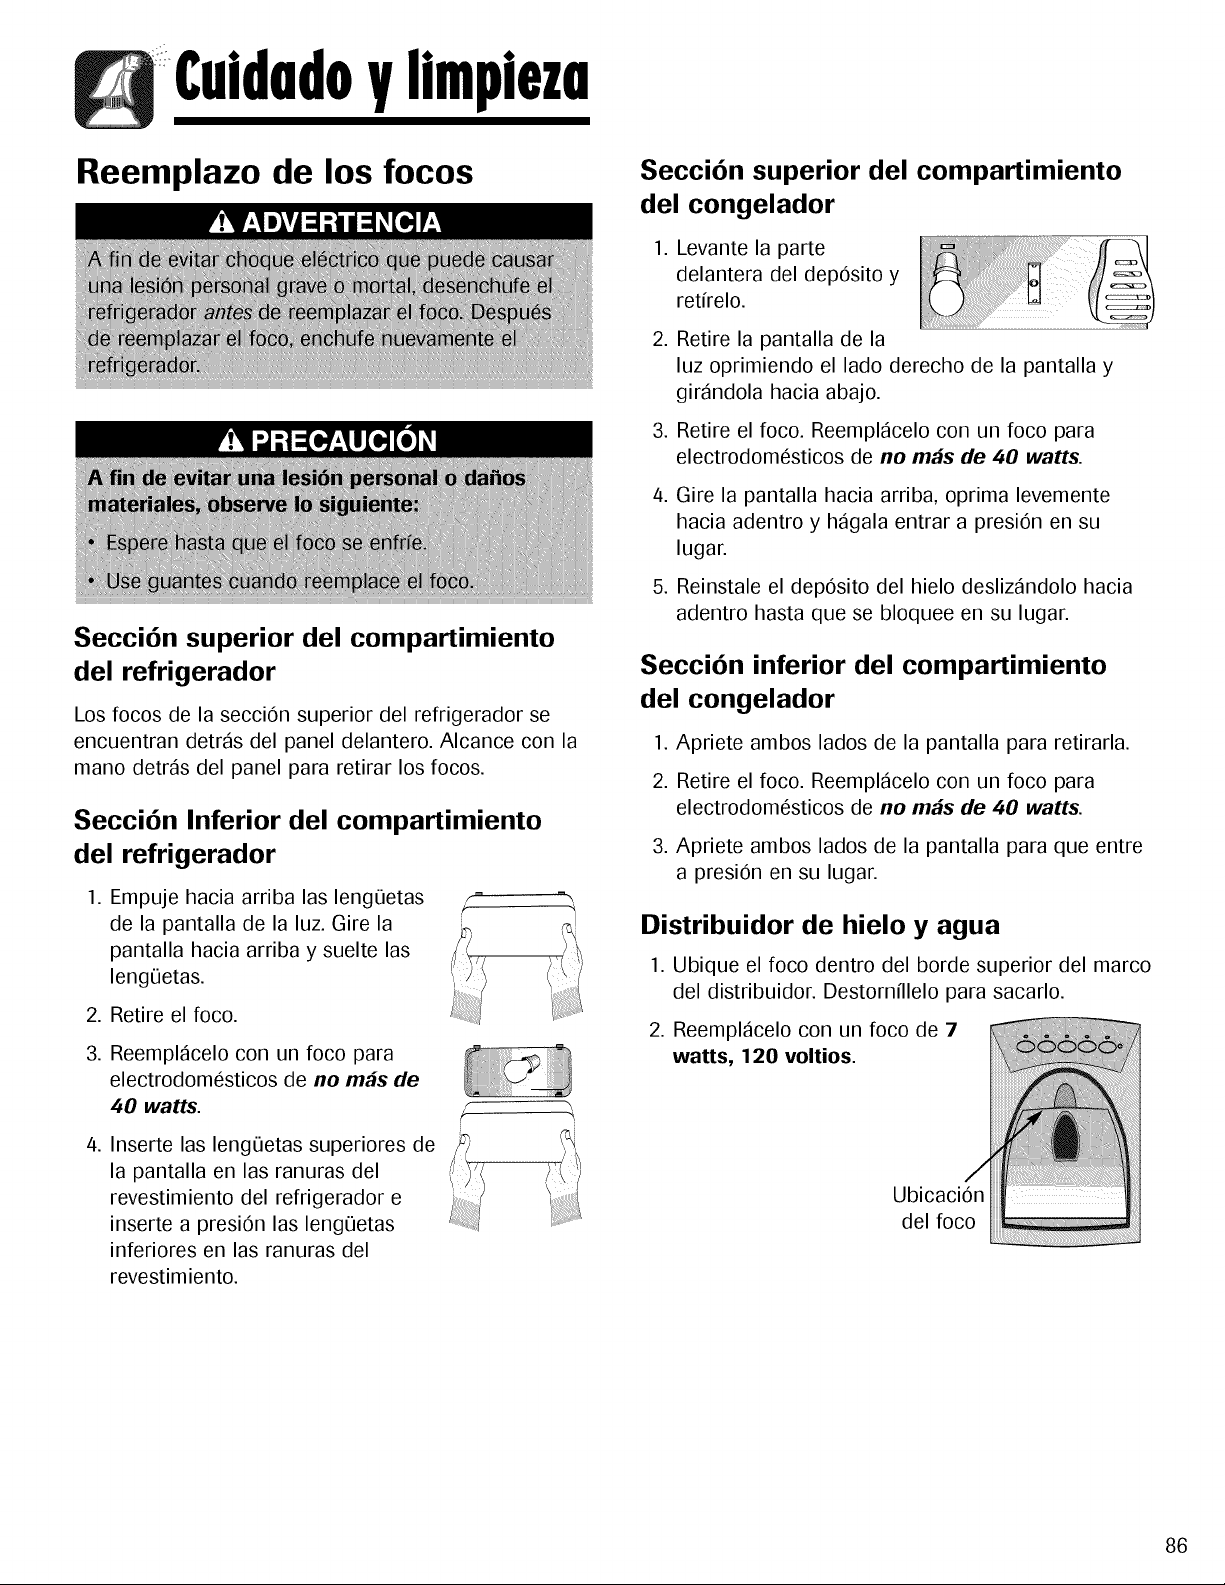
Ylimpieza
Reemplazo de los feces
Secci6n superior del compartimiento
del refrigerador
Los focos de la secciOn superior del refrigerador se
encuentran detras del panel delantero. Alcance con la
mano detras del panel para retirar los focos.
Secci6n Inferior del compartimiento
del refrigerador
1. Empuje hacia arriba las lengQetas
de la pantalla de la luz. Gire la
pantalla hacia arriba y suelte las
lengQetas.
2. Retire el foco.
/
3. Reemplacelo con un foco para
electrodomesticos de ne m#s de
40 watts.
4. Inserte las leng0etas superiores de !i_/
la pantalla en las ranuras del
revestimiento del refrigerador e
inserte a presiOn las lengQetas
inferiores en las ranuras del
revestimiento.
Secci6n superior del compartimiento
del congelador
1.
.
Levante la parte (_._.-_1
delantera del depOsito y
retirelo.
Retire la pantalla de la
luz oprimiendo el lado derecho de la pantalla y
girandola hacia abajo.
3. Retire el foco. Reemplacelo con un foco para
electrodomesticos de no m#s de 40 watts.
/4. Gire la pantalla hacia arriba, oprima levemente
hacia adentro y hagala entrar a presiOn en su
lugar.
5. Reinstale el depOsito del hielo deslizandolo hacia
adentro hasta que se bloquee en su lugar.
Secci6n inferior del compartimiento
del congelador
1. Apriete ambos lados de la pantalla para retirarla.
2. Retire el foco. Reemplacelo con un foco para
electrodomesticos de ne robs de 40 watts.
3. Apriete ambos lados de la pantalla para que entre
a presiOn en su lugar.
Distribuidor de hielo y agua
1. Ubique el foco dentro del borde superior del marco
del distribuidor. Destornillelo para sacarlo.
2. Reemplacelo con un foco de 7
watts, 120 voltios.
UbicaciOn
del foco
86
€uidadoYlimpieza
Preparaci6n para las vacaciones
Para vacaciones o ausencias cortas (tres meses
o menos):
1. Retire todos los productos perecederos.
2. Si nadie va a controlar el refrigerador durante su
ausencia, retire tambi6n todos los productos
congelados.
3. Si su refrigerador tiene una mdquina automdtica de
hacer hielo:
• Cierre el suministro de agua hacia la mdquina de
hacer hielo por Io menos un dfa antes de partir.
• Despu6s de que caiga el 01timo Iote de hielo,
levante la manecilla de alambre y col6quela en la
posici0n 'OFF' (Apagado).
• Vacfe el depOsito del hielo.
4. Si la temperatura ambiente descender_ a menos de
12° C (55° F), siga las instrucciones para ausencias
m_s largas.
Para ausencias o vacaciones largas, (m_s de tres
meses) 0 si la temperatura ambiente descender_ a
menos de 12° C (55 ° F):
1. Retire el alimento.
2. Si su refrigerador tiene una mdquina automdtica de
hacer hielo:
• Cierre el suministro de agua hacia la mdquina de
hacer hielo por Io menos un dfa antes de partir.
• Despu6s de que caiga el 01timo Iote de hielo,
levante la manecilla de alambre y col6quela en la
posiciOn 'OFF'.
• Vacfe el dep6sito del hielo.
3. Si su refrigerador tiene un sistema distribuidor con
filtro del agua, retire el cartucho filtrante e instale la
defivaci6n del filtro. Descarte el cartucho usado.
4. Gire el control del congelador a la posici6n 'OFF'.
5. Desenchufe el refrigerador.
6. Limpie completamente el interior de ambos
compartimientos con una soluci6n de bicarbonato y
un paso suave limpio (cuatro cucharadas de
bicarbonato en un litro/cuarto de gal6n de agua tibia).
7. Seque bien ambos compartimientos.
8. Deje las puertas abiertas a fin de evitar la formaci6n
de moho y mildiO.
A su regreso:
Despubs de una vacaci6n o ausencia corta:
Para los modelos con m_quinas autom_ticas de hacer
hielo o distribuidores:
• Conecte nuevamente el suministro del agua y abra la
vdlvula de suministro del agua (ver pdginas 69-70).
• Vigile la conexi6n del agua durante 24 horas y corrija
los escapes si es necesario.
• Deje salir 10-15 vasos de agua del distribuidor para
lavar el sistema.
• Vuelva a activar la mdquina de hacer hielo.
• Descarte por Io menos los tres primeros Iotes de hielo.
Despu_s de una vacaci6n o ausencia larga:
• Si su refrigerador tiene una m_quina autom_tica de
hacer hielo, vuelva a conectar el suministro del agua
y abra la Ilave del suministro del agua (ver p_ginas
69-70).
• Enchufe nuevamente el refrigerador y reajuste los
controles (ver p_gina 72).
• Vigile la conexi6n del agua durante 24 horas y corrija
los escapes si es necesario.
Para los modelos con distribuidor, deje correr agua a
trav6s del distribuidor por Io menos durante tres minutos
con la derivaci6n del filtro en su lugar, despu6s instale el
filtro del agua (ver p_gina 78).
• Despu6s de instalar el filtro del agua, deje correr agua
a trav6s del distribuidor continuamente durante por Io
menos dos minutos o hasta que el agua salga de
manera continua. Inicialmente usted observar_ que hay
uno o dos minutos de retraso en que salga el agua
hasta que el dep6sito intemo se Ilena.
• Active la m_quina de hacer hielo.
• Descarte el hielo producido dentro de las primeras 12
horas (por Io menos los tres primeros lores)
Preparaci6n para una
mudanza:
• Siga las instrucciones anteriores para
vacaciones/ausencias largas, hasta el paso 7.
• Asegure todos los artfculos sueltos, tal como bandejas y
cajones en sus lugares con cinta adhesiva a fin de
evitar que se da_en.
• Coloque cinta adhesiva en las puertas cerradas.
• Use una carretilla de mano cuando mueva el
refrigerador. SIEMPRE coloque la carretilla de mano
por el costado o pot la parte trasera del refrigerador,
NUNCA por el frente.
• Aseg0rese de que el refrigerador se mantenga en
posici6n vertical durante la mudanza.
87
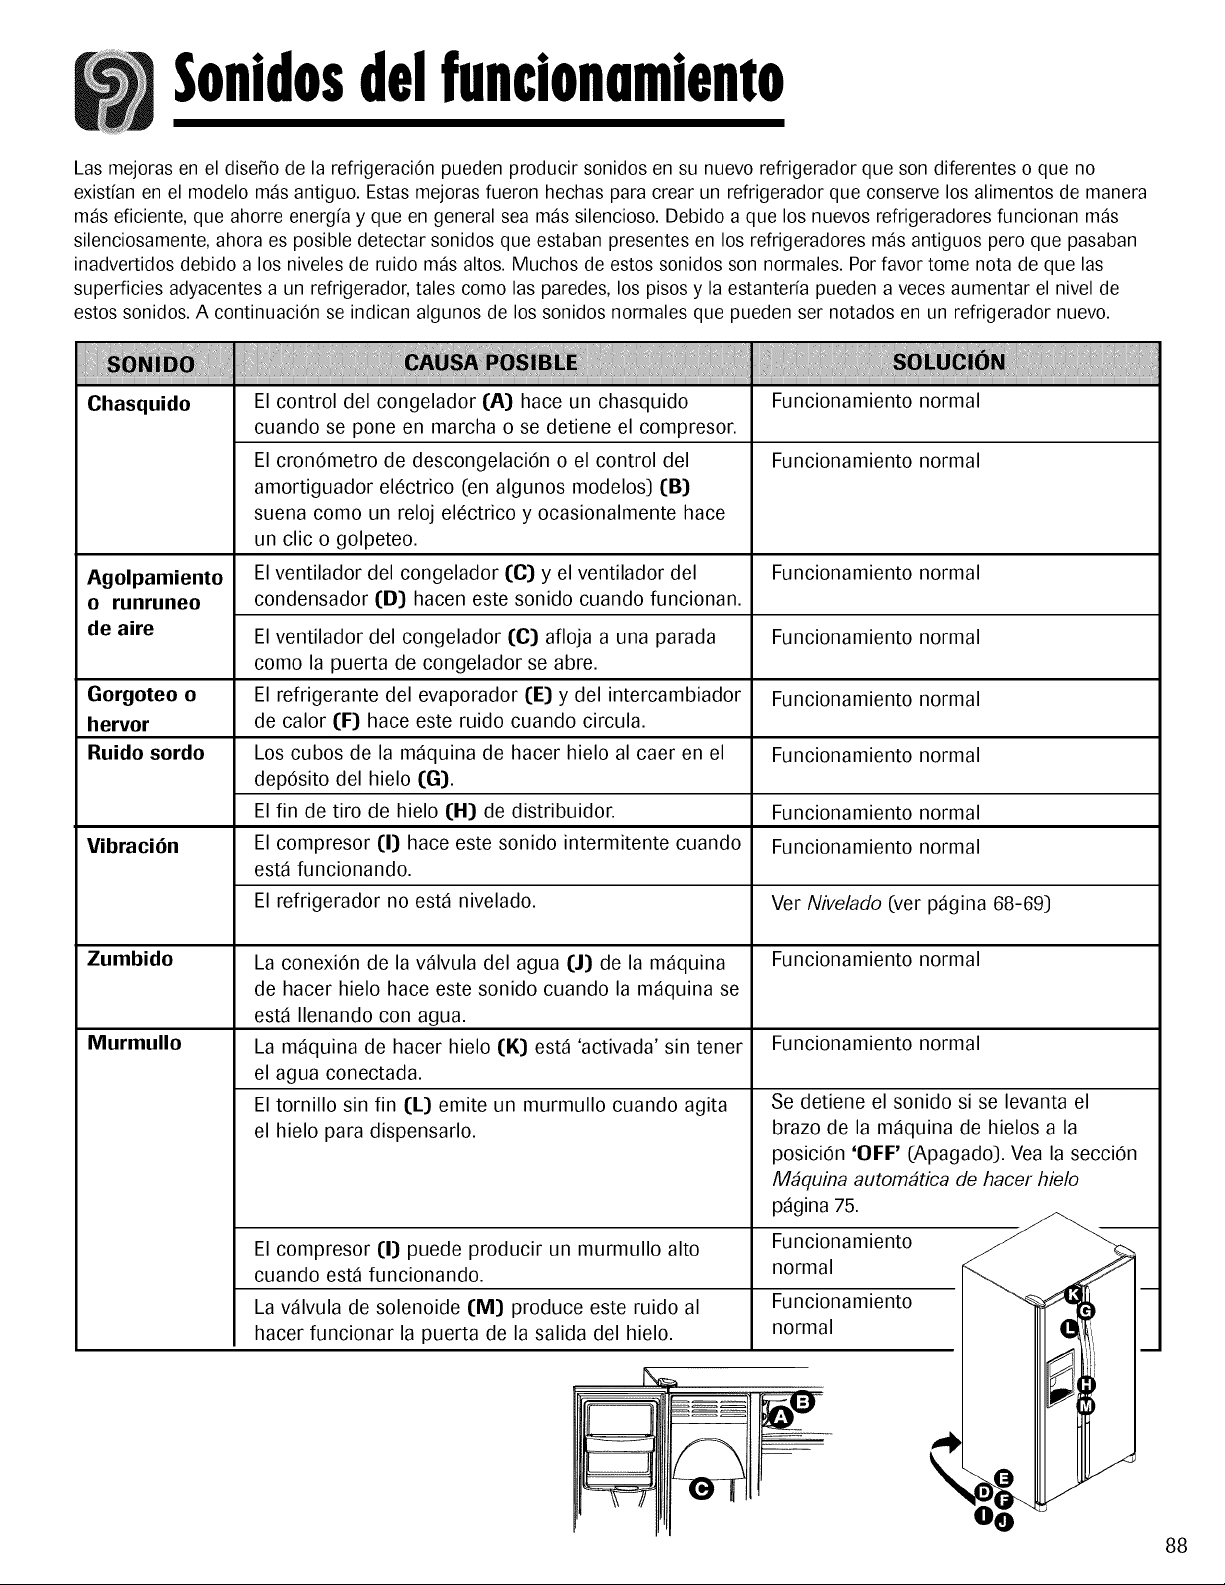
$onidosdelfuncionumiemo
Las mejoras en el dise_o de la refrigeraciOn pueden producir sonidos en su nuevo refrigerador que son diferentes o que no
existfan en el modelo m_s antiguo. Estas mejoras fueron hechas para crear un refrigerador que conserve los alimentos de manera
m_s eficiente, que ahorre energfa y queen general sea m_s silencioso. Debido a que los nuevos refrigeradores funcionan m_s
silenciosamente, ahora es posible detectar sonidos que estaban presentes en los refrigeradores m_s antiguos pero que pasaban
inadvertidos debido a los niveles de ruido m_s altos. Muchos de estos sonidos son normales. Por favor tome nota de que las
superficies adyacentes a un refrigerador, tales como las paredes, los pisos y la estanterfa pueden a veces aumentar el nivel de
estos sonidos. A continuaciOn se indican algunos de los sonidos normales que pueden ser notados en un refrigerador nuevo.
Chasquido Funcionamiento normal
Funcionamiento normal
El control del congelador (A) hace un chasquido
cuando se pone en marcha o se detiene el compresor.
El cron6metro de descongelaci6n o el control del
amortiguador electrico (en algunos modelos) (B)
suena como un reloj electrico y ocasionalmente hace
un clic o golpeteo.
El ventilador del congelador I:C) y el ventilador del
condensador (D) hacen este sonido cuando funcionan.
Agolpamiento Funcionamiento normal
o runruneo
de aire El ventilador del congelador I:C) afloja a una parada Funcionamiento normal
como la puerta de congelador se abre.
Gorgoteo o El refrigerante del evaporador (E) y del intercambiador Funcionamiento normal
hervor de calor (F) hace este ruido cuando circula.
Ruido sordo Los cubos de la m_quina de hacer hielo al caer en el Funcionamiento normal
depOsito del hielo (G).
El fin de tiro de hielo I:tt) de distribuidor. Funcionamiento normal
Vibraci6n El compresor (I) hace este sonido intermitente cuando Funcionamiento normal
est_ funcionando.
El refrigerador no est_ nivelado. Ver Nivelado (ver p_gina 68-69)
Zumbido Funcionamiento normal
Murmullo Funcionamiento normal
La conexiOn de la v_lvula del agua (J) de la m_quina
de hacer hielo hace este sonido cuando la m_quina se
est_ Ilenando con agua.
La m_quina de hacer hielo (K) est_ 'activada' sin tener
el agua conectada.
El tornillo sin fin (L) emite un murmullo cuando agita
el hielo para dispensarlo.
El compresor (I) puede producir un murmullo alto
cuando est_ funcionando.
La v_lvula de solenoide I:M) produce este ruido al
hacer funcionar la puerta de la salida del hielo.
Se detiene el sonido si se levanta el
brazo de la m_quina de hielos a la
posiciOn 'OFF' (Apagado). Vea la secciOn
M#quina autom#tica de hacer hielo
p_gina 75.
Funcionamiento
normal
Funcionamiento
normal
88
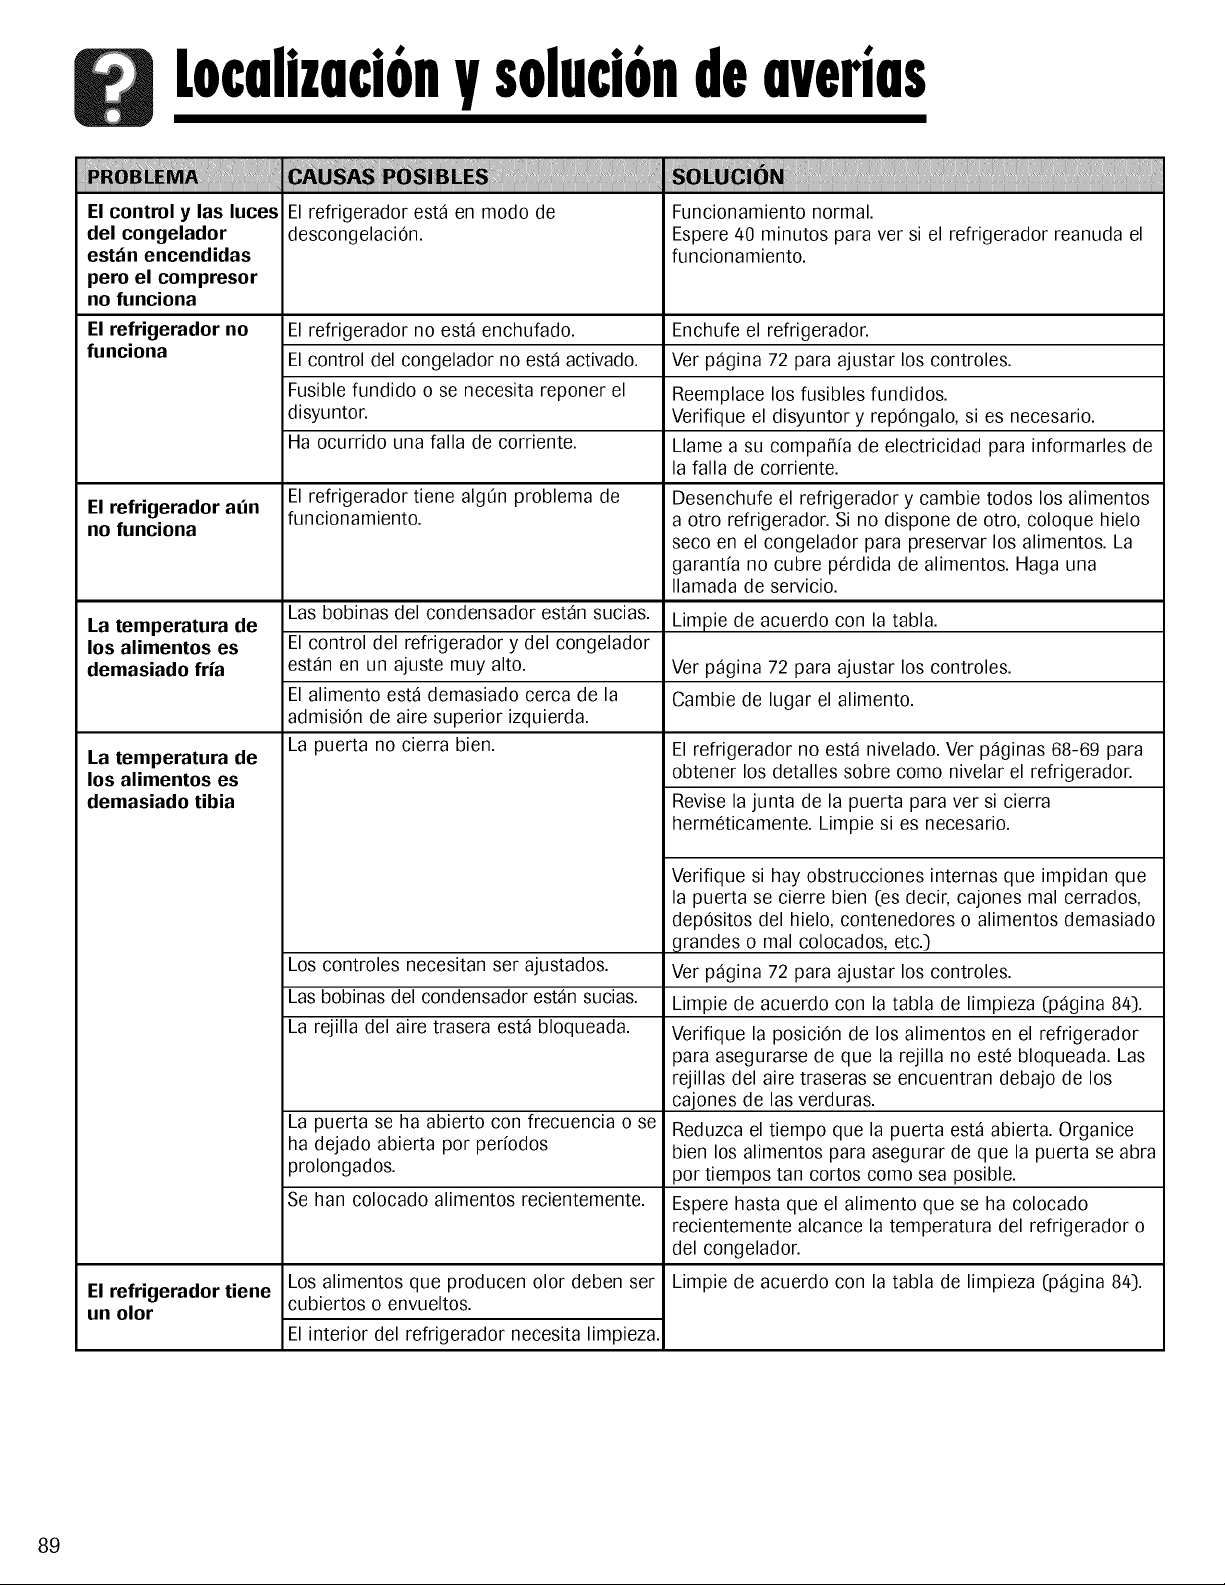
tocolizoci6ny solucionde overios
El control y las luces
del congelador
est_n encendidas
pero el compresor
no funciona
ii! li !iiiiiii ....
El refrigerador est_ en modo de Funcionamiento normal.
descongelaciOn. Espere 40 minutos para ver si el refrigerador reanuda el
funcionamiento.
El refrigerador no El refrigerador no est_ enchufado. Enchufe el refrigerador.
funciona El control del congelador no est_ activado. Ver p_gina 72 para ajustar los controles.
Fusible fundido o se necesita reponer el Reemplace los fusibles fundidos.
disyuntor. Verifique el disyuntor y repOngalo, si es necesario.
Ha ocurrido una falla de corriente. Llame a su compa_fa de electricidad para informarles de
la falla de corriente.
El refrigerador a_n
no funciona
La temperatura de
los alimentos es
demasiado fria
La temperatura de
los alimentos es
demasiado tibia
El refrigerador tiene
un olor
El refrigerador tiene algOn problema de
funcionamiento.
Las bobinas del condensador est_n sucias.
El control del refrigerador y del congelador
est_n en un ajuste muy alto.
El alimento est_ demasiado cerca de la
admisi6n de aire superior izquierda.
La puerta no cierra bien.
Desenchufe el refrigerador y cambie todos los alimentos
a otro refrigerador. Si no dispone de otro, coloque hielo
seco en el congelador para preservar los alimentos. La
garantfa no cubre perdida de alimentos. Haga una
Ilamada de servicio.
Los alimentos que producen olor deben ser
cubiertos o envueltos.
Limpie de acuerdo con la tabla.
Ver p_gina 72 para ajustar los controles.
Cambie de lugar el alimento.
El refrigerador no est_ nivelado. Ver p_ginas 68-69 para
obtener los detalles sobre como nivelar el refrigerador.
Revise la junta de la puerta para ver si cierra
hermeticamente. Limpie si es necesario.
Verifique si hay obstrucciones internas que impidan que
la puerta se cierre bien (es decir, cajones mal cerrados,
depOsitos del hielo, contenedores o alimentos demasiado
grandes o mal colocados, etc.)
Los controles necesitan ser ajustados. Ver p_gina 72 para ajustar los controles.
Las bobinas del condensador est_n sucias. Limpie de acuerdo con la tabla de limpieza (p_gina 84).
La rejilla del aire trasera est_ bloqueada. Verifique la posiciOn de los alimentos en el refrigerador
para asegurarse de que la rejilla no este bloqueada. Las
rejillas del aire traseras se encuentran debajo de los
cajones de las verduras.
La puerta se ha abierto con frecuencia o se Reduzca el tiempo que la puerta est_ abierta. Organice
ha dejado abierta por perfodos bien los alimentos para asegurar de que la puerta se abra
prolongados, por tiempos tan cortos como sea posible.
Se han colocado alimentos recientemente. Espere hasta que el alimento que se ha colocado
recientemente alcance la temperatura del refrigerador o
del congelador.
Limpiede acuerdo con la tabla de limpieza (p_gina 84).
El interior del refrigerador necesita limpieza.
89

tocolizaci6ny solucionde overios
i itli iltiliiliiliiliiliiliiliiliiliilliii,iiiii!!!iiii i lli
Seforman gotasde Las juntas de la puerta no sellan Limpie de acuerdo con la tabla en la p_gina 84.
agua en el exterior hermeticamente.
del refrigerador Los niveles de humedad son altos. Son normales durante epocas de alta humedad.
Los controles deben set ajustados. Vet p_gina 72 para ajustar los controles.
Se forman gotas de Los niveles de humedad son altos o la Reduzca el tiempo que la puerta est_ abierta. Organice
agua en el interior puerta se ha abierto con demasiada bien los alimentos para asegurar de que la puerta se
del refrigerador frecuencia, abra por tiempos tan cortos como sea posible.
Las juntas de la puerta no sellan Limpie de acuerdo con la tabla en la p_gina 84.
hermeticamente.
Funcionamiento normal. Vet p_gina 88.El refrigerador o la
m;tquina de hacer
hielo hacen ruidos
extra_os o
demasiado altos
El caj6n de las
verduras no ciermn
bien
El refrigerador
funciona con
demasiada
frecuencia
El contenido del cajOn o la posiciOn de los Cambie de lugar los alimentos y contenedores para
artfculos en el compartimiento vecino evitar interferencia con los cajones.
pueden estar obstruyendo el cajOn.
El refrigerador no est_ nivelado. Ver p_ginas 68-69 para los detalles sobre como nivelar
el refrigerador.
Las canaletas de los cajones est_n sucias.
La puerta se ha abierto con frecuencia o
se ha dejado abierta por perfodos
prolongados.
Limpie las canaletas con agua tibia y jabOn. Enjuague y
seque bien.
Aplique una capa delgada de vaselina en las canaletas
de los cajones.
Reduzca el tiempo que la puerta est_ abierta.
Organice bien los alimentos para asegurar de que la
puerta se abra pot tiempos tan cortos como sea
posible.
Espere a que el ambiente interior se ajuste por el
perfodo de tiempo que la puerta estuvo abierta.
La humedad o calor en el _rea vecina Funcionamiento normal.
es alta.
Se han colocado alimentos recientemente. Espere hasta que el alimento que se ha colocado
recientemente alcance la temperatura del refrigerador o
del congelador.
El refrigerador est_ expuesto al calor Evakie el medio ambiente de su refrigerador.
debido al medio ambiente o a otros Posiblemente sea necesario cambiarlo de lugar para
electrodomesticos a su alrededor, mejorar su rendimiento.
Las bobinas del condensador est_n Limpie si es necesario, de acuerdo con la tabla en la
sucias, p_gina 84.
Los controles necesitan set ajustados. Vet p_gina 72 para ajustar los controles.
La puerta no cierra bien. El refrigerador no est_ nivelado.Vet p%inas 68-69 Nivelado.
Verifique si hay obstrucciones internas que impidan
que la puerta se cierre bien (es decir, cajones mal
cerrados, depOsitos del hielo, contenedores o alimentos
demasiado grandes, etc.)
Las juntas de la puerta no sellan Limpie de acuerdo con la tabla en la p_gina 84.
hermeticamente.
Cont.
90
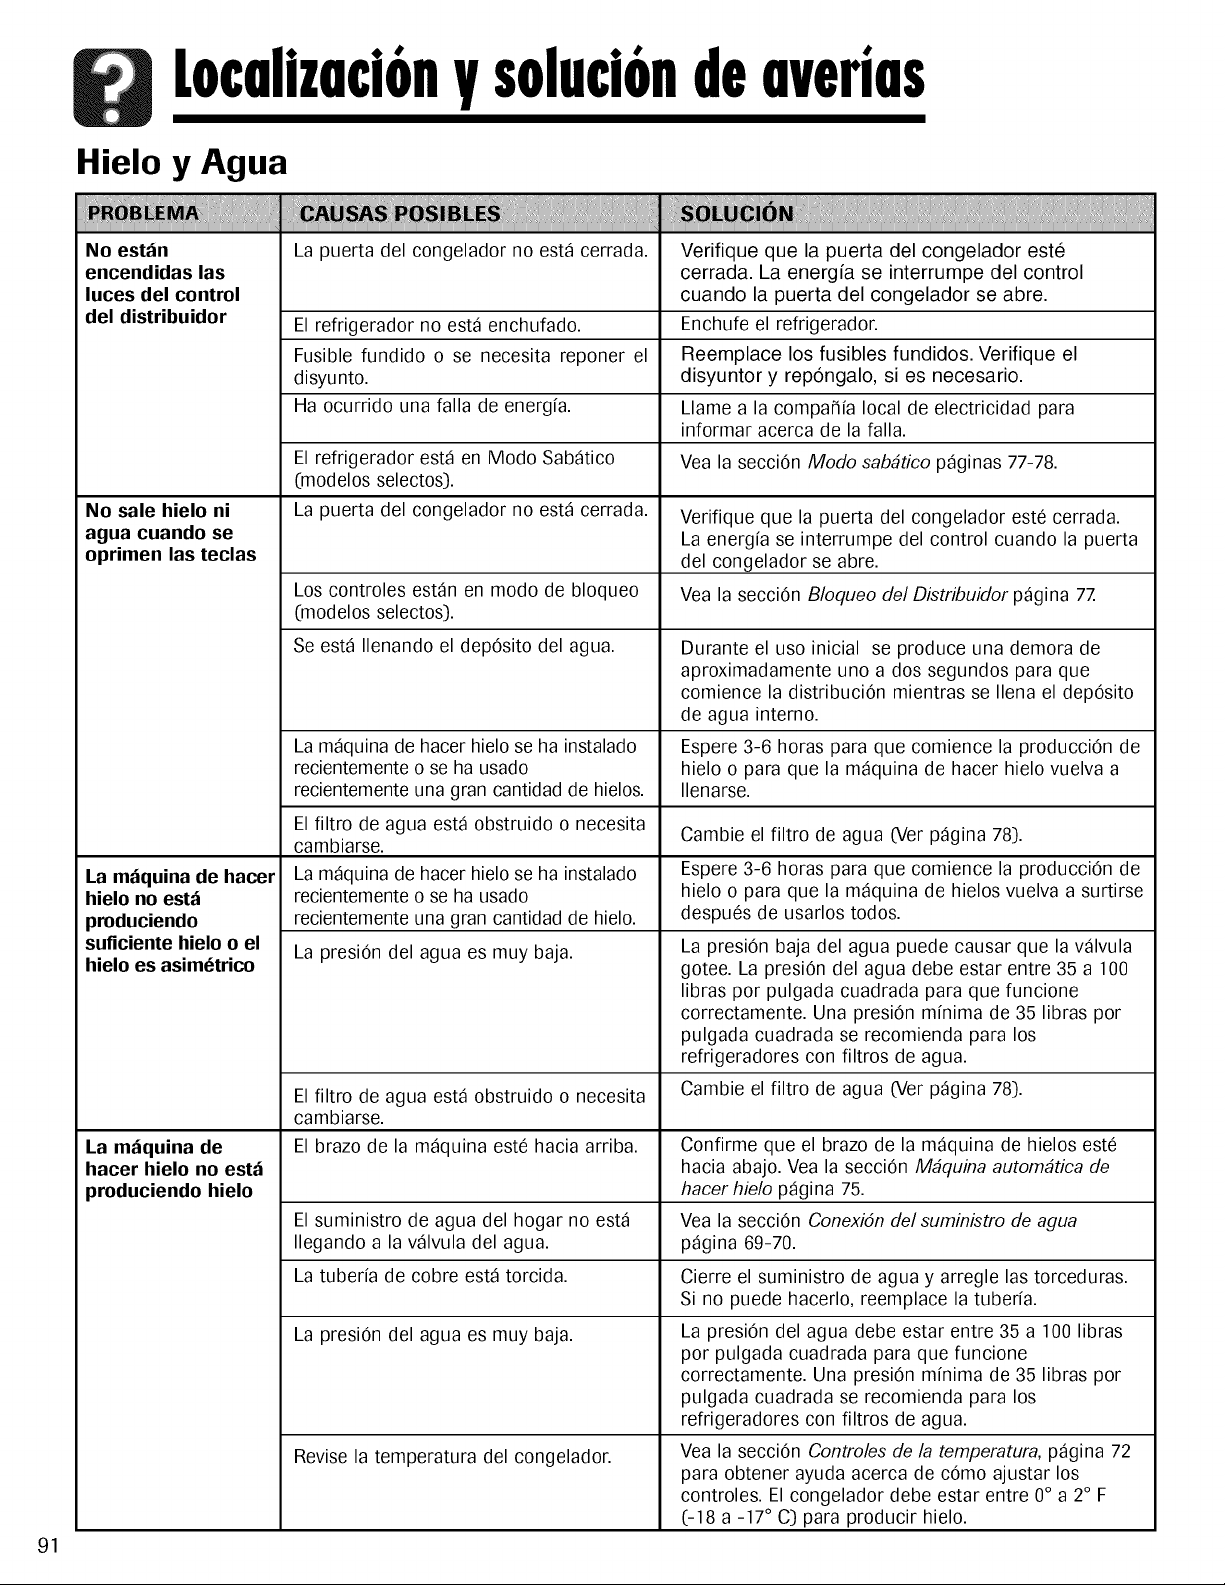
91
tocolizoci6ny solucionde overios
Hielo y Agua
No est_n La puerta del congelador no est_ cerrada. Verifique que la puerta del congelador este
encendidas las cerrada. La energfa se interrumpe del control
luces del control cuando la puerta del congelador se abre.
del distribuidor El refrigerador no est_ enchufado. Enchufe el refrigerador.
Fusible fundido o se necesita reponer el Reemplace los fusibles fundidos. Verifique el
disyunto, disyuntor y repongalo, si es necesario.
Ha ocurrido una falla de energfa. Llame a la compaSfa local de electricidad para
informar acerca de la fall&
El refrigerador est_ en Modo Sab_tico Vea la secci6n Modo sab_tico p_ginas 77-78.
(modelos selectos).
No sale hielo ni La puerta del congelador no est_ cerrada. Verifique que la puerta del congelador est6 cerrada.
agua cuando se La energfa se interrumpe del control cuando la puerta
oprimen las teclas del congelador se abre.
Los controles est_n en modo de bloqueo Vea la secci6n B/oqueo de/Distribuidor p_gina 77.
(modelos selectos).
Se est_ Ilenando el dep6sito del agua. Durante el uso inicial se produce una demora de
aproximadamente uno a dos segundos para que
comience la distribuci6n mientras se Ilena el dep6sito
de agua interno.
La m_quina de hacer hielo se ha instalado Espere 3-6 horas para que comience la producci6n de
recientemente o se ha usado hielo o para que la m_quina de hacer hielo vuelva a
recientemente una gran cantidad de hielos. Ilenarse.
El filtro de agua est_ obstruido o necesita
Cambie el filtro de agua (Vet p_gina 78).
cambiarse.
La m_iquina de hacer La m_quina de hacer hielo se ha instalado Espere 3-6 horas para que comience la producci6n de
hielo no est_i recientemente o se ha usado hielo o para que la m_quina de hielos vuelva a surtirse
produciendo recientemente una gran cantidad de hielo, despu6s de usarlos todos.
suficiente hielo o el La presi6n del agua es muy baja.
hielo es asimetrico
El filtro de agua est_ obstruido o necesita
cambiarse.
La m_iquina de El brazo de la m_quina est6 hacia arriba. Confirme que el brazo de la m_quina de hielos est6
hacer hielo no est_i hacia abajo. Vea la secciOn Mbquina autombtica de
produciendo hielo hacer hielo p_gina 75.
El suministro de agua del hogar no est_ Vea la secci6n ConexiSnde/suministro de agua
Ilegando a la v_lvula del agua. p_gina 69-70.
La tuberfa de cobre est_ torcida.
La presi6n del agua es muy baja.
Revise la temperatura del congelador.
La presiOn baja del agua puede causar que la v_lvula
gotee. La presiOn del agua debe estar entre 35 a 100
libras por pulgada cuadrada para que funcione
correctamente. Una presiOn mfnima de 35 libras por
pulgada cuadrada se recomienda para los
refrigeradores con filtros de agua.
Cambie el filtro de agua (Ver p_gina 78).
Cierre el suministro de agua y arregle las torceduras.
Si no puede hacerlo, reemplace la tuberfa.
La presi6n del agua debe estar entre 35 a 100 libras
pot pulgada cuadrada para que funcione
correctamente. Una presi6n mfnima de 35 libras pot
pulgada cuadrada se recomienda para los
refrigeradores con filtros de agua.
Vea la secci6n Contro/es de/a temperatura, p_gina 72
para obtener ayuda acerca de c6mo ajustar los
controles. El congelador debe estar entre 0° a 2° F
(-18 a -17° C) para producir hielo.
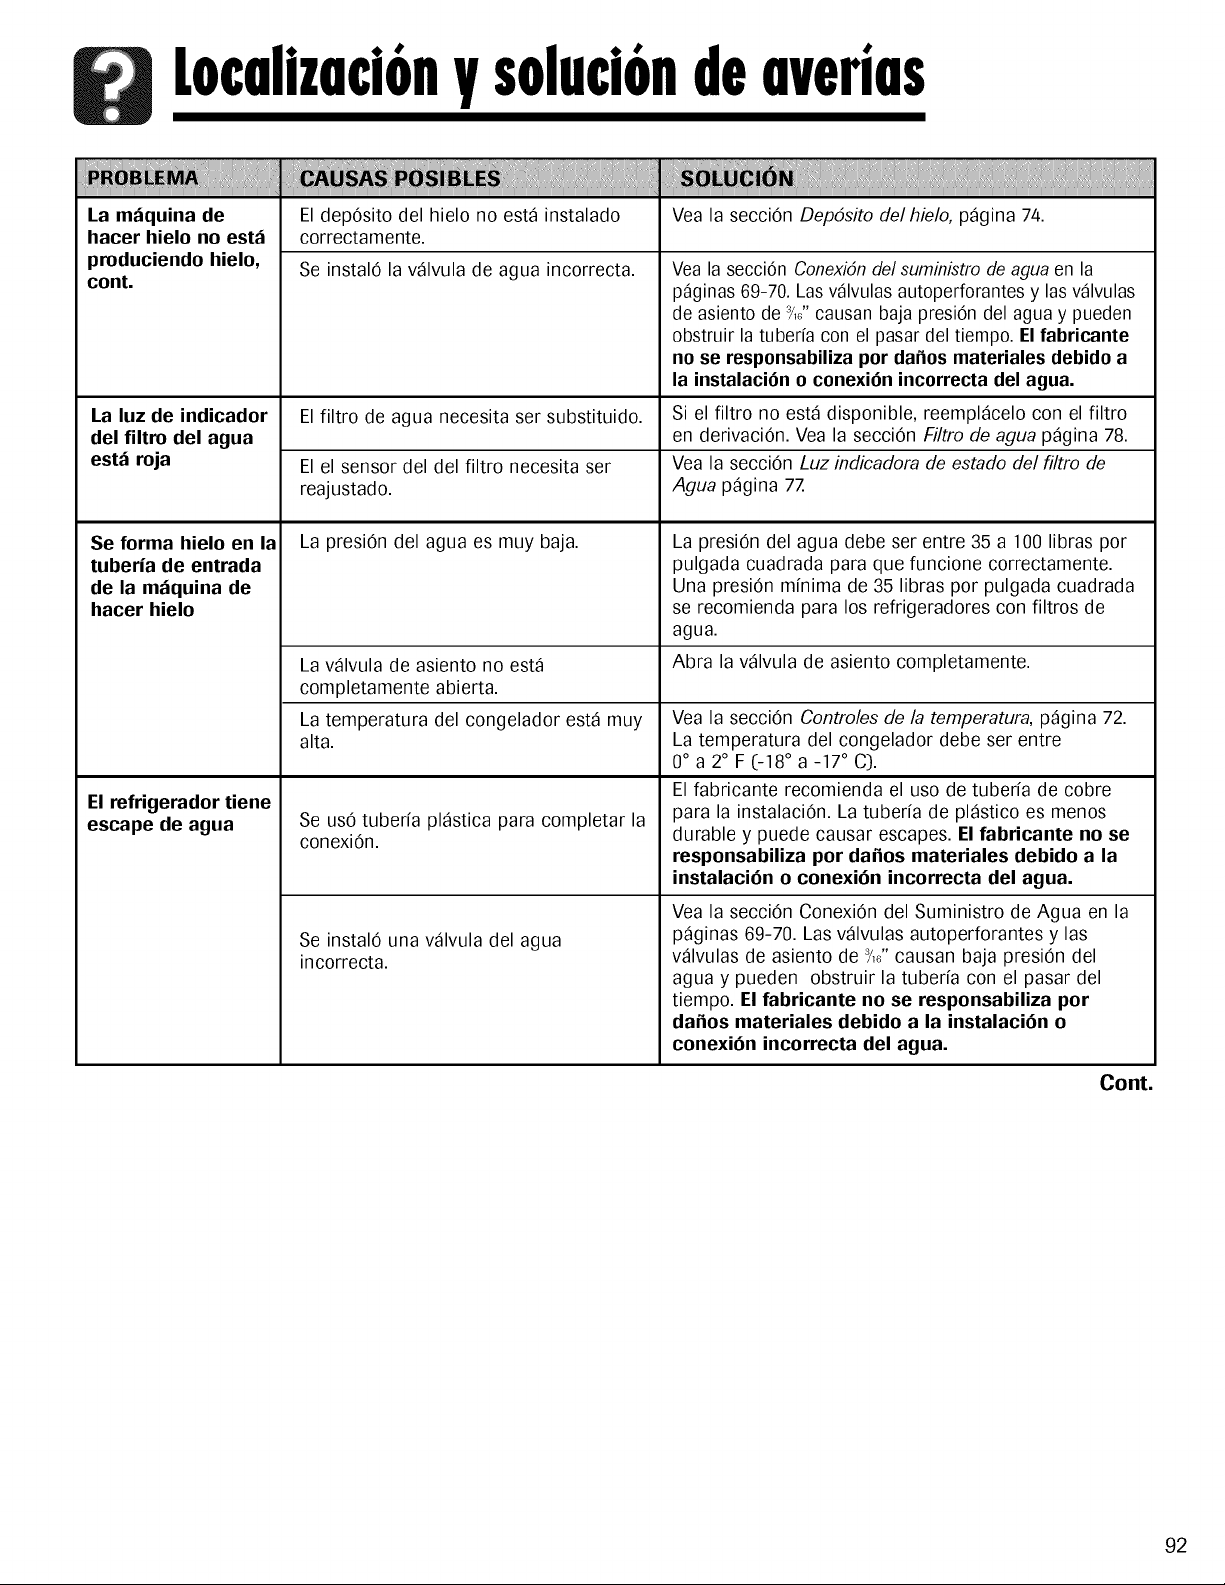
tocolizoci6ny solucionde overios
La m_quina de
hacer hielo no est;t
produciendo hielo,
cont.
liililJ!! i iilii iiiiii!!!iiii i iiiiJ Ii I iIiiIiiIiiIiiIiiIiiIiiIiiIiiIiiIiiIiiIiiIiiIiiIiiIiiIiiIiiIiiIiiIiiIiiIiiIiiIiiIiiI!
El depOsito del hielo no est_ instalado Vea la secciOn Depdsito delhielo, p_gina 74.
correctamente.
Se instal0 la v_lvula de agua incorrecta.
La luz de indicador El filtro de agua necesita ser substituido.
del filtro del agua
est_ roja El el sensor del del filtro necesita ser
reajustado.
Se forma hielo en la La presi6n del agua es muy baja.
tuberia de entrada
de la m;iquina de
hacer hielo
El refrigerador tiene
escape de agua
La v_lvula de asiento no est_
completamente abierta.
La temperatura del congelador est_ muy
alta.
Se us0 tuberfa pl_stica para completar la
conexiOn.
Se instal6 una v_lvula del agua
incorrecta.
Vea la secci6n Conexidndel suministrode agua en la
p_ginas 69-70. Las v_lvulas autoperforantes y las v_lvulas
de asiento de _,6"causan baja presi6n del agua y pueden
obstruir la tuberfa con el pasar del tiempo. El fabricante
no se responsabiliza per dafios materiales debido a
la instalaciOn o conexiOn incorrecta del agua.
Si el filtro no est_ disponible, reempl_celo con el filtro
en derivaciOn. Vea la secciOn Filtro de agua p_gina 78.
Vea la secciOn Luz indicadora de estado de/filtro de
Agua p_gina 77
La presiOn del agua debe ser entre 35 a 100 libras por
pulgada cuadrada para que funcione correctamente.
Una presi6n mfnima de 35 libras por pulgada cuadrada
se recomienda para los refrigeradores con filtros de
agua.
Abra la v_lvula de asiento completamente.
Vea la secciOn Controles de la temperatura, p_gina 72.
La temperatura del congelador debe ser entre
0° a 2° F (-18 ° a -17 ° C).
El fabricante recomienda el uso de tuberfa de cobre
para la instalaciOn. La tuberfa de pl_stico es menos
durable y puede causar escapes. El fabricante no se
responsabUiza per dafios materiales debido a la
instalaciOn o conexiOn incorrecta del agua.
Yea la secci6n ConexiOn del Suministro de Agua en la
p_ginas 69-70. Las v_lvulas autoperforantes y las
v_lvulas de asiento de _,6"causan baja presi6n del
agua y pueden obstruir la tuberfa con el pasar del
tiempo. El fabricante no se responsabiliza per
dafios materiales debido a la instalaciOn o
conexiOn incorrecta del agua.
Cont.
92
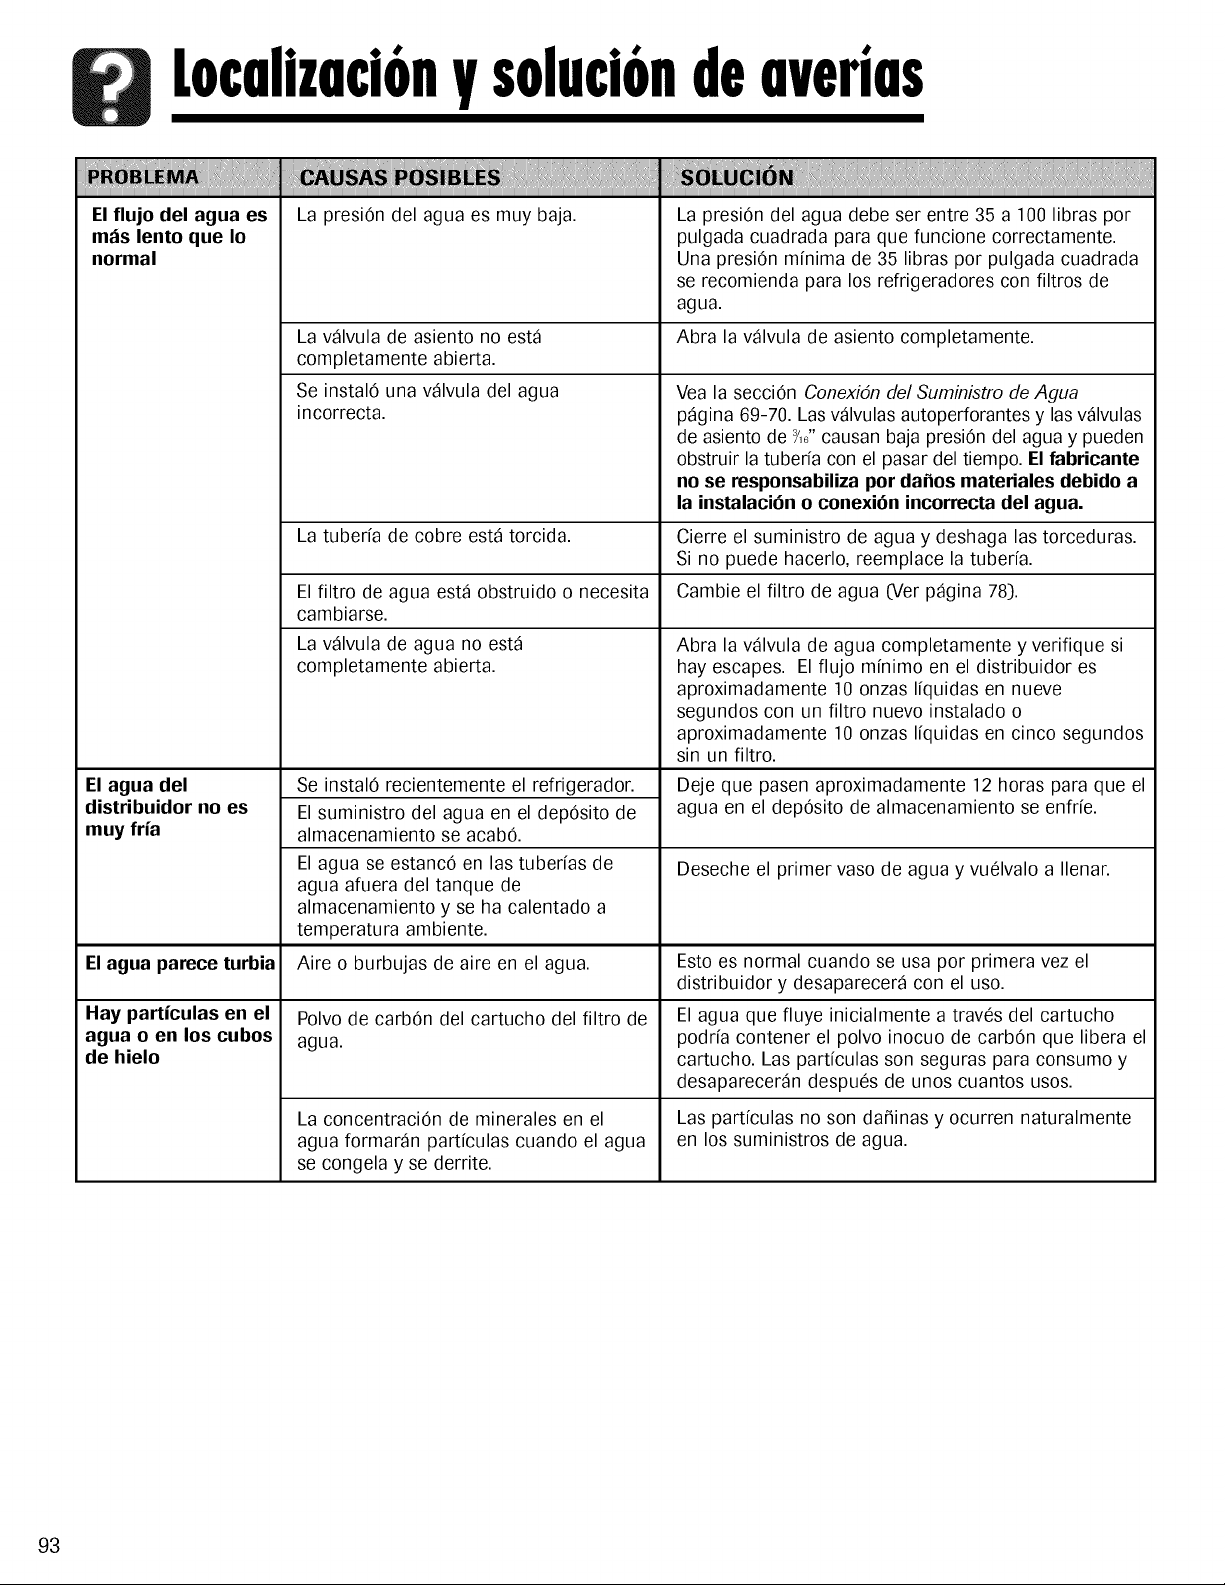
tocalizaci6n¥ soluci6ndeavedas
q iiiliillli
El flujo del agua es La presiOn del agua es muy baja. La presiOn del agua debe ser entre 35 a 100 libras por
m;ts lento que Io pulgada cuadrada para que funcione correctamente.
normal Una presiOn minima de 35 libras por pulgada cuadrada
se recomienda para los refrigeradores con filtros de
agua.
El agua del
distribuidor no es
muy fria
El agua parece turbia
Hay particulas en el
agua o en los cubes
de hielo
La v_lvula de asiento no est_
completamente abierta.
Se instalO una v_lvula del agua
incorrecta.
Abra la v_lvula de asiento completamente.
Vea la secciOn Conexidn de/Suministro de Agua
p_gina 69-70. Lasv_lvulas autoperforantes y las v_lvulas
de asiento de _,_;'causan baja presi0n del agua y pueden
obstruir la tuberfa con el pasar del tiempo. El fabricante
no se responsabiliza per dafios materiales debido a
la instalaciOn o conexiOn incorrecta del agua.
La tuberia de cobre est_ torcida. Cierre el suministro de agua y deshaga las torceduras.
Si no puede hacerlo, reemplace la tuberia.
El filtro de agua est_ obstruido o necesita Cambie el filtro de agua (Ver p%ina 78).
cambiarse.
La v_lvula de agua no est_
completamente abierta.
Se instal0 recientemente el refrigerador.
Elsuministro del agua en el depOsito de
almacenamiento se acab6.
El agua se estanc6 en las tuberias de
agua afuera del tanque de
almacenamiento y se ha calentado a
temperatura ambiente.
Aire o burbujas de aire en el agua.
Polvo de carbon del cartucho del filtro de
agua.
La concentraciOn de minerales en el
agua formar_n particulas cuando el agua
se congela y se derrite.
Abra la v_lvula de agua completamente y verifique si
hay escapes. El flujo minimo en el distribuidor es
aproximadamente 10 onzas Ifquidas en nueve
segundos con un filtro nuevo instalado o
aproximadamente 10 onzas Ifquidas en cinco segundos
sin un filtro.
Deje que pasen aproximadamente 12 horas para que el
agua en el depOsito de almacenamiento se enfrie.
Deseche el primer vaso de agua y vuelvalo a Ilenar.
Esto es normal cuando se usa por primera vez el
distribuidor y desaparecer_ con el uso.
El agua que fluye inicialmente a traves del cartucho
podria contener el polvo inocuo de carbon que libera el
cartucho. Las particulas son seguras para consumo y
desaparecer_n despues de unos cuantos usos.
Las part[culas no son da_inas y ocurren naturalmente
en los suministros de agua.
93

Ilotas
94
Gorontioy $ervicio
LA UNICAY EXCLUSIVASOLUCIONPARAEL
CLIENTEBAJOESTAGARANTiALIMITADAES
LA REPARACIONDEL PRODUCTOSEGUNSE
INDICA AQU[ LASGARANTfASIMPLfCITAS,
INCLUYENDOLASGARANTfASDE
COMERCIALIZACION0 DEAPTITUDPARAUN
PROPOSITOEN PARTICULARESTA,N
LIMITADASA UN ANO 0 AL PERfODODE
TIEMPOMfNIMO PERMITIDOPORLA LEY.
MAYTAGCORPORATIONNO SERA,
RESPONSABLEDE DANOSINCIDENTALES0
CONSECUENTES.ALGUNOSESTADOSY
PROVlNCIASNO PERMITENLA EXCLUSION0
LIMITACIONDE DANOSINCIDENTALES0
CONSECUENTES0 LA LIMITACIONDE LA
DURACIONDE LASGARANTfASIMPLfCITAS
DE COMERCIALIZACION0 APTITUD,PORLO
QUE ESTASEXCLUSIONES0 LIMITACIONES
PUEDENNO APLICARSEEN SU CASO.ESTA
GARANTfALEOTORGADERECHOSLEGALES
ESPECfFICOS.USTEDTAMBII_NPUEDETENER
OTROSDERECHOSQUEVARfANDEUN
ESTADOA OTRO0 DEUNA PROVlNCIAA
OTRA.
Lo que no cubren estas garantias
1. Situaciones y da_os resultantes de cualquiera de las siguientes
situaciones:
a. Instalaci0n, entrega o mantenimiento inapropiados.
b. Cualquier reparaci0n, modificaciOn, alteraciOn o ajuste no autorizados por
el fabricante o taller de servicio autorizado.
c. Mal uso, abuso, accidentes, uso no razonable o hechos fortuitos.
d. Corriente, voltaje, suministro electrico o suministro de gas incorrectos.
e. Ajuste inadecuado de cualquier.
f. Uso de elevadores (pedestales) de marcas que no son Maytag.
2. Las garantfas quedan nulas si los n0meros de serie originales han sido
retirados, alterados o no se pueden determinar f_cilmente.
3. Bombillas, filtros de agua y filtros de aire.
4. Los productos comprados para uso comercial o industrial.
5. El costo del servicio o Ilamada de servicio para:
a. Corregir errores de instalaciOn. Para los productos que requieran
ventilaciOn, se deben usar conductos de metal rfgido.
b. Instruir al usuario en el uso adecuado del producto.
c. Transporte del electrodomestico al establecimiento de servicio y de regreso.
d. Paracorregir problemasrelacionadosa elevadoresde marcas que no son Maytag.
6. Cualquier perdida de alimentos debido a fallas del refrigerador o
congelador.
7.Costos de viaje y transporte de servicio en _reas remotas.
8. Esta garantfa no se aplica fuera de los Estados Unidos y Canad& P0ngase en
contacto con su distribuidor para determinar si se aplica cualquier otra
garantfa.
9. Los da_os consecuentes o incidentales sufridos por cualquier persona como
resultado del incumplimiento de esta garantfa. En algunos
estados no se permite la exclusion o limitaci0n de da_os consecuentes o
incidentales, por Io tanto la limitaciOn o exclusion anterior puede no aplicarse
en su caso.
Si necesita servicio
Primero revise la secci0n de Iocalizaci0n y soluciOn de averfas en su gala de uso
y cuidado o Ilame al distribuidor donde adquiriO el electrodomestico. Tambien
puede Ilamar a Maytag Services, LLC, AtenciOn al cliente, al 1-800-688-9900 en
EE.UU.y al 1-800-688-2002 en Canad_ para ubicar a un agente de servicio
calificado.
• Aseg0rese de conservar el comprobante de compra para verificar el estado de
la garantfa. Consulte la secciOn sobre la GARANTIA para mayor informaciOn
sobre las responsabilidades del propietario para obtener servicio bajo la
garantfa.
• Si el distribuidor o la compa_fa de servicio no pueden resolver el problema,
escriba a Maytag Services, LLC, Attn: CAIW: Center, RO. Box 2370, Cleveland,
TN 37320-2370 0 Ilame al 1-800-688-9900 en EE.UU. y al
1-800-688-2002 en Canad;i.
• Las gufas del propietario, manuales de servicio e informaci0n sobre las piezas
pueden solicitarse a Maytag Services,LLC,AtenciOnal cliente.
Notas: Cuando Ilame o escriba acerca de un problema de servicio, por
favor incluya la siguiente informaciOn:
a. Su nombre, direcci0n y n0mero de telefono;
b. N0mero de modelo y n0mero de serie;
c. Nombre y direcciOn de su distribuidor o tecnico de servicio;
d. Una descripci0n clara del problema que est_ experimentando;
e. Comprobante de compra (recibo de compra).
Form No. ts,/01/06 Part No. 12842125 Litho U.S.A.