Loading ...
Loading ...
Loading ...
DA68-02493B (KAYRA)-EN-0.2.indd 5 2011.5.24 11:56:55 AM
Before you reverse the refrigerator door, make sure to
unplug the refrigerator. Samsung recommends that
reversing of the door opening
is only completed by Samsung approved Service
providers. This will be on a chargeable basis and at
the customers expense.
REVERSING THE DOOR(OPTIONAL)
Required Tools
Any damage caused while attempting to reverse
the door opening is not covered under the
appliance manufactures warranty. Any repairs
requested due to this circumstance will be
completed on
a chargeable basis at the customers expense.
1. Before attempting to reverse the refrigerator
doors ensure that the refrigerator is
disconnected from the main electricity supply
and all food stuffs and the accessories like door
guard are emptied from inside the appliance.
2. If the customer does not feel confident to follow
instruction in the user manual, a Samsung
qualified service engineer must be contacted to
carry out this change.
3. Handle parts carefully to avoid scratching paint.
4.Set screws and bolts down by their related parts to
avoid using them in the wrong places.
5. Provide a non-scratching work surface for doors
(ex:blanket)
6. During door reversing, refrigerator should not be
stained with oil.
7. Do not plug in Refrigerator just after door
reverse finished process and wait for at least
one hour.
Not provided
Phillips Head
Driver (+)
Flat Head Driver
(-)
12 mm Wrench
(for hinge shaft)
Not provided
Additional part
8 mm Socket
Wrench
(for bolts)
CAP-HINGE UPP L
(underneath the
cap table)
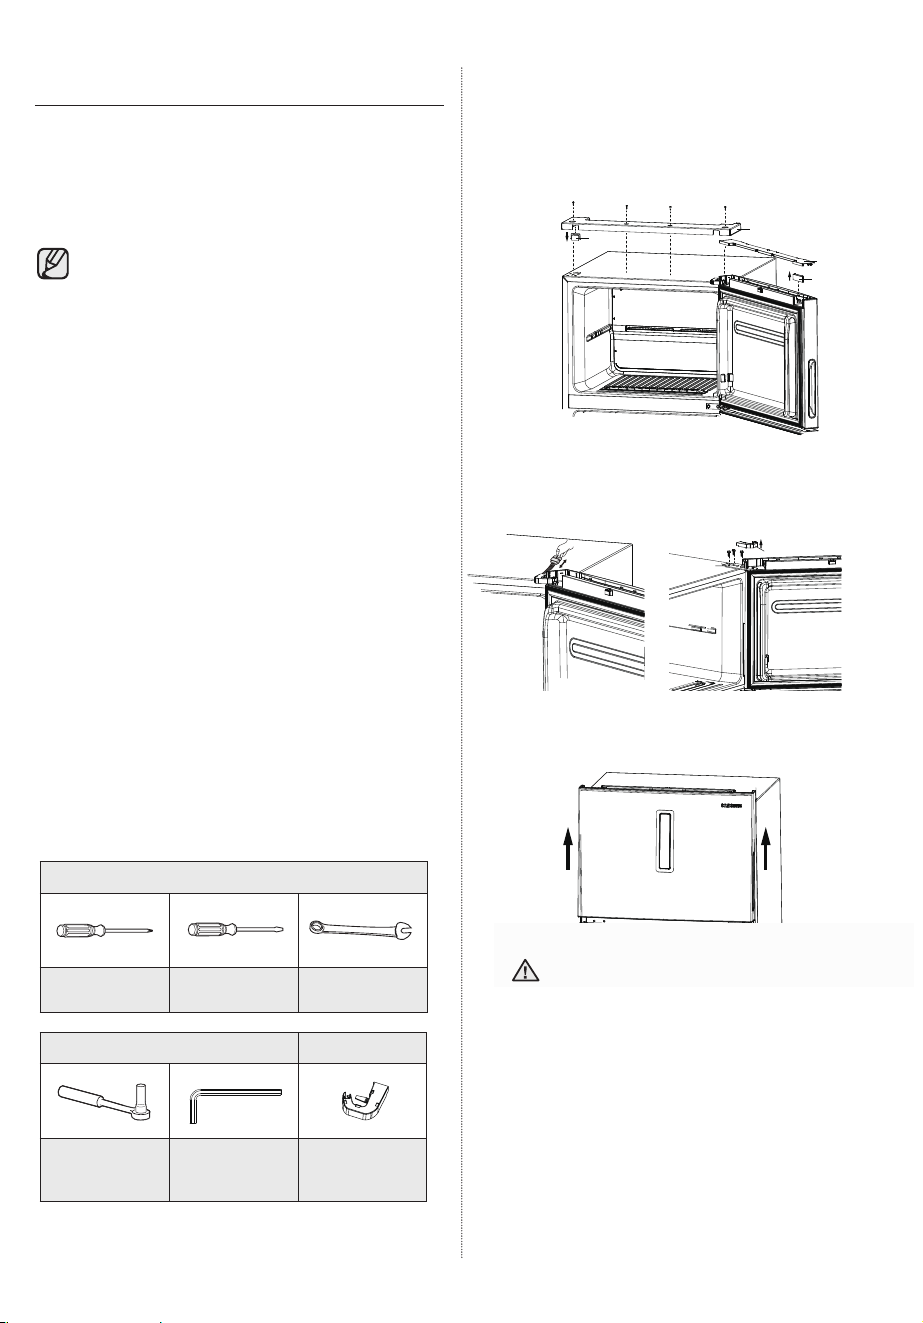
1. After removing the screws, disassemble the Cap
Table (1) and Cap Hole Top (2) on the cabinet,
disassemble the Cover Cap Door (3) and
Cap Spacer Door (4).
2. Disconnect the housing.
Disassemble the Cap Hinge Upp-R (5) and the
bolts, then remove the Upper Hinge (6).
3. Remove the Freezer door by lifting it upward.
Be careful not to drop and scratch the face of
the door.
The door is heavy, be careful not to injure
yourself when removing the door, and be
careful not to scratch.
CAUTION
3/16” Allen
Wrench
(for middle hinge)
8_Setting up
(1)
(3)
(4)
(2)
(5)
(6)
Loading ...
Loading ...
Loading ...