
Loading ...
Loading ...
Loading ...
6
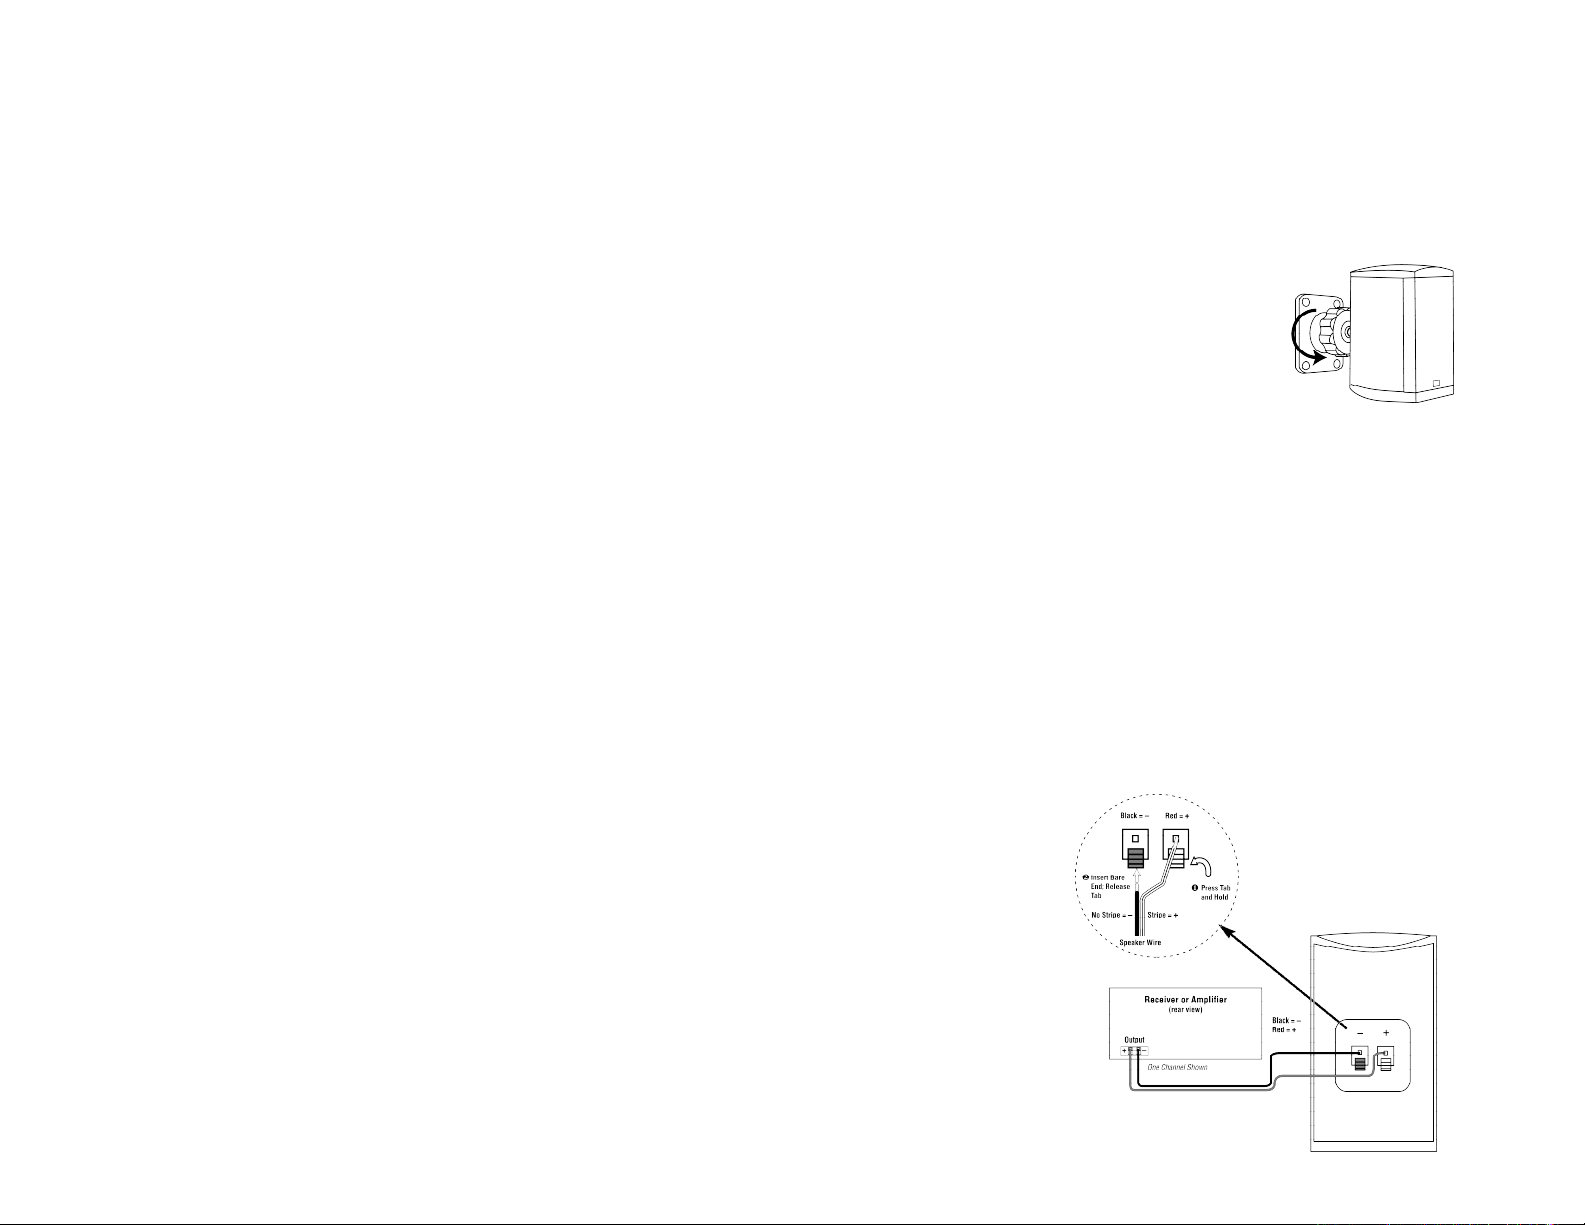
Figure 3.
Bracket on wall.
Figure 4. Wiring diagram shows
polarity connections for one channel
of a home theater system.
7
P L A C E M E N T
NOTE: The satellite speakers can be placed directly on a shelf, or mounted on a wall using
the included wall brackets.
LEFT AND RIGHT FRONT CHANNELS
CENTER CHANNEL
SURROUND CHANNELS
SUBWOOFER
WALL-MOUNTING THE SATELLITES
SATELLITE SPEAKER CONNECTIONS
The satellites are designed
to be mounted on the wall.
There is a wall bracket for
each satellite speaker. Each
speaker bracket will require
(4) 1-1/2,"#10 wood screws;
each screw should be fas-
tened to a wall stud. If a wall
stud is unavailable, install an
anchor appropriate for a
1-1/2,"#10 screw.
NOTE: The customer is
responsible for the correct
selection and use of mount-
ing hardware (available
through hardware stores)
that will ensure the proper
and safe wall-mounting of
the speakers.
Step 1.
Mark the positions on the
wall where you would like to
place the mounting screws.
Step 2.
Place bracket against wall
and fasten four 1-1/2,"#10
wood screws through the
bracket’s screw holes into
the wall. If a wall stud is not
available, use an appropriate
anchor.
Step 3.
Screw the post of the bracket
into the 1/4"-20 threaded
insert on the back of the
satellite. Adjust the satellite
to the desired angle and
tighten the knob.
Turn Off All Power
After placing the speakers,
you are ready to connect
your system. First, turn off
all audio-system power.
Use high-quality CL2/3 rated
speaker wire for in wall wire
runs. #18-Gauge speaker
wire with polarity coding is
included for outside the wall
use only. For longer dis-
tances, # 1 6 - g a u g e or heavier
wire is recommended. The
side of the wire with a ridge
or other coding is usually
considered positive polarity
(i.e., +). Also, consult the
owner’s manuals that were
included with your amplifier
or receiver to confirm con-
nection procedures.
Satellites
Observe polarities when
making speaker connections,
as shown in Figure 4.
Connect each + terminal on
the back of the amplifier or
receiver to the respective +
(red) terminal on each
speaker. Connect the –
(black) terminals in the
same way.
Important!
Do not reverse polarities
(i.e., + to – or – to +) when
making connections. Doing
so will cause poor imaging
and diminished bass
response. Be certain that
positive and negative wire
strands are completely
isolated to avoid short
circuits that may damage
your equipment.
For left and right front chan-
nels, place one satellite to
the left and another to the
right of the television, as
shown in Figure 1. Since the
speakers are magnetically
shielded, you can place
them very close to the TV
without worrying about the
magnetic field distorting the
picture.
For the center channel,
place the speaker directly
on top of, or below, your
television. Use included
brackets for wall mounting.
For left and right surround
channels, place one speaker
on the left and another on
the right, to the side of or
slightly behind the listening
area. The surround speakers
should be mounted at a
height of between 4 feet and
7 feet.
Since the installation of
a subwoofer can be some-
what more complicated
than installing full-range
speakers, it is essential that
you read this section very
carefully prior to connecting
the subwoofer to your
system. Should you have
questions relating to
installation, it is advisable
to call either your dealer or
Leviton’s Technical Support
Department for advice.
The performance of the
subwoofer is directly related
to its placement in the
listening room and how you
align the subwoofer with the
satellite speakers. Setting
the volume of the subwoofer
in relation to the left and
right speakers is also of
critical importance because
it is essential that the sub-
woofer integrate smoothly
with the entire system.
Setting the subwoofer’s vol-
ume level too high will result
in an overpowering, boomy
bass. Setting the volume
level too low will negate the
benefits of the subwoofer.
Here are several additional
facts on installation that may
prove useful. It is generally
believed that low frequen-
cies (below 125Hz) are
nondirectional and, there-
fore, placement of a sub-
woofer within any listening
room is not critical. While in
theory it is true that the
larger wavelengths of
extremely low frequencies
are basically nondirectional,
the fact is that, when
installing a subwoofer within
the limited confines of a
room, reflections, standing
waves and absorptions gen-
erated within the room will
strongly influence the per-
formance of any subwoofer
system. As a result, specific
location of the subwoofer
becomes important, and we
strongly recommend that
you experiment with place-
ment before choosing a final
location. Placement will
depend upon your room (for
example, whether or not
your room permits place-
ment of the subwoofer near
either satellite) and the
amount and quality of bass
required.
Loading ...
Loading ...