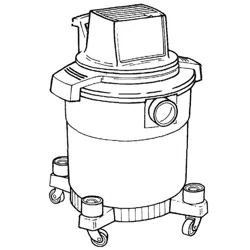
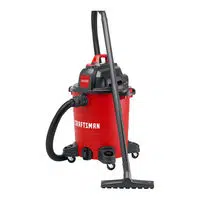
Craftsman 113177610 wet/dry vacuum
Product's Documents
Below are documents related to this product, you can read online or download:
- Owner's manual - (English) Read Online | Download pdf
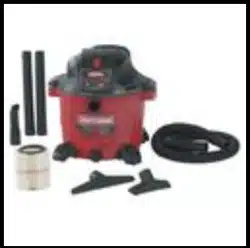
Table of Contents
WARNING To reduce the risk of fire or explosion, do not operate this vac in areas with flammable gases, vapors or explosive dust in the air. Flammable gases or vapors include but are not limited to; lighter fluid, solvent type cleaners, oilbase paints, gasoline, alcohol or aerosol sprays. Explosive dusts include but are not limited to; coal, magnesium, grain or gun powder. Do not vacuum explosive dust, flammable or combustible liquids or hot ashes. Do not use this vac as a sprayer. To reduce the risk of health hazards from vapors or dusts, do not vacuum toxic materials.
CAUTION: To reduce risk of hearing damage, wear ear protectors when using the vac for extended hours or when using it in a noisy area. The operation of any utility vac can result in foreign objects being blown into the eyes, which can result in severe eye damage. Always wear safety goggles complying with ANSI Z87.1 or in Canada, CSA A94.3-99) shown on Package before commencing operation. Safety Goggles are available at many local retail stores.
To reduce the risk of electric shock, this appliance has a polarized plug (one blade is wider than the other). This plug will fit in a polarized outlet only one way. If the plug does not fit fully in the outlet, reverse the plug. If it still does not fit, contact a qualified electrician to install the proper outlet. Do not change the plug in any way. After you plugthe power cord into the outlet, turn the unit on by pushing the switch from position "O" to position "1". The symbols used on the switch actuator are international "On & Off" symbols. "O" is the symbol for "OFF" and "1"is the symbol for "ON".
Vacuuming Dry Materials
1.The filter must always be in correct position to reduce the risk of leaks and possible damage to vac.
2. When using your vac to pick up very fine dust, it will be necessary for you to empty the drum and clean the filter at more frequent intervals to maintain peak vac performance.
NOTE: A dry filter is necessary to pick up dry material. If you use your vac to pick up dust when the filter is wet, the filter will clog quickly and be very difficult to clean.
3. If your filter is wet but you need to use the vac to pick up dry material, you can quickly dry the filter by running the vac without hose attached for about 10 minutes. The clean air rushing through the vac will help dry the filter. The optional Craftsman HEPA Rated Material Filter, stock number 9-17912 will do a better job stopping the very fine particles than the 9-17816 filter.
Vacuuming Liquids
1. When picking up small amounts of liquid the filter may be left in place,
2. When picking up large amounts of liquid we recommend that the filter be removed. If the filter is not removed, it will become saturated and misting may appear in the exhaust.
3.After using the vac to pick up liquids, the filter must be dried to reduce the risk of possible mildew and damage to the filter.
4.Wben the liquid in the drum reaches a predetermined level, the float mechanism will rise automatic_Uy to cut off air-flow. When this happens, turn off the vac, unplug the power cord, and empty the drum. You will know that the float has risen because vac airflow ceases and the motor noise will become higher in pitch, due to increased motor speed.
IMPORTANT: To reduce the risk of damage to the vac do not run motor with float in raised position.
Emptying the Drum
WARNING: To reduce the risk of injury from accidental starting, unplug power cord before emptying the drum.
1.The vac comes equipped with a drain for easy emptying of liquids. Simply unscrew the drain cap and lift the opposite side slightly to empty the drum.
2. Another option is to remove the power assembly.
3. Lay power assembly aside on a clean area while emptying drum.
4. Dump the drum contents into the proper waste disposal container.
WARNING: To reduce the risk of back injury or falls, do not lift a vac heavy with liquid or debris. Scoop or drain enough contents out to make the vac light enough to lift comfortably.
Moving the Vac
Should it become necessary to pick the vac up to move it, the handle on the sides of the dust drum are used to lift. To maneuver the vac, the push/pull handle in the rear of the unit should be used.
Blowing Feature
Your vac features a blowingport, It can blowsawdustand otherdebds, Followthe steps belowto useyour vac as a blower,
WARNING: Always wear safety goggles complying with ANSI Z87.1 (or in Canada, CSA Z94.3-99) before using as a blower.
WARNING: To reduce the risk of injury to bystanders, keep them clear of blowing debris.
1. Locate blowing port of your vac.
2. Insert the locking end of the "Pos-ILock" hose into the blowing port of the vac. The hose should snap into place. To remove the hose from the vac, press the release button in the hose assembly and pull the hose out of the vac inlet.
3. (Optional) Attach extension wand to opposite end of hose, then place the car nozzle on the wand.
4.Turn vac on and you are ready to use your vac as a blower.
Filter
WARNING: To reduce the risk of j injury from accidental starting, I I unplug power cord before changing or cleaning filter.
NOTE: This filter is made of high quality paper designed to stop very small particles of dust. The filter can be used for wet or dry pick up. Handle the filter carefully when removing to clean or installing it. Creases inthe filter pleats may occur from installation but creases will not affect the performance of the filter.
Cleaning
Your filter should be cleaned often to maintain peak vac performance, Be sure to dry the filter before storing or picking up dry debris,
IMPORTANT: After cleaning, check the filter for tears or small holes. Do not use a filter with holes or tears in it. Even a small hole can cause a lot of dust to come out of your vac. Replace it immediately.
Removal
To remove the filter for cleaning or replacement, unscrew the filter nut from the filter cage, remove filter plate and lift off filter,
WARNING: Do not remove the filter cage. It is there to help prevent your fingers from getting into the blower wheel.
IMPORTANT: To reduce the risk of damage to the blower wheel and motor, always reinstall the filter before using the vac for dry material pickup.
Dry Filter
Some removal of dry debris can be accomplished without removingthe filterfrom the vac. Slap your hand on top of the power assembly while the vac is turned off. For best cleaning results due to accumulated dust, clean the filter in an open area. Cleaning SHOULD be done outdoors and not in the living quarters. After filter removal from vac, remove the dry debris by gently tapping the filter against the inside wall of your dust drum. The debris will loosen and fall For thorough cleaning of dry filter with fine dust (no debris), run water through it as described under "Wet Filter".
Wet Filter
After filter is removed, runwater through the filter from a hose or spigot. Take care that water pressure from the hose is not strong enough to damage filter.
Remember: To dry a filter quickly, reinstallthe filter on the vac and allow the unit to run for approximately 10 minutes. The clean air rushing through the filter will dry it.
Installation
Refer to "Filter Assembly" Section of this manual. Allow the filter to dry before storing the vac.
Wet/Dry Vac
To keep your Wet/Dry Vac looking its best, clean the outside with a cloth dampened with warm water and mild soap. To clean the drum:
1. Dump debris out.
2. Wash drum thoroughly with warm water and mild soap.
3. Wipe out with dry cloth.
WARNING: To assure product SAFETY and RELIABILITY, repairs and adjustment should be performed by Sears Service Centers, always using Sears replacement parts.
NOTE: If your casters are noisy, you may put a drop of oil on the roller shaft to make them quieter.
Wet Nozzle
To pick up liquids off a smooth surface, use the 2-1/2" wet nozzle accessory supplied with your wet/dry vac. To use this nozzle, simply attach the nozzle to the end of an extension wand.
Connect a second extension wand to the first, and connect the 2-1/2" x 7' hose to the extension wand.
Liquids may be picked up by dragging the nozzle across the surface. The squeegee will dry the surface as you vacuum.
Replacement rubber for the squeegee nozzle may be obtained through Sears Parts. If the rubber becomes worn, it may be flipped over for use on the opposite side or replaced. (Replacement service part #822256). To reverse or replace the squeegee:
1. Lay the wet nozzle on a flat surface with the round inlet opening facing up and the two latches close to you as shown. holes inthe squeegee. (Make surethe new workingedge is located farthest from you.)
2. Using both hands, lower the nozzle body onto the insert and squeegee with the round opening of the nozzle closest to you. With fingers on the far side and thumbs holding the latches of the removable insert, flip the nozzle over so the latches are on the top and the round inlet opening is facing away from you. Make sure the squeegee stays on the insert pins.
3. Press down with each thumb below the latching tabs until you see and hear the removable insert snap into the nozzle body. Snap the latches over the locking tabs into their original position.
To reinstall the removable insert correctly, follow these steps:
1. Place the removable insert on a flat surface with the pins positioned upward and the latches close to you as shown. Place the rubber squeegee on the insert,
2. Using both hands, position each thumb on the removable insert, (below the latches) and two fingers of each hand on each latch, lift and disengage the two latches from the tabs on the nozzle body.
3. Gently pull the latches toward yourself to remove the insert
.4. Inspect the pins of the insert to make sure they fit through the holes of the squeegee and fit into the matching slots in the nozzle body.
NOTE: If the pins are out of position, hold the nozzle assembly with both hands and gently twist in opposite directions. The insert pins should snap into proper position. The wet nozzle assembly is ready for wet pickup use.