2-IN-1 PANINI GRILL
AND CONTACT GRILL
INSTRUCTION MANUAL
Before operating your new appliance, please read all instructions carefully and keep for
future reference.
Questions? Elite's customer service team is ready to help.
Call us toll-free at 800-365-6133 ext. 120/105.
For more Elite products, visit us at www.maxi-matic.com.
MODEL: EPN-2811


TABLE OF CONTENTS
IMPORTANT SAFEGUARDS
SHORT CORD PURPOSE
POLARIZED PLUG
PARTS IDENTIFICATION
BEFORE FIRST USE
HOW TO USE
PANINI PREPARATION
PANINI TIPS
CLEANING AND MAINTENANCE
STORAGE
WARRANTY POLICY
RETURN INSTRUCTIONS
IMPORTANTES MEDIDAS DE SEGURIDAD
OTRAS MEDIDAS DE SEGURIDAD IMPORTANTES
DESCRIPCION DE PARTES
ANTES DEL PRIMER USO
COMO UTILIZAR
PREPARACIÓN DE LOS PANINI
RECOMMENDACIONS
MANTENIMIENTO Y LIMPIEZA
ALMACENAMIENTO
PÓLIZA DE GARANTÍA
INSTRUCCIONES DE DEVOLUCIÓN
2
4
4
5
6
6
8
9
9
9
10
11
12
13
14
15
16
18
19
20
21
22
23

2
Questions? We’re here to help!
Visit: www.maxi-matic.com for support on this product.
IMPORTANT SAFEGUARDS
The Elite Brand takes consumer safety very seriously. Products are designed and
manufactured with our valued consumers’ safety in mind. Additionally, we ask that
you exercise a level of caution when using any electrical appliance by following all
instructions and important safeguards.
READ ALL INSTRUCTIONS BEFORE USE AND SAVE FOR FUTURE
REFERENCE
WARNING: When using electrical appliances, basic safety precautions should
always be followed as below:
1. READ ALL INSTRUCTIONS.
2. Use handles or knobs; do not touch
hot surfaces.
3. Do not immerse the cord, plugs, or
unit in water or any other liquid.
4. This appliance is not intended for use
by persons (including children) with
reduced physical, sensory or mental
capabilities, or lack of experience
and knowledge.
5. Use close supervision when any
appliance is used by or near children.
6. When not in use and before cleaning,
unplug from wall outlet. Allow
appliance to cool before cleaning or
storing.
7. Do not yank the cord to
disconnect the appliance from the
outlet. Grasp the plug and gently
pull to disconnect.
8. Do not operate any appliance with a
damaged cord or plug, after the
appliance malfunctions, or if it has
been damaged in any way. Return
appliance to the nearest authorized
service facility for repair.
9. Accessories not recommended by
the appliance manufacturer may
cause re, electrical shock or injuries.
10. Do not use outdoors. This is for
household only.
11. Do not use for commercial purposes.
12. Do not let the electrical cord hang
over the edge of the table or counter,
or touch hot surfaces.
13. Do not place on/near a hot gas,
electric burner, or in a heated oven.
14. Use on a heat-resistant, at level
surface only.
15. Use extreme caution when moving
an appliance containing hot food,
water, oil or other hot liquids.
16. This appliance should only be
plugged into a 120V AC electrical
outlet.
17. A short power-supply cord is
provided to reduce the risk of
tripping over a longer cord.
18. Longer extension cords are available
and may be used if care is exercised
in their use.
19. If an extension cord is used:
a. The marked electrical rating of
the detachable power-supply cord
or extension cord should be at least
as great as the electrical rating of the
appliance,
b. If the appliance is of the
grounded type, the extension cord
should be a grounding type 3-wire
cord; and
c. Place the longer cord so that it
will not drape over the counter top or
table top.
20. To disconnect, remove the plug from
the outlet.
21. Always unplug the appliance after
use.
22. Take proper precautions to prevent
the risk of burns, re or other damage
to persons or properties.
23. All users of this appliance must read
and understand this Instruction
Manual before operating or cleaning
this appliance.
24. Do not leave this appliance
unattended during use.

3
Questions? We’re here to help!
Visit: www.maxi-matic.com for support on this product.
IMPORTANT SAFEGUARDS (cont.)
25. Provide adequate ventilation on all
sides for air circulation. Do not
allow this appliance to touch
curtains, wall coverings, clothing,
dish towels or other ammable
materials during use.
26. This appliance is hot during
operation and remains hot after
turning OFF. Always use oven mitts
when handling hot materials and
allow metal parts to cool before
cleaning. Do not place anything on
top of the appliance while it is hot.
Notes on the Plug
This appliance has a grounded 3-prong plug. Connect to a properly grounded
outlet only. Do not attempt to modify the plug in any way.
Notes on the Cord
The provided short power-supply cord (or detachable power-supply cord) should
be used to reduce the risk resulting from becoming entangled in or tripping over
a longer cord.
Plasticizer Warning
CAUTION: To prevent plasticizers from transferring from the nish of the
counter top, table top, or other furniture, place non-plastic coasters or place mats
between the appliance and the counter top or table top. Failure to do so may cause
the nish to darken as well as permanent blemishes or stains.
Electric Power
If the electrical circuit is overloaded with other appliances, the appliance may not
operate properly. Operate on a separate electrical circuit from other appliances.
SAVE THESE INSTRUCTIONS.
THIS PRODUCT IS FOR
HOUSEHOLD USE ONLY.

4
Questions? We’re here to help!
Visit: www.maxi-matic.com for support on this product.
SHORT CORD PURPOSE
POLARIZED PLUG
be arranged so that it will not drape
over the counter top or tabletop where
it can unintentionally be pulled on or
tripped over by children or pets. If an
extension cord is used: (1) the marked
electrical rating of the extension cord
should be at least as great as the
electrical rating of the product; (2) the
extension cord should be arranged so
that it will not drape over the counter
top or tabletop where it can
unintentionally be pulled on or tripped
over by children or pets.
If the plug still does not t, contact a
qualied electrician. Never use the plug
with an extension cord unless the plug
can be fully inserted into the extension
cord. Do not alter the plug of the
product or any extension cord being
used with this product. Do not attempt
to defeat the safety purpose of the
polarized plug.
Note: A short power cord is provided
to reduce the risk of personal injury
resulting from becoming entangled in or
tripping over a long cord.
Longer power-supply cords or
extension cords are available and
may be used if care is exercised in
their use.
If an extension cord is used: (1) the
marked electrical rating of the
extension cord should be at least as
great as the electrical rating of the
product; (2) the extension cord should
If this appliance is equipped with a
polarized plug (one blade is wider than
the other), please follow the below
instructions:
To reduce the risk of electrical shock,
this plug is intended to t into a
polarized outlet only one way. If you
are unable to t the plug into the
electrical outlet, try reversing the plug.

5
Questions? We’re here to help!
Visit: www.maxi-matic.com for support on this product.
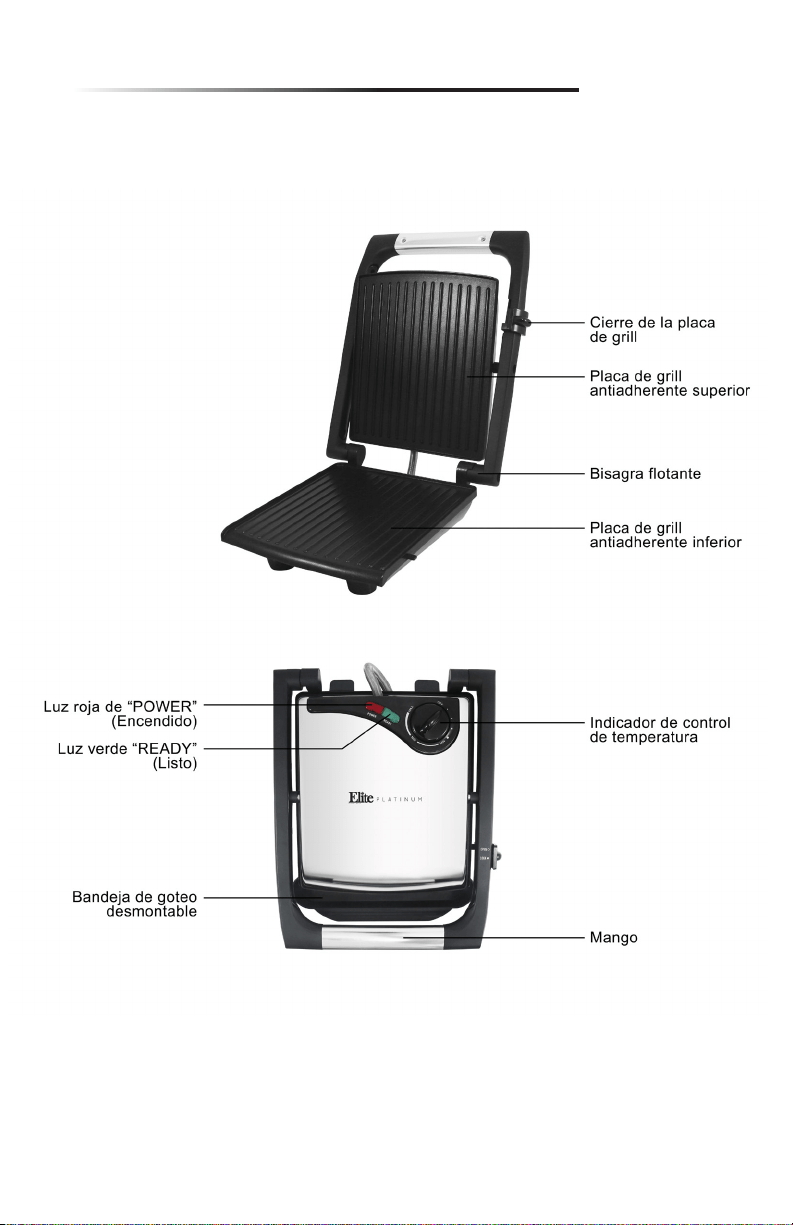
PARTS IDENTIFICATION
6
Questions? We’re here to help!
Visit: www.maxi-matic.com for support on this product.
CAUTION:
Do not let water run
into the appliance.
Never immerse panini
grill body in water or
any other liquids!
BEFORE FIRST USE
1. Unpack the Panini Grill and remove all packaging and
materials.
2. Set the appliance on a dry, clean, and at surface.
3. Slide the 2 prongs of the removable drip tray into the
bottom front of the unit. Push rmly to ensure the drip
tray is securely attached.
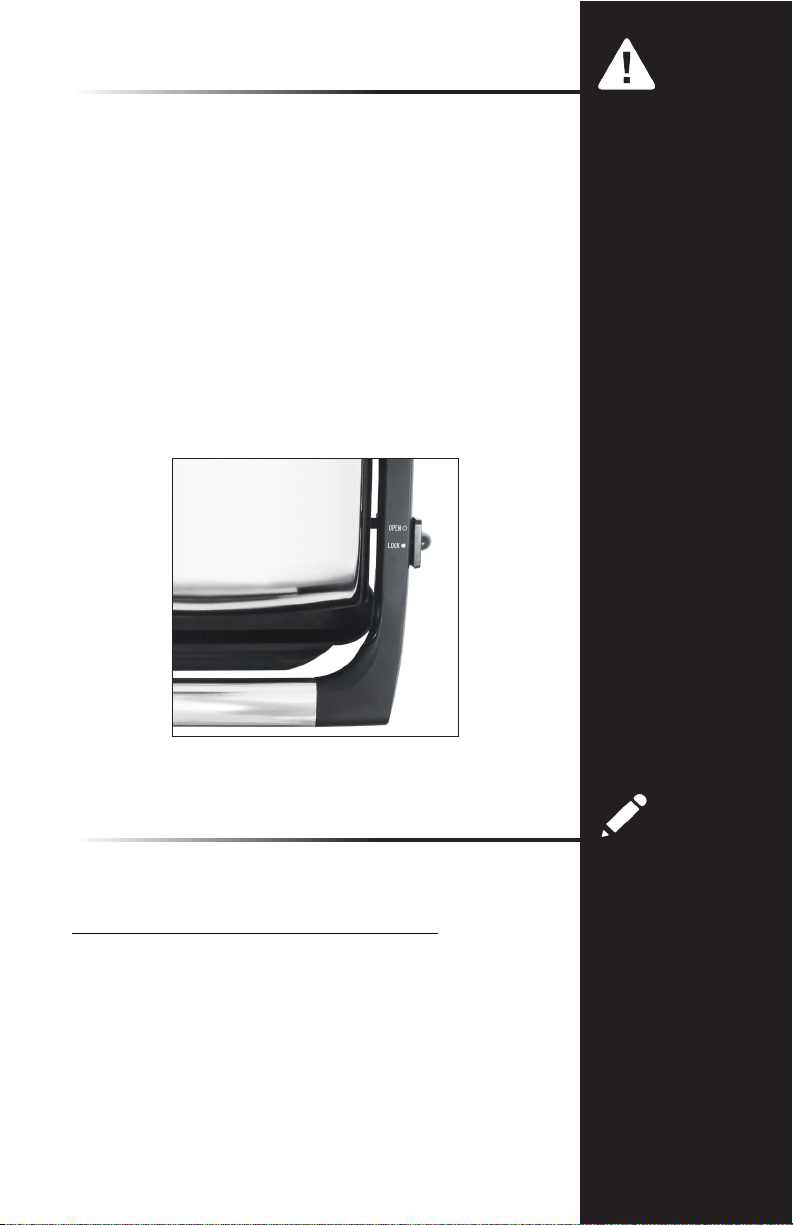
4. Slide the grill plate lock on the side of the handle to the
OPEN position. (See Figure 1)
5. Lift the top grill plate.
6. Before using your Panini Grill for the rst time, wipe the grill
plates with a damp cloth to remove all dust. Wipe dry then
wipe outer surfaces.
7. For best results, pour a teaspoon of vegetable oil onto an
absorbent kitchen towel. Spread onto the non stick grill
plates. Wipe off any excess oil.
NOTE:
When your Panini Grill
is heated for the rst
time, it may emit a
slight smoke or odor.
This is normal and
harmless. It should
disappear after one
or two uses. This does
not affect the safety of
the appliance.
-
-
HOW TO USE
The Panini Grill can be used open or closed. Cook burgers,
boneless, thin pieces of meat, sh, fruits, and vegetables.
TO USE AS A CONTACT GRILL (Open Position)
1. Plug unit into a 120 V AC electrical outlet. The red POWER
light will illuminate and remain lighted during use.
2. Slide the grill plate lock on the side of the handle to the
OPEN position. (See Figure 1)
3. To preheat, turn the temperature control dial to the MAX
setting. Operate the unit in the closed position during
preheat.
Figure 1

7
Questions? We’re here to help!
Visit: www.maxi-matic.com for support on this product.
4. After approximately 2 minutes, the green READY light will
illuminate, indicating the unit is preheated and is ready for
use.
5. Using a pot holder or oven mitt, grasp the handle to hold
the top grill plate open when placing or removing food on
the cooking surface.
6. Center food on the bottom grill plate.
7. When done cooking, turn the temperature control dial to
OFF. Remove the plug from the wall outlet.
HOW TO USE (cont.)
TO USE AS A PRESS GRILL (Closed Position)
1. Follow steps 1 through 6 of the How To Use section
entitled: “To Use as a Contact Grill (Open Position)”
described previously.
2. Using a pot holder or oven mitt, pull down the arm and
gently lower the top grill plate. The oating hinge will
automatically adjust to the thickness of the food.
3. To ensure perfectly grilled food, check that the top grill
plate lies evenly on the top of the food and that the food is
centered on the grill plate.
4. Adjust temperature control dial as needed. During grilling,
the green READY indicator light will cycle on and off during
cooking. This indicates that the thermostat is maintaining
the proper cooking temperature.
5. Using an oven mitt or pot holder, grasp the handle and
carefully lift the top grill plate. Always use a plastic or
wooden spatula to remove cooked food.
6. Turn the temperature control dial to OFF. Remove the plug
from the wall outlet.
NOTE:
When cooking more
than one piece of
food, prepare so that
the thickness of food
items is consistent.
This will allow food to
cook quickly, evenly
and produces rich grill
marks both top and
bottom.
The raised ridges and
tilted bottom plate
allow grease, fat and
other drippings to run
off away from your
food and into the drip
tray.
CAUTION:
Never use a sharp or
metal object as it may
damage the non-stick
surface of the grill
plates.
Do not leave
appliance unattended
during use!
-
-
-
-
7

8
Questions? We’re here to help!
Visit: www.maxi-matic.com for support on this product.
PANINI PREPARATION
To prepare delicious pressed sandwiches, follow these simple
steps:
1. Assemble panini. Brush or wipe both sides of the outside of
the sandwich with olive oil, butter or margarine (optional).
2. Follow steps 1 through 5 of the Operating Instructions
section entitled: “To Use as a Contact Grill (Open Position)”
described previously.
3. Center the panini, oiled side down, on the bottom grill
plate.
4. Using a pot holder or oven mitt, pull down the arm and
gently lower the top grill plate. The oating hinge will
automatically adjust to the thickness of the sandwiches.
5. To ensure perfectly grilled panini, all sandwiches placed on
the Panini Grill at the same time must be the same
thickness. Look to make sure that the top grill plate lies
evenly on the top of the bread. Make sure sandwiches
are centered on the grill plate. If desired, press the handle
down several times while cooking.
6. During grilling, the green READY indicator light will cycle
on and off during cooking. This indicates that the
thermostat is maintaining the proper cooking temperature.
7. Using an oven mitt or pot holder, grasp the handle and
carefully lift the top grill plate. Continue grilling until the
bread is toasted and food is cooked to your liking.
8. To remove the panini sandwiches, always use a plastic or
wooden spatula.
9. Turn the temperature control dial to OFF. Remove the plug
from the wall outlet.
10. Allow panini to cool to a safe handling temperature before
slicing.
NOTE:
The raised ridges and
tilted bottom plate
allow cheese, fat, and
other drippings to run
off away from your
panini and into the
drip tray.
CAUTION:
Never use a sharp or
metal object as it may
damage the non-stick
surface of the grill
plates.
Do not leave
appliance unattended
during use!
-
-
PANINI TIPS
• Preheat the Panini Grill before each use.
• Have all ingredients at hand before preparing panini.
• A wide variety of breads may be used, such as whole wheat,
rye, fruit breads, tortillas, atbreads, even pitas.
• It is not necessary to butter or oil the outside of the bread.
However, spreading a small amount of butter or olive oil is
recommended to encourage even browning of the bread.
• When using soft or liquid llings, use thicker-sliced breads.
• Remove the insides of soft rolls to ll with ingredients.
• If the recipe calls for canned fruit, drain and pat fruit dry
with a clean paper towel.
• Processed cheeses tend to “run” under high temperatures.

9
Questions? We’re here to help!
Visit: www.maxi-matic.com for support on this product.
PANINI TIPS (cont.)
• Sprinkle a teaspoon of sugar on the buttered side of a
panini to make it crispier and add avor, especially when
using sweet llings.
• Whole grain and sweet breads grill quicker than white
breads and should be grilled at lower temperatures.
• After you have removed nished panini, close the top grill
plate to retain heat while assembling more sandwiches.
• Use the Panini Grill to keep food warm. Place food onto the
grill, lower the top grill plate. Turn the temperature control
dial to MIN or to a lower setting before serving.
• Wear oven mitts and use a soft, absorbent paper towel
to wipe the grill plates clean after each use to avoid food
contamination.
NOTE:
The Panini Grill is
coated with a non-
stick surface. Do not
use non-stick sprays
as they can cause
build-up on the grill
plates. Use olive oil
instead.
CAUTION:
Do not use non-fat
spreads. They may
burn and damage the
non-stick grill plates.
CLEANING & MAINTENANCE
1. Never immerse appliance in water or other liquids. Never
place Panini Grill or drip tray in dishwasher.
2. The grill plates should be wiped clean, and if necessary,
conditioned before heating.
3. To condition plates, pour a teaspoon of vegetable oil onto
the grill plates. Spread with a kitchen towel and wipe off
any excess oil. Recondition after cleaning or as needed.
4. Use plastic, nylon or wooden utensils to protect the non-
stick coating on the grill plates.
5. Remove stubborn stains with a plastic mesh puff or pad,
then wipe off with a paper towel or soft cloth.
6. Do not use steel wool or coarse scouring pads.
7. Allow the run off to drip into the drip tray and pull it out.
Empty the tray and clean with warm soapy water. Wipe dry.
8. The exterior should be cleaned with a non-abrasive cleaner
and a soft, damp cloth. Dry thoroughly.
9. Hold the top grill plate open while cleaning to prevent
accidental closing or injury.
9
STORAGE
1. Ensure the unit is unplugged and fully cooled.
2. Attach clean drip tray to the unit.
3. Lower the top grill plate and slide the grill plate lock
(located on the side of the handle) to the LOCK position.
(See Figure 1) Store the Panini Grill in the locked position
for neat and compact storage.
4. Store the cord on the bottom of the Grill by wrapping it
around the back two legs and the central hub. Do not put
any stress on cord where it enters unit, as this could cause
the cord to fray and break.

10
Questions? We’re here to help!
Visit: www.maxi-matic.com for support on this product.
LIMITED WARRANTY* ONE (1) YEAR
WARRANTY IS ONLY VALID WITH A DATED PROOF OF PURCHASE
PLEASE DO NOT RETURN TO STORE OF PURCHASE.
If you have any problems with this unit, contact Customer Service for support.
1. Your small kitchen appliance is warranted to the original purchaser to be free from any
manufacturing defects under normal use and conditions for one (1) year, cord excluded.
This Warranty applies only to the original purchaser of this product.
2. Retail stores/merchants selling this product do not have the right to alter, modify, or in
any way revise the terms and conditions of the warranty.
3. If you use your appliance for household use and according to instructions, it should give
you years of satisfactory service.
4. At its sole discretion, Maxi-Matic USA will either repair or replace the product found to be
defective during the warranty period.
5. The repaired or replacement product will be in warranty for the remaining balance of the
one-year warranty period and an additional one-month period.
6. Consumer’s remorse is not an acceptable reason to return a product to our Service
Center.
7. This limited warranty covers appliances purchased and used within the 50 U.S. states
plus the District of Columbia and does NOT cover normal wear of parts or:
- Damages caused by unreasonable use, neglect, normal wear and tear, commercial
use, improper assembly or installation of product.
- Damages caused in shipping.
- Damages caused by replacement or resetting of house fuses or circuit breakers.
- Defects other than manufacturing defects.
- Breakage caused by misuse, abuse, accident, alteration, lack of proper care
and maintenance, or incorrect current or voltage.
- Lost or missing parts of the product. Parts will need to be purchased separately.
- Damages of parts that are not electrical; i.e. cracked or broken plastic/glass,
scratched/dented inner pots.
- Damage from service or repair by unauthorized personnel.
- Extended warranties purchased via a separate company or reseller.
- Acts of God such as re, oods, hurricanes, tornadoes, etc.
8. This warranty does not apply to re-manufactured merchandise.
Maxi-Matic, USA shall not be liable for any incidental or consequential damages caused by the
breach of any express or implied warranty. Apart from the extent prohibited by applicable
law, any implied warranty of merchantability or tness for a particular purpose is limited in
time to the duration of the warranty.
*One Year Limited Warranty valid only in the 50 U.S. states plus the District of Columbia,
excluding Puerto Rico and the Virgin Islands.
This warranty is effective only if the product is purchased and operated in the USA; product
usage which is in violation of the written instructions provided with the unit will void this
warranty. For international warranty, please contact the local distributor.
This warranty gives you special legal rights and you may also have other rights to which you
are entitled which may vary by state, province, and/or jurisdiction.
**Any instruction or policy included in this manual may be subject to change at any time.
MAXI-MATIC, USA
18401 E. Arenth Ave. City of Industry, CA 91748
Customer Support Hours of Operation MON-FRI 8:30 AM - 5:00 PM PST
(800) 365-6133 Ext: 120/107/105; (626) 912-9877 Ext: 120/107/105
Visit: www.maxi-matic.com for Live Chat Support and Contact Us Form

11
Questions? We’re here to help!
Visit: www.maxi-matic.com for support on this product.
RETURN INSTRUCTIONS
RETURNS:
A. Any return of defective merchandise to the manufacturer must be
processed accordingly by rst contacting customer service (info@
maxi-matic.com) to obtain an RA # (Return Authorization Number). We
will not accept any returns of merchandise without an applicable RA #.
B. IMPORTANT RETURN INSTRUCTIONS. Your Warranty depends on your
following these instructions if you are returning the unit to Maxi-Matic,
USA:
1. Carefully pack the item in its original carton or other suitable
box with sufcient cushioning to avoid damage in shipping.
2. Before packing your unit for return, be sure to enclose:
a) Your name, full address with zip code, daytime telephone
number, and RA#,
b) A dated sales receipt or PROOF OF PURCHASE,
c) The model number of the unit and the problem you
are having (Enclose in an envelope and tape directly to
the unit before the box is sealed,) and
d) Any parts or accessories related to the problem.
3. Maxi-Matic, USA recommends that you ship the package via UPS
ground service for tracking purposes. We cannot assume
responsibility for lost or damaged products returned to us
during incoming shipment. For your protection, always carefully
package the product for shipment and insure it with the carrier.
C.O.D shipments cannot be accepted.
4. All return shipping charges must be prepaid by you.
5. Once your return has been received by our warehouse, Maxi-Matic,
USA will repair or replace the product if it is defective in material or
workmanship, subject to the conditions in paragraph B.
6. Maxi-Matic will pay the shipping charges to ship the repaired or
replacement product back to you.

12
Questions? We’re here to help!
Visit: www.maxi-matic.com for support on this product.
IMPORTANTES MEDIDAS DE SEGURIDAD
ADVERTENCIA: Cuando se utilizan aparatos eléctricos, se deben seguir precauciones
de seguridad básicas, entre ellas:
1. Lea todas las instrucciones.
2. No toque las supercies calientes.
Utilice las asas o manijas.
3. Para protegerse contra riesgos de
descarga eléctrica, no sumerja, ni total
ni parcialmente, el cable, el enchufe
ni la unidad completa en agua u otros
líquidos.
4. Esté dispositivo no está disenado para
ser utilizado por personas (incluidos
niños) con capacidades físicas,
sensoriales o mentales reducidas, o
falta de experiencia y conocimiento, a
menos que una persona responsable
de su seguridad los supervise o
instruya en el uso del aparato.
5. Es necesario supervisar atentamente a
los niños si usan aparatos o están cerca
de ellos.
6. Desenchufe el aparato del
tomacorriente de la pared cuando no
lo utilice o antes de limpiarlo. Deje que
se enfríe el aparato antes de limpiarlo
o guardarlo.
7. Nunca tire del cable para desconectar
el aparato del tomacorriente. En
cambio, tome el enchufe y tire de él
para desconectarlo.
8. No utilice ningún aparato si el cable o
el enchufe están dañados, o si el
aparato no funciona bien o se ha
dañado de alguna forma. Lleve el
aparato al servicio técnico autorizado
más cercano para que lo examinen,
reparen o ajusten.
9. El uso de accesorios no recomendados
por el fabricante del artefacto puede
ocasionar incendios, descargas
eléctricas o lesiones.
10. No lo utilice en el exterior. Esté aparato
es para uso doméstico únicamente.
11. No lo utilice para nes comerciales.
12. No permita que el cable eléctrico
cuelgue del borde de la mesa o
mesada ni que toque supercies
calientes.
13. Solo utilice el aparato sobre una
supercie plana y resistente al calor.
14. No lo coloque encima ni cerca de un
quemador eléctrico o de gas calientes, ni
de un horno caliente.
15. Se debe tener sumo cuidado cuando se
traslada un aparato con alimento caliente,
o agua, aceite u otros líquidos calientes.
16. El cable del aparato se debe enchufar
únicamente a un tomacorriente eléctrico
de 120 V de CA.
17. Se suministrará un cable de alimentacion
corto para reducir el riesgo de enredarse o
tropezarse con un cable más largo.
18. Hay cables de extensión más largos
disponibles y pueden usarse si se tiene
cuidado.
19. Si usa un cable de extensión:
a. El calibre indicado del cable de
alimentacion separable o del cable de
extensión debe ser igual al calibre del
aparato.
b. Si el aparato tiene conexión a tierra
mediante 3 conductores, el cable de
extensión debe ser un cable a tierra de
conductores.
c. Por último, el cable más largo debe
manipularse de modo que no cuelgue por
la mesada ni la mesa, los ninos no puedan
jalarlo ni las personas puedan tropezar
con él accidentalmente.
20. Para desconectar la unidad, desenchúfela
del tomacorriente.
21. Siempre desenchufe el aparato después
de usarlo. El aparato permanecerá
encendido a menos que se desenchufe.
22. PRECAUCIÓN CON LAS SUPERFICIES
CALIENTES: Esté aparato genera calor
durante el uso. Se deben tomar las
medidas necesarias para evitar riesgos de
quemaduras, incendios u otros daños a
personas o a la propiedad.
23. Cuando utilice esté aparato, deje
suciente ventilación por encima y
alrededor de él para la circulación del aire.
No permita que esté aparato esté en
contacto con cortinas, revestimientos de
paredes, ropas, repasadores u otros
materiales inamables durante su uso.
24. No le dé al aparato otro uso que no sea el
indicado.

Questions? We’re here to help!
Visit: www.maxi-matic.com for support on this product.
13
OTRAS MEDIDAS DE
SEGURIDAD IMPORTANTES
PRECAUCIÓN: Esté electrodoméstico se calienta durante el funcionamiento y
mantiene el calor un tiempo después de apagado. Siempre use manoplas al
manipular materiales calientes y deje que las piezas metálicas se enfríen antes de
limpiarlas. No coloque nada sobre el electrodoméstico mientras esté en
funcionamiento o mientras esté caliente.
• Todos los usuarios de esté electrodoméstico deben leery comprender esté
manual de instrucciones antes de ponerlo en funcionamiento o limpiarlo.
• No descuide el electrodoméstico mientras esté en funcionamiento.
Notas sobre el enchufe
• Esté electrodoméstico tiene un enchufe de conexión a tierra de 3 dientes.
Debe conectarlo únicamente a un tomacorriente con conexión a tierra. No
intente realizar ninguna modicación al enchufe.
Notas sobre el cable
• Se debe usar el cable de alimentacin corto (o cable de alimentación separable)
para reducir el riesgo de enredarse o tropezarse con un cable más largo.
Advertencia sobre los plasticantes
• PRECAUCIÓN: A n de evitar que los plasticantes se adhieran al acabado de
la mesada, la mesa u otro mueble, coloque un posafuentes o salvamanteles
que NO SEA DE PLASTICO entre el aparato y la supercie de la mesada o mesa.
Si no se hace esto, es posible que el acabado se oscurezca, se formen marcas
permanentes aparezcan manchas.
Corriente eléctrica
• Si se recarga el circuito eléctrico con otros aparatos, es posible que este
aparato no funcione correctamente. Se debe utilizar en un circuito eléctrico
separado de los otros aparatos.
GUARDE ESTAS INSTRUCCIONES
ESTE PRODUCTO ES PARA USO
DOMĚSTICO UNICAMENTE
14
Questions? We’re here to help!
Visit: www.maxi-matic.com for support on this product.
Conozca su sandwichera
El producto puede diferir levemente de las ilustraciones.
DESCRIPCION DE PARTES
15
Questions? We’re here to help!
Visit: www.maxi-matic.com for support on this product.
ANTES DEL PRIMER USO
1. Retire con cuidado la sandwichera y todos los materiales
del embalaje.
2. Coloque el electrodoméstico sobre una supercie plana,
seca y limpia.
3. Deslice los dos dientes de la bandeja de goteo
desmontable hacia la parte inferior del frente de la unidad.
Empuje con rmeza para asegurarse de que la bandeja de
goteo esté bien colocada.
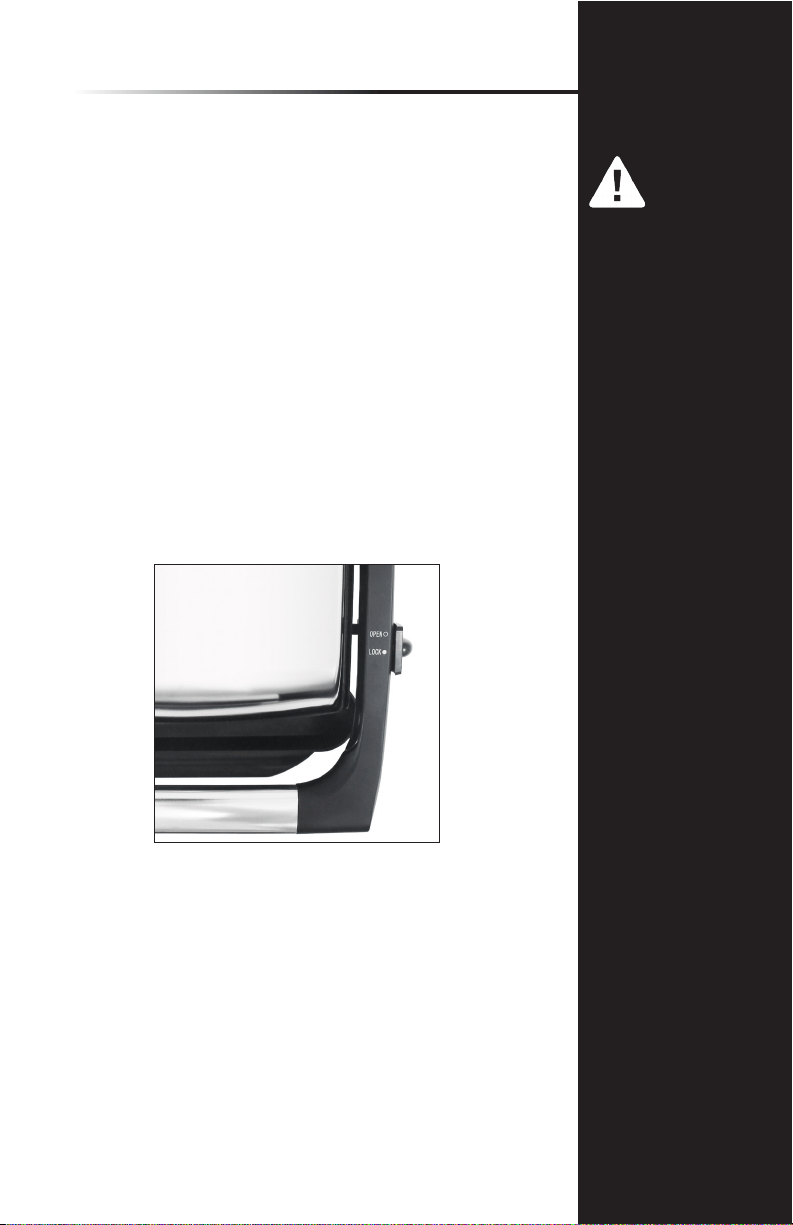
4. Deslice el cierre de la placa de grill que se encuentra del
lado del mango hasta la posición OPEN (Abierto). (Ver
Figura 1).
5. Levante la placa de grill superior.
6. Antes de utilizar la sandwichera por primera vez, limpie las
placas de grill con un paño húmedo para quitar el polvo y
luego séquelas. Limpie la supercie exterior con un paño
suave o una esponja ligeramente húmeda.
7. Para obtener mejores resultados, vierta una cucharadita de
aceite vegetal sobre un paño de cocina absorbente. Deslice
el paño sobre las placas de grill antiadherentes. Retire el
exceso de aceite.
PRECAUCIÓN:
Asegúrese de evitar que
el agua ingrese en el
electrodoméstico.
iNunca sumerja la
sandwichera en agua o
cualquier otro líquido!
Figura 1
15

16
Questions? We’re here to help!
Visit: www.maxi-matic.com for support on this product.
COMO UTILIZAR
La sandwichera se puede utilizar en la posición abierta o
cerrada. Cocine fácilmente hamburguesas, carnes deshuesadas,
tajadas nas de came, pescados, frutas y verduras. Las placas de
grill antiadherentes y la bandeja de goteo son muy fáciles de
limpiar.
Para utilizar como grill de contacto (posición abierta):
Asegúrese de que el cable esté completamente
desenvuelto y de que no toque ninguna de las piezas
exteriores de la unidad. Enchufe la unidad en un
tomacorriente eléctrico de CA de 120 V. La luz roja de
POWER (Encendido) se prenderá y permanecerá encendida
durante el funcionamiento.
1. Deslice el cierre de la placa de grill que se encuentra del
lado del mango hasta la posición OPEN (Abierto). (Ver
Figura 1).
2. Lleve el indicador de control de temperatura al ajuste MAX
(Maximo) para precalentar la sandwichera. Coloque la
unidad en la posición cerrada para precalentarla.
Mientras se precalienta, prepare los alimentos que desea
cocinar. Después de aproximadamente 2 minutes, se
prenderá la luz verde READY (Listo) para indicar que la
unidad está precalentada y lista para ser utilizada.
3. Con una manopla o un agarrador, sujete el mango para
mantener abierta la placa de grill superior mientras coloca
o retira los alimentos de la supercie de cocción, a n de
evitar lesiones y que
se cierre accidentalmente.
4. Con una manopla o un agarrador, coloque los alimentos en
el centro de la placa de grill inferior.
5. Ajuste el indicador de control de temperatura según sea
necesario; continúe cocinando en el grill abierto hasta que
los alimentos estén cocidos. Coloque el indicador de
control de temperatura en la posición OFF (Apagado).
Retire el enchufe del tomacorriente de pared.
NOTA
Cuando la sandwichera
se calienta por primera
vez, puede emitir un
poco de humo u olor.
Esto es normal y debería
desaparecer después de
uno o dos usos. Esto no
afecta la seguridad del
electrodoméstico.

17
Questions? We’re here to help!
Visit: www.maxi-matic.com for support on this product.
COMO UTILIZAR (cont.)
Para utilizar como grill de prensado (posición cerrada):
1. Siga los pasos 1 a 6 de la sección de las lnstrucciones de
funcionamiento titulada: “Para utilizar como grill de
contacto (posición abierta)”, descrita anteriormente.
2. Con una manopla o un agarrador, deslice el brazo y baje
suavemente la placa de grill superior. La bisagra otante se
ajustara automaticamente al grosor de los alimentos.
3. Para asegurarse de que los alimentos se cocinen
perfectamente, controls que la placa de grill superior cubra
uniformemente la parte superior de los alimentos.
Asegurese de que los alimentos estén ubicados en el
centre de la placa de grill. Si lo desea, presione el mango
hacia abajo varias veces durante la cocción.
4. Ajuste el indicador de control de temperatura segun sea
necesario. Durante la cocción al grill, se encenderá y
apagará la luz verde READY (Listo). Esto indica que el
termostato está manteniendo la temperatura de cocción
adecuada.
5. Con una manopla o un agarrador, sujete el mango y
levante cuidadosamente la placa de grill superior. Siempre
utilice una espátula de plástico o madera para retirar los
alimentos cocidos. Pruebe los alimentos para saber si
están cocidos. Cocine al grill los alimentos hasta que estén
cocidos a su gusto.
6. Coloque el indicador de control de temperatura en la
posición OFF (Apagado). Retire el enchufe del
tomacorriente de pared.
NOTA
Si cocina más de un
trozo de alimento,
prepárelos de modo
que el grosor de los
alimentos sea uniforms.
Esto permitirá que los
alimentos se cocinen de
forma rápida y uniforms
y que queden dorados
de ambos lados.
Los bordes elevados y la
placa inferior inclinada
permiten que las grasas
salgan de los alimentos
y caigan en la bandeja
de goteo.
PRECAUCIÓN:
Nunca utilice un objeto
loso ode metal ya que
puede danar la
supercie antiadherente
de las placas de grill.
No descuide el
electrodoméstico
mientras esté en
funcionamiento.
-
-
-
-
17

18
Questions? We’re here to help!
Visit: www.maxi-matic.com for support on this product.
PREPARACIÓN DE LOS PANINI
Para preparar deliciosos sándwiches prensados, siga estos
sencillos pasos. Se acostumbra preparar los panini con una
hogaza de pan grands. No obstante, los panini hechos con
rebanadas de pan o pancitos comprados en la tienda pueden
ser deliciosos y simples de preparar. Experiments con una
variedad de panes, tortillas, panes pianos e incluso pan árabe.
Para los cocineros que se preocupan por la salud, la capa
antiadherente de las placas de grill garantiza un tostado
crujiente y delicioso sin necesidad de utilizar aceite ni manteca.
Los bordes elevados y la placa inferior inclinada permiten que
las grasas salgan de los alimentos y caigan en la bandeja de
goteo.
1. Arme los panini. Pinte o frote ambos lados de la parte
exterior del sándwich con aceite de oliva, manteca o
margarina (opcional). Cuando se enciende la luz verde
READY (Listo), la sandwichera está lista para ser utilizada.
2. Siga los pasos 1 a 5 de la sección de las lnstrucciones de
funcionamiento titulada: “Para utilizar como grill de
contacto (posición abierta)”, descrita anteriormente.
3. Coloque los panini, con el lado untado con aceite hacia
abajo, en la placa de grill inferior.
4. Con una manopla o un agarrador, deslice el brazo y baje
suavemente la placa de grill superior. La bisagra otante se
ajustara automaticamente al grosor de los sándwiches.
5. Para asegurarse de que los panini se cocinen
perfectamente, todos los sándwiches que se colocan en la
sandwichera al mismo tiempo deben tener el mismo
grosor. Controls que la placa de grill superior cu bra uni-
formemente la parte superior del pan. Asegurese de que
los sándwiches estén ubicados en el centre de la placa
de grill. Si lo desea, presione el mango hacia abajo varias
veces durante la cocción.
6. Ajuste el indicador de control de temperatura según sea
necesario. Durante la cocción al grill, se encendera y
apagara la luz verde READY (Listo). Esto indica que el
termostato está manteniendo la temperatura de cocción
adecuada.
7. Con una manopla o un agarrador, sujete el mango y
levante cuidadosamente la placa de grill superior.
Continúe cocinando al grill hasta que el pan esté tostado y
los alimentos estén cocidos a su gusto.
8. Siempre utilice una espátula de plástico o madera para
retirar los sándwiches panini cocidos al grill.
9. Coloque el indicador de control de temperatura en la
posición OFF (Apagado). Retire el enchufe del
tomacorriente de pared.
10. Deje enfriar los panini unos minutes antes de cortarlos.
NOTA
Los bordes elevados y la
placa inferior inclinada
permiten que el queso
y las grasas salgan de
los panini y caigan en la
bandeja de goteo.
PRECAUCIÓN:
Nunca utilice un objeto
loso ode metal ya que
puede danar la
supercie antiadherente
de las placas de grill.
No descuide el
electrodoméstico
mientras esté en
funcionamiento.
-
-

19
Questions? We’re here to help!
Visit: www.maxi-matic.com for support on this product.
RECOMMENDACIONS
• Lleve el indicador de control de temperatura a MAX
(Maximo) para precalentar la sandwichera antes de cada
uso.
• Tenga todos los ingredientes a mano antes de preparar los
panini.
• Se puede utilizar una amplia variedad de panes, tales como
panes integrales, de centeno, de frutas, tortillas, panes
pianos e incluso pan árabe.
• Gracias a las placas de grill antiadherentes de la
sandwichera, no es necesario untar la pa rte exterior del
pan con manteca o aceite. No obstante, se recomienda
untar una pequeña cantidad de manteca o aceite de oliva
para que el pan se dore de forma pareja.
• Cuando utilice rellenos blandos o líquidos, use rebanadas
de pan más gruesas. Intents retirar el interior de los
pancitos blandos para crear una cavidad en la cual se puede
agregar el relleno.
• La mayoría de las frutas frescas sueltan jugo al calentarlas.
Si la receta incluye fruta en lata, cuele y seque la fruta con
una servilleta de papel limpia.
• Evite utilizar quesos procesados, ya que tienden a derretirse
a altas temperaturas.
• Una cucharadita de azúcar espolvoreada sobre el lado
untado con manteca hace que los panini sean más
crujientes y sabrosos cuando se utilizan rellenos du Ices.
• Los panes integrales y dulces se cocinan al grill más rápido
que los panes blancos y deben cocinarse a temperaturas
más bajas.
• Después de retirar los panini cocidos, cierre la placa de
grill superior para conservar el calor mientras arma más
sándwiches.
• Utilice la sandwichera para conservar calientes los
alimentos. Coloque los sándwiches cocidos sobre el grill y
baje la placa de grill superior. Lleve el indicador de control
de temperatura a MIN (Minimo) o a un ajuste más bajo
antes de servir.
• Para evitar la contaminación de los alimentos, usando
manoplas, limpie las placas de grill con una servilleta de
papel suave y absorbents después de cada uso.
NOTA
La sandwichera está
cubierta con una
supercie
antiadherente. No
utilice aceites
antiadherentes en
aerosol ya que pueden
producir una
acumulación sobre las
placas de grill. En su
lugar, utilice aceite de
oliva.
PRECAUCIÓN:
No utilice pastas para
untar sin grasa. Pueden
quemarse y dañar las
placas de grill
antiadherentes.
19

20
Questions? We’re here to help!
Visit: www.maxi-matic.com for support on this product.
MANTENIMIENTO Y LIMPIEZA
Este electrodoméstico requiere poco mantenimiento. No
contiene piezas que puedan ser reparadas por el usuario. No
intents repararlo usted mismo. Si el producto necesita
mantenimiento, consults a un tecnico autorizado para reparar
electrodomesticos.
1. Nunca sumerja el electrodoméstico en agua o cualquier
otro líquido. Nunca coloque la sandwichera ni la bandeja
de goteo en el lavavajillas.
2. Las placas de grill se deben limpiar y, si es necesario,
preparar antes de calentar.
3. Para preparar las placas: vierta una cucharadita de aceite
vegetal sobre las placas de grill antiadherentes. Extiendalo
con un paño de cocina absorbents y retire el exceso de
aceite. Repita el procedimiento después de la limpieza o
segun sea necesario.
4. Para proteger las placas de grill antiadherentes de primera
calidad, utilice sólo utensilios de plastico, nailon o madera.
5. Limpieza del interior: quite las manchas rebeldes con
una esponja o malla de plástico y luego limpie con una
servilleta de papel o un paiio suave. Para obtener mejores
resultados, utilice sólo productos en cuyas instrucciones se
indique que son aptos para limpiar supercies de
cocción antiadherentes. No utilice lana de acero ni esponjas
metálicas gruesas. Deje que los residues líquidos caigan en
la bandeja de goteo.
6. Retire la bandeja de goteo desde el frente de la
sandwichera. Vacie la bandeja de goteo y limpiela con agua
tibia y jabón. Séquela.
7. El acabado exterior se debe limpiar con un producto de
limpieza no abrasivo y un paño suave y húmedo. Seque
completamente.
8. Asegúrese de mantener abierta la placa de grill superior
durante la limpieza, a n de evitar lesiones o que se cierre
accidentalmente.
PRECAUCIÓN:
Desenchufe la
sandwichera del
tomacorriente y deje
que se enfrie
completamente antes
de limpiarla.

21
Questions? We’re here to help!
Visit: www.maxi-matic.com for support on this product.
ALMACENAMIENTO
1. Asegúrese de que la unidad esté desenchufada y
completamente enfriada.
2. Coloque la bandeja de goteo limpia en la unidad.
3. Baje la placa de grill superior. Deslice el cierre de la placa de grill que se
encuentra del lado del mango hasta la posición LOCK (Trabar). (Ver Figura 1).
Guarde la sandwichera en la posici6n cerrada para obtener un almacenamiento
compacto y prolijo.
4. Guarde el cable en la parte inferior de la sandwichera envolviéndolo alrededor
de las dos patas posteriores y del cubo central. No presione el cable donde
ingresa en la unidad, ya que esto podria hacer que el cable se desgaste y se
rompa.

22
Questions? We’re here to help!
Visit: www.maxi-matic.com for support on this product.
GARANTÍA LIMITADA * UN (1) AÑO
GARANTIA ES VALIDA CON UNA PRUEBA DE COMPRA FECHADA
1. Se garantiza, al comprador original, de estar libres de defectos de fabricación en
condiciones de uso normales y las condiciones para un (1) año, cordones excluidos. Está
garantía se aplica sólo al comprador original de esté producto.
2. Si necesita cambiar la unidad, devuélvala en su caja original, con el recibo de compra, a la
tienda donde lo compró. Si usted está más allá del plazo concedido para el retorno por la
política de la tienda, por favor consulte la garantía incluida.
3. Si utiliza el aparato para uso doméstico y de acuerdo con las instrucciones, debería
ofrecerle años de servicio satisfactorio.
4. Durante el período de garantía de un año, un producto con un defecto será reparado
o reemplazado por un modelo nuevo o reacondicionado (a nuestro criterio) cuando el
producto sea devuelto a nuestro Centro de Servicio. (Consulte la sección "Devoluciones"
a continuación).
5. El producto reparado o reemplazado estará garantizado por el saldo restante del período
de garantía de un año y un plazo adicional de un mes.
6. Está garantía limitada cubre los aparatos comprados y usados en los 50 estados
contiguos y el Distrito de Columbia, y no cubre:
-Los daños causados por el uso excesivo, negligencia, uso y desgaste normal, uso
comercial, montaje o instalación incorrecta del producto.
-Los daños causados durante el envío.
-Los daños causados por la sustitución o reposición de fusibles o disyuntores.
-Defectos que no sean defectos de fabricación.
-Rotura causada por mal uso, abuso, accidente, alteración, falta de cuidado y man
tenimiento, o incorrecta de corriente o voltaje.
-Pérdida o falta alguna pieza del producto. Las piezas se deben comprar por
separado.
-Daños de piezas que no sean eléctricos; por ejemplo: agrietado o roto de plástico o
de vidrio.
-Daños por servicio o reparación por personal no autorizado.
-Las garantías extendidas compradas a través de una empresa independiente o
revendedor.
-Remordimiento del consumidor no es una razón aceptable para devolver un
producto a nuestro Centro de Servicio.
* Un año de garantía limitada válida solamente en los 50 estados contiguos y el Distrito de
Columbia, excluyendo Puerto Rico y las Islas Vírgenes.
Está garantía es válida sólo si el producto es comprado y operado en los EE.UU., el uso del
producto que se encuentra en violación de las instrucciones escritas proporcionadas con la
unidad anulará está garantía.
Para la garantía internacional, por favor póngase en contacto con el distribuidor local.
** Cualquier instrucción o política incluida en esté manual puede estar sujeta a cambios en
cualquier momento.
MAXI-MATIC, EE.UU.
18401 E. Ave Arenth. City of Industry, CA 91748
Departamento de Atención al Cliente: (626) 912-9877 Ext: 120/107/105
Lunes a viernes 8:30am-5pm PST
Sitio web: www.maxi-matic.com

23
Questions? We’re here to help!
Visit: www.maxi-matic.com for support on this product.
INSTRUCCIONES DE DEVOLUCIÓN
DEVOLUCIONES:
A. Cualquier devolución de mercancía defectuosa al fabricante deben ser procesados
apropiadamente contactando primero al servicio al cliente (información de contacto se
muestra a continuación) para obtener un # RA (Número de autorización de devolución).
No se aceptará ninguna devolución de mercancía sin un # RA aplicable.
B. INSTRUCCIONES IMPORTANTES DE RETORNO. Su garantía depende que usted siga estas
instrucciones si va a devolver la unidad a Maxi-Matic EE.UU.:
1. Empaque cuidadosamente el producto en su caja original o en otra caja adecua
da para evitar daños durante el envío.
2. Antes del envío de la devolución unidad, asegúrese de adjuntar:
a) Su nombre, dirección completa con código postal, número de teléfono
durante el día, y #RA
b) Un recibo de compra fechado o COMPROBANTE DE COMPRA,
c) El número de modelo de la unidad y el problema que tiene (Encierre en un
sobre y pegue directamente a la unidad antes de sellar la caja) y
d) Todas las piezas o accesorios relacionados con el problema.
3. Maxi-Matic EE.UU. recomienda enviar el paquete de servicio terrestre de UPS para
nes de seguimiento. No podemos asumir la responsabilidad por productos
perdidos o dañados devueltos a nosotros durante el transporte entrante. Para su
protección, siempre cuidadosamente empaquetar el producto para su envío y
asegurarlo con la compañía. Envíos C.O.D no puede ser aceptado.
4. Todos los gastos de envío de devolución debe ser pagado por usted.
5. Una vez que su devolución ha sido recibida por nuestro almacén, Maxi-Matic
EE.UU. se compromete a reparar o sustituir el producto si presenta defectos de
materiales o mano de obra, sujeto a las condiciones del apartado B.
6. Maxi-Matic pagará los gastos de envío para enviar el producto reparado o
reemplazado de nuevo a usted.

24
Questions? We’re here to help!
Visit: www.maxi-matic.com for support on this product.
Elite Customer Service Center
Elite is a registered trademark of Maxi-Matic, USA.
Copyright Elite by Maxi-Matic.
Actual product may vary from the images/illustrations in this manual due to continual product improvement.
Mail:
Phone:
Website:
Maxi-Matic, USA
18401 E. Arenth Ave
City of Industry, CA
91748-1227
800-365-6133 ext. 120/105
www.maxi-matic.com
Visit our website for Live Chat Support
& Contact Us Form
Register your product online
elitebymaximatic @elite_by_maximatic
MODEL: EPN-2811