Loading ...
Loading ...
Loading ...
8.9 DIODE TEST:
Warning
Risk of electric shock.
When measuring diodes in line, make sure that the circuit power is off and the
capacitors on the circuit are fully discharged.
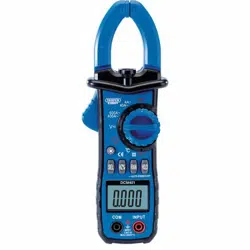
1. Rotate the measurement function selection dial to the diode, ( ) position, press the
"SEL" button to select the diode ( ) measurement function.
2. Connect the black test lead to the COM probe socket and the red test lead to the
INPUT probe socket.
3. Connect the black and red pen test leads to the anode and cathode of the diode.
4. The measured value is read from the LCD. If the test leads polarity is reversed, the
meter will display "OL" This can be used to distinguish between the anode and cathode
of the diode.
8.10 FREQUECY/DUTY CYCLE MEASUREMENTS:
Warning
Risk of electric shock.
When measuring high voltage, extra care should be taken to avoid electrical shock.
Do not attempt to use this meter on a voltage higher than the AC250V rms value.
1. Rotate the measurement function dial to the voltage or current measurement range.
2. Press the "Hz /%" key to select the frequency or duty cycle measurement function.
3. Connect the black and red pen test leads to the anode and cathode of the diode.
4. The measured value is read from the LCD.
8.11 TEMPERATURE MEASUREMENT:
1. Rotate the measurement function dial to the temperature measurement function.
2. Connect the black lead of the temperture probe to the COM probe socket and the red
lead of the temperture probe to the INPUT socket.
3. The measured value is read from the LCD.
8. OPERATING INSTRUCTIONS
14
Loading ...
Loading ...
Loading ...