Loading ...
Loading ...
Loading ...
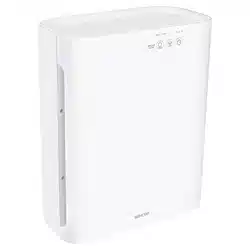
Air Purier
SHA 8400WH
EN
EN-7
2020 11/2020
HOW THE AIR PURIFIER WORKS
• This elegant air purier oers an eective solution to improving air quality in your indoor area. It is equipped with
a 3-stage ltration system, a UV-C germicidal lamp and an ionizer. The pre-lter captures initial dust and allergen
particles. The activated carbon lter absorbs odours and harmful gasses such as, for example, formaldehyde,
benzene, etc. The HEPA lter captures dust particles, smoke, pollen and other allergens. The integrated UV-C
germicidal lamp destroys micro-organisms such as germs, viruses, bacteria and fungi (such as mold toxins).
The ionizer emits negative ions, refreshes air and supports clustering and deposition of dust particles and other
undesirable objects. ALED indicator will inform you when the lters need to be replaced. The air purication
speed can be controlled at three levels and the timer function enables the purier to be shut o automatically.
BEFORE FIRST USE
• Before rst use, take the purier and its accessories out of the packaging material. Remove the front cover A9.
From the main unit A4 remove the frame with the lters A7. The frame has holders on both sides for easier
removal. Take the frame with the lters A7 out of the plastic bag and then install it back in its place. Reattach
the cover A9 to the main unit A4.
Note:
The frame with the lters A7 must be located inside the main unit A4 so that the HEPA lter points backwards
towards the fan A3 and the pre-lter forwards towards the front cover A9. You can identify the pre-lter by
its black colour and by the fact that it is attached to the frame with the combination lter using avelcro zip
and it can be removed. The combination lter (activated carbon lter and HEPA lter) cannot be removed
from the frame. The holders located on the sides of the frame point outwards from the main unit A4 towards
the front cover A9.
USING THE AIR PURIFIER
• Place the purier on astable, even, dry and rm surface within reach of apower socket. To ensure correct air
circulation, the appliance should be at least 30 cm away from walls and furniture.
• Check that the purier is properly assembled, that the lters A7 are correctly inserted inside and that the inlets
and outlets A5 or A1 are not blocked. Connect the power cord to apower socket.
1. Turning the purier and UV-C lamp / ionizer on and o
1.1 Button B5 serves to turn the air purier and the UV-C lamp and ionizer A6 on and o.
1.2 Press the button B5 once to turn on the air purier. THE LED indicator B1 will be lit. The UV-C lamp A6 is turned
o. THE LED indicator B2 is o.
1.3 Press button B5 again to turn on the UV-C lamp and the ionizer A6. The purier and the UV-C lamp A6 are running.
LED indicators B1 and B2 are lit.
1.4 Press button B5 a third time to turn the UV-C lamp and the ionizer o. LED indicator B2 will turn o.
1.5 Press button B5 a fourth time to turn the purier with o. All the LED indicators will be o.
2. Setting fan speed
2.1 When the air purier is running, use button B6to set the fan speed.
2.2 The speed can be set at three levels I, II and III (low, medium and high speed). Each time the button B6 is pressed,
the fan speed changes as follows: low –› medium –› high. The set fan speed is signalled by the respective LED
indicator B3 being lit.
Loading ...
Loading ...
Loading ...