User Manual AEG CCE84779FB Induction ExtractorHob
HINTS AND TIPS
1. Cookware
Use the induction cooking zones with suitable cookware.
- The bottom of the cookware must be as thick and flat as possible.
- Ensure pan bases are clean and dry before placing on the hob surface.
- In order to avoid scratches, do not slide or rub the pot across the ceramic glass.
Cookware material
- correct: cast iron, steel, enamelled steel, stainless steel, multi-layer bottom (with a correct marking from a manufacturer).
- not correct: aluminium, copper, brass, glass, ceramic, porcelain.
Cookware is suitable for an induction hob if:
- water boils very quickly on a zone set to the highest heat setting
- a magnet pulls on to the bottom of the cookware.
Cookware dimensions
- Induction cooking zones adapt to the dimension of the bottom of the cookware automatically.
- The cooking zone efficiency is related to the diameter of the cookware. The cookware with a diameter smaller than the minimum receives only a part of the power generated by the cooking zone.
- For both safety reasons and optimal cooking results, do not use cookware larger than indicated in "Cooking zones specification". Avoid keeping cookware close to the control panel during the cooking session. This might impact the functioning of the control panel or accidentally activate hob functions
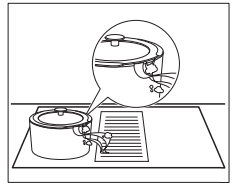
Steam Vented Lids
To further optimize the cooking sessions alongside the hood you can use the special Steam Vented Lids with your cookware. The lids are designed to direct the steam produced inside the pot towards the hood, minimizing unwanted cooking smells and excessive humidity in the kitchen. The lids are available to buy separately in several sizes to fit most common cookware types. For more information visit our website.
2. The noises during operation
If you can hear:
- crack noise: cookware is made of different materials (a sandwich construction).
- whistle sound: you use a cooking zone with a high power level and the cookware is made of different materials (a sandwich construction).
- humming: you use a high power level.
- clicking: electric switching occurs.
- hissing, buzzing: the fan operates.
The noises are normal and do not indicate any malfunction.
3. Öko Timer (Eco Timer)
To save energy, the heater of the cooking zone deactivates before the count down timer sounds. The difference in the operation time depends on the heat setting level and the length of the cooking operation.
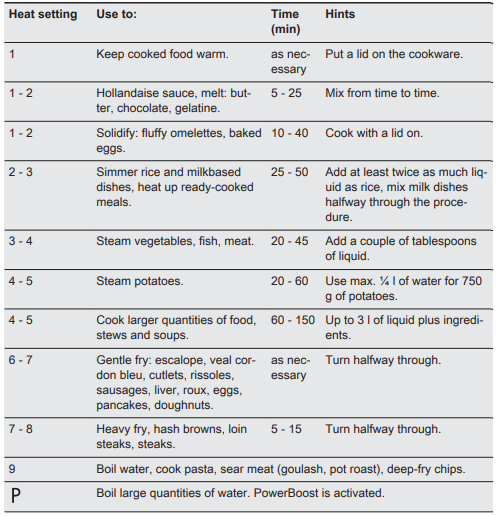
4. Examples of cooking applications
The correlation between the heat setting of a zone and its consumption of power is not linear. When you increase the heat setting, it is not proportional to the increase of the consumption of power. It means that a cooking zone with the medium heat setting uses less than a half of its power.
5 Hints and Tips for the hood
- The grid covering the hood is made of aluminium and stainless steel. You can put pots on it while the hood is not operating. It will not cause any damage.
- When AUTO mode operates, the fan starts at a low speed at the beginning of each cooking session. The speed increases gradually. You can also adjust the speed of the fan manually.
- In case of exhaust installation you have to install a window switch. You need to buy it separately as it is not supplied with the hood. The window switch has to be installed by an authorised technician. Refer to the installation booklet.
CARE AND CLEANING
-
Clean the hob after each use
-
Always use cookware with a clean base.
-
Scratches or dark stains on the surface have no effect on how the hob operates
-
Use a special cleaner suitable for the surface of the hob.
-
Use a special scraper for the glass.
2 Cleaning the hob
-
Remove immediately: melted plastic, plastic foil, sugar and food with sugar, otherwise, the dirt can cause damage to the hob. Take care to avoid burns. Use a special hob scraper on the glass surface at an acute angle and move the blade on the surface.
-
Remove when the hob is sufficiently cool: limescale rings, water rings, fat stains, shiny metallic discoloration. Clean the hob with a moist cloth and a non-abrasive detergent. After cleaning, wipe the hob dry with a soft cloth.
-
Remove shiny metallic discoloration: use a solution of water with vinegar and clean the glass surface with a cloth.
3 Cleaning the hood
Grid
The grid drives the air into the hood. Additionally, it protects the hood system and prevents foreign objects from falling inside by accident. You can wash the grid manually or in a dishwasher
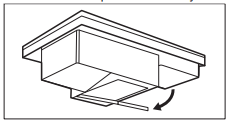
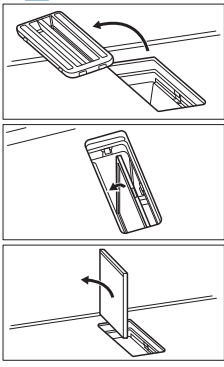
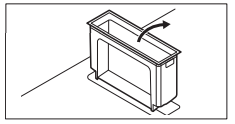
Water tank
There is a water tank located under the hood. It collects the condensation created during each cooking process. Remember to empty the water tank regularly.
Before you open the water tank, place a container or a tray under it to collect water. To open the water tank, slide the latches out and open them one by one.
If water or other liquids spill inside the hood system:
- switch off the hood in the first place,
- lift the grid and clean the hood area carefully with a moist cloth or sponge and a mild cleaning agent,
- wipe away the excess liquid gathered on the bottom of the hood cavity using a sponge or a dry cloth,
- switch on the hood, set the fan speed level to 2 or higher and let it run for some time to get rid of the remaining moisture
4 Cleaning the hood filter
The filter prevents grease particles from getting into the hood system. Clean the filter regularly and regenerate it periodically.
Normal cleaning
Clean the filter as soon as the built-up grease is visible. The cleaning frequency depends on the amount of fat and oil used in cooking. It is recommended to clean the filter every 10-20 hours, or more frequently, if needed.
1. Remove the filter and filter housing carefully. They are located right under the grid in the centre of the hob.
2. Clean the hood cavity with a cleaning foam.
3. Wash the filter and filter housing manually in warm water without using detergents or abrasive sponges. You can also wash them in a dishwasher at 65-70 °C (using a program longer than 90 minutes), without detergents and without dishes in the same load. Only the plastic parts can be cleaned using detergents.
4. Dry the filter for 20-30 minutes in the oven at 70 °C. Make sure to use a non-fan oven function.
Fix the filter and filter housing back in place when they are fully dried.
Regenerating the filter
The hob has a built-in counter that reminds you about regenerating the filter. The counter starts automatically when you turn on the hood for the first time. After 100 hours of use the filter indicator starts blinking to signal that it is time to regenerate the filter. The notification stays on for 30 seconds after you deactivate the hood and the hob. The notification does not block the use of the hob.
- Clean the filter manually or in a dishwasher, as described above (normal cleaning).
- Put the filter in the oven set to 80-110 °C for 60 minutes. Make sure to use a non-fan oven function.
- Fix the filter and filter housing back in place.
Reset the counter.
- Clean and regenerate the filter first, then place it back inside the hood.
- Press briefly, while the indicator is blinking.
The counter restarts.
TROUBLESHOOTING
You cannot activate or operate the hob.
- The hob is not connected to an electrical supply or it is connected incorrectly. -> Check if the hob is correctly connected to the electrical supply.
- The fuse is blown. -> Make sure that the fuse is the cause of the malfunction. If the fuse is blown again and again, contact a qualified electrician.
- You do not set the heat setting for 60 seconds. -> Activate the hob again and set the heat setting in less than 60 seconds.
- You touched 2 or more sensor fields at the same time. -> Touch only one sensor field
- Pause operates. -> Refer to "Daily use".
- There is water or fat stains on the control panel. -> Clean the control panel.
You can hear a constant beep noise.
- The electrical connection is incorrect. -> Disconnect the hob from the electrical supply. Ask a qualified electrician to check the in‐ stallation.
You cannot select the maximum heat setting for one of the cooking zones.
- The other zones consume the maximum available power. Your hob works properly. -> Reduce the heat setting of the other cooking zones connected to the same phase. Refer to "Power management".
An acoustic signal sounds and the hob deactivates. An acoustic signal sounds when the hob is deactivated.
- You put something on one or more sensor fields. -> Remove the object from the sensor fields.
The hob deactivates.
- You put something on the sensor field -> Remove the object from the sensor field.
Residual heat indicator does not come on
- The zone is not hot because it operated only for a short time or the sensor is dam-aged. -> If the zone operated sufficiently‐ ly long to be hot, speak to an Authorised Service Centre.
There is no sound when you touch the panel sen‐ sor fields
- The sounds are deactivated -> Activate the sounds. Refer to "Daily use".
The flexible induction cooking area does not heat up the cookware.
- The cookware is in a wrong position on the flexible induction cooking area. -> Place the cookware in the correct position on the flexible in-duction cooking area. The position of the cookware de‐ pends on the activated function or function mode. Refer to "Flexible induction cooking area".
- The diameter of the bottom of the cookware is incorrect for the activated function or function mode. -> Use cookware with a diameter applicable to the activated function or function mode. Re‐ fer to "Flexible induction cooking area".
The indicator above the symbol comes on.
- Child Safety Device or Lock operates. -> Refer to "Daily use".
The control bar blinks.
- There is no cookware on the zone or the zone is not fully covered. -> Put cookware on the zone so that it fully covers the cooking zone.
- The cookware is unsuitable. -> Use cookware suitable for in-duction hobs. Refer to "Hints and tips".
- The diameter of the bottom of the cookware is too small for the zone. -> Use cookware with correct dimensions. Refer to "Technical data".
- FlexiBridge (Flexible Bridge) operates. One or more sections of the function mode which operates are not covered by the cookware. -> Place the cookware on the correct number of sections of the function mode which operates or change the function mode. Refer to "Flexible induction cooking area".
The control bar blinks twice and turns off.
- PowerSlide operates. Two pots are placed on the flexi‐ ble induction cooking area or the cookware covers more than one cooking area acti‐ vated by the function. -> Use only one pot. Refer to "Flexible induction cooking area".
The control bar for hood blinks and the hood does not start or turns off.
- The fan may turn off by itself in certain conditions, e.g. when the room is not properly‐ ly ventilated. -> Open the window (you may need to install the window switch, refer to "Hints and Tips for the Hood"). Press any sym‐ bol. The hood operates again.
The hood fan does not work properly when the hood functions are activeted.
- The ambient temperature surrounding the hood is too high. There is insufficient air circu‐ lation inside and around the hood. -> Deactivate the hob and unplug it from the main power supply. Wait at least 10 seconds, then plug it in again. Other suggestions: Try to cool down the tempera‐ ture of the surrounding area. Take out the hood filter and re‐ move the residual moisture from the inside of the hood. Refer to "Care and cleaning". Leave the hood system to dry for one day, then activate the hood again.
The steam produced dur‐ ing cooking is not suffi‐ ciently absorbed by the hood.
- The lids on the cookware are not properly placed. -> If your cookware does not have vented lids, make sure to tilt the lids so that the released steam is directed towards the hood. Refer to "Hints and Tips" for information on the special Steam Vented Lids recom‐ mended to be used with the in‐ tegrated hood.
If you cannot find a solution...
If you cannot find a solution to the problem yourself, contact your dealer or an Authorised Service Centre. Give the data from the rating plate. Make sure, you operated the hob correctly. If not the servicing by a service technician or dealer will not be free of charge, also during the warranty period. The information about guarantee period and Authorised Service Centres are in the guarantee booklet.