
the Baker's Dozen
TM
Instruction Book - LBM250

2
BREVILLE
RECOMMENDS
SAFETY FIRST
At Breville we are very safety
conscious. We design and
manufacture consumer
products with the safety of you,
our valued customer, foremost
in mind. In addition, we ask
that you exercise a degree of
care when using any electrical
appliance and adhere to the
following precautions.
IMPORTANT
SAFEGUARDS
READ ALL INSTRUCTIONS
BEFORE USE AND SAVE
FOR FUTURE REFERENCE
• Remove and safely discard
any packaging material and
promotional labels before
using the bread maker for the
first time.
• To eliminate a choking hazard
for young children, remove and
safely discard the protective
cover fitted to the power plug
of this bread maker.
• Do not place the bread maker
near the edge of a bench or
table during operation. Ensure
the surface is level, clean and
free of water, flour and other
substances. Vibration during
the kneading cycles may cause
the machine to move slightly.
• Do not place this bread maker
on or near a hot gas or electric
burner, or where it could touch
a heated oven. Position the
bread maker at a minimum
distance of 20cm away from
walls. This will help prevent the
possibility of discolouration
due to radiated heat.
2 Breville Recommends Safety First
6 Components
8 Operating your Bread Maker
14 Hints & Tips for
Better Bread Making
17 Care, Cleaning & Storage
19 Recipes
25 Troubleshooting
Contents

3
• Always operate the bread
maker on a stable and heat
resistant surface. Do not use on
a cloth-covered surface, near
curtains or other flammable
materials.
• Do not operate the bread
maker on a sink drain board.
• Always ensure the bread maker
is properly assembled before
connecting to a power outlet
and operating. Follow the
instructions provided in this
book.
• The bread maker is not
intended to be operated by
means of an external timer
or separate remote control
system.
• The lid and the outer surface
may get hot when the bread
maker is operating.
• The temperature of accessible
surfaces may be high when the
bread maker is operating.
• Do not touch hot surfaces.
Allow the bread maker to cool
before cleaning any parts.
• Steam vents are very hot
during baking. Do not place
anything on top of the lid.
• Do not cover the air vents when
the bread maker is in use.
• Always place the ingredients
into the bread pan in the precise
order listed in the recipe.
Not doing so may cause the
ingredients to fail to incorporate
properly for a poor result.
• Use oven mitts when removing
the hot bread or any contents
from the pan.
• Take care when pouring jam
from the bread pan as the jam
will be extremely hot.
• Do not place any ingredients
directly into the baking
chamber. Place ingredients into
the bread pan or fruit and nut
dispenser only.
• The maximum quantities of
flour and raising agent that may
be used shall not exceed the
quantities stated in the Recipes.
• Do not pour liquids into the
fruit and nut dispenser. Do
not overpack the fruit and nut
dispenser as this may cause
them to compact and they may
not drop.
• Do not place fingers or hands
inside the bread maker during
operation. Avoid contact with
moving parts.
• Ensure the bread maker
is switched off and then
unplugged from the power
outlet when not in use and
before cleaning.

4
• Do not immerse the bread
pan in water. Doing so
may interfere with the free
movement of the drive shaft.
Wash only the interior of the
bread pan.
• Do not leave the lid standing
open for extended periods of
time.
• Always ensure the kneading
blade is removed from the
base of the baked loaf prior to
slicing.
• Do not place the bread maker
in direct sunlight. Colour
fading and discolouration may
occur when the bread maker is
consistently exposed to UV light.
• Keep the inside and outside of
the bread maker clean. Follow
the cleaning instructions
provided in this book.
IMPORTANT
SAFEGUARDS
FOR ALL
ELECTRICAL
APPLIANCES
• Fully unwind the power cord
before use.
• Connect only to 230V or 240V
power outlet.
• Do not let the power cord hang
over the edge of a bench or
table, touch hot surfaces or
become knotted.
• To protect against electric
shock, do not immerse the
power cord, power plug or
bread maker in water or any
other liquid.
• The bread maker is not
intended for use by persons
(including children) with
reduced physical, sensory or
mental capabilities, or lack of
experience and knowledge,
unless they have been given
supervision or instruction
concerning use of the bread
maker, by a person responsible
for their safety.
• Children should be supervised
to ensure that they do not play
with the bread maker.
• It is recommended to inspect
the bread maker regularly.
Do not use the bread maker if
the power supply cord, plug,
connector or bread maker
becomes damaged in anyway.
• Return the entire bread maker
to the nearest authorised
Breville Service Centre for
examination and/or repair.
• Any maintenance other than
cleaning should be performed
at an authorised Breville
Service Centre.

5
• This bread maker is for
household use only. Do not use
this bread maker for other than
its intended use. Do not use in
moving vehicles or boats.
Do not use outdoors. Misuse
may cause injury.
• The installation of a residual
current device (safety switch)
is recommended to provide
additional safety protection
when using electrical bread
makers. It is advisable that
a safety switch with a rated
residual operating current
not exceeding 30mA be
installed in the electrical circuit
supplying the bread maker.
See your electrician for
professional advice.
• During electrical storms,
the bread maker should be
disconnected from the power
source at the wall socket to
prevent any electrical surges that
may arise during the storm and
which may inadvertently cause
damage to the bread maker and
its electronic componentry.
• Always turn the bread maker
to the OFF position, switch off
at the power outlet and unplug
at the power outlet when the
bread maker is not in use.
• Before cleaning, always turn
the bread maker to the OFF
position, switch off at the
power outlet, unplug at the
power outlet and remove the
power cord, if detachable, from
the bread maker and allow all
parts to cool.
• Do not place this bread maker
on or near a heat source, such
as hot plate, oven or heaters.
• Position the bread maker at a
minimum distance of 20cm
away from walls, curtains and
other heat or steam sensitive
materials and provide adequate
space above and on all sides for
air circulation.
WARNING
Food particles on the heating
element in the baking chamber
may cause smoke to emanate
from the bread maker. Ensure
the baking chamber is clean
before use.
WARNING
Steam vents are very hot
during baking.
FOR HOUSEHOLD USE ONLY
SAVE THESE INSTRUCTIONS
6
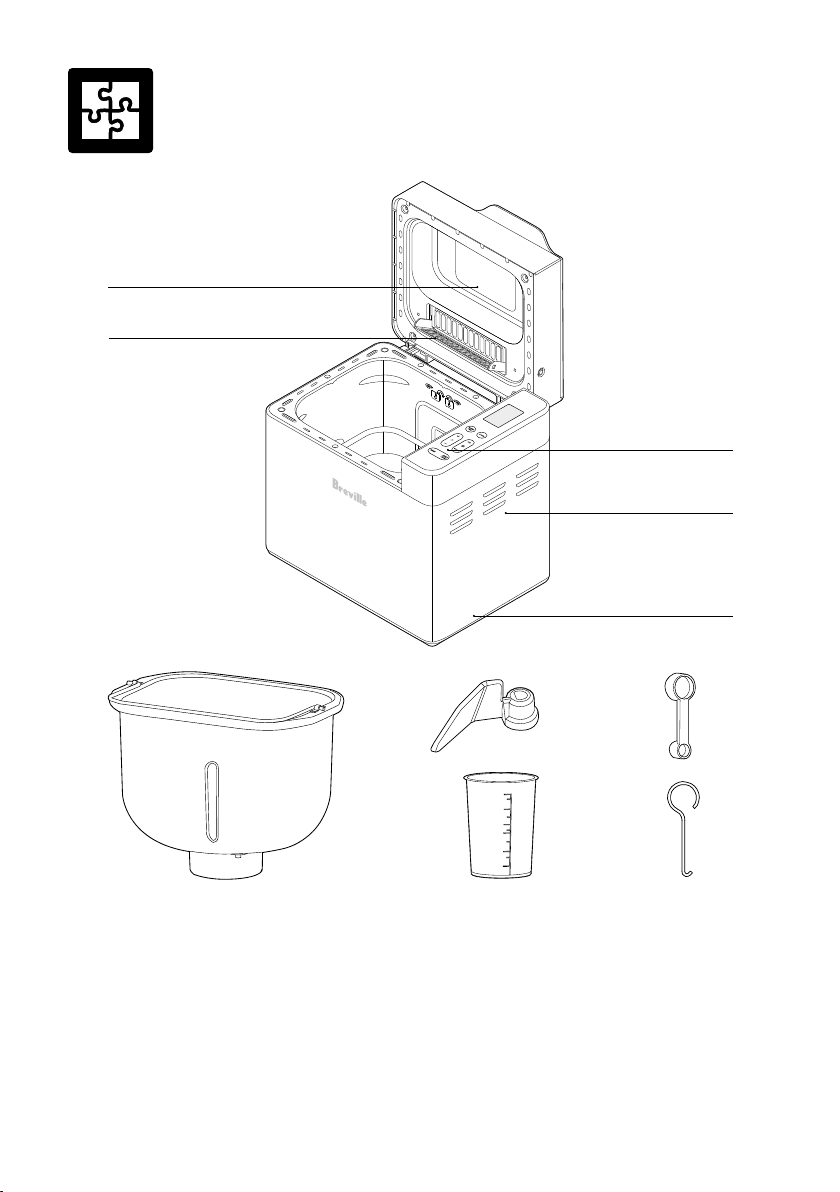
Components
A. Lid with Fruit and Nut Dispenser
B. Viewing Window
C. Control Panel
D. Bread Maker Housing
E. Base
F. Bread Pan
G. Kneading Blade
H. Measuring Spoon
I. Measuring Cup
J. Kneading Blade Hook
Not Shown
• Non-slip Feet for Stability
• Drive Shaft
• Power Cord
C
D
E
B
A
G
H
I J
F
7
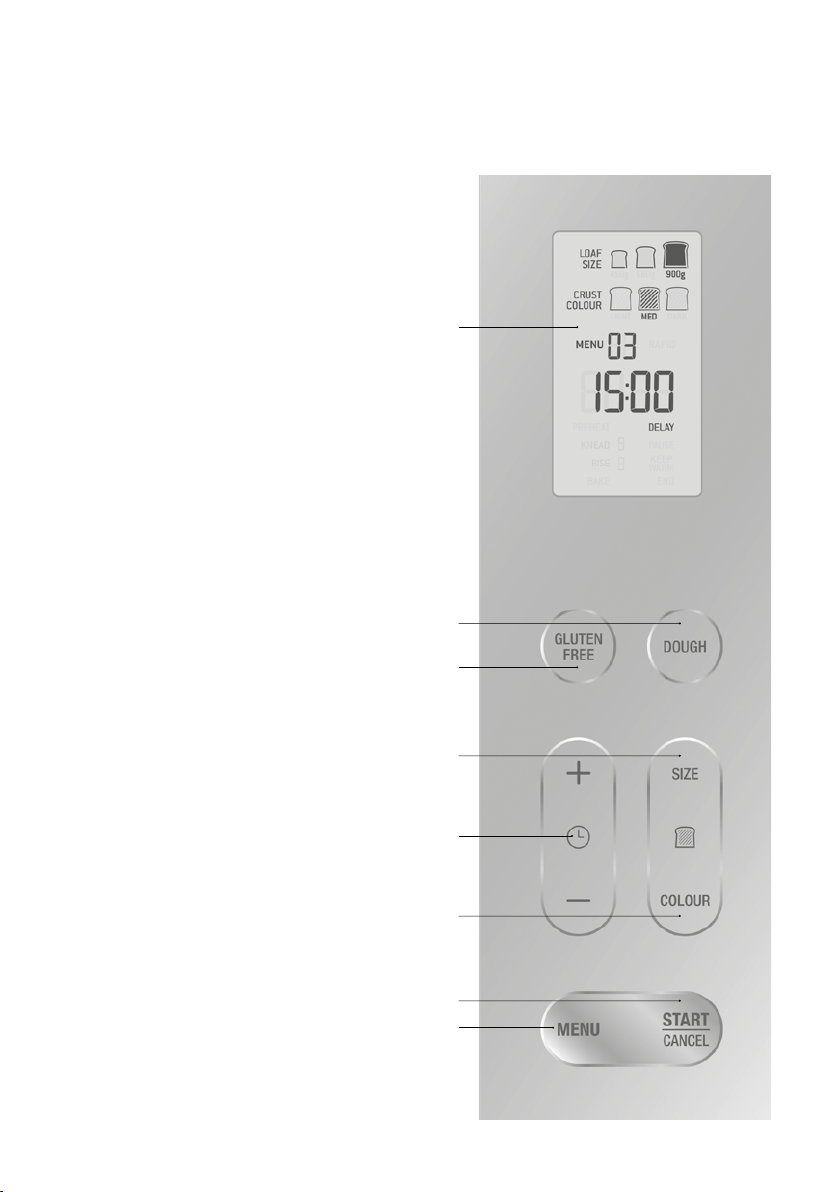
CONTROL PANEL
A
C
E
H
F
D
B
G
A. ILLUMINATED DISPLAY SCREEN
The LCD display indicates the menus and
settings selected.
B. DOUGH BUTTON SHORTCUT
Press to go directly to the dough function.
C. GLUTEN FREE BUTTON SHORTCUT
Press to go directly to the gluten free bread
function.
D. LOAF SIZE SELECTOR
E. DELAY START TIMER
Press
+
or
-
to increase or decrease start
time.
F. CRUST COLOUR SELECTOR
G. MENU
In standby mode, pressing the MENU
button will cycle through the menu options.
1. Basic
2. French
3. Whole Wheat
4. Sweet
5. Express 680g
6. Express 900g
7. Yeast Free
8. Continental
9. Dough
10. Gluten Free
11. Jam
12. Bake
13. Yoghurt
H. START/CANCEL
8
Operating Your Bread Maker
BREAD, DOUGH, YOGHURT &
JAM SETTINGS
SETTINGS CRUST
COLOUR
LOAF
SIZE
TOTAL
TIME
BASIC
LIGHT 450g 3 hours 13 mins
LIGHT 680g 3 hours 18 mins
LIGHT 900g 3 hours 25 mins
MEDIUM 450g 3 hours 13 mins
MEDIUM 680g 3 hours 18 mins
MEDIUM 900g 3 hours 25 mins
DARK 450g 3 hours 13 mins
DARK 680g 3 hours 18 mins
DARK 900g 3 hours 25 mins
RAPID 450g 2 hours 12 mins
RAPID 680g 2 hours 17 mins
RAPID 900g 2 hours 24 mins
FRENCH
LIGHT 450g 3 hours 30 mins
LIGHT 680g 3 hours 35 mins
LIGHT 900g 3 hours 40 mins
MEDIUM 450g 3 hours 30 mins
MEDIUM 680g 3 hours 35 mins
MEDIUM 900g 3 hours 40 mins
DARK 450g 3 hours 30 mins
DARK 680g 3 hours 35 mins
DARK 900g 3 hours 40 mins
RAPID 450g 2 hours 30 mins
RAPID 680g 2 hours 35 mins
RAPID 900g 2 hours 40 mins
WHOLE
WHEAT LIGHT 450g 3 hours 45 mins
LIGHT 680g 3 hours 50 mins
LIGHT 900g 3 hours 55 mins
MEDIUM 450g 3 hours 45 mins
MEDIUM 680g 3 hours 50 mins
MEDIUM 900g 3 hours 55 mins
DARK 450g 3 hours 45 mins
DARK 680g 3 hours 50 mins
DARK 900g 3 hours 55 mins
RAPID 450g 2 hours 30 mins
RAPID 680g 2 hours 35 mins
RAPID 900g 2 hours 40 mins
SETTINGS CRUST
COLOUR
LOAF
SIZE
TOTAL
TIME
SWEET
LIGHT 450g 3 hours 17 mins
LIGHT 680g 3 hours 22 mins
LIGHT 900g 3 hours 27 mins
MEDIUM 450g 3 hours 17 mins
MEDIUM 680g 3 hours 22 mins
MEDIUM 900g 3 hours 27 mins
DARK 450g 3 hours 17 mins
DARK 680g 3 hours 22 mins
DARK 900g 3 hours 27 mins
RAPID 450g 2 hours 37 mins
RAPID 680g 2 hours 42 mins
RAPID 900g 2 hours 47 mins
EXPRESS 680G 680g 1 hour 20 mins
EXPRESS 900G 900g 1 hour 55 mins
YEAST FREE 1 hour 50 mins
CONTINENTAL 3 hours 25 mins
DOUGH 1 hour 30 mins
GLUTEN FREE 2 hours 45 mins
JAM 1 hour 05 mins
BAKE 5 mins to 1 hour
30 mins
YOGHURT 4 hours to
12 hours
NOTE
Total times for the bread functions
do not include the Keep Warm time.
9
Functions
BEFORE FIRST USE
Before first use, remove and safely discard any
packing material, promotional labels , transparent
protective film on the control panel and tape
from the bread maker. Check for any missing or
damaged parts. Clean all parts according to the
Care, Cleaning & Storage section in this book.
OPERATING YOUR BREVILLE BREAD
MAKER
1. Open the lid of the bread maker and remove
the bread pan using the handle.
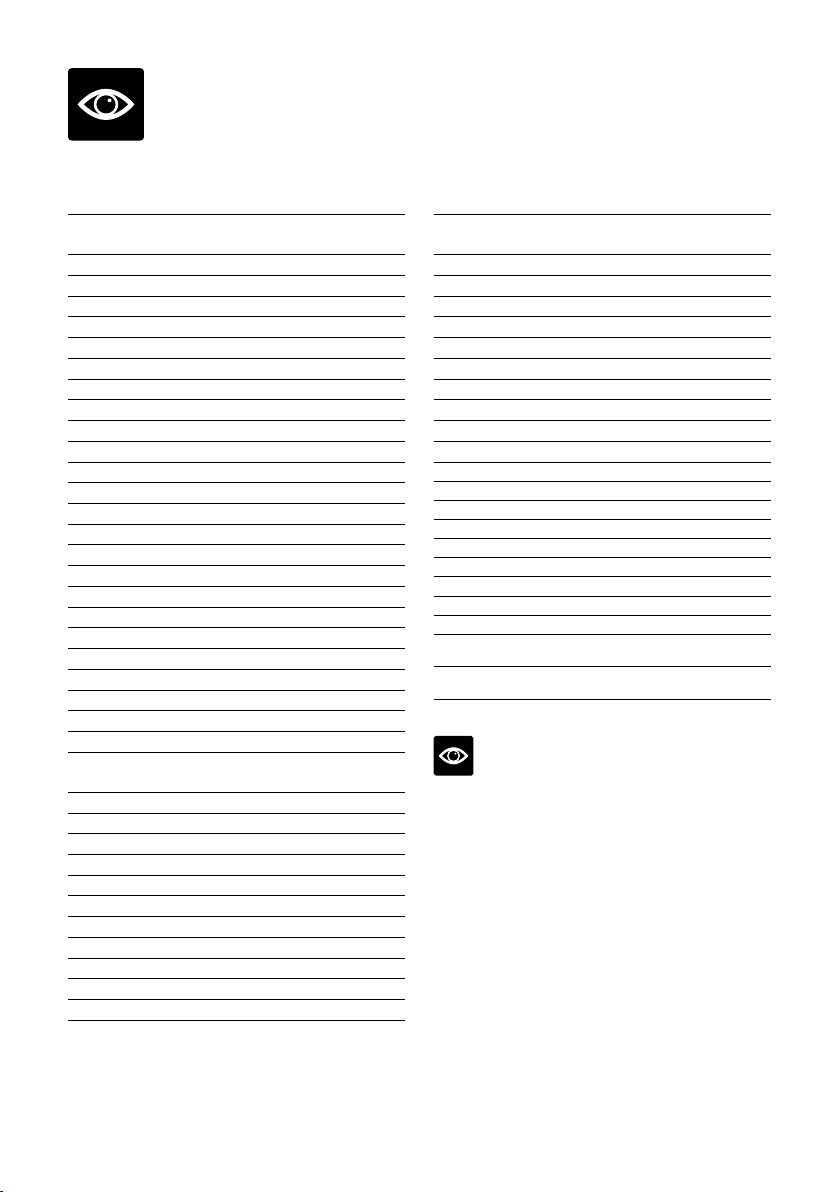
2. If required, align the groove on the top of the
kneading blade to the one on top of the drive
shaft and slide the blade down onto the drive
shaft, in the bread pan.
3. Add ingredients to the bread pan in the order
listed in the recipe. First add liquids, fats, salt,
sugar and add the yeast in last.
IMPORTANT
Ensure all ingredients for making bread or dough
are added in the exact order listed. Failing to do
so may lead to a poor result and/or ingredients
being expelled out of the bread pan.
NOTE
Ensure yeast does not come into contact with
sugars, salt or liquid.
NOTE
If using the delay start timer, make sure the
yeast is on top of the dry ingredients to avoid
contact with water, salt and sugar, otherwise
the yeast activity will be affected.
4. Lock the bread pan into the base of the
bread maker by twisting slightly clockwise
until the bowl sits horizontal.
5. Fold the handle down and close the lid.
NOTE
The bread pan is locked in place correctly if
you cannot lift it from the bread maker without
twisting.
6. If fruits and/or nuts are required press and
hold the latch upwards under the handle
of the dispenser holder located on the rear
of the lid. Pull out the dispenser holder
and add ingredients before closing the
dispenser.
7. Plug the bread maker into a 220–240V
power outlet and switch the outlet on. The
bread maker is now in standby mode and
the display screen will illuminate for
1 minute.
NOTE
In standby mode, the LCD screen will show the
first MENU selection Basic Bread, displaying
MENU 1 900g MEDIUM TIMER 3:25. Press the
MENU button repeatedly to cycle through the
MENU choices 1–13.

10
Menu
Selection
Menu
No.
Display Screen Default
Reading
Able to
adjust
defaults
Time Crust
Colour
Loaf
Size
Basic 1 3:25 Medium 900g YES
French 2 3:40 Medium 900g YES
Whole Wheat 3 3:55 Medium 900g YES
Sweet 4 3:27 Medium 900g YES
Express 680g 5 1:20 N/A N/A NO
Express 900g 6 1:55 N/A N/A NO
Yeast Free 7 1:50 N/A N/A NO
Continental 8 3:25 N/A N/A YES
Dough 9 1:30 N/A N/A NO
Gluten Free 10 2:45 N/A N/A NO
Jam 11 1:05 N/A N/A NO
Bake 12 1:00 N/A N/A YES
Yoghurt 13 8:00 N/A N/A YES
BREAD MAKING
1. Follow steps 1 to 7 on page 9 to set up the
bread maker.
2. Press the MENU button until the preferred
menu number is displayed on the
LCD screen.
3. To change the crust colour, press the
COLOUR button to cycle through Light,
Medium, Dark (and Rapid) shown on the
LCD screen.
4. To change the loaf size, press the SIZE
button to cycle through 450g, 680g or
900g shown on the LCD screen.
5. Press the START/CANCEL button, when
selections are complete, to begin the cycle.
NOTE
Press any button except the START/CANCEL
button during operation to illuminate the LCD
screen for 1 minute.
Press the START/CANCEL button once
during operation to PAUSE the bread maker.
NOTE
5 beeps will sound after the knead 6 stage of
BASIC, FRENCH, WHOLE WHEAT, SWEET
and CONTINENTAL settings. At this point, if
preferred, use the pause function to remove the
kneading blade before recommencing.
6. To cancel the cycle, press and hold the
START/CANCEL button for 3 seconds
during operation. The bread maker will
emit a long beep tone and return to
standby mode.
PAUSE
The PAUSE function can be used at anytime
during operation, to scrape the bread pan sides
down, remove the kneading blade or to add
ingredients.
1. Press the START/CANCEL button once to
PAUSE the bread maker.
NOTE
The LCD screen will display a flashing PAUSE
and the bread maker will beep 5 times every
30 seconds for the duration of 10 minutes
before resuming operation.
2. Press the START/CANCEL button again to
resume operation.
NOTE
The bread maker will remain in PAUSE mode
for 10 minutes before resuming operation if it
has not been cancelled.
NOTE
The pause function can be selected at anytime
during operation except the KEEP WARM
phase.
RAPID
The RAPID bread selection makes a loaf of
bread in less time and is available on BASIC,
WHOLE WHEAT, FRENCH and SWEET
bread menus. Selecting Rapid will bake a bread
loaf to a medium crust colour and reduce the
finishing time by about an hour. To select,
press the CRUST COLOUR button to cycle
through until RAPID is displayed. (See BREAD,
DOUGH, YOGHURT & JAM SETTINGS table
on page 8 for setting details).

11
NOTE
When using the RAPID option, increase the
yeast content by 1/4 teaspoon or Surebake by
1 teaspoon.
DELAY START TIMER
1. If desired, press the + or - TIMER button to
change the start time on the bread maker.
2. The time displayed represents the finishing
time. For example, if you adjust the Basic
Bread default time 3:25 to 5:00, the bread
will be finished at the end of 5 hours. The
time can be delayed by up to 15 hours.
NOTE
The Crust Colour, Loaf Size and Timer can
only be adjusted on MENU selections 1-4.
Selection 8 allows for the timer to be adjusted
only. All other menu selections operate as per
their default setting. See MENU Default Table
on page 10.
NOTE
If the Timer is activated, the kneading blade
will not mix the ingredients until the cycle is
set to begin. For example, for Basic Bread the
default time to complete the program is 3:25. If
the delayed time is changed to 5:00, the cycle
will not start for 1hr 35 minutes after pressing
START/CANCEL button.
WARNING
Do not touch the moving parts in the bread
maker while the machine is working.
3. Once the baking phase is complete, the
bread maker will beep 10 times and switch
to the Keep Warm function for 1 hour. Press
and hold START/CANCEL button for
3 seconds to cancel the Keep Warm
function and return to standby mode.
4. After 1 hour on the Keep Warm function,
the bread maker will beep 10 times, the
LCD screen will display a flashing END for
one minute and return to standby mode.
5. Let the bread pan cool down slightly before
removing. Use oven mitts to lift the handle,
and carefully twist and lift to remove the
bread pan from the bread maker.
6. To remove the bread loaf, turn the bread pan
upside down on a clean surface and lightly
shake until the loaf falls out. Place onto a
wire cooling rack to prevent a soggy
bread base.
7. Allow bread to cool for at least 10 minutes.
8. Remove the kneading blade from the base
of the bread by using the kneading blade
hook supplied. Hook into the groove in the
centre of the kneading blade, and carefully
pull the kneading blade out from the
bottom of the bread.
WARNING
During the kneading cycle, the bread maker
may wobble and move slightly.
WARNING
Both the bread pan and baking chamber will
be hot - oven mitts should be used. Use the
handle to remove the bread pan from the
baking chamber.
NOTE
Allow the bread to cool before slicing to
produce clean, neat slices.
WARNING
Remove the kneading blade from the bread
using the kneading blade hook before slicing.
NOTE
Once the bread has cooled, store remaining
bread in a sealed plastic bag for up to 2 days at
room temperature. To store for a longer time,
place sealed plastic bag in the refrigerator for
up to 5 days.

12
DOUGH MAKING FUNCTION
1. Press the DOUGH button shortcut on the
control panel. MENU setting 9 will display
on the LCD screen.
2. Press the START/CANCEL button to begin.
NOTE
Dough making is similar to the bread making
but without heating/baking.
Dough making function can also be selected
by pressing MENU button until DOUGH
setting 9 is displayed on the LCD screen.
GLUTEN FREE
1. Press the GLUTEN FREE button shortcut
on the control panel. MENU setting 10 will
display on the LCD screen.
2. Press the START/CANCEL button to begin.
NOTE
Gluten Free can also be selected by pressing
MENU until GLUTEN FREE setting 10 is
displayed on the LCD screen.
JAM MAKING FUNCTION
1. After fitting the bread pan with the
kneading blade, add the ingredients to the
bread pan. Twist and lock the bread pan
into the bread maker.
2. Press the MENU button until JAM setting
11 is displayed on the LCD screen.
3. Press the START/CANCEL button
to commence.
4. Store in sterilized jars.
NOTE
The JAM function is ideal for making sweet
jams from fresh fruits.
When using the JAM function, cut fresh fruit
into 1cm pieces before adding into the
bread pan.
Use no more than 2 cups of ingredients as the
maximum amount for the JAM function. Avoid
high liquid food such as tomatoes.
BAKE
The BAKE setting is a good menu selection to
add baking time for a darker, crisper crust.
The BAKE function can also be used to bake
cakes and to crispen and re-warm pre-baked
loaves.
1. Press the MENU button until BAKE setting
12 is displayed on the LCD screen.
2. Press + or - TIMER button to change the
BAKE time. Baking time can be adjusted
between 5 minutes (0:05) to 1 hour 30
minutes (1:30).
3. Press the START/CANCEL button to begin.
NOTE
Bake and yoghurt are the only Menu selections
that do not require the kneading blade to be
inserted into the bread pan.
YOGHURT FUNCTION
The YOGHURT function works by heating
the yoghurt ingredients at a constant low
temperature for a long period of time.
1. Press the MENU button until YOGHURT
setting 13 is displayed on the LCD screen.
2. Press + or - TIMER button to adjust the
YOGHURT time. YOGHURT time can be
adjusted between 4 to 12 hours.
3. Press the START/CANCEL button to begin.

13
FRUIT & NUT DISPENSER
The automatic Fruit and Nut Dispenser
releases fruits, nuts, seeds or other suitable
ingredients into the dough at a specific time
during the ‘knead’ phase. If added before
this time, excessive kneading may cause
the ingredients to break down rather than
maintain their shape.
1. Ensure that the bread ingredients are
placed in the bread pan and the bread pan
is fitted properly in the bread maker prior to
adding fruit and/or nuts to the fruit and nut
dispenser to avoid risk of ingredients falling
into the baking chamber.
2. Press and hold the latch upwards under the
handle of the dispenser holder located on
the rear of the lid. Pull out the dispenser
holder and touch the base of the dispenser
to check that it is completely closed
before adding a maximum ²/
³
cup of dry
ingredients. If the base is open, see the
troubleshooting section in this book.
3. Add the ingredients into the Fruit and Nut
dispenser, before replacing the dispenser
back into the machine, also noting:
• Ingredients should be sized between
0.5cm and 1cm so they do not fall through
the steam vents at the base of the dispenser.
We recommend separating ingredients that
may stick together, such as raisins and other
fruits, before adding.
• Liquids should never be added to
the dispenser.
• Glacé (glazed) fruits such as cherries,
ginger, pineapple, etc. should be washed
and well-dried on a kitchen paper towel
before adding into the dispenser. Sticky
ingredients can also be tossed in a little
flour to help with dispensing.
• Bottled or canned ingredients such as
olives, sun dried tomatoes etc. should be
drained and well-dried on kitchen paper
towel before adding to the dispenser.
• It is recommended that the dispenser be
cleaned thoroughly with a soft, damp cloth
after each use.
4. The Fruit and Nut Dispenser will
automatically release its contents on
the BASIC, WHOLE WHEAT, SWEET,
CONTINENTAL, DOUGH and GLUTEN
FREE settings.
NOTE
The base of the dispenser will still open during
the bread making cycle even when it is empty.
This is normal.
TIP
If ingredients exceed the maximum ²/
³
cup
capacity of the dispenser, do not use. Instead,
open the lid and add ingredients manually.
NOTE
The fruit and nut dispenser opens
automatically with all functions EXCEPT the
following selections: French, Express 680g,
Express 900g, Yeast Free, Jam, Bake and
Yoghurt.
POWER INTERRUPTION PROTECTION
This bread maker is equipped with a 10-minute
power interruption protection feature. If a
power outage occurs while in operation and if
the power is returned within 10 minutes, the
bread maker will restart, continuing from the
time that it stopped.

14
Hints & Tips
INGREDIENTS
Ensure you have a perfect loaf of bread by
using fresh, quality ingredients and measuring
them accurately.
The best results are obtained with flour that
has at least 11-12% protein content, for this
reason, all the recipes in this book use bread
flour, with a protein content of 11-13%. This is
normally stated on the packaging.
All-purpose Flour
Flour that contains no baking powder, suitable
replacement for bread flour though will result
in a doughier loaf.
Bread Flour
Bread flour is the most important ingredient
of making bread and is recommended in most
bread recipes. It has a high gluten content
and can assist in keeping the bread from
collapsing after rising.
Self-raising Flour
Flour that contains baking powder is used for
yeast free breads and cake batters. Do not use
self-raising flour in combination with yeast.
Whole-wheat Flour
Whole-wheat flour is ground from the entire
wheat kernel. Bread made with, all or part
whole-wheat flour will have higher fibre and
nutritional content resulting in a smaller loaf
and a heavier texture.
OTHER INGREDIENTS
Egg
Eggs provide liquid, help with raising and
increase the nutritional value. They help with
flavour, tenderness and colour and are usually
used in sweeter bread types. Whisk eggs in
with other liquid ingredients.
Salt
Salt is necessary to improve bread flavour and
crust colour. Salt inhibits yeast activity so be
careful when measuring as it should
be accurate.
Fat
Fat adds flavour and retains moisture. Butter,
margarine or vegetable oil can be used.
Sugar
Sugar provides food for yeast and increases
the sweet taste and colour of the bread. White
sugar, brown sugar, honey and maple syrup
are all suitable to use. When using honey or
golden syrup, it must be counted as
additional liquid.
Water and Other Liquids (always added first)
Water is an essential ingredient for making
bread. Water or other liquids should be tepid or
warm. Extreme hot or cold water will prevent
the yeast activating.
Yeast
Without yeast, the bread will not rise.
Yeast needs liquid, sugar and warmth to grow
and rise. Dried yeast has been used in all
the recipes in this instruction booklet. Yeast
is a living organism and should be kept in
the refrigerator to remain fresh. Yeast needs
carbohydrates found in sugar and flour as
nourishment. Before using yeast, check the
expiration date of the yeast.
Surebake*
Surebake is a mixture of active yeast and bread
improver, commonly used in New Zealand.
In some cases, the use of yeast will provide a
better result than using a mixture of yeast and
bread improver.
*Surebake may be a Trademark of its
respective owners.

15
TIP
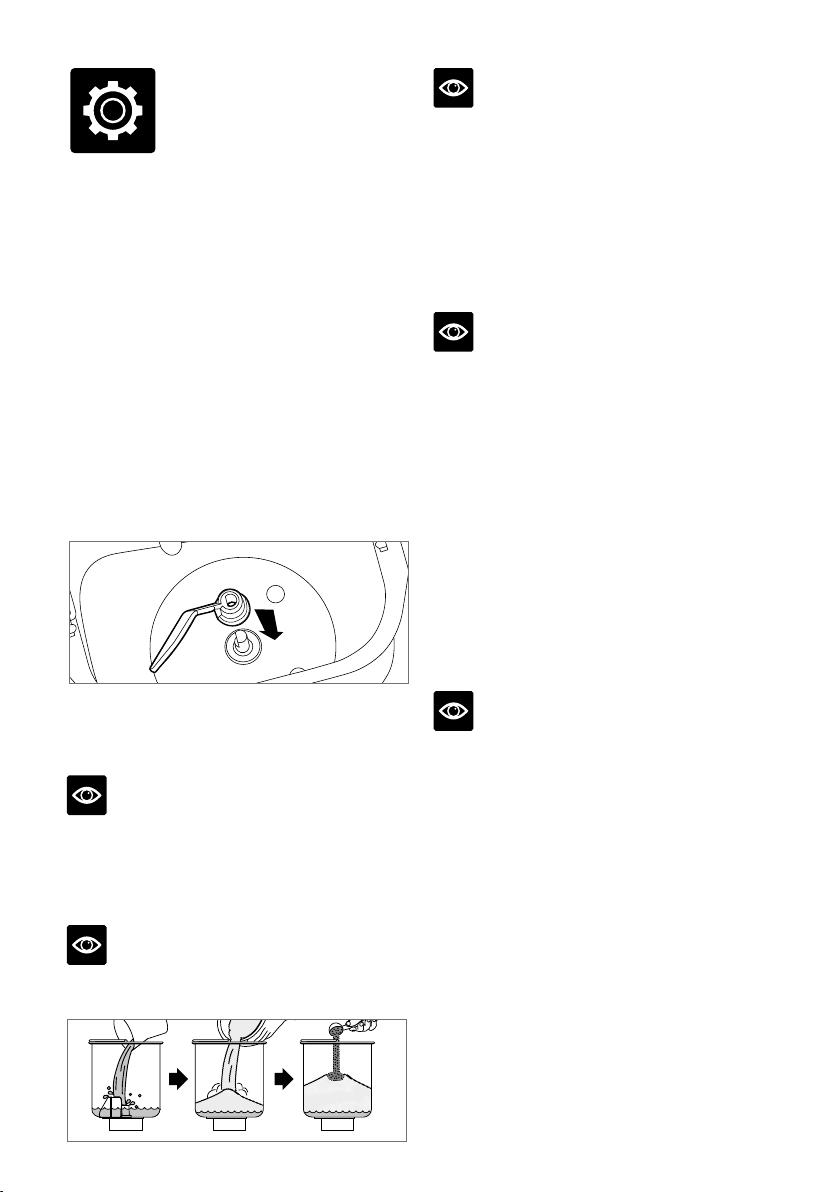
To check whether yeast is fresh and active:
1. Pour ¼ cup lukewarm tap water into a
measuring cup.
2. Add 1 teaspoon white sugar and 1 teaspoon
of yeast.
3. Place measuring cup in a warm place for
about 10 minutes.
4. Fresh, active yeast will begin to bubble or
“grow.” If it does not, the yeast is dead or
inactive so will need to be discarded.
MEASURING & ORDER SEQUENCE
Measure each ingredient carefully and add to
the bread pan in the exact order stated in
the recipe.
IMPORTANT
Ensure all ingredients for making bread or
dough are added in the exact order listed.
Failing to do so may lead to a poor result
and/or ingredients being expelled out of the
bread pan.
Always add ingredients in order given in
recipe.
FIRST: Liquid ingredients
SECOND: Dry ingredients
LAST: Yeast
Remember: The yeast should only be placed
on dry flour and never come in contact with
liquid , salt or sugar until kneading.
If setting the TIMER for a long delay, never
add perishable ingredients such as eggs
or milk.
Liquid Ingredients
Water, fresh milk, or other liquids should be
measured with a glass measuring cup, clear
markings and a spout. Set cup on counter and
lower yourself to check the liquid level. When
measuring cooking oil or other ingredients,
clean measuring cup in between.
Fluid ml Cup Tablespoons Teaspoons
250 1 16 48
175 O 12 36
125 K 8 24
60 N 4 12
1 3
K 1 K
Dry Measurements
Measure dry ingredients by gently spooning
flour, etc. into a measuring cup. Once filled,
level-off with a knife. Do not tap bottom of the
measuring cup or pack down.
HINT
Before measuring, sift flour to aerate. When
measuring small amounts of dry ingredients,
such as salt or sugar, use a measuring spoon,
making sure it is levelled off. Weigh dry
ingredients with a digital scale to provide more
accurate measurements.
Dry Measurement Weight Equivalents
1 cup of: Grams
All-purpose flour 120
Bread Flour 120
Whole-wheat flour 125
Rye flour 120

16
ABOUT INGREDIENTS
Can I use a sugar substitute in place of sugar?
Yes. Sugar is necessary for yeast to produce a
light loaf with good height. Results may vary
with the type and amount of sugar
substitute used.
Can I omit salt from the recipe?
No. Salt plays a very important part in bread
making. Omitting it will decrease water
retention in the dough, as well as affect mixing,
the strength of the gluten development and the
fermentation of the yeast. In the finished bread,
salt improves the loaf shape, crumb structure
and crust colour, as well as extending shelf life
and enhancing flavour.
Can I use my favourite bread recipes in my
bread maker?
Yes, but you will need to experiment to get the
correct portion of ingredients. Become familiar
with the unit and make several loaves of
bread with recipes provided before you begin
experimenting. Never exceed a total amount
of 4-5 cups of dry ingredients (that includes
flours, oats, cornmeal, etc.). Use the recipes in
this book to help determine the ratio of dry
ingredients to liquid and amounts of yeast,
sugar, salt, and fat to use.
ABOUT BAKING BREAD
Can I open the lid while the bread maker
is operating?
This bread maker is designed with a window in
the lid to let you watch your bread’s progress.
Quick checks are OK in early stages of
kneading and to add ingredients. However,
temperature in baking chamber adjusts for
Rising and Baking stages. Opening the lid
during these steps could cause the loaf to fall
or not bake properly.
What will happen if I leave bread in the bread
pan after baking?
This unit has a Keep Warm function that will
keep the bread warm in the pan for up to 1 hour
after baking is complete. Once Keep Warm is
over, it is best to remove bread immediately
or the bottom of the loaf may absorb moisture
and become soggy.
Why does flour sometimes stick to the side of
the bread?
During the ‘knead’ phase, small amounts of
flour may sometimes stick to the sides of the
bread pan and bake onto the sides of the loaf.
Scrape the floured portion from the outer crust
with a sharp knife. The next time you try the
recipe, if necessary, during the ‘knead 2’ phase
use a rubber spatula carefully to scrape in any
unmixed flour from around the edges of the
bread pan. This is especially important on the
GLUTEN FREE and YEAST FREE settings.

17
Care, Cleaning
& Storage
CLEANING THE HOUSING
• Wipe the exterior of the housing and the
display screen with a soft, damp cloth.
Do not use an abrasive cleanser or metal
scouring pad to clean any part of the bread
maker as these will scratch the surface.
WARNING
Never immerse the housing in water or place
any part of the bread maker in the dishwasher.
Take care not to allow water or cleaning fluids
to seep under the buttons or the display screen
on the control panel when wiping clean.
1. Ensure the bread maker is turned OFF
by pressing and holding the START /
CANCEL button for 3 seconds. Remove the
power plug from the power outlet. Allow
the bread maker and all accessories to
cool completely before disassembling and
cleaning.
2. If over-spills such as flour, nuts, raisins
etc. occur in the interior baking chamber,
allow the bread maker to completely cool
before carefully removing them using a
soft, damp cloth. Use extreme caution when
cleaning the heating elements inside the
baking chamber. Ensure the bread maker
is completely cool then gently wipe with
a soft, damp cloth. Do not use any type of
cleanser or cleaning agent.
CLEANING THE LID
1. Open the lid & use a soft, damp sponge or
cloth to clean the lid and dry thoroughly.
CLEANING THE FRUIT
& NUT DISPENSER
1. The fruit and nut dispenser can be removed
from the rear of the lid for cleaning.
2. Press and hold the latch upwards under
the handle of the dispenser holder located
on the rear of the lid. Pull out the dispenser
holder and remove the base of the Fruit and
Nut dispenser to clean.
3. Wash in warm soapy water and dry
thoroughly before reassembling and
returning to the bread maker.
NOTE
Never wash the fruit and nut dispenser in the
dishwasher.
CLEANING THE BREAD PAN
& KNEADING BLADE
The inside of the bread pan is coated with a
high quality non-stick coating. As with any
non-stick coated surface, do not use abrasive
cleansers, metal scouring pads or metal
utensils to clean these items as they may
damage the finish. Never wash the bread pan in
the dishwasher.
1. Remove the power plug from the power
outlet. Allow the bread maker and all
accessories to cool completely before
disassembling and cleaning.
2. Remove the bread pan from the bread
maker. If the kneading blade is still
connected, remove from the pan.
3. Half fill the bread pan with warm soapy
water and allow to stand for 10-20 minutes
to loosen any food residue.

18
NOTE
A non-abrasive liquid cleanser or mild spray
solution may be used. Do not scrub with an
abrasive scourer or cleanser.
4. Wash the kneading blade in the soapy water
in the pan. Allow to soak if required, to
remove any food residue. Ensure there is no
baked-on residue in the pan or on the blade,
then rinse and dry thoroughly.
5. Wipe the outside of the bread pan with a
damp cloth and dry thoroughly.
6. Ensure all parts are clean and dry prior
to using.
WARNING
Do not immerse the outside of the bread pan
in water as this may interfere with the free
movement of the wingnut and drive shaft.
Wipe with a soft, damp cloth only. Wash only
the interior of the bread pan.
NOTE
Some discolouration may appear on, and
inside the bread pan over time. This is a natural
effect caused by moisture and steam and will
not affect the bread in any way.
NOTE
Exposure to cooking oils and cleaning
chemicals may cause colour fading and
discolouration to the bread maker. If the bread
maker is exposed to oils or chemicals, turn off
and unplug the appliance , allow to cool and
use a damp cloth to clean the surface of the
bread maker. Dry thoroughly before use.
STORAGE
1. Ensure the bread maker is returned to the
main menu by pressing and holding the
START / CANCEL button for 3 seconds.
Remove the power plug from the
power outlet.
2. Ensure the bread maker and all accessories
are completely cool, clean and dry.
3. Place the bread pan and kneading blade
into the interior baking chamber.
4. Once assembled, close the lid of the bread
maker.
5. Store the bread maker in an upright
position on a flat, dry and level surface. Do
not store anything on top of the
bread maker.
WARNING
When moving the bread maker, allow the unit
to fully cool down and carry the unit via
the base.
NOTE
Use the provided measuring spoon when
following the recipes included in this booklet.
If using the RAPID option increase the yeast
amount by ¼ tsp or the Surebake by 1 tsp.

19
Recipes
TRADITIONAL WHITE BREAD
MENU 1
BASIC
INGREDIENTS
AUS
450g
AUS
680g
AUS
900g
NZ
450g
NZ
680g
NZ
900g
Water 180ml 260ml 340ml 180ml 260ml 340ml
Olive oil 25ml 30ml 35ml 25ml 30ml 35ml
Salt 1
tsp.
1 ½
tsp.
1 ¾
tsp.
1
tsp.
1 ½
tsp.
1 ¾
tsp.
Sugar 1
tbsp.
1 ½
tbsp.
1 ¾
tbsp.
1
tbsp.
1 ½
tbsp.
1 ¾
tbsp.
Bread flour 300g 450g 590g 300g 450g 590g
Milk Powder 2
tsp.
1
tbsp.
1 ½
tbsp.
2
tsp.
1 t
tbsp.
1 ½
tbsp.
Bread improver 1
tsp.
1 ½
tsp.
1 ¾
tsp.
- - -
Yeast ¾
tsp.
1
tsp.
1 ¼
tsp.
- - -
Surebake - - - 1 ½
tsp.
2 ½
tsp.
3
tsp.
Method
1. Fit the bread pan with the kneading blade.
2. Place the ingredients into the bread pan in
the listed order. Wipe any spills away from
the outside of the pan.
3. Insert the bread pan into the bread maker
and twist and lock into position. Close the
lid.
4. Press the MENU button until MENU 1
(BASIC) is displayed on the screen.
5. Choose the CRUST COLOUR and LOAF
SIZE.
6. Press START/CANCEL to commence the
function.
7. After the function has completed, press
START/CANCEL to stop the KEEP WARM
setting.
8. Using oven mitts, remove the bread pan
from the bread maker. Allow the bread to
rest in the pan for 5 minutes before turning
out to cool on a wire rack. Remove the
kneading blade before slicing.
FRENCH BREAD
MENU 2
FRENCH
INGREDIENTS
AUS
450g
AUS
680g
AUS
900g
NZ
450g
NZ
680g
NZ
900g
Water 200ml 300ml 340ml 200ml 300ml 340ml
Olive oil 5ml 10ml 15ml 5ml 10ml 15ml
Salt 1
tsp.
1 ½
tsp.
2
tsp.
1
tsp.
1 ½
tsp.
2
tsp.
Sugar 1
tsp.
1 ½
tsp.
2
tsp.
1
tsp.
1 ½
tsp.
2
tsp.
Bread flour 325g 450g 590g 325g 450g 590g
Bread improver ½
tsp.
¾
tsp.
¾
tsp.
- - -
Yeast ¾
tsp.
1
tsp.
1
tsp.
- - -
Surebake - - - 1 ½
tsp.
2
tsp.
2 ½
tsp.
Method
1. Fit the bread pan with the kneading blade.
2. Place the ingredients into the bread pan in
the listed order. Wipe any spills away from
the outside of the pan.
3. Insert the bread pan into the bread maker
and twist and lock into position. Close the
lid.
4. Press the MENU button until MENU 2
(FRENCH) is displayed on the screen.
5. Choose the CRUST COLOUR and LOAF
SIZE.
6. Press START/CANCEL to commence the
function.
7. After the function has completed, press
START/CANCEL to stop the KEEP WARM
setting.
8. Using oven mitts, remove the bread pan
from the bread maker. Allow the bread to
rest in the pan for 5 minutes before turning
out to cool on a wire rack. Remove the
kneading blade before slicing.

20
WHOLE WHEAT BREAD
MENU 3
WHOLE-
WHEAT
INGREDIENTS
AUS
450g
AUS
680g
AUS
900g
NZ
450g
NZ
680g
NZ
900g
Water 190ml 270ml 360ml 190ml 270ml 360ml
Olive oil 15ml 30ml 40ml 15ml 30ml 40ml
Salt ¾
tsp.
1
tsp.
1 ½
tsp.
¾
tsp.
1
tsp.
1 ½
tsp.
Sugar 1
tbsp.
1 ¼
tbsp.
1 ¾
tbsp.
1
tbsp.
1 ¼
tbsp.
1 ¾
tbsp.
Whole-meal
plain flour
300g 420g 560g 300g 420g 560g
Milk powder ¾
tbsp.
1
tbsp.
1 ½
tbsp.
¾
tbsp.
1
tbsp.
1 ½
tbsp.
Bread improver ½
tsp.
¾
tsp.
1
tsp.
- - -
Yeast ¾
tsp.
1
tsp.
1 ¼
tsp.
- - -
Surebake - - -
2
tsp.
2 ½
tsp.
3 ½
tsp.
Method
1. Fit the bread pan with the kneading blade.
2. Place the ingredients into the bread pan in
the listed order. Wipe any spills away from
the outside of the pan.
3. Insert the bread pan into the bread maker
and twist and lock into position. Close the
lid.
4. Press the MENU button until MENU 3
(WHOLEWHEAT) is displayed on the
screen.
5. Choose the CRUST COLOUR and LOAF SIZE.
6. Press START/CANCEL to commence the
function.
7. After the function has completed, press
START/CANCEL to stop the KEEP WARM
setting.
8. Using oven mitts, remove the bread pan
from the bread maker. Allow the bread to
rest in the pan for 5 minutes before turning
out to cool on a wire rack. Remove the
kneading blade before slicing.
FRUIT & NUT BREAD
MENU 4
SWEET
FRUIT AND
& NUT
INGREDIENTS
AUS
450g
AUS
680g
AUS
900g
NZ
450g
NZ
680g
NZ
900g
Water 140ml 210ml 275ml 140ml 210ml 275ml
Olive oil 25ml 40ml 50ml 25ml 40ml 50ml
Salt ¾
tsp.
1
tsp.
1 ¼
tsp.
¾
tsp.
1
tsp.
1 ¼
tsp.
Brown Sugar 25g. 40g 50g 25g 40g 50g
Bread flour 250g 370g 490g 250g 370g 490g
Milk powder ¾
tbsp.
1
tbsp.
1 ½
tbsp.
¾
tbsp.
1
tbsp.
1 ½
tbsp.
Bread improver 1/3
tsp.
½
tsp.
¾
tsp.
- - -
Ground mixed
spice
½
tbsp.
¾
tbsp
1
tbsp.
½
tbsp.
¾
tbsp
1
tbsp.
Ground
cinnamon
½
tbsp.
¾
tbsp.
1
tbsp.
½
tbsp.
¾
tbsp
1
tbsp.
Yeast
¾
tsp.
1
tsp.
1 ¼
tsp.
- - -
Surebake
- - - 2
tsp.
2 ½
tsp.
3 ½
tsp.
Add dried fruit and nuts to the fruit and nut dispenser
Dried fruit and
nut mix
¹⁄
³
cup
½
cup
²
⁄
³
cup
¹⁄
³
cup
½
cup
²
⁄
³
cup
Method
1. Fit the bread pan with the kneading blade.
2. Place the ingredients into the bread pan in
the listed order. Wipe any spills away from
the outside of the pan.
3. Insert the bread pan into the bread maker
and twist and lock into position. Close the
lid.
4. Press the MENU button until MENU 4
(SWEET) is displayed on the screen.
5. Choose the CRUST COLOUR and LOAF
SIZE.
6. Press START/CANCEL to commence the
function.
7. After the function has completed, press
START/CANCEL to stop the KEEP WARM
setting.
8. Using oven mitts, remove the bread pan
from the bread maker. Allow the bread to
rest in the pan for 5 minutes before turning
out to cool on a wire rack. Remove the
kneading blade before slicing.

21
EXPRESS BREAD
MENU 5
EXPRESS 680G
BASIC WHITE
INGREDIENTS
AUS
680g
NZ
680g
MENU 6
EXPRESS 900G
BASIC WHITE
INGREDIENTS
AUS
900g
NZ
900g
Water 260ml 260ml Water 340ml 340ml
Olive oil 30ml 30ml Olive oil 35ml 35ml
Salt 1 ½
tsp.
1 ½
tsp.
Salt 1 ¾
tsp.
1 ¾
tsp.
Sugar 1 ½
tbsp.
1 ½
tbsp.
Sugar 2
tbsp.
2
tbsp.
Bread flour 450g 450g Bread flour 590g 590g
Milk powder 1
tbsp.
1
tbsp.
Milk powder 1 ½
tbsp.
1 ½
tbsp.
Bread improver 2
tsp.
- Bread improver 3
tsp.
-
Yeast 2 ¼
tsp.
- Yeast 3 ¼
tsp.
-
Surebake - 4 ½
tsp.
Surebake - 6
tsp.
If using Surebake on the EXPRESS function,
the Surebake is best dissolved in the water
initially, as the yeast in the Surebake will not
dissolve within the allocated time.
Method
1. Fit the bread pan with the kneading blade.
2. Place the ingredients into the bread pan in
the listed order. Wipe any spills away from
the outside of the pan.
3. Insert the bread pan into the bread maker
and twist and lock into position. Close the
lid.
4. Press the MENU button until MENU 5
(EXPRESS 680g) or MENU 6 (EXPRESS
900g) is displayed on the screen.
5. Press START/CANCEL to commence the
function.
6. After the function has completed, press
START/CANCEL to stop the KEEP WARM
setting.
7. Using oven mitts, remove the bread pan
from the bread maker. Allow the bread to
rest in the pan for 5 minutes before turning
out to cool on a wire rack. Remove the
kneading blade before slicing.
YEAST FREE
MENU 7
YEAST FREE
BANANA BREAD
INGREDIENTS
AUS
& NZ
Milk 80ml
Eggs, lightly beaten 2
Butter, melted 60g
Banana puree 250g
Brown sugar 250g
Bread flour 350g
Salt ½ tsp.
Baking powder 2 tsp.
Bi-carb soda ½ tsp.
Method
1. Fit the bread pan with the kneading blade.
2. Mix the wet ingredients and the dry
ingredients separately.
3. Add the wet ingredients to the bread pan
first, then add the dry ingredients. Close
the lid.
4. Press MENU until MENU 7 (YEAST FREE)
is displayed on the screen.
5. Press START/CANCEL to begin the
function.
6. Scrape the sides of the bread pan using a
silicon scraper during the initial
knead stage.
7. After the function has completed, press
START/CANCEL to stop the KEEP WARM
setting.
8. Using oven mitts, remove the bread pan
from the bread maker. Allow to rest in the
pan for 5 minutes before turning out onto a
wire rack. Remove kneading blade
before slicing.

22
CONTINENTAL BREAD
MENU 8
CONTINENTAL
INGREDIENTS
AUS NZ
Water 315ml 315ml
Olive oil 15ml 15ml
Salt 1 ½ tsp. 1 ½ tsp.
Bread flour 560g 560g
Yeast 1 tsp.
-
Surebake -
2 ½ tsp.
Method
1. Fit the bread pan with the kneading blade.
2. Place the ingredients into the bread pan in
the listed order. Wipe any spills away from
the outside of the pan.
3. Insert the bread pan into the bread maker
and twist and lock into position. Close the
lid.
4. Press the MENU button until MENU 8
(CONTINENTAL) is displayed on the
screen.
5. Choose the CRUST COLOUR and LOAF
SIZE.
6. Press START/CANCEL to commence the
function.
7. After the function has completed, press
START/CANCEL to stop the KEEP WARM
setting.
8. Using oven mitts, remove the bread pan
from the bread maker. Allow the bread to
rest in the pan for 5 minutes before turning
out to cool on a wire rack. Remove the
kneading blade before slicing.
PIZZA DOUGH
MENU 9
DOUGH
PIZZA DOUGH
INGREDIENTS
AUS
& NZ
Water 380ml
Olive oil 40ml
Salt 2 tsp.
Bread flour 570g
Yeast 1 ½ tsp.
Method
1. Fit the bread pan with the kneading blade.
2. Place the ingredients into the bread pan in
the listed order. Wipe any spills away from
the outside of the pan.
3. Insert the bread pan into the bread maker
and twist and lock into position. Close the
lid.
4. Press the MENU button until MENU 9
(DOUGH) is displayed on the screen.
5. Press START/CANCEL to commence the
function.
6. After the function has completed, remove
the bread pan from the bread maker.
Remove the dough from the bread pan and
place onto a lightly floured bench. Remove
the kneading blade from the dough.
7. Use as desired.

23
GLUTEN FREE WHITE BREAD
MENU 10
GLUTEN FREE
WHITE BREAD
INGREDIENTS
AUS
& NZ
WET INGREDIENTS
Water 380ml
Olive oil 40ml
Eggs 2 tsp.
White vinegar 570g
DRY INGREDIENTS
White rice flour 220g
Brown rice flour 100g
Besan flour 35g
Arrowroot 75g
Xanthum gum 2 tsp.
Caster sugar 2 tsp.
Salt 1 tsp.
Yeast 2 tsp.
NOTE
Surebake is not gluten-free.
Method
1. Mix together the wet ingredients and the
dry ingredients separately.
2. Fit the bread pan with the kneading blade.
3. Add the wet ingredients to the bread pan
first and then the dry ingredients.
4. Place the bread pan into the bread maker
and twist and lock in position. Close the lid.
5. Press the GLUTEN FREE short cut button
OR press the MENU button until MENU 10
(GLUTEN FREE) is displayed on the screen.
6. Press START/CANCEL to begin.
7. Scrape the sides of the bread pan using
a silicon scraper during the initial knead
stage.
8. Using oven mitts, remove the bread pan
from the bread maker. Allow the bread to
rest in the pan for 5 minutes before turning
out to cool on a wire rack. Remove the
kneading blade before slicing.
STRAWBERRY, RHUBARB & ACAI JAM
MENU 11
JAM – STRAWBERRY,
RHUBARB AND ACAI
INGREDIENTS
AUS
& NZ
Rhubarb, cut into 1cm
pieces
140g
Strawberry ¼’s 170g
Caster sugar 240g
Lemon zest
¹⁄ 8 tsp.
Jamsetta 1 tsp.
Vanilla paste ½ tsp.
Acai powder
1 tsp.
Method
1. Wash and dry the rhubarb and strawberries
well and cut them into 1cm pieces.
2. Fit the bread pan with the kneading blade.
Place the ingredients into the bread pan.
3. Press the MENU button until MENU 11
(JAM) is displayed on the screen.
4. Press the START/CANCEL button to begin.
5. The bread maker will beep 10 times at
completion. Allow to cool before serving.
NOTE
The Jam will be extremely hot – take care when
handling the bread pan with jam.
NOTE
Sterilise jars prior to filling to extend the life
of the jam. All ingredients in total, should not
exceed 2 cups as this may cause overflow.

24
YOGHURT
MENU 13
YOGHURT
VANILLA YOGHURT
INGREDIENTS
AUS
& NZ
Full cream milk 1L
Caster sugar 2 tbsp.
Vanilla essence ½ tsp.
Natural yoghurt
¹⁄
³
cup
Full cream milk powder 50g
Method
1. Sterilise all equipment to be used in
yoghurt making.
2. In a medium saucepan, place the milk and
sugar. Heat the milk to be 80°C and then
allow to cool to 40°C.
3. Once the milk has cooled to 40°C, add the
vanilla, yoghurt and milk powder to the
milk and whisk well.
4. Place the mixture into the bread pan (with
no kneading blade), place the bread pan
into the bread maker and twist and lock into
position. Close the lid.
5. Press the MENU button until MENU 13
(YOGHURT) is displayed on the screen.
6. Press the START/CANCEL button to begin.
7. Remove the bread pan and place the pan
in the fridge to cool. Spoon into desired
storage ware and keep in the fridge for up
to 1 week.
TIP
The mixture can be placed into the bread pan
in sterilized jars for pot set yoghurt – be sure
the jars are clean and sterilized. Be wary that
the hard surface of the jars may scratch the
bread pan non-stick surface – place a layer of
silicon in the bottom to prevent scratching.
NOTE
If using jars for pot set yoghurt, do not put the
lids on the jars until they are cooled. Store in
the fridge for up to 1 week.

25
Troubleshooting
POSSIBLE PROBLEM POSSIBLE REASON EASY SOLUTION
Smoke comes out of the
baking chamber
during baking.
•
Flour or other ingredients
have spilled into baking
chamber.
•
Stop bread maker, switch it off and unplug
at the power outlet. Allow bread maker to
cool completely. Wipe excess flour, etc.,
from baking chamber with a damp cloth.
TIP: Measure ingredients on the kitchen
counter, adding them to the bread pan
prior to inserting the bread pan into the
bread maker.
The middle of the baked
bread has sunken and the
bottom of the crust
is thick.
•
Ingredients have been
placed into the bread pan
in the incorrect order.
Ingredients have been
substituted and have not
been effective.
•
Remove the bread from the bread pan in a
timely fashion.
The baked bread is
difficult to remove from
the bread pan.
•
The kneading blade is
stuck on the drive shaft.
•
Remove the bread pan from the bread
maker and invert the bread pan and give
a tap on a chopping board to assist in the
removal of the bread from the bread pan
Once the bread is removed, soak the bread
pan in hot water for 10 minutes. Remove
the kneading blade from the bread pan
and clean.
The ingredients are not
blending through and the
bread has not baked well.
•
Wrong program selected
•
Too many dry ingredients
•
Once the program has
started, the lid was opened
a number of times and
program interrupted.
•
The ingredients were
placed into the bread pan
in the incorrect order.
•
Check whether the recipe is appropriate
for the program chosen.
•
Make sure ingredients are measured
accurately and added in the proper order.
Use a rubber spatula to scrape sides of pan
while bread baker is mixing to ensure all
ingredients are blended.
•
Keep the lid closed during the last cycle.
•
Check the kneading blade for any damage.
Abnormal noise.
•
The bread pan is not
placed properly inside the
bread maker.
•
The dough is too large
to stir
•
Ensure the dough is prepared correctly.
Reduce quantities of ingredients
if required.

26
POSSIBLE PROBLEM POSSIBLE REASON EASY SOLUTION
The fermented volume
of the bread is too large
causing the lid to open.
•
Too much yeast, flour or
water has been added.
•
Appropriately reduce the ingredients.
The fermented dough
collapsed in the middle
after baking.
•
Bread flour was not used.
The flour used has low
protein.
•
Too much water, too wet
dough and too soft.
•
Use a different flour.
•
Use ingredients at room temperature.
•
Reduce the water in the ingredients.
The bread is heavy
and dense.
•
There is too much flour
and not enough water.
•
There is too much fruit or
whole wheat flour.
•
Reduce flour and increase water.
•
Reduce the amount of corresponding
ingredients and increase yeast.
There are too many holes
in the baked bread.
•
There is too much water
and no salt.
•
The water temperature is
too high.
•
Check the water temperature.
There is dry powder on the
surface of the bread.
•
Ingredients are being used
that are dissolvable or with
strong viscosity. E.g. Butter,
bananas etc.
•
Insufficient mixing & too
little water.
•
Check if the amount of water is
appropriate.
•
Check if the mixing mechanism is
abnormal during operation.
When baking cakes or
food with a lot of sugar,
the crust is too dark and
too thick.
•
Different formulas and
ingredients have a great
influence on the
burning colour.
•
Stop the program 5 – 10 minutes before
completion. Wait for 20 minutes before
opening the lid.
Beeping and E00
on LCD screen.
•
The ambient temperature
is too low.
•
Use the bread maker at room temperature.
Beeping and E01
on LCD screen.
•
The bread maker has not
cooled down after previous
baking cycle and it interior
will still be warm.
•
Unplug the bread maker, take out the bread
pan and let the bread maker cool down to
room temperature before using again.
Beeping and EEE
on LCD screen.
•
There is a problem with
the circuit.
•
Switch the unit off and contact the Breville
Customer Service Centre.
Beeping and HHH
on LCD screen.
•
There is a problem with
the circuit.
•
Switch the unit off and contact the Breville
Customer Service Centre.

27
Notes

Australian Customers
Phone: 1300 139 798
Fax: (02) 9700 1342
Web: www.breville.com
New Zealand Customers
Phone:
0800 273 845
Fax: 0800 288 513
Web: www.breville.com
Breville Customer Service Centre
Breville, the Breville logo, Master Every Moment and the Baker's Dozen
are registered trademarks of Breville Pty. Ltd. A.B.N. 98 000 092 928.
Copyright Breville Pty. Ltd. 2019. All other brands may be trademarks of their respective owners.
Due to continued product improvement, the products illustrated/photographed in this booklet
may vary slightly from the actual product.
LBM250 ANZ A21