Home
Bookmarks
Home
Avision
Avision AD225WN User Manual
Page 120
Avision AD225WN Your portable solution for batches scanning
User Manual - Page 120
For AD225WN.
PDF File Manual
,
179 pages
,
Read Online
|
Download pdf file
1. Introduction
1.1 Package Items
1.2 Front View
1.3 Rear View
1.4 Side View
2. Scanner Installation
2.1 Precautions
2.2 Installing the Rear Feed Tray
2.3 Connecting to Power
2.4 Turning on the Power
2.5 Installing the Scanner Driver
2.6 Connecting to the Computer
2.6.1 Via A USB Port
2.6.2 Via A Wired Network
2.6.2.1 Connecting the Network Scanner
3. Completing Your First Scan
3.1 Loading Your Paper
3.1.1 Notice on Using the ADF
3.1.2 Loading Your Document into the ADF Paper Tray
3.1.3 Loading Paper to the Document Feeder
3.1.4 Loading A Single-Page Document into the Front Input Tray
3.1.5 Loading A Single-Page Document into the Rear Feed Tray
3.1.6 Ejecting Paper Opposite
3.1.7 Scanning a Stack of Document with Various Sizes and Weights
3.2 Verifying Your Scanner Installation
3.3 A Glance of the Scanner Properties Dialog Box
4. Using the Scanner Properties Dialog Box
4.1 Buttons on the Scanner Properties Dialog Box
4.2 Showing or Hiding Tabs
4.3 The Image Tab
4.3.1 The Image Selection Box
4.3.2 Other Image Options
4.3.3 Scanning color images
4.3.4 Scanning grayscale images
4.3.5 Scanning B&W images
4.3.6 Editing Profiles
4.4 The Compression Tab
4.5 The Color Dropout Tab
4.5.1 Color Dropout Selection
4.6 The Paper Tab
4.6.1 Cropping
Relative to Document: (used for batches of same-sized documents)
4.6.2 Other Paper Selection
4.7 The Multi-Feed Detection Tab
4.8 The Preview Tab
4.9 The Enhancement Tab
4.10 The Rotation Tab
4.11 The Separation Tab
4.12 The Setting Tab
4.13 The Imprinter Tab
4.14 The Information Tab
5. ISIS Interface Operation
6. Using the Buttons
6.1 Installing Button Manager V2
6.2 Checking the Button Configurations before Scanning
6.3 Scanning From One Touch of the Buttons
7. Starting a Scan from Your Mobile Device
7.1 Making Preparation
7.2 Connecting to a wireless network
7.2.1 Connect to a Wi-Fi network in an AP (Access Point) mode
7.2.2 Connect the scanner to a Wi-Fi network in a client mode (default mode)
7.2.3 Connect to a wireless access point using the WPS button
7.3 Scanning a document from a mobile device
7.4 Use the Embedded Web Page
7.4.1 View the Embedded Web Page
7.4.2 The Status Page
7.4.3 The System Page
7.4.4 The Network Page
7.4.5 The WIFI Page
7.4.6 The Security Page
8. Maintenance
8.1 Clean the Scanner Glass, Separation Pad and Rollers
8.2 Replace the Feed Roller
8.3 Replace the Separation Pad
9. Troubleshooting
9.1 Clear a paper jam
9.2 Error Conditions
9.3 Frequently asked questions and answers
9.4 Technical Service
10. Specifications
Page 120/179
Page 1
Page 2
Page 3
Page 4
Page 5
Page 6
Page 7
Page 8
Page 9
Page 10
Page 11
Page 12
Page 13
Page 14
Page 15
Page 16
Page 17
Page 18
Page 19
Page 20
Page 21
Page 22
Page 23
Page 24
Page 25
Page 26
Page 27
Page 28
Page 29
Page 30
Page 31
Page 32
Page 33
Page 34
Page 35
Page 36
Page 37
Page 38
Page 39
Page 40
Page 41
Page 42
Page 43
Page 44
Page 45
Page 46
Page 47
Page 48
Page 49
Page 50
Page 51
Page 52
Page 53
Page 54
Page 55
Page 56
Page 57
Page 58
Page 59
Page 60
Page 61
Page 62
Page 63
Page 64
Page 65
Page 66
Page 67
Page 68
Page 69
Page 70
Page 71
Page 72
Page 73
Page 74
Page 75
Page 76
Page 77
Page 78
Page 79
Page 80
Page 81
Page 82
Page 83
Page 84
Page 85
Page 86
Page 87
Page 88
Page 89
Page 90
Page 91
Page 92
Page 93
Page 94
Page 95
Page 96
Page 97
Page 98
Page 99
Page 100
Page 101
Page 102
Page 103
Page 104
Page 105
Page 106
Page 107
Page 108
Page 109
Page 110
Page 111
Page 112
Page 113
Page 114
Page 115
Page 116
Page 117
Page 118
Page 119
Page 120
Page 121
Page 122
Page 123
Page 124
Page 125
Page 126
Page 127
Page 128
Page 129
Page 130
Page 131
Page 132
Page 133
Page 134
Page 135
Page 136
Page 137
Page 138
Page 139
Page 140
Page 141
Page 142
Page 143
Page 144
Page 145
Page 146
Page 147
Page 148
Page 149
Page 150
Page 151
Page 152
Page 153
Page 154
Page 155
Page 156
Page 157
Page 158
Page 159
Page 160
Page 161
Page 162
Page 163
Page 164
Page 165
Page 166
Page 167
Page 168
Page 169
Page 170
Page 171
Page 172
Page 173
Page 174
Page 175
Page 176
Page 177
Page 178
Page 179
Contents
Table of Contents
Search
Previous
Next
Troubleshooting
Bookmarks
Loading ...
Loading ...
Loading ...
4-
72
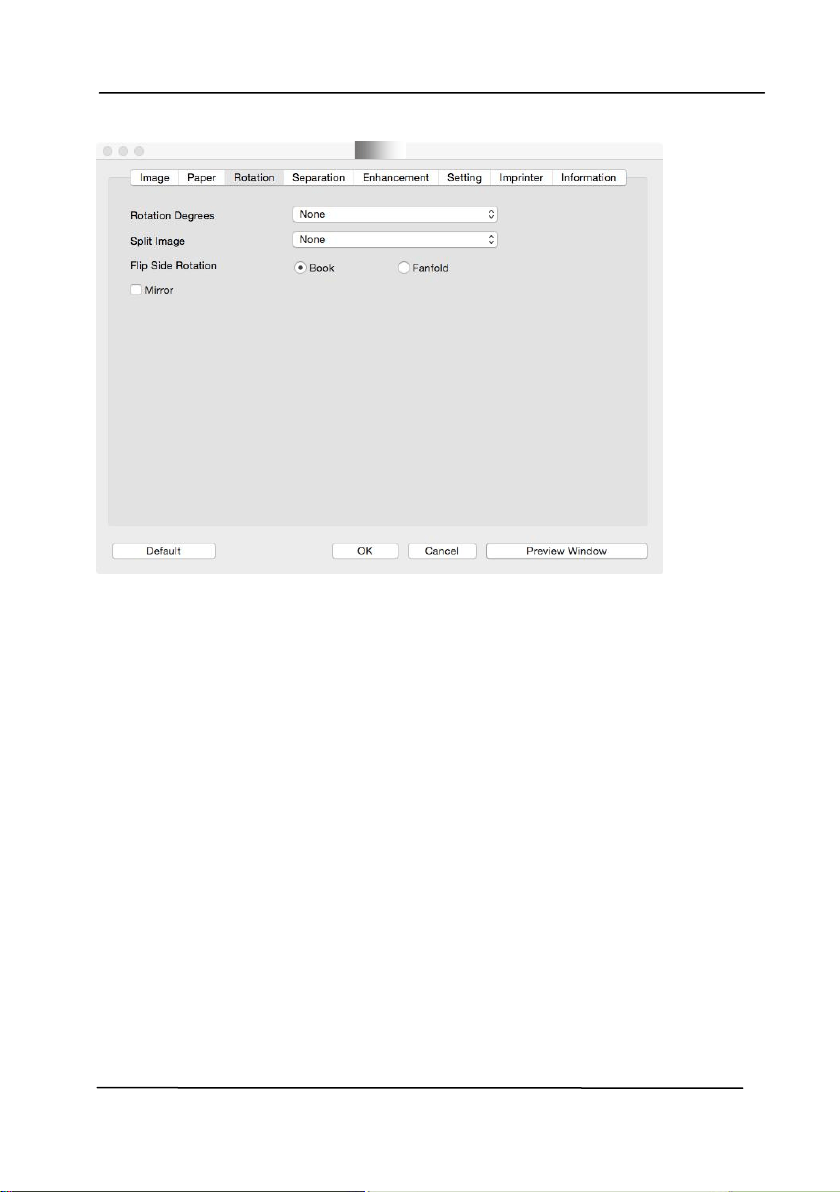
The Rotation Tab (Mac OS)
Loading ...
Loading ...
Loading ...
File type: PDF
File name: 97550701_ad225wn.pdf
File size: 5.73 MB
File Language: English
Pages: 179
Author: Avision
File created: 2022-02-22
Published: 2022-05-18
Updated: 2023-05-08
Download File
Table of Contents
×
1. Introduction
11
1.1 Package Items
11
1.2 Front View
13
1.3 Rear View
15
1.4 Side View
16
2. Scanner Installation
17
2.1 Precautions
17
2.2 Installing the Rear Feed Tray
18
2.3 Connecting to Power
19
2.4 Turning on the Power
19
2.5 Installing the Scanner Driver
20
2.6 Connecting to the Computer
24
2.6.1 Via A USB Port
24
2.6.2 Via A Wired Network
25
2.6.2.1 Connecting the Network Scanner
26
3. Completing Your First Scan
31
3.1 Loading Your Paper
31
3.1.1 Notice on Using the ADF
31
3.1.2 Loading Your Document into the ADF Paper Tray
32
3.1.3 Loading Paper to the Document Feeder
33
3.1.4 Loading A Single-Page Document into the Front Input Tray
35
3.1.5 Loading A Single-Page Document into the Rear Feed Tray
36
3.1.6 Ejecting Paper Opposite
37
3.1.7 Scanning a Stack of Document with Various Sizes and Weights
38
3.2 Verifying Your Scanner Installation
40
3.3 A Glance of the Scanner Properties Dialog Box
44
4. Using the Scanner Properties Dialog Box
49
4.1 Buttons on the Scanner Properties Dialog Box
51
4.2 Showing or Hiding Tabs
53
4.3 The Image Tab
57
4.3.1 The Image Selection Box
59
4.3.2 Other Image Options
64
4.3.3 Scanning color images
76
4.3.4 Scanning grayscale images
76
4.3.5 Scanning B&W images
76
4.3.6 Editing Profiles
77
4.4 The Compression Tab
81
4.5 The Color Dropout Tab
84
4.5.1 Color Dropout Selection
84
4.6 The Paper Tab
92
4.6.1 Cropping
94
Relative to Document: (used for batches of same-sized documents)
97
4.6.2 Other Paper Selection
100
4.7 The Multi-Feed Detection Tab
106
4.8 The Preview Tab
109
4.9 The Enhancement Tab
110
4.10 The Rotation Tab
119
4.11 The Separation Tab
126
4.12 The Setting Tab
132
4.13 The Imprinter Tab
136
4.14 The Information Tab
141
5. ISIS Interface Operation
144
6. Using the Buttons
145
6.1 Installing Button Manager V2
145
6.2 Checking the Button Configurations before Scanning
146
6.3 Scanning From One Touch of the Buttons
148
7. Starting a Scan from Your Mobile Device
149
7.1 Making Preparation
149
7.2 Connecting to a wireless network
150
7.2.1 Connect to a Wi-Fi network in an AP (Access Point) mode
150
7.2.2 Connect the scanner to a Wi-Fi network in a client mode (default mode)
151
7.2.3 Connect to a wireless access point using the WPS button
153
7.3 Scanning a document from a mobile device
155
7.4 Use the Embedded Web Page
158
7.4.1 View the Embedded Web Page
158
7.4.2 The Status Page
159
7.4.3 The System Page
160
7.4.4 The Network Page
161
7.4.5 The WIFI Page
162
7.4.6 The Security Page
163
8. Maintenance
164
8.1 Clean the Scanner Glass, Separation Pad and Rollers
164
8.2 Replace the Feed Roller
166
8.3 Replace the Separation Pad
170
9. Troubleshooting
172
9.1 Clear a paper jam
172
9.2 Error Conditions
173
9.3 Frequently asked questions and answers
174
9.4 Technical Service
176
10. Specifications
178
Search:
×
Search