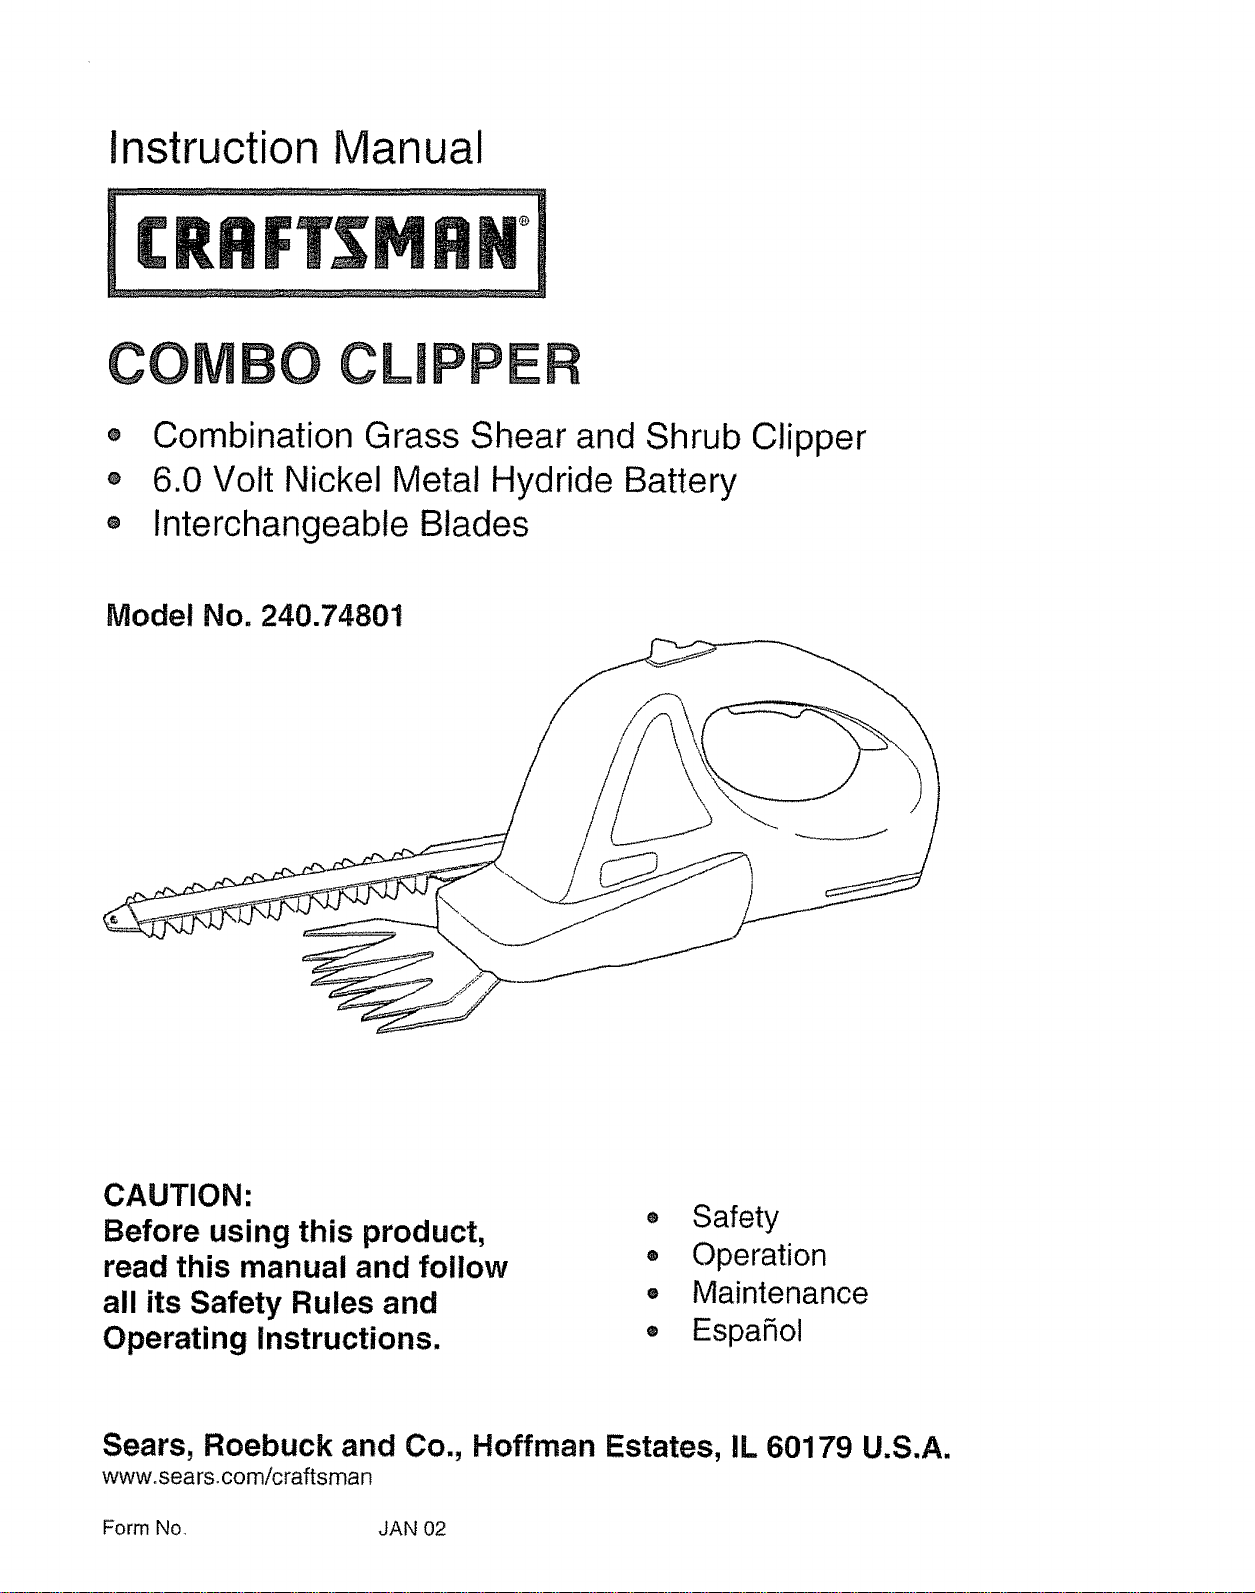
Instruction Manual
CO O CLIPPE
o Combination Grass Shear and Shrub Clipper
o 6.0 Volt Nickel Metal Hydride Battery
o Interchangeable Blades
Model No. 240.74801
CAUTION'.
Before using this product,
read this manual and follow
all its Safety Rules and
Operating Instructions.
o Safety
® Operation
,, Maintenance
® EspaSol
Sears, Roebuck and Co., Hoffman Estates, IL 60179 U.S.A.
wwwosears,comicraftsman
Form No. JAN 02
Warranty ..................................................................................................... 2
Safety Instructions ........................................................................................ 2
Operation .............................................................................................. 3
Maintenance .......................................................................................
Service .......................................................................................................... 6
Storage ................................................................................................... 6
Accessories ............................................................................................ 6
Espafiol ......................................................................................................................7
Full One Year Warranty on Craftsman Combo Clipper
If this Craftsman Combo Clipper fails due to a defect in material or
workmanship within one year from the date of purchase, return it to your
nearest Sears store or Craftsman outlet in the United States, and it will be
replaced free of charge,
This warranty applies only while this Combo Clipper is used in the United
States.
This warranty gives you specific legal rights, and you may also have other
rights, which vary from state to state.
Sears, Roebuck and Co., Dept. 817WA, Hoffman Estates, IL 60179
READ ALL INSTRUCTIONS
WARNING: When using the
Clipper, basic safety precautions
should always be followed to re-
duce the risk of fire, electric shock,
and personal injury, including _he
following:.
To reduce risk of injury:
• Before any use, be sure everyone
using this electric product reads
and understands all safety and
operation instructions contained in
this manual,
o Save these instructions and re-
view frequently prior to use.
o AVOID DANGEROUS ENVI-
RONMENTS - Don't use appli-
ance in damp or wet location.
Don't use in rain.
o KEEP CHILDREN AWAY- All
visitors should be kept at a safe
distance from work area.
o STORE IDLE UNIT INDOORS
When not in use, the unit should
be stored indoors in a dry loca-
tion - out of reach of children..
,, DON'T FORCE CLIPPER-It
will do the job better and with
tess likelihood of a risk of injury
at the rate for which it was de_
signed
• USE RIGHT TOOL- Do not use
the tool for any job except that
for which it is intended.
,, WARNING: KEEP HANDS AND
ALL BODY PARTS AWAY from
the blades. The edges are sharp
and can cause injury even when
the tool is OFF
2
o DRESS PROPERLY - Do not
wear loose clothing or jewelry
They can be caught in moving
parts. Use of rubber gloves and
substantial footwear is recom-
mended when working outdoors
Wear protective hair covering to
contain long hair.
o DON'T OVERREACH - Maintain
proper footing and balance at all
times
o USE SAFETY GLASSES- Al-
ways wear proper eye protection,
and use face or dust mask if op-
eration is dusty.
o MAINTAIN UNIT WITH CARE-
Keep cutting edges clean for best
performance and to reduce the
risk of injury.. Follow instructions
for lubricating and service Keep
handle dry, clean, and free from
oil and grease+
+ AVOID UNINTENTIONAL
STARTING - Don't carry unit with
a finger on the switch.
° CHECK DAMAGED PARTS-
if the clipper or blade pack experi-
ences a hard impact, check that
no parts were damaged and verify
that the unit operates properly
Check for misalignment or bend-
ing of moving parts, breakage of
parts, and any other condition that
may affect operation. A part that is
damaged should be properly re-
paired or replaced by an author-
ized service center.
+ STAY ALERT -Watch what you
are doing. Use common sense.
Do not operate the too! when you
are tired.
° DON'T GRASP THE EXPOSED
CUTTING BLADES or cutting
edges when picking up or holding
the unit. Do not attempt to remove
cut material nor hold material to
be cut when blades are moving
Make sure the unit's switch is off
when clearing jammed material
from blades.
To reduce risk when using charger:
+ DO NOT use charger outdoors or in
wet conditions; use inside only,
• DO NOT charge the unit when the
temperature is below +40 F or
above +120 F
o This unit and its charger are des-
igned to work together,, DO NOT
charge the combo clipper with any
other charger and DO NOT use this
charger with any other appliance
o The charger is designed to operate
on 120 volts, DO NOT attempt to
use it at any other voltage,,
SAVE THESE INSTRUCTIONS
o CHARGE BATTERY PRIORTO
USE - The Combo Clipper does
not come fully charged when pur-
chased. So before using the unit,
the battery must be charged, Be-
fore charging the batter€, read
safety and charging instructions
o PROPER RUNTIME AND PER-
FOMANCE can only be obtained
with a fully charged battery
o CHARGE TIME-20 hours of
charging is sufficient to replenish
the battery to a full charge Initial
use, long periods of inactivity, or
storage at extreme temperatures
may require extended charge time
+ WALL CHARGE BRACKET-
Before charging the unit, make
sure the charge bracket is securely
attached to the wall; attach with
screws to a walt stud, or use ap-
propriate wall anchors.
To Charge Battery:
1.. Plug the charger into a 120 Volt AC
outlet,
2. Place the Combo Clipper into the
wall charge bracket.
3 The Combo Clipper is now in
charge+
4. Charge for at least 20 hours..
Charging Notes:
o CAUTION: The charger can be
used with 60Hz cycle, and 1I5-120
VAC electricity only
o The chargerunit pluggedintothe
AC outletwill normallybecome
warm to touch during charging.
o SAFE CHARGE - The charger util-
izes trickle charging, which is the
safest way to charge a battery. The
unit will not overcharge and can be
left on charge indefinitely.
o NI-MH Green Power-The Clipper
utilizes Nickel Metal Hydride batter-
ies. They are environmentally safe
and do not have a memory effect.
o Longest life and best performance
wilt be obtained when charging in
normal room temperature.
o Battery life is dependent on usage,
storage temperature and time
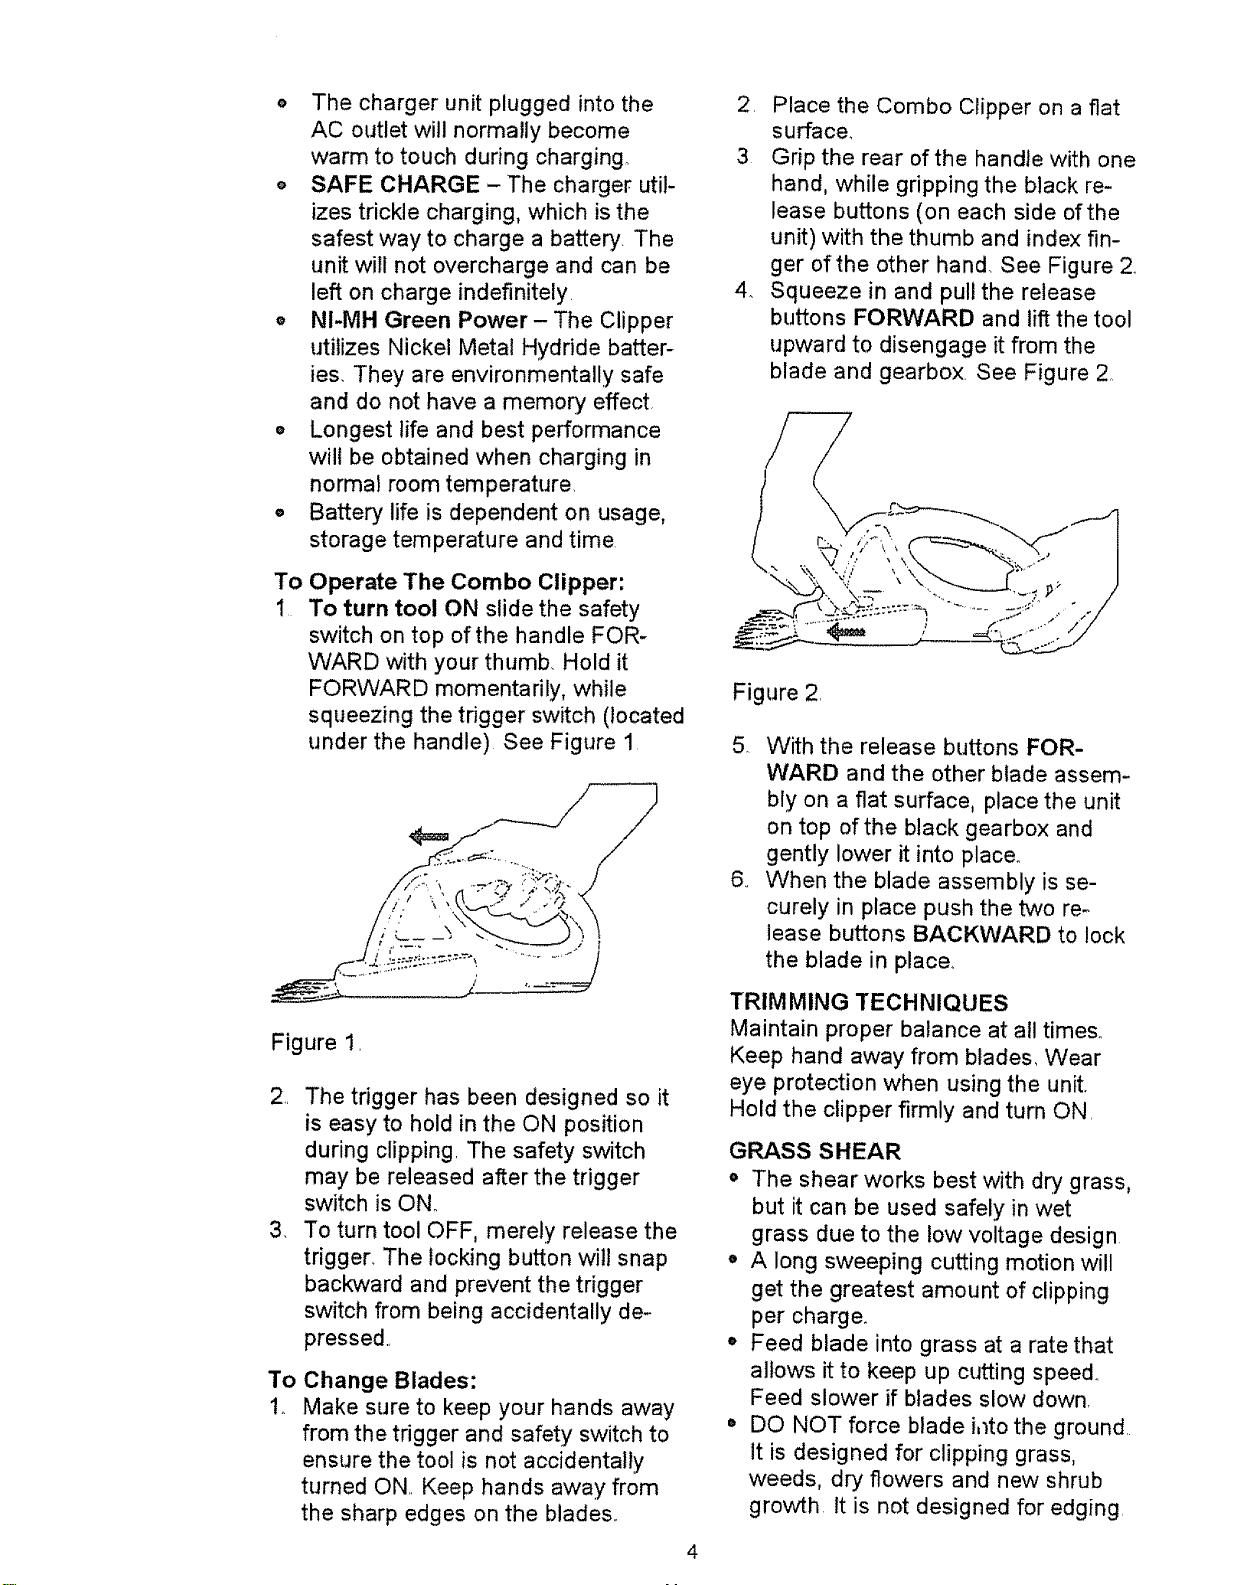
To Operate The Combo Clipper:
1 To turn tool ON slide the safety
switch on top of the handle FOR-
WARD with your thumb. Hold it
FORWARD momentarily, while
squeezing the trigger switch (located
under the handle) See Figure 1
Figure 1.
2.. The trigger has been designed so it
is easy to hold in the ON position
during clipping. The safety switch
may be released after the trigger
switch is ON.
3. To turn tool OFF, merely release the
trigger. The locking button ,will snap
backward and prevent the trigger
switch from being accidentally de-
pressed..
To Change Blades:
!_ Make sure to keep your hands away
from the trigger and safety switch to
ensure the tool is not accidentally
turned ON.. Keep hands away from
the sharp edges on the blades.
4
2. Place the Combo Ctipper on a flat
surface,
3 Grip the rear of the handle with one
hand, while gripping the black re-
lease buttons (on each side of the
unit) with the thumb and index fin-
ger of the other hand, See Figure 2.
4, Squeeze in and pull the release
buttons FORWARD and lift the tool
upward to disengage it from the
blade and gearbox, See Figure 2,
Figure 2.
5 With the release buttons FOR-
WARD and the other blade assem-
bly on a flat surface, place the unit
on top of the black gearbox and
gently lower it into place.
6.. When the blade assembly is se-
curely in place push the two re-
lease buttons BACKWARD to lock
the blade in place..
TRIM MING TECHNIQUES
Maintain proper balance at all times.
Keep hand away from blades, Wear
eye protection when using the unit,
Hold the clipper firmly and turn ON.
GRASS SHEAR
o The shear works best with dry grass,
but it can be used safely in wet
grass due to the low voltage design
• A long sweeping cutting motion will
get the greatest amount of clipping
per charge_
o Feed blade into grass at a rate that
allows it to keep up cutting speed..
Feed slower if blades slow down,
• DO NOT force blade Mto the ground.
It is designed for clipping grass,
weeds, dry flowers and new shrub
growth, tt is not designed for edging.
o Watch out for foreignobjectsin the
grass
SHRUB CLIPPER
,, The clipper works best with dry
shrubbery and bushes, but it could be
used safely with wet growth due to
the low voltage design
o A wide sweeping cutting motion away
from the body is recommended, and
will get the greatest amount of clip-
ping per charge,,
o A slight downward tilt of the blade, in
the direction of motion gets the best
result,
o To cut thicker twigs, use a little extra
pressure as you feed the blade
through the growth,
o This unit should NOT be used for
large trees and hedges with limbs in
excess of 5/16th of an inch
o Watch out for foreign objects
CAUTION: lfthe blades become JAM_
MED or stalled on a branch, stick, or
foreign object, release the trigger im-
mediately Failure to stop the unit when
the blades are jammed will cause ex-
cessive battery drainage and shorten
motor life (overheating). After the
blades have completely stopped moving,
carefully remove the obstruction.
BLADE CLEANING - After you have
OTHER LUBRICATION - No periodic
re-lubrication of the clipper's bearings
or other moving parts are required
CLEANING PLASTIC PARTS - Use
only warm water and mild soap to
clean plastic parts Many household
cleaners contain chemicals, which
could damage the plastic, Never use
gasoline, turpentine, paint thinner or
similar fluids,
BLADE NICKS AND BURRS -If you
accidentally hit a wire, fence, stone, or
other hard object, you may put a nick
on the blade.. There is no need to re-
move this nick or burr as long as it
does not interfere with the movement
of the blades If it does interfere, use
ONLY an oilstone to remove it. DO
NOT file or grind the blade as it will
alter the steel temper and reduce
useful life.
DROPPING THE COMBO CLIPPER -
If you drop the unit, carefully inspect it
for damage, if the blade is bent, hous-
ing cracked, or if you see any other
condition that may affect the safe op-
eration, contact your local Sears store
for repairs,
finished trimming, you may find that dirt
and vegetation have accumulated on
the blades, Wash the blades in water
after each use to prevent build-up, Hold
the unit, tilting it forward, to ensure that
NO water gets into the unit or the blade
gearbox, Only the blade tips should be
held under running water or in a pan of
water, Turn tool "ON" to help dislodge
any deposits,
BLADE LUBRICATION - After clean-
ing the blades, wipe them with a cloth
and allow to them dry Then, with a rag,
apply a thin film of engine oil to the top
and bottom of blades DO NOT overly
oil Turn the unit ON for a few seconds
to work lubricant between the blades
IMPORTANT: To assure product
SAFETY and RELIABILITY, repairs
and adjustments should be performed
by Sears service or other qualified
service organizations, always using
identical replacement parts.
TEMPERATURE - Temperature ex-
tremes limit the useful life of the bat-
tery. The best storage place is one that
is cool and dry Store the tool away
from direct sunlight, heating pipes,
furnaces, etc Do not store where tem-
peratures go below +40 F or above
+120 F
5
CHARGING - Always store the unit
with batteries fully charged., For off-
season Iong4erm storage you should
first recharge the unit for 20 hours
Then unplug it from charger,,
PREVENTING CORROSION - Fertiliz-
ers and other garden chemicals contain
compounds that greatly accelerate the
corrosion of metals, Do not store the
appliance on or adjacent to fertilizers or
chemicals. Prior to storage, clean and
oil blades as described in this manual_
Extension Handle Kit is available.
Note: Accessories are sold separately.
WARNING: Only use Sears approved
accessories with the Combo Clipper.
Use of non-approved accessories could
be hazardous
6
Cortadora combinada Craftsman con garantia total por un a5o
Siesta Cortadora combinada Craftsman falla debido a un defecto del
material o de fabricaci6n dentro de un aSo a partir de la fecha de compra,
devu_lvala a su tienda Sears o al punto de venta Craftsman m_s cercanos
en los Estados Unidos, y ser_ sustituida sin cargo alguno
Esta garantia es unicamente aplicable mientras la Cortadora combinada
sea utilizada en los Estados Unidos
Esta garant[a te ofrece derechos legales especificos, asi como otros der-
echos que varian de un estado a otro
Sears, Roebuck and Co., Dept. 817WA, Hoffman Estates, IL 60179
FF II11
LEA TODAS LAS INSTRUC-
CLONES
ADVERTENClA: At utilizar la
Cortadora, siempre deben to-
marse las precauciones b&sicas
de seguridad para reducir el des-
go de incendio, descarga el_ctrica
y lesiones personates, inctuido io
siguiente:;
Para reducir el riesgo de lesiones:
o Antes de cualquier uso, aseg_re-
se de que la persona que utilice
este producto el_ctrico lea y en-
tienda todas las instrucciones de
seguridad y de funcionamiento
contenidas en este manual
o Conserve estas instrucciones y
I_alas frecuentemente antes de su
utilizaci6n
o EVlTE ENTORNOS PELi-
GROSOS - No utilice la m_quina
en lugares mojados o ht_medos.
No la utilice bajo la lluvia
• MANTENGALA FUERA DEL
ALCANCE DE LOS NINOS- To-
dos los visitantes deber_n man-
tenerse a una distancia segura del
_rea de trabajo
7
o GUARDE LA UNIDAD APA-
GADA EN UN LUGAR CU-
BIERTO
Cuando no se utilice, la unidad
debe guardarse en un lugar cu-
bierto y seco - fuera del aicance
de los niSos
o NO FUERCE LA CORTA-
DORA- La cortadora har& mejor
su trabajo y con menos prob-
abilidad de riesgos de lesiSn si
se utiliza con et r_gimen para el
que fue diseSada
• UTILICE LA HERRAMIENTA
CORRECTA- No utilice la her-
ramienta para otto trabajo, ex-
cepto aquel para el cual fue
diseSada
o ADVERTENClA: MANTENGA
LAS MANOS Y TODAS LAS
PARTES DEL CUERPO LEJOS
de las cuchillas Los hordes es-
t&n afilados y pueden causar una
lesi6n incluso cuando la her-
ramienta est& apagada (OFF)
o UTILICE LA ROPA ADE-
CUADA- No use ropa holgada
o afhajas Se pueden atorar en
las piezas en movimiento AI tra-
bajar en exteriores se recomien-
da utilizar guantes de goma y
calzado apropiado Utilice pro-
tectores de cabello para sujetar
el cabello largo
O
NO SE ESTIRE DEMASIADO-
Mantenga el equilibrio y los pies
firmes en todo momento.
USE GAFAS DE SEGURIDAD -
Si el trabajo levanta mucho polvo,
siempre utilice la protecciSn ocu-
lar adecuada, asf como tapabocas
para la cara o el potvo
MANEJE CON CUIDADO LA
UNIDAD - Mantenga los bordes
de las cuchitlas limpios para ob-
tener un mejor rendimiento y re-
ducir el riesgo de lesiSn,. Siga las
instrucciones de lubricaciSn y
servicio.. Mantenga el mango
seco, limpio y libre de aceite y
gras&
EVlTE ENCENDER LA M,&QUI-
NA ACClDENTALMENTE - No
transporte la unidad con el dedo
en el interruptor,.
VERIFIQUE LAS PIEZAS
DANADAS -
Si la m_quina cortadora o el
paquete de cuchillas reciben un
fuerte impacto, verifique que las
piezas no se hayan daSado y que
la unidad funcione correctamente.
Verifique que las piezas en
movimiento no est_n de-
salineadas o dobladas, que no se
hayan roto o cualquier otra condi-
ciSn que pueda afectar el fun-
cionamiento. Una pieza daSada
deber& repararse correctamente o
sustituirse en un centro de servi-
cio autorizado.
MANTt_NGASE ALERTA- Est_
atento a !o que est_ haciendo,
Use el sentido comQn. No use ta
herramienta cuando est6 cansado.
NO AGARRE LAS CUCHILLAS
EXPUESTAS o los bordes afila-
dos al levantar o sostener la uni-
dad. No intente retirar et material
cortado o sostener el material que
se va a cortar cuando ias cuchillas
est_n en movimiento. Asegt'Jrese
de que el interruptor de la unidad
est_ apagado cuando se retira el
material atorado en las cuchillas
Para reducir riesgos al utilizar el car-
gador:
o NO utilice el cargador en exteriores
o en condiciones humedas,
util[celo unicamente en interiores.
o NO cargue la unidad cuando la
temperatura est_ por debajo de los
+4 ° C o por encima de los +48 ° C_
o Esta unidad y su cargador han sido
diseSados para trabajar en con-
junto.. NO cargue la cortadora
combinada con ningt_n otro carga-
dory NO use este cargador con
ningQn otro aparato
o El cargactor est_ diseSado para
funcionar con una corriente de 120
voltios NO intente utifizarlo con al-
gQn otro voltaje,
CONSERVE ESTAS JN-
STRUCCIONES
o CARGUE LA BATERiA ANTES
DE UTILIZARLA - La Cortadora
combinada no estQ totaimente car-
gada cuando usted la compra Por
Io tanto, antes de utilizar la unidad
debe cargar la baterra, Antes de
cargar la bateria, lea las instruccio-
nes de seguridad y de carga.
o EL TIEMPO DE EJECUClON Y
RENDIMIENTO ADECUADOS
t_nicamente se pueden obtener con
una bateda totalmente cargada.
• TIEMPO DE CARGA- 20 horas
de carga son suficientes para
abastecer la bateria de una carga
completa. AI utilizarse por primera
vez, despu_s de largos periodos
de inactividad o de alma-
cenamiento en temperaturas ex-
tremas, la bateria puede requerir
mayor tiempo de carga,
• BRAZO DE PARED PARA EL
CARGADOR - Antes de cargar la
unidad, asegQrese de que el brazo
para el cargador est_ bien asegu-
rado a la paredl ajuste los tornillos
a los tarugos de pared o utilice los
soportes de anclaje correspondi-
entes.
Para cargar la bateria:
5. Enchufe el cargador a un tomacorri-
ente CA de 120 voltios
6 Coloque la Cortadora combinada en
el brazo de pared para el cargador.
La Cortadora combinada ahora se
est_ cargando,
8. C_rguela por Io menos durante 20
horas
Observaciones de carga:
o PRECAUCION: El cargador puede
utilizarse con un ciclo de 60Hz, y
Qnicamente con una corriente AC de
115-120 V.
• Por Io general, la unidad del carga-
dor enchufada al tomacorriente de
CA est& caliente al tacto durante el
periodo de carga.
o CARGA SEGURA- El cargador
utiliza carga lenta, que es la forma
m&s segura para cargar una bater[a.
La unidad no se sobrecargarA y se
puede dejar cargando por tiempo
indefinido.
o Energia verde con niquel hi-
druro-La Cortadora utiliza baterias
de niquel hidruro Son seguras para
el medio ambiente y no tienen
efecto de memoria
o Se obtendr_n mayor duraci6n y
mejores rendimientos al cargar las
baterias a una temperatura ambi-
ente normal,
o La vida Qtil de la bateria depende de
su uso, de la temperatura de afma-
cenamiento y del tiempo.
Para operar la Cortadora combinada:
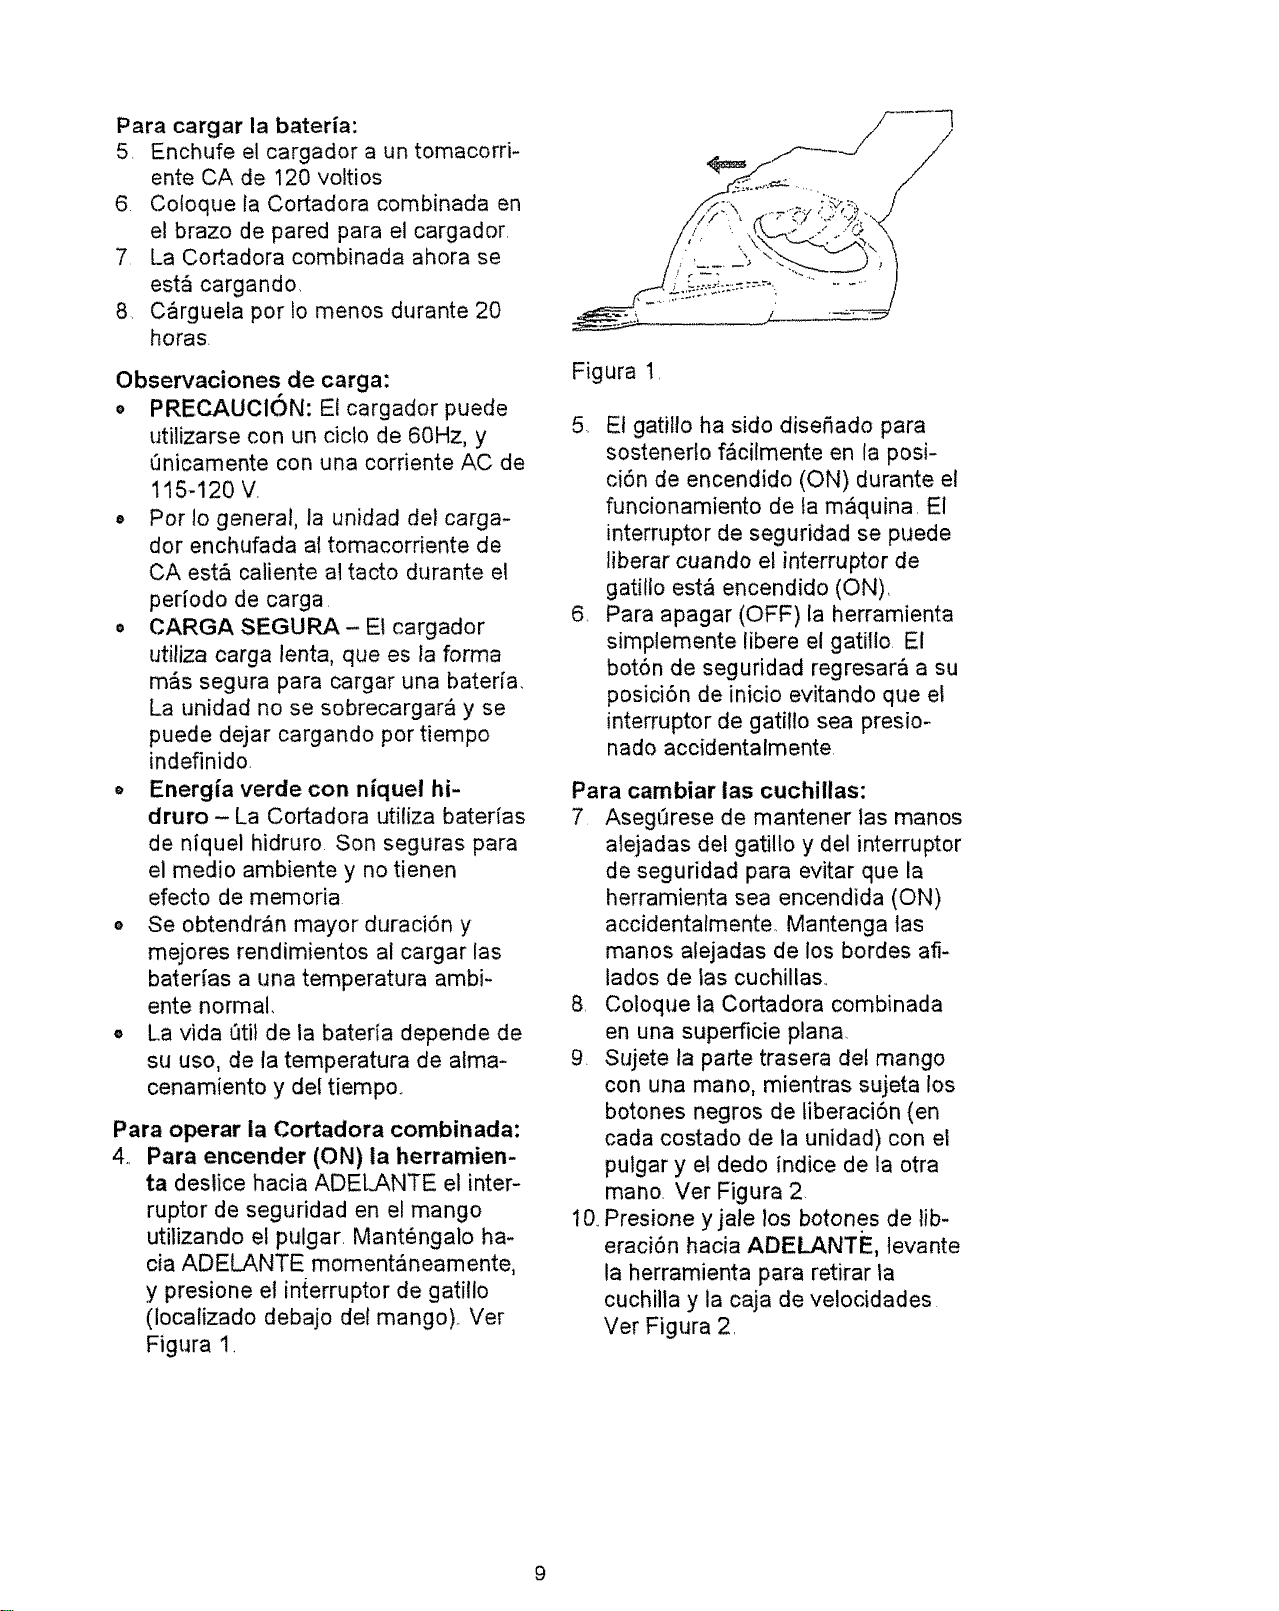
4., Para encender (ON) la herramien-
ta des!ice hacia ADELANTE el inter-
ruptor de seguridad en el mango
utilizando el pulgar. Mant6ngalo ha-
cia ADELANTE moment_neamente,
y presione el in{erruptor de gatillo
(Iocalizado debajo del mango). Ver
Figura 1.
/
Figura 1,
5. El gatillo ha sido diseSado para
sostenerlo f&cilmente en la posi-
ci6n de encendido (ON) durante el
funcionamiento de ta m&quina. E1
interruptor de seguridad se puede
liberar cuando el interruptor de
gatillo est_ encendido (ON),
6. Para apagar (OFF) la herramienta
simplemente libere el gatillo El
bot6n de seguridad regresar& a su
posici6n de inicio evitando que el
interruptor de gatillo sea presio-
nado accidentalmente
Para cambiar las cuchillas:
7 Aseg0rese de mantener las manos
alejadas del gatillo y del interruptor
de seguridad para evitar que la
herramienta sea encendida (ON)
accidentalmente. Mantenga tas
manos alejadas de los hordes aft-
lados de las cuchillas..
8. Coloque la Cortadora combinada
en una superficie plana.
9. Sujete la parle trasera del mango
con una mano, mientras sujeta los
botones negros de liberaci6n (en
cada costado de la unidad) con el
pulgar y el dedo indice de la otra
mano. Ver Figura 2.
10,.Presione y jale los botones de lib-
eraci6n hacia ADELANTE, tevante
la herramienta para retirar ta
cuchilla y la caja de velocidades
Ver Figura 2.
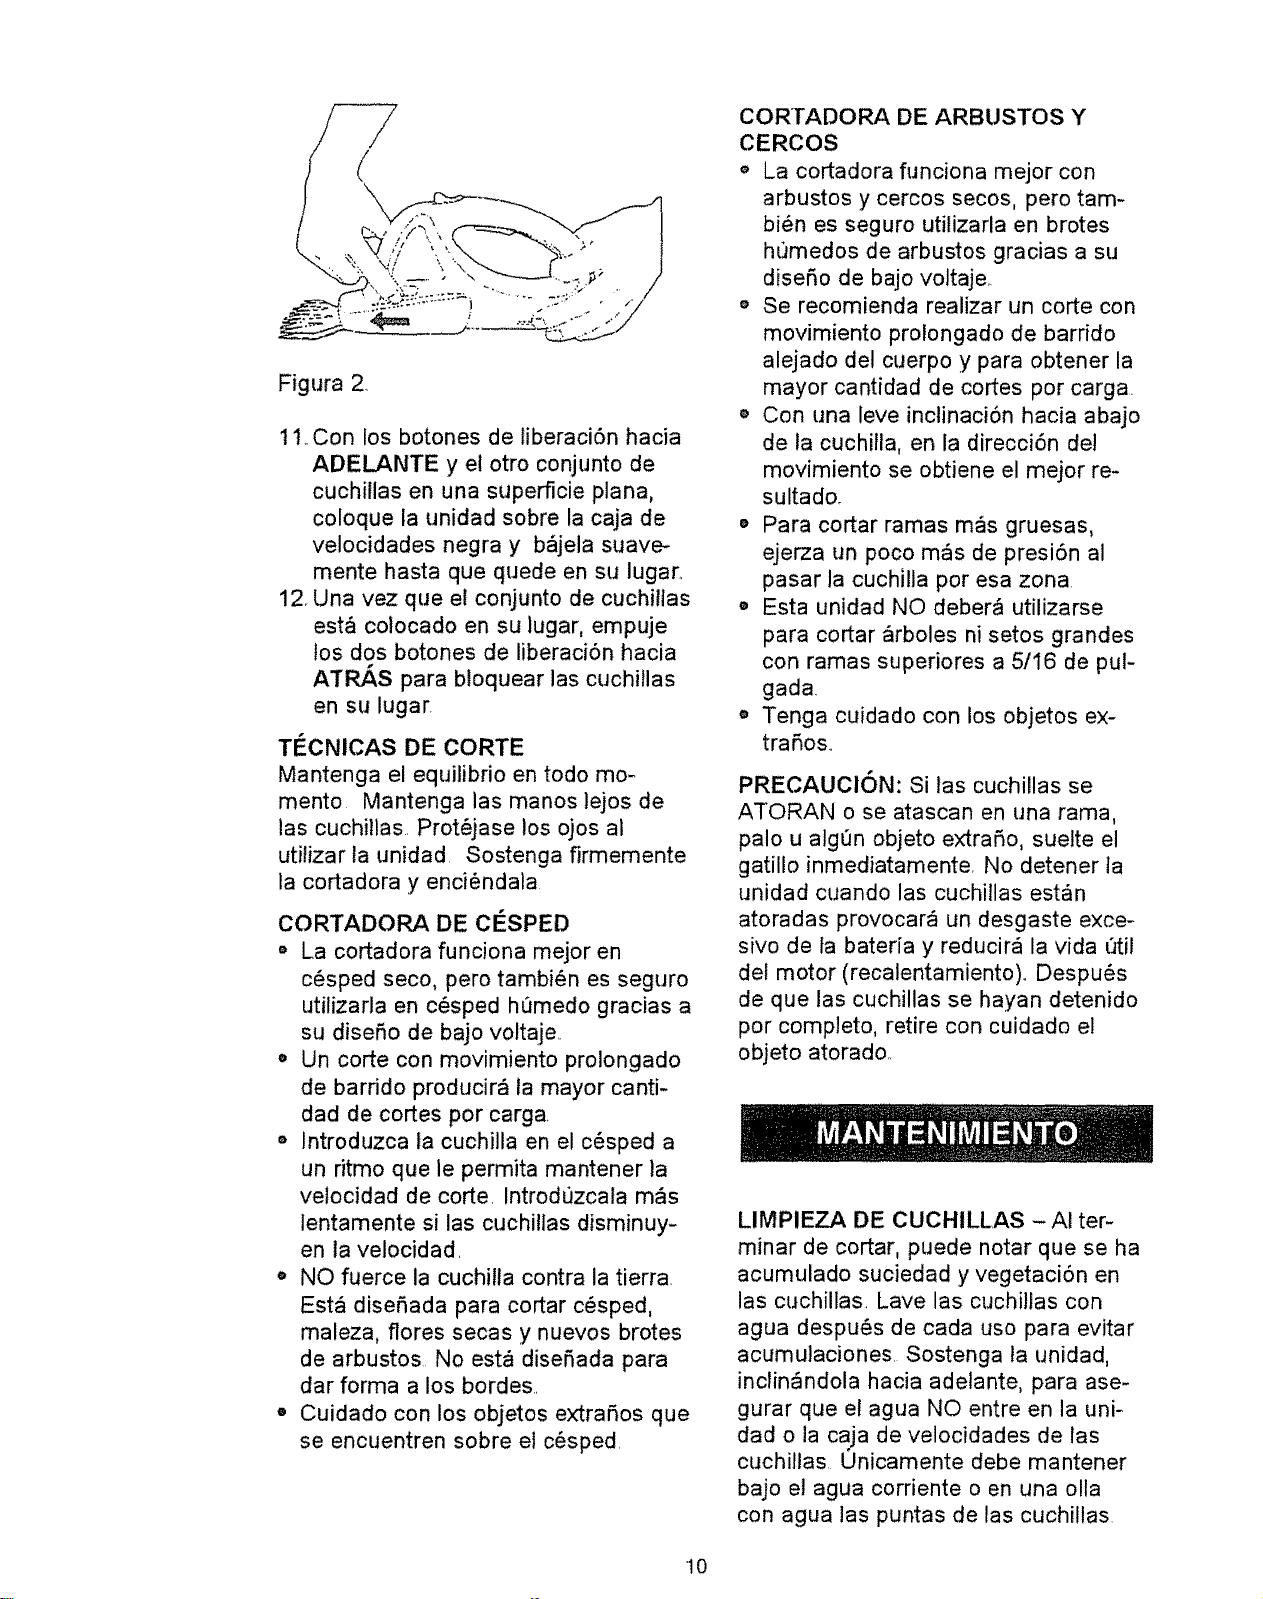
Figura2.
11..Con losbotonesde liberaci6nhacia
ADELANTE y elotro conjuntode
cuchillasen unasuperficieplana,
coloquela unidadsobrela cajade
velocidadesnegray b_jelasuave-
mente hasta quequedeen su lugar_
12.Unavez que elconjuntode cuchillas
est&cotocadoen sulugar,empuje
los dos botonesde liberaciSnhacia
ATP,_S para bloquearlascuchillas
en su lugar.
TE.CNICASDE CORTE
Mantengael equilibrioentodo mo-
mento Mantengalas manoslejos de
las cuchi!las.Prot_jaselos ojosal
utilizarla unidad. Sostengafirmemente
la cortadoray enci6ndala
CORTADORADECESPED
o La cortadorafuncionamejoren
c6spedseco,perotambi_nesseguro
utilizarlaen c_spedhQmedograciasa
su diseSode bajovoltaic.
• Un corte con movimiento prolongado
de barrido producir_, la mayor canti-
dad de cortes por carga
o Introduzca la cuchilla en el c6sped a
un dtmo que le permita mantener la
velocidad de corte. Introduzcala m&s
lentamente si las cuchillas disminuy-
en ta velocidad.
o NO fuerce la cuchilta contra la tierra
Est_ diseSada para cortar c_sped,
maleza, flores secas y nuevos brotes
de arbustos. No est_ diseSada para
dar forma a los bordes.
• Cuidado con los objetos extra_,os que
se encuentren sobre el cesped
CORTADORA DE ARBUSTOS Y
CERCOS
o La cortadora funciona mejor con
arbustos y cercos secos, pero tam-
bi_n es seguro utilizarla en brotes
humeclos de arbustos gracias a su
dise_o de bajo voltaje
o Se recomienda realizar un corte con
movimiento prolongado de barddo
alejado del cuerpo y para obtener la
mayor cantidad de cortes por carga.
o Con una leve inctinaci6n hacia abajo
de la cuchitla, en la direcci6n det
movimiento se obtiene el mejor re-
sultado.
° Para cortar ramas m_s gruesas,
ejerza un poco m_s de presiSn al
pasar la cuchilla por esa zona
o Esta unidad NO deber& utilizarse
para cortar _rboles ni setos grandes
con ramas superiores a 5/I6 de pul-
gada.
_, Tenga cuidado con los objetos ex-
tra_os.
PRECAUClON: Si las cuchillas se
ATORAN o se atascan en una rama,
palo u algQn objeto extraSo, suelte el
gatillo inmediatamente No detener ta
unidad cuando las cuchillas est_n
atoradas provocar_ un desgaste exce-
sivo de la bater[a y reducir_ la vida t)til
del motor (recalentamiento)_ Despu_s
de que las cuchillas se hayan detenido
por completo, retire con cuidado el
objeto atorado..
LIMPIEZA DE CUCHILLAS - AI ter-
minar de cortar, puede notar que se ha
acumulado suciedad y vegetaciSn en
las cuchillas. Lave las cuchillas con
agua despu6s de cada uso para evitar
acumulaciones. Sostenga la unidad,
inclin_ndola hacia adelante, para ase-
gurar que el agua NO entre en la uni-
dad o la ca ja de velocidades de las
cuchillas Unicamente debe mantener
bajo el agua corriente o en una olla
con agua las puntas de las cuchillas
1o
Enciendala herramientaparaayudara
sacar cualquierdep6sito
LUBRICAClON DE CUCHILLAS-
Despu_sde lavar lascuchiltas,lim*
pielas conun paso y deje quesese-
quen Luego,con untrapo, apliqueuna
capa delgadadeaceite paramotoren
la partesuperior einferiorde las
cuchillas NOengrase demasiado En-
cienda la unidadunos segundospara
dejar queel lubricantepenetrebienen
las cuchillas
LUBRICACIONADiClONAL- Los
cojinetesde la cortadoray dem&s
piezasmovibles no necesitanlubrica-
clonesposterioresperiSdicas
LIMPIEZADE PIEZAS DEPL._S-
TlCO - Utiliceunicamenteaguatibiay
jab6n suavepara limpiarlas piezasde
pl&stico,,Muchos delosart[culos de
timpiezaparael hogar contienenquimi-
cos quepuedendar_arel pf_stico
Nuncausegasolina, aguarr_s,tiner
para pinturao liquidos similares
MELLAS Y REBABAS DECUCHIL-
LAS- Si poraccidente golpeaun
afambre,una reja,una piedrao algun
otroobjetoduro, puede provocaruna
melta enla cuchiila No es necesario
retirar estamellao rebaba,siemprey
cuandono inte_era con el movimiento
de tascuchillas Si interfiere,utilice
0NICAMENTE unapiedra con aceite
pararetirarla NO lime opula facuchitla
ya que alterariaeltemple del aceroy
reduciriasuvida _'Jtil.
CAIDA DE LA CORTADORA
COMBINADA - Si se le cae la unidad,
verifique cuidadosamente si tiene algt'm
daSo Si la cuchilta est_ doblada, la
carcasa rota o si observa alguna otra
condici6n que pueda afectar el seguro
funcionamiento de la m_quina, comu-
niquese con la tienda Sears m_s cer-
cana para su reparaci6n
IMPORTANTE: Para garantizar la
SEGURIDAD y CONFIABILIDAD del
producto, toda reparaciQn y ajustes
deber_n ser realizados por el servicio
de Sears u otra organizaci6n de servi-
cio calificada, siempre utilizando
piezas de repuesto id6nticas
TEMPERATURA - Las temperaturas
extremas fimitan la vida 0til de la
bateria. E! mejor lugar de alma-
cenamiento es un lugar fresco y seco
Guarde la herramienta fuera de los
rayos directos de! sol, lejos de la tube-
ria de calefacciSn, hornos, etc. No
atmacene la herramienta donde ia
temperatura es menor a +4 ° C o supe-
rior a +48 ° C,
CARGA- Siempre guarde la unidad
con las baterias totalmente cargadas,
Para el almacenamiento fuera de tem-
porada y a largo plazo, primero debe
recargar la unidad durante 20 horas
Luego, descon_ctela del cargador
PREVENCIC)N DE CORROSION-
Los fertitizantes y otros productos
quimicos para jardin contienen com-
ponentes que aceleran en gran medi-
da fa corrosi6n de los metales. No
almacene la m_quina en o cerca de
fertilizantes o productos quimicos
Antes de almacenarta, limpie y engra-
se fas cuchiltas como 1o describe este
manual,
El kit de extensi6n de mango se
encuentra disponible,
Nota: Los accesorios se venden por
separado_
ADVERTENCIA: Con ta Cortadora
combinada, utilice unicamente los ac-
cesorios aprobados por Sears E1 uso
de accesorios no autorizados puede
resultar peligroso
I1

Get
fixed, at your home or ours!
For repair of major brand appliances in your own home...
no matter who made it, no matter who sold it!
1-800-4-MY-HOME ® Any_me,dayornight
(1-800-469-4663) (U.SA and Canada)
www, sears.com www.sears.ca
For repair of carry-in products like vacuums, lawn equipment, and
electronics, call for the nearest Sears Parts and Repair Center.
1-800-488-1222 Anytime, day or night(USA only)
www, sears,com
For the replacement parts, accessories and owner's manuals
that you need to do-it-yourself, call Sears PartsDirectSM!
1-800-366-PART
('1-800-366-7278)
6 &m. - 11 pom, 7 days a week
(U.SA. only)
www.sea rs.comipartsdirect
To purchase or inquire about a Sears Service Agreement
or Sears Maintenance Agreement:
1-800-827-6655 (USoA.) 1-800-361-6665 (Canada)
7 &m.- 5 pomo,CST, Mon. - Sat. 9am - 8 p.m EST,M- F,4 p.rn Sat.
Para pedir serviciode reparaci6na
domidlio, yparaordenar piezas:
1-888.SU4-1OGARsM
(1-888-.784--6427)
Au Canada pour se_ce enfranqais:
14_-LE-FOYER Mc
(1-800-533_937)
WWw.searsoa
© Sears,RoebuckandCo.
® Registered Trademark t TMTrademark / sMService Mark of Sears, Roebuck and Co
® Mama Registrada / TMMarca de F_brica / SMMarca de Ser¢icio de Sears, Roebuck and Co
MCMarque de commerce / MDMarque d_pos_e de Sears, Roebuck and Co