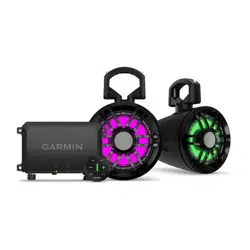

TREAD
®
AUDIO SYSTEM
Owner’s Manual

© 2022 Garmin Ltd. or its subsidiaries
All rights reserved. Under the copyright laws, this manual may not be copied, in whole or in part, without the written consent of Garmin. Garmin reserves the right to change or
improve its products and to make changes in the content of this manual without obligation to notify any person or organization of such changes or improvements. Go to
www.garmin.com for current updates and supplemental information concerning the use of this product.
Garmin
®
, the Garmin logo, ANT
®
, Fusion
®
, the Fusion logo, and Tread
®
are trademarks of Garmin Ltd. or its subsidiaries, registered in the USA and other countries. These trademarks
may not be used without the express permission of Garmin.
The BLUETOOTH
®
word mark and logos are owned by the Bluetooth SIG, Inc. and any use of such marks by Garmin is under license.

Table of Contents
Getting Started................................. 1
Installation....................................... 1
Tools and Materials Needed.................. 1
Tread Audio Box Mounting
Considerations........................................ 2
Mounting the Tread Audio Box Black
Box Device........................................... 2
Connections......................................... 2
Port Identification............................ 3
Speaker and LED Wiring Harness
Wire and Connector
Identification.................................... 4
RCA Wiring Harness Wire and
Connector Identification..................6
Connecting the Device to Vehicle
Power............................................... 7
Using the Heat-Shrink Crimp
Connectors....................................... 8
Complete System Wiring................. 8
Speaker Zones............................... 10
Single-Zone System Wiring
Example..........................................10
Wireless Remote Mounting
Considerations...................................... 10
Mounting the Wireless Remote........ 11
Mounting the Speakers and Brackets..11
Wiring................................................. 13
Wire Gauge Guide.......................... 13
Additional Speakers...................... 13
Pairing and Setup........................... 13
Pairing with a Garmin Navigation
Device.................................................... 13
Pairing with Your Smartphone............. 14
Wireless Remote Overview............. 14
Connecting the Wireless Remote to your
Tread Audio Box.................................... 15
Tread App...................................... 16
LED Controls.......................................... 16
Enabling LED Groups........................ 17
LED Light Settings............................. 17
Changing the Media Source................. 17
Audio Zone Settings..............................18
Device Maintenance....................... 18
Garmin Support Center......................... 18
Device Care............................................18
Cleaning the Outer Casing................ 18
Cleaning the Speakers and
Brackets............................................. 18
Updating Device Firmware................... 18
Replacing the Wireless Remote
Battery....................................................19
Troubleshooting............................. 20
My Tread Audio Box will not stay
connected.............................................. 20
There is no sound coming from the
speakers................................................ 20
The system lacks bass or high
frequencies............................................ 20
The audio is distorted........................... 20
The LED lights will not turn on..............20
Can the device get wet?........................ 20
Device Information......................... 21
Tread Audio Box Specifications........... 21
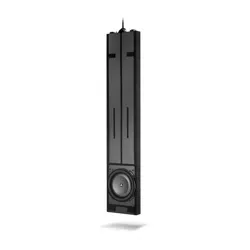
Tread 6.5" XS-LED Tower Speakers
Specifications........................................22
Dimensions........................................ 23
Bracket Specifications.......................... 23
Bracket Side Dimensions.................. 24
Bracket Top Dimensions...................24
Index.............................................. 25
Table of Contents i


Getting Started
WARNING
See the Important Safety and Product Information guide in the product box for product warnings and other
important information.
You can permanently damage your ears and lose hearing if you listen to the stereo at high volume. If you
experience ringing in your ears or muffled speech, stop listening and have your hearing checked.
Garmin
®
strongly recommends having an experienced installer with proper knowledge of electrical systems
install the device. Incorrectly wiring the power cables can result in damage to the device, the vehicle, or the
battery, and can cause bodily injury.
NOTICE
Disconnect the negative battery terminal in the vehicle before installing the device to prevent an electrical short
circuit. Reconnect the vehicle battery terminals only after installation is complete.
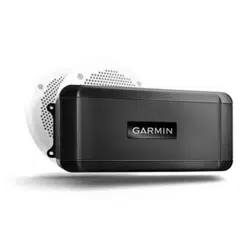
1 Mount the Tread Audio Box device (Tread Audio Box Mounting Considerations, page 2).
2 Mount the Tread 6.5" XS-LED Tower Speakers (Mounting the Speakers and Brackets, page 11).
3 Connect the Tread Audio Box device to vehicle power (Connecting the Device to Vehicle Power, page 7).
4 Pair your Tread Audio Box device with a compatible Garmin navigation device (Pairing with a Garmin
Navigation Device, page 13) or a smartphone (Pairing with Your Smartphone, page 14).
Installation
Tools and Materials Needed
• Phillips screwdriver
• Electric drill
• Drill bit (the size varies based on the surface material and screws used)
• Crimping pliers
• Wire strippers
• Heat gun
• 4 mm and 5 mm hex drivers or hex keys
NOTE: For customized installations, additional tools and materials may be needed.
Getting Started 1

Tread Audio Box Mounting Considerations
CAUTION
In high ambient temperatures and after extended use, the device enclosure may reach temperatures deemed
dangerous to touch. Therefore, you must install the device in a location where it is not touched during operation.
NOTICE
The storage and operating temperature ranges for this device are listed in the product specifications (Device
Information, page 21). Extended exposure to temperatures exceeding the specified temperature range, in
storage or operating conditions, may cause device failure. Device damage and related consequences caused by
extended exposure to these conditions are not covered by the warranty.
• You must mount the device in a location with adequate ventilation where it is not exposed to extreme
temperatures.
• You should mount the device so that the cables can be connected easily.
• To achieve IP67 water ingress protection and optimal heat sink cooling, you must mount the device on a
vertical surface with the connectors pointing downward.
• You can mount the device on a horizontal surface, but such positioning might not achieve IPX67 water
ingress protection.
• To avoid interference with a magnetic compass, you should install the device at least 203 mm (8 in.) away
from a compass.
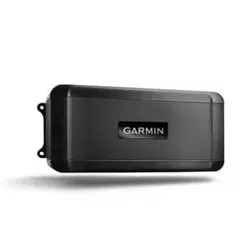
Mounting the Tread Audio Box Black Box Device
Before you mount the device, you must select a mounting location, and determine what screws and other
mounting hardware are needed for the surface.
1 Place the black box device in the mounting location, and mark the location of the pilot holes.
2 Drill a pilot hole for one corner of the device.
3 Loosely fasten the device to the mounting surface with one corner, and examine the other three pilot-hole
marks.
4 Mark new pilot-hole locations if necessary, and remove the device from the mounting surface.
5 Drill the remaining pilot holes.
6 Secure the device to the mounting location.
Connections
The stereo must be connected to power, to speakers, and to media input sources to function correctly. You
should carefully plan the layout of the stereo, speakers, and your input sources before making any connections.
2 Installation
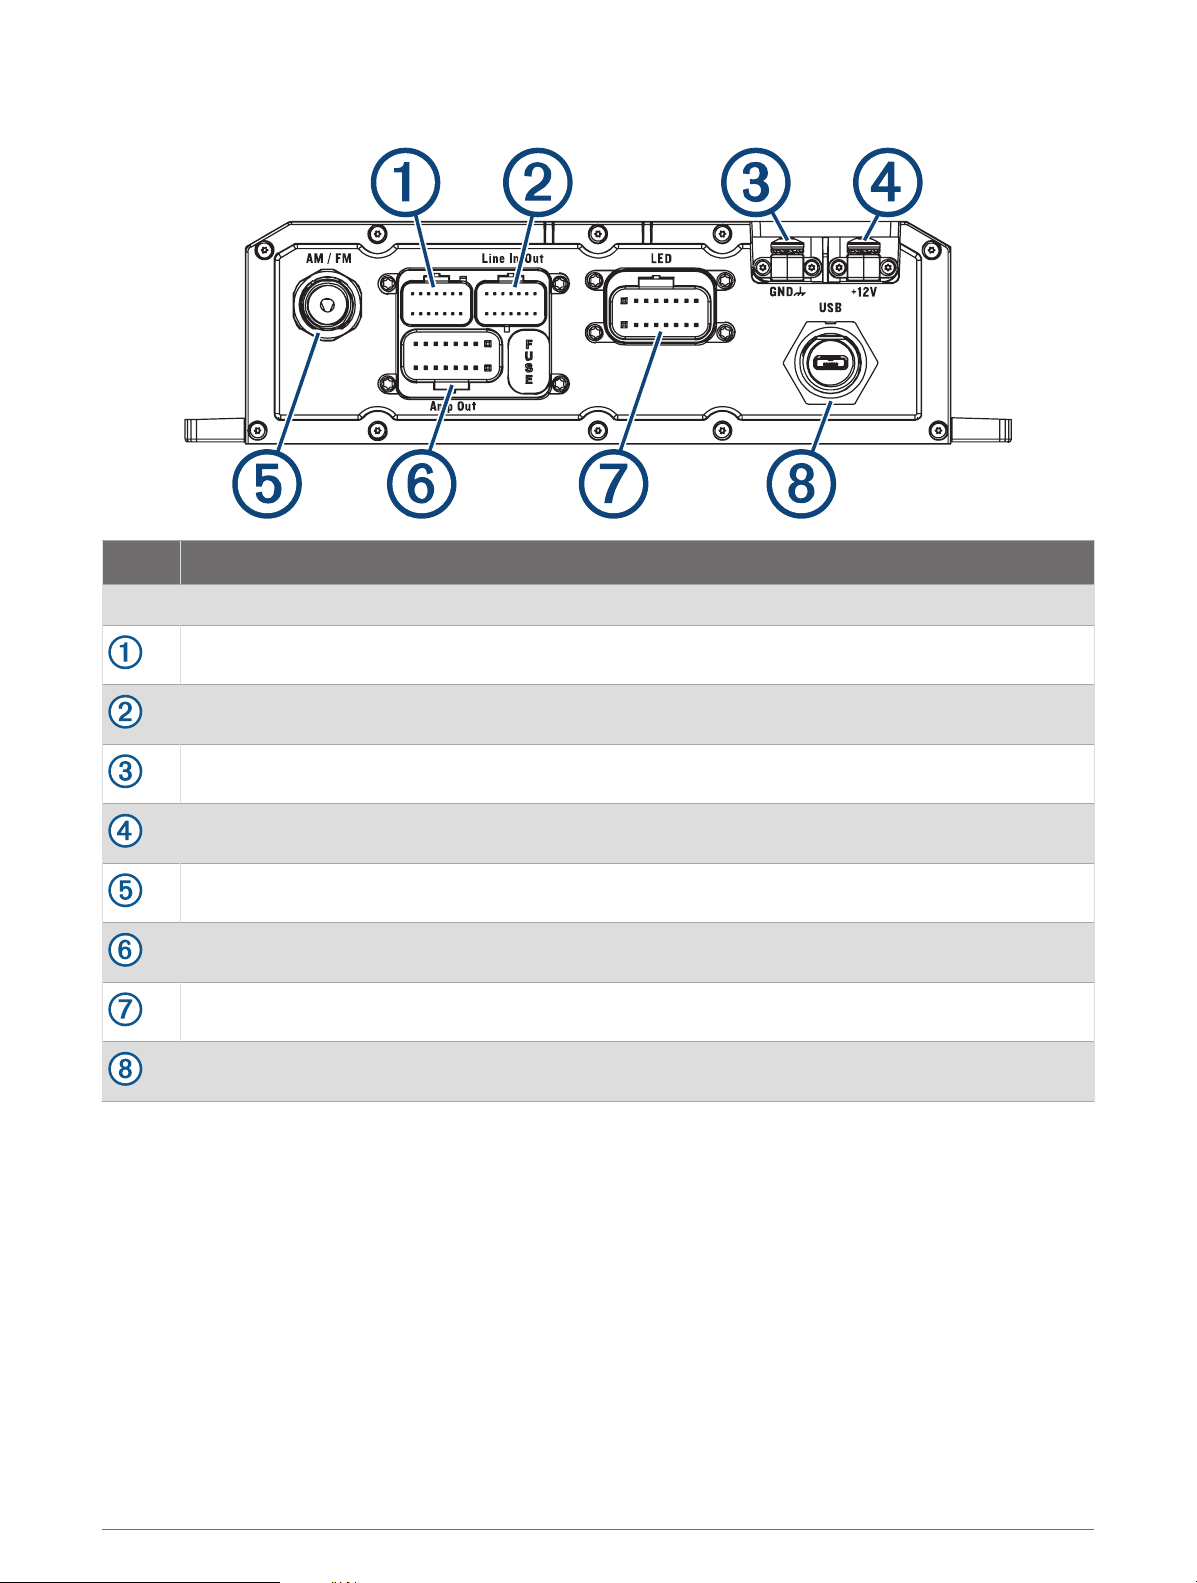
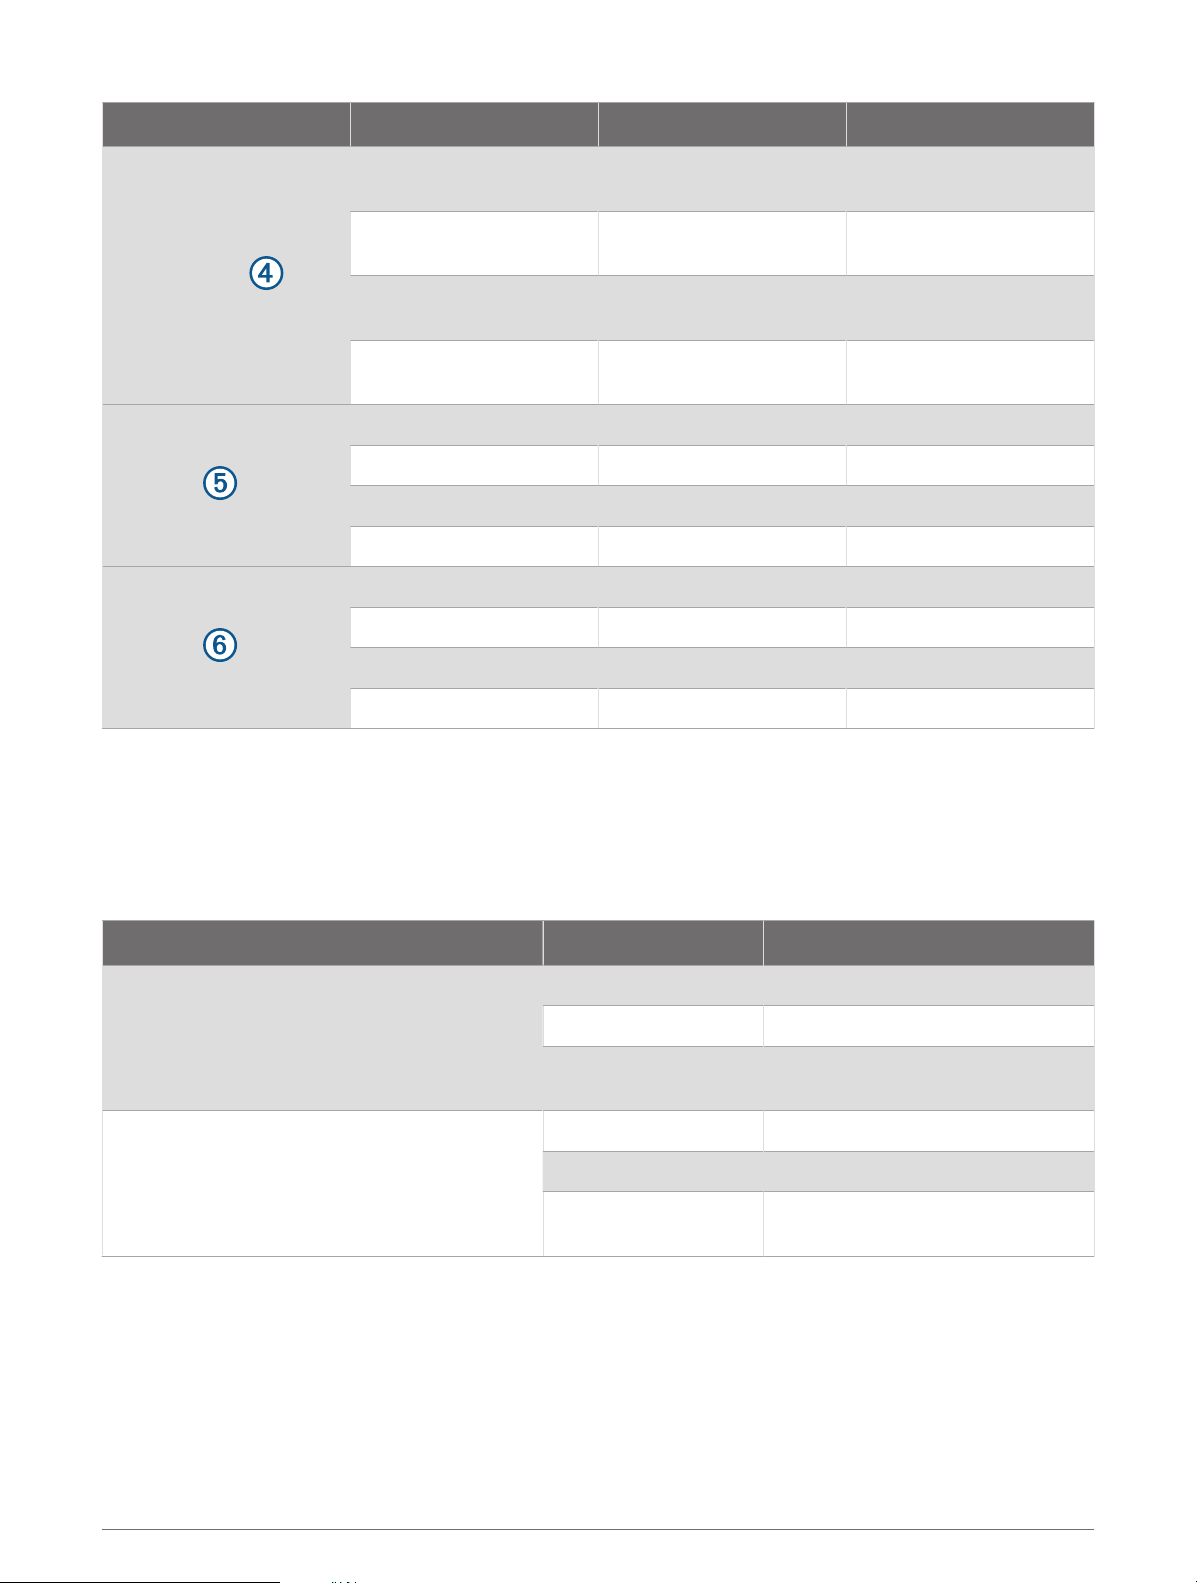
Port Identification
Item Description
FUSE Contains the 15 A fuse for the LED outputs.
Not used.
Connects the device to the auxiliary in and line/subwoofer out wiring harness.
Connects the device to the ground terminal wire (GND).
Connects the device to the +12V terminal wire.
Connects the device to the AM/FM antenna.
Connects the device to the speaker wiring harness.
Connects the device to the LED wiring harness.
Connects the device to an optional USB accessory.
Installation 3
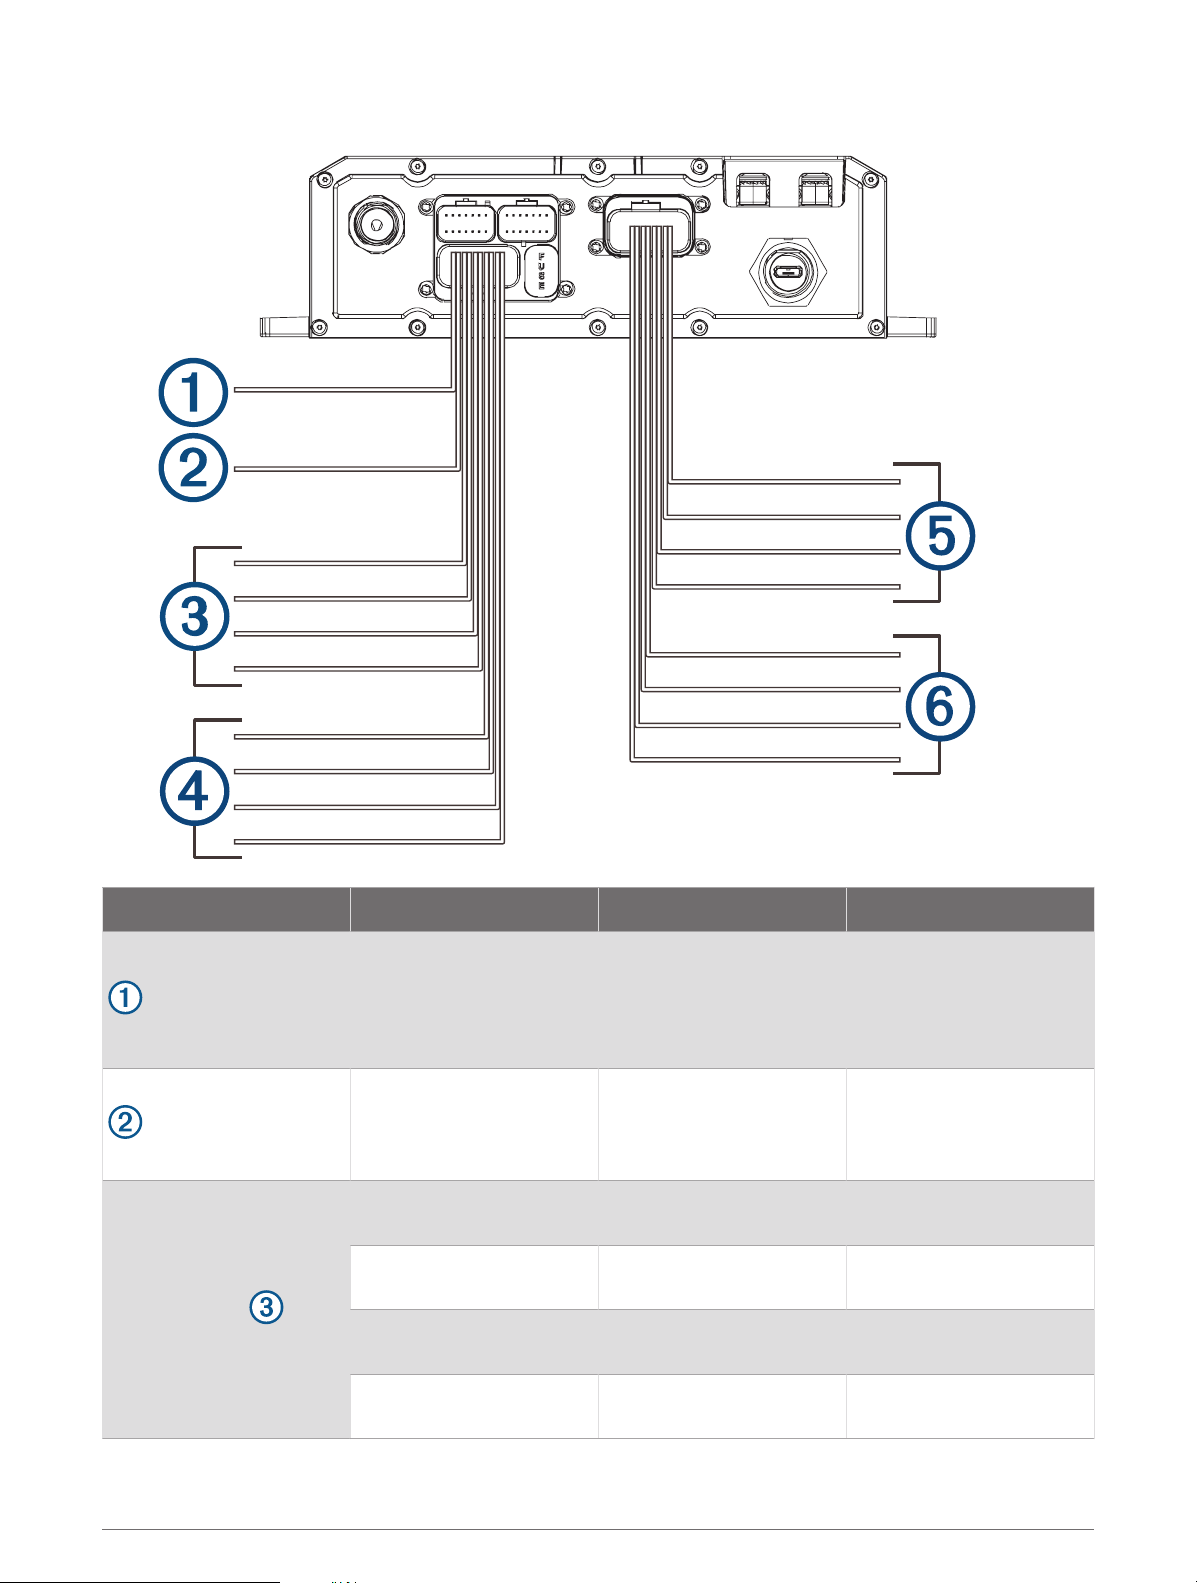
Speaker and LED Wiring Harness Wire and Connector Identification
Wire Group Wire Function Wire Color/Number Notes
Ignition Red
Connects to the vehicle
accessory line. If the
ignition wire is unused,
ground the ignition wire or
leave it disconnected.
Amplifier on Blue
Connects to an optional
external amplifier to turn it
on when the stereo turns
on.
Speaker zone 1
Left (+) White
Connects to the included
speaker.
Left (-) White with a black stripe
Connects to the included
speaker.
Right (+) Gray
Connects to the included
speaker.
Right (-) Gray with a black stripe
Connects to the included
speaker.
4 Installation
Wire Group Wire Function Wire Color/Number Notes
Speaker zone 2
Left (+) Green
Connects to an optional
additional speaker.
Left (-) Green with a black stripe
Connects to an optional
additional speaker.
Right (+) Purple
Connects to an optional
additional speaker.
Right (-) Purple with a black stripe
Connects to an optional
additional speaker.
LED RGB1
Power Black
Red LED Red
Green LED Green
Blue LED Blue
LED RGB2
Power Black
Red LED Red
Green LED Green
Blue LED Blue
Addressable LED Wiring Considerations
You can wire addressable LED lights to your Tread Audio Box. For more information, see the manual for your
addressable LED lights.
Compatible addressable LED types:
• WS2812B
• WS2813
Addressable LED LED Wire Color Wire Function
Addressable LED 1
Red +5V Power
White Ground
Green with a black
stripe
Data
Addressable LED 2
Red +5V Power
White Ground
Green with a black
stripe
Data
Installation 5
RCA Wiring Harness Wire and Connector Identification
Wire Function
Wire Color/
Number
Notes
Auxiliary in left
Auxiliary in right
Provides a red and white RCA stereo line input for audio sources, such as a
CD or MP3 player.
Line out left
Line out right
Provides a full-range output to an external amplifier, and is associated with
the volume control.
If you are connecting to an external amplifier, you should use a ground loop
isolator to ensure a clear signal.
Subwoofer out
Provides a single mono output to a powered subwoofer or subwoofer
amplifier.
If you are connecting to an external amplifier, you should use a ground loop
isolator to ensure a clear signal.
6 Installation
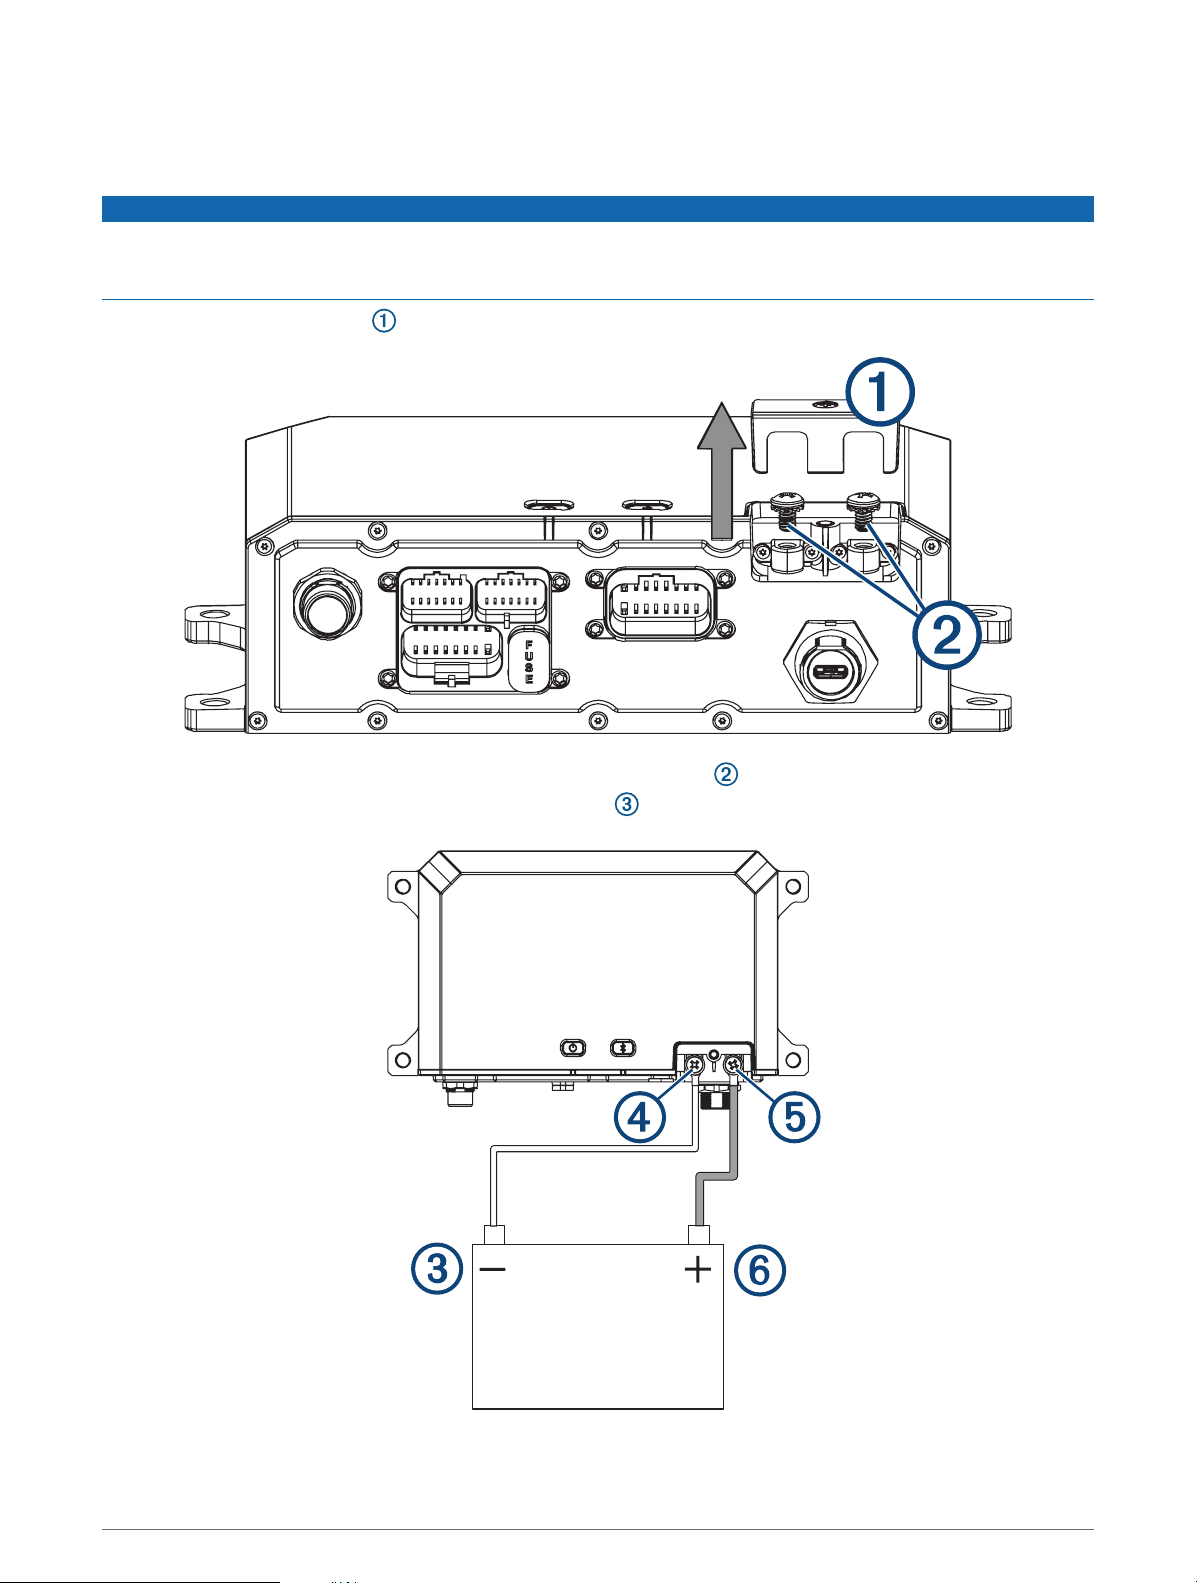
Connecting the Device to Vehicle Power
You should always confirm all electrical connections are secure and will not come loose while operating the
device.
NOTICE
If the ignition wire is not used, do not tie the ignition to the positive terminal on the vehicle battery. Ground the
ignition wire or leave it disconnected. Failure to ground or disconnect the ignition wire when the ignition is not
used could prevent the device from powering on.
1 Remove the terminal cover using a Phillips screwdriver.
2 Remove the screws from the GND terminal and the +12V terminal .
3 Connect the large ring end of the included ground wire to the negative terminal on the vehicle battery.
Installation 7
4 Connect the small ring end of the ground wire to the GND terminal on the device.
5 Tighten the screw on the GND terminal.
You should confirm the screws cannot be loosened by hand.
6 Connect the small ring end of the included 12V cable to the +12V terminal on the device.
7 Tighten the screw on the +12V terminal.
You should confirm the screws cannot be loosened by hand.
NOTICE
Do not overtighten the screw on the +12V terminal to prevent damage to the terminal.
8 Connect the large ring end of the 12V cable to the positive terminal on the vehicle battery.
9 Replace and tighten the terminal cover on the device.
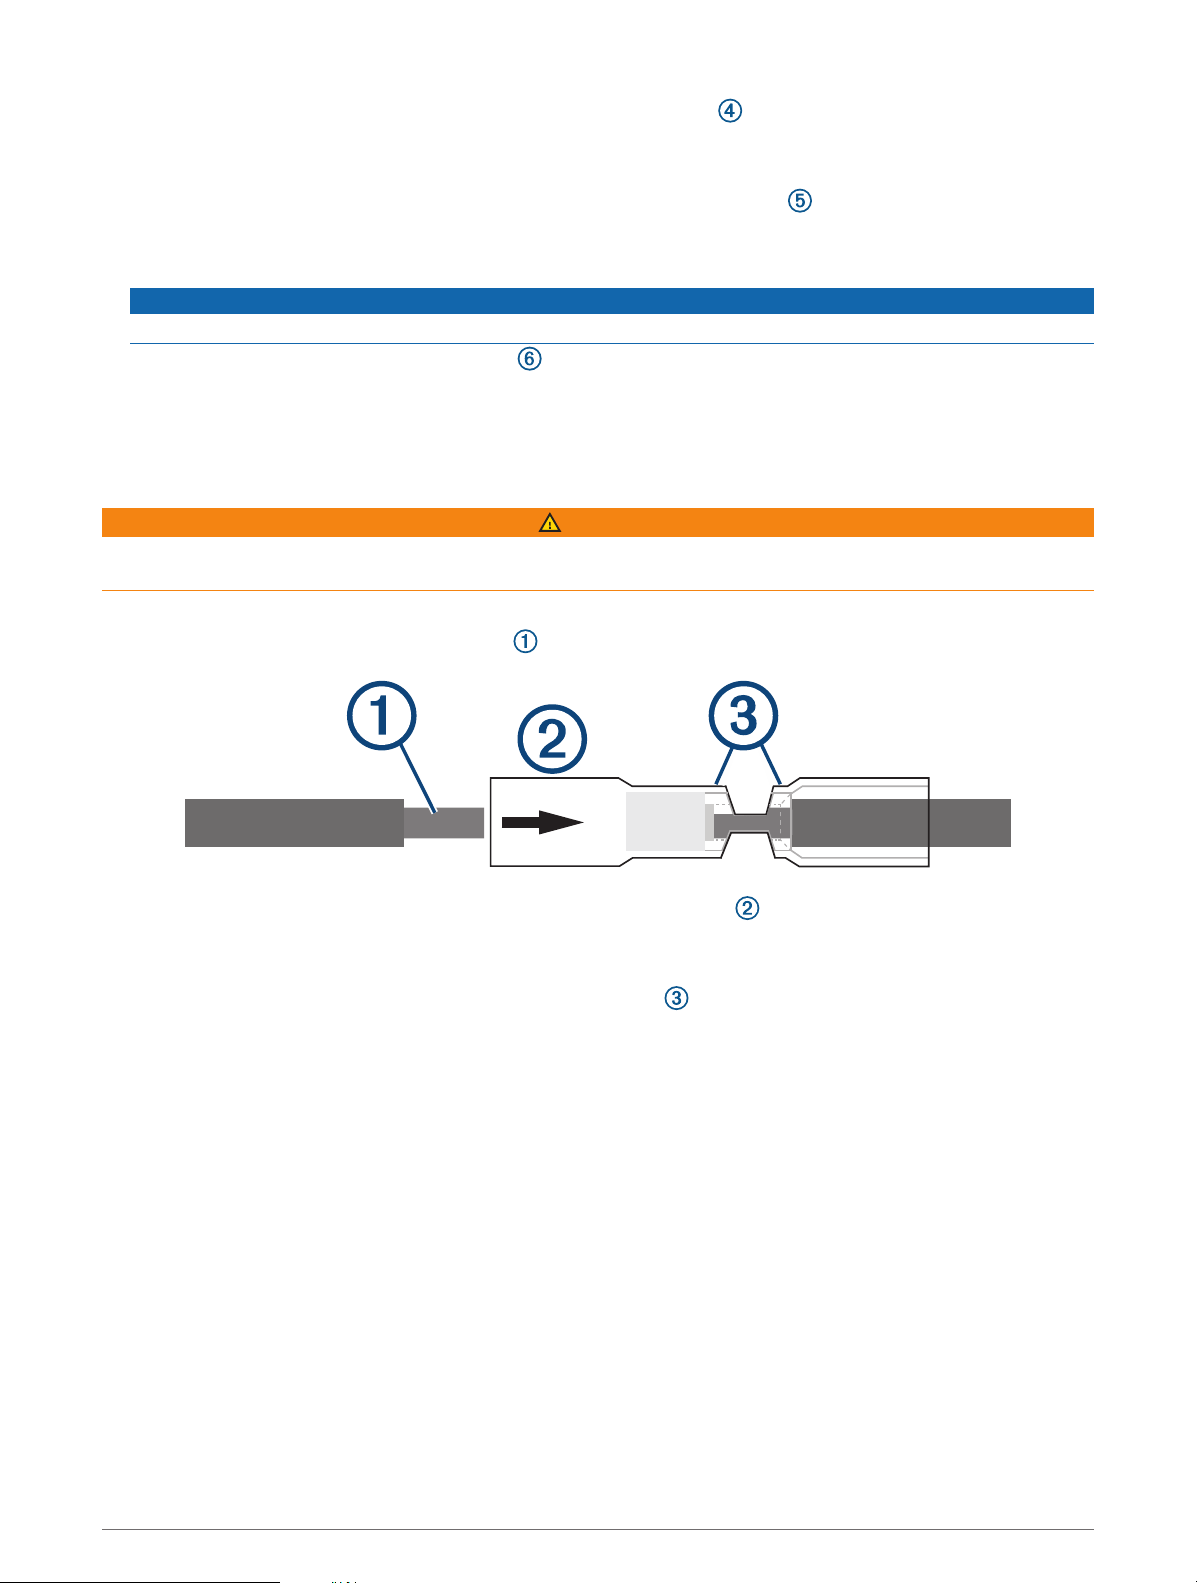
Using the Heat-Shrink Crimp Connectors
You should use the included heat-shrink crimp connectors to make a water-tight connection between the bare
wires.
WARNING
Only use the heat gun to apply heat to the heat-shrink crimp connectors in a well-ventilated area. Do not use the
heat gun near clothing or bare skin. Doing so can result in property damage or serious injury.
1 Using wire strippers, strip 6 mm (
1
/
4
in.) off the end of each bare wire.
2 If necessary, twist the strands of each wire clockwise to bundle them together.
3 Insert one bare wire into one end of the heat-shrink crimp connector .
The bare wires are not secure until they are crimped and sealed.
4 Insert the corresponding bare wire into the other end of the heat-shrink crimp connector.
5 Using pliers, crimp both sides of the center of the connector to secure the connection.
6 Using a heat gun, apply heat to the heat-shrink crimp connector until the connector is sealed to the wires.
Do not apply heat to the wires directly.
Complete System Wiring
This diagram illustrates a system installation with an external amplifier and subwoofer connected to the stereo
using a line out.
NOTE: You can also connect speakers to the speaker wires for the internal stereo amplifier while using an
external amplifier connected to the line out. Adjusting the volume affects speakers connected to the internal
amplifier and speakers connected to the line out. This may result in uneven volume levels.
8 Installation
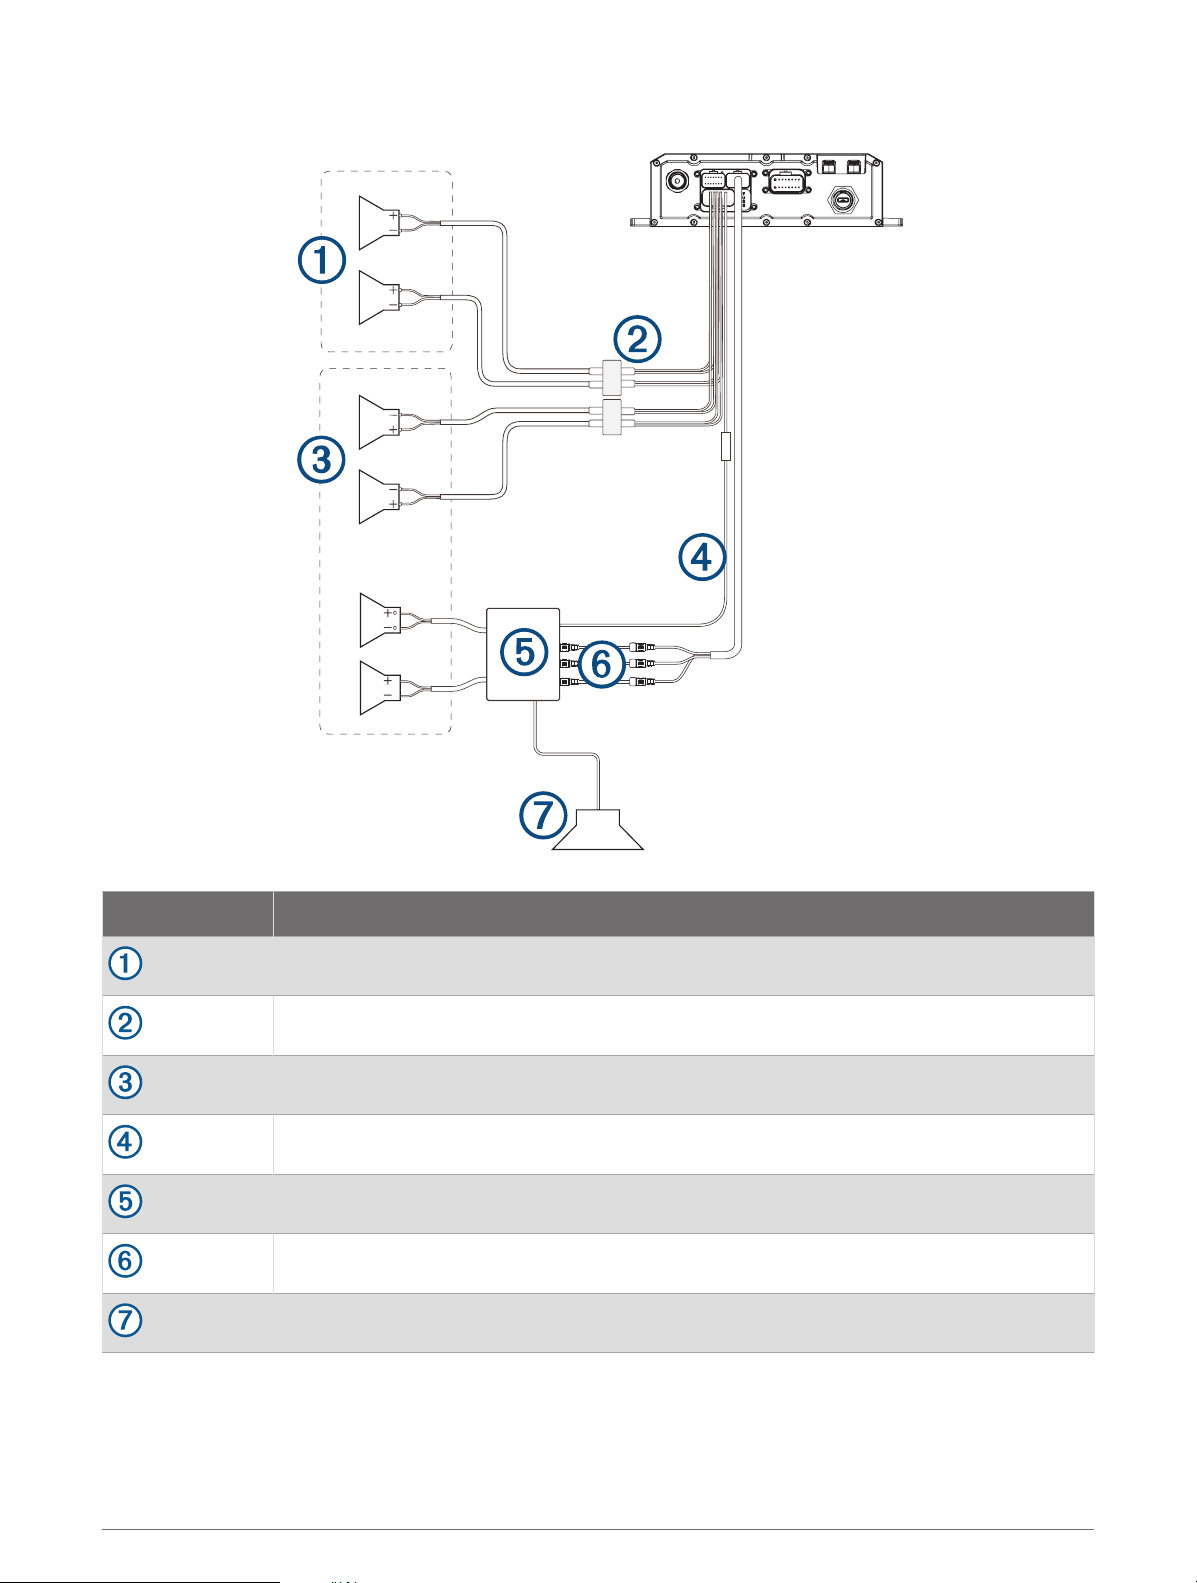
Item Description
Zone 2 speakers
Water-tight connection
Zone 1 speakers
Amplifier-on signal wire
Powered amplifier
Line out and subwoofer out
Subwoofer
Installation 9
Speaker Zones
You can group speakers in one area into speaker zones. This enables you to control the audio level of the each
zone individually.
Zones 1 and 2 are powered by the on-board amplifier. To use the RCA line output, you must connect an external
amplifier.
You can set the balance, tone, and name for each zone, and the fade between zones.
Single-Zone System Wiring Example
Speakers
Water-tight connection
Wireless Remote Mounting Considerations
NOTICE
Selecting the correct mounting location is critical to optimize the performance of the wireless remote.
• You must mount the wireless remote in a location that is within 10 m (33 ft.) of the stereo.
• You must mount the wireless remote in a location where it is not submerged.
• You should select a flat mounting surface for the best results.
• The mounting surface must be free of dirt, debris, wax, or coatings.
• Move away from sources that can interfere with the wireless remote's operation. Sources of interference may
include strong electromagnetic fields, some 2.4 GHz wireless sensors, high-voltage power lines, electric
motors, and wireless LAN access points.
• You should install the wireless remote in a location where you can allow the adhesive to dry at room
temperature for 72 hours.
10 Installation
Mounting the Wireless Remote
1 Select an appropriate location for the remote control (Wireless Remote Mounting Considerations, page 10).
2 Test the range at the selected location by holding the wireless remote at the location, pressing a few buttons,
and confirming the correct operation.
3 Thoroughly clean and dry the mounting surface using a mixture of water and isopropyl alcohol.
The mounting surface must be free of dirt, debris, wax, or coatings.
4 Place the wireless remote on the mount, and rotate the remote until you hear a click.
5 Remove the backing from the adhesive.
6 Carefully orient the wireless remote in the mount with the Fusion
®
logo at the bottom.
NOTICE
It is extremely difficult to remove the adhesive. Some mounting surfaces might be damaged after removing
the adhesive.
7 Press the wireless remote in the mount firmly onto the mounting surface, maintaining pressure for at least
60 seconds.
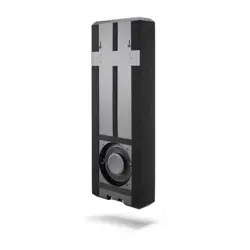
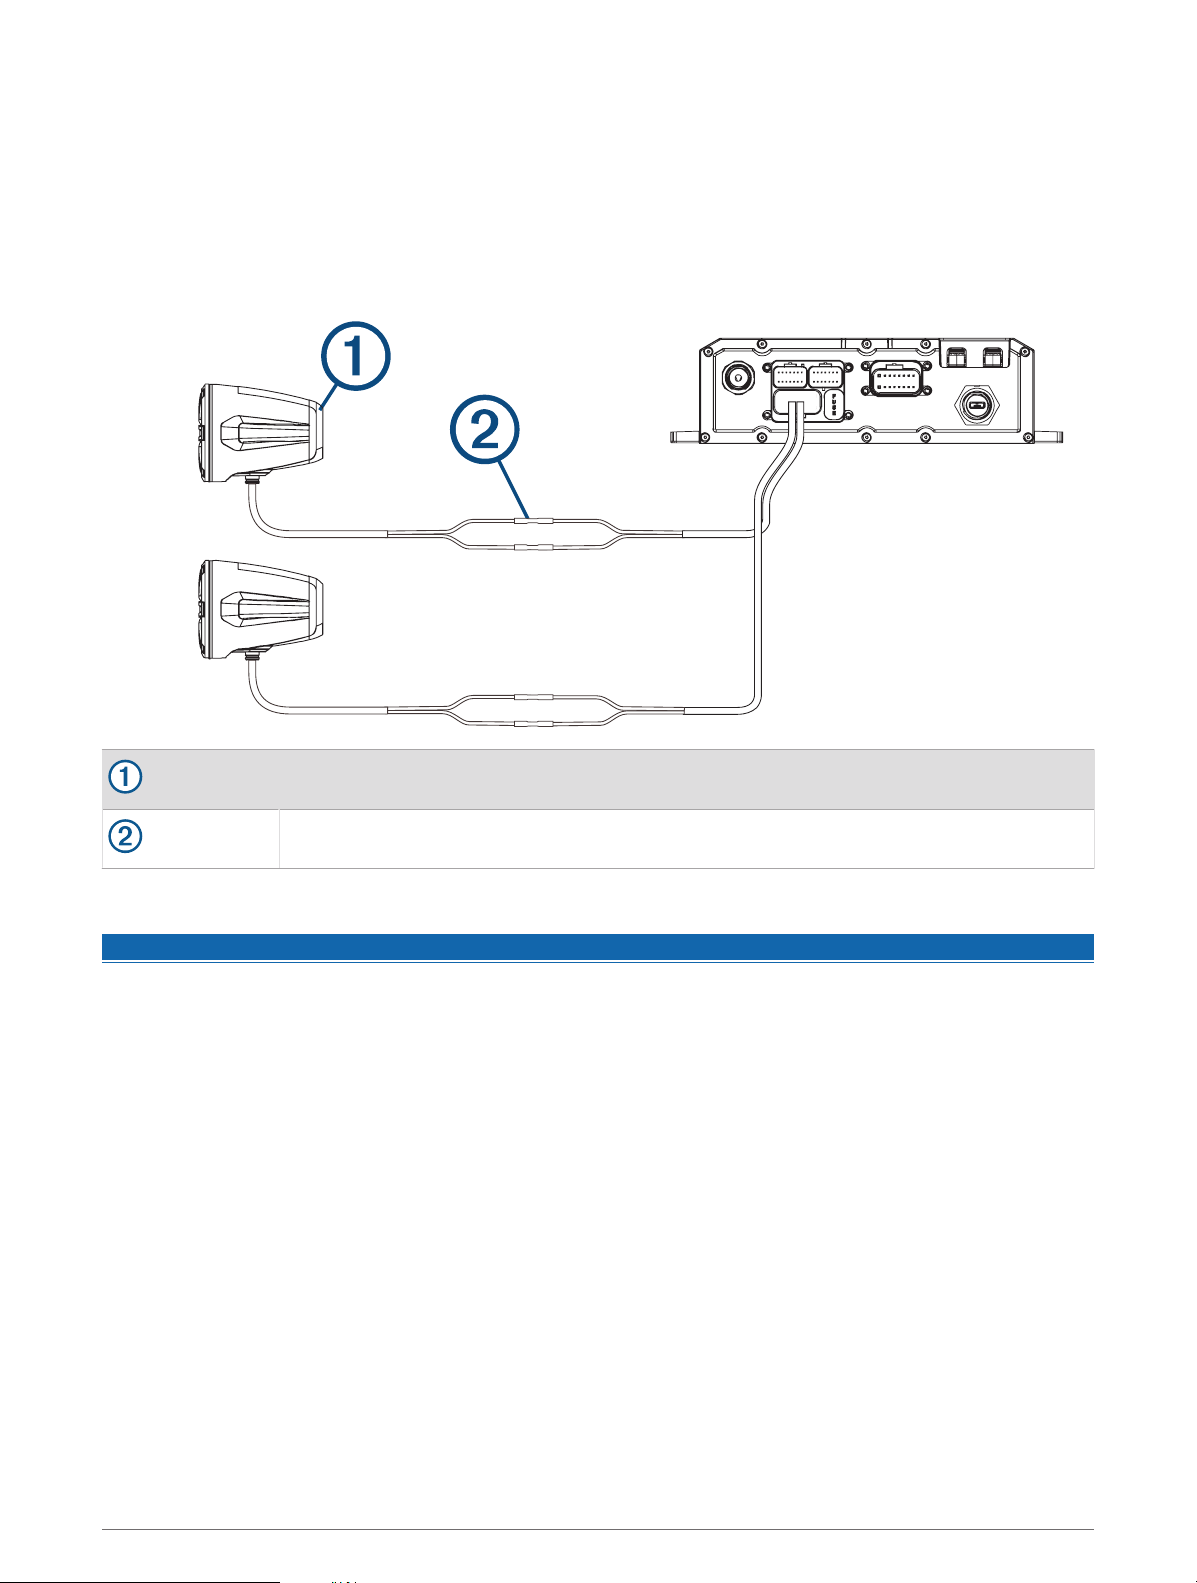
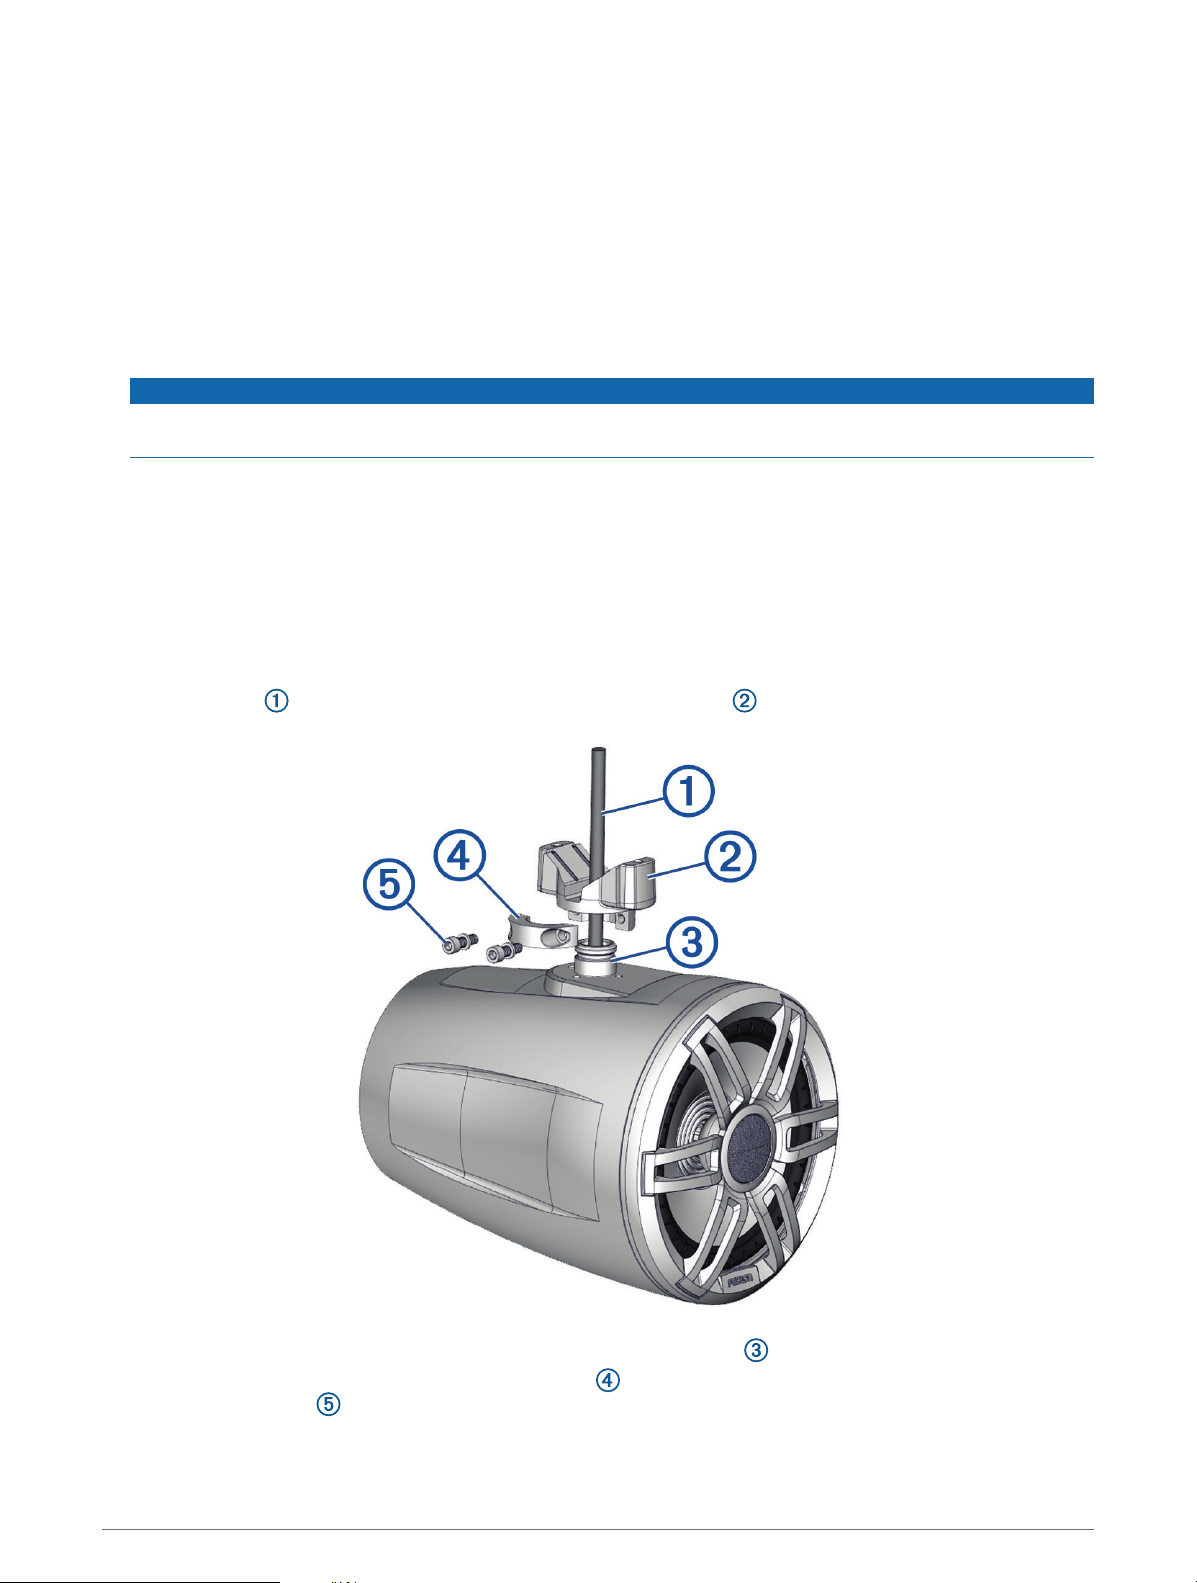
Mounting the Speakers and Brackets
You can mount the Tread 6.5" XS-LED Tower Speakers to a roll bar using the included brackets.
When installing the speaker and bracket, you can route the speaker and LED cable along the roll bar.
1 If necessary, mark the locations on the roll bar where you plan to mount the speakers.
2 Route the speaker and LED power wires along the roll bar to the mounting locations.
3 Feed the cable from the speaker through the base of the bracket .
4 Place the base of the bracket over the mounting knob on the speaker .
5 Using a 4 mm hex driver or hex key, attach the collar to the base of the bracket using the two shorter
screws and washers , but do not fully tighten them.
Installation 11
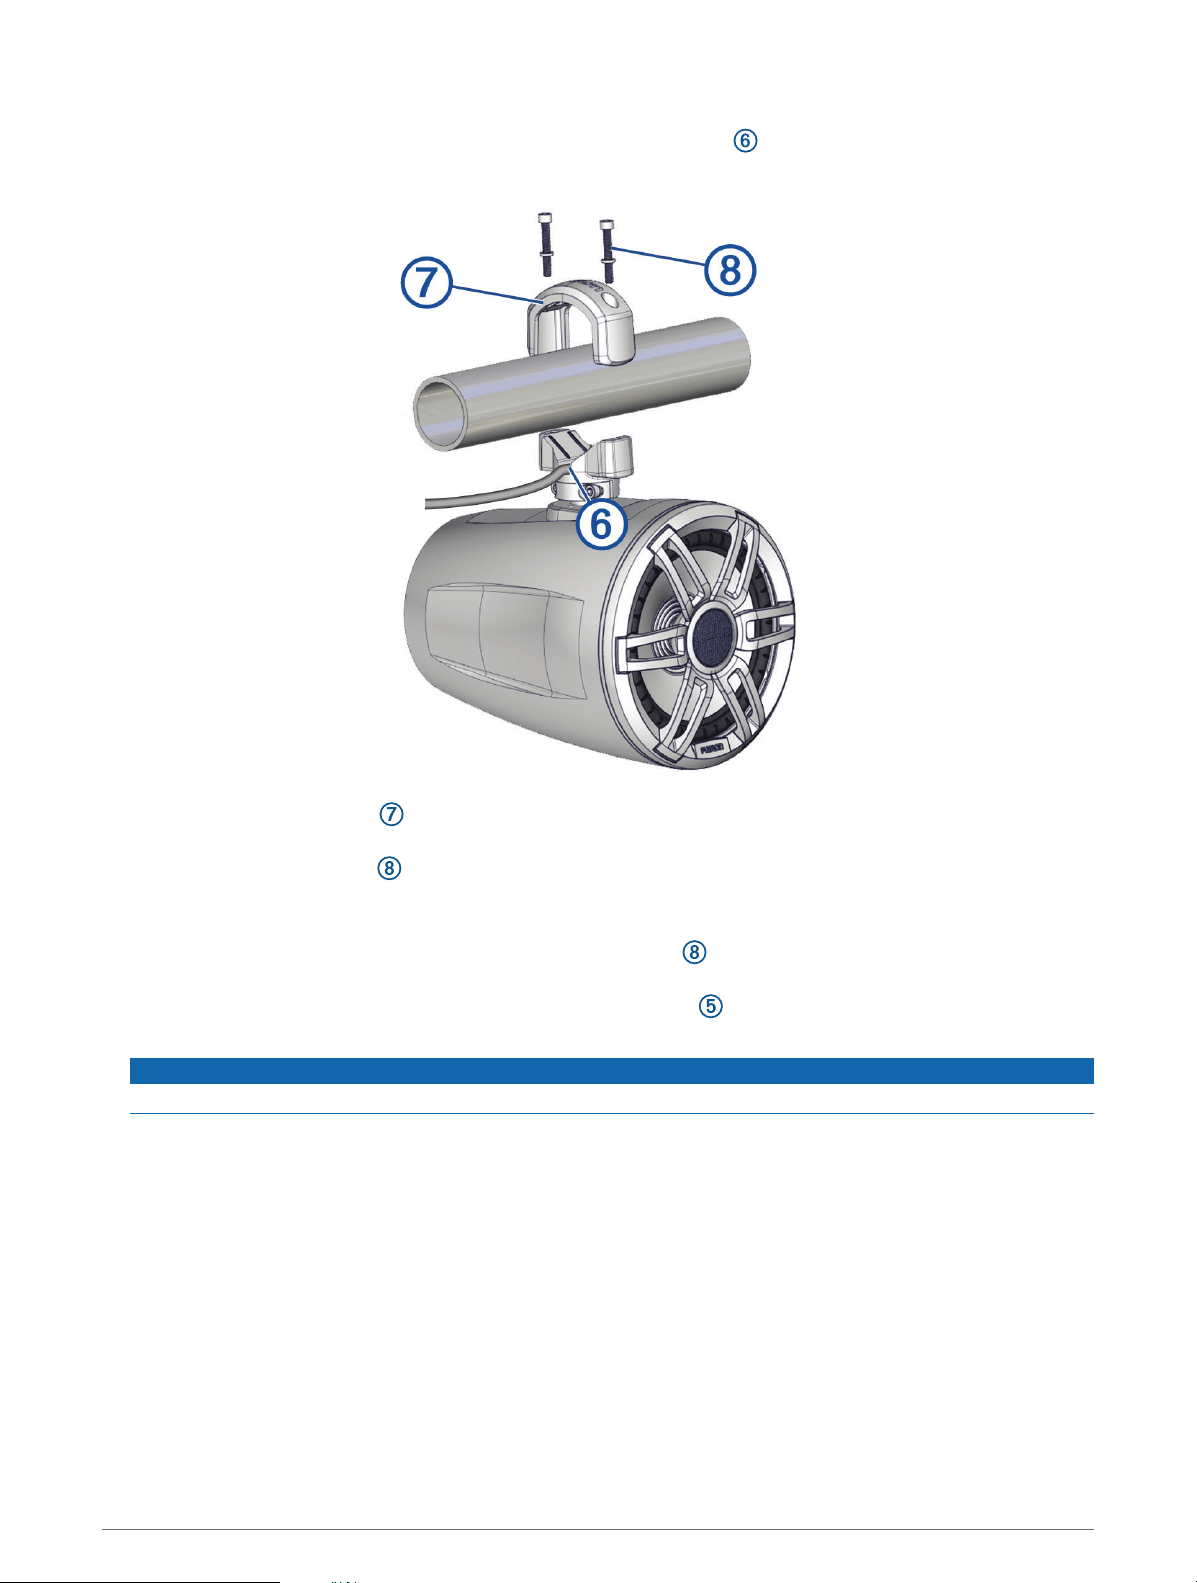
6 Connect the speaker and LED wires (Wiring, page 13).
7 Place the connected wires in the channel on the base of the bracket , and route the wires along the roll
bar.
8 Place the top of the bracket over the roll bar, and hold it against the base of the bracket.
9 Using a 5 mm hex driver or hex key, attach the top of the bracket to the base of the bracket using the two
longer screws and washers , but do not fully tighten them.
10 Adjust the angle of the speakers, and tighten all of the screws to secure the speaker to the roll bar, observing
these maximum torque measurements:
• For the longer screws that secure the bracket to the roll bar , do not tighten to more than 4 N-m
(2.95 lbf-ft.).
• For the shorter screws that secure the bracket to the speaker , do not tighten to more than 2.5 N-m
(1.84 lbf-ft.).
NOTICE
Tightening the screws more than the specified maximum torque measurement can damage the bracket.
11 Repeat these steps for additional brackets.
12 Route the speaker and LED wires along a suitable path in your vehicle, and secure them using the included
zip ties.
12 Installation

Wiring
When connecting the speakers and LED lights to your stereo or amplifier, observe these considerations.
• You should use the included wire to connect the speakers to the stereo or amplifier. If necessary, you can use
a larger gauge of wire (Wire Gauge Guide, page 13).
• You should make all of the wiring connections using the included heat-shrink crimp connectors. You should
plan and select the best connection type for your installation needs.
• You can use this table to identify the polarity of the leads on the speaker.
Lead color Polarity Use
White Positive (+) Speaker
White with a black stripe Negative (-) Speaker
Red Red LED
Green Green LED
Blue Blue LED
Black +12V Power
Wire Gauge Guide
If necessary, you can use longer cables for your installation.
NOTE: If you are using aluminum or tinned wire, you should use a wire two gauges larger than the gauge listed
below to compensate for a potential voltage drop due to the wire material.
• Use 16 AWG (1.31 mm
2
) for speaker wires.
• Use 20 AWG (0.52 mm
2
) for LED wires.
Additional Speakers
You can wire additional Tread 6.5" XS-LED Tower Speakers together. Refer to the owner's manual for your
stereo system at support.garmin.com for more information.
Pairing and Setup
Pairing with a Garmin Navigation Device
You can pair your Tread Audio Box device with a compatible Garmin navigation device.
1 Turn on power to your Tread Audio Box device, and place your compatible Garmin navigation device within
1 m (3.3 ft.) of it.
2 On your compatible navigation device, open the Tread app.
3 On your Tread Audio Box device, press .
4 Follow the on-screen instructions to complete the pairing and setup process.
The main app dashboard appears. After the devices are paired, they connect automatically when they are turned
on and within range.
Pairing and Setup 13

Pairing with Your Smartphone
You can pair your Tread Audio Box device with your smartphone and the Tread app to enable music and LED
controls.
1 From the app store on your smartphone, install the Tread app.
2 Turn on your Tread Audio Box device, and place your smartphone within 1 m (3.3 ft.) of your device.
3 On your smartphone, open the Tread app.
4 On your Tread Audio Box, press .
5 Follow the on-screen instructions to complete the pairing and setup process.
The main app dashboard appears. After the devices are paired, they connect automatically when they are turned
on and within range.
Wireless Remote Overview
WARNING
See the Important Safety and Product Information guide in the product box for product warnings and other
important information.
14 Wireless Remote Overview
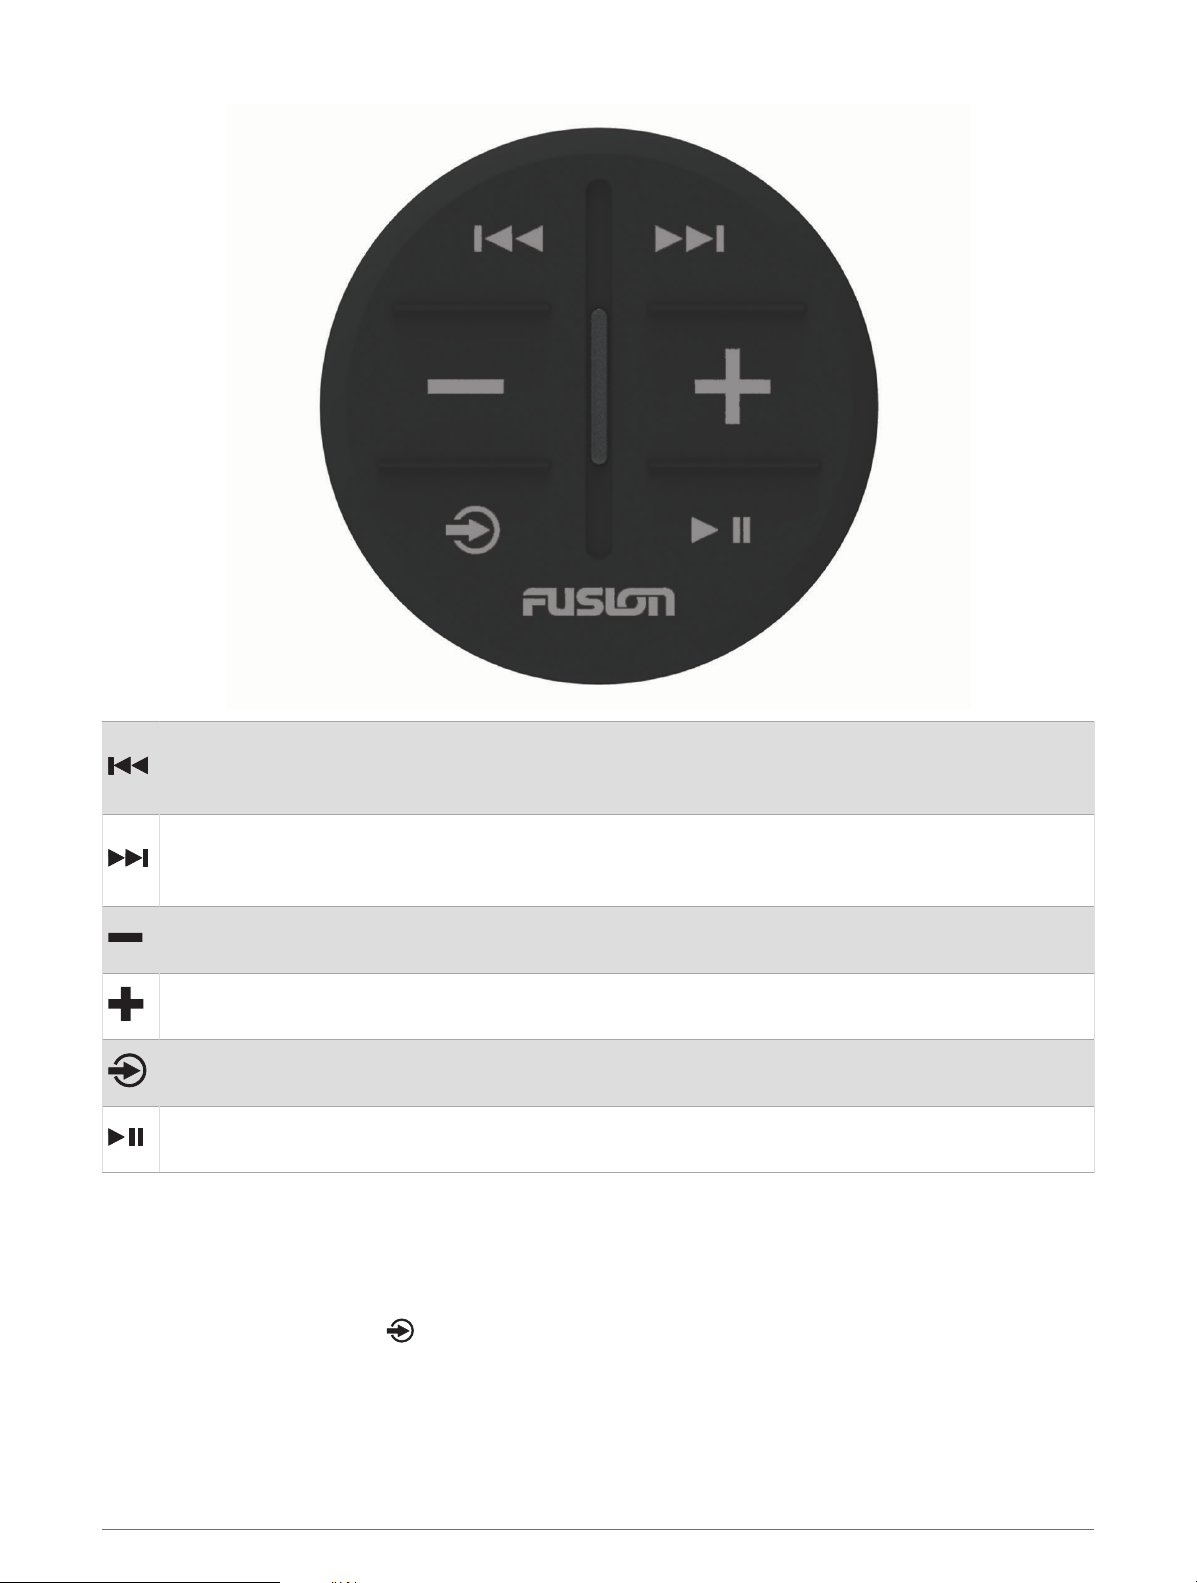
Radio sources: Press to tune to the previous station.
AUX sources: Press to decrease gain.
Other sources: Press to skip to the beginning of the track or to the previous track.
Radio sources: Press to tune to the next station.
AUX sources: Press to increase gain.
Other sources: Press to skip to the next track.
Press to decrease the volume.
Hold to quickly decrease the volume.
Press to increase the volume.
Hold to quickly increase the volume.
Press to cycle through the available sources.
Hold to pair with a stereo (Connecting the Wireless Remote to your Tread Audio Box, page 15).
Radio and AUX sources: Press to mute or un-mute.
Other sources: Press to pause or resume.
Connecting the Wireless Remote to your Tread Audio Box
1 Bring the Tread Audio System remote within 10 m (33 ft.) of the compatible stereo.
NOTE: Stay 10 m (33 ft.) away from other ANT
®
devices while pairing.
2 On the Tread Audio Box, enable Bluetooth
®
discoverable mode.
3 On the wireless remote, hold until the status LED flashes green and red.
The remote searches for the stereo. When the remote pairs successfully, the status LED flashes green briefly
and turns off.
If the remote cannot find the stereo, the status LED flashes red briefly and turns off.
Wireless Remote Overview 15
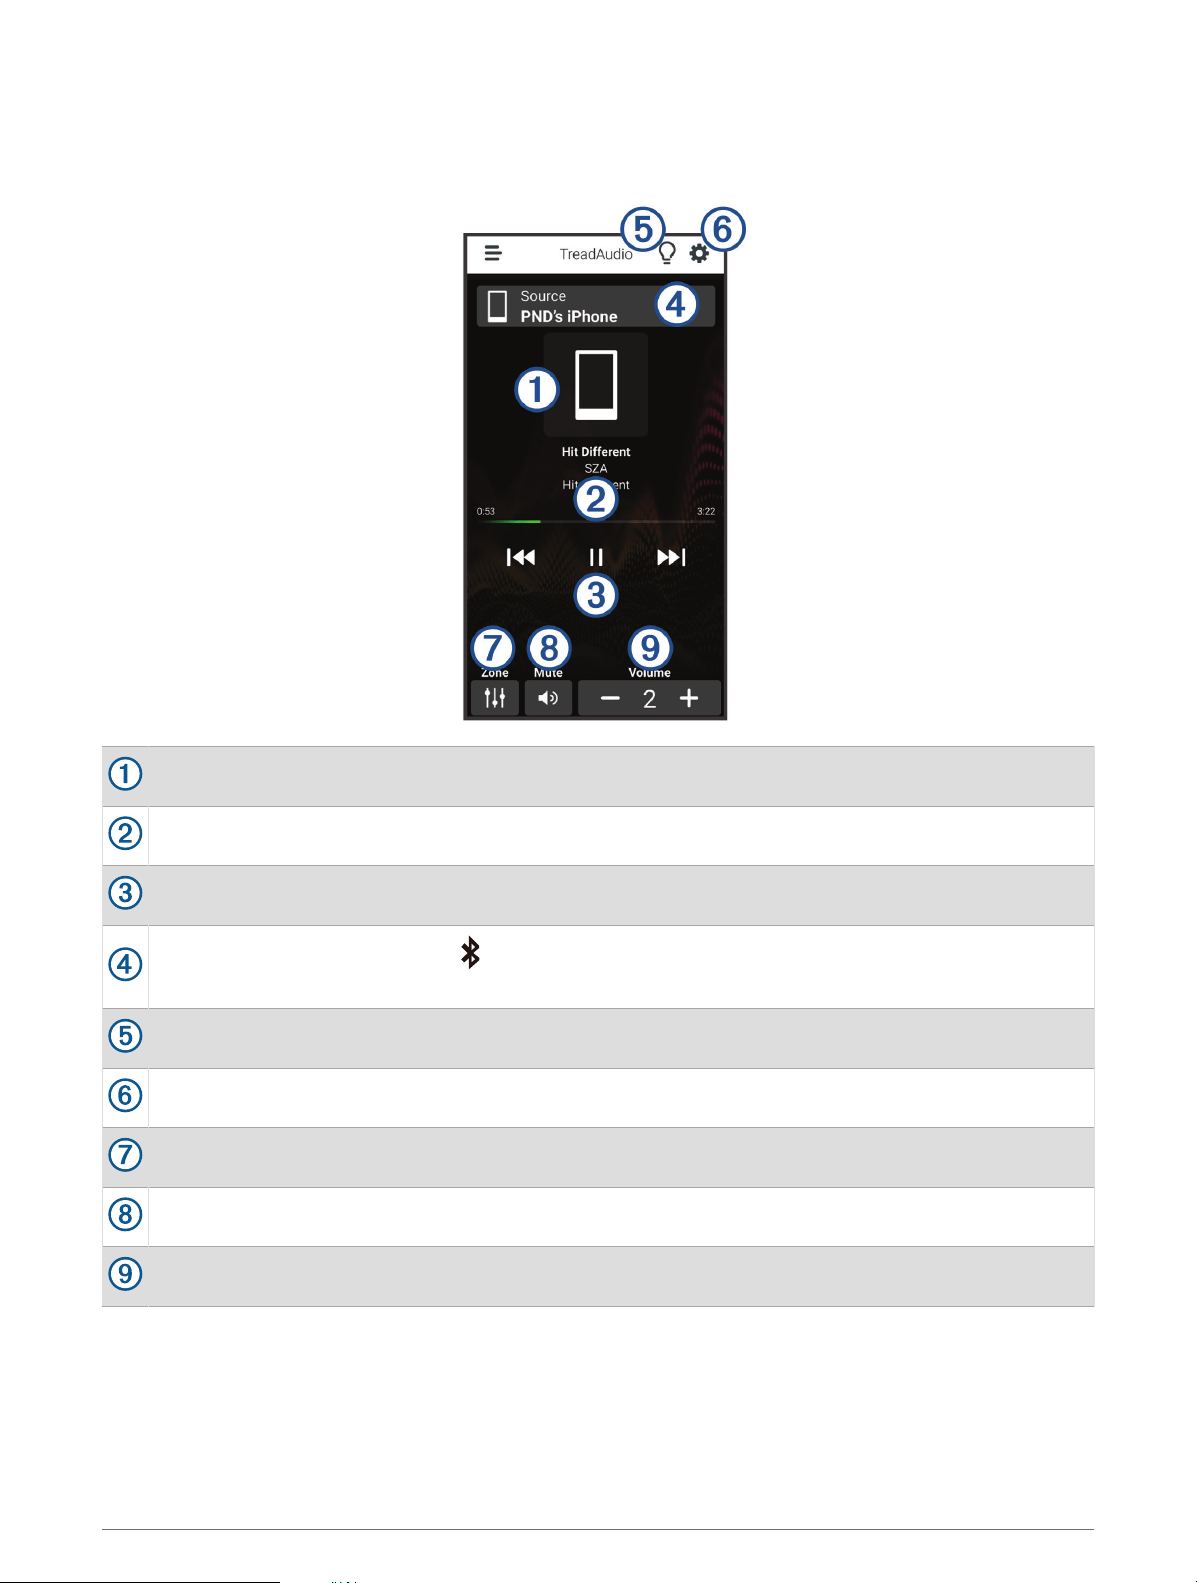
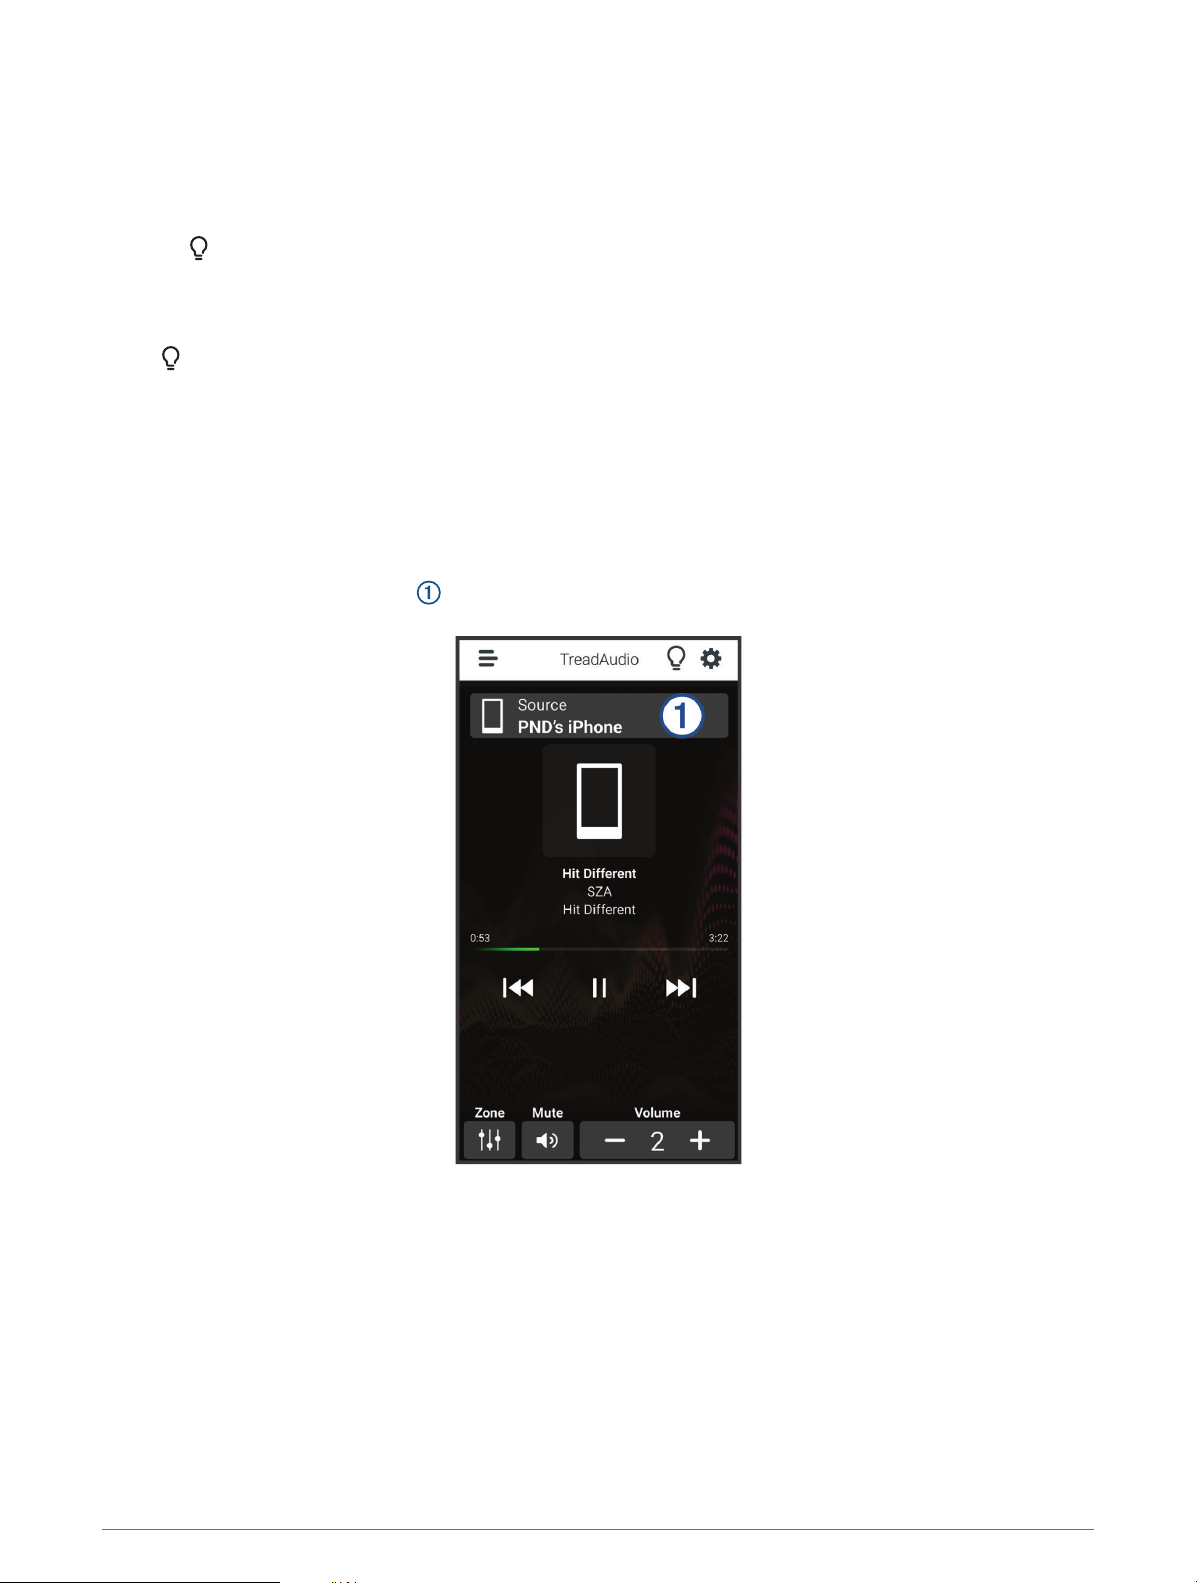
Tread App
Before you can use the controls in the Tread app, you must install your Tread Audio Box and Tread 6.5" XS-LED
Tower Speakers in your vehicle and pair the Tread Audio Box with the Tread app.
Displays information about the currently playing media, such as title, artist, album, station, or channel.
Displays progress through the current media item.
Displays playback controls. The controls change based on the service providing the media.
Displays the current audio source. indicates the media is being played by another media app on your
phone and sent to the device using a Bluetooth media connection.
Opens the LED controls.
Opens the app settings menu.
Opens the volume zone controls.
Mutes the audio.
Increases or decreases the volume.
LED Controls
The LED controls allow you to control the LED lights on your connected Tread 6.5" XS-LED Tower Speakers and
optional, addressable LEDs. You can set the color of the LEDs, sync the LEDs to your music or the speed of your
vehicle, and display a call sign color during a group ride.
16 Tread App
Enabling LED Groups
By default, the controls for LED groups RGB 1 and RGB 2 are enabled. Enabling an LED group allows you to use
the LED lighting controls for that group. You can enable the LED group for the Tread 6.5" XS-LED Tower
Speakers or any additional speakers or addressable LEDs after you set up and pair them with your Tread Audio
Box.
1 Select .
2 Select the LED group.
LED Light Settings
Select .
Set Color: Sets the color of the LED lights.
Music Sync: Syncs the LED lights to music playback.
Speed Sync: Syncs the LED lights to the vehicle's speed.
Group Ride Sync: Sets the LED lights to display a call sign color during a group ride.
Changing the Media Source
You can change the source from which media is played on your device.
1 Select the current media source .
2 Select an available media source from the list.
Tread App 17

Audio Zone Settings
Select > Stereo Settings > Audio Zones, and if necessary, select a zone.
Zone Name: Sets the name of the zone.
Loud: Boosts the high and low frequencies.
Subwoofer Filter: Sets the low-pass frequency of the subwoofer.
Bass: Sets the relative volume of low-frequency audio.
Middle: Sets the relative volume of middle-frequency audio.
Treble: Sets the relative volume of high-frequency audio.
Device Maintenance
Garmin Support Center
Go to support.garmin.com for help and information, such as product manuals, frequently asked questions,
videos, and customer support.
Device Care
NOTICE
Avoid extreme shock and harsh treatment, because it can degrade the life of the product.
Do not use a sharp object to clean the device.
Avoid chemical cleaners, solvents, and insect repellents that can damage plastic components and finishes.
Do not store the device where prolonged exposure to extreme temperatures can occur, because it can cause
permanent damage.
Cleaning the Outer Casing
NOTICE
Avoid chemical cleaners and solvents that can damage plastic components.
1 Clean the outer casing of the device using a cloth dampened with a mild detergent solution.
2 Wipe the device dry.
Cleaning the Speakers and Brackets
NOTICE
When mounted correctly, these speakers are rated IP67 for dust and water ingress protection under normal
conditions. They are not designed to withstand high pressure water spray, which may occur when you wash
down your vehicle. Failure to carefully spray-clean the vehicle may damage the product and void the warranty.
Do not use harsh or solvent-based cleaners on the speakers. Using such cleaners may damage the product and
void the warranty.
1 Clean all residue from the speakers using a damp cloth soaked in fresh water.
2 If necessary, use a mild detergent to remove a heavy buildup of salt or stains.
Updating Device Firmware
The Tread app notifies you when firmware updates for your Tread Audio Box device are ready to install.
When the update notification appears, follow the on-screen instructions to complete the update process.
NOTE: Do not disconnect power during the update process.
18 Device Maintenance
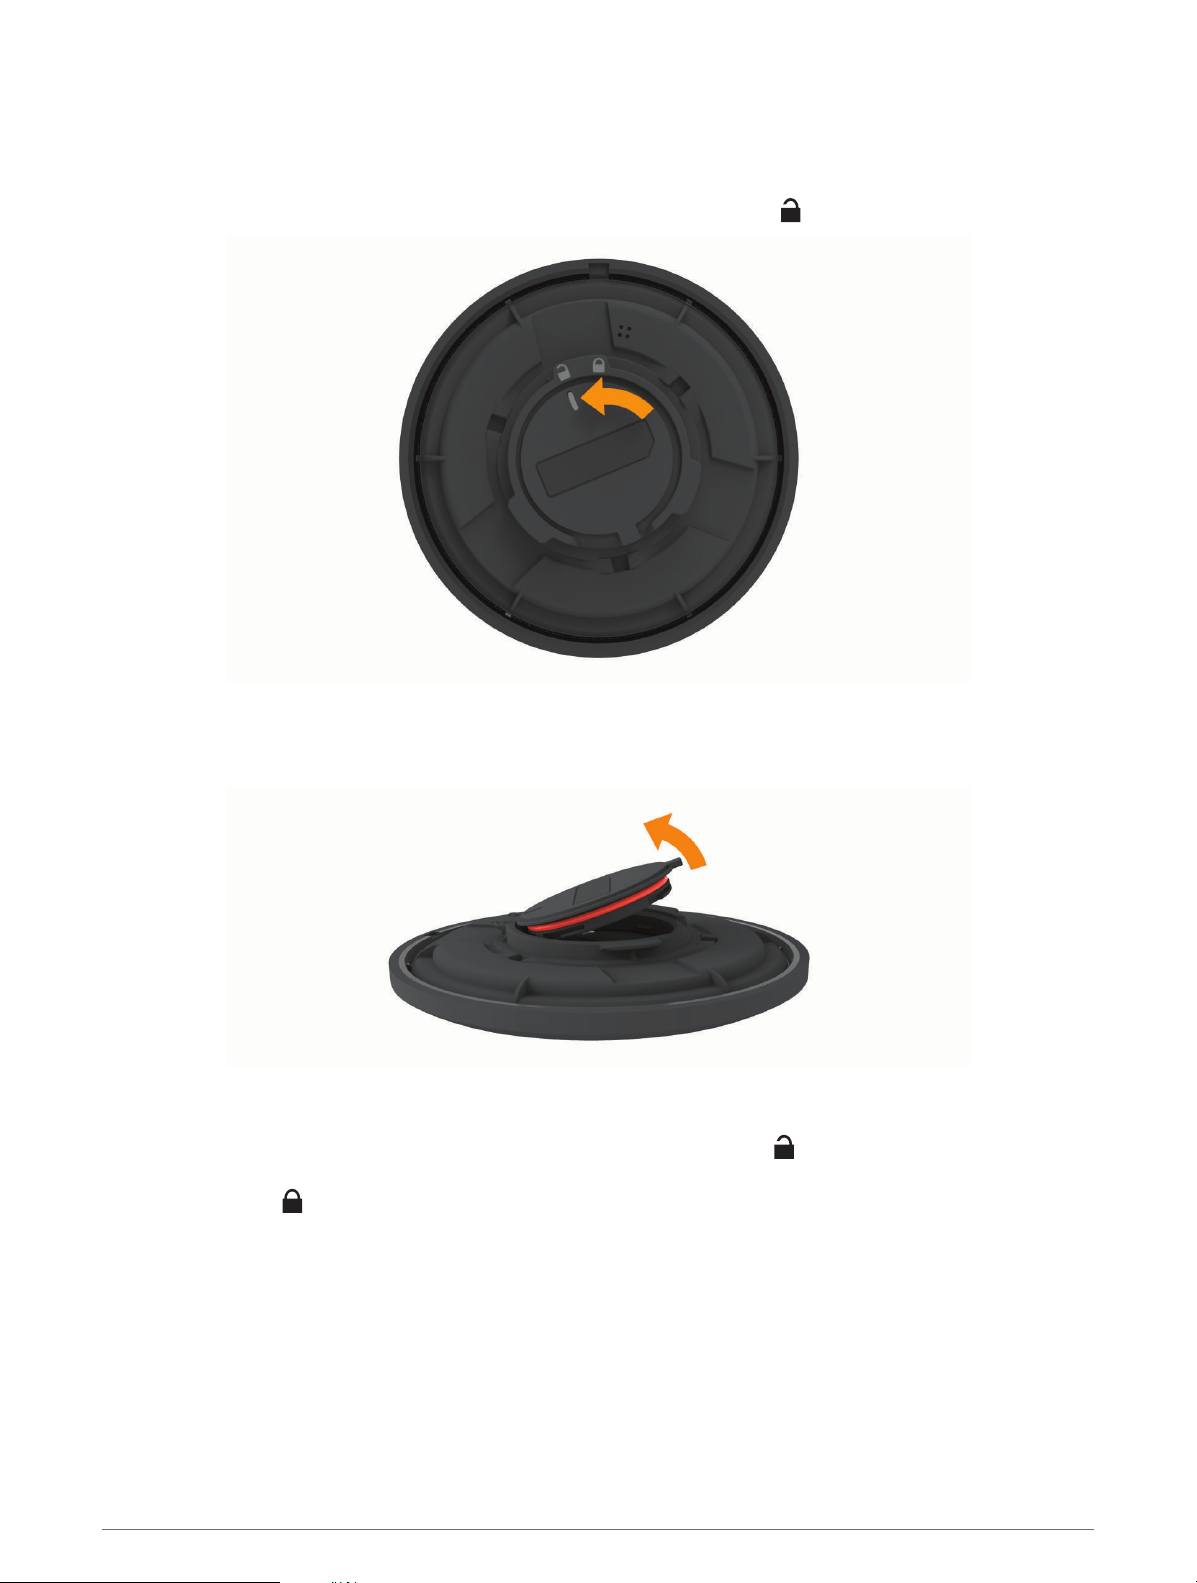
Replacing the Wireless Remote Battery
The remote uses one CR2032 lithium coin-cell battery.
1 Rotate the remote control, and remove it from the mount.
2 Rotate the battery compartment counter-clockwise until the line points to .
3 Wrap the end of a small flat screwdriver with tape.
The tape protects the battery, battery compartment, and contacts from damage.
4 Carefully pry the battery from the battery compartment.
5 Insert the new battery into the compartment with the positive side facing down.
NOTE: Do not damage or lose the O-ring gasket.
6 Align the battery compartment in the remote control so the line points to .
7 Press the battery compartment down into the remote control, and rotate the compartment clockwise until
the line points to .
8 Make sure the battery compartment is fully seated in the remote control.
9 Place the remote control in the mount, and rotate until it clicks.
Device Maintenance 19

Troubleshooting
My Tread Audio Box will not stay connected
• Verify the Tread Audio Box device is receiving power.
• Verify that Bluetooth technology is enabled on your paired navigation device or smartphone.
• Move the navigation device or smartphone closer to your Tread Audio Box device.
• Verify that your vehicle's battery is supplying at least 8 V of power.
There is no sound coming from the speakers
• Verify that all connections from the source device and/or the amplifier are connected correctly to the speaker
terminals.
The system lacks bass or high frequencies
• Verify that the correct wire polarity is observed between the source and speakers.
The wires should be connected positive to positive and negative to negative.
• Verify that the speakers are attached firmly to the mounting surface.
• Verify that the tone settings for each zone are accurate.
The audio is distorted
• Verify that the source volume is not too loud for the speaker, and reduce the volume if necessary.
• Verify that any panels surrounding the speaker on the vehicle are not rattling.
• Verify that the source device and the amplifier, if used, are connected to the speaker terminals correctly.
• If the speaker is connected to an amplifier, verify that the input level of the amplifier is matched to the output
level of the stereo. For more information, see the manual for the amplifier.
The LED lights will not turn on
• Verify that all wiring connections are correct and tight.
• Verify that the LEDs are enabled in the Tread app (Enabling LED Groups, page 17).
Can the device get wet?
The device is designed to operate in wet conditions, and it can be submerged for limited periods of time. Always
operate the device in accordance with the water rating listed in the device specifications (Device Information,
page 21). Submerging the device in water for prolonged periods of time may cause corrosion on the electrical
contacts.
20 Troubleshooting

Device Information
Tread Audio Box Specifications
General
Weight 997 g (2.2 lbs.)
Water resistance IEC 60529 IPX7 (water), IEC 60529 IP6X (dust)
1
Operating temperature range From -20 to 70°C (from -4 to 158°F)
Storage temperature range From -40 to 85°C (from -40 to 185°F)
Input voltage From 8 to 14.4 Vdc
Current (max.) 40 A
Current (muted) less than 650 mA
ANT wireless range Up to 3 m (10 ft.)
Compass-safe distance 203 mm (8 in.)
Fuse 15 A mini-blade type
Bluetooth wireless range Up to 10 m (30 ft.)
On-board, Class D Amplifier
Output power per channel 4 x 100 W RMS at 14.4 Vdc input, 4 ohm, 10% THD
2
Line output level (max.) 6.0 V (peak to peak)
Aux input level (typical) 1 V (RMS)
Tuner
FM radio frequency range 87.5 to 107.9 MHz
FM frequency step 200 kHz
AM radio frequency range 530 to 1710 kHz
AM frequency step 10 kHz
1
The device withstands incidental exposure to water of up to 1 m for up to 30 min, and is protected against powerful jets of water. For more information, go to
www.garmin.com/waterrating.
2
The stereo may limit the output power to prevent the amplifier from overheating, and to maintain the audio dynamics.
Device Information 21

Tread 6.5" XS-LED Tower Speakers Specifications
Max. power 200 W
RMS power 50 W
Sensitivity (1 W/1 m) 91 dB
Frequency response From 80 Hz to 18 kHz
Recommended amplifier power (RMS, playing music) From 20 to 150 W
Nominal voice coil diameter 30 mm
Impedance 4 ohms
Operating temperature range From 0 to 50°C (from 32 to 122°F)
Storage temperature range From -20 to 70°C (from -4 to 158°F)
Cone material Polypropylene (PP) cone with cloth surround
Tweeter type Aluminum dome
Water and dust rating IEC 60529 IP67
3
Compass-safe distance 310 cm (122 in.)
Weight 2.49 kg. (5.5 lb.)
3
Protected against dust and water ingress.
22 Device Information
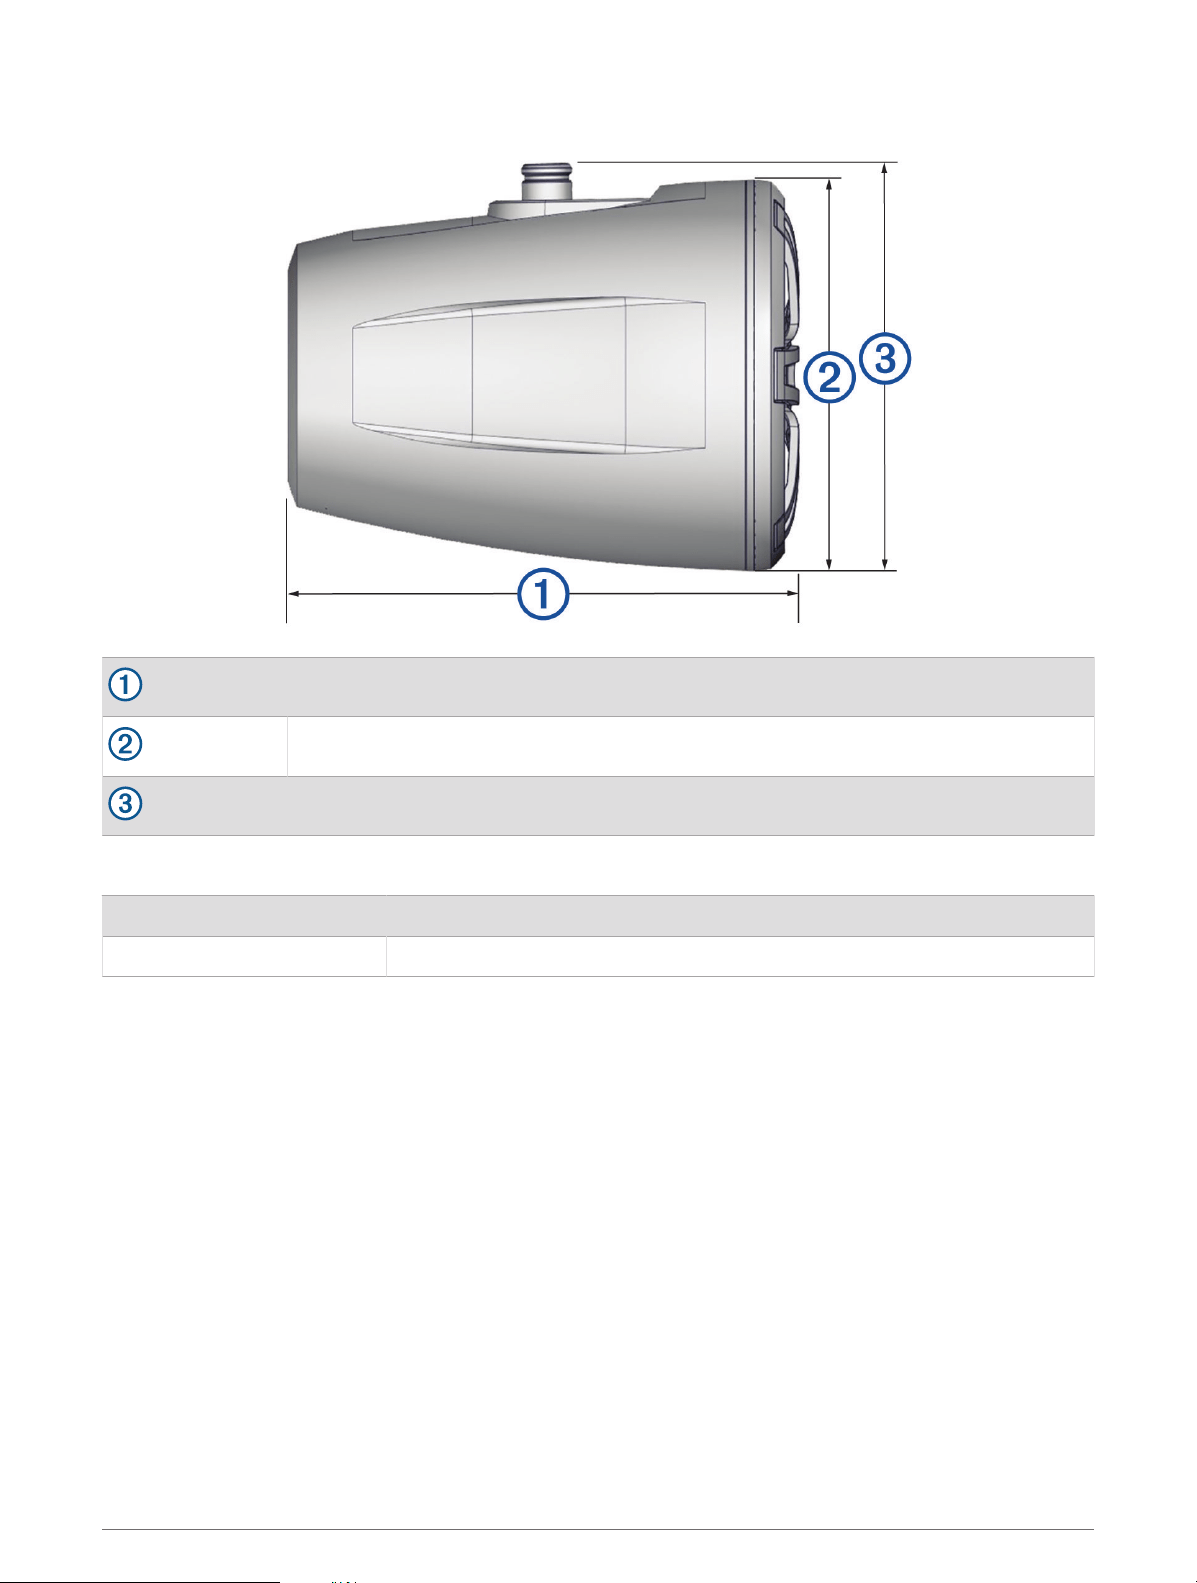
Dimensions
223 mm (8
13
/
16
in.)
Ø 176 mm (6
15
/
16
in.)
180 mm (7
1
/
8
in.)
Bracket Specifications
Material Aluminum alloy with silicone pads
Supported roll bar sizes From 33.4 mm (1.31 in.) to 50.8 mm (2.00 in.) outer diameter
Device Information 23
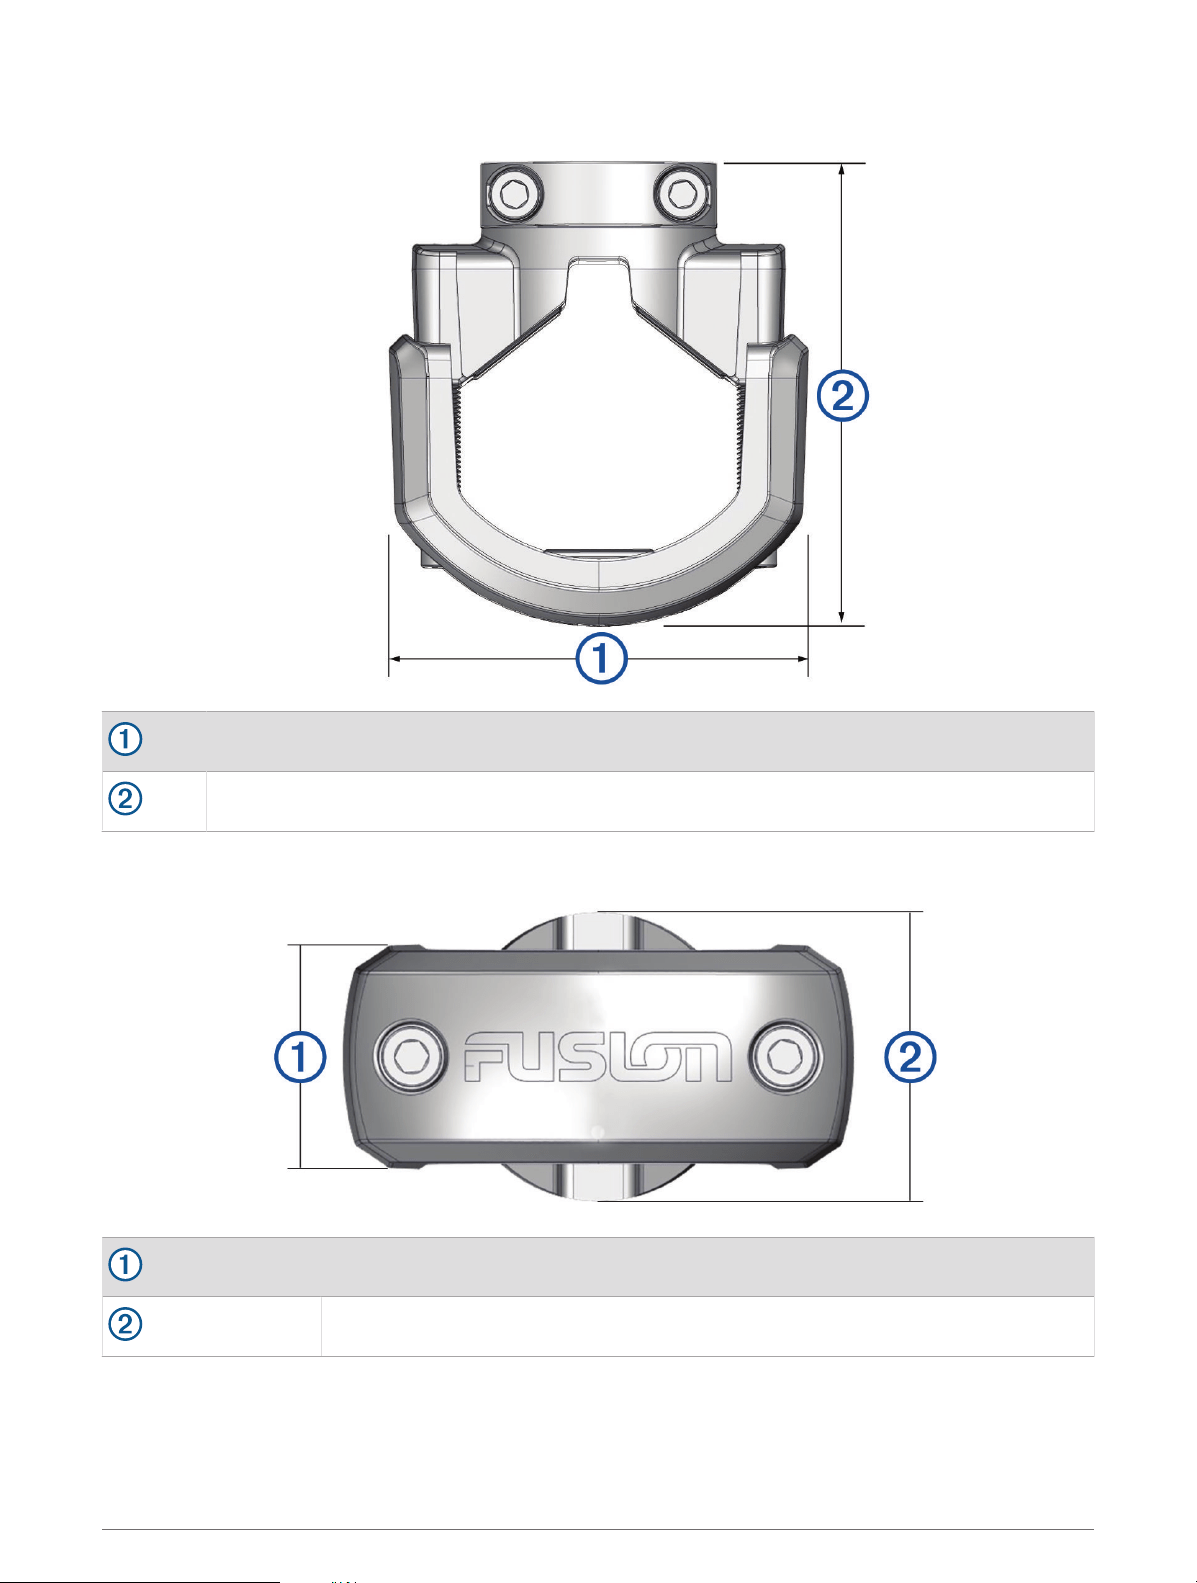
Bracket Side Dimensions
85 mm (3
3
/
8
in.)
From 74 mm (2
7
/
8
in.) to 94 mm (3
11
/
16
in.)
Bracket Top Dimensions
37 mm (1
7
/
16
in.)
48 mm (2 in.)
24 Device Information


support.garmin.com
GUID-8519D3E3-ACB5-4063-A5C1-0335CE7C87F6 v1July 2022