2
The appliance was designed and made in accordance with the European standards listed below:
=> EN 30-1-1, EN 30-2-1 and EN 437 plus subsequent amendments (gas)
=> EN 60 335-1 and EN 60 335-2-6 (electrical) plus relative amendments
The ap
pliance complies with the prescriptions of the European Directives as below:
=> 2006/95 EC concerning electrical safety (BT).
=>
2004/108 EC concerning electromagnetic compatibility (EMC)
=> 2009/142/EC concerning gas safety.
Oven accessories that could come into contact with foodstuffs are made with materials that comply with
the provisions of the 89/109 EC directive dated 21/12/88.
This product complies with EU Directive 2002/96/EC.
The crossed-out dustbin symbol reported on the appliance indicates that the appliance must be disposed
of separately from other domestic refuse at the end of its useful life. It must therefore be delivered to a
ZDVWHUHF\FOLQJFHQWUHVSHFLÀFDOO\IRUHOHFWULFDQGHOHFWURQLFHTXLSPHQWRUUHWXUQHGWRWKHUHWDLOHUDWWKH
moment of purchase of a new equivalent appliance.
The user is responsible for delivering the appliance to the appropriate collection centre at the end of its
XVHIXOOLIH)DLOXUHWRGRVRPD\UHVXOWLQDÀQHDVSURYLGHGIRUE\ODZVJRYHUQLQJZDVWHGLVSRVDO
Differential collection of waste products for eventual recycling, treatment and environmentally friendly
disposal helps reduce possible negative effects on the environment and health, and also enables the
materials making up the product to be recycled.
For more detailed information on the available refuse collection systems, refer to the local Municipal
Solid Waste disposal centre or the shop where the product was purchased.
3URGXFHUVDQGLPSRUWHUVDUHUHVSRQVLEOHIRUIXOÀOOLQJWKHLUREOLJDWLRQVDVUHJDUGVUHF\FOLQJWUHDWPHQW
and environmentally friendly disposal by directly or indirectly participating in the collection system.

3
ASSISTANCE AND SPARE PARTS
Before this appliance left the factory it was tested and set by specialized, expert personnel in order to guarantee
the best functioning results.
Any subsequent repairs or adjustments that may be necessary must be done with the maximum of care and
attention by authorised personnel.
For this reason we recommend you always contact us (refer below), specifying the brand, model, serial number and
W\SHRISUREOHP\RXDUHKDYLQJZLWKLW<RXZLOO¿QGWKHUHODWLYHGDWDSULQWHGRQDODEHODI¿[HGRQWKHDSSOLDQFHDQG
RQWKHODEHODI¿[HGWRWKHSDFNLQJER[
IMPORTANT NOTICE
The manufacturer shall not be held responsible for any damage to persons or property caused by incorrect
installation or use of the appliance.
For prompt warranty service, please ensure that the warranty registration form is completed and return posted
to us.
$GXSOLFDWHGDWDODEHODQGZLULQJGLDJUDPDUHFRQWDLQHGLQWKLVERRNOHW3OHDVHDWWDFKWKHVHODEHOVWRDQ
accessible surface near by the appliance for easy reference.
You can purchase original spare parts from authorised dealers or direct from us.
DOMESTIC USE ONLY
CONTENTS
ASSISTANCE AND SPARE PART 3
IMPORTANT NOTES AND PRECAUTIONS FOR USE 4-6
DESCRIPTION OF THE APPLIANCE 7-12
INSTRUCTIONS FOR THE USER 13-22
TROUBLESHOOTING 23
INSTRUCTIONS FOR THE INSTALLER 24-32
TECHNICAL FEATURES 33-40

4
IMPORTANT NOTES AND PRECAUTIONS FOR USE
You have purchased one of our
SURGXFWVIRUZKLFKZHWKDQN\RX:H
DUHFRQ¿GHQWWKDWWKLVQHZDSSOLDQFH
modern, functional and practical, made
with top quality materials, will meet all
your demands. This new appliance
is easy to use but before installing
and using it, it is important to read
this handbook through carefully.
It provides information for a safe
installation, use and maintenance. Keep
WKLVKDQGERRNLQDVDIHSODFHIRUIXWXUH
reference.
The manufacturer reserves the right
WRPDNHDOOWKHPRGLÀFDWLRQVWRLWV
products that it deems necessary
or useful, also in your interests,
without prejudicing its essential
functional and safety characteristics.
The manufacturer cannot be held
responsible for any inaccuracies due to
printing or transcription errors that may
EHIRXQGLQWKLVKDQGERRN
N.B.:WKHSLFWXUHVVKRZQLQWKH¿JXUHVLQ
WKLVKDQGERRNDUHSXUHO\LQGLFDWLYH
• The installation, adjustments,
conversions and maintenance
operations listed in section
«INSTRUCTIONS FOR THE
INSTALLER» must only be carried out
by authorised personnel .
• The installation of all-gas and combi
appliances must comply with the
standards in force.
• The appliance must only be used for
LWVRULJLQDOSXUSRVHWKDWLVFRRNLQJ
for domestic use. Any other use is
considered improper and, as such,
dangerous.
• The manufacturer cannot be held
responsible for any damage to
persons or property resulting from an
incorrect installation, maintenance or
use of the appliance.
2QFHWKHSDFNDJLQJKDVEHHQ
removed from the outer surfaces and
the various inner parts, thoroughly
FKHFNWKDWWKHDSSOLDQFHLVLQSHUIHFW
condition. If you have any doubts do
not use the appliance and call in an
authorised person.
7KHSDFNDJLQJPDWHULDOVXVHG
(cardboard, plastic bags, polystyrene
foam, nails, etc.) must not be
left within easy reach of children
because they are a potential hazard
VRXUFH$OOSDFNDJLQJPDWHULDOVXVHG
are environmentally-friendly and
recyclable.
• The electrical safety of this appliance
is only guaranteed if it is correctly
connected to a suitable earth system,
as prescribed by the electrical
safety standards. The manufacturer
disclaims all responsibility if these
instructions are not followed. Should
\RX KDYH DQ\GRXEWV VHHN WKH
assistance of an authorised person.
• Before connecting the appliance
ensure that the rating plate data
corresponds to that of the gas
and electricity supply (see section
«TECHNICAL FEATURES»).
• NOT FOR USE IN MARINE CRAFT,
CARAVANS OR MOBILE HOMES
UNLESS EACH BURNER IS FITTED
WITH A FLAME SAFEGUARD.
• DO NOT MODIFY THIS APPLIANCE
• DOMESTIC USE ONLY
During use the appliance becomes
KRW&DUHVKRXOGEHWDNHQWRDYRLG
touching heating elements inside the
oven.

5
WARNING - Accessible parts may
become hot during use. To avoid
EXUQV\RXQJFKLOGUHQVKRXOGEHNHSW
away.
WARNING - Accessible parts may
become hot when the grill is in use.
&KLOGUHQVKRXOGEHNHSWDZD\
• The oven door glass and the
accessible parts will become hot
when in use. To avoid burns and
scalds young children should be
NHSWDZD\
• Do not use this appliance as a space
heater.
• Do not touch any electrical appliance
if hands or feet are wet or damp.
• Do not use the appliance bare footed.
• Do not
SXOOWKHSRZHUOHDGWRWDNHWKH
SOXJRXWRIWKHVRFNHW
• Do not leave the appliance outside
under the sun, rain, etc.
• This appliance is not intended for use
by persons (including children) with
reduced physical, sensory or mental
FDSDELOLWLHVRUODFNRIH[SHULHQFH
DQGNQRZOHGJHXQOHVVWKH\KDYH
been given supervision or instruction
concerning use of the appliance by a
person responsible for their safety.
• Children should be supervised to
ensure that they do not play with
the appliance. Cleaning and user
maintenance shall not be made by
children
• WARNING - ln order to prevent
accidental tipping of the appliance, for
example by a child climbing over the
open oven door, or too high weights
are leant on the open oven door, two
FKDLQVPXVWEHVFUHZHGRQWKHEDFN
RQWKHFRRNHUDQG¿[HGWRWKHZDOO
ZLWKKRRNV(QVXUHWKHFKDLQVDUH
WDXW3OHDVHUHIHUWRLQVWUXFWLRQVIRU
installation..
%HIRUHFRRNLQJIRUWKH¿UVWWLPH
ensure the oven is empty and its door
closed, heat the oven at maximum
temperature for two hours. This
will allow the protective coating on
the interior of the oven to be burnt
off and dissipate the associated
smells. Ensure adequate ventilation
LQWKHNLWFKHQZKLOVWEXUQLQJRIIDQG
don’t be alarmed by a little bit of
VPRNHGXULQJWKLVSURFHVV
8QDWWHQGHGFRRNLQJRQDKREZLWK
fat or oil can be dangerous and may
UHVXOWLQ¿UH
1HYHUWU\WRH[WLQJXLVKD¿UHZLWK
water, but switch of the appliance
DQGWKHQFRYHUÀDPHHJZLWKD
OLGHRUD¿UHEODQNHW
'DQJHURI¿UH'RQRWVWRUHLWHPV
RQWKHFRRNLQJVXUIDFHV
• Do not use harsh abrasive cleaners
or sharp metal scrapers to clean
the oven glass door since they can
scratch the surface, which may
result in shattering of the glass.
• NEVER use sponges or abrasive
products, and solvents to remove
stains or adhesives on the painted
or stainless steel surfaces.
• Switch off the oven before removing
the fan guard for cleaning. Replace
the guard after cleaning in
accordance with the instructions.
• The oven can be equipped with
temperature probe. Only use the
temperature probe recommended
for this oven by our Service Centre.
• Remove any spillage from the lid
before opening.
IMPORTANT NOTES AND PRECAUTIONS FOR USE

6
• The appliance is not intended to be
operated by means of an external
timer or separate remote-control
system
• Ensure that the appliance is
switched off before replacing the
lamp to avoid the possibility of
HOHFWULFVKRFN
• 7KHFRRNHUVFDQEHHTXLSSHGZLWK
a small compartment under the
oven that can be used for storing
things Remember that the surfaces
become hot, it is strictly forbidden to
SODFHLQÀDPPDEOHPDWHULDOVLQVLGH
• Do not use a steam cleaner to
clean a hob, oven or range.
• The appliance is to be placed directly
RQWKHÀRRUDQGVKDOOQRWEHPRXQWHG
on a base.
•
,IWKHDSSOLDQFHLV¿WWHGZLWKD
glass lid, this can shatter when
heated. Turn off all the burners or
disconnect all the plates, and allow
them to cool before closing the lid
¿J
• Not suitable for installation or
RSHUDWLRQZLWKDIWHUPDUNHWOLGVRU
covers
• Avoid using the oven as a larder or as
a saucepan cupboard when you are
QRWXVLQJLWIRUFRRNLQJLIWKHRYHQLV
turned on accidentally it could cause
damage and accidents.
,I\RXDUHXVLQJDQHOHFWULFDOVRFNHW
QHDUWKHDSSOLDQFHPDNHVXUHWKDW
WKHFDEOHVDUHQRWWRXFKLQJWKHFRRNHU
and are far enough away from all hot
parts.
:KHQ\RXKDYH¿QLVKHGXVLQJWKH
DSSOLDQFHFKHFNWKDWDOOWKHFRQWUROVDUH
LQWKHRIIRUFORVHGSRVLWLRQFKHFNLQJ
WKDWWKH³´RIWKHNQREFRUUHVSRQGVWR
the “•” symbol serigraphed on the front
panel.
• Switch off the electrical supply before
you start cleaning or servicing the
appliance.
• In the case of a failure or malfunction,
turn the appliance off and switch off
the electrical supply and do not tamper
with it. All repairs or adjustments must
be carried out with maximum care and
the proper attention of an authorised
person.
• For this reason we recommend you
call our Service Centre.
IMPORTANT NOTES AND PRECAUTIONS FOR USE
7
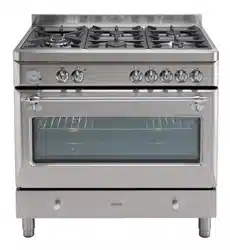
PRESENTATION
2XUFRRNHULV¿WWHGZLWKDIXOO\JDVKRWSODWH7KLV
innovative burner hotplate offers you more scope and
YHUVDWLOLW\LQKRWSODWHFRRNLQJWKDQHYHUEHIRUH7KH
round burners are graduated in their size and output
to provide the exact heat required for every style of
FRRNLQJ)RUH[DPSOHWKHODUJHRUZRNEXUQHUZLOO
JLYH\RXWKHLQWHQVHKHDWUHTXLUHGIRUZRNFRRNHU\
while the small simmer burner will handle the smallest
of saucepans with ease and safety. The low heat
VLPPHUVHWWLQJLVH[WUDRUGLQDULO\ORZVR\RXFDQFRRN
the most delicate sauces to perfection. This innovative,
yet very practical combination of burners allows you to
FRRNDQHQWLUHPHDORQWKHKRWSODWHDWRQFHDQGLVRI
VSHFLDODVVLVWDQFHZKHQHQWHUWDLQLQJ(DFKNQRERQWKH
front panel has a diagram printed above it showing to
which burner it refers.
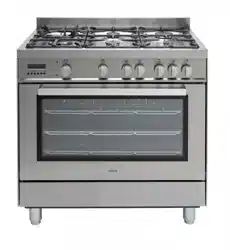
2XUFRRNHUVDUHÀWWHGZLWKDJDVRYHQEXUQHUDQG
an electric grill or, at the same time, with a gas
oven and an electric oven multifunction.
The cookers can also be equipped with a cooling
fan in order to reduce further the temperatures
on the front controls, knobs, door handle and
electrical components. It starts automatically and
stops same minutes after the cooking end.
:LWKWKHDLGRIWKHIDQWKHRYHQFDQEHXVHGIRUQDWXUDO
FRQYHFWLRQRUIRUFHGFRQYHFWLRQFRRNLQJTo guarantee
the customer a good and safe use of the appliance,
WKHFRRNHUVKDYHHTXLSSHGZLWKDVDIHW\WHPSHUDWXUH
device, which automatically turns on in case the
PDLQWKHUPRVWDWIDLOVWRZRUN,QVXFKDQHYHQWWKH
HOHFWULFLW\LVLQWHUUXSWHGWHPSRUDULO\do not attempt
to repair it yourself but turn the appliance off and
contact your nearest Assistance Centre.
DESCRIPTION OF THE APPLIANCE
1
2
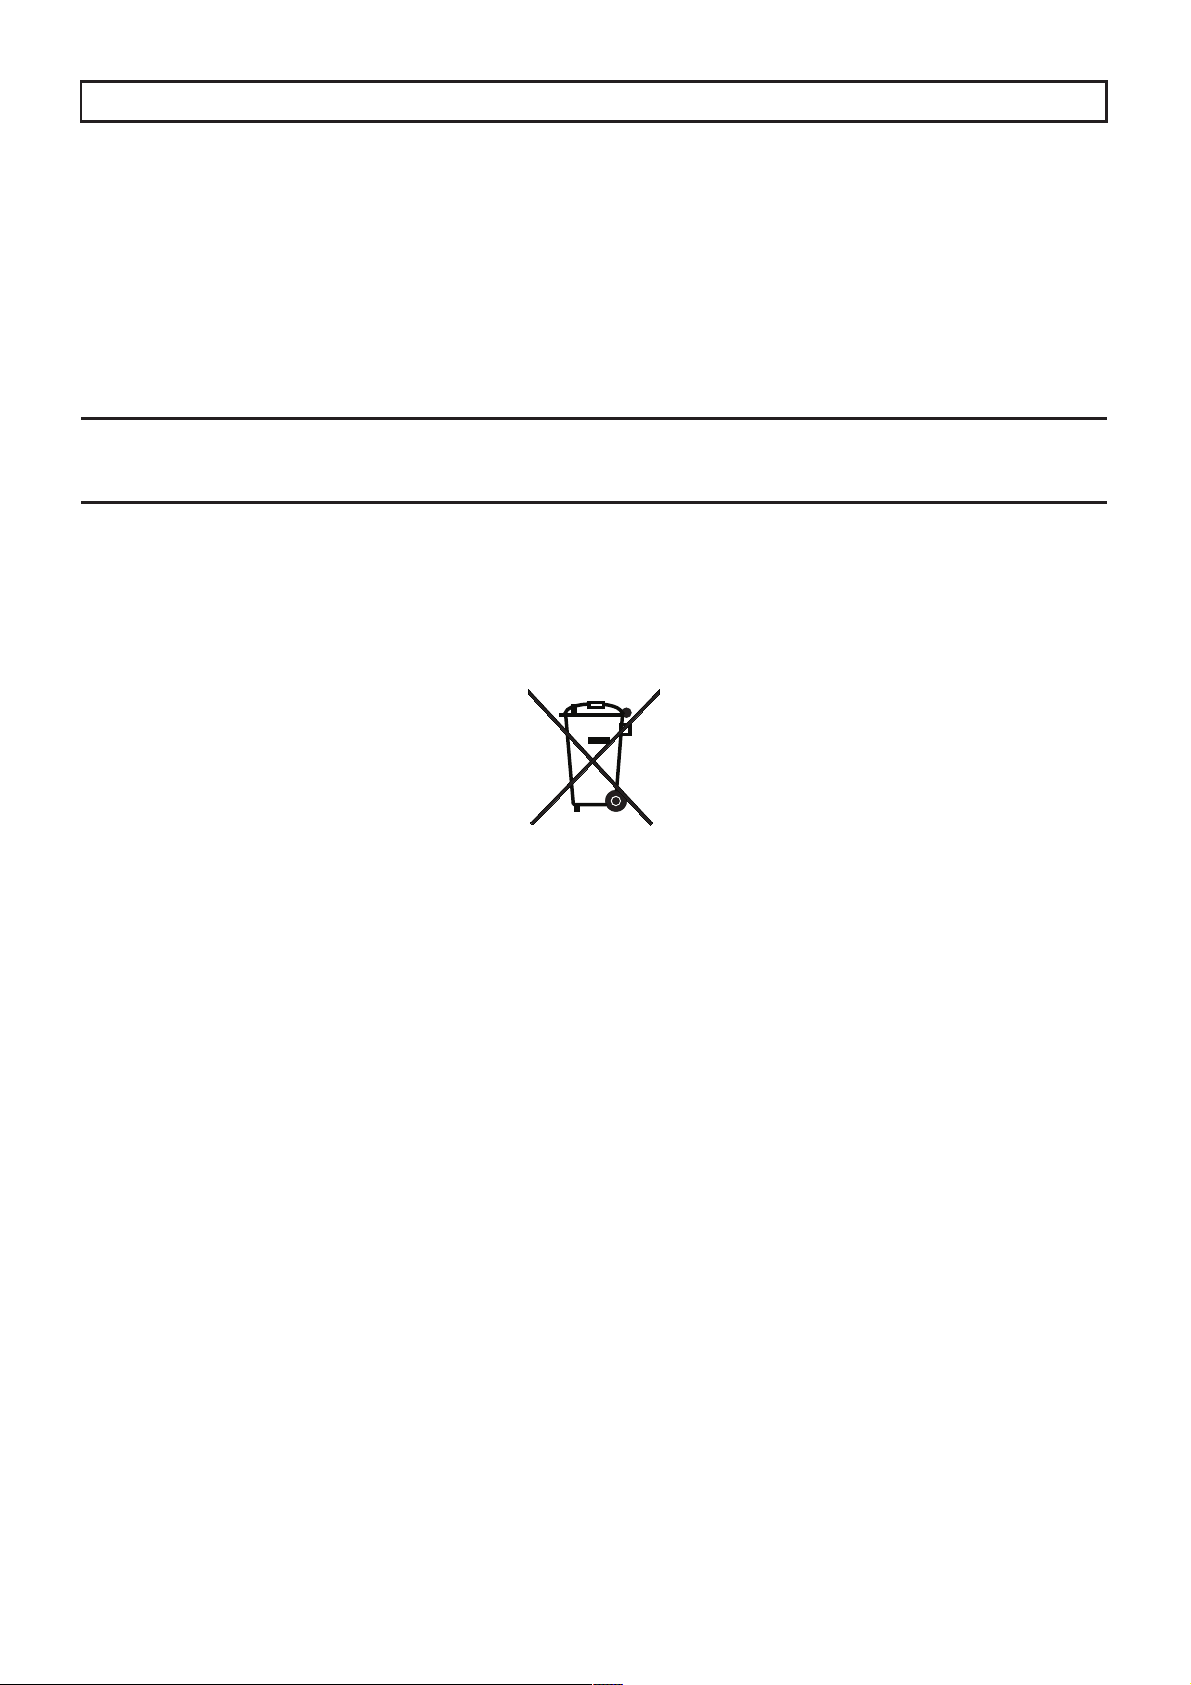
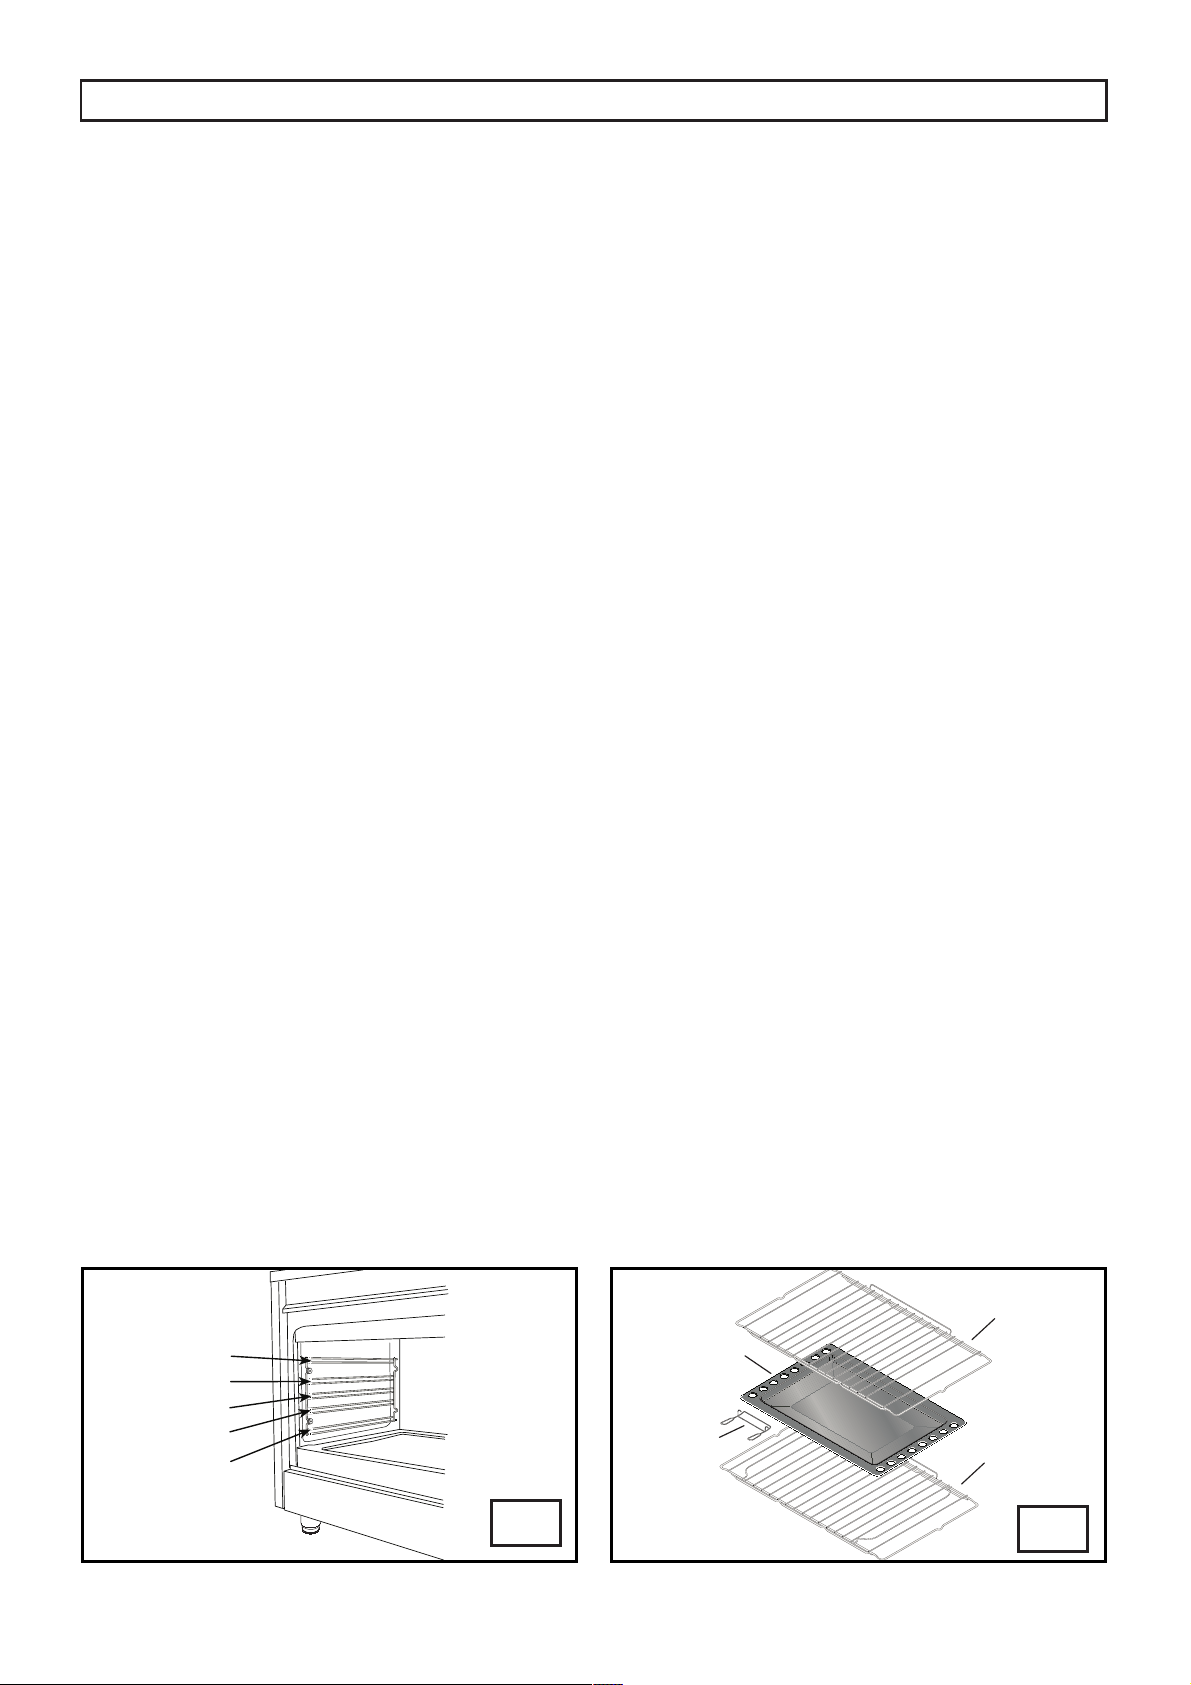
7KHRYHQZDOOVDUH¿WWHGZLWKYDULRXVJXLGHEDUVRU
UXQQHUV¿JRQZKLFKWKHIROORZLQJDFFHVVRULHVFDQ
be placed. Supply and quantities vary from model
WRPRGHOÀJ
• oven shelf rack (Gf). Ensure shelf is located with
dish and tray stop pointing upwards and at rear of
oven.
• food grill shelf (Gc) (*). Ensure shelf is located
with stop pointing upwards and at rear of oven.
• drip tray (V)
• handle (D)
• drip tray grid (E) (*)
(*) Only on certain models.
7KHFRRNHUVDUHHTXLSSHGZLWKDVPDOOFRPSDUWPHQW
under the oven that can be used for storing things.
Remember that the surfaces become hot, it is
VWULFWO\IRUELGGHQWRSODFHLQÁDPPDEOHPDWHULDOV
inside.

8
DESCRIPTION OF THE CONTROLS
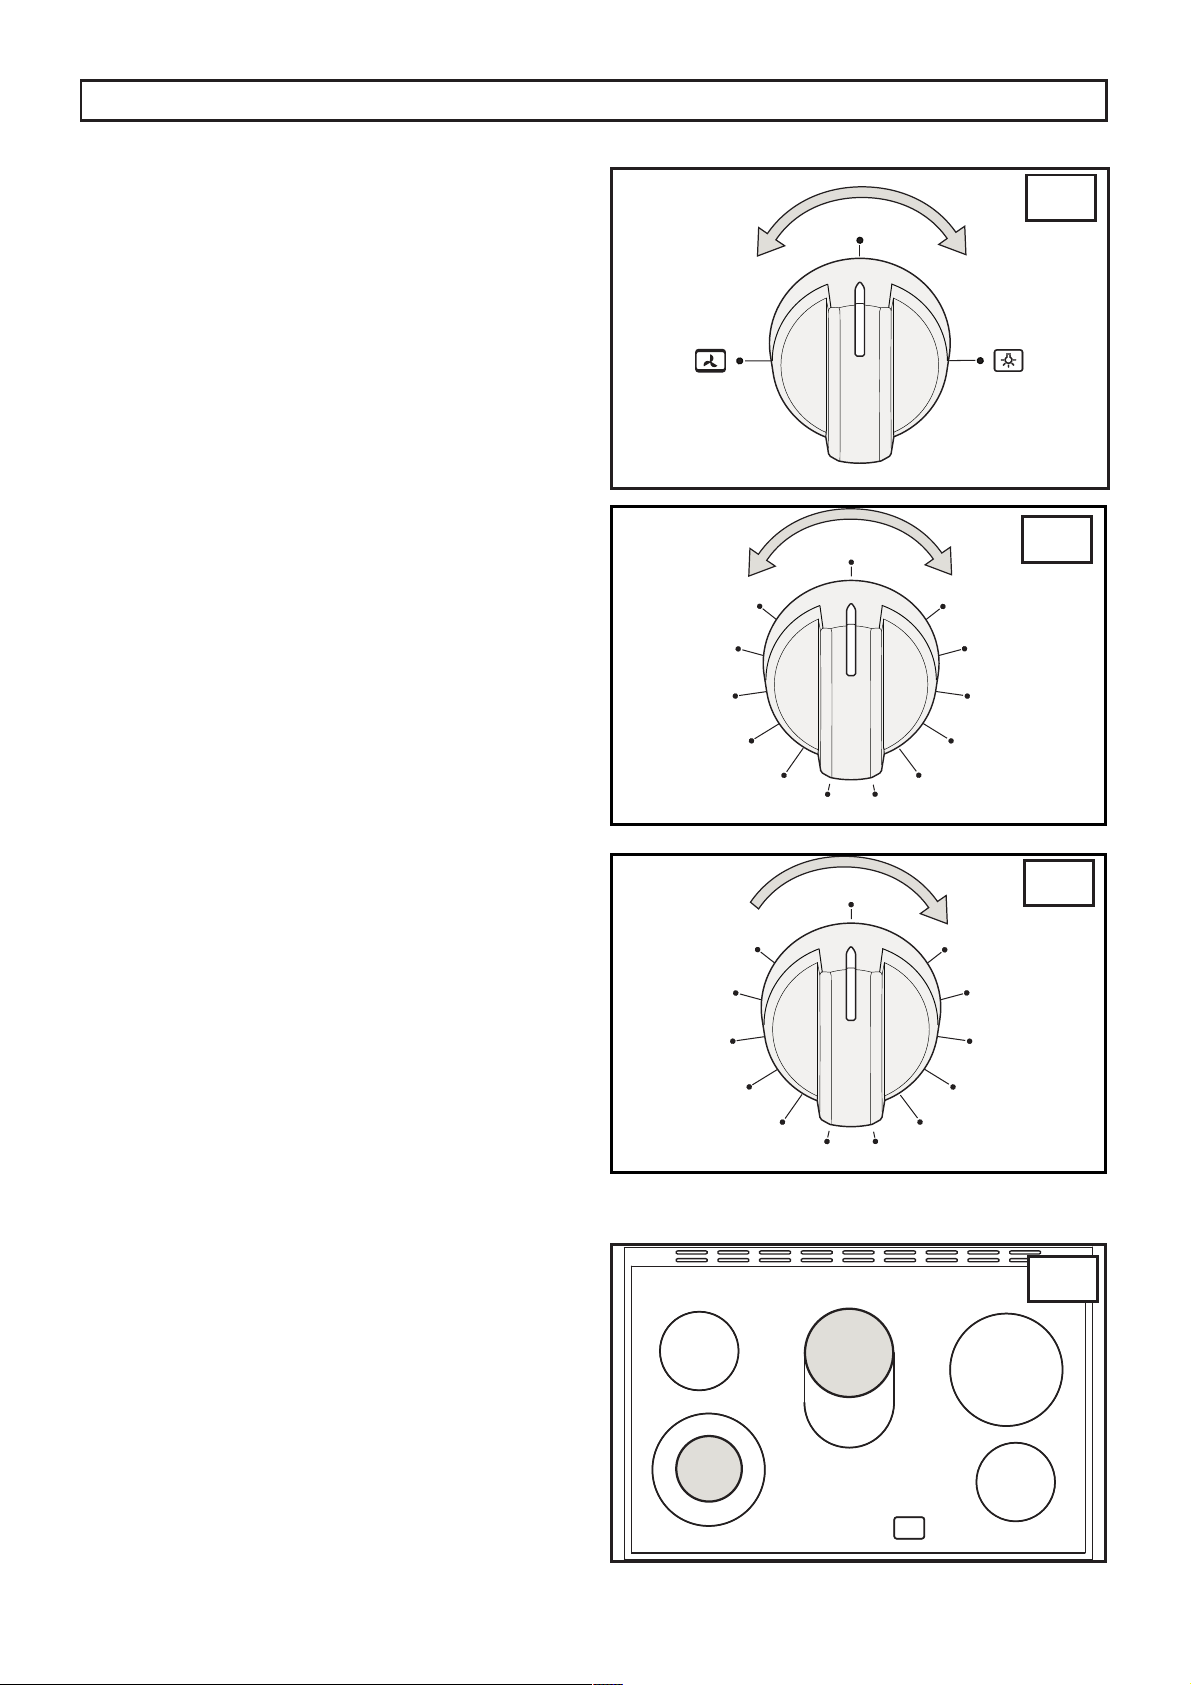
HOB GAS BURNER KNOB (A)
%\URWDWLQJWKHNQRELQDQDQWLFORFNZLVHGLUHFWLRQWKH
IROORZLQJV\PEROVDSSHDU
= Closed position
= “Full on” position
= “Reduced rate or Low” position
GAS OVEN/ELECTRIC GRILL THERMOSTAT KNOB (B)
%\URWDWLQJWKHNQRELQDQDQWLFORFNZLVHGLUHFWLRQWKH
IROORZLQJIXQFWLRQVDSSHDU
= Closed position
from Min. to Maxi (260°C)
= Oven temperatures
7XUQWKHNQREFORFNZLVHLI\RXZDQWWRXVHWKHHOHFWULF
grill
OVEN ELECTRIC THERMOSTAT KNOB (C)
%\WXUQLQJWKHRYHQNQREFORFNZLVHZHZLOO¿QGWKH
different oven temperature values (from 50°C to
Max).
OVEN FUNCTION SELECTOR KNOB (8) (D)
%\WXUQLQJWKHNQREWRWKHULJKWRUWRWKHOHIWZHZLOO¿QG
WKHIROORZLQJV\PEROV
0
= Oven off
= Oven light on, which stays on for all functions
= Defrost
= Top and bottom heating elements
= Top and bottom heating elements and fan
= Bottom heating element and fan
= Fan forced heating element and fan
= Grill heating element + turnspit (*)
= Grill heating element and fan
(*) turnspit is only on some selected models
A
D
C
DESCRIPTION OF THE APPLIANCE
B
9
DESCRIPTION OF THE APPLIANCE
F
G
RED WARNING LIGHT
:KHQOLWLWLQGLFDWHVWKDWWKHHOHFWULFJULOOor one of the
oven electric components is on.
YELLOW WARNING LIGHT
:KHQOLWLWLQGLFDWHVWKDWHLWKHUWKHHOHFWULFRYHQRU
HOHFWULFJULOOLVZRUNLQJ:KLOHWKHRYHQLVEHLQJXVHG
the light will switch off when the set temperature is
UHDFKHG'XULQJEDNLQJLWLVQRUPDOIRUWKH\HOORZOLJKW
to switch on and off several times as the oven tempe-
rature is controlled.
SELECTOR KNOB LIGHT AND FAN MOTOR (E)
%\WXUQLQJWKHNQREWRWKHULJKWRUWRWKHOHIWZHZLOO¿QG
WKHIROORZLQJV\PEROV
ENERGY REGULATOR KNOB (F-G)
%\WXUQLQJWKHNQREWRWKHULJKWZH¿QGWKHIROORZLQJ
V\PEROV
0
= heating elements off
from 1 to 12
= minimum and maximum power for single
FRRNLQJ]RQH
from 12 to 0
PD[LPXPSRZHUIRUGRXEOHFRRNLQJ]RQH
SWITCHING THE HEATING ELEMENTS
7KHFRRNLQJ]RQHVDUHFOHDUO\YLVLEOHRQWKHKREEHLQJ
circular.
Only the inside of the circles traced on the glass is
heated.
The hob has a built-in warning light that switches on when
WKHWHPSHUDWXUHLQWKHFRRNLQJ]RQHH[FHHGV&7KLV
warning light will only switch off when the temperature in
WKHFRRNLQJ]RQHKDVJRQHEHORZWKLVYDOXHDQGLWLVIRU
this reason it is called the “residual heat warning”.
7KHKHDWLQJHOHPHQWVZLWKDVLQJOHFFRNLQJ]RQHDUH
FRQWUROOHGE\HQHUJ\UHJXODWRUVZLWKSRVLWLRQV)WKDW
permit to obtain a big range of different temperatures.
7KHKHDWLQJHOHPHQWZLWKDGRXEOHFRRNLQJ]RQHDUH
FRQWUROOHGE\SRVLWLRQHQHUJ\UHJXODWRUV*
%\WXUQLQJWKHNQREIURPWRWKHSRZHUVRIWKH¿UVW
]RQHRIFRRNLQJ³1” are regulated. By turning besides the
QXPEHUDUHOHDVHLWLVZDUQHGWKDWVLJQDOVWKHLQVHUWLRQ
RIWKHVHFRQG]RQHRIFRRNLQJ³2´¿J+
,QWKLVSRVLWLRQERWKZRUNWKH]RQHRIFRRNLQJWRWKH
PD[LPXPSRZHU%\WXUQLQJWKHNQREFRXQWHUFORFNZLVH
to regulate its power.
Only returning on the position “0” the second zone of
FRRNLQJLVGLVFRQQHFWHG
A red coloured warning light signals that the heating
elements are on.
H
E
10
DESCRIPTION OF THE APPLIANCE
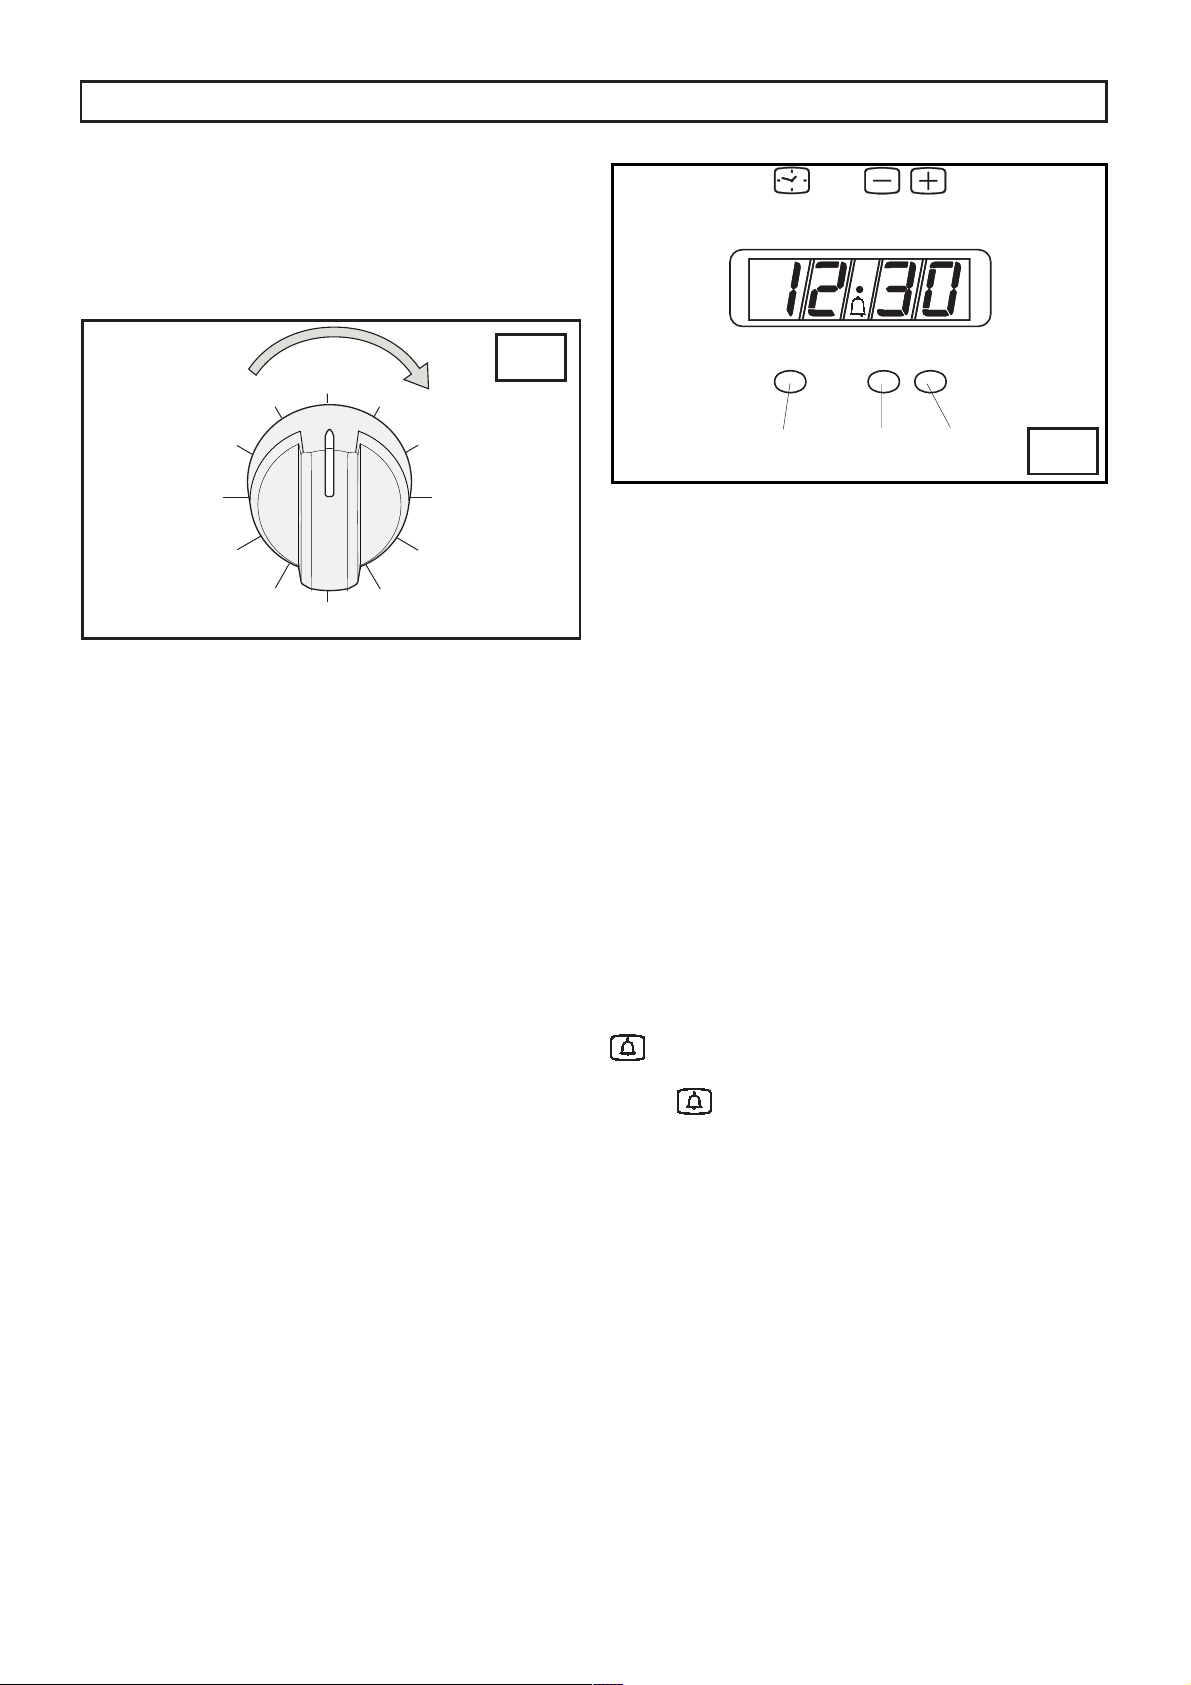
ELECTRONIC CLOCK (L)
7KLVDFFHVVRU\IXQFWLRQVDVDFORFNDQGDPLQXWH
counter. The digital display always shows the time but
will display the minute counter time when this function
is set.
Setting the time (from 0.01 to 24.00 - hh,mm)
After connecting to the electricity mains or subsequent
WRDSRZHUFXWWKH¿JXUHV³´ZLOOÀDVKRQWKHGLVSOD\
3UHVVSXVKEXWWRQDQGVWDUWVHWWLQJWKHFXUUHQWWLPH
E\SUHVVLQJSXVKEXWWRQRU7KHIXQFWLRQZLOOVWDUW
seconds after setting.
Minute counter (from 0.01 to 0.99 = hh,mm)
By selecting the time on the minute counter with push
EXWWRQWKLVIXQFWLRQZLOOEHDFWLYHDOORIWKHWLPHWLPHLV
VHWLQVHFRQGXQLWV7KHWLPHZLOOGLVDSSHDUOHDYLQJ
the minute counter time showing on the display and the
symbol lights up. Time is given in seconds during
countdown. At the end of the set time the buzzer goes
off, the
symbol disappears and the time reappears.
You can see the time while the minute counter is
IXQFWLRQLQJE\SUHVVLQJSXVKEXWWRQ
Buzzer
The buzzer goes off at the end of the minute counter
IXQFWLRQDQGODVWVDERXWPLQXWHV7KHEX]]HUFDQEH
VWRSSHGE\SUHVVLQJEXWWRQ
Buzzer intensity
7KHUHDUHWKUHHGLIIHUHQWEX]]HULQWHQVLWLHVWRVHOHFW
WKHRQH\RXZDQWSUHVVSXVKEXWWRQZKHQWKHWLPH
is displayed.
Correcting/cancelling the minute counter function
To correct or cancel the time set on the minute counter,
SUHVVNH\VDQGVLPXOWDQHRXVO\DQGWKHQUHOHDVH
NH\¿UVW7KHWLPHFDQEHFRUUHFWHGDWDQ\PRPHQW
E\SUHVVLQJSXVKEXWWRQIROORZHGE\RU
I
TIMER (I)
7RVHWFRRNLQJWLPH¿UVWZLQGWKHWLPHUXSE\WXUQLQJLW
FRPSOHWHO\RQFHIURPOHIWWRULJKWDQGWKHQEDFNWRWKH
number of minutes you want. The timer will ring when the
set time has elapsed.
L
11
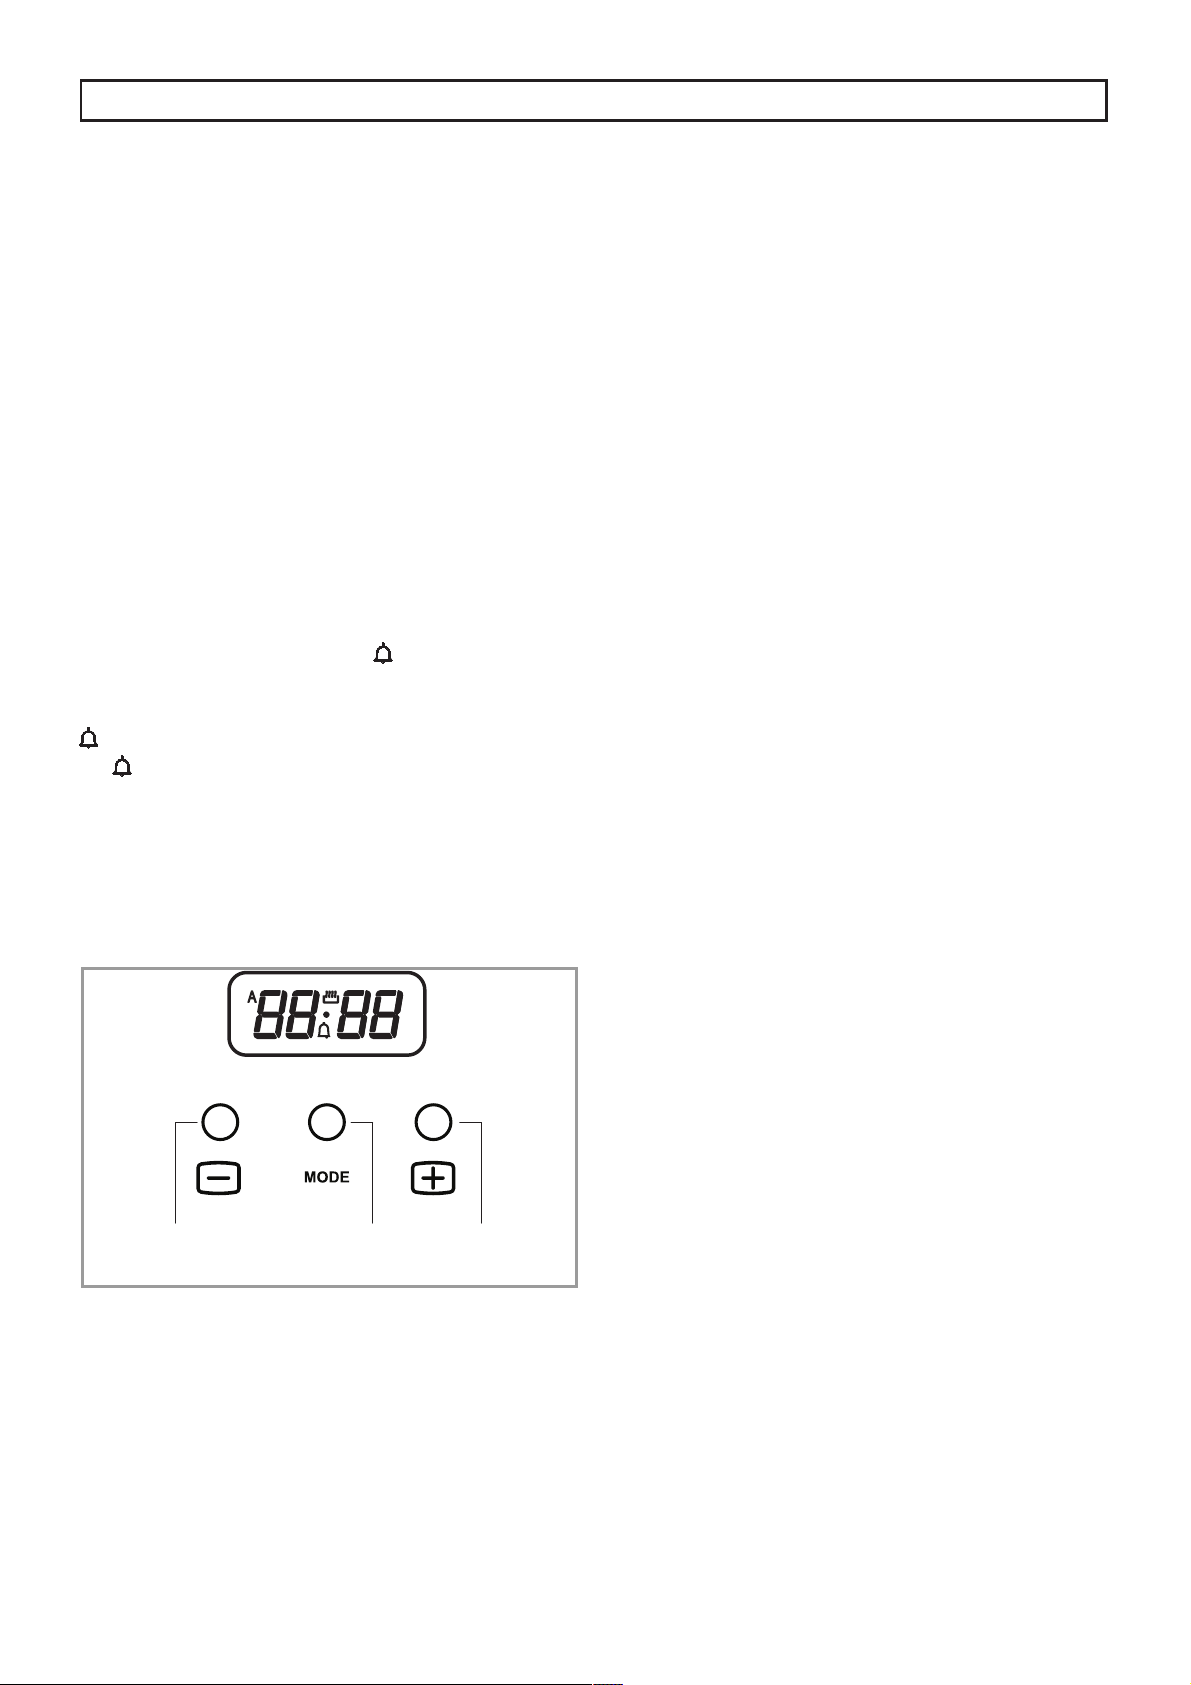
ELECTRONIC PROGRAMMER TOUCH.
Setting the time.
After connecting to mains or after a power cut, sym-
ERO³$´DQGZLOOERWKÀDVKVLPXOWDQHRXVO\RQWKH
display.
Keep pressed for some seconds simultaneously +
and - buttons or just MODE button, till when symbol
“A” turn off.
Time can be set just when the dot between the num-
EHUVÀDVKHV
Program selection
Keep pressed for some seconds MODE button and
pressing it in turns, the following programs are selec-
WHG
Minute Minder
The time turns off, the symbol
turns on and with +
and - buttons is possible to select the time alarm. At the
end of the set time, the buzzer will start and the symbol
ÀDVKHV7RWXUQRIIWKHEX]]HUDQGWXUQRIIWKHV\P-
bol
keep pressed for some seconds MODE button.
The minute minder program runs independently of
other cooking programs.
DESCRIPTION OF THE APPLIANCE
12
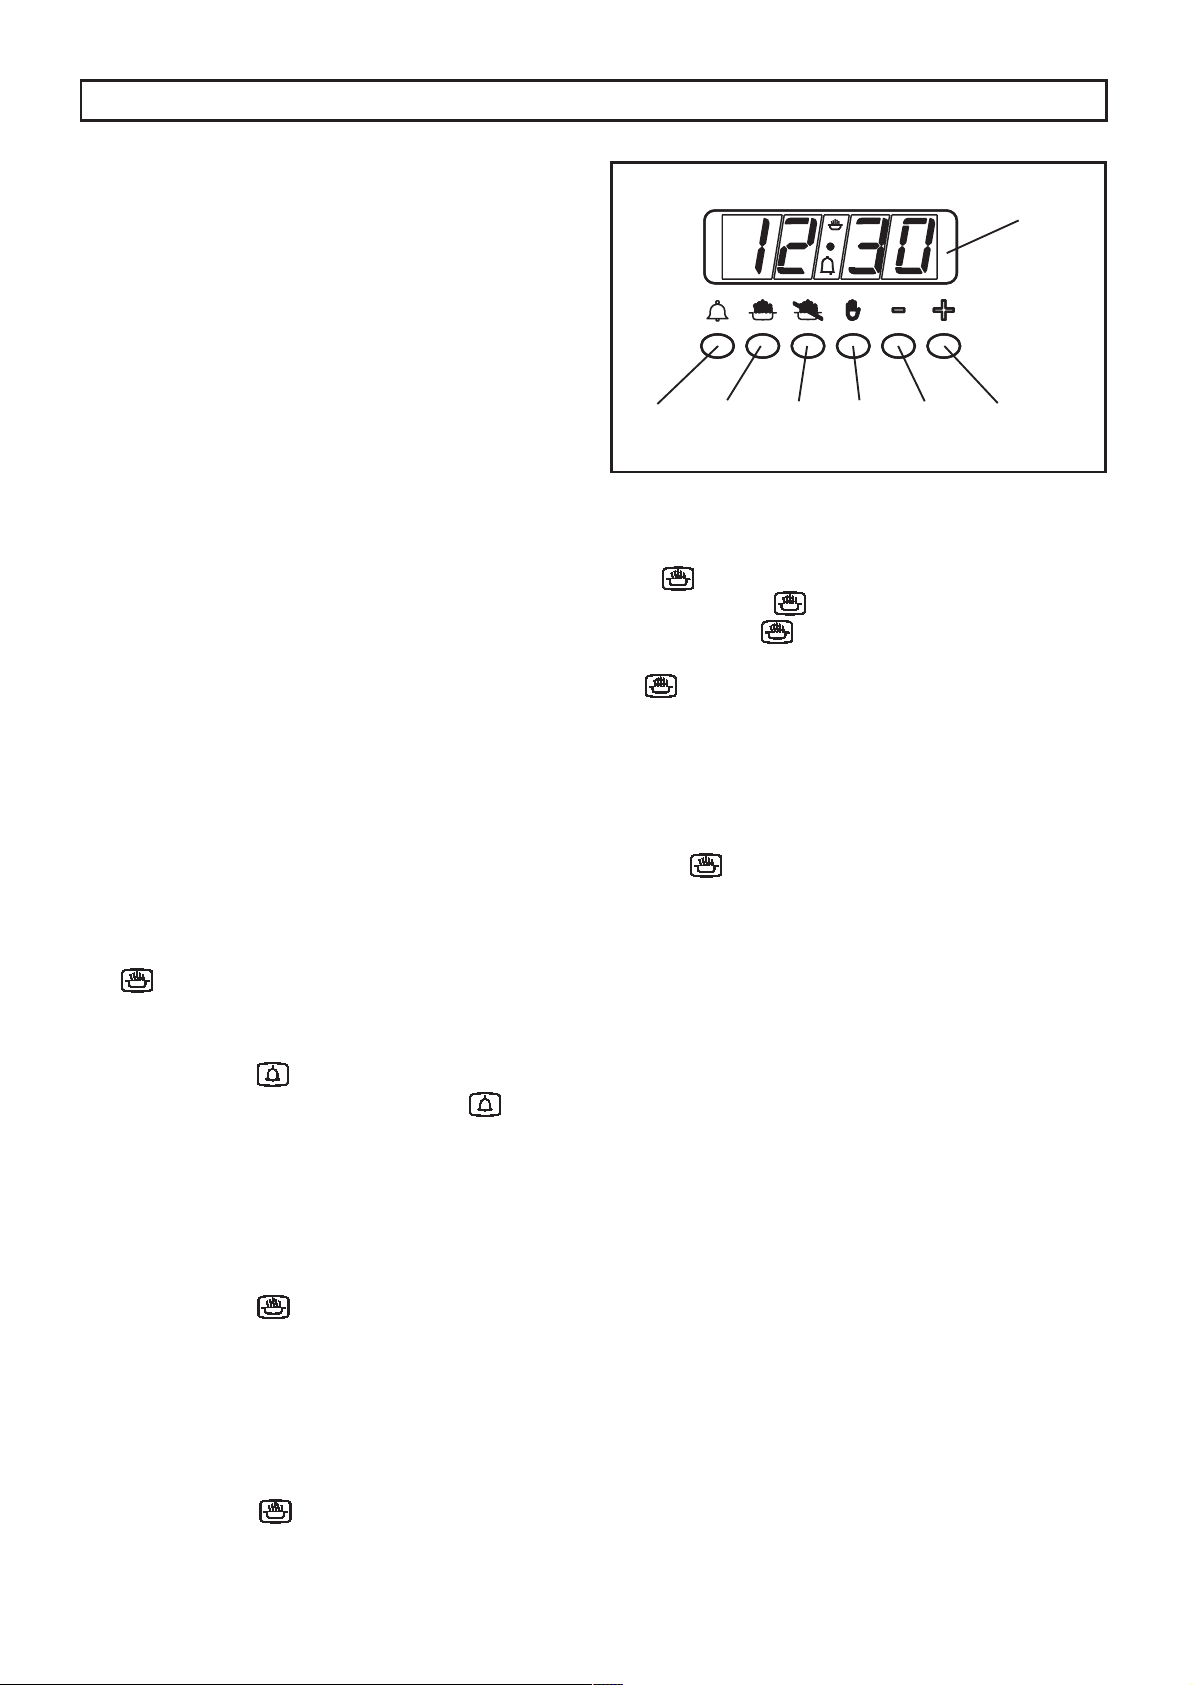
ELECTRONIC PROGRAMMER
7KHSURJUDPPHUFDQVHOHFWWKHIROORZLQJIXQFWLRQV
&ORFNVHWE\NH\VDQG
- Minute counter VHWE\NH\
&RRNLQJWLPHVHWE\NH\
(QGRIFRRNLQJVHWE\NH\
- Manual operation mode VHWE\NH\
6HWWLQJWLPHEDFNZDUGVVHWE\NH\
- Setting time forward VHWE\NH\
The digital display (N) always shows the time and
FDQGLVSOD\FRRNLQJDQGHQGRIFRRNLQJWLPHRUWKH
minute counter time by pressing the corresponding
push button.
N.B.: At the end of each setting session (except
for the minute counter) the programmer turns the
oven off. Check when next using the oven, if the
programmer is not going to be used, that the latter
is set on manual operation (see the instructions
given further on).
Setting the time (from 0.01 to 24.00 = hh,mm)
After connecting to the electricity mains or subsequent
WRDSRZHUFXW$872DQG³´ZLOOERWKÀDVK
simultaneously on the display.
3UHVVSXVKEXWWRQVDQGVLPXOWDQHRXVO\DQGVWDUW
VHWWLQJWKHFXUUHQWWLPHE\SUHVVLQJSXVKEXWWRQRU
Once set the AUTO symbol will turn off and
the symbol, for manual operation, will turn on.
Minute counter (from 0.01 to 0.59 = hh,mm)
3UHVVSXVKEXWWRQDQGVHOHFWFRRNLQJWLPHZLWKSXVK
EXWWRQRU7KHV\PEROWXUQVRQ$WWKHHQGRI
the set time the buzzer will go off and the symbol
turns off.
Semi-automatic operation
(with cooking time from 0.01 to 23.59 = hh,mm)
%\SUHVVLQJSXVKEXWWRQDQGVHWWLQJWKHOHQJWKRI
FRRNLQJWLPHZLWKSXVKEXWWRQRUWKH$872DQG
symbols will light up and stay on all the time. At the end
of the set time the symbol will turn off, the AUTO
V\PEROZLOOÀDVKDQGWKHEX]]HUZLOOJRRII
Semi-automatic operation
(with end of cooking time from 0.01 to 23.59 = hh,mm)
%\SUHVVLQJSXVKEXWWRQDQGVHWWLQJWKHHQGRI
FRRNLQJWLPHZLWKSXVKEXWWRQWKH$872DQG
symbols will turn on and stay on all the time. At the end
of the set time the symbol will turn off, the AUTO
V\PEROZLOOÀDVKDQGWKHEX]]HUZLOOJRRII
Automatic operation
(with the start of cooking time delayed)
)LUVWSURJUDPPHFRRNLQJWLPHERWKWKH$872
and symbol will turn on) and then the end of
FRRNLQJWLPHWKHV\PEROZLOOWXUQRIIDVGHVFULEHG
previously. The symbol will turn on again when
EDNLQJLQWKHRYHQVWDUWV$WWKHHQGRIFRRNLQJWLPH
WKHV\PEROZLOOWXUQRIIWKH$872V\PEROZLOOÀDVK
and the buzzer will go off.
Manual operation
Manual operation is only possible when the automatic
SURJUDPPLQJKDV¿QLVKHGRUDIWHUKDYLQJFDQFHOOHGLWE\
SUHVVLQJSXVKEXWWRQ7KH$872V\PEROGLVDSSHDUV
and the symbol turns on.
Buzzer
The buzzer will go off at the end of a programme or at
WKHHQGRIWKHPLQXWHFRXQWHUIXQFWLRQDQGODVWVDERXW
minutes. The buzzer can be stopped by pressing one of
the function push buttons.
Programme start and control
The programme starts after setting. The programme
set can be controlled at any time by pressing the
corresponding push button.
Correcting/cancelling the programme setting
An automatic function programming error will occur if the time
VKRZQRQWKHFORFNLVEHWZHHQWKHFRRNLQJVWDUWWLPHDQG
FRRNLQJHQGWLPH7KLVHUURUZLOOEHVLJQDOOHGLPPHGLDWHO\
E\DEX]]HUDQGWKH$872V\PEROZLOOÀDVK$VHWWLQJHUURU
FDQEHFRUUHFWHGE\DOWHULQJWKHGXUDWLRQRUHQGRIFRRNLQJ
time. Any programme that has been set can be corrected
at any time by pressing the corresponding programming
NH\DQGWKHQNH\RU7RFDQFHODSURJUDPPHFRUUHFW
the time set bringing it to a value of “0.00”. If functioning
time is cancelled the end of functioning is cancelled too
and vice versa. The oven turns off automatically and the
$872V\PEROÀDVKHV3UHVVNH\WRVHWWKHSURJUDPPHU
on manual operation. The right time cannot be corrected
ZKHQWKHDXWRPDWLFRSHUDWLRQSURJUDPPHLVZRUNLQJ
DESCRIPTION OF THE APPLIANCE
13
INSTRUCTIONS FOR THE USER
HOB: GENERAL NOTES ON SAFETY
:KHQXVLQJWKHEXUQHUVGRQRWOHDYHWKHDSSOLDQFH
XQVXSHUYLVHG(QVXUHWKDWFKLOGUHQDQGWKHLQ¿UP
GRQRWSOD\ZLWKWKHDSSOLDQFH,QSDUWLFXODUPDNH
sure that pan handles are positioned correctly and
VXSHUYLVHWKHFRRNLQJRIIRRGVZKLFKXVHRLOVDQG
IDWVDVWKHVHDUHKLJKO\LQÀDPPDEOH
• Do not use aerosols or sprays near the appliance
when it is in use.
• Even after use, the burners remain hot for a long
period; to avoid burning, do not place hands or
other objects on them.
• After using the appliance, ensure that all the controls
are in the closed or off position.
AUTOMATIC ELECTRIC IGNITION OF COOKTOP
BURNERS
3XVKWKHNQRE$which corresponds to burner to
be ignited and turn DQWLFORFNZLVHWRWKH³Full On”
positionWKHQGHSUHVVWKHFRQWURONQRE
$XWRPDWLFDOO\WKHLJQLWLRQVSDUNVKRRWV,IWKHUHLVQR
electric power the burner may be lit with matches.
OPTIMUM USE OF COOKTOP BURNERS
,QRUGHUWRDFKLHYHPD[LPXPHI¿FLHQF\ZLWKPLQLPXP
JDVFRQVXPSWLRQLWLVXVHIXOWRUHPHPEHU
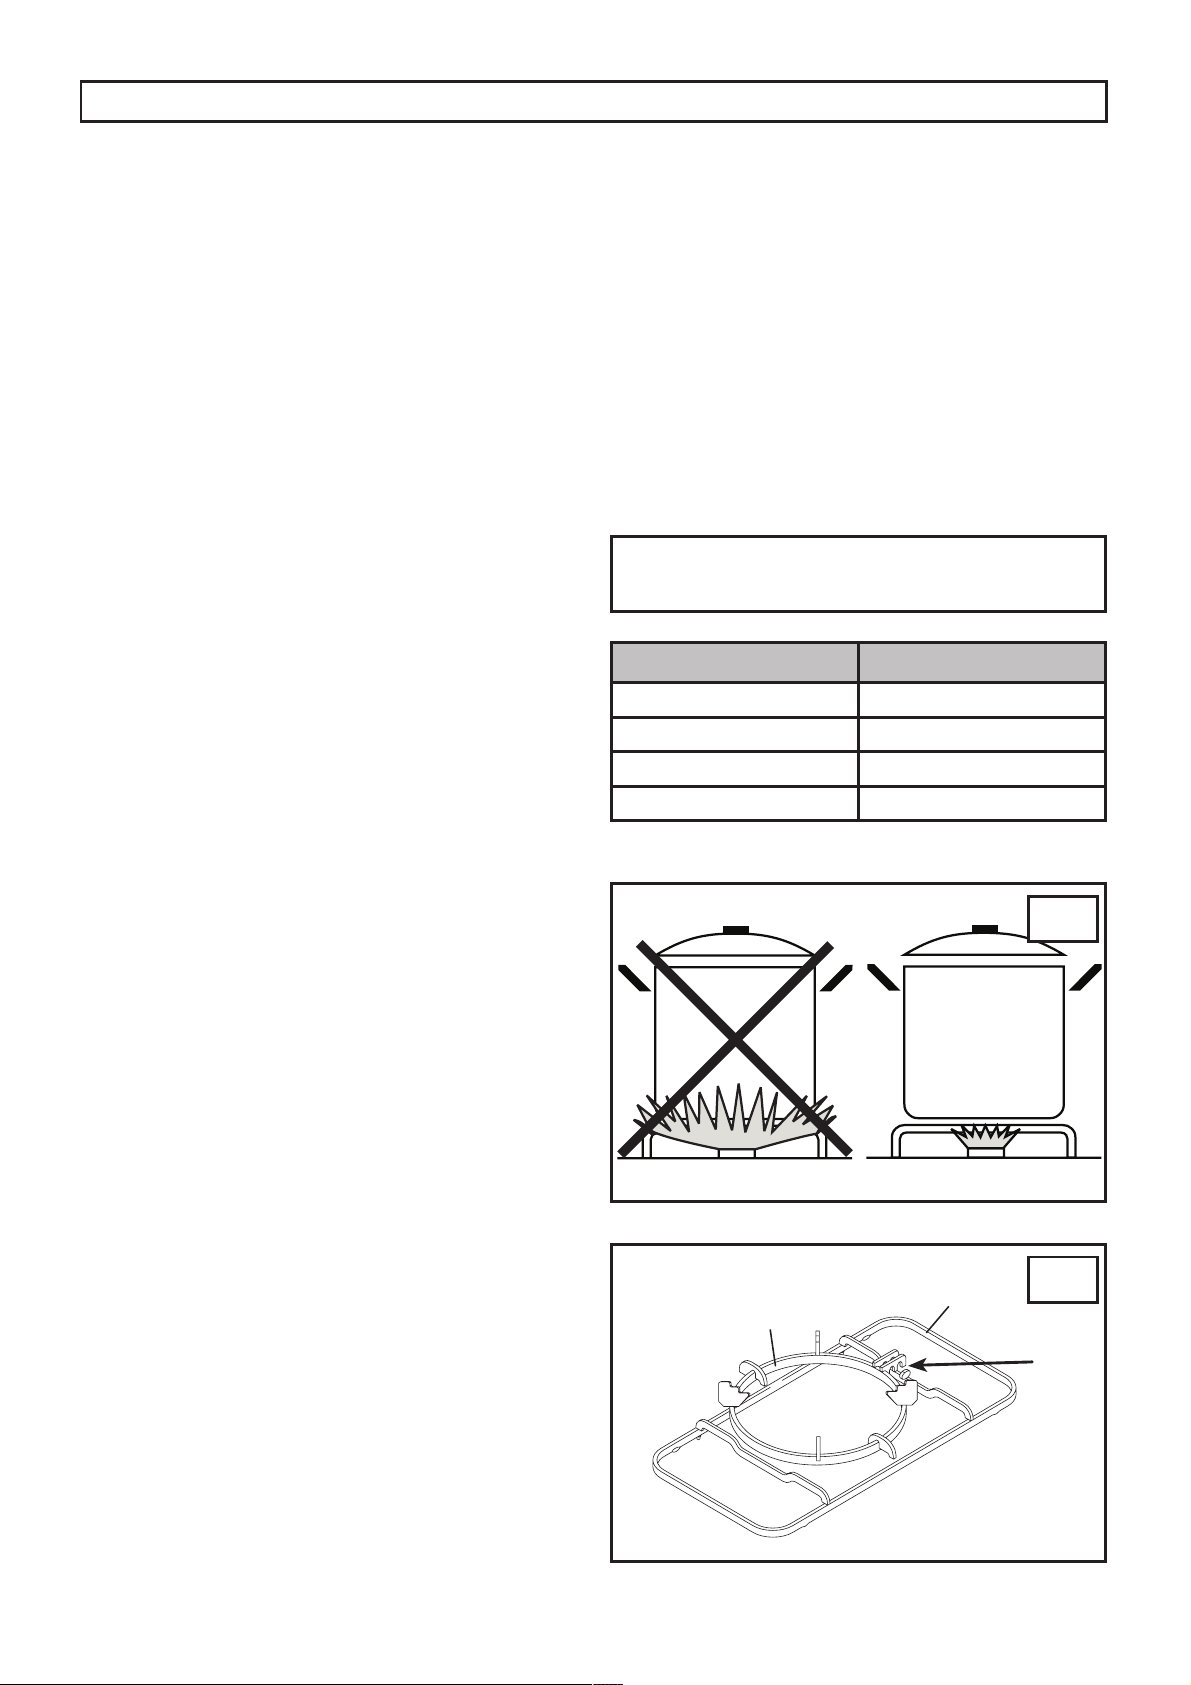
• Do not use large burners with pans of small diameter
LQRUGHUWRDYRLGÀDPHVVSUHDGLQJZLGHUWKDQSDQV
(consult the following table) and always use pans
ZLWKOLGV¿J
:KHQWKHERLOLQJSRLQWLVUHDFKHGLWLVEHVWWRWXUQ
WKHNQREWRWKH³Low position”.
• Avoid using over sized pans that may radiate
excessive heat and cause damage to surrounding
surfaces such as bench tops and glass lid.
• The appliance is equipped with a particular pan
VXSSRUWRQZKLFKPXVWEHSXWWKHZRNVXSSRUW
7RHQVXUHVWDELOLW\SRVLWLRQWKHQRWFK$RIZRN
VXSSRUWRQWKHSDQVXSSRUW¿QJHUVDVLQGLFDWHGLQ
¿J
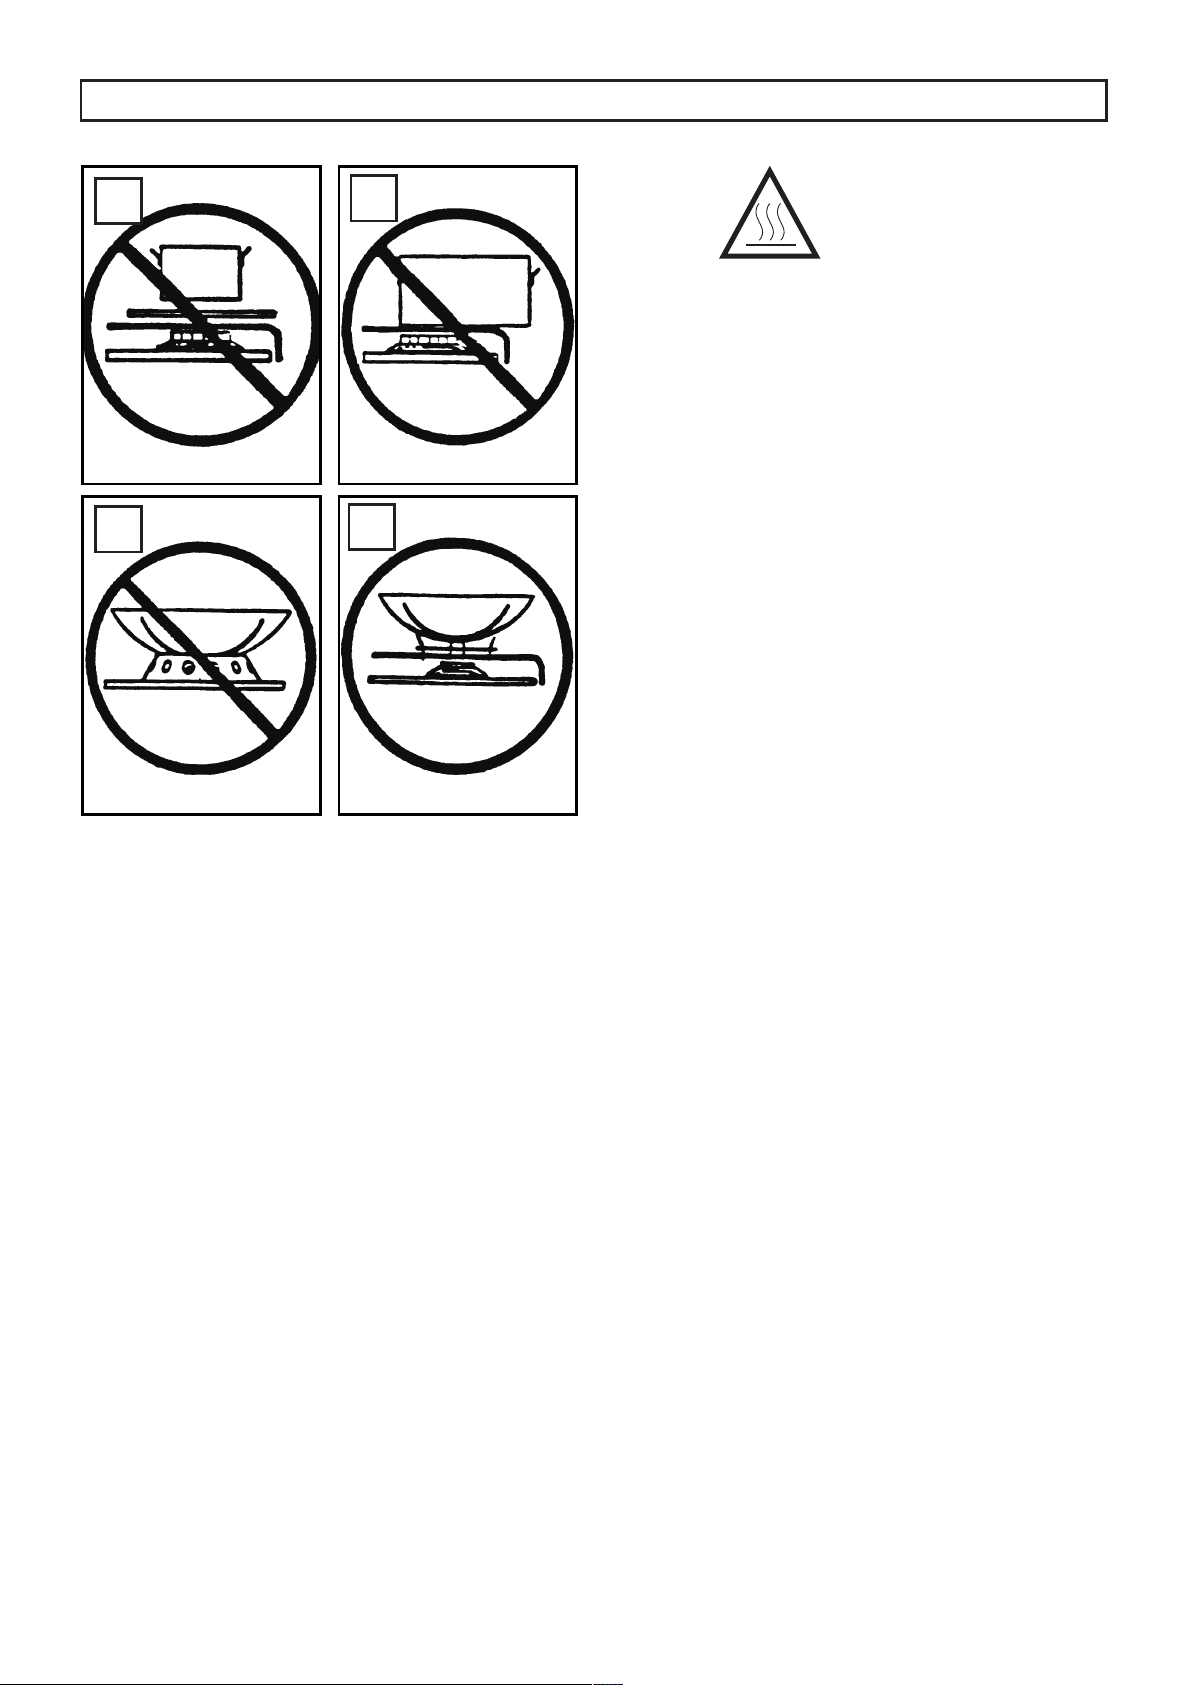
'RQRWSODFHDQ\WKLQJHJÀDPHWDPHUDVEHVWRV
mat, between pan and pan support, as serious
GDPDJHWRWKHDSSOLDQFHPD\UHVXOW¿J
• Locate pan centrally over the burner so that is stable
DQGGRHVQRWRYHUKDQJWKHDSSOLDQFH¿J
,IJDVEXUQVZLWKD\HOORZÀDPHGRQRWFRQWLQXHWR
use burner and arrange for service.
• Do not use burners without the proper pan support or
ZRNVWDQGDVWKLVZLOOFRQFHQWUDWHDQGGHÀHFWWKHKHDW
RQWRWKHKRWSODWH¿JDQGVXUURXQGLQJVXUIDFHV
• 8VHRQO\DZRNVXSSRUWVXSSOLHGRUUHFRPPHQGHG
E\WKHPDQXIDFWXUHURIWKHDSSOLDQFH¿J
ABNORMAL OPERATION
Any of the following are considered to be abnormal
RSHUDWLRQDQGPD\UHTXLUHVHUYLFLQJ
<HOORZWLSSLQJRIWKHKREEXUQHUÀDPH
6RRWLQJXSRIFRRNLQJXWHQVLOV
• Burners not igniting properly.
• Burners failing to remain alight.
• Burners extinguished by the oven door.
*DVYDOYHVZKLFKDUHGLI¿FXOWWRWXUQ
In case the appliance fails to operate correctly, contact
our Service Centre.
Warning: Servicing should be carried out only
by authorised personnel.
Burners Ø pan cm
:RN
Large
Medium
Small
3
4
14
INSTRUCTIONS FOR THE USER
6
8
5
7
• Never cover the base of the oven or the oven shelf
with aluminium foil or other materials, as this creates
D¿UHKD]DUG
:KHQJULOOLQJDOZD\VSXWDOLWWOHZDWHULQWKHJULOO
pan. The water prevents the grease from burning
DQGIURPJLYLQJRIIEDGVPHOOVDQGVPRNH$GG
more water during grilling to compensate for
evaporation.
• After using the appliance ensure that all the controls
are in the off position.
• WARNING - During and after use, the oven
door glass and the accessible parts will
become hot when in use. To avoid burns and
scalds children should be kept away.
15
INSTRUCTIONS FOR THE USER
GENERAL INFORMATION AND INSTRUCTIONS
FOR USING CERAMIC GLASS HOBS
&HUDPLFJODVVLVDQDWXUDOSURGXFWDQGOLNHDQ\RWKHU
material in ceramic, can have an uneven surface. You
might even see some bubbles inside the ceramic glass
LWVHOIWKHVHZLOOQRWLQÀXHQFHFRRNLQJRUWKHOLIHWLPHRI
the hob.
,OOXPLQDWLRQRIWKHVLQJOHFRRNLQJ]RQHVPLJKWGLIIHU
This depends on the technical characteristics of the
heating elements. This has absolutely no effect on
quality or operation.
$FFRUGLQJWRKRZ\RXORRNDWLWWKHLQFDQGHVFHQW
KHDWLQJPLJKWDSSHDUWRJRRYHUWKHHGJHRIWKHFRRNLQJ
zone.
• Do not put very hot pans on the outer edge of the hob.
• Do not use pans with aluminum bottom.
'RQRWXVHWKHKREDVDZRUNWRSDQGWDNHFDUHQRW
to let hard or sharp objects fall on it. The top could be
damaged.
• Do not put empty enamelled pans on the heat. Both
the bottom of the pan and the ceramic glass could be
damaged.
• Do not drag pans or other objects over the glass top
which could get scratched.
• Clean and dry the bottom of the pan before putting it on
the hob. Salt, sugar or grains of sand, for example, that
could be in greens, can scratch.
• Clean off immediately any spilled liquid.
'RQRWFRRNRUUHKHDWIRRGZUDSSHGLQWLQIRLORUSODVWLF
containers. Both the tin foil and the plastic containers
M
Position of
knobs
Heat intensity
Possible cooking processes
0
Off
1-2
Low To dissolve butter, chocolate, etc. To heat small amounts of liquid.
3-4
Moderate To heat greater quantities of liquid.
5-6
Slow Thawing frozen food and preparing stews, boiling or simmering.
7-8
Medium %ULQJLQJIRRGVWRERLOLQJSRLQW)RUGHOLFDWHURDVWVDQG¿VK
9-10
Strong )RUURDVWVFKRSVDQGVWHDNV)RUODUJHDPRXQWVRIERLOHGPHDW
11-12
Hot Bringing large amounts of water to the boil. Frying.
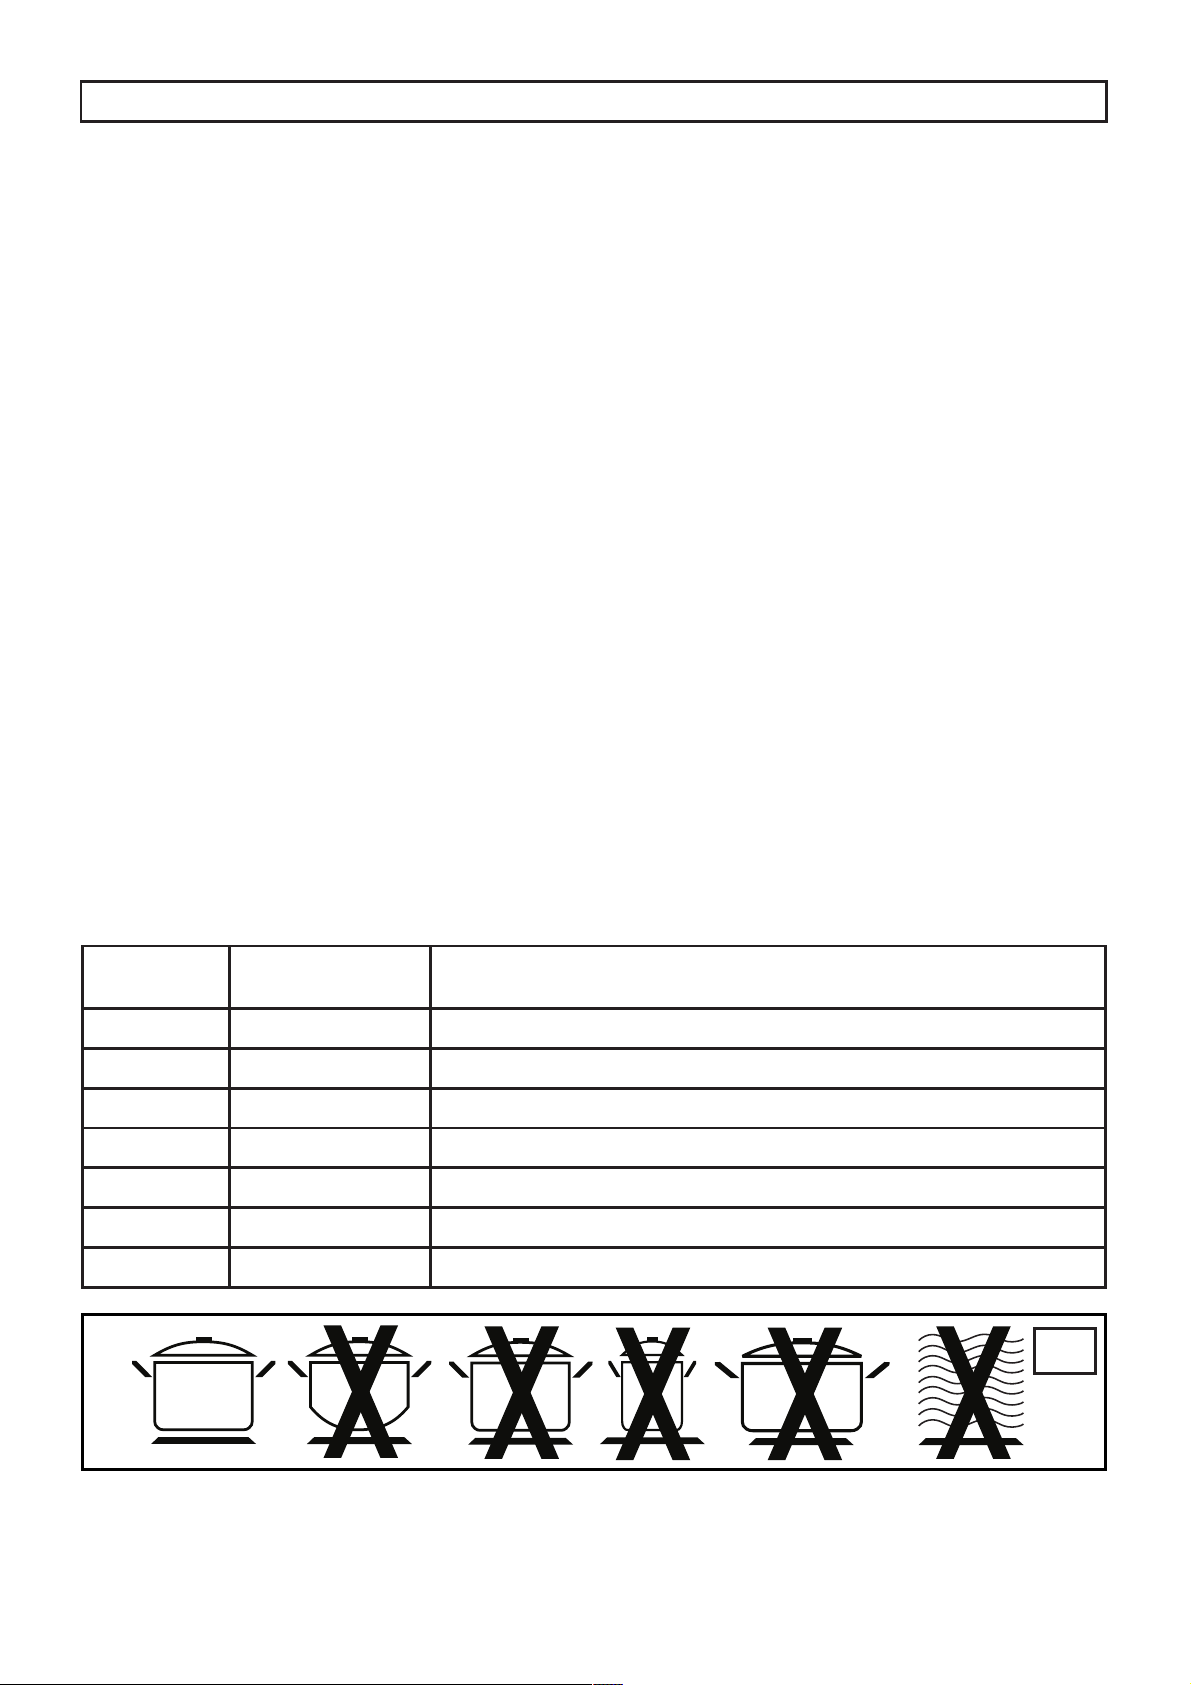
GOOD QUALITY
FLAT BASE
CONVEX
BASE TOO
CONCAVE
BASE
TOO
SMALL
TOO
LARGE
123$1
ELEMENT
ZRXOGPHOWVWLFNLQJWRWKHKRE
N.B.: Using the glass scraper, push immediately away
from the cooking zone, any pieces of tin foil or plastic
objects that could have melted or stuck; likewise
sugar or sugary food spilled over during cooking.
+2:726$9((/(&75,&,7<ÀJ0
To get the maximum yield with the minimum
FRQVXPSWLRQRIHOHFWULFLW\LWLVUHFRPPHQGHGWRNHHS
WKHIROORZLQJSRLQWVLQPLQG
• Switch the hob heating element on only after you
KDYHSXWWKHSDQRQWKHFRRNLQJ]RQHRUSODWH
• Thoroughly dry the bottom of the pan before putting
LWRQWKHFRRNLQJ]RQHRUSODWH
• Do not use pans with a diameter that is less than that
RIWKHFRRNLQJ]RQHRUSODWH:KHQ\RXDUHEX\LQJ
VDXFHSDQVNHHSLQPLQGWKDWWKHPDQXIDFWXUHU
usually gives the largest diameter of the pan which
is normally bigger than the base diameter.
8VHSDQVZLWKÀDWWKLFNERWWRPV%RWWRPVWKDWDUH
QRWÀDWZLOOPDNHFRRNLQJWLPHVORQJHU
• Always put a lid on the pan.
,IFRRNLQJWLPHLVORQJHUWKDQPLQXWHV\RXFDQ
VZLWFKWKHSODWHRIIWRPLQXWHVEHIRUHWKHHQG
RIFRRNLQJWLPHDQGPDNHXVHRIWKHUHVLGXDOKHDW
• For your information only, the table gives hints on
KRZWRXVHWKHFRRNLQJ]RQHVDQGSODWHV

16
INSTRUCTIONS FOR THE USER
OVEN: GENERAL SAFETY INSTRUCTIONS
• Do not leave the oven unsupervised during use.
(QVXUHWKDWFKLOGUHQDQGWKHLQ¿UPGRQRWSOD\ZLWK
the appliance.
• Do not spray aerosols in the vicinity of this appliance
while it is operating.
• Always grip the centre of the oven door when
opening. Do not practice excessive pressures on
the door when it is open.
'RQRWVWRUHRUXVHÀDPPDEOHOLTXLGVRULWHPVLQWKH
vicinity of this appliance.
• Do not worry if condensation forms on the door and
RQWKHLQWHUQDOZDOOVRIWKHRYHQGXULQJFRRNLQJ
7KLVGRHVQRWFRPSURPLVHLWVHI¿FLHQF\
:KHQRSHQLQJWKHRYHQGRRUEHYHU\FDUHIXORI
scalding vapours.
• During use the appliance becomes hot. Care
VKRXOGEHWDNHQWRDYRLGWRXFKLQJKHDWLQJHOHPHQWV
LQVLGHWKHRYHQ:HDURYHQJORYHVZKHQSODFLQJRU
removing pans from the oven or use WKHKDQGOH¿J
SURYLGHG+RRNWKHKDQGOHWRWKHHGJHRIWKHWUD\
and pull it out, slightly lifting it as you do so.
:KHQLQVHUWLQJRUUHPRYLQJIRRGIURPWKHRYHQ
FKHFNWKDWH[FHVVMXLFHVGRQRWRYHUÀRZRQWRWKH
RYHQEDVHRLOVDQGIDWVDUHKLJKO\LQÀDPPDEOH
when overheated).
• Use containers that will resist the temperatures
LQGLFDWHGRQWKHWKHUPRVWDWNQRE
17
HOW TO USE GAS OVEN
7KHRYHQEXUQHUFDQEHÀWWHGZLWKDVDIHW\
thermocouple so, once the burner has been lit,
keep the knob pressed for about 15 seconds. If, at
the end of this time, the burner fails to light, release
the knob and wait at least 1 minute before trying
again. Should the burner turn out accidentally, turn
the knob round to the closed position and wait at
least 1 minute before lighting it again.
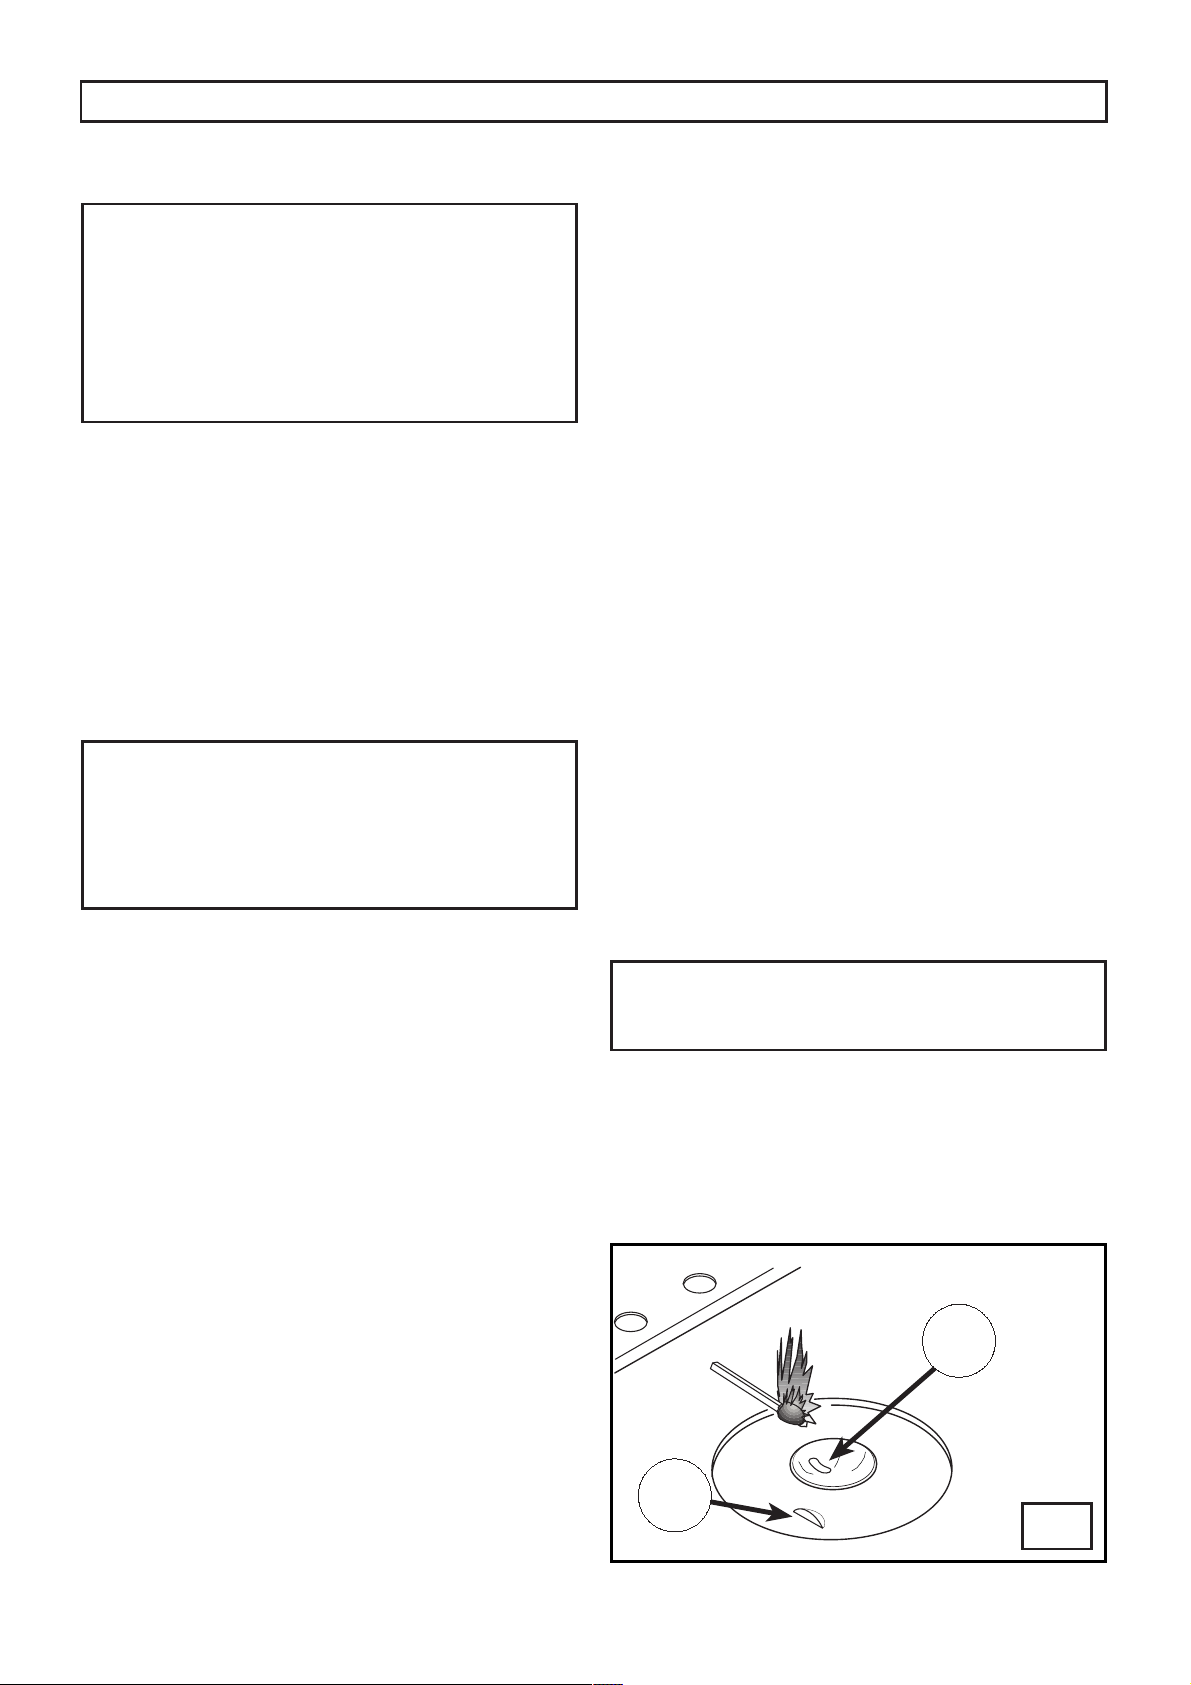
MANUAL IGNITION OF THE OVEN BURNER
Open the oven door SUHVVDQGWXUQWKHRYHQNQRE
FRXQWHUFORFNZLVHXQWLOLWUHDFKHVWRWKHPD[LPXP
temperature position, simultaneously placing a lighted
PDWFKWRWKHEXUQHUWKURXJKWKHKROH%¿J
AUTOMATIC ELECTRIC IGNITION OF OVEN BURNER.
Open the oven dooUSXVKOLJKWO\WKHRYHQNQREDQG
WXUQFRXQWHUFORFNZLVHXQWLOLWUHDFKHVWRWKHPD[LPXP
WHPSHUDWXUHSRVLWLRQWKHQGHSUHVVWKHNQRE
$XWRPDWLFDOO\WKHLJQLWLRQVSDUNVKRRWV0DWFKHVFDQ
EHXVHGWROLJKWWKHEXUQHUVLQDEODFNRXW
After the oven burner has been lit (check through
WKHRSHQLQJ&ÀJWKDWLWKDVLJQLWHGDGMXVW
the temperature according to your needs . Close the
GRRUJHQWO\VRWKHÀDPHVZLOOQRWEORZRXWDQGZDLW
PLQXWHVEHIRUHSXWWLQJDQ\IRRGLQWRFRRN2XURYHQFDQ
FRRNDOOIRRGVPHDW¿VKEUHDGSL]]DFDNHVHWF
USING THE OVEN
:LWKSODQQLQJDQGDFOHDUXQGHUVWDQGLQJRI\RXUDSSOLDQFH¶V
characteristics and capabilities you will be able to produce
superb results and larger than normal quantities. However
LQRUGHUWRREWDLQPD[LPXPHI¿FLHQF\LWLVXVHIXOWR
UHPHPEHU
• &RRNLQJWLPHVDQGVKHOISRVLWLRQVZLOOSUREDEO\EH
different from your previous oven. The size and type
RIGLVKHVXVHGZLOODIIHFWFRRNLQJWLPHVDQGWKHXVH
RIDOXPLQLXPIRLOZLOOLQFUHDVHFRRNLQJWLPHV:H
UHFRPPHQGGRLQJDWHVWEDNHDQGFRPSDULQJWKH
times in the time and temperature chart to some of
\RXUIDYRXULWHUHFLSHV$GGWRGHJUHHV&ZKHQ
FRRNLQJODUJHUTXDQWLWLHV6KHOYHVDUHQXPEHUHGIURP
WKHERWWRP¿J
• Be sure to remove the enamelled grill tray when the
RYHQLVLQXVH,WLVQRWLQWHQGHGWREHXVHGIRUEDNLQJ
or roasting purposes and it can interfere with heat
distribution in the oven.
• Slightly more heat is generated from the bottom of the
oven upwards, with the top shelf being the marginally
cooler zone. This is the reverse of other ovens you may
KDYHXVHGDQGVRPHPLQRUDGMXVWPHQWWR\RXUFRRNLQJ
methods with some dishes may be required. Most
EDNLQJZRXOGEHGRQHRQWKHPLGGOHVKHOYHVZLWKWKH
Contact our Service if assistance is required
with cooking results or thermostat operation
appears incorrect.
lower shelves being used for a greater degree of base
browning.
• $OZD\VSUHKHDWWKHRYHQZKHQFRRNLQJIUR]HQRUFKLOOHG
foods.
• Best results are achieved when preparing large
quantities or using two shelves simultaneously by
positioning serves with an «air space» around. More
HYHQFRRNLQJFDQEHPDGHSRVVLEOHLIWZRPHGLXP
VL]HGEDNLQJWUD\VDUHXVHGSHUVKHOIOHDYLQJDFP
«air space» between the trays and from the trays to the
RYHQZDOO$VLQJOHODUJHUWUD\PD\GLYHUWRUEORFNWKH
XVXDOÀRZRIKRWDLUDURXQGWKHRYHQ:KHQXVLQJWZR
shelves simultaneously allow an «air space» by leaving
one shelf space empty between.
• <RXFDQSODQEDWFKEDNLQJWRPDNHWKHPRVWHI¿FLHQW
XVHRIWKHKRWWHUDQGFRROHU]RQHVE\FRRNLQJDGLIIHUHQW
food requiring slightly different temperature on each
VKHOIHJVPDOOFDNHVDQGVODEFDNHVRUWZRGLIIHUHQW
types of biscuits (refer to the chart on TIME AND
TEMPERATURE CHART paragraph).
• Light weight, uncoated aluminium trays and pans are
UHFRPPHQGHGIRUJHQHUDOFRRNLQJ+HDY\JDXJHDQG
GDUNFRORXUHGXWHQVLOVGRDWWUDFWH[WUDKHDWDQGPD\EH
unsuitable for some foods.
• The aluminium can be easily corroded if it comes into
contact with organic acids present in the foods or added
GXULQJEDNLQJYLQHJDUOHPRQMXLFH7KHUHIRUHLWLVDGYLVHG
not to put directly the foods on aluminium or enamelled
WUD\VEXW$/:$<6XVHWKHSURSHURYHQSDSHU
9
INSTRUCTIONS FOR THE USER
18
HOW TO USE THE MULTIFUNCTION OVEN
DEFROSTING AT ROOM TEMPERATURE
7XUQWKHVHOHFWRUNQREWRWKHV\PERODQGSODFHWKH
food you want to defrost inside the oven.
The length of time required depends on the quantity
and type of food.
Selecting this function will only activate the fan. Mild
air circulation around frozen food will slowly defrost it.
,WLVSDUWLFXODUO\VXLWDEOHIRUIUXLWDQGFDNHV
TRADITIONAL COOKING
7XUQWKHVHOHFWRUNQREWRWKHV\PERODQGDGMXVWWKH
WKHUPRVWDWNQREWRWKHGHVLUHGWHPSHUDWXUH
If pre-heating is recommended wait till the thermostat
yellow warning light turns off before placing foods
inside the oven. This option turns on both bottom and
top heating units, evenly distributing heat on your
foods.
7KLVW\SHRIFRRNLQJLVLGHDOIRUDOONLQGRIIRRGVPHDWV
¿VKEUHDGSL]]DVFDNHV
COMBINED TRADITIONAL + FAN
COOKING
7XUQWKHVHOHFWRUNQREWRWKHV\PERODQGDGMXVWWKH
WKHUPRVWDWNQREWRWKHGHVLUHGWHPSHUDWXUH
If pre-heating is recommended wait till the thermostat
yellow warning light turns off before placing foods
inside the oven. This option turns on both bottom
and top heating units, and heat is distributed by fan
ventilation.
7KLVFRPELQDWLRQLVVXLWDEOHIRUUDSLGFRRNLQJDQG
allows for the use of more plates positioned on the
different levels of the oven.
DEFROSTING + WARM UP BY HOT AIR
7XUQWKHVHOHFWRUNQREWRWKHV\PERODQGDGMXVWWKH
WKHUPRVWDWNQREWRWKHGHVLUHGWHPSHUDWXUHWKHQ
place the food inside the oven. Selecting this function
will activate the bottom heating unit and its heat is
distributed by the fan. This function is particularly
recommended to defrost and warm up ready-made
meals.
FAN FORCED COOKING
7XUQWKHVHOHFWRUNQREWRWKHV\PERODQGDGMXVWWKH
WKHUPRVWDWNQREWRWKHGHVLUHGWHPSHUDWXUHWKHQ
place your food inside the oven.
If pre-heating is recommended wait till the thermostat
yellow warning light turns off before placing foods
inside oven. This function activates the rear heating
unit and the fan distributes the heat produced. This
FRPELQDWLRQDOORZVIRUDIDVWDQGHYHQFRRNLQJRI
several different foods placed on the diverse levels of
the oven.
CONVENTIONAL GRILL COOKING (turnspit
is only on some selected models)
7XUQWKHVHOHFWRUNQREWRWKHV\PERODQGDGMXVWWKH
WKHUPRVWDWNQREWRWKHGHVLUHGWHPSHUDWXUH
Selecting this function the top central heating element
turns on and heat is distributed directly on food
surface.
Apart from grilling, this function is ideal to add a golden
roast to your recipes or to toast bread slices.
FAN GRILL COOKING
7XUQWKHVHOHFWRUNQREWRWKHV\PERODQGDGMXVWWKH
WKHUPRVWDWNQREWRWKHGHVLUHGWHPSHUDWXUH
Selecting this function the top central heating
element turns on and heat is distributed by the fan.
This procedure mitigates the direct heat on food
surface and uses milder temperatures. It is therefore
UHFRPPHQGHGIRUDQHYHQJROGHQDQGFULVS\¿QLVK
WRXFKLGHDOIRUZKROH¿VKDQGSRXOWU\
:KHQ\RXXVHWKHJULOOGRQRWIRUJHWWRSODFHWKH
drip pan beneath it to collect any sauce dripping, as
VXJJHVWHGLQWKH³86()8/&22.,1*7,36³VHFWLRQ
INSTRUCTIONS FOR THE USER
COOKING WITH THE AID OF THE FAN
6RPHFRRNHUVFDQEHHTXLSSHGZLWKDIDQLQVWDOOHG
in the rear part of the oven compartment. This can be
activated by pressing the fan switch .
After the fan has been activated, the heat will be
TXLFNO\DQGUHJXODUO\GLVWULEXWHGWKURXJKRXWWKHRYHQ
WKXVDOORZLQJGLIIHUHQWIRRGVWREHHYHQO\FRRNHGRQ
several shelves at the same time, also reducing the
FRRNLQJWLPHV
19
INSTRUCTIONS FOR THE USER
TIME AND TEMPERATURE CHART
7KHDERYHWDEOHJLYHVJXLGHOLQHVIRUFRRNLQJDUDQJHRIGLIIHUHQWIRRGVLQGLYLGXDOIRRGRUSHUVRQDOSUHIHUHQFHV
PD\VOLJKWO\YDU\WKHRYHQSRVLWLRQWHPSHUDWXUHDQGFRRNLQJWLPHIURPWKRVHVXJJHVWHG
3OHDVHQRWHWKDW
$OOFRRNLQJWHPSHUDWXUHVVWDWHGUHIHUWRDSUHKHDWHGRYHQDOORZPLQXWHVIRUSUHKHDWLQJ
7KHVKHOYHVDUHQXPEHUHGIURPWKHERWWRPLHWKHWRSVKHOILV6KHOIERWWRPVKHOILV6KHOI
,IEDNLQJDODUJHUTXDQWLW\WKDQWKHH[DPSOHVKRZQLQWKHFKDUWVOLJKWO\LQFUHDVHWHPSHUDWXUHVDQGRUWLPH
,IEDNLQJDVPDOOHUTXDQWLW\WKDQWKHH[DPSOHVOLJKWO\GHFUHDVHWKHWHPSHUDWXUHDQGRUWLPH
5HPHQEHUWRUHPRYHJULOOWUD\IURPRYHQEHIRUHEDNLQJLQRYHQ
FOOD ITEM QUANTITY OVEN POSITION TEMPERATURE °C APPROXIMATE TIME
CAKES
3DWW\FDNHV
Sponges
%XWWHUFDNHVODE
%RLOHGIUXLWFDNHFPWLQ
5LFKIUXLWFDNHFPWLQ
RU
6KHOIRU
6KHOIRU
6KHOIRU
6KHOIRU
6KHOIRU
PLQV
PLQV
PLQV
KUV
KUV
SCONES - plain
6KHOIPLQV
BISCUITS
Anzacs
Burnt butter biscuits
6KHOIRU
6KHOIRU
PLQV
PLQV
MERINGUE - small
6KHOIRU
òKUV
allow to cool in oven
PASTRIES
&XVWDUGWDUWFP
Fruit pies - biscuit pastry,
GRXEOHFUXVWFRRNHG¿OOLQJ
Sausages rolls
6KHOI
6KHOIRU
PLQV
PLQV
PLQV
PIZZA\HDVWGRXJKFP
6KHOIPLQV
OVEN MEAL
Roast meat & vegetables
Fruit pies
6KHOIRU
6KHOIRU
as requested
PLQV
BREAD
ORDI6KHOIPLQV
RETAIN THIS CHART FOR EASY REFERENCE
ROAST MEATS
0HDWVDUHJHQHUDOO\URDVWHGLQWKHFHQWUHRIWKHRYHQVKHOIEXWWKHSRVLWLRQPD\EHYDULHGDFFRUGLQJWRWKH
VL]HRIWKHPHDWDQGWKHRWKHUIRRGVWREHFRRNHGDWWKHVDPHWLPH
$PRGHUDWHWHPSHUDWXUHFDQEHXVHG&DOWKRXJKVXSHULRUUHVXOWVDUHRIWHQDFKLHYHGE\FRRNLQJPHDW
TXLFNO\DWDKLJKWHPSHUDWXUHHJ&IRUPLQXWHVWRVHDUWKHPHDWWKHQFRPSOHWHWKHFRRNLQJRQD
PRGHUDWHKHDW7XUNH\RURWKHUYHU\ODUJHMRLQWVRIPHDWPD\EHFRRNHGDWORZHUWKDQPRGHUDWHWHPSHUDWXUHV

20
INSTRUCTIONS FOR THE USER
USEFUL COOKING TIPS
Cakes and bread:
+HDWWKHRYHQIRUDWOHDVWPLQXWHVEHIRUH\RX
VWDUWFRRNLQJEUHDGRUFDNHV
'RQRWRSHQWKHGRRUGXULQJEDNLQJEHFDXVHWKH
cold air would stop the yeast from rising.
:KHQWKHFDNHLVFRRNHGWXUQWKHRYHQRIIDQG
OHDYHLWLQIRUDERXWPLQXWHV
• Do not use the enamelled oven tray or drip pan,
VXSSOLHGZLWKWKHRYHQWRFRRNFDNHVLQ
+RZGR\RXNQRZZKHQWKHFDNHLVFRRNHG"$ERXW
PLQXWHVEHIRUHWKHHQGRIFRRNLQJWLPHSXWD
FDNHWHVWHURUVNHZHULQWKHKLJKHVWSDUWRIWKH
FDNH,ILWFRPHVRXWFOHDQWKHFDNHLVFRRNHG
$QGLIWKHFDNHVLQNV"7KHQH[WWLPHXVHOHVV
OLTXLGVRUORZHUWKHWHPSHUDWXUH&
,IWKHFDNHLVWRRGU\0DNHVRPHWLQ\KROHV
ZLWKDWRRWKSLFNDQGSRXUVRPHGURSVRIIUXLW
juice or spirits on it. The next time, increase the
WHPSHUDWXUH&DQGVHWDVKRUWHUFRRNLQJ
time.
,IWKHFDNHLVWRRGDUNRQWRSWKHQH[WWLPHSXW
WKHFDNHRQDORZHUVKHOIFRRNLWDWDORZHU
temperature and longer.
,IWKHWRSRIWKHFDNHLVEXUQWFXWRIIWKHEXUQWOD\HU
and cover with sugar or decorate it with cream,
jam, confectioner’s cream, etc..
,IWKHFDNHLVWRRGDUNXQGHUQHDWKWKHQH[WWLPH
SODFHLWRQDKLJKHUVKHOIDQGFRRNLWDWDORZHU
temperature.
,IWKHFDNHRUEUHDGLVFRRNHGQLFHO\RXWVLGHEXW
LVVWLOOXQFRRNHGLQVLGHWKHQH[WWLPHXVHOHVV
OLTXLGVFRRNDWDORZHUWHPSHUDWXUHDQGORQJHU
,IWKHFDNHZLOOQRWFRPHRXWRIWKHWLQVOLGHD
NQLIHDURXQGWKHHGJHVSODFHDGDPSFORWKRYHU
WKHFDNHDQGWXUQWKHWLQXSVLGHGRZQ7KHQH[W
WLPHJUHDVHWKHWLQZHOODQGVSULQNOHLWZLWKÀRXURU
bread crumbs.
,IWKHELVFXLWVZLOOQRWFRPHDZD\IURPWKHEDNLQJ
WUD\SXWWKHWUD\EDFNLQWKHRYHQIRUDZKLOHDQG
lift the biscuits up before they cool. The next time
XVHDVKHHWRIEDNLQJSDUFKPHQWWRSUHYHQWWKLV
happening again.
Meat:
,IZKHQFRRNLQJPHDWWKHWLPHQHHGHGLVPRUH
WKDQPLQXWHVWXUQWKHRYHQRIIPLQXWHV
EHIRUHWKHHQGRIFRRNLQJWLPHWRH[SORLWWKH
residual heat (energy saving).
<RXUURDVWZLOOEHMXLFLHULIFRRNHGLQDFORVHGSDQ
LWZLOOEHFULVSLHULIFRRNHGZLWKRXWDOLG
1RUPDOO\ZKLWHPHDWSRXOWU\DQG¿VKQHHG
PHGLXPWHPSHUDWXUHVOHVVWKDQ&
7RFRRN³UDUH´UHGPHDWVKLJKWHPSHUDWXUHVRYHU
&DQGVKRUWFRRNLQJWLPHVDUHQHHGHG
• For a tasty roast, lard and spice the meat.
,I\RXUURDVWLVWRXJKWKHQH[WWLPHOHDYHWKHPHDW
to ripen longer.
,I\RXUURDVWLVWRRGDUNRQWRSRUXQGHUQHDWKWKH
next time put it on a higher or lower shelf, lower
WKHWHPSHUDWXUHDQGFRRNORQJHU
<RXUURDVWLVXQGHUGRQH"&XWLWLQVOLFHVDUUDQJH
WKHVOLFHVRQDEDNLQJWUD\ZLWKWKHJUDY\DQG
¿QLVKFRRNLQJLW
Grilling:
6SDULQJO\JUHDVHDQGÀDYRXUWKHIRRGEHIRUH
grilling it.
• Always use the grill pan to catch the juices that drip
IURPWKHPHDWGXULQJJULOOLQJ¿J
• Always put a little water in the drip pan. The water
prevents the grease from burning and from giving
RIIEDGVPHOOVDQGVPRNH$GGPRUHZDWHUGXULQJ
FRRNLQJEHFDXVHLWHYDSRUDWHV
7XUQWKHIRRGKDOIZD\WKURXJKFRRNLQJ
• If you are grilling fatty poultry (goose) pierce the
VNLQVRWKHIDWFDQGULSDZD\
The aluminium can be easily corroded if it
comes into contact with organic acids present
in the foods or added during baking (vinegar,
lemon juice). Therefore it is advised not to put
directly the foods on aluminium or enamelled
trays, but ALWAYS use the proper oven paper.

21
10 11
11A
INSTRUCTIONS FOR THE USER
CLEANING AND MAINTENANCE
• Prior to any maintenance work or cleaning,
disconnect the appliance from the electricity
mains.
• Do not use a steam cleaner to clean a hob,
oven or range.
• Do not wash the parts if they are still hot.
• Do not use metal pads, abrasive powders or
corrosive spray products for cleaning
• Do not leave vinegar, coffee, milk, salty water
or the juice of lemon or tomato on enamelled
surfaces for any length of time.
• Switch off the oven before removing the fan guard
for cleaning. Replace the guard after cleaning
HOT PLATE
The enamelled steel pan supports, enamelled burner
caps and burner heads need to be cleaned after each
time they are used with warm soapy water, rinsed and
WKHQGULHGZHOOWRNHHSWKHPLQJRRGFRQGLWLRQ
WARNINGS:
$IWHUFOHDQLQJFKHFNWKDWWKHKHDGVEXUQHUVDQG
the relative burner caps, are correctly positioned in
WKHLUKRXVLQJV¿J
7DNHFDUHQRWWRGLVWXUEWKHLJQLWLRQVSDUNSOXJVRU
ÀDPHIDLOXUHGHYLFHV
,I\RX¿QGDWDSLVGLI¿FXOWWRRSHQRUFORVHGRQRW
force it but call for technical assistance urgently.
• Remove any spillage from the lid before opening.
• The hob surface should be cool before closing the
lid (if any).
• The appliance is not intended to be operated by
means of an external timer or separate remote-
control system
STRUCTURE
$OOWKHFRRNHUSDUWVLQHQDPHOOHGRUSDLQWHGPHWDO
steel, or glass) should be cleaned frequently with warm
soapy water and then rinsed and dried with a soft cloth.
DO NOT use harsh abrasive cleaners or sharp metal
scrapers to clean the oven glass door since they can
scratch the surface, which may result in shattering of
the glass. NEVER use sponges or abrasive products,
and aromatic or aliphatic solvents to remove stains or
adhesives on the painted or stainless steel surfaces.
CERAMIC GLASS HOB
It is very important to clean the top each time it is used
and while the glass is still warm, drying it with a soft
cloth. Do not use metal pads, abrasive powders or
corrosive spray products for cleaning.
'HSHQGLQJRQWKHGHJUHHRIGLUWZHUHFRPPHQG
• For slight stains a damp sponge is enough
7KHVFUDSHUPXVWEHXVHGIRUPRUHVWXEERUQGLUW¿J
$Use it carefully because it is easy to cut
yourself. To avoid any such possibility, scrape
away immediately from the cooking zone any
tin foil sheets or plastic objects that could have
melted or stuck, likewise sugar or sugary food
spilled over during cooking.
• Remove any traces of spilled liquid with vinegar or
lemon. Immediately remove any vinegar or lemon
from the enamelled outer edge otherwise it will
become opaque.
• Over time it is possible that colourings, metal
UHÀHFWLRQVRUVFUDWFKHVDSSHDU¿J$FDXVHGE\
LQHI¿FLHQWFOHDQLQJRUE\WKHLQFRUUHFWPRYHPHQWRI
WKHSDQV7KHVHVFUDWFKHVDUHGLI¿FXOWWRHOLPLQDWH
EXWWKH\ZLOOQRWSUHMXGLFHKRZ\RXUKREZRUNV
OVEN CAVITY
Do not spray or wash the thermostat bulb with
acid based products (check the product label
before use).
The manufacturer cannot be held liable for any
damage caused by incorrect cleaning.
The oven cavity should be cleaned after each use to
UHPRYHFRRNLQJUHVLGXDOVDQGRUJUHDVHRUVXJDUZKLFKLI
burnt on when the oven is used again, will form deposits or
unremovable stains as well as unpleasant smells.
To maintain the shine of the enamelled parts, clean them
with warm soapy water, rinse and dry them thoroughly.
$/:$<6ZDVKWKHDFFHVVRULHVXVHG
22
INSTRUCTIONS FOR THE USER
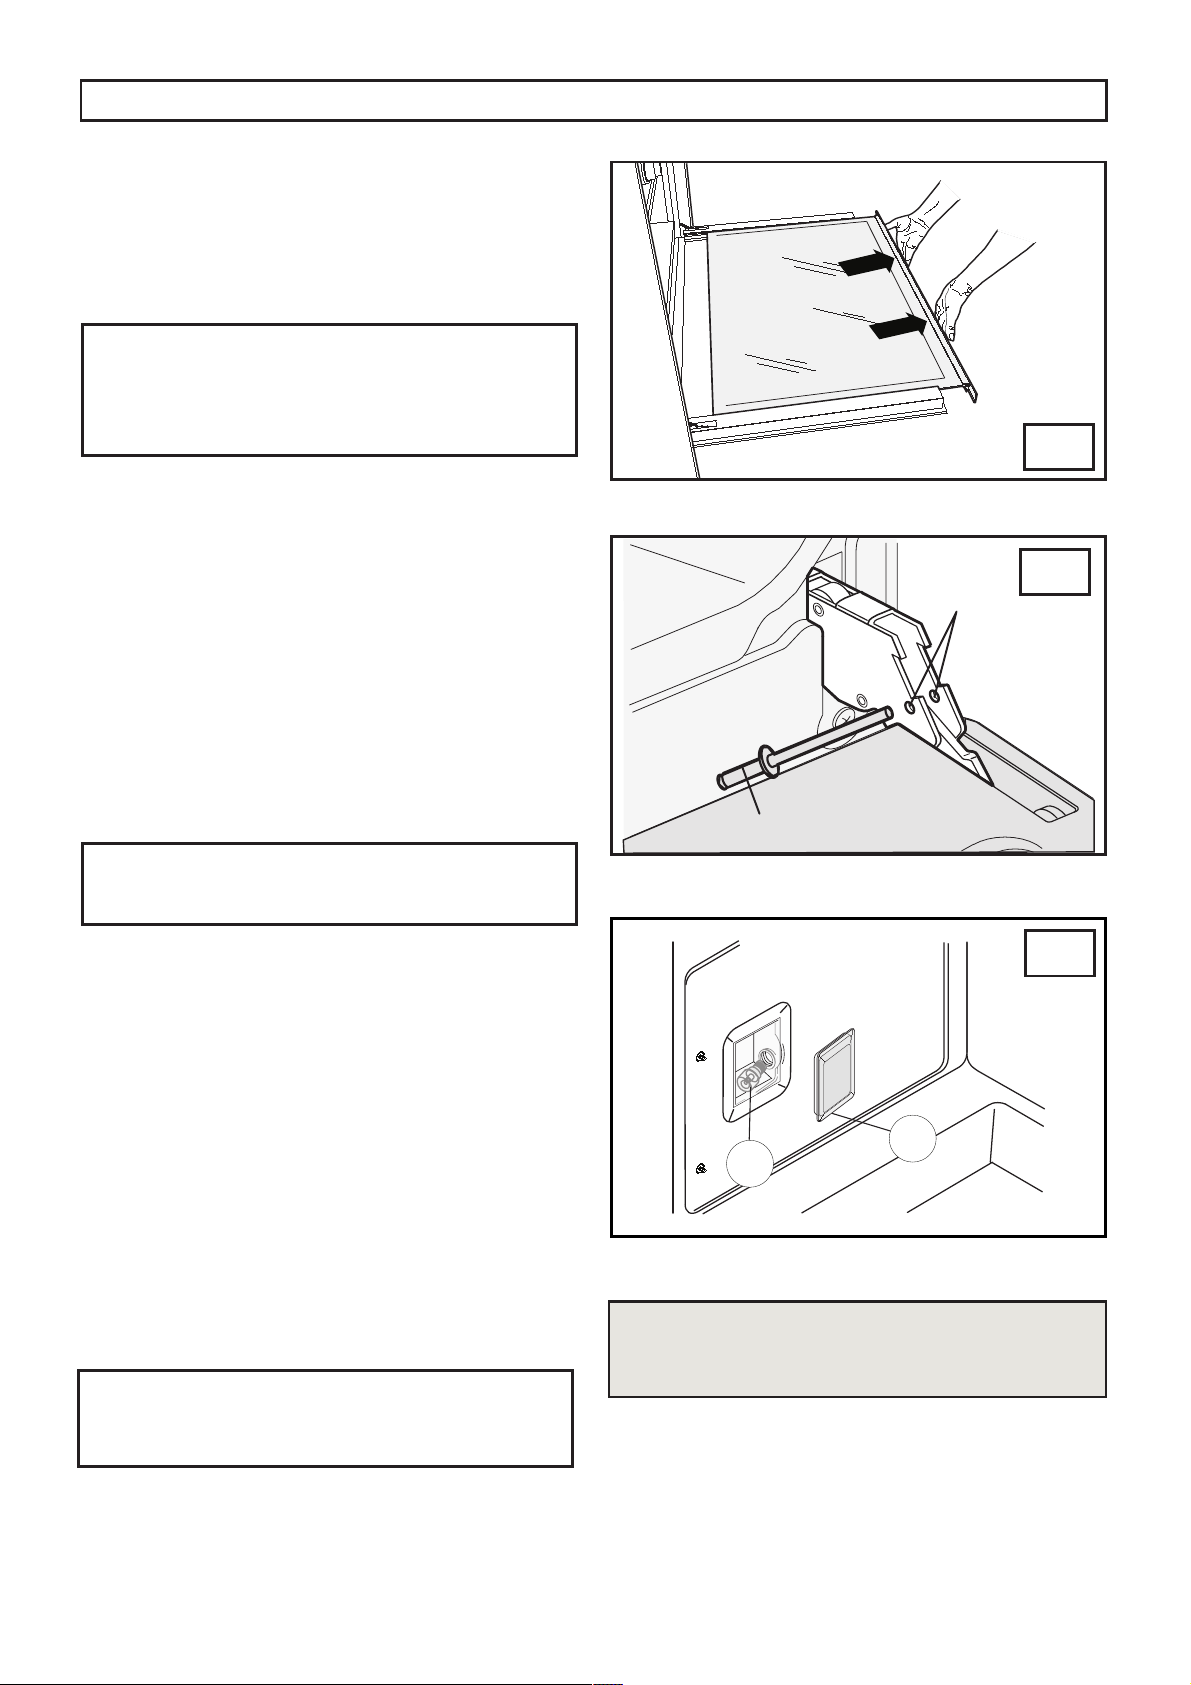
HOW TO CLEAN THE INNER OVEN DOOR GLASS
2QHRIWKHIHDWXUHVRIRXUFRRNHUVLVWKDWWKHLQQHU
oven door glass can be easily removed for cleaning
without the aid of specialized personnel. Just open the
oven door and remove the support securing the glass
¿JQ).
ATTENTION!!
This operation can be done also with the door
ÀWWHGRQDSSOLDQFHEXWLQWKLVZD\SD\DWWHQWLRQ
that when the glass is pull upwards, the force of
the hinges can close the door roughly.
OVEN DOOR REMOVAL
The oven door can be removed to give easier access to
WKHRYHQZKHQFOHDQLQJ7RUHPRYHSURFHHGDVIROORZV
• Open the oven door and insert rivet or nail (R) in the
KROH)RIWKHKLQJH¿J
3DUWLDOO\FORVHWKHGRRUIRUFLQJLWXSZDUGVDWWKH
same time to free stop tooth and hinge sector.
• Once the hinge is free, pull the door forwards tilting
it slightly upwards to free sector.
• To reassemble proceed in the reverse order,
paying attention to the correct position of sectors.
5(3/$&,1*7+(29(1/$03ÀJ
Ensure the appliance is switched off before
replacing the lamp to avoid the possibility of
electric shock..
In the event one or both oven lamps need replacing, the
QHZODPSVPXVWFRPSO\ZLWKWKHIROORZLQJUHTXLVLWHV
:9a+](DQGPXVWEHUHVLVWDQW
WRKLJKWHPSHUDWXUH&
7RFKDQJHWKHRYHQODPSIROORZWKHLQVWUXFWLRQV
• Draw out the side guide rails as described above.
Then, remove the glass protection cap (V) from
WKHEXOEVRFNHWOLIWLQJLWZLWKDVFUHZGULYHUSODFHG
between the cap and the oven wall and replace the
ODPS/)LWWKHDFFHVVRULHVEDFNLQUHYHUVHRUGHU
OVEN SEAL
The oven seal guarantees the correct functioning
RIWKHRYHQ:HUHFRPPHQG\RX
• clean it, avoiding abrasive tools or products.
FKHFNLWVVWDWHQRZDQGWKHQ
If the oven door seal has become hard or is
damaged, contact our Service Centre and avoid
using the oven until it has been repaired.
12
13
Q
MAINTENANCE SCHEDULE
NO REGULAR MAINTENANCE IS REQUIRED
EXCEPT FOR CLEANING
23
TECHNICAL INFORMATION
• The installations, conversions and maintenance
operations listed in this part must only be carried
out by authorised personnel. The manufacturer
cannot be held responsible for any damage to
persons or property resulting from an incorrect
installation of the appliance.
• If the appliances is installed on a base ,
measures must be taken to prevent the
appliance from slipping from the base
• The appliance is not intended to be operated by
means of an external timer or separate remote-
control system.
• The safety and automatic adjustment devices of the
DSSOLDQFHVPD\GXULQJLWVOLIHRQO\EHPRGL¿HGE\
the manufacturer or duly authorised supplier.
• This appliance shall be installed only by
authorised personnel and in accordance with
the manufacturer’s installation instructions, local
JDV¿WWLQJUHJXODWLRQVPXQLFLSDOEXLOGLQJFRGHV
HOHFWULFDOZLULQJUHJXODWLRQV$6*DV
Installations and any other statutory regulations.
• Failure to install the appliance correctly could
invalidate any manufactures warranty and lead to
prosecution under the above quoted regulation.
%HIRUHLQVWDOODWLRQPDNHVXUHWKDWORFDOGLVWULEXWLRQ
conditions (gas and electrical) are compatible with
the appliance’s adjustment. Refer to data label for
gas type.
• As it is not connected to a device for the evacuation
of the products of combustion, it must be installed in
accordance with current regulations and used in a
ZHOOYHQWLODWHGORFDWLRQ3DUWLFXODUDWWHQWLRQPXVWEH
paid to the regulations on ventilation.
VENTILATION
All rooms require an openable window or equivalent,
while some rooms require a permanent vent in addition
to the openable window.
9HQWLODWLRQPXVWEHLQDFFRUGDQFHZLWK$6*DV
Installations. In general, the appliance should have
adequate ventilation for complete combustion of gas,
SURSHUÀXHLQJDQGWRPDLQWDLQWHPSHUDWXUHRILPPHGLDWH
surroundings within safe limits.
The use of a gas appliance results in production of heat
and moisture in the room in which it is installed. Ensure
WKDWWKHNLWFKHQLVZHOOYHQWLODWHGNHHSQDWXUDOYHQWLODWLRQ
holes open or install a mechanical ventilation device
(mechanical extraction hood).
3URORQJHGLQWHQVLYHXVHRIWKHDSSOLDQFHPD\FDOOIRU
additional ventilation, for example increasing the level of
mechanical ventilation where present.
UNPACKING YOUR COOKER
2QFHWKHSDFNDJLQJKDVEHHQUHPRYHGWKRURXJKO\FKHFN
that the appliance is in perfect condition. If you have any
doubts do not use the appliance and call our Service
Centre.
• Do not move the appliance by the handles.
• Some parts mounted on the appliance are protected by a
SODVWLF¿OP7KLVSURWHFWLRQPXVWEHUHPRYHGEHIRUHXVLQJ
WKHDSSOLDQFH:HUHFRPPHQGVOLWWLQJWKHSODVWLF¿OPDORQJ
WKHHGJHVZLWKDVKDUSNQLIHRUSLQ
The packaging materials used (cardboard,plastic
bags, polystyrene foam, nails etc.) must not be left
anywhere within easy reach of children as they are a
potential hazard source.
Some problems can be caused either as the results of simple maintenance operations or by incorrect selection
RIVHWWLQJV3ULRUWRFRQWDFWLQJD6HUYLFH&HQWUHSOHDVHFKHFNWKHIROORZLQJFKDUW
PROBLEM REMEDY
7KHDSSOLDQFHLVQRWZRUNLQJ0DNHVXUHWKHJDVFRFNLVRSHQ
&KHFNWKHSOXJLVLQ
&KHFNWKDWWKHNQREVDUHVHWFRUUHFWO\IRUFRRNLQJDQGWKHQUHSHDWWKH
RSHUDWLRQVJLYHQLQWKHKDQGERRN
&KHFNWKHHOHFWULFDOV\VWHPVDIHW\VZLWFKHV5&',IWKHUHLVIDLOXUHLQ
the system call an electrician in.
7KHWKHUPRVWDWLVQRWZRUNLQJ• Contact Service Centre..
The oven light does not switch on 0DNHVXUHWKHODPSLV¿UPO\VFUHZHGLQSODFH
%X\DODPSIRUKLJKWHPSHUDWXUHVDWRQHRIRXU6HUYLFH&HQWUHDQG¿WLW
following the instructions given the <REPLACING THE OVEN LAMP>
paragraph.
Warning: Servicing should be carried out only by authorised personnel.
TROUBLESHOOTING
INSTRUCTIONS FOR THE INSTALLER
24
17
16
14
15
INSTRUCTIONS FOR THE INSTALLER
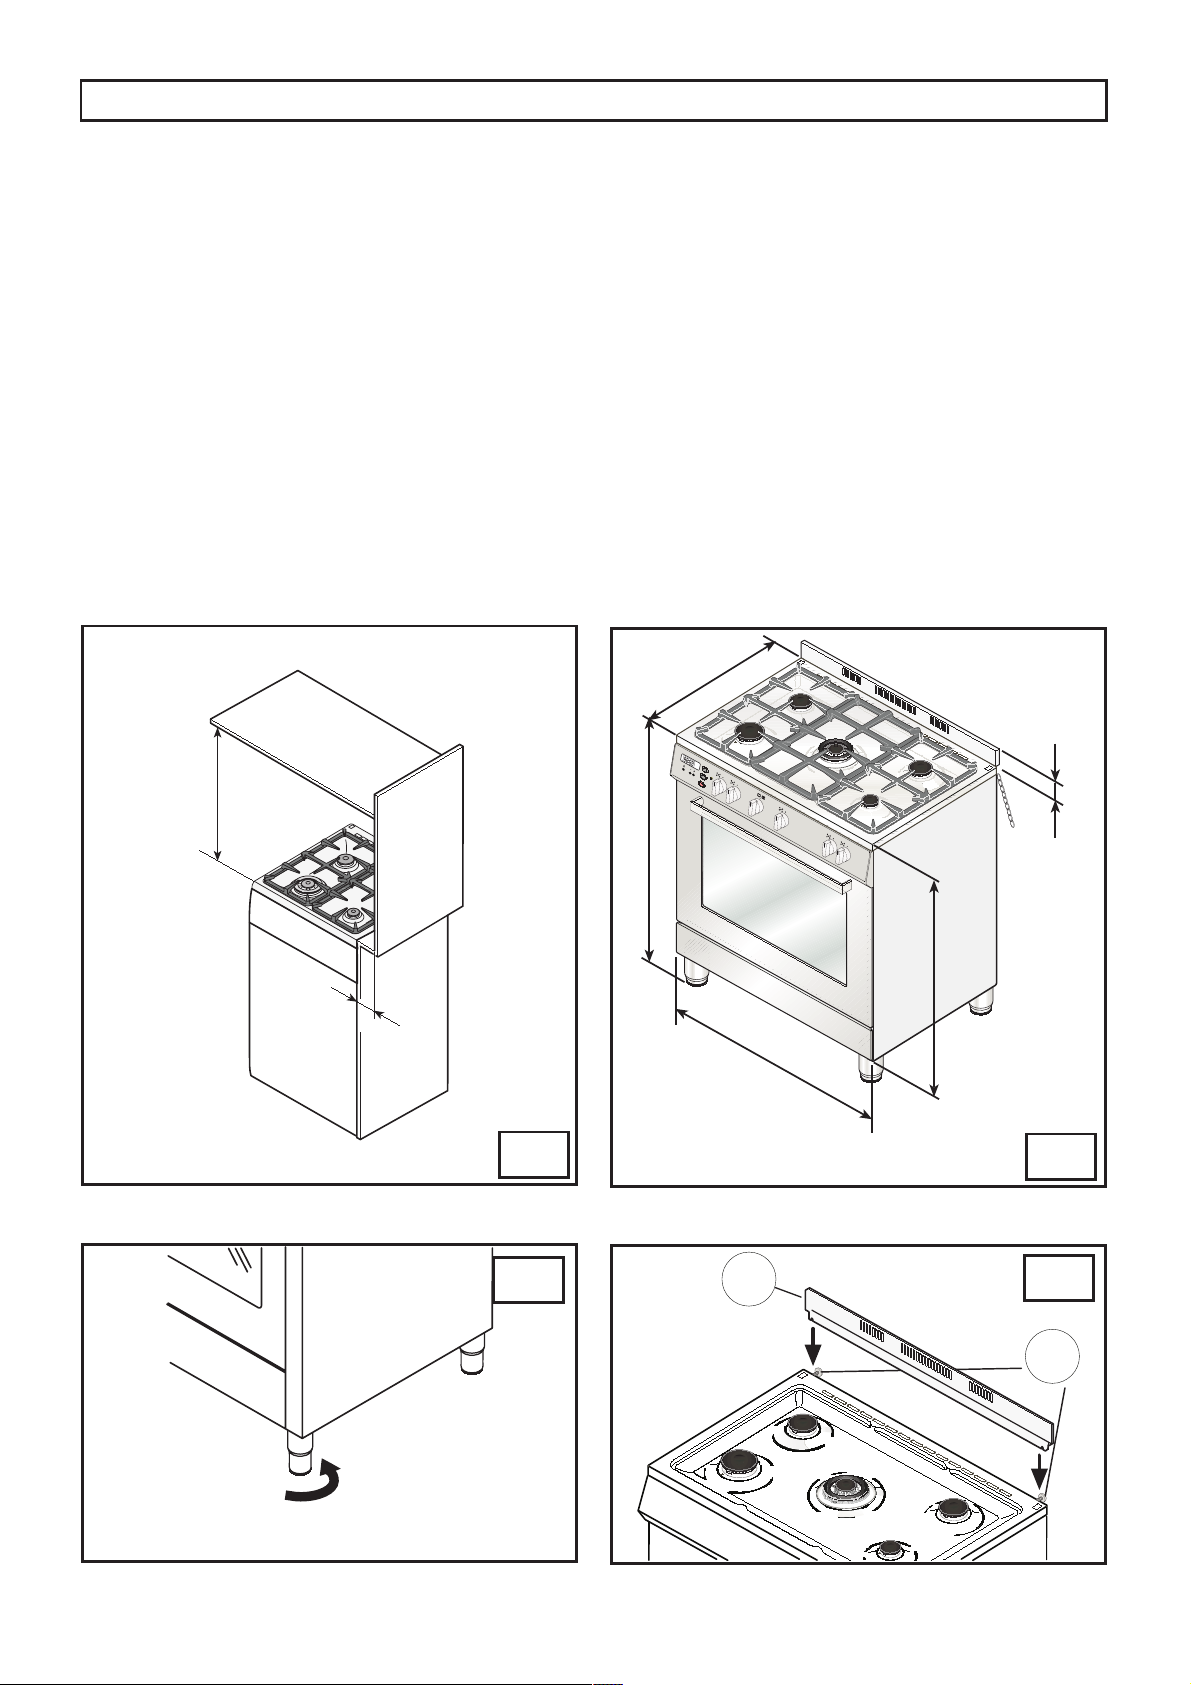
326,7,21ÀJ
The appliance should be positioned in good light and
free from draughts. Any adjoining wall surface situated
ZLWKLQPPIURPWKHHGJHRIDQ\KREEXUQHUPXVWEH
DVXLWDEOHQRQFRPEXVWLEOHPDWHULDOIRUDKHLJKWRI
mm for the entire length of the hob. Any combustible
FRQVWUXFWLRQDERYHWKHKRWSODWHPXVWEHDWOHDVW
mm above the top of the burner and no construction
VKDOOEHZLWKLQPPDERYHWKHWRSRIWKHEXUQHU
:KHUHDFRPEXVWLEOHVXUIDFHDGMDFHQWWRWKHFRRNHU
LVOHVVWKDQPPIURPWKHQHDUHVWEXUQHULWPD\
be protected by a non-combustible protective layer in
DFFRUGDQFHZLWK$67KHSURWHFWLRQPXVWensure
the surface temperature of the combustible surface
GRHVQRWH[FHHG&DERYHDPELHQW
LEVELLING THE COOKER
• Adjustable feet,WREH¿WWHGWRWKHDSSOLDQFHZKLFK
DOORZWKHKHLJKWRIWKHFRRNHUWREHDOLJQHGZLWK
RWKHUNLWFKHQIXUQLWXUHThis can be done by means
RIWKHWHUPLQDOSDUWRIWKHOHJWKHPVHOYHV¿J
• Backguard7KHFRRNHUVZKLFKDUHHTXLSSHG
with this accessory, leave the factory with this part
LQVHUWHGLQVLGHWKHSDFNDJLQJ,QRUGHUWRLQVWDOOWKH
EDFNJXDUGLWLVQHFHVVDU\WRORRVHQWKHVFUHZV
SRVLWLRQHGRQWKHEDFNRIWKHKREDQGWKHQWR¿[WKH
EDFNJDXUGDVLQGLFDWHGLQ¿JXUH
OVERALL DIMENSIONSÀJ
25
INSTRUCTIONS FOR THE INSTALLER
P
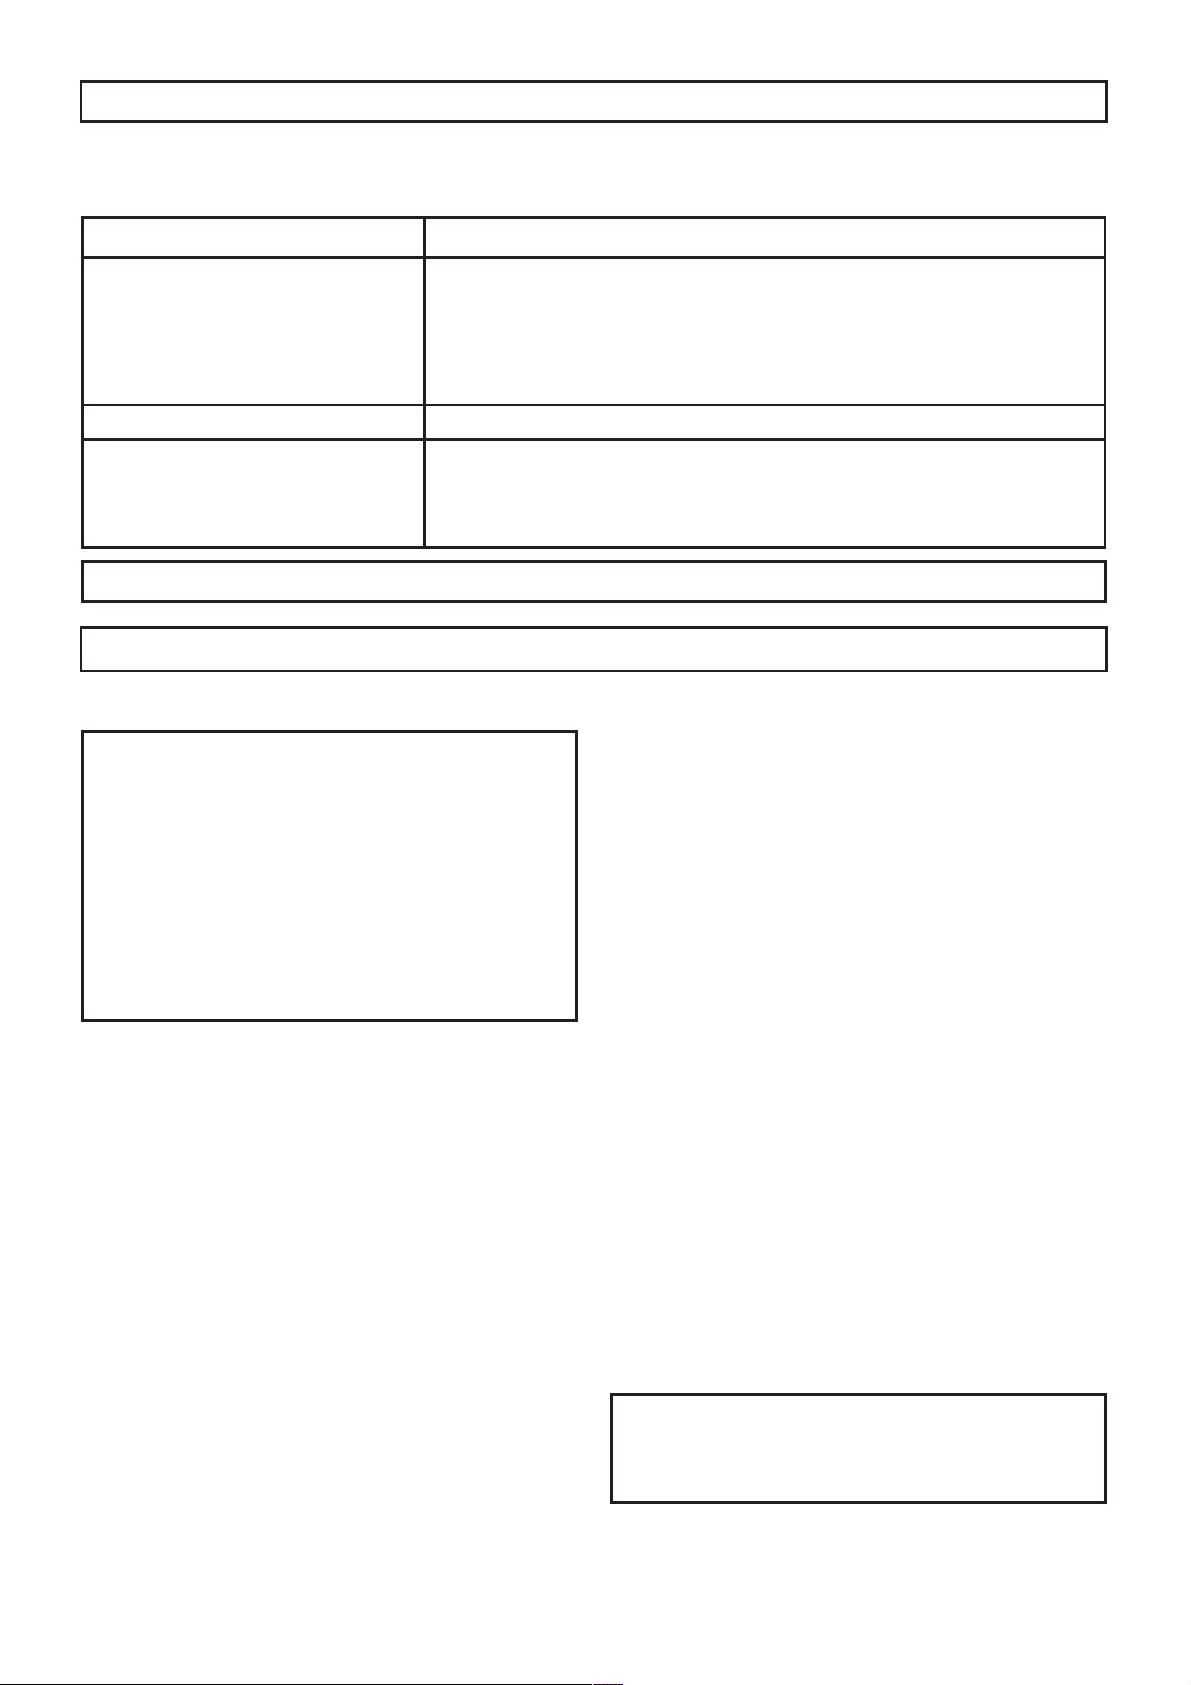
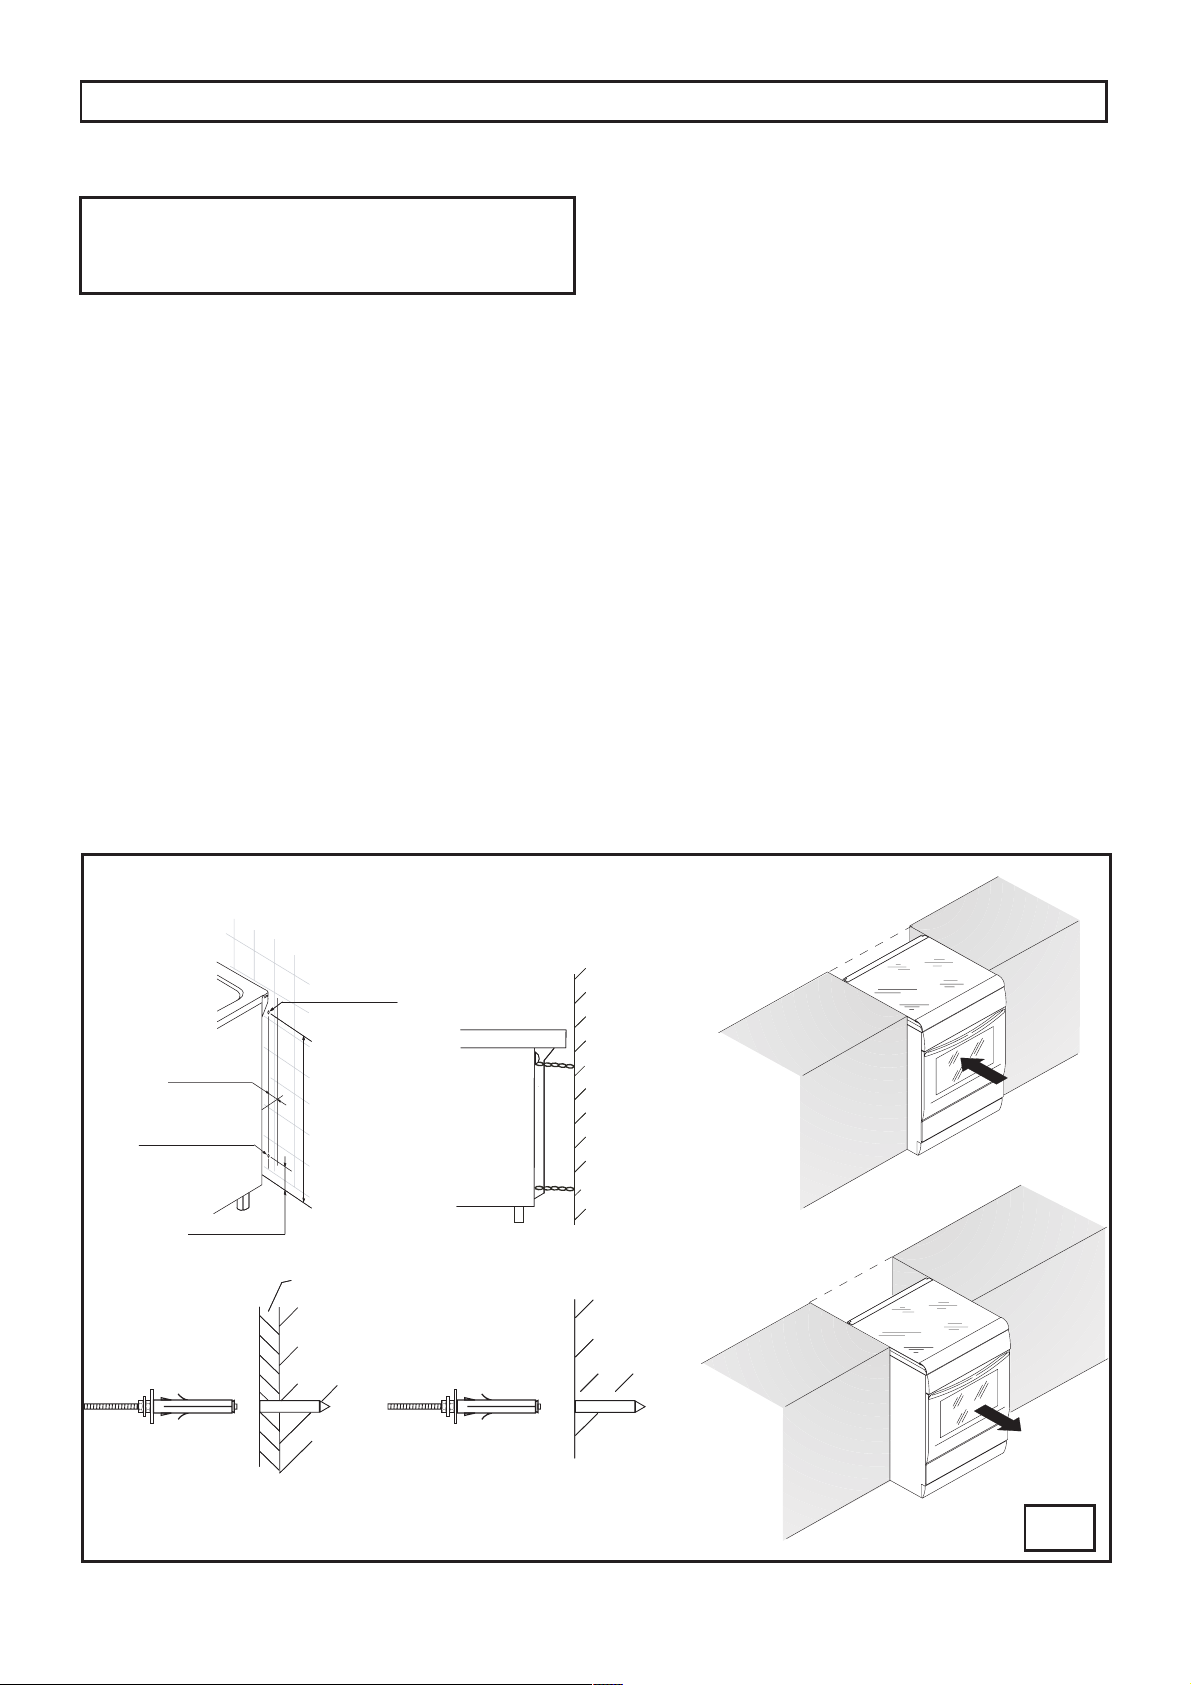
6(&85,1*7+(&22.(572:$//ÀJ
Note:- The installation of the chain provided
is for safety reasons, it must be installed as
indicated below.
7RSUHYHQWWKHFRRNHUWLSSLQJIRUZDUGVLQWKHHYHQWRI
children standing on the oven door or where users put
extreme weight on the door when in open position, two
FKDLQV0867%(¿[HGWRWKHEDFNRIWKHRYHQZKLFK
should at all times be secured to the threaded pins .
The threaded pins should be secured to the wall at
WKHEDFNRIWKHFRRNHU7KHFKDLQVVKRXOGDOZD\VEH
DWWDFKHGWRWKHXSSHUWKUHDGHGSLQVZKHQWKHFRRNHU
LVLQLWVSRVLWLRQDJDLQVWWKHZDOO3D\DWWHQWLRQLQIDFW
WKDWWKHFKDLQPXVWEH¿[HGZLWKRXWVODFN
WARNING: IF THE COOKER IS INSTALLED
BETWEEN TWO CUPBOARDS YOU MUST DRILL
A 16MM HOLE LEVEL TO THE SAFETY CHAIN
HEIGHT ON EITHER CUPBOARD AS FAR BACK
AS POSSIBLE, LOCATE THE COOKER INTO
POSITION AND PASS THE SAFETY CHAINS
THROUGH THE 16MM HOLES, WITH THE
COOKER IN FINAL POSITION PULL BOTH SAFETY
CHAINS AND SECURE THEM TO THE INSIDE OF
THE CUPBOARD WITH TWO SCREWS ON EACH
SAFETY CHAIN.
PLEASE TEST THAT THE COOKER DOES NOT
TILT FORWARD.
Assembly instructions
• Secure threaded pins into wall immediately behind
DQGWRWKHOHIWKDQGVLGHDERXWPPIURPWKH
ÀRRU
• Secure the chain under the nut before using or
FOHDQLQJHWFRIWKHFRRNHU¿J3
• NOTE FOR INSTALLER
• To prevent strain on the Flexible Hose assembly, a
FKDLQKRRNLVQHFHVVDU\DSSUR[PPXSIURP
WKHÀRRUQRWSURYLGHG
• $WWDFKWKHFKDLQWRWKHORZHUKRRNVLIWKHFRRNHULV
installed with a hose assembly so that there is no
VWUDLQRQWKHKRVHZKHQWKHFRRNHULVSXOOHGIRUZDUG
for cleaning or maintenance.
• 7KHVRFNHWRUWKHVZLWFKPXVWEHDFFHVVLEOHRQFH
the appliance is installed.
26
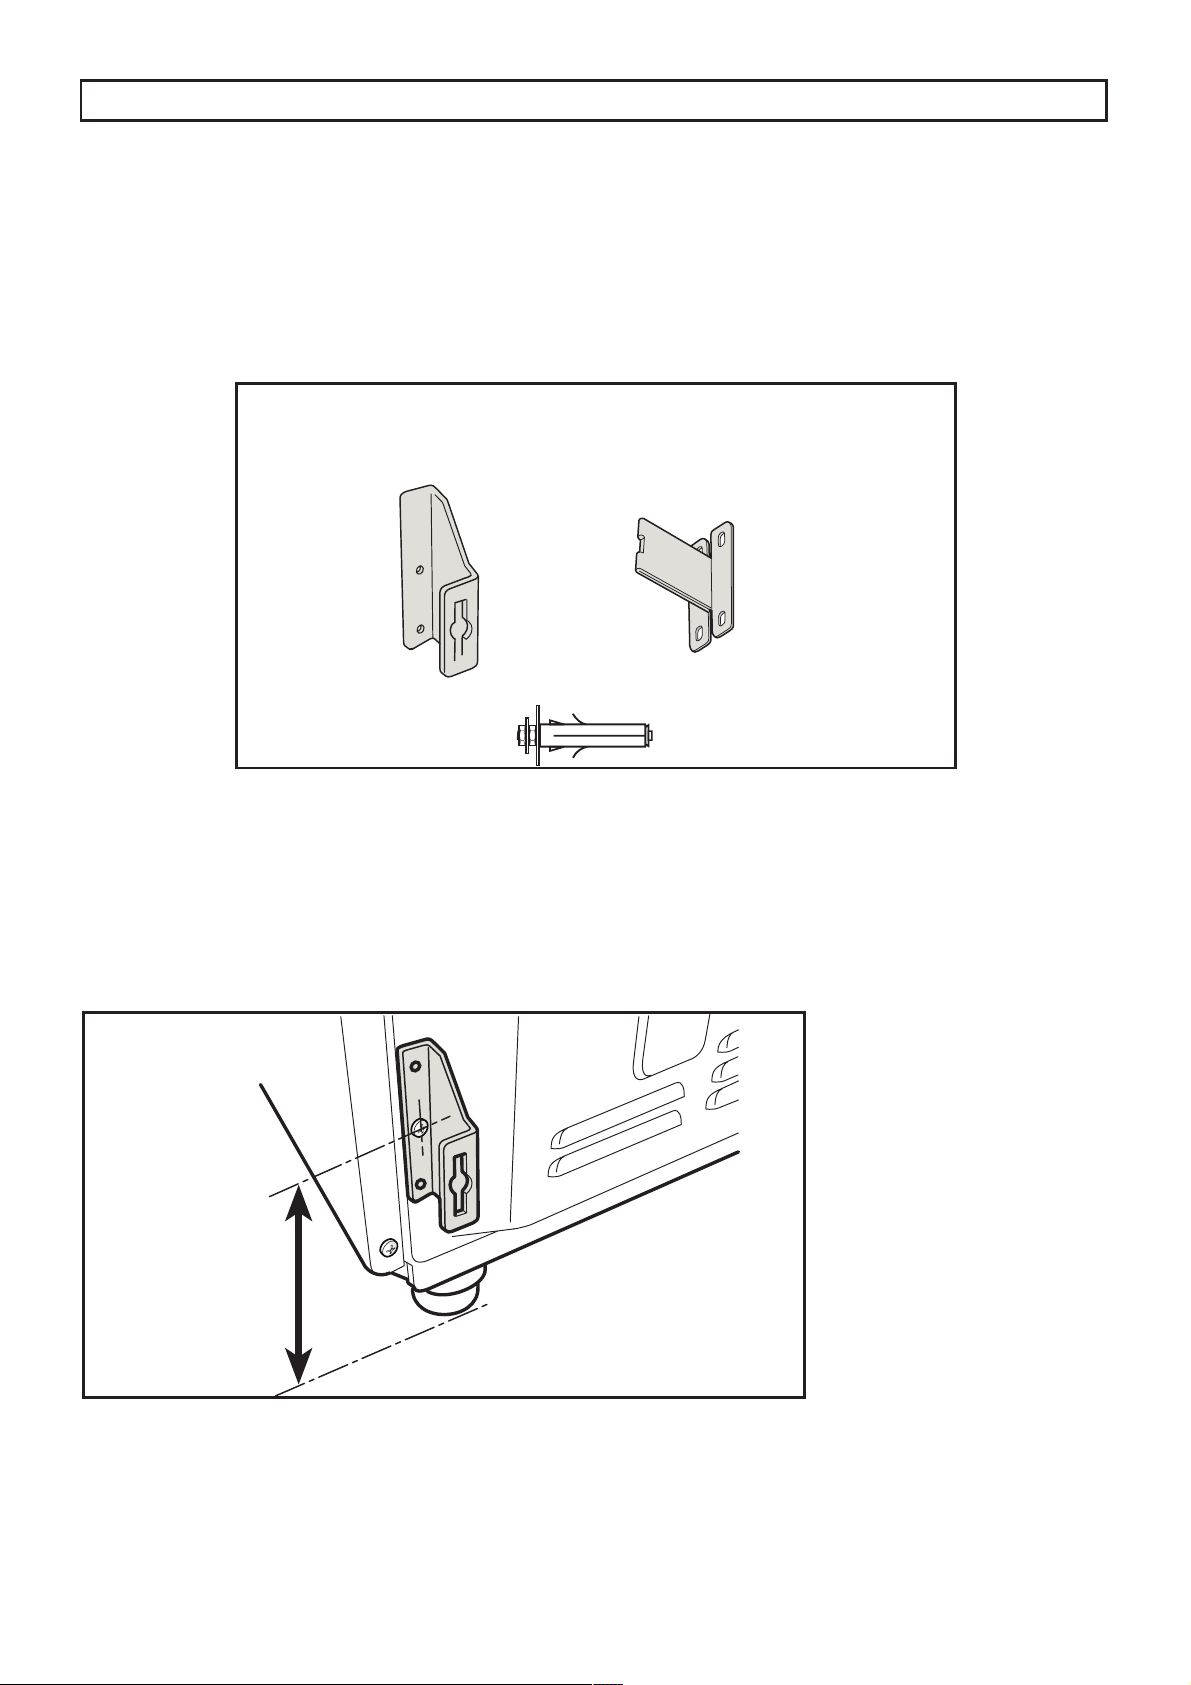
INSTRUCTION FOR STABILIZING THE COOKER
)L[WKHEUDFNHWRQWKHFRRNHU
One for each side.
$OLJQWKHFRRNHUZLWKWKHVXUURXQGLQJFXSERDUG
0HDVXUHWKHGLVWDQFHIURPWKHÀRRUDQGIURPWKH¿[LQJSRLQWRIWKHEUDFNHWX)
WARNING,QRUGHUWRSUHYHQWWKHFRRNHUWLSSLQJIRUZDUGVLQWKHHYHQWRIFKLOGUHQVWDQGLQJ
on the oven door or where users put extreme weight on the door when in open position,
WKHVWDELOLVLQJPHDQVPXVWEHLQVWDOOHGE\WKHLQVWDOOHU)DLOXUHWR¿WWKHVWDELOLVLQJEUDFNHWV
properly may cause personal burn injuries and damage to the gas pipe.
The installation of the brackets provided is for safety reasons and
must be installed as indicated below.
INSTRUCTIONS FOR THE INSTALLER

27
Drill two holes in the
ZDOOIRUHDFKEUDFNHW
DFFRUGLQJWRWKH¿J
DQG¿[WKHEUDFNHW
Hose Restraint Chain
7KHLQVWDOOHUPXVWÀWDFKDLQQRPRUHWKDQRIWKHKRVHOHQJWKWR
HQVXUHWKDWWKHUHLVQRVWUDLQRQWKHKRVHZKHQWKHFRRNHULVSXOOHG
IRUZDUG$WWDFKRQHHQGRIWKHFKDLQDVFORVHDVSRVVLEOHWRWKHJDV
LQOHWRQWKHFRRNHUDQGWKHRWKHUHQGDVFORVHDVSRVVLEOHWRWKHJDV
RXWOHWRQWKHZDOO6XLWDEOHFKDLQDQGÀWWLQJVDUHWREHVXSSOLHGE\WKH
LQVWDOOHU
0DUNLWWKHVDPHGLV-
tance, (XRQEDFNZDOO
,03257$17$IWHUÀWWLQJWKHVWDEOLVLQJEUDFNHWVDQGSXVKLQJWKHFRRNHU
into position, check that the cooker does not tilt forward or sideways
3XVKEDFNWKHFRRNHU
against the wall.
INSTRUCTIONS FOR THE INSTALLER
28
INSTRUCTIONS FOR THE INSTALLER
18
18B
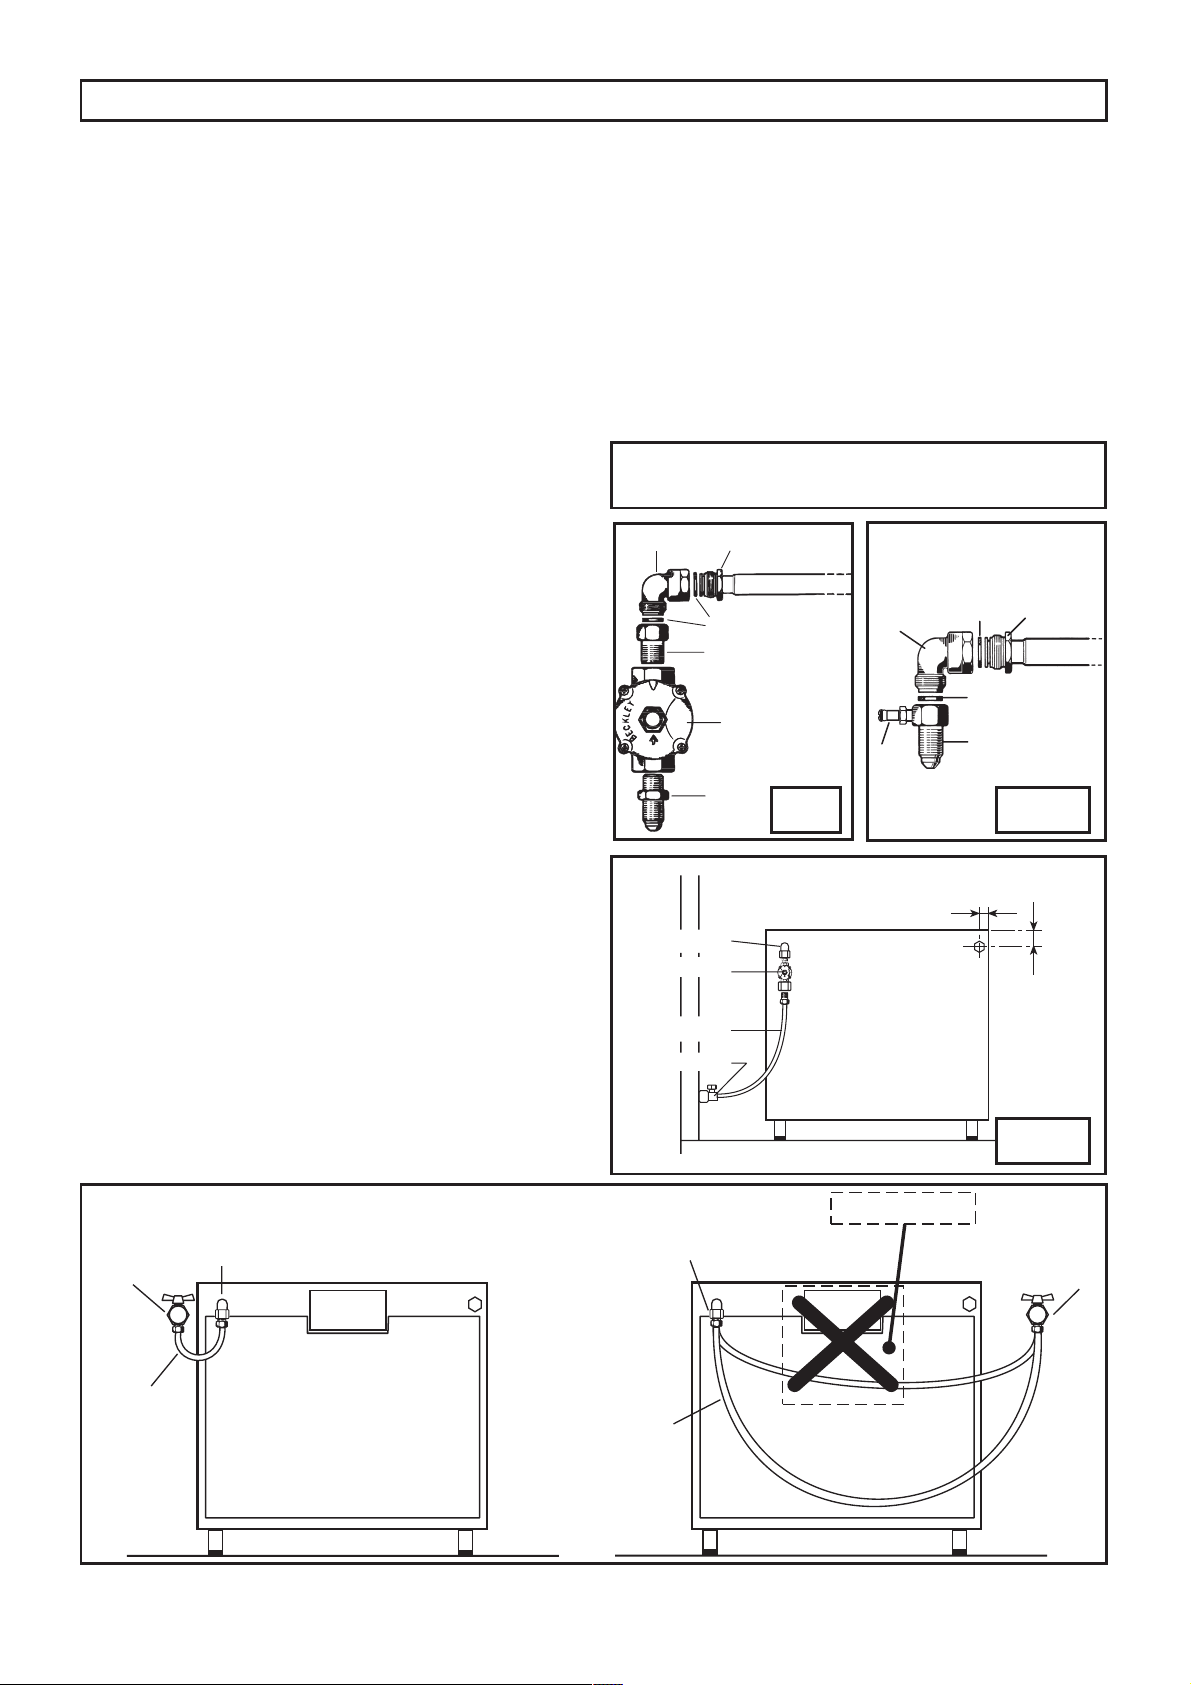
GAS CONNECTION
This appliance shall be installed only by authorised
personnel and in accordance with the manufacturer’s
LQVWDOODWLRQLQVWUXFWLRQVORFDOJDV¿WWLQJUHJXODWLRQV
municipal building codes, water supply regulations,
HOHFWULFDOZLULQJUHJXODWLRQV$6*DV,QVWDOODWLRQV
and any other statutory regulations.
7KHDSSOLDQFHLVDGMXVWHGWRZRUNDWJDVLQGLFDWHGRQ
the label which is applied on the glass-window of the
RYHQGRRUDQGRQWKHFRRNHUSDFNLQJ
Installation for Natural gas
&RQQHFWHGUHJXODWRU%WR¿WWLQJ$ZKLFKLVWKHQ¿WWHG
to elbow (F). Ensure arrow on regulator point in the
direction shown. Fitting (D) to be supplied by installer
¿J$GMXVWUHJXODWRUWRJLYHWHVWSRLQWSUHVVXUH
given on data label on <TECHNICAL FEATURES>
paragraph, with one large or one medium burner
alight at maximum.
3RVLWLRQRI5HJXODWRUÀJ
The stove must be installed on legs, a gas pipe
EHWZHHQ¿WWLQJ$DQG%ZLOODOORZORFDWLRQRIWKH
regulator (B) underneath the stove for adjustment and
maintenance.
Installation for Propane Gas ÀJ$
Connect by using a copper pipe starting, from the threaded
¿WWLQJRIHOERZ)
,QVWDOODWLRQXVLQJÁH[LEOHFRQQHFWLRQ
$VDQRSWLRQWKHFRRNHUPD\EHLQVWDOOHGZLWKD
ÀH[LEOHFRQQHFWLRQKRVHZKLFKFRPSOLHVZLWK$6
1=6$*$$SSURYHGPP,'FODVV%RU
'0LQLPXPPP0D[LPXPPPDVDQ
alternative connection.
$OOFRRNHUVRIIHUOHIWRUULJKWKDQGFRQQHFWLRQ7KH
PDQLIROGKDVDÀDWÀDLURYHUZKLFKLVLQVHUWHGD
screw nut male ½”JDV¿J%
• An isolating tap and pressure regulator must be
¿[HGWRWKHUHDUZDOODQGWKHÀH[LEOHSLSHDWWDFKHG
by means of a union connector.
• The gas connection and isolating tap must be
accessible to a service person or inspector.
• The hose assembly must be installed in accordance
ZLWK$6IRUDKLJKOHYHOFRQQHFWLRQ7KHKRVH
VKRXOGQRWEHVXEMHFWHGWRDEUDVLRQNLQNLQJRU
1RWH:KHQWKHUHJXODWRULVÀWWHGDWWKHUHDURI
the cooker at least 60 mm clearance is required.
permanent deformation and should be able to be
inspected along its entire length. Unions compatible
ZLWKWKHKRVH¿WWLQJVPXVWEHXVHGDQGFRQQHFWLRQV
WHVWHGIRUJDVOHDNV7KH¿[HGFRQVXPHUSLSLQJ
outlet should be at approximately the same height as
WKHFRRNHUFRQQHFWLRQSRLQWSRLQWLQJGRZQZDUGV
• 7KHKRVHVKRXOGEHFOHDURIWKHÀRRUZKHQWKH
FRRNHULVLQWKHLQVWDOOHGSRVLWLRQ7KHDQWLWLOWLQJ
chain supplied should be anchored to the lower
KRRN¿[HGWRWKHZDOOVRWKDWWKHFKDLQSUHYHQWV
VWUDLQRQWKHKRVHFRQQHFWLRQVZKHQWKHFRRNHULV
pulled forward.
18A
29
INSTRUCTIONS FOR THE INSTALLER
ELECTRICAL CONNECTION
The electrical connection must be carried out in
accordance with the current standards and laws
in force and by an authorised electrician.
• Warning this appliance must be earthed.
• Connection to the electricity supply must be made
by an authorised electrician to a suitable isolating
switch in accordance with the requirements of SAA
:LULQJ5XOHV$61=6
• A cable of the correct rating must be used (see
Electrical components).
• Means of disconnection shall be provided in the
¿[HGZLULQJLQDFFRUGDQFHZLWKWKH$XVWUDOLDQZLULQJ
rules.
• Remember that the earth wire must be longer
than the phase wires.
• Note: The power supply cable must be positioned
so that no part of cable can come into contact with
any surface which could reach temperatures in
H[FHVVRI.
ADJUSTMENTS
• Always disconnect the appliance from
the electricity supply before making any
adjustment.
• All seals must be replaced by the technician
following any adjustment or regulation.
• The adjustment of the reduce rate (simmer)
must be undertaken only with burners
functioning on natural gas while in the case
of burners functioning on Propane, the screw
must be locked down fully (in clockwise
direction).
• “Primary air adjustment” on hob gas burners
is unnecessary.
• If the appliance cannot be adjusted to perform
correctly refer to the authorised service
provider in your area.
19
7$36ÀJ
All gas taps are male cone type with only one way of
passage. The adjustment screw (V) is on the side of
the stem.
Adjustment of the “Reduced rate”SRVLWLRQDVIROORZV
O7XUQWKHEXUQHURQDQGSODFHWKHNQRERQWKH
³5HGXFHGUDWH´SRVLWLRQVPDOOÀDPH
5HPRYHWKHNQRERIWKHWDSZKLFKLVDWWDFKHGE\
simply applying pressure to the rod.
:LWKDVPDOOVFUHZGULYHU&WXUQWRWKHULJKWRU
OHIWWKHDGMXVWPHQWVFUHZ9XQWLOWKHÀDPHRI
the burner is conveniently regulated to the Low
position.
&KHFNWKDWWKHÀDPHGRHVQRWJRRXWZKHQWKHNQRE
is sharply switched from the “Full on” to “Reduced
rate” positions.
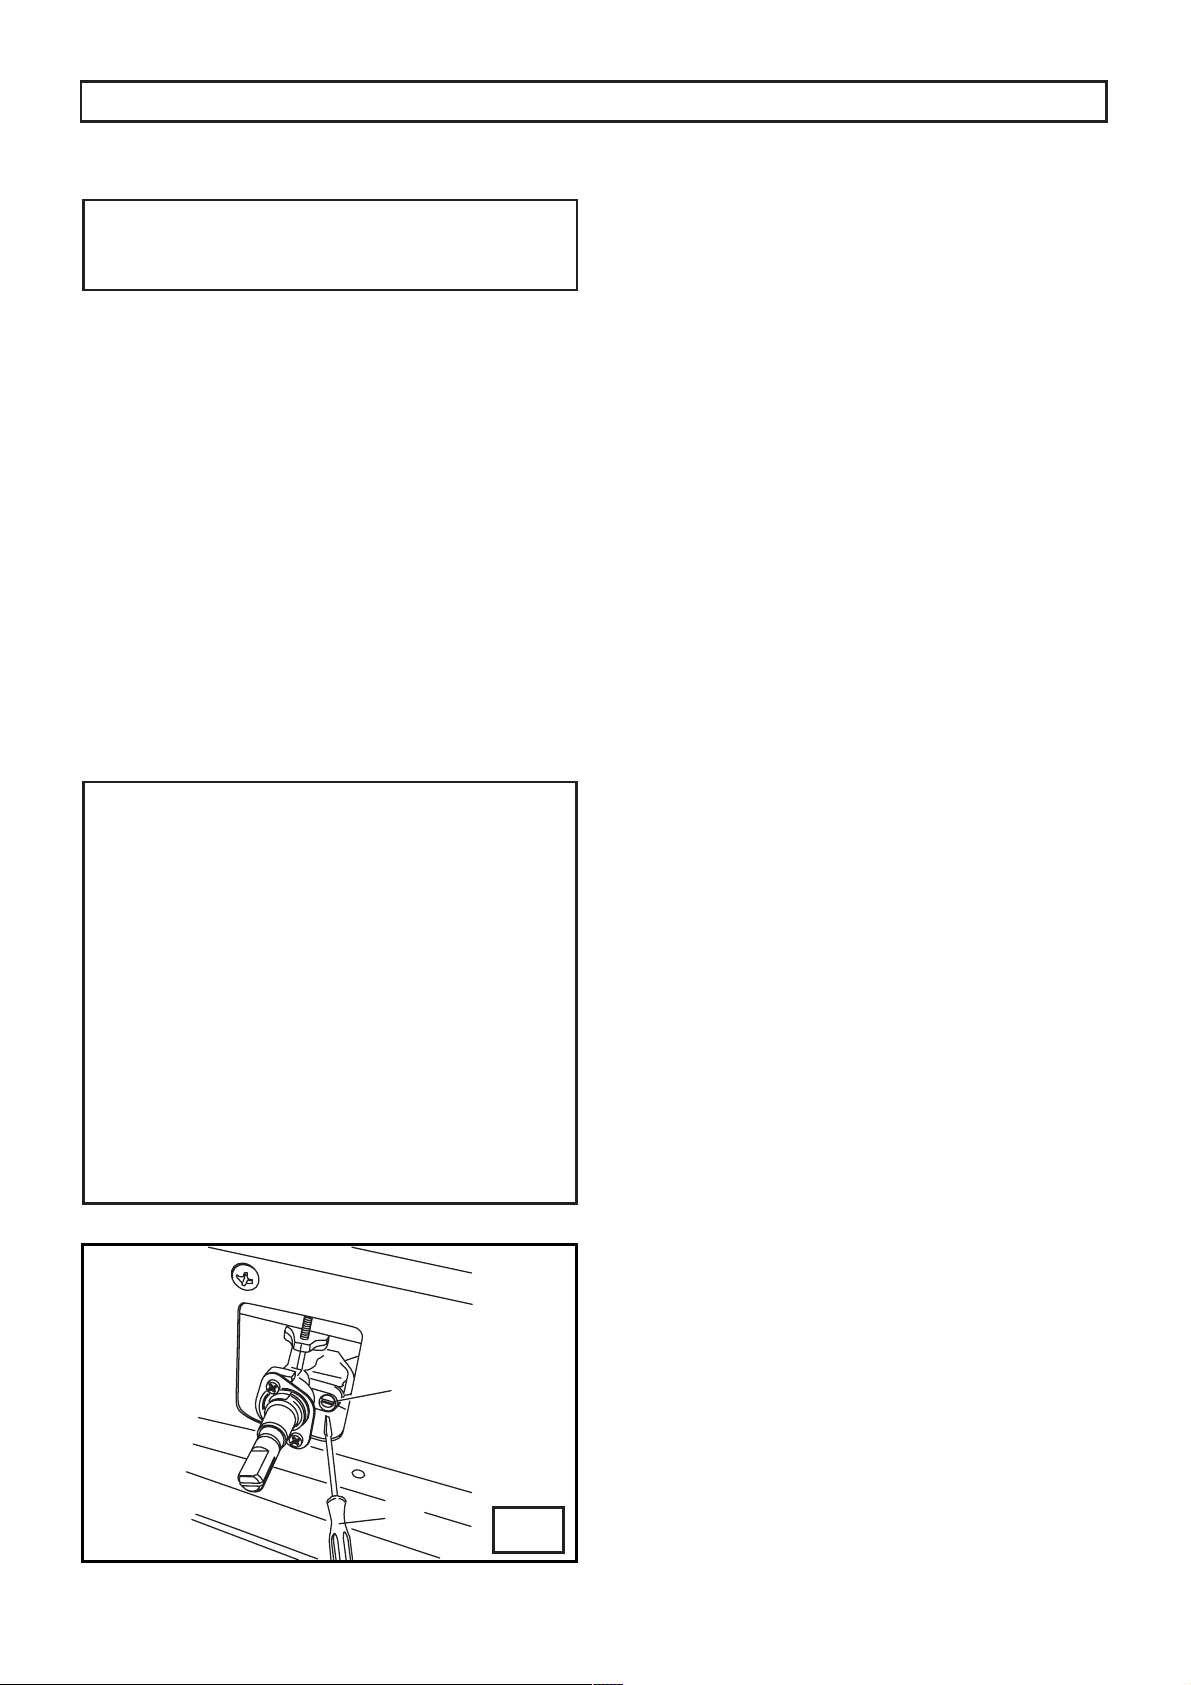
29(17+(50267$7ÀJ
Reduced rate adjustment should be carried out in
WKHIROORZLQJZD\
5HPRYHWKHNQREWKHUPRVWDW
• Switch on the oven burner by turning the relative
NQREWRWKH0D[LPXPSRVLWLRQWKHQZDLWDERXW
minutes.
6ORZO\WXUQWKHNQREEDFNWRWKH0LQLPXPSRVLWLRQ
and, using a small screwdriver (C), turn screw (V) to
WKHULJKWWRORZHUWKHÀDPHRUWRWKHOHIWWRLQFUHDVHLW
7KHÀDPHVPXVWEHVKRUWIRUDQHI¿FLHQW5HGXFHG
rate setting. They must be stable to prevent them
from accidentally going out and must be able to
stand up to normal oven door manoeuvres.
NOTE:
Oven Failure
&KHFNWKHUPRFRXSOHWHUPLQDO
,QVSHFWUHDURIWKHUPRVWDWXQGHUKREWRFKHFNWKDW
thermocouple connections are ”tight” and parallel to
each other.
&KHFNWKHUPRVWDWNQREIRUVXI¿FLHQWFOHDUDQFHIURP
the control panel to allow electromagnet to fully
seat.• If above cannot solve the problem, replace
thermocouple.
Oven Ignition Failure
• Ensure that the electrode lead is not ”earthing”
against cabinet.
&KHFNVSDUNJDSIURPHOHFWURGHWLSWREXUQHU
6KRXOGEHRQO\PP
&KHFNFHUDPLFERG\RIHOHFWURGHIRUREYLRXV
GDPDJHRUFUDFNV
,IQRVSDUNDWDOOFKHFNLJQLWLRQER[IDLOXUHRUSRZHU
source.
30
INSTRUCTIONS FOR THE INSTALLER
Hot Plate Ignition Failure
&KHFNDOLJQPHQWRIEXUQHUKROHVWRHOHFWURGH
&KHFNDHUDWLRQVOHHYHIRUDGMXVWPHQWIRUJDVW\SH
location and ambient conditions.
1RVSDUNFKHFNLJQLWLRQER[IDLOXUHRUSRZHUVXSSO\
Before Leaving
&KHFNDOOFRQQHFWLRQVIRUJDVOHDNVZLWKVRDSDQG
water. DO NOTXVHDQDNHGÀDPHIRUGHWHFWLQJ
OHDNV,JQLWHDOOEXUQHUVWRHQVXUHFRUUHFWRSHUDWLRQ
of gas valves, burners and ignition.
7XUQJDVWDSVWRORZÀDPHSRVLWLRQDQGREVHUYH
VWDELOLW\RIWKHÀDPH:KHQVDWLV¿HGZLWKWKHFRRNHU
please instruct the user on the correct method of
operation.
• In case the appliance fails to operate correctly
DIWHUDOOFKHFNVKDYHEHHQFDUULHGRXWUHIHUWRWKH
authorised service provider in your area.
29(1%851(5ÀJ
The burner is installed on the oven base and is covered
by the bottom plate which must always remain in that
position during oven operation,
To adjust the primary air, is performed when the
burner is ignited, by adjusting the sleeve (B) and
XQVFUHZLQJVFUHZ$/RFNVFUHZ$LQSODFHRQFH
the adjustments have been made.
CHANGING THE FLEXIBLE GAS HOSE
In order to guarantee that the gas hose is always in
excellent condition we strongly recommend changing
LWRQWKHGDWH\RXZLOO¿QGSULQWHGRQLW
21
GAS CONVERSIONS
REPLACING THE INJECTORS
Our burners can be adapted to different types of gas
by simply installing the injectors suitable for the gas
you want to use. To help the installer, the table (see
TECHNICAL FEATURES paragraph) gives the burner
nominal heat input, injector diameter and operating
pressure of the different gas types.
&RPSO\ZLWKWKHIROORZLQJLQVWUXFWLRQV
Injector replacement - Hob burners.
To change the injectors on the hob, remove the burner
FXSDQGKHDGDQGZLWKDPPVRFNHWVSDQQHU
UHSODFHWKHP¿J
Injector replacement - Oven burner.
5HPRYHRYHQEDVH5HPRYHVFUHZ'¿JZKLFK
will release burner and give access to the injector (C).
Unscrew injector and replace it. Replace burner and
replace screw (D).
After having replaced the injectors, it will be
necessary to proceed with burner adjustment as
explained in the previous paragraphs.
20
22
31
INSTRUCTIONS FOR THE INSTALLER
MAINTENANCE
Prior to any maintenance work or changing
parts, disconnect the appliance from the gas
and electricity power sources. Servicing must
only be carried out by authorised personnel.
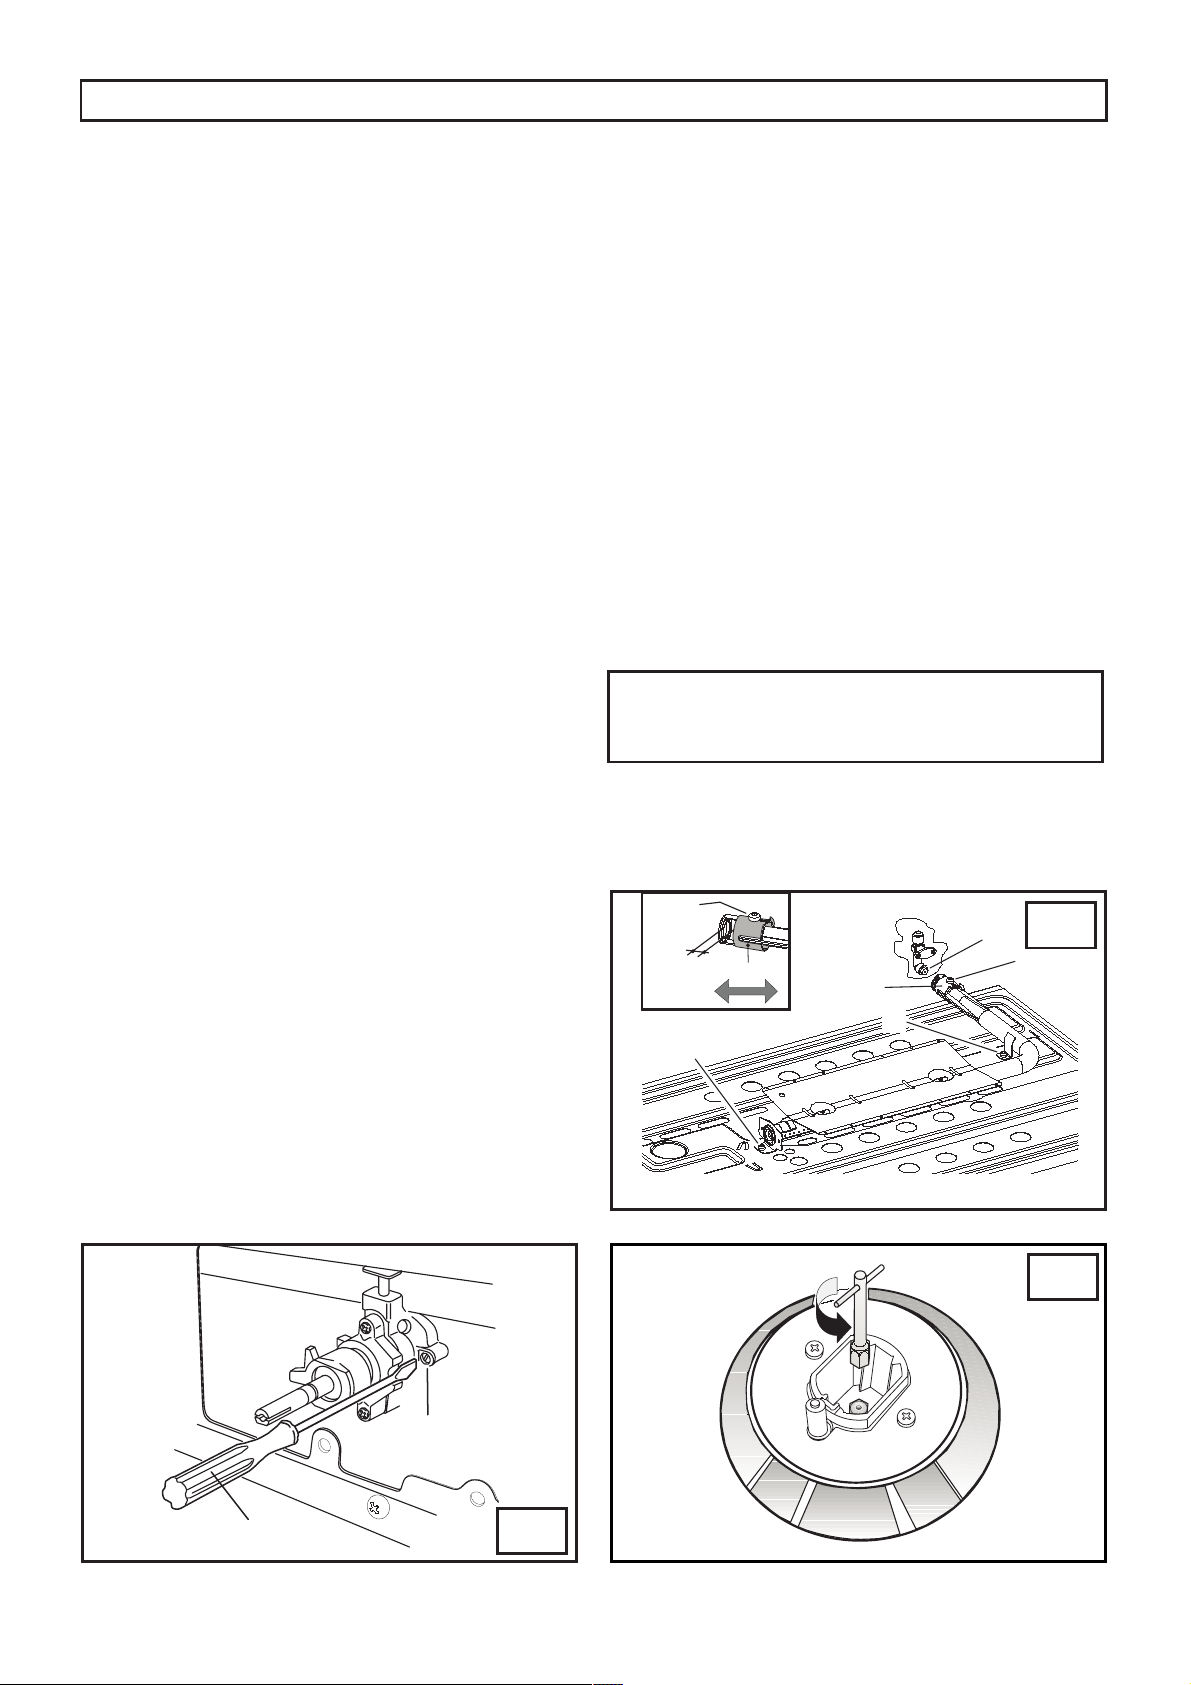
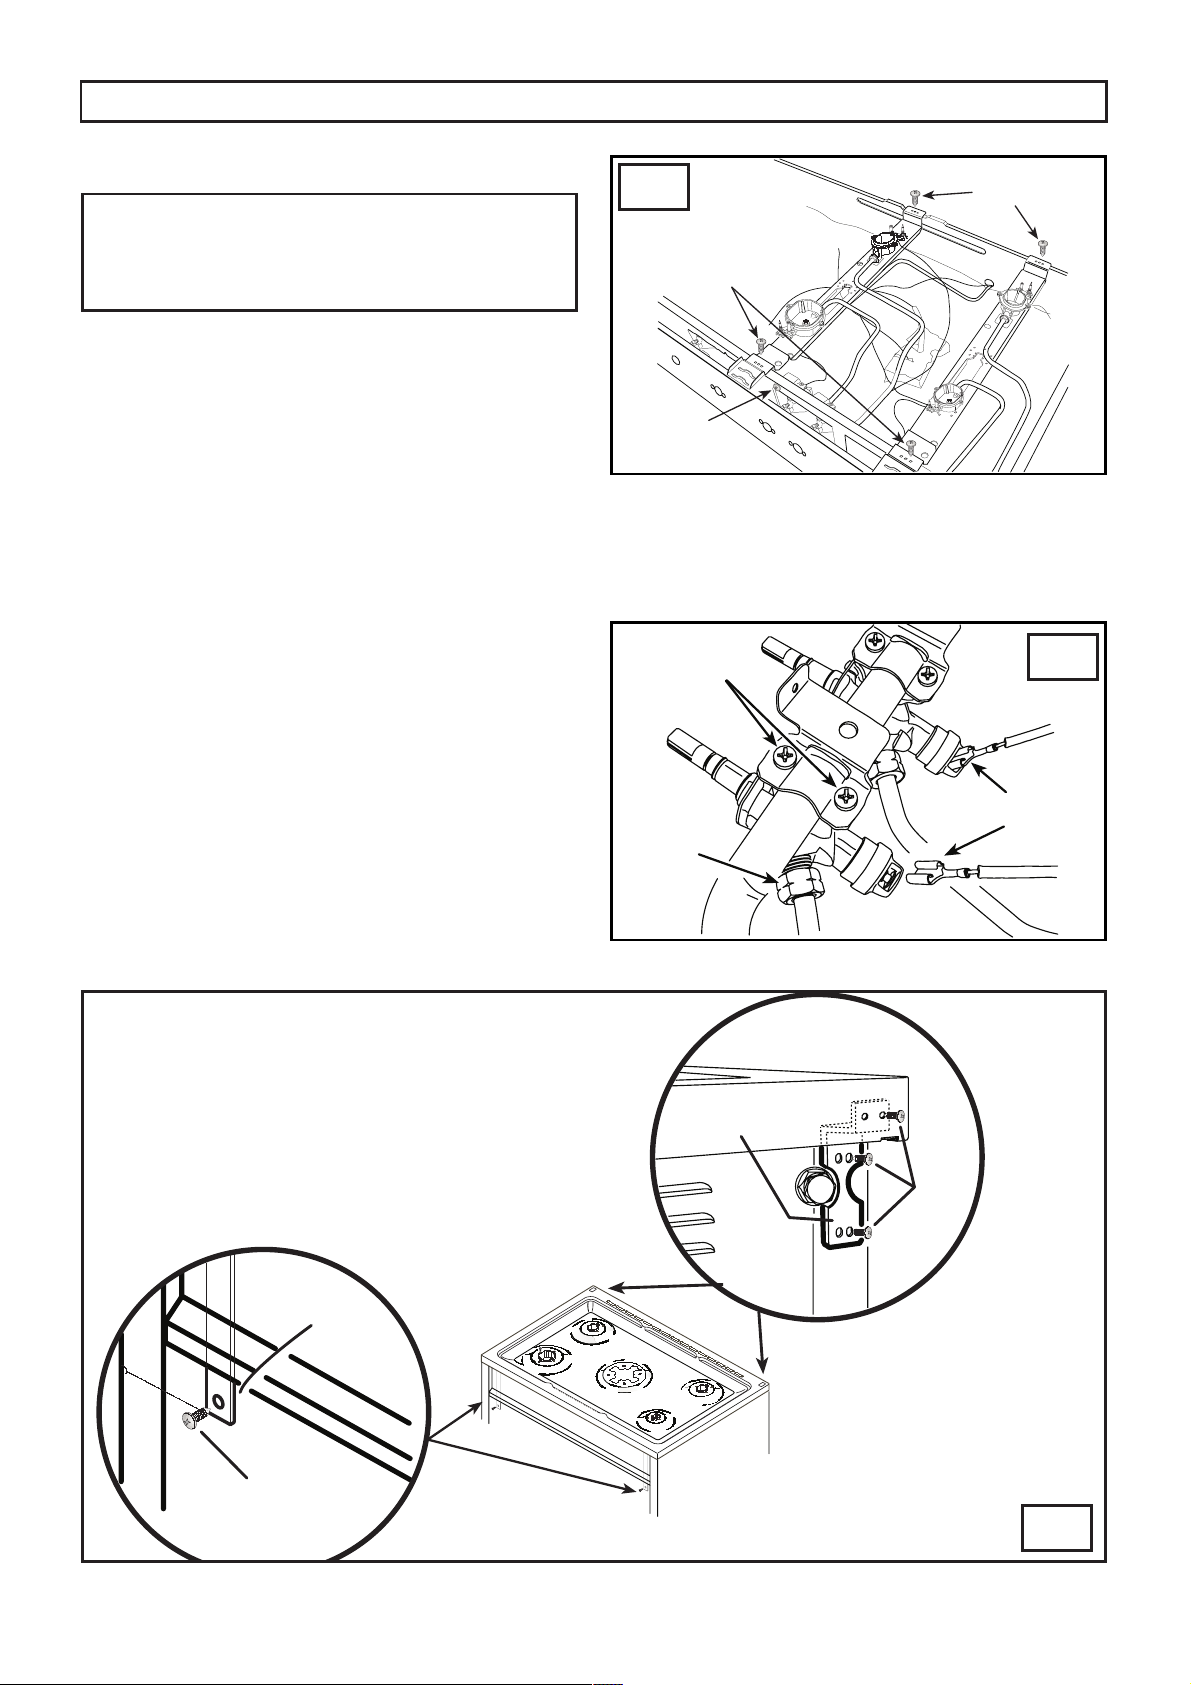
REPLACING THE TAPS
3URFHHGLQWKHIROORZLQJZD\ZKHQUHSODFLQJDWDS
Remove pan supports, burner heads.
8QVFUHZWKHEXUQHU¿[LQJVFUHZV9F¿JIRXU
for ultrarapid burner and two for the other burners)
3XOORXWWKHNQREV
• Remove the hob, unscrewing frontal and rear
¿[LQJVFUHZV9V¿JZKLFKORFNWKHKREDW
the supports (S).
• Unscrew the nuts (D) of the gas aluminium pipes
DQGSXOORXWWKHWKHUPRFRXSOHTXLFNFRQQHFWRUV)
¿J
8QVFUHZWKHVFUHZV9W¿JZKLFKORFNWKH
crosspieces.l
8QVFUHZWKHVFUHZV9E¿JZKLFKXQLWHWKH
the bridles of the taps to the front frame.
0DNHWRVOLSWKHUDPSWRZDUGWKHEDFNSDUWDQG
XQVFUHZWKHVFUHZV9E¿JLQRUGHUWRIUHHWKH
taps.
• Change seal each time a tap or a thermostat is
replaced. This will ensure perfect retention between
the tap or a thermostat and part.
• Reassemble all the parts following the same
procedure but in the reverse order.
23
24
25
32
INSTRUCTIONS FOR THE INSTALLER
26
REPLACING THE ELECTRICAL COMPONENT
• The rear protection will have to be removed in
order to change the electrical heating elements,
spit motor, terminal board and power cable.
• If you have to change the power cable (see
TECHNICAL FEATURES paragraph), always
keep the earth wire longer than the phase wires
and, in addition, follow all the instructions
given in the “ELECTRICAL CONNECTION”
paragraph.
• To change the oven lamp see the instructions
REPLACING THE OVEN LAMP paragraph.
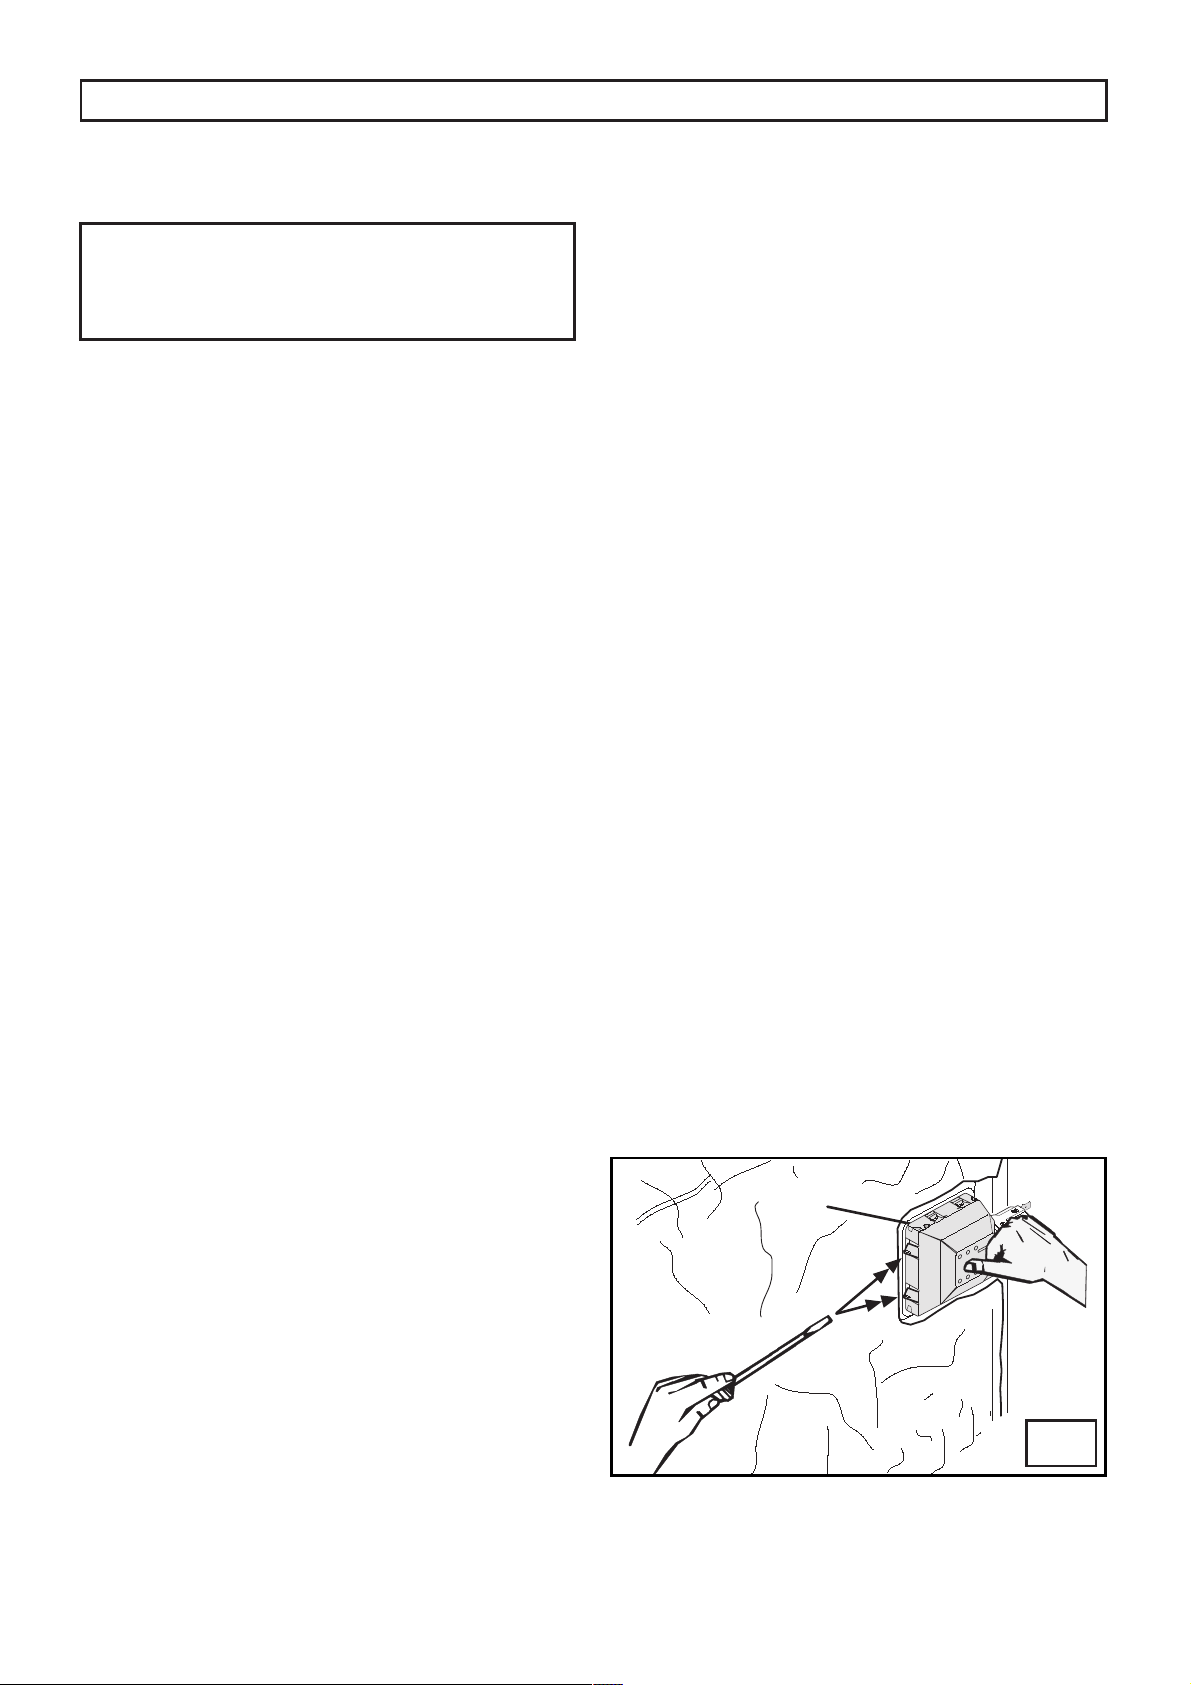
• 7RFKDQJHODPSKROGHU3ÀJ, use a
screwdriver to push the clamp tips (M) and pull the
lamp holder out towards the inside of the oven.
7RFKDQJHWKHODPSKROGHUWKHVSDUNJHQHUDWRU
DQGWKHVSDUNHOHFWURGHVWKHZRUNWRSKDV
to be removed as indicated in the paragraph
«REPLACING THE TAPS».
• To change the programming accessory, the
thermostat, the commutator and the warning lights,
remove the front panel by unscrewing the three
¿[LQJVFUHZVZKLFKORFNLWWRWKHIURQWIUDPH
MAINTENANCE
Prior to any maintenance work or changing
parts, disconnect the appliance from the gas
and electricity power sources. Servicing must
only be carried out by authorised personnel.
REPLACING THE TAPS AND THERMOSTAT
3URFHHGLQWKHIROORZLQJZD\ZKHQUHSODFLQJDWDSRU
WKHUPRVWDW
• Remove pan supports, burner heads.
8QVFUHZWKHEXUQHU¿[LQJVFUHZV9F¿JIRXU
for ultrarapid burner and two for the other burners)
• Remove the hob, unscrewing frontal and rear
¿[LQJVFUHZV9V¿JZKLFKORFNWKHKREDW
the supports (S).
3XOORXWWKHNQREV
• Unscrew the nuts (D) of the gas aluminium pipes
DQGSXOORXWWKHWKHUPRFRXSOHTXLFNFRQQHFWRUV)
¿J
8QVFUHZWKHVFUHZV9W¿JZKLFKORFNWKH
crosspieces.
8QVFUHZWKHVFUHZV9E¿JZKLFKXQLWHWKH
the bridles of the taps to the front frame.
0DNHWRVOLSWKHUDPSWRZDUGWKHEDFNSDUWDQG
XQVFUHZWKHVFUHZV9E¿JLQRUGHUWRIUHHWKH
taps.
• Change seal each time a tap or a thermostat
is replaced. This will ensure perfect retention
between the tap or a thermostat and part•
Reassemble all the parts following the same
procedure but in the reverse order.

33
BURNER DISPOSITION
BURNER TECHNICAL DATA TABLE
N.
BURNER
DENOMINATION
GAS
Operating
Pressure kPa
Diameter
Injectors 1/100 mm
Primary
aeration
Rating
MJ/h
Large
Left front
3URSDQH
Natural
Medium
Right rear
3URSDQH
Natural
Small
Right front
3URSDQH
Natural
:RN
Center
3URSDQH
Natural
Oven
3URSDQH
Natural
PPRSHQ
PPRSHQ
TECHNICAL FEATURES
ELECTRICAL TECHNICAL DATA
Voltage - Frequency 9a+]9a+]9a+]
Total rating electrical W ::
7
4
4
5
3
34
ELECTRICAL COMPONENTS - NOMINAL DATA
DESCRIPTION
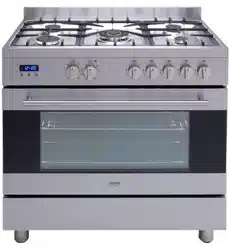
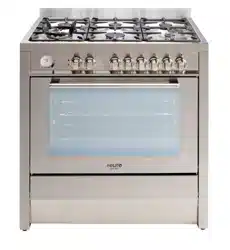
EG90GFSX EG900GDSX - EP90DMSX
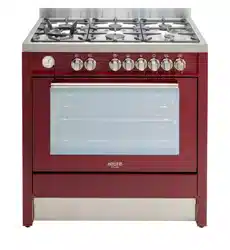
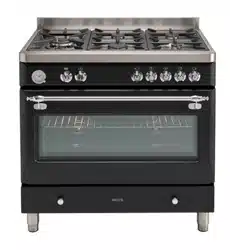
EG900GDCRM-
EG900GDANT
EE900GSXS
Lower heating element of the oven
Top heating element of the oven-grill
Rear heating element
Grill heating element
Oven lamp
Oven cooling fan
Fan of the rear heating element
Supply cable
3OXJ
:
:(7
:
:
+55)[PP
2P + T - 10 A
:
:
:
:(7
:
:
+55)[PP
2P + T - 15 A
:
:
:
:(7
:
:
+55)[PP
GAS TECHNICAL DATA NATURAL
PROPANE NATURAL PROPANE
2SHUDWLQJSUHVVXUHJDVN3D
Total input gas MJ
TECHNICAL FEATURES
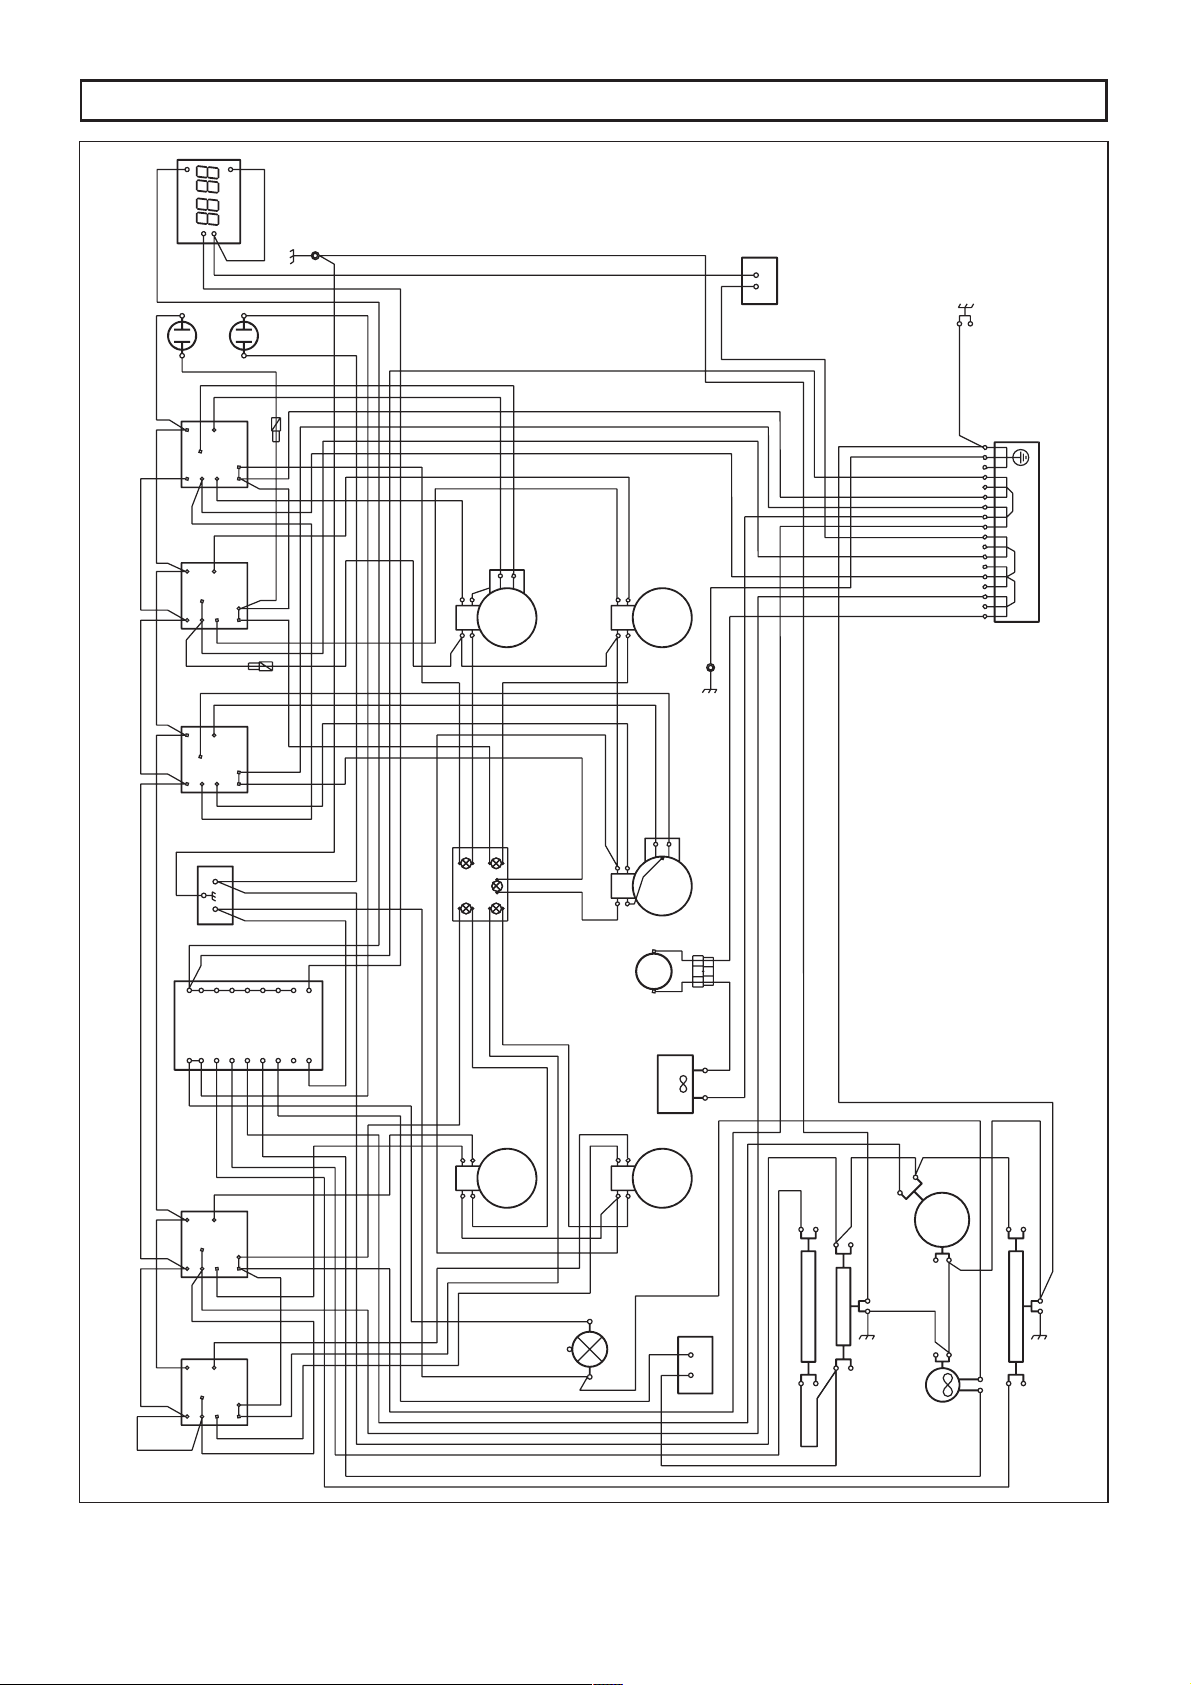
35
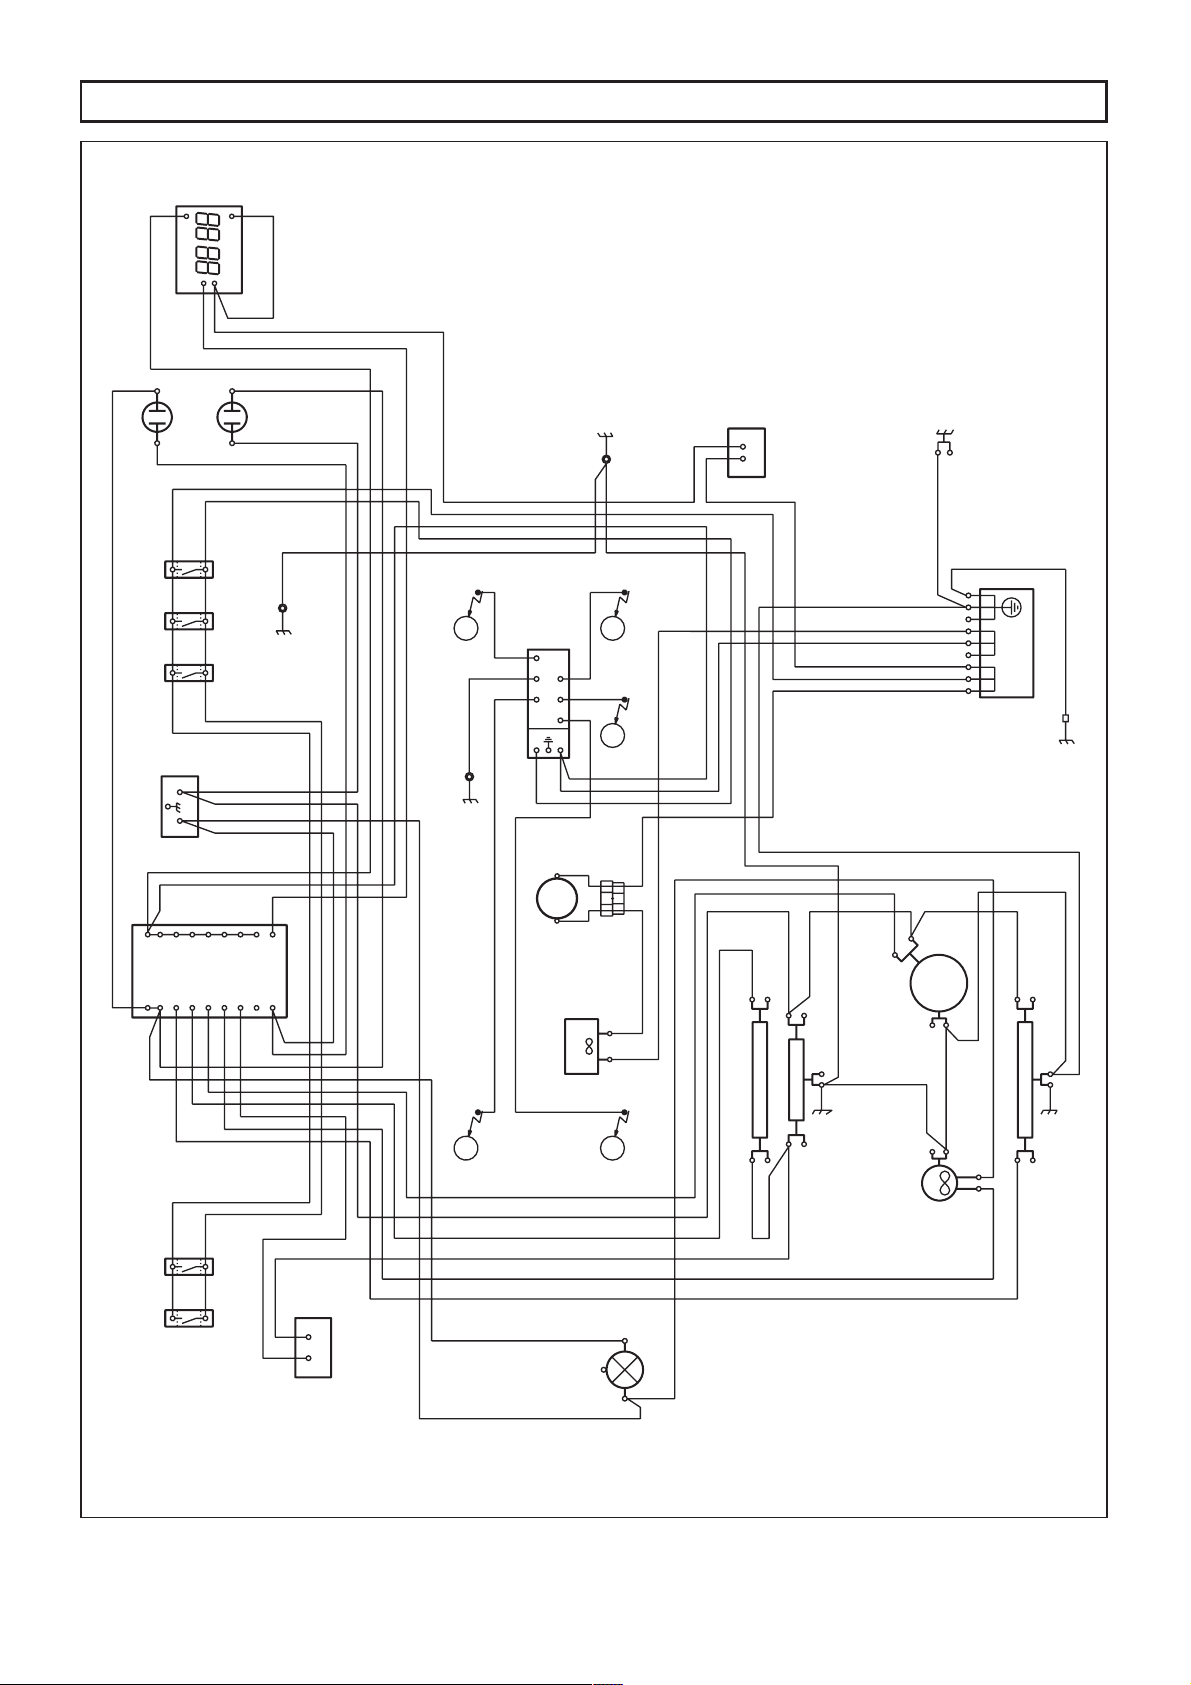
0RGHOFRRNHUEG900GDSX-EG900GDCRM- EG900GDANT
TECHNICAL FEATURES
36
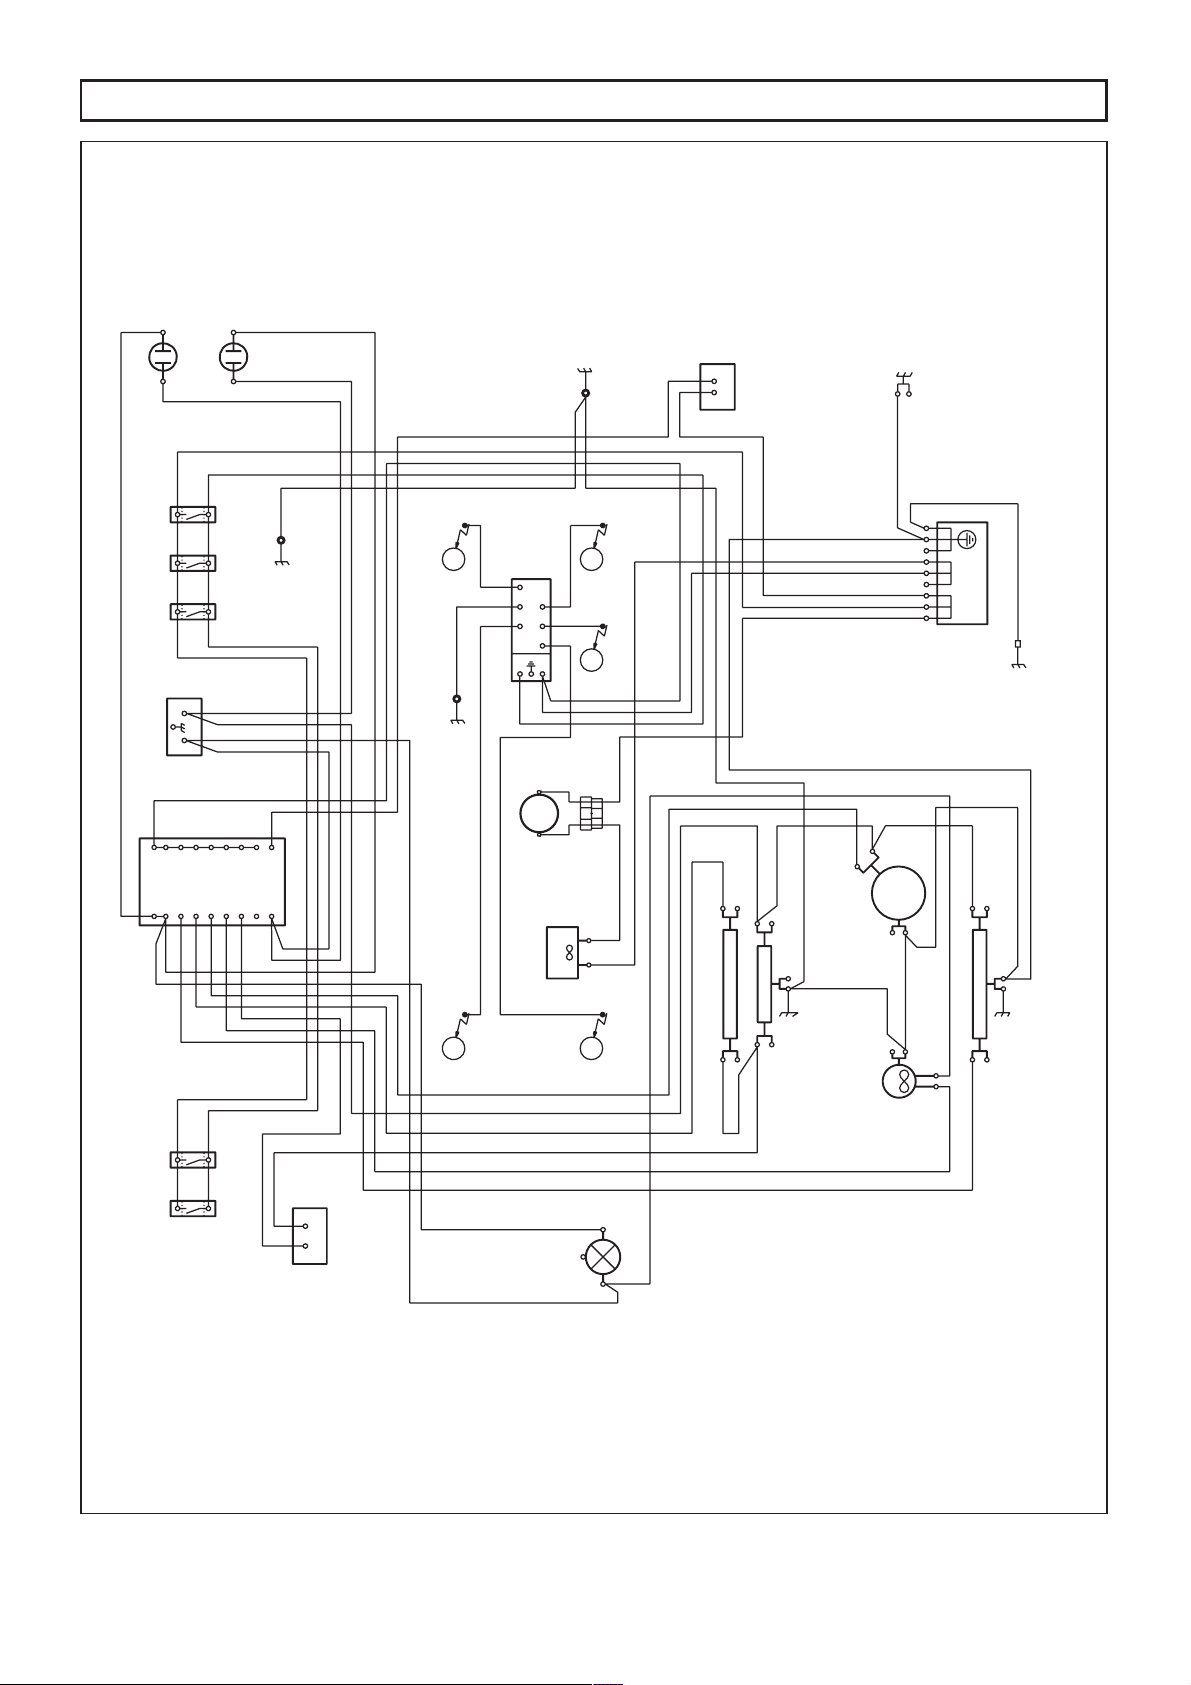
TECHNICAL FEATURES
0RGHOFRRNHUEP90DMSX
37
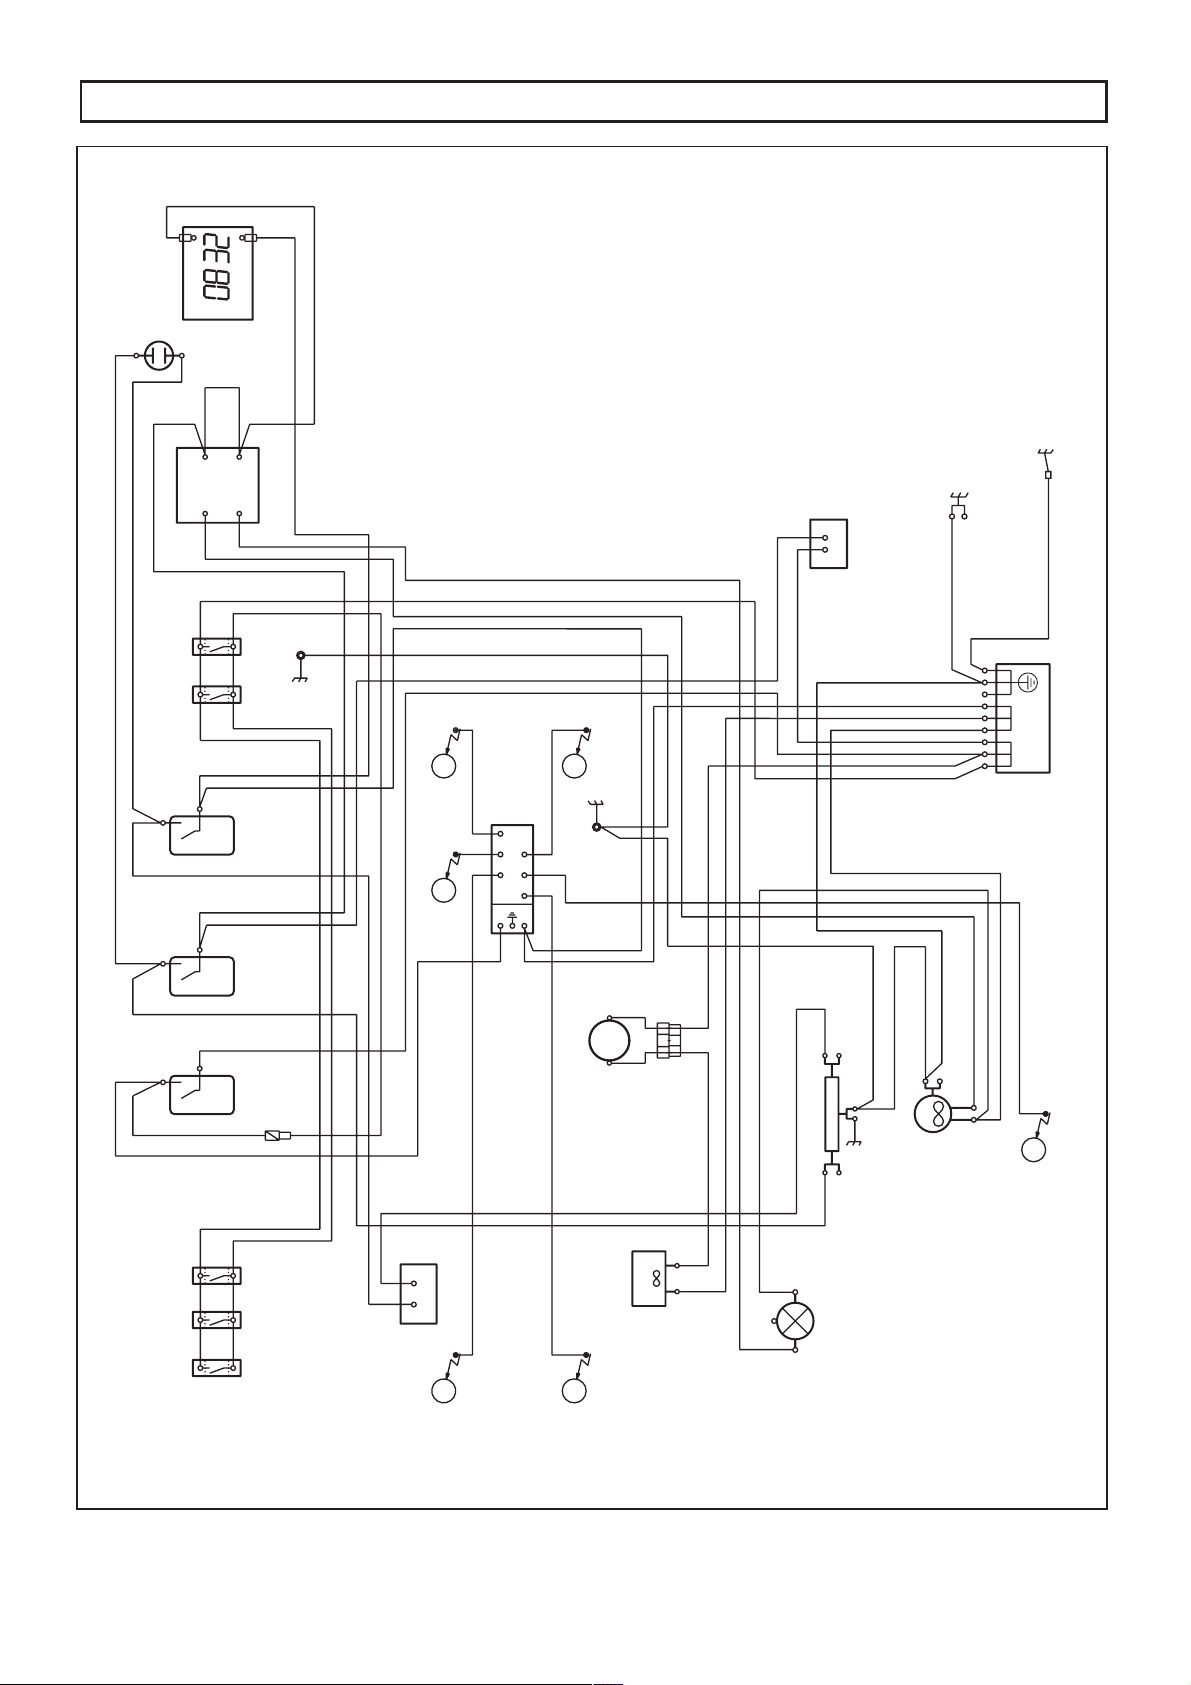
TECHNICAL FEATURES
0RGHOFRRNHUEG90GFSX
38
0RGHOFRRNHUEE900GSXS
TECHNICAL FEATURES

39

SPACE FOR DATA LABEL
461308131